Samsung Electronics Co SMG386T Multi-Band GSM/ EDGE/ WCDMA/ LTE Phone with WLAN, Bluetooth, RFID and ANT+ User Manual 1
Samsung Electronics Co Ltd Multi-Band GSM/ EDGE/ WCDMA/ LTE Phone with WLAN, Bluetooth, RFID and ANT+ Users Manual 1
Contents
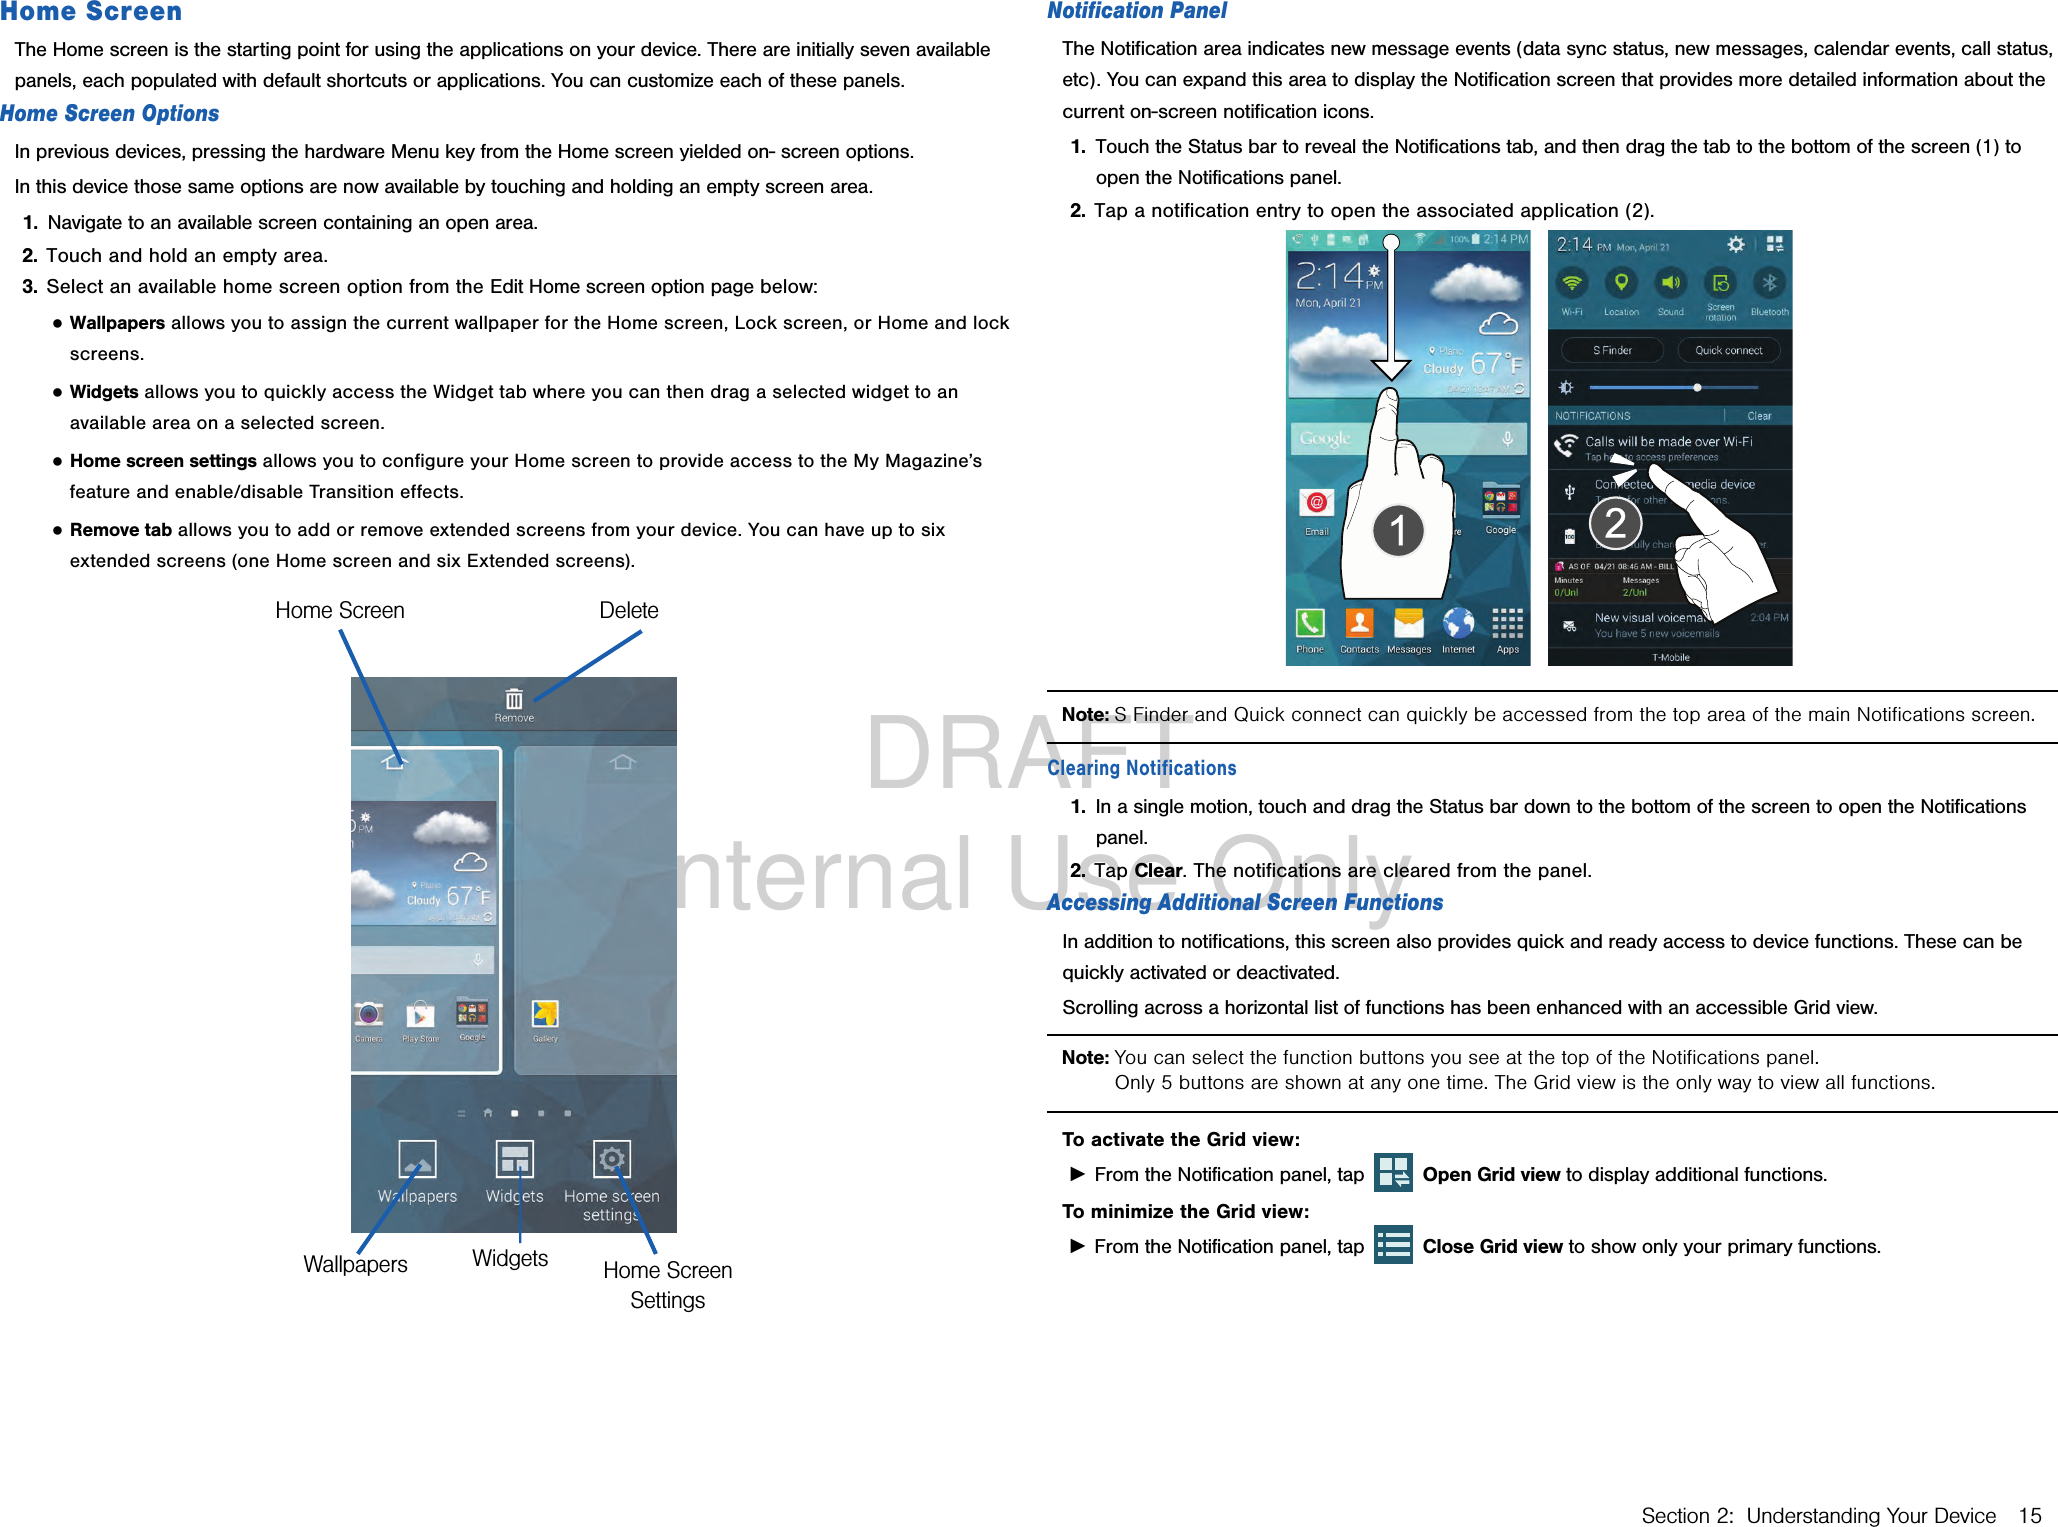
- 1. Users Manual 1
- 2. Users Manual 2
Users Manual 1

![DRAFT Internal Use OnlyG368T_UM_English_ND6_PS_042314_D3Warning! This product contains chemicals known to the State of California to cause cancer and reproductive toxicity.Intellectual PropertyAll Intellectual Property, as defined below, owned by or which is otherwise the property of Samsung or its respective suppliers relating to the SAMSUNG Phone, including but not limited to, accessories, parts, or software relating there to (the “Phone System”), is proprietary to Samsung and protected under federal laws, state laws, and international treaty provisions. Intellectual Property includes, but is not limited to, inventions (patentable or unpatentable), patents, trade secrets, copyrights, software, computer programs, and related documentation and other works of authorship. You may not infringe or otherwise violate the rights secured by the Intellectual Property. Moreover, you agree that you will not (and will not attempt to) modify, prepare derivative works of, reverse engineer, decompile, disassemble, or otherwise attempt to create source code from the software. No title to or ownership in the Intellectual Property is transferred to you. All applicable rights of the Intellectual Property shall remain with SAMSUNG and its suppliers.Open Source SoftwareSome software components of this product incorporate source code covered under GNU General Public License (GPL), GNU Lesser General Public License (LGPL), OpenSSL License, BSD License and other open source licenses. To obtain the source code covered under the open source licenses, please visit: http://opensource.samsung.com.Disclaimer of Warranties; Exclusion of LiabilityEXCEPT AS SET FORTH IN THE EXPRESS WARRANTY CONTAINED ON THE WARRANTY PAGE ENCLOSED WITH THE PRODUCT, THE PURCHASER TAKES THE PRODUCT "AS IS", AND SAMSUNG MAKES NO EXPRESS OR IMPLIED WARRANTY OF ANY KIND WHATSOEVER WITH RESPECT TO THE PRODUCT, INCLUDING BUT NOT LIMITED TO THE MERCHANTABILITY OF THE PRODUCT OR ITS FITNESS FOR ANY PARTICULAR PURPOSE OR USE; THE DESIGN, CONDITION OR QUALITY OF THE PRODUCT; THE PERFORMANCE OF THE PRODUCT; THE WORKMANSHIP OF THE PRODUCT OR THE COMPONENTS CONTAINED THEREIN; OR COMPLIANCE OF THE PRODUCT WITH THE REQUIREMENTS OF ANY LAW, RULE, SPECIFICATION OR CONTRACT PERTAINING THERETO. NOTHING CONTAINED IN THE INSTRUCTION MANUAL SHALL BE CONSTRUED TO CREATE AN EXPRESS OR IMPLIED WARRANTY OF ANY KIND WHATSOEVER WITH RESPECT TO THE PRODUCT. IN ADDITION, SAMSUNG SHALL NOT BE LIABLE FOR ANY DAMAGES OF ANY KIND RESULTING FROM THE PURCHASE OR USE OF THE PRODUCT OR ARISING FROM THE BREACH OF THE EXPRESS WARRANTY, INCLUDING INCIDENTAL, SPECIAL OR CONSEQUENTIAL DAMAGES, OR LOSS OF ANTICIPATED PROFITS OR BENEFITS.Modification of SoftwareSAMSUNG IS NOT LIABLE FOR PERFORMANCE ISSUES OR INCOMPATIBILITIES CAUSED BY YOUR EDITING OF REGISTRY SETTINGS, OR YOUR MODIFICATION OF OPERATING SYSTEM SOFTWARE. USING CUSTOM OPERATING SYSTEM SOFTWARE MAY CAUSE YOUR DEVICE AND APPLICATIONS TO WORK IMPROPERLY. YOUR CARRIER MAY NOT PERMIT USERS TO DOWNLOAD CERTAIN SOFTWARE, SUCH AS CUSTOM OS.SAFE™ (Samsung Approved For Enterprise) SAFE™: "SAFE™" (Samsung for Enterprise) is a mark for a Samsung device which has been tested against Samsung's own internal criteria for interoperability with certain third party security‑related solutions for MDM and VPN. The testing includes field testing with local network connection and menu tree testing which tests functionality of the solutions in conjunction with the Samsung device. During the testing, the device is tested with the security solutions to see if the solutions work with the device as described by the third party security solution providers. The testing, for example, includes field testing with local network connection and menu tree testing which tests functionality of the solutions in conjunction with the Samsung device. For more information about Samsung's SAFE™ program, please refer to www.samsung.com/us/safe.Disclaimer of Warranties: EXCEPT AS OTHERWISE PROVIDED IN THEIR STANDARD END USER LICENSE AND WARRANTY, TO THE FULL EXTENT PERMITTED BY LAW SAMSUNG ELECTRONICS CO., LTD., SAMSUNG TELECOMMUNICATIONS AMERICA, LLC, AND THEIR AFFILIATES (COLLECTIVELY REFERRED TO HEREIN AS THE "SAMSUNG ENTITIES") EXPRESSLY DISCLAIM ANY AND ALL WARRANTIES, EXPRESS OR IMPLIED, INCLUDING ANY WARRANTY OF MERCHANTABILITY, FITNESS FOR A PARTICULAR PURPOSE, INTEROPERABILITY OR NON‑INFRINGEMENT, WITH RESPECT TO INFORMATION TECHNOLOGY SECURITY PROTECTION, SAFE™ DEVICES AND APPLICATIONS TESTED WITH SAFE™ DEVICES. IN NO EVENT SHALL THE SAMSUNG ENTITIES BE LIABLE FOR ANY DIRECT, INDIRECT, INCIDENTAL, PUNITIVE, OR CONSEQUENTIAL DAMAGES OF ANY KIND WHATSOEVER WITH RESPECT TO INFORMATION TECHNOLOGY SECURITY PROTECTION, SAFE™ DEVICES OR APPLICATIONS TESTED WITH SAFE™ DEVICES. In addition, information technology security protection will be affected by features or functionality associated with, among other things the e‑mail platform, master data management, and virtual private network solutions selected by the software provider, solution provider or user. Choice of an e‑mail, master data management, and virtual private network solution is at the sole discretion of the software provider, solution provider or user and any associated effect on information technology security protection is solely the responsibility of the software provider, solution provider or user. For complete statement of limited warranty, please refer to www.samsung.com/us/safe, available on the web and where Samsung smartphone and Galaxy Tab™ devices are sold. [101212]](https://usermanual.wiki/Samsung-Electronics-Co/SMG386T.Users-Manual-1/User-Guide-2292028-Page-3.png)


![DRAFT Internal Use OnlySection 5: Messages 413. Tap the More settings field to access additional options: ●Account name: Displays your uniquely created account display name. ●Your name: Displays the name used in the From field of your outgoing email messages. ●Always Cc/Bcc myself: Allows you to include your own email address in either the CC, Bcc, or None fields. Lets you always receive a copy of outgoing emails. ●Show images: Allows you to view embedded images located within the body of the currently displayed email. ●Security options: Allows you to enable several security options such as: Encrypt all, Sign all, Create keys, Private keys, Public keys, and Set default key. These security policies could restrict some functions from corporate servers. ●Auto download attachments: Allows the device to automatically download email attachments when an active Wi‑Fi connection is detected. This process speeds up the process of downloading an emails attachments for offline review by not using a cellular network connection. ●Incoming settings: Lets you specify incoming email settings. ●Outgoing settings: Lets you specify outgoing email settings. Note: Some the above options may not be displayed when using some Internet account types.Microsoft Exchange Email (Outlook)Your phone also provides access to your company’s Outlook Exchange server. If your company uses the Microsoft Exchange Server, you can use this email application to wirelessly synchronize your email, Contacts, and Calendar information directly with your company’s Exchange server.Setting Up a Microsoft Exchange Email account1. From the Home screen, tap Apps g Email.Note: If you have already set up an email account and want to add an additional email account, tap g Settings g Manage accounts g Addaccount.2. Enter your Email address and Password information. ●Tap Show password to display the password as you enter it in the associated field.3. Follow the on‑screen instructions.Note: If prompted with an on-screen notification that the connection that the “Setup could not finish”, tap Edit details to continue with a manual update of necessary information.Important! Remember to manually place the cursor in the correct spot and enter a Domain name before the “[Domain]\[user name]” entry. Most servers only provide a username.4. Consult your IT Administrator if it is necessary to enable the Use client certification option.5. Identify your new work email account with a unique name (Ex: Work), then tap Done.Opening an Exchange Email1. From the Home screen, tap Apps g Email.2. Tap the account name field (upper‑left) to open the complete email account list page. 3. Select an exchange email account and tap an email message.Refreshing Exchange Email1. From the Home screen, tap Apps g Email.2. Select an email account. ●If you are already in an email account, tap the account name field (upper‑left) to open the complete email account list page. ●Select an available email account.3. Tap Refresh.Composing Exchange Email ►For more information, refer to “Composing Email” on page 40.Deleting an Exchange Email Message ►Touch and hold an email (from your inbox list) and select Delete from the on‑screen context menu.– or – With the email message open and displayed, tap Delete.](https://usermanual.wiki/Samsung-Electronics-Co/SMG386T.Users-Manual-1/User-Guide-2292028-Page-42.png)