Samsung Electronics Co SMG6000 GSM/WCDMA/LTE Phone +Bluetooth/BLE and DTS b/g/n User Manual 20150921 v2 A3LSMG6000

Samsung Electronics Co Ltd GSM/WCDMA/LTE Phone +Bluetooth/BLE and DTS b/g/n 20150921 v2 A3LSMG6000

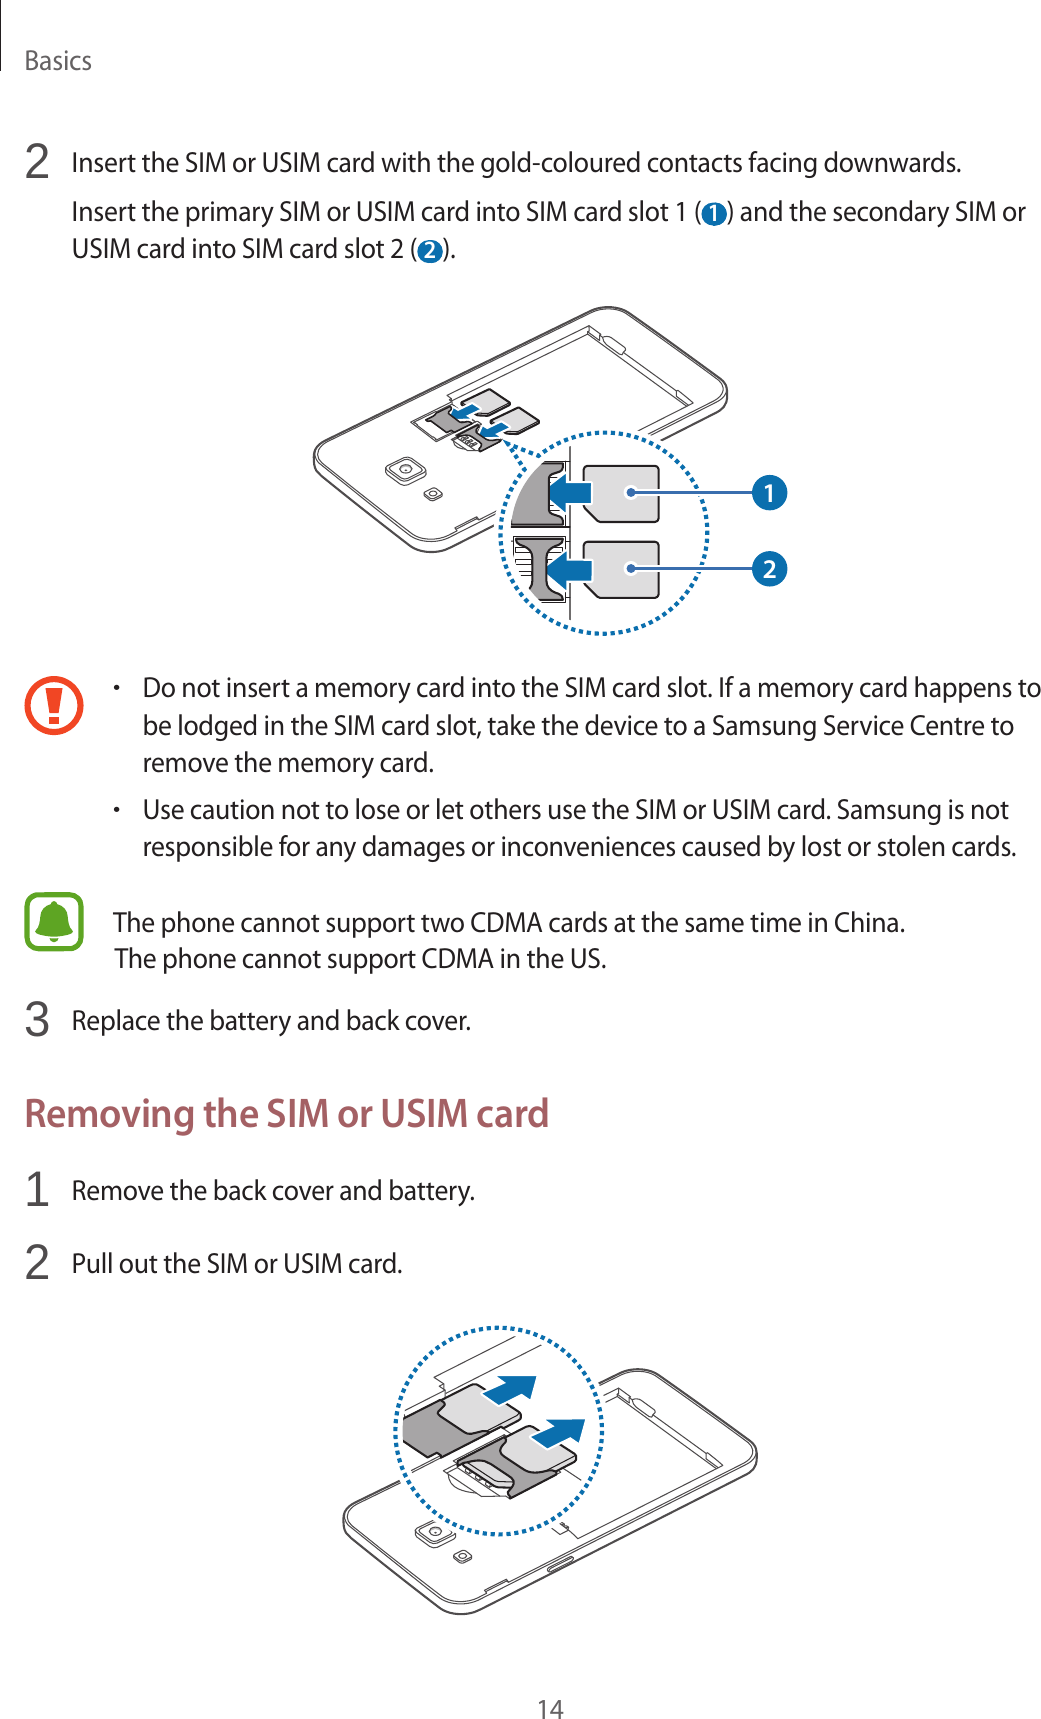
User Manual_20150921_v2 - [A3LSMG6000] User Manual_

www.samsung.com/cn User ManualSM-G6000English (CHN). 09/2015. Rev.1.0
2Table of ContentsBasics4  Read me first5  Package contents6  Device layout8 Battery13  SIM or USIM card16  Memory card17 Turning the device on and off18 Touchscreen21  Home screen26  Lock screen27  Notification panel28  Entering text29  Screen capture29 Opening apps30 Device and data managementApplications33  Installing or uninstalling apps34 Phone37 Contacts38 Messages40 Internet41 Email42 Camera48 Gallery49  Smart Manager51  S Planner52 Music53 Video54 Voice Recorder55 My Files55 Memo56 Clock57 Calculator58 Radio59  Theme StoreSettings60 Introduction60 WLAN62 Bluetooth63  Airplane mode64  WLAN hotspot and tethering65  Data usage65  SIM card manager66  Mobile networks66  More connection settings67  Sounds and notifications67 Display
Table of Contents368 Applications68 Wallpaper68  Lock screen and security69 Privacy69 Accessibility70 Accounts71 Reset71  Language and input71 Battery72 Storage72 Date and time73 User manual73  About deviceAppendix74 Troubleshooting79 Notices
4BasicsRead me firstPlease read this manual before using the device to ensure safe and proper use.•Descriptions are based on the device’s default settings.•Some content may differ from your device depending on the region, service provider, model specifications, or device’s software.•Content (high quality content) that requires high CPU and RAM usage will affect the overall performance of the device. Apps related to the content may not work properly depending on the device’s specifications and the environment that it is used in.•Samsung is not liable for performance issues caused by apps supplied by providers other than Samsung.•Samsung is not liable for performance issues or incompatibilities caused by edited registry settings or modified operating system software. Attempting to customise the operating system may cause the device or apps to work improperly.•Software, sound sources, wallpapers, images, and other media provided with this device are licensed for limited use. Extracting and using these materials for commercial or other purposes is an infringement of copyright laws. Users are entirely responsible for illegal use of media.•You may incur additional charges for data services, such as messaging, uploading and downloading, auto-syncing, or using location services depending on your data plan. For large data transfers, it is recommended to use the Wi-Fi feature.•Default apps that come with the device are subject to updates and may no longer be supported without prior notice. If you have questions about an app provided with the device, contact a Samsung Service Centre. For user-installed apps, contact service providers.•Modifying the device’s operating system or installing softwares from unofficial sources may result in device malfunctions and data corruption or loss. These actions are violations of your Samsung licence agreement and will void your warranty.
Basics5Instructional iconsWarning: situations that could cause injury to yourself or othersCaution: situations that could cause damage to your device or other equipmentNotice: notes, usage tips, or additional informationPackage contentsCheck the product box for the following items:•Device•Battery•Quick start guide•The items supplied with the device and any available accessories may vary depending on the region or service provider.•The supplied items are designed only for this device and may not be compatible with other devices.•You can purchase additional accessories from your local Samsung retailer. Make sure they are compatible with the device before purchase.•Use only Samsung-approved accessories. Using unapproved accessories may cause the performance problems and malfunctions that are not covered by the warranty.•Availability of all accessories is subject to change depending entirely on manufacturing companies. For more information about available accessories, refer to the Samsung website.
Basics6Device layoutHeadset jackMicrophoneBack keyFront cameraProximity sensorSpeakerPower keyMultipurpose jackTouchscreenRecents keyHome keyLoud speakerVolume keyRear cameraBack coverGPS antennaFlashMain antenna
Basics7•Do not cover the antenna area with your hands or other objects. This may cause connectivity problems or drain the battery.•Using a Samsung-approved screen protector is recommended. Unapproved screen protectors may cause the sensors to malfunction.•Do not allow water to contact the touchscreen. The touchscreen may malfunction in humid conditions or when exposed to water.KeysKeyFunctionPower•Press and hold to turn the device on or off.•Press to turn on or lock the screen.Recents•Tap to open the list of recent apps.Home•Press to turn on the screen while the screen is locked.•Press to return to the Home screen.Back•Tap to return to the previous screen.Volume•Press to adjust the device volume.
Basics8BatteryInstalling the battery1  Remove the back cover.Be careful not to damage your fingernails when you remove the back cover.Do not bend or twist the back cover excessively. Doing so may damage the cover.2  Insert the battery with the battery’s gold-coloured contacts properly aligned with the device’s contacts.12
Basics93  Replace the back cover.Removing the battery1  Remove the back cover.2  Pull out the battery.
Basics10Charging the batteryCharge the battery before using it for the first time or when it has been unused for extended periods.Use only Samsung-approved chargers, batteries, and cables. Unapproved chargers or cables can cause the battery to explode or damage the device.1  Connect the USB cable to the USB power adaptor and then plug the end of the USB cable into the multipurpose jack.Connecting the charger improperly may cause serious damage to the device. Any damage caused by misuse is not covered by the warranty.
Basics112  Plug the USB power adaptor into an electric socket.3  After fully charging, disconnect the device from the charger. First unplug the charger from the device, and then unplug it from the electric socket.Do not remove the battery before removing the charger. This may damage the device.To save energy, unplug the charger when not in use. The charger does not have a power switch, so you must unplug the charger from the electric socket when not in use to avoid wasting power. The charger should remain close to the electric socket and easily accessible while charging.Viewing the remaining charging timeWhile charging, open the Home screen and tap Apps → Settings → Battery.The actual charging time may vary depending on the status of your device and the charging conditions. The remaining charging time may not be displayed when you charge the device in very cold or very hot conditions.Reducing the battery consumptionYour device provides various options that help you conserve battery power.•Optimise the device using the Smart manager.•When you are not using the device, switch to sleep mode by pressing the Power key.•Activate power saving mode.•Close unnecessary apps.•Deactivate the Bluetooth feature when not in use.•Deactivate the Wi-Fi feature when not in use.•Deactivate auto-syncing of apps.•Decrease the backlight time.•Decrease the screen brightness.
Basics12Battery charging tips and precautions•When the battery power is low, the battery icon appears empty.•If the battery is completely discharged, the device cannot be turned on immediately when the charger is connected. Allow a depleted battery to charge for a few minutes before turning on the device.•If you use multiple apps at once, network apps, or apps that need a connection to another device, the battery will drain quickly. To avoid disconnecting from the network or losing power during a data transfer, always use these apps after fully charging the battery.•Using a power source other than the charger, such as a computer, may result in a slower charging speed due to a lower electric current.•The device can be used while it is charging, but it may take longer to fully charge the battery.•If the device receives an unstable power supply while charging, the touchscreen may not function. If this happens, unplug the charger from the device.•While charging, the device and the charger may heat up. This is normal and should not affect the device’s lifespan or performance. If the battery gets hotter than usual, the charger may stop charging.•If the device is not charging properly, take the device and the charger to a Samsung Service Centre.Power saving modeSave the battery power by limiting the device’s functions.On the Home screen, tap Apps → Settings → Battery → Power saving mode, and then tap the switch to activate it.To automatically activate power saving mode when the remaining battery power reaches the preset level, tap Start power saving and select an option.
Basics13Ultra power saving modeUse this mode to extend the device’s battery power. In ultra power saving mode, the device performs the following:•Restricts the available apps to essential and selected apps only.•Deactivates the mobile data connection when the screen turns off.•Deactivates the Wi-Fi and Bluetooth features.On the Home screen, tap Apps → Settings → Battery → Ultra power saving mode, and then tap the switch to activate it.To deactivate ultra power saving mode, tap MORE → Turn off Ultra power saving mode.The usage time left shows the time remaining before the battery power runs out. Usage time left may vary depending on your device settings and operating conditions.SIM or USIM cardInstalling the SIM or USIM cardInsert the SIM or USIM card provided by the mobile telephone service provider.•Only microSIM cards work with the device.•In some areas, data transfer speeds may be slower if two SIM cards are inserted in the device than when one SIM card is inserted.•Some LTE services may not be available depending on the service provider. For more information about service availability, contact your service provider.1  Remove the back cover and battery.
Basics142  Insert the SIM or USIM card with the gold-coloured contacts facing downwards.Insert the primary SIM or USIM card into SIM card slot 1 ( 1 ) and the secondary SIM or USIM card into SIM card slot 2 ( 2 ).12•Do not insert a memory card into the SIM card slot. If a memory card happens to be lodged in the SIM card slot, take the device to a Samsung Service Centre to remove the memory card.•Use caution not to lose or let others use the SIM or USIM card. Samsung is not responsible for any damages or inconveniences caused by lost or stolen cards.The phone cannot support two CDMA cards at the same time in China.3  Replace the battery and back cover.Removing the SIM or USIM card1  Remove the back cover and battery.2  Pull out the SIM or USIM card.The phone cannot support CDMA in the US.
Basics15Using dual SIM or USIM cardsIf you insert two SIM or USIM cards, you can have two phone numbers or service providers for a single device.Activating SIM or USIM cardsOn the Home screen, tap Apps → Settings → SIM card manager. Select a SIM or USIM card and tap the switch to activate it.If both cards are activated, you can receive calls and messages on each card. However, if you are on a call using one card, the other card cannot be used to receive new calls. These situations apply to voice calls only. Data calls or video calls may perform differently.Changing the display name and icon of SIM or USIM cardsOn the Home screen, tap Apps → Settings → SIM card manager. Select a SIM or USIM card, and tap Name or Icon. Set a display name and icon for each card.Switching between cardsWhen two SIM or USIM cards are activated, card selection icons appear on the dashboard of the notification panel. Open the notification panel and then select a card.
Basics16Memory cardInstalling a memory cardYour device accepts memory cards with maximum capacities of 128 GB. Depending on the memory card manufacturer and type, some memory cards may not be compatible with your device.•Some memory cards may not be fully compatible with the device. Using an incompatible card may damage the device or the memory card, or corrupt the data stored in it.•Use caution to insert the memory card right-side up.•The device supports the FAT and the exFAT file systems for memory cards. When inserting a card formatted in a different file system, the device asks to reformat the memory card.•Frequent writing and erasing of data shortens the lifespan of memory cards.•When inserting a memory card into the device, the memory card’s file directory appears in the My Files → SD card folder.1  Remove the back cover.2  Insert a memory card with the gold-coloured contacts facing downwards.3  Replace the back cover.
Basics17Removing the memory cardBefore removing the memory card, first unmount it for safe removal.On the Home screen, tap Apps → Settings → Storage → Unmount SD card.1  Remove the back cover.2  Pull out the memory card.3  Replace the back cover.Do not remove the memory card while the device is transferring or accessing information. Doing so can cause data to be lost or corrupted or damage to the memory card or device. Samsung is not responsible for losses that result from the misuse of damaged memory cards, including the loss of data.Formatting the memory cardA memory card formatted on a computer may not be compatible with the device. Format the memory card on the device.On the Home screen, tap Apps → Settings → Storage → Format SD card → FORMAT SD CARD → DELETE ALL.Before formatting the memory card, remember to make backup copies of all important data stored in the memory card. The manufacturer’s warranty does not cover loss of data resulting from user actions.Turning the device on and offPress and hold the Power key for a few seconds to turn on the device.When you turn on your device for the first time or after performing a data reset, follow the on-screen instructions to set up your device.To turn off the device, press and hold the Power key, and then tap Power off.•If your device is frozen and unresponsive, press and hold the Power key and the Volume key down simultaneously for more than 7 seconds to restart it.•Follow all posted warnings and directions from authorised personnel in areas where the use of wireless devices is restricted, such as aeroplanes and hospitals.
Basics18Touchscreen•Do not allow the touchscreen to come into contact with other electrical devices. Electrostatic discharges can cause the touchscreen to malfunction.•To avoid damaging the touchscreen, do not tap it with anything sharp or apply excessive pressure to it with your fingertips.•The device may not recognise touch inputs close to the edges of the screen, which are outside of the touch input area.•It is recommended to use fingers when you use the touchscreen.TappingTo open an app, to select a menu item, to press an on-screen button, or to enter a character using the keyboard on the screen, tap it with your finger.Tapping and holdingTap and hold an item or the screen for more than 2 seconds to access available options.
Basics19DraggingTo move an item, tap and hold it and drag it to the target position.Double-tappingDouble-tap on a webpage or image to zoom in. Double-tap again to return.
Basics20SwipingSwipe to the left or right on the Home screen or the Apps screen to view other panels. Swipe upwards or downwards to scroll through a webpage or a list of items, such as contacts.Spreading and pinchingSpread two fingers apart on a webpage or image to zoom in a part. Pinch to zoom out.
Basics21Home screenHome screenThe Home screen is the starting point for accessing all of the device’s features. It displays widgets, shortcuts to apps, and more.To view other panels, swipe to the left or right.An appScreen indicatorsFavourite apps Apps screen iconHome screen optionsOn the Home screen, tap and hold an empty area, or pinch your fingers together to access the available options. Customise the Home screen by adding, deleting, or rearranging Home screen panels. You can also set the Home screen wallpaper, add widgets to the Home screen, and more.•Wallpapers: Change the wallpaper settings for the Home screen and the locked screen.•Widgets: Add widgets to the Home screen. Widgets are small apps that launch specific app functions to provide information and convenient access on your Home screen.
Basics22•Themes: Change the device’s theme. Visual elements of interface, such as colours, icons, and wallpapers, will change depending on the selected theme.Adding itemsTap and hold an app or a folder from the Apps screen, and then drag it to the Home screen.To add widgets, tap and hold an empty area on the Home screen, tap Widgets, tap and hold a widget, and then drag it to the Home screen.Moving and removing an itemTap and hold an item on the Home screen, and then drag it to a new location.To move the item to another panel, drag it to the side of the screen.You can also move frequently used apps to the shortcuts area at the bottom of the Home screen.To remove an item, tap and hold the item. Then, drag it to Remove at the top of the screen.
Basics23Creating folders1  On the Home screen, tap and hold an app, and then drag it over another app.2  Drop the app when a folder frame appears around the apps.A new folder containing the selected apps will be created.3  Tap Enter folder name and enter a folder name.To add more apps to the folder, tap and hold another app, and then drag it to the folder.Managing panelsOn the Home screen, tap and hold an empty area to add, move, or remove a panel.To add a panel, swipe to the left, and then tap  .To move a panel, tap and hold a panel preview, and then drag it to a new location.To remove a panel, tap and hold a panel preview, and then drag it to Remove at the top of the screen.To set a panel as the main Home screen, tap  .
Basics24Apps screenThe Apps screen displays icons for all apps, including newly installed apps.On the Home screen, tap Apps to open the Apps screen. To view other panels, swipe to the left or right.Moving itemsOn the Apps screen, tap EDIT. Tap and hold an item and drag it to a new location.To move the item to another panel, drag it to the side of the screen.Creating folders1  On the Apps screen, tap EDIT.2  Tap and hold an app, and then drag it over another app.3  Drop the app when a folder frame appears around the apps.A new folder containing the selected apps will be created.4  Tap Enter folder name and enter a folder name.To add more apps to the folder, tap and hold another app, and then drag it to the folder.
Basics25Indicator iconsIndicator icons appear on the status bar at the top of the screen. The icons listed in the table below are most common.The status bar may not appear at the top of the screen in some apps. To display the status bar, drag down from the top of the screen.Icon MeaningNo signal /  Signal strength /  Currently accessing SIM or USIM card /  Roaming (outside of normal service area)GPRS network connectedEDGE network connectedUMTS network connectedHSDPA network connectedHSPA+ network connected /  LTE network connected (LTE-enabled models)Wi-Fi connectedBluetooth feature activatedGPS activatedCall in progressMissed callNew text or multimedia messageAlarm activatedMute mode activatedVibration mode activatedFlight mode activatedError occurred or caution requiredBattery power level
Basics26Lock screenPressing the Power key turns off the screen and locks it. Also, the screen turns off and automatically locks if the device is not used for a specified period.To unlock the screen, press the Power key or the Home key and swipe in any direction.You can change the way that you lock the screen to prevent others from accessing your personal information.On the Apps screen, tap Settings → Lock screen and security → Screen lock type, and then select a screen lock method. The device requires an unlock code whenever unlocking it.If the unlock code is forgotten, take the device to a Samsung Service Centre to reset it.PatternDraw a pattern by connecting four dots or more, and then draw the pattern again to verify it. Set a backup PIN to unlock the screen when you forget the pattern.PINA PIN consists of numbers only. Enter at least four numbers, and then enter the password again to verify it.PasswordA password consists of characters and numbers. Enter at least four characters including numbers and symbols, and then enter the password again to verify it.
Basics27Notification panelUsing the notification panelWhen you receive new notifications, such as messages or missed calls, indicator icons appear on the status bar. To see more information about the icons, open the notification panel and view the details.To open the notification panel, drag the status bar downwards. To close the notification panel, swipe upwards on the screen.You can use the following functions on the notification panel.Launch Settings.Tap a notification and perform various actions.Clear all notifications.Maximise brightness for better visibility in bright conditions.Rearrange quick setting buttons.Quick setting buttonsAdjust the brightness.Select a SIM or USIM card.Using quick setting buttonsTap quick setting buttons to activate some features. Swipe to the left or right on the buttons area to view more buttons. To view more detailed settings, tap and hold a button.To rearrange buttons, tap EDIT, tap and hold a button, and then drag it to another location.
Basics28Entering textKeyboard layoutA keyboard appears automatically when you enter text to send messages, create memos, and more.Text entry is not supported in some languages. To enter text, you must change the input language to one of the supported languages.Break to the next line.Delete a preceding character.Enter punctuation marks.Additional keyboard functionsEnter numbers.Enter a space. Change the input language.Hide the keyboard.Changing the input languageTap   → Select input languages, and then select the languages to use. Tap the input language key to switch between the input languages.Changing the keyboard layoutTap  , select a language under Input languages, and then select a keyboard layout to use.On Pinyin 3 x 4 keyboard, a key has three or four characters. To enter a character, tap the corresponding key repeatedly until the desired character appears.Additional keyboard functions• → PY. QWERTY: Switch to the qwerty keyboard.• → SHUANGPIN: Switch to shuangpin mode. To view the character input map, open the Apps screen and tap Settings → Language and input → Samsung Chinese IME → ShuangPin keyboard.• → PINYIN 3 x 4: Switch to pinyin mode. To enter a character, tap the corresponding key repeatedly until the desired character appears.
Basics29• → STROKE: Switch to stroke mode. Tap stroke keys to enter a character. Tap   when you are unsure about which stroke to enter.• → FULL HANDWRITING or HANDWRITING PAD: Switch to handwriting mode.• : Enter emoticons.• : Change the keyboard settings.Copying and pasting1  Tap and hold over text.2  Drag   or   to select the desired text, or tap Select all to select all text.3  Tap Copy or Cut.The selected text is copied to the clipboard.4  Tap and hold where the text is to be inserted and tap Paste.Screen captureCapture a screenshot while using the device.Press and hold the Home key and the Power key simultaneously. You can view captured images in Gallery.It is not possible to capture a screenshot while using some apps and features.Opening appsOn the Home screen or the Apps screen, select an app icon to open it.To open an app from the list of recently used apps, tap   and select a recent app window.Closing an appTap   and drag a recent app window to the left or right to close it. To close all running apps, tap CLOSE ALL.
Basics30Device and data managementTransferring data from your previous deviceYou can transfer data from a previous device to your new device via Samsung Smart Switch.The following versions of Samsung Smart Switch are available.•Mobile version: Transfer data between mobile devices. You can download the app from Galaxy Apps.•Computer version: Transfer data between your device and a computer. You can download the app from www.samsung.com/cn/smartswitch.•Samsung Smart Switch is not supported on some devices or computers.•Limitations apply. Visit www.samsung.com/cn/smartswitch for details. Samsung takes copyright seriously. Only transfer content that you own or have the right to transfer.Transferring data from a mobile deviceTransfer data from your previous device to your new device.Download and install Smart Switch from Galaxy Apps.Launch Smart Switch and follow the on-screen instructions to transfer data from your previous device.Transferring data from a computerBack up data from your previous device to a computer and import the data to your new device.1  On the computer, visit www.samsung.com/cn/smartswitch to download Smart Switch.2  On the computer, launch Smart Switch.If your previous device is not a Samsung device, back up data to a computer using a program provided by the device’s manufacturer. Then, skip to the fifth step.
Basics313  Connect your previous device to the computer using the USB cable.4  On the computer, follow the on-screen instructions to back up data from the device. Then, disconnect your previous device from the computer.5  Connect your new device to the computer using the USB cable.6  On the computer, follow the on-screen instructions to transfer data to your new device.Using the device as a removable disk for data transferMove audio, video, image, or other types of files from the device to the computer, or vice versa.Do not disconnect the USB cable from the device when you are transferring files. Doing so may cause data loss or device damage.The devices may not connect properly if they are connected via a USB hub. Directly connect the device to the computer’s USB port.1  Connect the device to the computer using the USB cable.2  Open the notification panel, and then tap Connected for charging → Media device (MTP).Tap Camera (PTP) if your computer does not support Media Transfer Protocol (MTP) or not have any appropriate driver installed.3  Transfer files between your device and the computer.Updating the deviceThe device can be updated to the latest software.The device supports only authorised operating system updates. Do not update an unauthorised operating system. Doing so may make your personal information vulnerable to leakage or theft.
Basics32Updating over the airThe device can be directly updated to the latest software by the firmware over-the-air (FOTA) service.On the Apps screen, tap Settings → About device → Software update → Update now.To automatically check for available updates, tap the Auto update switch to activate it. To download updates only when a Wi-Fi connection is activated, tap the WLAN only switch to activate it.Updating with Smart SwitchConnect the device to a computer and update the device to the latest software.1  On the computer, visit www.samsung.com/cn/smartswitch to download and install Smart Switch.2  On the computer, launch Smart Switch.3  Connect the device to the computer using a USB cable.4  If a software update is available, follow the on-screen instructions to update the device.•Do not turn off the computer or disconnect the USB cable while the device is updating.•While updating the device, do not connect other media devices to the computer. Doing so may interfere with the update process. Before updating, disconnect all other media devices from the computer.Performing a data resetDelete all settings and data on the device. Before performing a factory data reset, ensure you back up all important data stored on the device.On the Apps screen, tap Settings → Reset → Factory data reset → RESET DEVICE → DELETE ALL. The device automatically restarts.
33ApplicationsInstalling or uninstalling appsGalaxy AppsPurchase and download apps. You can download apps that are specialised for Samsung Galaxy devices.Tap Galaxy Apps on the Apps screen.This app may not be available depending on the region or service provider.Installing appsBrowse apps by category or tap SEARCH to search for a keyword.Select an app to view information about it. To download free apps, tap INSTALL. To purchase and download apps where charges apply, tap the price and follow the on-screen instructions.To change the auto update settings, tap   → Settings → Auto update apps, and then select an option.Managing appsUninstalling or disabling appsOn the Apps screen, tap EDIT. The   icon appears on the apps that you can disable or uninstall. Select an app and tap DISABLE or UNINSTALL. Alternatively, on the Apps screen, tap Settings → Applications → Application manager, select an app, and then tap DISABLE or UNINSTALL.•DISABLE: Disable selected default apps that cannot be uninstalled from the device.•UNINSTALL: Uninstall downloaded apps.Enabling appsOn the Apps screen, tap Settings → Applications → Application manager, scroll to DISABLED, select an app, and then tap ENABLE.
Applications34PhoneIntroductionMake or answer voice calls.Making calls1  Tap Phone on the Apps screen.2  Enter a phone number.If the keypad does not appear on the screen, tap   to open the keypad.3  Tap   or   to make a voice call.Add the number to the contacts list.Preview the phone number.Hide the keypad.Delete a preceding character.Access additional options.Making calls from the locked screenOn the locked screen, drag   outside the large circle.Making calls from call logs or contacts listTap LOG or CONTACTS, and then swipe to the right on a contact or a phone number to make a call.
Applications35Making an international call1  Tap   to open the keypad if the keypad does not appear on the screen.2  Tap and hold 0 until the + sign appears.3  Enter the country code, area code, and phone number, and then tap   or  .Receiving callsAnswering a callWhen a call comes in, drag   outside the large circle.Rejecting a callWhen a call comes in, drag   outside the large circle.To send a message when rejecting an incoming call, drag the reject message bar upwards.To create various rejection messages, open the Apps screen and tap Phone → MORE → Settings → Call blocking → Call-reject messages, enter a message, and then tap  .Missed callsIf a call is missed, the   icon appears on the status bar. Open the notification panel to view the list of missed calls. Alternatively, on the Apps screen, tap Phone → LOG to view missed calls.
Applications36Options during callsDuring a voice callThe following actions are available:Access additional options.Switch to a Bluetooth headset if it is connected to the device.Turn off the microphone so that the other party cannot hear you.Open or close the keypad.Activate or deactivate the speakerphone.End the current call.Increase the volume.Record a call conversation.When using the speakerphone, keep the device away from your ears.
Applications37ContactsIntroductionCreate new contacts or manage contacts on the device.Adding contactsCreating contacts manually1  Tap Contacts on the Apps screen.2  Tap   and select a storage location.3  Enter contact information.• : Add an image.• /   : Add or delete a contact field.4  Tap SAVE.To add a phone number to the contacts list from the keypad, open the Apps screen and tap Phone. If the keypad does not appear on the screen, tap   to open the keypad. Enter the number and tap Add to Contacts.To add a phone number to the contacts list from received calls or messages, open the Apps screen and tap Phone → LOG → a contact.Importing contactsImport contacts from storage services to your device.On the Apps screen, tap Contacts → MORE → Settings → Import/Export contacts → IMPORT and select an import option.
Applications38Searching for contactsOn the Apps screen, tap Contacts.Use one of the following search methods:•Scroll up or down the contacts list.•Tap the search field at the top of the contacts list and enter search criteria.Once a contact is selected, take one of the following actions:• : Add to favourite contacts.• : Make a voice call.• : Compose a message.• : Compose an email.MessagesIntroductionSend and view messages by conversation.Sending messagesYou may incur additional charges for sending messages when you are roaming.1  Tap Messages on the Apps screen.2  Tap  .
Applications393  Add recipients and enter a message.Access additional options.Enter a message.Select contacts from the contacts list.Enter recipients.Attach files.Insert a message template.Send the message.4  Tap   or   to send the message.Viewing messagesMessages are grouped into message threads by contact.You may incur additional charges for receiving messages when you are roaming.1  Tap Messages on the Apps screen.2  On the messages list, select a contact.3  View your conversation.
Applications40InternetBrowse the Internet to search for information and bookmark your favourite webpages to access them conveniently.1  Tap Internet on the Apps screen.2  Tap the address field.3  Enter the web address or a keyword, and then tap Go.To view the toolbars, drag your finger downwards slightly on the screen.Open the homepage.Move to the previously visited page.Open the browser's tab manager.Access additional options.Refresh the current webpage.View your bookmarks, saved webpages, and recent history.
Applications41EmailSetting up email accountsSet up an email account when opening Email for the first time.1  Tap Email on the Apps screen.2  Select an email service and enter the email address and password.3  Enter the email address and password, and then tap NEXT.To manually register a company email account, tap MANUAL SETUP.4  Follow the on-screen instructions to complete the setup.To set up another email account, tap MORE → Settings → Add account.If you have more than one email accounts, you can set one as the default account. Tap MORE → Settings → MORE → Set default account.Sending emails1  Tap   to compose an email.2  Add recipients and enter an email text.3  Tap SEND to send the mail.Reading emailsOn the emails list, tap an email to read.
Applications42CameraIntroductionTake photos and record videos using various modes and settings.Basic shootingYou can take photos or record videos. View your photos and videos in Gallery.Tap Camera on the Apps screen.Camera etiquette•Do not take photos or record videos of other people without their permission.•Do not take photos or record videos where legally prohibited.•Do not take photos or record videos in places where you may violate other people’s privacy.Taking photos or recording videos1  Tap the image on the preview screen where the camera should focus.2  Tap   to take a photo or tap   to record a video.•Spread two fingers apart on the screen to zoom in, and pinch to zoom out.•To capture an image from the video while recording, tap Capture.•To change the focus while recording a video, tap where you want to focus. To focus on the centre of the screen, tap  .Camera settingsHide or show the setting icons.Quick settingsRecord a video.Take a photo.Switch between the front and rear cameras.Shooting modesPreview thumbnailCurrent mode
Applications43On the preview screen, swipe to the right to access the list of shooting modes. Or, swipe to the left to view photos and videos you have captured.•The preview screen may vary depending on the shooting mode and which camera is being used.•The camera automatically shuts off when unused.•Make sure that the lens is clean. Otherwise, the device may not work properly in some modes that require high resolutions.Launching Camera on the locked screenTo quickly take photos, launch Camera on the locked screen.On the locked screen, drag   outside the large circle.•This feature may not be available depending on the region or service provider.•Some camera features are not available when you launch Camera from the locked screen while the security features are activated.Launching Camera quicklyPress the Home key twice quickly to launch Camera. Camera always launches in auto mode.Some camera features are not available when you launch Camera from the locked screen or when the screen is turned off while the security features are activated.Auto modeAuto mode allows the camera to evaluate the surroundings and determine the ideal mode for the photo.On the preview screen, tap MODE → Auto.
Applications44Pro modeTake photos while manually adjusting various shooting options, such as exposure value and ISO value.On the preview screen, tap MODE → Pro. Select options and customise the settings, and then tap   to take a photo.• : Select an appropriate white balance, so images have a true-to-life colour range.• : Select an ISO value. This controls camera light sensitivity. Low values are for stationary or brightly lit objects. Higher values are for fast-moving or poorly lit objects. However, higher ISO settings can result in noise in photos.• : Change the exposure value. This determines how much light the camera’s sensor receives. For low-light situations, use a higher exposure.PanoramaTake a series of photos horizontally or vertically and then stitch them together to create a wide scene.On the preview screen, tap MODE → Panorama.To get the best shots using panorama mode, follow these tips:•Move the camera slowly in one direction.•Keep the image within the frame on the camera’s viewfinder.•Avoid taking photos of indistinct backgrounds, such as an empty sky or a plain wall.Continuous shotTake a series of photos of moving subjects.On the preview screen, tap MODE → Continuous shot.Tap and hold   to take several photos continuously.
Applications45Beauty faceTake a photo with lightened faces for gentler images.On the preview screen, tap MODE → Beauty face.SelfieTake self-portraits with the front camera.1  On the preview screen, tap   to switch to the front camera for self-portraits.2  Tap MODE → Selfie.3  Face the front camera lens.4  When the device detects your face, tap the screen to take a photo of yourself.To take a photo using your palm, tap   and tap the Gesture control switch to activate it. Show your palm to the front camera. After recognising your palm, the device will take a photo after a few seconds.Wide selfieTake a wide self-portrait to include more people in the photo and avoid leaving people out.1  On the preview screen, tap   to switch to the front camera for self-portraits.2  Tap MODE → Wide selfie.3  Face the front camera lens.4  When the device detects your face, tap the screen to take a photo of yourself.To take a photo using your palm, tap   and tap the Gesture control switch to activate it. Show your palm to the front camera. After recognising your palm, the device will take a photo after a few seconds.
Applications465  Slowly swivel the device left and then right or vice versa to take a wide self-portrait.The device will take additional photos when the white frame moves to each end of the viewfinder window.•Make sure to keep the white frame inside the viewfinder window.•The subjects should remain still while taking wide self-portraits.•The resolution of a photo may be affected by lighting conditions.•The top and bottom parts of the image displayed on the preview screen may be cut out of the photo depending on the shooting conditions.Interval shotTake series of self-portraits at an interval and save photos you want.1  On the preview screen, tap   to switch to the front camera for self-portraits.2  Tap MODE → Interval shot.3  When the device detects your face, tap the screen to take a photo of yourself.The device will take four photos at the two-second intervals.To take a photo using your palm, tap   and tap the Gesture control switch to activate it. Show your palm to the front camera. After recognising your palm, the device will take a photo after a few seconds.4  Tick photos you want to save and tap SAVE.
Applications47Camera settingsQuick settingsOn the preview screen, use the following quick settings.The available options may vary depending on the shooting mode and which camera is being used.• : Select a filter effect to use when taking photos or recording videos.• : Select the length of the delay before the camera automatically takes a photo.• : Activate or deactivate the flash.Camera settingsOn the preview screen, tap  .The available options may vary depending on the shooting mode and which camera is being used.•Picture size (rear) / Picture size (front): Select a resolution for photos. Using a higher resolution will result in higher quality photos, but they will take up more memory.•Video size (rear) / Video size (front): Select a resolution for videos. Using a higher resolution will result in higher quality videos, but they will take up more memory.•Gesture control: Set the device to detect your palm, so you can use it to take self-portraits.•Save pictures as previewed: Invert the image to create a mirror-image of the original scene, when taking photos with the front camera.•Grid lines: Display viewfinder guides to help composition when selecting subjects.•Location tags: Attach a GPS location tag to the photo.•GPS signal strength may decrease in locations where the signal is obstructed, such as between buildings or in low-lying areas, or in poor weather conditions.•Your location may appear on your photos when you upload them to the Internet. To avoid this, deactivate the location tag setting.•Review pictures: Set the device to show photos after capturing them.•Quick launch: Set the device to launch the camera by pressing the Home key twice quickly.•Storage location: Select the memory location for storage.
Applications48•Volume keys function: Set the device to use the Volume key to control the shutter or zoom function.•Shutter sound: Enable or disable the shutter sound.•Reset settings: Reset the camera settings.GalleryIntroductionView and manage photos and videos stored in the device.Viewing images or videos1  Tap Gallery on the Apps screen.2  Select an image or a video.Video files show the   icon on the preview thumbnail. To play a video, tap  .More optionsMove to the previous screen.Share the image with others. Delete the image.Modify the image.To hide or show the menus, tap the screen.
Applications49Deleting images or videosDeleting an image or a videoSelect an image or a video and tap Delete at the bottom of the screen.Deleting multiple images and videos1  On the Gallery main screen, tap and hold an image or a video to delete.2  Tick the images or videos to delete.3  Tap DELETE.Smart ManagerIntroductionThe Smart manager provides an overview of the status of your device’s battery, storage, RAM, and system security. You can also automatically optimise the device with one tap of your finger.
Applications50Using the quick optimisation featureOn the Apps screen, tap Smart Manager → CLEAN ALL.The quick optimisation feature improves device performance through the following actions.•Identifying apps that use excessive battery power and clearing some memory.•Deleting unnecessary files and closing apps running in the background.•Scanning for malware and phishing attacks.Using the Smart managerOn the Apps screen, tap Smart Manager and select a feature.BatteryCheck the remaining battery power and time to use the device. For devices with low battery levels, conserve battery power by activating power saving features and closing apps that are consuming an excessive amount of battery power.The usage time left shows the time remaining before the battery power runs out. Usage time left may vary depending on your device settings and operating conditions.StorageCheck the status of used and available memory capacity. You can delete unused and residual files or uninstall apps that you do not use any more.RAMCheck the amount of available RAM. You can close background apps and reduce the amount of RAM you are using to speed up your device.Device securityCheck the device’s security status. This feature scans your device for malware.
Applications51S PlannerIntroductionManage your schedule by entering upcoming events in your planner.Creating events1  Tap S Planner on the Apps screen.2  Tap   or double-tap a date.If the date already has saved events or tasks in it, tap the date and tap  .3  Enter event details.Select a calendar to use or sync with.Enter the location of the event.Enter a title.Set a start and end date for the event.Add more details.Set an alarm.4  Tap SAVE to save the event.Syncing events with your accountsOn the Apps screen, tap Settings → Accounts, select an account service, and then tap the Sync Calendar switch to sync events with the account.To add accounts to sync with, open the Apps screen and tap S Planner → MORE → Manage calendars → Add account. Then, select an account to sync with and sign in.
Applications52MusicListen to music sorted by category and customise playback settings.Tap Music on the Apps screen.Tap  , select a category, and then select a song to play.Tap the album image at the bottom of the screen to open the music player screen.Change the repeat mode.Skip to the next song. Tap and hold to fast-forward.Pause and resume playback.Access additional options.Adjust the volume.Skip to the previous song. Tap and hold to rewind.Turn on shuffle.Set the file as your favourite song.Open the playlist.
Applications53VideoWatch videos stored in the device and customise playback settings.Tap Video on the Apps screen.Select a video to play.Change screen ratio.Rewind or fast-forward by dragging the bar.Skip to the previous video. Tap and hold to rewind.Skip to the next video. Tap and hold to fast-forward.Access additional options.Pause and resume playback.Adjust the volume.
Applications54Voice RecorderUse this app to record or play voice memos.1  On the Apps screen, tap 实用工具 → Voice Recorder.2  Tap   to start recording. Speak into the microphone.Tap Pause to pause recording.Tap Call rejection to automatically reject incoming calls while recording a voice memo.Start recording.3  Tap   to finish recording.
Applications55My FilesAccess and manage various files stored in the device.On the Apps screen, tap 实用工具 → My Files.•Category: View files by category.•Local storage: View files stored in the device.•STORAGE USAGE: View your device’s memory information.To search for files or folders, tap SEARCH.MemoCreate memos and organise them by category.On the Apps screen, tap 实用工具 → Memo.Composing memosTap   on the memos list and enter a memo. While composing a memo, use the following options:•Category: Create or set a category.•Image: Insert images.•Voice: Make a voice recording to insert.•Tasks: Add tick boxes at the beginning of each row to create a list of tasks.To save the memo, tap SAVE.To edit a memo, tap a memo, and then tap the content of the memo.Searching for memosTap SEARCH on the memos list and enter a keyword to search for memos that include the keyword.
Applications56ClockIntroductionSet alarms, check the current time in many cities around the world, time an event, or set a specific duration.AlarmOn the Apps screen, tap Clock → Alarm.Setting alarmsTap ADD in the alarms list, set an alarm time, select the days on which the alarm will repeat, set other various alarm options, and then tap SAVE.To activate or deactivate alarms, tap the clock icon next to the alarm in the alarms list.Stopping alarmsTap DISMISS to stop an alarm. If you have previously enabled the snooze option, tap SNOOZE to repeat the alarm after a specified length of time.Deleting alarmsTap   on an alarm in the list of alarms.World clockOn the Apps screen, tap Clock → World clock.Creating clocksTap ADD and enter a city name or select a city from the cities list.Deleting clocksTap   on a clock.
Applications57Stopwatch1  On the Apps screen, tap Clock → Stopwatch.2  Tap START to time an event.To record lap times while timing an event, tap LAP.3  Tap STOP to stop timing.To restart the timing, tap RESUME.To clear lap times, tap RESET.Timer1  On the Apps screen, tap Clock → Timer.2  Set the duration, and then tap START.To open the keypad to enter the duration, tap KEYPAD.3  Tap DISMISS when the timer goes off.CalculatorPerform simple or complex calculations.Tap Calculator on the Apps screen.Rotate the device to landscape orientation to display the scientific calculator. If Screen rotation is disabled, tap   to display the scientific calculator.To see the calculation history, tap HISTORY. To close the calculation history panel, tap KEYPAD.To clear the history, tap HISTORY → CLEAR HISTORY.
Applications58RadioListening to the FM radioTap Radio on the Apps screen.Before you use this app, you must connect a headset, which serves as the radio antenna.The FM radio scans and saves available stations automatically when running for the first time.Tap   to turn on the FM radio. Select the radio station you want from the stations list and tap  to return to the FM radio screen.View the list of available stations.Access additional options.Turn the FM radio on or off.Scan and save available stations automatically.Add the current radio station to the favourites list.Fine-tune the frequency.Record a song from the FM radio.Enter radio station frequency manually.Search for an available radio station.
Applications59Scanning radio stationsTap Radio on the Apps screen.Tap SCAN, and then select a scan option. The FM radio scans and saves available stations automatically.Select the radio station you want from the stations list and tap   to return to the FM radio screen.Theme StorePurchase and download themes to change the visual elements of the Home screen, locked screen, and icons.Tap Theme Store on the Apps screen.
60SettingsIntroductionCustomise settings for functions and apps. You can make your device more personalised by configuring various setting options.On the Apps screen, tap Settings.To search for settings by entering keywords, tap SEARCH.To edit the list of frequently used settings, tap EDIT. Then, tick items to add or deselect items to remove.WLANConnecting to a Wi-Fi networkActivate the Wi-Fi feature to connect to a Wi-Fi network and access the Internet or other network devices.Turn off Wi-Fi to save the battery when not in use.1  On the Settings screen, tap WLAN, and then tap the switch to activate it.2  Select a network from the Wi-Fi networks list.Networks that require a password appear with a lock icon.3  Tap CONNECT.Once the device connects to a Wi-Fi network, the device will reconnect to that network each time it is available without requiring a password. To prevent the device connecting to the network automatically, select it from the list of networks and tap FORGET.
Settings61WLAN DirectWi-Fi Direct connects devices directly via a Wi-Fi network without requiring an access point.1  On the Settings screen, tap WLAN, and then tap the switch to activate it.2  Tap WLAN Direct.The detected devices are listed.If the device you want to connect to is not in the list, request that the device turns on its Wi-Fi Direct feature.3  Select a device to connect to.The devices will be connected when the other device accepts the Wi-Fi Direct connection request.Sending and receiving dataYou can share data, such as contacts or media files, with other devices. The following actions are an example of sending an image to another device.1  Tap Gallery on the Apps screen.2  Select an image.3  Tap Share → WLAN Direct, select a device to transfer the image to, and then tap SHARE.4  Accept the Wi-Fi Direct connection request on the other device.If the devices are already connected, the image will be sent to the other device without the connection request procedure.Ending the device connection1  Tap WLAN on the Settings screen.2  Tap WLAN Direct.The device displays the connected devices in the list.3  Tap the device name to disconnect the devices.
Settings62BluetoothIntroductionUse Bluetooth to exchange data or media files with other Bluetooth-enabled devices.•Samsung is not responsible for the loss, interception, or misuse of data sent or received via Bluetooth.•Always ensure that you share and receive data with devices that are trusted and properly secured. If there are obstacles between the devices, the operating distance may be reduced.•Some devices, especially those that are not tested or approved by the Bluetooth SIG, may be incompatible with your device.•Do not use the Bluetooth feature for illegal purposes (for example, pirating copies of files or illegally tapping communications for commercial purposes).Samsung is not responsible for the repercussion of illegal use of the Bluetooth feature.Pairing with other Bluetooth devices1  On the Settings screen, tap Bluetooth, and then tap the switch to activate it.The detected devices are listed.2  Select a device to pair with.If your device has paired with the device before, tap the device name without confirming the auto-generated passkey.If the device you want to pair with is not in the list, request that the device turns on its visibility option. Refer to the other device’s user manuals.Your device is visible to other devices while the Bluetooth settings screen is open.3  Accept the Bluetooth connection request on your device to confirm.The devices will be connected when the other device accepts the Bluetooth connection request.
Settings63Sending and receiving dataMany apps support data transfer via Bluetooth. You can share data, such as contacts or media files, with other Bluetooth devices. The following actions are an example of sending an image to another device.1  Tap Gallery on the Apps screen.2  Select an image.3  Tap Share → Bluetooth, and then select a device to transfer the image to.If the device you want to pair with is not in the list, request that the device turns on its visibility option.4  Accept the Bluetooth connection request on the other device.Unpairing Bluetooth devices1  Tap Bluetooth on the Settings screen.The device displays the paired devices in the list.2  Tap   next to the device name to unpair.3  Tap Unpair.Airplane modeThis disables all wireless functions on your device. You can use only non-network services.On the Settings screen, tap Airplane mode.
Settings64WLAN hotspot and tetheringUse the device as a mobile hotspot to share the device’s mobile data connection with other devices when the network connection is not available. Connections can be made via Wi-Fi, USB, or Bluetooth.On the Settings screen, tap WLAN hotspot and tethering.You may incur additional charges when using this feature.•Mobile Hotspot: Use the mobile hotspot to share the device’s mobile data connection with computers or other devices.•Bluetooth tethering: Use Bluetooth tethering to share the device’s mobile data connection with computers or other devices via Bluetooth.•USB tethering: Use USB tethering to share the device’s mobile data connection with a computer via USB. When connected to a computer, the device is used as a wireless modem for the computer.Using the mobile hotspotUse your device as a mobile hotspot to share your device’s mobile data connection with other devices.1  On the Settings screen, tap WLAN hotspot and tethering → Mobile Hotspot.2  Tap the switch to activate it.The   icon appears on the status bar. Other devices can find your device in the Wi-Fi networks list.To set a password for the mobile hotspot, tap MORE → Configure Mobile Hotspot and select the level of security. Then, enter a password and tap SAVE.3  On the other device’s screen, search for and select your device from the Wi-Fi networks list.4  On the connected device, use the device’s mobile data connection to access the Internet.
Settings65Data usageKeep track of your data usage amount and customise the settings for the limitation.On the Settings screen, tap Data usage.•Mobile data: Set the device to use data connections on any mobile network.•Set mobile data limit: Set a limit for mobile data usage.•Background data: Prevent apps that are running in the background from using a mobile data connection.To change the monthly reset date for the monitoring period, tap   → Change cycle.Limiting data usage1  On the Settings screen, tap Data usage and tap the Set mobile data limit switch to activate it.2  Drag the limit adjustment bar upwards or downwards to set the limit.3  Drag the warning adjustment bar upwards or downwards to set a data usage alert level.The device will alert you when the warning level is reached.SIM card managerActivate your SIM or USIM cards and customise the SIM card settings. Refer to Using dual SIM or USIM cards for more information.On the Settings screen, tap SIM card manager.•Voice call: Select a SIM or USIM card for voice calls.•Text and multimedia messages: Select a SIM or USIM card for messaging.•Data service network: Select a SIM or USIM card for data service.•Dual SIM always on: Set the device to allow incoming calls from the other SIM or USIM card during a call.When this feature is enabled, you may incur additional charges for call forwarding depending on the region or service provider.
Settings66Mobile networksConfigure your mobile network settings.On the Settings screen, tap Mobile networks.•Data roaming: Set the device to use data connections when you are roaming.•Preferred networks: Set up the preferred networks list.•Access Point Names: Set up access point names (APNs).•Network mode SIM 1 / Network mode SIM 2: Select a network type.•Network operators: Search for available networks and manually register a network.More connection settingsOptionsCustomise settings to control other features.On the Settings screen, tap More connection settings.•Printing: Configure settings for printer plug-ins installed on the device. You can search for available printers or add one manually to print files. Refer to Printing for more information.•VPN: Set up and connect to virtual private networks (VPNs).•Default messaging app: Select the default app to use for messaging.PrintingConfigure settings for printer plug-ins installed on the device. You can connect the device to a printer via Wi-Fi or Wi-Fi Direct, and print images or documents.Some printers may not be compatible with the device.1  On the Settings screen, tap More connection settings → Printing.2  Select a printer plug-in and tap the switch to activate it.The device searches for printers that are connected to the same Wi-Fi network as your device.
Settings67To add printers manually, tap MORE → Add printer → ADD PRINTER.To change print settings, tap MORE → Printing settings.Printing contentWhile viewing content, such as images or documents, tap Share → Print →   → All printers, and then select a printer.Sounds and notificationsChange settings for various sounds on the device.On the Settings screen, tap Sounds and notifications.•Sound mode: Set the device to use sound mode or silent mode.•Volume: Adjust the volume level for call ringtones, music and videos, system sounds, and notifications.•Ringtones and sounds: Change the ringtone and system sound settings.•Vibrations: Change the vibration settings.•Sound quality and effects: Configure additional sound settings.•Do not disturb: Set the device to mute incoming call and notification sounds, except for allowed exceptions.•Notifications on lock screen: Set whether or not to show the content of notifications on the locked screen.•App notifications: Change the notification settings for each app.DisplayChange the display settings.On the Settings screen, tap Display.•Brightness: Adjust the brightness of the display.•Outdoor mode: Activate outdoor mode to make the display easier to see in bright conditions.•Font: Change the font size and type.
Settings68•One-handed operation: Activate one-handed operation mode for your convenience when using the device with one hand.•Screen timeout: Set the length of time the device waits before turning off the display’s backlight.•Daydream: Set the device to launch a screensaver when the device is charging.ApplicationsManage the device’s apps and change their settings.On the Settings screen, tap Applications.•Application manager: View and manage the apps on your device.•Application permissions: Specify functions to use for each app.•Default applications: Select a default setting for using apps.WallpaperChange the wallpaper settings for the Home screen and the locked screen.On the Settings screen, tap Wallpaper.Lock screen and securityChange the settings for securing the device and the SIM or USIM card.On the Settings screen, tap Lock screen and security.The available options may vary depending on the screen lock method selected.•Screen lock type: Change the screen lock method.•Show information: Change settings for the items displayed on the locked screen.•Unlock effect: Select an effect that you see when you unlock the screen.
Settings69•Find My Mobile: Activate or deactivate the Find My Mobile feature. This feature can help you locate your device if it is lost or stolen. You can also access the Find my mobile website (findmymobile.samsung.cn) to track and control your lost or stolen device.•Unknown sources: Set the device to allow the installation of apps from unknown sources.•Other security settings: Configure additional security settings.PrivacyChange the settings for maintaining your privacy.On the Settings screen, tap Privacy.•Location: Change settings for location information permissions.•Report diagnostic info: Set the device to automatically send the device’s diagnostic and usage information to Samsung.AccessibilityConfigure various settings to improve accessibility to the device.On the Settings screen, tap Accessibility.•Vision: Customise the settings to improve accessibility for visually impaired users.•Hearing: Customise the settings to improve accessibility for users with hearing impairment.•Dexterity and interaction: Customise the settings to improve accessibility for users who have reduced dexterity.•Direct access: Set the device to open selected accessibility menus when you press the Home key three times quickly.•Notification reminder: Set the device to alert you to notifications that you have not checked at the interval.•Answering and ending calls: Change the method of answering or ending calls.•Single tap mode: Set the device to control incoming calls or notifications by tapping the button instead of dragging it.•Services: View accessibility services installed on the device.
Settings70AccountsAdd your Samsung account and other accounts to sync with them.Adding accountsSome apps used on your device require a registered account. Create accounts to have the best experience with your device.1  On the Settings screen, tap Accounts → Add account.2  Select an account service.3  Follow the on-screen instructions to complete the account setup.To sync content with your accounts, select an account and select items to sync.Registering Samsung accountsYou need a Samsung account when using some Samsung apps. Register your Samsung account to the device to conveniently use Samsung services.1  On the Settings screen, tap Accounts → Add account.2  Tap Samsung account.3  Follow the on-screen instructions to complete the account setup.Once your Samsung account has been registered, you can use apps requiring your Samsung account without the sign in procedure.Removing accountsOn the Settings screen, tap Accounts, select an account name, select the account to remove, and then tap MORE → Remove account.
Settings71ResetChange the settings for managing settings and data.On the Settings screen, tap Reset.•Auto restart: Set the device to automatically optimise and restart itself at preset times for optimal performance.•Factory data reset: Reset settings to the factory default values and delete all data.Language and inputChange the settings for text input. Some options may not be available depending on the selected language.On the Settings screen, tap Language and input.•Language: Select a display language for all menus and apps.•Default keyboard: Select a default keyboard type for text input.•Samsung Chinese IME: Change the Samsung Chinese IME keyboard settings.•Samsung keyboard: Change the Samsung keyboard settings.•Text-to-speech options: Change the text-to-speech settings.•Pointer speed: Adjust the pointer speed for the mouse or trackpad connected to your device.BatteryView battery power information and change power saving options.On the Settings screen, tap Battery.The usage time left shows the time remaining before the battery power runs out. Usage time left may vary depending on your device settings and operating conditions.•BATTERY USAGE: View the amount of battery power consumed by your device.•Power saving mode: Activate power-saving mode and change the settings for power-saving mode. Refer to Power saving mode for more information.
Settings72•Ultra power saving mode: Extend standby time and reduce battery consumption by displaying a simpler layout and allowing limited access to an app. Refer to Ultra power saving mode for more information.•Abnormal battery usage: View a list of apps that are consuming an excessive amount of battery power.•Show power on status bar: Set the device to display the remaining battery life.•Network power saving: Activate the Network power saving feature to automatically turn off network features. You can also set when the network features will be turned off after the screen is turned off.StorageView memory information for your device.On the Settings screen, tap Storage.The actual available capacity of the internal memory is less than the specified capacity because the operating system and default apps occupy part of the memory. The available capacity may change when you update the device.Date and timeAccess and alter the following settings to control how the device displays the time and date.On the Settings screen, tap Date and time.If the battery remains fully discharged or removed from the device, the time and date is reset.•Automatic date and time: Automatically update the time and date when moving across time zones.•Automatic time zone: Set the device to receive time zone information from the network when you move across time zones.•Set date: Set the current date manually.•Set time: Set the current time manually.•Select time zone: Set the home time zone.•Use 24-hour format: Display time in 24-hour format.
Settings73User manualView help information to learn how to use the device and apps or configure important settings.On the Settings screen, tap User manual.About deviceAccess device information, edit the device name, or update device software.On the Settings screen, tap About device.
74AppendixTroubleshootingBefore contacting a Samsung Service Centre, please attempt the following solutions. Some situations may not apply to your device.When you turn on your device or while you are using the device, it prompts you to enter one of the following codes:•Password: When the device lock feature is enabled, you must enter the password you set for the device.•PIN: When using the device for the first time or when the PIN requirement is enabled, you must enter the PIN supplied with the SIM or USIM card. You can disable this feature by using the Lock SIM card menu.•PUK: Your SIM or USIM card is blocked, usually as a result of entering your PIN incorrectly several times. You must enter the PUK supplied by your service provider.•PIN2: When you access a menu requiring the PIN2, you must enter the PIN2 supplied with the SIM or USIM card. For more information, contact your service provider.Your device displays network or service error messages•When you are in areas with weak signals or poor reception, you may lose reception. Move to another area and try again. While moving, error messages may appear repeatedly.•You cannot access some options without a subscription. For more information, contact your service provider.Your device does not turn on•When the battery is completely discharged, your device will not turn on. Fully charge the battery before turning on the device.•The battery may not be inserted properly. Insert the battery again.•Wipe both gold-coloured contacts and insert the battery again.
Appendix75The touchscreen responds slowly or improperly•If you attach a protective cover or optional accessories to the touchscreen, the touchscreen may not function properly.•If you are wearing gloves, if your hands are not clean while touching the touchscreen, or if you tap the screen with sharp objects or your fingertips, the touchscreen may malfunction.•The touchscreen may malfunction in humid conditions or when exposed to water.•Restart your device to clear any temporary software bugs.•Ensure that your device software is updated to the latest version.•If the touchscreen is scratched or damaged, visit a Samsung Service Centre.Your device freezes or has fatal errorsIf your device freezes or hangs, you may need to close apps or turn off the device and turn it on again. If your device is frozen and unresponsive, press and hold the Power key and the Volume key down simultaneously for more than 7 seconds to restart it.If this does not solve the problem, perform a factory data reset. On the Apps screen, tap Settings → Reset → Factory data reset → RESET DEVICE → DELETE ALL. Before performing the factory data reset, remember to make backup copies of all important data stored in the device.If the problem is still not resolved, contact a Samsung Service Centre.Calls are not connected•Ensure that you have accessed the right cellular network.•Ensure that you have not set call barring for the phone number you are dialling.•Ensure that you have not set call barring for the incoming phone number.Others cannot hear you speaking on a call•Ensure that you are not covering the built-in microphone.•Ensure that the microphone is close to your mouth.•If using a headset, ensure that it is properly connected.
Appendix76Sound echoes during a callAdjust the volume by pressing the Volume key or move to another area.A cellular network or the Internet is often disconnected or audio quality is poor•Ensure that you are not blocking the device’s internal antenna.•When you are in areas with weak signals or poor reception, you may lose reception. You may have connectivity problems due to issues with the service provider’s base station. Move to another area and try again.•When using the device while moving, wireless network services may be disabled due to issues with the service provider’s network.The battery icon is emptyYour battery is low. Charge the battery.The battery does not charge properly (For Samsung-approved chargers)•Ensure that the charger is connected properly.•If the battery terminals are dirty, the battery may not charge properly or the device may turn off. Wipe both gold-coloured contacts and try charging the battery again.The battery depletes faster than when first purchased•When you expose the device or the battery to very cold or very hot temperatures, the useful charge may be reduced.•Battery consumption increases when you use messaging features or some apps, such as games or the Internet.•The battery is consumable and the useful charge will get shorter over time.Your device is hot to the touchWhen you use apps that require more power or use apps on your device for an extended period of time, your device may feel hot to the touch. This is normal and should not affect your device’s lifespan or performance.
Appendix77Error messages appear when launching the cameraYour device must have sufficient available memory and battery power to operate the camera app. If you receive error messages when launching the camera, try the following:•Charge the battery.•Free some memory by transferring files to a computer or deleting files from your device.•Restart the device. If you are still having trouble with the camera app after trying these tips, contact a Samsung Service Centre.Photo quality is poorer than the preview•The quality of your photos may vary, depending on the surroundings and the photography techniques you use.•If you take photos in dark areas, at night, or indoors, image noise may occur or images may be out of focus.Error messages appear when opening multimedia filesIf you receive error messages or multimedia files do not play when you open them on your device, try the following:•Free some memory by transferring files to a computer or deleting files from your device.•Ensure that the music file is not Digital Rights Management (DRM)-protected. If the file is DRM-protected, ensure that you have the appropriate licence or key to play the file.•Ensure that the file formats are supported by the device. If a file format is not supported, such as DivX or AC3, install an app that supports it. To confirm the file formats that your device supports, visit www.samsung.com/cn.•Your device supports photos and videos captured with the device. Photos and videos captured by other devices may not work properly.•Your device supports multimedia files that are authorised by your network service provider or providers of additional services. Some content circulated on the Internet, such as ringtones, videos, or wallpapers, may not work properly.
Appendix78Another Bluetooth device is not located•Ensure that the Bluetooth wireless feature is activated on your device.•Ensure that the Bluetooth wireless feature is activated on the device you wish to connect to.•Ensure that your device and the other Bluetooth device are within the maximum Bluetooth range (10 m).If the tips above do not solve the problem, contact a Samsung Service Centre.A connection is not established when you connect the device to a computer•Ensure that the USB cable you are using is compatible with your device.•Ensure that you have the proper driver installed and updated on your computer.•If you are a Windows XP user, ensure that you have Windows XP Service Pack 3 or higher installed on your computer.Your device cannot find your current locationGPS signals may be obstructed in some locations, such as indoors. Set the device to use Wi-Fi or a mobile network to find your current location in these situations.Data stored in the device has been lostAlways make backup copies of all important data stored in the device. Otherwise, you cannot restore data if it is corrupted or lost. Samsung is not responsible for the loss of data stored in the device.A small gap appears around the outside of the device case•This gap is a necessary manufacturing feature and some minor rocking or vibration of parts may occur.•Over time, friction between parts may cause this gap to expand slightly.
Appendix79NoticesThe names and content of toxic and hazardous substances or elementsPart Toxic and hazardous substances or elementsPb Hg Cd Cr6+ PBB PBDEPBA XOOOOOPlastic OOOOOOMetal XOOOOOBattery XOOOOOAccessory XOOOOOO:  Indicates that the toxic or hazardous substance contained in all of the homogeneous materials for this part is below the limit specified in GB/T 26572.X:  Indicates that the toxic or hazardous substance contained in at least one of the homogeneous materials used for this part is above the limit specified in GB/T 26572.The information provided in this table is based on figures presented by supply manufacturers and tests conducted by Samsung. All toxic and hazardous substances or elements are used at the minimum level allowed by current technology. Samsung continues to make every effort to reduce the need for these substances or elements through improved technology.The “environmental protection use period” for this product is 20 years and the corresponding logo is as shown on the left. Exchangeable parts, such as batteries, may have different periods of warranty. The “environmental protection use period” is valid only when the product is used under normal conditions, as described in the manual.
The maximum SAR value of your device is   W/kg , and accords with the requirement of standard GB 21288-2007.0.938Health and safety informationExposure to Radio Frequency (RF) SignalsCertification Information (SAR)Your wireless phone is a radio transmitter and receiver. It is designed and manufactured not toexceed the exposure limits for radio frequency (RF) energy set by the Federal CommunicationsCommission (FCC) of the U.S. government. These FCC exposure limits are derived from therecommendations of two expert organizations, the National Counsel on Radiation Protectionand Measurement (NCRP) and the Institute of Electrical and Electronics Engineers (IEEE). Inboth cases, the recommendations were developed by scientific and engineering experts drawnfrom industry, government, and academia after extensive reviews of the scientific literaturerelated to the biological effects of RF energy.The exposure limit set by the FCC for wireless mobile phones employs a unit of measurementknown as the Specific Absorption Rate (SAR). The SAR is a measure of the rate of absorptionof RF energy by the human body expressed in units of watts per kilogram (W/kg). The FCCrequires wireless phones to comply with a safety limit of 1.6 watts per kilogram (1.6 W/ kg). TheFCC exposure limit incorporates a substantial margin of safety to give additional protection tothe public and to account for any variations in measurements.SAR tests are conducted using standard operating positions accepted by the FCC with thephone transmitting at its highest certified power level in all tested frequency bands. Althoughthe SAR is determined at the highest certified power level, the actual SAR level of the phonewhile operating can be well below the maximum value. This is because the phone is designedto operate at multiple power levels so as to use only the power required to reach the network. Ingeneral, the closer you are to a wireless base station antenna, the lower the power output.Before a new model phone is available for sale to the public, it must be tested and certified tothe FCC that it does not exceed the exposure limit established by the FCC. Tests for eachmodel phone are performed in positions and locations (e.g. at the ear and worn on the body) asrequired by the FCC.For body worn operation, this model phone has been tested and meets the FCC RF exposureguidelines when used with a Samsung accessory designated for this product or when used withan accessory that contains no metal and that positions the handset a minimum of cm fromthe body.Non-compliance with the above restrictions may result in violation of FCC RF exposureguidelines.SAR information on this and other model phones can be viewed on-line at http://www.fcc.gov/oet/ea/fccid/.Please use the phone FCC ID number for search, A3LSMG6000. Sometimes it may be necessary to remove the battery pack to find the number. Once you have the FCC ID number for a particular phone, follow the instructions on the website andit should provide values for typical or maximum SAR for a particular phone. Additionalproduct specific SAR information can also be obtained at http://www.fcc.gov/encyclopedia/specific-absorption-rate-sar-cellular-telephones1.5
FCC Notice and Cautions  FCC Notice  This device complies with Part 15 of the FCC Rules. Operation is subject to the following two conditions:  (1) this device may not cause harmful interference, and (2)  this device must accept any interference received, including interference that may cause undesired operation.  This equipment has been tested and found to comply with the limits for a Class B digital device, pursuant to part 15 of the FCC Rules. These limits are designed to provide reasonable protection against harmful interference in a residential installation. This equipment generates, uses and can radiate radio frequency energy and, if not installed and used in accordance with the instructions, may cause harmful interference to radio communications. However, there is no guarantee that interference will not occur in a particular installation. If this equipment does cause harmful interference to radio or television reception, which can be determined by turning the equipment off and on, the user is encouraged to try to correct the interference by one or more of the following measures:  -  Reorient or relocate the receiving antenna.  -Increase the separation between the equipment and receiver. -  Connect the equipment into an outlet on a circuit from that to which the receiver is connected. -  Consult the dealer or an experienced radio/TV technician for help.  The device may cause TV or radio interference if used in close proximity to receiving equipment. The FCC can require you to stop using the device if such interference cannot be eliminated. Vehicles using petroleum gas (such as propane or butane) must comply with the National Fire Protection Standard (NFPA-58). For a copy of this standard, contact the National Fire Protection Association, One Battery march Park, Quincy, MA 02269, Attn: Publication Sales Division.   Cautions Changes or modifications made in the radio device, not expressly approved by Samsung, will void the user’s authority to operate the equipment.The use of any unauthorized accessories may be dangerous and void the device warranty if said accessories cause damage or a defect to the device. Although your device is quite sturdy, it is a complex piece of equipment and can be broken. Avoid dropping, hitting, bending or sitting on it.
CopyrightCopyright © 2015 Samsung ElectronicsThis manual is protected under international copyright laws.No part of this manual may be reproduced, distributed, translated, or transmitted in any form or by any means, electronic or mechanical, including photocopying, recording, or storing in any information storage and retrieval system, without the prior written permission of Samsung Electronics.Trademarks•SAMSUNG and the SAMSUNG logo are registered trademarks of Samsung Electronics.•Bluetooth® is a registered trademark of Bluetooth SIG, Inc. worldwide.•All other trademarks and copyrights are the property of their respective owners.

Navigation menu