Samsung Electronics Co SMG800R4 Mutli-band CDMA/LTE Phone with WLAN, Bluetooth and RFID User Manual 1
Samsung Electronics Co Ltd Mutli-band CDMA/LTE Phone with WLAN, Bluetooth and RFID Users Manual 1
Contents
- 1. Users Manual 1
- 2. Users Manual 2
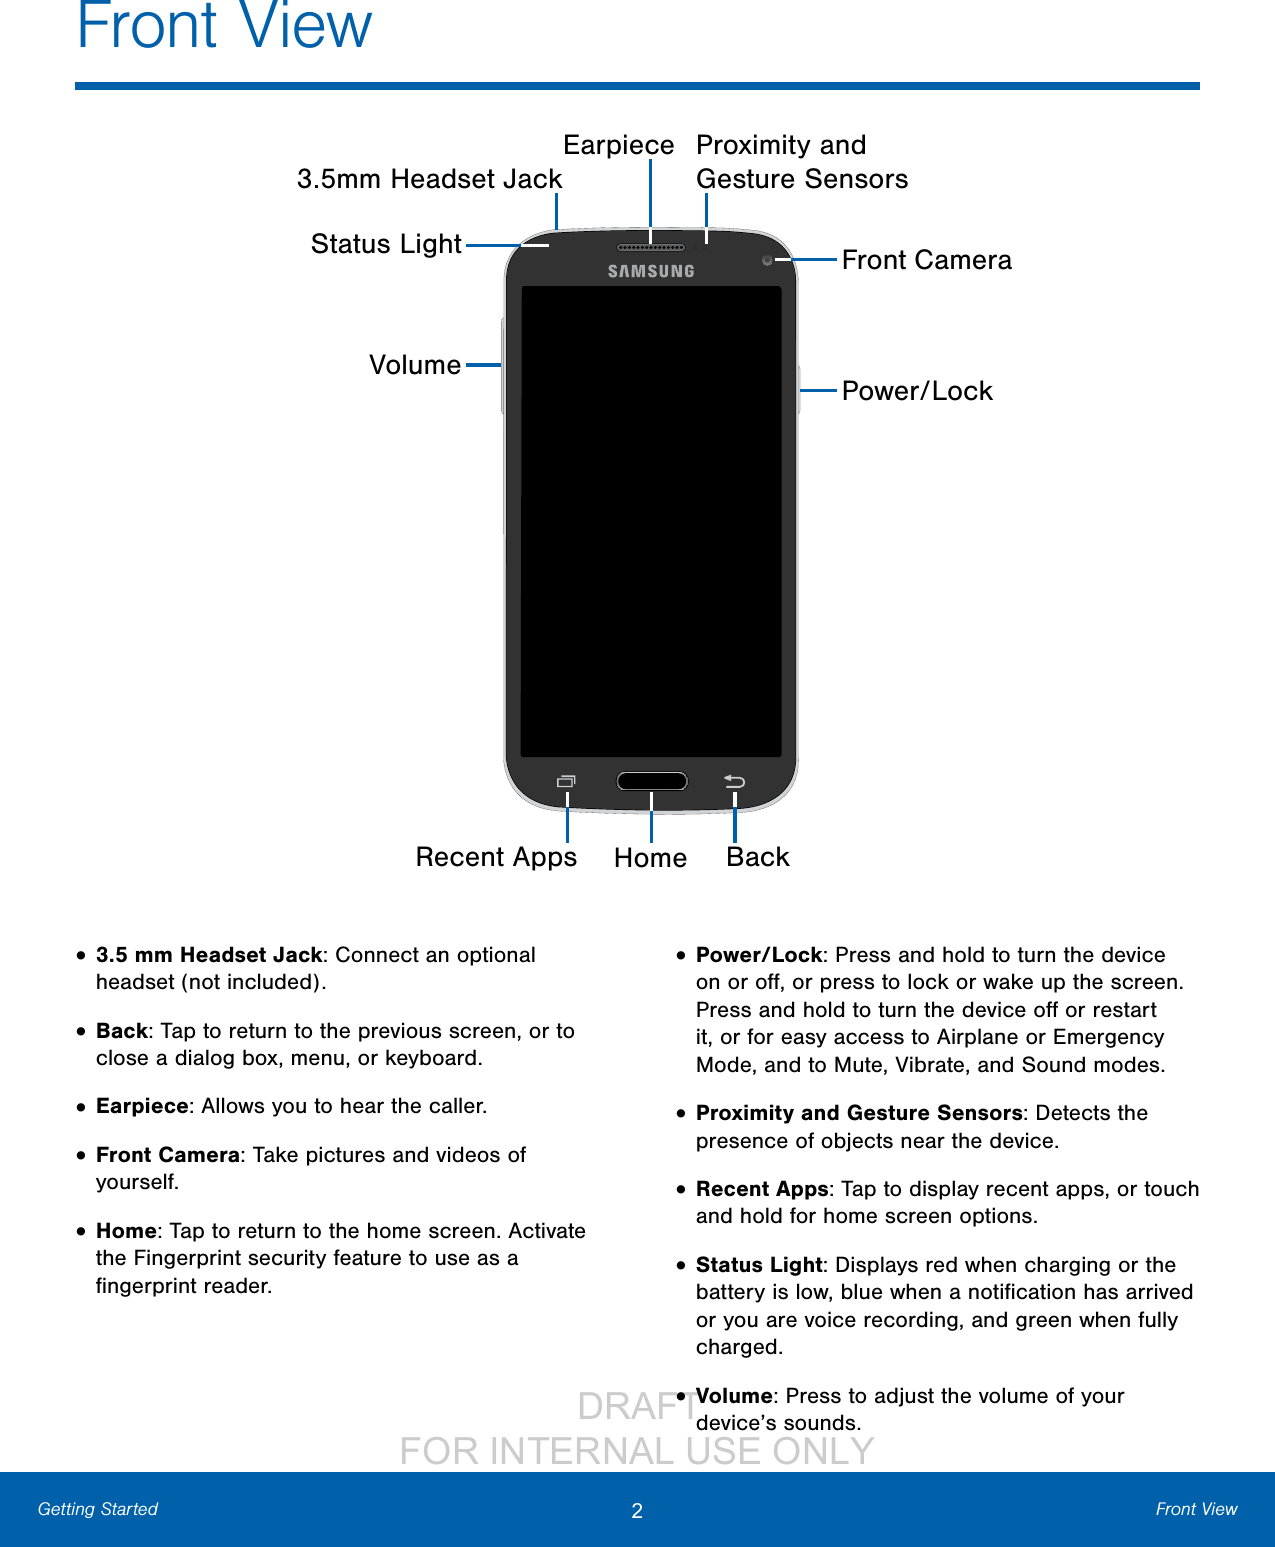
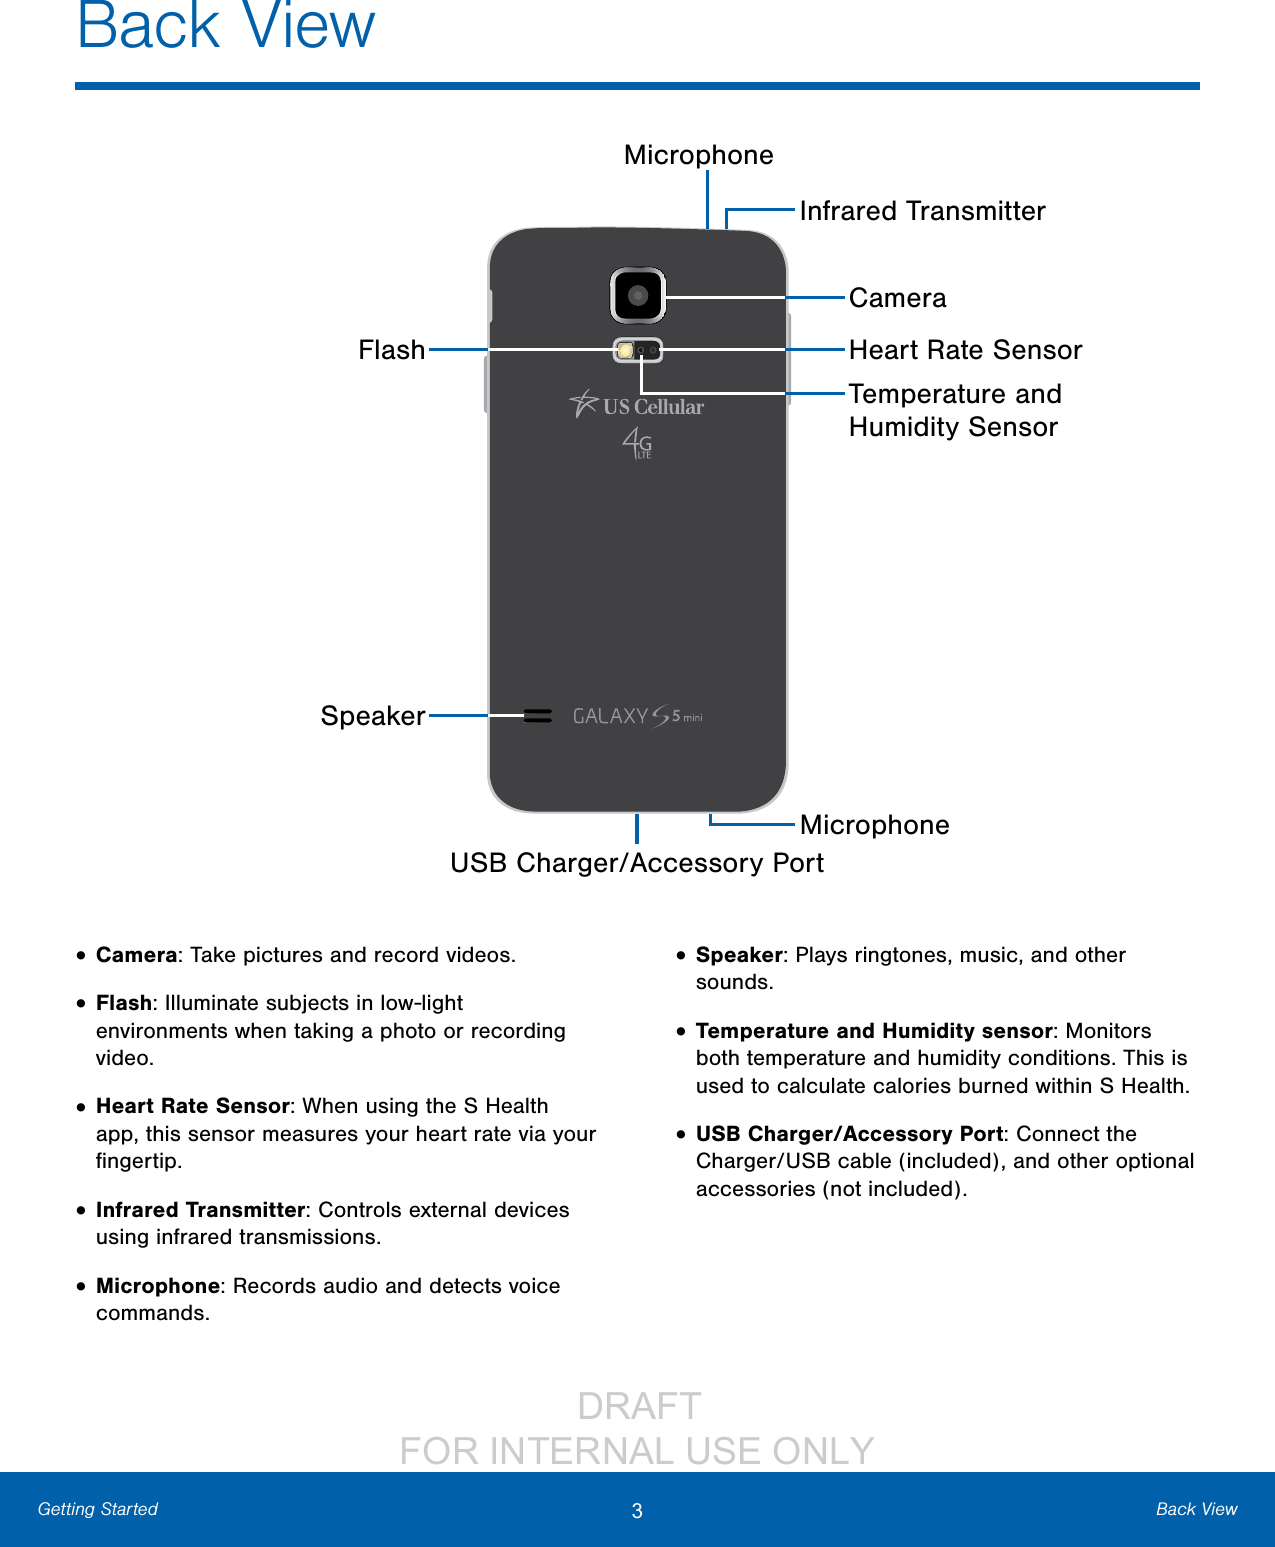
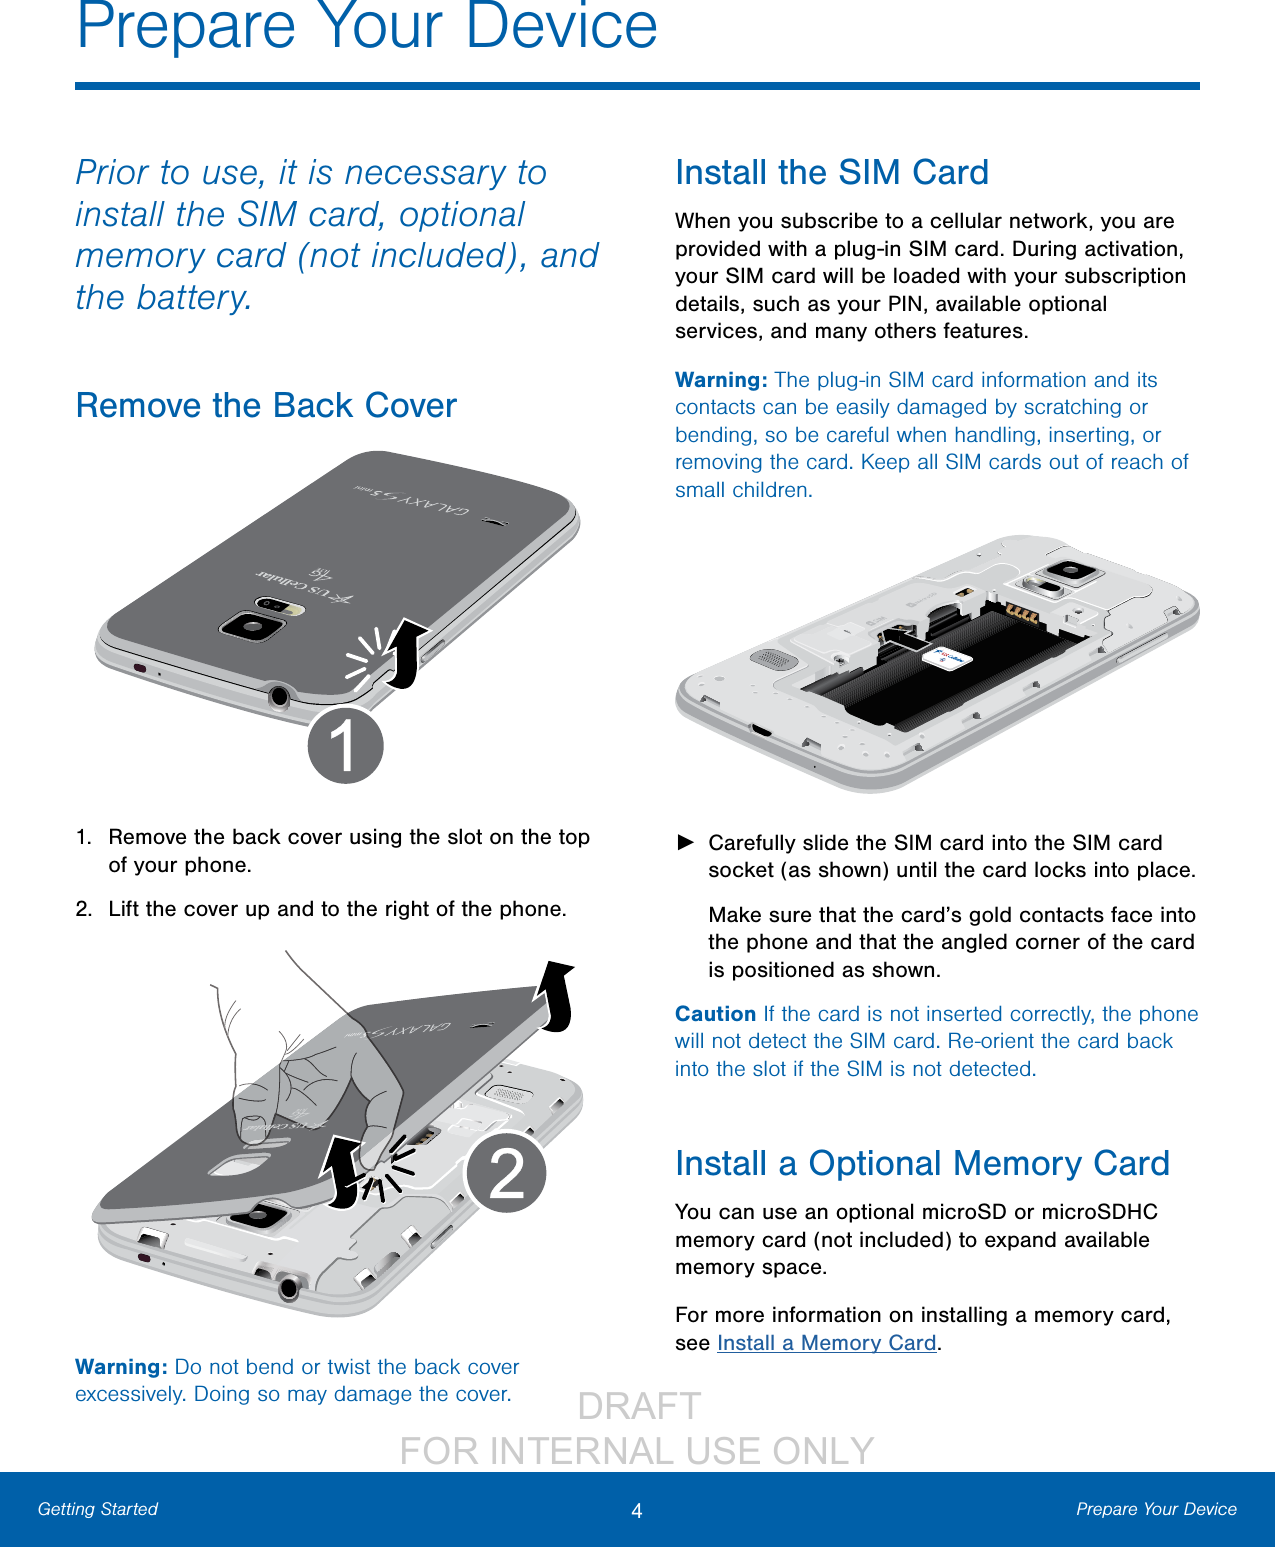
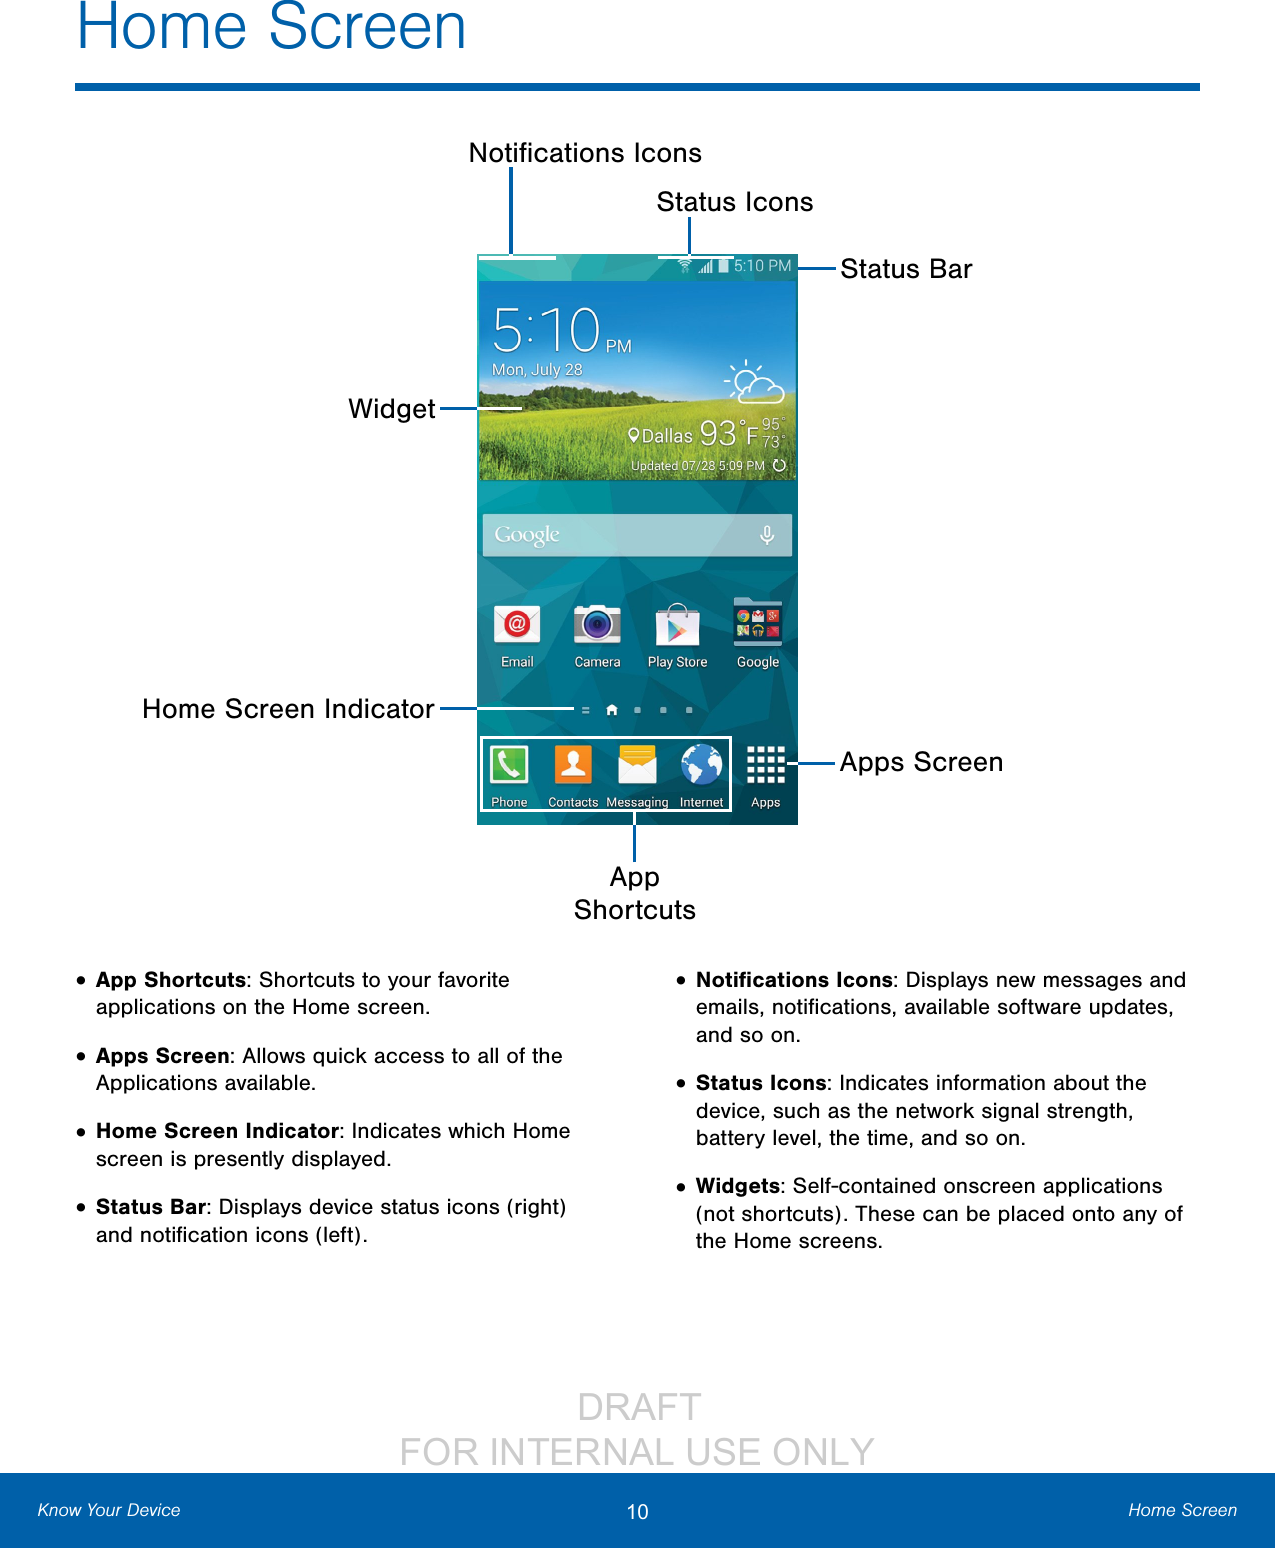
Users Manual 1
![DRAFT FOR INTERNAL USE ONLYii Legal NoticesSAFE™ (Samsung Approved For Enterprise) SAFE™: “SAFE™” (Samsung for Enterprise) is a mark for a Samsung device which has been tested against Samsung’s own internal criteria for interoperability with certain third party security-related solutions for MDM and VPN. The testing includes field testing with local network connection and menu tree testing which tests functionality of the solutions in conjunction with the Samsung device. During the testing, the device is tested with the security solutions to see if the solutions work with the device as described by the third party security solution providers. The testing, for example, includes field testing with local network connection and menu tree testing which tests functionality of the solutions in conjunction with the Samsung device. For more information about Samsung’s SAFE™ program, please refer to www.samsung.com/us/safe.Disclaimer of Warranties: EXCEPT AS OTHERWISE PROVIDED IN THEIR STANDARD END USER LICENSE AND WARRANTY, TO THE FULL EXTENT PERMITTED BY LAW SAMSUNG ELECTRONICS CO., LTD., SAMSUNG TELECOMMUNICATIONS AMERICA, LLC, AND THEIR AFFILIATES (COLLECTIVELY REFERRED TO HEREIN AS THE “SAMSUNG ENTITIES”) EXPRESSLY DISCLAIM ANY AND ALL WARRANTIES, EXPRESS OR IMPLIED, INCLUDING ANY WARRANTY OF MERCHANTABILITY, FITNESS FOR A PARTICULAR PURPOSE, INTEROPERABILITY OR NON-INFRINGEMENT, WITH RESPECT TO INFORMATION TECHNOLOGY SECURITY PROTECTION, SAFE™ DEVICES AND APPLICATIONS TESTED WITH SAFE™ DEVICES. IN NO EVENT SHALL THE SAMSUNG ENTITIES BE LIABLE FOR ANY DIRECT, INDIRECT, INCIDENTAL, PUNITIVE, OR CONSEQUENTIAL DAMAGES OF ANY KIND WHATSOEVER WITH RESPECT TO INFORMATION TECHNOLOGY SECURITY PROTECTION, SAFE™ DEVICES OR APPLICATIONS TESTED WITH SAFE™ DEVICES. In addition, information technology security protection will be affected by features or functionality associated with, among other things the e-mail platform, master data management, and virtual private network solutions selected by the software provider, solution provider or user. Choice of an e-mail, master data management, and virtual private network solution is at the sole discretion of the software provider, solution provider or user and any associated effect on information technology security protection is solely the responsibility of the software provider, solution provider or user. For complete statement of limited warranty, please refer to www.samsung.com/us/safe, available on the web and where Samsung smartphones and mobile devices are sold. [051214] Samsung Telecommunications America (STA), LLCHeadquarters:1301 E. Lookout DriveRichardson, TX 75082 Phone: 1-800-SAMSUNG (726-7864)1-888-987-HELP (4357) Internet Address:www.samsung.com ©2014 Samsung Telecommunications America, LLC. Samsung is a registered trademark of Samsung Electronics Co., Ltd.Do you have questions about your Samsung Mobile Phone? For 24 hour information and assistance, we offer a new FAQ/ARS System (Automated Response System) at: www.samsung.com/us/supportThe actual available capacity of the internal memory is less than the specified capacity because the operating system and default applications occupy part of the memory. The available capacity may change when you upgrade the device.Nuance®, VSuite™, T9® Text Input, and the Nuance logo are trademarks or registered trademarks of Nuance Communications, Inc., or its affiliates in the United States and/or other countries.ACCESS® and NetFront™ are trademarks or registered trademarks of ACCESS Co., Ltd. in Japan and other countries.](https://usermanual.wiki/Samsung-Electronics-Co/SMG800R4.Users-Manual-1/User-Guide-2388600-Page-3.png)

![DRAFT FOR INTERNAL USE ONLY18 CallingCallingOptions During a CallYour phone provides a number of functions that you can use during a call.Adjusting the Call Volume ►Press the Volume Key to increase or decrease the volume.– or –Quickly add more volume to the incoming audio by tapping Menu > Extra volume. Listen with the Speaker or BluetoothHeadsetListen to the call using the speaker or through a Bluetoothheadset (not included). ►Press Speaker to hear the caller using the speaker.– or –Press Bluetooth to use a Bluetooth headset (notincluded).Personalize the Call Sound SettingAdjust the sound by using an audio equalizer. ►From the currently active call, tap Menu > Personalize call sound. Place a New Call While in a CallIf your service plan supports this feature, you can make another call while a call is in progress. 1. From the active call, tap Add call to dial the second call. The first call is displayed as a thumbnail. 2. Dial the new number and tap Dial. -Tap Swap to switch between the two calls. -Tap Merge to hear both callers at once (multiconferencing). Call WaitingIf your service plan supports this feature, you can answer an incoming call while you have a call in progress. You are notified of an incoming call by a call waiting tone. To answer a new call while you have a call in progress:1. Slide Answer in any direction to answer the new call. Tap an option: -Putting [Caller] on hold to place the previous caller on hold while you answer the new incoming call. -Ending call with [Caller] to end the previous call and answer the new call.2. Tap the previous On hold number entry and select Swap to switch between the two calls. This places the new caller on hold and activates the previous call.Call LogThe numbers of the calls you have dialed, received, or missed are stored in the Call log.1. From a Home screen, tap Phone.2. Tap the Logs tab. A list of recent calls is displayed. If the caller is in your contacts list, their name is displayed.Save a Recent Call to Your Contacts List 1. From a Home screen, tap Phone > Logs tab.2. Tap the call you want to save add to your contacts list. 3. Tap Create contact.– or –If you want to replace the number for an existing contact, tap Update existing.](https://usermanual.wiki/Samsung-Electronics-Co/SMG800R4.Users-Manual-1/User-Guide-2388600-Page-24.png)