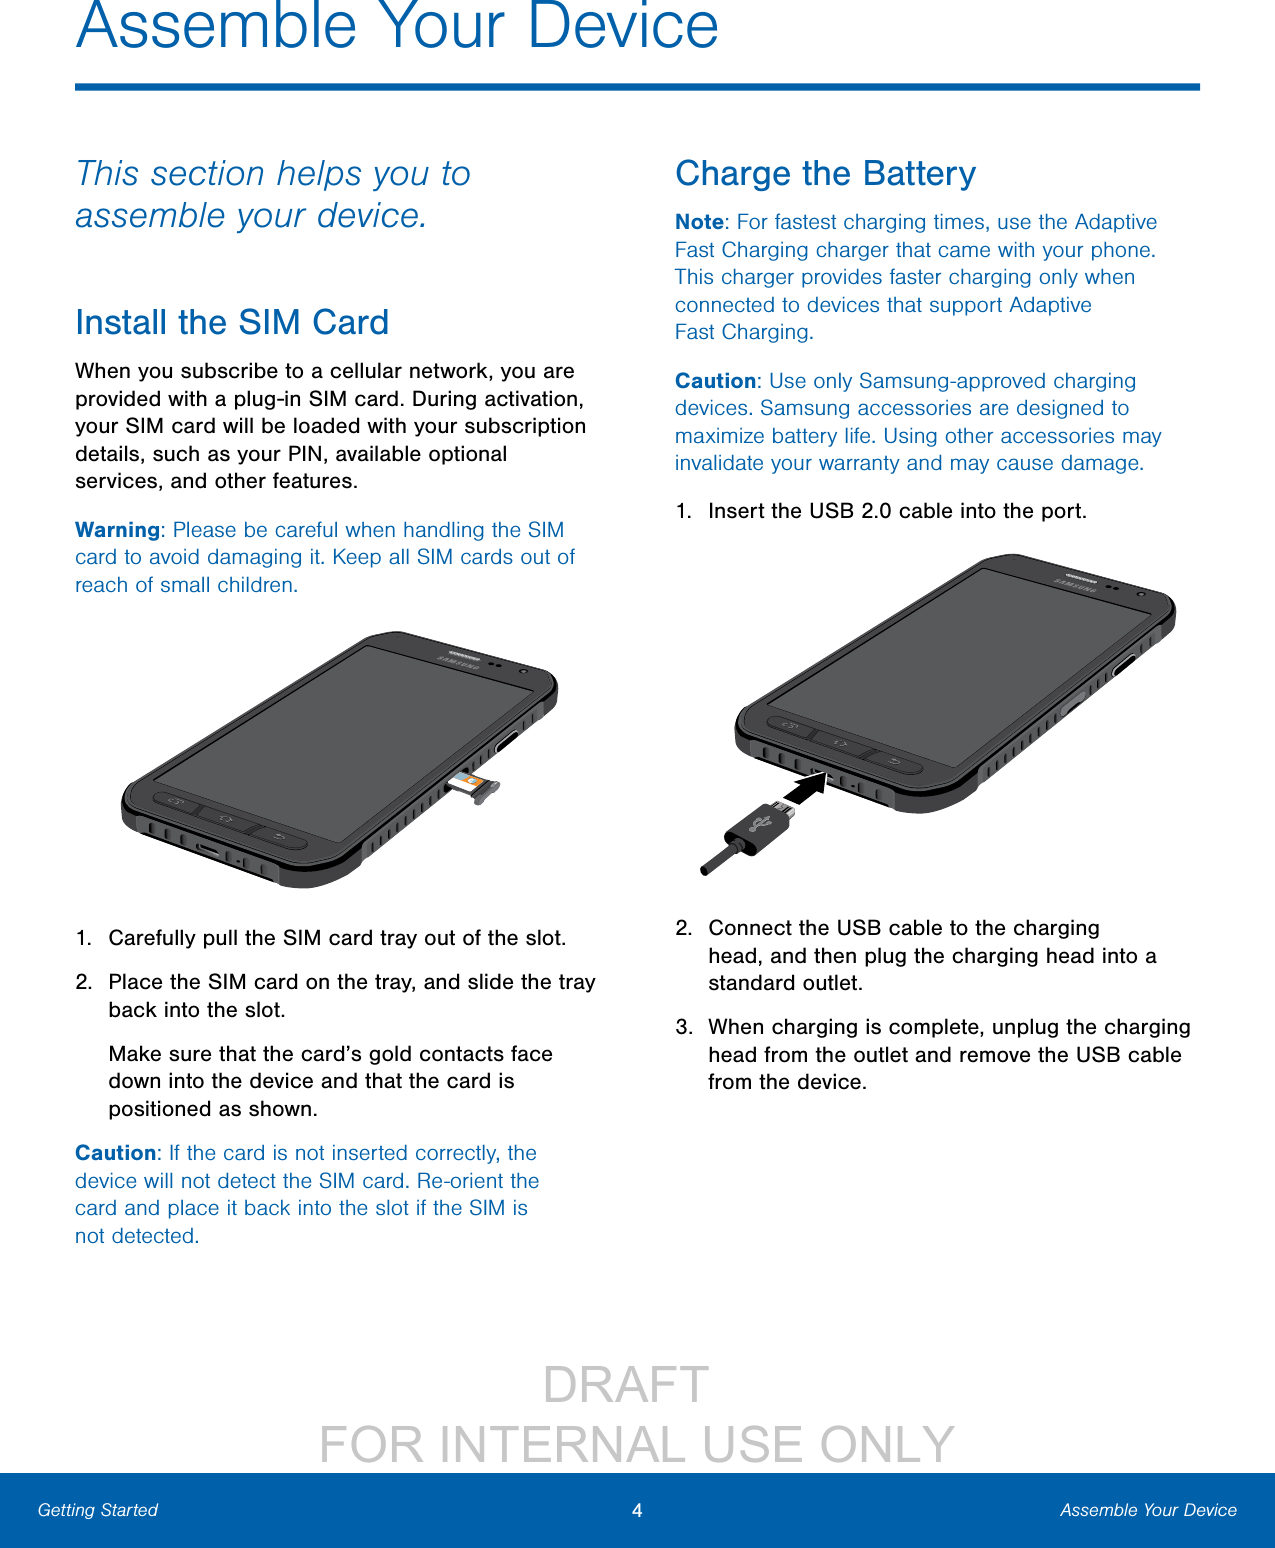
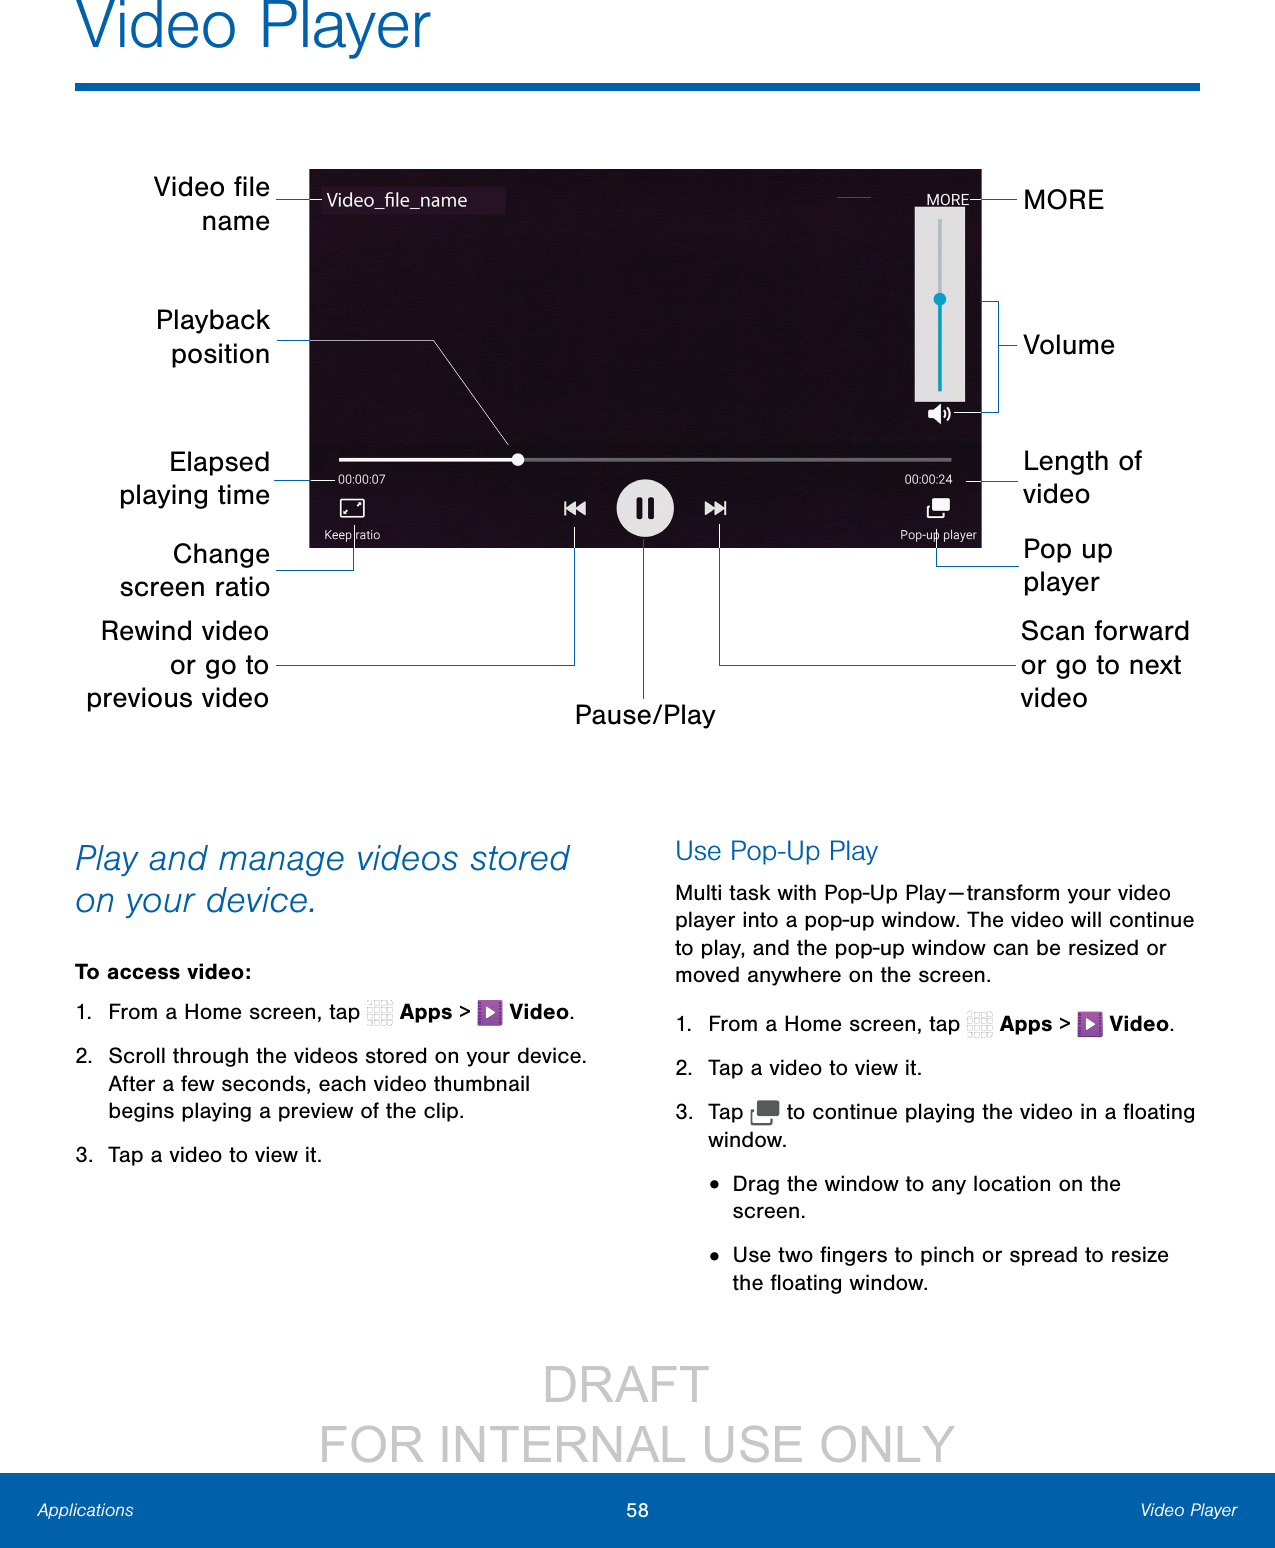
Samsung Electronics Co SMG890A Multi-band GSM/EDGE/UMTS/LTE Phone with WLAN, Bluetooth, ANT+ and RFID User Manual G890A
Samsung Electronics Co Ltd Multi-band GSM/EDGE/UMTS/LTE Phone with WLAN, Bluetooth, ANT+ and RFID G890A
UserManual.wiki
>
Samsung Electronics Co
>
SMG890A User Manual
Users Manual
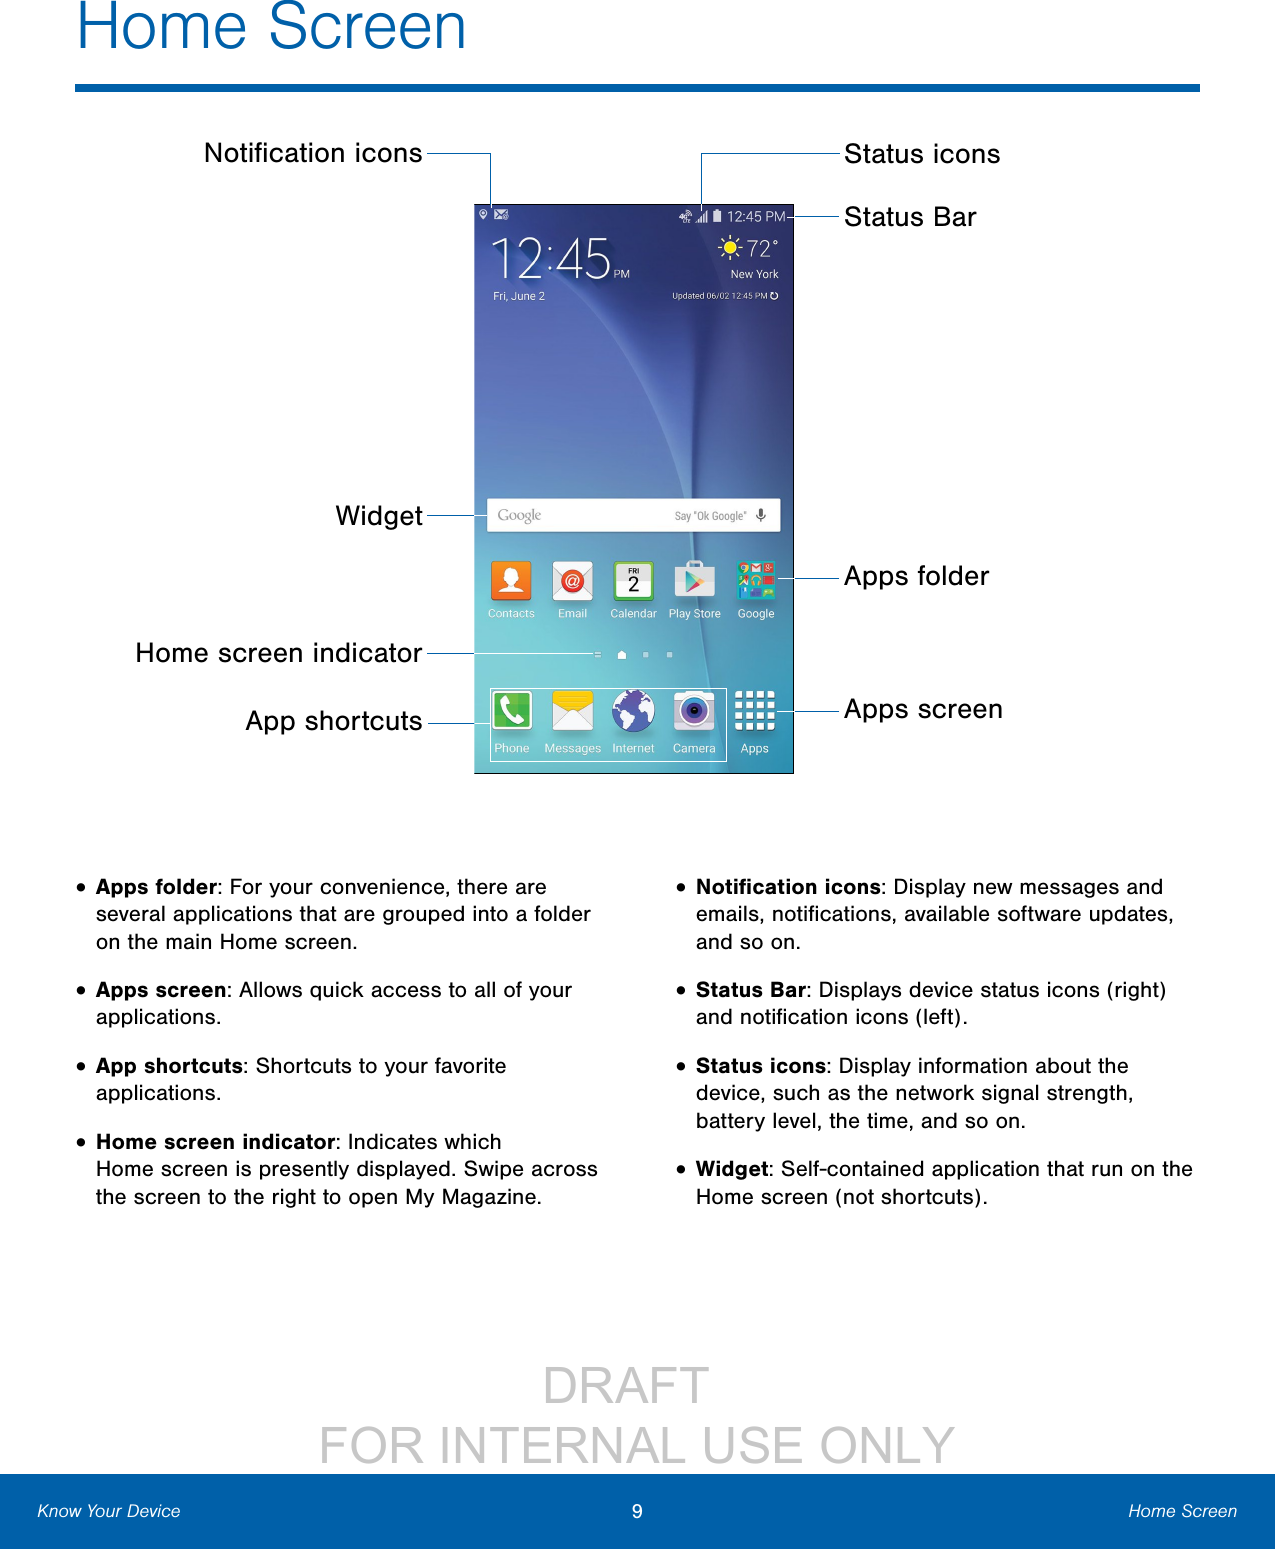
Navigation menu
Upload a User Manual
Namespaces
Wiki Guide
HTML
PDF
Info
Views
User Manual
Discussion / Help
Navigation
![IF YOUR CARRIER PROHIBITS THIS, IF YOU ATTEMPT TO DOWNLOAD SOFTWARE ONTO THE DEVICE WITHOUT AUTHORIZATION, YOU WILL BE NOTIFIED ON THE SCREEN THAT UNAUTHORIZED SOFTWARE HAS BEEN DETECTED. YOU SHOULD THEN POWER DOWN THE DEVICE AND CONTACT YOUR CARRIER TO RESTORE THE DEVICE TO THE CARRIER AUTHORIZED SETTINGS.Diagnostic SoftwareThis device is equipped with diagnostic software reporting usage and performance information used solely to deliver improved network quality and overall device experience to AT&T customers. Please refer to your AT&T Wireless Customer Agreement and/or the AT&T Privacy Policy (www.att.com/privacy) for more information. Samsung KNOX™Samsung Knox™ is Samsung’s security platform and is a mark for a Samsung device tested for security with enterprise use in mind. Additional licensing fee may be required. For more information about Knox, please refer to:www.samsung.com/us/knox. [030115] Samsung Electronics America (SEA), Inc Address:85 Challenger RoadRidgefield Park, New Jersey 07660Phone: 1-800-SAMSUNG (726-7864)Internet Address: www.samsung.comG890A_.book Page 4 Thursday, April 30, 2015 10:59 AM](https://usermanual.wiki/Samsung-Electronics-Co/SMG890A/User-Guide-2610063-Page-4.png)

![Health and Safety Information 4This device has a FCC ID number: A3LSMG890A [Model Number: SM-G890A] and the specific SAR levels for this device can be found at the following FCC website:www.fcc.gov/oet/ea/.The SAR information for this device can also be found on Samsung’s website: www.samsung.com/sar. SAR information on this and other model devices can be accessed online on the FCC's website through http://transition.fcc.gov/oet/rfsafety/sar.html. To find information that pertains to a particular model, this site uses the device FCC ID number which is usually printed somewhere on the case of the device. Sometimes it may be necessary to remove the battery pack to find the number. Once you have the FCC ID number for a particular device, follow the instructions on the website and it should provide values for typical or maximum SAR for a particular phone. Additional SAR information can also be obtained at www.fcc.gov/encyclopedia/specific-absorption-rate-sar-cellular-telephones.FCC Part 15 Information to UserPursuant to part 15.21 of the FCC Rules, you are cautioned that changes or modifications not expressly approved by Samsung could void your authority to operate the device.This device complies with part 15 of the FCC Rules. Operation is subject to the following two conditions: (1) This device may not cause harmful interference, and (2) this device must accept any interference received, including interference that may cause undesired operation.Note: This equipment has been tested and found to comply with the limits for a Class B digital device, pursuant to part 15 of the FCC Rules. These limits are designed to provide reasonable protection against harmful interference in a residential installation. This G890A_.book Page 4 Thursday, April 30, 2015 10:59 AM](https://usermanual.wiki/Samsung-Electronics-Co/SMG890A/User-Guide-2610063-Page-9.png)


![DRAFT FOR INTERNAL USE ONLYiiLegal NoticesIF YOUR CARRIER PROHIBITS THIS, IF YOU ATTEMPT TO DOWNLOAD SOFTWARE ONTO THE DEVICE WITHOUT AUTHORIZATION, YOU WILL BE NOTIFIED ON THE SCREEN THAT UNAUTHORIZED SOFTWARE HAS BEEN DETECTED. YOU SHOULD THEN POWER DOWN THE DEVICE AND CONTACT YOUR CARRIER TO RESTORE THE DEVICE TO THE CARRIER AUTHORIZED SETTINGS.Samsung KNOX™Samsung Knox is Samsung’s security platform and is a mark for a Samsung device tested for security with enterprise use in mind. Additional licensing fee may be required. For more information about Knox, please refer to: www.samsung.com/us/knox. [030115]Samsung Electronics America (SEA), Inc.Address:85 Challenger Road Ridgefield Park, New Jersey 07660 Phone: 1-800-SAMSUNG (726-7864)Internet Address: www.samsung.com ©2015 Samsung Electronics America, Inc. Samsung, Galaxy, Multiwindow, and SHealth are registered trademarks of SamsungElectronics Co., Ltd.Do you have questions about your Samsung Mobile Device? For 24 hour information and assistance, we offer a new FAQ/ARS System (Automated Response System) at: www.samsung.com/us/supportThe actual available capacity of the internal memory is less than the specified capacity because the operating system and default applications occupy part of the memory. The available capacity may change when you upgrade the device.Nuance®, VSuite™, T9® Text Input, and the Nuance logo are trademarks or registered trademarks of Nuance Communications, Inc., or its affiliates in the United States and/or other countries.The Bluetooth® word mark, figure mark (stylized “B Design”), and combination mark (Bluetooth word mark and “B Design”) are registered trademarks and are wholly owned by the Bluetooth SIG.Google, the Google logo, Android, the Android logo, Google Play, Gmail, Google Maps, Google Music, Google Hangouts, Picasa, Play Newsstand, YouTube, and other marks are trademarks of Google Inc.Wi-Fi is a registered trademark of the WirelessFidelity Alliance, Inc.LTE is a trademark of ETSI.Swype and the Swype logos are trademarks of Swype, Inc.Devices purchased for use on AT&T’s system are designed for use exclusively on AT&T’s system. You agree that you won’t make any modifications to the Equipment or programming to enable the Equipment to operate on any other system. A voice plan is required on all voice-capable devices, unless specifically noted otherwise in the terms governing your agreement. Some devices or plans may require you to subscribe to a data plan.Your phone is designed to make it easy for you to access a wide variety of content. For your protection, AT&T wants you to be aware that some applications that you enable may involve the location of your phone being shared. For applications available through AT&T, AT&T offers privacy controls that let you decide how an application may use the location of your phone and other phones on your account. However, AT&T’s privacy tools do not apply to applications available outside of AT&T. Please review the terms and conditions and the associated privacy policy for each location-based service to learn how location information will be used and protected.](https://usermanual.wiki/Samsung-Electronics-Co/SMG890A/User-Guide-2610063-Page-26.png)
![DRAFT FOR INTERNAL USE ONLY21 Make and Answer CallsCallingMultitask While On a CallIf you exit the call screen and return to a Homescreen, your active call is indicated by Active call on the Status Bar.This lets you continue with your current call and do something else, such as access the contacts list, view a recent email, locate a picture, and so on.To return to the call screen: ►Swipe the Status Bar downward to reveal the Notification Panel, and then tap the Call notification. To end a call from any application: ►Swipe the Status Bar downward to reveal the Notification Panel, and then tap End call. Options During a CallYour phone provides a number of functions that you can use during a call.Adjust the Call Volume ►Press the Volume Key to increase or decrease the volume.– or –Quickly add more volume to the incoming audio by tapping Extra volume.Listen with the Speaker or BluetoothHeadsetListen to the call using the speaker or through a Bluetoothheadset (not included). ►Tap Speaker to hear the caller using the speaker.– or –Tap Bluetooth to use a Bluetooth headset (notincluded).Place a New Call While On a CallIf your service plan supports this feature, you can make another call while a call is in progress. 1. From the active call, tap Add call to dial the second call.2. Dial the new number and tap Dial. When the call is answered:• Tap Swap to switch between the two calls.• Tap Merge to hear both callers at once (multiconferencing). Call WaitingIf your service plan supports this feature, you can answer an incoming call while you have a call in progress. You are notified of an incoming call by a call waiting tone. To answer a new call while you have a call in progress:1. Slide Answer in any direction to answer the new call. 2. Tap an option:• Put [caller] on hold to place the previous caller on hold while you answer the new incoming call.• Merge with [caller] to add the new caller to the current call.• End call with [caller] to end the previous call and answer the new call.3. Tap the previous On hold number entry and select Swap to switch between the two calls. This places the new caller on hold and activates the previous call.](https://usermanual.wiki/Samsung-Electronics-Co/SMG890A/User-Guide-2610063-Page-50.png)


![DRAFT FOR INTERNAL USE ONLY42 ContactsApplicationsShare a Name CardWhen you share a name card, the contact’s information is sent as a vCard file (.vcf). You can share a vCard via Bluetooth or Wi-Fi Direct, attach it to a message, or save it to a storage location.1. From a Home screen, tap Apps > Contacts.2. Tap a contact to display it, and then tap MORE > Share name card.3. Choose a sharing method and follow the prompts.Link ContactsWhen you have contacts from various sources (Gmail, Facebook, and so on), you may have multiple similar entries for a single contact. Contacts lets you link multiple entries into a single contact.1. From a Home screen, tap Apps > Contacts.2. Tap the contact to display it, and then tap Link.3. Tap LINK ANOTHER CONTACT, and then select contact(s) to link to the original contact.4. Tap LINK.Unlink Contacts1. From a Home screen, tap Apps > Contacts.2. Tap the contact to display it, and then tap Link.3. Tap Remove beside contacts to unlink them from the main contact.Delete ContactsYou can delete a single contact, or choose multiple contacts to delete.1. From a Home screen, tap Apps > Contacts.2. Touch and hold a contact to select it. You can also tap other contacts, or tap the checkbox at the top of the screen to select all.3. Tap DELETE.FavoritesWhen you mark contacts as favorites, they are easily accessible from other apps. Favorites display together on the Favorites tab in Contacts.Mark Contacts as Favorites1. From a Home screen, tap Apps > Contacts.2. Tap a contact to display it, and then tap Favorite (the star turns gold ).Remove Contacts from Favorites1. From a Home screen, tap Apps > Contacts.2. Tap a contact to display it, and then tap Favorite (the star loses the gold color ).GroupsYou can use groups to organize your contacts. Your device comes with preloaded groups, and you can create your own. You might create a group for your family, for coworkers, or a team. Groups make it easy to find contacts, and you can send messages to the members of a group.Create a Group1. From a Home screen, tap Apps > Contacts.2. Tap GROUPS, and then tap ADD.3. Tap fields to enter information about the group:• Tap Create group in [location] to choose where to save the group. You can save it to a specific account, to the device memory, or to all accounts. Tap the entries to select or deselect them.• Tap Group name to enter a name for the new group.• Tap Add member and select contact(s) to add to the new group, and then tap DONE.• Tap Group ringtone to assign a ringtone to members of the group.4. Tap SAVE.](https://usermanual.wiki/Samsung-Electronics-Co/SMG890A/User-Guide-2610063-Page-71.png)
![DRAFT FOR INTERNAL USE ONLY44 EmailApplicationsEmailUse the Email app to view and manage all your email accounts in one application.To access Email: ►From a Home screen, tap Apps > Email.Configure Email AccountsYou can configure Email for most accounts in just a few steps.1. From a Home screen, tap Apps > Email.2. Follow the onscreen instructions to set up your email account.– or –For additional accounts, tap MORE > Settings > Add account.The device communicates with the appropriate server to set up your account and synchronize your email. When complete, your email appears in the Inbox for the account.Note: To configure email account settings at any time, tap MORE > Settings. Tap the email account to manage to display its settings.Manage Your Email AccountsYou can view email you receive for all accounts on the Combined view screen or you can view email accounts individually.1. From a Home screen, tap Apps > Email.2. Tap the drop down menu at the top left of the screen to view the current account mailbox.3. Tap on the account name to view:• Combined view: View all email in a combined inbox.• [Account Name]: View email for only one email account.Delete Email AccountsTo delete an Email account:1. From a Home screen, tap Apps > Email.2. Tap MORE > Settings.3. Tap the account you want to remove.4. Tap REMOVE. Confirm by tapping REMOVE on the prompt.Email SettingsThese settings allow you to modify settings associated with using the Email app.1. From a Home screen, tap Apps > Email.2. Tap MORE > Settings.3. Tap an option and follow the onscreen instructions.](https://usermanual.wiki/Samsung-Electronics-Co/SMG890A/User-Guide-2610063-Page-73.png)


![DRAFT FOR INTERNAL USE ONLY93 AccountsSettingsAccountsSet up and manage accounts, including your Google Account, Samsung account, email, and social networking accounts.Depending on the account, you can choose to synchronize your calendar, contacts, and other types of content.Add an Account1. From a Home screen, tap Apps > Settings > PERSONAL tab.2. Tap Accounts > Add account.3. Tap one of the account types.4. Follow the prompts to enter your credentials and set up the account.Synchronize Accounts1. From a Home screen, tap Apps > Settings > PERSONAL tab.2. Tap Accounts > [Account type].3. Tap an account to view the sync settings for that account.4. Tap individual data items to sync.5. Tap MORE > Sync all or Sync now to synchronize the account.Note: Sync options and the location of the sync command differ depending on the account type.Account SettingsEach account has its own set of settings. In addition, you can configure common settings for all accounts of the same type.Note: Account settings and available features vary between account types and service providers. Contact your service provider for more information on your account’s settings.1. From a Home screen, tap Apps > Settings > PERSONAL tab.2. Tap Accounts > [Account type].• Tap an account to configure that account’s sync settings.• Tap other available options for the account.Delete an Account1. From a Home screen, tap Apps > Settings > PERSONAL tab.2. Tap Accounts > [Account type].3. Tap the account and then tap MORE > Removeaccount.](https://usermanual.wiki/Samsung-Electronics-Co/SMG890A/User-Guide-2610063-Page-122.png)