Samsung Electronics Co SMG925V Multi-band GSM/EDGE/CDMA/UMTS/LTE Phone with WLAN, Bluetooth, RFID, and ANT+ User Manual
Samsung Electronics Co Ltd Multi-band GSM/EDGE/CDMA/UMTS/LTE Phone with WLAN, Bluetooth, RFID, and ANT+ Users Manual
Users Manual


2
Table of Contents
Basics
4 Read me first
5 Package contents
6 Device layout
8 SIM or USIM card
11 Battery
15 Turning the device on and off
16 Touchscreen
19 Home screen
25 Lock screen
27 Notification panel
30 Entering text
33 Screen capture
33 Opening apps
34 Multi window
38 Device and data management
44 Connecting to a TV
46 Emergency mode
Settings
47 Introduction
47 Wi-Fi
49 Bluetooth
51 Tethering and Mobile hotspot
52 Flight mode
52 Data usage
53 Mobile networks
53 More
58 Sound and notification
58 Display
59 Motions & gestures
59 Applications
60 Wallpaper
60 Themes
60 Lock screen & security
65 Privacy & safety
68 Easy mode
68 Accessibility
69 Accounts
70 Backup and reset
70 Language and input
71 Battery
71 Storage
72 Date and time
72 User manual
72 About device
Applications
73 Installing or uninstalling apps
74 Phone
77 Contacts
79 Messages
80 Internet
81 Email
DRAFT,
DRAFT, DRAFT,
ta managementta managemen
o a TVo a TV
y modey mode
Emergency mode
y modey mode
Not
Not Not
Not Not
Not Not
Not Not
6868
68
6868
Easy mode
Easy mode
Easy mode
Easy modeEasy mode
68
68
68
6868
69
69
FINAL
FINALFINAL
FINALFINAL
FINALFINAL
FINAL
FINALFINAL
FINAL
Applications
tionstions
Wallpaper
allpaperallpaper
hemeshemes
Themes
hemeshemes
Lock screen & securLock screen & secur
Lock screen & security
Lock screen & securLock screen & secur
Privacy & safPrivacy & saf
Privacy & safet
Privacy & safPrivacy & saf
Easy modeEasy mode

Table of Contents
3
82 Camera
98 Gallery
99 Smart Manager
100 S Planner
102 S Health
105 S Voice
106 Music
107 Video
107 Voice Recorder
110 My Files
110 Memo
111 Clock
112 Calculator
113 Google apps
115 Microsoft apps
Appendix
116 Accessibility
131 Troubleshooting
136 Removing the battery (non-removable
type)
DRAFT,
y (non-ry (non-r
emovableemo
Not
FINAL

4
Basics
Read me first
Please read this manual before using the device to ensure safe and proper use.
•
Descriptions are based on the device’s default settings.
•
Some content may differ from your device depending on the region, service provider,
model specifications, or device’s software.
•
Content (high quality content) that requires high CPU and RAM usage will affect the
overall performance of the device. Apps related to the content may not work properly
depending on the device’s specifications and the environment that it is used in.
•
Samsung is not liable for performance issues caused by apps supplied by providers other
than Samsung.
•
Samsung is not liable for performance issues or incompatibilities caused by edited
registry settings or modified operating system software. Attempting to customise the
operating system may cause the device or apps to work improperly.
•
Software, sound sources, wallpapers, images, and other media provided with this device
are licensed for limited use. Extracting and using these materials for commercial or other
purposes is an infringement of copyright laws. Users are entirely responsible for illegal
use of media.
•
You may incur additional charges for data services, such as messaging, uploading and
downloading, auto-syncing, or using location services depending on your data plan. For
large data transfers, it is recommended to use the Wi-Fi feature.
•
Default apps that come with the device are subject to updates and may no longer be
supported without prior notice. If you have questions about an app provided with
the device, contact a Samsung Service Centre. For user-installed apps, contact service
providers.
•
Modifying the device’s operating system or installing softwares from unofficial sources
may result in device malfunctions and data corruption or loss. These actions are violations
of your Samsung licence agreement and will void your warranty.
DRAFT,
allpapers, images
allpapers
DRAFT,
. Extracting and using these ma
. Extracting and using these ma
ingement of copyrighingement of copyr
y incur additional charges fy incur additional char
, auto-syncing, or using loca, auto-syncing
DRAFT,
ansfers, it is r
ansfers, it is r
Not
e issues or incompae issues or inc
ting system softwting system softw
y cause the device or apps ty cause the device or apps t
, images
, images
FINAL
AM usage will aff
M usage will aff
ontent may not wtent may not w
vironment thaonment tha
e issues caused by apps supplied be issues caused by apps supplied b
e issues or incompae issues or incompa
Basics
5
•
Depending on the region or model, some devices are required to receive approval from
the Federal Communications Commission (FCC). If your device is approved by the FCC,
you can view the FCC ID of the device. To view the FCC ID, tap
Apps
→
Settings
→
About device
.
Instructional icons
Warning: situations that could cause injury to yourself or others
Caution: situations that could cause damage to your device or other equipment
Notice: notes, usage tips, or additional information
Package contents
Check the product box for the following items:
•
Device
•
Quick start guide
•
The items supplied with the device and any available accessories may vary
depending on the region or service provider.
•
The supplied items are designed only for this device and may not be compatible
with other devices.
•
Appearances and specifications are subject to change without prior notice.
•
You can purchase additional accessories from your local Samsung retailer. Make
sure they are compatible with the device before purchase.
•
Use only Samsung-approved accessories. Using unapproved accessories may cause
the performance problems and malfunctions that are not covered by the warranty.
•
Availability of all accessories is subject to change depending entirely on
manufacturing companies. For more information about available accessories, refer
to the Samsung website.
DRAFT,
ems supplied with the device and an
ems supplied with the device and an
depending on the region or servicdepending on the region or ser
he supplied items are desighe supplied items are desig
DRAFT,
with other devices.with other devices.
ances and specificaances and specifica
ou can purchase additional ac
Not
ems:
FINAL

Basics
6
Device layout
Microphone
Microphone Loud speaker
Back key
Multipurpose jack
Front camera
Speaker
Power key
Touchscreen
Recents key
Headset jack
Home key (Fingerprint
recognition sensor)
LED indicator
Proximity/Light sensor
SIM card tray
Main antenna
Infrared port
Flash
Volume key
NFC antenna/Wireless
charging coil
Rear camera
Microphone
GPS antenna
DRAFT,
DRAFT,
DRAFT,
DRAFT,
DRAFT,
DRAFT,
DRAFT,
DRAFT,
Infrared portInfrared port
ophoneophone
Not
Not
Not
Not
Not
Not
Not
Not
Not
Not
Not
Not
Not
Not
FINAL
FINAL
FINAL
Home key (FHome key (F
recognition sensor)recognition sensor)
Basics
7
•
Do not cover the antenna area with your hands or other objects. This may cause
connectivity problems or drain the battery.
•
Using a Samsung-approved screen protector is recommended. Unapproved screen
protectors may cause the sensors to malfunction.
•
Do not allow water to contact the touchscreen. The touchscreen may malfunction
in humid conditions or when exposed to water.
Keys
Key Function
Power
•
Press and hold to turn the device on or off.
•
Press to turn on or lock the screen.
Recents
•
Tap to open the list of recent apps.
•
Tap and hold to launch the split screen view.
Home
•
Press to turn on the screen while the screen is locked.
•
Press to return to the Home screen.
•
Press and hold to launch
Google
.
Back
•
Tap to return to the previous screen.
Volume
•
Press to adjust the device volume.
DRAFT,
DRAFT,
ap to r
DRAFT,
DRAFT,
••
Press to adjust the devic
Press to adjust the devic
Not
Not
n to the Home scr
n to the Home scr
ess and hold to launch ess and hold to launch
Not
o return to the pro return to the pr
FINAL
FINAL
e on or off
n on or lock the screen.een.
ecent apps.ent apps.
FINAL
FINAL
FINAL
o launch the split scro launch the split scr
n on the screen while the scrn on the screen while the scr
o the Home scro the Home scr
Basics
8
SIM or USIM card
Installing the SIM or USIM card
Insert the SIM or USIM card provided by the mobile telephone service provider.
•
Only nano-SIM cards work with the device.
•
Some LTE services may not be available depending on the service provider. For
more information about service availability, contact your service provider.
1 Insert the ejection pin into the hole on the SIM card tray to loosen the tray.
Ensure that the ejection pin is perpendicular to the hole. Otherwise, the device may
be damaged.
2 Pull out the SIM card tray gently from the SIM card tray slot.
tion pin is per
ay gently from the SIM caray gently fr
Not
Not
Not
tion pin is perpendicular ttion pin is perpendicular t
FINAL
FINAL
Basics
9
3 Place the SIM or USIM card on the SIM card tray with the gold-coloured contacts facing
downwards.
Use caution not to lose or let others use the SIM or USIM card. Samsung is not
responsible for any damages or inconveniences caused by lost or stolen cards.
4 Insert the SIM card tray back into the SIM card tray slot.
DRAFT,
DRAFT,
Not
Not
Not
Not
FINAL
y lost or st
y lost or st
FINAL

Basics
10
Removing the SIM or USIM card
1 Insert the ejection pin into the hole on the SIM card tray to loosen the tray.
2 Pull out the SIM card tray gently from the SIM card tray slot.
3 Remove the SIM or USIM card.
4 Insert the SIM card tray back into the SIM card tray slot.
Not
FINAL
d tray slot.d tray slot.
Basics
11
Battery
Charging the battery
Charge the battery before using it for the first time or when it has been unused for extended
periods.
Use only Samsung-approved chargers, batteries, and cables. Unapproved chargers or
cables can cause the battery to explode or damage the device.
•
When the battery power is low, the battery icon appears empty.
•
If the battery is completely discharged, the device cannot be turned on
immediately when the charger is connected. Allow a depleted battery to charge for
a few minutes before turning on the device.
•
If you use multiple apps at once, network apps, or apps that need a connection
to another device, the battery will drain quickly. To avoid disconnecting from the
network or losing power during a data transfer, always use these apps after fully
charging the battery.
•
Using a power source other than the USB power adaptor, such as a computer, may
result in a slower charging speed due to a lower electric current.
Connect the USB cable to the USB power adaptor, and then plug the end of the USB cable
into the multipurpose jack.
DRAFT,
o the USB power adapt
o the USB power adapt
Not
e other than the USB poe other than the USB po
ing speed due to a loing speed due to a lo
FINAL
e cannot be tur
w a depleted ba
w a depleted ba
k apps, or apps tha, or apps tha
ain quickly. To avoid discain quickly. To avoid disc
ansfer, alwaansfer, alwa

Basics
12
Connecting the charger improperly may cause serious damage to the device. Any
damage caused by misuse is not covered by the warranty.
•
The device can be used while it is charging, but it may take longer to fully charge
the battery.
•
If the device receives an unstable power supply while charging, the touchscreen
may not function. If this happens, unplug the charger from the device.
•
While charging, the device and the charger may heat up. This is normal and should
not affect the device’s lifespan or performance. If the battery gets hotter than usual,
the charger may stop charging.
•
If the device is not charging properly, take the device and the charger to a
Samsung Service Centre.
After fully charging, disconnect the device from the charger. First unplug the charger from the
device, and then unplug it from the electric socket.
To save energy, unplug the charger when not in use. The charger does not have a
power switch, so you must unplug the charger from the electric socket when not in
use to avoid wasting power. The charger should remain close to the electric socket
and easily accessible while charging.
Reducing the battery consumption
Your device provides various options that help you conserve battery power.
•
Optimise the device using the Smart manager.
•
When you are not using the device, switch to sleep mode by pressing the Power key.
•
Activate power saving mode.
•
Close unnecessary apps.
•
Deactivate the Bluetooth feature when not in use.
•
Deactivate the Wi-Fi feature when not in use.
•
Deactivate auto-syncing of apps.
•
Decrease the backlight time.
•
Decrease the screen brightness.
DRAFT,
onsumption
onsumption
ious options that help yious options that help y
e using the Smare using the Smar
e not using the device not using the devic
DRAFT,
er saving modeer saving mode
essary apps
essary apps
Not
ou must unplug the charger fr
ger should rger should r
FINAL
. First unplug the charirst unplug the char
ger when not in use. The charger when not in use. The char
ger from the elecger from the elec
ger should remain close tger should remain close t

Basics
13
Fast charging
The device has a built-in fast charging feature. You can use this feature to charge the battery
more quickly while the device or its screen is turned off.
About Fast charging
•
Fast charging uses battery charging technology that charges the battery faster by
increasing the charging power. The device supports Samsung’s Adaptive fast charging
feature and Qualcomm Quick Charge 2.0.
•
To use Fast charging on your device, connect it to a battery charger that supports
Adaptive fast charging or Quick Charge 2.0.
Increasing the charging speed
To increase the charging speed, turn the device or its screen off when you charge the battery.
•
While charging the battery when the device is turned off, the icon appears on the
screen.
•
You cannot use the fast charging feature when the screen is turned on. Turn off the
screen to increase the charging speed.
•
You cannot use the built-in fast charging feature when you charge the battery
using a standard battery charger.
•
If the device heats up or the ambient air temperature rises, the charging speed may
decrease automatically. This is a normal operating condition to prevent damage to
the device.
DRAFT,
-in fast char
DRAFT,
y charger.
y charger.
ts up or the ambients up or the ambien
DRAFT,
omatically. This is a noromatically. This is a nor
Not
e when the scr
e when the scr
-in fast charging f-in fast charging f
FINAL
een off when yeen off when y
e is turned off, the e is turned off, the

Basics
14
Wireless charging
The device has a built-in wireless charging coil. You can charge the battery using a wireless
charging pad (sold separately).
1 Place the centre of the device’s back on the centre of the charging pad.
You can check the remaining charge time on the screen. The actual remaining time may
vary depending on the charging conditions.
2 After fully charging, disconnect the device from the charging pad.
•
You can check the battery’s charging status from the battery icon on the screen.
•
When there are foreign materials between the device and the wireless charging
pad, the device may not charge properly.
•
If you use the wireless charging pad in areas with weak signals, you may lose
reception.
Power saving mode
Save the battery power by limiting the device’s functions.
On the Home screen, tap
Apps
→
Settings
→
Battery
→
Power saving mode
, and then tap
the switch to activate it.
To automatically activate power saving mode when the remaining battery power reaches the
preset level, tap
Enable Power saving mode when
and select an option.
To set the device to disable sync in the background while using a mobile network, tap the
Restrict background data
switch to activate it.
DRAFT,
DRAFT, DRAFT,
y not charge pr
y not charge pr
eless charging pad in ar
eless charging pad in ar
ving modeving mode
Power saving mode
ving modeving mode
er by limiting the devic
er by limiting the devic
Not
e from the char
om the char
ging status frging status fr
ials between the devicials between the devic
ge proper
ge proper
FINAL
om the charom the char

Basics
15
Ultra power saving mode
Use this mode to extend the device’s battery power. In ultra power saving mode, the device
performs the following:
•
Displays colours on the screen as grey tones.
•
Restricts the available apps to essential and selected apps only.
•
Deactivates the mobile data connection when the screen turns off.
•
Deactivates the Wi-Fi and Bluetooth features.
On the Home screen, tap
Apps
→
Settings
→
Battery
→
Ultra power saving mode
, and
then tap the switch to activate it.
To deactivate ultra power saving mode, tap
MORE
→
Disable ultra power saving mode
.
The usage time left shows the time remaining before the battery power runs
out. Usage time left may vary depending on your device settings and operating
conditions.
Turning the device on and off
Press and hold the Power key for a few seconds to turn on the device.
When you turn on your device for the first time or after performing a data reset, follow the on-
screen instructions to set up your device.
To turn off the device, press and hold the Power key, and then tap
Power off
.
•
If your device is frozen and unresponsive, press and hold the Power key and the
Volume key down simultaneously for more than 7 seconds to restart it.
•
Follow all posted warnings and directions from authorised personnel in areas
where the use of wireless devices is restricted, such as aeroplanes and hospitals.
DRAFT,
ew sec
or the first time or af
or the first time or af
our device.our device.
ess and hold the Pess and hold the P
DRAFT,
our device is frozen and unrour device is frozen and unr
olume key down simultaneously folume key down simultaneously f
w all posted w
w all posted w
Not
e on and off
e on and off
ew seconds to turew seconds to tur
FINAL
a pow
e the battery poe the battery po
our device settings and operour device settings and oper
Basics
16
Touchscreen
•
Do not allow the touchscreen to come into contact with other electrical devices.
Electrostatic discharges can cause the touchscreen to malfunction.
•
To avoid damaging the touchscreen, do not tap it with anything sharp or apply
excessive pressure to it with your fingertips.
•
The device may not recognise touch inputs close to the edges of the screen, which
are outside of the touch input area.
•
Leaving the touchscreen idle for extended periods may result in afterimages
(screen burn-in) or ghosting. Turn off the touchscreen when you do not use the
device.
•
It is recommended to use fingers when you use the touchscreen.
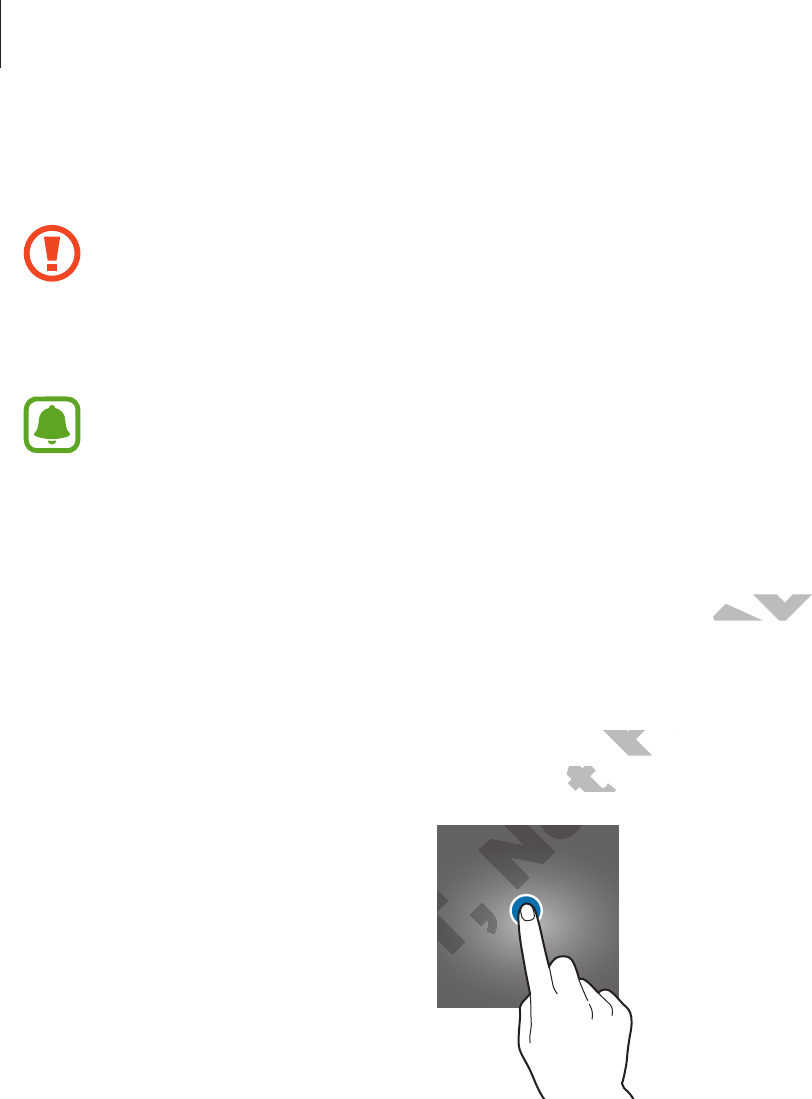
Tapping
To open an app, to select a menu item, to press an on-screen button, or to enter a character
using the keyboard on the screen, tap it with your finger.
DRAFT,
DRAFT,
Not
ess an on-scr
een, tap it with your finger
our finger
Not
FINAL
ou use the touchscreen.ou use the touchscreen.
ess an on-screen buttess an on-screen butt
Basics
17
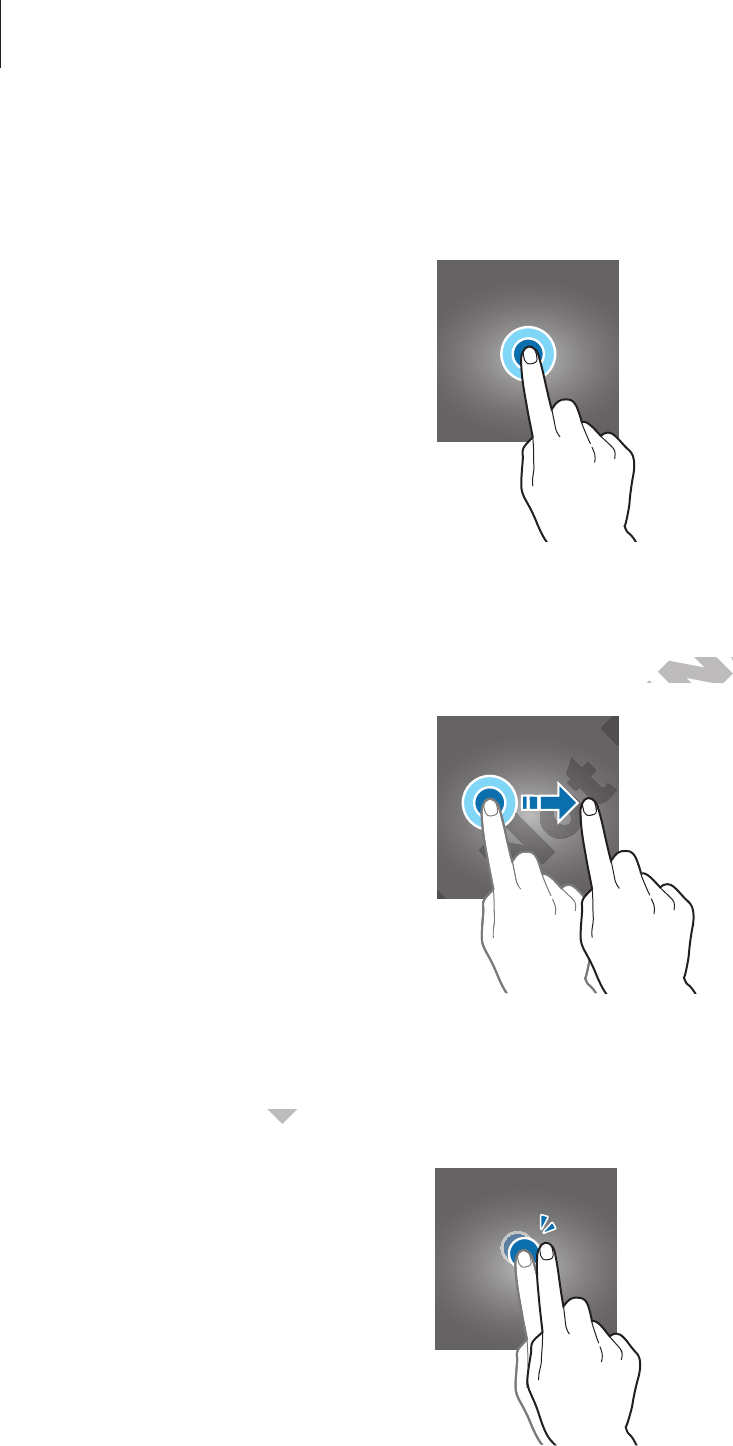
Tapping and holding
Tap and hold an item or the screen for more than 2 seconds to access available options.
Dragging
To move an item, tap and hold it and drag it to the target position.
Double-tapping
Double-tap on a webpage or image to zoom in. Double-tap again to return.
DRAFT,
DRAFT,
DRAFT,
DRAFT,
DRAFT,
DRAFT,
DRAFT,
ebpage or image t
ebpage or image t
Not
Not
Not
Not
Not
Not
Not
Not
Not
Not
Not
Not
Not
Not
Not
FINAL
get position.get position.
FINAL
Basics
18
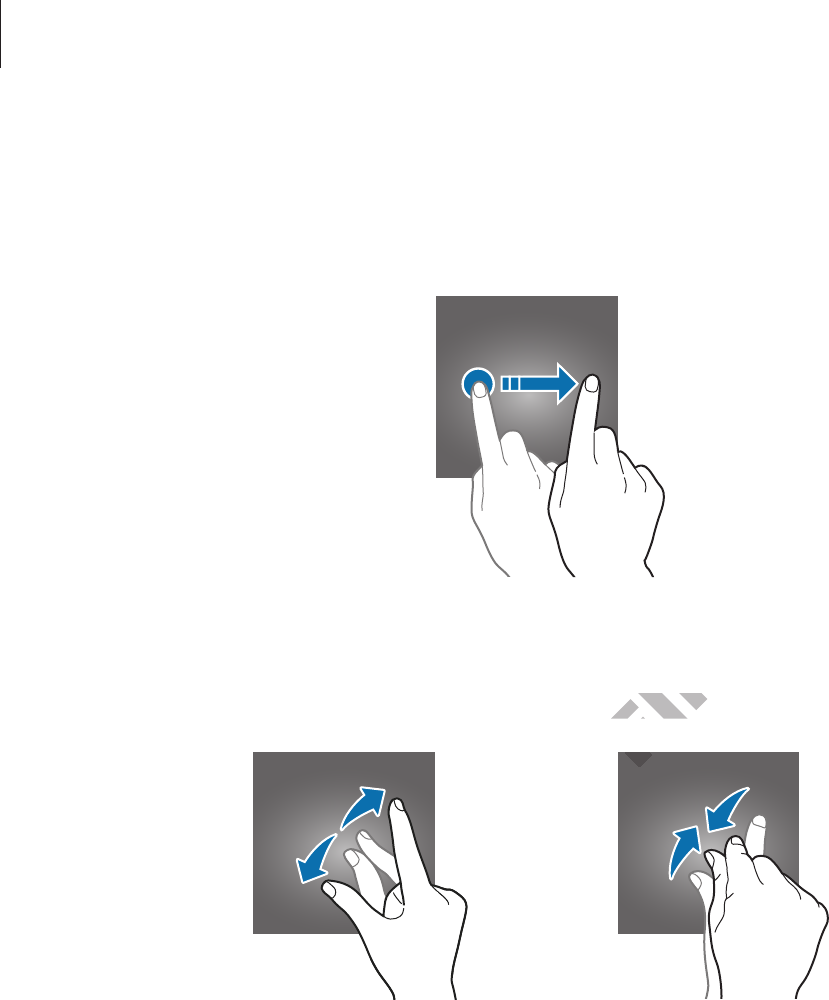
Swiping
Swipe to the left or right on the Home screen or the Apps screen to view other panels. Swipe
upwards or downwards to scroll through a webpage or a list of items, such as contacts.
Spreading and pinching
Spread two fingers apart on a webpage, map, or image to zoom in a part. Pinch to zoom out.
DRAFT,
DRAFT,
DRAFT,
DRAFT,
Not
Not
FINAL
, or image to zoom in a par, or image to zoom in a par
FINAL
Basics
19
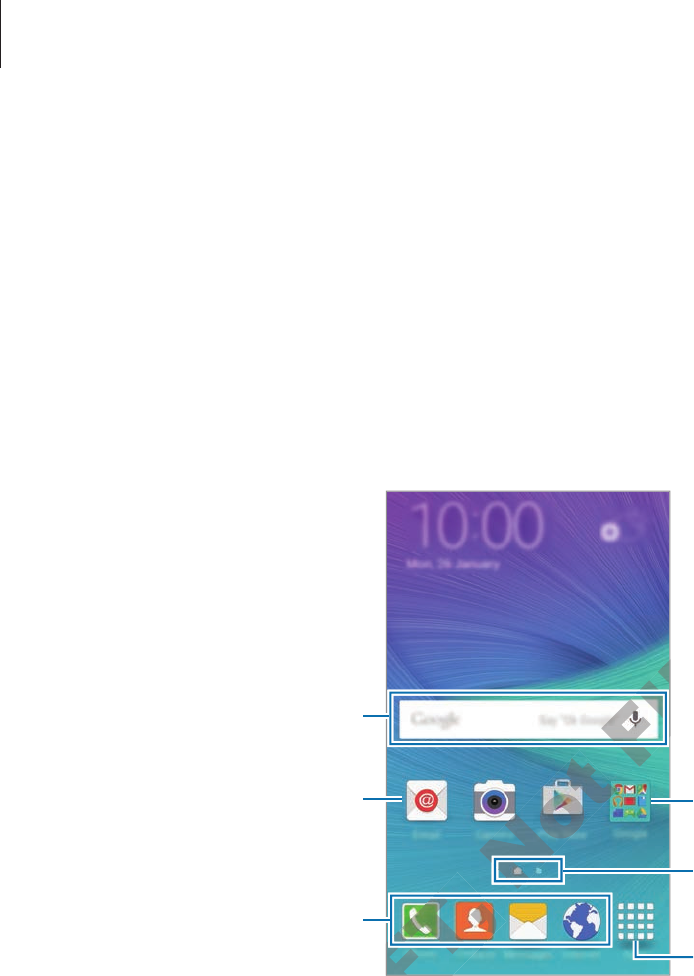
Home screen
Home screen
The Home screen is the starting point for accessing all of the device’s features. It displays
widgets, shortcuts to apps, and more.
To view other panels, swipe to the left or right, or tap one of the screen indicators at the
bottom of the screen.
A widget
An app A folder
Screen indicators
Favourite apps
Apps screen icon
DRAFT,
DRAFT,
DRAFT,
DRAFT,
DRAFT,
DRAFT,
Not
Not
FINAL
FINAL
FINAL
FINAL
FINAL
FINAL
Basics
20
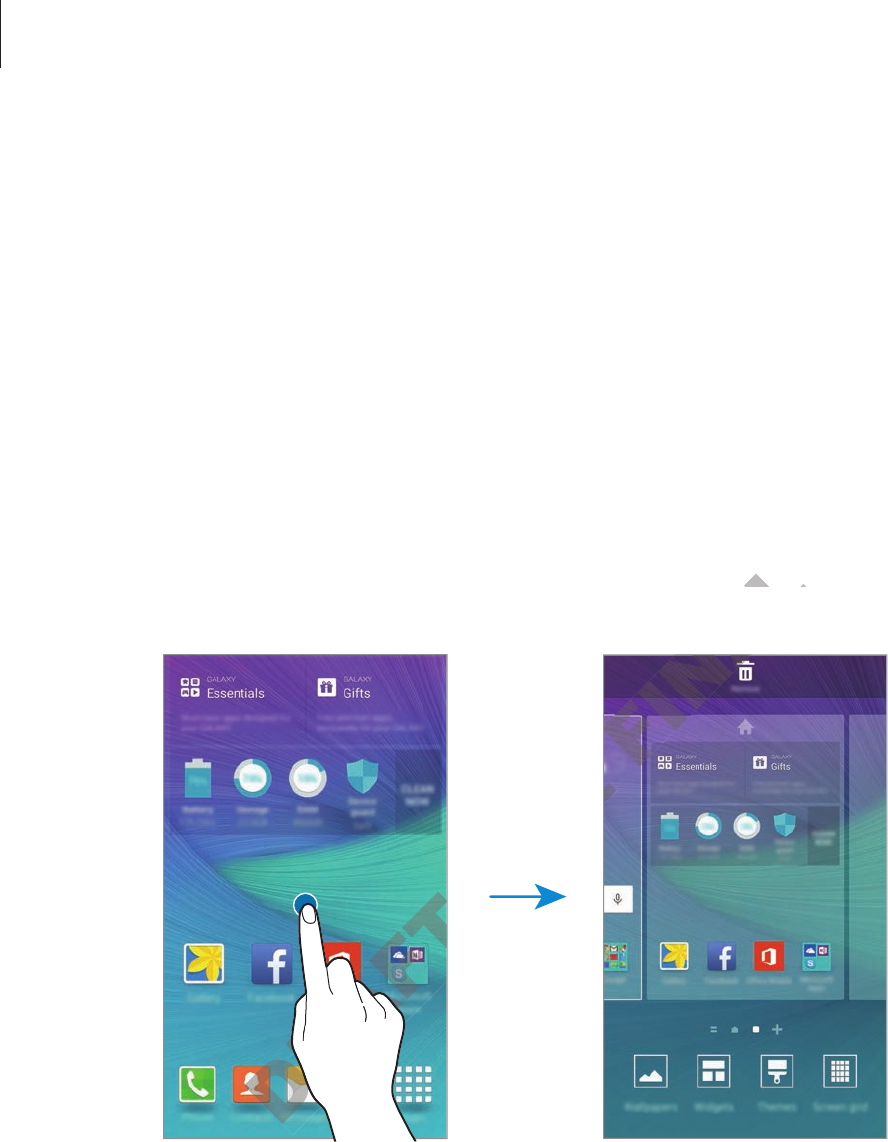
Home screen options
On the Home screen, tap and hold an empty area, or pinch your fingers together to access
the available options. Customise the Home screen by adding, deleting, or rearranging Home
screen panels. You can also set the Home screen wallpaper, add widgets to the Home screen,
and more.
•
Wallpapers
: Change the wallpaper settings for the Home screen and the locked screen.
•
Widgets
: Add widgets to the Home screen. Widgets are small apps that launch specific
app functions to provide information and convenient access on your Home screen.
•
Themes
: Change the device’s theme. Visual elements of interface, such as colours, icons,
and wallpapers, will change depending on the selected theme.
•
Screen grid
: Change the size of the grid to display more or less items on the Home
screen.
DRAFT,
DRAFT,
DRAFT,
DRAFT,
DRAFT,
DRAFT,
DRAFT,
DRAFT,
Not
Not
FINAL
e or less items on the Home
e or less items on the Home
FINAL
Basics
21
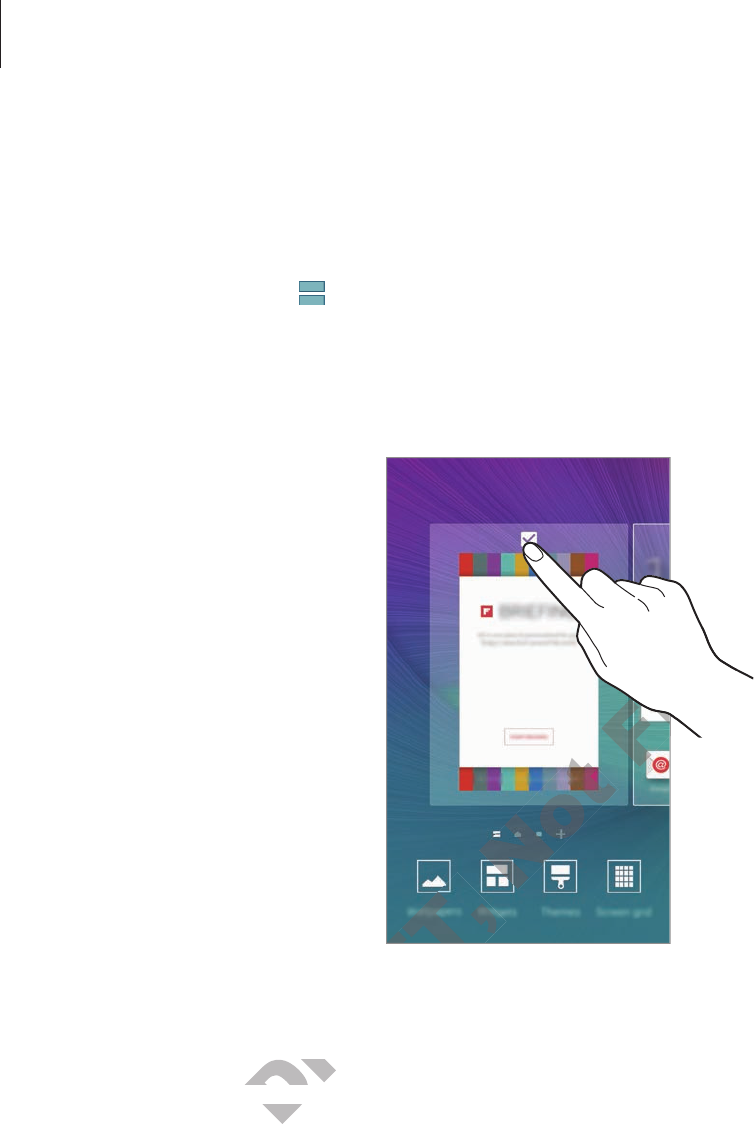
Flipboard Briefing
View the latest articles in various categories. You can get up to date on news that interests
you using this feature.
On the Home screen, tap or swipe to the right to open Flipboard Briefing. Swipe upwards
or downwards to browse articles in each news category.
To deactivate Flipboard Briefing, tap and hold an empty area on the Home screen. Then,
swipe to the right and deselect the tick box at the top of the Flipboard Briefing panel.
Adding items
Tap and hold an app or a folder from the Apps screen, and then drag it to the Home screen.
To add widgets, tap and hold an empty area on the Home screen, tap
Widgets
, tap and hold a
widget, and then drag it to the Home screen.
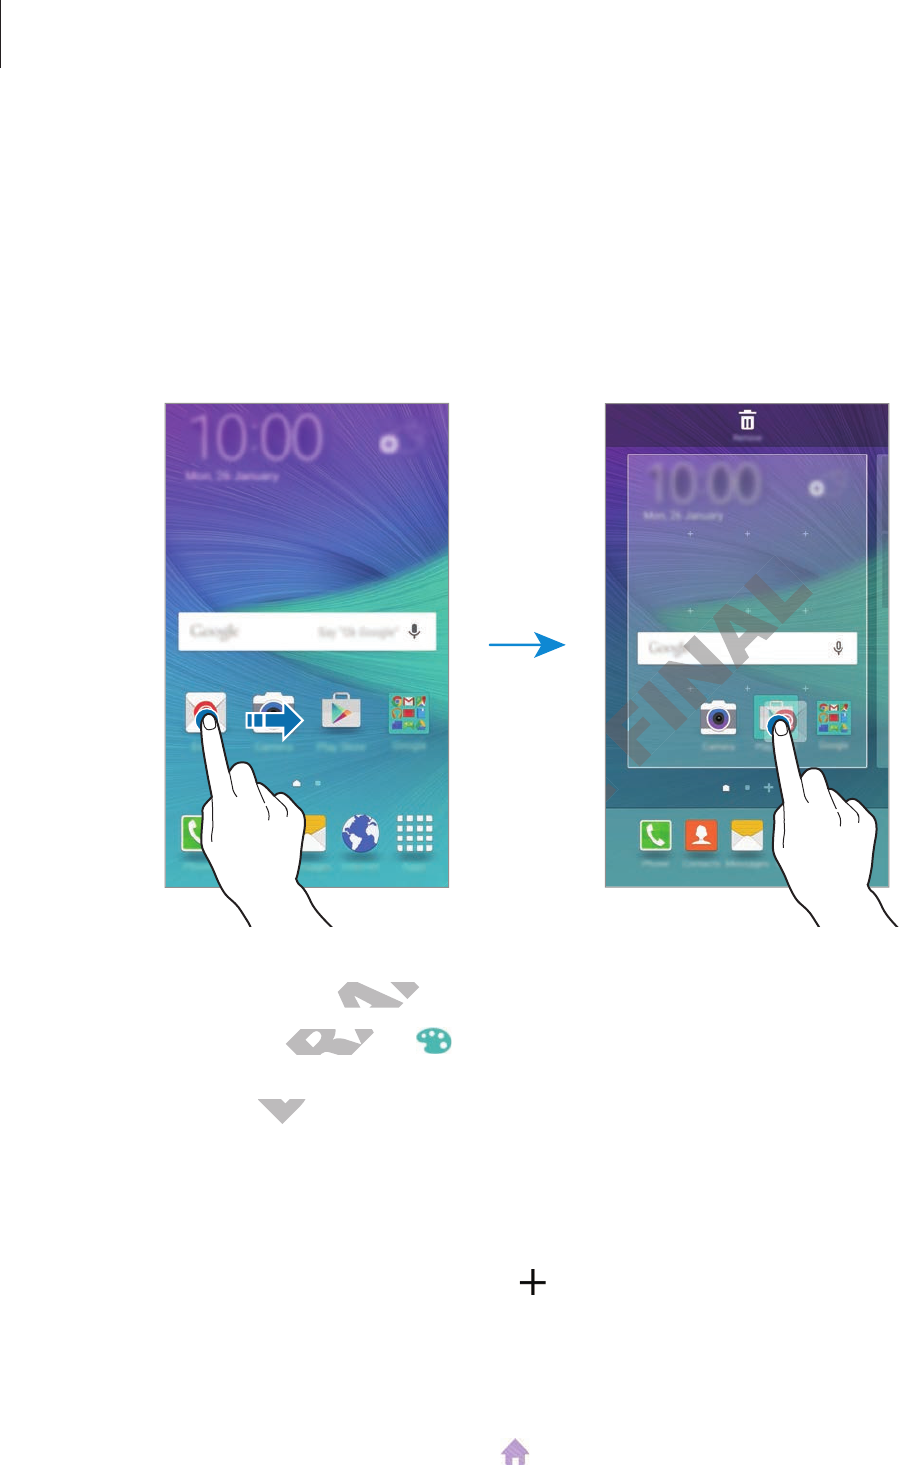
Moving and removing an item
Tap and hold an item on the Home screen, and then drag it to a new location.
To move the item to another panel, drag it to the side of the screen.
You can also move frequently used apps to the shortcuts area at the bottom of the Home
screen.
To remove an item, tap and hold the item. Then, drag it to
Remove
at the top of the screen.
DRAFT,
DRAFT,
DRAFT,
ap and hold an app or a folder frap and hold an app or a folder fr
, tap and hold an empt
, tap and hold an empt
FINAL
FINAL
FINAL
FINAL
Basics
22
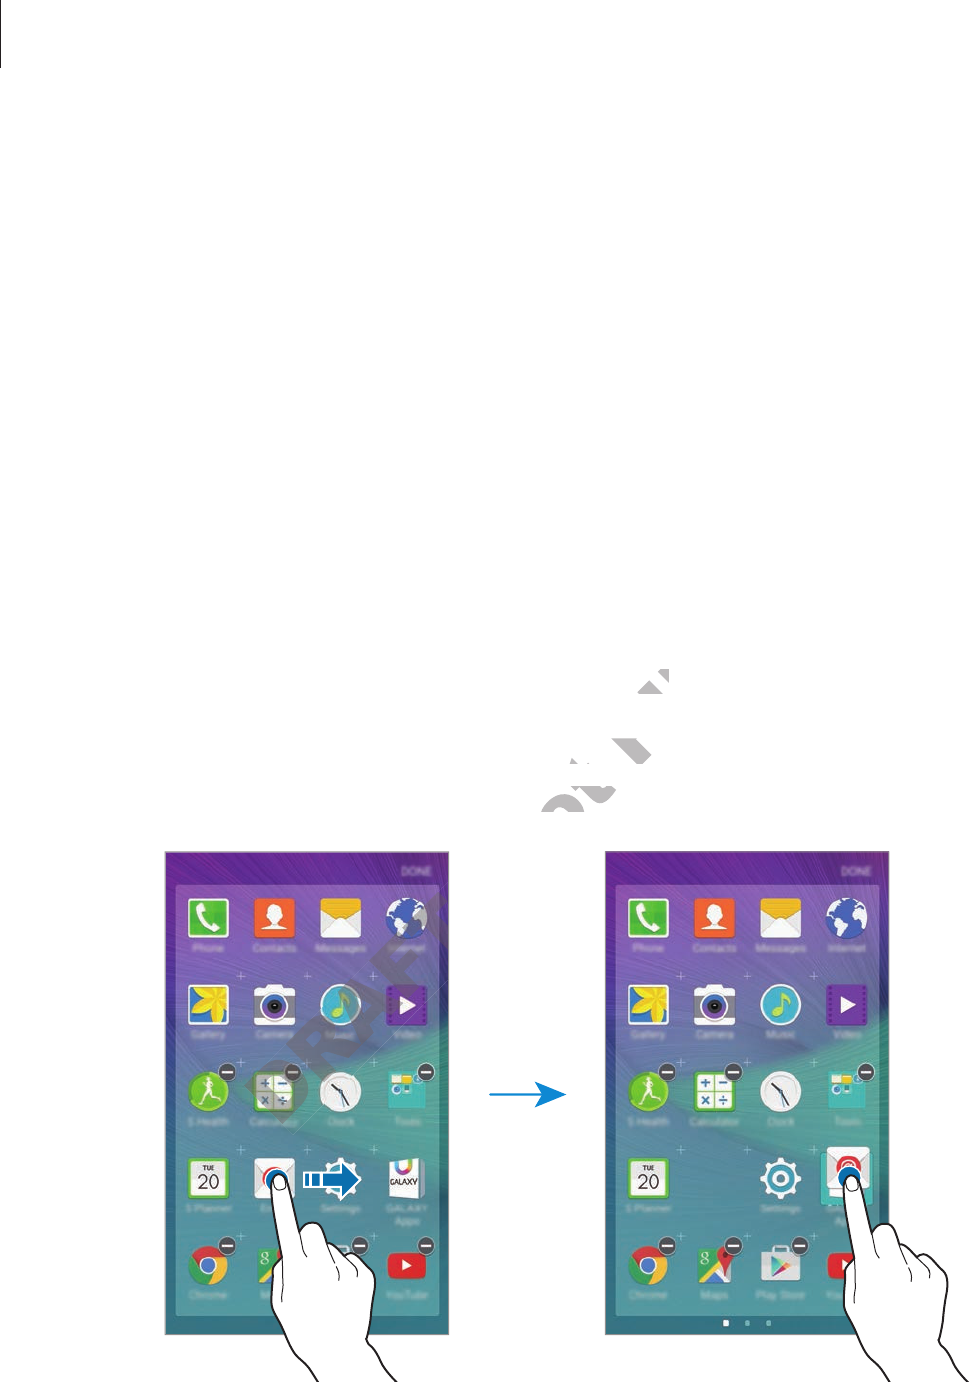
Creating folders
1 On the Home screen, tap and hold an app, and then drag it over another app.
2 Drop the app when a folder frame appears around the apps.
A new folder containing the selected apps will be created.
3 Tap the area above the horizontal line and enter a folder name.
To change the folder colour, tap .
To add more apps to the folder, tap and hold another app, and then drag it to the folder.
Managing panels
On the Home screen, tap and hold an empty area to add, move, or remove a panel.
To add a panel, swipe to the left, and then tap .
To move a panel, tap and hold a panel preview, and then drag it to a new location.
To remove a panel, tap and hold a panel preview, and then drag it to
Remove
at the top of
the screen.
To set a panel as the main Home screen, tap .
DRAFT,
DRAFT,
DRAFT,
e the horizontal line and ene the horizontal line and en
older colour, tap older colour, tap
DRAFT,
o the folder
o the folder
Not
Not
FINAL
FINAL
Basics
23
Apps screen
The Apps screen displays icons for all apps, including newly installed apps.
On the Home screen, tap
Apps
to open the Apps screen. To view other panels, swipe to the
left or right, or select a screen indicator at the bottom of the screen.
Moving items
On the Apps screen, tap
EDIT
. Tap and hold an item and drag it to a new location.
To move the item to another panel, drag it to the side of the screen.
Creating folders
1 On the Apps screen, tap
EDIT
.
2 Tap and hold an app, and then drag it over another app.
3 Drop the app when a folder frame appears around the apps.
A new folder containing the selected apps will be created.
DRAFT,
DRAFT,
Not
ame appears around the apps
ame appears around the apps
ed apps will be cr
ed apps will be cr
FINAL
er another app.er another app.
ound the appsound the apps
Basics
24
4 Tap the area above the horizontal line and enter a folder name.
To change the folder colour, tap .
To add more apps to the folder, tap and hold another app, and then drag it to the folder.
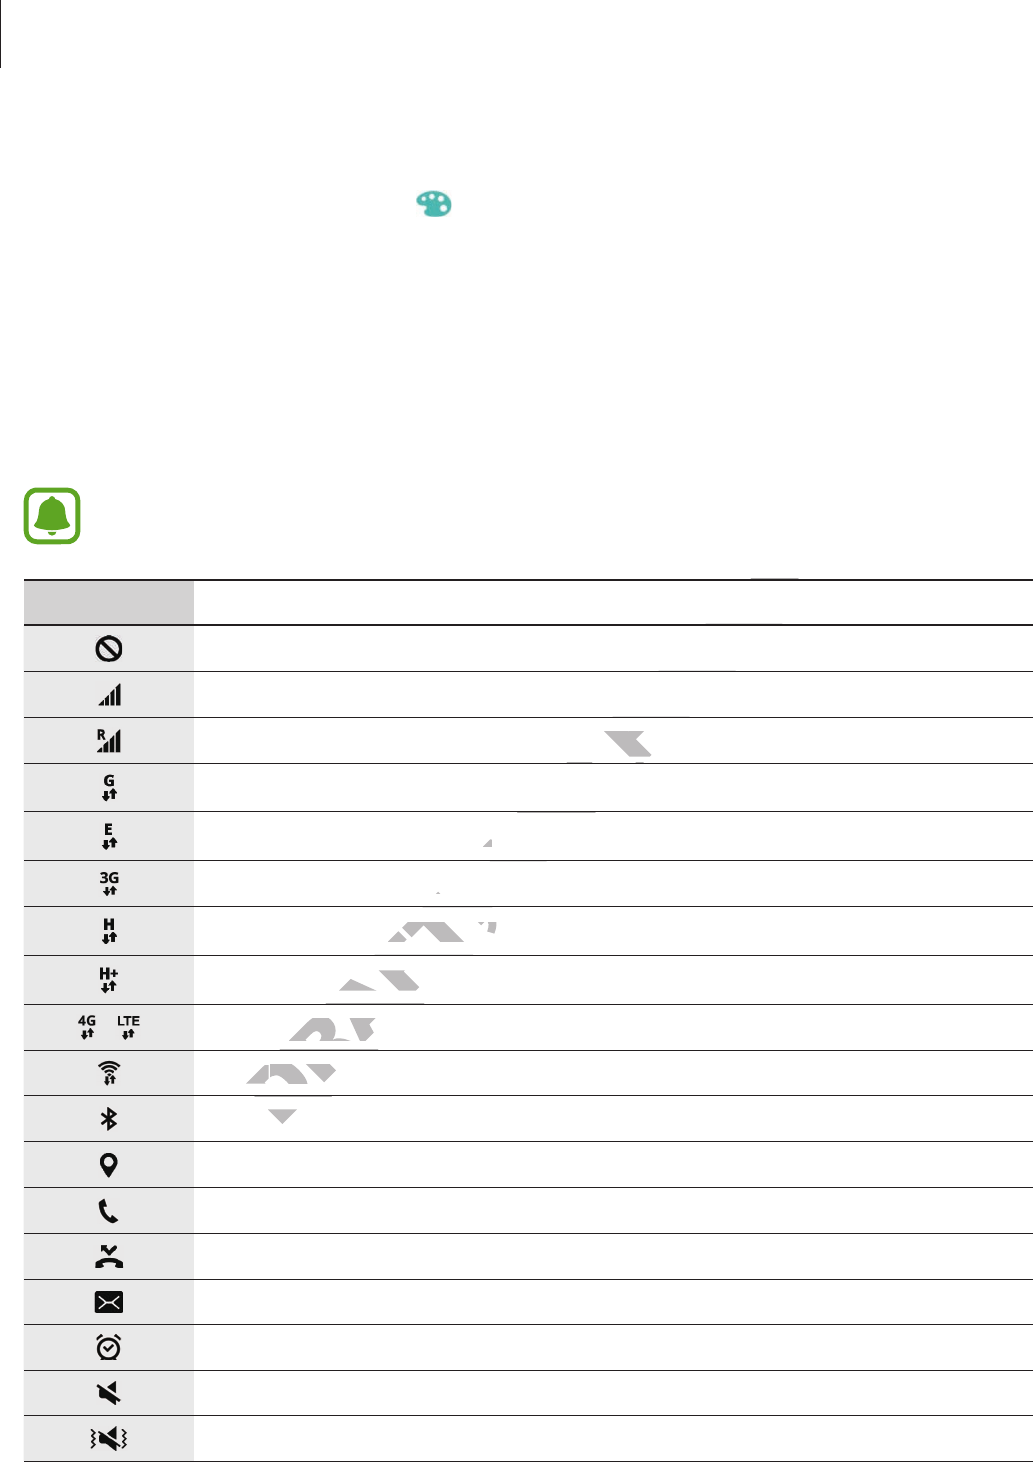
Indicator icons
Indicator icons appear on the status bar at the top of the screen. The icons listed in the table
below are most common.
The status bar may not appear at the top of the screen in some apps. To display the
status bar, drag down from the top of the screen.
Icon Meaning
No signal
Signal strength
Roaming (outside of normal service area)
GPRS network connected
EDGE network connected
UMTS network connected
HSDPA network connected
HSPA+ network connected
/ LTE network connected (LTE-enabled models)
Wi-Fi connected
Bluetooth feature activated
GPS activated
Call in progress
Missed call
New text or multimedia message
Alarm activated
Mute mode activated
Vibration mode activated
DRAFT,
DRAFT,
DRAFT,
onnected
onnec
ork connected
ork connected
DRAFT,
DRAFT,
DRAFT,
DRAFT,
DRAFT,
A+ network connecA+ network connec
TE network connecTE network connec
Wi-FiWi-Fi
connected connec
DRAFT,
Bluetooth f
Bluetooth f
Not
Not
Not
Not
mal service ar
tedted
FINAL
FINAL
FINAL
FINAL
FINAL
FINAL
vice area)vice area)
Basics
25
Icon Meaning
Flight mode activated
Error occurred or caution required
Battery power level
Lock screen
Locking and unlocking the screen
Pressing the Power key turns off the screen and locks it. Also, the screen turns off and
automatically locks if the device is not used for a specified period.
To unlock the screen, press the Power key or the Home key and swipe in any direction.
You can change the way that you lock the screen to prevent others from accessing your
personal information.
On the Apps screen, tap
Settings
→
Lock screen & security
→
Screen lock type
, and then
select a screen lock method. The device requires an unlock code whenever unlocking it.
If the unlock code is forgotten, take the device to a Samsung Service Centre to reset it.
DRAFT,
DRAFT,
DRAFT,
DRAFT,
DRAFT,
DRAFT,
ou can change the way that you lock the scrou can change the way that you lock the scr
tion.tion.
Settings
Not
Not
Not
Not
Not
Not
Not
Not
Not
Not
Not
Not
Not
Not
FINAL
, the screen tur
, the screen tur
or a specified period.or a specified period.
er key or the Home key and swipe in aner key or the Home key and swipe in an
FINAL

Basics
26
Pattern
Draw a pattern by connecting four dots or more, and then draw the pattern again to verify it.
Set a backup PIN to unlock the screen when you forget the pattern.
PIN
A PIN consists of numbers only. Enter at least four numbers, and then enter the password
again to verify it.
Password
A password consists of characters and numbers. Enter at least four characters including
numbers and symbols, and then enter the password again to verify it.
Fingerprint
Register your fingerprints to unlock the screen. Refer to Fingerprint recognition for more
information.
Dynamic lock screen
Set the locked screen’s wallpaper to change automatically based on your settings, your
location and weather, and your interests.
1 On the Home screen, tap and hold an empty area, and then tap
Wallpapers
.
Alternatively, on the Apps screen, tap
Settings
→
Wallpaper
.
2 Tap
→
Lock screen
.
3 Select a wallpaper option.
•
From Gallery
: Select images from
Gallery
. The device will display the images on the
locked screen at the interval you set.
•
Live weather
: The device will display high quality images on the locked screen based
on the time, weather, and your location information.
•
My interests
: Select categories that interest you. The device will display high quality
images on the locked screen based on your interests.
•
You may incur additional charges when using this feature.
•
This feature may not work properly depending on your region.
DRAFT,
o change aut
terests.
terests
een, tap and hold an empteen, tap and hold an empt
, on the Apps screen, tap , on the Apps screen, tap
ock screenock screen
.
Not
o change automao change automa
FINAL
ify it.
ify it.
FingerprinFingerprin
Basics
27
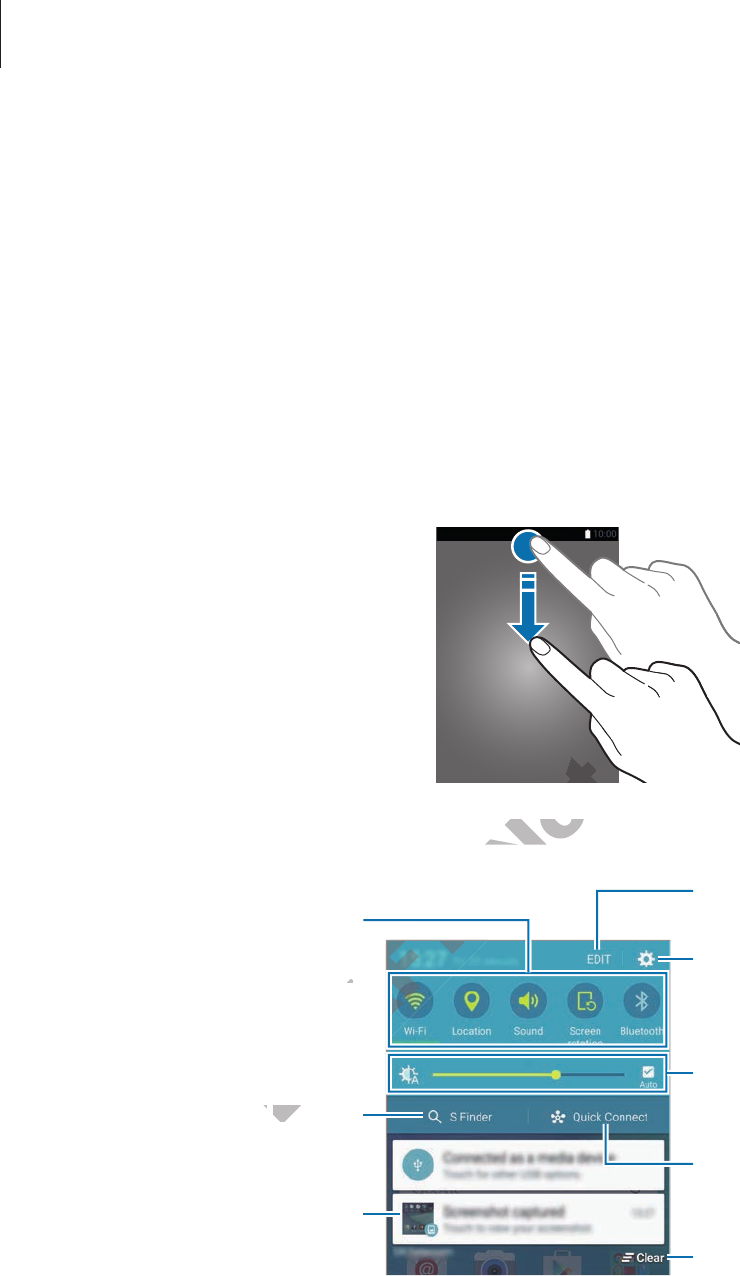
Notification panel
Using the notification panel
When you receive new notifications, such as messages or missed calls, indicator icons appear
on the status bar. To see more information about the icons, open the notification panel and
view the details.
To open the notification panel, drag the status bar downwards. To close the notification panel,
swipe upwards on the screen.
You can use the following functions on the notification panel.
Launch Settings.
Launch S Finder.
Tap a notification and perform
various actions. Clear all notifications.
Adjust the brightness.
Rearrange quick setting buttons.
Activate or deactivate options.
Tap and hold a button to view
more detailed settings.
Launch Quick Connect.
Rearranging quick setting buttons
To rearrange quick setting buttons on the notification panel, tap
EDIT
, tap and hold an item,
and then drag the item to another location.
DRAFT,
DRAFT,
DRAFT,
DRAFT,
Launch Launch
S FinderS Finder
DRAFT,
DRAFT,
DRAFT,
e detailed settings.e detailed settings.
DRAFT,
DRAFT,
Not
Not
Not
tions on the notification paneltions on the notification panel
FINAL
FINAL
FINAL
FINAL
FINAL
FINAL
FINAL
FINAL

Basics
28
S Finder
Search for a wide variety of content with a keyword.
Searching for content on the device
Open the notification panel and tap
S Finder
.
Enter a keyword in the search field or tap and say a keyword.
To get more refined results, tap the filter buttons under the search field, and then select filter
details.
Setting search categories
You can set search categories to search for content in specific search fields.
Tap
MORE
→
Select search locations
and select categories.
Quick Connect
Automatically search for nearby devices and quickly connect to them.
•
When connecting to a device that does not support the Quick connect feature,
ensure that Wi-Fi Direct or the Bluetooth feature is activated.
•
Connection methods may vary depending on the type of connected devices or the
shared content.
Connecting to other devices
1 Open the notification panel and tap
Quick Connect
.
When the panel opens, the Wi-Fi and the Bluetooth features are activated automatically
and the device searches for nearby devices.
The list of devices registered to your Samsung account appears at the top of the
screen.
DRAFT,
tion methods may vary depending on the t
tion methods may vary depending on the t
o other deviceso other devices
Open the notification panel and tap Open the notification panel and tap
hen the panel opens
Not
es and quickly connec
es and quickly connec
e that does not suppore that does not suppor
t or the Bluetooth ft or the Bluetooth f
FINAL
t in specific search fields
t in specific search fields
onneconnec

Basics
29
2 Select a device from the list and connect to it by following the on-screen instructions.
The next steps may vary depending on the connected device.
To allow nearby devices to search for your device and connect to it, tap
MORE
→
Set
device visibility
→
Device visibility
, and then select an option.
Re-searching for devices
If the desired device does not appear in the list, search for the device.
Tap
REFRESH
and select the device from the list of detected devices.
Deactivating the Quick connect feature
To deactivate the Quick connect feature, tap .
Sharing content
Share content with the connected devices.
1 Open the notification panel and tap
Quick Connect
.
2 Select a device from the list of detected devices.
3 Tap
Send content
and select a media category.
4 Follow the on-screen instructions to send content to the connected device.
The next steps may vary depending on the selected media category.
DRAFT,
t a media categor
t a media ca
een instructions to send ceen instructions t
DRAFT,
y vary depending on the selecy vary depending on the selec
Not
uick Connectonnec
ted devicested devices
FINAL

Basics
30
Entering text
Keyboard layout
A keyboard appears automatically when you enter text to send messages, create memos, and
more.
Text entry is not supported in some languages. To enter text, you must change the
input language to one of the supported languages.
Break to the next line.
Delete a preceding character.
Enter punctuation marks.
Enter uppercase. For all caps, tap
it twice.
Change the keyboard settings. Enter a space.
Changing the input language
Tap
→
Select input languages
, and then select the languages to use. When you select
two or more languages, you can switch between the input languages by swiping to the left or
right on the space key.
Changing the keyboard layout
Tap , select a language under
Input languages
, and then select a keyboard layout to use.
On
3x4 keyboard
, a key has three or four characters. To enter a character, tap the
corresponding key repeatedly until the desired character appears.
DRAFT,
, and then selec
, and then selec
ou can switch between the input languages b
ou can switch betw
yboard layoutyboard lay
t a language under t a language under
yboard
yboard
, a key has thr
Not
, and then selec
, and then selec
FINAL
FINAL
Break tBreak t
elete a prec
elete a prec
FINAL
FINAL
FINAL
FINAL
Basics
31
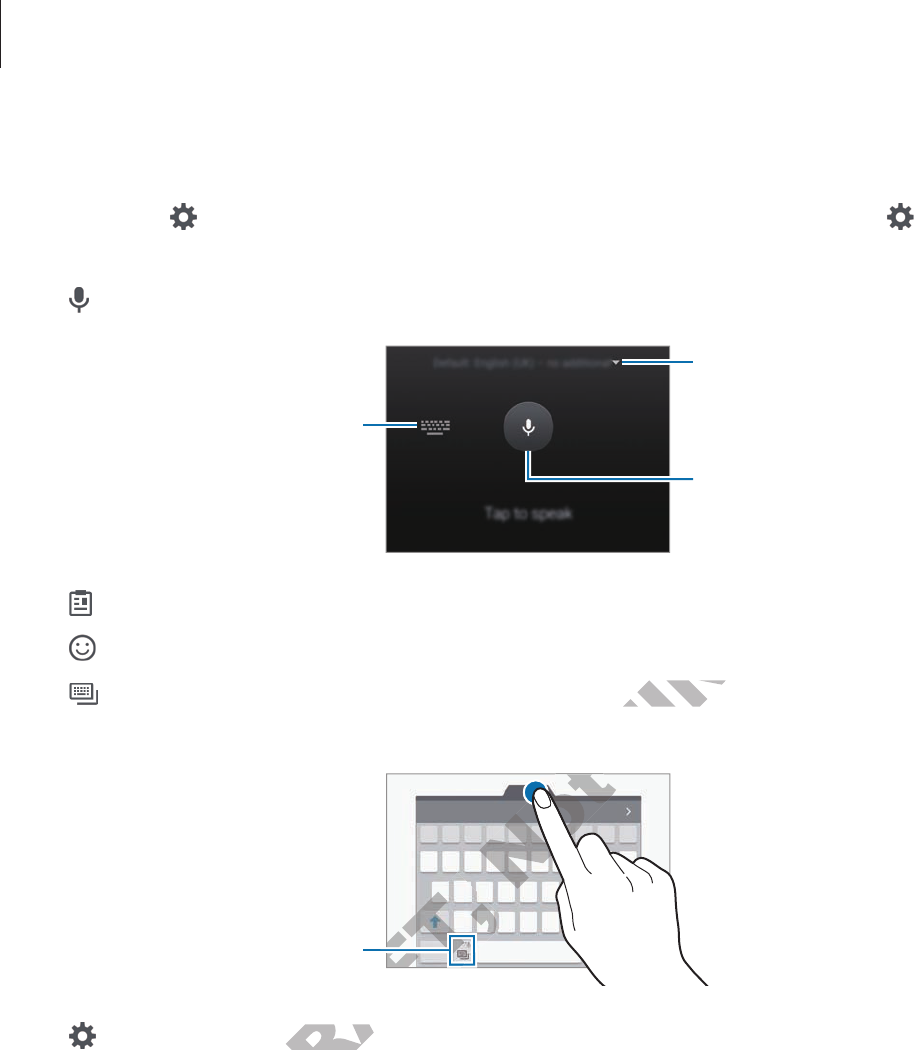
Additional keyboard functions
Tap and hold to use various functions. Other icons may appear instead of the icon
depending on the last function that was used.
•
: Enter text by voice.
Change the language.
Open the keyboard.
Start or pause entering text by
voice.
•
: Add an item from the clipboard.
•
: Enter emoticons.
•
: Switch to the floating keyboard. You can move the keyboard to another location by
dragging the tab.
Switch to the standard keyboard.
•
: Change the keyboard settings.
DRAFT,
DRAFT,
DRAFT,
DRAFT,
DRAFT,
DRAFT,
DRAFT,
: Change the keyboard settings : Change the keyboard settings
Not
Not
Not
Not
Not
Not
Not
FINAL
e the keyboare the keyboar

Basics
32
Copying and pasting
1 Tap and hold over text.
2 Drag or to select the desired text, or tap
Select all
to select all text.
3 Tap
Copy
or
Cut
.
The selected text is copied to the clipboard.
4 Place the cursor where the text is to be inserted and tap
→
Paste
.
To paste text that you have previously copied, tap
Clipboard
and select the text.
Dictionary
Look up definitions for words while using certain features, such as when browsing webpages.
1 Tap and hold over a word that you want to look up.
If the word you want to look up is not selected, drag or to select the desired text.
2 Tap
Dictionary
on the options list.
If a dictionary is not preinstalled on the device, tap next to a dictionary to download it.
3 View the definition in the dictionary pop-up window.
To switch to the full screen view, tap . Tap the definition on the screen to view more
definitions. In the detailed view, tap to add the word to your favourite words list or tap
SEARCH WEB
to use the word as a search term.
DRAFT,
einstalled on the devic
einstalled on the devic
iew the definition in the dictionary popiew the definition in the dictionar
o the full screen view, tap o the full screen view
n the detailed viewn the detailed view
to use the w to use the w
Not
o look up
o look up
o look up is not selected, drag
o look up is not selected, drag
FINAL
tures, such as when brtures, such as when br
o look up.o look up.

Basics
33
Screen capture
Capture a screenshot while using the device.
Press and hold the Home key and the Power key simultaneously. You can view captured
images in
Gallery
.
You can also capture screenshots by swiping your hand to the left or right across the screen.
Refer to Motions & gestures for more information.
It is not possible to capture a screenshot while using some apps and features.
Opening apps
On the Home screen or the Apps screen, select an app icon to open it.
To open an app from the list of recently used apps, tap and select a recent app window.
Closing an app
Tap and drag a recent app window to the left or right to close it. To close all running apps,
tap
CLOSE ALL
.
DRAFT,
Not
o the left or ro the left or r
FINAL
t an app icon to open itt an app icon to open it
, tap , tap
FINAL
FINAL
and selec and selec
and select a recent app window.

Basics
34
Multi window
Introduction
Multi window lets you run two apps at the same time in the split screen view. You can also run
multiple apps at the same time in the pop-up view.
Some apps may not support this feature.
Split screen view Pop-up view
DRAFT,
Not
FINAL
FINAL
Basics
35
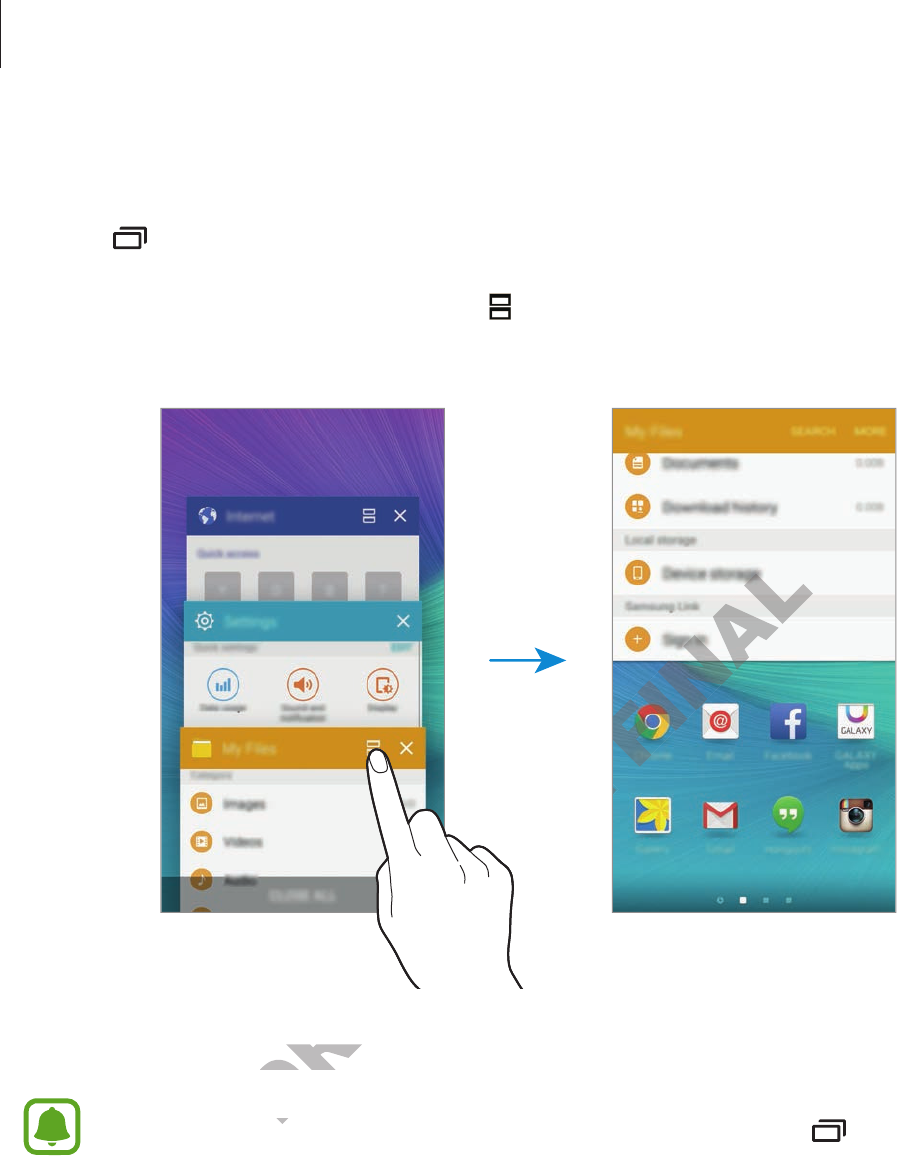
Split screen view
1 Tap to open the list of recently used apps.
2 Swipe upwards or downwards and tap on a recent app window.
The selected app will launch in the upper window.
3 Select another app to launch.
You can also launch the split screen view by tapping and holding .
DRAFT,
DRAFT,
DRAFT,
DRAFT,
DRAFT,
DRAFT,
t another app to launch.t another app to launch.
ou can also launch the split scr
ou can also launch the split scr
Not
Not
Not
Not
Not
FINAL
FINAL
Basics
36
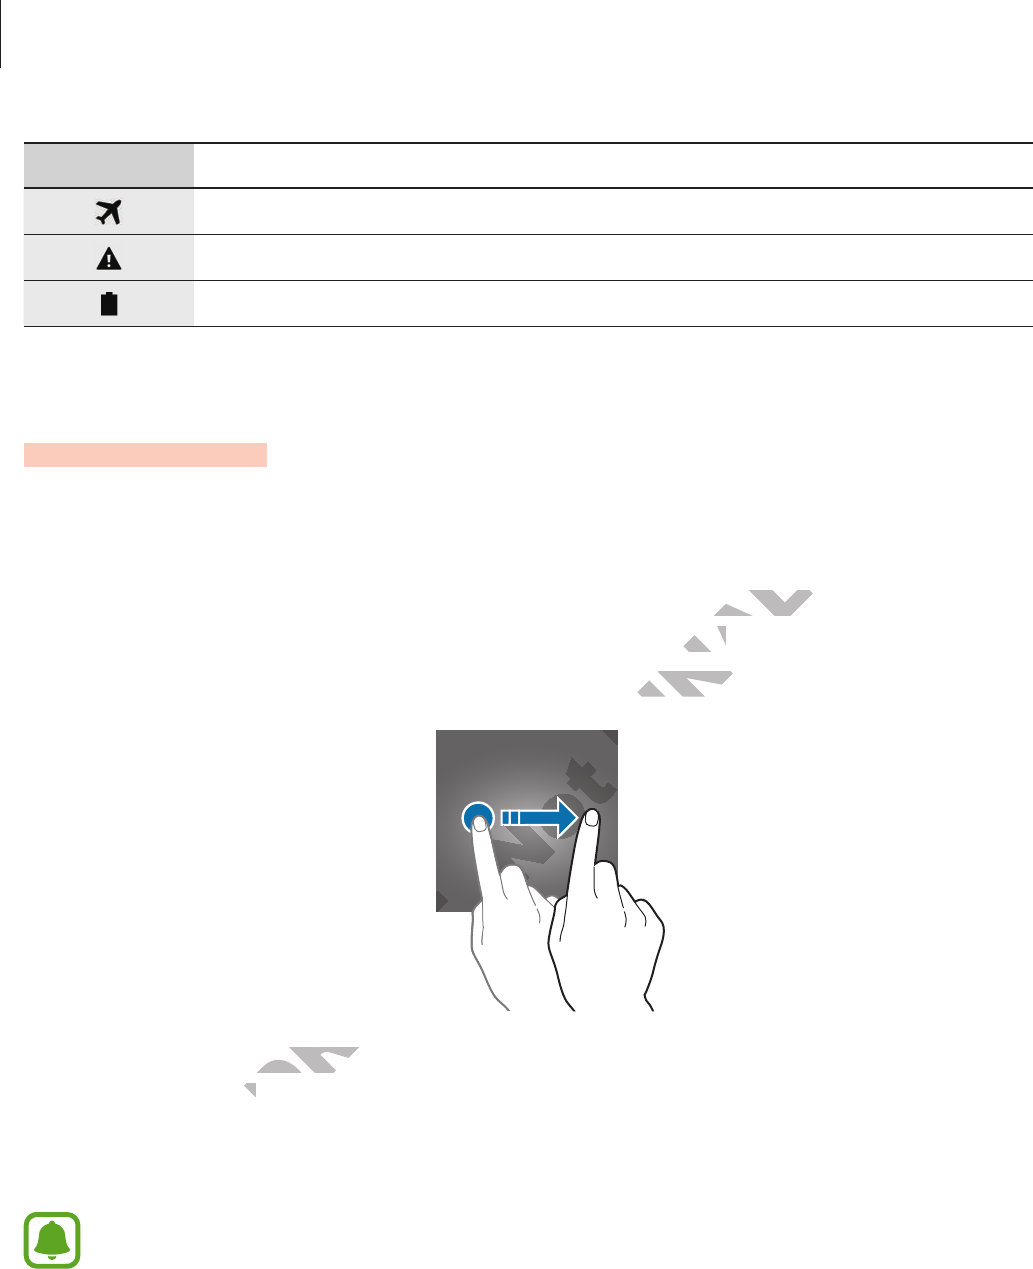
Using additional options
When using apps in the split screen view, select an app window and tap the circle between
the app windows to access the following options:
•
: Switch locations between app windows.
•
: Drag and drop text or copied images from one window to another. Tap and hold an
item in the selected window and drag it to a location in another window.
Some apps may not support this feature.
•
: Minimise the window.
•
: Maximise the window.
•
: Close the app.
DRAFT,
DRAFT,
DRAFT,
y not support this fy not support this f
inimise the window.inimise the window
DRAFT,
aximise the windo
aximise the windo
Not
Not
Not
Not
FINAL
om one window to anotherom one window to another
tion in another windotion in another windo
FINAL

Basics
37
Adjusting the window size
Drag the circle between the app windows up or down to adjust the size of the windows.
Pop-up view
1 On the Apps screen, launch an app to use in the pop-up view.
2 Drag down diagonally from either end of the top edge.
The app screen will appear in the pop-up view.
Minimise the window.
Close the app.
Maximise the window.
Drag and drop content.
DRAFT,
DRAFT,
Not
-up view.-up view.
Not
Not
FINAL
-up view.-up view.
op edge.op edge.

Basics
38
Moving pop-up windows
To move a pop-up window, tap and hold the circle on a window and drag it to a new location.
Launching the pop-up view from the split screen view
1 On the split screen view, tap an app window to launch it in the pop-up view.
2 Tap and hold the circle between the app windows.
The selected app will launch in the pop-up view.
Device and data management
Transferring data from your previous device
Using a backup account
You can transfer backup data from your previous device to your new device using your
Google or Samsung account.
Using a Google account
1 Tap
Settings
on the Apps screen.
2 Tap
Backup and reset
and tap the
Back up my data
switch to activate it.
DRAFT,
ta managemen
ta managemen
ta from your prta from your pr
sing a backup accountsing a backup account
er backup data fr
er backup da
Not
ta managemen
ta managemen
FINAL
FINAL

Basics
39
3 Tap
Backup account
and select an account as the backup account.
To restore data using a Google account, open the Apps screen, tap
Settings
→
Backup and reset
, and then tap the
Automatic restore
switch to activate it. When
you reinstall apps, backed up settings and data will be restored.
Using a Samsung account
On the Apps screen, tap
Settings
→
Backup and reset
→
Back up my data
, select the items
to back up, and then tap
BACK UP NOW
. To set the device to automatically back up data, tap
the
Auto back up
switch to activate it.
To restore data using a Samsung account, open the Apps screen and tap
Settings
→
Backup and reset
→
Restore
. Current data will be deleted from the device to restore
the selected items.
Using Samsung Smart Switch
You can transfer data from a previous device to your new device via Samsung Smart Switch.
The following versions of Samsung Smart Switch are available.
•
Mobile version (Smart Switch Mobile): Transfer data between mobile devices. You can
download the app from
GALAXY Apps
or
Play Store
.
•
Computer version: Transfer data between your device and a computer. You can download
the app from www.samsung.com/smartswitch.
•
Samsung Smart Switch is not supported on some devices or computers.
•
Visit www.samsung.com/smartswitch for more information.
DRAFT,
Y Apps
er data between y
er data between y
DRAFT,
.samsung.com/smartswit.samsung.com/smartswit
t Switch is not support Switch is not suppor
DRAFT,
.samsung.com/smar.samsung.com/smar
Not
our new devic
witch are available
ch are available
obile): Transfer daobile): Transfer da
ppspps
or or
Play SPla
FINAL
ed from the devic
our new devicour new devic

Basics
40
Transferring data from a mobile device
Transfer data from your previous device to your new device.
The following actions are an example of transferring data from your previous Android device.
To import data from a mobile device with a different operating system, refer to the on-screen
instructions.
1 When you turn on your new device for the first time, tap
START
in the Smart Switch
installation pop-up window to install the app.
If the Smart Switch installation pop-up window does not appear on the screen, you
can download the app from
GALAXY Apps
or
Play Store
.
2 On your previous device, download and install Smart Switch from
GALAXY Apps
or
Play
Store
.
3 Launch
Smart Switch Mobile
on both devices.
4 On your previous device, tap
ANDROID TO GALAXY
.
5 On your previous device, tap
SEND CONTENT
. Then, on your new device, tap
RECEIVE
CONTENT
.
The devices will automatically connect.
6 On your previous device, select data to send to your new device and tap
SEND
.
7 On your new device, tap
OK
on the connection request pop-up window to receive the
data.
The data transfer will begin.
8 On both devices, tap
FINISH
when the data transfer is complete.
DRAFT,
tically connect.tically connect.
evious device, select data te, select da
our new device, tap our new device, tap
OKOK
on the c
OK
on the connection request pop-up window to receive the
OK
on the connection request pop-up window to receive the
er will beg
Not
O GALAX
GALAX
SEND CONTENTSEND CONTENT
. Then, on y. Then, on y
FINAL
ch from ch from
GAL
GAL
XYXY

Basics
41
Transferring data from a computer
Back up data from your previous device to a computer and import the data to your new
device. If your previous device is a Samsung device, follow the instructions below.
If your previous device is not a Samsung device, back up data to a computer using a
program provided by the device’s manufacturer. Then, follow the instructions below
starting from the fifth step.
1 On the computer, visit www.samsung.com/smartswitch to download Smart Switch.
2 On the computer, launch Smart Switch.
3 Connect your previous device to the computer using the USB cable.
4 On the computer, follow the on-screen instructions to back up data from the device.
To select data to back up, tap
Settings
→
Back up
, and then select data.
5 Disconnect your previous device from the computer. Then, connect your new device to
the computer using the USB cable.
If your previous device is not a Samsung device, download and launch Smart Switch
on the computer before moving on to the next step.
6 On the computer, follow the on-screen instructions to transfer data to your new device.
DRAFT,
e is not a Samsung devic
e is not a Samsung devic
ore moving on tore moving on t
, follow the on-scr, follow the on-scr
Not
om the computom the comput
FINAL
er using the USB cable.
er using the USB cable.
o back up dao back up da
ack upack up
, and then selec, and then selec

Basics
42
Using the device as a removable disk for data transfer
Move audio, video, image, or other types of files from the device to the computer, or vice
versa.
Do not disconnect the USB cable from the device when you are transferring files.
Doing so may cause data loss or device damage.
The devices may not connect properly if they are connected via a USB hub. Directly
connect the device to the computer’s USB port.
1 Connect the device to the computer using the USB cable.
2 Open the notification panel, and then tap
Connected as a media device
→
Media
device (MTP)
.
Tap
Camera (PTP)
if your computer does not support Media Transfer Protocol (MTP) or
not have any appropriate driver installed.
3 Transfer files between your device and the computer.
Updating the device
The device can be updated to the latest software.
Updating over the air
The device can be directly updated to the latest software by the firmware over-the-air (FOTA)
service.
On the Apps screen, tap
Settings
→
About device
→
Software update
→
Update now
.
Tick
Auto update
to automatically check for available updates. To download updates
only when a Wi-Fi connection is activated, tick
Wi-Fi only
.
DRAFT,
o the latest softw
o the latest softw
DRAFT,
ectly updated tectly updated t
een, tap een, tap
Settings
Settings
Not
e and the comput
omput
FINAL
ed as a media devic
ed as a media de
t Media Transft Media Transf
omputer.omputer.

Basics
43
Updating with Smart Switch
Connect the device to a computer and update the device to the latest software.
1 On the computer, visit www.samsung.com/smartswitch to download and install Smart
Switch.
2 On the computer, launch Smart Switch.
3 Connect the device to the computer using a USB cable.
4 On the connection window, tap the update button.
•
Do not turn off the computer or disconnect the USB cable while the device is
updating.
•
While updating the device, do not connect other media devices to the computer.
Doing so may interfere with the update process. Before updating, disconnect all
other media devices from the computer.
Performing a data reset
Delete all settings and data on the device. Before performing a factory data reset, ensure you
back up all important data stored on the device. Refer to Using a Google account or Using a
Samsung account for more information.
On the Apps screen, tap
Settings
→
Backup and reset
→
Factory data reset
→
RESET
DEVICE
→
ERASE EVERYTHING
. The device automatically restarts.
DRAFT,
ta on the device. B
ta on the devic
ed on the devic
ed on the devic
e information.e information.
ettingsettings
→
→
Backup and r
VERYTHINGVERYTHING
. The devic.
Not
. Before per
. Befor
FINAL
t the USB cable while the devic
t the USB cable while the devic
t other media devict other media devic
ocess. Before updaocess. Before upda

Basics
44
Connecting to a TV
Introduction
Register a TV to your device to easily share content between them.
Some files may be buffered during playback, depending on the network connection.
Registering a TV
Register a TV to your device. Once you register a TV, you can easily share the screen between
your device and TV.
1 Turn on the TV and place your device close to the TV.
2 Open the notification panel and tap
Quick Connect
.
3 Select the TV and tap
Register TV
.
Sharing screen
You can mirror your device’s screen on a TV or vice versa.
This feature is compatible with Samsung’s 2015 Smart TV 5500 Series or higher.
Mirroring your device screen to a TV
When your device recognises the registered TV while you are watching a video, the icon
will appear on the device. Tap the icon to stream the video from your device to your TV.
If you tap the icon when your TV is off, the TV will turn on and your device’s screen will appear
on the TV screen.
DRAFT,
s screen on a TV or vics screen on a TV or vic
DRAFT,
ompatible with Sompatible with S
our device scr
our device scr
Not
FINAL
ou can easily share the scr
ou can easily shar
onnectonnect
.
.

Basics
45
Mirroring a TV screen to your device
1 Open the notification panel and tap
Quick Connect
.
The registered TV appears on the list.
2 Select the registered TV.
3 Tap
TV to mobile device
.
The TV screen will appear on your device.
Using the Briefing on TV feature
Your registered TV turns on automatically according to the preset time set on your device and
displays the time, weather, and your schedule information on the screen. To use this feature,
your device and the TV must be connected to the same access point.
This feature is compatible with Samsung’s 2015 Smart TV 5500 Series or higher.
1 Open the notification panel and tap
Quick Connect
.
The registered TV will appear on the list.
2 Select the registered TV.
3 Tap
Briefing on TV
.
DRAFT,
V will appear on the list.
V will appear on the list
Not
’s 2015 Smar
’s 2015 Smar
Not
Quick ConnecQuick Connec
FINAL
eset time set on yeset time set on y
tion on the screen. tion on the screen.
o the same access poino the same access poin
s 2015 Smars 2015 Smar
Basics
46
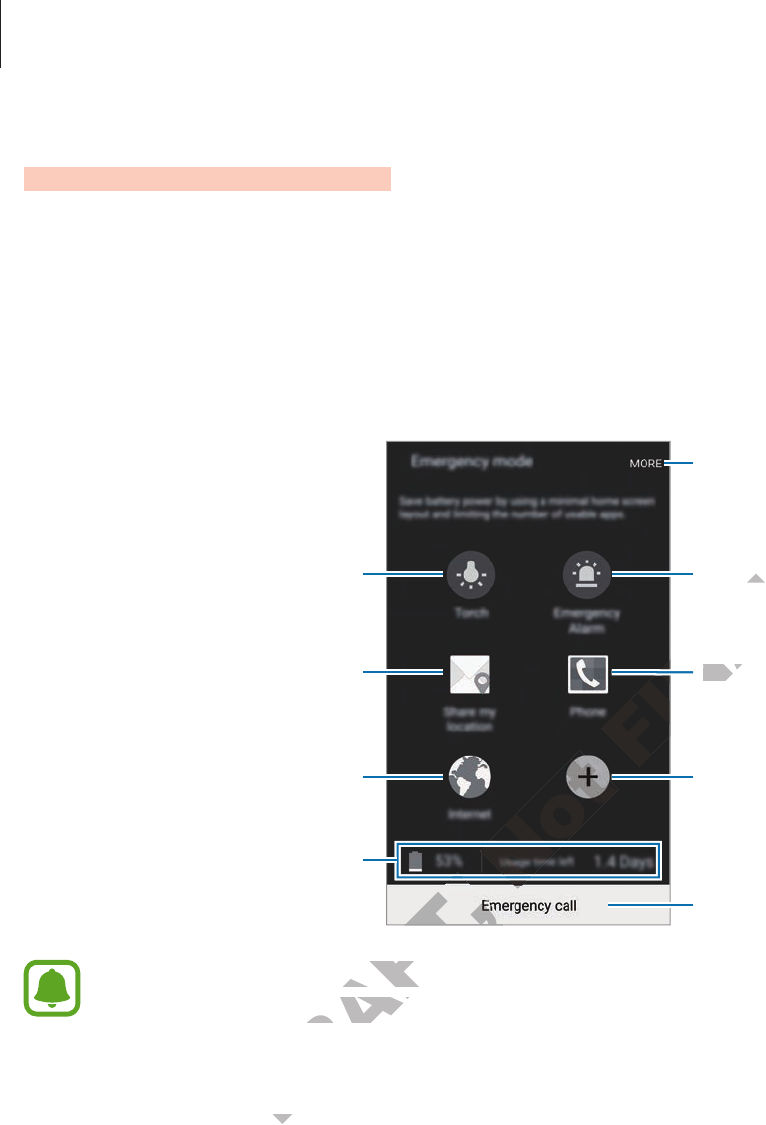
Emergency mode
Emergency mode changes the screen to grey tones to reduce battery consumption. Some
apps and functions will be restricted.
Activating emergency mode
Press and hold the Power key, and then tap
Emergency mode
.
Add more apps to use.
Make an emergency call.
Remaining battery power and
usage time left
Turn on the flash.
Make a call.
Send your current location
information in a message.
Browse the Internet.
Access additional options.
Sound alarms.
The usage time left shows the time remaining before the battery power runs
out. Usage time left may vary depending on your device settings and operating
conditions.
Deactivating emergency mode
To deactivate emergency mode, tap
MORE
→
Disable Emergency mode
. Alternatively, press
and hold the Power key, and then tap
Emergency mode
→
DISABLE
.
DRAFT,
DRAFT,
DRAFT,
DRAFT,
DRAFT,
t shows the time rt shows the time r
sage time left may vary depending on ysage time left may vary depending on y
ting emergenc
ting emergenc
Not
Not
FINAL
FINAL
FINAL
FINAL
Make a callMake a call
ound alarms
ound alar

47
Settings
Introduction
Customise settings for functions and apps. You can make your device more personalised by
configuring various setting options.
On the Apps screen, tap
Settings
.
To search for settings by entering keywords, tap
SEARCH
.
To edit the list of frequently used settings, tap
EDIT
. Then, tick items to add or deselect items
to remove.
Wi-Fi
Connecting to a Wi-Fi network
Activate the Wi-Fi feature to connect to a Wi-Fi network and access the Internet or other
network devices.
•
Your device uses a non-harmonised frequency and is intended for use in all
European countries. The WLAN can be operated in the EU without restriction
indoors, but cannot be operated outdoors.
•
Turn off Wi-Fi to save the battery when not in use.
1 On the Settings screen, tap
Wi-Fi
, and then tap the switch to activate it.
2 Select a network from the Wi-Fi networks list.
Networks that require a password appear with a lock icon.
DRAFT,
t to a
W
e uses a non-harmonised fre uses a non-harmonised fr
ountries. The WLAN can be opertries. The WLAN can be oper
, but cannot be oper, but cannot be oper
Wi-FiWi-Fi
to save the ba to sav
Not
orkork
i-Fii-Fi
net net
FINAL
ems to add or deselec
ems to add or deselec

Settings
48
3 Tap
CONNECT
.
Once the device connects to a Wi-Fi network, the device will reconnect to that
network each time it is available without requiring a password. To prevent the device
connecting to the network automatically, tap and hold the network from the list of
networks and tap
Forget network
.
Wi-Fi Direct
Wi-Fi Direct connects devices directly via a Wi-Fi network without requiring an access point.
1 On the Settings screen, tap
Wi-Fi
, and then tap the switch to activate it.
2 Tap
Wi-Fi Direct
.
The detected devices are listed.
If the device you want to connect to is not in the list, request that the device turns on its
Wi-Fi Direct feature.
3 Select a device to connect to.
The devices will be connected when the other device accepts the Wi-Fi Direct
connections request.
Sending and receiving data
You can share data, such as contacts or media files, with other devices. The following actions
are an example of sending an image to another device.
1 Tap
Gallery
on the Apps screen.
2 Select an image.
3 Tap
Share
→
Wi-Fi Direct
, select a device to transfer the image to, and then tap
SHARE
.
4 Accept the Wi-Fi Direct connection request on the other device.
If the devices are already connected, the image will be sent to the other device without
the connection request procedure.
DRAFT,
eiving dataeiving data
ta, such as contacts or media filesta, such as contacts or media files
DRAFT,
xample of sending an image txample of sending an image t
on the Apps scr
on the Apps scr
Not
ed when the other deviced when the other devic
FINAL
o is not in the list, request thao is not in the list, request tha

Settings
49
Ending the device connection
1 Tap
Wi-Fi
on the Settings screen.
2 Tap
Wi-Fi Direct
.
The device displays the connected devices in the list.
3 Tap the device name to disconnect the devices.
Bluetooth
Introduction
Use Bluetooth to exchange data or media files with other Bluetooth-enabled devices.
•
Samsung is not responsible for the loss, interception, or misuse of data sent or
received via Bluetooth.
•
Always ensure that you share and receive data with devices that are trusted
and properly secured. If there are obstacles between the devices, the operating
distance may be reduced.
•
Some devices, especially those that are not tested or approved by the Bluetooth
SIG, may be incompatible with your device.
•
Do not use the Bluetooth feature for illegal purposes (for example, pirating copies
of files or illegally tapping communications for commercial purposes).
Samsung is not responsible for the repercussion of illegal use of the Bluetooth
feature.
f there ar
, especially those tha, especially those tha
ompatible with yompatible with y
o not use the Bluetooth fo not use the Bluetooth f
DRAFT,
of files or illegally tapping cof files or illegally tapping c
amsung is not responsible famsung is not r
Not
or the loss, int
or the loss, in
e and receive dae and receive da
e are obstacles bete are obstacles bet
FINAL
ta or media files with other Bluetooth-ta or media files with other Bluetooth-
terception, or misuse of daterception, or misuse of da

Settings
50
Pairing with other Bluetooth devices
1 On the Settings screen, tap
Bluetooth
, and then tap the switch to activate it.
The detected devices are listed.
2 Select a device to pair with.
If your device has paired with the device before, tap the device name without confirming
the auto-generated passkey.
If the device you want to pair with is not in the list, request that the device turns on its
visibility option. Refer to the other device’s user manuals.
Your device is visible to other devices while the Bluetooth settings screen is open.
3 Accept the Bluetooth connection request on your device to confirm.
The devices will be connected when the other device accepts the Bluetooth connection
request.
Sending and receiving data
Many apps support data transfer via Bluetooth. You can share data, such as contacts or media
files, with other Bluetooth devices. The following actions are an example of sending an image
to another device.
1 Tap
Gallery
on the Apps screen.
2 Select an image.
3 Tap
Share
→
Bluetooth
, and then select a device to transfer the image to.
If the device you want to pair with is not in the list, request that the device turns on its
visibility option.
4 Accept the Bluetooth connection request on the other device.
DRAFT,
eiving data
DRAFT,
er via Bluetooth.
er via Bluetooth.
ooth devices. The following acooth devices. The follo
DRAFT,
on the Apps screen. on the Apps screen.
Not
FINAL
ooth settings scr
ooth settings scr
our device to confirour device to confir
ed when the other device accepts the Bluet
ed when the other device accepts the Bluet

Settings
51
Unpairing Bluetooth devices
1 Tap
Bluetooth
on the Settings screen.
The device displays the paired devices in the list.
2 Tap next to the device name to unpair.
3 Tap
Unpair
.
Tethering and Mobile hotspot
Use the device as a mobile hotspot to share the device’s mobile data connection with other
devices when the network connection is not available. Connections can be made via Wi-Fi,
USB, or Bluetooth.
On the Settings screen, tap
Tethering and Mobile hotspot
.
You may incur additional charges when using this feature.
•
Mobile hotspot
: Use the mobile hotspot to share the device’s mobile data connection
with computers or other devices.
•
Bluetooth tethering
: Use Bluetooth tethering to share the device’s mobile data
connection with computers or other devices via Bluetooth.
•
USB tethering
: Use USB tethering to share the device’s mobile data connection with
a computer via USB. When connected to a computer, the device is used as a wireless
modem for the computer.
Using the mobile hotspot
Use your device as a mobile hotspot to share your device’s mobile data connection with other
devices.
1 On the Settings screen, tap
Tethering and Mobile hotspot
→
Mobile hotspot
.
se the mobile hotspot t
ers or other devices.ers or other devices.
se Bluetooth tetherse Bluetooth t
DRAFT,
omputers or other devicomputers or other devic
se USB tethering tse USB tether
er via USB. When connecer via USB. When c
or the computer.or the comput
Not
ges when using this f
ges when using this f
se the mobile hotspot to sharse the mobile hotspot to shar
FINAL
s mobile data connecs mobile data connec
onnections can be made via onnections can be made via
obile hotspotobile hotspot
.

Settings
52
2 Tap the switch to activate it.
The icon appears on the status bar. Other devices can find your device in the Wi-Fi
networks list.
To set a password for the mobile hotspot, tap
MORE
→
Configure hotspot
and select the
level of security. Then, enter a password and tap
SAVE
.
3 On the other device’s screen, search for and select your device from the Wi-Fi networks
list.
4 On the connected device, use the device’s mobile data connection to access the Internet.
Flight mode
This disables all wireless functions on your device. You can use only non-network services.
On the Settings screen, tap
Flight mode
.
Data usage
Keep track of your data usage amount and customise the settings for the limitation.
On the Settings screen, tap
Data usage
.
•
Mobile data
: Set the device to use data connections on any mobile network.
•
Set mobile data limit
: Set a limit for mobile data usage.
To change the monthly reset date for the monitoring period, tap
→
Change cycle
.
Limiting data usage
1 On the Settings screen, tap
Data usage
and tap the
Set mobile data limit
switch to
activate it.
2 Drag the limit adjustment bar upwards or downwards to set the limit.
3 Drag the warning adjustment bar upwards or downwards to set a data usage alert level.
The device will alert you when the warning level is reached.
DRAFT,
ta usage amount and cust
ta usage amount and cust
Data usageData usage
.
et the device to use daet the device to use da
ta limitta limit
: Set a limit f: Set a limit f
o change the monthly reset dao change the monthly reset da
Not
FINAL
ou can use only non-netou can use only non-net

Settings
53
Mobile networks
Configure your mobile network settings.
On the Settings screen, tap
Mobile networks
.
•
Data roaming
: Set the device to use data connections when you are roaming.
•
Access Point Names
: Set up access point names (APNs).
•
Network mode
: Select a network type.
•
Network operators
: Search for available networks and manually register a network.
More
Customise settings to control other features.
On the Settings screen, tap
More
.
•
NFC
: Change settings for using the NFC feature. Refer to NFC for more information.
•
Printing
: Configure settings for printer plug-ins installed on the device. You can search
for available printers or add one manually to print files. Refer to Printing for more
information.
•
MirrorLink
: Use the MirrorLink feature to control your device’s MirrorLink apps on the
vehicle’s head unit monitor. Refer to MirrorLink for more information.
•
Download booster
: Set the device to download files larger than 30 MB, faster via Wi-Fi
and mobile networks simultaneously. Refer to Download booster for more information.
•
VPN
: Set up and connect to virtual private networks (VPNs).
•
Default messaging app
: Select the default app to use for messaging.
orLink feature t
orLink featur
. Refer to efer to
MirrorLink
Mirr
et the device to doet the devic
DRAFT,
ks simultaneouslyks simultaneously
et up and connect to viret up and connect to vir
Default messaging appDefault messaging app
: S
Not
er plug-ins installed on the devicer plug-ins installed on the devic
ers or add one manually to print filesers or add one manually to print files
e to con
e to con
FINAL
. Refer to . Refer to
NFCNFC
er plug-ins installed on the devicer plug-ins installed on the devic

Settings
54
NFC
Your device allows you to read near field communication (NFC) tags that contain information
about products. You can also use this feature to make payments and buy tickets for
transportation or events after downloading the required apps.
The device contains a built-in NFC antenna. Handle the device carefully to avoid
damaging the NFC antenna.
Using the NFC feature
Use the NFC feature to send images or contacts to other devices, and read product
information from NFC tags. If you insert a SIM or USIM card that has a payment feature, you
can use the device to make payments conveniently.
1 On the Settings screen, tap
More
→
NFC
, and then tap the switch to activate it.
2 Place the NFC antenna area on the back of your device near an NFC tag.
The information from the tag appears.
Ensure that the device’s screen is unlocked. Otherwise, the device will not read NFC
tags or receive data.
DRAFT,
DRAFT,
DRAFT,
DRAFT,
DRAFT,
t the devict the devic
e data.
Not
Not
FINAL
t has a pa
, and then tap the switch t, and then tap the switch t
our device near an NFC tagour device near an NFC tag

Settings
55
Making payments with the NFC feature
Before you can use the NFC feature to make payments, you must register for the mobile
payment service. To register or get more information about the service, contact your service
provider.
1 On the Settings screen, tap
More
→
NFC
, and then tap the switch to activate it.
2 Touch the NFC antenna area on the back of your device to the NFC card reader.
To set the default payment app, tap
Tap and pay
and select an app.
The payment services list may not include all available payment apps.
Sending data
Allow data exchange when your device’s NFC antenna touches the other device’s NFC
antenna.
1 On the Settings screen, tap
More
→
NFC
, and then tap the switch to activate it.
2 Tap
Android Beam
and tap the switch to activate it.
3 Select an item and touch the other device’s NFC antenna to your device’s NFC antenna.
4 When
Touch to beam.
appears on the screen, tap your device’s screen to send the item.
If both devices try to send data simultaneously, the file transfer may fail.
and tap the switch t
and tap the swit
ouch the other devicouch the other devic
o beam.o beam.
appears on the scr appears on the scr
DRAFT,
f both devices try to send daf both devices try t
Not
NFCNFC
, and then tap the swit, and then tap the swit
ch to activ
ch to ac
FINAL
yment apps
enna touches the other devicenna touches the other devic

Settings
56
Printing
Configure settings for printer plug-ins installed on the device. You can connect the device to a
printer via Wi-Fi or Wi-Fi Direct, and print images or documents.
Some printers may not be compatible with the device.
Adding printer plug-ins
Add printer plug-ins for printers you want to connect the device to.
1 On the Settings screen, tap
More
→
Printing
→
Download plug-in
.
2 Search for a printer plug-in in
Play Store
.
3 Select a printer plug-in and install it.
4 Select the printer plug-in and tap the switch to activate it.
The device searches for printers that are connected to the same Wi-Fi network as your
device.
To add printers manually, tap
MORE
→
Add printer
→
ADD PRINTER
.
To change print settings, tap
MORE
→
Printing settings
.
Printing content
While viewing content, such as images or documents, tap
Share
→
Print
, and then select a
printer.
MirrorLink
Connect your device to a vehicle to control your device’s MirrorLink apps on the vehicle’s
head unit monitor.
On the Settings screen, tap
More
→
MirrorLink
.
Your device is compatible with vehicles that support MirrorLink version 1.1 or higher.
DRAFT,
→→
Add prin
Add prin
MOREMORE
→
→
Printing settingsPrin
tent, such as images or documentent, such as images or documen
Not
ch to ac
ch to ac
e connected t
onnected t
FINAL
o activate ito activate it

Settings
57
Connecting your device to a vehicle via MirrorLink
When using this feature for the first time, connect the device to a Wi-Fi or mobile network.
1 Pair your device with a vehicle via Bluetooth.
Refer to Pairing with other Bluetooth devices for more information.
2 Connect your device to the vehicle using a USB cable.
When they are connected, access your device’s MirrorLink apps on the head unit monitor.
Ending the MirrorLink connection
Unplug the USB cable from your device and the vehicle.
Download booster
Set the device to download files larger than 30 MB, faster via Wi-Fi and mobile networks
simultaneously. A stronger Wi-Fi signal will provide a faster download speed.
On the Settings screen, tap
More
→
Download booster
.
•
This feature may not be supported by some devices.
•
You may incur additional charges when downloading files via the mobile network.
•
When you download large files, the device may heat up. If the device exceeds a set
temperature, the feature will turn off.
•
If network signals are unstable, the speed and performance of this feature may be
affected.
•
If the Wi-Fi and mobile network connections have significantly different data
transfer speeds, the device may use only the fastest connection.
•
This feature supports Hypertext Transmission Protocol (HTTP) 1.1 and Hypertext
Transmission Protocol Secure (HTTPS). The feature cannot be used with other
protocols, such as FTP.
y incur additional charges when do
y incur additional char
wnload large files, the devic
wnload large files, the devic
, the feature will tureature will tur
DRAFT,
nals are unstablenals are unstable
i-Fii-Fi
and mobile net and mobile net
er speeds, the devic
er speeds
Not
vide a fast
vide a fast
wnload booster
wnload booster
y not be supported by some devicy not be supported by some devic
ges when do
ges when do
FINAL
, faster via , faster via
Wi-FWi-F
vide a faster dovide a faster do

Settings
58
Sound and notification
Change settings for various sounds on the device.
On the Settings screen, tap
Sound and notification
.
•
Volume
: Adjust the volume level for call ringtones, music and videos, system sounds, and
notifications.
•
Ringtones and sounds
: Change the ringtone and system sound settings.
•
Vibrations
: Change the vibration settings.
•
Interruptions
: Change settings for managing interruptions.
•
Advanced
: Configure additional sound settings.
•
Notifications on lock screen
: Set whether or not to show the content of notifications on
the locked screen.
•
App notification
: Change the notification settings for each app.
•
LED indicators
: Set the device to turn on the notification light when you have missed
calls, messages, or notifications.
Display
Change the display settings.
On the Settings screen, tap
Display
.
•
Brightness
: Adjust the brightness of the display.
•
Font
: Change the font size and type.
•
Screen timeout
: Set the length of time the device waits before turning off the display’s
backlight.
•
Smart stay
: Set the device to prevent the display backlight from turning off while you are
looking at the display.
•
Screen mode
: Change the screen mode to adjust the display’s colour and contrast.
•
Daydream
: Set the device to launch a screensaver when the device is charging or
connected to a desktop dock.
DRAFT,
Displayisplay
.
.
djust the brightness of the displadjust the brightness of the displa
: Change the font size and t: Change the font size and t
: Set the length of time the devic: Set the length of time the devic
Not
FINAL
w the content of notifica
w the content of notifica
or each app.or each app.
n on the notification lighn on the notification ligh

Settings
59
Motions & gestures
Activate the motion recognition feature and change the settings that control motion
recognition on your device.
On the Settings screen, tap
Motions & gestures
.
Excessive shaking or impact on the device may result in unintended inputs. Control
motions properly.
•
Direct call
: Set the device to make a voice call by picking up and holding the device near
your ear while viewing call, message, or contact details.
•
Smart alert
: Set the device to alert you if you have missed calls or new messages when
you pick up the device.
This feature may not work if the screen is turned on or the device is not on a flat
surface.
•
Mute
: Set the device to mute incoming calls or alarms by using palm motions or facing
the device’s screen downwards.
•
Palm swipe to capture
: Set the device to capture a screenshot when you swipe your
hand to the left or right across the screen. You can view the captured images in
Gallery
.
It is not possible to capture a screenshot while using some apps and features.
Applications
Manage the device’s apps and change their settings.
On the Settings screen, tap
Applications
.
•
Application manager
: View and manage the apps on your device.
•
Default applications
: Select a default settings for using apps.
•
Application settings
: Customise the settings for each app.
DRAFT,
DRAFT, DRAFT,
e a screenshot while using some apps and f
e a screenshot while using some apps and f
tionstions
Applications
tionstions
’s apps and change their settings’s apps and change their settings
Not
o capture a scr
o capture a scr
oss the screen. You can view the captuross the screen. You can view the captur
eenshot while using some apps and f
eenshot while using some apps and f
FINAL
ned on or the device is not on a flaned on or the device is not on a fla
oming calls or alarms by using palm motions or facingoming calls or alarms by using palm motions or facing

Settings
60
Wallpaper
Change the wallpaper settings for the Home screen and the locked screen.
On the Settings screen, tap
Wallpaper
.
Themes
Apply various themes to the device to change the visual elements of the Home screen, locked
screen, and icons.
On the Settings screen, tap
Themes
.
To download more themes, tap
STORE
.
Lock screen & security
Change the settings for securing the device and the SIM or USIM card.
On the Settings screen, tap
Lock screen & security
.
The available options may vary depending on the screen lock method selected.
•
Screen lock type
: Change the screen lock method.
•
Show information
: Change settings for the items displayed on the locked screen.
•
Unlock effect
: Select an effect that you see when you unlock the screen.
•
Fingerprint
: Register your fingerprint to the device to secure the device or sign in to your
Samsung account. Refer to Fingerprint recognition for more information.
•
Anti-malware
: Scan for and remove malware from the device. You can also activate the
real-time scanning feature to block phishing attacks and malicious websites.
•
Find My Mobile
: Activate or deactivate the Find My Mobile feature. This feature can
help you locate your device if it is lost or stolen. You can also access the Find my mobile
website (findmymobile.samsung.com) to track and control your lost or stolen device.
•
Unknown sources
: Set the device to allow the installation of apps from unknown
sources.
•
Other security settings
: Configure additional security settings.
DRAFT,
ary depending on the scr
: Change the screen lock method: Change the screen lock method
: Change settings f: Change settings f
elect an effect thaelect an effec
egister your fingeregister your finger
DRAFT,
ount. Refer t
ount. Ref
Not
e and the SIM or USIM car
e and the SIM or USIM car
een & securityeen & security
.
.
y depending on the scry depending on the scr
FINAL
e and the SIM or USIM care and the SIM or USIM car

Settings
61
Fingerprint recognition
In order for fingerprint recognition to function, your fingerprint information needs to be
registered and stored in your device. After registering, you can set the device to use your
fingerprint for the features below:
•
Screen lock
•
Web sign-in
•
Verify Samsung account
•
Pay with PayPal
This feature may not be available depending on the region or service provider.
For better fingerprint recognition
When you scan your fingerprints on the device, be aware of the following conditions that
may affect the feature’s performance:
•
The Home key contains a fingerprint recognition sensor. Ensure that the Home key is not
scratched or damaged by metal objects, such as coins, keys, and necklaces.
•
The screen protector supplied with the device may cause the fingerprint recognition
sensor to malfunction. Remove the screen protector to improve fingerprint sensitivity.
•
Ensure that the fingerprint recognition area and your fingers are clean and dry.
•
The device may not recognise fingerprints that are affected by wrinkles or scars.
•
The device may not recognise fingerprints from small or thin fingers.
•
If you bend your finger or use a fingertip, the device may not recognise your fingerprints.
Make sure to cover the entire Home key with your finger.
•
To improve recognition performance, register fingerprints of the hand used most often to
perform tasks on the device.
•
In dry environments, static electricity can build up in the device. Avoid using this feature
in dry environments or before using the feature, discharge static electricity by touching a
metal object.
DRAFT,
e the screen pr
e the scr
t recognition ar
t recognition ar
ognise fingerprognise finger
y not recognise fingery not recognise finger
DRAFT,
our finger or use a fingerour finger or use a finger
over the enover the en
nition per
Not
nition sensornition sensor
ts, such as coinsts, such as coins
or supplied with the device maor supplied with the device ma
een pr
een pr
FINAL
are of the folloare of the follo
nition sensornition sensor

Settings
62
Registering fingerprints
1 On the Settings screen, tap
Lock screen & security
→
Fingerprint
→
Add fingerprint
.
2 Place your finger on the Home key.
3 Lift your finger when the device vibrates, and then place it on the Home key again.
Repeat this action using the same finger until the fingerprint is registered.
4 When a screen appears requesting to register a backup password, enter the backup
password, and then tap
CONTINUE
.
5 Enter the backup password again to verify it, and then tap
OK
.
You can use the backup password instead of scanning your fingerprints.
6 When a fingerprint lock pop-up window appears, tap
OK
. You can use your fingerprints to
unlock the screen.
DRAFT,
DRAFT,
DRAFT,
DRAFT,
een appears requesting teen appears requesting t
, and then tap
, and then tap
Not
Not
Not
Not
FINAL
, and then place it on the Home key again., and then place it on the Home key again.
til the fingerprintil the fingerprin

Settings
63
Deleting fingerprints
You can delete registered fingerprints using the fingerprint manager.
1 On the Settings screen, tap
Lock screen & security
→
Fingerprint
.
2 Scan a registered fingerprint, or tap and enter the backup password.
3 Tap
EDIT
.
4 Tick fingerprints to deregister and tap
DELETE
.
Changing the backup password
You can change the password that you use as a backup to scanning your fingerprints.
1 On the Settings screen, tap
Lock screen & security
→
Fingerprint
.
2 Scan a registered fingerprint, or tap and enter the backup password.
3 Tap
Change backup password
.
4 Enter a new password and tap
CONTINUE
.
5 Enter the password again and tap
OK
.
Verifying the Samsung account password
Use fingerprints to verify your Samsung account password. You can use a fingerprint instead
of entering your password, for example, when you purchase content from
GALAXY Apps
.
1 On the Settings screen, tap
Lock screen & security
→
Fingerprint
.
2 Scan a registered fingerprint, or tap and enter the backup password.
3 Tap the
Verify Samsung account
switch to activate it.
4 Sign in to your Samsung account.
CONTINUE
CONTINUE
d again and tap d again and tap
OKOK
amsung accounamsung acc
DRAFT,
o verify your So verify your S
our password, f
our password
Not
and enter the back
and enter the back
ONTINUE
ONTINUE
FINAL
o scanning your fingero scanning your finger
→→
FingerprinFingerprin
er the backer the back
Settings
64
Using fingerprints to sign in to accounts
You can use your fingerprints to sign in to webpages that support password saving.
1 On the Settings screen, tap
Lock screen & security
→
Fingerprint
.
2 Scan a registered fingerprint, or tap and enter the backup password.
3 Tap the
Web sign-in
switch to activate it.
4 Open a webpage that you want to sign in to with a fingerprint.
5 Enter your user name and password, and then tap the webpage’s sign in button.
6 Tick
Sign in using your fingerprints
and tap
REMEMBER
.
You can use your fingerprint to verify your account and password to sign in to the
webpage.
Using fingerprints for purchases via PayPal
You can make purchases by scanning your fingerprints.
This feature may not be available depending on the region or service provider.
1 On the Settings screen, tap
Lock screen & security
→
Fingerprint
.
2 Scan a registered fingerprint, or tap and enter the backup password.
3 Tap
Pay with PayPal
.
4 Tick
FIDO Ready™ support
and
PayPal
, and then tap
INSTALL
.
5 When the installation is complete, tap
LINK PayPal ACCOUNT
.
6 Follow the on-screen instructions to sign in to your PayPal account and register your
fingerprints.
DRAFT,
vailable depending on the r
vailable depending on the r
een, tap een, tap
Lock scrLock scr
ered fingerprintered fingerpr
yPal
Not
chases via PayPalchases via PayPal
our fingerprinour fingerprin
FINAL
ebpage’s sig
t and passwort and passwor

Settings
65
Privacy & safety
Change the settings for maintaining your privacy and safety.
On the Settings screen, tap
Privacy & safety
.
•
Location
: Change settings for location information permissions.
•
Private mode
: Activate private mode to prevent others from accessing your personal
content. Refer to Private mode for more information.
•
Report diagnostic info
: Set the device to automatically send the device’s diagnostic and
usage information to Samsung.
•
Send SOS messages
: Set the device to send help messages by pressing the Power
key three times. You can also send sound recordings along with the message to the
recipients. Refer to Send SOS messages for more information.
Private mode
Hide personal content in your device to prevent others from accessing it.
In private mode, you can hide items in
Gallery
,
Video
,
Music
,
Voice Recorder
,
My Files
, and
Internet
.
Activating private mode
1 On the Settings screen, tap
Privacy & safety
→
Private mode
, and then tap the switch to
activate it.
If you are activating private mode for the first time, follow the on-screen instructions to
set up a private mode access code.
2 Follow the on-screen instructions to enter the preset private mode access code.
Private mode is activated and the icon appears on the status bar.
You can view and access the hidden items only when private mode is activated. To
hide items stored in the private folder, deactivate private mode.
DRAFT,
een, tap
Privacy & safPrivacy & saf
DRAFT,
ting private mode fting private mode f
e mode access ce mode acc
Not
t others fr
Videoideo
,
,
Music
Music
FINAL
dings along with the message t
dings along with the message t
tion.tion.
t others from act others from ac

Settings
66
Hiding content
1 On the Apps screen, launch an app to hide items.
2 Select an item and tap
MORE
→
Move to Private
.
If private mode is not activated, follow the on-screen instructions to enter the preset
private mode access code.
The selected items will be moved to the private folder.
Viewing hidden content
You can view hidden items only when private mode is activated.
1 On the Settings screen, tap
Privacy & safety
→
Private mode
, and then tap the switch to
activate it.
2 Follow the on-screen instructions to enter the preset private mode access code.
3 On the Apps screen, tap
My Files
→
Private
.
All items moved in private mode appear on the screen.
Unhiding content
1 In the private folder, tap and hold an item, and then tick items to unhide.
2 Tap
MORE
→
Remove from Private
.
3 Select a folder to move the items to, and then tap
MOVE
.
The items will be moved to the selected folder.
DRAFT,
, tap and hold an it, tap and hold an it
emove from Pemove from P
o move the it
o mov
Not
vate
.
.
e mode appear on the scre mode appear on the scr
FINAL
e modee mode
, and then tap the swit, and then tap the swit
er the preset privaer the preset priva

Settings
67
Automatically deactivating private mode
You can set the device to automatically deactivate private mode each time the screen turns
off.
1 On the Settings screen, tap
Privacy & safety
→
Private mode
, and then tap the switch to
activate it.
2 Follow the on-screen instructions to enter the preset private mode access code.
3 Tap the
Auto disable
switch to activate it.
When the
Auto disable
option is enabled, the device will fail to transfer files to the
private folder if the screen turns off during transfer.
Send SOS messages
In an emergency situation, quickly press the Power key three times. The device sends
messages to your primary contacts. The messages include your location information.
1 On the Settings screen, tap
Privacy & safety
→
Send SOS messages
, and then tap the
switch to activate it.
2 Follow the on-screen instructions to add primary contacts if you have not already done
so.
To send help messages with audio recordings or photos, tap the
Attach audio recording
or
Attach pictures
switch to activate it.
The
Attach pictures
option may not be available depending on the region or service
provider.
Adding primary contacts
On the Settings screen, tap
Privacy & safety
→
Send SOS messages
→
Send messages to
→
ADD
. Tap
Create contact
and enter contact information or tap
Select from contacts
to
add an existing contact as a primary contact.
een instructions to add pr
een instructions to add pr
o send help messages with audio ro send help messages with audio r
DRAFT,
switch to activa switch to activ
ttach pictures
ttach pictur
Not
he messages include y
he messages include y
y & safetyy & safety
→→
SS
FINAL
e will fail to tr
er key three timeser key three times
he messages include yhe messages include y

Settings
68
Easy mode
Easy mode provides an easier user experience by using a simpler layout and bigger icons on
the Home screen.
Switching to easy mode
1 On the Settings screen, tap
Easy mode
→
Easy mode
.
2 Select apps under
Easy applications
to apply a simpler layout.
3 Tap
DONE
.
Returning to standard mode
Swipe to the left on the Home screen and tap
Settings
→
Easy mode
→
Standard mode
→
DONE
.
Managing shortcuts
To add a shortcut to an app to the Home screen, swipe to the left, tap , and then select an
app.
To add a shortcut to a contact on the Home screen, swipe to the right and tap .
To delete a shortcut from the Home screen, tap
EDIT
and select an app or contact with .
Accessibility
Configure various settings to improve accessibility to the device. Refer to Accessibility for
more information.
On the Settings screen, tap
Accessibility
.
DRAFT,
t on the Home scr
t on the Home scr
DRAFT,
DRAFT, DRAFT,
om the Home screen, tap om the Home screen, tap
essibilityessibility
Accessibility
essibilityessibility
ious settings t
ious settings t
Not
o the Home screen, swipe to the Home screen, swipe t
FINAL
Easy modeEasy mode

Settings
69
Accounts
Add your Samsung and Google accounts, or other accounts, to sync with.
On the Settings screen, tap
Accounts
.
Adding accounts
Some apps used on your device require a registered account. Create accounts to have the
best experience with your device.
1 On the Settings screen, tap
Accounts
→
Add account
.
2 Select an account service.
3 Follow the on-screen instructions to complete the account setup.
To sync content with your accounts, select an account and select items to sync.
Removing accounts
On the Settings screen, tap
Accounts
, select an account name, select the account to remove,
and then tap
MORE
→
Remove account
.
Registering Samsung accounts
You need a Samsung account when using some Samsung apps. You can back up or restore
data saved in the device to your Samsung account. Register your Samsung account to the
device to conveniently use Samsung services.
1 On the Settings screen, tap
Accounts
→
Add account
.
2 Tap
Samsung account
.
3 Follow the on-screen instructions to complete the account setup.
Once your Samsung account has been registered, you can use apps requiring your Samsung
account without the sign in procedure.
DRAFT,
countscounts
ount when using some Sount when using some S
e to your Samsung ace to your Samsung ac
eniently use Samsung sereniently use Samsung ser
ettings screen, tap
ettings screen, tap
Not
, select an accoun, select an accoun
FINAL
ount setup.ount setup.
ount and select itount and select it

Settings
70
Backup and reset
Change the settings for managing settings and data.
On the Settings screen, tap
Backup and reset
.
•
Back up my data
: Back up your personal information and app data to the Samsung
server. You can also set the device to automatically back up data.
•
Restore
: Restore previously backed up personal information and app data from your
Samsung account.
•
Back up my data
: Set the device to back up settings and app data to the Google server.
•
Backup account
: Set up or edit your Google backup account.
•
Automatic restore
: Set the device to automatically restore settings and app data from
the Google server when apps are reinstalled.
•
Factory data reset
: Reset settings to the factory default values and delete all data.
Language and input
Change the settings for text input. Some options may not be available depending on the
selected language.
On the Settings screen, tap
Language and input
.
•
Language
: Select a display language for all menus and apps.
•
Default
: Select a default keyboard type for text input.
•
Samsung keyboard
: Change the Samsung keyboard settings.
•
Google voice typing
: Change the voice input settings.
•
Voice input
: Select a default voice input service. You can also change settings for each
service.
•
Text-to-speech options
: Change the text-to-speech settings.
•
Pointer speed
: Adjust the pointer speed for the mouse or trackpad connected to your
device.
Language and input
Language and input
t a display language for all menus and appsy language f
t a default keyboard tt a default keyboar
yboardyboard
: Change the S: Change the S
e typinge typing
: Change the v: Change the v
elect a default v
Not
ome options may not be aome options may not be a
FINAL
e settings and app da
e settings and app da
y default values and delety default values and delet

Settings
71
Battery
View battery power information and change power saving options.
On the Settings screen, tap
Battery
.
•
BATTERY USAGE
: View the amount of battery power consumed by your device.
•
Power saving mode
: Activate power-saving mode and change the settings for power-
saving mode. Refer to Power saving mode for more information.
•
Ultra power saving mode
: Extend standby time and reduce battery consumption by
displaying a simpler layout and allowing limited access to an app. Refer to Ultra power
saving mode for more information.
The estimated maximum standby time shows the time remaining before the battery
power runs out if the device is not used. Standby time may vary depending on your
device settings and operating conditions.
•
Abnormal battery usage
: View a list of apps that are consuming an excessive amount of
battery power.
Storage
View memory information for your device.
On the Settings screen, tap
Storage
.
The actual available capacity of the internal memory is less than the specified
capacity because the operating system and default apps occupy part of the memory.
The available capacity may change when you update the device.
DRAFT,
our device.our device.
torageorage
.
.
ailable capacity of the inailable capacity of the in
y because the operay because the oper
DRAFT,
ailable capacity maailable capacity ma
Not
FINAL
emaining bef
emaining bef
y time may vary depending on y
y time may vary depending on y
t are consuming an et are consuming an e

Settings
72
Date and time
Access and alter the following settings to control how the device displays the time and date.
On the Settings screen, tap
Date and time
.
If the battery remains fully discharged or removed from the device, the time and date
is reset.
•
Automatic date and time
: Automatically update the time and date when moving across
time zones.
•
Automatic time zone
: Set the device to receive time zone information from the network
when you move across time zones.
•
Set date
: Set the current date manually.
•
Set time
: Set the current time manually.
•
Select time zone
: Set the home time zone.
•
Use 24-hour format
: Display time in 24-hour format.
•
Select date format
: Select a date format.
User manual
View help information to learn how to use the device and apps or configure important
settings.
On the Settings screen, tap
User manual
.
About device
Access device information, edit the device name, or update device software.
On the Settings screen, tap
About device
.
DRAFT,
n how to use the devic
n how to use the devic
DRAFT,
een, tap een, tap
User manualUser manual
vice
vice
About device
Not
FINAL
ormat.ormat.
73
Applications
Installing or uninstalling apps
Samsung GALAXY Apps
Purchase and download apps.
Tap
GALAXY Apps
on the Apps screen.
This app may not be available depending on the region or service provider.
Installing apps
Browse apps by category or tap to search for a keyword.
Select an app to view information about it. To download free apps, tap
INSTALL
. To purchase
and download apps where charges apply, tap the price and follow the on-screen instructions.
To change the auto update settings, tap
Settings
Auto update apps
, and
then select an option.
Play Store
Purchase and download apps.
Tap
Play Store
on the Apps screen.
Installing apps
Browse apps by category or tap to search for a keyword.
Select an app to view information about it. To download free apps, tap
INSTALL
. To purchase
and download apps where charges apply, tap the price and follow the on-screen instructions.
To change the auto update settings, tap
Settings
Auto-update apps
, and
then select an option.
DRAFT,
e settings, tap
e settings
wnload apps.wnload apps
DRAFT,
on the Apps scr
on the Apps scr
Not
or a keyw
or a keyw
. To download fr. To download fr
ges apply, tap the prges apply, tap the pr
e settings, tap
e settings, tap
FINAL
ion or service prion or service pr
word.word.

Applications
74
Managing apps
Uninstalling or disabling apps
On the Apps screen, tap
EDIT
. The icon appears on the apps that you can disable or
uninstall. Select an app and tap
DISABLE
or
UNINSTALL
. Alternatively, on the Apps screen,
tap
Settings
Applications
Application manager
, select an app, and then tap
DISABLE
or
UNINSTALL
.
•
Disabling apps: Disable selected default apps that cannot be uninstalled from the device.
•
Uninstalling apps: Uninstall downloaded apps.
Enabling apps
On the Apps screen, tap
Settings
Applications
Application manager
, scroll to
DISABLED
, select an app, and then tap
ENABLE
.
Phone
Introduction
Make or answer voice and video calls.
Making calls
1 Tap
Phone
on the Apps screen.
2 Enter a phone number.
If the keypad does not appear on the screen, tap to open the keypad.
DRAFT,
e and video calls.e and video calls.
DRAFT,
on the Apps screen. on the Apps scr
Not
FINAL
pplication managertion manager
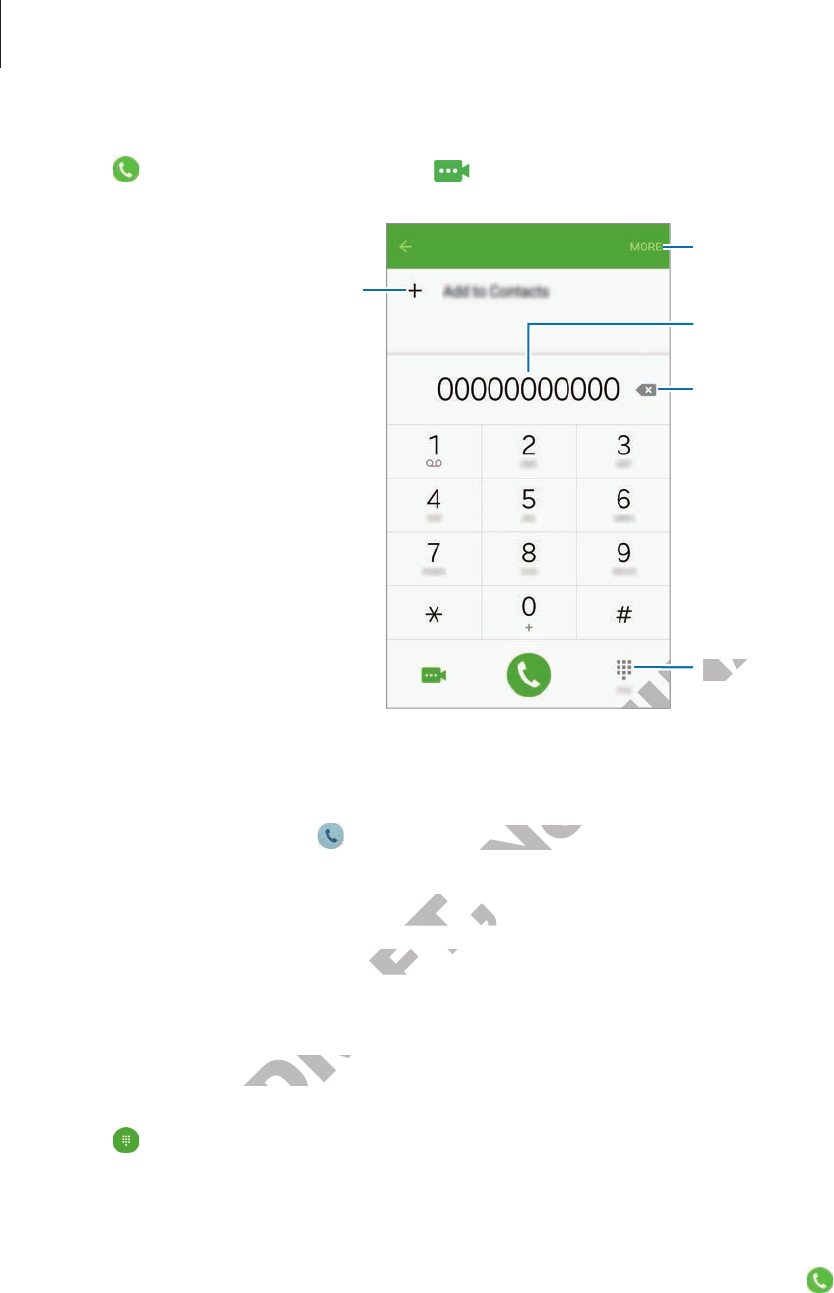
Applications
75
3 Tap to make a voice call, or tap to make a video call.
Add the number to the contacts
list. Preview the phone number.
Hide the keypad.
Delete a preceding character.
Access additional options.
Making calls from the locked screen
On the locked screen, drag outside the large circle.
Making calls from call logs or contacts list
Tap
LOGS
or
CONTACTS
, and then swipe to the right on a contact or a phone number to
make a call.
Making an international call
1 Tap to open the keypad if the keypad does not appear on the screen.
2 Tap and hold 0 until the + sign appears.
3 Enter the country code, area code, and phone number, and then tap .
DRAFT,
om call logs or contac
om call logs or contac
, and then swipe to the r, and then swipe t
ernational callernational call
o open the keypad if the keypad does not appear on the scr
Not
outside the large circle outside the large circle
FINAL
FINAL
Hide the keypadHide the keypad
FINAL
FINAL

Applications
76
Receiving calls
Answering a call
When a call comes in, drag outside the large circle.
Rejecting a call
When a call comes in, drag outside the large circle.
To send a message when rejecting an incoming call, drag the reject message bar upwards.
To create various rejection messages, open the Apps screen and tap
Settings
Applications
Phone
Call rejection
Rejection messages
, enter a message, and then tap .
Missed calls
If a call is missed, the icon appears on the status bar. Open the notification panel to view
the list of missed calls. Alternatively, on the Apps screen, tap
Phone
LOGS
to view missed
calls.
Options during calls
During a voice call
The following actions are available:
•
Add call
: Dial a second call.
•
Extra volume
: Increase the volume.
•
Bluetooth
: Switch to a Bluetooth headset if it is connected to the device.
•
Speaker
: Activate or deactivate the speakerphone. When using the speakerphone, speak
into the microphone at the top of the device and keep the device away from your ears.
•
Keypad
/
Hide
: Open or close the keypad.
•
Mute
: Turn off the microphone so that the other party cannot hear you.
•
Email
: Send an email.
ailable:ailable:
ond call.ond call.
ncrease the volumencrease the v
witch to a Bluetwitch to a Bluet
e or deac
Not
FINAL
er a message, and then tap
. Open the notifica. Open the notifica
een, tap een, tap
PhonePhone
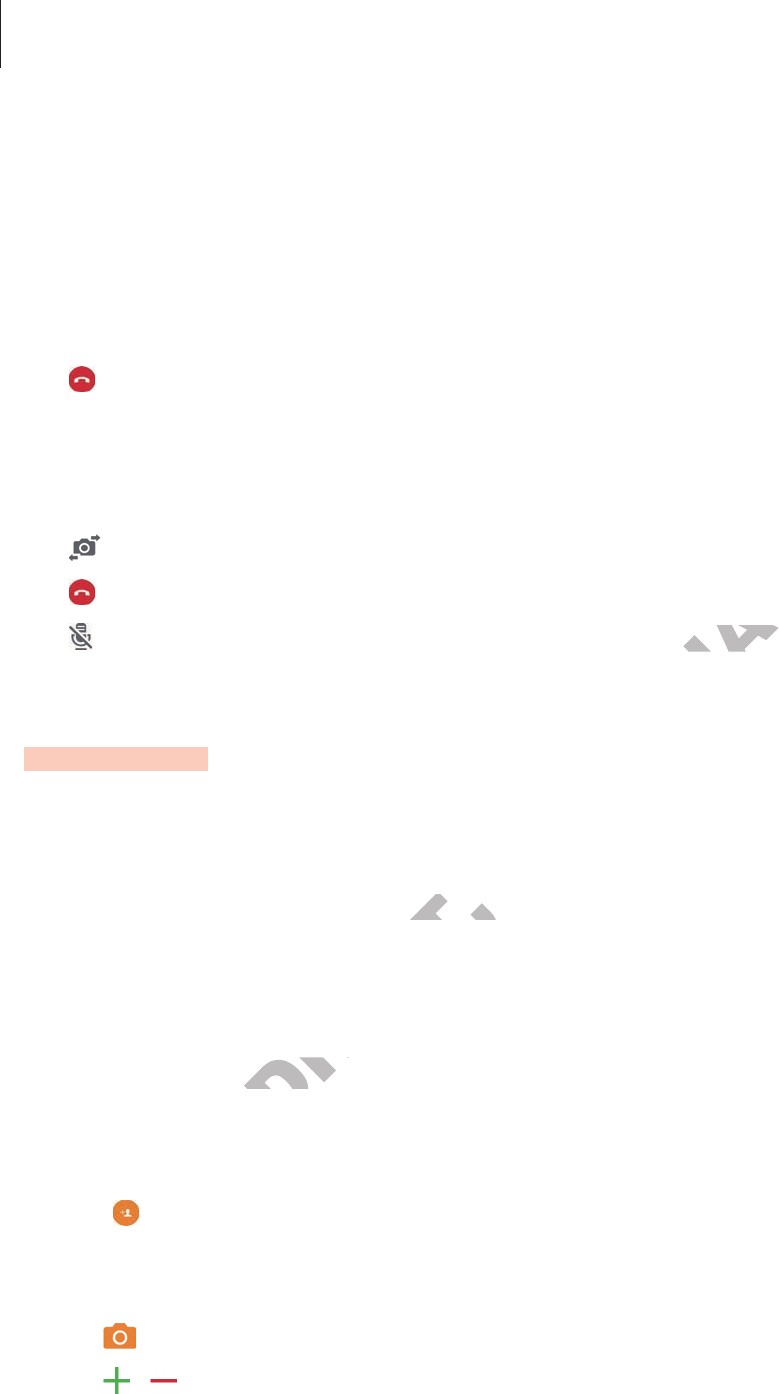
Applications
77
•
Message
: Send a message.
•
Internet
: Browse webpages.
•
Contacts
: Open the contacts list.
•
S Planner
: Open the calendar.
•
Memo
: Create a memo.
•
: End the current call.
During a video call
Tap the screen to use the following options:
•
: Switch between the front and rear cameras.
•
: End the current call.
•
: Turn off the microphone so that the other party cannot hear you.
Contacts
Introduction
Create new contacts or manage contacts on the device.
Adding contacts
Creating contacts manually
1 Tap
Contacts
on the Apps screen.
2 Tap and select a storage location.
3 Enter contact information.
•
: Add an image.
•
/ : Add or delete a contact field.
4 Tap
SAVE
.
DRAFT,
ontacts on the devic
ontacts on the devic
tacts manuallytacts manually
on the A
Not
FINAL
y cannot hear youy cannot hear you

Applications
78
To add a phone number to the contacts list from the keypad, open the Apps screen and tap
Phone
. If the keypad does not appear on the screen, tap to open the keypad. Enter the
number and tap
Add to Contacts
.
To add a phone number to the contacts list from received calls or messages, open the Apps
screen and tap
Phone
LOGS
a contact’s image.
Importing contacts
Import contacts from storage services to your device.
On the Apps screen, tap
Contacts
MORE
Settings
Import/Export contacts
IMPORT
and select an import option.
Searching for contacts
On the Apps screen, tap
Contacts
.
Use one of the following search methods:
•
Scroll up or down the contacts list.
•
Drag a finger along the index at the right side of the contacts list to scroll through it
quickly.
•
Tap the search field at the top of the contacts list and enter search criteria.
Once a contact is selected, take one of the following actions:
•
: Add to favourite contacts.
•
/ : Make a voice or video call.
•
: Compose a message.
•
: Compose an email.
op of the con
, take one of the follo
, take one of the follo
ontacts.ontacts.
DRAFT,
oice or video calloice or video call
ompose a message.ompose a message
DRAFT,
ompose an email.
ompose an email
Not
t side of the c
t side of the c
op of the contacts list and enop of the contacts list and en
FINAL
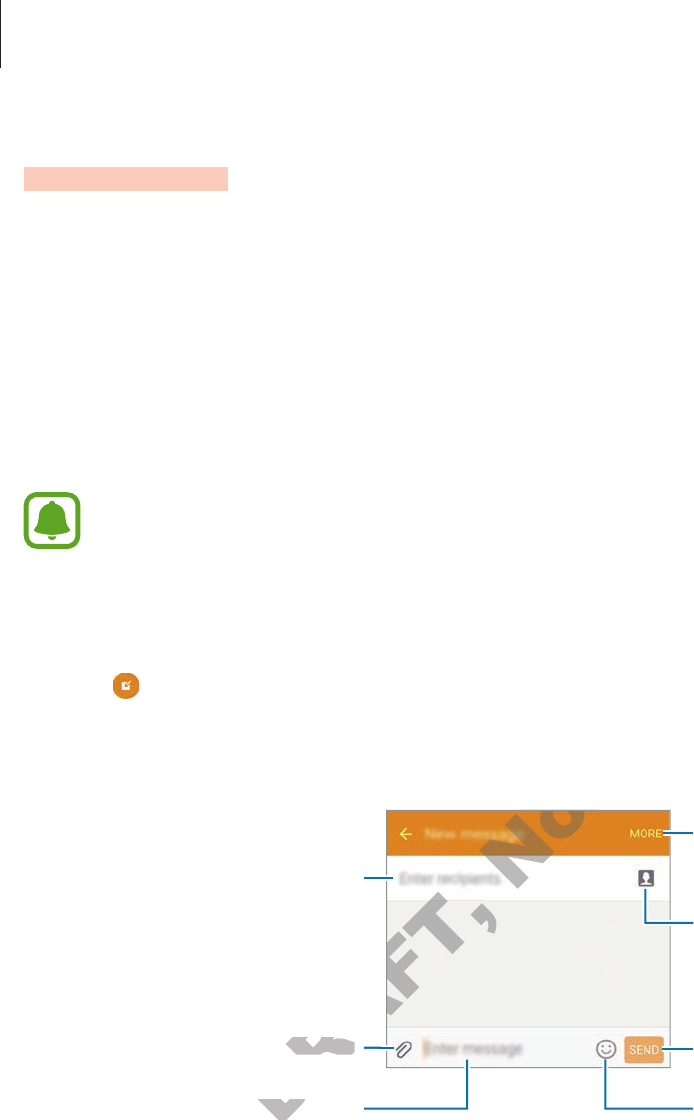
Applications
79
Messages
Introduction
Send text messages (SMS) or multimedia messages (MMS) and view messages by
conversation.
Sending messages
You may incur additional charges for sending messages when you are roaming.
1 Tap
Messages
on the Apps screen.
2 Tap .
3 Add recipients and enter a message.
Access additional options.
Enter a message.
Select contacts from the
contacts list.
Enter emoticons.
Enter recipients.
Attach files. Send the message.
4 Tap
SEND
to send the message.
DRAFT,
DRAFT,
er a messageer a message
DRAFT,
DRAFT,
ttach files.ttach files.
Not
Not
FINAL
Applications
80
Viewing messages
Messages are grouped into message threads by contact.
You may incur additional charges for receiving messages when you are roaming.
1 Tap
Messages
on the Apps screen.
2 On the messages list, select a contact.
3 View your conversation.
Internet
Browse the Internet to search for information and bookmark your favourite webpages to
access them conveniently.
1 Tap
Internet
on the Apps screen.
2 Tap the address field.
3 Enter the web address or a keyword, and then tap
Go
.
DRAFT,
ess or a keyword, and then tap
ess or a keyword, and then tap
Not
FINAL
tion and bookmark your fation and bookmark your fa

Applications
81
To view the toolbars, drag your finger downwards slightly on the screen.
Open the homepage.
Move to the previously visited
page.
Open the browser's tab
manager.
Access additional options.
Refresh the current webpage.
View your bookmarks, saved
webpages, and recent history.
Email
Setting up email accounts
1 Tap
Email
on the Apps screen.
Set up an email account when opening
Email
for the first time.
2 Enter the email address and password, and then tap
NEXT
.
To manually register a company email account, tap
MANUAL SETUP
.
3 Follow the on-screen instructions to complete the setup.
To set up another email account, tap
MORE
Settings
Add account
.
If you have more than one email accounts, you can set one as the default account. Tap
MORE
Settings
MORE
Set default account
.
DRAFT,
pps screen.pps screen.
et up an email account when opening et up an email account when opening
DRAFT,
er the email address and passw
er the email address and passw
Not
FINAL
FINAL
FINAL
FINAL
Open the brOpen the br
managermanager
iew your book
ebpages, and r
ebpages, and r

Applications
82
Sending emails
1 Tap to compose an email.
2 Add recipients and enter an email text.
3 Tap
SEND
to send the mail.
Reading emails
On the emails list, tap an email to read.
Camera
Introduction
Take photos and record videos using various modes and settings.
Basic shooting
You can take photos or record videos. View your photos and videos in
Gallery
.
Tap
Camera
on the Apps screen.
Camera etiquette
•
Do not take photos or record videos of other people without their permission.
•
Do not take photos or record videos where legally prohibited.
•
Do not take photos or record videos in places where you may violate other people’s
privacy.
DRAFT,
d videos. View your phot
d videos. View y
een.een.
o not take photos or record videos of other people without their pero not take photos or record videos of other people without their per
DRAFT,
o not take photos or recoro not take photos or rec
os or r
Not
ious modes and settings
ious modes and settings
FINAL
ious modes and settingsious modes and settings
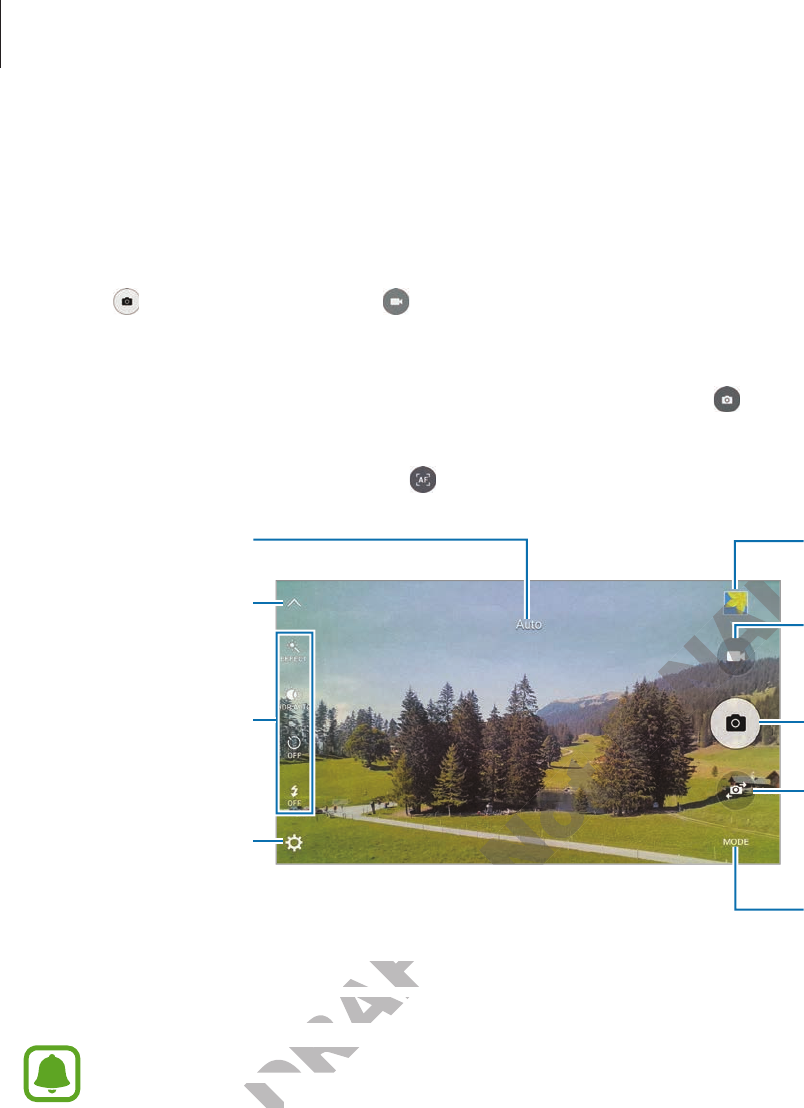
Applications
83
Taking photos or recording videos
1 Tap the image on the preview screen where the camera should focus.
2 Tap to take a photo or tap to record a video.
•
Spread two fingers apart on the screen to zoom in, and pinch to zoom out.
•
To capture an image from the video while recording, tap .
•
To change the focus while recording a video, tap where you want to focus. To focus on
the centre of the screen, tap .
Camera settings
Hide or show the
setting icons.
Quick settings
Record a video.
Take a photo.
Switch between the
front and rear
cameras.
Shooting modes
Preview thumbnail
Current mode
On the preview screen, swipe to the right to access the list of shooting modes. Or, swipe to
the left to view photos and videos you have captured.
•
The preview screen may vary depending on the shooting mode and which camera
is being used.
•
The camera automatically shuts off when unused.
•
Make sure that the lens is clean. Otherwise, the device may not work properly in
some modes that require high resolutions.
•
The front camera lens is suitable for taking wide-angle photos. Minor distortion
may occur in wide-angle photos and does not indicate device performance
problems.
•
The maximum recording time may reduce when you record video at high
resolution.
DRAFT,
een, swipe to the right teen, swipe to the r
os and videos you haos and videos you ha
eview screen may veview screen ma
is being used.is being used.
a automa
Not
Not
FINAL
FINAL
FINAL
FINAL

Applications
84
Launching Camera on the locked screen
To quickly take photos, launch
Camera
on the locked screen.
On the locked screen, drag outside the large circle.
•
This feature may not be available depending on the region or service provider.
•
Some camera features are not available when you launch
Camera
from the locked
screen while the security features are activated.
Launching Camera quickly
You can quickly launch
Camera
by pressing the Home key twice.
To automatically take a photo after quick launching
Camera
, open the preview screen and
tap
Quick open
Quick shot and open
.
Some camera features are not available when you launch
Camera
from the locked
screen or when the screen is turned off while the security features are activated.
HDR (Rich tone)
Take photos with rich colours and reproduce details even in bright and dark areas.
To activate or deactivate HDR mode, open the preview screen and tap until you reach the
desired option.
•
: The device automatically activates or deactivates HDR mode depending on the
shooting conditions.
•
: HDR mode is activated.
DRAFT,
, open the pr
tically activates or deactically activat
: HDR mode is activated. : HDR mode is activated.
Not
oduce details evoduce details ev
, open the preview scr, open the preview scr
FINAL
, open the pr
, open the pr
ou launch ou launch
CamerCamer
ned off while the security fned off while the security f
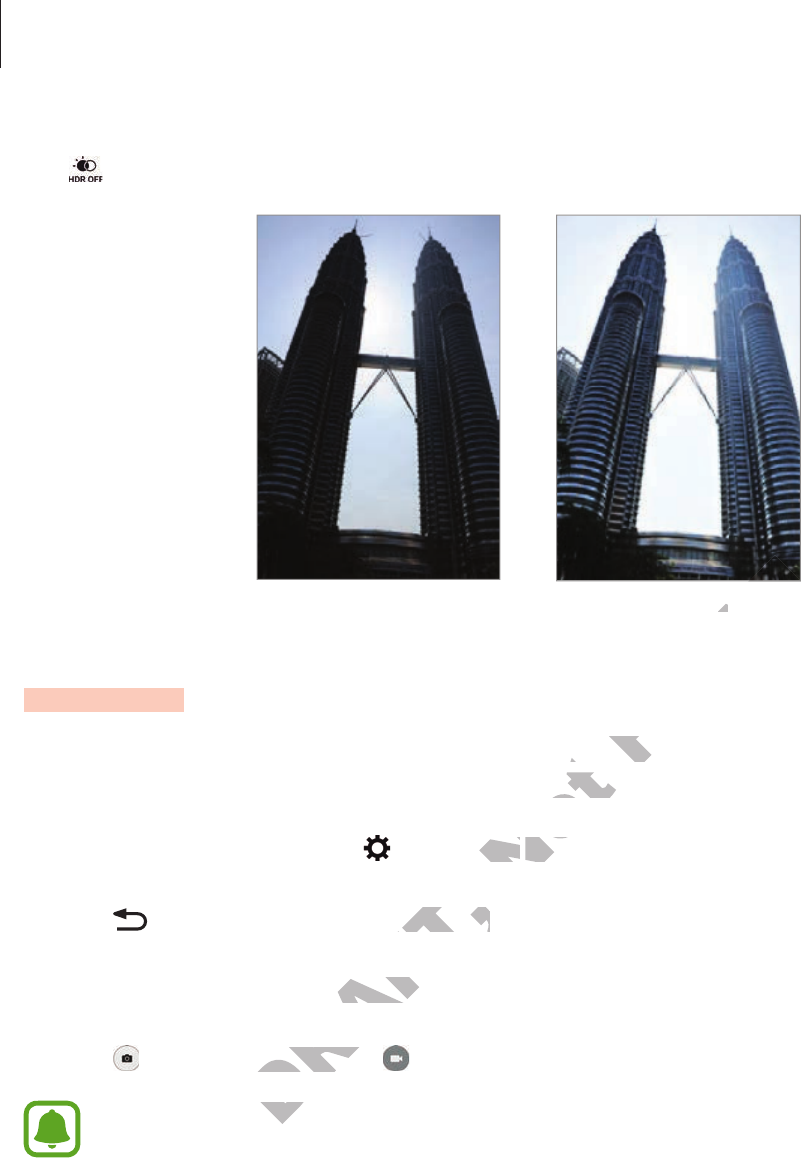
Applications
85
•
: HDR mode is deactivated.
Without effect With effect
Tracking AF
Set the device to track and automatically focus on a selected subject, even when the subject
is moving or when you change the shooting composition.
1 On the preview screen, tap and tap the
Tracking AF
switch to activate it.
2 Tap to return to the preview screen.
3 Tap the subject you want to track.
4 Tap to take a photo or tap to record a video.
Tracking a subject may fail in the following conditions:
•
The subject is too big or too small.
•
The subject moves excessively.
•
The subject is backlit or you are shooting in a dark place.
•
Colours or patterns on the subject and the background are the same.
•
The subject includes horizontal patterns, such as blinds.
•
The camera shakes excessively.
DRAFT,
eview screen.eview screen.
ant to track.ant to track
o take a photo or tap o take a photo or tap
DRAFT,
ing a subject ma
ing a subject ma
Not
ocus on a selec
ocus on a selec
ou change the shooting composition.
omposition.
and tap the and tap the
TrackTrack
FINAL
ith effectith effect
FINAL
ocus on a selected subjecocus on a selected subjec
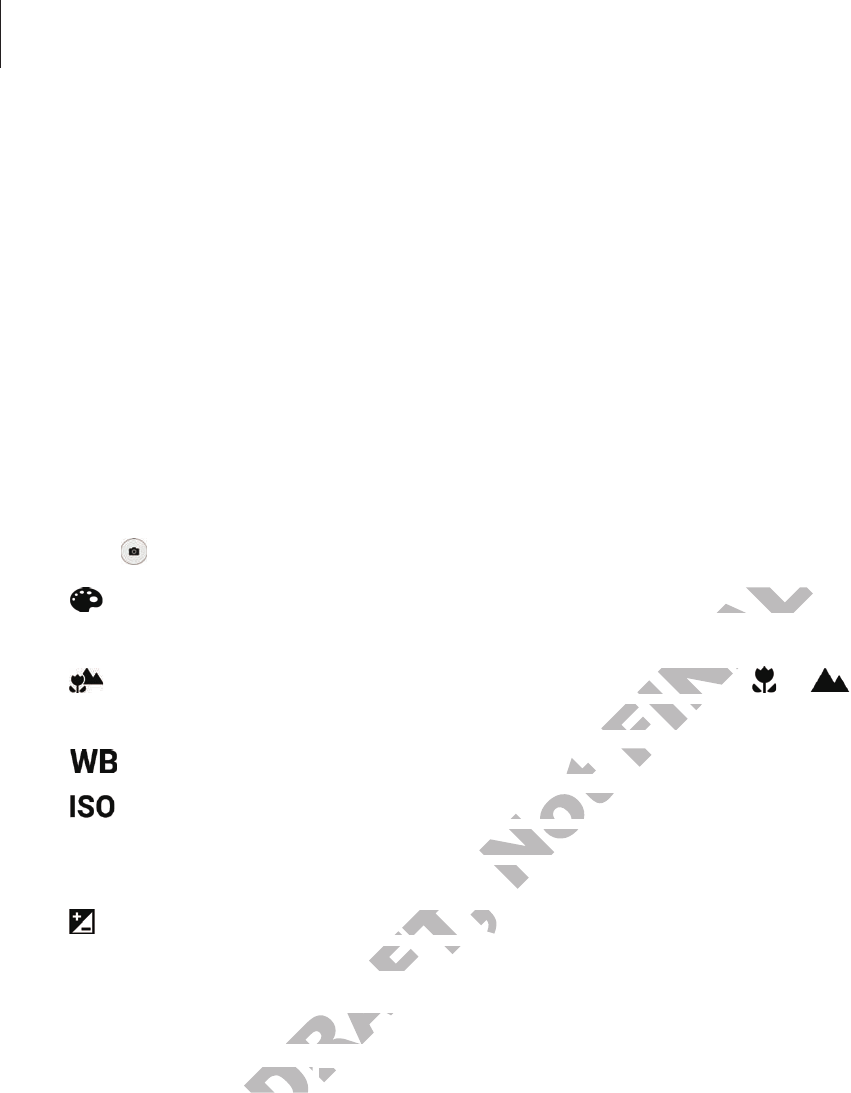
Applications
86
Auto mode
Auto mode allows the camera to evaluate the surroundings and determine the ideal mode
for the photo.
On the preview screen, tap
MODE
Auto
.
Pro mode
Take photos in manual mode. You can adjust shooting options, such as exposure value and
ISO value.
On the preview screen, tap
MODE
Pro
. Select options and customise the settings, and
then tap to take a photo.
•
: Select a colour effect. To customise the colour effect settings, tap
Custom 1
or
Custom 2
on the list of colour effects.
•
: Change the focus mode. Drag the adjustment bar towards or to manually
adjust the focus. To switch to auto focus mode, drag the adjustment bar towards
AUTO
.
•
: Select an appropriate white balance, so images have a true-to-life colour range.
•
: Select an ISO value. This controls camera light sensitivity. Low values are for
stationary or brightly lit objects. Higher values are for fast-moving or poorly lit objects.
However, higher ISO settings can result in noise in photos.
•
: Change the exposure value. This determines how much light the camera’s sensor
receives. For low-light situations, use a higher exposure.
Saving the current setting as a custom setting
On the preview screen, tap
Custom
Save current settings
, select a name, and then tap
SAVE
.
To apply the saved settings to the camera, open the preview screen, tap
Custom
, and then
select a name.
DRAFT,
, higher ISO settings can result in noise in phot
alue. This deter
alue. This deter
DRAFT,
t situations, use a higher et situations, use a higher e
t setting as a custt setting as a cust
eview screen, tap eview screen, tap
CustCust
Not
, so images ha
, so images ha
ols camera light sensitivitols camera light sensitivit
igher values arigher values ar
esult in noise in phot
esult in noise in phot
FINAL
t settings, tap
t settings, tap
t bar towards t bar towards
, drag the adjustmen, drag the adjustmen
, so images ha, so images ha

Applications
87
Separating the exposure area and the focus area
If bright light affects the contrast or the subject is outside the auto focus area, use this feature
to achieve an appropriate exposure. You can separate the exposure and focus areas and select
the exposure level you want for the subject.
1 On the preview screen, tap and hold the area to focus.
The AF/AE frame will appear on the focus area.
2 Tap and hold the AF/AE frame and drag it to the exposure area.
The exposure area will be separated from the focus area.
DRAFT,
DRAFT,
Not
o the e
o the e
om the focus ar
om the focus ar
Not
FINAL
o the exposuro the exposur
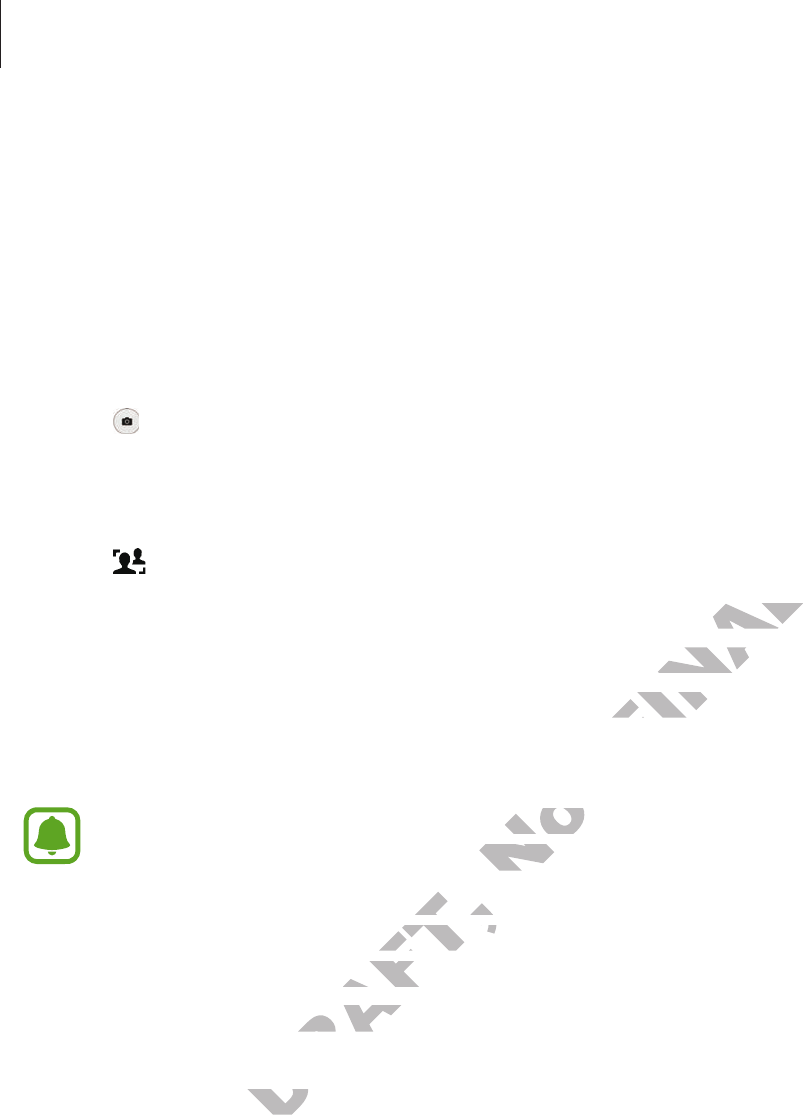
Applications
88
Selective focus mode
Use the out-of-focus effect to make specific objects stand out in a photo.
1 On the preview screen, tap
MODE
Selective focus
.
2 Tap the image on the preview screen where the camera should focus.
3 Tap to take a photo.
4 Tap the preview thumbnail.
5 Tap and select one of the following:
•
Near focus
: Make the subject stand out and blur the background around the subject.
•
Far focus
: Blur the subject and make the background stand out around the subject.
•
Pan focus
: Make the subject and its background stand out.
6 Tap
SAVE
.
•
It is recommended that you position subjects within 50 cm of the device. Position
the subject that you want to focus on close to the device.
•
When taking photos, ensure there is sufficient distance between the subject
and the background. The distance should be more than three times the distance
between the device and the subject.
•
The quality of photos taken by the device can be affected in the following
conditions:
–
The device or the subject is moving.
–
There is strong background light, low levels of light, or you are taking photos
indoors.
–
The subject or background has no pattern, or consists of a plain colour.
DRAFT,
, ensure there is sufficien
, ensure there is sufficien
. The distance should be mor
. The distance should be mor
een the device and the subjeceen the device and the subjec
DRAFT,
y of photos taken by of photos taken b
he device or the subjeche device or the subjec
Not
ou position subjecou position subjec
ocus on close tocus on close t
e is sufficien
FINAL
t stand out and blur the background art stand out and blur the background ar
ound stand out around stand out ar
ound stand outound stand out

Applications
89
Panorama mode
Take a series of photos horizontally or vertically and then stitch them together to create a
wide scene.
On the preview screen, tap
MODE
Panorama
.
To get the best shots using panorama mode, follow these tips:
•
Move the camera slowly in one direction.
•
Keep the image within the frame on the camera’s viewfinder.
•
Avoid taking photos of indistinct backgrounds, such as an empty sky or a plain
wall.
Slow motion mode
Record a video in this mode to play it in slow motion.
On the preview screen, tap
MODE
Slow motion
, and then record a video.
Viewing the slow motion video
After recording a video in slow motion mode, you can set the device to play the video in slow
motion.
1 On the preview screen, tap the preview thumbnail.
2 Tap .
The video will start playing with a randomly set slow motion section.
3 Tap to edit the slow motion section of the video.
4 Drag the start bracket and the end bracket to the desired point to trim segments of a
video.
DRAFT,
een, tap the preview thumbnail
een, tap the preview thumbnail
he video will start playing with a rhe video will start playing with a r
DRAFT,
o edit the slow motion sec
o edit the slow motion sec
Not
w motion mode, you can set the devicw motion mode, you can set the devic
FINAL
, and then rec, and then rec

Applications
90
5 Drag or to select the area of the video to be played in slow motion.
To set a slow motion section more precisely, tap and hold or , and then drag your
finger to the left or right to move through the section frame by frame.
To add another slow motion section, tap the slow motion section
Add
. To delete a
section, tap a section
Delete
.
To change the playback speed, tap a slow motion section and tap
Speed
.
6 Tap to preview the video.
7 Tap
EXPORT
to save the video.
Fast motion mode
Record a video in this mode to play it in fast motion.
On the preview screen, tap
MODE
Fast motion
, and then record a video.
Viewing the fast motion video
After recording a video in fast motion mode, you can set the device to play the video in fast
motion.
1 On the preview screen, tap the preview thumbnail.
2 Tap .
The video will start playing with a randomly set fast motion section.
DRAFT,
o play it in fast motion.o play it in fast motion.
MODEMODE
Fast motion
DRAFT,
wing the fast motion videowing the fast motion video
ding a video in fast motion mode
ding a video in fast motion mode
Not
FINAL

Applications
91
3 Tap to edit the fast motion section of the video.
4 Drag the start bracket and the end bracket to the desired point to trim segments of a
video.
5 Drag or to select the area of the video to be played in fast motion.
To set a fast motion section more precisely, tap and hold or , and then drag your finger
to the left or right to move through the section frame by frame.
To add another fast motion section, tap the fast motion section
Add
. To delete a
section, tap a section
Delete
.
To change the playback speed, tap a fast motion section and tap
Speed
.
6 Tap to preview the video.
7 Tap
EXPORT
to save the video.
DRAFT,
e the video.e the video.
Not
Not
FINAL
tion and tap
tion and tap
Speed
FINAL

Applications
92
Virtual Shot mode
Take a series of photos while circling a subject to create a view of the subject from multi
angles. You can view the subject from different angles by dragging your finger left or right on
the photo.
1 On the preview screen, tap
MODE
Virtual Shot
.
2 Place a subject in the centre of the preview screen and tap .
3 Move the device around the subject slowly in one direction to take more photos.
Viewing virtual shot photos
1 On the preview screen, tap the preview thumbnail.
2 Tap .
3 Drag your finger left or right on the screen, or slowly swivel the device left or right to view
the subject from different angles.
DRAFT,
een, tap the preview thumbnail
een, tap the preview thumbnail
our finger left or right on the scrour finger left or righ
DRAFT,
om different anglesom differen
Not
FINAL
FINAL

Applications
93
Selfie mode
Take self-portraits with the front camera.
1 On the preview screen, tap to switch to the front camera for self-portraits.
2 Tap
MODE
Selfie
.
3 Face the front camera lens.
4 Tap the sensor on the back of the device to take a photo of yourself. You can also tap the
screen to take a photo.
To take a photo using your palm, tap and tap the
Palm selfie
switch to activate it.
Show your palm to the front camera. After recognising your palm, the device will take a
photo after two seconds.
DRAFT,
Not
Not
Not
Not
FINAL
alm selfiealm selfie
switch t
swit
our palm, the devicour palm, the devic
FINAL

Applications
94
Wide selfie mode
Take a wide self-portrait to include more people in the photo and avoid leaving people out.
1 On the preview screen, tap to switch to the front camera for self-portraits.
2 Tap
MODE
Wide selfie
.
3 Face the front camera lens.
4 Tap the sensor on the back of the device to take a photo of yourself. You can also tap the
screen to take a photo.
To take a photo using your palm, tap and tap the
Palm selfie
switch to activate it.
Show your palm to the front camera. After recognising your palm, the device will take a
photo after two seconds.
5 Slowly swivel the device left and then right or vice versa to take a wide self-portrait.
The device will take additional photos when the white frame moves to each end of the
viewfinder window.
•
Make sure to keep the white frame inside the viewfinder window.
•
The subjects should remain still while taking wide self-portraits.
•
The resolution of a photo may be affected by lighting conditions.
•
The top and bottom parts of the image displayed on the preview screen may be
cut out of the photo depending on the shooting conditions.
DRAFT,
DRAFT,
o keep the whit
Not
os when the whit
os when the whit
Not
FINAL
alm selfiealm selfie
switch t
swit
our palm, the devicour palm, the devic
t or vice versa to take a wide self-port or vice versa to take a wide self-por
os when the white fros when the white fr

Applications
95
Interval shot mode
Take series of self-portraits at an interval and save photos you want.
1 On the preview screen, tap to switch to the front camera for self-portraits.
2 Tap
MODE
Interval shot
.
3 Tap the sensor on the back of the device to take a photo of yourself. You can also tap the
screen to take a photo.
The device will take four photos at the two-second intervals.
To take a photo using your palm, tap and tap the
Palm selfie
switch to activate it.
Show your palm to the front camera. After recognising your palm, the device will take a
photo in two seconds.
4 Tick photos you want to save and tap
SAVE
.
Downloading modes
Download more shooting modes from
GALAXY Apps
.
On the preview screen, tap
MODE
Download
.
DRAFT,
Download
Not
GALAXY AppsGALAXY Apps
wnloadwnload
FINAL
swit
our palm, the devic
our palm, the devic

Applications
96
Camera settings
Quick settings
On the preview screen, use the following quick settings.
The available options may vary depending on the shooting mode and which camera
is being used.
•
: Select a filter effect to use when taking photos or recording videos. To download
more effects, tap
Download
.
•
: Use this to take photos with rich colours and reproduce details even in bright and
dark areas.
•
: Select a metering method. This determines how light values are calculated.
Centre-
weighted
measures background light in the centre of the scene.
Spot
measures the light
value at a specific location.
Matrix
averages the entire scene.
•
: Select the length of the delay before the camera automatically takes a photo.
•
: Adjust the slide bar to take a photo with lightened faces for gentler images.
•
: Activate or deactivate the flash.
Camera settings
On the preview screen, tap .
The available options may vary depending on the shooting mode and which camera
is being used.
•
Rear camera picture size
/
Front camera picture size
: Select a resolution for photos.
Using a higher resolution will result in higher quality photos, but they will take up more
memory.
•
Rear camera video size
/
Front camera video size
: Select a resolution for videos. Using a
higher resolution will result in higher quality photos, but they will take up more memory.
•
Palm selfie
: Set the device to detect your palm, so you can use it to take self-portraits.
•
Save as flipped
: Invert the image to create a mirror-image of the original scene, when
taking photos with the front camera.
DRAFT,
ailable options may vary depending on the shooting mode and which camerailable options may var
a picture sizea picture size
/
F
DRAFT,
sing a higher resolution will rsing a higher resolution will r
Not
o with lightened fac
o with light
FINAL
t values are calcula
t values are calcula
e of the scene. e of the scene.
SpotSpot
tire scene.tire scene.
e the camera automae the camera automa
tened factened fac

Applications
97
•
Tracking AF
: Set the device to track and automatically focus on a selected subject, even
when the subject or camera moves.
•
Video stabilisation
: Activate anti-shake to reduce or eliminate blurriness resulting from
camera shake while recording a video.
•
Grid lines
: Display viewfinder guides to help composition when selecting subjects.
•
Location tags
: Attach a GPS location tag to the photo.
•
To improve GPS signals, avoid shooting in locations where the signal may be
obstructed, such as between buildings or in low-lying areas, or in poor weather
conditions.
•
Your location may appear on your photos when you upload them to the Internet.
To avoid this, deactivate the location tag setting.
•
Volume keys
: Set the device to use the Volume key to control the shutter or zoom
function.
•
Voice control
: Set the device to take photos or record videos with voice commands.
You can say “Smile”, “Cheese”, “Capture”, or “Shoot” to take a photo. To record a video, say
“Record video.”
•
Review pictures
: Set the device to show photos after capturing them.
•
Quick open
: Set the device to quickly launch the camera by pressing the Home key
twice. You can also set the device to take a photo after quick launching the camera.
•
Reset settings
: Reset the camera settings.
DRAFT,
o quickly launch the camer
ou can also set the device to take a phot
ou can also set the device to take a phot
DRAFT,
eset the camera settings
eset the camera settings
Not
“Shoot
o show photos afw photos af
Not
ly launch the camerly launch the camer
o take a phot
o take a phot
FINAL
ontrol the shutttrol the shutt
ecord videos with vecord videos with v
“Shoot” to take a phot“Shoot” to take a phot
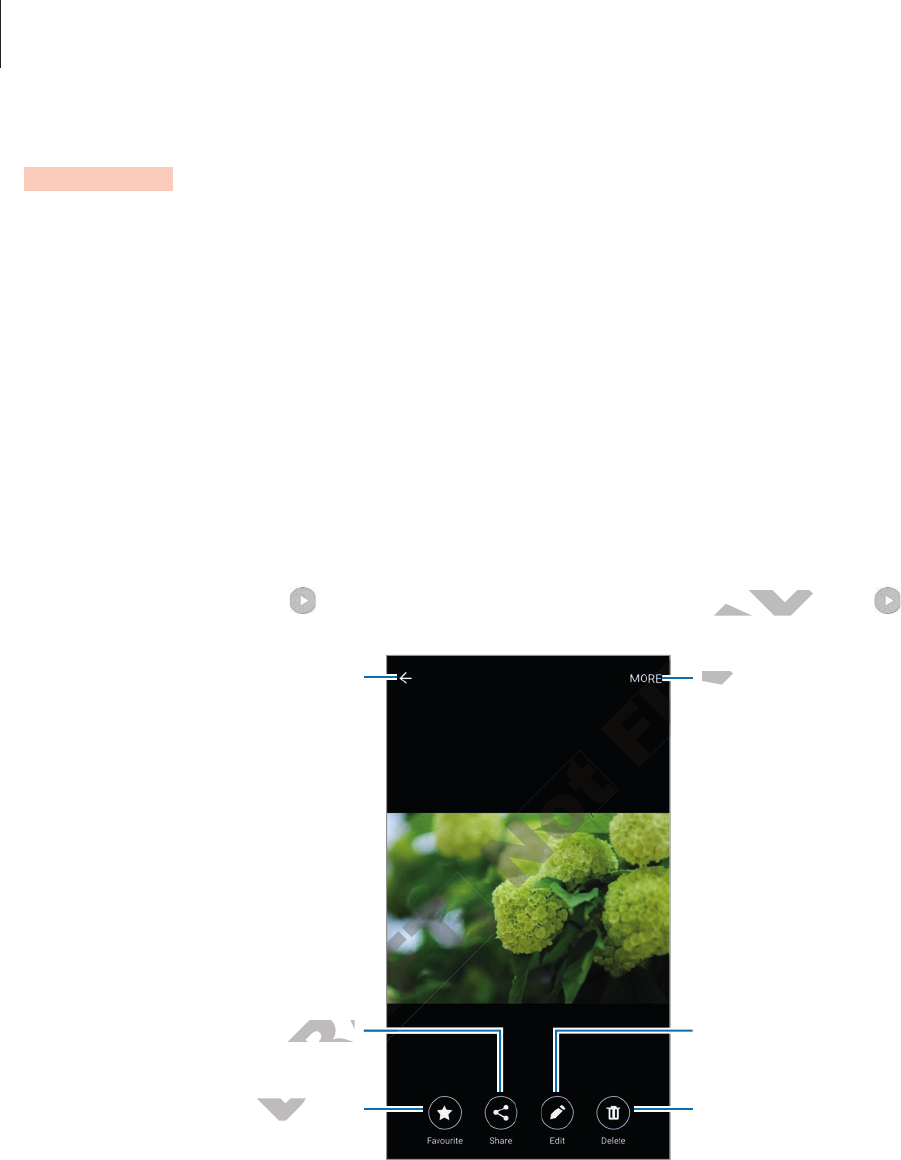
Applications
98
Gallery
Introduction
View and manage photos and videos stored in the device.
Viewing images or videos
1 Tap
Gallery
on the Apps screen.
2 Select an image or a video.
Video files show the icon on the preview thumbnail. To play a video, tap .
More options
Move to the previous screen.
Add the image to favourites.
Share the image with others.
Delete the image.
Modify the image.
To hide or show the menus, tap the screen.
DRAFT,
DRAFT,
dd the image to favouritesdd the image to favour
e the image with others.e the image with others.
DRAFT,
DRAFT,
FINAL
o play a video
o play a video
FINAL
More optionsMor
FINAL
FINAL

Applications
99
Deleting images or videos
Deleting an image or a video
Select an image or a video and tap
Delete
at the bottom of the screen.
Deleting multiple images and videos
1 On the Gallery main screen, tap and hold an image or a video to delete.
2 Tick the images or videos to delete.
3 Tap
DELETE
.
Smart Manager
Introduction
The Smart manager provides an overview of the status of your device’s battery, storage, RAM,
and system security. You can also automatically optimise the device with one tap of your
finger.
Using the quick optimisation feature
On the Apps screen, tap
Smart Manager
CLEAN NOW
.
The quick optimisation feature improves device performance through the following actions.
•
Identifying apps that use excessive battery power and deleting unnecessary files.
•
Deleting unwanted files and closing apps running in the background.
•
Scanning for malware and phishing attacks.
Using the Smart manager
On the Apps screen, tap
Smart Manager
and select a feature.
DRAFT,
view of the sta
ou can also automatically optimise the devic
ou can also automatically optimise the devic
sing the quick optimisation fsing the quick optimisa
een, tap een, tap
DRAFT,
Smart MSmart M
tion featur
tion fea
Not
view of the staview of the sta
tically optimise the devic
tically optimise the devic
FINAL

Applications
100
Battery
Check the remaining battery power and time to use the device. For devices with low battery
levels, conserve battery power by activating power saving features and closing apps that are
consuming an excessive amount of battery power.
Storage
Check the status of used and available memory capacity. You can delete unused and residual
files or uninstall apps that you do not use any more.
RAM
Check the amount of available RAM. You can close background apps and reduce the amount
of RAM you are using to speed up your device.
Device guard
Check the device’s security status. This feature scans your device for malware and blocks
phishing attacks and malicious websites.
S Planner
Introduction
Manage your schedule by entering upcoming events or tasks in your planner.
Creating events
1 Tap
S Planner
on the Apps screen.
2 Tap or double-tap a date.
If the date already has saved events or tasks in it, tap the date and tap .
DRAFT,
our schedule by entering upcour schedule by entering upc
entsents
Not
FINAL
ound apps and r
ound apps and r
e scans your device scans your devic
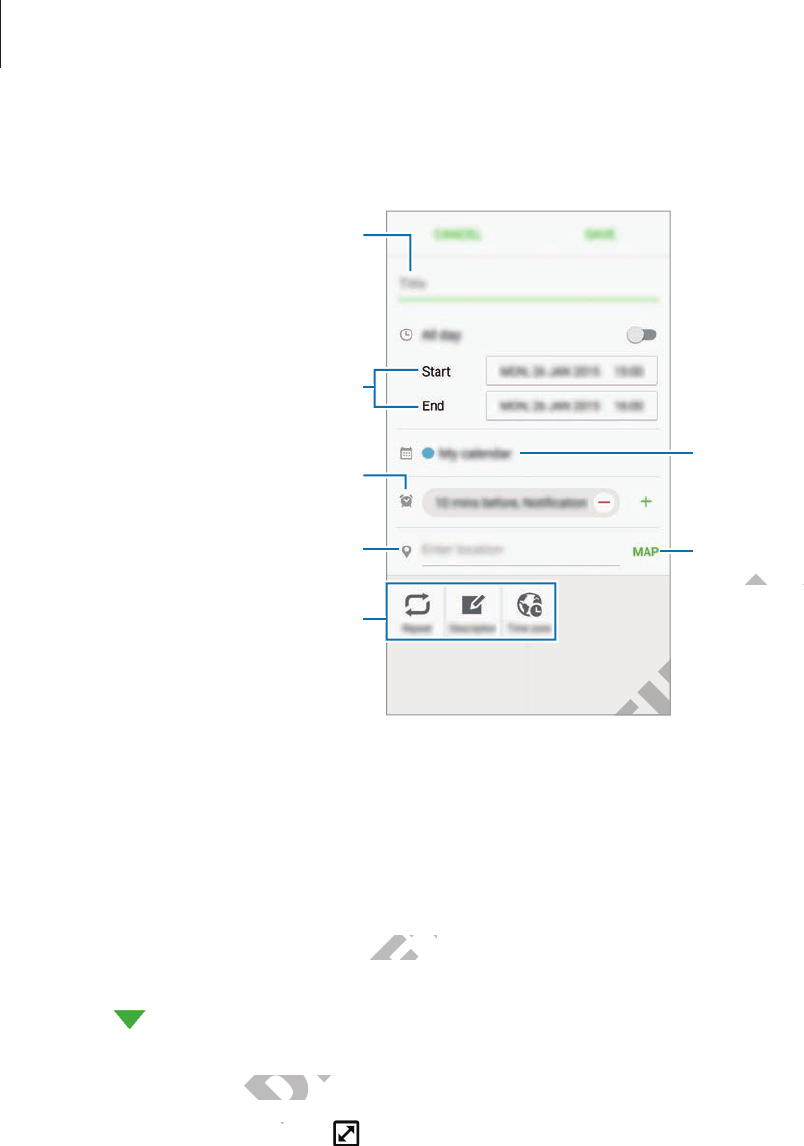
Applications
101
3 Enter event details.
Select a calendar to use or sync
with.
Attach a map showing the
location of the event.
Enter the location of the event.
Enter a title.
Set a start and end date for the
event.
Add more details.
Set an alarm.
4 Tap
SAVE
to save the event.
Creating tasks
1 Tap
S Planner
on the Apps screen.
2 Tap
Tasks
.
3 Enter task details and tap
TODAY
or
TOMORROW
to set a due date.
To add more details, tap .
4 Tap
SAVE
to save the task.
DRAFT,
pps screen.pps screen.
er task details and tap er task details and tap
T
e details, tap
e details, tap
Not
FINAL
FINAL
ttach a map sho
location of the ev
location of the ev

Applications
102
Syncing events and tasks with your accounts
On the Apps screen, tap
Settings
Accounts
, select an account service, and then tap the
Sync Calendar
switch to sync events and tasks with the account.
To add accounts to sync with, open the Apps screen and tap
S Planner
MORE
Manage
calendars
Add account
. Then, select an account to sync with and sign in. When an
account is added, a green circle is displayed next to the account name.
S Health
Introduction
S Health helps you manage your wellness and fitness. Set fitness goals, check your progress,
and keep track of your overall wellness and fitness.
Starting S Health
When running this app for the first time or restart it after performing a data reset, follow the
on-screen instructions to complete the setup.
1 Tap
S Health
on the Apps screen.
2 Follow the on-screen instructions to complete the setup.
Based on your physical statistics, the device calculates your standard basal metabolic
rate (BMR) and recommends a daily calorie intake. The recommendation may not be
accurate for all ages, body compositions, or nutritional needs.
DRAFT,
pps screen.een.
een instructions to ceen instructions t
our physical statisticsour physical sta
e (BMR) and recommends a daily calore (BMR) and recommends a daily calor
or all ages, body c
or all ages
Not
or the first time or restart it after peror the first time or restart it aft
e the setup.e the setup.
FINAL
et fitness goals, check yet fitness goals, check y
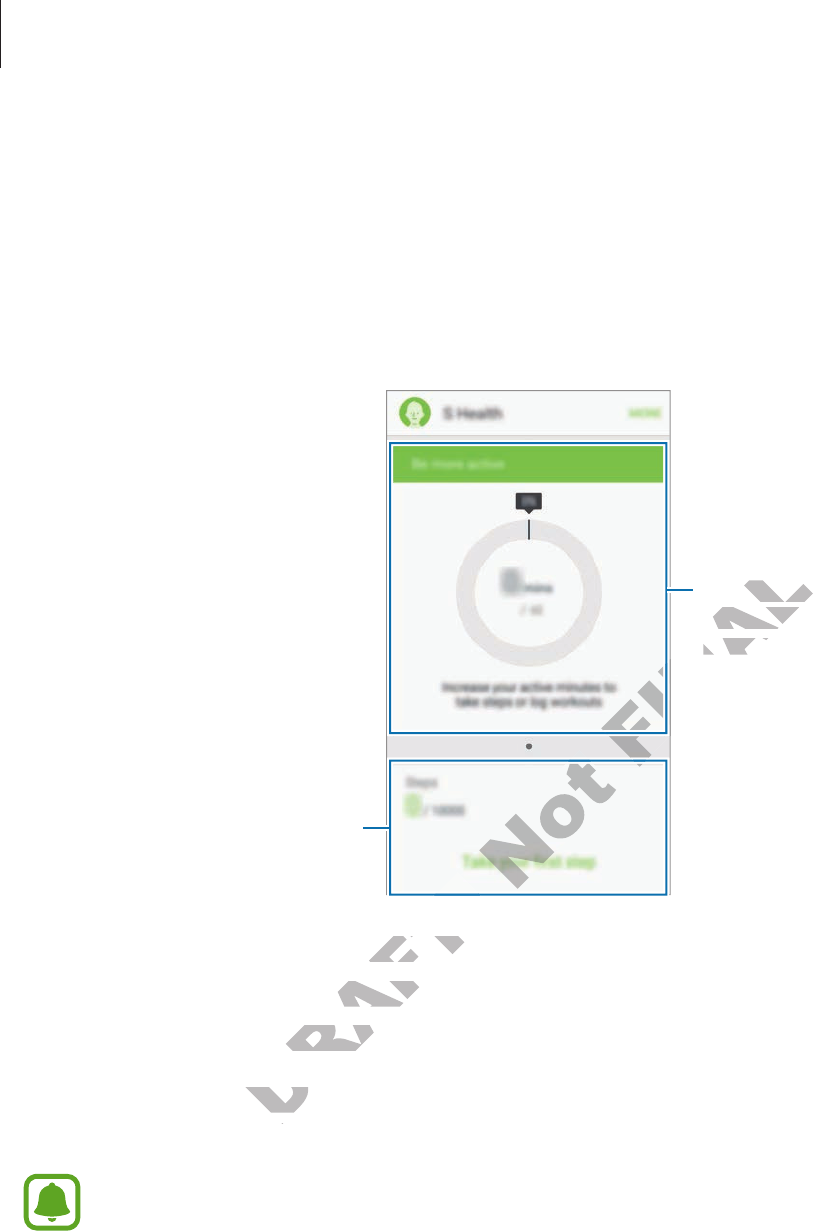
Applications
103
Using S Health
You can view the key information from S Health menus and trackers to monitor your wellness
and fitness.
Tap
S Health
on the Apps screen.
View a variety of health information using the S Health dashboard and trackers.
Trackers. Swipe upwards or
downwards to view more
trackers.
Dashboard. Swipe to the left or
right to view your goals and
programmes.
•
GOALS
: Set your fitness goals and view your progress.
•
PROGRAMS
: Use customisable exercise programmes.
•
TRACKERS
: Keep track of your overall fitness, such as food intake and step count.
To add trackers, goals, or programmes to the S Health screen, tap
MORE
Manage items
,
and then select items under
TRACKERS
,
GOALS
, or
PROGRAMS
.
To access more information about S Health functions, tap
MORE
Settings
Help
.
DRAFT,
DRAFT,
DRAFT,
our fitness goals and view your fitness goals and view y
se customisable exeromisable ex
: Keep track of your o: Keep track of your o
, goals, or progr, goals, or pr
ems under
ems under
Not
Not
FINAL
FINAL
Dashboard. S
Dashboard. S
right to view yright to view y
programmesprogrammes
FINAL
FINAL
FINAL
FINAL

Applications
104
Additional information
•
The purpose for such data collection is limited to providing the service that you have
requested, including providing additional information to enhance your wellness, back
up/sync data, data analysis and statistics or to develop and provide better services.
(But if you sign in to your Samsung account from S Health, your data may be saved on
the server for data backup purposes.) Personal information may be stored until the
completion of such purposes. You can delete personal data stored by S Health by using
the Reset data option in the Settings menu. To delete any data you have shared with
social networks or transferred to storage devices, you must delete them separately.
•
You assume full responsibility for the inappropriate use of data shared on social networks
or transmitted to others. Use caution when sharing your personal data with others.
•
If the device is connected to measuring devices, verify the communication protocol to
confirm proper operation. If you use a wireless connection, such as Bluetooth or ANT+,
the device may be affected by electronic interference from other devices. Avoid using the
device near other devices that transmit radio waves.
•
The content used in the S Health app may vary depending on the software version of
the app. The services provided with the app are subject to change or the cancellation of
support without prior notice.
•
Available S Health functions and services may vary depending on the local laws and
regulations in your region.
•
Some functions of S Health may not be provided depending on your region.
•
S Health functions are intended for fitness and informational purposes only and is not
intended for use in the diagnosis of disease or other conditions, or in the cure, mitigation,
treatment, or prevention of disease.
DRAFT,
tions and servic
DRAFT,
tions of S Health may not be prtions of S Health may not be pr
e intended for fitness and infe intended for fitness and inf
or use in the diagnosis of disease or other cor use in the diagnosis of disease or other c
, or prevention of disease, or prevention of disease
Not
ary depending on the sof
ary depending on the sof
vided with the app are subjec
vided with the app are subjec
vices may vvices may v
FINAL
our personal da
ify the communica
ify the communica
tion, such as Bluettion, such as Bluet
ence from other devicence from other devic
ves.ves.
y depending on the sofy depending on the sof

Applications
105
S Voice
Introduction
Perform various tasks simply by speaking.
Setting a wake-up command
You can launch
S Voice
using your own wake-up command.
When launching
S Voice
for the first time, tap
START
and set your own wake-up command.
To change the wake-up command, open the Apps screen and tap
S Voice
. Then, tap
Voice wake-up
Set Wake up Command
and follow the on-screen instructions.
Using S Voice
1 Say the preset wake-up command.
Alternatively, tap
S Voice
on the Apps screen.
When
S Voice
is launched, the device begins voice recognition.
This app may not be available depending on the region or service provider.
2 Say a voice command.
If the device recognises the command, the device will perform the corresponding action.
To repeat a voice command or say a different command, tap .
This app will close automatically if the device is not used for a specified period.
Tips for better voice recognition
•
Speak clearly.
•
Speak in quiet places.
•
Do not use offensive or slang words.
•
Avoid speaking in dialectal accents.
The device may not recognise your commands or may perform unwanted commands
depending on your surroundings or how you speak.
DRAFT,
ailable depending on the r
ailable depending on the r
ommand.ommand.
ognises the commandognises the c
oice command or saoice command or sa
Not
pps screen.een.
e begins voice begins voic
FINAL
S Voic
w the on-screen instruc
w the on-screen instruc
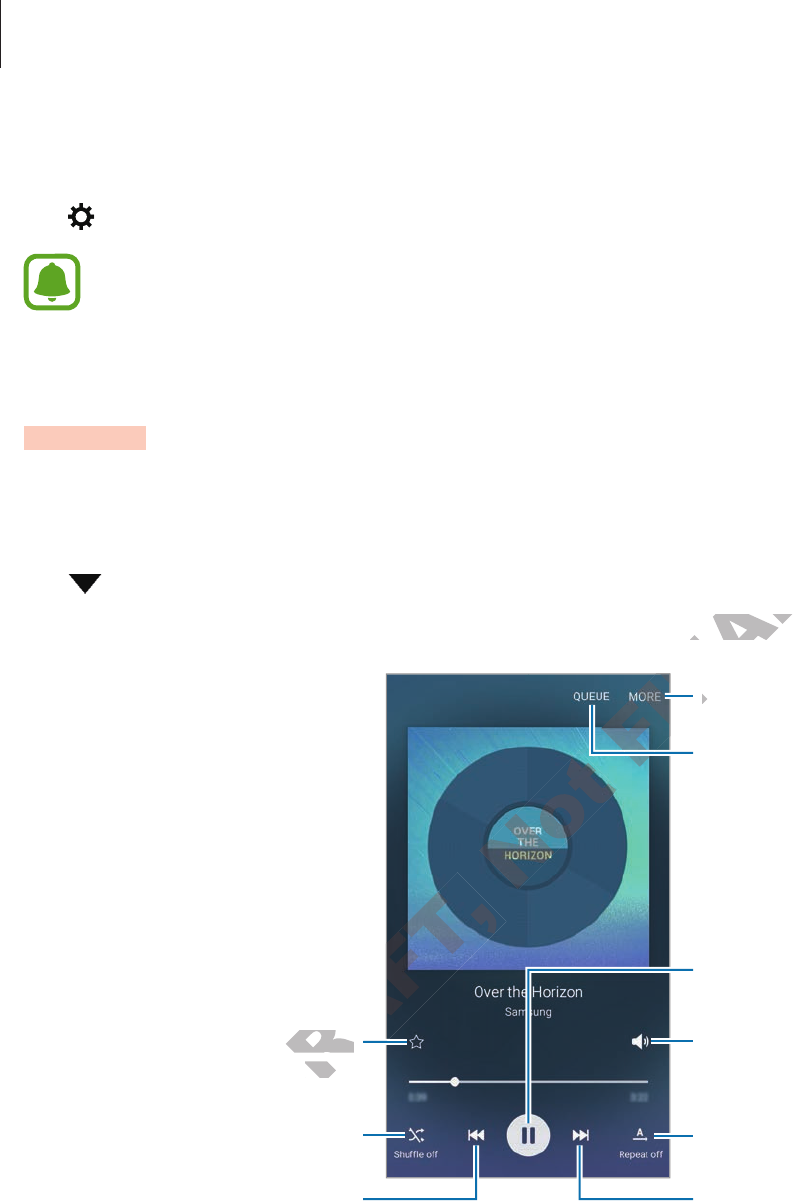
Applications
106
Setting the language
Tap
Language
, and then select a language.
The selected language is applied to
S Voice
only, not to the language displayed on
the device.
Music
Listen to music sorted by category and customise playback settings.
Tap
Music
on the Apps screen.
Tap , select a category, and then select a song to play.
Tap the album image at the bottom of the screen to open the music player screen.
Change the repeat mode.
Skip to the next song. Tap and
hold to fast-forward.
Pause and resume playback.
Access additional options.
Adjust the volume.
Skip to the previous song. Tap
and hold to rewind.
Turn on shuffle.
Set the file as your favourite
song.
Open the playlist.
DRAFT,
DRAFT,
n on shuffle
DRAFT,
DRAFT,
our favourite our favourite
song.song
FINAL
o open the music playo open the music play
FINAL
FINAL
FINAL
AcA
FINAL
FINAL
FINAL
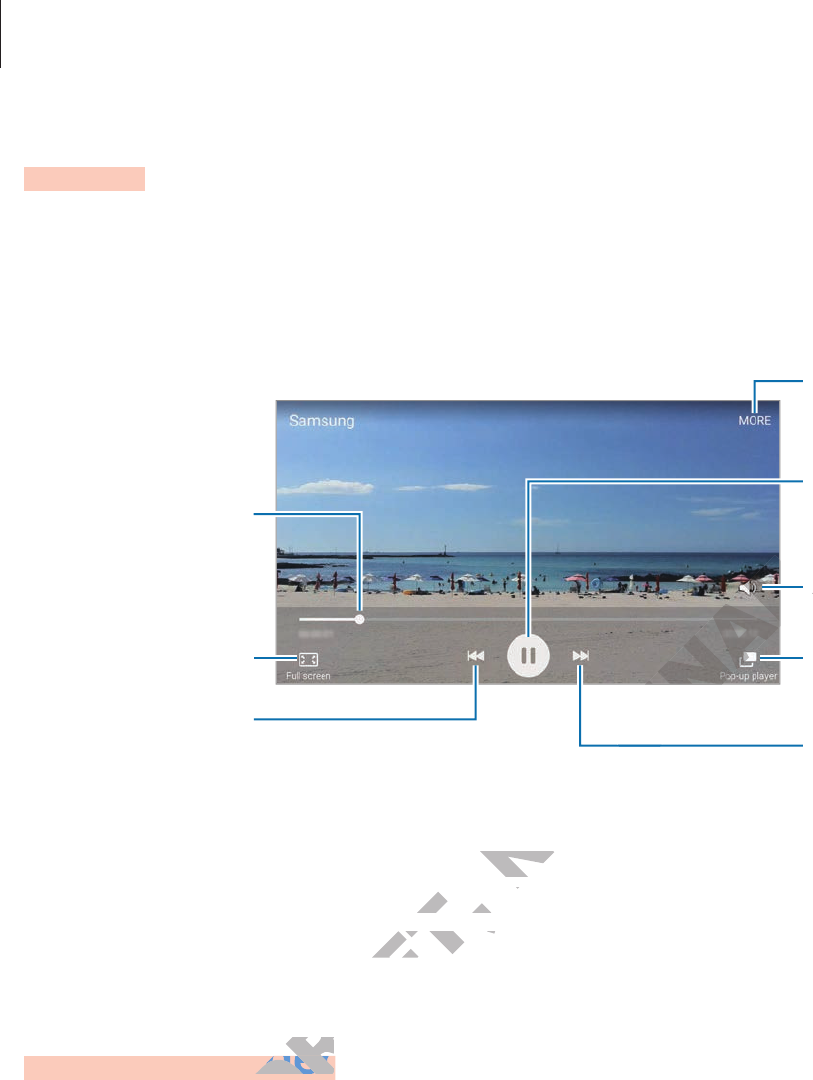
Applications
107
Video
Watch videos stored in the device and customise playback settings.
Tap
Video
on the Apps screen.
Select a video to play.
Change screen ratio.
Rewind or
fast-forward by
dragging the bar.
Skip to the previous
video. Tap and hold
to rewind.
Skip to the next
video. Tap and hold
to fast-forward.
Access additional
options.
Switch to the
pop-up video player.
Pause and resume
playback.
Adjust the volume.
Drag your finger up or down on the left side of the playback screen to adjust the brightness,
or drag your finger up or down on the right side of the playback screen to adjust the volume.
To rewind or fast-forward, swipe to the left or right on the playback screen.
Voice Recorder
Introduction
Use different recording modes for various situations, such as in an interview. The device can
convert your voice to text and distinguish between sound sources.
DRAFT,
wn on the left side of the pla
wn on the right side of the pla
wn on the right side of the pla
DRAFT,
DRAFT, DRAFT,
, swipe to the left or r, swipe to the left or r
orderorder
Voice Recorder
ecorderecorder
Not
t side of the plat side of the pla
t side of the pla
t side of the pla
FINAL
FINAL
FINAL
FINAL
A
A
FINAL
FINAL
FINAL
FINAL
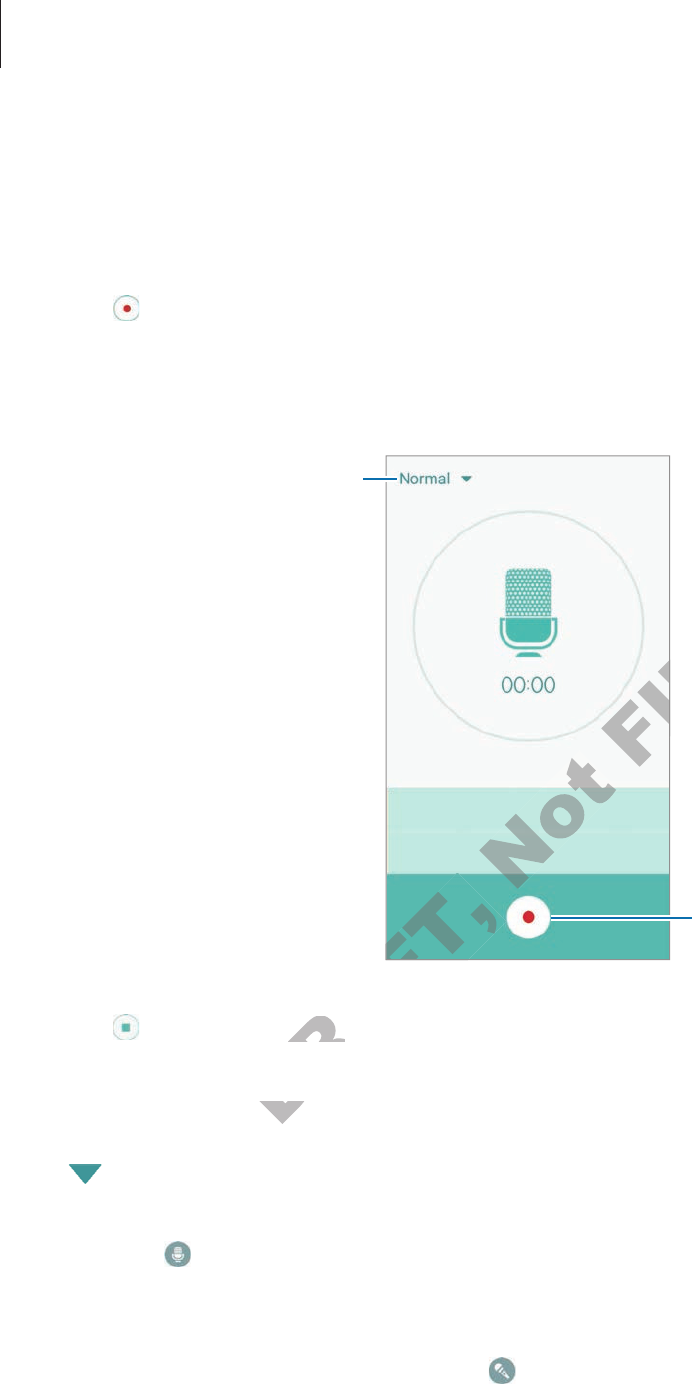
Applications
108
Recording voice memos
1 Tap
Voice Recorder
on the Apps screen.
2 Tap to start recording. Speak into the microphone.
Tap
Pause
to pause recording.
While recording a voice memo, tap
Bookmark
to insert a bookmark.
Change the recording mode.
Start recording.
3 Tap to finish recording.
Changing the recording mode
Tap to select a mode from the list.
•
Normal
: This is the normal recording mode. Voice memos recorded in this mode appear
with the icon next to them.
•
Interview
: The microphone is sensitive to sounds from two directions. In this mode, both
the top and the bottom of the device pick up equal amounts of sound. Voice memos
recorded in this mode appear with the icon next to them.
DRAFT,
DRAFT,
ording.ording.
ing the recording mode
ing the recor
FINAL
FINAL

Applications
109
•
Voice memo
: The device records your voice and simultaneously converts it to on-screen
text. For best results, keep the device near your mouth and speak loudly and clearly in a
quiet place. Voice memos recorded in this mode appear with the icon next to them.
If the voice memo system language does not match the language you are speaking,
the device will not recognise your voice. Before using this feature, tap the current
language to set the voice memo system language.
Playing selected voice memos
When you review interview recordings, you can mute or unmute certain sound sources in the
recording.
1 Tap
Voice Recorder
on the Apps screen.
2 Tap
Recordings
and select a voice memo recorded in interview mode.
3 To mute certain sound sources, tap for the corresponding direction that sound is to be
muted.
The icon will change to and the sound will be muted.
Unmuted sound source
Muted sound source
DRAFT,
DRAFT,
ed sound sourceed sound source
DRAFT,
DRAFT,
Not
or the cor
and the sound will be mut and the sound will be mut
Not
FINAL
ded in interview modeded in interview mode
orresponding dirorresponding dir

Applications
110
My Files
Access and manage various files stored in the device or in other locations, such as cloud
storage services.
Tap
My Files
on the Apps screen.
•
Category
: View files by category.
•
Local storage
: View files stored in the device.
•
Cloud storage
: View files stored in the cloud storage service.
•
STORAGE USAGE
: View your device’s memory information.
To search for files or folder, tap
SEARCH
.
Memo
Create memos and organise them by category.
Tap
Memo
on the Apps screen.
Composing memos
Tap on the memos list and enter a memo. While composing a memo, use the following
options:
•
Category
: Create or set a category.
•
Image
: Insert images.
•
Voice
: Make a voice recording to insert.
•
Tasks
: Add tick boxes at the beginning of each row to create a list of tasks.
To save the memo, tap
SAVE
.
To edit a memo, tap a memo, and then tap the content of the memo.
Searching for memos
Tap
SEARCH
on the memos list and enter a keyword to search for memos that include the
keyword.
er a memo
er a memo
e or set a category.e or set a categor
oice recording toice recording t
DRAFT,
dd tick boxes at the begdd tick boxes a
SAVE
Not
er a memo. While c
er a memo. While c
FINAL

Applications
111
Clock
Introduction
Set alarms, check the current time in many cities around the world, time an event, or set a
specific duration.
Alarm
On the Apps screen, tap
Clock
Alarm
.
Setting alarms
Set an alarm time and tap
SAVE
.
To select a sound mode, tap and select an option.
To set an alarm with various alarm options, tap
OPTIONS
, set alarm options, and then tap
SAVE
.
To activate or deactivate alarms, tap the switch next to the alarm in the alarms list.
Stopping alarms
Tap
DISMISS
to stop an alarm. If you have previously enabled the snooze option, tap
SNOOZE
to repeat the alarm after a specified length of time.
Deleting alarms
Tap on an alarm in the list of alarms.
World clock
On the Apps screen, tap
Clock
World clock
.
Creating clocks
Enter a city name or select a city from the globe, and then tap .
f you have previously enabled the snoo
f you have previously enabled the snoo
DRAFT,
m after a specified length of timem after a specified length of time
m in the list of alarm in the list of alar
Not
, tap the switch next to the alar
ch next to the alar
FINAL
OPTIONSOPTIONS
, set alar, set alar

Applications
112
Deleting clocks
Tap on a clock.
Stopwatch
1 On the Apps screen, tap
Clock
Stopwatch
.
2 Tap
START
to time an event.
To record lap times while timing an event, tap
LAP
.
3 Tap
STOP
to stop timing.
To restart the timing, tap
RESUME
.
To clear lap times, tap
RESET
.
Timer
1 On the Apps screen, tap
Clock
Timer
.
2 Set the duration, and then tap
START
.
3 Tap
DISMISS
when the timer goes off.
Calculator
Perform simple or complex calculations.
Tap
Calculator
on the Apps screen.
Rotate the device to landscape orientation to display the scientific calculator. If
Screen
rotation
is disabled, open the notification panel and tap
Screen rotation
to activate it.
To see the calculation history, tap
HISTORY
. To close the calculation history panel, tap
KEYPAD
.
To clear the history, tap
HISTORY
CLEAR HISTORY
.
DRAFT,
START
STAR
.
when the timer goes off. when the timer goes off
omplex calcula
Not
FINAL

Applications
113
Google apps
Google provides entertainment, social network, and business apps. You may require a Google
account to access some apps. Refer to Accounts for more information.
To view more app information, access each app’s help menu.
Some apps may not be available or may be labelled differently depending on the
region or service provider.
Chrome
Search for information and browse webpages.
Gmail
Send or receive emails via the Google Mail service.
Maps
Find your location on the map, search for locations, and view location information for various
places.
Play Music
Discover, listen to, and share music on your device.
Play Movies & TV
Watch videos stored on your device and download various content to watch from the
Play
Store
.
Play Books
Download various books from
Play Store
and read them.
Play Newsstand
Read news and magazines that interest you in one convenient location.
DRAFT,
e music on your device music on your devic
DRAFT,
ed on your deviced on your devic
Not
tions, and view loca
tions, and view loca
FINAL

Applications
114
Play Games
Download games from
Play Store
and play them with others.
Drive
Store your content on the cloud, access it from anywhere, and share it with others.
YouTube
Watch or create videos and share them with others.
Hangouts
Chat with your friends individually or in groups and use images, emoticons, and video calls
while you are chatting.
Google
Search quickly for items on the Internet or your device.
Voice Search
Search quickly for items by saying a keyword or phrase.
Google Settings
Configure settings for some features provided by Google.
DRAFT,
ying a keywor
or some features proor some features pr
Not
our devic
our devic
ord or phrord or phr
FINAL
, emoticons
, emoticons
our device.our device.
Applications
115
Microsoft apps
Microsoft provides social network, business, and productivity apps. You may require a
Microsoft account to access some apps.
To view more app information, access each app’s help menu.
Some apps may not be available depending on the region or service provider.
Office Mobile
View and edit documents in various formats.
OneDrive
Store your content on the cloud, access it from anywhere, and share it with others.
OneNote
Create and share your notes with others.
Skype
Make voice or video calls to your friends over the Internet. You can also chat with your friends
individually or in groups.
DRAFT,
our friends over the I
our friends over the I
Not
FINAL
, and share it with others, and share it with others

116
Appendix
Accessibility
About Accessibility
Improve accessibility with features that make the device easier to use for users who have
impaired vision, hearing, and reduced dexterity.
On the Apps screen, tap
Settings
Accessibility
.
Using the Home key to open accessibility menus
You can access the following accessibility menus by pressing the Home key three times
quickly.
•
Accessibility
•
Galaxy Talkback
•
Universal switch
•
Negative colours
•
Greyscale
•
Colour adjustment
•
Interaction control
•
Page reader
•
Magnifier
On the Apps screen, tap
Settings
Accessibility
Direct access
, and then tap the switch
to activate it. Then, select an accessibility menu to open when you press the Home key three
times quickly.
DRAFT,
DRAFT, DRAFT,
Interaction control
troltrol
Not
FINAL
essibility menusessibility menus
y pressing the Home key thry pressing the Home key thr

Appendix
117
Voice feedback (TalkBack)
Activating or deactivating TalkBack
When you activate TalkBack, the device reads aloud the text on the screen or selected
features when you tap it once.
On the Apps screen, tap
Settings
Accessibility
Vision
Galaxy Talkback
, and then
tap the switch to activate it. The device will start voice feedback.
To deactivate TalkBack, tap the switch and tap anywhere on the screen twice quickly.
When you activate TalkBack for the first time, the tutorial will start after activation. You can
replay it by tapping
Galaxy Talkback tutorial
.
Some features are not available while you are using TalkBack.
Controlling the screen with finger gestures
You can use various finger gestures to control the screen while you are using TalkBack.
One finger gestures
•
Tapping: Read aloud the item under your finger. To explore the screen, place a finger on
the screen and move it on the screen.
•
Tapping twice: Open the selected item. While selected items are read aloud, when you
hear the item you want, release your finger from the item. Then, tap anywhere on the
screen twice quickly.
•
Double-tapping and holding the screen: Move an item or access an available option.
•
Swiping to the left: Move to the previous item.
•
Swiping to the right: Move to the next item.
•
Swiping upwards or downwards: On the contextual menu, use an option or change
settings for the option. In text selection mode, move the cursor backwards or forwards to
select text.
DRAFT,
e it on the screen.
e it on the screen.
e: Open the selected item. W
e: Open the selected item. W
, release your finger fr, release y
-tapping and holding the scr-tapping and holding the scr
DRAFT,
o the left: Move to the left: Move t
ight: M
Not
ol the screen while y
ol the screen while y
em under your fingerem under your finger
FINAL
alkBack.alkBack.
een while yeen while y

Appendix
118
•
Swiping to the left then right in one motion: Scroll up the screen.
•
Swiping to the right then left in one motion: Scroll down the screen.
•
Swiping upwards then downwards in one motion: Move to the first item on the screen.
•
Swiping downwards then upwards in one motion: Move to the last item on the screen.
Two finger gestures
•
Tapping: Pause or resume voice feedback.
•
Tapping twice: Start, pause, or resume playback.
•
Tapping three times: Check the current time, remaining battery power, and mode.
To change items that are read aloud, open the Apps screen and tap
Settings
Accessibility
Vision
Galaxy Talkback
SETTINGS
Indicator information
.
•
Double-tapping and holding the screen: Enable or disable text selection mode.
•
Swiping to the left: Move to the next page. In text selection mode, copy the selected text.
•
Swiping to the right: Return to the previous page. In text selection mode, paste the
copied text.
•
Swiping upwards: Scroll up the list. In text selection mode, cut the selected text.
•
Swiping downwards: Scroll down the list. In text selection mode, select all text.
•
Swiping in any direction on the locked screen: Unlock the screen.
•
Swiping downwards from the top of the screen: Open the notification panel.
Three finger gestures
•
Tapping: Start reading items aloud from the top.
•
Tapping twice: Start reading from the next item.
•
Tapping three times: Read the last selected text and copy it to the clipboard.
•
Swiping to the left or right: Open the contextual menu and scroll through the options.
•
Swiping upwards or downwards: Change the text reading and selecting granularity.
DRAFT,
op of the scr
op of the scr
eading items aloud from the teading items aloud fr
DRAFT,
tart reading from the netart reading from the ne
ee times: Read the last selecee times: Read the last selec
DRAFT,
o the left or righ
o the left or righ
Not
t selection mode
t selection mode
wn the list. In text selec
. In text selec
tion on the locked screen: Unlock the scrtion on the locked screen: Unlock the scr
op of the screen: Open the notifica
op of the scr
FINAL
ext selection mode
xt selection mode
tion mode, ction mode, c
n text selection moden text selection mode
tion modetion mode

Appendix
119
Using the contextual menu
While you are using TalkBack, swipe to the left or right with three fingers. The contextual
menu will appear and the device will read the options aloud. Swipe to the left or right
with three fingers to scroll through the options. When you hear the option you want,
swipe upwards or downwards to use the option or adjust the settings for the option. For
example, when you hear
Media Volume
, you can adjust the volume by swiping upwards or
downwards.
Adding and managing image labels
You can assign labels to images on the screen. The device reads aloud the labels when the
images are selected. Add labels to unlabelled images by tapping the screen twice with three
fingers and holding.
To view the labels, open the Apps screen and tap
Settings
Accessibility
Vision
Galaxy Talkback
SETTINGS
Manage custom labels
.
Configuring settings for TalkBack
Configure settings for TalkBack for your convenience.
On the Apps screen, tap
Settings
Accessibility
Vision
Galaxy Talkback
SETTINGS
.
•
Speech volume
: Adjust the volume level for voice feedback.
•
Speech rate
: Select a speed for voice feedback.
•
Use pitch changes
: Set the device to read aloud text at a low pitch when it is entered
using a keyboard.
•
Keyboard echo
: Set the device to read aloud a word that you enter using a keyboard
when you tap the space key.
•
Speak when screen is off
: Set the device to provide voice feedback when the screen is
turned off.
•
Use proximity sensor
: Set the device to pause voice feedback when you place your hand
over the sensor at the top of the device.
•
Shake to start continuous reading
: Set the device to read aloud the text displayed on
the screen when you shake the device. You can select from various shaking speeds.
DRAFT,
djust the volume level f
djust the volume level f
DRAFT,
t a speed for voice feedbackt a speed for voice f
: Set the device t: Set the devic
: Set the devic: Set the devic
ou tap the space key
ou tap the spac
Not
enience.enience.
cessibilityessibility
FINAL
y tapping the scr
AccessibilitAccessibilit
om labelsom labels
.

Appendix
120
•
Vibration feedback
: Set the device to vibrate when you explore the screen.
•
Sound feedback
: Set the device to emit a sound when you control the screen, such as
scrolling the screen, and more.
•
Focus speech audio
: Set the device to turn the media volume down when the device
reads an item aloud.
•
Sound volume
: Adjust the volume that sound is played when you touch the screen to
control it. This feature is available when
Sound feedback
is selected.
•
Explore by touch
: Set the device to read aloud the items under your finger.
•
Single-tap selection
: Set the device to open the selected item by tapping it once.
•
Back/Recent key feedback
: Set the device to provide voice feedback when you tap
or once. Tap or twice to activate them.
•
Manage custom labels
: View the labels you added.
•
Indicator information
: Select items to read aloud when you tap the screen three times
with two fingers.
•
Developer settings
: Set options for app development.
Using the device with the screen turned off
Set the device to turn the screen off at all times to keep the content on your screen private.
The screen does not turn on when you press the Home key or tap the screen. Currently
activated features do not turn off when the screen is off.
On the Apps screen, tap
Settings
Accessibility
Vision
, and then tap the
Dark screen
switch to activate it. You can activate or deactivate this feature by pressing the Power key
twice.
Reading passwords aloud
Set the device to read the password aloud when you enter the password while TalkBack is
activated.
On the Apps screen, tap
Settings
Accessibility
Vision
, and then tap the
Speak
passwords
switch to activate it.
DRAFT,
t all times t
n on when you press the Home key or tap the scr
n on when you press the Home key or tap the scr
n off when the scr
n off when the scr
ettingsettings
DRAFT,
Accessibilit
ou can activate or deacou can activate or deac
ords aloud
ords aloud
Not
elopmen
een turned offeen turned off
t all times to keep the ct all times to keep the c
ess the Home key or tap the scr
ess the Home key or tap the scr
FINAL
ead aloud when you tap the scread aloud when you tap the scr
elopment.elopment.

Appendix
121
Setting text-to-speech features
Change the settings for text-to-speech features used when TalkBack is activated, such as
languages, speed, and more.
On the Apps screen, tap
Settings
Accessibility
Vision
Text-to-speech options
, and
then use the following functions:
•
Preferred TTS engine
: Select an engine for the text-to-speech feature.
•
Speech rate
: Adjust the speed for the text-to-speech feature.
•
Default language status
: View the status of the current language set for the text-to
speech feature.
Entering text using the keyboard
To display the keyboard, tap the text input field, and then tap anywhere on the screen twice
quickly.
When you touch the keyboard with your finger, the device reads aloud the character keys
under your finger. When you hear the character you want, release your finger from the screen
to select it. The character is entered and the device reads the text aloud.
If
Rapid key input
is not activated, release your finger from the character you want, and
then tap anywhere on the screen twice quickly. To activate the rapid key input feature, open
the Apps screen, tap
Settings
Accessibility
Vision
, and then tap the
Rapid key input
switch to activate it.
Entering additional characters
Tap and hold a key on the keyboard to enter additional characters available for the key. A
pop-up window appears above the key showing available characters. To select a character,
drag your finger on the pop-up window until you hear the character you want, and release it.
ccessibilit
ccessibilit
ering additional charactersering additional characters
DRAFT,
ap and hold a key on the keyboard tap and hold a key on the keyboar
w appears above the key show appears abov
DRAFT,
our finger on the pop-up windo
our finger on the pop
Not
ou w
ed and the device reads the ted and the device reads the t
elease your finger frelease your finger fr
e quickly. To ace quickly. To ac
essibility
essibility
FINAL
, and then tap anywhere on the scr, and then tap anywhere on the scr
, the device reads aloud the char, the device reads aloud the char
ou want, release you want, release y
eads the teads the t

Appendix
122
Vision
Writing voice memos to voice labels
You can use voice labels to distinguish objects of similar shape by attaching labels to them.
You can record and assign a voice memo to an NFC-enabled voice label. The voice memo is
played back when you place your device near the label.
Turn on the NFC feature before using this feature.
1 On the Apps screen, tap
Settings
Accessibility
Vision
Voice label
.
The voice recorder will start.
2 When you are finished recording, tap to stop.
3 Hold the back of your device over the voice label.
The information in the voice recording will be written to the voice label.
Using the page reader
Set the device to launch the page reader and to read the screen aloud.
1 On the Apps screen, tap
Settings
Accessibility
Vision
, and then tap the
Page
reader
switch to activate it.
2 Tap and hold the screen with three fingers.
The page reader controller will appear.
3
Tap to start reading the screen.
To adjust the speed, tap or .
DRAFT,
eader and t
eader and t
Settingsettings
Ac
ate it.te it.
ap and hold the screen with thrap and hold the screen with thr
eader controller will appear
eader controller will appear
Not
ding will be writt
ding will be writt
eader and to r
eader and to r
FINAL
itten to the vitten t

Appendix
123
Changing the font size
Change the font size displayed on the screen. Setting the font size to
Large
may not be
available in some apps.
On the Apps screen, tap
Settings
Accessibility
Vision
Larger font
, and then tap the
Larger font
switch to activate it.
Magnifying the screen
Magnify the screen and zoom in on a specific area.
On the Apps screen, tap
Settings
Accessibility
Vision
Magnification gestures
, and
then tap the switch to activate it.
•
Zooming in and out: Quickly tap the screen three times to zoom in on a specific area.
Quickly tap the screen three times again to return to the normal view.
•
Exploring the screen by scrolling: Drag two or more fingers across the magnified screen.
•
Adjusting zoom ratio: Pinch two or more fingers on the magnified screen or spread them
apart.
You can also temporarily magnify the screen by tapping the screen three times and holding.
While holding the screen, drag your finger to explore the screen. Release your finger to return
to the normal view.
•
Keyboards on the screen cannot be magnified.
•
When this feature is activated, the performance of some apps, such as
Phone
and
Calculator
, may be affected.
Using a magnifier
Activate a magnifier to zoom in on the screen to view a larger version of the content.
On the Apps screen, tap
Settings
Accessibility
Vision
Magnifier
, and then tap the
switch to activate it. The magnifier will appear on the screen.
Tap and move the magnifier to where you want to zoom in on the screen.
DRAFT,
een cannot be mag
een cannot be mag
e is activated, the pere is activated, the per
DRAFT,
y be affected.y be affected
nifiernifier
nifier to zoom in on the scr
nifier to zoom in on the scr
Not
een by tapping the scr
y tapping the scr
our finger to explore the scrour finger to explore the scr
FINAL
oom in on a specific ar
oom in on a specific ar
o the normal viewo the normal view
e fingers across the mage fingers across the mag
e fingers on the magnified scre fingers on the mag

Appendix
124
Converting the screen to greyscale mode
Display colours on the screen as grey tones.
On the Apps screen, tap
Settings
Accessibility
Vision
, and then tap the
Greyscale
switch to activate it.
Reversing the display colours
Improve screen visibility to help users recognise text on the screen more easily.
On the Apps screen, tap
Settings
Accessibility
Vision
, and then tap the
Negative
colours
switch to activate it.
Colour adjustment
Adjust how colours are displayed on the screen if you have difficulty in distinguishing colours.
The device changes the colours into more recognisable colours.
On the Apps screen, tap
Settings
Accessibility
Vision
Colour adjustment
, and
then tap the switch to activate it. Follow the on-screen instructions to complete the colour
adjustment procedure.
Hearing
Sound detectors
Set the device to vibrate when it detects your doorbell or a baby crying.
Baby crying detector
On the Apps screen, tap
Settings
Accessibility
Hearing
Sound detectors
, and then
tap the
Baby crying detector
switch to activate it. The device will vibrate when it detects
sound and the alert will be saved as a log.
DRAFT,
DRAFT, DRAFT,
e when it detects ye when it detec
tortor
Baby crying detector
tortor
een, tap een, tap
SettingsSettings
ying detec
Not
w the on-screen instruc
FINAL
e difficulty in distinguishing ce difficulty in distinguishing c
olours.olours.
VisionVision
Colour adjustmenC
een instruceen instruc

Appendix
125
Doorbell detector
1 On the Apps screen, tap
Settings
Accessibility
Hearing
Sound detectors
, and
then tap the
Doorbell detector
switch to activate it.
2 Tap to make a recording of your doorbell.
The device will detect and record the doorbell.
3 Tap and ring your doorbell to check if it is recorded correctly. When the device detects
the doorbell sound, tap
OK
.
To change the doorbell sound, tap
Change sound
.
The device will vibrate when it detects sound and the alert will be saved as a log.
Setting flash notification
Set the flash to blink when you have incoming calls, new messages, or notifications.
On the Apps screen, tap
Settings
Accessibility
Hearing
, and then tap the
Flash
notification
switch to activate it.
Turning off all sounds
Set the device to mute all device sounds, such as media sounds, and the caller’s voice during
a call.
On the Apps screen, tap
Settings
Accessibility
Hearing
, and then tap the
Turn off all
sounds
switch to activate it.
Caption settings
On the Apps screen, tap
Settings
Accessibility
Hearing
Samsung subtitles (CC)
or
Google subtitles (CC)
, and then tap the switch to activate it.
Select an option for configuring the caption settings.
DRAFT,
e sounds, such as media sounds
e sounds, such as media sounds
Settingsettings
Ac
ate it.ate it.
Not
essibility
Hearing
FINAL
t will be saved as a log
t will be saved as a log
, new messages, new messages
HearingHearing

Appendix
126
Adjusting the sound balance
Set the device to adjust the sound balance when using a headset.
1 Connect a headset to the device and wear it.
2 On the Apps screen, tap
Settings
Accessibility
Hearing
Sound balance
.
3 Drag the adjustment bar to the left or right and adjust the sound balance, and then tap
SET
.
Mono audio
Mono output combines stereo sound into one signal that is played through all headset
speakers. Use this if you have a hearing impairment or if a single earbud is more convenient.
On the Apps screen, tap
Settings
Accessibility
Hearing
, and then tap the
Mono audio
switch to activate it.
Auto haptic
When the auto haptic feature is activated, the device will vibrate with the sound when
playing music, watching videos, or playing games. It will also vibrate when buttons are
tapped in supported apps.
On the Apps screen, tap
Settings
Accessibility
Hearing
, and then tap the
Auto haptic
switch to activate it.
Some apps may not support this feature.
DRAFT,
ying games
ettingsettings
DRAFT,
Accessibilit
Accessibilit
ome apps may not supporome apps may not suppor
Not
, the device will vibr, the device will vibr
ying games. Iying games. I
FINAL
ed through all headset
ed through all headset
t or if a single earbud is mort or if a single earbud is mor
HearingHearing
, and then tap the , and then tap the

Appendix
127
Dexterity and interaction
Universal switch
Set the device to scan and highlight items on the screen, and then read them aloud. You can
control the touchscreen by connecting an external switch, tapping the screen, or by using
head movements and face gestures.
On the Apps screen, tap
Settings
Accessibility
Dexterity and interaction
Universal
switch
, and then tap the switch to activate it. If the universal switches are not registered on
the device, tap
ADD SWITCH
and set switches to control the device.
To activate the universal switch feature, at least one switch must be registered on the
device.
To set switches to control the device, tap
SETTINGS
Switch
.
To quickly deactivate this feature, press the Home key three times.
Assistant menu
Displaying the assistive shortcut icon
Set the device to display the assistive shortcut icon for accessing apps, features, and settings.
You can easily control the device by tapping the assistive menus in the icon.
1 On the Apps screen, tap
Settings
Accessibility
Dexterity and interaction
Assistant menu
.
2 Tap the switch to activate it.
The assistive shortcut icon appears at the bottom right of the screen.
3 Tap
Dominant hand
to move the assistive shortcut icon to a convenient location.
Accessing assistive menus
The assistive shortcut icon appears as a floating icon for easy access to the assistive menus
from any screen.
When you tap the assistive shortcut icon, the icon expands slightly and the assistive menus
appear on the icon. Tap the up or down arrow to move to other panels or swipe upwards or
downwards to select other menus.
DRAFT,
e shor
y tapping the assistiv
y tapping the assistiv
Settingsettings
A
DRAFT,
ch to activate it.ch to activate it
e shortcut icon appears a
e shortcut ic
Not
e shortcut icon fe shortcut icon f
y tapping the assistiv
y tapping the assistiv
FINAL
.
ess the Home key three times.ess the Home key three times.

Appendix
128
Using the cursor
On the assistive menu, tap
Cursor
. You can control the screen using small finger movements
on the touch area. Drag your finger on the touch area to move the cursor. Also, tap the screen
to select items under the cursor.
Use the following options:
•
/ : Select an item or scroll left or right on the screen.
•
/ : Scroll up or down the screen.
•
: Magnify the area where the cursor is located.
•
: Move the touch area to another location.
•
: Close the touch area.
To change the cursor settings, open the Apps screen, tap
Settings
Accessibility
Dexterity and interaction
Assistant menu
. Then, customise settings in
Touchpad and
cursor settings
.
Using enhanced assistive menus
Set the device to display enhanced assistive menus for selected apps.
On the Apps screen, tap
Settings
Accessibility
Dexterity and interaction
Assistant
menu
Assistant plus
, tap the switch to activate it, and then select apps.
Turning on the screen with the air gesture feature
Use the air gesture feature to turn on the screen by moving your hand above the sensor at
the top of the device. You can turn on the screen without pressing a key. When you use this
feature, place the device on a flat surface with the screen facing upwards or hold the device
securely to prevent it from moving.
On the Apps screen, tap
Settings
Accessibility
Dexterity and interaction
Air wake
up
, and then tap the switch to activate it.
Setting tap and hold delay options
Set the recognition time for tapping and holding the screen.
On the Apps screen, tap
Settings
Accessibility
Dexterity and interaction
Tap and
hold delay
, and then select an option.
een with the air gestur
een with the air gestur
e to turn on the scre to turn on the scr
ou can turn on the scrou can turn on the scr
e the device on a flat sure the device on a fla
t it from movingt it from mo
een, tap een, tap
Settings
Not
e menus for selec
e menus for selec
essibilityessibility
ch to activate itch to activate it
FINAL
ettingsettings
Accessibilit
Accessibilit
omise settings in omise settings in
or selecor selec

Appendix
129
Interaction control
Activate interaction control mode to restrict the device’s reaction to inputs while using apps.
1 On the Apps screen, tap
Settings
Accessibility
Dexterity and interaction
Interaction control
.
2 Tap the switch to activate it.
3 Press and hold the Home key and the Volume key down simultaneously while using an
app.
4 Adjust the size of the frame or draw a line around an area that you want to restrict.
5 Tap
DONE
.
The device displays the restricted area. The restricted area will not react when you touch
it and the device’s hard keys will be disabled.
To deactivate interaction control mode, press and hold the Home key and the Volume key
down simultaneously.
Direction Lock
Create a directional combination to unlock the screen.
1 On the Apps screen, tap
Settings
Accessibility
Direction Lock
and tap the switch
to activate it.
2 Drag your finger up, down, left, or right more than four times, and then tap
CONTINUE
.
3 Draw the direction combination again to verify it and tap
CONFIRM
.
4 Set a backup PIN to unlock the screen in case you forget the combination.
DRAFT,
tion to unlock the scrtion to unlock the scr
een, tap een, tap
SettingsSettings
DRAFT,
our finger up, down, lef
our finger up, do
Not
ess and hold the Home key and the
ess and hold the Home key and the
FINAL
t you w
ed area will not red area will not r

Appendix
130
Setting notification reminders
Set the device to alert you to notifications that you have not checked at the interval.
On the Apps screen, tap
Settings
Accessibility
Notification reminder
, and then tap
the switch to activate it.
To set the device to vibrate when you have unchecked notifications, tick
Vibrate
.
To set the device to turn on the notification light when you have unchecked notifications
while the screen is turned off, tick
LED indicator
.
To set an interval between alerts, tap
Reminder interval
.
To set apps to alert you to notifications, tick apps under
Select applications
.
Answering or ending calls
Change the method of answering or ending calls.
On the Apps screen, tap
Settings
Accessibility
Answering and ending calls
.
Select the desired method.
Using single tap mode
When an alarm sounds or a call comes in, tap the button to stop the alarm or answer the call
instead of dragging the button.
On the Apps screen, tap
Settings
Accessibility
, and then tap the
Single tap mode
switch
to activate it.
Managing accessibility settings
Saving accessibility settings in a file
Export the current accessibility settings in a file.
On the Apps screen, tap
Settings
Accessibility
Manage accessibility
Import/
Export
Export to My Files
.
omes in, tap the butt
ettingsettings
DRAFT,
AccessibilitAccessibilit
ing accessibility settingsing accessibilit
Not
omes in, tap the butt
omes in, tap the butt
FINAL
Answering and ending callsAnswering and ending calls

Appendix
131
Importing an accessibility settings file
Import an accessibility settings file and update the current settings.
On the Apps screen, tap
Settings
Accessibility
Manage accessibility
Import/
Export
Import from My Files
. Select a file to import and tap
DONE
. The accessibility
settings will be updated according to the imported file.
Sharing accessibility settings files
Share accessibility settings files with others via email, Wi-Fi Direct, Bluetooth, and more.
On the Apps screen, tap
Settings
Accessibility
Manage accessibility
Share via
.
Then, select the accessibility files and tap
DONE
. Select a sharing method and follow the on-
screen instructions to share the files.
Troubleshooting
Before contacting a Samsung Service Centre, please attempt the following solutions. Some
situations may not apply to your device.
When you turn on your device or while you are using the device, it
prompts you to enter one of the following codes:
•
Password: When the device lock feature is enabled, you must enter the password you set
for the device.
•
PIN: When using the device for the first time or when the PIN requirement is enabled, you
must enter the PIN supplied with the SIM or USIM card. You can disable this feature by
using the Lock SIM card menu.
•
PUK: Your SIM or USIM card is blocked, usually as a result of entering your PIN incorrectly
several times. You must enter the PUK supplied by your service provider.
•
PIN2: When you access a menu requiring the PIN2, you must enter the PIN2 supplied with
the SIM or USIM card. For more information, contact your service provider.
DRAFT,
vice or while y
er one of the follo
er one of the follo
hen the device lock featurhen the device lock f
DRAFT,
hen using the device for the first time or when the PIN rhen using the device f
er the PIN supplied with the SIM or USIM carer the PIN supplied with the SIM or USIM car
DRAFT,
ock SIM card menu
ock SIM car
Not
, please a
, please a
e or while y
e or while y
FINAL
, please attempt the f, please attempt the f

Appendix
132
Your device displays network or service error messages
•
When you are in areas with weak signals or poor reception, you may lose reception. Move
to another area and try again. While moving, error messages may appear repeatedly.
•
You cannot access some options without a subscription. For more information, contact
your service provider.
Your device does not turn on
When the battery is completely discharged, your device will not turn on. Fully charge the
battery before turning on the device.
The touchscreen responds slowly or improperly
•
If you attach a protective cover or optional accessories to the touchscreen, the
touchscreen may not function properly.
•
If you are wearing gloves, if your hands are not clean while touching the touchscreen,
or if you tap the screen with sharp objects or your fingertips, the touchscreen may
malfunction.
•
The touchscreen may malfunction in humid conditions or when exposed to water.
•
Restart your device to clear any temporary software bugs.
•
Ensure that your device software is updated to the latest version.
•
If the touchscreen is scratched or damaged, visit a Samsung Service Centre.
Your device freezes or has fatal errors
If your device freezes or hangs, you may need to close apps or reinsert the battery and turn
on the device to regain functionality. If your device is frozen and unresponsive, press and hold
the Power key and the Volume key down simultaneously for more than 7 seconds to restart it.
If this does not solve the problem, perform a factory data reset. On the Apps screen,
tap
Settings
Backup and reset
Factory data reset
RESET DEVICE
ERASE
EVERYTHING
. Before performing the factory data reset, remember to make backup copies of
all important data stored in the device.
If the problem is still not resolved, contact a Samsung Service Centre.
DRAFT,
y temporar
y tempor
e software is updat
e software is upda
een is scratched or damagedeen is scratched or damaged
eezes or has faeezes or has fa
es or hangs
es or hangs
Not
ts or your finger
ts or your finger
tion in humid conditions or when etion in humid conditions or when e
emporary sof
emporary sof
FINAL
ies to the touchscries to the touchscr
e not clean while te not clean while t
our fingerour finger

Appendix
133
Calls are not connected
•
Ensure that you have accessed the right cellular network.
•
Ensure that you have not set call barring for the phone number you are dialling.
•
Ensure that you have not set call barring for the incoming phone number.
Others cannot hear you speaking on a call
•
Ensure that you are not covering the built-in microphone.
•
Ensure that the microphone is close to your mouth.
•
If using a headset, ensure that it is properly connected.
Sound echoes during a call
Adjust the volume by pressing the Volume key or move to another area.
A cellular network or the Internet is often disconnected or audio
quality is poor
•
Ensure that you are not blocking the device’s internal antenna.
•
When you are in areas with weak signals or poor reception, you may lose reception. You
may have connectivity problems due to issues with the service provider’s base station.
Move to another area and try again.
•
When using the device while moving, wireless network services may be disabled due to
issues with the service provider’s network.
The battery icon is empty
Your battery is low. Charge the battery.
The battery does not charge properly (For Samsung-approved
chargers)
•
Ensure that the charger is connected properly.
•
Visit a Samsung Service Centre and have the battery replaced.
ing the devic
eak signals or poor r
eak signals or poor r
oblems due to issues with the ser
oblems due to issues with the ser
ea and try again.ea and try again.
hen using the device while movinghen using the device while mo
issues with the service providerissues with the service provider
on is empt
Not
ernet is often disc
ernet is often disc
ing the device’s ining the device’s in
FINAL
e to another are to another ar
en discen disc

Appendix
134
The battery depletes faster than when first purchased
•
When you expose the device or the battery to very cold or very hot temperatures, the
useful charge may be reduced.
•
Battery consumption increases when you use messaging features or some apps, such as
games or the Internet.
•
The battery is consumable and the useful charge will get shorter over time.
Your device is hot to the touch
When you use apps that require more power or use apps on your device for an extended
period of time, your device may feel hot to the touch. This is normal and should not affect
your device’s lifespan or performance.
Error messages appear when launching the camera
Your device must have sufficient available memory and battery power to operate the camera
app. If you receive error messages when launching the camera, try the following:
•
Charge the battery.
•
Free some memory by transferring files to a computer or deleting files from your device.
•
Restart the device. If you are still having trouble with the camera app after trying these
tips, contact a Samsung Service Centre.
Photo quality is poorer than the preview
•
The quality of your photos may vary, depending on the surroundings and the
photography techniques you use.
•
If you take photos in dark areas, at night, or indoors, image noise may occur or images
may be out of focus.
DRAFT,
e still having tr
e still having tr
ervice Centre.ervice Centre.
y is poorer than the pry is poorer than the pr
DRAFT,
y of your photos may of your photos ma
echniques y
echniques y
Not
or messages when launching the camer
or messages when launching the camer
ing files to a computing files to a comput
FINAL
mal and should not aff
or messages appear when launching the cameraor messages appear when launching the camera
y and battery poy and battery po
or messages when launching the cameror messages when launching the camer

Appendix
135
Error messages appear when opening multimedia files
If you receive error messages or multimedia files do not play when you open them on your
device, try the following:
•
Free some memory by transferring files to a computer or deleting files from your device.
•
Ensure that the music file is not Digital Rights Management (DRM)-protected. If the file is
DRM-protected, ensure that you have the appropriate licence or key to play the file.
•
Ensure that the file formats are supported by the device. If a file format is not supported,
such as DivX or AC3, install an app that supports it. To confirm the file formats that your
device supports, visit www.samsung.com.
•
Your device supports photos and videos captured with the device. Photos and videos
captured by other devices may not work properly.
•
Your device supports multimedia files that are authorised by your network service
provider or providers of additional services. Some content circulated on the Internet,
such as ringtones, videos, or wallpapers, may not work properly.
Another Bluetooth device is not located
•
Ensure that the Bluetooth wireless feature is activated on your device.
•
Ensure that the Bluetooth wireless feature is activated on the device you wish to connect
to.
•
Ensure that your device and the other Bluetooth device are within the maximum
Bluetooth range (10 m).
If the tips above do not solve the problem, contact a Samsung Service Centre.
A connection is not established when you connect the device to a
computer
•
Ensure that the USB cable you are using is compatible with your device.
•
Ensure that you have the proper driver installed and updated on your computer.
•
If you are a Windows XP user, ensure that you have Windows XP Service Pack 3 or higher
installed on your computer.
DRAFT,
eless featur
e and the other Bluete and the other Bluet
DRAFT,
e do not solve the problem, ce do not solve the pr
tion is not established when y
tion is not established when y
Not
e is not locatede is not located
eature is activeature is activ
ture is ac
ture is ac
FINAL
ised by your netised by your net
ontent circulaontent circula
y not work propery not work proper

Appendix
136
Your device cannot find your current location
GPS signals may be obstructed in some locations, such as indoors. Set the device to use Wi-Fi
or a mobile network to find your current location in these situations.
Data stored in the device has been lost
Always make backup copies of all important data stored in the device. Otherwise, you cannot
restore data if it is corrupted or lost. Samsung is not responsible for the loss of data stored in
the device.
A small gap appears around the outside of the device case
•
This gap is a necessary manufacturing feature and some minor rocking or vibration of
parts may occur.
•
Over time, friction between parts may cause this gap to expand slightly.
Removing the battery (non-removable type)
•
These instructions are only for your service provider or an authorised repair agent.
•
Damage or faults caused by the unauthorised removal of the battery are not
covered by the warranty.
•
To remove or replace the battery, contact your service provider or an authorised
repair agent
1 Remove the SIM card tray from the device before starting battery removal.
2 Apply heat, higher than 80°C, to the edges of the device’s screen for approximately
20 minutes.
DRAFT,
e only for y
Damage or faults caused by the unauthor
Damage or faults caused by the unauthor
ranty.ranty.
eplace the batteplace the ba
DRAFT,
e the SIM card tray fre the SIM card tr
Not
y (non-remo
y (non-remo
or your servicor your servic
FINAL
vice case
e and some minor rocking or vibre and some minor rocking or vibr
y cause this gap to expand slighy cause this gap to expand sligh

Appendix
137
3 Lift the screen using a suction cup, and then remove the connector using an opening tool
to separate the screen from the device’s body.
Do not forcefully lift the screen. This may result in damage to the connector or device.
4 Remove the Home key, and then loosen and remove the screws.
5 Remove the circuit board by lifting it out of the back cover using an opening tool, then
put the back cover aside and place the circuit board face down on a flat work surface.
DRAFT,
DRAFT,
DRAFT,
cuit board by lifting it out of the back ccuit board by lifting it out of the back c
ver aside and placver aside and plac
Not
Not
Not
Not
FINAL
esult in damage to the c
e the screws.e the screws.
FINAL
Appendix
138
6 Disconnect the battery connector as shown in the image below.
7 Push the back of the battery with your fingers and remove the battery.
Make sure not to press or puncture the battery with your fingernails or other objects
when removing it. This may cause explosion or fire.
DRAFT,
ess or punctur
y cause explosion or fir
y cause explosion or fir
Not
Not
Not
ture the bature the ba
FINAL
FINAL

Health and safety information
Exposure to Radio Frequency (RF) Signals
Certification Information (SAR)
Your wireless phone is a radio transmitter and receiver. It is designed and
manufactured not to exceed the exposure limits for radio frequency (RF) energy set
by the Federal Communications Commission (FCC) of the U.S. government. These
FCC exposure limits are derived from the recommendations of two expert
organizations, the National Counsel on Radiation Protection and Measurement
(NCRP) and the Institute of Electrical and Electronics Engineers (IEEE). In both
cases, the recommendations were developed by scientific and engineering experts
drawn from industry, government, and academia after extensive reviews of the
scientific literature related to the biological effects of RF energy.
The exposure limit set by the FCC for wireless mobile phones employs a unit of
measurement known as the Specific Absorption Rate (SAR). The SAR is a measure
of the rate of absorption of RF energy by the human body expressed in units of watts
per kilogram (W/kg). The FCC requires wireless phones to comply with a safety limit
of 1.6 watts per kilogram (1.6 W/ kg). The FCC exposure limit incorporates a
substantial margin of safety to give additional protection to the public and to account
for any variations in measurements.
SAR tests are conducted using standard operating positions accepted by the FCC
with the phone transmitting at its highest certified power level in all tested frequency
bands. Although the SAR is determined at the highest certified power level, the
actual SAR level of the phone while operating can be well below the maximum value.
This is because the phone is designed to operate at multiple power levels so as to
use only the power required to reach the network. In general, the closer you are to a
wireless base station antenna, the lower the power output.
Before a new model phone is available for sale to the public, it must be tested and
certified to the FCC that it does not exceed the exposure limit established by the
FCC. Tests for each model phone are performed in positions and locations (e.g. at
the ear and worn on the body) as required by the FCC.
For body worn operation, this model phone has been tested and meets the FCC RF
exposure guidelines when used with a Samsung accessory designated for this
product or when used with an accessory that contains no metal and that positions
the handset a minimum of 1.5 cm from the body.
Non-compliance with the above restrictions may result in violation of FCC RF
exposure guidelines.
SAR information on this and other model phones can be viewed on-line at
http://www.fcc.gov/oet/ea/fccid/.Please use the phone FCC ID number for search,
A3LSMG925.Sometimes it may be necessary to remove the battery pack to find
the number. Once you have the FCC ID number for a particular phone, follow the
instructions on the website and it should provide values for typical or maximum SAR
for a particular phone. Additional product specific SAR information can also be
obtained at http://www.fcc.gov/encyclopedia/specific-absorption-rate-sar-cellular-telephones
Consumer Information on Wireless Phones
DRAFT,
the power required to reach the netwo
the power required to reach the netwo
wireless base station antenna, the lower the power output. wireless base station antenna, the lower the power output.
Before a new model phone is available for Before a new model phone is available for
DRAFT,
FCC that itthat it
does not e does no
ach model phoach model ph
worn on the body) a worn on the body)
body worn operation, this model
body worn operation, this model
exposure guidelines when used with a
actual SAR level of the phone while operatinactual SAR level of the phone while operatin
This is because the phone is designed to operatThis is because the phone is designed to operat
use only the power required to reach the netwouse only the power required to reach the netwo
does not exceed the exposure limit established by the does not exceed the exposure limit established by the
FCC. Tests for each model phoFCC. Tests for each model pho
SAR tests are conducted using standard opeSAR tests are conducted using standard operating positions accepted by the FCC rating positions accepted by the FCC
s highest certified power level in all tested frequency s highest certified power level in all tested frequency
bands. Although the SAR is determined at the highest certified power level, the bands. Although the SAR is determined at the highest certified power level, the
actual SAR level of the phone while operatinactual SAR level of the phone while operating can be well below the maximum value. g can be well below the maximum value.
This is because the phone is designed to operatThis is because the phone is designed to operat
FINAL
nes employs a
es employs a
R). The SAR i. The SAR i
tion Rate (SAR). The SAR is a measure tion Rate (SAR). The SAR is a measure
RF energy by the human body expressed in units of watts RF energy by the human body expressed in units of watts
ess phones to comply with a safety limit ess phones to comply with a safety limit
The FCC exposure limit incorporates a The FCC exposure limit incorporates a
onal protection to the public and to account onal protection to the public and to account

The U.S. Food and Drug Administration (FDA) has published a series of Questions
and Answers for consumers relating to radio frequency (RF) exposure from wireless
phones. The FDA publication includes the following information:
What kinds of phones are the subject of this update?
The term wireless phone refers here to hand-held wireless phones with built-in
antennas, often called “cell,” “mobile,” or “PCS” phones. These types of wireless
phones can expose the user to measurable radio frequency energy (RF) because of
the short distance between the phone and the user's head. These RF exposures are
limited by Federal Communications Commission safety guidelines that were
developed with the advice of FDA and other federal health and safety agencies.
When the phone is located at greater distances from the user, the exposure to RF is
drastically lower because a person's RF exposure decreases rapidly with increasing
distance from the source. The so-called “cordless phones,” which have a base unit
connected to the telephone wiring in a house, typically operate at far lower power
levels, and thus produce RF exposures well within the FCC's compliance limits.
Do wireless phones pose a health hazard?
The available scientific evidence does not show that any health problems are
associated with using wireless phones. There is no proof, however, that wireless
phones are absolutely safe. Wireless phones emit low levels of radio frequency
energy (RF) in the microwave range while being used. They also emit very low levels
of RF when in the stand-by mode. Whereas high levels of RF can produce health
effects (by heating tissue), exposure to low level RF that does not produce heating
effects causes no known adverse health effects. Many studies of low level RF
exposures have not found any biological effects. Some studies have suggested that
some biological effects may occur, but such findings have not been confirmed by
additional research. In some cases, other researchers have had difficulty in
reproducing those studies, or in determining the reasons for inconsistent results.
What is FDA's role concerning the safety of wireless phones?
Under the law, FDA does not review the safety of radiation-emitting consumer
products such as wireless phones before they can be sold, as it does with new drugs
or medical devices. However, the agency has authority to take action if wireless
phones are shown to emit radio frequency energy (RF) at a level that is hazardous to
the user. In such a case, FDA could require the manufacturers of wireless phones to
notify users of the health hazard and to repair, replace or recall the phones so that
the hazard no longer exists.
Although the existing scientific data do not justify FDA regulatory actions, FDA has
urged the wireless phone industry to take a number of steps, including the following:
“Support needed research into possible biological effects of RF of the type
emitted by wireless phones;
“Design wireless phones in a way that minimizes any RF exposure to the
user that is not necessary for device function; and
“Cooperate in providing users of wireless phones with the best possible
information on possible effects of wireless phone use on human health.
FDA belongs to an interagency working group of the federal agencies that have
responsibility for different aspects of RF safety to ensure coordinated efforts at the
federal level. The following agencies belong to this working group:
“National Institute for Occupational Safety and Health
DRAFT,
in determining the reasons for inconsistent results.
in determining the reasons for inconsistent results.
What is FDA's role concerniWhat is FDA's role concerni
ng the safetyng the safety
does not review does not revie
products such as wireless phones before theyproducts such as wireless phones before they
or medical devices. However, the agency hasor medical devices. However, the agency has
phones are shown to emit radio frequency energyphones are shown to emit radio frequency energy
such a case, FDA such a case,
notify users of the health haz
notify users of the health haz
y occur, but such findings y occur, but such findings
additional research. In some cases, additional research. In some cases, other researchers have had difficulty in other researchers have had difficulty in
Under the law, FDA does not review the Under the law, FDA does not review the
products such as wireless phones before they can be sold, as it does with new drugs products such as wireless phones before they can be sold, as it does with new drugs
of RF when in the stand-by mode. Whereas high levels of RF can produce health of RF when in the stand-by mode. Whereas high levels of RF can produce health
effects (by heating tissue), exposure to low effects (by heating tissue), exposure to low level RF that does not produce heating level RF that does not produce heating
effects causes no known adverse health eeffects causes no known adverse health effects. Many studies of low level RF ffects. Many studies of low level RF
exposures have not found any biological effeexposures have not found any biological effects. Some studies have suggested that cts. Some studies have suggested that
y occur, but such findings y occur, but such findings
other researchers have had difficulty in other researchers have had difficulty in
FINAL
typically operate at far lower power
CC's compliance limits.
CC's compliance limits.
show that any health problems are show that any health problems are
e is no proof, however, that wireless e is no proof, however, that wireless
emit low levels of radio frequency emit low levels of radio frequency
energy (RF) in the microwave range while being used. They also emit very low levels energy (RF) in the microwave range while being used. They also emit very low levels
of RF when in the stand-by mode. Whereas high levels of RF can produce health of RF when in the stand-by mode. Whereas high levels of RF can produce health

“Environmental Protection Agency
“Federal Communications Commission
“Occupational Safety and Health Administration
“National Telecommunications and Information Administration
The National Institutes of Health participates in some interagency working group
activities, as well.
FDA shares regulatory responsibilities for wireless phones with the Federal
Communications Commission (FCC). All phones that are sold in the United States
must comply with FCC safety guidelines that limit RF exposure. FCC relies on FDA
and other health agencies for safety questions about wireless phones.
FCC also regulates the base stations that the wireless phone networks rely upon.
While these base stations operate at higher power than do the wireless phones
themselves, the RF exposures that people get from these base stations are typically
thousands of times lower than those they can get from wireless phones. Base
stations are thus not the primary subject of the safety questions discussed in this
document.
What are the results of the research done already?
The research done thus far has produced conflicting results, and many studies have
suffered from flaws in their research methods. Animal experiments investigating the
effects of radio frequency energy (RF) exposures characteristic of wireless phones
have yielded conflicting results that often cannot be repeated in other laboratories. A
few animal studies, however, have suggested that low levels of RF could accelerate
the development of cancer in laboratory animals. However, many of the studies that
showed increased tumor development used animals that had been genetically
engineered or treated with cancer-causing chemicals so as to be pre-disposed to
develop cancer in absence of RF exposure. Other studies exposed the animals to
RF for up to 22 hours per day. These conditions are not similar to the conditions
under which people use wireless phones, so we don't know with certainty what the
results of such studies mean for human health.
Three large epidemiology studies have been published since December 2000.
Between them, the studies investigated any possible association between the use of
wireless phones and primary brain cancer, glioma, meningioma, or acoustic
neuroma, tumors of the brain or salivary gland, leukemia, or other cancers. None of
the studies demonstrated the existence of any harmful health effects from wireless
phones RF exposures. However, none of the studies can answer questions about
long-term exposures, since the average period of phone use in these studies was
around three years.
What research is needed to decide whether RF exposure from wireless phones
poses a health risk?
A combination of laboratory studies and epidemiological studies of people actually
using wireless phones would provide some of the data that are needed. Lifetime
animal exposure studies could be completed in a few years. However, very large
numbers of animals would be needed to provide reliable proof of a cancer promoting
effect if one exists. Epidemiological studies can provide data that is directly
applicable to human populations, but ten or more years' follow-up may be needed to
provide answers about some health effects, such as cancer. This is because the
interval between the time of exposure to a cancer-causing agent and the time tumors
develop - if they do - may be many, many years. The interpretation of
DRAFT,
of RF exposure.
of RF exposure.
RF for up to 22 hours per day. These conditions are not similar to the conditio
RF for up to 22 hours per day. These conditions are not similar to the conditio
h people use wireless phones, so weh people use wireless phones, so we
f such studies mean for human healtf such studies mean for human healt
DRAFT,
Three large epidemiology studies Three large epidemiology studies
them, the studies inve them, the studies inve
wireless phones and primary braiwireless phones and primary brai
neuroma, tumors of the brain neuroma, tumors of the brain
ies demonstrated t
ies demonstrated t
with cancer-causing chemicals so as to be pre-disposed to with cancer-causing chemicals so as to be pre-disposed to
develop cancer in absence of RF exposure.develop cancer in absence of RF exposure.
Three large epidemiology studies Three large epidemiology studies
cannot be repeated in other laboratories. A cannot be repeated in other laboratories. A
few animal studies, however, have suggested thatfew animal studies, however, have suggested that low levels of RF could accelerate low levels of RF could accelerate
laboratory animals. However, laboratory animals. However,
showed increased tumor development usshowed increased tumor development used animals that had been genetically ed animals that had been genetically
with cancer-causing chemicals so as to be pre-disposed to with cancer-causing chemicals so as to be pre-disposed to
FINAL
ess phones. Base
questions discussed in t
questions discussed in t
onflicting results, and many studies have onflicting results, and many studies have
hods. Animal experiments investigating the hods. Animal experiments investigating the
effects of radio frequency energy (RF) exposures characteristic of wireless phones effects of radio frequency energy (RF) exposures characteristic of wireless phones
cannot be repeated in other laboratories. A cannot be repeated in other laboratories. A

epidemiological studies is hampered by difficulties in measuring actual RF exposure
during day-to-day use of wireless phones. Many factors affect this measurement,
such as the angle at which the phone is held, or which model of phone is used.
What is FDA doing to find out more about the possible health effects of
wireless phone RF?
FDA is working with the U.S. National Toxicology Program and with groups of
investigators around the world to ensure that high priority animal studies are
conducted to address important questions about the effects of exposure to radio
frequency energy (RF).
FDA has been a leading participant in the World Health Organization international
Electromagnetic Fields (EMF) Project since its inception in 1996. An influential result
of this work has been the development of a detailed agenda of research needs that
has driven the establishment of new research programs around the world. The
Project has also helped develop a series of public information documents on EMF
issues.
FDA and Cellular Telecommunications & Internet Association (CTIA) have a formal
Cooperative Research and Development Agreement (CRADA) to do research on
wireless phone safety. FDA provides the scientific oversight, obtaining input from
experts in government, industry, and academic organizations. CTIA-funded research
is conducted through contracts to independent investigators. The initial research will
include both laboratory studies and studies of wireless phone users. The CRADA will
also include a broad assessment of additional research needs in the context of the
latest research developments around the world.
What steps can I take to reduce my exposure to radio frequency energy from
my wireless phone?
If there is a risk from these products - and at this point we do not know that there is -
it is probably very small. But if you are concerned about avoiding even potential risks,
you can take a few simple steps to minimize your exposure to radio frequency
energy (RF). Since time is a key factor in how much exposure a person receives,
reducing the amount of time spent using a wireless phone will reduce RF exposure.
“If you must conduct extended conversations by wireless phone every day,
you could place more distance between your body and the source of the RF,
since the exposure level drops off dramatically with distance. For example,
you could use a headset and carry the wireless phone away from your body.
Again, the scientific data do not demonstrate that wireless phones are harmful. But if
you are concerned about the RF exposure from these products, you can use
measures like those described above to reduce your RF exposure from wireless
phone use.
What about children using wireless phones?
The scientific evidence does not show a danger to users of wireless phones,
including children and teenagers. If you want to take steps to lower exposure to radio
frequency energy (RF), the measures described above would apply to children and
teenagers using wireless phones. Reducing the time of wireless phone use and
increasing the distance between the user and the RF source will reduce RF
exposure.
Some groups sponsored by other national governments have advised that children
be discouraged from using wireless phones at all. For example, the government in
DRAFT,
oducts - and at this point we do not know that there is -
oducts - and at this point we do not know that there is -
ll. But if you are concerned about avoiding even potential risks,
ll. But if you are concerned about avoiding even potential risks,
you can take a few simple steps to miyou can take a few simple steps to mi
nimize
energy (RF). Since time is a key factor in how much exposure a person receives, energy (RF). Since time is a key factor in how much exposure a person receives,
amount of time spent amount of time spent
DRAFT,
“If you must conduct extended conver“If you must conduct extended conver
could place more could place mo
since the exposure levsince the exposure lev
you could use a headset a
you could use a headset a
oducts - and at this point we do not know that there is - oducts - and at this point we do not know that there is -
reducing the amount of time spent using a reducing the amount of time spent using a
es and studies of wireless phone users. The CRADA will es and studies of wireless phone users. The CRADA will
of additional research needs of additional research needs
latest research developments around the world.latest research developments around the world.
What steps can I take to reduce my exposure to radio frequency energy from What steps can I take to reduce my exposure to radio frequency energy from
FINAL
on documents
net Association (CTIA) have a formal net Association (CTIA) have a formal
velopment Agreement (CRADA) to do research on velopment Agreement (CRADA) to do research on
entific oversight, obtaining input from entific oversight, obtaining input from
mic organizations. CTIA-funded research mic organizations. CTIA-funded research
es and studies of wireless phone users. The CRADA will es and studies of wireless phone users. The CRADA will

the United Kingdom distributed leaflets containing such a recommendation in
December 2000. They noted that no evidence exists that using a wireless phone
causes brain tumors or other ill effects. Their recommendation to limit wireless phone
use by children was strictly precautionary; it was not based on scientific evidence
that any health hazard exists.
Do hands-free kits for wireless phones reduce risks from exposure to RF
emissions?
Since there are no known risks from exposure to RF emissions from wireless phones,
there is no reason to believe that hands-free kits reduce risks. Hands-free kits can be
used with wireless phones for convenience and comfort. These systems reduce the
absorption of RF energy in the head because the phone, which is the source of the
RF emissions, will not be placed against the head. On the other hand, if the phone is
mounted against the waist or other part of the body during use, then that part of the
body will absorb more RF energy. Wireless phones marketed in the U.S. are
required to meet safety requirements regardless of whether they are used against
the head or against the body. Either configuration should result in compliance with
the safety limit.
Do wireless phone accessories that claim to shield the head from RF radiation
work?
Since there are no known risks from exposure to RF emissions from wireless phones,
there is no reason to believe that accessories that claim to shield the head from
those emissions reduce risks. Some products that claim to shield the user from RF
absorption use special phone cases, while others involve nothing more than a
metallic accessory attached to the phone. Studies have shown that these products
generally do not work as advertised. Unlike “hand-free” kits, these so-called “shields”
may interfere with proper operation of the phone. The phone may be forced to boost
its power to compensate, leading to an increase in RF absorption. In February 2002,
the Federal trade Commission (FTC) charged two companies that sold devices that
claimed to protect wireless phone users from radiation with making false and
unsubstantiated claims. According to FTC, these defendants lacked a reasonable
basis to substantiate their claim.
What about wireless phone interference with medical equipment?
Radio frequency energy (RF) from wireless phones can interact with some electronic
devices. For this reason, FDA helped develop a detailed test method to measure
electromagnetic interference (EMI) of implanted cardiac pacemakers and
defibrillators from wireless telephones. This test method is now part of a standard
sponsored by the Association for the Advancement of Medical instrumentation
(AAMI). The final draft, a joint effort by FDA, medical device manufacturers, and
many other groups, was completed in late 2000. This standard will allow
manufacturers to ensure that cardiac pacemakers and defibrillators are safe from
wireless phone EMI. FDA has tested wireless phones and helped develop a
voluntary standard sponsored by the Institute of Electrical and Electronic Engineers
(IEEE). This standard specifies test methods and performance requirements for
hearing aids and wireless phones so that no interference occurs when a person uses
a compatible phone and a compatible hearing aid at the same time. This standard
was approved by the IEEE in 2000.
FDA continues to monitor the use of wireless phones for possible interactions with
other medical devices. Should harmful interference be found to occur, FDA will
DRAFT,
its power to compensate, leading to an incr
its power to compensate, leading to an incr
DRAFT,
the Federal trade Commission (FTC) charged twthe Federal trade Commission (FTC) charged tw
claimed to protect wireless phone users claimed to protect wireless phone users
unsubstantiated claims. According to unsubstantiated claims. According to
basis to substantiate their claim.basis to substantiate their claim.
What about wireless phone interfWhat about wireless phone interf
Radio frequency energy (RF) from wireless Radio frequency energy (RF) from wireless
devices. For this reason, FDA helped devel
devices. For this reason, FDA helped devel
tised. Unlike “hand-free” kitstised. Unlike “hand-free” kits
may interfere with proper operation of may interfere with proper operation of the phone. The phone may be forced to boost the phone. The phone may be forced to boost
unsubstantiated claims. According to unsubstantiated claims. According to
that accessories that claithat accessories that clai
those emissions reduce risks. Some products that claim to shield the user from RF those emissions reduce risks. Some products that claim to shield the user from RF
absorption use special phone cases, whileabsorption use special phone cases, while others involve nothing more than a others involve nothing more than a
metallic accessory attached to the phone. metallic accessory attached to the phone. Studies have shown that these products Studies have shown that these products
tised. Unlike “hand-free” kitstised. Unlike “hand-free” kits
the phone. The phone may be forced to boost the phone. The phone may be forced to boost
FINAL
marketed in the U.S.
dless of whether they are used against
dless of whether they are used against
ation should result in compliance with ation should result in compliance with
shield the head from RF radiation shield the head from RF radiation
e to RF emissions from wireless phones, e to RF emissions from wireless phones,
that accessories that claithat accessories that claim to shield the head from m to shield the head from
conduct testing to assess the interference and work to resolve the problem.
Additional information on the safety of RF exposures from various sources can be
obtained from the following organizations:
FCC RF Safety Program:
http://www.fcc.gov/oet/rfsafety/
Environmental Protection Agency (EPA):
http://www.epa.gov/radiation/
Occupational Safety and Health Administration's (OSHA):
http://www.osha.gov/SLTC/radiofrequencyradiation/index.html
National institute for Occupational Safety and Health (NIOSH):
http://www.cdc.gov/niosh/
World health Organization (WHO):
http://www.who.int/peh-emf/
International Commission on Non-Ionizing Radiation Protection:
http://www.icnirp.de
National Radiation Protection Board (UK):
http://www.hpa-radiationservices.org.uk/rpa
Updated 4/3/2002: US food and Drug Administration
http://www.fda.gov/Radiation-
EmittingProducts/RadiationEmittingProductsandProcedures/HomeBusinessandEntertainment/
CellPhones/default.htm
Road Safety
Your wireless phone gives you the powerful ability to communicate by voice, almost
anywhere, anytime. But an important responsibility accompanies the benefits of
wireless phones, one that every user must uphold.
When driving a car, driving is your first responsibility. When using your wireless
phone behind the wheel of a car, practice good common sense and remember the
following tips:
1. Get to know your wireless phone and its features, such as speed dial and
redial. If available, these features help you to place your call without taking
your attention off the road.
2. When available, use a hands-free device. If possible, add an additional layer
of convenience and safety to your wireless phone with one of the many
hands free accessories available today.
3. Position your wireless phone within easy reach. Be able to access your
wireless phone without removing your eyes from the road. If you get an
incoming call at an inconvenient time, let your voice mail answer it for you.
4. Let the person you are speaking with know you are driving; if necessary,
suspend the call in heavy traffic or hazardous weather conditions. Rain, sleet,
snow, ice and even heavy traffic can be hazardous.
5. Do not take notes or look up phone numbers while driving. Jotting down a “to
do” list or flipping through your address book takes attention away from your
primary responsibility, driving safely.
6. Dial sensibly and assess the traffic; if possible, place calls when you are not
moving or before pulling into traffic. Try to plan calls when your car will be
stationary. If you need to make a call while moving, dial only a few numbers,
check the road and your mirrors, then continue.
DRAFT,
When driving a car, driving is your firsWhen driving a car, driving is your firs
t responsibility. When using y
t responsibility. When using y
hind the wheel of a hind the wheel of a
car, practicecar, pract
w your wireless pw your wireless
f available, these ff available, the
your attention off the road.your attention off the road.
When available, use a haWhen available, use a ha
of convenience and safety to your
of convenience and safety to your
free accessories
anywhere, anytime. But an important responsanywhere, anytime. But an important respons
wireless phones, one that every user must uphold.wireless phones, one that every user must uphold.
When driving a car, driving is your firsWhen driving a car, driving is your first responsibility. When using your wireless t responsibility. When using your wireless
1. Get to know your wireless phone and it1. Get to know your wireless phone and it
redial. If available, these features help redial. If available, these features help
Your wireless phone gives you the powerful abiliYour wireless phone gives you the powerful abili
anywhere, anytime. But an important responsanywhere, anytime. But an important respons
wireless phones, one that every user must uphold.wireless phones, one that every user must uphold.
FINAL
g Radiation Protection:
g Radiation Protection:
ood and Drug Administrationood and Drug Administration

7. Do not engage in stressful or emotional conversations that may be distracting.
Make people you are talking with aware you are driving and suspend
conversations that have the potential to divert your attention from the road.
8. Use your wireless phone to call for help. Dial 9-1-1 or other local emergency
number in the case of fire, traffic accident or medical emergencies.
Remember, it is a free call on your wireless phone!
9. Use your wireless phone to help others in emergencies. If you see an auto
accident, crime in progress or other serious emergency where lives are in
danger, call 9-1-1 or other local emergency number, as you would want
others to do for you.
10. Call roadside assistance or a special non-emergency wireless assistance
number when necessary. If you see a broken-down vehicle posing no serious
hazard, a broken traffic signal, a minor traffic accident where no one appears
injured, or a vehicle you know to be stolen, call roadside assistance or other
special non-emergency number.
“The wireless industry reminds you to use your phone safely when driving.”
For more information, please call 1-888-901-SAFE, or visit our web-site
www.wow-com.com
Provided by the Cellular Telecommunications & Internet Association
Operating Environment
Remember to follow any special regulations in force in any area and always switch
your phone off whenever it is forbidden to use it, or when it may cause interference
or danger. When connecting the phone or any accessory to another device, read its
user's guide for detailed safety instructions. Do not connect incompatible products.
As with other mobile radio transmitting equipment, users are advised that for the
satisfactory operation of the equipment and for the safety of personnel, it is
recommended that the equipment should only be used in the normal operating
position.
Using Your Phone Near Other Electronic Devices
Most modern electronic equipment is shielded from radio frequency (RF) signals.
However, certain electronic equipment may not be shielded against the RF signals
from your wireless phone. Consult the manufacturer to discuss alternatives.
Pacemakers
Pacemaker manufacturers recommend that a minimum distance of 15 cm (6 inches)
be maintained between a wireless phone and a pacemaker to avoid potential
interference with the pacemaker.
These recommendations are consistent with the independent research and
recommendations of Wireless Technology Research.
Persons with pacemakers:
should always keep the phone more than 15 cm
(6 inches) from their pacemaker when the phone is switched on.
should not carry the phone in a breast pocket.
should use the ear opposite the pacemaker to minimize potential interference.
If you have any reason to suspect that interference is taking place, switch your
phone off immediately.
Hearing Aids
uipment should o
uipment should
Using Your Phone Near Using Your Phone Near
Other Electronic DevicesOther Electronic Devices
DRAFT,
DRAFT,
Most modern electronic equipment is shieMost modern electronic equipment is shie
r, certain electronic equipment mar, certain electronic equipment ma
from your wireless phone. Consult the from your wireless phone. Consult the
As with other mobile radio transmitting equipment, users are advised that for the As with other mobile radio transmitting equipment, users are advised that for the
satisfactory operation of the equipment and satisfactory operation of the equipment and
Most modern electronic equipment is shieMost modern electronic equipment is shie
in force in any area and always switch in force in any area and always switch
your phone off whenever it is forbidden to usyour phone off whenever it is forbidden to use it, or when it may cause interference e it, or when it may cause interference
or danger. When connecting the phone or any aor danger. When connecting the phone or any accessory to another device, read its ccessory to another device, read its
user's guide for detailed safety instructiuser's guide for detailed safety instructions. Do not connect incompatible products.ons. Do not connect incompatible products.
As with other mobile radio transmitting equipment, users are advised that for the As with other mobile radio transmitting equipment, users are advised that for the
FINAL
e safely when
e safely when
use your phone safely when driving.”use your phone safely when driving.”
901-SAFE, or visit our web-site 901-SAFE, or visit our web-site
Provided by the Cellular Telecommunications & Internet AssociationProvided by the Cellular Telecommunications & Internet Association
in force in any area and always switch in force in any area and always switch

Some digital wireless phones may interfere with some hearing aids. In the event of
such interference, you may wish to consult your hearing aid manufacturer to discuss
alternatives.
Other Medical Devices
If you use any other personal medical devices, consult the manufacturer of your
device to determine if it is adequately shielded from external RF energy. Your
physician may be able to assist you in obtaining this information. Switch your phone
off in health care facilities when any regulations posted in these areas instruct you to
do so. Hospitals or health care facilities may be using equipment that could be
sensitive to external RF energy.
Vehicles
RF signals may affect improperly installed or inadequately shielded electronic
systems in motor vehicles. Check with the manufacturer or its representative
regarding your vehicle. You should also consult the manufacturer of any equipment
that has been added to your vehicle.
Posted Facilities
Switch your phone off in any facility where posted notices require you to do so.
Potentially Explosive Environments
Switch your phone off when in any area with a potentially explosive atmosphere and
obey all signs and instructions. Sparks in such areas could cause an explosion or fire
resulting in bodily injury or even death.
Users are advised to switch the phone off while at a refueling point (service station).
Users are reminded of the need to observe restrictions on the use of radio
equipment in fuel depots (fuel storage and distribution areas), chemical plants or
where blasting operations are in progress.
Areas with a potentially explosive atmosphere are often but not always clearly
marked. They include below deck on boats, chemical transfer or storage facilities,
vehicles using liquefied petroleum gas (such as propane or butane), areas where the
air contains chemicals or particles, such as grain, dust or metal powders, and any
other area where you would normally be advised to turn off your vehicle engine.
Emergency Calls
This phone, like any wireless phone, operates using radio signals, wireless and
landline networks as well as user programmed functions, which cannot guarantee
connection in all conditions. Therefore, you should never rely solely on any wireless
phone for essential communications (medical emergencies, for example).
Remember, to make or receive any calls the phone must be switched on and in a
service area with adequate signal strength. Emergency calls may not be possible on
all wireless phone networks or when certain network services and/ or phone features
are in use. Check with local service providers.
To make an emergency call:
1. If the phone is not on, switch it on.
2. Key in the emergency number for your present location (for example, 911 or
other official emergency number). Emergency numbers vary by location.
3. Press .
If certain features are in use (call barring, for example), you may first need to
deactivate those features before you can make an emergency call. Consult this
DRAFT,
Areas with a potentially explosive atmos
Areas with a potentially explosive atmos
phere
e below deck on boats, e below deck on boats,
vehicles using liquefied petroleum gas (svehicles using liquefied petroleum gas (s
chemicals or particles, such chemicals or particles, such
DRAFT,
where you would where you would
normally be advised to turn off your vehicle engine.
Calls Calls
This phone, like any wireless phone, operat
This phone, like any wireless phone, operat
works as well as user progr
storage and distribution area storage and distribution area
are in progress. are in progress.
vehicles using liquefied petroleum gas (svehicles using liquefied petroleum gas (s
air contains chemicals or particles, such air contains chemicals or particles, such
obey all signs and instructions. Sparks in suchobey all signs and instructions. Sparks in such areas could cause an explosion or fire areas could cause an explosion or fire
Users are advised to switch the phone off while Users are advised to switch the phone off while at a refueling point at a refueling point
Users are reminded of the need to observeUsers are reminded of the need to observe restrictions on the use of radio restrictions on the use of radio
storage and distribution area storage and distribution area
FINAL
ult the manufacturer of any equipment
ult the manufacturer of any equipment
e posted notices require you to do so. e posted notices require you to do so.
h a potentially explosive atmosphere and h a potentially explosive atmosphere and
areas could cause an explosion or fire areas could cause an explosion or fire

document and your local cellular service provider.
When making an emergency call, remember to give all the necessary information as
accurately as possible. Remember that your phone may be the only means of
communication at the scene of an accident; do not cut off the call until given
permission to do so.
Restricting Children's access to your Phone
Your phone is not a toy. Children should not be allowed to play with it because they
could hurt themselves and others, damage the phone or make calls that increase
your phone bill.
DRAFT,
FINAL
FCC Notice and Cautions
FCC Notice
This device complies with Part 15 of the FCC Rules. Operation is subject to
the following two conditions: (1) this device may not cause harmful interference, and
(2) this device must accept any interference received, including interference that may
cause undesired operation.
This equipment has been tested and found to comply with the limits for a
Class B digital device, pursuant to part 15 of the FCC Rules. These limits are
designed to provide reasonable protection against harmful interference in a
residential installation. This equipment generates, uses and can radiate radio
frequency energy and, if not installed and used in accordance with the
instructions, may cause harmful interference to radio communications.
However, there is no guarantee that interference will not occur in a particular
installation. If this equipment does cause harmful interference to radio or
television reception, which can be determined by turning the equipment off
and on, the user is encouraged to try to correct the interference by one or
more of the following measures:
-Reorient or relocate the receiving antenna.
-Increase the separation between the equipment and receiver.
-Connect the equipment into an outlet on a circuit different from that to which the
receiver is connected.
-Consult the dealer or an experienced radio/TV technician for help.
The phone may cause TV or radio interference if used in close proximity to receiving
equipment. The FCC can require you to stop using the phone if such interference
cannot be eliminated.
Vehicles using liquefied petroleum gas (such as propane or butane) must comply
with the National Fire Protection Standard (NFPA-58). For a copy of this standard,
contact the National Fire Protection Association, One Battery march Park, Quincy,
MA 02269, Attn: Publication Sales Division.
Cautions
Changes or modifications made in the radio phone, not expressly approved by
Samsung, will void the user’s authority to operate the equipment.
The use of any unauthorized accessories may be dangerous and void the phone
warranty if said accessories cause damage or a defect to the phone.
Although your phone is quite sturdy, it is a complex piece of equipment and can be
broken. Avoid dropping, hitting, bending or sitting on it.
DRAFT,
The phone may cause TV or radio interference
The phone may cause TV or radio interference
The FCC can require you to stop The FCC can require you to stop
ing liquefied petroleum gas (sing liquefied petroleum gas (s
National Fire ProtecNational Fire Protec
tion Standard (NFPA-58). For a
National Fire Protection National Fire Protection
Attn: Public Attn: Public
ationati
The phone may cause TV or radio interference The phone may cause TV or radio interference
Vehicles using liquefied petroleum gas (sVehicles using liquefied petroleum gas (s
tion Standard (NFPA-58). For a tion Standard (NFPA-58). For a
the equipment and receiver. the equipment and receiver.
-Connect the equipment into an outlet on a circ-Connect the equipment into an outlet on a circuit different from that to which the uit different from that to which the
ed radio/TV technician for help. ed radio/TV technician for help. ed radio/TV technician for help. ed radio/TV technician for help.
FINAL
rference to radio communications.
rference to radio communications.
FINAL
will not occur in
ll not occur in
erence will not occur in a particularerence will not occur in a particular
ause harmful interference to radio orause harmful interference to radio or
ermined by turning the equipment offermined by turning the equipment off
correct the interference by one orcorrect the interference by one or
the equipment and receiver. the equipment and receiver.

Other Important Safety Information
Only qualified personnel should service the phone or install the phone in a
vehicle. Faulty installation or service may be dangerous and may invalidate
any warranty applicable to the device.
Check regularly that all wireless phone equipment in your vehicle is mounted
and operating properly.
Do not store or carry flammable liquids, gases or explosive materials in the
same compartment as the phone, its parts or accessories.
For vehicles equipped with an air bag, remember that an air bag inflates with
great force. Do not place objects, including both installed or portable wireless
equipment in the area over the air bag or in the air bag deployment area. If
wireless equipment is improperly installed and the air bag inflates, serious
injury could result.
Switch your phone off before boarding an aircraft. The use of wireless phone
in aircraft is illegal and may be dangerous to the aircraft's operation.
Failure to observe these instructions may lead to the suspension or denial of
telephone services to the offender, or legal action, or both.
Product Performance
Getting the Most Out of Your Signal Reception
The quality of each call you make or receive depends on the signal strength in your
area. Your phone informs you of the current signal strength by displaying a number
of bars next to the signal strength icon. The more bars displayed, the stronger the
signal.
If you're inside a building, being near a window may give you better reception.
Understanding the Power Save Feature
If your phone is unable to find a signal after 15 minutes of searching, a Power Save
feature is automatically activated. If your phone is active, it periodically rechecks
service availability or you can check it yourself by pressing any key.
Anytime the Power Save feature is activated, a message displays on the screen.
When a signal is found, your phone returns to standby mode.
Maintaining Your Phone's Peak Performance
For the best care of your phone, only authorized personnel should service your
phone and accessories. Faulty service may void the warranty.
There are several simple guidelines to operating your phone properly and
maintaining safe, satisfactory service.
Place the mobile phone's acoustic output next to your ear for proper
orientation.
Do not tamper or alter the phone's antenna.
Don't use the phone if the antenna is damaged.
Speak directly into the phone's receiver.
Avoid exposing your phone and accessories to rain or liquid spills. If your
phone does get wet, immediately turn the power off and remove the battery.
If it is inoperable, call Customer Care for service.
Availability of Various Features/Ring Tones
DRAFT,
find a signal after
find a signal aft
feature is automatically activated. If yfeature is automatically activated. If y
our phone is active, it periodically rechec
ilability or you can cheilability or you can che
ck it yourself by pressing any key.
DRAFT,
Anytime the Power Save feature is actiAnytime the Power Save feature is acti
When a signal is found, your phone returns to standby mode.When a signal is found, your phone returns to standby mode.
Maintaining Your PhoneMaintaining Your Phone
For the best care of your phone, only aut
If you're inside a building, being near a window may give you better reception.If you're inside a building, being near a window may give you better reception.
Understanding the Power Save FeatureUnderstanding the Power Save Feature
Anytime the Power Save feature is actiAnytime the Power Save feature is acti
The quality of each call you make or receive depends on the signal strength in your The quality of each call you make or receive depends on the signal strength in your
the current signa the current signal strength by displaying a number l strength by displaying a number
he more bars displayhe more bars display
If you're inside a building, being near a window may give you better reception.If you're inside a building, being near a window may give you better reception.
Understanding the Power Save FeatureUnderstanding the Power Save Feature
FINAL
raft. The use of wireless phone
ous to the aircraft's operation
ous to the aircraft's operation
Failure to observe these instructions may lead to the suspension or denial ofFailure to observe these instructions may lead to the suspension or denial of
, or legal action, or both., or legal action, or both.
Your Signal Reception Your Signal Reception
The quality of each call you make or receive depends on the signal strength in your The quality of each call you make or receive depends on the signal strength in your

Many services and features are network dependent and may require additional
subscription and/or usage charges. Not all features are available for purchase or use
in all areas. Downloadable Ring Tones may be available at an additional cost. Other
conditions and restrictions may apply. See your service provider for additional
information.
Battery Standby and Talk Time
Standby and talk times will vary depending on phone usage patterns and conditions.
Battery power consumption depends on factors such as network configuration, signal
strength, operating temperature, features selected, frequency of calls, and voice,
data, and other application usage patterns.
Battery Precautions
Never use any charger or battery that is damaged in any way.
Use the battery only for its intended purpose.
If you use the phone near the network's base station, it uses less power; talk
and standby time are greatly affected by the signal strength on the cellular
network and the parameters set by the network operator.
Battery charging time depends on the remaining battery charge and the type
of battery and charger used. The battery can be charged and discharged
hundreds of times, but it will gradually wear out. When the operation time
(talk time and standby time) is noticeably shorter than normal, it is time to buy
a new battery.
If left unused, a fully charged battery will discharge itself over time.
Use only Samsung-approved batteries and recharge your battery only with
Samsung-approved chargers. When a charger is not in use, disconnect it
from the power source. Do not leave the battery connected to a charger for
more than a week, since overcharging may shorten its life.
Extreme temperatures will affect the charging capacity of your battery: it may
require cooling or warming first.
Do not leave the battery in hot or cold places, such as in a car in summer or
winter conditions, as you will reduce the capacity and lifetime of the battery.
Always try to keep the battery at room temperature. A phone with a hot or
cold battery may temporarily not work, even when the battery is fully charged.
Li-ion batteries are particularly affected by temperatures below 0 °C (32 °F).
Do not short-circuit the battery. Accidental short- circuiting can occur when a
metallic object (coin, clip or pen) causes a direct connection between the +
and - terminals of the battery (metal strips on the battery), for example when
you carry a spare battery in a pocket or bag. Short-circuiting the terminals
may damage the battery or the object causing the short-circuiting.
Dispose of used batteries in accordance with local regulations. In some areas,
the disposal of batteries in household or business trash may be prohibited.
For safe disposal options for Li-Ion batteries, contact your nearest Samsung
authorized service center. Always recycle. Do not dispose of batteries in a
fire.
Care and Maintenance
Your phone is a product of superior design and craftsmanship and should be treated
with care. The suggestions below will help you fulfill any warranty obligations and
DRAFT,
since over since over
charg
char
mperatures will affect the charmperatures will affect the char
require cooling or warming first.require cooling or warming first.
DRAFT,
ve the battery ive the battery i
winter conditions, as you will reduce twinter conditions, as you will reduce t
ys try to keep theys try to keep th
cold battery may temporarily not work, cold battery may temporarily not work,
DRAFT,
Li-ion batteries are particularly affected
Li-ion batteries are particularly affected
Samsung-approved chargers. Samsung-approved chargers.
from the power source. Do not leave from the power source. Do not leave
more than a week, since overmore than a week, since overcharging may shorten its life.charging may shorten its life.
Do not leave the battery in hot or coldDo not leave the battery in hot or cold
is noticeably shorter than nois noticeably shorter than no
If left unused, a fully charged battery will discharge itself over time.If left unused, a fully charged battery will discharge itself over time.
Use only Samsung-approved batteries and recharge your battery only withUse only Samsung-approved batteries and recharge your battery only with
When a charger is not inWhen a charger is not in
from the power source. Do not leave from the power source. Do not leave
FINAL
station, it uses less
station, it uses less
d by the signal strength on the celtrength on the cel
affected by the signal strength on the cellular affected by the signal strength on the cellular
by the network operator.by the network operator.
Battery charging time depends on the remaining battery charge and the typeBattery charging time depends on the remaining battery charge and the type
battery can be charged and dischargedbattery can be charged and discharged
wear out. When the operation time wear out. When the operation time
is noticeably shorter than nois noticeably shorter than no

allow you to enjoy this product for many years.
Keep the phone and all its parts and accessories out of the reach of small
children.
Keep the phone dry. Precipitation, humidity and liquids contain minerals that
will corrode electronic circuits.
Do not use the phone with a wet hand. Doing so may cause an electric shock
to you or damage to the phone.
Do not use or store the phone in dusty, dirty areas, as its moving parts may
be damaged.
Do not store the phone in hot areas. High temperatures can shorten the life
of electronic devices, damage batteries, and warp or melt certain plastics.
Do not store the phone in cold areas. When the phone warms up to its
normal operating temperature, moisture can form inside the phone, which
may damage the phone's electronic circuit boards.
Do not drop, knock or shake the phone. Rough handling can break internal
circuit boards.
Do not use harsh chemicals, cleaning solvents or strong detergents to clean
the phone. Wipe it with a soft cloth slightly dampened in a mild soap-and-
water solution.
Do not paint the phone. Paint can clog the device's moving parts and prevent
proper operation.
Do not put the phone in or on heating devices, such as a microwave oven, a
stove or a radiator. The phone may explode when overheated.
When the phone or battery gets wet, the label indicating water damage inside
the phone changes color. In this case, phone repairs are no longer
guaranteed by the manufacturer's warranty, even if the warranty for your
phone has not expired.
If your phone has a flash or light, do not use it too close to the eyes of people
or animals. This may cause damage to their eyes.
Use only the supplied or an approved replacement antenna. Unauthorized
antennas or modified accessories may damage the phone and violate
regulations governing radio devices.
If the phone, battery, charger or any accessory is not working properly, take it
to your nearest qualified service facility. The personnel there will assist you,
and if necessary, arrange for service.
Correct disposal of this product
(Waste Electrical & Electronic Equipment)
(Applicable in the European Union and other European countries with separate
collection systems)
This marking shown on the product or its literature, indicates that it should not be
DRAFT,
guaranteed by the manufacturer's warrant
guaranteed by the manufacturer's warrant
phone has not expired.phone has not expired.
If your phone has a flash or light, do not If your phone has a flash or light, do not
This may cause damage This may cause
Use only the supplied or an approved Use only the supplied or an approved
antennas or modified accessories antennas or modified
DRAFT,
regulations governing radio devicregulations governing radio devic
If the phone, battery, charger or any accessoIf the phone, battery, charger or any accesso
nearest q
the phone changes color. In this cathe phone changes color. In this ca
guaranteed by the manufacturer's warrantguaranteed by the manufacturer's warrant
or animals. This may cause damage to their eyes.or animals. This may cause damage to their eyes.
Use only the supplied or an approved Use only the supplied or an approved
Do not put the phone in or on heating devDo not put the phone in or on heating devices, such as a microwave oven, aices, such as a microwave oven, a
stove or a radiator. The phone may explode when overheated.stove or a radiator. The phone may explode when overheated.
When the phone or battery gets wet, the When the phone or battery gets wet, the
the phone changes color. In this cathe phone changes color. In this case, phone repairs are no longerse, phone repairs are no longer
FINAL
phone. Rough handling can break internal
phone. Rough handling can break internal
phone. Rough handling can break internalphone. Rough handling can break internal
solvents or strong detergents to cleansolvents or strong detergents to clean
lightly dampened in lightly dampened in
the device's moving parts and preventthe device's moving parts and prevent
disposed with other household wastes at the end of its working life. To prevent
possible harm to the environment or human health from uncontrolled waste disposal,
please separate this from other types of wastes and recycle it responsibly to promote
the sustainable reuse of material resources.
Household users should contact either the retailer where they purchased this product,
or their local government office, for details of where and how they can take this item
for environmentally safe recycling.
Business users should contact their supplier and check the terms and conditions of
the purchase contract. This product should not be mixed with other commercial
wastes for disposal.
Correct disposal of batteries in this product
(Applicable in the European Union and other European countries with separate
battery return systems)
This marking on the battery, manual or packaging indicates that the batteries in this
product should not be disposed of with other household waste at the end of their
working life. Where marked, the chemical symbols Hg, Cd or Pb indicate that the
battery contains mercury, cadmium or lead above the reference levels in EC
Directive 2006/66. If batteries are not properly disposed of, these substances can
cause harm to human health or the environment.
To protect natural resources and to promote material reuse, please separate
batteries from other types of waste and recycle them through your local, free battery
return system.
DRAFT,
batteries from other types of waste and recyclbatteries from other types of waste and recycl
mbols Hg, Cd or Pb indicate that the mbols Hg, Cd or Pb indicate that the
lead above the reference levels in EC lead above the reference levels in EC
operly disposed of, these substances can operly disposed of, these substances can
cause harm to human health or the environment. cause harm to human health or the environment.
To protect natural resources and to promTo protect natural resources and to promote material reuse, please separate ote material reuse, please separate
batteries from other types of waste and recyclbatteries from other types of waste and recycl
FINAL
her European countries with separate her European countries with separate
aging indicates that the batteries in this aging indicates that the batteries in this
her household waste at the end of their her household waste at the end of their
mbols Hg, Cd or Pb indicate that the mbols Hg, Cd or Pb indicate that the
lead above the reference levels in EC lead above the reference levels in EC

FCC Hearing Aid Compatibility (HAC)
Regulations for Wireless Devices
The U.S. Federal Communications Commission (FCC) has established
requirements for digital wireless mobile devices to be compatible
with hearing aids and other assistive hearing devices.
When individuals employing some assistive hearing devices (hearing
aids and cochlear implants) use wireless mobile devices, they may
detect a buzzing, humming, or whining noise. Some hearing devices
are more immune than others to this interference noise, and mobile
devices also vary in the amount of interference they generate.
The wireless telephone industry has developed a rating system for
wireless mobile devices to assist hearing device users find mobile
devices that may be compatible with their hearing devices. Not all
mobile devices have been rated. Mobile devices that are rated have
the rating on their box or a label located on the box.
The ratings are not guarantees. Results will vary depending on the
user's hearing device and hearing loss. If your hearing device
happens to be vulnerable to interference, you may not be able to
use a rated mobile device successfully. Trying out the mobile device
with your hearing device is the best way to evaluate it for your
personal needs.
M-Ratings
: Wireless mobile devices rated M3 or M4 meet FCC
requirements and are likely to generate less interference to
hearing devices than mobile devices that are not labeled. M4 is the
better/higher of the two ratings. M-ratings refer to enabling
acoustic coupling with hearing aids that do not operate in telecoil
mode.
DRAFT,
The ratings are not guarantees.
user's hearing device and heariuser's hearing device and heari
ng
ng
be vulnerable to interfbe vulnerable to interf
mobile device successfully. Trmobile device successfully. Tr
DRAFT,
hearing hearing
devic devic
e
needs.needs.
Not
obile
bile
a label located on the
a label located on the
The ratings are not guarantees. The ratings are not guarantees.
Results will varyResults will vary
FINAL
the amount of interference they
generate.
has developed a rating has developed a rating
mobile devices to assist hearing device users find mobile mobile devices to assist hearing device users find mobile
with their hearing devices. Not all with their hearing devices. Not all
dev dev
ic
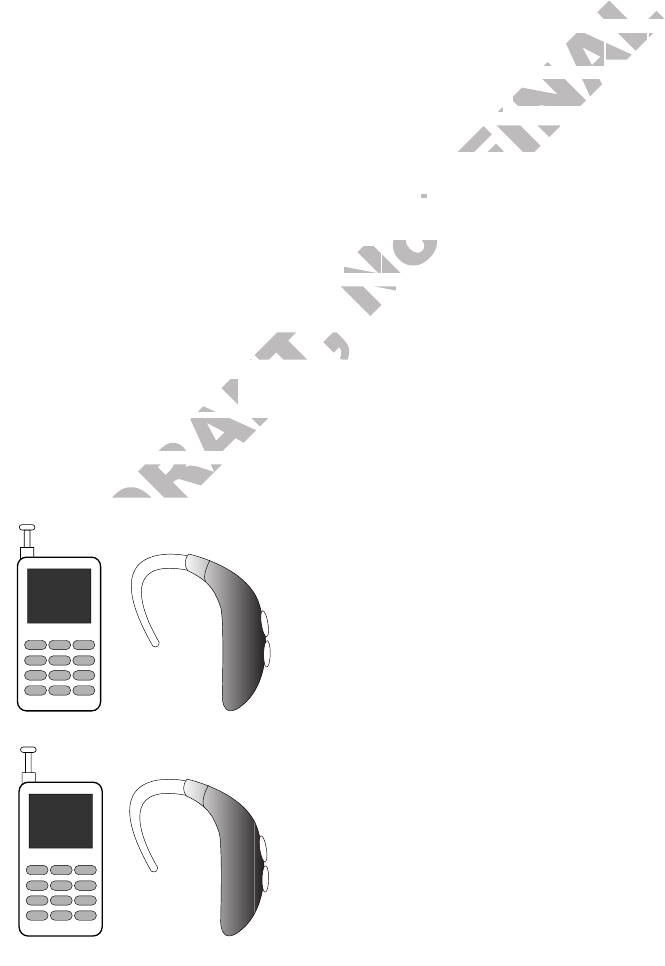
T-Ratings
: Mobile devices rated T3 or T4 meet FCC requirements
and are likely to generate less interference to hearing devices
than mobile devices that are not labeled. T4 is the better/higher of
the two ratings. T-ratings refer to enabling inductive coupling with
hearing aids operating in telecoil mode.
Hearing devices may also be rated. Your hearing aid manufacturer or
hearing health professional may help you find this rating. Higher
ratings mean that the hearing device is relatively immune to
interference noise.
Under the current industry standard, American National Standards
Institute (ANSI) C63.19, the hearing aid and wireless mobile
device rating values are added together to indicate how usable
they are together. For example, if a hearing aid meets the M2 level
rating and the wireless mobile device meets the M3 level rating,
the sum of the two values equals M5.
Under the standard, this should provide the hearing aid user with
normal use while using the hearing aid with the particular
wireless mobile device. A sum of 6 or more would indicate
excellent performance.
However, these are not guarantees that all users will be satisfied.
T ratings work similarly.
The HAC rating and measurement procedure are described in the
American National Standards Institute (ANSI) C63.19 standard.
M3 M3
DRAFT,
the hearing
the hearing
device. A sum of
device. A sum of
performance. performance.
these are not guarantees thatthese are not guarantees that
DRAFT,
work similarly.work similarly.
DRAFT,
DRAFT,
Not
equals M5
.
.
pr pr
ovide ovide
the hearing
the hearing
FINAL
hearing aid and wireless mobile
hearing aid and wireless mobile
dicatedicate
ho ho
ww
ing ing
aid meetsaid meets
mobile device meets the M3 levemobile device meets the M3 leve

HAC for Newer Technologies
This phone has been tested and rated for use with hearing aids for
some of the wireless technologies that it uses. However, there may
be some newer wireless technologies used in this phone that have
not been tested yet for use with hearing aids.
It is important to try the different features of this phone thoroughly
and in different locations, using your hearing aid or cochlear implant,
to determine if you hear any interfering noise. Consult your service
provider or the manufacturer of this phone for information on hearing
aid compatibility. If you have questions about return or exchange
policies, consult your service provider or phone retailer.
DRAFT,
Not
FINAL
urnurn
or exchange
or exchange
or phoneor phone
ret ret
ailer.ailer.

Copyright
Copyright © 2015 Samsung Electronics
This manual is protected under international copyright laws.
No part of this manual may be reproduced, distributed, translated, or transmitted in any form
or by any means, electronic or mechanical, including photocopying, recording, or storing
in any information storage and retrieval system, without the prior written permission of
Samsung Electronics.
Trademarks
•
SAMSUNG and the SAMSUNG logo are registered trademarks of Samsung Electronics.
•
Bluetooth® is a registered trademark of Bluetooth SIG, Inc. worldwide.
•
Wi-Fi®, Wi-Fi Protected Setup™, Wi-Fi Direct™, Wi-Fi CERTIFIED™, and the Wi-Fi logo are
registered trademarks of the Wi-Fi Alliance.
•
All other trademarks and copyrights are the property of their respective owners.
DRAFT,
amsung Electronicsamsung Electr
otected under inotected under in
t of this manual ma
Not
FINAL