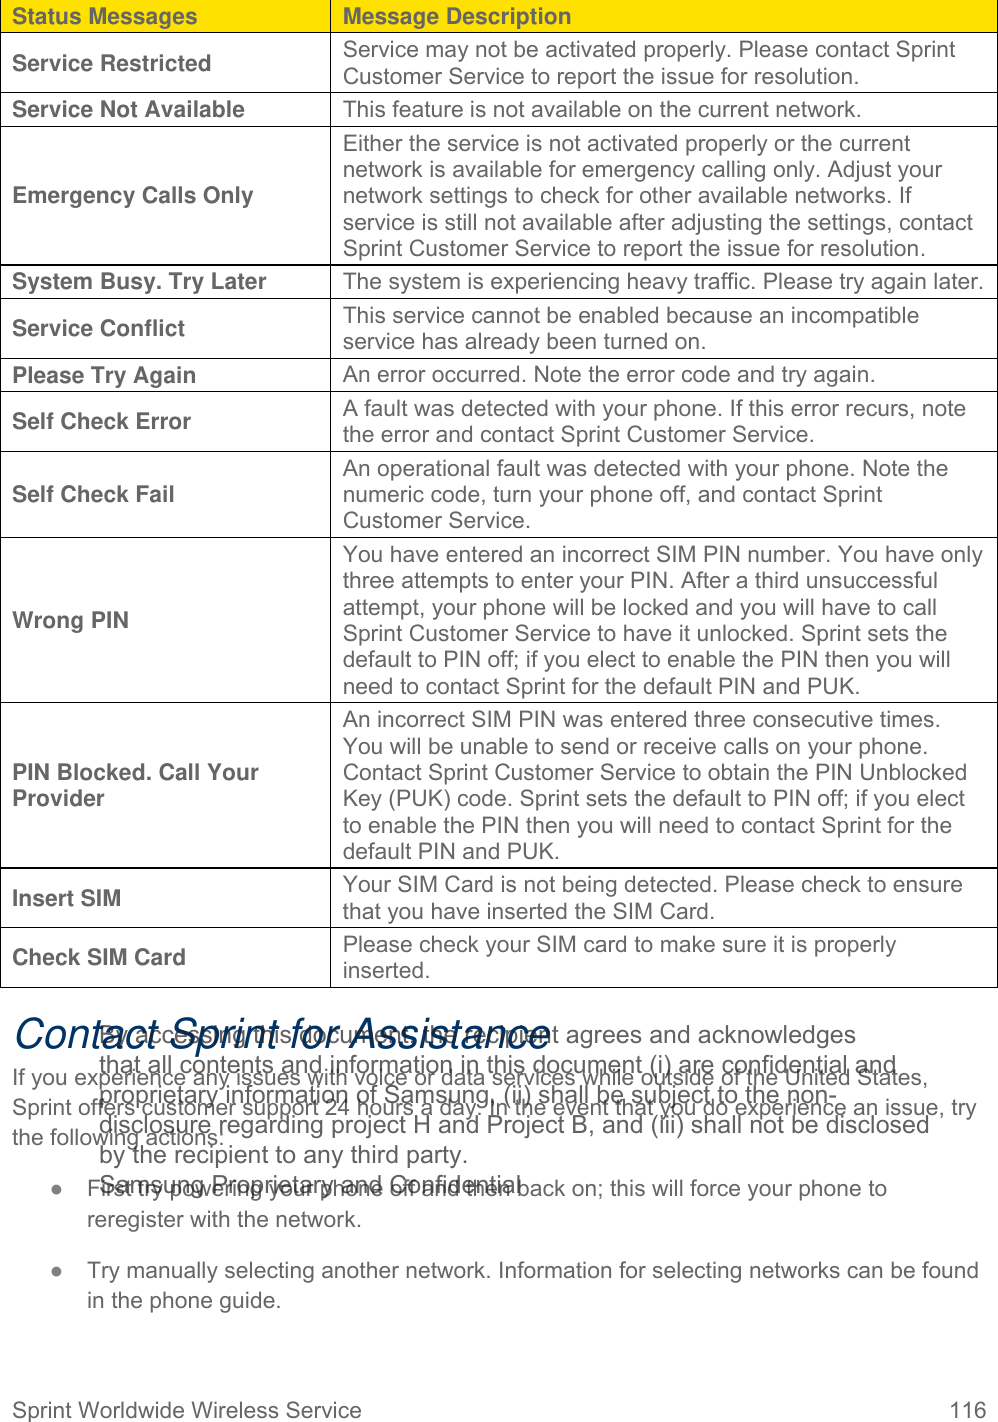
Samsung Electronics Co SMN900P Multi-band GSM/EDGE/UMTS/CDMA/LTE Phone with WLAN, Bluetooth, RFID and ANT+ User Manual

Samsung Electronics Co Ltd Multi-band GSM/EDGE/UMTS/CDMA/LTE Phone with WLAN, Bluetooth, RFID and ANT+ Users Manual

Users Manual

  User Guide            ©2013 Sprint. Sprint and the logo are trademarks of Sprint. Other marks are trademarks of their respective owners. (Sprint UG template version 13c) H_UG_Eng_TE_MGP_081413_D3By accessing this document, the recipient agrees and acknowledges that all contents and information in this document (i) are confidential and proprietary information of Samsung, (ii) shall be subject to the non- disclosure regarding project H and Project B, and (iii) shall not be disclosed by the recipient to any third party. Samsung Proprietary and Confidential
TOC  i   Table of Contents Get Started .................................................................................................................................... 1  Your Phone at a Glance ........................................................................................................ 1  Set Up Your Phone ................................................................................................................ 1  Activate Your Phone .............................................................................................................. 2  Complete the Setup ............................................................................................................... 3  Set Up Voicemail ................................................................................................................... 4 Sprint Account Information and Help ..................................................................................... 4 Sprint Account Passwords ............................................................................................. 4 Manage Your Account .................................................................................................... 5 Sprint Support Services .................................................................................................. 6 Phone Basics ................................................................................................................................ 7  Your Phone’s Layout ............................................................................................................. 7  Turn Your Phone On and Off ................................................................................................. 8  Turn Your Screen On and Off ................................................................................................ 8 S Pen ..................................................................................................................................... 9  Air Gestures ........................................................................................................................... 9  Motion Gestures .................................................................................................................... 9 Smart Screen ....................................................................................................................... 10 Air View................................................................................................................................ 11 Voice Control ....................................................................................................................... 11 Multi Window ....................................................................................................................... 12 Touch Gestures ................................................................................................................... 13 Tap ............................................................................................................................... 13 Touch and Hold ............................................................................................................ 13 Swipe or Slide .............................................................................................................. 13 Drag .............................................................................................................................. 14 Flick .............................................................................................................................. 14 Rotate ........................................................................................................................... 14 Pinch and Spread ......................................................................................................... 14 Your Home Screen .............................................................................................................. 15 By accessing this document, the recipient agrees and acknowledges that all contents and information in this document (i) are confidential and proprietary information of Samsung, (ii) shall be subject to the non- disclosure regarding project H and Project B, and (iii) shall not be disclosed by the recipient to any third party. Samsung Proprietary and Confidential
TOC ii   Create Shortcuts .......................................................................................................... 15 Add and Remove Primary Shortcuts ............................................................................ 16 Add and Remove Widgets ............................................................................................ 16 Extended Home Screens ............................................................................................. 17 Recent Applications ...................................................................................................... 17 Notifications ......................................................................................................................... 17 Status Bar ............................................................................................................................ 17 Enter Text ............................................................................................................................ 19 Text Input Methods ....................................................................................................... 19 Google Voice Typing .................................................................................................... 19 Samsung Keyboard ...................................................................................................... 20 Swype ........................................................................................................................... 20 Tips for Editing Text ..................................................................................................... 21 Phone Calls ................................................................................................................................. 23 Make Phone Calls ................................................................................................................ 23 Call Using the Keypad .................................................................................................. 23 Call from Logs .............................................................................................................. 23 Call from Contacts ........................................................................................................ 23 Call a Number in a Text Message ................................................................................ 24 Call a Number in an Email Message ............................................................................ 24 Call Emergency Numbers ............................................................................................ 24 Receive Phone Calls ........................................................................................................... 25 Answer an Incoming Call .............................................................................................. 25 Mute the Ringing Sound ............................................................................................... 25 Reject an Incoming Call ............................................................................................... 25 Reject a Call with a Text Message ............................................................................... 25 Phone Call Options .............................................................................................................. 26 Dialing Options ............................................................................................................. 26 Caller ID ....................................................................................................................... 26 Call Waiting .................................................................................................................. 27 3-way Calling ................................................................................................................ 27 Call Forwarding ............................................................................................................ 27 In-call Options .............................................................................................................. 28 By accessing this document, the recipient agrees and acknowledges that all contents and information in this document (i) are confidential and proprietary information of Samsung, (ii) shall be subject to the non- disclosure regarding project H and Project B, and (iii) shall not be disclosed by the recipient to any third party. Samsung Proprietary and Confidential
TOC iii   Speed Dials .................................................................................................................. 29 Voicemail ............................................................................................................................. 29 Set Up Voicemail .......................................................................................................... 30 Retrieve Your Voicemail Messages ............................................................................. 30 Voicemail Notification ................................................................................................... 30 Visual Voicemail .................................................................................................................. 31 Logs ..................................................................................................................................... 31 View Logs ..................................................................................................................... 31 Logs Options ................................................................................................................ 32 Clear Logs .................................................................................................................... 32 Contacts ...................................................................................................................................... 33 Get Started With Contacts ................................................................................................... 33 Access Contacts ........................................................................................................... 33 Contacts Options .......................................................................................................... 33 Add a Contact ...................................................................................................................... 34 Save a Phone Number to a Contact .................................................................................... 35 Edit a Contact ...................................................................................................................... 35 Add or Edit Information for a Contact ........................................................................... 35 Assign a Picture to a Contact ....................................................................................... 36 Assign a Ringtone to a Contact .................................................................................... 36 Join a Contact .............................................................................................................. 37 Delete a Contact ........................................................................................................... 37 Add Entries to Favorites ...................................................................................................... 37 Create Groups ..................................................................................................................... 38 Share a Contact ................................................................................................................... 39 Contacts Settings................................................................................................................. 39 Accounts and Messaging ............................................................................................................ 40 Google Account ................................................................................................................... 40 Create a Google Account ............................................................................................. 40 Sign In to Your Google Account ................................................................................... 40 Access Gmail ............................................................................................................... 40 Send a Gmail Message ................................................................................................ 41 Samsung Account................................................................................................................ 41 By accessing this document, the recipient agrees and acknowledges that all contents and information in this document (i) are confidential and proprietary information of Samsung, (ii) shall be subject to the non- disclosure regarding project H and Project B, and (iii) shall not be disclosed by the recipient to any third party. Samsung Proprietary and Confidential
TOC iv   Email .................................................................................................................................... 41 Add an Email Account .................................................................................................. 42 Add a Microsoft Exchange ActiveSync Account ........................................................... 42 Compose and Send Email ............................................................................................ 43 Reply or Forward Email ................................................................................................ 44 Manage Your Email Inbox ............................................................................................ 44 Edit Email Settings ....................................................................................................... 45 Delete an Email Account .............................................................................................. 48 Text and Multimedia Messaging .......................................................................................... 48 Send a Text Message (SMS) ....................................................................................... 48 Send a Multimedia Message (MMS) ............................................................................ 48 Save and Resume a Draft Message ............................................................................ 49 New Messages Notification .......................................................................................... 50 Managing Message Conversations .............................................................................. 50 Text and MMS Settings ................................................................................................ 52 Social Networking Accounts ................................................................................................ 54 YouTube ....................................................................................................................... 54 Google Hangouts ......................................................................................................... 55 Google+ ........................................................................................................................ 55 Google Messenger ....................................................................................................... 55 Apps and Entertainment ............................................................................................................. 57 DivX ..................................................................................................................................... 57 DivX Legal Information ................................................................................................. 57 Locate Your VOD Registration Number ....................................................................... 57 Register Your DivX Device for VOD Playback of Purchased Movies ........................... 57 Google Play Store................................................................................................................ 58 Find and Install an App ................................................................................................. 58 Create a Google Wallet Account .................................................................................. 59 Open an Installed App .................................................................................................. 59 Uninstall an App ........................................................................................................... 59 Navigation ............................................................................................................................ 60 Google Maps ................................................................................................................ 60 Google Navigation ........................................................................................................ 60 By accessing this document, the recipient agrees and acknowledges that all contents and information in this document (i) are confidential and proprietary information of Samsung, (ii) shall be subject to the non- disclosure regarding project H and Project B, and (iii) shall not be disclosed by the recipient to any third party. Samsung Proprietary and Confidential
TOC  v   Scout™  ......................................................................................................................... 61 Samsung Apps .................................................................................................................... 61 S Magazine .......................................................................................................................... 61 Music ................................................................................................................................... 61 Google Play Music ....................................................................................................... 61 Music ............................................................................................................................ 61 Sprint Music Plus ................................................................................................................. 64 Google Play Movies ............................................................................................................. 65 Google Play Books .............................................................................................................. 65 Google Play Magazines ....................................................................................................... 65 Group Play ........................................................................................................................... 66 Sprint Zone .......................................................................................................................... 67 Sprint TV & Movies .............................................................................................................. 67 Samsung Link ...................................................................................................................... 68 Configure Samsung Link Settings ................................................................................ 69 Use Samsung Link to Share Media with Another Device ............................................. 69 CBS Sports .......................................................................................................................... 70 BaconReader ....................................................................................................................... 70 1Weather ............................................................................................................................. 70 Web and Data ............................................................................................................................. 71 Wi-Fi .................................................................................................................................... 71 Turn Wi-Fi On and Connect to a Wireless Network ..................................................... 71 Connect to a Different Wi-Fi Network ........................................................................... 72 Data Services (Sprint 3G and 4G) ....................................................................................... 72 Your Data Services User Name ................................................................................... 73 Launch the Browser ..................................................................................................... 73 4G Services ......................................................................................................................... 73 Virtual Private Networks (VPN) ............................................................................................ 74 Prepare Your Phone for VPN Connection .................................................................... 74 Add a VPN .................................................................................................................... 74 Connect to a VPN ......................................................................................................... 75 Disconnect from a VPN ................................................................................................ 75 Chrome ................................................................................................................................ 75 By accessing this document, the recipient agrees and acknowledges that all contents and information in this document (i) are confidential and proprietary information of Samsung, (ii) shall be subject to the non- disclosure regarding project H and Project B, and (iii) shall not be disclosed by the recipient to any third party. Samsung Proprietary and Confidential
TOC vi   Internet ................................................................................................................................ 76 Pictures and Video ...................................................................................................................... 77 Camera ................................................................................................................................ 77 Open the Camera ......................................................................................................... 77 Take a Pictures ............................................................................................................ 78 Record Videos .............................................................................................................. 78 Camera Options ........................................................................................................... 79 Quick Camera Settings ................................................................................................ 80 Advanced Camera Settings .......................................................................................... 80 Gallery ................................................................................................................................. 82 View Photos and Videos .............................................................................................. 83 Zoom In or Out on a Photo ........................................................................................... 83 Working with Photos ..................................................................................................... 84 Share Photos and Videos ............................................................................................. 84 Samsung Hub ...................................................................................................................... 87 Use Samsung Hub ....................................................................................................... 87 WatchON ............................................................................................................................. 89 Optical Reader ..................................................................................................................... 90 Story Album ......................................................................................................................... 90 Flipboard .............................................................................................................................. 90 Video ................................................................................................................................... 90 Tools and Calendar ..................................................................................................................... 92 Google Now ......................................................................................................................... 92 S Health ............................................................................................................................... 92 S Translator ......................................................................................................................... 92 Polaris Office 5 .................................................................................................................... 92 Lumen Toolbar..................................................................................................................... 92 Calendar .............................................................................................................................. 93 Add an Event to the Calendar ...................................................................................... 93 Event Alerts .................................................................................................................. 94 View Events .................................................................................................................. 95 Erase Events ................................................................................................................ 96 Alarm & Timer ...................................................................................................................... 96 By accessing this document, the recipient agrees and acknowledges that all contents and information in this document (i) are confidential and proprietary information of Samsung, (ii) shall be subject to the non- disclosure regarding project H and Project B, and (iii) shall not be disclosed by the recipient to any third party. Samsung Proprietary and Confidential
TOC vii   Calculator............................................................................................................................. 97 S Memo ............................................................................................................................... 97 My Files ............................................................................................................................... 99 Dropbox ............................................................................................................................. 100 Download the Desktop Application ............................................................................. 100 Accessing Dropbox on Your Device ........................................................................... 100 Manually Uploading a Picture to Dropbox .................................................................. 100 Lookout Security ................................................................................................................ 101 Voice Services ................................................................................................................... 101 S Voice ....................................................................................................................... 101 Voice Recorder ........................................................................................................... 102 Bluetooth ........................................................................................................................... 103 Turn Bluetooth On or Off ............................................................................................ 103 The Bluetooth Settings Menu ..................................................................................... 103 Connect a Bluetooth Headset or Car Kit .................................................................... 103 Reconnect a Headset or Car Kit ................................................................................. 104 Disconnect or Unpair from a Bluetooth Device .......................................................... 104 Send Information Using Bluetooth .............................................................................. 105 Receive Information Using Bluetooth ......................................................................... 106 microSD Card .................................................................................................................... 107 Remove a microSD Card ........................................................................................... 107 View microSD Card Memory ...................................................................................... 108 Format a microSD Card ............................................................................................. 108 Unmount a microSD Card .......................................................................................... 108 Transfer Files Between Your Phone and a Computer ....................................................... 108 Update Your Phone ........................................................................................................... 109 Before Updating Your Firmware ................................................................................. 109 Update your Phone .................................................................................................... 110 Sprint Worldwide Wireless Service ........................................................................................... 111 Activate Sprint Worldwide Service on Your Account ......................................................... 111 Your SIM Card ................................................................................................................... 111 Enable Global Roaming Mode ........................................................................................... 111 Make and Receive Worldwide Calls .................................................................................. 112 By accessing this document, the recipient agrees and acknowledges that all contents and information in this document (i) are confidential and proprietary information of Samsung, (ii) shall be subject to the non- disclosure regarding project H and Project B, and (iii) shall not be disclosed by the recipient to any third party. Samsung Proprietary and Confidential
TOC viii   Sprint Voicemail Service .................................................................................................... 113 Set Up Your Voicemail Access Number ..................................................................... 113 Access Your Voicemail ............................................................................................... 114 Voicemail Troubleshooting ......................................................................................... 114 International Data Roaming ............................................................................................... 114 Get Started With Data Services ................................................................................. 115 Access Email and Data Services on GSM/UMTS Networks ...................................... 115 Access Email and Data Services on CDMA Networks ............................................... 115 Status Messages ............................................................................................................... 115 Contact Sprint for Assistance ............................................................................................ 116 Settings ..................................................................................................................................... 118 Wi-Fi Settings .................................................................................................................... 118 Turn Wi-Fi On or Off ................................................................................................... 118 Configure Wi-Fi Settings ............................................................................................ 118 Wi-Fi Direct ................................................................................................................. 120 Bluetooth ........................................................................................................................... 120 Turn Bluetooth On or Off ............................................................................................ 120 Bluetooth Settings ...................................................................................................... 120 Tethering............................................................................................................................ 121 Tethering .................................................................................................................... 121 Turn Hotspot On or Off ............................................................................................... 122 Configure Hotspot ...................................................................................................... 122 Allowed Devices ......................................................................................................... 122 Airplane Mode.................................................................................................................... 123 Data Usage ........................................................................................................................ 123 Location Services .............................................................................................................. 124 More Networks Settings ..................................................................................................... 125 Mobile Networks ......................................................................................................... 125 VPN ............................................................................................................................ 125 Roaming ..................................................................................................................... 126 NFC ................................................................................................................................... 126 Turn NFC On or Off .................................................................................................... 127 Android Beam ............................................................................................................. 127 By accessing this document, the recipient agrees and acknowledges that all contents and information in this document (i) are confidential and proprietary information of Samsung, (ii) shall be subject to the non- disclosure regarding project H and Project B, and (iii) shall not be disclosed by the recipient to any third party. Samsung Proprietary and Confidential
TOC ix   S Beam .............................................................................................................................. 127 Turn S Beam On or Off .............................................................................................. 127 Nearby Devices ................................................................................................................. 127 Screen Mirroring ................................................................................................................ 128 Lock Screen ....................................................................................................................... 128 Screen Lock ............................................................................................................... 129 Set a Swipe Screen Lock ........................................................................................... 129 Set a Face Unlock Screen Lock ................................................................................. 130 Set a Pattern Screen Lock ......................................................................................... 131 Set a PIN Screen Lock ............................................................................................... 132 Set a Password Screen Lock ..................................................................................... 133 Wallpaper........................................................................................................................... 134 Brightness .......................................................................................................................... 134 Screen Timeout ................................................................................................................. 134 Font ................................................................................................................................... 135 More Display Settings ........................................................................................................ 135 Touch Key Light Duration ........................................................................................... 135 Screen Mode .............................................................................................................. 135 Reading Mode ............................................................................................................ 135 Auto Adjust Screen Tone ........................................................................................... 136 Daydream ................................................................................................................... 136 Notification Panel ............................................................................................................... 136 Multi Window ..................................................................................................................... 137 LED Indicator ..................................................................................................................... 137 Home Screen Mode ........................................................................................................... 137 Auto-rotate Screen............................................................................................................. 138 Show Battery Percentage .................................................................................................. 138 Language And Input .......................................................................................................... 138 Choose a Default Language ....................................................................................... 138 Set a Default Input Method ......................................................................................... 138 Google Voice Typing Settings .................................................................................... 138 Samsung Keyboard Settings ...................................................................................... 139 Swype Settings ........................................................................................................... 141 By accessing this document, the recipient agrees and acknowledges that all contents and information in this document (i) are confidential and proprietary information of Samsung, (ii) shall be subject to the non- disclosure regarding project H and Project B, and (iii) shall not be disclosed by the recipient to any third party. Samsung Proprietary and Confidential
TOC  x   Speech Settings ......................................................................................................... 142 Pointer Speed ............................................................................................................. 143 Handwriting Search ........................................................................................................... 143 Voice Control ..................................................................................................................... 143 Driving Mode...................................................................................................................... 144 S Pen ................................................................................................................................. 145 One-handed Operation ...................................................................................................... 145 Edit After Screen Capture .................................................................................................. 146 Air Gesture......................................................................................................................... 146 Motions .............................................................................................................................. 147 Palm Motion ....................................................................................................................... 147 Air View.............................................................................................................................. 148 Smart Screen ..................................................................................................................... 149 Smart Stay .................................................................................................................. 149 Smart Rotation ........................................................................................................... 150 Smart Pause ............................................................................................................... 150 Smart Scroll ................................................................................................................ 150 High Touch Sensitivity ....................................................................................................... 151 Sound ................................................................................................................................ 151 Volume ....................................................................................................................... 151 Vibration Intensity ....................................................................................................... 151 Ringtones ................................................................................................................... 152 Vibrations ................................................................................................................... 152 Default Notification Sound .......................................................................................... 152 Vibrate When Ringing ................................................................................................ 152 Dialing Keypad Tone .................................................................................................. 153 Touch Sounds ............................................................................................................ 153 Screen Lock Sound .................................................................................................... 153 Haptic Feedback ........................................................................................................ 153 Emergency Tone ........................................................................................................ 153 Audio Output .............................................................................................................. 154 Adapt Sound ............................................................................................................... 154 Call Settings....................................................................................................................... 154 By accessing this document, the recipient agrees and acknowledges that all contents and information in this document (i) are confidential and proprietary information of Samsung, (ii) shall be subject to the non- disclosure regarding project H and Project B, and (iii) shall not be disclosed by the recipient to any third party. Samsung Proprietary and Confidential
TOC xi   Call Rejection ............................................................................................................. 154 Set Up Call Rejection Messages ................................................................................ 155 Answering/Ending Calls ............................................................................................. 155 Turn Off Screen During Calls ..................................................................................... 155 Call Alerts ................................................................................................................... 155 Call Accessories ......................................................................................................... 156 Ringtones And Keypad Tones .................................................................................... 156 Personalize Call Sound .............................................................................................. 157 Noise Reduction ......................................................................................................... 157 Increase Volume In Pocket ........................................................................................ 157 US Dialing .................................................................................................................. 158 International Dialing .................................................................................................... 158 TTY Mode ................................................................................................................... 158 Hearing Aids ............................................................................................................... 158 DTMF Tones .............................................................................................................. 159 Voicemail Settings ...................................................................................................... 159 Voice Privacy .............................................................................................................. 159 Accounts ............................................................................................................................ 159 Add an Account .......................................................................................................... 159 Date and Time ................................................................................................................... 160 Blocking Mode ................................................................................................................... 160 Power Saving Mode ........................................................................................................... 161 Accessibility ....................................................................................................................... 162 Accessory .......................................................................................................................... 164 Backup Options ................................................................................................................. 164 Security .............................................................................................................................. 165 Encryption .................................................................................................................. 165 Passwords .................................................................................................................. 165 Device Administration ................................................................................................. 166 Credential Storage ..................................................................................................... 166 Application Manager .......................................................................................................... 166 Battery ............................................................................................................................... 167 Storage .............................................................................................................................. 167 By accessing this document, the recipient agrees and acknowledges that all contents and information in this document (i) are confidential and proprietary information of Samsung, (ii) shall be subject to the non- disclosure regarding project H and Project B, and (iii) shall not be disclosed by the recipient to any third party. Samsung Proprietary and Confidential
TOC xii   Activate this Device ........................................................................................................... 167 System Update .................................................................................................................. 168 About Device ..................................................................................................................... 168 Index ......................................................................................................................................... 170 By accessing this document, the recipient agrees and acknowledges that all contents and information in this document (i) are confidential and proprietary information of Samsung, (ii) shall be subject to the non- disclosure regarding project H and Project B, and (iii) shall not be disclosed by the recipient to any third party. Samsung Proprietary and Confidential
Get Started  1   Get Started The following topics give you all the information you need to set up your phone and Sprint service the first time. Your Phone at a Glance The following illustration outlines your phone’s primary features.  Set Up Your Phone You must first install and charge the battery to begin setting up your phone. 1. Install the battery.  Using the slot provided, gently lift the cover off the phone.   Insert the battery, aligning the gold contacts on the battery with the gold contacts on the phone, and gently press the battery into place.  Replace the battery compartment cover, making sure all the tabs are secure and there are no gaps around the cover. 2. Plug the USB cable into the Charger/Accessory Jack on the bottom of the phone.  3. Plug the other end of the USB cable into the Charging Head, and then plug the Charging Head into an electrical outlet to charge your battery. Fully charging a battery may take up to three hours. By accessing this document, the recipient agrees and acknowledges that all contents and information in this document (i) are confidential and proprietary information of Samsung, (ii) shall be subject to the non- disclosure regarding project H and Project B, and (iii) shall not be disclosed by the recipient to any third party. Samsung Proprietary and Confidential
Get Started  2   Note:  Your phone’s battery should have enough charge to turn the phone on and find a signal, run the setup application, set up voicemail, and make a call. You should fully charge the battery as soon as possible. 4.  Press and hold the Power/Lock Key to turn the phone on.  If your phone is activated, it will turn on, search for Sprint service, and begin the setup application.  If your phone is not yet activated, see Activate Your Phone for more information. Activate Your Phone Depending on your account or how and where you purchased your phone, it may be ready to use or you may need to activate it on your Sprint account. ● If you purchased your phone at a Sprint Store, it is probably activated and ready to use. ● If you received your phone in the mail and it is for a new Sprint account or a new line of service, it is designed to activate automatically.  When you turn the phone on for the first time, you should see a Hands Free Activation screen, which may be followed by a PRL Update screen and a Firmware Update screen. Follow the onscreen instructions to continue. ● If you received your phone in the mail and you are activating a new phone for an existing number on your account (you’re swapping phones), you can activate on your computer online or directly on your phone.  Activate on your computer: •  Go to sprint.com/activate and complete the online instructions to activate your phone.  Activate on your phone: •  Turn on your new phone. (Make sure the old one is turned off.) Your phone will automatically attempt Hands-Free Activation. •  Follow the onscreen prompts to complete the activation process. ● To confirm activation, make a phone call. If your phone is still not activated or you do not have access to the Internet, contact Sprint Customer Service at 1-888-211-4727 for assistance. Tip:   Do not press the Power/Lock Key while the phone is being activated. Pressing the Power/Lock Key cancels the activation process. By accessing this document, the recipient agrees and acknowledges that all contents and information in this document (i) are confidential and proprietary information of Samsung, (ii) shall be subject to the non- disclosure regarding project H and Project B, and (iii) shall not be disclosed by the recipient to any third party. Samsung Proprietary and Confidential
Get Started  3   Note:   If you are having any difficulty with activation, contact Sprint Customer Service by calling 1-888-211-4727 from any other phone. Complete the Setup After you turn on your phone and activate it, your phone displays a Welcome screen, and begins preparing for first-time use. Note: In some cases, you may be able to complete the setup process before your phone has been activated on your Sprint account. At the Welcome screen, follow the onscreen instructions to complete setup for each topic. Tap Next, or the right arrow, to move through the steps. You can skip options to continue to the next one. During setup, you may see these options: ● Language: Choose the default language for your phone’s operation. ● Accessibility: Configure settings to access settings to improve the accessibility of your phone’s features if you are visually impaired or hard of hearing. ● Wi-Fi: By default, your phone prompts you to use Wi-Fi when accessing data services. Tap a Wi-Fi access point to connect to it, or you can continue setup using your phone’s connection to the network. ● Date and time: By default, your phone uses the date and time provided by the wireless network, or you can enter a different date and time. ● Samsung account: Your Samsung account is used with some apps and features. Sign in to your Samsung account, or follow the prompts to create a new account. ● Got Google?: Your phone uses your Google account to provide access to many fetures and apps. Complete the steps to sign in to your current Google account, or sign up for a new Google account right from your phone. You can also skip signing in to your Google account, or sign in later. ● Google & location: Select Google location options, for allowing your phone to provide location information to Google.. ● This phone belongs to: Enter your First and Last name, to personalize Google features and apps. ● Dropbox: Dropbox provides Web-based “cloud” storage, so you can save your photos and videos. You can create a new account here, or sign in to your existing Dropbox account.  ● Learn about key features: Learn about the features of your new phone. Tap the feature name to learn more about it, and tap the ON/OFF switch to turn the feature On or Off. By accessing this document, the recipient agrees and acknowledges that all contents and information in this document (i) are confidential and proprietary information of Samsung, (ii) shall be subject to the non- disclosure regarding project H and Project B, and (iii) shall not be disclosed by the recipient to any third party. Samsung Proprietary and Confidential
Get Started  4   ● Device name: Your device name is how you and other devices identify your phone, such as when sharing via Bluetooth or Wi-Fi Direct. If you want to use a different name, tap the field and enter a name.  Note: During or after setup, you may see a Connections Optimizer notice. Read the notice and then touch I Agree to allow your phone to connect automatically to the best available data network, including Wi-Fi. To turn Connections Optimizer off at any time, touch > Settings > More settings > Mobile networks > Connections optimizer and uncheck the box. See Connections Optimizer for details.. Set Up Voicemail Your phone automatically transfers all unanswered calls to voicemail, even if your phone is in use or turned off. You should set up your Sprint Voicemail and personal greeting as soon as your phone is activated. Always use a password to protect against unauthorized access.  1.  Press Home  and tap   Phone.  If your screen is locked, press the Power/Lock Key to turn on the display and then swipe your screen in any direction. See Turn Your Screen On and Off. 2. Touch and hold  to dial your voicemail number. 3. Follow the system prompts to:  Create your password.  Record your name announcement.  Record your greeting. Note: Voicemail Password – Sprint strongly recommends that you create a password when setting up your voicemail to protect against unauthorized access. Without a password, anyone who has access to your phone is able to access your voicemail messages. Sprint Account Information and Help Find out about account passwords and information about managing your account and finding help. Sprint Account Passwords As a Sprint customer, you enjoy unlimited access to your personal account information, your voicemail account, and your data services account. To ensure that no one else has access to your information, you will need to create passwords to protect your privacy. By accessing this document, the recipient agrees and acknowledges that all contents and information in this document (i) are confidential and proprietary information of Samsung, (ii) shall be subject to the non- disclosure regarding project H and Project B, and (iii) shall not be disclosed by the recipient to any third party. Samsung Proprietary and Confidential
Get Started  5   Account User Name and Password If you are the account owner, you will create an account user name and password when you sign on to sprint.com. (Click Sign in/Sign up and then click Sign up now! to get started.) If you are not the account owner (if someone else receives the bill for your Sprint service), you can get a sub-account password at sprint.com. Voicemail Password You’ll create your voicemail password when you set up your voicemail. See Set Up Voicemail for more information on your voicemail password. Data Services Password With your Sprint phone, you may elect to set up an optional data services password to control access and authorize Premium Service purchases. For more information, or to change your passwords, sign on to sprint.com or call Sprint Customer Service at 1-888-211-4727. Manage Your Account Manage your Sprint account from your computer, your Sprint phone, or any other phone. Online: sprint.com ● Access your account information. ● Check your minutes used (depending on your Sprint service plan). ● View and pay your bill. ● Enroll in Sprint online billing and automatic payment. ● Purchase accessories. ● Shop for the latest Sprint phones. ● View available Sprint service plans and options. ● Learn more about data services and other products like games, ring tones, screen savers, and more. From Your Sprint Phone 1.  Press   and then tap   Phone.  2. Do any of the following: By accessing this document, the recipient agrees and acknowledges that all contents and information in this document (i) are confidential and proprietary information of Samsung, (ii) shall be subject to the non- disclosure regarding project H and Project B, and (iii) shall not be disclosed by the recipient to any third party. Samsung Proprietary and Confidential
Get Started  6    Tap       to make a payment.  Tap       to access Sprint Zone and a summary of your Sprint service plan or to get answers to other questions. Note: You can also access Sprint Zone app from your device. Press   and then tap  Sprint Zone. From Any Other Phone ● Sprint Customer Service: 1-888-211-4727. ● Business Customer Service: 1-888-788-4727. Sprint Support Services Sprint 411 and Sprint Operator Services let you easily access information and calling assistance from your Sprint phone. Sprint 411 Sprint 411 gives you access to a variety of services and information, including residential, business, and government listings; movie listings or showtimes; driving directions, restaurant reservations, and major local event information. You can get up to three pieces of information per call, and the operator can automatically connect your call at no additional charge. There is a per-call charge to use Sprint 411, and you will be billed for airtime. ► Press Home  and tap   Phone, and then tap        . Sprint Operator Services Sprint Operator Services provides assistance when you place collect calls or when you place calls billed to a local telephone calling card or third party. ► Press Home  and tap   Phone, and then tap    .  For more information or to see the latest in products and services, visit us online at sprint.com. By accessing this document, the recipient agrees and acknowledges that all contents and information in this document (i) are confidential and proprietary information of Samsung, (ii) shall be subject to the non- disclosure regarding project H and Project B, and (iii) shall not be disclosed by the recipient to any third party. Samsung Proprietary and Confidential
Phone Basics  7   Phone Basics Your phone is packed with features that simplify your life and expand your ability to stay connected to the people and information that are important to you. The following topics will introduce the basic functions and features of your phone. Your Phone’s Layout This illustration outlines your phone’s basic layout.   ● LED indicator displays red when charging, green when fully charged, blue when powering up, and orange when a notification has arrived.  ● Light Sensor detects the ambient light level, such as when setting screen brightness when Automatic brightness is enabled, and when using the Camera. ● Earpiece lets you hear the caller and automated prompts during calls. ● Proximity and Gesture Sensors detect the presence of objects near the phone, such as when using air gesture or motion settings. For example, while talking on the phone the sensor detects when it’s near your ear and turns off the screen to prevent accidental key presses. ● Front Camera  allows you to take pictures and videos of yourself. ● Power/Lock Key lets you turn the phone on or off, turn the screen on or off, or lock the screen. Press and hold for a Device options menu, where you can turn the phone off or restart it, or for easy access to Airplane mode, and to Mute, Vibrate, and Sound modes. ● Back Key lets you return to the previous screen, or close a dialog box, options menu, the Notifications panel, or onscreen keyboard. ● Home Key returns you to the Home screen. Press and hold to open the recently used applications window, and access Task Manager and Google Search. ● Menu Key allows you to access a menu from most of your phone’s screens. ● Volume Key adjusts the volume of your phone’s sounds. From the Home screen, press to adjust master volume. During calls or playback, press to adjust volume. Press to mute the ringtone of an incoming call. By accessing this document, the recipient agrees and acknowledges that all contents and information in this document (i) are confidential and proprietary information of Samsung, (ii) shall be subject to the non- disclosure regarding project H and Project B, and (iii) shall not be disclosed by the recipient to any third party. Samsung Proprietary and Confidential
Phone Basics  8   ● Cover Release allows you to lift the cover from the back of your phone. ● Infrared transmitter allows you to control other devices, such as a TV, in conjunction with apps like WatchON.  ● Camera lets you take pictures and record videos. ● Flash helps illuminate subjects in low-light environments when the camera is focusing and capturing a photo or video. ● Microphones allow other callers to hear you when you are using the speakerphone, and captures sound during recording. ● 3.5 mm Headset Jack allows you to plug in either a stereo headset or an optional headset for convenient, hands-free conversations.  ● Speaker plays ringtones and sounds. The speaker also lets you hear the caller’s voice in speakerphone mode. ● USB Charger/Accessory Port allows you to connect the phone charger/USB cable (included) and other optional accessories (not included). CAUTION!   Inserting an accessory into the incorrect jack may damage the phone. Turn Your Phone On and Off Use the Power/Lock Key to turn the phone On or Off. Turn Your Phone On or Off ► Press and hold the Power/Lock Key. The screen remains blank while your phone is off. If the phone is off during charging, the screen displays a charging animation. Turn Your Screen On and Off Your phone allows you to quickly turn the screen off when not in use and to turn it back on and unlock it when you need it. Turn the Screen Off When Not in Use ► To quickly turn the screen off, press the Power/Lock Key. Pressing the Power/Lock Key again will turn on the screen and display the lock screen. To save battery power, the phone automatically turns off the screen (times out) after a certain period of time when you leave it idle. You will still be able to receive messages and calls while the phone’s screen is off. By accessing this document, the recipient agrees and acknowledges that all contents and information in this document (i) are confidential and proprietary information of Samsung, (ii) shall be subject to the non- disclosure regarding project H and Project B, and (iii) shall not be disclosed by the recipient to any third party. Samsung Proprietary and Confidential
Phone Basics  9   Note: For information on how to adjust the time before the screen turns off, see Screen Timeout.  Turn the Screen On and Unlock It 1. To turn the screen on, press the Power/Lock Key. 2. Unlock the screen:  If you are using the default screen lock, swipe the screen in any direction to unlock it.  If you have set up a screen lock, use  your screen lock. See Screen lock. S Pen xxx Air Gestures Control your phone by making specific gestures with your hand above the Gesture sensor, located near the Earpiece at the top of your phone’s screen. Air gestures include: ● Quick glance: When On, you can reach toward the device with the screen off to see important information at a glance. ● Air jump: When On, you can scroll web pages in screen-sized jumps. ● Air browse: When On, you can move between pictures, pages, or music tracks. ● Air move: When On, you can move app shortcuts or Calendar events. ● Air call-accept: When On, you can wave your hand over the screen to answer incoming calls. To enable Air gestures: ■  Press   and tap   > Settings > My Device > Motions and gestures > Air gesture. For more information, see Motions and Gestures. Motion Gestures Control your phone with natural movements, like putting the device to your ear to call a contact displayed on the screen. Motions include: ● Direct call: When On, you can lift the device to your ear while viewing a contact to call the contact. By accessing this document, the recipient agrees and acknowledges that all contents and information in this document (i) are confidential and proprietary information of Samsung, (ii) shall be subject to the non- disclosure regarding project H and Project B, and (iii) shall not be disclosed by the recipient to any third party. Samsung Proprietary and Confidential
Phone Basics 10   ● Smart alert: When On, you can lift the phone to receive notifications of missed calls and notifications that occurred while the device was stationary. ● Zoom: When On, you can tilt the phone to zoom in or out when viewing pictures in Gallery. ● Browse an image: When On, you can move the phone in a side-to-side motion to pan from side to side while viewing an image. ● Mute/pause: When On, you can mute incoming calls and pause playback by turning the phone screen-side down. ● Palm motion: When On, you can control your device by touching the screen with the palm of your hand. •  Capture screen: When On, you can save a copy of the current screen to the clipboard by swiping the side of your hand across the screen. •  Mute/pause: When On, you can mute incoming calls and pause playback by covering the screen with your hand. To enable Motion gestures: ■  Press   and tap   > Settings > My Device > Motions and gestures > Motion. For more information, see Motions and Gestures. Smart Screen Smart screen features allow you to have your phone automatically adjust screen timeout, rotation when it detects you are looking at the screen, and control scrolling and playback based whether you are facing the screen. Smart screen features include: ● Smart stay: The screen will not time out as long as you are looking at it. ● Smart rotation: The screen automatically updates to match the angle at which you are viewing it. ● Smart pause: The screen automatically pauses video playback when you look away from the screen. ● Smart scroll: The screen will scroll according to the tilt of the phone and your face. Smart screen uses the front camera to detect when you are facing the screen. Some factors that may affect the ability of the front camera to detect your face are: ● When the phone is not docked or held upright, for example when placed on a table. ● When the front camera cannot detect your face and eyes. By accessing this document, the recipient agrees and acknowledges that all contents and information in this document (i) are confidential and proprietary information of Samsung, (ii) shall be subject to the non- disclosure regarding project H and Project B, and (iii) shall not be disclosed by the recipient to any third party. Samsung Proprietary and Confidential
Phone Basics 11   ● When the front camera is being used for the current application. ● When the source of light is behind you, or when using the phone in the dark. Configure Smart Screen Enable Smart screen features, and learn about using them. ■  Press   and tap   > Settings > My Device > Smart screen. Air View Air view allows you to hover your finger over items on the screen to display more information. ● Information preview: Hover over items to display information previews, extended text, or enlarged images, depending on the type of item. ● Progress preview: Hover over a progress bar, such as for video playback, to display a scene preview or elapsed playback time. ● Speed dial preview: Hover over a speed dial to display the name of the contact assigned to the speed dial. ● Webpage magnifier: Hover over a webpage to magnify the content under your finger. Configure Air View Enable Air view features, and learn about using them. ■  Press   and tap   > Settings > My Device > Air view. Voice Control Use spoken commands to control and interact with your phone, such as: ● Incoming calls: When enabled, you can answer or reject calls with the voice commands “Answer” and “Reject”. When you answer a call with the voice command, the Speaker will automatically be turned on for hands-free talking. ● Alarm: When enabled, you can stop or snooze alarms with the voice commands “Stop” and “Snooze”. ● Camera: When enabled, you can take pictures with the voice commands “Smile”, “Cheese”, “Capture” and “Shoot”. ● Music: When enabled, you can control the music player with the voice commands “Next”, “Previous”, “Pause”, “Play”, “Volume Up”, and “Volume Down”.  By accessing this document, the recipient agrees and acknowledges that all contents and information in this document (i) are confidential and proprietary information of Samsung, (ii) shall be subject to the non- disclosure regarding project H and Project B, and (iii) shall not be disclosed by the recipient to any third party. Samsung Proprietary and Confidential
Phone Basics 12   Configure Voice Control Enable Voice control features, and learn about using them. ■  Press   and tap   > Settings > My Device > Voice control. Multi Window Multi Window allows you to use two apps on the same screen, in separate, resizable windows. Enable Multi Window Enable Multi window in the Display settings. 1.  Press   and tap   > Settings > My device > Display. 2. Tap the check box beside Multi window to enable or disable the option. Display Multi Window After you enable Multi window in Display settings, you can control whether Multi window displays on the screen, for easy access to its features. When Multi Window is enabled, it displays on the left side of the screen by default. You can drag the tab along the side of the screen, or tap the tab to open Multi Window, then drag Multi window to another edge of the screen (top, bottom, or side). ■ Touch and hold the   Back Key. Work With Multi Window After enabling Multi Window, you can use it to run two apps at the same time. You can launch apps from Multi window, or drag an app to the screen to run multiple apps at the same time. The apps display together on a split screen. You can switch between the apps, or adjust the size of their display on the screen. Use Multi Window to Launch Multiple Apps When you drag an app from Multi window on top of an open app, both apps display in a split window. ■ While using one app, touch the tab to display Multi Window, and then touch and drag an app to the screen. Adjust the Size of Apps in Multi Window While using Multi Window, you can adjust the size of the two apps on the screen. ■ Touch and drag the border between the windows. By accessing this document, the recipient agrees and acknowledges that all contents and information in this document (i) are confidential and proprietary information of Samsung, (ii) shall be subject to the non- disclosure regarding project H and Project B, and (iii) shall not be disclosed by the recipient to any third party. Samsung Proprietary and Confidential
Phone Basics 13   Switch Multi Window App Positions While using Multi Window, you can switch the position of the app windows on the screen. ■ Touch the border between the windows, then touch   Make a Multi Window App Full Screen While using Multi Window, you can expand an app to full screen anytime. ■ Touch the border between the windows, then touch  . Touch Gestures Your phone’s touchscreen lets you control actions through a variety of touch gestures. Tap When you want to type using the onscreen keyboard, select items onscreen such as application and settings icons, or press onscreen buttons, simply tap them with your finger.  Touch and Hold To open the available options for an item (for example, a contact or link in a Web page), touch and hold the item.  Swipe or Slide To swipe or slide means to quickly drag your finger vertically or horizontally across the screen.  By accessing this document, the recipient agrees and acknowledges that all contents and information in this document (i) are confidential and proprietary information of Samsung, (ii) shall be subject to the non- disclosure regarding project H and Project B, and (iii) shall not be disclosed by the recipient to any third party. Samsung Proprietary and Confidential
Phone Basics 14   Drag To drag, touch and hold your finger with some pressure before you start to move your finger. While dragging, do not release your finger until you have reached the target position.  Flick Flicking the screen is similar to swiping, except that you need to swipe your finger in light, quick strokes. This finger gesture is always in a vertical direction, such as when flicking the contacts or message list.  Rotate For most screens, you can automatically change the screen orientation from portrait to landscape by turning the phone sideways. When entering text, you can turn the phone sideways to bring up a bigger keyboard.   Note: You can control screen rotation with the Auto-rotate screen setting. To make this selection, press   and then tap   > Settings > My Device > Display > Auto-rotate screen. See Auto-rotate screen for more information. Pinch and Spread “Pinch” the screen using your thumb and forefinger to zoom out or “spread” the screen to zoom in when viewing a picture or a Web page. (Move fingers inward to zoom out and outward to zoom in.)  By accessing this document, the recipient agrees and acknowledges that all contents and information in this document (i) are confidential and proprietary information of Samsung, (ii) shall be subject to the non- disclosure regarding project H and Project B, and (iii) shall not be disclosed by the recipient to any third party. Samsung Proprietary and Confidential
Phone Basics 15   Tip:  Pinching any Home screen will let you see thumbnails of all seven Home screens. Tap a thumbnail to go straight to another Home screen. Your Home Screen The home screen is the starting point for your phone’s applications, functions, and menus. You can customize your home screen by adding application icons, shortcuts, folders, widgets, and more. Your home screen extends beyond the initial screen. Swipe the screen left or right to display additional screens. Note:   You can keep swiping in one direction to move through all the home screens, back to the home screen. The small circles toward the bottom of the screen let you know your current screen position.  Tip:   Press   to return to the main Home screen from any other screen.  Create Shortcuts Learn how to add, move, or remove items from the home screen. Add Shortcuts from the Applications Menu 1.  Press   to display the main Home screen, and then navigate to the desired screen. 2.  Tap   Apps to display applications, then scroll to locate your desired application. 3. Touch and hold the application icon, and then drag it to a position on the home screen. 4.  Release the shortcut to place it on the screen. Add Shortcuts from the Home screen 1.  Press   to display the main Home screen, and then navigate to the desired screen. 2.  Touch and hold an empty area of the Home screen, and then tap Apps and widgets. 3.  Touch and hold the application icon, and then drag it to a position on the home screen. 4.  Release the shortcut to place it on the screen. Remove a Shortcut 1.  Press   to display the main Home screen. By accessing this document, the recipient agrees and acknowledges that all contents and information in this document (i) are confidential and proprietary information of Samsung, (ii) shall be subject to the non- disclosure regarding project H and Project B, and (iii) shall not be disclosed by the recipient to any third party. Samsung Proprietary and Confidential
Phone Basics 16   2.  Touch and hold the desired shortcut to unlock it from its location on the current screen. 3. Drag the icon to the Remove icon and release it. As you place the shortcut into the Trash, both items turn red. Note:  Removing a shortcut does not delete the application, it simply removes the shortcut from the home screen. Add and Remove Primary Shortcuts Primary shortcuts appear at the bottom of the main Home screen by default (Phone, Contacts, Messaging, Internet, and Apps). You can change any of your primary shortcuts, except the Apps shortcut. Note:  Before replacing a primary shortcut, you must first add the replacement shortcut to the Home Screen. For more information, see Create Shortcuts.    Press   to display the main Home screen.  1.  Touch and hold the primary shortcut you want to replace and then drag it to an empty 2.space on any Home screen.  Scroll the Home screen to find the shortcut you want to add as the new primary shortcut. 3.  Touch and hold the new shortcut and then drag it to the empty space in the row of 4.primary shortcuts. The new primary shortcut will now appear on all Home screens.  Add and Remove Widgets Widgets are self-contained applications that reside either in your Widgets tab or on the main or extended Home screens. Unlike a shortcut, the Widget appears as an onscreen application. Widgets can include Contacts shortcuts, bookmarks, Facebook® status windows, Gmail and email accounts, and many other types of apps. Add a Widget   Press   to display the main Home screen, and then navigate to the desired screen. 1. Touch and hold an empty area of the Home screen, and then tap Apps and widgets > 2.Widgets.  Touch and hold a widget, and then drag it to a position on the home screen. 3.  Release the widget to place it on the screen. 4.Remove a Widget 1.  Press   to display the main Home screen. By accessing this document, the recipient agrees and acknowledges that all contents and information in this document (i) are confidential and proprietary information of Samsung, (ii) shall be subject to the non- disclosure regarding project H and Project B, and (iii) shall not be disclosed by the recipient to any third party. Samsung Proprietary and Confidential
Phone Basics 17   2. Touch and hold the desired widget. This unlocks it from its location on the current screen. 3. Drag the widget to the Remove icon and release it. As you place the widget into the Trash, both items turn red. Note:  Removing a widget does not delete the widget, it simply removes the widget from the current screen. Extended Home Screens In addition to the main home screen, your phone has six extended home screens to provide more space for adding icons, widgets, and more. Touch and hold the icon or widget and then drag across the screen to move from the main screen to an extended screen. Note:  You can have up to seven screens, including the Main home screen. Recent Applications You can access recently-used applications through a display of shortcuts to the applications themselves.  1. Press and hold   from any screen to display recently used applications. 2. Tap an application to open it. Notifications xxx Status Bar The status bar at the top of the home screen provides phone and service status information on the right side and notification alerts on the left. To view notification alerts, touch and hold the status bar and drag it down. Status Icons Icon Description  Bluetooth® is On  Bluetooth® paired  Wi-Fi® active   Smart screen enabled  Air gesture enabled By accessing this document, the recipient agrees and acknowledges that all contents and information in this document (i) are confidential and proprietary information of Samsung, (ii) shall be subject to the non- disclosure regarding project H and Project B, and (iii) shall not be disclosed by the recipient to any third party. Samsung Proprietary and Confidential
Phone Basics 18    Vibrate  Mute  Speakerphone Active  Network (full signal)   Network (roaming)   3G (data service)   4G (data service)  Airplane Mode  Battery (charging)   Battery (full charge)  Notification Icons Icon Description  Missed call  New email   New Gmail   New message  New voicemail  Event  USB connection  Updates available  Downloading    Connected to a PC using Kies air.  Keyboard active By accessing this document, the recipient agrees and acknowledges that all contents and information in this document (i) are confidential and proprietary information of Samsung, (ii) shall be subject to the non- disclosure regarding project H and Project B, and (iii) shall not be disclosed by the recipient to any third party. Samsung Proprietary and Confidential
Phone Basics 19   Enter Text You can type on your device using the available touchscreen QWERTY keyboard, or by speaking your inputs. Text Input Methods Your device offers several text input methods. ● Google voice typing allows you to speak your entries. ● Samsung keyboard allows you to enter text by touching keys on a virtual QWERTY keyboard. Samsung keyboard includes optional predictive text, which matches your key touches to common words so you can select a word to insert it into your text. ● Swype lets you enter words by swiping across the virtual QWERTY keyboard. Instead of tapping each key, use your finger to trace over each letter of a word. You can also tap letters to enter words. Select a Default Text Input Method You can select a default Text Input Method from Settings, or choose on at any time while entering text. From Settings: ■ Press    and tap    > Settings > My Device > Language and input > Default. While entering text: 1. From a screen where you can enter text, drag down from the top of the screen to open the Notifications panel. 2. Tap Select input method, and then choose a text entry method. Google Voice Typing This feature uses Google voice recognition to convert your spoken words into text.  Use Google Voice Typing to Enter Text 3. From a screen where you can enter text, drag down from the top of the screen to open the Notifications panel, and then tap Google voice typing. 4. Speak into the microphone and watch your text being entered onscreen. 5. If the text is incorrect, tap DELETE. 6. Once you have completed entering your text, tap Done. The onscreen keyboard will reappear. By accessing this document, the recipient agrees and acknowledges that all contents and information in this document (i) are confidential and proprietary information of Samsung, (ii) shall be subject to the non- disclosure regarding project H and Project B, and (iii) shall not be disclosed by the recipient to any third party. Samsung Proprietary and Confidential
Phone Basics 20   Note:  Select a language by tapping at the bottom of the Listening area. Tap Add more languages to assign a new language via the Google voice typing menu. Removing the check mark from the Automatic field allows you to select additional languages. Configure Google Voice Typing ■  Press   and tap    > Settings > My Device > Language and input, and then tap    beside Google voice typing. Samsung Keyboard With Samsung Keyboard, it's easy to enter text, symbols, and numbers. Use Samsung Keyboard to Enter Text 1. From a screen where you can enter text drag down from the top of the screen to open the Notifications panel, and then tap Samsung keyboard. 2. Tap keys to enter text. While entering text, use these options:  If you make a mistake, tap   to delete incorrect characters. Touch and hold  to delete a whole word or field.  Tap   to change the case of the text. Tap   twice to switch to all capitals.  Tap   to switch to a symbols keyboard, to enter symbols. There are two symbol keyboards.  Tap   to switch to Google Voice typing, to enter text by speaking. Configure Samsung Keyboard ■ Press    and tap    > Settings > My Device > Language and input, and then tap    beside Samsung keyboard. Note:  For more information about Samsung Keyboard settings, see Samsung Keyboard Settings. Swype Swype lets you enter words by tracing over the letters on the virtual QWERTY keyboard. Instead of tapping each key, use your finger to trace over each letter of a word. You can also tap letters to enter words. Swype provides next-letter prediction and regional error correction, which can compensate for tapping the wrong keys on the virtual QWERTY keyboards. By accessing this document, the recipient agrees and acknowledges that all contents and information in this document (i) are confidential and proprietary information of Samsung, (ii) shall be subject to the non- disclosure regarding project H and Project B, and (iii) shall not be disclosed by the recipient to any third party. Samsung Proprietary and Confidential
Phone Basics 21   Use Swype to Enter Text 1. From a screen where you can enter text drag down from the top of the screen to open the Notifications panel, and then tap Swype. 2. Swipe your finger continuously over the letters to form a word. As you swipe over letters, words matching your pattern display at the top of the Swype keyboard. To enter a word, lift your finger, or tap a word at the top of the keyboard. 3. While entering text, use these options:  If you make a mistake, tap   to delete a single character. Touch and hold   to delete an entire word or field.  By default, Swype starts with a capital at the beginning of text. Tap   to start with a capital letter, or tap   twice to enter all capitals.  Tap   to switch to a symbols keyboard, and then tap keys to enter symbols. Configure Swype ■ Press    and tap    > Settings > My Device > Language and input, and then tap    beside Swype. - or - From the Swype keyboard, touch and hold .  Note:  For more information about Swype settings, see Swype Settings. Tips for Editing Text These tips allow you to cut or copy selected text and paste it into a separate selected area. 1. In a text entry field, double-tap the text. 2. Touch and drag the sliders to highlight and select the desired text.  3. Tap an onscreen option from the Edit text menu bar. You can drag your finger along the menu bar to see all the options:   Select all: Highlights all the text in the field.    Cut: Removes the selected text and saves it to the clipboard. By accessing this document, the recipient agrees and acknowledges that all contents and information in this document (i) are confidential and proprietary information of Samsung, (ii) shall be subject to the non- disclosure regarding project H and Project B, and (iii) shall not be disclosed by the recipient to any third party. Samsung Proprietary and Confidential
Phone Basics 22      Copy: Copies the selected text to the clipboard.    Translate: Launch S Translator to translate the selected text.    Paste: Insert the last copied or cut text into the current field.    Clipboard: Display the clipboard to choose previously cut or copied text. By accessing this document, the recipient agrees and acknowledges that all contents and information in this document (i) are confidential and proprietary information of Samsung, (ii) shall be subject to the non- disclosure regarding project H and Project B, and (iii) shall not be disclosed by the recipient to any third party. Samsung Proprietary and Confidential
Phone Calls 23   Phone Calls With the Sprint National Network and your phone’s phone, you can enjoy clear calling across the country. Make Phone Calls There are several convenient ways to place calls from your phone. Call Using the Keypad The most “traditional” way to place a call is by using the Phone’s Keypad.  1.  Press   and tap   Phone. 2. Tap the number keys on the keypad to enter the phone number.  As you enter digits, contacts with matching numbers display. If you see the number you want to dial, tap it to place the call immediately without entering the rest of the number. 3.   Tap   to call the number. To end the call, tap  . Call from Logs All incoming, outgoing and missed calls are recorded in the Call log. You can place a call to numbers or contacts that display in this area. 1.  Press   and tap   Phone. 2. Tap the Logs tab. A list of recent calls displays. 3. Tap a recent call, and then tap   to dial the call.  Tip:  You can also swipe the entry from left to right to place a call, or from right to left to send a message. Call from Contacts You can place calls directly from your Contacts list using either of the following procedures. Note:   You can also access Contacts from the Phone app. Tap   Phone, and then tap the Contacts tab. 1.  Press   and tap   Contacts. By accessing this document, the recipient agrees and acknowledges that all contents and information in this document (i) are confidential and proprietary information of Samsung, (ii) shall be subject to the non- disclosure regarding project H and Project B, and (iii) shall not be disclosed by the recipient to any third party. Samsung Proprietary and Confidential
Phone Calls 24   2. Tap a contact and then tap  beside a number to dial the call. - or - Touch and hold the contact record, and then tap   to dial the call. - or - Swipe your finger across the contact from left to right. Call a Number in a Text Message While viewing a text message, you can place a call to a number that is in the body of the message. 1.  Press   and tap   Messaging. 2. Open the message with the phone number and then tap the phone number. 3. The Phone screen displays, with the phone number automatically entered and ready to be dialed. To place the call, tap  . Call a Number in an Email Message While viewing an email or Gmail message, you can place a call to a number that is in the body of the message.  1.  Press   and tap   >   Email. 2. Open the message with the phone number and then tap the phone number. 3. The Phone screen displays, with the phone number automatically entered and ready to be dialed. To place the call, tap  . Call Emergency Numbers You can place calls to 911 even if the phone’s screen is locked or your account is restricted. Note:  To call the 911 emergency number when the phone’s screen is locked, press   to turn the screen on, and then touch Emergency call at the bottom of the lock screen. 1.  Press   and tap   Phone. 2. Tap     .  By accessing this document, the recipient agrees and acknowledges that all contents and information in this document (i) are confidential and proprietary information of Samsung, (ii) shall be subject to the non- disclosure regarding project H and Project B, and (iii) shall not be disclosed by the recipient to any third party. Samsung Proprietary and Confidential
Phone Calls 25   Enhanced 911 (E911) Information This phone features GPS (Global Positioning System), which is used for E911 emergency location service, where available. When you place a call to 911, the GPS feature of your phone provides information about your approximate location. Depending on several variables, including availability and access to satellite signals, it may take up to 30 seconds or more to determine and report your approximate location. Important! Always report your location to the 911 operator when placing an emergency call. Some designated emergency call takers, known as Public Safety Answering Points (PSAPs), may not be equipped to receive GPS location information from your phone. Receive Phone Calls When you receive a phone call from a contact, the Incoming call screen appears and displays the caller ID icon, name, and phone number of the calling party. When you receive a phone call from someone who is not stored in Contacts, only the default caller ID icon and phone number appear on the Incoming call screen. Note:   If your phone is turned off, all calls automatically go to voicemail. Answer an Incoming Call The following procedure shows you how to answer an incoming call. ► When the call comes in, touch and slide   to the right to answer the call. Mute the Ringing Sound You can mute the ringtone without rejecting the call by doing either of the following. ● Press the Volume Key down. ● Place the phone face down on a level surface. See Motions and Gestures for options, including the Mute/pause Motion to mute incoming calls by turning over the phone. Reject an Incoming Call The following procedure shows you how to reject and incoming call. ► When the call comes in, touch and slide   to the left. Reject a Call with a Text Message You can automatically reject an incoming call by sending a text message to the caller. 1. Touch and drag Reject call with message toward the top of the screen. By accessing this document, the recipient agrees and acknowledges that all contents and information in this document (i) are confidential and proprietary information of Samsung, (ii) shall be subject to the non- disclosure regarding project H and Project B, and (iii) shall not be disclosed by the recipient to any third party. Samsung Proprietary and Confidential
Phone Calls 26   2. Select an existing message and tap  . - or - Tap Create new message to compose a new text message.  Phone Call Options The Phone app provides many useful features and options to help you make the most of your calling experience. Dialing Options 1.  Press   and tap   Phone. 2. While dialing a call, tap   for options, including:   Send message: Send a text message to the number you dialed.  Add to Contacts: Save the number to a new contact, or update an existing contact. See Add a Contact for more information.  Speed dial setting: View speed dials.   Add 2-sec pause: Insert a 2-second pause into the number you are dialing. This can be useful when storing numbers for automated phone menus.  Add wait: Insert a pause into the number you are dialing, to wait for input from you. This can be useful when storing numbers for automated phone menus.  One-handed operation on/One-handed operation off: Move the Keypad display to the left or right side of the screen, to make dialing with one hand easier. When On, you can tap the arrows to move the Keypad to the right or left.  Swipe to call or message: When enabled, you can swipe your finger across a call in the Logs tab to call the number or send a message to the number. Swipe left-to-right to place a call, or right-to-left to send a message.  Call settings: Configure call settings. For more information, see Call Settings. Caller ID Caller ID identifies a caller while the phone is ringing, by displaying the number of the incoming call.  Block Caller ID You can block your Caller ID (visible to other when you make a call), before making a call. The blocking only lasts for that call, then returns to regular Caller ID. By accessing this document, the recipient agrees and acknowledges that all contents and information in this document (i) are confidential and proprietary information of Samsung, (ii) shall be subject to the non- disclosure regarding project H and Project B, and (iii) shall not be disclosed by the recipient to any third party. Samsung Proprietary and Confidential
Phone Calls 27   To permanently block your number, you must call Sprint Customer Service. 1.  Press   and tap   Phone. 2. Tap      . Call Waiting When you’re on a call, Call Waiting alerts you to incoming calls by sounding a tone. Your phone’s screen informs you that another call is coming in and displays the caller’s phone number (if it is available). To respond to an incoming call while you’re on a call:  Slide   to the right. (This puts the first caller on hold and answers the second call.) 1. To switch back to the first caller, tap Swap. 2.3-way Calling With 3-Way Calling (also known as Conference calling), you can talk to two people at the same time. When using this feature, the normal airtime rates will be charged for each of the two calls. 1.  Press   and tap   Phone. 2. Tap the number keys to enter a phone number, and then tap  . 3. Once you have established the call, tap Add call and dial the second number. (This puts the first caller on hold and dials the second number.) 4. When you’re connected to the second party, tap Merge. If one of the people you called hangs up during your call, you and the remaining caller stay connected. If you initiated the call and are the first to hang up, all callers are disconnected. 5. To end the three-way call, tap  . Call Forwarding Call Forwarding lets you forward all your incoming calls to another phone number – even when your phone is turned off. You can continue to make calls from your phone when you have Call Forwarding is activated. Note: You are charged a higher rate for forwarded calls. To activate Call Forwarding: By accessing this document, the recipient agrees and acknowledges that all contents and information in this document (i) are confidential and proprietary information of Samsung, (ii) shall be subject to the non- disclosure regarding project H and Project B, and (iii) shall not be disclosed by the recipient to any third party. Samsung Proprietary and Confidential
Phone Calls 28   1.  Press   and tap   Phone. 2. Tap      . 3. Enter the area code and phone number to which you want your calls forwarded. 4. Tap  . (You will hear a tone to confirm the activation of Call Forwarding.) To deactivate Call Forwarding: 1.  Press   and tap   Phone. 2. Tap        . 3. Tap  . (You will see a message and hear a tone to confirm the deactivation.) In-call Options While you’re on a call, you will see a number of onscreen options. Tap an option to select it. ● Add call/Merge: Dial another call, or merge two calls for a 3-way call. ● Keypad: Enter numbers using DTMF (Dual Tone Multi-Frequency). This can be useful if you need to enter an access code or other information while on an call. ● End call: Terminate the call. ● Speaker: Play call sounds through the speaker or the earpiece. Warning! Because of higher volume levels, do not place the phone near your ear during speakerphone use. ● Mute: Play call sounds through the Speaker on the back of the phone. Note: If Mute is activated, the speaker mode is deactivated. ● Headset: Play call sounds through a paired Bluetooth headset or device. ● Tap   for more options:  Contacts: Launch Contacts.  S Note: Launch S Note, to create a note.  Memo: Launch Memo, to create memo during a call.  Message: Launch Messaging, to create a new message. By accessing this document, the recipient agrees and acknowledges that all contents and information in this document (i) are confidential and proprietary information of Samsung, (ii) shall be subject to the non- disclosure regarding project H and Project B, and (iii) shall not be disclosed by the recipient to any third party. Samsung Proprietary and Confidential
Phone Calls 29    One-handed operation on/One-handed operation off: Move the Keypad display to the left or right side of the screen, to make dialing with one hand easier. When On, you can tap the arrows to move the Keypad to the right or left. Speed Dials You can assign Speed dials to Contacts, to make dialing easier.  You can assign Speed dials from 1-100. By default, Speed dial 1 is assigned to Voicemail, and cannot be reassigned. Assign Speed Dials 1.  Press   and tap   Phone. 2. Tap   > Speed dial setting. 3. Tap an unused Speed dial and then select a contact to assign it to the Speed dial. Remove Speed Dials 1.  Press   and tap   Phone. 2. Tap   > Speed dial setting. 3. Tap   > Remove, and then tap the X beside the speed dials you want to remove. Edit Speed Dials   Press   and tap   Phone. 1. Tap   > Speed dial setting. 2. Tap   > Change order, and then tap an entry to highlight it. 3.3. Tap an unassigned space to move the highlighted Speed dial to the new Speed dial. Making a Call Using a Speed Dial 1.  Press   and tap   Phone. 2. Tap the speed dial digits, holding the last digit until the number dials. Voicemail Your phone automatically transfers all unanswered calls to your voicemail, even if your phone is in use or turned off. You should set up your Sprint Voicemail and personal greeting as soon as your phone is activated. Always use a password to protect against unauthorized access. By accessing this document, the recipient agrees and acknowledges that all contents and information in this document (i) are confidential and proprietary information of Samsung, (ii) shall be subject to the non- disclosure regarding project H and Project B, and (iii) shall not be disclosed by the recipient to any third party. Samsung Proprietary and Confidential
Phone Calls 30   Set Up Voicemail The following steps will guide you through setting up your standard voicemail from the Phone app.  For information about setting up voicemail using the Visual Voicemail app, see Visual Voicemail. You should set up your Sprint Voicemail and personal greeting as soon as your phone is activated. Always use a password to protect against unauthorized access. Your phone automatically transfers all unanswered calls to your voicemail, even if your phone is in use or turned off. 1.  Press   and tap   Phone. 2. Press and hold  . 3. Follow the system prompts to:  Create your password.  Record your name announcement.  Record your greeting. Note: Voicemail Password – Sprint strongly recommends that you create a password when setting up your voicemail to protect against unauthorized access. Without a password, anyone who has access to your phone can access your voicemail messages. Retrieve Your Voicemail Messages You can access your voicemail by using the following process.  1.  Press   and tap   Phone. 2. Press and hold  . 3. Follow the system prompts to enter your voicemail password and manage voicemail. Note:  You can also access Visual Voicemail from the Phone keypad by tapping  . Voicemail Notification There are several ways your phone alerts you to a new message. ● By sounding the notification ringtone. ● By displaying   in the Notifications area of the Status bar when a new voicemail message(s) are received. By accessing this document, the recipient agrees and acknowledges that all contents and information in this document (i) are confidential and proprietary information of Samsung, (ii) shall be subject to the non- disclosure regarding project H and Project B, and (iii) shall not be disclosed by the recipient to any third party. Samsung Proprietary and Confidential
Phone Calls 31   ● By displaying the number of new voicemail message(s) on the Voicemail app icon. Note: Your phone accepts voicemail even when it is turned off. However, your phone only notifies you of new messages when it is turned on and you are in a Sprint service area. When you are outside the Nationwide Sprint Network, you may not receive notification of new voicemail messages. Sprint recommends that you periodically check your voicemail by dialing 1 + area code + your wireless phone number. Roaming rates apply when you access voicemail while outside the Nationwide Sprint Network. Visual Voicemail Visual Voicemail offers a new way to manage your voicemail. Use Visual Voicemail to: ● View your voicemails as text. ● Choose messages to view. You don’t have to listen to them in the order they arrived. ● Archive important messages. ● Compose new messages, and send them to Email, as a text message, or directly to Voicemail.  ● Share messages via Email and text message.  ● With a Premium account, you can read your voicemails, have them auto-forwarded to Email, or share them with Facebook® or Twitter. 1.  Press   and tap   Apps >   Samsung >   Voicemail. 2. Follow the prompts to set up an account and learn about using Visual Voicemail. Note:  You can also access Visual Voicemail from the Phone keypad by tapping  . Logs The Logs tab of the Phone application lists all recent incoming, outgoing, and missed calls. View Logs The following procedures will guide you through viewing your call logs list. 1.  Press   and tap   Phone > Logs. 2. To choose logs to display, tap  > View, and then tap All calls, Missed calls, Dialed calls, Received calls, or Rejected calls. By accessing this document, the recipient agrees and acknowledges that all contents and information in this document (i) are confidential and proprietary information of Samsung, (ii) shall be subject to the non- disclosure regarding project H and Project B, and (iii) shall not be disclosed by the recipient to any third party. Samsung Proprietary and Confidential
Phone Calls 32   Logs Options The following procedures will guide you through accessing and understanding your call log options. 1.  Press   and tap   Phone > Logs. 2. Touch and hold a call to display the options list.  Copy to dialing screen  Send number  Add to Contacts/View contact  Add to reject list  Delete Clear Logs Follow these steps to clear the Logs list. 1.  Press   and tap   Phone > Logs. 2. Tap    > Delete. 3. Tap the check box beside calls, or beside Select all or tap individual entries to select them for deletion. 4. Tap Delete and then tap Delete to confirm. By accessing this document, the recipient agrees and acknowledges that all contents and information in this document (i) are confidential and proprietary information of Samsung, (ii) shall be subject to the non- disclosure regarding project H and Project B, and (iii) shall not be disclosed by the recipient to any third party. Samsung Proprietary and Confidential
 Contacts 33   Contacts The Contacts application lets you store and manage contacts from a variety of sources, including contacts you enter and save directly in your phone as well as contacts synchronized with your Google account, your PC, compatible email programs (including Exchange Server), and your Facebook friends. Get Started With Contacts Before using Contacts, it’s best to learn a few basics. You can create a Google contact, a phone contact, or a Corporate (Microsoft Exchange ActiveSync) contact. ● Google contacts are synchronized between your phone and a Google account you set up on your phone. ● Microsoft Exchange ActiveSync contacts are synchronized between your phone and  an Exchange Server or Microsoft® Outlook® account set up on your phone. ● Device contacts are stored locally on the phone. Note:   If the phone is ever reset to its factory default parameters, locally stored contacts (phone contacts) can be lost. Access Contacts There are a few ways to display Contacts. ■  Press   and tap   Contacts. - or - Press   and tap   Phone > Contacts tab. Tip: To quickly move to a specific section in your contact list, tap a letter on the right side of the list to go directly to that letter in the alphabetical list. Contacts Options 1.  Press   and tap   Contacts. 2. Tap   to display options, including:   Delete: Select contacts to erase. By accessing this document, the recipient agrees and acknowledges that all contents and information in this document (i) are confidential and proprietary information of Samsung, (ii) shall be subject to the non- disclosure regarding project H and Project B, and (iii) shall not be disclosed by the recipient to any third party. Samsung Proprietary and Confidential
 Contacts 34    Import/Export: Import or export contacts from an optional, installed memory card (not included). You might have contacts stored on a memory card if you are moving from and old phone, or if you received them via Bluetooth from another device.  Share namecard via: Choose contacts to share as namecards (vcards).Not all other devices support the use of vcards.   Merge accounts: Combine device contacts with a Google or Samsung account.  Accounts: Access an account that is set up on your phone, or set up a new account.   Speed dial setting: Assign Speed dials to a contacts.  Send message/email: Create a new text message or email, and select contacts as recipients.  Contacts to display: Allows you choose contacts to display, from accounts set up on your phone, or other sources.  Settings: Configure contact options, including whether to show only contacts with phone numbers and whether to list or display by first name or last name. There is also an option to specify how contacts are transferred to another device, either individually or as a full group. For more information, see Contacts Settings.  Help: Learn about Contacts. Add a Contact You can add contacts directly from the Contacts application. Enter details such as name, phone numbers, email addresses, mailing addresses, and more. 1.  Press   and tap   Contacts. 2. Tap  . If you have accounts set up on your phone, choose an account to assign the contact to the account. 3. Touch contact fields to enter information.   Tap   and assign a picture to the new entry: •  Image: Choose a picture from Gallery. •  Pictures by people: Choose pictures by tags. •  Take picture: Take a new picture with Camera. •  S Note: Choose an image from S Note. By accessing this document, the recipient agrees and acknowledges that all contents and information in this document (i) are confidential and proprietary information of Samsung, (ii) shall be subject to the non- disclosure regarding project H and Project B, and (iii) shall not be disclosed by the recipient to any third party. Samsung Proprietary and Confidential
 Contacts 35    Tap the Name field and use the onscreen keyboard to enter the full name. Tap   beside the Name field to display additional fields.  Tap the Phone number field, and then enter the phone number. Tap   to add another Phone number. Tap  , and then choose a label for the number.  Tap the Email address field, and then enter an email address. Tap   to add another Email address. Tap  , and then choose a label for the address  Tap Groups to assign the contact to a group.  Tap Ringtone to choose a ringtone to play for calls from the contact.  Tap Message alert to choose a ringtone to play for new messages from the contact.  Tap Vibration pattern to choose a vibration to play for new calls or messages from the contact.  Tap Add another field to add new fields for the contact.  4. Tap Save to save the new contact.  Save a Phone Number to a Contact You can save a phone number to Contacts directly from the Phone Keypad. Note:  If you have accounts set up on your phone, you can save the contact to an account.  1.  Press   and tap   Phone. 2. Enter a phone number on the Keypad. 3. Tap Add to Contacts, and then tap Create contact or Update existing.  4. Select an account for the contact, and then continue adding information for the contact, as desired. See Add a Contact. 5. Tap Save to save the contact. Edit a Contact Once you’ve added a contact, you can add or edit any of the information in the entry, assign a caller ID picture, customize with a unique ringtone, and more. Add or Edit Information for a Contact You can modify existing contact information to keep your information up-to-date. By accessing this document, the recipient agrees and acknowledges that all contents and information in this document (i) are confidential and proprietary information of Samsung, (ii) shall be subject to the non- disclosure regarding project H and Project B, and (iii) shall not be disclosed by the recipient to any third party. Samsung Proprietary and Confidential
 Contacts 36   1.  Press   and tap   Contacts. 2. Tap a contact to display it, and then tap  > Edit. Tip: You can also touch and hold the contact and then tap Edit. 3. Tap any field you want to change or add. See Add a Contact. 4. Add or edit the information, and then tap Save. Assign a Picture to a Contact Adding a picture to a contact creates a more personal and easily recognized entry. For example, when you receive a call from a contact, the picture will display.  1.  Press   and tap   Contacts. 2. Tap a contact to display it, and then tap  > Edit.  3. Tap  , or the currently assigned picture, and then choose an option:  Image: Choose a picture from Gallery.  Pictures by people: Choose pictures by tags.  Take picture: Take a new picture with Camera.  S Note: Choose an image from S Note. 4. Follow the prompts to save the picture to the contact. Tip:  You can also touch and hold the contact and then tap Edit. Assign a Ringtone to a Contact You can assign a special ringtone to individual contacts for more personalization. 1.  Press   and tap   Contacts. 2. Tap a contact to display it. 3. Tap the Ringtone field and choose a ringtone. You can choose a ringtone preloaded on your phone, or tap Add to choose a sound from Music. 4. Tap OK to assign the ringtone. By accessing this document, the recipient agrees and acknowledges that all contents and information in this document (i) are confidential and proprietary information of Samsung, (ii) shall be subject to the non- disclosure regarding project H and Project B, and (iii) shall not be disclosed by the recipient to any third party. Samsung Proprietary and Confidential
 Contacts 37   Join a Contact When you have contacts from various sources (Gmail, phone, Facebook, etc.), you may have multiple similar entries for a single contact. In Contacts, you can link multiple entries to display them as a single contact. 1.  Press   and tap   Contacts. 2. Tap a contact to display it, and then tap   Join. – or –  Tap   > Join contact. 3. Tap another contact to link it to the original contact. Note:  You can join up to five contacts in a single entry. Delete a Contact You can delete a contact from the contacts details page. 1.  Press   and tap   Contacts. 2. Touch and hold a contact, and then tap Delete. – or – Tap the contact to display it, and then tap   > Delete. 3. Tap OK. Add Entries to Favorites The Favorites tab is a listing that can help you quickly access your most used or preferred Contacts entries. 1.  Press   and tap   Contacts. 2. Touch and hold the entry name from the Contacts tab listing. 3. From the Contacts Entry context menu, tap Add to favorites.  Note:  You can also use the star icon on the Contact’s details page to indicate favorites. Tap the star; the star turns yellow when the contact is a favorite. By accessing this document, the recipient agrees and acknowledges that all contents and information in this document (i) are confidential and proprietary information of Samsung, (ii) shall be subject to the non- disclosure regarding project H and Project B, and (iii) shall not be disclosed by the recipient to any third party. Samsung Proprietary and Confidential
 Contacts 38   Create Groups This feature allows you to add a new or existing contact to a call group. This group can be one of the already present groups (Family, Friends, or Work) or a group you create. Create a new group 1.  Press   and tap   Contacts. 2. Tap the Groups tab, and then tap   > Create. 3. Tap fields to enter information about the group:  Tap Group name to enter a name for the new group.  Tap Group ringtone to select a ringtone for notifications for incoming calls from group members.  Tap Message alert to select a ringtone for notifications for new messages from group members.  Tap Vibration pattern to select a vibration pattern for alerts to incoming calls or messages from group members. 4. Tap Add member and select a member or members to add to the new group, and then tap Done. 5.  Tap Save to save the new group. Add a contact to a group 1.  Press   and tap   Contacts. 2. Tap the Groups tab, and then tap a group. 3.  Tap    > Edit > Add member. 4. From the list of contacts, tap the contact(s) you want to add. (A green check-mark appears beside the selected entries.) 5. Tap Done > Save. Send a message to a group 1.  Press   and tap   Contacts. 2. Tap the Groups tab, and then tap a group. By accessing this document, the recipient agrees and acknowledges that all contents and information in this document (i) are confidential and proprietary information of Samsung, (ii) shall be subject to the non- disclosure regarding project H and Project B, and (iii) shall not be disclosed by the recipient to any third party. Samsung Proprietary and Confidential
 Contacts 39   3.  Tap   > Send message. 4. Select the recipients of the new message (indicated by a green checkmark) and then tap Done. 5. Type your message, and then tap .  Share a Contact You can quickly share contacts using Bluetooth, Email, Gmail, Messaging, or Wi-Fi Direct. 1.  Press   and tap   Contacts. 2. Tap a contact to display it, and then press   > Share namecard via. 3. Choose a sending method, then follow the prompts to send the contact:  Bluetooth: Send the information via Bluetooth. See Bluetooth for information on pairing and sending via Bluetooth.  Email: Attach the contact to a new Email message. If prompted, select an email account. Address the message, add a subject and a message, and then tap Send. See Compose and Send Email for details on sending email.  Gmail: Send the information as a Gmail attachment. Address the message, add a subject and a message, and then tap Send. See Send a Gmail Message for details.  Messaging: Attach the contact to a message(converts the message to MMS). Select a contact or enter a wireless phone number or email address, enter any additional information, and then tap Send. For more information on text messaging, see Text and Multimedia Messaging.  Wi-Fi Direct: Transfer the contact via a peer-to-peer Wi-Fi connection. Contacts Settings xxx  By accessing this document, the recipient agrees and acknowledges that all contents and information in this document (i) are confidential and proprietary information of Samsung, (ii) shall be subject to the non- disclosure regarding project H and Project B, and (iii) shall not be disclosed by the recipient to any third party. Samsung Proprietary and Confidential
 Accounts and Messaging 40   Accounts and Messaging With Sprint service and your phone’s messaging capabilities, you have the opportunity to share information through many different channels and accounts. Google Account Many of your phone’s applications, such as Gmail, Google Maps, Google Hangout, and the Google Play Store, require a Google account. To use these apps on your phone, you must set up your Google account on your phone. Setting up your account on your phone syncs your phone and your online Google account. For more information about Google accounts, visit google.com. Create a Google Account If you do not already have a Google account, you can create from your phone. Note: Although you need a Google account to use certain features of your phone, such as Google Play, you do not need to use Gmail as the default email account for your phone. 1.  Press   and tap   > Settings > General. 2. Tap Accounts > Add account > Google > New. 3. Follow the onscreen prompts to create your free account. Sign In to Your Google Account If you have a Google Account but have not yet signed in with your phone, follow these instructions to sign in to your Google Account. 1.  Press   and tap   > Settings > General. 2. Tap Accounts > Add account > Google > Existing.  3. Follow the prompts to enter your Google account and password, and choose options for your account on your phone. Access Gmail When you set up your Google account on your phone, you are automatically signed in to your Gmail account, and you can access Gmail from your phone.  ■  Press   and tap   Apps >   Gmail.  By accessing this document, the recipient agrees and acknowledges that all contents and information in this document (i) are confidential and proprietary information of Samsung, (ii) shall be subject to the non- disclosure regarding project H and Project B, and (iii) shall not be disclosed by the recipient to any third party. Samsung Proprietary and Confidential
 Accounts and Messaging 41   Send a Gmail Message Send and receive Gmail from your phone. 1.  Press   and tap   Apps >   Gmail. 2. From the Inbox, tap  . 3.  Enter the message recipient’s email address in the To field. You can add as many message recipients as you want. Note: To send a carbon copy (Cc) or a blind carbon copy (Bcc) of the email to other recipients, tap  > Add Cc/Bcc. 4. Tap the Subject field and enter the email subject. 5. Tap the Compose email field and compose your email. To add an attachment, tap   > Attach picture or Attach video. 6. To send the message, tap  .  To save the current email as a draft, tap   > Save draft. To view your draft email messages, from the Inbox, tap Inbox and then tap Drafts.  To delete the current email message, tap  > Discard. Samsung Account Create a Samsung account, for access to Samsung apps and services, such as Samsung Apps, Samsung Link, WatchON, and much more. When you sign in to your Samsung account on your phone, can access Samsung-specific content and features from your phone. 1.  Press   and tap   > Settings. 2. Tap Accounts > Add account >Samsung account, and then tap Sign in or Create new account. 3. Follow the prompts to sign into your account, or create a new account. Note: Tap Help for more information about Samsung accounts, or for help with your account. Email Use the Email application to send and receive email from your webmail or other accounts. You can also access your Exchange ActiveSync email on your phone. By accessing this document, the recipient agrees and acknowledges that all contents and information in this document (i) are confidential and proprietary information of Samsung, (ii) shall be subject to the non- disclosure regarding project H and Project B, and (iii) shall not be disclosed by the recipient to any third party. Samsung Proprietary and Confidential
 Accounts and Messaging 42   Add an Email Account Email allows you to send and receive email using various email services. You can also receive text message alerts when you receive an important email. 1.  Press   and tap   Apps >   Email.  Enter your email address in the Email address field. 2. Enter your password in the Password field. To see your password as you enter it, tap 3.Show password.  Tap Next to start automatic email setup. If you need to configure custom settings, tap 4.Manual setup and then enter your settings. These may include mail type, user name, password, server, security type, etc.  Follow the onscreen prompts to configure options for the account. 5. Tap Done to complete setup. 6.Note:  You can also add email accounts from Settings. Press   and tap   > Settings > General > Accounts > Add account. Add a Microsoft Exchange ActiveSync Account The Email application also provides access to your Microsoft Exchange account from your phone. If your company uses Microsoft Exchange Server 2003, 2007, or 2010 as the corporate email system, you can use this email application to wirelessly synchronize your email, Contacts, and Task information directly with your company’s Exchange server. Use the following procedure to synchronize your phone with a corporate email account.  Note:   You can set up multiple Microsoft Exchange ActiveSync accounts on your phone. 1.  Press   and tap   Apps >   Email. 2. Enter your email address in the Email address field. 3. Enter your password in the Password field. To see your password as you enter it, tap Show password. 4. Tap Next to start automatic email setup. For systems that require custom settings, tap Manual setup and then enter your settings. You may need to consult your network administrator for this information:  Domain\Username: Enter your network domain and username, separated by “\”.  Password: Enter your network access password (case-sensitive). By accessing this document, the recipient agrees and acknowledges that all contents and information in this document (i) are confidential and proprietary information of Samsung, (ii) shall be subject to the non- disclosure regarding project H and Project B, and (iii) shall not be disclosed by the recipient to any third party. Samsung Proprietary and Confidential
 Accounts and Messaging 43    Exchange Server: Enter your system’s Exchange server remote email address. Obtain this information from your company network administrator.  Use secure connection (SSL): Tap to place a checkmark in the box, if your system requires SSL encryption.  Use client certification: Tap to place a checkmark in the box, if your system requires certification. 5. Follow the onscreen prompts to configure options for the account. 4.  Tap Done to complete setup. Note:  You can also add email accounts from Settings. Press   and tap   > Settings > Accounts > Add account. Compose and Send Email Compose and send email using any account you have set up on your phone. Increase your productivity by attaching files such as pictures, videos, or documents to your email messages. 1.  Press   and tap   Apps >   Email. 2. From the Inbox, tap  . 3. Tap fields to compose your message:  Tap the To field and enter the recipient’s email address. You can add multiple message recipients.  To send a carbon copy (Cc) or a blind carbon copy (Bcc) of the current email to other recipients, tap the Cc/Bcc field.   Tap the Subject field and enter the email subject.  Tap the text entry field and compose your email.  •  To add an attachment, tap . Choose from the following: My Files, Images, Take picture, Video, Record video, Audio, Record audio, S Memo, Calendar, Contacts, or Location. •  Tap   for more options, including Send email to myself, Schedule sending, Priority, Tracking options, and Security options. 4. To send the message, tap  . By accessing this document, the recipient agrees and acknowledges that all contents and information in this document (i) are confidential and proprietary information of Samsung, (ii) shall be subject to the non- disclosure regarding project H and Project B, and (iii) shall not be disclosed by the recipient to any third party. Samsung Proprietary and Confidential
 Accounts and Messaging 44   Reply or Forward Email Reading and replying to email on your phone is as simple as on your computer. 1.  Press   and tap   Apps >   Email. 2. On the email account Inbox, tap a message to view it. 3. Tap   (Reply),   (Reply all) to reply to the original recipient list, or tap   (Forward) to forward the message to new recipient(s) in the To field. 4. Enter a message (if desired) and then tap  . Manage Your Email Inbox The following procedures allow you to view, refresh, sort, and delete your email messages. View Your Email Inbox 1.  Press   and tap   Apps >   Email. 2. If you have multiple accounts set up on your phone, tap the toolbar at the top of the screen and then choose one from the menu. Synchronize an Email Account Whatever your automatic synchronization settings are, you can also synchronize your sent and received email messages manually at any time. 1.  Press   and tap   Apps >   Email. 2. Select an email account.   If you are already in an email account, tap the account name field (upper-left) to open the complete email account list page.  Select an available email account.  3. Tap   Sync.  Sort Email Messages 1.  Press   and tap   Apps >   Email. 2. On the email account Inbox, tap  > Sort by. By accessing this document, the recipient agrees and acknowledges that all contents and information in this document (i) are confidential and proprietary information of Samsung, (ii) shall be subject to the non- disclosure regarding project H and Project B, and (iii) shall not be disclosed by the recipient to any third party. Samsung Proprietary and Confidential
 Accounts and Messaging 45   3. Select an option to sort email messages. Delete Email Messages 1.  Press   and tap   Apps >   Email. 2. On the email account Inbox, touch and hold the message you want to delete. – or – Tap the check boxes beside email you want to delete. 3. On the pop-up menu, tap Delete. Tap Delete again to confirm. Edit Email Settings You can edit general preferences, which apply to all email accounts, or configure settings for specific email accounts, such as email address and password, name display and signature, frequency of retrieval, and more. Note:  Available settings depend on the type of email account. Edit General Preferences 1.  Press   and tap   Apps >   Email. 2. Tap  > Settings > General settings to configure settings. Available settings depend on the type of email account, and may include:  Auto-advance: Choose how the email list displays after you delete or move an email.  Message preview line: Choose the number of lines displayed in the email list to give you a preview of an email’s contents.  Title line in list: Choose the title line (in bold for unread messages), to display the sender or the subject.  Confirm deletions: Choose whether the phone prompts you to confirm the action when you mark emails for deletion.  Quick responses: Create and edit text strings that you can add to an email to respond quickly.  Spam addresses: Create a list of email addresses and domains, to block emails from these senders.  Priority sender settings: Maintain a list of email addresses to ensure that emails from the addresses receive priority handling. By accessing this document, the recipient agrees and acknowledges that all contents and information in this document (i) are confidential and proprietary information of Samsung, (ii) shall be subject to the non- disclosure regarding project H and Project B, and (iii) shall not be disclosed by the recipient to any third party. Samsung Proprietary and Confidential
 Accounts and Messaging 46    Rules for filtering: Set filters and manage filtered email.  Email notifications: Choose whether notifications for new emails are displayed in the Status bar at the top of the screen.  Delay email sending: Delay the sending of emails so that they can be cancelled if needed. When enabled, a Cancel button will display for a specified time after tap Send. If you enable Delay email sending, use the Set length of delay option to choose how long to delay.  Default image size: Set the default size of images you attach to emails. Edit Account Settings You can edit settings for your individual email accounts, such as email address and password, name display and signature, frequency of retrieval, and more. Note:  Available settings depend on the type of email account. 1.  Press   and tap   Apps >   Email. 2. Tap   > Settings, and then tap an account to configure settings:  Email notifications: When enabled, an icon displays in the Status bar when you receive new emails.  Select ringtone: Choose a ringtone to play for new email notifications.  Vibrate: When enabled, vibration plays for new email notifications.  Sync Email: When enabled, your phone maintains synchronization with your email account. The last synchronization is displayed.  Sync schedule: Set options for synchronizing your phone with your email account. Available when Sync Email is enabled.  Period to sync Email: Choose a period of time to maintain synchronization between your phone and email account.  Size to retrieve emails: Choose a maximum size for emails, for your phone to automatically retrieve during synchronization. For larger emails, your phone will prompt you to download the contents when you open them.  Signature: When On, a text signature is automatically added to emails you send. Tap the ON ON/OFF switch to turn signatures On or Off. After turning signatures On, tap Signature to edit the default text signature. By accessing this document, the recipient agrees and acknowledges that all contents and information in this document (i) are confidential and proprietary information of Samsung, (ii) shall be subject to the non- disclosure regarding project H and Project B, and (iii) shall not be disclosed by the recipient to any third party. Samsung Proprietary and Confidential
 Accounts and Messaging 47    Default account: Assign an account as the default email account for outgoing messages. When you launch an email from other apps, the email will automatically be from this account.  More settings: Configure other options, including the account name, carbon copy and blind carbon copy, synchronization, and security options. •  Account name: Enter a name to identify this email account. •  Always Cc/Bcc myself: Choose options for sending a copy of emails you send to yourself, as a copy (Cc) or blind copy (Bcc). •  Forward with attachments: Choose whether to automatically include attachments when forwarding an email. •  Show images: Choose whether to automatically display embedded images in the body of an email. •  Auto download attachments: Choose whether the phone automatically downloads email attachments when you are connected to Wi-Fi. You might use this option to control how and whether you use your plan’s data services to download attachments. •  Auto resend times: Choose the number of times the phone attempts to resend an email after a delivery failure. •  Folder sync settings: Choose folders to synchronize between your phone and account. •  Period to sync Calendar: Choose the period for synchronizing calendar events between your phone and account. •  Sync Contacts: Choose whether contacts are synchronized between your phone and the account. •  Sync Calendar: Choose whether calendar events are synchronized between your phone and the account. •  Sync Task: Choose whether emails are synchronized between your phone and the account. •  In case of sync conflict: Choose whether information from the server or phone has priority when there is a conflict. •  Security options: Configure advanced security options, including encryption. •  Exchange server settings: Configure the Domain\user name, Password, and other Exchange server settings. By accessing this document, the recipient agrees and acknowledges that all contents and information in this document (i) are confidential and proprietary information of Samsung, (ii) shall be subject to the non- disclosure regarding project H and Project B, and (iii) shall not be disclosed by the recipient to any third party. Samsung Proprietary and Confidential
 Accounts and Messaging 48   Delete an Email Account If you no longer want an email account on your phone, you can remove it. 1.  Press   and tap   Apps >   Email. 2. Tap   > Settings, and then tap  . 3. Tap an account to mark it for deletion. 4. Tap Delete, and then follow the prompts to delete the account. Text and Multimedia Messaging With Text Messaging (SMS), you can send and receive text messages between your phone and another phone that supports messaging. Multimedia messages, (MMS), can contain text and pictures, recorded voice, audio or video files, picture slideshows, contact namecards (vCard), or calendar events (vCalendar). See your service plan for applicable charges for messaging. Send a Text Message (SMS) Quickly compose and sent text messages on your phone. 1.  Press   and tap   Messaging. 2. Tap  . 3. Tap Enter recipient, and then enter a contact name, a mobile phone number, or an email address using the onscreen keyboard. As you enter letters, possible matches from your accounts and contacts display on the screen. Touch a match to add it to the message. 4. Tap Enter message and enter your message.  5. Review your message and tap .  Send a Multimedia Message (MMS) When you need to add a little more to a text message, you can send a multimedia message (MMS) text and pictures, recorded voice, audio or video files, picture slideshows, contact namecards (vCard), or calendar events (vCalendar). Composing MMS messages is the same as composing text messages, except that you attach a file to the message. By accessing this document, the recipient agrees and acknowledges that all contents and information in this document (i) are confidential and proprietary information of Samsung, (ii) shall be subject to the non- disclosure regarding project H and Project B, and (iii) shall not be disclosed by the recipient to any third party. Samsung Proprietary and Confidential
 Accounts and Messaging 49   1.  Press   and tap   Messaging. 2. Tap  . 3. Tap Enter recipient, and then enter a contact name, a mobile phone number, or an email address using the onscreen keyboard. As you enter letters, possible matches from your accounts and contacts display on the screen. Touch a match to add it to the message. 4. Tap Enter message and enter your message.  5. To add an attachment, tap , and then select a file to attach:  Image: Choose a picture from Gallery.  Take picture: Launch the Camera to take a photo, and then add it to your message by tapping Save.  Video: Choose a video from Gallery.  Record video: Launch the Camera to record a video, and then add it to your message by tapping Save.  Audio: Choose a sound from Music.  Record audio: Launch Voice Recorder to record a new sound.  S Memo: Launch S Memo to choose or create a memo. For more information, see S Memo.  Calendar: Add an event from your calendar.  Location: Attach a map showing your location.  Contacts: Add a contact entry (namecard) to the message. 6. When done, tap   to send the message. Save and Resume a Draft Message If you tap   while composing a text or multimedia message, or leave the Messaging screen, the message is automatically saved as a draft. To resume composing a Draft message: 1.  Press   and tap   Messaging. By accessing this document, the recipient agrees and acknowledges that all contents and information in this document (i) are confidential and proprietary information of Samsung, (ii) shall be subject to the non- disclosure regarding project H and Project B, and (iii) shall not be disclosed by the recipient to any third party. Samsung Proprietary and Confidential
 Accounts and Messaging 50   2. On the Messaging screen, tap the message with the with Draft marked. 3. When you finish editing the message, tap  . New Messages Notification Depending on your notification settings, the phone will play a ringtone, vibrate, or display the message briefly in the status bar when you receive a new text or multimedia message. To change the notification for new text and multimedia messages, see Text and MMS Settings for details. A new message icon   also appears in the notifications area of the status bar to notify you of a new text or multimedia message. The Messaging application icon   also displays the number of new messages. To open the message, touch and hold the status bar, and then slide the status bar down to open the Notifications panel. Tap the new message to open and read it. For information on reading and replying to messages see Managing Message Conversations. Managing Message Conversations Text and multimedia messages that are sent to and received from a contact (or a number) are grouped into conversations or message threads in the All messages screen. Threaded text or multimedia messages let you see exchanged messages (similar to a chat program) with a contact on the screen. To read a text message:  On the Messaging screen, tap the text message or message thread to open and read it.  If you have a new message notification, slide the status bar down to open the Notifications panel. Tap the new message to open and read it. Note:  To view the details of a particular message, in the message thread, touch and hold the message to open the options menu, and then tap View message details. If a message contains a link to a Web page, tap the message and then tap the link to open it in the Web browser. If a message contains a phone number, tap the message and then tap the phone number to dial the number or add it to your contacts. To view a multimedia message (MMS): 1.  Press   and tap   Messaging. By accessing this document, the recipient agrees and acknowledges that all contents and information in this document (i) are confidential and proprietary information of Samsung, (ii) shall be subject to the non- disclosure regarding project H and Project B, and (iii) shall not be disclosed by the recipient to any third party. Samsung Proprietary and Confidential
 Accounts and Messaging 51   2. From the message list, tap a message to display it. 3. While the message is open, tap the play icon (on a video or audio file) to play back the file or tap an image to view a picture. Note:  The file attachment on the MMS message can be saved to an optional installed memory  card (not included). Touch and hold on the attachment, and then tap Save attachment. Select the attachment check box and tap Save.  To reply to a text or multimedia message: 1.  Press   and tap   Messaging. 2. From the message list, tap a message. 3. Tap the Enter message field and then type your reply message. 4. Once complete, tap  . To protect a message from deletion: You can lock a message so that it will not be deleted even if you delete the other messages in the conversation. 1.  Press   and tap   Messaging. 2. On the Messaging screen, tap a message thread. 3. Touch and hold the message that you want to lock.  4. Tap Lock message on the options menu. A lock icon displays at the lower right hand side of the message. To delete a message thread: 1.  Press   and tap   Messaging. 2. Touch and hold the message thread that you want to delete. 3. Tap Delete thread and follow the prompts to delete the thread. To delete several message threads: 1.  Press   and tap   Messaging. 2. Tap  > Delete threads. By accessing this document, the recipient agrees and acknowledges that all contents and information in this document (i) are confidential and proprietary information of Samsung, (ii) shall be subject to the non- disclosure regarding project H and Project B, and (iii) shall not be disclosed by the recipient to any third party. Samsung Proprietary and Confidential
 Accounts and Messaging 52   3. Select the message threads you want to delete and tap Delete.  Note:  Locked messages will not be deleted, unless you select the Include protected messages check box before confirming the deletion. To delete a single message: 1.  Press   and tap   Messaging. 2. While viewing a message thread, touch and hold the message that you want to delete.  Note:  If the message is locked, tap Unlock message on the Message options menu and then touch and hold the message to display the options menu again. 3. Tap Delete message on the options menu, and then follow the prompts to confirm the deletion. To view contact details and communicate with a contact: When you receive a message from someone in your stored contacts, you can tap the contact’s photo or icon in the message thread to open a menu of options. Depending on the stored contact information, you can view the contact details, phone, or send an email message to the contact, and more. Text and MMS Settings The messages settings menu lets you control options for your text and MMS messages including message limits, size settings, and notifications. 1.  Press   and tap   Messaging. 2. Tap  >Settings. 3. Configure message settings:  Delete old messages allows the phone to automatically delete the oldest messages when the maximum number of messages is reached. Set the maximum number of messages with the Text message limit and Multimedia message limit settings below.  Text message limit allows you to set the maximum number of text messages per conversation.  Multimedia message limit allows you to set the maximum number of multimedia messages per conversation.  Text templates allows you to create and manage text strings that you can add to messages. By accessing this document, the recipient agrees and acknowledges that all contents and information in this document (i) are confidential and proprietary information of Samsung, (ii) shall be subject to the non- disclosure regarding project H and Project B, and (iii) shall not be disclosed by the recipient to any third party. Samsung Proprietary and Confidential
 Accounts and Messaging 53    Auto combination allows you to choose whether long messages that are received in multiple parts are automatically re-assembled to display as a single message.  Group messaging allows you to control how messages to multiple recipients are handled. When enabled, a single message is sent to multiple recipients. When disabled, a separate message is sent to each recipient.  Auto-retrieve allows you to choose whether message attachment(s) are automatically downloaded when you display a multimedia message. If you disable this option, only the message header displays in the message list, and you’ll be prompted to download the attachment(s).  Roaming auto-retrieve allows you to choose whether message attachment(s) are automatically downloaded while your phone is in roaming mode.  MMS alert allows you to have the phone alert you when you make a change to a message that will convert the message to a multimedia message (MMS).  Bubble style allows you to choose how messages appear on the screen. Bubbles are the boxes that surround each message.  Background style allows you to choose the background of the message screen.  Use the volume key allows you to change the text size while reading a message by pressing the Volume Key up or down.  Notifications allows you specify whether notifications for new messages display in the status bar.  Select ringtone allows you to set the ringtone for your message notifications.  Vibrate allows you to choose whether vibration plays along with the ringtone for new message notifications.  Message alert repetition allows you to choose how often your phone notifies you of new message(s).  Preview message allows you to choose whether a preview of a new message appears in the status bar with the message notification.  Emergency Alerts allows you to configure emergency alert settings. You can enable or disable some alerts: Extreme Alert, Severe Alert, Amber Alert, and Emergency alert test messages. You cannot disable Presidential alerts. Important! The Commercial Mobile Alert System (CMAS) system provides the government the ability to send geographically targeted notifications of emergencies, such as threats to public safety, severe weather events, a hazardous material spill or a missing child in the phone user’s area.  By accessing this document, the recipient agrees and acknowledges that all contents and information in this document (i) are confidential and proprietary information of Samsung, (ii) shall be subject to the non- disclosure regarding project H and Project B, and (iii) shall not be disclosed by the recipient to any third party. Samsung Proprietary and Confidential
 Accounts and Messaging 54    Emergency notification preview allows you to play a sample emergency alert tone. Tap Stop to cancel the playback.  Vibrate allows you to select vibrate options for emergency messages.  Alert reminder allows you to configure the reminder interval.  Add signature allows you add a text signature to all messages you send.  Signature text allows you to enter a text signature, when Add signature is enabled.  Spam settings allows you to filter incoming messages for spam messages.  Add to spam numbers allows you to enter telephone numbers, to automatically flag messages from the numbers as spam, when Spam settings is enabled.  Add to spam phrases allows you to enter a text phrase, to automatically flag messages as spam when they contain the phrase. Available when Spam settings are enabled.  Block unknown senders allows you to automatically block messages from numbers that are not stored as contacts on your phone. Social Networking Accounts Stay in touch on the go with all your social networking accounts. Post updates on Facebook and Twitter®, review your LinkedIn® contacts, see what everyone’s talking about on YouTube™, and more. YouTube YouTube is a video sharing website on which users can upload and share videos. The site is used to display a wide variety of user-generated video content, including movie clips, TV clips, and music videos, as well as video content such as video blogging, informational shorts, and other original videos.  YouTube is a data-intensive feature. Sprint recommends that you upgrade to an unlimited data plan to avoid unexpected data charges. 1.  Press   >    Apps >    YouTube. 2. Tap  to enter keywords in the Search field to search for specific videos, scroll down to browse through the main page thumbnails, or scroll to the bottom to explore additional options. 3. To view a video, tap an available preview thumbnail or tap the title link. By accessing this document, the recipient agrees and acknowledges that all contents and information in this document (i) are confidential and proprietary information of Samsung, (ii) shall be subject to the non- disclosure regarding project H and Project B, and (iii) shall not be disclosed by the recipient to any third party. Samsung Proprietary and Confidential
 Accounts and Messaging 55   Note:   It is not necessary to sign in to the YouTube site to view content. However, if you wish to sign in to access additional options tap the ACCOUNT tab. Select an account (if available) or create a new account. (Even if you sign in to YouTube via the Web, you must separately sign in via your phone.) Google Hangouts Google Talk is a free Windows and Web-based application for instant messaging offered by Google. Conversation logs are automatically saved to a Chats area in your Gmail account. This allows you to search a chat log and store them in your Gmail accounts. 1.  Press   >    Apps > Google >    Hangouts. 2. Tap ADD ACCOUNT to add a Google account to Google Talk. Tap New to create a new Google account, or tap Existing to sign in to an existing Google account.  3. After entering your user name and password, tap Sign in. 4. Begin using Google Talk. Note:  If you have already signed into your Google account, it displays on the Talk application screen. Google+ Google+™  makes messaging and sharing with your friends a lot easier. You can set up Circles of friends, visit the Stream to get updates from your Circles, use Messenger for fast messaging with everyone in your Circles, or use Instant Upload to automatically upload videos and photos to your own private album on Google+. Visit www.google.com/mobile/+/ for more information. Google+ is part of your Google account, and uses your Google account sign-in. Before using Google+, set up your Google account on your phone. For more information, see Create a Google Account or Sign In to Your Google Account. 1.  Press   >    Apps > Google >    Google+. The app will sign in to your Google account. If you are signed into more than one Google account, select the account you would like to use with Google+. 2. Follow the onscreen instructions to use Google+. Google Messenger Messenger allows you to bring groups of friends together into a simple group conversation. When you get a new conversation in Messenger, Google+ sends an update to your phone. By accessing this document, the recipient agrees and acknowledges that all contents and information in this document (i) are confidential and proprietary information of Samsung, (ii) shall be subject to the non- disclosure regarding project H and Project B, and (iii) shall not be disclosed by the recipient to any third party. Samsung Proprietary and Confidential
 Accounts and Messaging 56   Messenger is part of your Google account, and uses your Google account sign-in. Before using Messenger, set up your Google account on your phone. For more information, see Create a Google Account or Sign In to Your Google Account. 1.  Press   >    Apps > Google >    Messenger. 2. If prompted, configure the Instant Upload parameters as desired and tap Continue. 3. If prompted, configure the Sync contacts parameter (Sync contacts or Don’t sync) and tap Continue. If you are signed into more than one Google account, select the account you would like to use with Google+. (Messenger is a component of Google+.) 4. Follow any onscreen setup instructions. By accessing this document, the recipient agrees and acknowledges that all contents and information in this document (i) are confidential and proprietary information of Samsung, (ii) shall be subject to the non- disclosure regarding project H and Project B, and (iii) shall not be disclosed by the recipient to any third party. Samsung Proprietary and Confidential
 Apps and Entertainment 57   Apps and Entertainment All your phone’s features are accessible through the Applications list. DivX DivX® is a digital media format that provides your phone with high-quality videos. DivX Legal Information DivX®, DivX Certified® and associated logos are trademarks of Rovi Corporation or its subsidiaries and are used under license. DivX Certified® to play DivX® video up to HD 720p, including premium content.  ABOUT DIVX VIDEO: DivX® is a digital video format created by DivX, LLC, a subsidiary of Rovi Corporation. This is an official DivX Certified® device that has passed rigorous testing to verify that it plays DivX video. Visit divx.com for more information and software tools to convert your files into DivX videos. ABOUT DIVX VIDEO-ON-DEMAND: This DivX Certified® device must be registered in order to play purchased DivX Video-on-Demand (VOD) movies. To obtain your registration code, locate the DivX VOD section in your device setup menu (tap Apps > Settings > More > About device > Legal information > License settings > DivX® VOD > Register). Go to vod.divx.com for more information on how to complete your registration.  Important!   DivX VOD content is protected by a DivX DRM (Digital Rights Management) system that restricts playback to registered DivX Certified devices. Locate Your VOD Registration Number Follow these procedures to locate your VOD registration number. ■  Press   and tap   > Settings > More > About device > Legal information > License settings > DivX® VOD > Register. Register Your DivX Device for VOD Playback of Purchased Movies To play purchased DivX movies on your phone, you will first need to complete a one-time registration using both your phone and your computer.  1. Locate your VOD Registration code. Press   and tap   > Settings > More > About device > Legal information > License settings > DivX® VOD > Register. 2. Open the DivX Player on your computer. To download the free player for your computer,  visit divx.com. By accessing this document, the recipient agrees and acknowledges that all contents and information in this document (i) are confidential and proprietary information of Samsung, (ii) shall be subject to the non- disclosure regarding project H and Project B, and (iii) shall not be disclosed by the recipient to any third party. Samsung Proprietary and Confidential
 Apps and Entertainment 58   3. From the DivX Player on your computer, choose the VOD menu and select Register a DivX Certified Device. Follow the prompts to log in, or create a DivX account if you don’t already have one. 4. Follow the instructions in DivX Player to enter your phone’s VOD registration code and create a phone nickname. 5. Choose a location on your computer to download the DivX registration video,  then download the file. 6. Connect your phone to the computer via USB and transfer the DivX registration video to your phone. From the Registration screen (Transfer), select USB (the phone) as the target destination for the DivX registration video and tap Start. Return to the DivX VOD Manager screen (from within your computer’s DivX Player) and confirm both your computer and your new phone appears in the list of registered DivX devices. Note:  There is no special registration or configuration necessary to play back DRM-free DivX movies. Registration of your phone is only required for playback of DivX material. Google Play Store The Google PlayTM Store app is the place to go to find new Android apps, games, movies, music, and books for your phone. Choose from a wide variety of free and paid apps ranging from productivity apps to games. When you find an app you want, you can easily download and install it on your phone. To access the Google Play Store app, you must first connect to the Internet using your phone’s Wi-Fi or Sprint 4G or 3G data connection and sign in to your Google Account. See Web and Data and Google for details. Important! Sprint’s policies often do not apply to third-party applications. Third-party applications may access your personal information or require Sprint to disclose your customer information to the third-party application provider. To find out how a third-party application will collect, access, use, or disclose your personal information, check the application provider’s policies, which can usually be found on their website. If you aren’t comfortable with the third-party application’s policies, don’t use the application. Find and Install an App When you install apps from the Google Play Store app and use them on your phone, they may require access to your personal information (such as your location, contact data, and more) or access to certain functions or settings of your phone. Download and install only apps that you trust. Note:  You need a Google WalletTM account to purchase items from the Google Play Store app. See Create a Google Wallet Account to set up a Google Wallet account if you do not have one. By accessing this document, the recipient agrees and acknowledges that all contents and information in this document (i) are confidential and proprietary information of Samsung, (ii) shall be subject to the non- disclosure regarding project H and Project B, and (iii) shall not be disclosed by the recipient to any third party. Samsung Proprietary and Confidential
 Apps and Entertainment 59   1.  Press   and tap   Apps >   Play Store. 2. Browse through the categories to find an app you're interested in, and tap the name. 3. Read the app descriptions. 4. Tap Install or Download (for free applications) or the price (for paid applications). 5. The subsequent screen notifies you whether the app will require access to your personal information or access to certain functions or settings of your phone. If you agree to the conditions, tap Accept & download (for free apps) or Accept & buy (for paid apps) to begin downloading and installing the app. Warning! Read the notification carefully! Be especially cautious with apps that have access to many functions or a significant amount of your data. Once you agree to the download and installation on this screen, you are responsible for the results of using this item on your phone. Create a Google Wallet Account You must have a Google Wallet account associated with your Google Account to purchase items from the Google Play Store app. The first time you turn on your phone, the setup process will prompt you to create a Google Wallet account. If you did not create one at setup, you can create an account at any time using one of these methods: ■ On your computer, go to google.com/wallet/ to create a Google Wallet account. – or – ■ The first time you use your phone to buy an item from Google Play, follow the prompts to enter your billing information to set up a Google Wallet account. Warning: When you’ve used Google Wallet once to purchase an application from the Google Play Store app, the phone remembers your password, so you don’t need to enter it the next time. For this reason, you should secure your phone to prevent others from using it without your permission. (For more information, see Lock screen.) Open an Installed App There are several options for opening an installed app. ■  Press   and tap   Apps, and then tap the app icon. Uninstall an App You can uninstall any app that you have downloaded and installed from Google Play. By accessing this document, the recipient agrees and acknowledges that all contents and information in this document (i) are confidential and proprietary information of Samsung, (ii) shall be subject to the non- disclosure regarding project H and Project B, and (iii) shall not be disclosed by the recipient to any third party. Samsung Proprietary and Confidential
 Apps and Entertainment 60   1.  Press   and tap   and tap Settings > More > Application manager > Downloaded. 2. Tap the app you want to uninstall, and then tap Uninstall. 3. When prompted, tap OK to remove the app from your phone. 4. Once the app is removed, tap OK again to return to the Application manager. Navigation Your phone offers a number of location-based navigation programs to help you figure out where you are and get you where you’re going. Google Maps Use the Google Maps™  application to find directions, location information, business addresses, etc. Determine your current location with or without GPS, get driving and transit directions and get phone numbers and addresses for local businesses.  For more information about Google Maps, visit maps.google.com. To use Google Maps, enable your phone’s GPS location services and agree to share location information with Google. To enable your phone’s GPS Location feature: 1.  Press   and tap   > Settings > More > Location services. 2. Tap Use GPS satellites. A green checkmark indicates the GPS location feature is enabled. To launch the Google Maps application: ► Press   and tap   Apps >  Maps. Google Navigation Another Google Maps navigation application is available on your phone. It uses your current location (provided by the GPS feature of your phone) to provide various location-based services. For more information about Google Maps, visit www.google.com/mobile/maps. ■  Press   and tap   Apps >  Navigation. By accessing this document, the recipient agrees and acknowledges that all contents and information in this document (i) are confidential and proprietary information of Samsung, (ii) shall be subject to the non- disclosure regarding project H and Project B, and (iii) shall not be disclosed by the recipient to any third party. Samsung Proprietary and Confidential
 Apps and Entertainment 61   Scout™ Scout™  by Telenav is a daily personal navigator that helps you get where you’re going. It lets you see and hear turn-by-turn directions and it can provide important, personalized information about traffic and alternate routes. ■  Press   and tap   Apps >   Scout. Samsung Apps Browse, search, and find apps to download and install on your phone. Log in to your Samsung account to manage your downloads. ■  Press   and tap   Apps >    Samsung Apps. S Magazine xxx Music Your phone lets you discover, download, and listen to your favorite music through a variety of applications. Note: For information about loading music onto your phone, see Transfer Files Between Your Phone and a Computer. Google Play Music Google Play Music lets you browse, shop, and play back songs purchased from the Google Play Store app, as well as songs you have loaded from your own music library. The music you choose is automatically stored in your Google Music library and instantly ready to play or download. For more information about Google Play Music, visit music.google.com. Note: For information about loading music onto your phone, see Transfer Files Between Your Phone and a Computer. ■  Press   and tap   Apps >   Play Music.  Music The Music app plays music files. Use Music to browse your music library, play songs, and create playlists. You can also set songs as ringtones for incoming calls, or as alarm tones. Note: For information about loading music onto your phone, see Transfer Files Between Your Phone and a Computer. By accessing this document, the recipient agrees and acknowledges that all contents and information in this document (i) are confidential and proprietary information of Samsung, (ii) shall be subject to the non- disclosure regarding project H and Project B, and (iii) shall not be disclosed by the recipient to any third party. Samsung Proprietary and Confidential
 Apps and Entertainment 62   When you close the Music screen, playback will continue in the background, so you can listen to music while you use other features of your phone. When music is playing in the background, you can access playback controls from Notifications. Play Music 1.  Press   and tap   Apps >   Music.  2. Tap the category tabs at the top of the screen. The default tabs are Songs, Playlists, Albums, Artists, Music square, and Folders. You may have to swipe your finger right or left along the tabs to see all of them. 3. Scroll through the list and tap a song to begin. While playing music, use these controls:  Tap   to move to the previous song. Tap   to move to the next song.  Tap the repeat button to control playback. Choose   to play all songs once. Choose   to repeat all songs. Choose   to repeat the current song.  Tap the shuffle button to control the order songs are played. Choose   to play songs in the order they appear in the list. Choose   to play songs in random order.  Tap   to mark a song as a favorite. When a song is a favorite, the star is orange. Favorite songs are included in the Favorites playlist.  Tap   to set the volume. You can also set volume by pressing the Volume Key on the side of the phone.  Tap   to share music with nearby devices using Group Play. 4. To close Music and stop playback, tap   > End. Use Playlists Create playlists to group songs, so you can listen to them together. 1.  Press   and tap   Apps >   Music.  2. Tap the Playlists tab, and then use these options:  Tap an existing playlist to play its songs. By accessing this document, the recipient agrees and acknowledges that all contents and information in this document (i) are confidential and proprietary information of Samsung, (ii) shall be subject to the non- disclosure regarding project H and Project B, and (iii) shall not be disclosed by the recipient to any third party. Samsung Proprietary and Confidential
 Apps and Entertainment 63    Tap   > Create playlist to create a new playlist. Follow the prompts to name the playlist, and then select songs for the playlist.  Tap   for other options, including Edit title, to rename playlists. Note:  While playing music, you can touch and hold on a song to choose Add to playlist.  Set a Song as a Ringtone or Alarm Tone You can set a song as a ringtone for all incoming calls, or for a contact. You can also set a song as an alarm tone. 3.  Press   and tap   Apps >   Music.  4. Scroll through the list to find a song, and then touch and hold on the song. 5. Choose Set as, and then use these options:  Choose how to use the song: •  From the beginning: Plays the song from the beginning. •  Auto recommendations: Plays the best part of the song, as detected by the Music app.  Choose what to set the song as: •  Phone ringtone: Plays the song for all incoming calls. •  Caller ringtone: Plays the song for calls from a Contact. •  Alarm tone: Plays the song as the notification for alarms. 6. After choosing options, tap OK, and then follow the prompts to complete the setup. Music Options 1.  Press   and tap   Apps >   Music.  2. Tap   for options. Available options depend on the tab:  Add to playlist/Create playlist: Depending on the tab, you can add songs to a playlist, or create a new playlist.  Via Bluetooth: Share music with another Bluetooth-compatible device. For more information about using Bluetooth, see Bluetooth.  Delete: On the Songs or Playlists tabs, you can choose songs to delete, or delete playlists. By accessing this document, the recipient agrees and acknowledges that all contents and information in this document (i) are confidential and proprietary information of Samsung, (ii) shall be subject to the non- disclosure regarding project H and Project B, and (iii) shall not be disclosed by the recipient to any third party. Samsung Proprietary and Confidential
 Apps and Entertainment 64    Search: Enter keywords to search for songs.  Scan for nearby devices: Search for nearby DLNA-compatible devices, to share music. For more information, see Nearby devices.  Settings: Configure settings for music and playback, including: •  SoundAlive: Choose a setting to match the type of music. •  Adapt Sound: Customize sound output when you are listening with earphones. Only available when earphones are inserted into the Earphone Jack. •  Play speed: Touch and drag the slider to set the default speed for music playback. •  Music menu: Choose categories for the tabs on the main Music screen. •  Music auto off: Choose a time period for music to play, after which Music will end. •  Lyrics: When enabled, lyrics display for songs as they play, if the lyric information is stored in the music file. •  Smart volume: When enabled, Music automatically adjusts the volume of all songs to an equal level. •  Voice control: When enabled, you can control music playback by speaking commands. Follow the prompts to configure Voice control settings.  End: Close Music.  Sprint Music Plus With Sprint Music Plus and the Music Store, Ringtone Store, and Ringback Tone Store, you can purchase, download, and play music, ringtones, and ringback tones for your phone.  Install the Sprint Music Plus App on Your Phone Before you use Sprint Music Plus on your phone, you must download and install the app from the Google Play Store app. 1.  Press   and tap   Apps >   Play Store. 2. Tap the Search icon and search for "sprint music plus". 3. Tap Sprint Music Plus from the results list. 4. Follow the prompts to download and install the app. 5. When the download has completed, tap Open. By accessing this document, the recipient agrees and acknowledges that all contents and information in this document (i) are confidential and proprietary information of Samsung, (ii) shall be subject to the non- disclosure regarding project H and Project B, and (iii) shall not be disclosed by the recipient to any third party. Samsung Proprietary and Confidential
 Apps and Entertainment 65   Access Sprint Music Plus 1.  Press   and tap   Apps >   Play Store. 2. Touch My Library, select a category, and touch a song to begin playback.  Tap the onscreen navigation tools to skip ahead or rewind. Touch [menu icon] at any time to see additional options.   To stop playback and exit the application, tap   > More > Exit.  Google Play Movies The Google Play Movies application allows you to connect to the Google Play Store app, download a movie and then watch it instantly. Choose from thousands of movies, including new releases and HD titles in Google Play and stream them instantly on your Android phone. Previously rented movies are automatically added to your My Movies library across your phones. Learn more about Google Play Movies at: play.google.com/about/movies. ■  Press   and tap   Apps >   Play Movies & TV.  Google Play Books Discovering your favorite books and authors has never been easier. With Google Play Books, you can shop the world's largest selection of ebooks and read them anywhere you like - on a tablet, phone, ereader, or the Web. ■  Press   and tap   Apps >   Play Books.  Google Play Magazines Enjoy your favorite magazines, anywhere you go. Discover hundreds of bestselling magazines on Google Play. You can shop a wide selection of titles, from cooking to technology, travel, fashion, sports, photography, and so much more. It's never been easier to find a great read to enjoy on vacation, lounging at home or on your morning commute. Buy new issues or back issues, subscribe and get free 14 or 30-day trials, and customize your reading experience for Android tablet or phone. ■  Press   and tap   Apps >  Play Magazines.  By accessing this document, the recipient agrees and acknowledges that all contents and information in this document (i) are confidential and proprietary information of Samsung, (ii) shall be subject to the non- disclosure regarding project H and Project B, and (iii) shall not be disclosed by the recipient to any third party. Samsung Proprietary and Confidential
 Apps and Entertainment 66   Group Play Use Group Play to share media from your phone to other devices, via Wi-Fi, using your phone as an AP (Access Point). Many of your phone’s apps offer sharing via Group Play. Tap   to find sharing options, usually from the Share via list of options. To use Group Play, all participants must be connected to the same Wi-Fi network. Important:  If you are using Group Play via an unsecured Wi-Fi network, your information may be vulnerable to unauthorized third parties while being transferred.  Use Group Play only for personal and non-profit purposes. Using Group Play for commercial use violates copyright law. The company is not responsible for copyright infringement by users. Create a Group and Share Note:  To use Group Play, all participants must be connected to the same Wi-Fi network. 1.  Press   and tap   Apps >   Group Play.  2. Tap Set group password > Create Group, and then follow the prompts to create a group. You’ll need to set up a group password, which participants will use to join your Group Play session. 3. After you create the group, your phone turns on the mobile AP (Access Point). Follow the onscreen directions to bring other devices back-to-back with your phone to join the group. 4. Choose options for sharing:  Share music: Select music stored on your phone or on an optional installed memory card (not included).  Share pictures: Select pictures stored on your phone or on an optional installed memory card (not included).  Share documents: Select documents stored on your phone or on an optional installed memory card (not included).  Play games: Play games with other participants. Note:  For more information about using Group Play, tap   > Help. Join a Group 1.  Press   and tap   Apps >   Group Play. By accessing this document, the recipient agrees and acknowledges that all contents and information in this document (i) are confidential and proprietary information of Samsung, (ii) shall be subject to the non- disclosure regarding project H and Project B, and (iii) shall not be disclosed by the recipient to any third party. Samsung Proprietary and Confidential
 Apps and Entertainment 67   2. Tap Join Group. Your phone scans for nearby available groups. Your device can only detect groups on the same Wi-Fi network your phone is connected to. 3. Select a group to join. After connecting, you can see and interact with the group’s shared media. Sprint Zone Access your Sprint account, get device information and help, find recommended apps, and more. ■  Press   and tap   Apps >   Sprint Zone. Sprint TV & Movies With Sprint TV & Movies, you can watch live TV and access movies and other on demand entertainment on the go. Note: Coverage not available everywhere. Content and lineup subject to change. Select channels also available for casual usage. Go to sprintchannels.mobitv.com for more information. Install the Sprint TV & Movies App on Your Phone Before you use Sprint Music Plus on your phone, you must download and install the app from the Google Play Store app.   Press   and tap   Apps >   Play Store. 1. Touch the Search icon and search for "sprint tv". 2. Touch Sprint TV & Movies from the results list, and then follow the onscreen 3.instructions to download and install the app. Your Sprint TV Channel Options The Sprint TV application offers a wide variety of accessible channels. Subscription options include comprehensive basic packages as well as a full menu of “a la carte” channels. Visit sprintchannels.mobitv.com for more information on channels and pricing.  Watch TV 1.  Press   and tap   Apps >   SprintTV & Movies.  2. Depending on your settings, your phone may prompt you to accept a data connection. 3. In the top bar, touch an option to see what’s available.  By accessing this document, the recipient agrees and acknowledges that all contents and information in this document (i) are confidential and proprietary information of Samsung, (ii) shall be subject to the non- disclosure regarding project H and Project B, and (iii) shall not be disclosed by the recipient to any third party. Samsung Proprietary and Confidential
 Apps and Entertainment 68   4. Browse through the available programming and touch a clip or channel to view the program.  Note: The first time you access a channel that requires a subscription, you will be prompted to purchase access. Touch Subscribe to purchase access, or touch Preview to see a preview of the selected channel. Tip: For quick access, touch a featured item in the center of the screen or select a live channel from the bottom bar. Samsung Link Samsung Link makes staying connected easy. You can wirelessly synchronize your Samsung device with your TV, stream content, and even keep tabs on who calls or sends text messages with real-time, on-screen monitoring.  Samsung Link allows users to share their in-device media content with other external devices using DLNA certified™  (Digital Living Network Alliance) Devices. These external devices must also be DLNA-compliant. Wi-Fi capability can be provided to TVs via a digital multimedia streamer. Samsung Link uses your Samsung account. For more information, see Samsung Account. Both your device, and the devices that connect to your device, must be on the same Wi-Fi access point (AP). For more information about using Wi-Fi, see Wi-Fi. 1.  Press   and tap   Apps >   Samsung Link. 2. Follow the prompts to sign in to your Samsung account and learn about Samsung Link. 3. On the Samsung Link screen, swipe your finger left or right across the screen to scroll between:  MY RECENT CONTENT: Media you’ve recently viewed.  DEVICES & STORAGE: Choose an option: •  Registered storage: Add storage service(s) to view multimedia files anywhere. Storage services include Web storage, such as DropBox or other services. Web storage is sometimes referred to as the “cloud.” •  Registered devices: Stream or share multimedia content from your device to other DLNA-compliant devices connected to the same Wi-Fi network. When you launch Samsung Link, compatible devices on the same Wi-Fi network display automatically in Registered devices. By accessing this document, the recipient agrees and acknowledges that all contents and information in this document (i) are confidential and proprietary information of Samsung, (ii) shall be subject to the non- disclosure regarding project H and Project B, and (iii) shall not be disclosed by the recipient to any third party. Samsung Proprietary and Confidential
 Apps and Entertainment 69   Configure Samsung Link Settings Configure Samsung Link options, such as storage location, account information, and registered storage services. 1.  Press   and tap   Apps >   Samsung Link. 2. Tap   > Settings for options:  Registered storage: Add a Web storage service, to view or share files.  My device: View your device name, used by other devices to identify your device. Tap to change the device name.  Save to: Choose a default file storage location. You can save to your phone’s internal memory or to an optional installed memory card (not included).  Auto upload: When turned On, photos and videos from your device will be automatically uploaded to a Web storage service. You can also choose how files are uploaded. Turn On Use mobile network to allow your phone to use your phone’s connection to the wireless data network, or turn it Off to only allow uploads when connected to Wi-Fi.  Video optimization: When turned On, video quality for streamed video content is optimized depending on current network conditions.  Password lock: When turned On, access to Samsung Link on your device is password-protected. You must enter your Samsung account password to start Samsung Link.  My account: Access information about your Samsung account.  Customer support: Contact the Samsung Link team via email. You must have an email account set up on your phone to use this option.  About this service: Learn about Samsung Link. Use Samsung Link to Share Media with Another Device Share media with another DLNA-compliant device via Samsung Link. Both your device, and the device(s) that connect to your device, must be on the same Wi-Fi access point (AP). For more information about using Wi-Fi, see Wi-Fi. 1.  Press   and tap   Apps >   Samsung Link. 2. Launch AllShare Play or Samsung Link on the target device. By accessing this document, the recipient agrees and acknowledges that all contents and information in this document (i) are confidential and proprietary information of Samsung, (ii) shall be subject to the non- disclosure regarding project H and Project B, and (iii) shall not be disclosed by the recipient to any third party. Samsung Proprietary and Confidential
 Apps and Entertainment 70   3. On the DEVICES & STORAGE screen, tap your device, and then tap media file(s) to select them for streaming. 4. Tap  , and then choose a device for sharing. Your device requests permission for sharing from the target device. 5. Follow the prompts on the target device to allow sharing. CBS Sports All the scores and stats you could ever want, delivered with updates from top fantasy gurus and live commentary from players, writers, analysts, and bloggers. Before you use CBS Sports on your phone, you must download and install the app from the Google Play Store. 1.  Press   and tap   Apps >   CBS Sports. 2. Follow the prompts to download and install the app from the Google Play Store. BaconReader BaconReader serves up Reddit content in a stylish package with powerful features like subreddit grouping, domain filtering, full user profile access, and much more. Before you use Bacon Reader on your phone, you must download and install the app from the Google Play Store. 1.  Press   and tap   Apps >   BaconReader. 2. Follow the prompts to download and install the app from the Google Play Store. 1Weather 1Weather offers a full suite of weather tools to keep you informed. Before you use 1Weather on your phone, you must download and install the app from the Google Play Store. 1.  Press   and tap   Apps >   1Weather. 2. Follow the prompts to download and install the app from the Google Play Store.  By accessing this document, the recipient agrees and acknowledges that all contents and information in this document (i) are confidential and proprietary information of Samsung, (ii) shall be subject to the non- disclosure regarding project H and Project B, and (iii) shall not be disclosed by the recipient to any third party. Samsung Proprietary and Confidential
 Web and Data 71   Web and Data The following topics address your phone’s data connections and the built-in Web browser. Additional data-related features can be found in Accounts and Messaging, Applications and Entertainment, and Tools and Calendar. Your phone’s data capabilities let you wirelessly access the Internet or your corporate network through a variety of connections, including: Wi-Fi Wi-Fi provides wireless Internet access over distances of up to 300 feet. To use your phone’s Wi-Fi, you need access to a wireless access point or “hotspot”. The availability and range of the Wi-Fi signal depends on a number of factors, including infrastructure and other objects through which the signal passes. Turn Wi-Fi On and Connect to a Wireless Network By default, your phone’s Wi-Fi feature is turned off. Turning Wi-Fi on makes your phone able to discover and connect to compatible in-range Wi-Fi networks (or WAPs - wireless access points). Turn Wi-Fi on: 1.  Press   and tap   > Settings > Connections > Wi-Fi. 2. Tap the ON/OFF switch to turn Wi-Fi On.  Tip:  You can also turn Wi-Fi on and off through the Notifications panel. Drag the Notifications panel down and tap Wi-Fi. Note: Wi-Fi networks are self-discoverable, which means no additional steps are required for your phone to connect to a Wi-Fi network. It may be necessary to provide a user name and password for certain closed wireless networks. Scan and connect to a Wi-Fi network: 1.  Press   and tap   > Settings > Connections > Wi-Fi.  2. The network names and security settings (Open network or Secured with xxx) of detected Wi-Fi networks are displayed.  When you select an open network, you will be automatically connected to the network. By accessing this document, the recipient agrees and acknowledges that all contents and information in this document (i) are confidential and proprietary information of Samsung, (ii) shall be subject to the non- disclosure regarding project H and Project B, and (iii) shall not be disclosed by the recipient to any third party. Samsung Proprietary and Confidential
 Web and Data 72    When you select a secured network, you will need to enter the wireless password to connect to the network. Enter the password and tap Connect. You can use the show password option to display the password as you enter it. Add a new Wi-Fi network manually: 1.  Press   and tap   > Settings > Connections > Wi-Fi.  2. Tap Add Wi-Fi network.  3. Enter the Network SSID. This is the name of the Wi-Fi network. 4. Tap the Security field and select the security method used by the Wi-Fi network. If a password is required, enter it in the Password field. 5. Tap Connect to store the new information and connect to the Wi-Fi network. Note:   The next time your phone connects to a previously accessed or secured wireless network, you won’t prompted to enter the wireless password again, unless you reset your phone back to its factory default settings. Connect to a Different Wi-Fi Network The following information is designed to help you connect your device to a different Wi-Fi network. 1.  Press   and tap   > Settings > Connections > Wi-Fi. 2. Detected Wi-Fi networks are displayed. To manually scan for available Wi-Fi networks, on the Wi-Fi settings screen, tap Scan. 3. Tap another Wi-Fi network to connect to it. Note:  If the wireless network you want to connect to is not in the list of detected networks, scroll down the screen, and tap Add network. Enter the wireless network settings and tap Save. Data Services (Sprint 3G and 4G) With your Sprint service, you are ready to start enjoying the advantages of data services. The following topics will help you learn the basics of using your data services, including managing your user name, launching a data connection, and navigating the Web with your phone. Important! Certain data services requests may require additional time to process. While your phone is loading the requested service, the touchscreen keyboard may appear unresponsive when in fact it is functioning properly. Allow the phone some time to process your data usage request. By accessing this document, the recipient agrees and acknowledges that all contents and information in this document (i) are confidential and proprietary information of Samsung, (ii) shall be subject to the non- disclosure regarding project H and Project B, and (iii) shall not be disclosed by the recipient to any third party. Samsung Proprietary and Confidential
 Web and Data 73   Your Data Services User Name When you buy your phone and sign up for service, you’re automatically assigned a user name, which is typically based on your name and a number, followed by “@sprintpcs.com”. (For example, the third John Smith to sign up for Sprint data services might have jsmith003@sprintpcs.com as his user name.) When you use data services, your user name is submitted to identify you to the Nationwide Sprint Network. Your user name is automatically programmed into your phone. You don’t have to enter it. Update Your User Name If you choose to change your user name and select a new one online, or make any changes to your services, you must then update the profile on your phone. 1.  Press   and tap   > Settings > More > System Update.  2. Tap Update Profile. Launch the Browser  The Browser automatically launches when a Web link is touched from within either an email or a text message. To launch the browser to connect browse the Internet: ■  Press   and tap   Internet. Note:  The first time you access the Web on your phone, you may be prompted to sign in with your phone number. Enter your number and tap Ok. 4G Services 4G is a service that must be included in your service plan and also available within your area. 4G coverage is currently available in only certain markets. For more details on 4G availability go to: www.sprint.com/4G and click the See the coverage map link. Note:  If 4G service is not included in your service plan, the 4G icon will not appear in the Notifications area. 4G is up to 10x faster than 3G (based on download speed comparison of 3G's ~600 kbps vs. 4G's ~ 6 Mbps). (Actual speeds may vary.)  Not all services are available on 4G and coverage may default to 3G/separate network where 4G is not available. Important!   4G service must be added to your account before attempting a connection to the 4G network. By accessing this document, the recipient agrees and acknowledges that all contents and information in this document (i) are confidential and proprietary information of Samsung, (ii) shall be subject to the non- disclosure regarding project H and Project B, and (iii) shall not be disclosed by the recipient to any third party. Samsung Proprietary and Confidential
 Web and Data 74   Depending on which icons appear within the Notifications area, your services and features will change. The following table indicates what functions and features are available when combinations of these service icons appear:  Icon Description  3G Coverage: The phone is connected to the Sprint 3G network. The arrows are colored when data is being transferred.  4G Coverage: The phone is connected to the Sprint 4G network. The arrows are colored when data is being transferred. Virtual Private Networks (VPN) From your phone, you can add, set up, and manage virtual private networks (VPNs) that allow you to connect and access resources inside a secured local network, such as your corporate network. Prepare Your Phone for VPN Connection Depending on the type of VPN, you may be required to enter your login credentials or install security certificates before you can connect to your company’s local network. You can get this information from your network administrator. To connect to a VPN, you must have Mobile data enabled, or your phone must be connected to a Wi-Fi network. For information about setting up and using these connections on your phone, see Data usage and Turn Wi-Fi On and Connect to a Wireless Network. Set a Screen Lock Before setting up a VPN, you must set a screen lock to prevent access to your phone by unauthorized users. Pattern, PIN, or password screen locks provide sufficient security to set up trusted credential storage. 1.  Press   and tap   > Settings > My device. 2.  Tap Lock screen > Screen lock. 3.  Choose a screen lock, from Pattern, PIN, or Password. 4. Follow the prompts to configure the screen lock. For more information, see Screen lock. Add a VPN Configure a connected to a VPN. You must have a Pattern, PIN, or Password screen lock set before adding a VPN.   Press   and tap   > Settings > Connections. 1.By accessing this document, the recipient agrees and acknowledges that all contents and information in this document (i) are confidential and proprietary information of Samsung, (ii) shall be subject to the non- disclosure regarding project H and Project B, and (iii) shall not be disclosed by the recipient to any third party. Samsung Proprietary and Confidential
 Web and Data 75    Tap More networks > VPN. 2. Tap   to add a VPN, with these options: 3. Name: Enter the name of the VPN.  Type: Choose the type of VPN, from PPTP, L2TP/IPSec PSK, L2TP/IPSec RSA, IPSec Xauth PSK, IPSec Xauth RSA, or IPSec Hybrid RSA.  Server address: enter the VPN server address.  PPP Encryption (MPPE): Tap to enable, if applicable for the VPN.  Show advanced options: Tap to set other options, depending on the type of VPN. 3. Tap Save to save the VPN. Connect to a VPN Connect to a VPN that’s already set up on your phone. 1.  Press   and tap   > Settings > Connections. 2. Tap More networks > VPN. 3. In the VPNs section, tap a VPN. 4. Follow the prompts to enter your login credentials, and connect. When you are connected, the VPN connected icon appears in the notification area of the title bar. Disconnect from a VPN The following describes how to disconnect from a VPN connection. 1. Touch and hold the title bar, and then drag down to open the Notifications panel. 2. Tap the VPN connection to return to the VPN settings screen, and then tap the VPN connection to disconnect from it.  When your phone has disconnected from the VPN, the VPN disconnected icon displays in the notification area of the title bar. Chrome Use Chrome for Mobile to browse fast and sign in to bring your Chrome experience from your computer, anywhere you go. For more information, visit: https://www.google.com/intl/en/chrome/browser/mobile/ ■  Press   and tap   Apps >   Chrome. By accessing this document, the recipient agrees and acknowledges that all contents and information in this document (i) are confidential and proprietary information of Samsung, (ii) shall be subject to the non- disclosure regarding project H and Project B, and (iii) shall not be disclosed by the recipient to any third party. Samsung Proprietary and Confidential
 Web and Data 76   Internet Your phone’s Internet browser gives you full access to both mobile and traditional websites on the go, using your phone’s 3G or 4G Mobile data or Wi-Fi connections. ■  Press   and tap   Apps >   Internet. Note:  The first time you launch Internet, you may be prompted to enter your 10-digit wireless phone number to access the SprintWeb home page.  By accessing this document, the recipient agrees and acknowledges that all contents and information in this document (i) are confidential and proprietary information of Samsung, (ii) shall be subject to the non- disclosure regarding project H and Project B, and (iii) shall not be disclosed by the recipient to any third party. Samsung Proprietary and Confidential
 Pictures and Video 77   Pictures and Video Camera You can use the camera or camcorder to take and share pictures and videos. Taking pictures with your phone’s built-in camera is as simple as choosing a subject, pointing the camera, then pressing the camera key. Open the Camera Follow the below procedure to access your phone’s camera. ► Press   and tap   Apps >   Camera.  ● Front/Back Camera: Switch between the front and back cameras. ● Dual Camera: Take a picture with the back camera and front camera at once, or record videos with both cameras. The image from the front camera displays as a inset on the screen, so you can take a picture of yourself along with the scene from the back camera. Tap the inset image to resize it, or drag it to a new position on the screen. ● Settings: Access camera settings. ● Mode Indicator: Displays the current shooting mode, chosen with Mode Selector. Shooting modes allow you to choose modes for automatically adjusting settings to suit conditions, or to access special features like panorama or other specialty shots.  ● Record: Tap to record video. ● Capture: Tap to take a picture. ● Mode Selector: Tap to choose a shooting mode. The current mode displays on the camera screen. ● Effects: Choose an effect to add to pictures or videos as you take them. ● Gallery: View your pictures or videos. By accessing this document, the recipient agrees and acknowledges that all contents and information in this document (i) are confidential and proprietary information of Samsung, (ii) shall be subject to the non- disclosure regarding project H and Project B, and (iii) shall not be disclosed by the recipient to any third party. Samsung Proprietary and Confidential
 Pictures and Video 78   Take a Pictures You can take pictures with your phone’s front or back camera, or combine shots with Dual mode. 1.  Press   and tap   Apps >   Camera.  2. Using the phone’s screen as a viewfinder, compose your shot by aiming the camera at the subject. While composing your picture, use the onscreen options, or these gestures:  Press the Volume Key up or down to zoom in or out, or touch the screen with two fingers and pinch or spread them on the screen to zoom.  Tap the screen to focus on the area you tapped. 3. Tap   Capture to take the picture.  Note:  To include your location in photos, turn on GPS tag in Settings. Record Videos In addition to taking pictures, you can record, view, and send videos with your phone’s built-in video camera.   Press   and tap   Apps >   Camera.  1. Using the phone’s screen as a viewfinder, compose your shot by aiming the camera at 2.the subject. While composing your shot, use the onscreen options, or these gestures:  Press the Volume Key up or down to zoom in or out, or touch the screen with two fingers and pinch or spread them on the screen to zoom.  Tap the screen to focus on the area you tapped.  Tap   Record to begin recording. While recording, you can use these options: 3.  Tap the screen to change the focus area to the area you tapped.  Tap   Capture to take a still picture while continuing recording.  Tap   Pause to temporarily stop recording.  Tap   Stop to stop recording. By accessing this document, the recipient agrees and acknowledges that all contents and information in this document (i) are confidential and proprietary information of Samsung, (ii) shall be subject to the non- disclosure regarding project H and Project B, and (iii) shall not be disclosed by the recipient to any third party. Samsung Proprietary and Confidential
 Pictures and Video 79   Camera Options Camera options are special options that you can choose, right on the camera screen, to make your pictures or videos special.   Press   and tap   Apps >   Camera.  1. Tap an option: 2. Front/back camera: Tap   to switch between the front and back cameras. With the front camera, you can take self-portraits or record yourself. With the back camera, you can take pictures or record what’s in front of you.  Dual mode: Tap   to display the screen for the front camera inset on the screen for the back camera. You can use dual mode to put yourself in a picture or video.  Mode: Tap   to choose a shooting mode. Scroll available modes, and then tap a mode to select it. Modes include: •  Auto: Automatically adjusts the exposure to optimize the color and brightness of pictures. In Auto mode, you can take single or burst shots (take burst shots by holding Capture button to take multiple shots until you lift your finger). •  Beauty face: Automatically enhances facial features. •  Best photo: Allows you to select the best shot from multiple shots you take at the same time. •  Best face: Allows you to select the best shot of each subject, to get the best possible group shot. •  Sound & shot: Adds a few seconds of background sound to enhance pictures. •  Drama: Captures multiple shots of a moving subject, to merge them into one dynamic picture. •  Animated photo: Allows you to create a picture containing animated elements. •  Rich tone (HDR): Allows you to take pictures in various exposures and merge them to create pictures with rich color. •  Eraser: Allows you to take a series of pictures, and then remove objects that are blurred because of movement. •  Panorama: Take multiple pictures to merge into one expansive panoramic picture. •  Sports: Allows you to capture clear shots of a moving subject. By accessing this document, the recipient agrees and acknowledges that all contents and information in this document (i) are confidential and proprietary information of Samsung, (ii) shall be subject to the non- disclosure regarding project H and Project B, and (iii) shall not be disclosed by the recipient to any third party. Samsung Proprietary and Confidential
 Pictures and Video 80   •  Night: Allows you to take clearer, brighter pictures in low light. Quick Camera Settings Use Quick settings to quickly configure settings while you take pictures and record videos.   Press   and tap   Apps >   Camera.  1. From the Camera screen, tap   to access settings: 2. Advanced settings: Tap   to access advanced camera settings.  Flash: Tap to choose a flash setting.  Auto night detection: Tap to enable or disable automatic night detection, to help you take clearer, brighter pictures in low light. Auto night detection does not apply when recording videos.  Voice control: Tap to access voice control settings, for using voice commands to take pictures and record video. For more information, see Voice Control.  Recording mode: Tap to choose a mode for recording. Choose Limit for MMS to restrict recordings to a size that can be attached to a multimedia message. Choose Normal, Slow motion, or Fast motion to control the speed of recording.  Share: Tap to choose a method for sharing pictures and videos. You can choose Share shot, Buddy photo share, ChatON photo share, or Remote viewfinder. Advanced Camera Settings Use Advanced settings to configure default options for pictures and videos.   Press   and tap   Apps >   Camera.  1. From the Camera screen, tap   and then tap  for these settings: 2. Photos: •  Photo size: Choose the default size for pictures. •  Burst shot: When On, you can take multiple pictures when you touch and hold the Capture button. •  Face detection: When On, the Camera will automatically adjust settings for taking pictures of faces. •  Metering: Set how the Camera measures the light source. •  ISO: Set the sensitivity of the camera’s light meter. By accessing this document, the recipient agrees and acknowledges that all contents and information in this document (i) are confidential and proprietary information of Samsung, (ii) shall be subject to the non- disclosure regarding project H and Project B, and (iii) shall not be disclosed by the recipient to any third party. Samsung Proprietary and Confidential
 Pictures and Video 81   •  Anti-Shake: When turned On, the camera compensates for movement of the phone when taking pictures. •  Auto night detection: Enable or disable automatic night detection, to help you take clearer, brighter pictures in low light. Auto night detection does not apply when recording videos. •  Save as: Choose whether pictures are saved with Rich Tone, to create rich, soft color.  Videos: •  Video size: Choose the default size for videos. •  Video stabilization: When On, the Camera adjusts settings to improve image stability in videos.  General: •  GPS tag: When On, GPS location information is stored in picture files. •  Review: When On, pictures display briefly after you take them so you can review them. •  Volume Key: Choose a function for the Volume Key while using the Camera. •  Timer: Choose a timer setting to delay the taking of pictures or recording. •  White balance: Choose a setting for current light conditions. •  Exposure value: Adjust the brightness of pictures. •  Guidelines: When On, guidelines display on the screen to aid in composition. •  Flash: Choose a flash setting. •  Voice control: When On, you can take pictures or record videos by speaking commands. For more information, see Voice Control. •  Contextual filename: When On, filenames include GPS information. GPS tag must be enabled to use contextual filenames. •  Save as flipped: When On, pictures or recordings you make using the front camera are saved as a mirror-image. •  Storage: If you have an optional memory card installed (not included), you can choose whether to save files to device memory or to the memory card. •  Reset: Return settings to the factory defaults. By accessing this document, the recipient agrees and acknowledges that all contents and information in this document (i) are confidential and proprietary information of Samsung, (ii) shall be subject to the non- disclosure regarding project H and Project B, and (iii) shall not be disclosed by the recipient to any third party. Samsung Proprietary and Confidential
 Pictures and Video 82   Gallery Using the Gallery application, you can view pictures and watch videos that you’ve taken with your phone’s camera, downloaded, or copied to an optional memory card (not included).  For pictures stored on an optional memory card, you can do basic editing such as rotating and cropping. You can also set a picture as your contact picture or wallpaper and share pictures with your friends. While viewing pictures in the Gallery, scroll up the screen to view more albums. Simply tap an album to view the photos or videos in that album. If you have pictures or videos stored on an optional memory card (not included), they will be display folders they are stored in, and folders are treated as albums. The actual folder names will be used as the album names. If you have downloaded any photos and videos, these will be placed in the All downloads album. Note: Tap   > Help to learn about Gallery. 1.  Press   and tap   Apps >   Gallery. 2. Select a folder location (such as Camera) and tap an image to view your picture. 3. From the Gallery screen, you have these options:  Tap a picture or video to display it in full screen view.   Touch and hold thumbnails to select them (indicated by a check mark).  Tap New album to create an album. Give the album a name, and then select and drag thumbnails to the album to move or copy files to the new album.  Tap   for options, including: •  Select album/Select item: Depending on the view, tap albums or items to select them. After selection, you can tap   again for options you can use with the selected item. •  Slideshow: Choose options to create a slideshow for viewing your pictures and videos. •  Content to display: Choose content to display in Gallery. You can choose content saved to your phone’s memory, content from other sources such as Dropbox, Facebook, or Picasa™. •  Scan for nearby devices: Search for nearby DLNA devices, to share photos or videos. •  Settings: Configure Gallery settings. By accessing this document, the recipient agrees and acknowledges that all contents and information in this document (i) are confidential and proprietary information of Samsung, (ii) shall be subject to the non- disclosure regarding project H and Project B, and (iii) shall not be disclosed by the recipient to any third party. Samsung Proprietary and Confidential
 Pictures and Video 83   •  Help: Learn about Gallery. View Photos and Videos After selecting an album from the Albums tab, you can browse the photos and videos of that album in either photo pile or grid view. Tap a photo or video to view it in full screen. View Photos 1.  Press   and tap   Apps >   Gallery. 2. Tap a thumbnail to view the picture. While viewing a picture full-screen you can use these options:    Share: Choose an option for sharing the picture. Options may include Bluetooth, Dropbox, Email, Gmail, Google+, Messaging, Picasa, Wi-Fi Direct, or YouTube.    Delete: Erase the current picture.    Camera: Launch the Camera, to take pictures or record video. View Videos Note:  If no control icons are displayed on the screen in addition to the picture, tap anywhere on the screen to display them. 1. Tap a video to select it. When the video is displayed full-screen, you can use these options:    Share: Choose an option for sharing the video. Options may include Bluetooth, Dropbox, Email, Gmail, Google+, Messaging, Picasa, Wi-Fi Direct, or YouTube.    Trim: Edit the length of the video.    Delete: Erase the current video.  Tap   to play the video. Zoom In or Out on a Photo There are two ways you can zoom in or out of a photo. ► Tap the screen twice quickly to zoom in and then tap the screen twice quickly again to zoom out. By accessing this document, the recipient agrees and acknowledges that all contents and information in this document (i) are confidential and proprietary information of Samsung, (ii) shall be subject to the non- disclosure regarding project H and Project B, and (iii) shall not be disclosed by the recipient to any third party. Samsung Proprietary and Confidential
 Pictures and Video 84   - or - You can also use pinch and spread to zoom in or out. See Pinch and spread. Working with Photos You can touch and hold on a photo to open a selection menu and choose what to do with it. You can choose to delete the photo, rotate or crop it, and more. Rotate and Save a Photo To rotate or save your photo, follow the below procedures. 1.  Press   and tap   Apps >   Gallery. 2. Select a folder location (such as Camera) and tap an image to view your picture. 3. Tap   > Rotate left or Rotate right. The rotated picture is saved in your default storage location as a copy. Crop a Photo The crop your photos, follow the below procedures. 1.  Press   and tap   Apps >   Gallery. 2. Select a folder location (such as Camera) and tap an image to view your picture. 3.  Tap  > Crop. 4. To adjust the crop box size, touch and hold the edge of the box. When directional arrows appear, drag your finger inward to or outward to resize the crop box. 5. To move the crop box to the part of the photo that you want to crop, drag the crop box to the desired position. 6. Tap Done to apply the changes to the picture. The cropped picture is saved along with the original copy in your default storage location.  Share Photos and Videos The Gallery application lets you send photos and videos using email or multimedia messages. You can share photos on your social networks (such as Facebook, Picasa, and Twitter) and share videos on YouTube. You can also send them to another phone or your computer using Bluetooth. By accessing this document, the recipient agrees and acknowledges that all contents and information in this document (i) are confidential and proprietary information of Samsung, (ii) shall be subject to the non- disclosure regarding project H and Project B, and (iii) shall not be disclosed by the recipient to any third party. Samsung Proprietary and Confidential
 Pictures and Video 85   Send Photos or Videos by Email You can send several photos, videos, or both in an email message. They are added as file attachments in your email. 1.  Press   and tap   Apps >   Gallery. 2. Tap the album that contains the photos or videos you want to share. 3. Tap the photos you want to send. 4. Touch the screen and then tap   > Gmail or Email. 5. Compose your message and then tap   or . Note: If you selected Email and you have multiple email accounts, the default email account will be used. Send a Photo or Video by Multimedia Message Although you can send several photos or videos in a multimedia message, it may be better to send one at a time, especially if the files are large in size. 1.  Press   and tap   Apps >   Gallery. 2. Tap the album that contains the photos or videos you want to send. 3. Tap the photo or video you want to send.  4. Touch the screen and then tap   > Messaging. 5. Compose your message and then tap .  Send Photos or Videos Using Bluetooth You can select several photos, videos, or both and send them to someone’s phone or your computer using Bluetooth. 1.  Press   and tap   Apps >   Gallery. 2. Tap the album that contains the photos or videos you want to send. 3. Select the photos or videos you want to send. 4. Touch the screen and then tap   > Bluetooth. By accessing this document, the recipient agrees and acknowledges that all contents and information in this document (i) are confidential and proprietary information of Samsung, (ii) shall be subject to the non- disclosure regarding project H and Project B, and (iii) shall not be disclosed by the recipient to any third party. Samsung Proprietary and Confidential
 Pictures and Video 86   In the next few steps, you’ll be asked to turn on Bluetooth on your phone and connect to the receiving Bluetooth phone so the files can be sent. For more information, see Bluetooth. Share Photos or Videos on Google+ 1.  Press   and tap   Apps >   Gallery. 2. Tap the album that contains the photos or videos you want to send. 3. Tap the photo or video you want to send.  4. Touch the screen and then tap   > Google+. 5. Compose your message and then tap . Share Photos on Picasa You need to be signed in to a Google Account to upload pictures to the Picasa photo organizing service. 1.  Press   and tap   Apps >   Gallery. 2. Tap the album that contains the photos or videos you want to share. 3. Select the photos you want to share.  4. Touch the screen and then tap   > Picasa. 5. Select the online album where you want to upload the pictures. 6. Tap Upload. You can view the photos online at picasaweb.google.com. Share Videos on YouTube You can share your videos by uploading them to YouTube. Before you do this, you must create a YouTube account and sign in to that account on your phone. 1.  Press   and tap   Apps >   Gallery. 2. Tap the album that contains the videos you want to share. 3. Select the video you want to share. 4. Touch the screen and then tap   > YouTube. By accessing this document, the recipient agrees and acknowledges that all contents and information in this document (i) are confidential and proprietary information of Samsung, (ii) shall be subject to the non- disclosure regarding project H and Project B, and (iii) shall not be disclosed by the recipient to any third party. Samsung Proprietary and Confidential
 Pictures and Video 87   5. Enter the prompted information, such as description and tags, and select a privacy option. 6. Tap Upload. Samsung Hub Samsung Hub is your one stop for the hottest movie and TV content. With hundreds of titles available, entertaining your family on the go was never easier. You can rent or purchase your favorite content and watch from any location. Featuring the stunning viewing quality Samsung is known for, Samsung Hub is your gateway to mobile video like you've never experienced it before. You must be connected to Mobile data service, or to a Wi-Fi network, to preview and download a media file. Files you download or purchase are stored in the phone’s internal memory. Samsung Hub uses your Samsung account to manage access and account information. For more information about creating or signing in to a Samsung account, see Samsung Account. Use Samsung Hub The Samsung Hub screen provides an overview of all the available categories on one page such as: Music, Video, Books, and Games. The overview page also displays recently-added media that you can rent or purchase. 1.  Press   and tap   Apps >   Samsung Hub. 2. Scroll across the screen to select from the following available pages:  Overview: displays an main access for all available categories and recently available content for purchase or rental.  MUSIC: displays music that is available for purchase and allows you to search for new music.  VIDEO: displays videos and TV shows that are available for purchase/rental and allows you to search for new content.  BOOKS: displays books and magazines that are available for purchase and allows you to search for new content.  GAMES: displays games that are available for purchase or as trials and allows you to search for new content. 3. Scroll through the media listings. You can tap items to buy or rent them. As you tap some items, you can listen or watch a preview. 4. Follow the prompts to buy or rent media. By accessing this document, the recipient agrees and acknowledges that all contents and information in this document (i) are confidential and proprietary information of Samsung, (ii) shall be subject to the non- disclosure regarding project H and Project B, and (iii) shall not be disclosed by the recipient to any third party. Samsung Proprietary and Confidential
 Pictures and Video 88   Samsung Hub Notices ● Any media item (Media Content) may be rented or purchased after you create an account in Samsung Hub.  ● Media Content that is purchased and downloaded may be viewed concurrently on up to five (5) devices with Samsung Hub (or “the service”) that are also registered to the same account.  ● You may remove a device from your account no more than once every 90 days.  ● You may remove Media Content from a device as many times as you’d like. You will have the ability to re-download the Media Content later subject to content re-download availability and content provider permissions.  ● You may need network coverage to access Media Content you have acquired through the Service.  ● You can use 3G, 4G, or Wi-Fi connectivity to download Media Content.  ● Unlike purchased Media Content, rented Media Content will be viewable on only 1 device in your account at a time.  ● Media Content is downloaded and saved to your authorized device's SD card. No SD Card included out of box. ● Your Media Content may pause/stop or not download in networks where there is a weak signal.  ● You may begin watching downloaded Media Content as soon as a) license acquisition has occurred and b) sufficient amount of the Media Content has been buffered. ● You must finish watching Media Content within the time limit set out for each piece of content (which may be as short as 24 consecutive hours).  Stopping, pausing or restarting rented Media Content does not extend the available viewing time.   In no event will rented Media Content be available for a period of more than thirty (30) days (or shorter on a title-by-title basis) after the Media Content has been rented (e.g., if you begin viewing rented Media Content on the 29th day after the rental transaction, but do not finish viewing the entire title, that rented Media Content may not be available for the entire twenty-four (24) consecutive hour period if such period would extend the viewable time beyond the thirty (30) day rental window). Unless otherwise restricted by the Content Providers, you can download Media Content to your TV using HDMI connections; otherwise, you cannot play Media Content downloaded from your mobile device output. By accessing this document, the recipient agrees and acknowledges that all contents and information in this document (i) are confidential and proprietary information of Samsung, (ii) shall be subject to the non- disclosure regarding project H and Project B, and (iii) shall not be disclosed by the recipient to any third party. Samsung Proprietary and Confidential
 Pictures and Video 89   WatchON Use WatchON and your phone to control your TV and other devices. Set up WatchON Configure basic WatchON settings, to identify your TV provider and sign in to your accounts. 1.   Press   and tap   Apps >   WatchON. 2. Follow the prompts to configure options, including:  Select your country/region to help WatchON find TV information for you.  Enter your zip code to help WatchON find your TV service provider.  Find your TV service provider to customize WatchON for your own TV service.  Select channel list to make sure WatchON can control your TV service.  Personalize your setup.  Set up Netflix (optional) to find and share content from your Netflix account.  Learn about Peel remote.  Sign in to your Samsung account. 3. Continue on to set up your phone as a remote to control your TV. Note:  Tap   > Help to learn more about WatchON. Set Up Your Phone as a Remote Use WatchON and your phone to control your TV, set-top box, DVR, Blu-ray or DVD player, stereo, and other electronic devices. 1.  Press   and tap   Apps >   WatchON. 2. From the toolbar, tap  , and then tap Set up now. 3. Follow the prompts to find your TV or other devices and configure your phone to control their operation. Note:  Tap   > Help to learn more about WatchON. By accessing this document, the recipient agrees and acknowledges that all contents and information in this document (i) are confidential and proprietary information of Samsung, (ii) shall be subject to the non- disclosure regarding project H and Project B, and (iii) shall not be disclosed by the recipient to any third party. Samsung Proprietary and Confidential
 Pictures and Video 90   Optical Reader Optical reader allows you to use your camera to identify text and QR codes. For example, you can use Optical reader to capture information from a business card. ■  Press   and tap   Apps >   Optical reader. Note: Tap   >Help to learn more about Optical reader. Story Album With Story Album, you can create a digital album of your story in media. Special moments will be on a timeline, and if you wish, you can have your album published as a hard copy. ■  Press   and tap   Apps >   Story album. Note: Tap   >Help to learn more about Story album. Flipboard Use Flipboard to create a personalized digital “magazine” out of everything being shared with you. Access news stories, personal feeds and other related material. Flip through your Facebook newsfeed, tweets from your Twitter account, photos from friends and much more. ■  Press   and tap   Apps >   Flipboard. Video Play videos stored on your phone, and share them via Bluetooth, Dropbox, Email, Gmail, Google+, Messaging, Picasa, Wi-Fi Direct, or YouTube. 1.  Press   and tap   Apps >   Video. 2. Scroll through the videos stored on your device. After a few seconds, each video thumbnail begins playing a preview of the clip. 3. Tap a video to view it. Share videos 1.  Press   and tap   Apps >   Video. 2. Tap   > Share via. 3. Tap video(s) to select them for sharing, and then tap Done. 4. Choose a sharing option, and then follow the prompts to share the video. By accessing this document, the recipient agrees and acknowledges that all contents and information in this document (i) are confidential and proprietary information of Samsung, (ii) shall be subject to the non- disclosure regarding project H and Project B, and (iii) shall not be disclosed by the recipient to any third party. Samsung Proprietary and Confidential
 Pictures and Video 91   Use Pop-up Play Multitask with Pop-up Play - transform your video player into a pop-up window floating on the screen. The video will continue to play, and the pop-up window can be resized or moved anywhere on the screen. 1.  Press   and tap   Apps >   Video. 2. Tap a video to view it. 3. Tap   to continue playing the video in a floating window. Drag the window to any location on the screen, and use two fingers to pinch or spread to resize the floating window.       By accessing this document, the recipient agrees and acknowledges that all contents and information in this document (i) are confidential and proprietary information of Samsung, (ii) shall be subject to the non- disclosure regarding project H and Project B, and (iii) shall not be disclosed by the recipient to any third party. Samsung Proprietary and Confidential
 Tools and Calendar 92   Tools and Calendar Learn how to use many of your phone’s productivity-enhancing apps and features. Google Now Google Now gets you just the right information at just the right time.   It tells you today’s weather before you start your day, how much traffic to expect before you leave for work, when the next train will arrive as you’re standing on the platform, or your favorite team's score while they’re playing. And the best part? All of this happens automatically. Cards appear throughout the day at the moment you need them.  For more information, visit http://www.google.com/landing/now/. 1.  Press and hold   and tap   Google Now. 2. Follow the prompts to learn about Google Now, and set up your preferences. S Health S Health is a wellness application that can help you manage your health. Set fitness goal, check your progress, and keep track of your overall health. ■  Press   and tap   Apps >   S Health.  S Translator Easily translate words and phrases, either spoken or in text. ■  Press   and tap   Apps >   S Translator.  Polaris Office 5 Polaris Office Mobile for Android is a Microsoft Office compatible office suite. This application provides a central place for managing your documents online or offline. Polaris Office can also open Adobe PDF (Portable Document Format) files. ■  Press   and tap   Apps >   Polaris Office 5.  Lumen Toolbar The Lumen Toolbar, available to Sprint Customers, enables an extensive array of new browser extensions that enhance user experience – from contextual recommendations to App discovery By accessing this document, the recipient agrees and acknowledges that all contents and information in this document (i) are confidential and proprietary information of Samsung, (ii) shall be subject to the non- disclosure regarding project H and Project B, and (iii) shall not be disclosed by the recipient to any third party. Samsung Proprietary and Confidential
 Tools and Calendar 93   to social applications and browser utilities. With one-click access to News Feeds and one-click sharing of content via Facebook™, Twitter™   and other networks, along with community- and friend-based recommendations. ■  Press   and tap   Apps >   Lumen toolbar.  Calendar Use Calendar to create and manage events, meetings, and appointments. Your Calendar helps organize your time and reminds you of important events. Depending on your synchronization settings, your phone’s Calendar stays in sync with your Calendar on the Web, Exchange ActiveSync calendar, and Outlook calendar. Add an Event to the Calendar Add events to your Calendar to help you organize your time and remind you of important events. Note:   To synchronize calendar events among your Google and Corporate accounts, make sure they are being managed by your phone. See Accounts and Messaging for more information. 1.  Press   and tap   Apps >   Calendar.  2. Double-tap a day to which you would like to add an event to reveal the Add event/Add task screen. 3. Assign the new calendar event to a current account by tapping the Calendar field and then selecting an account. For this example we are choosing a Corporate account.   My calendars are calendar entries that are stored locally on the phone and not part of an email account.  Google/Gmail are calendar entries that are synchronized between your phone and your online Google account.  Corporate are calendar entries that are synchronized between your phone and either an Exchange Server or available from within Microsoft® Outlook®. 4. Tap the Title field and enter a title for the event.  5. Tap Save, or tap Edit event details to enter more information about the event:  Select a From/To time for the event by tapping the corresponding fields, and adjusting the month, day, and year. By accessing this document, the recipient agrees and acknowledges that all contents and information in this document (i) are confidential and proprietary information of Samsung, (ii) shall be subject to the non- disclosure regarding project H and Project B, and (iii) shall not be disclosed by the recipient to any third party. Samsung Proprietary and Confidential
 Tools and Calendar 94    Select a time for the event by tapping the time field and then adjusting the hour and minute. Tap the All day field to assign this as an all day event. If assigned as an all day event, the time fields are removed as options.  Select a recurrence cycle for the event by tapping the Repeat field.  Select an alarm time by tapping the Reminder field.  Enter a location for the event in the Location field or tap   to select the location on the a map.  Enter a description for the event in the Description field.  Enter participants in the Participants field.  Tap Show me as to choose how the event shows on your calendar to other event organizers.  Tap Privacy to select who is allowed to see this event. Private allows only the participants to see the event. Public allows anyone with access to your calendar to see the event.  Tap Memos to add an S Memo file as an attachment. For more information, see S Memo.  Tap Images to add an image from the Gallery or take a new picture using the camera.  6. Tap Add event to store the new event and synchronize it with your selected account. Event Alerts When your phone is turned on and you have an event alarm scheduled, your phone alerts you and displays the event summary. There are several ways your phone alerts you to scheduled events: ● By playing the assigned ringtone. ● By showing the Alert screen. Event Reminders When your phone is turned on and you have an event alarm scheduled, there are several ways your phone alerts you to scheduled events: ● By playing a short beep. ● By indicating an icon within the Status bar. By accessing this document, the recipient agrees and acknowledges that all contents and information in this document (i) are confidential and proprietary information of Samsung, (ii) shall be subject to the non- disclosure regarding project H and Project B, and (iii) shall not be disclosed by the recipient to any third party. Samsung Proprietary and Confidential
 Tools and Calendar 95   To view additional options: 1. Tap the Status bar, and then slide your finger down the screen to open the Notifications panel. 2. Tap the upcoming event name from the onscreen list to display the event within the Calendar notifications screen. 3. Tap an option.  Set snooze duration to set the length of time to allow before you are reminded of the event. Choose from: 3 minutes, 5 minutes, 10 minutes,15 minutes, or 30 minutes.  Snooze to be reminded of the event at a future time.  Dismiss to dismiss the reminder. View Events The following procedure helps you view your calendar events. 1.  Press   and tap   Apps >   Calendar.  2. To view a Calendar event farther out, tap either Week or Month. 3. Tap the day for which you would like to view events. (Your phone lists events in chronological order.) 4. To display an event’s details, tap it from the current screen. Day and List Views Day view displays a list of the events of one day.  List view shows a list of events in chronological order.  The color bars on the left side of the events indicate the type of calendar that includes the event. When in Day view, slide left or right across the screen to view earlier or later days. Week View Week view displays a chart of the events of one week.  When in Week view: ● You can touch and hold on a time slot to create a new event at that time. ● Tap an event to view its details. By accessing this document, the recipient agrees and acknowledges that all contents and information in this document (i) are confidential and proprietary information of Samsung, (ii) shall be subject to the non- disclosure regarding project H and Project B, and (iii) shall not be disclosed by the recipient to any third party. Samsung Proprietary and Confidential
 Tools and Calendar 96   ● Slide left or right across the screen to view earlier or later weeks. Month View In Month view, you’ll see markers on days that have events. When in Month view: ● Tap a day to view the events of that day. ● Touch and hold a day to create a new event. ● Slide up or down to view earlier or later months. Erase Events The following procedures show you how to erase your calendar events. 1.  Press   and tap   Apps >   Calendar.  2. Open the calendar event details:  In List, Day, and Week views, tap the calendar event you want to delete.  In Month view, tap the date where the calendar event occurs, and then tap the calendar event.  In Year view, tap the month in which the event is located. 3. Tap  > Delete.  4. In the Delete confirmation box, tap OK. - or - If the calendar event is recurring, select Only this event, This & future events, or All events, and tap OK. Alarm & Timer The Clock app offers features for keeping track of time and setting alarms.   Press   and tap   Apps >   Clock. 1. Swipe your finger along the taps at the top of the screen to view features. Tap a tab to 2.use a feature:  Alarm: This feature allows you to set an alarm to ring at a specific time. By accessing this document, the recipient agrees and acknowledges that all contents and information in this document (i) are confidential and proprietary information of Samsung, (ii) shall be subject to the non- disclosure regarding project H and Project B, and (iii) shall not be disclosed by the recipient to any third party. Samsung Proprietary and Confidential
 Tools and Calendar 97    World clock: allows you to view the time of day or night in other parts of the world. World Clock displays time in hundreds of different cities, within all 24 time zones around the world.  Stopwatch: You can use this option to measure intervals of time.  Timer: You can use this option to set a countdown timer. Use a timer to count down to an event based on a preset time length (hours, minutes, and seconds).  Desk clock: Display a clock and calendar on the screen, with shortcuts to your favorite apps. Create an Alarm Create an alarm event. You can set one-time or recurring alarms, and choose options for how to be notified for the alarm.   Press   and tap   Apps >   Clock. 1. Tap   Create alarm, and then enter information for the alarm. 2.Delete an Alarm 1.  Press   and tap   Apps >   Clock. 2. Touch and hold an alarm, and then tap Delete from the pop-up menu. Calculator Use the Calculator app to perform mathematical calculations. Note:  Rotate the phone to switch to a scientific calculator. 1.  Press   and tap   Apps >   Calculator. 2. Tap the keypad to enter your equation. You can touch and hold C to clear all numbers. S Memo The S Memo application allows you to create memos using the keyboard, your finger, or both. You can add images, voice recordings, and text all in one place. View the S Memo Screen Follow the steps below to explore the S Memo app.   Press   and tap   Apps >   S Memo.  1.By accessing this document, the recipient agrees and acknowledges that all contents and information in this document (i) are confidential and proprietary information of Samsung, (ii) shall be subject to the non- disclosure regarding project H and Project B, and (iii) shall not be disclosed by the recipient to any third party. Samsung Proprietary and Confidential
 Tools and Calendar 98    From the S Memo screen, tap    to access the following options: 2. Search: Tap to search for a saved memo.  Delete: Touch one or all memos and then tap Done.  Sort by: Set whether to sort the memo list by Date (most recent), Date (oldest), Name, Tag, or Favorites.  List view/Thumbnail view: Tap to view your existing memos in a list or thumbnail (default) view.  Import/Export: Export a memo as an S Note or S Memo file, or import an S Note or S Memo file.  Create folder: Enter a name for a folder in the Folder name field and touch OK.   Move: Move a memo to a folder.   Copy: Copy the selected memo to the clipboard.  Settings: Tap Accounts to access these S Memo settings: •  Samsung account: Sign in to your Samsung account to sync memos with your account. •  Google Docs: Sign in to your Google Docs account to sync memos with your account. •  Evernote: Sign in to your Evernote account to sync memos with your account.  Help: Learn about S Memo. Create a New S Memo Follow the steps below to create a new memo or expand or reply to an existing memo using the S Memo app.   Press   and tap   Apps >   S Memo. 1. Tap   to start a new memo in text mode, or tap   to start a new memo in 2.drawing mode. You can change back and forth in a memo to add text with the keyboard and by writing with your finger.  Tap   to access memo options. Available options depend on whether you have saved 3.the memo, or are in keyboard mode. Memo options may include:  Rename: allows you to change the current memo title. By accessing this document, the recipient agrees and acknowledges that all contents and information in this document (i) are confidential and proprietary information of Samsung, (ii) shall be subject to the non- disclosure regarding project H and Project B, and (iii) shall not be disclosed by the recipient to any third party. Samsung Proprietary and Confidential
 Tools and Calendar 99    Share via: allows you to share your memo using Group Cast, Picasa, Bluetooth, Wi-Fi Direct, Messaging, Dropbox, Google+, Email, or Gmail.  Delete: allows you to erase the memo.  Export: allows you to save the memo to your Gallery or as a PDF.  Save as: allows you to save the memo with a different name.  Add tag: allows you to set tags to add in searches.  Add to Favorites: allows you to tag the current memo as a favorite.  Change background: allows you to set the background for your memo. Swipe the screen to the left or right to select a background and then tap Done.  Edit pages: allows you to drag pages to a new order.  Create event: allows you to launch Calendar to create a new event.  Link to Calendar: allows you to link the memo to your Calendar.  Lock: allows you to lock the memo by using a PIN number.  Set as: allows you to set a memo as a contact icon, Home screen wallpaper, Lock screen wallpaper, or a widget.  Print: allows you to print a memo to a compatible Samsung printer (not included) via Wi-Fi.  When you are finished creating your memo, tap Save on the top menu bar. 4.My Files My files allows you to manage your manage your sounds, images, videos, Bluetooth files, Android files, and other memory card data in one convenient location. This application allows you to launch a file if the associated application is already on your phone. 1.  Press   and tap   Apps >    My files. 2.  Folders display, including:  All files: Tap to choose Device storage, or SD memory card, to show files stored in the phone’s internal memory, or on an optional installed memory card (not included).  Images: Pictures stored on your phone.  Videos: Videos stored on your phone.  Music: Songs stored on your phone. By accessing this document, the recipient agrees and acknowledges that all contents and information in this document (i) are confidential and proprietary information of Samsung, (ii) shall be subject to the non- disclosure regarding project H and Project B, and (iii) shall not be disclosed by the recipient to any third party. Samsung Proprietary and Confidential
 Tools and Calendar 100    Documents: Other files stored on your phone. Note: Different folders may appear depending on how your phone is configured. Dropbox Dropbox works to provide access to your desktop files directly from your phone. This applications allows you to bring your files with you when you're on the go, edit files in your Dropbox from your phone, upload photos and videos to Dropbox, and share your selected files freely with family and friends. The in-phone application works in conjunction with a partner program placed on a target computer using an active Internet connection.  Dropbox creates a folder that automatically synchronizes its contents across all of your connected devices on your account. Update a file to your Dropbox on your computer, and it’s automatically updated to the same folder on your other devices. Download the Desktop Application Follow the procedures below to download the desktop application.  Use your computer’s browser to navigate to: http://www.dropbox.com/. 1. Follow the onscreen setup and installation instructions on your target computer 2.containing the desired files. Important!   The computer application must be installed on the computer containing the desired files. This computer must have an active Internet connection. Note:  The Dropbox service offers 2GB of free “Cloud” storage. Accessing Dropbox on Your Device Follow the procedures below to access the Dropbox app. 1.  Press   and tap   Apps >   Dropbox. 2. Tap Next, and then tap I’m already a Dropbox user, enter your current account credentials, and tap Log in. - or - Tap I’m new to Dropbox and follow the onscreen instructions to register for a new account. Manually Uploading a Picture to Dropbox Follow the below procedures to manually upload pictures to the Dropbox app. By accessing this document, the recipient agrees and acknowledges that all contents and information in this document (i) are confidential and proprietary information of Samsung, (ii) shall be subject to the non- disclosure regarding project H and Project B, and (iii) shall not be disclosed by the recipient to any third party. Samsung Proprietary and Confidential
 Tools and Calendar 101   1.  Press   and tap   Apps >   Camera. 2. After the image is taken, tap the Image Viewer box at the bottom right. This previews the current image. 3. Tap the image to reveal the image options at the top of the screen. 4. Tap   > Dropbox, select a folder location, and tap Upload. Note:  If your share folder is located on your computer, you will momentarily receive an onscreen popup notifying you that a new image was uploaded to your shared Dropbox folder. Lookout Security Lookout Security™ provides mobile device-specific security features that are coupled with a minimal performance hit. Lookout Mobile Security provides key security options that are unique to the mobile market. Along with the antivirus and anti-malware tech, there's a lost and stolen phone locator service, an application privacy adviser, and a backup service. ■  Press   and tap   Apps >    Lookout Security. Voice Services The following information will guide you through using Voice Services. S Voice Your phone’s S Voice is a voice recognition application used to activate a wide variety of functions on your phone. This is a natural language recognition application. This goes beyond the Google Search Voice Actions feature that simply recognizes Google commands and search terms. You can ask it questions (Is it raining in Dallas?) or give it commands (Show me where to find cheap gas). 1.  Press   and tap   Apps >    S Voice. 2. Navigate through the following onscreen tutorial screens by reading the information and tapping Next, or tap Skip to continue without reading the information. 3. Wake up the application by repeating the phrase Hi Galaxy. Note:  The wake-up command/phrase can be changed from “Hi Galaxy” to anything else.    Tap Speak if the phone does not hear you or to give it a command. 6.By accessing this document, the recipient agrees and acknowledges that all contents and information in this document (i) are confidential and proprietary information of Samsung, (ii) shall be subject to the non- disclosure regarding project H and Project B, and (iii) shall not be disclosed by the recipient to any third party. Samsung Proprietary and Confidential
 Tools and Calendar 102   Voice Recorder The Voice recorder allows you to record an audio file up to one minute long and then immediately share it using AllShare, Messaging, Gmail, or via Bluetooth. Recording time will vary based on the available memory within the phone.   Press   and tap   Apps >   Voice Recorder. 1. To start recording, tap   and speak into the microphone. 2. To pause recording, tap . To end the recording, tap  . 3.4. Tap   for options:  Share: allows you to share your recording using such methods as Bluetooth, Email, Gmail, Messaging, or Wi-Fi Direct.  Delete: allows you to delete one or more voice recordings. Tap the recordings to delete and tap Delete. Tap OK to confirm the deletion.  Settings: the following settings are available: •  Storage: allows you to choose where your recordings will be saved. Select between Phone or memory card. •  Recording quality: allows you to set the recording quality to High or Normal. •  Limit for MMS: allows you to choose whether voice recordings you make are limited to a size that can be attached to a multimedia message. •  Contextual filename: allows you to choose whether the phone automatically creates a filename that includes GPS location information. When turned On, contextual filenames are assigned when the GPS tag options is turned On in the Camera, and the phone is connected with a network.  •  Default name: allows you to choose the name prefix for your recordings. For example, if your Default name is Voice, your recordings would be named Voice 001, Voice 002, Voice 003, etc. •  Noise reduction: allows you to choose whether the phone uses noise reduction during recording, to improve recording quality. •  Recording volume: allows you to choose the default volume for recordings. •  Channel: allows you to choose whether recordings are made in Stereo or Mono. By accessing this document, the recipient agrees and acknowledges that all contents and information in this document (i) are confidential and proprietary information of Samsung, (ii) shall be subject to the non- disclosure regarding project H and Project B, and (iii) shall not be disclosed by the recipient to any third party. Samsung Proprietary and Confidential
 Tools and Calendar 103   •  Skip interval: allows you to choose the number of seconds to skip when you press the Forward and Back buttons during playback. Bluetooth Bluetooth is a short-range communications technology that allows you to connect wirelessly to a number of Bluetooth phones, such as headsets and hands-free car kits, and Bluetooth-enabled handhelds, computers, printers, and wireless phones. The Bluetooth communication range is usually approximately 30 feet. Turn Bluetooth On or Off When Bluetooth is On, you can scan and find other Bluetooth devices, to share information between the devices. Turn Bluetooth Off when not in use to conserve battery power. 1.  Press   and tap   > Settings > Connections.  2. Tap the ON/OFF switch beside Bluetooth to turn Bluetooth On or Off. Note:  You can also turn Bluetooth On or Off from Notifications. Drag down from the top of the screen, then tap the Bluetooth button. The Bluetooth Settings Menu The following procedure provides you with a path to the Bluetooth settings menu. ■  Press   and tap   > Settings > Connections > Bluetooth. Connect a Bluetooth Headset or Car Kit You can listen to music over a Bluetooth stereo headset, or have hands-free conversations using a compatible Bluetooth headset or car kit. It’s the same procedure to set up stereo audio and hands-free devices. To listen to music with your headset or car kit, the headset or car kit must support the A2DP Bluetooth profile. 1.  Press   and tap   > Settings > Connections > Bluetooth. 2. If Bluetooth is not on, tap the ON/OFF switch to turn it on. 3. Make sure that the headset is discoverable, so that your phone can find the headset. Refer to the instructions that came with the headset to find out how to set it to discoverable mode. 4. Tap Scan. Your phone will start to scan for Bluetooth devices within range. 5. When you see the name of your headset displayed in the Bluetooth devices section, tap the name. Your phone then automatically tries to pair with the headset. By accessing this document, the recipient agrees and acknowledges that all contents and information in this document (i) are confidential and proprietary information of Samsung, (ii) shall be subject to the non- disclosure regarding project H and Project B, and (iii) shall not be disclosed by the recipient to any third party. Samsung Proprietary and Confidential
 Tools and Calendar 104   6. If automatic pairing fails, enter the passcode supplied with your headset. The pairing and connection status is displayed below the hands-free headset or car kit name in the Bluetooth devices section. When the Bluetooth headset or car kit is connected to your phone,   (Bluetooth connected) displays in the status bar. Depending on the type of headset or car kit you have connected, you can then start using the headset or car kit to listen to music or make and receive phone calls. Note:  Due to different specifications and features of other Bluetooth-compatible devices, display and operations may be different, and functions such as transfer or exchange may not be possible with all Bluetooth-compatible devices. Reconnect a Headset or Car Kit When you have paired a headset with your phone, you should be able to reconnect it automatically by turning on Bluetooth on your phone and then turning on the headset. However, sometimes you will need to reconnect manually, for example if you have been using your headset with another Bluetooth device. 1.  Press   and tap   > Settings > Connections > Bluetooth. 2. If Bluetooth is not on, tap the ON/OFF switch to turn it on. 3. Make sure that the headset is discoverable. 4. Tap the headset’s name in the Bluetooth devices section. 5. If prompted to enter a passcode, try 0000 or 1234, or consult the headset or car kit documentation to find the passcode. 6. If you still cannot reconnect to the headset or car kit, follow the instructions in Disconnect or Unpair From a Bluetooth Device, and then follow the instructions in Connect a Bluetooth Headset or Car Kit. Disconnect or Unpair from a Bluetooth Device Follow these instructions to disconnect or unpair your phone from a Bluetooth device. Disconnect from a Bluetooth Device You can disconnect from a Bluetooth device, without removing the pairing relationship between the devices. 1.  Press   and tap   > Settings > Connections > Bluetooth. 2. In the Bluetooth devices section, tap the device, and then tap Disconnect. By accessing this document, the recipient agrees and acknowledges that all contents and information in this document (i) are confidential and proprietary information of Samsung, (ii) shall be subject to the non- disclosure regarding project H and Project B, and (iii) shall not be disclosed by the recipient to any third party. Samsung Proprietary and Confidential
 Tools and Calendar 105   Unpair from a Bluetooth Device You can make your phone forget its pairing connection with another Bluetooth device. To connect to the device again, you will need to pair with it again. 1.  Press   and tap   > Settings > Connections > Bluetooth. 2. In the Bluetooth devices section, tap the device, and then tap Unpair. Send Information Using Bluetooth You can use Bluetooth to transfer information between your phone and another Bluetooth-enabled device such as a phone or notebook computer. The first time you transfer information between your phone and another device, you need to enter or confirm a security passcode. After that, your phone and the other device are paired, and you will not need to exchange passcodes to transfer information in the future. Send Information From Your Phone to Another Device You can send the following types of information, depending on the device you are sending to: ● Images and videos ● Calendar events ● Contacts ● Audio files 1. Set the receiving device to discoverable mode. You may also need to set it to “Receive Beams” or “Receive Files”. Refer to the device’s documentation for instructions on receiving information over Bluetooth.  2. On the phone, open the application that contains the information or file you want to send. Follow the steps for the type of item you want to send:  Photo or video (in Camera). After capturing a photo, on the preview screen, tap   > Bluetooth.  Photos and videos (in Gallery). On the Albums tab, tap an album, and then tap   > Bluetooth. Tip:  If your phone remembers Bluetooth as a previous selection within the Camera or Gallery, you can tap   (to the right of the   icon).   Calendar event. In the Calendar’s Day view, Agenda view, or Week view, tap the event and then tap    > Send via > Bluetooth. By accessing this document, the recipient agrees and acknowledges that all contents and information in this document (i) are confidential and proprietary information of Samsung, (ii) shall be subject to the non- disclosure regarding project H and Project B, and (iii) shall not be disclosed by the recipient to any third party. Samsung Proprietary and Confidential
 Tools and Calendar 106    Music track. This feature is available through the Music Player. With the track displayed on the Now playing screen, tap   > Share music via > Bluetooth.   Voice recording. On the main Voice Recorder screen, touch and hold a recording and then tap Share > Bluetooth. 3. If you are prompted to turn on Bluetooth, tap Yes. 4.  Tap the name of the receiving device. 5. If prompted, accept the connection on the receiving phone, and enter the same passcode on both your phone and the other device, or confirm the auto-generated passcode. 6. On the receiving device, accept the file. The location where the information is saved depends on the type of information and the receiving device: ● If you send a calendar event or contact, it is normally added directly to the corresponding application on the receiving device. For example, if you send a calendar event to a compatible phone, the event is shown in that phone’s calendar application. ● If you send another file type to a Windows computer, it is normally saved in the Bluetooth Exchange folder within your personal document folders.  On Windows XP, the path may be: C:\Documents and Settings\[your username]\ My Documents\Bluetooth Exchange.  On Windows Vista, the path may be: C:\Users\[your username]\Documents. ● If you send a file to another device, the saved location may depend on the file type. For example, if you send an image file to another wireless phone, it may be saved in a folder named “Images.” Receive Information Using Bluetooth Your phone is capable of receiving a wide variety of file types with Bluetooth, including photos, music tracks, and documents such as PDFs. 1.  Press   and tap   > Settings > Connections > Bluetooth. 2. If Bluetooth is not on, tap the ON/OFF switch to turn it on. 3. Tap the check box beside your phone's Bluetooth name to make it discoverable.  4. On the sending device, send one or more files to your phone. Refer to the device’s documentation for instructions on sending information over Bluetooth. By accessing this document, the recipient agrees and acknowledges that all contents and information in this document (i) are confidential and proprietary information of Samsung, (ii) shall be subject to the non- disclosure regarding project H and Project B, and (iii) shall not be disclosed by the recipient to any third party. Samsung Proprietary and Confidential
 Tools and Calendar 107   5. If prompted, enter the same passcode on both your phone and the other device, or confirm the auto-generated passcode. A Bluetooth authorization request is displayed on your phone.  6. When your phone receives a file transfer request notification, tap Accept.  7. When the file is transferred, a notification displays. To open the file immediately, slide down the notifications panel, and then tap the relevant notification.  When you open a received file, what happens next depends on the file type: ● Media files and documents are usually opened directly in a compatible application. For example, if you open a music track, it starts playing in the Music application. ● For a vCalendar file, select the calendar where you want to save the event, and then tap Import.  ● The vCalendar is added to your Calendar events. (For more information on using the Calendar, see Calendar.) ● For a vCard contact file, if there are multiple vCard files on your storage card, you can choose to import one, several, or all of those contacts to your contacts list. microSD Card A microSDTM memory card is an optional accessory (not included) that allows you to store images, videos, music, documents, and other data on your phone. Remove a microSD Card Use the following procedures to remove an optional microSD card from your phone. 1. Remove the battery cover.  Grasp the phone firmly and locate the slot at the top of the phone.  Place your fingernail in the opening and firmly “pop” the cover off the phone (similar to a soda can). 2. Firmly press the card into the slot and release it. The card should pop partially out of the slot. 3. Remove the card from the slot. 4. Replace the battery cover. Important!   You can damage the microSD card by improper installation. Please be careful when inserting, removing, or handling it. By accessing this document, the recipient agrees and acknowledges that all contents and information in this document (i) are confidential and proprietary information of Samsung, (ii) shall be subject to the non- disclosure regarding project H and Project B, and (iii) shall not be disclosed by the recipient to any third party. Samsung Proprietary and Confidential
 Tools and Calendar 108   View microSD Card Memory Use the following procedure to view memory usage information for an optional installed microSD card.  ► Press   and tap   > Settings > More > Storage. (The total and available memory space will be displayed.) See Device Memory for more information. Format a microSD Card Formatting a microSD card permanently removes all files stored on the card. See SD Card for more information. 1.  Press   and tap   > Settings > More > Storage. 2. Scroll down the screen, tap Format SD card > Format SD card > Delete all. Note: Formatting erases all the data on an installed microSD card, after which the files CANNOT be retrieved. To prevent the loss of important data, please check the contents before you format the card. Unmount a microSD Card When you need to remove an optional installed microSD card, you must unmount the card first to prevent corrupting the data stored on it or damaging the card. 1.  Press   and tap   > Settings > More > Storage. 2. Tap Unmount SD card. 3. Remove the microSD card. See Remove a microSD Card. Transfer Files Between Your Phone and a Computer You can use the supplied USB cable to connect your phone directly to your computer and transfer music, pictures, and other content files. For example, if you have a music album stored on your computer that you want to listen to on your phone with the music player, Google Play Music, or Sprint Music Plus, just attach your phone to the computer and copy the files to the Music folder. 1. Connect your phone to your computer using the supplied USB/charging cable. You may need to remove the USB cable from the Charging Head.  Insert the smaller end of the cable to the USB Charger/Accessory jack at the bottom of the phone.  Insert the larger end of the cable into an available USB port on your computer.  By accessing this document, the recipient agrees and acknowledges that all contents and information in this document (i) are confidential and proprietary information of Samsung, (ii) shall be subject to the non- disclosure regarding project H and Project B, and (iii) shall not be disclosed by the recipient to any third party. Samsung Proprietary and Confidential
 Tools and Calendar 109   2. Your phone will automatically detect the connection. When   appears in the Status bar, swipe your finger down from the Status bar to open Notifications. 3. On Notifications, the type of connection is shown:  Connected as a media device: Used for most transfers. You can transfer files in Windows or from a Mac.  Connected as a camera: Used for transfers of photos using camera software on your computer.  To change the connection type, tap it in the notifications panel to open the Storage settings > USB PC Connection option, and then tap the desired option.  4. On your computer, navigate to the detected phone (such as through the My Computer menu) and open it. 5. If available, select a drive (Card for an optional installed memory card (not included), or Phone for internal phone storage). 6. Select a folder (for example, Music for songs and albums) and copy files to it from your computer. 7. When you are done, disconnect your phone from the computer. Update Your Phone From time to time, updates may become available for your phone. Use System update options to update your phone’s internal software. Before Updating Your Firmware Updating your phone firmware will erase all user data from your phone. You must back up all critical information before updating your phone firmware. To back up information to your Google account: 1.  Press   and tap   > Settings > Accounts > Backup and reset.  2. Tap Back up my data to turn on the feature (checkmark).   Tap Backup account to choose or sign in to a Google account to use for backups.   Tap Automatic restore if you want information saved to the Google account above to be restored when you reinstall apps, such as after a firmware update, or when setting up a new device. By accessing this document, the recipient agrees and acknowledges that all contents and information in this document (i) are confidential and proprietary information of Samsung, (ii) shall be subject to the non- disclosure regarding project H and Project B, and (iii) shall not be disclosed by the recipient to any third party. Samsung Proprietary and Confidential
 Tools and Calendar 110   To back up your Microsoft Exchange ActiveSync information: 1.  Press   and tap   > Settings. 2. Tap Accounts, and then tap your Microsoft Exchange ActiveSync account. 3.  Tap Sync all. To preserve data on an optional installed memory card: As an added precaution, to preserve any data on an optional installed microSD card, please remove it from your phone prior to starting the update process. Update your Phone 1.  Press   and tap   > Settings > More. 2. Tap System Update to use these options:  Update PRL: Download and the latest Preferred Roaming List (PRL), used by your phone to access the network.  Update Profile: Update the user profile related to your wireless service account. If you choose to change your user name online, use this option to update the user name on your phone.  Update Samsung Software: Upgrade to the latest software available for your device.  Update Firmware: Update your phone’s firmware. Follow the prompts to download and install the update.  UICC Unlock: Unlock your device’s Universal Integrated Circuit Card. By accessing this document, the recipient agrees and acknowledges that all contents and information in this document (i) are confidential and proprietary information of Samsung, (ii) shall be subject to the non- disclosure regarding project H and Project B, and (iii) shall not be disclosed by the recipient to any third party. Samsung Proprietary and Confidential
 Sprint Worldwide Wireless Service 111   Sprint Worldwide Wireless Service With your phone and global roaming service from Sprint WorldwideSM Wireless Service, you can make phone calls and use wireless data services around the globe on compatible CDMA and GSM/UMTS networks. For a country-specific travel guide, select your device and destination from sprint.com/traveltips. Activate Sprint Worldwide Service on Your Account  Before using your phone in global roaming mode, you must activate Sprint Worldwide service.  To activate Sprint Worldwide service: ■ Chat with or email an international support rep by visiting sprint.com/swwsupport. – or – ■ Call Sprint Worldwide Customer support at 1-888-226-7212.  Your SIM Card Your phone comes with a preinstalled SIM (Subscriber Identity Module) card to support roaming on compatible GSM networks. Note: Your SIM card should be preinstalled. If you need to reinstall your SIM card, follow the instructions below.  Note: The SIM included contains information specific to your phone and should be retained with the phone for use on GSM networks. 1. Using the slot provided, gently lift the cover off the phone. Remove the battery. 2. Hold the SIM card so that the metal contacts on the SIM card face down and the cut off corner points to the bottom-right corner of your phone. 3. Slide the SIM card into the SIM card slot until it stops. 4. Replace the battery and battery cover.  Enable Global Roaming Mode Your phone is designed to enter global roaming mode automatically when you activate your Sprint Worldwide service, meaning that it should automatically connect to an appropriate CDMA/LTE network or GSM/UMTS network when you travel. You may set global roaming options through the settings menu. You may also need to set your network mode options through the settings menu. By accessing this document, the recipient agrees and acknowledges that all contents and information in this document (i) are confidential and proprietary information of Samsung, (ii) shall be subject to the non- disclosure regarding project H and Project B, and (iii) shall not be disclosed by the recipient to any third party. Samsung Proprietary and Confidential
 Sprint Worldwide Wireless Service 112   To set your roaming options manually: 1.  Press   and tap   > Settings > Connections > More networks > Mobile networks > Network mode. 2. Select a category and settings for each category.  Roaming network: Select Automatic for international use. Home only restricts use to the Nationwide Sprint Network only.  Roaming settings: Under Domestic CDMA and International CDMA, select the Voice and Data check marks. Under GSM, select the Data check mark.  Roaming guard: Select your roaming guard preferences for Domestic CDMA, International CDMA, and GSM. To set your network mode options manually: ■  Press   and tap   > Settings > Connections > More networks > Network mode.  To allow connections to CDMA or LTE networks only, touch CDMA or LTE/CDMA.  To allow connections to GSM or UMTS networks only, touch GSM/UMTS.  To allow connections to available CDMA/LTE or GSM/UMTS networks, touch Automatic. This is the recommended setting for international use. Make and Receive Worldwide Calls When travelling on international networks, you can place and answer calls as you would on the Sprint network (see Make Phone Calls and Receive Phone Calls), although some additional instructions may be required to place a call. Some features and services are not available in all countries. For more information on services that are available while roaming, visit sprint.com/sww. Make Calls Using Plus (+) Code Dialing Placing calls from one country to another country is simple with the Plus (+) Code Dialing feature. When placing international calls, you can use Plus Code Dialing to enter the appropriate international access code for your location (for example, 011 for international calls placed from the United States). Note: Plus Code Dialing is only available when roaming internationally on GSM networks and on certain CDMA networks in the United States, Canada, and the Caribbean.  Note: International access codes and dialing information are available online at sprint.com/sww. By accessing this document, the recipient agrees and acknowledges that all contents and information in this document (i) are confidential and proprietary information of Samsung, (ii) shall be subject to the non- disclosure regarding project H and Project B, and (iii) shall not be disclosed by the recipient to any third party. Samsung Proprietary and Confidential
 Sprint Worldwide Wireless Service 113   To use Plus Code Dialing to place an international call:  1.  Press   and tap   Phone > Keypad to display the phone screen. 2. Dial the appropriate sequence for your location:  If you are on the GSM network, touch   to insert a “+” on the dial er screen. (The “+” symbol automatically inserts the international access code for the country from which you are calling.)  If you are on the CDMA network outside Canada or the Caribbean, enter the international access code for the country from which you are calling. 3. Touch   to insert the US country code, and then enter the area code and number. 4. Touch   to place the call. Sprint Voicemail Service Your Sprint voicemail will follow you as you travel. All of your unanswered calls will be forwarded to your Sprint voicemail. You will need to be sure your voicemail box is already set up and that you know your voicemail password. Note: Sprint voicemail may not be available on all networks; check sprint.com/sww for service information. Set Up Your Voicemail Access Number To simplify accessing your Sprint Voicemail while travelling, you can set up your voicemail access number as a Contacts entry. Save the voicemail access number with the international dialing code, to make it faster and easier to access your messages while roaming internationally. 1.  Press   and tap   Contact. 2. Touch   to add a contact. 3. If you have accounts set up on your phone, tap a storage account. 4. Enter a name for the new contact, for example, “Voicemail”. 5. Touch     (+1), your area code, and your wireless phone number.  6. Touch Save. By accessing this document, the recipient agrees and acknowledges that all contents and information in this document (i) are confidential and proprietary information of Samsung, (ii) shall be subject to the non- disclosure regarding project H and Project B, and (iii) shall not be disclosed by the recipient to any third party. Samsung Proprietary and Confidential
 Sprint Worldwide Wireless Service 114   Access Your Voicemail You will need to call your voicemail number to access your voicemail while roaming internationally. New Message Indicators Your voicemail message indicators may be displayed differently when roaming internationally. ● A “Message Waiting” indicator icon or a text message is displayed when a voicemail message is received.  ● You may see “Missed Call” on your screen prior to receiving a message notification. ● You must call voicemail in order to retrieve messages. Follow the instructions on the previous page to store your voicemail number for easy access. Retrieve Voicemail Messages The voicemail retrieval process while travelling is the same as on the Sprint Network; however, you will be required to enter your voicemail password. To retrieve your voicemail messages:  1.  Press   and tap   Phone > Contacts tab, touch the voicemail entry and then touch the number to call it. 2. When your voicemail answers, touch  , enter the password, and touch   to access your voicemail. Voicemail Troubleshooting There are a few tips to keep in mind when using Sprint voicemail while traveling. ● Some carriers may not support voicemail indicators. It may be necessary to call your voicemail to see if you have any new messages. ● If you hear the message “Please enter the number of the subscriber you wish to call,” enter your 10-digit wireless phone number.  International Data Roaming Sprint Worldwide Wireless Service can also keep you connected via email and Web browsing when travelling in countries in which Sprint offers data service. Data services are available on both CDMA and GSM/UMTS networks. Check www.sprint.com/sww to determine the services available where you are travelling. Note: Prior to using your Sprint Worldwide GSM/UMTS Data Services, you must establish and utilize your CDMA data services domestically on the Sprint Network. By accessing this document, the recipient agrees and acknowledges that all contents and information in this document (i) are confidential and proprietary information of Samsung, (ii) shall be subject to the non- disclosure regarding project H and Project B, and (iii) shall not be disclosed by the recipient to any third party. Samsung Proprietary and Confidential
 Sprint Worldwide Wireless Service 115   Get Started With Data Services To use Sprint Worldwide Data Services, you will need to have these services activated on your account. ■ To activate, call Sprint Worldwide Customer Support at 1-888-226-7212. Representatives are available 24 hours a day, 7 days a week to assist you. Access Email and Data Services on GSM/UMTS Networks To access your email and browse the Web when travelling, you may need to manually select the carrier that provides Sprint service in your location. You can find a list of carriers for each country where GSM data service is offered at sprint.com/sww. Then, follow the instructions below to select the appropriate carrier network on your phone. To select a GSM data service carrier for a specific country:  1.  Press   and tap   > Settings > Connections > More networks > Roaming. 2. Tap Roaming network, and then change the Roaming network option to Automatic.  3. Tap Roaming settings, and then tap Data under GSM networks to allow access to data services while roaming. Note:  Depending on the networks available you may need to choose a specific network under Roaming network. Access Email and Data Services on CDMA Networks If data service is available on a CDMA network, then you only need to set the phone to CDMA, you will not need to select the specific carrier. Selecting a specific carrier is only necessary for providers on the GSM network. If your phone has automatically selected a GSM network while traveling, then you will need to set the phone to CDMA to access CDMA data services. (See Enable Global Roaming Mode.) Visit sprint.com/sww for a list of services available in each country. Status Messages You may receive status messages under certain conditions. Before contacting Sprint Worldwide Customer Support, note the message, numeric code, and the conditions under which it appeared. The following table lists and describes the status messages.  Status Messages Message Description Number Not in Service The number that you entered is not valid.  User Not Available The phone that you called is either busy, out-of-range, or turned off. Please try again later.  User Not Authorized The phone that you called is either busy, out-of-range, or turned off. Please try again later.  Please Try Later This service is temporarily not available. Please try again later.  By accessing this document, the recipient agrees and acknowledges that all contents and information in this document (i) are confidential and proprietary information of Samsung, (ii) shall be subject to the non- disclosure regarding project H and Project B, and (iii) shall not be disclosed by the recipient to any third party. Samsung Proprietary and Confidential
 Sprint Worldwide Wireless Service 116   Status Messages Message Description Service Restricted Service may not be activated properly. Please contact Sprint Customer Service to report the issue for resolution.  Service Not Available This feature is not available on the current network.  Emergency Calls Only Either the service is not activated properly or the current network is available for emergency calling only. Adjust your network settings to check for other available networks. If service is still not available after adjusting the settings, contact Sprint Customer Service to report the issue for resolution.  System Busy. Try Later The system is experiencing heavy traffic. Please try again later. Service Conflict This service cannot be enabled because an incompatible service has already been turned on.  Please Try Again An error occurred. Note the error code and try again.  Self Check Error A fault was detected with your phone. If this error recurs, note the error and contact Sprint Customer Service.  Self Check Fail An operational fault was detected with your phone. Note the numeric code, turn your phone off, and contact Sprint Customer Service.  Wrong PIN You have entered an incorrect SIM PIN number. You have only three attempts to enter your PIN. After a third unsuccessful attempt, your phone will be locked and you will have to call Sprint Customer Service to have it unlocked. Sprint sets the default to PIN off; if you elect to enable the PIN then you will need to contact Sprint for the default PIN and PUK.  PIN Blocked. Call Your Provider An incorrect SIM PIN was entered three consecutive times. You will be unable to send or receive calls on your phone. Contact Sprint Customer Service to obtain the PIN Unblocked Key (PUK) code. Sprint sets the default to PIN off; if you elect to enable the PIN then you will need to contact Sprint for the default PIN and PUK.  Insert SIM Your SIM Card is not being detected. Please check to ensure that you have inserted the SIM Card.  Check SIM Card Please check your SIM card to make sure it is properly inserted.  Contact Sprint for Assistance If you experience any issues with voice or data services while outside of the United States, Sprint offers customer support 24 hours a day. In the event that you do experience an issue, try the following actions: ● First try powering your phone off and then back on; this will force your phone to reregister with the network. ● Try manually selecting another network. Information for selecting networks can be found in the phone guide. By accessing this document, the recipient agrees and acknowledges that all contents and information in this document (i) are confidential and proprietary information of Samsung, (ii) shall be subject to the non- disclosure regarding project H and Project B, and (iii) shall not be disclosed by the recipient to any third party. Samsung Proprietary and Confidential
 Sprint Worldwide Wireless Service 117   If neither of these actions resolves your issue, you will need to contact customer service (see below). When calling to report an issue, the following information will be beneficial in trying to resolve your issue as quickly as possible:  ● Your wireless phone number. ● The city and country you are travelling in. ● Any error message that displays on your phone or that you heard when trying to place a call.  ● If the issue is with data, were you able to place voice calls? ● If the issue is with voice service, were you able to access data? Please call the numbers below if you need assistance:  While in the United States: Call 1-888-226-7212. While traveling outside the United States:  ● In GSM mode: touch   and then dial 1-817-698-4199. ● In CDMA mode: enter the country code and then dial 1-817-698-4199. There is no charge for this call from your wireless phone. From a landline phone when outside the United States: Sprint Worldwide Customer Support can be reached from a landline phone at 1-817-698-4199. Access or connection fees may apply. The toll free numbers below can also be used to contact Sprint Worldwide Customer Support in the following countries: Country From Landline Phone Caribbean (Anguilla, Barbados,  Cayman Islands, and Dominica)  1-888-226-7212  France  0800-903200  Germany  0800-180-0951  Italy  800-787-986  Mexico  001-877-294-9003  Trinidad and Tobago  1-800-201-7545  United Kingdom  0808-234-6616   Note: This toll free service is available on ordinary landline phones and some public pay phones. This service does not cover any hotel access charges.By accessing this document, the recipient agrees and acknowledges that all contents and information in this document (i) are confidential and proprietary information of Samsung, (ii) shall be subject to the non- disclosure regarding project H and Project B, and (iii) shall not be disclosed by the recipient to any third party. Samsung Proprietary and Confidential
 Settings 118   Settings Use Settings to configure your phone to your preferences. Access Settings Settings are arranged on tabs by category, to quickly access options. 1.  Press   and tap   > Settings.  2. Tap a tab to access settings by category:   Connections: Connect to wireless networks, including 3G, 4G, and Wi-Fi, and to other devices.  Display: Personalize your phone’s display.   Input and control: Configure options for input, including voice input.  General: Configure other settings, for things like calls, sounds, accessibility, and system updates.  Wi-Fi Settings Use Wi-Fi settings to control your phone’s connections to Wi-Fi networks, and for using Wi-Fi Direct to connect directly to other Wi-Fi Direct devices. Turn Wi-Fi On or Off When Wi-Fi is turned On, your device will notify you of available Wi-Fi networks, and you can connect to the Wi-Fi networks. Turn Wi-Fi Off when not in use, to conserve battery power. 1.  Press   and tap   > Settings > Connections.  2. Tap the ON/OFF switch beside Wi-Fi to turn Wi-Fi On or Off. Note:  You can also turn Wi-Fi On or Off from Notifications. Drag down from the top of the screen, then tap the Wi-Fi button. Configure Wi-Fi Settings Set up and manage wireless access points. 1.  Press   and tap   > Settings > Connections.  2. Tap Wi-Fi, and then tap the ON/OFF switch beside Wi-Fi to turn Wi-Fi On. Wi-Fi must be On to configure settings. By accessing this document, the recipient agrees and acknowledges that all contents and information in this document (i) are confidential and proprietary information of Samsung, (ii) shall be subject to the non- disclosure regarding project H and Project B, and (iii) shall not be disclosed by the recipient to any third party. Samsung Proprietary and Confidential
 Settings 119   3. Configure these settings:  Add Wi-Fi network: Connect to a new Wi-Fi network. For more information,  see Wi-Fi.  Scan: Search for available Wi-Fi networks.  Wi-Fi Direct: Connect to other Wi-Fi Direct devices. For more information, see Wi-Fi Direct. 4. Tap   to configure other settings:  Advanced: •  Network notification: When enabled, your phone alerts you when a new Wi-Fi network is available. •  Passpoint: When turned On, your phone will connect to passpoint-enabled Wi-Fi networks automatically. •  Sort by: Choose how scanned Wi-Fi networks are presented on the Wi-Fi settings screen. •  Keep Wi-Fi on during sleep: Specify when to switch from Wi-Fi to mobile data for data communications, when the device goes to sleep (when the backlight goes out). This setting can affect data usage, and the behavior of devices you connect to your device, such as when using it as a hotspot. •  Check for internet service: When enabled, your phone will check for Wi-Fi Internet service when connected to a Wi-Fi network. If Wi-Fi Internet service is available, your phone will us it, along with the phone’s connection to mobile  data networks, when accessing the Internet. •  Wi-Fi timer: When turned On, your phone will automatically connect or disconnect from a Wi-Fi network, using the Starting time and Ending times you set. •  MAC address: (Not configurable) View your device’s MAC address, needed for connecting to some secured networks. •  IP address: (Not configurable) View your device’s IP address.  WPS push button: Set up a connection to a WPS (Wi-Fi Protected Setup) router or other equipment.  WPN PIN entry: (Not configurable) View the PIN used by your device to set up a PIN-secured connection to a Wi-Fi router or other equipment.  Help: Learn about setting up and using Wi-Fi networks, and other settings. By accessing this document, the recipient agrees and acknowledges that all contents and information in this document (i) are confidential and proprietary information of Samsung, (ii) shall be subject to the non- disclosure regarding project H and Project B, and (iii) shall not be disclosed by the recipient to any third party. Samsung Proprietary and Confidential
 Settings 120   Wi-Fi Direct Wi-Fi Direct allows devices to connect to each other directly via Wi-Fi, without a Wi-Fi network or hotspot, and without having to set up the connection. For example, your device can use Wi-Fi Direct to share photos, contacts and other content with other Wi-Fi Direct devices. 1.  Press   and tap   > Settings > Connections.  2. Tap Wi-Fi, and then tap the ON/OFF switch beside Wi-Fi to turn Wi-Fi On. Wi-Fi must be On to configure Wi-Fi Direct settings. 3. Tap Wi-Fi Direct at the bottom of the screen. Your device automatically scans for nearby Wi-Fi Direct devices, or you can tap Scan to start scanning. 4. After scanning for devices, select a device, then follow the prompts to complete the connection. – or – Touch Multi-connect to create a connection to devices that support multi-connect. Touch Scan to search for available multi-connect devices, then select the devices and follow the prompts to complete the connection. Bluetooth Bluetooth is a short-range wireless communications technology for exchanging information over a distance of about 30 feet. You don’t need to line up the devices to send information with Bluetooth. If the devices are in range, you can exchange information between them, even if they are in different rooms. Your device can use Bluetooth to share photos, contacts and other content with other Bluetooth devices. Many of the apps on your device provide options for sharing via Bluetooth under   Menu. Turn Bluetooth On or Off When Bluetooth is On, you can scan and find other Bluetooth devices to share information between the devices. Turn Bluetooth Off when not in use to conserve battery power. 1.  Press   and tap   > Settings > Connections.  2. Tap the ON/OFF switch beside Bluetooth to turn Bluetooth On or Off. Note:  You can also turn Bluetooth On or Off from Notifications. Drag down from the top of the screen, then tap the Bluetooth button. Bluetooth Settings Pair with other Bluetooth devices, manage your Bluetooth connections, and control your device’s visibility to other devices. By accessing this document, the recipient agrees and acknowledges that all contents and information in this document (i) are confidential and proprietary information of Samsung, (ii) shall be subject to the non- disclosure regarding project H and Project B, and (iii) shall not be disclosed by the recipient to any third party. Samsung Proprietary and Confidential
 Settings 121   1.  Press   and tap   > Settings > Connections.  2. Tap Bluetooth, and then tap the ON/OFF switch to turn Bluetooth On. Bluetooth must be On to configure settings. 3. From the Bluetooth screen, configure these settings:  Tap the ON/OFF switch to turn Bluetooth On or Off.  Tap your device’s name to enable or disable visibility to other Bluetooth devices. When your device is visible, other devices can find your devices during a scan. Your device remains visible for the period of time set in the Visibility timeout setting.  Tap a paired device to connect to it, or touch   beside a device to change its settings.  Tap Scan to search for visible Bluetooth devices. After searching, tap a device to pair with it. 4. Tap   for more settings:  Visibility timeout: Set the length of time your device is visible to other devices when you turn on visibility.  Received files: View files transferred to your device via Bluetooth.  Help: Learn about Bluetooth, and other settings. Tethering Use the Tethering feature to share your phone’s data network connection with other devices via USB, Wi-Fi, or Bluetooth. XXX Note: Using the Tethering feature consumes battery power and uses data services. Tethering Use Tethering to share your device’s internet connection with a computer that connects to your device via USB cable, or by Bluetooth. 1.  Press   and tap   > Settings > Connections. 2. Tap More networks > Tethering. 3. Choose a tethering method:  USB tethering: Connect the computer to the device via USB cable, then touch USB tethering to turn tethering On or Off. The linked image cannot be displayed.  The file may have been moved, renamed, or deleted. Verify that the link points to the correct file and location.By accessing this document, the recipient agrees and acknowledges that all contents and information in this document (i) are confidential and proprietary information of Samsung, (ii) shall be subject to the non- disclosure regarding project H and Project B, and (iii) shall not be disclosed by the recipient to any third party. Samsung Proprietary and Confidential
 Settings 122    Bluetooth tethering: Pair your device with the computer via Bluetooth. Consult the computer’s documentation for more information about configuring your computer to pair via Bluetooth. Touch Bluetooth Tethering to turn tethering On or Off. Note: Tap Help for information about using Tethering. Turn Hotspot On or Off 1.  Press   and tap   > Settings > Connections.  2. Tap the ON/OFF switch beside Hotspot to turn Hotspot On or Off. Configure Hotspot 1.  Press   and tap   > Settings > Connections.  2. Tap Hotspot > Configure to set these options:  Network SSID: View and change the name of your mobile hotspot.  Hide my device: When enabled, your mobile hotspot is not visible to other Wi-Fi devices during a scan. Other devices can still connect to your mobile hotspot, but will have to set up the connection manually with your Network SSID and Password.  Security: Choose the security level for your Mobile Hotspot.  Password: If you choose a security level that uses a password, set a password. By default, the password is your mobile telephone number.  Show password: When enabled, the contents of the Password field are visible.  Show advanced options: When enabled, you can access advanced options, including Broadcast channel, to specify the channel your device uses for Hotspot, and you can set the maximum number of connections to your Hotspot. Allowed Devices Control whether devices can connect to your Mobile Hotspot with the Allowed devices list. After you add devices to the list, they can scan for your phone and connect using your phone’s Hotspot name and password. Note: Using the Hotspot feature consumes battery power and uses data services 1.  Press   and tap   > Settings > Connections.  2. Tap Hotspot > Allowed Devices. 3. Tap  , and then enter the other device’s Device name and MAC address. Consult the other device’s settings to find its MAC address. By accessing this document, the recipient agrees and acknowledges that all contents and information in this document (i) are confidential and proprietary information of Samsung, (ii) shall be subject to the non- disclosure regarding project H and Project B, and (iii) shall not be disclosed by the recipient to any third party. Samsung Proprietary and Confidential
 Settings 123   4. Tap OK to add the device to the Allowed devices list. Airplane Mode When you turn on airplane mode, all wireless connections are disabled. While in airplane mode, you cannot access the wireless network for calling, messaging, or browsing the Web.  When you turn on airplane mode, It also turns off other connectivity features, such as Wi-Fi and Bluetooth. You can turn on Wi-Fi or Bluetooth to use those features, or you can use other features of your device, such as playing music, watching videos, or other applications. To use Wi-Fi and Bluetooth when Airplane mode is enabled, turn them on in Settings, or on the Notifications panel. 1.  Press   and tap   > Settings > Connections. 2. Tap More networks, and then tap the check box beside Airplane mode to enable or disable the option. Note:  You can also control Airplane mode from the Device options menu. Press and hold the Power/Lock Key, then tap Airplane mode. Data Usage Monitor data usage, and control your device’s connection to mobile data service. Note:  Data is measured by your phone. Your service provider may account for data usage differently. 1.  Press   and tap   > Settings > Connections.  2. Tap Data usage to configure options:  Mobile data: Enable or disable Mobile data. You can also control Mobile Data at Notifications.  Limit mobile data usage: When enabled, your mobile data connection will be disabled when the specified limit is reached. After enabling the setting, drag the red limit line on the graph below to set the data usage limit.  Alert me about data usage: When enabled, your device will alert you when mobile data usage reaches the warning limit you set. After enabling the setting, drag the orange warning line on the graph below to set the data usage warning limit.  Data usage cycle: Tap the menu, and then choose a time period for data usage. Data usage for the period displays on the graph, along with usage by application below. 3. Tap   to set other options: By accessing this document, the recipient agrees and acknowledges that all contents and information in this document (i) are confidential and proprietary information of Samsung, (ii) shall be subject to the non- disclosure regarding project H and Project B, and (iii) shall not be disclosed by the recipient to any third party. Samsung Proprietary and Confidential
 Settings 124    Data roaming: When enabled, your device can connect to mobile data service when outside your home network area. Using data while roaming may incur additional costs; contact your service provider for more information.  Restrict background data: Your device is capable of connecting to the network in the background, for synchronization or other services. When enabled, background connections will not occur.  Auto sync data: When enabled, your device will synchronize with accounts automatically, at any time.  Show Wi-Fi usage: When turned On, a separate tab displays data usage while connected to Wi-Fi.  Mobile hotspots: Select Wi-Fi networks that are mobile hotspots. You can restrict apps from using these networks, and you can configure apps to warn you before using these networks for large downloads. Location Services Control apps’ access to your location, and configure location sources. Some apps may require one or more location services be turned On for full app functionality. GPS signals may be affected by your surroundings, including: ● Buildings ● Tunnels or underground structures ● Weather conditions ● High-voltage or electromagnetic fields ● Tinted windows Note:  E911 location service is standard on all mobile phones, to allow sharing of GPS information with emergency personnel when you make a call to emergency services, such as 911. 1.  Press   and tap   > Settings > More. 2. Tap Location services to set these options:  Access to my location: Tap the ON/OFF switch to turn location services On or Off. When On, you are allowing Google’s location service to collect anonymous location data. Some data may be stored on your device, and collection may occur even when no apps are running. By accessing this document, the recipient agrees and acknowledges that all contents and information in this document (i) are confidential and proprietary information of Samsung, (ii) shall be subject to the non- disclosure regarding project H and Project B, and (iii) shall not be disclosed by the recipient to any third party. Samsung Proprietary and Confidential
 Settings 125    Location sources: When Access to my location is turned On, select sources for location information. •  Use GPS satellites: When enabled, your phone obtains location information from GPS satellites. •  Use wireless networks: When enabled, your phone obtains location information from Wi-Fi and/or wireless networks. •  My places: Set up places you visit frequently, to make the locations available for use with services or apps that require location information. Tap Home, Office, or Car, and then follow the prompts to configure options for identifying the location. Tap   to set up a different location. More Networks Settings More networks settings provide additional options for configuring connections between your phone and the work, or to other devices. Mobile Networks Set options for network selection and data service. 1.  Press   and tap   > Settings > Connections. 2. Tap More networks > Mobile networks. 3. Configure options:  Mobile data: When enabled, your device connects to the mobile data network.  Network mode: Choose a preferred network mode.  Connections optimizer: Enable or disable Connections optimizer. When enabled, Connections optimizer helps you manage and enhance your data experience by finding and connecting to remembered Wi-Fi networks, and if applicable, the Sprint 4G Network.  Network operators: Configure network operators. VPN Set up and manage Virtual Private Networks (VPN). Note:  VPN settings include storage of login credentials on your device. You must configure a screen unlock pattern, PIN or password before setting up a VPN.   Press   and tap   > Settings > Connections. 4. Tap More networks > VPN. 5.By accessing this document, the recipient agrees and acknowledges that all contents and information in this document (i) are confidential and proprietary information of Samsung, (ii) shall be subject to the non- disclosure regarding project H and Project B, and (iii) shall not be disclosed by the recipient to any third party. Samsung Proprietary and Confidential
 Settings 126    Tap   to add a VPN, with these options: 6. Name: Enter the name of the VPN.  Type: Choose the type of VPN.  Server address: Enter the VPN server address.  PPP Encryption (MPPE): Tap to enable, if applicable for the VPN.  Show advanced options: Tap to set other options, depending on the type of VPN. 4. Tap Save to save the VPN. Roaming When you are outside your home network area, your phone can still connect to other networks that your provider supports via roaming. There may be additional costs for accessing networks while roaming, so you may want to control your phone’s roaming behavior with Roaming settings. 1.  Press   and tap   > Settings > Connections. 2. Tap More networks > Roaming. 3. Configure options:  Roaming network: Select a roaming default, from Home only, to only connect to the Sprint network, or Automatic, to allow connections to Sprint’s partner  networks, if available.  Roaming settings: Choose options for roaming, including Voice and data for Domestic CDMA and International CDMA networks, and Data for GSM networks (if available).  Roaming guard: Choose options for preventing roaming for certain functions. Enable or disable roaming access for Voice and data for Domestic CDMA, Voice, Data and Outgoing SMS for International CDMA networks, and Voice, Data and Outgoing SMS for GSM networks (if available). NFC Use NFC (Near Field Communication) to share information between your device and another NFC device by touching the devices together, typically back-to-back. NFC is used with S Beam and Android Beam, and must be turned On to use these features. Note: Tap   > Help for information about using NFC. By accessing this document, the recipient agrees and acknowledges that all contents and information in this document (i) are confidential and proprietary information of Samsung, (ii) shall be subject to the non- disclosure regarding project H and Project B, and (iii) shall not be disclosed by the recipient to any third party. Samsung Proprietary and Confidential
 Settings 127   Turn NFC On or Off Use NFC (Near Field Communication) to send or receive information when your phone touches another NFC device or NFC tags. 1.  Press   and tap   > Settings > Connections. 2. Tap the ON/OFF switch beside NFC to turn NFC On or Off. Android Beam With Android beam, you can transmit app content via NFC to other NFC devices. 1.  Press   and tap   > Settings > Connections. 2. Tap the ON/OFF switch beside NFC to turn NFC On. NFC must be on to use Android Beam. 3. Tap NFC to access Android Beam settings, and then tap the ON/OFF switch beside Android Beam to turn Android Beam On or Off. Note: Tap   > Help for information about using NFC and Android Beam. S Beam Share more and share it faster with S Beam. From photos to documents, large video files to maps, you can share almost anything instantly with one touch, simply by placing your devices back-to-back. S Beam uses your device’s NFC (Near Field Communication) feature to send, or “beam”, content to other NFC and Wi-Fi Direct devices. S Beam works in the background. Use the sharing options from your favorite apps to select content to share via S Beam. For example, you can beam pictures or videos from Gallery, or songs from Music player. Just bring the devices together (typically back to back), and then tap the screen. Turn S Beam On or Off When S Beam is turned On, you can send or receive data by touching your device to another NFC-capable device. 1.  Press   and tap   > Settings > Connections. 2. Tap the ON/OFF switch beside S Beam to turn S Beam On or Off. Nearby Devices Share files with devices using DLNA (Digital Living Network Alliance) standards, over Wi-Fi.  By accessing this document, the recipient agrees and acknowledges that all contents and information in this document (i) are confidential and proprietary information of Samsung, (ii) shall be subject to the non- disclosure regarding project H and Project B, and (iii) shall not be disclosed by the recipient to any third party. Samsung Proprietary and Confidential
 Settings 128   To use Nearby devices, you must connect to the same Wi-Fi network as the devices you wish to share with, and the other devices must support DLNA. Note: Use care when enabling file sharing. When enabled, other devices can access data on your device. 1.  Press   and tap   > Settings > Connections. 2. Tap Nearby devices to configure these options:  Touch the File sharing check box to enable or disable file sharing.  Under Advanced, touch options to control how content is shared from your device: •  Shared contents: Choose the type of content to share, from Videos, Photos, or Music. •  Allowed devices list: View and manage a list of devices allowed to connect to your device. •  Not-allowed devices list: View and manage a list of devices restricted from connecting to your device. •  Download to: Choose a location to save downloaded content, from USB storage (device memory) or optional installed SD card (not included). •  Upload from other devices: Choose how to handle incoming files from other devices, from Always accept, Always ask, or Always reject. Screen Mirroring With Screen mirroring, you can share your device’s screen with another device, using an optional AllShare Cast accessory and A-to-A HDMI cable (accessories not included). Turn Screen Mirroring On or Off 1.  Press   and tap   > Settings > Connections. 2. Tap Screen mirroring, and then tap the ON/OFF switch beside Screen Mirroring to turn Screen mirroring On or Off. Note: Tap   > Help to find instructions for using Screen mirroring to connect to a device. Lock Screen Configure settings for locking the screen, to improve security. By accessing this document, the recipient agrees and acknowledges that all contents and information in this document (i) are confidential and proprietary information of Samsung, (ii) shall be subject to the non- disclosure regarding project H and Project B, and (iii) shall not be disclosed by the recipient to any third party. Samsung Proprietary and Confidential
 Settings 129   Screen Lock Choose a screen lock, to dim and lock the screen. Depending on the Screen lock you choose, you can also choose screen lock options to work along with the screen lock. Set a Swipe Screen Lock When a Swipe screen is set, you swipe your finger across the screen to unlock the device.  This is the default screen lock on your phone, and offers no security, but you can set special lock screen options. 1.  Press   and tap   > Settings > Display. 2. Tap Lock screen > Screen lock. 3. Tap Swipe, and then follow the prompts to create or change your screen unlock pattern. Configure Swipe Screen Lock Options When you select a Swipe screen lock, you can also configure options to display on the lock screen. 1.  Press   and tap   > Settings > Display. 2. Tap Lock screen, and then configure these options under the Swipe unlock heading:.  Multiple widgets: When enabled, more than one widget can be accessed from the lock screen. Choose widgets to display with the Lock screen widgets option below.  Lock screen widgets: Choose widgets to display on the lock screen, so you can access information and your favorite apps, right from the lock screen. •  Favorite apps or Camera: When turned On, you can swipe the lock screen from right to left to launch either Favorite apps or Camera. Tap the ON/OFF switch beside Favorite apps or Camera to turn the option On or Off. After you turn the option On, select Favorite apps or Camera, to make the widget(s) available from the Lock screen. •  Clock or personal message: Choose whether to display a Clock, or a personal message, on the Lock screen. Depending on the option you choose, you can then customize the clock or enter a personal message to display.  Shortcuts: When turned On, you can choose to display shortcut(s) to Phone, Messaging, Google search, Internet, or Camera on the lock screen. Tap the ON/OFF switch beside Shortcuts to turn the option On or Off. After you turn the option On, tap Shortcuts to choose shortcuts to display.  Lock automatically: When enabled, the screen will lock automatically, after a period of time you set. By accessing this document, the recipient agrees and acknowledges that all contents and information in this document (i) are confidential and proprietary information of Samsung, (ii) shall be subject to the non- disclosure regarding project H and Project B, and (iii) shall not be disclosed by the recipient to any third party. Samsung Proprietary and Confidential
 Settings 130    Lock instantly with power key: When enabled, you can lock the screen instantly by pressing the Power/Lock Key.  Unlock effect: When enabled, swiping your finger across the lock screen displays an effect. Tap to choose an effect.  Ink effect: When enabled, swiping your finger across the lock screen displays an effect. Tap to choose an effect.  Help text: When enabled, your phone displays helpful hints on the lock screen.  Wake up in lock screen: When enabled, you can press the   Home Key, and then speak a wake-up command to unlock the screen.  Set wake-up command: When Wake up in lock screen is enabled, set options for wake-up commands.   Popup Note on lock screen: When enabled, you can open a Popup Note from the lock screen xxx. Set a Face Unlock Screen Lock When Face unlock is enabled, you unlock the device by looking at the screen.  This option offers low security, because someone who looks similar to you could unlock your device. The data used to identify your face is kept private on the phone. When you set up a Face unlock screen lock, you will also set up a back-up PIN or Pattern screen unlock. 1.  Press   and tap   > Settings > Display. 2. Tap Lock screen > Screen lock. 3. Tap Face Unlock, and then follow the prompts to create or change your screen unlock pattern. Configure Face Unlock Options When you select the Face unlock screen lock, you can also configure options to display on the lock screen. 1.  Press   and tap   > Settings > Display. 2. Tap Lock screen, and then configure these options under the Face unlock options heading:  Lock screen widgets: Choose widgets to display on the lock screen, so you can access information and your favorite apps, right from the lock screen. •  Favorite apps or Camera: When enabled, you can swipe the lock screen from right to left to launch either Favorite apps or Camera. Tap the ON/OFF switch By accessing this document, the recipient agrees and acknowledges that all contents and information in this document (i) are confidential and proprietary information of Samsung, (ii) shall be subject to the non- disclosure regarding project H and Project B, and (iii) shall not be disclosed by the recipient to any third party. Samsung Proprietary and Confidential
 Settings 131   beside Favorite apps or Camera to turn the option On or Off. After you turn the option On, select Favorite apps or Camera, to make the widget(s) available from the Lock screen. •  Clock or personal message: Choose whether to display a Clock, or a personal message, on the Lock screen. Depending on the option you choose, you can then customize the clock or enter a personal message to display.  Popup Note on lock screen: When enabled, you can open a Popup Note from the lock screen xxx.  Improve facial recognition: Use this option to capture your facial image in different conditions, such as in different lighting, with or without glasses, or with or without facial hair.  Make pattern visible: When enabled, you can choose whether the pattern is visible briefly as you draw it on the lock screen. This option is available if you chose a Pattern unlock to back up the Face unlock.  Lock automatically: When enabled, the screen will lock automatically, after a period of time you set.  Lock instantly with power key: When enabled, you can lock the screen instantly by pressing the Power/Lock Key. Set a Pattern Screen Lock When a Pattern screen lock is set, you draw a pattern, which you create, on the screen to unlock the device. Note:  When you select a Pattern screen lock, you can also configure options to display on the lock screen. 1.  Press   and tap   > Settings > Display. 2. Tap Lock screen > Screen lock. 3. Tap Pattern, and then follow the prompts to create or change your screen unlock pattern. Configure Pattern Screen Lock Options When you select a Pattern screen lock, you can also configure options to display on the lock screen. 1.  Press   and tap   > Settings > Display. 2. Tap Lock screen, and then configure these options under the Secured with pattern heading:. By accessing this document, the recipient agrees and acknowledges that all contents and information in this document (i) are confidential and proprietary information of Samsung, (ii) shall be subject to the non- disclosure regarding project H and Project B, and (iii) shall not be disclosed by the recipient to any third party. Samsung Proprietary and Confidential
 Settings 132    Lock screen widgets: Choose widgets to display on the lock screen, so you can access information and your favorite apps, right from the lock screen. •  Favorite apps or Camera: When enabled, you can swipe the lock screen from right to left to launch either Favorite apps or Camera. Tap the ON/OFF switch beside Favorite apps or Camera to turn the option On or Off. After you turn the option On, select Favorite apps or Camera, to make the widget(s) available from the Lock screen. •  Clock or personal message: Choose whether to display a Clock, or a personal message, on the Lock screen. Depending on the option you choose, you can then customize the clock or enter a personal message to display.  Popup Note on lock screen: When enabled, you can open a Popup Note from the lock screen xxx.  Make pattern visible: When enabled, you can choose whether the pattern is visible briefly as you draw it on the lock screen.   Lock automatically: When enabled, the screen will lock automatically, after a period of time you set.  Lock instantly with power key: When enabled, you can lock the screen instantly by pressing the Power/Lock Key. Set a PIN Screen Lock With a PIN screen lock, you enter a Personal Identification Number, which you create, on the screen to unlock the device. Note:  When you select a PIN screen lock, you can also configure options to display on the lock screen. 1.  Press   and tap   > Settings > Display. 2. Tap Lock screen > Screen lock. 3. Tap PIN, and then follow the prompts to create or change your screen unlock PIN. Configure PIN Screen Lock Options When you select a PIN screen lock, you can also configure options to display on the lock screen. 1.  Press   and tap   > Settings > Display. 2. Tap Lock screen, and then configure these options under the Secured with pattern heading:. By accessing this document, the recipient agrees and acknowledges that all contents and information in this document (i) are confidential and proprietary information of Samsung, (ii) shall be subject to the non- disclosure regarding project H and Project B, and (iii) shall not be disclosed by the recipient to any third party. Samsung Proprietary and Confidential
 Settings 133    Popup Note on lock screen: When enabled, you can open a Popup Note from the lock screen xxx.  Lock automatically: When enabled, the screen will lock automatically, after a period of time you set.  Lock instantly with power key: When enabled, you can lock the screen instantly by pressing the Power/Lock Key. Set a Password Screen Lock With a Password screen lock, you enter an alphanumeric password, which you create, on the screen to unlock the device. Note:  When you select a Password screen lock, you can also configure options to display on the lock screen. 1.  Press   and tap   > Settings > Display. 2. Tap Lock screen > Screen lock. 3. Tap Password, and then follow the prompts to create or change your screen unlock password. Configure Password Screen Lock Options When you select a Password screen lock, you can also configure options to display on the lock screen. 1.  Press   and tap   > Settings > Display. 2. Tap Lock screen, and then configure these options under the Secured with pattern heading:.  Lock screen widgets: Choose widgets to display on the lock screen, so you can access information and your favorite apps, right from the lock screen. •  Favorite apps or Camera: When enabled, you can swipe the lock screen from right to left to launch either Favorite apps or Camera. Tap the ON/OFF switch beside Favorite apps or Camera to turn the option On or Off. After you turn the option On, select Favorite apps or Camera, to make the widget(s) available from the Lock screen. •  Clock or personal message: Choose whether to display a Clock, or a personal message, on the Lock screen. Depending on the option you choose, you can then customize the clock or enter a personal message to display.  Popup Note on lock screen: When enabled, you can open a Popup Note from the lock screen xxx. By accessing this document, the recipient agrees and acknowledges that all contents and information in this document (i) are confidential and proprietary information of Samsung, (ii) shall be subject to the non- disclosure regarding project H and Project B, and (iii) shall not be disclosed by the recipient to any third party. Samsung Proprietary and Confidential
 Settings 134    Lock automatically: When enabled, the screen will lock automatically, after a period of time you set.  Lock instantly with power key: When enabled, you can lock the screen instantly by pressing the Power/Lock Key. Wallpaper Customize the background of the Home and Lock screens. 1.  Press   and tap   > Settings > Display. 2. Tap Wallpaper, and then choose a screen to customize, from Home screen, Lock screen, or Home and lock screens. 3. Choose a source for wallpaper:  Gallery: Select a picture from Gallery. Follow the prompts to crop the picture and save it as wallpaper.  Live wallpapers: Select a moving scene for the background.  Wallpapers: Choose an image from the Wallpapers gallery. Brightness Adjust the screen brightness to suit your surroundings, or to your personal preference. 1.  Press   and tap   > Settings > Display. 2. Tap Brightness to configure options:  Tap the checkmark beside Automatic brightness to allow the phone to adjust brightness automatically.   To set a custom brightness level, clear the Automatic brightness checkmark and then touch and drag the Brightness level. 4.  Tap OK to save the settings. Screen Timeout Screen timeout lets you select how long the display screen remains lit after you press any key.  1.  Press   and tap   > Settings > Display. 2. Tap Screen timeout to choose a time period. By accessing this document, the recipient agrees and acknowledges that all contents and information in this document (i) are confidential and proprietary information of Samsung, (ii) shall be subject to the non- disclosure regarding project H and Project B, and (iii) shall not be disclosed by the recipient to any third party. Samsung Proprietary and Confidential
 Settings 135   Font You can choose the font style and size for all text that displays on the screen.  1.  Press   and tap   > Settings > Display. 2. Tap Font to choose options:  Font style: Select a font to use.  Font size: Set the size of font to use. Tip:  To find new fonts, tap Get fonts online to access new fonts in the Google Play Store app. More Display Settings Touch Key Light Duration This feature allows you to set the length of time the   Home Key and   Back Key remain lit after you touch them. 1.  Press   and tap   > Settings > Display > More display settings. 2. Tap Touch key light duration to choose a duration period. Screen Mode Choose a screen mode to match your type of viewing. 1.  Press   and tap   > Settings > Display > More display settings. 2. Tap Screen mode to configure these options:  Adapt display: Tap the check box to enable or disable automatic optimization of the screen to match the type of image being displayed and other criteria, such as battery level.  When Adapt display is disabled, select a specific screen mode to match the content you display. Reading Mode When turned On, your phone automatically adjusts screen settings when you use selected applications. You can choose the apps that will use the option. 1.  Press   and tap   > Settings > Display > More display settings. 2. Tap the ON/OFF switch beside Reading mode to turn the option On or Off. After you turn the option On, tap Reading mode to choose apps that will use this option. By accessing this document, the recipient agrees and acknowledges that all contents and information in this document (i) are confidential and proprietary information of Samsung, (ii) shall be subject to the non- disclosure regarding project H and Project B, and (iii) shall not be disclosed by the recipient to any third party. Samsung Proprietary and Confidential
 Settings 136   Auto Adjust Screen Tone When Auto adjust screen tone is enabled, your device automatically analyzes the screen and adjusts the brightness to conserve battery power. 1.  Press   and tap   > Settings > Display > More display settings. 2.  Tap the check box beside Auto adjust screen tone to enable or disable the option. Daydream The Daydream setting controls what the screen displays when the phone is docked, or while charging. You can choose to display a Colors screen, or display photos stored on your phone. 1.  Press   and tap   > Settings > Display > More display settings. 2. Tap the ON/OFF switch beside Daydream to turn the option On or Off. When On, you can configure these options:  Colors: Tap the selector to enable or disable display of a colorful screen.  Flipboard: Display pictures from Flipboard. After enabling the option, tap   to choose pictures to display.  Photo Frame: Tap the selector to enable or disable display of pictures in a photo frame. After enabling the option, tap   to choose pictures to display.  Photo Table: Tap the selector to enable or disable display of pictures in a photo table. After enabling the option, tap   to choose pictures to display. 3. Tap Start now to switch to daydream, or tap Select dream time to choose when daydream displays, from While docked, While charging, or All. Notification Panel Configure options for the Notification panel, available when you swipe your finger down from Status bar at the top of the screen. At the top of the Notification panel, you can control settings with the Quick setting buttons. Choose Quick setting buttons in Notification panel settings. 1.  Press   and tap   > Settings > Display. 2. Tap Notification panel, and then configure settings:  Brightness adjustment: Tap the check box to display a slider for adjusting the screen brightness on the notification panel. By accessing this document, the recipient agrees and acknowledges that all contents and information in this document (i) are confidential and proprietary information of Samsung, (ii) shall be subject to the non- disclosure regarding project H and Project B, and (iii) shall not be disclosed by the recipient to any third party. Samsung Proprietary and Confidential
 Settings 137    Set the quick setting buttons:  Quick setting buttons display at the top of the Notification panel, to allow you to set favorite options quickly. •  Tap buttons to add or hide the button from the Notification panel. •  Touch and hold a button, then drag it into a new position in the list. Multi Window Multi window allows you to use two apps on the same screen, in separate, resizable windows. You can enable Multi window in Settings, and then control whether it displays on the screen by touching and holding on the   Back Key. 1.  Press   and tap   > Settings > Display. 2. Tap the check box beside Multi window to enable or disable the option. LED Indicator The LED indicator on the front of the device displays when the device is locked, to notify you of status changes and events. Use LED indicator settings to configure how the LED functions. 1.  Press   and tap   > Settings > Display. 2. Tap LED indicator, and then tap the check box beside options to enable or disable the option:  Charging: When enabled, the LED glows red during charging, and green when the battery is fully charged.  Low battery: When enabled, the LED blinks red to indicate low battery charge.  Notifications: When enabled, the LED blinks blue when the screen is turned off, to show that you have missed calls, new messages, or application events.  Voice recording: When enabled, the LED glows blue when recording with the screen turned off. Home Screen Mode Your phone offers two Home screen modes: ● Standard mode provides a conventional layout for apps and widgets on the Home screen. ● Easy mode provides an easier experience for the first-time smartphone user. You can choose the Home screen mode at any time. By accessing this document, the recipient agrees and acknowledges that all contents and information in this document (i) are confidential and proprietary information of Samsung, (ii) shall be subject to the non- disclosure regarding project H and Project B, and (iii) shall not be disclosed by the recipient to any third party. Samsung Proprietary and Confidential
 Settings 138   1.  Press   and tap   > Settings > Display. 2. Tap Home screen mode, and then choose a mode. Touch Apply to save your selection. Auto-rotate Screen When Auto-rotate screen is enabled, the screen automatically updates when you rotate the phone. See Rotate for more information. 1.  Press   and tap   > Settings > Display. 2. Tap Auto-rotate screen to enable or disable the setting. Show Battery Percentage The battery charge level displays as an icon in the notification panel by default. This feature allows you to display the battery icon plus the percentage of remaining charge. 1.  Press   and tap   > Settings > Display. 2. Tap the check box beside Display battery percentage to enable or disable the option. Language And Input Use Language and input settings to choose a default language for your phone’s operations, plus settings for text entry and other inputs. Choose a Default Language Choose the language for operating your phone. 1.  Press   and tap   > Settings > Input and control. 2. Tap Language and input, and then tap Language to select a language. Set a Default Input Method The following procedure allows you to select and set the default method you will use when accessing the keyboard. 1.  Press   and tap   > Settings > Input and control. 2. Tap Language and input, and then tap Default to select the default input method. Google Voice Typing Settings Google voice typing allows you to speak your entries. When you enable Google voice typing, it’s available for use when you touch a field to enter text. 1.  Press   and tap   > Settings > Input and control. By accessing this document, the recipient agrees and acknowledges that all contents and information in this document (i) are confidential and proprietary information of Samsung, (ii) shall be subject to the non- disclosure regarding project H and Project B, and (iii) shall not be disclosed by the recipient to any third party. Samsung Proprietary and Confidential
 Settings 139   2. Tap Language and input, and then tap the check box beside Google voice typing to enable or disable the feature. 3. Tap   beside Google voice typing to configure options:  Choose input languages: Select language(s) to use for voice input, or choose Automatic to let Google decide.  Block offensive words: Tap the check box to control whether Google displays words generally recognized as offensive.  Download offline speech recognition: Download and install speech recognition engines, to allow you to use voice input while not connected to the network, such as during Airplane mode. Samsung Keyboard Settings The Samsung Keyboard is an onscreen QWERTY keyboard, so you can enter text by “typing” on the keyboard. Samsung keyboard is enabled by default, and you can choose options for using it. 1.  Press   and tap   > Settings > Input and control. 2. Tap Language and input, and then tap   beside Samsung keyboard to configure these options:  Input languages: Tap Select input languages to choose language(s) for use with Samsung keyboard. When you have more than one language enabled, you can slide your finger on the space bar while entering text to switch languages.  Predictive text: Tap the ON/OFF switch to turn predictive text On or Off. Predictive text suggests words matching your text entries, and optionally, complete common words automatically. Tap Predictive text to configure options: •  Live language: When enabled, predictive text automatically updates with popular new words. •  Personalized data: When enabled, predictive text uses personal language data you have entered to make better predictions. Samsung keyboard can collect all the text you enter, including personal data and credit card numbers, in order to give better prediction results. •  Learn from Facebook: When Personalized data is enabled, you can log into Facebook to allow your device to learn from your Facebook postings. •  Learn from Gmail: When Personalized data is enabled, you can log into Gmail to allow your device to learn from your Gmail email. By accessing this document, the recipient agrees and acknowledges that all contents and information in this document (i) are confidential and proprietary information of Samsung, (ii) shall be subject to the non- disclosure regarding project H and Project B, and (iii) shall not be disclosed by the recipient to any third party. Samsung Proprietary and Confidential
 Settings 140   •  Learn from Twitter: When Personalized data is enabled, you can log into Twitter to allow your device to learn from your Twitter postings. •  Learn from Messaging: When Personalized data is enabled, you can allow your device to learn from your text and multimedia messages. •  Learn from Contacts: When Personalized data is enabled, you can allow your device to learn from your Contacts entries. •  Clear remote data: Delete your anonymous information stored on the personalization server. •  Clear personal data: Remove all personalized data you have entered. •  Privacy: Read the privacy policy.  Auto-capitalization: When enabled, predictive text automatically capitalizes words in your text based on common usage, such as at the beginning of sentences.  Auto spacing: When enabled, predictive text automatically inserts spaces between words.  Auto-punctuate: When enabled, a period and space are automatically entered to end a sentence, when you tap the space bar twice.  Keyboard swipe: When enabled, you can enter text by sliding your finger across the keys on the keyboard.  •  None: When enabled, Samsung Keyboard will not accept text entry by swiping. •  SwiftKey Flow: When enabled, you can enter text by swiping your finger across the keyboard. •  Cursor control: When enabled, you can slide your finger across the keyboard to move the cursor to begin entering text.  Key-tap feedback: Enable or disable options for sound or vibration feedback to your onscreen keyboard touches. •  Sound: When enabled, a sound plays for your key touches. •  Vibration: When enabled, a vibration plays for your key touches. •  Character preview: When enabled, the character appears in a bubble as you tap keys.  Pen detection: When enabled, the Samsung keyboard switches to handwriting recognition mode when you remove the S-Pen.  Help: Learn about Samsung Keyboard. By accessing this document, the recipient agrees and acknowledges that all contents and information in this document (i) are confidential and proprietary information of Samsung, (ii) shall be subject to the non- disclosure regarding project H and Project B, and (iii) shall not be disclosed by the recipient to any third party. Samsung Proprietary and Confidential
 Settings 141    Reset settings: Return settings to the defaults. Swype Settings Swype is a new way to enter text on touch screens. Instead of touching each key individually, use your finger to trace over the letters of a word. For each word, place your finger on the first letter and glide to the subsequent letters, lifting on the last letter. 1.  Press   and tap   > Settings > Input and control. 2. Tap Language and input, and then tap   beside Swype to configure options:  Settings: Set Swype options: •  Vibrate on keypress: When enabled, the device vibrates for your Swype touches. •  Sound on keypress: When enabled, the device plays sounds for your Swype touches. •  Pop-up on keypress: When enabled, the characters display briefly as you tap keys. •  Show complete trace: When enabled, Swype displays the trace of each word until you start the next word. •  Auto-correction: When enabled, Swype automatically corrects common typing mistakes. •  Auto-capitalization: When enabled, Swype automatically capitalizes the first word of sentences. •  Auto-spacing: When enabled, Swype automatically inserts spaces between words as you complete them. •  Next word prediction: When enabled, Swype predicts the next word based on the previous word. •  Show voice key: When enabled, a Voice input key displays on the Swype keyboard.  My words: Choose options for customizing Swype based on your text entries. •  Backup & Sync: Use Swype Connect to back up your words. •  Living language: When enabled, Swype will automatically update with popular new words. By accessing this document, the recipient agrees and acknowledges that all contents and information in this document (i) are confidential and proprietary information of Samsung, (ii) shall be subject to the non- disclosure regarding project H and Project B, and (iii) shall not be disclosed by the recipient to any third party. Samsung Proprietary and Confidential
 Settings 142   •  Social integration: Log into your favorite social networking sites to use your entries there to update Swype,  •  Edit my dictionary: Modify words added to Swype. •  Clear language data: Delete all the words you’ve added to the Swype dictionary. •  Contribute usage data: Allow Nuance to collect usage data to provide better text prediction. •  Cellular data: When enabled, Swype can use your phone’s connection to the wireless data network for updates, language downloads, and other Swype Connect features.  Languages: Choose the current language for Swype, and download new languages to use with Swype.  Gestures: Learn about shortcuts you can use on the keyboard to quickly accomplish common tasks.  Show helpful tips: When enabled, Swype displays helpful information as you Swype.  Help: Learn about using Swype.  Updates: Check for updates to Swype, and install them if desired. Speech Settings Configure settings for using voice to input information, and for text outputs. Voice Search Voice Search performs Google searches by speaking the criteria. 1.  Press   and tap   > Settings > Input and control. 2. Tap Language and input, and then tap Voice Search for these options:  Language: Choose a language for voice searching.  Speech output: Choose options for speech output.  Block offensive words: When enabled, words many people find offensive are not shown in results of Google voice searches. Offensive words are replaced in results with a placeholder (####).  Hotword detection: When enabled, you can say “Google” to launch voice search.  By accessing this document, the recipient agrees and acknowledges that all contents and information in this document (i) are confidential and proprietary information of Samsung, (ii) shall be subject to the non- disclosure regarding project H and Project B, and (iii) shall not be disclosed by the recipient to any third party. Samsung Proprietary and Confidential
 Settings 143    Download offline speech recognition: Download speech recognition, to enable voice input while offline.  Personalized recognition: Enable to have your device improve recognition based on your speech. Available when you have a Google account set up on your phone.  Google account dashboard: View and manage your collected data. Available when you have a Google account set up on your phone.  Bluetooth headset: Records audio through a Bluetooth headset, when using an optional Bluetooth headset (not included), paired with your phone. Text-to-speech Options Text-to-speech (TTS) provides audible readout of text, for example, the contents of text messages and the Caller ID for incoming calls. 1.  Press   and tap   > Settings > Input and control. 2. Tap Language and input, and then tap Text-to-speech options:  Preferred TTS engine: Select Samsung text-to-speech engine, or Google Text-to-speech Engine. Tap   to configure options.  General: •  Speech rate: Choose a rate for text readouts. •  Listen to an example: Play an example of speech used for readouts. Pointer Speed This feature allows you to adjust the speed of the Mouse/trackpad. 1.  Press   and tap   > Settings > Input and control. 2. Tap Language and input, and then tap Pointer speed to set the pointer speed. Tap OK to save your selection. Handwriting Search Configure options for using the S Pen to write symbols to search. Voice Control When Voice control is turned On, you can use voice commands to control your phone. Note:  If you set the alert type for calls or notifications to vibrate, voice command is not available. By accessing this document, the recipient agrees and acknowledges that all contents and information in this document (i) are confidential and proprietary information of Samsung, (ii) shall be subject to the non- disclosure regarding project H and Project B, and (iii) shall not be disclosed by the recipient to any third party. Samsung Proprietary and Confidential
 Settings 144   1.  Press   and tap   > Settings > Input and control. 2. Tap Voice control, and then tap the ON/OFF switch beside Voice control to turn the feature On or Off. 3. After you turn the feature On, you can configure options:  Incoming calls: When enabled, you can answer or reject calls with the voice commands “Answer” and “Reject”. When you answer a call with the voice command, the Speaker will automatically be turned on for hands-free talking.  ChatON: When enabled, you can answer or reject ChatON messages with the voice commands Answer and Reject.  Alarm: When enabled, you can stop or snooze alarms with the voice commands “Stop” and “Snooze”.  Camera: When enabled, you can take pictures with the voice commands “Smile”, “Cheese”, “Capture” and “Shoot”.  Music: When enabled, you can control the music player with the voice commands “Next”, “Previous”, “Pause”, “Play”, “Volume Up”, and “Volume Down”.  Driving Mode When Driving mode is On, your phone automatically reads out notifications. You can choose the types of notifications to be read out. 1.  Press   and tap   > Settings > Input and control. 2. Tap Driving mode, and then tap the ON/OFF switch beside Voice control to turn the feature On or Off. 3. After you turn the feature On, you can configure options:  Incoming call: When enabled, your phone reads out the caller’s information when you receive a call.  ChatON: When enabled, your phone reads out the caller’s information when you receive a call.  Message: When enabled, your phone reads out the sender’s information when you receive a message.  Alarm: When enabled, your phone reads out alarm information when an alarm sounds.  Schedule: When enabled, your phone reads out event information when a reminder sounds. By accessing this document, the recipient agrees and acknowledges that all contents and information in this document (i) are confidential and proprietary information of Samsung, (ii) shall be subject to the non- disclosure regarding project H and Project B, and (iii) shall not be disclosed by the recipient to any third party. Samsung Proprietary and Confidential
 Settings 145   S Pen Configure options for using S Pen to input information or control your device. 1.  Press   and tap   > Settings > Input and control. 2. Tap S Pen to configure options:  Dominant hand: Choose the hand you use most often, to allow your phone to optimize S Pen recognition for your dominant hand.  Turn off pen detection: When enabled, pen detection is turned off when the pen is attached to the phone (inserted). This can extend battery life.  S Pen keeper: sounds an alert and shows a pop-up message if you move the phone away from the pen without attaching the pen to the phone.  Pen input: When turned On, the phone will automatically display the handwriting pad in the text input area when it detects the S Pen.  Pen detachment option: Choose an option to automatically display when you detach the S Pen from the phone.  Pen attach/detach sound: Choose a sound to be played when the pen is attached or detached. One-handed Operation Use One-handed operation settings to adjust the position of your phone’s screens to help you to use it with only one hand. 1.  Press   and tap   > Settings > Input and control. 2. Tap One-handed operation to configure options:  Enable on any screen: When enabled, you can adjust the position of any screen to the left or right, to make it easier to use with one hand.  Keypad & in-call buttons: When enabled, the Phone keypad and in-call buttons can be moved to the left or the right to make them easier to use with one hand.  Samsung keyboard: When enabled, the Samsung keyboard can be moved to the left or the right to make it easier to use with one hand.   Calculator: When enabled, the Calculator keypad can be moved to the left or the right to make it easier to use with one hand.  Unlock pattern: When enabled, the pattern lock screen can be moved to the left or the right to make it easier to use with one hand By accessing this document, the recipient agrees and acknowledges that all contents and information in this document (i) are confidential and proprietary information of Samsung, (ii) shall be subject to the non- disclosure regarding project H and Project B, and (iii) shall not be disclosed by the recipient to any third party. Samsung Proprietary and Confidential
 Settings 146   Note:  Tap Learn about on-handed operation for more information about using one-handed options. Edit After Screen Capture When Edit after screen capture is enabled, screens you capture are automatically displayed, so you can add a note. 1.  Press   and tap   > Settings > Input and control. 2. Tap Edit after screen capture to enable or disable the option. Air Gesture Use Air gestures to control your device, without touching it. Gestures you make are detected by the sensor on the front of the phone, to the right of the Earpiece. The sensor will detect smooth, steady gestures up to 3 inches away. The   Air gesture icon displays in the Status bar when you have Air gesture option turned On, and the current app supports Air gestures.  1.  Press   and tap   > Settings > Input and control. 2. Tap Air gesture, and then configure options:  Tap the ON/OFF switch beside Air gesture to turn the option On or Off.  Learn about sensor and icon: Tap for information about using air gestures.  Quick glance: When turned On, you can view important information on your phone when the screen is turned off, by moving your hand above the phone. The phone must be on a screen side up on a flat surface, and you move the palm of your hand above the phone in an up or down motion. Tap Quick glance to see the location of the sensor and the gesture.  Air jump: When turned On, you can scroll web pages and email messages by moving your hand over the phone. To use Air jump, sweep the side of your hand over the screen in an up or down motion. Tap Air jump to see the location of the sensor and the gesture.  Air browse: When turned On, you can move between pictures, pages, or songs by moving your hand over the phone. To use Air browse, sweep the side of your hand over the screen in a left or right motion. Tap Air browse to see the location of the sensor and the gesture.  Air call-accept: When turned On, you can accept an incoming call by moving your hand over the phone. To use Air call-accept, move the palm of your hand above the By accessing this document, the recipient agrees and acknowledges that all contents and information in this document (i) are confidential and proprietary information of Samsung, (ii) shall be subject to the non- disclosure regarding project H and Project B, and (iii) shall not be disclosed by the recipient to any third party. Samsung Proprietary and Confidential
 Settings 147   phone in a left or right motion. Tap Air call-accept to see the location of the sensor and the gesture. Motions With Motions, you can control your phone by moving it in specific ways. 1.  Press   and tap   > Settings > Input and control. 2. Tap Motions, and then configure options:  Tap the ON/OFF switch beside Motions to turn the option On or Off. •  Direct call: When turned On, you can lift the device to your ear while viewing a contact to call the contact whose recent call, message, or contact details are displayed on the screen. Tap the ON/OFF switch to turn the option On or Off, and then tap Direct call to see an example of the motion. •  Smart alert: When turned On, you can lift the phone to receive notifications of missed calls and notifications that occurred while the device was stationary. Tap the ON/OFF switch to turn the option On or Off, and then tap Smart alert to see an example of the motion. •  Zoom: When turned On, you can tilt the phone to zoom in or out when viewing pictures in Gallery. Tap the ON/OFF switch to turn the option On or Off, and then tap Zoom to see an example of the motion. •  Browse an image: When turned On, you can move the phone in a side-to-side motion to pan from side to side while viewing an image. Tap the ON/OFF switch to turn the option On or Off, and then tap Browse an image to see an example of the motion. •  Mute/pause: When turned On, you can mute incoming calls and pause playback by turning the phone screen-side down. Tap the ON/OFF switch to turn the option On or Off, and then tap Mute/pause to see an example of the motion. Palm Motion Use Palm motion to control your phone by motions with the palm of your hand. 1.  Press   and tap   > Settings > Input and control. 2. Tap Palm motion, and then configure options:  Tap the ON/OFF switch beside Palm motion to turn the option On or Off. •  Capture screen: When turned On, you can save a copy of the current screen to the clipboard by swiping the side of your hand across the screen in a left or right By accessing this document, the recipient agrees and acknowledges that all contents and information in this document (i) are confidential and proprietary information of Samsung, (ii) shall be subject to the non- disclosure regarding project H and Project B, and (iii) shall not be disclosed by the recipient to any third party. Samsung Proprietary and Confidential
 Settings 148   motion. Tap the ON/OFF switch to turn the option On or Off, and then tap Capture screen to see an example of the motion. •  Mute/pause: When On, you can mute incoming calls, message notifications, and alarms, and pause music or video playback by covering the screen with your hand. Tap the ON/OFF switch to turn the option On or Off, and then tap Mute/pause to see an example of the motion. Air View Use Air view to display helpful information by hovering your finger, or the S Pen, over the screen. For some Air view gestures, you can choose to have your phone recognize the specific gestures exclusively with your finger, or the S Pen, or either input. 1.  Press   and tap   > Settings > Input and control. 2. Tap Air view, and then configure options:  Tap the ON/OFF switch beside Air view to turn the option On or Off.  Air view mode: Choose whether Air view recognizes gestures with your finger only, the S Pen only, or automatically recognizes gestures regardless of how they’re made.  Air view pen options: Choose what will display when you hover the S Pen over items on the screen. •  Pointer: Displays a pointer on the screen. •  Information preview: Displays preview information (if available), the full text, or a zoomed-in image. •  Progress preview: Displays a scene, or the elapsed time, when you hover the S Pen over the progress bar during video playback. •  Speed dial preview: When you hover the S Pen over a number key on the Phone dialer, the contact assigned to that number’s speed dial displays. •  Icon labels (by pen nib): When you hover the S Pen over an app icon, the icon’s label displays.  •  List scrolling: When you hover the S Pen over the edge of the screen, you can scroll up or down lists by moving the S Pen along the edge of the screen. •  Sound and haptic feedback: When you hover the S Pen over air view items, the phone plays sounds and vibrations as feedback. By accessing this document, the recipient agrees and acknowledges that all contents and information in this document (i) are confidential and proprietary information of Samsung, (ii) shall be subject to the non- disclosure regarding project H and Project B, and (iii) shall not be disclosed by the recipient to any third party. Samsung Proprietary and Confidential
 Settings 149    Air view finger options: Choose what will display when you hover your finger over items on the screen. •  Information preview: Displays preview information (if available), the full text, or a zoomed-in image. •  Progress preview: Displays a scene, or the elapsed time, when you hover your finger over the progress bar during video playback. •  Speed dial preview: When you hover your finger over a number key on the Phone dialer, the contact assigned to that number’s speed dial displays. •  Webpage magnifier: Magnifies a portion of a web page when you hover your finger over the page. •  Sound and haptic feedback: When you hover your finger over air view items, the phone plays sounds and vibrations as feedback.  Air button: When turned On, you can press the button on the S Pen while hovering above the screen to see a menu of options you can use on the screen. Smart Screen Use Smart screen options to have your phone automatically adjust screen timeout, rotation when it detects you are looking at the screen, and control scrolling and playback based whether you are facing the screen. Smart screen options use the front camera to detect when you are facing the screen. Some factors that may affect the ability of the front camera to detect your face are: ● When the phone is not docked or held upright, for example when placed on a table. ● When the front camera cannot detect your face and eyes. ● When the front camera is being used for the current application. ● When the source of light is behind you, or when using the phone in the dark. Smart Stay When Smart stay is enabled, the screen will not time out as long as you are looking at it. When enabled, the Smart stay icon   displays in the Status bar. 1.  Press   and tap   > Settings > Input and control. 2. Tap Smart screen, and then tap the check box beside Smart stay to enable or disable the option. Note: Tap Smart screen for tips on using the feature. By accessing this document, the recipient agrees and acknowledges that all contents and information in this document (i) are confidential and proprietary information of Samsung, (ii) shall be subject to the non- disclosure regarding project H and Project B, and (iii) shall not be disclosed by the recipient to any third party. Samsung Proprietary and Confidential
 Settings 150   Smart Rotation When Smart rotation is enabled, the screen automatically updates to match the angle at which you are viewing. 1.  Press   and tap   > Settings > My Device. 2. Tap Smart screen, and then tap the check box beside Smart rotation to enable or disable the option. Note: Tap Smart rotation for tips on using the feature. Smart Pause When Smart pause is enabled, the phone will automatically pause video playback when you look away from the screen. 1.  Press   and tap   > Settings > My Device. 2. Tap Smart screen, and then tap the check box beside Smart pause to enable or disable the option. Note: Tap Smart pause for tips on using the feature. Smart Scroll When Smart scroll is enabled, the phone will scroll the screen display according to the tilt of the phone and your face. You can use Smart scroll to scroll through web pages and email messages by tilting your head, or the device, while looking at the screen. 1.  Press   and tap   > Settings > My Device. 2. Tap Smart screen, and then tap the ON/OFF switch beside Smart scroll to turn the feature On or Off. 3. After you turn the feature On, tap Smart scroll to configure these options:  Tilting head: Scrolling follows the tilt of your head. Tilt your head backwards or forward, while keeping the phone steady.  Tilting device: Scrolling follows the tilt of the phone. Tilt the phone backwards or forward, while keeping your head steady.  Speed: Drag the slider to set the speed at which pages will scroll.  Visual Feedback display: When enabled, an icon will display when Smart scroll is in use. By accessing this document, the recipient agrees and acknowledges that all contents and information in this document (i) are confidential and proprietary information of Samsung, (ii) shall be subject to the non- disclosure regarding project H and Project B, and (iii) shall not be disclosed by the recipient to any third party. Samsung Proprietary and Confidential
 Settings 151   High Touch Sensitivity When High touch sensitivity is enabled, the screen’s sensitivity to touches is increased, to improve results when using the phone while wearing gloves. 1.  Press   and tap   > Settings > Input and control. 2. Tap the check box beside High touch sensitivity to enable or disable the option. Sound Volume Set the system volume level, and set default volume for call ringtones, notifications, and media playback. Note: You can also set System volume setting from many screens by pressing the Volume Key. 1.  Press   and tap   > Settings > General. 2. Tap Sound, and then tap Volume to set volume levels. Drag the sliders to set the default volume for:  Music, video, games, and other media  Ringtone  Notifications  System 3. Tap OK to save the settings. Vibration Intensity Set the level for vibration to accompany ringtones and notifications. 1.  Press   and tap   > Settings > General. 2. Tap Sound, and then tap Vibration intensity to set vibrations. Drag the sliders to set the vibration intensity for:  Incoming call  Notification  Haptic feedback 3. Tap OK to save the settings. By accessing this document, the recipient agrees and acknowledges that all contents and information in this document (i) are confidential and proprietary information of Samsung, (ii) shall be subject to the non- disclosure regarding project H and Project B, and (iii) shall not be disclosed by the recipient to any third party. Samsung Proprietary and Confidential
 Settings 152   Ringtones Choose a ringtone for incoming calls. 1.  Press   and tap   > Settings > General. 2. Tap Sound, and then tap Ringtones to choose a ringtone:  Tap a ringtone to select it. As you tap a ringtone, a sample plays.  Tap Add to choose a music track from Google Play Music, a sound file from Dropbox, or use Sound picker to choose a song from Music player. 3. Tap OK to save the setting. Vibrations Choose vibrations to play for notifications, such as for incoming calls, new messages, and event reminders. 1.  Press   and tap   > Settings > General. 2. Tap Sound, and then tap Vibrations to choose a pattern.   Tap a pattern to select it. As you tap a pattern, a sample plays.  Tap Create to create your own vibration pattern. 3. Tap OK to save the setting. Default Notification Sound Choose a sound for notifications, such as for new messages and event reminders. 1.  Press   and tap   > Settings > General. 2. Tap Sound, and then tap Notifications to choose a notification tone.  3. Tap a sound to play a sample and select the sound. 4. Tap OK to save the setting. Vibrate When Ringing When Vibrate when ringing is enabled, a vibration plays for calls and notifications, along with the ringtone or sound. You can use the Vibrations setting to customize the vibration. 1.  Press   and tap   > Settings > General. 2. Tap Sound, and then tap the check box beside Vibrate when ringing to enable or disable the option. By accessing this document, the recipient agrees and acknowledges that all contents and information in this document (i) are confidential and proprietary information of Samsung, (ii) shall be subject to the non- disclosure regarding project H and Project B, and (iii) shall not be disclosed by the recipient to any third party. Samsung Proprietary and Confidential
 Settings 153   Dialing Keypad Tone When Dialing keypad tone is enabled, tones play when you tap keys on the Phone keypad. 1.  Press   and tap   > Settings > General. 2. Tap Sound, and then tap the check box beside Dialing keypad tone to enable or disable the option. Touch Sounds When Touch sounds is enabled, tones play when you tap or touch the screen to make selections. 1.  Press   and tap   > Settings > General. 2. Tap Sound, and then tap the check box beside Touch sounds to enable or disable the option. Screen Lock Sound When Screen lock sound is enabled, tones play when you touch the screen to lock or unlock it. 1.  Press   and tap   > Settings > General. 2. Tap Sound, and then tap the check box beside Screen lock sound to enable or disable the option. Haptic Feedback When Haptic feedback is enabled, vibration plays when you tap the Menu and Back keys, and for certain screen touches. 1.  Press   and tap   > Settings > General. 2. Tap Sound, and then tap the check box beside Haptic feedback to enable or disable the option. Emergency Tone You can choose to have a sound or vibration play periodically during an emergency call. 1.  Press   and tap   > Settings > General. 2. Tap Sound, and then tap Emergency tone to select a tone:  Off: No tone or vibration plays during emergency calls.  Alert: A tone plays during emergency calls.  Vibrate: A vibration plays during emergency calls. By accessing this document, the recipient agrees and acknowledges that all contents and information in this document (i) are confidential and proprietary information of Samsung, (ii) shall be subject to the non- disclosure regarding project H and Project B, and (iii) shall not be disclosed by the recipient to any third party. Samsung Proprietary and Confidential
 Settings 154   Audio Output Choose the type of sound output when you attach your phone to another device via HDMI cable. 1.  Press   and tap   > Settings > General. 2. Tap Sound, and then tap Audio output to choose whether sound is output as Stereo or Surround. Adapt Sound Find the best sound for you, to use during calls, and for media playback.  Note:  This setting uses earphones to ensure the best sound during setup. You must connect optional earphones (not included) to the phone to configure this setting. 1.  Press   and tap   > Settings > General. 2. Tap Sound, and then tap Adapt Sound. 3. Read the information about My sound and connect optional earphones (not included). 4. Tap Start, and then follow the prompts to set My sound. Call Settings Configure options for calling with your phone. Call Rejection Create and manage a list of phone numbers, to have your device automatically reject calls you receive from those numbers. 1.  Press   and tap   > Settings > General. 2. Tap Call, and then tap Call rejection to configure these options:  Auto reject mode: When All numbers is selected, calls from all numbers are rejected. When Auto reject numbers is selected, calls from numbers on the Auto reject list are rejected.  Auto reject list: Enter telephone numbers, to reject calls from the numbers when Auto reject mode is turned On. •  Tap   to enter a telephone number, or select a number from a contact. Tap Match criteria to set options for using the reject number list. •  Tap the check box beside Unavailable to reject calls with numbers that display “Unavailable” in Caller ID. By accessing this document, the recipient agrees and acknowledges that all contents and information in this document (i) are confidential and proprietary information of Samsung, (ii) shall be subject to the non- disclosure regarding project H and Project B, and (iii) shall not be disclosed by the recipient to any third party. Samsung Proprietary and Confidential
 Settings 155   Set Up Call Rejection Messages Create and manage text messages to send to callers when rejecting incoming calls. Messages you create here are available from the incoming call screen when you use the Reject with message option. 1.  Press   and tap   > Settings > General. 2. Tap Call, and then tap Set up call rejection messages to manage messages:  To create new messages, tap Create, then follow the prompts.  To modify an existing message, tap the message, then edit the text. Answering/Ending Calls Manage settings for answering and ending calls. 1.  Press   and tap   > Settings > General. 2. Tap Call, and then tap Answering/ending calls to configure these options:  The home key answers calls: When enabled, you can answer incoming calls by pressing the Home key.  Voice control: When turned On, you can answer calls by speaking commands. Tap the ON/OFF switch to turn Voice control On, then tap Voice control to configure the Incoming calls option. When enabled, you can answer or reject calls with the voice commands “Answer” and “Reject”. When you answer a call with a voice command, the Speaker will automatically turn on for hands-free calls.  The power key ends calls: When enabled, you can end calls by pressing the Power key. In this case, pressing the power key during a call will not lock the screen. Turn Off Screen During Calls When enabled, the screen automatically turns off during phone calls, and uses the sensor on the front of the device to turn the screen back on when you move the device is brought close to another object, such as when you move the device to your ear. 1.  Press   and tap   > Settings > General. 2. Tap Call, and then tap Turn off screen during calls to enable or disable the setting. Call Alerts Set options for sounds and vibrations to occur during calls. 1.  Press   and tap   > Settings > General. 2. Tap Call, and then tap Call alerts to configure settings: By accessing this document, the recipient agrees and acknowledges that all contents and information in this document (i) are confidential and proprietary information of Samsung, (ii) shall be subject to the non- disclosure regarding project H and Project B, and (iii) shall not be disclosed by the recipient to any third party. Samsung Proprietary and Confidential
 Settings 156    Vibrate on connection to network: When enabled, your phone will vibrate when a call connects to the network.  Call-end vibration: When enabled, the phone vibrates when the other caller ends the call.  Call connect tone: When enabled, the phone plays a tone when the other caller answers a call.   Minute minder: When enabled, a tone plays once per minute during a call.  Call end tone: When enabled, the device plays a tone when the other caller ends the call.   Alerts on call: When enabled, notifications for alarms and new messages play during calls. When disabled, these notifications will be muted during a call. Call Accessories Configure options for using a headset. 1.  Press   and tap   > Settings > General. 2. Tap Call, and then tap Call accessories to configure settings:  Automatic answering: When enabled, and you have a headset connected to the Headset Jack, incoming calls are answered automatically after a delay, which you can set at Automatic answering timer. Tap to enable or disable the setting.  Automatic answering timer: Choose a time period to delay before automatically answering an incoming call when Automatic answering is enabled and a headset is connected to the device. Tap to choose 2 seconds, 5 seconds, or 10 seconds.  Outgoing call conditions: When the device is paired with a Bluetooth headset, you can choose to make calls even when the device is locked. Tap to choose Even when device locked, or Only when device unlocked. Ringtones And Keypad Tones Choose tones and vibrations to play for incoming calls and keypad taps. 1.  Press   and tap   > Settings > General. 2. Tap Call, and then tap Ringtones and keypad tones. 3. Configure settings:  Tap Ringtones, and then select a ringtone for incoming calls. Tap OK to save your selection. By accessing this document, the recipient agrees and acknowledges that all contents and information in this document (i) are confidential and proprietary information of Samsung, (ii) shall be subject to the non- disclosure regarding project H and Project B, and (iii) shall not be disclosed by the recipient to any third party. Samsung Proprietary and Confidential
 Settings 157    Tap Vibrations, and then select a vibration pattern to play for incoming calls when the Vibrate when ringing option is enabled. You can tap Create to create a custom pattern. Tap OK to save the settings.  Tap Vibrate when ringing to play a vibration for incoming calls. The vibration pattern is set at the Vibrations setting.  Tap the check box beside Keypad tones to enable or disable tones for keypad taps. Personalize Call Sound Choose options for call audio, in cases where you might need the sound softer or more clear, or optimized for your right or left ear. 1.  Press   and tap   > Settings > General. 2. Tap Call, and then tap Personalize call sound. 3. Tap a setting, and then configure options if available:  Adapt sound: Tap Start, and then follow the onscreen prompts to find the best sound for you.  Soft sound: Use softer sounds during calls.  Clear sound: Use clearer sounds during calls.  Off: Use the default call sound settings. Noise Reduction When enabled, Noise reduction suppresses background noise from your environment during calls. 1.  Press   and tap   > Settings > General. 2. Tap Call, and then tap Noise reduction to enable or disable noise reduction. Increase Volume In Pocket When enabled, this setting uses the proximity sensor to detect when the device is in a pocket or other close-fitting location such as a purse or bag, and increases the volume for incoming call ringtones. 1.  Press   and tap   > Settings > General. 2. Tap Call, and then tap the check box Increase volume in pocket to enable or the setting. By accessing this document, the recipient agrees and acknowledges that all contents and information in this document (i) are confidential and proprietary information of Samsung, (ii) shall be subject to the non- disclosure regarding project H and Project B, and (iii) shall not be disclosed by the recipient to any third party. Samsung Proprietary and Confidential
 Settings 158   US Dialing When enabled, the US dialing option automatically replaces “+” during dialing, with the international access code for your location. 1.  Press   and tap   > Settings > General. 2. Tap Call, and then tap the check box beside US dialing to enable or disable the setting. International Dialing When US dialing is enabled, it uses the International dialing code to replace “+”. US dialing must be disabled to access the International dialing code. 1.  Press   and tap   > Settings > General. 2. Tap Call, and then tap the check box beside US dialing to disable the setting. US dialing must be disabled to access the International dialing setting. 3. Tap International dialing, and then use the keypad to enter the international dialing code. 4. Tap OK to save the code. TTY Mode A TTY (teletypewriter, also known as a TDD or Text Telephone) is a telecommunications phone that allows people who are deaf, hard of hearing, or who have speech or language disabilities, to communicate by telephone. Your phone is compatible with select TTY phones. Please check with the manufacturer of your TTY phone to ensure that it supports digital wireless transmission. Your phone and TTY phone will connect using a special cable that plugs into your phone’s headset jack. If this cable was not provided with your TTY phone, contact your TTY phone manufacturer to purchase the connector cable. 1.  Press   and tap   > Settings > General. 2. Tap Call, and then tap TTY mode to choose a mode, from TTY Off, TTY Full, TTY HCO, or TTY VCO. Hearing Aids When enabled, the Hearing aids option adjusts your phone’s settings to improve compatibility with hearing aids. 1.  Press   and tap   > Settings > General. 2. Tap Calls, and then tap the check box beside Hearing aids to turn the option On or Off.  By accessing this document, the recipient agrees and acknowledges that all contents and information in this document (i) are confidential and proprietary information of Samsung, (ii) shall be subject to the non- disclosure regarding project H and Project B, and (iii) shall not be disclosed by the recipient to any third party. Samsung Proprietary and Confidential
 Settings 159    DTMF Tones Set the length of Dual-tone Multi-frequency (DTMF) tones, which play when you tap keys on the dialer keypad during a call, such as when navigating menus. 1.  Press   and tap   > Settings > General. 2. Tap Call, and then tap DTMF tones to choose a tone length, from Normal, or Long. Voicemail Settings Set options for Voicemail-to-text service. 1.  Press   and tap   > Settings > General. 2. Tap Call, and then tap Voicemail settings to configure options for voicemail-to-text. Voice Privacy When enabled, Voice privacy activates Enhanced privacy mode, to improve the security of voice calls. 1.  Press   and tap   > Settings > General. 2. Tap Call, and then tap the check box beside Voice privacy to enable or disable enhanced privacy mode. Accounts When you set up accounts on your phone, such as your Google or Samsung accounts, and your email or social networking accounts, you can synchronize account information between your phone and the account. Types of information you can synchronize include contacts, pictures, videos, and other types of files. You can also set up options for backing up information from your phone to the cloud, and back up or reset your device. Add an Account Add an account to your phone to share information between your phone and the account. 1.  Press   and tap   > Settings > General. 2. Tap Accounts > Add account, and then choose a type of account. 3. Follow the prompts to enter your account credentials and complete the account set up.  By accessing this document, the recipient agrees and acknowledges that all contents and information in this document (i) are confidential and proprietary information of Samsung, (ii) shall be subject to the non- disclosure regarding project H and Project B, and (iii) shall not be disclosed by the recipient to any third party. Samsung Proprietary and Confidential
 Settings 160    Date and Time By default, your device receives date and time information from the wireless network. When you are outside network coverage, you may want to set date and time information manually using the Date & time settings. 1.  Press   and tap   > Settings > General. 2. Tap Date and time to configure settings:  Automatic date and time: When enabled, the device takes date and time updates from the wireless network.  Set date: Enter the current date (only available when Automatic date and time is disabled).  Set time: Enter the current time (only available when the Automatic setting is disabled).   Automatic time zone: When enabled, the device takes the time zone from the wireless network.  Select time zone: Choose your local time zone (only available when the Automatic setting is disabled).  Use 24-hour format: Set the format for time displays.  Select date format: Set the format for date displays. Blocking Mode When Blocking mode is turned On, notifications for selected features are blocked, and you only receive the notifications you choose. You can choose to block notifications by feature or contact, and choose blocking all the time, or during a specific time period. 1.  Press   and tap   > Settings > General. 2. Tap Blocking mode, and then configure options:  Tap the ON/OFF switch beside Blocking mode to enable or disable the setting. Blocking mode must be enabled to configure options.  Block incoming calls: When enabled, notifications for incoming calls will not display. Tap the check box beside the option to enable or disable it.  Turn off notifications: When enabled, notifications for new messages will not display. Tap the check box beside the option to enable or disable it. By accessing this document, the recipient agrees and acknowledges that all contents and information in this document (i) are confidential and proprietary information of Samsung, (ii) shall be subject to the non- disclosure regarding project H and Project B, and (iii) shall not be disclosed by the recipient to any third party. Samsung Proprietary and Confidential
 Settings 161    Turn off alarm and timer: When enabled, notifications for alarms and timers will not display. Tap the check box beside the option to enable or disable it.  Turn off LED indicator: When enabled, the LED indicator will not light for notifications, even when the screen is off. Tap the check box beside the option to enable or disable it.  Set time: Set a time period for blocking mode: •  Tap the check box beside Always, to block notifications at all times. •  To set a specific time period to block notifications each day, disable the Always option, and then set a starting (From field) time and ending time (To field). Tap the time fields and then set the time.  Allowed contacts: Set options for blocking by contact: •  Tap Allowed contacts, and then choose options. •  If you chose to block a Custom list of contacts, you can tap Allowed contact list to modify the list of allowed contacts. This option is only available when the Custom list is enabled. Power Saving Mode Configure Power saving mode settings to conserve battery power. 1.  Press   and tap   > Settings > General. 2. Tap Power saving mode to configure options:  Tap the ON/OFF switch beside Power saving mode to turn the mode On or Off. Power saving mode must be turned On to configure settings.  CPU power saving: When enabled, the maximum performance of the device’s CPU (Central Processing Unit) is disabled to conserve battery power. Tap the check box beside the option to enable or disable it.  Screen power saving: When enabled, the frame refresh rate and brightness level are reduced to conserve power. Tap the check box beside the option to enable or disable it.  Turn off haptic feedback: When enabled, Haptic feedback is disabled to conserve battery power. Tap the check box beside the option to enable or disable it. Note: Tap Learn about Power saving mode to view information about these settings. By accessing this document, the recipient agrees and acknowledges that all contents and information in this document (i) are confidential and proprietary information of Samsung, (ii) shall be subject to the non- disclosure regarding project H and Project B, and (iii) shall not be disclosed by the recipient to any third party. Samsung Proprietary and Confidential
 Settings 162   Accessibility Your device offers features to make using the device easier for those with certain physical disabilities. Use Accessibility settings to configure these features. 1.  Press   and tap   > Settings > General. 2. Tap Accessibility to configure options:  Auto-rotate screen: When enabled, the screen automatically rotates when you rotate the phone.  Screen timeout: Set a period of time for the screen to remain lit after your last key press or screen touch, after which it will dim and lock.  Speak passwords: When enabled, your phone will read aloud password characters as you enter them.  Answering/ending calls: When enabled, you can accept incoming calls by pressing the   Home Key or end calls by pressing the Power/Lock Key.  Show shortcut: When enabled, a shortcut to Accessibility settings displays on the Device options menu. The Device options menu displays when you press and hold the Power/Lock Key.  Manage accessibility: Save and update your accessibility settings by exporting them as a file or importing a previously-saved file, or share the file.  Services: Tap TalkBack to activate the TalkBack feature and configure options. If you have downloaded and installed other services, you can enable or disable them here.  Font size: Choose the size of fonts used on the screen.   Magnification gestures: When turned On, you can use special magnification gestures, including: •  Triple-tap on most screens to zoom in or out.  •  While zoomed in, you can drag two or more fingers across the screen to pan (move around the screen). •  While zoomed in, you can use pinch with two fingers to adjust the zoom level. Move your fingers closer together to zoom in, or apart to zoom out. •  Triple-tap and hold to temporarily magnify what’s under your finger. You can then drag your finger across the screen to explore the screen. Lift your finger to return to the regular-size screen. By accessing this document, the recipient agrees and acknowledges that all contents and information in this document (i) are confidential and proprietary information of Samsung, (ii) shall be subject to the non- disclosure regarding project H and Project B, and (iii) shall not be disclosed by the recipient to any third party. Samsung Proprietary and Confidential
 Settings 163    Negative colors: When enabled, screen colors are reversed.  Color adjustment: When turned On, you can adjust the color of the screen if you have difficulty reading the screen because of the color. Follow the prompts to fine-tune screen colors.  Accessibility shortcut: when turned On, you can quickly turn on accessibility features by performing a special gesture: •  Press and hold the Power/Lock Key until you hear a sound or feel a vibration, and then press and hold with two fingers until you hear an audio confirmation.  Text-to-speech options: Configure options for converting text to speech. For more information, see Text-to-speech Options.  Enhance web accessibility: Choose whether to allow apps to install scripts from Google that make their Web content more accessible.  Sound Balance: Choose how the sound is sent to the left and right when using earphones.  Mono audio: When enabled, audio is output in mono instead of stereo, for when you are using a single earphone.  Turn off all sounds: When enabled, every sound made by the phone is turned off, including screen taps, notifications, and call sounds.  Hearing aids: Enable or disable hearing aid compatibility.  Flash notification: When enabled your phone blink the Camera flash with notifications.  Assistant menu: Control the display of a special menu to improve device accessibility for users with reduced dexterity. After turning the feature On, tap Assistant menu to choose options. Tap Dominant hand to choose whether the menu displays on the left or right side of the screen, and tap Edit to choose features to display on the Assistant menu.  Touch sensibility: Choose how long your phone waits during a screen tap and hold on the screen, before interpreting the tap as a tap and hold gesture and continuing with the tap and hold action.  Interaction control: Choose how your phone interprets motions and screen touches. When Interaction control is On, you can turn motions and screen timeout on or off. You can also block areas of the screen from touch interaction. Auto-rotate and hardkey functions (Power/Lock Key, Volume Key, etc.) will be turned off, and app notifications will only be shown in the notification panel and status bar. By accessing this document, the recipient agrees and acknowledges that all contents and information in this document (i) are confidential and proprietary information of Samsung, (ii) shall be subject to the non- disclosure regarding project H and Project B, and (iii) shall not be disclosed by the recipient to any third party. Samsung Proprietary and Confidential
 Settings 164   Accessory Configure your device’s behavior when it is connected to an optional dock (not included). 1.  Press   and tap   > Settings > General. 2. Tap Accessory to configure settings:  Dock sound: When enabled, a sound plays when you insert and remove the device from the dock.  Audio output mode: When enabled, audio plays through the dock speakers when the device is docked.  Desk home screen display: When enabled, displays a special screen when the device is docked.  Automatic unlock: When enabled, flipping a cover open automatically unlocks the screen, when no screen lock is enabled.  Audio output: Choose a destination for audio output when you connect to devices via HDMI cable. Backup Options Set up a backup account  on your phone to save information from your phone to the account. 1.  Press   and tap   > Settings > General. 2. Tap an option to configure backup features:  Cloud: Configure options for synchronizing and backing up information.  •  Tap Add account to sign in to your Samsung account, or create a new Samsung account. You can sync contacts, calendar events, memos, and Internet shortcuts. You can back up Logs, SMS and MMS messages, and current wallpaper settings. •  Tap Link Dropbox account to sign in to your Dropbox account, or set up a new account, to sync pictures, videos and documents.  Backup and reset: Configure options for backing up data from your phone to a Google account.  •  Back up my data: Tap the check box to turn On automatic backup to a Google account, and then set up an account for the backups.  By accessing this document, the recipient agrees and acknowledges that all contents and information in this document (i) are confidential and proprietary information of Samsung, (ii) shall be subject to the non- disclosure regarding project H and Project B, and (iii) shall not be disclosed by the recipient to any third party. Samsung Proprietary and Confidential
 Settings 165   •  Backup account: When Back up my data is turned On, set up a Google account for backups. You can set up a new Google account, or sign in to an existing account. •  Automatic restore: When Back up my data is turned On, you can also turn on Automatic restore to automatically restore settings and other information from the backup when you reinstall an app.  Factory data reset: Erase all your information from the phone, and return the settings to the factory defaults. All data will be erased, and cannot be recovered. A factory data reset also erases the key for decrypting files stored on an optional installed memory card, so files on the card cannot be used after the reset. Security Configure options for securing information on your phone. Encryption You can encrypt accounts, settings, downloaded apps and their data, media, and other files. After encryption, you must enter the PIN or password you set each time you turn on your phone. You can also encrypt information stored on an optional installed memory card (not included). Encryption may take an hour or more to complete. Start with a charged battery, and keep the device on the charger until encryption is complete. Interrupting the encryption process may result in the loss of some or all data. 1.  Press   and tap   > Settings > More. 2. Tap Security, and then tap an option:  Encrypt device: Tap Set screen lock type to start, and then follow the prompts to encrypt information.  Encrypt external SD card: Tap Set screen lock type to start, and then follow the prompts to encrypt information. Passwords Use the Make passwords visible setting to briefly display password characters as you enter them into password fields. 1.  Press   and tap   > Settings > More. 2. Tap Security, and then tap the check box beside Make passwords visible to enable or disable the setting. By accessing this document, the recipient agrees and acknowledges that all contents and information in this document (i) are confidential and proprietary information of Samsung, (ii) shall be subject to the non- disclosure regarding project H and Project B, and (iii) shall not be disclosed by the recipient to any third party. Samsung Proprietary and Confidential
 Settings 166   Device Administration Some applications, such as Corporate email, may require you allow access to your device by device administrators in certain circumstances, such as if your device is lost or stolen. Some features a device administrator might control include: ● Setting the number of failed password attempts before the device is restored to factory settings. ● Automatically locking the device. ● Restoring factory settings on the device. 1.  Press   and tap   > Settings > More. 2. Tap Security, and then tap an option:  Device administrators: Tap to view, add, or remove device administrators.  Unknown sources: Tap the check box to enable or disable your phone’s ability to install apps from sources other than Google Play Store.  Verify apps: Tap the check box to enable or disable a warning before installing apps that may cause harm. Credential Storage You can install credentials from an optional installed memory card (not included), and use the Credential storage settings to allow applications to access the security certificates and other credentials. 1.  Press   and tap   > Settings > More. 2. Tap Security, and then tap an option:  Trusted credentials: Tap to view credentials you’ve installed.  Install from device storage: Tap to install encrypted certificates from an optional installed memory card (not included).  Clear credentials: Tap to clear stored credentials and reset the password (only available when credentials are installed). Application Manager You can download and install applications from the Google Play Store or Samsung Apps, or create applications using the Android SDK and install them on your device. Use Application manager to manage applications on your device. By accessing this document, the recipient agrees and acknowledges that all contents and information in this document (i) are confidential and proprietary information of Samsung, (ii) shall be subject to the non- disclosure regarding project H and Project B, and (iii) shall not be disclosed by the recipient to any third party. Samsung Proprietary and Confidential
 Settings 167   Warning!  Because this device can be configured with system software not provided by or supported by Google or any other company, end-users operate these devices at their own risk. 1.  Press   and tap   > Settings > More. 2. Tap Application manager, and then tap Downloaded, Running, or All to view the status of apps and services. Tap an app or service for more information, and for app options, such as stopping and uninstalling. Battery See what’s using battery power. 1.  Press   and tap   > Settings > More. 2. Tap Battery to view battery usage for apps and services. Tap an item for more information, or to configure options for managing power use. Storage Manage the use of memory resources in your phone’s Device memory, and on an optional installed memory card (not included). 1.  Press   and tap   > Settings > More. 2. Tap Storage to view information about memory usage, and for other options:  Device memory: View memory usage for the different types of information stored on your phone’s memory. Tap an item for more information.  SD card: View memory usage for the different types of information stored on an optional installed memory card. •  Mount SD card: Prepare the card for use as storage in the phone. This option is only available if an optional memory card is installed, and is not already mounted. Usually, your phone mounts a memory card as soon as you install it. •  Unmount SD card: Prepare an installed optional memory card for safe removal or formatting. •  Format SD card: Permanently remove all content from an optional installed memory card. After formatting, the content cannot be retrieved. Activate this Device Connect to the network and activate your device. If your device is already activated, use this option to view information about your plan and usage. 1.  Press   and tap   > Settings > More. By accessing this document, the recipient agrees and acknowledges that all contents and information in this document (i) are confidential and proprietary information of Samsung, (ii) shall be subject to the non- disclosure regarding project H and Project B, and (iii) shall not be disclosed by the recipient to any third party. Samsung Proprietary and Confidential
 Settings 168   2. Tap Activate this device, and then follow the prompts to activate your device on the network.  System Update Use System update options to update your phone’s internal software. 1.  Press   and tap   > Settings > More. 2. Tap System Update to use these options:  Update PRL: Download and the latest Preferred Roaming List (PRL), used by your phone to access the network.  Update Profile: Update the user profile related to your wireless service account. If you choose to change your user name online, use this option to update the user name on your phone.  Update Samsung Software: Upgrade to the latest software available for your device.  Update Firmware: Update your phone’s firmware. Follow the prompts to download and install the update.  UICC Unlock: Unlock your device’s Universal Integrated Circuit Card. About Device View information about your device, including status, legal information, hardware and software versions, and a tutorial. 1.  Press   and tap   > Settings > More. 2. Tap About device, and then tap items for more details:  Software version: View your phone’s software version.  Hardware version: View the hardware version of your device.  Status: View information about your device’s current status.  Legal information: Display open source licenses, configure license settings, including your DivX®  VOD registration, and Google info.  Device name: View your device’s name, and enter a new name if desired.  Model number: View your device’s model number.   Android version: View the firmware version of your device.  By accessing this document, the recipient agrees and acknowledges that all contents and information in this document (i) are confidential and proprietary information of Samsung, (ii) shall be subject to the non- disclosure regarding project H and Project B, and (iii) shall not be disclosed by the recipient to any third party. Samsung Proprietary and Confidential
 Settings 169    Baseband version: View the baseband version of your device.  Kernel version: View the kernel version of your device.   Build number: View the build number of your device.  SELinux status: View your device’s current status.    By accessing this document, the recipient agrees and acknowledges that all contents and information in this document (i) are confidential and proprietary information of Samsung, (ii) shall be subject to the non- disclosure regarding project H and Project B, and (iii) shall not be disclosed by the recipient to any third party. Samsung Proprietary and Confidential
 Index 170   Index 3-way Calling, 27 4G Services, 73 Accessibility, 162 Settings, 162 Account Manage, 5 Services, 6 Account Passwords, 4 Accounts, 40 Email, 41 Gmail, 40 Google, 40 Social Network, 54 Activation, 2 Alarm & Timer, 96 Answer a Call, 25 Applications, 57 Back Key, 7 Battery Install, 1 Bluetooth, 85, 103 Connect to a Car Kit, 103 Receive Information, 106 Send Information, 105 Unpair, 104 Brightness, 134 Browser, 76 Calculator, 97 Call Forwarding, 27 Call Waiting, 27 Caller ID, 26 Camera, 8, 77 Settings, 80 Clock, 96 Contacts, 33 Add, 34 Adding Entries to Your Favorites, 37 Edit, 35 Groups, 38 Make call from, 23 Save a Number, 35 Share, 39 Corporate Email Creation, 42 Cover release, 8 Data, 76 Data Services, 72 Password, 5 Data Usage, 123 DivX, 57 Drag, 14 Dropbox, 100 Earpiece, 7 Editing Text, 21 Email, 41 Compose, 43 Corporate Accounts, 42 Email Message Make call from, 24 Emergency Numbers, 24 Enhanced 911 (E911), 25 Enter Text, 19 Entertainment, 77 Extended Home Screen, 17 Favorites, 37 Files Transfer between phone and computer, 108 Flash, 8, 172 Flick, 14 Front camera, 7 Gestures, 13 Global Roaming Mode, 111 Gmail, 40 Google Sign in, 40 Voice Typing, 19 Google Checkout, 59 Google Maps, 60 Google Messenger, 55 By accessing this document, the recipient agrees and acknowledges that all contents and information in this document (i) are confidential and proprietary information of Samsung, (ii) shall be subject to the non- disclosure regarding project H and Project B, and (iii) shall not be disclosed by the recipient to any third party. Samsung Proprietary and Confidential
 Index 171   Google Navigation, 60 Google Play Movies, 65 Google Play Music, 61 Google Play Store, 58 Install an App, 58 Google Talk, 55 Google Voice Typing, 138 Configuring, 20 Using, 19 Google+, 55, 86 Group Creating a New Group, 38 Headset Jack, 8 Home Key, 7 Home Screen, 15 Extended, 17 Shortcuts, 15 Widgets, 16 In-call Options, 28 Incoming Call Answer, 25 Reject, 25 Infrared transmitter, 8 International Data Roaming, 114 Keyboard, 139, 141 Samsung, 139, 141 Language and Input, 138 LED indicator, 7 Light sensor, 7 Maps Google, 60 Menu Key, 7 Messaging, 40, 48 Options, 52 Microphones, 8 MMS Messaging, 48 Music, 61 Google Play Music, 61 Player, 61 Sprint Music Plus, 61 My Files, 99 Navigation, 60 Scout, 61 Notification Icons, 18 Phone, 23 Layout, 7 Navigation, 13 Phone calls Using contacts, 23 Phone Calls Emergency numbers, 24 From email messages, 24 From text messages, 24 Make calls, 23 Receive, 25 Using phone keypad, 23 Using recent calls, 23 Picasa, 86 Pinch, 14 Play Store, 58 Plus (+) Code Dialing, 112 Power Key, 7 Power On, 8 Proximity sensor, 7 Recent Calls Clear, 32 Make call from, 23 View, 31 Reject Incoming Call, 25 Rotate, 14 S Memo, 97 Creating, 97 S Voice, 101 Samsung Keyboard, 139, 141 Scout, 61 SD Card, 107 Remove, 107 Settings, 118 Accessibility, 162 Data Usage, 123 Language and Input, 138 Wi-Fi, 118 Setup Application, 3 SIM Card, 111 Slide, 13 SMS Messaging, 48 Social Network Accounts, 54 By accessing this document, the recipient agrees and acknowledges that all contents and information in this document (i) are confidential and proprietary information of Samsung, (ii) shall be subject to the non- disclosure regarding project H and Project B, and (iii) shall not be disclosed by the recipient to any third party. Samsung Proprietary and Confidential
 Index 172   Speaker, 8 Speed Dialing, 29 Spread, 14 Sprint 411, 6 Sprint Operator Services, 6 Sprint TV & Movies, 67 Sprint Worldwide Wireless Service, 111 Status Icons, 17 Swipe, 13 Text Editing, 21 Text Entry, 19 Text Input Methods, 19 Text Messaging, 48 Make call from, 24 Text-to-Speech, 143 Tools, 92 Touch, 13 Touch and Hold, 13 Touchscreen Turn off, 8 Turn on, 9 Turn Device On, 8 Typing, 19 Update Firmware, 109 USB Charger/Accessory port, 8 Videos Record, 78 Sharing, 84 Voice Recorder, 102 Voice Services, 101 Voice Typing, 19 Configuring, 20 Using, 19 Voicemail, 29 International, 113 Notification, 30 Password, 5 Setup, 4 VPN, 74, 125 Web, 71 Wi-Fi, 71 Settings, 118 YouTube, 54, 86 Zoom, 14   By accessing this document, the recipient agrees and acknowledges that all contents and information in this document (i) are confidential and proprietary information of Samsung, (ii) shall be subject to the non- disclosure regarding project H and Project B, and (iii) shall not be disclosed by the recipient to any third party. Samsung Proprietary and Confidential Legal Notice  1. All functionality, descriptions, ideas, drawings, features, specifications and other information  provided in this document are (i) Samsung’s proprietary and confidential information,  (ii) subject to the non-disclosure agreement  regarding Project H and Project B, (iii) provided for discussion purpose only, and (iv) shall not be disclosed by the recipient to any third party.  2. Samsung reserves the right to make changes to this document, at any time, without obligation  on Samsung to provide notification of such change.  3. Nothing in this document grants to the recipient any license or right in or  to information or materials provided in this document, or any intellectual property therein.  SAMSUNG PROPRIETARY AND CONFIDENTIAL  4. THIS DOCUMENT AND ANY INFORMATION CONTAINED HEREIN ARE PROVIDED  ON "AS IS" BASIS WITHOUT WARRANTY OF ANY KIND, EITHER IMPLIED OR EXPRESSED.”
18 Important Safety InformationSpecific Absorption Rate (SAR) Certification InformationYour wireless phone is a radio transmitter and receiver. It is designed and manufactured not to exceed the exposure limits for Radio Frequency (RF) energy set by the Federal Communications Commission (FCC) of the U.S. Government.These FCC RF exposure limits are derived from the recommendations of two expert organizations: the National Council on Radiation Protection and Measurement (NCRP) and the Institute of Electrical and Electronics Engineers (IEEE). In both cases, the recommendations were developed by scientific and engineering experts drawn from industry, government, and academia after extensive reviews of the scientific literature related to the biological effects of RF energy.The RF exposure limit set by the FCC for wireless mobile phones employs a unit of measurement known as the Specific Absorption Rate (SAR). The SAR is a measure of the rate of absorption of RF energy by the human body expressed in units of watts per kilogram (W/kg). The FCC requires wireless phones to comply with a safety limit of 1.6 watts per kilogram (1.6 W/kg).The FCC SAR limit incorporates a substantial margin of safety to give additional protection to Sprint_L600_IIB_.book  Page 18  Thursday, August 15, 2013  5:19 PMDRAFT For Internal Use Only
   the public and to account for any variations in measurements. SAR tests are conducted using standard operating positions accepted by the FCC with the phone transmitting at its highest certified power level in all tested frequency bands. Although the SAR is determined at the highest certified power level, the actual SAR level of the phone while operating can be well below the maximum reported value. This is because the phone is designed to operate at multiple power levels so as to use only the power required to reach the network. In general, the closer you are to a wireless base station antenna, the lower the power output of the phone.          Before a new model phone is available for sale to the public, it must be tested and certified to the FCC that it does not exceed the SAR limit established by the FCC. Tests for each model phone are performed in positions and locations (e.g. at the ear and worn on the body) as required by the FCC. For body-worn operation, this phone has been tested and meets FCC RF exposure guidelines when used with an accessory that contains no metal and that positions the mobile device a minimum of 1.0 cm from the body. Use of other accessories may not ensure compliance with FCC RF exposure guidelines. The FCC has granted an Equipment Authorization for this mobile phone with all    Important Safety Information
reported SAR levels evaluated as in compliance with the FCC RF exposure guidelines. The maximum SAR values for this model phone as reported to the FCC are:  Head: 0.5 W/Kg Body-worn: 1.09 W/Kg  SAR information on this and other model phones can be accessed online on the FCC's website through http://transition.fcc.gov/oet/ rfsafety/sar.html. To find information that pertains to a particular model phone, this site uses the phone FCC ID number which is usually printed somewhere on the case of the phone. Sometimes it may be necessary to remove the       battery pack to find the number. Once you have the FCC ID number for a particular phone, follow the instructions on the website and it should provide values for typical or maximum SAR for a particular phone. Additional SAR information can also be obtained at http://www.fcc.gov/encyclopedia/specificabsorption- rate-sar-cellular-telephones.  FCC Part 15 Information to User Pursuant to part 15.21 of the FCC Rules, you are cautioned that changes or modifications not expressly approved by Samsung could void your authority to operate the device. This device complies with part 15 of the FCC Rules. Operation is subject to the following two  Important Safety Information
FCC Notice and Cautions  FCC Notice  This device complies with Part 15 of the FCC Rules. Operation is subject to the following two conditions:  (1) this device may not cause harmful interference, and (2)  this device must accept any interference received, including interference that may cause undesired operation.  This equipment has been tested and found to comply with the limits for a Class B digital device, pursuant to part 15 of the FCC Rules. These limits are designed to provide reasonable protection against harmful interference in a residential installation. This equipment generates, uses and can radiate radio frequency energy and, if not installed and used in accordance with the instructions, may cause harmful interference to radio communications. However, there is no guarantee that interference will not occur in a particular installation. If this equipment does cause harmful interference to radio or television reception, which can be determined by turning the equipment off and on, the user is encouraged to try to correct the interference by one or more of the following measures:  -  Reorient or relocate the receiving antenna.  -Increase the separation between the equipment and receiver. -  Connect the equipment into an outlet on a circuit from that to which the receiver is connected. -  Consult the dealer or an experienced radio/TV technician for help.  The device may cause TV or radio interference if used in close proximity to receiving equipment. The FCC can require you to stop using the device if such interference cannot be eliminated. Vehicles using petroleum gas (such as propane or butane) must comply with the National Fire Protection Standard (NFPA-58). For a copy of this standard, contact the National Fire Protection Association, One Battery march Park, Quincy, MA 02269, Attn: Publication Sales Division.   Cautions Changes or modifications made in the radio device, not expressly approved by Samsung, will void the user’s authority to operate the equipment.The use of any unauthorized accessories may be dangerous and void the device warranty if said accessories cause damage or a defect to the device. Although your device is quite sturdy, it is a complex piece of equipment and can be broken. Avoid dropping, hitting, bending or sitting on it.
HAC Mode   To ensure that the Hearing Aid Compatibility rating for your phone is maintained, secondary transmitters such as Bluetooth and WLAN components must be disabled during a call.    >> This phone has been tested and rated for use with hearing aids for some of the technologies that it uses, however, there may be some newer wireless technologies used in the phone that have not been tested yet for use with hearing aids. It is important to try the different features of this phone thoroughly and in different locations, using your hearing aid or cochlear implant, to determine if you hear any interfering noise. Consult your service provider or the manufacturer of this phone for information on hearing aid compatibility. If you have questions about return or exchange policies, consult your service provider or phone retailer.
Hearing Aid Compatibility with Mobile Phones   When some mobile phones are used near some hearing devices (hearing aids and cochlear implants), users may detect a buzzing, humming, or whining noise. Some hearing devices are more immune than others to this interference noise, and phones also vary in the amount of interference they generate.    The wireless telephone industry has developed ratings for some of their mobile phones, to assist hearing device users in finding phones that may be compatible with their hearing devices.    Not all phones have been rated.    Phones that are rated have the rating on their box or a label on the box.    The ratings are not guarantees. Results will vary depending on the user’s hearing device and hearing loss. If your hearing device happens to be vulnerable to interfer-ence, you may not be able to use a rated phone successfully. Trying out the phone with your hearing device is the best way to evaluate it for your personal needs.    M-Ratings:  Phones rated M3 or M4 meet FCC requirements and are likely to gener-ate less interference to hearing devices than phones that are not labeled. M4 is the better/higher of the two ratings.    T-Ratings:    Phones rated T3 or T4 meet FCC requirements and are likely to be more usable with a hearing device’s telecoil (“T Switch” or “Telephone Switch”) than unrated phones.    T4 is the better/higher of the two ratings.    (Note that not all hearing devices have telecoils in them.)   Hearing devices may also be measured for immunity to this type of interference. Your hearing device manufacturer or hearing health professional may help you find results for your hearing device. The more immune your hearing aid is, the less likely you are to experience interference noise from mobile phones.    This phone has been tested and rated for use with hearing aids for some of the wireless technologies that it uses. However, there may be some newer wireless technologies used in this phone that have not been tested yet for use with hearing aids. It is important to try the different features of this phone thoroughly and in different locations, using your hearing aid or cochlear implant, to determine if you hear any interfering noise. Consult your service provider or the manufacturer of this phone for information on hearing aid compatibility. If you have questions about return or exchange policies, consult your service provider or phone retailer.

Navigation menu