Samsung Electronics Co SMN915R4 Multi-band CDMA/LTE Phone with WLAN, Bluetooth, RFID, and ANT+ User Manual
Samsung Electronics Co Ltd Multi-band CDMA/LTE Phone with WLAN, Bluetooth, RFID, and ANT+ Users Manual
Contents
- 1. Users Manual
- 2. Health/Safety/Warranty Guide
Users Manual

User manual
SM-N915R4
This device is capable of operating in 802.11a/n/ac mode. For 802.11a/n/ac devices operating in the frequency range of
5.15 - 5.25 GHz, they are restricted for indoor operations to reduce any potential harmful interference for Mobile Satellite
Services (MSS) in the US. WIFI Access Points that are capable of allowing your device to operate in 802.11a/n/ac mode
(5.15 - 5.25 GHz band) are optimized for indoor use only. If your WIFI network is capable of operating in this mode, please
restrict your WIFI use indoors to not violate federal regulations to protect Mobile Satellite Services.

1
Table of Contents
DEVICE FUNCTIONS ........................................ 4
SETTING UP YOUR DEVICE ............................. 6
Turning Your Device On and Off ............................................. 10
Locking and Unlocking Screen .............................................. 10
Initial Device Configuration .................................................... 10
Samsung Smart Switch ........................................................ 10
S PEN ............................................................ 11
Using the S Pen .................................................................... 12
Using Handwriting ................................................................ 13
EDGE SCREEN FEATURES ............................ 14
CALLING FEATURES ..................................... 15
Making a Call ....................................................................... 15
Answering a Call .................................................................. 16
Rejecting a Call..................................................................... 16
Ending a Call ........................................................................ 16
2
VOICEMAIL .................................................... 17
Set Up Voicemail ................................................................... 17
Access Voicemail .................................................................. 17
CONTACTS .................................................... 18
Creating a New Contact ........................................................ 18
Adding a Number to an Existing Contact ............................... 18
Deleting an Existing Contact .................................................. 19
MESSAGING .................................................. 20
Create and Send a Message ................................................. 20
CUSTOMIZE YOUR DEVICE ........................... 21
VVolume ............................................................................... 21
Widgets ................................................................................ 21
Wallpaper ............................................................................. 22
Notification Panel.................................................................. 23
CONNECTIONS ..............................................24
Connecting to Bluetooth ........................................................ 24
Connecting to Wi-Fi .............................................................. 24
3
APPS & MORE ............................................... 25
Installing Apps ...................................................................... 25
Setting Up Your Email Accounts ............................................ 25
Internet ................................................................................ 26
Multi Window ....................................................................... 27
Camera ................................................................................ 28
Lock Screen ......................................................................... 29
4
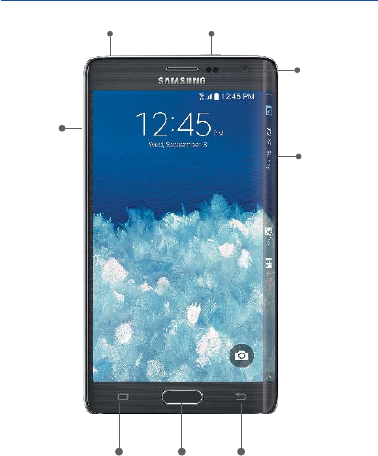
*Recent Apps and Back illuminate when navigating through the device.
Device Functions
Recent*
Apps
Home Back*
Power/LockHeadset Jack
Front
Camera
Edge
Screen
Volume
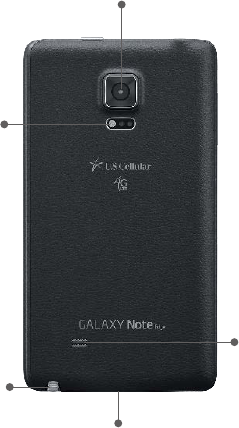
5
Speaker
Camera
Flash
S Pen
Charging/USB port
6
Setting Up Your Device
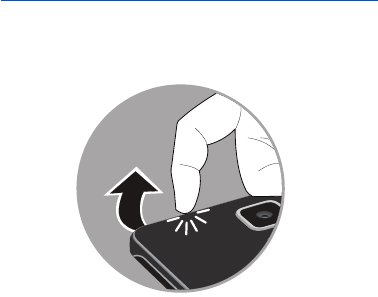
Step 1. Remove the Back Cover
• Locate the cover release latch and carefully remove the
cover off the device.
7
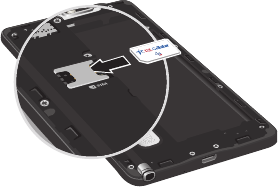
Step 2. Install the SIM Card
• Slide the SIM card into the SIM card slot until it is secured
into place.
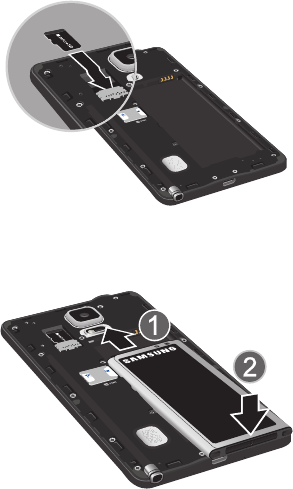
8
Step 3. Install an optional microSD card
• Slide the memory card into the card slot until it is secured
into place.
Step 4. Insert the Battery
• Insert the battery, making sure to align the gold contacts.
Press down gently to secure the battery.
9
Step 5. Replace the Back Cover
• Position the back cover over the battery compartment and
press down until you hear a click.
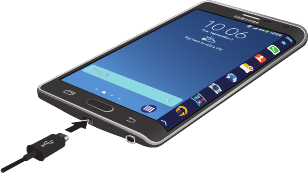
Step 6. Charging the Device
• Before turning on your device, charge it fully. Be sure to use
the charger that came with the device.

10
Turning Your Device On and Off
• To turn ON, press and hold the Power/Lock key.
• To turn OFF, press and hold Power/Lock key and
follow the prompts.
Locking and Unlocking Screen
• To Lock, press the Power/Lock key.
• To Unlock, press the Power/Lock key then swipe your finger
across the screen.
Initial Device Configuration
1. Select a language and tap Start or tap Accessibility to access
options for interacting with your device.
2. Follow the on-screen instructions to complete the set up process.
NOTE: If you do not set up or log into your Google account during this process,
you can later access Gmail from within the Applications page.
Samsung Smart Switch
Easily move over your photos, videos, music, apps and more with
Samsung Smart Switch™. Get started today at
samsungsmartswitch.com
11
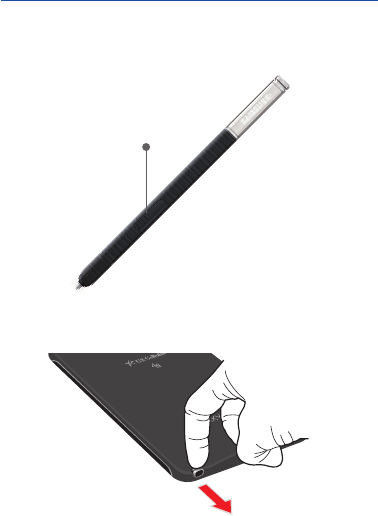
S Pen
The S Pen™ enables fast, accurate, and precise input providing the
most natural writing experience. By using the S Pen button, you can
minimize having to switch between touch and pen input.
To remove the S Pen:
¬Pull the end of the S Pen from the device.
S Pen Button
12
Using the S Pen
Effectively express yourself. Write/Draw directly into an email, or the
calendar, annotate Word, Excel, PowerPoint, and PDF documents,
capture your ideas in S Note, write a note on the back of the picture.
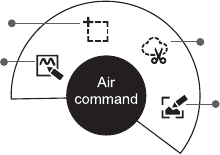
Air command: Once removed from its slot, S Pen shows an
on-screen Air command button toolbar that allows you to quickly
activate frequently used applications or actions.
• Action memo: Quickly link short notes to applications like Phone,
Contacts, Messages and so on.
• Smart select: Instantly outline and crop anything on the screen
and freely edit or share with others via several applications.
• Image clip: Draw a shape on the screen to copy it, and then
share it or save it in Scrapbook.
• Screen write: Capture a screen image and write or draw on it.
Action
memo
Smart select
Image clip
Screen
write

13
Using Handwriting
1. Remove the S Pen from its slot.
2. Launch an application that contains an input area
(ex: Messages, Calculator, Dialer Keypad, etc.)
3. Hover the S Pen over a input area until Handwriting Input
appears, then quickly tap the icon to reveal a new handwriting
area. Use this area to enter your input (text or numbers) and
then have the device recognize that information.
14
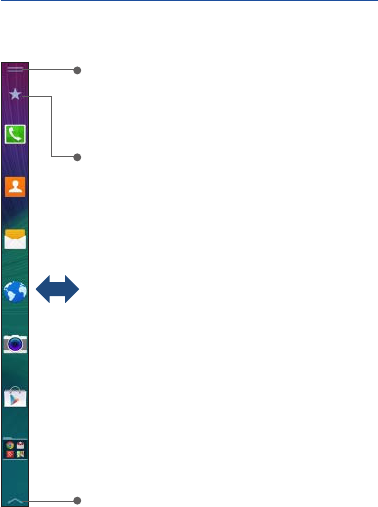
Edge Screen Features
The Edge screen delivers always-on access to email, Internet, apps,
notifications, news and more—without interrupting the main screen.
Quick Tools: Swipe down from the top of the
edge screen to access tools, such as flashlight
and stopwatch.
Edit Favorites: Place your favorite apps on the
edge screen. Tap to edit Favorites.
Settings: Tap to access edge a settings.
Swipe left or right to access additional
edge screen panels.
15
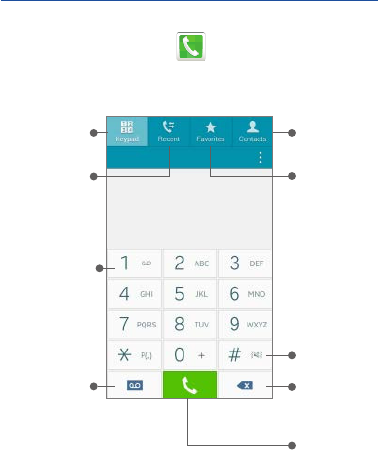
Calling Features
Making a Call
¬From the Home screen, tap Phone.
*From the contact list, make a call by sliding your
finger across the contact name from left to right.
Dial a
number
Call
history Access
favorite
contacts
Access
contacts
list*
Place call
Delete
Touch and
hold for
vibrate
mode
Tap to
open
Visual
Voicemail
Press and
hold to call
voicemal

16
Answering a Call
¬At the incoming call screen, touch and slide Answer in
any direction to answer the call.
Rejecting a Call
¬At the incoming call screen, touch and slide Reject in any
direction to route the call to your voicemail system.
Ending a Call
¬While on a call, tap End Call.
1716
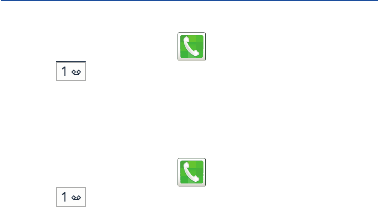
Voicemail
Set Up Voicemail
1. From the Home screen, tap Phone and then touch and
hold until the device dials your voicemail.
2. Follow the prompts in the new user tutorial to set up your mail
box.
Access Voicemail
1. From the Home screen, tap Phone and then touch and
hold . After connection, you will hear your voice greeting.
2. When connected, follow the voice prompts from your voicemail
center.
NOTE: Your voice mailbox is not password protected until you create a password
by following the setup tutorial.
18
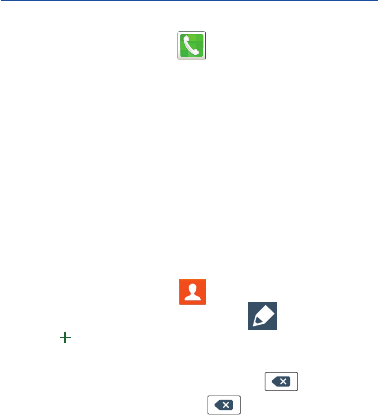
Contacts
Creating a New Contact
1. From the Home screen, tap Phone.
2. Enter a phone number using the on-screen dialpad.
3. Tap Add to contacts g Create contact or select the Contact
entry from the on-screen list.
4. Choose a save location for the new contact. You can save to
the Device, Microsoft Exchange ActiveSync, Google, or
Samsung account.
5. Enter the desired information into the appropriate fields.
6. Tap Save to store the new entry.
Adding a Number to an Existing Contact
1. From the Home screen, tap Contacts.
2. Tap a contact name from the list and tap Edit.
3. Tap within the phone number area and enter a new phone
number.
• If you make a mistake while dialing, tap to clear
the last digit. Touch and hold to clear the entire
sequence.
4. Tap Save to complete and store the new entry.

19
Deleting an Existing Contact
1. From the Home screen, tap Contacts.
2. Touch and hold a contact name from the list and select
g Delete.
20
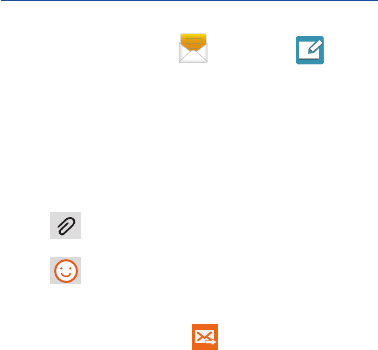
Messaging
Create and Send a Message
1. From the Home screen, tap Messages g Tap to
compose message.
2. Enter either the recipient’s phone number or email address.
NOTE: If adding a recipient from Logs, Contacts, or Groups, tap the contact to
place a check mark alongside the entry and tap Done.
3. Tap the Enter message field and use the on-screen keypad to
enter a message.
4. Add more recipients by tapping the recipient field.
5. Tap Attach to insert various file types to your
message.
6. Tap Add emoticons to choose an available emoticon.
7. Select the file and complete the on-screen instructions to insert
it to the current message.
8. Review your message and tap Send.

21
Customize Your Device
Volume
Press the Volume key (on the left side of your device) up or down
to increase or decrease volume while on a call, listening to music or
video playback.
Widgets
Widgets are self-contained apps that run on a Home screen. There
are all kinds of widgets, including links to a specific contact, Internet
bookmarks, Gmail and email accounts, and many others.
1. From a Home screen, pinch the screen.
2. Tap Widgets.
3. Touch and hold a widget, drag it to a Home screen and release it.
Remove a Widget
1. From a Home screen, touch and hold a widget to release it.
2. Drag the widget to the Remove icon and release it.
NOTE: Removing a widget does not delete the widget, it just removes the widget
from the Home screen.
22
Wallpaper
Change the look of the Home and Lock screens with wallpaper. You
can display a favorite picture, or choose from preloaded wallpapers.
1. From a Home screen, pinch the screen.
2. Tap Wallpapers, and then choose Home screen, Lock
screen, or Home and lock screens.
3. Tap a wallpaper to see a sample, and then tap Set wallpaper.
23
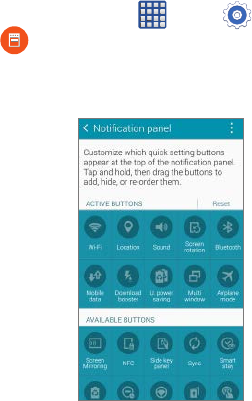
Notification Panel
Customize which quick setting buttons appear at the top of the
notification panel.
¬From a Home screen, tap Apps g Settings g
Notification panel.
24
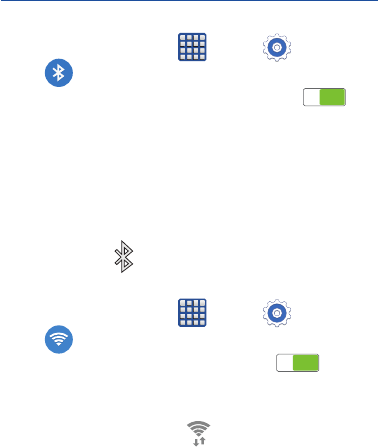
Connections
Connecting to Bluetooth
1. From the Home screen, tap Apps g Settings
g Bluetooth.
2. Slide the Bluetooth slider to the right to turn it on (
ON
ON
).
3. If necessary, tap Scan. Review the list of discovered in-range
Bluetooth® devices.
4. Tap a device from the list to initiate pairing.
5. Enter the passkey/PIN code, if needed, and tap OK.
6. The external device will then have to also accept the connection
and enter your device’s PIN code. Once successfully paired to an
external device, appears within the Status area.
Connecting to Wi-Fi
1. From the Home screen, tap Apps g Settings
g Wi-Fi.
2. Slide the Wi-Fi slider to the right to turn it on (
ON
ON
).
3. Tap Scan to display a list of Wi-Fi networks in-range.
4. Tap a network to connect and enter the password if prompted.
When connected you will see in the status bar.
25
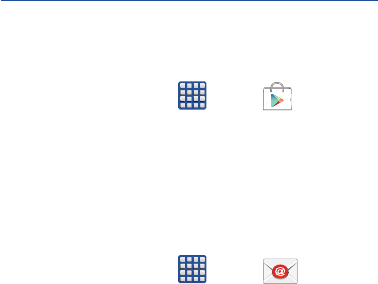
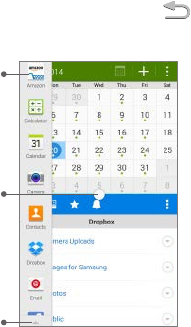
Apps & More
Installing Apps
Google Play™ is music, books, magazines, movies, TV shows, and
apps, available anywhere you go.
1. From the Home screen, tap Apps g
(the Google Play store app).
2. If prompted, follow the on-screen prompts to add an existing
Google™ account.
Setting Up Your Email Accounts
Check email on the go with popular Internet-based email accounts,
including Gmail™, Yahoo!® Mail, Hotmail®, etc.
1. From the Home screen, tap Apps g Email.
2. Enter your email address and password into the appropriate
fields and tap Next.
3. At the Account options screen, select the frequency which the
device should check for new email on the server and tap Next.
4. At the Set up email screen, name the account and enter a screen
name to identify yourself on this account.
5. Tap Done to store the new account.
26
Internet
Take the Internet on the go. You can reach the latest news, get the
weather and follow your stocks.
¬From the Home screen, Apps g Internet.
To enter a URL:
¬From the homepage tap the URL field at the top of the screen,
enter the URL and tap .
To add a new window:
1. From your browser window, tap Window g
+ New tab. A new browser window displays.
NOTE: The number of currently open windows is displayed at the bottom of the
Windows screen.
2. Scroll across the screen to view the currently active windows and
tap an entry to launch the selected Internet window.
27
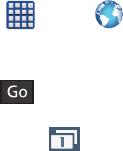
Multi Window
Run multiple applications on the current screen at the same time.
NOTE: Only applications found within the Multi window panel can be active atop
another current application on the screen.
1. Activate the Multi Window feature:
• Using two fingers, touch and drag the Status bar downwards
to display additional functions.
• Tap the Multi window entry to activate the feature.
2. To display the Multi window tab, press and hold the Back
key.
Touch and
hold app to
drag on
screen
Tap to adjust
screen size,
switch windows,
move content,
collapse
windows
expand
and close
applications
Options panel
28
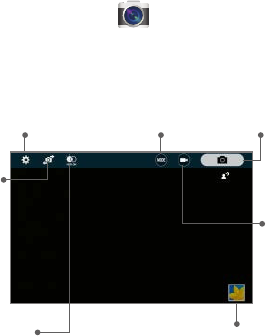
Camera
This device gives you the magic of professional digital photography.
Going pro has never been this easy or this fun.
¬From the Home screen, tap Camera.
Settings
Image viewer
Mode
Front
Camera
Capture
picture
Record
video
Tap to turn
HDR on/off

2928
Lock Screen
Configure the device’s security parameters.
¬From the Home screen, tap Apps g Settings g
Lock screen g Screen lock.
The Screen lock setting allows to choose from a variety of locking
features.

Notes