Samsung Electronics Co SMP555 GSM/WCDMA/LTE Tablet with Bluetooth, DTS/UNII a/b/g/n and ANT+ User Manual SM T555 UM EU Lollipop Eng D01 150309 Query

Samsung Electronics Co Ltd GSM/WCDMA/LTE Tablet with Bluetooth, DTS/UNII a/b/g/n and ANT+ SM T555 UM EU Lollipop Eng D01 150309 Query
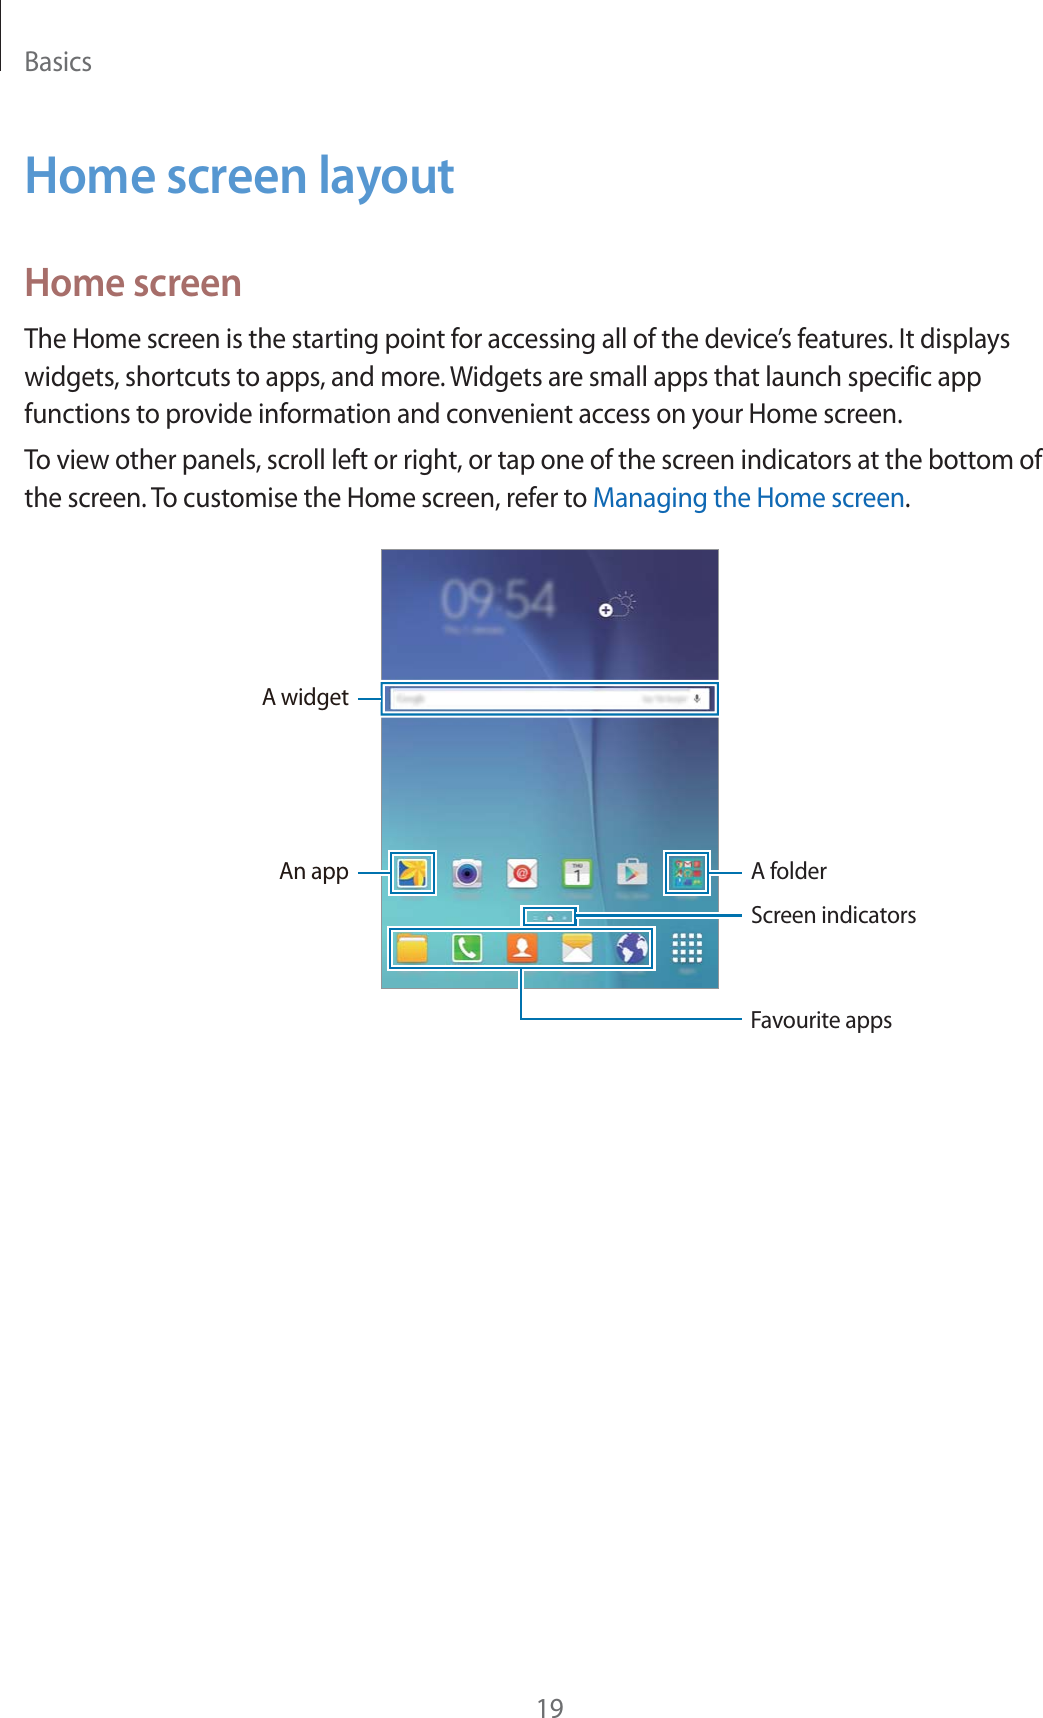
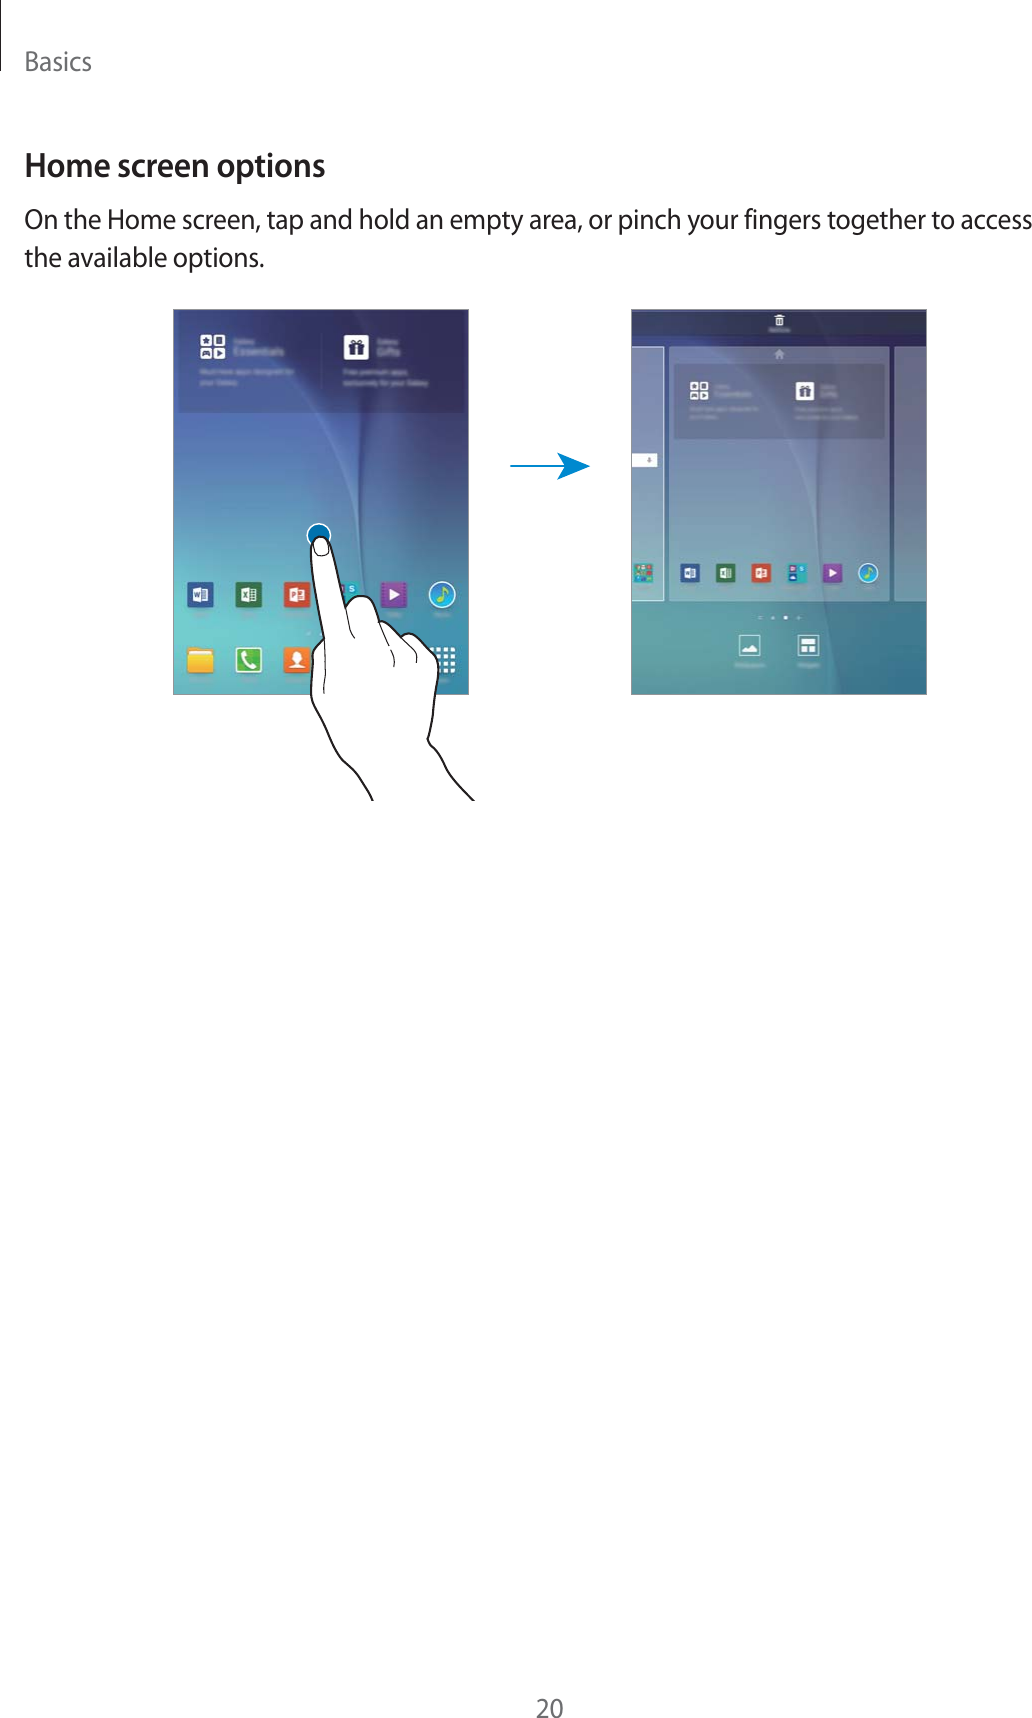
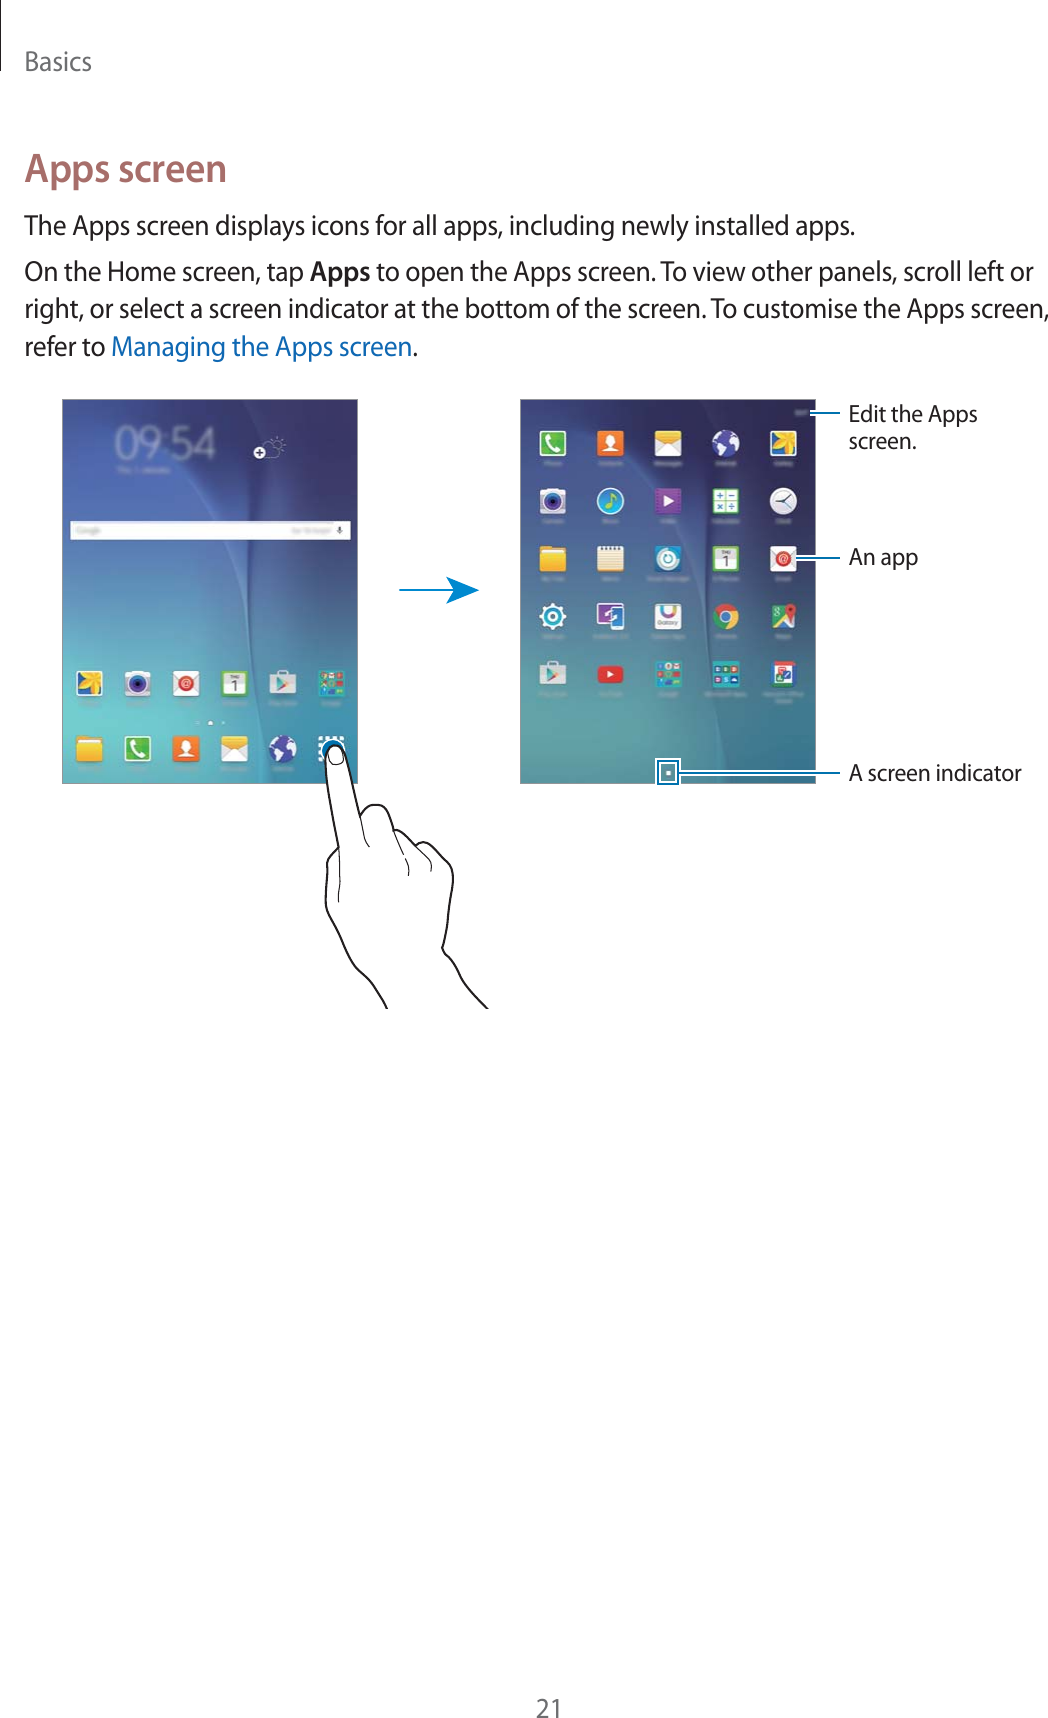
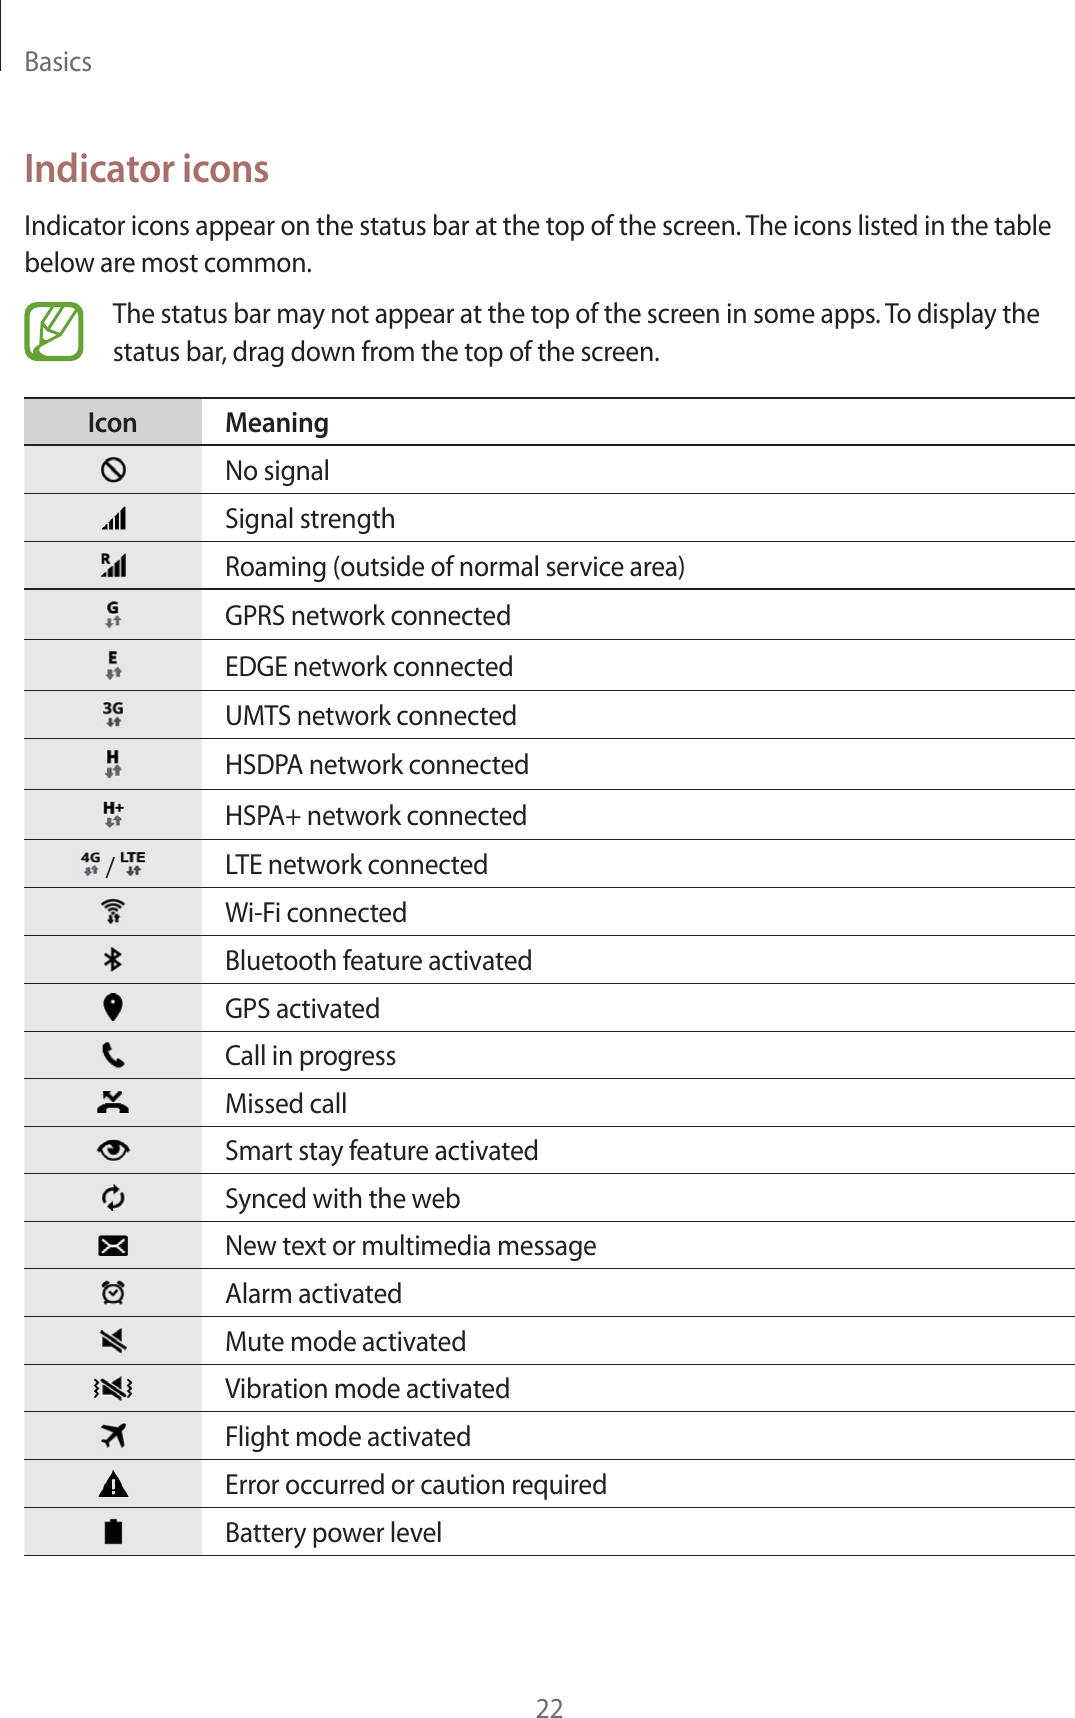
User Manual

www.samsung.comUser ManualSM-T555English (EU). 03/2015. Rev.1.0SM-P555
2Table of ContentsRead me firstGetting started6 Package contents7 Device layout9  Using the SIM or USIM card and battery12  Using a memory card14  Turning the device on and off15  Locking and unlocking the screenBasics16  Using the touch screen19  Home screen layout23 Notifications panel25 Opening apps25  Installing or uninstalling apps27 Entering text29 Screen capture29 My Files30  Power saving featureNetwork connectivity31 Mobile data31 Wi-Fi32  Mobile hotspot and tetheringMotions & usability features34  Motions and gestures35 Multi windowPersonalising40  Managing the Home and Apps screens41  Setting wallpaper and ringtones42  Changing the screen lock method43 Private mode45  Setting up accountsPhone46 Making calls47 Receiving calls48  Options during calls
Table of Contents3Connecting with other devices70 Bluetooth72 Wi-Fi Direct74 Quick Connect75 SideSync 3.082 Screen Mirroring84 Mobile printingDevice & data manager85  Transferring data from your previous device87  Using the device as a removable disk for data transfer87  Updating the device88  Backing up and restoring data89  Performing a data resetSettings90 About Settings90 Connections93 Device95 Personal99 SystemAppendix103 Troubleshooting108  Removing the battery (non-removable type)Contacts49 Adding contacts50  Importing and exporting contacts50  Searching for contactsMessages & email51 Messages52 EmailCamera54 Basic shooting55 Shooting modes57 Camera settingsGallery58  Viewing content on the deviceUseful apps and features59 S Finder59 S Planner61 Internet62 Music63 Video64 Clock65 Calculator65 Memo66 Smart Manager67 Google apps
4Read me firstPlease read this manual before using the device to ensure safe and proper use.rDescriptions are based on the device’s default settings.rSome content may differ from your device depending on the region, service provider, or device’s software.rContent (high quality content) that requires high CPU and RAM usage will affect the overall performance of the device. Apps related to the content may not work properly depending on the device’s specifications and the environment that it is used in.rSamsung is not liable for performance issues caused by apps supplied by providers other than Samsung.rSamsung is not liable for performance issues or incompatibilities caused by edited registry settings or modified operating system software. Attempting to customise the operating system may cause the device or apps to work improperly.rSoftware, sound sources, wallpapers, images, and other media provided with this device are licensed for limited use. Extracting and using these materials for commercial or other purposes is an infringement of copyright laws. Users are entirely responsible for illegal use of media.rYou may incur additional charges for data services, such as messaging, uploading and downloading, auto-syncing, or using location services depending on your data plan. For large data transfers, it is recommended to use the Wi-Fi feature.rDefault apps that come with the device are subject to updates and may no longer be supported without prior notice. If you have questions about an app provided with the device, contact a Samsung Service Centre. For user-installed apps, contact service providers.rModifying the device’s operating system or installing softwares from unofficial sources may result in device malfunctions and data corruption or loss. These actions are violations of your Samsung licence agreement and will void your warranty.
Read me first5Instructional iconsWarning: situations that could cause injury to yourself or othersCaution: situations that could cause damage to your device or other equipmentNote: notes, usage tips, or additional information
6Getting startedPackage contentsCheck the product box for the following items:rDevicerQuick start guiderThe items supplied with the device and any available accessories may vary depending on the region or service provider.rThe supplied items are designed only for this device and may not be compatible with other devices.rAppearances and specifications are subject to change without prior notice.rYou can purchase additional accessories from your local Samsung retailer. Make sure they are compatible with the device before purchase.rUse only Samsung-approved accessories. Using unapproved accessories may cause the performance problems and malfunctions that are not covered by the warranty.rAvailability of all accessories is subject to change depending entirely on manufacturing companies. For more information about available accessories, refer to the Samsung website.
Getting started7Device layoutTouch screenLight sensorRecent apps buttonHome buttonBack buttonHeadset jackVolume buttonPower buttonMicrophoneFront cameraMultipurpose jackMemory card slotSIM card slotSpeakerSpeakerRear cameraGPS antenna Push clipPush clip
Getting started8rDo not cover the antenna area with your hands or other objects. This may cause connectivity problems or drain the battery.rUsing a Samsung-approved screen protector is recommended. Unapproved screen protectors may cause the sensors to malfunction.rDo not allow water to contact the touch screen. The touch screen may malfunction in humid conditions or when exposed to water.ButtonsButton FunctionPowerrPress and hold to turn the device on or off.rPress to turn on or lock the screen.Recent appsrTap to open the list of recent apps.rTap and hold to launch the split screen view.HomerPress to turn on the screen while the screen is locked.rPress to return to the Home screen.rPress and hold to launch Google.BackrTap to return to the previous screen.VolumerPress to adjust the device volume.
Getting started9Using the SIM or USIM card and batteryInstalling the SIM or USIM cardInsert the SIM or USIM card provided by the mobile telephone service provider.rOnly microSIM cards work with the device.rSome LTE services may not be available depending on the service provider. For more information about service availability, contact your service provider.1Open the cover of the SIM card slot.2Insert the SIM or USIM card with the gold-coloured contacts facing downwards.3Push the SIM or USIM card into the slot until it locks in place.rDo not insert a memory card into the SIM card slot. If a memory card happens to be lodged in the SIM card slot, take the device to a Samsung Service Centre to remove the memory card.rUse caution not to lose or let others use the SIM or USIM card. Samsung is not responsible for any damages or inconveniences caused by lost or stolen cards.4Close the cover of the SIM card slot.
Getting started10Removing the SIM or USIM card1Open the cover of the SIM card slot.2Press the SIM or USIM card with your finger, and then pull it out.3Close the cover of the SIM card slot.Charging the batteryUse the charger to charge the battery before using it for the first time. A computer can be also used to charge the battery by connecting them via the USB cable.Use only Samsung-approved chargers, batteries, and cables. Unapproved chargers or cables can cause the battery to explode or damage the device.rWhen the battery power is low, the battery icon appears empty.rIf the battery is completely discharged, the device cannot be turned on immediately when the charger is connected. Allow a depleted battery to charge for a few minutes before turning on the device.rIf you use multiple apps at once, network apps, or apps that need a connection to another device, the battery will drain quickly. To avoid disconnecting from the network or losing power during a data transfer, always use these apps after fully charging the battery.
Getting started111Connect the USB cable to the USB power adaptor and then plug the end of the USB cable into the multipurpose jack.Connecting the charger improperly may cause serious damage to the device. Any damage caused by misuse is not covered by the warranty.2Plug the USB power adaptor into an electric socket.rThe device can be used while it is charging, but it may take longer to fully charge the battery.rIf the device receives an unstable power supply while charging, the touch screen may not function. If this happens, unplug the charger from the device.rWhile charging, the device may heat up. This is normal and should not affect the device’s lifespan or performance. If the battery gets hotter than usual, the charger may stop charging.rIf the device is not charging properly, take the device and the charger to a Samsung Service Centre.3After fully charging, disconnect the device from the charger. First unplug the charger from the device, and then unplug it from the electric socket.To save energy, unplug the charger when not in use. The charger does not have a power switch, so you must unplug the charger from the electric socket when not in use to avoid wasting power. The charger should remain close to the electric socket and easily accessible while charging.
Getting started12Reducing the battery consumptionYour device provides options that help you save the battery power. By customising these options and deactivating features in the background, you can use the device longer between charges:rOptimise the device using the Smart manager.rWhen you are not using the device, switch to sleep mode by pressing the Power button.rClose unnecessary apps using the task manager.rDeactivate the Bluetooth feature.rDeactivate the Wi-Fi feature.rDeactivate auto-syncing of apps.rDecrease the backlight time.rDecrease the screen brightness.Using a memory cardInstalling a memory cardYour device accepts memory cards with maximum capacities of 128 GB. Depending on the memory card manufacturer and type, some memory cards may not be compatible with your device.rSome memory cards may not be fully compatible with the device. Using an incompatible card may damage the device or the memory card, or corrupt the data stored in it.rUse caution to insert the memory card right-side up.rThe device supports the FAT and the exFAT file systems for memory cards. When inserting a card formatted in a different file system, the device asks to reformat the memory card.rFrequent writing and erasing of data shortens the lifespan of memory cards.rWhen inserting a memory card into the device, the memory card’s file directory appears in the My Files ĺ SD card folder.
Getting started131Open the cover of the memory card slot.2Insert a memory card with the gold-coloured contacts facing downwards.3Push the memory card into the slot until it locks in place.4Close the cover of the memory card slot.Removing the memory cardBefore removing the memory card, first unmount it for safe removal. On the Home screen, tap Apps ĺ Settings ĺ Storage ĺ Unmount SD card.1Open the cover of the memory card slot.2Push the memory card until it disengages from the device, and then pull it out.3Close the cover of the memory card slot.Do not remove the memory card while the device is transferring or accessing information. Doing so can cause data to be lost or corrupted or can damage the memory card or device. Samsung is not responsible for losses that result from the misuse of damaged memory cards, including the loss of data.
Getting started14Formatting the memory cardA memory card formatted on a computer may not be compatible with the device. Format the memory card on the device.On the Home screen, tap Apps ĺ Settings ĺ Storage ĺ Format SD card ĺ FORMAT SD CARD ĺ ERASE EVERYTHING.Before formatting the memory card, remember to make backup copies of all important data stored in the device. The manufacturer’s warranty does not cover loss of data resulting from user actions.Turning the device on and offPress and hold the Power button for a few seconds to turn on the device.When you turn on your device for the first time or after performing a data reset, follow the on-screen instructions to set up your device.To turn off the device, press and hold the Power button, and then tap Power off.Follow all posted warnings and directions from authorised personnel in areas where the use of wireless devices is restricted, such as aeroplanes and hospitals.
Getting started15Locking and unlocking the screenPressing the Power button turns off the screen and locks it. Also, the screen turns off and automatically locks if the device is not used for a specified period.To unlock the screen, press the Power button or the Home button and flick your finger in any direction within the unlock screen area.You can change the unlock code to unlock the screen. Refer to Changing the screen lock method for more information.
16BasicsUsing the touch screenrDo not allow the touch screen to come into contact with other electrical devices. Electrostatic discharges can cause the touch screen to malfunction.rTo avoid damaging the touch screen, do not tap it with anything sharp or apply excessive pressure to it with your fingertips.rThe device may not recognise touch inputs close to the edges of the screen, which are outside of the touch input area.rLeaving the touch screen idle for extended periods may result in afterimages (screen burn-in) or ghosting. Turn off the touch screen when you do not use the device.rIt is recommended to use fingers when you use the touch screen.TappingTo open an app, to select a menu item, to press an on-screen button, or to enter a character using the keyboard on the screen, tap it with a finger.
Basics17Tapping and holdingTap and hold an item or the screen for more than 2 seconds to access available options.DraggingTo move an item, tap and hold it and drag it to the target position.
Basics18Double-tappingDouble-tap on a webpage or image to zoom in. Double-tap again to return.FlickingFlick left or right on the Home screen or the Apps screen to see another panel. Flick up or down to scroll through a webpage or a list of items, such as contacts.Spreading and pinchingSpread two fingers apart on a webpage, map, or image to zoom in a part. Pinch to zoom out.
Basics19Home screen layoutHome screenThe Home screen is the starting point for accessing all of the device’s features. It displays widgets, shortcuts to apps, and more. Widgets are small apps that launch specific app functions to provide information and convenient access on your Home screen.To view other panels, scroll left or right, or tap one of the screen indicators at the bottom of the screen. To customise the Home screen, refer to Managing the Home screen.A widgetA folderAn appScreen indicatorsFavourite apps
Basics20Home screen optionsOn the Home screen, tap and hold an empty area, or pinch your fingers together to access the available options.
Basics21Apps screenThe Apps screen displays icons for all apps, including newly installed apps.On the Home screen, tap Apps to open the Apps screen. To view other panels, scroll left or right, or select a screen indicator at the bottom of the screen. To customise the Apps screen, refer to Managing the Apps screen.Edit the Apps screen.An appA screen indicator
Basics22Indicator iconsIndicator icons appear on the status bar at the top of the screen. The icons listed in the table below are most common.The status bar may not appear at the top of the screen in some apps. To display the status bar, drag down from the top of the screen.Icon MeaningNo signalSignal strengthRoaming (outside of normal service area)GPRS network connectedEDGE network connectedUMTS network connectedHSDPA network connectedHSPA+ network connected /  LTE network connectedWi-Fi connectedBluetooth feature activatedGPS activatedCall in progressMissed callSmart stay feature activatedSynced with the webNew text or multimedia messageAlarm activatedMute mode activatedVibration mode activatedFlight mode activatedError occurred or caution requiredBattery power level
Basics23Notifications panelUsing the notifications panelWhen you receive new notifications, such as messages or missed calls, indicator icons appear on the status bar. To see more information about the icons, open the notifications panel and view the details.To open the notifications panel, drag the status bar downwards. To close the notifications panel, drag the bar from the bottom of the screen upwards.You can use the following functions on the notifications panel.Launch Settings.Clear all notifications.Adjust the brightness.Launch S Finder. Launch Quick Connect.Activate or deactivate options. Tap and hold a button to view more detailed settings.Rearrange quick setting buttons.Tap a notification and perform various actions.
Basics24Rearranging quick setting buttonsTo rearrange quick setting buttons on the notifications panel, tap EDIT, tap and hold an item, drag the item to another location, and then tap DONE.Using the quick setting buttonsYou can activate or deactivate some features on the notifications panel. Tap the following options to activate or deactivate them. You can view more detailed settings if you tap and hold a button.rWi-Fi: Refer to Wi-Fi for more information.rLocation: Activate or deactivate the GPS feature.rSound / Vibrate / Mute: Select a sound mode.rScreen rotation: Allow or prevent the interface from rotating when you rotate the device.Some apps do not allow screen rotation.rBluetooth: Refer to Bluetooth for more information.rMobile data: Refer to Data usage or Mobile networks for more information.rPower saving: Refer to Power saving feature for more information.rFlight mode: Refer to Flight mode for more information.rDo not disturb: Activate or deactivate blocking mode. In blocking mode, the device will block notifications. To select which notifications will be blocked, tap Settings ĺ Sounds and notifications ĺ Do not disturb.rU. power saving: Refer to Ultra power saving mode for more information.rMobile hotspot: Refer to Mobile hotspot and tethering for more information.rSmart stay: When you activate this feature, the screen stays on as long as you look at it.rPrivate mode: Refer to Private mode for more information.rScreen Mirroring: Refer to Screen Mirroring for more information.rSync: When you activate this feature, the device automatically syncs apps, such as calendar or email.
Basics25Opening appsOn the Home screen or the Apps screen, select an app icon to open it.To open the list of recently-used apps, tap   and select an app icon to open.Closing an appTap   and drag an app icon to the left or right to close it. To close all running apps, tap CLOSE ALL.Installing or uninstalling appsSamsung Galaxy AppsUse this app to purchase and download apps.Tap Galaxy Apps on the Apps screen.This app may not be available depending on the region or service provider.Installing appsBrowse apps by category or tap SEARCH to search for a keyword.Select an app to view information about it. To download free apps, tap Install. To purchase and download apps where charges apply, tap the button that shows the app’s price.To change the auto update settings, tap   ĺ Settings ĺ Auto update apps, and then select an option.
Basics26Play StoreUse this app to purchase and download apps.Tap Play Store on the Apps screen.Installing appsBrowse apps by category or tap   to search for a keyword.Select an app to view information about it. To download free apps, tap INSTALL. To purchase and download apps where charges apply, tap the price and follow the on-screen instructions.To change the auto update settings, tap   ĺ Settings ĺ Auto-update apps, and then select an option.Managing appsUninstalling or disabling appsTo disable default apps, open the Apps screen and tap EDIT.   appears on the apps that you can disable. Select an app and tap DISABLE ĺ DONE.To uninstall downloaded apps, open the Apps screen and tap EDIT ĺ   ĺ UNINSTALL ĺ DONE. Alternatively, on the Apps screen, tap Settings ĺ Applications ĺ Application manager, select an app, and then tap UNINSTALL.Enabling appsOn the Apps screen, tap Settings ĺ Applications ĺ Application manager, scroll to DISABLED, select an app, and then tap ENABLE.rDisabling apps: Disable selected default apps that cannot be uninstalled from the device. You cannot use disabled apps.rUninstalling apps: Uninstall downloaded apps.
Basics27Entering textKeyboard layoutA keyboard appears automatically when you enter text to send messages, create memos, and more.Text entry is not supported in some languages. To enter text, you must change the input language to one of the supported languages.Break to the next line.Move the cursor.Delete a preceding character.Enter punctuation marks.Enter uppercase. For all caps, tap it twice.Change the keyboard settings. Enter a space.Changing the input languageTap   ĺ Select input languages, and then select the languages to use. If you select two or more languages, you can switch between the input languages by sliding the space key left or right.Using additional keyboard functionsTap and hold   to use various functions. Other icons may appear instead of   depending on the last function that was used.r : Enter text by voice.Change the language.Open the keyboard.Start or pause entering text by voice.
Basics28r : Switch to handwriting mode.Switch to the standard keyboard.r : Add an item from the clipboard.r : Enter emoticons.r : Switch to the floating or split keyboard.r : Change the keyboard settings.Copying and pasting1Tap and hold over text.2Drag   or   to select the desired text, or tap Select all to select all text.3Tap Copy or Cut. The selected text is copied to the clipboard.4Place the cursor where the text is to be inserted and tap   ĺ Paste. To paste text that you have previously copied, tap   ĺ Clipboard and select the text.
Basics29Screen captureCapture a screenshot while using the device.Press and hold the Home button and the Power button simultaneously. You can view captured images in Gallery. After capturing a screenshot, you can edit the image and share it with others.You can also capture screenshots using other methods. Refer to Palm swipe to capture for more information.It is not possible to capture a screenshot while using some apps.My FilesUse this app to access various files stored in the device or in other locations, such as cloud storage services.Tap My Files on the Apps screen.Search for files or folders.View files saved in cloud storage services.View files by categories.View recent files.View files stored in the device.View storage information.
Basics30Power saving featurePower saving modeSave the battery power by limiting the device’s functions.On the Apps screen, tap Settings ĺ Battery ĺ Power saving mode, and then tap the switch to activate it.Select from the following options:rStart power saving: Select a power level at which the device automatically switches to power-saving mode.Ultra power saving modeUse this mode to extend the device’s battery power. In ultra power saving mode, the device performs the following:rRestricts the available apps to essential and selected apps only.rDeactivates the mobile data connection when the screen turns off.rDeactivates the Wi-Fi and Bluetooth features.On the Apps screen, tap Settings ĺ Battery ĺ Ultra power saving mode, and tap switch to activate it.To add an app to the Home screen, tap   and select an app.To remove an app from the Home screen, tap MORE ĺ Remove, select an app with  , and then tap DONE.To change the settings for ultra power saving mode, such as network connectivity or sound, tap MORE ĺ Settings.To deactivate ultra power saving mode, tap MORE ĺ Disable ultra power saving mode.The usage time left shows the time remaining before the battery power runs out. Usage time left may vary depending on your device settings and operating conditions.
31Network connectivityMobile dataConnect the device to a mobile network to use the Internet or share media files with other devices. Refer to Data usage for additional options.On the Apps screen, tap Settings ĺ Data usage, and then tap the Mobile data switch to activate it.Wi-FiConnect the device to a Wi-Fi network to use the Internet or share media files with other devices. Refer to Wi-Fi for additional options.rYour device uses a non-harmonised frequency and is intended for use in all European countries. The WLAN can be operated in the EU without restriction indoors, but cannot be operated outdoors.rTurn off Wi-Fi to save the battery when not in use.1On the Apps screen, tap Settings ĺ Wi-Fi, and then tap the switch to activate it.2Select a network from the Wi-Fi networks list. Networks that require a password appear with a lock icon.3Tap CONNECT.Once the device connects to a Wi-Fi network, the device will reconnect to that network each time it is available without requiring a password. To prevent the device connecting to the network automatically, select it from the list of networks and tap FORGET.
Network connectivity32Mobile hotspot and tetheringAbout tethering and mobile hotspotsUse this feature to share the device’s mobile data connection with computers and other devices if an Internet connection is unavailable. Connections can be made via the Wi-Fi, USB, or Bluetooth.You may incur additional charges when using this feature.Using the mobile hotspotUse your device as a mobile hotspot to share your device’s mobile data connection with other devices.1On the Apps screen, tap Settings ĺ Mobile hotspot and tethering ĺ Mobile hotspot.2Tap the switch to activate it.r appears on the status bar. Other devices can find your device in the Wi-Fi networks list.rTo set a password for the mobile hotspot, tap MORE ĺ Configure Mobile hotspot and select the level of security. Then, enter a password and tap SAVE.3On the other device’s screen, search for and select your device from the Wi-Fi networks list.4On the connected device, use the device’s mobile data connection to access the Internet.
Network connectivity33Using USB tetheringShare the device’s mobile data connection with other devices via a USB cable.1On the Apps screen, tap Settings ĺ Mobile hotspot and tethering.2Connect your device to the computer via the USB cable.3Tap the USB tethering switch to activate it. appears on the status bar when the two devices are connected.4On the computer, use your device’s mobile data connection.Using Bluetooth tetheringShare the device’s mobile data connection with other devices via Bluetooth. Ensure that the computer that you connect to supports the Bluetooth feature.1Pair your device with the other device via Bluetooth. Refer to Pairing with other Bluetooth devices for more information.2On the Apps screen of your device, tap Settings ĺ Mobile hotspot and tethering.3Tap the Bluetooth tethering switch to activate it.4On the connected device, open the Bluetooth settings screen, tap   ĺ Internet access. appears on the status bar when the two devices are connected.5On the connected device, use the device’s mobile data connection to access the Internet.The connection methods may vary depending on the connected devices.
34Motions & usability featuresMotions and gesturesExcessive shaking or impact on the device may result in unintended inputs. Control motions properly.MuteOn the Apps screen, tap Settings ĺ Motions and gestures, and then tap the Mute switch to activate it.Cover the screen with your palm or turn the device over to mute incoming calls or alarms.
Motions & usability features35Palm swipe to captureOn the Apps screen, tap Settings ĺ Motions and gestures, and then tap the Palm swipe to capture switch to activate it.Place the side of your hand on the screen and sweep it across the screen from the right to the left or vice versa to capture a screenshot. You can view captured images in Gallery. After capturing a screenshot, you can edit the image and share it with others.It is not possible to capture a screenshot while using some apps.Multi windowAbout Multi windowMulti window lets you run two apps at the same time in the split screen view. You can also run multiple apps at the same time in the pop-up view.Some apps may not support this feature.
Motions & usability features36Split screen view1Tap   to open the list of recently used apps.2Swipe upwards or downwards and tap   on a recent app window.The selected app will launch in the upper window.3Select another app to launch.You can also launch the split screen view by tapping and holding  .
Motions & usability features37Using additional optionsWhen using apps in the split screen view, select an app window and tap the circle between the app windows to access the following options:r : Switch locations between app windows.r : Drag and drop text or copied images from one window to another. Tap and hold an item in the selected window and drag it to a location in another window.Some apps may not support this feature.
Motions & usability features38r : Minimise the window.r : Maximise the window.r : Close the app.Adjusting the window sizeDrag the circle between the app windows up or down to adjust the size of the windows.Pop-up view1On the Apps screen, launch an app to use in the pop-up view.2Drag down diagonally from either end of the top edge.The app screen will appear in the pop-up view.Close the app.Drag and drop content.Minimise the window.Maximise the window.
Motions & usability features39Moving pop-up windowsTo move a pop-up window, tap and hold the circle on a window and drag it to a new location.Launching the pop-up view from the split screen view1On the split screen view, tap an app window to launch it in the pop-up view.2Tap and hold the circle between the app windows.The selected app will launch in a pop-up window.
40PersonalisingManaging the Home and Apps screensManaging the Home screenAdding itemsTap and hold an app or a folder from the Apps screen, and then drag it to the Home screen.To add widgets, open the Home screen, tap and hold an empty area, tap Widgets, tap and hold a widget, and then drag it to the Home screen.Moving and removing an itemTap and hold an item on the Home screen, and then drag it to a new location.To move the item to another panel, drag it to the side of the screen.You can also move frequently-used apps to the shortcuts area at the bottom of the Home screen.To remove an item, tap and hold the item. Then, drag it to Remove that appears at the top of the screen.Creating a folder1On the Home screen, tap and hold an app, and then drag it to the another app.2Enter a folder name.Managing panelsOn the Home screen, tap and hold an empty area to add, move, or remove a panel.To add a panel, scroll left to the last panel, and then tap  .To move a panel, tap and hold a panel preview, and then drag it to a new location.To remove a panel, tap and hold a panel preview, and then drag it to Remove at the top of the screen.To set a panel as the main Home screen, tap  .
Personalising41Managing the Apps screenMoving itemsOn the Apps screen, tap EDIT. Tap and hold an item and drag it to a new location.To move the item to another panel, drag it to the side of the screen.Setting wallpaper and ringtonesSetting wallpaperSet an image or photo stored in the device as wallpaper for the Home screen or the locked screen.1On the Home screen, tap and hold an empty area, and then tap Wallpapers. Alternatively, on the Apps screen, tap Settings ĺ Wallpaper.2Select a screen to change or apply wallpaper to.3Scroll left or right and select from images displayed at the bottom of the screen.To select photos taken by the device’s camera or other images, tap From Gallery.4Tap SET AS WALLPAPER or DONE.Changing ringtonesChange ringtones for incoming calls and notifications.On the Apps screen, tap Settings ĺ Sounds and notifications.To set a ringtone for incoming calls, tap Ringtones and sounds ĺ Ringtone, select a ringtone, and then tap OK. To use a song stored in the device or in your account as a ringtone, tap ADD.To set a ringtone for notifications, tap Ringtones and sounds ĺ Default notification sound, select a ringtone, and then tap OK.
Personalising42Changing the screen lock methodYou can change the way that you lock the screen to prevent others from accessing your personal information.On the Apps screen, tap Settings ĺ Lock screen and security ĺ Screen lock type, and then select a screen lock method. The device requires an unlock code whenever unlocking it.If the unlock code is forgotten, take the device to a Samsung Service Centre to reset it.PatternDraw a pattern by connecting four dots or more, and then draw the pattern again to verify it. Set a backup PIN to unlock the screen when you forget the pattern.PINA PIN consists of numbers only. Enter at least four numbers, and then enter the password again to verify it.PasswordA password consists of characters and numbers. Enter at least four characters including numbers and symbols, and then enter the password again to verify it.
Personalising43Private modeHide personal content in your device to prevent others from accessing it.In private mode, you can hide items in Gallery, Video, Music, My Files, and Internet.Activating private mode1On the Apps screen, tap Settings ĺ Privacy and safety ĺ Private mode, and then tap the switch to activate it.If you are activating private mode for the first time, follow the on-screen instructions to set up a private mode access code.2Follow the on-screen instructions to enter the preset private mode access code.Private mode is activated and the   appears at the top of the screen.You can view and access the hidden items only when private mode is activated. To hide items stored in the private folder, deactivate private mode.Hiding content1On the Apps screen, launch an app to hide items.2Select an item and tap MORE ĺ Move to Private.If private mode is not activated, follow the on-screen instructions to enter the preset private mode access code.The selected items will be moved to the private folder.
Personalising44Viewing hidden contentYou can view hidden items only when private mode is activated.1On the Apps screen, tap Settings ĺ Privacy and safety ĺ Private mode, and then tap the switch to activate it.2Follow the on-screen instructions to enter the preset private mode access code.3On the Apps screen, tap My Files ĺ Private.Items moved to the private folder will appear on the screen. For bookmarks, you can view them with the Internet app.Unhiding content1In the private folder, tap and hold an item, and then tick items to unhide.2Tap MORE ĺ Remove from Private.3Select a folder to move the items to, and then tap MOVE HERE.The items will be moved to the selected folder.Automatically deactivating private modeYou can set the device to automatically deactivate private mode each time the screen turns off.1On the Apps screen, tap Settings ĺ Privacy and safety ĺ Private mode, and then tap the switch to activate it.2Follow the on-screen instructions to enter the preset private mode access code.3Tap the Auto disable switch to activate it.When the Auto disable option is enabled, the device will fail to transfer files to the private folder if the screen turns off during transfer.
Personalising45Setting up accountsAdding accountsSome apps used on your device require a registered account. Create accounts to have the best experience with your device.On the Apps screen, tap Settings ĺ Accounts ĺ Add account and select an account service. Then, follow the on-screen instructions to complete the account setup.To sync content with your accounts, select an account and select items to sync.Removing accountsOn the Apps screen, tap Settings ĺ Accounts, select an account, and then tap MORE ĺ Remove account.
46PhoneMaking callsTap Phone on the Apps screen.On the keypad, enter a phone number, and then tap   to make a voice call, or tap   to make a video call. You can also make calls to phone numbers listed in LOG, FAVOURITES, and CONTACTS.Access additional options.View favourite contacts.Delete a preceding character.Hide the keypad.View the contacts list.Add the number to the contacts list.Preview the phone number.View call and message logs.Making calls from call logs or contacts listTap LOG or CONTACTS, and then drag a contact or a phone number to the right to make a call.
Phone47Making an international callTap Phone.Open the keypad, tap and hold 0 until the + sign appears. Enter the country code, area code, and phone number, and then tap  .To block outgoing international calls, tap MORE ĺ Settings ĺ Call settings ĺ More settings ĺ Call barring. Then, select a call type, tap the International calls switch, enter a password, and then tap OK.Receiving callsAnswering a callWhen a call comes in, drag   outside the large circle.Rejecting a callWhen a call comes in, drag   outside the large circle.To send a message when rejecting an incoming call, drag the reject message bar upwards.To create various rejection messages, open the Apps screen and tap Phone ĺ MORE ĺ Settings ĺ Call settings ĺ Call rejection ĺ Rejection messages, enter a rejection message, and then tap  .Missed callsIf a call is missed,   appears on the status bar. Open the notifications panel to view the list of missed calls. Alternatively, on the Apps screen, tap Phone ĺ LOG to view missed calls.
Phone48Options during callsDuring a voice callDuring a voice call, the device automatically locks the screen to prevent unwanted touch inputs.The following actions are available:rAdd call: Dial a second call.rExtra volume: Increase the volume.rBluetooth: Switch to a Bluetooth headset if it is connected to the device.rSpeaker: Activate or deactivate the speakerphone. When using the speakerphone, speak into the microphone at the top of the device and keep the device away from your ears.rKeypad: Open the keypad.rMute: Turn off the microphone so that the other party cannot hear you.r : End the current call.rVOLUME: Adjust the volume.Tap MORE to view more options.During a video callTap the screen to use the following options:r : Switch between the front and rear cameras.r : End the current call.r : Turn off the microphone so that the other party cannot hear you.rVOLUME: Adjust the volume.Tap MORE to view more options.
49ContactsAdding contactsMoving contacts from other devicesYou can move contacts from other devices to your device. Refer to Transferring data from your previous device for more information.Creating contacts manually1On the Apps screen, tap Contacts.2Tap   and enter contact information.r : Add an image.r /   : Add or delete a contact field.3Tap SAVE.
Contacts50Importing and exporting contactsImport contacts from storage services to your device or export contacts from the device to storage services.On the Apps screen, tap Contacts.Tap MORE ĺ Settings ĺ Manage & back up contacts ĺ Import/Export contacts, and then select an import or export option.Searching for contactsOn the Apps screen, tap Contacts.Use one of the following search methods:rScroll up or down the contacts list.rDrag a finger along the index at the left side of the contacts list to scroll through it quickly.rTap the search field at the top of the contacts list and enter search criteria.Once a contact is selected, take one of the following actions:r : Add to favourite contacts.r /   : Make a voice or video call.r : Compose a message.r : Compose an email.Adding shortcuts for contacts to the Home screenAdd shortcuts to contacts that you frequently communicate with on the Home screen.1On the Apps screen, tap Contacts.2Select a contact.3Tap MORE ĺ Add shortcut on home screen.
51Messages & emailMessagesSending messagesSend text messages (SMS) or multimedia messages (MMS).You may incur additional charges for sending or receiving messages when you are roaming.1Tap Messages on the Apps screen.2Tap  .3Add recipients and enter a message.Enter a message.Select contacts from the contacts list.Enter recipients.Attach files. Send the message.Enter emoticons.Access additional options.4Tap SEND to send the message.
Messages & email52Viewing incoming messagesIncoming messages are grouped into message threads by contact. Select a contact to view the person’s messages.You may incur additional charges for sending or receiving messages when you are roaming.While viewing a message, tap MORE to view more options.EmailSetting up email accountsTap Email on the Apps screen.Set up an email account when opening Email for the first time.Enter the email address and password. Tap NEXT for a private email account or tap MANUAL SETUP for a company email account. After that, follow the on-screen instructions to complete the setup.To set up another email account, tap MORE ĺ Settings ĺ Add account.If you have more than one email account, you can set one as the default account. Tap MORE ĺ Settings ĺ MORE ĺ Set default accout, select an account, and then tap DONE.
Messages & email53Sending emailsTap Email on the Apps screen.Tap   at the bottom of the screen to compose an email.Add a CC or BCC.Add recipients.Add recipients from the contacts list.Enter the email text.Enter a subject.Send the email.Access additional options.Attach images, videos and others.Reading emailsTap Email on the Apps screen.Select an email account to use, and new emails are retrieved.Tap an email to read.Open attachments.Reply to the email.Add this email address to the contacts list or view other options.Mark the email as a reminder.Go to the previous or next email. Delete the email.Forward the email.Access additional options.
54CameraBasic shootingTaking photos or recording videos1Tap Camera on the Apps screen.2Tap the image on the preview screen where the camera should focus.3Tap   to take a photo or tap   to record a video.rSpread two fingers apart on the screen to zoom in, and pinch to zoom out.rTo capture an image from the video while recording, tap Capture.rTo change the focus while recording a video, tap where you want to focus. To focus on the centre of the screen, tap  .Switch between the front and rear cameras.Start recording a video.Take a photo.Change the shooting mode.Hide or show the setting icons.Display current mode.View photos and videos you have captured.Select among various effects that are available.Use this for delayed-time shots.Change camera settings.
Camera55rThe camera automatically shuts off when unused.rMake sure that the lens is clean. Otherwise, the device may not work properly in some modes that require high resolutions.Launching Camera on the locked screenTo quickly take photos of special moments, launch Camera on the locked screen.On the locked screen, drag   outside the large circle.This feature may not be available depending on the region or service provider.Camera etiquetterDo not take photos or record videos of other people without their permission.rDo not take photos or record videos where legally prohibited.rDo not take photos or record videos in places where you may violate other people’s privacy.Shooting modesThe available modes vary depending on the camera used.AutoUse this mode to allow the camera to evaluate the surroundings and determine the ideal mode for the photo.On the Apps screen, tap Camera ĺ MODE ĺ Auto.Interval shotUse this mode to take a series of self-portraits using the front camera. You can tick self-portraits to save them on the preview thumbnail.On the Apps screen, tap Camera ĺ MODE ĺ Interval shot.
Camera56PanoramaUse this mode to take a photo composed of many photos strung together. The device identifies the photo with   in Gallery.On the Apps screen, tap Camera ĺ MODE ĺ Panorama.To get the best shot, follow these tips:rMove the camera slowly in one direction.rKeep the image within the frame on the camera’s viewfinder.rAvoid taking photos of indistinct backgrounds, such as an empty sky or a plain wall.Beauty faceUse this mode to take a photo with lightened faces for gentler images.On the Apps screen, tap Camera ĺ MODE ĺ Beauty face.Sound & shotUse this mode to take a photo with sound. The device identifies the photos with in Gallery.On the Apps screen, tap Camera ĺ MODE ĺ Sound & shot.SportsUse this mode to take a photo of fast-moving subjects.On the Apps screen, tap Camera ĺ MODE ĺ Sports.Continuous shotUse this mode to take a series of photos of moving subjects.On the Apps screen, tap Camera ĺ MODE ĺ Continuous shot.Tap and hold   to take several photos continuously.
Camera57Camera settingsOn the Apps screen, tap Camera ĺ . Not all of the following options are available in both still camera and video camera modes.rPicture size (front) / Picture size (rear): Select a resolution. Higher resolutions result in higher quality photos, however they will take up more memory.rVideo size (front) / Video size (rear): Select a resolution. Higher resolutions result in higher quality videos, however they will take up more memory.rGesture control: Set the device to detect your palm, so you can use it to take self-portraits.rSave as horizontally flipped: Invert the image to create a mirror-image of the original scene, when taking photos with the front camera.rGrid lines: Display viewfinder guides to help composition when selecting subjects.rLocation tags: Set the device to attach the location tag to the photo.rTo improve GPS signals, avoid shooting in locations where the signal may be obstructed, such as between buildings or in low-lying areas, or in poor weather conditions.rWhen you share a photo with the location tag attached, the location information may be exposed to others. To avoid this, when viewing the photo, tap MORE ĺ Details ĺ EDIT, and then tap   under Location to delete your location information.rReview pictures: Set the device to show photos after capturing them.rStorage location: Select the memory location for storage.rVolume keys function: Set the device to use the Volume button to control the shutter or zoom function.rReset settings: Reset the camera settings.The available options vary depending on the mode used.
58GalleryViewing content on the deviceOn the Apps screen, tap Gallery and select an image or a video.Video files show the   icon on the preview thumbnail.To hide or show the menu bar, tap the screen.Access additional options.Move to the previous screen.Delete the image.Add to the favourites list.Modify the image.Share the image to others.
59Useful apps and featuresS FinderUse this app to search for content on the device. You can apply various filters and view the search history.Open the notifications panel and tap S Finder.Searching for contentTap the search field and enter a keyword, or tap   and say a keyword.To get more refined results, tap filters under the search field.To select search categories, tap MORE ĺ Select search locations.S PlannerCreating events1Tap S Planner on the Apps screen.2Tap  . Alternatively, select a date with no events in it and tap the date again.If the date already has saved events in it, tap the date and tap  .
Useful apps and features603Enter event details.Enter a title.Enter the location of the event.Add more details.Select a calendar to use or sync with.Set a start and end date for the event.Set a reminder for the event.Attach a map showing the location of the event.4Tap SAVE to save the event.Creating tasks1Tap S Planner on the Apps screen.2Tap TASK, enter details, and then tap TODAY or TOMORROW to set a due date.To add more details, tap  .3Tap SAVE to save the task.Syncing events and tasks with your accountsTap S Planner on the Apps screen.To add accounts to sync with, tap MORE ĺ Manage calendars ĺ Add account. Then, select an account to sync with and sign in.To change an account’s syncing option, open the Apps screen, tap Settings ĺ Accounts, and then select an account service.
Useful apps and features61Internet1Tap Internet on the Apps screen.2Tap the address field.3Enter the web address or a keyword, and then tap Go.To view the toolbars, drag your finger downwards slightly on the screen.Close the tab.Move to the previously-visited page.Open a new tab.Read an article in reading mode.Refresh the current webpage.View your bookmarks, saved pages, and recent Internet history.Open the homepage.Access additional options.
Useful apps and features62MusicPlaying musicTap Music on the Apps screen.Select a music category, and then select a song to play.Turn on shuffle.Pause and resume playback.Set the file as your favourite song.Skip to the previous song. Tap and hold to move backwards quickly.Skip to the next song. Tap and hold to move forwards quickly.Access additional options.Change the repeat mode.Adjust the volume.Open the playlist.To listen to songs at equal volume levels, tap MORE ĺ Settings, and then tap the Smart volume switch to activate it.When Smart volume is activated, the volume may end up louder than the device volume level. Use caution to avoid long-term exposure to loud sounds to prevent damage to your hearing.Smart volume may not be activated for some files.
Useful apps and features63VideoPlaying videosTap Video on the Apps screen.Select a video to play.Move the control panel to the left. Move forwards or backwards by dragging the bar.Change screen ratio.Skip to the previous video. Tap and hold to move backwards quickly.Skip to the next video. Tap and hold to move forwards quickly.Access additional options.Move the control panel to the right.Pause and resume playback.Adjust the volume.Switch to the pop-up video player.Open the playlist.
Useful apps and features64ClockALARMOn the Apps screen, tap Clock ĺ ALARM.Setting alarmsSet an alarm time and tap OPTIONS to set other various alarm options, and then tap SAVE. To activate or deactivate alarms, tap   next to the alarm in the alarms list.rSnooze: Set an interval and the number of times for the alarm to repeat after the preset time.rIncreasing volume: Set a time and tone for the smart alarm. A smart alarm starts at a low volume a few minutes before a preset alarm is scheduled to sound. The volume of the smart alarm increases gradually until you turn it off or the preset alarm sounds.Stopping alarmsTap DISMISS to stop an alarm. If you have previously enabled the snooze option, tap SNOOZE to repeat the alarm after a specified length of time.Deleting alarmsSelect alarms, and then tap  .WORLD CLOCKOn the Apps screen, tap Clock ĺ WORLD CLOCK.Creating clocksTap SEARCH, enter a city name or select a city from the cities list or globe, and then tap  .Deleting clocksSelect clocks, and then tap  .
Useful apps and features65STOPWATCHOn the Apps screen, tap Clock ĺ STOPWATCH.Tap START to time an event. Tap LAP to record lap times.Tap STOP to stop timing. To clear lap times, tap RESET.TIMEROn the Apps screen, tap Clock ĺ TIMER.Set the duration, and then tap START.Tap DISMISS when the timer goes off.CalculatorUse this app for simple or complex calculations.Tap Calculator on the Apps screen.To clear the history, tap CLEAR HISTORY.MemoUse this app to create memos and organise them by category.Tap Memo on the Apps screen.Composing memosTap   on the memos list and enter a memo. While composing a memo, use the following options:rCategory: Create or set a category.rImage: Insert images.rVoice: Make a voice recording to insert.rTasks: Add tick boxes at the beginning of each row to create a list of tasks.To save the memo, tap SAVE.To edit a memo, tap a memo, and then tap the content of the memo.
Useful apps and features66Searching for memosTap SEARCH on the memos list and enter a keyword to search for memos that include the keyword.Smart ManagerThe Smart manager provides an overview of the status of your device’s battery, storage, RAM, and system security. You can also automatically optimise the device with one tap of your finger.Using the quick optimisation featureOn the Apps screen, tap Smart Manager ĺ CLEAN ALL.The quick optimisation feature improves device performance through the following actions.rIdentifying apps that use excessive battery power and clearing some memory.rDeleting unnecessary files and closing apps running in the background.rScanning for malware and phishing attacks.Using the Smart managerOn the Apps screen, tap Smart Manager and select a feature.BatteryCheck the remaining battery power and time to use the device. For devices with low battery levels, conserve battery power by activating power saving features and closing apps that are consuming an excessive amount of battery power.The usage time left shows the time remaining before the battery power runs out. Usage time left may vary depending on your device settings and operating conditions.
Useful apps and features67StorageCheck the status of used and available memory capacity. You can delete unused and residual files or uninstall apps that you do not use any more.RAMCheck the amount of available RAM. You can close background apps and reduce the amount of RAM you are using to speed up your device.Device securityCheck the device’s security status. This feature scans your device for malware and blocks phishing attacks and malicious websites.Google appsGoogle provides entertainment, social network, and business apps. You may require a Google account to access some apps. Refer to Setting up accounts for more information.To view more app information, access each app’s help menu.Some apps may not be available or may be labelled differently depending on the region or service provider.ChromeSearch for information and browse webpages.GmailSend or receive emails via the Google Mail service.Google+Share your news and follow updates that your family, friends, and others share. You can also back up your photos and videos, and more.
Useful apps and features68MapsFind your location on the map, search for locations, and view location information for various places.Play MusicDiscover, listen to, and share music on your device.Play Movies & TVWatch videos stored on your device and download various content to watch from Play Store.Play BooksDownload various books from Play Store and read them.Play NewsstandRead news and magazines that interest you in one convenient location.Play GamesDownload games from Play Store and play them with others.DriveStore your content on the cloud, access it from anywhere, and share it with others.YouTubeWatch or create videos and share them with others.PhotosManage photos, albums, and videos that you have saved on the device and uploaded to Google+.
Useful apps and features69HangoutsChat with your friends individually or in groups and use images, emoticons, and video calls while you are chatting.GoogleSearch quickly for items on the Internet or your device.Voice SearchSearch quickly for items by saying a keyword or phrase.Google SettingsConfigure settings for some features provided by Google.
70Connecting with other devicesBluetoothAbout BluetoothBluetooth creates a direct wireless connection between two devices over short distances. Use Bluetooth to exchange data or media files with other devices.rSamsung is not responsible for the loss, interception, or misuse of data sent or received via Bluetooth.rAlways ensure that you share and receive data with devices that are trusted and properly secured. If there are obstacles between the devices, the operating distance may be reduced.rSome devices, especially those that are not tested or approved by the Bluetooth SIG, may be incompatible with your device.rDo not use the Bluetooth feature for illegal purposes (for example, pirating copies of files or illegally tapping communications for commercial purposes).Samsung is not responsible for the repercussion of illegal use of the Bluetooth feature.
Connecting with other devices71Pairing with other Bluetooth devices1On the Apps screen, tap Settings ĺ Bluetooth, and then tap the switch to activate it.The detected devices are listed.2Select a device to pair with.If your device has paired with the device before, tap the device name without confirming the auto-generated passkey.If the device you want to pair with is not in the list, request that the device turns on its visibility option.3Accept the Bluetooth authorisation request on both devices to confirm.Sending and receiving dataMany apps support data transfer via Bluetooth. You can share data, such as contacts or media files, with other Bluetooth devices. The following actions are an example of sending an image to another device.Sending an image1On the Apps screen, tap Gallery.2Select an image.3Tap Share ĺ Bluetooth, and then select a device to transfer the image to.If the device you want to pair with is not in the list, request that the device turns on its visibility option.4Accept the Bluetooth authorisation request on the other device.
Connecting with other devices72Receiving an imageWhen another device sends you an image, accept the Bluetooth authorisation request. You can view received images in Gallery.Unpairing Bluetooth devices1On the Apps screen, tap Settings ĺ Bluetooth.The device displays the paired devices in the list.2Tap   next to the device’s name to unpair.3Tap Unpair.Wi-Fi DirectAbout Wi-Fi DirectWi-Fi Direct connects devices directly via a Wi-Fi network without requiring an access point.Connecting to other devices1On the Apps screen, tap Settings ĺ Wi-Fi, and then tap the switch to activate it.2Tap Wi-Fi Direct.The detected devices are listed.3Select a device to connect to.4Accept the Wi-Fi Direct authorisation request on the other device to confirm.
Connecting with other devices73Sending and receiving dataYou can share data, such as contacts or media files, with other devices. The following actions are an example of sending an image to another device.Sending an image1On the Apps screen, tap Gallery.2Select an image.3Tap Share ĺ Wi-Fi Direct, select a device to transfer the image to, and then tap SHARE.4Accept the Wi-Fi Direct authorisation request on the other device.Receiving an imageWhen another device sends you an image, accept the Wi-Fi Direct authorisation request. You can view received images in Gallery.Ending the device connection1On the Apps screen, tap Settings ĺ Wi-Fi.2Tap Wi-Fi Direct.The device displays the connected devices in the list.3Tap the device name to disconnect the devices.
Connecting with other devices74Quick ConnectAbout Quick connectUse this feature to easily search and connect to nearby devices.rConnection methods may vary depending on the type of connected devices or the shared content.rDevice name may vary depending on the Bluetooth devices to pair with. For example, the device name can be shown as BT MAC.Connecting to other devices1Open the notifications panel and tap Quick Connect.If you are using this feature for the first time, select a visibility option and tap ENABLE QUICK CONNECT.When the panel opens, the Wi-Fi and Bluetooth features are activated automatically and the device searches for nearby devices.If you have installed Samsung Link on your device, the list of devices registered with Samsung Link will appear at the top of the screen.2Select a device to connect to.The next steps may vary depending on the connected device. Follow the on-screen instructions to complete the connection between the devices.To allow nearby devices to search for your device and connect to it, tap SETTINGS ĺ Device visibility, and then select an option.Re-searching for devicesIf the desired device does not appear in the list, search for the device.Tap REFRESH and select the device from the list of detected devices.Deactivating the Quick connect featureTap  .
Connecting with other devices75Sharing contentShare content with the connected devices.1Open the notifications panel and tap Quick Connect.2Select a device from the list of detected devices.3Tap Share content and select a media category.4Select the content to share and tap DONE.Your device sends the content to the connected device.SideSync 3.0About SideSync 3.0Use this app to control a smartphone’s screen with a virtual smartphone screen on your tablet.rOn your tablet, view messages or use the smartphone’s chat room.rOn your tablet, watch a video playing on the smartphone on a larger display.rEasily transfer files between your tablet and smartphone by dragging and dropping the files.Before using this apprYour tablet and smartphone must support Wi-Fi Direct.rSideSync 3.0 must be installed on both your tablet and smartphone.If it is not installed on any device, download and install it from Galaxy Apps or Play Store.rSideSync 3.0 operates only on devices with Android version 4.4 or higher.
Connecting with other devices76Connecting your tablet and a smartphone1On your tablet, tap SideSync 3.0 on the Apps screen.2Launch SideSync 3.0 on a smartphone.3The tablet searches for available smartphones automatically.Select one of the detected smartphones.4Tap OK on the smartphone screen.
Connecting with other devices775The smartphone’s virtual screen is displayed on your tablet and the smartphone’s screen is turned off.
Connecting with other devices78Using the virtual smartphone screenBrowse the screen and use apps in the virtual smartphone screen. You can send or receive messages, or chat with others.rSome features, such as Screen Mirroring, may not work in the virtual smartphone screen.rThe smartphone’s virtual screen may differ depending on the smartphone.Close SideSync 3.0.Virtual smartphone screenBack buttonHome buttonRecent apps buttonScreen rotationAccess additional options.Screen captureOpen the same webpage in the web browser of your tablet.Minimise the screen.Maximise the screen to fit your tablet's screen.
Connecting with other devices79Moving the virtual smartphone screenTap and drag the top edge of the virtual smartphone screen to move it to another location.Adjusting the size of the virtual smartphone screen1Tap and hold   at the bottom right of the virtual smartphone screen.2When the frame appears, drag the frame to adjust the size.Entering textWhen you enter text in the virtual smartphone screen, the tablet’s keyboard appears. Enter text using the keyboard.
Connecting with other devices80Switching between the smartphone screen and the virtual smartphone screenIt is not possible to use the smartphone screen and the virtual smartphone screen at the same time. When you are using the virtual smartphone screen on the tablet, the smartphone screen turns off.Using the smartphone screenPress the Home button on the smartphone to turn on the smartphone screen and turn off the virtual smartphone screen on the tablet.Using the virtual smartphone screenTap SWITCH TO TABLET on the tablet’s screen to turn on the virtual smartphone screen and turn off the smartphone screen.Playing music or videos on the tabletPlay music or videos stored in the smartphone via the screen and speaker of the tablet.1Open a music or video file in the virtual smartphone screen on the tablet.2The selected file is played using the tablet’s screen and speaker.Adjust the volume on the virtual smartphone screen or the tablet during playback.
Connecting with other devices81Copying files between devicesCopying files from the smartphone to the tablet1Tap and hold a file on the virtual smartphone screen.2Select the files to copy, tap and hold any selected file, and then drag it to the tablet’s screen.3My Files is launched on the tablet’s screen. Select a folder to save the file in and tap DONE.Copying files from the tablet to the smartphone1Tap and hold a file on the tablet’s screen.2Select the files to copy, tap and hold any selected file, and then drag it to the virtual smartphone screen.3My Files is launched on the virtual smartphone screen. Select a folder to save the file in and tap DONE.Using call functions with the tabletYou can use your smartphone’s call functions with the speaker and the microphone of the tablet. Receive an incoming call or make a call using virtual smartphone screen.For more information about the call functions, refer to the smartphone’s user manual.
Connecting with other devices82Screen MirroringAbout Screen MirroringUse this feature to connect your device to a large screen with an AllShare Cast dongle or HomeSync and then share your contents.Screen mirroring -enabled devices(AllShare Cast dongle, HomeSync)rThis feature may not be available depending on the region or service provider.rSome files may be buffered during playback, depending on the network connection.rTo save energy, deactivate this feature when not in use.rIf you specify a Wi-Fi frequency, AllShare Cast dongles or HomeSync may not be detected or connected.rIf you play videos or games on a TV, select an appropriate TV mode to get the best experience.
Connecting with other devices83Viewing content on a TVBefore you connect your device to a TV, connect the screen mirroring-enabled device to the TV. To set up the connection, refer to the device’s user manual. The following actions are an example of viewing content on a TV connected via an AllShare Cast dongle.1Connect the AllShare Cast dongle to the TV using an HDMI cable.2On the TV, select a connection mode, such as HDMI mode, to connect an external device.3Open the notifications panel and tap EDIT ĺ Screen Mirroring.The detected devices are listed.4Select a device to connect to.Your device’s screen appears on the TV screen.If you connect the device for the first time, tap and hold the dongle’s name in the list and enter the PIN shown on the TV screen.5Open or play a file, and then control the display with the keys on your device.
Connecting with other devices84Mobile printingConnect the device to a printer via Wi-Fi or Wi-Fi Direct, and print images or documents.Some printers may not be compatible with the device.Adding printer plug-insAdd printer plug-ins for printers you want to connect the device to.On the Apps screen, tap Settings ĺ More connection settings ĺ Printing ĺ Download plug-in, and search for a printer plug-in in Play Store. Select a printer plug-in and install it.Connecting to a printerOn the Apps screen, tap Settings ĺ More connection settings ĺ Printing, select a printer plug-in, and then tap the switch to activate it. The device searches for printers that are connected to the same Wi-Fi network as your device.To add printers manually, select a printer plug-in, tap MORE ĺ Add printer ĺ ADD PRINTER, enter details, and then tap OK.To change print settings, select a printer plug-in and tap MORE ĺ Printing settings.Printing contentWhile viewing content, such as images or documents, tap Share ĺ Print ĺ   ĺ All printers, and then select a printer.
85Device & data managerTransferring data from your previous deviceYou can transfer data from a previous device to your new device via Samsung Smart Switch. The following versions of Samsung Smart Switch are available.rMobile version (Smart Switch Mobile): Transfer data between mobile devices. You can download the app from Galaxy Apps or Play Store.rComputer version: Transfer data between your device and a computer. You can download the app from www.samsung.com/smartswitch.rSamsung Smart Switch is not supported on some devices or computers.rLimitations apply. Visit www.samsung.com/smartswitch for details. Samsung takes copyright seriously. Only transfer content that you own or have the right to transfer.Transferring data from a mobile deviceTransfer data from your previous device to your new device.The following actions are an example of transferring data from your previous Android device. To import data from a mobile device with a different operating system, refer to the on-screen instructions.1Download and install Smart Switch from Galaxy Apps or Play Store on your previous and new device.2Launch Smart Switch Mobile on both devices.3On your previous device, tap Android to Galaxy ĺ   ĺ Connect device manually ĺ Send content.You can see a password to connect with your new device.
Device & data manager864On your new device, tap Android to Galaxy ĺ   ĺ Connect device manually ĺ Receive content.5On your new device, enter the password, and then tap Connect.The devices will connect.6On your previous device, select data to send to your new device and tap Transfer.7On your new device, tap OK on the connection request pop-up window to receive the data.The data transfer will begin.8On both devices, tap Done when the data transfer is complete.Transferring data from a computerBack up data from your previous device to a computer and import the data to your new device.1On the computer, visit www.samsung.com/smartswitch to download Smart Switch.2On the computer, launch Smart Switch.If your previous device is not a Samsung device, back up data to a computer using a program provided by the device’s manufacturer. Then, skip to the fifth step.3Connect your previous device to the computer using the USB cable.4On the computer, follow the on-screen instructions to back up data from the device. Then, disconnect your previous device from the computer.5Connect your new device to the computer using the USB cable.6On the computer, follow the on-screen instructions to transfer data to your new device.
Device & data manager87Using the device as a removable disk for data transferMove audio, video, image, or other types of files from the device to the computer, or vice versa.Do not disconnect the USB cable from the device when you are transferring files. Doing so may cause data loss or device damage.The devices may not connect properly if they are connected via a USB hub. Directly connect the device to the computer’s USB port.1Connect the device to the computer using the USB cable.2Open the notifications panel, and then tap Connected as a media device ĺ Media device (MTP).Tap Camera (PTP) if your computer does not support Media Transfer Protocol (MTP) or not have any appropriate driver installed.3Transfer files between your device and the computer.Updating the deviceThe device can be updating to the latest software.Updating over the airThe device can be directly updated to the latest software by the firmware over-the-air (FOTA) service.On the Apps screen, tap Settings ĺ About device ĺ Software update ĺ Update now.To automatically check for available updates, tap the Auto update switch to activate it. To download updates only when a Wi-Fi connection is activated, tap the Wi-Fi only switch to activate it.
Device & data manager88Updating with Smart SwitchConnect the device to a computer and update the device to the latest software.1On the computer, visit www.samsung.com/smartswitch to download and install Smart Switch.2On the computer, launch Smart Switch.3Connect the device to the computer using a USB cable.4On the computer, click the update button in the connection window.rDo not turn off the computer or disconnect the USB cable while the device is updating.rWhile updating the device, do not connect other media devices to the computer. Doing so may interfere with the update process. Before updating, disconnect all other media devices from the computer.Backing up and restoring dataKeep your personal information, app data, and settings safe on your device. You can back up your sensitive information to a backup account and access it later. You must sign in to your Google or Samsung account to back up or restore data. Refer to Setting up accounts for more information.Using a Samsung accountOn the Apps screen, tap Settings ĺ Backup and reset ĺ Back up my data, select the items to back up, and then tap BACK UP NOW.To set the device to automatically back up data, tap the Auto back up switch to activate it.To restore data using a Samsung account, tap Restore. Current data will be deleted from the device to restore the selected items.
Device & data manager89Using a Google accountOn the Apps screen, tap Settings ĺ Backup and reset, and then tap the Back up my data switch to activate it. Tap Backup account and select an account as the backup account.To restore data using a Google account, tap the Automatic restore switch to activate it. When you reinstall apps, backed up settings and data will be restored.Performing a data resetDelete all settings and data on the device. Before performing a factory data reset, ensure you back up all important data stored on the device. Refer to Backing up and restoring data for more information.On the Apps screen, tap Settings ĺ Backup and reset ĺ Factory data reset ĺ RESET DEVICE ĺ ERASE EVERYTHING. The device automatically restarts.
90SettingsAbout SettingsUse this app to configure the device, set app options, and add accounts.Tap Settings on the Apps screen.To search for settings by entering keywords, tap SEARCH.ConnectionsWi-FiActivate the Wi-Fi feature to connect to a Wi-Fi network and access the Internet or other network devices.On the Settings screen, tap Wi-Fi, and then tap the switch to activate it.The device can maintain a stable network connection by automatically selecting either the Wi-Fi or mobile network to use the strongest signal. To automatically switch between networks, tap MORE ĺ Smart network switch ĺ On.To use options, tap MORE.Setting Wi-Fi sleep policyTap MORE ĺ Keep Wi-Fi on during sleep.When the screen is turned off, the device automatically turns off Wi-Fi connections. When this happens, the device automatically accesses mobile networks if it is set to use them. This may incur data transfer fees. To avoid additional charges, set this option to Always.BluetoothActivate the Bluetooth feature to exchange information over short distances.On the Settings screen, tap Bluetooth, and then tap the switch to activate it.
Settings91Flight modeThis disables all wireless functions on your device. You can use only non-network services.On the Settings screen, tap Flight mode, and then tap the switch to activate it.Mobile hotspot and tetheringUse the device as a mobile hotspot to share the device’s mobile data connection with other devices. Refer to Mobile hotspot and tethering for more information.On the Settings screen, tap Mobile hotspot and tethering.rMobile hotspot: Use the mobile hotspot to share the device’s mobile data connection with computers or other devices through the Wi-Fi network. You can use this feature when the network connection is not available.rBluetooth tethering: Use Bluetooth tethering to share the device’s mobile data connection with computers or other devices via Bluetooth.rUSB tethering: Use USB tethering to share the device’s mobile data connection with a computer via USB. When connected to a computer, the device is used as a wireless modem for the computer.Data usageKeep track of your data usage amount and customise the settings for the limitation.On the Settings screen, tap Data usage.rMobile data: Set the device to use data connections on any mobile network.rSet mobile data limit: Set a limit for mobile data usage.To use more options, tap MORE.rRestrict background data: Set the device to disable sync in the background while using a mobile network.rShow Wi-Fi usage: Set the device to show your data usage via Wi-Fi.rRestrict networks: Set the device to disable sync in the background while using Wi-Fi network.
Settings92Mobile networksConfigure your mobile network settings.On the Settings screen, tap Mobile networks.rData roaming: Set the device to use data connections when you are roaming.rAccess Point Names: Set up access point names (APNs).rNetwork mode: Select a network type.rNetwork operators: Search for available networks and manually register a network.More connection settingsCustomise settings to control networks.On the Settings screen, tap More connection settings.PrintingConfigure settings for printer plug-ins installed on the device. You can search for available printers or add one manually to print files.VPNSet up and connect to virtual private networks (VPNs).Default messaging appSelect the default app to use for messaging.EthernetThe Ethernet option is available when an Ethernet adaptor is connected to the device. Use this option to activate the Ethernet feature and configure network settings.
Settings93DeviceSounds and notificationsChange settings for various sounds on the device.On the Settings screen, tap Sounds and notifications.rSound mode: Set the device to use sound mode or silent mode.rVolume: Adjust the volume level for call ringtones, music and videos, system sounds, and notifications.rRingtones and sounds: Change the ringtone and system sound settings.rVibrations: Add or select a vibration pattern.rSound quality and effects: Select a sound effect to apply when you adjust to music.rDo not disturb: Change settings for managing interruptions.rNotifications on lock screen: Set whether or not to show the content of notifications on the locked screen.rApp notifications: Change the notification settings for each app.DisplayChange the display settings.On the Settings screen, tap Display.rBrightness: Set the brightness of the display.rFont: Change the font size and type.rScreen timeout: Set the length of time the device waits before turning off the display’s backlight.rSmart stay: Set the device to prevent the display backlight from turning off while you are looking at the display.rScreen mode: Change the screen mode.rDaydream: Set the device to launch a screensaver when the device is charging or connected to a desktop dock.
Settings94Motions and gesturesActivate the motion recognition feature and change the settings that control motion recognition on your device.On the Settings screen, tap Motions and gestures.rMute: Set the device to mute incoming calls or alarms by using palm motions or placing the device face down.rPalm swipe to capture: Set the device to capture a screenshot when you sweep your hand to the left or right across the screen.ApplicationsApplication managerView and manage the apps on your device.Default applicationsSelect a default setting for using apps.Application settingsCustomise the settings for each app.
Settings95PersonalWallpaperChange the wallpaper settings.On the Settings screen, tap Wallpaper.rHome screen: Select a background image for the Home screen.rLock screen: Select a background image for the locked screen.rHome and lock screens: Select a background image for the Home screen and the locked screen.Lock screen and securityChange the settings for securing the device.On the Settings screen, tap Lock screen and security.rScreen lock type: Change the screen lock method.rShow information: Change settings for the items displayed on the locked screen.rUnlock effect: Select an effect that you see when you unlock the screen.rDevice security: Scan for and remove malware from the device. You can also activate the real-time scanning feature to block phishing attacks and malicious websites.rFind My Mobile: Access the Find my mobile website (findmymobile.samsung.com). You can track and control your lost or stolen device from the Find my mobile website.rUnknown sources: Set the device to allow the installation of apps from unknown sources.rOther security settings: Configure additional security settings.
Settings96Privacy and safetyOn the Settings screen, tap Privacy and safety.rLocation: Change settings for location information permissions.rPrivate mode: Set the device to prevent others from accessing your personal content by activating private mode.rReport diagnostic info: Set the device to automatically send the device’s diagnostic and usage information to Samsung.AccessibilityUse this feature to improve accessibility to the device.On the Settings screen, tap Accessibility.rVision: Customise the settings to improve accessibility for visually impaired users.–Galaxy TalkBack: Activate TalkBack, which provides voice feedback.–Galaxy TalkBack help: View help information to learn how to use Galaxy TalkBack.–Dark screen: Set the device to turn the screen off at all times to keep the content on your screen private.–Rapid key input: Set the device to enter a character when you release your finger from the character on the keyboard. You can use this feature to enter characters instead of releasing your finger and double-tapping on the screen.–Speak passwords: Set the device to read the password aloud when you enter the password while TalkBack is activated.–Font size: Change the font size.–Magnification gestures: Set the device to magnify the screen and to zoom in on a specific area.–Greyscale: Display colours on the screen as grey tones.
Settings97–Negative colours: Reverse the display colours to improve visibility.–Colour adjustment: Adjust the colour scheme for the screen when the device determines that you are colour blind or having difficulty reading content.–Accessibility shortcut: Set the device to activate TalkBack when you press and hold the Power button, and then tap and hold the screen with two fingers.–Text-to-speech options: Change the settings for text-to-speech features used when TalkBack is activated, such as languages, speed, and more.rHearing: Customise the settings to improve accessibility for users with hearing impairment.–Turn off all sounds: Set the device to mute all device sounds, such as media sounds, and the caller’s voice during a call.–Samsung subtitles (CC): Set the device to display closed captions on content supported by Samsung and to change the closed caption settings.–Google subtitles (CC): Set the device to display closed captions on content supported by Google and to change the closed caption settings.–Left/right sound balance: Set the device to adjust the sound balance when using a headset.–Mono audio: Set the device to switch the sound output from stereo to mono when a headset is connected.–Auto haptic: Set the device to vibrate when playing sounds in downloaded apps, such as games.rDexterity and interaction: Customise the settings to improve accessibility for users who have reduced dexterity.–Universal switch: Set the device to scan and highlight items on the screen, and then read them aloud. You can control the touch screen by connecting an external switch, tapping the screen, or by using head movements and face gestures.–Assistant menu: Set the device to show the assistive shortcut icon that helps you access functions supported by external buttons or features on the notifications panel. You can also edit the menu on the shortcut icon.–Tap and hold delay: Set the recognition time for tapping and holding the screen.–Interaction control: Activate interaction control mode to restrict the device’s reaction to inputs while using apps.
Settings98rDirect access: Set the device to open selected accessibility menus when you press the Home button three times quickly.rNotification reminder: Set the device to alert you to notifications that you have not checked at the interval.rAnswering and ending calls: Change the method of answering or ending calls.rSingle tap mode: Set the device to control incoming calls or notifications by tapping the button instead of dragging it.rManage accessibility: Export or import the accessibility settings to share them with other devices.rServices: View accessibility services installed on the device.AccountsAdd email or SNS accounts.On the Settings screen, tap Accounts.Backup and resetChange the settings for managing settings and data.On the Settings screen, tap Backup and reset.rBack up my data: Back up your personal information and app data to the Samsung server. You can also set the device to automatically back up data.rRestore: Restore previously backed up personal information and app data from your Samsung account.rBackup account: Set up or edit your Google backup account.rBack up my data: Set the device to back up settings and app data to the Google server.rAutomatic restore: Set the device to restore settings and app data when the apps are reinstalled on the device.rFactory data reset: Reset settings to the factory default values and delete all data.
Settings99SystemLanguage and inputChange the settings for text input. Some options may not be available depending on the selected language.On the Settings screen, tap Language and input.rLanguage: Select a display language for all menus and apps.rDefault keyboard: Select a default keyboard type for text input.rSamsung keyboard: Change the Samsung keyboard settings.The available options may vary depending on the region or service provider.rGoogle voice typing: Change the voice input settings.rVoice input: Change the settings for the voice recogniser.rText-to-speech options: Change the text-to-speech settings.rPointer speed: Adjust the pointer speed for the mouse or trackpad connected to your device.BatteryView battery power information and change power saving options.On the Settings screen, tap Battery.rPower saving mode: Activate power-saving mode and change the settings for power-saving mode.rUltra power saving mode: Extend usage time and reduce battery consumption by displaying a simpler layout and allowing limited access to an app.The usage time left shows the time remaining before the battery power runs out. Usage time left may vary depending on your device settings and operating conditions.rDisplay battery percentage: Set the device to display the remaining battery life.
Settings100StorageView memory information for your device and memory card, or format a memory card.On the Settings screen, tap Storage.Formatting a memory card permanently deletes all data from it.The actual available capacity of the internal memory is less than the specified capacity because the operating system and default apps occupy part of the memory. The available capacity may change when you upgrade the device.AccessoriesChange the accessory settings.On the Settings screen, tap Accessories.rAutomatic unlock: Set the device to unlock automatically when the cover is flipped open. You can use this feature only for some screen lock methods.Date and timeAccess and alter the following settings to control how the device displays the time and date.On the Settings screen, tap Date and time.If the battery remains fully discharged or removed from the device, the time and date is reset.rAutomatic date and time: Automatically update the time and date when moving across time zones.rAutomatic time zone: Set the device to receive time zone information from the network when you move across time zones.rSet date: Set the current date manually.rSet time: Set the current time manually.rSelect time zone: Set the home time zone.rUse 24-hour format: Display time in 24-hour format.rSelect date format: Select a date format.
Settings101User manualView help information to learn how to use the device and apps or configure important settings.On the Settings screen, tap User manual.About deviceAccess device information, edit the device name, or update device software.On the Settings screen, tap About device.
102AppendixTroubleshootingBefore contacting a Samsung Service Centre, please attempt the following solutions. Some situations may not apply to your device.When you turn on your device or while you are using the device, it prompts you to enter one of the following codes:rPassword: When the device lock feature is enabled, you must enter the password you set for the device.rPIN: When using the device for the first time or when the PIN requirement is enabled, you must enter the PIN supplied with the SIM or USIM card. You can disable this feature by using the Lock SIM card menu.rPUK: Your SIM or USIM card is blocked, usually as a result of entering your PIN incorrectly several times. You must enter the PUK supplied by your service provider.rPIN2: When you access a menu requiring the PIN2, you must enter the PIN2 supplied with the SIM or USIM card. For more information, contact your service provider.Your device displays network or service error messagesrWhen you are in areas with weak signals or poor reception, you may lose reception. Move to another area and try again. While moving, error messages may appear repeatedly.rYou cannot access some options without a subscription. For more information, contact your service provider.Your device does not turn onWhen the battery is completely discharged, your device will not turn on. Fully charge the battery before turning on the device.
Appendix103The touch screen responds slowly or improperlyrIf you attach a protective cover or optional accessories to the touch screen, the touch screen may not function properly.rIf you are wearing gloves, if your hands are not clean while touching the touch screen, or if you tap the screen with sharp objects or your fingertips, the touch screen may malfunction.rThe touch screen may malfunction in humid conditions or when exposed to water.rRestart your device to clear any temporary software bugs.rEnsure that your device software is upgraded to the latest version.rIf the touch screen is scratched or damaged, visit a Samsung Service Centre.Your device freezes or has fatal errorsIf your device freezes or hangs, you may need to close apps or turn off the device and turn it on again. If your device is frozen and unresponsive, press and hold the Power button and the Volume button down simultaneously for more than 7 seconds to restart it.If this does not solve the problem, perform a factory data reset. On the Apps screen, tap Settings ĺ Backup and reset ĺ Factory data reset ĺ RESET DEVICE ĺ ERASE EVERYTHING. Before performing the factory data reset, remember to make backup copies of all important data stored in the device.If the problem is still not resolved, contact a Samsung Service Centre.Calls are not connectedrEnsure that you have accessed the right cellular network.rEnsure that you have not set call barring for the phone number you are dialling.rEnsure that you have not set call barring for the incoming phone number.Others cannot hear you speaking on a callrEnsure that you are not covering the built-in microphone.rEnsure that the microphone is close to your mouth.rIf using a headset, ensure that it is properly connected.
Appendix104Sound echoes during a callAdjust the volume by pressing the Volume button or move to another area.A cellular network or the Internet is often disconnected or audio quality is poorrEnsure that you are not blocking the device’s internal antenna.rWhen you are in areas with weak signals or poor reception, you may lose reception. You may have connectivity problems due to issues with the service provider’s base station. Move to another area and try again.rWhen using the device while moving, wireless network services may be disabled due to issues with the service provider’s network.The battery icon is emptyYour battery is low. Charge the battery.The battery does not charge properly (For Samsung-approved chargers)rEnsure that the charger is connected properly.rVisit a Samsung Service Centre and have the battery replaced.The battery depletes faster than when first purchasedrWhen you expose the device or the battery to very cold or very hot temperatures, the useful charge may be reduced.rBattery consumption increases when you use messaging features or some apps, such as games or the Internet.rThe battery is consumable and the useful charge will get shorter over time.Your device is hot to the touchWhen you use apps that require more power or use apps on your device for an extended period of time, your device may feel hot to the touch. This is normal and should not affect your device’s lifespan or performance.
Appendix105Error messages appear when launching the cameraYour device must have sufficient available memory and battery power to operate the camera app. If you receive error messages when launching the camera, try the following:rCharge the battery.rFree some memory by transferring files to a computer or deleting files from your device.rRestart the device. If you are still having trouble with the camera app after trying these tips, contact a Samsung Service Centre.Photo quality is poorer than the previewrThe quality of your photos may vary, depending on the surroundings and the photography techniques you use.rIf you take photos in dark areas, at night, or indoors, image noise may occur or images may be out of focus.Error messages appear when opening multimedia filesIf you receive error messages or multimedia files do not play when you open them on your device, try the following:rFree some memory by transferring files to a computer or deleting files from your device.rEnsure that the music file is not Digital Rights Management (DRM)-protected. If the file is DRM-protected, ensure that you have the appropriate licence or key to play the file.rEnsure that the file formats are supported by the device. If a file format is not supported, such as DivX or AC3, install an app that supports it. To confirm the file formats that your device supports, visit www.samsung.com.rYour device supports photos and videos captured with the device. Photos and videos captured by other devices may not work properly.rYour device supports multimedia files that are authorised by your network service provider or providers of additional services. Some content circulated on the Internet, such as ringtones, videos, or wallpapers, may not work properly.
Appendix106Another Bluetooth device is not locatedrEnsure that the Bluetooth wireless feature is activated on your device.rEnsure that the Bluetooth wireless feature is activated on the device you wish to connect to.rEnsure that your device and the other Bluetooth device are within the maximum Bluetooth range (10 m).If the tips above do not solve the problem, contact a Samsung Service Centre.A connection is not established when you connect the device to a computerrEnsure that the USB cable you are using is compatible with your device.rEnsure that you have the proper driver installed and updated on your computer.rIf you are a Windows XP user, ensure that you have Windows XP Service Pack 3 or higher installed on your computer.Your device cannot find your current locationGPS signals may be obstructed in some locations, such as indoors. Set the device to use Wi-Fi or a mobile network to find your current location in these situations.Data stored in the device has been lostAlways make backup copies of all important data stored in the device. Otherwise, you cannot restore data if it is corrupted or lost. Samsung is not responsible for the loss of data stored in the device.A small gap appears around the outside of the device caserThis gap is a necessary manufacturing feature and some minor rocking or vibration of parts may occur.rOver time, friction between parts may cause this gap to expand slightly.
Appendix107Removing the battery (non-removable type)rThese instructions are only for your service provider or an authorised repair agent.rDamage or faults caused by the unauthorised removal of the battery are not covered by the warranty.rTo remove or replace the battery, contact your service provider or an authorised repair agent.1Insert the device opening tool into the gap between the device’s screen and the back cover.Then, start separating the screen from the back cover by using the tool to pry them apart as shown in the image below.Take care when inserting the tool to avoid damaging the device’s internal components.2Continue reinserting the tool and prying the screen and the back cover apart at close intervals around the device.Rotate the back cover carefully and ensure that the hooks are not damaged.3When the screen is disengaged, separate the screen and the back cover.Then, put the back cover aside and place the screen face down on a flat work surface.
Appendix1084Loosen and remove the screws as shown in the image below.5Disconnect the battery connectors as shown in the image below.6Remove the battery.
48Exposure to Radio Frequency (RF) SignalsYour wireless device is a radio transmitter and receiver. It is designed and manufactured not to exceed the exposure limits for radio frequency (RF) energy set by the Federal Communications Commission (FCC) of the U.S. government. These FCC exposure limits are derived from the recommendations of two expert organizations, the National  Counsel  on Radiation Protection and Measurement (NCRP) and the Institute of Electrical and Electronics Engineers (IEEE). In both cases, the engineering experts drawn from industry, government, The exposure limit set by the FCC for wireless mobiledevices employs a unit of measurement known as the the rate of absorption of RF energy by the human body expressed in units of watts per kilogram (W/kg). T he FCC requires wireless devices to comply with a safety limit of 1.6 watts per kilogram (1.6 W/kg). The FCC exposure limit incorporates a substantial margin of safety to give additional protection to the public and to account for any variations in measurements.SAR tests are conducted using recommended operating positions accepted by the FCC with the device  tested frequency bands. Although the SAR is determined of the device while operating can be well  below the  maximum value. This is because the device is designed  to operate at multiple power levels so as to use only the power required to reach the network. In general, the closer you are to a wireless base station antenna, the lower the power output.Before a new model device is available for sale to the it does not exceed the exposure limit established by the FCC. Tests for each model are performed in positions and locations (e.g.  near the body) as requiredby the FCC. Health and safety informationFor typical operations, this model has been tested and meets the FCC exposure guidelines.    SAR information on this and other models can be viewed on-line at http://www.fcc.gov/oet/ea/fccid/.  This site uses the FCC ID number A3LSMP555.You can check the  FCC ID on the rear case.Once you have the FCC ID number for a particular device,follow the instructions on the website and it should  provide values for typical  or maximum SAR fora particular deviceSAR information can also be obtained at www.fcc.gov/cgb/sar.Operating EnvironmentRemember to follow any special regulations in force in any area and always switch your deviceforbidden to use it, or when it may cause interference or danger. When connecting the device or any accessory  to another device, read its user’s guide for detailed safety instructions. Do not connect incompatible products.
FCC Notice and Cautions  FCC Notice  This device complies with Part 15 of the FCC Rules. Operation is subject to the following two conditions:  (1) this device may not cause harmful interference, and (2)  this device must accept any interference received, including interference that may cause undesired operation.  This equipment has been tested and found to comply with the limits for a Class B digital device, pursuant to part 15 of the FCC Rules. These limits are designed to provide reasonable protection against harmful interference in a residential installation. This equipment generates, uses and can radiate radio frequency energy and, if not installed and used in accordance with the instructions, may cause harmful interference to radio communications. However, there is no guarantee that interference will not occur in a particular installation. If this equipment does cause harmful interference to radio or television reception, which can be determined by turning the equipment off and on, the user is encouraged to try to correct the interference by one or more of the following measures:  -  Reorient or relocate the receiving antenna.  -Increase the separation between the equipment and receiver. -  Connect the equipment into an outlet on a circuit from that to which the receiver is connected. -  Consult the dealer or an experienced radio/TV technician for help.  The device may cause TV or radio interference if used in close proximity to receiving equipment. The FCC can require you to stop using the device if such interference cannot be eliminated. Vehicles using petroleum gas (such as propane or butane) must comply with the National Fire Protection Standard (NFPA-58). For a copy of this standard, contact the National Fire Protection Association, One Battery march Park, Quincy, MA 02269, Attn: Publication Sales Division.   Cautions Changes or modifications made in the radio device, not expressly approved by Samsung, will void the user’s authority to operate the equipment.The use of any unauthorized accessories may be dangerous and void the device warranty if said accessories cause damage or a defect to the device. Although your device is quite sturdy, it is a complex piece of equipment and can be broken. Avoid dropping, hitting, bending or sitting on it.
This device is capable of operating in 802.11a/n mode. For 802.11a/n devices operating in the frequency range of 5.15 - 5.25 GHz, they are restricted for indoor operations to reduce any potential harmful interference for Mobile Satellite Services (MSS) in the US.    WIFI Access Points that are capable of allowing your device to operate in 802.11a/n mode (5.15 - 5.25 GHz band) are optimized for indoor use only. If your WIFI network is capable of operating in this mode, please restrict your WIFI use indoors to not violate federal regulations to protect Mobile Satellite Services.
CopyrightCopyright © 2015 Samsung ElectronicsThis manual is protected under international copyright laws.No part of this manual may be reproduced, distributed, translated, or transmitted in any form or by any means, electronic or mechanical, including photocopying, recording, or storing in any information storage and retrieval system, without the prior written permission of Samsung Electronics.TrademarksrSAMSUNG and the SAMSUNG logo are registered trademarks of Samsung Electronics.rBluetooth® is a registered trademark of Bluetooth SIG, Inc. worldwide.rWi-Fi®, Wi-Fi Protected Setup™, Wi-Fi Direct™, Wi-Fi CERTIFIED™, and the Wi-Fi logo are registered trademarks of the Wi-Fi Alliance.rAll other trademarks and copyrights are the property of their respective owners.

Navigation menu