Samsung Electronics Co SMP907A Portable Tablet with Multi-Band WCDMA/LTE, WLAN, Bluetooth and ANT+ User Manual P905V

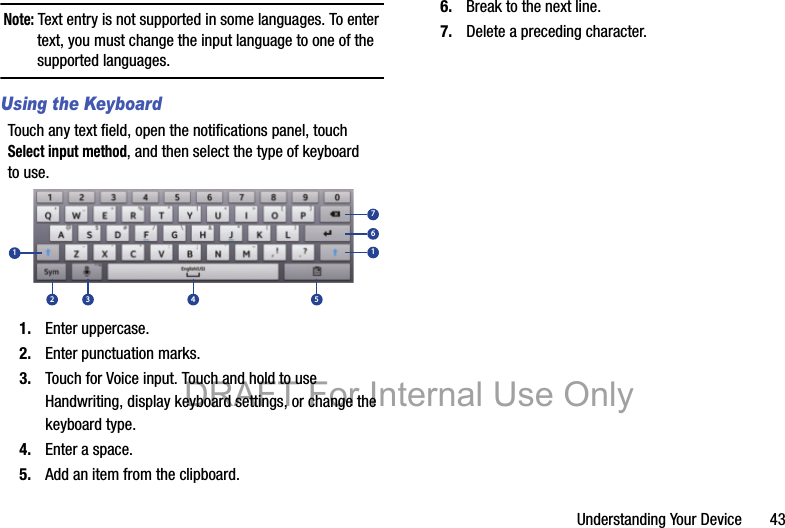
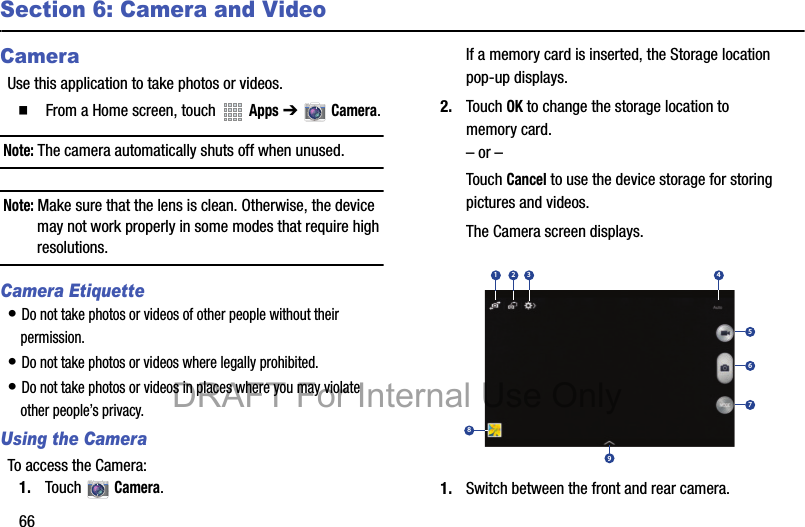
Samsung Electronics Co Ltd Portable Tablet with Multi-Band WCDMA/LTE, WLAN, Bluetooth and ANT+ P905V

Contents

Users Manual 1

DRAFT For Internal Use OnlySM-P907AA N D R O I D   T A B L E TUser ManualPlease read this manual before operating yourdevice and keep it for future reference.
Warning! This product contains chemicals known to the State of California to cause cancer and reproductive toxicity.Intellectual PropertyAll Intellectual Property, as defined below, owned by or which is otherwise the property of Samsung or its respective suppliers relating to the SAMSUNG Phone, including but not limited to, accessories, parts, or software relating there to (the “Phone System”), is proprietary to Samsung and protected under federal laws, state laws, and international treaty provisions. Intellectual Property includes, but is not limited to, inventions (patentable or unpatentable), patents, trade secrets, copyrights, software, computer programs, and related documentation and other works of authorship. You may not infringe or otherwise violate the rights secured by the Intellectual Property. Moreover, you agree that you will not (and will not attempt to) modify, prepare derivative works of, reverse engineer, decompile, disassemble, or otherwise attempt to create source code from the software. No title to or ownership in the Intellectual Property is transferred to you. All applicable rights of the Intellectual Property shall remain with SAMSUNG and its suppliers.Open Source SoftwareSome software components of this product, including but not limited to 'PowerTOP' and 'e2fsprogs', incorporate source code covered under GNU General Public License (GPL), GNU Lesser General Public License (LGPL), OpenSSL License, BSD License and other open source licenses. To obtain the source code covered under the open source licenses, please visit:http://opensource.samsung.com.Disclaimer of Warranties; Exclusion of LiabilityEXCEPT AS SET FORTH IN THE EXPRESS WARRANTY CONTAINED ON THE WARRANTY PAGE ENCLOSED WITH THE PRODUCT, THE PURCHASER TAKES THE PRODUCT "AS IS", AND SAMSUNG MAKES NO EXPRESS OR IMPLIED WARRANTY OF ANY KIND WHATSOEVER WITH RESPECT TO THE PRODUCT, INCLUDING BUT NOT LIMITED TO THE MERCHANTABILITY OF THE PRODUCT OR DRAFT For Internal Use Only
ITS FITNESS FOR ANY PARTICULAR PURPOSE OR USE; THE DESIGN, CONDITION OR QUALITY OF THE PRODUCT; THE PERFORMANCE OF THE PRODUCT; THE WORKMANSHIP OF THE PRODUCT OR THE COMPONENTS CONTAINED THEREIN; OR COMPLIANCE OF THE PRODUCT WITH THE REQUIREMENTS OF ANY LAW, RULE, SPECIFICATION OR CONTRACT PERTAINING THERETO. NOTHING CONTAINED IN THE INSTRUCTION MANUAL SHALL BE CONSTRUED TO CREATE AN EXPRESS OR IMPLIED WARRANTY OF ANY KIND WHATSOEVER WITH RESPECT TO THE PRODUCT. IN ADDITION, SAMSUNG SHALL NOT BE LIABLE FOR ANY DAMAGES OF ANY KIND RESULTING FROM THE PURCHASE OR USE OF THE PRODUCT OR ARISING FROM THE BREACH OF THE EXPRESS WARRANTY, INCLUDING INCIDENTAL, SPECIAL OR CONSEQUENTIAL DAMAGES, OR LOSS OF ANTICIPATED PROFITS OR BENEFITS.Modification of SoftwareSAMSUNG IS NOT LIABLE FOR PERFORMANCE ISSUES OR INCOMPATIBILITIES CAUSED BY YOUR EDITING OF REGISTRY SETTINGS, OR YOUR MODIFICATION OF OPERATING SYSTEM SOFTWARE. USING CUSTOM OPERATING SYSTEM SOFTWARE MAY CAUSE YOUR DEVICE AND APPLICATIONS TO WORK IMPROPERLY. YOUR CARRIER MAY NOT PERMIT USERS TO DOWNLOAD CERTAIN SOFTWARE, SUCH AS CUSTOM OS.IF YOUR CARRIER PROHIBITS THIS, IF YOU ATTEMPT TO DOWNLOAD SOFTWARE ONTO THE DEVICE WITHOUT AUTHORIZATION, YOU WILL BE NOTIFIED ON THE SCREEN THAT THE PHONE WILL NO LONGER OPERATE AND BE INSTRUCTED TO POWER DOWN THE DEVICE. YOU MUST THEN CONTACT YOUR CARRIER TO RESTORE THE DEVICE TO THE CARRIER AUTHORIZED SETTINGS.SAFE™ (Samsung Approved For Enterprise) SAFE™: "SAFE™" (Samsung for Enterprise) is a mark for a Samsung device which has been tested against Samsung's own internal criteria for interoperability with certain third party security-related solutions for MDM and VPN. The testing includes field testing with local network connection and menu tree testing which tests functionality of the solutions in conjunction with the Samsung device.  During the testing, the device is tested with the security solutions to see if the solutions work with the device as described by the third party security solution providers. The testing, for example, includes field testing with local network DRAFT For Internal Use Only
connection and menu tree testing which tests functionality of the solutions in conjunction with the Samsung device. For more information about Samsung's SAFE™ program, please refer to www.samsung.com/us/safe.Disclaimer of Warranties:  EXCEPT AS OTHERWISE PROVIDED IN THEIR STANDARD END USER LICENSE AND WARRANTY, TO THE FULL EXTENT PERMITTED BY LAW SAMSUNG ELECTRONICS CO., LTD., SAMSUNG TELECOMMUNICATIONS AMERICA, LLC, AND THEIR AFFILIATES (COLLECTIVELY REFERRED TO HEREIN AS THE "SAMSUNG ENTITIES") EXPRESSLY DISCLAIM ANY AND ALL WARRANTIES, EXPRESS OR IMPLIED, INCLUDING ANY WARRANTY OF MERCHANTABILITY, FITNESS FOR A PARTICULAR PURPOSE, INTEROPERABILITY OR NON-INFRINGEMENT, WITH RESPECT TO INFORMATION TECHNOLOGY SECURITY PROTECTION, SAFE™ DEVICES AND APPLICATIONS TESTED WITH SAFE™ DEVICES. IN NO EVENT SHALL THE SAMSUNG ENTITIES BE LIABLE FOR ANY DIRECT, INDIRECT, INCIDENTAL, PUNITIVE, OR CONSEQUENTIAL DAMAGES OF ANY KIND WHATSOEVER WITH RESPECT TO INFORMATION TECHNOLOGY SECURITY PROTECTION, SAFE™ DEVICES OR APPLICATIONS TESTED WITH SAFE™ DEVICES. In addition, information technology security protection will be affected by features or functionality associated with, among other things the e-mail platform, master data management, and virtual private network solutions selected by the software provider, solution provider or user. Choice of an e-mail, master data management, and virtual private network solution is at the sole discretion of the software provider, solution provider or user and any associated effect on information technology security protection is solely the responsibility of the software provider, solution provider or user. For complete statement of limited warranty, please refer to www.samsung.com/us/safe, available on the web and where Samsung smartphone and Galaxy Tab™ devices are sold. [101212] Samsung Telecommunications America (STA), LLC   Headquarters:1301 E. Lookout DriveRichardson, TX 75082DRAFT For Internal Use Only
©2013 Samsung Electronics America, Inc. All rights reserved.Do you have questions about your Samsung Mobile Device? For 24 hour information and assistance, we offer a new FAQ/ARS System (Automated Response System) at:www.samsung.com/us/supportNuance®, VSuite™, T9® Text Input, XT9® Smart Input, and the Nuance logo are trademarks or registered trademarks of Nuance Communications, Inc., or its affiliates in the United States and/or other countries.The Bluetooth® word mark, figure mark (stylized “B Design”), and combination mark (Bluetooth word mark and “B Design”) are registered trademarks and are wholly owned by the Bluetooth SIG.microSDTM, microSDHCTM, and the microSD logo are Trademarks of the SD Card Association.Customer Care Center:1000 Klein Rd.Plano, TX 75074Toll Free Tel: 1.888.987.HELP (4357)Internet Address: http://www.samsung.comDRAFT For Internal Use Only
Google, the Google logo, Android, the Android logo, Gmail, Google Hangouts, Google Maps, Google Play, Google Play Books, Google Play Magazines, Google Play Movies & TV, Google Play Music, Picasa, and YouTube and other marks are trademarks of Google Inc.Wi-Fi is a registered trademark of the Wireless Fidelity Alliance, Inc.Peel and the Peel logo are marks owned by Peel Technologies, Inc. and may be registered.Polaris Office and the Polaris Office logo are marks owned by Infraware and may be trademarks or registered trademarks.DRAFT For Internal Use Only
       1Table of ContentsSection 1:  Getting Started .......................... 6Understanding This User Manual  . . . . . . . . . . .  6Battery . . . . . . . . . . . . . . . . . . . . . . . . . . . . . . .  7Turning Your Device On and Off  . . . . . . . . . . . .  9Setting Up Your Device . . . . . . . . . . . . . . . . . . .  9Task Manager  . . . . . . . . . . . . . . . . . . . . . . . .  11Memory Card . . . . . . . . . . . . . . . . . . . . . . . . .  12Securing Your Device . . . . . . . . . . . . . . . . . . .  14Section 2:  Understanding Your Device  .... 15Features   . . . . . . . . . . . . . . . . . . . . . . . . . . . .  15Front and Sides  . . . . . . . . . . . . . . . . . . . . . . .  16Home Screen  . . . . . . . . . . . . . . . . . . . . . . . . .  18Navigating Your Device   . . . . . . . . . . . . . . . . .  21Using the Touch Screen  . . . . . . . . . . . . . . . . .  22S Pen . . . . . . . . . . . . . . . . . . . . . . . . . . . . . . .  28Samsung Smart Pause . . . . . . . . . . . . . . . . . .  32Samsung Smart Scroll  . . . . . . . . . . . . . . . . . .  33Activating Multi Window . . . . . . . . . . . . . . . . .  33Notifications . . . . . . . . . . . . . . . . . . . . . . . . . .  35Notifications Panel  . . . . . . . . . . . . . . . . . . . . .  36Indicator Icons  . . . . . . . . . . . . . . . . . . . . . . . .  37Primary Shortcuts   . . . . . . . . . . . . . . . . . . . . .  38Other App Shortcuts  . . . . . . . . . . . . . . . . . . . .  38Widgets  . . . . . . . . . . . . . . . . . . . . . . . . . . . . .  39App Shortcuts   . . . . . . . . . . . . . . . . . . . . . . . .  39Folders . . . . . . . . . . . . . . . . . . . . . . . . . . . . . .  40Wallpapers . . . . . . . . . . . . . . . . . . . . . . . . . . .  41Apps Screen . . . . . . . . . . . . . . . . . . . . . . . . . .  42Entering Text  . . . . . . . . . . . . . . . . . . . . . . . . .  42Section 3:  Accounts and Contacts  ...........46Accounts  . . . . . . . . . . . . . . . . . . . . . . . . . . . .  46Your Google Account   . . . . . . . . . . . . . . . . . . .  47Your Samsung Account   . . . . . . . . . . . . . . . . .  47Contacts . . . . . . . . . . . . . . . . . . . . . . . . . . . . .  47Groups  . . . . . . . . . . . . . . . . . . . . . . . . . . . . . .  51Favorites   . . . . . . . . . . . . . . . . . . . . . . . . . . . .  53Section 4:  Messaging ................................54Types of Messages   . . . . . . . . . . . . . . . . . . . .  54DRAFT For Internal Use Only
2Gmail   . . . . . . . . . . . . . . . . . . . . . . . . . . . . . . . 54Email . . . . . . . . . . . . . . . . . . . . . . . . . . . . . . . . 55Hangouts . . . . . . . . . . . . . . . . . . . . . . . . . . . . . 58Google+   . . . . . . . . . . . . . . . . . . . . . . . . . . . . . 58Messenger   . . . . . . . . . . . . . . . . . . . . . . . . . . . 58ChatON  . . . . . . . . . . . . . . . . . . . . . . . . . . . . . . 58Section 5:  Music ........................................60Listening to Music  . . . . . . . . . . . . . . . . . . . . . . 60Play Music   . . . . . . . . . . . . . . . . . . . . . . . . . . . 60Music Player  . . . . . . . . . . . . . . . . . . . . . . . . . . 60Section 6:  Camera and Video  ...................66Camera  . . . . . . . . . . . . . . . . . . . . . . . . . . . . . . 66Zooming In and Out . . . . . . . . . . . . . . . . . . . . . 70Gallery . . . . . . . . . . . . . . . . . . . . . . . . . . . . . . . 74Story Album   . . . . . . . . . . . . . . . . . . . . . . . . . . 78Video . . . . . . . . . . . . . . . . . . . . . . . . . . . . . . . . 80YouTube  . . . . . . . . . . . . . . . . . . . . . . . . . . . . . 82Section 7:  Connections  .............................83Wi-Fi  . . . . . . . . . . . . . . . . . . . . . . . . . . . . . . . . 83Wi-Fi Direct . . . . . . . . . . . . . . . . . . . . . . . . . . . 86Bluetooth   . . . . . . . . . . . . . . . . . . . . . . . . . . . . 87Kies Via Wi-Fi  . . . . . . . . . . . . . . . . . . . . . . . . . 89Synchronizing with Windows Media Player   . . .89Connecting as a Mass Storage Device  . . . . . . .90Section 8:  Applications .............................91Accessing Applications   . . . . . . . . . . . . . . . . . .91Action Memo  . . . . . . . . . . . . . . . . . . . . . . . . . .92Alarm   . . . . . . . . . . . . . . . . . . . . . . . . . . . . . . .92Bloomberg Businessweek+  . . . . . . . . . . . . . . .93Calculator  . . . . . . . . . . . . . . . . . . . . . . . . . . . .93Calendar  . . . . . . . . . . . . . . . . . . . . . . . . . . . . .94Camera  . . . . . . . . . . . . . . . . . . . . . . . . . . . . . .95ChatON  . . . . . . . . . . . . . . . . . . . . . . . . . . . . . .96Chrome  . . . . . . . . . . . . . . . . . . . . . . . . . . . . . .96Contacts  . . . . . . . . . . . . . . . . . . . . . . . . . . . . .96Downloads   . . . . . . . . . . . . . . . . . . . . . . . . . . .96Dropbox . . . . . . . . . . . . . . . . . . . . . . . . . . . . . .96Email . . . . . . . . . . . . . . . . . . . . . . . . . . . . . . . .97Evernote  . . . . . . . . . . . . . . . . . . . . . . . . . . . . .97Flipboard  . . . . . . . . . . . . . . . . . . . . . . . . . . . . .97Gallery . . . . . . . . . . . . . . . . . . . . . . . . . . . . . . .97Gmail . . . . . . . . . . . . . . . . . . . . . . . . . . . . . . . .97Google Search  . . . . . . . . . . . . . . . . . . . . . . . . .97Google Settings  . . . . . . . . . . . . . . . . . . . . . . . .99DRAFT For Internal Use Only
       3Google+ . . . . . . . . . . . . . . . . . . . . . . . . . . . . .  99Group Play  . . . . . . . . . . . . . . . . . . . . . . . . . . .  99Hangouts  . . . . . . . . . . . . . . . . . . . . . . . . . . .  101Help . . . . . . . . . . . . . . . . . . . . . . . . . . . . . . .  101Internet  . . . . . . . . . . . . . . . . . . . . . . . . . . . .  101KNOX  . . . . . . . . . . . . . . . . . . . . . . . . . . . . . .  101Maps  . . . . . . . . . . . . . . . . . . . . . . . . . . . . . .  101Messenger . . . . . . . . . . . . . . . . . . . . . . . . . .  101Music . . . . . . . . . . . . . . . . . . . . . . . . . . . . . .  101My Files . . . . . . . . . . . . . . . . . . . . . . . . . . . .  102NYTimes   . . . . . . . . . . . . . . . . . . . . . . . . . . .  102Play Books . . . . . . . . . . . . . . . . . . . . . . . . . .  102Play Games  . . . . . . . . . . . . . . . . . . . . . . . . .  102Play Magazines  . . . . . . . . . . . . . . . . . . . . . .  102Play Movies & TV  . . . . . . . . . . . . . . . . . . . . .  102Play Music  . . . . . . . . . . . . . . . . . . . . . . . . . .  102Play Store   . . . . . . . . . . . . . . . . . . . . . . . . . .  103Polaris Office 5   . . . . . . . . . . . . . . . . . . . . . .  104S Finder . . . . . . . . . . . . . . . . . . . . . . . . . . . .  105S Note  . . . . . . . . . . . . . . . . . . . . . . . . . . . . .  105S Translator  . . . . . . . . . . . . . . . . . . . . . . . . .  109S Voice   . . . . . . . . . . . . . . . . . . . . . . . . . . . .  110Samsung Apps . . . . . . . . . . . . . . . . . . . . . . .  111Samsung Hub   . . . . . . . . . . . . . . . . . . . . . . .  111Samsung Link   . . . . . . . . . . . . . . . . . . . . . . .  111Scrapbook  . . . . . . . . . . . . . . . . . . . . . . . . . .  112Screen Saver  . . . . . . . . . . . . . . . . . . . . . . . .  112Settings  . . . . . . . . . . . . . . . . . . . . . . . . . . . .  113SketchBook for Galaxy  . . . . . . . . . . . . . . . . .  113Story Album  . . . . . . . . . . . . . . . . . . . . . . . . .  114TripAdvisor . . . . . . . . . . . . . . . . . . . . . . . . . .  114Twitter  . . . . . . . . . . . . . . . . . . . . . . . . . . . . .  114Video  . . . . . . . . . . . . . . . . . . . . . . . . . . . . . .  114Video Editor  . . . . . . . . . . . . . . . . . . . . . . . . .  114Voice Search   . . . . . . . . . . . . . . . . . . . . . . . .  114WatchON  . . . . . . . . . . . . . . . . . . . . . . . . . . .  114World Clock  . . . . . . . . . . . . . . . . . . . . . . . . .  115YouTube . . . . . . . . . . . . . . . . . . . . . . . . . . . .  115Section 9:  Settings  ..................................116About Settings  . . . . . . . . . . . . . . . . . . . . . . .  116Settings Tabs  . . . . . . . . . . . . . . . . . . . . . . . .  116Connections  . . . . . . . . . . . . . . . . . . . . . . . . .  116Wi-Fi   . . . . . . . . . . . . . . . . . . . . . . . . . . . . . .  116Wi-Fi Direct Settings   . . . . . . . . . . . . . . . . . .  116DRAFT For Internal Use Only
4Bluetooth   . . . . . . . . . . . . . . . . . . . . . . . . . . . 116Airplane Mode . . . . . . . . . . . . . . . . . . . . . . . . 117Data Usage  . . . . . . . . . . . . . . . . . . . . . . . . . . 117Location Services   . . . . . . . . . . . . . . . . . . . . . 118More Networks  . . . . . . . . . . . . . . . . . . . . . . . 118Nearby Devices  . . . . . . . . . . . . . . . . . . . . . . . 120Screen Mirroring  . . . . . . . . . . . . . . . . . . . . . . 120Device . . . . . . . . . . . . . . . . . . . . . . . . . . . . . . 121Sound  . . . . . . . . . . . . . . . . . . . . . . . . . . . . . . 121Display  . . . . . . . . . . . . . . . . . . . . . . . . . . . . . 123Multi Window   . . . . . . . . . . . . . . . . . . . . . . . . 123Lock Screen   . . . . . . . . . . . . . . . . . . . . . . . . . 124Wallpaper  . . . . . . . . . . . . . . . . . . . . . . . . . . . 125Font   . . . . . . . . . . . . . . . . . . . . . . . . . . . . . . . 126Notification Panel   . . . . . . . . . . . . . . . . . . . . . 126Accessibility   . . . . . . . . . . . . . . . . . . . . . . . . . 126Blocking Mode   . . . . . . . . . . . . . . . . . . . . . . . 129Controls   . . . . . . . . . . . . . . . . . . . . . . . . . . . . 129Language and Input . . . . . . . . . . . . . . . . . . . . 129Voice Control . . . . . . . . . . . . . . . . . . . . . . . . . 133S Pen   . . . . . . . . . . . . . . . . . . . . . . . . . . . . . . 133Motions . . . . . . . . . . . . . . . . . . . . . . . . . . . . . 134Palm Motion   . . . . . . . . . . . . . . . . . . . . . . . . .134Smart Screen   . . . . . . . . . . . . . . . . . . . . . . . .135General  . . . . . . . . . . . . . . . . . . . . . . . . . . . . .136Accounts  . . . . . . . . . . . . . . . . . . . . . . . . . . . .136Cloud . . . . . . . . . . . . . . . . . . . . . . . . . . . . . . .138Backup and Reset  . . . . . . . . . . . . . . . . . . . . .139Date and Time . . . . . . . . . . . . . . . . . . . . . . . .140Accessory  . . . . . . . . . . . . . . . . . . . . . . . . . . .140Application Manager  . . . . . . . . . . . . . . . . . . .141Battery   . . . . . . . . . . . . . . . . . . . . . . . . . . . . .143Power Saving Mode . . . . . . . . . . . . . . . . . . . .143Storage  . . . . . . . . . . . . . . . . . . . . . . . . . . . . .144Security . . . . . . . . . . . . . . . . . . . . . . . . . . . . .145About Device  . . . . . . . . . . . . . . . . . . . . . . . . .149Section 10:  Health and Safety Information ..151Exposure to Radio Frequency (RF) Signals  . . .151Specific Absorption Rate (SAR) Certification Information . . . . . . . . . . . . . . . . . . . . . . . . .156FCC Part 15 Information to User . . . . . . . . . . .158Smart Practices While Driving  . . . . . . . . . . . .158Battery Use and Safety   . . . . . . . . . . . . . . . . .159DRAFT For Internal Use Only
       5Samsung Mobile Products and Recycling . . .  161UL Certified Travel Charger   . . . . . . . . . . . . .  161Display / Touch-Screen  . . . . . . . . . . . . . . . .  162GPS  . . . . . . . . . . . . . . . . . . . . . . . . . . . . . . .  162Care and Maintenance  . . . . . . . . . . . . . . . . .  163Responsible Listening   . . . . . . . . . . . . . . . . .  164Operating Environment   . . . . . . . . . . . . . . . .  166Restricting Children's Access to Your Mobile Device 168FCC Notice and Cautions  . . . . . . . . . . . . . . .  168Other Important Safety Information   . . . . . . .  168Section 11:  Warranty Information .......... 171Standard Limited Warranty . . . . . . . . . . . . . .  171End User License Agreement for Software  . .  176Social Hub  . . . . . . . . . . . . . . . . . . . . . . . . . .  183LIMITATION OF LIABILITY  . . . . . . . . . . . . . . .  189Social Hub Privacy Policy  . . . . . . . . . . . . . . .  191INFORMATION THAT WE COLLECT  . . . . . . . .  192USE OF INFORMATION WE COLLECT   . . . . . .  192DISCLOSURE OF INFORMATION TO THIRD PARTIES 193CHILDREN  . . . . . . . . . . . . . . . . . . . . . . . . . .  194SECURITY OF THE INFORMATION WE COLLECT 194CHAT ROOMS AND OTHER PUBLIC AREAS  . .  195CONTESTS AND SWEEPSTAKES  . . . . . . . . . .  195ACCURACY OF THE INFORMATION WE COLLECT 195CHANGES TO PRIVACY POLICY  . . . . . . . . . . .  196Social Hub End User License Agreement   . . .  196Index .............................................................1DRAFT For Internal Use Only
6Section 1: Getting StartedThis section helps you to quickly start using your device.Understanding This User ManualThe sections of this manual generally follow the features of your device. A robust index for features begins on page 218.Also included is important safety information, beginning on page 154, that you should know before using your device.This manual gives navigation instructions according to the default display settings. If you select other settings, navigation steps may be different.Unless otherwise specified, all instructions in this manual assume that you are starting from a Home screen. To get to a Home screen, you may need to unlock the device. For more information, refer to “Securing Your Device” on page 14.Note: Instructions in this manual are based on default settings and may vary from your device depending on the software version on your device and any changes to the device’s settings.Note: Unless stated otherwise, instructions in this user manual start with the device unlocked, at the Home screen.All screen images in this manual are simulated. Actual displays may vary depending on the software version of your device and any changes to the device’s settings.Special TextIn this manual, some text is set apart from the rest. This special text is intended to point out important information, share quick methods for activating features, define terms, and more. The definitions for these methods are as follows:• Notes: Presents alternative options for the current feature, menu, or sub-menu.• Tips: Provides quick or innovative methods or useful shortcuts.• Important: Points out important information about the current feature that could affect performance.• Warning: Brings important information to your attention that can help to prevent loss of data or functionality or damage to your device.DRAFT For Internal Use Only
Getting Started       7Text ConventionsThis manual provides condensed information about how to use your device. To make this possible, the following text conventions are used to represent often-used steps:BatteryYour device is powered by a rechargeable, standard Li-Ion battery. A Wall/USB Charger (Charging Head and USB cable) are included with the device for charging the battery.Warning! Use only approved charging devices. Approved accessories are designed to maximize battery life. Using other accessories may invalidate your warranty and may cause damage.Battery IndicatorThe Battery icon   in the Status Bar shows the battery power level. When battery power is 15% or less, your device prompts you to charge the battery. If you continue to operate the device without charging, the device powers off. For battery use information, see “About Device” on page 149.Charging the BatteryYour device comes with a Wall/USB Charger (Charging Head, and USB cable) to charge your device from any standard AC power outlet.Note: The battery comes partially charged. You must fully charge the battery before using your device for the first time. After the first charge, you can use the device while charging.➔ Arrows are used to represent the sequence of selecting successive options in longer, or repetitive, procedures. For example:From a Home screen, touch   Apps ➔  Settings ➔Connections tab ➔ Wi-Fi.DRAFT For Internal Use Only
81. Insert the USB cable into the Charging Head.2. Insert the USB cable into the device’s Charger/Accessory Port.Warning! While the device is charging, if the touch screen does not function due to an unstable power supply, unplug the USB power adapter from the power outlet or unplug the USB cable from the device.3. Plug the Charging Head into a standard AC power outlet.4. When charging is complete, unplug the Charging Head from the power outlet and remove the USB cable from the device.Note: You cannot charge the battery using the USB cable and your PC.Note: If the battery is completely discharged, you cannot turn on the device, even with the USB power adapter connected. Allow a depleted battery to charge for a few minutes before you try to turn on the device.DRAFT For Internal Use Only
Getting Started       9Turning Your Device On and OffTurning Your Device On䡲  Press and hold the Power/Lock Key.For more information, refer to “Unlocking the device” on page 14.Note: Your device’s internal antenna is located along the top back of the device. Do not block the antenna; doing so may affect signal quality and may cause the device to operate at a higher power level than is necessary.Turning Your Device Off1. Press and hold the Power/Lock Key.2. On the Device options menu, touch Power off.Setting Up Your DeviceWhen you turn on your device for the first time, it displays a Welcome screen. Follow the prompts to set up features and preferences on your device.Some screens can be skipped (touch Next) or re-displayed (touch Back). 1. From the Welcome screen, select a language and touch Next to get started.Note: If you are visually impaired or hard of hearing, touch Accessibility. For more information, see Accessibility Settings. For more information, refer to “Accessibility” on page 126.DRAFT For Internal Use Only
102. Follow the prompts to complete each section. For each topic, you will have the option to skip it and continue to the next screen.•Wi-Fi: Sign in to an available Wi-Fi network. For secured Wi-Fi networks, you will need to enter a password. For more information, refer to “Wi-Fi” on page 83.• Date and time: Set the date, time, and select a time zone.• End User License Agreement: Read the End User License Agreement and touch I understand and agree to the terms and conditions above. If you would like to send Samsung error reports during device failures, touch Yes. • Samsung Account: Touch Sign in to sign in to your current Samsung Account, or touch Create new account and follow the instructions to set up a new Samsung Account. –Touch variety of services to learn more using your Samsung Account.•Got Google?: Touch Yes to sign in to your current Google Account, or touch No and follow the instructions to set up a new Google Account.• Make it Google: Touch Get an account and follow the instructions to create a new Google Account, or touch Not now.–Touch   to learn more about Google Accounts.–This screen only displays if you did not previously sign in to your Google Account.• Google and your Location: Read the information about location services. Touch each location service to enable.•Entertainment: Touch Set up credit card and follow the instructions to enter credit card information for your Google Play account, or touch Not now.–This screen only displays if you previously signed in to your Google Account.• This tablet belongs to…: Enter your first and last name. This information is used by the tablet to personalize certain apps.• Dropbox Account: Touch Create account and follow the instructions to set up a new Dropbox Account, or touch Sign in to sign in to your existing Drop Box Account.DRAFT For Internal Use Only
Getting Started       11• Thank you: This screen displays the Device name and an option to learn more.– Device name: Enter a name for the tablet. This name is used to identify the tablet when using Bluetooth, Wi-Fi Direct, and so on. The default is the model name, SM-P600.–Learn more: Touch this option and then touch each feature to see more details.–Finish: Your setup is now complete. Touch this option to display the Home screen.Task ManagerYour device can run applications simultaneously and some applications run in the background.Use Task Manager to see which applications are running on your device and to end running applications to extend battery life. You can also uninstall applications from your device and see how much memory is used by applications.Task Manager ApplicationThe Task Manager application provides information about applications, including Active applications, Downloaded, RAM manager, and Storage.To access the Task Manager:1. Add the Active Apps Manager widget to a Home screen and then touch the Active Apps Manager widget. For more information, refer to “Widgets” on page 39.2. Touch Active applications to view applications running on your device. Touch End to end an application or End all to end all running applications.3. Touch Downloaded to view applications installed from Google Play. Touch Uninstall to remove an application from your device.4. Touch RAM manager to display the amount of Random Access Memory (RAM) currently in use. Touch Clear memory to clear inactive and background processes.5. Touch Storage to view internal (Device memory) and external (SD card) storage memory statistics.For more information, refer to “Apps Screen” on page 42.DRAFT For Internal Use Only
12Memory CardYour device supports removable microSD or microSDHC memory cards with maximum capacities of 64 GB (depending on the memory card manufacturer and type). Memory cards are used to store music, photos, videos, and other files.Note: You can only store music files that you own (from a CD or purchased with the device) on a memory card.Installing a Memory Card1. Open the Memory Card Slot cover and turn to expose the slot.2. With the gold contacts facing down, carefully slide the memory card into the slot, pushing gently until it clicks into place.3. Replace the Memory Card Slot cover.DRAFT For Internal Use Only
Getting Started       13Removing a Memory CardImportant! To prevent damage to information stored on the memory card, unmount the card before removing it from the device.1. From a Home screen, touch   Apps ➔  Settings ➔General tab ➔Storage.2. Under SD card, touch Unmount SD card and then touchOK.3. Open the Memory Card Slot cover and turn to expose the slot.4. Gently press down on the memory card, so that it pops out from the slot, and carefully pull the card out.5. Replace the Memory Card Slot cover.Formatting a Memory CardFormatting erases all content from the memory card and prepares it for use with your device.1. From a Home screen, touch   Apps ➔  Settings ➔ General tab ➔Storage.2. After mounting the SD card, touch Format SD card.3. Follow the prompts to confirm the formatting of the card.DRAFT For Internal Use Only
14Securing Your DeviceBy default, the device locks automatically when the screen times out or you can lock it manually. You can unlock the device using one of the default Unlock screens or, for increased security, use a personal screen unlock pattern.For more information about creating and enabling a Screen unlock pattern, see “More Networks” on page 118.For other settings related to securing your device, see “Location Services” on page 118.Note: Unless stated otherwise, instructions in this User Manual start with the device unlocked, at the Home screen.Locking the device䡲  Press the Power/Lock Key.Unlocking the device䡲  Press the Power/Lock Key, and then swipe across the screen as shown.DRAFT For Internal Use Only
Understanding Your Device       15Section 2: Understanding Your DeviceThis section outlines key features of your device and describes the screen and the icons that appear when the device is in use. It also shows how to navigate through the device.Features• 10.1-inch WQXGA (2560x1600) TFT (PLS) LCD touch screen• Android Version: Jelly Bean 4.3• Wi-Fi, 1.9 GHz dual-core processor• Full HTML Web Browser• Bluetooth 4.0 Wireless technology. For more information, refer to “Bluetooth” on page 87.• Built-in Wi-Fi technology (802.11 a/b/g/n/ac)• 8 megapixel camera and camcorder, plus 2 megapixel full HD forward-facing camera for video chat• Full integration of Google applications (Gmail, YouTube, Google Maps, and Voice Search)• Photo gallery that supports GIF, AGIF, JPEG, PNG, BMP, WBMP, and WEBP formats• Messaging Features:–Gmail–Email (corporate and personal)–Google Hangouts (Instant Messaging and Video Chat)• HD Video Player (1080p)–Codec: MPEG4, H.264, H.263, VC-1, VP8, WMV7/8, Sorenson Spark, MP43–Format: AVI, MP4, 3GP, MKV, WMV, ASF, FLV• Music player that supports MP3, AAC/AAC+/EAAC+, WMA, Vorbis, FLAC, AC-3, AMR-NB/WB, WAV• Support for microSD and microSDHC memory cards• Preloaded applications such as AllShare Play, Google Play Books, Google Play Store, Music Hub, and Polaris Office. DRAFT For Internal Use Only
16Front and SidesThe following items can be found on the front and sides of your device as illustrated.1.Light Sensor: Used to control screen brightness automatically when taking photos with the front-facing Camera.2.Front-facing Camera Lens: Used when taking photos or recording videos.3.3.5mm Headset Jack: Plug in for headphones.4.External Speakers: Used in music or video playback, notification tones, and for other sounds.5.Display Screen: The orientation of the display screen rotates with the tablet as you turn it. You can turn this feature on and off. For more information, refer to “Rotating the Screen” on page 25.6.Memory Card Slot: Install a memory card for storage of files.7.Menu: Display a list of options.8.Home: Display the central Home screen. Touch and hold to display recent apps that have been accessed.9.Back: Return to the previous screen or option.DRAFT For Internal Use Only
Understanding Your Device       17Back, Top, and BottomThe following items can be found on the back, top, and bottom of your device as illustrated.1.Flash: Provides adequate light when taking pictures in dark places.2.Camera Lens: Used when taking photos or recording videos.3.Infrared Blaster: Emits infrared signals used for controlling external devices.4.Volume Key: From a Home screen, press to adjust Master Volume. During music playback, press to adjust volume.5.Power/Lock Key: Press and hold to turn the device on or off. Press to lock the device or to wake the screen for unlocking.6.S Pen: A built-in stylus that allows you to perform various functions. For more information, refer to “S Pen” on page 28.7.Charger/Accessory Port: Plug in a USB cable for charging or to sync music and files.8.Microphone: Used for video chat.DRAFT For Internal Use Only
18Home ScreenThe Home screen is the starting point for using your device.Note: Unless stated otherwise, instructions in this user manual start with the device unlocked, at the Home screen.1.System Bar: The area along the bottom of the Home screen where you can find navigation buttons and icons that show notifications, battery power, and connection details.2.Status Icons: Indicate the status of your tablet. Touch the Time / Status Icons area to display the Status Details panel. For more information, refer to “Indicator Icons” on page 37.3.Time: The current time. For more information, refer to “Date and Time” on page 140.4.Widgets: Applications that run on the Home screen. Some widgets are found on the Home screen by default. For more information, refer to “Widgets” on page 39.5.Home screen: The starting point for using your device. Place shortcuts, widgets, and other items to customize your device to your needs.6.Primary Shortcuts: Shortcuts to common features. These shortcuts are found on all Home screens by default. For more information, refer to “Primary Shortcuts” on page 38.DRAFT For Internal Use Only
Understanding Your Device       197.Google Search: Search the web by typing or speaking. For more information, refer to “Google Search” on page 87.8.Apps: Display the Apps screen.Extended Home ScreenThe Home screen consists of the Home panel plus additional panels that extend beyond the display width to provide more space for adding shortcuts and widgets. For more information, refer to “Adding and Removing Home Screen Panels” on page 20.Slide your finger horizontally across the screen to scroll to the left or right side panels.Note: The center panel displays when you touch Home.Customizing the Home ScreensTo customize the Home screens to suit your preferences:1. Navigate to one of the Home screen panels.2. Touch and hold on the screen until the Home screen pop-up displays.3. Touch Set wallpaper to change the Home screen wallpaper. For more information, refer to “Wallpapers” on page 41.4. Under Add to Home screen touch:• Apps and widgets to add app or widget shortcuts on the Home screen.•Folder to add a folder on a Home screen. For more information, refer to “Folders” on page 40.•Page to add a Home screen.Display SettingsYou can customize display screen settings to your preferences. For more information, refer to “Display” on page 123.DRAFT For Internal Use Only
20Adding and Removing Home Screen PanelsYour device comes with seven Home screen panels. You can customize the Home screen by removing or adding panels.Note: The panel in the center position displays when you touch  Home.䡲  From a Home screen, pinch the screen from the left and right side to the center to display the editing screen.Tip: Tip: Touch and hold on the screen until the Home screen pop-up displays. Under Add to Home screen, touch Page to add a Home screen.Use these controls to configure panels:1.Remove: Touch and drag a panel to the Trash Can to remove the panel from the Home screen.2.Default Home Page: Touch the Home icon on a panel to set it as the default home screen.3.Add: Touch to add a new panel, up to a total of seven. This option is available when less than seven panels have been added.To rearrange the order of panels:䡲  Touch and drag a panel to a new location.To return to the Home screen:䡲  Touch  Back.DRAFT For Internal Use Only
Understanding Your Device       21Navigating Your DeviceUse command buttons and the touch screen to navigate.Command ButtonsBackTouch  Back to return to the previous screen, option, or step.HomeTouch  Home to display the center Home screen.Touch and hold to open a list of thumbnail images of apps you have worked with recently. Touch an App to open it.Touch   to display the Task Manager.To launch Google Search, touch  .Touch   to clear all thumbnail images.Context-Sensitive MenusContext-sensitive menus offer options for features or screens. To access context-sensitive menus:• Touch  Menu to display a list of options.• Touch an option in the list.Screen Capture䡲  Touch and hold the Power/Lock Key and  Home to capture and save an image of the current screen.Note: A copy of the screenshot is automatically saved to the clipboard.To view the screen shots:1. From a Home screen, touch   Apps ➔ Samsungfolder ➔   My Files.2. Touch storage ➔ Device storage ➔ Pictures ➔ Screenshots.3. Touch a screen capture file to display it.Application BarThe Application Bar is the area along the top of various application screens. It usually contains the Search and Menu icons, as well as other icons that are used to display options and settings.DRAFT For Internal Use Only
22Using the Touch ScreenUse only fingers or the S Pen to use the touch screen.Caution! Do not allow the touch screen to come into contact with other electrical devices. Electrostatic discharges can cause the touch screen to malfunction.To avoid damaging the touch screen, do not tap it with anything sharp or apply excessive pressure to it with your fingertips.Finger GesturesTouchingTo open an application, to select a menu item, to press an on-screen button, or to enter a character using the on-screen keyboard, touch it with a finger.DRAFT For Internal Use Only
Understanding Your Device       23Touching and HoldingTouch and hold an item for more than 2 seconds to access available options.DraggingTo move an icon, thumbnail, or preview to a new location, touch and hold it and drag it to the target position.DRAFT For Internal Use Only
24Double-TappingDouble-tap on a webpage, map, or image to zoom in a part. Double-tap again to return.FlickingFlick left or right on the Home screen or the Applications screen to see another panel. Flick up or down to scroll through a webpage or a list, such as contacts.DRAFT For Internal Use Only
Understanding Your Device       25PinchingSpread two fingers apart on a webpage, map, or image to zoom in a part. Pinch to zoom out.Control MotionsSimple motions allow easy control of the device.Before using motions, make sure the motion feature is activated.1. From a Home screen, touch   Apps ➔  Settings ➔ Controls tab ➔ Motions.2. Touch the OFF/ON button to turn Motions ON .Note: Excessive shaking or impact to the device may result in unintended inputs. Control motions properly.Rotating the ScreenMany applications allow display in either portrait or landscape orientation. Rotating the device causes the display to automatically adjust to fit the new screen orientation.To prevent the display from rotating automatically, open the notifications panel and deselect Screen rotation.Note: Some applications do not allow screen rotation.Some applications display a different screen depending on the orientation. The calculator turns into a scientific calculator when rotated to landscape.DRAFT For Internal Use Only
26TiltingTouch and hold two points on the screen, and then tilt the device back and forth to zoom in or out.Note: To move an icon to a new location, touch and hold it and drag it to the target position. For more information, refer to “Dragging” on page 23.Panning to BrowseWhen an image is zoomed in, touch and hold a point on the screen, and then move the device in any direction to browse the image.DRAFT For Internal Use Only
Understanding Your Device       27Palm MotionsUse palm motions to control the device by touching the screen.Before using motions, make sure the palm motion feature is activated.1. From a Home screen, touch   Apps ➔  Settings ➔ Controls tab ➔ Palm motion.2. Touch the OFF/ON button to turn Palm motion ON.SweepingSweep your hand across the screen to capture a screenshot. The image is saved in   Gallery ➔ Screenshots. It is not possible to capture a screenshot while using some applications.CoveringCover the screen with a palm to pause media playback.DRAFT For Internal Use Only
28SPenThe S Pen is a stylus that assists you in performing different functions. By using the Pen button, you can minimize having to switch between touch and pen input.Using the S PenThe included S Pen can be used to easily select items or perform functions. Actions using the S Pen with the button pressed provide additional conveniences, such as screen capture.Pull out the S Pen from the slot to use it.S Pen ButtonS Pen TipDRAFT For Internal Use Only
Understanding Your Device       29When you pull out the S Pen from the slot, the device detects it and performs the following:• Turns on the touch screen (if it is off).• Launches action memo, or display general air commands.Notes:• The pen nib of the S Pen is replaceable. If the pen nib gets dull, replace it with a new one.• If the S Pen is not working properly, take it to a Samsung Service Centre. Refer to the Samsung website for more information about the S Pen.• For best results, keep the S Pen mostly perpendicular to the touch screen and avoid using it at sharp angles.• The Menu button and the Back button cannot be activated by the S Pen.Capturing ScreenshotsWith the S Pen button pressed, touch the screen until you hear a click. A screenshot is saved in the Gallery ➔ Screenshots folder.It is possible to draw or write on or to crop a screenshot. The edited image is saved in the Gallery ➔ Screenshots folder.It is not possible to capture a screenshot while using some applications.DRAFT For Internal Use Only
30Launching Action MemoWith the S Pen button pressed, double-tap the screen to launch action memo.Jot down or draw a note, and then select the memo by tapping   to perform various actions, such as adding contacts or sending a email. With the memo selected, draw a line around an area with the S Pen to perform actions with the selected area.Selecting and Capturing an ImageWith the S Pen button pressed, draw a line around an area to select it.If necessary, use one of the following options:Select an application to use with the selected area from the icons that appear at the bottom of the screen.Restore the original selection.Convert the selection to circular shape.Convert the selection to rectangular shape.Customize the selection.DRAFT For Internal Use Only
Understanding Your Device       31Using Air CommandPress the S Pen button while hovering the S Pen over the screen.In most cases, general air commands appear on the screen when pressing the S Pen button.Use the following actions:• Action Memo: Launch action memo.• Scrap booker: Select and capture an image, and then save the image into Scrapbook.• Screen Write: Capture a screenshot and edit it with the S Pen.• S Finder: Launch S Finder.• Pen Window: Launch multiple applications in specified areas on the screen.Some items have contextual menus that make the S Pen pointer glow. Press the S Pen button to display the menu while hovering the S Pen over the item.DRAFT For Internal Use Only
32Air ViewUse this feature to perform various functions while the S Pen is hovering over the screen.1. From a Home screen, touch   Apps ➔  Settings ➔ Controls tab ➔ S Pen ➔ Air view.2. Touch the OFF/ON button to turn Air view ON .Point at an item with the S Pen to preview content or view information in a pop-up window.You can scroll through panels or lists by moving the S Pen pointer to an edge (top/bottom/left/right) of the screen.For more information, refer to “S Pen” on page 28.Samsung Smart PauseUse this feature to pause videos when you look away from the screen.1. From a Home screen, touch   Apps ➔  Settings ➔ Controls tab ➔ Smart screen.2. Touch Smart pause to enable it.During video playback, look away from the screen to pause the video. To resume playback, look at the screen again.DRAFT For Internal Use Only
Understanding Your Device       33Samsung Smart ScrollUse this feature to scroll the screen up or down by tilting your head or the device.1. From a Home screen, touch   Apps ➔  Settings ➔ Controls tab ➔ Smart screen ➔ Smart scroll.2. Touch the OFF/ON button to turn Smart scroll ON.3. Touch Smart scroll and select a scroll type.When you are viewing email or webpages, the scroll type icon (  for head orientation or   for tilting the device) that shows the recognition status for movements appears in blue.When the device recognizes your head or device’s movements, the icon turns green. Tilt your head downward or upward, or tilt the device forward or backward to scroll in that direction.Activating Multi WindowUse this feature to run two applications on the screen at the same time.Notes:• Only applications on the Multi Window panel can run.• When launching applications that contain multimedia files, such as music or videos, sound from both files will be played.• This feature may not be available depending on the region or service provider.DRAFT For Internal Use Only
34To use Multi Window:1. From a Home screen, touch   Apps ➔  Settings ➔ Device tab.2. Touch the OFF/ON button to turn Multi window ON.Using the Multi Window PanelTo show the Multi Window panel:1. Touch and hold  Back.The Multi Window panel appears on the left side of the screen.2. Select one application, and then drag another application to a new location.You can launch the same application on the two windows at the same time.To hide the Multi Window panel:䡲  Touch and hold  Back again.Drag the circle between the application panels left or right to adjust the size of the panels.Touch the panel handle to hide or show the panel. When a panel is open, touch and hold the handle and drag it to the left or right edge of the screen to move the panel. When a panel is hidden, touch and hold the handle and drag it up or down to move the handle.DRAFT For Internal Use Only
Understanding Your Device       35Using Multi Window ApplicationsWhile using Multi Window applications, select an application panel, touch the circle between the application panels, and then use one of the following:Sharing FilesDrag an item you want to share to the other window to share the item from one window to another.Creating a Paired WindowUse this feature to save the combination of current running Multi Window applications.On the Multi Window panel:1. Touch  ➔ Create.2. Enter a title and then touch OK.NotificationsNotification icons appear on the status bar at the top of the screen to report new messages, calendar events, device status, and more. Drag down from the status bar to open the notifications panel. Scroll the list to see additional alerts. To close the notifications panel, drag up the bar that is at the bottom of the screen.Switch app to compact screen.Switch locations between Multi Window applications.Share items between the application windows. Drag an item to share from one window to another. Some applications may not support this feature.Close the application.DRAFT For Internal Use Only
36Notifications PanelFrom the notifications panel, you can view your device’s current settings. Drag down from the status bar, touch   to open the notifications panel, and then use the following options:• Wi-Fi: Activate or deactivate the Wi-Fi feature.• GPS: Activate or deactivate the GPS feature.• Sound: Activate or deactivate silent mode. You can vibrate or mute your device in silent mode.• Screen rotation: Allow or prevent the interface from rotating when you rotate the device.• Bluetooth: Activate or deactivate the Bluetooth feature.• Reading mode: Activate or deactivate reading mode, which optimizes the screen for reading.• Blocking mode: Activate or deactivate blocking mode. In blocking mode, the device will block notifications. To select which notifications will be blocked:–From a Home screen, touch   Apps ➔  Settings ➔ Device tab ➔ Blocking mode.• Power saving: Activate or deactivate power-saving mode.• Multi window: Set to use Multi Window.• Screen Mirroring: Activate or deactivate the screen mirroring feature.• Air view: Activate or deactivate the air view feature.• Smart stay: Activate or deactivate the smart stay feature.• Smart pause: Activate or deactivate the smart pause feature.• Smart scroll: Activate or deactivate the smart scroll feature.• Sync: Activate or deactivate auto-syncing of applications.• Airplane mode: Activate or deactivate airplane mode.Note: The available options may vary depending on the region or service provider.To rearrange the options on the notifications panel:1. Open the notifications panel and touch  .2. Touch and hold an item, and then drag the item to another location.DRAFT For Internal Use Only
Understanding Your Device       37To open the Settings application:䡲  Touch  Settings. For more information, refer to “Settings” on page 116.To set brightness options:䡲  Touch the Brightness slider and drag it to set the brightness or touch Auto to allow the device to set brightness automatically based on available light and battery charge status. For more information, refer to “Display” on page 123.Notifications displays system notifications.䡲  Touch a notification entry to display the details. Touch Clear to remove Notification Icons from the System Bar.For more information, refer to “Notifications” on page 35.To close the Notification Panel:䡲  Touch  Home,  Back, or swipe up.Indicator IconsThe icons displayed at the top of the screen provide information about the status of the device. The icons listed in the table below are most common.Wi-Fi connectedBluetooth feature activatedGPS activatedAir gesture feature activatedSmart screen feature activatedSynced with the webConnected to computerDRAFT For Internal Use Only
38Primary ShortcutsPrimary Shortcuts display at the bottom of the Home screens.Tip: The main Home screen is usually the center Home screen.The default Primary Shortcuts are: S Note, Calendar, Internet, Email, Gallery, Scrapbook, Dropbox, Play Store.Other App ShortcutsThere are also other application shortcuts on the Home screens, such as Dropbox, Samsung Apps, and Play Store.For more information, refer to “More Application Information” on page 53.Application shortcuts can be added to any Home screen. For more information, refer to “App Shortcuts” on page 39.Alarm activatedS Pen removedSilent mode activatedVibration mode activatedAirplane mode activatedError occurred or caution requiredBattery power levelDRAFT For Internal Use Only
Understanding Your Device       39WidgetsWhen you first turn on your tablet, there are various widgets on the center Home screen. They can also appear on the Home screens to the left and right of the center Home screen.Widgets are self-contained applications that you can place on the Home screens to access your favorite features.For more information, refer to “Applications” on page 91.Adding Widgets to a Home screen1. Navigate to the Home screen on which you want to place the Widget and touch   Apps.2. Touch the Widgets tab.Note: Swipe across the screen horizontally to view all Widgets.3. Touch and hold the widget’s icon until the Home screen displays, then slide your finger where you want to place the icon and release it.Note: There must be room on the screen where you want to place the widget, otherwise the widget will not add to the Home screen.Removing Widgets䡲  Touch and hold the Widget until the   Remove icon displays, then drag the widget to the Remove icon.Note: This action does not actually delete the Widget, it just removes it from the current Home screen.App ShortcutsUse App Shortcuts for quick access to applications or features, such as Email or other applications.1. Navigate to the Home screen on which you want to place the App Shortcut.2. From a Home screen, touch   Apps.– or –Touch and hold on the screen until the Home screen options pop-up displays and then touch Apps and widgets.3. Touch the Apps tab.DRAFT For Internal Use Only
404. Touch and hold the application icon until the Home screen displays, then slide your finger where you want to place the icon and release it. For more information, refer to “Apps Screen” on page 42.5. Touch and hold the App Shortcut and then drag the application icon to reposition it on the Home screen.Removing App Shortcuts䡲  Touch and hold the App Shortcut until   Remove displays, then drag the App Shortcut to the Removeicon.FoldersPlace Folders on a Home screen to organize items together.Adding FoldersTo create a folder on a Home page:1. Navigate to the desired Home screen.2. Touch and hold on the screen until the Home screen pop-up displays and then touch Folder.The Create folder pop-up displays.3. Touch the Enter folder name field, use the keyboard to enter a name for the folder, and touch OK.A new folder displays on the Home screen.Managing FoldersTo rename a folder:䡲  Touch the folder, touch the current name, and use the keyboard to enter a new name for the folder.DRAFT For Internal Use Only
Understanding Your Device       41To add an App shortcut to a folder:1. Add the App shortcut to the Home screen that the folder is on.2. Touch and hold the App shortcut, drag it to the folder, and drop it.To remove an App shortcut from a folder:1. Touch the folder to view the contents.2. Touch the App shortcut, drag it out of the folder, and drop it on the Home screen.Removing a Folder䡲  Touch and hold the folder until the   Remove icon displays, then drag the folder to the Remove icon.Note: Any App shortcuts in the folder are also removed.WallpapersYou can choose a picture to display on the Home Screen, Lock screen, or on both the Home and Lock screens. Choose from preloaded wallpaper images or select a photo you have downloaded or taken with the Camera.1. From a Home screen, touch and hold on the screen.The Home screen options pop-up displays.2. Touch Set wallpaper.The Set wallpaper pop-up displays.3. Touch Home screen, Lock screen, or Home and lock screens.The Select wallpaper from pop-up displays the following options:•Gallery: Access the Gallery to select a photo. Touch a photo to select it. Crop and resize the picture, if desired. Touch Done to save the picture as wallpaper. Touch Cancel to cancel.• Live wallpapers: Choose from pre-loaded interactive animated wallpapers. Touch a wallpaper to see an example. If available, touch Settings to view options for the selection. Touch Set wallpaper to save your choice. Touch  Back to return to the Live wallpapers menu.DRAFT For Internal Use Only
42• Wallpapers: Choose from pre-loaded wallpaper images. Touch an image to view it. Touch Set wallpaper to save it as wallpaper. Touch  Back to return to the Home screen.Note: Live wallpapers is not available for the Lock screen.Apps ScreenThe Apps screen displays all applications installed on your wireless device. Applications that you download and install from Google Play or from the web are also added to a Home screen.The Apps icons are arranged in a customizable grid. To arrange the Apps icons in alphabetical order:1. From a Home screen, touch   Apps.2. Touch  Menu ➔ View type.3. Touch Alphabetical grid.To manually change the order of the icons on the Apps screen:1. From a Home screen, touch   Apps.2. Touch  Menu ➔ Edit.3. Touch and hold an icon and drag it to a new position.4. Touch Save to save the changes.You can place shortcuts to applications on the Home screen for quick access to the application. For more information, refer to “App Shortcuts” on page 39.To view your downloaded applications:1. From a Home screen, touch   Apps.2. Touch  Download to view downloaded apps.3. Touch an icon on the Downloaded applications screen to launch the application.– or –Add an App Shortcut to a Home screen by dragging the App icon onto the Home Screen. For more information, refer to “App Shortcuts” on page 39.Entering TextUse the Samsung keyboard or the voice input feature to enter text.DRAFT For Internal Use Only
Understanding Your Device       43Note: Text entry is not supported in some languages. To enter text, you must change the input language to one of the supported languages.Using the KeyboardTouch any text field, open the notifications panel, touch Select input method, and then select the type of keyboard to use.1. Enter uppercase.2. Enter punctuation marks.3. Touch for Voice input. Touch and hold to use Handwriting, display keyboard settings, or change the keyboard type.4. Enter a space.5. Add an item from the clipboard.6. Break to the next line.7. Delete a preceding character.12 3 4 5167DRAFT For Internal Use Only
44Entering UppercaseTouch   before entering a character. For all caps, touch it twice.Changing the keyboard typeTouch and hold  , and then touch   to change the keyboard type.Changing language keyboardsAdd languages to the keyboard, and then slide the space key left or right to change language keyboards.HandwritingTouch and hold   ➔  , and then write a word with a finger or the S Pen. Suggested words appear as characters are entered. Select a suggested word.Use handwriting gestures to perform actions, such as editing or deleting characters and inserting spaces. To view the gesture guides, touch and hold  , and then touch Settings ➔ Help ➔ Keyboard ➔ Use handwriting gestures.Direct Pen Input1. From a Home screen, touch   Apps ➔  Settings ➔ Controls tab ➔ S Pen ➔ Direct pen input.2. Touch the OFF/ON button to turn Direct pen input ON.DRAFT For Internal Use Only
Understanding Your Device       45When hovering the S Pen over a text field, the   icon appears at the upper left corner of the text field. Touch   to write with the S Pen.To make simple corrections, change input languages, or enter a space between characters, touch each correction tool displayed on the handwriting pad.When this feature is enabled, you can do the following actions:• Send a handwritten message.• Set an alarm just by writing numbers.Entering Text By VoiceActivate the voice input feature and then speak into the microphone. The device displays what you speak.If the device does not recognise your words, touch the underlined text and select an alternative word or phrase from the dropdown list.To change the language or add languages for voice recognition, touch the current language.Copying and PastingTouch and hold over text, drag   or   to select more or less text, and then touch COPY to copy or CUT to cut. The selected text is copied to the clipboard.To paste it into a text entry field, touch and hold at the point where it should be inserted, and then touch PASTE.DRAFT For Internal Use Only
46Section 3: Accounts and ContactsThis section explains how to manage accounts and contacts.AccountsYour device can synchronize with a variety of accounts. With synchronization, information on your device is updated with any information that changes in your accounts.• Samsung Account: Add your Samsung Account.• ChatON: Add your ChatON Account.• Dropbox: Add your Dropbox Account.• Email: Add an Email Account to sync Contacts.• Evernote: Add an Evernote Account.• Google: Add your Google Account to sync your Contacts, Calendar, and Gmail.• LDAP: Add an LDAP Account to find entries in an LDAP directory server.• Microsoft Exchange ActiveSync: Add your Exchange Account to sync Contacts, Calendar, and Email.• Server: Add a Server to sync and access your data.• Facebook: Add a Facebook Account to sync apps.• Twitter: Add a Twitter Account.Setting Up AccountsSet up and manage your synchronized accounts with the Accounts setting.1. From a Home screen, touch   Apps ➔  Settings ➔ General tab ➔ Accounts ➔ Add account.2. Touch the account type.3. Follow the prompts to enter your account credentials to complete the set up process.Your tablet communicates with the appropriate account servers to set up your account. When complete, your account displays in the Accounts area of the Settings screen.DRAFT For Internal Use Only
Accounts and Contacts       47Your Google AccountIn order to utilize your device to the fullest extent, you will need to create a Google Account when you first use your device. With a Google Account, Google applications will always be in sync between your tablet and computer.If you need to create a Google account, follow these steps:1. From a Home screen, touch   Apps ➔  Settings ➔ General tab ➔ Accounts ➔ Add account ➔ Google.2. Follow the prompts to sign into your existing account or create a new account.Your Samsung AccountCreate a Samsung Account for access to Samsung apps and services, such as Samsung Hub, Samsung Apps, Samsung Link, and much more.1. From a Home screen, touch   Apps ➔  Settings ➔ General tab ➔ Accounts ➔ Add account ➔ Samsung account.2. Follow the prompts to sign into your existing account or create a new account.ContactsStore contact information for your friends, family, and colleagues to quickly access information or to send a message.To access Contacts:䡲  From a Home screen, touch   Apps ➔   Contacts.Add a Contact1. Touch  Contacts ➔  Create. The Save contact to pop-up displays.2. To choose where the contact is stored, touch Device or an account.– or –Touch Add new account to add a different account. For more information, refer to “Setting Up Accounts” on page 46.DRAFT For Internal Use Only
483. Touch each field to enter information. Touch   to add another entry, or   to remove an entry. Touch  to choose a label.•Picture: Touch the picture icon to assign a picture to the new contact. •Name: Enter the name. Touch   to display additional name fields.• Phone: Enter a phone number.•Email: Enter an email address.•Groups: Assign the contact to a group.• Add another field: Add additional fields for the contact. 4. Touch Save.Updating Contacts1. Touch  Contacts.2. Touch a contact in the Contacts list to display it.3. Touch  Edit.4. Touch any field to edit. For more information, refer to “Add a Contact” on page 47.Deleting Contacts1. Touch  Contacts.2. Touch a contact in the Contacts list to display it.3. Touch  Delete.Contacts Display OptionsThere are various ways to display your contacts.1. Touch  Contacts.2. Touch the Groups tab, Favorites tab, or Contacts tab to view contacts in various ways:•Groups: Display contacts sorted into groups—such as Not assigned, Co-workers, Family, Friends, etc. The number of contacts in each group is displayed next to the group name. Touch a group name to show only contacts in that group. For more information, refer to “Create a New Group” on page 51.•Favorites: Show only your favorite (or starred), contacts. For more information, refer to “Favorites” on page 53.•Contacts: Show all your contacts. Touch the Search field and enter a keyword to list contacts that contain that keyword.DRAFT For Internal Use Only
Accounts and Contacts       493. While viewing Groups, Favorites, or Contacts, touch  Menu for options.4. While viewing the Contacts tab, touch  Menu ➔ Settings for Contact settings.Linked ContactsYour device can synchronize with multiple accounts, including Google, Corporate Exchange, and other email providers. When you synchronize contacts from these accounts with your device, you may have multiple contacts for the same person.Linking, or joining, imported contact records allows you to see all of a contact’s numbers and addresses together in a single contact entry. Linking also helps you keep your contacts updated, because any changes that your contacts make to their information in the respective accounts are automatically updated the next time you synchronize with that account.Linking Contacts1. Touch  Contacts.2. Touch a contact in the Contacts list to display it.3. Touch  Menu ➔ Link contact.4. Touch the contact you want to link. The linked contact’s information is displayed with the original contact’s information.5. Repeat Steps 3 and 4 to link other contacts.Separating Contacts1. Touch  Contacts.2. Touch a contact in the Contacts list to display it.3. Touch  Menu ➔ Separate contact. A list of linked contacts is displayed.4. Touch  to separate a linked contact.DRAFT For Internal Use Only
50Sharing Contact InformationYou can send a contact’s information using Bluetooth to other Bluetooth devices, or in an Email or Gmail as an attachment.Note: Not all Bluetooth devices accept contacts and not all devices support transfers of multiple contacts. Check the target device’s documentation.1. Touch  Contacts.2. Touch  Menu ➔ Share namecard via.3. Touch Selected contact so share only the displayed contact, or touch Multiple contacts.4. Touch a sending method, such as Bluetooth or email.5. Follow the prompts to send the contact information.Importing and Exporting ContactsTo back up and restore your contacts, you can export your contacts list to a storage device (such as a PC), or import your contacts list from a storage device.1. Use the USB cable to connect your device to the storage device.2. Touch  Contacts.3. Touch  Menu ➔ Import/Export.4. Touch an option and then follow the prompts.DRAFT For Internal Use Only
Accounts and Contacts       51GroupsAssign contacts to Groups to make searching for contacts faster or to quickly send messages to group members.Create a New GroupCreate a new group when you add or edit a contact.1. Touch  Contacts.2. Touch the Groups tab.3. Touch  Menu ➔ Create.4. Touch the Group name field enter a name.5. Touch  Add member. Touch individual contacts or touch Select all, then touch   Done to add the selected contacts to the group.6. Touch  Save.Tip: Contacts can belong to more than one group. While editing the contact, touch the Groups field to add additional groups.Once you create a new group, the Contacts List can be set to display only the contacts in that group. For more information, refer to “Contacts Display Options” on page 48.Adding Group MembersTo add a contact to a group, just Edit a contact’s Group field. For more information, refer to “Updating Contacts” on page 48.To add multiple contacts to a group:1. Touch  Contacts.2. Touch Groups and then touch the group to which you want to add members.3. Touch  Add member.The contacts that can be added display.4. Touch Select all or the name of each contact to add.5. Touch  Done to add the contacts to the group.DRAFT For Internal Use Only
52Removing Group MembersTo remove contacts from a group:1. Touch  Contacts.2. Touch Groups and then touch the group from which you want to remove members.3. Touch  Menu ➔ Remove member.4. Touch Select all or the name of each contact to remove.5. Touch  Done to remove the contacts.Contacts are removed from the group and the group name is removed from each contact’s Group field.Renaming a Group1. Touch  Contacts.2. Touch the Groups tab and touch the group you want to rename.3. Touch  Menu ➔ Edit.4. Touch the Group name field and enter a new name.5. Touch  Save.Deleting Groups1. Touch  Contacts ➔ Groups tab ➔  Delete.2. Touch individual groups or touch Select all, then touch  Delete.3. Touch Group only (to delete only the group) or Group and group members (to delete both the group and the group’s members).DRAFT For Internal Use Only
Accounts and Contacts       53FavoritesMark contact records with a   gold star to identify them as favorites.Mark a Contact as a Favorite1. Touch  Contacts.2. Touch a contact in the Contacts list to display it.3. Touch the   Star so that it turns gold  .Tip: You do not have to edit the contact to mark it as a favorite.View FavoritesThere are two ways to view your favorites.1. Touch  Contacts.2. Touch the Favorites tab. Only your starred contacts are displayed.– or –Touch the Groups tab, then touch Starred in Android to list only your starred contacts that are being saved to your Google account.Remove Favorites1. Touch  Contacts ➔ Favorites tab.2. Touch  Menu ➔ Remove from favorites.3. Touch individual contacts or touch Select all, then touch  Done to remove.Note: To remove the currently displayed contact your favorites list, touch the   Star next to the contact’s name so that it is no longer gold  .DRAFT For Internal Use Only
54Section 4: MessagingThis section describes how to send and receive messages and other features associated with messaging.Types of MessagesYour device supports these types of messages:• Email• Gmail• Hangouts• Google+• Google Messenger• ChatON• TwitterNote: Your Wi-Fi-only device does NOT support voice calling and messaging services. Please disregard any “dial” and “message” related menus because some Gmail options are identically set in all Android devices.GmailSend and receive email with Gmail, Google’s web-based email service.䡲  From a Home screen, touch   Apps ➔ Googlefolder ➔  Gmail.Setting Up Your Gmail AccountIf you did not set up a Google account during the initial configuration, the first time you launch Gmail, your device prompts you to set up your Google account.1. Touch  Gmail.2. Follow the prompts to sign in or create a new account. The device communicates with the Google server to set up your account and synchronize your email. When complete, your Gmail displays in the Inbox.Note: You can use more than one Google account on your device. To add another account, touch  Menu ➔Settings ➔ General tab ➔ Accounts ➔ Add account.DRAFT For Internal Use Only
Messaging       55Refreshing Your Gmail AccountRefresh your account to update your device from the Gmail servers.1. Touch  Gmail.2. While viewing your Inbox, drag your finger downward across your messages.Gmail SettingsUse the Gmail Settings to configure your Gmail preferences.1. Touch  Gmail.2. Touch  Menu ➔ Settings for settings.Tip: Touch  Menu ➔ Help for more information.Composing and Sending Gmail1. Touch  Gmail.2. Touch  Compose, then touch fields to compose the message. While composing a message, touch Menu for options.3. Touch  SEND to send this message.– or –Touch  Menu ➔ Save draft to save a draft of this message.EmailUse Email to view and manage all your email accounts in one application.䡲  From a Home screen, touch   Apps ➔  Email.Configuring Email AccountsYou can configure Email for most accounts in just a few steps.1. Touch  Email.2. The first time you set up an email account, at the Set up email screen, enter an Email address and Password, then touch Next.– or –For additional accounts, touch  Menu ➔ Settings ➔ Add account.3. Follow the on-screen instructions to set up your email account.DRAFT For Internal Use Only
564. Touch Next to go to the next screen or touch Previous to go to the Apps screen.Note: For Exchange ActiveSync accounts, the Activate device administrator? screen may appear. Read the information and touch Activate to continue.5. Enter an account name and Your name, if required.6. Touch Done.The device communicates with the appropriate server to set up your account and synchronize your email. When complete, your email appears in the Inbox for the account.Note: To configure email account settings at any time, use  Menu ➔ Settings. Touch the account to display Account settings.Managing Your Email AccountsYou can view email you receive for all accounts in the Combined view screen or you can view email accounts individually.1. Touch  Email.2. Touch the  drop-down menu at the top left of the screen to select:• Combined view: View all email in a combined inbox.•<Account Name>: View email for the account.Refreshing Your Email AccountRefresh your account to update your device from the Email servers.1. Touch  Email.2. In the Application Bar, touch  Refresh.DRAFT For Internal Use Only
Messaging       57Deleting Email AccountsTo delete an Email account:1. Touch  Email.2. Touch  Menu ➔ Settings ➔ Delete account.Email SettingsUse the Email Settings to configure your Email preferences.Note: Available settings depend on the email provider.1. Touch  Email.2. Touch  Menu ➔ Settings, then touch General settings. The following options display:•Display: Set how email is shown in the email list and when you open them.• Composing and sending: Set what functions are available while composing and sending email.• Auto-advance: Set the screen to show after deleting a message. Choices are: Next email, Previous email, or Email list.• Confirm deletions: Ask for confirmation before deleting email.•Priority senders: Enter email addresses that you want treated as a priority.• Spam addresses: Manage your spam address list.• Rules for filtering: Create rules for filtering email based on names, address, or subject.3. Touch an account to configure specific settings.Available options depend on the account.Composing and Sending Email1. Touch  Email.2. If you have multiple accounts set up, choose an account from the menu at the top of the screen.3. Touch  Compose, then touch fields to enter recipients and the email text.4. While composing a message:•Touch displayed buttons to set Priority, Tracking options, Security options, and so on.•Touch  Attach to add a file to the message.Available options depend on the type of email account.5. Touch the body of the email to enter the text of your email. Touch the text option buttons to edit and format your message text.DRAFT For Internal Use Only
586. Touch  Send to send the message.– or –Touch  Save to save the email to the Drafts folder.HangoutsPreviously known as Google Talk, Hangouts is an online place to meet friends and family, share photos, and host video calls. Conversation logs are automatically saved to a Chats area in your Gmail account. 䡲  From a Home screen, touch   Apps ➔ Googlefolder ➔  Hangouts.Google+Google+ makes messaging and sharing with your friends a lot easier. You can set up Circles of friends, visit the Stream to get updates from your Circles, use Messenger for fast messaging with everyone in your Circles, or use Instant Upload to automatically upload videos and photos to your own private album on Google+.䡲  From a Home screen, touch   Apps ➔ Googlefolder ➔  Google+.MessengerWith Google Messenger, you can bring groups of friends together into a simple group conversation, putting everyone on the same page. When you get a new conversation in Messenger, Google+ sends an update to your device.䡲  From a Home screen, touch   Apps ➔ Googlefolder ➔ Messenger.ChatONA smart-messaging app that gives you a host of innovative ways to stay connected with all your friends and family, regardless of their device or platform. Use ChatON to send and receive instant messages from any device that has a mobile phone number.1. From a Home screen, touch   Apps ➔  ChatON.If you are launching this application for the first time, follow the on-screen instructions to complete the account setup.2. Enter and send your message.DRAFT For Internal Use Only
Messaging       59DRAFT For Internal Use Only
60Section 5: MusicListening to MusicYou can listen to music by using your device’s built-in speakers, through a wired headset, or through a wireless Bluetooth stereo headset.For more information, refer to “Bluetooth” on page 87.Press the Volume Key on the side of the device to activate on-screen volume control, then touch and drag on the scale to set volume. You can also press the Volume Key to adjust playback volume.Play Music Google Play Music is a Google service that gives you instant access to your personal music collection on the Internet and your compatible Android devices without the hassle of wires or syncing. For more information, visit music.google.com.䡲  From a Home screen, touch   Apps ➔ Googlefolder ➔ Play Music.Music PlayerMusic Player plays songs stored on your tablet or an installed memory card.To access Music Player:1. From a Home screen, touch   Apps ➔Music.The Music Player application searches your device’s internal storage or on an installed memory card for music and playlists. This can take from a few seconds to several minutes, depending on the amount of new music added since you last opened the application. It then displays your music in several ways.2. Touch a tab, such as Songs, Playlists, Albums, and so on, to change the way you view the contents of your library.3. Touch the Music application icon   at the top-left of the Application bar to return to the previous Music screen.Searching for MusicTo find music in your library:1. Touch  Music.DRAFT For Internal Use Only
Music       612. Touch  Search and use the keyboard to type the name of an artist, album, or song.Music Player Options and SettingsTo use Music Player options and configure settings:1. Touch  Music.2. Touch Menu to display the following options:• List view / Thumbnail view: View your music in a list or thumbnail format.•Delete: Delete a song, an album, or every song or album.• Scan for nearby devices: Discover and connect directly to nearby devices.•Settings: The following settings display:–SoundAlive: Configure SoundAlive.–Adapt Sound: Enhance sound quality. –Play speed: Decrease or increase play speed.–Smart volume: Automatically adjust volume to surroundings.–Voice control: Use voice commands to control playback.–Lyrics: Display the lyrics of the song, if available.–Music auto off: Set the option Off or set your music to turn off automatically by touching one of the time values.•End: Close the Music Player app.Managing PlaylistsTo create, manage, or delete a playlist:䡲  Touch  Music.Creating a Playlist䡲  Touch  Create playlist and use the keyboard to enter a name for the playlist.Renaming a Playlist1. Touch the Playlists tab.2. Touch a playlist, touch Menu ➔ Edit title and use the keyboard to enter a new name for the playlist.DRAFT For Internal Use Only
62Adding Songs to or Removing Songs from Playlists1. Touch  Create playlist and touch a playlist.– or –Touch Playlists, touch a playlist, and then touch Add music.All songs are displayed.2. Touch  next to each song you want to add or next to Add all to add all songs to the playlist.– or –Touch  to remove a song from the playlist.3. Touch  Done to save the playlist.Changing the Order of a Playlist1. Touch the Playlists tab and touch a playlist.2. Touch  Change order.3. Touch the grid   for an entry and drag the entry to a new position in the list.4. Touch Done to change the order and save the playlist.Playing a Playlist1. Touch the Playlists tab.2. Touch Favorites, Most played, Recently played, or Recently added, or touch a playlist title that you created.3. Touch a song to start playing the playlist at that song.Deleting a Playlist1. Touch the Playlists tab and touch a playlist.2. Touch Menu ➔ Remove.3. Touch the box next to Select all, touch Remove, and then touch OK.Playing MusicTo play a song:1. Touch  Music.2. Touch a song or touch an album or genre and then touch a song in the list of songs on the album.The song you touch starts to play. The tracks in the current list play in order until you reach the end of the list (unless you choose a repeat option). Otherwise, playback stops only if you stop it, even when you switch applications.DRAFT For Internal Use Only
Music       63Accessing the Music PlayerIf you navigate away from the Music Player application and music is playing, the Music notification icon   is displayed in the System Bar.You can change songs or easily return to the Music Player:1. Touch the top of the screen and swipe downward.The Notification Panel displays.2. Touch the song thumbnail to display the Music Player. You can also pause and resume playback and skip to the next or previous song in the panel. For more information, refer to “Notifications” on page 35.Music Player ControlsWhen a song is playing, the Music Player screen displays and various controls are available.1. Touch  Music.2. Touch a song or playlist to begin playback.The music player displays below (portrait mode) or to the right (landscape mode) of the music listing.3. Touch the song thumbnail to enlarge the music player.Music Player ControlsDuring playback, use the sound and playlist controls:1. Scan DLNA-enabled devices.2. Touch to display the volume control, then touch and drag on the scale to set volume. You can also press the Volume Key on the side of the device to adjust playback volume.12457 8 9 10 1163DRAFT For Internal Use Only
643. Touch to view and set SoundAlive options.4. Set the file as your favorite song.5. Turn on shuffle.6. Change the repeat mode.7. Hide the music player screen.8. Restart the currently-playing song or skip to the previous song. Touch and hold to move backwards quickly.9. Pause and resume playback.10. Skip to the next song. Tap and hold to move forwards quickly.11. Open the playlist.Options While Playing a SongThere are various options and controls available while a song is playing:1. Touch  Music, touch a song or an album, and then a song.2. Touch the music player to enlarge it.3. Touch Menu to display the following options:• Add to playlist: Add the song to a new playlist or an existing playlist.• Via Bluetooth: Play the current song by using a Bluetooth device.• Play via Group Play: Share the current song by using Group Play.• Scan for nearby devices: Discover and connect directly to nearby devices.DRAFT For Internal Use Only
Music       65•Details: View song details.• Set as alarm tone: Use the current song as an alarm tone.•Settings: Displays Music Player settings. For more information, refer to “Music Player Options and Settings” on page 61.•End: This option returns you to the home screen.Playing Music by MoodPlay music grouped by mood. The playlist is automatically created by the device. When a new song is added:1. Touch  Music ➔ Music square ➔ Library update.2. Touch Music square and select a cell of mood. Or select multiple cells by dragging your finger.•DRAFT For Internal Use Only
66Section 6: Camera and VideoCameraUse this application to take photos or videos.䡲  From a Home screen, touch   Apps ➔   Camera.Note: The camera automatically shuts off when unused.Note: Make sure that the lens is clean. Otherwise, the device may not work properly in some modes that require high resolutions.Camera Etiquette• Do not take photos or videos of other people without their permission.• Do not take photos or videos where legally prohibited.• Do not take photos or videos in places where you may violate other people’s privacy.Using the CameraTo access the Camera:1. Touch  Camera.If a memory card is inserted, the Storage location pop-up displays.2. Touch OK to change the storage location to memory card.– or –Touch Cancel to use the device storage for storing pictures and videos.The Camera screen displays.1. Switch between the front and rear camera.167534289DRAFT For Internal Use Only
Camera and Video       672. Switch to dual camera mode.3. View more options.4. Display current mode.5. Record video button.6. Camera button.7. Shooting mode.8. Open Gallery to view photos and videos.9. Select an available effect.Taking Photos1. Touch the image on the preview screen where the camera should focus.When the subject is in focus, the focus frame turns green.2. Touch   to take the photo.Shooting ModeSeveral photo effects are available.䡲  Touch MODE, and then scroll up or down the screen at the right side of the screen.•Auto: Use this to allow the camera to evaluate the surroundings and determine the ideal mode for the photo.• Beauty face: Take a photo with lightened faces for gentler images.•Best photo: Take a series of photos, and then save the best one.DRAFT For Internal Use Only
68• Best face: Use this to take multiple group shots at the same time and combine them to create the best possible image.–Touch   to take multiple photos. To get the best shot, hold the camera steady and remain still while taking photos. When Gallery opens, touch the yellow frame on each face, and choose the best individual pose for the subject. After choosing a pose for each individual, touch Save to merge the images into a single photo, and save it.• Sound & shot: Use this to take a photo with sound.–Touch   to take a photo. The device records a few seconds of audio after taking a photo.Note: While taking photos in this mode, sound is recorded by the internal microphone.•Drama: Use this to take a series of photos and combine them to create an image that shows trails of the movement.To get the best shot, follow these tips. The device may not take photos properly in other shooting conditions.–Hold the camera steady and remain still while taking photos.–Take photos of a subject that is moving in one direction.–Take photos with backgrounds that are free of moving objects.–Avoid taking photos of a subject and background with similar colors.–Avoid taking photos of a subject that is too close or too far away to fit within the viewfinder or that is too long such as a bus or a train.• Rich tone (HDR): Use this to take photos without losing details in bright and dark areas.•Eraser: Use this to erase the movements of moving subjects in the background.–Touch   to take a series of photos. The device erases traces of movement from a moving subject. To restore the original photo, touch Show moving objects, and then touch the highlighted area.To get the best shot, follow these tips:–Hold the camera steady and remain still while taking photos.–Avoid taking photos of a subject and background with similar colors.DRAFT For Internal Use Only
Camera and Video       69–When taking photos of a subject that is moving very little or moving a great deal, the camera may not recognise all of the movements.–If there are multiple subjects moving in the background, the camera may not recognise all of the movement.•Panorama: Take a photo composed of many photos strung together.To get the best shot, follow these tips:–Move the camera slowly in one direction.–Keep the camera’s viewfinder within the guide frame.–Avoid taking photos of a subject in front of unrecognizable backgrounds, such as empty skies or plain walls.•Sports: Use this setting for fast-moving subjects.•Night: Use this setting for images taken in darker conditions.Panoramic PhotosA panoramic photo is a wide landscape image consisting of multiple shots.1. Touch MODE ➔ Panorama.2. Touch   and move the camera in one direction. When the blue frame aligns with the viewfinder, the camera automatically takes another shot in a panoramic sequence. To stop shooting, touch  . If the viewfinder is out of the direction, the device stops shooting.Applying Filter EffectsUse the filter effects to take unique photos or videos.䡲  Touch   and select a filter effect. The available options vary by mode.DRAFT For Internal Use Only
70Recording VideosTo record a video:䡲  Touch   to take a video. To pause recording, touch . To stop recording, touch  .While recording, use the following actions:䡲  To change the focus, touch where you want to focus. To focus on the centre of the screen, touch  .䡲  To capture an image from the video while recording, touch .Recording Mode䡲  Touch  Options ➔  Recording mode to change the recording mode.•Normal: Use this mode for normal quality.• Limit for email: Use this mode to lower quality for sending via messages.• Fast motion: Use this mode when recording action scenes.Zooming In and OutUse one of the following methods:䡲  Use the Volume button to zoom in or out.䡲  Spread two fingers apart on the screen to zoom in, and pinch to zoom out.Note: The zoom in and out effect is available when using the zoom feature while shooting video.DRAFT For Internal Use Only
Camera and Video       71Dual Camera ModeWhen you take a landscape photo with the rear camera, the photo or video captured by the front camera appears in an inset window, or vice versa. Use this feature to take a beautiful landscape photo and a self-portrait simultaneously.䡲  Touch   to switch to dual camera mode. Touch  to take a photo or touch   to take a video.1. Tap to resize it or move the location.Note: You can record videos in dual camera mode for up to 5 minutes in Full HD and up to 10 minutes in HD. While taking videos in this mode, sound is recorded by the internal microphone.Share Shot䡲  Touch  Options ➔  , and then select one of the following:•Share shot: Send a photo directly to another device via Wi-Fi Direct.• Buddy photo share: Set the device to recognise a person’s face that you have tagged in a photo and send it to that person.• ChatON photo share: Send a photo to another device via ChatON.• Remote viewfinder: Set a device to control the camera remotely.1OFFDRAFT For Internal Use Only
72Controlling the Camera RemotelySet a device as a viewfinder to control the camera remotely.Touch  Options ➔  ➔ Remote viewfinder, and then connect the device and the camera using Wi-Fi Direct. Touch to take a photo remotely using the device as a viewfinder.Configuring Settings for Camera䡲  Touch  ➔   to configure settings for Camera. Not all of the following options are available in both still camera and video camera modes. The available options vary depending on the mode used.• Photo size/ Video size: Select a resolution. Use higher resolution for higher quality. But it takes up more memory.• Burst shot: Take a series of photos of moving subjects.• Tap to take pics: Touch the image on the preview screen to take photos.• Face detection: Set the device to recognise people’s faces and help you take photos of them.• Metering: Select a metering method. This determines how light values are calculated. Centre-weighted measures background light in the centre of the scene. Spot measures the light value at a specific location. Matrix averages the entire scene.•ISO: Select an ISO value. This controls camera light sensitivity. It is measured in film-camera equivalents. Low values are for stationary or brightly-lit objects. Higher values are for fast-moving or poorly-lit objects.• Video stabilization: Activate or deactivate anti-shake. Anti-shake helps focus when the camera is moving.• Auto night detection: Set the device to automatically detect darker conditions and adjust the brightness of the photo without the flash.• Save as: Set the device to delete the original photo when taking photos with rich tone mode.OFFDRAFT For Internal Use Only
Camera and Video       73•Location tag: Attach a GPS location tag to the photo. Note: To improve GPS signals, avoid shooting in locations where the signal may be obstructed, such as between buildings or in low-lying areas, or in poor weather conditions. •Review: Briefly display photos taken.•Volume key: Set the device to use the Volume button to control the shutter or zoom function.•Timer: Use this for delayed-time shots.• White balance: Select an appropriate white balance, so images have a true-to-life color range. The settings are designed for specific lighting situations. These settings are similar to the heat range for white-balance exposure in professional cameras.•Exposure value: Change the exposure value. This determines how much light the camera’s sensor receives. For low light situations, use a higher exposure.• Guidelines: Display viewfinder guides to help composition when selecting subjects.•Flash: Activate or deactivate the flash.• Voice control: Set the camera to take photos with voice commands.• Contextual filename: Set the camera to display contextual tags. Activate this to use Tag Buddy in Gallery and Story Album.• Save as flipped: Invert the image to create a mirror-image of the original scene.•Storage: Select the memory location for storage.• Reset: Reset the camera settings.DRAFT For Internal Use Only
74ShortcutsReorganize shortcuts for easy access to the camera’s various options.1. Touch Menu ➔ Edit quick settings.2. Touch and hold an option and drag it to a slot at the top of the screen. The other icons can be moved within the list by touching and dragging them.GalleryUse this application to view images and videos.䡲  From a Home screen, touch   Apps ➔  Gallery.Note: Some file formats are not supported depending on the software installed on the device. Some files may not play properly depending on the encoding method used.Viewing ImagesLaunching Gallery displays images by creation date. 䡲  To sort images by location, people, or other categories, touch Time and select a category. Albums displays images by folder.䡲  In a folder, images are displayed by creation date. Select an image to view it in full screen.䡲  Scroll left or right to view the next or previous image.Zooming In and OutUse one of the following methods to zoom in an image:䡲  Double-touch anywhere to zoom in.䡲  Spread two fingers apart on any place to zoom in. Pinch to zoom out, or double-tap to return.DRAFT For Internal Use Only
Camera and Video       75Viewing Images Using the Motion FeatureUse the motion feature to execute a function with particular motion.1. On the Applications screen, touch Settings ➔ Controlstab ➔ Motions, drag the Motions switch to the right, and then turn on the switch for each feature.2. To stop using a motion feature, drag the Motions switch to the left.Playing VideosVideo files show the   icon on the preview. 䡲  Select a video to watch it and touch  .Trimming Segments of a Video1. Select a video, and then touch  . 2. Move the start bracket to the desired starting point, move the end bracket to the desired ending point, and then save the video.Editing Images䡲  When viewing an image, touch Menu and use the following functions:•Edit: Use Photo Editor to edit your photo.•Favorite: Add to the favorites list.•Slideshow: Start a slideshow with the images in the current folder.•Photo frame: Use this to add a frame and a note to an image. The edited image is saved in the Photo frame folder.•Photo note: Use this to write a note on the back of the image. Touch   to edit the note.•Copy to clipboard: Copy to clipboard.•Print: Print the image via a USB or Wi-Fi connection. Some printers may not be compatible with the device.•Rename: Rename the file.DRAFT For Internal Use Only
76• Buddy photo share: Send the image to a person whose face is tagged in the image.•Rotate left: Rotate counter-clockwise.• Rotate right: Rotate clockwise.•Crop: Resize the blue frame to crop and save the image in it.•Set as: Set the image as wallpaper or a contact image.•Details: View image details.• Settings: Change the Gallery settings.Modifying Images䡲  When viewing an image, touch Menu ➔ Edit and use the following functions:•Rotate: Rotate the image.•Crop: Crop the image.• Color: Adjust the saturation or brightness of the image.• Effect: Apply effects to the image.• Sticker: Attach stickers.•Drawing: Draw on the image.•Frame: Apply frames to the image.Favorite Images䡲  When viewing an image, touch Menu ➔ Favorite to add the image to the favorites list.Deleting ImagesUse one of the following methods:䡲  In a folder, touch Menu ➔ Select item, select images by ticking, and then touch   Delete.䡲  When viewing an image, touch   Delete.Sharing ImagesUse one of the following methods:䡲  In a folder, touch Menu ➔ Select item, select images by ticking, and then touch   to send them to others or share them via social network services.䡲  When viewing an image, touch   to send it to others or share it via social network services.DRAFT For Internal Use Only
Camera and Video       77Setting as Wallpaper䡲  When viewing an image, touch Menu ➔ Set as to set the image as wallpaper or to assign it to a contact.Tagging Faces1. Touch Menu ➔ Settings ➔ Tags ➔ Face tag. A yellow frame appears around the recognized face.2. Touch the face, touch Add name, and then select or add a contact.3. When the face tag appears on an image, touch the face tag and use available options, such as sending messages.Note: Face recognition may fail depending on the face angle, face size, skin color, facial expression, light conditions, or accessories the subject is wearing.Using Tag Buddy䡲  Touch Menu ➔ Settings ➔ Tags ➔ Tag buddy, and then drag the Tag buddy switch to the right to display a contextual tag (weather, location, date, and person’s name) when opening an image.DRAFT For Internal Use Only
78Story AlbumUse this application to create your own digital album to keep your stories by organizing the images neatly and automatically.Note: The Story Album app must be installed before you can use it. Touch OK on the pop-up and follow the on-screen instructions.To access Story Album:1. From a Home screen, touch   Apps ➔ Samsungfolder ➔Story Album.2. Touch  Menu ➔ Help to learn more about Story Album.Creating Story AlbumsCreate story albums by selecting images from Gallery or images sorted by tag information.To create a story album manually:1. Touch   Create album.The Create album screen displays.2. Touch From Gallery to add pictures from the Gallery.– or –Touch By tag information to create the story album automatically. Select criteria, and then touch Find pictures. Enter a title for the album, select a theme, and then touch Create album.DRAFT For Internal Use Only
Camera and Video       79Creating Recommended AlbumsWhen you take photos at one location, the device automatically sorts your photos into albums based on your specified criteria and suggests making the new albums.䡲  Touch Menu ➔ Settings ➔ Home city, and then set a method for recognizing your location. Select an album type and set a minimum number of photos.Viewing Story Albums1. Select a story album. The cover image appears on the first page. Scroll left or right to view images in the story album.2. On a page of the album, touch Menu and use the following functions. The available options vary depending on the page.• Edit title: Rename the album.• Change theme: Change the theme for the album.• Change cover image: Change the cover image of the album.•Slideshow: Start a slideshow with the images in the current album.•Share via: Send the album to others.•Print: Print the album via a USB or Wi-Fi connection. Some printers may not be compatible with the device.• Order photo book: Place an order for a printed album.•Export Album: Export the album to other storage locations.• Add content: Add more content to the current page.• Remove content: Delete content on the current page.•Edit: Change the layout of the current page.• Delete page: Delete the current page.Managing Story Albums1. Touch and hold a story album.2. Touch one or more story albums or touch the selected tab ➔ Select all.3. Touch  Share via to create a PDF file or a Story Album file (.scc).4. Touch  Delete to delete the selected story albums.# selectedDRAFT For Internal Use Only
80Editing Images1. Touch the image of the page in an album.The following options are available:2. Touch  Menu, and then use the following functions:•Slideshow: Start a slideshow or change the slideshow settings.• Set as cover: Set the image as an album cover image.•Rotate left: Rotate the image counter-clockwise.• Rotate right: Rotate the image clockwise.VideoUse this application to play video files.䡲  From a Home screen, touch   Apps ➔  Video.Note: Some file formats are not supported depending on the device's software.Add a caption.Send the image to others.Delete the image.Select among various effects that are available.DRAFT For Internal Use Only

Navigation menu