Samsung Electronics Co SMR765V LTE Watch + Bluetooth/BLE and DTS b/g/n User Manual 2 of 2
Samsung Electronics Co Ltd LTE Watch + Bluetooth/BLE and DTS b/g/n 2 of 2
UserManual.wiki
>
Samsung Electronics Co
>
SMR765V User Manual
>
User manual 2 of 2
Contents
1.
User manual 1 of 2
2.
User manual 2 of 2
3.
User Manual_[A3LSMR765V] VZW_R765V_EN_HS_020617_R3
4.
User Manual_[A3LSMR765V] VZW_R765V_EN_UM_TN_XXX_011717_R0_enabled
User manual 2 of 2
Navigation menu
Upload a User Manual
Namespaces
Wiki Guide
HTML
PDF
Info
Views
User Manual
Discussion / Help
Navigation
![DRAFT–FOR INTERNAL USE ONLY7Getting StartedSamsung KnoxSamsung Knox is Samsung’s security platform and is a mark for a Samsung device tested for security with enterprise use in mind. Additional licensing fee may be required. For more information about Knox, please refer to: samsung.com/us/knoxMaintaining Water and Dust ResistanceThis device is rated IP68 using the Ingress Protection rating system.Your device has been tested in a controlled environment and shown to be water and dust resistant in certain circumstances (meets requirements of classification IP68 as described by the international standard IEC 60529 – Degrees of Protection provided by Enclosures [IP Code]; test conditions: 15-35°C, 86-106 kPa, 5.0 feet, for 30 minutes). Despite this classification, your device is not impervious to water damage in any situation. It is important that all compartments are closed tightly.Note: If any liquid is found to have entered your device components or an internally sealed system, this condition will void your device warranty.Follow these tips carefully to prevent damage to the device.• Any device which uses accessible compartments or ports that can be opened, should have these sealed or closed tightly to prevent liquid from entering the system.• Whenever your device gets wet, dry it thoroughly with a clean, soft cloth. If your device has gotten wet, you should dry the inside of the charging port before inserting a power connector to charge your device. If the charging port is not fully dry, your device may operate abnormally. For example, it may charge more slowly or overheat.](https://usermanual.wiki/Samsung-Electronics-Co/SMR765V.User-manual-2-of-2/User-Guide-3281536-Page-11.png)
![DRAFT–FOR INTERNAL USE ONLY8Getting StartedDo not expose the device to salt water or ionized water, or to water over 5.0 feet deep for more than 30 minutes. If your device is exposed to fresh water, dry it thoroughly with a clean, soft cloth. If the device is exposed to any liquid other than fresh water, rinse the device with fresh water immediately and dry it thoroughly with a clean, soft cloth. Failure to rinse the device in fresh water and dry it as instructed may cause the device to suffer from operability or cosmetic issues.• Do not expose the device to water at high pressure.• If the device is dropped or receives an impact, the water and dust resistant features of the device may be damaged.• To maintain the water-resistant and dust-resistant features of your device, if an S Pen is available for use, verify it is securely inserted prior to any exposure to liquids.• The touchscreen and other features may not work properly if the device is used in water or in other liquids. [110116]Restricting Children’s Access to Your Mobile DeviceYour device is not a toy. Do not allow children to play with it because they could hurt themselves and others, damage the device, or make calls that increase your device bill. Keep the device and all its parts and accessories out of the reach of small children.Samsung Electronics America, Inc.Address: 85 Challenger Road Ridgefield Park, New Jersey 07660Phone: 1-800-SAMSUNG (726-7864)Internet: samsung.com©2017 Samsung Electronics America, Inc. Samsung, Samsung Galaxy, SHealth, Samsung Gear are all trademarks of SamsungElectronics Co., Ltd.](https://usermanual.wiki/Samsung-Electronics-Co/SMR765V.User-manual-2-of-2/User-Guide-3281536-Page-12.png)
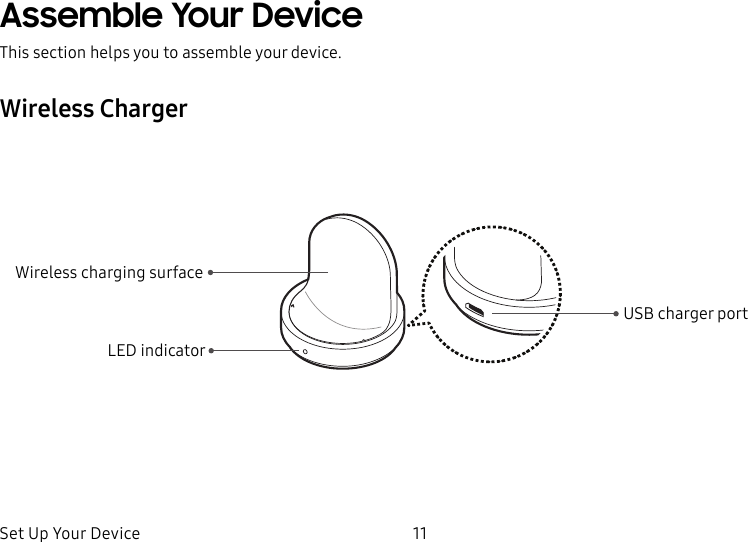
![DRAFT–FOR INTERNAL USE ONLYSet Up Your Device 12Charge the BatteryYour device is powered by a rechargeable, standard Li-Ion battery. Warning: Do not disassemble, modify, or repair your device. Placing objects, such as magnetic stripe cards, including credit cards, phone cards, passbooks, and boarding passes, next to the device or charger may cause damage from the charger or device’s magnetic field.The battery comes partially charged. You can use the device while charging.Caution: Charging head for plugging USB cable into wall outlet is not included. Use only Samsung charging devices rated with an output [voltage of XX5XXXv] and an output current of over [XXX 500XXmA] (sold separately). Samsung accessories are designed for your device to maximize battery life. Using other accessories may void your warranty and may cause damage.1. Insert the USB cable into the USB charger port.2. Connect the USB cable to the charging head, and then plug the charging head into a standard outlet.3. Place the Gear onto the wireless charger dock.Note: Prevent the USB charger port and the small end of the charger from coming into contact with conductive materials, such as liquids, dust, metal powders, and pencil leads.](https://usermanual.wiki/Samsung-Electronics-Co/SMR765V.User-manual-2-of-2/User-Guide-3281536-Page-16.png)