Samsung Electronics Co SMT820 Portable Tablet with Bluetooth, WLAN and ANT+ User Manual
Samsung Electronics Co Ltd Portable Tablet with Bluetooth, WLAN and ANT+ Users Manual
Users Manual

www.samsung.com
User Manual
607
'UDIW0DQXDO7KH0DQXDOLVSUHOLPLQDU\DQGVRPHIHDWXUHVGLVFXVVHGPD\QRWEHDSSOLFDEOHRUFRPSOHWHDQGDUH
QRWILQDOLH0RGHO1DPHVDQG,WHPVVXFKDVEDWWHU\6,0&DUG6RIWNH\GLVFXVVLRQHWF

2
About this manual
This device provides high quality mobile communication and entertainment using Samsung’s
high standards and technological expertise. This user manual is specially designed to detail
the device’s functions and features.
r
Please read this manual before using the device to ensure safe and proper use.
r
Descriptions are based on the device’s default settings.
r
Images and screenshots may differ in appearance from the actual product.
r
Content may differ from the final product, or from software provided by service providers
or carriers, and is subject to change without prior notice. For the latest version of the
manual, refer to the Samsung website,
www.samsung.com
.
r
Content (high quality content) that requires high CPU and RAM usage will affect the
overall performance of the device. Applications related to the content may not work
properly depending on the device’s specifications and the environment that it is used in.
r
Available features and additional services may vary by device, software, or service
provider.
r
Applications and their functions may vary by country, region, or hardware specifications.
Samsung is not liable for performance issues caused by applications from any provider
other than Samsung.
r
Samsung is not liable for performance issues or incompatibilities caused by edited
registry settings or modified operating system software. Attempting to customise the
operating system may cause the device or applications to work improperly.
r
Software, sound sources, wallpapers, images, and other media provided with this device
are licensed for limited use. Extracting and using these materials for commercial or other
purposes is an infringement of copyright laws. Users are entirely responsible for illegal
use of media.
DRAFT
singsing
signed tosigned
nd proper use.nd proper us
the actual product.the act
oftware provided by service providers
oftware provided by service provider
or notice. For the latest version of theor notice. For the late
samsung.comamsung
.
ires high CPU and RAM usage will affect tCPU and RAM
pplications related to the content may nod to the
e’s specifications and the environment the’s specifications and the enviro
nal services may vary by device, softwareervices may vary by device, softwa
functions may vary by country, region, ovary by country, region, o
ble for performance issues caused by appble for performance issues cau
sung.sung.
not liable for performance issues or inconot liable for performance issues or i
settings or modified operating system soettings or modified operating system so
ating system may cause the device or apstem may cause the device or ap
Software, sound sources, wallpapers, imaoftware, sound sources
are licensed for limited use. Extractingare licensed for limited use.
purposes is an infringement of coppurposes is an infringement of
use
o
f m
ed
i
a.
About this manual
3
r
Default applications that come with the device are subject to updates and may no longer
be supported without prior notice. If you have questions about an application provided
with the device, contact a Samsung Service Centre. For user-installed applications,
contact service providers.
r
Modifying the device’s operating system or installing softwares from unofficial sources
may result in device malfunctions and data corruption or loss. These actions are violations
of your Samsung licence agreement and will void your warranty.
Instructional icons
Warning: situations that could cause injury to yourself or others
Caution: situations that could cause damage to your device or other equipment
Note: notes, usage tips, or additional information
Copyright
Copyright © 2014 Samsung Electronics
This guide is protected under international copyright laws.
No part of this guide may be reproduced, distributed, translated, or transmitted in any form or
by any means, electronic or mechanical, including photocopying, recording, or storing in any
information storage and retrieval system, without the prior written permission of Samsung
Electronics.
DRAFT
nofficial sonofficial
e actions are violae action
y to yourself or othersy to yourself or others
se damage to your device or other equipour devi
r additional informationtional information
014 Samsung Electronics014 Samsung Electronics
e is protected under international copyrigotected under international copyrig
rt of this guide may be reproduced, distrof this guide may be r
any means, electronic or mechanical, incany means, electronic or me
information storage and retrieval systeminformation storage and retrieval s
El
ect
r
o
ni
cs.Ele

About this manual
4
Trademarks
r
SAMSUNG and the SAMSUNG logo are registered trademarks of Samsung Electronics.
r
Bluetooth® is a registered trademark of Bluetooth SIG, Inc. worldwide.
r
Wi-Fi®, Wi-Fi Protected Setup™, Wi-Fi Direct™, Wi-Fi CERTIFIED™, and the Wi-Fi logo are
registered trademarks of the Wi-Fi Alliance.
r
All other trademarks and copyrights are the property of their respective owners.
DRAFT
d the Wi-Fi logd the Wi
espective owners.espective owne

5
Table of Contents
Getting started
7 Device layout
8 Buttons
9 Package contents
10 Charging the battery
12 Inserting a memory card
14 Turning the device on and off
15 Holding the device
15 Locking and unlocking the device
15 Adjusting the volume
15 Switching to silent mode
Basics
16 Indicator icons
17 Using the touch screen
20 Control motions
22 Using Multi Window
26 Notifications
27 Home screen
29 Applications screen
31 Using applications
31 Help
32 Entering text
34 Connecting to a Wi-Fi network
35 Setting up accounts
36 Transferring files
38 Securing the device
39 Upgrading the device
Communication
40 Contacts
44 Email
46 Google Mail
48 Hangouts
48 Google+
49 Photos
Web & network
50 Internet
51 Chrome
52 Bluetooth
Media
54 Music
56 Camera
61 Gallery
65 Video
66 YouTube
DRAFT
evice
ode
ator iconscons
sing the t
ouc
h
scree
nch screen
ConCon
t
r
o
l m
ot
i
o
n
strol mot
2222
Using
U
M
ulti Window
ulti Wind
2
626
Noti
f
ic
a
tions
2
727
H
o
m
e
sc
r
een
2929
App
l
ic
aAp
t
i
ons scree
nreen
Using applicaUsing applica
tionstions
elpelp
ng texng tex
g filesg files
ng the deviceng the d
grgr
ading the deviceading
Communicationommunicati
4
0
C
ontact
sontacts
44
E
mai
l
46
46
G
oo
g
le M
Google M
ai
lail
4
848
H
an
g
outs
Hangouts
4
848
GG
oog
l
e
+ogle+
4
949
P
h
otos
WeW

Table of Contents
6
97 General
100 Google Settings
Troubleshooting
Application & media stores
67 Play Store
68 Samsung Apps
68 Play Music
69 Play Games
69 Play Newsstand
Utilities
70 Memo
71 S Planner
73 Dropbox
74 Cloud
75 Drive
75 Hancom Viewer
78 Alarm
79 World Clock
79 Calculator
80 S Voice
81 Google
82 Voice Search
82 My Files
Travel & local
85 Maps
Settings
86 About Settings
86 Connections
89 Device
94 Controls
DRAFT
gg
earcharch
y F
iles
Tr
a
vel
&
l
o
c
alTravel & local
8585
Map
s
ingsings
Setti Setti

7
Getting started
Device layout
Recent apps button
Home button
Touch screen
Front camera
Back button
Multipurpose jack
Volume button
Memory card slot
Microphone
Power button
Rear camera
Speaker
Headset jack
DRAFT
ps buttonps button
n
Multipurpose jackMultipur
Volume buttonolume b
MemoMemo
MicrophoneMicrop
Po
w
e
r
button
RA
RA
RA
RA
RA
RA
RA
RA
RA
RA
RA
RA
A
A
A
A
F
F
F
A
A
A
A
AF
F
AF
AF
AF
AF
F
F
AF
R
ear camer
aar came
R
R
Hea
d
set
j
ac
kHeadset jack
R
R
R
AF
A
AF
AF
AF

Getting started
8
r
Do not cover the antenna area with your hands or other objects. This may cause
connectivity problems or drain the battery.
r
Do not use a screen protector. This causes sensor malfunctions.
r
Do not allow water to contact the touch screen. The touch screen may malfunction
in humid conditions or when exposed to water.
Buttons
Button Function
Power
r
Press and hold to turn the device on or off.
r
Press and hold for 8 seconds to reset the device if it has fatal
errors or hang-ups, or freezes.
r
Press to lock or unlock the device. The device goes into lock
mode when the touch screen turns off.
Recent apps
r
Tap to open the list of recent applications.
Home
r
Press to return to the Home screen.
r
Press and hold to launch Google search.
Back
r
Tap to return to the previous screen.
Volume
r
Press to adjust the device volume.
DRA
DR
R
R
RA
RA
RA
D
D
DR
AF
AF
AFT
may mmay m
FT
FT
R
R
DR
DR
n the device on or off.n the device on or off
or 8 seconds to reset the device if it has fseconds to reset th
g-ups, or freezes.eezes.
ock or unlock the device. The device goeock or unlock the device. Th
e when the touch screen turns off.when the touch screen turns off.
Tap to open the list of recent applicationspen the list of recent applications
r
Press to return to the Home screen.urn to the Home screen.
rr
Press and hold to launch GooglePress and hold to lau
r
Tap to return to the previouTap to return to the
ume
r
r
Press to adjust the dPress to adjust the d

Getting started
9
Package contents
Check the product box for the following items:
r
Device
r
Quick start guide
r
The items supplied with the device and any available accessories may vary
depending on the region or service provider.
r
The supplied items are designed only for this device and may not be compatible
with other devices.
r
Appearances and specifications are subject to change without prior notice.
r
You can purchase additional accessories from your local Samsung retailer. Make
sure they are compatible with the device before purchase.
r
Other accessories may not be compatible with your device.
r
Use only Samsung-approved accessories. Malfunctions caused by using
unapproved accessories are not covered by the warranty service.
r
Availability of all accessories is subject to change depending entirely on
manufacturing companies. For more information about available accessories, refer
to the Samsung website.
DRAFT
sories may varysories ma
e and may not be compatiblee and may not be compa
to change without prior notice.to chan
s from your local Samsung retailer. Makefrom your local Samsu
evice before purchase.before purchase.
mpatible with your device.h your dev
d accessories. Malfunctions caused by usd accessories. Malfunctions ca
are not covered by the warranty service.not covered by the warranty serv
essories is subject to change depending s subject to change depending
ompanies. For more information about avmore information about a
ng website.ng website
Getting started
10
Charging the battery
Use the charger to charge the battery before using it for the first time.
Use only Samsung-approved chargers, batteries, and cables. Unapproved chargers or
cables can cause the battery to explode or damage the device.
r
When the battery power is low, the battery icon appears empty.
r
If the battery is completely discharged, the device cannot be turned on
immediately when the charger is connected. Allow a depleted battery to charge for
a few minutes before turning on the device.
r
If you use multiple applications at once, network applications, or applications
that need a connection to another device, the battery will drain quickly. To avoid
disconnecting from the network or losing power during a data transfer, always use
these applications after fully charging the battery.
Charging with the charger
Connect the USB cable to the USB power adaptor and then plug the end of the USB cable into
the multipurpose jack.
DRAFT
ved cved c
mpty.mpty.
not be turned onnot be turned on
a depleted battery to charge for
a depleted battery to cha
work applications, or applicationswork applications, or applications
e, the battery will drain quickly. To avoide, the battery will drain quickly. To avoid
osing power during a data transfer, alwayg power during a da
ging the battery.attery.
gerr
USB power adaptor and then plug the enr adaptor and then plug the en
DRA
RA
RA
RA
RA
RA
RA

Getting started
11
Connecting the charger improperly may cause serious damage to the device. Any
damage caused by misuse is not covered by the warranty.
r
The device can be used while it is charging, but it may take longer to fully charge
the battery.
r
If the device receives an unstable power supply while charging, the touch screen
may not function. If this happens, unplug the charger from the device.
r
While charging, the device may heat up. This is normal and should not affect the
device’s lifespan or performance. If the battery gets hotter than usual, the charger
may stop charging.
r
If the device is not charging properly, take the device and the charger to a
Samsung Service Centre.
After fully charging, disconnect the device from the charger. First unplug the charger from the
device, and then unplug it from the electric socket.
To save energy, unplug the charger when not in use. The charger does not have a
power switch, so you must unplug the charger from the electric socket when not in
use to avoid wasting power. The charger should remain close to the electric socket
and easily accessible while charging.
Checking the battery charge status
When you charge the battery while the device is off, the following icons will show the current
battery charge status:
Charging Fully charged
the touch scr the tou
the device.the devi
and should not affect theand should not a
hotter than usual, the chargerhotter than usual, the c
e device and the charger to ae device
om the charger. First unplug the charger farger. First unp
ic socket.
harger when not in use. The charger doearger when not in use. The charg
st unplug the charger from the electric solug the charger from the electric s
power. The charger should remain close tocharger should remain close to
le while charging.ng.
battery charge statusbattery charge
arge the battery while the device is off, thrge the battery while the device is off, t
arge status:status:

Getting started
12
Reducing the battery consumption
Your device provides options that help you save battery power. By customising these options
and deactivating features in the background, you can use the device longer between charges:
r
When you are not using the device, switch to sleep mode by pressing the Power button.
r
Close unnecessary applications with the task manager.
r
Deactivate the Bluetooth feature.
r
Deactivate the Wi-Fi feature.
r
Deactivate auto-syncing of applications.
r
Decrease the backlight time.
r
Decrease the brightness of the display.
Inserting a memory card
Your device accepts memory cards with maximum capacities of 32 GB. Depending on the
memory card manufacturer and type, some memory cards may not be compatible with your
device.
r
Some memory cards may not be fully compatible with the device. Using an
incompatible card may damage the device or the memory card, or corrupt the data
stored in it.
r
Use caution to insert the memory card right-side up.
r
The device supports the FAT and the exFAT file systems for memory cards. When
inserting a card formatted in a different file system, the device asks to reformat the
memory card.
r
Frequent writing and erasing of data shortens the lifespan of memory cards.
r
When inserting a memory card into the device, the memory card’s file directory
appears in the
SD Memory card
folder.
DRAFT
e Power e Powe
cardcar
with maximum capacities of 32 GB. Deph maximum capacities of 32 GB. D
d type, some memory cards may not be come memory cards may not be c
ry cards may not be fully compatible withry cards may not be fully com
ible card may damage the device or the ible card may damage the dev
in it.in it.
se caution to insert the memory card righ caution to insert the memory card righ
The device supports the FAT and the evice supports the FAT and the e
inserting a card formatted in a diffinserting a card for
m
emory car
d.memory c
r
Frequent writing and erasient writing and eras
r
When inserting a memerting
a
ppears in t
h
e
the
SD M

Getting started
13
1Open the cover of the memory card slot.
2Insert a memory card with the gold-coloured contacts facing downwards.
3Push the memory card into the slot until it locks in place.
4Close the cover of the memory card slot.
Removing the memory card
Before removing the memory card, first unmount it for safe removal. On the Home screen, tap
ĺ
Settings
ĺ
General
ĺ
Storage
ĺ
Unmount SD card
.
1Open the cover of the memory card slot.
2Push the memory card until it disengages from the device, and then pull it out.
3Close the cover of the memory card slot.
Do not remove the memory card while the device is transferring or accessing
information. Doing so can cause data to be lost or corrupted or damage to the
memory card or device. Samsung is not responsible for losses that result from the
misuse of damaged memory cards, including the loss of data.
F
y card slot.d slot.
emory card
memory card, first unmount it for safe rememory card, first unmount i
GeneralGener
ĺ
S
torage
orag
ĺ
Unmount SD camoun
he cover of the memory card slot.cover of the memory card slot.
ush the memory card until it disengagessh the memory card un
33
Close the cover of the memory cardClose the cover of the memory
D
D
D
F
Do not remove the memoove the memo
information. Doing so cDoin
memory card or devmemory card or d
misuse of damagmisuse of dama
F
Getting started
14
Formatting the memory card
A memory card formatted on a computer may not be compatible with the device. Format the
memory card on the device.
On the Home screen, tap
ĺ
Settings
ĺ
General
ĺ
Storage
ĺ
Format SD card
ĺ
Format SD card
ĺ
Erase everything
.
Before formatting the memory card, remember to make backup copies of all
important data stored on the device. The manufacturer’s warranty does not cover loss
of data resulting from user actions.
Turning the device on and off
When turning on the device for the first time, follow the on-screen instructions to set up your
device.
Press and hold the Power button for a few seconds to turn on the device.
r
Follow all posted warnings and directions from authorised personnel in areas
where the use of wireless devices is restricted, such as aeroplanes and hospitals.
r
Press and hold the Power button and tap
Flight mode
to disable the wireless
features.
To turn off the device, press and hold the Power button, and then tap
Power off
.
DRAFT
D cardD card
kup copies of all kup copies o
warranty does not cover loss
warranty does not
d offoff
e, follow the on-screen instructions to sete on-screen i
a few seconds to turn on the device.few seconds to turn on the devi
D
rr
Follow all posted warnings and dFollow all posted wa
where the use of wireless devere the use of wireles
r
Press and hold the Powerd hold the Power
f
eatures
.
To turn off the device, pressTo turn off the device, pre
RAF
RA
RA
RA
RA
RA

Getting started
15
Holding the device
Do not cover the antenna area with your hands or other objects. This may cause connectivity
problems or drain the battery.
Locking and unlocking the device
When not in use, lock the device to prevent unwanted operation. Pressing the Power button
turns off the screen and puts the device into lock mode. The device automatically gets locked
if it is not used for a specified period.
To unlock the device, press the Power button or the Home button when the touch screen is
turned off, tap anywhere on the screen, and then flick your finger in any direction.
Adjusting the volume
Press the Volume button up or down to adjust the sound volume when playing music or
video.
Switching to silent mode
Use one of the following methods:
r
Press and hold the Volume button down until it switches to silent mode.
r
Press and hold the Power button, and then tap
Mute
.
r
Open the notifications panel at the top of the screen, and then tap
Sound
.
DRAFT
on. Pressing the Power buttonon. Pressing the Power b
e device automatically gets locked
e device automatically gets loc
Home button when the touch screen isHome button when the touch screen is
n flick your finger in any direction.ick your finger in any
meme
down to adjust the sound volume when padjust the sound volume when p
g to silent modeg to silent mode
the following methods:e following methods:
ss and hold the Volume button down und the Volume button down un
Press and hold the Power button, and thPress and hold the Power
r
r
Open the notifications panel at the Open the notifications panel a
16
Basics
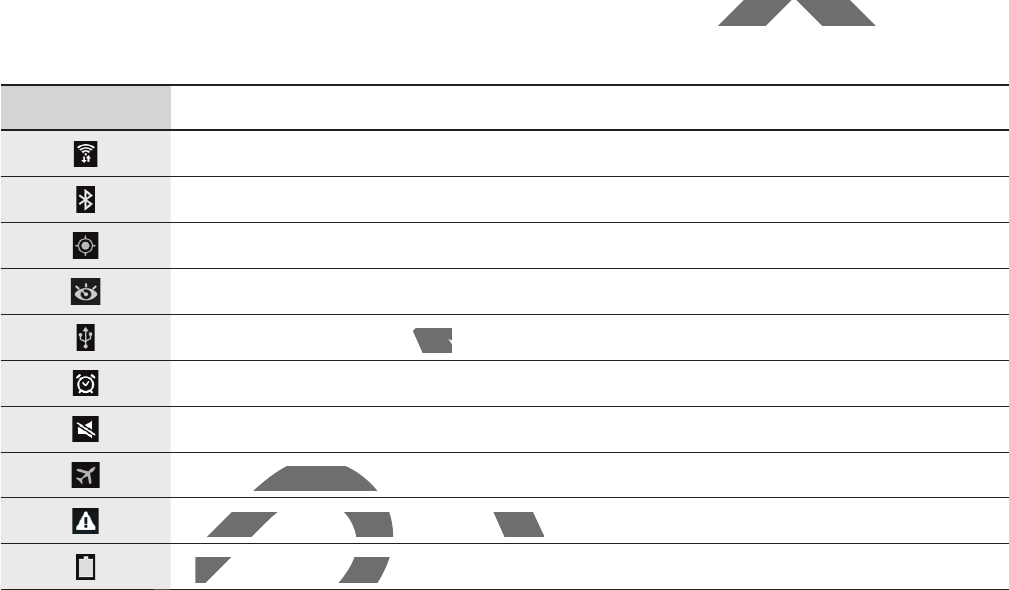
Indicator icons
The icons displayed at the top of the screen provide information about the status of the
device. The icons listed in the table below are most common.
Icon Meaning
Wi-Fi connected
Bluetooth feature activated
GPS activated
Smart screen feature activated
Connected to computer
Alarm activated
Mute mode activated
Flight mode activated
Error occurred or caution required
Battery power level
DRA
R
RAFT
bout the status of thebout the status
FT
AFT
AF
AF
AF
FT
FT
A
RA
RA
RA
RA
R
R
ctivatedc
mputeruter
d
de activated
t mode activatedt mode activ
rror occurred or caution requiredrror occurred or caution require
Batter
y
power leve
lBattery power leve

Basics
17
Using the touch screen
Use only fingers to use the touch screen.
r
Do not allow the touch screen to come into contact with other electrical devices.
Electrostatic discharges can cause the touch screen to malfunction.
r
To avoid damaging the touch screen, do not tap it with anything sharp or apply
excessive pressure to it with your fingertips.
r
The device may not recognise touch inputs close to the edges of the screen, which
are outside of the touch input area.
r
Leaving the touch screen idle for extended periods may result in afterimages
(screen burn-in) or ghosting. Turn off the touch screen when you do not use the
device.
Finger gestures
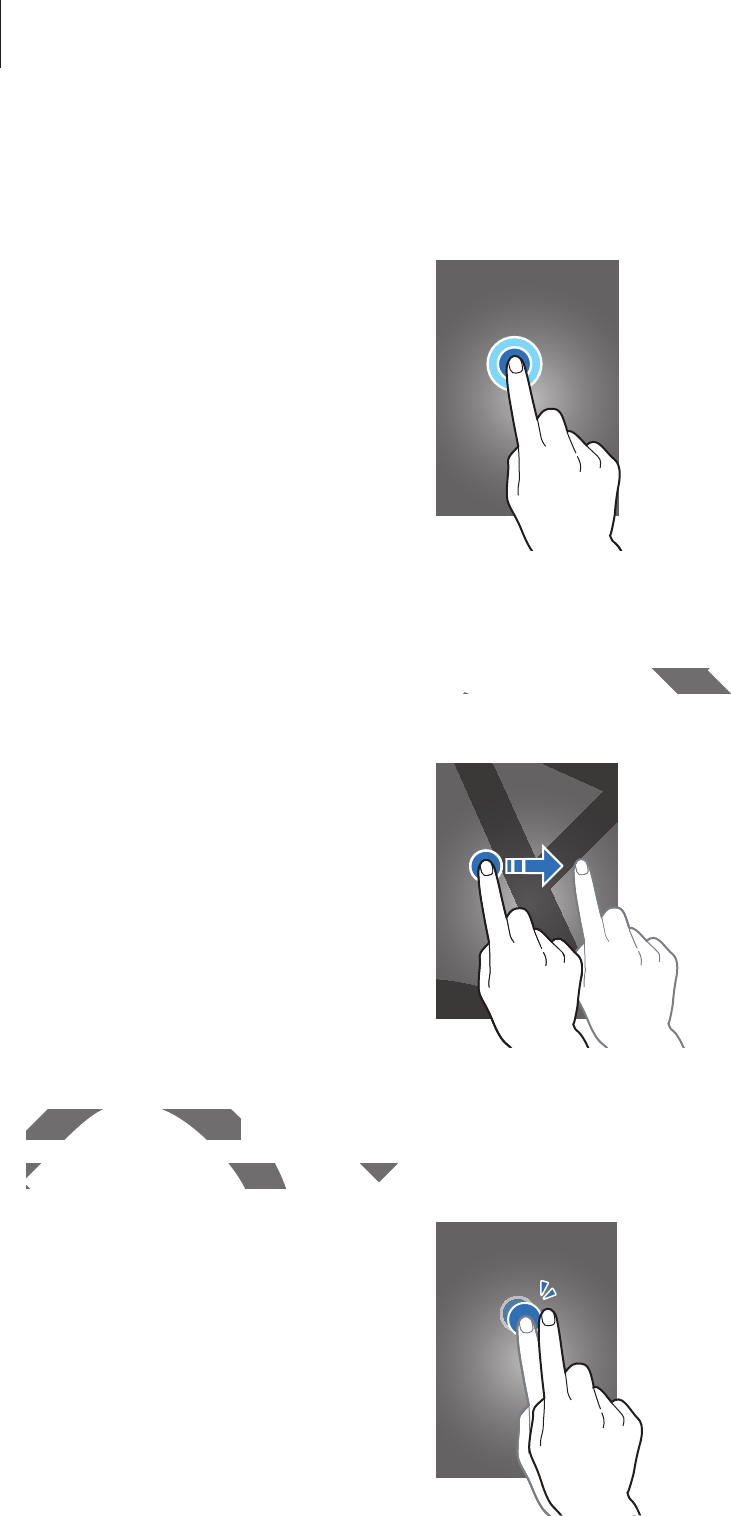
Tapping
To open an application, to select a menu item, to press an on-screen button, or to enter a
character using the on-screen keyboard, tap it with a finger.
DRAFT
tricaltrical
on.on.
thing sharp or applyhing sh
o the edges of the screen, whicho the edges of the screen,
periods may result in afterimagesperiods may result in afterimages
e touch screen when you do not use thee touch screen when you do not use the
select a menu item, to press an on-screeem, to press an on-scree
-screen keyboard, tap it with a finger.-screen keyboard, tap it with a
RA
RA
R
R
R
Basics
18
Tapping and holding
Tap and hold an item for more than 2 seconds to access available options.
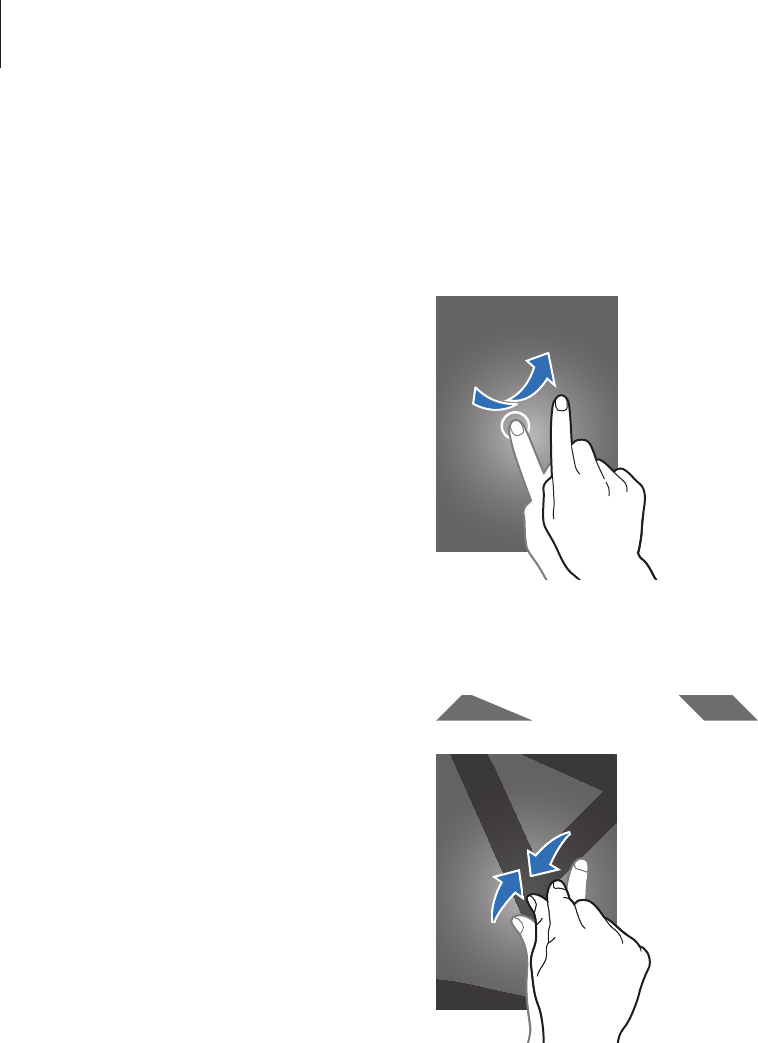
Dragging
To move an icon, thumbnail, or preview to a new location, tap and hold it and drag it to the
target position.
Double-tapping
Double-tap on a webpage or image to zoom in a part. Double-tap again to return.
DRAFT
F
F
o a new location, tap and hold it and drao a new location, tap and
A
A
A
RA
RA
RA
RA
RA
RA
RA
RA
A
A
A
A
RA
RA
RA
RA
RA
RA
RA
RA
Double-tappingDouble-tapping
Double-tap on a webpage or imageDouble-tap on a webpage or image
Basics
19
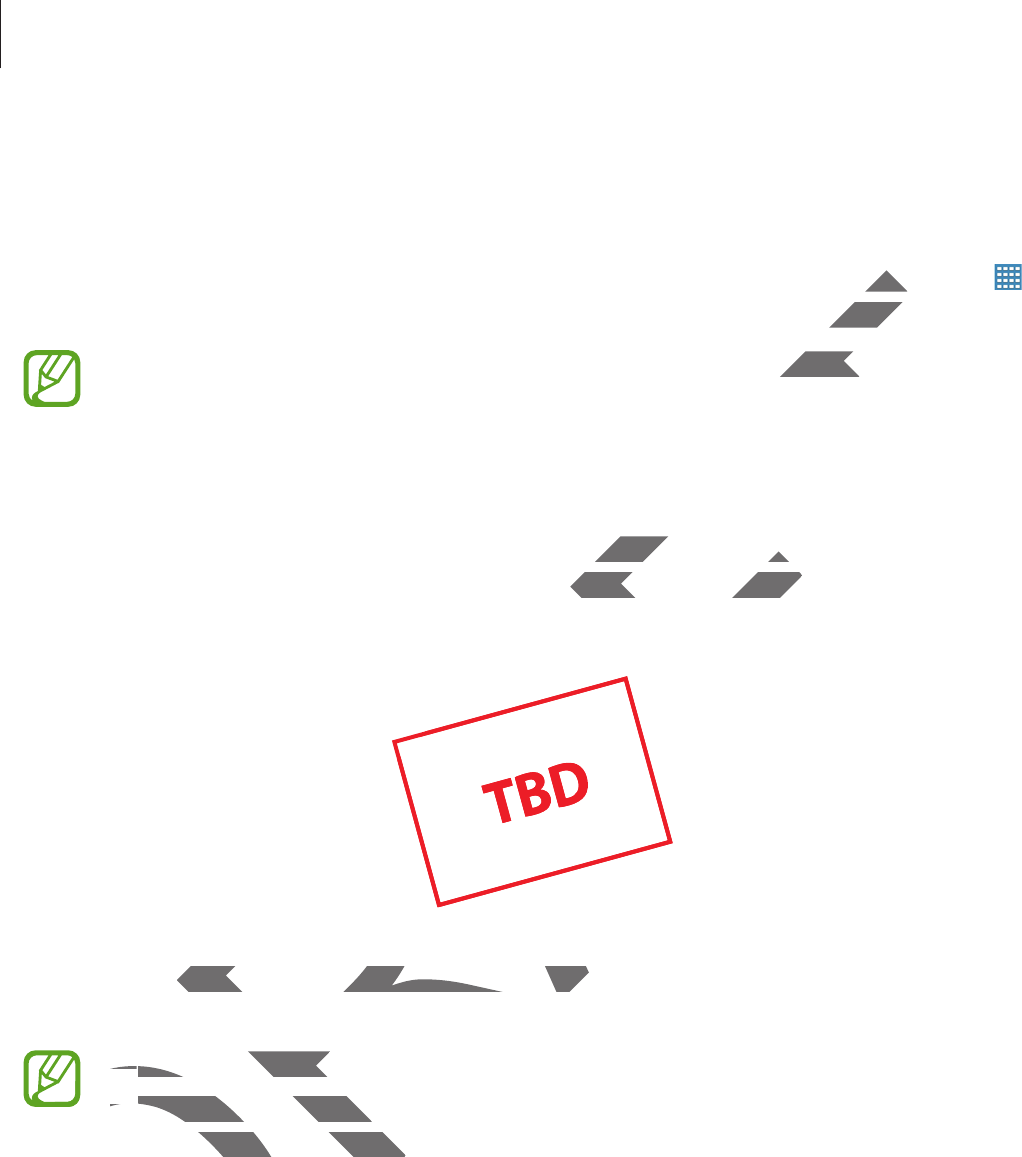
Flicking
Flick left or right on the Home screen or the Applications screen to see another panel. Flick up
or down to scroll through a webpage or a list, such as contacts.
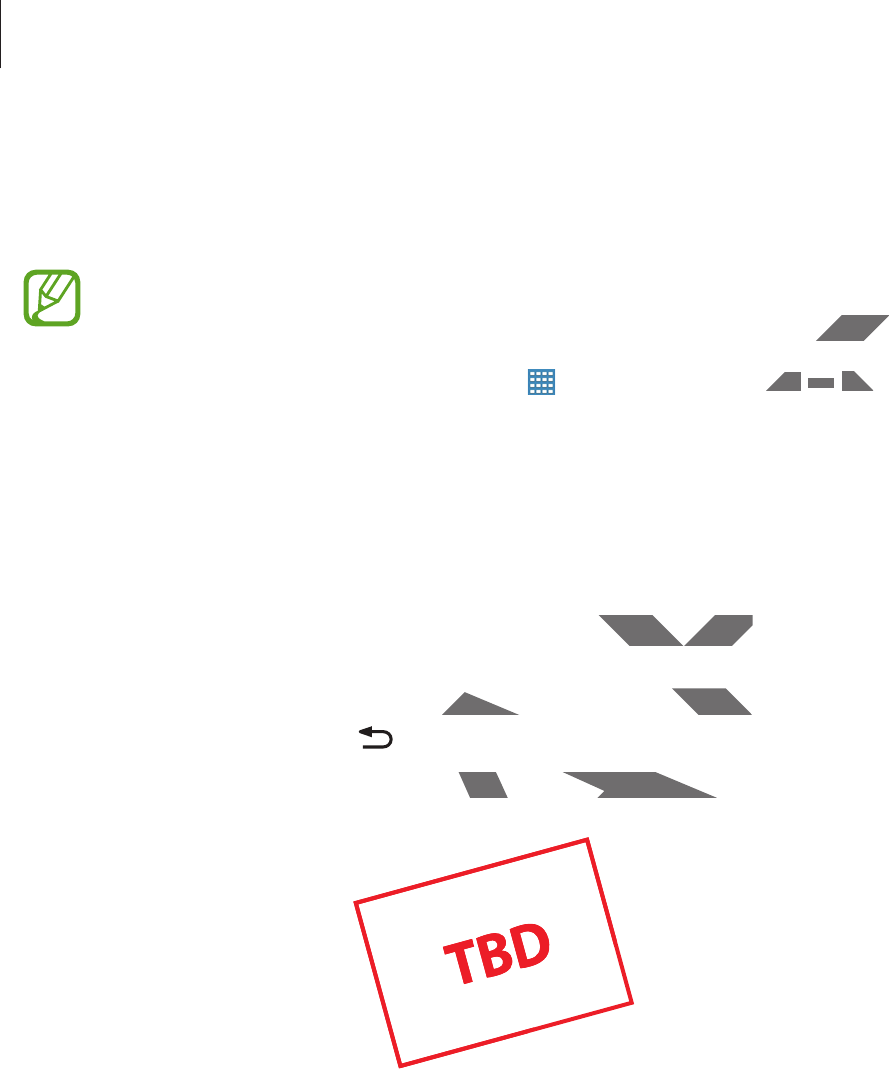
Pinching
Spread two fingers apart on a webpage, map, or image to zoom in a part. Pinch to zoom out.
DRAFT
F
F
F
e, map, or image to zoom in a part. Pinche, map, or image to zoom in a
RA
RA
RA
RA
RA
RA
RA
A
RA
RA
RA
RA
RA
A
A
A
RA
RA
Basics
20
Control motions
Simple motions allow easy control of the device.
Before using motions, make sure the motion feature is activated. On the Home screen, tap
ĺ
Settings
ĺ
Controls
ĺ
Palm motion
, and then drag the
Palm motion
switch to the right.
Excessive shaking or impact to the device may result in unintended inputs. Control
motions properly.
Rotating the screen
Many applications allow display in either portrait or landscape orientation. Rotating the
device causes the display to automatically adjust to fit the new screen orientation.
To prevent the display from rotating automatically, open the notifications panel and deselect
Screen rotation
.
r
Some applications do not allow screen rotation.
r
Some applications display a different screen depending on the orientation. The
calculator turns into a scientific calculator when rotated to landscape.
DRAFT
e scree scre
switch to thswitch
nded inputs. Controlnded inp
andscape orientation. Rotating theandscape orientati
to fit the new screen orientation.o fit the new screen ori
he display from rotating automatically, ope display from rotating automatically, o
tation
.
D
RAF
r
Some applications do not allow scrSome applications
rr
Some applications display a difSome applications dis
calculator turns into a scienator turns into a scie
RAF
RA
RA
RA
AF
RAF

Basics
21
Sweeping
Sweep your hand across the screen to capture a screenshot. The image is saved in
Gallery
ĺ
Screenshots
. It is not possible to capture a screenshot while using some applications.
Covering
Cover the screen with a palm to pause media playback.
DRAFT
se media playback.media playb
RA
RA
RA
RA
RA
Basics
22
Using Multi Window
Use this feature to run multiple applications on the screen at the same time.
r
Only applications on the Multi Window tray can run.
r
This feature may not be available depending on the region or service provider.
To use Multi Window, on the Home screen, tap
ĺ
Settings
ĺ
Device
ĺ
Multi window
,
and then drag the
Multi window
switch to the right.
Using a split screen Multi Window
Use this feature to run applications in a split screen.
Launching applications in a split screen Multi Window
1
Drag your finger from the right edge of the screen towards the middle of the screen.
Alternatively, tap and hold .
The Multi Window tray appears at the right side of the screen.
DRAFT
ervice provideervice p
vicevice
ĺĺ
Multi windowMu
,
een Multi Windowulti Window
ge of the screen towards the middle of thge of the screen towards the m
pears at the right side of the screen.e right side of the screen
RA
RA
RA
RA
RA

Basics
23
2Tap and hold an application icon on the Multi Window tray, and then drag it to the screen.
Release the application icon when the screen turns blue.
3Tap and hold another application icon on the Multi Window tray, and then drag it to a
new location.
ther application icon on the Multi Windowther application icon on the M
Basics
24
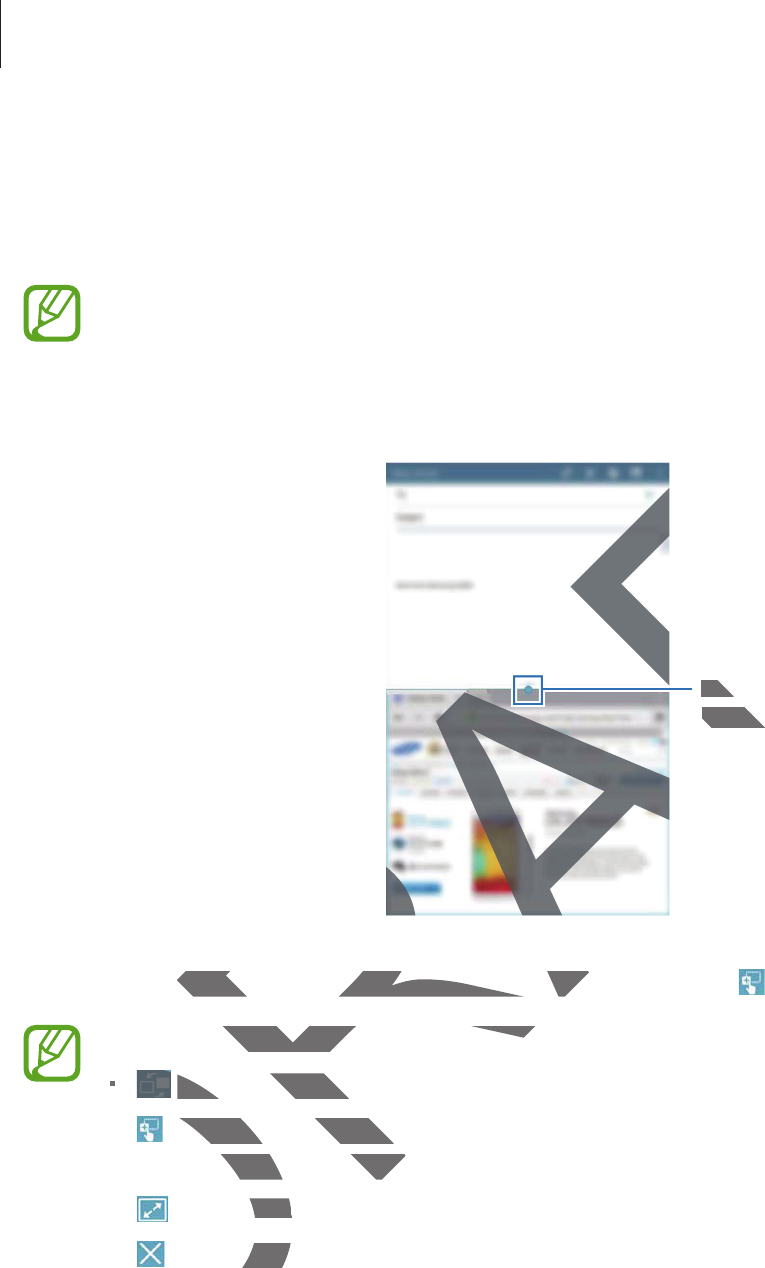
Sharing content between applications
You can easily share content between applications, such as
Email
and
Internet
, by dragging
and dropping them.
Some applications may not support this feature.
1Launch
Email
and
Internet
in a split screen Multi Window.
Access the Multi Window
options
2Tap the circle between the application windows, and then tap .
Tap the circle between application windows to access the following options:
r
: Switch locations between Multi Window applications.
r
: Share items, such as images, text, or links, between application windows by
dragging and dropping them.
r
: Maximise the window.
r
: Close the application.
DRAFT
Access the Multi WinAcc
op
t
i
on
soptions
A
A
AF
AF
circle between the application windows, rcle between the application windows,
Tap the circle between application windcle between application wind
rr
: Switch locations between M: Switch location
r
: Share items, such as imagShare items, such as
d
rag
g
ing and dropping thng and dropping t
r
: Maximise the winmise
r
: Close the appthe a

Basics
25
3Tap and hold an item in the Internet window and drag it to a location in the Email
window.
DRAFT
AF
AF
RAF
RAF
A
A
A
AF
A
AF

Basics
26
Notifications
Notification icons appear on the status bar at the top of the screen to report new messages,
calendar events, device status, and more. Drag down from the status bar to open the
notifications panel. Scroll the list to see additional alerts. To close the notifications panel, drag
up the bar that is at the bottom of the screen.
From the notifications panel, you can view your device’s current settings. Drag down from the
status bar, and then tap to use the following options:
r
Wi-Fi
: Activate or deactivate the Wi-Fi feature.
r
Location
: Activate or deactivate the GPS feature.
r
Sound
: Activate or deactivate silent mode.
r
Screen rotation
: Allow or prevent the interface from rotating when you rotate the device.
r
Bluetooth
: Activate or deactivate the Bluetooth feature.
r
Multi window
: Set the device to use Multi Window.
r
Sync
: Activate or deactivate auto-syncing of applications.
r
Smart stay
: Activate or deactivate the smart stay feature.
r
Power saving
: Activate or deactivate power-saving mode.
r
Blocking mode
: Activate or deactivate blocking mode. In blocking mode, the device will
block notifications. To select which notifications will be blocked, tap
Settings
ĺ
Device
ĺ
Blocking mode
.
r
Flight mode
: Activate or deactivate flight mode.
r
Hands-free mode
: Activate or deactivate hands-free mode.
The available options may vary depending on the region or service provider.
To rearrange the options on the notifications panel, open the notifications panel, tap
ĺ
,
tap and hold an item, and then drag the item to another location.
DRAFT
en ten t
ations panations p
ngs. Drag down from thengs. Drag do
ace from rotating when you rotate the dee from rotating when
uetooth feature.ature.
e Multi Window.e M
to-syncing of applications.syncing of applic
ctivate the smart stay feature.he smart stay feature.
or deactivate power-saving mode.power-saving mode.
ctivate or deactivate blocking mode. In bctivate or deactivate blocking
ons. To select which notifications will be bons. To select which notification
modemode
.
modede
: Activate or deactivate flight mode.: Activate or deactivate flight mode.
ds-free modemode
D
: Activate or deactivate ha: Activate or deactivate ha
D
The available options may vary depThe available options m
To rearrange the options on the notTo rearrange the options on the not
tap and hold an item, and then dtap and hold an item, and

Basics
27
Home screen
The Home screen is the starting point to access all of the device’s features. It displays indicator
icons, widgets, shortcuts to applications, and others.
The Home screen can have multiple panels. To view other panels, scroll left or right.
Rearranging items
Adding an application icon
On the Home screen, tap , tap and hold an application icon, and then drag it into a panel
preview.
Moving an item
Tap and hold an item and drag it to a new location. To move it to another panel, drag it to the
side of the screen.
Removing an item
Tap and hold an item, and drag it to the rubbish bin that appears at the top of the Home
screen. When the rubbish bin turns red, release the item.
DRAFT
or right.or right
on icon, and then drag it into a panelon icon, and then drag it into a panel
ew location. To move it to another panel, ew location. To move it to an
d drag it to the rubbish bin that appears d drag it to the rubbish bin that appears
bish bin turns red, release the item.bish bin turns red, release the

Basics
28
Rearranging panels
Adding a new panel
Pinch on the screen and tap .
Moving a panel
Pinch on the screen, tap and hold a panel preview, and then drag it to a new location.
Removing a panel
Pinch on the screen, tap and hold a panel preview, and then drag it to the rubbish bin at the
top of the screen.
Setting wallpaper
Set an image or photo stored in the device as wallpaper for the Home screen.
On the Home screen, tap and hold the empty area, tap
Set wallpaper
ĺ
Home screen
, and
then select one of the following:
r
Gallery
: See photos taken by the device’s camera or images downloaded from the
Internet.
r
Live wallpapers
: See animated images.
r
Photos
: See images in
Photos
.
r
Wallpapers
: See wallpaper images.
Select an image, resize the frame if necessary, and then set it as wallpaper.
DRAFT
g it to a new location.it to a new locatio
d then drag it to the rubbish bin at thed then drag it to the rubbish bin at the
device as wallpaper for the Home screen.evice as wallpaper for the Home
d the empty area, tap empty area, tap
S
et wallpaper
Set wallpaper
ĺĺ
ng:
aken by the device’s camera or images daken by the device’s camera or images d
ersers
: See animate
d
images
.: See animated i
ee images in ee ima
P
h
oto
sotos
..
papers
: See wa
ll
paper images
.See wallpaper images.
t an image, resize the frame if necessary, an image, resize the fra
Basics
29
Using widgets
Widgets are small applications that provide convenient functions and information on your
Home screen. To use them, add widgets from the widgets panel to the Home screen.
r
Some widgets connect to web services. Using a web-based widget may result in
additional charges.
r
The widgets available may vary depending on the region or service provider.
On the Home screen, tap
ĺ
Widgets
. Scroll left or right on the widgets panel, and then
tap and hold a widget to add it to the Home screen. Put it on a location you want, resize it by
dragging the frame if necessary, and then tap anywhere on the screen to save the location of
the widget.
Applications screen
The Applications screen displays icons for all applications, including any new applications
installed.
On the Home screen, tap to open the Applications screen.
To view other panels, scroll left or right.
Rearranging applications
This feature is available only in the customisable grid view.
Tap
ĺ
Edit
, tap and hold an application, and then drag it to a new location. To move it to
another panel, drag it to the side of the screen.
DRAFT
et may reet may
or service provider.or service p
he widgets panel, and then he widgets panel, and
n a location you want, resize it byn a location you want, resize i
on the screen to save the location of on the screen to save the location o
ns for all applications, including any new for all applications, including an
to open the Applications screen.Applications screen.
oll left or right.oll left or
g applicationsg applications
is available only in the customisable gridavailable only in the customisable grid
Edit
, tap and hold an application, and thand hold an application, and th
her panel, drag it to the side of the screeher panel, drag it to the s
Basics
30
Organising with folders
Put related applications together in a folder for convenience.
Tap
ĺ
Edit
, tap and hold an application, and then drag it to
Create folder
. Enter a folder
name and then tap
OK
. Put applications into the new folder by dragging, and then tap
Save
to save the arrangement.
Rearranging panels
Pinch on the screen, tap and hold a panel preview, and then drag it to a new location.
Installing applications
Use application stores, such as
Samsung Apps
, to download and install applications.
Uninstalling applications
Tap
ĺ
Uninstall/disable apps
, and then select an application to uninstall it.
Default applications that come with the device cannot be uninstalled.
Disabling applications
Tap
ĺ
Uninstall/disable apps
, and then select an application to disable it.
To enable applications, on the Applications screen, tap
ĺ
Show disabled apps
, select the
applications, and then tap
Done
.
r
Downloaded applications and some default applications that come with the
device cannot be disabled.
r
When you use this feature, disabled applications disappear from the Applications
screen but are still stored in the device.
DRAFT
ee
d then tad then
drag it to a new location.drag it to a new location.
to download and install applications.ownload and instal
nd then select an application to uninstalhen select an application to unins
that come with the device cannot be unth the device cannot be un
pplicationspplications
nstall/disable appsstall/disable apps
, and then select an a, and then select an a
e applications, on the Applications screeations, on the Applications scree
cations, and then tapations, and then tap
D
on
eDo
.
D
r
Downloaded applications and Downloaded applicati
device cannot be disabled.e cannot be disable
r
When you use this featu use this feat
screen but are still sare

Basics
31
Using applications
This device can run many different types of applications, ranging from media to Internet
applications.
Opening an application
On the Home screen or the Applications screen, select an application icon to open it.
Some applications are grouped into folders. Tap a folder, and then tap an application
to open it.
Opening from recently-used applications
Tap to open the list of recently-used applications.
Select an application icon to open.
Closing an application
Close applications not in use to save battery power and maintain device performance.
Tap
ĺ
Task manager
, and then tap
End
next to an application to close it. To close all
running applications, tap
End all
. Alternatively, tap
ĺ
Close all
.
Help
Access help information to learn how to use the device and applications or configure
important settings.
Tap
Help
on the Applications screen. Select a category to view tips.
To sort categories by an alphabetical order, tap .
To search for keywords, tap .
DRAFT
on icon to open it.on icon to open
er, and then tap an applicationer, and then tap an applic
licationscation
ications.
n
e to save battery power and maintain dery power and maintain de
erer
, and then tap, and then
En
d
next to an applicatinext to
s, taps, tap
En
d
a
llEnd all
. A
l
ternative
l
y, tap
. Alternatively, tap
A
A
ĺ
Clo
p
cess help information to learn how to usecess help information to lea
important settings.important settings.
T
ap
Tap
H
el
p
on the Applications screenApplications screen
To sort categories by an alphabeTo sort categories by an a
To search for keywords, tap To search for keywords, ta
Basics
32
Entering text
Use the Samsung keyboard or the voice input feature to enter text.
Text entry is not supported in some languages. To enter text, you must change the
input language to one of the supported languages.
Changing the keyboard type
Tap any text field, open the notifications panel, tap
Choose input method
, and then select
the type of keyboard to use.
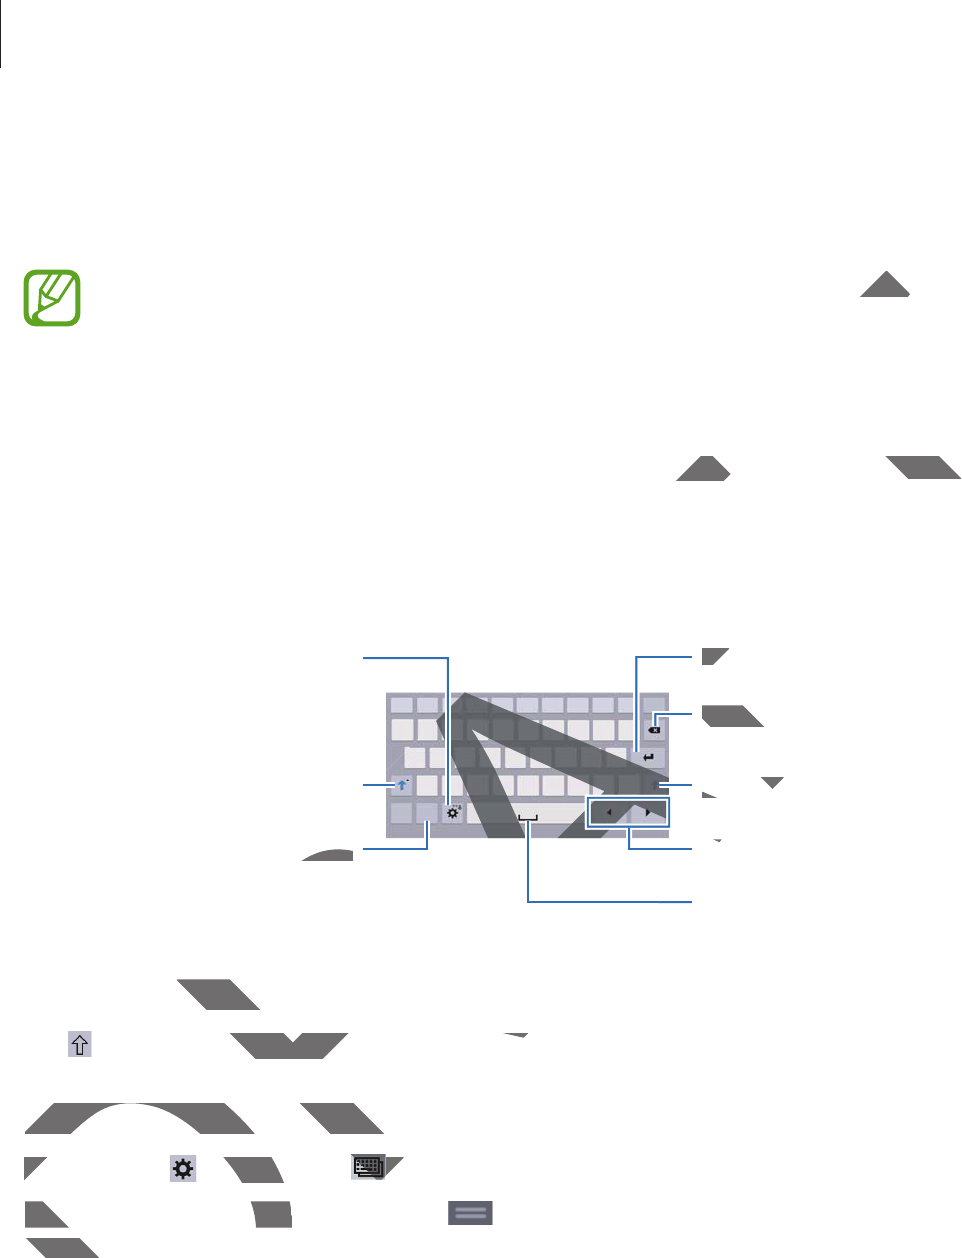
Using the Samsung keyboard
Break to the next line.
Delete a preceding character.
Enter punctuation marks.
Enter uppercase.
Set options for the Samsung
keyboard.
Enter a space.
Enter uppercase.
Move the cursor.
Entering uppercase
Tap before entering a character. For all caps, tap it twice.
Changing the keyboard type
Tap and hold , and then tap to change the keyboard type.
On the floating keyboard, tap and hold and move the floating keyboard to another
location.
DRAFT
t chant cha
nput methodnput
,
and then select
then sel
Break to the next line.Bre
Delete a precedinDelete
marks.marks.
RA
RA
AF
AF
Enter uppEnter upp
AF
AF
A
A
MoM
AF
AF
A
A
RA
RA
RA
RA
A
A
uppercasepperca
before entering a character. For all caps, ring a character. For all caps,
Changing the keyboard typeChanging the keyboard typ
T
ap an
d
h
o
ldTa
,
an
d
t
h
en tap
nd the
toto
On the floating keyboard, tap aOn the floating keyboard
location.location
Basics
33
Changing language keyboards
Add languages to the keyboard, and then slide the space key left or right to change language
keyboards.
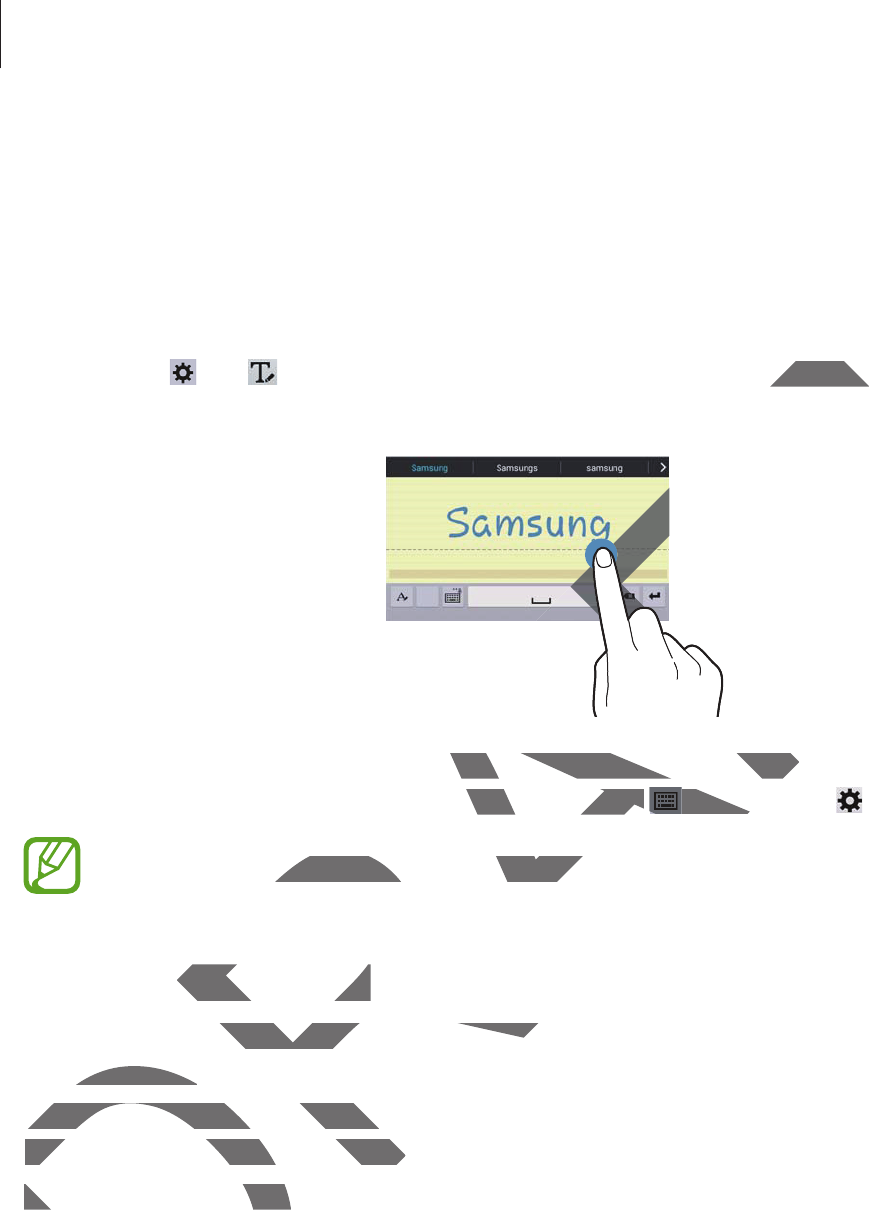
Handwriting
Tap and hold , tap , and then write a word with a finger. Suggested words appear as
characters are entered. Select a suggested word.
Use handwriting gestures to perform actions, such as editing or deleting characters and
inserting spaces. To view the gesture guides, tap and hold , and then tap
ĺ
Help
.
This feature may not be available depending on the region or service provider.
Entering text by voice
Activate the voice input feature and then speak into the microphone. The device displays
what you speak.
If the device does not recognise your words correctly, tap the underlined text and select an
alternative word or phrase from the dropdown list.
To change the language or add languages for the voice recognition, tap the current language.
DRAFT
ed words appear as ed words
F
AF
AF
F
AF
AF
AF
AF
AF
form actions, such as editing or deleting cctions, such as editing or deleting
gesture guides, tap and holddes, tap and hold
, and the, and the
y not be available depending on the regy not be available depending
g text by voicetext by voice
e the voice input feature and then speak input feature and then speak
t you speak.t you speak.
If the device does not recognise your woIf the device does not recognise y
alternative word or phrase from the dalternative word or phrase from the
To change the language or add laTo change the language o

Basics
34
Copying and pasting
Tap and hold over text, drag or to select more or less text, and then tap
Copy
to copy or
Cut
to cut. The selected text is copied to the clipboard.
To paste it into a text entry field, place the cursor at the point where it should be inserted, and
then tap
ĺ
Paste
.
Connecting to a Wi-Fi network
Connect the device to a Wi-Fi network to use the Internet or share media files with other
devices. (p. 86)
Ensure that the Wi-Fi connection is active before using Internet applications.
Turning Wi-Fi on and off
Open the notifications panel, and then tap
Wi-Fi
to turn it on or off.
r
Your device uses a non-harmonised frequency and is intended for use in all
European countries. The WLAN can be operated in the EU without restriction
indoors, but cannot be operated outdoors.
r
Turn off Wi-Fi to save the battery when not in use.
Joining Wi-Fi networks
On the Applications screen, tap
Settings
ĺ
Connections
ĺ
Wi-Fi
, and then drag the
Wi-Fi
switch to the right.
Select a network from the list of detected Wi-Fi networks, enter a password if necessary, and
then tap
Connect
. Networks that require a password appear with a lock icon. After the device
connects to a Wi-Fi network, the device will automatically connect to it any time it is available.
d be insed be ins
t or share media files with other t or share media files with other
ve before using Internet applications.fore using Interne
nd then tap ap
W
i-Fi
W
to turn it on or o
ff
.
o turn it on or
s a non-harmonised frequency and is inteised frequency and is inte
untries. The WLAN can be operated in thuntries. The WLAN can be ope
but cannot be operated outdoors.but cannot be operated outdoo
off Wi-Fi to save the battery when not in off Wi-Fi to save the battery when no
ing Wi-Fi networksi network
n the Applications screen, tapn the Applications screen, tap
Settings
ĺ
switch to the right.switch to the right.
Select a network from the list of deSelect a network from the list of de
t
h
en tap
then
Connect
. Networks thaetwo
connects to a Wi-Fi network,connects to a Wi-Fi netwo

Basics
35
Adding Wi-Fi networks
If the desired network does not appear in the networks list, tap
Add Wi-Fi network
at the
bottom of the networks list. Enter the network name in
Network SSID
, select the security
type and enter the password if it is not an open network, and then tap
Connect
.
Forgetting Wi-Fi networks
Any network that has ever been used, including the current network, can be forgotten so the
device will not automatically connect to it. Select the network in the networks list, and then
tap
Forget
.
Setting up accounts
Google applications, such as
Play Store
, require a Google account, and
Samsung Apps
requires a Samsung account. Create Google and Samsung accounts to have the best
experience with the device.
Adding accounts
Follow the instructions that appear when opening a Google application without signing in to
set up a Google account.
To sign in with or sign up for a Google account, on the Applications screen, tap
Settings
ĺ
General
ĺ
Accounts
ĺ
Add account
ĺ
Google
. After that, tap
New
to sign up, or tap
Existing
, and then follow the on-screen instructions to complete the account setup. More
than one Google account can be used on the device.
Set up a Samsung account as well.
Removing accounts
On the Applications screen, tap
Settings
ĺ
General
ĺ
Accounts
, select an account name
under
MY ACCOUNTS
, select the account to remove, and then tap
Remove account
.
DRAFT
ctct
..
work, can be forgotten so the ork, can be forgotte
k in the networks list, and then k in the networks list, and t
require a Google account, and account
Samsung
Google and Samsung accounts to have thoogle and Samsung accounts t
ns that appear when opening a Google ans that appear when opening
ccount.ccount.
h or sign up for a Google account, on the h or sign up for a Google account, on th
ĺ
A
ccount
sAccoun
ĺ
A
dd
accoun
tAdd account
ĺĺ
GoogGoog
g
, and then follow the on-screen instructfollow the on-screen instruct
n one Google account can be used on then one Google account can
Set up a Samsung account as well.Set up a Samsung account as well
Removing accountsRemoving accoun
On the Applications screen,On the Applications scree
erer
MY ACCOUNTSMY ACCOUNTS
s

Basics
36
Transferring files
Move audio, video, image, or other types of files from the device to the computer, or vice
versa.
The following file formats are supported by some applications. Some file formats are
not supported depending on the version of the device’s software or the computer
operating system.
r
Music: mp3, m4a, 3ga, aac, ogg, oga, wav, wma, amr, awb, flac, mid, midi, xmf,
mxmf, imy, rtttl, rtx, and ota
r
Image: bmp, gif, jpg, and png
r
Video: mp4, m4v, 3gp, 3g2, wmv, asf, avi, flv, mkv, webm, and ts
r
Document: rtf, dot, doc, docx, dotx, hwdt, show, hsdt, htheme, pptx, ppt, thmx,
potx, cell, csv, hcdt, html, htm, prn, tsv, xls, xlt, xlsb, xlsm, xltx, xlsx, xltm, hwp, hwt,
hml, hwpx, bak, and txt
If the applications cannot play files in divx or ac3 format, install applications that
support them.
Connecting with Samsung Kies
Samsung Kies is a computer application that manages media contents and personal
information with Samsung devices. Download the latest Samsung Kies from the Samsung
website.
1Connect the device to the computer using the USB cable.
Samsung Kies launches on the computer automatically. If Samsung Kies does not launch,
double-click the Samsung Kies icon on the computer.
2Transfer files between your device and the computer.
Refer to the Samsung Kies help for more information.
me file formame file f
re or the computerre or th
awb, flac, mid, midi, xmf,awb, flac, mid, midi, xm
flv, mkv, webm, and tsflv, mkv, webm, and t
wdt, show, hsdt, htheme, pptx, ppt, thmx, show, hsdt, hthem
n, tsv, xls, xlt, xlsb, xlsm, xltx, xlsx, xltm, hwt, xlsb, xlsm, x
y files in divx or ac3 format, install applicfiles in divx or ac3 format, instal
h Samsung Kiesh Samsung Kies
omputer application that manages mediomputer application that mana
h Samsung devices. Download the latest h Samsung devices. Download the la
nnect the device to the computer using tevice to the computer using t
Samsung Kies launches on the computSamsung Kies launches on
double-click the Samsung Kies icondouble-click the Samsung Kie
22
Transfer files between your dtwee
Refer to the Samsung KieRefer to the Samsung

Basics
37
Connecting with Windows Media Player
Ensure that Windows Media Player is installed on the computer.
1Connect the device to the computer using the USB cable.
2Open Windows Media Player and sync music files.
Connecting as a media device
1Connect the device to the computer using the USB cable.
2Open the notifications panel, and then tap
Connected as a media device
ĺ
Media
device (MTP)
.
Tap
Camera (PTP)
if your computer does not support Media Transfer Protocol (MTP) or
not have any appropriate driver installed.
3Transfer files between your device and the computer.
DRAFT
cable.cable.
nnected as a media devicennected as a media de
ĺ
M
e
d
i
a
oes not support Media Transfer Protocol t Media T
stalled.stalled.
device and the computer.nd the computer.
Basics
38
Securing the device
Prevent others from using or accessing personal data and information stored in the device by
using the security features. The device requires an unlock code whenever unlocking it.
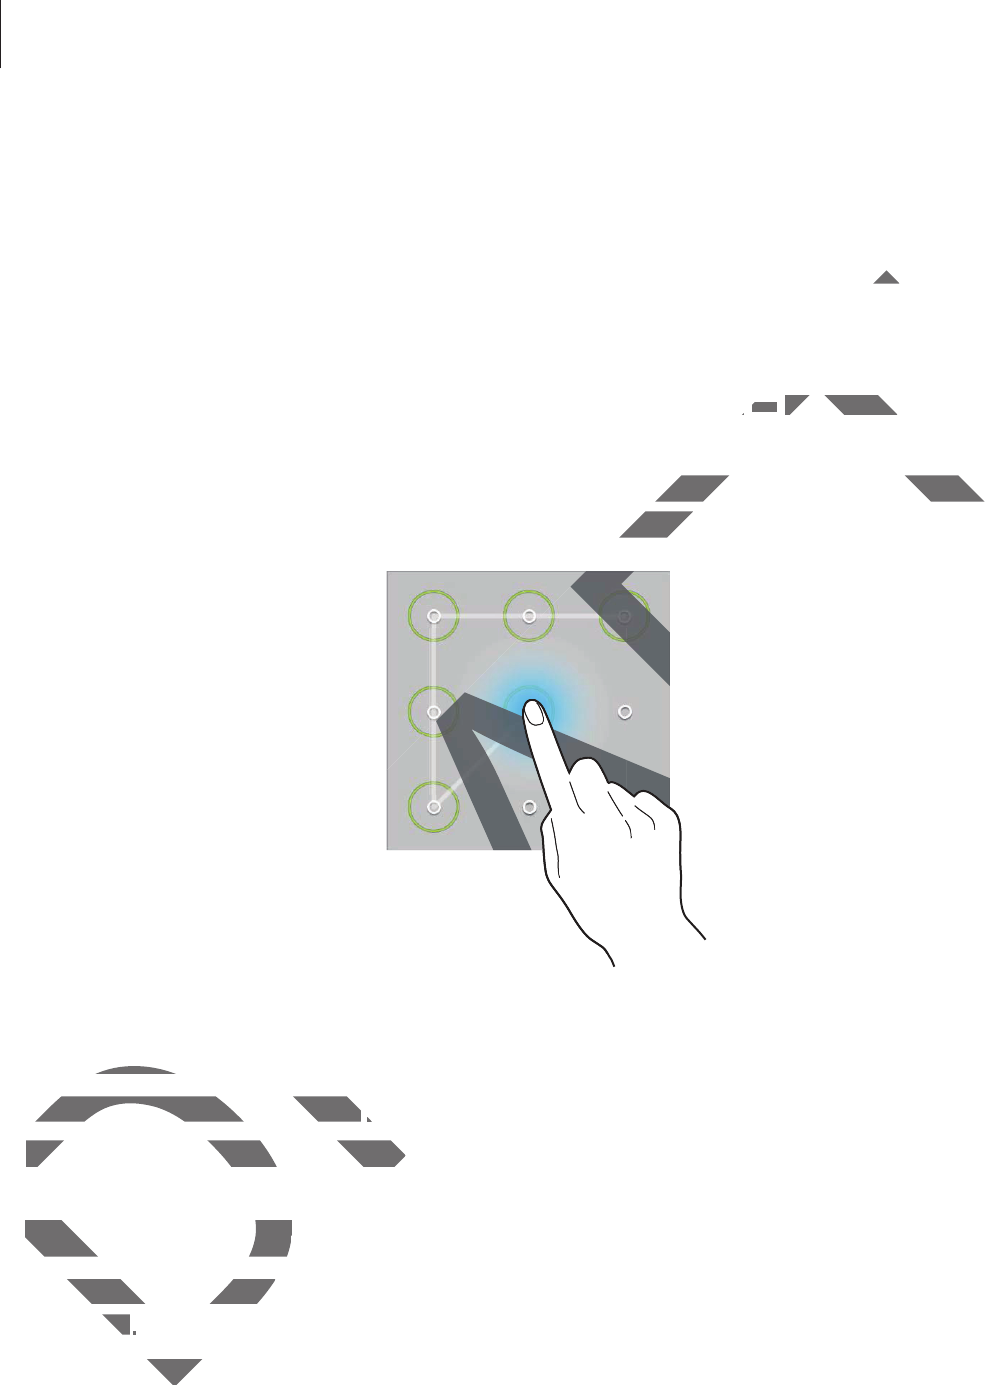
Setting a pattern
On the Applications screen, tap
Settings
ĺ
Device
ĺ
Lock screen
ĺ
Screen lock
ĺ
Pattern
.
Draw a pattern by connecting four dots or more, and then draw the pattern again to verify it.
Set a backup unlock PIN to unlock the screen when you forget the pattern.
Setting a PIN
On the Applications screen, tap
Settings
ĺ
Device
ĺ
Lock screen
ĺ
Screen lock
ĺ
PIN
.
Enter at least four numbers, and then enter the password again to verify it.
Setting a password
On the Applications screen, tap
Settings
ĺ
Device
ĺ
Lock screen
ĺ
Screen lock
ĺ
Password
.
Enter at least four characters including numbers and symbols, and then enter the password
again to verify it.
DRAFT
ckinckin
nn
ĺĺ
S
creen l
o
c
kScreen loc
ĺ
draw the pattern again to verify it.draw the pattern again to verify
forget the pattern. forget
RAF
RAF
RA
AF
A
A
A
A
ting a PINga
On the Applications screen, tapOn the Applications screen, tap
Settings
Enter at least four numbers, and thenEnter at least four numbers, and the
Setting a passwordSetting a passwo
the Applications screthe Applications scre
ordord
..
st foust fou
Basics
39
Unlocking the device
Turn on the screen by pressing the Power button or the Home button, and enter the unlock
code.
If the unlock code is forgotten, take the device to a Samsung Service Centre to reset it.
Upgrading the device
The device can be upgraded to the latest software.
This feature may not be available depending on the region or service provider.
Upgrading with Samsung Kies
Launch Samsung Kies and connect the device to the computer. Samsung Kies automatically
recognises the device and shows available updates in a dialogue box, if any. Click the Update
button in the dialogue box to start upgrading. Refer to the Samsung Kies help for details on
how to upgrade.
r
Do not turn off the computer or disconnect the USB cable while the device is
upgrading.
r
While upgrading the device, do not connect other media devices to the computer.
Doing so may interfere with the update process.
Upgrading over the air
The device can be directly upgraded to the latest software by the firmware over-the-air
(FOTA) service.
On the Applications screen, tap
Settings
ĺ
General
ĺ
About device
ĺ
Software update
ĺ
Update now
.
DRAFT
ce Centre to ce Cent
ding on the region or service provider.ng on the region or se
g KiesKies
ct the device to the computer. Samsung device to the computer. Samsung
ows available updates in a dialogue box, ie updates in a dialogue box, i
x to start upgrading. Refer to the Samsuning. Refer to the Samsun
turn off the computer or disconnect the Uturn off the computer or disconn
rading.rading.
While upgrading the device, do not conne upgrading the device, do not conn
Doing so may interfere with the updao may interfere with the upda
Upgrading over the airUpgrading over the air
The device can be directly upgradThe device can be directly upgrad
(
FOTA
)
service
.(FOTA
n the Applications screenn the Applications scree
pdate nowpdate n
.

40
Communication
Contacts
Use this application to manage contacts, including phone numbers, email addresses, and
others.
Tap
Contacts
on the Applications screen.
Managing contacts
Tap
Contacts
.
Creating a contact
Tap and enter contact information.
r
: Add an image.
r
/ : Add or delete a contact field.
Editing a contact
Select a contact to edit, and then tap .
Deleting a contact
Tap .
DRAFT
s, email addresses, and s, email address
on.
a contact field.
ctct
t to edit, and then tapt to edit, and then tap
.
ng a contactntact
..

Communication
41
Searching for contacts
Tap
Contacts
.
Use one of the following search methods:
r
Scroll up or down the contacts list.
r
Use the index at the left side of the contacts list for quick scrolling, by dragging a finger
along it.
r
Tap the search field at the top of the contacts list and enter search criteria.
Once a contact is selected, take one of the following actions:
r
: Add to favourite contacts.
r
: Compose an email.
Displaying contacts
Tap
Contacts
.
By default, the device shows all saved contacts.
Tap
ĺ
Settings
ĺ
Contacts to display
, and then select a location where contacts are
saved.
Moving contacts
Tap
Contacts
.
Moving contacts to Google
Tap
ĺ
Merge accounts
ĺ
Merge with Google
.
Contacts moved to Google Contacts appear with in the contacts list.
Moving contacts to Samsung
Tap
ĺ
Merge accounts
ĺ
Merge with Samsung
.
Contacts moved to Samsung Contacts appear with in the contacts list.
DRAFT
by dragging a fingeby drag
search criteria.earch criteria.
ns:ns:
saved contacts.ontac
ts to display
, and then select a location wand then select a location
ntactsntacts
s
.
ving contacts to Googleing contacts to Goo
Tap Tap
ĺ
ĺ
Merge accounts
Merge acco
ĺĺ
Merge withMer
Contacts moved to Google Contacts Contacts moved to Google Contacts
Moving contacts to SamMoving contacts to
ĺĺ
Merge accountsMerge account
ts moved to Sats moved to Sa

Communication
42
Importing and exporting contacts
Tap
Contacts
.
Importing contacts
Tap
ĺ
Settings
ĺ
Import/Export
, and then select an import option.
Exporting contacts
Tap
ĺ
Settings
ĺ
Import/Export
, and then select an export option.
Sharing contacts
Tap
ĺ
Share namecard via
ĺ
Multiple contacts
, select contacts, tap
Done
, and then
select a sharing method.
Favourite contacts
Tap
Favourites
.
Tap to add contacts to favourites.
Tap , and then take one of the following actions:
r
Search
: Search for contacts.
r
Remove from favourites
: Remove contacts from favourites.
r
List view
/
Grid view
: View contacts in grid or list form.
r
Help
: Access help information about using contacts.
DRAFT
ort option.ort optio
ctss
, select contacts, tap, select contacts, tap
Don
e
, and then
ourites.
of the following actions:of the following actions:
or contacts.or contacts.
m favouritesm favo
: Remove contacts from favemove contacts from
w
/ /
Gri
d
vie
wGrid v
: View contacts in grid or lisew contacts in grid or lis
p
: Access help information about using chelp information about using c

Communication
43
Contact groups
Tap
Groups
.
Creating a group
Tap , set details for the group, add contacts, and then tap
Save
.
Adding contacts to a group
Select a group, and then tap
ĺ
Add member
. Select contacts to add, and then tap
Done
.
Managing groups
Tap , and then take one of the following actions:
r
Search
: Search for contacts.
r
Delete groups
: Select user-added groups, and then tap
Done
. Default groups cannot be
deleted.
r
Edit
: Change the group settings.
r
Add member
: Add members to the group.
r
Remove member
: Remove members from the group.
r
Send email
: Send an email to a group’s members.
r
Change order
: Tap and hold next to the group name, drag it up or down to another
position, and then tap
Done
.
r
Help
: Access help information about using contacts.
Sending an email to a group’s members
Select a group, tap
ĺ
Send email
, select members, and then tap
Done
.
DRAFT
cts to add, and then tap cts to add, and then tap
Don
eDo
.
roups, and then tap roups, and then tap
D
on
eDone
. Default group
ngs.
bers to the group.group
emove members from the group.emove members from the gro
d an email to a group’s members.d an email to a group’s memb
erer
: Tap and hold: Tap
next to the group na next to the grou
and then tapand the
Don
ene
..
: Access help information about using co help information about using co
ending an email to a group’s memending an email to a gro
Select a group, tapSelect a group, tap
ĺĺ
S
en
d
emai
ld emai
, se

Communication
44
Business card
Tap
Contacts
.
Create a business card and send it to others.
Tap
Set up my profile
, enter details, such as phone number, email address, and postal
address, and then tap
Save
. If user information has been saved when you set up the device,
select the business card, and then tap to edit.
Tap
ĺ
Share namecard via
ĺ
Selected contact
, and then select a sharing method.
Email
Use this application to send or view email messages.
Tap
Email
on the Applications screen.
Setting up email accounts
Set up an email account when opening
Email
for the first time.
Enter the email address and password. Tap for a private email account, such as Google
Mail, or tap
Manual setup
for a company email account. After that, follow the on-screen
instructions to complete the setup.
To set up another email account, tap
ĺ
Settings
ĺ
Add account
.
Sending messages
Tap the email account to use, and then tap at the top of the screen. Enter recipients,
subject, and message, and then tap .
Tap to add a recipient from the contacts list.
Tap
+Me
to add yourself as a recipient.
Tap to add more recipients.
Tap to attach images, videos, contacts, memos, events, and others.
Tap
ĺ
to insert images, events, contacts, location information, and others into the
message.
and postaand pos
u set up the deviu set up
ect a sharing method.ct a sharing metho
ages.s
ntss
opening
E
m
a
i
lEmai
fo
r
t
h
e
f
ir
st
t
im
e.the first time.
d password. Tap
for a private email acco for a private email acco
upup
for a company email account. After th for a company email accou
plete the setup.plete the setup.
er email account, taper email account, tap
ĺ
S
ett
i
ng
sngs
ĺĺ
Ad
ing messagesessages
p the email account to use, and then tapthe email account to use, a
subject, and message, and then tapsubject, and message, and then ta
Ta
pTap
to add a recipient from the cocipient from the co
T
ap
Tap
+M
e
to add yourself as a recrself a
Tap Tap
to add more recipie to add more recip
to attach images,to attach images
to inse to inse
Communication
45
Sending scheduled messages
While composing a message, tap
ĺ
Schedule sending
. Tick
Schedule sending
, set a time
and date, and then tap
Done
. The device will send the message at the specified time and
date.
r
If the device is turned off at the scheduled time, is not connected to the network,
or the network is unstable, the message will not be sent.
r
This feature is based on the time and date set on the device. The time and date
may be incorrect if you move across time zones and the network does not update
the information.
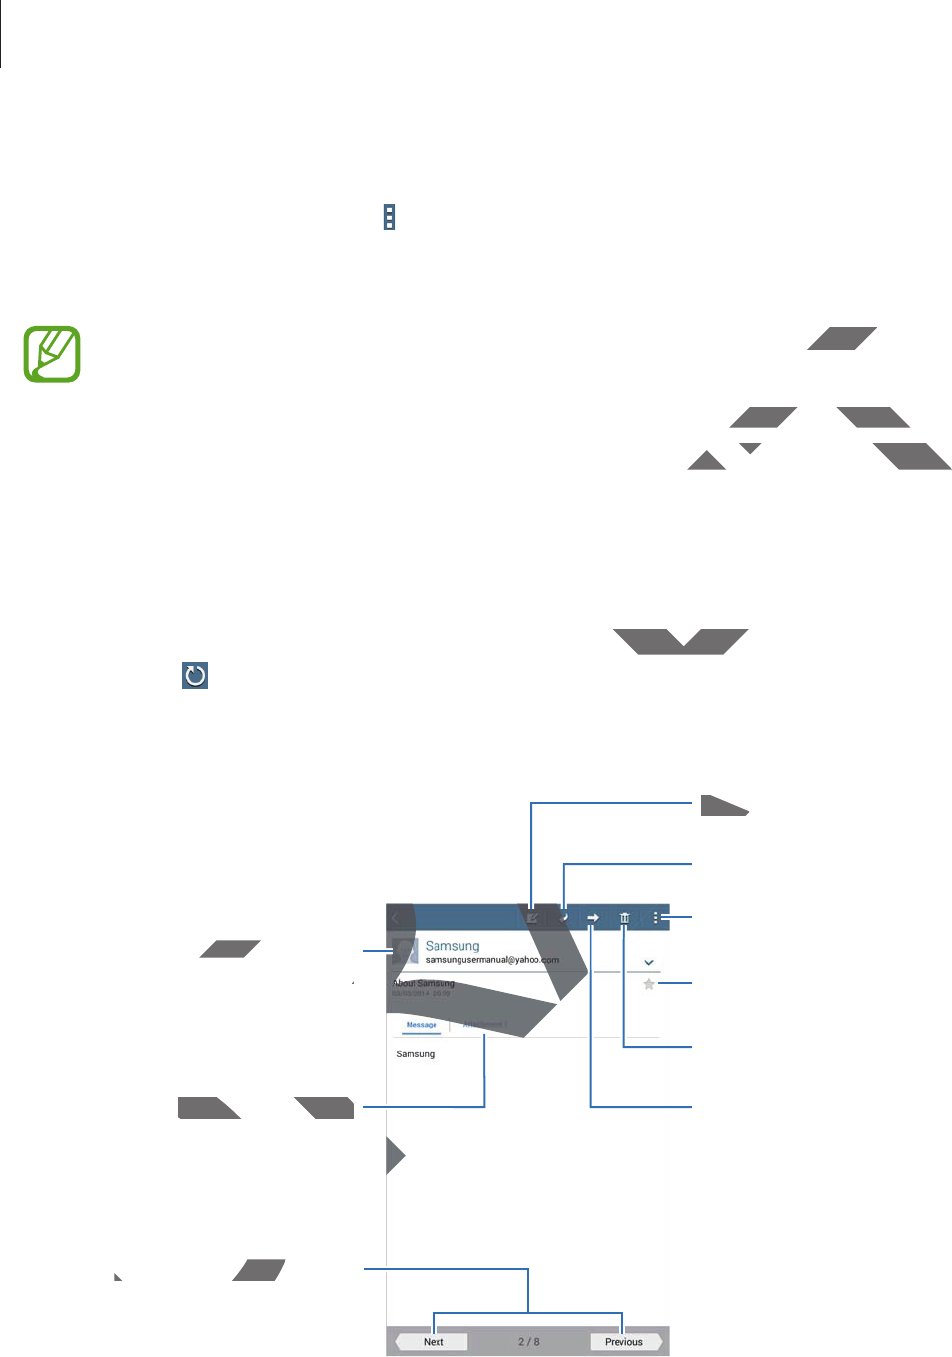
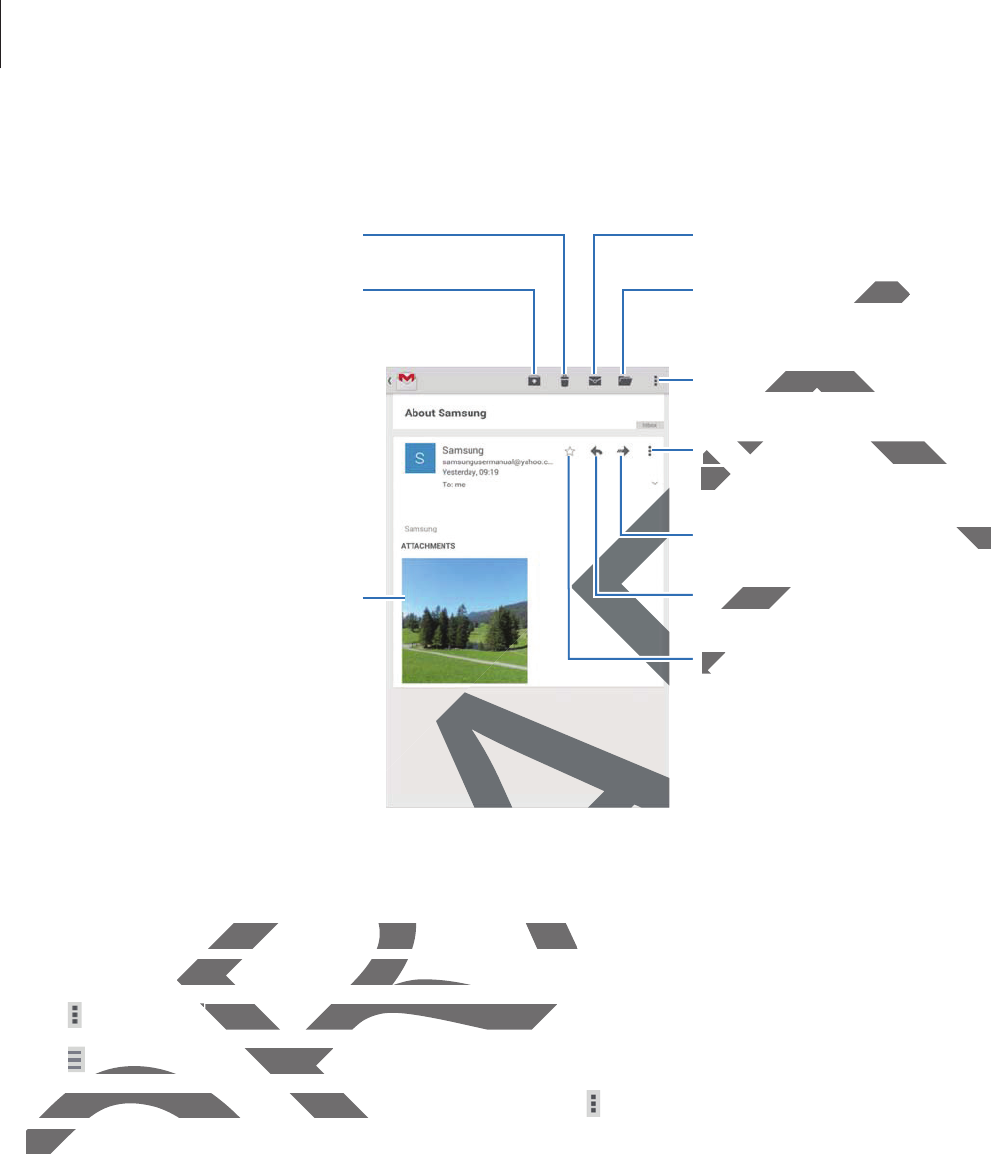
Reading messages
Select an email account to use, and new messages are retrieved. To manually retrieve new
messages, tap .
Tap a message to read.
Open attachments.
Go to the previous or next
message.
Delete the message.
Compose a message.
Reply to the message.
Access additional options.
Add this email address to the
contacts list.
Forward the message.
Mark the message as a reminder.
Tap the attachment tab to open attachments, and then tap
Save
to save it.
DRAFT
ted to the netwoted to t
evice. The time and dateevice. The time an
d the network does not updated the network does not up
ssages are retrieved. To manually retrieveretrieved. To m
O
p
en attac
h
ments
.Open attachments.
Go to the previous oGo to the previous
m
CompoComp
R
RA
RA
ail address to theail addr
co
n
tacts
li
st..
A
A
RA
RA
A
A
A
A
R
R

Communication
46
Google Mail
Use this application to quickly and directly access the Google Mail service.
Tap
Google Mail
on the Applications screen.
r
This application may not be available depending on the region or service provider.
r
This application may be labelled differently depending on the region or service
provider.
Sending messages
In any mailbox, tap , enter recipients, a subject, and a message, and then tap
SEND
.
Tap
ĺ
Save draft
to save the message for later delivery.
Tap
ĺ
Attach file
to attach images, videos, music, and others.
Tap
ĺ
Discard
to start over.
Tap
ĺ
Settings
to change the Google Mail settings.
Tap
ĺ
Send feedback
to report your opinions for application development.
Tap
ĺ
Help
to access help information for the Google Mail.
DRAFT
or service proor serv
the region or servicethe region
nd a message, and then tap nd a message, and th
S
END
.
r delivery.elivery.
s, music, and others.d others.
ogle Mail settings.le Mail settings.
ort your opinions for application developopinions for application develop
p information for the Google Mail.for the Google Mail.
Communication
47
Reading messages
Preview attachment.
Delete the message.
Keep the message for long-term
storage.
Reply to the message.
Mark the message as unread.
Move the message to another
mailbox.
Reply to all recipients or print
the message.
Forward the message to others.
Mark the message as a reminder.
Access additional options.
Labels
Google Mail does not use actual folders, but uses labels instead. When Google Mail is
launched, it displays messages labelled Inbox.
Tap
ĺ
Refresh
to manually retrieve new messages.
Tap to view messages in other labels.
To add a label to a message, select the message, tap
ĺ
Change labels
, and then select the
label to assign.
DRAFT
R
epl
y
to the message.
eply to th
ge to ange to a
Reply to all recipients or print Reply to all recipients or pr
t
h
e messa
g
e.
the
F
orwar
d
t
h
e messa
g
e to ot
h
ers.
hers.
F
F
F
F
Mark the message as a Ma
AF
AF
additional options.additional o
s not use actual folders, but uses labels ins not use actual folders, but uses lab
isplays messages labelled Inbox.splays messages labelled In
Refreshh
to manually retrieve new messag to manually retrieve new messag
to view messages in other labels.to view messages in ot
o add a label to a message, select the meo add a label to a message, sele
label to assign.label

Communication
48
Hangouts
Use this application to chat with others.
Tap
Hangouts
on the Applications screen.
This application may not be available depending on the region or service provider.
Select a friend from the friends list or enter data to search and select a friend from the results
to start chatting.
Google+
Use this application to stay connected with people via Google’s social network service.
Tap
Google+
on the Applications screen.
This application may not be available depending on the region or service provider.
Tap
All
to change the category, and then scroll up or down to view posts from your circles.
DRAFT
or service provideor servic
ect a friend from the results ect a friend from t
eople via Google’s social network service Google’s socia
e available depending on the region or sailable depending on the region o
ory, and then scroll up or down to view pscroll up or down to view p
Communication
49
Photos
Use this application to view and share images or videos via Google’s social network services.
Tap
Photos
on the Applications screen.
This application may not be available depending on the region or service provider.
Select one of the following categories:
r
CAMERA
: View all the images or videos that are taken or downloaded to the device.
r
HIGHLIGHTS
: View images or videos grouped by date or album. Tap to view all of the
images or videos in the group.
Then, select an image or video.
While viewing it, use one of the following icons:
r
: Modify the image.
r
: Share the image or video with others.
r
: Delete the image or video.
DRAFT
or service provideor servic
downloaded to the device.downloaded to the device
te or album. Tapte or alb
to
vi
e
w
a
ll
o
f
t
h
el of the
ns:
th others.others.
o.

50
Web & network
Internet
Use this application to browse the Internet.
Tap
Internet
on the Applications screen.
Viewing webpages
Tap the address field, enter the web address, and then tap
Go
.
Tap to access additional options while viewing a webpage.
To change the search engine, tap the address field, and then tap the search engine icon next
to the web address.
Opening a new page
Tap
ĺ
New tab
.
To go to another webpage, scroll left or right on the title field, and then tap the title to select
it.
Searching the web by voice
Tap the address field, tap
ĺ
, speak a keyword, and then select one of the suggested
keywords that appear.
This feature may not be available depending on the region or service provider.
Bookmarks
To bookmark the current webpage, tap
ĺ
ĺ
Save
.
To open a bookmarked webpage, tap , and then select one.
DRAFT
then taphen tap
Go
.
ng a webpage.bpage.
ress field, and then tap the search engineen tap t
e
bpage, scroll left or right on the title field,bpage, scroll left or right on th
hing the web by voicethe web by voice
he address field, taphe address field, tap
ĺ
, speak a key
eywords that appear.eywords that appe
D
This feature may not be avae may not be ava
ookmarksookm
kmark the cumark the cu
ookm
ookm
Web & network
51
History
Tap
ĺ
Bookmarks
ĺ
History
to open a webpage from the list of recently-visited
webpages. To clear the history, tap .
Saved pages
To view saved webpages, tap
ĺ
Bookmarks
ĺ
Saved pages
.
Links
Tap and hold a link on the webpage to open it in a new page, save, or copy.
To view saved links, on the Applications screen, tap
My Files
ĺ
Download history
.
Sharing webpages
To share a webpage address with others, tap
ĺ
Share via
.
To share a part of a webpage, tap and hold the desired text, and then tap
Share via
.
Chrome
Use this application to search for information and browse webpages.
Tap
Chrome
on the Applications screen.
This application may not be available depending on the region or service provider.
Viewing webpages
Tap the address field, and then enter a web address or search criteria.
Opening a new page
Tap
ĺ
New tab
.
To go to another webpage, scroll left or right on the title field, and tap the title to select it.
DRAFT
w page, save, or copy.w page, s
pp
My FilesMy Fil
ĺ
D
own
l
oa
d
h
istory
wnloa
.
ers, tap ers, tap
ĺ
S
h
a
re vi
a
.
and hold the desired text, and then tap old the desired text, and then tap
S
on to search for information and browse on to search for information and br
on the Applications screen.on the Applications screen.
This application may not be available dation may not be available d
V
iewin
g
we
b
pa
g
e
sViewing webpag
Tap the address field, and then eTap the address field, and
pening a new ppening a new
New tabNew tab
h
h

Web & network
52
Bookmarks
To bookmark the current webpage, tap
ĺ
Save
.
To open a bookmarked webpage, tap
ĺ
Bookmarks
, and then select one.
Searching the web by voice
Tap , speak a keyword, and then select one of the suggested keywords that appear.
Syncing with other devices
Sync open tabs and bookmarks to use with Chrome on another device, when you are logged
in with the same Google account.
To view open tabs on other devices, tap
ĺ
Other devices
. Select a webpage to open.
To view bookmarks, tap
BOOKMARKS
.
Bluetooth
Bluetooth creates a direct wireless connection between two devices over short distances. Use
Bluetooth to exchange data or media files with other devices.
r
Samsung is not responsible for the loss, interception, or misuse of data sent or
received via the Bluetooth feature.
r
Always ensure that you share and receive data with devices that are trusted
and properly secured. If there are obstacles between the devices, the operating
distance may be reduced.
r
Some devices, especially those that are not tested or approved by the Bluetooth
SIG, may be incompatible with your device.
r
Do not use the Bluetooth feature for illegal purposes (for example, pirating copies
of files or illegally tapping communications for commercial purposes).
Samsung is not responsible for the repercussion of illegal use of the Bluetooth
feature.
To activate Bluetooth, on the Applications screen, tap
Settings
ĺ
Connections
ĺ
Bluetooth
, and then drag the
Bluetooth
switch to the right.
DRAFT
words that appear.words that app
n another device, when you are loggedn another device, when you are logged
ther devicesdevices
. Select a webpage to open. Select a w
wireless connection between two devicetion between two device
e data or media files with other devices.e data or media files with othe
ng is not responsible for the loss, intercepng is not responsible for the loss, i
ived via the Bluetooth feature.ived via the Bluetooth
Always ensure that you share and receivys ensure that you share and receiv
and properly secured. If there are obsperly secured. If there are obs
d
istance ma
y
be reduced
.distance may be red
r
Some devices, especially thosme devices, especiall
SIG, may be incompatible ay be incompatible
r
Do not use the Bluetoe the
of files or illegally tllega
Samsung is nong is no
f
eature
.feature.
ue
e

Web & network
53
Pairing with other Bluetooth devices
On the Applications screen, tap
Settings
ĺ
Connections
ĺ
Bluetooth
ĺ
Scan
, and
detected devices are listed. Select the device you want to pair with, and then accept the auto-
generated passkey on both devices to confirm.
Sending and receiving data
Many applications support data transfer via Bluetooth. An example is
Gallery
. Open
Gallery
,
select an image, tap
ĺ
Bluetooth
, and then select one of the Bluetooth devices. After that,
accept the Bluetooth authorisation request on the other device to receive the image.
When another device sends you data, accept the Bluetooth authorisation request made by
another device. Received files are saved in the
Download
folder. If a contact is received, it is
added to the contacts list automatically.
DRAFT
ple isle is
G
a
ll
er
yGallery
. O
p
en
. Open
Gallery
,
the Bluetooth devices. After that,
the Bluetooth devices. Afte
device to receive the image.device to receive the image.
etooth authorisation request made by etooth authorisation request made by
wnloadwnload
folder. If a contact is received, it isa cont
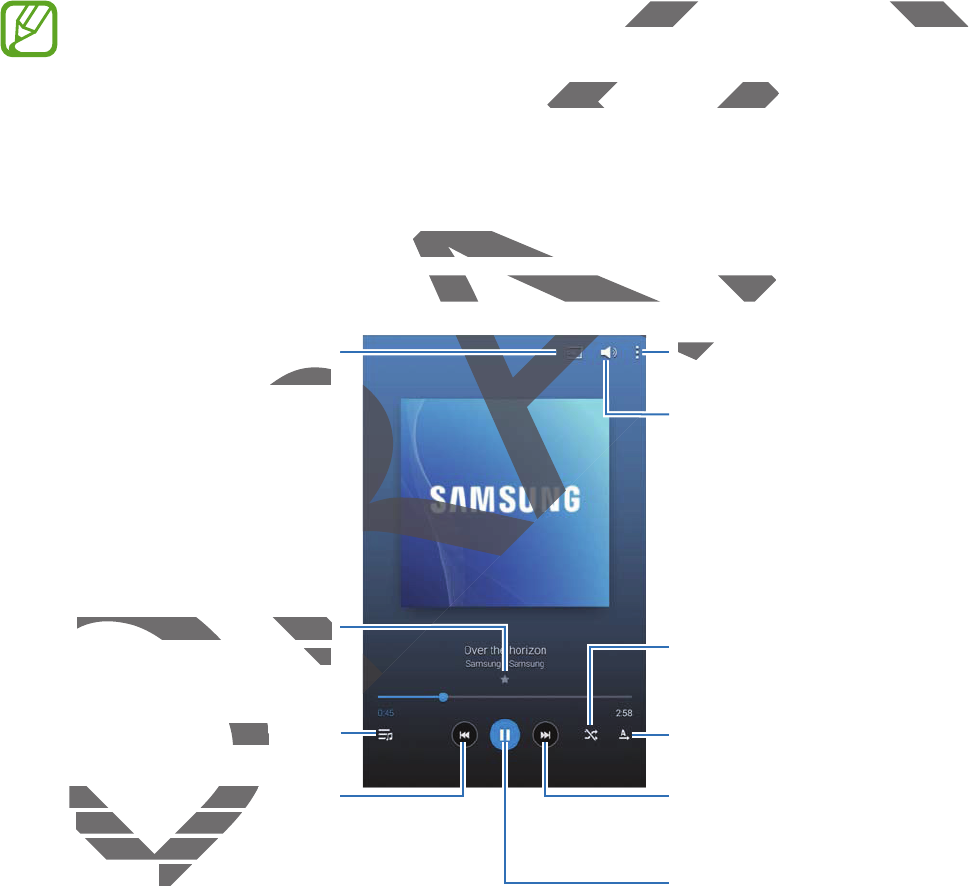
54
Media
Music
Use this application to listen to music.
Tap
Music
on the Applications screen.
r
Some file formats are not supported depending on the software installed on the
device.
r
Some files may not play properly depending on the encoding method used.
Playing music
Select a music category, and then select a song to play.
Tap the album image at the bottom of the screen to open the music player screen.
Skip to the next song. Tap and
hold to move forwards quickly.
Pause and resume playback.
Adjust the volume.
Access additional options.
Change the repeat mode.
Restart the currently-playing
song or skip to the previous
song. Tap and hold to move
backwards quickly.
Turn on shuffle.
Open the playlist.
Search for other devices to play
the file.
Set the file as your favourite
song.
DRAFT
g on the software installed on theg on the software installed on the
ding on the encoding method used.ding on the encoding
lect a song to play.ct a song to p
om of the screen to open the music playhe screen to open the music play
A
A
R
R
A
A
AcceAcce
Restart the currently-pRestart the currently-
song or skip to thesong or skip to the
song. Tap and hsong. Tap and h
backback
Open the playlist.the p
RA
RA
play
the file.the file.
S
et the
f
ile as your
f
avourite
Set the file as your favourite
son
g.ng.
Media
55
To listen to songs at equal volume levels, tap
ĺ
Settings
ĺ
Player
ĺ
Smart Volume
.
When
Smart Volume
is activated, the volume may end up louder than the device
volume level. Use caution to avoid long-term exposure to loud sounds to prevent
damage to your hearing.
Smart Volume
may not be activated for some files.
To set a personalised sound while listening to songs with a headset, tap
ĺ
Settings
ĺ
Player
ĺ
Adapt Sound
ĺ
On
. When you turn the volume up to level 14 or higher, the adapt
sound option is not applied to music playback. If you turn the volume down to level 13 or
lower, the option is reapplied.
Setting a song as alarm ringtone
To use the currently-playing song as alarm ringtone, tap
ĺ
Set as alarm tone
.
Creating playlists
Make an own selection of songs.
Tap
Playlists
, and then tap
ĺ
Create playlist
. Enter a title and tap
OK
. Tap
Add tracks
,
select songs to include, and then tap
Done
.
To add the currently-playing song to a playlist, tap
ĺ
Add to playlist
.
Playing music by mood
Play music grouped by mood. The playlist is automatically created by the device.
Tap
ĺ
Music square
, and select a cell of mood. Or select multiple cells by dragging your
finger.
DRAFT
dset, tapdset, tap
ĺ
Setting
sSettings
ĺ
up to level 14 or higher, the adapt
up to level 14 or higher, the a
n the volume down to level 13 orn the volume down to level 13 or
m ringtone, tap
ĺĺ
S
e
t
a
s
ala
rm
to
n
eSet
.
ngs.
ap p
ĺĺ
Create p
l
ay
l
ist
Create playlist
. Enter a title and ta. Enter a title and ta
e, and then tapde, and then tap
D
on
e
.
ntly-playing song to a playlist, tapntly-playing song to a playlist, tap
ĺ
Ad
g music by moodusic by mood
music grouped by mood. The playlist is amusic grouped by mood
Tap Tap
ĺĺ
Music squar
eMusic squar
, and select a cell ond select
f
inger.
fing
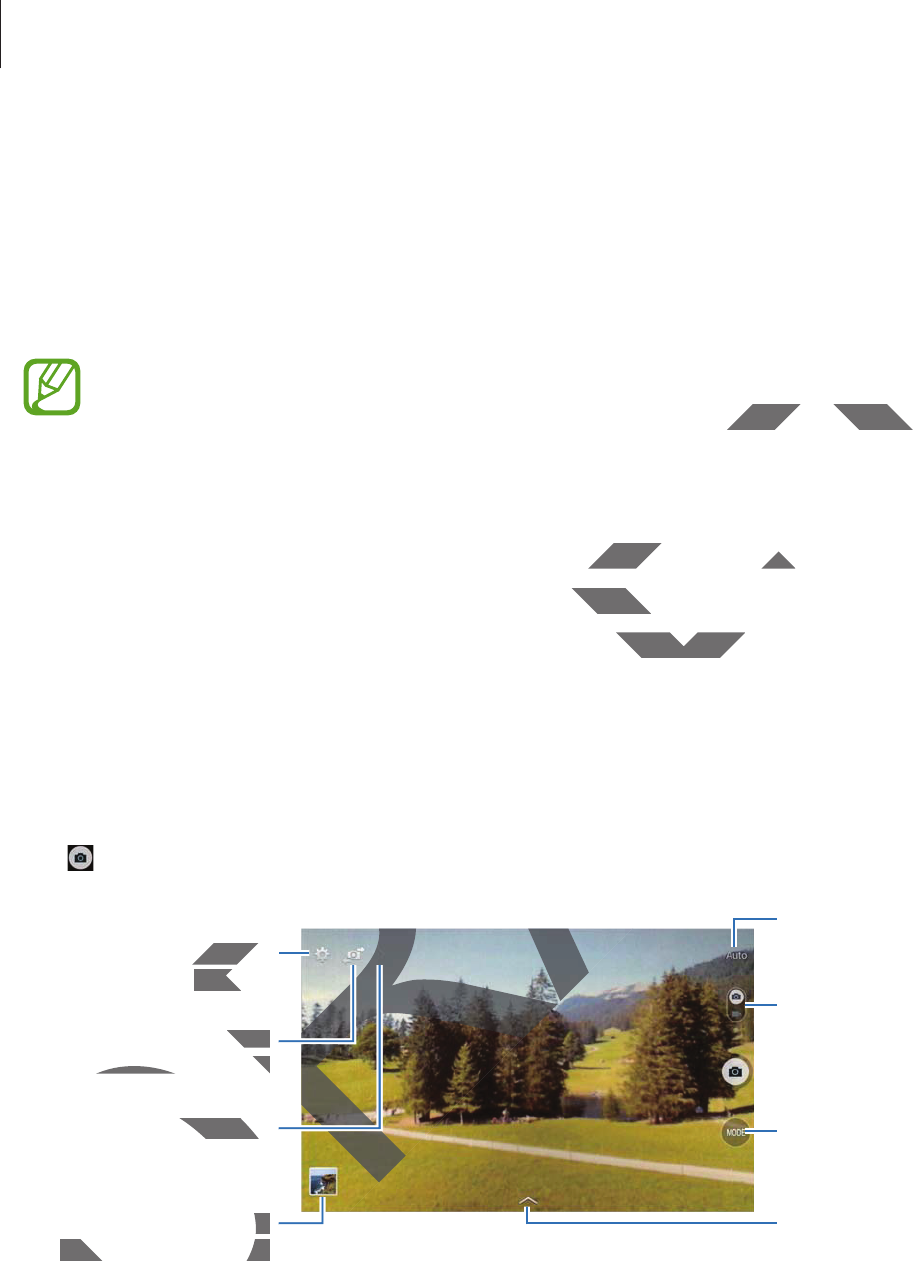
Media
56
Camera
Use this application to take photos or videos.
Use
Gallery
to view photos and videos taken with the device’s camera. (p. 61)
Tap
Camera
on the Applications screen.
r
The camera automatically shuts off when unused.
r
Make sure that the lens is clean. Otherwise, the device may not work properly in
some modes that require high resolutions.
Camera etiquette
r
Do not take photos or videos of other people without their permission.
r
Do not take photos or videos where legally prohibited.
r
Do not take photos or videos in places where you may violate other people’s privacy.
Taking photos
Taking a photo
Tap to take a photo.
Display current mode.
Change the shooting
mode.
Change the camera
settings.
Switch between the
front and rear camera.
Select among various
effects that are
available.
View more options.
Switch between still
and video mode.
View photos and
videos you have taken.
DRAFT
may not work properly inmay not work pro
thout their permission.thout their permissi
prohibited.ohibited
where you may violate other people’s privmay violate o
e camerae camer
sett
i
n
g
s
.settin
witch between then the
ont and rear camera.nt and rear camera.
R
R
DR
DR
D
D
V
i
ew more o
p
t
i
ons
.re options
DRA
DRA
View
ph
otos an
dnd
vi
d
eos you
h
ave ta
k
en
.videos you have taken.

Media
57
Shooting mode
Several photo effects are available.
Tap
MODE
, and then scroll up or down the screen at the right side of the screen.
r
Auto
: Use this to allow the camera to evaluate the surroundings and determine the ideal
mode for the photo.
r
Beauty face
: Take a photo with lightened faces for gentler images.
r
Sound & shot
: Use this to take a photo with sound.
Tap to take a photo. The device records a few seconds of audio after taking a photo.
While taking photos in this mode, sound is recorded by the internal microphone.
r
Panorama
: Take a photo composed of many photos strung together.
To get the best shot, follow these tips.
–
Move the camera slowly in one direction.
–
Keep the camera’s viewfinder within the guide frame.
–
Avoid taking photos of a subject in front of unrecognisable backgrounds, such as
empty skies or plain walls.
r
Sports
: Use this setting for fast-moving subjects.
r
Night
: Use this setting for images taken in darker conditions.
Panoramic photos
A panoramic photo is a wide landscape image consisting of multiple shots.
Tap
MODE
ĺ
Panorama
.
Tap and move the camera in one direction. When two panorama guide frames are aligned,
the camera automatically takes another shot in a panoramic sequence. To stop shooting, tap
.
If the viewfinder is out of the direction, the device stops shooting.
termine ttermine
es.es.
s of audio after taking a photo.s of audio after taking a phot
orded by the internal microphone.orded by the internal microphone.
ny photos strung together.otos strung togeth
direction. direction
der within the guide frame.ithin the guide fram
f a subject in front of unrecognisable bacn front of unrecognisable bac
n walls.
etting for fast-moving subjects.etting for fast-moving subject
s setting for images taken in darker conds setting for images taken in dark
mic photosphotos
oramic photo is a wide landscape image o is a wide landscape image
p p
MODEMODE
ĺ
ĺ
P
anoram
aPanorama
..
Tap Tap
and move the camera in one dirve the camera in one
the camera automatically takes anothe camera automatically takes ano
..
If the viewfinder is out of theIf the viewfinder is out of
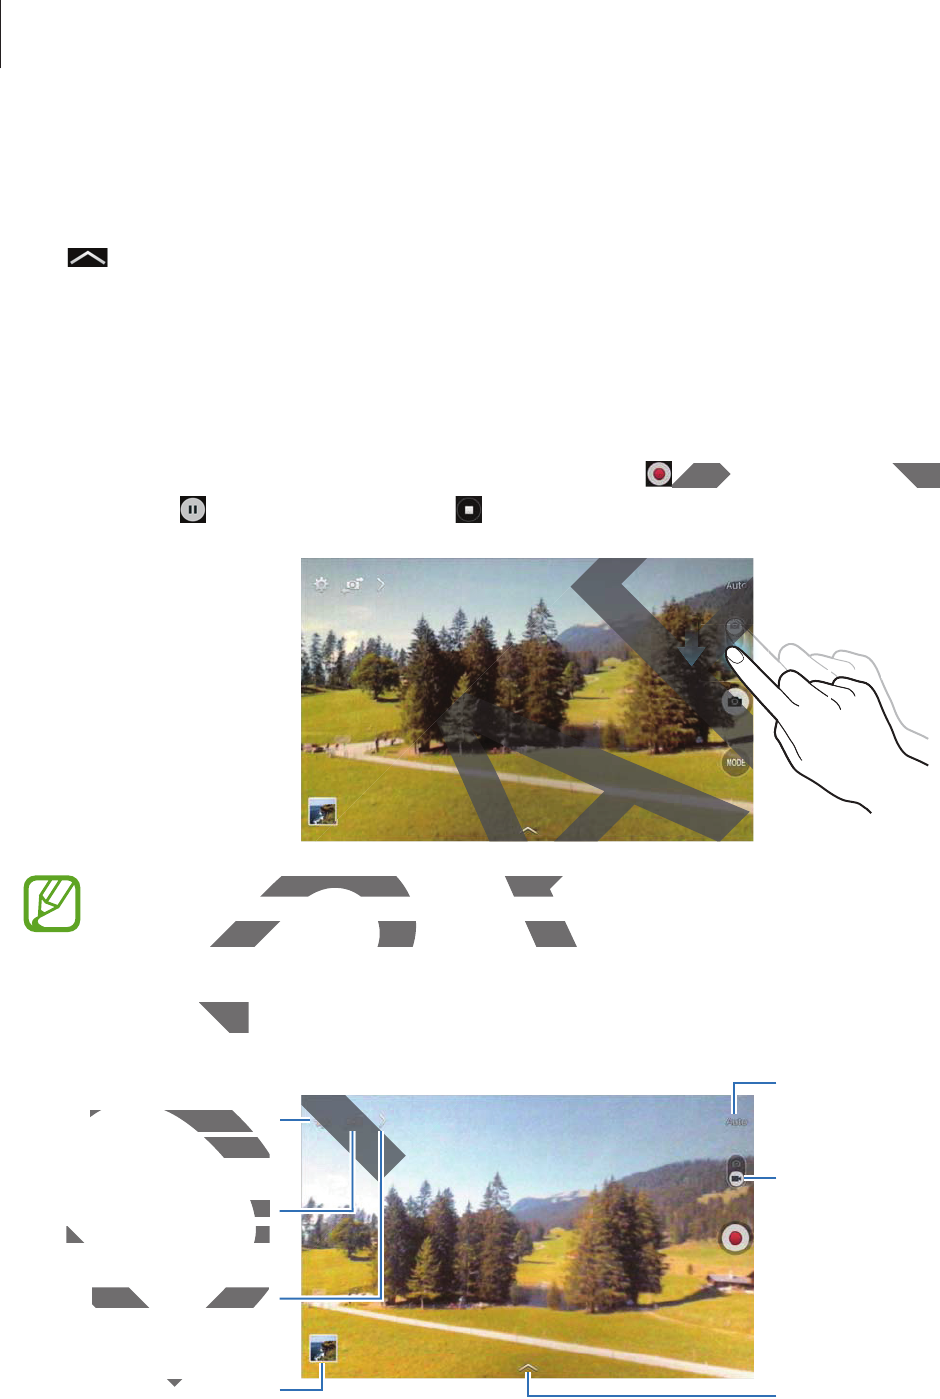
Media
58
Applying filter effects
Use the filter effects to take unique photos or videos.
Tap and select a filter effect. The available options vary by mode.
Taking videos
Taking a video
Slide the still-video switch to the video icon, and then tap to take a video. To pause
recording, tap . To stop recording, tap .
r
Manual focus is not available in video mode.
r
The zoom function may not be available when recording at the highest resolution.
Recording mode
Switch between the
front and rear camera.
View photos and
videos you have taken. Select among various
effects that are
available.
Change the camera
settings.
View more options.
Display current mode.
Switch between still
and video mode.
D
ph
ph
DRAFT
to take a video. To pause to take a video. To pause
F
F
F
F
F
F
AF
AF
F
F
F
F
AF
F
us is not available in video mode.us is not available in video m
om function may not be available when om function may not be available w
ing modeode
DR
DR
DR
DR
R
R
S
witc
h
b
etween t
h
e
he
f
ront and rear camera
.front and rear camera.
C
h
an
g
e t
h
e camera
Change the came
settin
g
s
.ettings.
View more options.View more options.
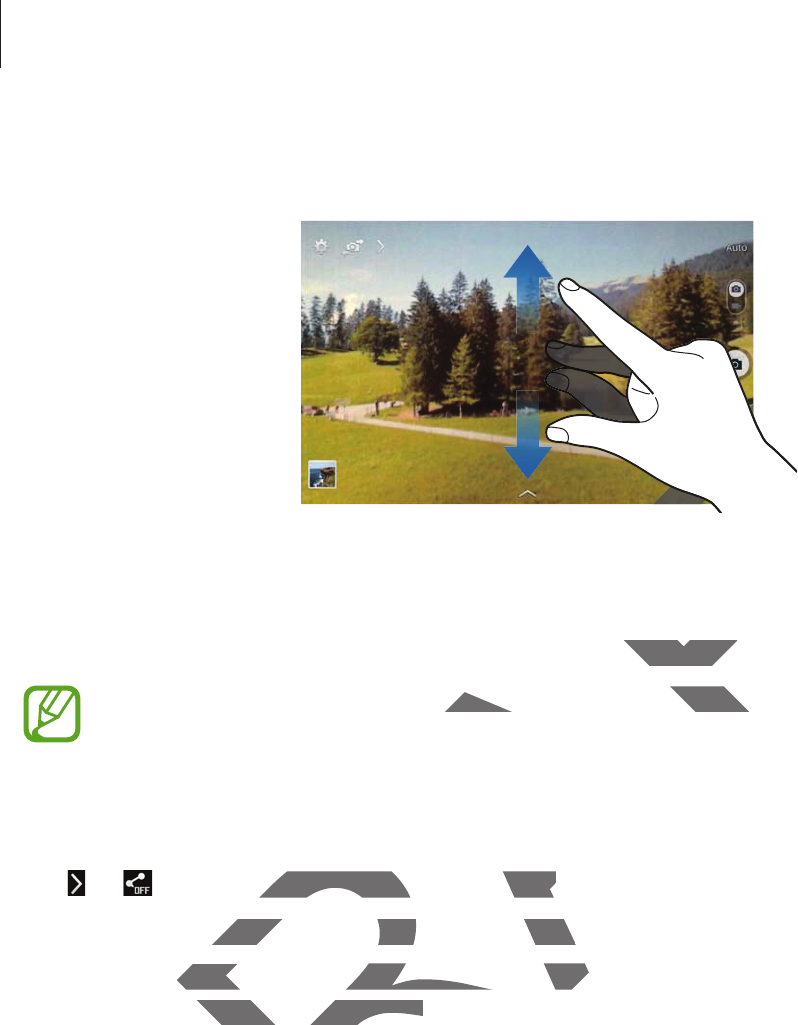
Media
59
Zooming in and out
Use one of the following methods:
r
Use the Volume button to zoom in or out.
r
Spread two fingers apart on the screen to zoom in, and pinch to zoom out.
The zoom in/out effect is available when using the zoom feature while shooting
video.
Share shot
Tap
ĺ
, and then select one of the following:
r
Share shot
: Send a photo directly to another device via Wi-Fi Direct.
r
Buddy photo share
: Set the device to recognise a person’s face that you have tagged in a
photo and send it to that person.
DRAFT
FT
FT
to zoom in, and pinch to zoom out.and pinch t
ble when using the zoom feature while sble when using the zoom fea
select one of the following: select one of the following:
end a photo directly to another device vSend a photo directly to another de
hoto sharehoto sh
: Set the device to recognise ahe device to recognise
o and send it to that person.send it to that person.

Media
60
Configuring settings for Camera
Tap to configure settings for Camera. Not all of the following options are available in both
still camera and video camera modes. The available options vary depending on the mode
used.
r
Photo size
/
Video size
: Select a resolution. Use higher resolution for higher quality. But it
takes up more memory.
r
Metering modes
: Select a metering method. This determines how light values are
calculated.
Centre-weighted
measures background light in the centre of the scene.
Spot
measures the light value at a specific location.
Matrix
averages the entire scene.
r
Location tag
: Attach a GPS location tag to the photo.
r
To improve GPS signals, avoid shooting in locations where the signal may be
obstructed, such as between buildings or in low-lying areas, or in poor weather
conditions.
r
Your location may appear on your photos when you upload them to the Internet.
To avoid this, deactivate the GPS tag setting.
r
Review pics/videos
: Set the device to show photos or videos after taking them.
r
Volume key
: Set the device to use the Volume button to control the shutter or zoom
function.
r
Timer
: Use this for delayed-time shots.
r
White balance
: Select an appropriate white balance, so images have a true-to-life colour
range. The settings are designed for specific lighting situations. These settings are similar
to the heat range for white-balance exposure in professional cameras.
r
Brightness
: Change the brightness.
DRAFT
higher quality. higher
s how light values ares how light values
in the centre of the scene.in the centre of the scene
Spo
t
averages the entire scene.averages the entire scene.
oto.oto.
in locations where the signal may ben locations where the
ngs or in low-lying areas, or in poor weathin low-lying areas
your photos when you upload them to t your photos when you uplo
he GPS tag setting.e GPS tag setting
he device to show photos or videos after o show photos or videos after
evice to use the Volume button to controVolume button to contro
s for delayed-time shots.s for delayed-time
anceance
: Select an appropriate white balanc: Select an appropriate white bala
The settings are designed for specific ligh settings are designed for specific ligh
he heat range for white-balance exposurnge for white-balance exposur
BrightnessBrightness
: C
h
ange t
h
e
b
rig
h
tness.
: Change the b

Media
61
r
Guidelines
: Display viewfinder guides to help composition when selecting subjects.
r
Contextual filename
: Set the camera to display contextual tags. Activate this to use Tag
Buddy in
Gallery
.
r
Save as flipped
: Invert the image to create a mirror-image of the original scene.
r
Storage
: Select the memory location for storage.
r
Reset
: Reset the camera settings.
r
Help
: Access help information for using the camera.
Shortcuts
Reorganise shortcuts for easy access to the camera’s various options.
Tap and tap and hold a shortcut icon.
Tap and hold an option and drag it to a slot at the top of the screen.
Gallery
Use this application to view images and videos.
Tap
Gallery
on the Applications screen.
r
Some file formats are not supported depending on the software installed on the
device.
r
Some files may not play properly depending on the encoding method used.
DRAFT
scenescene
various options.various
at the top of the screen.of the screen.
images and videos.deos
ications screen.ications scr
e formats are not supported depending oe formats are not supported dep
e.e.
ome files may not play properly dependme files may not play properly depend

Media
62
Viewing images
Launching
Gallery
displays available folders. When another application, such as
Email
, saves
an image, the
Download
folder is automatically created to contain the image. Likewise,
capturing a screenshot automatically creates the
Screenshots
folder. Select a folder to open
it.
In a folder, images are displayed by creation date. Select an image to view it in full screen.
Scroll left or right to view the next or previous image.
Zooming in and out
Use one of the following methods to zoom in an image:
r
Double-tap anywhere to zoom in.
r
Spread two fingers apart on any place to zoom in. Pinch to zoom out, or double-tap to
return.
Playing videos
Video files show the icon on the preview. Select a video to watch it and tap .
Trimming segments of a video
Select a video and tap . Move the start bracket to the desired starting point, move the end
bracket to the desired ending point, and then save the video.
Editing images
When viewing an image, tap and use the following functions:
r
Favourite
: Add to the favourites list.
r
Slideshow
: Start a slideshow with the images in the current folder.
r
Photo frame
: Use this to add a frame and a note to an image. The edited image is saved
in the
Photo frame
folder.
r
Photo note
: Use this to write a note on the back of the image. Tap to edit the note.
r
Copy to clipboard
: Copy to clipboard.
folderfolde
view it in full screen.view it in f
e:e:
zoom in. Pinch to zoom out, or double-ta. Pinch to zoom
n the preview. Select a video to watch it ew. Select a video to watch
ments of a videoments of a video
d tapd tap
. Move the start bracket to the dthe start bracket to t
e desired ending point, and then save thedesired ending point, and then save th
ting imagesting images
When viewing an image, tapWhen viewing an image, tap
and use th an
r
r
F
a
v
ou
ri
te
: Add to the favourites dd to the favourites
r
r
S
l
i
d
es
h
o
w
: Start a slideshowt a sli
rr
Ph
oto
f
r
a
m
ePh
: Use this tose thi
in the in the
Photo framerame
f
oto noteoto note
: Use: Use
o clip
o clip
Media
63
r
Print
: Print the image by connecting the device to a printer. Some printers may not be
compatible with the device.
r
Rename
: Rename the file.
r
Buddy photo share
: Send the image to a person whose face is tagged in the image.
r
Rotate left
: Rotate anticlockwise.
r
Rotate right
: Rotate clockwise.
r
Crop
: Resize the blue frame to crop and save the image in it.
r
Set as
: Set the image as wallpaper or a contact image.
r
Details
: View image details.
r
Settings
: Change the Gallery settings.
Favourite images
When viewing an image, tap
ĺ
Favourite
to add the image to the favourites list.
Deleting images
Use one of the following methods:
r
In a folder, tap
ĺ
Select item
, select images, and then tap .
r
When viewing an image, tap .
Sharing images
Use one of the following methods:
r
In a folder, tap
ĺ
Select item
, select images, and then tap to send them to others or
share them via social network services.
r
When viewing an image, tap to send it to others or share it via social network services.
DRAFT
the imthe im
itei
to add the image to the favourites lisge to th
ethods:
Select itemSelect item
, select images, and then tapmages, a
an image, tapan image, tap
..
g imagesmages
ne of the following methods:wing meth
In a folder, tapIn a folder, tap
ĺ
Select ite
mSelect i
, select
share them via social network servishare them via social network
r
When viewing an image, tapan image, tap
Media
64
Setting as wallpaper
When viewing an image, tap
ĺ
Set as
to set the image as wallpaper or to assign it to a
contact.
Tagging faces
When viewing an image, tap
ĺ
Settings
ĺ
Tags
, and then tick
Face tag
. A yellow frame
appears around the recognised face. Tap the face, tap
Add name
, and then select or add a
contact.
When the face tag appears on an image, tap the face tag and use available options, such as
sending messages.
Face recognition may fail depending on the face angle, face size, skin colour, facial
expression, light conditions, or accessories the subject is wearing.
Using Tag buddy
Tap
ĺ
Settings
ĺ
Tags
ĺ
Tag buddy
, and then drag the
Tag buddy
switch to the right to
display a contextual tag (weather, location, date, and person’s name) when opening an image.
Organising with folders
Create a folder to organise images or videos stored in the device. You can copy or move files
from one folder to another.
To create a new folder, tap . Enter a name for the folder, tap
OK
, and then tick images or
videos. Tap and hold any selected image or video, drag it to the new folder, and then tap
Done
. Tap
Copy
to copy or
Move
to move.
DRAFT
ace tagace tag
. A yellow frame . A yell
, and then select or add aand then select or
and use available options, such as and use available options, such as
the face angle, face size, skin colour, faciae face angle, face size,
ories the subject is wearing.e subject is wea
g buddyy
, and then dra
g
the
, and then drag the
Tag buddyTag buddy
ather, location, date, and person’s name) n, date, and person’s name
ith foldersith folders
to organise images or videos stored in thto organise images or videos stored in
der to another.er to an
e a new folder, tapolder, tap
. Enter a name for t. Enter a name for t
os. Tap and hold any selected image or vos. Tap and hold any sele
oneone
.
T
ap
. Tap
CopyCopy
to copy or to copy or
yy
Mo
v
eMov
to move
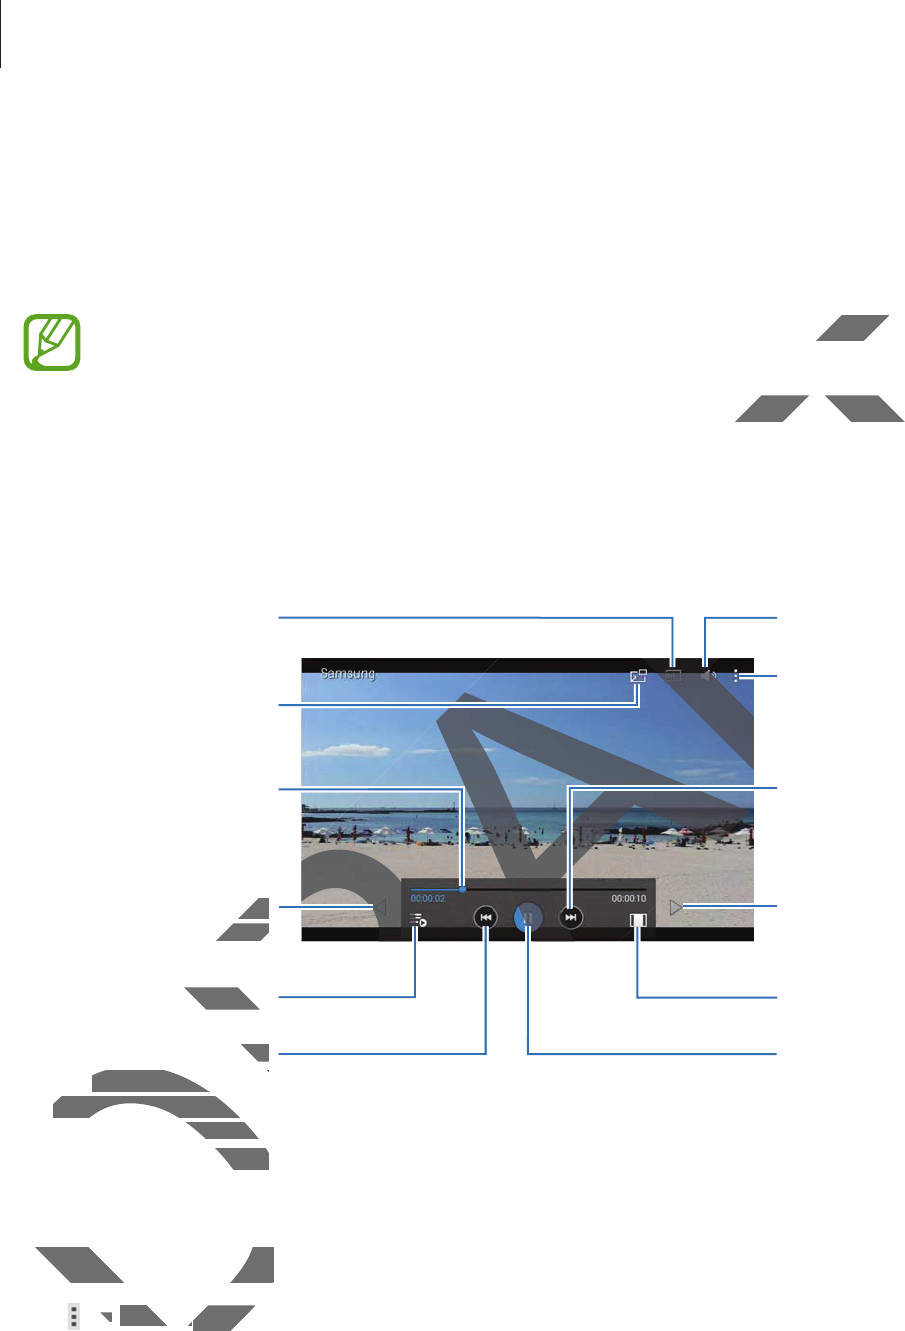
Media
65
Video
Use this application to play video files.
Tap
Video
on the Applications screen.
r
Some file formats are not supported depending on the software installed on the
device.
r
Some files may not play properly depending on the encoding method used.
Playing videos
Select a video to play.
Move the control panel
to the left.
Open the playlist.
Move forwards or
backwards by dragging
the bar.
Search for other
devices to play the file.
Restart the current
video or skip to the
previous video. Tap and
hold to move
backwards quickly.
Skip to the next video.
Tap and hold to move
forwards quickly.
Adjust the volume.
Pause and resume
playback.
Access additional
options.
Switch to floating
screen mode.
Change screen ratio.
Move the control panel
to the right.
Deleting videos
Tap
ĺ
Delete
, select videos, and then tap
Delete
.
DRAFT
e installed one instal
coding method used.coding method u
AF
AF
AFT
AFT
AF
AF
AF
AF
RA
RA
RA
RA
anelanel
he left.he left.
n the playlist.e playlist
DRA
DRA
RA
RA
A
Restart the current ent
v
i
d
eo or s
k
ip to t
h
e
video or skip to the
previous video. Tap andprevious video. Tap a
h
o
ld
to move
d to move
b
ac
k
war
d
s quic
kl
y
.uickly.
Adjust the volume
Access addit
options.
AF
AF
RA
RA
Deleting videosDeleting videos
ĺĺ
De
l
et
eDelete
, selec, selec
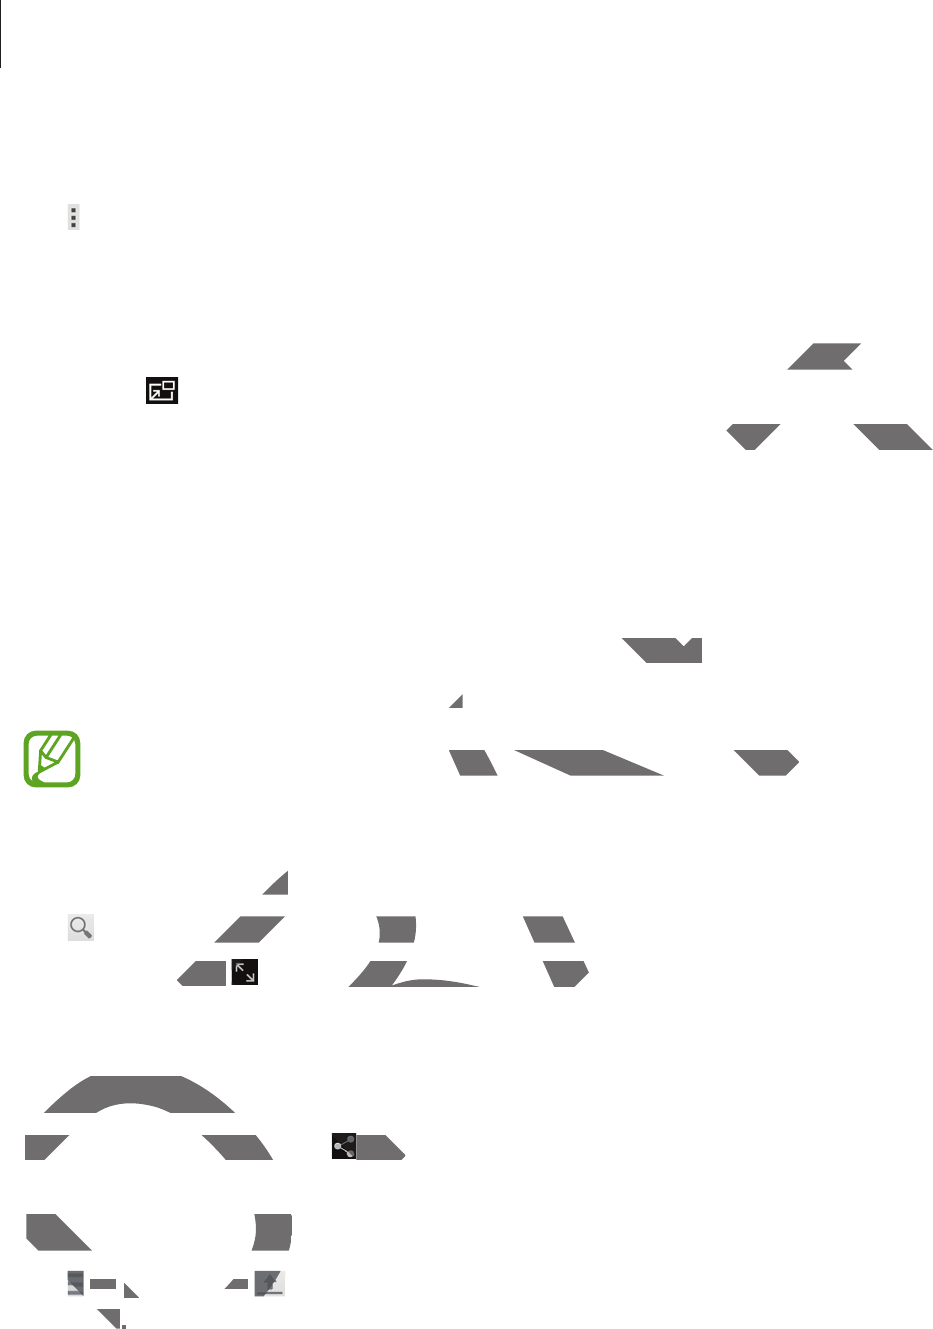
Media
66
Sharing videos
Tap
ĺ
Share via
, select videos, tap
Done
, and then select a sharing method.
Using Popup Video player
Use this feature to use other applications without closing the video player. While watching
videos, tap to use the pop-up player.
Spread two fingers apart on the screen to enlarge the player or pinch to reduce it. To move
the player, drag the player to another location.
YouTube
Use this application to watch videos from the YouTube website.
Tap
YouTube
on the Applications screen.
This application may not be available depending on the region or service provider.
Watching videos
Tap , and then enter a keyword. Select one of the returned search results to watch a video.
Tap the screen, tap , and then rotate the device to landscape orientation to display full
screen.
Sharing videos
Select the video to view, tap , and then select a sharing method.
Uploading videos
Tap
ĺ
Uploads
ĺ
, select a video, enter information for the video, and then tap
UPLOAD
.
DRAFT
yer. While watchingyer. Wh
pinch to reduce it. To movench to reduce it. To
he YouTube website.website.
n.n.
be available depending on the region orilable depending on the region o
osos
enter a keyword. Select one of the returnenter a keyword. Select one of the
n, tap n, tap
, and then rotate the device to laen rotate the device to
haring videosharing video
Se
l
ect t
h
e vi
d
eo to view, tap
Select the video to view
, and th, and
Uploading videosUploading video
ĺĺ
U
p
l
oa
d
s
U
ĺ
ĺ
ADAD
..

67
Application & media stores
Play Store
Use this application to purchase and download applications and games that are able to run
on the device.
Tap
Play Store
on the Applications screen.
This application may not be available depending on the region or service provider.
Installing applications
Browse applications by category, or tap to search with a keyword.
Select an application to view information. To download it, tap
INSTALL
. If there is a charge for
the application, tap the price, and follow the on-screen instructions to complete the purchase
process.
r
When a new version is available for any installed application, an update icon
appears at the top of the screen to alert you to the update. Open the notifications
panel and tap the icon to update the application.
r
To install applications that you downloaded from other sources, on the
Applications screen, tap
Settings
ĺ
General
ĺ
Security
ĺ
Unknown sources
.
Uninstalling applications
Uninstall the applications purchased from
Play Store
.
Tap
ĺ
My apps
, select an application to delete in the list of installed applications, and then
tap
UNINSTALL
.
DRAFT
ames that are able to runames that are a
ding on the region or service provider.ding on the region or service provider.
ap p
to search with a keyword. to search with a keyword.
rmation. To download it, tapon. To download it, ta
I
N
S
TALL
TALL
. If t. If
and follow the on-screen instructions to the on-screen instructions to
w version is available for any installed appw version is available for any i
at the top of the screen to alert you to that the top of the screen to alert y
el and tap the icon to update the applicatel and tap the icon to update the appl
To install applications that you downloadnstall applications that you download
A
pp
l
ications screen, tap
tions screen, t
Sett
i
ng
sngs
ĺĺ
GG
Uninstalling applicationsUninstalling application
Uninstall the applications purchasUninstall the applications purchas
TapTap
ĺ
M
y
apps
, select an aelect
ap ap
U
NINSTAL
LUNIN
.

Application & media stores
68
Samsung Apps
Use this application to purchase and download dedicated Samsung applications. For more
information, visit
apps.samsung.com
.
Tap
Samsung Apps
on the Applications screen.
This application may not be available depending on the region or service provider.
Installing applications
Browse applications by category. Tap
CATEGORY
to select a category.
To search for an application, tap at the top of the screen, and then enter a keyword in the
search field.
Select an application to view information. To download it, tap
Free
. If there is a charge for the
application, tap the price, and follow the on-screen instructions to complete the purchase
process.
When a new version is available for any installed application, an update icon appears
at the top of the screen to alert you to the update. Open the notifications panel and
tap the icon to update the application.
Play Music
Use this application to listen to music from the device or stream music from the Google cloud
service.
Tap
Play Music
on the Applications screen.
This application may not be available depending on the region or service provider.
DRAFT
on or service provider.on or servic
elect a category.elect a category.
he screen, and then enter a keyword in te screen, and then ent
. To download it, taptap
F
ree
Fre
. If there is a cha
he on-screen instructions to complete thhe on-screen instructions to co
available for any installed application, anfor any installed application, an
reen to alert you to the update. Open theu to the update. Open the
update the application.update the application.
Musicusic
his application to listen to music from theapplication to listen t
vice.vice.
Tap Tap
Pl
ay Musi
cP
on the Applications scron the Applications
D
D
This application may notion m

Application & media stores
69
Play Games
Use this application to download and play games.
Tap
Play Games
on the Applications screen.
This application may not be available depending on the region or service provider.
Play Newsstand
Use this application to read the latest news articles.
Tap
Play Newsstand
on the Applications screen.
This application may not be available depending on the region or service provider.
DRAFT
or service provideor servic
ble depending on the region or service pon the re

70
Utilities
Memo
Use this application to record important information to save and view at a later date.
Tap
Memo
on the Applications screen.
Adding and managing categories
Create categories to sort and manage your memos.
To add a new category, tap
ĺ
Add category
, enter a category name, and then tap
OK
.
To delete a category, tap
ĺ
Edit categories
, and then tap next to the category.
To rename a category, select a category, tap
ĺ
Rename category
, enter a new name for the
category, and then tap
OK
.
To change the category order, tap
ĺ
Edit categories
, and then tap next to a category
and drag it up or down to another position.
Composing memos
Tap on the memos list and enter a memo. While composing a memo, use the following
options:
r
: Create or set a category.
r
: Insert images.
r
: Make a voice recording to insert.
To save the memo, tap
Save
.
To edit a memo, tap a memo, and then tap the content of the memo.
DRAFT
ew at a later date.ew at a later da
os..
y
, enter a category name, and then tapa category nam
O
ries
,
and then tap
p
next to the categor ne
ory, tap y, tap
ĺĺ
R
ename category
Rename category
, enter a ne, e
, tap
ĺ
E
dit categorie
sdit categories
, and then tap , and then tap
another position.n.
memosmemo
memos list and enter a memo. While commemos list and enter a memo. While co
: Create or set a category.: Create or set a categ
:
Insert
i
ma
g
es
.: Insert image
rr
: Make a voice recording to insevoice recording to in
T
o s
aT
ve the memo, tap
tap
Sa
ve
Sa
.
To edit a memo, tap a memo, aTo edit a memo, tap a me
Utilities
71
Browsing memos
Browse memo thumbnails by scrolling up or down.
To search for a memo, tap .
To send memos to others, tap
ĺ
Select
, select memos, and then tap .
To print memos, tap
ĺ
Select
, select memos, and then tap . Some printers may not be
compatible with the device.
To delete memos, tap
ĺ
Select
, select memos, and then tap .
Viewing a memo
Tap a memo thumbnail to open it.
To delete the memo, tap .
To send the memo to others, tap .
To print the memo by connecting the device to a printer, tap . Some printers may not be
compatible with the device.
S Planner
Use this application to manage events and tasks.
Tap
S Planner
on the Applications screen.
Creating events or tasks
Tap , and then use one of the following methods:
r
Event
: Enter an event with an optional repeat setting.
r
Task
: Enter a task with an optional priority setting.
DRAFT
printers may not bprinters
.
evice to a printer, tap evice to a printer, tap
. Some printers m. So
to manage events and tasks.to manage events and tasks.
n the Applications screen.n the Applications sc
ting events or tasksents or task
pp
, and then use one of the following m, and then use one of th
r
r
Even
tEv
: Enter an event with an optioer an event with an o
r
T
as
k
: Enter a task with an optiosk with an optio
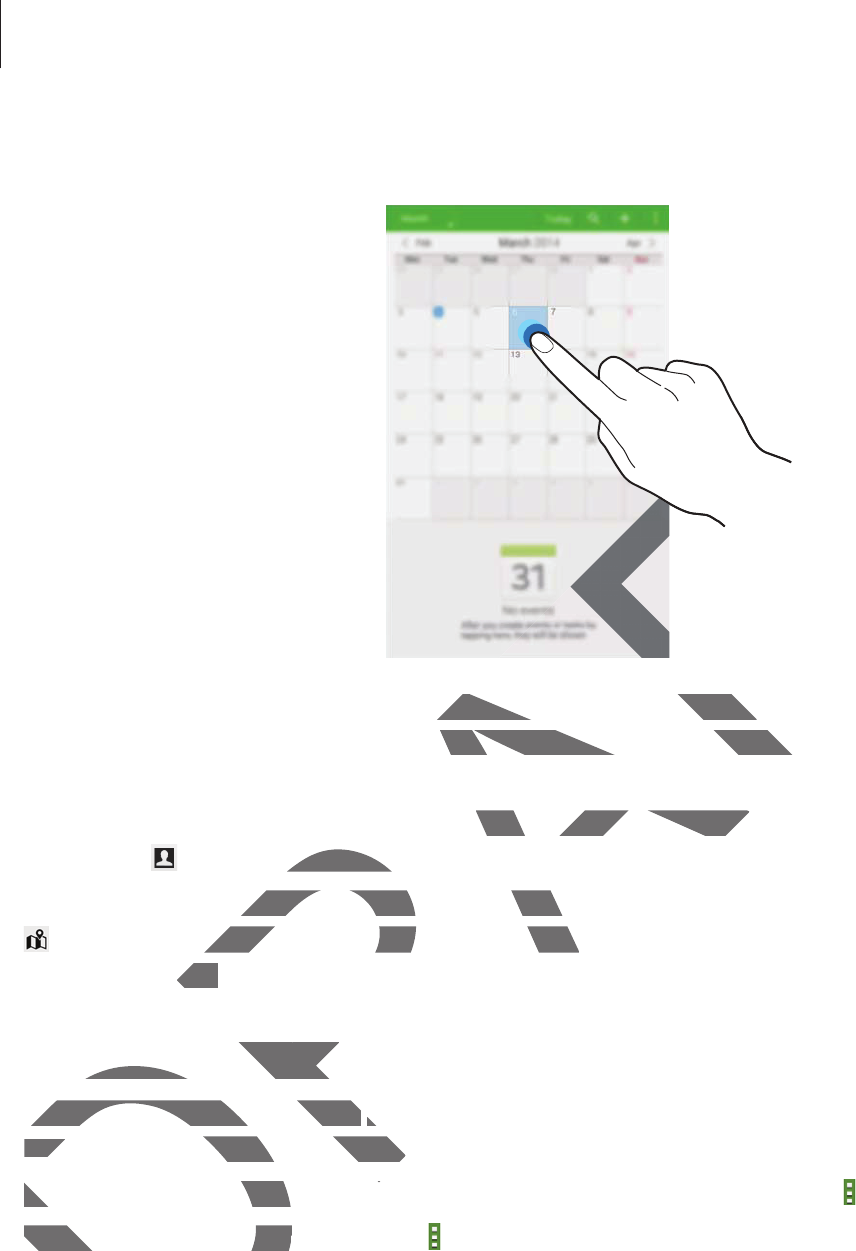
Utilities
72
To add an event or task more briefly, tap a date to select it and tap it again.
Enter a title and specify which calendar to use or sync with. Then tap
Edit event details
or
Edit task details
to add more details, such as how often the event repeats, when it has an
advance alert, or where it takes place.
Invite others to the event by sending an email. Enter the email address to the
Participants
field, or tap to open the contacts list.
Attach a map showing the location of the event. Enter the location in the
Location
field, tap
next to the field, and then pinpoint the precise location by tapping and holding on the
map that appears.
Syncing with Google Calendar
On the Applications screen, tap
Settings
ĺ
General
ĺ
Accounts
ĺ
Google
under
My
accounts
, select the Google account, and then tick
Sync Calendar
.
To manually sync for updating, on the Applications screen, tap
S Planner
ĺ
ĺ
Sync
.
To display synced events or tasks, tap
ĺ
Calendars
, and then tick the Google account.
DRAFT
FT
FT
r to use or sync with. Then tap r to use or sync with. Then tap
Edit event
ls, such as how often the event repeats, wuch as how often the event repea
place.
y sending an email. Enter the email addremail. Enter the email addre
he contacts list.he contact
ng the location of the event. Enter the long the location of the event. En
ld, and then pinpoint the precise locatiold, and then pinpoint the precise lo
pears.ears.
ncing with Google Calendarcing with Google
On the Applications screen, tapOn the Applications screen, tap
SettingsS
accoun
tsacco
, select the Google account, the Google accoun
To manually sync for updating, onTo manually sync for updating, on
To display synced events or taTo display synced events

Utilities
73
Changing calendar type
Tap the top left of the screen, and then select one from among different types of calendars
including year, month, week, and others.
Searching for events or tasks
Tap , and then enter a keyword to search for.
To view today’s events or tasks, tap
Today
at the top of the screen.
Deleting events or tasks
Select an event or task, and then tap
ĺ
Delete
.
Sharing events or tasks
Select an event or task, tap
ĺ
Share via
, and then select a sharing method.
Dropbox
Use this application to save and share files with others via the Dropbox cloud storage. When
you save files to Dropbox, your device automatically syncs with the web server and any other
computers that have Dropbox installed.
Tap
Dropbox
on the Applications screen.
This application may not be available depending on the region or service provider.
DRAFT
en.
viavia
, and then select a sharing method., and then select a sharing m
o save and share files with others via the o save and share files with oth
ropbox, your device automatically syncs ropbox, your device automatically
t have Dropbox installed.t have Dropbox instal
box
on the Applications screen.n the Applications screen.
x
D
This application may not be availableThis application may
Utilities
74
Scroll left to the last page, tap
Sign in!
, enter a user name or password, and then tap
Sign in
.
Once Dropbox is activated, tap
Turn on Camera Upload
to upload photos and videos taken
with the device’s camera to Dropbox automatically. To view the uploaded photos or videos,
tap . To share or delete files or create albums, tap , and then select files.
To upload files to Dropbox, tap
ĺ
ĺ
Upload here
ĺ
Photos or videos
or
Other files
. To
open files in Dropbox, select a file.
While viewing images or videos, tap to add it to the favourites list. To open files in the
favourites list, tap .
Cloud
Use this feature to sync files with your Samsung account or Dropbox.
On the Applications screen, tap
Settings
ĺ
General
ĺ
Cloud
.
This feature may not be available depending on the region or service provider.
Syncing with the Samsung account
Tap your Samsung account or
Sync settings
to sync files.
Backing up or restoring data
Tap
Backup
or
Restore
to back up or restore data with your Samsung account.
Syncing with Dropbox
Tap
Link Dropbox account
, and then enter the Dropbox account. Follow the on-screen
instructions to complete the setup.
Once you sign in, tap
Allow
and the device automatically syncs files with Dropbox whenever
you make some changes.
DRAFT
osos
or or
OtherOt
st. To open files in the st. To open files
g account or Dropbox.ount or Dropbox.
General
ĺ
C
l
ou
dCloud
..
able depending on the region or service ble depending on the region or s
Samsung accountSamsung account
ccount orccount or
Sy
nc sett
i
ngs
Sync s
to s
y
nc
f
iles.
to syn
up or restoring dataup or restoring data
kup
or
R
estore
store
to back up or restore data to back up or restore data
Syncing with DropboxSyncing with Dropbox
T
ap
Ta
L
ink Dropbox accoun
taccou
, and thend the
instructions to complete the setuinstructions to complete
Once you sign in, tap Once you sign in, tap
AllowAllo
a
u make some changesu make some change
Utilities
75
Drive
Use this application to create and edit documents and share them with others via Google
Drive storage. When you create documents or upload files to Google Drive, your device
automatically syncs with the web server and any other computer with Google Drive installed.
Access your files without transferring or downloading.
Tap
Drive
on the Applications screen.
This application may not be available depending on the region or service provider.
Hancom Viewer
Use this application to view documents in various formats, including spreadsheets and
presentations.
Tap
Hancom Viewer
on the Applications screen.
This application may not be available depending on the region or service provider.
Searching documents
Tap
Open
to browse a document.
While browsing a document, use one of the following options:
r
: Create a folder.
r
: Retrieve new documents.
r
: Sort documents and folders.
r
: Change the view mode.
r
: Select documents or folders.
To search for recently-used documents, tap
Recent Documents
.
DRAFT
r dr d
gle Drive ingle Drive
he region or service provider.he region or service prov
various formats, including spreadsheets ts, includi
ations screen.ns screen.
not be available depending on the regioable depending on the reg
ocumentsocuments
browse a document.browse a document.
owsing a document, use one of the followa document, use one of the follow
: Create a folder.: Create a folder.
rr
:
R
et
ri
e
v
e
n
e
w
docu
m
e
n
ts.: Retrieve new document
rr
: Sort documents and folders.uments and folders
rr
: Change the view mode.view
rr
: Select documents orment
search for recently-usesearch for recently-us

Utilities
76
Reading documents
Tap a document in
Recent Documents
or in a folder.
Tap or , and then use one of the following functions:
Word processor
r
Find
: Search for text.
r
Zoom
: Change the view size.
r
Document Info
: View document details such as title, date, and author.
r
Print
: Print the document by connecting the device to a printer. Some printers may not
be compatible with the device.
r
Send
: Send the document to others or share it.
r
Help
: View information about Hancom Viewer.
Presentation
r
Find
: Search for text.
r
Zoom
: Change the view size.
r
Document Info
: View document details such as title, date, and author.
r
Slide Show
: Start a slideshow from the first page.
r
From Current Slide
: Start a slideshow from the current page.
r
Show Presenter View
: Display presentation tools on the device when it is connected to
an external monitor.
r
Print
: Print the document by connecting the device to a printer. Some printers may not
be compatible with the device.
r
Send
: Send the document to others or share it.
r
Help
: View information about Hancom Viewer.
DRAFT
and author.and aut
a printer. Some printers may nota printer. Some printers may no
wer.
ument details such as title, date, and authails such as title, date, and auth
deshow from the first page.e first page.
ee
: Start a slideshow from the current pag: Start a slideshow from the
er Viewer View
: Display presentation tools on thay presentation too
monitor. monit
Print the document by connecting the dethe document by connecting the de
compatible with the device.e with the de
SendSend
: Send the document to others or : Send the documen
r
r
He
l
p
He
: View information about Hancw information about

Utilities
77
Spreadsheet
r
Find
: Search for text.
r
Zoom
: Change the view size.
r
Document Info
: View document details such as title, date, and author.
r
Sort
: Sort cells by specific criteria.
r
Show Formulas
: View the formulas inside cells instead of their calculated results.
r
Freeze Panes
: Keep the selected row in place.
r
Gridlines
: Hide or show gridlines.
r
Show All Comments
: Hide or show memos on the document.
r
Print Area
: Select an area to print.
r
Print
: Print the document by connecting the device to a printer. Some printers may not
be compatible with the device.
r
Send
: Send the document to others or share it.
r
Help
: View information about Hancom Viewer.
PDF
r
Search
: Search for text.
r
Send
: Send the document to others or share it.
r
Properties
: View document details such as title, date, and author.
r
Zoom
: Change the view size.
r
Hide comments
: Hide or show comments on the document.
r
Vertical page scrolling
/
Continuous view
/
Horizontal page scrolling
: Change the view
mode.
r
Reading view
: View the document contents only, without margins.
r
Go to page
: Move to a specified page.
r
Bookmarks
: View bookmarks on the document.
r
Print
: Print the document by connecting the device to a printer. Some printers may not
be compatible with the device.
lculated results.lculated re
ocument.ocume
e device to a printer. Some printers may nevice to a printer. So
or share it.o
ancom Viewer.com Viewer.
ument to others or share it.ument to others or share it.
w document details such as title, date, anw document details such as title
nge the view size.nge the view size.
ommentsments
: Hide or show comments on th: Hide or show comments on th
rtical page scrollingscrolling
/
/
Continuous viewContinuous view
mode.mode.
r
r
Rea
d
ing view
Reading view
: View the document c: View the docu
r
r
G
o to page
: Move to a specifiedMove to a specified
r
r
Boo
k
mar
k
s
: View bookmarw bo
rr
Pr
i
nt
Prin
: Print the documedocum
be compatible with be compatible with
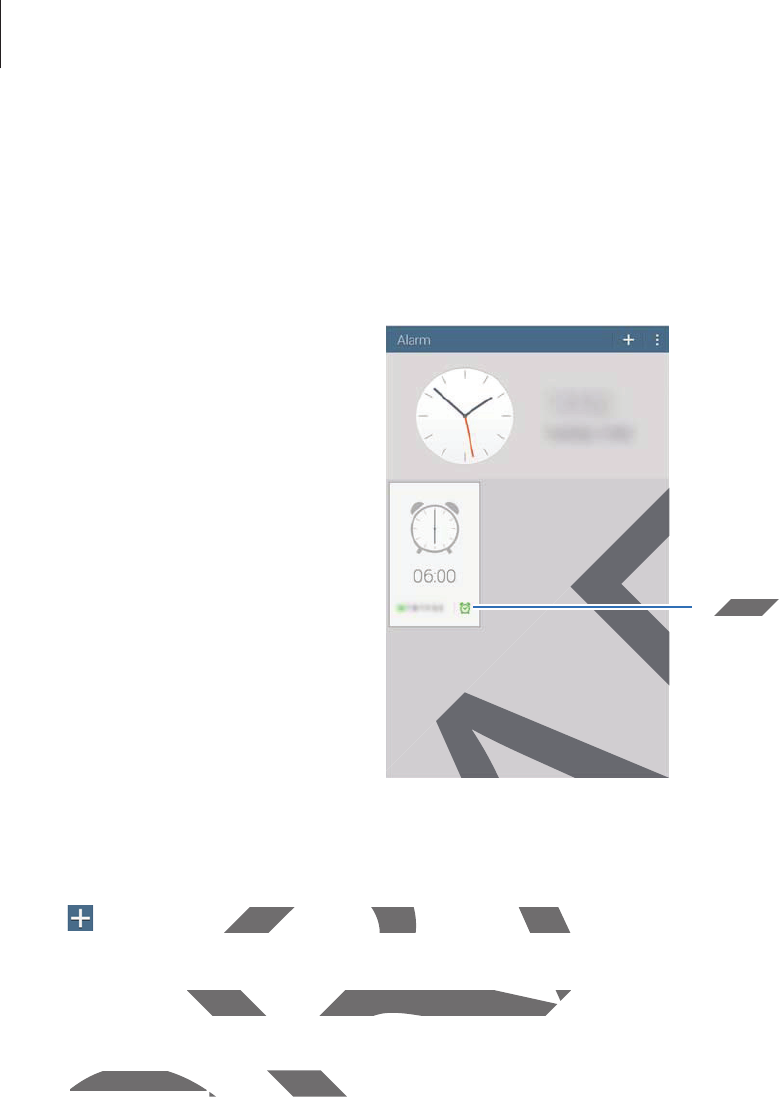
Utilities
78
Alarm
Use this application to set alarms for important events.
Tap
Alarm
on the Applications screen.
Turn this alarm on or off.
Setting alarms
Tap , set a time for the alarm to go off, select days for the alarm to repeat, and then tap
Save
.
r
Snooze
: Set an interval and the number of times for the alarm to repeat after the preset
time.
r
Smart alarm
: Set a time for the alarm to go off before the preset time.
DR
e
RAFT
AF
F
T
urn this alarm on or o
ff
.
urn this
or the alarm to go off, select days for the or the alarm to go off, select days
: Set an interval and the number of timeet an interval and the number of time
e.
Smart alarmSmart alarm
: Set a time for the alarm to: Set a time fo
Utilities
79
Stopping alarms
Drag outside the large circle to stop an alarm. Drag outside the large circle to repeat
the alarm after a specified length of time.
Deleting alarms
Tap and hold the alarm, and then tap .
World Clock
Use this application to check the time of many major cities in the world.
Tap
World Clock
on the Applications screen.
Creating clocks
Tap and enter a city name or select a city from the cities list.
To apply summer time, tap
ĺ
Select
, select a clock, and then tap .
Deleting clocks
Tap and hold the clock, and then tap .
Calculator
Use this application for simple or complex calculations.
Tap
Calculator
on the Applications screen.
Rotate the device to landscape orientation to display the scientific calculator. If
Screen
rotation
is disabled, tap
ĺ
Scientific calculator
.
To see the calculation history, tap to hide the keypad.
To clear the history, tap
ĺ
Clear history
.
DRAFT
or cities in the world.or cities in the world.
lect a city from the cities list.a city from the citie
ĺ
Select
,
select a clock, and then ta
p
elect a clock, and then tap
ss
clock, and then tapclock, and then tap
.
culator
Use this application for simple or compleUse this application for simple or
T
a
p
Tap
Ca
lc
u
l
ator
on the Applications scn the Applications s
Rotate the device to landscape oRotate the device to land
rotationrotati
is
d
isa
bl
e
d
, tap
tap
ĺ
S
see the calculation hissee the calculation hi
r the history, tar the history, ta
Utilities
80
S Voice
Use this application to command the device by voice to perform various features.
Tap
S Voice
on the Applications screen. Alternatively, press the Home button twice.
r
This application may not be available depending on the region or service provider.
r
This application is not supported in some languages.
Here are several examples of spoken commands:
r
Open music
r
Launch calculator
r
Check schedule
Tips for better voice recognition
r
Speak clearly.
r
Speak in quiet places.
r
Do not use offensive or slang words.
r
Avoid speaking in dialectal accents.
The device may not recognise your commands or may perform unwanted commands
depending on your surroundings or how you speak.
Hands-free mode
In hands-free mode, the device will read content aloud when you have messages and
notifications so you can use the device without hands while driving.
To activate hands-free mode, say “Hands-free mode on.”
Deactivate hands-free mode when not in use to prevent the device from reading
content aloud. To deactivate hands-free mode, say “Hands-free mode off.”
DRAFT
wicewice
or service proor serv
ng words.
ectal accents.
cognise your commands or may performcognise your commands or m
surroundings or how you speak.surroundings or how you spea
ree modeee mo
ds-free mode, the device will read contene, the device will read conten
tifications so you can use the device withifications so you can use th
To activate hands-free mode, say “HandTo activate hands-free mode, say “H
D
Deactivate hands-free modhands-free mod
content aloud. To deactd. To

Utilities
81
Google
Use this application to search not only the Internet, but also applications and their contents
on the device as well.
Tap
Google
on the Applications screen.
This application may not be available depending on the region or service provider.
Searching the device
Tap the search field, and then enter a keyword. Alternatively, tap , and then speak a
keyword.
If no results are returned from the applications, the web browser appears, displaying the
search results.
Search scope
To select what applications to search, tap
ĺ
Settings
ĺ
Tablet search
, and then tick the
items to search for.
Google Now
Launch Google search to view Google Now cards that show the current weather, public
transit info, your next appointment, and more when you are most likely to need it.
Join Google Now when opening Google search for the first time. To change Google Now
settings, tap
ĺ
Settings
, and then drag the
Google Now
switch to the left or right.
DRAFT
on or service provider.on or servic
natively, tapnatively,
,
and then speak a
nd
s, the web browser appears, displaying theb browser app
o search, tap
ĺĺ
S
ettin
gsngs
ĺĺ
Tablet searTablet se
gle search to view Google Now cards thate search to view Google Now cards tha
o, your next appointment, and more wher next appointment, and more whe
Google Now when opening Google searcogle Now when open
ttings, tap ttings, tap
ĺĺ
S
ett
i
ng
sSettings
, and then drag t, and

Utilities
82
Voice Search
Use this application to search webpages by speaking.
Tap
Voice Search
on the Applications screen.
This application may not be available depending on the region or service provider.
Speak a keyword or phrase when
Speak now
appears on the screen.
My Files
Use this application to access all kinds of files stored in the device, including images, videos,
songs, and sound clips.
Tap
My Files
on the Applications screen.
Viewing files
Files stored in the device are sorted by criteria. From the left pane of the screen, select one of
the following categories:
r
Timeline
: View files that are grouped by date.
r
Favourite folders
: View shortcuts to folders.
r
Folders
: View files stored in the internal memory or a memory card, and shortcuts to FTP
servers.
r
Categories
: View files sorted by their types.
r
Apps
: View files stored or created in specific applications.
Select a category, and then select a file or folder to open it.
DRAFT
or service provideor servic
een.en.
red in the device, including images, vided in the device, includ
sorted by criteria. From the left pane of tteria. From the left pane of
iles that are grouped by date.iles that are grouped by date.
lderslders
:
View shortcuts to
f
olders.
: View shortcuts to folders.
: View files stored in the internal memoryView files stored in the internal memory
ers.
CategoriesCategories
: View files sorted by their typ: View files so
rr
App
sApps
: View files stored or created in s: View files stored or cre
Select a category, and then select a fiSelect a category, and then select a

Utilities
83
After selecting a category, tap , and then use one of the following options:
r
Select
: Select files or folders.
r
Sort by
: Sort files or folders.
r
Add to favourite folders
: Add a shortcut to the folder in
Favourite folders
.
r
Add shortcut to home
: Add a shortcut to a file or folder to the Home screen.
r
Add FTP
: Add an FTP server shortcut in
Folders
.
r
Scan for Nearby Devices
: Search for devices that have media sharing activated.
r
Display options
: Change the file display options.
Tap
ĺ
Select
, select a file or folder, and then use one of the following functions:
r
: Send files to others or share them.
r
: Delete files or folders.
r
: Move files or folders to another folder.
r
: Copy files or folders to another folder.
r
ĺ
Go to folder
: Go to the folder that the selected file is in.
r
ĺ
Rename
: Rename a file or folder.
r
ĺ
Add to favourite folders
: Add a shortcut to the folder in Favourite folders.
r
ĺ
Add shortcut to home
: Add a shortcut to a file or folder to the Home screen.
r
ĺ
Zip
: Compress files or folders to create a zip file.
r
ĺ
Details
: View file or folder details.
Searching for a file
Tap , and then enter search criteria.
Viewing storage information
Tap to view memory information for your device and memory card.
DRAFT
ersers
..
e screen.e scree
dia sharing activated.dia sharing activated.
of the following functions:of the f
der.
r folder.r folder.
der that the selected file is in.that the selected
le or folder.r
folders
: Add a shortcut to the folder in Fhortcut to the folder in F
t to homet to home
: Add a shortcut to a file or fold: Add a shortcut to
mpress files or folders to create a zip file.mpress files or folders to create a zip
ilsils
: View
f
ile or
f
older details.
: View file or folder detai
rching for a filerching for a file
Tap Tap
,
and then enter search criteria.
, and then enter search cri
Viewing storage informViewing storage inform
Tap Tap
to view memory infor to view memory in

Utilities
84
Changing the view mode
Tap to change the view mode.
Creating folders
Tap , enter a name for the folder, and then tap
OK
.
Adding shortcuts to folders
Add a shortcut to frequently-used folders in
Favourite folders
. Select a folder and tap
ĺ
Add to favourite folders
.
Adding FTP server shortcuts to the device
Add an FTP server shortcut in
Folders
. Tap
ĺ
Add FTP
, enter details for the FTP server, and
then tap
Done
.
DRAFT
ersers
.
Select a
f
older and ta
p
. Select a folder and tap
ĺĺ
the devicedevic
ĺ
A
dd
FTP
, enter details for the FTP senter de

85
Travel & local
Maps
Use this application to pinpoint the location of the device, search for places, or get directions.
Tap
Maps
on the Applications screen.
This application may not be available depending on the region or service provider.
Searching for locations
Search for locations by entering an address or a keyword. Once the location is found, select a
location to view the detailed information. Refer to the help for more information.
Getting directions for a destination
Tap to set starting and ending locations, and then select a travel method. The device
shows the routes to get to the destination.
or places, or get directions.
or places, or get
g on the region or service provider.g on the region or service provider.
ess or a keyword. Once the location is fouess or a keyword. Once the
tion. Refer to the help for more information. Refer to the help for more in
or a destinationtination
d ending locations, and then select a travd ending locations, and then select a trav
get to the destination.get to the destin

86
Settings
About Settings
Use this application to configure the device, set application options, and add accounts.
Tap
Settings
on the Applications screen.
Connections
Wi-Fi
Activate the Wi-Fi feature to connect to a Wi-Fi network and access the Internet or other
network devices.
To use options, tap .
r
Advanced
: Customise Wi-Fi settings.
r
WPS push button
: Connect to a secured Wi-Fi network with a WPS button.
r
WPS PIN entry
: Connect to a secured Wi-Fi network with a WPS PIN.
r
Help
: Access help information for Wi-Fi.
Setting Wi-Fi sleep policy
On the Settings screen, tap
Connections
ĺ
Wi-Fi
ĺ
ĺ
Advanced
ĺ
Keep Wi-Fi on
during sleep
.
DRAFT
s, and add accounts.s, and add acco
o a Wi-Fi network and access the Interneo a Wi-Fi network and access th
e Wi-Fi settings.e Wi Fi s
nn
: Connect to a secured Wi-Fi network w: Connect to a secured Wi-Fi
ryry
: Connect to a secured Wi-Fi network w: Connect to a secured Wi-Fi netw
cess help information for Wi-Fi.ess help information for Wi-Fi.
ng Wi-Fi sleep policyeep polic
n the Settings screen, tap n the Settings screen, tap
ConnectionsCon
during sleepdurin
.

Settings
87
Setting Network notification
The device can detect open Wi-Fi networks and display an icon on the status bar to notify
when available.
On the Settings screen, tap
Connections
ĺ
Wi-Fi
ĺ
ĺ
Advanced
and tick
Network
notification
to activate this feature.
Wi-Fi Direct
Wi-Fi Direct connects two devices directly via a Wi-Fi network without requiring an access
point.
On the Settings screen, tap
Connections
ĺ
Wi-Fi
ĺ
Wi-Fi Direct
.
Bluetooth
Activate the Bluetooth feature to exchange information over short distances.
To use more options, tap .
r
Visibility timeout
: Set duration that the device is visible.
r
Received files
: View received files via the Bluetooth feature.
r
Rename device
: Change the device name.
r
Help
: Access help information for Bluetooth.
Flight mode
This disables all wireless functions on your device. You can use only non-network services.
NetwoNetw
without requiring an access without requiring an acce
Wi-Fi DirectWi-Fi Di
.
ge information over short distances.ver shor
on that the device is visible.t the device is visibl
ved files via the Bluetooth feature.the Bluetooth feature.
ange the device name.nge the device name.
p information for Bluetooth.p information for Bluetooth.
odede
ables all wireless functions on your deviceireless functions on your device

Settings
88
Data usage
Keep track of your data usage amount.
r
Data usage cycle
: Enter monthly reset date to monitor your data usage.
To use more options, tap .
r
Auto sync data
: Activate or deactivate auto-syncing of applications. You can select what
information to sync for each account in
Settings
ĺ
General
ĺ
Accounts
.
r
Mobile hotspots
: Select Wi-Fi hotspots to prevent applications that are running in the
background from using them.
Location
Change settings for location information permissions.
r
Mode
: Select a method to collect your location data.
r
RECENT LOCATION REQUESTS
: View which apps request your current location
information and their battery usage.
r
LOCATION SERVICES
: View the location services your device is using.
r
My places
: Set up profiles that will be used for specific locations when you use GPS, Wi-Fi,
or Bluetooth features to find your current location.
r
TAG CURRENT LOCATION
: Select applications to allow them to use your current location
information.
More networks
Customise settings to control connections with other devices or networks.
Printing
Configure settings for printer plug-ins installed on the device. You can search for available
printers or add one manually to print files via Wi-Fi or cloud services.
DRAFT
ons. You can select whaons. You ca
ĺĺ
A
ccount
sAccounts
.
.
ations that are running in theations that are running in
missions.
ur location data.
View which apps request your current locew which apps request your cu
usage.e.
w the location services your device is usiion services your device is usi
ofiles that will be used for specific locatiofiles that will be used for specific locatio
ures to find your current location.ures to find your current locat
T LOCATIONT LOCA
: Select applications to allowelect applications t
n.n.
e networksrks
ustomise settings to control connectionsustomise settings to control co
Pr
i
nt
i
n
gPr
Configure settings for printer pConfigure settings for pri
printers or add one manualprinters or add one manu

Settings
89
VPN
Set up and connect to virtual private networks (VPNs).
Nearby devices
r
DEVICE NAME
: View the device name.
r
Shared contents
: Set the device to share your content with other devices.
r
Allowed devices
: View the list of devices that can access your device.
r
Denied devices
: View the list of devices that are blocked from accessing your device.
r
Download to
: Select a memory location for saving media files.
r
Download from other devices
: Set the device to accept uploads from other devices.
Device
Sound
Change settings for various sounds on the device.
r
Volume
: Adjust the volume level for music and videos, system sounds, and notifications.
r
Notifications
: Select a ringtone for events, such as incoming messages.
r
Touch sounds
: Set the device to sound when selecting an application or option on the
touch screen.
r
Screen lock sound
: Set the device to sound when locking or unlocking the touch screen.
r
SAMSUNG APPLICATIONS
: Change the notification settings for each application.
r
Sound when tapped
: Set the device to sound when a key is touched.
r
Adapt Sound
: Personalise the sound for the ear you use most while listening to music.
DRAFT
her devices.her devices.
our device.our dev
ed from accessing your device.ed from accessing your device.
media files. media
to accept uploads from other devices.to accept uploads from
us sounds on the device.s sounds on the device.
he volume level for music and videos, syhe volume level for music and
ss
: Select a ringtone for events, such as inc: Select a ringtone for events, such
undsunds
: Set the device to sound when sele: Set the device to sound when sel
screen.n
creen lock soundeen lock sound
: Set the device to soun: Set t
rr
SAMSUNG APPLICATI
O
NS
SAMSUNG APPLICATIONS
: Change t:
r
r
Sound when ta
pp
ed
n tappe
: Set the devet the d
r
A
d
apt Soun
d
: Personalise thPersonalise th

Settings
90
Display
Change the settings for the display.
r
Brightness
: Set the brightness of the display.
r
Screen timeout
: Set the length of time the device waits before turning off the display’s
backlight.
r
Daydream
: Set the device to launch a screensaver when your device is connected to a
desktop dock or charging.
r
Display battery percentage
: Set the device to display the remaining battery life.
Multi window
Activate the Multi Window feature to run multiple applications on the screen at the same
time.
r
Open in multi window view
: Set the device to activate the Multi Window feature when
you open files from
My Files
or
Video
. Also, the device activates this feature when you
view attachments in messages.
Lock screen
Change settings for the locked screen.
r
Screen lock
: Activate the screen lock feature. The following options may vary depending
on the screen lock feature selected.
r
Clock widget options
: Configure settings for the clock widget.
–
Clock size
: Change the size of the clock.
–
Show date
: Set the device to show the date with the clock.
r
Shortcuts
: Set the device to show and edit application shortcuts on the locked screen.
This feature may not be available depending on the region or service provider.
DRAFT
off the disoff the
evice is connected to a evice is conne
he remaining battery life.he remaining battery life.
ple applications on the screen at the samepplications on the s
e device to activate the Multi Window feae device to activate the Mu
ideodeo
. Also, the device activates this featu. Also, the device activates th
es.
the locked screen.the locked scree
: Activate the screen lock feature. The foll: Activate the screen lock feature. Th
reen lock feature selected.een lock feature selected.
k widget optionst options
: Configure settings for: Configure settings for
Clo
c
k
siz
eClock si
: Change the size of the clocange th
––
Sh
ow
d
at
eShow date
: Set the device to sho: Set the device
r
r
S
h
ortcut
s
: Set the device to shot the device to sho
D
This feature may not bmay

Settings
91
r
Personal message
: Edit the personal message.
–
Edit personal information
: Edit the personal message.
r
Owner information
: Enter your information that is shown with the clock.
r
Unlock effect
: Select an effect when you unlock the screen.
r
Help text
: Set the device to show the help text on the locked screen.
Wallpaper
Change the wallpaper settings.
r
Home screen
: Select a background image for the Home screen.
r
Lock screen
: Select a background image for the locked screen.
r
Home and lock screens
: Select a background image for the Home screen and the locked
screen.
Font
Change the settings for the font.
r
Font style
: Change the font type for display text.
r
Font size
: Change the font size.
Notification panel
Customise the items that appear on the notifications panel.
r
Brightness and volume
: Set the device to display the brightness and volume adjustment
bars on the notifications panel.
r
Recommended apps
: Set the device to display a list of recommended applications on
the notifications panel based on your actions, such as connecting a headset to the device.
r
Set quick setting buttons
: Rearrange the quick setting buttons displayed on the
notifications panel.
DRAFT
ome screen.ome sc
e locked screen.e locked
nd image for the Home screen and the lomage for the Home
t.
e font type for display text.isplay text.
the font size.the font size.
on panelon pan
e the items that appear on the notificatiotems that appear on the notificatio
rightness and volumeghtness and volume
: Set the device to:
bars on the notifications panel.bars on the notifications pa
r
r
Recommen
d
e
d
apps
Recommended ap
: Set the deviSet the d
the notifications panel based ons panel based o
r
r
Set quick setting buttonsSet quick setting bu
n
otifications panel
.notifications panel.

Settings
92
Accessibility
Accessibility services are special features for those with certain physical disabilities. Access
and alert the following settings to improve accessibility to the device.
r
Auto rotate screen
: Set the interface to rotate automatically when you rotate the device.
r
Screen timeout
: Set the length of time the device waits before turning off the display’s
backlight.
r
Speak passwords
: Set the device to read aloud passwords you enter with TalkBack.
r
Single tap mode
: Set the device to control notifications by tapping the button instead of
dragging it.
r
Show shortcut
: Add a shortcut to
Accessibility
or
TalkBack
on the quick menu that
appears when you press and hold the Power button.
r
Manage accessibility
: Export or import the accessibility settings to share them with
other devices.
–
Export
: Export the current accessibility settings as a file.
–
Update
: Import the current accessibility settings as a file.
–
Share via
: Send the accessibility settings file to others.
r
TalkBack
: Activate TalkBack, which provides voice feedback.
r
Font size
: Change the font size.
r
Magnification gestures
: Set the device to zoom in and out with finger gestures.
r
Negative colours
: Reverse the display colours to improve visibility.
r
Notification reminder
: Set the device to alert you when you have missed notifications
and set an interval for repeating the alert.
r
Accessibility shortcut
: Set the device to activate TalkBack when you press and hold the
Power button, and then tap and hold the screen with two fingers.
DRAFT
rotate therotate t
ing off the displaying off t
ou enter with TalkBack.ou enter with TalkBa
by tapping the button instead of
by tapping the button inste
r r
TalkBackTalkB
on the quick menu thathe q
k
button.utton.
he accessibility settings to share them wisibility settings
essibility settings as a file.essibility settings as a file.
nt accessibility settings as a file.essibility settings as a
ccessibility settings file to others.ettings file to others.
alkBack, which provides voice feedback.alkBack, which provides voice
ge the font size.ge the font size.
on gestureson ges
: Set the device to zoom in at the device to zoom
ve colourscolours
: Reverse the display colours tose the display colours to
fication reminderreminder
: Set the device to ale: Set the device to ale
and set an interval for repeating the alertnd set an interval for rep
rr
Accessi
b
i
l
it
y
s
h
ortcu
tAccessibility shortcut
: Set the device: Set th
Power button, and then tap and hn, and then tap and

Settings
93
r
Text-to-speech options
:
–
PREFERRED TTS ENGINE
: Select a speech synthesis engine. To change the settings for
speech synthesis engines, tap .
–
Speech rate
: Select a speed for the text-to-speech feature.
–
Listen to an example
: Listen to the spoken text for an example.
–
Default language status
: View the status of the default language for the text-to-
speech feature.
r
Sound balance
: Adjust the sound balance when using a dual headset.
r
Mono audio
: Enable mono sound when listening to audio with one earbud.
r
Turn off all sounds
: Mute all device sounds.
r
Google subtitles (CC)
: Set the device to display closed captions on content supported by
Google and to change the closed caption settings.
r
Samsung subtitles (CC)
: Set the device to display closed captions on content supported
by Samsung and to change the closed caption settings.
r
Assistant menu
: Set the device to show the assistive shortcut icon that helps you access
functions supported by external buttons or features on the notifications panel. You can
also edit the menu on the shortcut icon.
–
Dominant hand
: Select the left or right hand for easy assistant menu use.
–
Edit
: Customise the items that appear on the assistant menu.
r
Tap and hold delay
: Set the recognition time for tapping and holding the screen.
r
Interaction control
: Activate interaction control mode to restrict the reaction of the
device for inputs in an application.
Blocking mode
Select which notifications will be blocked and how long to block them.
DRAFT
uage for the text-to-uage for the
dual headset.dual he
audio with one earbud.audio w
play closed captions on content supportey closed captions on c
n settings.
ce to display closed captions on contented capt
osed caption settings.osed captio
ce to show the assistive shortcut icon thashow the assistive shortcut icon th
xternal buttons or features on the notificatons or features on the notifica
he shortcut icon.n.
dd
: Select the left or right hand for easy as: Select the left or right hand
omise the items that appear on the assistaomise the items that appear on the
hold delayhold de
: Set the recognition time for the recognition time for
ction controlcontro
: Activate interaction contrctivate interaction contr
evice for inputs in an application.ts in an app
Blocking modeBlocking mode
Select which notifications will be bSelect which notifications will be b

Settings
94
Controls
Language and input
Change the settings for text input. Some options may not be available depending on the
selected language.
Language
Select a display language for all menus and applications.
Default
Select a default keyboard type for text input.
Samsung keyboard
To change the Samsung keyboard settings, tap .
The available options may vary depending on the region or service provider.
r
Select input languages
: Select languages for text input.
r
Predictive text
: Activate predictive text mode to predict words based on your input and
show word suggestions. You can also customise the word prediction settings.
r
Auto replacement
: Set the device to correct misspelled and incomplete words by
tapping the space bar or punctuation mark.
r
Auto capitalisation
: Set the device to automatically capitalise the first character after a
final punctuation mark, such as a full stop, question mark, or exclamation mark.
r
Auto spacing
: Set the device to automatically insert a space between words.
r
Auto-punctuate
: Set the device to insert a full stop when you double-tap the space bar.
r
None
: Set the device to deactivate the keyboard swipe feature.
r
Continuous input
: Set the device to enter text by sweeping on the keyboard.
DRAFT
pending on thpending
ettings, tap ings, tap
..
may vary depending on the region or seepending on the region or
uagesuages
: Select languages for text input.: Select languages for te
tt
: Activate predictive text mode to predi: Activate predictive text mode t
d suggestions. You can also customise thed suggestions. You can also customise t
eplacementcement
: Set the device to correct mt the device to correct m
pping the space bar or punctuation markpace bar or punctuation mark
Auto capitalisationAuto capitalisation
: Set the device to a: Set th
final punctuation mark, such as a fulfinal punctuation mark, such a
rr
Auto spac
i
n
g
: Set the device to : Set the device to
rr
Auto-punctuate
: Set the de: Set
rr
No
ne
No
: Set the device toevice
Continuous inputContinuous input
:

Settings
95
r
Cursor control
: Enable the smart keyboard navigation feature to move the cursor by
scrolling the keyboard.
r
Sound
: Set the device to sound when a key is touched.
r
Character preview
: Set the device to display a large image of each character tapped.
r
Help
: Access help information for using the Samsung keyboard.
r
Reset settings
: Reset Samsung keyboard settings.
Google voice typing
To change the voice input settings, tap .
r
Choose input languages
: Select input languages for text input.
r
Block offensive words
: Set the device to prevent the device from recognising offensive
words in voice inputs.
r
Offline speech recognition
: Download and install language data for offline voice input.
Voice recogniser
Select a voice recognition engine.
This feature appears once you use a voice recognition application.
Voice search
For Samsung voice recognition, use the following options:
r
Language
: Select a language for the voice recognition.
r
Hide offensive words
: Hide offensive words from voice search results.
r
About
: View version information.
r
Open via the home key
: Set the device to launch
S Voice
when you press the Home
button twice.
r
Voice wake-up
: Set the device to start voice recognition by saying a wake up command
while using
S Voice
.
DRAFT
ter tater ta
for text input.for text
vent the device from recognising offensivent the device from rec
d and install language data for offline vonguage d
ne.
ears once you use a voice recognition appears once you use a voice recognition app
ng voice recognition, use the following ooice recognition, use the following o
anguageg
: Select a language for the voicect a langu
Hide o
ff
ensive word
sHide offensive words
: Hide offensive : Hide
rr
A
boutA
: View version information.w version informatio
r
O
pen via t
h
e
h
ome
k
ey
ome
: Set ttt
b
utton twice
.b
Voice wake-u
pVoice wake-up
: Set th: Set t
while using while us
S VoiceS Voice

Settings
96
r
Show body of message
: Set the device to display the text of a new message.
r
Check missed events
: Set the device to check missed messages or events when
S Voice
is launched by pressing the headset button.
r
Home address
: Enter your home address to use location information with the voice
command feature.
r
Log in to Facebook
: Enter your Facebook account information to use Facebook with
S
Voice
.
r
Log in to Twitter
: Enter your Twitter account information to use Twitter with
S Voice
.
For Google voice recognition, use the following options:
r
Language
: Select a language for the voice recognition.
r
Speech output
: Set the device to provide voice feedback to alert you to the current
action.
r
Block offensive words
: Hide offensive words from voice search results.
r
Hotword detection
: Set the device to begin voice recognition when you say the wake up
command while using the search application.
r
Offline speech recognition
: Download and install language data for offline voice input.
r
Bluetooth headset
: Set the device to allow a voice search with a Bluetooth headset,
when one is connected to the device.
Text-to-speech options
r
PREFERRED TTS ENGINE
: Select a speech synthesis engine. To change the settings for
speech synthesis engines, tap .
r
Speech rate
: Select a speed for the text-to-speech feature.
r
Listen to an example
: Listen to the spoken text for an example.
r
Default language status
: View the status of the default language for the text-to-speech
feature.
Pointer speed
Adjust the pointer speed for the mouse or trackpad connected to your device.
DRAFT
h the vh the v
use Facebook with use Face
S
o use Twitter with o use Twitter with
S Vo
i
ce
S Vo
.
gnition.gnition.
oice feedback to alert you to the currente feedback to alert yo
e words from voice search results.ce searc
ice to begin voice recognition when youe to begin voice recognition wh
arch application.pplication.
on
: Download and install language dataad and install language dat
Set the device to allow a voice search witet the device to allow a voice search wit
ected to the device.ected to the d
ech optionsech op
RRED TTS ENGINED TTS ENGINE
: Select a speech synt: Select a speech synt
eech synthesis engines, tapsis engines,
.
Speech rateSpeech rate
: Select a speed for the tex: Select a spee
r
r
Listen to an examp
l
e
Listen to an exam
: Listen to theListen to
r
Default lan
g
ua
g
e status
age st
: ViewView
feature
.
ointer speedointer s
he pointer sphe pointer sp

Settings
97
Hands-free mode
Set the device to read contents aloud and specify applications to use in hands-free mode.
Palm motion
Activate the palm motion feature to control the device by touching the screen.
r
Capture screen
: Set the device to capture an image of the screen when you sweep your
hand to the left or right across the screen.
r
Mute/Pause
: Set the device to pause media playback when you touch the screen with
your palm.
Smart screen
r
Smart stay
: Set the device to prevent the display backlight from turning off while you are
looking at the display.
General
Accounts
Add email or SNS accounts.
Cloud
Change settings for syncing data or files with your Samsung account or Dropbox cloud
storage.
Backup and reset
Change the settings for managing settings and data.
r
Back up my data
: Set the device to back up settings and application data to the Google
server.
r
Backup account
: Set up or edit your Google backup account.
r
Automatic restore
: Set the device to restore settings and application data when the
applications are reinstalled on the device.
r
Factory data reset
: Reset settings to the factory default values and delete all data.
DRAFT
screen.screen
een when you sweep youreen when you sw
when you touch the screen withwhen you touch the screen wit
he display backlight from turning off whcklight fro
NS accounts.NS acco
d
hange settings for syncing data or files whange settings for syncing dat
storage.storag
Bac
k
up an
d
reset
Backup and reset
hange the settings for mhange the settings for m
ack up my dataack up my data

Settings
98
Date and time
Access and alter the following settings to control how the device displays the time and date.
If the battery remains fully discharged or removed from the device, the time and date
is reset.
r
Set date
: Set the current date manually.
r
Set time
: Set the current time manually.
r
Select time zone
: Set the home time zone.
r
Use 24-hour format
: Display time in 24-hour format.
r
Select date format
: Select a date format.
Accessories
Change the accessory settings.
r
Dock sound
: Set the device to play a sound when your device is connected to or
removed from a desktop dock.
r
Audio output mode
: Set the device to use the dock speaker when your device is
connected to a desktop dock.
Application manager
View and manage the applications on your device.
Default applications
r
Home
: Select a default Home screen mode.
Battery
View the amount of battery power consumed by your device.
r
Display battery percentage
: Set the device to display the remaining battery life.
DRAFT
timtim
ay a sound when your device is connectey a sound when your device is c
k.
the device to use the dock speaker whento use the dock speaker wh
op dock.p
managermana
nage the applications on your device.age the applications on your device.
fault applicationsault applications
rr
Home
Home
: Select a default Home screen: Select a default Hom
Batter
yBa
View the amount of battery View the amount of batte
Display battery peDisplay battery pe
Settings
99
Power saving mode
Activate power-saving mode and change the settings for power-saving mode.
r
CPU performance
: Set the device to limit some system resource usage.
r
Screen output
: Set the device to decrease the brightness of the display.
r
Learn about Power saving
: Discover how to reduce battery consumption.
Storage
View memory information for your device and memory card, or format a memory card.
Formatting a memory card permanently deletes all data from it.
The actual available capacity of the internal memory is less than the specified
capacity because the operating system and default applications occupy part of the
memory. The available capacity may change when you upgrade the device.
Security
Change settings for securing the device.
r
Encrypt device
: Set a password to encrypt data saved on the device. You must enter the
password each time you turn on the device.
Charge the battery before enabling this setting because it may take more than an
hour to encrypt your data.
r
Encrypt external SD card
: Set the device to encrypt files on a memory card.
If you reset your device to the factory defaults with this setting enabled, the device
will not be able to read your encrypted files. Disable this setting before resetting the
device.
r
Remote controls
: Set the device to allow control of your lost or stolen device remotely
via the Internet. To use this feature, you must sign in to your Samsung account.
–
ACCOUNT REGISTRATION
: Add or view your Samsung account.
–
Use wireless networks
: Set the device to allow location data collection or to
determine the location of your lost or stolen device via Wi-Fi.
DRAFT
yy
mption.mption
rd, or format a memory card.rd, or format a memory card.
etes all data from it.etes all data from it.
ternal memory is less than the specified emory is less th
stem and default applications occupy pault applic
y may change when you upgrade the devy may change when you upgr
ring the device.ing the d
Set a password to encrypt data saved onSet a password to encrypt dat
ch time you turn on the device.ch time you turn on the device.
ge the battery before enabling this settine the battery before enabling this settin
our to encrypt your data.encrypt your data.
Encrypt external SD cardEncrypt external SD card
: Set the device
D
D
D
D
If you reset your device to the fau reset your device to
will not be able to read your ee able to read your
device.
rr
Remote control
sRemote controls
: Set th: Se
via the Internet. To uvia the Internet. To u
ACCOUNT RACCOUNT R
wire
wire

Settings
100
r
Go to website
: Access the Find my mobile website (
findmymobile.samsung.com
). You
can track and control your lost or stolen device on the Find my mobile website.
r
Make passwords visible
: Set the device to display passwords as they are entered.
r
Device administrators
: View device administrators installed on the device. You can allow
device administrators to apply new policies to the device.
r
Unknown sources
: Choose to install applications from any source. If not chosen,
download applications only from
Play Store
.
r
Verify apps
: Set the device to allow Google to check applications for harmful behaviour
before installing them.
r
Storage type
: Set a storage type for credential files.
r
Trusted credentials
: Use certificates and credentials to ensure secure use of various
applications.
r
Install from device storage
: Install encrypted certificates stored on the USB storage.
r
Clear credentials
: Erase the credential contents from the device and reset the password.
About device
Access device information, edit the device name, or update device software.
Google Settings
Use this application to configure settings for some features provided by Google.
Tap
Google Settings
on the Applications screen.
DRAFT
. You. You
. If not chosen,. If not c
cations for harmful behaviourcations for harmful beh
ntials to ensure secure use of variousntials to ensure secure
rypted certificates stored on the USB storficates store
tial contents from the device and reset thtial contents from the device
edit the device name, or update device sname, or update device s
SettingsSetti
pplication to configure settings for some ation to configure settings for some
oogle Settingsgs
on the Applications scree on the A

101
Troubleshooting
Before contacting a Samsung Service Centre, please attempt the following solutions. Some
situations may not apply to your device.
When you turn on your device or while you are using the device, it
prompts you to enter one of the following codes:
r
Password: When the device lock feature is enabled, you must enter the password you set
for the device.
r
PIN: When using the device for the first time or when the PIN requirement is enabled, you
must enter the PIN supplied with the SIM or USIM card. You can disable this feature by
using the Lock SIM card menu.
r
PUK: Your SIM or USIM card is blocked, usually as a result of entering your PIN incorrectly
several times. You must enter the PUK supplied by your service provider.
r
PIN2: When you access a menu requiring the PIN2, you must enter the PIN2 supplied with
the SIM or USIM card. For details, contact your service provider.
Your device displays network or service error messages
r
When you are in areas with weak signals or poor reception, you may lose reception. Move
to another area and try again. While moving, error messages may appear repeatedly.
r
You cannot access some options without a subscription. Contact your service provider for
more details.
Your device does not turn on
r
When the battery is completely discharged, your device will not turn on. Charge the
battery completely before turning on the device.
r
The battery may not be inserted properly. Insert the battery again.
r
Wipe both gold-coloured contacts and insert the battery again.
DRAFT
tiotio
ng the device, it ng the dev
s:
u must enter the password you setu must enter the password you
when the PIN requirement is enabled, yowhen the PIN requirement is enabled, yo
r USIM card. You can disable this feature bIM card. You can disa
ed, usually as a result of entering your PINed, usually as a result of ent
e PUK supplied by your service provider.PUK supplied by your service pro
nu requiring the PIN2, you must enter theuiring the PIN2, you must enter th
details, contact your service provider.tact your service provider.
plays network or service error mplays network or servic
re in areas with weak signals or poor recere in areas with weak signals or poor
er area and try again. While moving, error area and try again. While moving, erro
cannot access some options without a suaccess some options without a su
ore details.e de
Your device does not turn onYour device does not turn o
r
r
When the battery is completry is c
battery completely beforbattery completely b
The battery may not The battery may not
pe both gold-cpe both gold-c

Troubleshooting
102
The touch screen responds slowly or improperly
r
If you attach a protective cover or optional accessories to the touch screen, the touch
screen may not function properly.
r
If you are wearing gloves, if your hands are not clean while touching the touch screen,
or if you tap the screen with sharp objects or your fingertips, the touch screen may
malfunction.
r
The touch screen may malfunction in humid conditions or when exposed to water.
r
Restart your device to clear any temporary software bugs.
r
Ensure that your device software is upgraded to the latest version.
r
If the touch screen is scratched or damaged, visit a Samsung Service Centre.
Your device freezes or has fatal errors
If your device freezes or hangs, you may need to close applications or reinsert the battery and
turn on the device to regain functionality. If your device is frozen and unresponsive, press and
hold the Power button for 8 seconds to reboot.
If this does not solve the problem, perform a factory data reset. On the Applications screen,
tap
Settings
ĺ
General
ĺ
Backup and reset
ĺ
Factory data reset
ĺ
Reset device
ĺ
Erase everything
. Before performing the factory data reset, remember to make backup
copies of all important data stored on the device.
If the problem is still not resolved, contact a Samsung Service Centre.
Calls are not connected
r
Ensure that you have accessed the right cellular network.
r
Ensure that you have not set call barring for the phone number you are dialling.
r
Ensure that you have not set call barring for the incoming phone number.
Others cannot hear you speaking on a call
r
Ensure that you are not covering the built-in microphone.
r
Ensure that the microphone is close to your mouth.
r
If using a headset, ensure that it is properly connected.
DRAFT
touch sctouch
ch screen maych scree
hen exposed to water.hen exposed to w
atest version.atest ve
a Samsung Service Centre.a Samsung Service
rors
need to close applications or reinsert theneed to close applications
ality. If your device is frozen and unrespolity. If your device is frozen and u
ds to reboot.reboot.
blem, perform a factory data reset. On them a factory data reset. On t
ĺ
Backup and resetBackup and reset
ĺ
ĺ
Factory data resFactory data res
ore performing the factory data reset, remore performing the factory da
ant data stored on the device.ant data stored on the device.
s still not resolved, contact a Samsung Ses still not resolved, contact a Samsung
are not connectedonnected
Ensure that you have accessed the rigEnsure that you have access
rr
Ensure that you have not set call bEnsure that you have not set ca
r
Ensure that you have not set c have not set c
Others cannot hear Others cannot hea
sure that you asure that you a
that t
that t

Troubleshooting
103
Sound echoes during a call
Adjust the volume by pressing the Volume button or move to another area.
A cellular network or the Internet is often disconnected or audio
quality is poor
r
Ensure that you are not blocking the device’s internal antenna.
r
When you are in areas with weak signals or poor reception, you may lose reception. You
may have connectivity problems due to issues with the service provider’s base station.
Move to another area and try again.
r
When using the device while moving, wireless network services may be disabled due to
issues with the service provider’s network.
The battery icon is empty
Your battery is low. Recharge or replace the battery.
The battery does not charge properly (For Samsung-approved
chargers)
r
Ensure that the charger is connected properly.
r
If the battery terminals are dirty, the battery may not charge properly or the device may
turn off. Wipe both gold-coloured contacts and try charging the battery again.
r
The batteries in some devices are not user-replaceable. To have the battery replaced, visit
a Samsung Service Centre.
The battery depletes faster than when first purchased
r
When you expose the battery to very cold or very hot temperatures, the useful charge
may be reduced.
r
Battery consumption increases when you use messaging features or some applications,
such as games or the Internet.
r
The battery is consumable and the useful charge will get shorter over time.
r audior aud
, you may lose reception. You, you may lose receptio
service provider’s base station.service provider’s base statio
etwork services may be disabled due toetwork services may be disabled due to
ace the battery.e the battery.
t charge properly (For Samsungoperly (For Samsung
e charger is connected properly.e charger is connected properly.
ery terminals are dirty, the battery may nery terminals are dirty, the battery may
f. Wipe both gold-coloured contacts andipe both gold-coloured contacts and
e batteries in some devices are not user-rn some devices are not user-r
a Samsung Service Centre.a Samsung Service Centre
The battery depletes faster The battery depletes faster
r
r
When you expose the batteWhen you expose the
m
ay be reduced.
may be reduced.
Battery consumptioBattery consumptio
h as games oh as games o
tery
tery

Troubleshooting
104
Your device is hot to the touch
When you use applications that require more power or use applications on your device for an
extended period of time, your device may feel hot to the touch. This is normal and should not
affect your device’s lifespan or performance.
Error messages appear when launching the camera
Your device must have sufficient available memory and battery power to operate the camera
application. If you receive error messages when launching the camera, try the following:
r
Charge the battery or replace it with a battery that is fully charged.
r
Free some memory by transferring files to a computer or deleting files from your device.
r
Restart the device. If you are still having trouble with the camera application after trying
these tips, contact a Samsung Service Centre.
Photo quality is poorer than the preview
r
The quality of your photos may vary, depending on the surroundings and the
photography techniques you use.
r
If you take photos in dark areas, at night, or indoors, image noise may occur or images
may be out of focus.
Error messages appear when opening multimedia files
If you receive error messages or files do not play, when opening multimedia files on your
device, try the following:
r
Free some memory by transferring files to a computer or deleting files from your device.
r
Ensure that the music file is not Digital Rights Management (DRM)-protected. If the file is
DRM-protected, ensure that you have the appropriate licence or key to play the file.
r
Ensure that your device supports the file type.
DRAFT
power to operate the cameraower to operate the
e camera, try the following:e camera, try the following
fully charged.fully ch
mputer or deleting files from your device.mputer or deleting files from your device.
uble with the camera application after trye with the camera ap
ntre.
n the previewthe previe
may vary, depending on the surroundingy, depending on the surrounding
s you use.
n dark areas, at night, or indoors, image n dark areas, at night, or indoo
cus.cus.
ssages appear when opening mages appear when opening m
ceive error messages or files do not play,r messages or files do not play,
ce, try the following:e, try the following:
rr
Free some memory by transferring fiFree some memory by transfe
r
r
Ensure that the music file is not Dhe music file is not
DRM-protected, ensure that yensu
r
r
Ensure that your device sEnsure that your dev

Troubleshooting
105
r
Your device supports photos and videos captured with the device. Photos and videos
captured by other devices may not work properly.
r
Your device supports multimedia files that are authorised by your network service
provider or providers of additional services. Some content circulated on the Internet,
such as ringtones, videos, or wallpapers, may not work properly.
Another Bluetooth device is not located
r
Ensure that the Bluetooth wireless feature is activated on your device.
r
Ensure that the Bluetooth wireless feature is activated on the device you wish to connect
to.
r
Ensure that your device and the other Bluetooth device are within the maximum
Bluetooth range (10 m).
If the tips above do not solve the problem, contact a Samsung Service Centre.
A connection is not established when you connect the device to a
computer
r
Ensure that the USB cable you are using is compatible with your device.
r
Ensure that you have the proper driver installed and updated on your computer.
r
If you are a Windows XP user, ensure that you have Windows XP Service Pack 3 or higher
installed on your computer.
r
Ensure that you have Samsung Kies or Windows Media Player 10 or higher installed on
your computer.
Your device cannot find your current location
GPS signals may be obstructed in some locations, such as indoors. Set the device to use Wi-Fi
or a mobile network to find your current location in these situations.
DRAFT
e Ine In
your device.your de
on the device you wish to connecton the device you wish to conne
th device are within the maximumth device are within th
contact a Samsung Service Centre.msung Serv
ished when you connect the deed when you connect the
able you are using is compatible with youble you are using is compatible with you
ave the proper driver installed and updatave the proper driver installed
indows XP user, ensure that you have Winindows XP user, ensure that you h
n your computer.n your computer.
e that you have Samsung Kies or Windowyou have Samsung Kies or Window
ur computer.
Your device cannot find your cYour device cannot find yo
GPS signals may be obstructed in sGPS signals may be obstructed in s
or a mobile network to find youor a mobile network to fin

Troubleshooting
106
Data stored on the device has been lost
Always make backup copies of all important data stored on the device. Otherwise, you
cannot restore data if it is corrupted or lost. Samsung is not responsible for the loss of data
stored on the device.
A small gap appears around the outside of the device case
r
This gap is a necessary manufacturing feature and some minor rocking or vibration of
parts may occur.
r
Over time, friction between parts may cause this gap to expand slightly.
DRAFT
ce casece case
nor rocking or vibration ofor rocking or vibrat
p to expand slightly.p to exp

Some content may differ from your device depending on the region, service provider, or
software version, and is subject to change without prior notice.
www.samsung.com English (EU). 03/2014. Rev.1.0
DRAFT
SAR information on this and other model can
be viewed on-line at http://www.fcc.gov/oet/ea/fccid/.
This siteuses theFCCID number
A3LSMT820.
Exposure to Radio Frequency (RF) Signals
Your wireless device is a radio transmitter and receiver.
It is designed and manufactured not to exceed the
exposure limits for radio frequency (RF) energy set by
the Federal Communications Commission (FCC) of the
U.S. government. These FCC exposure limits are derived
from the recommendations of two expert organizations,
the National Counsel on Radiation Protection and
Measurement (NCRP) and the Institute of Electrical
and Electronics Engineers (IEEE). In both cases, the
engineering experts drawn from industry, government,
The exposure limit set by the FCC for wireless mobile
devices employs a unit of measurement known as the
the rate of absorption of RF energy by the human body
expressed in units of watts per kilogram (W/kg). The FCC
requires wireless devices to comply with a safety limit
of 1.6 watts per kilogram (1.6 W/kg). The FCC exposure
limit incorporates a substantial margin of safety to give
additional protection to the public and to account for
any variations in measurements.
SAR tests are conducted using recommended operating
positions accepted by the FCC with the
tested frequency bands. Although the SAR is determined
of the whi e operating can be we l below the
maximum value. This is because the is designed
to operate at multiple power levels so as to use only the
power required to reach the network. In general, the
closer you are to a wireless base station antenna, the
lower the power output.
Before a new model device is available for sale to the
it does not exceed the exposure limit established by
the FCC. Tests for each model are per ormed in
positions and locations (e.g. near the body) as required
by the FCC.
Health and safety information
For typical operations, this model has been
tested and meets the FCC exposure guidelines.
You can check the FCC ID on the rear case.
Once you have the FCC ID number for a particular ,
follow the instructions on the website and it should
provide values for typical or maximum SAR for
a particular
SAR information can also be obtained at www.fcc.gov/
cgb/sar.
Operating Environment
Remember to follow any special regulations in force in
any area and always switch your
forbidden to use it, or when it may cause interference or
danger. When connecting the or any a cessor to
another device, read its user’s guide for detailed safety
instructions. Do not connect incompatible products.
DRAFT
RAFT
SAR information on this and oSAR information on this and
b
e
be
v
iewe
d
vie
o
n-
l
ine
line
at http://at http://
Th
is
Thi
si
t
e
use
s
th
e
F
CC
ID D
A
AFT
D
bodyody
. The FCC The FCC
y limit y limit
exposureosure
afety to give give
to account forfor
ommended operatingmended operating
FCC with the
RA
RA
Althoughthough
th
e SAR is
d
etermine
dthe SA
RA
e operating can be wee operating can be we
RA
l
b
e
l
ow t
hel b
ThisThis
is
b
ec
au
se t
h
e
is bec
RA
is
d
esigne
d is
multipmultip
l
e power
l
eve
l
s so as to use on
l
y t
h
e
le power levels so as to use
uired to reach the network. In general, theuired to reach the network. In gen
ou are to a wireless base station antenna, the ou are to a wireless base station ant
r the power output.r the powe
efore a new model device is a new mod
a
v
v
a
il
ab
le
fo
r s
a
le t
o
the
ailable for sale to the
DR
i
t
do
es n
o
t excee
d
t
h
e
exceed the
e
x
pos
u
rxposur
e
l
imit esta
bl
is
h
e
d
b
y
e limit established by
the FCC. Tests for each model are per
or each model are
R
ormed in
positions an
d
l
ocations (e.g. near t
h
e
b
o
dy)positions and locations (e.g. n
as re
q
uire
d
bb
y
t
h
e FCC.
y the FCC
For t
y
pica
l
operations, t
h
is mo
d
e
operations, this mo
l
h
as
b
een
tested and meets the FCC exposure guideeets the FCC expo
You can check the F
Once you have th
follow the inst
provide val
a particu
SAR in
cgbc

FCC Notice and Cautions
FCC Notice
This device complies with Part 15 of the FCC Rules. Operation is subject to the
following two conditions:
(1) this device may not cause harmful interference, and
(2) this device must accept any interference received, including interference that
may cause undesired operation.
This equipment has been tested and found to comply with the limits for a Class B
digital device, pursuant to part 15 of the FCC Rules. These limits are designed to
provide reasonable protection against harmful interference in a residential
installation. This equipment generates, uses and can radiate radio frequency
energy and, if not installed and used in accordance with the instructions, may
cause harmful interference to radio communications. However, there is no
guarantee that interference will not occur in a particular installation. If this
equipment does cause harmful interference to radio or television reception, which
can be determined by turning the equipment off and on, the user is encouraged
to try to correct the interference by one or more of the following measures:
- Reorient or relocate the receiving antenna.
-Increase the separation between the equipment and receiver.
- Connect the equipment into an outlet on a circuit from that to which the
receiver is connected.
- Consult the dealer or an experienced radio/TV technician for help.
The GHYLFH may cause TV or radio interference if used in close proximity to
receiving equipment. The FCC can require you to stop using the GHYLFH if such
interference cannot be eliminated. Vehicles using petroleum gas (such as
propane or butane) must comply with the National Fire Protection Standard
(NFPA-58). For a copy of this standard, contact the National Fire Protection
Association, One Battery march Park, Quincy, MA 02269, Attn: Publication Sales
Division.
&DXWLRQV
&KDQJHVRUPRGLILFDWLRQVPDGHLQWKHUDGLRGHYLFHQRWH[SUHVVO\DSSURYHGE\
6DPVXQJZLOOYRLGWKHXVHU¶VDXWKRULW\WRRSHUDWHWKHHTXLSPHQW
7KHXVHRIDQ\XQDXWKRUL]HGDFFHVVRULHVPD\EHGDQJHURXVDQGYRLGWKHGHYLFH
ZDUUDQW\LIVDLGDFFHVVRULHVFDXVHGDPDJHRUDGHIHFWWRWKHGHYLFH$OWKRXJK
\RXUGHYLFHLVTXLWHVWXUG\LWLVDFRPSOH[SLHFHRIHTXLSPHQWDQGFDQEHEURNHQ
$YRLGGURSSLQJKLWWLQJEHQGLQJRUVLWWLQJRQLW
DRAFT
ubject to the ubject to
cluding interference that cluding interference that
mply with the limits for a Class Bmply wi
Rules. These limits are designed toRules. These limits ar
ful interference in a residentialul interference in a resid
ses and can radiate radio frequencynd can radiate radio
accordance with the instructions, mayce with the ins
communications. However, there is nos. Howev
ot occur in a particular installation. If thisot occur in a particular install
interference to radio or television receptiointerference to radio or television
g the equipment off and on, the user is ene equipment off and on, the user is
rence by one or more of the following meay one or more of the following mea
te the receiving antenna. antenna.
aration between the equipment and receivaration between the equipmen
equipment into an outlet on a circuit from tequipment into an outlet on a c
onnected.onnecte
the dealer or an experienced radio/TV tecthe dealer or an experienced radio/
GHYLFHYLFH
may cause TV or radio interferenc may cause TV or radio interferenc
eceiving equipment. The FCC can requireequipment. The FCC can require
interference cannot be eliminated. Vehiinterference cannot be
propane or butane) must comply withpropane or butane) mus
(NFPA-58). For a copy of this stan(NFPA-58). For a copy of
Association, One Battery marchtion, One Battery ma
Di
v
is
io
n.
&
DXWLRQV
&
&KDQJHVRUPR&KDQJHVRUPR
6DPVXQJZ6DPVXQJZ
XVH
XVH