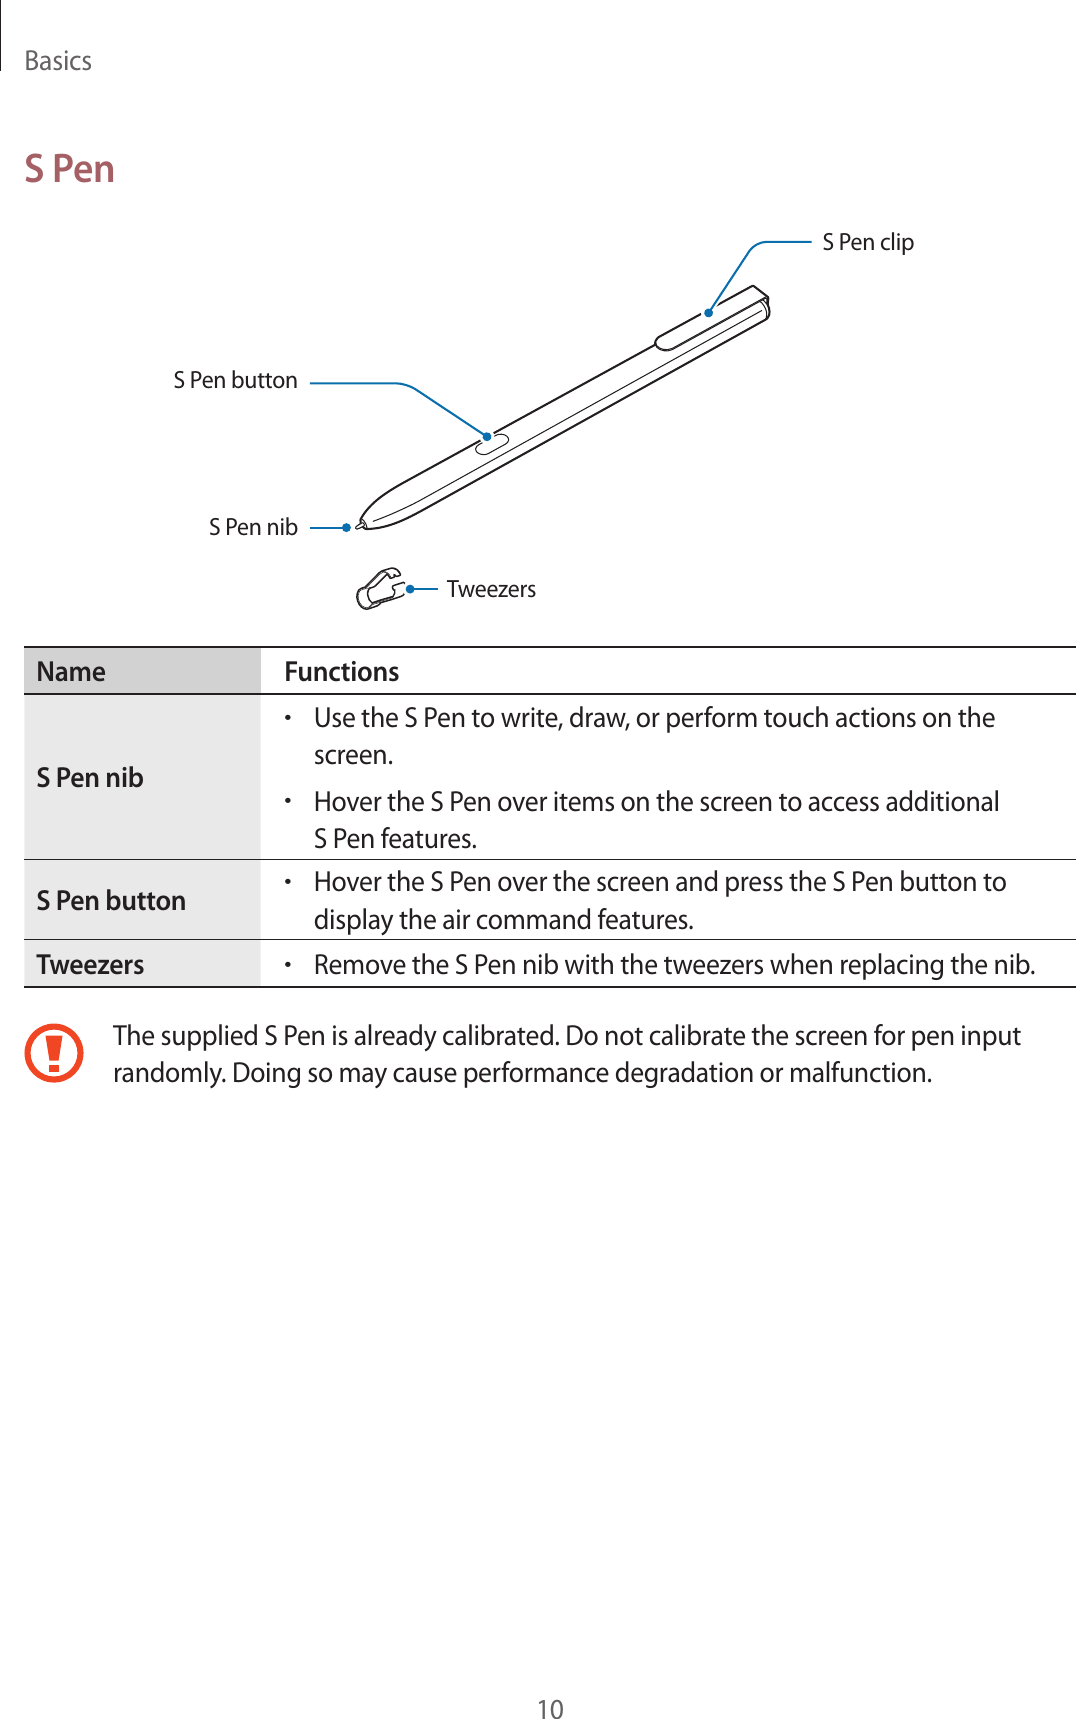
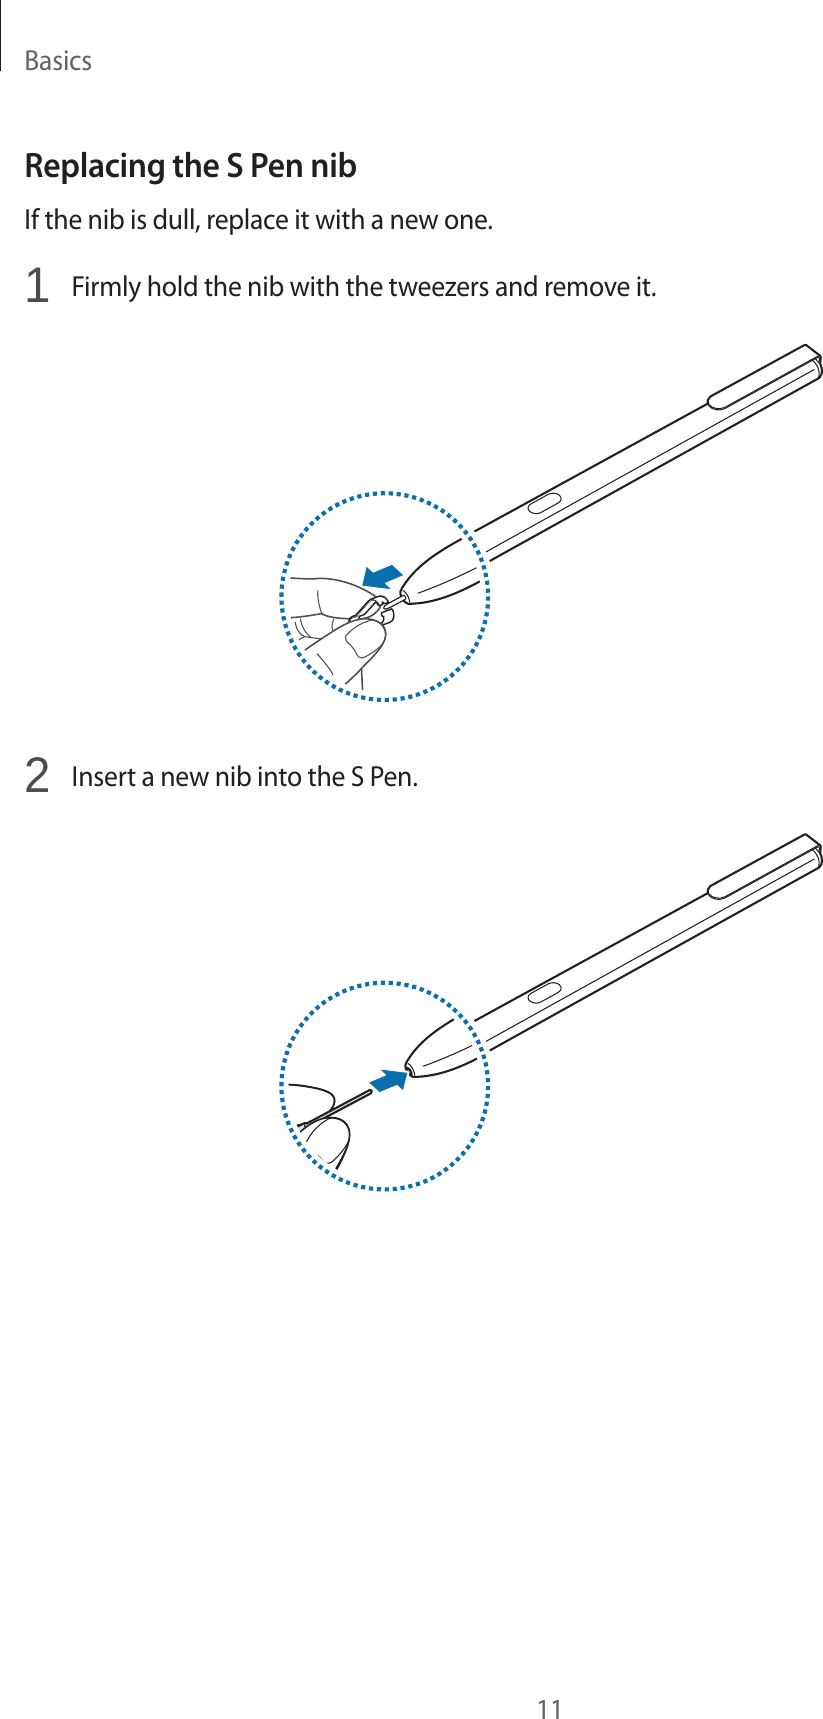
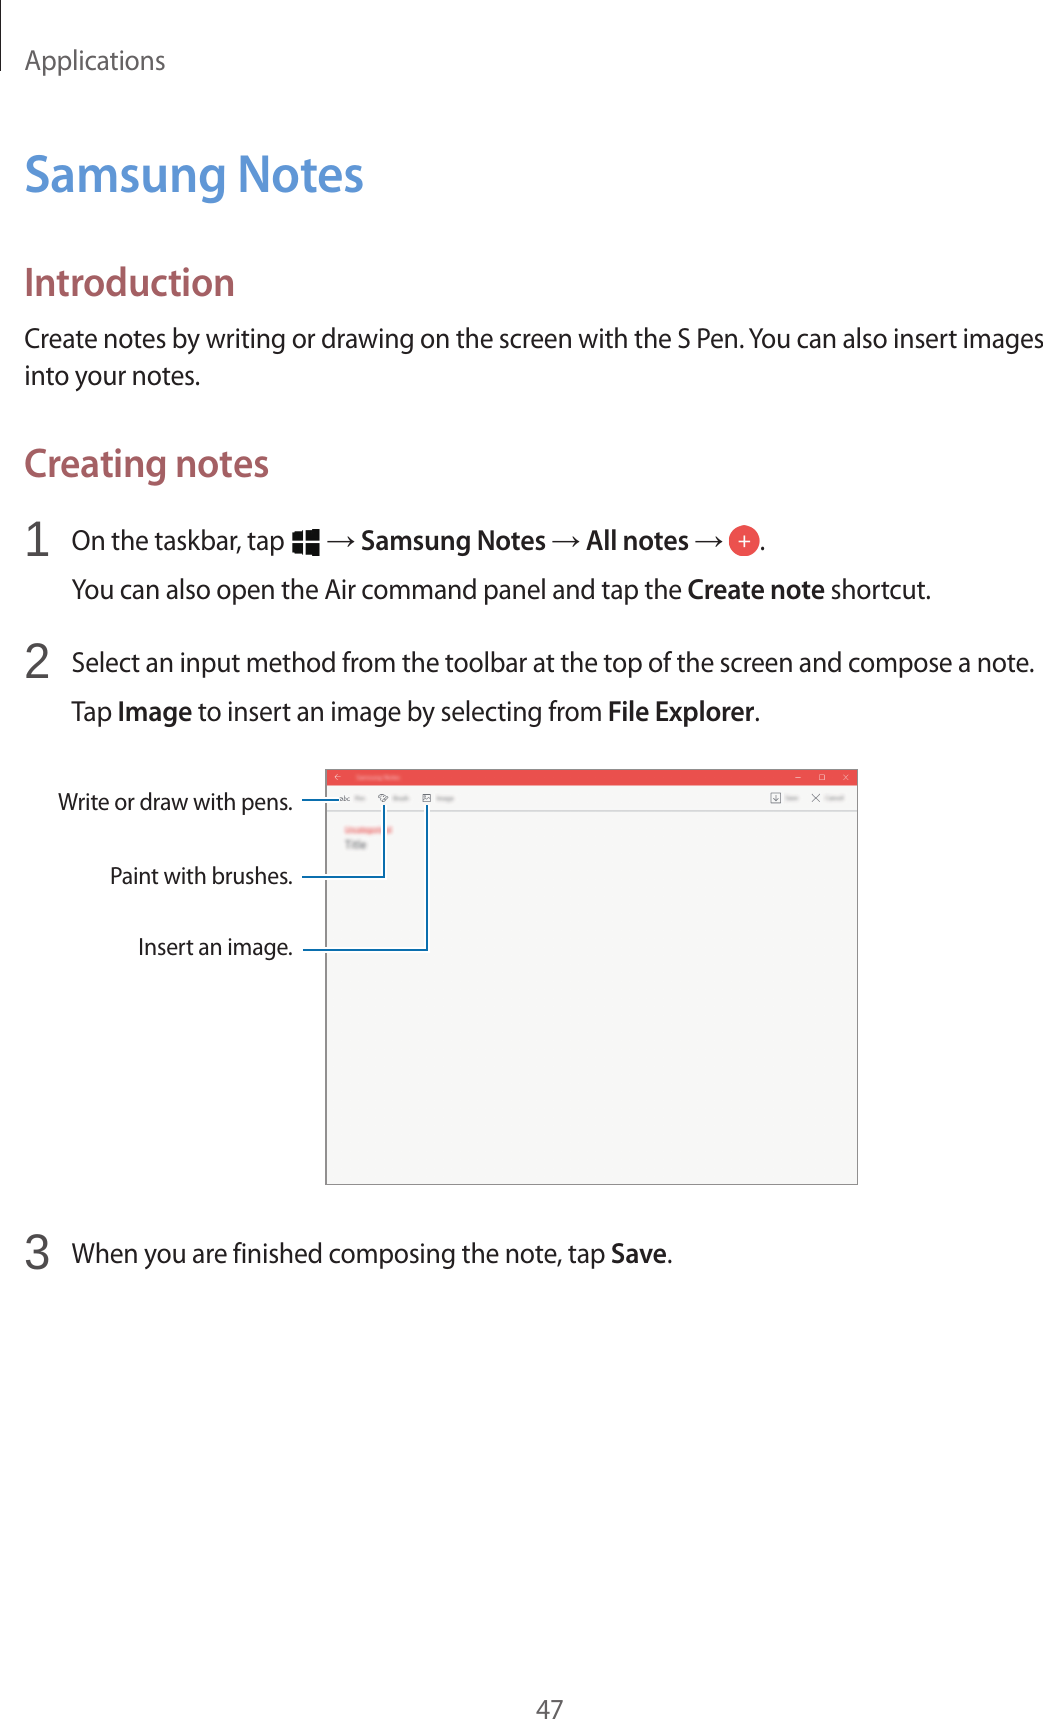
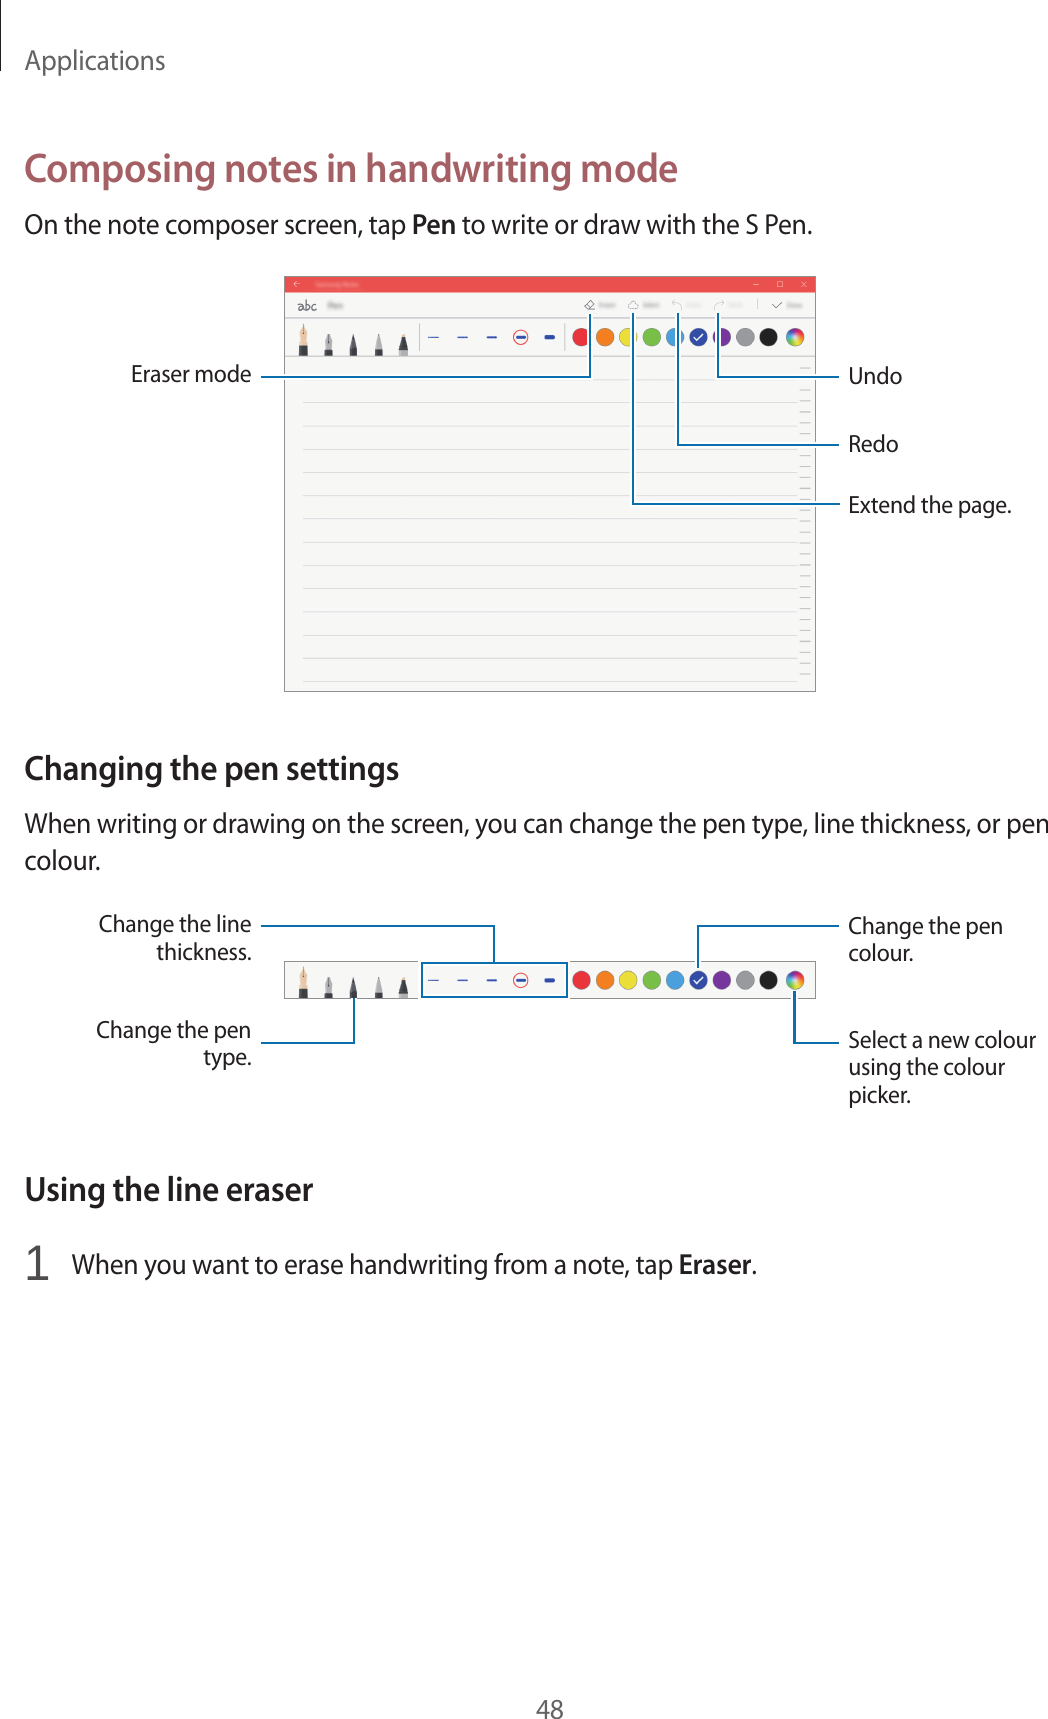
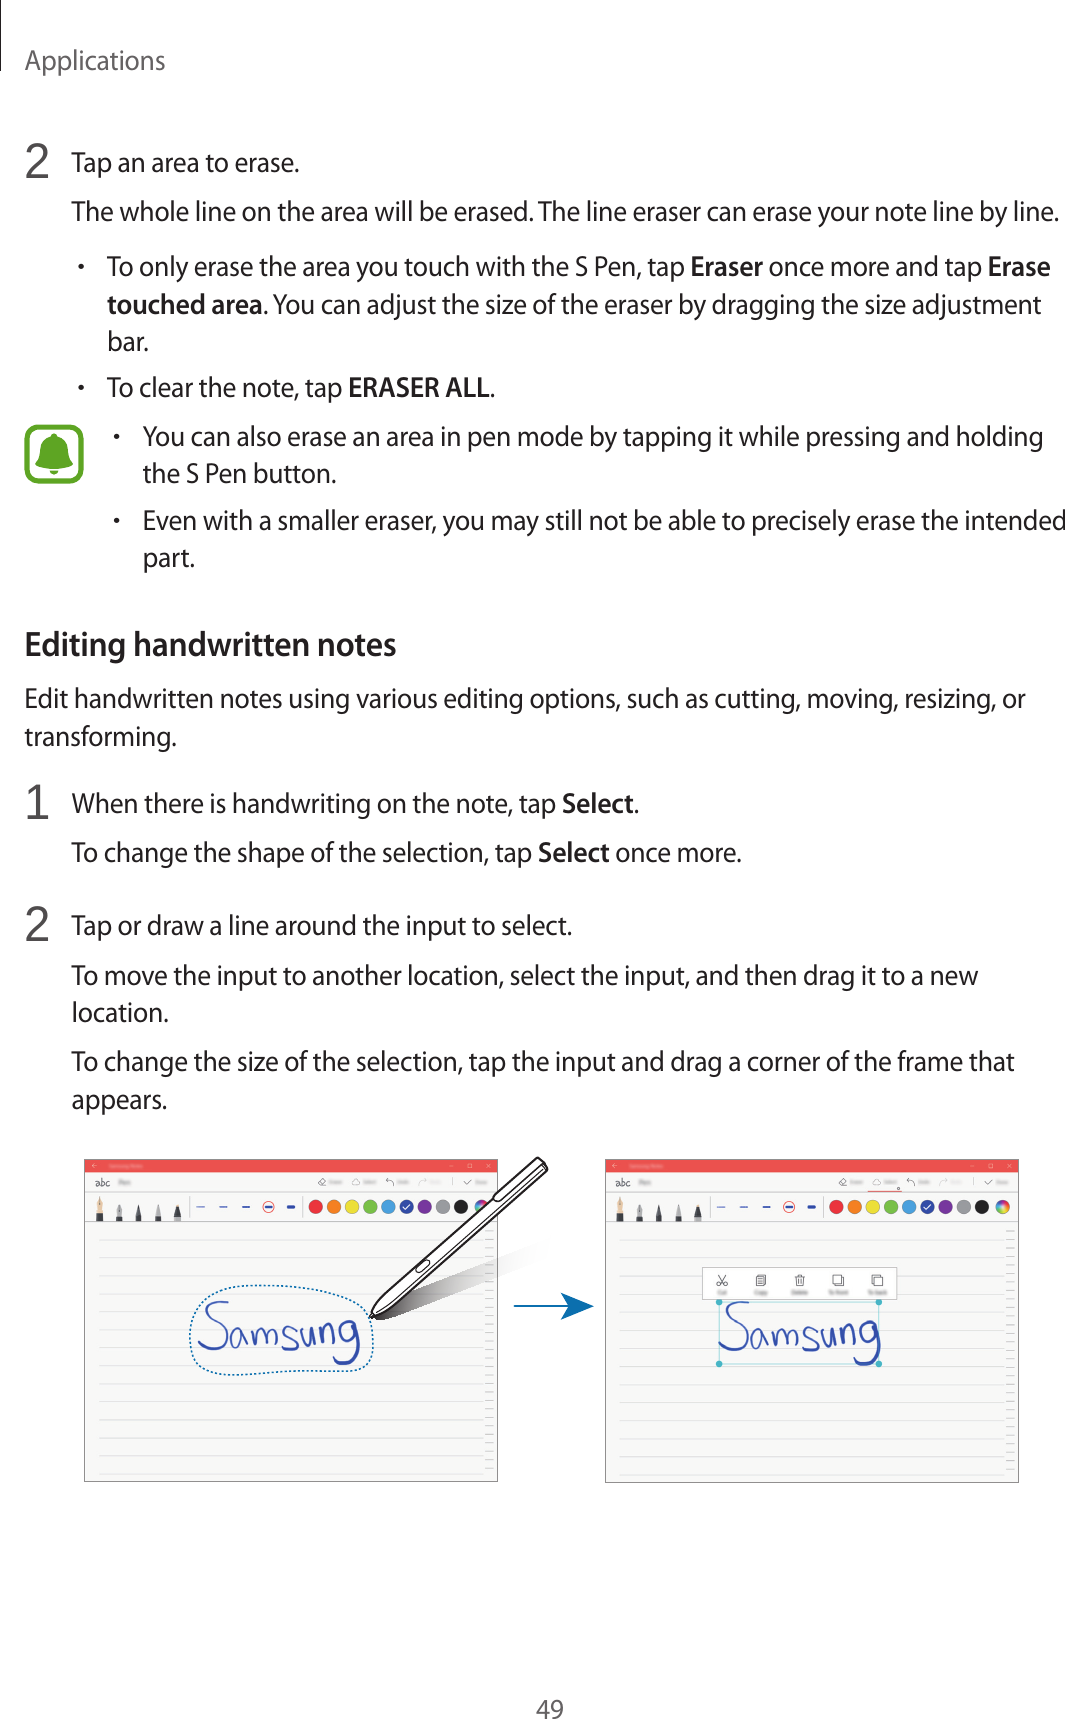
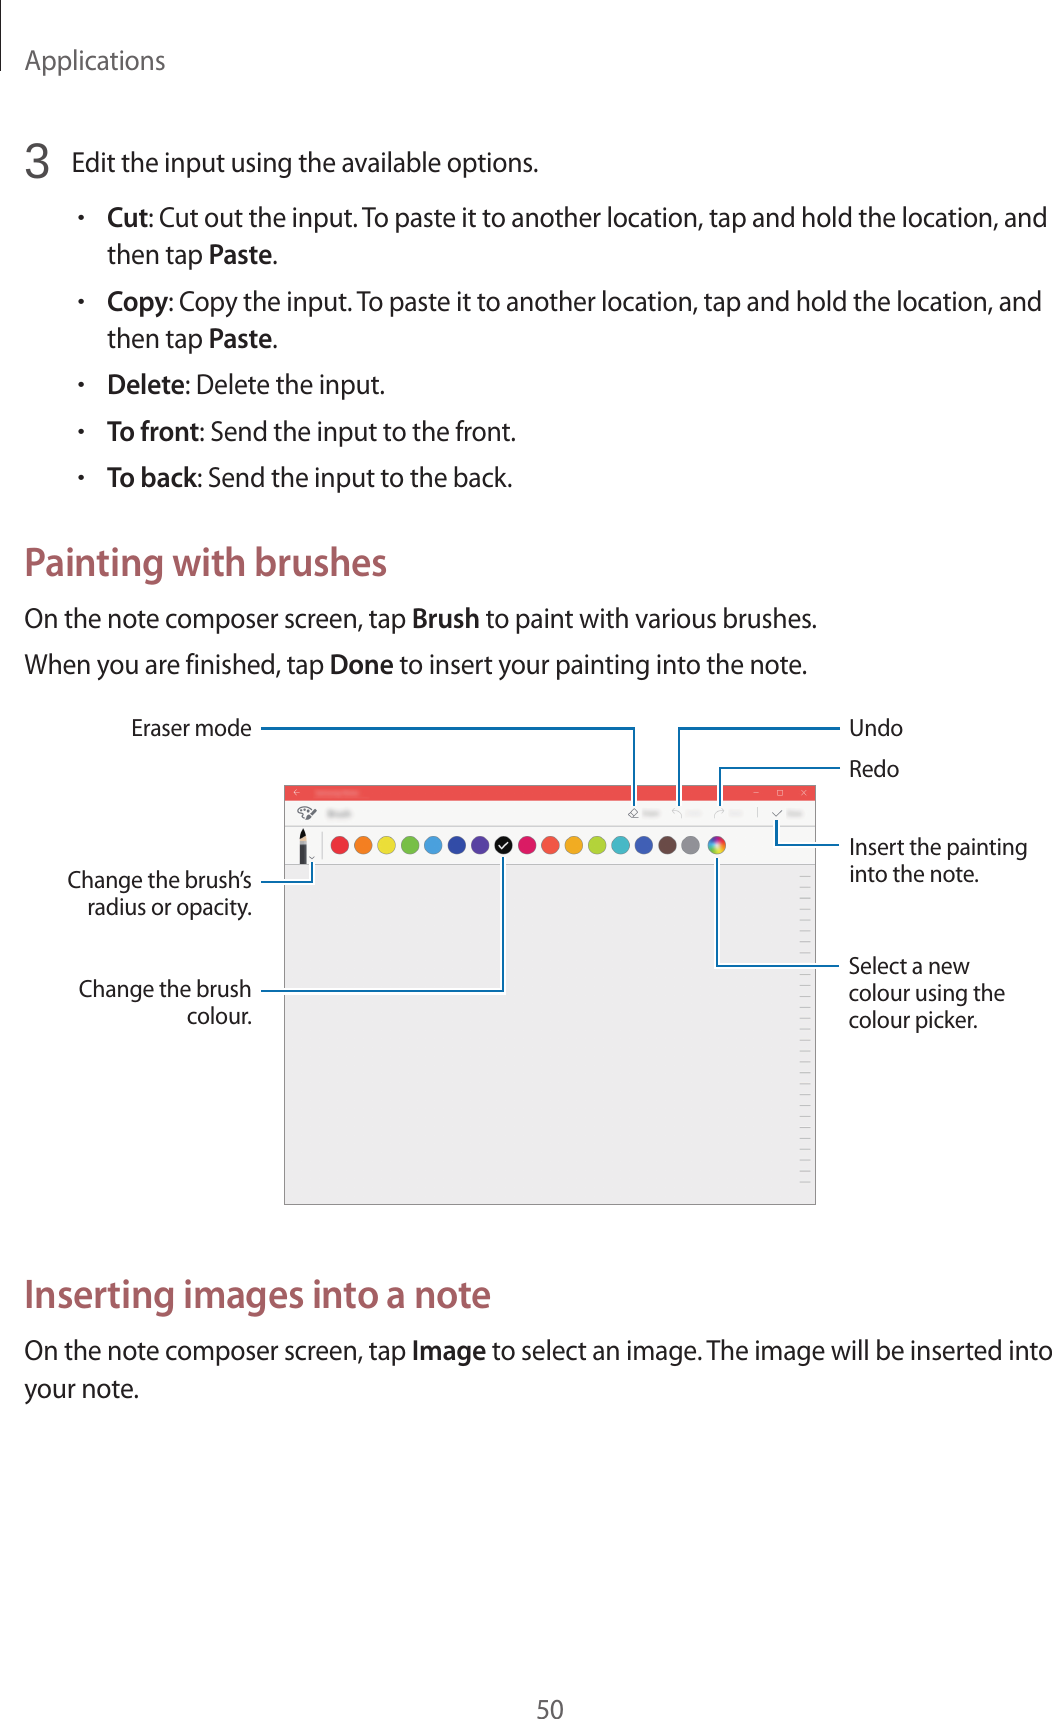
Samsung Electronics Co SMW728 WCDMA/LTE Tablet + Bluetooth/BLE and DTS/UNII a/b/g/n/ac User Manual A3LSMW728 170217

Samsung Electronics Co Ltd WCDMA/LTE Tablet + Bluetooth/BLE and DTS/UNII a/b/g/n/ac A3LSMW728 170217
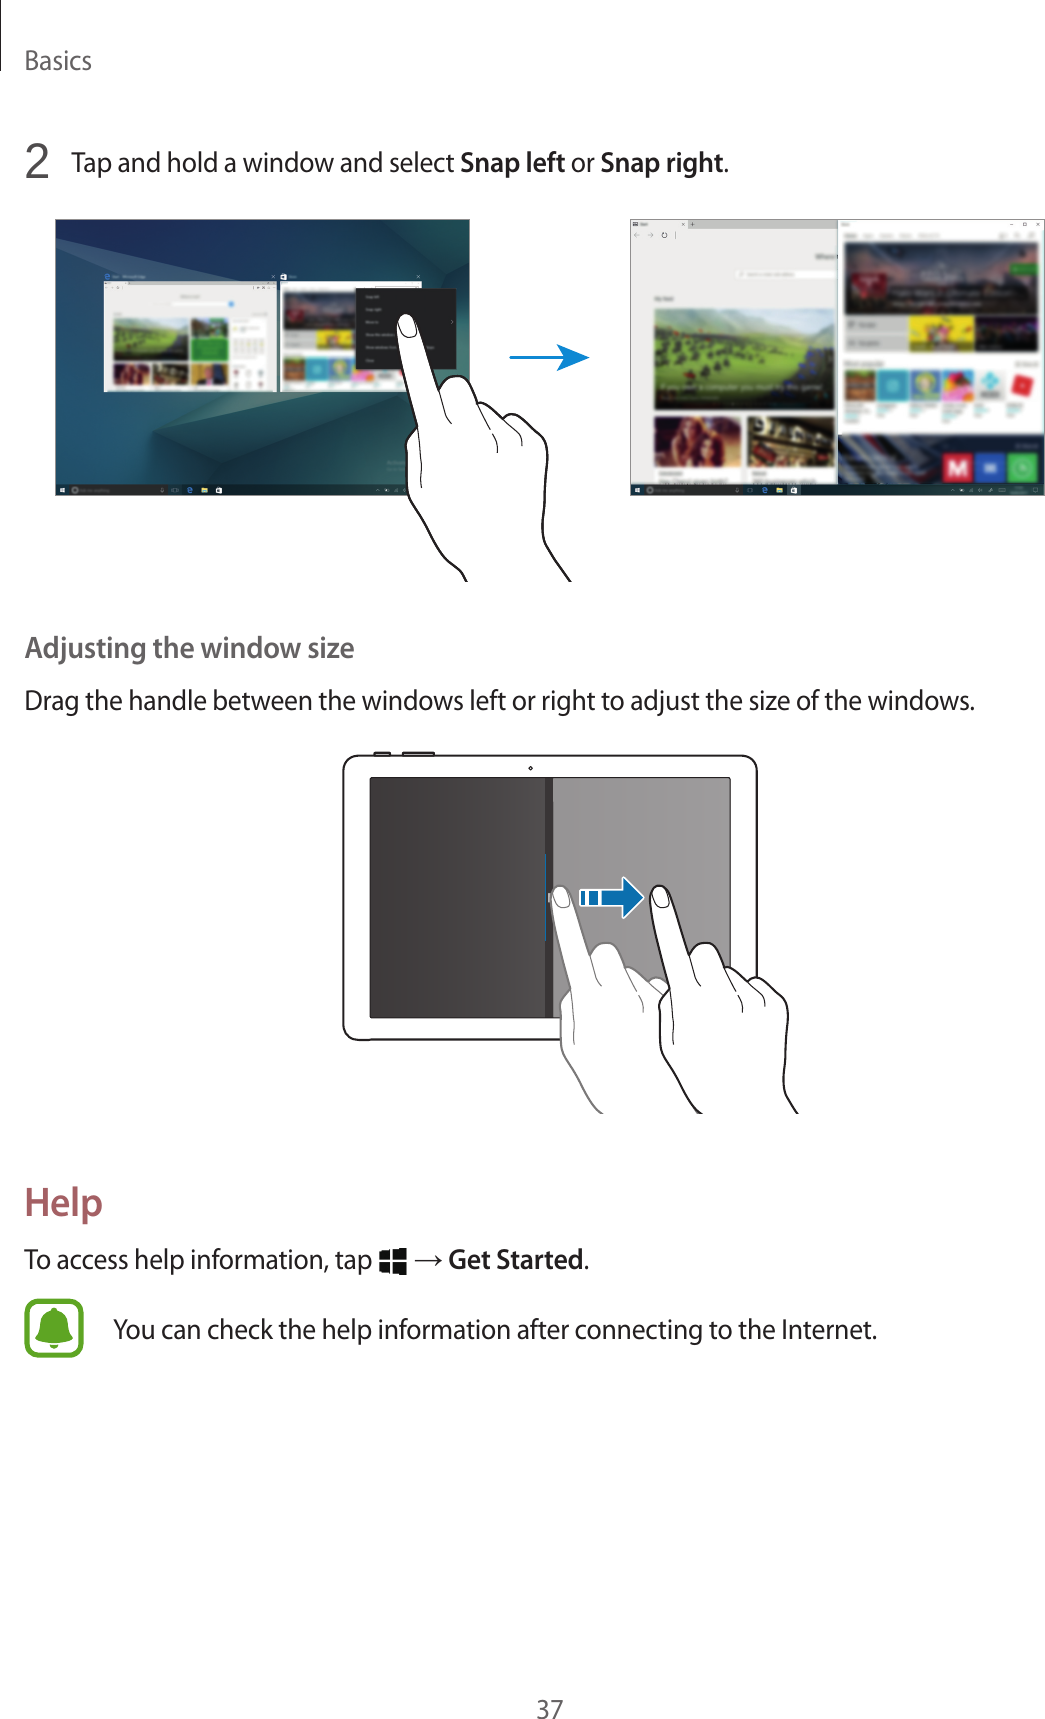
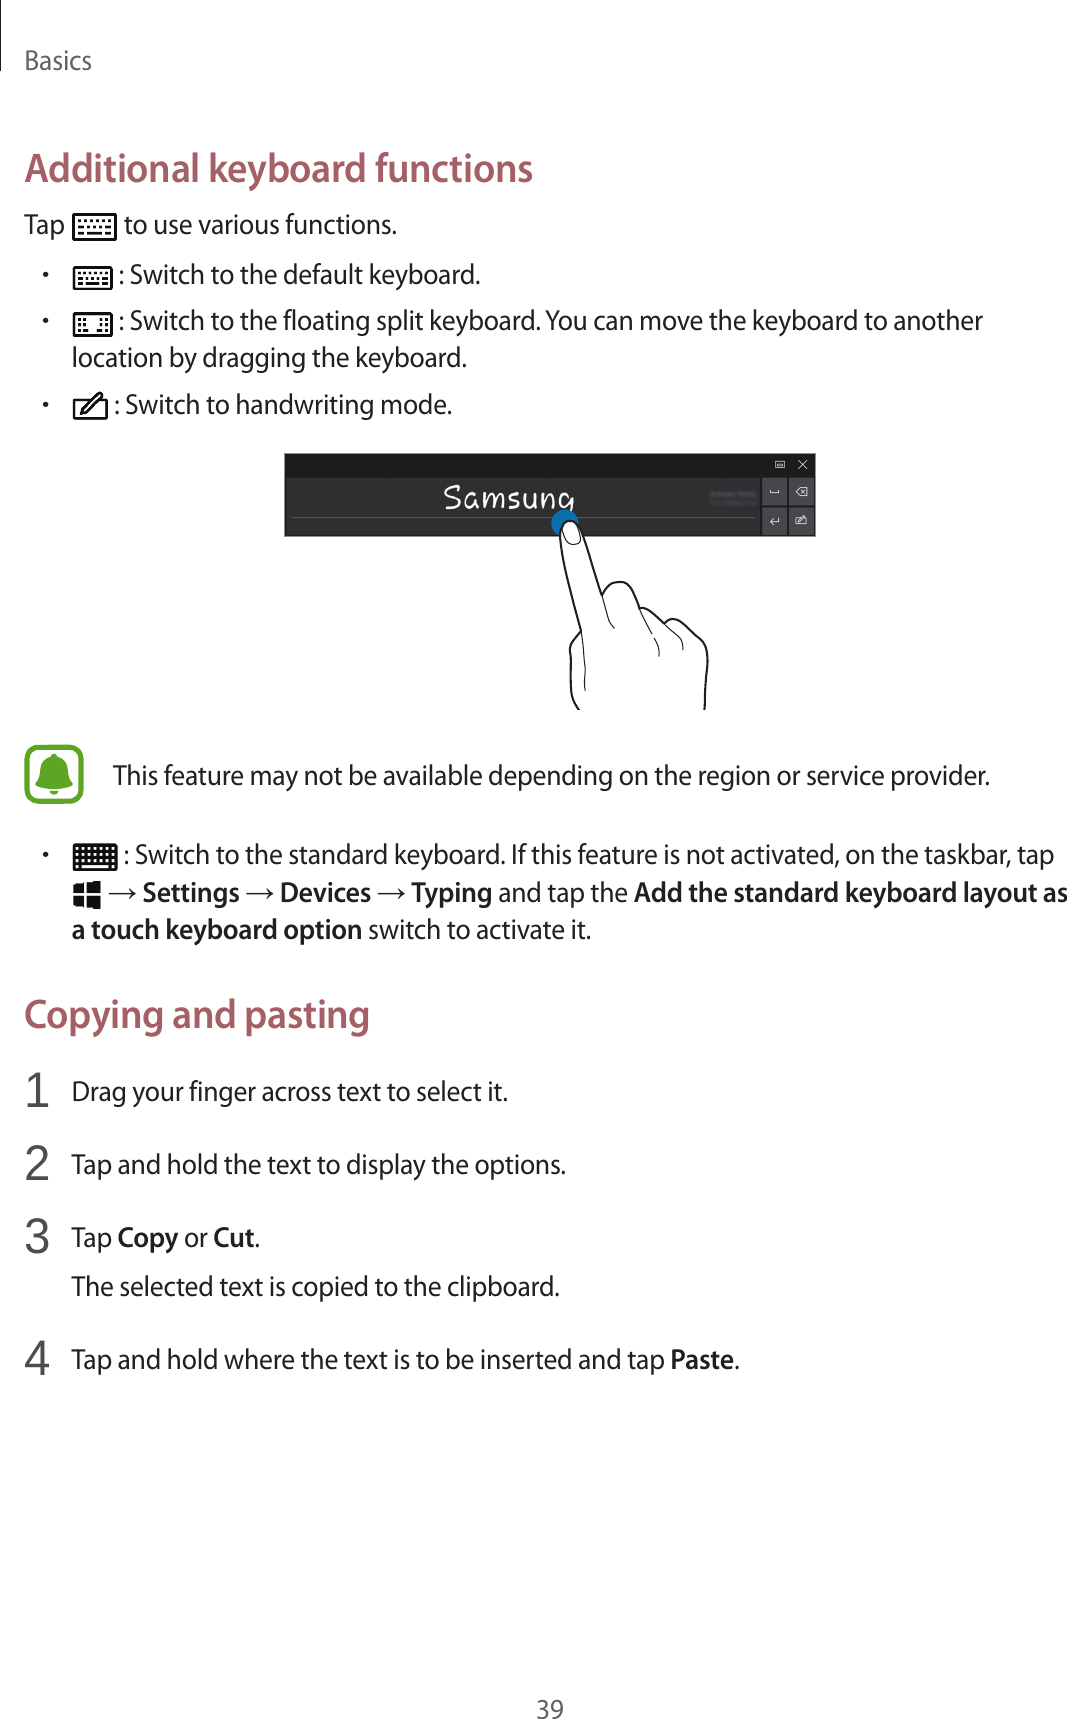
[A3LSMW728] User Manual_170217_

www.samsung.comUser ManualEnglish (EU). 02/2017. Rev.1.0SM-W728
2Table of ContentsBasics3  Read me first4  Device overheating situations and solutions7  Package contents8  Device layout12 Battery15  SIM or USIM card (nano-SIM card)17  Memory card (microSD card)20  Turning the device on and off21  Keyboard Cover28  Controlling the touchscreen30 Windows38  Entering text40  Screen capture40  Device and data management41  InstantGo (Connected standby)41  External displayApplications43  Installing or uninstalling apps44  Air Command47  Samsung Notes51  Samsung Flow52  Book Settings53  Samsung Recovery56  Show WindowSettings58  Windows Settings60  BIOS (Setup utility)Appendix64 Troubleshooting69  Windows recovery function70  Removing the battery
3BasicsRead me firstPlease read this manual before using the device to ensure safe and proper use.•Descriptions are based on the device’s default settings.•Some content may differ from your device depending on the region, service provider, model specifications, or device’s software.•Content (high quality content) that requires high CPU and RAM usage will affect the overall performance of the device. Apps related to the content may not work properly depending on the device’s specifications and the environment that it is used in.•Samsung is not liable for performance issues caused by apps supplied by providers other than Samsung.•Samsung is not liable for performance issues or incompatibilities caused by edited registry settings or modified operating system software. Attempting to customise the operating system may cause the device or apps to work improperly.•Software, sound sources, wallpapers, images, and other media provided with this device are licensed for limited use. Extracting and using these materials for commercial or other purposes is an infringement of copyright laws. Users are entirely responsible for illegal use of media.•You may incur additional charges for data services, such as messaging, uploading and downloading, auto-syncing, or using location services depending on your data plan. For large data transfers, it is recommended to use the Wi-Fi feature.•Default apps that come with the device are subject to updates and may no longer be supported without prior notice. If you have questions about an app provided with the device, contact a Samsung Service Centre. For user-installed apps, contact service providers.•Modifying the device’s operating system or installing softwares from unofficial sources may result in device malfunctions and data corruption or loss. These actions are violations of your Samsung licence agreement and will void your warranty.•Depending on the region, you can view the regulatory information on the device. To view the information, tap   → Book Settings → Legal information → Regulatory information.
Basics4Instructional iconsWarning: situations that could cause injury to yourself or othersCaution: situations that could cause damage to your device or other equipmentNotice: notes, usage tips, or additional informationDevice overheating situations and solutionsWhen the device heats up while charging the batteryWhile charging, the device and the charger may become hot. During wireless charging or fast charging, the device may feel hotter to the touch. This does not affect the device’s lifespan or performance and is in the device’s normal range of operation. If the battery becomes too hot, the charger may stop charging.Do the following when the device heats up:•Disconnect the charger from the device and close any running apps. Wait for the device to cool down and then begin charging the device again.•If the lower part of the device overheats, it could be because the connected USB cable is damaged. Replace the damaged USB cable with a new Samsung-approved one.•When using a wireless charger, do not place foreign materials, such as metal objects, magnets, and magnetic stripe cards, between the device and the wireless charger.The wireless charging or fast charging feature is only available on supported models.
Basics5When the device heats up during useWhen you use features or apps that require more power or use them for extended periods, your device may temporarily heat up due to increased battery consumption. Close any running apps and do not use the device for a while.The following are examples of situations in which the device may overheat. Depending on the functions and apps you use, these examples may not apply to your model.•During the initial setup after purchase or when restoring data•When downloading large files•When using apps that require more power or using apps for extended periods–When playing high-quality games for extended periods–When recording videos for extended periods–When streaming videos while using the maximum brightness setting–When connecting to a TV•While multitasking (or, when running many apps in the background)–When using Multi window–When updating or installing apps while recording videos–When downloading large files during a video call–When recording videos while using a navigation app•When using large amount of data for syncing with the cloud, email, or other accounts•When using a navigation app in a car while the device is placed in direct sunlight•When using the mobile hotspot and tethering feature•When using the device in areas with weak signals or no reception•When charging the battery with a damaged USB cable•When the device’s multipurpose jack is damaged or exposed to foreign materials, such as liquid, dust, metal powder, and pencil lead•When you are roaming
Basics6Do the following when the device heats up:•Keep the device updated with the latest software.•Conflicts between running apps may cause the device to heat up. Restart the device.•Deactivate the Wi-Fi, GPS, and Bluetooth features when not using them.•Close apps that increase battery consumption or that run in the background when not in use.•Delete unnecessary files or unused apps.•Decrease the screen brightness.•If the device overheats or feels hot for a prolonged period, do not use it for a while. If the device continues to overheat, contact a Samsung Service Centre.Device limitations when the device overheatsWhen the device heats up, the features and performance may be limited or the device may turn off to cool down. This feature is only available on supported models.•If the device becomes hotter than usual, a device overheating message will appear. To lower the device’s temperature, the screen brightness and the performance speed will be limited and battery charging will stop. Running apps will be closed and you will only be able to make emergency calls until the device cools down.•If the device overheats or feels hot for a prolonged period, a power off message will appear. Turn off the device, and wait until it cools down.Precautions for operating environmentYour device may heat up due to the environment in the following conditions. Use caution to avoid shortening the battery’s lifespan, damaging the device, or causing a fire.•Do not store your device in very cold or very hot temperatures.•Do not expose your device to direct sunlight for extended periods.•Do not use or store your device for extended periods in very hot areas, such as inside a car in the summertime.
Basics7•Do not place the device in any areas that may overheat, such as on an electric heating mat.•Do not store your device near or in heaters, microwaves, hot cooking equipment, or high pressure containers.•Never use a damaged charger or battery.Package contentsCheck the product box for the following items:•Device•Keyboard Cover•S Pen•S Pen holder•Quick start guide•The items supplied with the device and any available accessories may vary depending on the region or service provider.•The supplied items are designed only for this device and may not be compatible with other devices.•Appearances and specifications are subject to change without prior notice.•You can purchase additional accessories from your local Samsung retailer. Make sure they are compatible with the device before purchase.•Use only Samsung-approved accessories. Using unapproved accessories may cause the performance problems and malfunctions that are not covered by the warranty.•Availability of all accessories is subject to change depending entirely on manufacturing companies. For more information about available accessories, refer to the Samsung website.
Basics8Device layoutDeviceKeyboard dock portTouchscreenMicrophoneFront cameraLight sensorSpeakerHeadset jackMultipurpose jack (USB Type-C)SpeakerVolume keyPower keyCamera indicator lightSpeakerGPS antennaNFC antennaMain antennaSIM card / Memory card trayMain antennaRear camera
Basics9The device and the Keyboard Cover contain magnets. The American Heart Association (US) and the Medicines and Healthcare Products Regulatory Agency (UK) both warn that magnets can affect the operation of implanted pacemakers, cardioverters, defibrillators, insulin pumps or other electro medical devices (collectively, “Medical Device”) within the range of 15 cm (6 inches). If you are a user of any of these Medical Devices, DO NOT USE THIS DEVICE AND THE KEYBOARD COVER UNLESS YOU HAVE CONSULTED WITH YOUR PHYSICIAN.Do not store your device and the Keyboard Cover near magnetic fields. Magnetic stripe cards, including credit cards, phone cards, passbooks, and boarding passes, may be damaged by magnetic fields.•Connectivity problems and battery drain may occur in the following situations:–If you attach metallic stickers on the antenna area of the device–If you attach a device cover made with metallic material to the device–If you cover the device’s antenna area with your hands or other objects while using certain features, such as calls or the mobile data connection•Using a Samsung-approved screen protector is recommended. Unapproved screen protectors may cause the sensors to malfunction.•Do not allow water to contact the touchscreen. The touchscreen may malfunction in humid conditions or when exposed to water.KeysKey FunctionPower•Press and hold to turn the device on or off.•Press to turn on or lock the screen.Volume•Press to adjust the device volume.
Basics10S PenS Pen buttonS Pen clipS Pen nibTweezersName FunctionsS Pen nib•Use the S Pen to write, draw, or perform touch actions on the screen.•Hover the S Pen over items on the screen to access additional S Pen features.S Pen button•Hover the S Pen over the screen and press the S Pen button to display the air command features.Tweezers•Remove the S Pen nib with the tweezers when replacing the nib.The supplied S Pen is already calibrated. Do not calibrate the screen for pen input randomly. Doing so may cause performance degradation or malfunction.
Basics11Replacing the S Pen nibIf the nib is dull, replace it with a new one.1  Firmly hold the nib with the tweezers and remove it.2  Insert a new nib into the S Pen.
Basics12Be careful not to pinch your fingers with the tweezers.•Do not reuse old nibs. Doing so may cause the S Pen to malfunction.•Do not press the nib excessively when inserting the nib into the S Pen.•Do not insert the round end of the nib into the S Pen. Doing so may cause damage to the S Pen or your device.•Do not bend or apply excessive pressure with the S Pen while using it. The S pen may be damaged or the nib may be deformed.•The S Pen may not be attached firmly if you clip it on the objects that are too thick or too thin.•If the S Pen is not working properly, take it to a Samsung Service Centre.•If you use the S Pen at sharp angles on the screen, the device may not recognise the S Pen actions. Do not bend or apply excessive pressure with the S Pen while using it.•For more information about the S Pen, visit the Samsung website.BatteryCharging the batteryCharge the battery before using it for the first time or when it has been unused for extended periods.Use only Samsung-approved chargers, batteries, and cables. Unapproved chargers or cables can cause the battery to explode or damage the device.Connecting the charger improperly may cause serious damage to the device. Any damage caused by misuse is not covered by the warranty.To save energy, unplug the charger when not in use. The charger does not have a power switch, so you must unplug the charger from the electric socket when not in use to avoid wasting power. The charger should remain close to the electric socket and easily accessible while charging.
Basics131  Connect the USB cable to the USB power adaptor, and plug the USB cable into the device’s multipurpose jack.2  Plug the USB power adaptor into an electric socket.3  After fully charging, disconnect the device from the charger. First unplug the charger from the device, and then unplug it from the electric socket.Viewing the remaining charging timeWhile charging, on the taskbar, tap   → Settings → System → Battery.The actual charging time may vary depending on the status of your device and the charging conditions. The estimated charging time may not be displayed when you charge the device in very cold or very hot conditions.Reducing the battery consumptionYour device provides various options that help you conserve battery power.•When you are not using the device, switch to sleep mode by pressing the Power key.•Activate battery saver mode.•Close unnecessary apps.•Deactivate the Bluetooth feature when not in use.•Deactivate the Wi-Fi feature when not in use.•Deactivate auto-syncing of apps that need to be synced, such as emails.•Decrease the backlight time.•Decrease the screen brightness.
Basics14Battery charging tips and precautions•Use the charger supplied with the device. It may take longer to charge the battery if you use other chargers.•When the battery power is low, the battery icon appears empty.•If the battery is completely discharged, the device cannot be turned on immediately when the charger is connected. Allow a depleted battery to charge for a few minutes before turning on the device.•If you use multiple apps at once, network apps, or apps that need a connection to another device, the battery will drain quickly. To avoid losing power during a data transfer, always use these apps after fully charging the battery.•Using a power source other than the charger, such as a computer, may result in a slower charging speed due to a lower electric current.•The device can be used while it is charging, but it may take longer to fully charge the battery.•If the device receives an unstable power supply while charging, the touchscreen may not function. If this happens, unplug the charger from the device.•While charging, the device and the charger may heat up. This is normal and should not affect the device’s lifespan or performance. If the battery gets hotter than usual, the charger may stop charging.•If you charge the device while the multipurpose jack is wet, the device may be damaged. Thoroughly dry the multipurpose jack before charging the device.•If the device is not charging properly, take the device and the charger to a Samsung Service Centre.Battery saverSave the battery power by limiting the device’s functions.On the taskbar, tap   → Settings → System → Battery, and then tap the Battery saver status until next charge switch to activate it.To automatically activate battery saver mode when the remaining battery power reaches the preset level, tap Turn battery saver on automatically if my battery falls below: and set the battery level.
Basics15SIM or USIM card (nano-SIM card)Installing the SIM or USIM cardInsert the SIM or USIM card provided by the mobile telephone service provider.•Use only a nano-SIM card.•Use caution not to lose or let others use the SIM or USIM card. Samsung is not responsible for any damages or inconveniences caused by lost or stolen cards.Some LTE services may not be available depending on the service provider. For more information about service availability, contact your service provider.1  Insert the ejection pin into the hole on the tray to loosen the tray.Ensure that the ejection pin is perpendicular to the hole. Otherwise, the device may be damaged.2  Pull out the tray gently from the tray slot.
Basics163  Place the SIM or USIM card on the tray with the gold-coloured contacts facing upwards.4  Gently press the SIM or USIM card into the tray to secure it.If the card is not fixed firmly into the tray, the SIM card may leave or fall out of the tray.5  Insert the tray back into the tray slot.•If you insert the tray into your device while the tray is wet, your device may be damaged. Always make sure the tray is dry.•Fully insert the tray into the tray slot to prevent liquid from entering your device.Removing the SIM or USIM card1  Insert the ejection pin into the hole on the tray to loosen the tray.2  Pull out the tray gently from the tray slot.
Basics173  Remove the SIM or USIM card.4  Insert the tray back into the tray slot.Memory card (microSD card)Installing a memory cardYour device’s memory card capacity may vary from other models and some memory cards may not be compatible with your device depending on the memory card manufacturer and type. To view your device’s maximum memory card capacity, refer to the Samsung website.•Some memory cards may not be fully compatible with the device. Using an incompatible card may damage the device or the memory card, or corrupt the data stored in it.•Use caution to insert the memory card right-side up.•The device supports the FAT and the exFAT file systems for memory cards. When inserting a card formatted in a different file system, the device will ask to reformat the card or will not recognise the card. If the device does not recognise your memory card, format it on your computer.•Frequent writing and erasing of data shortens the lifespan of memory cards.•When inserting a memory card into the device, the memory card’s file directory appears in the File Explorer → Secure Digital storage device (D:) folder.
Basics181  Insert the ejection pin into the hole on the tray to loosen the tray.Ensure that the ejection pin is perpendicular to the hole. Otherwise, the device may be damaged.2  Pull out the tray gently from the tray slot.When you remove the tray from the device, the mobile data connection will be disabled.3  Place a memory card on the tray with the gold-coloured contacts facing downwards.
Basics194  Gently press the memory card into the tray to secure it.5  Insert the tray back into the tray slot.•If you insert the tray into your device while the tray is wet, your device may be damaged. Always make sure the tray is dry.•Fully insert the tray into the tray slot to prevent liquid from entering your device.Removing the memory cardBefore removing the memory card, first unmount it for safe removal.On the taskbar, tap   → Windows System → File Explorer → This PC, tap and hold Secure Digital storage device (D:), and then tap Eject.1  Insert the ejection pin into the hole on the tray to loosen the tray.2  Pull out the tray gently from the tray slot.3  Remove the memory card.4  Insert the tray back into the tray slot.Do not remove the memory card while the device is transferring or accessing information. Doing so can cause data to be lost or corrupted or damage to the memory card or device. Samsung is not responsible for losses that result from the misuse of damaged memory cards, including the loss of data.Formatting the memory cardA memory card formatted on a computer may not be compatible with the device. Format the memory card on the device.On the taskbar, tap   → Windows System → File Explorer → This PC, tap and hold Secure Digital storage device (D:), and then tap Format....Before formatting the memory card, remember to make backup copies of all important data stored in the memory card. The manufacturer’s warranty does not cover loss of data resulting from user actions.
Basics20Turning the device on and offPress and hold the Power key for a few seconds to turn on the device.Before turning on your device for the first time, you must connect the device to a power supply.When you turn on your device for the first time or after performing a data reset, follow the on-screen instructions to set up your device.To turn off the device, tap   →   → Shut down. In Tablet mode, tap   → Shut down. Alternatively, press and hold the Power key until Slide to shut down your PC appears, and then drag the screen downwards.Follow all posted warnings and directions from authorised personnel in areas where the use of wireless devices is restricted, such as aeroplanes and hospitals.Restarting the deviceIf your device is frozen and unresponsive, press and hold the Power key for more than 10 seconds until the device turns off. Then, press and hold the Power key again to restart it.Power key
Basics21Keyboard CoverIntroductionConnecting the device to the Keyboard Cover allows you to use a traditional keyboard and touchpad. The bottom of the touchpad has two parts that act as the left and right buttons of a mouse. You can also stand your device upright using the stand on the Keyboard Cover.When you close the Keyboard Cover, your device will enter sleep mode. When you open the cover and set the device in position using the stand, the touchscreen will turn on. To change the settings, tap   → Settings → System → Power & sleep → Additional power settings → Choose what closing the lid does, and then configure the When I close the lid: settings.Keyboard CoverConnectorKeyboardTouchpadNFC tagStandDo not remove keycaps from the keyboard. Doing so may damage the keyboard and the keycaps.The function of the NFC tag may differ depending on the model and region.
Basics22Connecting the Keyboard Cover1  Connect the keyboard dock port at the bottom of the device to the connector on the keyboard, and then set the device in position.Make sure that the Keyboard Cover is securely attached to your device. If not, check the location of the keyboard dock port and reconnect the Keyboard Cover to your device.2  Attach the device to the stand.21You can attach the device to the stand in 4 different angles.
Basics23Attaching the S Pen holderYou can insert the S Pen into the S Pen holder attached to the S Pen holder slot.•Make sure that the S Pen holder is securely attached after 1 hour.•To avoid detaching the S Pen holder from the keyboard cover, do not apply excessive force.Hot keysUse hot keys to easily use features and change settings, such as brightness and volume.To use hot keys, simultaneously press and hold the Fn key and press a hot key.If you lock the Fn key, you can use hot keys without pressing the Fn key. To lock the Fn key, tap the Fn Lock key.The Fn Lock key will automatically unlock when you reconnect the device and the Keyboard Cover.
Basics24Hot key functionsKey/Icon FunctionF1•Launch Settings.F2•Adjust the brightness of the display.F3F4•Change the display mode when an external display is connected to the device.F5•Lock or unlock the touchpad.F6•Mute or unmute the audio.F7•Adjust the volume.F8F9•Turn the keyboard backlight on or off.F10•Open the task view screen.F11•Hide or show currently open windows.F12•Activate or deactivate flight mode.•Perform the same function as the right buttons of a mouse.TouchpadUse the touchpad to move the cursor or select items. The left and right buttons of the touchpad function the same as the left and right buttons of a mouse.Use only your fingers on the touchpad.
Basics25Basic touchpad functionsMovingTo move the cursor, move your finger on the touchpad.ClickingTap the touchpad or press the left-click button.orDouble-clickingDouble-tap the touchpad or press the left-click button twice.or
Basics26Right-clickingPress the right-click button to perform the right-click function. Alternatively, tap the touchpad with two fingers.orDraggingTo move an item, select and drag it to the target position while pressing and holding the left-click button. Alternatively, double-tap and hold the item, and then drag it to the target position.
Basics27Additional functionsSwipingTo scroll up, down, left, or right to a desired location, swipe with two fingers on the touchpad.orSpreading and pinchingSpread two fingers apart on a webpage, map, or image to zoom in a part. Pinch to zoom out.Configuring touchpad settingsConfigure touchpad settings to use the touchpad more efficiently.Tap   → Settings → Devices → Mouse & touchpad, and configure the settings under Touchpad.Locking and unlocking the touchpadPress and hold the Fn key and press the F5 key to lock or unlock the touchpad.If the touchpad was locked when it was disconnected, it will still be locked when you reconnect the Keyboard Cover. To use the touchpad again, unlock it manually.
Basics28Controlling the touchscreen•Do not allow the touchscreen to come into contact with other electrical devices. Electrostatic discharges can cause the touchscreen to malfunction.•To avoid damaging the touchscreen, do not tap it with anything sharp or apply excessive pressure to it with your fingertips.•The device may not recognise touch inputs close to the edges of the screen, which are outside of the touch input area.•Leaving the touchscreen idle for extended periods may result in afterimages (screen burn-in) or ghosting. Turn off the touchscreen when you do not use the device.•It is recommended to use fingers or the S Pen when you use the touchscreen.TappingTo open an app, to select a menu item, to press an on-screen button, or to enter a character using the keyboard on the screen, tap it with your finger or the S Pen.
Basics29Tapping and holdingTap and hold an item or the screen for more than 2 seconds to access available options.DraggingTo move an item, tap and hold it and drag it to the target position.Double-tappingDouble-tap on a webpage or image to zoom in. Double-tap again to return.
Basics30SwipingSwipe to the left or right on the screen to scroll left or right. Swipe upwards or downwards to scroll through a webpage or a list of items.Spreading and pinchingSpread two fingers apart on a webpage, map, or image to zoom in a part. Pinch to zoom out.WindowsMicrosoft Windows is an operating system that is used to control a computer.•Images and available features may differ depending on the model and operating system.•This manual is designed for Windows 10 and content may differ depending on the OS version.•The image displayed on the desktop screen may differ between models and OS versions.
Basics31Start screenStart screenThe Start screen is the starting point for accessing all of the device’s features.TaskbarStart menuMoving and removing an itemDrag an item on the Start screen to a new location.To remove an item, tap and hold the item, and then tap Delete.TaskbarThe bottom area of the screen is the taskbar. You can access the Start menu, launch the search box, view notification icons, and more on the taskbar.ShortcutsTask viewStart menu Notification iconsSearch boxManaging shortcutsTo add a shortcut, on the taskbar, tap  , tap and hold an item, tap More → Pin to taskbar.To delete a shortcut, tap and hold a shortcut, and then tap Unpin from taskbar.To move a shortcut to another location, drag it to a new location.
Basics32Managing notification iconsOn the taskbar, tap   → Settings → Personalisation → Taskbar → Select which icons appear on the taskbar, and then select items to display in the notification area.Search boxSearch for a wide variety of content on the device or web with a keyword.Tap the search box on the taskbar and enter a keyword in the search field.CortanaIf Cortana is supported in your region, it will launch when you tap the search box. Cortana will help you find things on your device, manage your schedules, and more. Enter a keyword or question into the search field to search for something, set a reminder, and more.This feature may not be available depending on the region and language settings.Start menuOn the taskbar, tap   to open the Start menu.From the Start menu, you can access your frequently used apps, shortcuts to other locations on your device, and more.SettingsApp tilesPowerYour accountFrequently used appsApps list
Basics33Managing app tilesYou can pin your favourite apps on the app tile area.To add more apps, tap and hold an app from the apps list, and then drag it to the app tile area.To move a tile, tap and hold a tile, and then drag it to a new location.To adjust the size of a tile, tap and hold a tile, and then tap   → Resize.To delete a tile, tap and hold a tile, and then tap  .Multi desktopMulti desktop allows you to work on various tasks at the same time via multiple desktops. You can use different desktops for a variety of purposes.Creating new desktops1  On the taskbar, tap  . Alternatively, swipe from the left edge of the screen.2  Tap New desktop.A new desktop will be added. You can select a desktop from the list displayed at the bottom of the screen.Currently open windowsMulti desktop listDeleting desktops1  On the taskbar, tap  .2  On the multi desktop list, tap   on the desktop to delete.
Basics34Moving windows to another desktop1  On the taskbar, tap   to view the current desktop’s open windows.2  Tap and hold a window to move, and then tap Move to.3  Select a desktop to move the window.Switching to tablet modeYou can switch between PC mode and tablet mode. In Tablet mode, the full Start menu screen will be the Start screen. Switching to tablet mode makes the device more touch-friendly.To switch to tablet mode, on the taskbar, tap   → Tablet mode. Alternatively, Swipe from the right edge of the screen towards the centre of the screen, then tap Tablet mode.To return to PC mode, tap Tablet mode again.Lock screenPressing the Power key turns off the screen and locks it. Also, the screen turns off and automatically locks if the device is not used for a specified period.To unlock the screen, press the Power key and drag the locked screen upwards.You can change the way that you lock the screen to prevent others from accessing your personal information.On the taskbar, tap   → Settings → Accounts → Sign-in options, and then select a screen lock method. The device requires an unlock code whenever unlocking it.•If the unlock code is forgotten, take the device to a Samsung Service Centre to reset it.•You must sign in to your Microsoft account or add a password before you can use the other lock methods.PasswordA password consists of characters or numbers. Enter a password, enter the password again to verify it, and then enter a password hint.If you have signed in to your Microsoft account, your account password will be set as the password automatically.
Basics35PINA PIN consists of numbers only. Enter at least four numbers, and then enter the password again to verify it.Picture passwordA password consists of circles, straight lines, and taps. Select an image and draw on the image to create gestures.Pattern Log-inTo unlock the screen using a pattern, on the taskbar, tap   → Book Settings → Pattern Log-in, and then tap the switch to activate it.Draw a pattern by connecting four dots or more, and then draw the pattern again to verify it.ACTION CENTREYou can view new notifications from Windows and apps, and use quick action buttons. Quick action buttons allow you to easily adjust frequently used settings, such as activating Wi-Fi.To open the action centre panel, on the taskbar, tap  . Alternatively, swipe from the right edge of the screen.
Basics36You can use the following functions on the action centre panel.Clear all notifications.Tap a notification and perform various actions.Quick action buttonsUsing quick action buttonsTap quick action buttons to activate certain features. To view more detailed settings, tap and hold a button, and then tap Go to settings.You can change the top four buttons. On the taskbar, tap   → Settings → System → Notifications & actions, and then change quick action buttons under Quick actions.Split screen viewIn Tablet mode, you can open two windows at the same time in the split screen view by selecting windows from the task view screen.Some apps may not support this feature.1  On the taskbar, tap   to view currently open windows. Alternatively, swipe from the left edge of the screen.
Basics372  Tap and hold a window and select Snap left or Snap right.Adjusting the window sizeDrag the handle between the windows left or right to adjust the size of the windows.HelpTo access help information, tap   → Get Started.You can check the help information after connecting to the Internet.
Basics38Using the control panelYou can adjust basic system settings, such as hardware, software, or user account settings.Tap   → Windows System → Control Panel. Alternatively, press the right-click button on  and tap Control Panel.Then, select options you want to change.Entering textUsing the on-screen keyboardIn Tablet mode, the on-screen keyboard appears automatically when you enter text to send emails, create notes, and more. To use the on-screen keyboard in PC mode, on the taskbar, tap .Text entry is not supported in some languages. To enter text, you must change the input language to one of the supported languages.Break to the next line.Move the cursor.Delete a preceding character.Enter numbers and punctuation marks.Enter uppercase. For all caps, tap it twice.Enter emoticons.Switch to the floating keyboard.Enter a space.Change the input language or the keyboard layout, or add input languages.Hide the keyboard.Changing the input languageTap   → Language preferences → Add a language, and then select a language to add. When you add languages, you can select other input languages by tapping  .
Basics39Additional keyboard functionsTap   to use various functions.• : Switch to the default keyboard.• : Switch to the floating split keyboard. You can move the keyboard to another location by dragging the keyboard.• : Switch to handwriting mode.This feature may not be available depending on the region or service provider.• : Switch to the standard keyboard. If this feature is not activated, on the taskbar, tap  → Settings → Devices → Typing and tap the Add the standard keyboard layout as a touch keyboard option switch to activate it.Copying and pasting1  Drag your finger across text to select it.2  Tap and hold the text to display the options.3  Tap Copy or Cut.The selected text is copied to the clipboard.4  Tap and hold where the text is to be inserted and tap Paste.
Basics40Using the Keyboard CoverWhen your device is connected to the Keyboard Cover, you can enter text using the traditional keyboard. Refer to Keyboard Cover for more information.Screen captureCapture a screenshot while using the device.You can view captured images in the This PC → Pictures → Screenshots folder.It is not possible to capture a screenshot while using some apps and features.Capturing screenshots with the S PenYou can also use the Air command features to capture screenshots.Screen write allows you to write on captured screenshots.To select and capture a specific area, use Smart select.Refer to Screen write and Smart select for more information.Device and data managementUpdating the deviceKeep the device up to date by downloading and installing updates, such as service packs and patches, for the operating system and other Microsoft apps.The device is set to download and install updates automatically. To check for available updates manually, on the taskbar, tap   → Settings → Update & security → Windows Update → Check for updates.Backing up and restoring dataKeep your personal information, app data, and settings safe on your device using Samsung Recovery. Refer to Samsung Recovery for more information.
Basics41Performing a data resetDelete all settings and data on the device. Before performing a factory data reset, ensure you back up all important data stored on the device. Refer to Restoring to factory default and Backing up the current system for more information.InstantGo (Connected standby)InstantGo (Connected standby) is a low-power mode that allows the device to maintain network connectivity. When the screen turns off, the device will enter connected standby mode.While the device is in connected standby mode, the device can still sync content, such as emails, from the cloud and run background apps. It also allows the device to wake from sleep instantly, faster than the traditional sleep and hibernation states.Connected standby consumes more battery power than the traditional sleep mode. To disable this feature, tap   → Settings → System → Power & sleep → Additional power settings → Choose what the power button does, and then set the When I press the power button: and the When I close the lid: settings to Hibernate.External displayConnecting the tablet to an external display device can be useful for presentations or when watching a movie. The adapters required to connect an external display are sold separately. The computer supports USB-C™ display adapters.•Check the available ports on the display device to ensure that it is compatible with the tablet.•An external display and TV output are not supported when using DOS.
Basics42Connecting to a display1  Connect the USB-C™ display adapter to the multipurpose jack of the tablet.2  Connect one end of the USB cable into the adapter.3  Connect the other end of the cable to the multipurpose jack of the external display.4  Connect the power cord to the external display.5  Use features and change settings of the external display by using hot keys of the tablet.Screen mirroringView your device’s displayed content on a larger screen via a wireless connection.If a large screen, such as a TV, does not support the Screen mirroring feature, use compatible accessories to enable the feature. Compatible accessories include HomeSync and an AllShare Cast dongle.1  On the TV, activate the screen mirroring feature.2  On the action centre panel, tap Connect.The detected devices are listed.3  Select a device to connect to.Your device’s screen appears on the TV screen.4  Open or play a file, and then control the display with the keys on your device.•This feature may not be available depending on the region or service provider.•For more information about connecting your device and the large screen, refer to the user manual for the large screen or the Screen mirroring-enabled accessory.•Some files may be buffered during playback, depending on the network connection.•If you specify a Wi-Fi frequency, AllShare Cast dongles or HomeSync may not be detected or connected.
43ApplicationsInstalling or uninstalling appsStorePurchase and download apps.On the taskbar, tap  . Alternatively, on the taskbar, tap   → Store.For service requests for apps provided by third-party providers, contact the provider. If you contact a Samsung Service Centre, troubleshooting actions in response to service requests may have limitations depending on the app.Installing appsBrowse apps by category or tap the search field to search for a keyword.Select an app to view information about it. To download free apps, tap Free. To purchase and download apps where charges apply, tap the price and follow the on-screen instructions.To change the auto update settings, tap   → Settings, and then tap the Update apps automatically when I’m on WiFi switch to activate or deactivate it.Uninstalling appsSome apps cannot be uninstalled.1  On the taskbar, tap  .2  Tap and hold an app, and then tap Uninstall.Some apps will automatically move to the Uninstall or change a program screen. Tap and hold an app, tap Uninstall, and then follow the on-screen instructions to uninstall the app.3  Tap Uninstall.
Applications44Air CommandIntroductionTo open the Air command panel, hover the S Pen over the screen and press the S Pen button. Alternatively, tap   → Samsung → Air Command.Create noteShow WindowSmart selectScreen writeView all notes•Create note: Launch Samsung Notes and create a new note. Refer to Samsung Notes for more information.•View all notes: Launch Samsung Notes and view all notes.•Smart select: Collect content quickly. Refer to Smart select for more information.•Screen write: Capture, edit, and write memos on screenshots, and then share them. Refer to Screen write for more information.•Show Window: Select an area on the screen and show it in full screen mode on an external display. Refer to Show Window for more information.
Applications45Smart selectUse the S Pen to select an area and perform actions, such as sharing or saving.1  When there is content you want to capture, such as a part of an image, open the Air command panel and tap Smart select.2  Select a desired shape icon on the toolbar and drag the S Pen across the content you want to select.3  Edit the selected area using various editing options.Pen modeEraser modeUndoRedoRecognise and extract text from the selected area.Save the selected area.Share the selected area with others.Automatically reshape the selected area.
Applications46Screen writeCapture screenshots to write or draw on them.1  When there is content you want to capture, open the Air command panel and tap Screen write.The current screen is automatically captured and the editing toolbar appears on the screen.2  Write a memo on the screenshot.3  Select an option to use with the screenshot.• : Recognise and extract text from the screenshot.• : Crop the screenshot.• : Share the screenshot with others.• : Save the screenshot.It is not possible to capture a screenshot while using some apps.
Applications47Samsung NotesIntroductionCreate notes by writing or drawing on the screen with the S Pen. You can also insert images into your notes.Creating notes1  On the taskbar, tap   → Samsung Notes → All notes →  .You can also open the Air command panel and tap the Create note shortcut.2  Select an input method from the toolbar at the top of the screen and compose a note.Tap Image to insert an image by selecting from File Explorer.Write or draw with pens.Paint with brushes.Insert an image.3  When you are finished composing the note, tap Save.
Applications48Composing notes in handwriting modeOn the note composer screen, tap Pen to write or draw with the S Pen.UndoRedoEraser modeExtend the page.Changing the pen settingsWhen writing or drawing on the screen, you can change the pen type, line thickness, or pen colour.Change the pen colour.Change the line thickness.Change the pen type. Select a new colour using the colour picker.Using the line eraser1  When you want to erase handwriting from a note, tap Eraser.
Applications492  Tap an area to erase.The whole line on the area will be erased. The line eraser can erase your note line by line.•To only erase the area you touch with the S Pen, tap Eraser once more and tap Erase touched area. You can adjust the size of the eraser by dragging the size adjustment bar.•To clear the note, tap ERASER ALL.•You can also erase an area in pen mode by tapping it while pressing and holding the S Pen button.•Even with a smaller eraser, you may still not be able to precisely erase the intended part.Editing handwritten notesEdit handwritten notes using various editing options, such as cutting, moving, resizing, or transforming.1  When there is handwriting on the note, tap Select.To change the shape of the selection, tap Select once more.2  Tap or draw a line around the input to select.To move the input to another location, select the input, and then drag it to a new location.To change the size of the selection, tap the input and drag a corner of the frame that appears.
Applications503  Edit the input using the available options.•Cut: Cut out the input. To paste it to another location, tap and hold the location, and then tap Paste.•Copy: Copy the input. To paste it to another location, tap and hold the location, and then tap Paste.•Delete: Delete the input.•To front: Send the input to the front.•To back: Send the input to the back.Painting with brushesOn the note composer screen, tap Brush to paint with various brushes.When you are finished, tap Done to insert your painting into the note.UndoRedoInsert the painting into the note.Select a new colour using the colour picker.Eraser modeChange the brush colour.Change the brush’s radius or opacity.Inserting images into a noteOn the note composer screen, tap Image to select an image. The image will be inserted into your note.
Applications51Deleting notes1  On the taskbar, tap   → Samsung Notes → All notes.2  Tap Select and tick a note to delete.To delete multiple notes, tick more notes to delete.3  Tap Delete.Samsung FlowIntroductionSamsung Flow allows you to easily connect your tablet to your smartphone. You can share contents between the connected devices.Samsung Flow must be installed on both devices that you want to connect. If Samsung Flow is not installed, download it from app stores.•This feature is only available on some Samsung Android devices.•To use this feature, you must register your fingerprint on your smartphone. Connecting your tablet and smartphone1  On your smartphone, launch Samsung Flow, and then tap the switch to activate it.If you have not registered your fingerprint, a pop-up window requesting to add a fingerprint will appear.2  On your tablet, launch Samsung Flow, and then tap PAIR.3  Select your smartphone from the detected devices list, and then tap PAIR → Yes.4  Accept the connection request on both devices.The virtual screen of your smartphone will appear on your tablet.
Applications52Unlocking your tablet with fingerprintsYou can launch Samsung Flow on your tablet by using the registered fingerprints on your smartphone.Sharing your smartphone’s hotspotYou can share your smartphone’s mobile data connection with your tablet if the Internet connection is not available.Checking notifications on your tabletWhen you receive new notifications on your smartphone, check notifications from the virtual screen or in pop-up window on your tablet.If you receive a message, you can directly reply to the message from your tablet.Sharing contentsYou can share your smartphone’s contents with your tablet.Book SettingsSamsung-integrated settings application offers various settings functions.1  On the taskbar, tap   → Book Settings.2  Select an option to configure the corresponding function.•Pen: Select an app to launch when you press the S Pen button while hovering the S Pen over the screen.•Pattern Log-in: Set a pattern to use it as your screen lock method.•APN: Set up access point names (APNs).•Legal information: View the Samsung legal information, the open source licence announcement, and the safety information.•User manual: View help information to learn how to use the device and apps or configure important settings.•About device: Access device information.
Applications53Samsung RecoveryIntroductionBack up your data and settings, and restore your device to a previously backed up point or to the factory default.•To use this app, you must sign in to the device with an administrator account, or enter the administrator’s password.•When you restore your device, it will erase the data or apps saved after the selected backup point. Ensure you back up important data regularly. If necessary, back up important data to an external storage device before restoring the system.•When you launch the application for the first time, read and accept the Terms and Conditions when they display on the screen.Restoring to factory defaultRestore the device to its factory default settings. Before performing a factory data reset, ensure you back up all important data stored on the device. Refer to Backing up the current system for more information.On the taskbar, tap   → Samsung → Samsung Recovery → Factory image → Recover → Recover → OK.
Applications54Backing up the current systemBack up important data to an external storage device regularly to prevent restore.1  Connect an external storage device.2  On the taskbar, tap   → Samsung → Samsung Recovery.3  Tap Backup management → New backup.4  Enter backup information and select the external storage device.5  Tap Backup.6  When the backup start window appears, tap Yes.7  When the backup complete window appears, tap OK.When the backup is finished, the backup image will appear on the backup management screen.
Applications55Restoring the systemRestoring to a backup pointSelect a backup point saved on an external storage device to restore the device to that point.1  Connect the external storage device to your device.2  On the taskbar, tap   → Samsung → Samsung Recovery.3  Tap Backup management, select a backup image, and then tap Recover.4  Tap Recover.
Applications56Show WindowShow Window allows you to select an area on the screen and show it in full screen mode on an external display. You can draw or highlight items on the screen using tools.Before you use this app, you must connect the device to an external display.Showing a selected area on an external display1  Connect the device to an external display.•You can connect an external display using a cable. Cables, such as HDMI cables, or adaptors for connecting to an external display are sold separately.•You can also wirelessly connect the devices. Refer to Screen mirroring for more information.2  On the taskbar, tap   → Samsung → Show Window.3  Tap Start.A white frame for selecting an area will appear.Start is activated only when the display mode is set to Extend. Press and hold the Fn key and press the F4 key simultaneously, and then press the F4 key again to select Extend.4  Drag   to select an area to show in full screen mode on the external display, and then tap Done.The selected area will be shown on the external display.To fix the ratio of the selected area to the ratio of the external screen, tap   and tap the Fixed ratio switch to activate it.To stop displaying the screen, tap Stop.
Applications57Using toolsWhile showing the screen on the connected display, you can use the following tools.CursorPenClear all drawingUndo/RedoEraserHighlighterWhile using the pen or highlighter, tap the desired icon again to change the colour or line thickness.Setting the connection notificationYou can set the device to display a notification which prompts you to use Show Window when an external device is connected. Tap   and tap the Auto launch switch to activate it.
58SettingsWindows SettingsIntroductionCustomise settings for functions and apps. You can make your device more personalised by configuring various setting options.On the taskbar, tap   → Settings.To search for settings by entering keywords, tap the search field at the top of the screen.The available options may vary depending on the region or service provider.SystemChange the system settings.On the Settings screen, tap System.
Settings59DevicesChange settings related to your connected devices.On the Settings screen, tap Devices.Network & InternetChange the network and Internet settings.On the Settings screen, tap Network & Internet.PersonalisationChange the display settings, such as a wallpaper, colour, and theme.On the Settings screen, tap Personalisation.AccountsChange the account settings.On the Settings screen, tap Accounts.Time & languageChange settings to control how the device displays the time and date, and select your country or region.On the Settings screen, tap Time & language.If the battery remains fully discharged or removed from the device, the time and date is reset.Ease of AccessChange settings to improve the device’s accessibility.On the Settings screen, tap Ease of Access.
Settings60PrivacyChange the privacy settings.On the Settings screen, tap Privacy.Update & securityChange the Windows update, data backup, and device security settings.On the Settings screen, tap Update & security.BIOS (Setup utility)IntroductionBIOS is the program that starts the operating system when you turn on your device. Access the BIOS setup screen to set a boot password, perform battery calibration, and more.Be careful when changing BIOS settings. Incorrect changes may cause the system to malfunction or crash.•The BIOS setup screens, menus, and items may appear differently depending on the model and BIOS version.•To enter the BIOS screen, the device must be connected to the Keyboard Cover.
Settings61Entering the BIOS screenPress the F2 key several times immediately after you turn on your device, before the Samsung logo appears.If the locked screen or the Start screen appears, restart the device and try again.Setup menusHelp informationSetup itemsSetup toolsSetup tools•Help: View the help information for the BIOS setup.•Default: Restore the device to the default settings.•Restore: Undo changes.•Save: Save the changes and restart the device.•Exit: Restart the device without saving the changes.Setup menus•SysInfo: View the basic specifications of the device.•Advanced: Configure the advanced settings and perform the battery calibration.•Security: Configure security functions.•Boot: Configure boot-related settings.
Settings62Setting the boot passwordSetting a password with the BIOS enhances protection against viruses and hacking attacks.On the BIOS screen, tap Security.The following password settings are available:•Supervisor Password: This password is required when turning on the device or entering the BIOS screen. This password allows you to enter the BIOS screen as an administrator. You can change the BIOS settings.•User Password: This password is required when turning on the device or entering the BIOS screen. This password allows you to enter the BIOS screen as a user. You cannot change the BIOS settings. The password will be deactivated automatically if the supervisor password is removed.•HDD Password: This password is required to access the hard disk drive (HDD) from another computer. This password may not be supported depending on the model.Do not forget your password or expose it to others.•If you forget your supervisor password or HDD password, contact a Samsung Service Centre.•If you forget your user password, you can remove it by removing the supervisor password.Setting a boot passwordTo set a user password or HDD password, you must set the supervisor password first.1  Tap Set Supervisor Password, Set User Password, or Set HDD Password.2  Enter a password and tap Ok.The password can be up to 20 characters long.3  Enter the password again and tap Ok.4  Tap Save to save the password and restart the device.
Settings63Removing a password1  Tap Set Supervisor Password, Set User Password, or Set HDD Password.2  Enter the password and tap Ok.3  Without entering any characters, tap Ok → Ok.The password will be removed.Boot priorityChange the boot priority from the BIOS setup.1  On the BIOS screen, tap Boot.2  Tap the drop-down menu and select an option.3  Tap Save to save the setting and restart the device.Smart Battery CalibrationIf the battery is charged or discharged repeatedly over a short period, the actual battery power and the detected remaining battery power may be different. Performing a battery calibration will discharge the battery completely to ensure more accurate battery level detection.The battery calculation will take three to five hours. The time may differ depending on the remaining battery level.1  Fully charge the battery.2  Disconnect the charger from the device.3  On the BIOS screen, tap Advanced.4  Tap Smart Battery Calibration.The battery calibration will start and the battery will be discharged.To stop the calibration, press the Esc key.
64AppendixTroubleshootingBefore contacting a Samsung Service Centre, please attempt the following solutions. Some situations may not apply to your device.When you turn on your device or while you are using the device, it prompts you to enter one of the following codes:•Password: When the device lock feature is enabled, you must enter the password you set for the device.•PIN: When using the device for the first time or when the PIN requirement is enabled, you must enter the PIN supplied with the SIM or USIM card. You can disable this feature by using the Lock SIM card menu.•PUK: Your SIM or USIM card is blocked, usually as a result of entering your PIN incorrectly several times. You must enter the PUK supplied by your service provider.•PIN2: When you access a menu requiring the PIN2, you must enter the PIN2 supplied with the SIM or USIM card. For more information, contact your service provider.Your device displays network or service error messages•When you are in areas with weak signals or poor reception, you may lose reception. Move to another area and try again. While moving, error messages may appear repeatedly.•You cannot access some options without a subscription. For more information, contact your service provider.Your device does not turn onWhen the battery is completely discharged, your device will not turn on. Fully charge the battery before turning on the device.
Appendix65The touchscreen responds slowly or improperly•If you attach a screen protector or optional accessories to the touchscreen, the touchscreen may not function properly.•If you are wearing gloves, if your hands are not clean while touching the touchscreen, or if you tap the screen with sharp objects or your fingertips, the touchscreen may malfunction.•The touchscreen may malfunction in humid conditions or when exposed to water.•Restart your device to clear any temporary software bugs.•Ensure that your device software is updated to the latest version.•If the touchscreen is scratched or damaged, visit a Samsung Service Centre.The device responds slowlyIf you use the device without connecting the Keyboard Cover, the device’s speed and performance may be affected. Use the device with the Keyboard Cover connected.Your device freezes or has fatal errorsTry the following solutions. If the problem is still not resolved, contact a Samsung Service Centre.Restarting the deviceIf your device freezes or hangs, you may need to close apps or turn off the device and turn it on again.Forcing restartIf your device is frozen and unresponsive, press and hold the Power key for more than 10 seconds until the device turns off. Then, press and hold the Power key again to restart it.Resetting the deviceIf the methods above do not solve your problem, perform a factory data reset.On the taskbar, tap   → Samsung → Samsung Recovery → Factory image → Recover → Recover → OK. Before performing the factory data reset, remember to make backup copies of all important data stored in the device.If Windows does not start, press the F4 key several times immediately after you turn on your device, to launch Samsung Recovery.
Appendix66Calls are not connected•Ensure that you have accessed the right cellular network.•Ensure that you have not set call barring for the phone number you are dialling.•Ensure that you have not set call barring for the incoming phone number.Others cannot hear you speaking on a call•Ensure that you are not covering the built-in microphone.•Ensure that the microphone is close to your mouth.•If using a headset, ensure that it is properly connected.Sound echoes during a callAdjust the volume by pressing the Volume key or move to another area.A cellular network or the Internet is often disconnected or audio quality is poor•Ensure that you are not blocking the device’s internal antenna.•When you are in areas with weak signals or poor reception, you may lose reception. You may have connectivity problems due to issues with the service provider’s base station. Move to another area and try again.•When using the device while moving, wireless network services may be disabled due to issues with the service provider’s network.The battery icon is emptyYour battery is low. Charge the battery.The battery does not charge properly (For Samsung-approved chargers)•Ensure that the charger is connected properly.•Visit a Samsung Service Centre and have the battery replaced.
Appendix67The battery depletes faster than when first purchased•When you expose the device or the battery to very cold or very hot temperatures, the useful charge may be reduced.•Battery consumption increases when you use messaging features or some apps, such as games or the Internet.•The battery is consumable and the useful charge will get shorter over time.Your device is hot to the touchWhen you use apps that require more power or use apps on your device for an extended period of time, your device may feel hot to the touch. This is normal and should not affect your device’s lifespan or performance.If the device overheats or feels hot for a prolonged period, do not use it for a while. If the device continues to overheat, contact a Samsung Service Centre.Error messages appear when launching the cameraYour device must have sufficient available memory and battery power to operate the camera app. If you receive error messages when launching the camera, try the following:•Charge the battery.•Free some memory by transferring files to a computer or deleting files from your device.•Restart the device. If you are still having trouble with the camera app after trying these tips, contact a Samsung Service Centre.Photo quality is poorer than the preview•The quality of your photos may vary, depending on the surroundings and the photography techniques you use.•If you take photos in dark areas, at night, or indoors, image noise may occur or images may be out of focus.
Appendix68Error messages appear when opening multimedia filesIf you receive error messages or multimedia files do not play when you open them on your device, try the following:•Free some memory by transferring files to an external storage device or deleting files from your device.•Ensure that the music file is not Digital Rights Management (DRM)-protected. If the file is DRM-protected, ensure that you have the appropriate licence or key to play the file.•Ensure that the file formats are supported by the device. If a file format is not supported, such as DivX or AC3, install an app that supports it. To confirm the file formats that your device supports, visit www.samsung.com.•Your device supports photos and videos captured with the device. Photos and videos captured by other devices may not work properly.•Your device supports multimedia files that are authorised by your network service provider or providers of additional services. Some content circulated on the Internet, such as ringtones, videos, or wallpapers, may not work properly.Another Bluetooth device is not located•Ensure that treless feature is activated on your device.•Ensure that the Bluetooth wireless feature is activated on the device you wish to connect to.•Ensure that your device and the other Bluetooth device are within the maximum Bluetooth range (10 m).If the tips above do not solve the problem, contact a Samsung Service Centre.A connection is not established when you connect the device to a computer•Ensure that the USB cable you are using is compatible with your device.•Ensure that you have the proper driver installed and updated on your computer.•If you are a Windows XP user, ensure that you have Windows XP Service Pack 3 or higher installed on your computer.
Appendix69Your device cannot find your current locationGPS signals may be obstructed in some locations, such as indoors. Set the device to use Wi-Fi to find your current location in these situations.Data stored in the device has been lostAlways make backup copies of all important data stored in the device. Otherwise, you cannot restore data if it is corrupted or lost. Samsung is not responsible for the loss of data stored in the device.The touchscreen does not turn on when you open the Keyboard CoverEnsure that your device connects to the Keyboard Cover, and the device is in correct position using the stand of the Keyboard Cover. Refer to Keyboard Cover for more information.A small gap appears around the outside of the device case•This gap is a necessary manufacturing feature and some minor rocking or vibration of parts may occur.•Over time, friction between parts may cause this gap to expand slightly.Windows recovery functionIf the Samsung Recovery app is not supported, reinstall Windows using the Windows recovery function.Reinstalling Windows will erase all apps and data on the device. Back up important apps and data to an external storage device before reinstalling Windows.After Windows is reinstalled, you can install the required Samsung apps.1  On the taskbar, tap   → Settings → Update & security → Recovery.2  Tap Get started.3  Tap Keep my files or Remove everything.
Appendix70Removing the battery•To remove the battery, contact an authorised service centre. To obtain battery removal instructions, please visit www.samsung.com/global/ecodesign_energy.•For your safety, you must not attempt to remove the battery. If the battery is not properly removed, it may lead to damage to the battery and device, cause personal injury, and/or result in the device being unsafe.•Samsung does not accept liability for any damage or loss (whether in contract or tort, including negligence) which may arise from failure to precisely follow these warnings and instructions, other than death or personal injury caused by Samsung’s negligence.
48Exposure to Radio Frequency (RF) SignalsYour wireless device is a radio transmitter and receiver. It is designed and manufactured not to exceed the exposure limits for radio frequency (RF) energy set by the Federal Communications Commission (FCC) of the U.S. government. These FCC exposure limits are derived from the recommendations of two expert organizations, the National  Counsel  on Radiation Protection and Measurement (NCRP) and the Institute of Electrical and Electronics Engineers (IEEE). In both cases, the engineering experts drawn from industry, government, The exposure limit set by the FCC for wireless mobiledevices employs a unit of measurement known as the the rate of absorption of RF energy by the human body expressed in units of watts per kilogram (W/kg). T he FCC requires wireless devices to comply with a safety limit of 1.6 watts per kilogram (1.6 W/kg). The FCC exposure limit incorporates a substantial margin of safety to give additional protection to the public and to account for any variations in measurements.SAR tests are conducted using recommended operating positions accepted by the FCC with the device  tested frequency bands. Although the SAR is determined of the device while operating can be well  below the  maximum value. This is because the device is designed  to operate at multiple power levels so as to use only the power required to reach the network. In general, the closer you are to a wireless base station antenna, the lower the power output.Before a new model device is available for sale to the it does not exceed the exposure limit established by the FCC. Tests for each model are performed in positions and locations (e.g.  near the body) as requiredby the FCC. Health and safety informationFor typical operations, this model has been tested and meets the FCC exposure guidelines.    SAR information on this and other models can be viewed on-line at http://www.fcc.gov/oet/ea/fccid/.  This site uses the FCC ID number A3LSMW728.You can check the  FCC ID on the rear case.Once you have the FCC ID number for a particular device,follow the instructions on the website and it should  provide values for typical  or maximum SAR fora particular deviceSAR information can also be obtained at www.fcc.gov/cgb/sar.Operating EnvironmentRemember to follow any special regulations in force in any area and always switch your deviceforbidden to use it, or when it may cause interference or danger. When connecting the device or any accessory  to another device, read its user’s guide for detailed safety instructions. Do not connect incompatible products.
FCC Notice and Cautions  FCC Notice  This device complies with Part 15 of the FCC Rules. Operation is subject to the following two conditions:  (1) this device may not cause harmful interference, and (2)  this device must accept any interference received, including interference that may cause undesired operation.  This equipment has been tested and found to comply with the limits for a Class B digital device, pursuant to part 15 of the FCC Rules. These limits are designed to provide reasonable protection against harmful interference in a residential installation. This equipment generates, uses and can radiate radio frequency energy and, if not installed and used in accordance with the instructions, may cause harmful interference to radio communications. However, there is no guarantee that interference will not occur in a particular installation. If this equipment does cause harmful interference to radio or television reception, which can be determined by turning the equipment off and on, the user is encouraged to try to correct the interference by one or more of the following measures:  -  Reorient or relocate the receiving antenna.  -Increase the separation between the equipment and receiver. -  Connect the equipment into an outlet on a circuit from that to which the receiver is connected. -  Consult the dealer or an experienced radio/TV technician for help.  The device may cause TV or radio interference if used in close proximity to receiving equipment. The FCC can require you to stop using the device if such interference cannot be eliminated. Vehicles using petroleum gas (such as propane or butane) must comply with the National Fire Protection Standard (NFPA-58). For a copy of this standard, contact the National Fire Protection Association, One Battery march Park, Quincy, MA 02269, Attn: Publication Sales Division.   Cautions Changes or modifications made in the radio device, not expressly approved by Samsung, will void the user’s authority to operate the equipment.The use of any unauthorized accessories may be dangerous and void the device warranty if said accessories cause damage or a defect to the device. Although your device is quite sturdy, it is a complex piece of equipment and can be broken. Avoid dropping, hitting, bending or sitting on it.
This device is capable of operating in 802.11a/n/ac mode. For 802.11a/n/ac devices operating in the frequency range of 5.15 - 5.25 GHz, they are restricted for indoor operations to reduce any potential harmful interference for Mobile Satellite Services (MSS) in the US.    WIFI Access Points that are capable of allowing your device to operate in 802.11a/n/ac mode (5.15 - 5.25 GHz band) are optimized for indoor use only. If your WIFI network is capable of operating in this mode, please restrict your WIFI use indoors to not violate federal regulations to protect Mobile Satellite Services.
CopyrightCopyright © 2017 Samsung ElectronicsThis manual is protected under international copyright laws.No part of this manual may be reproduced, distributed, translated, or transmitted in any form or by any means, electronic or mechanical, including photocopying, recording, or storing in any information storage and retrieval system, without the prior written permission of Samsung Electronics.Trademarks•SAMSUNG and the SAMSUNG logo are registered trademarks of Samsung Electronics.•Microsoft, MS-DOS, and Windows are trademarks or registered trademarks of the Microsoft Corporation.•Bluetooth® is a registered trademark of Bluetooth SIG, Inc. worldwide.•Wi-Fi®, Wi-Fi Protected Setup™, Wi-Fi CERTIFIED™, and the Wi-Fi logo are registered trademarks of the Wi-Fi Alliance.•All other trademarks and copyrights are the property of their respective owners.

Navigation menu