Samsung Electronics Co SNCL200W NETWORK CAMERA User Manual USERS MANUAL
Samsung Electronics Co Ltd NETWORK CAMERA USERS MANUAL
UserManual.wiki
>
Samsung Electronics Co
>
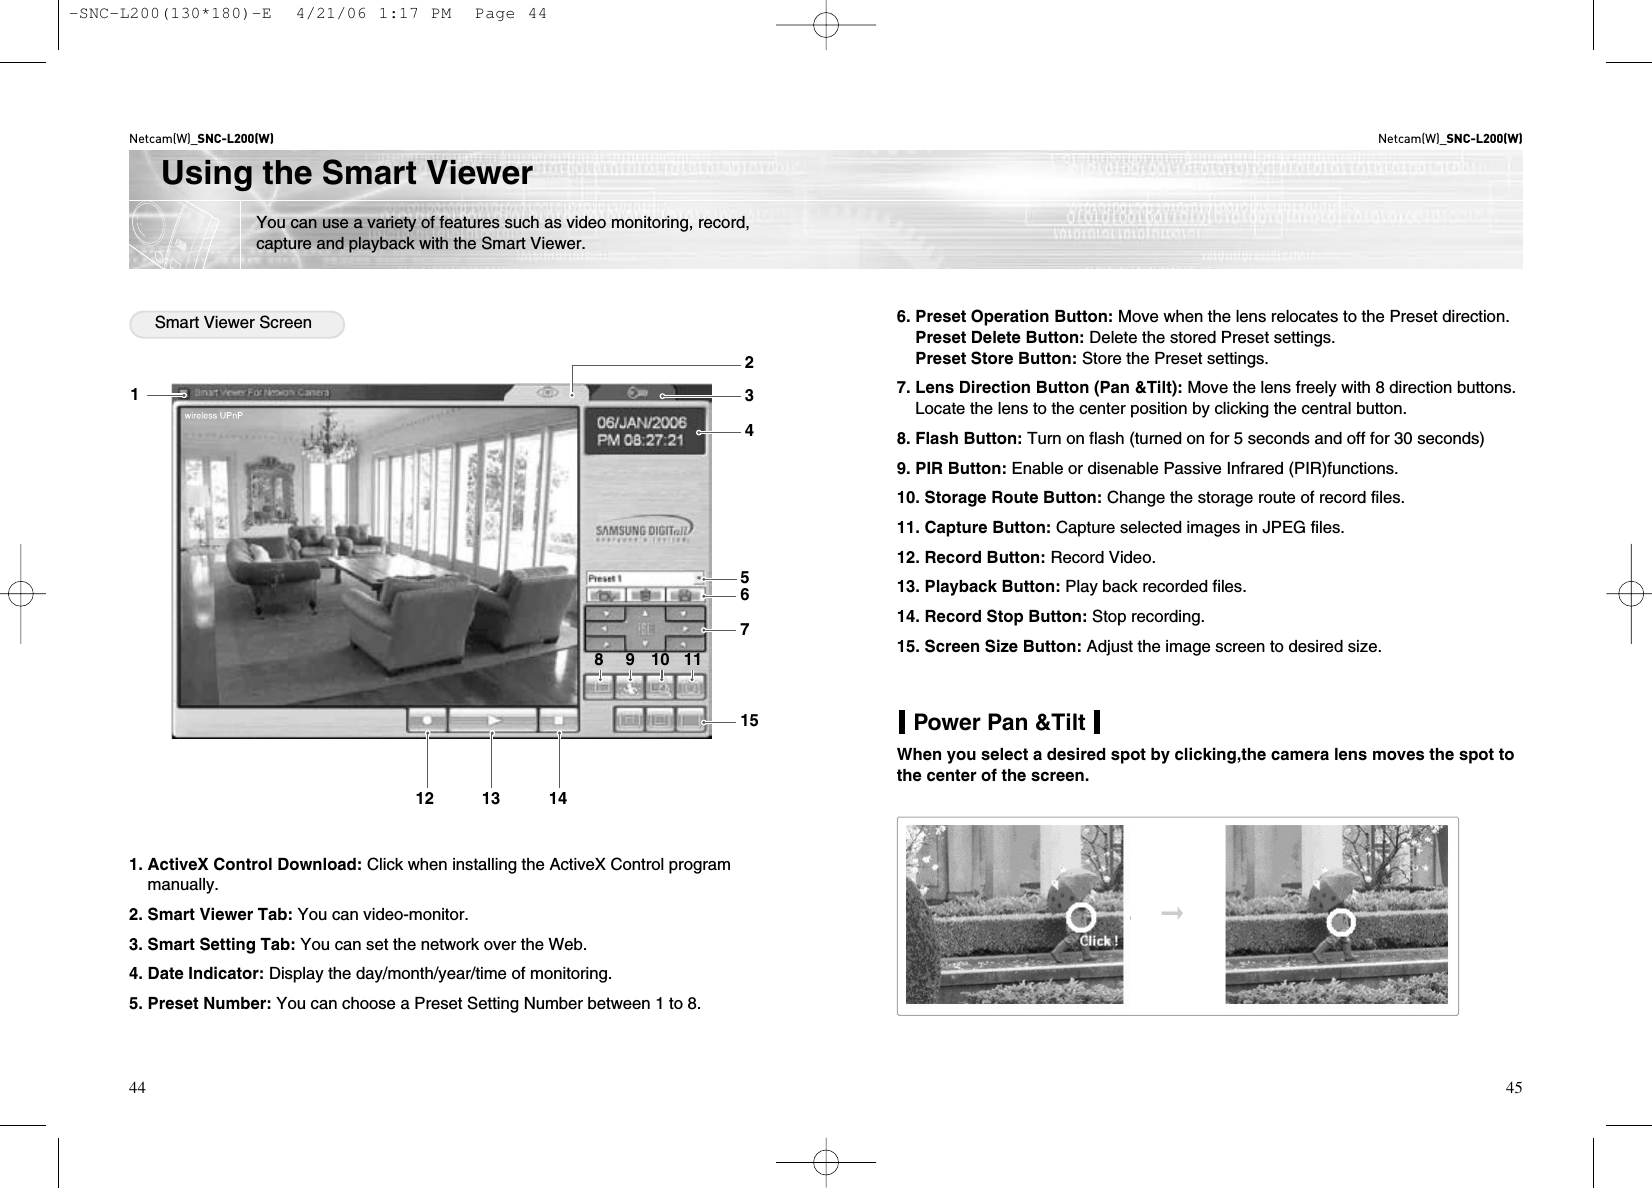
SNCL200W User Manual
USERS MANUAL
Navigation menu
Upload a User Manual
Namespaces
Wiki Guide
HTML
PDF
Info
Views
User Manual
Discussion / Help
Navigation
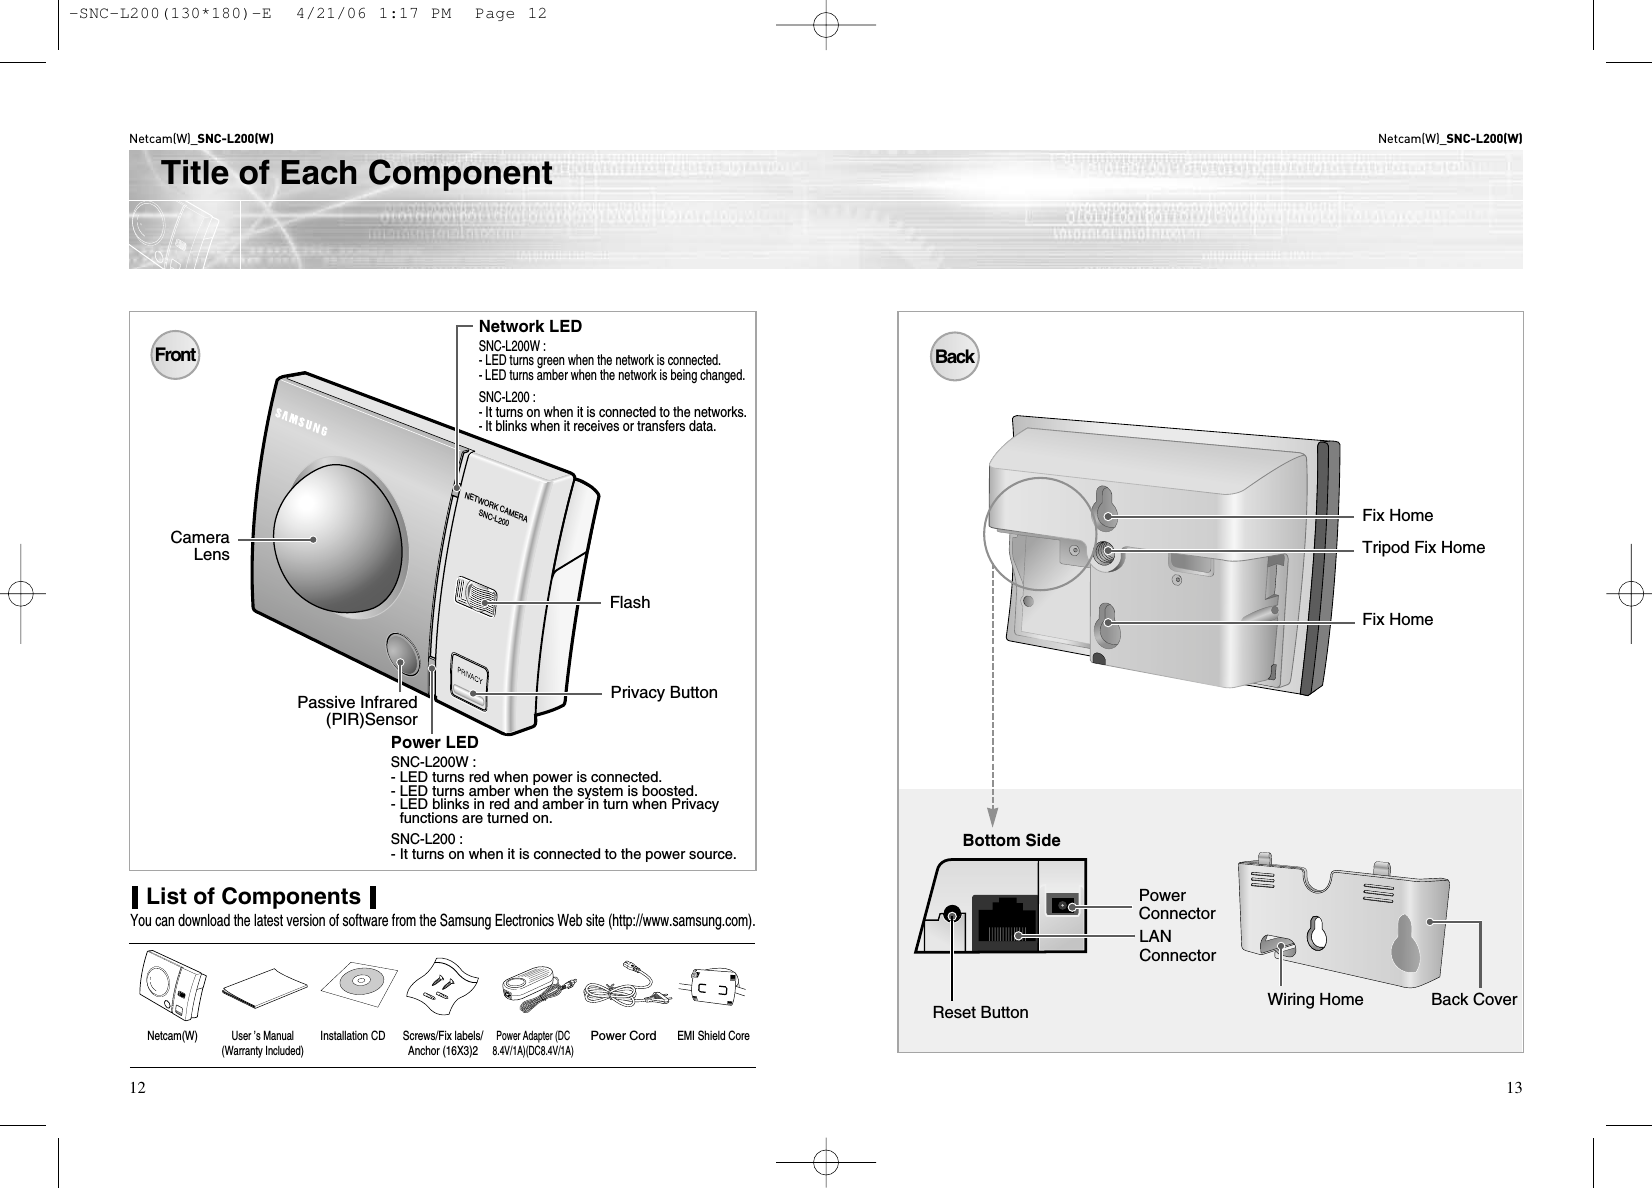
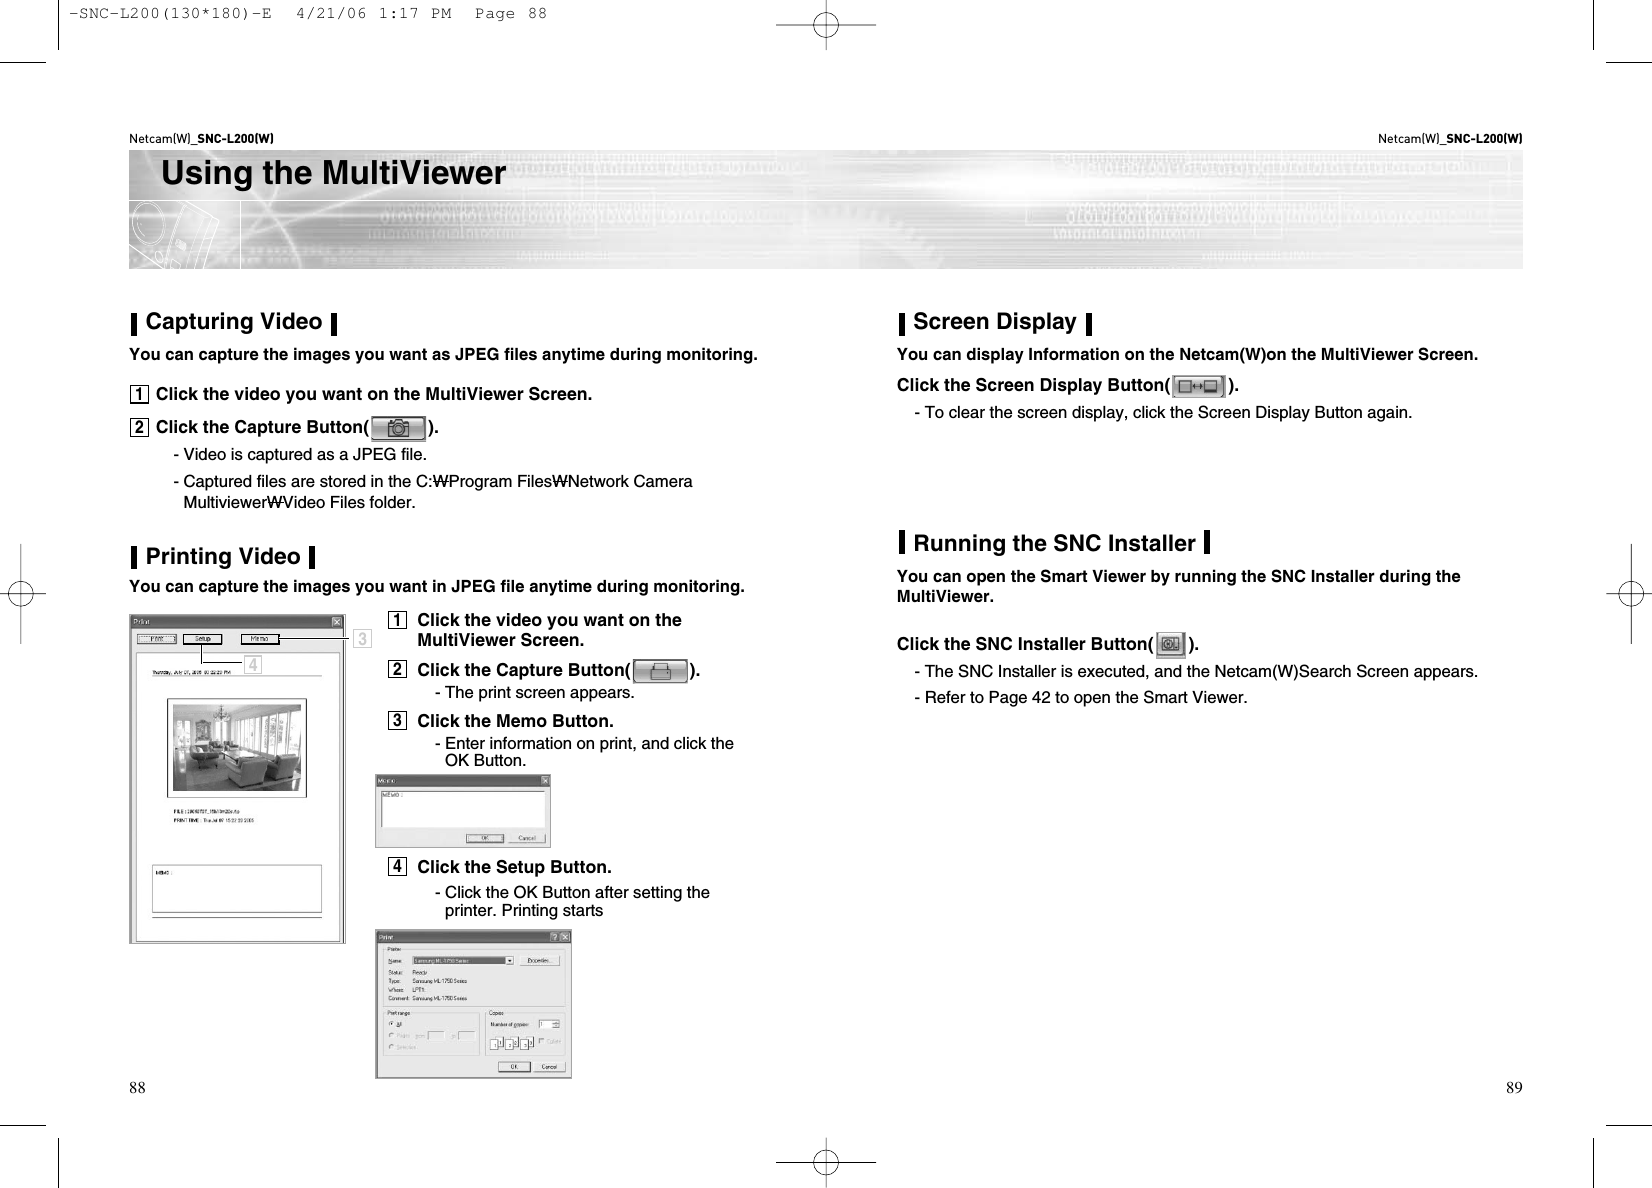
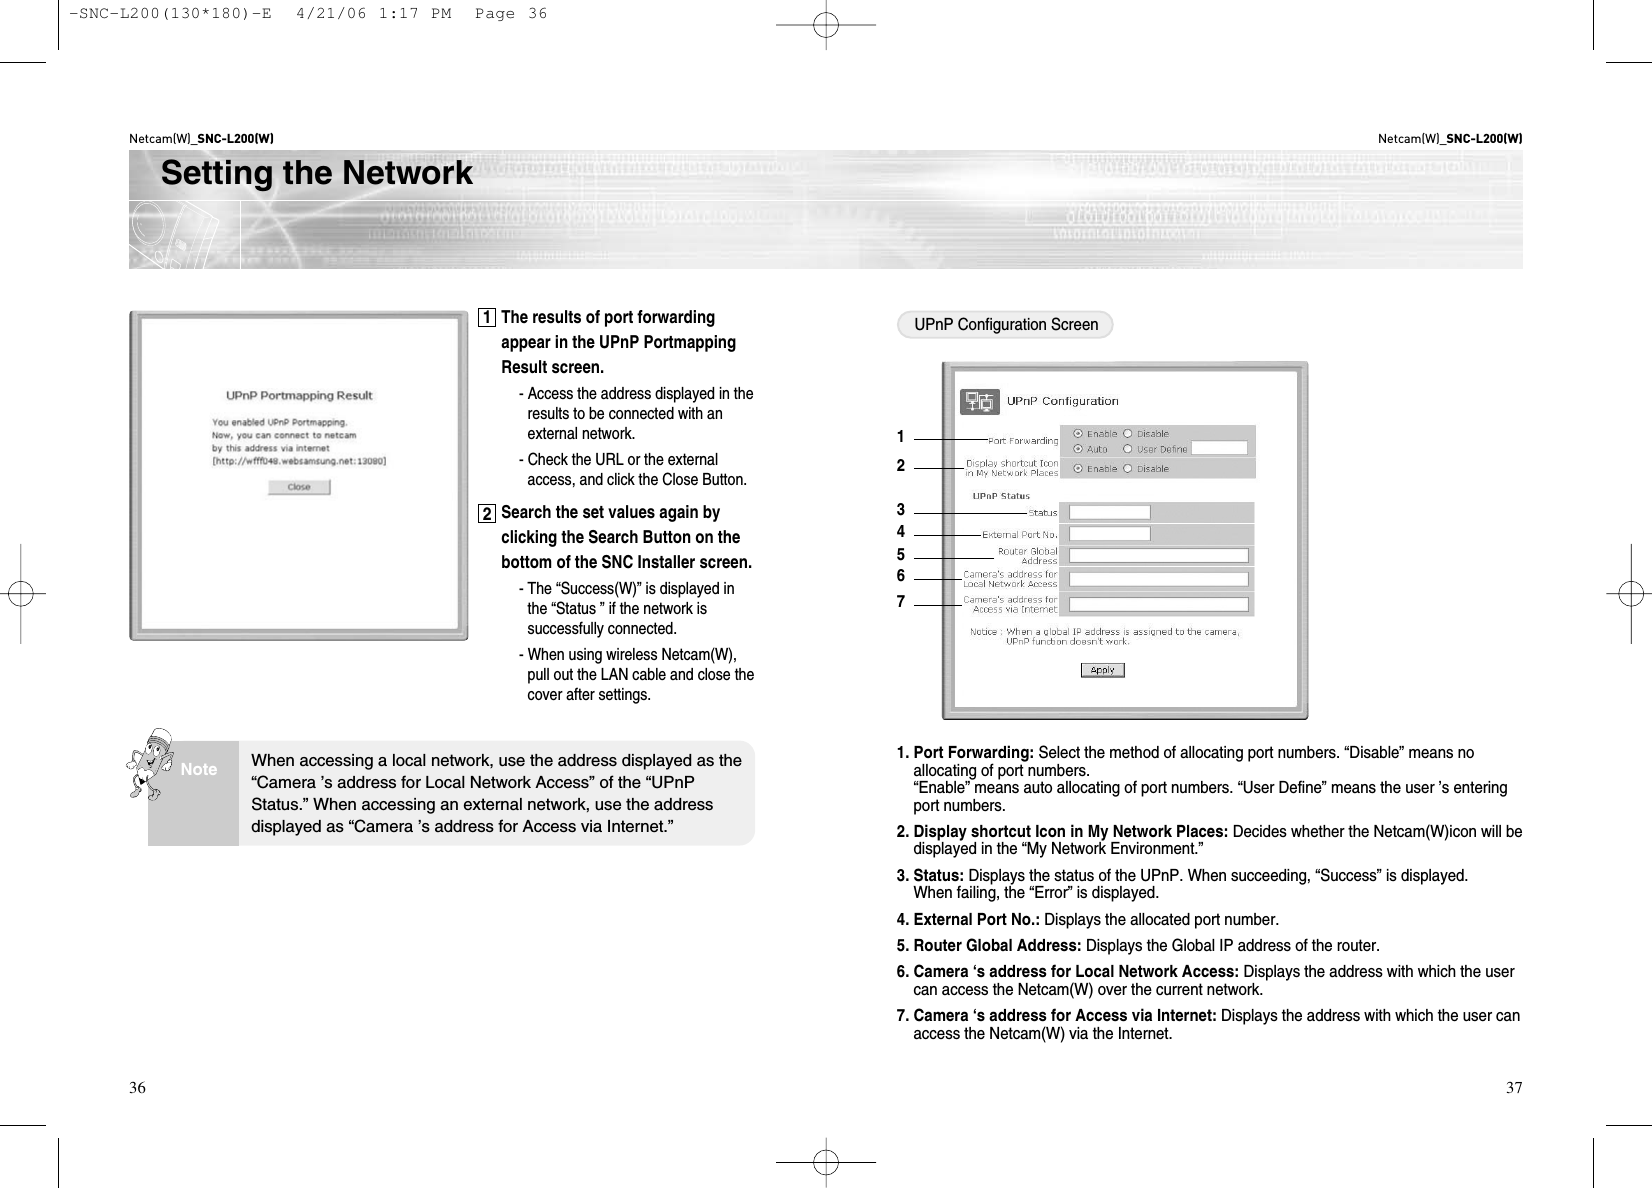
![Netcam(W)_SNC-L200(W)15Netcam(W)_SNC-L200(W)14Title of Each ComponentPassive Infrared (PIR)Sensor Detects and records motion of a human or an animal by using an infrared ray.- Selects perform or cancel by using the PIR Sensor Button of Smart/Multi Viewer.- Flash can be turned on in link with the PIR Sensor.Distance and RangeDistance of Detection : Up to 3mRange of detection (up and down) : Around 85°Range of detection (left and right) : Around 40°Distance and RangeDistance of Light Emitting : Up to 3mRange of detection (up and down) : Around 67°Range of detection (left and right) : Around 67°FlashYou can monitor the environment even in a dark room by using flash.- Turns on the flash by using the Flash button of the Smart/Multi Viewer.- Flash can be turned on in link with the PIR Sensor.- Flash is turned on for 5 seconds and off for 30 seconds. Even i f you click the Flash Button in 30 seconds, flash is not turned on.- Flash is also turned on for 5 seconds and off for 30 seconds when using the PIR Sensor.Range of detection left and right Range of detection up and downRange of light emitting left and right Range of light emitting up and downPrivacyTurns the lens out of the performance range to preventshooting for privacy.Press the Privacy Button.- Every time you press the button, [the lens moves out ofthe performance range ‘Privacy Mode’ is displayedand video is not transmitted restore to the previousstate ] process is repeated.ResetWhen the product is not in normal conditions, you canset the values to factory default.Press the Reset Button on the back for more than 3seconds.- Refer to the title of each component for the location ofthe Reset Button (page 12).- All the values are restored to factory default settings,and the system is rebooted. Use the product after some2 minutes.The left and right range of detection may change if motion is fast.Avoid exposing this product to direct sunlight, air conditioner or heater, high orcold temperature, humidity, oil, smoke and glass when installing the product.The Sensor may malfunction.WarningDo not use this function unless necessary. Stored values such as the network settings, registered users, the title of the Netcam(W), firmware upgrades are all switched tofactory default settings.Warning-SNC-L200(130*180)-E 4/21/06 1:17 PM Page 14](https://usermanual.wiki/Samsung-Electronics-Co/SNCL200W/User-Guide-650896-Page-8.png)
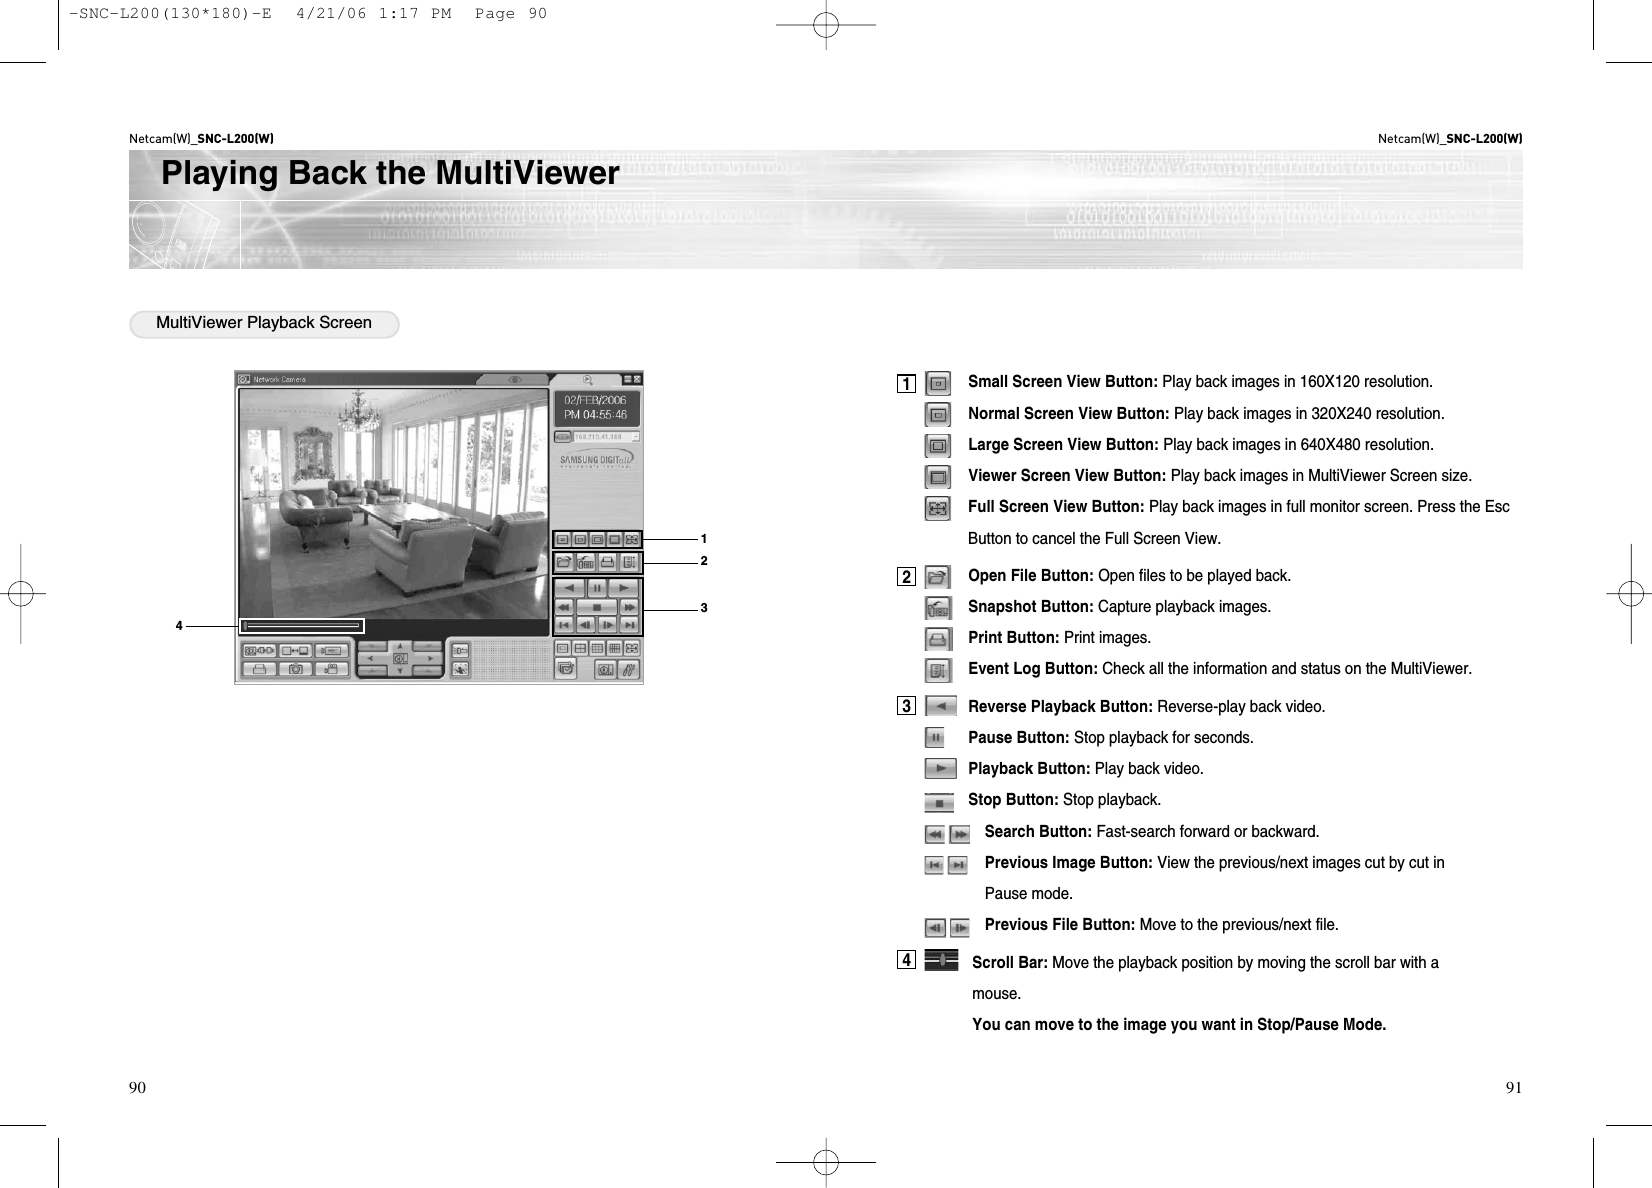
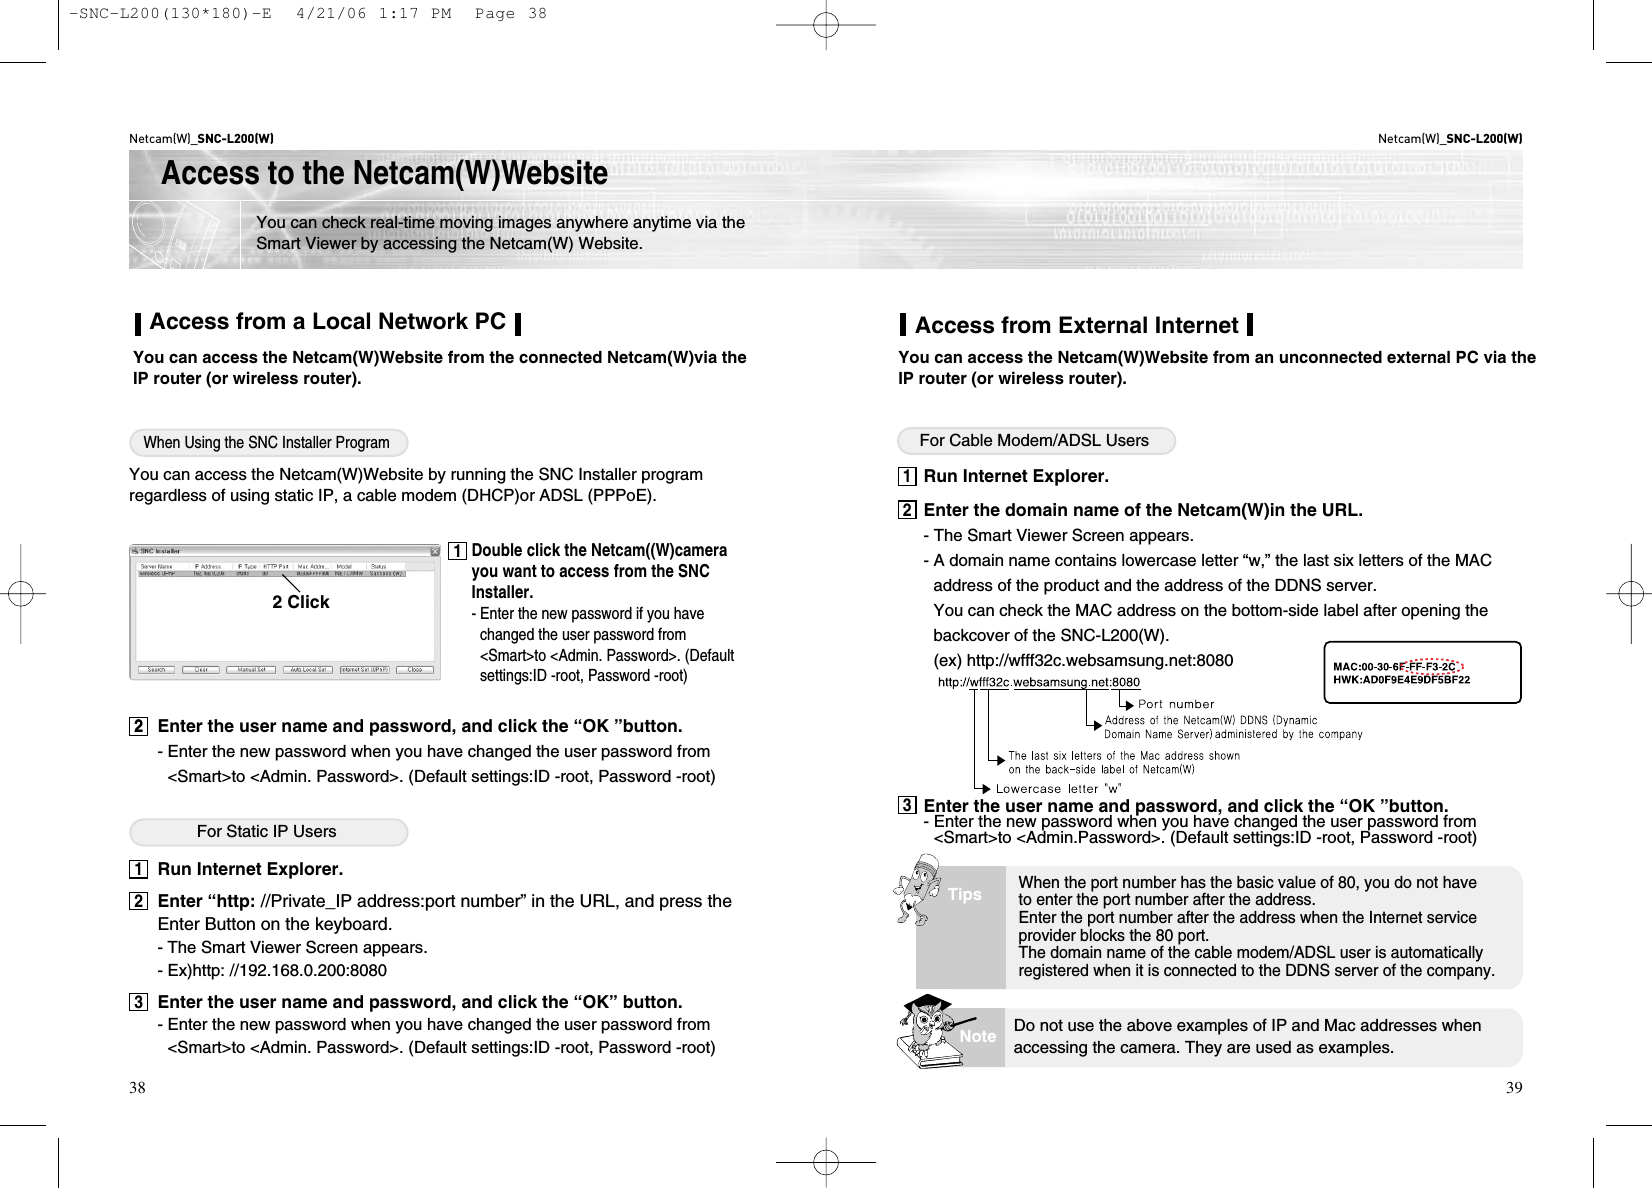
![Netcam(W)_SNC-L200(W)27Netcam(W)_SNC-L200(W)26Searching the Connected Netcam (W)Used to search an IP router (router or wireless router)connectedwith the Netcam(W)or a Netcam(W)directly connected with the PC.Run the program by double-clicking the SNC Installer icon. Or you can click [Start ]-[All Programs ]-[SNC Installer ]-[SNC Installer ].- If a warning screen appears, click the ‘block clear’ button (Windows XP Service Pack2).Press the ‘OK ’Button.When the SNC Installer is run, thefollowing window appears and all theNetcam(W)over the single network aresearched automatically.- Press the Cancel Button on the [Searching ….] window to cancel the search during process.1. Server Name: The name of the Netcam(W)set by the manager2. Model: The model name of the Netcam(W)3. IP Type: Displays the current status of network among Static,DHCP and PPPoE.4. IP Address: The IP address of the Netcam(W)5. HTTP Port: The port number used to access the Netcam(W)connected over a local network.6. Mac Address: The hardware address of the Netcam(W)shown on the back of the label.7. Ext Port: The port number that allows access to the Netcam(W)from the external Internet.8. Status : “Success(W)”appears when the network settings are correct,and “Auto Fail ”appears when thesettings are not authorized during the installation process.9. Search Button: Searches the Netcam(W)currently connected over the network.10. Clear Button: Deletes the list of the Netcam(W)s from the SNC Installer List.11. Manual Set Button: The user enters the network settings of the Netcam(W).12. Auto Local Set Button: The SNC Installer automatically sets the network settings of the Netcam(W).13. Internet Set (UPnP)Button: Port-forward to enable access to the Netcam(W)from the externalInternet.14. Close Button: Closes the SNC Installer window.15. URL via internet: The URL address used for access from the external Internet.SNC Installer ScreenThe search function of the SNC Installer is enabled when the camera is connected with the PC via an IP router or directly with the PCover a single network.NoteClick19101112 13 1415234 5 67812-SNC-L200(130*180)-E 4/21/06 1:17 PM Page 26](https://usermanual.wiki/Samsung-Electronics-Co/SNCL200W/User-Guide-650896-Page-14.png)

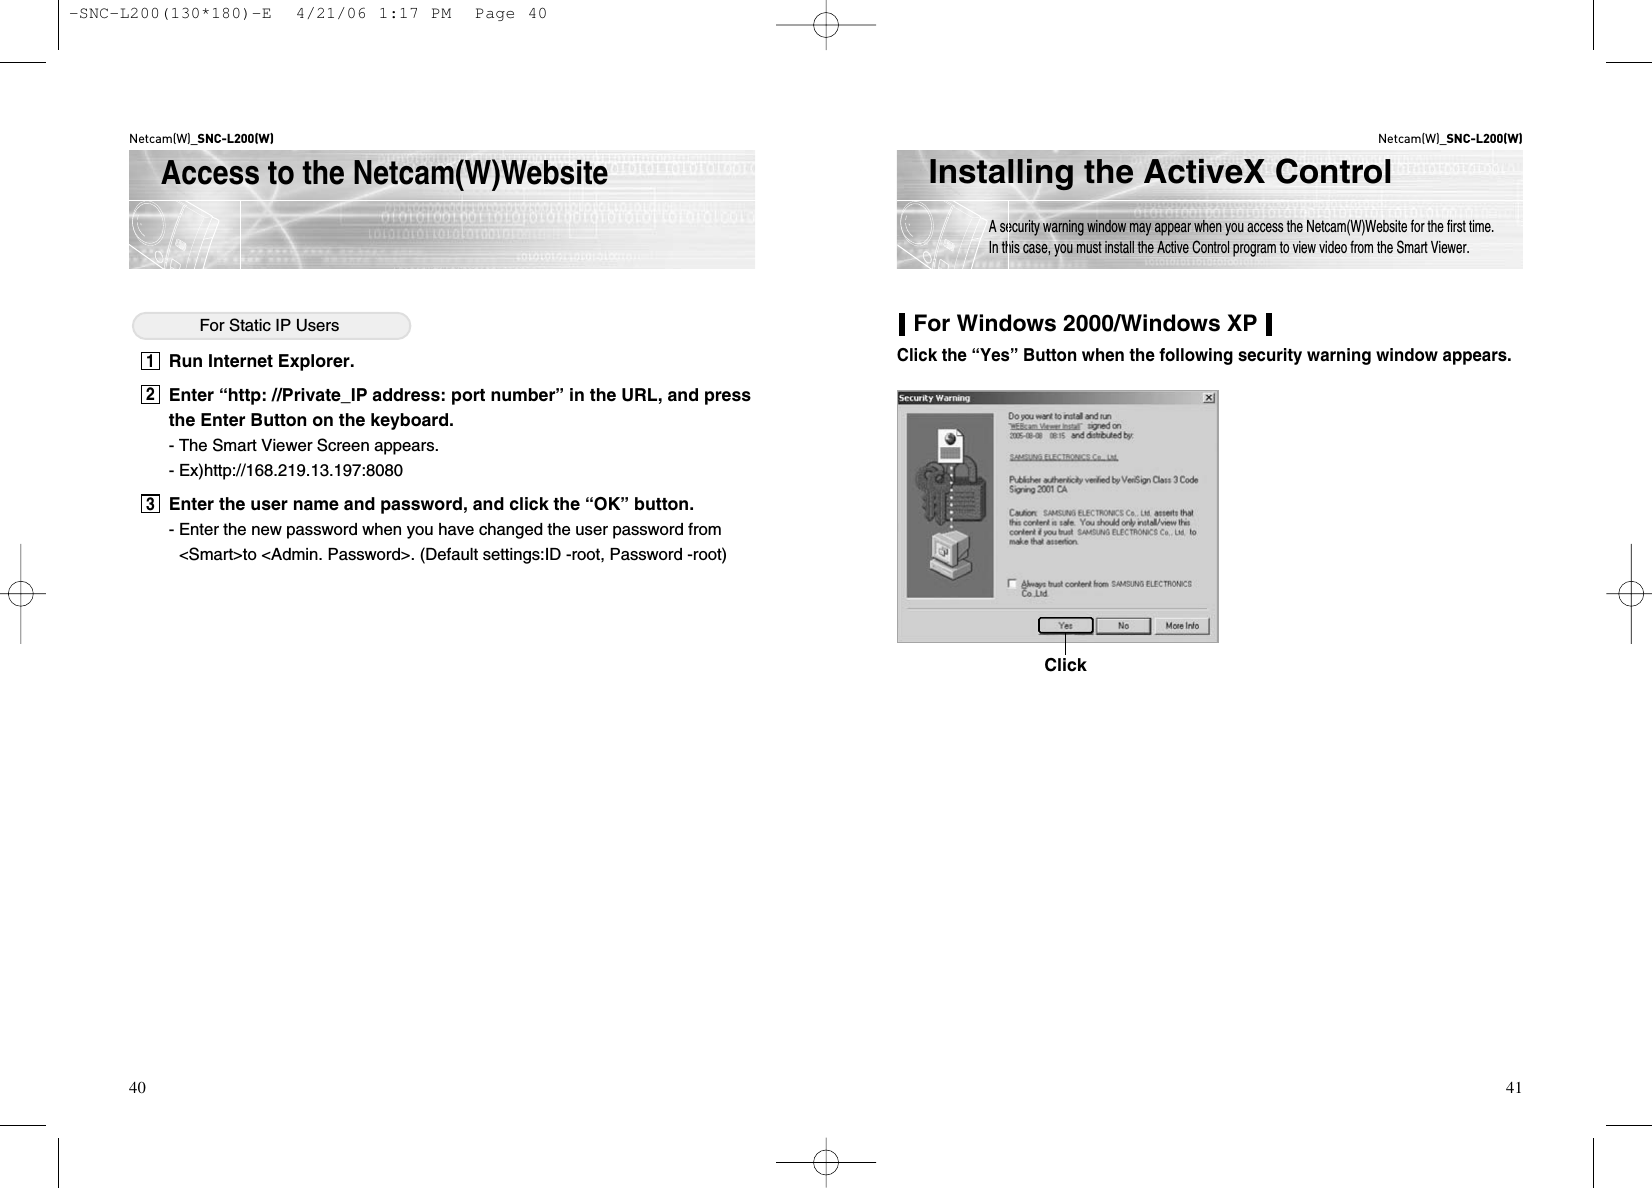
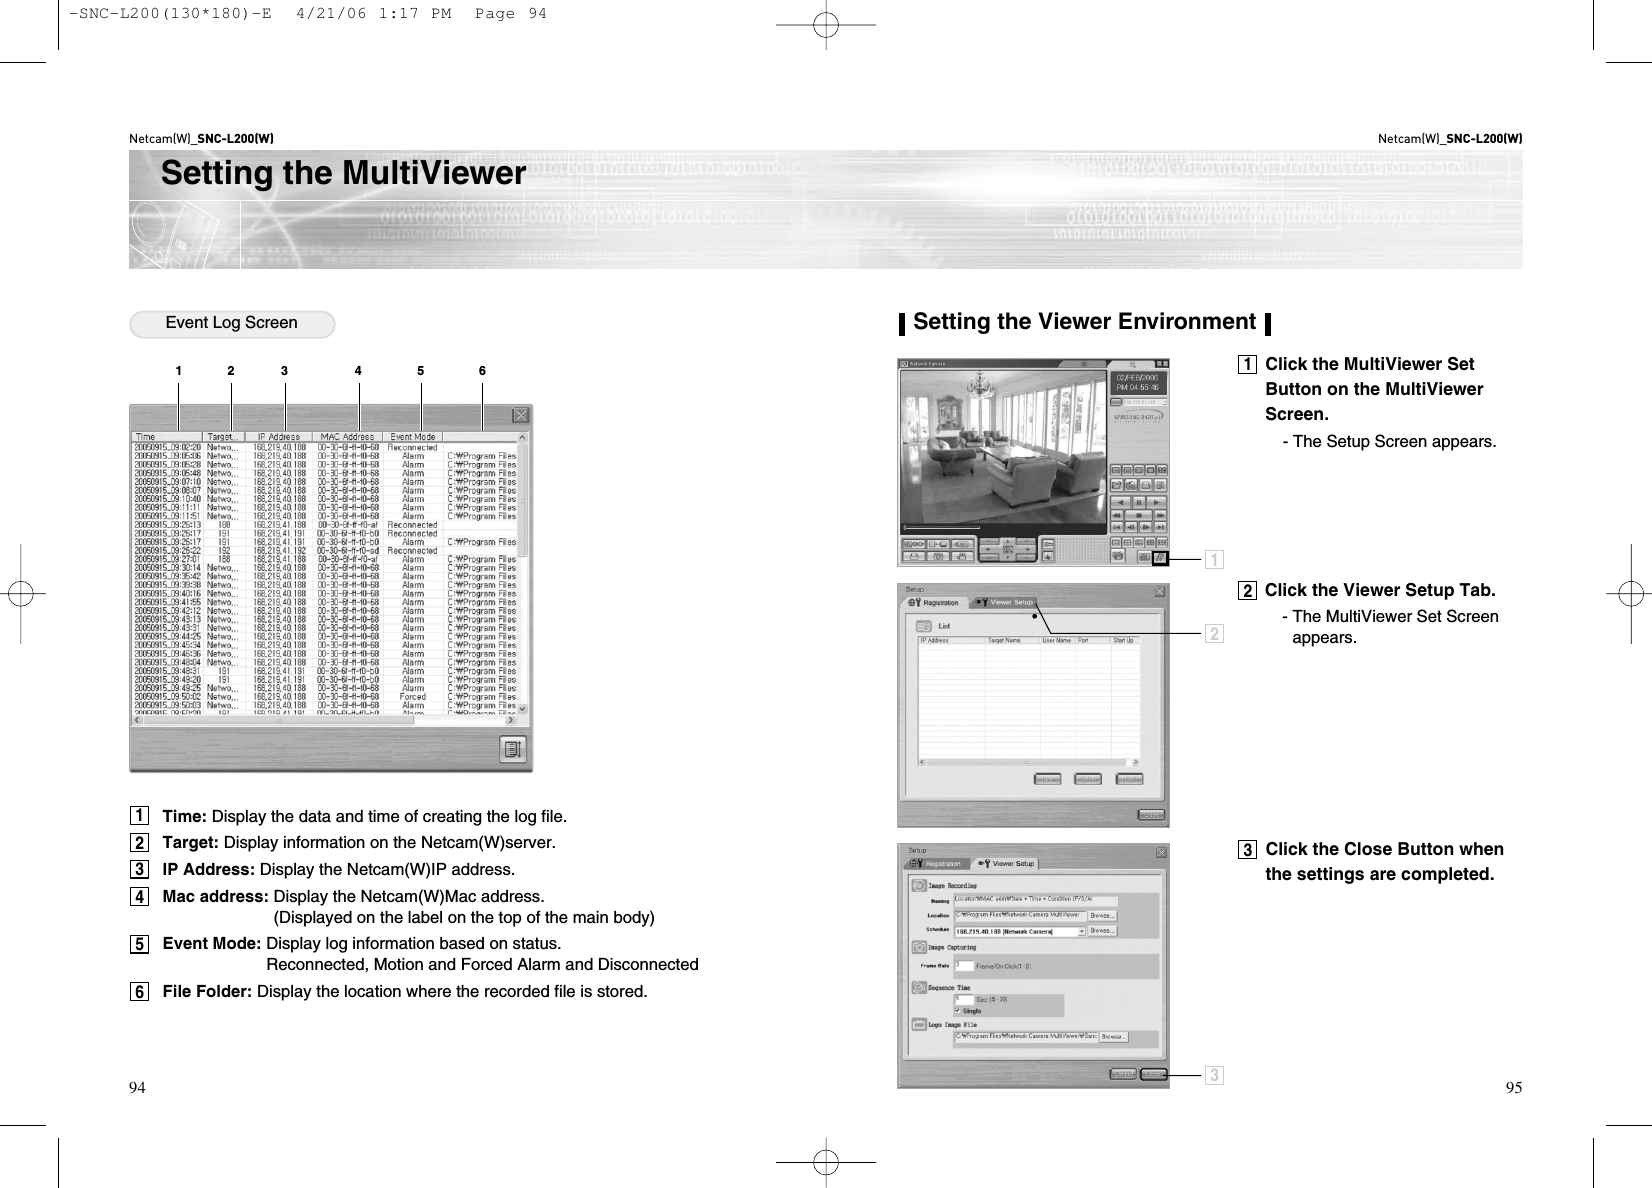
![Netcam(W)_SNC-L200(W)77Netcam(W)_SNC-L200(W)76Registering the Netcam(W)You can register up to Netcam(W)16 units.Double-click the “Network Camera MultiViewer”icon on the Background Screen.Or Click [Start ] -[All Programs ] -[Network Camera MultiViewer ] -[Network Camera MultiViewer ] to start.Click the MultiViewer Set Button.- The Registration Screen appears.Click the New Button.Enter information on theNetcam(W).- Check the ‘StartUp’ item, andvideo is automatically connectedwhen the MultiViewer programstarts.Click the OK Button.- Registration is completed, and thelist of registered Netcam(W)isdisplayed.Select the Netcam(W)to bedeleted from the registration list.Click the Delete Button.Click the Yes Button.Registering the Netcam(W)Deleting the Registered Netcam(W)Select the Netcam(W)to bemodified from the registration list.Click the Modify Button.Enter modified information.Click the OK Button.Modifying the Registered Netcam(W)12234534511234232324-SNC-L200(130*180)-E 4/21/06 1:17 PM Page 76](https://usermanual.wiki/Samsung-Electronics-Co/SNCL200W/User-Guide-650896-Page-39.png)
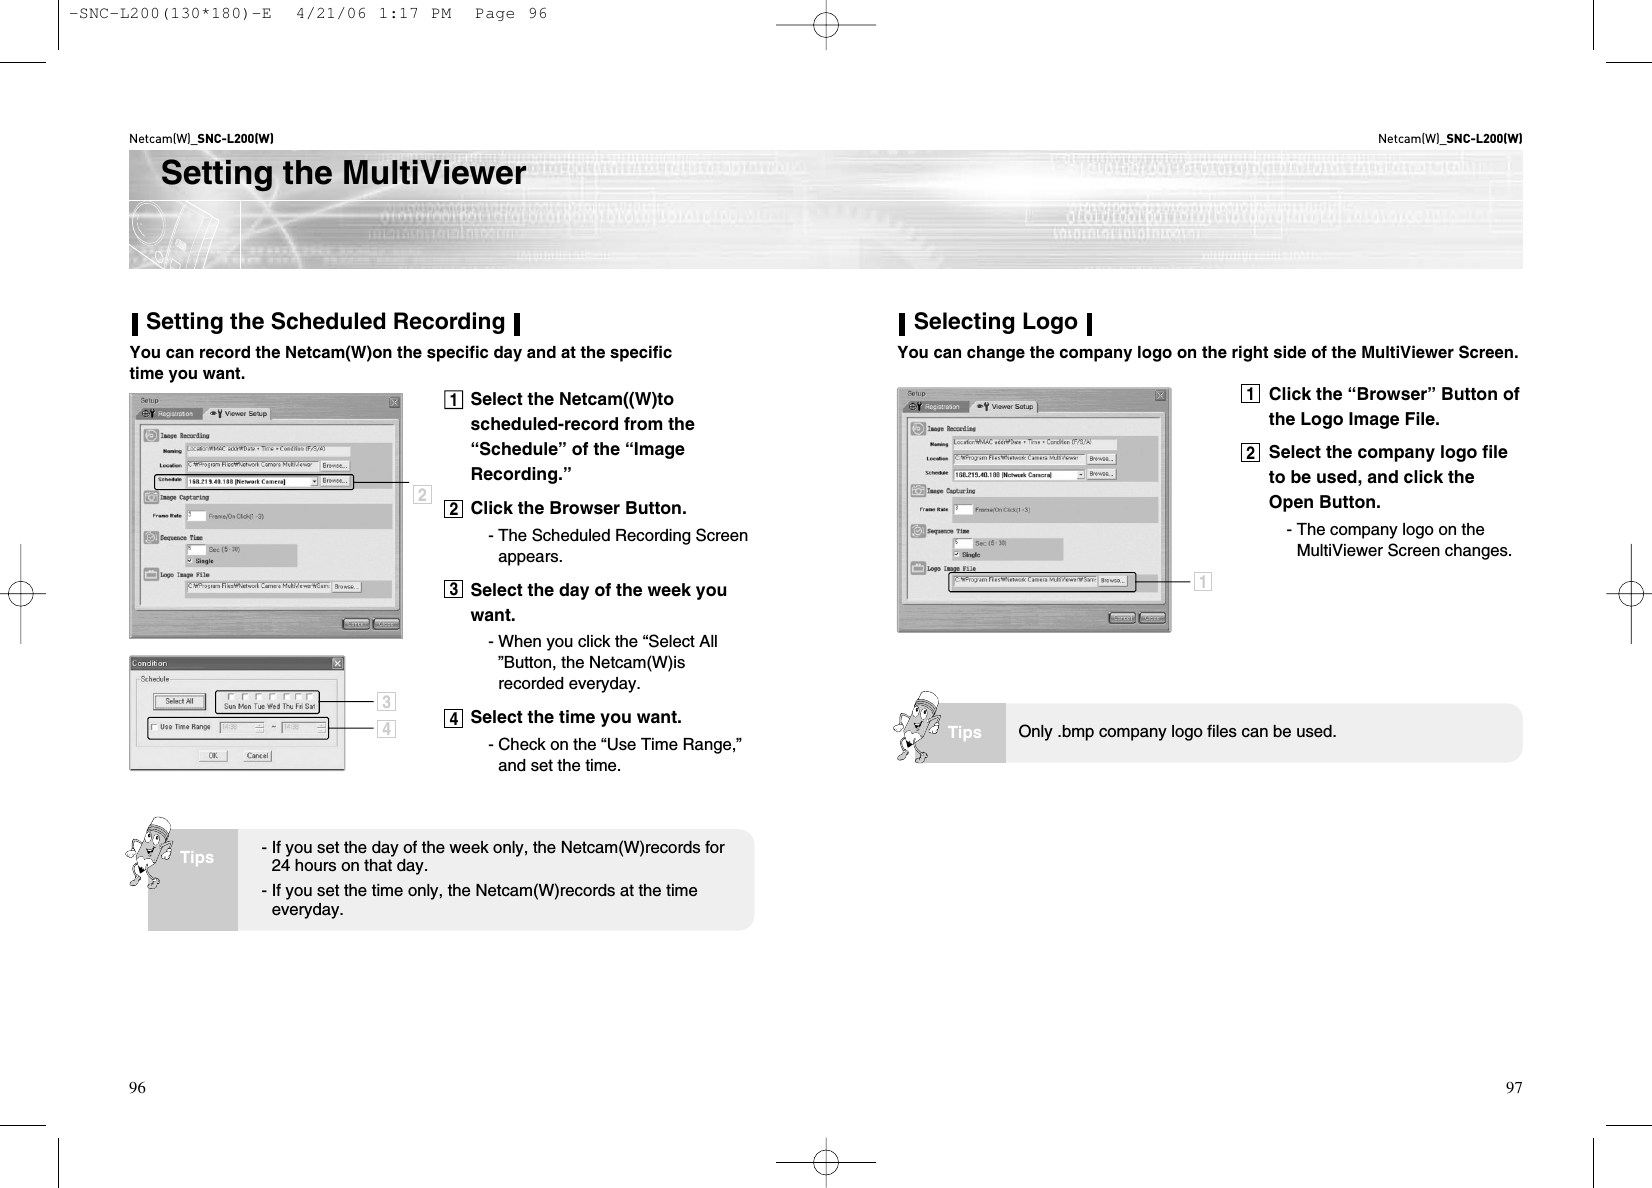
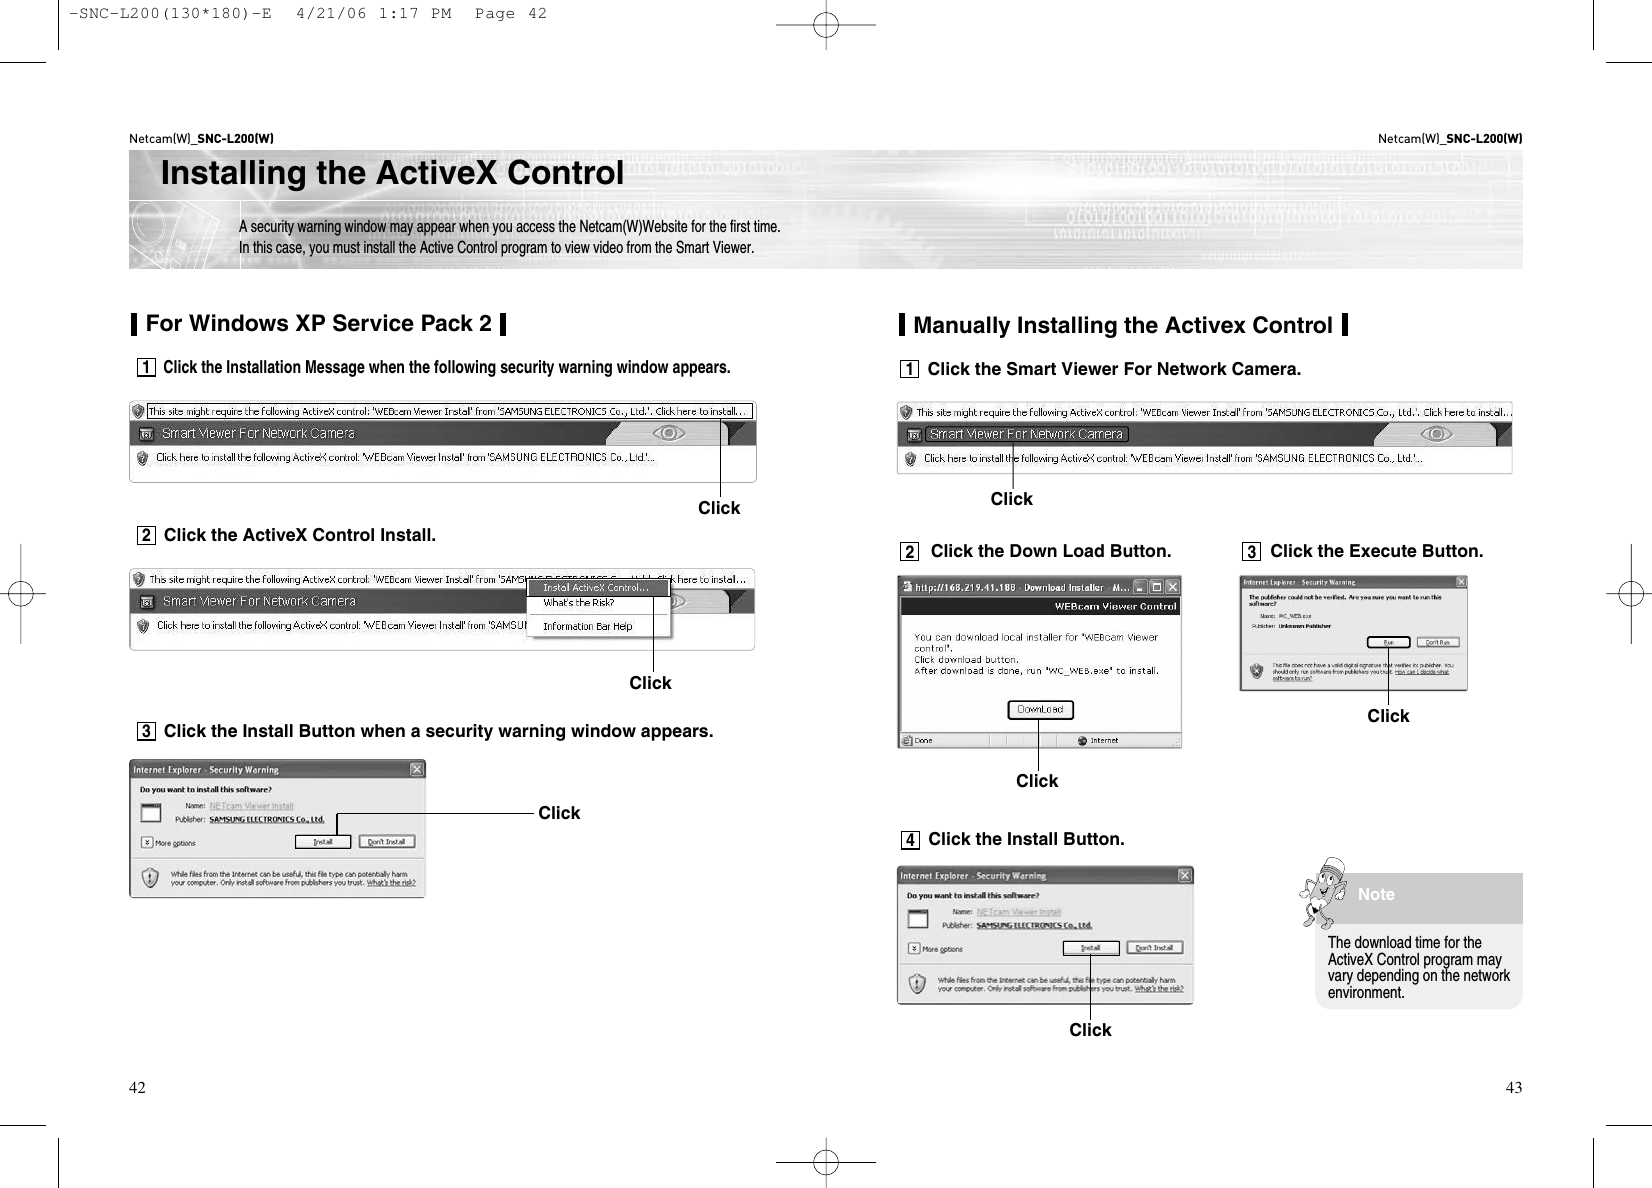
![Netcam(W)_SNC-L200(W)79Netcam(W)_SNC-L200(W)78Connecting the Netcam(W)You must first connect the registered Netcam(W)to view video from the MultiViewer.Double-click the Network Camera MultiViewer icon on the BackgroundScreen.Or Click [ Start ]-[ All Programs ]-[ Network Camera MultiViewer ]-[ Network Camera MultiViewer ] to start.Select the Netcam(W)to be connected from the Netcam(W)list.If you want to connect another Netcam(W), repeat the step 2 and 3.- Videos of the connected Netcam(W)s are shown in sequence.Click the video you want from theMultiViewer Screen.Click the Disconnect Button.Click the Yes Button when the message screen appears.- Video of the selected Netcam(W)isdisconnected,and the following images are moved up.Disconnecting the Netcam(W)231234123123-SNC-L200(130*180)-E 4/21/06 1:17 PM Page 78](https://usermanual.wiki/Samsung-Electronics-Co/SNCL200W/User-Guide-650896-Page-40.png)