Samsung Electronics Co SPHA450 Tri-Mode Dual-Band Analog/PCS Phone User Manual
Samsung Electronics Co Ltd Tri-Mode Dual-Band Analog/PCS Phone Users Manual
UserManual.wiki
>
Samsung Electronics Co
>
SPHA450 User Manual
Users Manual
Navigation menu
Upload a User Manual
Namespaces
Wiki Guide
HTML
PDF
Info
Views
User Manual
Discussion / Help
Navigation

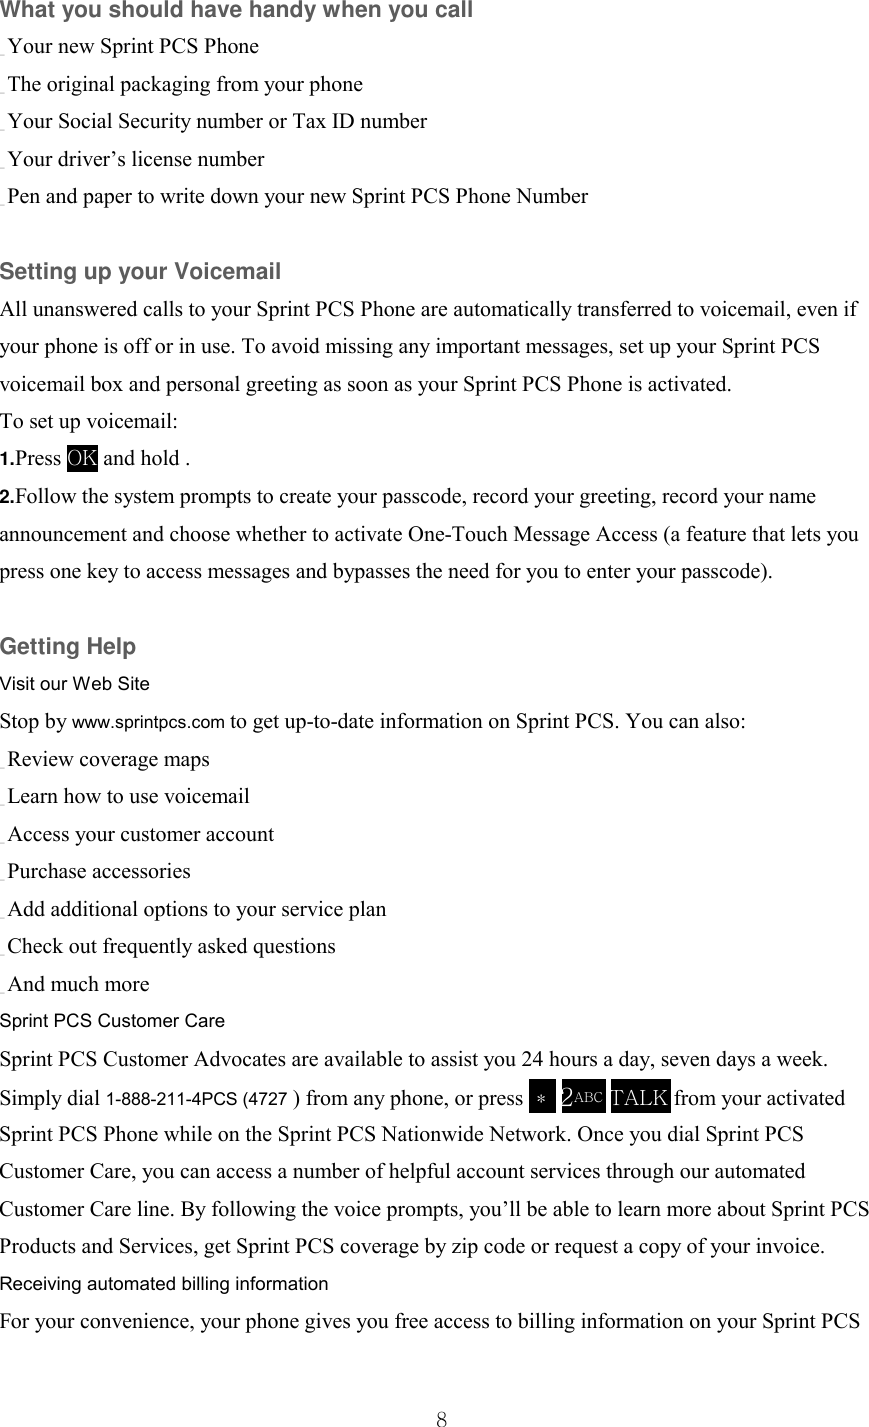


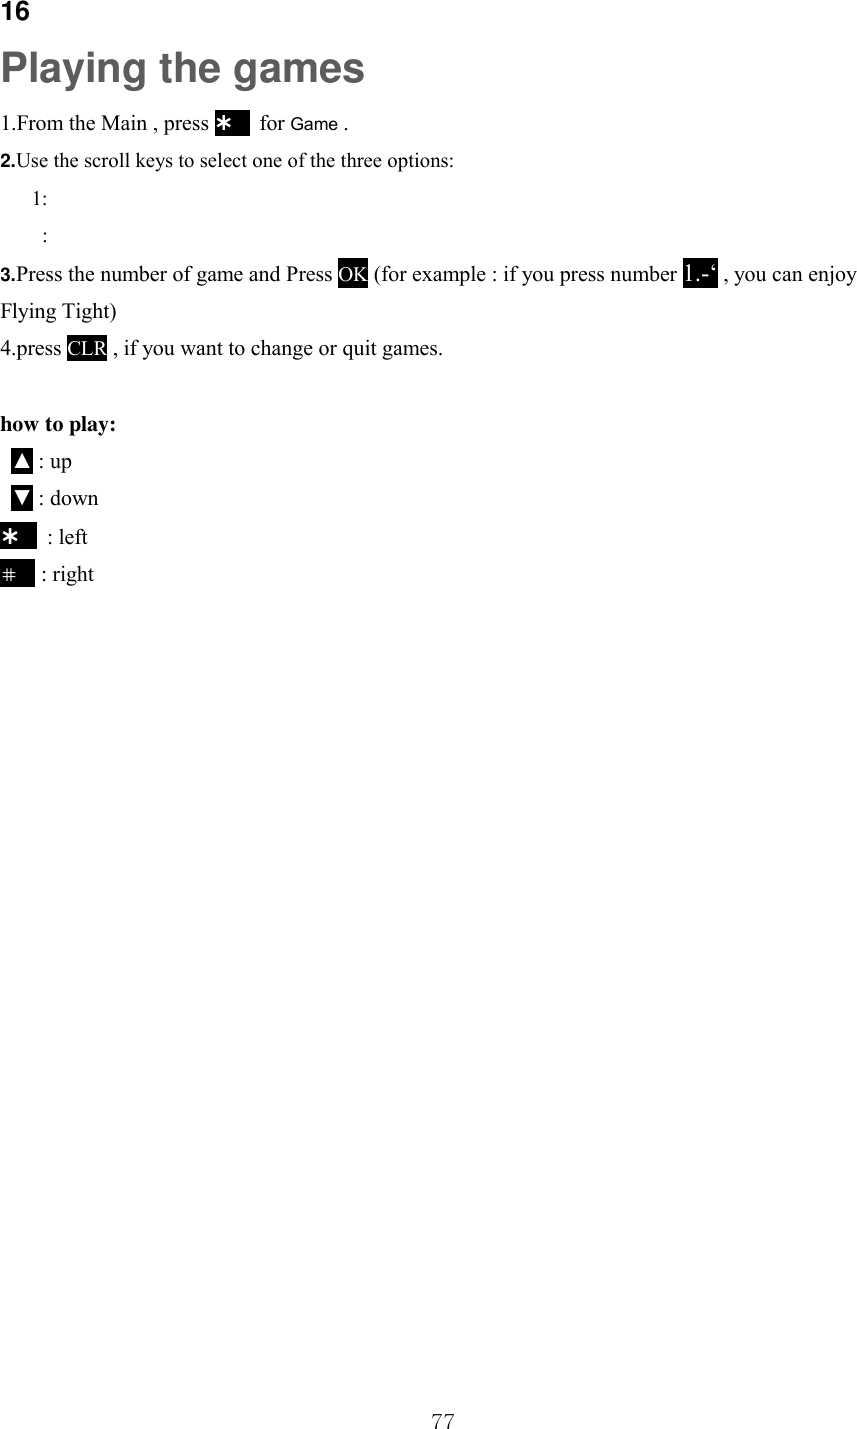
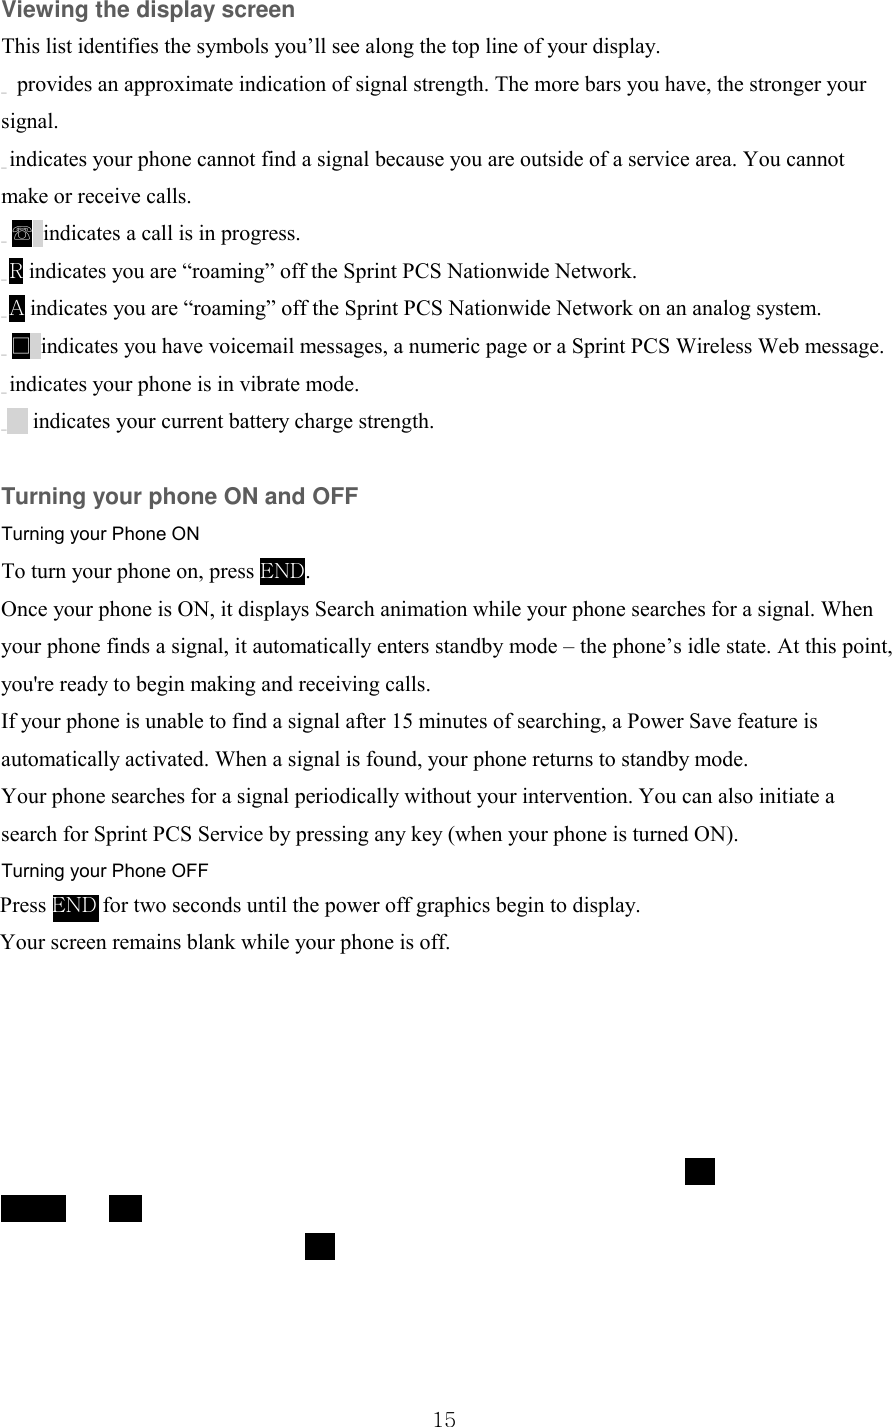
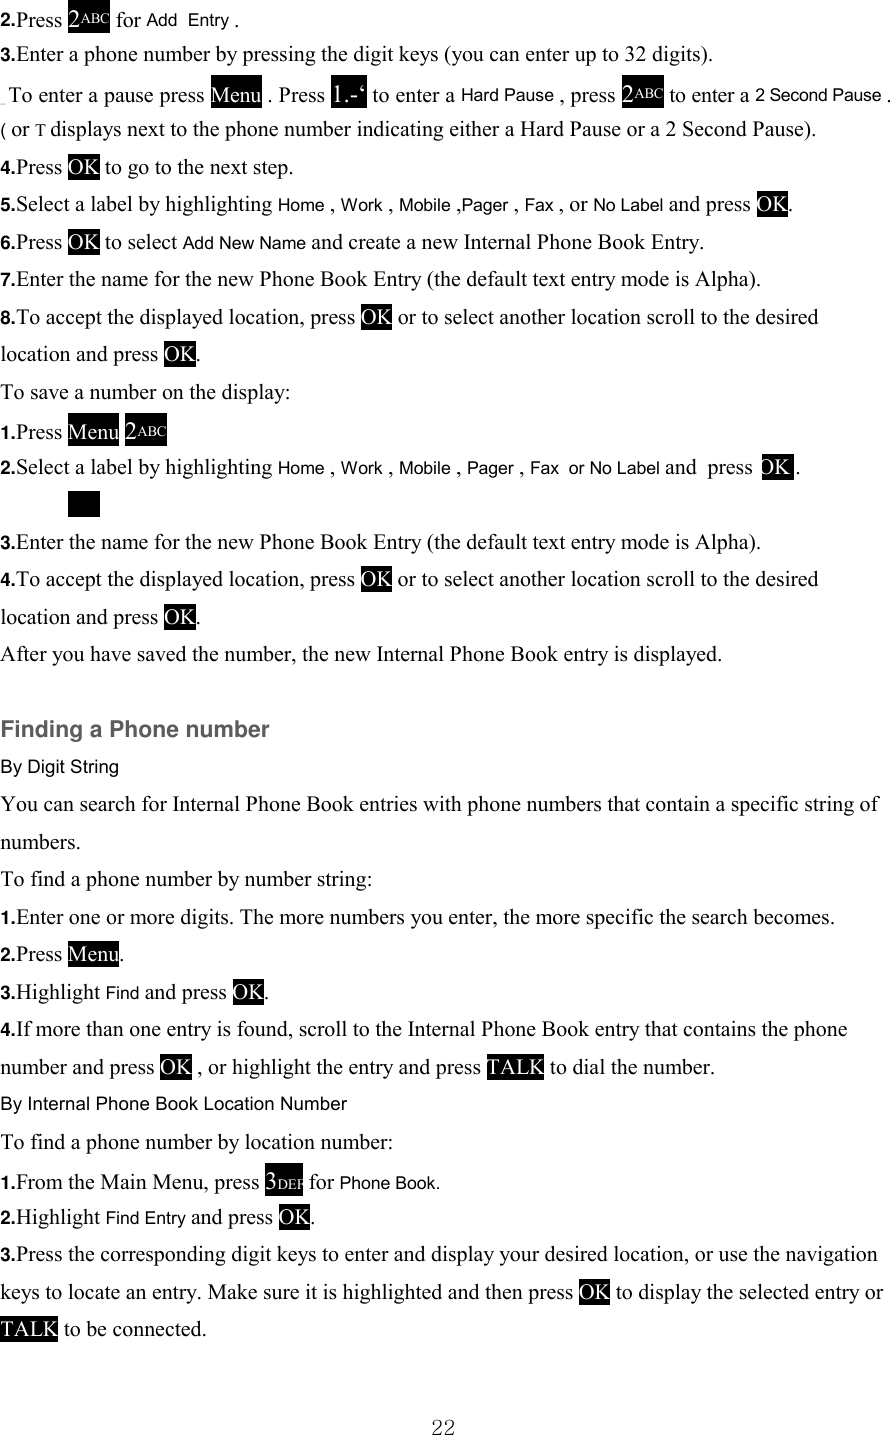
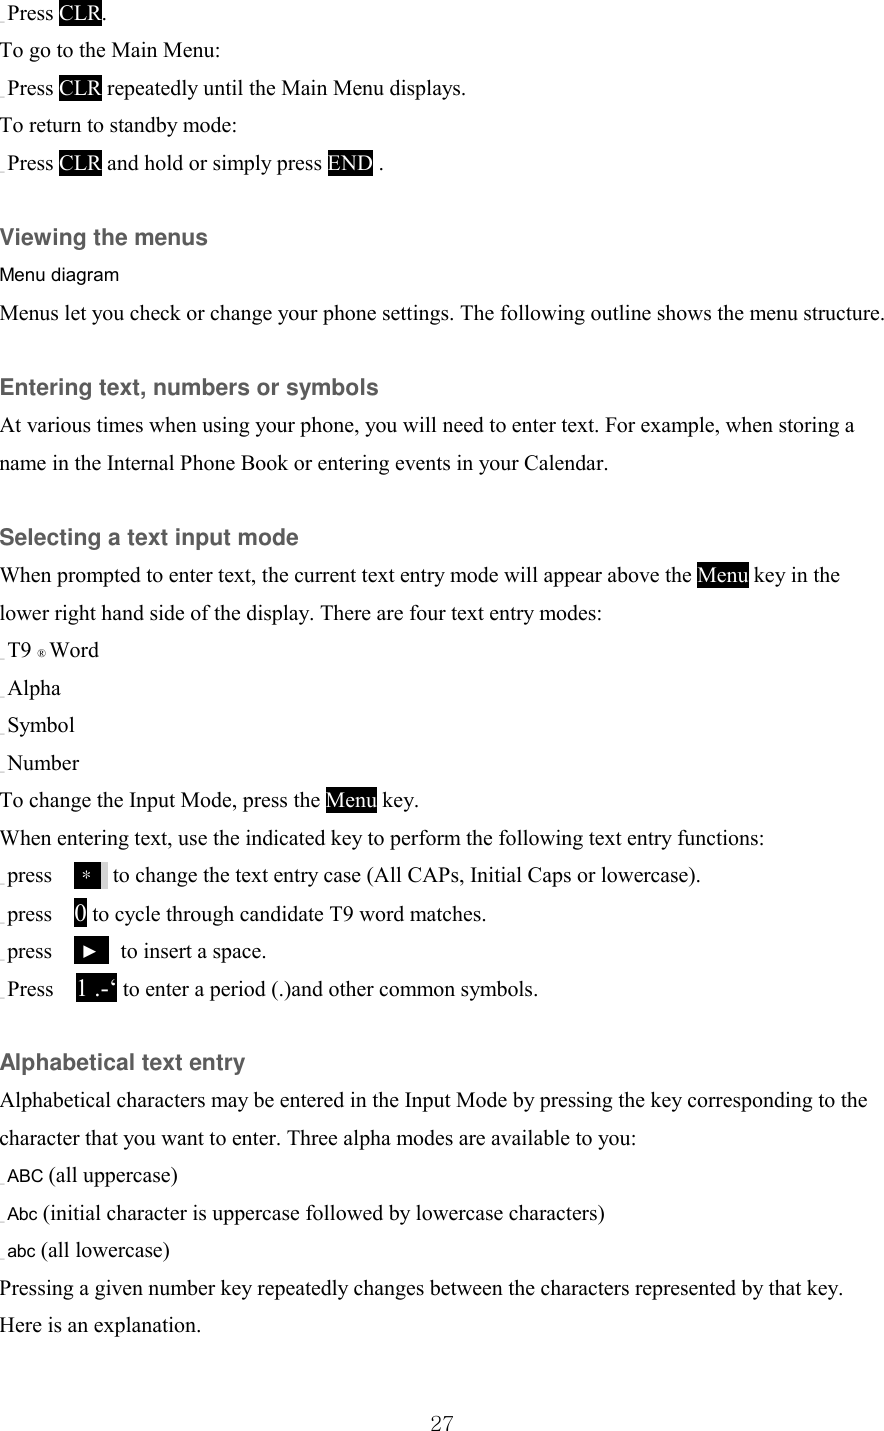
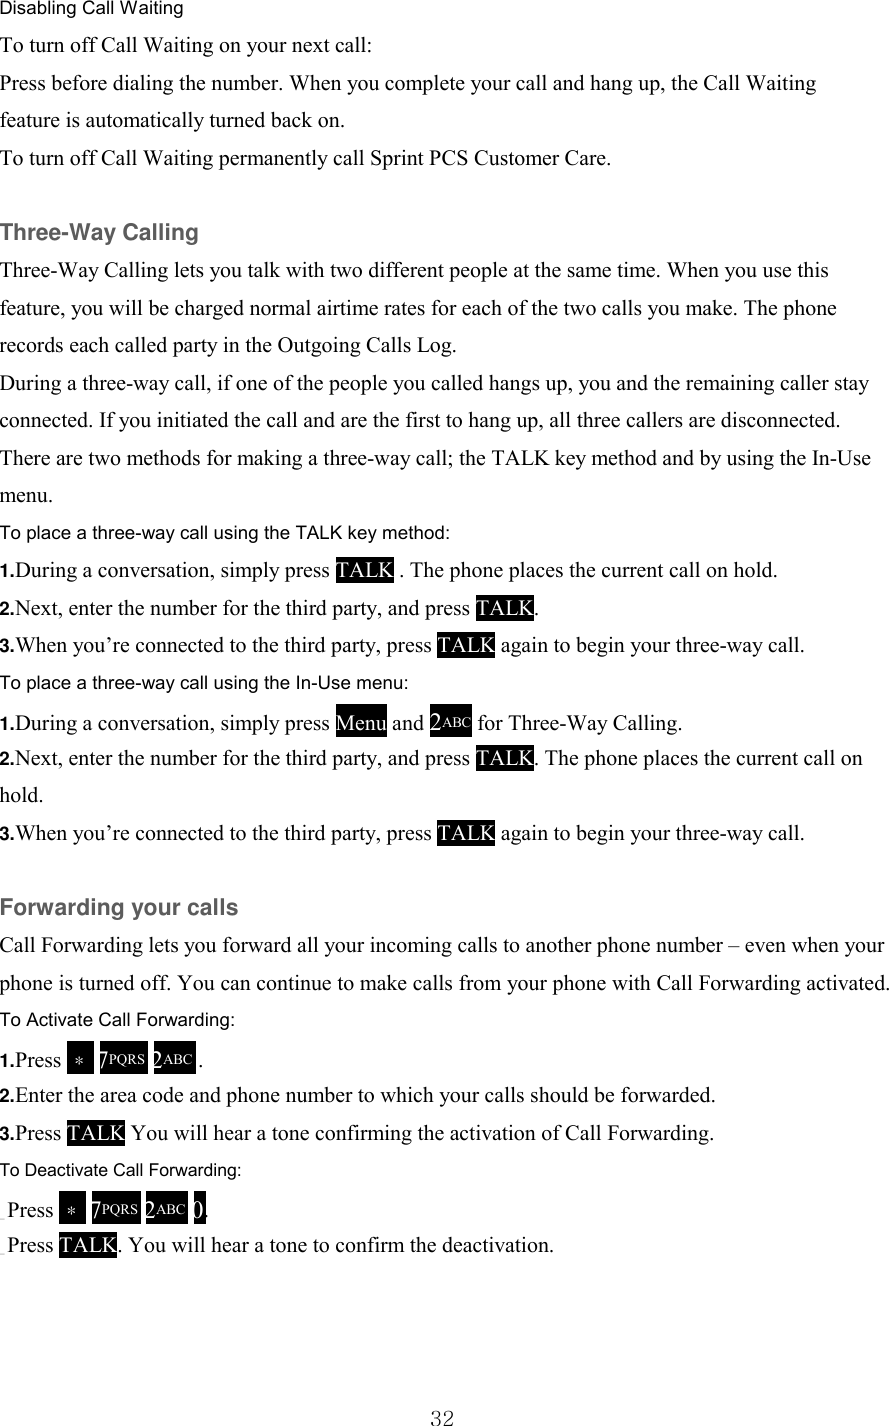
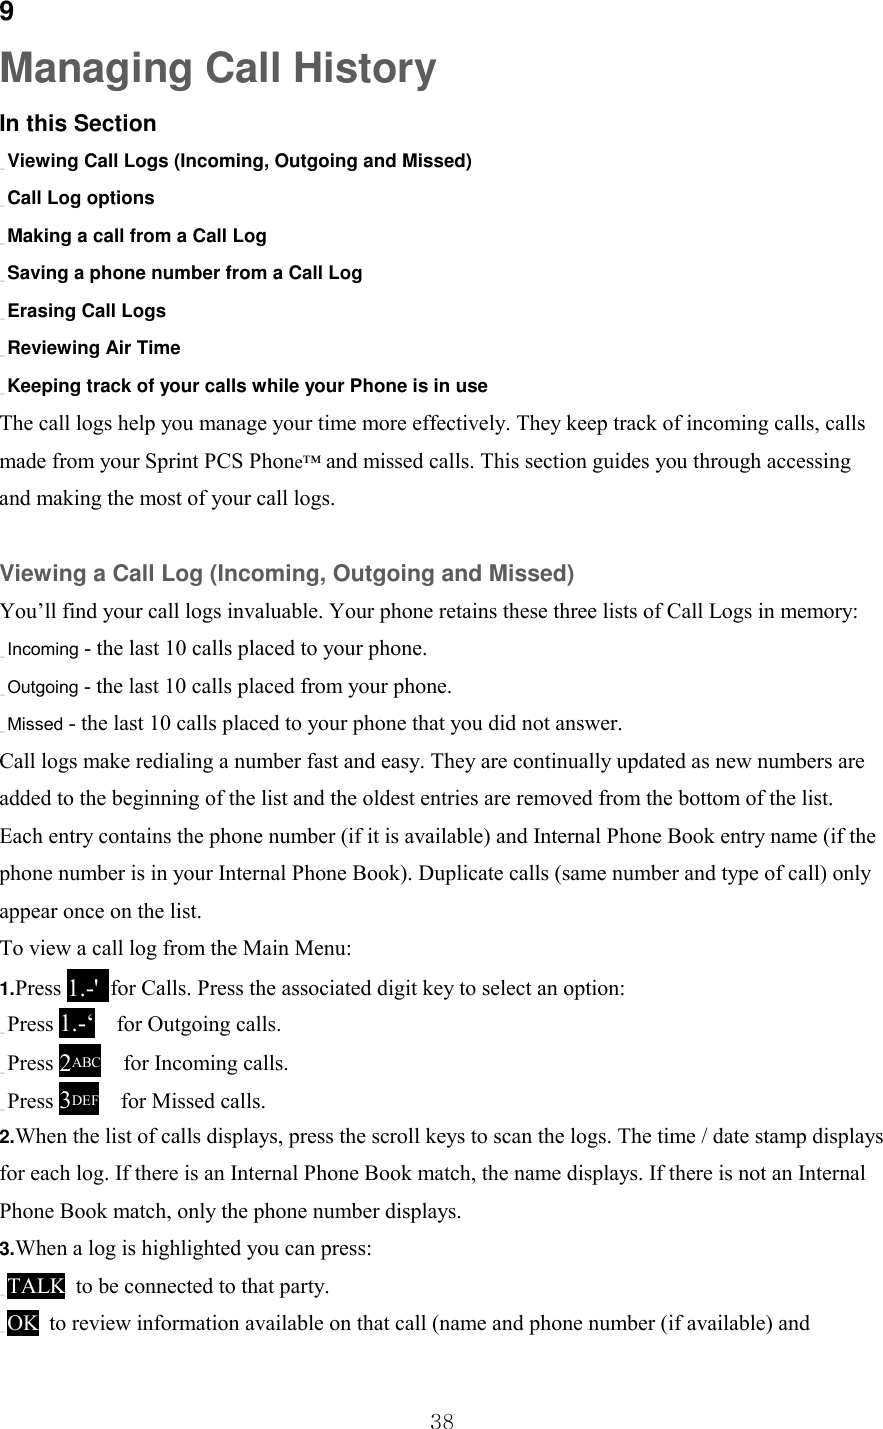
![14 Sprint PCS has implemented roaming agreements. _ Sprint PCS Wireless Web SM Connection offers wireless modem capabilities for your personal computer. _ Sprint PCS Wireless Web SM Browser provides access to the wireless Internet in digital mode. _ Active flip can be set to answer an incoming call when opened and to cancel a call when closed. _ Backlit Display Screen makes it easy to read the display in low light environments and at night. _ Internal Phone Book with 199 memory registers. Name entries can have up to 6 numbers. _ Speed dialing, 4 methods of calling numbers stored in the Internal Phone Book. _ Calendar function allows you to schedule events, create To-Do Lists, set timers and alarms. _ Voice activated dialing with 10 locations. _ T9 predictive text entry for ease in entering names and events into the Internal Phone Book and Calendar. _ Vibrate Alert makes you aware of incoming calls and messages without disturbing others. _ Bi-lingual - your menus and displays can be displayed in either English or Spanish. Components 1. MENU Menu: Displays the Main Menu of options on your phone. Press and hold to scroll through the Main Menu options. 2. OK OK: In standby mode, enters the messages menu. While displaying a menu, it selects the highlighted option. 3. TALK Talk: Makes or answers a call. In standby mode, press once to enter the outgoing call log. 4. CLR Clear: Deletes characters from the display. While in menus, press to return to the previous menu. 5. END End: Also, switches the phone on or off when pressed and held briefly. In the menu facility, returns the phone to standby mode and cancels your input. 6. 0through 9WXYZ: Used to enter numbers, letters and characters. 7.: * Enters the [*] character for calling features.8.: 0 Displays the next or alternate word form found in T9 text entry mode. 9.: # Enters the [#] character for calling features.10. ▲▼ Volume keys: (On the side of your phone). In standby mode, adjusts the ringer volume. During a conversation, adjusts the voice volume. In a menu, scrolls up or down through the menu options. 11. ▼ Down keys: Opens Phone Book menu.(search stored entrys by name) 12. ▲ Up keys: Begins Browser](https://usermanual.wiki/Samsung-Electronics-Co/SPHA450/User-Guide-181562-Page-15.png)
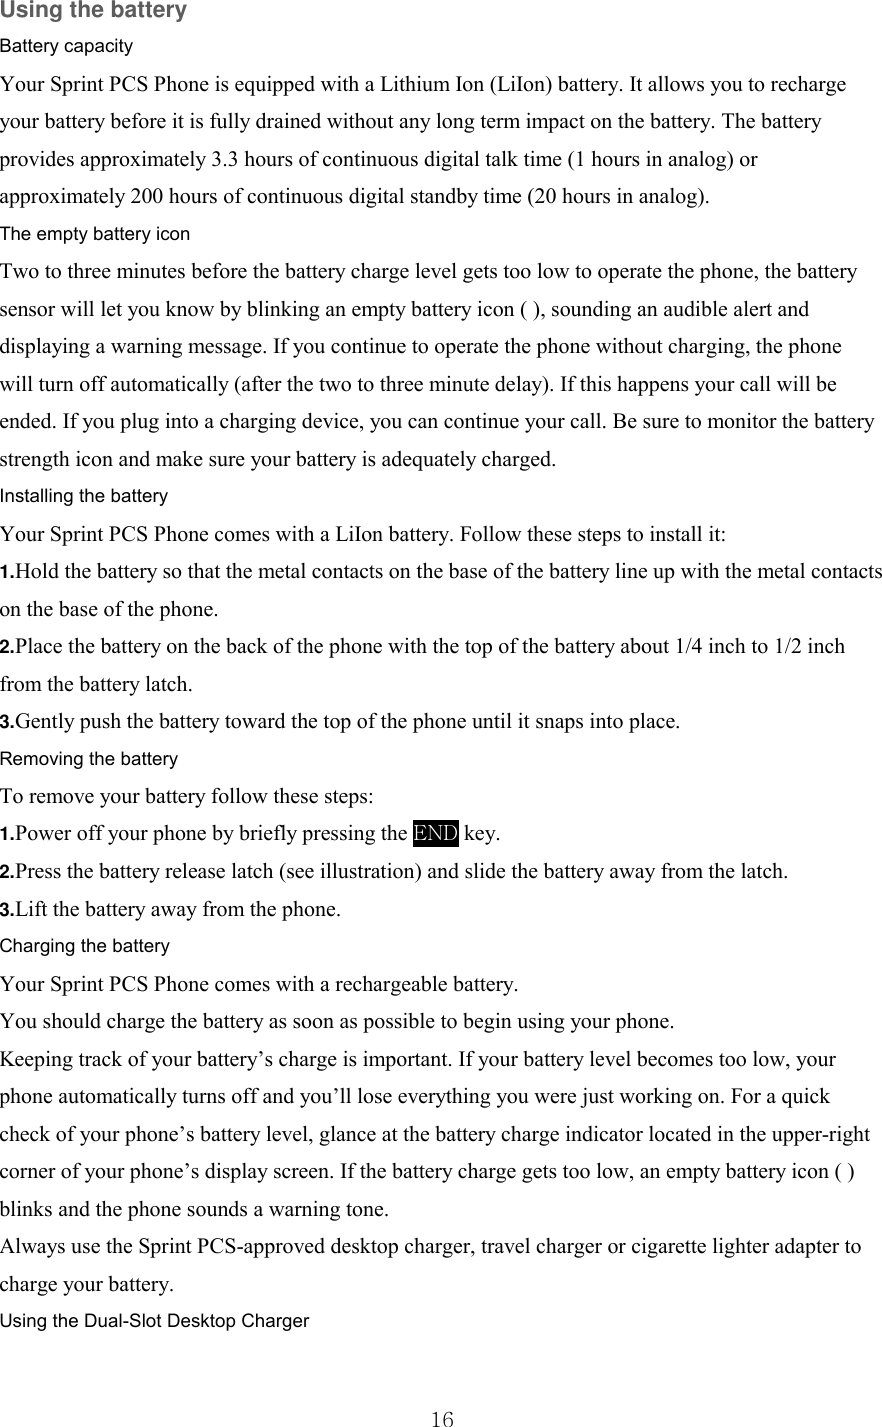

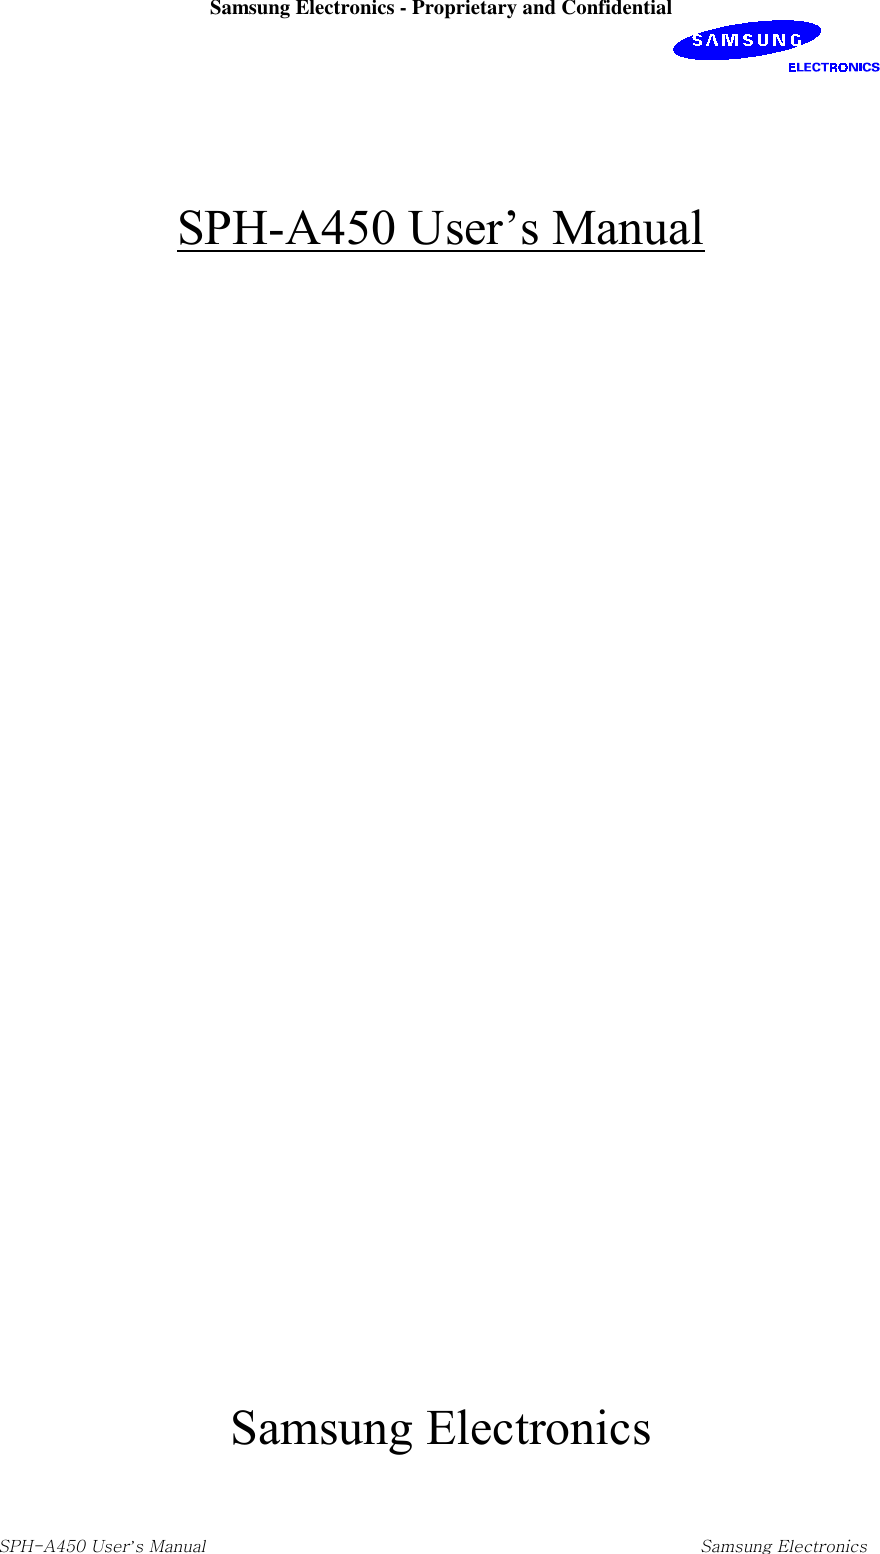
![19 4 Making and Answering Calls In this Section _ Making calls _ Answering calls _ Missed call notification _ Dialing options and In-Call options _ Incoming call notification _ End-of-Call options _ Saving a Phone num er _ Finding a Phone num er _ Dialing and saving Phone numbers with pauses _ Four-digit dialing _ Calling emergency numbers _ Dialing from the Internal Phone Book _ Using One-Touch/Two-Touch/Three-Touch Speed Dialing _ Displaying your Phone number Your Sprint PCS Phone™ gives you different options for making calls so that you can use the method that works best for you. Once you learn the basics, the possibilities are endless. Making calls Your Sprint PCS Phone ™ offers many different ways to make calls, including Voice dialing, Speed Dialing and using Call History. To make a call using your keypad: 1.Make sure your phone is on. 2.Enter a phone number. If you make a mistake while dialing, press CLR to erase one digit at a time. Or, press and hold CLR to erase the entire number. 3.Press TALK. To make a call when you are roaming and Call Guard is enabled, your phone prompts you to press [1] to make the call. 4.To disconnect the call, press END. Answering calls 1.Make sure your phone is on. If your phone is off, incoming calls go to voice mail. 2.When your phone rings, simply open the flip or press TALK. To answer incoming calls when you are roaming and Call Guard is enabled, press 1.-‘ .](https://usermanual.wiki/Samsung-Electronics-Co/SPHA450/User-Guide-181562-Page-19.png)


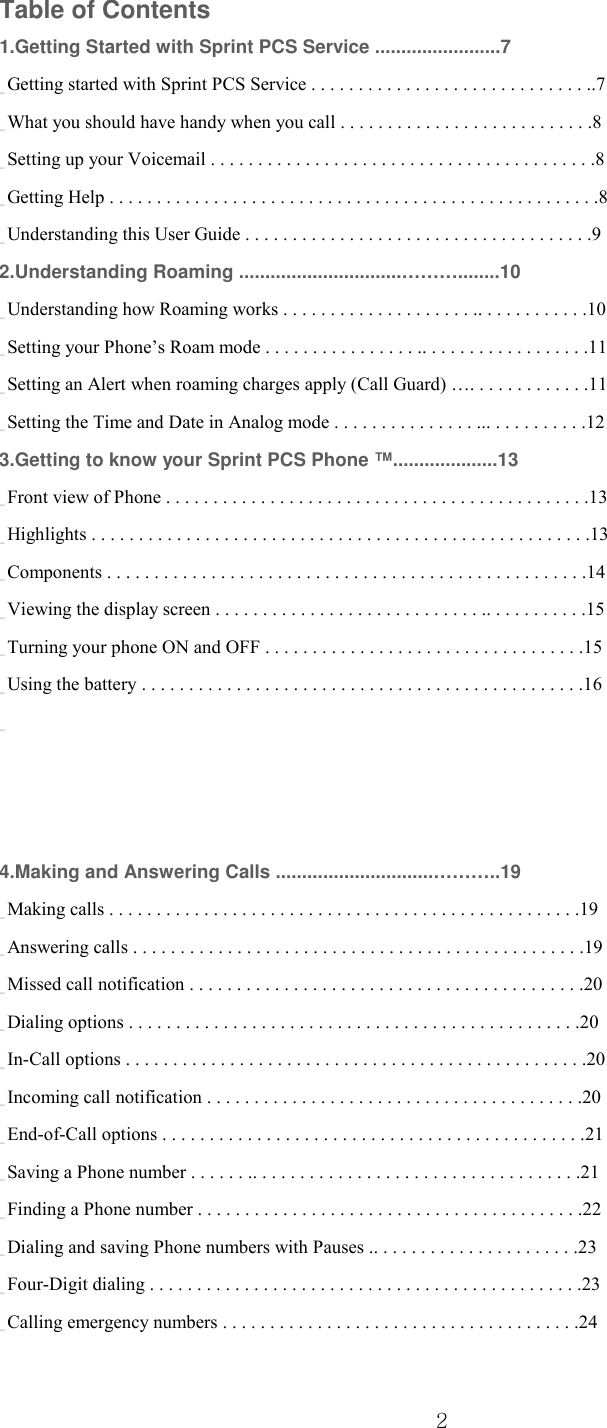
![47 5.Press OK to Save the setting. The screen displays “No incoming data/fax calls can be received”. Your phone then returns to standby mode. Ending a call Although you can end a call in various ways, for example, closing the phone, always close the connection through the application on your computer. Your phone will return to standby mode. Disconnecting the data cable or turning off your phone will end a wireless web call, but may disrupt your computer. Calculator You can perform calculations including addition, subtraction, multiplication and division on your phone. To perform a calculation: 1.From the Main Menu, press 5JKL for Calendar . 2.Press 6MNO for Calculator . 3.Press digit keys to enter the first number in your calculation. Numbers can be up to 9 digits long. _ Press ! to enter a decimal point. _ Press ⋕ to change the sign of a number to a negative (-). 4.Press ▲ or ▼ to set the operator for your calculation. Your choices are: _ [+] addition _ [-] subtraction _ [x ] multiplication _ [/] division 5.Press digit keys to enter the second number of your calculation. 6.Press OK to perform the calculation and see the Result , or: _ You can continue to perform calculations with the same operator or change the operator and continue your calculations. Every time that you change the operator, the previous calculation is performed and the result is displayed as the top number in the display. 7.Press OK to perform the calculation and see the Result .](https://usermanual.wiki/Samsung-Electronics-Co/SPHA450/User-Guide-181562-Page-47.png)

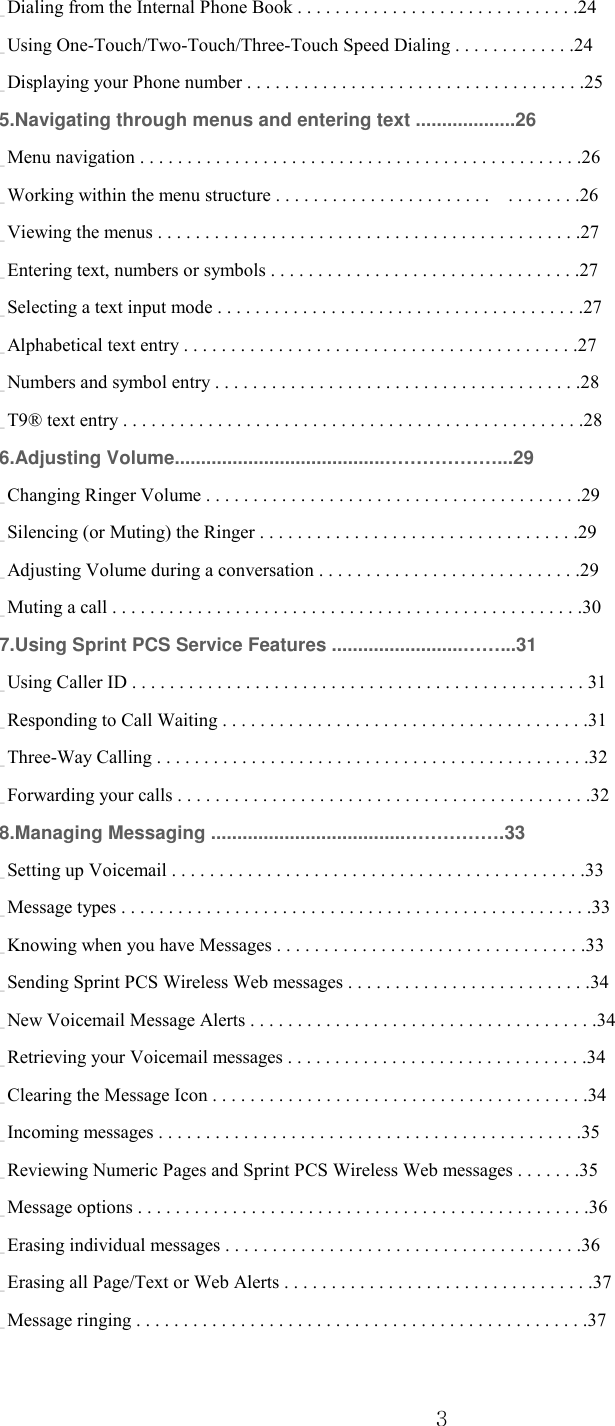
![70 _ Prompt To Start : The default setting. You will see the prompt when you enter the browser, but not when you exit it. _ Prompt Both:You will be prompted when you enter or exit the browser. _ Prompt To End:You will see the prompt only when you exit the browser. _ Prompt None:You will never see the prompt. 4.Press OK to Save your setting or CLR to cancel. Using the Sprint PCS Wireless Web Browser Using the MiniBrowser is easy once you've learned a few basics. Here are some tips for navigating the Sprint PCS Wireless Web. At the bottom of the Browser display is a solid bar which contains browser commands. “Soft” keys (OK and Menu ) below the solid bar are used to execute the commands. These two keys are called soft keys because their function changes depending on where you are in the Browser software. Scrolling As with other parts of your phone's menu, you'll have to scroll up and down to see everything on some wireless Internet sites. There are two ways to scroll: _ The ▲▼ key scrolls down one line at a time. _ You can use the volume keys on the side of your phone to quickly scroll one page at a time rather than one line at a time. Selecting Once you've learned how to activate softkeys, you can start navigating wireless Internet sites. _ Select on-screen items by scrolling, highlighting the desired item, then pressing the correct softkey. You'll find that the left softkey (OK ) is used primarily for selecting items. _ If the items on a page are numbered, you can also use your keypad (number keys) to select an item. Links, which appear [in brackets], allow you to jump to different wireless Internet pages, select special functions, or even place phone calls. _ Select links by highlighting the link and then activating the appropriate softkey, which is usually (but not always) the left softkey (OK ). Going Home _ To return to the Sprint PCS Wireless Web home page, highlight the Home softkey and press OK , or simply press CLR the key for about one second. Going to a Wireless Internet Site From the Sprint PCS Wireless Web home page, you can go to a wireless Internet site simply by highlighting the desired site name and pressing the softkey OK . Note that the list of wireless Internet sites extends beyond one page.](https://usermanual.wiki/Samsung-Electronics-Co/SPHA450/User-Guide-181562-Page-70.png)