Samsung Electronics Co SPHA505 Tri-Mode Dual-Band Analog / PCS Phone (AMPS/CDMA) User Manual
Samsung Electronics Co Ltd Tri-Mode Dual-Band Analog / PCS Phone (AMPS/CDMA) Users Manual
UserManual.wiki
>
Samsung Electronics Co
>
SPHA505 User Manual
Users Manual
Navigation menu
Upload a User Manual
Namespaces
Wiki Guide
HTML
PDF
Info
Views
User Manual
Discussion / Help
Navigation
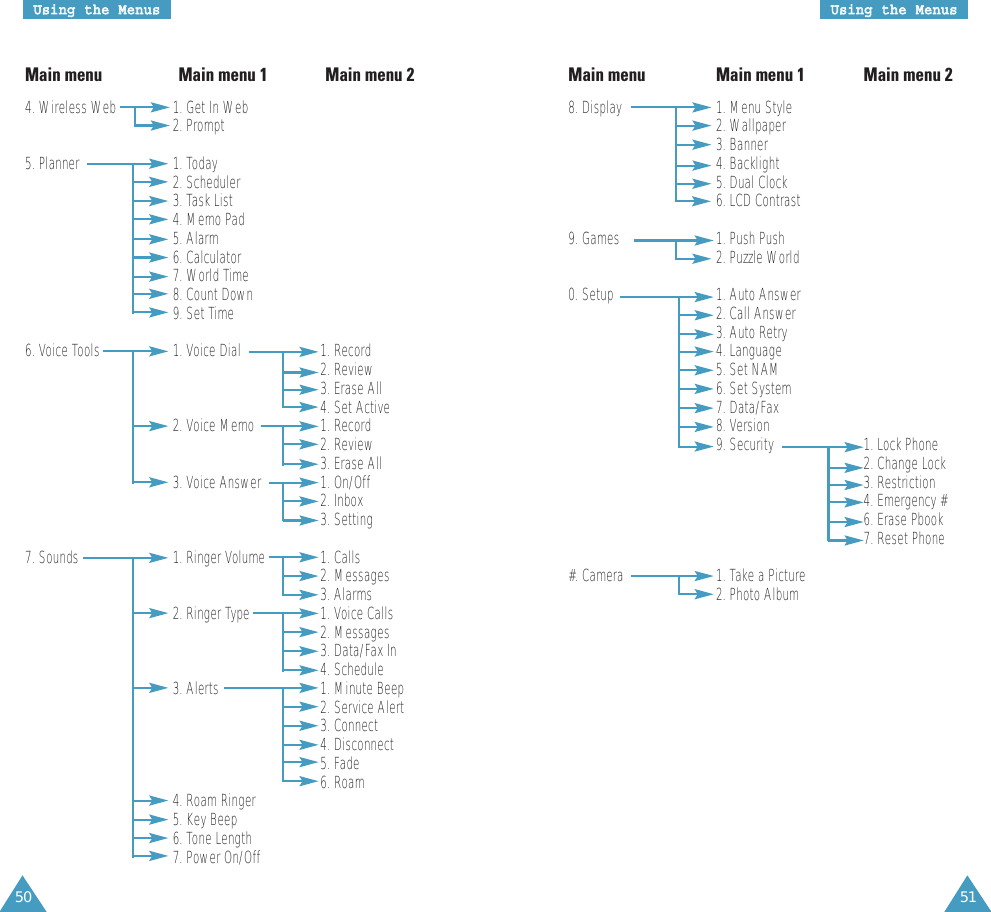
![91VVooiiccee TToooollss90VVooiiccee TToooollssReviewWhen a list of your stored voice dial numbers displays,scroll to the desired entry and press . The recordedname plays audibly. Erase AllThis option erases all of the entries in the Voice Diallist.Set ActiveVoice Dialing is always active once you haveprogrammed the phone to accept voice dialing entriesand the associated phone numbers. To place a call using voice dialing, simply press andhold in Standby mode and then say the name intothe phone after you hear a prompt.You can also initiate a voice dialing call by thefollowing options:[ ] Only: enables voice dialing only by pressing andholding .[ ]/Folder: enables voice dialing by pressing andholding or by opening the folder.[ ] /EarMic: enables voice dialing by pressing andholding or by pressing and holdingthe button on your ear-microphone.Voice Memo MENU 6-2Note: You can enter quickly this menu by pressing inStandby mode.RecordYou can record up to voice memos of 4 minutes in lengthin all. This feature shars the memory with Voice Answerand the amount of time for memos are dependant on theavailable memory less any callers' messages; forexample, if your phone has the callers' messages of 4minutes total, you cannot record any voice memo. Whenrecording, a 60-second timer displays and an alert soundsto indicate when the recording time expires.1. Record a memo by speaking to the microphone. Thedisplay shows the elapsed time.You can pause recording by pressing and thenresume by pressing .2. Press to end recording. The screen provides youwith the following choices. Scroll to an option andpress .• Review: allows you to review the voice memo. Thescreen displays the length of the memo along withthe date and time.• Rerecord: allows you to rerecord the voice memo.• Save: allows you to save the voice memo and add atitle.• Quit: allows you to quit the voice mem withoutsaving.3. When you are satisfied, select the Save option andpress .4. Enter a title for the memo and press to save.](https://usermanual.wiki/Samsung-Electronics-Co/SPHA505/User-Guide-291522-Page-46.png)