Samsung Electronics Co SPHA720 Dual-Band CDMA Phone with Bluetooth User Manual
Samsung Electronics Co Ltd Dual-Band CDMA Phone with Bluetooth Users Manual
Users Manual

SPH-A720
User’s Manual
for Draft Version
Please read this manual before operating your phone,
and keep it for future reference.

3
Table of contents
Important safety precautions .......................7
Unpacking .....................................................9
Your phone .................................................10
Key Description .................................................. 10
Display.............................................................. 11
Backlight ........................................................... 13
Service light ...................................................... 13
Camera............................................................. 13
Getting started............................................14
Using the battery................................................ 14
Switching on or off the phone............................... 16
Using the soft keys ............................................. 16
Your phone’s modes............................................ 17
Using the Keypad Lock feature ............................. 18
Call functions ..............................................19
Making a call...................................................... 19
Ending a call ...................................................... 19
Emergency dialing .............................................. 19
Making a call from the recent call logs ................... 20
Making a call from Contacts ................................. 20
Speed dialing ..................................................... 20
Pause dialing ..................................................... 21
Voice dialing ...................................................... 22
Adjusting the volume during a call ........................ 23
Answering a call ................................................. 23
Viewing missed calls ........................................... 24
Options during a call ........................................... 24
Using caller ID ................................................... 24
Call forwarding................................................... 25
Call waiting........................................................ 25
Three-way calling ............................................... 26

Table of contents
4
Entering text ...............................................27
Changing the text input mode .............................. 28
Using T9 English mode ........................................ 28
Using Alpha mode............................................... 30
Using 123 mode ................................................. 31
Using Symbol mode ............................................ 31
Using the menus .........................................32
Accessing a menu function by scrolling .................. 32
Using shortcuts .................................................. 33
List of menu functions......................................... 34
Web ............................................................36
Call History .................................................37
Outgoing Calls
(Menu 2-1)
................................... 37
Incoming Calls
(Menu 2-2)
.................................. 37
Missed Calls
(Menu 2-3)
...................................... 37
Recent Calls
(Menu 2-4)
...................................... 38
Media Player ...............................................39
On Demand .................................................40
Missed Alerts ..............................................41
Music ..........................................................42
My Content..................................................43
Messaging ...................................................44
Send Message
(Menu 8-1)
.................................... 44
Text Message
(Menu 8-2)
...................................... 44
Picture Mail
(Menu 8-3)
........................................ 45
VoiceSMS
(Menu 8-4)
.......................................... 45
IM & Email
(Menu 8-5)
........................................ 46
Voicemail
(Menu 8-6)
........................................... 46
Chat & Dating
(Menu 8-7)
.................................... 46
Premium Msg
(Menu 8-8)
..................................... 47
Settings
(Menu 8-9)
............................................ 47

Table of contents
5
Tools ...........................................................48
Mass Storage
(Menu 9-1)
..................................... 48
Voice Service
(Menu 9-2)
..................................... 48
Voice Memo
(Menu 9-3)
...................................... 48
Bluetooth
(Menu 9-4)
........................................... 48
Planner
(Menu 9-5)
............................................. 49
Memo Pad
(Menu 9-6)
......................................... 50
World Time
(Menu 9-7)
........................................ 51
Alarm Clock
(Menu 9-8)
...................................... 51
Calculator
(Menu 9-9)
.......................................... 51
Contacts......................................................52
Find
(Menu 0-1)
.................................................. 52
Add New Entry
(Menu 0-2)
................................... 52
Speed Dial #s
(Menu 0-3)
.................................... 53
Group
(Menu 0-4)
............................................... 53
My Name Card
(Menu 0-5)
................................... 53
Services
(Menu 0-6)
............................................ 53
Pictures.......................................................54
Camera
(Menu *-1)
............................................. 54
Camcorder
(Menu *-2)
......................................... 54
Picture Mail
(Menu *-3)
........................................ 54
My Albums
(Menu *-4)
......................................... 54
Order Prints
(Menu *-5)
....................................... 55
Pictbridge Print
(Menu *-6)
................................... 55
Settingd and Info
(Menu *-7)
................................ 55
Settings ......................................................56
Display
(Menu #-1)
............................................ 56
Sounds
(Menu #-2)
............................................ 57
Power Vision
(Menu #-3)
..................................... 59
Voice Service
(Menu #-4)
.................................... 59
Security
(Menu #-5)
........................................... 59
Roaming
(Menu #-6)
........................................... 62
Launch Pad
(Menu #-7)
........................................ 62
Others
(Menu #-8)
.............................................. 62
Phone Info
(Menu #-9)
........................................ 63
Bluetooth
(Menu #-0)
.......................................... 64

Table of contents
6
Health and safety information.....................67
Getting the Most Out of Your Reception ................. 67
Maintaining Safe Use of and Access to Your Phone .. 68
Caring for the Battery ......................................... 70
Acknowledging Special Precautions and the FCC Notice
72
Owner’s Record .................................................. 74
Phone Guide Proprietary Notice ............................ 74

7
Important safety
precautions
Read these guidelines before using your wireless
phone. Failure to comply with them may be
dangerous or illegal.
Road safety at all times
Do not use a hand-held phone while driving; park
the vehicle first.
Switching off when refuelling
Do not use the phone at a refuelling point (service
station) or near fuels or chemicals.
Switching off in an aircraft
Wireless phones can cause interference. Using
them in an aircraft is both illegal and dangerous.
Switching off near all medical equipment
Switch off your phone near medical equipment.
Hospitals or health care facilities may be using
equipment that could be sensitive to external RF
energy. Follow any regulations or rules in force.
Interference
All wireless phones may be subject to
interference, which could affect their performance.
Special regulations
Meet any special regulations in force in any area
and always switch off your phone whenever it is
forbidden to use it, or when it may cause
interference or danger (in a hospital for example).
Water resistance
Your phone is not water-resistant. Keep it dry.

Important safety precautions
8
Sensible use
Use only in the normal position (held to the ear).
Avoid unnecessary contact with the antenna when
the phone is switched on.
Emergency call
Key in the emergency number for your present
location, then press the key. Give all the
necessary information as accurately as possible.
Do not end the call until given permission to do so.
Keeping small children away from your
phone
Keep the phone and all its parts including
accessories out of the reach of small children.
Accessories and batteries
Use only Samsung-approved accessories. Use of
any unauthorized accessories could damage your
phone and may be dangerous.
Use only Samsung-approved batteries and
recharge your battery only with Samsung-
approved chargers.
Qualified service
Only qualified service personnel may repair your
phone.
For more detailed safety information, see “Health
and safety information” on page 65.
CAUTION
RISK OF EXPLOSION IF A BATTERY IS
REPLACED BY AN INCORRECT TYPE.
DISPOSE USED BATTERIES ACCORDING TO
THE INSTRUCTIONS.

9
Unpacking
Your package contains the following items.
In addition, you can obtain the following
accessories for your phone from your local
Samsung dealer:
Handset Battery
Desktop Charger Start Here Guide
Headset CD
Welcome to Sprint Card Terms & Conditions Card
• Headset • Car charger/
adapter
• Standard and Extended
batteries
• Cigarette lighter
adapter
• Hands-free car kit • Data cable
• Bluetooth headset kit • Bluetooth full
hands-free kit

10
Your phone
Key Description
Key
(s)
Description
soft keys
Performs the functions indicated by
the screen text on the bottom line of
the display.
Navigation
keys
In Standby mode, quickly enters your
favorite menus.In Menu mode, scrolls
through menu options.
OK key
In Standby mode, enters the Pics.
video menu.
In Menu mode, selects the currently
highlighted menu or option, or
confirms your input.
TALK key
Makes or answers a call.
In Standby mode, retrieves the most
recent numbers dialed, received, or
missed. Redials the last number when
pressed and held.
END key
Ends a call. Also switches the phone
on and off when pressed and held.
In Menu mode, cancels your input and
returns to Standby mode.
BACK key Deletes characters from the display.
In Menu mode, returns to the previous
menu level.
Numeric
keys
Enters numbers, letters, and some
special characters.

Your phone
11
Display
Layout
The display has 3 areas; the top line of icons, the
text and graphics area, and the bottom line of soft
key indicators.
* key
In Standby mode, initiates the voice
command feature when pressed and
held.
In the text entry mode, changes case
of letters.
# key
In Standby mode, quickly enters or
exits Silent mode when pressed and
held.
In the text entry mode, inserts a
space.
Camera
key
In Standby mode, allows you to
quickly access the
Camera
menu.
Also turn on the camera when pressed
and held.
In Capture mode, takes a photo or
starts recording a video.
t
Volume
keys (on the left side of the phone)
During a call, adjust the earpiece
volume.
In Standby mode, adjusts the key
tone volume.
In Menu mode, scrolls through menus.
Key
(s)
Description
(continued)
Your phone
12
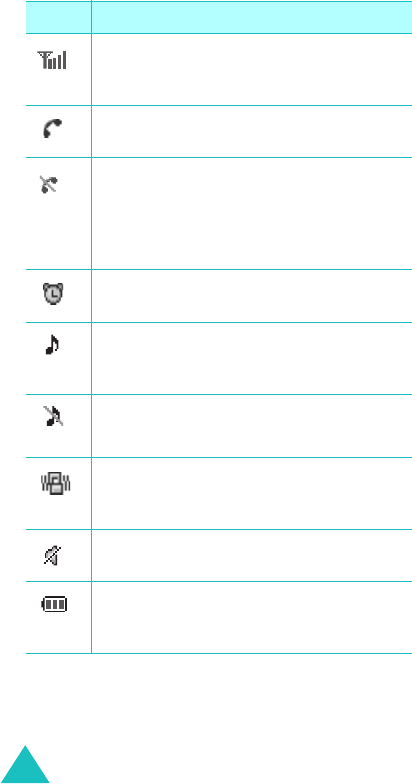
Icons
Icon Description
Signal strength
: Shows the received
signal strength. The greater the number
of bars, the better the signal.
Service
: Appears when a call is in
progress.
No service
: Appears when you are
outside a service area. When it displays,
you cannot make or receive calls. Wait a
little while for a better signal or move
into an open area to regain service.
Alarm mode
: Appears when you set an
alarm to ring at a specified time.
Ringer on
: Appears when you set the
ringer volume for calls to one from
Level
1
~
8
,
1-Beep
or
Vib+Ring
.
Ringer off
: Appears when you set the
volume of the call ringer to
Silent
.
Vibration mode
: Appears when the
ringer volume for calls is set to
Vibrate
,
or when your phone is in Silent mode.
Silent mode
: Appears when the phone
is Silent mode.
Battery status
: Shows the level of your
battery. The more bars you see, the
more power you have remaining.

Your phone
13
Backlight
The backlight illuminates the display and the
keypad. When you press any key or open the
phone, the backlight illuminates. It turns off if no
key has been pressed within a given period of
time, depending on the setting in the
Backlight
menu
The backlight remains on at all times when the
phone is connected to an optional car kit.
Service light
The service light on the bottom tip of the phone
flashes to indicate an incoming call, a message, or
an alarm and flashes for a few seconds when you
turn on or off the phone.
It flashes while the battery is charging with the
travel adapter; it turns green when the battery is
fully charged.
Camera
The camera embedded in your phone allows you
to take a photo or record a video while on the
move.

14
Getting started
Using the battery
Your phone is powered by a rechargeable Li-ion
battery. Use only approved batteries and
chargers. Ask your local Samsung dealer for
further details.
Note
: You must fully charge the battery before using
your phone for the first time.
Installing the battery
1. Place the battery so that the tabs on the end
align with the slots at the bottom of the phone.
2. Press the battery until it clicks into place. Make
sure that the battery is properly installed
before switching the phone on.
Removing the battery
1. If necessary, switch off the phone by pressing
and holding the END key until the power-off
image displays.
2. Slide the battery lock towards the top of the
phone and lift away the battery, as shown.
1. With the battery in position on the phone, plug
the connector of the travel adapter into the
jack at the bottom of the phone.

Getting started
15
Low battery indicator
When the battery is weak and only a few minutes
of talk time remain, a warning tone sounds and a
message repeats at regular intervals on the
display. In this case, your phone turns off the
backlight to conserve the remaining battery
power.
When the battery level becomes too low, the
phone automatically turns off.

Getting started
16
Switching on or off the phone
1. Open the phone.
2. Press and hold the END key until the power-on
image displays to switch on the phone.
The service light on the phone flashes and an
alert sounds. When the system locates
services, the greeting message displays along
with the time and date. You can now place and
receive calls.
If the phone is out of service, the No Service
icon ( ) appears on the display. In this case,
you cannot place and receive calls. You can try
again later when service is available.
3. When you wish to switch off the phone, press
and hold the END key until the power-off
image displays.
WARNING!
Do not switch on the phone when mobile phone
use is prohibited or when it may cause
interference or danger.
Using the soft keys
Your phone offers a set of functions that allows
you to customize and use it. These functions are
arranged in menus and submenus, accessed using
the two soft keys. Each menu and submenu allows
you to view and alter the settings of a particular
function.

Getting started
17
The roles of the soft keys vary depending on the
current function you are using; the labels on the
bottom line of the display just above each key
indicate their current role.
Your phone’s modes
Standby mode
Standby is the most basic state of your phone.
The phone goes into Standby mode after you turn
it on or whenever you briefly press the END key.
When your phone is in Standby mode, you will
typically see the greeting message and the current
time and date.
Press the END key at any time to return to
Standby mode. Be careful; if you are on a call
when you press the END key, the call disconnects
and the phone returns to Standby mode.
Talk mode
You can place and answer calls only when your
phone is turned on. During a call, the phone is in
Talk mod e .
Lock mode
When you lock your phone using the
Lock Phone
menu, you cannot use the phone. In Lock mode,
you can receive messages and calls, but you
cannot place an outgoing call until you unlock the
phone.

Getting started
18
Using the Keypad Lock feature
You can open the phone to use the number
keypad and close so that it takes up less space.
When you close the phone, the display turns off
and the phone automatically locks the exposed
function keys so that even if they are pressed
accidentally, nothing will happen.
To unlock the keypad, press and hold one of the
Volume keys, press the
Unlock
soft key, and then
press the
OK
soft key.
The keypad is activated and you can use the
phone’s functions.

19
Call functions
Making a call
In Standby mode, enter the area code and phone
number and press the SEND key.
Send
: sends a message to the number.
Save
: saves the number in Contacts.
P Pause
: enters a hard pause.
T Pause
: enters a 2-second pause.
Ending a call
When you want to end your call, press the END
key.
The call time, the length of the call, displays along
with the phone number of the called person. If the
number is stored in your Contacts, the name
displays. If there is no match, you can store the
number in Contacts.
Alternatively, simply close the phone to end a call.
Emergency dialing
You can place calls to standard emergency
numbers, even if your phone is locked or all of the
outgoing calls are restricted.

Call functions
20
Making a call from the recent call
logs
The phone stores up the calls you have dialed,
received, or missed chronologically. The last call is
saved in the first position.
To recall any of these numbers:
1. In Standby mode, press the SEND key to access
call logs. The list of recent calls displays.
2. Press the Navigation keys, or the Volume keys
on the left side of the phone until you find the
number you want.
3. Press the SEND key to dial the highlighted
number.
Making a call from Contacts
You can store the phone numbers you called
regularly in the phone’s memory, which is called
“Contacts”. You then simply recall the number by
pressing the OK key and selecting from the
Contacts list.
Speed dialing
Once you have stored phone numbers from your
Phonebook list, you can set up speed dial entries
and then dial them easily whenever you want,
simply by pressing the associated numeric key.
To speed dial, in Standby mode, enter a speed
dialing number you have set and press the SEND
key to dial the number. You can also press the first
digit briefly, then hold down the second digit of the
speed dialing number.

Call functions
21
Pause dialing
When you call an automated system, like a
banking service, you are often required to enter a
password or account number. Instead of manually
entering the numbers each time, you can store
the numbers in your Contacts, separated by
pauses.
There are 2 kinds of pauses that can be entered
on your phone:
•
P pause
: A hard pause stops the dialing
sequence until you press the SEND key.
•
T pause
: A 2-second pause stops the dialing
sequence for two seconds and then
automatically sends the remaining digits.
Storing pauses in a Contacts entry
To store a number in your Contacts that contains
pauses:
1. In Standby mode, enter a phone number you
want to store, such as the bank’s teleservice
phone number.
2. Press the
Options
soft key.
3. Select the required pause type and press the
OK
soft key.
•
P Pause
. The letter “P” displays, meaning
that a hard pause will occur at that point in
the dialing sequence.
•
T Pause
. The letter “T” displays, meaning
that a “2-second” pause will occur at that
point in the dialing sequence.
4. Enter the digits that need to follow the pause,
such as your account number.

Call functions
22
5. Repeat steps 2 through 4 to add more pauses
and numbers, if necessary.
6. Press the OK key to store the number in your
Contacts as you normally would when storing a
number.
Pause dialing from a Contacts entry
1. Dial the number of the service from Contacts.
For further details about finding a number, see
page 51.
2. For a hard pause(s), wait for the appropriate
prompt from the number you are calling. When
prompted, press the SEND key to send the
DTMF (Dual tone multi-frequency) number that
follows the pause.
For a 2-second pause(s), your phone transmits
the number that follows the “T” pause two
seconds after the connection.
“Sending DTMF” flashes on the display and the
transmitted tone sounds.
3. Repeat from step 2, if necessary.
Voice dialing
Once you have stored a phone number in
Contacts, you can dial it simply by saying the
associated name or the number.
Before using the voice dial feature, you first need
to programme your phone to recognize your voice
and pronunciation in the
Adapt Digits
menu

Call functions
23
Adjusting the volume during a call
During a call, if you want to adjust the earpiece
volume, use the Volume keys on the left side of
the phone.
The image on the display shows all 8 levels; the
more bars, the higher level.
In Standby mode, you can also adjust the keypad
tone volume using these keys.
Answering a call
When somebody calls you, the phone alerts you
by ringing and blinking the service light.
If the caller can be identified, the caller’s phone
number, or name if stored in your Contacts,
displays.
There are 2 ways to answer a call depending on
your setting in the
Call Answer
menu
To end the call, close the phone or press the END
key.
If you select To answer the call,
TALK Key
press the TALK key.
Flip Open
open the phone. If the
phone is already open,
press the SEND key.
Any Key
press the Any key except
the END key.

Call functions
24
Viewing missed calls
If you fail to answer a call for any reason, the
phone indicates the missed call by displaying a
text notification on the screen. Additionally, if
caller information is available, the screen displays
the phone number of the last missed call along
with the time and date the call was made.
When the display informs you of the missed call,
press the SEND key to dial the missed number, or
the END key to clear the message and return to
Standby mode.
To view missed calls, access the
Missed
menu.
Options during a call
Your phone provides a number of functions that
you can use during a call.
Press the
Options
soft key during a call to access
the options.
Using caller ID
This feature tells you who is calling you by
displaying the caller’s number when the phone
rings. If the name and number are stored in your
Contacts, the corresponding name is also
displayed. If you call someone who has this
feature, your phone number displays on her/his
phone.
Note
: Contact your service provider to set up the
Caller line identification service.

Call functions
25
Call forwarding
This network feature allows you to forward
incoming calls to another phone number, even
while your phone is turned off. Activating Call
forwarding does not affect outgoing calls made
from your phone.
Note
: Contact your service provider to activate Call
forwarding.
Call waiting
Call waiting lets you receive a second call during a
conversation. Your phone notifies you of a waiting
call by beeping and displaying “Call waiting.”
Your network provides you with the option of
turning the Call waiting feature on and off, if you
have subscribed to the service. Call waiting is on
by default in the phone. If you choose to have a
undisturbed conversation, simply turn off the
feature for the current call.
Note
: If you do not respond to a Call waiting
notification, the phone will forward the call to
voice mail server or another number that you
have specified. Contact your service provider
for more information.

Call functions
26
Three-way calling
This feature enables you to conduct conference
calls with 2 separate people at the same time. The
phone records both of them into the Outgoing
calls log and you are billed air time for each of
outgoing calls separately. Contact your service
provider to activate Three-way calling.
To place a Three-way call:
1. During a conversation, press the SEND key.
The phone places the other person on hold.
2. Enter the phone number for the third person,
and then press the SEND key. The phone dials
the third person.
3. When you are connected to the person, press
the SEND key again to begin your three-way
call.
If one of the callers (not you) hangs up, you and
remaining caller stay connected. If you initiated
the call and you hang up first, all 3 participants
are disconnected.

27
Entering text
At many times when using your phone, you will
need to enter text, such as when storing a name
in Contacts, creating your personal greeting, or
scheduling events on your calendar. You can enter
alphanumeric characters into your phone using
your phone’s keypad.
Your phone has the following text input modes:
•
T9 English mode
: This mode allows you to
enter words with only one keystroke per letter.
Each key on the keypad has more than one
letter; for example, pressing can enter J, K,
or L. However, T9 English mode automatically
compares the series of keystrokes you make
with an internal linguistic dictionary to
determine the most likely word, thus requiring
far fewer keystrokes than the traditional
Alphabet
mode.
•
Alpha mode
: This mode allows you to enter
letters by pressing the key labeled with the
letter you want. Press the key once, twice, three
or four times until it displays.
•
123 mode
: This mode allows you to enter
numbers.
•
Symbol mode
: This mode allows you to enter
various symbols and special characters.

Entering text
28
Changing the text input mode
When you are in a field that allows characters to
be entered, you will notice the text input mode
indicator on the display.
Using T9 English mode
T9 is a predictive text input mode that allows you
to key in any character using single keystrokes.
This text input mode is based on a built-in
dictionary.
To enter a word in T9 English mode:
1. Press the keys on the phone just once per
desired letter. For example, to enter “hello”,
press 4,3 5,5 and 6 key.
2. The word that you are typing appears on the
display. It may change with each key that you
press.
3.
Type to the end of the word before editing or
deleting any keystrokes.
4. Insert a space between each word by
pressing
the # key
.
If the word doesn’t display correctly, press the
0 key repeatedly to display alternative word
choices for the keys that you have pressed.
Example: Both “of” and “me” use 6 and 3 key.
The phone displays the most
commonly used choice first.

Entering text
29
5. Continue entering the next word.
Note
: To type words not found in T9
English
mode,
you need to change the text input mode to
Alpha mode.
Smart punctuation
Periods, hyphens, and apostrophes are available
by pressing the 1 key. T9 English mode applies
rules of grammar to insert the correct
punctuation.
Changing the letter case
To shift the case of the next letter(s) that you
type, press the * key . There are 3 cases:
•Lower Case (
T9abc
)
• Initial Capital (
T9Abc
)
• Capitals Lock (
T9ABC
)
Inserting a space
Press the # key to insert a space between words.
Inserting a number
You can insert a number between letters without
exiting T9 English mode. Press and hold the
corresponding number key.
Scrolling
To move the cursor to the left or right through
your text, press the Navigation keys.

Entering text
30
Clearing letters and words
Press the BACK key once or repeatedly to clear
letters one by one to the left. Press and hold the
BACK key to erase all of the letters on the display.
Using Alpha mode
When typing in Alpha mode, you need to press the
keys labeled with the required letter:
- once for the first letter
- twice for the second letter
- and so on
This method is called multi-tap typing.
For example, you press the 2 key 3 times to
display the letter “C” and the 3 key 2 times to
display the letter “K.”
The cursor moves to the right when you press a
different key. When entering the same letter twice
or a different letter on the same key, just wait for
a few seconds for the cursor to move to the right
automatically, and then enter the next letter.
Changing the letter case
To shift the case of the next letter(s) that you
type, press the * key. There are 3 cases:
• Initial Capital (
Abc
)
•Capitals Lock (
ABC
)
•Lower Case (
abc
)
Inserting a space
Press the # key to insert a space between words.

Entering text
31
Inserting a number
You can quickly insert a number between letters.
Press and hold the corresponding number key.
Scrolling
To move the cursor through your text message,
press the Navigation keys.
Clearing letters and words
Press the BACK key once or repeatedly to clear
letters one by one to the left. Press and hold the
BACK key to erase all of the letters on the display.
Using 123 mode
Number mode enables you to enter numbers.
Press the keys corresponding to the digits you
want to enter and manually switch back to the
text entry mode of choice.
Using Symbol mode
Symbol mode enables you to enter symbols.
Press the Navigation keys to display more symbol
sets.
Press the keys corresponding to the symbols you
want, then the phone automatically switches back
to the text entry mode used just prior to selecting
Symbol mode.

32
Using the menus
This phone offers a range of functions that allow
you to tailor the phone to your needs. These
functions are arranged in menus and submenus.
They can be accessed by scrolling or by using the
shortcuts.
Accessing a menu function by
scrolling
1. In Standby mode, press the
Menu
soft key to
access Menu mode.
2. Scroll using the Navigation keys to reach the
main menu, for example,
Settings
. Press the
OK
key to enter the menu.
3. If the menu contains any submenus, for
example,
Others
, find the one you want by
scrolling using the Navigation keys. Press the
OK
key to enter the submenu.
If the menu you have selected contains
submenus, repeat this step.
4. Scroll using Up or Down key to find the setting
of your choice.
5. Press the OK key to confirm the chosen
setting.
Notes
:
• You can return to the previous menu level by
pressing
the BACK key
.
• You can exit the menu without changing the menu
settings by pressing
the END key
.

Using the menus
33
Using shortcuts
The menu items, such as menus, submenus, and
setting options, are numbered and can be
accessed quickly by using their shortcut numbers.
Note
: The numbers assigned to each menu function
are indicated on the list. See the next page.
1. In Standby mode, press the
Menu
soft key to
access Menu mode.
2. Enter the first digit of the shortcut number.
Repeat this for each digit of the shortcut
number.
3. Scroll using the Navigation keys to select the
setting of your choice.
4. Press the OK key to confirm the chosen
setting.

Using the menus
34
List of menu functions
The following list shows the menu structure and
indicates the number assigned to each option.
1. Web
2. Call History
2.1 Outgoing Calls
2.2 Incoming Calls
2.3 Missed Calls
2.4 Recent Calls
3. Media Player
4. On Demand
5. Missed Alerts
6. Music
7. My Content
8. Messaging
8.1 Send Message
8.2 Text Message
8.3 Picture Mail
8.4 VoiceSMS
8.5 IM & Email
8.6 Voicemail
8.7 Chat & Dating
8.8 Premium Msg
8.9 Settings

Using the menus
35
9. Tools
9.1 Mass Storage
9.2 Voice Service
9.3 Voice Memo (
9.4 Bluetooth
9.5 Planner
9.6 Memo Pad
9.7 World Time
9.8 Alarm Clock
9.9 Claculator
0. Contacts
0.1 Find
0.2 Add New Entry
0.3 Speed Dial #s
0.4 Group
0.5 My Name Card
0.6 Services
*. Pictures
*.1 Camera
*.2 Camcorder
*.3 Picture Mail
*.4 My Albums
*.5 Order Prints
*.6 Pictbridge Print
*.7 Setting and Info
#. Settings
#.1 Display
#.2 Sounds
#.3 Power Vision
#.4 Voice Service
#.5 Security
#.6 Roaming
#.7 Launch Pad
#.8 Others
#.9 Phone Info
#.0 Bluetooth

36
Web
With Web access on your Sprint PCS Vision Phone,
you can browse full-color graphic versions of your
favorite Web sites, making it easier than ever to
stay informed while on the go. Follow sports
scores and breaking news and weather and shop
on your Sprint PCS Vision Phone anywhere on the
Sprint Nationwide PCS Network.
In addition to the features already covered in this
section, the Sprint PCS Vision home page offers
access to these colorful, graphically rich Web
categories, including News, Weather,
Entertainment, Sports, Finance, Travel, Shopping,
Tools, and Business Links, as well as useful
management options including My Account and
Search. Many sites are available under more than
one menu . choose the one that's most convenient
for you.

37
Call History
You can use the Call History menu to:
• .View and dial the missed, outgoing or incoming
numbers.
• Erase the numbers in the Call Log memory.
Outgoing Calls
(Menu 2-1)
The phone stores up to 10 outgoing calls you
dialed. When you access this menu, the list of
outgoing calls is displayed.
Incoming Calls
(Menu 2-2)
This option lets you view the last 10 calls received.
(if you are subscribed to the caller ID service).
When you access this menu, the last incoming
calls are displayed.
Missed Calls
(Menu 2-3)
This option lets you view the last 10 calls missed.
(if you are subscribed to the caller ID service).
When you access this menu, the last missed calls
are displayed.

Call History
38
Recent Calls
(Menu 2-4)
Use All recent to view received, dialed, and missed
calls for your phone. You can also use All recent to
erase your call history and view Call Timers.
While viewing All recent, you have options such as
saving recent call numbers to your Phonebook,
sending messages to recent call numbers, and
prepending (editing) numbers before saving.

39
Media Player
Your Sprint PCS Vision Multimedia Phone's built-in
media player gives you the ability to listen to
audio clips and view video clips right from your
phone's display. It's a great way to stay up-todate
with news, weather, and sports information while
also enjoying the latest blockbuster movie trailers
or music videos . anywhere, anytime on the Sprint
Nationwide PCS Network. Just access your media
player from your phone's main menu, scroll to
your choice of channel, and select one of the video
or audio clips to play. It's like having a TV in the
palm of your hand.
This section explains the features and options of
your phone's built-in media player.

40
On Demand
The On Demand feature from Sprint Power Vision
makes it easier than ever to retrieve the most
popular Web information and categories instantly.
On Demand uses the ZIP code you provide to
customize the content it retrieves to your area, so
you can get the information you want, when you
want it.
On Demand acts like a PC browser’s customized
home page, displaying a variety of top categories
such as News, Sports, Weather, Money, Movies,
and more, tailored to your preferred area. These
categories and the associated information are
updated continuously throughout the day, so you’ll
always be up-to-date and in-the-know. In addition
to presenting a number of fixed categories, On
Demand also offers optional categories you can
select (for an additional monthly charge), allowing
you faster access to the information you really
want.

41
Missed Alerts
There are several ways your Sprint PCS Phone
alerts you of missed events.

42
Music
Your Sprint Power Vision service allows you to
access the Sprint Music Store, an online music
distribution site that lets you purchase and
download digital music files to play on your Sprint
Power Vision Multimedia Phone.

43
My Content
With Sprint PCS Vision and your new Sprint Power
Vision Phone, you have access to a dynamic
variety of Premium Service content, such as
downloadable Games, Ringers, Screen Savers,
and other applications. (Additional charges may
apply.) The basic steps required to access and
download Premium Service content are outlined
below.

44
Messaging
Send Message
(Menu 8-1)
1. Enter the number or e-mail address of the
recipient and press OK.
2. Enter your message using the keypad. Press
the Option soft key. A pop-up menu appears in
the display.
3. Use the navigation key to select the input
mode (ABC, T9Word, Symbol, or 123). Also
use the navigation key to choose the text
format, or if you wish to Add Media such as a
picture, animation, melody, or a canned
message.
4. Once you’re finished entering your message,
press OK.
5. Press the Send soft key. Your message is sent
to the intended recipient.
Text Message
(Menu 8-2)
You can use following options in this menu :
Inbox
New messages are stored in your inbox.
1. Use the navigation key to highlight the
message you wish to view.
2. Press OK to view the contents of the message.

Messaging
45
Outbox
Your phone stores messages in Outbox, regardless
of whether the message was successfully
transmitted.
Drafts
Draft messages are those that have been
composed but never sent. You can return to the
Draft folder at any time to view, edit, or send a
draft message.
Send Message
You can send message from Inbox.
Picture Mail
(Menu 8-3)
You can send or receive picture mail in this menu.
VoiceSMS
(Menu 8-4)
In addition to sending and receiving SMS Text
Messages, your phone is enabled with SMS Voice
Messaging. With SMS Voice Messaging, you can
quickly and easily send a voice message to other
SMS-enabled Sprint PCS Phones or working email
addresses without making a phone call. Just
record a message and send it directly to the
recipient’s phone messaging inbox.

Messaging
46
IM & Email
(Menu 8-5)
Sprint PCS Vision also provides you with access to
popular instant messaging (IM) clients, including
AOL Instant MessengerTM, MSN Messenger, and
Yahoo! Messenger.
With Sprint PCS Vision, you can use popular email
services such as AOL Mail, Yahoo! Mail, MSN
Hotmail and EarthLink to keep in touch, even
while you’re on the go.
Voicemail
(Menu 8-6)
All unanswered calls to your Sprint PCS Phone are
automatically transferred to your voicemail, even
if your phone is in use or turned off. Therefore,
you will want to set up your Sprint PCS Voicemail
and personal greeting as soon as your phone is
activated.
Chat & Dating
(Menu 8-7)
Sprint PCS Vision gives you the ability to join
wireless chatrooms from your phone, to send text
messages and icons to chatroom participants, or
to launch a one-on-one (private) chatroom.

Premium Msg
(Menu 8-8)
Settings
(Menu 8-9)
Staying connected to your friends and family has
never been easier. With your phone°Øs advanced
messaging capabilities, you can send and receive
many different kinds of text messages without
placing a voice call. Your phone,s messaging
settings make text messaging even faster and
easier by letting you decide how you would like to
be notified of new messages, create a signature
with each sent message, and create your own
canned messages, to name just a few.

48
Tools
Mass Storage
(Menu 9-1)
The mass storage tool allows you to connect a
USB data cable from your phone to a PC, manage
your files using the file manager, and check the
available memory information.
Voice Service
(Menu 9-2)
Your Sprint PCS Phone’s Voice Services let you
place calls using your voice. This section includes
easy-to-follow instructions on using voice-
activated dialing.
Voice Memo
(Menu 9-3)
You can use your phone’s Voice Services to record
brief memos to remind you of important events,
phone numbers, or grocery list items.
Bluetooth
(Menu 9-4)
Bluetooth technology enables cost-free
wirelessconnections between electronic devices
within a maximum range of 10 meters. A
Bluetooth connection can be used to send photos,
images, videos, phonebook, scheduled items, and
to connect wirelessly to devices using Bluetooth
technology, such as computers. Since Bluetooth
devices communicate using radio waves, your
phone and the other Bluetooth device do not need

Tools
49
to be in line of sight to each other. The 2 devices
only need to be within a maximum of 10 meters of
each other, although the connection can be
subjected to interference from obstructions, such
as walls or other electronic devices. In some
countries, there may be restrictions on using
Bluetooth devices.Please contact your service
provider.
Enable/Disable
This feature allows you to activate the Bluetooth
feature. When this option is set to On, the
Bluetooth icon appears.
Search Device
This feature allows you to search for connectable
Bluetooth devices.
Planner
(Menu 9-5)
Today
You can schedule for the current day indicating
each event’s start and end time. You can even
have your phone's calendar alert you before an
event is to start. Events scheduled for future dates
automatically appear on your Today events
schedule on that day.
Scheduler
This option allows you to view in calendar format
the current month, or a past of future month. In

Tools
50
this option, the current date is highlighted on the
calendar. Days with the scheduled events are
underlined.with the scheduled events are
underlined.
Task List
This feature allows you to draw up a list of tasks to
be done and assign a priority and deadline to each
task.
Countdown
This menu help you know how much time it takes
you to do something, or how many months, days,
hours and minutes until a specific day. You can
create up to 20 Count down timers using this
menu.
Memo Pad
(Menu 9-6)
This feature allows you to write down memos. You
can enter up to 60 characters for each memo. If
memos are already saved, scroll to the desired
item by pressing up or down navigation key.
The following options available; .
Erase: allows you to erase a selected memo.
Erase All: allows you to erase memos.

Tools
51
World Time
(Menu 9-7)
This menu allows you to check the current time for
Greenwich Mean Time (GMT) and 24 major cities
around the world: Select the city corresponding to
your time zone by pressing the navigation keys
one or more times. The local date and time are
displayed.
Alarm Clock
(Menu 9-8)
Your phone has an alarm clock function with three
separate alarms.Each alarm can be set to go off
once, or daily at a set programmed time. Once
you set an alarm, it is easy to change it’s time or
to turn it off.
Calculator
(Menu 9-9)
Using this feature, you can use the phone as a
calculator. The calculator provides the basic
arithmetic functions: addition, subtraction,
multiplication and division.

52
Contacts
Contacts allows you to store frequently used
phone numbers and the associated names in your
personal directory to make it easy for you to make
a call without having to remember or enter the
phone number. You can store up to 500 entries
including E-mail and URL addresses.
Find
(Menu 0-1)
This menu allows you to find an entry using a
person’s name, entry number, or group name in
your Contacts.
To change the finding method, press the
navigation keys until the option you want
displays;
By Name
,
By Speed Dial
, or
By
Group
.
Add New Entry
(Menu 0-2)
This menu allows you to store a number with a
name in your Phone Book. You can save a person’s
various numbers, such as workplace number,
mobile number and fax number, into one entry.
Using this feature, you can keep someone’s
information together. It also helps you to find
numbers easily in the Phone Book.

Contacts
53
Speed Dial #s
(Menu 0-3)
Speed dialing allows you to press and hold a key
(or keys) to dial the number associated with those
key(s).
There are three types of speed dialing; 1-touch, 2-
touch, and 3-touch dialing.
Group
(Menu 0-4)
This menu allows you to change the settings for
the caller groups. You can create groups and edit
the groups. You can also send a message to an
entry(ies) you selected from a group.
My Name Card
(Menu 0-5)
My Name Card allows you to create a virtual
business card. Once completed, you can send the
card to recipients as a V-card attachment..
Services
(Menu 0-6)
Your Contacts are preprogrammed with phone
numbers for various Sprint PCS Services.

54
Pictures
Camera
(Menu *-1)
In this menu, you can take a picture. The camera
produces JPEG pictures.
Camcorder
(Menu *-2)
Your phone is capable of recording short videos
(and audio) of up to a few seconds in length.
Saved videos are stored in the My Videos.
Picture Mail
(Menu *-3)
Once you’ve taken a picture, you can use the
messaging capabilities of your Sprint PCS Vision
Picture Phone to instantly share it with family and
friends. You can send a picture to up to ten people
at a time using their email addresses or their
Sprint PCS Phone Numbers.
My Albums
(Menu *-4)
In this menu option, you can review the pictures
you have taken.

Pictures
55
Order Prints
(Menu *-5)
Order Prints to order printed copies of the image
from an online printer.
Pictbridge Print
(Menu *-6)
Using this menu option, you can select pictures,
adjust print setting and execute print function.
Settingd and Info
(Menu *-7)
Using this menu option, you can change
information about your web page account.
Accessing the Online Albums menu option
connects your phone to the wireless web. Once
you are connected to the web, the setting options
displays.

56
Settings
Display
(Menu #-1)
Screen saver
You can select an image to be displayed in idle
mode.
Set foreground
A foreground image can be used to display a
calendar, clock, or other images on top of the
background image.
Incomig Call
To display the picture for all incoming calls. You
can select either With Caller ID or No Caller ID
Greeting
The banner option allows you to edit the greeting
displayed on the standby screen. Enter your
greeting using the alphanumeric keys.
Backlight
You have several options for setting how the LCD,
keypad backlight operates. Remember that
backlight use drains your battery faster.
Service Light
This menu allows you to select whether or not the
service light on.

Settings
57
Sounds
(Menu #-2)
Ringer Volume
This menu option allows you to adjust the ringer
volume.
Calls
: allows you to adjust the ringer volume for
the incoming calls.
Messages
: allows you to adjust the ringer volume
for the messages.
Alarms
: allows you to adjust the ringer volume
for the alarms.
Press up or down navigation key to adjust the
volume or select the type.
Volume Level: adjust the volume level (the more
bars, the louder).
Vibrate: switches the phone to vibration mode. An
incoming call vibrates the phone.
1 Beep: sounds a beep.
Off: does not sound the ring.
Ringer Type
This option allows you to set a unique ring for
voice calls, messages, data/fax, alarm, and
planner. Select a unique ring tone for each status.
As you change it, it sounds for a few seconds.
Note
: You can download 5 melodys using PC Link.
Voice Calls
: allows you to set a unique ring for an
incoming voice call.

Settings
58
Messages
: allows you to have a distinctive ring
for a voice mail, page, text message or browser
message.
Schedule
: allows you to have a distinctive ring
for a planner alarm.
Alerts
Minute Beep
: With this menu option set to ON,
the phone sounds an alert 10 seconds before each
elapsed minute to remind you of the length of the
current call.
Service
: With this menu option set to ON, the
phone beeps when you exit service area or when
you return to a service area.
Connect
: You can set your phone to sound the
connect tone when your call is connected to the
system.
Sig. Fade Tone
: When this option is set to On,
the phone sounds an alert when a dropped call
occurs during conversation in response to a signal
fade.
Power On/Off
:When this option is set to On, the
phone sounds when you turn on or off the phone.
Key tone
Using this menu, you can set up the keypad tone
that the phone sounds when you press a key.

Settings
59
Power Vision
(Menu #-3)
With your Sprint Power Vision Phone and Sprint
PCS Service, you are ready to start enjoying the
advantages of Sprint PCS Vision. This section will
help you learn the basics of using your Sprint PCS
Vision services, including managing your User
name, launching a Vision connection, and
navigating the Web with your phone.
Voice Service
(Menu #-4)
Your Sprint PCS Phone’s Voice Services let you
place calls using your voice. This section includes
easy-to-follow instructions on using voice-
activated dialing.
Security
(Menu #-5)
Your phone provides many security options,
including a user-programmable lock code and call
restriction features.
To access the security menu, you must enter a
four-digit lock code. The lock code is preset to
0000 at factory.
Lock Phone
When the phone is locked, you cannot operate the
phone until you enter the lock code.
The following options are available:
Unlocked: the phone remains unlocked.
On power up: the phone locks automatically at the
next time your phone turned on.
Lock Now: the phone locks immediately.

Settings
60
Lock Pic/Video
When the picture/video is locked, you cannot
enter the camera mode until you enter the lock
code.
Change Lock
This feature allows you to change your current
lock code to a new one. The lock code is preset to
0000 at factory. Enter a new, four-digit lock code,
then press OK.
Special #
Your phone provides the option of storing
emergency numbers. All emergency numbers can
be manually dialed at any time even when your
phone is locked or all default priority numbers are
depending on your service provider.
To store an emergency number, select a location
using a numeric keys or up or down navigation
key and enter the desired number. Each priority
number can be up to 32 digits long. The number
already stored in the location is automatically
deleted when you enter the new number. To make
an emergency call in Lock mode, simply enter the
emergency number, then press the TALK key.
Erase Contacts
This menu allows you to erase all the numbers in
your Contacts and the voice dial.
When a confirmation message displays, press OK
to clear the memory.

Settings
61
Erase My Content
This menu allows you to erase all the downloads in
the memory.
Erase Pic/Video
This menu allows you to erase all the pictures/
videos in my pictures.
Reset Favorites
Resetting the Account Info erases all of your saved
options and returns them to the factory default
settings.
Reset Phone
Resetting the phone erases all of your saved
options and returns them to the factory default
settings. Your Phone Book, Call Logs, and SMS
messages remain.
The phone reboots (turns itself off then on),
restores the default settings, and then returns to
Standby mode.
Lock Service
This setting allows you to lock voice call functions
and Sprint PCS Vision services. When you enable
Lock Services, you are unable to make new calls
(excluding emergency numbers) or access the
Sprint PCS Vision services until the lock has been
disabled in the Security menu.

Settings
62
Roaming
(Menu #-6)
Set your phone to sound a unique tone when a call
is received outside a network service area. This
feature is set to Off by default.
Launch Pad
(Menu #-7)
The Navigation Keys can be used as shortcut keys.
In stanby mode, they allow you to access specific
menu directly.
Others
(Menu #-8)
Call Setup
:
-Abbrev. Dial
: Sets the abbreviation dialling on
or off.
-Contacts Match
: Contacts Match allows you to
enter the last 3-6 digits of a phone number stored
in the Contacts and press TALK key to dial without
having to enter the remaining digits.
-Restriction
: Allows you to limit the phone from
making outgoing calls to only those listed in the
phonebook or programmed in special’s.
-Call Answer
: Allows you to determine what
action will answer
-Auto Answer
: With this menu option activated,
the phone automatically answers calls after
predefined time. This option is useful while
driving, for instance.
Language
: Sets the language of voice prompts,
menus and key input.

Settings
63
Select the desired language by pressing the
navigation key.
Airplane Mode
: Airplane Mode allows you to use
many of your phone’s features, such as Games,
Memo Pad, Voice Memos, etc.,
when you are in an airplane or in any other area
where making or receiving calls or data is
prohibited. When your phone is in Airplane Mode,
it cannot send or receive any calls or access online
information.
Location
:Your PCS Phone is equipped with a
Location feature for use in connection with
location-based services that may be available in
the future.
Audio Routing:
TTY Options:
A TTY (also known as a TDD or Text
Telephone) is a telecommunications device that
allows people who are deaf, hard of hearing, or
who have speech or language disabilities, to
communicate by telephone.
Update Phone SW:
Phone Info
(Menu #-9)
Allows you to view phone nubmer, icon glossary,
s/w and h/w version and advanced information.

Settings
64
Bluetooth
(Menu #-0)
Bluetooth technology enables cost-free
wirelessconnections between electronic devices
within a maximum range of 10 meters. A
Bluetooth connection can be used to send photos,
images, videos, phonebook, scheduled items, and
to connect wirelessly to devices using Bluetooth
technology, such as computers. Since Bluetooth
devices communicate using radio waves, your
phone and the other Bluetooth device do not need
to be in line of sight to each other. The 2 devices
only need to be within a maximum of 10 meters of
each other, although the connection can be
subjected to interference from obstructions, such
as walls or other electronic devices. In some
countries, there may be restrictions on using
Bluetooth devices.Please contact your service
provider.
Enable/Disable
This feature allows you to activate the Bluetooth
feature. When this option is set to Enable, the
Bluetooth icon appears.
Visibility
This feature allows you to set whether or not your
phone is available to other Bluetooth devices.

Settings
65
Device name
This feature allows you to change your phone’s
Bluetooth device name, which is displayed on
other devices.
Exchange FTP Folder
You can send and receive files between your
handset and PC via Bluetooth using the FTP
transfer protocol.
Device Info
: allows you to view the information
of the selected device.

Settings
66

67
Health and safety
information
Getting the Most Out of Your
Reception
Keeping Tabs on Signal Strength
The quality of each call you make or receive depends on
the signal strength in your area. Your phone informs you
of the current signal strength by displaying a number of
bars next to the signal strength icon. The more bars
displayed, the stronger the signal. If you’re inside a
building, being near a window may give you better
reception.
Understanding the Power Save Feature
If your phone is unable to find a signal after 15 minutes
of searching, a Power Save feature is automatically
activated. If your phone is active, it periodically rechecks
service availability; you can also check it yourself by
pressing any key. Anytime the Power Save feature is
activated, a message is displayed on the screen. When a
signal is found, your phone returns to Standby mode.
Understanding How Your Phone Operates
Your phone is basically a radio transmitter and receiver.
When it’s turned on, it receives and transmits
radiofrequency (RF) signals. When you use your phone,
the system handling your call controls the power level.
This power can range from 0.006 watts to 0.2 watts in
digital mode.
Knowing Radio Frequency Safety
The design of your Sprint PCS Phone complies with
updated NCRP standards described below.

Health and safety information
68
In 1991-92, the Institute of Electrical and Electronics
Engineers (IEEE) and the American National
Standards Institute (ANSI) joined in updating ANSI’s
1982 standard for safety levels with respect to human
exposure to RF signals. More than 120 scientists,
engineers and physicians from universities,
government health agencies and industries developed
this updated standard after reviewing the available
body of research. In 1993, the Federal
Communications Commission (FCC) adopted this
updated standard in a regulation. In August 1996, the
FCC adopted hybrid standard consisting of the
existing ANSI/IEEE standard and the guidelines
published by the National Council of Radiation
Protection and Measurements (NCRP).
Maintaining Your Phone’s Peak Performance
There are several simple guidelines to operating your
phone properly and maintaining safe, satisfactory
service.
• Speak directly into the mouthpiece.
• Avoid exposing your phone and accessories to rain
or liquid spills.
If your phone does get wet, immediately turn the
power off and remove the battery.
Note
: For the best care of your phone, only Sprint
authorized personnel should service your
phone and accessories. Faulty service may
void the warranty.
Maintaining Safe Use of and Access
to Your Phone
FAILURE TO FOLLOW THE INSTRUCTIONS OUTLINED
MAY LEAD TO SERIOUS PERSONAL INJURY AND
POSSIBLE PROPERTY DAMAGE
Using Your Phone While Driving
Talking on your phone while driving (or operating the
phone without a hands-free device) is prohibited in
some jurisdictions. Laws vary as to specific

Health and safety information
69
restrictions. Remember that safety always comes
first.
Note
: Purchase an optional hands-free accessory at
your local Sprint Store, or call the Sprint PCS
Accessory Hotline
SM
at 1-800-974-2221 or by
dialing
#222
on your Sprint PCS Phone.
Following Safety Guidelines
To operate your phone safely and efficiently, always
follow any special regulations in a given area. Turn
your phone off in areas where use is forbidden or
when it may cause interference or danger.
Using Your Phone Near Other Electronic
Devices
Most modern electronic equipment is shielded from
radiofrequency (RF) signals. However, RF signals from
wireless phones may affect inadequately shielded
electronic equipment.
RF signals may affect improperly installed or
inadequately shielded electronic operating systems
and/or entertainment systems in motor vehicles.
Check with the manufacturer or their representative
to determine if these systems are adequately
shielded from external RF signals. Also check with the
manufacturer regarding any equipment that has been
added to your vehicle.
Consult the manufacturer of any personal medical
devices, such as pacemakers and hearing aids, to
determine if they are adequately shielded from
external RF signals.
Note
: Always turn off the phone in health care
facilities and request permission before using
the phone near medical equipment.
Turning Off Your Phone Before Flying
Turn off your phone before boarding any aircraft. To
prevent possible interference with aircraft systems,
the U.S. Federal Aviation Administration (FAA)
regulations require you to have permission from a

Health and safety information
70
crew member to use your phone while the plane is on
the ground. To prevent any risk of interference, FCC
regulations prohibit using your phone while the plane
is in the air.
Turning Off Your Phone in Dangerous Areas
To avoid interfering with blasting operations, turn
your phone off when in a blasting area or in other
areas with signs indicating two-way radios should be
turned off. Construction crews often use
remotecontrol RF devices to set off explosives.
Turn your phone off when you're in any area that has
a potentially explosive atmosphere. Although it's rare,
your phone and accessories could generate sparks.
Sparks can cause an explosion or fire, resulting in
bodily injury or even death. These areas are often,
but not always, clearly marked. They include:
• Fueling areas such as gas stations.
• Below deck on boats.
• Fuel or chemical transfer or storage facilities.
• Areas where the air contains chemicals or
particles such as grain, dust, or metal powders.
• Any other area where you would normally be
advised to turn off your vehicle’s engine.
Note
: Never transport or store flammable gas,
liquid or explosives in the compartment of
your vehicle that contains your phone or
accessories.
Restricting Children’s Access to Your Phone
Your phone is not a toy. Do not allow children to play
with it as they could hurt themselves and others,
damage the phone or make calls that increase your
Sprint PCS Invoice.
Caring for the Battery
Protecting Your Battery
The guidelines listed below help you get the most out
of your battery’s performance.

Health and safety information
71
• Use only Sprint-approved batteries and battery
chargers. These chargers are designed to
maximize battery life. Using other batteries or
chargers voids your warranty and may cause
damage.
• In order to avoid damage, charge the battery only
in temperatures that range from 32º F to 113º F
(0º C to 45º C).
• Don’t use the battery charger in direct sunlight or
in high humidity areas, such as the bathroom.
• Never dispose of the battery by incineration.
• Keep the metal contacts on top of the battery
clean.
• Don’t attempt to disassemble or short-circuit the
battery.
• The battery may need recharging if it has not
been used for a long period of time.
• It’s best to replace the battery when it no longer
provides acceptable performance. It can be
recharged hundreds of times before it needs
replacing.
• Don’t store the battery in high temperature areas
for long periods of time. It’s best to follow these
storage rules:
Less than one month:
4º F to 140º F (-20º C to 60º C)
More than one month:
4º F to 113º F (-20º C to 45º C)
Disposal of Lithium Ion (Li-Ion) Batteries
For safe disposal options of your Li-Ion batteries,
contact your nearest Sprint authorized service center.
Special Note
: Be sure to dispose of your battery
properly. In some areas, the disposal of batteries in
household or business trash may be prohibited.
Note
: For safety, do not handle a damaged or
leaking Li-Ion battery.

Health and safety information
72
Acknowledging Special Precautions
and the FCC Notice
FCC Notice
Note
:
This device complies with Part 15 of the FCC
Rules. Operation is subject to the following two
conditions: (1) this device may not cause
harmful interference, and (2) this device must
accept any interference received, including
interference that may cause undesired operation.
This phone may cause TV or radio interference if used
in close proximity to receiving equipment. The FCC
can require you to stop using the phone if such
interference cannot be eliminated.
Vehicles using liquefied petroleum gas (propane or
butane) must comply with the National Fire Protection
Standard (NFPA-58). For a copy of this standard,
contact the National Fire Protections Association, One
Batterymarch Park, Quincy, MA 02269, Attn.:
Publication Sales Division.
Cautions
Changes or modifications made in the radio phone, not
expressly approved by Samsung, will void the user’s
authority to operate the equipment.
Only use approved batteries, antennas and chargers.
The use of any unauthorized accessories may be
dangerous and void the phone warranty if said
accessories cause damage or a defect to the phone.
Although your phone is quite sturdy, it is a complex
piece of equipment and can be broken. Avoid
dropping, hitting, bending or sitting on it.
Body-Worn Operation
To maintain compliance with FCC RF exposure
guidelines, if you wear a handset on your body, use
the Sprint supplied or approved carrying case, holster
or other body-worn accessory. Use of non-Sprint
approved accessories may violate FCC RF exposure
guidelines.

Health and safety information
73
For more information about RF exposure, visit the
FCC Website at www.fcc.gov.
Specific Absorption Rates (SAR) for Wireless
Phones
The SAR is a value that corresponds to the relative
amount of RF energy absorbed in the head of a user
of a wireless handset.
The SAR value of a phone is the result of an extensive
testing, measuring and calculation process. It does
not represent how much RF the phone emits. All
phone models are tested at their highest value in
strict laboratory settings. But when in operation, the
SAR of a phone can be substantially less than the
level reported to the FCC. This is because of a variety
of factors including its proximity to a base station
antenna, phone design and other factors. What is
important to remember is that each phone meets
strict federal guidelines. Variations in SARs do not
represent a variation in safety.
All phones must meet the federal standard, which
incorporates a substantial margin of safety. As stated
above, variations in SAR values between different
model phones do not mean variations in safety. SAR
values at or below the federal standard of 1.6 W/kg
are considered safe for use by the public.
Before a new model phone is available for sale to the
public, it must be tested and certified to the FCC that
it does not exceed the limit estabilished by the FCC.
Tests are performed in positions and locations(e.g. at
the ear and worn on the body) as required by the
FCC. The highest SAR values for this model phone as
reported to the FCC are Head: 1.28W/Kg, Body-worn:
0.861 W/Kg.
For body worn operation, this model phone has been
tested and meets the FCC RF exposure guidelines
when used with a Samsung accessory designated for
this product or when used with an accessory that
contains no metal and that positions the handset a
minimum of 1.5 cm from the body.
None-compliance with the above restrictions may
result in violation of FCC RF esposure guidelines.

Health and safety information
74
FCC Radiofrequency Emission
This phone meets the FCC Radiofrequency Emission
Guidelines.
FCC ID number:
A3LSPHA720
. More information on
the phone's SAR can be found from the following FCC
Website: http://www.fcc.gov/oet/fccid.
Owner’s Record
The model number, regulatory number and serial
number are located on a nameplate inside the battery
compartment. Record the serial number in the space
provided below. This will be helpful if you need to
contact us about your phone in the future.
Model:
Sprint PCS Vision Multimedia Phone
MM-A720 by Samsung
®
Serial No.:
Phone Guide Proprietary Notice
CDMA Technology is licensed by QUALCOMM
Incorporated under one or more of the following
patents:
4,901,307 5,109,390 5,267,262 5,416,797
5,506,865 5,544,196 5,657,420 5,101,501
5,267,261 5,414,796 5,504,773 5,535,239
5,600,754 5,778,338 5,228,054 5,337,338
5,710,784 5,056,109 5,568,483 5,659,569
5,490,165 5,511,073
T9 Text Input is licensed by Tegic Communications
and is covered by U.S. Pat. 5,818,437, U.S. Pat.
5,953,541, U.S. Pat. 6,011,554 and other patents
pending.
Phone Guide template version 4A (November 2005)

GH68-08136A
Hearing Aid Compatibility with Mobile Phones
When some mobile phones are used near some hearing devices (hearing aids and
cochlear implants), users may detect a buzzing, humming, or whining noise. Some
hearing devices are more immune than others to this interference noise, and phones
also vary in the amount of interference they generate.
The wireless telephone industry has developed ratings for some of their mobile
phones, to assist hearing device users in finding phones that may be compatible
with their hearing devices. Not all phones have been rated. Phones that are rated
have the rating on their box or a label on the box.
The ratings are not guarantees. Results will vary depending on the user’s hearing
device and hearing loss. If your hearing device happens to be vulnerable to interfer-
ence, you may not be able to use a rated phone successfully. Trying out the phone
with your hearing device is the best way to evaluate it for your personal needs.
M-Ratings: Phones rated M3 or M4 meet FCC requirements and are likely to gener-
ate less interference to hearing devices than phones that are not labeled. M4 is the
better/higher of the two ratings.
T-Ratings: Phones rated T3 or T4 meet FCC requirements and are likely to be more
usable with a hearing device’s telecoil (“T Switch” or “Telephone Switch”) than
unrated phones. T4 is the better/higher of the two ratings. (Note that not all hearing
devices have telecoils in them.)
Hearing devices may also be measured for immunity to this type of interference. Your
hearing device manufacturer or hearing health professional may help you find results
for your hearing device. The more immune your hearing aid is, the less likely you are
to experience interference noise from mobile phones.