Samsung Electronics Co SPHL520 Multi-Band CDMA/LTE Phone with WLAN, Bluetooth and RFID User Manual Sprint L520 IIB
Samsung Electronics Co Ltd Multi-Band CDMA/LTE Phone with WLAN, Bluetooth and RFID Sprint L520 IIB
Contents
- 1. Users Manual
- 2. Users Manual 2
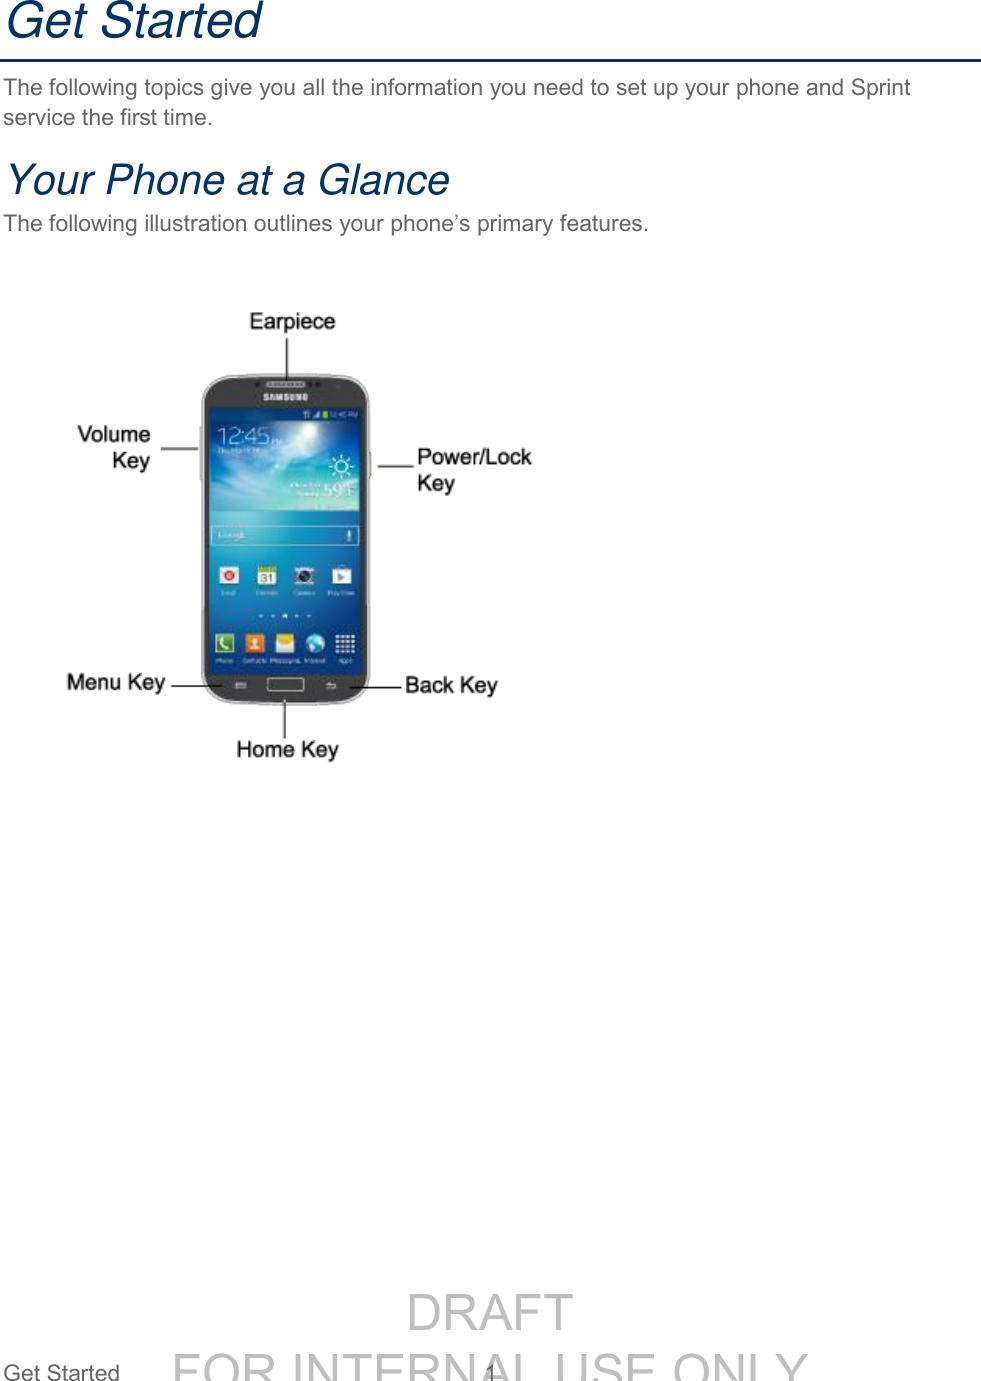
Users Manual


![DRAFT FOR INTERNAL USE ONLY Tools and Calendar 114 2. On the phone, open the application that contains the information or file you want to send. Follow the steps for the type of item you want to send: Photo or video (in Camera). After capturing a photo, on the preview screen, tap > Bluetooth. Photos and videos (in Gallery). On the Albums tab, tap an album, and then tap > Bluetooth. Tip: If your phone remembers Bluetooth as a previous selection within the Camera or Gallery, you can tap (to the right of the icon). Calendar event. In the Calendar’s Day view, Agenda view, or Week view, tap the event and then tap > Send via > Bluetooth. Music track. This feature is available through the Music Player. With the track displayed on the Now playing screen, tap > Share music via > Bluetooth. Voice recording. On the main Voice Recorder screen, touch and hold a recording and then tap Share > Bluetooth. 3. If you are prompted to turn on Bluetooth, tap Yes. 4. Tap the name of the receiving device. 5. If prompted, accept the connection on the receiving phone, and enter the same passcode on both your phone and the other device, or confirm the auto-generated passcode. 6. On the receiving device, accept the file. The location where the information is saved depends on the type of information and the receiving device: ● If you send a calendar event or contact, it is normally added directly to the corresponding application on the receiving device. For example, if you send a calendar event to a compatible phone, the event is shown in that phone’s calendar application. ● If you send another file type to a Windows computer, it is normally saved in the Bluetooth Exchange folder within your personal document folders. On Windows XP, the path may be: C:\Documents and Settings\[your username]\ My Documents\Bluetooth Exchange. On Windows Vista, the path may be: C:\Users\[your username]\Documents.](https://usermanual.wiki/Samsung-Electronics-Co/SPHL520.Users-Manual/User-Guide-2048405-Page-126.png)


![6WARRANTY OF MERCHANTABILITY, FITNESS FOR A PARTICULAR PURPOSE, INTEROPERABILITY OR NON-INFRINGEMENT, WITH RESPECT TO INFORMATION TECHNOLOGY SECURITY PROTECTION, SAFE™ DEVICES AND APPLICATIONS TESTED WITH SAFE™ DEVICES. IN NO EVENT SHALL THE SAMSUNG ENTITIES BE LIABLE FOR ANY DIRECT, INDIRECT, INCIDENTAL, PUNITIVE, OR CONSEQUENTIAL DAMAGES OF ANY KIND WHATSOEVER WITH RESPECT TO INFORMATION TECHNOLOGY SECURITY PROTECTION, SAFE™ DEVICES OR APPLICATIONS TESTED WITH SAFE™ DEVICES. In addition, information technology security protection will be affected by features or functionality associated with, among other things the e-mail platform, master data management, and virtual private network solutions selected by the software provider, solution provider or user. Choice of an e-mail, master data management, and virtual private network solution is at the sole discretion of the software provider, solution provider or user and any associated effect on information technology security protection is solely the responsibility of the software provider, solution provider or user. For complete statement of limited warranty, please refer to www.samsung.com/us/safe, available on the web and where Samsung smartphone and Galaxy Tab™ devices are sold. [101212] Sprint_L520_IIB_.book Page 6 Wednesday, August 7, 2013 4:50 PMDRAFT For Internal Use Only](https://usermanual.wiki/Samsung-Electronics-Co/SPHL520.Users-Manual/User-Guide-2048405-Page-193.png)


![49●Seizures or blackouts can occur when you are exposed to flashing lights while watching videos or playing games for extended periods. If you feel any discomfort, stop using the device immediately.●Reduce risk of repetitive motion injuries. When you repetitively perform actions, such as pressing keys, drawing characters on a touch screen with your fingers, or playing games, you may experience occasional discomfort in your hands, neck, shoulders, or other parts of your body. When using your device for extended periods, hold the device with a relaxed grip, press the keys lightly, and take frequent breaks. If you continue to have discomfort during or after such use, stop use and see a physician.●If your device has a camera flash or light, do not use the flash or light close to the eyes of people or pets. [122011]Sprint_L520_IIB_.book Page 49 Wednesday, August 7, 2013 4:50 PMDRAFT For Internal Use Only](https://usermanual.wiki/Samsung-Electronics-Co/SPHL520.Users-Manual/User-Guide-2048405-Page-236.png)
![60 Manufacturer’s WarrantySamsung Telecommunications America, LLC 1301 E. Lookout Drive Richardson, Texas 75082Phone: 1-800-SAMSUNG Phone: 1-888-987-HELP (4357)No reproduction in whole or in part allowed without prior written approval. Specifications and availability subject to change without notice. [111611]End User License Agreement for SoftwareIMPORTANT. READ CAREFULLY: This End User License Agreement ("EULA") is a legal agreement between you (either an individual or a single entity) and Samsung Electronics Co., Ltd. ("Samsung") for software, owned by Samsung and its affiliated companies and its third party suppliers and licensors, that accompanies this EULA, which includes computer software and may include associated media, printed materials, "online" or electronic documentation in connection with your use of this device ("Software"). This device requires the use of preloaded software in its normal operation. BY USING Sprint_L520_IIB_.book Page 60 Wednesday, August 7, 2013 4:50 PMDRAFT For Internal Use Only](https://usermanual.wiki/Samsung-Electronics-Co/SPHL520.Users-Manual/User-Guide-2048405-Page-247.png)
![74 Manufacturer’s Warrantydispute resolution procedure. Opting out of this dispute resolution procedure will not affect your use of the device or its preloaded Software, and you will continue to enjoy the benefits of this license.17. ENTIRE AGREEMENT; SEVERABILITY. This EULA is the entire agreement between you and Samsung relating to the Software and supersedes all prior or contemporaneous oral or written communications, proposals and representations with respect to the Software or any other subject matter covered by this EULA. If any provision of this EULA is held to be void, invalid, unenforceable or illegal, the other provisions shall continue in full force and effect. [050113]Sprint_L520_IIB_.book Page 74 Wednesday, August 7, 2013 4:50 PMDRAFT For Internal Use Only](https://usermanual.wiki/Samsung-Electronics-Co/SPHL520.Users-Manual/User-Guide-2048405-Page-261.png)


![v.7-1-13 General Terms and Conditions of Service 117encompassing the billing address of the Device, without regard to the conflicts of law rules of that state. If either of us waives or doesn’t enforce a requirement under this Agreement in an instance, we don’t waive our right to later enforce that requirement. Except as the Agreement specifically provides otherwise, if any part of the Agreement is held invalid or unenforceable, the rest of this Agreement remains in full force and effect. This Agreement isn’t for the benefit of any third party except our corporate parents, affiliates, subsidiaries, agents, and predecessors and successors in interest. You can’t assign the Agreement or any of your rights or duties under it, unless we agree to the assignment. We can assign the Agreement without notice. You cannot in any manner resell the Services to another party. The Agreement and the documents it incorporates make up the entire agreement between us and replaces all prior written or spoken agreements—you can’t rely on any contradictory documents or statements by sales or service representatives. The rights, obligations, and commitments in the Agreement that—by their nature—would logically continue beyond the termination of Services (for example, those relating to billing, payment, 911, dispute resolution, no class action, no jury trial) survive termination of Services.[End General Terms and Conditions of Service]Sprint_L520_IIB_.book Page 117 Wednesday, August 7, 2013 4:50 PMDRAFT For Internal Use Only](https://usermanual.wiki/Samsung-Electronics-Co/SPHL520.Users-Manual/User-Guide-2048405-Page-304.png)