Samsung Electronics Co SPHN345 Single-Mode PCS CDMA Phone User Manual
Samsung Electronics Co Ltd Single-Mode PCS CDMA Phone Users Manual
Users Manual
ELECTRONIC
S
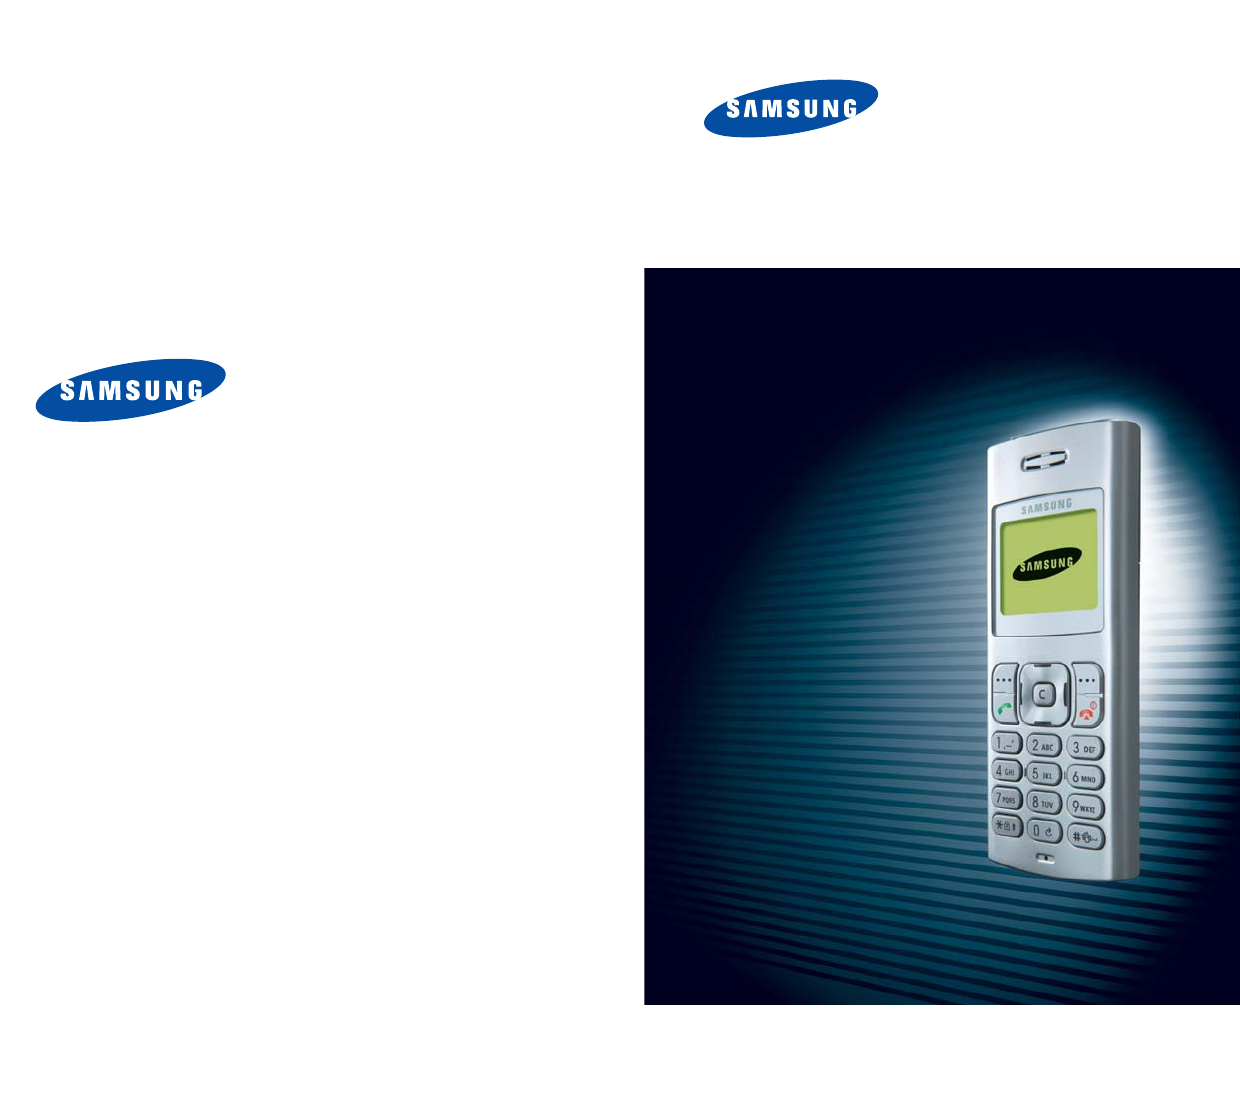
SPH-N345
User’s Manual
Please read this manual before operating your phone, and
keep it for future reference.

3
Contents
Contents................................................................ 3
Important Safety Precautions................................ 7
Unpacking ............................................................. 9
Your Phone.......................................................... 10
Phone Layout.......................................................... 10
Display................................................................... 13
Getting Started.................................................... 16
Installing the Battery ............................................... 16
Charging the Battery................................................ 17
Switching the Phone On/Off ...................................... 20
Your Phone’s Mode................................................... 21
Call Functions...................................................... 23
Making a Call .......................................................... 23
Answering a Call...................................................... 30
Options During a Call ............................................... 31
Using the Caller ID................................................... 32
Viewing Missed Calls ................................................ 32
Quickly Switching to Silent Mode................................ 33
Call Forwarding ....................................................... 33
Call Waiting ............................................................ 34
Three-way Calling.................................................... 35
Entering Text....................................................... 36
Changing the Text Input Mode................................... 37
T9 Mode................................................................. 38
ABC Mode............................................................... 40
Symbol Mode.......................................................... 42
123 Mode ............................................................... 42
Using the Menus .................................................. 43
Accessing a Menu Function by Scrolling ...................... 43
Using Shortcuts....................................................... 44
List of Menu Functions.............................................. 45

4
Calls .................................................................... 48
Outgoing
(Menu 1-1)
................................................. 48
Incoming
(Menu 1-2)
................................................ 49
Missed
(Menu 1-3)
.................................................... 49
Erase History
(Menu 1-4)
........................................... 50
Air Time
(Menu 1-5)
.................................................. 50
Contacts .............................................................. 51
Find By Name
(Menu 2-1)
.......................................... 51
Add New Entry
(Menu 2-2)
......................................... 52
Find By Entry
(Menu 2-3)
........................................... 55
Find By Group
(Menu 2-4)
......................................... 55
Add E-mail
(Menu 2-5)
.............................................. 56
My Phone #
(Menu 2-6)
............................................. 56
Memory
(Menu 2-7)
.................................................. 56
Messages............................................................. 57
New Message
(Menu 3-1)
.......................................... 58
Voice
(Menu 3-2)
...................................................... 59
Inbox
(Menu 3-3)
..................................................... 60
Sent
(Menu 3-4)
....................................................... 61
Draft
(Menu 3-5)
...................................................... 62
Erase Msg
(Menu 3-6)
............................................... 63
Msg Setting
(Menu 3-7)
............................................. 63
Planner................................................................ 66
Today
(Menu 4-1)
..................................................... 66
Scheduler
(Menu 4-2)
................................................ 67
Task List
(Menu 4-3)
................................................. 69
Memo Pad
(Menu 4-4)
............................................... 70
Alarm
(Menu 4-5)
..................................................... 71
Calculator
(Menu 4-6)
............................................... 72
World Time
(Menu 4-7)
............................................. 72
Count Down
(Menu 4-8)
............................................ 73
Set Time
(Menu 4-9)
................................................. 74
5
Sounds ................................................................ 75
Ringer Volume
(Menu 5-1)
......................................... 75
Ringer Type
(Menu 5-2)
............................................. 76
Key Tone
(Menu 5-3)
................................................ 76
Alerts
(Menu 5-4)
..................................................... 77
Voice Volume
(Menu 5-5)
.......................................... 78
Roam Ringer
(Menu 5-6)
........................................... 78
Tone Length
(Menu 5-7)
............................................ 78
Power On/Off
(Menu 5-8)
........................................... 79
Display ................................................................ 80
Menu Style
(Menu 6-1)
.............................................. 80
Wallpaper
(Menu 6-2)
............................................... 80
Backlight
(Menu 6-3)
................................................ 81
Banner
(Menu 6-4)
................................................... 81
Contrast
(Menu 6-5)
................................................. 82
Setup................................................................... 83
Auto Key Lock
(Menu 7-1)
......................................... 83
Auto Answer
(Menu 7-2)
............................................ 83
Call Answer
(Menu 7-3)
............................................. 84
Auto Retry
(Menu 7-4)
.............................................. 84
Language
(Menu 7-5)
................................................ 84
Select NAM
(Menu 7-6)
............................................. 85
Set System
(Menu 7-7)
............................................. 85
Version
(Menu 7-8)
................................................... 86
Security ............................................................... 87
Lock Phone
(Menu 8-1)
............................................. 87
Change Lock
(Menu 8-2)
........................................... 88
Restriction
(Menu 8-3)
.............................................. 88
Emergency #
(Menu 8-4)
........................................... 88
Erase Contacts
(Menu 8-5)
......................................... 89
Reset Phone
(Menu 8-6)
............................................ 89
Voice Privacy
(Menu 8-7)
............................................ 90

6
Health and Safety Information ............................ 92
Exposure to radio frequency (RF) signals .................... 92
Precautions When Using the Batteries......................... 95
Road Safety............................................................ 96
Operating Environment............................................. 97
Electronic Devices.................................................... 98
Potentially Explosive Atmospheres
........................... 99
Emergency Calls.................................................... 100
Other Important Safety Information......................... 101
Care and Maintenance............................................ 102

7
Important Safety Pre-
cautions
Read these guidelines before using your wireless
phone. Failure to comply with them may be
dangerous or illegal. For more detailed safety
information, see “Health and Safety Information” on
page 91.
Road Safety at All Times
Do not use a hand-held phone while driving; park
the vehicle first.
Switching Off When Refueling
Do not use the phone at a refueling point (service
station) or near fuels or chemicals.
Switching Off in Aircraft
Wireless phones can cause interference. Using them
in aircraft is both illegal and dangerous.
Switching Off in Hospitals
Switch off your phone near medical equipment.
Follow any regulations or rules in force.
Interference
All wireless phones may be subject to interference,
which could affect their performance.
Special Regulations
Meet any special regulations in force in any area
and always switch off your phone whenever it is
forbidden to use it, or when it may cause
interference or danger (in a hospital for example).
Important Safety Precautions
8
Appropriate Use
Use only in the normal position (held to the ear).
Avoid unnecessary contact with the antenna when
the phone is switched on.
Accessories and Batteries
Use only Samsung-approved accessories and
batteries.
Qualified Service
Only qualified service personnel may install or
repair your phone.
CAUTION
RISK OF EXPLOSION IF BATTERY IS REPLACED
BY AN INCORRECT TYPE DISPOSE OF
USED BATTERIES ACCORDING TO
THE INSTRUCTIONS
9
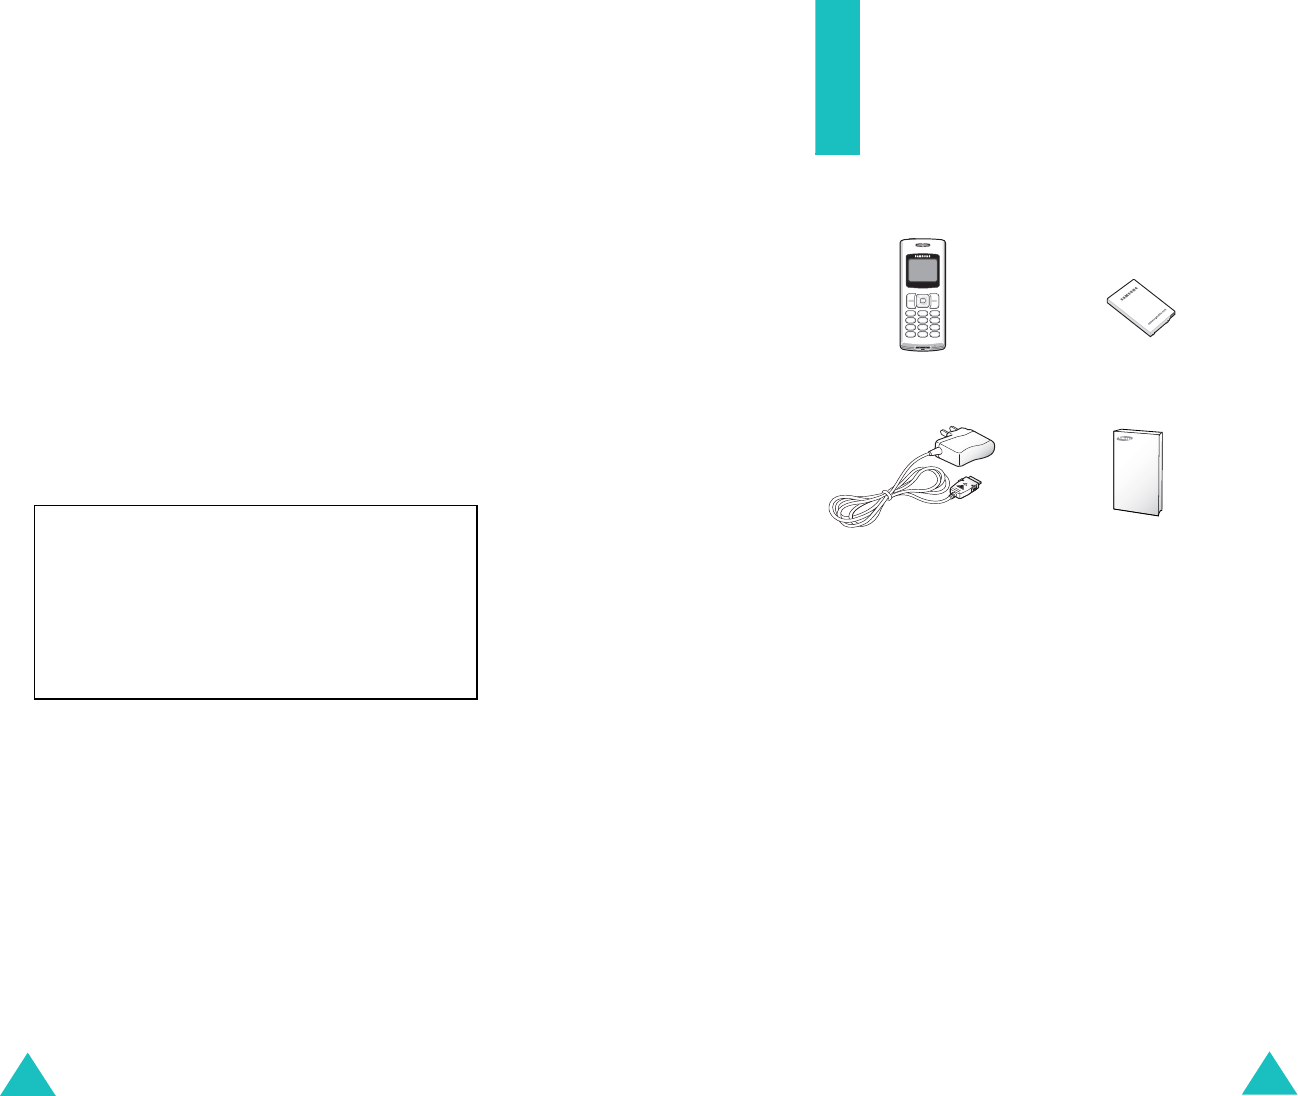
Unpacking
Your package contains the following items:
In addition, you can buy the following accessories
for your phone from your local Samsung dealer:
• Standard battery
• Travel adapter
• PC data cable
•Car charger
•PC link CD
• Headset
Handset Battery
Travel Adapter User’s Manual
10
Your Phone
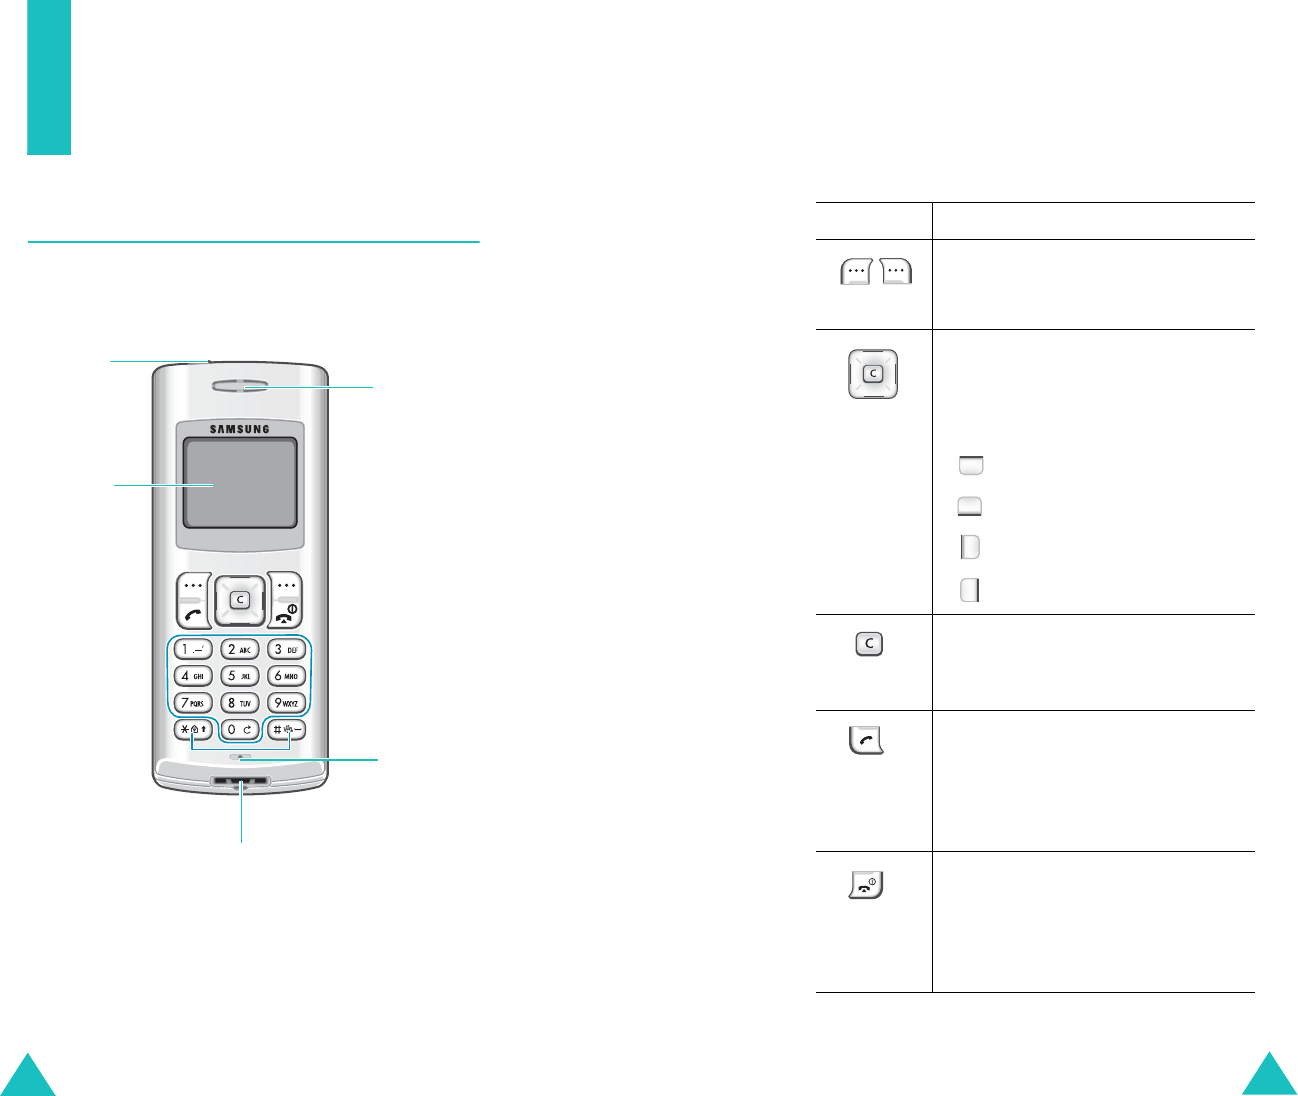
Phone Layout
The following illustrations show the main elements
of your phone.
Earpiece
Display
Adapter jack
Headset
jack
Microphone
Your Phone
11
Key
Key
(s)
Functions
Performs the functions indicated by
the text above them, on the bottom
line of the display.
In Menu mode, scrolls through
menu options.
In Standby mode, quickly enters the
following menus respectively:
• :
Messages
• :
Ringer Type
• :
Scheduler
• :
Calculator
Deletes characters from the display.
In Menu mode, returns to the
previous menu level.
Makes or answers a call.
In Standby mode, retrieves the
most recent numbers dialed,
received, or missed. Redials the last
number when pressed and held.
Ends a call. Also switches on and off
the phone when pressed and held.
In Menu mode, cancels your input
and returns the phone to Standby
mode.
Your Phone
12
Enters numbers, letters, and some
special characters.
In Standby mode, activates Key
Lock mode when pressed and held.
In the text entry mode, changes the
case of letters.
In Standby mode, enters or exits
Silent mode on and off when held
down.
It can also be used when dialing
special services, such as
teleservices.
Key
(s)
Functions
(Continued)
~
Your Phone
13
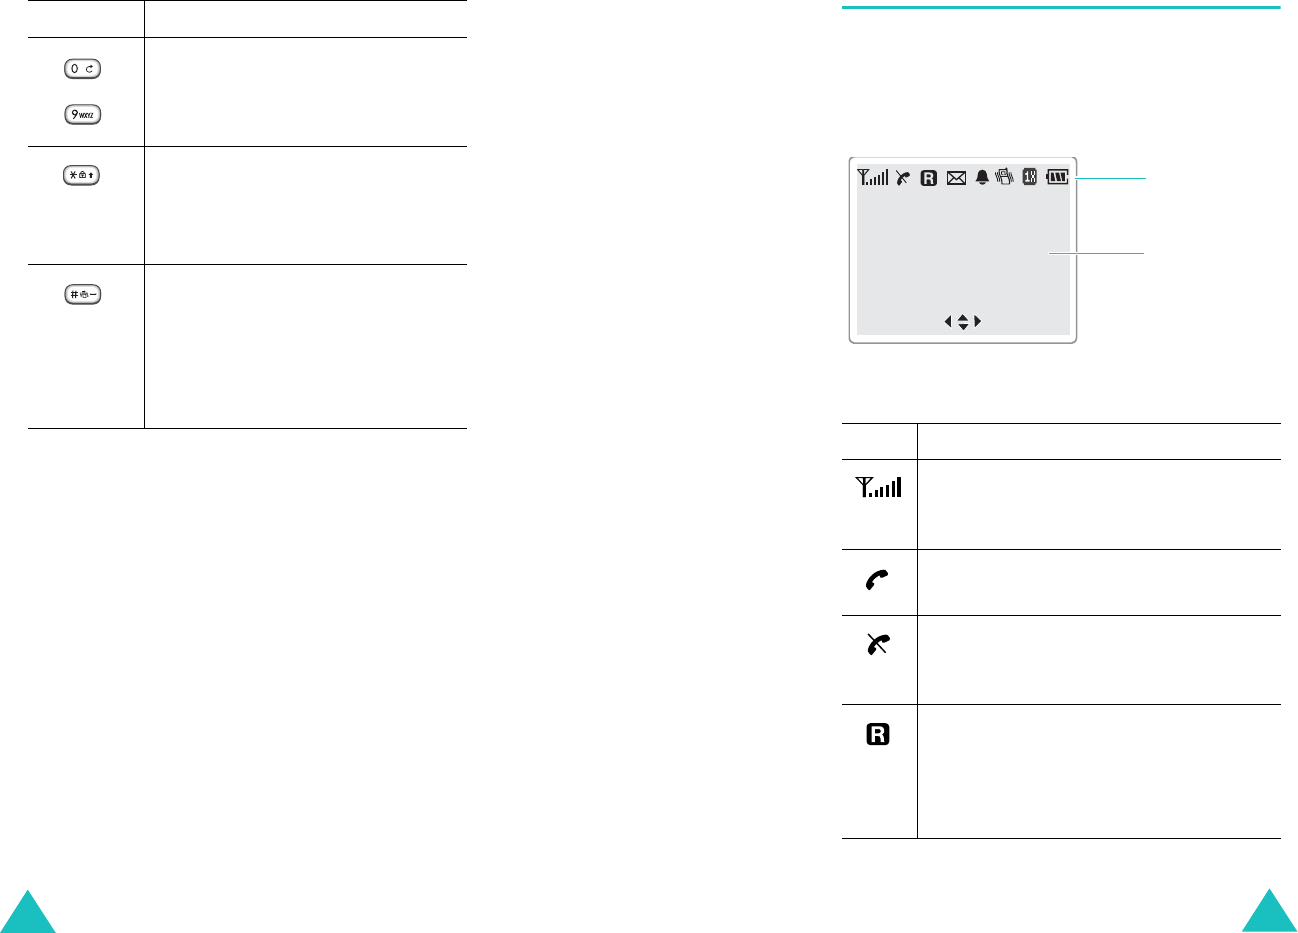
Display
Layout
The display comprises two areas; an upper line of
fixed icons, and the lower text and graphic area.
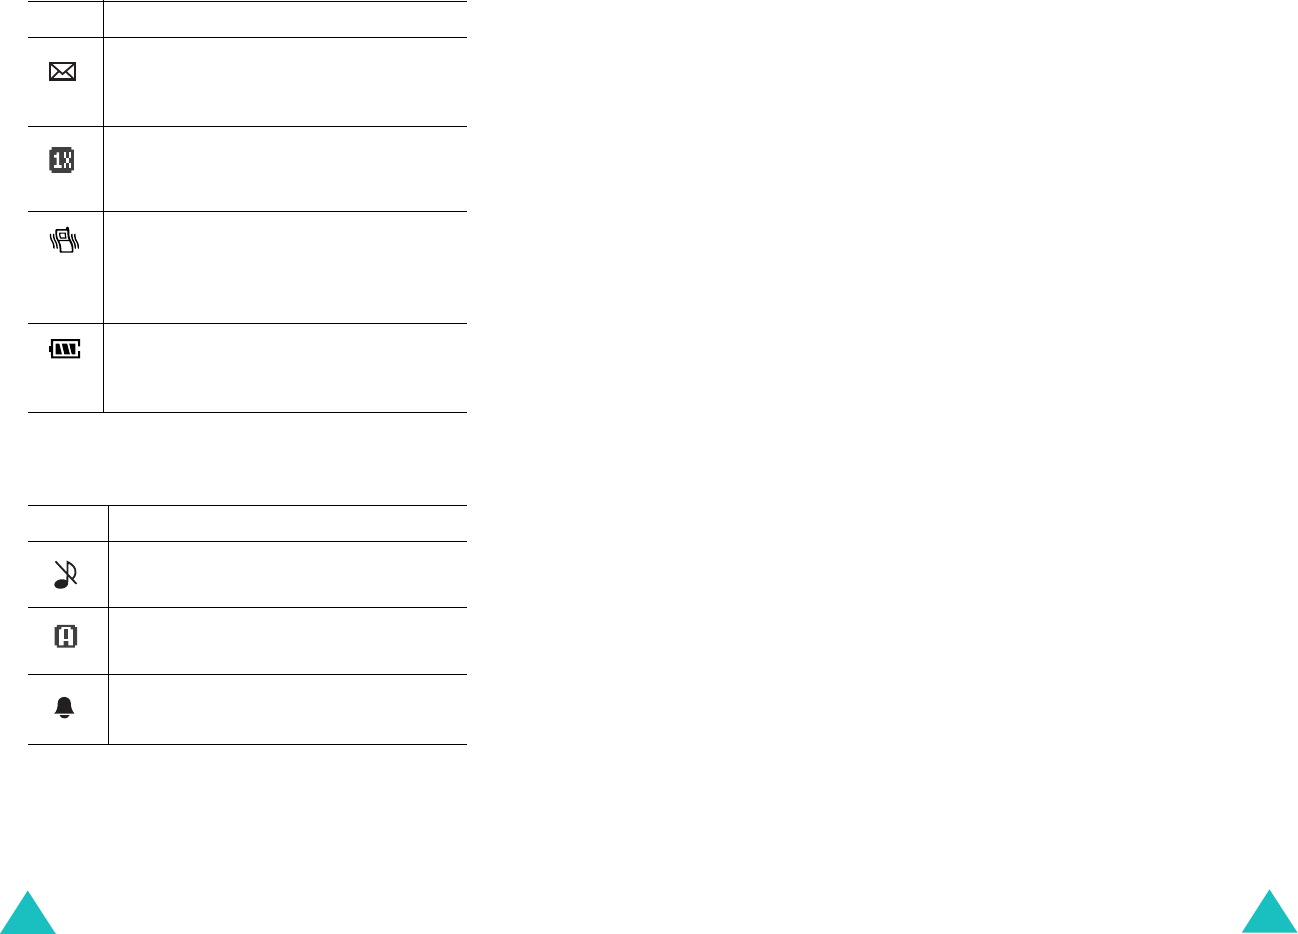
Icons
Icon Description
Signal Strength
: Shows the received
signal strength. The greater the number
of bars, the better the signal strength.
Service
: Appears when a call is in
progress.
No Service
: Appears when you are
outside a service area. When it appears,
you cannot make or receive calls.
Roaming
: Appears when you are out of
your registered coverage area and have
registered onto a different network,
when traveling in other countries, for
example.
Text and
graphics area
Menu Find
Icons
Your Phone
14
Another Icons
New Message
: Appears when a new
text message or voice mail message are
received.
1X Mode
: Appears when 1X system is
engaged.
Vibrator
: Appears when the ringer
volume for calls set to
Vibrate
,
High+Vib
, or when Silent mode is
activated.
Battery Status
: Shows the level of
your battery. The more bars you see,
the more power you have left.
Icons Description
Ringer Off
: Appears when you set the
ringer volume for calls to
Off
.
Auto Answer Mode
: Appears when
auto answer feature is activated.
Alarm
: Appears when you set an
alarm to ring at a specified time.
Icon Description
(Continued)
Your Phone
15
Backlight
The display is illuminated by a backlight. When you
press any key, the backlight comes on. It goes off if
no keys are pressed within a given period of time,
depending on the setting in the
Backlight
menu
(
Menu 6-3
).
To specify the length of time for which the backlight
is active, set the
Backlight
menu; see page 81 for
further details.
16
Getting Started
Installing the Battery
Your phone is powered by a rechargeable Li-ion
battery. Use only approved batteries and chargers.
Ask your local Samsung dealer for further details.
Note
: You must fully charge the battery before using
your phone for the first time. A discharged
battery is fully recharged in approximately 180
minutes for a standard battery.
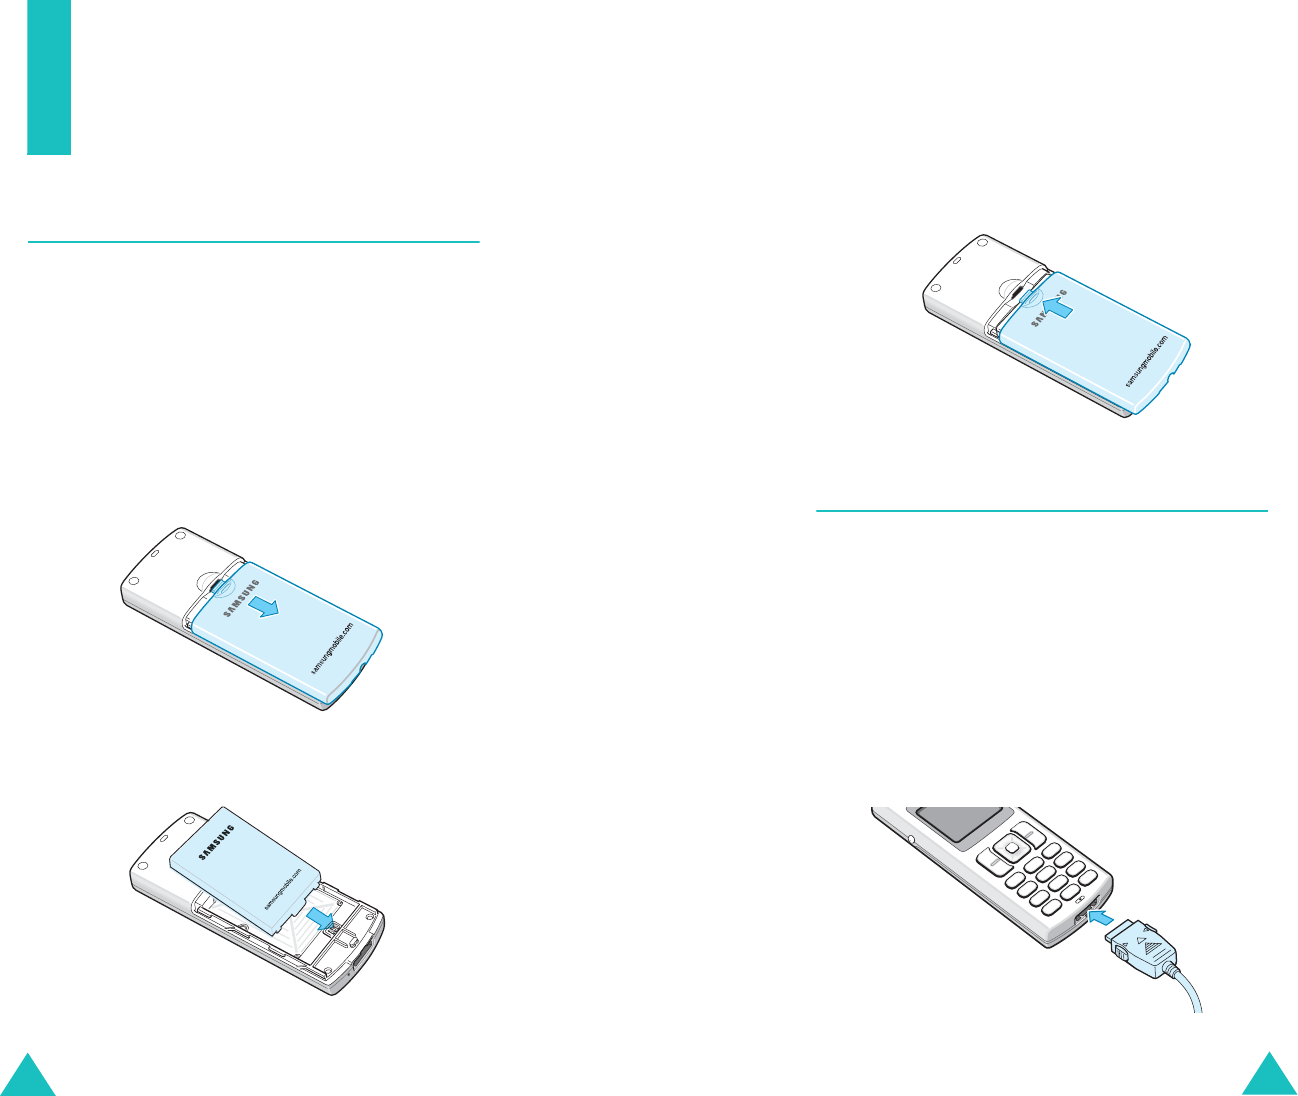
1. Remove the battery cover by pressing down the
groove and then sliding the cover out.
2. Place the battery into the battery slot, making
sure that the metal contacts are facing down.
Getting Started
17
3. Place the battery cover, as shown, and slide it
toward the top of the phone until it clicks into
place.
Charging the Battery
Your phone is powered by a rechargable Li-ion
battery. A travel adapter comes with your phone.
Use only approved batteries and chargers. Ask your
local Samsung dealer.
You can use the phone while the battery is being
charged, but this will cause the battery to charge
more slowly.
1. With the battery in position on the phone, plug
the connector of the travel adapter into the
adapter jack at the bottom of the phone.
Getting Started
18
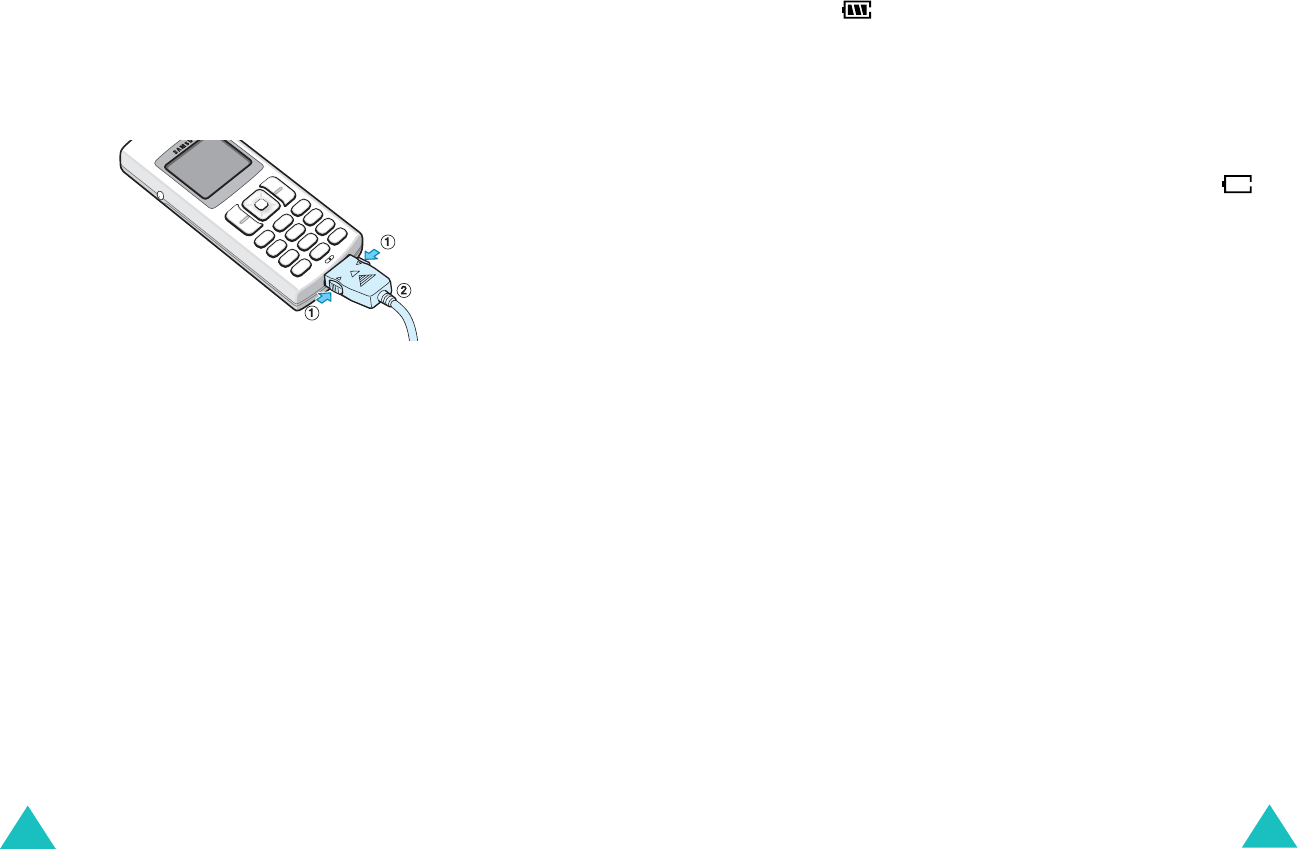
2. Plug the adapter into a standard AC wall outlet.
The Battery Strength icon on the display
repeats filling and emptying itself to indicate
that the battery is charging.
3. When charging is finished, unplug the adapter
from both the power outlet and the phone by
pressing the buttons on both sides of the
connector and pulling the connector out.
Note
: Do not remove the battery from the phone
without unplugging the adapter while it is
charging. Otherwise, the phone may be
damaged.
Getting Started
19
Low Battery Indicator
You can easily tell if your battery needs to be
recharged by checking the battery strength icon
( ) at the upper-right corner of your phone’s
display. The presence of all three bars indicates a
full charge, two bars indicates a smaller charge
and one bar indicates an even smaller charge. No
bars (the battery icon is empty) means your
battery must be charged.
When the battery charge level gets low, the
battery sensor blinks an empty battery icon ( )
and sounds a warning tone. If the battery level
gets too low, the phone will automatically turn off.
Unfortunately, if this happens, you’ll lose whatever
you are doing, and your phone call will cut off.
Watch the battery strength icon and make sure
your battery is adequately charged.

Getting Started
20
Switching the Phone On/Off
1. Hold down until the power-on animation is
displayed to switch the phone on.
When the system locates services, the greeting
message displays along with the current date
and time. You can now place and receive calls.
If your phone is out of service, the No Service
icon ( ) appears on the display. In this case,
you cannot make and receive calls. You can try
again later when service is available.
Note
: You can change the LCD language using
the
Language
menu option (
Menu 7-
5
); for further details, refer to page 84.
2. When you wish to switch the phone off, hold
down until the power-off animation is
displayed.
Getting Started
21
Your Phone’s Mode
Standby Mode
Standby is the most basic state of your phone.
The phone goes into Standby mode after you turn
it on, or whenever you briefly press . When
your phone is in Standby mode, you will typically
see the greeting message and current date and
time. If you enter a phone number, you can press
to dial it or press to save it in the internal
Contacts.
Press at any time to return to Standby mode.
Be careful; if you are on a call when you press
, you will disconnect the call and return to
Standby mode. Press several times or hold it
down to return to Standby mode without ending
the call.
The main menu can be accessed when you are in
Standby mode.
Talk Mode
You can place and answer calls only when your
phone is turned on. During a call, the phone is in
Talk mode. While you are in Talk mode, pressing
gives you a list of options. See page 31 for
details on the options.
Getting Started
22
Power Save Mode
Your phone comes with a Power Save feature that
will automatically be activated if your phone is
unable to find a signal after 15 minutes of
searching. While this feature is active, the phone’s
battery charge is conserved. The phone will
automatically recheck for a signal periodically. To
manually force the phone to recheck for a signal,
press any key. A message on the display lets you
know when your phone is operating in Power Save
mode.
Key Lock Mode
You can lock the keypad by pressing and holding
in Standby mode. By doing this, you can
prevent accidental key pressing.
To unlock the keypad, press and then . The
Key Lock icon ( ) displays in the display.
When you have an incoming call or the alarm goes
off while in Key Lock mode, the mode is
automatically deactivated and the phone goes to
Standby mode.
Note
: You can set the phone to automatically lock the
keypad after a specified period of time, in the
Auto Key Lock
menu (
Menu 7-1
). See
page 83.
23
Call Functions
Making a Call
In Standby mode, key in the area code and phone
number and press .
When entering a number, pressing allows you
to insert a pause or a hyphen. For more details
about pause dialing, see page 27.
Note
: If you have activated
Auto Retry
menu
(
Menu 7-4
), the phone will automatically retry
to make the call when the line is busy or the
remote person does not answer you.
Correcting the Number
Ending a Call
When you want to finish your call, briefly press .
The call time, the length of the call, displays briefly
and the phone returns to Standby mode.
To clear the Press
last digit displayed .
whole display for more than one
second.

Call Functions
24
Redialing the Last Call
To redial the last call you made, press twice in
Standby mode.
Your phone stores the last 20 incoming, outgoing
and missed calls. To recall any of these numbers:
1. If there are any characters on the display,
press to return to Standby mode.
2. Press . The list of the call logs is displayed.
3. Use or to scroll through the list until
you select the required name or number.
4. Press to dial the number.
Making a Call from your Contacts list
You can store the phone numbers called regularly
in memory, which is called Contacts list. You then
simply recall the number to dial. For further
information on the Contacts feature, refer to
page 51.
Emergency Dialing
You can place an emergency call from your
emergency number list, even if your phone is
locked or all outgoing calls are restricted. For
further information on emergency numbers, refer
to page 88.
Call Functions
25
Prepend Dialing
The
Prepend
option lets you add digits, such as
area codes and network feature activation codes
to a phone number that is in your internal
Contacts or call logs.
To prepend existing phone numbers in the
Contacts or call logs:
1. Access a call log entry referring to in page 24
or a Contacts entry referring to in page 51.
2. When the desired phone number displays,
press to access the option menu.
3. Use or to scroll through the list until
Prepend
option is highlighted.
4. Press .
5. Enter the area code or feature code.
6. Press to dial the number.

Call Functions
26
Speed Dialing
Once you have stored phone numbers in the
Contacts memory, you can dial them easily by
pressing a few keys.
One-Touch Dial
Memory locations 001 through 009 are special
one-touch locations. You can dial the phone
numbers stored in those memory locations simply
by pressing one number key.
Press and hold the third digit of the memory
location.
For example: Location no. 009
Press and hold.
The number (and name) stored is displayed, then
dialed.
Two-Touch Dial
Memory locations 010 through 099 are special
two-touch locations.
Press the second digit briefly, then hold down the
third digit of the memory cell.
For example: Location no. 023
Press briefly and hold down
.
The number (and name) stored is displayed, then
dialed.
Call Functions
27
Three-Touch Dial
Memory locations 100 through 999 are special
three-touch locations.
Press the first and the second digit briefly, then hold
down the third digit of the memory cell.
For example: Location no. 123
Press and briefly, then hold
down .
The number (and name) stored is displayed, then
dialed.
Note
: When several numbers are saved in one
location, only the phone number which is
specified with the
Speed Dial
label category
will be automatically dialed. For details, refer to
page 53.
Pause Dialing
When you call automated systems, like banking
services, you are often required to enter a password
or account number. Instead of manually entering
the numbers each time, you can store them in your
Contacts, separated by special characters which are
called pauses.
Storing Pauses in a Contacts Entry
To store a number in your Contacts that contains
pauses:
1. Enter the phone number you want to store, such
as the bank’s teleservice phone number.
2. Press to display the menu options.

Call Functions
28
3. Press or to highlight the desired pause
type.
•
P
Pause
: The letter “P” displays within the
number, meaning that a hard pause will
occur at that point in the calling sequence.
•
T
Pause
: The letter “T” displays in the
number, meaning that a timed (2-second)
pause will occur at that point in the calling
sequence.
4. Press to enter a pause. Continue entering
numbers and using to enter pauses.
5. Store the number in your Contacts as you
normally would by pressing and following
the screen prompts.
Pause Dialing from a Stored Contacts Entry
1. Dial the number from the Contacts.
2. If you stored the number using “T” pause,
simply call the number form the Contacts.
If you stored the number using “P” pause, wait
for the appropriate prompt for the number,
such as a credit card number or a bank
account number.
3. When prompted, press to send the DTMF
(Dual-Tone Multi-Frequency) number that
follows your pause.
Call Functions
29
Manual Pause Dialing
You can enter pauses manually during the dialing
process.
1. Enter the phone number of the service you
want to connect to, such as a bank’s
teleservice phone number.
2. Press to display the menu options.
3. Press or to highlight the desired pause
type.
4. Press to enter a pause. Continue entering
numbers and using to enter pauses.
5. When you finish entering the numbers, press
to dial the number.
Call Functions
30
Answering a Call
When somebody calls you, the phone rings and
the phone icon is displayed in the middle of the
display.
The caller’s phone number, or name if stored in
Contacts, displays.
1. To answer a call, press . Your phone is
preset to answer a call when the key is pressed
via the
Call
Answer
menu (
Menu 7-3
).
If the menu is set to
Any Key
, you can answer
a call by pressing any key except for .
When you set the menu to
SEND Key
, you
must press to answer a call. For details
about the menu, see page 84.
2. End the call by pressing .
Note
: You can answer a call while using the Contacts
or menu features. The current operation will
be interrupted.
Call Functions
31
Options During a Call
Your phone provides a number of functions that
you can use during a call. As many of these
options are network services, you may not be able
to use all of them at all times.
Press during a call to access the following
options:
Mute/Quit
: allows you to switch your phone’s
microphone off, so that the other person cannot
hear you.
Example: You wish to say something to another
person in the room but do not want the other
person to hear you.
Calls
: allows you to access the Calls menu. For
details, see page 48
Phone Book
: allows you to access the Contacts
menu.For details, see page 51.
Silent/Quit
: does not transmit the key tones. It
allows you to press keys without hearing annoying
key tones during a call.
Send Tel #
: send your telephone number to the
other party.
My Phone #
: displays own number.
Version:
allows you to view the software and
hardware version of your phone.

Call Functions
32
Send DTMF (Dual Tone Multi Frequency):
Sends DTMF tones from the displayed number.
DTMF tones can be used to control e-services,
such as telebanking or voice mail. During a call,
input the digits you wish to send as DTMF tones,
for instance, your bank account number and
password. Subsequently select the Send DTMF
option.
Using the Caller ID
This feature tells you who is calling you by
displaying the caller’s number when the phone
rings. If a caller’s name and number are stored in
the Contacts, the corresponding name is also
displayed. If you call someone who has this
feature, your phone number will be displayed on
the their phone.
Note
: Contact your service provider to set up the
Caller line identification service.
Viewing Missed Calls
Your phone keeps a list of calls that you do not
answer when the phone is on and service is
available. The phone indicates a missed call by
displaying a text notification on the screen.
Additionally, if caller information is available, the
screen displays the phone number of the most
recent missed call.
Press to call the displayed number.
Call Functions
33
Quickly Switching to Silent Mode
Silent mode disables all sounds on the phone. This
feature is best used in situations where the phone
might disturb others, such as in a meeting, in a
library or at the theater. Your phone can be set to
Silent mode with one press of a key.
To enter Silent mode, press and hold down
until “Entering Silent Mode” and the Vibration icon
( ) appear.
Pressing and holding down once again Exits
Silent Mode. The Vibration icon is no more
displayed.
Call Forwarding
This feature provides the option of forwarding
incoming calls to another phone number, even
while your phone is turned off. Activating Call
Forwarding does not affect outgoing calls made
from this phone. Contact your service provider to
activate Call Forwarding.

Call Functions
34
Call Waiting
Call Waiting lets you receive a second call during
conversation. Your phone notifies you of a call
waiting by beeping an displaying “Call Waiting.”
Your phone provides the option of turning the Call
Waiting feature on and off if you have subscribed
to the service. Call Waiting is on by default in the
phone. If you choose to have a undisturbed
conversation, simply turn off the feature for the
current call.
Note
: Contact your service provider to activate the
Call Waiting service.
To answer a waiting call:
1. To answer the call, press . The phone
connects the calling party and places the
current party on hold.
2. Press again to switch between the two
parties.
Note
: If you do not respond to a Call Waiting
notification, the phone will forward the call to
voicemail or another number that you have
set up. Contact your service provider for more
information.
Call Functions
35
Three-way Calling
This feature enables you to conduct conference
calls with two separate parties at the same time.
The phone records each party into the Outgoing
calls log. Also, You are billed airtime for each
outgoing call separately.
Note
: Contact your service provider to activate
Three-way Calling.
To place a Three-way call:
1. During a conversation, enter the phone
number for the third party, and then press .
The phone places the other party on hold and
dials the third party.
2. When you are connected to the third party,
press again to begin your three-way call.
If one of the callers (not you) hangs up, you and
remaining caller stay connected. If you initiated
the call and you hang up first, all three parties are
disconnected.
36
Entering Text
At many times when using your phone, you will
need to enter text; for example, when storing a
name in the Contacts, creating your personal
greeting or scheduling events in your calendar. You
can enter alphanumeric characters into your phone
using your phone’s keypad.
Your phone has the following text input modes:
•
T9 Word
: This mode allows you to enter words
with only one key press per letter. Each key on a
keypad has more than one letter; for example,
pressing can enter J, K, or L. However, T9
mode automatically compares the series of
keystrokes you make with an internal linguistic
dictionary to determine the word, thus requiring
far fewer keystrokes than the traditional Alphabet
mode.
•
ABC
: This mode allows you to enter letters by
pressing the key labeled with the desired letter
once, twice, or three times until the letter
appears on the display.
•
Symbol
: This mode allows you to enter special
characters.
•
123
: This mode allows you to enter numbers.
Entering Text
37
Changing the Text Input Mode
When you are in a field that allows characters
entry, you should notice the text input mode
indicator on the display.
Example: Entering a name for a Contacts entry
You can change the text input mode by pressing
.
To change to another text input mode:
1. Press .
2. Scroll to the desired mode by pressing or
.
Note
: If you want to exit the menu without
changing to a new mode, press .
3. To select the highlighted mode, press .
4. You will find the selected text input mode
indicator on the display.
Text mode
indicator
MODE
Entering Text
38
T9 Mode
To type a word, press the keys corresponding to
the letters you need. Remember the following as
you are typing:
1. Press the keys on the phone just once per
desired letter. For example, to enter “Hello,”
press , , , , and .
2. The word you are typing appears on the
display. It may change with each key press.
3. Type to the end of the word before editing or
deleting any keystrokes.
4. Put a space between each word by pressing
.
If the word doesn’t display correctly, press
one or more times to display alternative word
choices for the keys you have typed.
Example: Both “Of” and “Me” use the and
keys. The phone displays the
most commonly used choice first.
5. Continue entering the next word.
Entering Text
39
Smart Punctuation
Periods, hyphens, and apostrophes are available
by pressing . T9 applies rules of grammar to
insert the correct punctuation. Notice that is
used twice in this example to display two
punctuation marks.
Including a Number
You can include a number between letters without
exiting the T9 input mode. Press and hold the
desired number key.
Changing the Case
Your phone offers three cases;
• : initial letter is capitalized
• : all letters are capitalized
• : all letters are lower case
Press one or more times to display the
appropriate case indicator, and begin typing
normally.
Erasing Letters and Words
Press one or more times to erase letters to the
left. Press and hold to erase all.
L
e
t ’ s
e
a
t .
Entering Text
40
ABC Mode
When typing in ABC mode, you should press the
keys labeled with the required letter:
- Once for the first letter
- Twice for the second letter
- And so on.
This method is called multi-tap typing.
For example, you press three times quickly to
display the letter “C” and two times quickly
to display the letter “K.”
The cursor moves to the right when you press a
different key. When entering the same letter twice
or a different letter on the same key, just wait for
a few seconds for the cursor to move to the right
automatically, and then enter the next letter.
Refer to the table below for further details about
available characters:
(Caps Lock mode)
Key Characters in the Order Displayed
1 . @ , : ? - ; ’ / ( ) ! # % &
* < > _ + = ” \ { } $ [ ]
A B C 2
D E F 3
G H I 4
J K L 5
M N O 6
P Q R S 7
T U V 8
W X Y Z 9
0
Entering Text
41
Changing the Case
Your phone offers three cases;
• : initial letter is capitalized
• : all letters are capitalized
• : all letters are lower case
Press one or more times to display the
appropriate case indicator and begin typing
normally.
Inserting a Space
Press to put a space between each word.
Erasing Letters and Words
Press one or more times to clear letters to the
left. Press and hold to erase all.
Entering Text
42
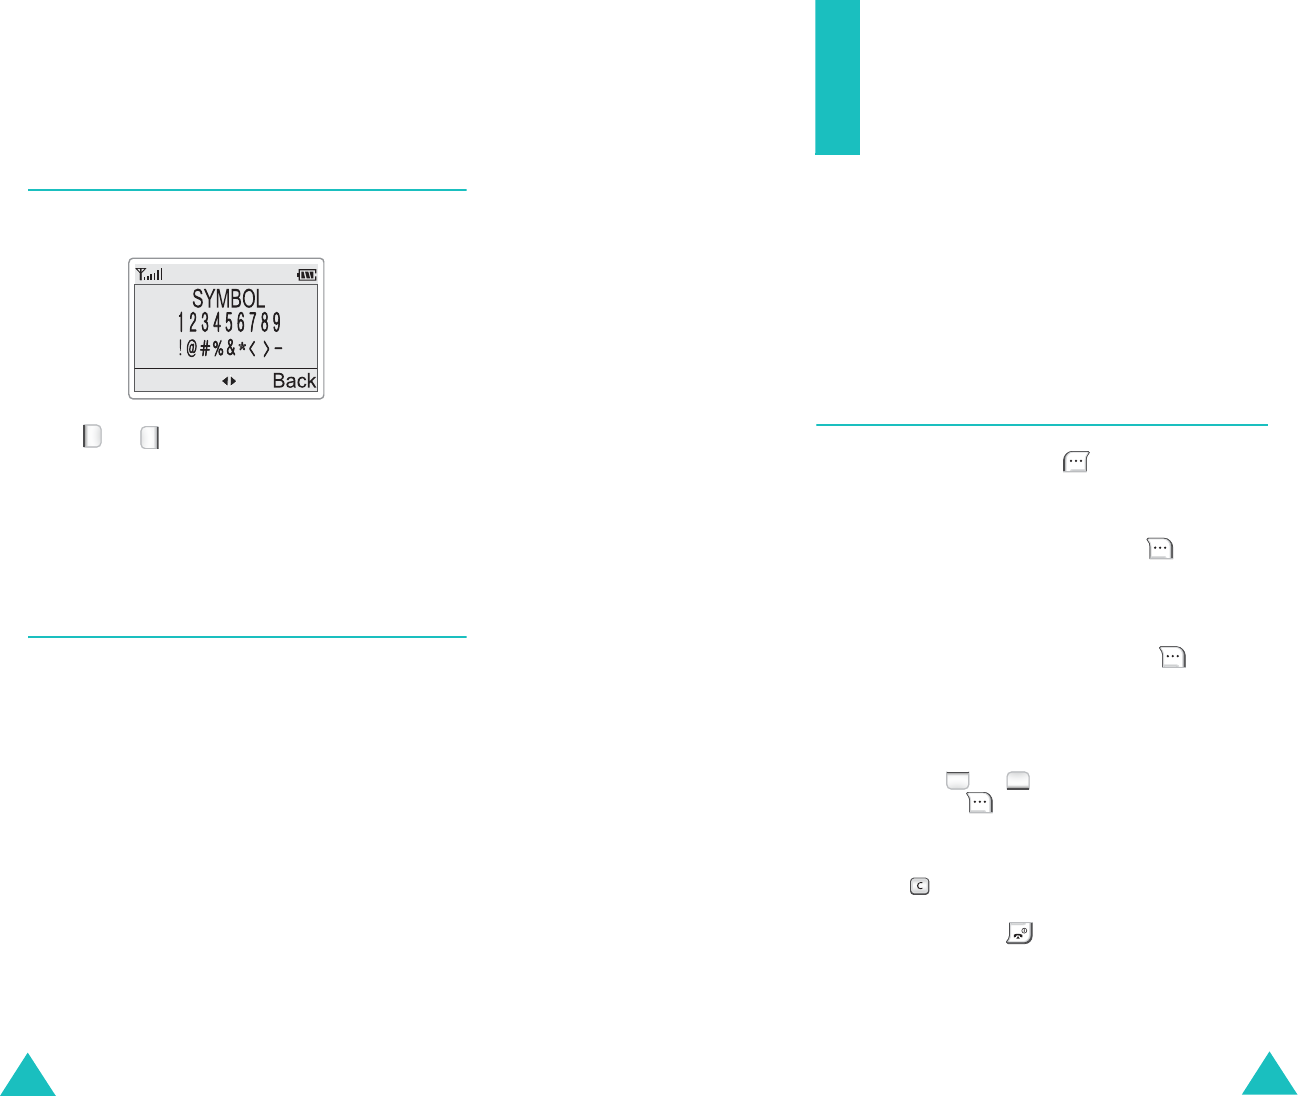
Symbol Mode
Symbol mode enables you to enter symbols.
Press or to display more symbols.
Press the keys corresponding to the desired
symbols. The phone automatically switches back
to the text input mode used just prior to selecting
Symbol mode.
123 Mode
123 mode enables you to enter numbers. Press
the keys corresponding to the desired digits, and
manually switch back to text entry mode of
choice.
43
Using the Menus
The phone offers a range of functions that allow you
to tailor the phone to your needs. These functions
are arranged in menus and submenus.
The menus and submenus can be accessed by
scrolling or by using the shortcuts.
Accessing a Menu Function by
Scrolling
1. In Standby mode, press to access Menu
mode.
2. Press the Navigation keys to reach the main
menu; for example,
Setup
. Press to enter
the menu.
3. If the menu contains any submenus: for
example,
Language
, find the one you want by
pressing the Navigation keys. Press to enter
the submenu.
If the menu you selected contains submenus,
repeat this step.
4. Scroll with or to find the setting of your
choice. Press to confirm the chosen setting.
Notes
:
• You can return to the previous menu level by
pressing .
• You can exit the menu without changing the menu
settings by pressing .

Using the Menus
44
Using Shortcuts
The menu items (menus, submenus, and setting
options) are numbered and can be accessed
quickly by using their shortcut numbers.
Note
: The numbers assigned to each menu function
are indicated on the list on page 45.
1. In Standby mode, press to access Menu
mode.
2. Enter the first digit of the shortcut number.
Repeat this for each digit of the shortcut
number.
Example: Changing the ringer type for voice
calls Press , , and .
5
for
Sounds
,
2
for
Ringer Type
,
and
1
for
Calls
menu function.
3. Find the setting of your choice pressing or
and then press to confirm the chosen
setting.
Using the Menus
45
List of Menu Functions
1. Calls
(see page 48)
1.1 Outgoing
1.2 Incoming
1.3 Missed
1.4 Erase History
1.5 Air Time
1.5.1 Last Call
1.5.2 Total
1.5.3 Life Time
1.5.4 Erase Total
2. Contacts
(see page 51)
2.1 Find By Name
2.2 Add New Entry
2.3 Find By Entry
2.4 Find By Group
2.5 Add E-mail
2.6 My Phone #
2.7 Memory
3. Messages
(see page 57)
3.1 New Message
3.2 Voice
3.3 Inbox
3.4 Sent
3.5 Draft
3.6 Erase Msg
3.6.1 Voice
3.6.2 Old Inbox
3.6.3 New Inbox
3.6.4 Sent
3.6.5 Draft
3.6.6 All Messages
3.7 Msg Setting
3.7.1 General
3.7.2 New Message

Using the Menus
46
4. Planner
(see page 66)
4.1 Today
4.2 Scheduler
4.3 Task List
4.4 Memo Pad
4.5 Alarm
4.6 Calculator
4.7 World Time
4.8 Count Down
4.9 Set Time
5. Sounds
(see page 75)
5.1 Ringer Volume
5.1.1 Calls
5.1.2 Messages
5.1.3 Alarm/Schedule
5.2 Ringer Type
5.2.1 Calls
5.2.2 Messages
5.2.3 Alarm/Schedule
5.3 Key tone
5.3.1 Type
5.3.2 Volume
5.4 Alerts
5.4.1 Minute
5.4.2 Service
5.4.3 Connect
5.4.4 Disconnect
5.4.5 Fade
5.4.6 Roam
5.4.7 Privacy
5.5 Voice Volume
5.6 Roam Ringer
5.7 Tone Length
5.8 Power On/Off
Using the Menus
47
6. Display
(see page 80)
6.1 Menu Style
6.2 Wallpaper
6.3 Backlight
6.4 Banner
6.5 Contrast
7. Setup
(see page 83)
7.1 Auto Key Lock
7.2 Auto Answer
7.3 Call Answer
7.4 Auto Retry
7.5 Language
7.6 Select NAM
7.7 Set System
7.8 Version
8. Security
(see page 87)
8.1 Lock Phone
8.2 Change Lock
8.3 Restriction
8.4 Emergency #
8.5 Erase Contacts
8.6 Reset Phone
8.7 Voice Privacy
48
Calls
You can use the
Calls
menu to:
• view and dial the last outgoing, incoming, or
missed numbers.
• erase the numbers in the call log memory.
• view the duration of calls.
Outgoing
(Menu 1-1)
Note
: You can also access this menu by pressing
in Standby mode.
The phone stores up to 20 outgoing calls you
dialed. When you access this menu, a list of
outgoing calls is displayed.
1. Scroll to the desired number (or name if saved
in the Contacts).
2. Press to select the highlighted number.
The dialed number (and name if stored in the
Contacts) is displayed.
3.
To Press
place a call to the
displayed number .
use the menu
options . For details about
the options, see the
following page.
exit the call log
and return to
Standby mode
.
Calls
49
When you access the menu options, the following
options are available:
Talk
: dials the selected number.
Save
: allows you to save the number in the
Contacts.
Show Entry
: (shown when the number is stored
in your Contacts) displays the phone number and
memory location number.
Prepend
: allows to add an area code or feature
code to the number before calling the number.
Incoming
(Menu 1-2)
This option lets you view the last 20 calls received
if you are subscribed to the caller ID service.
When you access this menu, a list of the incoming
calls is displayed.
For further information on scrolling through the
list and accessing the call log, see “Outgoing” on
the previous page.
Missed
(Menu 1-3)
If Caller Line Identification is available (contact
your service provider), your phone keeps a list of
20 missed calls that you failed to answer.
For further information on scrolling through the
list and accessing the call log, see “Outgoing” on
the previous page.

Calls
50
Erase History
(Menu 1-4)
You can erase the entries stored in each of the
three call logs; outgoing, incoming, or missed
calls. You can also erase all three logs at one time.
When you see a confirming message, press to
erase the log. If you want to cancel, press .
Air Time
(Menu 1-5)
Your phone records the amount of air time, or talk
time, used. Using this option, you can view the
number of the calls to or from your phone, and the
air time for all calls. You can easily erase the air
time record at any time.
Note
: This feature is not intended to be used for
billing purposes.
The following options are available:
Last Call
: shows the air time of the last call.
Total
: shows the number of all calls made to and
the total duration of the calls since the air time
counter was last set to zero by using the
Erase
Total
option.
Life Time
: shows the number and total duration
of all calls made to or from your phone since the
phone was shipped from the factory. The lifetime
cannot be deleted even though you reset your
phone using the
Reset Phone
or
Erase Contacts
feature.
Erase Total
: allows you to erase the “Total” air
time measurement and reset the air time counter.
51
Contacts
The Contacts allows you to store frequently used
phone numbers and the associated names in your
personal directory to make it easy for you to place
a call without having to remember or enter the
phone number. You can store up to 999 numbers,
each having up to 7 different numbers.
Find By Name
(Menu 2-1)
This option allows you to find an entry by entering
a person’s name.
1. Press or to scroll to the desired name.
Or enter the first few letters of the name you
want to find. The phone shows the first entry
matching your input.
2. When the desired entry is highlighted, press
to access the entry.
Note
: All of the numbers assigned to an entry
display, including numbers stored into
different categories. Press
or
to
find the number you want.
3. Press to place a call.

Contacts
52
If you press with viewing the details, you can
access the following options:
Talk
: dials the number.
Add #
: allows you to add a new entry or a
number to the current entry.
Edit
: allows you to edit the phone number, name,
location number, category and so on.
Prepend
: allows you to add digits, such as area
codes and network feature activation codes to a
phone number.
Erase
: erases the number.
Name Ring
: allows you to specify a unique tone
or melody to alert you to an incoming call from the
number.
E-mail address
: allows you to store an e-mail
address in the entry.
Add New Entry
(Menu 2-2)
This menu allows you to store a number with a
name in the Contacts. You can save a person’s
various numbers, such as workplace number,
mobile number and fax number, into one entry.
Using this feature, you can keep someone’s
information together. It also helps you to find
numbers easily in the Contacts.
Contacts
53
Creating a New Entry
1. When you are prompted to confirm adding a
new entry, press .
2. Enter a phone number and press .
3. Highlight the desired option you want to
customize by pressing or , The
following options are available:
•
Name
: allows you to enter a name of up to
20 characters. For further information on
how to enter text, see page 36.
•
Entry
: the first available location displays. If
necessary, enter the location number using
the number keys.
•
Secret Off/On
: allows you to set the
number to secret. This prevents a number
from being displayed when it is accessed or
dialed by unauthorized users. Only a person
with your phone’s lock code can view the
secret number.
•
Speed Dial
: allows you to select the
category of number to be stored. The
available categories are
Home
,
Work
,
Mobile
,
Pager
,
Fax
, and
No Label
.
•
Group
: allows you to select one of four
predefined relation groups, where the entry
is included. Grouping the entries enables you
to locate only the numbers in the desired
group.
•
Inactive
: allows you to specify a unique ring
type for the entry. By selecting different
tones, incoming voice calls having a caller ID
can be distinguished from those that do not.

Contacts
54
4. To edit the option setting, press . Select the
desired setting by pressing or , or
enter the required name or number. Press
to accept your input or selection.
5. Repeat steps 3 and 4 to customize another
option.
6. Press to save the entry.
Storing Phone Numbers at Call’s End
To store a phone number at the end of your call:
1. Press to end the call. The call time and the
phone number display.
2. To store the phone number, press .
3. Follow the instructions in “Creating a New
Entry” on page 53.
Contacts
55
Find By Entry
(Menu 2-3)
This option allows you to find an entry by entering
its location number.
1. Enter the location by pressing the numeric
keys.
2. When the desired entry highlighted, press
to view the details, press to make a call to
the number.
Note
: All of the numbers assigned to an entry
display, including numbers stored into
different categories. Press
or
to
find the number you want.
While viewing entry details, you can access the
menu options by pressing . For further
information on the options, refer to the
Find By
Name
menu on page 51.
Find By Group
(Menu 2-4)
This option allows you to find an entry by selecting
its relation group.
1. Press or until the group containing the
entry you want appears at the bottom of the
display. The phone lists all entries in the
selected group.
2. Scan through the list using or to find
the desired entry.
3. Press to view the details or to make a
call.

Contacts
56
Add E-mail
(Menu 2-5)
This option allows you to store an e-mail address
instead of a number.
1. When the phone asks if you want to add a new
entry, press .
2. Enter the e-mail address and press . For
further information about entering text, see
page 36.
3. Follow from step 3 in “Creating a New Entry”
on page 53.
My Phone #
(Menu 2-6)
This option shows your own phone number.
After viewing the number, pressing returns to
Standby mode.
Memory
(Menu 2-7)
Using this menu option, you can check how many
names and numbers are stored in the Contacts
and how many free locations remain.
57
Messages
Your phone can receive voicemail messages, text
messages, and pages. Also, your phone can send
text messages and pages if you system supplier
provides this service.
When the phone receives a message, an alert
sounds, a text notification displays along with the
name and phone number of the caller if available.
The New Message icon ( ) remains on the
screen until you read the new text, numeric page,
or until you listen to the new voicemail messages.
If you are on a conversation and you receive an
incoming message, your phone automatically
mutes the ringer. This is to avoid ringing in your
ear while you are trying to converse.
Note
: You can quickly access the
Messages
menu
by pressing in Standby mode.
Message-related Icons
Filed message
: displays if a message
has been filed.
Message sent
: displays when outgoing
messages are transmitted.
Message read
: displays when you have
read a message.
Message received
: indicates that an
incoming text, voicemail, page, or
browser message has been received.
Urgent message
: displays if a message
is urgent.

Messages
58
New Message
(Menu 3-1)
You can create short text messages and numeric
pages, and then send them to other mobile
numbers.
Note
: Message transmission is only supported in
digital networks and if service is provided by
your service provider.
1. Enter a destination phone number using the
numeric keys and press .
You can select a number from your Contacts by
pressing .
2. Enter the message contents or a numeric
page. For further details about how to enter
text, see page 36.
3. When you finish entering the message, press
.
4. Press or to select one of the following
option and press to edit your input or
setting.
•
Send To
: edits the destination phone
number you entered in step 1.
•
Msg
: edits the message contents you
entered in step 2.
•
CB #
: edits the callback number. Enter the
new number to replace the current number.
The default call back number is your phone
number.
Messages
59
•
Option
: allows you to change the message
options. Press or to scroll to the
required item and press or to change
the setting.
-
Priority
: select the message priority.
-
Delivery Ack
: turn the delivery
acknowledgment feature on or off. when this
is activated, the network informs you of
whether or not the message has been read
by the recipient.
-
Message
: set if the phone will save the
message in the Sent message box after
transmission. When you select
Prompt
Save
, the phone will ask if you want to save
the message.
•
Draft
: stores the message in the
Draft
menu (
Menu 3-5
).
Note
: The
Call Back #
,
Delivery Ack
, and
Message
options can be preset to default
values in the
Msg Setting
menu (
Menu
3-7
).
5. Press to send the message.
Voice
(Menu 3-2)
When a new voice message is received, the
voicemail notification displays. If multiple new
voicemails are received but not reviewed, only the
last received voicemail information will be
displayed. The display information will include
time/date stamp, the total number of the new
voicemails, and the callback number.

Messages
60
Press and the sender’s callback number, if
available, or the voice server number is displayed.
To listen to the message, press again to
connect to the voice server and follow the voice
prompt.
Press to access the following options:
Listen
: allows you to listen to the voice message.
The phone automatically dials the number of your
voice mail center.
Clear Icon
: clears the New Message icon and
resets the counter for a new voice message, if
necessary. The system resets the counter
automatically after you listen to all of the new
messages.
Inbox
(Menu 3-3)
Your phone can store up to 98 pages and text
messages all together in the Inbox, Sent, and
Draft message box. If the message memory is full,
a warning message is displayed and the phone
rejects additional messages until you erase the old
ones.
Press or to scroll to one of the messages
in the list and press . The phone displays the
message contents. If necessary, press or
to scan through the contents.
You can dial the callback number of the message
by pressing twice.
While viewing a message, if you send a reply
message to the sender, press and press
to access the following options:
Messages
61
Reply
: allows you to send a reply message to the
sender.
Forward
: allows you to send the message to
another person.
Delete
: deletes the message from the Inbox.
Talk:
places a call to the callback number.
Save
: allows you to save the sender’s phone
number into the Contacts. For further information
about storing a number, see page 52.
Extract #'s
: allows you to extract a number of
morethan 7-digits from the text message so that
you can dial the number or save it in your
Phonebook.
Sent
(Menu 3-4)
Your phone can store up to 98 pages and text
messages all together in the Inbox, Sent, and
Draft message box. You can review or resend the
messages stored in the Sent message box, if
needed.
Press or to scroll to the desired message
and press . The display shows the time and
date when the message is created, the designated
number (and name if saved in the Contacts) and
the message contents. If necessary, press or
to scan through the contents.
While reviewing a message, press to access
the following options:

Messages
62
Re-send
: allows you to resend the message. For
further information about sending a message, see
page 58.
Delete
: deletes the message from the Sent
message box.
Draft
(Menu 3-5)
Your phone can store draft messages that are yet
to be sent in the filed message folder. You can
access this folder at a later time to edit and send
the message.
To store a message to the Draft message box:
1. Follow the process of writing a new message
on page 58.
2. When you finish inputting the message, press
for options.
3. Select
Draft
, and press . The message is
stored in the Draft box.
When you access the
Draft
menu, the list of the
stored messages appears. Press or to
scroll to one of the messages in the list and press
.
While viewing a message, press to access the
following options:
Resend
: allows you to edit and send the
message.
Delete
: deletes the message.
Messages
63
Erase Msg
(Menu 3-6)
Using this menu option, you can erase all
messages in each message box separately;
Voice
,
Old Inbox
,
New Inbox
,
Sent
, and
Draft
message box. You can also erase all of the
messages at one time by selecting the
All
Messages
option.
Msg Setting
(Menu 3-7)
Using this menu, you can set up various options
for messages.
General
(Menu 3-7-1)
You can set up the following options for incoming
messages.
Auto Scroll
: If an incoming message is too long
for the display, the phone displays it by scrolling
the screen automatically. You can set the screen
to scroll automatically or not.
-
1~5 Seconds
: set how often the phone scrolls
to the next screen.
-
Off
: you need to scroll to the next screen
manually using or .

Messages
64
Msg Reminder
: when a message is received, the
phone alerts you by sounding the selected ringer.
You can set how often this will happen.
-
Off
: the phone doesn’t alert you.
-
Once
: the phone alerts you just once.
-
Every 2 Min
: the phone alerts you every 2
minutes.
Voice Mail #
: You can view the number of the
voice mail center. If necessary, edit the number
and press .
New Message
(Menu 3-7-2)
You can set up the default settings of following
options for creating a new message.
Callback #
: allows you to set the call back
number. Your phone number is preset at the
factory.
Save Message
: allows you to set whether you
want the transmitted message to be saved in the
Sent message box or not.
-
Do Not Save
: the phone does not save the
message.
-
Prompt Save
: the phone asks you if you want
to save it or not.
-
Auto Save
: the phone saves the message
automatically.
Messages
65
Entry Method
: allows you to select the text input
mode between
T9 Word
and
Alphabet
(ABC).
Delivery Ack
: allows you to activate or deactivate
the delivery acknowledgement feature. Select
Yes
to turn on the feature or
No
to turn it off.
Auto Erase:
allows you to set whether or not the
phone will automatically erase the oldest message
when the phone’s memory is full and a new
message is received.
Canned Msg.:
allows you to edit 10 canned
messages and make up to 20 new canned
messages. You can use the messages when
writing a message.

66
Planner
The Planner feature enables you to:
• keep track of important dates and events and
view the calendar.
• create a list of things to do.
• check the current time in another part of the
world.
• use the phone as a calculator.
• set an alarm to ring at a specified time, for
example, to remind you of an appointment.
Today
(Menu 4-1)
You can schedule up to 9 events for the current
day indicating each event’s start and end time.
You can be alerted by a schedule alarm before an
event commences. Events scheduled for future
dates automatically appear on your Today events
schedule on that day.
Scheduling an Event
1. Enter your event contents.
You can enter up to 32 characters. For more
information about entering characters, see
page 36.
2. Press to accept your input.
3. Enter the start time using the numeric keys
and press .
You can move to each input field using and
. You must enter the hour in a 12-hour
format. Press for
A
(AM) or press for
P
(PM).
Planner
67
4. Enter the end time and date using the numeric
keys and press .
5. Select when the alarm will inform you of your
event by pressing or . Selecting
No
alarm
means that the phone will not ring the
alarm.
6. Press to save your event.
Viewing an Event
The first event of the current day is displayed
when you select the
Today
menu option. Press
or to select the event you want to view.
To scroll through the event details, press or
.
While viewing an event, the following options are
available when you press .
Add New
: allows you to add a new event.
Edit
: allows you to edit the current event.
Erase
: allows you to erase the current event.
Erase All
: allows you to erase all of the events.
Scheduler
(Menu 4-2)
This option allows you to view the current month
as well as the past or future month in calendar
format. In this option, the current date is
automatically highlighted on the calendar. Days
with scheduled events are underlined.
Note
: You can quickly access this menu by pressing
in Standby mode.

Planner
68
Scrolling through the Calendar
• You can move right or left one day by pressing
or .
• Yo u ca n mo v e up or d ow n o n e we ek b y pr ess ing
or .
On the calendar, the following options are
available when you press .
View
: allows you to view the scheduled events of
the selected day.
Add New
: allows you to add a new event on the
selected day.
Creating a New Event
You can store up to 20 events total in the
scheduler.
1. Select a day from the calendar, referring to
“Scrolling through the Calendar” above and
press .
2. Schedule a new event, following from step 1
on page 66.
Viewing an Event
Days with scheduled events are indicated by a
underline on the calendar when you access the
Scheduler
menu. Select one of them, and press
. The first event of the day is displayed.
If necessary, when an event is displayed, press
to access the options. For further details on
the options, refer to “Today” on page 66.
Planner
69
Task List
(Menu 4-3)
This feature allows you to enter up a list of tasks
to be done and assign both a priority and a
deadline to each task.
Creating a Task Item
You can store up to 20 events total in the task list.
1. Enter the first task.
You can enter up to 32 characters. For further
details on how to enter characters, see
page 36.
2. Press to confirm your input.
3. Enter your deadline using the numeric keys,
and press .
You can move to each input field using and
. You must enter the hour in a 12-hour
format. Press for
A
(AM) or press for
P
(PM).
4. Select high or low priority using or and
then press to store the task.
Viewing a Task Item
The first task is displayed with the deadline and
the associated priority ( for High or - for Low)
when you select the
Task list
menu.
Scroll to the task you want to view by pressing
or .
While viewing a task, the following options
available when you press .

Planner
70
Add New
: allows you to add a new task.
Edit
: allows you to edit the current task.
Erase
: allows you to erase the current task.
Erase All
: allows you to erase all of the tasks.
Memo Pad
(Menu 4-4)
This menu allows you to write down memos about
anything you need to remember.
Writing a New Memo
You can store up to 10 memos total in the memo
pad.
1. Enter the memo.
For further details on how to enter characters,
see page 36.
2. Press to store the memo.
Viewing a Memo
The list of your memos displays when you access
the
Memo Pad
menu.
While viewing the memo list, press to use the
following options:
Add New
: allows you to add a new memo.
Edit:
allows you to edit the memo.
Erase
: allows you to erase the selected memo.
Erase All
: allows you to erase all of the memos.
Planner
71
To view details, press the Navigation keys to scroll
to a memo and press . You can use the options
above by pressing .
Alarm
(Menu 4-5)
This option allows you to set an alarm to ring at a
specific time or release it.
To set an alarm, access the
Alarm
menu
option
(MENU 4-5)
and select
Set
.
1. Select the alarm frequency option by pressing
or and press .
•
Once
: the alarm rings only once and is then
deactivated.
•
Daily
: the alarm rings every day at the same
time.
2. Enter the required time for the alarm to ring
using the numeric keys.
You can move to each input field using and
. You must enter the hour in a 12-hour
format. Press for
A
(AM) or for
P
(PM).
3. Press to save the setting.
To stop the alarm when it rings, press any key.
To release the alarm, access the
Alarm
menu
option
(MENU 4-5)
and select
Release
.

Planner
72
Calculator
(Menu 4-6)
Using this feature, you can use the phone as a
calculator. The calculator provides the basic
arithmetic functions: addition, subtraction,
multiplication, and division.
Note
: You can quickly access this menu by pressing
in Standby mode.
1. Enter the first number using the numeric keys.
2. Set the operation for your calculation by
pressing the Navigation keys until the required
arithmetic symbol appears:
+
(add),
-
(subtract),
x
(multiply), (divide).
3. Enter the second number.
4. To get the result, press .
5. Repeat steps 1 to 4 as many times as required.
Each time you change the operator, the
previous calculation is performed and the
result is displayed as the top number on the
display.
Notes
:
• To erase any mistakes or clear the display, press
.
• Use to enter a decimal point and to
change the sign of a number to a negative (-).
World Time
(Menu 4-7)
This menu allows you to check the current time for
24 major cities around the world.
Planner
73
Select the city corresponding to your time zone by
pressing the Navigation keys one or more times.
The local date and time display.
To turn the DST (Daylight Saving Time) setting
on:
1. After selecting the time zone you want to apply
the DST, press .
2. When DST setting highlights, press .
3. Select On and press . The DST icon appears
on the left of the time.To cancel the setting, select
Off.
Count Down
(Menu 4-8)
This menu allows you to check the current time for
This menu help you know how much time it takes
you to do something, or how many months, days,
hours and minutes until a specific day arrives. You
can create up to 20 Count Down timers using this
menu.
Creating a Count Down Timer
1. Enter a name for your new Count down timer
and press .
For further details about entering text, see
page 36.
2. Enter the time and date that you want to count
down from using the numeric keys.
You can move to each input field using and
. You must enter the hour in a 12-hour
format.
Press for
A
(AM) or press for
P
(PM).
Note
: You can enter a year between 1980 and
2099.
3. Press to save the timer.

Planner
74
Viewing a Count Down Timer
The first Count Down timer is displayed when you
select the
Count Down
menu.
Scroll to the timer you want to view by pressing
or .
While viewing a Count Down timer, the following
options are available when you press .
Add New
: allows you to create a new timer.
Edit
: allows you to edit the current timer.
Erase
: allows you to delete the current timer.
Erase All
: allows you to delete all of the timers.
Set Time
(Menu 4-9)
This option allows you to set the current time and
date.
To set the time and date:
1. Enter the current time and date using the
numeric keys.
The month, day, hour and minute must be
entered with 2 digits. The year requires all four
digits. You must enter the hour in a 12-hour
format. Press for
A
(AM) or for
P
(PM).
2. When you finish entering the time and date,
press to save it.
If you enter a wrong time, the phone displays
“Invalid time” and prompts you to enter again.
75
Sounds
You can use the
Sounds
menu to customize
various sound settings, such as the:
• ringer volume, type and tone.
• key beep and voice volume.
• alert sounds and a ringer for the roaming calls.
• ringer which sounds when the phone is switched
on or off.
Ringer Volume
(Menu 5-1)
This menu option allows you to adjust the ringer
volume for the following items:
Calls
: allows you to adjust the ringer volume for
incoming voice calls.
Messages
: allows you to adjust the ringer volume
for incoming messages.
Alarm/Schedule
: allows you to adjust the ringer
volume for alarm settings and schedule alarms.
you can select one of the following settings:
Level 1~5
: you can adjust the volume level. The
more bars you see, the louder the ringer.
Beep
: the phone sounds a beep.
Vibrate
: the phone switches to Vibration mode.
An incoming call vibrates the phone.
Silent
: the phone does not sound the ringer.
High+Vib
: the phone rings in the highest volume
level and then vibrates.

Sounds
76
Ringer Type
(Menu 5-2)
Note
: You can quickly access this menu by pressing
in Standby mode.
This option allows you to set unique ringers for the
following items:
Calls
: allows you to set a unique ringer for
incoming voice calls.
Messages
: allows you to have a distinctive ringer
type from 10 different tones for incoming each
messages.
Alarm/Schedule
: allows you to have a
distinctive ringer for alarm settings and schedule
alarms.
For Calls and Alarm/Schedule items, you can
select a unique ringer type from 30 different tones
or melodies.
Key Tone
(Menu 5-3)
This option allows you to set up the sound and
adjust the tone volume that the keypad generates
each time you press a key.
The following options are available:
Type
: allows you to select the type of key tones.
Volume
: adjusts the volume using the Navigation
keys.
Sounds
77
Alerts
(Menu 5-4)
Your phone gives audible alerts (beeps) at a
specified time to inform you that certain things
have happened. The alerts only occur in your
earpiece so the other party does not hear them.
The available alerts are:
Minute
: When this menu option is set to
On
, the
phone sounds an alert 10 seconds before each
elapsed minute to remind you of the length of the
current call.
Service
: When this menu option is set to
On
, the
phone sounds an alert when you exit service area
or when you return to a service area.
Connect
: When this menu option is set to
On
, the
phone sounds a connect tone when your call is
connected to the system.
Disconnect
: When this menu option is set to
On
,
the phone sounds a disconnect tone when a call is
disconnected.
Fade
: When this menu option set is to
On
, the
phone sounds an alert when a dropped call occurs
during conversation in response to a signal fade.
Roam
: When this menu option is set to
On
, the
phone sounds an alert when your phone starts
roaming.

Sounds
78
Voice Volume
(Menu 5-5)
This option enables you to adjust the voice volume
of the earpiece.
The graphic shows the volume level; the more
bars you see, the louder the sound.
Roam Ringer
(Menu 5-6)
You can set the phone to use a distinctive ring for
incoming roaming calls.
Press navigation keys to select
Ring1
or
Ring2
to turn the Ring on or
Off
to turn it off
Tone Length
(Menu 5-7)
The tone length setting enables you to select
Long
or
Short
DTMF (Dual-Tone Multi-Frequency)
tones. When you use a teleservice, such as
accessing your bank account, and press the keys
to enter numbers into the teleservice, you are
sending DTMF tones. The system used by the
bank or other service determines if you need short
or long DTMF tones. If the service is digital, as
most are, short DTMF will almost always work.
Sounds
79
Power On/Off
(Menu 5-8)
This option allows you to turn on or off the sound
that the phone generates when it is switched on
and off.
Press navigation keys to select
Sound1
or
Sound2
to turn the sound on or
Off
to turn it off

80
Display
The Display feature enables you to:
• change the display for Menu mode.
• create your own greeting, and select an
animation to be displayed in Standby mode .
• set the length of time for the backlight.
• adjust the brightness of the LCD screen.
Menu Style
(Menu 6-1)
This option allows you to set the style of showing
the main menu list. The
Horizontal
and
Vertical
options are available.
Wallpaper
(Menu 6-2)
You can select the background image (wallpaper)
to be displayed in Standby mode. Select an image
to be displayed by pressing the Navigation keys
and press .
Display
81
Backlight
(Menu 6-3)
You have several options for setting how the LCD
backlight operates. Remember that backlight use
drains your battery faster.
The following options are available:
7/15/30 Seconds
: the backlight comes on when
you press a key or receive a call and switches off
7/15/30 seconds after the last key is pressed.
Always Off
: the backlight is always off.
Banner
(Menu 6-4)
This option allows you to set a banner message to
be displayed at the bottom of the display in
Standby mode.
To change the banner:
1. If necessary, press repeatedly to delete
each letter of the old greeting. Press are hold
to remove the whole greeting.
2. Enter your banner message of up to 12
characters by using the alphanumeric keys.
3. When you finish entering the message, press
to save the new banner.

Display
82
Contrast
(Menu 6-5)
This option allows you to see the LCD screen
better in different lighting conditions. Scroll
through the contrast settings to make the screen
darker or brighter.
83
Setup
Many different features of your phone can be
customized to suit your preferences.
Auto Key Lock
(Menu 7-1)
This menu allows you to lock the keypad
automatically after predefined time.
15 Seconds
,
30 Seconds
and
1 minute
are
available.
Select
Off
to unlock the phone.
Auto Answer
(Menu 7-2)
With this menu option activated, the phone
automatically answers calls after predefined time.
This option is useful while driving, for instance.
To activate this feature, select how long your
phone waits before answering an incoming call.
Select one from
After 1 sec
,
After 3
sec
or
After 5 sec.
When this menu is option set to
Off
, the phone
does not answer an incoming call. If you do not
answer the call, it is stored in the Missed call log
(see page 49).

Setup
84
Call Answer
(Menu 7-3)
This menu option allows you to select how to
answer an incoming call.
The following options are available:
Any Key
: the phone answers when you press any
key except .
SEND Key
: the phone answers only when you
press .
Auto Retry
(Menu 7-4)
With this menu option activated, your phone will
automatically retry the call up to 10 times when a
connection fails.
To activate this feature, select how often the
phone will automatically retry the call;
10
seconds
,
30 seconds
and
60 seconds
are
available.
Select
Off
to deactivate this feature.
Language
(Menu 7-5)
You can change the language of voice prompts,
menus and key-input.
Select the language from
English
,
Spanish
, and
Portuguese
.
Setup
85
Select NAM
(Menu 7-6)
NAM stands for numerical assignment module,
essentially your telephone number. Your Samsung
phone can store two NAMs. This means you can
have two phone numbers on your phone, and you
can quickly and easily switch your service back
and forth between the two numbers.
Select
NAM 1
or
NAM 2
. If you change the NAM,
the phone will reboot and acquire service using
the new NAM setting.
Set System
(Menu 7-7)
The system selection feature of your phone
enables you to choose how your phone will roam.
Roaming is a feature which is only relevant in
areas where there are usually at least two cellular
service providers which are referred to as “A” and
“B” and have valid roaming agreements. Your
service provider will provide you information
about this service or the best roaming methods for
you.
The following options are available:
Home Only
: with this setting, you cannot roam.
If your home system is not available then your call
will not be connected and the No Service icon
( ) is displayed. In some service areas an
operator may come on line asking you how you
would like to pay for the call.
Standard
: this option allows you to provide the
best system automatically.

Setup
86
Version
(Menu 7-8)
This option allows you to view the software and
the hardware version of your phone. This feature
is helpful if you need to call the customer care.
87
Security
Your phone provides many security options,
including a user-programmable lock code and call
restriction features.
To access the security menu, you need to enter a
four-digit lock code. The lock code is preset to
“0000” or “1234” at the factory.
Note
: Different code may apply for different service
providers. Consult your local provider or
vendor for details
Lock Phone
(Menu 8-1)
In Lock mode, you cannot dial number, except for
making an emergency call, or accessing menu
options. You can receive incoming calls and
messages, even though the phone is locked.
The following options are available:
Unlocked
: the phone remains unlocked.
On Power-up
: the phone locks automatically the
next time you turn the phone on.
Lock Now
: the phone locks immediately.
To place an emergency call, enter the number and
then press . The phone recognizes standard
emergency number, and three emergency
numbers saved via the
Emergency #
menu
(
Menu 8-4
); see page 88.
To unlock the phone, press and enter the lock
code.

Security
88
Change Lock
(Menu 8-2)
You can change your current lock code to a new
one. The lock code is preset to “0000” or “1234”
at the factory.
Note
: Different code may apply for different service
providers. Consult your local provider or
vendor for details
Enter a new four-digit lock code, and your phone
prompts you to enter the code again. Re-enter the
lock code.
Note
: Your phone does not allow viewing of the lock
code for security reasons, so be sure to write
the lock code down or memorize it if you have
changed.
Restriction
(Menu 8-3)
This feature allows you to restrict all your
outgoing calls. You cannot make any call, except
for emergency calls (see below).
Select
On
to use the call restriction feature or
Off
to release the feature.
Emergency #
(Menu 8-4)
Your phone provides the option of storing
emergency numbers. These numbers can be
manually dialed at any time, even though your
phone is locked or all outgoing calls are restricted.
You can store up to three emergency numbers.
Security
89
To store an emergency number:
1. Select a location using a numeric key, or
, followed by .
2. Enter the required number. Each number can
be up to 32 digits long.
If there is a number already stored, delete the
number using .
3. Press to save the number.
To make an emergency call in Lock mode, simply
enter a emergency number, then press .
Erase Contacts
(Menu 8-5)
This menu allows you to erase all the numbers in
the Contacts.
When a confirming message displays, press
to clear the memory.
Reset Phone
(Menu 8-6)
Resetting the phone erases all of your saved
options and information and returns them to the
factory default settings, except for the Contacts
entries and SMS messages.
When a confirming message displays, press
to reset the phone.
The phone turns itself off and back on, restores
the default settings, and then returns to Standby
mode.

Security
90
Voice Privacy
(Menu 8-7)
The Voice Privacy function, used only on digital
networks, encrypts the voice channel in order to
prevent third parties from listening to your
conversation.
The following options are available:
Standard
: Deactivates Voice Privacy. The phone
will use a conventional line to make and receive
calls.
Enhanced
: Activates Voice Privacy. The phone
will make and receive calls in a maximum security
encrypted line.
Note
: This function may not be available in all areas.
For further details and availability, contact
your service provider.
90

92
Health and safety
information
Exposure to radio frequency (RF)
signals
Your wireless phone is a radio transmitter and
receiver. It is designed and manufactured not to
exceed the emission limits for exposure to radio
frequency (RF) energy set by the Federal
Communications Commission (FCC) of the U.S.
Government. These limits are part of
comprehensive guidelines and establish permitted
levels of RF energy for the general population. The
guidelines are based on the safety standards that
were developed by independent scientific
organizations through periodic and through
evaluation of scientific studies.
The standards include a substantial safety margin
designed to assure the safety of all persons,
regardless of age and health.
The exposure standard for wireless phones
employs a unit of measurement known as Specific
Absorption Rate (SAR). The SAR limit set by the
FCC is 1.6W/kg.
*
* In the U.S. and Canada, the SAR limit for mobile
phones used by the public is 1.6 watts/kg (W/kg)
averaged over one gram of tissue. The standard
incorporates a substantial margin of safety to give
additional protection for the public and to account
for any variations in measurements.
Health and safety information
93
SAR tests are conducted using standard operating
positions specified by the FCC with the phone
transmitting at its highest certified power level in
all tested frequency bands. Although the SAR is
determined at the highest certified power level,
the actual SAR level of the phone while operating
can be well below the maximum value. This is
because the phone is designed to operate at
multiple power levels so as to use only the power
required to reach the network. In general, the
closer you are to a wireless base station antenna,
the lower the power output of the phone.
Before a new model phone is available for sale to
the public, it must be tested and certified to the
FCC that it does not exceed the limit established
by the government-adopted requirement for safe
exposure. The tests are performed in positions
and locations (e.g., at the ear and worn on the
body) as required by the FCC for each model.
While there may be differences between the SAR
levels of various phones and at various positions,
they all meet the government requirement.
The FCC has granted an Equipment Authorization
for this model phone with all reported SAR levels
evaluated as in compliance with the FCC RF
exposure guidelines. SAR information on this
model phone is on file with the FCC and can be
found under the Display Grant section of http://
www.fcc.gov/oet/fccid after searching on FCC ID
printed in the label on the phone.
FCC certification information for this model phone
is attached separation paper.

Health and safety information
94
For body operation
To maintain compliance with FCC RF exposure requirements,
use only belt-clips, holsters or similar accessories that maintain
a 1.5 cm. separation distance between the user's body and
the back of the phone, including the antenna. The use of
belt-clips, holsters and similar accessories should not contain
metallic components in its assembly. The use of accessories
that do not satisfy these requirements may not comply with
FCC RF exposure requirements, and should be avoided.
Non-compliance with the above conditions may
violate FCC RF exposure guidelines.
For more Information concerning exposure to
radio frequency signals, see the following
websites:
Federal Communications Commission (FCC)
http://www.fcc.gov/oet/rfsafety
Cellular Telecommunications Industry Association
(CTIA): http://www.wow-com.com
U.S.Food and Drug Administration (FDA)
http://www.fda.gov/cdrh/consumer
World Health Organization (WHO)
http://www.who.int/peh-emf/en
Health and safety information
95
Precautions when using batteries
• Never use any charger or battery that is
damaged in any way.
• Use the battery only for its intended purpose.
• If you use the phone near the network’s base
station, it uses less power; talk and standby
time are greatly affected by the signal strength
on the cellular network and the parameters set
by the network operator.
• Battery charging time depends on the remaining
battery charge, the type of battery, and the
charger used. The battery can be charged and
discharged hundreds of times, but it will
gradually wear out. When the operation time
(talk time and standby time) is noticeably
shorter than normal, it is time to buy a new
battery.
• If left unused, a fully charged battery will
discharge itself over time.
• Use only Samsung-approved batteries and
recharge your battery only with Samsung-
approved chargers. When a charger is not in
use, disconnect it from the power source. Do
not leave the battery connected to a charger for
more than a week, since overcharging may
shorten its life.
• Extreme temperatures will affect the charging
capacity of your battery: it may require cooling
or warming first.

Health and safety information
96
• Do not leave the battery in hot or cold places,
such as in a car in summer or winter conditions,
as you will reduce the capacity and lifetime of
the battery. Always try to keep the battery at
room temperature. A phone with a hot or cold
battery may temporarily not work, even when
the battery is fully charged. Li-ion batteries are
particularly affected by temperatures below 0
°C (32 °F).
• Do not short-circuit the battery. Accidental
short- circuiting can occur when a metallic
object (coin, clip or pen) causes a direct
connection between the + and – terminals of
the battery (metal strips on the battery), for
example when you carry a spare battery in a
pocket or bag. Short-circuiting the terminals
may damage the battery or the object causing
the short-circuiting.
• Dispose of used batteries in accordance with
local regulations. Always recycle. Do not dispose
of batteries in a fire.
Road safety
Your wireless phone gives you the powerful ability
to communicate by voice, almost anywhere,
anytime. But an important responsibility
accompanies the benefits of wireless phones, one
that every user must uphold.
When driving a car, driving is your first
responsibility. When using your wireless phone
behind the wheel of a car, make sure that you are
following the special regulations in a given area or
country.
Health and safety information
97
Operating environment
Remember to follow any special regulations in
force in any area and always switch your phone off
whenever it is forbidden to use it, or when it may
cause interference or danger.
When connecting the phone or any accessory to
another device, read its user’s guide for detailed
safety instructions. Do not connect incompatible
products.
As with other mobile radio transmitting
equipment, users are advised that for the
satisfactory operation of the equipment and for
the safety of personnel, it is recommended that
the equipment should only be used in the normal
operating position (held to your ear with the
antenna pointing over your shoulder).
Electronic devices
Most modern electronic equipment is shielded
from radio frequency (RF) signals. However,
certain electronic equipment may not be shielded
against the RF signals from your wireless phone.
Consult the manufacturer to discuss alternatives.
Pacemakers
Pacemaker manufacturers recommend that a
minimum distance of 15 cm (6 inches) be
maintained between a wireless phone and a
pacemaker to avoid potential interference with the
pacemaker. These recommendations are
consistent with the independent research and

Health and safety information
98
recommendations of Wireless Technology
Research.
Persons with pacemakers:
• Should always keep the phone more than 15 cm
(6 inches) from their pacemaker when the
phone is switched on
• Should not carry the phone in a breast pocket
• Should use the ear opposite the pacemaker to
minimize potential interference
If you have any reason to suspect that
interference is taking place, switch your phone off
immediately.
Hearing aids
Some digital wireless phones may interfere with
some hearing aids. In the event of such
interference, you may wish to consult your
hearing aid manufacturer to discuss alternatives.
Other medical devices
If you use any other personal medical devices,
consult the manufacturer of your device to
determine if it is adequately shielded from
external RF energy. Your physician may be able to
assist you in obtaining this information. Switch
your phone off in health care facilities when any
regulations posted in these areas instruct you to
do so. Hospitals or health care facilities may be
using equipment that could be sensitive to
external RF energy.
Health and safety information
99
Vehicles
RF signals may affect improperly installed or
inadequately shielded electronic systems in motor
vehicles. Check with the manufacturer or its
representative regarding your vehicle.
You should also consult the manufacturer of any
equipment that has been added to your vehicle.
Posted facilities
Switch your phone off in any facility where posted
notices require you to do so.
Potentially explosive environment
Switch your phone off when in any area with a
potentially explosive atmosphere and obey all
signs and instructions. Sparks in such areas could
cause an explosion or fire resulting in bodily injury
or even death.
Users are advised to switch the phone off while at
a refueling point (service station). Users are
reminded of the need to observe restrictions on
the use of radio equipment in fuel depots (fuel
storage and distribution areas), chemical plants or
where blasting operations are in progress.
Areas with a potentially explosive atmosphere are
often but not always clearly marked. They include
the areas below decks on boats, chemical transfer
or storage facilities, vehicles using liquefied
petroleum gas (such as propane or butane), areas
where the air contains chemicals or particles, such
as grain, dust or metal powders, and any other
area where you would normally be advised to turn
off your vehicle engine.

Health and safety information
100
Emergency calls
This phone, like any wireless phone, operates
using radio signals, wireless and landline networks
as well as user-programed functions, which cannot
guarantee connection in all conditions. Therefore,
you should never rely solely on any wireless phone
for essential communications (medical
emergencies, for example).
Remember, to make or receive any calls the phone
must be switched on and in a service area with
adequate signal strength. Emergency calls may
not be possible on all wireless phone networks or
when certain network services and/or phone
features are in use. Check with local service
providers.
To make an emergency call:
1. If the phone is not on, switch it on.
2. Key in the emergency number for your present
location. Emergency numbers vary by location.
3. Press .
If certain features are in use (call barring, for
example), you may first need to deactivate those
features before you can make an emergency call.
Consult this document and your local cellular
service provider.
When making an emergency call, remember to
give all the necessary information as accurately as
possible. Remember that your phone may be the
only means of communication at the scene of an
accident; do not end the call until given
permission to do so.
Health and safety information
101
Other important safety information
• Only qualified personnel should service the
phone or install the phone in a vehicle. Faulty
installation or service may be dangerous and
may invalidate any warranty applicable to the
device.
• Check regularly that all wireless phone
equipment in your vehicle is mounted and
operating properly.
• Do not store or carry flammable liquids, gases
or explosive materials in the same compartment
as the phone, its parts or accessories.
• For vehicles equipped with an air bag,
remember that an air bag inflates with great
force. Do not place objects, including both
installed or portable wireless equipment in the
area over the air bag or in the air bag
deployment area. If wireless equipment is
improperly installed and the air bag inflates,
serious injury could result.
• Switch your phone off before boarding an
aircraft. The use of wireless phones in an
aircraft may be dangerous to the operation of
the aircraft, and is illegal.
• Failure to observe these instructions may lead
to the suspension or denial of telephone
services to the offender, or legal action, or both.

Health and safety information
102
Care and maintenance
Your phone is a product of superior design and
craftsmanship and should be treated with care.
The suggestions below will help you fulfill any
warranty obligations and allow you to enjoy this
product for many years.
• Keep the phone and all its parts and accessories
out of the reach of small children’s.
• Keep the phone dry. Precipitation, humidity and
liquids contain minerals that will corrode
electronic circuits.
• Do not use the phone with a wet hand. Doing so
may cause an electric shock to you or damage
to the phone.
• Do not use or store the phone in dusty, dirty
areas, as its moving parts may be damaged.
• Do not store the phone in hot areas. High
temperatures can shorten the life of electronic
devices, damage batteries, and warp or melt
certain plastics.
• Do not store the phone in cold areas. When the
phone warms up to its normal operating
temperature, moisture can form inside the
phone, which may damage the phone’s
electronic circuit boards.
• Do not drop, knock or shake the phone. Rough
handling can break internal circuit boards.
• Do not use harsh chemicals, cleaning solvents
or strong detergents to clean the phone. Wipe it
with a soft cloth slightly dampened in a mild
soap-and-water solution.
Health and safety information
103
• Do not paint the phone. Paint can clog the
device’s moving parts and prevent proper
operation.
• Do not put the phone in or on heating devices,
such as a microwave oven, a stove or a radiator.
The phone may explode when overheated.
• Use only the supplied or an approved
replacement antenna. Unauthorized antennas or
modified accessories may damage the phone
and violate regulations governing radio devices.
• If the phone, battery, charger or any accessory
is not working properly, take it to your nearest
qualified service facility. The personnel there will
assist you, and if necessary, arrange for service.
Acknowledging special precautions
and the FCC and industry canada
notice
Cautions
Modifications not expressly approved by the party
responsible for compliance could void the user's
authority to operate the equipment.
FCC compliance information
This device complies with Part 15 of FCC Rules.
Operation is subject to the following two
conditions:
(1) This device may not cause harmful
interference.

Health and safety information
104
(2) This device must accept any interference
received. Including interference that may
cause undesired operation.
Information to user
This equipment has been tested and found to
comply with the limits for a Class B digital device,
pursuant to part 15 of the FCC Rules. These limits
are designed to provide reasonable protection
against harmful interference in a residential
installation.
This equipment generates, uses and can radiate
radio frequency energy and, if not installed and
used in accordance with the instructions, may
cause harmful interference to radio
communications. However, there is no guarantee
that interference will not occur in a particular
installation. If this equipment does cause harmful
interference to radio or television reception, which
can be determined by turning the equipment off
and on, the user is encouraged to try to correct
the interference by one or more of the following
measures:
• Reorient or relocate the receiving antenna.
• Increase the separation between the equipment
and receiver.
• Connect the equipment into an outlet on a
circuit different from that to which the receiver
is connected.
• Consult the dealer or an experienced radio/ TV
technician for help.
Health and safety information
105
Appendix A: CERTIFICATION
INFORMATION (SAR)
THIS MODEL PHONE MEETS THE GOVERNMENT ’S
REQUIREMENTS FOR EXPOSURE TO RADIO
WAVES. Your wireless phone is a radio transmitter
and receiver. It is designed and manufactured not
to exceed the emission limits for exposure to radio
frequency (RF) energy set by the Federal
Communications Commission of the U.S.
Government. These limits are part of
comprehensive guidelines and establish permitted
levels of RF energy for the general population. The
guidelines are based on safety standards that
were developed by independent scientific
organizations through periodic and thorough
evaluation of scientific studies. The standards
include a substantial safety margin designed to
assure the safety of all persons, regardless of age
and health.
The exposure standard for wireless mobile phones
employs a unit of measurement known as the
Specific Absorption Rate(SAR). The SAR limit set
by the FCC is 1.6 W/kg. SAR Tests are conducted
using standard operating positions accepted by
the FCC with the phone transmitting at its highest
certified power level in all tested frequency bands.
Although the SAR is determined at the highest
certified power level, the actual SAR level of the
phone while operating can be well below the
maximum value. This is because the phone is
designed to operate at multiple power levels so as
to use only the power required to reach the
network. In general, the closer you are to a
wireless base station antenna, the lower the
power output.
Before a new model phone is available for sale to
the public, it must be tested and certified to the

Health and safety information
106
FCC that it does not exceed the limit established
by the government-adopted requirement for safe
exposure. The tests are performed in positions
and locations (e.g.,at the ear and worn on the
body) as required by the FCC for each model.
The highest SAR values for this model phone as
reported to the FCC are Head:1.45W/Kg, Body-
worn:1.03W/Kg. Body-worn operations are
restricted to Samsung-supplied, approved or none
Samsung designated accessories that have no
metal and must provide at least 1.5cm separation
between the device, including its antenna whether
extended or retracted, and the user’s body. None
compliance to the above restrictions may violate
FCC RF exposure guidelines.
The FCC has granted an Equipment Authorization
for this model phone with all reported SAR levels
evaluated as in compliance with the FCC RF
exposure guidelines. SAR information on this
model phone is on file with the FCC and can be
found under the Display Grant section of http://
www.fcc.gov/oet/fccid after searching on FCC ID
A3LSPHN345.
Health and safety information
107
Appendix B: GUIDE TO SAFE AND
RESPONSIBLE WIRELESS PHONE USE
Cellular Telecommunications & Internet
Association
“Safety is the most important call you will ever
make.”
A Guide to Safe and Responsible Wireless Phone
Use
TENS OF MILLIONS OF PEOPLE IN THE U.S.
TODAY TAKE ADVANTAGE OF THE UNIQUE
COMBINATION OF CONVENIENCE, SAFETY AND
VALUE DELIVERED BY THE WIRELESS
TELEPHONE. QUITE SIMPLY, THE WIRELESS
PHONE GIVES PEOPLE THE POWERFUL ABILITY TO
COMMUNICATE BY VOICE-ALMOST ANYWHERE,
ANYTIME-WITH THE BOSS, WITH A CLIENT, WITH
THE KIDS, WITH EMERGENCY PERSONNEL OR
EVEN WITH THE POLICE. EACH YEAR, AMERICANS
MAKE BILLIONS OF CALLS FROM THEIR
WIRELESS PHONES, AND THE NUMBERS ARE
RAPIDLY GROWING.
But an important responsibility accompanies those
benefits, one that every wireless phone user must
uphold. When driving a car, driving is your first
responsibility. A wireless phone can be an
invaluable tool, but good judgment must be
exercised at all times while driving a motor
vehicle-whether on the phone or not.
The basic lessons are ones we all learned as
teenagers. Driving requires alertness, caution and
courtesy. It requires a heavy dose of basic
common sense-keep your head up, keep your
eyes on the road, check your mirrors frequently
and watch out for other drivers. It requires

Health and safety information
108
obeying all traffic signs and signals and staying
within the speed limit. It means using seatbelts
and requiring other passengers to do the same.
But with wireless phone use, driving safely means
a little more. This brochure is a call to wireless
phone users everywhere to make safety their first
priority when behind the wheel of a car. Wireless
telecommunications is keeping us in touch,
simplifying our lives, protecting us in emergencies
and providing opportunities to help others in need.
When it comes to the use of wireless phones,
safety is your most important call.
Wireless Phone “Safety Tips”
Below are safety tips to follow while driving and
using a wireless phone which should be easy to
remember.
1. Get to know your wireless phone and its
features such as speed dial and redial. Carefully
read your instruction manual and learn to take
advantage of valuable features most phones offer,
including automatic redial and memory. Also, work
to memorize the phone keypad so you can use the
speed dial function without taking your attention
off the road.
2. When available, use a hands free device. A
number of hands free wireless phone accessories
are readily available today. Whether you choose
an installed mounted device for your wireless
phone or a speaker phone accessory, take
advantage of these devices if available to you.
3. Position your wireless phone within easy reach.
Make sure you place your wireless phone within
easy reach and where you can grab it without
removing your eyes from the road. If you get an
Health and safety information
109
incoming call at an inconvenient time, if possible,
let your voice mail answer it for you.
4. Suspend conversations during hazardous
driving conditions or situations. Let the person you
are speaking with know you are driving; if
necessary, suspend the call in heavy traffic or
hazardous weather conditions. Rain, sleet, snow
and ice can be hazardous, but so is heavy traffic.
As a driver, your first responsibility is to pay
attention to the road.
5. Do not take notes or look up phone numbers
while driving. If you are reading an address book
or business card, or writing a °×to do°± list while
driving a car, you are not watching where you are
going. It’scommon sense. Don°Øt get caught in a
dangerous situation because you are reading or
writing and not paying attention to the road or
nearby vehicles.
6. Dial sensibly and assess the traffic; if possible,
place calls when you are not moving or before
pulling into traffic. Try to plan your calls before
you begin your trip or attempt to coincide your
calls with times you may be stopped at a stop
sign, red light or otherwise stationary. But if you
need to dial while driving, follow this simple tip-
dial only a few numbers, check the road and your
mirrors, then continue.
7. Do not engage in stressful or emotional
conversations that may be distracting. Stressful or
emotional conversations and driving do not mix-
they are distracting and even dangerous when you
are behind the wheel of a car. Make people you
are talking with aware you are driving and if
necessary, suspend conversations which have the
potential to divert your attention from the road.

Health and safety information
110
8. Use your wireless phone to call for help. Your
wireless phone is one of the greatest tools you can
own to protect yourself and your family in
dangerous situationswith your phone at your side,
help is only three numbers away. Dial 9-1-1 or
other local emergency number in the case of fire,
traffic accident, road hazard or medical
emergency. Remember, it is a free call on your
wireless phone!
9. Use your wireless phone to help others in
emergencies. Your wireless phone provides you a
perfect opportunity to be a “Good Samaritan” in
your community. If you see an auto accident,
crime in progress or other serious emergency
where lives are in danger, call 9-1-1 or other local
emergency number, as you would want others to
do for you.
10. Call roadside assistance or a special wireless
nonemergency assistance number when
necessary. Certain situations you encounter while
driving may require attention, but are not urgent
enough to merit a call for emergency services. But
you still can use your wireless phone to lend a
hand. If you see a broken-down vehicle posing no
serious hazard, a broken traffic signal, a minor
traffic accident where no one appears injured or a
vehicle you know to be stolen, call roadside
assistance or other special nonemergency wireless
number. Careless, distracted individuals and
people driving irresponsibly represent a hazard to
everyone on the road.
Since 1984, the Cellular Telecommunications
Industry Association and the wireless industry
have conducted educational outreach to inform
wireless phone users of their responsibilities as
safe drivers and good citizens. As we approach a
Health and safety information
111
new century, more and more of us will take
advantage of the benefits of wireless telephones.
And, as we take to the roads, we all have
aresponsibility to drive safely.
“The wireless industry reminds you to use your
phone safely when driving”
Cellular Telecommunications & Internet
Association. For more information, please call 1-
888-901-SAFE.
For updates: http://www.wowcom.com/
consumer/issues/driving/articles.cfm?ID=85

Health and safety information
112
Appendix C: Consumer Update on
Wireless Phones
U.S. Food and Drug Administration
1. What kinds of phones are the subject of this
update?
The term wireless phone refers here to hand-held
wireless phones with built-in antennas, often
called cell, mobile, or PCS phones. These types of
wireless phones can expose the user to
measurable radiofrequency energy (RF) because
of the short distance between the phone and the
user s head. These RF exposures are limited by
Federal Communications Commission safety
guidelines that were developed with the advice of
FDA and other federal health and safety agencies.
When the phone is located at greater distances
from the user, the exposure to RF is drastically
lower because a person°Øs RF exposure
decreases rapidly with increasing distance from
the source. The socalled “cordless phones,” which
have a base unit connected to the telephone
wiring in a house, typically operate at far lower
power levels, and thus produce RF exposures well
within the FCC’s compliance limits.
2. Do wireless phones pose a health hazard?
The available scientific evidence does not show
that any health problems are associated with
using wireless phones. There is no proof, however,
that wireless phones are absolutely safe. Wireless
phones emit low levels of radiofrequency energy
(RF) in the microwave range while being used.
They also emit very low levels of RF when in the
stand-by mode. Whereas high levels of RF can
produce health effects (by heating tissue),
exposure to low level RF that does not produce
Health and safety information
113
heating effects causes no known adverse health
effects. Many studies of low level RF exposures
have not found any biological effects. Some
studies have suggested that some biological
effects may occur, but such findings have not been
confirmed by additional research. In some cases,
other researchers have had difficulty in
reproducing those studies, or in determining the
reasons for inconsistent results.
3. What is FDA’s role concerning the safety of
wireless phones?
Under the law, FDA does not review the safety of
radiation-emitting consumer products such as
wireless phones before they can be sold, as it does
with new drugs or medical devices. However, the
agency has authority to take action if wireless
phones are shown to emit radiofrequency energy
(RF) at a level that is hazardous to the user. In
such a case, FDA could require the manufacturers
of wireless phones to notify users of the health
hazard and to repair, replace or recall the phones
so that the hazard no longer exists.
Although the existing scientific data do not justify
FDA regulatory actions, FDA has urged the
wireless phone industry to take a number of steps,
including the following:
Support needed research into possible
biologicaleffects of RF of the type emitted by
wireless phones; Design wireless phones in a way
that minimizes any RF exposure to the user that is
not necessary for device function; and Cooperate
in providing users of wireless phones with the best
possible information on possible effects of wireless
phone use on human health.

Health and safety information
114
FDA belongs to an interagency working group of
the federal agencies that have responsibility for
different aspects of RF safety to ensure
coordinated efforts at the federal level. The
following agencies belong to this working group:
National Institute for Occupational Safety and
Health Environmental Protection Agency
FederalCommunications Commission Occupational
Safety and Health Administration National
Telecommunications and Information
Administration
The National Institutes of Health participates
insome interagency working group activities, as
well. FDA shares regulatory responsibilities for
wireless phones with the Federal Communications
Commission (FCC). All phones that are sold in the
United States must comply with FCC safety
guidelines that limit RF exposure. FCC relies on
FDA and other health agencies for safety
questions about wireless phones.
FCC also regulates the base stations that the
wireless phone networks rely upon. While these
base stations operate at higher power than do the
wireless phones themselves, the RF exposures
that people get from these base stations are
typically thousands of times lower than those they
can get from wireless phones. Base stations are
thus not the primary subject of the safety
questions discussed in this document.
4. What is FDA doing to find out more about the
possible health effects of wireless phone RF?
FDA is working with the U.S. National Toxicology
Program and with groups of investigators around
the world to ensure that high priority animal
studies are conducted to address important
Health and safety information
115
questions about the effects of exposure to
radiofrequency energy (RF).
FDA has been a leading participant in the World
Health Organization International Electromagnetic
Fields (EMF) Project since its inception in 1996. An
influential result of this work has been the
development of a detailed agenda of research
needs that has driven the establishment of new
research programs around the world. The Project
has also helped develop a series of public
information documents on EMF issues.
FDA and the Cellular Telecommunications &
Internet Association (CTIA) have a formal
Cooperative Research and Development
Agreement (CRADA) to do research on wireless
phone safety. FDA provides the scientific
oversight, obtaining input from experts in
government, industry, and academic
organizations. CTIA-funded research is conducted
through contracts to independent investigators.
The initial research will include both laboratory
studies and studies of wireless phone users. The
CRADA will also include a broad assessment of
additional research needs in the context of the
latest research developments around the world.
5. What steps can I take to reduce my exposure to
radiofrequency energy from my wireless phone?
If there is a risk from these products.and at this
point we do not know that there is.it is probably
very small. But if you are concerned about
avoiding even potential risks, you can take a few
simple steps to minimize your exposure to
radiofrequency energy (RF). Since time is a key
factor in how much exposure a person receives,
reducing the amount of time spent using a
wireless phone will reduce RF exposure.

Health and safety information
116
If you must conduct extended conversations by
wireless phone every day, you could place more
distance between your body and the source of the
RF, since the exposure level drops off dramatically
with distance. For example, you could use a
headset and carry the wireless phone away from
your body or use a wireless phone connected to a
remote antenna Again, the scientific data do not
demonstrate that wireless phones are harmful.
But if you are concerned about the RF exposure
from these products, you can use measures like
those described above to reduce your RF exposure
from wireless phone use.
6. What about children using wireless phones?
The scientific evidence does not show a danger to
users of wireless phones, including children and
teenagers. If you want to take steps to lower
exposure to radiofrequency energy (RF), the
measures described above would apply to children
and teenagers using wireless phones. Reducing
the time of wireless phone use and increasing the
distance between the user and the RF source will
reduce RF exposure. Some groups sponsored by
other national governments have advised that
children be discouraged from using wireless
phones at all. For example, the government in the
United Kingdom distributed leaflets containing
such a recommendation in December 2000. They
noted that no evidence exists that using a wireless
phone causes brain tumors or other ill effects.
Their recommendation to limit wireless phone use
by children was strictly precautionary; it was not
based on scientific evidence that any health
hazard exists.
7. Do hands-free kits for wireless phones reduce
risks from exposure to RF emissions?
Health and safety information
117
Since there are no known risks from exposure to
RF emissions from wireless phones, there is no
reason to believe that hands-free kits reduce
risks. Handsfree kits can be used with wireless
phones for convenience and comfort. These
systems reduce the absorption of RF energy in the
head because the phone, which is the source of
the RF emissions, will not be placed against the
head. On the other hand, if the phone is mounted
against the waist or other part of the body during
use, then that part of the body will absorb more
RF energy. Wireless phones marketed in the U.S.
are required to meet safety requirements
regardless of whether they are used against the
head or against the body. Either configuration
should result in compliance with the safety limit.
8. Do wireless phone accessories that claim to
shield the head from RF radiation work?
Since there are no known risks from exposure to
RF emissions from wireless phones, there is no
reason to believe that accessories that claim to
shield the head from those emissions reduce risks.
Some products that claim to shield the user from
RF absorption use special phone cases, while
others involve nothing more than a metallic
accessory attached to the phone. Studies have
shown that these products generally do not work
as advertised. Unlike “hand-free” kits, these so-
called “shields”may interfere with proper
operation of the phone. The phone may be forced
to boost its power to compensate, leading to an
increase in RF absorption. In February 2002, the
Federal trade Commission (FTC) charged two
companies that sold devices that claimed to
protect wireless phone users from radiation with
making false and unsubstantiated claims.

Health and safety information
118
According to FTC, these defendants lacked a
reasonable basis to substantiate their claim.
9. What about wireless phone interference with
medical equipment?
Radiofrequency energy (RF) from wireless phones
can interact with some electronic devices. For this
reason, FDA helped develop a detailed test
method to measure electromagnetic interference
(EMI) of implanted cardiac pacemakers and
defibrillators from wireless telephones. This test
method is now part of a standard sponsored by
the Association for the Advancement of Medical
instrumentation (AAMI). The final draft, a joint
effort by FDA, medical device manufacturers, and
many other groups, was completed in late 2000.
This standard will allow manufacturers to ensure
that cardiac pacemakers and defibrillators are safe
from wireless phone EMI.
FDA has tested hearing aids for interference from
handheld wireless phones and helped develop
avoluntary standard sponsored by the Institute of
Electrical and Electronic Engineers (IEEE). This
standard specifies test methods and performance
requirements for hearing aids and wireless phones
so that that no interference occurs when a person
uses a compatible phone and a compatible hearing
aid at the same time. This standard was approved
by the IEEE in 2000.
FDA continues to monitor the use of wireless
phones for possible interactions with other
medical devices. Should harmful interference be
found to occur, FDA will conduct testing to assess
the interference and work to resolve the problem.
10. What are the results of the research done
already?
Health and safety information
119
The research done thus far has produced
conflicting results, and many studies have
suffered from flaws in their research methods.
Animal experiments investigating the effects of
radiofrequency energy (RF) exposures
characteristic of wireless phones have yielded
conflicting results that often cannot be repeated in
other laboratories. A few animal studies, however,
have suggested that low levels of RF could
accelerate the development of cancer in
laboratory animals. However, many of the studies
that showed increased tumor development used
animals that had been genetically engineered or
treated with cancercausing chemicals so as to be
pre-disposed to develop cancer in the absence of
RF exposure. Other studies exposed the animals
to RF for up to 22 hours per day. These conditions
are not similar to the conditions under which
people use wireless phones, so we don t know
with certainty what the results of such studies
mean for human health.
Three large epidemiology studies have been
published since December 2000. Between them,
the studies investigated any possible association
between the use of wireless phones and primary
brain cancer, glioma, meningioma, or acoustic
neuroma, tumors of the brain or salivary gland,
leukemia, or other cancers. None of the studies
demonstrated the existence of any harmful health
effects from wireless phone RF exposures.
However, none of the studies can answer
questions about long-term exposures, since the
average period of phone use in these studies was
around three years.
11. What research is needed to decide whether RF
exposure from wireless phones poses a health
risk?

Health and safety information
120
A combination of laboratory studies and
epidemiological studies of people actually using
wireless phones would provide some of the data
that are needed. Lifetime animal exposure studies
could be completed in a few years. However, very
large numbers of animals would be needed to
provide reliable proof of a cancer promoting effect
if one exists. Epidemiological studies can provide
data that is directly applicable to human
populations, but 10 or more years follow-up may
be needed to provide answers about some health
effects, such as cancer. This is because the
interval between the time of exposure to a cancer-
causing agent and the time tumors develop - if
they do - may be many, many years. The
interpretation of epidemiological studiesis
hampered by difficulties in measuring actual RF
exposure during day-to-day use of wireless
phones. Many factors affect this measurement,
such as the angle at which the phone is held, or
which model of phone is used.
12. Which other federal agencies have
responsibilities related to potential RF health
effects?
Additional information on the safety of RF
exposures from various sources can be obtained
from the following organizations.
FCC RF Safety Program:
http://www.fcc.gov/oet/rfsafety/
Environmental Protection Agency (EPA):
http://www.epa.gov/radiation/
Occupational Safety and Health Administration’s
(OSHA):
http://www.oshaslc.
Health and safety information
121
gov/SLTC/radiofrequencyradiation/index.html
National Institute for Occupational Safety and
Health (NIOSH):
http://www.cdc.gov/niosh/emfpg.html
World health Organization (WHO):
http://www.who.int/peh-emf/
International Commission on Non-Ionizing
Radiation Protection:
http://www.icnirp.de
National Radiation Protection Board (UK):
http://www.nrpb.org.uk
Updated 4/3/2002: US Food and Drug
Administration
http://www.fda.gov/cellphones