Samsung Electronics Co STR2100 ICE-PAD 802.11(a) Wireless Multimedia Transceiver User Manual DA99 01278D REV 0
Samsung Electronics Co Ltd ICE-PAD 802.11(a) Wireless Multimedia Transceiver DA99 01278D REV 0
UserManual.wiki
>
Samsung Electronics Co
>
STR2100 User Manual
Users Manual
Navigation menu
Upload a User Manual
Namespaces
Wiki Guide
HTML
PDF
Info
Views
User Manual
Discussion / Help
Navigation


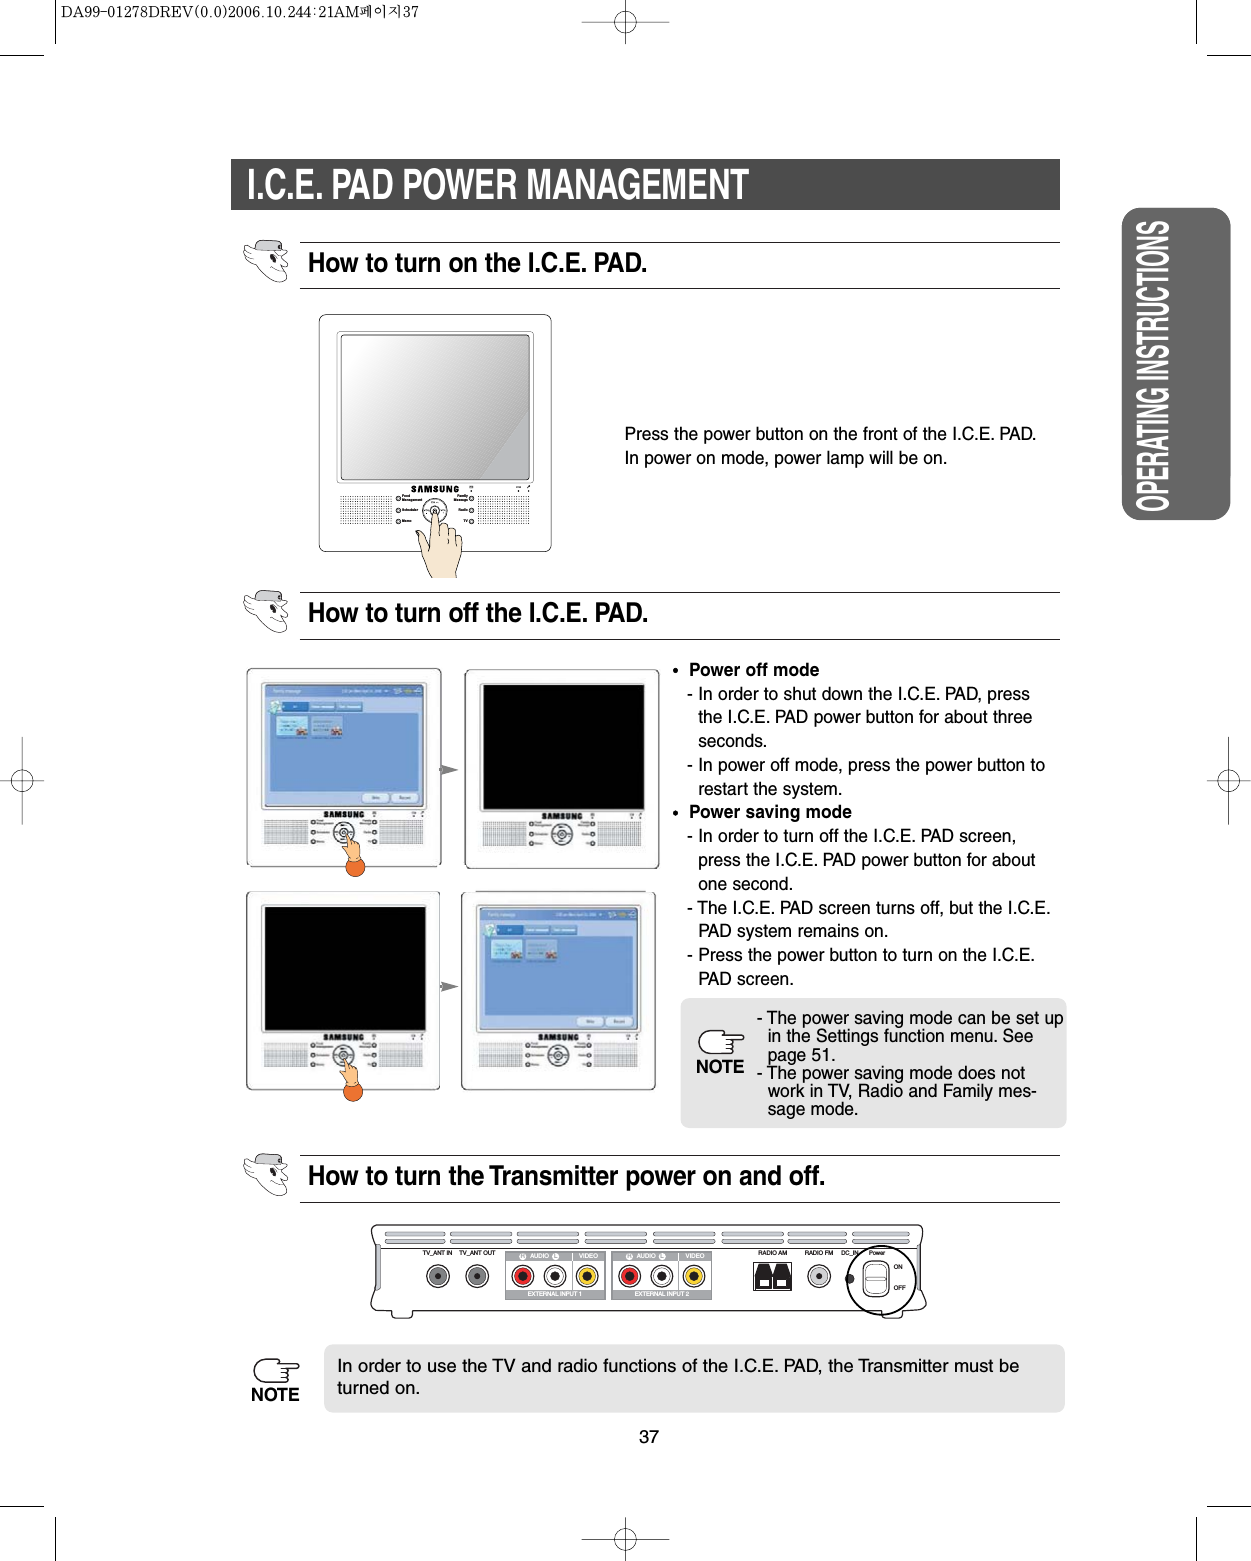
![35VIEW OF I.C.E. PAD/TRANSMITTERRear viewRight viewBottom viewLeft viewStylus penStylus penStylus pen:- Use to touch the screen.Stand :-Allows you to stand the I.C.E. PAD on a desk.Battery Case :- Built-in battery case.A/S port :- Service port (for service only).- Do not open the cover.[Rear view ][Left view ]Reset Button : Use to reset the system. There is reset button in the hole inside that a resetposition( ) is marked.Headphone Port:- Connects to commonlyused PC headphones.Adaptor port:- Connects to the provid-ed adaptor.Docking Connection Port :- To charge the I.C.E. PAD, mount the connection port ofI.C.E. PAD in the door of the refrigerator(docking station).A/S port :- Service port (for serviceonly). Do not open thecover.111 11214453322[Right view ][Bottom view ]The I.C.E. PAD can be charged by connecting it to an adapter or the docking station ofthe refrigerator.NOTESAFETY WARNING SIGNSOPERATING INSTRUCTIONS](https://usermanual.wiki/Samsung-Electronics-Co/STR2100/User-Guide-723967-Page-36.png)
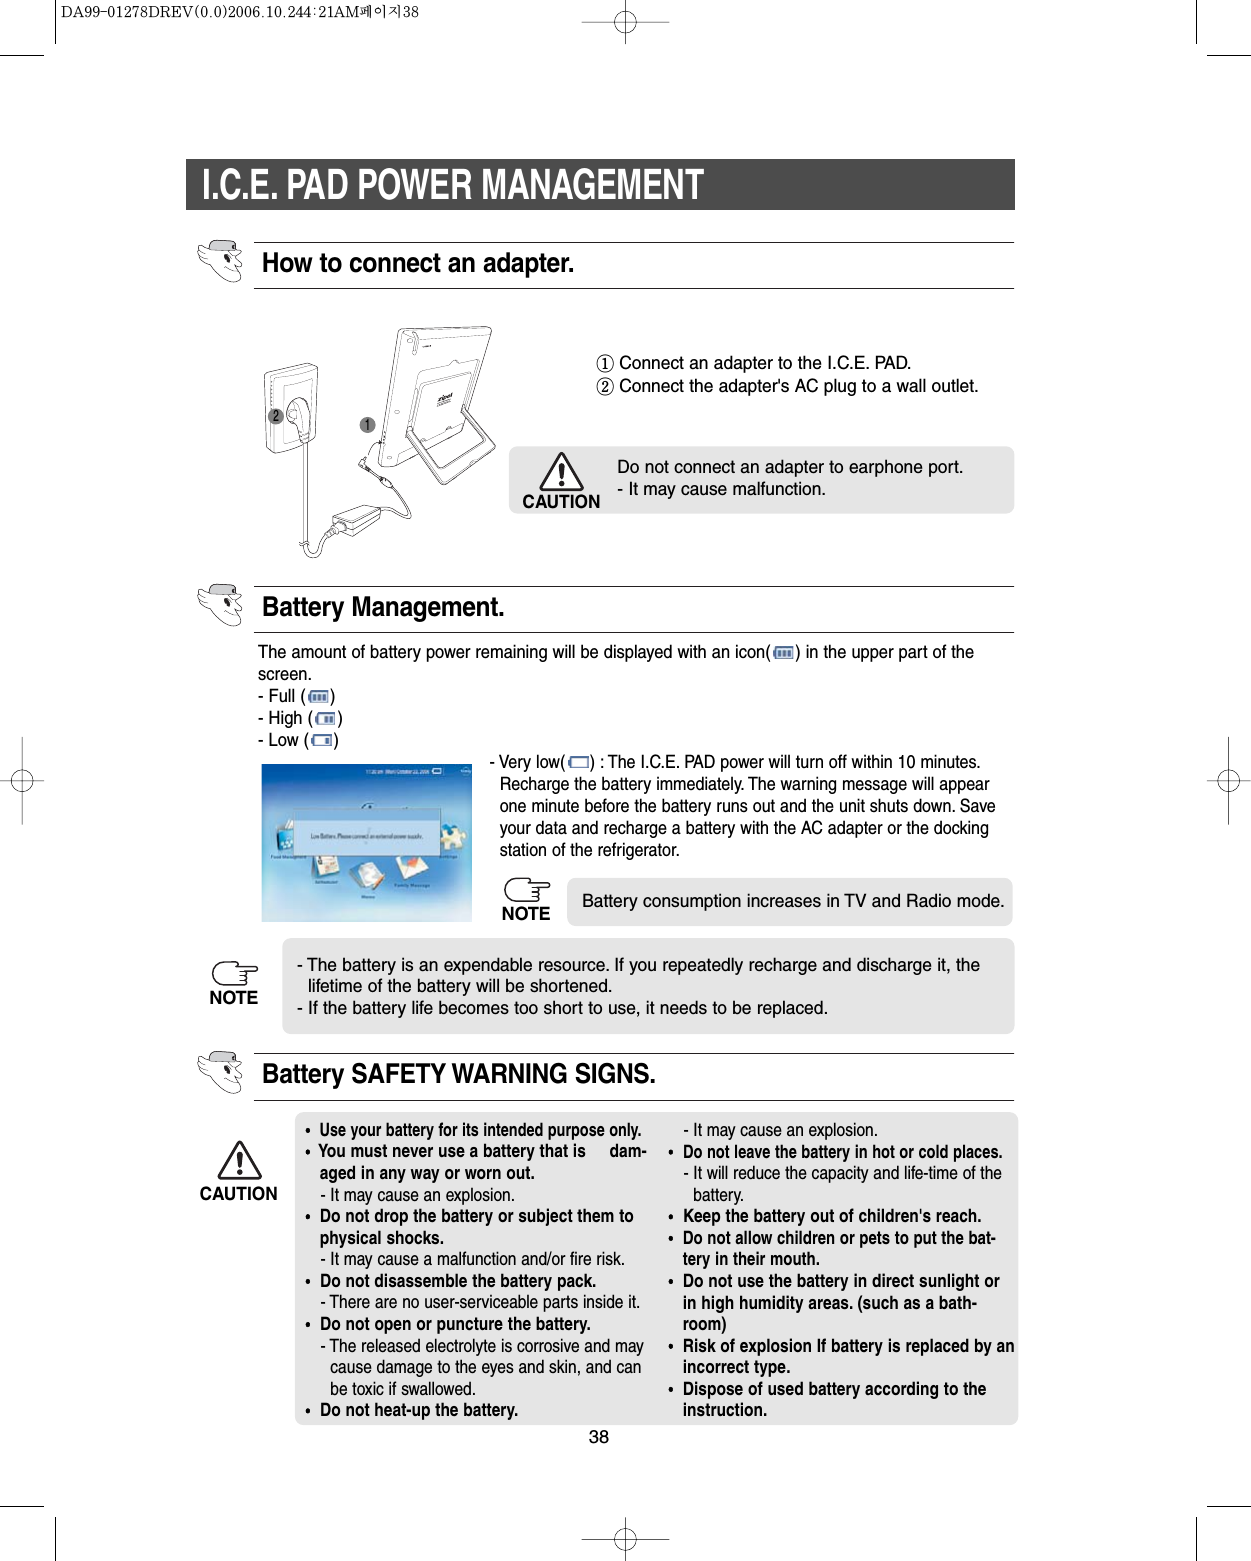
![36VIEW OF I.C.E. PAD/TRANSMITTERTV_ANT IN TV_ANT OUT RADIO AM RADIO FM DC_IN PowerONOFFEXTERNAL INPUT 1 EXTERNAL INPUT 2Status lamp : This displays the transmission status of the wireless signal.- If this lamp blinks, the Transmitter is sending a signal tothe I.C.E. PAD.Power lamp : This displays the Transmitter power status.- On : The Transmitter is in power on mode.- Off : The Transmitter is in power off mode.[Front view ]View of Transmitter.How to connect external sources.Front viewTV_ANT IN TV_ANT OUTR AUDIO L VIDEO R AUDIO L VIDEORADIO AM RADIO FM DC_IN PowerONOFFEXTERNAL INPUT 1 EXTERNAL INPUT 2TV_ANT IN : TV Antenna InputTV_ANT OUT : TV Antenna OutputExternal Input 1 : External Audio/Video Input #1External Input 2 : External Audio/Video Input #2Radio AM : Connect Radio AM Antenna cable.Radio FM : Connect Radio FM Antenna cable.DC_IN : Connect an adaptor.Power : Use to power on or off.ANT IN : Connect to an external antenna cable.ANT OUT : Connect to an antenna input port on a TV. AV IN 1, 2 : Video and audio inputs forexternal devices, such as a DVD or VCR.RADIO FM : Connect to an FM antenna.RADIO AM : Connect to an AM antenna.DC IN : Connect to an adapter.POWER SWITCH : Use in order to turn the Transmitterpower on or off.Rear viewYou should use only the A/V cable which is provided with the I.C.E. PAD.CAUTION121 2 3 4 5 6 7 81 2345 678](https://usermanual.wiki/Samsung-Electronics-Co/STR2100/User-Guide-723967-Page-37.png)
![41USER INTERFACEMAIN.Task Bar : Indicates the present function, time,date( ), battery level( ), new familymessage( ) and today( ).Food Management : You can manage the food you have stored in the refrigerator.Scheduler : You can manage your daily schedule.Memo : You can save or check necessary memos.Family Message : You can leave text or voice messages for your family.Settings : You can set the brightness, power saving time, touch point, sound volume, alarmtype and time setting.Today icon : This function offers you to see the food information, schedules and specialdays(Birthday, Party, Wedding and Anniversary) for the day.New Family Message icon : This icon indicates that there is new family message.Home icon : Press this icon to change to the main screen in each function.[Main screen ]If the I.C.E. PAD is connected to an adapter or the refrigerator's docking station, thebattery level icon( )changes to the plug icon( ).NOTEHow to control touch point.This setting helps to calibrate the I.C.E. PAD for use with the Stylus Pen.- Hold the stylus pen and press down lightly on the center of the "+" mark.- Repeat as the '+" mark moves on the screen. (refer to screen)- After finishing touch point setting, touch a screen within 30 seconds in order to apply setting.The Touch point setting will be run when you press the resetbutton, or you can select the "Touchpoint" calibration in theSettings function(refer to 51-How to calibrate touch point)NOTESAFETY WARNING SIGNSOPERATING INSTRUCTIONS](https://usermanual.wiki/Samsung-Electronics-Co/STR2100/User-Guide-723967-Page-42.png)
![42USER INTERFACEFood Management[Main screen]FoodManagementSchedulerMemoFamilyMessageRadioTV[I.C.E. PAD front view] [Saved food display mode][Select category mode] [Create new mode] [Monthly calendar]How to enter a new food item1. Choose the "Food Management" icon on the main screen or press the I.C.E. PAD's "FoodManagement" button.- It will then change to "Saved food display mode".2. [Saved food display mode] Choose the "New" button( )located on the lower right.- It will then change to "Select category mode".3. [Select category mode] Choose the desired food item.- It will then change to "Create new mode".4. [Create new mode] Choose the "Memo" button( ), and then a cursor will blink.- Type food information using the screen keyboard.5. [Create new mode] Choose the "D-Day" button( ), and then the monthly calendar will be displayed.- "D-Day" means the expiration date of food.6. [Monthly calendar] Choose the desired date in the monthly calendar.(from January 1, 2000 to December 31, 2040).- You can change a year and month using the direction button( ).7. [Create new mode] Choose the "Save" button( ) after entering all the information or choose the"Cancel" button( ) to cancel.- If you choose the "Save" button without entering a D-Day, today's date will be inputted automatically.- Food lists stored in a freezer are marked with an asterisk( ).- Food lists that pass their expiration date are marked with yellow ( ).NOTEThis feature helps you to keep track of food in the fridge and its expiration date.](https://usermanual.wiki/Samsung-Electronics-Co/STR2100/User-Guide-723967-Page-43.png)
![43USER INTERFACEScheduler[Edit mode][Edit mode-Delete message window)[Main screen]FoodManagementSchedulerMemoFamilyMessageRadioTV[I.C.E. PAD front view] [Monthly mode]How to change food item.1. [Saved food display mode] Choose the window containing thefood item you previously entered. This window is directly abovethe calendar window.2. [Edit mode] Change the contents using the screen keyboard andcalendar.3. [Edit mode] After you change the contents, press the "Save”button( ) to save the changes.- If you no longer want to make changes, press the "Cancel”button( ).How to delete food item.1. [Saved food display mode] Choose the window containing thefood item you previously entered.2. [Edit mode] Choose the "Delete" button( ) to delete.- The following message window will be displayed to confirm.Press "OK" to delete.How to enter a new schedule.1. Choose the "Scheduler" icon on the main screen or press the "Scheduler" button of the I.C.E. PAD.- It will then change to "Monthly mode".2. [Monthly mode] Choose the desired date (from January 1, 2000 to December 31, 2040) to input aschedule.- It will then change to "Daily mode".This feature can be used to help organize your personal schedule. It operates in a way sim-ilar to hand-held PDAs.SAFETY WARNING SIGNSOPERATING INSTRUCTIONS](https://usermanual.wiki/Samsung-Electronics-Co/STR2100/User-Guide-723967-Page-44.png)
![44USER INTERFACE[Daily mode ] [Input mode ][Input mode ]3. [Daily mode] Choose the "New" button( ), and then it will change to "Input mode".4. [Input mode ]Type the content of your memo using the screen keyboard.5. [Input mode ]Press the "Set Time" button( ) to set the time and alarm.- Choose AM or PM.- Press the hour and minute button to set, and a pop up window is displayed.- Choose the desired hour and minute.6. [Input mode ]Press the "Set Alarm" button( ). Choose the intervaltime between the alarms. (3hr prior to/1 hr prior to/30 min prior to/10 min priorto/5 min prior to/On time/No alarm)7. [Input mode ]Press the "Repeat" button( ).- Choose the repetition period. (Daily/Weekly/Monthly/No repeat)8. [Input mode ]Choose “Save” after entering all the information or choose“Cancel”.- If you set up alarm, the alarm icon( )will be displayed in the daily mode'sschedule title. ( )If you choose the "Recent" button( ), you can see the contents that were input recently."Set Alarm" button is displayed only if time is set.- The default setting is "No repeat".- If you choose the "Daily", the schedule is not shown inthe monthly mode.[Input mode ][Input mode ][Input mode ]NOTENOTENOTE](https://usermanual.wiki/Samsung-Electronics-Co/STR2100/User-Guide-723967-Page-45.png)
![45USER INTERFACE- You can set the alarm sound setting in the Settings function menu (refer to page 52 - Howto control the alarm volume and sound).How to change your schedule.1. [Daily mode] Choose the desired schedule to change.2. [Edit mode] Change the information using the screen keyboard.- To save changes, press the "Save" button( ).- To cancel the changes, press the "Cancel" button( ).[Edit mode]1. [Monthly mode] Choose the desired date to check, and then it will change to "Daily mode".2. [Daily mode] You can check schedules of the date chosen. Select the "Week" or "Month"button( ) to change weekly or monthly mode.3. [Weekly mode] Choose the desired date to check, and then it will change to "Daily mode".Press the direction button( ) to select the desired week.[Monthly mode] [Daily mode] [Weekly mode]How to delete your schedule.1. [Daily mode] Choose the desired schedule to delete.2. [Edit mode] To delete a schedule, press "Delete" ( ).- A message will automatically be displayed to confirm. Press "OK "to delete.[Edit mode-Delete message window]Alarm message window.- If it is alarm time, an alarm window appears with an alarm sound atthe same time.- In power saving mode, an alarm window appears at the same timethat LCD screen is turned on.- If you press the "OK" button, the window will disappear.[Alarm message window]How to check your schedule.NOTESAFETY WARNING SIGNSOPERATING INSTRUCTIONS](https://usermanual.wiki/Samsung-Electronics-Co/STR2100/User-Guide-723967-Page-46.png)
![46USER INTERFACESpecial Day(Birthday, Party, Wedding and Anniversary)[Main screen]FoodManagementSchedulerMemoFamilyMessageRadioTV[I.C.E. PAD front view] [Monthly mode][Saved special day mode] [Select category mode] [Create new mode ][Create new mode ]How to enter new special day.1. Choose the "Schedule" icon on the main screen or press the "Schedule" button on the I.C.E. PAD.2. [Monthly mode] Choose the "Special day" button( ), and then it will change to the "Savedspecial day mode".- Default screen will display a recently saved special day.3. [Saved special day mode] Choose the "New" button( ), and thenit will change to "Select category mode".4. [Select category mode] Choose the desired special day item to input.- It will change to "Create new mode".5. [Create new mode ]Choose the "memo" button( ), and then acursor will blink.- Type special day information using the screen keyboard.6. [Create new mode ]Choose the desired month and day using thenavigation button( ).- You can also choose the desired year, month and day using the"Calendar" button( ).7. [Create new mode]Choose "Save" button( ) after entering all the information.- If you press the "Save" button, the following message will pop up.- To cancel, press "Cancel" ( ).](https://usermanual.wiki/Samsung-Electronics-Co/STR2100/User-Guide-723967-Page-47.png)
![47USER INTERFACEMemo.[Main screen]FoodManagementSchedulerMemoFamilyMessageRadioTV[I.C.E. PAD front view] [Saved memo mode][Input memo]How to leave a new memo.1. Choose the "Memo" icon on the main screen or press the"Memo" button on the I.C.E. PAD.2. [Saved memo mode] Choose the "New" button( ), andthen it will change to "Input mode".3. [Input memo] Enter the memo contents using the stylus penor screen keyboard.[Edit mode]How to change special day.1. [Saved special day mode]Choose the desired special day to change.2. [Edit mode] Change the information using the screen keyboard.- To save the changes, press the "Save" button( ).- To cancel the changes, press the "Cancel" button( ).[Edit mode-Delete message window]How to delete your special day.1. [Saved special day mode]Choose the desired special day to delete.- It will then change to "Edit mode" with the original information.2. [Edit mode] To delete a schedule, press the "Delete"button( ).- A confirmation message will automatically be displayed.Press "OK" to delete.There are two methods to input your memo.- Pen mode : Select the "Pen" button( ) to write your memo with stylus pen.- Keyboard mode :Select the "Keyboard" button( ) to type your memo with screen keyboard.NOTEThis feature can be used to leave a memo for yourself or someone else.SAFETY WARNING SIGNSOPERATING INSTRUCTIONS](https://usermanual.wiki/Samsung-Electronics-Co/STR2100/User-Guide-723967-Page-48.png)
![48USER INTERFACE4. [Input memo] Press the "Screen", "Brush" and "Color" button, and then pop up window is displayed.Choose the desired background, pen thickness and pen color.5. [Input mode] Choose "Save"( ) after entering all the information or choose "Cancel" ( ).- If you press "Save", the following message will pop up.- Eraser( ) : Select to erase the inputted memo in pen mode.- Pen( ) : Select to input a memo in pen mode.- Keyboard( ) : Select to input a memo in keyboard mode.- Screen( ) : Select the memo background.- Brush( ) : Select pen thickness.- Color( ) : Select pen color.- All Eraser( ) : Select to erase all the memo contents in pen mode.[Edit mode]How to change memo.1. [Saved memo mode] Choose the desired memo to change.2. [Edit mode] Change the information using the screen keyboard orstylus pen.- To save the changes, press "Save" ( ).- To cancel the changes, press "Cancel" ( ).[Edit mode-Delete message window]How to delete memo.1. [Saved special day mode] Choose the desired memo to delete.2. [Edit mode] Choose the “Delete” button( ).- The following message will appear to confirm.- Press “OK” to delete.](https://usermanual.wiki/Samsung-Electronics-Co/STR2100/User-Guide-723967-Page-49.png)
![49USER INTERFACE3. [New voice message mode ]Choose the person that you want to receive the voice message and press the "Start" button( ) to record.4. [New voice message mode ]If you want to finish recording, press the "Done" button( ).- Press "Rerecord" to re-record( ).- Press "Play" ( )to confirm the content that recorded.5. [New voice message mode ]If you choose "Pause" button( ), recording will be paused.- Press "Continue" ( ) to continue recording, and then recording is continued after pause.6. [New voice message mode ]Press the "Save" button ( ) to save.- Press the "Cancel" button ( ) to cancel.- Control the volume using the volume button ( ).How to leave a new voice message.1.Choose the "Family Message" icon on the main screen or press the "Family Message" button on the I.C.E. PAD.- Default screen will display recent saved family messages.2. [Saved family message mode] Choose the "Record" button ( ).- It will then change to "New voice message mode".Family Message.[Main screen]FoodManagementSchedulerMemoFamilyMessageRadioTV[I.C.E. PAD front view] [Saved family message mode][New voice message mode ]FamilyGrand Mother Grand FatherMother FatherOlder SisterOlder BrotherYounger SisterYounger Brother[New voice message mode ][New voice message mode ][Saved family message mode] [Input mode ][Input mode ]The message icon( ) is displayed in task bar to indicate that there is the new family message. When you record, stand close to the microphone.NOTENOTEThis mode enables you to leave a voice or text message for your family members or roomates.The illustrations below represent different members of your family.SAFETY WARNING SIGNSOPERATING INSTRUCTIONS](https://usermanual.wiki/Samsung-Electronics-Co/STR2100/User-Guide-723967-Page-50.png)
![50USER INTERFACE- Brush ( ) :Select pen thickness. If you choose the "Eraser" button( ), "Brush" button( ) will bechanged to "Eraser" button( ).- Color ( ) : Select pen color.- Eraser ( ) : Select to erase Inputted message in pen mode.- Pen ( ) : Select to input message in pen mode.- keyboard ( ) : Select to input message in keyboard mode.3. [Input mode ]Choose "Save" ( ) after entering text message. To cancel, choose "Cancel" ( ).A message icon ( ) is displayed in the task bar to indicate that there is a new family message.The new message box is highlighted.[Saved family message mode][Input mode][Voice message] [Text message]How to check text or voice messages.1. [Saved family message mode] Choose the desired family message in the family message list.2. [Voice/Text message] Press the "Play" button ( ) to Open or Play Message.- Press the "Reply" button ( ) to reply.- Press the "Delete" button ( ) to delete.How to change text message.1. [Saved family message mode]Choose the desired message tochange.2. [Input mode]Change the text message in the same way as inputting a newmessage.- After changing your text message, press "Save" or "Cancel".How to leave new text message.1. [Saved family message mode]Choose the "Write" button ( ), and then it will change to "Input mode".2. [Input mode ]Choose the person that you want to receive the text message. Enter the text messageusing the stylus pen or screen keyboard.There are two methods to input your text message.- Pen mode : Select the "Pen" button ( ) to write your text message with the stylus pen.- Keyboard mode :Select the "Keyboard" button ( ) to type your text message with screen keyboard.NOTENOTENOTE](https://usermanual.wiki/Samsung-Electronics-Co/STR2100/User-Guide-723967-Page-51.png)
![51USER INTERFACE- Power saving mode : The I.C.E. PAD screen turns off, but the I.C.E. PAD remains on.- If you choose midnight off mode, the I.C.E. PAD screen turns off from 1:00 to 5:00AM.[Main screen] [Setting-Screen mode]Screen- This menu displays the I.C.E. PAD user screen properties including brightness, touch point settings andpower saving time settings.How to control screen brightness1. Choose the "Settings" icon on the main screen, and then it will change to Screen.2. Control the screen brightness using the " " button.- To apply your new settings, press "Apply" button( ).[Touch point reset mode]How to calibrate the touch point- This function can be used to calibrate the stylus pen touch point toimprove usability with the Touch screen.1. Press the "Touchpoint" button ( ), and then a screen willappear with pointer instructions on the top.2. Hold the pen softly and press down lightly on the center of the"+"mark. Repeat as the "+" mark moves on the screen.3. To save the new calibration data, touch the LCD screen within 30seconds.- To keep the current setting, wait for 30 seconds.How to set power saving time.- In this mode, you can set a time for the screen to shut off after thelast button press. This helps to save power.1. Press the "Change" button ( ), and then a pop up window isdisplayed.2. Choose the desired time. (After 1hr, After 30min, After 10min, After5min, After 3min, Always on, Midnight off)- The default setting is always on.3. To apply your new settings, press "Apply" button ( ).Setting.NOTESAFETY WARNING SIGNSOPERATING INSTRUCTIONS](https://usermanual.wiki/Samsung-Electronics-Co/STR2100/User-Guide-723967-Page-52.png)
![52USER INTERFACE[Setting-Screen mode] [Setting-Sound mode][Setting-Screen mode] [Setting-Time mode]Sound- This menu enables you to set the I.C.E. PAD's sound properties including key volume, alarm volume andalarm sound settings.Time- This menu displays the I.C.E. PAD user's time and date settings.How to set the key volume.1. Choose the "Sound" tab ( ) to bring up the sound mode.2. Set the key volume using the button.- To apply your new settings, press "Apply" button ( ).How to change time.1. Choose the "Time" tab ( ) to bring up the Time mode.2. Choose the desired month, day, year, hour, minute and AM/PM by using the ( )button.- You can set the desired month, day and year using "Calendar" ( ) also.3. To apply your new settings, press "Apply" button ( ).- Key sound is heard when a button is pressed or a message window or menu list appears.How to control the alarm volume and sound.1. Control the alarm volume by using the button.2. Choose the alarm sound by using the button.- The alarm sound settings are comprised of morning, peace, summer, winter, bell, dingdong, melody,footstep, and no alarm.3. To apply your new settings, press "Apply" button ( ).NOTE](https://usermanual.wiki/Samsung-Electronics-Co/STR2100/User-Guide-723967-Page-53.png)
![53USER INTERFACE53- Food management shows the list of foods with an expiration date within the next seven days.- Special day shows special day list for the next seven days.- To listen to the radio, you have to turn on the Transmitter and connect the AM/FM antenna cable(supplied) to the AM/FM portof the Transmitter.[Main screen] [Today mode]-This menu displays food management, schedule and special day.How to use today.1. Choose the "Today" button ( ) in the upper right corner of the screen to bring up the Today mode.2. You can check the food management, schedule and special day settings for today.- Check yesterday’s or tomorrow’s content using the direction " "button.Today.RadioFoodManagementSchedulerMemoFamilyMessageRadioTV[I.C.E. PAD front view][Radio mode]How to listen to the radio.1. Press the "Radio" button on the I.C.E. PAD to bring up the "Radio mode".2. Select AM or FM using the " " or " " button.3. Search for a Frequency using the " " button or the CH/CHbutton on the I.C.E. PAD.4. Press a "Preset" button ( ), and then the current frequency isadded to preset.5. Control the volume using the " " button or VOL - / VOL + buttonon the I.C.E. PAD.- Manual Search : Press the " " buttons to change the frequen-cy up or down. The frequency is adjusted in increments 0.1MHz.- Automatic Search : Press and hold the " " or CH/CHbuttons to automatically search for receiving frequencies.NOTENOTESAFETY WARNING SIGNSOPERATING INSTRUCTIONS](https://usermanual.wiki/Samsung-Electronics-Co/STR2100/User-Guide-723967-Page-54.png)
![55USER INTERFACETV.FoodManagementSchedulerMemoFamilyMessageRadioTV[I.C.E. PAD front view][TV mode]How to watch TV.1. Press the "TV" button on the I.C.E. PAD, and then the default TV mode willbe shown.2. In the default TV mode, a small TV screen and TV control section will be dis-played. The TV control section offers basic TV functions including channelcontrol, input selection, picture control and sound control.3. If you press the small TV screen, the full TV screen will be displayed. Pressthe screen again to return to the small screen.4. Control the volume and channel using the "VOL- / VOL+" and "CH/ CH"button on the I.C.E. PAD.FoodManagementSchedulerMemoFamilyMessageRadioTVTV Function ButtonsADD CH. ( ) : Use to store channels to memory.DELETE CH. ( ) : Use to delete channels from memory.CH. SCAN ( ) : Press to automatically store selected Air/Cable channels.- To cancel channel scanning, press the "CH. SCAN" button during channel scanning.P. Mode ( ) : Select the type of picture using this button.- Press this button repeatedly to select the desired picture mode (Dynamic, Standard, Movie,Custom).- Choose "Dynamic" for viewing the TV during the day or when there is a bright light in the room.- Choose "Standard" for the standard factory settings.- Choose "Movie" when viewing a movie.- Choose "Custom" if you want to adjust the settings according to personal preference.Fine Tune ( ) : Select to manually adjust a particular channel for optimal reception conditions.Air/Cable ( ) : Press repeatedly to select "AIR" or "CABLE".MUTE ( ) : Select to temporarily cut off the sound.Pre-Ch ( ) : Use to select the previous channel.Source ( ) : Press to select a signal source.- When you connect equipment to the Transmitter, you can choose between the following modes :TV, External Input 1 and External Input 2 (refer to page 56).Fullscreen( ) : Press to change to the full TV screen.If the wireless communication condition is poor, channel scanning will stop automatically.NOTESAFETY WARNING SIGNSOPERATING INSTRUCTIONSCAUTIONAs the electromagnetic wave, the user should beusing the distance over the 7.9 20cm)between the user and the transmitter.](https://usermanual.wiki/Samsung-Electronics-Co/STR2100/User-Guide-723967-Page-56.png)