Samsung Electronics Co SX10 Notebook PC User Manual AquilaC XP English v0 9
Samsung Electronics Co Ltd Notebook PC AquilaC XP English v0 9
Contents
- 1. Users Manual 1
- 2. Users Manual 2
Users Manual 1
Using Your Documentation 1
Using Your Documentation
Congratulations on your purchase of a notebook computer with the Windows® XP
operating system. Whether you are new to using a portable computer or are an
experienced user, this user’s manual can help you get the most from your computer.
Manual Documentation Conventions
Information Icons
Three icons and their associated messages appear in this manual. The information
icons are placed before the step/information they apply to:
Warning:
Indicates the possibility of personal injury.
Caution:
Warns you of possible damage to equipment or data.
Note:
Informs you of special circumstances.
Technical Information:
Informs you of special requirements or limitations for use of item(s).
Keyboard Conventions
Keys that you need to press to perform certain functions are displayed in the manual in
brackets. For example:
<Ctrl> indicates the control key (Ctrl on the keyboard).
If you need to press two keys at the same time, the key names are shown joined by a
plus sign. For example:
<Fn+F8> means that you should press the Fn key and hold it and then press the F8
key.
2 Users Manual
CD-ROM Device Naming Convention
In many installation programs you will have to get a program from the CD-ROM
device. The program installation sequence assumes that the CD is drive d:\, however
this is not always the case. The name of the CD-ROM drive is the letter following the
letter assigned to your last HDD. For instance, if you have one HDD with two
partitions, the HDD is drives C: and D: and the CD-ROM drive is then drive E.
Touchpad Conventions
You may be asked to click or double-click on items on the display screen. As a general
note the touchpad actions act much in the same way as a wheel mouse, any differences
are explained fully.
The object that needs to be clicked upon will be displayed in Bold text or shown in a
small figure such as the “Start Button” shown on the right =>.
Table 1. Touchpad Click Conventions
Windows Conventions:
Almost all “Windows” programs will display the name/function of a button or
icon if you place the touchpad pointer on the item you want information about.
Software User Documentation
Your computer is shipped from the factory with several software programs installed.
The software may include its own online or printed documentation. Refer to the
documentation or the Help options in the software for more information.
The figures and illustrations in this manual may not be identical to those on
your system.
General Icon Note:
Some of the Icons used in Windows XP may be placed on the taskbar by
selecting (ex: Place the volume icon in the taskbar) in the properties dialog
box.
Action Process
Click Depress the touchpad left button and release
Double-click Quickly click the left touchpad button two times
Getting Started 3
Getting Started
Introducing Your Computer
The next section will explain the location of all of the buttons, status indicators and
equipment needed to operate your notebook computer.
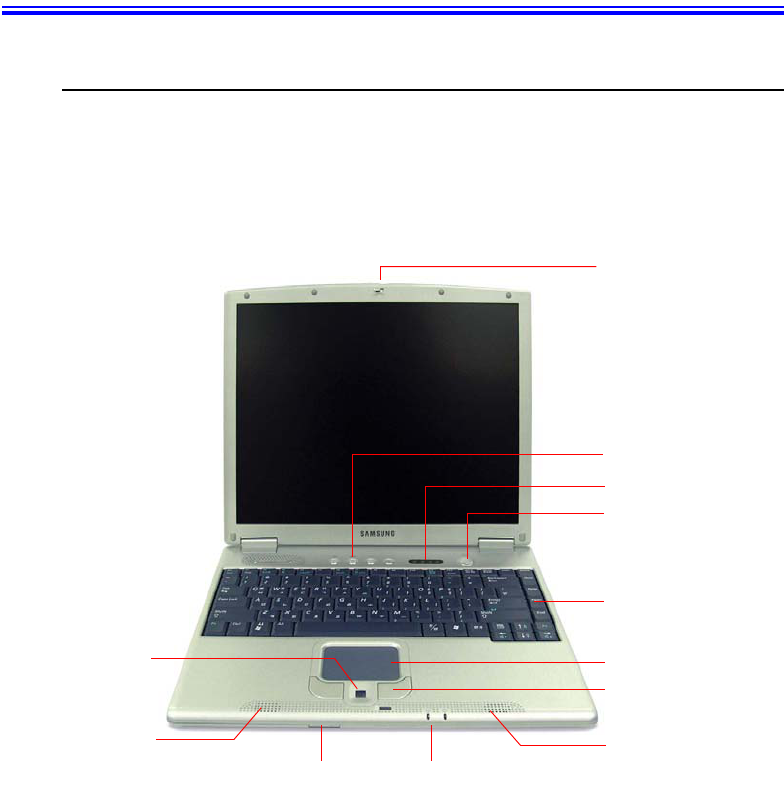
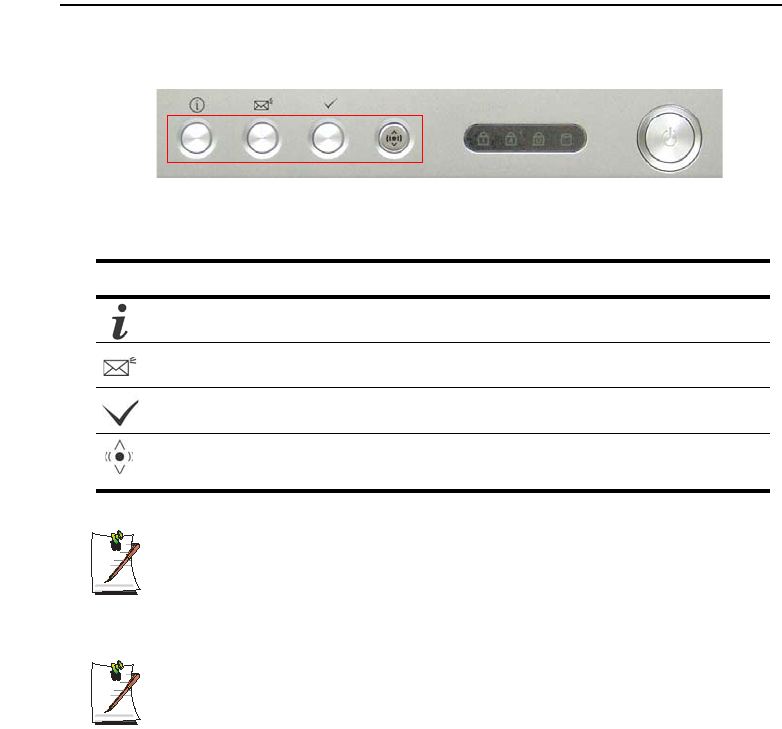
Front
Hot Keys (p14)
Status Indicators (p16)
Power Button
Touchpad (p11)
Touchpad Buttons
Scroll Wheel
Speaker
LCD Latch
Keyboard (p8)
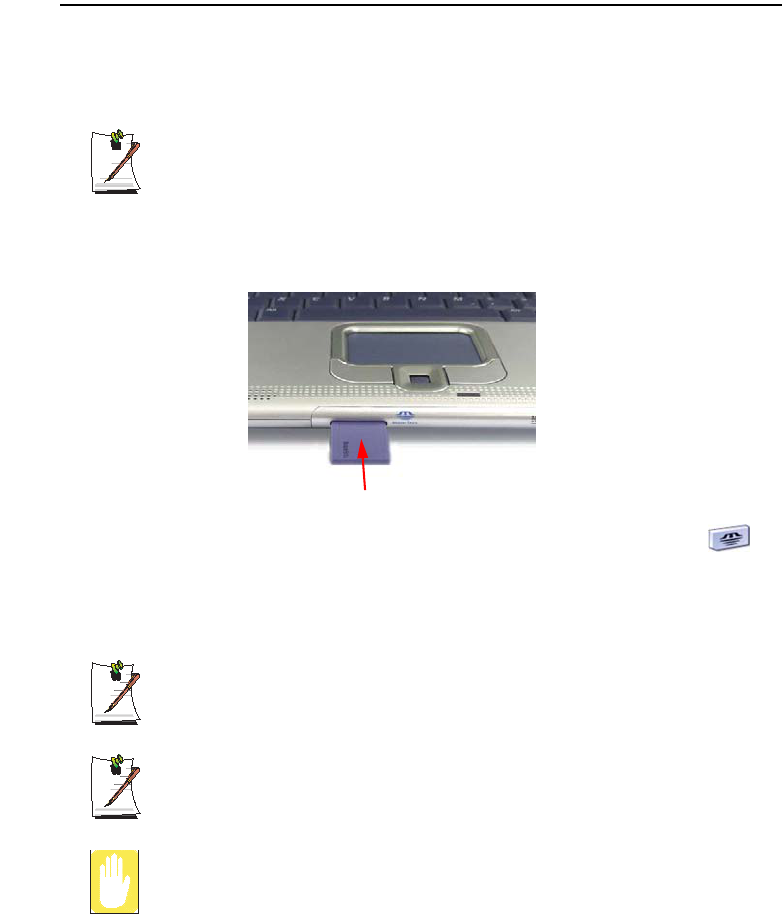
Memory Stick Slot (option, p30) Status Indicators (p16)
Speaker
4 Users Manual
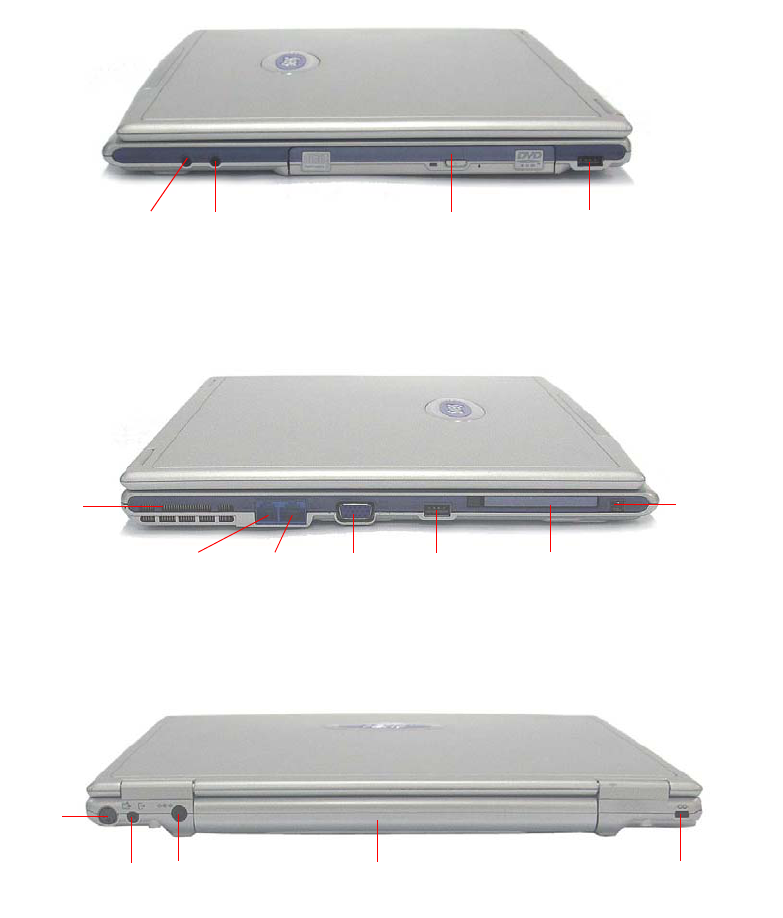
Right Side
Left Side
Back Side
Earphone Jack Microphone Jack CD Drive (option, p21) USB Port
Fan Vent
Modem Port
(p31)
LAN Port
(p32)
VGA Port USB Port PCMCIA Slot (p29)
1394 Port
TV-Out
Port
(S-VHS)
S/PDIF Jack
(p26)
DC Jack Battery (p66) Security Lock Port (p78)
Getting Started 5
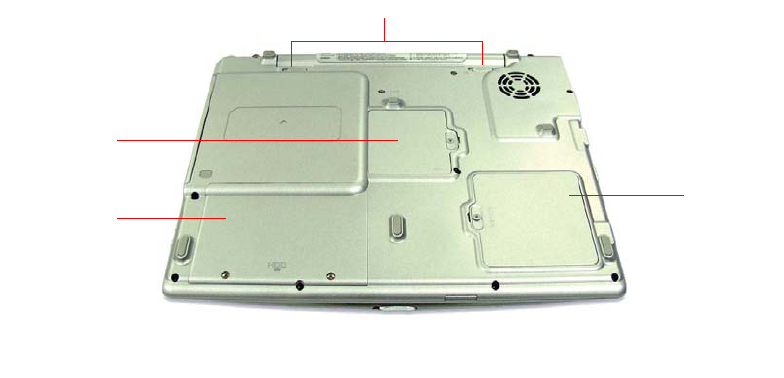
Bottom
Battery Latches
Memory
Compartment
(p73)
HDD
Compartment
(p72)
Mini-PCI
Compartment*
* Wireless communication module(option, p35) is installed in the mini PCI compartment.
6 Users Manual
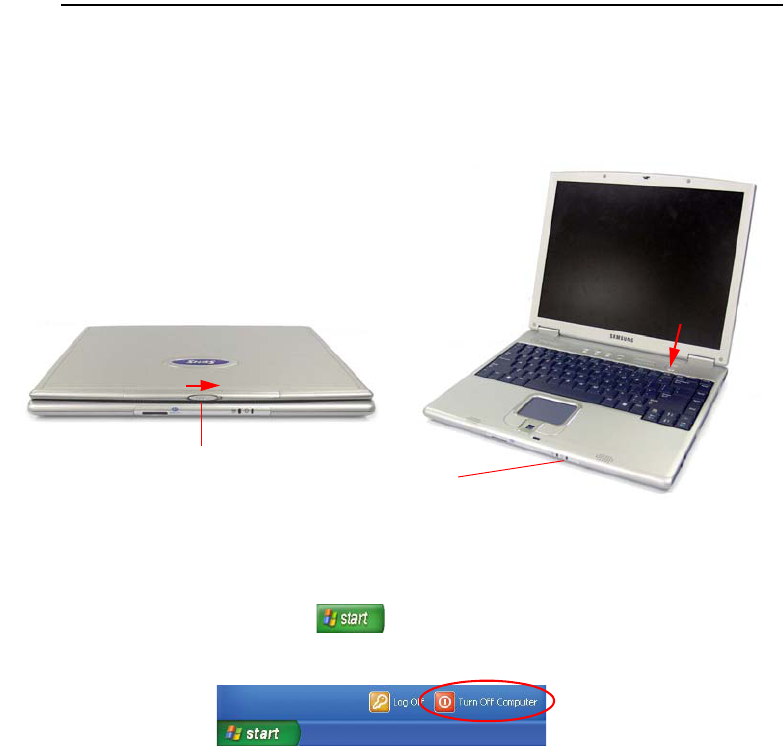
Turning the Computer On and Off
To turn on the computer
1. Insert the battery and connect the AC adapter according to the Installation Guide.
2. Slide the LCD latch to the right and open the LCD panel.
3. Press the power button.
To turn off the computer
1. Click the start button ( ) on the taskbar.
2. Click Turn Off Computer.
Power
Button
Power LED
LCD Cover Latch
Getting Started 7
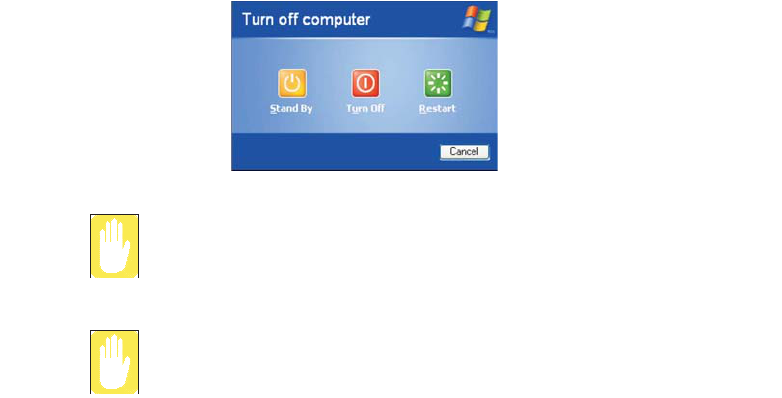
3. Click Turn Off.
If the computer is not turned off properly due to a system error, press
<Ctrl>+<Alt>+<Delete>. When [Windows Task Manager] dialogs appears,
click Shut Down > Turn Off to turn off the computer. Your unsaved work may
be damaged.
If <Ctrl>+<Alt>+<Delete> keys do not operate either, press the power button
for more than 4 seconds to turn off the computer. Your unsaved work may be
damaged. When you turn on the computer next time, it will perform a disk
checking process.
8 Users Manual
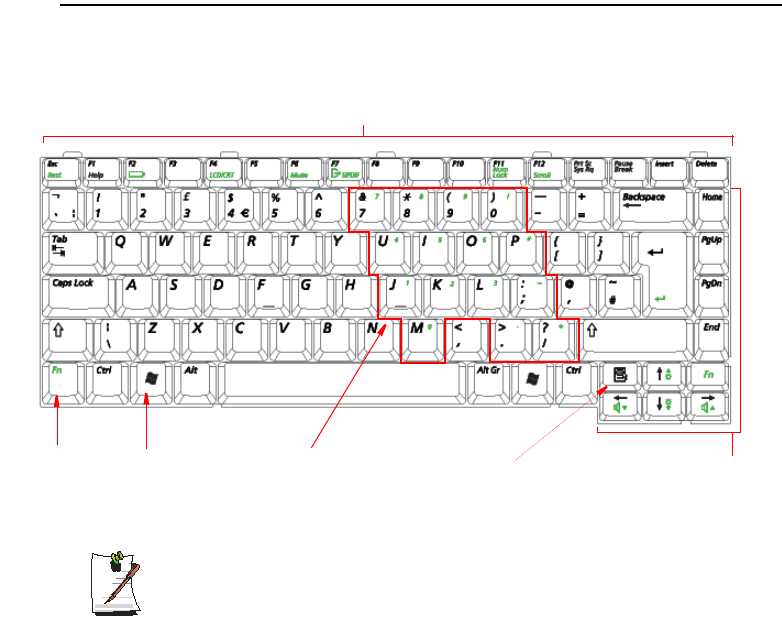
Using the Keyboard
Your computer has an 87/88-key keyboard. By pressing designated key combinations,
you can have access to all the key functions of a full-sized keyboard.
Although the layout of the keys on your computer’s keyboard is different from
that on a desktop computer’s keyboard, the keyboard feels like a full-sized
keyboard when you use it.
The keys on the keyboard can be grouped into the following categories:
xFull-sized Alphanumeric typewriter keys are arranged like a standard
typewriter keyboard and are used for text entry. The Windows keys on either
side of the spacebar open Windows menus and perform other special functions.
xFunction keys, when pressed together with the <Fn> key, enable special
functions.
xCursor and Screen control keys move the cursor. They may perform other
functions, depending on your software.
Function & Special Purpose Keys
Embedded Numeric Keypad
Application Key Cursor/Screen
Control Keys
Windows
Key
Function
Key
Getting Started 9
To clean the computer keyboard, use slightly damp cotton swabs. Scrub the keys and
the surface around the keys.
Do not allow liquid to drip into the keyboard or you may damage the keyboard.
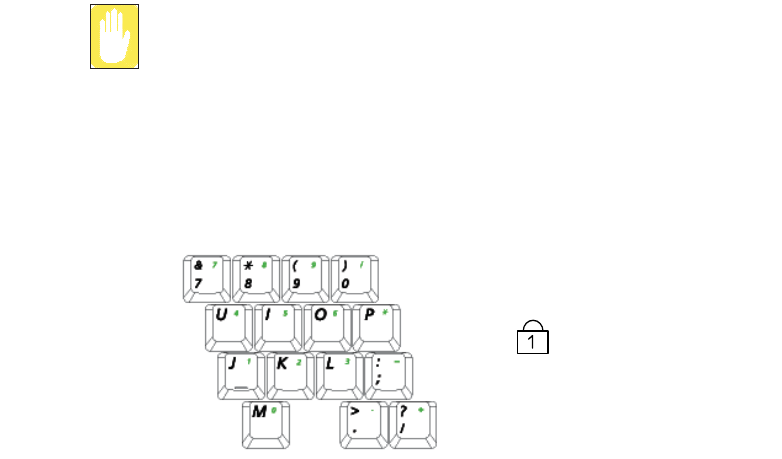
Using the Numeric Keypad
Your keyboard includes a numeric keypad, which is a group of keys that you can set to
type numbers and mathematical symbols, such as the plus sign. A number or symbol
on the left corner of each keypad key shows its numeric function.
Press <Fn+F11> to turn on the embedded numeric keypad. The numeric functions of
the keypad are enabled and the Num Lock LED turns on. (See ”Reading the Status
Indicators” on page 16 for the location of the Num Lock LED.)
While the numeric functions are enabled, you can temporarily return a key to its normal
function by pressing the key and the <Fn> key. For example to type the letter m, press
<Fn+M>, this operation displays the letter m.
To turn the numeric keypad off, press <Fn+F11> again. The Num Lock LED turns off.
Num Lock LED

10 Users Manual
Using Special Function Keys
The function key activates special functions when it is pressed in combination with
another keys. Table 2 shows the special key combinations.
Table 2. Description of Special Function Key Combinations
When you press a function key combination, the system sound may be
temporarily muted.
<Fn> Key
Combinations Key Name Key Function
<Fn+Esc> Esc
Rest
Rest Puts the computer into Suspend mode. To resume
normal operation from rest, press the power button.
<Fn+F2> F2
Gauge
Gauge Displays the battery gauge and the power source in
the upper-left corner of your screen. The gauge
closes in a few seconds.
<Fn+F4> F4
LCD/CRT
LCD/CRT Switches the display between the LCD, the external
display device, and simultaneous display on both the
LCD and the external display device.
<Fn+F6> F6
Mute
Mute Mutes the audio.
<Fn+F7> F7
S/PDIF
S/PDIF Toggles the S/PDIF function On/Off.
<Fn+F11> F11
Num Lock
Num Lock Activates the numeric keypad.
<Fn+F12> F12
Scroll
Scroll In some applications, sets the cursor-control keys to
scroll the page up or down while the cursor position
does not change. Pressing key combination again
turns off the scrolling function.
<Fn+Up Arrow> Up Arrow Brightness
Up
Increases the LCD brightness.
<Fn+Down Arrow> Down Arrow Brightness
Down
Decreases the LCD brightness.
<Fn+Right Arrow> Right Arrow Volume Up Increases the audio volume.
<Fn+Left Arrow> Left Arrow Volume
Down
Decreases the audio volume.
Getting Started 11
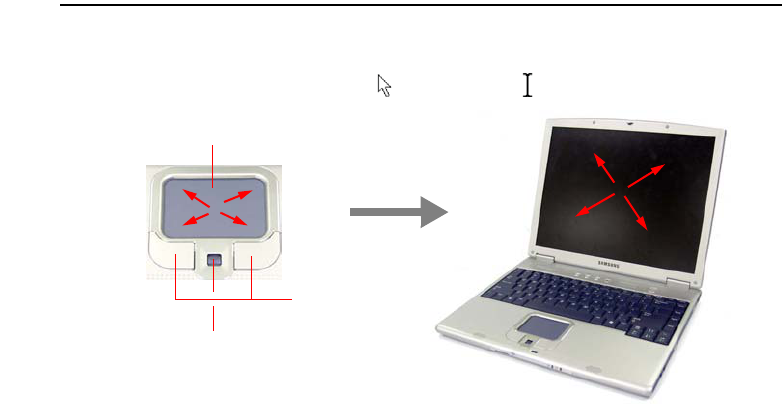
Using the Touchpad
On Windows, you always see a small graphical image on the screen that indicates the
location where you can take the next action. This image is called a pointer, and is
usually displayed in arrow shape ( ) or ‘I’ shape ( ).
The touchpad on your computer allows you to move the pointer on the LCD screen,
just like a mouse that is used with a desktop computer. The touchpad buttons allow you
to take actions with the pointer, such as selecting an item or executing a command. The
scroll wheel between the touchpad buttons moves the displayed area up and down
within a window.
Touchpad Buttons
Touchpad
Scroll Wheel or Fingerprint Sensor
12 Users Manual
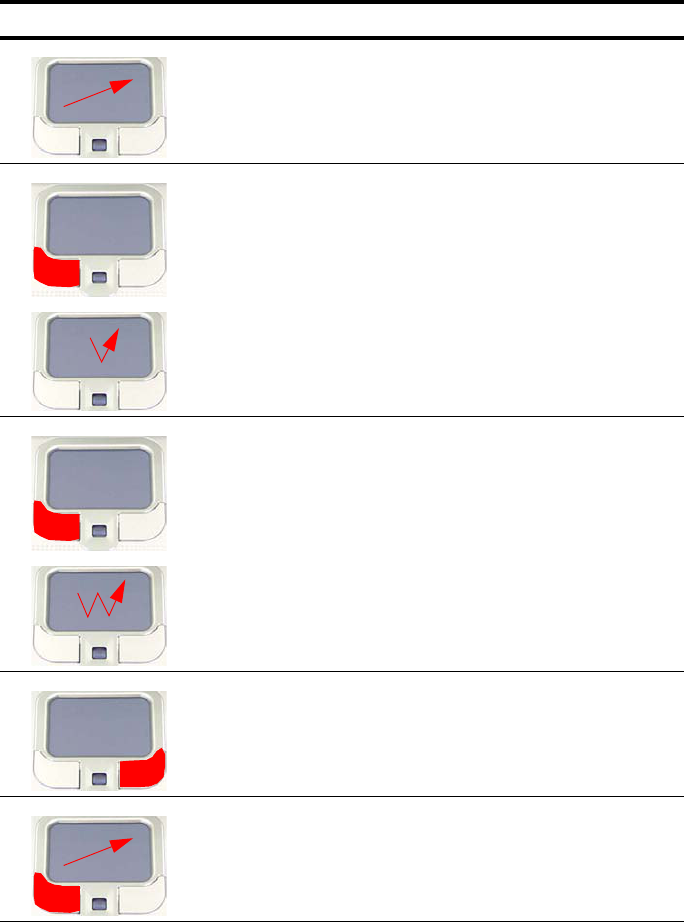
You can use various actions with your touchpad as described below.
d
Action Function Process
Move Move the pointer Place your finger on the touchpad
and slide your finger to a
destination.
Click Select an object, open a menu, or
execute a button
Place the pointer over an object,
then press left touchpad button
once.
Or, place the pointer over an
object, then tap the touchpad once
with your finger.
Double-Click Launch a program or open a file Place the pointer over an object,
then quickly press left touchpad
button twice.
Or, place the pointer over an
object, then quickly tap the
touchpad twice with your finger.
Right-Click Display a short cut menu Place the pointer over an object,
then press right touchpad button
once
Drag Move an object, or select an area
or multiple objects
Place the pointer over an object or
on a starting location.
While pressing the left touchpad
button, press down on the
touchpad and slide your finger to a
destination or ending location.
Getting Started 13
Make sure to use your finger to move the pointer with the touchpad. Do not
use any sharpened tool because it may damage your touchpad.
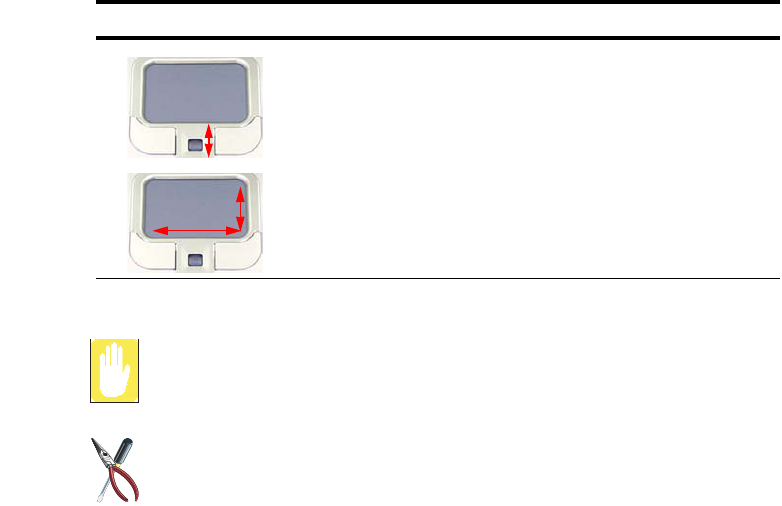
Scroll Wheel Use
If the scroll wheel does not function properly, install the scroll wheel driver
provided on the Software CD.
Scroll Display upper/lower/left/right part
of the content within a window
(Applicable to only some
programs)
Place your finger on the scroll
wheel, and roll the wheel up or
down.
Or, place your finger on the right
edge or bottom edge of the
touchpad and move vertically or
horizontally.
Action Function Process
14 Users Manual
Hot Keys
You may program the four keys to the left of the power button to start any program you
have installed on your computer.
The default settings for these keys are:
What is Bluetooth?
Bluetooth is a worldwide standard for the wireless exchange of data between
two devices.
Using Wireless LAN/Bluetooth Key
Loading or unloading wireless LAN/Bluetooth driver takes about 5 seconds.
Therefore, if you turn wireless LAN/Bluetooth on/off using the wireless LAN/
Bluetooth key, the button does not work in 5 seconds. (For wireless LAN/
Bluetooth installed models)
Icon Name Function
Internet Key Launches Internet Explorer.
E-Mail Key Launches Outlook Express.
User Key Executes user-defined action.
WLAN/Bluetooth
On/Off Key
Turns WLAN/bluetooth on and off.
(If you do not have WLAN/Bluetooth module installed, an additional
User Key is provided instead.)
Getting Started 15
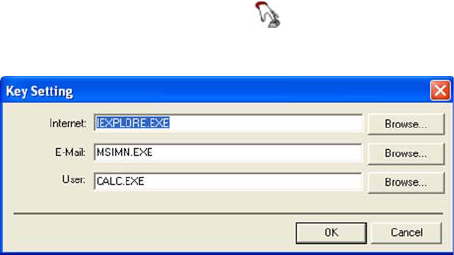
To reprogram a hot key
1. Double-click Sens Keyboard icon ( ) on the taskbar.
2. Select a key and click Browse to locate the program you wish to assign to the key.
3. Click on your program choice to select it. Click Open.
4. Click OK.
16 Users Manual
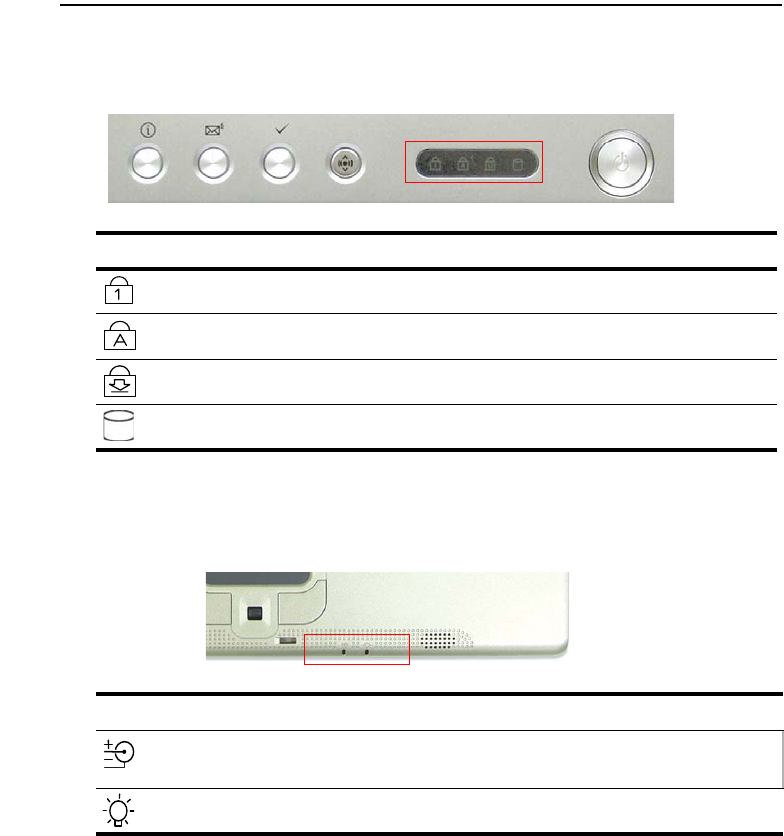
Reading the Status Indicators
System Status lights show the status of computer functions.
System Top
System Bottom
LED Name Function
Num Lock Changes a portion of the keyboard to a numeric keypad.
See ”Using the Numeric Keypad” on page 9.
Caps Lock Changes all alphabet letter input into capital letters.
No changes occur to numeric and special keys.
Scroll Lock Scroll lock in certain software.
HDD Access Blinking Green - HDD is being accessed.
LED Name Function
Battery Status Green - No battery pack installed/battery fully charged.
Amber - Charging.
Blinking - Bad Battery.
Power Green - System power on.
Blinking - Standby mode.
Introducing Windows 17
Introducing Windows
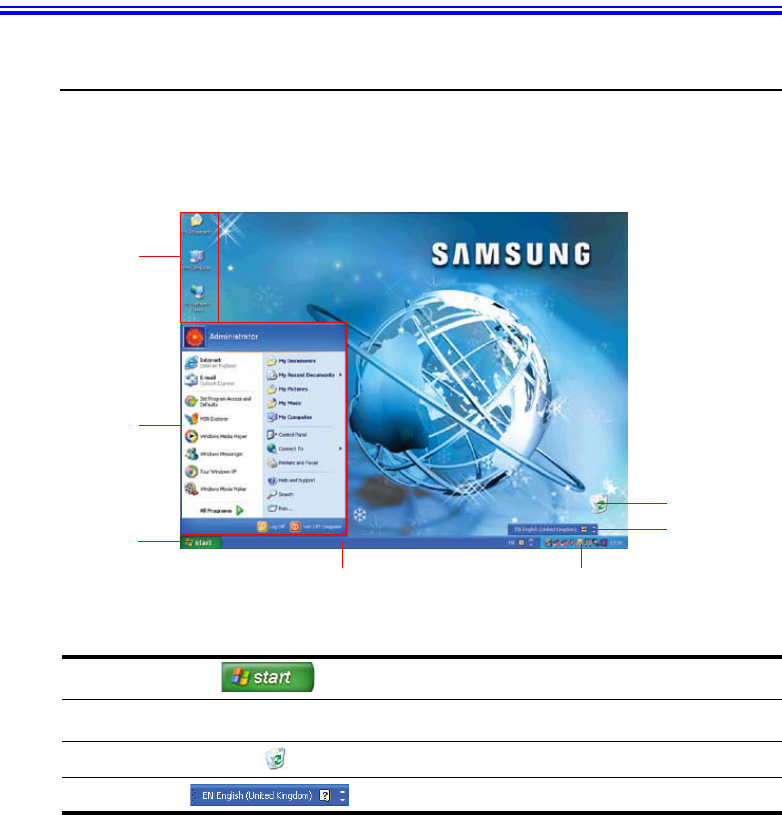
Understanding the Desktop
The desktop is the working area on the computer. It consists of the large workspace and
a taskbar at the bottom.
Start Button Opens the Start menu.
Taskbar Displays programs that are currently running. Frequently used
icons can be placed here.
Recycle Bin Deleted files or folders end up here.
Language Bar Switches text input language.
Start Button
Taskbar
Shortcut
Icons
Start Menu
Recycle Bin
Language Bar
System Tray withClock
18 Users Manual
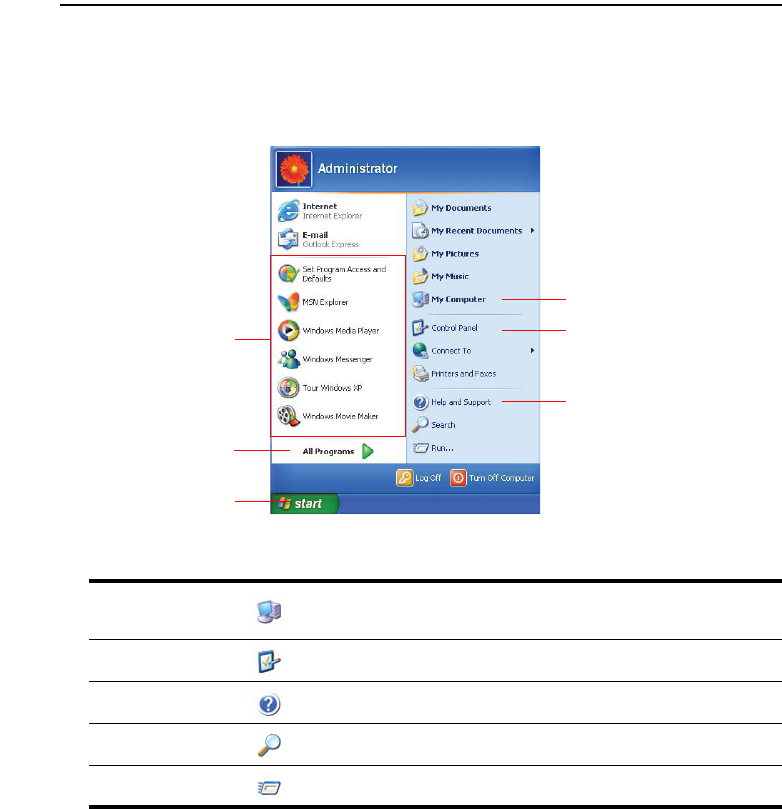
Understanding the Start Menu
The Start menu includes everything that is required to start Windows. From the Start
menu it is possible to run a program, open a file, assign system users with Control
Panel, receive support by clicking Help and Support, and search desired items from
computer of Internet by clicking Search.
My Computer Displays the contents of the hard disk, the CD-ROM drive, the network
drive, and floppy disks. It can also be used to search and open files and
folders.
Control Panel Enables users to configure settings on the computer.
Help and
Support
Provides on-line help, information on Windows and troubleshooting.
Search Enables users to search for information in files or the Internet.
Run Run programs or documents.
My Computer
Control Panel
Help and Support
Start Button
All Programs
Currently used programs
Introducing Windows 19
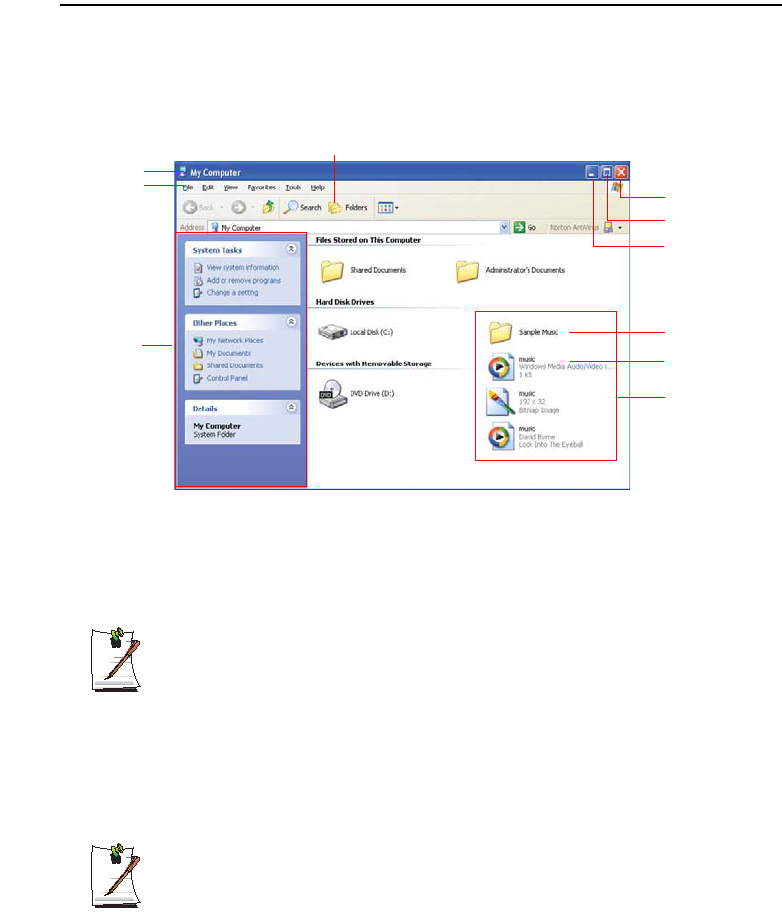
Understanding a Window
A window is the basic component in working with the computer. The My Computer
window, which is a window for the computer's hard drive, will be used as an example
here to show the basic composition of a window.
Click Start > My Computer.
Double-click the hard drive (local disk) to view internal folders and files stored in it. If
the contents do not appear, click Show the contents of this folder.
What is a drive?
A storage device in which files and folders are saved in, and read from.
What is a folder?
A folder is used to group and manage files systematically, and may include
files in sub-folders. It is similar to a bookshelf.
What is a file?
A file is a document or various kinds of material that is generated as a result
of program operation. It is also called data.
To view the entire structure of the drive
Click the Folder icon in the taskbar to view the entire structure. Click again to
return to the Quick Task Window.
Close Button
Maximize Button
Minimize Button
Folders
Double-click
Shared
Documents or
Local Disk.
You can see files
and folders.
Files
Title Bar
Menu Bar
Quick Task Window
Folder Icon

20 Users Manual
Help and Support Center
Help and Support Center provides references and troubleshooting information
regarding computer use.
Click Start > Help and Support.
Windows XP Tour
You can tour elementary functions provided by Windows XP.
Click Start > Tour Windows XP.
Or click Start > All Programs > Accessories > Tour Windows XP.
Click on the topics to find out about important functions of Windows XP.
Using The Computer 21
Using The Computer
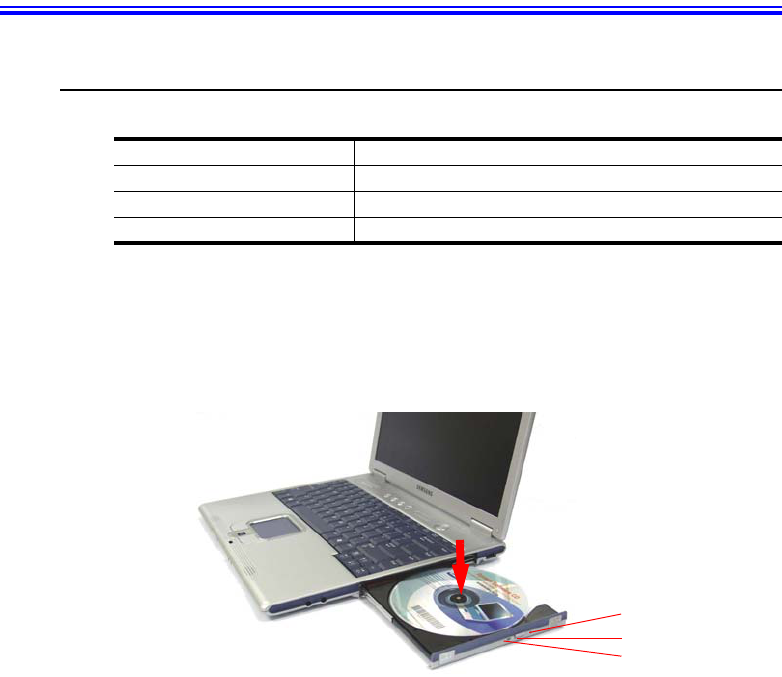
Using the CD Drive
You have one of following drives installed on your computer.
To insert a CD
1. Press the eject button on right side of the CD drive.
2. When the tray slides out, place a CD onto the tray with the label facing up, and
push the CD down until it clicks.
3. Push the tray in gently until it clicks.
To eject a CD
1. Stop any process that accesses the CD drive and ensure the CD access LED is
turned off.
2. Press the eject button on right side of the CD drive.
3. When the tray slides out, remove the CD from the tray.
4. Push the tray in gently until it clicks.
CD-ROM drive Reads a CD.
CD-RW drive Reads and writes a CD.
DVD-ROM drive Reads a CD/DVD.
CD-RW/DVD-ROM Combo drive Reads a CD/DVD and writes a CD.
Emergency Eject Hole
Eject Button
CD-ROM LED
22 Users Manual
If you remove the CD when the CD access LED is on, the disk and the data in
it may be damaged.
Emergency Eject Hole
To eject a CD when the CD drive is not working or the computer is turned off,
unfold a paper clip, and insert the unfolded end of the clip into the emergency
eject hole and press until the CD tray opens.
To clean a CD or DVD title
Clean the disc with a soft clean cloth by wiping from the center outwards.
To play a DVD
You have to install the DVD software provided on a separate CD to view a
DVD title.
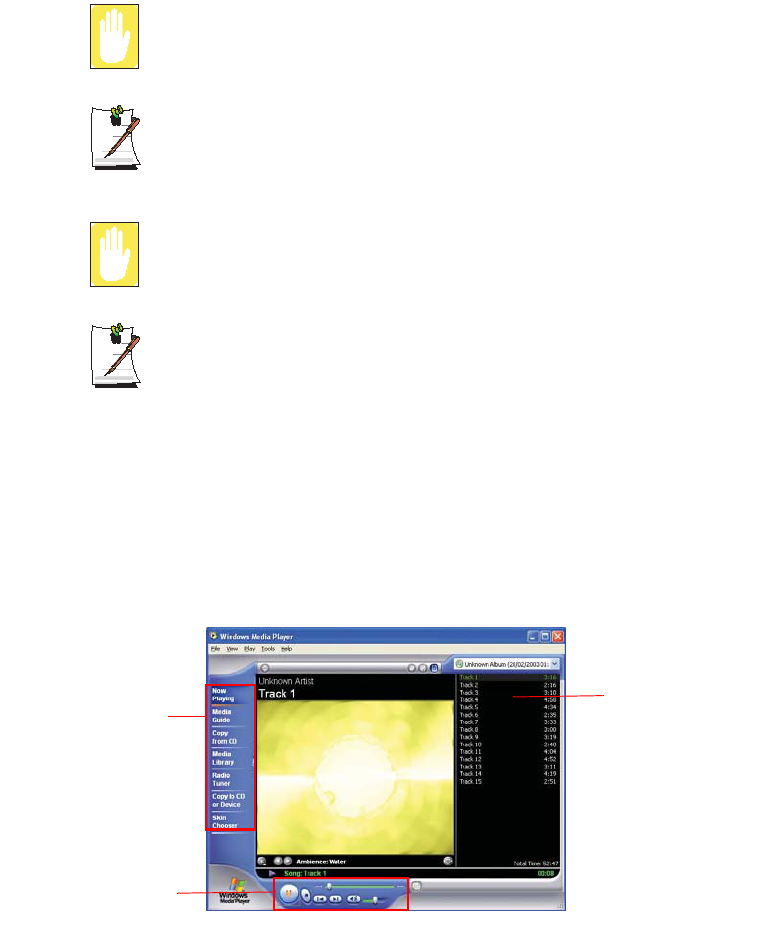
To use the Windows Media Player
The Windows Media Player allows you to play audio and video files from the computer
or the Internet.
To launch the Windows Media Player, click Start > All Programs > Accessories >
Entertainment > Windows Media Player.
Features
Playback Control Area
Playlist

Using The Computer 23
Windows Media Player tour
For more information about using the Windows Media Player, run the
Windows Media Player and click Help > Help Topics > Windows Media
Player tour.
To play a video CD
If a video CD does not run automatically, follow these steps.
1. Insert a video CD into the CD drive.
2. When the CD drive window appears, double-click the MPEGAV folder.
3. Double-click the .dat file.
4. When the [Caution] dialog appears, click Open With.
5. Select “Select the program from a list” and click OK.
6. Select the Windows Media Player, and click OK. The video starts playing.
Above procedure applies only to the video CDs that has a .dat file as the
execution file. Playing procedure may be different according to video CDs.
To control the volume
Using the keyboard:
Press <Fn>+<PgDn> or <Fn>+<PgUp> to adjust volume.
Using the volume control program:
Click the Volume icon ( ) on the taskbar, and adjust the slide bars.
Or, double-click the Volume icon ( ) on the taskbar, and adjust the settings in the
[Master Volume] dialog.
To display the Volume icon on the taskbar
Click Start > Control Panel > Sound, Speech, and Audio Devices >
Sounds and Audio Devices. On the Volume tab, select “Place volume icon
in the taskbar” check box and click OK.
24 Users Manual
To write data on a CD (Option)
If you have CD-RW drive or CD-RW/DVD ROM combo drive installed on your
computer, you can write data on a CD.
This function is provided in Windows XP only. Install the CD writer software
provided on a separate CD to write a CD in other operating systems.
You cannot write on a CD that already has data in it.
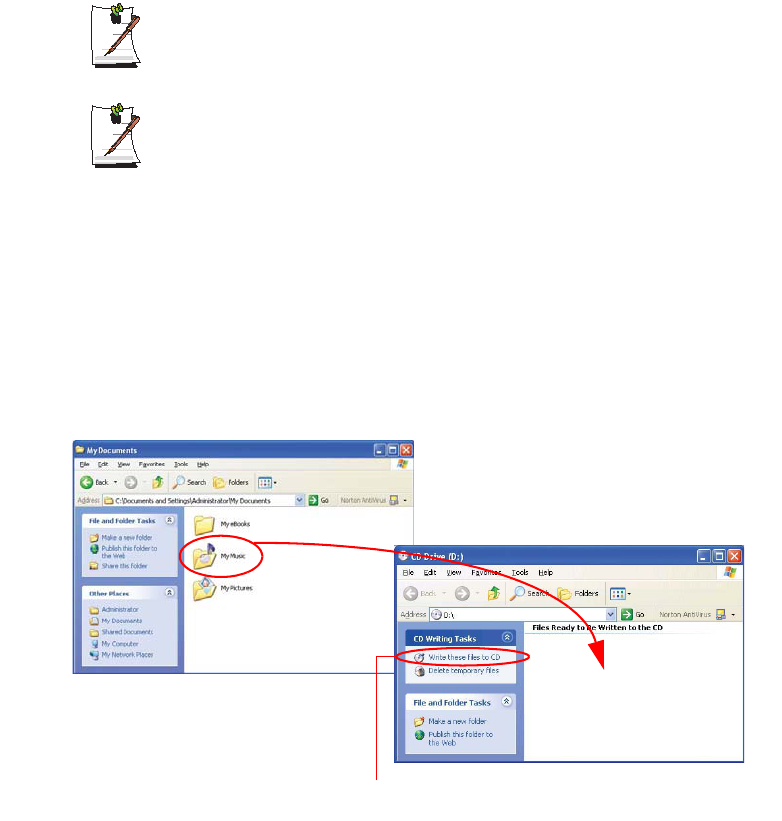
1. Insert a blank CD into the CD drive.
2. On the [CD Drive] dialog, select Open Writable CD Folder and click OK. The
CD drive window appears.
3. Click Start > My Computer.
4. In My Computer window, select files and folders to copy, then drag and drop them
onto the CD drive window.
My Computer window
5. Click Write these files to CD.
CD drive window
4. Drag and drop folders or
files to copy.

Using The Computer 25
5. Click Write these files to CD in the CD drive window.
6. When the CD Writing Wizard appears, enter the CD label, and click Next. The
data begins copying.
7. When copying is completed, a message ‘completed’ appears and the CD drive
window opens automatically.
For more information on writing CDs
Click Start > Help and Support. Type “CD copy” in the search field, and click
the Search icon ( ).
To create an audio CD
Run the Windows Media Player program, click the Help > Help Topics. Click
Using Windows Media Player > Using CDs > Creating your own CDs > To
create your own CD.

26 Users Manual
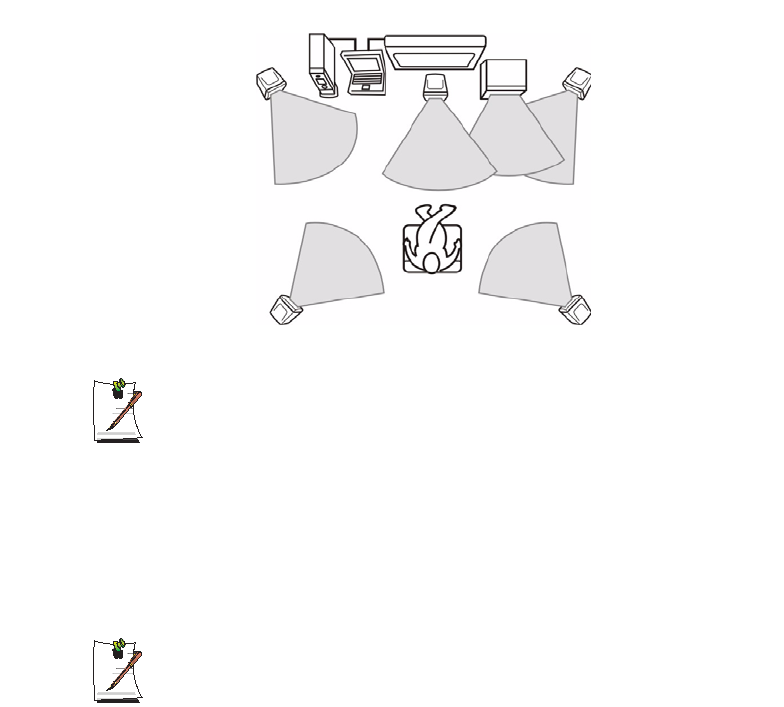
Enjoying Home Theater (S/PDIF Port)
Your computer supports 5.1 channel output, which is a basic function for home theater
systems, and DVD drives. It provides 3D surrounding sound and vivid screen.
What is a home theater system?
Home theater system usually consists of a TV, DVD, 5.1 channel speaker, and
digital amp and provides a high-resolution screen (MPEG2) and 3D
surrounding sound (Dolby 5.1 or DTS). With a home theater system, you can
enjoy a vivid screen and sound in your home as if you are in a movie theater.
Following devices is required to enjoy a home theater system.
x5.1 channel speakers including amplifier and connection cables (Purchased
separately)
xDVD drive and program
xTV output port on your computer
When purchasing a 5.1 channel speaker, make sure it supports S/PDIF
(optical) port.
You need a CD/DVD that supports 5.1 channel to enjoy the 5.1 channel
speaker system.
To use home theater system, complete the following procedures:
xStep 1. Connect digital amp and speakers to the computer.
xStep 2. Enable S/PDIF port on the computer.
xStep 3. Enable S/PDIF on the DVD program.
Using The Computer 27
Step 1. Connect digital amp, speakers, and TV to the computer
1. Connect a digital amp to the S/PDIF port of your computer.
2. Connect speakers to the digital amp.
To watch through a TV
Connect the TV and change the setting in the Display Properties to TV. See
“Using External Display Devices” on page 60.
Step 2. Enable S/PDIF port on the computer
Press <Fn>+<F7 / S/PDIF> to output the audio signal through the S/PDIF port. If you
press these keys again, the output sound signal is cancelled.
The S/PDIF setting also can be changed in the Sound and Audio Device
properties. (Click Start > Control Panel > Sounds, speech, and Audio
Devices > Sounds and Audio Devices.)
However, <Fn>+<F7/SPDIF> keys have priority.
Front Left Speaker
TV
Surround Left Speaker Surround Right Speaker
Center
Speaker
Front Right Speaker
Digital Amplifier
Computer
Sub
Woofer
28 Users Manual
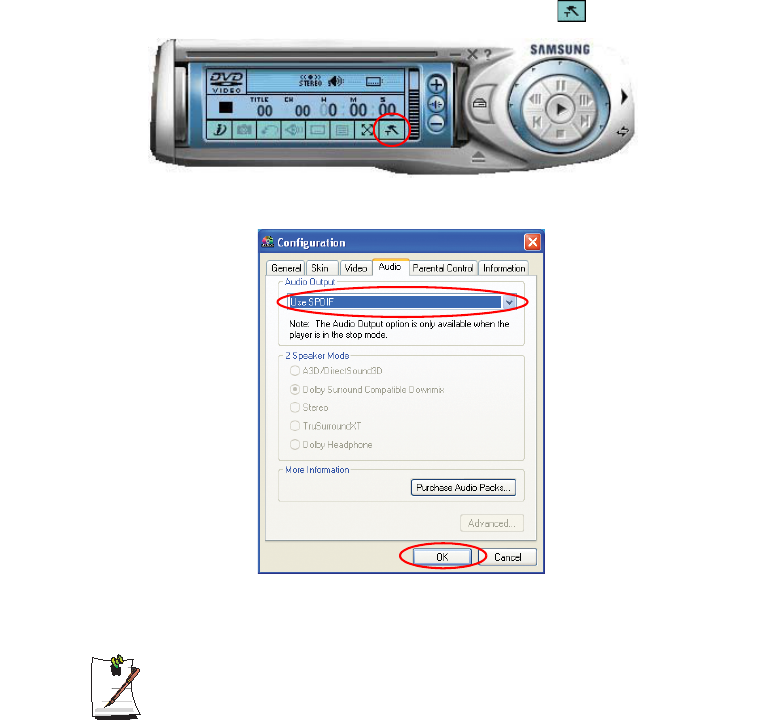
Step 3. Enable S/PDIF on the DVD program
To use 5.1 channel speakers, you need to install the Power DVD program from the
DVD Installation CD provided with your computer, then change the settings as
following procedure.
1. Run Power DVD program and click the Settings icon ( ).
2. On the Audio tab, set the Audio Output setting to “Use SPDIF” and click OK.
Now, you can enjoy home theater using DVD titles.
To control volume for your 5.1 channel speaker, use the control on the digital
amp. (Please refer to the speaker manual.)
Using The Computer 29
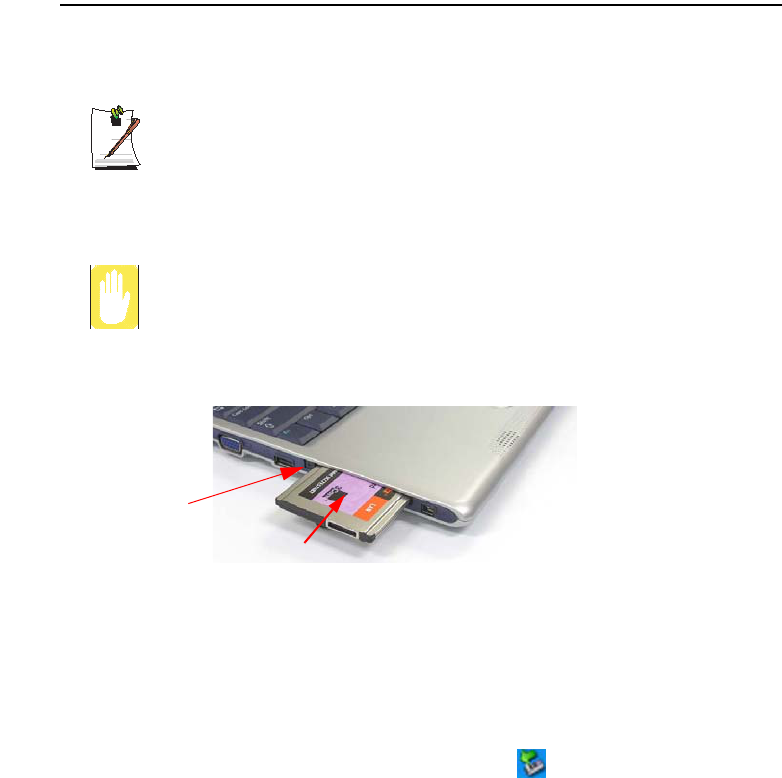
Using the PCMCIA Card Slot
Various different functions can be added by inserting PCMCIA cards into the system.
This system supports 16/32 bit, type I or II PCMCIA card types.
The PCMCIA card slot does not support a ZV card or a PCMCIA III card.
To insert a PCMCIA card
Before using the PCMCIA slot, remove the slot protector.
Push the eject button of the PCMCIA card slot once to pop it out. Push the
button again to eject the slot protector.
1. Insert a PCMCIA card into the PCMCIA card slot on the side of the computer.
2. Windows automatically installs the necessary driver for the card. If there is no
available driver found by Windows, you have to install the driver using a disk
supplied with the card.
To remove a PCMCIA card
1. Double-click Safely Removes Hardware icon ( ) on the taskbar.
2. On the [Safely Remove Hardware] dialog, select the appropriate PCMCIA card
and click Stop.
3. When [Stop a Hardware Device] dialog appears, click OK.
4. Click Close to close the [Safely Remove Hardware] dialog.
5. Push eject button of the PCMCIA card slot once, then the button pops out.
6. Push the button again to eject the PCMCIA card.
Eject Button
30 Users Manual
Using the Memory Stick Slot
In recent, Memory Stick is popular as a removable storage device like floppy diskette.
It is widely used for many digital products like digital camera, PDA, etc. Users can
easily install a memory stick to save and remove data in it.
Memory stick slot is optional when purchasing a computer. First decide the
necessary capacity of storage for actual usage and then purchase separately
the right amount of memory stick. Maximum 128MB is available until now, and
MagicGate model is not supported.
1. Slightly slide a memory stick into the slot.
2. Click Start > My Computer, and double-click the Memory Stick icon ( ) to
see the content.
3. To remove a memory stick, slightly push in the end of the memory stick. When the
memory stick is ejected, pull it out.
To format a memory stick
Right-click the memory stick drive, and click Format. On the [Format] dialog,
click Start.
To protect data in a memory stick
To prevent overwriting or deleting the data in the memory stick, move the slide
lock to the "Lock" position.
To remove a memory stick in Windows 2000
Remove a memory stick after at least 20 seconds after finishing a task, such
as formatting, copying or deleting.
Connecting to the Internet 31
Connecting to the Internet
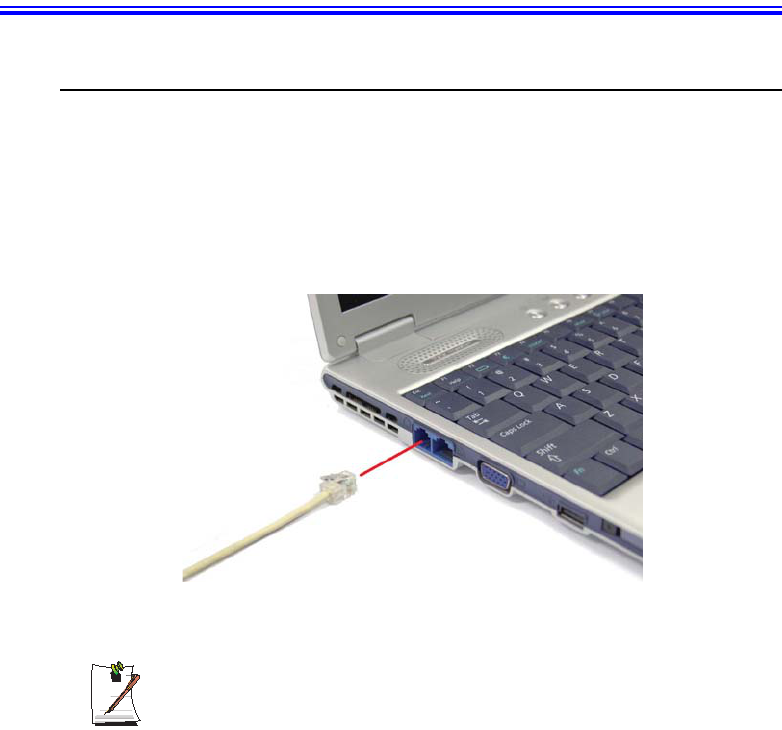
Connecting with a Modem
Before Start:
xPrepare a telephone line that is not digital.
xContact an internet service provider (ISP) for instructions on how to connect to
and disconnect from the Internet, and fees.
1. Connect a telephone line to the computer’s modem port.
2. Connect to the Internet according to the instructions provided by your ISP.
If the Internet connection is not disconnected properly, additional telephone
charges may be imposed.
32 Users Manual
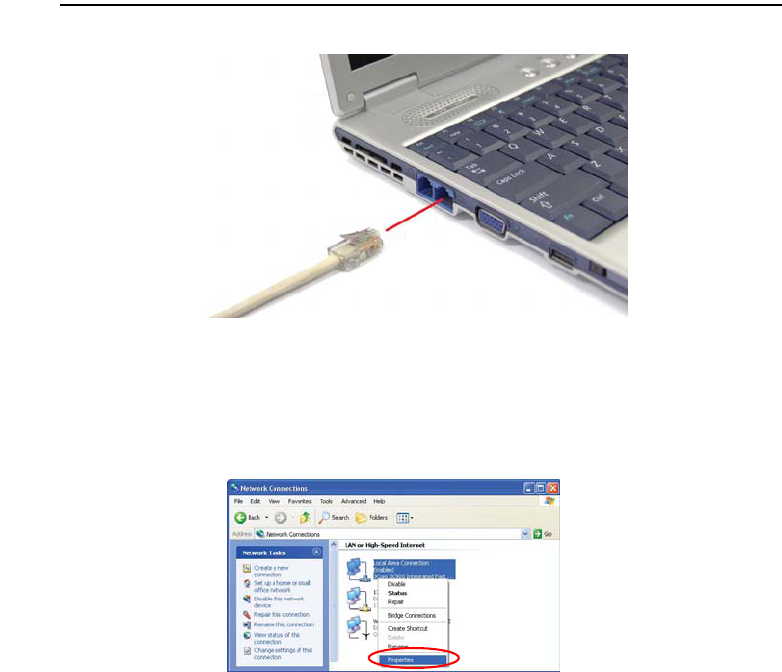
Connecting Through a Wired LAN
1. Connect a LAN cable to the computer’s LAN port.
2. Click Start > Control Panel.
3. Click Network and Internet Connections in the [Control Panel] window.
4. Click Network Connections in the [Network and Internet Connections] window.
5. Right-click the Local Area Connection icon and click Properties.
Connecting to the Internet 33
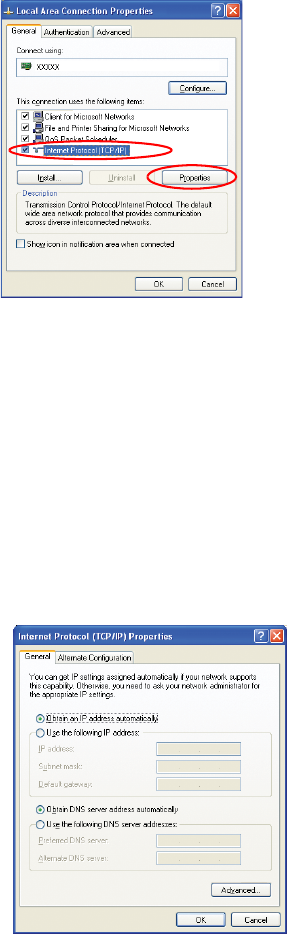
6. On the General tab, select “Internet Protocol(TCP/IP)” and click Properties.
7. To use DHCP:
On the General tab, select “Obtain an IP address automatically” and “Obtain DNS
server address automatically”. Click OK.
To use a static IP:
On the General tab, select “Use the following IP address” and fill in the IP
address, Subnet mask, Default gateway, Preferred DNS server, and Alternative
DNS server fields. Click OK.
To use both DHCP and static IP simultaneously:
On the Alternate Configuration tab, click User configured and fill in the fields.
Click OK.
34 Users Manual
Wake On LAN Function
<Wake On LAN> is a function that activates the system in rest mode when a signal
(such as ping or magic packet commands) arrives from network(wired LAN).
To use <Wake On LAN> function:
1. Click Start > My Computer > My Network Places > View network
connections.
2. Click the right button on the touchpad over Local Area Connection, and select
Properties.
3. Click Configure, and select Power Management tab. Select 'Allow this device to
bring the computer out of standby', then click OK. Restart the system.
If the system in rest mode is activated when there is no received signal, use the system
after disabling <Wake On LAN> function.
Connecting wired LAN while using wireless LAN may not execute <Wake On LAN>
function. Configure wireless LAN to 'Disable' to use <Wake On LAN> function.

Connecting to the Internet 35
Connecting Through a Wireless LAN (Option)
A wireless network (Wireless LAN) environment is a network environment that
enables communication between multiple computers at home or a small-size office
through wireless LAN devices.
Using the wireless network connections between the systems, you can use normal
network functions such as sharing of files, folders and printers. Using computer-to-
computer network (ad hoc) connections, you can access the Internet through a
computer connected directly to the Internet even if your computer is not directly
connected to the Internet. For details, see “Using Network Services” on page 46.
The information provided in this section only applies to models equipped with
an optional wireless LAN device.
Wireless network connections can be classified into two categories.
1) Access Point
You can connect to an AP to use the network. This is possible only in an environment
equipped with an AP. For details, see “Connecting to an Access Point (AP)” on page
36.
What is an Access Point (AP)?
An AP is a network device that bridges wired and wireless LANs, and
corresponds to a wireless hub in a wired network. You can connect multiple
wireless LAN installed computers to an AP.
2) Computer-to-computer (ad hoc)
This is also called a peer-to-peer or ad hoc network.
In computer-to-computer wireless networks, you can wirelessly connect 2 or more
computers that have wireless LAN modules. Using computer-to-computer wireless
networks, you can access the Internet through a computer that is connected to the
Internet even if your computer is not directly connected to the Internet. For details, see
“Connecting to computer-to-computer networks (peer-to-peer or ad hoc)” on page 37.
36 Users Manual
Connecting to an Access Point (AP)
This section describes how to connect to an AP. You can use the network when you are
connected to an AP.
In this section, the configuration procedures are described for Windows XP
installed computers. For information on the configuration procedures for other
operating systems, see “Using Wireless Networks in Other Operating
Systems” on page 42. Please ask your network administrator about detailed
configuration information such as the network key (encryption key).
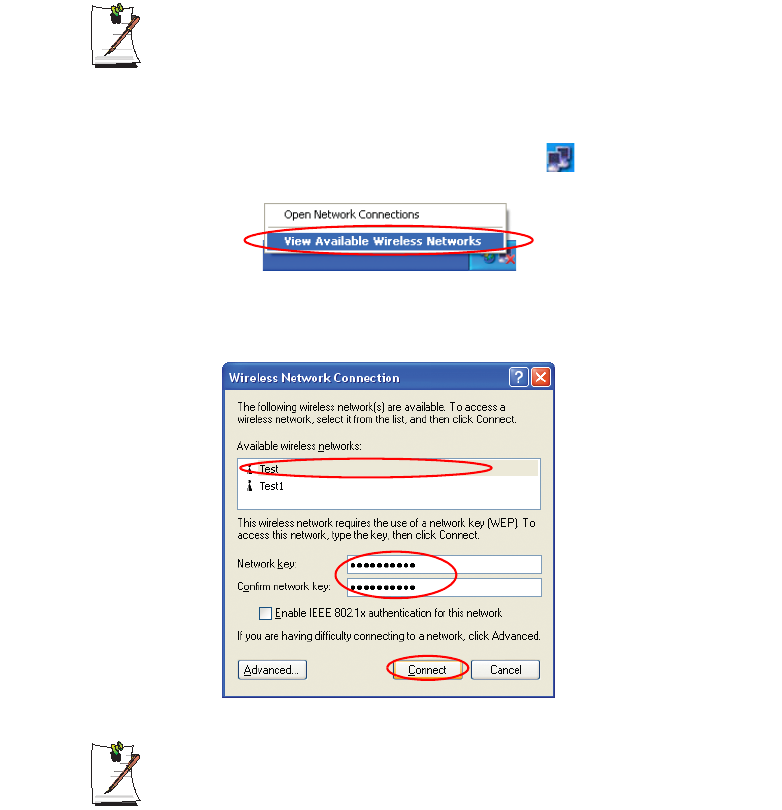
1. Right-click on the Wireless Network Connection ( ) icon on the taskbar, and
select View Available Wireless Networks.
2. Select your desired AP (e.g. Test) to connect, and enter the encryption key for the
AP in the Network key field, and click Connect.
If the network key is not configured for the desired AP, select 'Allow me to
connect to the selected wireless network, even though it is not secure’.
Now you are connected to the AP, and you can access the network.
Connecting to the Internet 37
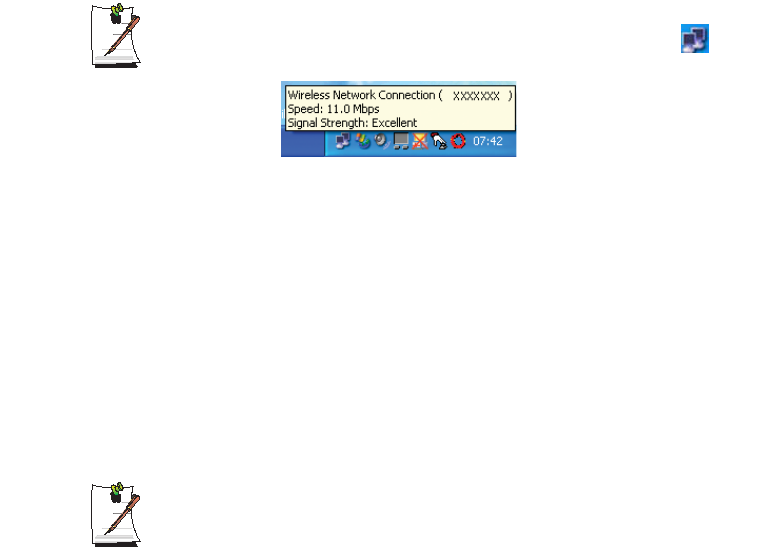
Checking the connection status
Move the mouse pointer over the Wireless Network Connection ( ) icon on
the taskbar, and the connection status is displayed.
Connecting to computer-to-computer networks (peer-to-peer or
ad hoc)
In computer-to-computer wireless networks, you can wirelessly connect 2 or more
computers that have wireless LAN modules.
You can connect by completing the following steps:
xStep 1. Set up a computer-to-computer network on a computer.
xStep 2. Connect to the configured computer from other computers.
In this section, the configuration procedures are described for Windows XP
installed computers. For information on the configuration procedures for other
operating systems, see “Using Wireless Networks in Other Operating
Systems” on page 42.
38 Users Manual
Step 1. Setting up a computer-to-computer network
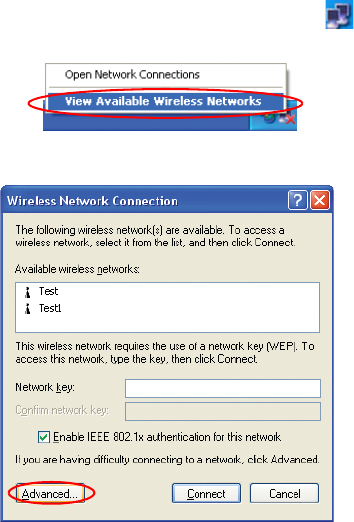
1. Right-click on the Wireless Network Connection ( ) icon on the taskbar, and
select View Available Wireless Networks.
2. Click Advanced.
3. On the Wireless Network tab, click Advanced.
4. Clear 'Automatically connect to non-default network' check box, if it is selected.
Select 'Computer-to-computer (ad hoc) networks only', and click Close.
5. In the Wireless Networks tab, click Add.
Connecting to the Internet 39
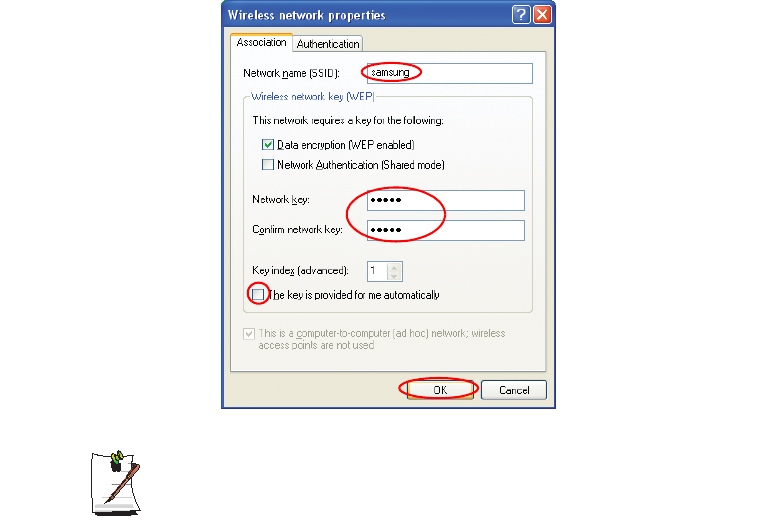
6. Enter the network name (e.g. samsung), and unselect 'The key is provided for me
automatically'. Enter the encryption key in the Network key field, and click OK.
To prevent a network connection from an unauthorized user, it would be better
to configure a network key (encryption key). A network key consists of 5 or 13
alphanumeric characters (e.g. magic), or of 10 or 26 hexadecimal numbers (a
hexadecimal number is represented by numbers '0' to '9' or letters 'a' to 'f').
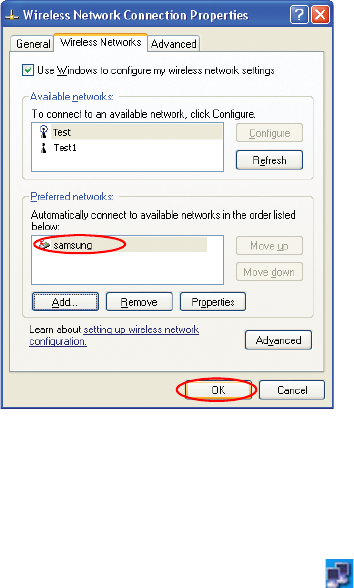
40 Users Manual
7. Check that the configured network name (e.g. samsung) is in the ’Preferred
networks’ item, and click OK.
Now your wireless network setup has been completed.
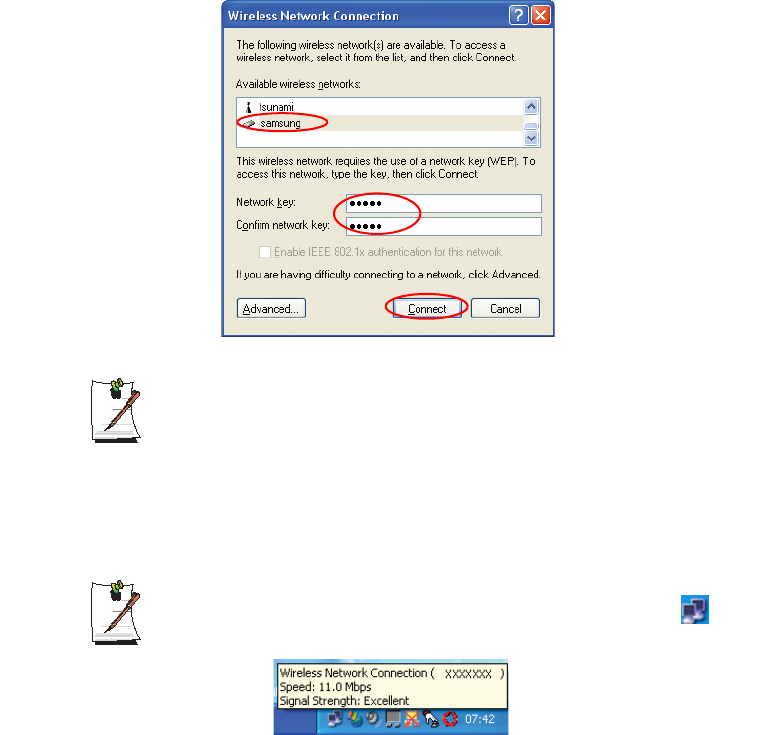
Step 2. Connecting to the configured computer
1. Right-click on the Wireless Network Connection ( ) icon on the taskbar, and
select View Available Wireless Networks.
2. Select the wireless network name (e.g. samsung) specified in ”Connecting to
computer-to-computer networks (peer-to-peer or ad hoc)” on page 37, enter the
encryption key in the Network key field, and then click Connect.
Connecting to the Internet 41
If the network key is not configured in ”Connecting to computer-to-computer
networks (peer-to-peer or ad hoc)” on page 37, select 'Allow me to connect to
the selected wireless network, even though it is not secure'.
The two computers are connected and are able to communicate with each other. When
the computers are connected, the 'Wireless Network Connection' message is displayed
for a short time over the Wireless Network Connection icon of the two computers.
Checking the connection status
Move the mouse pointer over the Wireless Network Connection ( ) icon on
the taskbar, and the connection status is displayed.

42 Users Manual
Using Wireless Networks in Other Operating Systems
In a operating system other than Windows XP, you have to install additional wireless
LAN configuration program, and configure wireless network settings.
To use wireless network connection, complete the following procedures.
xStep1. Install the wireless LAN configuration program (PROSet).
xStep2. Configure wireless network settings through the wireless LAN
configuration program.
Step 1. Installing the wireless LAN configuration program (PROSet)
You can install the wireless LAN client administrator program following the
instruction displayed automatically when you insert the system software CD. Insert the
system software CD into the CD-ROM drive, and install the wireless LAN
configuration program.
To not display 'Intel Configuration Service' window afterward
After installing the wireless LAN configuration program, select "Do not show
this again." check box, then click Close.
Step 2. Using the wireless LAN configuration program (PROSet)
Double-click the wireless LAN program ( ) icon on the taskbar.
(Or, click Start > All Programs > Intel Network Adapters > Intel(R) PROSet.)
In some languages, some buttons on the window may not be displayed.
Resize the window to use the program.
Configure wireless network settings in PROSet following the procedures below.

Connecting to the Internet 43
To connect to an Access Point:
To connect to an access point or existing computer-to-computer (Ad Hoc) network,
refer to the following procedures. (To create a new computer-to-computer network,
refer to the following To create computer-to-computer (Ad Hoc) network section.)
1. Click Scan in the Networks tab.
2. Select the name of desired access point or computer-to-computer network to
connect from the searched available networks list, and click Connect.
If your desired network does not appear, click Refresh.
An access point is represented by ( ) icon, and a computer-to-computer
network is represented by ( ) icon. An ( ) icon is displayed in front of an
access point or a computer-to-computer network with configured security
settings.
3. Select "Yes, create a profile for this Network.", and click OK.
4. Enter Profile Name and click Next.
5. Enter the network authentication,data encryption (WEP),key index, and
password configured for the target access point or computer-to-computer network
in the Security Settings window, and click Finish.
The network authentication, data encryption (WEP), key index, and password
of a access point are configured in the access point management program.
For the information on the security information, check the security settings of
the access point or ask your wireless network administrator.
To connect to an existing computer-to-computer (Ad Hoc) network, enter the
password configured when creating the computer-to-computer network for the
first time. You do not need to enter network authentication and key index.
Security Settings
-Network authentication: Network authentication has two options of Open
System and Shared Key. If you select Open, no authentication procedure is
used. If you select Shared, WEP key is used as authentication procedure.
Default option setting is Open.

44 Users Manual
-Data encryption (WEP): IEEE 802.11 WEP (Wired Equivalent Privacy)
standard has two security levels of 64-bit key (40-bit key for some cases) and
128-bit key.
-Key index: Select the current encryption key index used by the access point
out of 1 to 4.
-To use pass phrase: Click Use pass phrase to activate, and enter 5 (for 64-
bit) or 13 (for 128-bit) alphanumeric characters (represented by 0-9, a-z, or A-
Z).
-To use WEP key: Click Use WEP keys to activate, and enter a hexadecimal
number (represented by 0-9 and A-F) of 10 (for 64-bit) or 26 (for 128-bit) digits
in the WEP key field.
When a wireless connection to an access point is established, connection icon
( ) appears in front of the name of connected profile.
To create a computer-to-computer (Ad Hoc) network:
To create a new computer-to-computer (Ad Hoc) network or to connect to a hidden
access point (Stealth/Closed Mode), refer to the following procedures.
A hidden access point is an access point that exists, but is configured not to
be detected by the scan operation to prevent access attempts from
unauthorized users.
1. Click Add in the Networks tab.
2. Enter Profile Name and Network name (SSID), select Operating Mode, then
click Next.
What is a network name (SSID)?
Network name (SSID) is a name that a wireless adapter uses for identifying
connection. Enter the name of computer-to-computer network to create (e.g.,
P2P) or the name of access point to connect. The network name identifies
cases. (capital and lowercase) For the name of access point, check the
settings of the access point, or ask your wireless network administrator.
Operating Mode:
Infrastructure - Connect to an Access Point - Select to connect to an
access point.
Ad hoc - Connect directly to other computers - Select to create a
computer-to-computer (Ad Hoc) network.

Connecting to the Internet 45
3. Configure password setting to be used for computer-to-computer network
connection in the Security Settings window.
To connect to an access point, enter the network authentication,data encryption
(WEP),key index, and password configured in the access point.
It is recommended to configure data encryption for security purposes when
creating a computer-to-computer network connection profile. For more
information on security settings refer to the security settings in Connecting to
AP or Help.
When you are creating a computer-to-computer network connection profile,
the network authentication setting is disabled.
4. When a profile creation is completed, the new created profile appears in the
profiles list in the Networks tab. Select corresponding profile, and click Connect
to connect to the created profile.
When a wireless connection to the created profile is established, connection icon
( ) appears in front of the name of connected profile.

46 Users Manual
Using Network Services
While the computer is connected to the network, you can use network services to share
files, folders, and printers. Using computer-to-computer wireless networks, you can
access the Internet through a computer that is connected to the Internet even if your
computer is not directly connected to the Internet.
Network services are provided for the computers that are connected to the
network through wired or wireless network connections. For details, see
“Connecting Through a Wired LAN” on page 32 and see “Connecting Through
a Wireless LAN (Option)” on page 35.
Sharing files or folders
This section describes how to share files and folders between computers connected to
the network.
To share files, complete the following procedures:
xStep 1. Configuring the sharing of files and folders on a computer.
xStep 2. Accessing shared files and folders from another computer.
When a file or folder is shared, anyone connected to the network can open and
delete the shared file or folder.
Configure a file sharing network only when the network is secure, and do not
share important data.
Connecting to the Internet 47
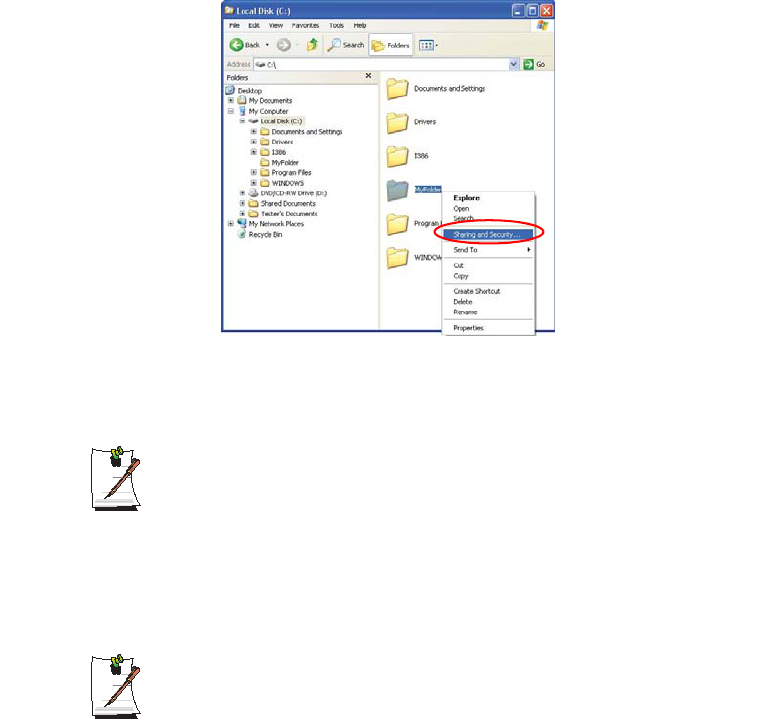
Step 1. Configuring Sharing
1. Right-click the target file or folder to share in My Computer, and select Sharing
and Security.
2. Click 'IF you understand the security risks but want to share files without running
the wizard, click here'.
It has the same security effect as that of the 'Network Setup Wizard'.
This screen does not appear if Internet Sharing Network Wizard has been
installed in the computer-to-computer wireless network environment.
3. Select 'Just enable file sharing', and click OK.
4. In the 'Network sharing and security' field, select 'Share this folder on the network',
enter the share name, and click OK.
Be cautious when selecting 'Allow network users to change my files' since
other network users can change the files in the shared folder.
The file and folder sharing configuration has been completed.
48 Users Manual
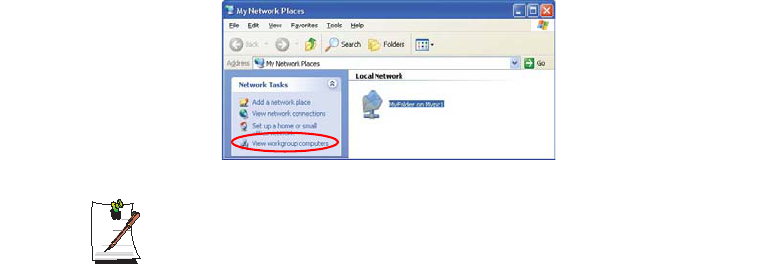
Step 2. Using Shared Files or Folders
This section describes how to access shared files or folders if your computer is a
member of the same workgroup.
1. Click Start > My Computer. Under Other Places, click My Network Places in
your computer.
2. Click 'View workgroup computers', and click the desired computer to access the
shared file.
If your computer is a member of another workgroup:
1. Click Other Places > Microsoft Windows Network.
2. Click the desired workgroup.
3. Click the desired computer to display the shared files or folders.
Sharing Printers
This section describes how to share a printer between computers connected to a
network.
To share a printer, complete the following procedures:
xStep 1. Configure printer sharing in the computer connected to the printer.
xStep 2. Add and use the shared printer in other computers on the network.
Connecting to the Internet 49
Step 1. Configuring Printer Sharing
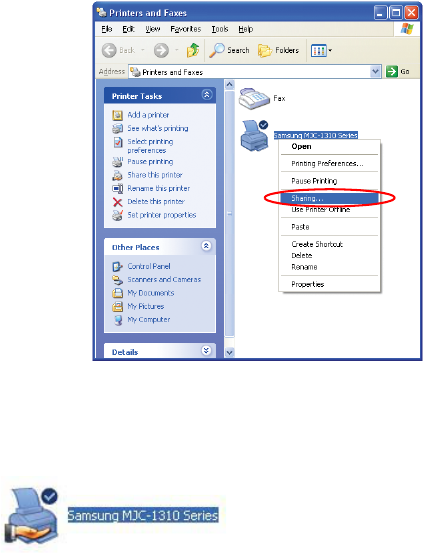
1. From the computer connected to the printer, click Start > Printers and Faxes.
2. Right-click the printer you want to share, and click Sharing.
3. Select 'Share this printer', enter a share name for the shared printer, and click OK.
4. In the Printers and Faxes window, you will find the printer icon has been changed
to another icon on a hand.
Step 2. Adding and Using a Shared Printer.
1. From a different computer that wants to use the shared printer, click Start >
Printers and Faxes.
2. Click Add a printer.
3. In the Add Printer Wizard, click Next.
4. Select 'A network printer, or a printer attached to another computer', and click
Next.
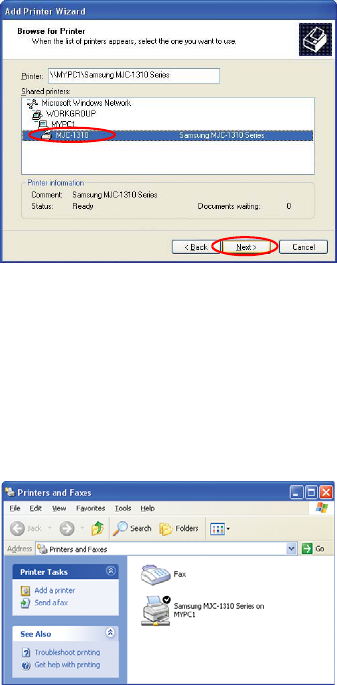
50 Users Manual
5. Select 'Browse for a printer', and click Next.
6. Select the workgroup or computer, select the desired printer, and click Next.
If you cannot find the desired printer, try again after a while.
7. Read the warning about a shared printer, and click Yes to install the shared printer.
8. Select Yes for 'Do you want to use this printer as a default printer?', and click Next.
9. Click Finish.
10. When the printer sharing configuration has been completed, the shared printer
appears in the Printers and Faxes window.
Now you can print using the shared printer even if your computer is not directly
connected to a printer.

Connecting to the Internet 51
Sharing an Internet Connection
Using computer-to-computer (peer-to-peer) network connections, you can access the
Internet through a computer connected to the Internet even if your computer is not
directly connected to the Internet.
To share an Internet connection, the computers should be connected to a
computer-to-computer (peer-to-peer) wireless network. For details, see
“Connecting to computer-to-computer networks (peer-to-peer or ad hoc)” on
page 37.
Also, one of the computers has to be connected to the Internet (external
network).
The configuration procedure to share an Internet connection are described for
Windows XP installed computers.
To share an Internet connection, complete the following procedures:
xStep 1. Configuring a Internet connection sharing from the computer connected
to the Internet.
xStep 2. After completing the shared Internet connection configuration, check
that the other computers can access the Internet through the shared Internet
connection.
Step 1. Configuring Internet Sharing.
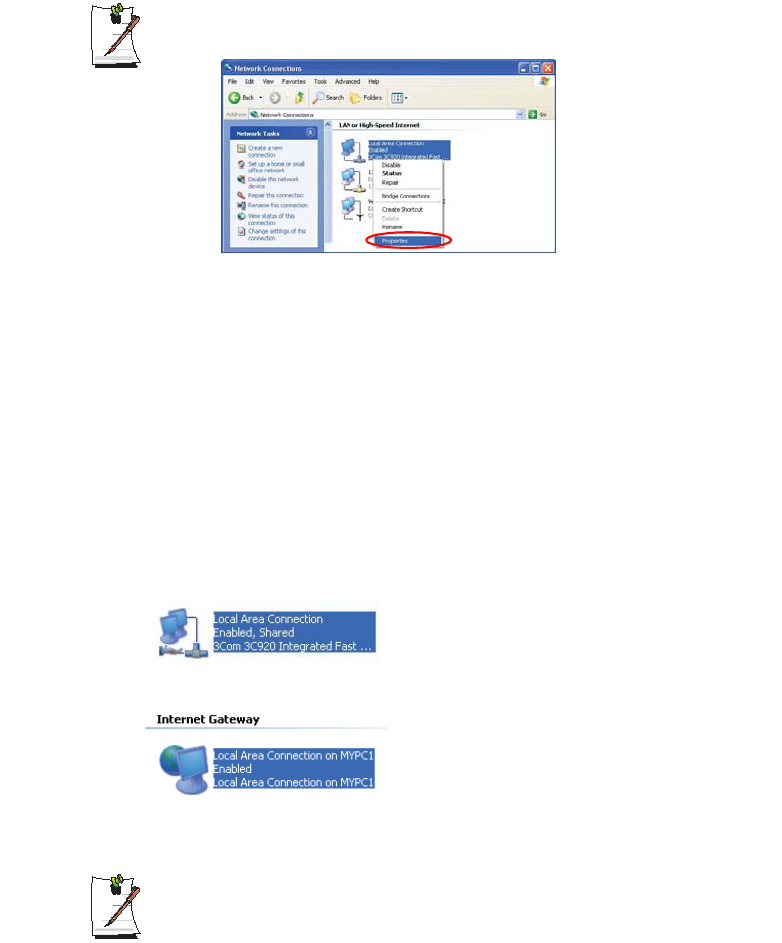
Configuring a shared Internet connection on the computer connected to the Internet.
1. Click Start > Control Panel > Network and Internet Connections > Network
Connections.
2. Right-click on the device connected to the Internet, the external network, and
select Properties.
52 Users Manual
If the computer is connected to the Internet through a wired LAN, select 'Local
Area Connection'.
3. On the Advanced tab, select 'Allow other network users to connect through this
computer's Internet connection', and click OK.
Step 2. Checking the Shared Internet Connection.
When the Internet connection sharing configuration has been completed, the network
icon in the Network Connections window is displayed as follows:
Click Start > Control Panel > Network and Internet Connections > Network
Connections.
– A computer connected to the Internet.
– A computer sharing the remote Internet connection (other computer).
If the icon does not appear after a long time, restart the computer.
Computers on the network can access the Internet through the shared Internet
connection only when the computer connected to the Internet is turned on.
Customizing Your Computer 53
Customizing Your Computer
Using System Setup
The System Setup (BIOS) program enables you to configure your computer hardware
and set security and power-savings options. The settings you choose are stored in
battery-maintained CMOS memory that saves the information even when the
computer’s power is turned off. When your computer is turned back on, it is configured
with the values found in this memory.
Run System Setup if you get a message prompting you to run the program. You may
also want to run System Setup, particularly the first time you use your computer, to set
the time and date, use security or power-management features, or alter the settings of
other features.
BIOS Caution:
If you are not familiar with BIOS setup and what the parameters mean, seek
help from a person who is knowledgeable. Incorrect settings may cause your
system to “Crash”.
Your computer’s version of System Setup may not include all the fields listed
here or may include additional fields. Field names and order of appearance
can vary according to the version of the BIOS (basic input/output system) on
your computer.