Samsung Electronics Co TWIN2000 VCR User Manual
Samsung Electronics Co Ltd VCR Users Manual
UserManual.wiki
>
Samsung Electronics Co
>
TWIN2000 User Manual
Users Manual
Navigation menu
Upload a User Manual
Namespaces
Wiki Guide
HTML
PDF
Info
Views
User Manual
Discussion / Help
Navigation


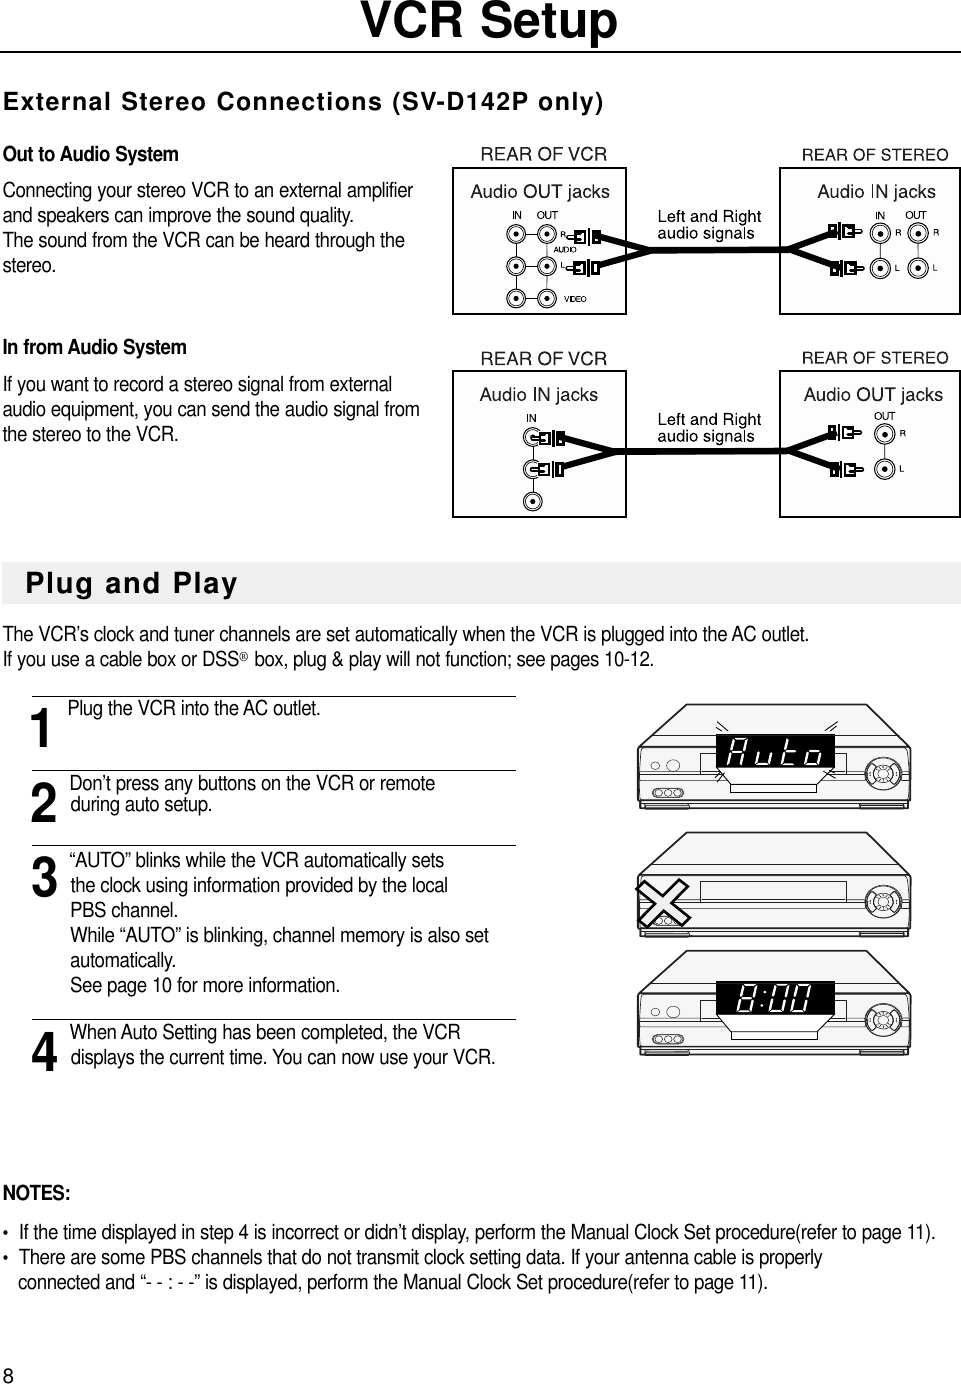
![9VCR SetupYour VCR has on-screen menus that allow you to access and control the VCR’s programmable features. You will use thebuttons on the remote control or on the front panel to work with the on-screen programming. Each button works not only PLAY, STOP, F.F, REW but also as a shift cursor in the on screen menus. : PLAY/Pause or ▲ cursor : STOP or ▼cursor : MENU ON or OFF: REW or Ãcursor : F.F or ¨cursor 1Press the MENU button on your remote control. TheMain Menu will appear on screen. 2Select the item you want to adjust using the ▼buttonfollowed by the ¨button on your remote control. If you want to exit any on-screen menu, simply press the button on the remote control.If the main menu does not appear, make sure the TV is tuned to the same channel as the CH3/4 switch on the rear panelof the VCR, and check for the VCR indicator on the front display. If the VCR indicator does not light, press the TV/VCRbutton on the remote control to turn it on. 1To select the language for the on-screen menu display,press the MENU button on the remote control.2Press ▼ on the remote control to select “Language.”3Press ¨to select the language you want for the onscreen menus (English, Spanish, French).MAIN MENU¨Timer recordingClock set/adjustChannel setup VCR function setupLanguage/Lengua/Langue [ ¹/¨] [MENU/EXIT]MAIN MENU¨Timer recordingClock set/adjustChannel setup VCR function setupLanguage/Lengua/Langue[ ¹/¨] [MENU/EXIT]MAIN MENUTimer recordingClock set/adjustChannel setup VCR function setup¨Language/Lengua/Langue[ ¹/¨] [MENU/EXIT]MENU PRINCIPALProgrammationRéglage de l’horlogeRéglage des chaînes Réglage des fonctions¨Language/Lengua/Langue[ ¹/¨] [MENU/EXIT]MENUMENUUsing Menus and the Remote ControlSEARCH/EXITSelecting the On-Screen Language](https://usermanual.wiki/Samsung-Electronics-Co/TWIN2000/User-Guide-94132-Page-13.png)
![10VCR SetupThe VCR has an internal clock which is used to turn the VCR on and off for timer recording. Automatically Setting the ClockWhen the AUTO CLOCK SET feature is selected, the VCR automatically updates its internal clock using CoordinatedUniversal Time information transmitted by some broadcast stations. If the VCR is connected to a cable box or DSS®box,cable box or DSS®box setup must be completed first (see page 7) and it’s activated when the cable box is tuned to thePBS channel.1Press MENU on the remote control. Press ▼ and ¨toselect “CLOCK SET/ADJUST.” 2Press ¨to select AUTO.3Clock Data CH : If you select AUTO, the VCR will automatically tune to a channel providing time data.This may take the VCR up to 20 minutes. You can alsotune the VCR manually to a channel that you know carries time information (PBS channel) with à ¨buttons. Time ZONE : If you select AUTO for your time zone,the VCR sets the clock using the first CoordinatedUniversal Time information it finds. If the time is not correct, select another time zone.Daylight Savings Time : If you select AUTO, the VCRsets the clock using the DST information broadcast inthe signal (channel). If you select YES, DaylightSavings Time is observed:Spring : The clock changes forward one hour on the first Sunday in April. Autumn : The clock changes back one hour on the last Sunday in October.4 Press MENU when you finish setting the clock. If you selected AUTO CLOCK, the VCR clock will beset automatically when the VCR is turned OFF.If AUTO CLOCK SET is unsuccessful, check local station listings for channels with Coordinated Universal Time. Tune theVCR to one of these channels, and turn the VCR off. If the time does not set within 20 minutes, set the time and date manually.MAIN MENUTimer recording¨Clock set/adjustChannel setup VCR function setupLanguage/Lengua/Langue [ ¹/¨] [MENU/EXIT]CLOCK SET/ADJUST¨AUTOMANUALSelect [ ¹ ] and press [¨][ ¹/¨] [MENU/EXIT]CLOCK SET/ADJUST¨Clock data CH: [AUTO]Time zone : [AUTO]Do you observe [AUTO]DST in summer? [ ¹/è] [MENU/EXIT]Setting the Clock](https://usermanual.wiki/Samsung-Electronics-Co/TWIN2000/User-Guide-94132-Page-14.png)
![11VCR SetupManually Setting the Clock1Press MENU on the remote control. Press ▼ and ¨toselect “CLOCK SET/ADJUST.” 2Use ▼ and ¨on the remote control to select MANUAL.3The first clock setting display appears. To enter the current time, press ▼or ▲and press ¨tomove to the the next setting.4To enter the current month and date, press ▼or ▲andpress ¨to move to the next setting.5To enter the current year, press ▲ or ▼. The day of the week is automatically added after you setthe year. 6Press the MENU button to start the clock. Press the MENU button again when you finish settingthe clock. MAIN MENUTimer recording¨Clock set/adjustChannel setup VCR function setupLanguage/Lengua/Langue [ ¹/¨] [MENU/EXIT]CLOCK SET/ADJUSTAUTO¨MANUALSelect [ ¹ ] and press [¨][ ¹/¨] [MENU/EXIT]CLOCK SET/ADJUSTAMCLOCK SET/ADJUSTPMCLOCK SET/ADJUSTPMTIME DATEYEAR12:00 1/012000 SAT[ ¹ /è] [MENU/EXIT]TIME DATEYEAR9:00 5/052000 FRI[ ¹ /è] [MENU/EXIT]TIME DATEYEAR9:00 5/052000 FRI[ ¹ /è] [MENU/EXIT]](https://usermanual.wiki/Samsung-Electronics-Co/TWIN2000/User-Guide-94132-Page-15.png)
![12VCR SetupOnce the VCR memorizes all the available channels, you can use the CH ▼▲ buttons to select channels.Setting the SourceBefore the VCR can memorize available channels, you must set the signal source for your VCR. 1With the VCR on, press the MENU button. Press ▼ and ¨to select “CHANNEL SETUP.” 2 If you have a cable system hooked up to your VCR,leave CABLE TV displayed in the Ant/Cable screen. 3If you have an antenna hooked up to your VCR, press¨until ANTENNA appears. Press the MENU buttonwhen you have selected the correct signal source. Memorizing the Channels1Press the MENU button. Press ▼ and ¨to select“CHANNEL SETUP.” 2Press ▼ and ¨to start Auto channel memory function. 3Your VCR will begin memorizing all available channels.To interrupt, press the MENU button on the remote con-trol. When the channel number on screen stops chang-ing, the VCR has finished.MAIN MENUTimer recordingClock set/adjust¨Channel setup VCR function setupLanguage/Lengua/Langue[ ¹/¨] [MENU/EXIT]MAIN MENUTimer recordingClock set/adjust¨ Channel setup VCR function setupLanguage/Lengua/Langue[ ¹/¨] [MENU/EXIT]CHANNEL SETUP¨Ant/Cable: [CABLE TV]Auto channel memoryChannel add/delete[ ¹/¨] [MENU/EXIT]CHANNEL SETUP¨Ant/Cable: [ANTENNA]Auto channel memoryChannel add/delete[ ¹/¨] [MENU/EXIT]CHANNEL SETUPAnt/Cable: [CABLE TV]¨Auto channel memoryChannel add/delete[ ¹/¨] [MENU/EXIT]Memorizing CH 02. . . . . please wait . . . . .Setting the Channels](https://usermanual.wiki/Samsung-Electronics-Co/TWIN2000/User-Guide-94132-Page-16.png)
![13VCR SetupAdding or Deleting Memorized Channels You can add or delete channels that have been memorized with the Automatic Channel Memory function. The AutoChannel Memory function must be performed before Channel Add/Delete can be used.1Press the MENU button. Press ▼ and ¨button to select“CHANNEL SETUP.”2Press ▼ and ¨button to select “Channel Add/Delete.”3Press two number buttons or press CH ▼▲ for the channel you want to add or delete. For numbers over100, press the 100 button on the remote control first.For example : To add channel 7, press 0 then 7 or use CH ▼▲ .For example : To delete channel 121, press the 100 button, then 2 and 1 or use ▼▲ .4To ADD the selected channel: Press ¨button on theremote control. To DELETE the selected channel: Press Ãbutton onthe remote control.When you have finished, press the MENU button twice.Note:• A deleted channel can be accessed with the number buttons, but the CH ▼▲ buttons skip past it. • To add the LINE input to channel memory, select LINE using the LINE IN button on the remote control, then press ¨button on the remote control. MAIN MENUTimer recordingClock set/adjust¨ Channel setup VCR function setupLanguage/Lengua/Langue[ ¹/¨] [MENU/EXIT]CHANNEL SETUPAnt/Cable: [CABLE TV]Auto channel memory¨Channel add/delete[ ¹ /¨] [MENU/EXIT]CHANNEL ADD/DELETE¨Select channel: [ 1]and press[¨] to ADDpress[Ã] to DELETE[ ¹ /è] [MENU/EXIT]CHANNEL ADD/DELETE¨Select channel: [121](in memory)and press[¨] to ADDpress[Ã] to DELETE[ ¹/è] [MENU/EXIT]](https://usermanual.wiki/Samsung-Electronics-Co/TWIN2000/User-Guide-94132-Page-17.png)
![14VCR SetupTo make all of the VCR’s features available, set the VCR functions before playing or recording a tape. Tape length 1Press the MENU button on the remote control. Press ▼toselect VCR Function Setup, then press ¨.2Press ¨to select the video cassette length. This information is usually printed on the tape box. The menu cycles through: T120, T160 or T180. Once the type of cassette is set, the VCR can display theamount of time remaining on the tape when you press theDISPLAY button (see page 18).3Press the MENU button when you are finished.Auto playAccess the “VCR FUNCTION SETUP” menu as describedabove. Press ▼ to set the cursor to “Auto play”, then press ¨toset ON or OFF. When “Auto play” is ON, the VCR will automati-cally begin playing a video tape when it is inserted, as long asthe safety tab of the cassette has been removed (see page 18).Press the MENU button on the remote control when you are finished.Auto repeatAccess the “VCR FUNCTION SETUP” menu.Press the ▼ and ¨buttons to set “Auto repeat” ON or OFF. In the VCR FUNCTION SETUP “Auto repeat” sets the VCR toplay a tape repeatedly [unless a tape control is activated (stop,fast forward or rewind)] . Press the MENU button on the remotecontrol when you are finished.MAIN MENUTimer recordingClock set/adjustChannel setup ¨VCR function setupLanguage/Lengua/Langue[ ¹/¨] [MENU/EXIT]VCR FUNCTION SETUP¨Tape length: [T120]Auto play: [ON]Auto repeat: [OFF]Auto power off: [OFF][ ¹/¨] [MENU/EXIT]VCR FUNCTION SETUPTape length: [T120]¨Auto play: [ON]Auto repeat: [OFF]Auto power off: [OFF][ ¹/¨] [MENU/EXIT]VCR FUNCTION SETUPTape length: [T120]Auto play: [ON]¨Auto repeat: [ON]Auto power off: [OFF][ ¹/¨] [MENU/EXIT]VCR FunctionsAuto power offAccess the “VCR FUNCTION SETUP” menu.Press ▼ and ¨to set “Auto power off” to 1Hr or 2Hr. “Auto power off ” sets the VCR to turn off automatically.Note: VCR will shut off 1 or 2 hours after the last button is pressed.VCR FUNCTION SETUPTape length: [T120]Auto play: [ON]Auto repeat: [OFF]¨Auto power off: [1Hr][ ¹/¨] [MENU/EXIT]](https://usermanual.wiki/Samsung-Electronics-Co/TWIN2000/User-Guide-94132-Page-18.png)
![17VCR OperationVariable Search SystemPress the SEARCH/EXIT button to display or exitthe search screen.When a program is recorded, the starting point is givenan Index mark for easy location. However, the VHS Index Search System(VISS) cannot recognize index marks made by old VCRs. If the VCR has trouble finding a mark, it is probably because the cassette wasrecorded on a VCR without VISS.If you want to index two programs in a row, set your VCR to stop. Then start recording each program. Pause has no effect on index marks.SEARCH/EXIT1. Scan and play Use scan and play when you don’t know exactly where a program is located on a cassette tape.1. Press ¨for forward scan or Ãfor reverse scan.2. The display will show “Scan and Play”.3. When an index mark is found, the VCR plays for about five seconds.4. Press PLAY to view that program.If you don’t press PLAY, the VCR automatically searches for the next index, or until the end of tape is reached.2. Go to 0:00:00 stopUse this feature when you want to search for the 0:00:00 counter position on a cassette. Press CLEAR at thepoint on the tape where you want to set the counter to 0:00:00. Later, while a cassette is playing or stopped,press ▲button. The VCR will rewind or fast forward, searching for the 0:00:00 counter position, and then automatically stop at that position.3. End searchUse this feature when you want to search for a blank position to record a program on a cassette. While a cassette is playing or stopped, press ▼button. The VCR will rewind or fast forward, searching to a blank position, and then automatically stop at that position. If the VCR reaches the end of the tape during end search, the tape will be ejected.Scan and play:press [Ã] or [¨]Go to [0:00:00]:Press [¹ ]End search:Press [ ]0:00:00 SP](https://usermanual.wiki/Samsung-Electronics-Co/TWIN2000/User-Guide-94132-Page-21.png)
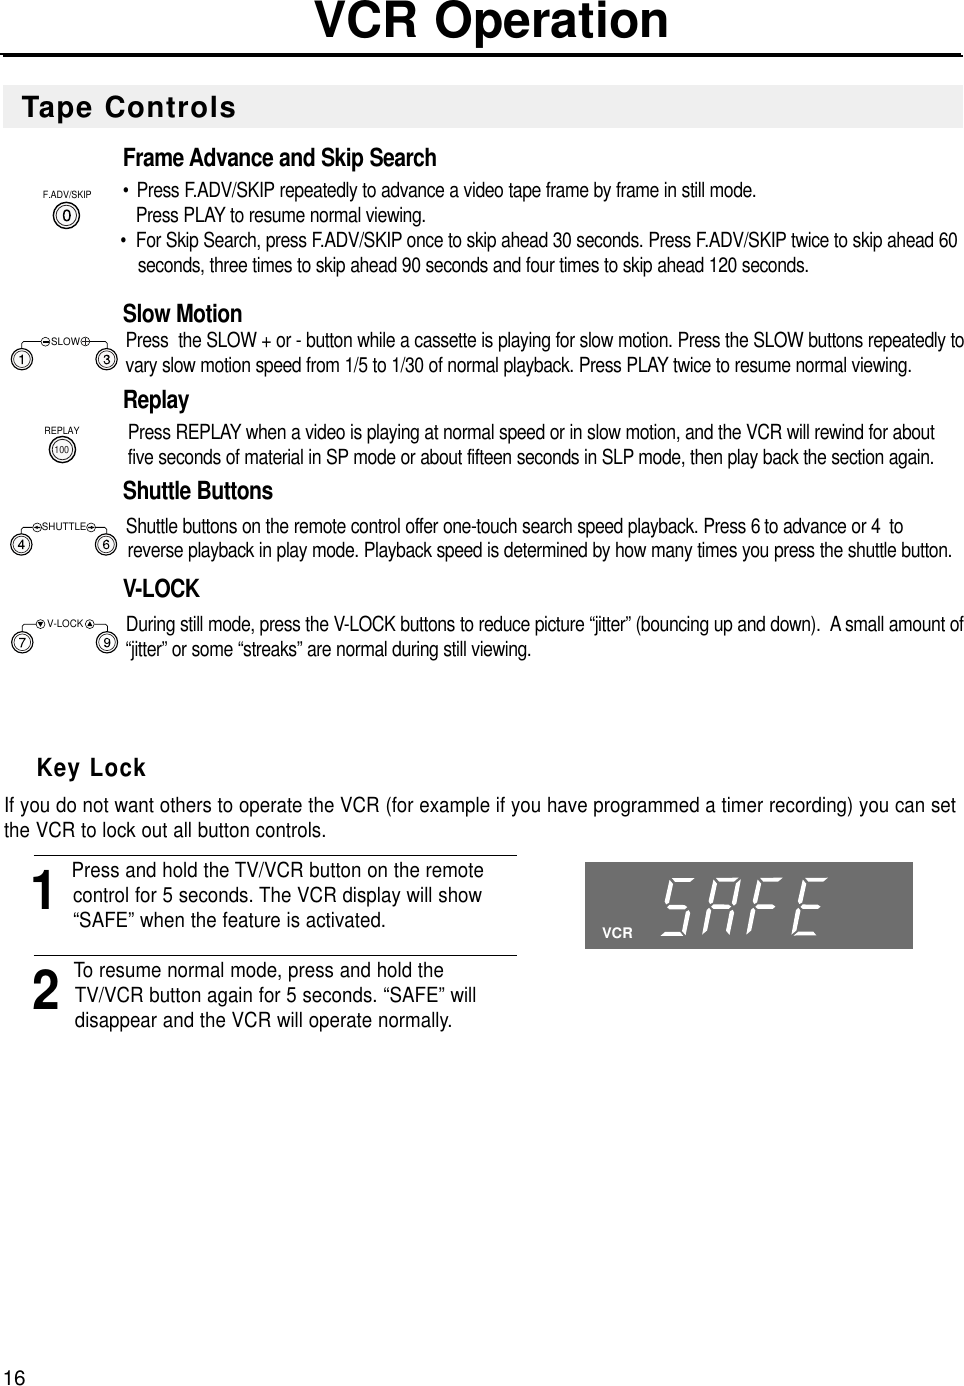
![21RecordingThe Timer feature allows you to set the VCR to automatically record up to eight different programs.Setting a timer recordingYour VCR can record on a specific day, or every day, Monday through Friday. Daily and weekly programs remain in the timeruntil erased. A single program is erased after the program records.1 To display a timer recording list, press MENU and ¨on the remote control.2Press ¨and ▲▼ to set the channel. Press ¨to move to the next setting. 3Repeat step 2 to set start time, end time, date and record speed. Date can be set for one time, daily or weeklyrecording. See below.4Press the MENU button to complete programming thetimer recording. Stop the VCR or turn the power off. Thetimer indicator comes on the VCR. The VCR will automati-cally turn on and begin recording at the time you have set.To stop a timer recording, press the VCR power button.Note: When using a cable decoder box or DSS®, makesure the decoder box is on and set to the correct channelfor timer recording. CH START END DATESPD¨- - - : - - - : - - - - - - - - - - : - - - : - - - - - - - - - - : - - - : - - - - - - - - - - : - - - : - - - - - - - - - - : - - - : - - - - - - - - - - : - - - : - - - - - - - - - - : - - - : - - - - - - - - - - : - - - : - - - - - - - [ ¹ /è] [MENU/CLEAR]Auto Speed SelectIf you are not sure the tape is long enough for timer program recording in the SP tape speed, set the recording tapespeed to “AUTO”. Recording starts in the SP tape speed. If the tape length is not long enough, the tape speed automatically changes from SP to SLP.Daily/Weekly Date ProgrammingWeekly [SUN’S~SAT’S]: You can record TV programs on the same channel at the same time every week.Daily [MO ~ FR] : You can record TV programs on the same channel at the same time every day Monday throughFriday. Timer RecordingCH START END DATESPD¨03- : - - - : - - - - - - - - - - : - - - : - - - - - - - - - - : - - - : - - - - - - - - - - : - - - : - - - - - - - - - - : - - - : - - - - - - - - - - : - - - : - - - - - - - - - - : - - - : - - - - - - - - - - : - - - : - - - - - - - [ ¹ /è] [MENU/CLEAR]CH START END DATESPD¨037:24 9:24 5/10AUTO- - - : - - - : - - - - - - - - - - : - - - : - - - - - - - - - - : - - - : - - - - - - - - - - : - - - : - - - - - - - - - - : - - - : - - - - - - - - - - : - - - : - - - - - - - - - - : - - - : - - - - - - - [ ¹/è] [MENU/CLEAR]PMPMMAIN MENU¨Timer recordingClock set/adjustChannel setup VCR function setupLanguage/Lengua/Langue[ ¹/¨] [MENU/EXIT]](https://usermanual.wiki/Samsung-Electronics-Co/TWIN2000/User-Guide-94132-Page-25.png)
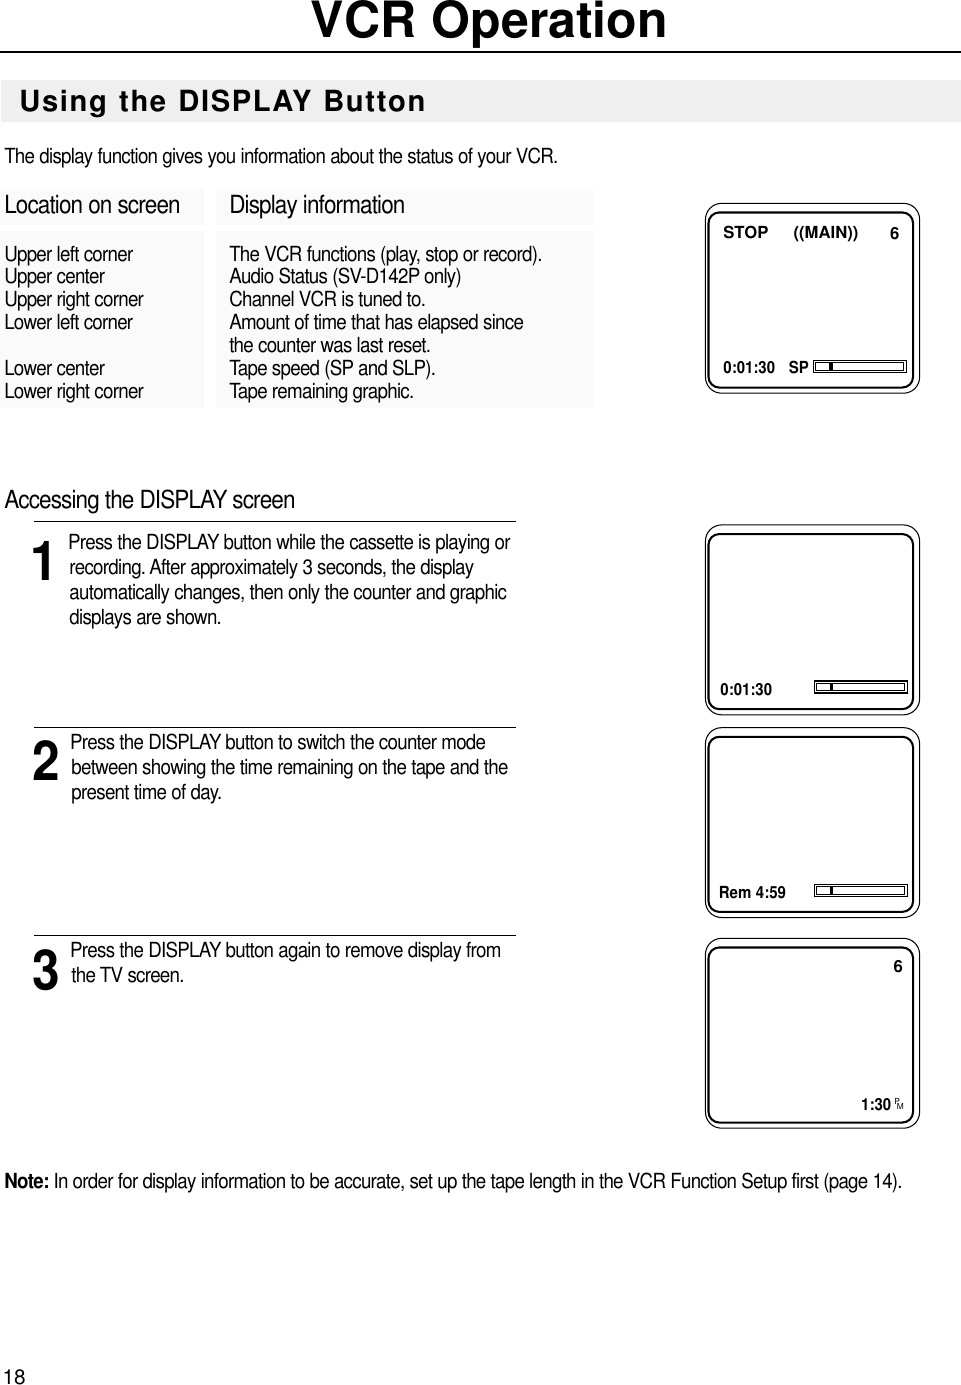
![23Copying or Dubbing a VideoTo make a copy, or “dub” of a video, you need two VCRs and two RCA-type cables. Warning: One Federal Court has held that unauthorized recording of copyrighted TV programs may be an infringement ofcopyright laws. 1Attach one end of the video cable to the Video OUTjack of the playback VCR and the other end to the VideoIN jack of the record VCR.2Attach one end of the Audio cable to the Audio OUTjacks on the playback VCR, and the other end to theAudio IN jacks on the record VCR.3Set your new Samsung VCR to record, and the otherVCR to play back. You have a choice between using theLINE 1 jacks on the rear of the VCR, or the LINE 2 jackson the front of the VCR. If you use the LINE 2 jacks on the front, the VCR will automatically switch the input mode to LINE 2. If necessary, you can change this by pressing the LINE IN button on the remote control. Note: If your VCR doesn’t have jacks on the front [SV-D52P], “LINE” will be displayed on the screen.4Press play on the playback VCR, and record on therecording VCR. Note: Rental tapes with Copyguard protection cannot be copied. Before you copy a rental tape, checkfirst.RECORD VCR PLAYBACK VCRAudio signalVideo signalCopying or Dubbing a VideoSV-D142PSV-D52P(Samsung)(Samsung)LINE1((LINE2))](https://usermanual.wiki/Samsung-Electronics-Co/TWIN2000/User-Guide-94132-Page-27.png)