Samsung Electronics Co U28E590D LCD monitor User Manual
Samsung Electronics Co Ltd LCD monitor
UserManual.wiki
>
Samsung Electronics Co
>
U28E590D User Manual
>
user manual.pdf
Contents
1.
user manual.pdf
2.
user manual_Warning.pdf
user manual.pdf
Navigation menu
Upload a User Manual
Namespaces
Wiki Guide
HTML
PDF
Info
Views
User Manual
Discussion / Help
Navigation
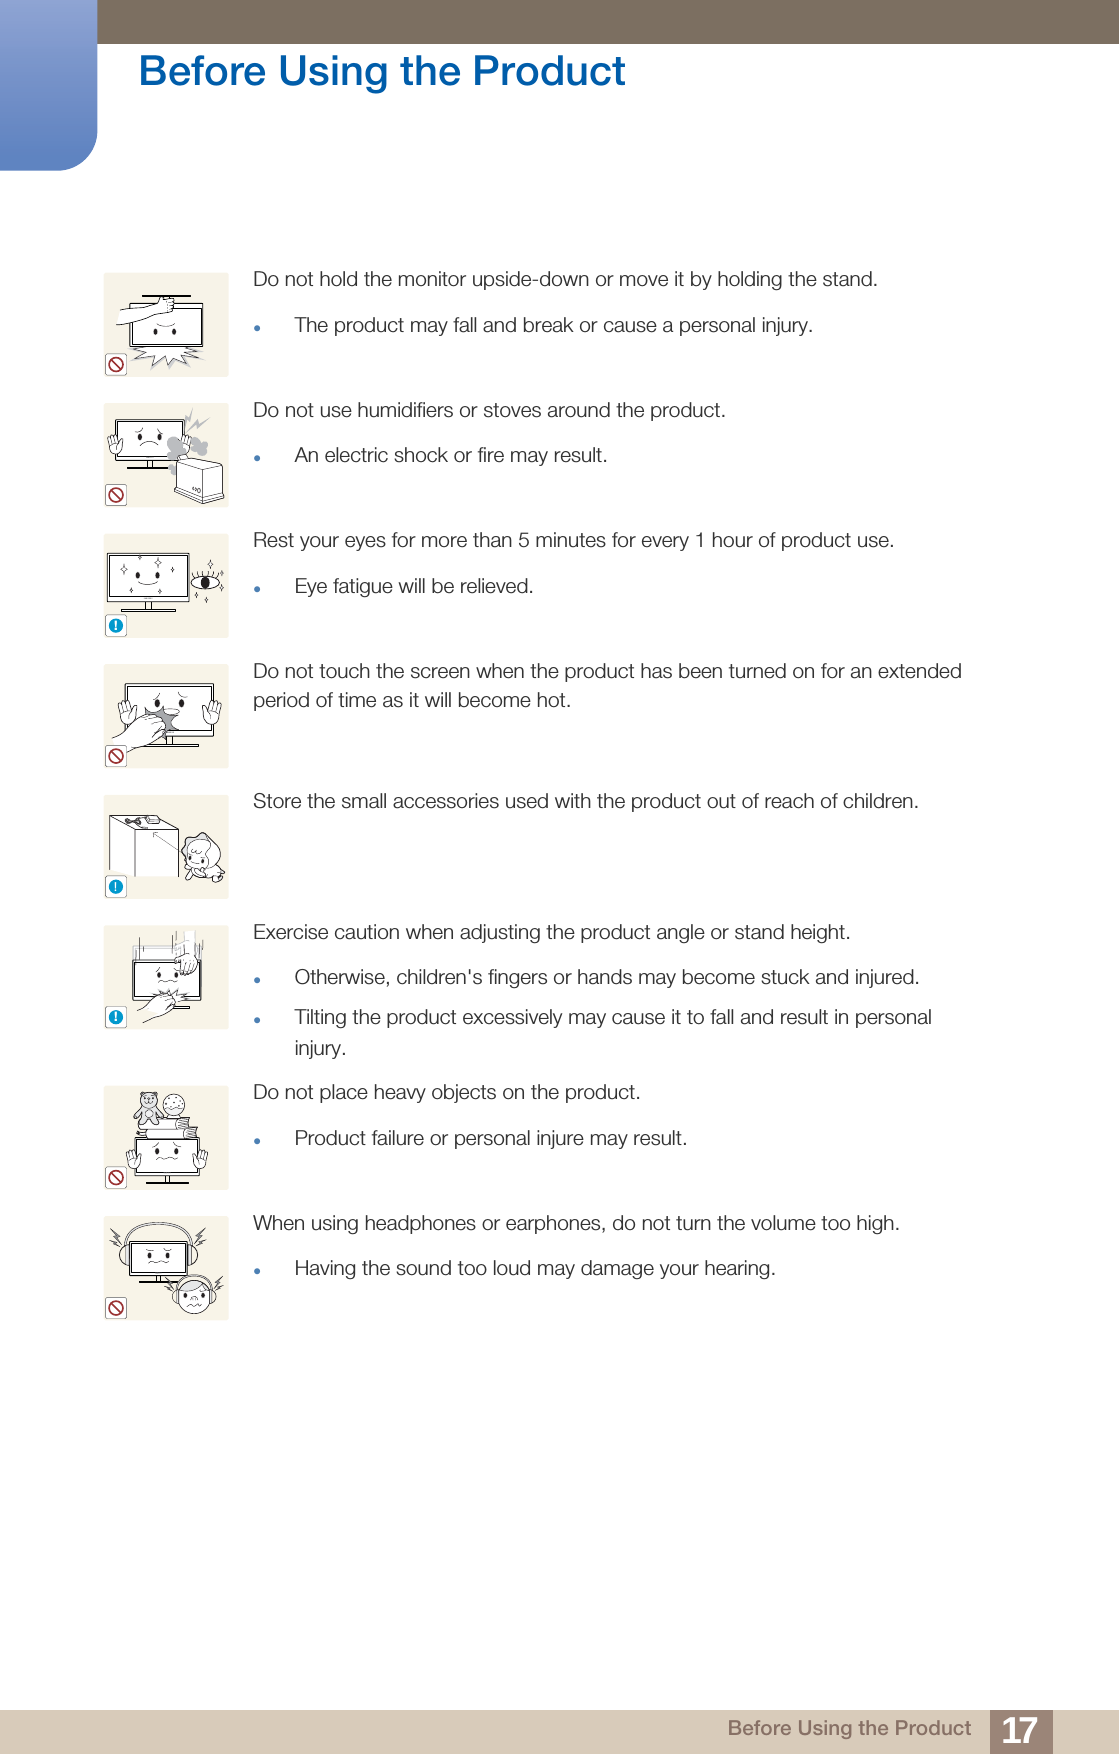
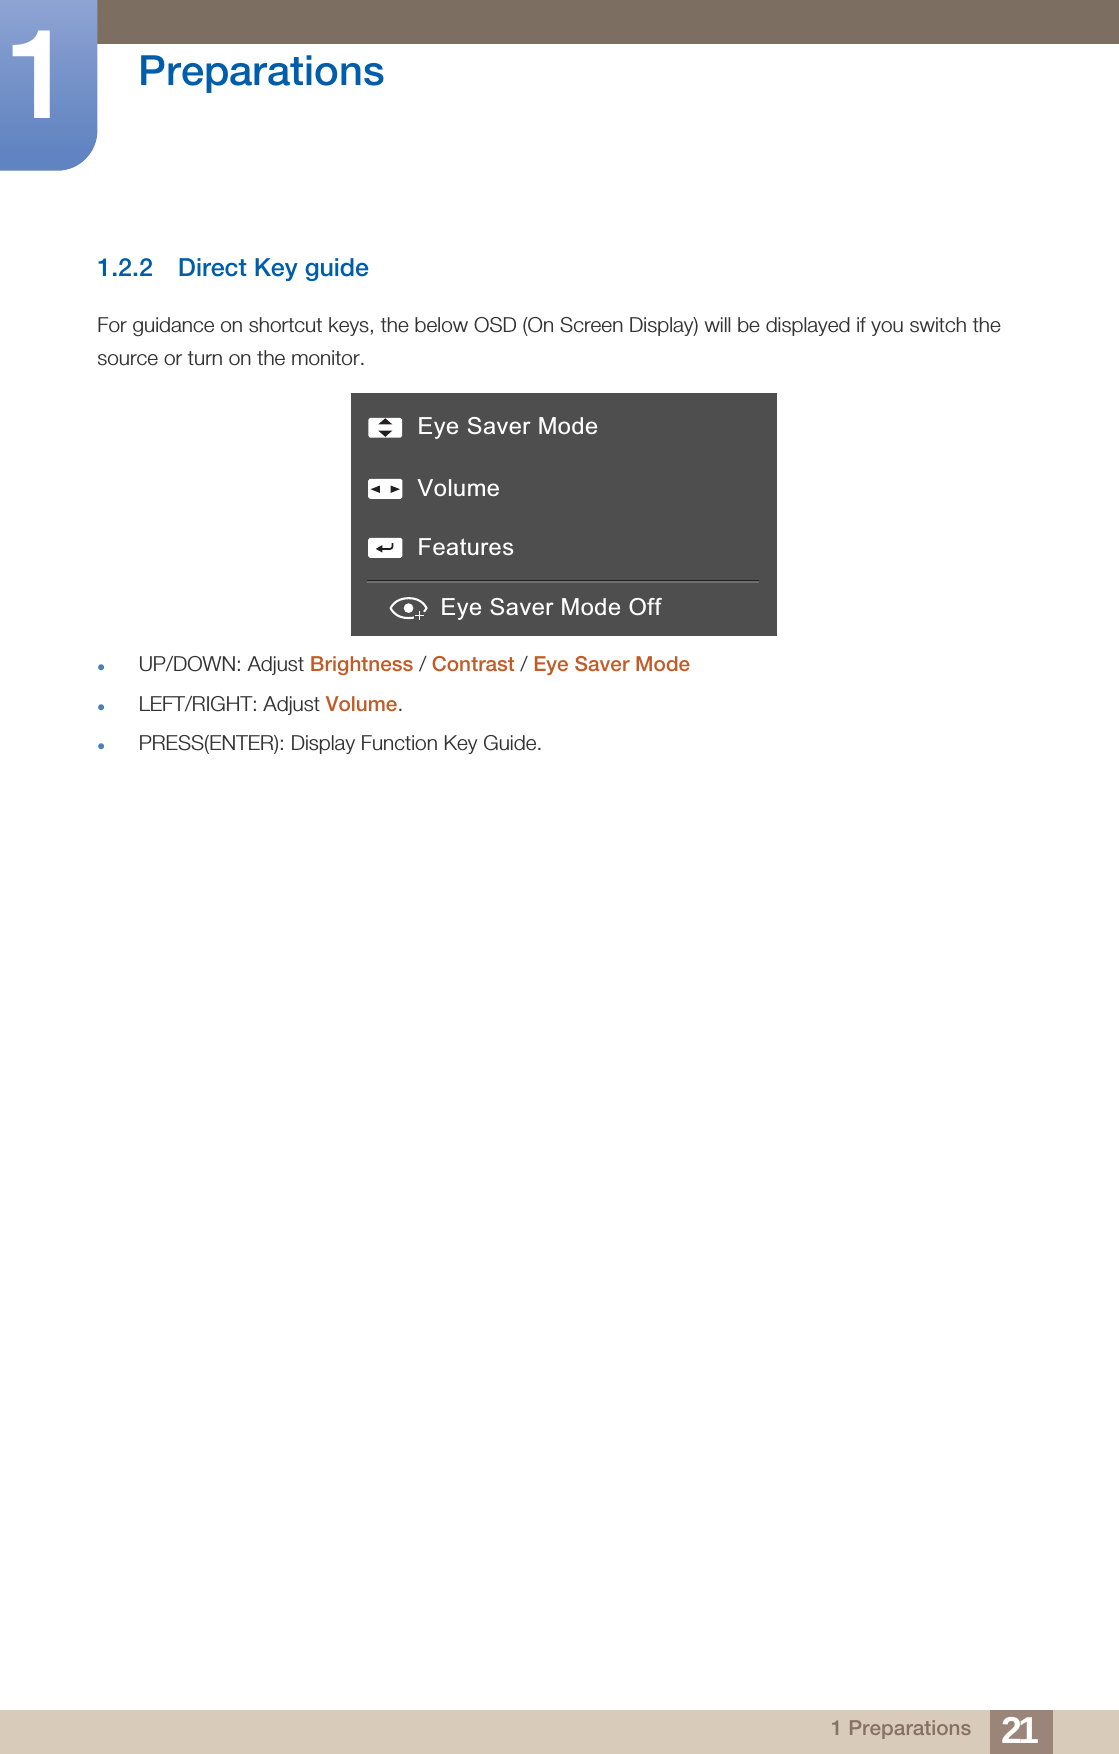
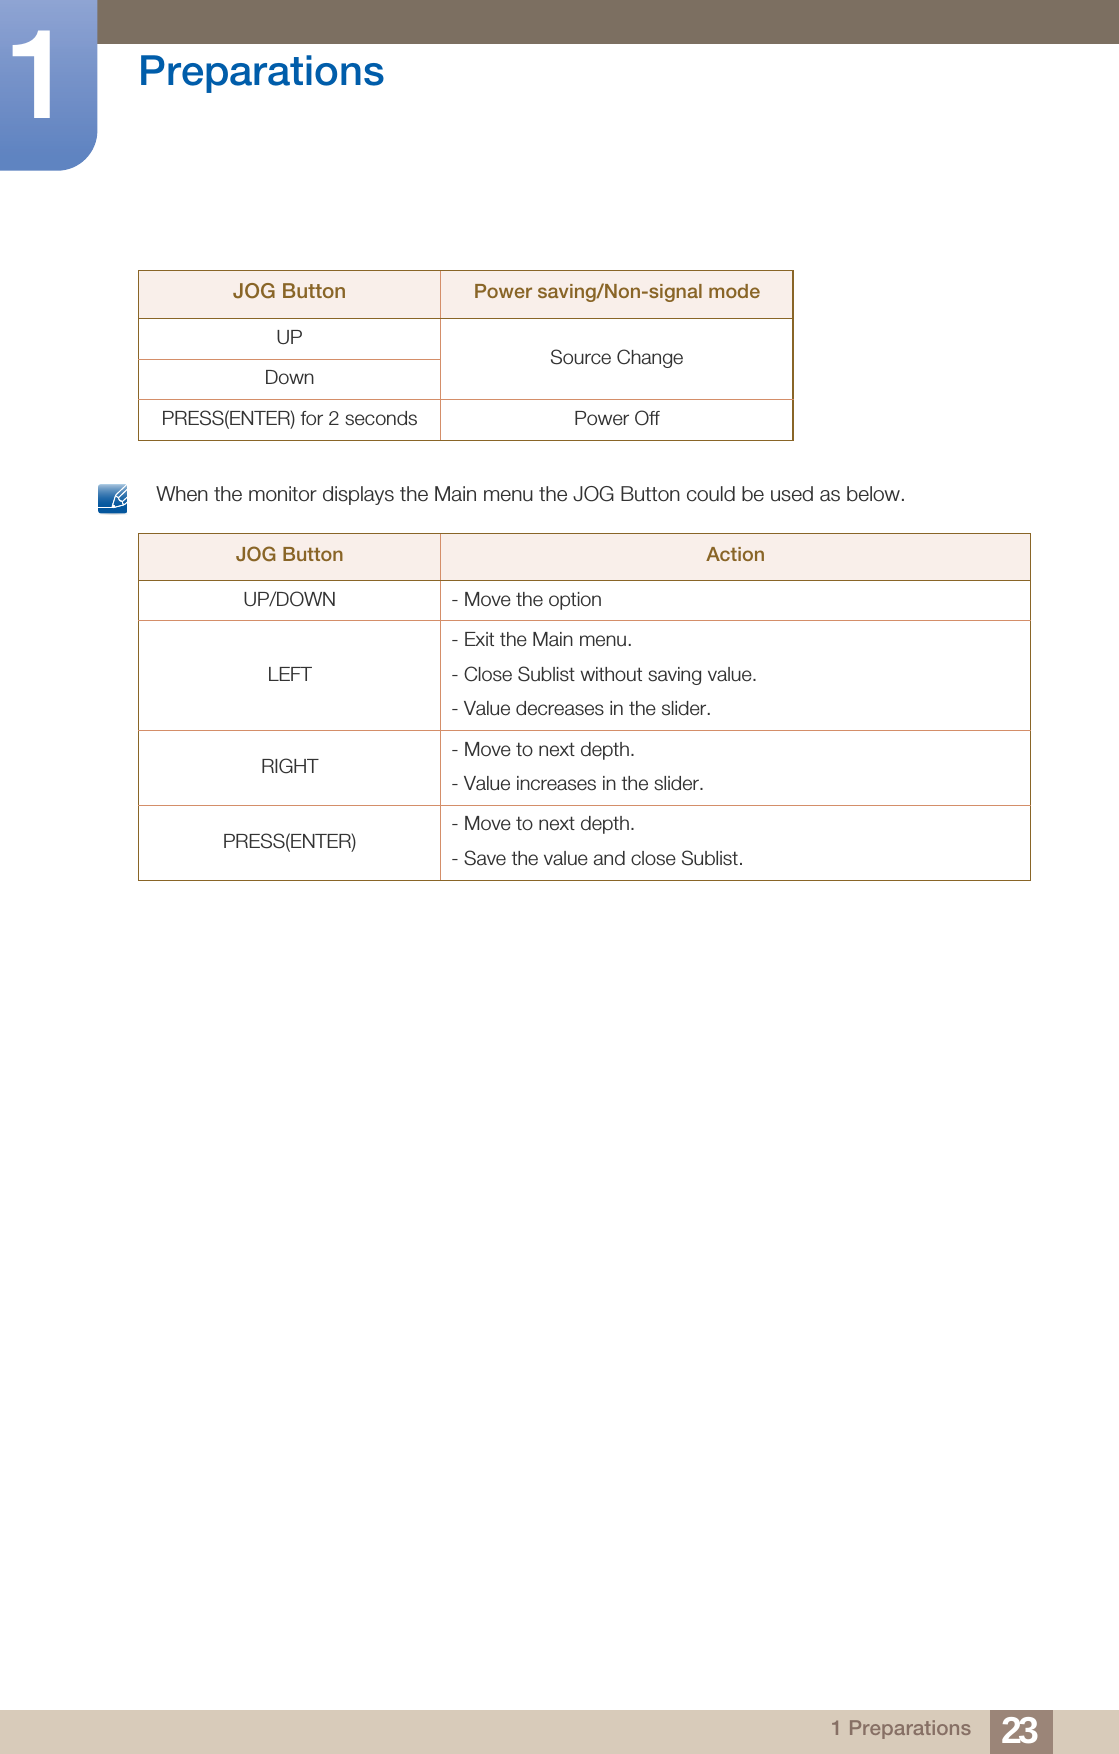
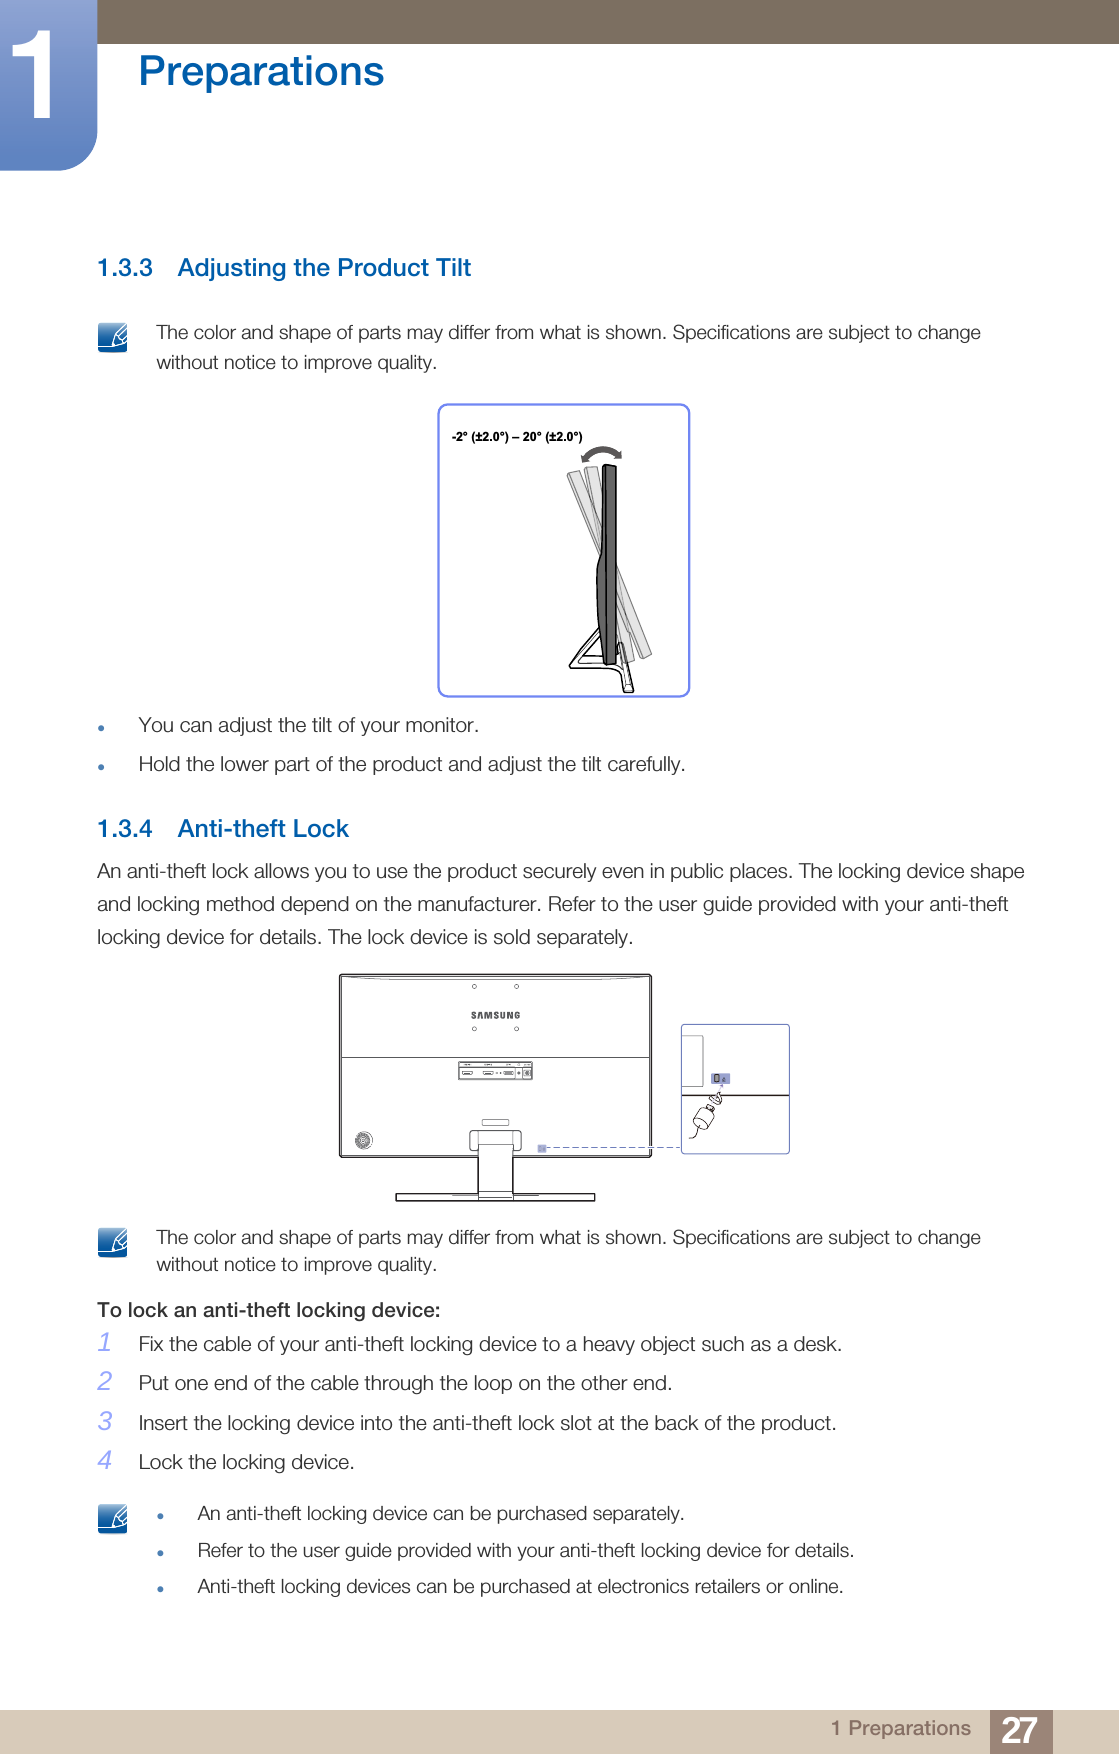
![22Preparations11 Preparations1.2.3 Function Key GuideTo enter the main menu or to use other items, press the JOG button to display the Function Key Guide. You can exit by pressing the JOG button again.UP/DOWN/LEFT/RIGHT: Move to the item you want. The description for each item will appear when the focus changes.PRESS(ENTER): The selected item will be applied. Actual models because of functional variation, Function key guide options will be different.Please run the corresponding function based on the actual icon and description. When the monitor displays nothing (i.e. Power saving mode or Non-signal mode), 2 direct keys for control source and power could be used as below.Icons DescriptionSelects [ ] to change the input signal by moving the JOG button in the Function Key Guide screen. A message will appear on the top left corner of the screen if the input signal has been changed.Selects [ ] by moving the JOG button in the function key guide screen. The OSD (On Screen Display) of your Monitor’s feature appears.OSD control lock: Maintain the current settings, or lock the OSD control to prevent unintended changes to settings. Enable/Disable: To lock/unlock the OSD control, press the LEFT button for 10 seconds when the main menu displayed. If the OSD control is locked,Brightness and Contrast can be adjusted. PIP/PBP is available.Eye Saver Mode is available. Information can be viewed. Selects [ ] by moving the JOG button in the function key guide screen.Press the button when configuring settings for the PIP/PBP function is required.Selects [ ] to turn the Monitor off by moving the JOG button in the function key guide screen.Return](https://usermanual.wiki/Samsung-Electronics-Co/U28E590D.user-manual-pdf/User-Guide-2567798-Page-22.png)

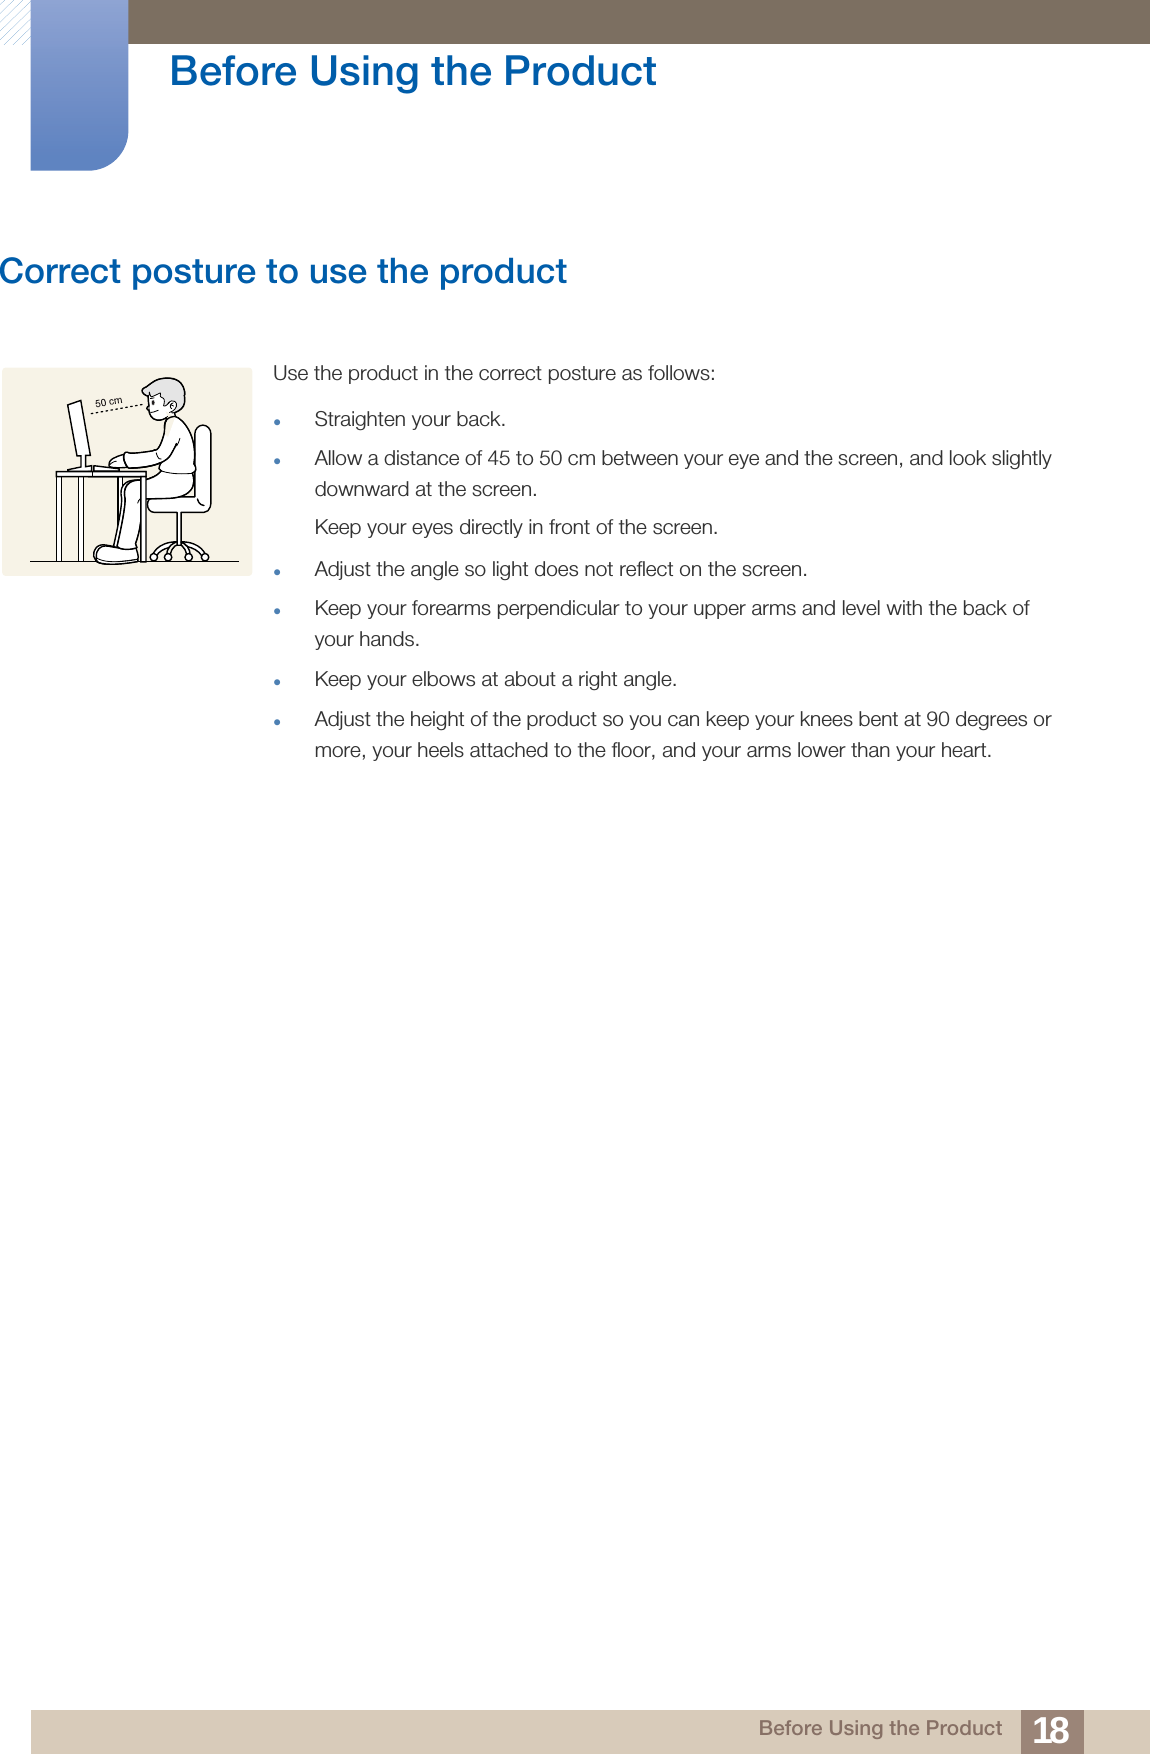
![282 Connecting and Using a Source Device2 Connecting and Using a Source Device2.1 Before Connecting2.1.1 Pre-connection CheckpointsBefore connecting a source device, read the user manual provided with it.The number and locations of ports on source devices may differ from device to device.Do not connect the power cable until all connections are completed.Connecting the power cable during connection may damage the product.Check the types of ports at the back of the product you want to connect.2.2 Connecting and Using a PCSelect a connection method suitable for your PC. Connecting parts may differ in different products.If you don't use the cable that came with the components of the monitor, the monitor may not support the best resolution. 2.2.1 Connection Using the HDMI Cable Do not connect the power cable before connecting all other cables. Ensure you connect a source device first before connecting the power cable. 1Connect the [HDMI IN 1] or [HDMI IN 2] port on the back of the product to the HDMI port on the PC using an HDMI cable. 2Connect the DC power adapter to the product and a power socket. Next, turn on the power switch on the PC. (For details, refer to "2.2.5 Connecting the Power".)3Change the input source to HDMI 1 or HDMI 2 controlling the JOG button UP/DOWN, when input source is not set. Provided ports may vary depending on the product.HDMI IN 1 / HDMI IN 2](https://usermanual.wiki/Samsung-Electronics-Co/U28E590D.user-manual-pdf/User-Guide-2567798-Page-28.png)
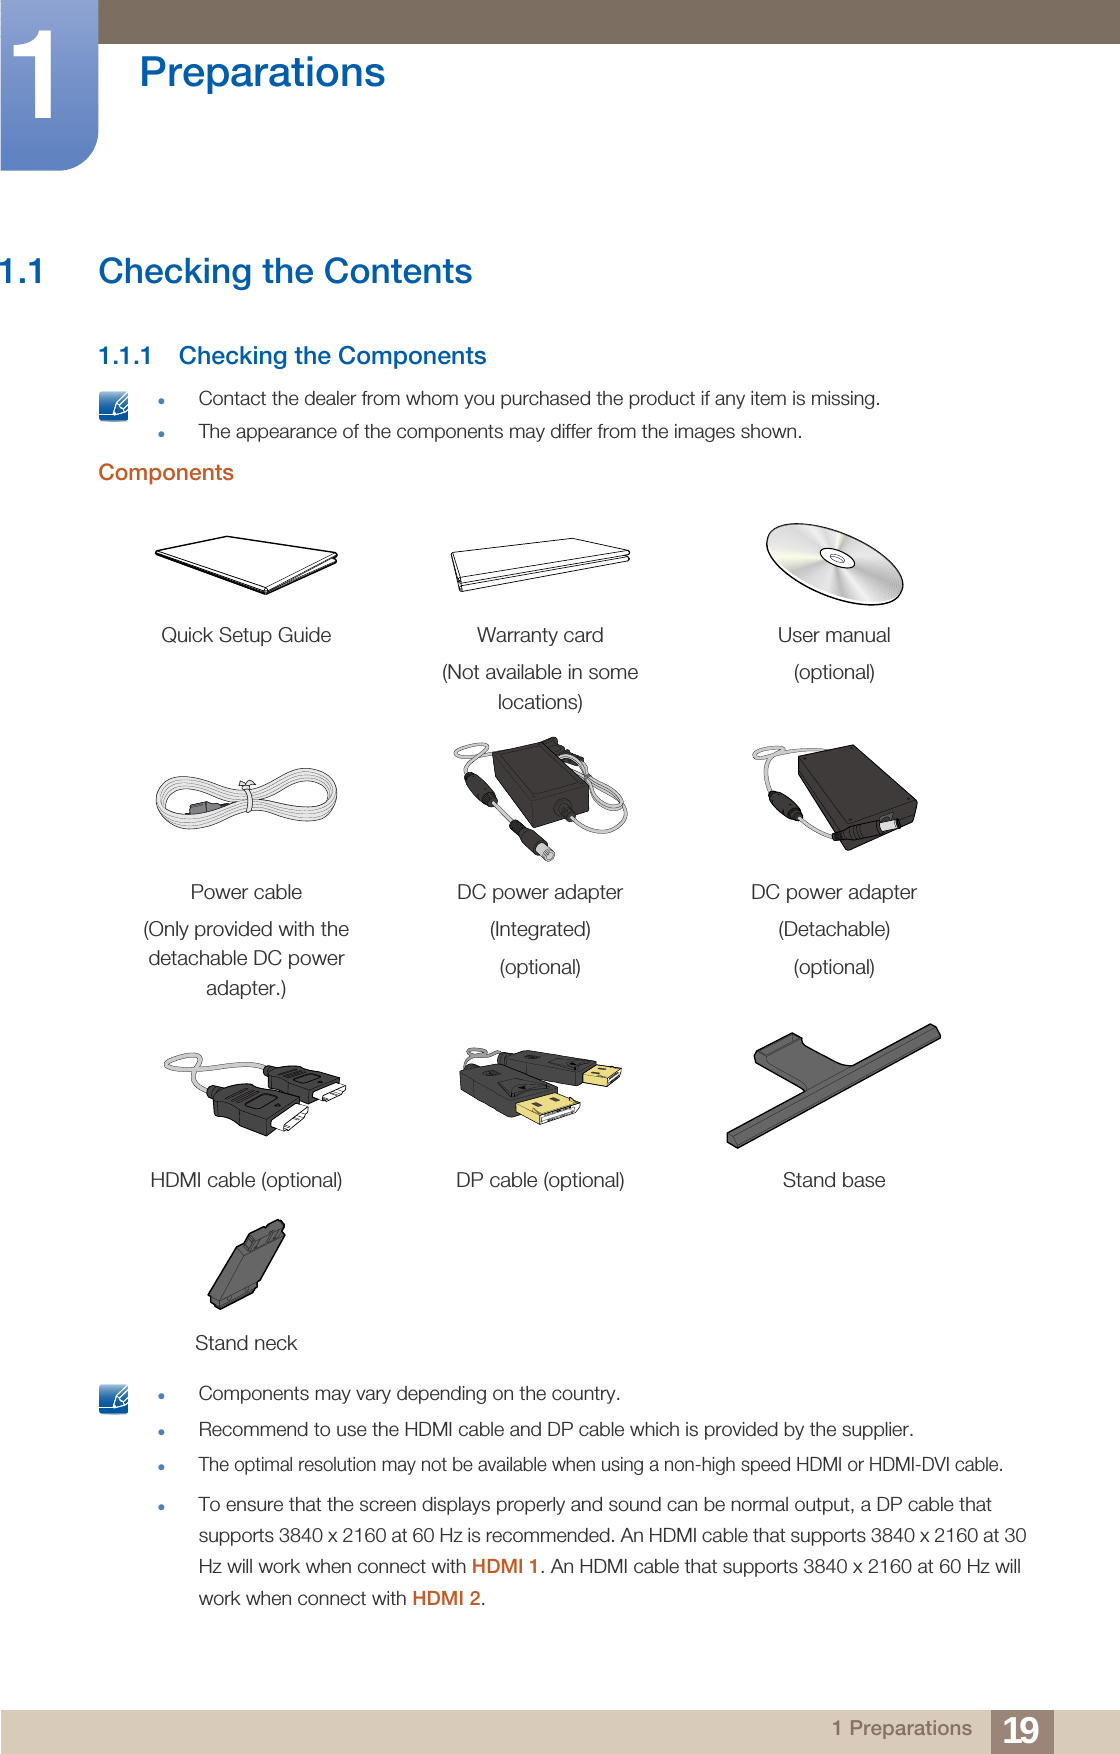
![29Connecting and Using a Source Device22 Connecting and Using a Source DeviceTo display 3840 x 2160 at 30 Hz, use an HDMI cable that supports 3840 x 2160 at 30 Hz to connect HDMI 1.Make sure that the graphics card of the HDMI source supports 3840 x 2160 at 30 Hz. To display 3840 x 2160 at 60 Hz, use an HDMI cable that supports 3840 x 2160 at 60 Hz to connect HDMI 2.Make sure that the graphics card of the HDMI source supports 3840 x 2160 at 60 Hz.When connecting an HDMI cable, use the cable that came with the components of the monitor.If you use an HDMI cable other than provided by Samsung, the image quality may be degraded. 2.2.2 Connection Using an DP Cable Do not connect the power cable before connecting all other cables. Ensure you connect a source device first before connecting the power cable. 1Connect the DP cable to the [DP IN] port on the back of the product and the DP port on the PC.2Connect the DC power adapter to the product and a power socket. Next, turn on the power switch on the PC. (For details, refer to "2.2.5 Connecting the Power".)3Change the input source to DisplayPort controlling the JOG button UP/DOWN, when input source is not set. Provided ports may vary depending on the product.To display 3840 x 2160 at 60 Hz, use a DP cable that supports 3840 x 2160 at 60 Hz. Make sure that the graphics card of the DP source supports 3840 x 2160 at 60 Hz. DP IN](https://usermanual.wiki/Samsung-Electronics-Co/U28E590D.user-manual-pdf/User-Guide-2567798-Page-29.png)
![30Connecting and Using a Source Device22 Connecting and Using a Source Device2.2.3 Connecting to Headphones Do not connect the power cable before connecting all other cables. Ensure you connect a source device first before connecting the power cable. 1Connect an audio output device such as headphones to [ ] port on the product. The sound could only be heard when using the HDMI to HDMI cable or DP cable. 2.2.4 Tidying Up the Connected Cables](https://usermanual.wiki/Samsung-Electronics-Co/U28E590D.user-manual-pdf/User-Guide-2567798-Page-30.png)
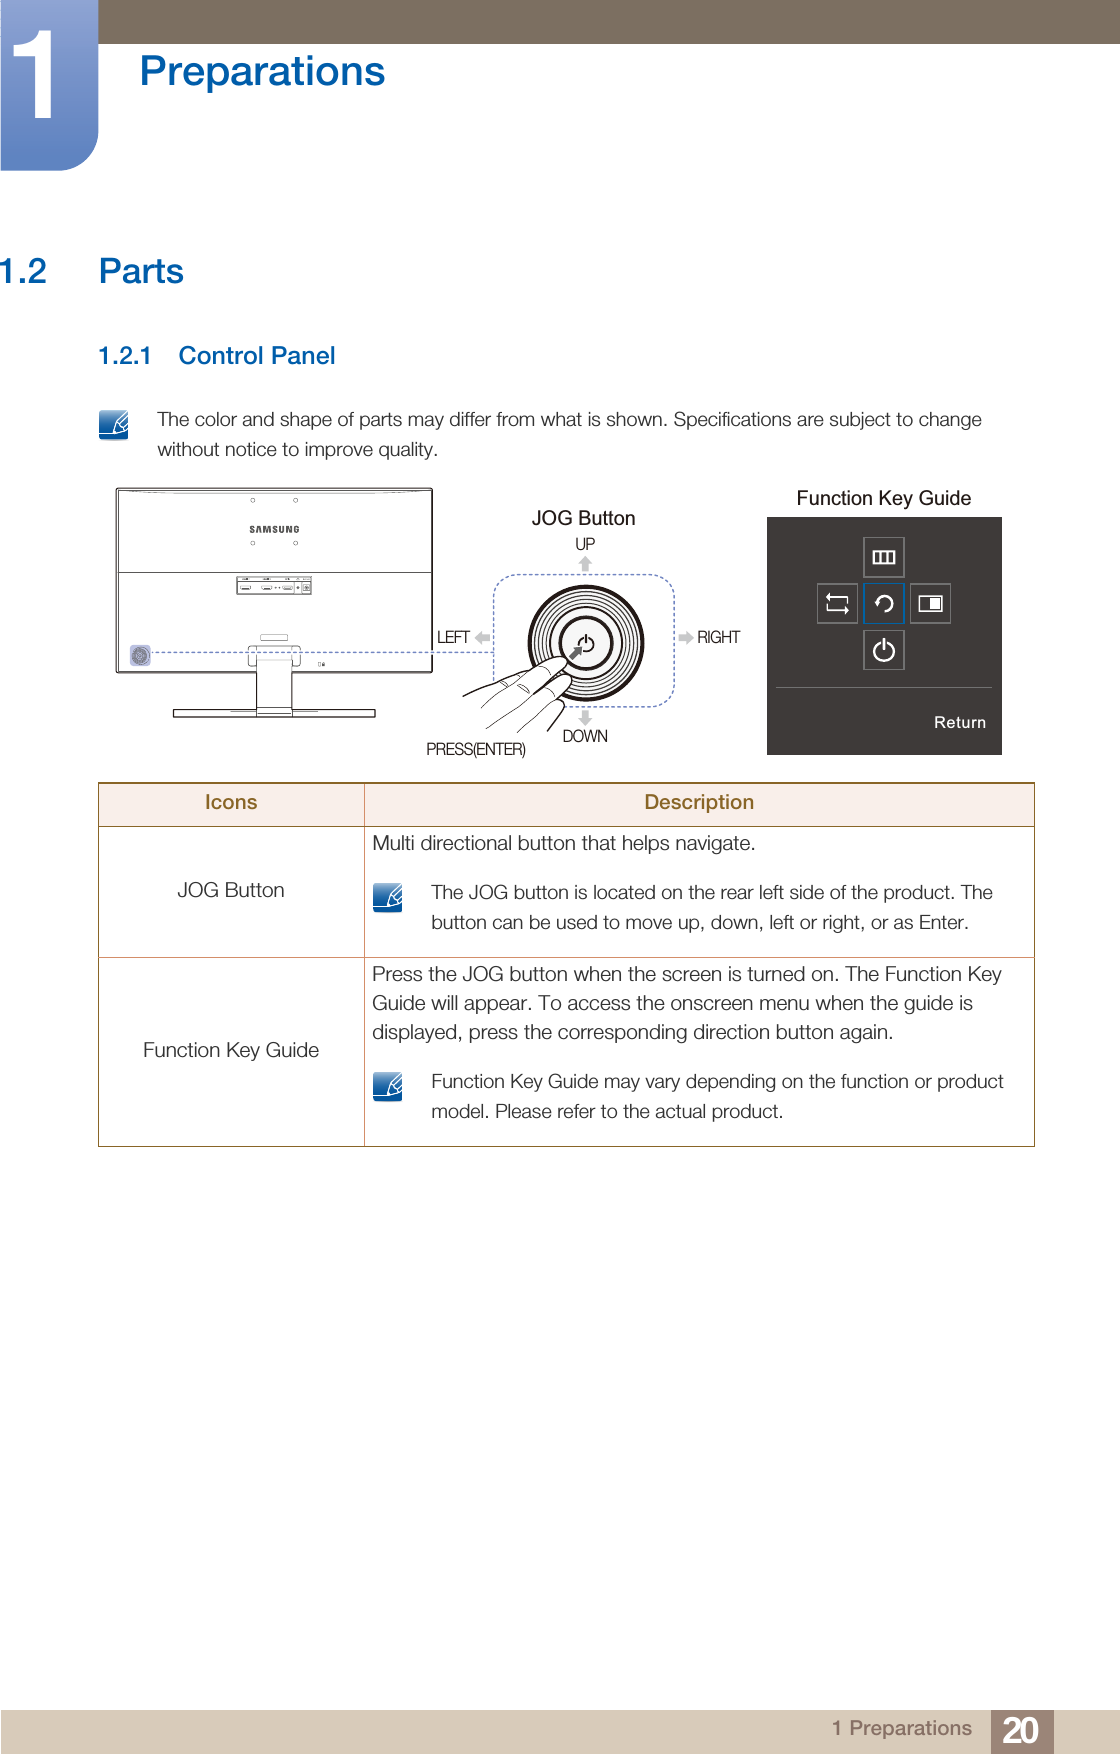
![31Connecting and Using a Source Device22 Connecting and Using a Source Device2.2.5 Connecting the PowerPower connection using integrated DC power adapterConnect the power adapter to [DC 14V] jack on the rear of the product. Plug in the power cable to the power socket. The input voltage is switched automatically. Power connection using detachable DC power adapterConnect the power cable to the DC power adapter.Then, connect the DC power adapter to the [DC 14V] port on the back of the product. Next, connect the power cable to the power outlet. The input voltage is switched automatically. DC 14V DC 14V](https://usermanual.wiki/Samsung-Electronics-Co/U28E590D.user-manual-pdf/User-Guide-2567798-Page-31.png)
![34Connecting and Using a Source Device22 Connecting and Using a Source Device2.2.7 Setting Optimum ResolutionAn information message about setting optimum resolution will appear if you power on the product for the first time after purchase.Select a language on the product and change the resolution on your PC to the optimum setting.1Press the JOG button to display the language settings menu.2To hide the message, move to Close with the JOG button. Next, press the JOG button. If the optimum resolution is not selected, the message will appear up to three times for a specified time even when the product is turned off and on again.The optimum resolution can also be selected in Control Panel on your PC. &ORVH7KHRSWLPDOUHVROXWLRQIRUWKLVPRQLWRULVDVIROORZV[+]/DQJXDJH (QJOLVK8VHWKHDERYHVHWWLQJVWRVHWWKHUHVROXWLRQRQ\RXU3&&XUUHQW5HVROXWLRQ[6HWXS*XLGH](https://usermanual.wiki/Samsung-Electronics-Co/U28E590D.user-manual-pdf/User-Guide-2567798-Page-34.png)
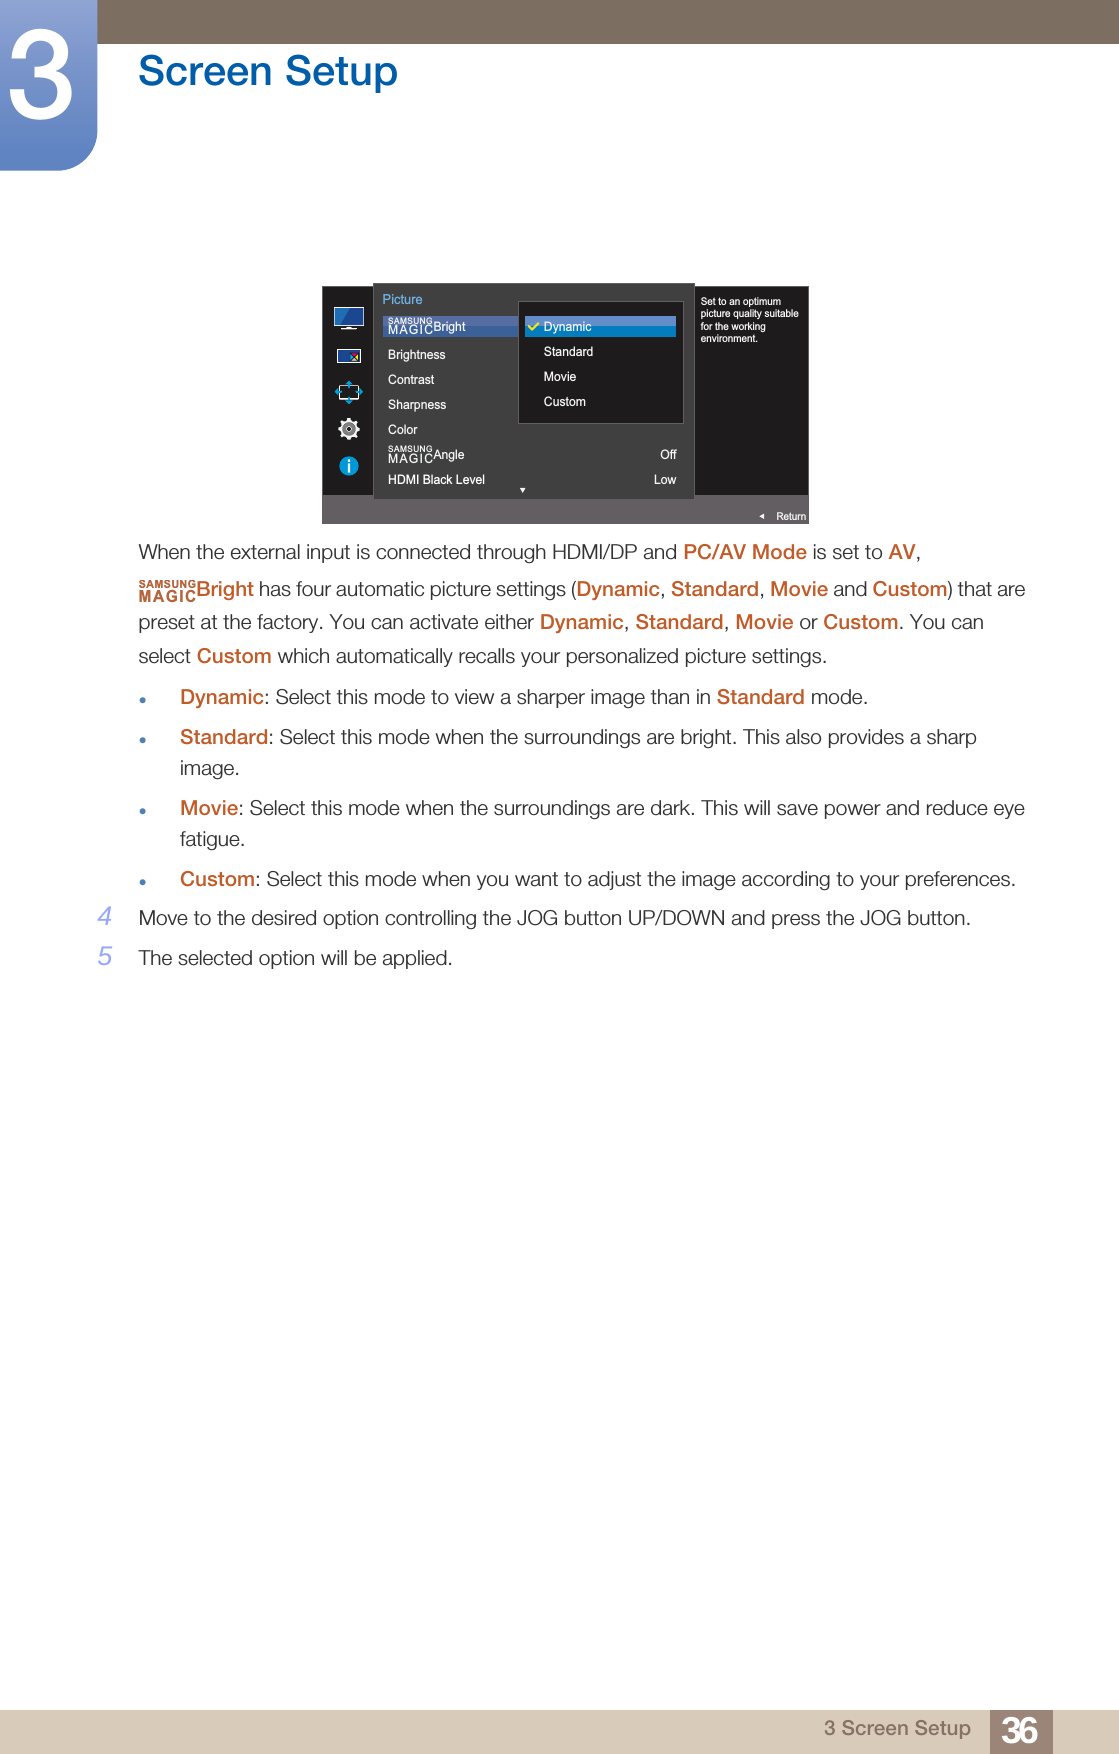
![353 Screen Setup3 Screen SetupConfigure the screen settings such as brightness.A detailed description of each function is provided. Refer to your product for details.3.1 SAMSUNG MAGIC BrightThis menu provides an optimum picture quality suitable for the environment where the product will be used. This menu is not available when Eco Saving Plus is enabled.This menu is not available when Angle is enabled.This menu is not available when Game Mode is enabled.This menu is not available when Eye Saver Mode is enabled.Not available when PIP/PBP Mode is set to On. You can customize the brightness to suit your preferences.3.1.1 Configuring SAMSUNG MAGIC Bright1When the Function Key Guide appears, select [ ] by moving the JOG button UP. Next, press the JOG button.2Move to Picture controlling the JOG button UP/DOWN and press the JOG button.3Move to Bright controlling the JOG button UP/DOWN and press the JOG button.The following screen will appear.Custom: Customize the contrast and brightness as required.Standard: Obtain a picture quality suitable for editing documents or using Internet.Cinema: Obtain the brightness and sharpness of TVs suitable for enjoying video and DVD content.Dynamic Contrast: Obtain balanced brightness through automatic contrast adjustment.SAMSUNGMAGICSAMSUNGMAGIC SAMSUNGMAGICBrightSAMSUNGMAGICAngleBrightnessContrastSharpnessColorHDMI Black LevelOffReturnPictureCustomStandardCinemaDynamic ContrastSet to an optimum picture quality suitable for the working environment.](https://usermanual.wiki/Samsung-Electronics-Co/U28E590D.user-manual-pdf/User-Guide-2567798-Page-35.png)
![37Screen Setup33 Screen Setup3.2 BrightnessYou can adjust the general brightness of the picture. (Range: 0~100)A higher value will make the picture appear brighter. This menu is not available when Bright is set to Dynamic Contrast mode.This menu is not available when Eco Saving Plus is enabled.This menu is not available when Eye Saver Mode is enabled. 3.2.1 Configuring Brightness1When the Function Key Guide appears, select [ ] by moving the JOG button UP. Next, press the JOG button.2Move to Picture controlling the JOG button UP/DOWN and press the JOG button.3Move to Brightness controlling the JOG button UP/DOWN and press the JOG button.The following screen will appear. 4Adjust the Brightness controlling the JOG button LEFT/RIGHT.5The selected option will be applied.SAMSUNGMAGICAUTO SAMSUNGMAGICBrightSAMSUNGMAGICAngleBrightnessContrastSharpnessColorHDMI Black LevelCustom1007560OffReturnPictureAdjust the brightnesslevel. Values closer to100 mean a brighterscreen.](https://usermanual.wiki/Samsung-Electronics-Co/U28E590D.user-manual-pdf/User-Guide-2567798-Page-37.png)
![38Screen Setup33 Screen Setup3.3 ContrastAdjust the contrast between the objects and background. (Range: 0~100)A higher value will increase the contrast to make the object appear clearer. This option is not available when Bright is in Cinema or Dynamic Contrast mode.This menu is not available when Game Mode is enabled.This menu is not available when PIP/PBP Mode is set to On and the Size is set to (PBP Mode). 3.3.1 Configuring Contrast1When the Function Key Guide appears, select [ ] by moving the JOG button UP. Next, press the JOG button.2Move to Picture controlling the JOG button UP/DOWN and press the JOG button.3Move to Contrast controlling the JOG button UP/DOWN and press the JOG button.The following screen will appear.4Adjust the Contrast controlling the JOG button LEFT/RIGHT.5The selected option will be applied.SAMSUNGMAGICAUTO SAMSUNGMAGICBrightSAMSUNGMAGICAngleBrightnessContrastSharpnessColorHDMI Black LevelCustom1007560OffReturnPictureAdjust the contrast level. Values closer to 100 mean a bigger light/dark contrast.](https://usermanual.wiki/Samsung-Electronics-Co/U28E590D.user-manual-pdf/User-Guide-2567798-Page-38.png)
![39Screen Setup33 Screen Setup3.4 SharpnessMake the outline of objects more clear or blurry. (Range: 0~100)A higher value will make the outline of objects clearer. This option is not available when Bright is in Cinema or Dynamic Contrast mode.This menu is not available when Game Mode is enabled.Not available when PIP/PBP Mode is set to On. 3.4.1 Configuring Sharpness1When the Function Key Guide appears, select [ ] by moving the JOG button UP. Next, press the JOG button.2Move to Picture controlling the JOG button UP/DOWN and press the JOG button.3Move to Sharpness controlling the JOG button UP/DOWN and press the JOG button.The following screen will appear.4Adjust the Sharpness controlling the JOG button LEFT/RIGHT.5The selected option will be applied.SAMSUNGMAGICAUTO SAMSUNGMAGICBrightSAMSUNGMAGICAngleBrightnessContrastSharpnessColorHDMI Black LevelCustom1007560OffReturnPictureAdjust the sharpnessof the picture.Values closer to 100mean a sharper image.](https://usermanual.wiki/Samsung-Electronics-Co/U28E590D.user-manual-pdf/User-Guide-2567798-Page-39.png)
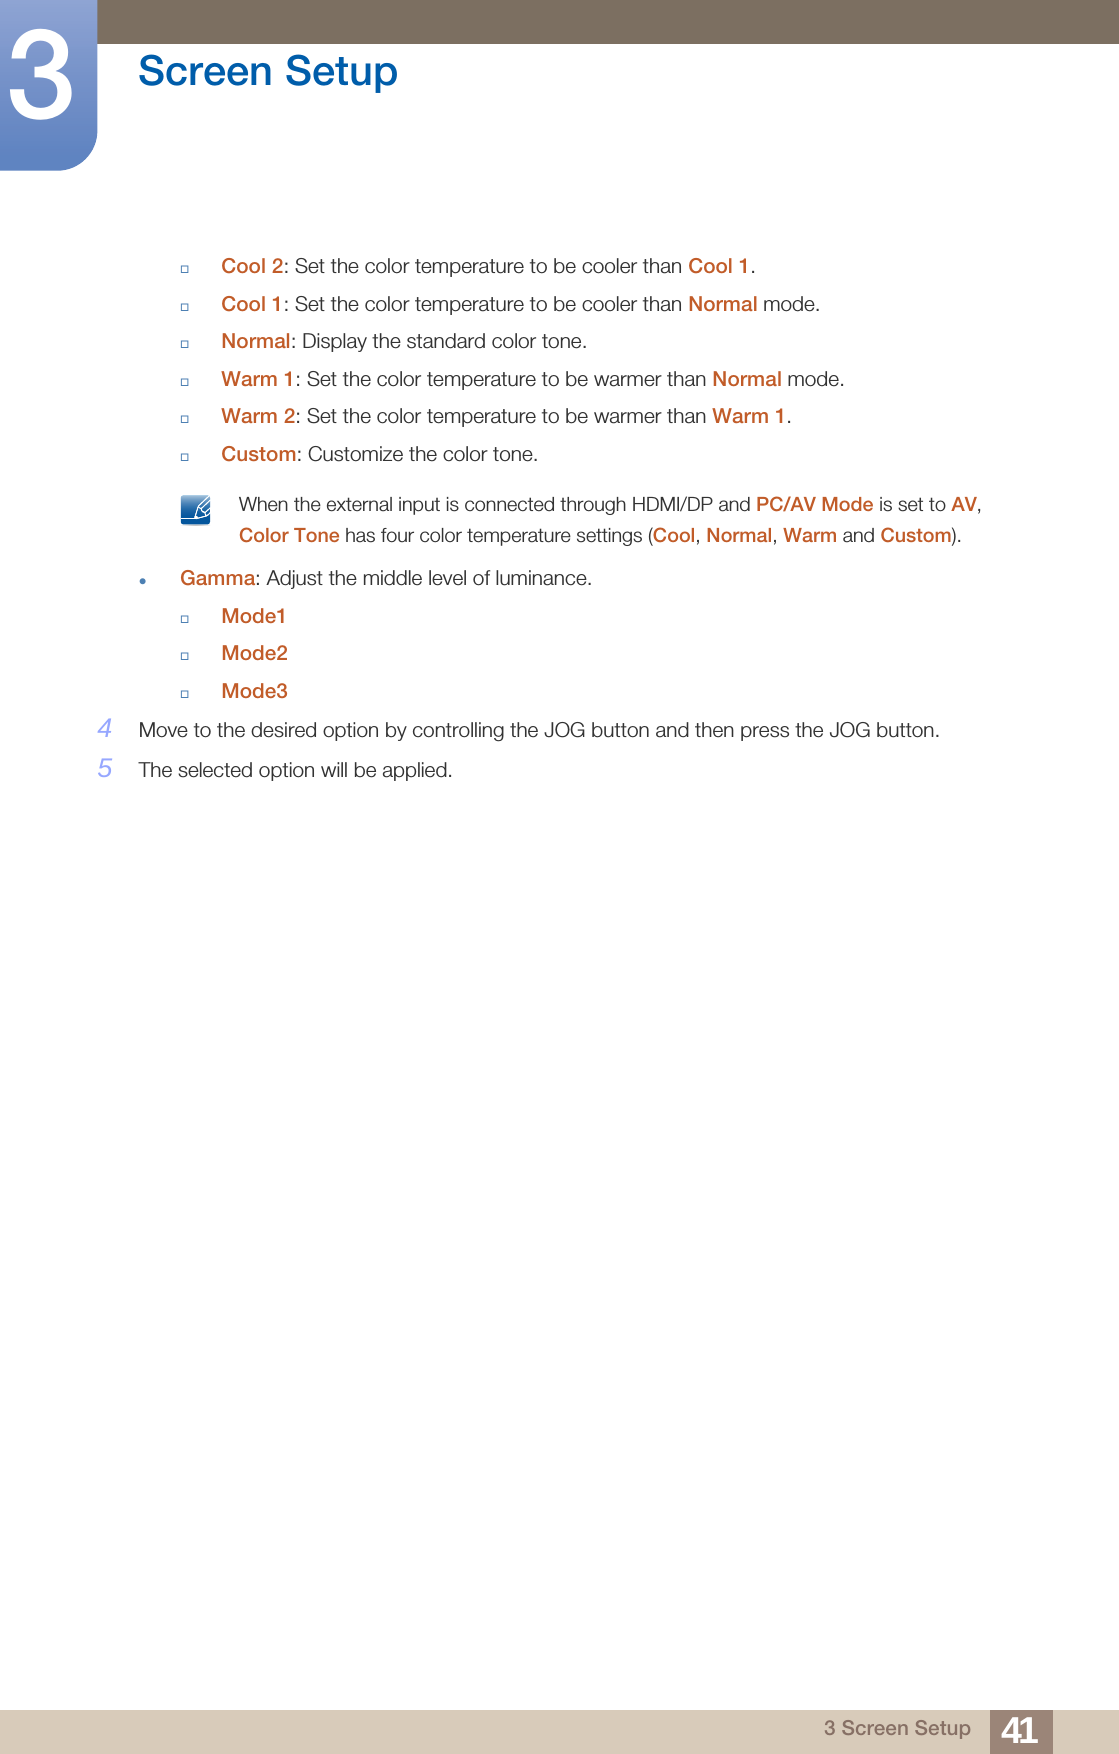
![40Screen Setup33 Screen Setup3.5 ColorA detailed description of each function is provided. Refer to your product for details. Adjust the tint of the screen. This menu is not available when Bright is set to Cinema or Dynamic Contrast mode.This menu is not available when Game Mode is enabled.This menu is not available when Eye Saver Mode is enabled.The Color Tone and Gamma menu is not available when Angle is enabled.Not available when PIP/PBP Mode is set to On. 3.5.1 Configuring Color1When the Function Key Guide appears, select [ ] by moving the JOG button UP. Next, press the JOG button.2Move to Picture controlling the JOG button UP/DOWN and press the JOG button.3Move to Color controlling the JOG button UP/DOWN and press the JOG button.The following screen will appear.Red: Adjust the red saturation level. Values closer to 100 mean greater intensity for the color.Green: Adjust the green saturation level. Values closer to 100 mean greater intensity for the color.Blue: Adjust the blue saturation level. Values closer to 100 mean greater intensity for the color.Color Tone: Select a color tone that best suits your viewing needs.SAMSUNGMAGICSAMSUNGMAGICAUTO SAMSUNGMAGICBrightSAMSUNGMAGICAngleBrightnessContrastSharpnessColorHDMI Black LevelCustom1007560OffReturnPictureConfigure color settings.AUTO RedGreenBlueColor ToneGammaReturnColorAdjust the red saturation level. Values closer to 100 mean greater intensity for the color.505050NormalMode1](https://usermanual.wiki/Samsung-Electronics-Co/U28E590D.user-manual-pdf/User-Guide-2567798-Page-40.png)
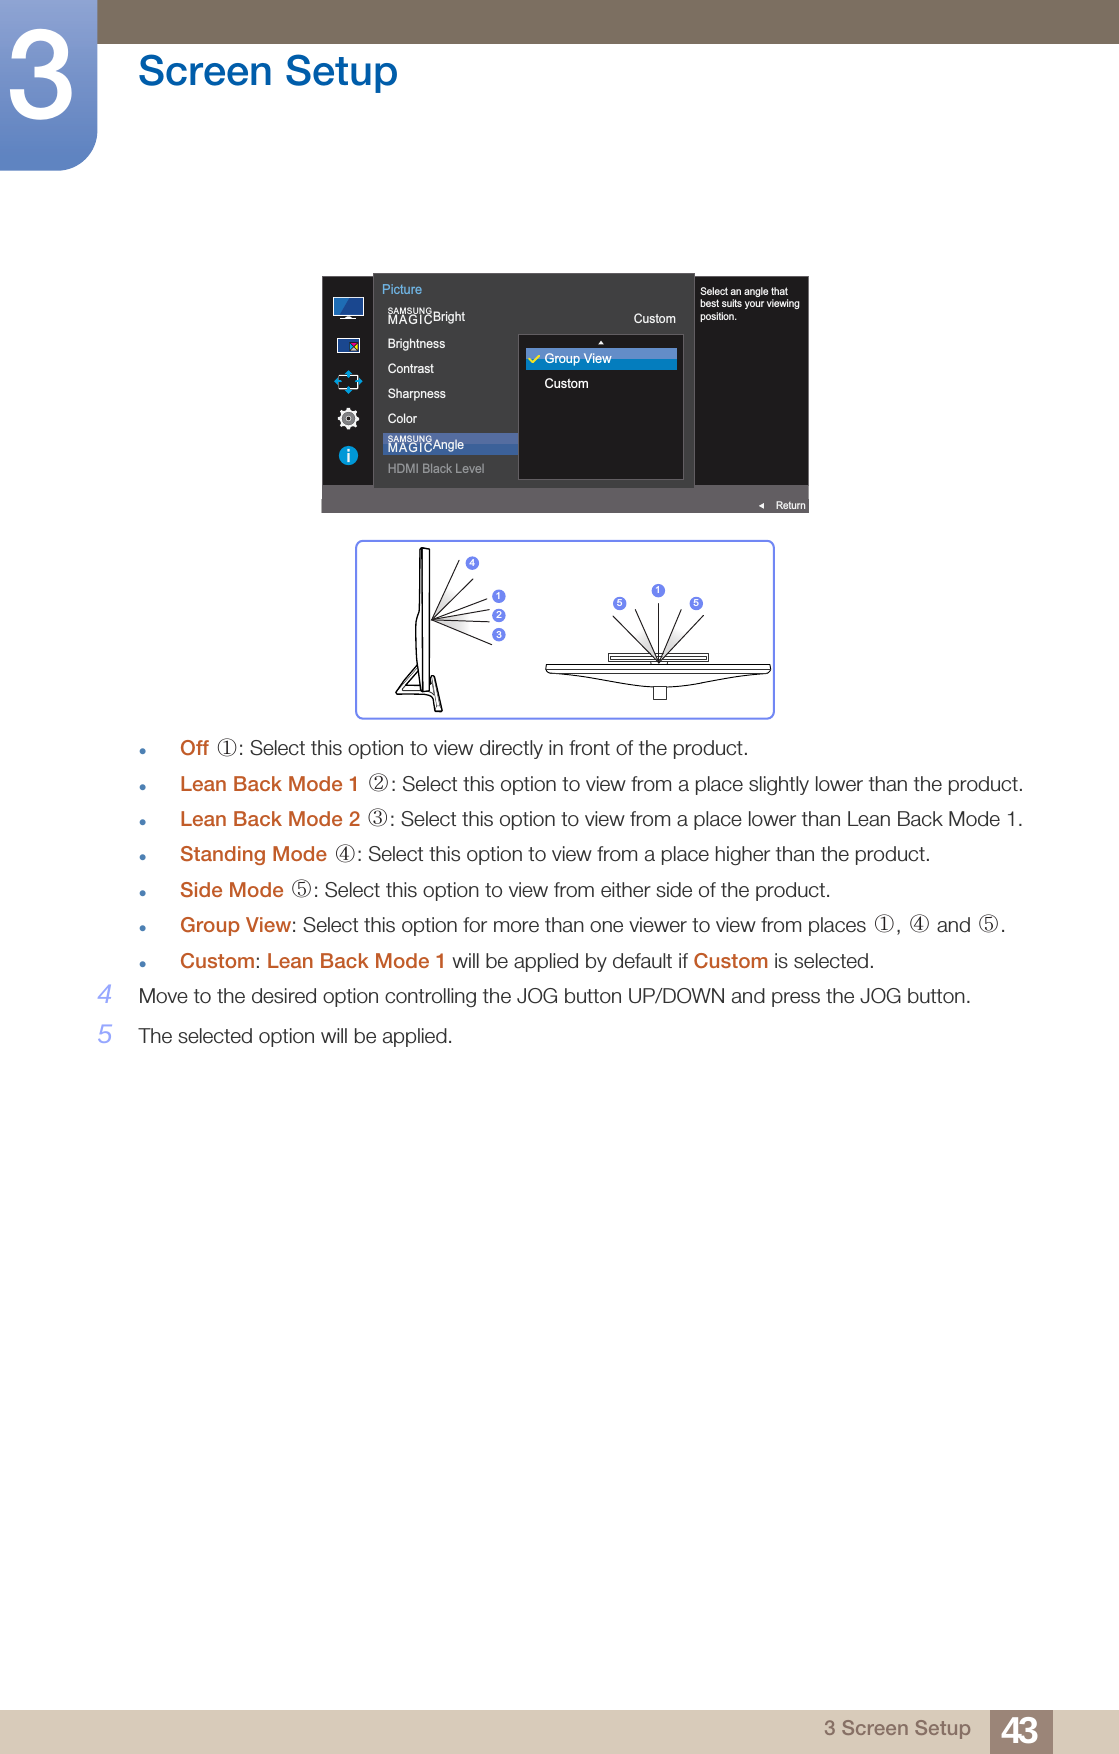
![42Screen Setup33 Screen Setup3.6 SAMSUNG MAGIC AngleAngle allows you to configure the settings to obtain the optimum picture quality according to your viewing angle. This option is not available when Bright is in Cinema or Dynamic Contrast mode.This menu is not available when Game Mode is enabled.This menu is not available when Eye Saver Mode is enabled.Not available when PIP/PBP Mode is set to On. This feature provides the viewing angle, brightness, and tint to suit your preferences.3.6.1 Configuring SAMSUNG MAGIC Angle1When the Function Key Guide appears, select [ ] by moving the JOG button UP. Next, press the JOG button.2Move to Picture controlling the JOG button UP/DOWN and press the JOG button.3Move to Angle controlling the JOG button UP/DOWN and press the JOG button.The following screen will appear.SAMSUNGMAGICSAMSUNGMAGICSAMSUNGMAGICAUTO SAMSUNGMAGICBrightSAMSUNGMAGICAngleBrightnessContrastSharpnessColorHDMI Black LevelCustom1007560OffReturnPictureSelect an angle that best suits your viewing position.OffLean Back Mode 1Lean Back Mode 2Standing ModeSide Mode](https://usermanual.wiki/Samsung-Electronics-Co/U28E590D.user-manual-pdf/User-Guide-2567798-Page-42.png)
![44Screen Setup33 Screen Setup3.7 HDMI Black LevelIf a DVD player or set-top box is connected to the product via HDMI, image quality degradation (contrast/color degradation, black level, etc.) may occur, depending on the connected source device. In such case, HDMI Black Level can be used to adjust the image quality. If this is the case, correct the degraded picture quality using HDMI Black Level. This function is only available in HDMI 1 or HDMI 2 mode.Not available when PIP/PBP Mode is set to On. 3.7.1 Configuring the HDMI Black Level Settings1When the Function Key Guide appears, select [ ] by moving the JOG button UP. Next, press the JOG button.2Move to Picture controlling the JOG button UP/DOWN and press the JOG button.3Move to HDMI Black Level controlling the JOG button UP/DOWN and press the JOG button.The following screen will appear.Normal: Select this mode when there is no contrast ratio degradation.Low: Select this mode to reduce the black level and increase the white level when there is a contrast ratio degradation.4Move to the desired option controlling the JOG button UP/DOWN and press the JOG button.5The selected option will be applied. HDMI Black Level may not be compatible with some source devices. AUTO SAMSUNGMAGICBrightSAMSUNGMAGICAngleBrightnessContrastSharpnessColorHDMI Black LevelDynamic1007560OffReturnPictureOptimize HDMI picturebrightness and contrastby adjusting the blacklevel of the video signal.NormalLow](https://usermanual.wiki/Samsung-Electronics-Co/U28E590D.user-manual-pdf/User-Guide-2567798-Page-44.png)
![45Screen Setup33 Screen Setup3.8 Eye Saver Mode Not available when PIP/PBP Mode is set to On. Set to an optimum picture quality suitable for eye relaxation.TÜV Rheinland “Low Blue Light Content” is a certification for products which meet requirements for lower blue light levels. When Eye Saver Mode is 'On', the blue light that wavelength is around 400nm will become lower and lower, and one hour later it will approach the optimum picture quality suitable for eye relaxation. At the same time, the blue light level is lower than in the default settings, and it was tested by TÜV Rheinland and certified as it met the requirements of TÜV Rheinland “Low Blue Light Content” standards.3.8.1 Configuring Eye Saver Mode1When the Function Key Guide appears, select [ ] by moving the JOG button UP. Next, press the JOG button.2Move to Picture controlling the JOG button UP/DOWN and press the JOG button.3Move to Eye Saver Mode controlling the JOG button UP/DOWN and press the JOG button.The following screen will appear.4Move to the desired option controlling the JOG button UP/DOWN and press the JOG button.5The selected option will be applied.AUTO Eye Saver ModeGame ModeResponse TimePicture SizeScreen AdjustmentWideReturnPictureSet to an optimumpicture quality suitablefor eye relaxation.OffOn](https://usermanual.wiki/Samsung-Electronics-Co/U28E590D.user-manual-pdf/User-Guide-2567798-Page-45.png)
![46Screen Setup33 Screen Setup3.9 Game ModeConfigure the product screen settings for game mode.Use this feature when playing games on a PC or when a game console such as PlayStation™ or Xbox™ is connected. This menu is not available when Eye Saver Mode is enabled.Not available when PIP/PBP Mode is set to On. 3.9.1 Configuring Game Mode1When the Function Key Guide appears, select [ ] by moving the JOG button UP. Next, press the JOG button.2Move to Picture controlling the JOG button UP/DOWN and press the JOG button.3Move to Game Mode controlling the JOG button UP/DOWN and press the JOG button. The following screen will appear.4Move to the desired option controlling the JOG button UP/DOWN and press the JOG button.5The selected option will be applied. Game Mode turns Off when the monitor turns on, power-saving mode activates, or the input source changes. If you want to keep Game Mode enabled all the time, select Always On. AUTO Eye Saver ModeGame ModeResponse TimePicture SizeScreen Adjustment16:9ReturnPictureOptimizes imagesettings for playinggames.OffOnAlways On](https://usermanual.wiki/Samsung-Electronics-Co/U28E590D.user-manual-pdf/User-Guide-2567798-Page-46.png)
![47Screen Setup33 Screen Setup3.10 Response TimeAccelerate the panel response rate to make video appear more vivid and natural. It is best to set Response Time to Standard or Faster when you are not viewing a movie.This menu is not available when PIP/PBP Mode is set to On and the Size is set to / / (PIP Mode). 3.10.1 Configuring the Response Time1When the Function Key Guide appears, select [ ] by moving the JOG button UP. Next, press the JOG button.2Move to Picture controlling the JOG button UP/DOWN and press the JOG button.3Move to Response Time controlling the JOG button UP/DOWN and press the JOG button.The following screen will appear.4Move to the desired option controlling the JOG button UP/DOWN and press the JOG button.5The selected option will be applied.AUTO Eye Saver ModeGame ModeResponse TimePicture SizeScreen AdjustmentOff16:9ReturnPictureAccelerate the panelresponse rate to makevideo appear morevivid and natural.StandardFasterFastest](https://usermanual.wiki/Samsung-Electronics-Co/U28E590D.user-manual-pdf/User-Guide-2567798-Page-47.png)
![48Screen Setup33 Screen Setup3.11 Picture SizeChange the picture size. This menu is not available when PIP/PBP Mode is set to On and the Size is set to (PBP Mode). 3.11.1 Changing the Picture Size1When the Function Key Guide appears, select [ ] by moving the JOG button UP. Next, press the JOG button.2Move to Screen controlling the JOG button UP/DOWN and press the JOG button.3Move to Picture Size controlling the JOG button UP/DOWN and press the JOG button.The following screen will appear.Auto: Display the picture according to the aspect ratio of the input source.Wide: Display the picture in full screen regardless of the aspect ratio of the input source.In PC modeAUTO Eye Saver ModeGame ModeResponse TimePicture SizeScreen AdjustmentOffOff16:9ReturnPictureChoose the size andaspect ratio of thepicture displayed onscreen.AutoWide](https://usermanual.wiki/Samsung-Electronics-Co/U28E590D.user-manual-pdf/User-Guide-2567798-Page-48.png)
![50Screen Setup33 Screen Setup3.12 Screen Adjustment3.12.1 Configuring H-Position & V-PositionH-Position: Move the screen to the left or right.V-Position: Move the screen up or down. This menu is only available when Picture Size is set to Screen Fit in AV Mode. When a 480P or 576P or 720P or 1080P signal is input in AV mode and the monitor can display normally, select Screen Fit to adjust horizontal position in 0-6 levels. 1When the Function Key Guide appears, select [ ] by moving the JOG button UP. Next, press the JOG button.2Move to Picture controlling the JOG button UP/DOWN and press the JOG button.3Move to Screen Adjustment controlling the JOG button UP/DOWN and press the JOG button.4Move to the H-Position or V-Position controlling the JOG button UP/DOWN and press the JOG button.The following screen will appear.5Adjust the H-Position or V-Position controlling the JOG button LEFT/RIGHT and press the JOG button.6The selected option will be applied.AUTO Eye Saver ModeGame ModeResponse TimePicture SizeScreen AdjustmentOffOffFasterScreen FitReturnPictureAUTO H-PositionV-Position33ReturnScreen AdjustmentMove the imagedisplayed on thescreen to the left orright.AUTO H-PositionV-Position33ReturnScreen AdjustmentMove the imagedisplayed on thescreen up or down.](https://usermanual.wiki/Samsung-Electronics-Co/U28E590D.user-manual-pdf/User-Guide-2567798-Page-50.png)
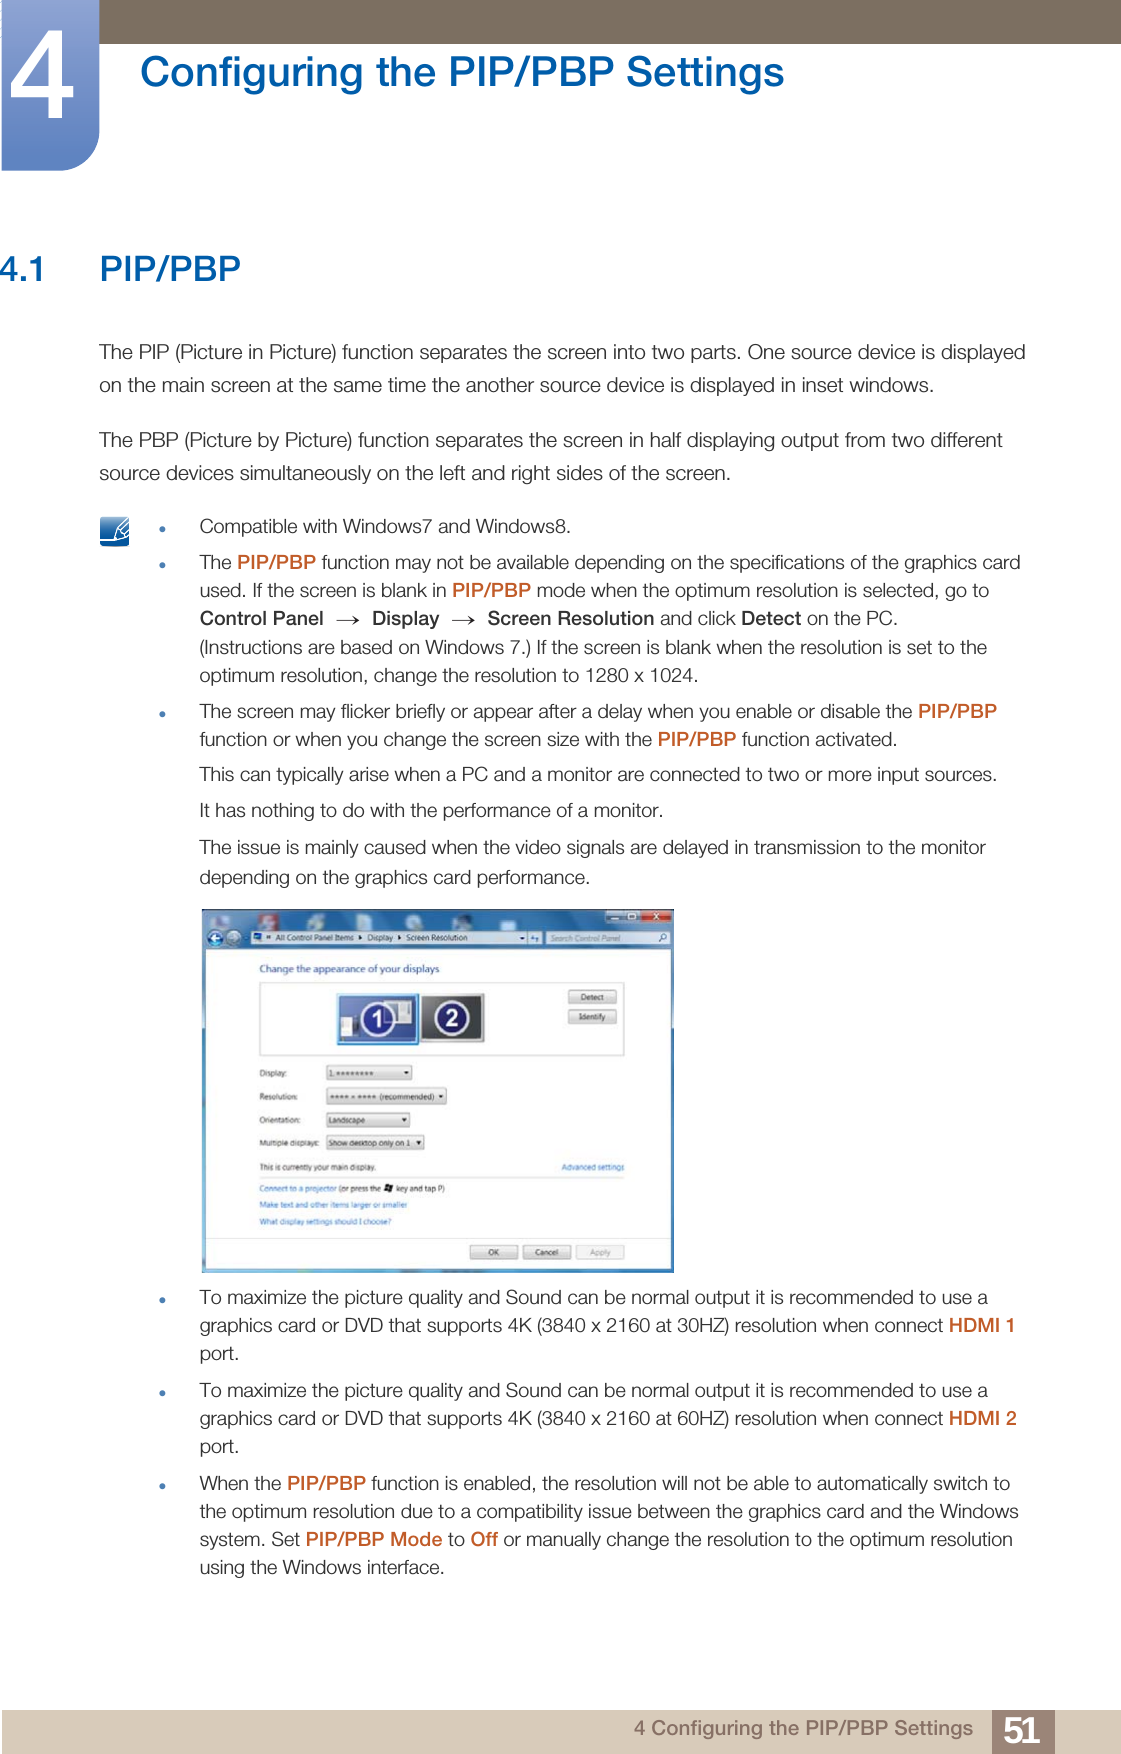
![52Configuring the PIP/PBP Settings44 Configuring the PIP/PBP Settings4.1.1 Configuring PIP/PBP ModeEnable or disable the PIP/PBP function.1When the Function Key Guide appears, select [ ] by moving the JOG button UP. Next, press the JOG button.2Move to the PIP/PBP controlling the JOG button UP/DOWN and press the JOG button.3Move to the PIP/PBP Mode controlling the JOG button UP/DOWN and press the JOG button.The following screen will appear.Off / On4Move to the desired option controlling the JOG button UP/DOWN and press the JOG button.5The selected option will be applied.OffTurn PIP/PBP Modeon or off. PIP/PBPReturnfOffOnPIP/PBP ModeSizePositionSound SourceSourcePicture SizeContrast](https://usermanual.wiki/Samsung-Electronics-Co/U28E590D.user-manual-pdf/User-Guide-2567798-Page-52.png)
![53Configuring the PIP/PBP Settings44 Configuring the PIP/PBP Settings4.1.2 Configuring SizeSelect the size and aspect ratio of the sub-screen.1When the Function Key Guide appears, select [ ] by moving the JOG button UP. Next, press the JOG button.2Move to the PIP/PBP controlling the JOG button UP/DOWN and press the JOG button.3Move to the Size controlling the JOG button UP/DOWN and press the JOG button.The following screen will appear.: Select the icon image if you want to use PBP mode where the optimum resolution for the left and right sides of the screen is 1920 x 2160 (width x height).: Select the icon image if you want to use PIP mode where the optimum resolution for the sub-screen is 720 x 480 (width x height).: Select the icon image if you want to use PIP mode where the optimum resolution of the sub-screen is 1280 x 720 (width x height).: Select the icon image if you want to use PIP mode where the optimum resolution of the sub-screen is 1920 x 1080 (width x height).4Move to the desired option controlling the JOG button UP/DOWN and press the JOG button.5The selected option will be applied. Select the size andaspect ratio of thesub-screen.Main:HDMI 1Sub:HDMI 2 PIP/PBPReturnPIP/PBP ModeSizePositionSound SourceSourcePicture SizeContrast 75/75](https://usermanual.wiki/Samsung-Electronics-Co/U28E590D.user-manual-pdf/User-Guide-2567798-Page-53.png)
![54Configuring the PIP/PBP Settings44 Configuring the PIP/PBP Settings4.1.3 Configuring PositionSelect the position of the sub-screen from the available options.1When the Function Key Guide appears, select [ ] by moving the JOG button UP. Next, press the JOG button.2Move to the PIP/PBP controlling the JOG button UP/DOWN and press the JOG button.3Move to the Position controlling the JOG button UP/DOWN and press the JOG button.The following screen will appear. / / / 4Move to the desired option controlling the JOG button UP/DOWN and press the JOG button.5The selected option will be applied. Not available when PBP is selected.The screen may flicker if the input signal is unstable. Select the position ofthe sub-screen fromthe available options. PIP/PBPReturnPIP/PBP ModeSizePositionSound SourceSourcePicture SizeContrastOnMain:HDMI 1Sub:HDMI 2](https://usermanual.wiki/Samsung-Electronics-Co/U28E590D.user-manual-pdf/User-Guide-2567798-Page-54.png)
![55Configuring the PIP/PBP Settings44 Configuring the PIP/PBP Settings4.1.4 Configuring Sound SourceSet which screen you want to hear the sound for.1When the Function Key Guide appears, select [ ] by moving the JOG button UP. Next, press the JOG button.2Move to the PIP/PBP controlling the JOG button UP/DOWN and press the JOG button.3Move to the Sound Source controlling the JOG button UP/DOWN and press the JOG button.The following screen will appear. The white area of the icon means that the Sound Source comes from the main screen/sub-screen or the left/right screen. / / 4Move to the desired option controlling the JOG button UP/DOWN and press the JOG button.5The selected option will be applied.PIPPBP Set which screen youwant to hear thesound for. PIP/PBPReturnPIP/PBP ModeSizePositionSound SourceSourcePicture SizeContrastOn75Main:HDMI 1Sub:HDMI 2 Set which screen youwant to hear thesound for. PIP/PBPReturnPIP/PBP ModeSizePositionSound SourceSourcePicture SizeContrastOn75/75Main:HDMI 1Sub:HDMI 2](https://usermanual.wiki/Samsung-Electronics-Co/U28E590D.user-manual-pdf/User-Guide-2567798-Page-55.png)
![56Configuring the PIP/PBP Settings44 Configuring the PIP/PBP Settings4.1.5 Configuring SourceSelect the source for each screen.PIP1When the Function Key Guide appears, select [ ] by moving the JOG button UP. Next, press the JOG button.2Move to the PIP/PBP controlling the JOG button UP/DOWN and press the JOG button.3In PIP mode (Size / / ), move the JOG button UP/DOWN to select Source and then press the JOG button.The following screen will appear.HDMI 1HDMI 2DisplayPort4Move to the desired option controlling the JOG button UP/DOWN and press the JOG button.5The selected option will be applied. The input source for the main screen changes.With the exception of the current input source, the other two input sources can be selected.The screen may flicker if the input signal is unstable.When the Function Key Guide appears, move the JOG button LEFT to select the [ ] icon and then press the JOG button. The main screen will switch in the order DisplayPort HDMI 1 HDMI 2. Select the source foreach screen. PIP/PBPReturnPIP/PBP ModeSizePositionSound SourceSourcePicture SizeContrastDisplayPortHDMI 2On→ →](https://usermanual.wiki/Samsung-Electronics-Co/U28E590D.user-manual-pdf/User-Guide-2567798-Page-56.png)
![57Configuring the PIP/PBP Settings44 Configuring the PIP/PBP SettingsPBP1When the Function Key Guide appears, select [ ] by moving the JOG button UP. Next, press the JOG button.2Move to the PIP/PBP controlling the JOG button UP/DOWN and press the JOG button.3In PBP mode (Size ), move the JOG button UP/DOWN to select Source and then press the JOG button.The following screen will appear.HDMI 1HDMI 2DisplayPort4Control the JOG button UP/DOWN and choose the left/right external input source.5Move the JOG button LEFT/RIGHT to select Apply and then press the JOG button. Pressing the JOG button after selecting Cancel will cancel Source configuration and revert back to the PIP/PBP control menu. The input source for the main screen changes.The screen may flicker if the input signal is unstable.When the input signal of the left and right screens are the same, the operation cannot be performed.When the Function Key Guide appears, move the JOG button LEFT to select the [ ] icon and then press the JOG button. The same PBP source setting menu appears. Select the source foreach screen. PIP/PBPReturnPIP/PBP ModeSizePositionSound SourceSourcePicture SizeContrastOn75/756RXUFH $SSO\&DQFHOHDMI 1 HDMI 2](https://usermanual.wiki/Samsung-Electronics-Co/U28E590D.user-manual-pdf/User-Guide-2567798-Page-57.png)
![58Configuring the PIP/PBP Settings44 Configuring the PIP/PBP Settings4.1.6 Configuring Picture SizeSelect the image size for sub-screen.PIP1When the Function Key Guide appears, select [ ] by moving the JOG button UP. Next, press the JOG button.2Move to the PIP/PBP controlling the JOG button UP/DOWN and press the JOG button.3In PIP mode (Size / / ), move the JOG button UP/DOWN to select Picture Size and then press the JOG button.The following screen will appear.Auto: Display the picture according to the aspect ratio of the each screen input source.Wide: Display the picture in full screen regardless of the aspect ratio of the each screen input source.In PC mode Select the image sizefor each screen. PIP/PBPReturnPIP/PBP ModeSizePositionSound SourceSourcePicture SizeContrastOn75/75AutoWide](https://usermanual.wiki/Samsung-Electronics-Co/U28E590D.user-manual-pdf/User-Guide-2567798-Page-58.png)
![60Configuring the PIP/PBP Settings44 Configuring the PIP/PBP SettingsPBP1When the Function Key Guide appears, select [ ] by moving the JOG button UP. Next, press the JOG button.2Move to the PIP/PBP controlling the JOG button UP/DOWN and press the JOG button.3In PBP mode (Size ), move the JOG button UP/DOWN to select Picture Size and then press the JOG button.The following screen will appear.Auto: Display the picture according to the aspect ratio of the each screen input source.Wide: Display the picture in full screen regardless of the aspect ratio of the each screen input source.In PC mode Select the image sizefor each screen. PIP/PBPReturnPIP/PBP ModeSizePositionSound SourceSourcePicture SizeContrastOn75/753LFWXUH6L]H $SSO\&DQFHOAuto Auto](https://usermanual.wiki/Samsung-Electronics-Co/U28E590D.user-manual-pdf/User-Guide-2567798-Page-60.png)
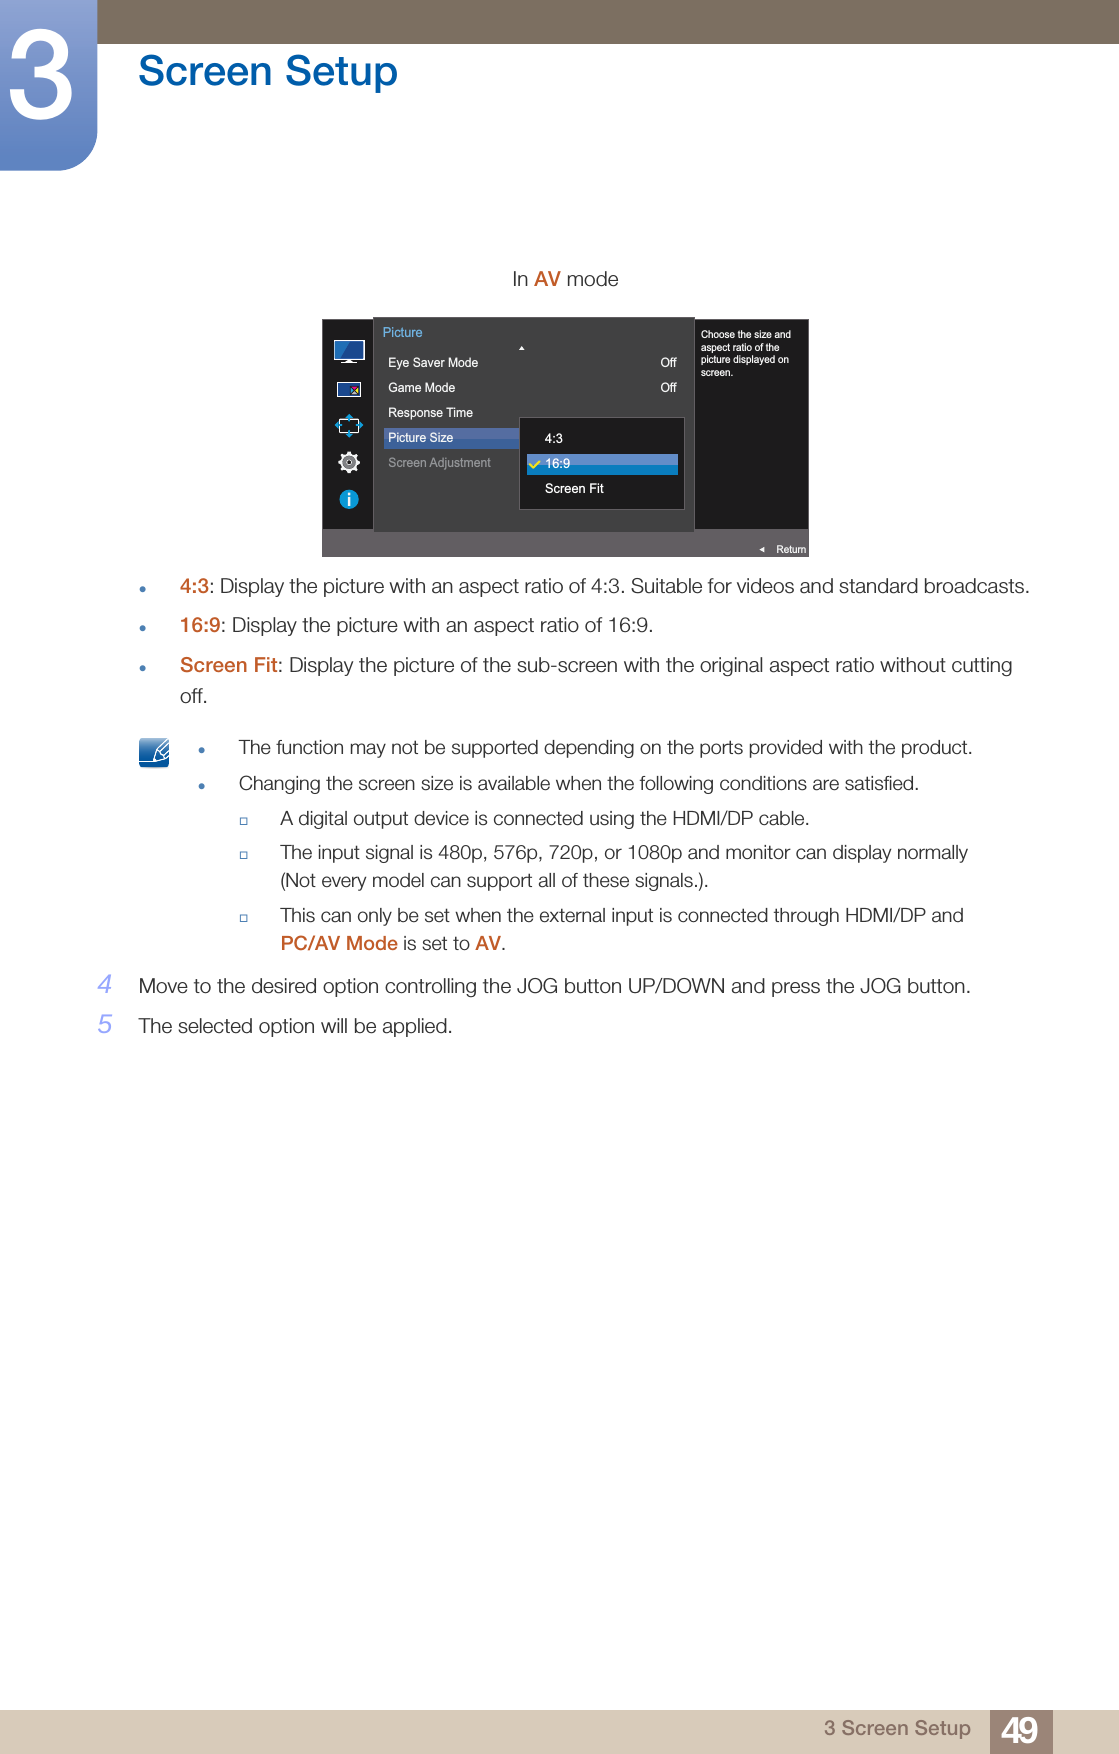
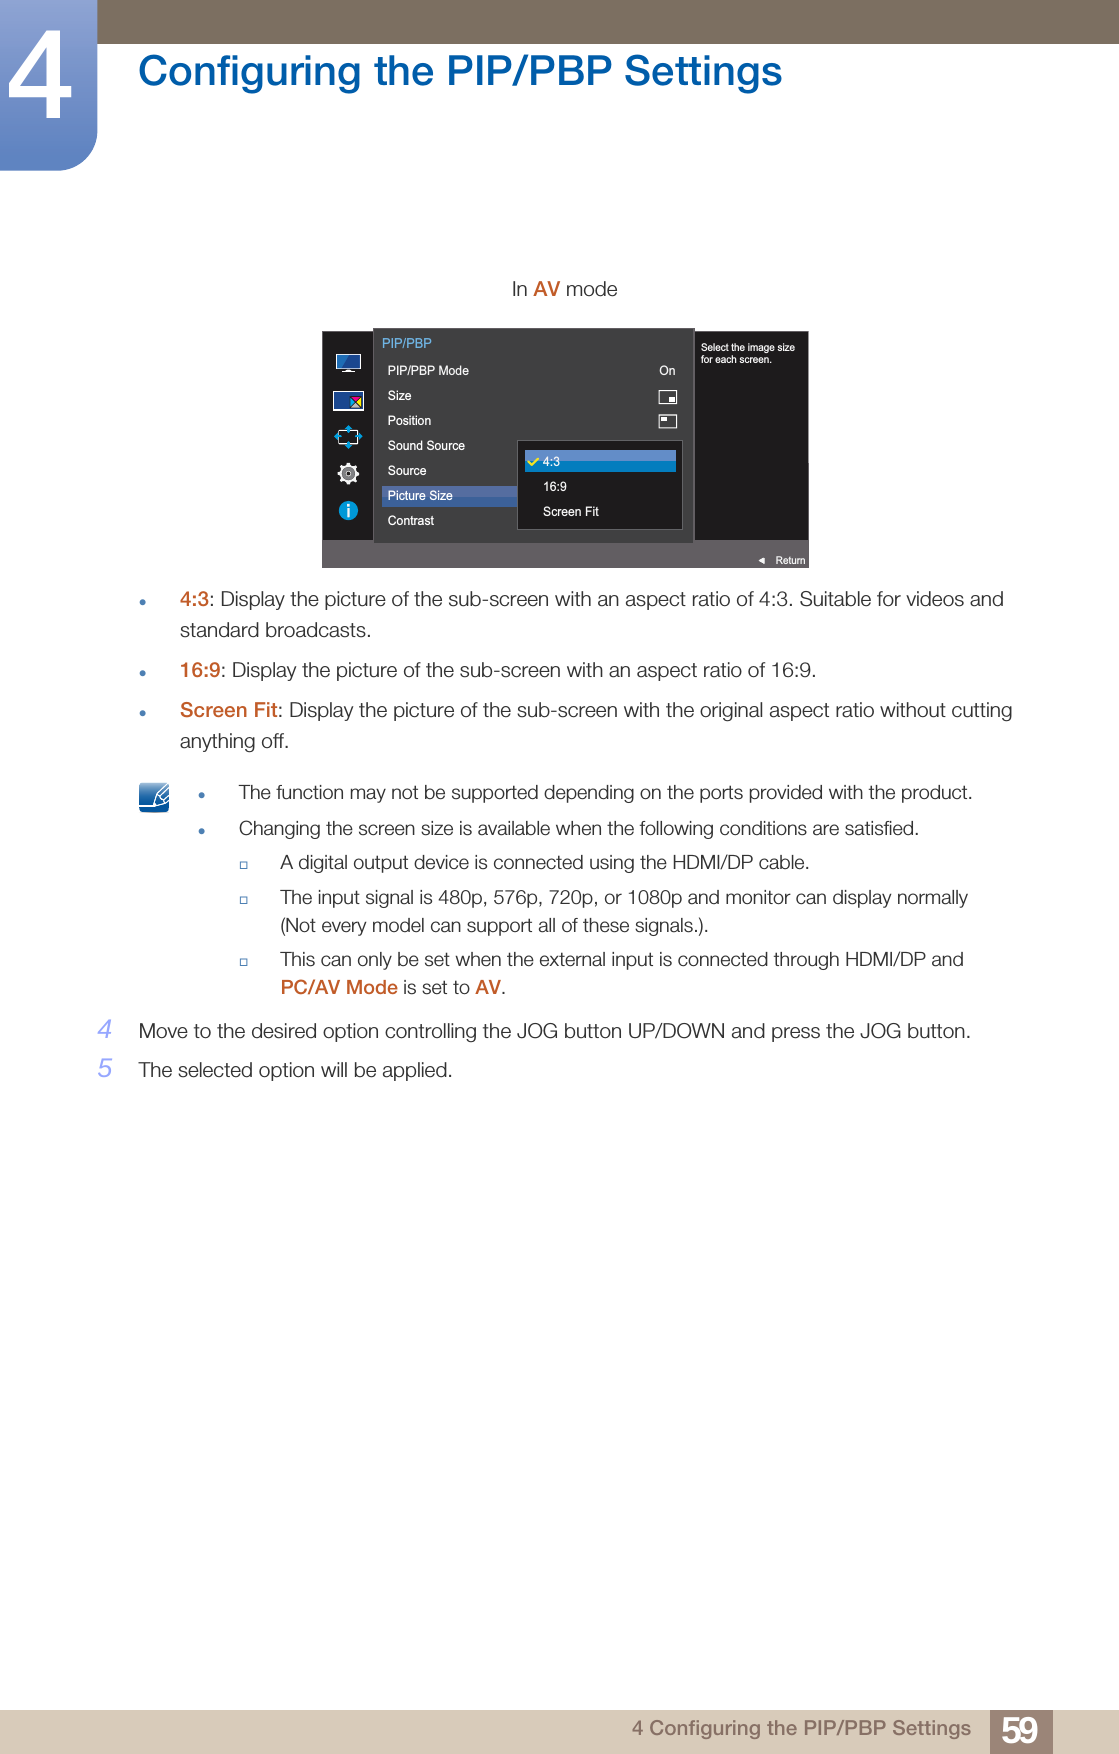
![61Configuring the PIP/PBP Settings44 Configuring the PIP/PBP Settings4:3: Display the picture of the sub-screen with an aspect ratio of 4:3. Suitable for videos and standard broadcasts.16:9: Display the picture of the sub-screen with an aspect ratio of 16:9.Screen Fit: Display the picture of the sub-screen with the original aspect ratio without cutting anything off. The function may not be supported depending on the ports provided with the product.Changing the screen size is available when the following conditions are satisfied.A digital output device is connected using the HDMI/DP cable.The input signal is 480p, 576p, 720p, or 1080p and monitor can display normally (Not every model can support all of these signals.).This can only be set when the external input is connected through HDMI/DP and PC/AV Mode is set to AV. 4Move to the desired option controlling the JOG button and press the JOG button.5The selected option will be applied.In AV mode3LFWXUH6L]H $SSO\&DQFHO16:9 Wide](https://usermanual.wiki/Samsung-Electronics-Co/U28E590D.user-manual-pdf/User-Guide-2567798-Page-61.png)
![62Configuring the PIP/PBP Settings44 Configuring the PIP/PBP Settings4.1.7 Configuring ContrastPIPAdjust the contrast level for sub-screen.1When the Function Key Guide appears, select [ ] by moving the JOG button UP. Next, press the JOG button.2Move to the PIP/PBP controlling the JOG button UP/DOWN and press the JOG button.3In PIP mode (Size / / ), move the JOG button UP/DOWN to select Contrast and then press the JOG button.The following screen will appear.4Adjust the Contrast controlling the JOG button LEFT/RIGHT.5The selected option will be applied. Adjust the contrastlevel for each screen. PIP/PBPReturnPIP/PBP ModeSizePositionSound SourceSourcePicture SizeContrastOn75/7575](https://usermanual.wiki/Samsung-Electronics-Co/U28E590D.user-manual-pdf/User-Guide-2567798-Page-62.png)
![63Configuring the PIP/PBP Settings44 Configuring the PIP/PBP SettingsPBPAdjust the contrast level for each screen.1When the Function Key Guide appears, select [ ] by moving the JOG button UP. Next, press the JOG button.2Move to the PIP/PBP controlling the JOG button UP/DOWN and press the JOG button.3In PBP mode (Size ), move the JOG button UP/DOWN to select Contrast and then press the JOG button.The following screen will appear.4Adjust the Contrast controlling the JOG button LEFT/RIGHT.5The selected option will be applied. Adjust the contrastlevel for each screen. PIP/PBPReturnPIP/PBP ModeSizePositionSound SourceSourcePicture SizeContrastOn75/75&RQWUDVW ](https://usermanual.wiki/Samsung-Electronics-Co/U28E590D.user-manual-pdf/User-Guide-2567798-Page-63.png)
![645 Coordinating OSD5 Coordinating OSDA detailed description of each function is provided. Refer to your product for details.5.1 TransparencySet the transparency for the menu windows.5.1.1 Changing Transparency1When the Function Key Guide appears, select [ ] by moving the JOG button UP. Next, press the JOG button.2Move to OnScreen Display controlling the JOG button UP/DOWN and press the JOG button.3Move to Transparency controlling the JOG button UP/DOWN and press the JOG button. The following screen will appear.4Move to the desired option controlling the JOG button UP/DOWN and press the JOG button.5The selected option will be applied. Configure the transparency of the menu windows.TransparencyLanguageDisplay Time OffOnOnScreen DisplayReturn](https://usermanual.wiki/Samsung-Electronics-Co/U28E590D.user-manual-pdf/User-Guide-2567798-Page-64.png)
![65Coordinating OSD55 Coordinating OSD5.2 LanguageSet the menu language. A change to the language setting will only be applied to the onscreen menu display.It will not be applied to other functions on your PC. 5.2.1 Configuring Language1When the Function Key Guide appears, select [ ] by moving the JOG button UP. Next, press the JOG button.2Move to OnScreen Display controlling the JOG button UP/DOWN and press the JOG button.3Move to Language controlling the JOG button UP/DOWN and press the JOG button.The following screen will appear.4Move to the desired option controlling the JOG button UP/DOWN and press the JOG button.5The selected option will be applied. Set the menulanguage.TransparencyLanguageDisplay Time DeutschEnglishEspañolFrançaisItalianoOnScreen DisplayReturn](https://usermanual.wiki/Samsung-Electronics-Co/U28E590D.user-manual-pdf/User-Guide-2567798-Page-65.png)
![66Coordinating OSD55 Coordinating OSD5.3 Display TimeSet the on-screen display (OSD) menu to automatically disappear if the menu is not used for a specified period of time.Display Time can be used to specify the time after which you want the OSD menu to disappear.5.3.1 Configuring Display Time1When the Function Key Guide appears, select [ ] by moving the JOG button UP. Next, press the JOG button.2Move to OnScreen Display controlling the JOG button UP/DOWN and press the JOG button.3Move to Display Time controlling the JOG button UP/DOWN and press the JOG button.The following screen will appear.4Move to the desired option controlling the JOG button UP/DOWN and press the JOG button. 5The selected option will be applied. Set how long the menuwindow will remain onscreen for when it isnot in use.TransparencyLanguageDisplay Time 5 sec10 sec20 sec200 secOnScreen DisplayOnReturn](https://usermanual.wiki/Samsung-Electronics-Co/U28E590D.user-manual-pdf/User-Guide-2567798-Page-66.png)
![676 Setup and Reset6 Setup and Reset A detailed description of each function is provided. Refer to your product for details.6.1 Eco Saving PlusThe Eco Saving Plus function reduces power consumption by controlling the electric current used by the monitor panel. This menu is not available when Bright is in Dynamic Contrast mode.This menu is not available when Game Mode is enabled.This menu is not available when Eye Saver Mode is enabled.Not available when PIP/PBP Mode is set to On. 6.1.1 Configuring Eco Saving Plus1When the Function Key Guide appears, select [ ] by moving the JOG button UP. Next, press the JOG button.2Move to System controlling the JOG button UP/DOWN and press the JOG button.3Move to Eco Saving Plus controlling the JOG button UP/DOWN and press the JOG button.The following screen will appear.Off: Deactivate the Eco Saving Plus function.Auto: The power consumption will automatically be reduced by about 10% over the current setting.(The reduction of power consumption depends on the customer screen brightness condition.)Low: The power consumption will be reduced by 25% over the default setting.High: The power consumption will be reduced by 50% over the default setting.4Move to the desired option controlling the JOG button UP/DOWN and press the JOG button.5The selected option will be applied.SAMSUNGMAGICAccelerationStand-by Adjust the powerconsumption of theproduct to save energy.Eco Saving PlusOff TimerPC/AV ModeDisplayPort Ver.Source DetectionKey Repeat TimePower LED OnOffAutoLowHighSystemReturn](https://usermanual.wiki/Samsung-Electronics-Co/U28E590D.user-manual-pdf/User-Guide-2567798-Page-67.png)
![68Setup and Reset66 Setup and Reset6.2 Off TimerYou can set the product to automatically turn off.6.2.1 Configuring Off Timer1When the Function Key Guide appears, select [ ] by moving the JOG button UP. Next, press the JOG button.2Move to System controlling the JOG button UP/DOWN and press the JOG button.3Move to Off Timer controlling the JOG button UP/DOWN and press the JOG button.4Move to Off Timer controlling the JOG button UP/DOWN and press the JOG button.The following screen will appear.Off: Deactivate the off timer so that the product does not power off automatically.On: Activate the off timer so that the product powers off automatically.5Move to the desired option controlling the JOG button UP/DOWN and press the JOG button.6The selected option will be applied.On1.2AutoAccelerationStand-by Enable or disable theOff Timer.Eco Saving PlusOff TimerPC/AV ModeDisplayPort Ver.Source DetectionKey Repeat TimePower LED OnSystemReturn Enable or disable theOff Timer.Off TimerTurn Off AfterOffOnOff TimerReturn](https://usermanual.wiki/Samsung-Electronics-Co/U28E590D.user-manual-pdf/User-Guide-2567798-Page-68.png)
![69Setup and Reset66 Setup and Reset6.2.2 Configuring Turn Off After1When the Function Key Guide appears, select [ ] by moving the JOG button UP. Next, press the JOG button.2Move to System controlling the JOG button UP/DOWN and press the JOG button.3Move to Off Timer controlling the JOG button UP/DOWN and press the JOG button.4Move to Turn Off After controlling the JOG button UP/DOWN and press the JOG button.The following screen will appear. 5Adjust the Turn Off After controlling the JOG button LEFT/RIGHT.6The selected option will be applied. The off timer can be set within a range of 1 to 23 hours. The product will automatically power off after the specified number of hours.This option is only available when Off Timer is set to On.For products for the market in some regions, the Off Timer is set to automatically activate 4 hours after the product powers on. This is done in accordance with power supply regulations. If you do not want the timer to activate, go to MENU System and set Off Timer to Off. On Set the monitor toautomatically turn offafter a certain timeperiod.Off TimerTurn Off AfterOff TimerReturn→](https://usermanual.wiki/Samsung-Electronics-Co/U28E590D.user-manual-pdf/User-Guide-2567798-Page-69.png)
![70Setup and Reset66 Setup and Reset6.3 PC/AV ModeSet PC/AV Mode to AV. The picture size will be enlarged. This option is useful when you view a movie. Supplied for the wide models only such as 16:9 or 16:10.If the monitor (when set to HDMI 1, HDMI 2 or DisplayPort) is in power saving mode or is displaying the message Check Signal Cable, press the MENU button to display the On Screen Display(OSD). You can select PC or AV. 6.3.1 Configuring PC/AV Mode1When the Function Key Guide appears, select [ ] by moving the JOG button UP. Next, press the JOG button.2Move to System controlling the JOG button UP/DOWN and press the JOG button.3Move to PC/AV Mode controlling the JOG button UP/DOWN and press the JOG button.4Move to the HDMI 1, HDMI 2 or DisplayPort controlling the JOG button UP/DOWN and press the JOG button.The following screen will appear.5Move to the desired option controlling the JOG button UP/DOWN and press the JOG button.6The selected option will be applied.On1.2AutoAccelerationStand-by Set to AV to enlargethe picture.Eco Saving PlusOff TimerPC/AV ModeDisplayPort Ver.Source DetectionKey Repeat TimePower LED OnSystemReturn Select the PC/AV modefor the DisplayPortsource.DisplayPortHDMI 1HDMI 2PC/AV ModeReturnPCAV Select the PC/AV modefor the HDMI 1 source.DisplayPortHDMI 1HDMI 2PC/AV ModeReturnPCAV](https://usermanual.wiki/Samsung-Electronics-Co/U28E590D.user-manual-pdf/User-Guide-2567798-Page-70.png)
![71Setup and Reset66 Setup and Reset6.4 DisplayPort Ver.Select your Displayport. Displayport 1.1 supports High Bit Rate 1, while 1.2 supports High Bit Rate 2. Incorrect settings may cause the screen to go blank. If this occurs, check the device specifications.If the monitor (when set to HDMI 1, HDMI 2 or DisplayPort) is in power saving mode or is displaying the message Check Signal Cable, press the [ ] button to display the On Screen Display (OSD). You can select 1.1 or 1.2.If you select 1.1, the maximum resolution of your screen drops to 2560 x 1440 due to the limitations in HBR1 transmission speeds. 6.4.1 Configuring DisplayPort Ver.1When the Function Key Guide appears, select [ ] by moving the JOG button UP. Next, press the JOG button.2Move to System controlling the JOG button UP/DOWN and press the JOG button.3Move to DisplayPort Ver. controlling the JOG button UP/DOWN and press the JOG button.The following screen will appear.1.1 / 1.24Move to the desired option controlling the JOG button UP/DOWN and press the JOG button.5The selected option will be applied.OnAutoStand-by Select yourDisplayport.Displayport 1.1supports HBR 1,while 1.2 supportsHBR 2.Eco Saving PlusOff TimerPC/AV ModeDisplayPort Ver.Source DetectionKey Repeat TimePower LED OnSystemReturn1.11.2](https://usermanual.wiki/Samsung-Electronics-Co/U28E590D.user-manual-pdf/User-Guide-2567798-Page-71.png)
![72Setup and Reset66 Setup and Reset6.5 Source DetectionYou can activate Source Detection. Not available when PIP/PBP Mode is set to On. 6.5.1 Configuring Source Detection1When the Function Key Guide appears, select [ ] by moving the JOG button UP. Next, press the JOG button.2Move to System controlling the JOG button UP/DOWN and press the JOG button.3Move to Source Detection controlling the JOG button UP/DOWN and press the JOG button.The following screen will appear.Auto: The input source is automatically recognized.Manual: Manually select an input source.4Move to the desired option controlling the JOG button UP/DOWN and press the JOG button.5The selected option will be applied.OffAuto Decide how inputsources will bedetected.Eco Saving PlusOff TimerPC/AV ModeDisplayPort Ver.Source DetectionKey Repeat TimePower LED OnSystemReturnAutoManual](https://usermanual.wiki/Samsung-Electronics-Co/U28E590D.user-manual-pdf/User-Guide-2567798-Page-72.png)
![73Setup and Reset66 Setup and Reset6.6 Key Repeat TimeControl the response rate of a button when the button is pressed. 6.6.1 Configuring Key Repeat Time1When the Function Key Guide appears, select [ ] by moving the JOG button UP. Next, press the JOG button.2Move to System controlling the JOG button UP/DOWN and press the JOG button.3Move to Key Repeat Time controlling the JOG button UP/DOWN and press the JOG button. The following screen will appear.Acceleration, 1 sec, or 2 sec can be selected. If No Repeat is selected, a command responds only once when a button is pressed.4Move to the desired option controlling the JOG button UP/DOWN and press the JOG button.5The selected option will be applied.Off1.2AutoAcceleration Configure theresponse rate of abutton when the buttonis pressed.Eco Saving PlusOff TimerPC/AV ModeDisplayPort Ver.Source DetectionKey Repeat TimePower LED OnSystemReturnAcceleration1 sec2 secNo Repeat](https://usermanual.wiki/Samsung-Electronics-Co/U28E590D.user-manual-pdf/User-Guide-2567798-Page-73.png)
![74Setup and Reset66 Setup and Reset6.7 Power LED OnConfigure the settings to enable or disable the power LED located at the lower part of the product.6.7.1 Configuring Power LED On1When the Function Key Guide appears, select [ ] by moving the JOG button UP. Next, press the JOG button.2Move to System controlling the JOG button UP/DOWN and press the JOG button.3Move to Power LED On controlling the JOG button UP/DOWN and press the JOG button.The following screen will appear.Working: The power LED is on when the product is turned on.Stand-by: The power LED is on when the product is turned off.4Move to the desired option controlling the JOG button UP/DOWN and press the JOG button.5The selected option will be applied. Set the status of the power LED.ReturnOff1.2AutoAccelerationEco Saving PlusOff TimerPC/AV ModeDisplayPort Ver.Source DetectionKey Repeat TimePower LED OnSystemWorkingStand-by](https://usermanual.wiki/Samsung-Electronics-Co/U28E590D.user-manual-pdf/User-Guide-2567798-Page-74.png)
![75Setup and Reset66 Setup and Reset6.8 Reset AllReturn all the settings for the product to the default factory settings.6.8.1 Initializing Settings (Reset All)1When the Function Key Guide appears, select [ ] by moving the JOG button UP. Next, press the JOG button.2Move to System controlling the JOG button UP/DOWN and press the JOG button.3Move to Reset All controlling the JOG button UP/DOWN and press the JOG button.The following screen will appear.4Move to the desired option controlling the JOG button LEFT/RIGHT and press the JOG button.5The selected option will be applied. Return all the settingsfor the product to thedefault factory settings.Reset AllSystemReturn $OOWKHPHQXVHWWLQJVZLOOEHUHVHWWRGHIDXOW$UH\RXVXUH\RXZDQWWRUHVHW"<HV 1R](https://usermanual.wiki/Samsung-Electronics-Co/U28E590D.user-manual-pdf/User-Guide-2567798-Page-75.png)
![767 Information Menu and Others7 Information Menu and OthersA detailed description of each function is provided. Refer to your product for details.7.1 InformationView the current input source, frequency and resolution.7.1.1 Displaying Information1When the Function Key Guide appears, select [ ] by moving the JOG button UP. Next, press the JOG button.2Move to Information controlling the JOG button UP/DOWN and press the JOG button.The following screen will appear.PBPPIP InformationPicturePIP/PBPOnScreen DisplaySystemInformationHDMI 1**** x ******kHz **HzLU********/**S/N:**************Exit InformationPicturePIP/PBPOnScreen DisplaySystemInformationExitHDMI 1**** x ******kHz **HzHDMI 2**** x ******kHz **HzLU********/**S/N:************** InformationPicturePIP/PBPOnScreen DisplaySystemInformationExitHDMI 1**** x ******kHz **HzHDMI 2**** x ******kHz **HzLU********/**S/N:**************](https://usermanual.wiki/Samsung-Electronics-Co/U28E590D.user-manual-pdf/User-Guide-2567798-Page-76.png)
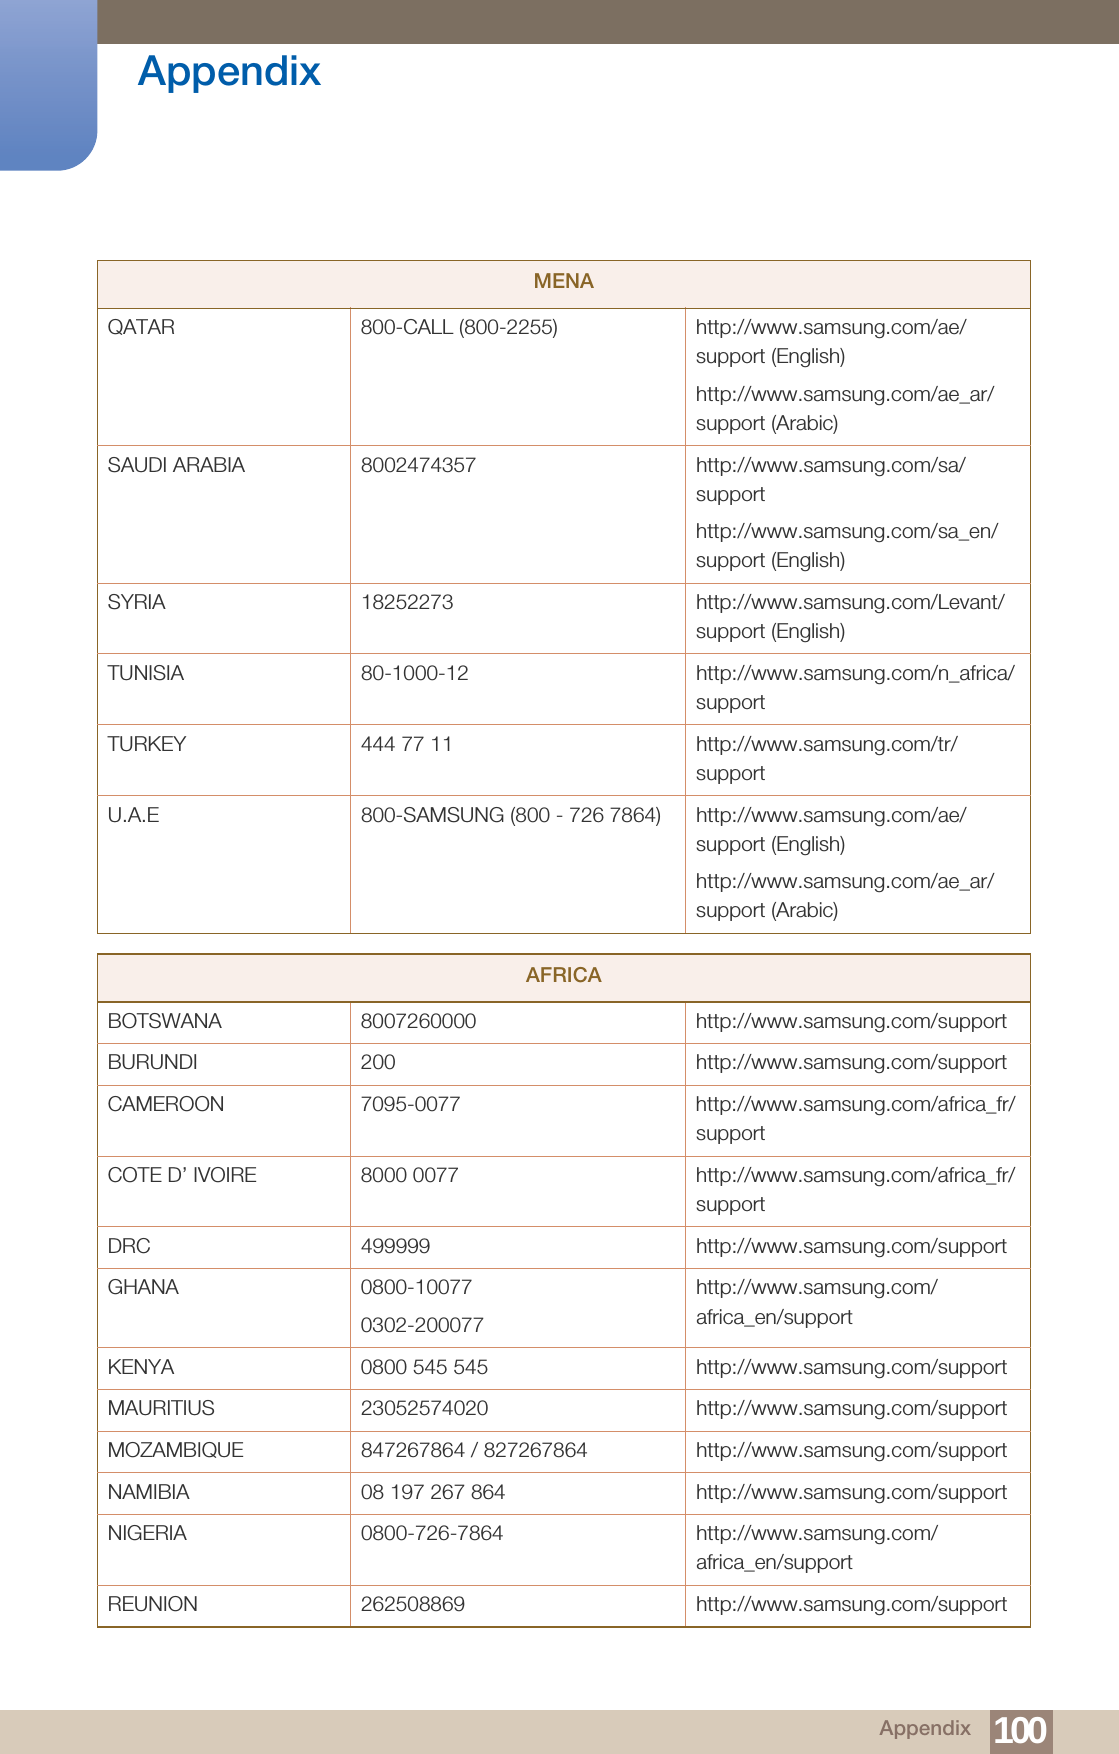
![98Appendix AppendixUKRAINE 0-800-502-000 http://www.samsung.com/ua/support (Ukrainian)http://www.samsung.com/ua_ru/support (Russian)UZBEKISTAN 8-10-800-500-55-500(GSM: 7799)http://www.samsung.com/supportCHINACHINA 400-810-5858 http://www.samsung.com/cn/supportHONG KONG (852) 3698 4698 http://www.samsung.com/hk/support (Chinese)http://www.samsung.com/hk_en/support (English)MACAU 0800 333 http://www.samsung.com/supportS.E.AAUSTRALIA 1300 362 603 http://www.samsung.com/au/supportINDONESIA 021-5699777708001128888http://www.samsung.com/id/supportJAPAN 0120-363-905 http://www.samsung.com/jp/supportMALAYSIA 1800-88-9999603-77137477 (Overseas contact)http://www.samsung.com/my/supportMYANMAR +95-01-2399-888 http://www.samsung.com/supportNEW ZEALAND 0800 726 786 http://www.samsung.com/nz/supportPHILIPPINES 1-800-10-7267864 [PLDT]1-800-8-7267864 [Globe landlineand Mobile]02-4222111 [Other landline]http://www.samsung.com/ph/supportSINGAPORE 1800-SAMSUNG (726-7864) http://www.samsung.com/sg/supportTAIWAN 0800-329999 http://www.samsung.com/tw/supportCIS](https://usermanual.wiki/Samsung-Electronics-Co/U28E590D.user-manual-pdf/User-Guide-2567798-Page-98.png)
![99Appendix AppendixTHAILAND 0-2689-3232,1800-29-3232http://www.samsung.com/th/supportVIETNAM 1800 588 889 http://www.samsung.com/vn/supportS.W.ABANGLADESH 09612300300 http://www.samsung.com/in/supportINDIA 1800 3000 8282 - Toll Free1800 266 8282 - Toll Freehttp://www.samsung.com/in/supportSRI LANKA 94117540540 http://www.samsung.com/supportMENAALGERIA 021 36 11 00 http://www.samsung.com/n_africa/supportBAHRAIN 8000-GSAM (8000-4726) http://www.samsung.com/ae/support (English)http://www.samsung.com/ae_ar/support (Arabic)EGYPT 08000-726786416580http://www.samsung.com/eg/supportIRAN 021-8255 [CE] http://www.samsung.com/iran/supportJORDAN 0800-2227306 5777444http://www.samsung.com/Levant/support (English)KUWAIT 183-CALL (183-2255) http://www.samsung.com/ae/support (English)http://www.samsung.com/ae_ar/support (Arabic)MOROCCO 080 100 22 55 http://www.samsung.com/n_africa/supportOMAN 800-SAMSUNG (800 - 726 7864) http://www.samsung.com/ae/support (English)http://www.samsung.com/ae_ar/support (Arabic)PAKISTAN 0800-Samsung (72678) http://www.samsung.com/pk/supportS.E.A](https://usermanual.wiki/Samsung-Electronics-Co/U28E590D.user-manual-pdf/User-Guide-2567798-Page-99.png)