Samsung Electronics Co YPGS1 Mobile Internet Device User Manual
Samsung Electronics Co Ltd Mobile Internet Device
UserManual.wiki
>
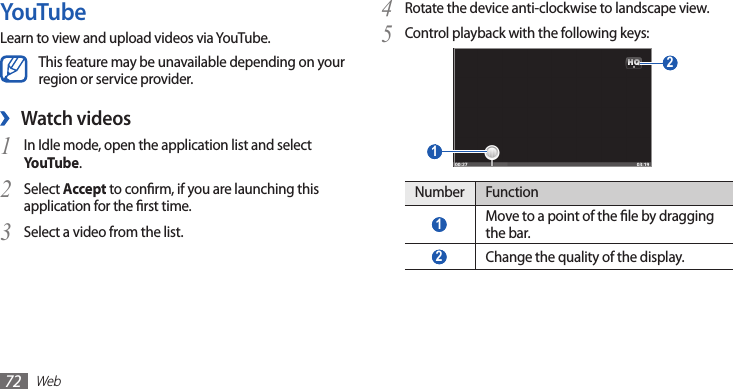
Samsung Electronics Co
>
YPGS1 User Manual
user manual
Navigation menu
Upload a User Manual
Namespaces
Wiki Guide
HTML
PDF
Info
Views
User Manual
Discussion / Help
Navigation

![Using this manual4CopyrightCopyright © 2011 Samsung ElectronicsThis user manual is protected under international copyright laws.No part of this user manual may be reproduced, distributed, translated, or transmitted in any form or by any means, electronic or mechanical, including photocopying, recording, or storing in any information storage and retrieval system, without the prior written permission of Samsung Electronics.►Refer to—pages with related information; for example: ► p.12 (represents “see page 12”)→Followed by—the order of options or menus you must select to perform a step; for example: In Idle mode, open the application list and select Settings →About device (represents Settings, followed by About device)[ ] Square brackets—device keys; for example: [ ] (represents the Power/Reset/Lock key)](https://usermanual.wiki/Samsung-Electronics-Co/YPGS1/User-Guide-1632536-Page-4.png)
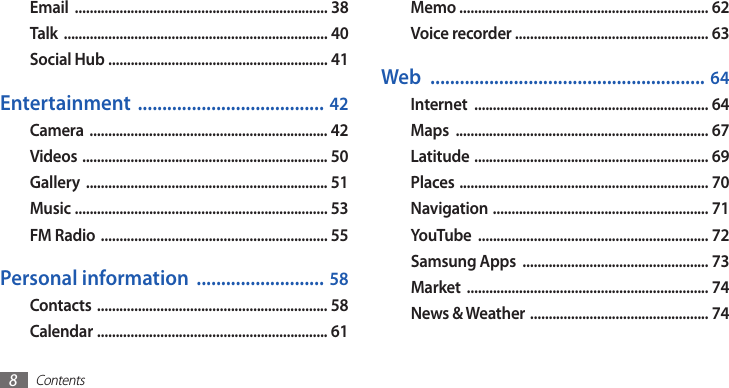

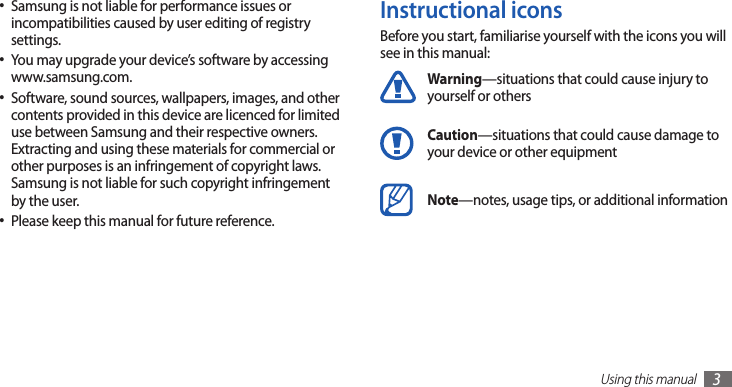
![Assembling12Insert the battery.3 Replace the back cover.4 Install the batteryIf the device is on, press and hold [1 ] and select Power o → OK to turn it o.Remove the back cover.2 Be careful not to damage your ngernails when you remove the back cover.](https://usermanual.wiki/Samsung-Electronics-Co/YPGS1/User-Guide-1632536-Page-12.png)
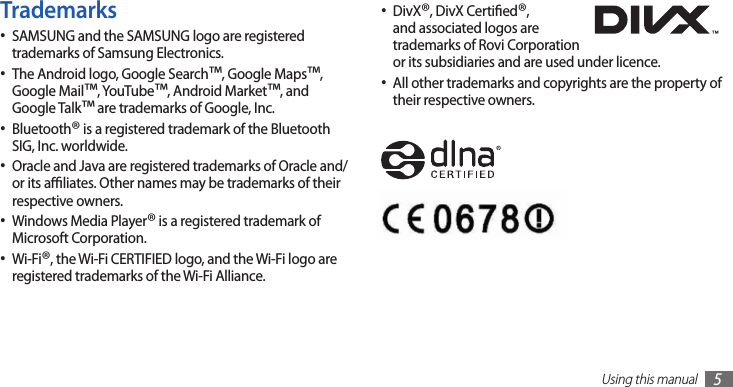
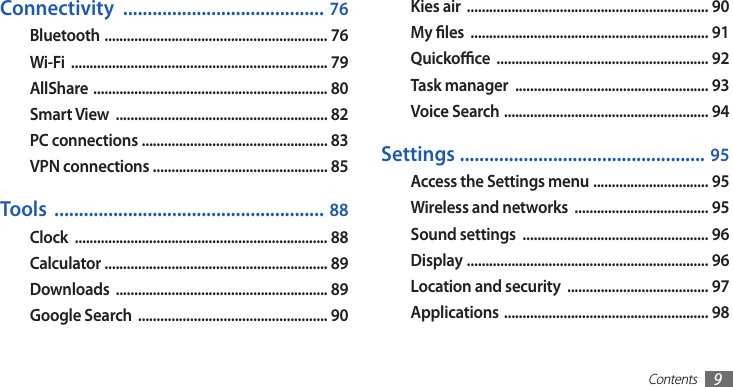
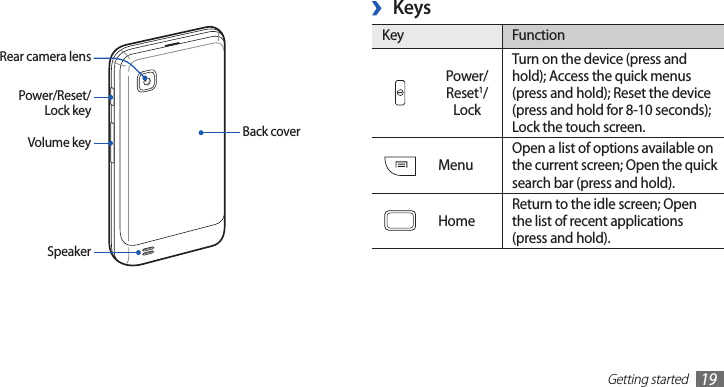
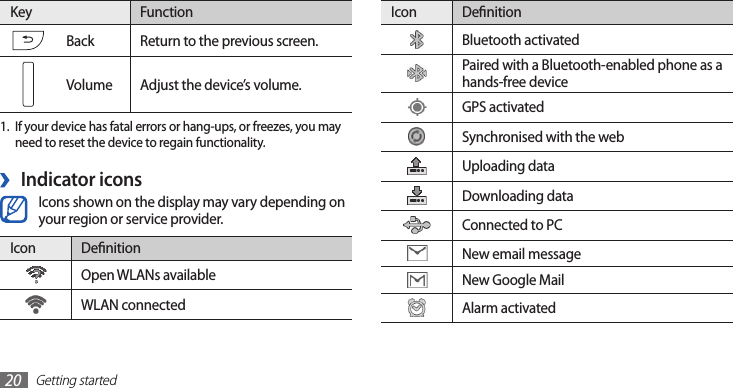
![Getting started18Getting startedTurn your device on and oTo turn on your device, press and hold [ ].To turn o your device, press and hold [ ] and select Power o → OK.Follow all posted warnings and directions from •ocial personnel when in areas where the use of wireless devices is restricted, such as aeroplanes and hospitals.To use your device's non-network services only, •switch to Flight mode. Press and hold [ ] and select Flight mode.Get to know your deviceDevice layout ›Home keyMenu keyTouch screenBack keyEarpiece Front camera lensHeadset jack Multifunction jack](https://usermanual.wiki/Samsung-Electronics-Co/YPGS1/User-Guide-1632536-Page-18.png)
![Getting started23Get to know the idle screenWhen the device is in Idle mode, you will see the idle screen. From the idle screen, you can view your device’s status and access applications.The idle screen has multiple panels. Scroll left or right to a panel of the idle screen. ›Add items to the idle screenYou can customise the idle screen by adding shortcuts to applications or items in applications, widgets, or folders. To add items to the idle screen,Press [1 ] → Add or tap and hold the empty area on the idle screen.Your device turns o the touch screen when you •do not use the device for a specied period. To turn on the screen, press [ ] or the Home key.You can adjust the backlight time. In Idle mode, •open the application list and select Settings → Display → Screen timeout.Lock or unlock the touch screen and keysYou can lock the touch screen and keys to prevent any unwanted device operations. To lock, press [ ]. To unlock, turn on the screen by pressing [ ] or the Home key and then ick the grey window with your nger.You can activate the screen lock feature to prevent others from using or accessing your personal data and information saved in your device. ► p. 29](https://usermanual.wiki/Samsung-Electronics-Co/YPGS1/User-Guide-1632536-Page-23.png)
![Getting started25 ›Add or remove panels to the idle screenYou can add or remove panels of the idle screen to organise widgets according to your preferences and needs.In Idle mode, press [1 ] → Edit.You can also place your two ngers on the screen and pinch to switch to Edit mode. Add or remove panels by using the following features:2 To remove a panel, tap and hold the thumbnail of a •panel and drag it to the trash bin at the bottom of the screen.To add a new panel, select • .To change the order of the panels, tap and hold the •thumbnail of a panel and drag it to the location you want.When you are nished, press [3 ].From the shortcuts panel, you can use the following options:Wi-Fi• : Activate or deactivate the WLAN connection feature. ► p. 79Bluetooth• : Activate or deactivate the Bluetooth wireless connection feature. ► p. 76GPS• : Activate or deactivate the GPS feature.Sound• /Vibration: Activate or deactivate Vibration mode.Auto rotation• : Activate or deactivate the auto rotation.Available options may vary depending on your region or service provider.](https://usermanual.wiki/Samsung-Electronics-Co/YPGS1/User-Guide-1632536-Page-25.png)
![Getting started26Before using location services, such as map and •navigation applications, or internet services, ensure that the wireless connection is active.Your device has a built-in motion sensor that •detects its orientation. If you rotate the device while using some features, the interface will automatically switch to landscape view. To set the interface to keep the orientation when you rotate the device, select Settings → Display → Auto-rotate screen.Organise applications ›You can reorganise the applications in the application list by changing their order or grouping them into categories to suit your preferences and needs.In the application list, press [1 ] → Edit. Tap and hold an application.2 Access applicationsTo access your device’s applications,In Idle mode, select 1 to access the application list.Scroll left or right to another application screen.2 Select an application.3 When you use applications provided by Google, •you must have a Google account. If you do not have a Google account, sign up for a Google account.You can add a shortcut to an application by •tapping and holding the application icon from the application list. You can move the icon to the location you want on the idle screen.Press [4 ] to return to the previous screen; Press the Home key to return to the idle screen.](https://usermanual.wiki/Samsung-Electronics-Co/YPGS1/User-Guide-1632536-Page-26.png)
![Getting started27Use the task manager ›Your device is a multitasking device. It can run more than one application at the same time. However, multitasking may cause hang-ups, freezing, memory problems, or additional power consumption. To avoid these problems, end unnecessary programs using the task manager.In Idle mode, open the application list and select 1 Task manager → Active applications.The list of all the applications currently running on your device appears.To close an application, select 2 EndTo close all active applications, select End all.Customise your deviceGet more from your device by customising it to match your preferences.Drag the application icon to the location you want.3 You can move an application icon to another main menu screen.Press [4 ] → Save.To change the order of the main menu screens,In the application list, place your two ngers on the 1 screen and pinch.Tap and hold the thumbnail of a screen and drag it to 2 the location you want.Access recent applications ›Press and hold the Home key to open the list of 1 applications you have accessed recently.Select an application to access.2](https://usermanual.wiki/Samsung-Electronics-Co/YPGS1/User-Guide-1632536-Page-27.png)
![Getting started28Switch to Silent mode ›To mute or unmute your device, do one of the following:Open the shortcuts panel from the top of the screen and •select Sound.Press and hold [• ] and select Silent mode.You can set the device to alert you to various events in Silent mode. In Idle mode, open the application list and select Settings → Sound settings → Vibrate → Always or Only in Silent mode. When you switch to Silent mode, will appear in place of .Activate animation for switching ›windowsIn Idle mode, open the application list and select Settings → Display → Animation → Some animations or All animations.Set the current time and date ›In Idle mode, open the application list and select 1 Settings → Date and time.Set the time and date and change other options.2 Turn on or o the touch tone ›In Idle mode, open the application list and select Settings → Sound settings → Audible selection.Adjust the volume of the device ›Press the Volume key up or down to adjust the device volume.](https://usermanual.wiki/Samsung-Electronics-Co/YPGS1/User-Guide-1632536-Page-28.png)
![Getting started29 ›Set a screen lockYou can lock the touch screen with an unlock pattern or password to prevent unauthorised people from using the device without your permission.Once you set a screen lock, your device will require •an unlock code each time you turn it on or unlock the touch screen.If you forget your pattern or password, bring your •device to a Samsung Service Centre to reset it. Samsung is not responsible for any loss of security •codes or private information or other damages caused by illegal software.Set an unlock patternIn Idle mode, open the application list and select 1 Settings → Location and security → Set screen lock → Pattern.Select a wallpaper for the idle screen ›In Idle mode, press [1 ] →Wallpaper → an option.Select an image.2 Select 3 Save or Set wallpaper.Samsung is not responsible for any use of default images or wallpapers provided on your device.Adjust the brightness of the display ›In Idle mode, open the application list and select 1 Settings → Display → Brightness.Drag the slider2 to adjust the level of brightness.Select 3 OK.The brightness level of the display will aect how quickly the device consumes battery power.](https://usermanual.wiki/Samsung-Electronics-Co/YPGS1/User-Guide-1632536-Page-29.png)

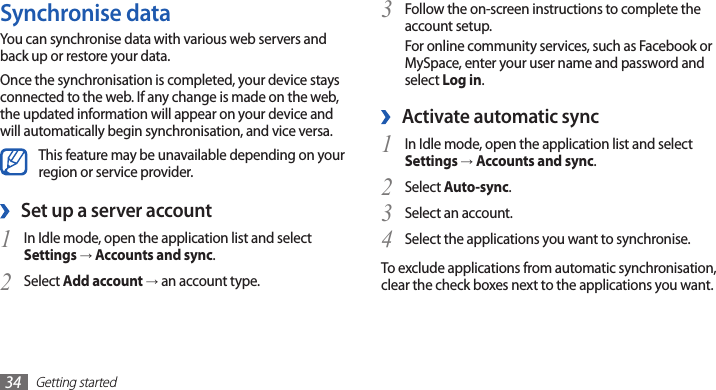
![Getting started35Synchronise data manually ›In Idle mode, open the application list and select 1 Settings → Accounts and sync.Select an account.2 Press [3 ] → Sync now. Your device will start synchronising the data you set for synchronisation.](https://usermanual.wiki/Samsung-Electronics-Co/YPGS1/User-Guide-1632536-Page-35.png)
![Communication36CommunicationGoogle MailYou can retrieve new email messages from Google Mail™ to your Inbox. When you access this application, the Inbox screen appears. The total number of unread messages displays in the title bar and unread messages display in bold.This feature may be unavailable depending on •your region or service provider.This Google Mail menu may be labelled dierently •depending on your service provider.Send an email message ›In Idle mode, open the application list and select 1 Google Mail.If you are launching this application for the rst time, 2 select OK.Press [3 ] → Compose. Enter a name or address in the recipient eld.4 Enter a subject and message.5 To attach an image le, press [6 ] → Attach → a le.Select 7 to send the message.View email messages ›In Idle mode, open the application list and select 1 Google Mail.Select an email message.2](https://usermanual.wiki/Samsung-Electronics-Co/YPGS1/User-Guide-1632536-Page-36.png)
![Communication37Organise email by labels ›You can organise your email by labelling your messages or adding stars to mark important messages. You can sort messages by label lter.Add a label to a messageFrom the Inbox screen, tap and hold a message.1 Select 2 Change labels.Select a label to add and select 3 OK.Filter messagesFrom the Inbox screen, press [1 ] → Go to labels.Select the label of the messages you want to view.2 From the message view, use the following options:To reply to the message, select • .To reply to the message including all recipients, select • →Reply all.To forward the message to other people, select • →Forward.To add a star to the message, select • .To view an attachment, select • Preview. To save it to your memory card, select Download.To archive the message, select • Archive.To delete the message, select • Delete.To move to the previous or next message, select • or .](https://usermanual.wiki/Samsung-Electronics-Co/YPGS1/User-Guide-1632536-Page-37.png)
![Communication38When you are nished setting up the email account, the email messages are downloaded to your device. If you have created more than two accounts, you can switch between email accounts; Press [ ] → Accounts and select one you want to retrieve messages from.Send an email message ›1 In Idle mode, open the application list and select Email →an email account.Press [2 ] → Compose.Select 3 Contacts.You can enter an email address manually or select one from the logs or contact groups by selecting another option.Select contacts and select 4 Add.EmailLearn to send or view email messages via your personal or company email account.Set up an email account ›1 In Idle mode, open the application list and select Email.Enter your email address and password.2 Select 3 Next (for general email accounts) or Manual setup (for other company email accounts).Follow the on-screen instructions.4](https://usermanual.wiki/Samsung-Electronics-Co/YPGS1/User-Guide-1632536-Page-38.png)
![Communication39In Idle mode, open the application list and select 1 Email → an email account.Press [2 ] → Refresh to update the message list.Select an email message.3 From the message view, use the following options:To reply to the message, press [• ] → Reply.To forward the message to other people, press [• ] → Forward.To delete the message, press [• ] → Delete.To move the message to another folder, press [• ] →Move to folder.To load images from the message, press [• ] →Show pictures.To view an attachment, select the attachment item. To •save it to your memory card, select .Select the Cc/Bcc eld and add more recipients.5 Select the subject eld and enter a subject.6 Select the text input eld and enter your email text.7 Select8 Attach and attach a le.You can select a le from the le list or create a new photo, video, or sound.Select 9 Send to send the message.If you are oine, the message will be held in the message thread list until you are online.View an email message ›When you open an email account, you can view previously retrieved emails oine or connect to the email server to view new messages. After retrieving email messages, you can view them oine.](https://usermanual.wiki/Samsung-Electronics-Co/YPGS1/User-Guide-1632536-Page-39.png)
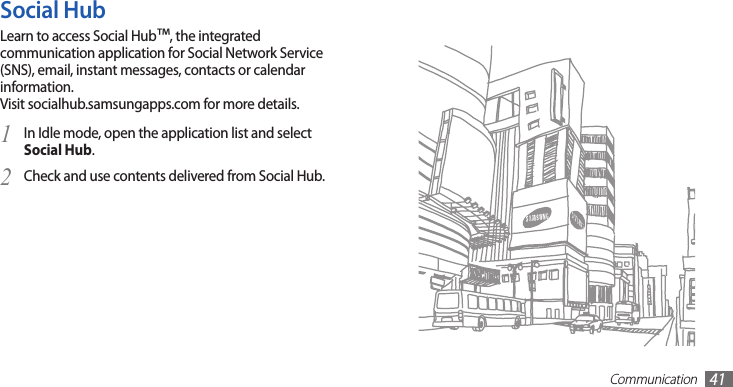
![Communication40Start a chat ›In Idle mode, open the application list and select 1 Talk.Select a friend from the friend list. The chat screen 2 opens.Enter your message and select 3 Send.To insert emoticons, press [ ] → More → Insert smiley.To switch between active chats, press [4 ] → Switch chats.To end the chat, press [5 ] → End chat.TalkLearn to chat with friends and family via Google Talk™.This feature may be unavailable depending on your region or service provider.Add friends to your friend list ›In Idle mode, open the application list and select 1 Talk.The friend list shows all of your Google Talk contacts at a glance.Press [2 ] → Add friend.Enter an email address of the friend and select 3 Send invitation.When your friend accepts the invitation, the friend is added to your friend list.](https://usermanual.wiki/Samsung-Electronics-Co/YPGS1/User-Guide-1632536-Page-40.png)
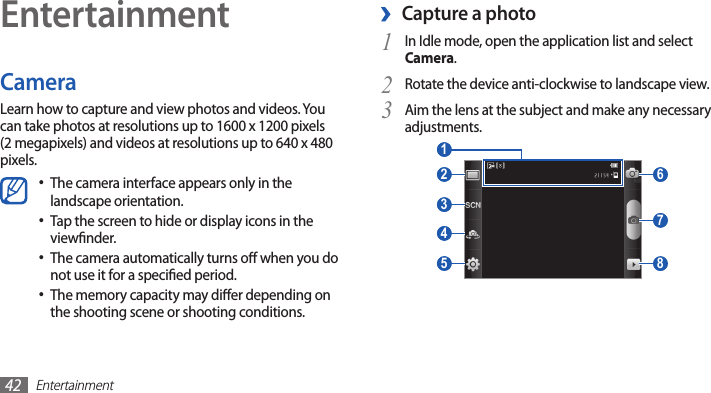

![Entertainment52Play a video ›1 In Idle mode, open the application list and select Gallery.Select a folder.2 Select a video (with the 3 icon) to play.Rotate the device anti-clockwise to landscape view.4 Control playback with the virtual keys. 5 ► p. 50Share images or videos ›In Idle mode, open the application list and select 1 Gallery.Select a folder.2 Press [3 ] and select image or video les.Select 4 Share → a sharing option.To start a slideshow in the selected folder, select •Slideshow. Tap the screen to stop the slideshow.To send a photo to others, select • Menu → Share → an option.To delete a photo, select • Menu → Delete → Conrm deletions.To use additional features, select • Menu → More and select one of the following options:Details - : View photo details.Set as - : Set a photo as wallpaper or an image for a contact.Crop - : Crop an image from a photo.Rotate left - : Rotate a photo anti-clockwise.Rotate right - : Rotate a photo clockwise.](https://usermanual.wiki/Samsung-Electronics-Co/YPGS1/User-Guide-1632536-Page-52.png)
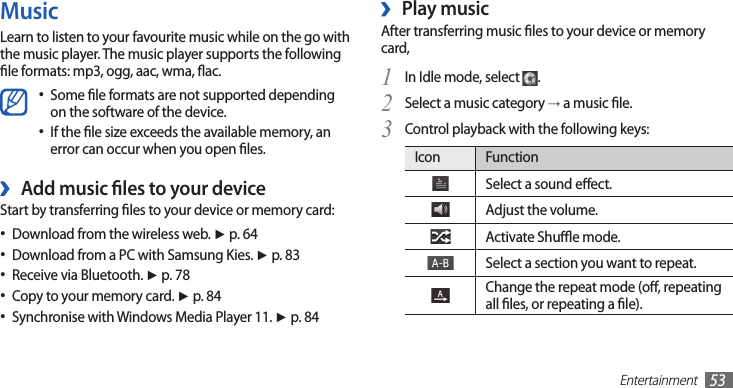
![Entertainment54You can control the music player with a headset. In Idle mode, press and hold the headset button to launch the music player. Press the headset button to start or pause playback.Create a playlist ›In Idle mode, select 1 .Select 2 playlists.Press [3 ] → Create.Enter a title for your new playlist and select 4 Save.Select 5 Add music.Select the les you want to include and select 6 Add.During playback, you can add les to a playlist by pressing [] → Add to playlist.Icon FunctionRestart playback; Skip backward (tap within 2 seconds); Scan backward in a le (tap and hold).Pause playback; Select to resume playback.Skip forward; Scan forward in a le (tap and hold).](https://usermanual.wiki/Samsung-Electronics-Co/YPGS1/User-Guide-1632536-Page-54.png)
![Entertainment55FM RadioLearn to listen to music and news on the FM radio. To listen to the FM radio, you must connect a headset, which serves as the radio antenna.Listen to the FM radio ›Plug a headset into the device.1 In Idle mode, open the application list and select 2 FM Radio.The FM radio scans and saves available stations automatically.The rst time you turn on the FM radio, it will start automatic tuning.Select the radio station you want from the all station 3 list and press [ ] to return to the FM radio screen.Customise music player settings ›In Idle mode, select 1 .Press [2 ] →Settings.Adjust the following settings to customise your music 3 player:Option FunctionSoundAlive Select a sound eect.Play speed Set the speed of music playback.Music menu Select music categories to display on the music library screen.](https://usermanual.wiki/Samsung-Electronics-Co/YPGS1/User-Guide-1632536-Page-55.png)
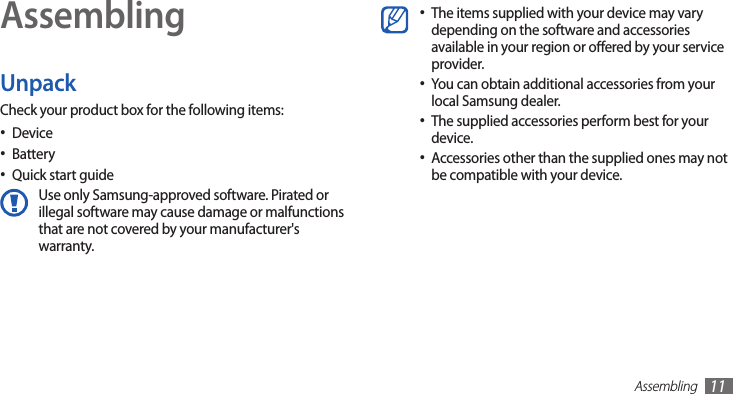
![Entertainment56Number Function 4 Add the current radio station to the favourites list. 5 Adjust the volume.Save a radio station automatically ›Plug a headset into the device.1 In Idle mode, open the application list and select 2 FM Radio.Press [3 ] → Scan →a scanning option. The FM radio scans and saves available stations automatically.Select the radio station you want from the all station 4 list and press [ ] to return to the FM radio screen. Control the FM radio with the following keys:4 1 4 2 3 5 3 Number Function 1 Turn the FM radio on or o. 2 Fine-tune the frequency. 3 Search for an available radio station.](https://usermanual.wiki/Samsung-Electronics-Co/YPGS1/User-Guide-1632536-Page-56.png)
![Entertainment57Option FunctionBackground playingSet whether or not to run the FM radio in the background while using other applications. If this feature is on, you can control the FM radio from the shortcuts panel.Show Station IDSet whether or not to show the station ID on the FM radio screen; Station IDs are available only from radio stations that provide this information.Alternative frequencySet whether or not the FM radio attempts to retune a radio station when the signal is weak.FM auto oSet the FM radio to automatically turn o after a specied length of time.Add a radio station to the favourites list ›Plug a headset into the device.1 In Idle mode, open the application list and select 2 FM Radio.Scroll to the radio station you want.3 Select + to add to the favourites list. 4 Customise FM radio settings ›In Idle mode, open the application list and select 1 FM Radio.Press [2 ] → Settings.Adjust the following settings to customise your FM 3 radio:Option FunctionRegion Select your region.](https://usermanual.wiki/Samsung-Electronics-Co/YPGS1/User-Guide-1632536-Page-57.png)
![Personal information58Personal informationContactsLearn to create and manage a list of your personal or business contacts. You can save names, mobile phone numbers, home phone numbers, email addresses, birthdays and more for your contacts. ›Create a contactIn Idle mode, open the application list and select 1 Contacts.Select 2 .Select a memory location.3 If you have more than one account, select an account to which you want to add the contact.Enter contact information.4 To add a new item, select . To delete an item, select .Select 5 Save to add the contact to memory.Find a contact ›1 In Idle mode, open the application list and select Contacts.Scroll up or down on the contact list.2 Select a contact’s name.3 Once you nd a contact, you can:send an email message by selecting an email address.•edit the contact information by pressing [• ] → Edit.](https://usermanual.wiki/Samsung-Electronics-Co/YPGS1/User-Guide-1632536-Page-58.png)
![Personal information59In Idle mode, open the application list and select1 Contacts.Press [2 ] → Get friends.Select an account. 3 Create a group of contacts ›By creating groups of contacts, you can manage multiple contacts and send email to an entire group. Start by creating a group.In Idle mode, open the application list and select 1 Contacts → Groups.Press [2 ] → Create.Enter a name for the group and select 3 Save.Create your namecard ›In Idle mode, open the application list and select 1 Contacts.Press [2 ] → My prole.Enter your own personal details.3 Select 4 Save.You can send your namecard by attaching it to an email or transferring it via the Bluetooth wireless feature.Retrieve contacts from your community ›accountsYou can view the list of community website accounts and select an account to add a contact from the website to your device contacts.](https://usermanual.wiki/Samsung-Electronics-Co/YPGS1/User-Guide-1632536-Page-59.png)
![Personal information60To export contacts from your device to a memory card,In Idle mode, open the application list and select 1 Contacts.Press [2 ] → Import/Export → Export to SD card.Select 3 Yes to conrm.View social network activities ›You can view the recent activities of contacts in social network services, such as Facebook, MySpace, and Twitter.In Idle mode, open the application list and select Contacts → Activities.Import or export contacts ›To import contact les (in vcf format) from a memory card to your device,In Idle mode, open the application list and select 1 Contacts.Press [2 ] → Import/Export → Import from SD card.Select a memory location.3 If you have more than one account, select an account to which you want to add the contact.Select an option for importing a single contact le, 4 multiple contact les, or all contact les, and select OK.Select contact les to import and select 5 OK.](https://usermanual.wiki/Samsung-Electronics-Co/YPGS1/User-Guide-1632536-Page-60.png)
![Personal information61View events ›To change the calendar view,In Idle mode, open the application list and select 1 Calendar.Press [2 ] and select a view mode.To view events of a specic date,In Idle mode, open the application list and select 1 Calendar.Select a date on the calendar.2 To move to a specic day by entering a date •manually, press [ ] → More → Go to, enter the date by selecting + or -, and select Set.To select today’s date, press [• ] → Today.Select an event to view its details.3 CalendarLearn to create and manage daily, weekly or monthly events, and set alarms to remind yourself of important events.Create an event ›In Idle mode, open the application list and select 1 Calendar.Press [2 ] → More → Create.Enter the details of the event as required.3 Select 4 Done.](https://usermanual.wiki/Samsung-Electronics-Co/YPGS1/User-Guide-1632536-Page-61.png)
![Personal information62Create a memo ›In Idle mode, open the application list and select 1 Memo.Select 2 Create memo or press [ ] → Create.Enter your memo text.3 Press [4 ] to hide the keypad.Select a colour to change a background colour.5 Select 6 Save.View memos ›In Idle mode, open the application list and select 1 Memo.Stop an event alarm ›If you set an alarm for a calendar event, the event alarm icon will appear at the specied time.Open the shortcuts panel from the top of the screen.1 Select a reminder to view more details about the 2 event.To snooze or dismiss the reminder, select 3 Snooze all or Dismiss all.MemoLearn to record important information to save and view at a later date.](https://usermanual.wiki/Samsung-Electronics-Co/YPGS1/User-Guide-1632536-Page-62.png)
![Personal information63Speak into the microphone.3 When you are nished recording a memo, select 4 Stop.Your memo is saved automatically.To record more voice memos, select 5 Record from the bottom of the screen.Play a voice memo ›In Idle mode, open the application list and select 1 Voice recorder.Select 2 List.Select a voice memo to play.3 You can send the voice memo to others by pressing [] → Share →an option. Select a memo to view its details.2 To edit the memo, select • .To delete the memo, select • → OK.You can send the memo to others by tapping and holding the memo and selecting Send via →an option.Voice recorderLearn to operate your device’s voice recorder.Record a voice memo ›In Idle mode, open the application list and select 1 Voice recorder.Select 2 Record to start recording.](https://usermanual.wiki/Samsung-Electronics-Co/YPGS1/User-Guide-1632536-Page-63.png)
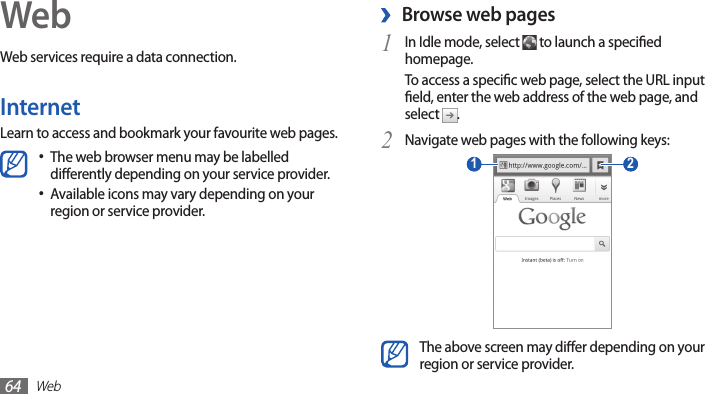
![Web65To go to the next page in history, press [• ] → Forward.To bookmark the current web page, press [• ] → Add bookmark.To add a shortcut to the current web page to the idle •screen, press [ ] →More→Add shortcut to Home.To search for text on the web page, press [• ] → More → Find on page.To view web page details, press [• ] → More → Page info.To send the web address of the web page to others, •press [ ] → More → Share page.To view the download history, press [• ] → More → Downloads.To customise browser settings, press [• ] → More → Settings.Number Function 1 Enter the web address of a web page to access. 2 Open a list of saved bookmarks, frequently visited pages and recent internet history.While browsing the web page, use the following options:To zoom in or out, double-tap the screen. You can also •use the two nger zoom; Place your two ngers on the screen and slowly pinch or spread apart.To open a new window, press [• ] → New window.To view the currently active windows, press [• ] → Windows. You can open multiple pages and switch back and forth between them.To reload the current web page, press [• ] → Refresh.](https://usermanual.wiki/Samsung-Electronics-Co/YPGS1/User-Guide-1632536-Page-65.png)
![Web66From the bookmark list, tap and hold a bookmark and use the following options:To open the web page in the current window, select •Open.To open the web page in a new window, select • Open in new window.To edit the bookmark details, select • Edit bookmark.To add the bookmark shortcut to the idle screen, select •Add shortcut to Home.To send the web address of the web page to others, •select Share link.To copy the web address of the web page, select • Copy link URL.To delete the bookmark, select • Delete bookmark.To use the web page as your homepage of the browser, •select Set as homepage.Bookmark your favourite web pages ›If you know the web address of a web page, you can manually add a bookmark. To add a bookmark,In Idle mode, select 1 .Select 2 →Bookmarks.Select 3 Add or press [ ] → Bookmark last-viewed page.Enter a page title and a web address.4 Select 5 OK.](https://usermanual.wiki/Samsung-Electronics-Co/YPGS1/User-Guide-1632536-Page-66.png)
![Web68Search for a specic location ›In Idle mode, open the application list and select 1 Maps.If you are launching this application for the rst time, 2 select OK to conrm.The map will display your current location.Press [3 ] → Search or select .Enter a keyword for the location and select 4 .To search for a location by voice, select • .To view a list of all results for your search, select • .To zoom in or out, select • or .To search for a place around you, select • .Activate location services to use with ›Google MapsYou must activate location services to nd your location and search the map.In Idle mode, open the application list and select 1 Settings → Location and security.Adjust the following settings to activate location 2 services:Option FunctionUse wireless networksSet to use WLANs for nding your location.Use GPS satellitesSet to use the GPS satellite for nding your location.](https://usermanual.wiki/Samsung-Electronics-Co/YPGS1/User-Guide-1632536-Page-68.png)
![Web69Select a travel method (car, bus, or walk) and select 4 Go.Select a travel route to view details of your trip (if 5 necessary).Select 6 .The route is indicated on the map. To view only the single part of the route, select or . When you are nished, press [7 ] → Clear Map.LatitudeLearn to share your location with your friends and view friends’ locations via Google Latitude™.This feature may be unavailable depending on •your region or service provider.Before using location services, ensure that the •wireless connection is active.To add layers to the map, select • .To view your current location, select • .To add a star to the location, select the balloon of the location name → .Get directions to a specic destination ›In Idle mode, open the application list and select 1 Maps.Press [2 ] → Directions.Enter the addresses of the starting location and the 3 ending location.To enter an address from your contact list or point the location on the map, select → Contacts or Point on map.](https://usermanual.wiki/Samsung-Electronics-Co/YPGS1/User-Guide-1632536-Page-69.png)
![Web70PlacesLearn to search for a place around you.This feature may be unavailable depending on •your region or service provider.Before using location services, ensure that the •wireless connection is active.In Idle mode, open the application list and select 1 Places.Select a category.2 Your device searches for places around your current location that are related to the category.Select a place name to view its details.3 To view the place on the map, select 4 Map.To view the route to the place, select Directions.In Idle mode, open the application list and select 1 Latitude.The device automatically joins Latitude. Press 2 →Select from Contacts or Add via email address.Select a friend you want to add, or enter an email 3 address and select Add friends.Select 4 Yes.When your friend accepts your invitation, you can share locations.Press [5 ] → See map.Your friends’ locations are marked with their photos on the map.](https://usermanual.wiki/Samsung-Electronics-Co/YPGS1/User-Guide-1632536-Page-70.png)
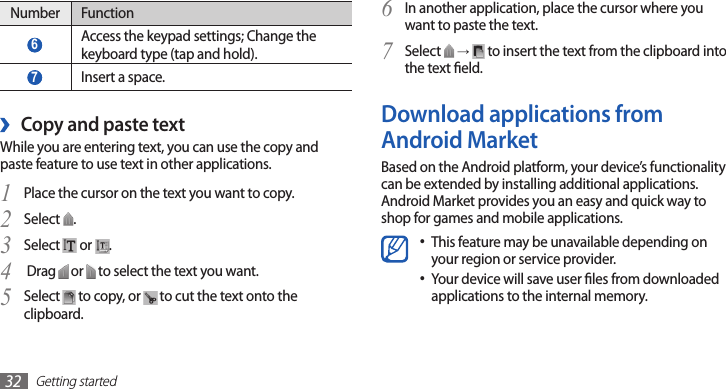
![Web73Samsung AppsSamsung Apps allows you to simply and easily download an abundance of applications directly to your device. Featuring a wealth of games, news, reference, social networking, navigation, health related applications and more, Samsung Apps gives you instant access to a huge choice of mobile experience.Your device gets smarter with fully optimised applications from Samsung Apps. Explore amazing applications and make your mobile life even better. The feature may be unavailable depending on •your region or service provider.For details, please visit www.samsungapps.com.•In Idle mode, open the application list and select 1 Samsung Apps.Upload videos ›In Idle mode, open the application list and select 1 YouTube.Press [2 ] → Upload and select a video. Skip to 8.If you want to upload new videos, select to turn on the camera.Rotate the device anti-clockwise to landscape view.3 Aim the lens at the subject and make any adjustments.4 Select 5 to start recording.Select 6 to stop recording. Select 7 Save to upload the video that you have recorded.Enter your user name and password and select 8 Sign in.Enter details of the upload and select 9 Upload.](https://usermanual.wiki/Samsung-Electronics-Co/YPGS1/User-Guide-1632536-Page-73.png)
![Web74News & WeatherLearn to view the weather information and read top news and other news articles.View the weather information ›In Idle mode, open the application list and select 1 News & Weather.Select 2 Weather at the top of the screen.Your device searches for your current location and displays the weather information. You can change the location to view the weather information in another region. Press [ ] →Settings →Weather settings and clear the check box next to Use My Location. Then select a location in Set location.If you are launching this application for the rst time, 2 select a region, and then read the terms and conditions and select Accept.Search for and download applications as desired.3 MarketYou can download games or other applications from the Android Market. This feature may be unavailable depending on your region or service provider.In Idle mode, open the application list and select 1 Market. Search for a le and download it to the device. 2 ►p. 32](https://usermanual.wiki/Samsung-Electronics-Co/YPGS1/User-Guide-1632536-Page-74.png)
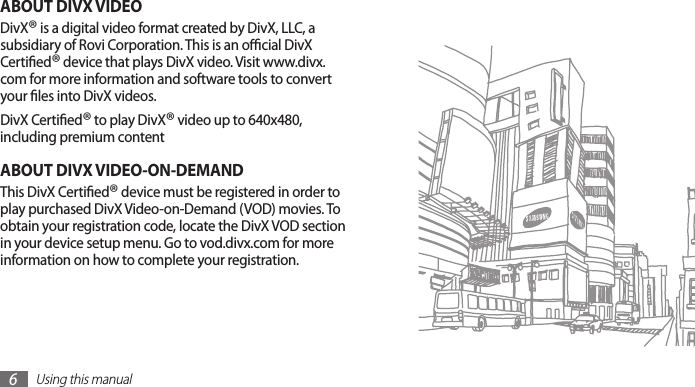
![Web75Read news articles ›In Idle mode, open the application list and select 1 News & Weather.Scroll left to a news topic at the top of the screen.2 Select an article to open it.3 To add news topics, press [ ] →Settings →News setting → Select news topics.](https://usermanual.wiki/Samsung-Electronics-Co/YPGS1/User-Guide-1632536-Page-75.png)

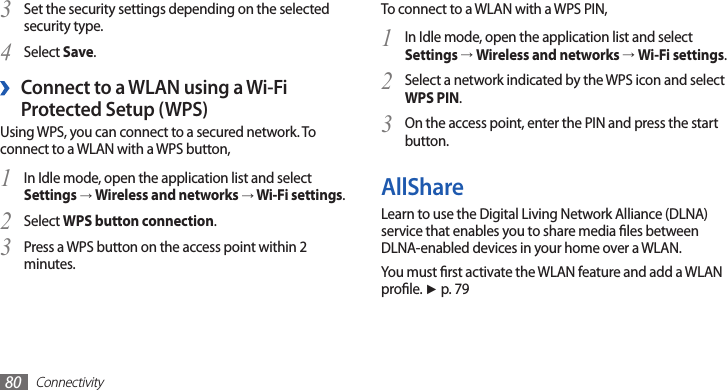
![Connectivity81Option FunctionShare photosTurn on image sharing with other DLNA-enabled devices.Share music Turn on music sharing with other DLNA-enabled devices.Upload from other devicesSet whether or not to accept the upload from other devices.Default memorySelect the default memory location for saving downloaded media les.Subtitles Set to display subtitles.Play your les on another DLNA- ›enabled deviceIn Idle mode, open the application list and select 1 AllShare.Customise DLNA settings for sharing ›media lesTo allow other DLNA-enabled devices to access media les on your device, you must activate media sharing. Some les may not play on the DLNA-enabled devices depending on the devices.In Idle mode, open the application list and select 1 AllShare.Press [2 ] → Settings.Adjust the following settings to customise the DLNA 3 feature:Option FunctionDevice name Enter a name for your device as a media server.Share videos Turn on video sharing with other DLNA-enabled devices.](https://usermanual.wiki/Samsung-Electronics-Co/YPGS1/User-Guide-1632536-Page-81.png)
![Connectivity87Option FunctionDNS search domainsEnter the domain name server (DNS) address.When you are nished, press [4 ] →Save.Connect to a private network ›In Idle mode, open the application list and select 1 Settings → Wireless and networks → VPN settings.Select a private network to connect.2 Enter the user name and password and select 3 Connect.](https://usermanual.wiki/Samsung-Electronics-Co/YPGS1/User-Guide-1632536-Page-87.png)
![Tools88ToolsClockLearn to use clock display on the Idle screen, and set and control alarms for important events.Use the clock display ›In Idle mode, open the application list and select 1 Clock.While using the clock display, use the following 2 features:To create or delete an alarm, select • .To play a slideshow with photos in Gallery, select • .To launch the music player, select • .To return to the idle screen, select • .Set a new alarm ›In Idle mode, open the application list and select 1 Clock.Press [2 ] → Add alarm.Set alarm details.3 When you are nished, select 4 Done.The snooze feature sets the device to repeat the alarm after a specic length of time. To set the length of time for the snooze feature, press [ ] → Settings → Snooze duration.](https://usermanual.wiki/Samsung-Electronics-Co/YPGS1/User-Guide-1632536-Page-88.png)
![Tools89Stop an alarm ›When the alarm sounds,Select • Dismiss to stop the alarm.Select • Snooze to repeat the alarm after a specied length of time.Delete an alarm ›In Idle mode, open the application list and select 1 Clock → .Select alarms to delete.2 Press [3 ] → Delete.Select 4 Delete → OK.CalculatorLearn to perform mathematical calculations directly on your device like a typical hand-held or desktop calculator.In Idle mode, open the application list and select 1 Calculator.Use the keys that correspond to the calculator display 2 to perform basic mathematical operations.Press [3 ] → Advanced panel to use scientic calculator.DownloadsLearn to manage logs of les you have downloaded from the web.In Idle mode, open the application list and select 1 Downloads.](https://usermanual.wiki/Samsung-Electronics-Co/YPGS1/User-Guide-1632536-Page-89.png)
![Tools90Enter a letter or a word of the data to search.3 Select the item’s name you want to access.4 Kies airKies air allows you to connect a PC to your device via a WLAN. From the PC browser, you can view and control media les, contacts, messages, and any other data saved on your device.Customise Kies air settings ›In Idle mode, open the application list and select 1 Kies air.Press [2 ] → Settings. Select a download folder.2 To open a downloaded le, select the log.3 To delete a log, select the check box and then select Delete.Google SearchYou can search for applications and les in your device and specic data on the web.In Idle mode, open the application list and select 1 Google Search.If you are launching this application for the rst time, 2 set whether or not to view the search history of your Google account.](https://usermanual.wiki/Samsung-Electronics-Co/YPGS1/User-Guide-1632536-Page-90.png)
![Tools92QuickoceLearn to view Word, Excel, PowerPoint, and PDF les on your device or memory card.Open a Quickoce document ›In Idle mode, open the application list and select 1 Quickoce.If you are launching this application for the rst time, 2 read the terms and conditions and select I Accept, and then register as an online user or skip the registration.Select a Quickoce program.3 Select 4 SD Card → a document le.To create and edit Word, Excel, and PowerPoint les, create a Quickoce account and purchase a licence.Select a folder.2 To move up one level in the le directory, select • Up.To return to the Home directory, select • Home.Select a le to open.3 In a folder, press [ ] to use the following options:To send a le to others, select • Share.To create a new folder, select • Create folder.To delete les or folders, select • Delete.To change the view mode, select • View by.To sort les or folders, select • List by.To use additional features using a le, such as moving, •copying or renaming option, select More.](https://usermanual.wiki/Samsung-Electronics-Co/YPGS1/User-Guide-1632536-Page-92.png)
![Troubleshooting104The battery does not charge properly or the device turns oThe battery terminals may be dirty. Wipe both gold-•coloured contacts with a clean, soft cloth and try charging the battery again.If the battery will no longer charge completely, dispose •of the old battery properly and replace it with a new battery (refer to your local ordinances for proper disposal instructions).Your device is hot to the touchWhen you use applications that require more power or use applications on your device for an extended period of time, your device may feel hot to the touch. This is normal and should not aect your device’s lifespan or performance.Your device freezes or has fatal errorsIf your device freezes or hangs, you may need to close programs or reset the device to regain functionality. If your device is frozen and unresponsive, press and hold [ ] for 8-10 seconds. The device will reboot automatically.If this does not solve the problem, perform a factory data reset. In Idle mode, open the application list and select Settings → Privacy → Factory data reset → Reset device → Erase everything.The device beeps and the battery icon ashesYour battery is low. Recharge or replace the battery to continue using the device.](https://usermanual.wiki/Samsung-Electronics-Co/YPGS1/User-Guide-1632536-Page-104.png)