Samsung Electronics Co YPP2 DIGITAL AUDIO PLAYER User Manual 0608 YPP2 USA ENGLISH0 0 print indd
Samsung Electronics Co Ltd DIGITAL AUDIO PLAYER 0608 YPP2 USA ENGLISH0 0 print indd
UserManual.wiki
>
Samsung Electronics Co
>
YPP2 User Manual
Manual
Navigation menu
Upload a User Manual
Namespaces
Wiki Guide
HTML
PDF
Info
Views
User Manual
Discussion / Help
Navigation
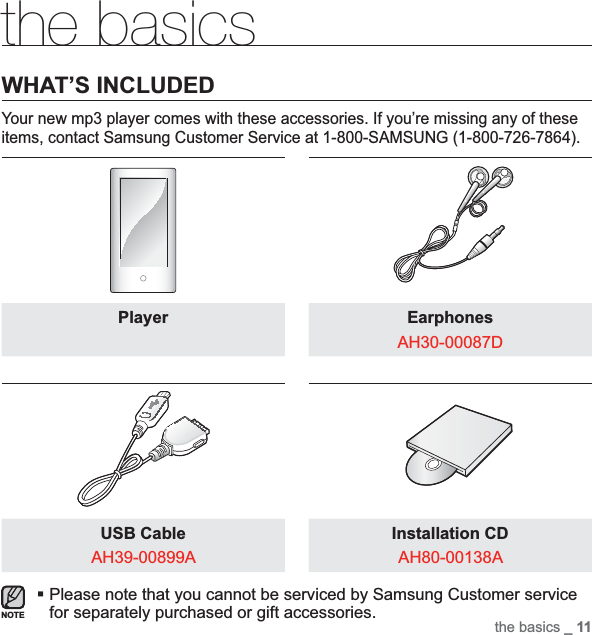
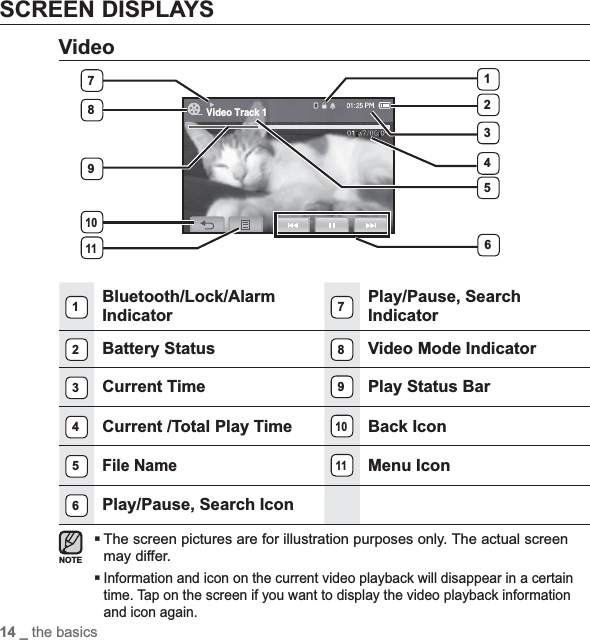
![16 _ the basicsSCREEN DISPLAYS (Continued)Picture1Bluetooth/Lock/Alarm Indicator2Current Time3Battery Status4Current fi le / Total number of fi les Indicator5Next Image Icon6Zoom Icon7Music Play Status8Picture Mode Indicator9File Name10Previous Image Icon11Back Icon12Menu IconInformation and icon on the current picture viewing will disappear in a certain time. Tap on the screen if you want to display the picture information and icon again,The Previous/Next Image [ , ] icon appears if you tap on the screen once. Tapping it again will display both picture information and icon.Picture image 18/17341279851061112NOTE[Photo View Screen]](https://usermanual.wiki/Samsung-Electronics-Co/YPP2/User-Guide-824563-Page-15.png)
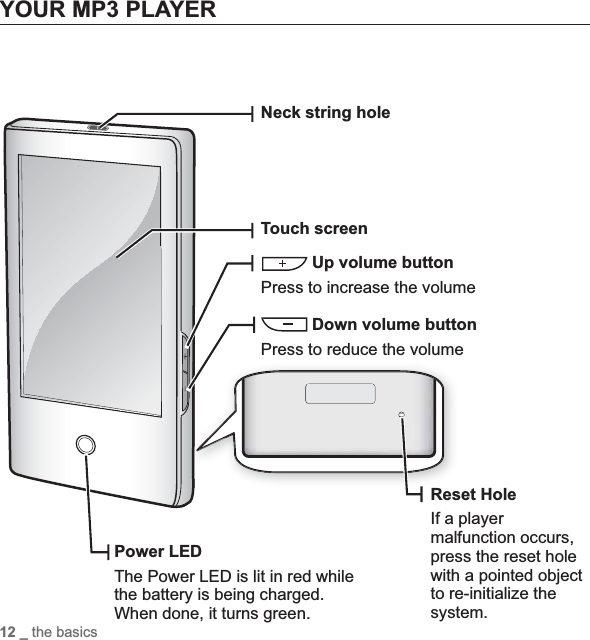
![24 _ the basicsPLAYING A VIDEO FILELoad video fi les onto your new mp3 player using Samsung Media Studio. Learn more about Media Studio on page 39.1. Tap the icon on the main menu screen.The video list appears.2. Tap on the video fi le twice you want to play.The selected video fi le horizontally starts to play.Tap the [ ] icon to move to the previous screen.Press and briefl y hold the [] icon to move to the main menu screen.CONTROLLING THE VOLUMEYou can adjust the volume while a fi le is stopped or in its playback.How To 1Press the , button.The volume control bar appears. The range of volume is set between 0 to 30.Press the button to increase the volume or the button to decrease it.How To 2Tap on the middle right of the screen upward or downward as if you keep snapping it.The volume control bar appears.Tapping on upward will increase the volume while tapping on downward will decrease it.NOTEVideo Track 1](https://usermanual.wiki/Samsung-Electronics-Co/YPP2/User-Guide-824563-Page-23.png)
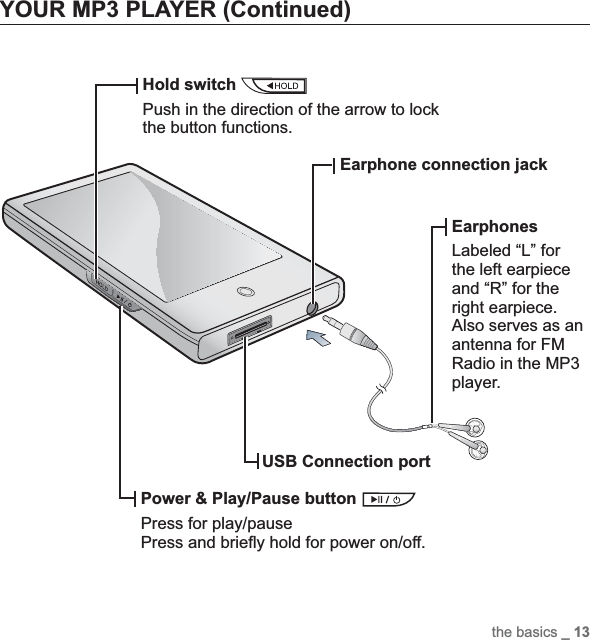
![the basics _ 25DISABLING THE BUTTONSThe hold function disables all the other buttons and icons on the mp3 player, so that if you accidentally bump one-while working out, for example-your music won’t be interrupted.1. Push the switch in the direction of the arrow.2. Push the switch in the opposite direction of the arrow to release the hold function.BROWSING FOR FILES USING “File Browser”Search easily for fi les using the “File Browser” function.1. Tap on the icon on the main menu screen.The <File Browser> folder list containing “Datacasts, Music, Pictures, Playlists, Texts and Video” appears.2. Tap on a desired folder to bring up the fi le list.Tap on the [ ] icon to move to the previous screen.3. Tap on a desired fi le twice.The fi le will start playing.Video Track 1DatacastsMusicPicturesPlaylistsTextsVideoFile Browser1/6](https://usermanual.wiki/Samsung-Electronics-Co/YPP2/User-Guide-824563-Page-24.png)
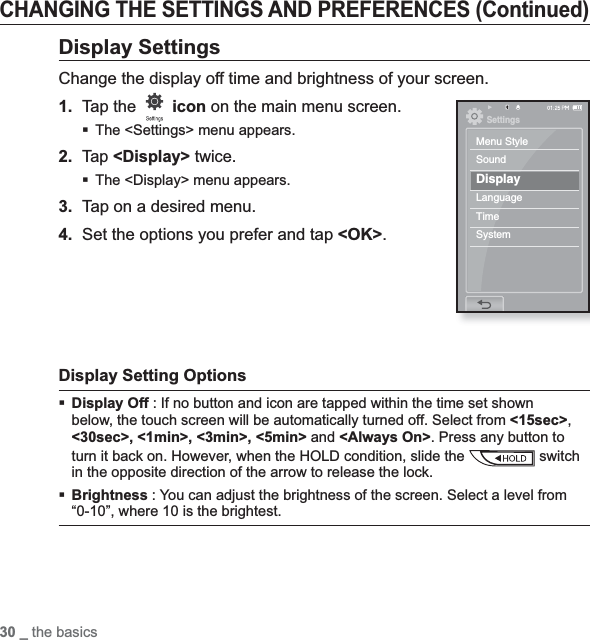
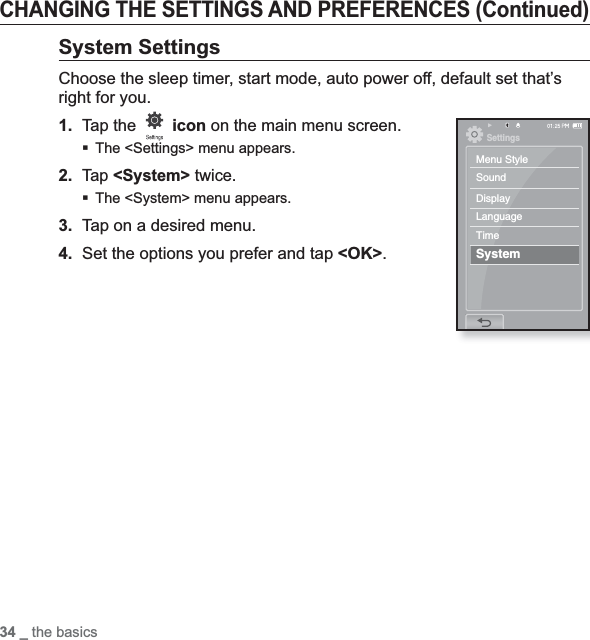
![26 _ the basicsCHANGING THE SETTINGS AND PREFERENCESYour mp3 player comes with settings and preferences that were set up at the factory, but you can change these pre-set values to truly customize your player.Tap the [ ] icon to move to the previous screen.Press and briefl y hold the [] icon to move to the main menu screen.Menu Style SettingsYou can change the menu design and font and delete background image of the main menu.1.Tap the icon on the main menu screen.The <Settings> menu appears.2.Tap <Menu Style> twice.The <Menu Style> menu appears.3. Tap on a desired menu.4. Set the options you prefer and tap <OK>.Menu Style Setting Options Menu Disign : You can change the style of the main menu screen. Select from <Cosmos>,<Matrix> and <My Skin>.Font : You can change the font type of the menu language. Select one from 3 font types.Reset My Skin : Initializes the background image of the touch screen to its default image..If the <Settings> screen is open and you don’t push any buttons for about 1 minute, the unsaved settings will be lost, and the player will return to the previous function.NOTENOTESettingsMenu StyleSoundDisplayLanguageTimeSystem](https://usermanual.wiki/Samsung-Electronics-Co/YPP2/User-Guide-824563-Page-25.png)
![the basics _ 29CHANGING THE SETTINGS AND PREFERENCES (Continued)Sound SettingsYou can set the master EQ, beep sound, volume limit.1.Tap the icon on the main menu screen.The <Settings> menu appears.2.Tap <Sound> twice.The <Sound> menu appears.3. Tap on a desired menu.4. Set the options you prefer and tap <OK>.Sound Setting Options Master EQ : You can optimize sound settings to your earphone.Tap the [,] icon to select the frequency you want to adjust. Tap the [,]icon to adjust the selected frequency’s level and tap <OK>.Beep Sound : Sets the beep sound for touch screen operations to on or off. Select from <Off> and <On>.Volume Limit : You can avoid hearing damage by setting the limit of the volume when using the earphone. <On> will limit the maximum volume level up to 15. The maximum volume level when volume limit is set to <Off> is 30.SettingsMenu StyleSoundDisplayLanguageTimeSystem](https://usermanual.wiki/Samsung-Electronics-Co/YPP2/User-Guide-824563-Page-28.png)
![32 _ the basicsCHANGING THE SETTINGS AND PREFERENCES (Continued)Language Setting OptionsMenu : Set the menu language. Tap the [a ,b] icon to move to the next page.Select from <English>, <한국어>, <Français>, <Deutsch>, <Italiano>, <日本語>,<∝䇁ㅔԧ>, <⓶䁲㐕储)>, <Español>, <Ɋɭɫɫɤɢɣ>, <Magyar>, <Nederlands>, <Polski>, <Português>, <Svenska>, <ѳъѕ>, <ýeština>,<ǼȜȜȘȞȚțȐ>, <Türkçe>, <Norsk>, <Dansk>, <suomi>, <Español (Sudamérica)>, <Português (Brasil)>, <Indonesia>, <TiӃng ViӋt>, <Bulgarian>, <Romani>, <ɍɤɪɚʀɧɫɶɤɚ>, <Slovenšþina> or <Slovenský>.Contents : Set the language in which the track information will appear. Tap the [a ,b] icon to move to the next page. Select from <Afrikaans>, <Basque>,<Catalan>, <Chinese (S)>, <Chinese(T)>, <Czech>, <Danish>, <Dutch>,<English>, <Estonian>, <Finnish>, <French>, <German>, <Greek>, <Hrvatski>,<Hungarian>, <Icelandic>, <Italian>, <Japanese>, <Korean>, <Norwegian>,<Polish>, <Portuguese>, <Romany>, <Russian>, <Slovak>, <Slovene>,<Spanish>, <Swedish>, <Turkish> <Vietnamese>, <Thai>, <Indonesian>, <Ukrainian>, <Bulgarian> or <Romanian>.The supported languages can be changed or added.What is Contents?This is what is attached to an MP3 to carry information relevant to the fi le, such as the title, artist, album, year, genre and a comment fi eld.NOTE](https://usermanual.wiki/Samsung-Electronics-Co/YPP2/User-Guide-824563-Page-31.png)
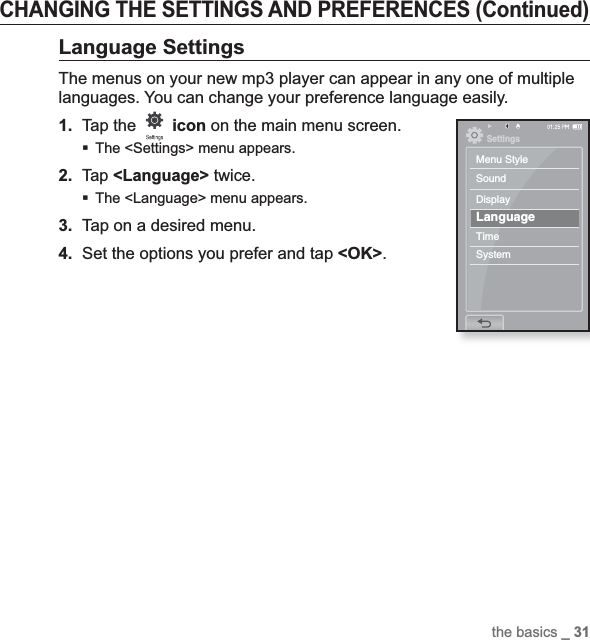
![the basics _ 33CHANGING THE SETTINGS AND PREFERENCES (Continued)Time SettingsSetting the time allows you to use the date/time set, date type and even time zone.1.Tap the icon on the main menu screen.The <Settings> menu appears.2.Tap <Time> twice.The <Time> menu appears.3. Tap on a desired menu.4. Set the options you prefer and tap <OK>.Time Setting OptionsDate/Time Set : Set the current date and time. Tap the [,] icon to set each item of <Year>, <Month>, <Day>, <Hour>, <Min> and <AM/PM>.Date Type : You can set the time display type for the world clock. Select from <YY-MM-DD>,<MM-DD-YY> and <DD-MM-YY>.Time Zone : You can change the current time by selecting an international city specifi c time zone. You must set the time zone before you can display the world time information ඖ page 87SettingsMenu StyleSoundDisplayLanguageTimeSystem](https://usermanual.wiki/Samsung-Electronics-Co/YPP2/User-Guide-824563-Page-32.png)
![40 _ samsung media studioTRANSFERRING FILES TO THE PLAYER WITH SAMSUNG MEDIA STUDIO (Continued)3. Click the icon for the type of fi le you want to transfer.Click to display music list.Click to display video list.Click to display picture listClick to display etc list. The ETC list includes fi le types (ex: TXT, etc) other than music, picture, and video fi les.4. Click <Add File> on the bottom of <Media Studio>.The <Open> window will appear.5. Select the fi les to add and click <Open>.The fi les are added to the list on the left side the <Media Studio> Screen.6. Select the fi le to transfer from the list on the left side.7. Click the icon.The fi le you selected is transferred to the player.[YP-P2[MTP]][YP-P2[MTP]]345[YP-P2[MTP]][YP-P2[MTP]]76](https://usermanual.wiki/Samsung-Electronics-Co/YPP2/User-Guide-824563-Page-39.png)
![42 _ watching a videowatching a videoBefore you start - Transfer video fi les to the player using <Media Studio>. See page 39.Connect the earphones, then turn on the player, and check the battery.Tap the [ ] icon to move to the previous screen.Press and briefl y hold the [] icon to move to the main menu screen.1. Tap the icon on the main menu screen.The viedo list appears.2. Tap on the video fi le twice you want to play.The selected video fi le horizontally starts to play.PAUSING1. Tap the [ ] icon during playback.The Video playback will be paused.2. Tap the [ ] icon to resume playing.The video will play from the point where it stopped. Information and icon on the current video playback will disappear in a certain time. Tap on the screen if you want to display the video playback information and icon again.When transferring a video fi le to the player using <Media Studio>, it is automatically converted into SVI(video) format before transfer. The fi le size is automatically adjusted, too. However a WMV fi le supported by the player is not converted into a SVI fi le.NOTENOTE](https://usermanual.wiki/Samsung-Electronics-Co/YPP2/User-Guide-824563-Page-41.png)
![watching a video _ 43TO MOVE TO A SPECIFIC FRAMEHow To 11. In a horizontal view, press and briefl y hold the [,] icon during playback .This enables you to move up or back in the current video fi le.2. Release the icon when you have moved to the position you want.The video starts playing from the position.How To 2Tap on the point you want at the video play status bar.The video starts playing from the point you have selected.If it is set to <Horizontal Stroke> other than <1 File>, tapping on the center of the touch screen to the left / right direction will move to the next / previous by the set stroke interval . See page 46.NOTEVideo Track 1](https://usermanual.wiki/Samsung-Electronics-Co/YPP2/User-Guide-824563-Page-42.png)
![44 _ watching a videoTO PLAY THE PREVIOUS VIDEO FILEHow To 1Tap the [ ] icon within 5 seconds after the current video started playing. Tap the [ ] icon twice after 5 seconds after the current video started playingThis will return to the previous video.How To 2Tap on the center area of the touch screen to the right as if you keep fl ipping it.TO PLAY THE NEXT VIDEO FILEHow To 1Tap the [ ] icon.This will move to the next video.How To 2Tap on the center area of the touch screen to the left as if you keep fl ipping it.Video Track 1How To 2How To 2Video Track 1](https://usermanual.wiki/Samsung-Electronics-Co/YPP2/User-Guide-824563-Page-43.png)
![watching a video _ 45USING THE VIDEO MENUTo set a bookmarkOnce you bookmark a specifi c scene that you want to see again, you can enjoy it at any time you want.1. Tap the [ ] icon at the scene you want during video playback.The <Video> menu appears.2. Tap <Bookmark>.The <Bookmark> menu appears.3. Tap <Add>.The currently played/stopped point is set to a bookmark.The Overwrite window appears if there is a bookmark previously set. If you select <Yes>, the previously set bookmark is deleted and a new bookmark is added.The bookmark can be set one for each video fi le, and you can set a maximum of 100 bookmarks.To move / remove the bookmark1. Tap the [ ] icon on the video playback screen.The <Video> menu appears.2. Tap <Bookmark>.The <Bookmark> menu appears.3. Tap <Go to> or <Delete>.When you selected <Go to> then it will move to the selected bookmark and <Delete> will remove the selected bookmark from the video fi le.Tap the [] icon to exit the menu.NOTENOTEBookmarkDNSeHorizontal StrokeScreen SizeConnect to HeadsetAddAddGo toDeleteBookmarkDNSeHorizontalScreen SizeConnect to Headset](https://usermanual.wiki/Samsung-Electronics-Co/YPP2/User-Guide-824563-Page-44.png)
![46 _ watching a videoUSING THE VIDEO MENU (Continued)To Set the Digital Natural Sound engine (DNSe)Select the right sound for each video genre.1. Tap the [] icon.The <Video> menu appears.2. Tap <DNSe>.The <DNSe> menu appears.3. Tap on a desired DNSe.Select from <Normal>,<Drama> and <Action>.To set the horizontal strockeYou can fast forward through a fi le at various intervals when you touch the screen to the left or right. Skip a whole track or skip several seconds at a time.1. Tap the [ ] icon on the video playback screen.The <Video> menu appears.2. Tap <Horizontal Stroke>.The <Horizontal Stroke> menu appears.3. Tap on a desired horizontal stroke.Select from <1 File>, <Seek>,<10secSkip>,<30sec Skip> and <1min Skip>.Left : Moves to the next by the set horizontal stroke interval.Right : Moves to the previous by the set horizontal stroke interval.For <Seek> option, tapping on the touch screen to the left / right cycles through<x2> ĺ <x4> ĺ <x8> playback speed.If the fi le was developed with a variable bit rate, the actual length of the horizontal stroke may not be exactly what you select.NOTEBookmarkDNSeHorizontal StrokeScreen SizeConnect to HeadsetNormalDramaActionBookmarkDNSeHorizontal StrokeScreen SizeConnect to Headset1 FileSeek10Sec Skip30Sec Skip](https://usermanual.wiki/Samsung-Electronics-Co/YPP2/User-Guide-824563-Page-45.png)
![watching a video _ 47USING THE VIDEO MENU (Continued)To select the screen sizeYou can select the display size of the movie playback.1. Tap the [ ] icon on the video playback screen.The <Video> menu appears.2. Tap <Screen Size>.The <Screen Size> menu appears.3. Tap on a desired Screen Size.Select from <Actual Size>, <Standard>, <Full> and <Zoom>.Images in 4:3 ratioImages in 16:9 or wider ratioBookmarkDNSeHorizontal StrokeScreen SizeConnect to HeadsetActual SizeStandardFullZoom<Actual Size> <Full> <Zoom><Actual Size> <Full> <Zoom>](https://usermanual.wiki/Samsung-Electronics-Co/YPP2/User-Guide-824563-Page-46.png)
![48 _ watching a videoUSING THE VIDEO MENU (Continued)Before you start - Check if the stereo headset has been registered. <Connect to Headset> appears when there is a registered headset. For more information, refer to “Using the Stereo Headset.” See page 78To connect a stereo headsetYou can directly connect to a registered Bluetooth headset during video playback.1. Tap the [ ] icon on the video playback screen.The <Video> menu appears.2. Tap <Connect to Headset>.If <Bluetooth Mode> is set to <Off>, it will be switched to <On>.When the connection is successfully done, you will see the [ ]You can enjoy your video fi le via the stereo headset.To disconnect the stereo headset1. Tap the [ ] icon on the video playback screen.The <Video> menu appears.2. Tap <Disconnect Headset>.The headset is disconnected. BookmarkDNSeHorizontal StrokeScreen SizeConnect to HeadsetBookmarkDNSeHorizontal StrokeScreen SizeDisconnect Headset](https://usermanual.wiki/Samsung-Electronics-Co/YPP2/User-Guide-824563-Page-47.png)
![listening to music _ 49Songs1/52Audio Track 1listening to musicBefore you start - Connect the earphones, then turn on the player, and check the battery.Tap the [ ] icon to move to the previous screen.Press and briefl y hold the [] icon to move to the main menu screen.LISTENING BY CATEGORY1. Tap the icon on the main menu screen.The <Music> list will appear.2. Tap on a desired list.The Music fi le appear.3. Tap on a music fi le twice on the screen.The music will start playing.NOTEMusicNow PlayingArtistsAlbumsSongsGenresPlaylistsMusic Browser](https://usermanual.wiki/Samsung-Electronics-Co/YPP2/User-Guide-824563-Page-48.png)
![50 _ listening to musicLISTENING BY CATEGORY (Continued)Music ListFile information including the artist name, album name, music title and genre will be displayed according to the Contents information on the appropriate music fi le. A fi le without an Contents is displayed as [Unknown].Now Playing : Plays a recently played fi le or moves to the playback screen of the current fi le.Artists : To play by artist Albums : To play by albumSongs : To play in numeric or alphabetical order Genres : To play by genrePlaylists : To play by Playlist.Music Browser : Shows all the music fi les stored in the Music Folder.MP3 and WMA music fi les are compatible with the player. MP1 or MP2 fi les which only have a changed extension to MP3, may not play on the player.What is Contents?This is what is attached to an MP3 to carry information relevant to the such as the title, artist, album, year, genre and a comment fi eld.NOTE](https://usermanual.wiki/Samsung-Electronics-Co/YPP2/User-Guide-824563-Page-49.png)
![listening to music _ 51PAUSING1. Tap the [ ] icon or press the button while the music is playing.The music playback will be paused.2. Tap the [ ] icon or press the button again.The music will play from the point where it stopped.PLAYING FROM THE BEGINNING OF THE CURRENT TRACK1. Tap the [ ] icon after 3 seconds of play.The current track starts playing from the beginning.PLAYING THE PREVIOUS TRACKHow To 1Tap the [ ] icon within 3 seconds of play.Tap the [ ] icon twice after 3 seconds of play.How To 2Tap on the center area of the touch screen to the right as if you keep fl ipping it.The previous track will start playing.When playing VBR fi les, the previous track may not play even if you tap the []icon within 3 seconds of the play.Songs52/52Audio Track 0How To 2CAUTION](https://usermanual.wiki/Samsung-Electronics-Co/YPP2/User-Guide-824563-Page-50.png)
![52 _ listening to musicPLAYING THE NEXT TRACKHow To 1Tap the [ ] icon.How To 2Tap on the center area of the touch screen to the left as if you keep fl ipping it.The next track will start playing.SEARCHING WITHIN A TRACKHow To 11. Press and briefl y hold the [ ] or [ ] icon while the selected track is playing.It searches to the beginning or the end of the track.2. Release the icon at the point you wish to start.It starts playing from the point you release the icon.How To 2Tap on a desired point in the play status bar.If it is set to <Horizontal Stroke> other than <1 File>, tapping on the center of the touch screen to the left / right direction will move to the next / previous by the stroke interval setting.Songs1/52Audio Track 1How To 2Songs2/52Audio Track 2NOTE](https://usermanual.wiki/Samsung-Electronics-Co/YPP2/User-Guide-824563-Page-51.png)
![listening to music _ 53CREATING AN ALBUM (PLAYLIST) USING SAMSUNG MEDIA STUDIOWith <Media Studio>, you can create your own collection, or album, of audio fi les.Before you start - Connect the player to your PC.Media Studio must be installed on your PC.Creating an Album (Playlist)1. Click <My Album> on the top of <Media Studio>.The <My Album> window appears.2. Click <New Album> on the bottom.The <Creation> window appears.3. Type in the album title and click [OK].A new album (playlist) will be named and stored in the <My Album> section of <Media Studio>.25My Album[YP-U3[MTP]][YP-U3[MTP]]1OKNew Album3](https://usermanual.wiki/Samsung-Electronics-Co/YPP2/User-Guide-824563-Page-52.png)
![54 _ listening to musicCREATING AN ALBUM (PLAYLIST) USING SAMSUNG MEDIA STUDIO (Continued)Adding music fi les to an Album (Playlist) you’ve created1. Click <My PC> on the top of <Media Studio>.The <My PC> window appears.2. Click <My Album> in the right corner of the window.The <My Album> window appears.3. Double click on an album in the right window.4. Select fi les that you want to transfer in the <My PC> window.5. Click .The selected fi les will be added to the album (playlist).5[YP-U3[MTP]]1My PCMy Album342](https://usermanual.wiki/Samsung-Electronics-Co/YPP2/User-Guide-824563-Page-53.png)
![listening to music _ 55CREATING AN ALBUM (PLAYLIST) USING SAMSUNG MEDIA STUDIO (Continued)Transferring an Album (Playlist) to your player using Media Studio1. Click <My Album> on the top of <Media Studio>.The <My Album> window appears.2. Select an album in the <My Album> list.3. Click .The selected album will be transferred to the player folder by folder in <File Browser> ĺ <Playlists>.A maximum of 999 playlists transferred to the player can be played.[YP-U3[MTP]]1My Album32[YP-U3[MTP]]NOTE](https://usermanual.wiki/Samsung-Electronics-Co/YPP2/User-Guide-824563-Page-54.png)
![56 _ listening to musicCREATING A PLAYLIST ON YOUR MP3 PLAYERIf you’ve already downloaded fi les to your mp3 player, you can create a “Favorites” playlist without Media Studio or your PC.1. Tap the icon on the main menu screen.2. Tap <Music> twice.The music fi le list appears.3Select a fi le to add to the playlist and tap [ ] icon.The Playlist menu appears.4. Tap <Add to Playlist>.<Playlist 1> to <Playlist 5> appear.5. Tap on the playlist number to which the selected fi le is added.You can check the playlist in <Music> ĺ <Playlists> ĺ<Playlist 1> to <Playlist 5> in the main menu.You can add up to 200 music fi les to each of <Playlist 1> to <Playlist 5>.NOTEMusic1/5Song 1Song 2Song 3Song 4Song 5Add to Playlist](https://usermanual.wiki/Samsung-Electronics-Co/YPP2/User-Guide-824563-Page-55.png)
![listening to music _ 57PLAYING A PLAYLIST1. Tap the icon on the main menu screen.The music list appears.2. Tap <Playlists> twice.The Playlist(s) will appears.3. Tap on a desired playlist twice.The music fi les saved in the selected playlist will appear.If there is no playlist found, you will see a <No fi le> message on the screen.2. Tap on a fi le to play fi le twice.The music fi le will start playing.See page 34 and 35 for how to transfer the playlist using <Media Studio>.DELETING A PLAYLISTFollow the same 1-3 steps above.1. Select a fi le to delete to the playlist and tap the [ ] icon.The Playlist menu appears.2. Tap <Delete from Playlist>.The playlist including the selected fi le appears.3. Tap on the playlist that you want to delete the selected fi le from.The selected fi le is removed from the playlist.A playlist cannot be deleted while in use.PlaylistsPlaylist 1Playlist 2Playlist 3Playlist 4Playlist 5Song 1Song 4Song 6Song 8Song 9Add to PlaylistDelete from PlaylistPlaylists1/5NOTE](https://usermanual.wiki/Samsung-Electronics-Co/YPP2/User-Guide-824563-Page-56.png)
![58 _ listening to musicUSING THE MUSIC MENUThe Music menu allows you manage all facets of listening - from repeating tracks and albums to choosing the background on the screen as you listen.To set the sound effectYou can enjoy clearer sound.1. Tap the [ ] icon on the music play screen.The <Music> menu appears.2. Tap <Sound Effect>.The <Sound Effect> menu appears.3. Tap on a desired sound effect.Select from <Street Mode> and <Clarity>.Sound Effect OptionsStreet Mode : Allows you to hear the music outdoors as clearly as indoors by fi ltering out some of the street noise. Select either <Off> or <On>Clarity : You can enjoy clearer sound with improved quality. Select from <0-2>.Tap the [] icon to exit the menu.Sound EffectDNSePlay ModeMusic Play ScreenAdd to AlarmHorizontal StrokeConnect to HeadsetAdd to PurchaseStreet ModeClaritySongs2/52NOTE](https://usermanual.wiki/Samsung-Electronics-Co/YPP2/User-Guide-824563-Page-57.png)
![listening to music _ 59Sound EffectDNSePlay ModeMusic Play ScreenAdd to AlarmHorizontal StrokeConnect to HeadsetAdd to PurchaseNormalStudioRockClassicalJazzBalladClubSongs2/52USING THE MUSIC MENU (Continued)To set the Digital Natural Sound engine (DNSe)Select the right sound for each music genre.1. Tap the [ ] icon on the music play screen.The <Music> menu appears.2. Tap <DNSe>.The <DNSe> menu appears.3. Tap on one of the DNSe options.Select from <Normal>,<Studio>,<Rock>,<Classical>,<Jazz>,<Ballad>,<Club>,<Rhythm & Blues>,<Dance>,<Concert Hall> and <User>.You can set <EQ> and <3D&Bass> when you have selected <User>. See page 69You can also set DNSe by touching the [DNSe]icon on the music play screen.What is DNSe?Digital Natural Sound Engine (DNSe) is a sound effect function for MP3 players developed by Samsung. It provides various sound settings to enhance the type of music you’re listening to.NOTE](https://usermanual.wiki/Samsung-Electronics-Co/YPP2/User-Guide-824563-Page-58.png)
![60 _ listening to musicUSING THE MUSIC MENU (Continued)To set the Digital Natural Sound engine (DNSe) (Continued)<3D&Bass>Sets 3D sound effect and bass enhancement.1Tap the [ ] icon of <User>.The <User> menu appears.2. Tap <3D&Bass>.The <3D&Bass> setting screen appears.3. Tap either <3D> or <Bass> and tap the [,]icon to set the point you want. Tap <OK>.You can select from <0-4> for the <3D> and <Bass>.The setting is completed.<EQ>You can adjust individual frequencies to adjust the sound to your preference.1Tap the [ ] icon of <User>.The <User> menu appears.2. Tap <EQ>.The <EQ> setting screen appears.3. Tap the [ , ] icon to to select the frequency you want to adjust, and tap the [,] icon to adjust the selected frequency’s level. Tap <OK>.You can select from <–10 - +10> for <EQ>.The setting is completed.[ZYXW[ZYXWZk iUserOK Cancel+100-10UserOK Cancel](https://usermanual.wiki/Samsung-Electronics-Co/YPP2/User-Guide-824563-Page-59.png)
![listening to music _ 61USING THE MUSIC MENU (Continued)To set the play modeSelect playback mode such as repeat settings.1. Tap the [ ] icon on the music play screen.The <Music> menu appears.2. Tap <Play Mode>.The <Play Mode> menu appears.3. Tap on a desired play mode.Select from <Normal>,<Repeat>,<Repeat One>and <Shuffl e>.Play Mode OptionsNormal : To play all the tracks in order one time.Repeat: To repeat all fi les.Repeat One: To repeat one fi le.Shuffl e: To play fi les at random.Sound EffectDNSePlay ModeMusic Play ScreenAdd to AlarmHorizontal StrokeConnect to HeadsetAdd to PurchaseSongs2/52NormalRepeatRepeat OneShuffl e](https://usermanual.wiki/Samsung-Electronics-Co/YPP2/User-Guide-824563-Page-60.png)
![62 _ listening to musicUSING THE MUSIC MENU (Continued)To select the music play screenChoose a background image from those provided, or choose an image of your own to be displayed as you listen to music.1. Tap the [ ] icon on the music play screen.The <Music> menu appears.2. Tap <Music Play Screen>.The <Music Play Screen> menu appears.3. Tap the [ , ] icon to select a desired music play screen, and tap <OK>.Select from <Type 1>,<Type 2>,<Type 3>,<Type 4>,<Album Info.> and <Album Art>.Music Play Screen OptionsType 1 ~ Type 4 : You can select a desired music play screen.Album Info. : Information on the artist name, album and genre displays if Contents information is stored on the music fi le.Album Art :The album cover image displays if an album cover image is included in the Contents information of the music fi le.The album cover image stored in the player displays if there is no album cover image in the Contents information of the music fi le.Album Cover supports only less than 200 pixel (horizontal) x 200 pixel(vertical) in size.Sound EffectDNSePlay ModeMusic Play ScreenAdd to AlarmHorizontal StrokeConnect to HeadsetAdd to PurchaseSongs2/52Type 4OK Cancel](https://usermanual.wiki/Samsung-Electronics-Co/YPP2/User-Guide-824563-Page-61.png)
![listening to music _ 63USING THE MUSIC MENU (Continued)To add to alarm soundYou can add your favorite music fi le to the alarm sound list, so it can be heard the next time the alarm goes off. See page 83 to set the alarm.1. Select a music fi le to add to the alarm sound and tap the [] icon.The <Music> menu appears.2. Tap <Add to Alarm>.The Save window appears. 3. Tap <OK>.The selected music will be added to the alarm sound list.You can add only one music fi le at a time to the alarm sound list.To set the horizontal strockeYou can set the stroke interval of scrolling a music fi le playback by tapping on the touch screen to the left or right.1. Tap the [] icon on the music play screen.The <Music> menu appears.2. Tap <Horizontal Stroke1>.The <Horizontal Stroke> menu appears.3. Tap on a desired horizontal stroke.Select from <1 File>,<5sec Skip>,<10sec Skip>,<30sec Skip> and <1min Skip>.If the fi le was developed with a variable bit rate, the actual length of the horizontal stroke may not be exactly what you select.NOTESound EffectDNSePlay ModeMusic Play ScreenAdd to AlarmHorizontal StrokeConnect to HeadsetAdd to PurchaseSongs2/52OK CancelSave?GGGXٜٜٜٜGGG\ٜG GٜٜٜٜGGGXWٜG GٜٜٜٜGGGZWٜG GٜٜٜٜGGG]WٜG GٜٜٜٜSound EffectDNSePlay ModeMusic Play ScreenAdd to AlarmHorizontal StrokeConnect to HeadsetAdd to PurchaseSongs2/521 File5sec Skip10sec Skip30sec Skip1min Skip](https://usermanual.wiki/Samsung-Electronics-Co/YPP2/User-Guide-824563-Page-62.png)
![64 _ listening to musicUSING THE MUSIC MENU (Continued)Before you start - Check if the stereo headset has been registered.<Connect to Headset> appears when there is a registered headset. For more information, refer to “Using the Stereo Headset.” See page 78To connect a stereo headsetYou can connect directly to the registered Bluetooth headset during music playback.1. Tap the [ ] icon on the music play screen.The <Music> menu appears.2. Tap <Connect to Headset>.If <Bluetooth Mode> is set to <Off>, it will be switched to <On>.When the connection is successfully done, you will see the [ ]You can listen to the music through the stereo headset.To disconnect the stereo headset1. Tap the [ ] icon on the music play screen.The <Music> menu appears.2. Tap <Disconnect from Headset>.The headset is disconnected.Sound EffectDNSePlay ModeMusic Play ScreenAdd to AlarmHorizontal StrokeConnect to HeadsetAdd to PurchaseSongs2/52](https://usermanual.wiki/Samsung-Electronics-Co/YPP2/User-Guide-824563-Page-63.png)
![viewing pictures _ 65viewing picturesBefore you start - Connect the earphones, then turn on the player, and check the battery.Tap the [ ] icon to move to the previous screen.Press and briefl y hold the [] icon to move to the main menu screen.1. Tap the icon on the main menu screen.The picture preview window appears.2. Tap on a desired picture fi le twice.The selected picture is displayed.Tap the [ ] icon to move to the preview window.To move to the previous/next photoTap on the screen once in the slideshow screen.The previous/next video fi le will be displayed.Information and icon on the current picture viewing will disappear in a certain time. Tap on the screen if you want to display the picture information and icon again,The Previous/Next Image [ , ] icon appears if you tap on the screen once. Tapping it again will display both picture information and icon.A JPG fi le including incorrect thumbnail data will be displayed in [ ].Some picture fi les can be displayed slowly.When transferring a picture fi le to the player using <Media Studio>, it is automaticallyconverted into JPG format before transfer. The fi le size is automatically adjusted.You can also use the <File Browser> to search for a picture fi le. See page 18.You can keep listening to music even if you select <Pictures> to view a picture.NOTENOTE](https://usermanual.wiki/Samsung-Electronics-Co/YPP2/User-Guide-824563-Page-64.png)
![66 _ viewing picturesUSING THE PICTURE MENUTo watch a slideshowHow To 1Tap the [ ] icon on the preview screen.The [ ] icon on the screen appeara on the screen, and the slideshow will start.How To 21. Tap the [ ] icon on the picture view screen.The <Pictures> menu appears.2. Tap <Start Slideshow>.The [ ] icon on the screen appears on the screen, and the slideshow will start.To set the slideshow speed1. Tap the [ ] icon on the picture view screen.The <Pictures> menu appears.2. Tap <Slideshow Speed>.The <Slideshow Speed> menu appears.3. Tap on a desired speed.Select from <Fast>,<Normal>, and <Slow>.Tap the [] icon to exit the menu.NOTEStart SlideshowSlideshow SpeedSelect as My SkinView ModeFastNormalSlow](https://usermanual.wiki/Samsung-Electronics-Co/YPP2/User-Guide-824563-Page-65.png)
![viewing pictures _ 67USING THE PICTURE MENU (Continued)To stop the slideshowTap on the screen in the slideshow modeThis will stop the slideshow.To select a picture as a background imageYou can set a desired picture to the background image for the screen.1. Select a picture fi le to set as a background image and tap the [ ] icon.The <Pictures> menu appears.2. Tap <Select as My Skin>.The Save window appears.3. Tap <OK>.The selected picture fi le is set to a background image.If you turn off and restart the player, the selected picture fi le is still displayed as background image.NOTEStart SlideshowSlideshow SpeedSelect as My SkinView Mode](https://usermanual.wiki/Samsung-Electronics-Co/YPP2/User-Guide-824563-Page-66.png)
![68 _ viewing picturesUSING THE PICTURE MENU (Continued)To select the picture view mode1. Tap the [ ] icon on the picture view screen.The <Picture> menu appears.2. Tap <View Mode>.The <View Mode> menu appears.3. Tap on a desired mode.Select from <Auto> and <Horizontal>.If you select <Horizontal>, the picture fi le is displayed hozontally.To enalarge a pictureYou can zoom in a picture.1. Tap the [ ] icon on the picture view screen.The picture is enlarged.Each time you press the [] icon, the size of the picture is enlarged in the sequence of <x2> ĺ <x3> ĺ <x4>.2. To move to a desired position, tap on the screen to the desired direction as if you keep snapping it. See page 17You can move the picture in a desired direction.Start SlideshowSlideshow SpeedSelect as MView ModeAutoHorizontalX2X2](https://usermanual.wiki/Samsung-Electronics-Co/YPP2/User-Guide-824563-Page-67.png)
![viewing pictures _ 69listening to FM radioBefore you start - Connect the earphones, then turn on the player, and check the battery.Tap the [ ] icon to move to the previous screen.Press and briefl y hold the [] icon to move to the main menu screen.Tap the icon on the main menu screen.FM radio reception will start.TO USE MUTE FUNCTIONPress the button while listening to FM Radio.Sound is muted.Press the button once again to resume listening.Always connect your earphones to the player when searching or setting frequencies. The earphones serve as antennas to receive FM Radio reception.In poor reception areas, the player may not fi nd an available FM frequency.NOTENOTEFM Radio](https://usermanual.wiki/Samsung-Electronics-Co/YPP2/User-Guide-824563-Page-68.png)
![70 _ listening to FM radioTO SEARCH FOR FM STATIONS1. Press and briefl y hold the [,] icon and then release in the manual mode.<Searching> appears on the screen.The search will stop at the frequency nearest from the point the button is released.OR,1. Tap the [,] icon to progress through the frequencies one by one in the manual mode.Moves to frequencies whenever the button is pressed.FM RadioFM Radioyxxx Searching xxxy](https://usermanual.wiki/Samsung-Electronics-Co/YPP2/User-Guide-824563-Page-69.png)
![listening to FM radio _ 71USING THE FM RADIO MENUTo switch to Preset ModeSelect this mode if you want to search through your saved FM presets one preset at a time.1. Tap the [] icon in the manual mode.The <FM Radio> menu appears2. Tap <Go to Preset Mode>.FM radio reception will start.You will see <PRESET> on the screen.If no frequencies were preset, <Preset list does not exist> will appear and the player will not switch to <Preset Mode>.If you set <Settings>ĺ <System> ĺ <Default Set>, the saved preset lists are deleted.Preset frequencies are stored in the numeric sequence.To switch to Manual ModeSelect this mode if you want to manually search through the FM band one frequency at a time.1. Tap the [ ] icon in the preset mode.The <FM Radio> menu appears2. Tap <Go to Manual Mode>.You will see <MANUAL> on the screen.NOTEFM RadioFM Radio](https://usermanual.wiki/Samsung-Electronics-Co/YPP2/User-Guide-824563-Page-70.png)
![72 _ listening to FM radioUSING THE FM RADIO MENU (Continued)To store stations in the preset memoryYou can store up to 30 stations in your MP3 player’s memory and return to them with the press of just one number. Have the MP3 player choose only the stations you want using the manual process, or fi nd and store the local stations automatically.Manual - choose only the stations you want to store1. Tap the [,] icon to select a frequency to preset in the manual mode and tap [ ] icon.2. Tap <Add to Preset>.The selected frequency is stored as one of empty preset numbers.If the same frequency is already set, the <This preset already exists> message appears and the setting is disabled.To listen to preset stationsTap on a desired preset number in the preset mode.The preset number is selected and you can listen to the radio frequency that is previously stored for the number.Tap the [,] icon to move to the previous or the next number list.Tap the [] icon to exit the menu.NOTEFM RadioGo to Preset ModeAdd to PresetAuto PresetFM SensitivityFM RegionFM RadioNOTE](https://usermanual.wiki/Samsung-Electronics-Co/YPP2/User-Guide-824563-Page-71.png)
![listening to FM radio _ 73USING THE FM RADIO MENU (Continued)To store stations in the preset memory (Continued)Automatic – automatically store all the stations the player receives1. Tap the [ ] icon on the FM Radio screen.The <FM Radio> menu appears.2. Tap <Auto Preset>.The< Auto Preset> window appears.3. Tap <OK>.The <Auto Preset> will appear and up to 30 frequencies are automatically set.To cancel during settingIf you want to cancel the auto preset, touch the screen in the process.The auto preset setting is canceled, and only frequencies set up to that point are stored.You may want to re-set the stored stations if you’re going to listen to your MP3 player in a different city. To delete the preset stations and store new ones, simply repeat the process.NOTEFM RadioGo to Preset ModeAdd to PresetAuto PresetFM SensitivityFM Region](https://usermanual.wiki/Samsung-Electronics-Co/YPP2/User-Guide-824563-Page-72.png)
![74 _ listening to FM radioUSING THE FM RADIO MENU (Continued)To delete a preset Follow the steps below to delete frequencies while listening to FM Radio.1. Tap the [ ] icon in the preset mode.The <FM Radio> menu appears2. Tap <Delete from Preset>.The preset frequency list appears.3. Tap on the frequency twice that you want to remove from the preset list.The confi rmation window will appear.4. Tap <Yes>.The selected preset number is deleted. If you don’t want to delete the preset number, select <No>.When a preset frequency is deleted, the numbers of the following presets are moved up by one.NOTEFM RadioGo to Manual ModeDelete from PresetAuto PresetFM SensitivityFM Region](https://usermanual.wiki/Samsung-Electronics-Co/YPP2/User-Guide-824563-Page-73.png)
![listening to FM radio _ 75USING THE FM RADIO MENU (Continued)To set the FM sensitivityTo receive more or fewer FM radio frequencies, adjust the <FM Sensitivity>.1. Tap the [ ] icon on the FM Radio screen.The <FM Radio> menu appears2. Tap <FM Sensitivity>.The <FM Sensitivity> menu appears.3. Tap on a desired reception sensitivity.Select from <High>,<Middle> and <Low>.If you select <High>, the more frequencies can be received.To set the FM regionYou can change an FM area setting in preparation for overseas travel.1. Tap the [] icon on the FM Radio screen.The <FM Radio> menu appears2. Tap <FM Region>.The <FM Region> appears.3. Tap on a desired FM Region.Select from <Korea/US>,<Japan> and <Other Countries>.Frequency range by region- Korea/US: Search for FM frequencies in 100 kHz increments between 87.5 MHz~108.0 MHz.- Japan: Search for FM frequencies in 100 kHz increments between 76.0 MHz~108.0 MHz.- Other Countries: Search for FM frequencies in 50 kHz increments between 87.50 MHz~108.00 MHz.Your previously stored radio frequencies will be deleted when you change the <FM Region> on your player.NOTEFM RadioGo to Preset ModeAdd to PresetAuto PresetFM SensitivityFM RegionHighMiddleLowFM RadioGo to Preset ModeAdd to PresetAuto PresetFM SensitivityFM RegionKorea/USJapanOther Countries](https://usermanual.wiki/Samsung-Electronics-Co/YPP2/User-Guide-824563-Page-74.png)
![78 _ using the DatacastVIEWING DATACASTSYou can view the posts of the channels added to <My Cast>.Before you start - Transfer the post of a desired channel to the player using <Media Studio>. See page 77Tap the [ ] icon to move to the previous screen.Press and briefl y hold the [] icon to move to the main menu screen.1. Tap the icon on the main menu screen.The Datacast list appears.2. Tap on a desired channel title twice.The title is the same as that of the channel added to <My Cast> in <Media Studio>.3. Tap on a desired post title twice.The fi le list appears. icon: main text for the transferred post icon: picture fi le icon: music fi le icon: video fi le4. Tap on a desired fi le twice.File playback begins.In <My Cast> using <Media Studio>, you can download a multimedia attachment to the post such as music, picture and video to the player and play it.NOTENOTEData Cast1/6My Cast 1My Cast 2My Cast 3](https://usermanual.wiki/Samsung-Electronics-Co/YPP2/User-Guide-824563-Page-77.png)
![enjoying the prime pack_ 79enjoying the prime packREADING TEXTWhether it’s a novel, the manuscript of a new story, or your research paper, your mp3 player allows you to read it… all while listening to music!Before you start - Turn on the player and check the battery.Transfer text fi les to the player using <Media Studio>. See page 39.Set a preferred for text in <Settings> ˧<Language> ˧<Contents>. See page 31Tap the [ ] icon to move to the previous screen.Press and briefl y hold the [] icon to move to the main menu screen.1. Tap the icon on the main menu screen.2. Tap <Texts>.The text fi le list appears.3. Tap on a desired text fi le twice.You will see the text on the screen.You can also use the “File Browser” to search for a text fi le.Your mp3 player supports the TXT fi le format in Text mode.You can keep listening to music even if you select text fi le.NOTENOTEDatacasts1/3My Cast 1My Cast 2My Cast 3](https://usermanual.wiki/Samsung-Electronics-Co/YPP2/User-Guide-824563-Page-78.png)
![80 _ enjoying the prime packREADING TEXT (Continued)To move to previous/next pageHow to 1Tap the [Ż,Ź] icon on the bottom of the touch screen, or drag the page scroll bar to the left or right.How to 2Tap on the touch screen left or right as if you keep snapping it.Tapping to the left will display the next page, while to the right will display the previous page.USING THE TEXT MENUTo set a bookmarkSet a bookmark to return to that point in the text at any time.1. Tap on the [] icon on a desired page of the text view screen.The <Bookmark> menu appears.2. Tap <Add Bookmark>.The current text screen is set to a bookmark with the [] symbol displayed on the top left corner.The Overwrite window appears if there is a bookmark previously set. If you select <Yes>, the previously set bookmark is deleted and a new bookmark is added.One bookmark can be set for each text fi le, and you can set a maximum of 100 bookmarks.Texts 17.0%My doggy likes to disco dance.He boogies every night.He dances in his doghousetill the early morning light.The other dogs come runningwhen they hear my doggy swing.A few will bring play their instruments The others dance and sing.They pair off with their partnersas their tails begin to wag.Add BookmarkTexts 17.0%My doggy likes to disco dance.He boogies every night.He dances in his doghousetill the early morning light.The other dogs come runningwhen they hear my doggy swing.A few will bring play their instruments The others dance and sing.They pair off with their partnersas their tails begin to wag.Add BookmarkNOTE](https://usermanual.wiki/Samsung-Electronics-Co/YPP2/User-Guide-824563-Page-79.png)
![enjoying the prime pack_ 81Texts 17.0%My doggy likes to disco dance.He boogies every night.He dances in his doghousetill the early morning light.The other dogs come runningwhen they hear my doggy swing.A few will bring play their instruments The others dance and sing.They pair off with their partnersas their tails begin to wag.Add BookmarkGo to BookmarkDelete BookmarkUSING THE TEXT MENU (Continued)To move / remove the bookmark1. Tap the [ ] icon on the text view screen.The <Bookmark> menu appears.2. Tap <Go to Bookmark> or <Delete Bookmark>.When you selected <Go to Bookmark> then it will move to the selected bookmark and <DeleteBookmark> will remove the selected bookmark from the text fi le.To set the text viewer colorChoose what color you’d like the text to appear.1. Tap the [ ] icon on the text view screen.The <Text> menu appears.2. Tap <Text Viewer Color>.The <Text Viewer Color> menu window appears.3. Tap the [ , ] icon to select a color for the text viewer. Select from <Type 1> to <Type 9>.4. Tap <OK>.The selected text viewer color is displayed.Tap the [] icon to exit the menu.My doggy likes to disco dance.He boogies every night.He dances in his doghousetill the early morning light.The other dogs come runningwhen they hear my doggy swing.Text Viewer ColorType 1OK CancelNOTE](https://usermanual.wiki/Samsung-Electronics-Co/YPP2/User-Guide-824563-Page-80.png)
![82 _ enjoying the prime packUSING THE TEXT MENU (Continued)To change the font sizeYou can change the font size of the text.1. Tap the [ ] icon on the text view screen.The <Text> menu appears.2. Tap <Font Size>.The <Font Size> menu appears.3. Tap the [ , ] icon to select a desired font size.Select from <Small>,<Medium> and <Large>.4. Tap <OK>.The font size is changed.My doggy likes to disco dance.He boogies every night.He dances in his doghousetill the early morning light.The other dogs come runningwhen they hear my doggy swing.Font SizeSmallOK Cancel](https://usermanual.wiki/Samsung-Electronics-Co/YPP2/User-Guide-824563-Page-81.png)
![enjoying the prime pack_ 83SETTING THE ALARMThis player has an alarm which can be set to go off at a scheduled time.Before you start - First, you should set the clock for the current time.Źpage 331. Tap the icon on the main menu screen.2. Tap <Alarm> twice.3. Tap <New Alarm>.The alarm setting screen appears.4. Tap on the fi rst item repeatedly to select the alarm frequency.Select from <Once>,<Everyday>,<Mon~Fri>,<Mon~Sat>,<Sat~Sun> and <Off>.5. Tap on the second item.The alarm time setting screen appears.6. Tap the [ , ] icon to set <Hour>,<Min> and <AM/PM>.7. Tap <OK> on the alarm time setting screen.OK CancelPrime PackTextsAlarmCalendarWorld Clock](https://usermanual.wiki/Samsung-Electronics-Co/YPP2/User-Guide-824563-Page-82.png)

![enjoying the prime pack_ 85SETTING THE ALARM (CONTINUED)To edit the alarm setting1. Tap on the alarm setting you want to change twice on the alarm screen.The alarm setting screen appears.2. Follow the same steps as the new alarm setting above to edit the setting. See page 83To delete an alarm setting1. Tap on an alarm setting to delete in the alarm list.2. Tap the [ ] icon.Tap the [ ] icon to delete all of the alarm setting.The Delete window appears.3. Tap <Yes>.The selected alarm will be deleted.The player will sound the alarm when it reaches the scheduled time. Alarm stops briefl y and starts to sound again after the alarm interval you previously set, if there is no button or Touch screen operation. Alarm sounds work repeatedly as above for one hour if there is no operation.If the USB cable is connected to the player, the alarm function does not work.NOTECAUTIONOnceAM 12 : 40Alarm Sound 1Interval : 5 minAlarmAlarmNew AlarmAM 01 : 53](https://usermanual.wiki/Samsung-Electronics-Co/YPP2/User-Guide-824563-Page-84.png)
![86 _ enjoying the prime packVIEWING THE CALENDARYou can check the calendar.Before you start - First, you should set the clock for the current time.Źpage 331. Tap the icon on the main menu screen.2. Tap <Calendar> twice.The <calendar> screen appears.3. Tap the [ , ] icon to select a desired month.You can view the calendar of the month of your choice.To set the type of the calendarYou can view the calendar by changing the order of days of the week.1. Tap the [ ] icon on the calendar view screen.The <Calendar> menu appears.2. Tap <View Type>.The <View Type> screen appears.3. Tap the [ , ] icon to select the view mode you want and Tap <OK>.Select either <Type 1> or <Type 2>.<Type 1> displays Sunday through Saturday while <Type 2> displays Monday through Sunday.SUN MON TUE WEO THU FRI SAT1 2 3 4 5 6 7 8 9 10 11 12 1314 15 16 17 18 19 2021 22 23 24 25 26 2728 29 30 31View TypeType 1OK CancelPrime PackTextsAlarmCalendarWorld Clock](https://usermanual.wiki/Samsung-Electronics-Co/YPP2/User-Guide-824563-Page-85.png)
![enjoying the prime pack_ 87VIEWING THE WORLD CLOCKYou can check the location and date/time of major world cities based on their respective time zone. Before you start - First, you should set the clock for the current time.Źpage 33Set the time zone you want in the <Setting> ˧<Time> ˧<Time Zone>.1. Tap the icon on the main menu screen.2. Tap <World Clock> twice.The <World Clock> screen appears.3. Tap the [ , ] icon to select a time zone.You can view the date/time of the city you select.You can check local time of the following time zone. (‘/’ indicates the standard time zone in the region)Cape Verde / London, Lisbon / Rome, Paris, Berlin, Stockholm, Madrid, Frankfurt / Athens, Helsinki, Cairo, Ankara / Moscow, Riyadh / Abu Dhabi, Muskat / Tashkent, Ashgabat / Alma Ata, Kathmandu / Bangkok, Jakarta, Rangoon / Hong Kong, Beijing, Taipei, Manila, Singapore / Seoul, Tokyo, Pyongyang / Guam, Sydney, Brisbane / Okhotsk / Wellington, Oakland, Fiji / Samoa, Midway / Honolulu, Hawaii, Tahiti / Alaska / LA, San Francisco, Vancouver, Seattle / Denver, Phoenix, Salt Lake City / Chicago, Dallas, Houston, Mexico City / New York, Miami, Washington DC, Montreal, Atlanta / Cracas, LA Paz, Santiago / Buenos Aires, Brasilia, Sao Paulo / The middle AtlanticPrime PackTextsAlarmCalendarWorld Clock](https://usermanual.wiki/Samsung-Electronics-Co/YPP2/User-Guide-824563-Page-86.png)
![88 _ using bluetoothusing bluetoothTap the [ ] icon to move to the previous screen.Press and briefl y hold the [] icon to move to the main menu screen.WHAT IS BLUETOOTH?Bluetooth is an industry specifi cation that describes how Bluetooth-compliant stereo headsets, mobile phones, and external devices can easily interconnect with each other using a short wireless connection.The Bluetooth device can cause a noise or malfunction, depending on the use conditions.Physical signal interference, for instance, if you hold the player in the hand and wear a stereo headset in the ears.When a part of the body is in contact with the receiving/transmitting system of the player or the stereo headset.Electrical variation from electrical jamming by the wall, corner or offi ce partitioning.Electrical interference from the same frequency-band devices including medical equipment, microwave oven and wireless LAN.When pairing the Bluetooth device with the player, make it within a short distance as possible.The farther the distance between player and stereo headset is, the worse the quality is. If the distance exceeds the limit, the communications are disconnected.You are not recommended to use text and picture view modes while listening to the music with the headset. Otherwise, it can cause deterioration of both player performance and Bluetooth communications.Depending on the model of the stereo headset, fi les in less than 32 KHz can not be played.In poor reception-sensitivity areas such as inside the elevator or under the ground, the Bluetooth connection may not work properly.The maximum distance that enables wireless connection between the player and the bluetooth is 10m. The connection will be automatically cut off if the distance is out of this range. The sound quality will be deteriorated in places of obstacles such as walls or doors even within this range.NOTE](https://usermanual.wiki/Samsung-Electronics-Co/YPP2/User-Guide-824563-Page-87.png)
![90 _ using bluetoothUSING A STEREO HEADSETYou can use a Bluetooth stereo headset to let you enjoy music with high quality stereo sound.Before you start - Ensure that the Bluetooth device to connect is ready for pairing. (refer to the device’s user manual)Set <Search Options> under <Bluetooth Setting> to <Search Enabled>.Registering the Stereo Headset(simply register it only once)1. Tap the icon on the main menu screen.The Bluetooth Settings window appears.2. Tap <Yes>.The <Bluetooth Mode> is set to <On>.The icon appears brightly.3. Set the stereo headset ready for pairing.To set the headset ready for the pairing mode, refer to the device’s user manual.4. Tap <Stereo Headset>5. Tap the [] icon.This player automatically starts search for any Bluetooth device even if you do not press the [ ]icon, if there is no device detected previously.A device to be registered will be listed.BluetoothStereo HeadsetBluetooth ModeBluetooth Settings](https://usermanual.wiki/Samsung-Electronics-Co/YPP2/User-Guide-824563-Page-89.png)
![92 _ using bluetoothUSING A STEREO HEADSET (Continued)Connecting the registered stereo headset1. Tap the icon on the main menu screen.2. Tap <Stereo Headset>3. Tap on the stereo headset to connect.When the connection is successfully done, you will see the [ ]You can connect up to 2 headsets.4. Play a fi le of your choice.You can listen to the music using a stereo headset.If you can’t fi nd the desired headset to connect, register it fi rst. Źpage 90If you turn off the player or the headset, and then turn it on, the bluetooth communication may be disconnected. If you want to listen to the music again using the stereo headset, repeat the instructions above.NOTEStereo HeadsetNONAME DEVICE](https://usermanual.wiki/Samsung-Electronics-Co/YPP2/User-Guide-824563-Page-91.png)
![using bluetooth_ 93SETTING A BLUETOOTHBefore you start - Set <Bluetooth Mode> to <On>.1. Tap the icon on the main menu screen.2. Tap <Bluetooth Settings>.The <Bluetooth Settings> menu appears.3. Set the options you prefer and tap <OK>.Bluetooth Settings OptionsDiscover Option : You can set to enable or disable a Bluetooth stereo headset to detect this player when it searches for a Bluetooth device. Select from<Discoverable> and <Non-Discoverable>.Search Timeout :: You can select the search time period for a new device. Select one from <10sec>,<20sec>, <30sec>,<45sec> and <60sec>.Delete Device : You can delete a registered device in the player. Press the []icon to delete all of the registered devices.My Device Info. : You can check the name and address of your player.BluetoothStereo HeadsetBluetooth ModeBluetooth Settings](https://usermanual.wiki/Samsung-Electronics-Co/YPP2/User-Guide-824563-Page-92.png)
![94 _ using bluetoothSETTING A BLUETOOTH (Continued)To delete a bluetooth device1. Tap <Delete Device> twice.You will see the list of the registered devices.2. Select a device to remove and tap the [ ]icon.Tap the [ ] icon to delete all of the registered devices.3. Tap <Yes>.The selected device will be removed.To rename a bluetooth device1. Tap <My Device Info> twice.The My Device Info screen appears.2. Tap the [ ] icon.The Edit Device Name window appears.3. Rename the device by tapping on the number or character icon.[1Aa] : The input mode switches from number to uppercase english and to lowercase English.[] : You can delete the characters from the end one at a time.[ – ] : You can add space between characters.[OK] : Confi rm your change.Bluetooth SettingsDiscover OPtionSear ch TimeoutDelete DeviceMy Device lnfo.Bluetooth SettingsDiscover OPtionSear ch TimeoutDelete DeviceMy Device lnfo.](https://usermanual.wiki/Samsung-Electronics-Co/YPP2/User-Guide-824563-Page-93.png)
![using bluetooth_ 95USING BLUETOOTH MENUTo disconnect the Bluetooth Device1. Tap the icon on the main menu screen.2. Tap the [ ] icon.The Bluetooth menu appears.3. Tap <Disconnect>The Disconnection Confi rmation window appears.4. Tap <Yes>.The currently connected device will be disconnected.To check the Bluetooth Device connected1. Tap the icon on the main menu screen.2. Tap the [] icon.The Bluetooth menu appears.3. Tap <Connected Device>You can see a list of connected devices.Tap the [ ] icon to exit the menu.NOTEBluetoothStereo HeadsetBluetooth ModeBluetooth SettingsDisconnectConnected DeviceBluetoothStereo HeadsetBluetooth ModeBluetooth SettingsDisconnectConnected Device](https://usermanual.wiki/Samsung-Electronics-Co/YPP2/User-Guide-824563-Page-94.png)
![96 _ upgrading fi rmware upgrading fi rmware Future upgrades may be available for this player to enhance performance andcompatibility.1. Connect to http://www.samsung.com, select [SUPPORT] [DOWNLOADCENTER] and then select your player.2. When the player page appears, select [Firmware] below the model name to download the latest fi rmware.3. Uncompress the downloaded fi le onto your Desktop.The uncompressed fi les will be displayed.4. Connect the player to your PC.5. Right click on the Start button on the bottom left of your PC’s screen, then choose Explore to Open Windows Explorer on your PC.[P2] is displayed in Windows Explorer.](https://usermanual.wiki/Samsung-Electronics-Co/YPP2/User-Guide-824563-Page-95.png)
![upgrading fi rmware _ 976. Locate and click on the Desktop icon in Windows Explorer (left column).The contents of the Desktop will appear in the right column.7. Locate and select the Firmware update fi les (right column) and drag-and-drop it into the folder of [P2] [Data] [System].8. After disconnecting USB plug, the player will be turned off automatically.9. Press and briefl y hold the button.The fi rmware will be upgraded.When upgrading is complete, the player will be turned off automatically.Check the battery charge status of the player. If the battery is not suffi ciently charged, the fi rmware will not be upgraded.You need to have at least 20 MB of free space on the player for the upgrade.NOTE](https://usermanual.wiki/Samsung-Electronics-Co/YPP2/User-Guide-824563-Page-96.png)