Samsung Electronics Co YPT9 DIGITAL AUDIO PLAYER User Manual YP T9 ENG blue
Samsung Electronics Co Ltd DIGITAL AUDIO PLAYER YP T9 ENG blue
UserManual.wiki
>
Samsung Electronics Co
>
YPT9 User Manual
users manual
Navigation menu
Upload a User Manual
Namespaces
Wiki Guide
HTML
PDF
Info
Views
User Manual
Discussion / Help
Navigation
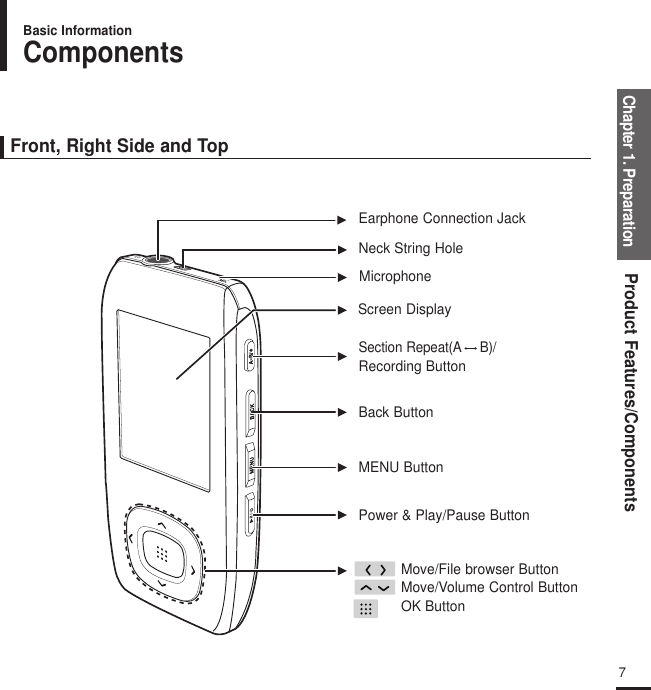
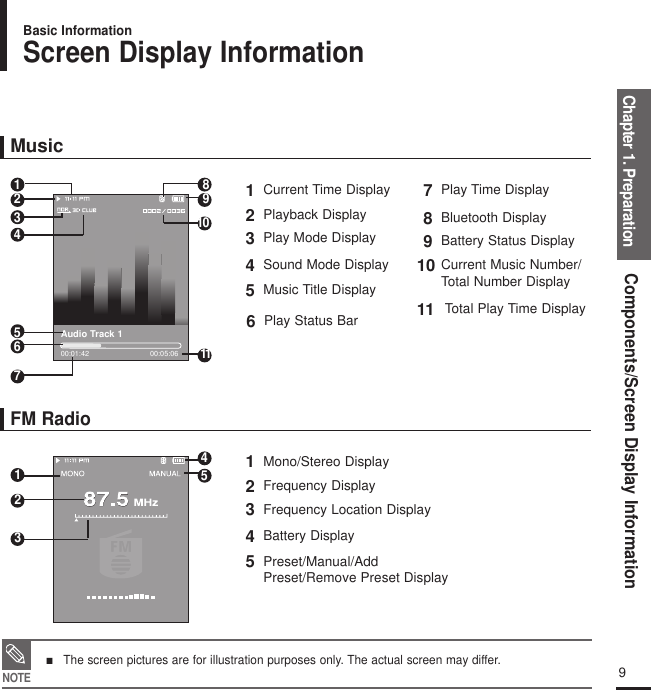
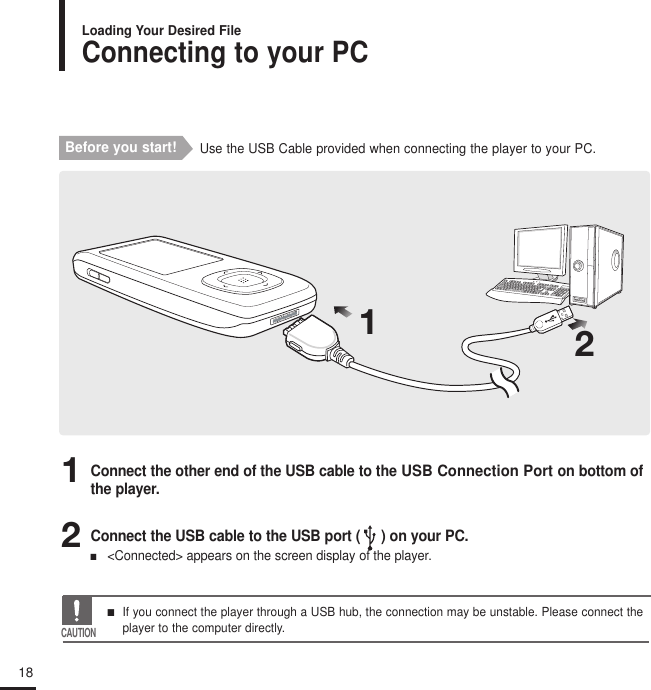
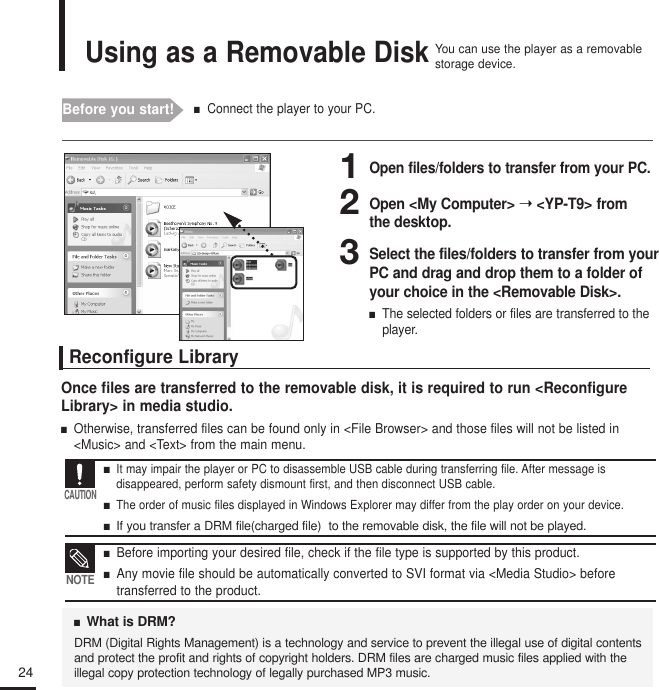
![12■ Press the [ ] button to move to the sub level.■ Press the [BACK] button to move to the previous screen. Basic UseTurning the Power On & OffPlaying MusicTurning the Power OnPress and hold the []button■Power is turned on. Turning the Power OffPress and hold the []button■Power is turned off. 1Press the [ ] button to select <Music> and thenpress the [ ] button.2Press the [ ] button to select the desired music file.3Press the [ ] button.■The music file will begin playing.NOTE■ Power is automatically turned off when none of the buttons have been pressed for a preset period of time (Default: 1 minute) in the pause mode. √ Page 72NOTEAudio Track 100:01:42 00:05:06](https://usermanual.wiki/Samsung-Electronics-Co/YPT9/User-Guide-675959-Page-11.png)
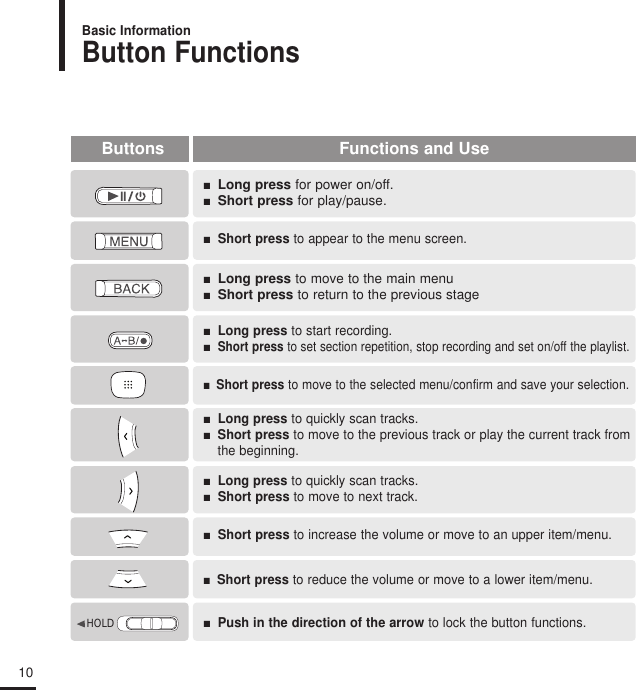
![Chapter 1. PreparationBasic Use13Volume ControlLock FunctionPress the [ ] button.■ You will see a volume control icon.■ Press the button to increase the volume or the button to decrease it.In Hold mode, all buttons are disabled. This function is usefulwhen you are walking or jogging.1Push the [HOLD] button in the direction of the arrow.2Push the [HOLD] button in the opposite direction of thearrow to release the Lock function.](https://usermanual.wiki/Samsung-Electronics-Co/YPT9/User-Guide-675959-Page-12.png)
![14Basic Use (Continued)Searching for Files with <File Browser>Search easily for files using the <File Browser> function.4Use the [ ] button to move to the file list in the selected folder.■ Use the [ ] button to move to the lower step, the [ ] buttonto the upper step.3Press the[] button to select a folder of your choice.6Press the [ ] button.■ The selected file will start playing.Press the [ ] button.■ The <File Browser> folder list containing Music, Text, Photo andVideo appears.2Press the [ ] button to select a file of your choice.51Press the [ ] button to select <File Browser>.](https://usermanual.wiki/Samsung-Electronics-Co/YPT9/User-Guide-675959-Page-13.png)
![Chapter 1. PreparationBasic Use15File Deletion1Press the [ ] button to select <File Browser> andthen press the [ ] button.2Press the [ ] button to select the file that youwant to delete and press the [MENU] button.3Press the [ ] button to select <Delete> and thenpress the [ ] button.■The selected file will be deleted.DeleteNOTE■ You couldn't recover the file once it is deleted. So check if it is the right file to delete.](https://usermanual.wiki/Samsung-Electronics-Co/YPT9/User-Guide-675959-Page-14.png)
![16Basic Use (Continued)If a product malfunction occurs, you can re-initialize the system.Press and hold the [MENU] and [A B/ ]buttons at the same time.■ The system will be initialized.■ Resetting the system does not loose the time information and the data stored in the internal memory.Reset FunctionEarphone Connection√ Top Earphones](https://usermanual.wiki/Samsung-Electronics-Co/YPT9/User-Guide-675959-Page-15.png)
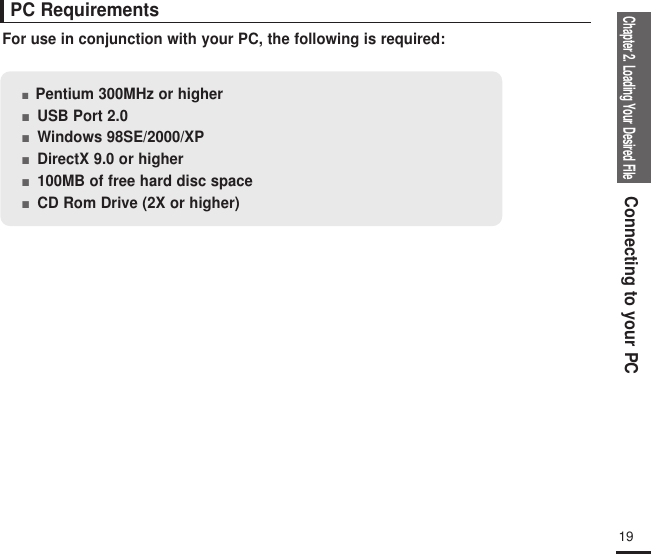
![20Adding Folders/Files in Samsung Media StudioLoading Your Desired FilePlease refer to Help for more information on how to use Media Studio.■Click <MENU> ➝ <Help> ➝ <Help> from the menu on the top of the Media Studio program.332[YP-T9][YP-T9]](https://usermanual.wiki/Samsung-Electronics-Co/YPT9/User-Guide-675959-Page-19.png)
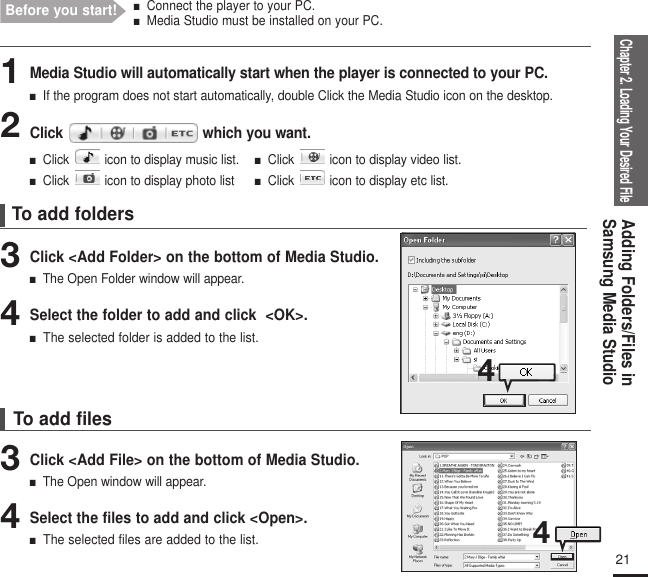
![22Transferring Files to the Player with Samsung Media StudioLoading Your Desired FileNOTE■ Music recognition technology and related data are provided by Gracenote and Gracenote CDDB®Music Recognition ServiceSM. ■ CDDB is a registered trademark of Gracenote. The Gracenote logo and logotype, the GracenoteCDDB logo and logotype, and the "Powered by Gracenote CDDB" logo are trademarks of Gracenote. Music Recognition Service and MRS are service marks of Gracenote.432Portable window[YP-T9][YP-T9]](https://usermanual.wiki/Samsung-Electronics-Co/YPT9/User-Guide-675959-Page-21.png)
![Listening to MusicListening to MusicBefore you start! Connect the earphones, then switch on the player, and check the battery. 1Press the [ ] button to select <Music> andthen press the [ ] button.2Press the [ ] button to select the desiredlistand then press the [ ] button.■ <Now Playing> : You can listen to the last played music orrecording file.■ <Artists> : To play by artist■ <Albums> : To play by album ■ <Tracks> : To play in numeric or alphabetical order■ <Genres> : To play by genre ■ <Playlists> : To play by Playlist NOTE■ The music files compatible with the player are MP3, WMA and Ogg.■ MP1 or MP2 files which only have a changed extension to MP3, may not play on the player.■ A file without an ID3 Tag (Unknown) is displayed as [Unknown]. ■ If you press the [ ] button in Music mode, the “S” mark appears on the screen and the Street modeis set to On. Pressing the [ ] again to disappear “S” and set off the Street mode. √ page70261,2,3Audio Track 100:01:42 00:05:063Press the [ ] button to select the fileto play and then press the [ ] button.■The music file starts to play.](https://usermanual.wiki/Samsung-Electronics-Co/YPT9/User-Guide-675959-Page-25.png)
![Chapter 3. Multimedia FunctionListening to Music27To Pause 1Press the [ ] button while the music is playing. ■ The music playback will be paused. 2Press the [ ] button again. ■ The music will play from the point where it stopped.To play a folder1Press the [ ] button to select <Music> and then press the [ ] button.2Press the [ ] button to select the desired list and then press the [ ] button.3Press the [ ] buttonto select the desired folder and then press the[]button.■The music files in the selected folder are played one by one.To search within a track1Press and hold the [ ] or [ ] button while the selected track is playing. ■ It searches to the beginning or the end of the track.2Release the button at the point you wish to start.■ It starts playing from the point you release the button.](https://usermanual.wiki/Samsung-Electronics-Co/YPT9/User-Guide-675959-Page-26.png)
![28To Play from the beginning of the current trackPress the [ ] button after 5 seconds of play. ■ The current track starts playing from the beginning.To play the previous/next trackPress the [ ] button within 5 seconds of play. ■ The previous track will start playing.Press the [ ] button.■ The next track will start playing.CAUTION■ When playing VBR files, the previous track may not play even if you press the []button within 5 seconds of the play.Listening to Music (Continued)Listening to Music](https://usermanual.wiki/Samsung-Electronics-Co/YPT9/User-Guide-675959-Page-27.png)
![Chapter 3. Multimedia FunctionListening to Music/Section Repetition29To set a section for repetitionTo cancel the section repetition2,3Audio Track 100:01:42 00:05:06Section RepetitionThis function enables you to listen to specific parts of a track repeat-edly. Recommended for language learning.Listening to Music1Play a file of your choice.Press the [A B/ ] button again during SectionRepeat.■Section Repeat will be canceled.2Press the [A B/ ] button at the beginning of the section you want to repeat.■The starting point is set and <A > will appear inthe screen display window.3Press the [A B/ ] button again to set theending of the section you want to repeat.■<A B> will appear on the screen and the specifiedsection starts to play repeatedly.](https://usermanual.wiki/Samsung-Electronics-Co/YPT9/User-Guide-675959-Page-28.png)
![30Creating Playlist Using Samsung Media StudioListening to Music[YP-K5][YP-K5]1Click <My Album> on the top of Media Studio.■ The My Album window appears.2Click <New Album> on the bottom.■ The New album window appears.3Type in the album title and click <OK>.■ A new album (playlist) will be created.1233](https://usermanual.wiki/Samsung-Electronics-Co/YPT9/User-Guide-675959-Page-29.png)
![■ To remove a file from the playlist, select the marked file(s) and press the [A B/ ]button again.Alternately, press the [MENU] button to select <Delete from Favorites> and press the []button.32To Play a PlaylistYou can easily listen to your favorite music by adding it to a Playlist.Listening to MusicTo make your own PlaylistHow To 1MusicSong 1Song 2Song 3Song 4Song 51Press the [ ] button to select <File Browser> andthen press the [ ] button.2Press the [ ] button to select <Music> and then pressthe [ ] button.■ The file list appears.3Press the []button to select a file to add to theplay list and then press the [A B/ ] button.■ Next to the selected file, the mark appears and the file is included in <File Browser> →<Playlist>→<Favorites>.NOTE](https://usermanual.wiki/Samsung-Electronics-Co/YPT9/User-Guide-675959-Page-31.png)
![Chapter 3. Multimedia FunctionTo Play a Playlist33To make your own Playlist (Continued)How To 21Press the [ ] button to select <File Browser> andthen press the [ ] button.2Press the [ ] button to select <Music> and then pressthe [ ] button.■ The file list appears.3Press the [ ] buttons to add files to theplaylist and then press the [MENU] button.4Press the [ ] button to select <Add to Favorites> andthen press the [ ] button.■ Next to the selected file, the mark appears and the file is included in <File Browser> →<Playlist>→<Favorites>.NOTE■ To remove a file from the playlist, select the marked file(s) and press the [A B/ ]button again.Alternately, press the [MENU] button to select <Remove File from Favorites> and press the []button.Add to FavoritesDelete](https://usermanual.wiki/Samsung-Electronics-Co/YPT9/User-Guide-675959-Page-32.png)
![34To Play a Playlist1Press the [ ] button to select <File Browser> and thenpress the [ ] button.2Press the [ ] button to select <Playlist> and thenpress the [ ] button.■ The Playlist(s) will appear.3Press the [ ] to select the playlist of your choice, then press the [ ] button.■ The music files saved in the selected Playlist will appear.4Press the [ ] button to select the file to play andthen press the [ ] button.■ The music file will start playing.FavoritesSong 1Song 2Song 3To Play a Playlist (Continued)Listening to Music](https://usermanual.wiki/Samsung-Electronics-Co/YPT9/User-Guide-675959-Page-33.png)
![Chapter 3. Multimedia FunctionTo Play a Playlist/Using Music menu35To select Street modeThis allows you to enjoy the music outdoors as clearly as indoors.To select 3D surround sound (DNSe)You can listen to the music with 3D surround sound.1Press the [MENU] button when you are in the music playback mode.2Press the [ ] button to select <Street Mode> andthen press the [ ] button.3Press the [ ] buttonto select the desired mode andthen press the [ ] button.■ You can select either <On> or <Off>.1Press the [MENU] button when you are in the music playback mode.2Press the [ ] button to select <DNSe> and thenpress the [ ] button.3Press the [ ] buttonto select the desired mode andthen press the [ ] button.■ Select either <3D-User> <3D-Studio> <3D-Stage> <3D-Club><Normal> <Rock> <House> <Dance> <Jazz> <Ballad> <Rhythm & Blues> <Classical> or <User EQ>.Using Music menuListening to MusicStreet ModeDNSePlay ModeMusic Backgrou..Play SpeedSkip IntervalStreet ModeDNSePlay ModeMusic Backgrou..Play SpeedSkip IntervalTo exit the menu, press the [MENU] button.](https://usermanual.wiki/Samsung-Electronics-Co/YPT9/User-Guide-675959-Page-34.png)
![36To select Play mode (Repeat)To select a background image for Music modeYou can set a background image for Music mode.1Press the [MENU] button when you are in the music playback mode.2Press the [ ] button to select <Play Mode> and thenpress the [ ] button.3Press the [ ] buttonto select the desired mode andthen press the [ ] button.■ Select either <Normal> <Repeat> <Repeat One> or <Shuffle>.1Press the [MENU] button when you are in the music playback mode.2Press the [ ] button to select <Music Background> andthen press the [ ] button.3Press the [ ] button to select the desired backgroundimage and then press the [ ] button.■ Select either <FLASH1> <FLASH2> <FLASH3> <Album Cover><Photo> or <Auto>.■ Selecting <Auto> will change the background image by picking onefrom <FLASH1> to <FLASH3> each time a different file is played.Using Music menu (Continued)Listening to MusicStreet ModeDNSePlay ModeMusic Backgrou..Play SpeedSkip IntervalStreet ModeDNSePlay ModeMusic Backgrou..Play SpeedSkip IntervalNOTE■ If there is an image contained in the tag information of a music file, it will be displayed as a back-ground image when you have selected <Album Cover>. <Album Cover> supports only less than 200(horizontal) x 200 (vertical) in size.](https://usermanual.wiki/Samsung-Electronics-Co/YPT9/User-Guide-675959-Page-35.png)
![Chapter 3. Multimedia FunctionUsing Music menu37To select the play speedYou can select the play speed either faster or lower.To set the skip intervalYou can st the playback interval when you press the [ ] or [ ] button during playback.1Press the [MENU] button when you are in the music playback mode.2Press the [ ] button to select <Play Speed> and thenpress the [ ] button.3Press the [ ] button to select theplay speedandthen press the [ ] button.■ Select either <X0.7> <X0.8> <X0.9> <X1.0>(Normal) <X1.1><X1.2> or <X1.3>.■ Greater numbers indicate higher play speeds.1Press the [MENU] button when you are in the music playback mode.2Press the [ ] button to select <Skip Interval> andthen press the [ ] button.3Press the [ ] button to select the desired skip interval and then press the [ ] button.■ Select either <1track> <3sec> <5sec> <7sec> <10sec> <30sec>or <1min>.Street ModeDNSePlay ModeMusic Backgrou..Play SpeedSkip IntervalStreet ModeDNSePlay ModeMusic Backgrou..Play SpeedSkip Interval](https://usermanual.wiki/Samsung-Electronics-Co/YPT9/User-Guide-675959-Page-36.png)
![38VideoVideoBefore you start! Connect the earphones, then switch on the player, and check the battery. 1Press the [ ] button to select <Video> andthen press the [ ] button.2Press the [ ] button to select thedesiredvideo clip and then press the [ ] button.■The selected video file starts to play.NOTE■ Any movie file should be automatically converted to SVI format via <Media Studio> before transferredto the product.The file size is automatically adjusted before actually transferred.1,2To stop playing the video filePress the [ ] button in Video mode.■Each time you press the [ ] button, the player stopsplaying the video file or resumes playback.](https://usermanual.wiki/Samsung-Electronics-Co/YPT9/User-Guide-675959-Page-37.png)
![Chapter 3. Multimedia FunctionVideo39any story 1Press the[] button in Video mode.■ Information on the current video appears. Press the[] button again to disappear the information.Video Information Display1Play/Pause Indicator3Play Position Indicator2File Name4Current Play Time Indicator5Volume Level Indicator6Full play time for the current video123456](https://usermanual.wiki/Samsung-Electronics-Co/YPT9/User-Guide-675959-Page-38.png)
![40To move to a certain position of the current video fileTo play the previous/next video file1Press and hold the[]or [ ] button in Video mode.■ This enables you to move up or back in the current video file.2Release the button when you have moved to the desiredposition.■ The video starts playing from the position.Press the []button within 5 seconds after the currentvideo started playing.■ This will return to the previous movie.Press the []button.■ This will move to the next movie.Video (Continued)Videoany story 1any story 2](https://usermanual.wiki/Samsung-Electronics-Co/YPT9/User-Guide-675959-Page-39.png)
![Chapter 3. Multimedia FunctionVideo/Using Video menu41To set a bookmarkTo move/remove the bookmark1Press the [MENU] button in Video mode.2Press the [ ] button.■ The Bookmark menu appears.3Press the [ ]button to select <Go to> or <Delete>and press the [ ] button.■ When you selected <Go To> then it will move to the selectedbookmark and <Delete> will remove the selected bookmark fromthe video file.Press the [A B/ ] button at the desired scene.■ The currently played/stopped point is set to a bookmark.any story 1NOTE■ You can set a maximum of 20 bookmarks.Go toDeleteUsing Video menuVideo](https://usermanual.wiki/Samsung-Electronics-Co/YPT9/User-Guide-675959-Page-40.png)
![42Photo ViewingPhoto ViewingBefore you start! Connect the earphones, then switch on the player, and check the battery. 1Press the [ ] button to select <Photo> andthen press the [ ] button.■The photo preview window appears.2Press the [ ] button to select the desiredphoto and then press the [ ] button.■The selected photo is displayed.NOTE■ Any photo file should be automatically converted to JPG format via <Media Studio> before transferredto the product.The file size is automatically adjusted before actually transferred.The file size is automatically adjusted before actually transferred.■ To locate a photo file, use the <File Browser> menu. √page 14■ You can keep listening to music even if you select <Photo> to view a photo.1,2](https://usermanual.wiki/Samsung-Electronics-Co/YPT9/User-Guide-675959-Page-41.png)
![Chapter 3. Multimedia FunctionPhoto Viewing43Photo Display Window1Preview Pane3Thumbnails2File Name4The current file number/total file numberPhototest0 1/201234NOTE■ Press the [ ] or [ ] button while viewing a photo to display the previous or next photo.](https://usermanual.wiki/Samsung-Electronics-Co/YPT9/User-Guide-675959-Page-42.png)
![44Slideshow ViewingTo stop the slideshow1Press the [MENU] in Photo Viewing mode.2Press the [ ] button to select <Start Slideshow> andthen press the [ ] button.■ The slideshow will start.Press the [ ] buttonin Slideshow mode.■ This will stop the slideshow.Using Photo menuPhoto ViewingStart SlideshowZoomAs Music Backgr..](https://usermanual.wiki/Samsung-Electronics-Co/YPT9/User-Guide-675959-Page-43.png)
![Chapter 3. Multimedia FunctionUsing Photo menu45Photo Enlarging1Press the [MENU] in Photo Viewing mode.2Press the [ ] button to select <Zoom> and then pressthe [ ] button.■ The Zoom Setting menu appears.3Press the [ ] button to selectthe desired scale factorand then press the [ ] button.■ You can select either <100%> <200%> or <400%>.4Press the [ ] to move to the portion of the phototo magnify.5To cancel the magnification, select <100%> from the Zoomoptions and then press the [ ] button.■ This returns to the original size.100%200%400%NOTE■ Press the []button in the Photo Viewing mode to display the Zoom Setting menu.](https://usermanual.wiki/Samsung-Electronics-Co/YPT9/User-Guide-675959-Page-44.png)
![46Using Photo menu (Continued)Photo ViewingTo set the photo as a music background image1Select a photo file to set as a background image.2Press the [MENU] in Photo Viewing mode.3Press the [ ] button to select <As MusicBackground> and then press the [ ] button.■ The Music Background Image Setting menu appears.4Press the[]or []button to select <Yes> and thenpress the [ ] button.■ The selected photo file is set to a background image for music.NOTE■ Press the [A B/ ]button in the Photo Viewing mode to display the Music Background Settingmenu.■ Once a photo file is set to a background image, it still appears even if you turn off the player and turn it on.Audio Track 100:01:42 00:05:06](https://usermanual.wiki/Samsung-Electronics-Co/YPT9/User-Guide-675959-Page-45.png)
![Chapter 3. Multimedia FunctionUsing Photo menu/Text Viewing47Text ViewingYou can read a novel or see the manuscript text of a news story or soapopera while listening to music.Text ViewBefore you start! Connect the earphones, then switch on the player, and check the battery. 1Press the [ ] button to select <Text> andthen press the [ ] button.■The Text View menu appears.2Press the [ ] button to selectText and thenpress the [ ] button.■You will see the text on the screen. NOTE■ To locate a test file, use the <File Browser> menu. √page 14■ This product supports the TXT file format in Text mode. ■ You can keep listening to music even if you select <Text> in Music mode.■ Press the [ ] button if you want to play a music while viewing text. Press the [ ] buttonagain to stop playing the music.1,2To scroll the text by the linePress the[]or []button.■Once you set <Scroll By> →<Page> in Text mode, you canmove up or back the text file by the page.■Once you set <Scroll By> →<Line> in Text mode, you canmove up or back the text file by the line. Press and hold the[]or []button to fast move up or back through the file.](https://usermanual.wiki/Samsung-Electronics-Co/YPT9/User-Guide-675959-Page-46.png)
![48To set a bookmarkTo move/remove the bookmark1Press the [MENU] button in Text viewing mode.2Press the [ ] button to select <Bookmark> andthen press the [ ] button.■ The Bookmark menu appears.3Press the [ ] button to select <Go to> or <Delete>and then press the [ ] button.■ When you selected <Go To> then it will move to the selectedbookmark and <Delete> will remove the selected bookmarkfrom the text file. Press the [A B/ ]button in Text viewing mode.■ The current text screen is set to a bookmark with the †symbol displayedon the top left corner.■ If you press the [A B/ ] buttonagain anywhere within the bookmarkedpage, the page will be removed of the bookmark.Using Text menuText ViewNOTE■ You can set a maximum of 20 bookmarks.Go to 1st PageBookmarkScroll ByText Viewer TypeText Viewer Color](https://usermanual.wiki/Samsung-Electronics-Co/YPT9/User-Guide-675959-Page-47.png)
![Chapter 3. Multimedia FunctionUsing Text menu49To move to the first page1Press the [MENU] button in Text viewing mode.Use this if you want to see the text file from the beginning.2Press the [ ] button to select <Go to 1st Page> andthen press the [ ] button.■ This will move to the first page of the text file.To set the scroll option1Press the [MENU] button in Text viewing mode.2Press the [ ] button to select <Scroll By> and thenpress the [ ] button.■The Scroll option menu appears.3Press the [ ] button to select thedesired option andthen press the [ ] button.■ You can select either <Page> or <Line>.■ <Page>: Use the [ ] or [ ] button to scroll through the file by the page.■ <Line>: Use the [ ] or [] button to scroll through the file by the line.NOTE■ Even if you didn’t set a scroll option, you can press the []button to change the scroll option in TextView mode.Go to 1st PageBookmarkScroll ByText Viewer TypeText Viewer ColorGo to 1st PageBookmarkScroll ByText Viewer TypeText Viewer Color](https://usermanual.wiki/Samsung-Electronics-Co/YPT9/User-Guide-675959-Page-48.png)
![50Using Text menu (Continued)Text ViewTo set the text viewer type1Press the [MENU] button in Text viewing mode.2Press the [ ] button to select <Text Viewer Type> andthen press the [ ] button.■ The Text Viewer Type menu appears.3Press the [ ] button to select the desired text viewer type.■ You can select either <Vertical> or <Horizontal>.To set the text viewer color1Press the [MENU] button in Text viewing mode.2Press the [ ] button to select <Text Viewer Color> andthen press the [ ] button.■ The Text Viewer Color menu appears.3Press the [ ] buttonto select the desired text viewercolor.■ Select either <Auto> <Blue> <Green> <Orange> <Pink> or <Purple>.■ Selecting <AUTO> will set the viewer color to the same as the mainmenu. Go to 1st PageBookmarkScroll ByText Viewer TypeText Viewer ColorGo to 1st PageBookmarkScroll ByText Viewer TypeText Viewer Color](https://usermanual.wiki/Samsung-Electronics-Co/YPT9/User-Guide-675959-Page-49.png)
![Chapter 3. Multimedia FunctionUsing Text menu/Listening to FM Radio51Listening to FM RadioListening to FM RadioBefore you start! Connect the earphones, then switch on the player, and check the battery. Press the [ ] button to select <FM Radio> and then pressthe [ ] button.■ FM radio reception will start.■ It will display <Searching…> while scanning for the first frequency available. To use Mute functionPress [ ] button during listening to FM radio.■ sound is muted.■ Press []button once again to sound back.](https://usermanual.wiki/Samsung-Electronics-Co/YPT9/User-Guide-675959-Page-50.png)
![52Listening to FM Radio (Continued)Listening to FM RadioTo automatically search for frequencies1Press the [ ] button to select <MANUAL>.■ You will see <MANUAL> in the top right corner.2Press and hold the []or []button and then release.■ The frequency nearest from the point the button is released will be searched.To manually search for frequencies1Press the [ ] button to select <MANUAL>.■ You will see <MANUAL> in the top right corner.2Press the []or []button.■ Moves to frequencies whenever the button is pressed.NOTE■ In <PRESET> mode, press [MENU] and use the [ ] button to select <Go to Manual Mode> and press the [ ] button. You will switch to<MANUAL> mode. ■ In <MANUAL> mode, press [MENU] and use the [ ] button to select <Go to Preset Mode> and press the [ ] button. You will switch to <PRESET> mode. Auto Searching...■ Always connect your earphones to the player when searching or setting frequencies. The earphones are used as antennas to receive FM radio reception.CAUTION](https://usermanual.wiki/Samsung-Electronics-Co/YPT9/User-Guide-675959-Page-51.png)
![Chapter 3. Multimedia FunctionListening to FM Radio/Setting a Frequency53Setting a FrequencyListening to FM RadioTo automatically set frequencies1Press the [MENU] button in FM Radio mode.To cancel during settingTo cancel setting during <Auto Preset> setting, press the [ ]button.■ The auto preset setting is canceled and frequencies set up to then arestored.2Press the [ ] button to select <Auto Preset> and thenpress the [ ] button.■ The Auto Preset Confirm window will appear.3Press the []or []button to select <Yes> and thenpress the [ ] button.■ The <Auto Preset> message will appear and frequencies are automatically set between 1~30.Go to Preset Mo..Add to PresetAuto PresetFM RegionFM Search Level■ To set <Auto Preset> again after setting preset, existing frequencies are deleted entirely and you canreset from start.NOTE](https://usermanual.wiki/Samsung-Electronics-Co/YPT9/User-Guide-675959-Page-52.png)
![54Setting a Frequency (Continued)Listening to FM RadioTo manually set frequencies1Press the [ ] button to select <MANUAL>.■ You will see <MANUAL> in the top right corner.2Press the []or []button to search for frequencies toset in preset.3Press the [A B/ ] button.■ <ADD> blinks before the preset number appears.4Press the []or [] button to select the desired frequencyand press the [ ]button.■ The selected frequency is set as a preset number.To search for frequencies in PRESET mode1Press the [ ] button to select <PRESET>.■ You will see <PRESET> in the top right corner.2Press the []or []button.■ The preset number is selected and you can listen to the stored radiofrequency.■ Alternately, you can set the preset frequency by pressing [MENU] to select <Add to Preset> in <MANUAL> mode.NOTE■ If you didn’t set a preset frequency, you will see <No preset> and couldn’t switch to <PRESET> mode.■ If you set an identical frequency, you will see <The frequency already exists. Do you want to save it anyway?. Press the []or []button to select <Yes> or <No> and press the []button.NOTE](https://usermanual.wiki/Samsung-Electronics-Co/YPT9/User-Guide-675959-Page-53.png)
![Chapter 3. Multimedia FunctionSetting a Frequency/To Delete Presets55Listening to FM RadioTo Delete Presets1Press the [ ] button to select <PRESET>.■ You will see <PRESET> in the top right corner.2Press the [A B/ ] button.■ <DELETE> blanks.3Press the []or []button to select the frequency thatyou want to remove from the PRESET list and press the[]button.■ The Delete Preset winow will appear.4Press the []or []button to select <Yes> and press the []button.■The selected preset number will be deleted.■ If you don’t want to delete the number, select <NO>.Before you start! ■Follow the steps below to delete frequencies while listening to FM radio.■ Alternately, you can remove the preset frequency by pressing [MENU] to select <Delete Preset> in<PRESET> mode.NOTE](https://usermanual.wiki/Samsung-Electronics-Co/YPT9/User-Guide-675959-Page-54.png)
![56Using FM Radio menuListening to FM RadioTo set FM region1Press the [MENU] button in FM Radio mode.2Press the [ ] button to select <FM Region> and thenpress the [ ] button.■ The FM Region menu appears.3Press the [ ] button to select the FM Region and thenpress the [ ] button.■ You can select from <Korea/USA> <Japan> <Other Countries>.To set FM sensitivity1Press the [MENU] button in FM Radio mode.2Press the [ ] button to select <FM Search Level> andthen press the [ ] button.■ The FM Serch Level menu appears.3Press the [ ] button to select the search level and thenpress the [ ] button.■ You can select from <High> <Middle> and <Low>.■ The higher FM search level is, the more frequencies can be received.■ Frequency range by region- Korea/USA: Search for FM frequencies in 100 kHz increments between 87.5 MHz~108.0 MHz.- Japan: Search for FM frequencies in 100 kHz increments between 76.0 MHz~108.0 MHz.- Other Countries: Search for FM frequencies in 50 kHz increments between 87.50 MHz~108.00 MHz.■ FM region can be deleted or changed according to the target region of the player.■ If you change the FM region, the previously stored radio frequencies are removed.NOTEGo to Preset Mo..Add to PresetAuto PresetFM RegionFM Search LevelGo to Preset Mo..Add to PresetAuto PresetFM RegionFM Search Level](https://usermanual.wiki/Samsung-Electronics-Co/YPT9/User-Guide-675959-Page-55.png)
![581,23■ <Record Voice>: you can make a voice recording.■ <Record FM Radio>: you can record the FM radiobroadcasting that you listened to the last time■ <Recorded Files>: you can choose to listen to voicerecording and FM radio broadcasting.RecordingRecording (Continued)1Press the [ ] button to select <Record>and then press the [ ] button.■ Then, press the [MENU] button and use the[]and[] buttons to set your recording options.2Press the[] button to select the desiredrecording mode and press the[] button.■ The appropriate window appears.3Press the [A B/ ] button.■ Recording is started with displaying the file name tosave.To stop recording1Press the[] or[A B/ ]button while in recording.■ You will see a message that prompts you to confirm your choice.2Press the []or []button to select <Yes> or <No> and press the[] button.■ <Yes> will play the just recorded file.■ <No> will not play the just recorded file.■ Any recording file is stored in the <File Browser> →<Recorded>.](https://usermanual.wiki/Samsung-Electronics-Co/YPT9/User-Guide-675959-Page-57.png)
![Chapter 3. Multimedia FunctionRecording/Voice/FM Radio Recording5932kbps100:00:00100:00:00V0129001.mp3To make a voice recordingPress and hold the [A B/ ] button.■ Recording is started with displaying the file name to save.You can make voice recording at any time while usingdifferent functions.To record FM radio broadcastingIn FM Radio mode, press and hold the [A B/ ] button.■ An automatically created file name appears and the recordingstarts.You can record FM radio broadcasting at any time whilelistening to the radio.RecordingVoice/FM Radio Recording■ Do not place the microphone too close or too far away during recording, as this can affect the recording quality. ■ Voice recording does not perform properly when the battery is low.■ You can make a voice recording for about 69 hours (based on 32Kbps, 1GB)NOTE](https://usermanual.wiki/Samsung-Electronics-Co/YPT9/User-Guide-675959-Page-58.png)
![60BluetoothUsing Bluetooth Wireless connection is enabled upon registering your headset and hands-freedevice if they are compatible with Bluetooth. When connected, you can listento the music with the Bluetooth headset or hands-free device. Before you start! ■Ensure that the device to use is compatible with Bluetooth. (refer to the user’smanual for the device to use.)1,2,3Registering a Device Ex) Registering your headset1Press the [ ] button to select <Bluetooth>and then press the [ ] button.2Press the [ ] button to select <BluetoothMode> and then press the [ ] button.3Press the [ ] button to select <On (theSearch function)> and then press the [ ] button.■The Search Device window appears and, in a moment, disappears.■ The maximum distance that enables wireless connection between the product and a Bluetoothheadset or hands-free device is 10m. The connection becomes automatically cut off if the distanceis out of this range. The sound quality will be deteriorated in places of obstacles such as walls ordoors even within this range. NOTE](https://usermanual.wiki/Samsung-Electronics-Co/YPT9/User-Guide-675959-Page-59.png)
![Chapter 3. Multimedia FunctionUsing Bluetooth614Press and hold the Power button on the headset until theLED blinks in an alternation of blue and red.5Press the [ ] button to select <New Device> and thenpress the [ ] button.6Press the[] button to select a device to register, andthen press the[ ] button.■A message box that prompts you to enter the password will appear. 7Press the []button to enter the password forthe headset.■ The default password of the provided headset is 0000.8Press the[]button to select <OK>and then press the[ ] button.■The name of device and its address will be displayed, and then awindow indicating the registration is complete appears. Power button LEDBluetooth ModeNew DeviceConnect DeviceDelete DeviceBluetooth Settings](https://usermanual.wiki/Samsung-Electronics-Co/YPT9/User-Guide-675959-Page-60.png)
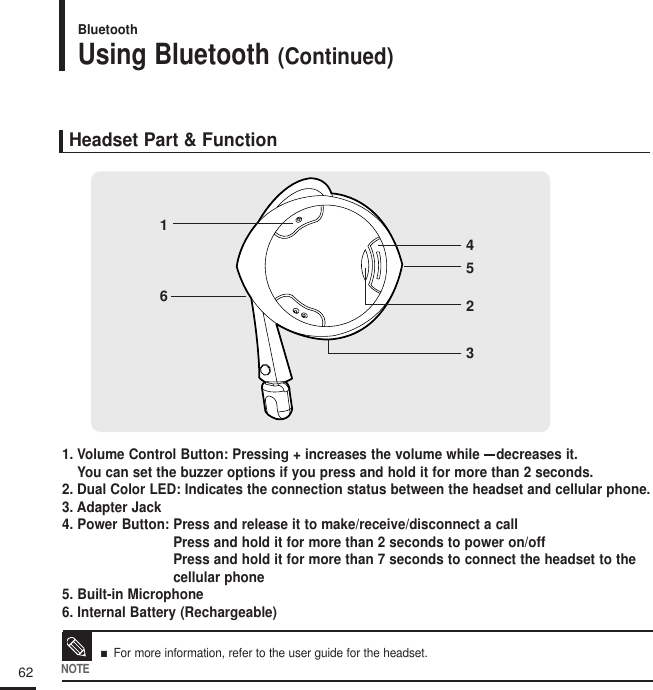
![Chapter 3. Multimedia FunctionUsing Bluetooth631,2,3Bluetooth ModeNew DeviceConnect DeviceDelete DeviceBluetooth SettingsRegistering a Device 1Press the [ ] button to select <Bluetooth>and then press the [ ] button.2Press the [ ] button to select <ConnectDevice> and then press the [ ] button.3Press the [ ] button to selecta device toconnect, and then press the [ ] button.■Connection is complete.4Play the music. ■You can listen to the music using a Bluetooth headset. ■ If you couldn’t find the device connected, register it first.NOTE](https://usermanual.wiki/Samsung-Electronics-Co/YPT9/User-Guide-675959-Page-62.png)
![Using Bluetooth(Continued)Bluetooth641,2Bluetooth ModeNew DeviceConnect DeviceDelete DeviceBluetooth SettingsTo delete a Device 1Press the [ ] button to select the <Delete Device> and then press the [ ] button.■ You will see the list of devices available. 2Press the [ ] button to selecta delete to connect, and then press the [ ] button.■Connection is delete.■ If you want to delete all of the registered devices, select<Delete All>.](https://usermanual.wiki/Samsung-Electronics-Co/YPT9/User-Guide-675959-Page-63.png)
![Chapter 3. Multimedia FunctionUsing Bluetooth65To set Bluetooth1Press the [ ] button to select <Bluetooth Settings>and then press the [ ] button.2Use the [ ] and [ ] buttons to set the desiredfunctions1Press the [MENU] button in the <My Device Information> window.2Press the [ ] button to select <Edit Device Name> andthen press the [ ] button.■ The Edit Device Name window appears.3Use the [ ] and [ ] buttons to rename the device.■ : Pressing the [A B/ ]button will switch the mode in thesequence of Number →English Upper Case →English Lower Case.■ : You can clear the characters from the end one at a time.■ : Confirm your change.Bluetooth ModeNew DeviceConnect DeviceDelete DeviceBluetooth SettingsEdit Device NameRename■ <Discover Option> : You can set to enable or disable a Bluetoothcellular phone to detect this product when it searches for aBluetooth device. Select from <On(Enable)> and <Off(Disable)>.■ <Discover Time Setting>: You can select the scanning time periodfor a new device. Select one from <10s>, <20s>, <30s>, <45s> and<60s>. ■ <My device Information>: You can check the name and address of yourplayer.](https://usermanual.wiki/Samsung-Electronics-Co/YPT9/User-Guide-675959-Page-64.png)
![Using Bluetooth menuBluetooth66To disconnect the device1Press the [MENU] button in Bluetooth menu2Press the [ ] button to select <Disconnect> and thenpress the [ ] button.3Press the [ ] button to select the device to disconnect and then press the [ ] button.■ The selected device will be disconnected.To disconnect the device1Press the [MENU] button in Bluetooth menu.2Press the [ ] button to select <Connected Device>and then press the [ ] button.■ You can see a list of connected devices.To exit the menu, press the [MENU] button.DisconnectConnected Devi..DisconnectConnected Devi..](https://usermanual.wiki/Samsung-Electronics-Co/YPT9/User-Guide-675959-Page-65.png)
![Chapter 3. Multimedia FunctionUsing Bluetooth menu/Game67GameGameYou can enjoy Base Ball, Circus Ball and Pizza Delivery games.Before you start! ■ Connect the earphones, then switch on the player, and check the battery. 1,21Press the [ ] button to select <Game> andthen press the [ ] button.■ The Game menu appears.2Press the [ ] button to select the desiredgame and then press the [ ] button.](https://usermanual.wiki/Samsung-Electronics-Co/YPT9/User-Guide-675959-Page-66.png)
![68GameGame(Continued)A pizza delivery boy on a motor bike gets his way to thedestination dodging about obstacles on the road or pitfalls.■ Press the [ ] button to jump upPizza DeliverThis is a family game that provides you with dynamic animationand various characters, making you feel yourself in a real baseball stadium.■ Press the [ ] button to select a menu or function.■ Press the [ ] button to pitch or hit the ball.Base Ball](https://usermanual.wiki/Samsung-Electronics-Co/YPT9/User-Guide-675959-Page-67.png)
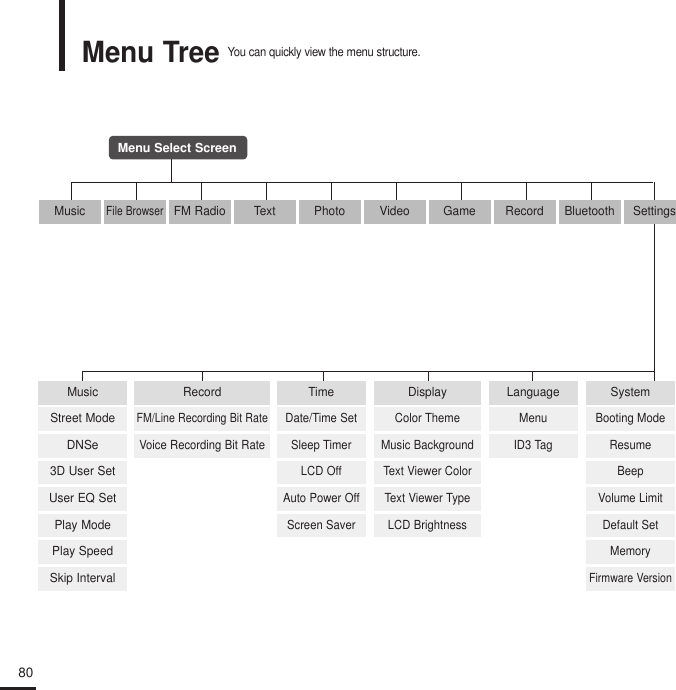
![Chapter 4. SettingsGame/Setting Music692Press the [ ] button to select <Music> and thenpress the [ ] button.■ The Music menu appears.3Use the [ ] and [ ] buttons to set thedesired functions1Press the [ ] button to select <Settings> and thenpress the [ ] button.■ The Settings menu appears.SettingsMusicRecordTimeDisplayLanguageSystem■ Button functions to use during setting.- Press the [ ] button to move to the previous item.- Press the [ ] button to move to the next item.- Press the [ ] button to move up or down through the current menu.- Press the [ ] button to select or save the menu.■ If there is no button operation during about 1 minute in the Settings screen, settings will be canceledand returned to through previous function.NOTESetting MusicYou can set detailed settings for music playback.Settings](https://usermanual.wiki/Samsung-Electronics-Co/YPT9/User-Guide-675959-Page-68.png)
![70■<Street mode>: Allows you to enjoy the music outdoors as clearly as indoors.You can select either <On> or <Off>.■ <DNSe> : You can select a suitable sound for each music genre. Select either <3D-User> <3D-Studio> <3D-Stage> <3D-Club> <Normal> <Rock> <House> <Dance> <Jazz> <Ballad><Rhythm & Blues> <Classical> or <User EQ>.■ <3D User Set> : Sets 3D sound effect and bass enhancement.3D can be set between 0~5 levels, and Bass Enhance between 0~3 levels. After you set <3D User Set>, select <3D User> from <DNSe>.■ <User EQ Set> : Directly select a sound effect (EQ). After you set <User EQ Set>, select<User EQ> from <DNSe>.■ <Play Mode> : Select playback mode such as repeat settings. Select from <Normal> <Repeat > <Repeat One> and <Shuffle>.■ <Play Speed> : Adjust the playback speed of music/voice recording. Select either <x0.7> <x0.8><x0.9> <x1.0> <x1.1> <x1.2> or <x1.3>. (The higher the number is, the faster the playbackspeed is.)■ <Skip Interval> : Set the playback interval when you press the [ ] or [ ] button during playback. Select either <1 Track> <3 sec> <5 sec> <7 sec> <10 sec> <30 sec> or <1 min>.■ For a VBR or Ogg file, the Skip Interval and Serach Speed may not be exact.■ During playback of an Ogg Q10 file, <Street mode> and <DNSe> modes will be deactivated.■ What is DNSe? DNSe is a sound effect function for MP3 players developed by Samsung and consists of 3D and Streetmodes. The 3D adds a stereophonic sound effect to the music and the Street mode provides an automatic volume control function that amplifies quiet sounds in noisy street environments.NOTESetting Music (Continued)Settings](https://usermanual.wiki/Samsung-Electronics-Co/YPT9/User-Guide-675959-Page-69.png)
![Chapter 4. SettingsSetting Music/Setting Record 2Press the [ ] button to select <Record> and thenpress the [ ] button.■ The Record menu appears.3Use the [ ] and [ ] buttons to set thedesired functions1Press the [ ] button to select <Settings> and thenpress the [ ] button.■ The Settings menu appears.SettingsMusicRecordTimeDisplayLanguageSystem■ <FM Recording Bit Rate> :You can choose the recording quality for FM radio. Select one from <96kbps> <128kbps> <160kbps> <192kbps>.(The greater the number is, the better the quality is but the file size is bigger)■ <Voice Recording Bit Rate> :You can select the voice recording quality. Select one from<32kbps> <64kbps> <96kbps> <128kbps>. (The greater the number is, the better the quality isbut the file size is bigger)Setting RecordYou can refine your recording options for FM radio and voice recording.Settings71](https://usermanual.wiki/Samsung-Electronics-Co/YPT9/User-Guide-675959-Page-70.png)
![722Press the [ ] button to select <Time> and then pressthe [ ] button.■ The Time menu appears.3Use the [ ] and [ ] buttons to set thedesired functions1Press the [ ] button to select <Settings> and thenpress the [ ] button.■ The Settings menu appears.SettingsMusicRecordTimeDisplayLanguageSystem■ <Date/Time Set> : You can set the current time and date (see page 73).■ <Sleep Timer> : Turns off power automatically after the preset time. Select either <Off> <15 min ><30 min> <60 min> <90 min> or <120 min>.■ <LCD Off> : You can choose to set the background light to turn off if no keystroke is entered fora specified time period. Select either <10 sec> <30 sec> <1 min> <5 min> or <10 min>.■ <Auto Power Off> : Automatically turns power off when there is no button operation after thepreset time in the pause mode. Select either <10 sec> <30 sec> <1 min> <5 min> <10 min> or<Always On>■ <Screen Saver> : You can choose to set the background light to turn off if no keystroke isentered for a specified time period. Select either <10 sec> <30 sec> < 1 min > <5 min > or <10 min>.Setting Time You can set functions related to the Sleep Timer and Auto Power Off.Settings](https://usermanual.wiki/Samsung-Electronics-Co/YPT9/User-Guide-675959-Page-71.png)
![Chapter 4. SettingsSetting Time732Press the[]or []button to move to <AM/PM, Hour,Minute, Year, Month, Date> and press the [ ] to set it.■ Press and release the[] button to set the time one level at atime and press and hold it to set the time multi-levels at a time.3When done, press the [ ] button.■ The Confirmation window will appear.4Press the [ ]or [ ] button to select <Yes> and pressthe [ ] button.■ The set time/date will be saved.■ <No> will cancel the time setting.1Press the [ ] button to select <Date/Time Set> andthen press the [ ] button.Date/Time SettingTimeDate/Time SetSleepLCD OffAuto Power OffScreen Saver](https://usermanual.wiki/Samsung-Electronics-Co/YPT9/User-Guide-675959-Page-72.png)
![742Press the [ ] button to select <Display> and thenpress the [ ] button.■ The Display menu appears.3Use the [ ] and [ ] buttons to set thedesired functions1Press the [ ] button to select <Settings> and thenpress the [ ] button.■ The Settings menu appears.SettingsMusicRecordTimeDisplayLanguageSystem■ <Color Theme> : You can set the background color for the display screen. Choose one from the6 color theme options. When <Random> is selected, each time you turn off and turn on thepower, the background color will be changed.■ <Music Background> : You can select the background image to add to your listening experience. Select either <FLASH 1> <FLASH 2> <FLASH 3> <Album Cover> <Photo> or<Auto>. Selecting <Auto> will change the background image by picking one from <FLASH1> to<FLASH3> each time a different file is played.■ <Text Viewer Color> : You can set the background color for text. Choose one from 6 colors.■ <Text Viewer Type> : You can choose to view the text either vertically or horizontally. You can select either <Vertical> or <Horizontal>.■ <LCD Brightness> : You can adjust the brightness of the display light. Select one from <0-10>.Setting the Display You can set the display options including color theme andmusic background image.Settings](https://usermanual.wiki/Samsung-Electronics-Co/YPT9/User-Guide-675959-Page-73.png)
![Chapter 4. SettingsSetting the Display/Setting Language752Press the [ ] button to select <Language> and thenpress the [ ] button.■ The Language menu appears.3Use the [ ] and [ ] buttons to set thedesired functions1Press the [ ] button to select <Settings> and thenpress the [ ] button.■ The Settings menu appears.SettingsMusicRecordTimeDisplayLanguageSystem■ <Menu> : Set the menu language. Select from < > <English> <Français> <Deutsch><Italiano> < > < > <Español> < > < > <Magyar> <Nederlands><Polski> <Português> <Svenska> < >.■ <ID3 Tag> : Set the track information language.Select from <Afrikaans> <Basque> <Catalan><Chinese(S)> <Chinese(T)> <Czech> <Danish> <Dutch> <English> <Estonian> <Finnish><French> <German> <Greek> <Hrvatski> <Hungarian> <Icelandic> <Italian> <Japanese><Korean> <Norwegian> <Polish> <Portuguese> <Romany> <Russian> <Slovak> <Slovene><Spanish> <Swedish> <Turkish> and <Vietnamese>.Setting LanguageSet the language for the menu and track information (ID3 Tag).SettingsNOTE■ The supported languages can be changed or added.](https://usermanual.wiki/Samsung-Electronics-Co/YPT9/User-Guide-675959-Page-74.png)
![762Press the [ ] button to select <System> and thenpress the [ ] button.■ The System menu appears.3Use the [ ] and [ ] buttons to set thedesired functions1Press the [ ] button to select <Settings> and thenpress the [ ] button.■ The Settings menu appears.SettingsMusicRecordTimeDisplayLanguageSystem■ <Booting Mode> : You can set the start window after the system reboots. Select either <MainMenu> and <Last Played>.■ <Resume> : Specifies the starting point to restart playback after playback is stopped. If set to <Off>, the last file will play from the beginning. If set to <On>, the last file will play fromthe point it was previously stopped.■ <Beep> : Sets the beep sound for button operations to on or off. Select either <On> or <Off>.■ <Volume Limit> : You can avoid hearing damage by setting the limit of the volume when usingthe earphone. <On> will limit the maximum volume level up to 20 while <Off> enables to controlthe volume as you want.■ <Default Set> : Returns all settings to the default value. √Page 77■ <Memory> : Indicates the remaining capacity of the memory. <Used> indicates the usage,<Remaining> indicates the remaining capacity and <Total> means the whole capacity of the memory.■<Firmware Version> : Informs you of the currently used firmware version.Setting the System You can set the booting mode, resume and beep sound.Settings](https://usermanual.wiki/Samsung-Electronics-Co/YPT9/User-Guide-675959-Page-75.png)
![Chapter 4. SettingsSetting the System77Press the [ ] or [ ] button to select either <Yes> or <No>and then press the [ ] button.■ <Yes> : Initializes all settings to default.■ <No> : Cancels default settings.Default SetSystemBooting ModeResumeBeepDefault SetMemoryFirmware Version■ Regarding the Built-In MemoryThe actual built-in memory available is slightly less than indicated as the internal firmware uses a portionof the memory.NOTE](https://usermanual.wiki/Samsung-Electronics-Co/YPT9/User-Guide-675959-Page-76.png)
![78TroubleshootingIf a malfunction is experienced, check thefollowing.If the problem persists, contact a Samsung Service Center near you.Power will not turn on. Buttons do not work. The screen will not turn on. Power is turning off. Problem Check points & Troubleshooting ■ Power will not turn on if the batteries are fully discharged. Recharge the batteries and turn the power on again. ■ Press and hold the [MENU] and [A B/ ]buttons at the sametime to reset the system.■ Check if the [HOLD] switch is in the direction of the arrow position.■ Check if you pressed the right button, then press again. ■ Press and hold the [MENU] and [A B/ ]buttons at the sametime to reset the system.■ The screen may not be visible under direct sunlight.■ When <LCD Off> is selected from <Settings> →<Display>, theLCD can be turn off. Press any button and see if it turns on.The power is automatically turned off when the battery is fully discharged. Recharge the battery.Battery life differs fromthe Manual. ■ The battery time can vary, depending on the sound mode anddisplay setting.■ Product life may be shortened when left for extended periods inlow or high temperatures.Program MalfunctionConnection to your PCis disabled. Please check if your PC requirements are met.Press <Start> on the toolbar of your PC to run Windows Update.Select Key Updates and Service Packs, then update all.Reboot your PC and reconnect.](https://usermanual.wiki/Samsung-Electronics-Co/YPT9/User-Guide-675959-Page-77.png)
![Chapter 5. Troubleshooting79TroubleshootingThe product is hot.Heat may be generated during recharging. This has no effect onthe product life or functions.I couldn’t see a movie witha message popping up.Try to download the movie clip through Media Studio again.Playing is disabled. File upload is disabled. Files or Data are Missing. Abnormal Play TimeDisplay during Play.Problem Check points & Troubleshooting ■ Check if the available file has been saved in the memory.■ Check if the music file is damaged. ■ Check if there is enough battery power.■ Check if the USB cable is securely connected. Reconnect if necessary. ■ Check if the memory is full. ■ Press and hold the [MENU] and [A B/ ]buttons at the sametime to reset the system.Check if the USB cable has been disconnected during file or datatransmission. If this is the case, it may cause serious damage notonly to files/data but also to the product. You have to be extra cautious as Samsung is not held responsible for data loss. Check if the file is in VBR (Variable Bit Rate) format.Abnormal Displayof File Name.Move to <Settings> →<Language> →<ID3 Tag> in the Menuscreen and set an appropriate language.](https://usermanual.wiki/Samsung-Electronics-Co/YPT9/User-Guide-675959-Page-78.png)
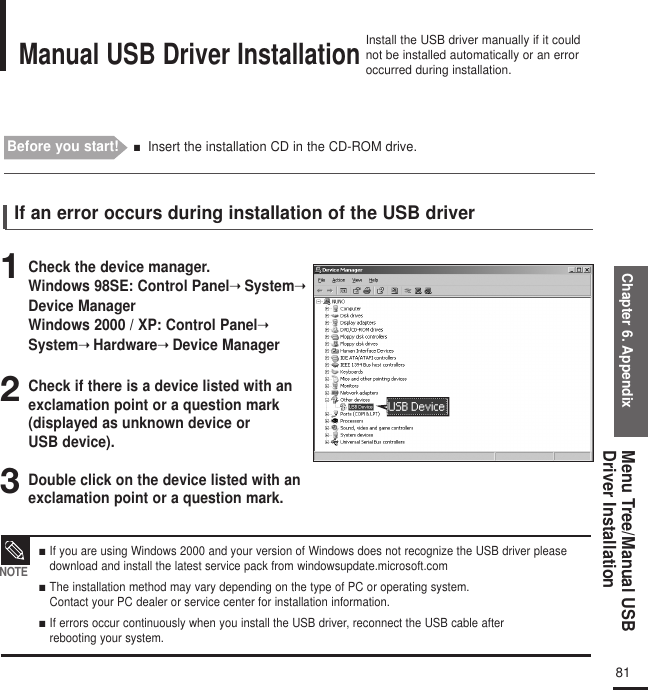
![824After selecting the driver, click [Reinstall Driver]. 5Click [Next].6Select [Search for a suitable driver for my device] and then click [Next].7Click [Next] to finish.Next>Next>Next>Reinstall DriverManual USB Driver Installation(Continued)](https://usermanual.wiki/Samsung-Electronics-Co/YPT9/User-Guide-675959-Page-81.png)
![Chapter 6. Appendix83Manual USB DriverInstallationYP-T9\USB Driver\win98 USBNext>Next>Next>FinishNext>■ You cannot use it as a removable disc in Windows 98SE if the YP-T9 program is not installed. Make sure to install the USB driver file first. NOTEFollow the instructions in the window to complete the installation.You must reboot your computer to complete the installation.USB driver location[CD-ROM] \USB Driver\win98 USBIn Windows 98SE](https://usermanual.wiki/Samsung-Electronics-Co/YPT9/User-Guide-675959-Page-82.png)