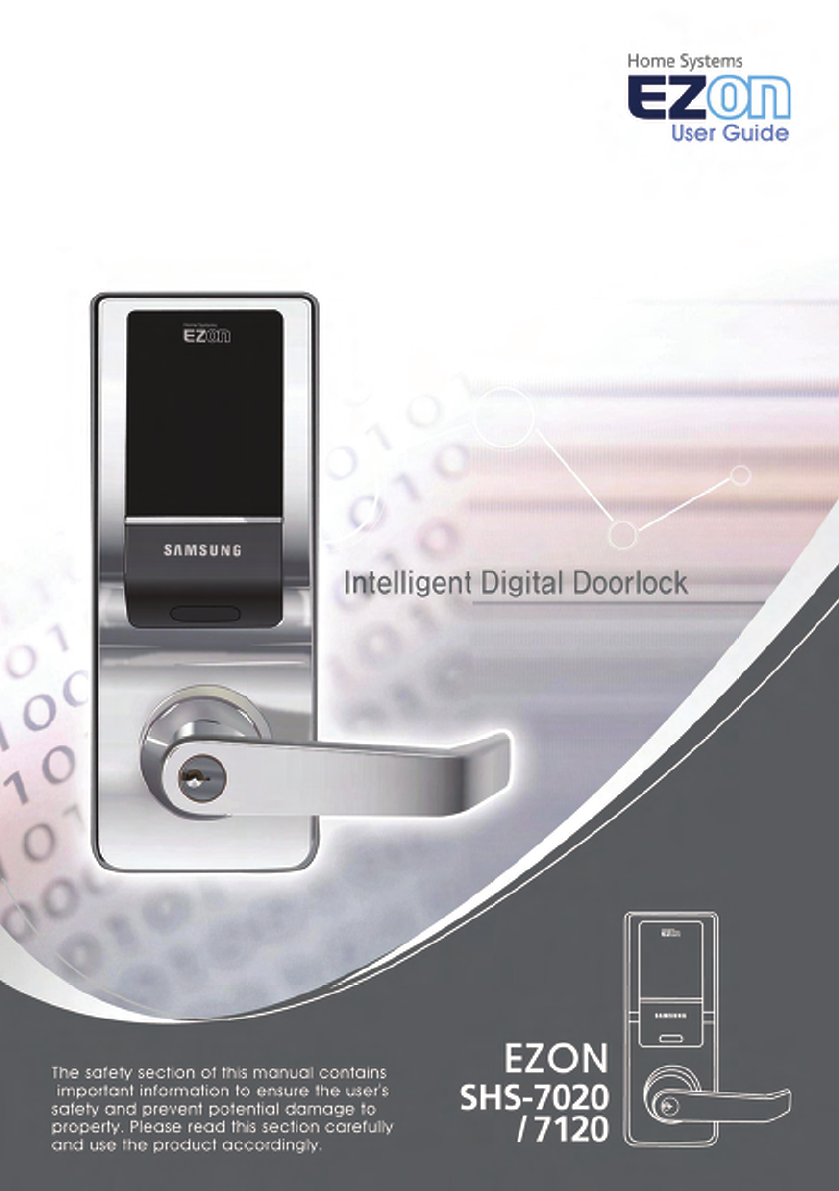
Samsung SDS SHS-7120XMSEN DIGITAL DOORLOCK User Manual
Samsung SDS Co., Ltd. DIGITAL DOORLOCK
User manual
1
Product Features
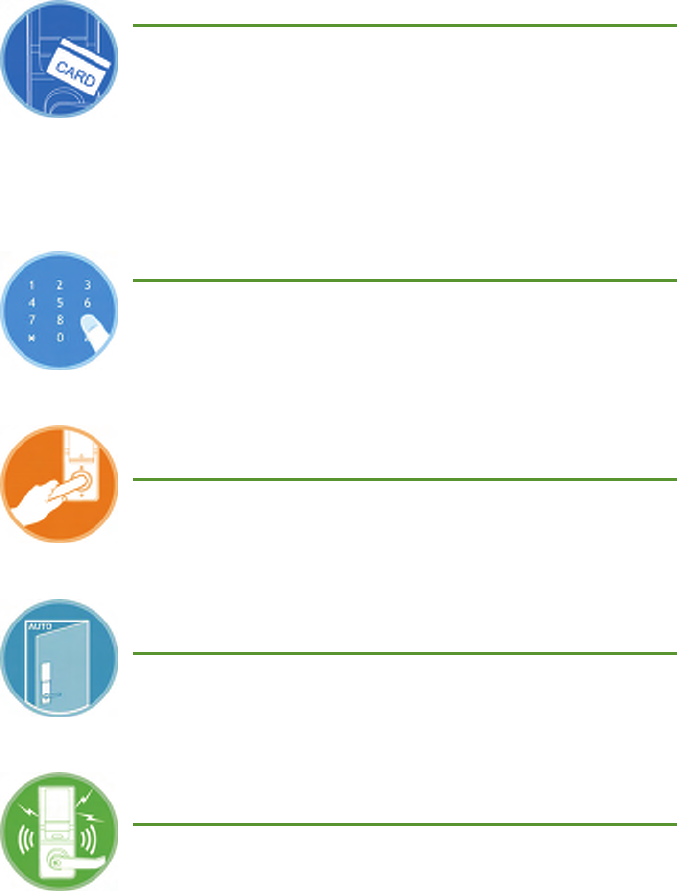
The door can be opened with a card.
The door can be opened with the card contained in the product
package.
SHS-7020 model accept MIFARE® 13.56MHz ISO14443A type card.
SHS-7120 is compatible with most HID Proximity 125KHz cards
(ProxCard®Ⅱ, ISOProx®Ⅱ, DuoProx®Ⅱ, Smart ISOProxⅡ™, Smart
DuoProx®Ⅱ, iCLASS® Prox 26bit up to 37bit).
The door can be opened with the password.
A password can be registered and used to open the door without the
key.
Anti-panic function can easily open the
locked door.
The locked door can be easily opened from inside by just rotating the
handle.
The door does not have to be locked
manually.
The door is automatically locked when it closes, eliminating the need to
lock it manually (excluded when the mode is set for Passage).
Pranks played by children and juveniles can
be prevented.
When an unregistered card or key tag is used, or when an invalid
password is entered 3 or more times consecutively, an alarm sound is
generated and power to the lock is automatically cut off for one minute.

2
Table of Contents
Product Features 1
Safety Cautions 4
Before Using the Product 7
Product Components................................................................... 7
Outdoor Unit Parts ...................................................................... 9
Indoor Unit Parts .......................................................................10
Replacing the Battery ................................................................ 11
Using the Emergency Battery ......................................................12
Using the Emergency Key...........................................................13
Basic Functions 14
Opening the Door from Outside with a Password or a Card ..............14
Opening the Door from Inside......................................................15
Program Function 16
User Group Management ............................................................16
Functional Setup or Release Summary..........................................17
Program Mode ..........................................................................18
Changing the Master Password (Code 10) .....................................19
Registering the User Password (Code 20) .................................... 20
Registering the Temporary Password (Code 30) ............................ 22
Registering the User Card (Code 40)........................................... 23
User Code Activation/Deactivation/ Deletion (Code 50~55) ........... 25
Entrance Control Setup (Code 60~63)......................................... 26

3
Additional Functions 27
Setting up and Releasing the Passage Mode (Code 70/71) ..............27
Setting up Current Time .............................................................27
Setting up and Releasing the Random Security Function
(Code 90~95)...........................................................................28
Setting up and Releasing the Sound (Code 00~03)........................29
Warning Sound/Alarm Sound ..................................................... 30
PC Connection..........................................................................32
Initialization..............................................................................32
Troubleshooting 33
User Code Registration Table 35
Product Specification 36
Product Warranty 39
4
Safety Cautions
This section contains important information to ensure the user’s safety and prevent
potential damage to property. Please read this section carefully and use the product
accordingly.
Warning, Caution and Note Explained:
Warning
Information given under this heading is information the user must be aware of to
prevent physical harm.
Caution
Information given under this heading is information the user must be aware of to
prevent service problems or system damage.
Note
Information given under this heading provides additional information relating to the
text in this manual..
Description of Symbols
General warning or caution
Prohibited activity
Recommended activity
5
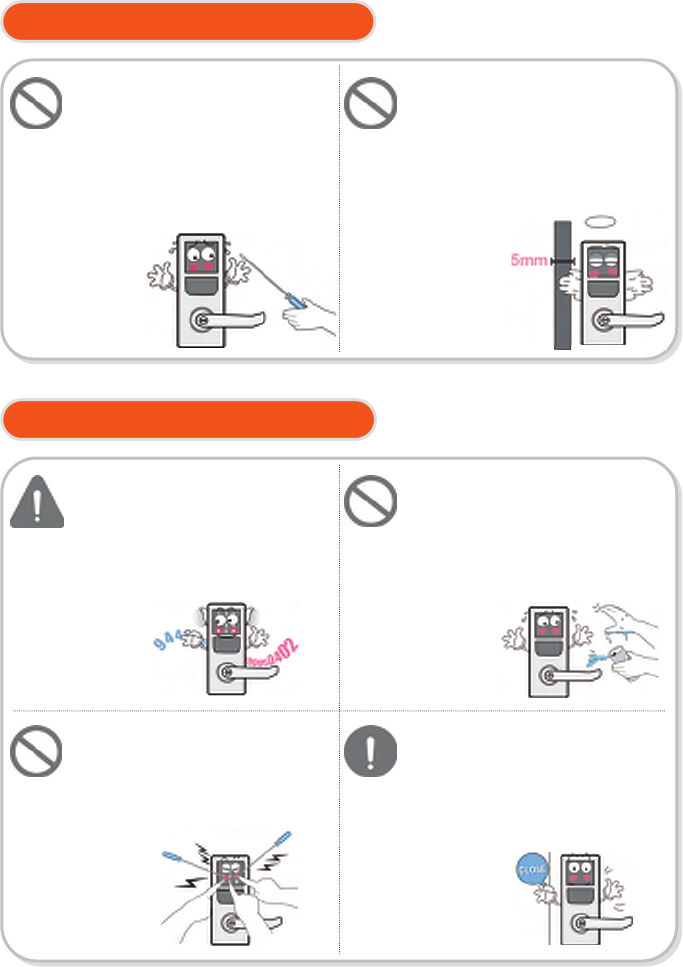
Cautions during Installation
Cautions during Operation.
Do not use the excessive force or
sharp objects to push the doorlock
buttons, as this can damage the
product.
Make sure that no unauthorized
person has the access to the
password.
To minimize the risk of burglary, it is
recommended that you periodically
change the password.
Do not operate the product with
wet hands, and keep liquids such
as water or drinks away from the
product, or the product may
malfunction or be damaged.
Make sure that the door is
completely closed when going
outside.
The manufacturer does assume the
responsibility for any harm caused by
engagement of the lock on an improperly
closed door.
Do not install the product in the
place where the gap between
the door and the frame is 5mm
or more.
If the gap is too wide, the product may
not function properly.
The user shall not install or repair
the product without authorization.
The manufacturer does not assume the
responsibility for damage to the product
resulting from attempts to the user to
install or repair it without authorization.
6
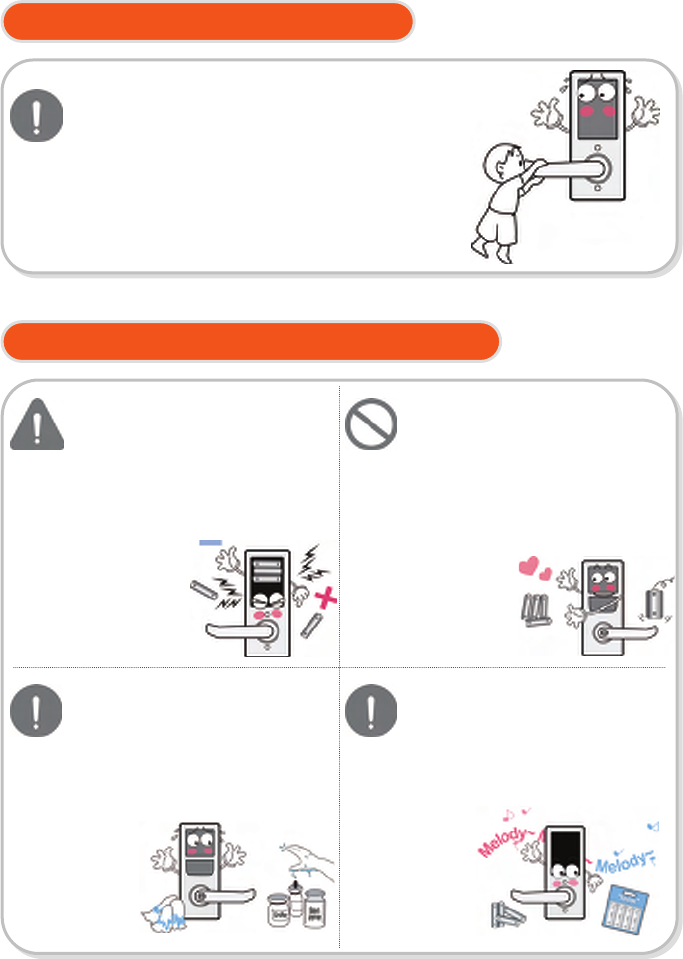
Cautions during Installationnce
Cautions during Repair or Maintenance
Be sure to correctly match the
poles (+/-) when installing the
batteries. Install the batteries with
the correct poles (+/-).
Improperly installed batteries can cause
rupture or battery fluid leakage.
Replace all batteries immediately
after they run out of power, and
never mix new batteries with used
ones.
This can cause reduction of product life or
a malfunction in the product.
Do not use water, benzene or
alcohol when cleaning the product,
as these fluids can cause product
malfunction.
Use a soft and dry cloth instead.
Please do not hang on the product or pull it.
It can damage the product or cause its malfunction.
Replace the batteries within 1 week
after the battery replacement alarm
sounds.
The product can stop operating if the
batteries are not replaced in time.
7
Before Using the Product
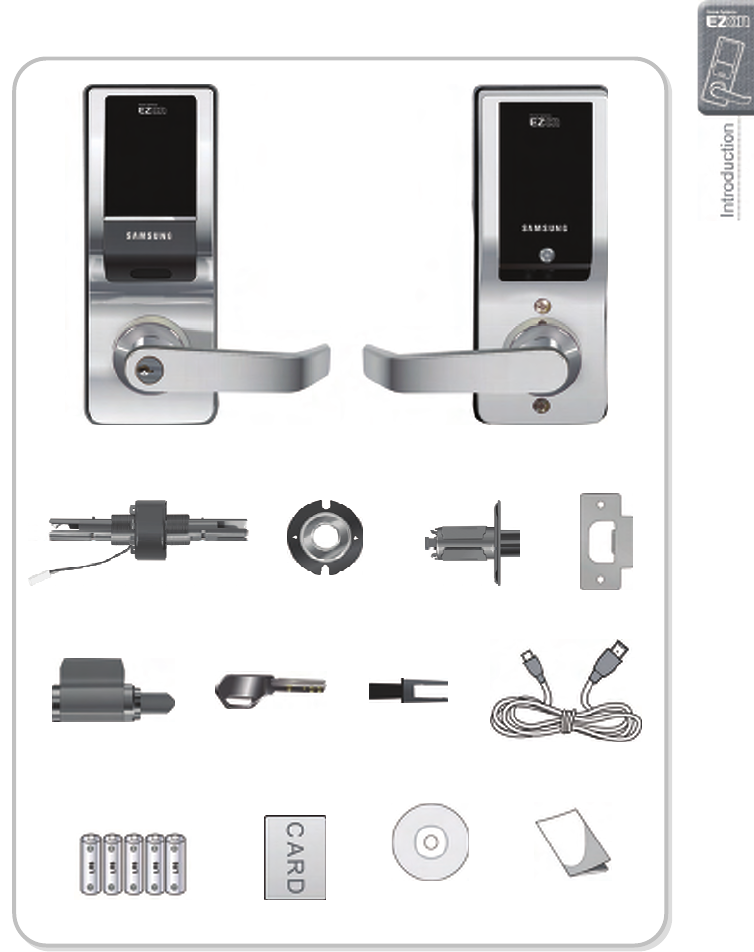
Product Components
Indoor Unit Outdoor Unit
Cylinder Strike Rose Latch Bolt
User/Installation
Manual 'AA' Batteries (LR6)
Cylinder
Retainer
Key Cylinder USB Cable
Access Mgmt.
Program CD
Emergency Key
Card
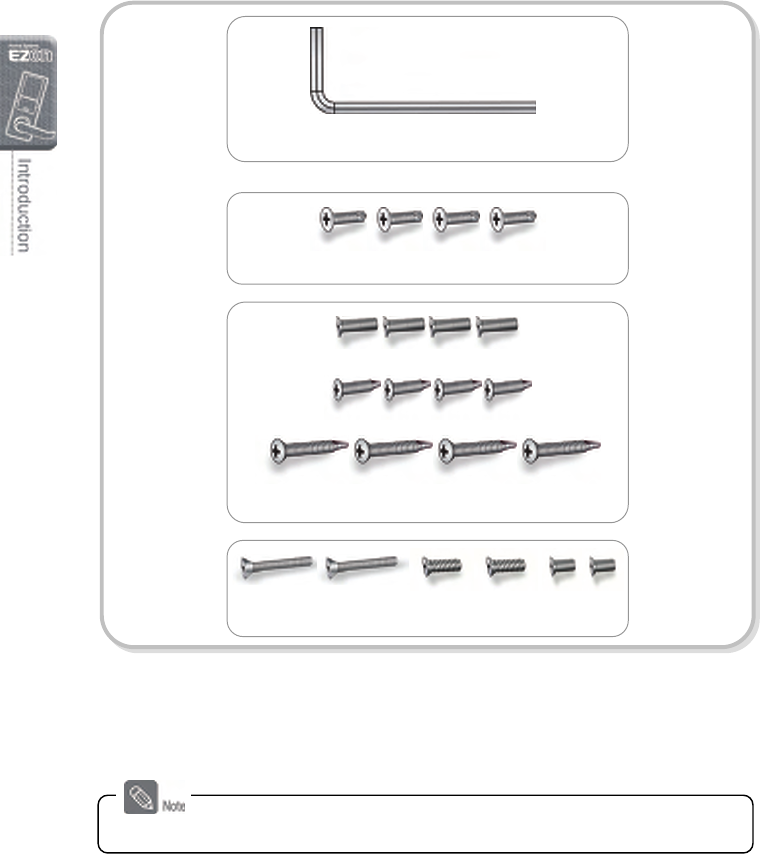
8
The product components to be used may vary depending on the installation environment.
Strike and Latch Bolts
Indoor Unit Fastening Bolts
Indoor/Outdoor Unit Fastening Bolts
Allen - Wrench
9
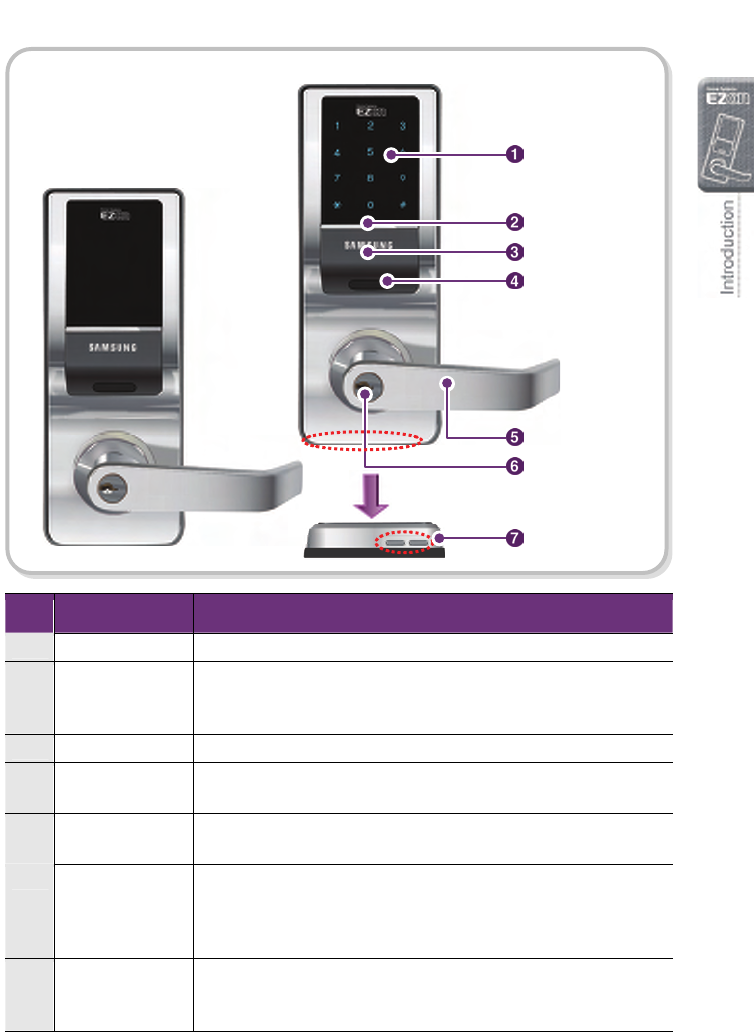
Outdoor Unit Parts
No Name Function Description
1 Keypad The code is entered in the program mode, or the password is input.
2 [Wake Up] Button The keypad is lighted so that the password can be entered or input
of card can be read.
It is pressed to terminate the program mode.
3 Card Reader Card reader is the unit that reads the user card to open the door.
4 USB Cable
Connector
The card and/or password can be easily registered from the
connected PC.
5 Outdoor Handle If the lock is released, the door can be opened by turning the
outdoor handle.
6 Emergency Key
Hole
When the door becomes non-operational because of completely
discharged batteries or other circuit problem, the door can be
unlocked by using the emergency key and then the door will be
opened after the outdoor handle is turned.
7 External Power
Contact
If the batteries are completely discharged, the power can be returned
when the emergency battery is placed on the external power contact
(9V battery).
Keypad Off
Outdoor Handle
Card Reader
Keypad
[Wake Up] Button
External Power
Contact
Emergency Key
Hole
Keypad On
USB Cable
Co
nn
ec
t
o
r
10
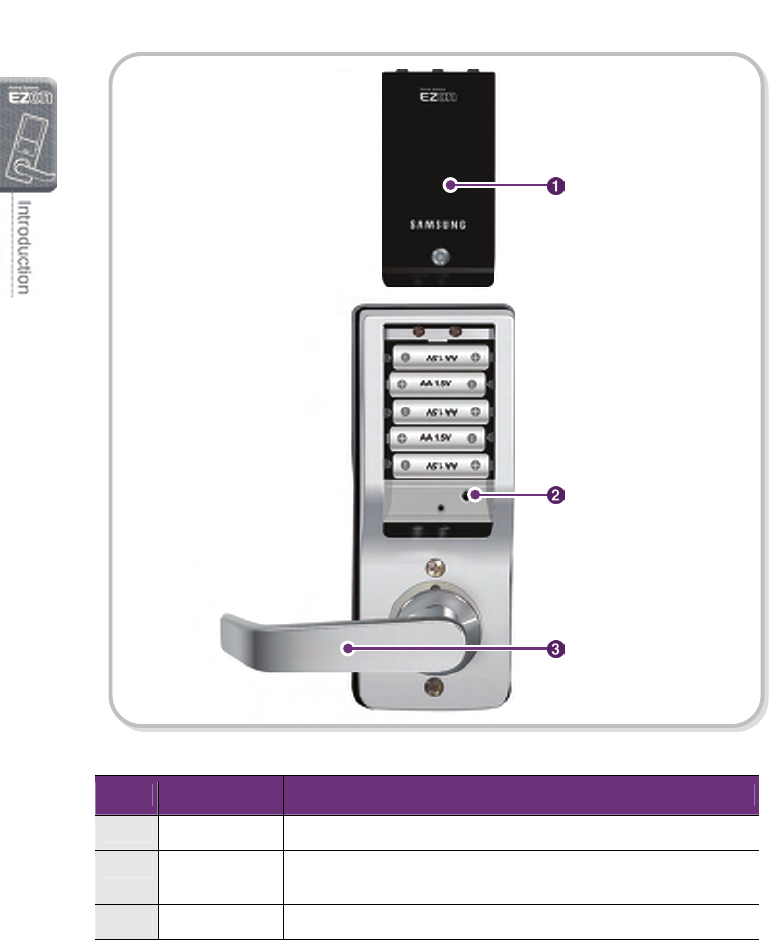
Indoor Unit Parts
No. Name Description
1 Battery Cover It is the cover that protects batteries and the [Register] button.
2 [Register] Button The button is used to run in program mode or to release the warning
sound.
3 Indoor Handle The door can be opened while the indoor handle is turned down.
Battery Cover
[Register] Button
Indoor Handle
11
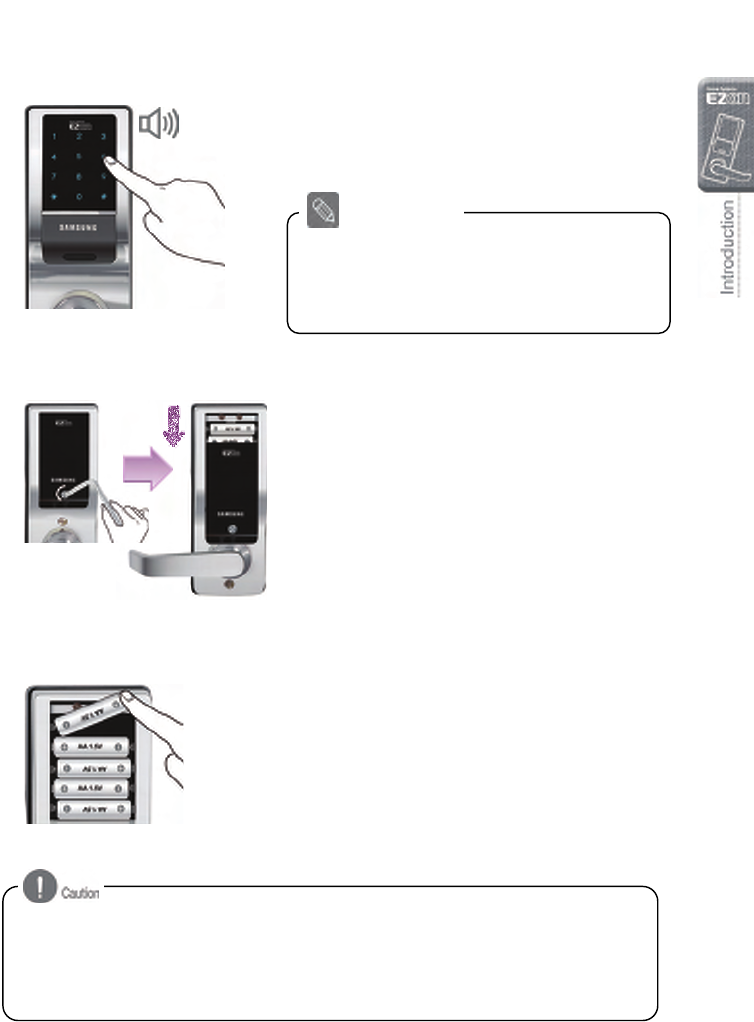
Replacing the Battery
1. Battery Replacement Alarm Generation
It is time to replace the battery if the low
voltage warning sound is activated before the
door is opened with a password or a card.
2. Opening the Battery Cover
To remove the battery cover, turn the screw
counter-clock-wise with supplied Allen
wrench and push down the cover as indicated
in the picture.
3. Replacing the Battery
Replace all 5 batteries with new ones within a
week from the first warning sound.
- If the batteries are not replaced, the unit will stop
operating.
The actual life of the batteries can differ from the
manufacturer, date of manufacturing and operating
environment. Assuming 5 AA alkaline 1.5V batteries
used 10 times a day, it should last at least a year.
Battery Use
5 AA Batteries
“For Elise”
- If the poles of the batteries are not placed properly, the doorlock will not operate normally.
- Liquid leaks from batteries can damage the product. Check the batteries regularly (once
every 6 months).
- After the battery replacement melody has sounded, password/card information cannot be
registered, changed, deleted, initialized or configured until the batteries are replaced.
12
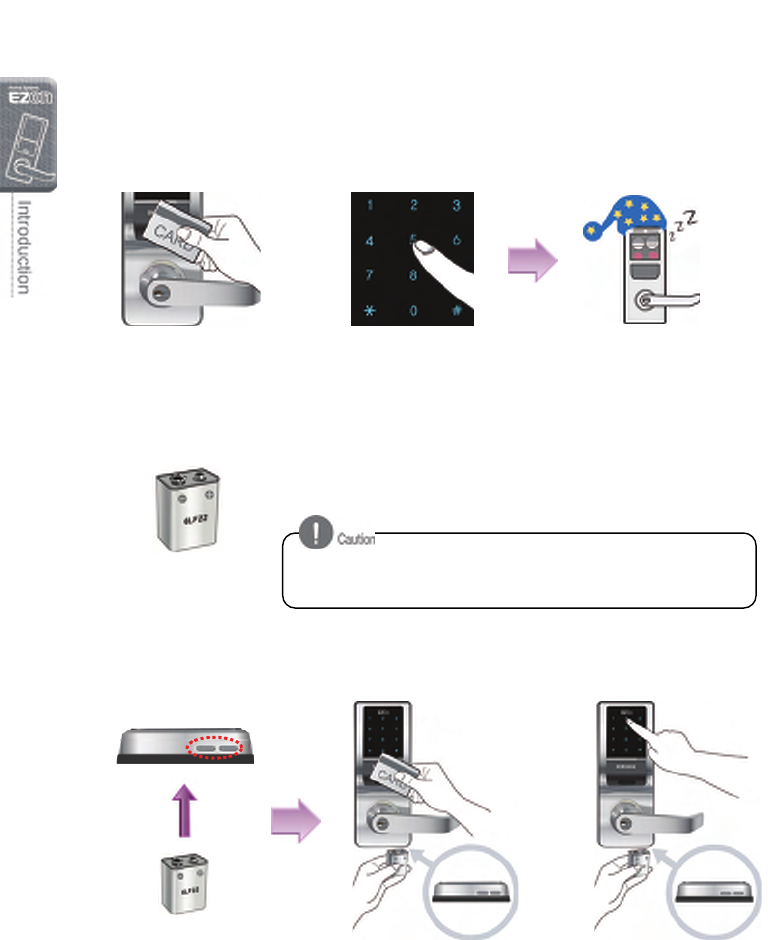
Using the Emergency Battery
1. When Lock Fails to Operate Due to Discharged
AA Batteries
If the batteries are not replaced after their replacement time comes, they will be
completely discharged and the doorlock will not operate.
2. Using the 9V Battery
Buy an emergency 9V battery at the nearest
store.
3. Opening the Door Using the Emergency Battery
Place the card or key tag on the card reader, or enter the password, while the 9V battery
is connected to the external power contact of the outdoor unit.
A
s the alkaline batteries offer longer life, they are recommended
than the manganese batteries or rechargeable one
s
.
Password Entry The door is not opened.
Card Recognition
or
or
13
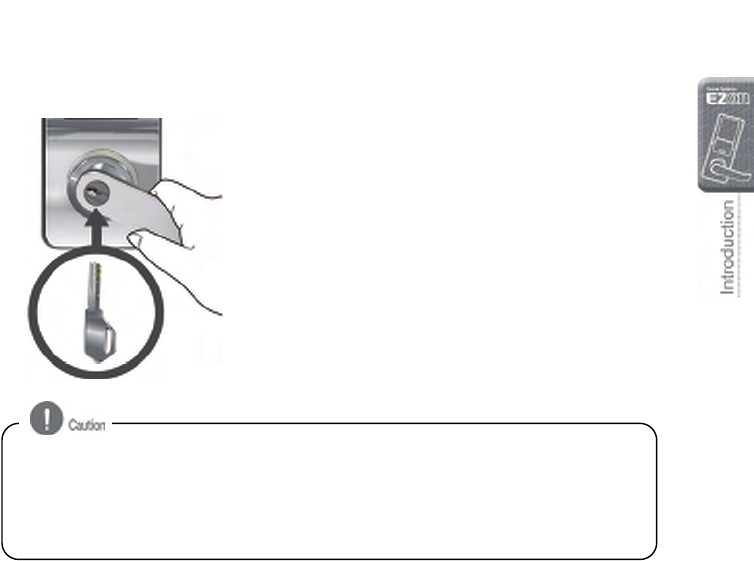
Using the Emergency Key
The emergency key is used when the unit stops operating due to the discharged
batteries or other circuit problems.
Insert the emergency key into the emergency
key hole on the outdoor handle and rotates it
left and right to unlock the door.
- Make sure to keep or carry one or more emergency key.
- When you’ve lost the emergency key, contact the service center to exchange the key
cylinder wholly. (The exchange of the key cylinder is a paid service.)
- When the door is unlocked, take the emergency key out from the key hole and keep it
well.
14
Basic Functions
This section describes the ways to initialize the information registered in the doorlock, to
register the password and card data, and to open or close the door.
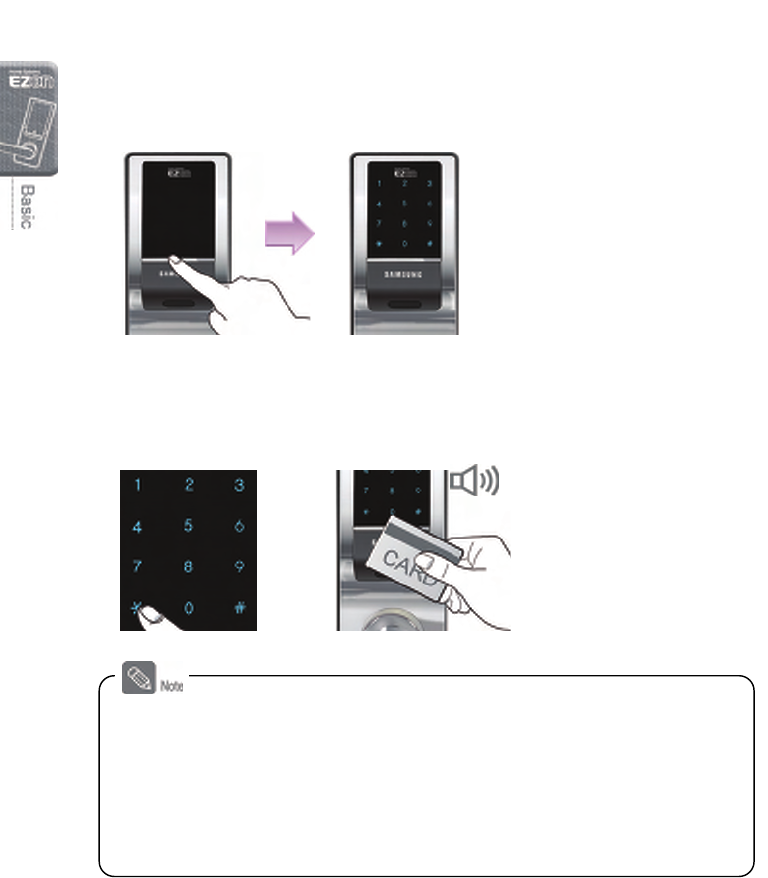
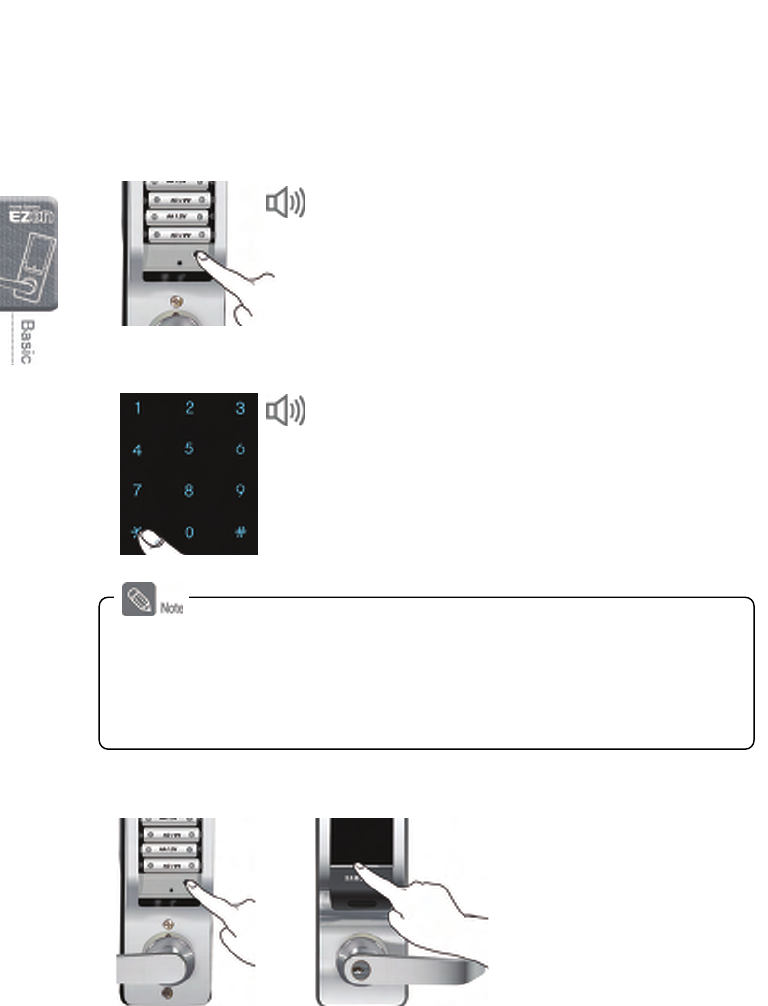
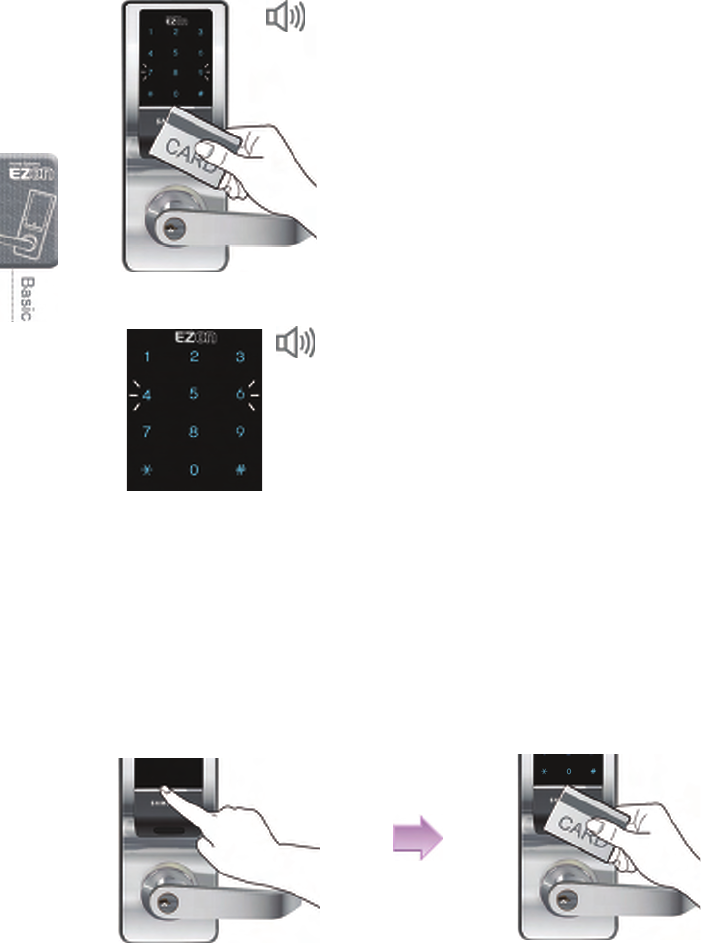
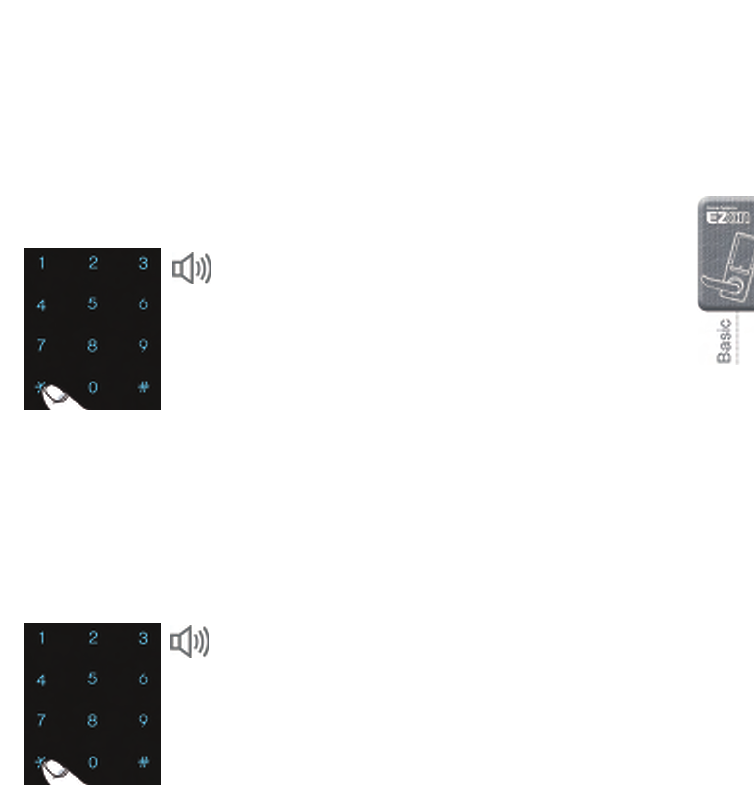
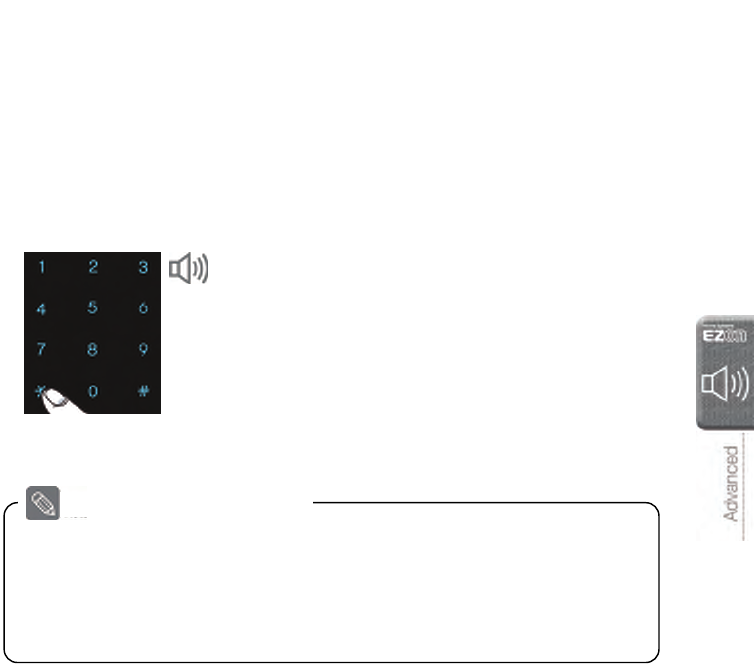
Opening the Door from Outside with a
Password or a Card
1. Pressing the [Wake Up] Button
The keypad is lighted
when the [Wake Up] button
is pressed.
2. Entering the Password or Contacting the Card
Press the [¿] button after
entering the password or
place the card.
or
Successful: "Too~~t”
Failed: "Toot~"
- Password entry or card contact is validated only when the keypad is lighted. If it is lighted
off, press the [Wake Up] button first.
- To cancel the password entry, press the [#] button and start again.
- When an invalid password entry or unregistered card contact is attempted for 5 times in a
row, the beep warning is sounded 20 times and the doorlock becomes inactive for 3
minutes. The “toot” sound is activated every 10 seconds while the unit is inactive, and
then the “toot~ toot~ toot~ toot~ toot~” sound is activated before the unit becomes
operational again.
15
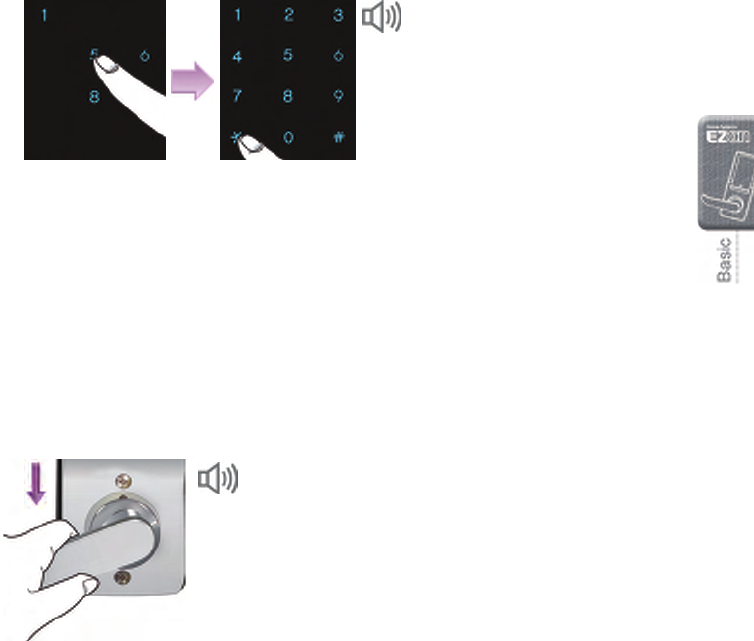
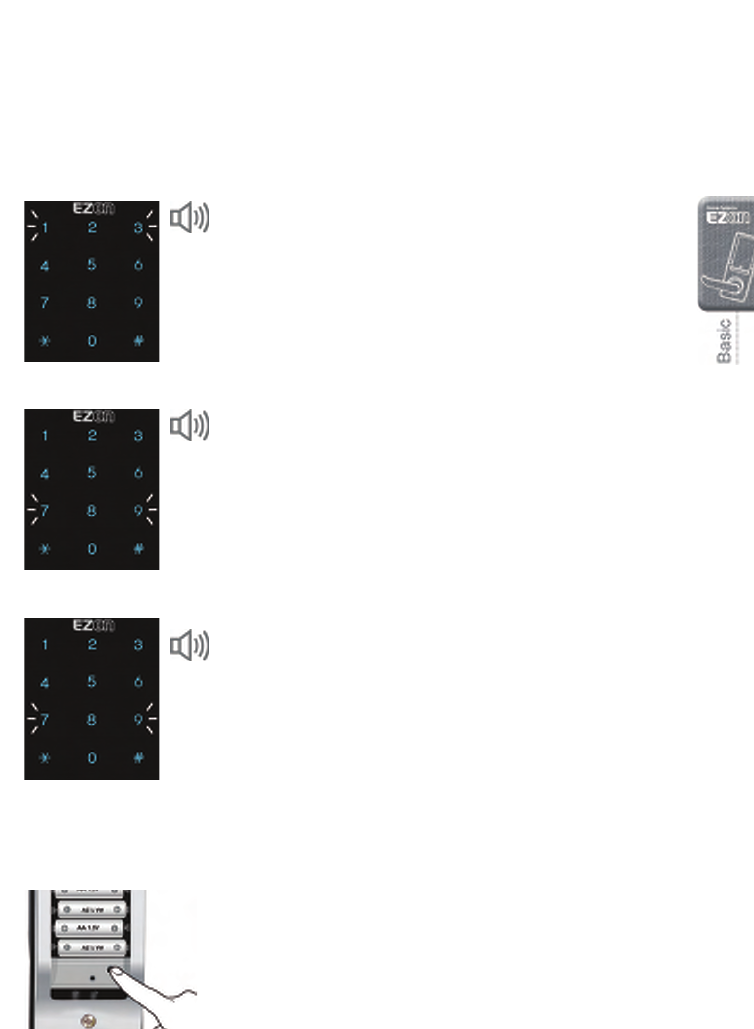
3. Entering the Password
(When the random security function is activated)
Touch all randomly
displayed numbers and
enter the password
before pressing the
[¿] button.
- Please refer to the section
for ‘Random Security
Function Setup and
Release’ (page 30).
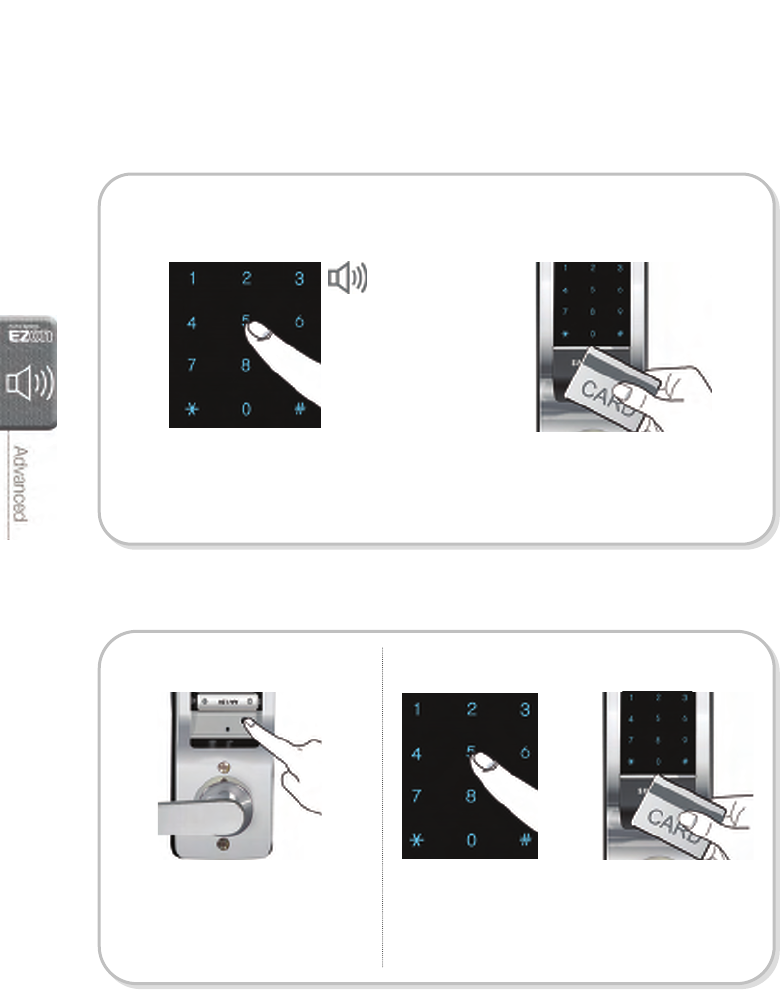
Opening the Door from Inside
Turning the Doorlock Handle
Turn down the doorlock handle on the indoor
unit.
Too~~t
Successful: "Too~~t”
Failed: "Toot~"
16
Program Function
This section describes how to initialize the user data registered in the doorlock and how
to start the program mode. It also describes how to designate users into a group to
register the group’s password and card data as a way of easy management.
User Group Management
SHS-7020/7120 allows the registration of password and card data for each user group.
Up to 250 user codes can be grouped. Either a password or card data can be
registered for each user. When registering a new user, the relevant group and empty
number (ID) must be considered.
User Group Description Group Code
Administrator Group User data with user code 001~010 0
Group 1 User data with user code 011~050 1
Group 2 User data with user code 051~100 2
Group 3 User data with user code 101~150 3
Group 4 User data with user code 151~200 4
Group 5 User data with user code 201~250 5
- Master Password: No limitation in function setting.
- Administrator Group: Privilege on all function settings except initialization, master password
change and registered data removal.
- The registered user data can be managed using the ‘User Code Registration Table’.
17
Functional Setup or Release Summary
Code Function Setup or Release
(Follow the steps in the exact sequence.)
Ref.
Page
-
Initialization
(Complete removal
of all passwords
and card data)
Press the [Initialization] button on the indoor unit.
Input the current master password or '1470852369'.
Press the [¿] button.
※ The password is reset to ‘1234’ after initialization.
32
- Program Mode
Execution
Press the [Register] button on the indoor unit.
Current master password, administrator password, or card
authentication Press the [¿] button.
18
10 Master Password
Change
Program mode run. Press 10. Press the [¿] button.
Enter the current master password. Press the [¿] button.
Enter the new master password. Press the [¿] button.
19
20/40 User Password/
Card Registration
Program Mode Run Press 20/40. Press the [¿] button.
Enter the user code. Press the [¿] button.
Enter the password/card data. Press the [¿] button
(when entering the password).
20/23
30
Temporary
(Single Use only)
Password
Registration
Program Mode Run Press 30. Press the [¿] button.
Enter the user code (except the administrator group). Press the [¿]
button. Enter the password. Press the [¿] button.
22
50~55
User or Group
Removal, Activation
or Deactivation
Program Mode Run Pres 50~55. Press the [¿] button.
Enter the user code / group code. Press the [¿] button. 25
60/62
User Entry Control
Release
(by User/Group)
Program Mode Run Press 61/63. Press the [¿] button.
Enter the user code / group code. Press the [¿] button. 26
61/63
User Entry Control
Setup
(by User/Group)
Program Mode Run Press 61/63 Press the [¿] button.
Enter the user code / group code. Press the [¿] button.
Enter [Start Time][End Time]. Press the [¿] button
26
70/71 Passage Mode
Setup/Release Program Mode Run Press 70/71. Press the [¿] button. 27
80 Current Time Setup Program Mode Run Press 80. Press the [¿] button.
Enter [YYMMDDHHMM]. Press the [¿] button. 27
90~95
Random Security
Function Setup and
Release
Release: Program Mode Run Press 90. Press the [¿] button.
Setup: Program Mode Run Press 91~95. Press the [¿]
button.
28
00~03 Sound Setup and
Release
Release: Program Mode Run Press 00. Press the [¿] button.
Setup: Program Mode Run Press 01~03. Press the [¿]
button.
29
18
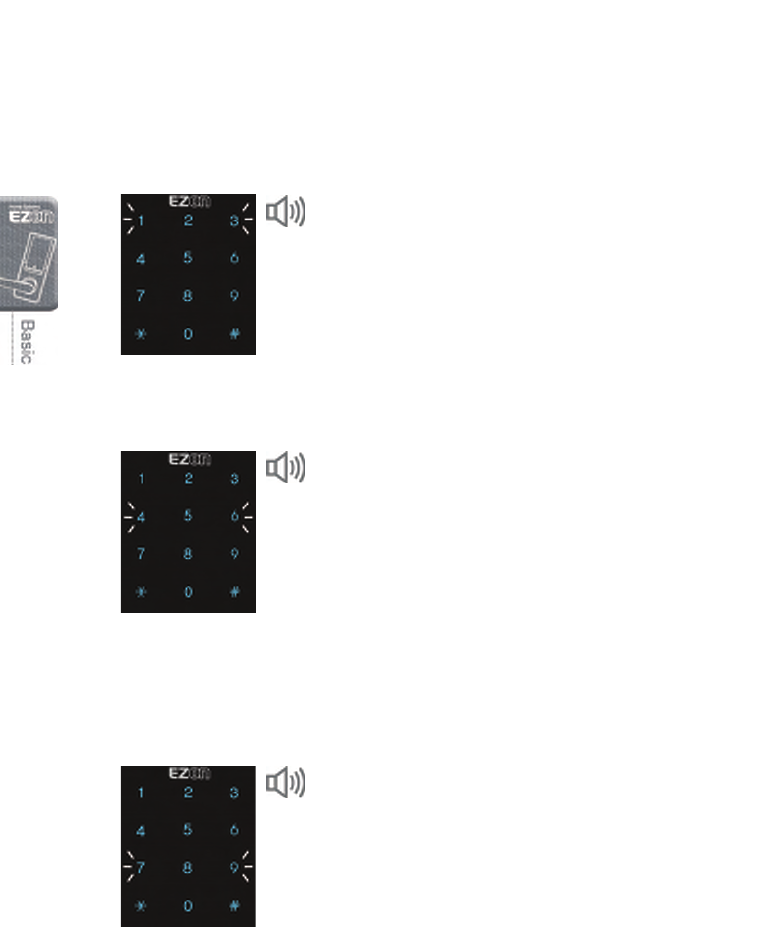
Program Mode
The user data can be registered, changed or deleted by entering the code in the
doorlock after making it the Program Mode.
1. Pressing the [Register] Button (from inside)
Open the battery cover of the indoor unit and
press the [Register] button.
2. Entering the Master Password (from outside)
Enter the current master password or
administrator password. Then press the
[¿] button or place the administrator card.
- The unit returns to the normal mode if the
password is not entered within 10 seconds.
3. Terminating the Program
To terminate the program
mode, press the [Register]
button on the indoor unit or
the [Wake Up] button on the
outdoor unit.
Successful: "Too~~t”
Failed: "Toot~~"
or
In the program mode,
- If LED nos. 1, 2 and 3 flash → Program code entry standby mode
- If LED nos. 4, 5 and 6 flash → User code or group code entry standby mode
- If LED nos. 7, 8, and flash → User data entry standby mode
- To return to the higher menu → Press the [¿] button.
- Please refer to the error code list (page 34) in case an error is generated.
Toot
19
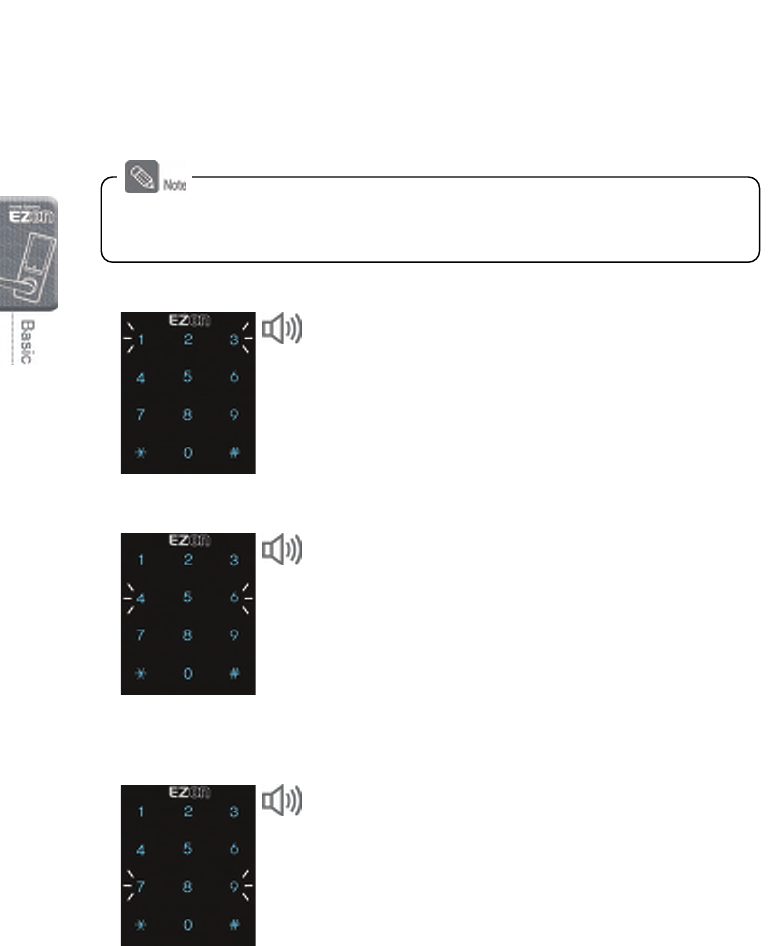
Changing the Master Password (Code 10)
A master password can be 4~12 digits. Attention must be paid to security since there is
no control in doorlock configuration as well as user data registration and removal must
be after authenticating the master password. Please register a new master password
after initializing the doorlock.
1. Entering the Code in the Program Mode
When 1, 2 and 3 flash after the program mode is
operated, enter the code 10 and press the [¿] button.
2. Entering the Previous Master Password
When LED numbers 7, 8 and 9 flash, enter the previous
master password and then press the [¿] button.
- Valid Entry: ‘Toot toot’ sound activates.
- Invalid Entry: ‘Toot~~ toot, toot’ sound activates and program
mode returning to code entry standby.
3. Entering a New Master Password
Enter the new master password and press the [¿]
button.
- Entered password is displayed on the keypad in the same
order and saved. The unit then turns into the standby mode
of program code.
- It is recommended to use the password of at least 6 digits for
the security reason (use of 0~9 numeric codes).
4. Checking New Master Password Operation
Terminate the program mode and restart the unit to
check if the master password is properly changed.
- Please refer to ‘Program Mode’ (page18).
Toot, Toot
Valid Entry: "Too~~t, toot, toot”
Failed:
"
Toot~~, toot, toot
"
20
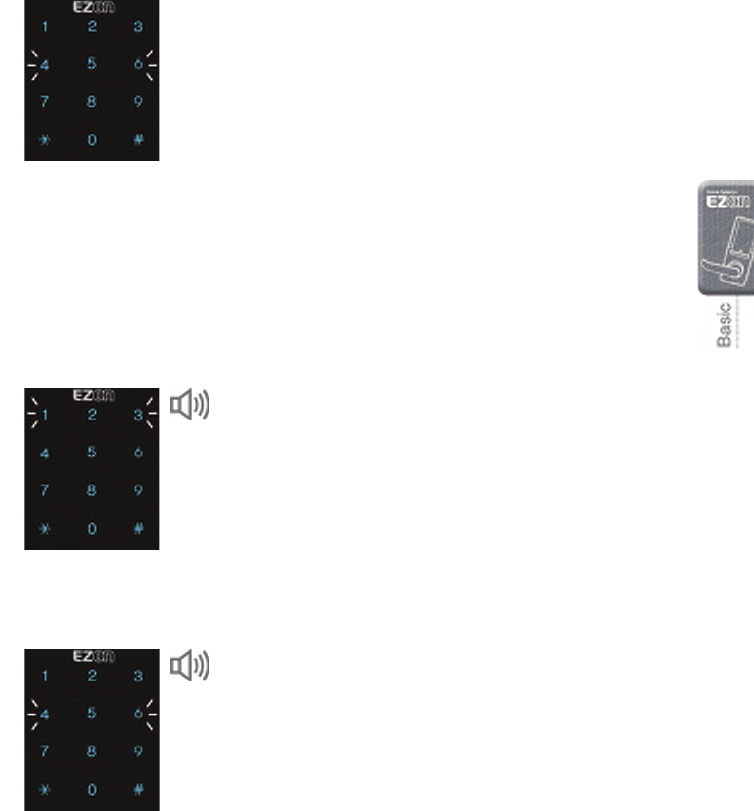
Registering the User Password (Code 20)
The user password can be 4~12 digits. Up to 250 codes can be registered, including
the card registration.
1. Entering the Code in the Program Mode
When the LED numbers 1, 2 and 3 flash after
the program mode is run, press the code 20
and then the [¿] button.
2. Entering the User Code
When the LED numbers 4, 5 and 6 flash, press
the user code (1~250) and then the [¿] button.
- Valid Entry: The ‘toot, toot’ sound is activated, and
the mode is turned into the password entry
standby mode.
- Invalid Entry: The ‘toot~~ toot, toot’ sound is
activated, and the mode is turned into the program
code entry standby mode.
3. Entering the User Password
When the LED 7, 8 and 9 flash, enter the user
password and then the [¿] button.
- Entered password is displayed on the keypad in
the same order and saved. The unit then turns into
the user code standby mode.
- It is recommended to use the password of at least
6 digits for the security reason (use of 0~9
numeric codes).
Valid Entry: "Too~~t, toot, toot”
Failed: "Toot~~, toot, toot"
Toot, toot
Toot, toot

21
4. Registering an Additional Password (optional)
When the LED numbers 4, 5 and 6 flash after
the password is saved, repeat the steps 2 and
3 within 10 seconds to register the additional
passwords.
(The program mode is automatically terminated
when there is no key entry within 10 seconds.)
- To terminate the program mode without registering
the additional password, press the [Register] button
on the indoor unit or the [Wake Up] button on the
outdoor unit.
5. Checking New Password Operation (from outside)
Check if the new password is successfully
registered by opening the door using it and
close the door.
- Please refer to ‘Opening the Door from Outside with
a Password or a Card’ (page 14).
- Check the new password registration with reference to ‘Opening the Door from Outside
with a Password or a Card’ (page 14).
- Manage your password with care so that unauthorized people will not have access to it.
Regular changing your password can reduce the risk of it being disclosed.
Toot, toot
22
Registering the Temporary Password
(Code 30)
A temporary password can be registered for one time use. The registered temporary
user code and password are deleted after a single use.
1. Entering the Code in the Program Mode
When the LED numbers 1, 2 and 3 flash after the
program mode is run, press the code 30 and then the
[¿] button.
2. Entering the User Code
When the LED numbers 4, 5 and 6 flash, press the user
code (1~250) and then the [¿] button.
- Valid Entry: The ‘toot, toot’ sound is activated, and the mode is
turned into the password entry standby mode.
- Invalid Entry: The ‘toot~~ toot, toot’ sound is activated, and
the mode is turned into the program code entry standby
mode.
3. Entering a Temporary Password
When the LED numbers 7, 8 and 9 flash, enter the
temporary password and then the [¿] button.
- Entered password is displayed on the keypad in the same
order and saved. The unit then turns into the user code
standby mode.
- It is recommended to use the password of at least 6 digits for
the security reason (use of 0~9 numeric codes).
Valid Entry: "Too~~t, toot, toot”
Failed: "Toot~~, toot, toot"
- A temporary password cannot be in the administrator group.
Therefore, the temporary password should be registered in the user code 11 ~ 250.
- A temporary password can be used only once.
Toot, toot
23
4. Entering an Additional Temporary Password (optional)
When the LED numbers 4, 5 and 6 flash after the
password is saved, repeat the steps 2 and 3 within 10
seconds to register the additional passwords.
(The program mode is automatically terminated when
there is no key entry within 10 seconds.)
Registering the User Card (Code 40)
Either the card enclosed in the product package or ISO 14443 A Type can be registered.
User care up to 250, including the passwords, can be registered.
1. Entering the Code in the Program Mode
When the LED numbers 1, 2 and 3 flash after the
program mode is operated, press the code 40 and
then the [¿] button.
2. Entering the User Code
When the LED numbers 4, 5 and 6 flash, press the
user code (1~250) and then the [¿] button.
- Valid Entry: The ‘toot, toot’ sound is activated, and the mode
is turned into card entry standby mode.
- Invalid Entry: The ‘toot~~ toot, toot’ sound is activated, and
the mode is turned into the program code entry standby
mode.
Toot, toot
24
3. Placing the Card
When the LED numbers 7, 8 and 9 flash, place the card
to the card reader on the outdoor unit. The card is
registered after the sound of ‘Too~~t, toot, toot’.
- The unit turns into the user code entry standby mode.
4. Registering an Additional Card (optional)
When the LED numbers 4, 5 and 6 flash, repeat the
steps 2 and 3 within 10 seconds to register the
additional cards.
(The program mode is automatically terminated when
there is no key entry within 10 seconds.)
- To terminate the program mode without registering an
additional card, press the [Register] button on the indoor unit
or the [Wake Up] button on the outdoor unit.
5. Checking Card Registration (from outside)
Press the [Wake Up] button on the outdoor unit and place the registered card on the card
reader.
- Please refer to ‘Opening the Door from Outside with a Password or a Card’ (page 14).
Too~~t, toot, toot
Toot, toot
25
User Code Activation/Deactivation/
Deletion (Code 50~55)
It is the function to activate/deactivate/delete the registered user codes individually or in
groups.
It temporarily allows or disallows the entrance of a particular user or group.
1. Entering the Code in the Program Mode
When the LED numbers 1, 2 and 3 flash after
the program mode is operated, press one of
the following codes and then press the [¿]
button.
- Individual Deletion: 50
- Individual Activation: 51
- Individual Deactivation: 52
- Group Deletion: 53
- Group Activation: 54
- Group Deactivation: 55
2. Entering the User Code or Group Code
When the LED numbers 4, 5 and 6 flash, enter
the user code or group code and then press
the [¿] button.
- 50~52 entered in step 1
: Enter the user code
- 53~55 entered in step 1
: Enter the group code
Success: "Too~~t"
Failure: "Toot~"
Success: "Too~~t"
Failure: "Toot~"
26
Entrance Control Setup (Code 60~63)
The entrance control can be set up or released to the registered user codes individually
or in a group.
1. Entering the Code in the program mode
When the LED numbers 1, 2 and 3 flash after
the program mode is run, press one of the
following codes and then press the [¿] button.
- Entrance control release by individual user: 60
- Entrance control setup by individual user: 61
- Entrance control release by group: 62
- Entrance control setup by group: 63
2. Entering the User Code or Group Code
When the LED numbers 4, 5 and 6 flash, enter
the user code or group code and then press
the [¿] button.
- 60~61 entered in step 1
: Enter the user code
- 62~63 entered in step 1
: Enter the group code
- In case of entrance control release (code 60 or 62),
step 2 completes the process.
3. Setting up the Entrance Control Start Time/End Time
When the LED numbers 7, 8 and 9 flash, enter
the entrance control start time and end time in
that order and then press the [¿] button.
Ex) Entrance control start time: 10:00 PM
Entrance control end time: 08:30 AM
=> Code Entry: 22000830
Success: "Too~~t"
Failure: "Toot~"
Success: "Too~~t"
Failure: "Toot~"
Success: "Too~~t"
Failure: "Toot~"
27
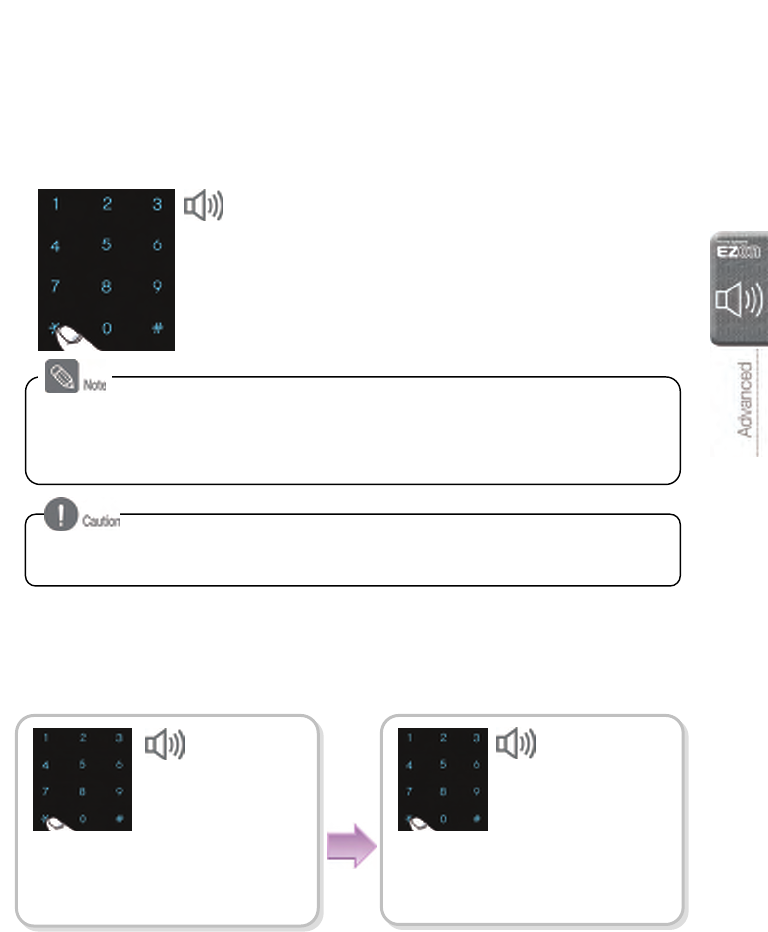
Additional Functions
Setting up and Releasing the Passage
Mode (Code 70/71)
The Passage function allows free entrance and exit of the people by maintaining the
door unlocked. It is a convenient when the free access is needed.
Entering the code in the program mode
When the LED numbers 1, 2 and 3 flash after the
program mode is operated, press one of the
following codes and then press the [¿] button.
- Passage mode release: Code 70
- Passage mode setup: Code 71
Setting up Current Time
Since the current time is used to set up the entrance control as well as to record the
entrance/exit history, it must be set up at least once after the product is installed.
- In Passage mode, the doorlock does not operate until the [Register] button on the indoor
unit is pressed or PC connection mode is run.
- The Passage mode is set when the door is opened after the outdoor unit handle is
turned without any keypad entry or card contact.
Valid Entry: "Too~~t"
Invalid Entry: "Toot~~"
- Please pay attention to security when in the Passage mode, since the door is not
automatically locked when it is closed.
W
hen the LED numbers 1, 2 and 3 flash
after the program mode is operated,
press code 80 and then the [¿] button.
Enter the year, month, day, hour and
minute in two digits each for total of 10
digits and then press the [¿] button.
Ex) 2009/03/16 01:45 PM => Enter 0903161345
Toot, toot Valid Entry:
"Too~~t, toot, toot
”
Invalid Entry:
"Toot~~, toot, toot
"
28
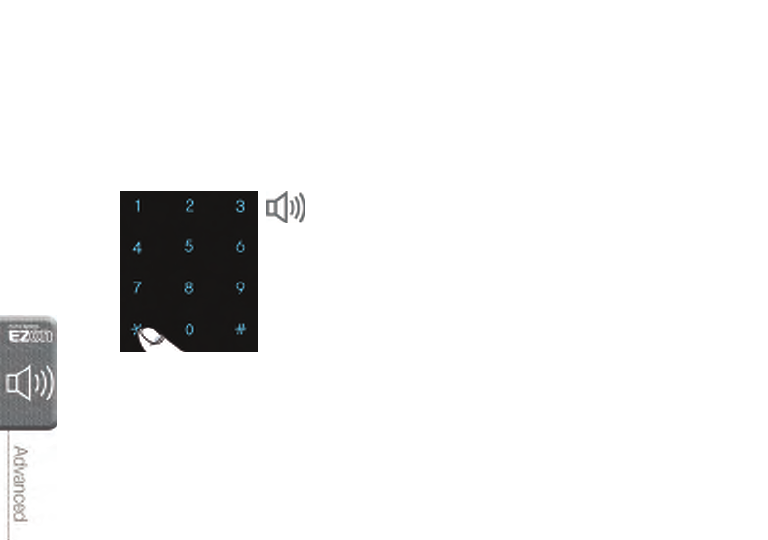
Setting up and Releasing the Random
Security Function (Code 90~95)
It lights up a series of random numbers on keypad so that the lighted numbers must be
all touched before the password is entered. The feature can enhance the doorlock
security.
When the LED numbers 1, 2 and 3 flash after
the program mode is operated, enter the code
90~95 and then press the [¿] button.
- 90: Release
- 91: 1 random number displayed
- 92: 2 random numbers displayed
- 93: 3 random numbers displayed
- 94: 4 random numbers displayed
- 95: 5 random numbers displayed
Valid Entry: "Too~~t"
Invalid Entry: "Toot~"
29
Setting up and Releasing the Sound
(Code 00~03)
This function allows setting up the sound activated when the keypad is pressed or the
door is locked or unlocked.
Setting up the sound function
Default setting is to activate all sound levels (3 sound level setting).
When the LED numbers 1, 2 and 3 flash after
the program mode is operated, enter the code
00~03 and then press the [¿] button.
- 00: No sound
- 01: Level 1
- 02: Level 2
- 03: Level 3
- [00] Button: No sound is activated (except the warning sound).
- [01]~[03] Button: All sounds are activated. The sound volume gets higher as the level
increases.
- The level is set at level 3 after initialization.
- In program mode, the level 3 sound is activated regardless of the sound setting.
- Sound setting and release are enabled only when the door is opened.
- The sound of the outdoor unit is set at the optimum level.
Sound Function Operation
30
Warning Sound/Alarm Sound
Warning Sound Activated (prevention of mischief behavior)
It is a function of activating the warning sound and deactivating the unit in case the
doorlock is improperly operated from outside.
Releasing the Warning Sound
Case of using invalid master password, user password or card for 5 times in a row
(A warning sound is activated, and the doorlock becomes deactivated for 3 minutes. The
“toot” sound is activated every 10 seconds while the unit is deactivated, and the unit becomes
operational again with “toot, toot, toot, toot, toot” sound after one minute.
Press the [Register] button on the
indoor unit.
Enter a valid password or place the card on the
card reader. Press the [¿] button.
(Releasing of the warning sound is allowed only
within 10 seconds from the warning sound.)
[From Inside] [From Outside]
Password and Card
Authentication Error
Toot~ toot~
(Activated 20 times)
or
or
31
Releasing the Alarm
It is the function of activating the emergency alarm when the outdoor unit of the installed
doorlock is forcefully separated.
If the outdoor unit is forcefully separated, the alarm sound “toot~, toot~, toot~” is
continuously activated.
The alarm sound is released when the micro switch inside the outdoor unit is pressed.
Intrusion Detection Operation
Releasing the Intrusion
Detection Alarm Sound
Toot~, toot~, toot~
32
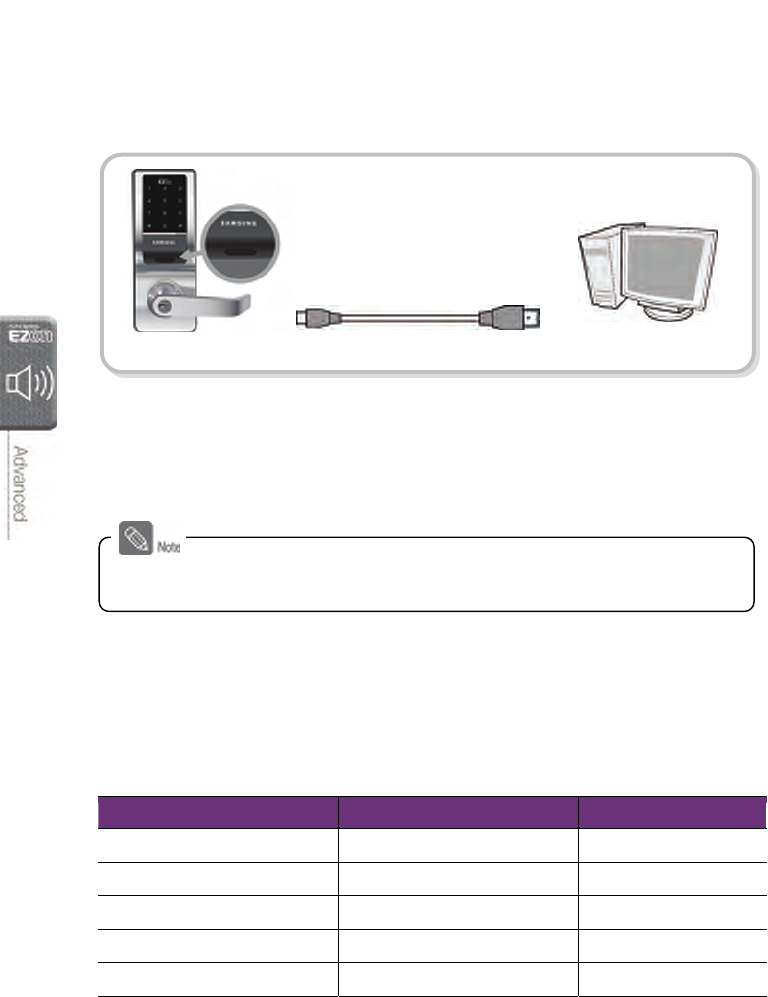
PC Connection
Connect the USB cable (A-B Type) to the USB adapter on the outdoor unit and turn the
unit into the PC registration mode. In this mode, all user data registered in the doorlock
can be downloaded or uploaded.
Initialization
All registered administrator and user data are deleted, and the unit is reset default
setting.
1. Separate the inside doorlock unit and press the [Initialize] button located inside.
2. Enter a master password or ‘1470852369’and then press the [¿] button.
Default doorlock setting after initialization
Function/Set Value Description Page
Master Password 1234 19
Volume 3 levels 30
Passage Mode Released 29
Current Time Not initialized 29
Random Security Released 30
- After the doorlock is initialized, register a new master password.
Outdoor unit PC
33
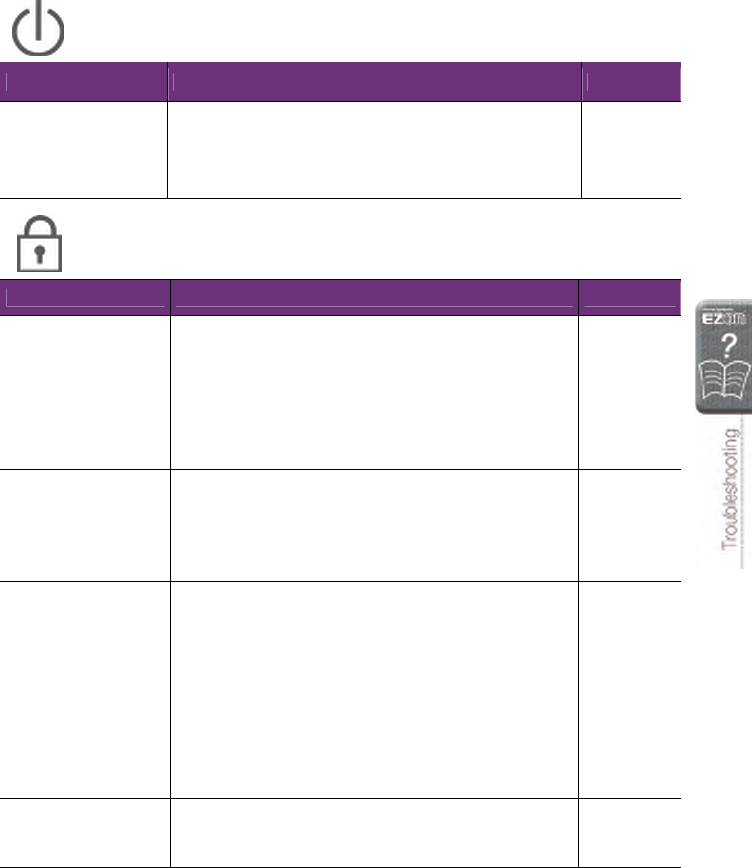
Troubleshooting
Check the following first if the product does not operate properly.
Contact the nearest service center if the problem remains unsolved.
Power
Problem Resolution Reference
No power is supplied.
- Check if the batteries are OK or if they are inserted with
the poles in the right places.
- Check if the batteries are properly inserted or whether
they are completely discharged.
Page 11~12
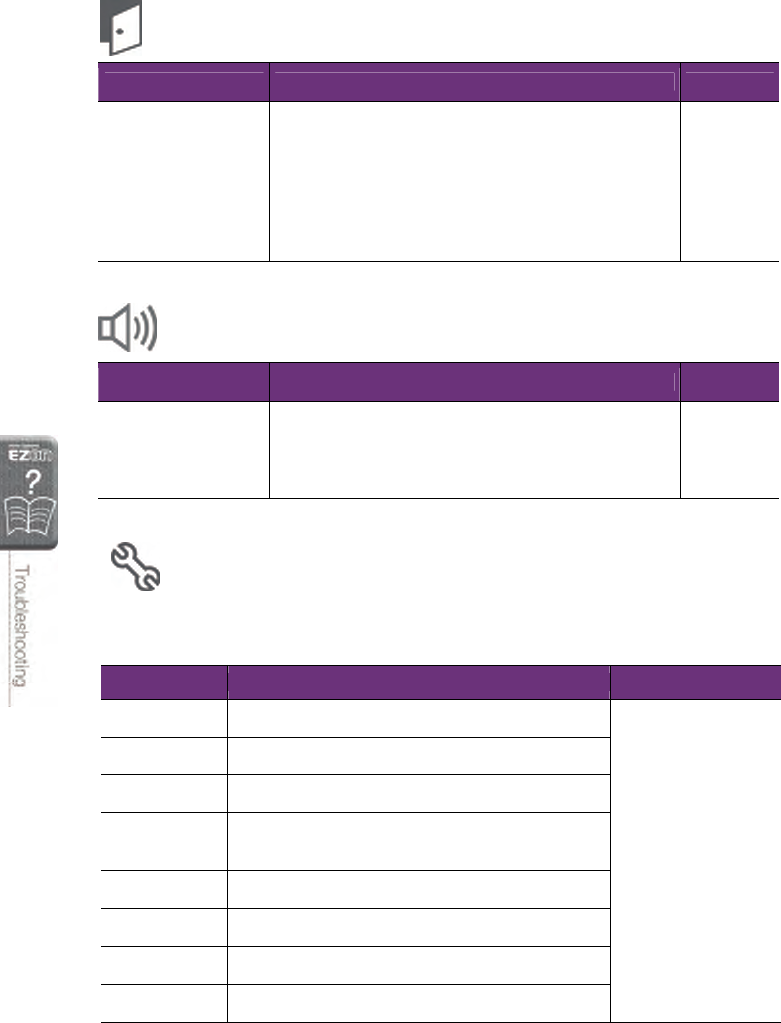
Master Password and User Password/Card
Problem Resolution Reference
The master password
cannot be changed.
- It is the case of delayed keypad entry when a new
master password is registered. The keypad must be
lighted when entering the password. There must be
keypad activities within 5 seconds of last entry.
- Replace the batteries if they are discharged.
- Repeat the procedure again, referring to “Master
Password Change” in the user guide.
Page 19
The user
password/card cannot
be registered.
- If the card or password is already registered for a user
code, change the user code and then register the
password or card.
- A password must be 4~12 digits for registration.
- Use a valid card that can be registered.
Pages
20~21
Pages
23~24
The doorlock is not
unlocked even after
the valid password is
entered and the [¿]
button is pressed.
- Check that the registered password has been correctly
entered.
- If number buttons are not illuminated while the password
is being entered, then the entry will not be accepted.
Reenter the password from the beginning when the
number pad is illuminated after touching the [Wake Up]
button. (The light on the number pad is automatically
turned off if an entry is not initiated within 5 seconds.)
- Check if there is the entrance control time set. Release it
if it is set. (Please refer to ‘Entrance Control Setup’.)
Page 14
The door cannot be
unlocked with the
card.
- It may be the unregistered card. Register the card and
try again.
- The card must be properly placed on the card reader.
Page 14
34
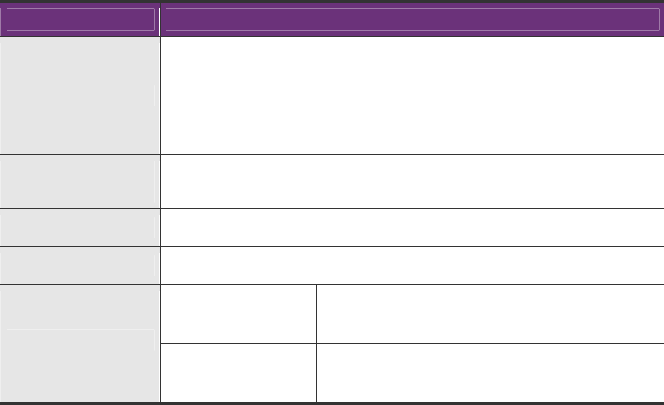
Passage Mode
Problem Resolution Reference
The doorlock is not
automatically locked.
- Check if the Passage mode is set up. The mode is set if
the door is locked when the handle on the outdoor unit
is turned without any keypad entry.
- The doorlock is improperly installed if it is not
automatically locked while the Passage mode is
released. Please contact s Digital Doorlock reseller and
have it reinstalled.
Page 27
Warning Sound
Problem Resolution Reference
Strange boozer sound
(For Elise) keeps being
activated when
operating the doorlock.
It is the warning sound indicating the batteries must be
replaced. Replace them with the new ones within a week. Page 11
Error Code List
The following table shows the type of errors occurred when the invalid keypad entry is
made in the program mode.
Error Code Error Description Note
1 Late key entry
2 Unregistered password or card being authenticated
3 Input keypad entry out of valid range
4 Invalid code entry
(program code, user code or group code)
5 Already registered user code
6 Unregistered user code
7 Invalid date and time entry
8 Already registered user code (new registration)
A program code is a
2-digit numeric value.
- 10, 20, 30, 40, 50, 51,
52, 53, 54, 55, 60, 61,
62, 63, 70, 71, 80, 90,
91, 92, 93, 94, 95, 00,
01, 02, 03. Other
codes generate an
error.

35
User Code Registration Table
User Code Password (4~12 digits) User Name
36
Product Specification
Item Specifications
Voltage
When using a battery
This product accepts 1.5V AA Size battery only(5EA, 7.5V)
When using an external power supply
This product accepts our genuine accessory, SHT-PS1250X.
For more product information, please contact Seoul Commtech.
Emergency Power
Source 9V Battery (6LF22) (Separately purchased)
Operation Method Electronic Control Method (Password entry or card reading)
Weight 2.2Kg (including both indoor and outdoor units)
Outdoor Unit 86 mm(W)×222 mm(H)×69 mm(D)
(3.39 inch(W)×8.74 inch(H)×2.72 inch(D))
Product Dimensions
Indoor Unit 86 mm(W)×222 mm(H)×69 mm(D)
(3.39 inch(W)×8.74 inch(H)×2.72 inch(D))
The content of this manual is subject to change without prior notice to the user in order
to enhance performance of the product.
FCC NOTICE
NOTE : This equipment has been tested and found to comply with the limits for a Class
B digital device, pursuant to part 15 of the FCC Rules. These limits are designed to pro-
vide reasonable protection against harmful interference in a residential installation.
This equipment generates, uses and can radiate radio frequency energy and, if not in-
stalled and used in accordance with the instructions, may cause harmful interference to
radio communications. However, there is no guarantee that interference will not occur in
a particular installation. If this equipment does cause harmful interference to radio or
television reception, which can be determined by turning the equipment off and on, the
user is encouraged to try to correct the interference by one or more of the following
measures:
- Reorient or relocate the receiving antenna.
- Increase the separation between the equipment and receiver.
-
Connect the equipment into an outlet on a circuit different from that to which the receiver is connected.
- Consult the dealer or an experienced radio/TV technician for help.
CAUTION : Changes or modifications not expressly approved by the manufacturer
responsible for compliance could void the user’s authority to operate the equipment.

Product Warranty