Samsung BD H5100/ZA HK01 User Manual DVD PLAYER Manuals And Guides 1403274L
User Manual: Samsung BD-H5100/ZA-HK01 BD-H5100/ZA-HK01 SAMSUNG DVD PLAYER - Manuals and Guides View the owners manual for your SAMSUNG DVD PLAYER #BDH5100ZAHK01. Home:Electronics Parts:Samsung Parts:Samsung DVD PLAYER Manual
Open the PDF directly: View PDF ![]() .
.
Page Count: 26
the possibiHities
Thank you for purchasing ths Samsuqg product
To recewe more complete serwce,
pUeasere%ster your oroduct at
www_samsungocom/regaster
ENGLIS H
Safety !nformation
TO REDUCE THE RISK OF ELECTRIC SHOCK DO NOT REMOVE THE COVER (OR BACK).
NO USER-SERVICEABLE PARTS ARE INSIDE. REFERSERVICING TO QUAUFtED SERVICE
PERSONNEL.
The lighting flash and
Arrowhead within the triangle
is a warning sign alerting you
to dangerous voltage inside
the product
CAUTION
CAUTION: TO REDUCE THE
RISKOF ELECTRICSHOCK, DO
NOT REMOVE THE COVER (OR
BACK) NO USER SERVICEABLE
PARTSARE INSIDE REFER
SERVICINGTO QUALIFIED
SERVICEPERSONNEL
The exclamation point within
the triangle is a warning sign
alerting you to important
instructions accompanying the
product
WARNING
, 1omducetheriskoffimorelectdcsh_k, do
not exposethisapplianceto rainormoisture..
FCC NOTE (for U.S.A)
This equipment has been tested and found
to comply with the limits for a Class B digital
device, pursuant to Part 15 of the FCC
rules. These limits are designed to provide
reasonable protection against harmful
interference in a residential instalation. This
equipment generates, uses and can radiate
radio frequenet energy and, if not installed
and used in accordance with the instructions,
may cause harmful interference to radio or
television reception, which can be determined
by turning the equipment off and on.
The user isencouraged to try to correct the
interference by one or more of the following
measures:
Reorient or relocate the receiving antenna.
Increase the separation between the
equipment and receiver.
Connect this equipment into an outlet on
a @cult different from that to which the
receiver isconnected.
Consult the dealer or an experienced
radio/TV technician for help.
This class ! digital product meets all
requirements of the Canadian Interference -
Causing Equipment Regulations.
Note to CAW system installer
This reminder is provided to call the CATV
system instalePs attention to Article 820-
40 of the National Electrical Code (Section
54 of Canadian Electrical Code, Part t) that
provides guidelines for proper grounding
and, in particular, specifies that the cable
ground shall be connected to the grounding
system of the building as close to the point
of cable entry as practical.
CLASS ! LASER PRODUCT
This Compact Disc player is classified as a
CLASS 1 LASER product. Use of controls,
adjustments or performance of procedures
other than those specified herein may
result in hazardous radiation exposure.
Complies with 21CFR 1040.10 except for
deviations pursuant to Laser Notice No.
S0, dated June 24, 2007.
DANGER :
• VtSItLE AND tNVtSttLE LASER RADIATION
WHEN OPEN. AVOID DIRECTEXPOSURE
TO tEAM. (FDA 21 CFR)
CAUTION :
• CLASS 3! VtSItLE AND tNVISItLE LASER
RADIATION WHEN OPEN./t-(VOID
EXPOSURETO THE BEAM. (tEC 60825-1 )
,, THIS PRODUCT UTILIZESA LASER. USE
OF CONTROLS OR ADJUSTMENTS OR
PERFORMANCE OF PROCEDURESOTHER
THAN THOSE SPECIFIEDHEREIN MAY
RESULTIN HAZARDOUS RADIATION
EXPOSURE. DO NOT OPEN COVER
AND DO NOT REPAIR YOURSELF. REFER
SERVICINGTO QUALIFIED PERSONNEL.
,_.2 NOTES
tf the Region number of a Blu-ray
Disc/DVDs does not correspond to
the Region number of this player,
the player cannot play the disc.
important Safety instructions
Read these operating instructions careful
before using the unit. Follow all the safet
instructions listed below.
Keep these operating instructions handy
for future reference.
1. Read these instructions.
2. Keep these instructions.
3. Need all warnings.
4. Follow all instructions.
5. Do not use this apparatus near water
6. Clean only with a dry cloth.
7. Do not block any ventilation openings.
Install in accordance with the
manufactureCs instructions.
8. Do not install near any heat sources
such as radiators, heat registers,
stoves, or other apparatus (including
fS./receivers) that produce heat.
9. Do not defeat the safety purpose of
the pobrized or grounding-type plug.
A polarized plug has two blades with
one wider than the other. A grounding
type plug has two blades and a third
grounding prong. The wide blade or
the third prong are provided for your
safety, tf the provided plug does not fit
into your outlet, consult an electrician
for replacement of the obsolete outlet.
10°Protect the power cord from being
walked on or pinched particularly at
plugs, convenience receptacles, and
the point where it exits the apparatus.
11 oOnly use attachments/accessories
specified by the manufacturer.
12_Useonlywiththecart,
_rand,tripod, bracket,
or table specified by the
manufaGurer, or sold
with the apparatus.
When acart isused,use
caution when moving
the cart/apparatuscombination to avoidinjury
from tip-over,
13°Unplug this apparatus during lightning
storms or when unused for long periods
of time_
14° Refer all sere'icing to qualified service
pemonneL Sere'icingis required when the
apparatus has been damaged in any way,
such as when the power-supply cord or
plug is damaged, liquid has been spilled
or objects have fallen into the apparatus,
the apparatus has been exposed to rain
or moisture, does not operate normally,
or has been @opped_
Holding Discs
- Fingerprints or scratches 1:s-._.->
on a disc may reduce ':.
sound and picture quality or cause
skipping
- Avoid touching the sufiace of a disc
where data has been recorded.
- Hold the disc by the edges so that
fingerprints will not get on the surface.
- Do not stick paper or tape on the disc.
, Cleaning Discs
- If you get fingerprints or /_'/
dirt on a disc, clean it with t9
a mild detergent diluted in
water and wipe with a soft
cloth
- When cleaning, wipe gently from the
inside to the outside of the disc_
Disc Storage
, Do not keep in direct sunlight
, Keep in a cool ventilated area_
, Keep in a clean protection }acket
and store vertically_
Do not expose this apparatus to dripp ng
or spbshing_ Do not put obied5 fled wth
I quids, such asvases on the apparatus_
-_sturn this apparatus off complete y, you
must pull the power plug out of the wall
socket Consequently, the power plug must
be easiy and readily accessble at all times_
Do not plug mult pie electric devices into
the same wall socket Over oading a socket
can cause it to overheat, resu ting n a fire_
Before connecting other components to
this pbyer, be sure to turn them of£
If you move your p!ayersudden!yfrom a co!d
p!aceto a warm p!ace,condensaton may
occur on the operat ng parts and lens and
cause abnorma!disc p!ayback_If ths occurs,
unplug the p!ayer,wait for two hours,and then
connect the p!ug to the power outleL Then,
nsert the disc,and try to p!ayback agan
If the product makes an abnormal noise or
produces a burning smel or smoke, turn
off the power switch immediately and
disconnect the power plug f_om the wall
outbt Then, contact the nearest customer
service center for technical assistance_ Do
not use the p_9duct Using the product asit
is may cause a fire or an electric shock
@2014 Samsung Electronics Co. Ltd
Ail rights reserved; No pad. or whole of this
user's manual may be reproduced or copied
without the prior written permission of
Samsung Electronics Co.,Ltd_
Contents
CONNECTIONS
Connecting to a TV ................................ 7
Connecting to an Audio System ............. 8
Connecting to a Network Router ............ 8
SE_INGS
The Initial Settings Procedure .................. 9
Menu Navigation ................................... 9
Accessing the Settings Menu ................ 10
Display Settings .................................... 10
Audio Settings ..................................... 11
Network Settings ................................. 12
System Settings .................................... 13
Language Settings...............................13
SecuritySettings...................................13
General Settings..................................14
Support Settings .................................. 14
MEDIA Pb_Y
Playing a Commerdally Recorded Disc_ 15
PlayingFileson a USB Device................15
Playinga DiscwithUser Recorded
Content ...............................................15
PlayingContent Locatedon Your PC or
DLNA Devk-ethroughthe Blu-rayDisc
Player...................................................16
ControllingVideo Playback...................16
Controlling Musk: Playback ................... 16
Playing Photo Contents ........................ 18
Using Netflix ........................................ 18
Using Pandora .....................................19
Using You Tube .................................... 19
APPENDIX
Troubleshooting ................................... 21
Specifications ....................................... 22
Getting Started
D!SCTypesand C°ntents YOUrP!ayercan p!ay...................................................................................................................................
iiiiiiiiiiiiiiiiiiiiiiii_!_!_i_i_'ii'ii'ii'ii'ii'ii'ii'ii'ii'ii'ii'ii'ii'ii'ii'ii'ii'ii'ii'iiii__iiiiiiiiiiiii_B!_i@i_i_ii_!i!!i!!i!!i!!i!!i_!;!ii_iiiiiiiiiiiiiiiiiiiiiiiiiiiiiiiiiiiiiiiiiiiiiiiiiiiiiiiiiiiiiiiiiiiiiiiiiiiiiiiiiiiiiiiiiiiiiiiiiii_i_i__I_I_I_I_I_I_I_I__I_I_I_I_I_I_I_I__I_I_I_I_I_I_I_I__I_I_I_I_I_I_I_I__I_I_I_I_I_I_I_I__I_I_I_I_I_I_I_I__I_I_I_I_I_I_I_I__I_I_I_I_I_I_I_I__I_I_I_I_I_I_I_I__I_I_I_I_I_I_I_I__I_I_I_I_I_I_I_I__I_I_I_
Suray Disc BD-ROM or BD RE/R recorded in the BD-RE format
DVD-VBDEO
VIDEO DVD-RW DVD-VIDEO, recorded DVD+RWiDVD-RW(V)iDVD -
eve-R Pd+Rthat have been recorded and finalized, or aUSB
DVD+RW storage media containing M KV or MP4 contents
DVD+R Btu_ray
CDoRW/oR, Music recorded on CDop,WioR, DVDoRWi R, BDoREioR Disc
MUSIC DVDoRWi R, or a USB storage media containing MP3 or WMA
BDoREi R contents
CD_RWi_R' Photos recorded on CD RWi_R, DVD_RWi R, BD_REi R
PHOTO DVD_RWi_R,
BD_REi R OFa USB storage media containing JPEG contents
'_% NOTES
• The player may not pby certain CD-RW/R and DVD-R because of the disc type or
recording conditions,
• If a DVD_RW/R has not been recorded properly in DVD video format, it will not be pbyaUe,
• Your player will not pby content that has been recorded on a DVD_Rat a bit€ate that
exceeds 10 Mbps,
• Your player will not play content that has been recorded on a BDR or USBdevice at a
bitrate that exceeds 25 Mbps,
• Playback may not work for some types of discs,or when you use specific functions, such
asangle change and aspect ratio adjustment, Information about the discs is wdtten in
detail on the disc box, Pleaserefer to this if necessapy,
• When you play a BD-Jtitle, loading may take longer than a norrrla title or some functions
may perform slowly,
Disc types your piayer cannot piay
He DVD _ DVD_RAM • DVDRW (VRmode) _ 39 GB DVD_Rfor
DVD_ROMiPDi _ Super Audio CD • CVD/CD ROM/CDV/ Authoring
M\{ etc (except CD ayer) CD G/CD I!LD
(CD_Gs play audio
ony, not graphics)
4
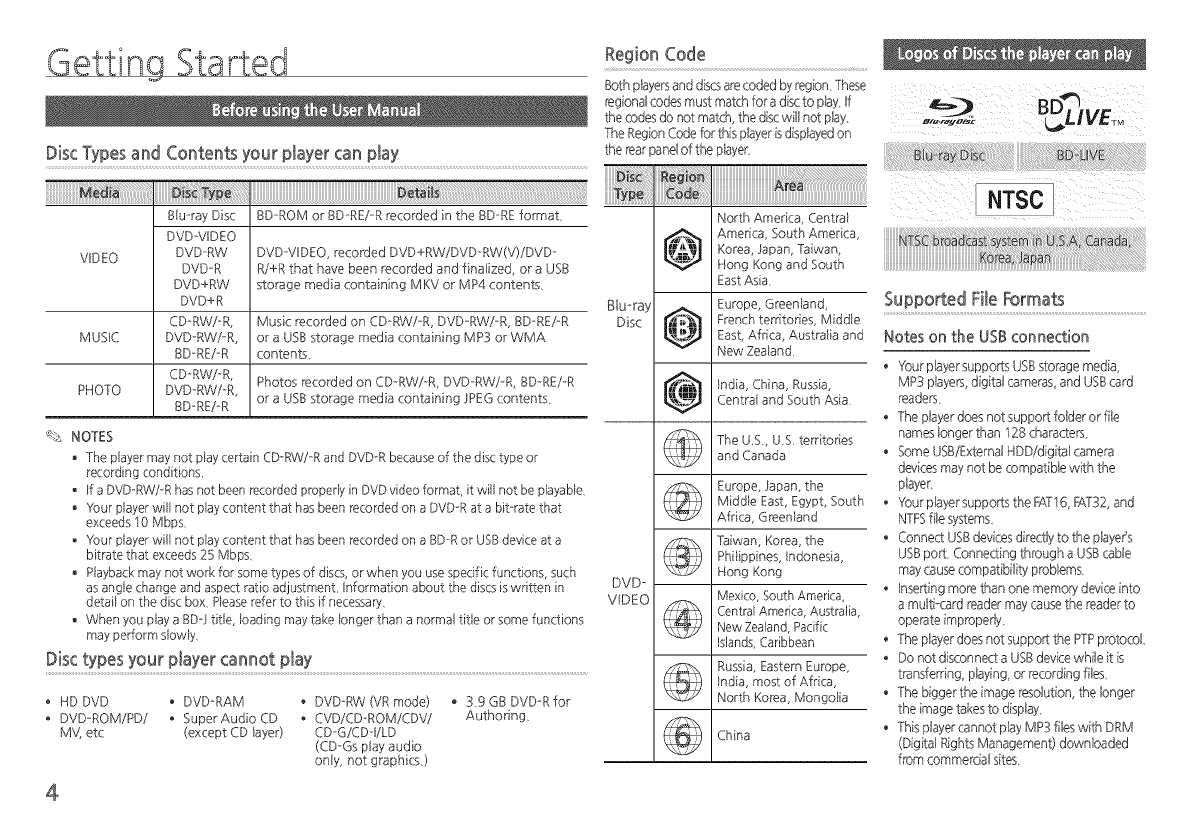
Region Code
Both players and discsare coded by region These
regionalcodes must match for a disc to pby Ifthe codes do not match, the discwill not pby .... _, _;_
The Region Codefor this player isdisplayedon
the rear panel of the pbyer
North America, Centrai
DVD-
VIDEO
America, South America,
Korea, Japan, Taiwan,
Hong Kong and South
East Asia
Europe, Greeniand,
French territories, Middie
East, Africa, Austraiia and
New Zeaiand
India, China, Russia,
Centrai and South Asia
The U,S, U,S territories
and Canada
Europe, Japan, the
Middie East, Egypt, South
Africa, Greenland
]:aiwan, Korea, the
Phiiippines, Indonesia,
Hong Kong
Mexico, South America,
Central America, Australb,
New Zealand,Pacific
Islands,Caribbean
Russia, Eastern Europe,
India, most of Africa,
North Korea, Mongoiia
China
Supported FiteFormats
Notes on the USB connection
• Your pbyer suppo£s USBstorage media
MP3 players, digital cameras, and USBcard
readers
• The pbyerdoes notsuppo£folderorfile
names longer than 128 characters
• Some U%/Extemal HDD/digitai camera
devices may not be compatible with the
player-
• Your player-supports the FAT16,FAT32,and
NTFSfile systems
• Connect USBdevicesdirectly to the piayeCs
USBport Connecting tMough a USBcabie
maycause compatibility psoblems
• Inserting more than one memory device into
a multi-card reader may cause the reader to
operate improperly
• The pbyer does not support the PTPpr_otocol
• Do not disconnect a USBdevice while it is
transferring, playing, or recording files
• The bigger the image resolution, the longer
the image takes to display
• This pbyer cannot play MP3 files with DRM
(Digital Rights Management) downloaded
from commer_U sites
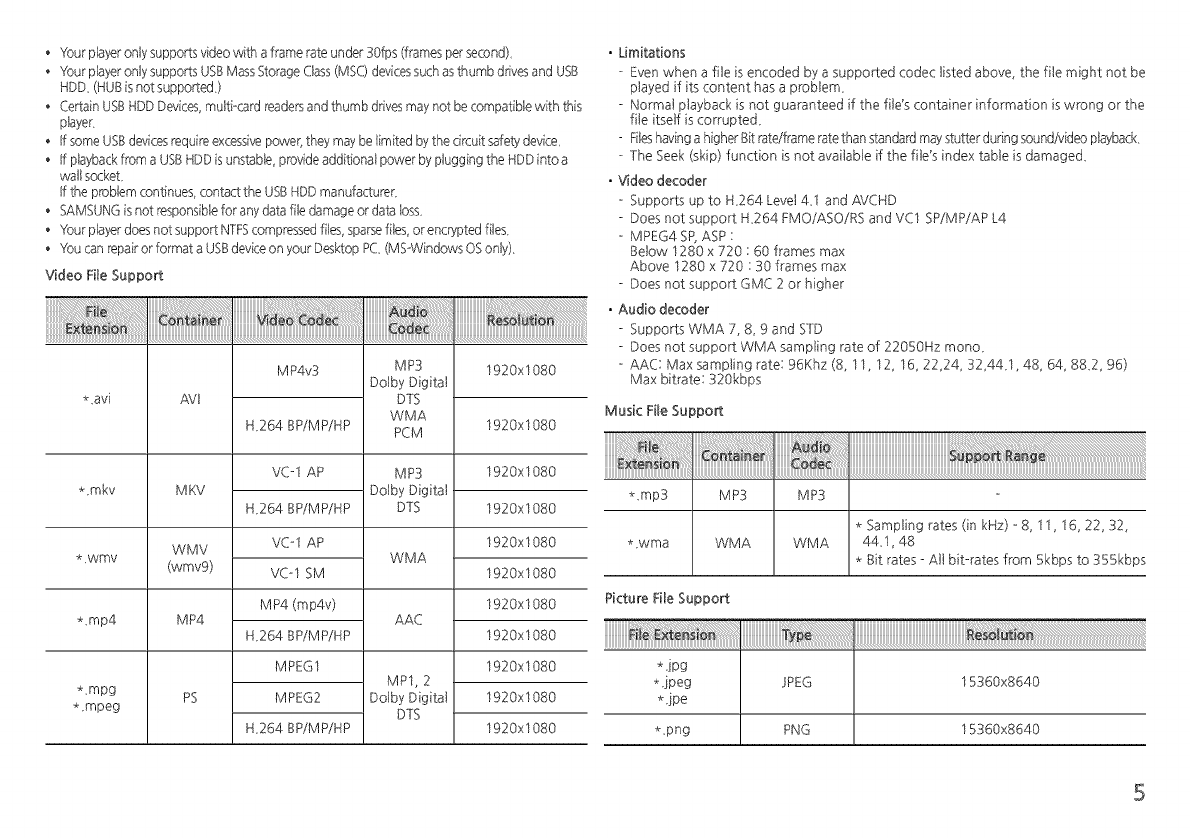
• 'fourplayeronlysupportsvideowithaframerateunder30fps(framespersecond)
• YourpbyeronlysupportsUSBMassStorageCbss(MSC)devicessuchasthumbddvesandU%
HDD(HUBisnotsupported)
• CertainU%HDDDevices,multi-cardreademandthumbdrivesmaynotbecompatiblewiththis
player-
• IfsomeUSBdevicesrequireexcessivepower}theymaybelimitedbythecircuitsafetydevice
• IfplaybackfromaU%HDDisunstable,provideadditionalpowerbypluggingtheHDDintoa
wallsocket
Iftheproblemcontinues,contacttheUSBHDDmanufacturer
• SAMSUNGisnotresponsibleforanydatafiledamageordataloss
• YourpbyerdoesnotsupportNTFScompressedfiles,sparsefiles,orencryptedfiles
• YoucanrepairorformataUSBdeviceonyourDesktopPC(MS-WindowsOSonly)
V_deoFileSupport
* vavi
*.mkv
* _wmv
f_7t
MKV
WMV
(wmvg)
MP4
PS
MP4v3
H_264 BP/MP/HP
VC-1 AP
H_264 BP/MP/HP
VC-1 AP
VC-1 SM
MP4 (mp4v)
H_264 BP/MP/HP
MPEG1
MPEG2
H_264 BP/MP/HP
*_mp4
*_mpg
*_mpeg
MP3
Dolby Digital
DTS
WMA
PCM
MP3
Dolby Digital
DTS
WMA
AAC
MP1, 2
Dolby Digital
DTS
1920x 1080
1920x 1080
1920x1080
1920x1080
1920x1080
1920x1080
1920x1080
1920x1080
1920x1080
1920x1080
1920x1080
•Limitations
- Even when a file is encoded by a supported codec listed above the file might not be
played if its content has a problem_
- Normal playback is not guaranteed if the file's container information is wrong or the
file itself is corrupte&
- Fileshaving a higher Bitrate/frame rate than standard may stutter during sound!video playback
- The Seek (skip) function is not available if the file's index table is damage&
• '_fdeo decoder
- Supportsup to H264 Level4_I and AVCHD
- Does not support H_264 FMO/ASO/RS and VCI SP/MP/AP L4
- MPEG4 SP,ASP :
Below 1280 x 720 : 60 frames max
Above 1280 x 720 : 30 frames max
- Does not support GMC 2 or higher
• Audio decoder
- Supports WMA 7, 8, 9 and STD
- Does not support WMA sampling rate of 22050Hz mono_
- AAC: Max sampling rate: 96Khz (8, 11, 12, 16, 22,24, 32,44_1,48, 64, 882, 96)
Max bitrate: 320kbps
Musk File Support
::::::
*.rap3 MP3 MP3
*_wma WMA
* Sampling rates (in kHz) -8, 11, 16, 22, 32,
WMA 44_1,48
* Bit rates - All bit-rates from 5kbps to 355kbps
Picture File Support
*jpg
* jpeg JPEG 15360x8640
* jpe
*_png PNG 15360x8640
AVCHD (Advanced Video Codec High Definition)
*This player can play back AVCND format discs These discs are normally recorded and
used in camcorders
The AVCHD format is a high definition digital video camera format
The MPEG-4 AVC/H 264 format compresses images with greater efficiency than the
conventional image compressing format
Some AVCHD discs use the "x v Color" format This player can play back AVCHD discs
that use the "x v Color" format
"x v Color" is a trademark of Sony Corporation
"AVCHD" and the AVCHD logo are trademarks of Matsushita Electronic Industrial Co,
Ltd and Sony Corporation
% NOTES
. Some AVCHD format discs may not play, depending on the recording condition
AVCHD format discs need to be finalized
. "× v Color" offers a wider color range than normal DVD camcorder discs
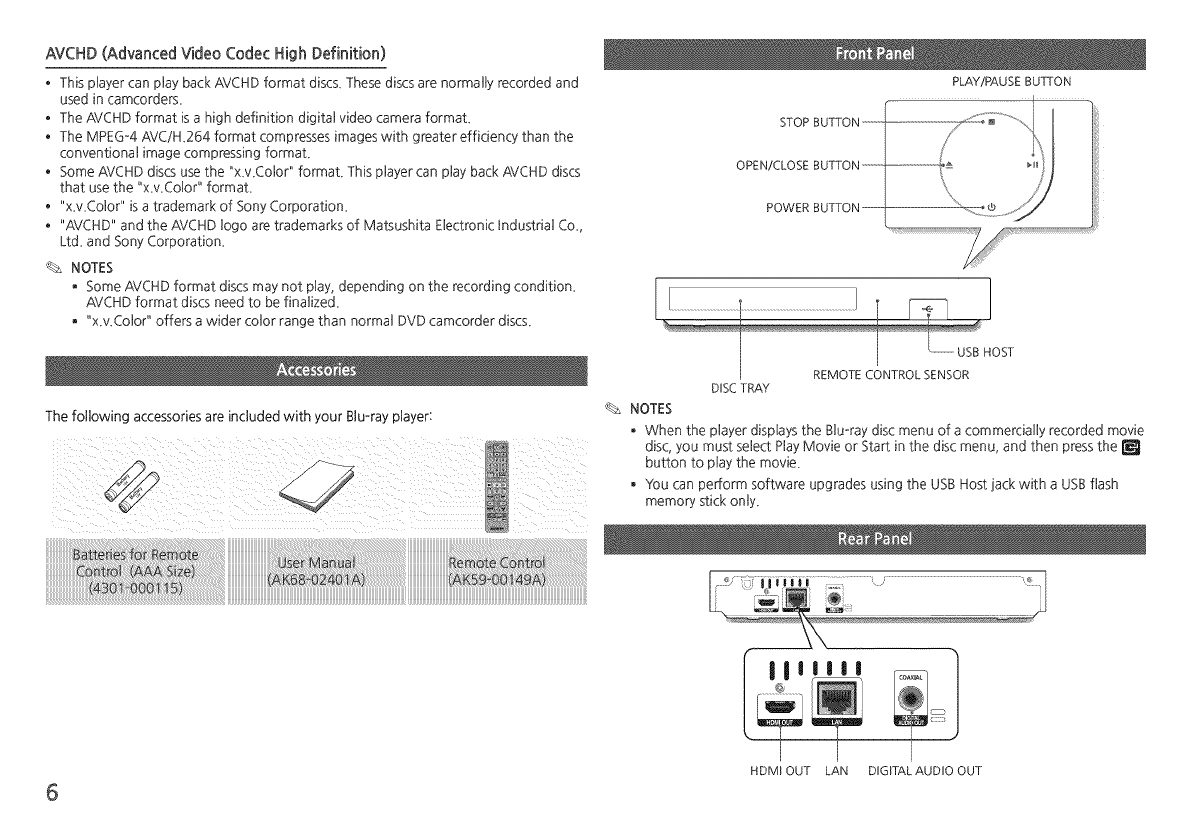
The following accessories are included with your Blu-ray player:
PLAY/PAU SE BU_ON
STOP BUTTON---
OPEN/CLOSE BUTTON------
POWER BUTTON---
OST
REMOTECONTROLSENSOR
DISCTRAY
NOTES
, When the player displays the Blu-ray disc menu of a commercially recorded movie
disc, you must select Play Movie or Start in the disc menu, and then press the
button to play the movie,
You can perform software upgrades using the USB Host jack with a USB flash
memory stick only,
m m
HDMI OUT LAN DIGITALAUDIO OUT
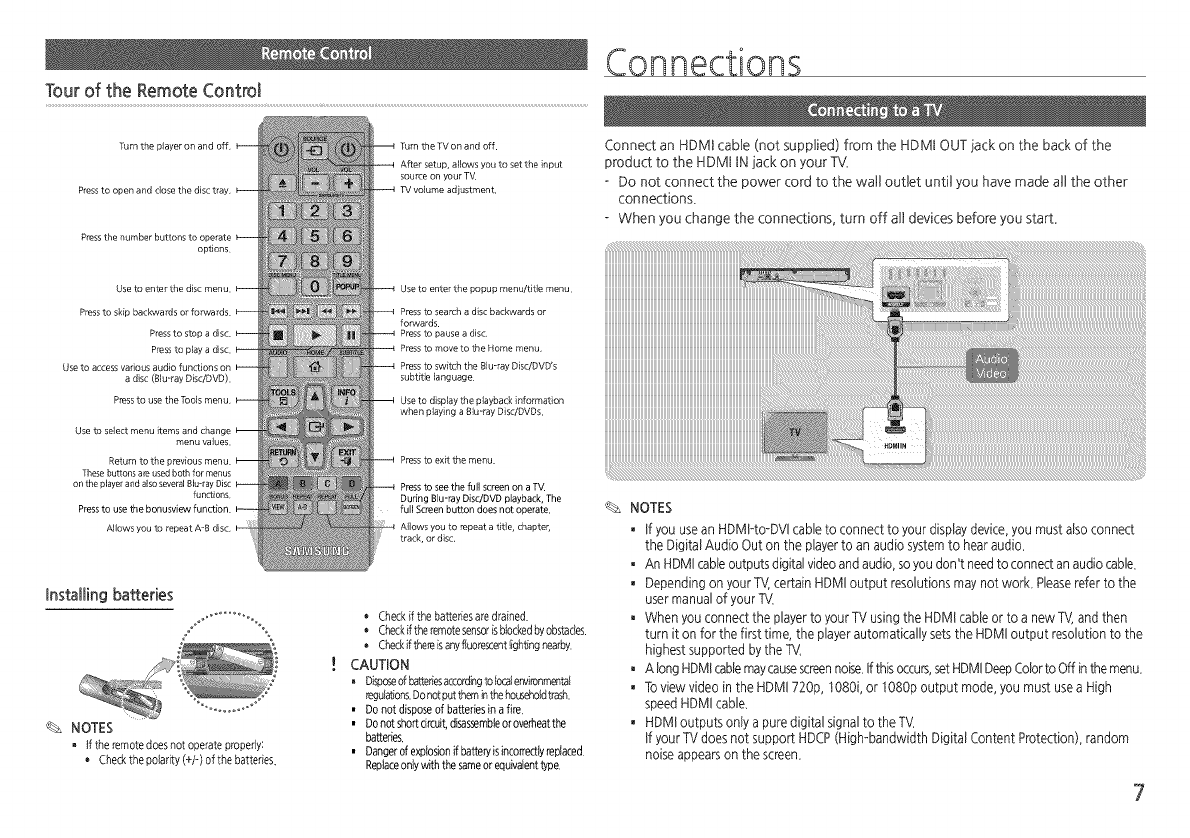
Tour of the Remote Control
Turn the player on and off,
Press to open and close the disc tray,
Turn the TV on and off.
After setup, allows you to set the input
source on your TV.
TV volume adjustment,
press the number buttons to operate
options
Use to enter the disc menu,
Press to skip backwards or forwards.
Press to stop a disc.
Press to play a disc.
Use to access various audio functions on
a disc (Biu-ray DJsdDVD),
Press to use the Tools menu,
Use to select menu items and change
menu values.
Return to the previous menu.
These buttons are used both for menus
on the player and also several Blu-ray Disc
functions
Press to use the bonusview function.
Allows you to repeat A-B disc,
Use to enter the popup menu/title menu,
Press to search a disc backwards or
forwards.
Press to pause a disc,
Press to move to the Home menu,
press to switch the giu-ray DisGDVD's
subtitle language.
Use to display the playback information
when playing a 8]u-ray DisGDVDs,
Press to exit the menu.
Press to see the full screen on a T_
During Blu-ray DisUDVD playback, The
full Screen button does not operate,
A]Jows you to repeat a title, chapter,
track, or disc,
Installing batteries
%_ NOTES
tf the remote d0es not operate properly:
Check the polarity (+/-) of the batteries
* Check if the batteries are drained.
* Checkifthe remotesensorisblocked by obstades.
* Checkifthereisanyfluorescentlightingnearby
CAUTION
, Disposeof b_eriesaccordingto localer_,ir0nmental
regulations.Do not puttheminthe ho_eholdtrash.
• Do not dispose of batteries in afire,
• Do not short cireuit,disassembleor overheatthe
batteries.
• Dangerof exNosionif batteryisinco_edtY replaced.
Replaceonty with the sameor equivalenttype.
Connections
Connect an HDMI cable (not supplied) from the HDMI OUT jack on the back of the
product to the HDMI IN jack on your TV.
- Do not connect the power cord to the wail outlet until you have made a]] the other
connections
- When you change the connections, turn off all devices before you starL
%_ NOTES
• If you use an HDMFto-DVI cane to connect to your display device,you must ago connect
the Digital Audio Out on the player to an audio system to hear audio.
• An HDMI cable outputs digital video and audio, soyou don't need to connect an audio cable,
• Depending on your TV,certain HDMI output resolutions may not work. Pleaserefer to the
user manual of your TV,
• When you connect the player to your TV using the HDMI cane or to a new TV,and then
turn it on for the first time, the player automatically sets the HDMI output resolution to the
highest supported by the TV,
• A long HDMIcablemaycausescreennoise,Ifthis occurs,set HDMIDeepColor to Off inthe menu,
• To view video in the HDM1720p, t080i, or t080p output mode, you must usea High
speed HDMI cane,
• HDMI outputs only a pure digital signal to the TV.
If your TV does not support HDCP (High-bandwidth Digital Content Protection), random
noise appears on the screen.
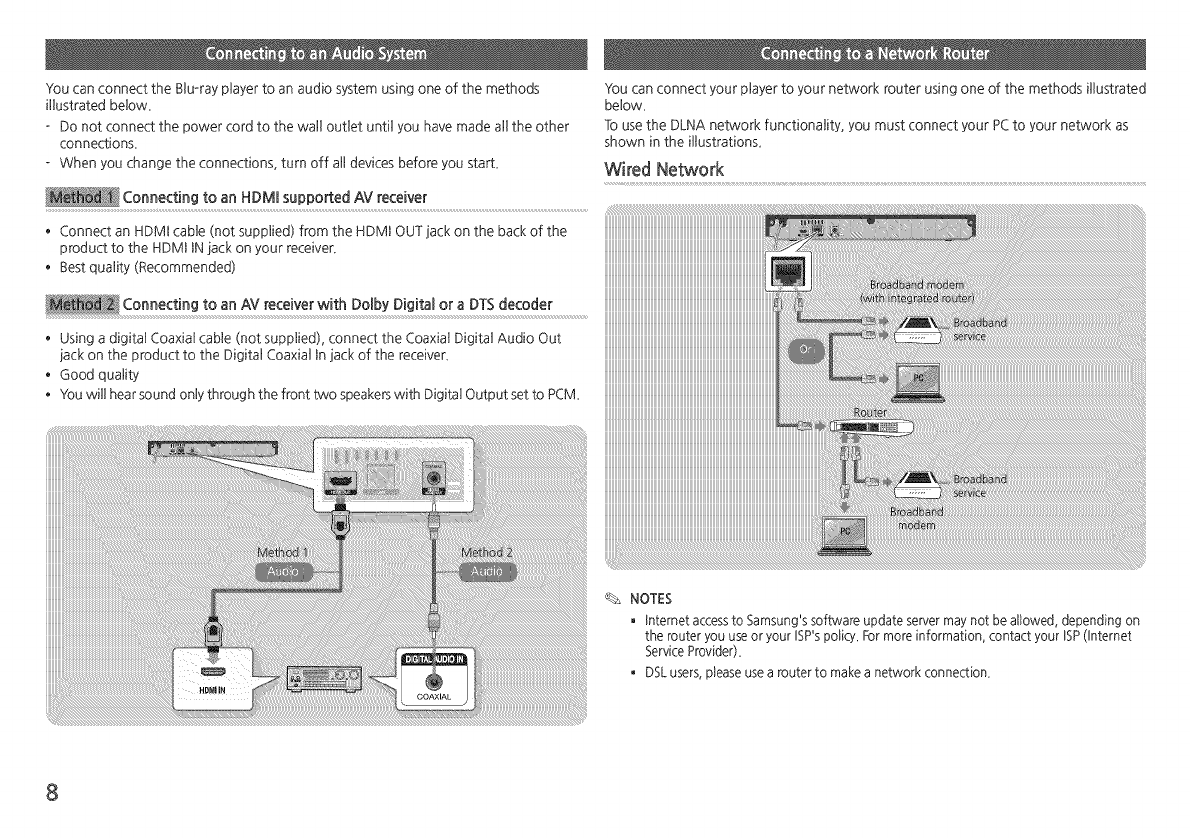
YoucanconnecttheSlu-rayplayertoanaudiosystemusingoneofthemethods
illustratedbelow
-Do not connect the power cord to the wall outlet until you have made all the other
connections
-When you change the connections, turn off all devices before you start_
Connecting to an HDMI supported AV receiver
Connect an NDMD cabHe (not suppHied) from the NDMD OUT jack on the back of the
product to the HDMD DNjack on your receiver
Best quality (Recommended)
You can connect your player to your network router using one of the methods illustrated
below
To use the DLNA network functionality, you must connect your PCto your network as
shown in the illustration£
Wired Network
Connecting to an AV receiver with Dolby Digital or a DTS decoder
Using a digital Coaxial cable (not supplied), connect the Coaxial Digital Audio Out
iack on the product to the Digital Coaxial In iack of the receiver
Good quality
You will hear sound only through the front two speakers with Digital Output set to PCM
NOTES
• Intemet accessto Samsung's software update server may not be allowed, depending on
the router you use or your ISP'spolicy. For more information, contact your ISP(Intemet
Service Provider).
• DSL users, please use a router to make a network connection.
Settings
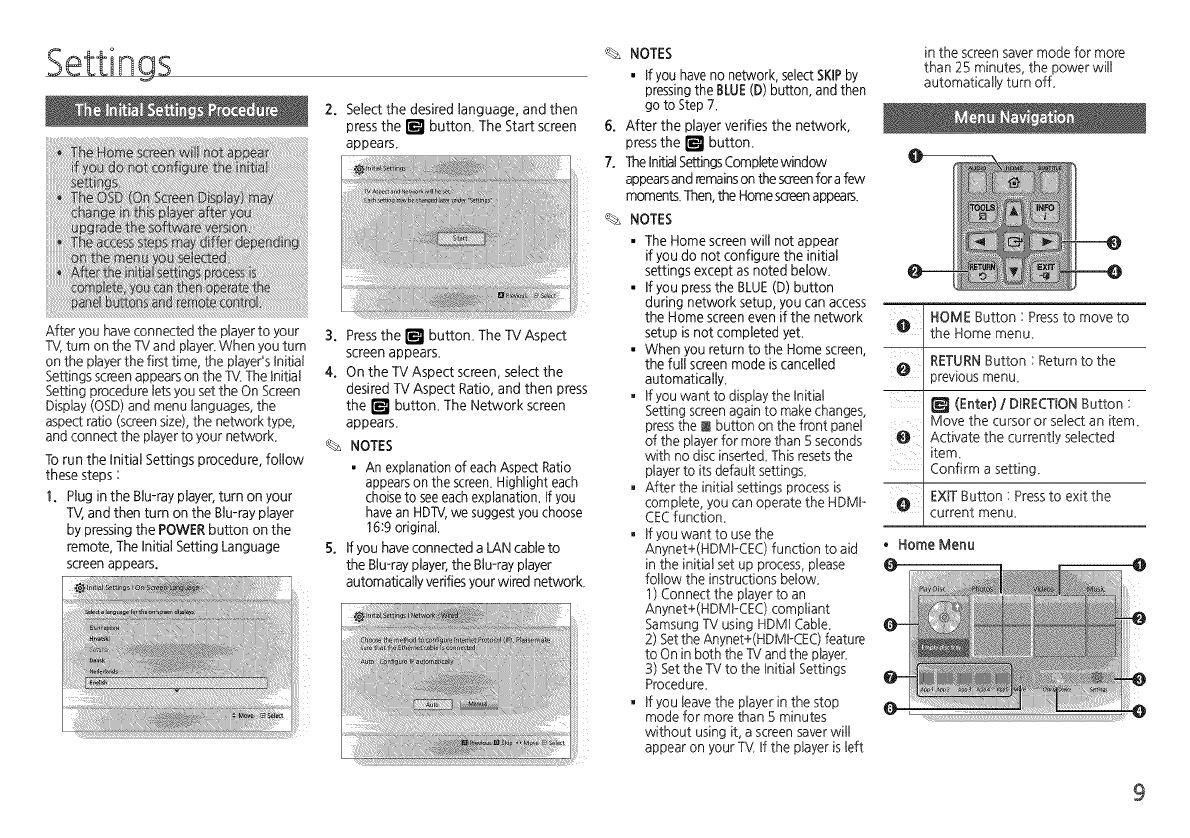
2. Select the desired language, and then
press the _ button. The Start screen
appears.
,after you have connected the player to your
TV, turn on the TV and player. When you turn
on the player the first time, the player's Initial
Settings screen appears on the TV The Initial
Setting procedure lets you set the On Screen
Display (OSD) and menu languages, the
aspect ratio (screen size), the network type,
and connect the player to your network_
To run the Initial Settings procedure, follow
these steps :
1. Plug in the Blu-ray player, turn on your
TV,and then turn on the Blu-ray player
by pressing the POWER button on the
remote, The 0nitialSetting Language
screen appears.
3. Press the _ button The TV Aspect
screen appears
4. On the TV Aspect screen, select the
desired TV Aspect Ratio, and then press
the _ button The Network screen
appears
NOTES
• An explanation of each Aspect Ratio
appears on the screen, Highlight each
choise to seeeach explanation, If you
have an HDTV, we suggest you choose
18:9 original.
5. Ofyou have connected a LAN cable to
the Blu-ray player, the Blu-ray player
automatically verifies your wired network.
NOTES
• If you have no network, select SKIPby
pressing the BLUE(D) button, and then
go to Step 7.
6. After the player verifies the network,
press the r_l button.
7. The OnitialSettings Complete window
appears and remains on the screenfor a few
moments. Then, the Home sat=enappears.
NOTES
• The Home screen will not appear
if you do not configure the initial
settings except as noted below
• If you press the BLUE (D) button
during network setup, you can access
the Home screen even if the network
setup is not completed yet
• When you return to the Home screen,
the full screen mode is cancelled
automatically
• If you want to display the Initial
Setting screen again to make changes,
press the E button on the front panel
of the player for more than 5 seconds
with no disc inserte& This resets the
player to its default settings_
• After the initial settings process is
complete, you can operate the HDMk
CEC function_
• If you wantto use the
Anynet+(HDMkCEC) function to aid
in the initial set up process, please
follow the instructions below_
1) Connect the player to an
Anynet+(HDMkCEC) compliant
Samsung TV using HDM! Cable_
2) Set the Anynet+(HDMkCEC) feature
to On in both the TV and the player_
3) Set the TV to the Initial Settings
Procedure
• If you leave the player in the stop
mode for more than 5 minutes
without using it, a screen saver will
appear on your TV, If the player is left
in the screen saver mode for more
than 25 minutes, the power will
automatically turn off_
m
,_ HOME Button : Press to move to
Vthe Home menu
O RETURN Button : Return to the
)revious menu_
(Enter) /DIRECTION Button :
Move the cursor or select an item.
Activate the currently selected
item
Confirm a setting
e EXIT Button: Press to exit the
current menu,
, HomeMenu
@
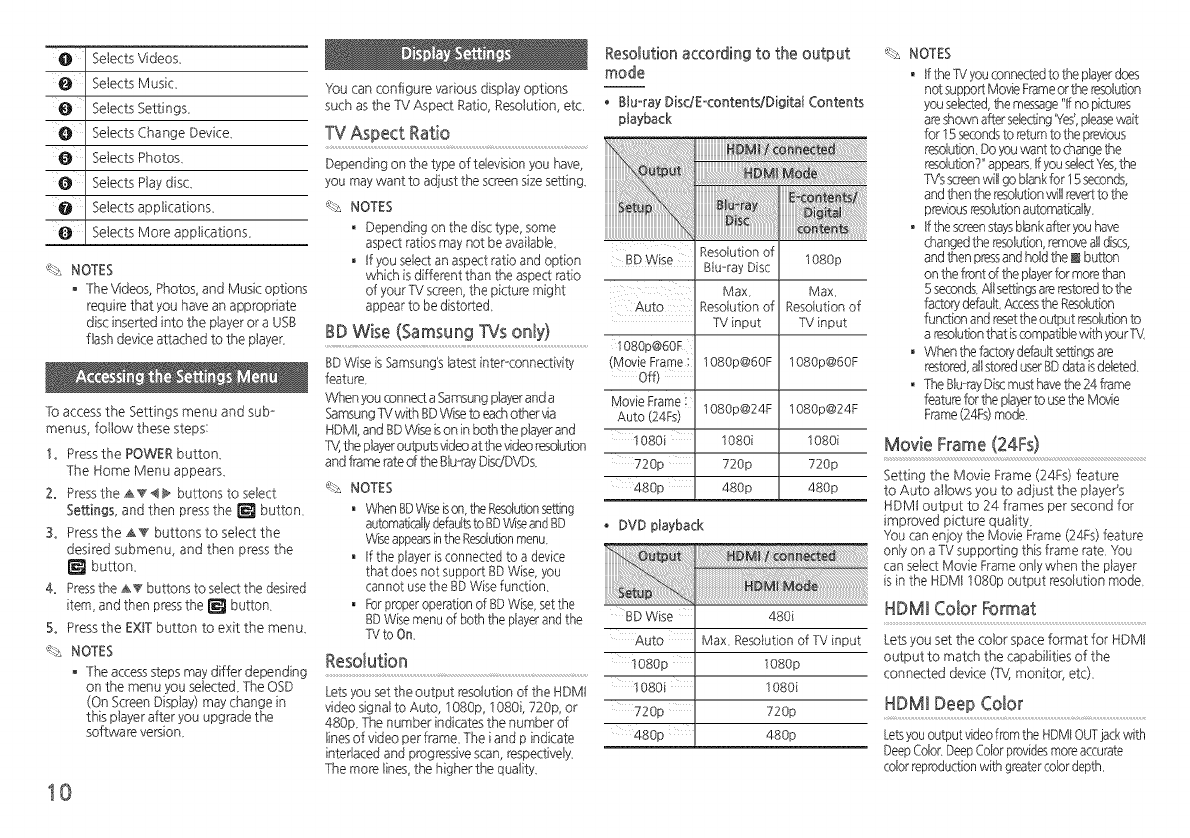
0Selects Video£
0 Selects Music_
0Selects Settings_
O Selects Change Device_
0Selects Photo£
O Selects Play disc_
O Selects app%ations_
0Selects More app%ations_
'_.:_NOTES
, The \Adeos,Photos,and Musicoptions
requirethatyou havean appropriate
discinsertedintotheplayerora USB
flashdevkTeattachedtotheplayer_
To access the Settings menu and sub-
menus, follow these steps:
I. Pressthe POWER button_
The Home Menu appeara_
2. Press the _ < _ buttons to select
Settings, and then press the r_ button_
3. Press the _ buttons to select the
desired submenu, and then press the
r_ button_
4. Pressthe A_ buttons to select the desired
item, and then press the r_ button
5° Press the EXIT button to exit the menu_
'_L:_NOTES
, The access steps may differ depending
on the menu you selecteG The OSD
(On Screen Display) may change in
this player after you upgrade the
software vemion_
10
_Loucan configure various display options
such as the TV Aspect Ratio, Resolution, eL
TV Aspect Ratio
Depending on the type of television you have,
you may want to adiust the screen size setting_
'_L:_NOTES
• Depending on the disc type some
aspect ratios may not be available
• If you select an aspect ratio and option
which is different than the aspect ratio
of yourF,! screen the picture might
appear to be distorted
BD Wise (Samsung Yes only)
BD Wise isSamsung's latest inter-connectivia,
feature
When you_?onnecta Samsung playeranda
Samsung1_7with BD%4seto each other _a
HDMt, and BD'¢4se_5on in both the playerand
1_7,the playeroutputs _deo at the videoresdut!on
and frame rate of the Blu-rayDisdDVD£
'_L:_NOTES
• When BDWiseison,the Resobt_onsetting
automat£allydefaultsto BDV_o4seand BD
Wiseappearsin theResobtionmenu_
• If the player isconnected to a device
that does not support BDWise, you
cannot use the BDWise function
• Parproper operation of BDWise, set the
BDWise menu of both the playerand the
I_Vto Om
Reso!ot!on......................................................................
Lets you setthe output resolution of the HDMI
video signal to Auto, 1080p, 1080i, 720p, or
480p_ The number indicates the number of
lines of video per frame_ The iand p indicate
interlaced and progressive scan, respectively_
The more lines, the higher the quality_
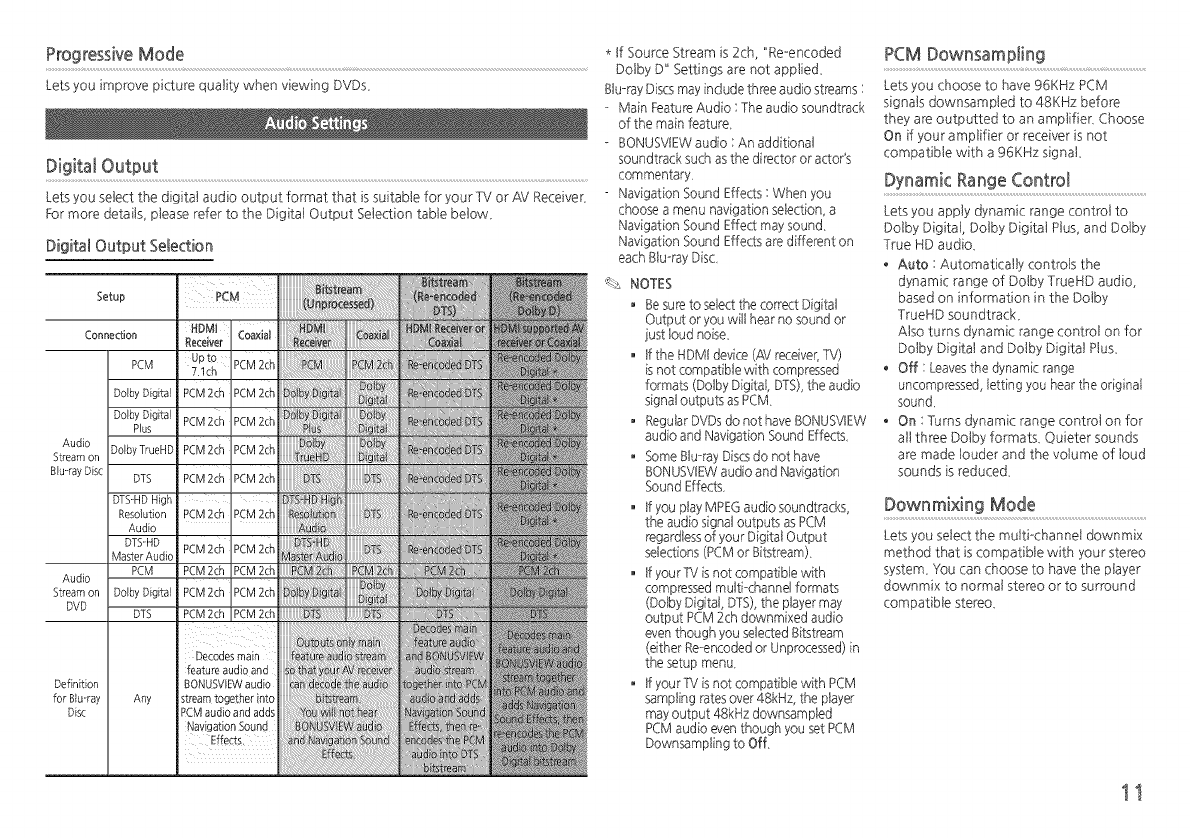
Resolution according to the output
mode
•BluorayDisdEocontents/Digital Contents
playback
BD Wise Resoiution of
@u-ray Disc
Max
Auto Resoiution of
TV input
1080p@60F
(Movie Frame i 108Op@6OF
Off)
Movie Frame:
Auto (24Fs) 1080p@24F
t080 I080i
720p 720p
480p 480p
1080p
Max,
Resoiution of
TV input
1080p@60F
1080p@24F
I080i
720p
480p
.DVD playback
BD Wise
Auto
t080p
t080
720p
480p
480_
Max. Resoiution of TV input
I080p
1080i
720p
480p
'_-:_NOTES
• Ifthe TVyou conne_ed to the pb_er does
not support Movb Frameor the resolution
yousebcted 8-_emessage"_fno pi_ures
areshown after-sele_ng _{es'pleasewait
for I 5 secondsto returnto the previous
resolution Do you want to change _-_e
resolution?"appears _fyou seleQYes the
TVs screenwillgo btankfor 15 seconds
and then the resolution_*_11revertto the
previousre_btion automatically
• Ifthe screenstaysbbnk after you have
changed the resobtion, remove all discs,
and Y_enpressand hold the t button
on the front of the pt@erfor more than
5seconds All settingsarerestoredto the
factorydefault Accessthe Resolution
function and resetthe output resolutionto
aresolutionthat is compatible with yourP,/
• When the f&ctorydefault settingsare
restored,all stored userBDdata is deleted
• The Blu-rayDiscmust havethe 24 frame
featurefor the pt@erto usethe Movie
Frame(24F9 mode.
Movie Frame (24Fs)
Setting the Movie Frame (24Fs) feature
to Auto allows you to adjust the player's
HDMt output to 24 frames per second for
improved picture quality_
You can enjoy the Movie Frame (24Fs) feature
only on aTV supporting this frame rate. You
can select Move Frame only when the pbyer
is in the HDMI t080p output resolution mode
HDMI Cotor Format
Lets you set the color space format for HDMI
output to match the capabilities of the
connected devkra OVI monitor, etc)_
HDMI Deep Color
Letsyou output video from the HDMIOUTjack with
DeepColor_DeepColor providesmoreaccurate
color reproductionwith greatercolor depth.
Progressive Mode
Lets you improve picture quality when viewing DVDs_
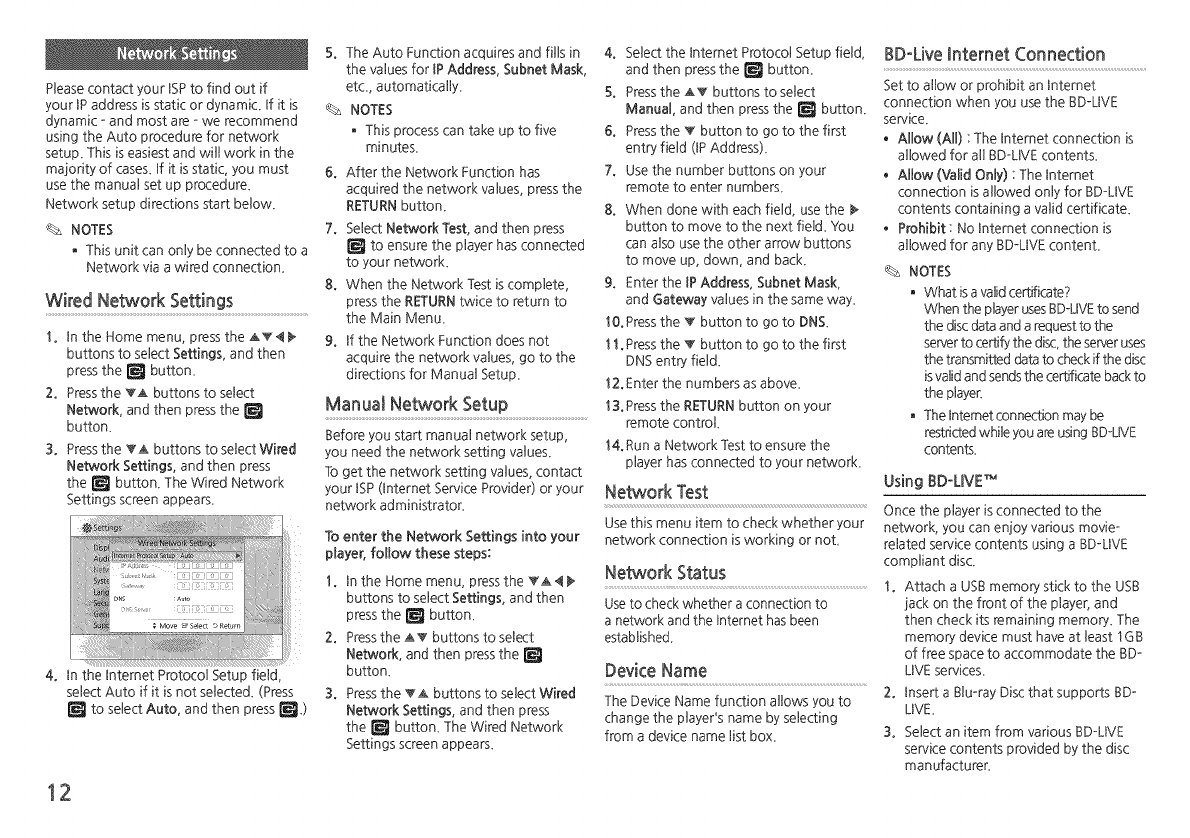
Digitat Output
Lets you select the digital audio output format that is suitable for your TV or/_7 Receiver_
For more details, please refer to the Digital Output Selection table below_
Digital Output Selection
Setup
Connection
PCM
Dolby Digital
DoBy Digital
Plus
Audio
Stream on DoBy TrueHD
Blu--rayDisc DTS
DTS--HD High
Resolution
Audio
DTS-HD
MasterAudio
PCM
Audio
Stream on Dolby Digital
DVD DTS
Definition
for Blu--ray
Disc
PCM 2ch IPCM 2ch
PCM 2ch IPCM 2ch
PCM 2ch IPCM 2ch
PCM 2ch IPCM 2ch
PCM 2oh IPCM 2oh
PCM 2oh IPCM 2ch
PCM 2oh IPCM 2oh
PCM 2ch IPCM 2ch
PCM 2oh IPCM 2oh
Any stream together into
* tf Source Stream is 2ch, "Re-encoded
Dotby D" Settings are not applied_
Blu-ray Discsmay include three audio streams :
- Main Feature Audio : The audio soundtrack
of the main feature
- BONUSVIEW audio : An additional
soundtrack such as the director or actor's
commentary
- Navigation Sound Effects : When you
choose a menu navigation seiection, a
Navigation Sound Effect may sound
Navigation Sound Effects are different on
each Blu-ray Disc
% NOTES
• Be sure to select the correct Digital
Output or you will hear no sound or
just loud noise
• If the HDMI device (_,/receivec W)
is not compatible with compressed
formats (Dolby Digital, DTS),the audio
signal outputs as PCM
• Regular DVDs do not have BONUSVIEW
audio and Navigation Sound Effects
• Some Blu-ray Discsdo not have
BONUSVIEW audio and Navigation
Sound Effects
• If you play MPEG audio soundtracks
the audio signal outputs as PCM
regardless of your Digital Output
seiections (PCM or Bitstream)
• If yourfl! is not compatible with
compressed multi-channel formats
(Dolby Digitai, DTS), the player may
output PCM 2ch downmixed audio
even though you selected Bitstream
(either Re-encoded or Unprocessed) in
the setup menu
• If yourP? is not compatible with PCM
sampling rates over 48kHz, the player
may output 48kHz downsampled
PCM audio even though you set PCM
Down_ampling to Off
PCMDownsampting
Lets you choose to have 96Ktqz PCM
signals downsampled to 48KHz before
they are outputted to an amplifier_ Choose
On if your amplifier or receiver is not
compatible with a 96KHz signal
DynamicRangeControl
Lets you apply dynamic range control to
Dolby Digital, Dolby Digital Plus, and Dolby
True HD audio_
Auto :Automaticallycontrolsthe
dynamic range of Dolby TrueHD audio
based on informationin the Dolby
TrueHD soundtrack
Alsoturnsdynamic range controlon for
Dolby Digitaland Dolby DigitalPlus_
Off :Leavesthedynamic range
uncompmssed iettingyou heartheoriginal
sound,
On : ]urns dynamic range control on for
all three Dotby formats_ Quieter sounds
are made louder and the volume of loud
sounds is reduced_
Downmixing Mode
Lets you select the multi-channel downmix
method that is compatible with your stereo
system_ You can choose to have the player
downmix to normal stereo or to surround
compatible stereo_
1t
Please contact your ISP to find out if
your IP address is static or dynamic. If it is
dynamic -and most are -we recommend
using the Auto procedure for network
setup. This is easiest and will work in the
majority of cases. If it is static, you must
use the manual set up procedure.
Network setup directions start below.
_-_ NOTES
, This unit can only be connected to a
Network via a wired connection_
Wired Network Settings
1. In the Home menu, press the AT4_
buttons to select Settings, and then
press the _ button.
2. Press the _Ak buttons to select
Network, and then press the
button.
3. Press the _Ak buttons to select Wired
Network Settings, and then press
the _ button. The Wired Network
Settings screen appears.
4. In the Internet Protocol Setup field,
select Auto if it is not selected (Press
to select Auto, and then press 6)
12
5, The Auto Function acquires and fills in
the values for IP Address, Subnet Mask,
etc., automatically.
_-_ NOTES
, This process can take up to five
minutes
6. After the Network Function has
acquired the network values, press the
RETURN button.
7. Select Network Test, and then press
to ensure the player has connected
to your network.
8. When the Network Test is complete,
press the RETURN twice to return to
the Main Menu.
9. If the Network Function does not
acquire the network values, go to the
directions for Manual Setup.
Manual Network Setup
Before you start manual network setup,
you need the network setting values.
To get the network setting values, contact
your ISP 0nternet Service Provider) or your
network administrator.
To enter the Network Settings into your
p[ayero follow these steps:
1. In the Home menu, pressthe TA4_
buttons to select Settings,and then
pressthe _ button,
2. Pressthe Ak_ buttons to select
Network, and then pressthe
button,
3. Pressthe TA buttons to selectWired
Network Settings,and then press
the _ button, The Wired Network
Settingsscreenappears,
4. Select the Internet Protocol Setup field,
and then press the _ button.
5. Press the AT buttons to select
Manual, and then press the _ button.
6. Press the T button to go to the first
entry field (IP Address).
7. Use the number buttons on your
remote to enter numbers.
8. When done with each field, use the
button to move to the next field. You
can also use the other arrow buttons
to move up, down, and back.
9. Enter the IP Address, Subnet Mask,
and Gateway values in the same way.
10.Press the T button to go to DNS.
11 .Press the T button to go to the first
DNS entry field.
12.Enter the numbers as above.
13.Press the RETURN button on your
remote control.
14.Run a Network Test to ensure the
player has connected to your network.
Network Test
Use this menu item to check whether your
network connection is working or noL
Network StatUS..............................................................................................
Use to check whether a connection to
a network and the Internet has been
established
DeviceName
The Device Name function allows you to
change the player's name by selecting
from a device name list box.
BDoLive[ntemet Connection
Set to allow or prohibit an Internet
connection when you use the BD-LIVE
service.
,Allow (AI0 : The Internet connection is
allowed for all BD-LIVE contents.
,Allow (Valid Only) : The Internet
connection is allowed only for BD-LIVE
contents containing a valid certificate.
,Prohibit : No Internet connection is
allowed for any BD-LIVE content.
_-_ NOTES
, What is a valid certificate?
When the player uses BD-UVE to send
the disc data and a request to the
server to certify the disc, the server uses
the transmitted data to check if the disc
isvalid and sends the certificate back to
the player.
,The Intemet connection may be
restricted while you a_eusing BD-LIVE
contents
Using BD-LIVETM
Once the player is connected to the
network, you can enjoy various movie-
related service contents using a BD-UVE
compliant disc.
I. Attach a USB memory stick to the USB
lack on the front of the player, and
then check its remaining memory. The
memory device must have at least 1GB
of free space to accommodate the BD-
LIVE services.
2. Insert a Blu-ray Disc that supports BD-
LIVE
3. Select an item from various BD-LIVE
service contents provided by the disc
manufacturer
'_-'_NOTES
ThewayyouuseBD-LWEand
theprovidedcontentsmay
differ,dependingonthedisc
manufacturen
The DLNA Function
DLNA lets you play music, video, and
photo files located in your PC or NAS
(Networbattached Storage) on the playen
To use DLNA with your player, you must
connect the player to your network
(See pages 12_13)_
To use DLNA with your PC, you must install
DLNA software on your PC_
tf you have NAS, you can use DLNA
without any additional software_
Todownload DLNAsoftware
1. Go to Samsungxom
2. Click Get Support ) Find Product
Support, enter your player's product
number in the search field, and then
click the product number in the drop
down_
3. On the next screen, click See All
Downloads under Downloads_
4. Click Software on the next page_
5. Click the icon in the DLNA S/W line
under Download File to start the
downloa&
Initial Settings
By using the Initial Settings function, you can
set the language, Network Settings, etc_
For more information about the Initial
Settings function, refer to the Initial Settings
section of this user manual (See page 9)_
When set to On, Quick Start lets the player
start up more quickly be descreasing the
boot time_
'_-'_ NOTES
, tf this function is set to On, Standby
power consumption will be
increase&
Anynet+ (HDMIoCEC)
Anynet+ is a convenient function that offers
linked operations with other Samsung
product that have the Anynet+ feature_
b operate this function, connect this player
to an Anynet+ Samsung ]V with an HDMI
cable_ With Anynet+ on, you can operate
this player using a Samsung TV remote
control and start disc playback simply by
pressing the PLAY ( :; ) button on the TV's
remote control
For more information, please see the T\! user
manual
'_.:_ NOTES
• Thisfunction is not avaibble if the HDMI
cable does not suppo_ CEC
• Ifyour SamsungTV hasan Anynet+ logo,
then it supports the Anynet_ function
• Depending on yourP,!, ce£ain HDMI
output resobtions may not work
Pieasereferto the user manual of },our
TV
• If you have Anynet+ turned on when
you turn off the product, disconnect,
and then reconnect the power cable,
the product turns on automatically to re-
establishthe Anynet+ connection After
about 15 seconds, it turns off again
automatically
• Some SamsungTVs when connected to
this product using the Anynet+ function
will when you turn them on dispby
a warning popup messagesayingno
connection hasbeen found NeveF=the-
less the Anynet+ connection isproperly
establishedand availabie to use_
BD Data Management
Enables you to manage the downloaded
contents you accessed through a Blu-ray
disc that supports the BD-LtVE service and
stored o a flash drive_
You can check the device's information
including the storage size, delete the BD
data, or change the Flash memory device_
'_.:_ NOTES
, tn the external memory mode, disc
playback may be stopped if you
disconnect the USB device in the
middle of playback
, Your player supports the FA]16,
FAT32, and NTFS file systems_ We
recommend you use USB devices
that support the USB 2Pprotocol
with 4 MB/sec or faster read/write
spee&
, The Resume Play function may not
work after you format the storage
device_
, The total memory available to BD
Data Management may differ,
depending on the conditions_
You can select the language you prefer for
the On-Screen menu, disc menu, audio,
and subtitle£
'_.:_NOTES
, The selected language will only
appear if it is supported o the disc_
When you access this function for the
first time, the PIN screen appeara_ Enter
the default PIN - oeee - using the number
buttons_ ]b change the PIN, use the
Change PIN function_ Each time you
access the Security Settings hereafter, you
must enter that four digit PtN_tf you don't
change the PIN, continue usingthe default
PtN_
BD ParentalRating
Prevents playback of Stu-ray Discs with
specific age ratings unless the 4 digit PIN is
entere&
DVDParental Rating
Thisfunction works in conjunction with DVDs
that have been assignedan age rating or
numeric rating that indicates the maturity levei
of the content. These numbers help you control
the types of DVDs that your family can watch
Select the rating level you want to set
For example, if you select Level 6, discs rated
above 6 - Level 7 and 8 - will not play_
A larger number indicates more mature content
When the DVD Parental Rating function is
on, you must enter the 4 digit PIN to play
discs with restricted rating leve&
13
Ch=ngeP!N.......................................................................................................................
Change the 4-digit password used to
access security functions.
To change the PIN, follow these steps:
1. Select Change PIN, and then press the
button. The Enter old PIN screen
appears.
2. Enter the old PIN. tf you never changed
the PIN, enter the default PIN: 0OOO.
The Enter new PIN screen appears.
3. Enter the new PIN in the Enter new PIN
fields.
4. Re-enter the new PIN in the Confirm
new PIN fields. The "PIN is changed
successfully." message appears.
5. Press the r_ button.
If you forget your password
1. Remove any discs.
2. Press and hold the @ button on the
front panel for 5 seconds or more.
All settings will revert to their factory
sett;ngs.
'_-:_NOTES
When the factory default settings
are restored all the user stored tD
data is deleted.
Time Zone
Lets you specify the time zone that is
applicable to your area.
Software Upgrade
The Software Upgrade menu allows
you to upgrade the player's software for
performance improvements or additional
services.
ty Online
To upgrade By Online, follow these steps:
1. Remove any discs from the player
2. In the players menu, go to Settings >
Support > Software Upgrade
3. Select ty Onlne and then press the
r_ button The Connecting to Server
message appears
4. A popup message will appear if an
update is available
5. If a download is available, select Yes The
download and upgrade process starts
(Important : Never turn the player off or
on manually during an upgrade)
6. When the update is complete, the player
will restart automatically
'_.:_ NOTES
, The upgrade is complete when the
player turns off, and then turns on
again by itself.
, Never turn the player off or back
on manually during the update
process.
, Samsung Electronics takes no legal
responsibility for player malfunction
caused by an unstable tntemet
connection or co sumer negligence
during a software upgrade.
, No disc should be i the product
when you upgrade the software By
Online.
ByUSB
]b upgrade by US!, follow these steps:
1. Visit www.samsung.com/
bluraysupport
2. Download the latest USB software
upgrade zip archive to your computer.
3. Unzip the zip archive to your computer.
_Iou should have a single RUF file with
the same name as the zip file.
4. Copy the RUF file to a US! flash drive.
5. Make sure there is no disc in the player,
and then insert the USt flash drive into
the US! port of the player.
6. tn the player's menu, go to Settings >
Support >Software Upgrade.
7. Select ly USI.
'_.'_ NOTES
, No disc should be in the product
when you upgrade the software
using the US! Host }ack.
, When the software upgrade is done
check the software details in the
software Upgrade menu.
• Do not turn off the player during the
software upgrade It may cause the
player-to malfunction
, Softwareupgrades usingthe USB
Host }ack must be performed with a
Ugh flash memory stick only.
Auto Upgrade Notification
tf you have connected the player to your
network, and then set Auto Upgrade
Notification on, the player automatically
notifies you when a new software version
is available for the player.
1:oset Auto Upgrade Notification on,
follow these steps:
1. Select Auto Upgrade Notification, and
then press the _ button.
2. Use the _ buttons to select On, and
then press the _ button.
tf there isa new software vemion available, the
player notifies you with a popup message.
1. 1:oupgrade the firmware, remove any
discs from the player.
2. Select Yes in the Pop-up. The player
turns off automatically, then restarts,
and begins the download. (Never turn
the player on or off manually during an
upgrade.)
3. The update progress popup appears.
4. When the update is complete, the
player will restart automatically.
'_.:_NOTES
• The upgrade is complete when the
player turns off, and then turns on
again by itself
• Never turn the player off or on
manually during the update process
• Samsung Electronics takes no legal
responsibility for- player malfunction
caused by an unstable lntemet
connection or consumer negligence
during software upgrade.
Contact Samsung
Provides contact information for assistance
with your player.
Termsof ServkeAgreement
Lets you view the general disclaimer
regarding thgd party contents and services.
Reset
Returns all setti gs to their factory defaults
except for the network settings.
14
Media POay
1° Press the D button to open the disc
tray
2° Place a disc gently into the disc tray
with the disc's label facing up
3° Press the O button to close the disc
tray Playback starts automatically
There are two methods you can use to
play or view multimedia files located on a
USiBdevice
Method 1
1. Turn the player on
2. Connect the US_Bdevice to the US_B
port on the front panel of the pbyer
The New Device Connected pop-up
appears
i
_ NOTES
• if the pop-up does not appear, go to
Method 2.
3. Use the AT buttons to select Photos,
Videos, or Music and then press the
button. The Photos, Videos & Music
screen appears listing the content dthe
device. Depending on how the contents
is arranged, you will see either folders,
individual files, or both.
NOTES
• Even though the player will display
folders for all content types, it will only
display files of the Content Type you
selected in Step 3 For example, if you
selected music, you will only be able
to see music files You can change this
selection by returning to the Photos,
VBdeos& Music s,a_en and going to
Step S in Method 2 below
4. If necessary, use the AT4_ buttons
to select a folder, and then press the
button
5. Select a file to view or play, and then
press the _ button.
6. Press the RETURN button to exit a
folder or the EXIT button to return to
the Home screen
7. Go to pages 16 ~I8 for instructions that
explain how to control playback of videos,
music, and pictures on a USB device
Method 2
1. Turn the player on
2. Connect the USB device to the USB
port on the front panel of the player.
Select Change Device and then press
the AT to select USB. Press the
button.
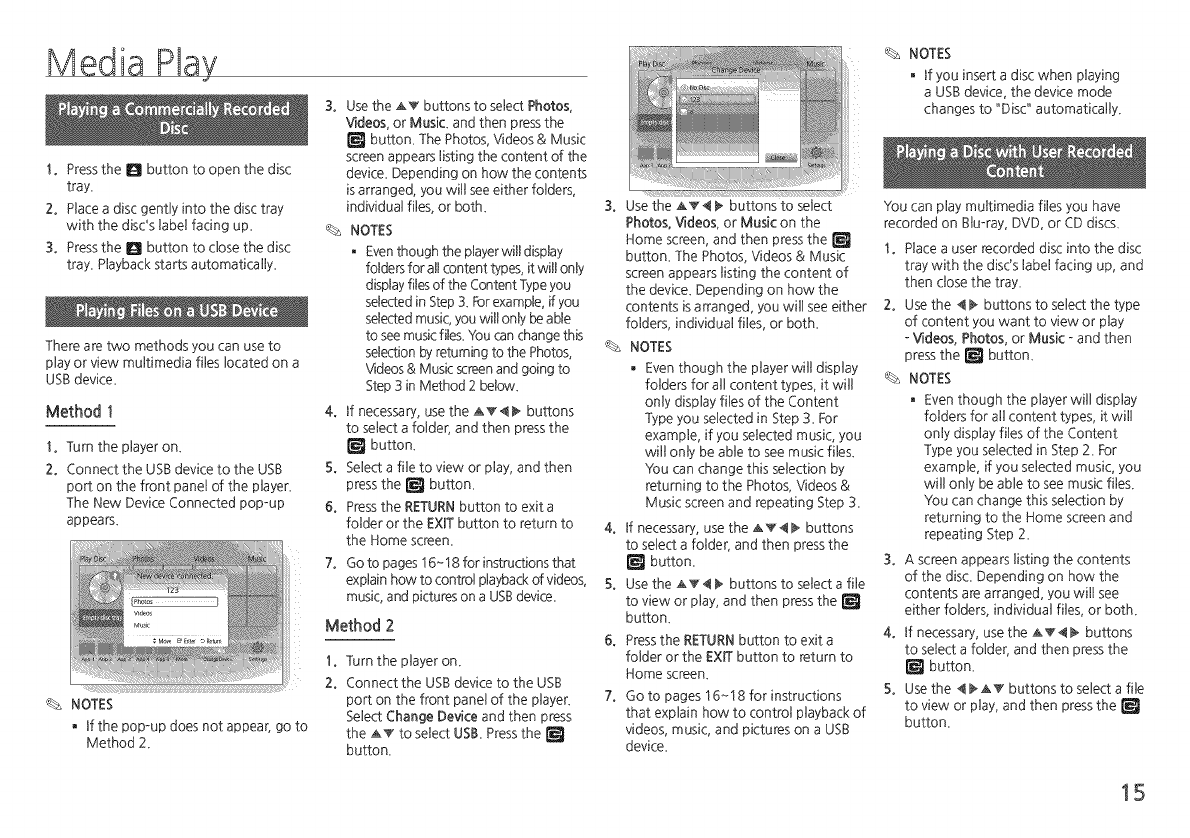
3. Use the A_4 _ buttons to select
Photos. Videos, or Music on the
Home screen, and then press the
button. The Photos, Videos & Music
screen appears listing the content of
the device. Depending on how the
contents is arranged, you will see either
folders, individual files, or both.
NOTES
, Even though the player will display
folders for all content types, it will
only display files of the Content
Type you selected in Step 3. For
example, if you selected music, you
will only be able to see music files.
You can change this selection by
returning to the Photos, Videos &
Music screen and repeating Step 3.
4. If necessary, use the AT4_ buttons
to select a folder, and then press the
button
5. Use the AT4_ buttons to select a file
to view or play, and then press the
button
6. Press the RETURN button to exit a
folder or the EXIT button to return to
Home screen.
7. Go to pages 16 ~ I8 for instructions
that explain how to control playback of
videos, music, and pictures on a USB
device
NOTES
, If you insert a disc when playing
a USB device, the device mode
changes to "Disc" automatically
You can play multimedia files you have
recorded on Slu-ray, DVD, or CD discs
1. Place a user recorded disc into the disc
tray with the disc's label facing up, and
then close the tray
2. Use the 4 _ buttons to select the type
of content you want to view or play
- Videos, Photos, or Music - and then
press the _ button.
NOTES
, Even though the player will display
folders for all content types, it will
only display files of the Content
Type you selected in Step 2 For
example, if you selected music, you
will only be able to see music flies
You can change this selection by
returning to the Home screen and
repeating Step 2
3. A screen appears listing the contents
of the disc Depending on how the
contents are arranged, you will see
either folders, individual files, or both.
4. If necessary, use the AT 4 _ buttons
to select a folder, and then press the
button
5. Use the 4 _ AT buttons to select a file
to view or play, and then press the
button.
15
6. Press the RETURN button one or more
times to exit a current screen, exit a
folde£ or to return to the Home screen,
Press the EXiT button to return directly
to the Home Screen,
7° Go to pages 16~18 for instructions
that explain how to control pbyback of
videos, music, and pictures on a disc,
PC Blu-ray Disc Player
Play back PC's
files
DLNA Connection
1. Connect the Slu-ray Disc Player, your
PC, and/or your DLNA compatibHe
device to the network
2. Follow the directions in the DLNA
software hstallationiDnstruction
manual to set up devices and files for
playing or viewing
3. Select Change Device on the player's
Home screen, and then press the
button. In the list of DLNA connected
devices that appears, select your PC
or other DLNA compatible device, and
then press the _ button.
4. Use the <_ buttons to select the type
of content you want to view or play
- Videos, Photos, or Music - and then
press the _ button.
%_ NOTES
, Even though the player will display
folders for all content types, it will
only display files of the Content
Type you selected in Step 4. For
example, if you selected music, you
will only be able to see music files.
You can change this selection by
returning to the Home screen and
repeating Step 4.
5. A screen appears listing the contents
of the disc. Depending on how the
contents are arranged, you will see
either folders, individual files, or both.
6. If necessary, use the AT<_ buttons
to select a folder, and then press the
button
7. Use the <_ AT buttons to select a file
to view or play, and then press the
button
8. Press the RETURN button one or more
times to exit a current screen, exit a
folder, or to return to the Home screen
Press the EXIT button to return directly
to the Home Screen
9. Go to pages 16~I8 for instructions
that explain how to control playback of
videos, music, and pictures on a disc
You can control the playback of video
content located on a Slu-ray disc, DVD,
CD, US8 device, or you computer.
Depending on the media, some of the
functions described in this manual may not
be available.
During Slu-ray or DVD disc playback, the
Full screen button does not operate.
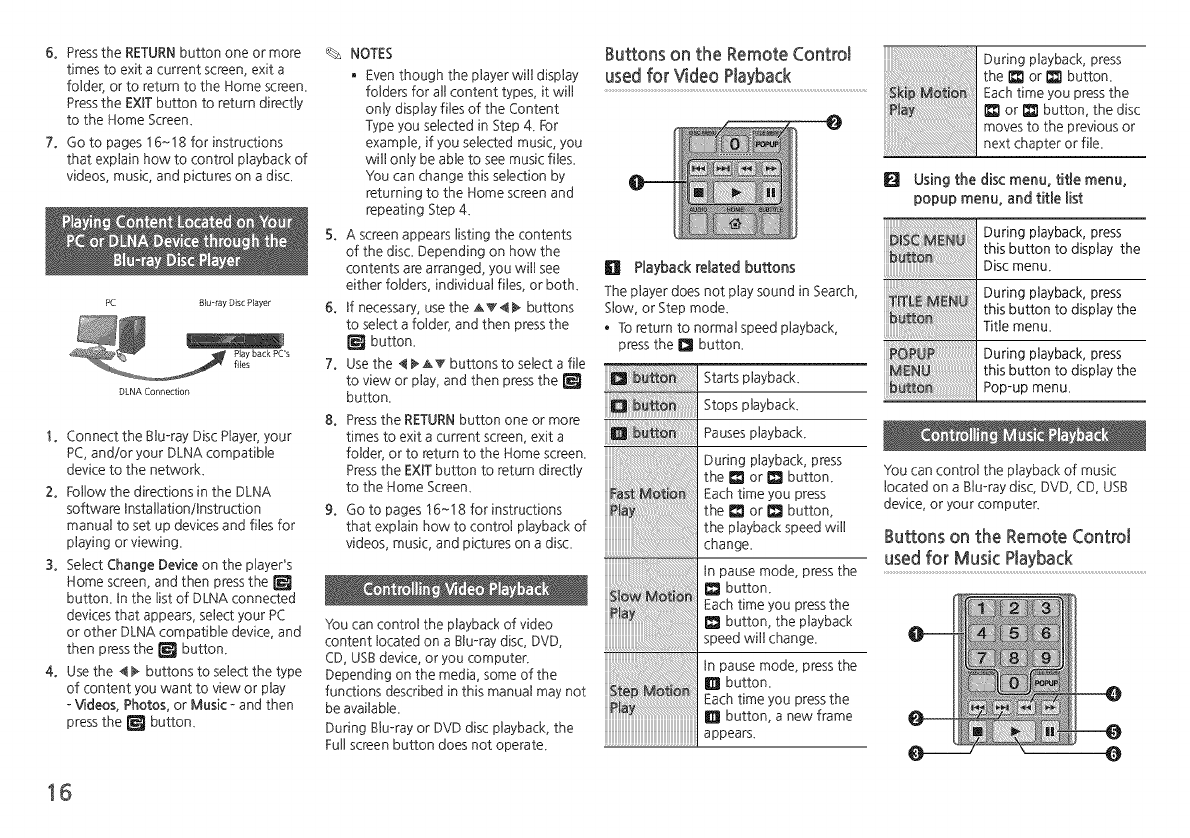
Buttons on the Remote Control
used for Video Playback
Itl Playback related buttons
The player does not play sound in Search,
Slow, or Step mode.
To return to normal speed playback,
press the Q button.
Startsp,ayback
Stops playback.
Pauses playback
During playback, press
the I_ or I_ button.
Each time you press
the _ or I_ button,
the playback speed will
change.
In pause mode, press the
0 button.
Each time you press the
0 button, the playback
speed will change.
,opausemode,pressthe
D button
Each time you press the
D button, a new frame
appears
During pJayback, press
the I_ or I_ button.
Each time you press the
1_1or I_ button, the disc
moves to the previous or
next chapter or fiJe.
I_ Using the disc menu, title menu,
popup menu, and title list
r,ogp,ayback,press
I thiSoiscbuttonmeootodisplaythe
During playback, press
this button to display the
Title menu,
During playback, press
this button to display the
Pop-up menu,
You can control the playback of music
located on a Slu-ray disc, DVD, CD, USB
device, or your computer
Buttons on the Remote Control
usedfor Music Playback
16
m
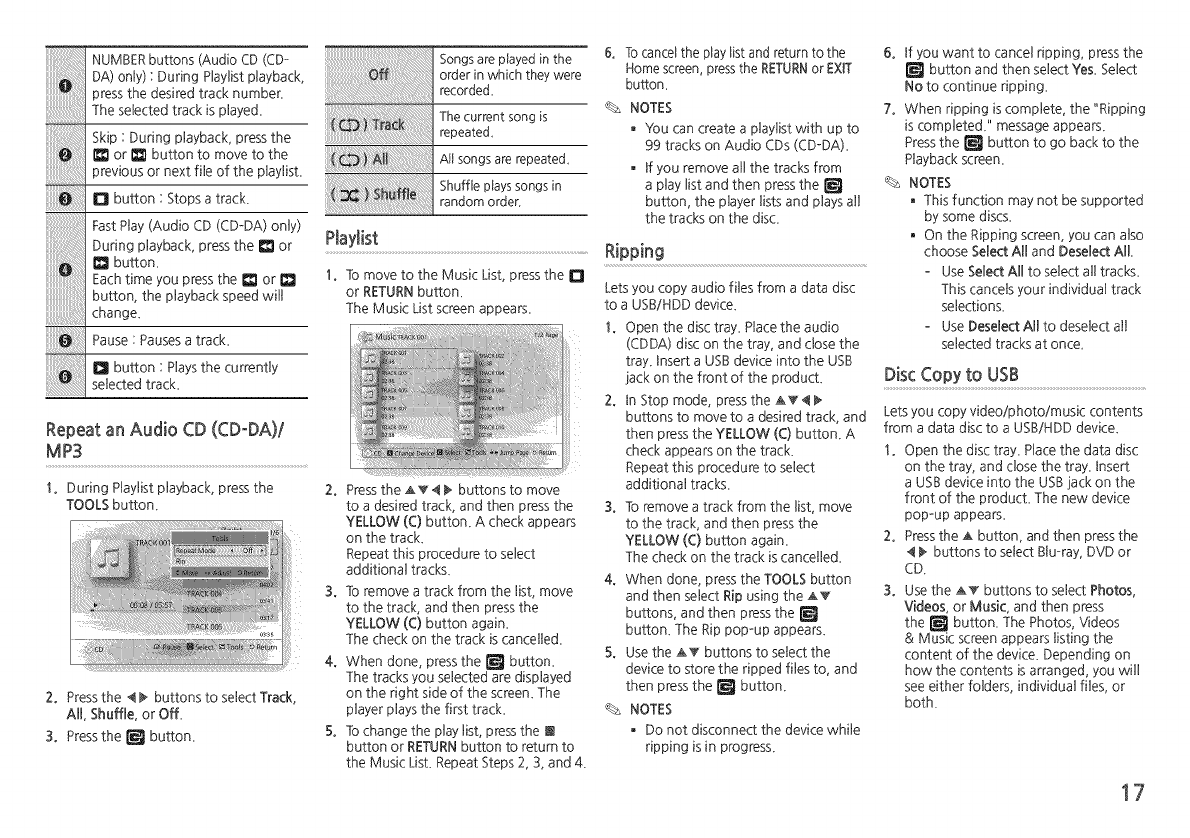
NUMBER buttons (Audio CD (CD-
Oor,ngP,ay,,stp,ayback,
)ress the desired track number
The selected track is played
Skip : During playback, press the
I_ or I_ button to move to the
)revious or next file of the playlist
o botton:Stopsatrack
Fast Play (Audio CD (CD-DA) only)
During playback, press the _ or
O button
Each time you press the I_! or O
button, the playback speed will
change
Pause:Paosesatrack
=botton:P,aysthecorrent,y
selected track
Repeat an Audio CD (CDoDA)t
MP3
1. During Playlist playback, press the
TOOLS button
2° Press the 4 _ buttons to select Track,
All, Shuffle, or Off
3° Press the [] button
Ptaylist
Songs are played in the
order in which they were
recorded
The current song is
repeated
All songs are repeated
Shuffle plays songs in
random order.
1° To move to the Music List, press the D
or RETURN button
The Music List screen appears
2. Press the AT 4 _ buttons to move
to a desired track, and then press the
YELLOW (C) button A check appears
on the track
Repeat this procedure to select
additional tracks
3° To remove a track from the list, move
to the track, and then press the
YELLOW (C) button again
The check on the track is cancelled
4° When done, press the [] button
The tracks you selected are displayed
on the right side of the screen The
player plays the first track
5° To change the play list, press the E
button or RETURN button to return to
the Music List Repeat Steps 2, 3, and 4
6. To cancel the play tist and return to the
Home screen, press the RETURNor EXIT
button.
NOTES
, You can create a playlist with up to
99 tracks on Audio CDs (CD-DA)
. If you remove all the tracks from
a play list and then press the []
button, the player lists and plays all
the tracks on the disc_
Ripping
Lets you copy audio files from a data disc
to a USB/HDD device
1. Open the disc tray Place the audio
(CDDA) disc on the tray, and close the
tray Insert a USB device into the USB
iack on the front of the product
2. In Stop mode, press the AT 4
buttons to move to a desired track, and
then press the YELLOW (C) button A
check appears on the track
Repeat this procedure to select
additional tracks
3. To remove a track from the list, move
to the track, and then press the
YELLOW (C) button again
The check on the track is cancelled
4. When done, press the TOOLS button
and then select Rip using the AT
buttons, and then press the []
button The Rip pop-up appears
5. Use the AT buttons to select the
device to store the ripped files to, and
then press the [] button
NOTES
, Do not disconnect the device while
ripping BSBnprogress
6. If you want to cancel ripping, press the
[] button and then select Yes. Select
No to continue ripping.
7. When ripping is complete, the "Ripping
is completed." message appears.
Press the [] button to go back to the
Playback screen.
NOTES
, This function may not be supported
by some discs.
. On the Ripping screen, you can also
choose Select All and Deselect All,
Use Select All to select all tracks.
This cancels your individual track
selections.
Use Deselect All to deselect all
selected tracks at once_
DiscCopy to USB
Lets you copy video/photo/music contents
from a data disc to a USB/HDD device
1. Open the disc tray Place the data disc
on the tray, and close the tray Insert
a USB device into the USB lack on the
front of the product The new device
pop-up appears
2. Press the Ak button, and then press the
4 _ buttons to select Bluoray, DVD or
CD
3. Use the AT buttons to select Photos,
Videos, or Music, and then press
the [] button. The Photos, Videos
& Music screen appears listing the
content of the device Depending on
how the contents is arranged, you will
see either folders, individual files, or
both
17
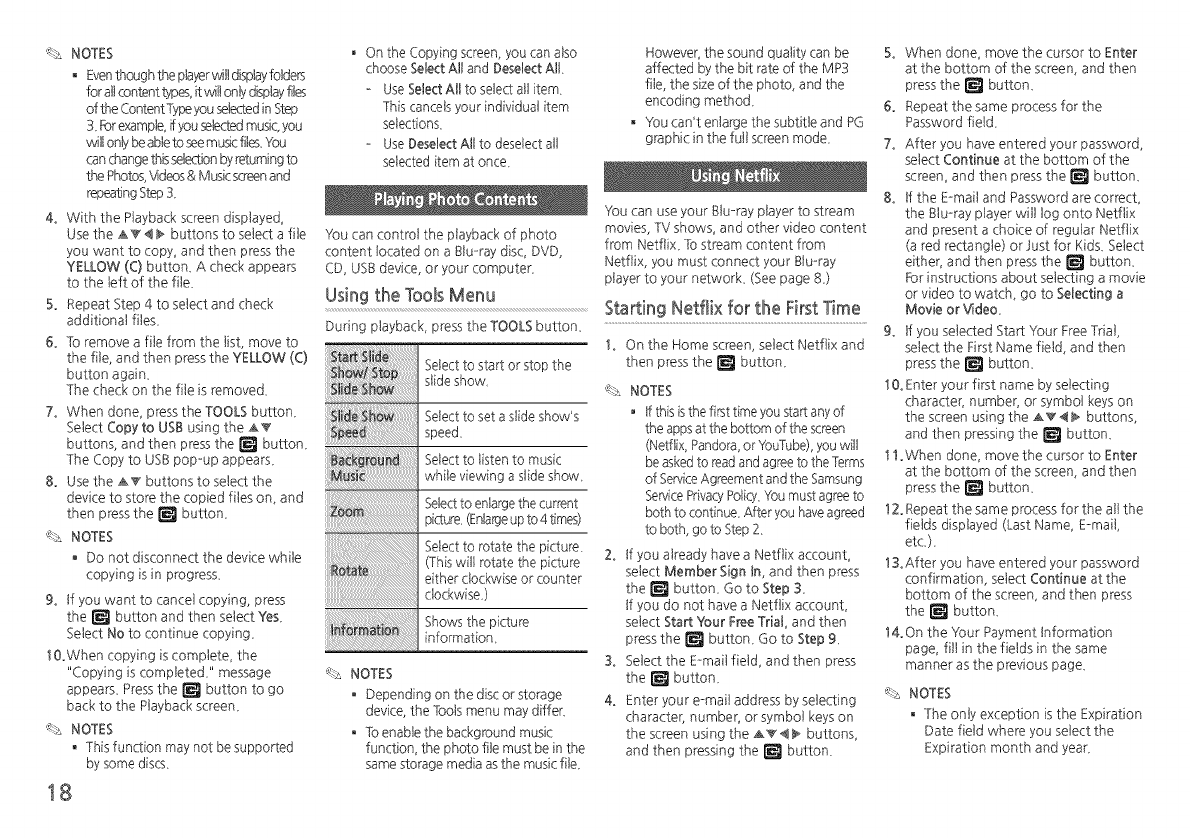
'_L-_NOTES
, Eventhc_Jghthe FJayerwill disptayblders
for all _ontent types, it willonly d_splayfiles
of the Content Typeyou sele£ed in Step
3_For example, if you selected music you
will on}ybe able to seemuJc files_You
can change th_sselectbn by renaming to
the Photos,\Adeos& Music screenand
repea§ngStep 3_
4. With the Playback screen displayed,
Use the AT < _ buttons to select a file
you want to copy, and then press the
YELLOW (C) button_ A check appears
to the left of the file_
5. Repeat Step 4 to select and check
additional files_
6. To remove a file from the list, move to
the file, and then press the YELLOW (C)
button again_
The check on the file is removed_
7. When done, press the TOOLS button_
Select Copy to USB usingthe _
buttons, and then press the _ button_
The Copy to USB pop-up appears_
8. Use the A_ buttos to select the
device to store the copied files on and
then press the r_l button_
'_.'_ NOTES
, Do not disconnect the device while
copyingisin progress_
9. tf you want to cancel copying, press
the r_ button and then select Yes_
Select No to continue copying_
10.When copying is complete, the
"Copying is completed_" message
appears_ Press the _ button to go
back to the Playback screen_
'_.:_NOTES
• This function may not be supported
by some discs
18
• On the Copying screen, you can a!so
choose Select All and Deselect All
o Use Select All to select ail item
This cancels your individuai item
selections.
o Use Deselect All to deselect all
selected item at once
You can control the playback of photo
content located on a Stu-ray disc, DVD,
CD, USB device, or your computer_
Using the Tools Menu
During playback, press the TOOLS button_
Select to start or stop the
slide show
Select to set a slide show's
speed
Select to listen to music
while viewing a slide show
Selectto enlaF:gethe current
picture (Enlargeup to 4times)
Seiect to rotate the picture
(This will rotate the picture
either clockwise or counter
clockwise)
Shows the picture
information
'_-'_ NOTES
, Depending on the disc or storage
device, the fools menu may differ_
, To enable the background music
function, the photo file must be in the
same storage media as the music file_
However, the sound quality can be
affected by the bit rate of the MP3
file, the size of the photo, and the
encoding method_
, _Loucant enlarge the subtitle and PG
graphic in the full screen mode_
You can use your Btu-ray player to stream
movies, TV shows, and other video content
from Netftix_ lb stream content from
Nedtix, you must connect your Stuoray
player to your network_ (See page &)
Starting Netflix for the FirstTime
1. On the Home screen, select Netflix and
then press the r_l button_
'_.:_ NOTES
• If this isthe first time you start any of
the apps at the bottom of the screen
(Netfiix Pandora, or YouTube), you will
be asked to read and agree to the Terms
of SewiceAgreement and the Samsung
Sewice PrivacyPolicy.You must agree to
both to continue After you have agreed
to both, go to Step 2
2. tf you already have a Netfiix account,
select Member Sign In, and then press
the r_ button_ Go to Step 3_
tf you do not have a Netflix account,
select Start Your Free Trial, and then
press the r_ button_ Go to Step 9_
3. Select the E-mail field, and then press
the r_ button_
4. Enter your e-mail address by selecting
character, number, or symbol keys on
the screen using the A_ < _ buttons,
and then pressing the r_l button_
5. When done, move the cursor to Enter
at the bottom of the screen, and then
press the rc_ button_
6. Repeat the same process for the
Password field_
7. After you have entered your password,
select Continue at the bottom of the
screen, and then press the r_ button_
8. tf the E-mail and Password are correct,
the Blu-ray player will log onto Netflix
and present a choice of regular Netflix
(a red rectangle) or Just for Kids_ Select
either, and then press the rc_ button_
For instructions about selecting amovie
or video to watch, go to Selecting a
Movie or '_fdeo_
9. tf you selected Start Your Free Trial,
select the First Name field, and then
press the r_ button_
10.Enter your first name by selecting
character, number, or symbol keys on
the screen using the A_ < _ buttons,
and then pressing the r_ button_
11 .When done, move the cursor to Enter
at the bottom of the screen, and then
press the r_ button_
12.Repeat the same process for the all the
fields displayed (Last Name, E-mail,
etc_)_
13.After you have entered your password
co firmation, select Continue at the
bottom of the screen, and then press
the r_ button_
14.On the _LourPayment Information
page, fill in the fields in the same
manner as the previous page_
'_.:_NOTES
, The only exception is the Expiration
Date field where you select the
Expiration month and year_
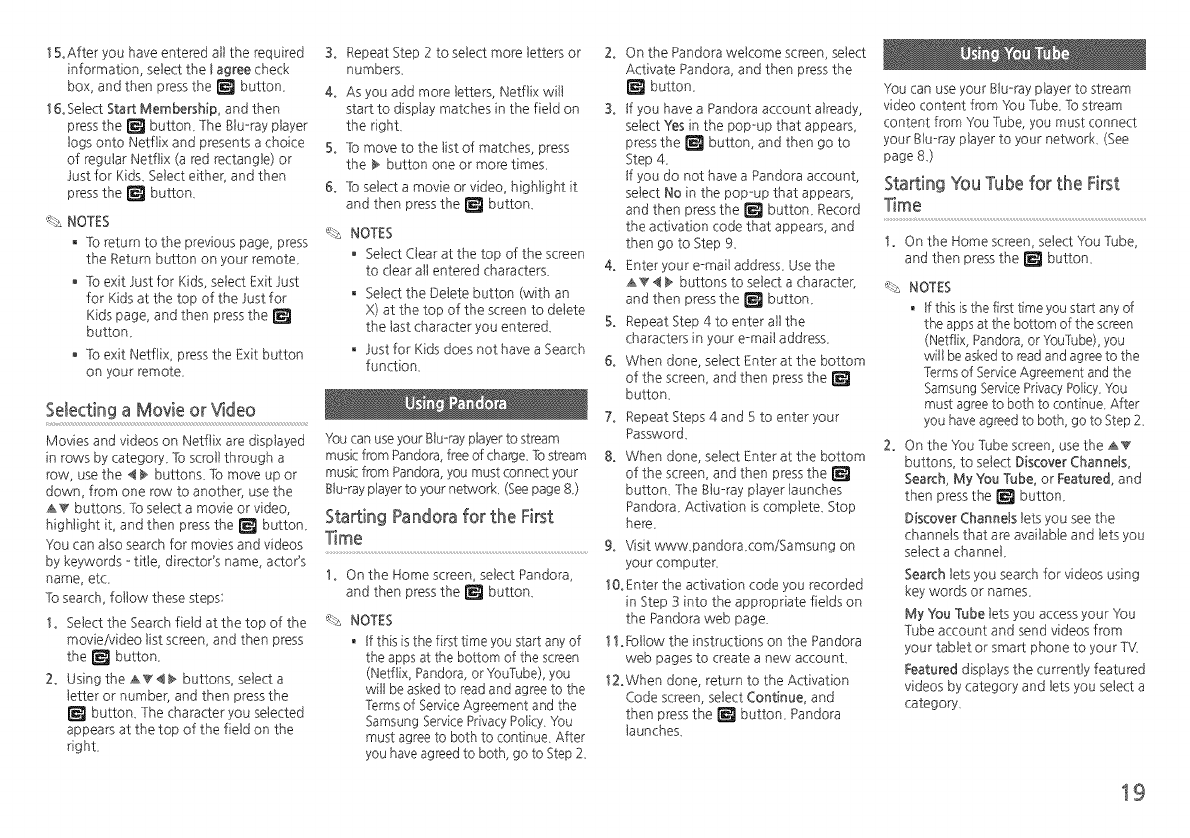
1S°Afteryouhaveenteredalltherequired
information,selectthe_agreecheck
box,andthenpressther_ button_
16°Select Start Membership, and then
press the [_ button_ The Blu-ray player
logs onto Netflix and presents a choice
of regular Netflix (a red rectangle) or
Just for Kids_ Select either, and then
press the r_l button_
*% NOTES
, To return to the previous page, press
the Return button on your remote_
, To exit Just for Kids, select Exit .Just
for Kids at the top of the Just for
Kids page, and then press the r_l
button_
, To exit Netflix, press the Exit button
on your remote_
Selectinga Movie or V_deo
Movies and videos on Netfiix are displayed
in rows by category_ To scroll through a
row, use the < _ buttons_ To move up or
down, from one row to another, use the
aT buttons_ To select a movie or video,
highlight it, and then press the r_ button_
You can also search for movies and videos
by keywords - title, director's name, actor's
name, eL
To search, follow these steps:
1° Select the Search field at the top of the
movie/video list screen, and then press
the r_ button_
2° Using the A_ < _ buttons, select a
letter or number, and then press the
button_ The character you selected
appears at the top of the field on the
righL
3° Repeat Step 2 to select more letters or
numbers_
4° As you add more letters, Netfiix will
start to display matches in the field on
the dghL
S° 1:omove to the list of matches, press
the _ button one or more times_
6° Io select a movie or video, highlight it
and then press the r_l button_
*% NOTES
, Select Clear at the top of the screen
to clear all entered characters_
, Select the Delete button (with an
X) at the top of the screen to delete
the last character you entered_
, Just for Kids does not have a Search
function_
You can use your Btu-ray player to stream
music fism Pandora, free of charge_To stream
music fl_)m Pandora, you must connect your
Btu-ray player to your network (Seepage &)
Starting Pandorafor the First
Time
1° On the Home screen, selectPandora,
and then pressthe r_l button_
*% NOTES
, If this is the first time you start any of
the apps at the bottom of the screen
(Netfiix Pandora, or YouTube), you
will be asked to read and agree to the
Terms of Sewice Agreement and the
Samsung Service Privacy Policy You
must agree to both to continue After-
you have agreed to both, go to Step 2_
2° On the Pandora welcome screen, select
Activate Pandora, and then press the
r_ button_
3° tf you have a Pandora account already,
select Yes in the pop-up that appears,
press the r_l button, and then go to
Step 4_
tf you do not have a Pandora account,
select No in the pop-up that appears,
and then press the r_ button_ Record
the activation code that appears, and
then go to Step 9_
4° Enter your e-mail address_ Use the
_ < _ buttons to select a character,
and then press the rc_ button_
5° Repeat Step 4 to enter all the
characters in your e-mail address_
6° When done, select Enter at the bottom
of the screen, and then press the r_l
button_
7° Repeat Steps 4 and S to enter your
Password_
8° When done, select Enter at the bottom
of the screen, and then press the rc_
button_ The Blu-ray player launches
Pandora_ Activation is complete_ Stop
here_
9° Visit www_pandoraxom/Samsung on
your computer_
10° Enter the activation code you recorded
in Step 3 ito the appropriate fields on
the Pandora web page_
11 °Follow the i structions on the Pandora
web pages to create a new accounL
12°When done, return to the Activation
Code screen, select Continue, and
then press the r_l button_ Pandora
launches_
You can use your Blu-ray player to stream
video content from Ybu Tube_ _a stream
content from You Tube, you must connect
your Blu-ray player to your network (See
page 8_)
Starting YouTube for the First
Time
1° On the Home screen, selectYouTube,
and then pressthe r_l button_
*% NOTES
. If this is the first time you start any of
the apps at the bottom of the screen
(Netflix Pandora orYouTube) you
will be asked to read and agree to the
Terms of Service Agreement and the
Samsung Sewice Privacy Policy 'You
must agree to both to continue After
you have agreed to both go to Step 2_
On the You Tube screen, use the A_
buttons, to select Discover Channels,
Search, My You Tube, or Featured, and
then press the r_ button_
Discover Channels lets you see the
channels that are available and lets you
select a channel
Search lets you search for videos using
key words or names_
My You Tube lets you access your You
Tube account and send videos from
your tablet or smart phone to your T\Z
Featured displays the currently featured
videos by category and lets you select a
category_
19
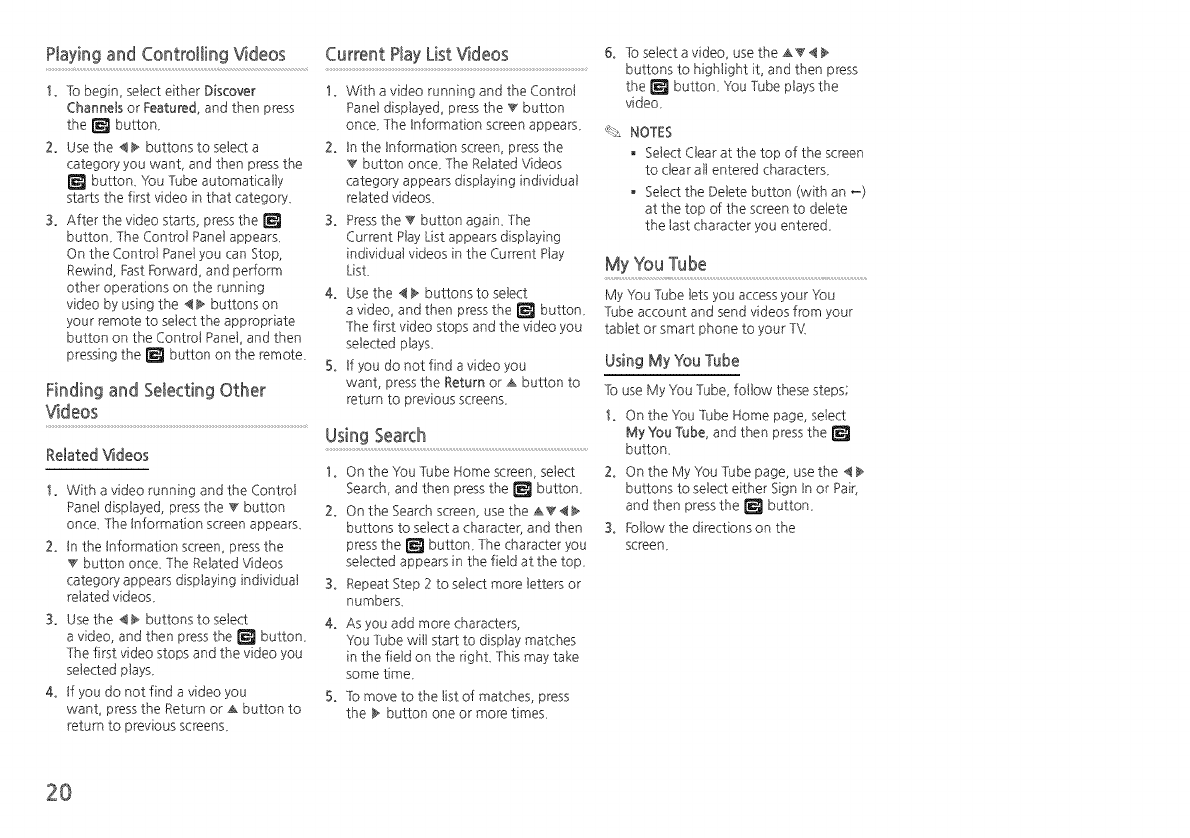
Playing and Controlling Videos Current Play List Videos
1° To begin, select edher Discover
Channels or Featured and then press
the r=_ button_
2° Use the .1 _ buttons to select a
category you want, and then press the
r_ button_ You Tube automatically
starts the first video in that category_
3° After the video starts, press the []
button_ The Control Panel appears_
On the Control Panel you can Stop,
Rewind, Fast Forward, and perform
other operations on the runni g
video by using the .! _ buttons on
your remote to select the appropriate
button on the Control Panel, and then
pressing the IEI button on the remote_
Finding and SelectingOther
Videos
RelatedVideos
1° With a video running and the Control
Panel displayed, press the _ button
once_ The Information screen appears_
2° tn the Information screen, press the
button once_ The Related Videos
category appears displaying individual
related videos_
3° Use the .1 _ butto s to select
a video, and then press the _ button_
The first video stops and the video you
selected plays_
4° tf you do not fid a video you
want, press the Return or _ button to
return to previous screens_
1° With a video running and the Control
Panel displayed, press the _ button
once_ The Information screen appears_
2° tn the Information screen, press the
button once_ The Related Videos
category appears displaying individual
related videos_
3° Press the _ button again_ The
Current Play List appears displaying
individual videos in the Current Play
List
4° Use the .1 _ buttons to select
a video, and then press the _ button_
The first video stops and the video you
selected plays_
5° tf you do not find a video you
want, press the Return or _ button to
return to previous screens_
Using Search
1° On the You Tube Home screen, select
Search, and then press the I_ button_
2° On the Search screen, use the _.1_
buttons to select a character, and then
press the r_ button_ The character you
selected appears in the field at the top_
3° Repeat Step 2 to select more letters or
numbers_
4° As you add more characters,
You Tube will start to display matches
in the field on the right This may take
some time_
5° To move to the list of matches, press
the _ button one or more times_
6° To select a video, use the aT*1
buttons to highlight it, and then press
the I_ button_ You Tube plays the
video_
'_-:_ NOTES
, Select Clear at the top of the screen
to clear all entered characters_
, Select the Delete button (with an -)
at the top of the screen to delete
the last character you entered_
My You Tube
My You Tube lets you access your _1ou
Tube account and send videos from your
tablet or smart phone to your TV:
Using My You Tube
To use My You Tube, follow these steps;
1° On the You Tube Home page, select
MyYou Tube, and then press the IEI
button_
2° On the My You Tube page, use the .1
buttons to select either Sign tn or Pair,
and then press the IEI button_
3° Follow the directions on the
screen_
2O
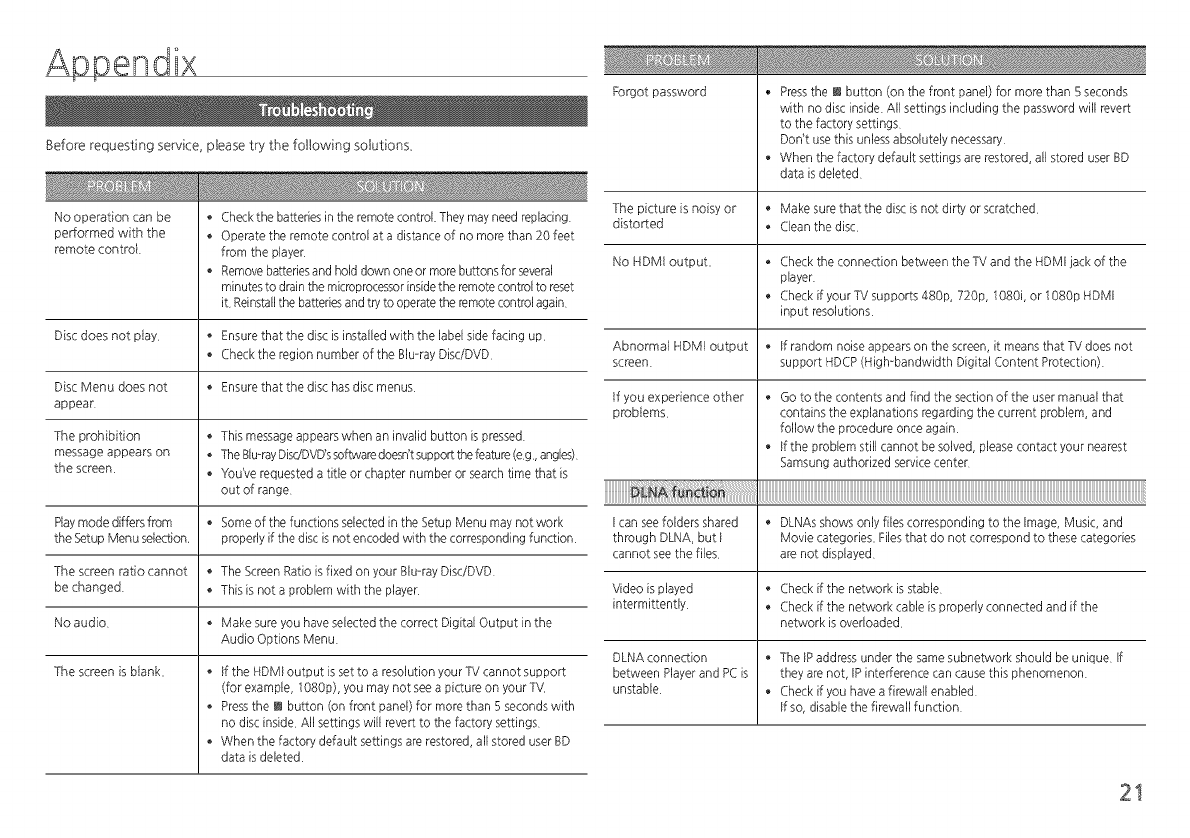
Before requesting service, please try the following solutions,
No operation can be
performed with the
remote controi
• Check the batteries in the remote control. Theymay needreplacing
• Operate the remote control at a distance of no more than 20 feet
from the player
• Removebatteriesand hold down one or more buttons for several
minutes to drain the microprocessorinsidethe remotecontrol to reset
it. Reinstallthe batteriesand try'to operatethe remotecontrol again
Disc does not piay • Ensure that the disc is installed with the label side facing up
• Check the region number of the Blu-ray Disc/DVD
Disc Menu does not • Ensure that the disc has disc menus
appear
The prohibition • This messageappearswhen an invalid button ispressed
message appears on • TheBlu-rayDi_JDVD'ssoftwaredoesn'tsupportthefeature(eg, angles)
the screen • You've requested a title or chapter number or search time that is
out of range
Piaymode differs from • Some of the functions selected in the Setup Menu maynot work
the Setup Menu seiection, properly if the disc isnot encoded with the corresponding function
The screen ratio cannot • The ScreenRatio isfixed on your Blu-ray Disc/DVD
be changed • This isnot a problem with the player
No audio • Make sure you have selectedthe correct Digital Output in the
Audio Options Menu
The screen is biank, • If the HDMI output is set to a resolution your TV cannot support
(for example, 1080p), you may not see a picture on your TV
• Pressthe ! button (on front panel) for more than 5 secondswith
no disc inside All settings will revert to the factory settings
• When the factory default settings are restored, all stored user BD
data isdeleted
Forgot password Pressthe I button (on the front panel) for more than 5seconds
with no disc inside All settings including the password will revert
to the factory settings
Don't usethis unlessabsolutely necessary
When the factory default settings are restored, all stored user BD
data is deleted
The picture is noisy or • Make sure that the disc is not dirty or scratched
distorted • Cleanthe disc
No HDMI output, • Checkthe connection between the TVand the HDMI jack of the
player.
• Checkif your TV supports 480p, 720p, 1080i, or 1080p HDMI
input resolutions
Abnormai HDMI output • If random noiseappears on the screen, it means that TV does not
screen support HDQP(High-bandwidth Digital Content Protection)
If you experience other • Goto the contents and find the section of the usermanual that
probiems contains the explanations regarding the current problem, and
follow the procedure once again
• If the problem still cannot be solved, please contact your nearest
Samsungauthorized servicecenter
I can seefolders shared • DLNAsshows only files corresponding to the Image, Music, and
through DLNA,but I Movie categories, Filesthat do not correspond to these categories
cannot see the files are not displayed
Video is played • Check if the network isstable
intermittently • Check if the network cable is properly connected and if the
network isoverloaded
DLNA connection • The IP address under the samesubnetwork should be unique If
between Player and PCis they are not, IPinterference can cause this phenomenon
unstable • Check if you have a firewall enabled
If so, disable the firewall function
21
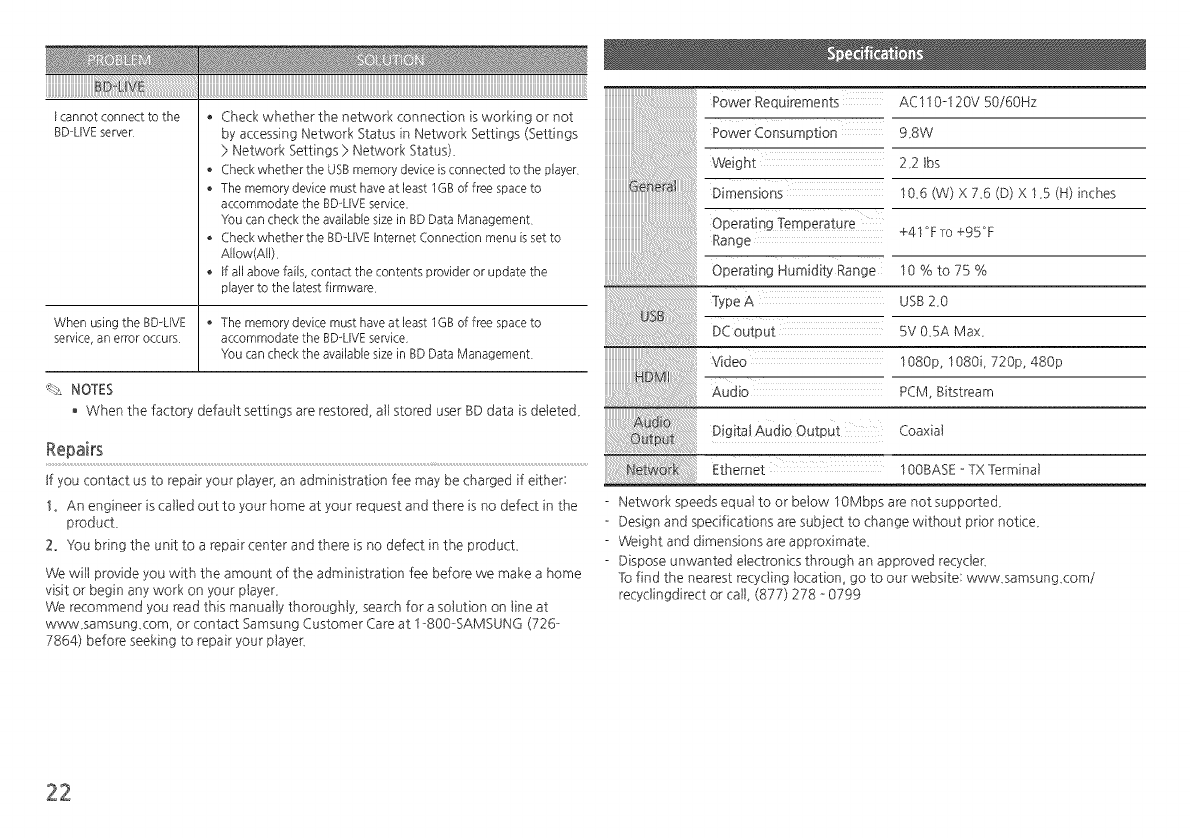
I cannot connect to the
BD¢IVE server Check whether the network connection is working or not
by accessing Network Status in Network Settings (Settings
} Network Settings } Network Status)_
Check whether the USBmemory device isconnected to the player
The memory device must haveat least 1GBof free spaceto
accommodate the BDAIVE service.
You can check the available size in BD Data Management
• Check whether the BD¢IVE Internet Connection menu is set to
Allow(All)
• If all above fails, contact the contents provider or update the
player to the latest firmware
P0werRequirements ACl10-120V SO/60nz
P0we,C0osumpt_oo 9_sw
Weight 22tbs
_mens_ons 10_6 (W) X 7_6 (D) X 1_5 (H) inches
OperatingTemPerature
Range ......... ÷41°FT° +95°F
OperatingHumidityRange 10%to75%
TypeA USBZ0
When using the BDAIVE • The memory device must have at least 1GBof free spaceto
service,an error occurs accommodate the BDAIVE service,
You can check the available size in BD Data Management
'_-'_ NOTES
, When the factory default settings are restored all stored user BD data is delete&
DC output 5V 0_5A Max_
Video 1080p, lO80i, 720p, 480p
Audio PCM, Bitstream
Coaxial
Ethemet IOOBASE - TX Terminal
1. An engineer is called out to your home at your request and there is no defect in the
producL
2. You bring the unit to a repair center and there is no defect in the product
We will provide you with the amount of the administration fee before we make a home
visit or begin any work on your playen
We recommend you read this manually thoroughly, search for a solution on line at
www_samsung_com, or contact Samsung Customer Care at 1-800-SAMSUNG (726-
7864) before seeking to repair your playen
- Network speeds equal to or below 10Mbps are not supporte&
- Design and specifications are subiect to change without prior notice_
- Weight and dimensions are approximate_
- Dispose unwanted electronics through an approved recyclen
1:ofind the nearest recycling location, go to our website: www_samsung_com/
recycling@red or call, (877) 278 - 0799
Compliance and Compatibility Notice
NOT ALL discs are compatible
Subiect to the restrictions described below and those noted throughout this Manual,
including the Disc Type and Characteristics section of this user manual, disc types that
can be played are: pre-recorded commercial BD-ROM, DVD-VtDEO, and Audio CD
(CD-DA) discs; BD-RE/-R, DVD-RW/-R discs; and CD-RW/-R discs_
Discs other than those listed above cannot be and are not intended to be played by
this pbyer_ Some of the discs listed above may not play due to one or more reasons
provided below_
Samsung cannot assure that this player will play every disc bearing the BD-ROM, BD-
RE/-R,
DVD-VDEO, DVD-RW/-R, DVD+RW/+R and CD-RW/-R logos, and this player may not
respond to all operating commands or operate all features of every disc_ These and
other disc compatibility and player operation issues with new and existing format
discs are possible because:
- Blu-ray is a new and evolving format and this player may not operate all features of
Blu-ray Discs because some features may be optional, additional features that may
have been added to the Blu-ray Disc format after the production of this player, and
certain available features may be subiect to delayed availability;
- not all new and existing disc format versions are supported by this player;
new and existing disc formats may be revised, changed, updated, improved and/or
supplemented;
some discs are produced in a manner that allows specific or limited operation or
restricts features during playback;
some discs bearing the BD-ROM, BD-RE/-R, DVD-VDEO, DVD-RW/-R, DVD+RW/+R
and CD-RW/-R logos may still be non-standardized discs;
some discs may not be played depending on their physical state or recording
conditions;
problems and errors can occur durig the creation of Blu-ray Disc or DVD software
and/or the manufacture of discs;
this player operates differently than a standard DVD player or other/87 equipment;
and/or
for reasons noted throughout this user manual and for other reason(s) discovered
and posted by SAMSUNG customer care center_
tf you encounter disc compatibility or player operation problems, please contact
SAMSUNG customer care center_
You may also contact SAMSUNG customer care center for possible updates on this player_
For additional information on playback restrictions and disc compatibility, refer to the
Precautions, Before Reading the user manual, Disc Types and Characteristics, and
Before Playing sections of this user manual
_r Bluoray Disc Player progressive scan output : CONSUMERS SHOULD NOTE THAT
NOT ALL HIGH DEFINITION TELEVISION SETSARE FULI}¢ COMPATIBLE WITH THIS
product AND MAY CAUSE ARTIFACTS TO BE DISPLAYED tN THE PtCTURE_tN CASE
OF PROGRESSIVE SCAN PICTURE PROBLEMS, tT tS RECOMMENDED THAT THE USER
SWITCH THE CONNECTION TO THE 'S]IANDARD DEFINITION' OUTPUT_ tFTHERE ARE
QUESTIONS REGARDING OUR TV SET COMPATtB&tTY WITH THIS product, PLEASE
CON]tACT OUR CUSTOMER SERVICE CENTER_
Copy Protection
Because AACS (Advanced Access Content System) is approved as the content
protection system for the Blu-ray Disc format, similar to use of CSS (Content Scramble
System) for the DVD format, certai restrictions are imposed on playback, analog
signal output, etc. of AACS protected contents_
The operation of this product and restrictions on this product may vary depending
on your time of purchase as those restrictions may be adopted and/or changed by
AACS after the production of this product Furthermore, BD-ROM Mark and BD+ are
additionally used as content protection systems for the Blu-ray Disc format, which
imposes certain restrictions including playback restrictions for BD-ROM Mark and/or
BD+ protected contents_ To obtain additional information on AACS, BD-ROM Mark,
BD+, or this product, please contact SAMSUNG customer care center_
Many Blu-ray Disc/DVDs are encoded with copy protection_ Because of this, you
should only connect your Player directly to your TV] not to a VCR_Connecting to a
VCR results in a distorted picture from copy-protected Blu-ray DisdDVDs_
Under the U_S_Copyright laws and Copyright laws of other countries, unauthorized
recording, use, display, distribution, or revision of televisio programs, videotapes,
Blu-ray Discs, DVDs, and other materials may subject you to civil and/or criminal
liability_
Cinavia Notice : This product uses Cinavia technology to limit the use of unauthorized
copies of some commercially-produced film and videos and their soundtracks_
When a prohibited use of an unauthorized copy is detected, a message will be
displayed and playback or copying will be interrupte& More information about
Cinavia technology is provided at the Cinavia Online Consumer Information Center
at http://www_cinavi&com_ To request additio al information about Cinavia by mail,
send a postcard with your mailing address to: Cinavia Consumer Information Center,
RO_ Box 86851, San Diego CA, 92138, USA_
This product incorporates proprietary technology under licence from Verance
Corporation and is protected by U_S_Patent 7,369,677 and other U_S_and worldwide
patents issued and pending as well as copyright and trade secret protection for certain
aspects of such technology_ Cinavia is a trademark of Verance Corporation_ Copyright
2004-2013 Verance Corporation_ All rights reserved by Verance_ Reverse engineering
or disassembly is prohibite&
23
Network Service Disclaimer
All content and services accessible through this device belong to third parties and are
protected by copyright, patent, trademark and/or other intellectual property laws_ Such
content and services are provided solely for your personal noncommercial use_ You may
not use any co tent or services in a manner that has not been authorized by the content
owner or service provider_ Without limiting the foregoing, unless expressly authorized by
the applicable content owner or service provider, you may not modify, copy, republish,
upload, post, transmit, translate, sell, create derivative works, exploit, or distribute in
any manner or medium any content or services displayed through this device_
THIRD PARTY CONTENT AND SERVICESARE PROVIDED "AS IS/' SAMSUNG DOES NOT
WARRANT CONTENT OR SERVICES SO PROVIDED, EITHER EXPRESSLYOR tMPLIEDL'_
FOR ANY PURPOSE SAMSUNG EXPRESSLYDISCLAIMS ANY IMPLIED WARRANTIES
INCLUDING BUT NOT LIMITED TO, WARRANTIES OF MERCHAN17_BEtTY OR FITNESS
FOR A PARTICULAR PURPOSE SAMSUNG DOES NOT GUARANTEE THE ACCURACY
VAUDtT% TIMELINESS, LEGALITY, OR COMPLETENESS OF ANY CONTENT OR SERVICE
MADE AVAEABLE THROUGH THIS DEVICE AND UNDER NO CtRCUMS]XNCES,
INCLUDING NEGLIGENCE, SHALL SAMSUNG BE LIABLE, WHETHER tN CONTRACT
OR TORT, FOR ANY DIRECT, INDIRECT, tNCDENFAL, SPECIAL OR CONSEQUENTIAL
DAMAGES, A]]ORNEY FEES,EXPENSES, OR ANY OTHER DAMAGES ARISING OUT
OF, OR tN CONNECTION WITH, ANY INFORMATION CONIXtNED IN, OR AS A RESULT
OF THE USE OF ANY CONTENT OR SERVICE BY YOU OR ANY THIRD PARTY, EVEN tF
ADVISED OFTHE POSSIBILITY OF SUCH DAMAGEE
Third party services may be terminated or interrupted at any time, and Samsung makes
no representation or warranty that any content or service will remain available for
any period of time_ Content and services are transmitted by third parties by means
of networks and transmission facilities over which Samsung has no control Without
limiting the generality of this disclaimer, Samsung expressly disclaims any responsibility
or liability for any interruption or suspension of any content or service made available
through this device_
Samsung is neither responsible nor liable for customer service related to the content and
services_ Any question or request for service relating to the content or services should be
made directly to the respective content and service providers_
License
Manufactured under license from Dolby Laboratode£ Dolby and the
doubte-D symbol are trademarks of Dolby Laboratories_ [] DOLBY
TRU_ ]
DIGITALPLUS ]
For DTS patents, see http://patents_dt£com_ Manufactured under
license from DTS Licensing Limited_ DTS, the Symbol, & DTS and the
Symbol together are registered trademarks, and DTS 2_O+Digital Out is
a trademark of DTS, tnc_ © DTS, tnc_ All Rights Reserved_
_dt_
2.0+DigRalOut
The terms HDMt and HDMt Nigh-Definition Multimedia Interface,
andtheHDM Logoaretrademarksorregisteredtrademarksof 1-4111=llrl'lll
HDMt Licensing LLC in the United States and other countries_
Oracle and .Javaare registered trademarks of Oracle and/or its
affiliates_ Other names may be trademarks of their respective owners
Java
POWERED
Open Source License Notice
- tn the case of using open source software, Open Source Licenses are available on
the product menu_
Blu-ray Disc_, Slu-ray _ and the logos are trademarks of the Blu-ray Disc Association_
o DLNA®, the DLNA Logo and DLNA CERTtFtED® are trademarks, @all
service marks, or certification marks of the Digital Living na
Network Alliance_ CERTiFieD
24

This SAMSUNG brand product, as suppled and distributed by SAMSUNG and delivered new, in the original carton to the original consumer purchaser, is warranted by SAMSUNG
against manufacturing defects in materials and workmanship for a limited warranty period of:
One (1) Year Parts and Labor*
(.90 Days Parts and Labor for Commercial Use)
This I mited warranty begins on the original date of purchase, and isvalid only on products purchased and used in the United States To receive warranty serv ce, the purchaser must
contact SAMSUNG for- problem determ nation and ser,_ce procedures Warranty service can only be performed by a SAMSUNG author zed service center- The or ginal dated bill of
sale must be presented upon request as proof of purchase to SAMSUNG or SAMSUNG's authorized service center-. Transportation of the product to and from the service center- is the
responsibility of the purchaser.
SAMSUNG will repair or replace this product, at our- option and at no charge as st pulated herein, with new or recond toned parts or products if found to be defect ve during the
limited warranty period specif ed above_ All replaced parts and products become the property of SAMSUNG and must be returned to SAMSUNG. Replacement parts and products
assume the remaining original warranty, or ninety (90) days, whichever- is longer-.
SAMSUNG's obligations with respect to software products distributed by SAMSUNG under the SAMSUNG brand name are set forth in the applicable end user license agreement. Non
SAMSUNG hardware and software products, if provided, are on an "AS IS" basis.
NomSAMSUNG manufacturer:s, suppliers, publishers, and service providers may provide their- own warranties.
This limited warranty covers manufacturing defects in materials and workmanship encountered n normal, and except to the extent othe_vise expressly provided for- in this statement,
noncommercial use of ths product, and shall not apply to the following, including, but not limited to: damage which occurs in shipment; delivery and installat on; applications and uses
for- whch this product was not intended; altered product or serial numbers; cosmetic damage or exterior finish; accidents, abuse, neg ect, fire, water-, lightning or other- acts of nature;
use of products, equipment, systems, ut lities, services, parts, supplies, accessor es, applications, installat ons, repairs, external wMng or connectors not supplied and authorized by
SAMSUNG, or which damage ths product or result in service problems; incorrect electrical line voltage, fluctuations and surges; customer adiustments and failure to follow operating
instruct ons, cleaning, maintenance and environmental instructions that are covered and prescribed n the instruct on book; product removal or reinstallat on; recept on problems and
distortion related to noise, echo, interference or other- signal transmission and delivery problems. SAMSUNG does not warrant uninterrupted or error_free operation of the product.
THERE ARE NO EXPRESSWARRANTIES OTHER THAN THOSE LISTED AND DESCRIBED ABOVE, AND NO WARRANTIES WHETHER EXPRESSOR IMPLIED, INCLUDING, BUT NOT LIMITED
TO, ANY IMPLIED WARRANTIES OF MERCHANTABILITY OR FITNESSFOR A PARTICULAR PURPOSE, SHALL APPLYAFTER THE EXPRESS'v_{ARRANTYPERIODS SLATEDABOVE, AND NO
OTHER EXPRESSWARRANTY OR GUARANTY GIVEN BY ANY PERSON, FIRM OR CORPORATION WITH RESPECTTO THIS PRODUCT SHALL BE BINDING ON SAMSUNG. SAMSUNG
SHALL NOT BE LIABLE FOR LOSS OF REVENUE OR PROFITS, FAILURETO REALIZE SAVINGS OR OTHER BENEFITS, OR ANY OTHER SPECIAL, INCIDENTAL OR CONSEQUENTIAL
DAMAGES CAUSED BY THE USE, MISUSE OR INABILITY TO USE THIS PRODUCT, REGARDLESS OF THE LEGAL THEORY ON WHICH THE CLAIM IS BASED, AND EVEN IF SAMSUNG HAS
BEENADVISED OFTHE POSSIBILITYOF SUCH DAMAGES_ NOR SHALL RECOVERY OF ANY KIND AGAINST SAMSUNG BE GREATER IN AMOUNT THAN THE PURCHASE PRICEOF THE
PRODUCT SOLD BY SAMSUNG AND CAUSING THE ALLEGED DAMAGE. WITHOUT LIMITING THE FOREGOING, PURCHASER ASSUMES ALL RISK AND LIABILITY FOR LOSS, DAMAGE
OR IN,)URYTO PURCHASER AND PURCHASER'S PROPERTY AND TO OTHERS AND THEIR PROPERTY ARISING OUT OF THE USE, MISUSE OR INABILITY TO USETHIS PRODUCT SOLD
BY SAMSUNG NOT CAUSED DRECTLY BY THE NEGLIGENCE OF SAMSUNG. THIS LIMITED WARRANTY SHALL NOT EXTEND TO ANYONE OTHER THAN THE ORIGINAL PURCHASER OF
THIS PRODUCT, ISNONTRANSFERABLE AND S]:ATESYOUR EXCLUSIVE REMEDY
Some states do not allow limitat ons on how long an implied warranty lasts, or the exdus on or lim tat on of nc dental or consequential damages, so the above limitations or exclusions
may not apply to you. This warranty gives you specific legal rights, and you may also have other- rights which vary from state to state.
To obtain warranty service, please contact the SAMSUNG customer- care center.
QUESTIONS OR COMMENTS?
COUNTRY CALL I ORvIsiTus ONliNEAT I wRITE
1-800-SAMSUNG Samsu_]g ElectroNics America, hc
ANTHE US (726_7864) www.samsuNg.comius 85 Challel]ger- Road Rdgefield Park,
N,) 07660
IIIIIIIIHIIHIIIlUlUlIIIHIIIIIII
AK68-02401A-00
