Samsung DVD V1000 User Manual VCR Manuals And Guides L0204105
SAMSUNG DVD/VCR Combo Manual L0204105 SAMSUNG DVD/VCR Combo Owner's Manual, SAMSUNG DVD/VCR Combo installation guides
User Manual: Samsung DVD-V1000 DVD-V1000 SAMSUNG DVD-VCR - Manuals and Guides View the owners manual for your SAMSUNG DVD-VCR #DVDV1000. Home:Electronics Parts:Samsung Parts:Samsung DVD-VCR Manual
Open the PDF directly: View PDF ![]() .
.
Page Count: 39
DVD-VIO00
Instruction Manual
_ Hi-Fi
VIDEO www.samsungasc.com
Important Safety Instructions
WARNING:
TO reduce the risk of fire or electric shock, do not
expose this appliance to rain or moisture. Do not
open the cabinet; dangerous high voltage is present.
Refer servicing to qualified personnel only. This
DVD-VCR should only be used with 120V, 60Hz
(standard U.S. household) current.
WARNING:
TO AVOID HAZARDOUS EXPOSURE TO
INVISIBLE LASER RADIATION, DO NOT OPEN
OR REMOVE/DEFEAT LASER TRANSPORT
PROTECTIVE HOUSING.
USER/INSTALLER CAUTION:
Your authority to operate this FCC certified
equipment could be voided if you make changes or
modifications not expressly approved by the
manufacturer, who is responsible for compliance
with Part 15 ECC rules.
NOTE TO CATV SYSTEM INSTALLER:
This reminder is provided to call the CATV system
installer's attention to Article 820-40 of the
National Electronic Code that provides guidelines
for proper grounding and, in particular, specifies
that the cable ground shall be connected to the
grounding system of the building, as close to the
)oint of cable entry as practical.
CAU_ON: TO REDUCE 1HEBSK OF ELECTRIC SHOCK
DO NOT REMOVE COVER
NO USER-SERMCEABLE PARI_ INSIDE
REFER sIErN1CING TO QUAUFIED SERVICE PERSONNEL
//_ This symbol is intended to alert
the user to the presence of
uninsulated dangerous voltage
within the product's enclosure
that may be of sufficient
magnitude to constitute risk of
fire or electric shock.
//_ This symbol is intended to alert
the user to the presence of
important operating and
maintenance instructions in the
literature accompanying this
product.
Copy Notification
Federal law provides severe civil and criminal
penalties for the unauthorized reproduction,
distribution, or exhibition of copyrighted motion
pictures and videotapes. (Title 17, United States
Code, Sections 501 and 506).
Macrovision Notification
This product incorporates copyright protection
technology that is protected by method claims of
certain U.S. patents and other intellectual property
rights owned by Macrovision Corporation and other
rights owners. Use of this copyright protection
technology must be authorized by Macrovision
Corporation, and is intended for home and other
limited viewing uses only unless otherwise
authorized by Macrovision Corporation. Reverse
engineering or disassembly is prohibited.
CAUTION:
TO prevent fire, shock hazard, or annoying
interference, use only the recommended
accessories. To prevent electric shock, do not use
this (polarized) plug with an extension cord,
receptacle, or other outlet unless the blades can be
fully inserted to prevent blade exposure. To reduce
the risk of electric shock, do not remove the unit
cover or back. There are no serviceable parts
inside. Refer servicing to qualified personnel only.
CUIDADO:
Para prevenir incendio, riesgo de choque, o
interferencia enfadosa, use solamente los
accesorios recomendados. Para prevenir
electrochoque, no use este enchufe (potarizado)
con un cordon de extension, toma de corriente, o
cualquier otra toma a menos que los dientes
puedan set completamente insertados para prevenir
exposiciOn de los dientes. Para reducir et riesgo de
descarga electrica, no remueva la cubierta o la
parte posterior del equipo. Dentro del equipo no
hay partes que requieren servicio. Dirijase
solamente a personal calificado cuando requiera
servicio.
ATTENTION:
Pour eviter les incendis, risque de chocs, ou
interferences fScheuses, employer seulement les
accessoires recommandes. Pour eviter les chocs
electriques, ne pas employer cette prise (polarisee)
avec une rallonge, une prise de courant ou une
autre sortie de courant _ moins que les lames
peuvent etre inserees 8 fond pour l'exposition des
lames. Pour reduire les risques de chocs
electriques, ne pas retirer le couvercle ou l'arriere
du module. II n'y a pas de piece utilisable
I'interieur. Ne faire effectuer Fentretien que par un
personnel qualifie.
1. READ INSTRUCTIONS - All the safety and operating instructions should be read before the DVD-VCR is operated.
2. RETAIN INSTRUCTIONS -The safety and operating instructions should be retained for future reference,
3. HEED WARNIr'JGS - All warnings on the DVD-VCR and in the operating instructions should be adhered to.
4. FOLLOW II_ISTRUCTIONS -All operating and maintenance instructions should be followed.
5. CLEANII_JG -Unplug this DVD-VCR from the wall outlet before cleaning. Do not use liquid or aerosol cleaners. Use
a dry cloth for dusting cabinet.
6. ATTACHMENTS - Do not use attachments not recommended by the product manufacturer, as they may be
hazardous,
7. WATER & MOISTURE - DO not use this DVD-VCR near water--for example, near a bathtub, wash bowl, kitchen
sink, laundry tub, in a wet basement, near a swimming pool or the like.
8. ACCESSORIES - Do not place this DVD-VCR on an unstable cart, stand, tripod, bracket or table, The DVD-VCR may
fall, causing serious injury to a child or adult, and serious damage to the unit. Use only with a cart, stand, tripod,
bracket or table recommended by the manufacturer or sold with the DVD-VCR. Any mounting of the unit should
follow the manufacturer's instructions and should use a mounting accessory recommended by the manufacturer,
8a. An appliance and cart combination should be moved with care. Quick stops, excessive force, and uneven surfaces
may cause the appliance and cart combination to overturn.
9. VENTILATION -Slots and openings in the cabinet are provided for ventilation to ensure reliable operation of the
DVD-VCR and to protect it from overheating, These openings must not be blocked or covered. Never place your
VCR on a bed, sofa, rug or other similar surface, on or near a radiator or heat register, This DVD-VCR should not be
placed in a built-in installation such as a bookcase or rack unless proper ventilation is provided or the
manufacturer's instructions have been adhered to.
10. POWER SOURCES -This DVD-VCR should be operated only from the type of power source indicated on the
marking label. If you are not sure of the type of power supply to your home consult your appliance dealer or local
power company,
11. GROUNDING OR £OLARIZATIOF; - This DVD-VCR may be equipped with either a polarized 2-wire AC line plug
(a plug having one blade wider than the other) or a 3-wire grounding plug having a third (grounding) pin.
The 2-wire polarized plug will fit into the power outlet only one way. This is a safety feature, If you are unable to
insert the plug fully into the outlet try reversing the plug. If the plug still fails to fit, contact your electrician to replace
your obsolete Outlet. Do not defeat the safety purpose of the polarized plug.
12. POWER-CORD PROTECTION - Power-supply cords should be routed so that they are not likely to be walked on or
pinched by items placed upon or against them, paying particular attention to cords of plugs, convenience
receptacles, and the point where they exit from the DVD-VCR.
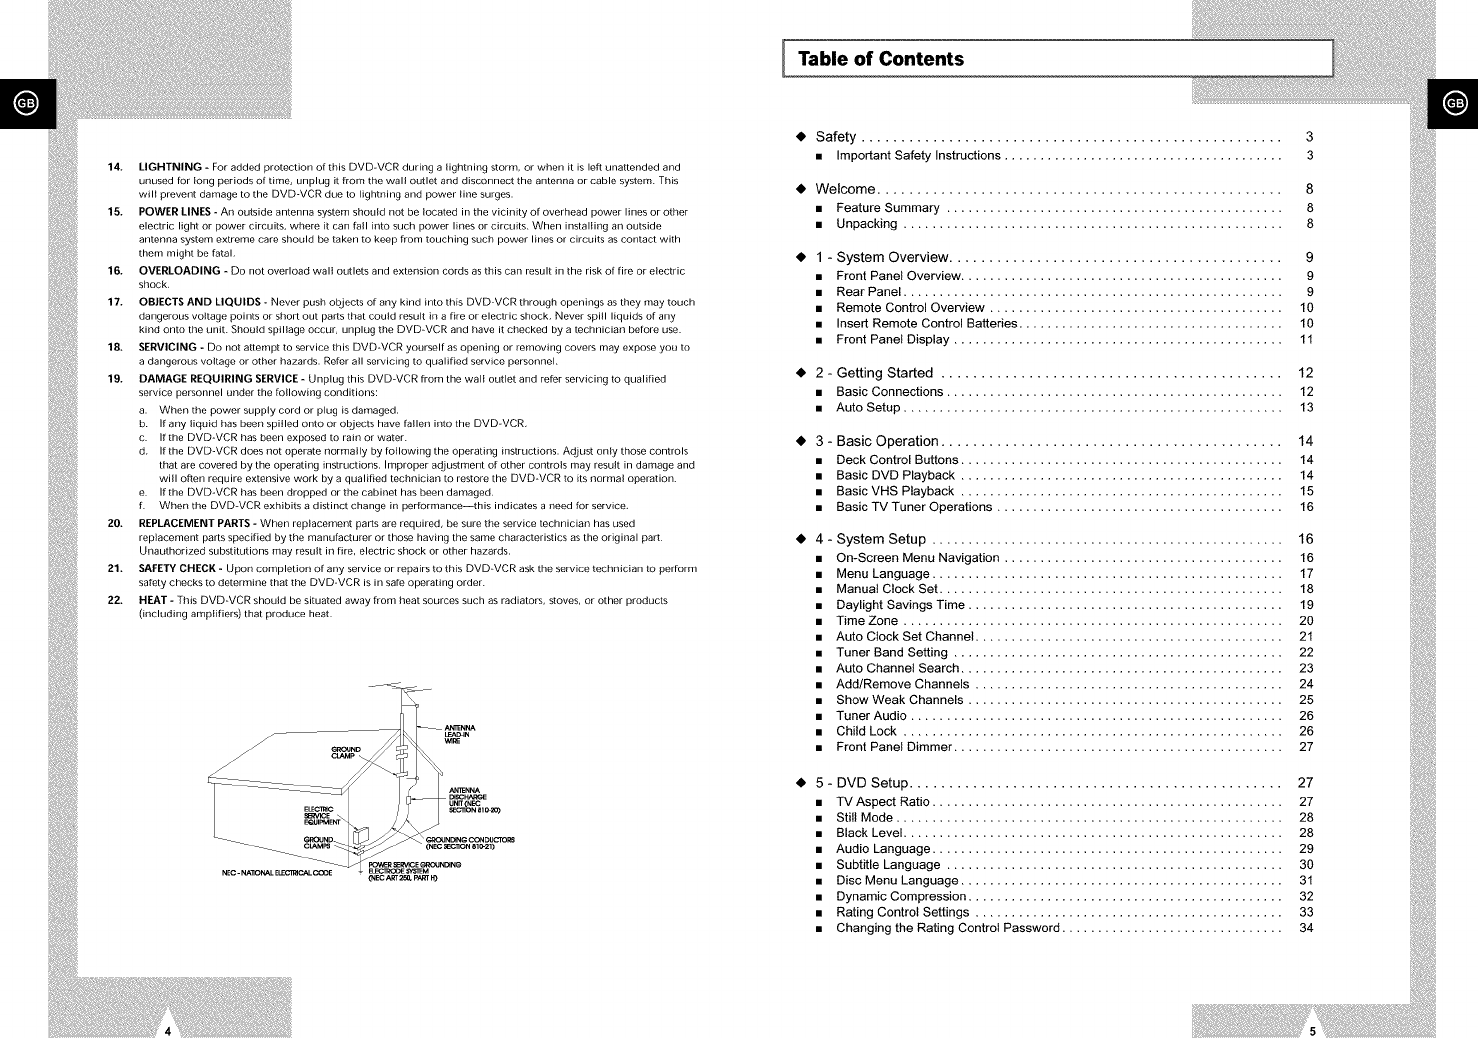
13. OUTDOOR ANTENNA GROUNDING -If an outside antenna or cable system is connected to the DVD-VCR, be
sure the antenna or cable system is grounded to provide some protection against voltage surges and built-up static
charges. Section 810 of the National Electrical Code, ANSI/NFPA No. 70-1984, provides information with respect to
proper grounding of the mast and supporting structure, grounding of the leaddn wire to an antenna discharge unit,
size of grounding conductors, location of antenna-discharge unit, connection to grounding electrodes, and
requirements for the grounding electrode. See figure below.
PORTABLE CART WARNING
(Symbol provided by RETAC)
14. LIGHTNING - For added protection of this DVD-VCR during a lightning storm, or when it is lelt unattended and
unused for long periods of time, unplug it from the wall outlet and disconnect the antenna or cable system. This
will prevent damage to the DVD-VCR due to lightning and power line surges.
15. POWER LINES - An outside antenna system should not be located in the vicinity of overhead power lines or other
electric light or power circuits, where it can fall into such power lines or circuits. When installing an Outside
antenna system extreme care should be taken to keep from touching such power lines or circuits as contact with
them might be fatal.
16. OVERLOADING - Do not overload wall outlets and extension cords as this can result in the risk of fire or electric
shock.
17. OBJECTS AND LIQUIDS - Never push objects of any kind into this DVD=VCR through openings as they may touch
dangerous voltage points or short Out parts that could result in a fire or electric shock. Never spill liquids of any
kind onto the unit. Should spillage Occur, unplug the DVD-VCR and have it checked by a technician before use.
18. SERVICING - Do not attempt to service this DVD-VCR yourself as opening or removing covers may expose you to
a dangerous voltage or other hazards. Refer all servicing to qualified service personnel.
19. DAMAGE REQUIRIr'JG SERVICE - Unplug this DVD-VCR from the wall outlet and refer servicing to qualified
service personnel under the following conditions:
a. When the power supply cord or plug is damaged.
b. If any liquid has been spilled onto or objects have fallen into the DVD-VCR<
c. If the DVD-VCR has been exposed to rain or water.
d. If the DVD-VCR does not operate normally by following the operating instructions. Adjust only those controls
that are covered by the operating instructions. Improper adjustment of other controls may result in damage and
will often require extensive work by a qualified technician to restore the DVD-VCR to its normal operation.
e. If the DVD-VCR has been dropped or the cabinet has been damaged.
f. When the DVD-VCR exhibits a distinct change in performanceithis indicates a need for service.
20. REPLACEMENT PARTS - When replacement parts are required, be sure the service technician has used
replacement parts specified by the manufacturer or those having the same characteristics as the original part.
Unauthorized substitutions may result in fire, electric shock or other hazards.
21. SAFETY CHECK - Upon completion of any service or repairs to this DVD-VCR ask the service technician to perform
safety checks to determine that the DVD-VCR is in safe operating order.
22. HEAT - This DVD-VCR should be situated away from heat sources such as radiators, stoves, or other products
(including amplifiers) that produce heat.
Table of Contents
Safety ..................................................... 3
• Important Safety Instructions ....................................... 3
Welcome ................................................... 8
• Feature Summary ............................................... 8
• Unpacking ..................................................... 8
1 - System Overview .......................................... 9
• Front Panel Overview ............................................. 9
• Rear Panel ..................................................... 9
• Remote Control Overview ......................................... 10
• Insert Remote Control Batteries ..................................... 10
• Front Panel Display .............................................. 11
2 - Getting Started ........................................... 12
• Basic Connections ............................................... 12
• Auto Setup ..................................................... 13
3 - Basic Operation ........................................... 14
• Deck Control Buttons ............................................. 14
• Basic DVD Playback ............................................. 14
• BasicVHS Playback ............................................. 15
• Basic TV Tuner Operations ........................................ 16
4 - System Setup ................................................. 16
• On-Screen Menu Navigation ....................................... 16
• Menu Language ................................................. 17
• Manual Clock Set ................................................ 18
• Daylight Savings Time ............................................ 19
• Time Zone ..................................................... 20
• Auto Clock Set Channel ........................................... 21
• Tuner Band Setting .............................................. 22
• Auto Channel Search ............................................. 23
• Add/Remove Channels ........................................... 24
• ShowWeak Channels ............................................ 25
• Tuner Audio .................................................... 26
• Child Lock ..................................................... 26
• Front Panel Dimmer .............................................. 27
5 - DVD Setup ............................................... 27
• TV Aspect Ratio ................................................. 27
• Still Mode ...................................................... 28
• Black Level ..................................................... 28
• Audio Language ................................................. 29
• Subtitle Language ............................................... 30
• Disc Menu Language ............................................. 31
• Dynamic Compression ............................................ 32
• Rating Control Settings ........................................... 33
• Changing the Rating Control Password ............................... 34
Table of Contents ] ITable of Contents
• 6 - DVD Sound Setup ......................................... 35
•A/V Receiver Connections ......................................... 35
• Dolby Digital Decoder Setting ...................................... 36
• DTS Decoder Setting ............................................. 37
• 7 - DVD Operations .......................................... 38
• Special Playback Features ......................................... 38
• Disc Menu Navigation ............................................ 39
• Title/ChaptedTime Selection ....................................... 40
•Zoom ......................................................... 41
• Angle ......................................................... 41
• Subtitle ........................................................ 42
• A-B Repeat ..................................................... 43
• Repeat ChaptedTitle ............................................. 44
• Audio ......................................................... 44
• Bookmarks ..................................................... 45
• Programmed Playback ............................................ 46
• Random Playback ............................................... 47
• MP3 Playback .................................................. 47
• 3D Sound ...................................................... 48
• 8 - VCR Playback ............................................ 49
• SpeciatVCR Playback Features .................................... 49
• Tracking ....................................................... 50
• Auto Play/Rewind ................................................ 51
• S-VHS Playback ................................................ 51
• 9 - VCR Recording ........................................... 52
• Basic Recording ................................................. 52
• Special Recording Features ........................................ 53
• One-Touch Recording (OTR) ....................................... 54
• Record Speed .................................................. 55
• Record Source .................................................. 55
• Date/Time Stamp ................................................ 56
• Copying from DVD To VHS ........................................ 57
• Audio Dubbing a Pre-recorded Videocassette .......................... 58
• 10 - Timer Recording ......................................... 59
• How to Set a Timer Recording ...................................... 59
• Timer Recording Errors/Solutions ................................... 61
• 11 - Search/Index Features .................................... 62
• The Clock/Counter Button ......................................... 62
• Placing Index Marks .............................................. 63
• Index Scan ..................................................... 63
• Index Search ................................................... 64
• Blank Search ................................................... 64
• Direct Time Search .............................................. 65
• Return to 0:00:00 ................................................ 66
• Appendix A - Advanced Connections ............................. 67
• S-Video/Component Video Connections (for DVD) ...................... 67
• AIt Video Out Setting ............................................. 68
• Stereo Connections .............................................. 69
• MonitorTV Connections ........................................... 70
• Connecting Other Video Equipment .................................. 71
• Using the TV Buttons on the Remote Control .......................... 72
• Appendix B - Help ............................................ 73
• Technical Specifications ........................................... 73
Fea,ureSumm.,, I [Fro.,,a.e,Ove,.iew
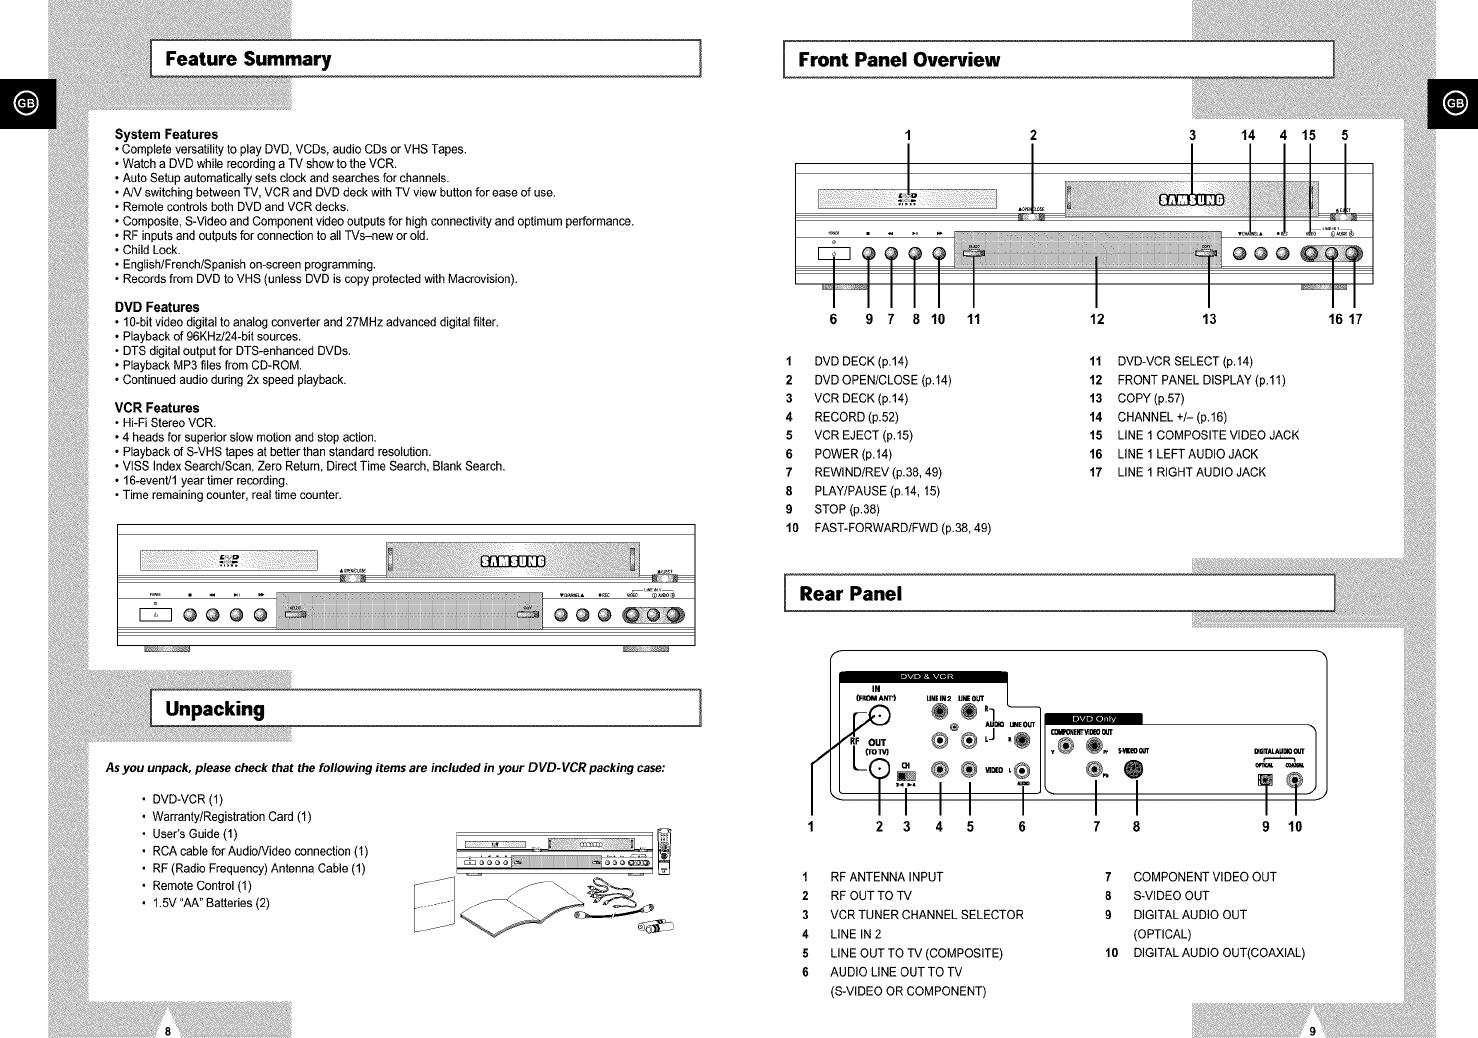
System Features
•Complete versatility to play DVD, VCDs, audio CDs or VHS Tapes.
Watch a DVD while recording a TV show to the VCR.
Auto Setup automatically sets clock and searches for channels.
A/V switching between TV, VCR and DVD deck with TV view button for ease of use.
Remote controls both DVD and VCR decks.
Composite, S-Video and Component video outputs for Hgh connectivity and optimum performance.
RF inputs and outputs for connection to all TVs-new or old.
Child Lock.
English/French/Spanish on-screen programming.
Records from DVD to VHS (unless DVD is copy protected with Macrovision).
DVD Features
• 10-bit video digital to analog converter and 27MHz advanced digital filter.
• Playback of 96KHz/24-bit sources.
• DTS digital output for DTS-enhanced DVDs.
• Playback MP3 files from CD-ROM
• Continued audio dudng 2x speed playback.
VCR Features
• Hi-Fi Stereo VCR.
• 4 heads for superior slow motion and stop action.
• Playback of S-VHS tapes at better than standard resolution.
• VISS Index Search/Scan, Zero Return, Direct Time Search, Blank Search.
• 16-event/1 year timer recording.
• Time remaining counter, real time counter.
Unpacking
As you unpack, please check that the following items are included in your DVD-VCR packing case:
DVD-VCR (1)
Warranty/Registration Card (1)
User's Guide (1)
RCA cable for AudioNideo connection (1)
RF (Radio Frequency) Antenna Cable (1)
Remote Control (1)
1.5V "AA" Batteries (2)
.=_IE!iiiiiiii!i;!!iiiiii!iii:;iiil ._
_iiiiiiiiiiiiiiiiiiiiiiiiiiiiiiiiiiiiiiiiiiiiiiiiiiiiiiiiiiiiiiiiiiiiiiii_._
I
3 14 4 15 5
1DVD DECK (p.14) 11 DVD-VCR SELECT(p.14)
2 DVD OPEN/CLOSE (p.14) 12 FRONT PANEL DISPLAY (p.11)
3 VCR DECK(p.14) 13 COPY(p.57)
4 RECORD(p.52) 14 CHANNEL +/-(p.16)
5VCR EJECT (p.15) 15 LINE 1 COMPOSITE VIDEO JACK
6 POWER(p.14) 16 LINE 1 LEFTAUDIO JACK
7 REWlND/REV (p.38, 49) 17 LINE 1 RIGHT AUDIO JACK
8 PLAY/PAUSE (p.14, 15)
9 STOP (p.38)
10 FAST-FORWARD/FWD(p.38,49)
16 17
Rear Panel
1
1RF ANTENNA INPUT 7 COMPONENT VIDEO OUT
2 RF OUT TO TV 8 S-VIDEO OUT
3 VCR TUNER CHANNEL SELECTOR 9 DIGITAL AUDIO OUT
4 LINE IN 2 (OPTICAL)
5LINE OUT TO TV (COMPOSITE) 10 DIGITAL AUDIO OUT(COAXIAL)
6 AUDIO LINE OUT TO TV
(S-VIDEO OR COMPONENT)

.emo,eCon,.o,Ove.ie. [ [Fron,Pane,Oi.p,.,
Im
2
3
4
5
6
7
8--
9
10--
11
12--
13
14
15
16--
17
SAMSUNG
1POWER (p.14)
2AUTO TRACKING (p.50)
TRACKING +/- (p.50)
3SHUTTLE <</>>(p.49)
4 ANGLE (p.41)
53DSOUND (p.48)
100+ (p.48)
6A DUB(p.58)
7 DVD(p.14)
8 TV VIEW (p.14)
INPUT (p.72)
9 VOLUME +/-(p.16)
10 REWIND (p.38,49)
SKIP BACK (p.38, 49)
11 STOP (p.38)
12 RECORD (p.52)
13 DISPLAY/UP (p.16, 40, 49)
14 MODE/LEFT (p.46, 47)
REPEAT (p.43, 44, 49)
15 SETUP (p.16)
ENTER (p.16)
16 TITLE (p.39)
SP/SLP (p.55)
17 SUBTITLE (p.42)
SET TIMER (p.59)
18 OPEN/CLOSE (p.14)
19 o-g (p.16)
20 ZOOM (p.41)
21 TV/VCR (p.16)
22 VCR, TV SELECT (p.72)
23 PREVIOUS CHANNEL (p.16, 72)
24 CHANNEL +/-(p.16)
25 FAST-FORWARD (p.38, 49)
SKIP NEXT (p.38)
26 MENU (p.39)
CLEAR (p.16)
27 PLAY/PAUSE (p.14, 15)
28 SKIP/F.ADV/RIGHT (p.38, 48)
29 CLOCK/COUNTER/DOWN (p.62)
30 MARK (p.45, 63)
SEARCH (p.64)
INDEX (p.63)
31 AUDIO (p.26, 44)
RETURN (p.16)
Insert Remote Control Batteries
•Remove the battery cover by pushing down on the thumb tab and
sliding the cover in the direction of the arrow.
• Insert two 1.5V "AA" batteries as shown, paying attention to the correct
polarities (+/-).
• When finished, slide the cover until it clicks back into place.
E
1234
Jovoooo1,o
-
11 12 13 14 15 16
5 6 7 8 9 10
°NN °@ .';%0,, ,
I I I
17 18 19
1 The DVD Deck is active
2A DVD, CD, VCD, or SVCD is loaded
3A disc with LPCM (Linear Pulse Code Modulation) audio is loaded
4 A DVD with a DTS soundtrack is loaded
5The time, counter position, time remaining, or current deck status is displayed
6 The current TV show or video is broadcast in Stereo
7The Hi-Fi track of a VHS tape is playing
8 A Timer Recording is programmed or in progress. If blinking there is an error. Also displays without the clock
hands to indicate that a recording is in progress, and blinks when the VCR is in Pause mode.
9 The VCR Record Speed is set to SP or SLP
10 The VCR Deck is active
11 The status of the DVD deck is graphically displayed
12 3D Sound is active
13 The DVD has multiple angles to choose from
14 A CD with MP3 tracks is playing
15 The number to the right of the "T" symbol is the current title number
16 The number to the right of the "C" symbol is the current chapter number
17 The current time is a.m. or p.m.
18 DVD to VHS copy is in progress
19 The status of the VCR deck is graphically displayed
...i°Co..e°,io.. ] [,.,oSe,.p
'y,1
From Antenna or Cable
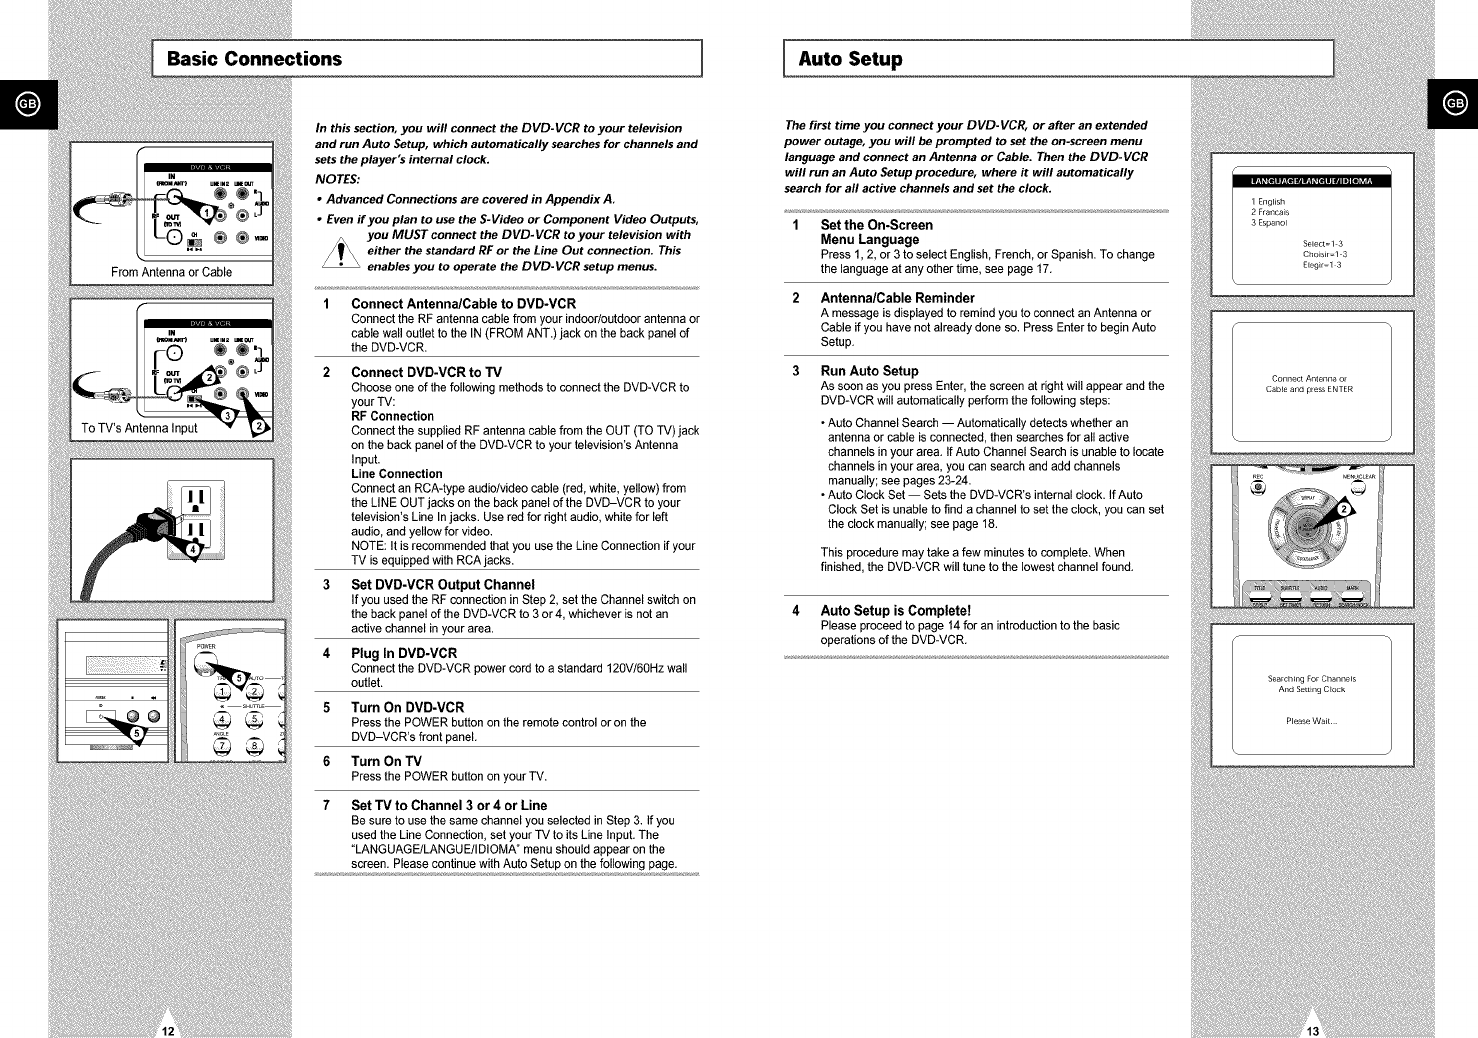
In this section, you will connect the DVD-VCR to your television
and run Auto Setup, which automatically searches for channels and
sets the player's internal clock.
NOTES:
• Advanced Connections are covered in Appendix A,
•Even if you plan to use the S-Video or Component Video Outputs,
you MUST connect the DVD-VCR to your television with
_ither the standard RF or the Line Out connection, This
enables you to operate the DVD-VCR setup menus.
1 Connect Antenna/Cable to DVD-VCR
Connect the RF antenna cable from your indoor/outdoor antenna or
cable wall outlet to the IN (FROM ANT.) jack on the back panel of
the DVD-VCR.
2 Connect DVD-VGR to TV
Choose one of the following methods to connect the DVD-VCR to
your TV:
RF Connection
Connect the supplied RF antenna cable from the OUT (TO TV) jack
on the back panel of the DVD-VCR to your television's Antenna
Input.
Line Connection
Connect an RCA-type audio/video cable (red, white, yellow) from
the LINE OUT jacks on the back panel of the DVD-VCR to your
television's Line In jacks. Use red for right audio, white for left
audio, and yellow for video.
NOTE: It is recommended that you use the Line Connection if your
TV is equipped with RCA jacks.
3 Set DVD-VCR Output Channel
If you used the RF connection in Step 2, set the Channel switch on
the back panel of the DVD-VCR to 3 or 4, whichever is not an
active channel in your area.
4 Plug In DVD-VGR
Connect the DVD-VCR power cord to a standard 120V/60Hz wall
outlet.
5 Turn On DVD-VGR
Press the POWER button on the remote control oron the
DVD-VCR's front panel.
6 Turn On TV
Press the POWER button on your TV.
7 Set TV to Channel 3 or 4 or Line
Be sure to use the same channel you selected in Step 3. If you
used the Line Connection, set your TV to its Line Input. The
"LANGUAGE/LANGUE/IDIOMA" menu should appear on the
screen. Please continue with Auto Setup on the following page.
The first time you connect your DVD-VCR, or after an extended
power outage, you will be prompted to set the on-screen menu
language and connect an Antenna or Cable. Then the DVD-VCR
will run an Auto Setup procedure, where it will automatically
search for all active channels and set the clock.
Set the On-Screen
Menu Language
Press 1, 2, or 3 to select English,French,or Spanish.To change
the languageat any other time, see page 17.
Antenna/Cable Reminder
A message is displayed to remind you to connect an Antenna or
Cable if you have not already done so. Press Enter to begin Auto
Setup.
Run Auto Setup
As soon as you press Enter, the screen at right will appear and the
DVD-VCR will automatically perform the following steps:
• Auto Channel Search -- Automatically detects whether an
antenna or cable is connected, then searches for all active
channels in your area. If Auto Channel Search is unable to locate
channels in your area, you can search and add channels
manually; see pages 23-24.
• Auto Clock Set -- Sets the DVD-VCR's internal clock. If Auto
Clock Set is unable to find a channel to set the clock, you can set
the clock manually; see page 18.
This procedure may take a few minutes to complete. When
finished, the DVD-VCR will tune to the lowest channel found.
4Auto Setup is Complete!
Please proceed to page 14 for an introduction to the basic
operations of the DVD-VCR.
1 English
2 Franca_s
3 Espanol
Selects1 3
Cho_s_r=l 3
Eleg_r=l 3
Connect Antenna or
CaMe and press ENTER
Searching For Channels
And Selling C_ock
Oec.Co.,.o,Bu.o.. I [Ba.icV.SP,a.bac.
AUTO
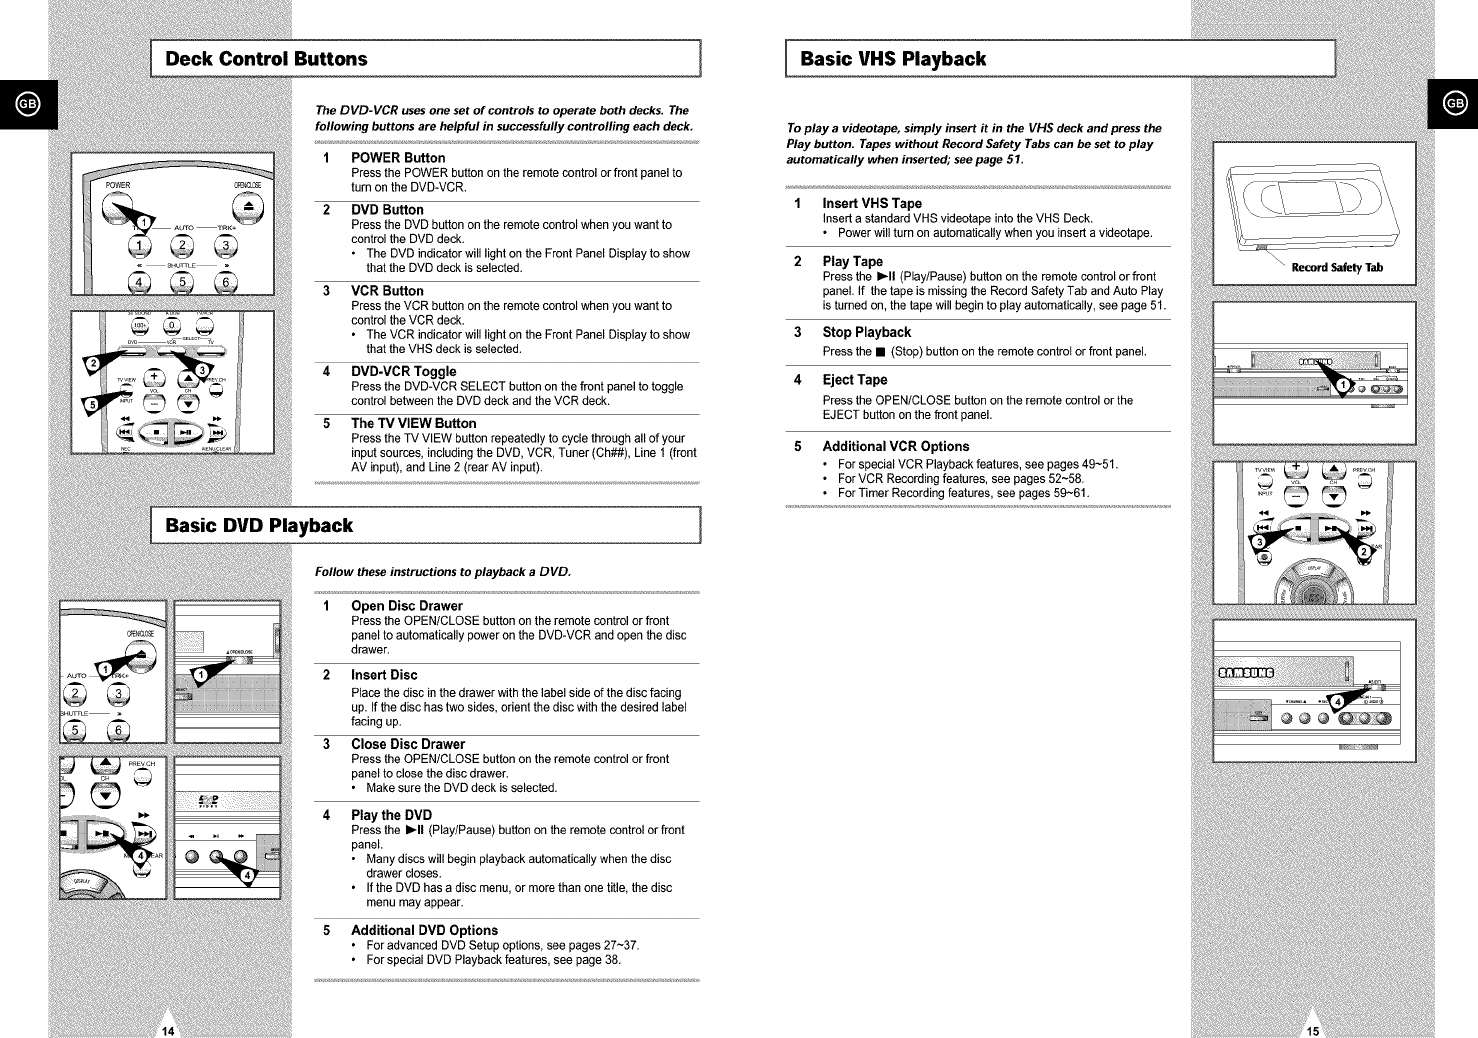
The DVD-VCR uses one set of controls to operate both decks. The
following buttons are helpful in successfully controlling each deck,
1
2
4
5
POWER Button
Press the POWER button on the remote control or front panel to
turn on the DVD-VCR.
DVD Button
Press the DVD button on the remote control when you want to
control the DVD deck.
•The DVD indicator will light on the Front Panel Display to show
that the DVD deck is selected.
VCR Button
Press the VCR button on the remote control when you want to
control the VCR deck.
• The VCR indicator will light on the Front Panel Display to show
that the VHS deck is selected.
DVD-VCR Toggle
Press the DVD-VCR SELECT button on the front panel to toggle
control between the DVD deck and the VCR deck.
The TV VIEW Button
Press the TV VIEW button repeatedly to cycle through all of your
input sources, including the DVD, VCR, Tuner (Ch##), Line 1 (front
AV input), and Line 2 (rear AV input).
Basic DVD Playback
iiii
Follow these instructions to playback a DVD.
1 Open Disc Drawer
Press the OPEN/CLOSE button on the remote control or front
panel to automatically power on the DVD-VCR and open the disc
drawer.
2 Insert Disc
Place the disc in the drawer with the label side of the disc facing
up. If the disc has two sides, orient the disc with the desired label
facing up.
3 Close Disc Drawer
Press the OPEN/CLOSE button on the remote control or front
panel to close the disc drawer.
• Make sure the DVD deck is selected.
4 Play the DVD
Press the I_11 (Play/Pause) button on the remote control or front
panel.
• Many discs will begin playback automatically when the disc
drawer closes.
• If the DVD has a disc menu, or more than one title, the disc
menu may appear.
5 Additional DVD Options
• For advanced DVD Setup options, see pages 27~37.
• For special DVD Playback features, see page 38.
I
To play a videotape, simply insert it in the VHS deck and press the
Play button. Tapes without Record Safety Tabs can be set to play
automatically when inserted; see page 51,
1Insert VHS Tape
Insert a standard VHS videotape into the VHS Deck.
• Power will turn on automatically when you insert a videotape.
2 Play Tape
Press the I_11 (Play/Pause) button on the remote control or front
panel. If the tape is missing the Record Safety Tab and Auto Play
is turned on, the tape will begin to play automatically, see page 51.
3Stop Playback
Press the • (Stop) button on the remote control or front panel.
4Eject Tape
Press the OPEN/CLOSE button on the remote control or the
EJECT button on the front panel.
5Additional VCR Options
• For special VCR Playback features, see pages 49~51.
• For VCR Recording features, see pages 52~58.
• For Timer Recerding features, see pages 59~61.

Basic "IV Tuner Operations ][ Menu Language
The following buttons are used when watching television via the
DVD-VCR's built-in TV tuner,
1TVNC R
Press to switch between your TV's tuner and the VCR's internal
tuner.
2 Channel Up/Down
Press to change to the next or previous channel.
36-9 Buttons
Press to select channels directly.
4 160+ Button
Press to select channels 100 and Hgher. First, press the 100+
button, then press the remaining digits using the 0-9 buttons.
5 Previous Channel
Press to jump directly to the previously viewed channel.
6 Volume
Press to adjust the volume of the program you are watcHng.
•Also works in DVD and VCR mode.
7 Display
Press to display the channel you are watcHng.
• Also works in DVD and VCR mode.
On-Screen Menu Navigation
Set 33mer Recording
Child Lock Off
Set Cl_k
DVD Setup
VCR & Channel Setup
\RETU Pd_ TO Quit J
The Setup Menu is the opening
screen of the on-screen menu
system
The on-screen menu system allows you to set all functions for your
DVD-VCR. The following buttons are used to open and navigate
through the on-screen menu system.
1 SETUP Button
Press to access the DVD-VCR on-screen menu system.
2 Up/Down
Moves menu selecfion arrow up and down to cycle through menu
options
3 Right
Selects or changes menu options.
4 Left
Moves backward through menu opfions on certain screens.
5 ENTER Button
Press to confirm settings in certain menus.
6 RETURN Button
Returns to the last menu viewed or exits the menu system.
7 CLEAR Button
Clears Menu options on certain screens.
I
Follow these steps to change the on-screen menu language to
English, French or Spanish.
1 Open "SETUP MENU"
Press the SETUP button.
2 Set "LanguagelLanguelldioma"
Using the Up/Down buttons, move the selection arrow to
"Language/Langue/Idiomai' then push right button repeatedly to
translate the menu screen into English, French or Spanish.
Manual Clock Set 1 I Daylight Savings Time
SetCl_k
DVDSetup
VCR & ChannelSetup
Languag_Langu_ldi_a
_/_ To Move _To Select
RETURN ToQuK
F
Set 11m_ Recondlng
Child L_k Off
") Set Cl_k
DVD Setup
VCR & Channel Setup
I_nguage__angue!Idi_a
_'/_, To Move ") To Select
\RETURN ToQuit
Auto Clock Set Off
Daylight Savir_ Aura
.eSet Cl_k
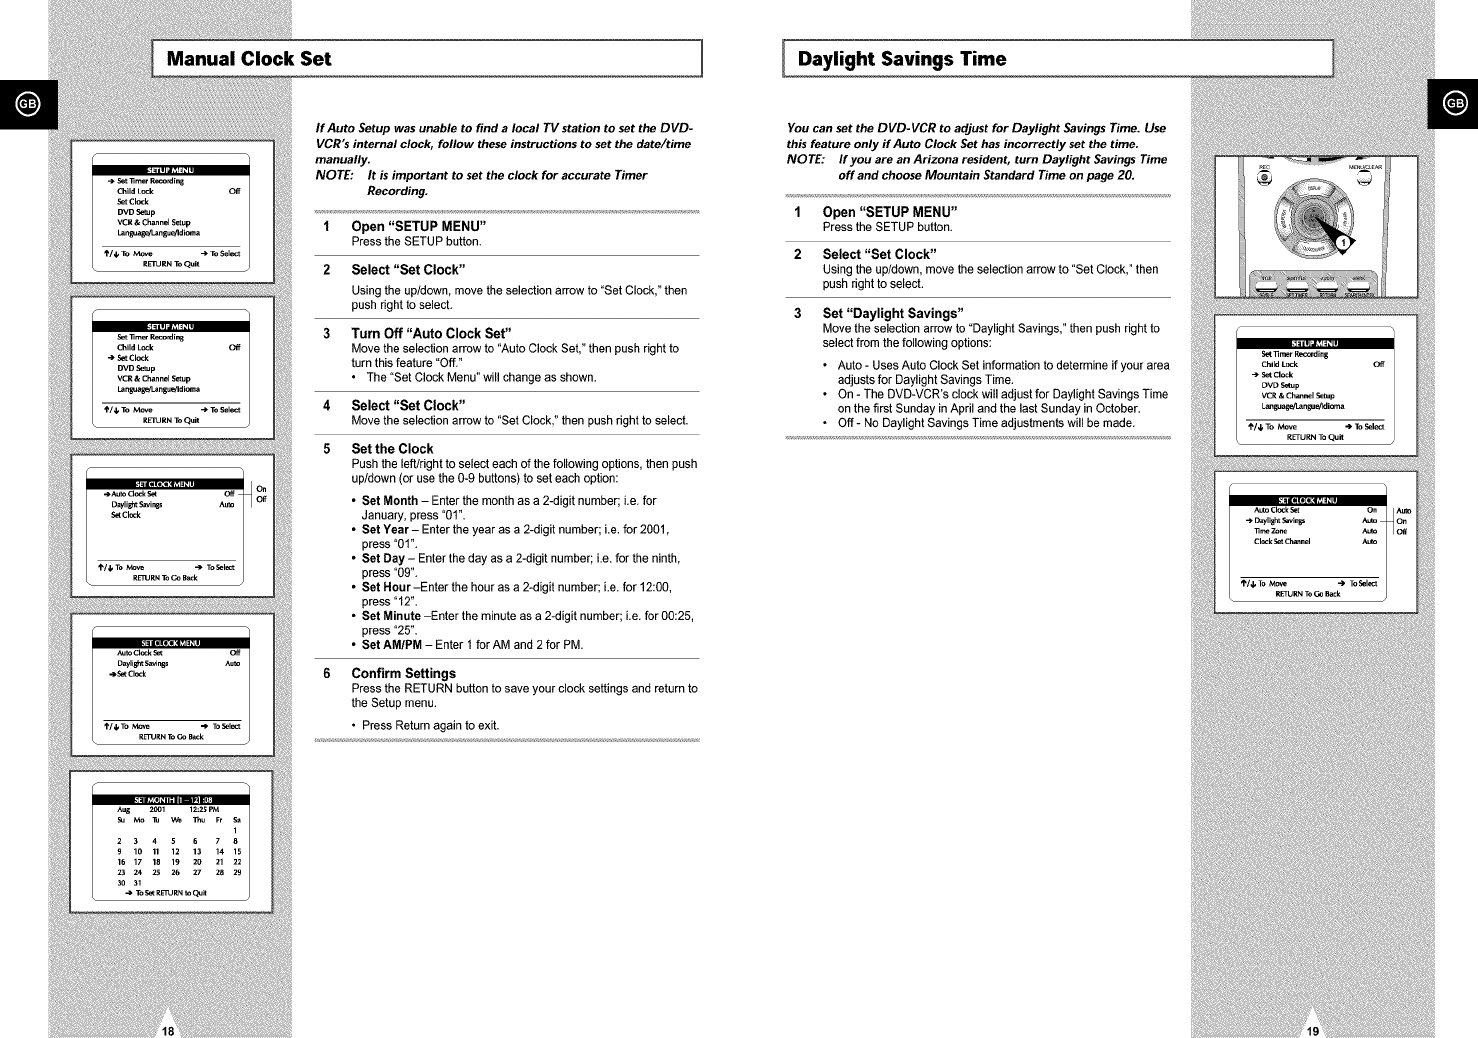
If Auto Setup was unable to find a local TV station to set the DVD-
VCR's internal clock, follow these instructions to set the date/time
manually.
NOTE: It is important to set the clock for accurate Timer
Recording.
1 Open "SETUP MENU"
Pressthe SETUP button.
2 Select "Set Clock"
Usingthe up/down,move the selection arrow to "Set Clock," then
pushright to select.
3 Turn Off "Auto Clock Set"
Move the selection arrow to "Auto Clock Set," then pushright to
turn this feature"Off."
• The "Set Clock Menu" will change as shown.
4 Select "Set Clock"
Move the selection arrow to"Set Clock,"then push rightto select.
5Set the Clock
Push the left/right to select each of the following options, then push
up/down (or use the 0-9 buttons) to set each option:
• Set Month - Enter the month as a 2-digit number; i.e. for
January, press "01".
•Set Year- Enter the year as a 2-digit number; i.e. for 2001,
press "01".
•Set Day- Enter the day as a 2-digit number; Le. for the ninth,
press "09".
•Set Hour-Enter the hour as a 2-digit number; Le. for 12:00,
press "12".
•Set Minute -Enter the minute as a 2-digit number; Le. for 00:25,
press "25".
•Set AM/PM - Enter 1 for AM and 2 for PM
Confirm Settings
Press the RETURN button to save your clock settings and return to
the Setup menu.
• Press Return again to exit.
You can set the DVD-VCR to adjust for Daylight Savings Time. Use
this feature only if Auto Clock Set has incorrectly set the time.
NOTE: If you are an Arizona resident, turn Daylight Savings Time
off and choose Mountain Standard Time on page 20.
1 Open "SETUP MENU"
Press the SETUP button.
2Select "Set Clock"
Using the up/down, move the selection arrow to "Set Clock," then
push right to select.
3Set "Daylight Savings"
Move the selection arrow to "Daylight Savings," then push right to
select from the following options:
• Auto - Uses Auto Clock Set information to determine if your area
adjusts for Daylight Savings Time.
• On - The DVD-VCR's clock will adjust for Daylight Savings Time
on the first Sunday in April and the last Sunday in October.
•Off- No Daylight Savings Time adjustments will be made.
Time Zone 1 [Auto Clock Set Channel
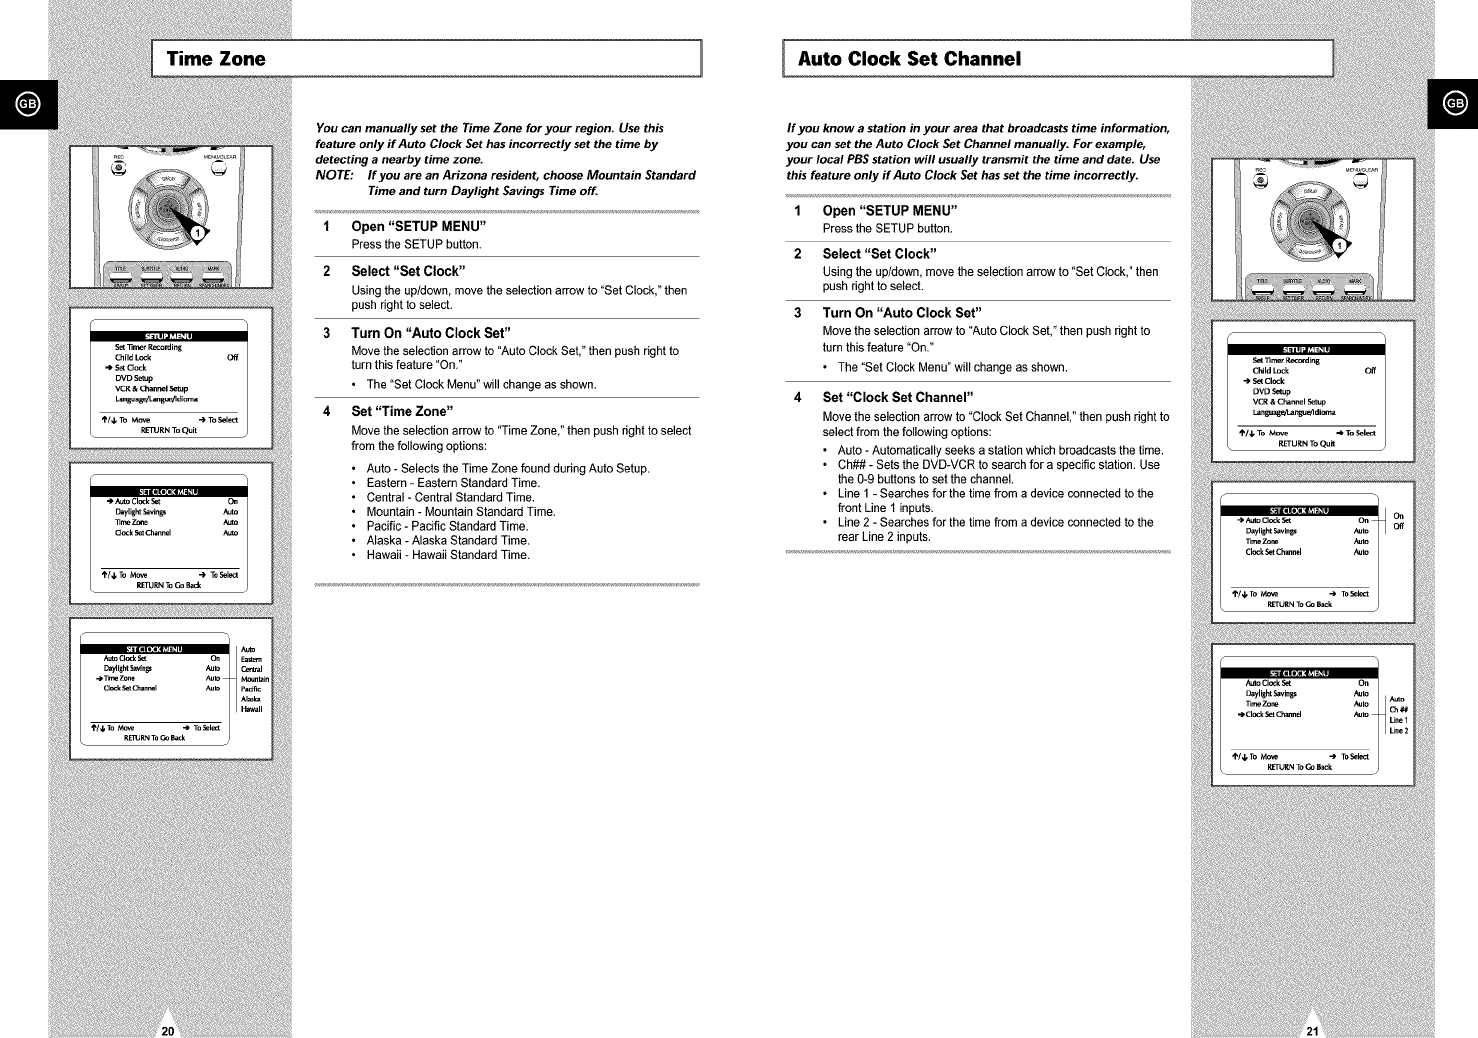
You can manually set the Time Zone for your region. Use this
feature only if Auto Clock Set has incorrectly set the time by
detecting a nearby time zone.
NOTE: If you are an Arizona resident, choose Mountain Standard
Time and turn Daylight Savings Time off.
1 Open "SETUP MENU"
Press the SETUP button.
2 Select "Set Clock"
Using the up/down, move the selection arrow to "Set Clock," then
push right to select.
3 Turn On "Auto Clock Set"
Move the selection arrow to "Auto Clock Set," then push right to
turn this feature "On."
• The "Set Clock Menu" will change as shown.
4 Set "Time Zone"
Move the selection arrow to "Time Zone," then push right to select
from the following options:
Auto - Selects the Time Zone found during Auto Setup.
Eastern - Eastern Standard Time.
Central -Central Standard Time.
Mountain - Mountain Standard Time.
Pacific -Pacific Standard Time.
Alaska - Alaska Standard Time.
Hawaii - Hawaii Standard Time.
If you know a station in your area that broadcasts time information,
you can set the Auto Clock Set Channel manually. For example,
your local PBS station will usually transmit the time and date. Use
this feature only if Auto Clock Set has set the time incorrectly.
1 Open "SETUP MENU"
Press the SETUP button.
2 Select "Set Clock"
Using the up/down, move the selection arrow to "Set Clock," then
push right to select.
3 Turn On "Auto Clock Set"
Move the selection arrow to "Auto Clock Set," then push right to
turn this feature "On."
• The "Set Clock Menu" will change as shown.
4Set "Clock Set Channel"
Move the selection arrow to "Clock Set Channel," then push right to
select from the following options:
• Auto - Automatically seeks a station which broadcasts the time.
• Ch## - Sets the DVD-VCR to search for a specific station. Use
the 0-9 buttons to set the channel.
• Line 1 - Searches for the time from a device connected to the
front Line 1 inputs.
• Line 2 - Searches for the time from a device connected to the
rear Line 2 inputs.
Tuner Band Setting Auto Channel Search
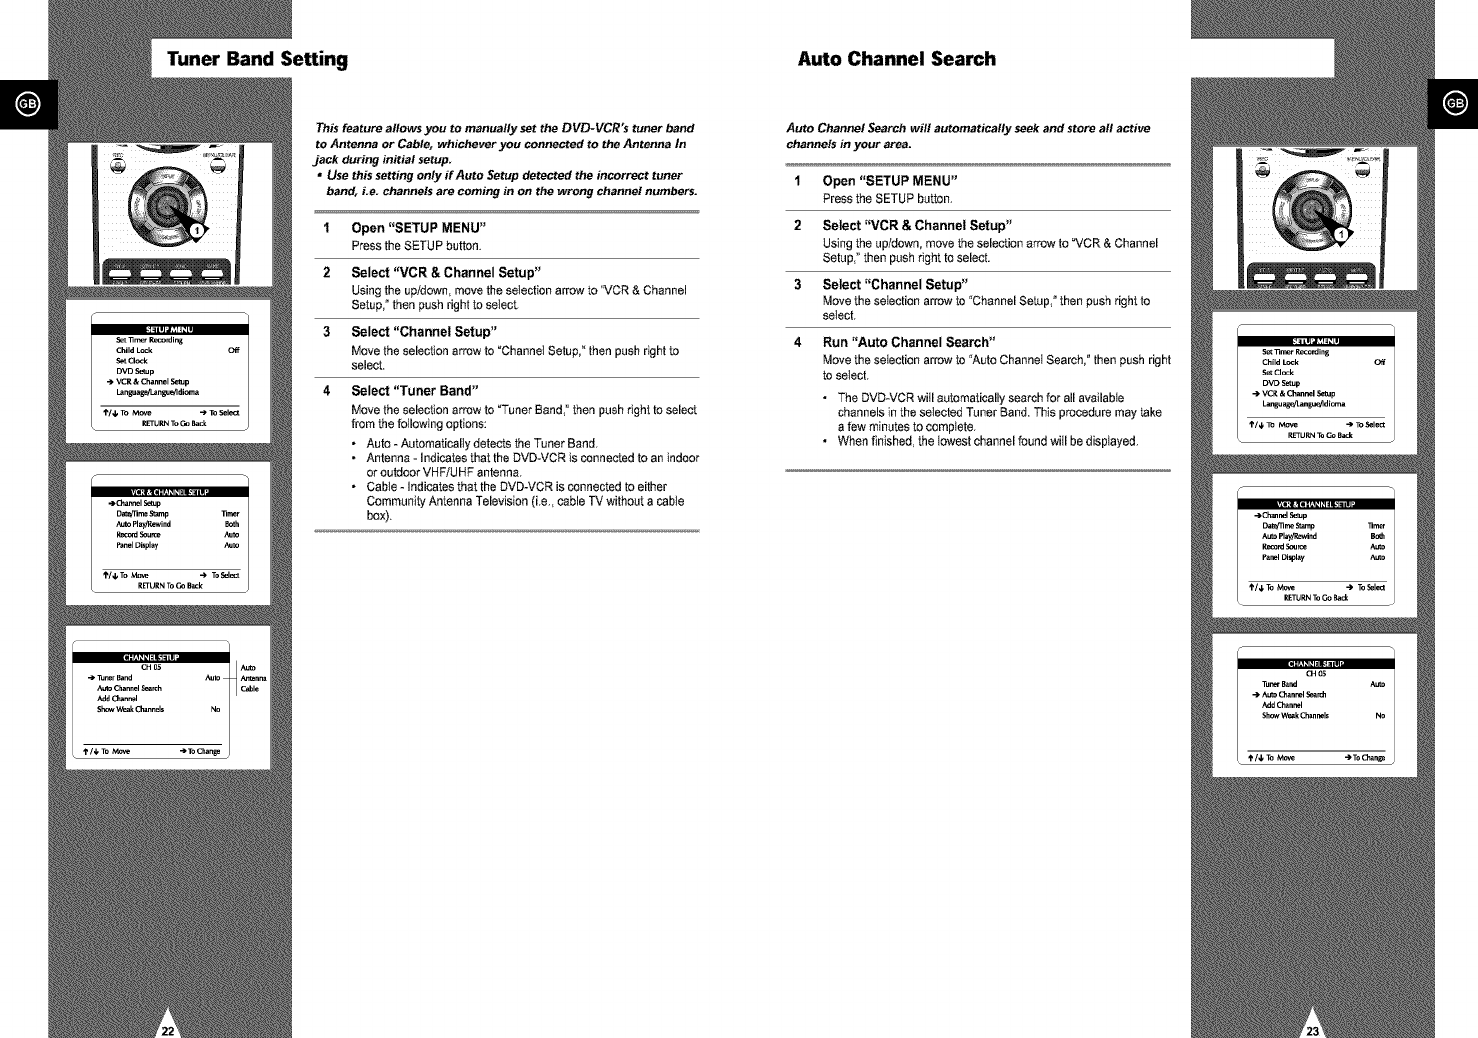
This feature allows you to manually set the DVD-VCR's tuner band
to Antenna or Cable, whichever you connected to the Antenna In
jack during initial setup.
* Use this setting only ffAuto Setup detected the incorrect tuner
band, Le. channels are coming in on the wrong channel numbers.
1Open "SETUP MENU"
Press the SETUP button.
2 Select "VCR & Channel Setup"
Using the up]down, move the selection arrow to "VCR & Channel
Setup," then push right to select.
3Select "Channel Setup"
Move the selection arrow to "Channel Setup," then push right to
select.
4Select "Tuner Band"
Move the selection arrow to Tuner Band," then push right to select
from the following options:
• Auto - Automatically detects the Tuner Band.
• Antenna - indicates that the DVD-VCR is connected to an indoor
or outdoor VHF]UHF antenna.
• Cabte - Indicates that the DVD-VCR is connected to either
Community Antenna Television (i.e., cable TV without a cable
box).
Auto Channel Search will automatically seek and store all active
channels in your area.
1Open "SETUP MENU"
Pressthe SETUP button,
2 Select "VCR & Channel Setup"
Usingthe up/down,move the selection arrow to"VCR & Channel
Setup,"then push rightto select.
3Select "Channel Setup"
Move theselection arrow to "ChannelSetup,"then push right to
select.
4 Run "Auto Channel Search"
Move theselection arrow to "AutoChannel Search,"then push right
to setect.
• The DVD-VCR wiil automatically search for all available
channels in the selected Tuner Band. This procedure may take
a few minutes to complete,
• When finished, the lowest channel found wiil be displayed,
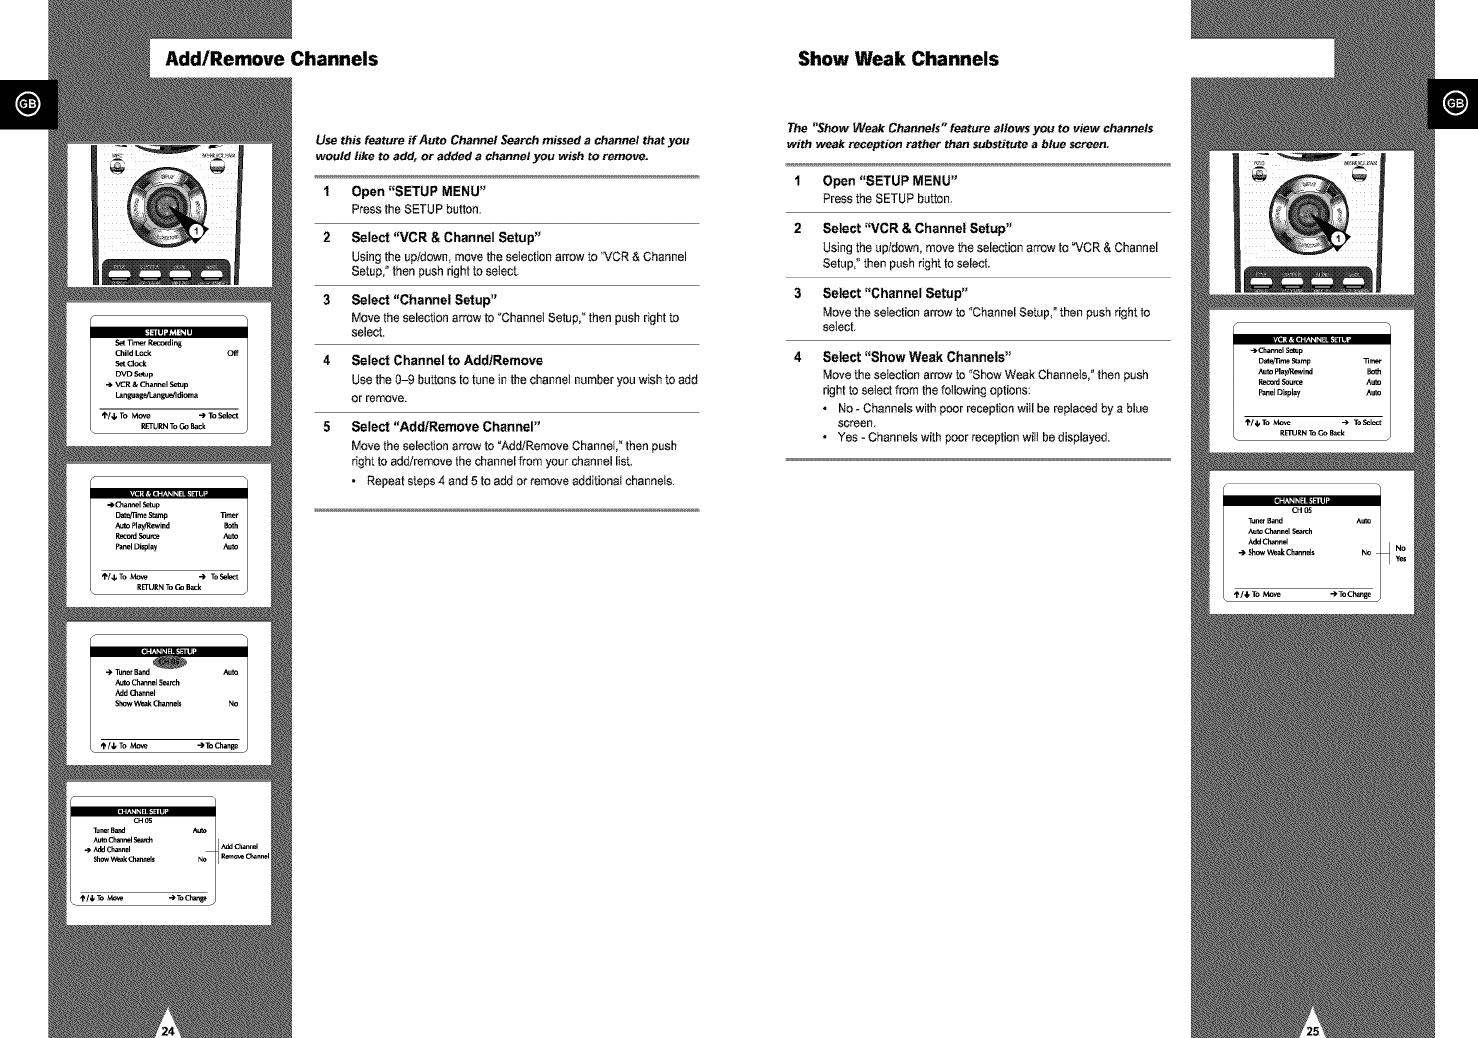
Add/Remove Channels Show Weak Channels
Use this feature if Auto Channel Search missed achannel that you
would like to add, or added achannel you wish to remove.
1 Open "SETUP MENU"
Press the SETUP button.
2 Select "VCR & Channel Setup"
Using the up/down move the seiection arrow to "VCR & Channel
Setup," then push right to select.
3 Select "Channel Setup"
Move the selection arrow to "ChanneI Setup," then push right to
select.
4 Select Channel to Add/Remove
Use the 0-9 buttons to tune in the channel number you wish to add
or remove.
5 Select "Add/Remove Channel"
Move the selection arrow to "Add/Remove ChanneI," then push
right to add/remove the channel from your channel list.
• Repeat steps 4 and 5 to add or remove additional channels.
The "Show Weak Channels" feature allows you to view channels
with weak reception rather than substitute a blue screen.
1Open "SETUP MENU"
Press the SETUP button.
2 Select "VCR & Channel Setup"
Using the up/down, move the selection arrow to "VCR & Channel
Setup," then push right to select.
3 Select "Channel Setup"
Move the seIection arrow to "Channel Setup," then push right to
select.
4 Select "Show Weak Channels"
Move the seiection arrow to "Show Weak Channeis," then push
right to setect from the following options:
• No - Channels with poor reception will be replaced by a blue
screen,
• Yes - Channels with poor reception will be displayed.
Tuner Audio Front Panel Dimmer
Child Lock
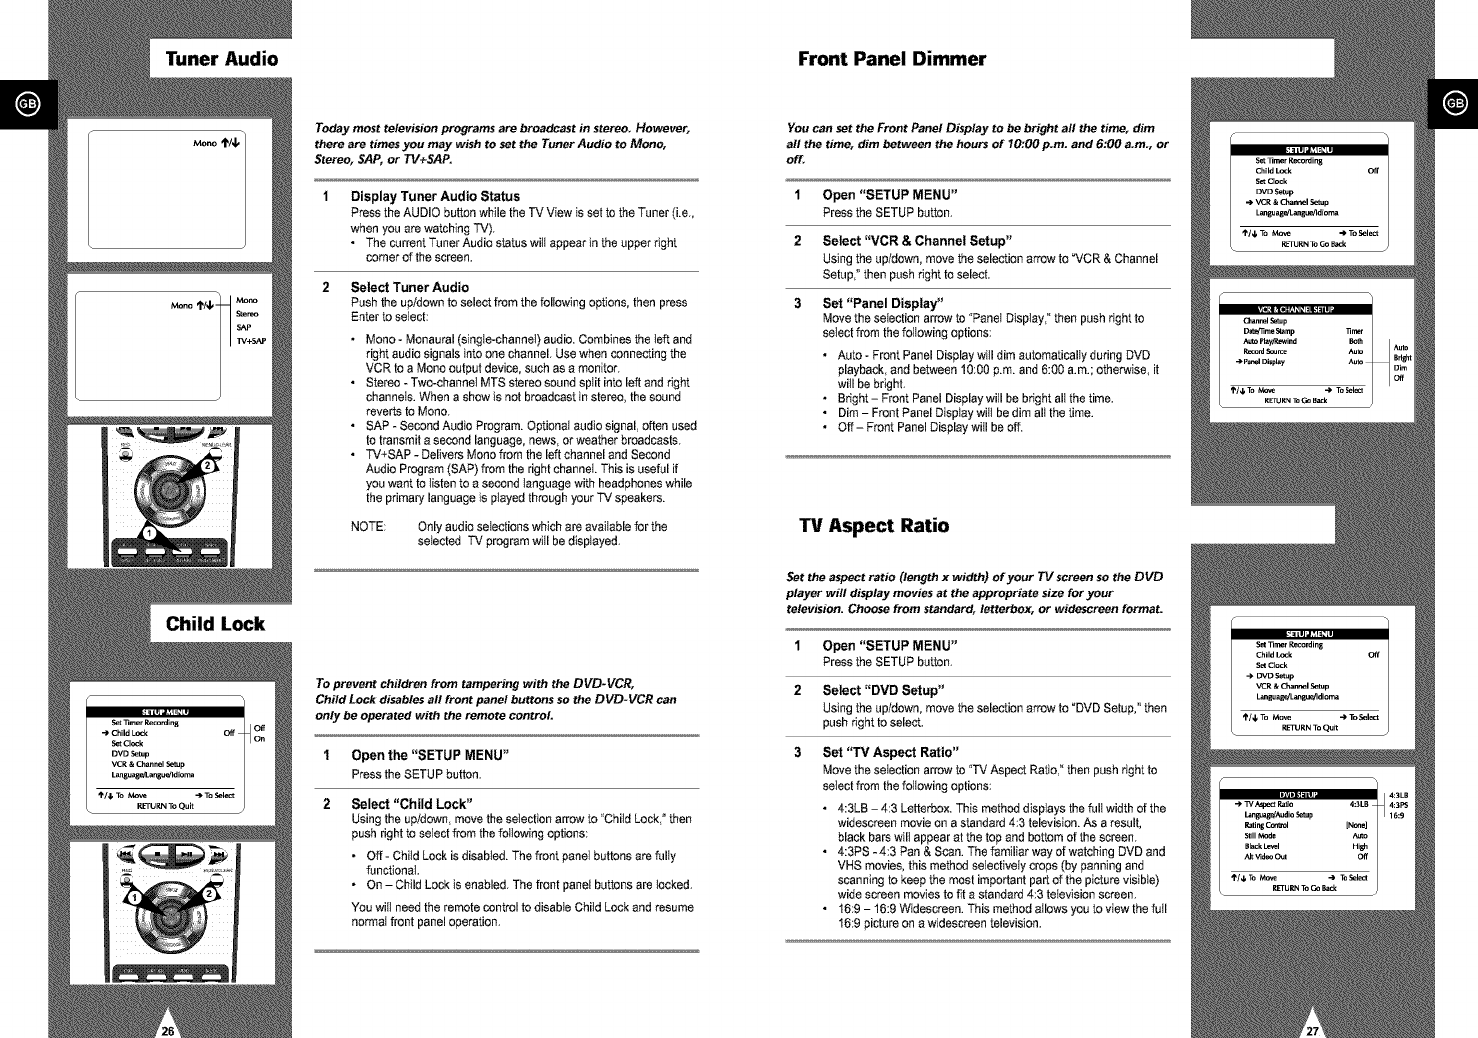
Today most television programs are broadcast in stereo. However,
there are times you may wish to set the Tuner Audio to Mono,
Stereo, SAP, or TV+SAP.
Display Tuner Audio Status
Press the AUDIO button while the TV View is set to the Tuner (i.e.,
when you are watching "Fv').
• The current Tuner Audio status will appear in the upper right
comer of the screen.
Select Tuner Audio
Push the up/down to select from the following options, then press
Enter to select:
• Mono - Monaural (siogte-channeI) audio. Combines the left and
right audio signals into one channel. Use when connecting the
VCR to a Mono output device, such as a monitor.
• Stereo - Two-channel MTS stereo sound spilt into left and right
channeIs. When a show is not broadcast in stereo, the sound
reverts to Mono.
• SAP - Second Audio Program. Optional audio signal, often used
to transmit a second language, news, or weather broadcasts.
• TV+SAP - Delivers Mono from the left channel and Second
Audio Program (SAP) from the right channel This is useful if
you want to listen to a second language with headphones while
the primary language is played through your TV speakers.
NOTE: Onlyaudio seIectionswhich are avaiIable for the
selected TV programwill be displayed,
To prevent children from tampering with the DVD-VCR,
Child Lock disables all front panel buttons so the DVD-VCR can
only be operated with the remote control
1Open the "SETUP MENU"
Pressthe SETUP button.
2Select "Child Lock"
Using the up/down, move the selection arrow to "Child Lock, ° then
push right to setect from the following options:
•Oft - Child Lock is disabled. The front panel buttons are fully
functional
• On - Child Lock is enabled. The front panel buttons are tocked.
You witI need the remote control to disable Child Lock and resume
normal front panel operation.
You can set the Front Panel Display to be bright all the time, dim
all the time, dim between the hours of 70:00 p.m. and 6:00 a.m., or
off.
1Open "SETUP MENU"
Press the SETUP button.
2 Select "VCR & Channel Setup"
Using the up/down, move the selection arrow to "VCR & Channel
Setup," then push right to select.
3Set "Panel Display"
Move the selection arrow to "Panel Display," then push right to
select from the following options:
• Auto - Front Panel Display wiII dim automatically during DVD
playback, and between 10:00 p.m. and 6:00 a.m.; otherwise, it
will be bright.
• Bright- Front Panel Display witl be bright alt the time.
• Dim -Front Panel Disptay witI be dim alt the time.
• Off- Front Panel Display will be off.
TV Aspect Ratio
Set the aspect ratio (length x width) of your TV screen so the DVD
player will display movies at the appropriate size for your
television. Choose from standard, letterbex, or widescreen format.
1Open "SETUP MENU"
Press the SETUP button.
2 Select "DVD Setup"
Using the up/down, move the selection arrow to "DVD Setup," then
push right to select.
3Set "TM Aspect Ratio"
Move the selection arrow to "TV Aspect Ratio," then push right to
select from the following options:
• 4:3LB - 4:3 Letterbox. This method disptays the fult width of the
widescreen movie on a standard 4:3 television. As a result,
black bars wilt appear at the top and bottom of the screen.
• 4:3PS - 4:3 Pan & Scan. The familiar way of watching DVD and
VHS movies, this method selectively crops (by panning and
scanning to keep the most important part of the picture visible)
wide screen movies to fit a standard 4:3 television screen.
• 169 - 16:9 Widescraen. This method allows you to view the full
16:9 picture on a widescraen television.
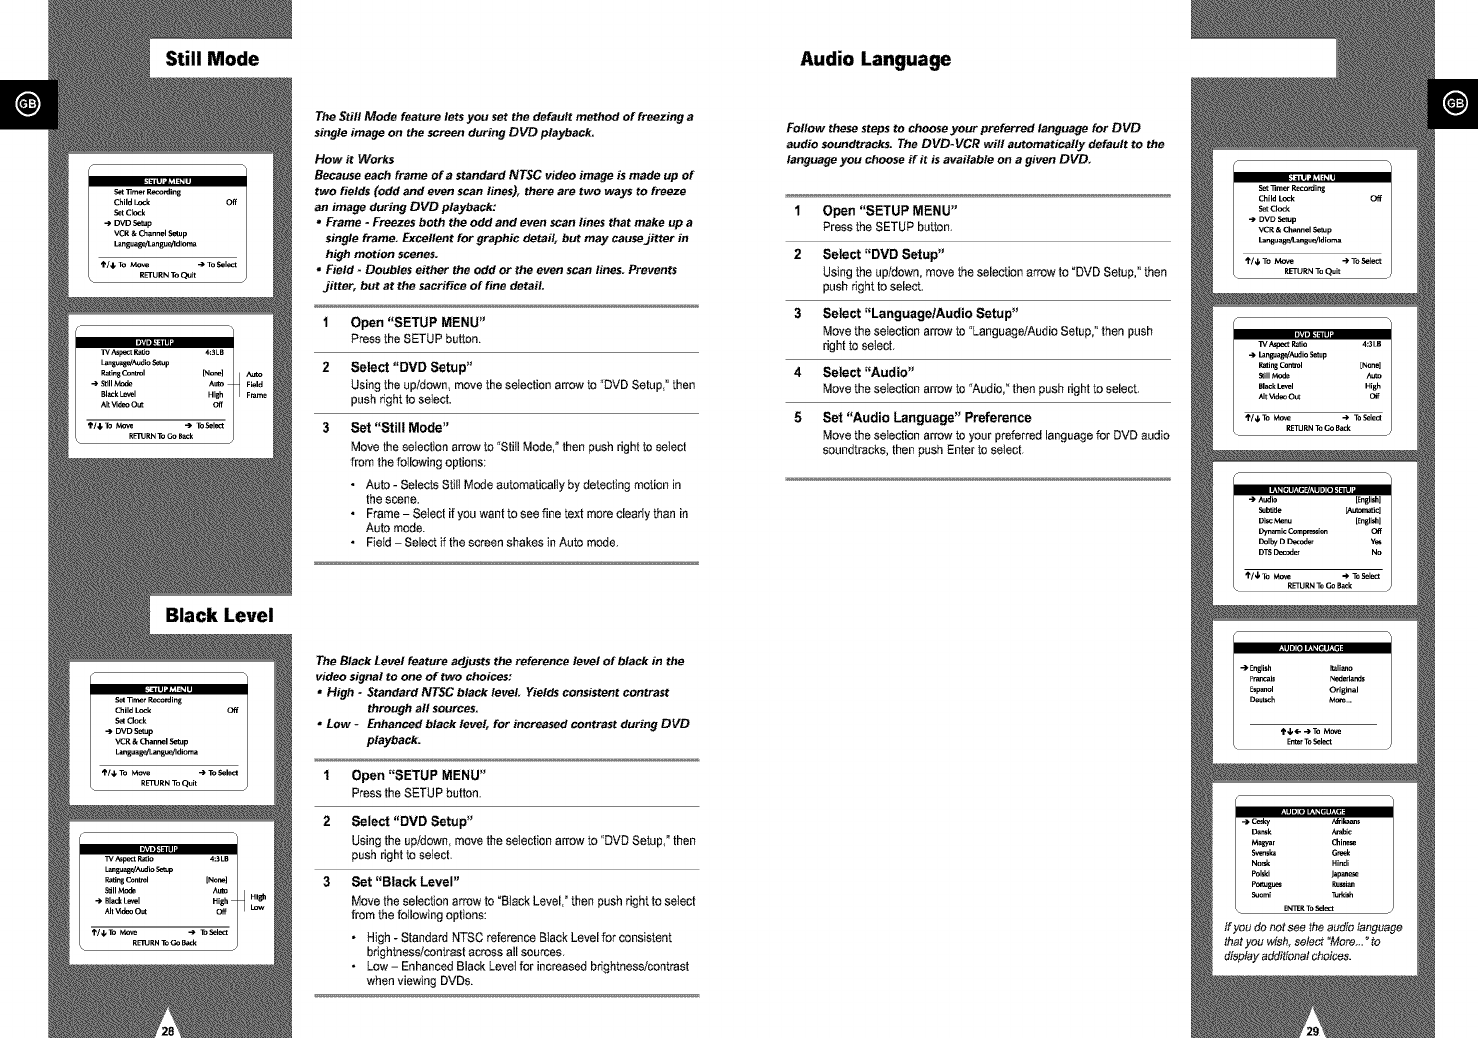
Still Mode Audio Language
Black Level
The Still Mode feature lets you set the default method of freezing a
single image on the screen during DVD playback:
How it Works
Because each frame of astandard NTSC video image is made up of
two fields (odd and even scan lines), there are two ways to freeze
an image during DVD playback:
•Frame - Freezes both the odd and even scan lines that make up a
single frame. Excellent for graphic detail, but may causejittar in
high motion scenes.
• Field - Doubles either the odd or the even scan lines. Prevents
jitter, but at the sacrifice of fine detail.
1Open "SETUP MENU"
Press the SETUP button.
2 Select "DVD Setup"
Using the up/down, move the selection arrow to "DVD Setup," then
push right to select.
3 Set "Still Mode"
Move the selection arrow to "Still Mode, ° then push right to select
from the following options:
•Auto - Selects Still Mode automatically by detecting motion in
the scene.
• Frame - Select if you want to see fine text more clearly than in
Auto mode.
• Field - Select if the screen shakes in Auto mode.
The Black Level feature adjusts the reference level of black in the
video signal to one of two choices:
•High - Standard NTSC black level. Yields consistent contrast
through all sources.
• Low -Enhanced black level, for increased contrast during DVD
playback:
1Open "SETUP MENU"
Pressthe SETUP button.
2 Select "DVD Setup"
Usingthe up]down,move theselection arrow to "DVD Setup,°then
pushright to select.
3Set "Black Level"
Move the selection arrow to"BtackLevel," then pushright to select
from thefollowingoptions:
•High- Standard NTSCreferenceBtack Level for consistent
brightness]contrastacross all sources.
• Low - Enhanced Black LeveIfor increasedbrightness]contrast
whenviewing DVDs.
Follow these steps to choose your preferred language for DVD
audio seuodtracks. The DVD-VCR will automatically default to the
language you choose if it is available on a given DVD.
1Open "SETUP MENU"
Pressthe SETUP button.
2 Select "DVD Setup"
Usingthe up/down,move the selection arrow to"DVD Setup," then
push right toselect.
3 Select "Language/Audio Setup"
Move the selection arrow to "Language]AudioSetup,_'then push
right to select.
4 Select "Audio"
Move the selection arrow to "Audio,_'thenpush right to select.
5Set "Audio Language" Preference
Move theselection arrow to your preferredlanguagefor DVD audio
soundtracks,then push Enter to select.
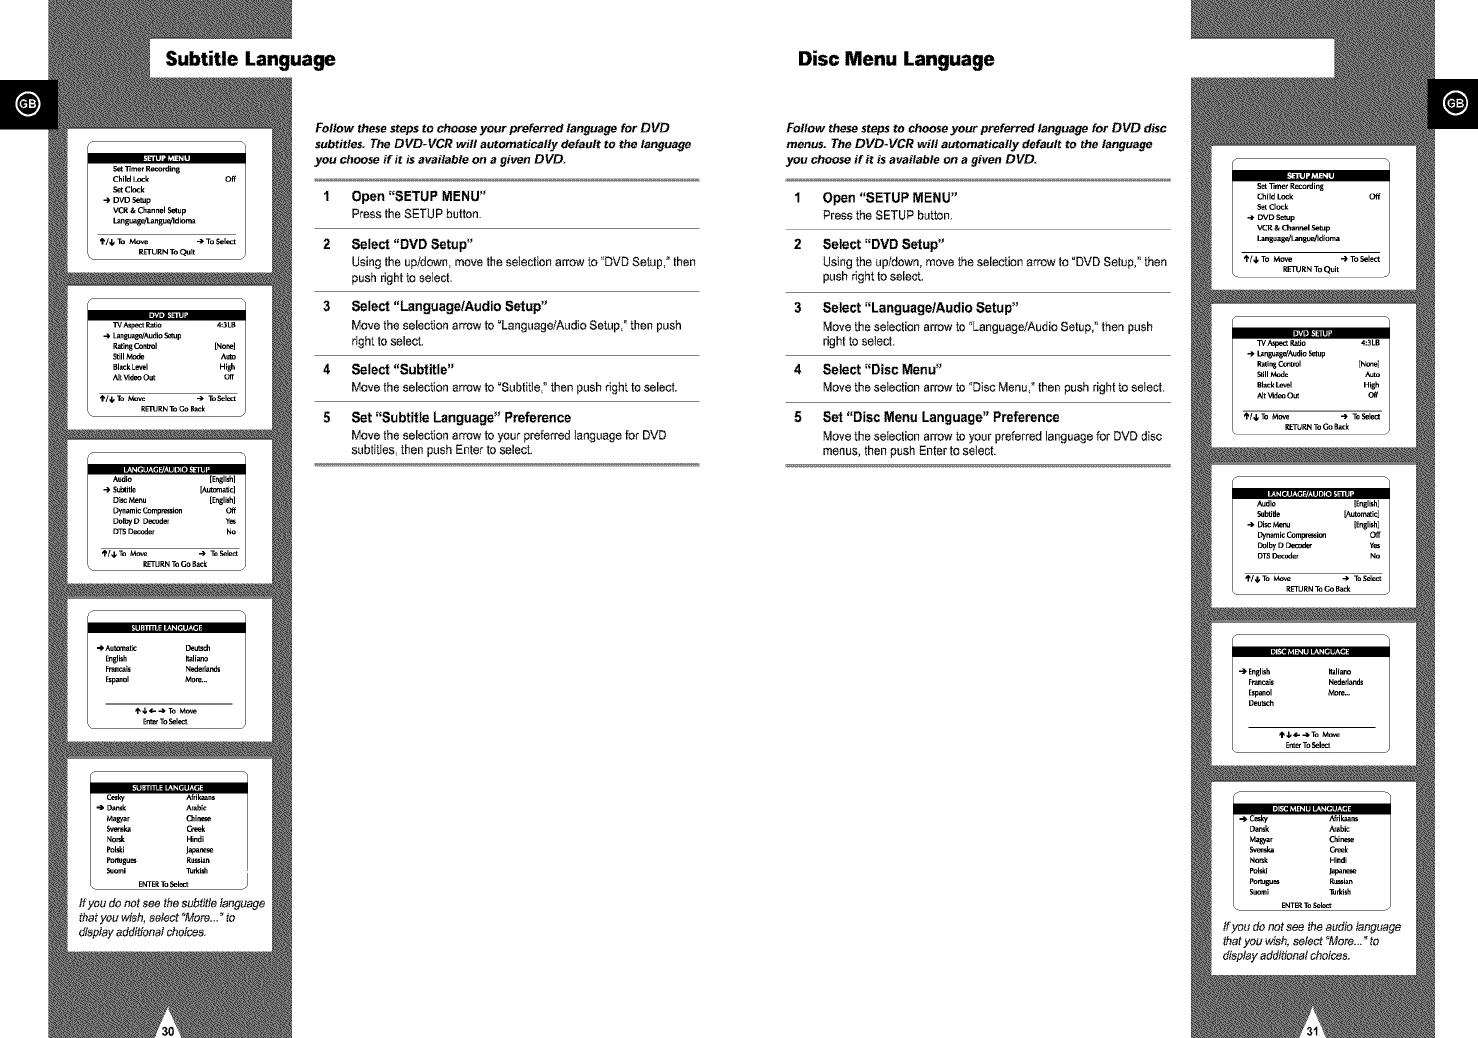
Subtitle Language Disc Menu Language
Follow these steps to choose your preferred language for DVD
subtitles. The DVD-VCR will automatically default to the language
you choose if it isavailable on agiven DVD.
1Open "SETUP MENU"
Press the SETUP button.
2 Select "DVD Setup"
Using the up/down, move the selection arrow to "DVD Setup," then
push right to selecL
3Select "Language/Audio Setup"
Move the selection arrow to "Language/Audio Setup," then push
right to select.
4Select "Subtitle"
Move the selection arrow to "Subtitle," then push right to select.
5 Set "Subtitle Language" Preference
Move the selection arrow to your preferred language for DVD
subtitles, then push Enter to select.
Follow these steps to choose your preferred language for DVD disc
menus. The DVD-VCR will automatically default to the language
you choose if it is available on a given DVD.
1Open "SETUP MENU"
Pressthe SETUP button,
2 Select "DVD Setup"
Usingthe up/down,move the selection arrow to"DVD Setup," then
push right toselect.
3 Select "Language/Audio Setup"
Move the selection arrow to "Language/AudioSetup,"then push
right to selecL
4 Select "Disc Menu"
Move theselection arrow to "Disc Menu,_then push right toselect.
5Set "Disc Menu Language" Preference
Move theselection arrow to your preferredlanguagefor DVD disc
menus, then push Enter to seIed.
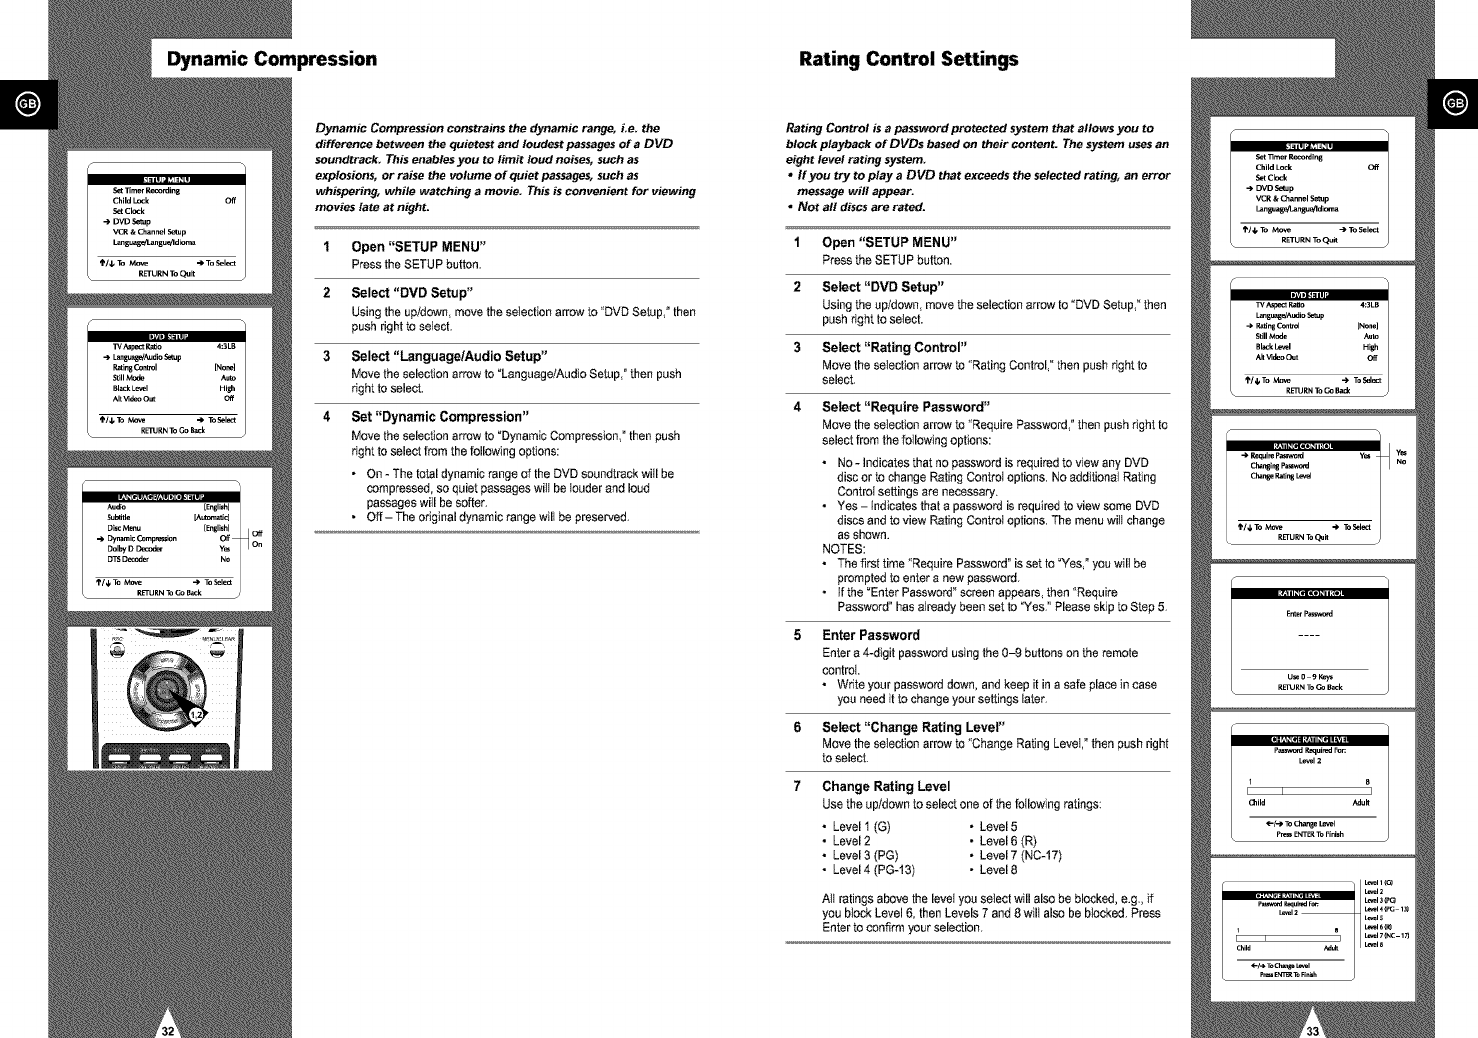
Dynamic Compression Rating Control Settings
Dynamic Compression constrains the d_mamic range, Le. the
difference between the quietest and loudest passages of aDVD
soundtrack. This enables you to limit loud noises, such as
explosions, or raise the volume of quiet passages, such as
whispering, while watching a movie. This is convenient for viewing
movies late at night.
1Open "SETUP MENU"
Press the SETUP button.
2 Select "DVD Setup"
Using the up]down, move the selection arrow to "DVD Setup," then
push right to selecL
3Select "LanguagelAudio Setup"
Move the selection arrow to "Language/Audio Setup," then push
right to select.
4Set "Dynamic Compression"
Move the selection arrow to "Dynamic Compression," then push
right to select from the following options:
• On - The total dynamic range of the DVD soundtrack witl be
compressed, so quiet passages will be louder and loud
passages will be softer.
• Off- The original dynamic range wilt be preserved.
Rating Control is apassword protected system that allows you to
block playback of DVDs based on their content. The system uses an
eight level rating system.
,If you try to play a DVD that exceeds the selected rating, an error
message will appear.
• Not all discs are rated.
1Open "SETUP MENU"
Press the SETUP button.
2 Select "DVD Setup"
Using the up/down, move the selection arrow to "DVD Setup," then
push right to select.
3Select "Rating Control"
Move the selection arrow to "Rating Control," then push right to
select.
4 Select "Require Password"
Move the selection arrow to "Require Password," then push right to
select from the following options:
•No - Indicates that no password is required to view any DVD
disc or to change Rating Control options. No additional Rating
Control settings are necessary.
• Yes - indicates that a password is required to view some DVD
discs and to view Rating Control options. The menu will change
as shown.
NOTES:
•The first time "Require Password" is set to _fes," you will be
prompted to enter a new password.
• If the "Enter Password" screen appears, then "Requira
Password" has already been set to "Yes." Please skip to Step 5.
Enter Password
Enter a 4-digit password using the 0-9 buttons on the remote
control
• Write your password down, and keep it in a safe place in case
you need it to change your settings later.
6 Select "Change Rating Level"
Move the selection arrow to "Change Rating Level," then push right
to select.
7 Change Rating Level
Use the up/down to select one of the following ratings:
• Level 1 (G) • Level 5
• Level 2 • Level 6 (R)
• Level 3 (PC) • Level 7 (NC-17)
• Level 4 (PC-13) • Level 8
AII ratings above the levet you setect will also be blocked, e.g, if
you btock Level 6, then Levels 7 and 8 wilt also be btocked. Press
Enter to confirm your selection.
Set 13mer Recording
Child Lock Off
.%t Cl_k
•-> DVD Setup
VCR & Channel Setup
Lansuage!Lanb'u_ldi_a
_/4. To Move "> To Select
RETURN To Quit
,_DI._=III
w AspectRa_o 4:3LB
language/AudioSetup
•->R_ngControl [None]
S_llMade Auto
BlackLevel High
Ak_deoOut Off
->Requf_P_rd Yes
Changing Pa_o_J No
Ckar_e RaUr_ L_I
RETURN To(_J_
EnterPassword
Password gequiped For
Level 2
s
11 I I
Child Adult
<'-/_ To Change Level
P_B ENTER To Finish
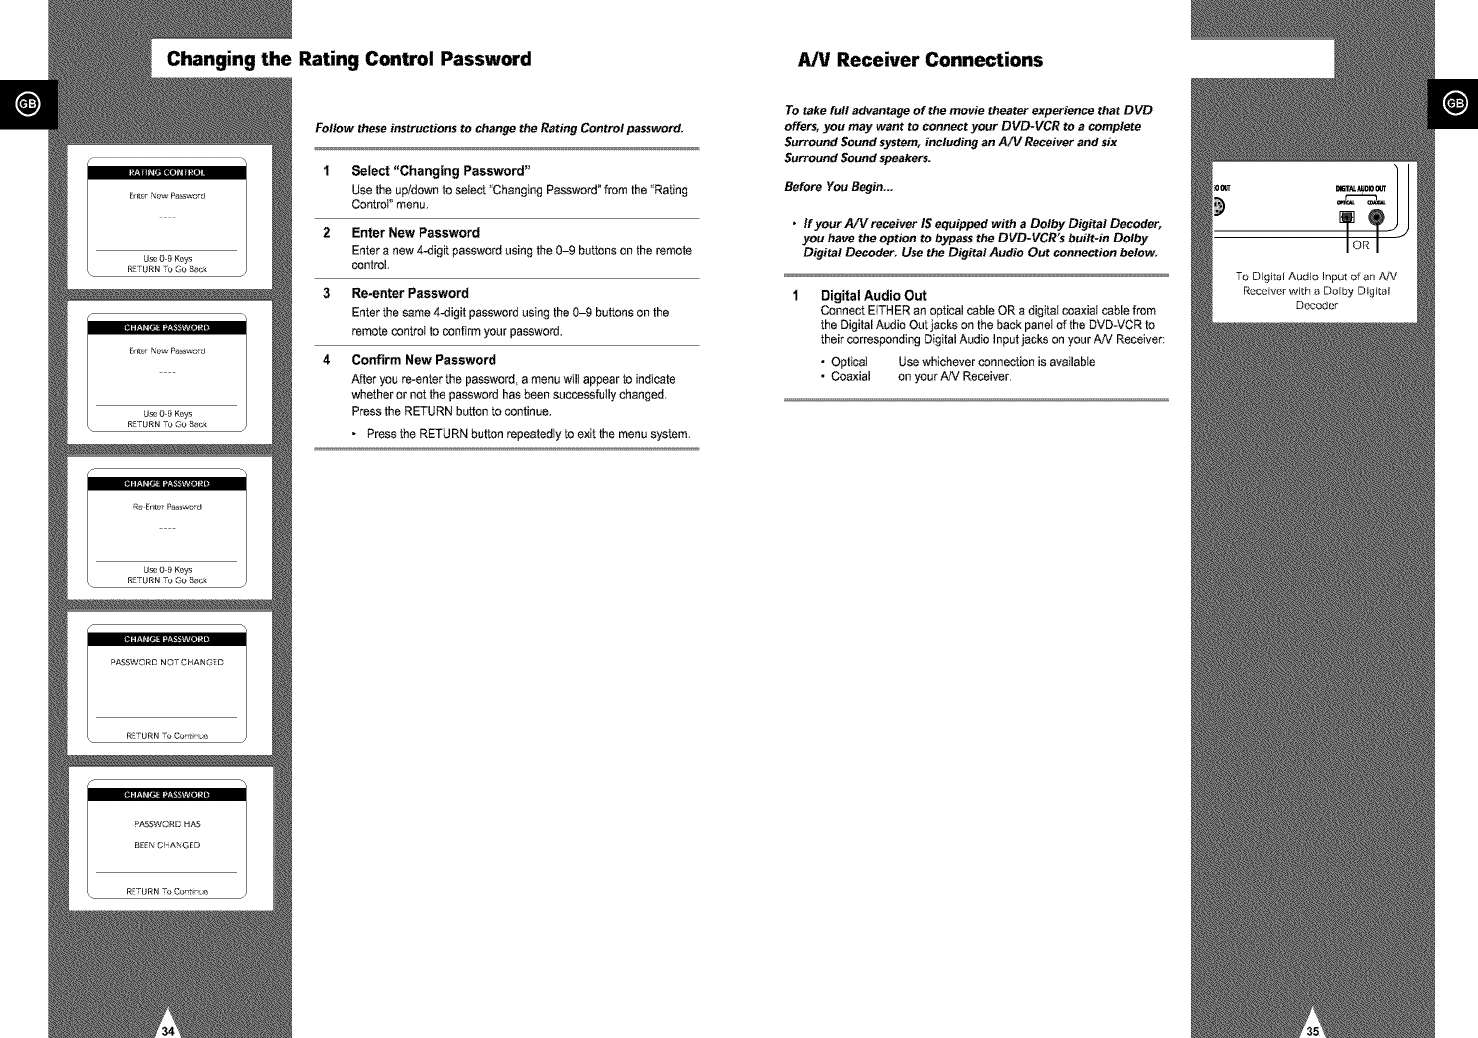
Changing the Rating Control Password A/V Receiver Connections
Follow these instructions to change the Rating Control password.
1 Select "Changing Password"
Use the up/down to select "Changing Password _from the "Rating
Control" menu.
2 Enter New Password
Enter a new 4-digit password using the 0-9 buttons on the remote
control.
3Re-enter Password
Enter the same 4-digit password using the 0-9 buttons on the
remote control to confirm your password.
4 Confirm New Password
After you re-enter the password, a menu wilt appear to indicate
whether or not the password has been successfully changed.
Press the RETURN button to continue.
• Press the RETURN button repeatedly to exit the menu system.
To take full advantage of the movie theater experience that DVD
offers, you may want to connect your DVD-VCR to a complete
Surround Sound system, including an A/V Receiver and six
Surround Sound speakers.
Before You Begin...
•If your A/V receiver IS equipped with a Dolby Digital Decoder,
you have the option to bypass the DVD-VCR's built-in Dolby
Digital Decoder. Use the Digital Audio Out connection below.
Digital Audio Out
Connect EITHER an optical cable OR a digitat coaxiat cable from
the Digital Audio Out jacks on the back panel of the DVD-VCR to
their corresponding Digital Audio Input jacks on your AN Receiver:
•Opticat Use whichever connection is available
• Coaxial on your AN Receiver.
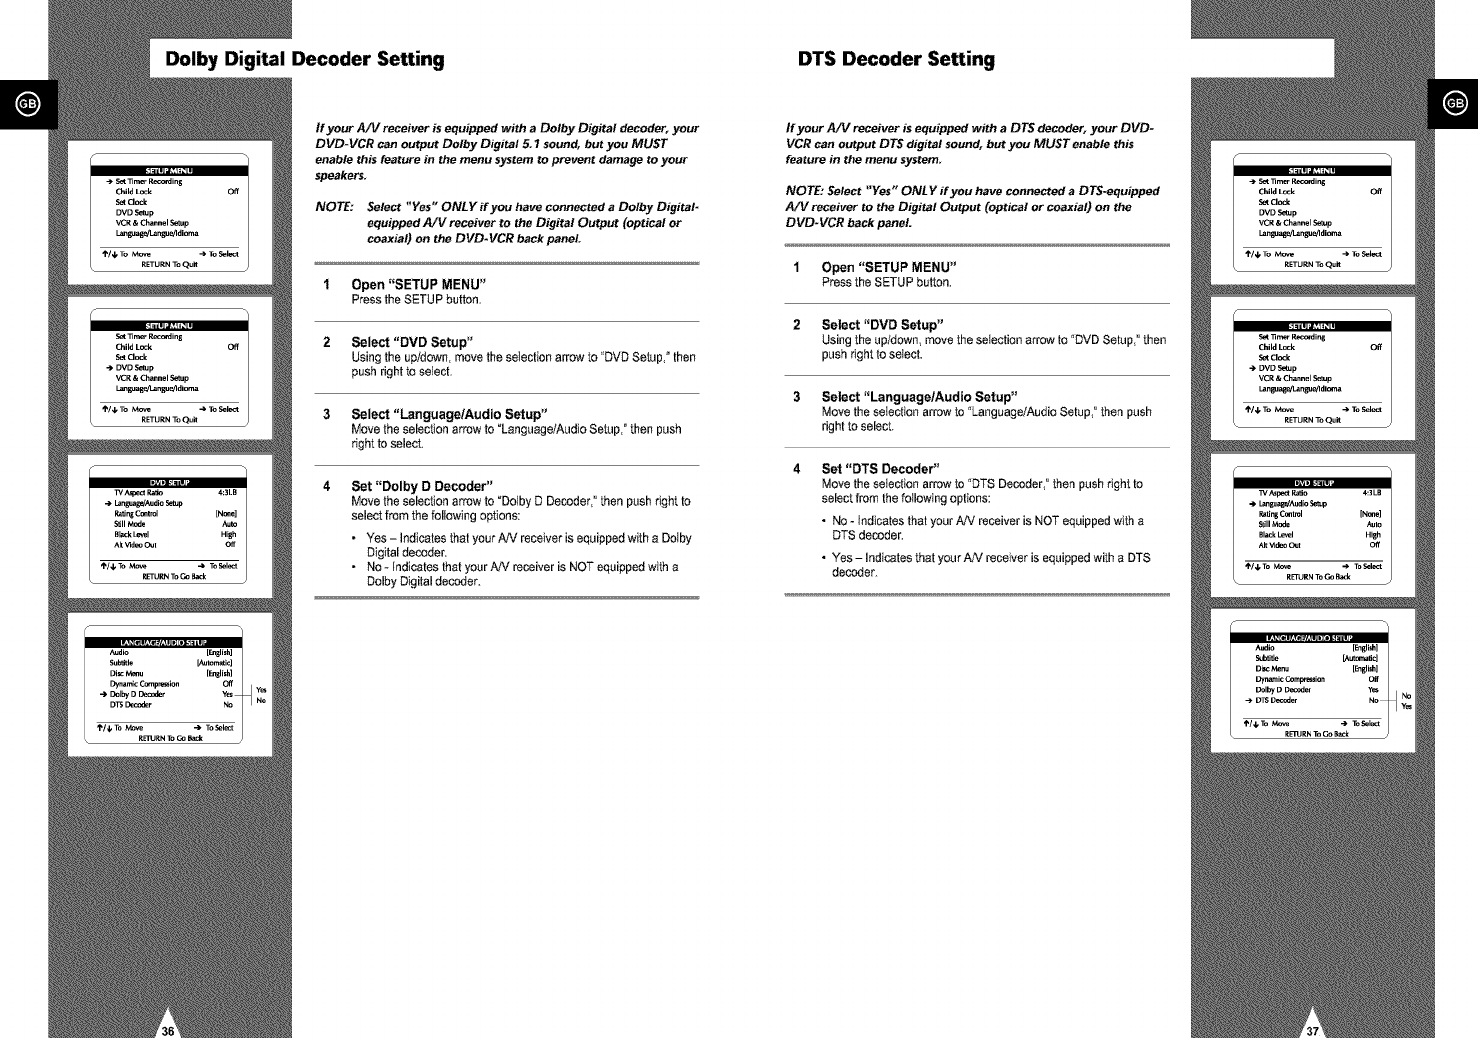
Dolby Digital Decoder Setting DTS Decoder Setting
If your A/V receiver is equipped with a Dolby Digital decoder, your
DVD-VCR can output Dolby Digital 5. 7sound, but you MUST
enable this feature in the menu system to prevent damage to your
speakers.
NOTE: Select "Yes" ONLY if you have connected a Dolby Digital-
equipped A/V receiver to the Digital Output (optical or
coaxial) on the DVD-VCR back panel.
1Open "SETUP MENU"
Press the SETUP button.
2 Select "DVD Setup"
Using the up/down, move the selection arrow to "DVD Setup," then
push right to select.
3Select "Language]Audio Setup"
Move the selection arrow to "Language/Audio Setup," then push
right to select.
4Set "Dolby D Decoder"
Move the selection arrow to "Dolby D Decoder," then push right to
select from the following options:
• Yes - Indicates that your AN receiver is equipped with a Dolby
Digital decoder.
• No - Indicates that your AN receiver is NOT equipped with a
Dolby Digital decoder.
If your A/V receiver is equipped with a DTS decoder, your DVD-
VCR can output DTS digital sound, but you MUST enable this
feature in the menu system
NOTE: Select "Yes" ONLY if you have connected a DTS-equipped
A/V receiver to the Digital Output (optical or coaxial) on the
DVD-VCR back panel
1Open "SETUP MENU"
Pressthe SETUP button.
2 Select "DVD Setup"
Usingthe up/down,move the selection arrow to "DVD Setup,"then
push right toselect.
3 Select "Language/Audio Setup"
Movethe seIection arrow to "Language/AudioSetup," then push
rightto select.
4Set "DTS Decoder"
Movethe selection arrow to"DTS Decoder,"then push right to
select from the followingoptions:
•No - Indicatesthat yourAN receiveris NOT equippedwith a
DTS decoder.
• Yes -Indicates that your AN receiver is equippedwith a DTS
decoder.
Special Playback Features Disc Menu Navigation
During DVD/CD playback you can select from the following
special playback options. To resume normal playback, press the II_ll
(Play/Pause) button.
Pause
Pressthe I_11(Play/Pause)button on the remote control during
playback.
• The picture wilt pause and theaudio will mute.
• To resume playback,press the I_11(Play/Pause)button.
• If the playeris left in Pause mode for 2 minutes, it will stop
automatically.
Frame Advance
While in Pause mode_ press the SKIP]F.ADV button on the remote
control to advance one frame at a time.
• Audio is muted during Frame Advance mode.
• Press Play/Pause to resume normal playback.
NOTE: Frame Advance operates only in the forward direction.
Skip Forward/Back
While a CD or DVD disc is in Play mode, press the Skip
Forward/Back (_1/_ ) buttons on the remote control or front
panel to jump forward and backward through disc chapters/tracks.
• Skip Forward wilt jump to the next chapter/track.
• Skip Back will jump to the beginning of the current chapter/track.
• Press Skip Back again to jump to the beginning of the previous
chapter/track.
Search Forward/Back
While a disc is in Play mode, press the Search Forward/Back (1_1/
I<,11)buttons on the remote control to visually search forward and
backward at variable speeds:
• Each press increases or decreases the speed from normal
playback to 2X - 4X - 8X - 16X - 32X - 128X. Press Play to
resume normal speed.
• Front Panel Search Buttons - Press and hold the Forward/Back
buttons on the front panel to visually search forward/backward at
2x - 4X - 8)( - 16X - 32X - 128)( speed. Release the
Forward/Back button to resume normal speed.
Slow Motion
During playback, press the I_11 (Play/Pause) button to Pause the
image. Then use the Search Forward (_i,) to play in slow motion at
variable speeds.
• Each press increases or decreases the speed from normal
playback to 1/8, 1/4 or 1/2 speed.
• Audio is muted during slow motion playback.
• Press the I_11 (Play/Pause) button to resume normal playback.
• Front Panel Stow Motion Buttons - Press and hold the Forward
buttons on the front panel to activate slow motion playback.
Release button to resume normal speed.
Stop/Resume
• Press theStop button once to stop playback. To resume the
DVD/CD fromthe pointwhere the disc stopped,pressthe 1_11
(Play/Pause)button.
• Press the• (Stop)button twiceto completelystop playback.
The nexttime you press Play/Pause, the discwill start over from
the beginning.
Many DVDs feature their own menu systems, where you can select
Titles, Chapters, Audio Tracks, Subtitles, and special disc features,
such as movie trailers, and information On the cast. Use these
buttons to make selections in the Disc menus.
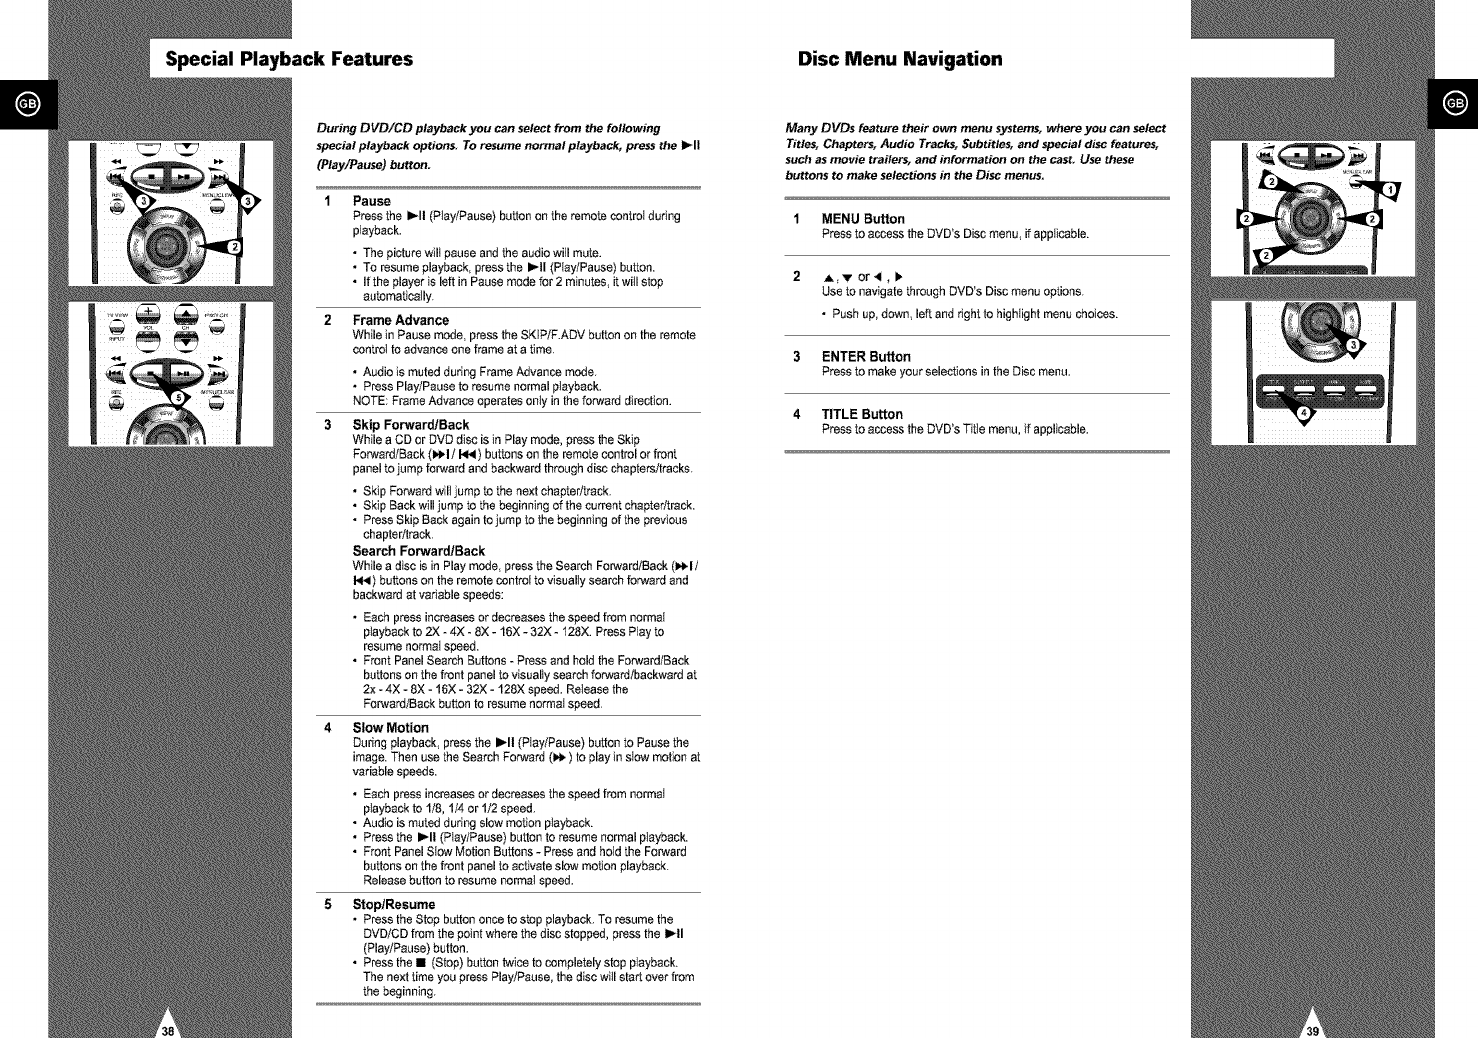
1 MENU Button
Press to access the DVD's Disc menu, if applicable.
2A,'v oral, !_
Use to navigate through DVD's Disc menu options.
• Push up, down, left and right to highlight menu choices.
3 ENTER Button
Press to make your selections in the Disc menu.
4 TITLE Button
Press to access the DVD's Title menu, if applicable.
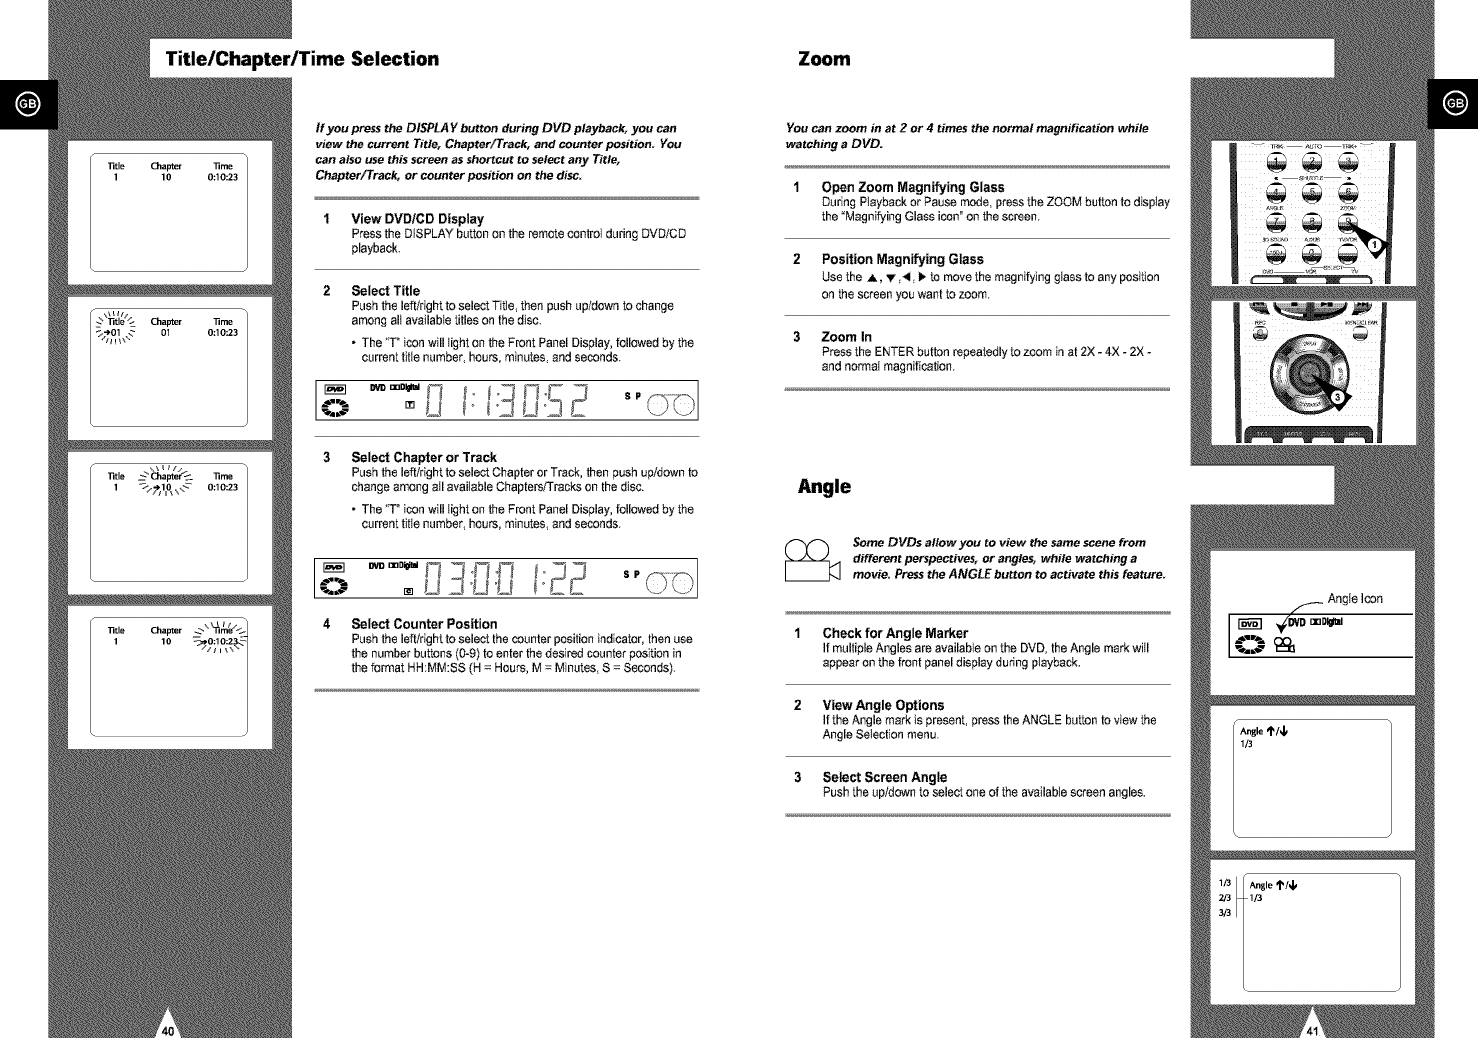
Title/Chapter/Time Selection Zoom
If you press the DISPLA Y button during DVD playback, you can
view the current Title, Chapter/Track, and counter position. You
can also use this screen as shortcut to select any Title,
Chapter/Track, or counter position on the disc.
1 View DVD/CD Display
Press the DISPLAY button on the remote control during DVD/CD
playback.
Select Title
Push the left/right to select Titte, then push up/down to change
among alt available titles on the disc.
• The "T ° icon will light on the Front Panel Display, followed by the
current titte number, hours, minutes, and seconds.
Select Chapter or Track
Push the left/right to select Chapter or Track, then push up/down to
change among atl available Chapters/Tracks on the disc.
• The "T ° icon will light on the Front Panel Display, followed by the
current titie number, hours, minutes, and seconds.
4Select Counter Position
Push the left/right to select the counter position indicator, then use
the number buttons (0-9) to enter the desired counter position in
the format HH:MM:SS (H = Hours, M = Minutes, S = Seconds).
You can zoom in at 2 or 4 times the normal magnification while
watching a DVD.
1Open Zoom Magnifying Glass
During Playback or Pause mode, press the ZOOM button to display
the "Magnifying Glass icon" on the screen.
2 Position Magnifying Glass
Use the A, v ,_1, lb to move the magnifying glass to any position
on the screen you want to zoom.
3 Zoom In
Pressthe ENTERbutton repeatedlyto zoom in at 2X- 4X - 2X -
and normatmagnification.
Angle
Some DVDs allow you to view the same scene from
different perspectives, or angles, while watching a
movie. Press the ANGLE button to activate this feature.
1 Check for Angle Marker
If multiple Angles are available on the DVD, the Angle mark will
appear on the front panel display during playback.
2 View Angle Options
If the Angle mark is present, press the ANGLE button to view the
Angle Seleclion menu.
3Select Screen Angle
Push the up/down to select one of the available screen angles.
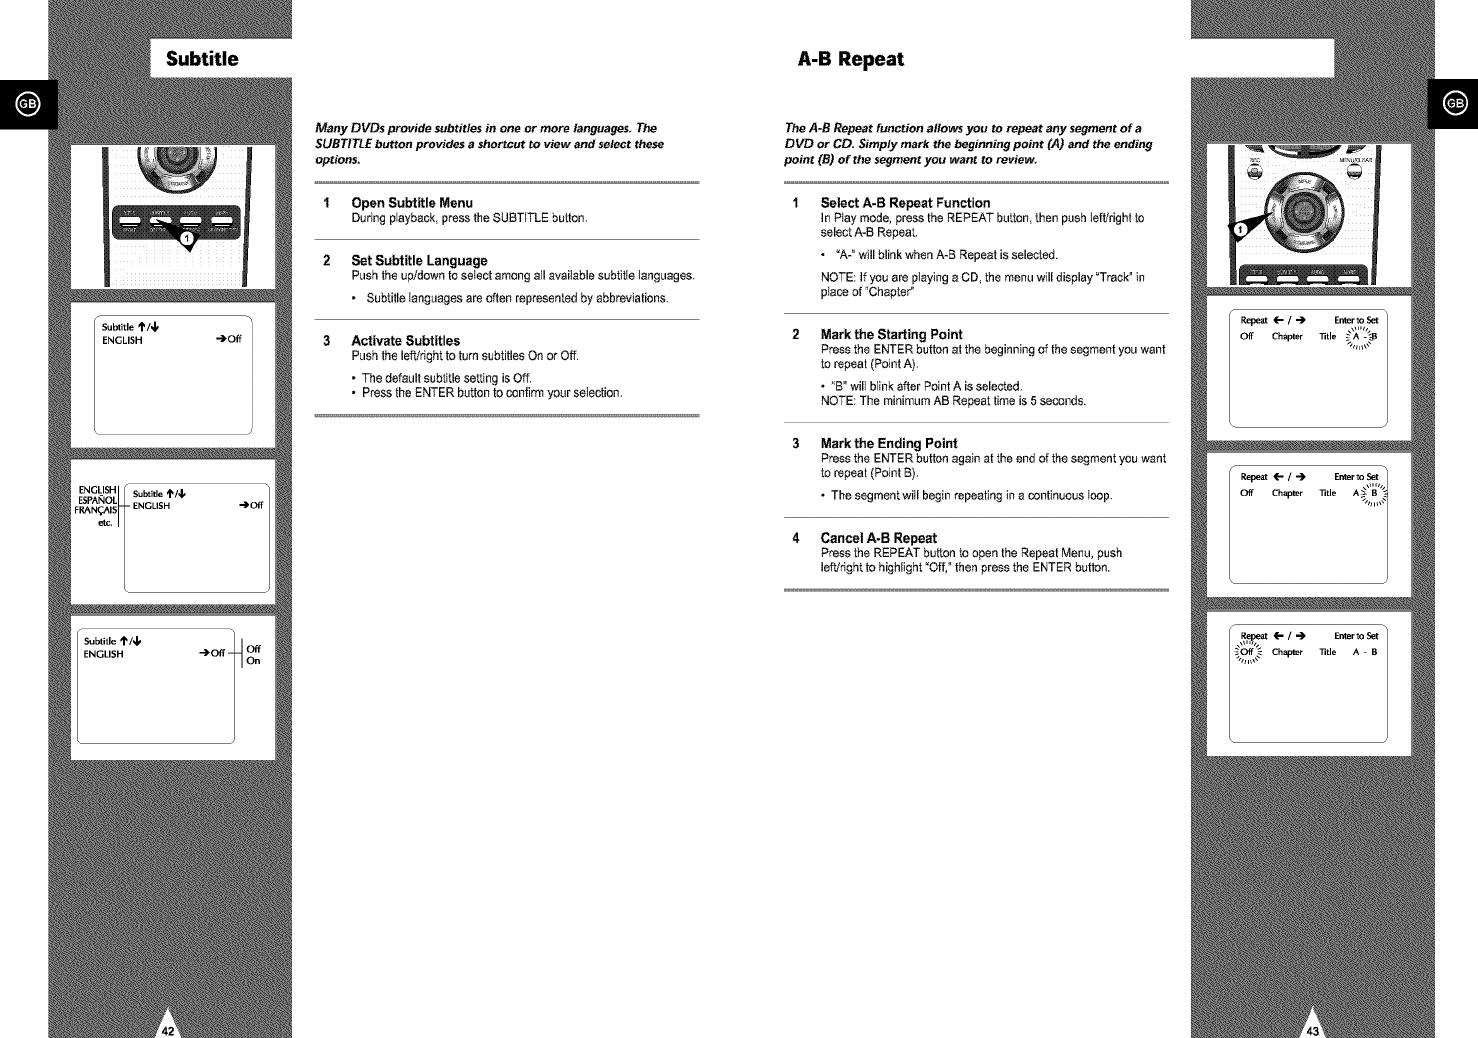
Subtitle A-B Repeat
Many DVDs provide subtitles in one or more languages. The
SUBTITLE button provides ashortcut to view and select these
options.
1Open Subtitle Menu
Duringplayback, pressthe SUBTITLE button,
2 Set Subtitle Language
Push the up/down to select among all available subtitte languages.
• Subtitle languages are often represented by abbreviations.
Activate Subtitles
Push the left/right to turn subtitles On or Off.
• The default subtitle setting is Off.
• Press the ENTER button to confirm your seIection.
The A-B Repeat function allows you to repeat any segment of a
DVD or CD. Simply mark the beginning point (A) and the ending
point (B) of the segment you want to review.
Select A-B Repeat Function
In Play mode, press the REPEAT button, then push left!right to
select A-B Repeat.
•"A-" will blink when A-B Repeat is selected.
NOTE: If you are playing a CD, the menu will display "Track° in
place of "Chapter"
Mark the Starting Point
Press the ENTER button at the beginning of the segment you want
to repeat (Point A).
• "B" wilt blink after Point A is selected.
NOTE: The minimum AB Repeat time is 5 seconds.
Mark the Ending Point
Pressthe ENTERbuttonagain at the end of the segmentyou want
to repeat (Point B),
• The segment will begin repeating in a continuousloop.
4 Cancel A-B Repeat
Press the REPEAT button to open the Repeat Menu, push
left!right to highlight "Off," then press the ENTER button.
Repeat Chapter/Title Bookmarks
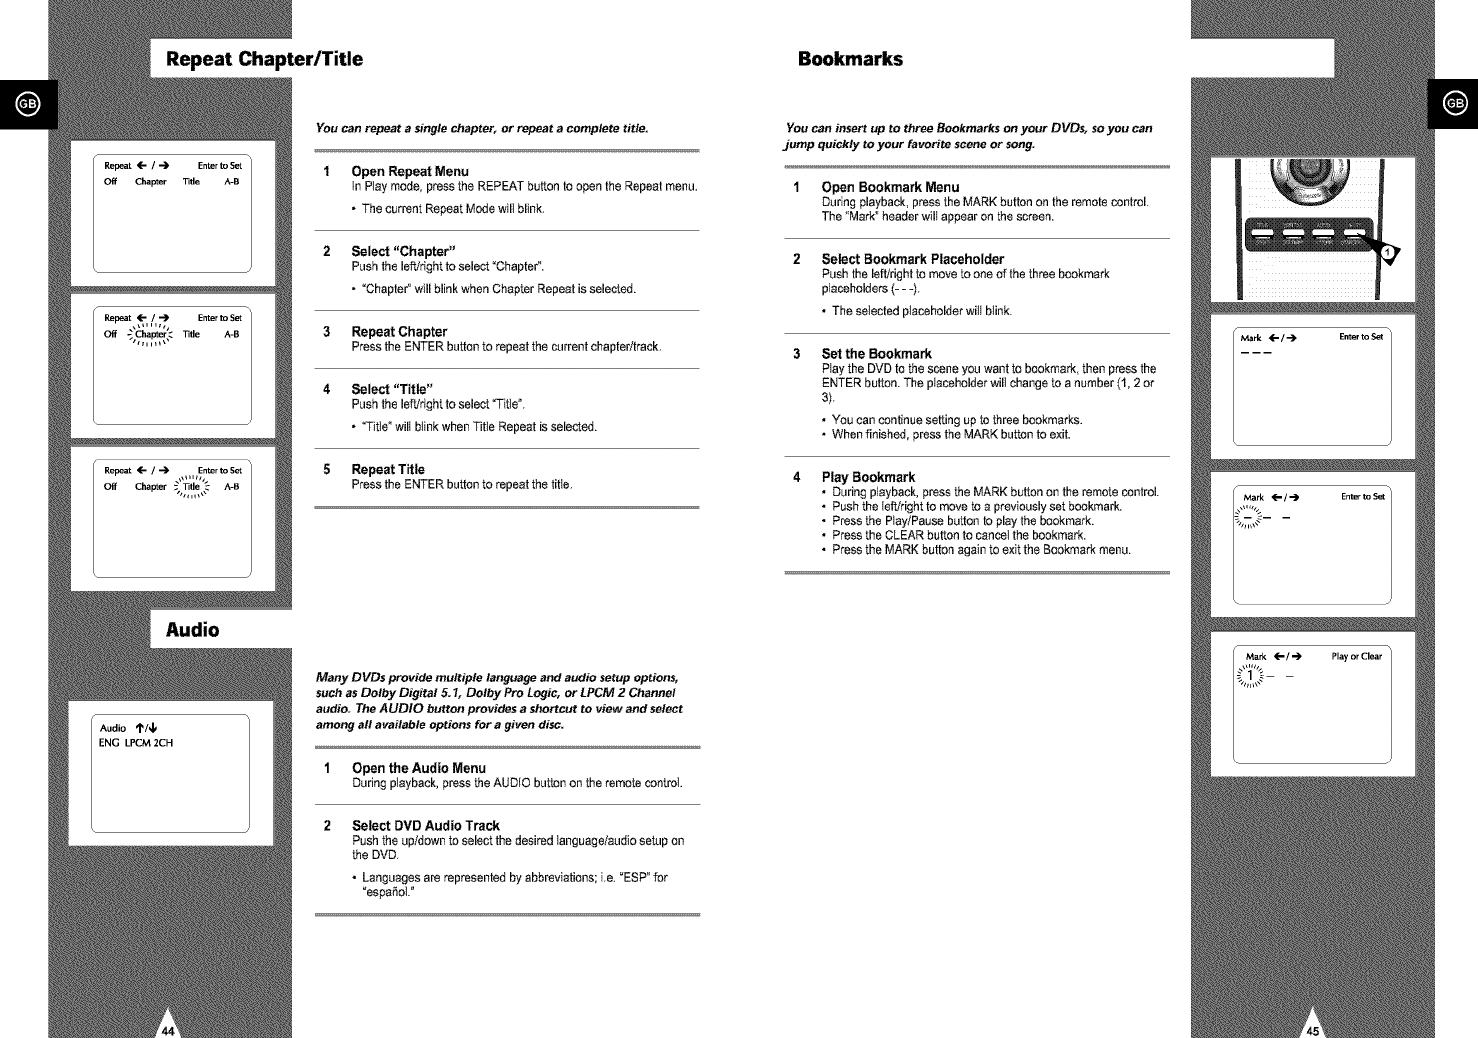
You can repeat a single chapter, or repeat a complete title.
1 Open Repeat Menu
In Piay mode, press the REPEAT button to open the Repeat menu.
• The current Repeat Mode will blink,
2 Select "Chapter"
Push the left/right to select "Chapter".
• "Chapter" will blink when Chapter Repeat is selected.
3Repeat Chapter
Press the ENTER button to repeat the current chapter/treck.
4Select "Title"
Push the left!right to select _itte °.
• _itTe ° will blink when Title Repeat is selected.
5 Repeat Title
Press the ENTER button to repeat the titte.
Audio
Many DVDs provide multiple language and audio setup options,
such as Dolby Digital 5.1, Dolby Pro Logic, or LPCM 2 Channel
audio. The AUDIO button provides a shortcut to view and select
among all available options for agiven disc.
1Open the Audio Menu
During playback, press the AUDIO button on the remote control.
2 Select DVD Audio Track
Push the up/down to select the desired language/audio setup on
the DVD.
• Languages are represented by abbreviations; i,e. "ESP" for
_espa_ol. _
You can insert up to three Bookmarks on your DVDs, so you can
jump quickly to your favorite scene or song.
1Open Bookmark Menu
During playback, press the MARK button on the remote control.
The "Mark" header will appear on the screen.
Select Bookmark Placeholder
Pushthe left/rightto move to one of the three bookmark
placeholders(- - -).
•TheseIecled placeholderwill blink.
Set the Bookmark
Ptaythe DVD to the scene you want to bookmark, then press the
ENTERbutton.The placeholder willchange to a number(1, 2 or
3).
• You can continuesetting up to three bookmarks.
• When finished, press the MARKbutton toexit.
Play Bookmark
• During playback, press the MARK button on the remote control.
• Push the tefVright to move to a previously set bookmark.
• Press the Play/Pause button to play the bookmark.
• Press the CLEAR button to cancel the bookmark.
• Press the MARK button again to exit the Bookmark menu.
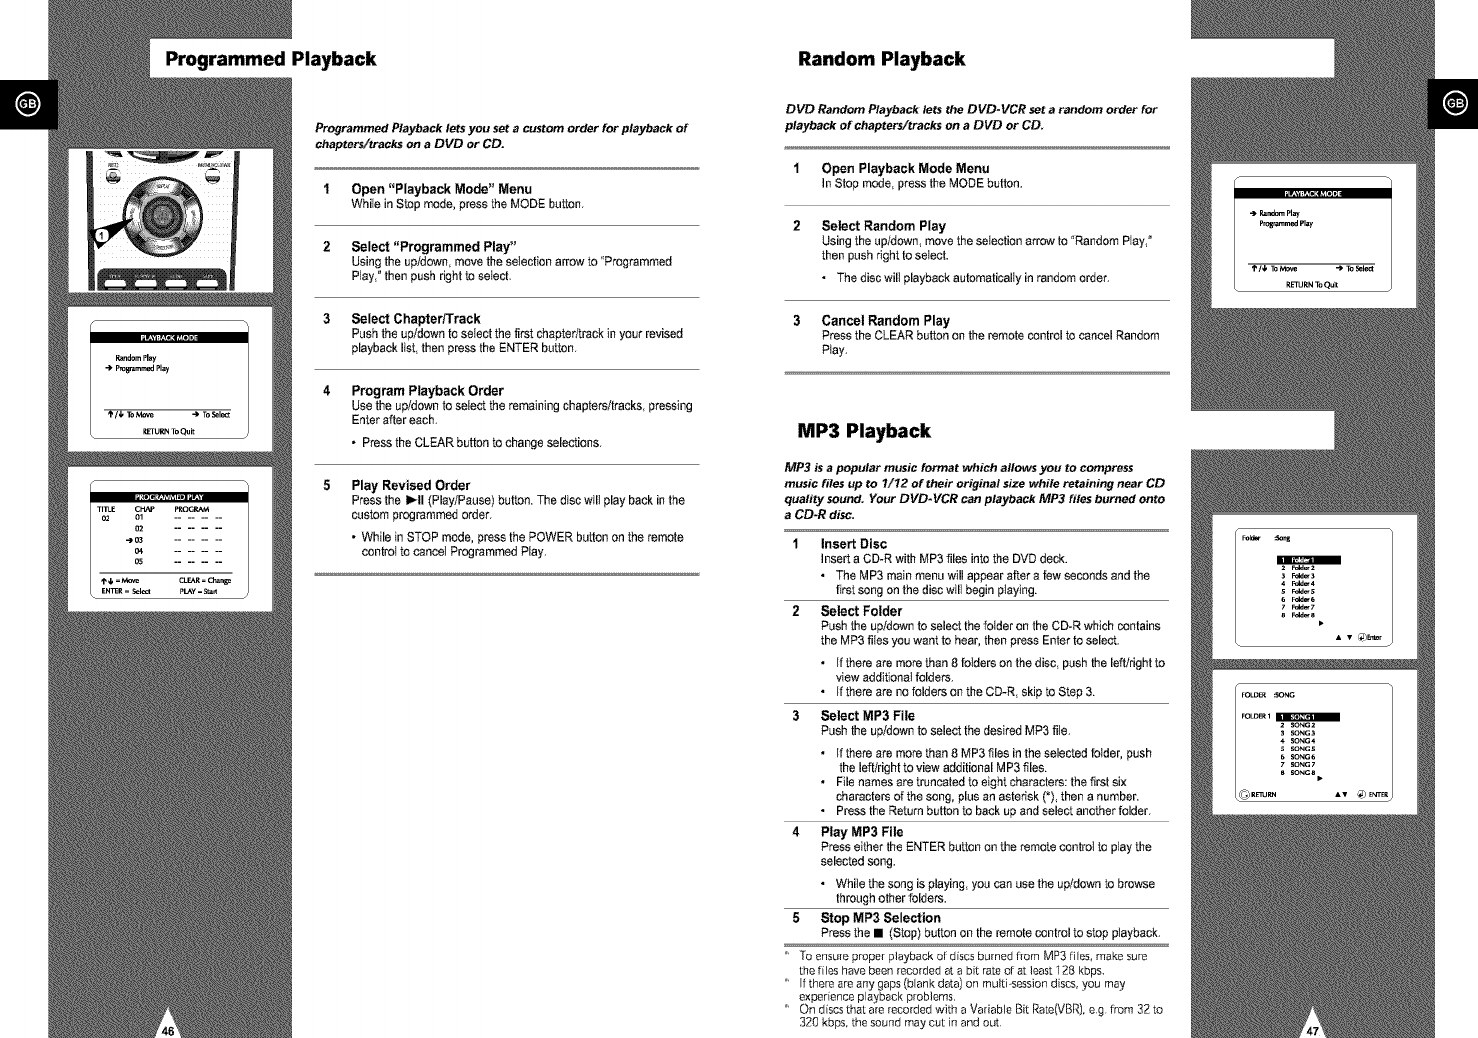
Programmed Playback Random Playback
Programmed Playback lets you set acustom order for playback of
chapters/tracks on a DVD or CD.
1Open "Playback Mode" Menu
While inStopmode, press the MODE button,
2 Select "Programmed Play"
Using the up/down, move the selection arrow to "Programmed
Play, ° then push right to select.
3 Select Chapter/Track
Push the up/down to setect the first chapter/track in your revised
playback list, then press the ENTER button.
Program Playback Order
Use the up/down to select the remaining chapters/tracks, pressing
Enter after each.
•Press the CLEAR button to change selections.
Play Revised Order
Press the II, II (Play/Pause) button. The disc will play back in the
custom programmed order.
• While in STOP mode, press the POWER button on the remote
control to cancel Programmed Play.
DVD Random Playback lets the DVD-VCR sot a random order for
playback of chapters/tracks on a DVD or CD.
1Open Playback Mode Menu
In Stop mode, pressthe MODE button.
Select Random Play
Using the up/down, move the selection arrow to "Random Play, °
then push right to select.
• The disc will playback automatically in random order.
3 Cancel Random Play
Press the CLEAR button on the remote control to cancel Random
Ptay.
MP3 Playback
MP3 is a popular music format which allows you to compress
music files up to 7/12 of their original size while retaining near CD
quafity sound. Your DVD-VCR can playback MP3 files burned onto
a CD-R disc.
Insert Disc
Insert a CD-R with MP3 files into the DVD deck.
• The MP3 main menu will appear after a few seconds and the
first song on the disc will begin playing.
Select Folder
Push the up/down to select the folder on the CD-R which contains
the MP3 fibs you want to hear, then press Enter to select.
• If there are more than 8 folders on the disc, push the left/right to
view additional folders.
• If there are no folders on the CD-R, skip to Step 3.
3 Select MP3 File
Push the up/down to select the desired MP3 file.
• if there are more than 8 MP3 files in the selected folder, push
the leftlright to view additional MP3 files.
• File names are truncated to eight characters: the first six
characters of the song, plus an asterisk (*), then a number.
• Press the Return button to back up and select another folder.
4 Play MP3 File
Press either the ENTER button on the remote controI to play the
selected song.
• While the song is playing, you can use the up/down to browse
through other folders.
5Stop MP3 Selection
Press the • (Stop) button on the remote control to stop playback.
' To ensure proper playback of discs burned flora MP3 fibs, make sure
the fibs have been recorded at a bit rate of at least 128 kbps.
" If there are any gaps (blank data) on multi-session discs, you may
experience playback problems.
" On discs that are recorded with a Variabb Bit Rate(VBR), e g from 32 to
320 kbps, the sound may cut in and out
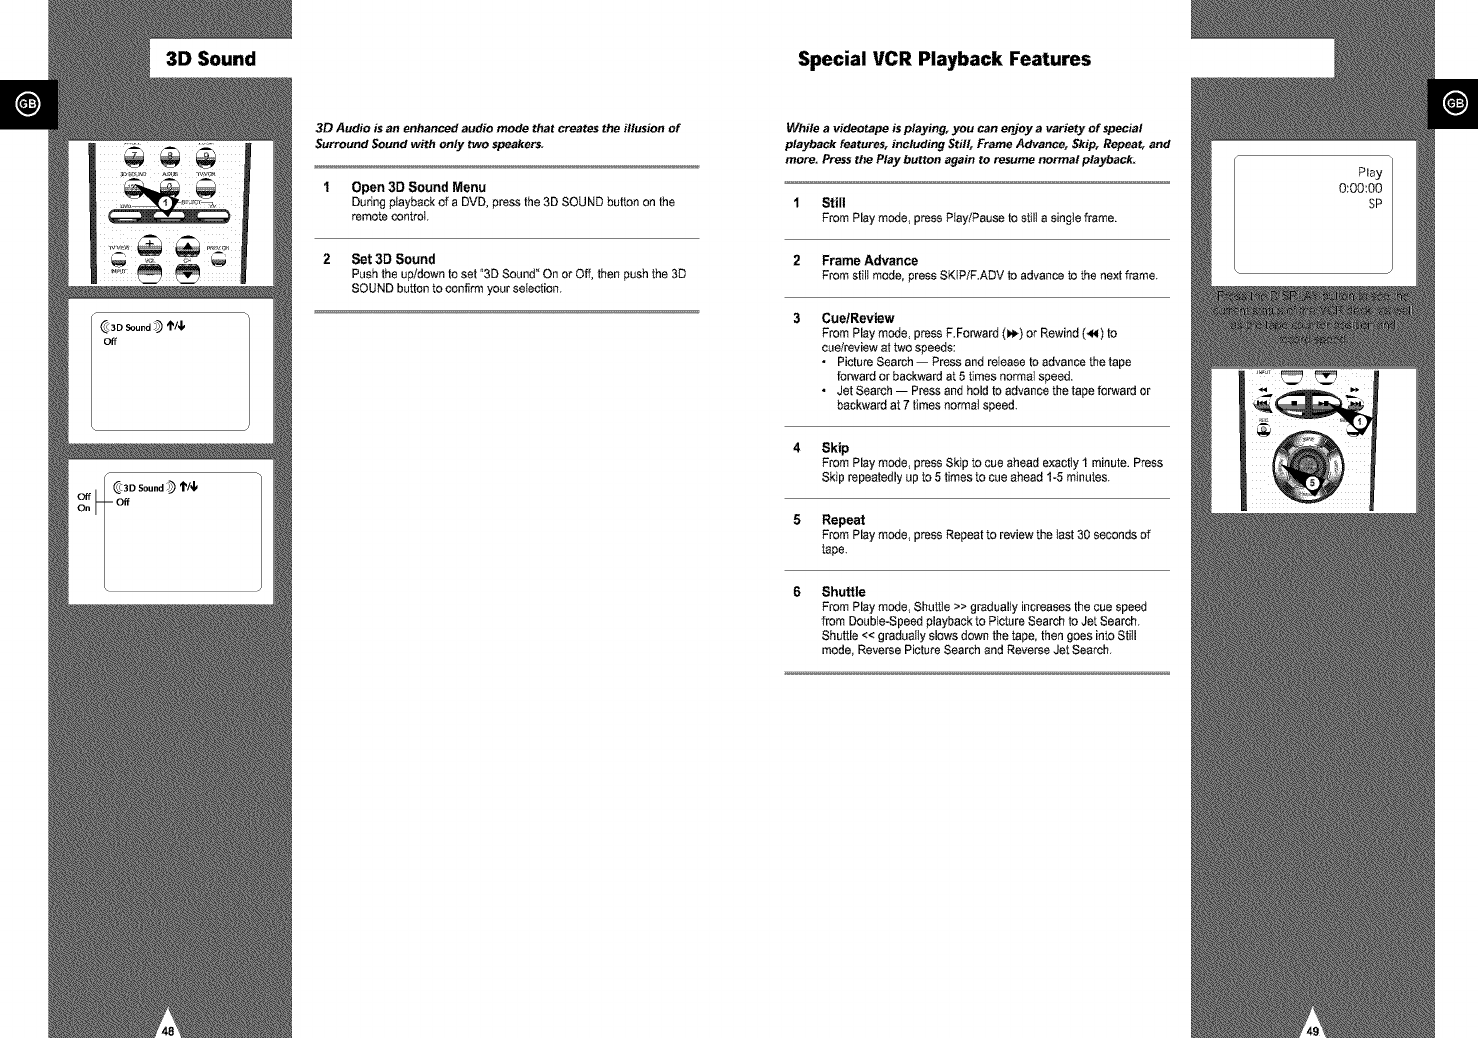
3D Sound Special VCR Playback Features
3D Audio is an enhanced audio mode that creates the illusion of
Surround Sound with only two speakers.
1 Open 3D Sound Menu
Duringplayback of a DVD, pressthe 3D SOUND button on the
remote control,
2 Set 3D Sound
Push the up/down to set "3D Sound" On or Off, then push the 3D
SOUND button to confirm your selection.
While a videotape is playing, you can enjoy a variety of special
playback features, including Still, Frame Advance, Skip, Repeat, and
more. Press the Play button again to resume normal playback:
1 Still
From Play mode, press Play/Pause to still a singte frame.
2Frame Advance
From still mode, press SKIP/F.ADV to advance to the next frame.
3 Cue/Review
From Play mode, press F.Forward (H_) or Rewind (<4) to
cue/review at two speeds:
•Picture Search -- Press and release to advance the tape
forward or backward at 5 times normal speed.
• Jet Search -- Press and hold to advance the tape forward or
backward at 7 times normal speed.
4 Skip
From Play mode, press Skip to cue ahead exactly 1 minute. Press
Skip repeatedly up to 5 times to cue ahead 1-5 minutes.
5 Repeat
From Play mode, press Repeatto review the last30 seconds of
tape.
Shuttle
From Play mode, Shuttle >> gradually increases the cue speed
from Double-Speed playback to Picture Search to Jet Search.
Shuttle << gradually slows down the tape, then goes into Still
mode, Reverse Picture Search and Reverse Jet Search.
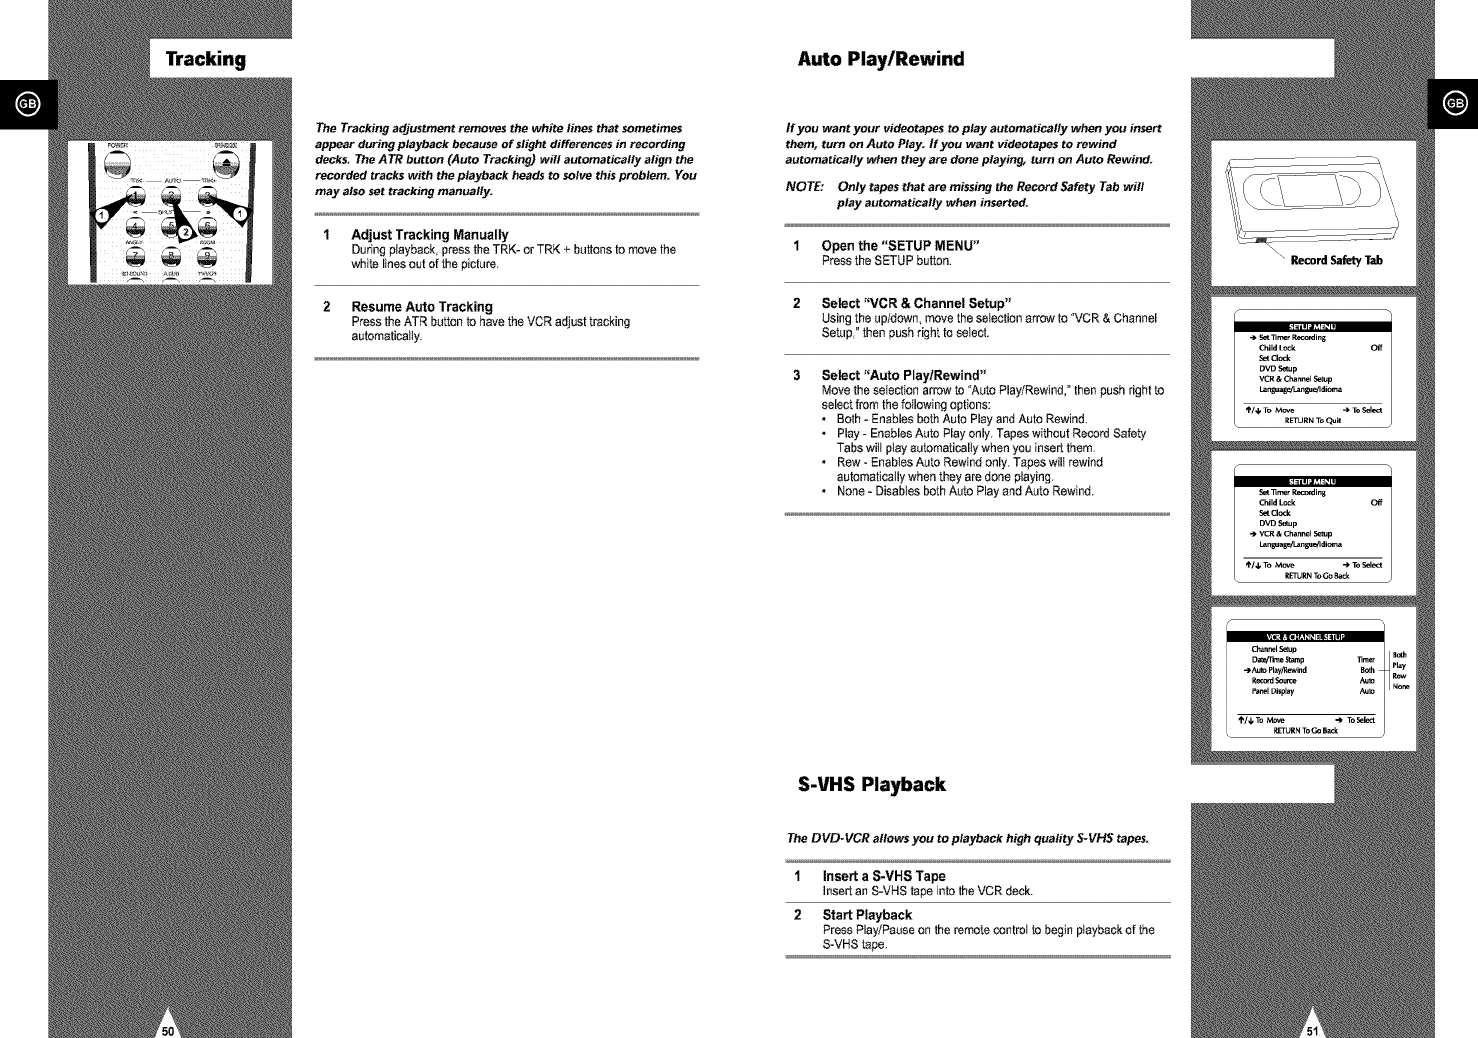
g Auto Play/Rewind
The Tracking adjustment removes the white lines that sometimes
appear during playback because of slight differences in recording
decks. The A TR button (Auto Tracking) will automatically align the
recorded tracks with the playback heads to solve this problem. You
may also set tracking manually.
1 Adjust Tracking Manually
During playback, press the TRK- or TRK + buttons to move the
white lines out of the picture.
2 Resume Auto Tracking
Press the ATR button to have the VCR adjust tracking
automaticaIIy.
If you want your videotapes to play automatically when you insert
them, turn on Auto Play. If you want videotapes to rewind
automatically when they are done playing, turn on Auto Rewind.
NOTE: Only tapes that are missing the Record Safety Tab will
play automatically when inserted.
1 Open the "SETUP MENU"
Press the SETUP button.
2 Select "VCR & Channel Setup"
Using the up/down move the selection arrow to "VCR & Channel
Setup, ° then push right to select.
3Select "Auto Play/Rewind"
Move the selection arrow to "Auto Play]Rewind, ° then push right to
select from the following options:
• Both - Enables both Auto Play and Auto Rewind,
• Play - Enables Auto Play only, Tapes without Record Safety
Tabs will play automatically when you insert them,
• Row - Enables Auto Rewind only, Tapes wilt rewind
automatically when they are done playing.
• None - Disables both Auto Play and Auto Rewind.
S-VHS Playback
The DVD-VCR allowsyou to playback high quafity $-VHS tapes.
1 Insert a S-VHS Tape
Insert an S-VHS tapeinto theVCR deck.
2 Start Playback
PressPlay]Pauseon the remotecontrol to begin playbackof the
S-VHStape,
Basic Recording Special Recording Features
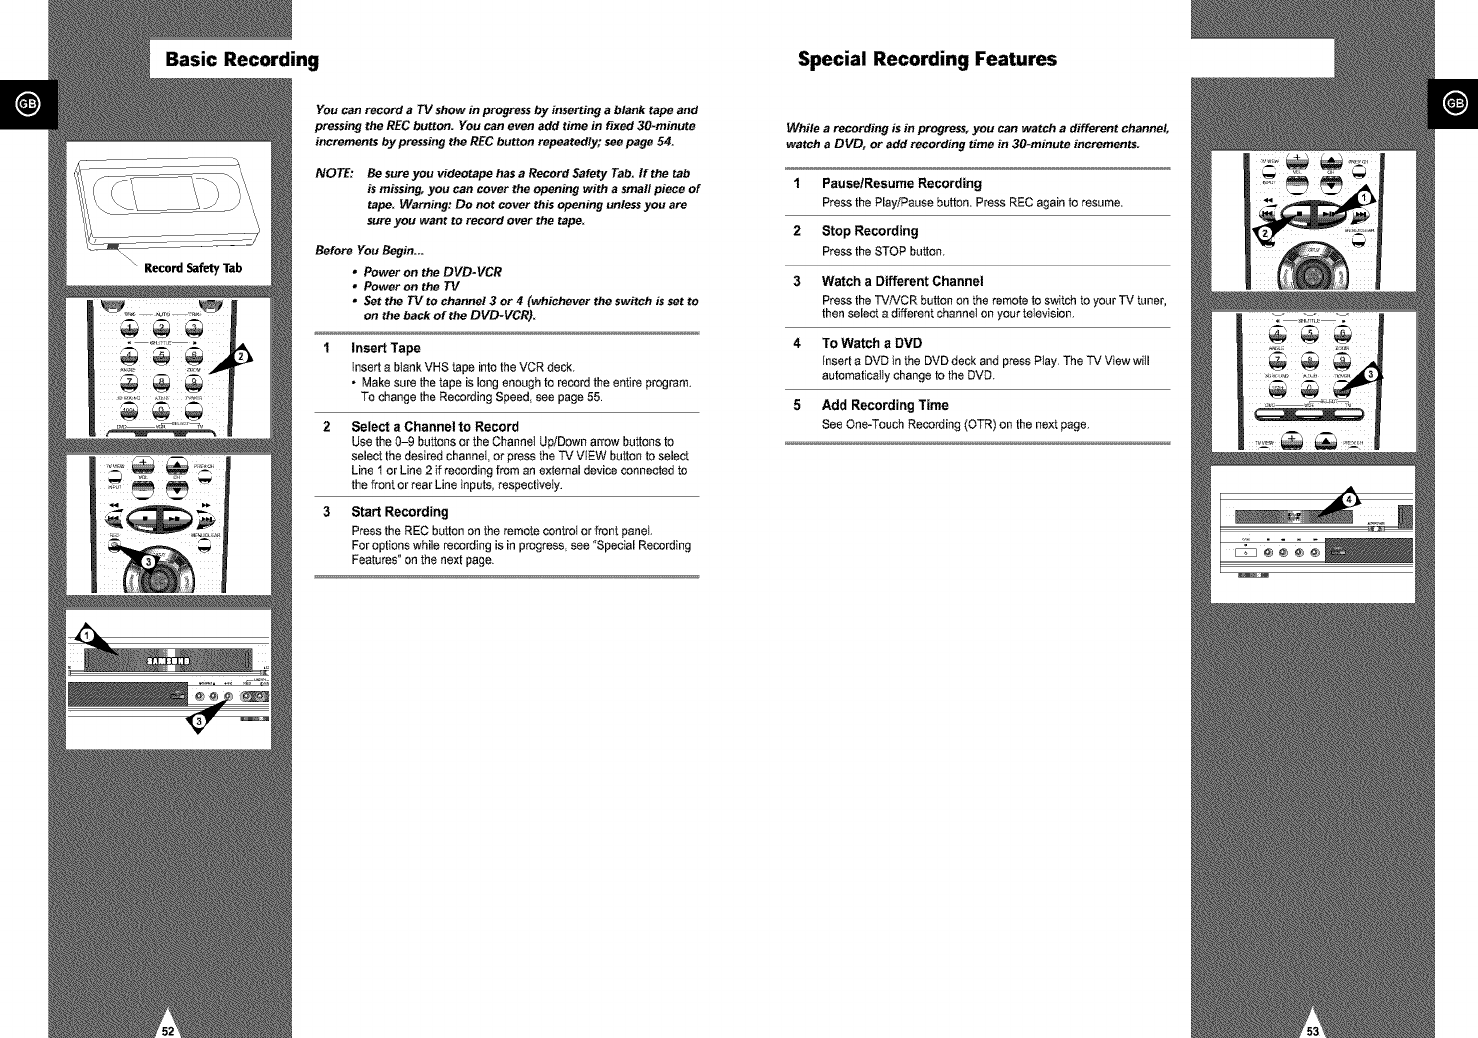
You can record aTV show in progress by inserting a blank tape and
pressing the REC button= You can even add time in fixed 30-minuta
increments by pressing the REC button repeatedly; see page 54.
NOTE: Be sure you videotape has a Record Safety Tab= If the tab
is missing, you can cover the opening with a small piece of
tape= Warning: Do not cover this opening unless you are
sure you want to record over the tape=
Before You Begin=.=
• Power on the DVD-VCR
•Power on the TV
•Set the TV to channel 3 or 4 (whichever the switch is set to
on the back of the DVD-VCR)=
Insert Tape
Insert a blank VHS tape into the VCR deck.
•Make sure the tape is long enough to record the entire program.
To change the Recording Speed, see page 55.
Select a Channel to Record
Use the 0-9 buttons or the Channel Up/Down arrow buttons to
select the desired channet, or press the TV VIEW button to select
Line t or Line 2 if recording from an external device connected to
the front or rear Line inputs, respectively.
Start Recording
Press the REC button on the remote control or front panel
For options while recording is in progress, see "Special Recording
Features ° on the next page.
While a recording is in progress, you can watch a different channel,
watch a DVD, or add recording time in 30-minuta increments.
1 Pause/Resume Recording
Press the Play/Pause button. Press REC again to resume.
2 Stop Recording
Press the STOP button.
3 Watch a Different Channel
Press the TVNCR button on the remote to switch to your TV tuner,
then select a different channel on your television.
4 To Watch aDVD
Insert a DVD in the DVD deck and press Play. The TV View will
automatically change to the DVD.
5 Add Recording Time
See One-Touch Recording (OTR) on the next page.

One-Touch Recording (OTR) Record Speed
One-Touch Recording (O TR) allows you to add recording time in
30-minute increments up to 9:30 minutes at the touch of a button.
1 Start Recording
Follow the instructions on page 52 to begin recording.
2 Activate OTR
White in Record mode, press the REC button again to activate
One-Touch Recording (OTR).
• OTR 0:30 appears on the On-Screen Display and the DVD-VCR
will record for axactiy 30 minutes.
3 Add Recording Time
Continue pressing REC to add recording time in 30 minute
increments up to 9 hours and 30 minutes.
4Activate Loop Record
When you reach OTR 9:30, press REC again to enter Loop
Record mode. The DVD-VCR will record the entire videotape over
and over in a continuous loop until you press STOP. This can be
used for continuous recording of security cameras.
• If you press Power during OTR, the DVD-VCR wilt turn off
automatically when the recording time has elapsed.
• The DVD-VCR stops recording automatically when the time has
etapsed.
You can slow down the recording speed from SP to SLP in order to
fit six hours of programming on a T-120 tape.
1
2
Start Recording
Follow the Basic Recording instructions on page 52.
Set Record Speed
Press the SP/SLP button on the remote control to set the Record
Speed to one of the following options:
•SP - Standard Play, for best quality.
• SLP - Super Long Play, for maximum recording time (3 times
SP).
NOTE: The selected Record Speed will appear on the front panel
display.
Maximum Recording Time -SP vs, SLP
Tape Length SP (Standard Play) SLP (Super Long Play)
T- 120 2 hrs 6 h_
T-160 2h_ 40 rains 8 h_
T-180 3 hrs 9 h_
Record Source
You can set the DVD-VCR to record from a variety of sources,
including the Tuner, DVD deck, Line 7(front) input, or Line 2
(rear) input. The Auto setting will record whatever is currently
visible on-screen, as set by the TV VIEW button.
1
2
3
Open the "SETUP MENU"
Press the SETUP button on the remote control. The _Setup Menu"
appears.
Select "VCR & Channel Setup"
Using the up/down move the selection arrow to _VCR & Channel
Setup," then push right to select.
Set "Record Source"
Move the selection arrow to "Record Source," then push right to
select from the following options. The VCR wilt record from:
• Auto - Whatever is currently visible on screen.
• Tuner-The VCR's buitt-in television tuner.
• Line 1 -An axtemat source, such as a camcorder, connected to
the front line inputs.
• Line 2 -An extemat source, such as a Satellite receiver,
connected to the rear line inputs.
• DVD - A DVD playing in the DVD deck.
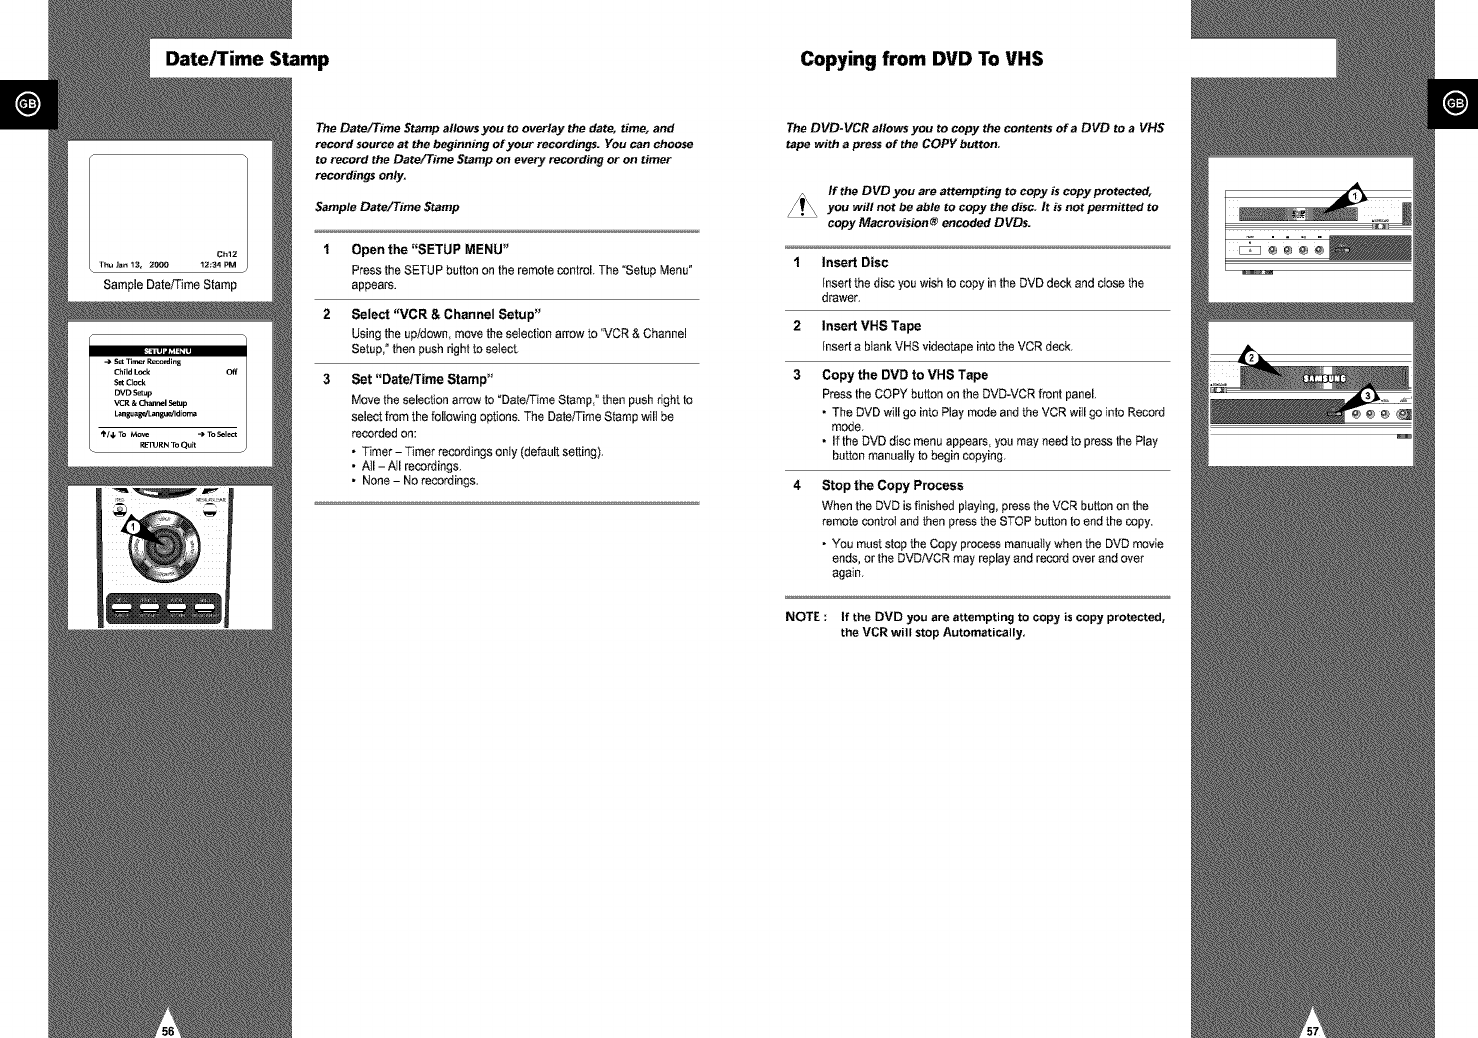
Date/Time Stamp Copying from DVD To VHS
The Date/Time Stamp allows you to overlay the date, time, and
record source at the beginning of your recordings. You can choose
to record the Date/Time Stamp on every recording or on timer
recordings only.
Sample Date/Time Stamp
1 Open the "SETUP MENU"
Press the SETUP button on the remote control. The "Setup Menu _
appears.
2 Select "VCR & Channel Setup"
Using the up/down, move the selection arrow to "VCR & Channel
Setup, ° then push right to select.
3 Set "Date/Time Stamp"
Move the selection arrow to "Date/Time Stamp," then push right to
select from the following options. The Date/Time Stamp will be
recorded on:
• Timer - Timer recordings only (default setting).
•NI-All recordings.
• None - No recordings.
The DVD-VCR allows you to copy the contents of a DVD to a VHS
tape with a press of the COPY button.
If the DVD you are attempting to copy is copy protected,
you will not be able to copy the disc It is not permitted to
copy Macrovision_ encoded DVDs.
1Insert Disc
Insert the disc you wish to copy in the DVD deck and close the
drawer.
2 Insert VHS Tape
Insert a blank VHS videotape into the VCR deck.
3 Copy the DVD to VHS Tape
Press the COPY button on the DVD-VCR front panel.
• The DVD will go into Play mode and the VCR will go into Record
mode.
• If the DVD disc menu appears, you may need to press the Play
button manually to begin copying.
Stop the Copy Process
When the DVD is finished ptaying, press the VCR button on the
remote control and then press the STOP button to end the copy.
• You must stop the Copy process manually when the DVD movie
ends, or the DVDiVCR may replay and record over and over
again.
NOTE : If the DVD you are attempting to copy is copy protected,
the VCR will stop Automatically.
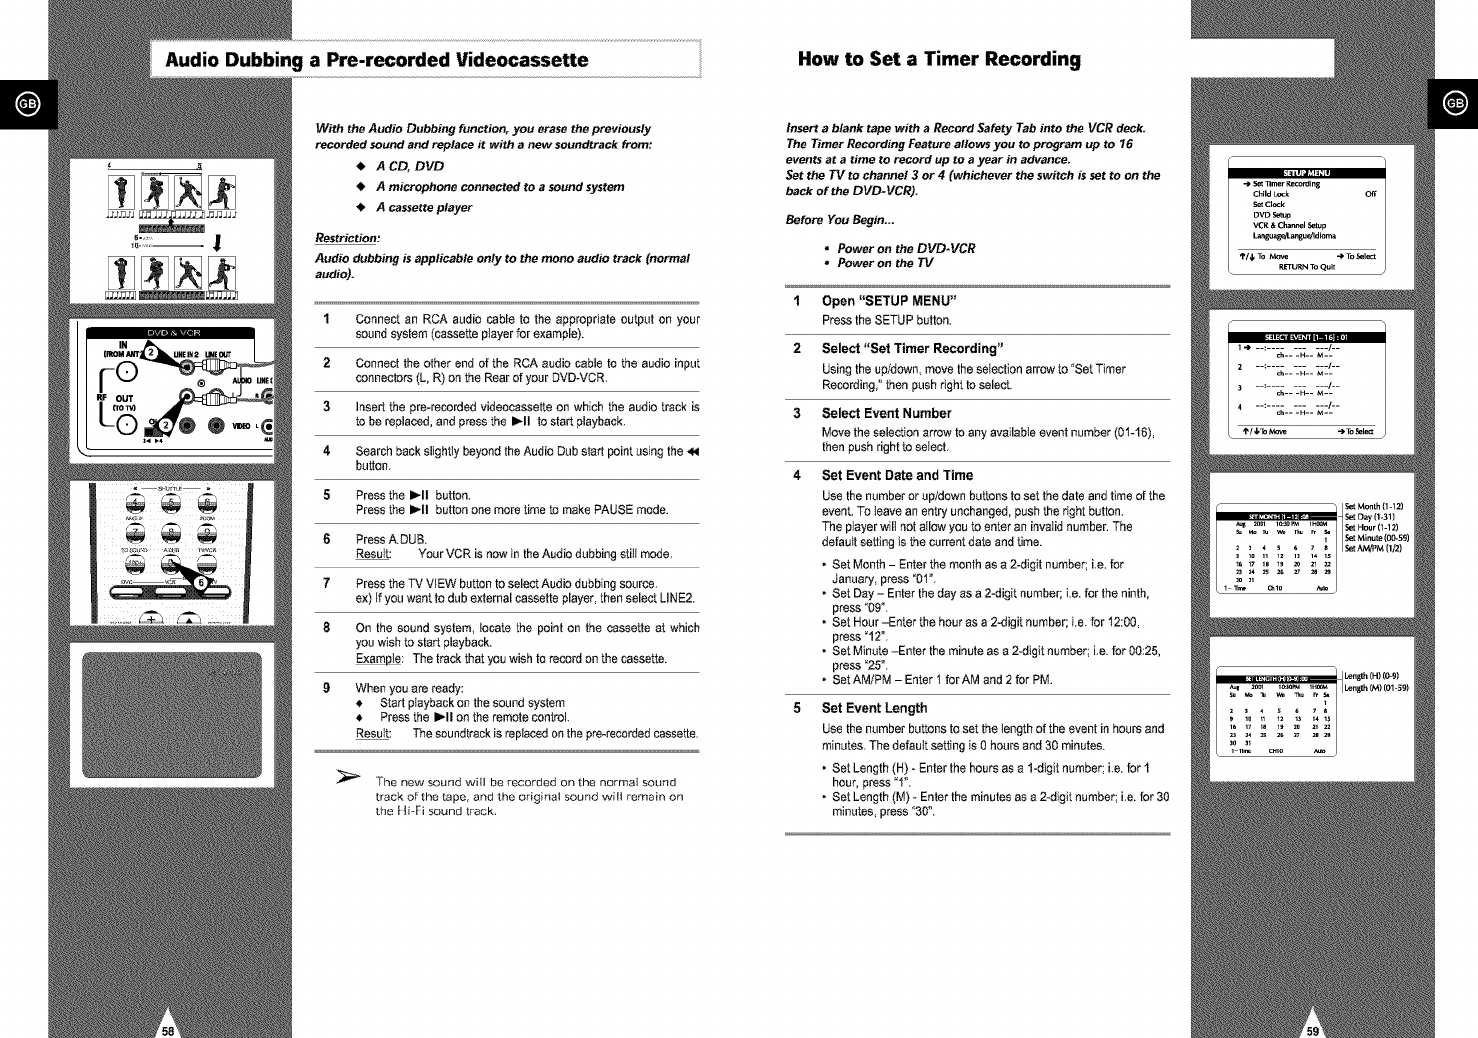
Audio Dubbing a Pre-recorded Videocassette
With the Audio Dubbing function, you erase the previously
recorded sound and replace it with a new soundtrack from:
A CD, DVD
•A microphone connected to a sound system
• A cassette player
Restriction:
Audio dubbing is applicable only to the mono audio track (normal
audio).
1
2
3
4
5
6
7
8
Connect an RCA audio cable to the appropriate output on your
sound system (cassette player for example).
Connect the other end of the RCA audio cable to the audio input
connectors (L, R) on the Rear of your DVD-VCR.
Insert the pre-recorded videocassette on which the audio track is
to be replaced, and press the I_11 to start playback.
Search back slightly beyond the Audio Dub start point using the
button.
Press the I_11 button.
Press the I_11 button one more time to make PAUSE mode.
Press A.DUB.
Result: Your VCR is now in the Audio dubbing still mode.
Press the TV VIEW button to select Audio dubbing source.
ex) If you want to dub external cassette player, then select LINE2.
On the sound system, locate the point on the cassette at which
you wish to start playback.
Example: The track that you wish to record on the cassette.
When you are ready:
*, Start playback on the sound system
*, Press the I_11 on the remote control.
Result: The scundtrack is replaced on the pre-recorded cassette.
The new sound will be recorded on the normal sound
track of _the tape, and the original sound will remain on
the Hi-Fi sound [rack,
How to Set a Timer Recording
Insert a blank tape with a Record Safety Tab into the VCR deck.
The Timer Recording Feature allows you to program up to 76
events at a time to record up to a year in advance.
Set the TV to channel 3 or 4 (whichever the switch is set to on the
back of the DVD-VCR)
Before You Begin...
•Power on the DVD-VCR
"Power on the TV
1Open "SETUP MENU"
Press the SETUP button.
2 Select "Set Timer Recording"
Using the up/down, move the selection arrow to "Set Timer
Recording," then push right to select.
3Select Event Number
Move the selection arrow to any available event number (01-16),
then push right to select.
4Set Event Date and Time
Use the number or up/down buttons to set the date and time of the
event. To leave an entry unchanged, push the right button.
The ptayer will not allow you to enter an invalid number. The
default setting is the current date and time.
•Set Month - Enter the month as a 2-digit number; i.e. for
January, press "01°,
• Set Day - Enter the day as a 2-digit number; i.e. for the ninth,
press "09°.
• Set Hour -Enter the hour as a 2-digit number; i.e. for 12:00,
press "12°,
• Set Minute -Enter the minute as a 2-digit number; i.e. for 00:25,
press "25",
• Set AM/PM - Enter 1 for AM and 2 for PM.
Set Event Length
Use the number buttons to set the length of the event in hours and
minutes. The default setting is 0 hours and 30 minutes.
• Set Length (H) - Enter the hours as a 1-digit number; i.e. for 1
hour, press "1".
• Set Length (M) - Enter the minutes as a 2-digit number; i.e. for 30
minutes, press "30".
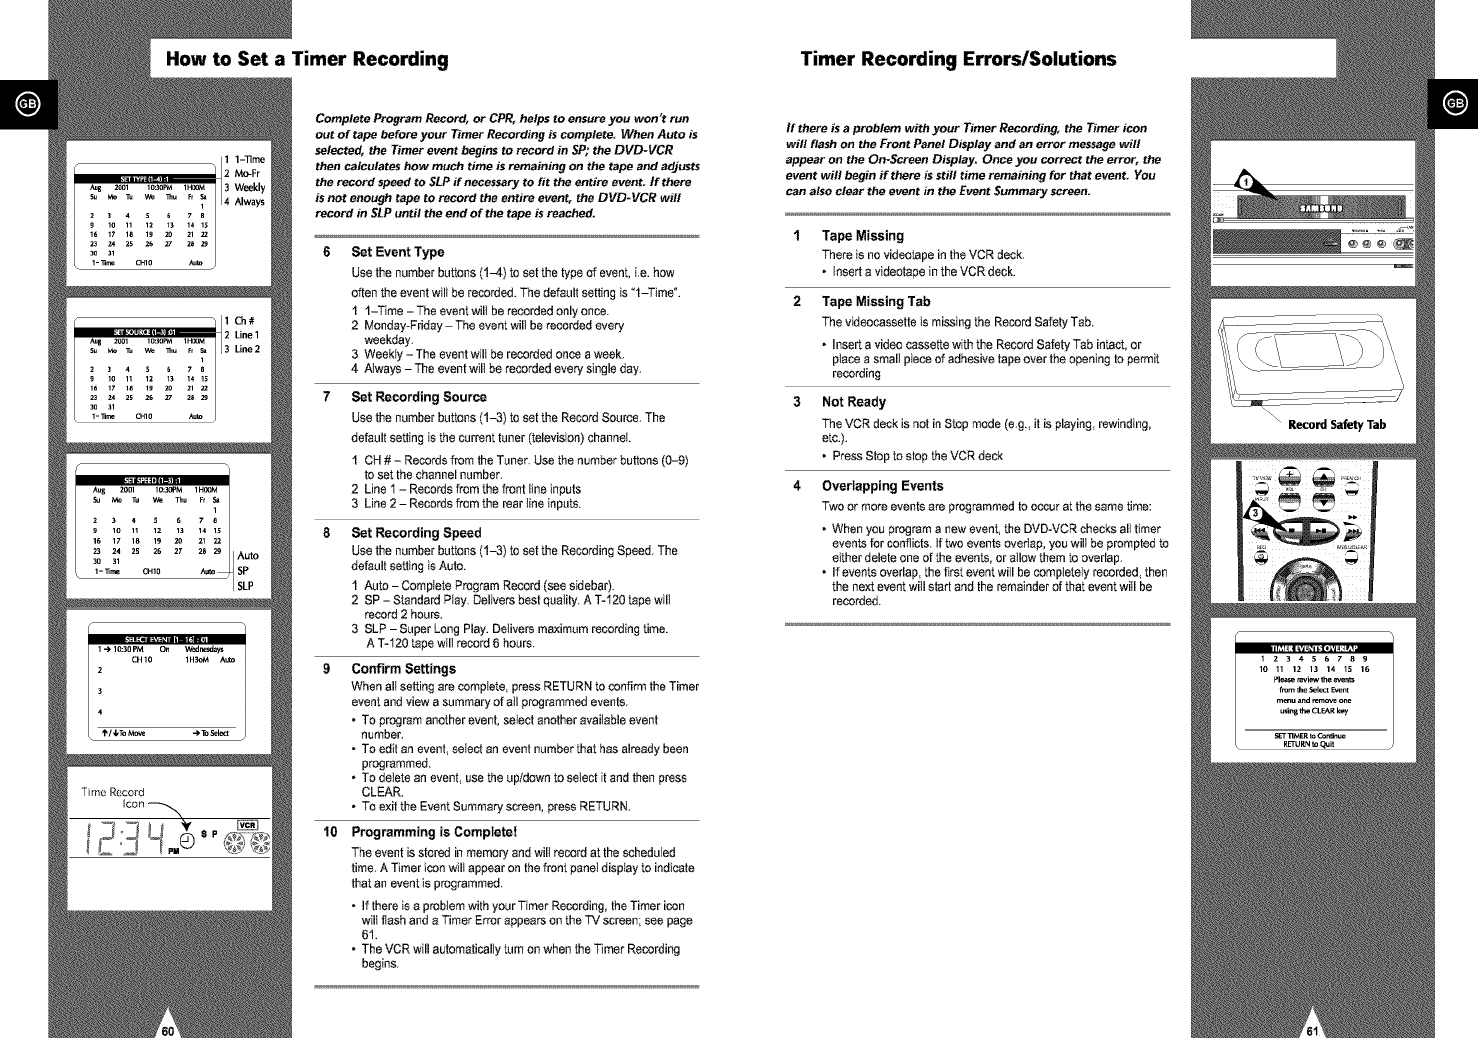
How to Set a Timer Recording Timer Recording Errors/Solutions
Complete Program Record, or CPR, helps to ensure you won't run
out of tape before your Timer Recording is complete. When Auto is
selected, the Timer event begins to record in SP; the DVD-VCR
then calculates how much time is remaining on the tape and adjusts
the record speed to SLP ff necessary to fit the entire event. If there
is not enough tape to record the entire event, the DVD-VCR will
record in SLP until the end of the tape is reached.
lO
Set Event Type
Use the number buttons (14) to set the type of event, i.e. how
often the event wilt be recorded. The default setting is "l-Time °.
1 1-Time-The eventwilt be recorded onlyonce.
2 Monday-Friday - The event will be recorded every
weekday.
3 Weekly - The event wilt be recorded once a week.
4 Always - The event will be recorded every single day.
Set Recording Source
Use the number buttons (1-3) to set the Record Source. The
default setting is the current tuner (television) channel
1 CH # - Records from the Tuner. Use the number buttons (0-9)
to set the channel number.
2 Line t - Records from the front line inputs
3 Line 2 - Records from the rear line inputs.
Set Recording Speed
Use the number buttons (1-3) to set the Recording Speed. The
default setting is Auto.
1 Auto - Comptete Program Record (see sidebar).
2 SP - Standard Play. Delivers best quality. A T-120 tape will
record 2 hours.
3 SLP - Super Long Play. Detivers maximum recording time.
A T-120 tape will record 6 hours.
Confirm Settings
When alt setting are complete, press RETURN to confirm the Timer
event and view a summary of atl programmed events.
•To program another event, select another available event
number.
• To edit an event, seled an event number that has already been
programmed.
• To detete an event, use the up/down to select it and then press
CLEAR.
• To exit the Event Summary screen, press RETURN.
Programming is Complete!
The event is stored in memory and wilt record at the scheduled
time. A Timer icon wilt appear on the front panel display to indicate
that an event is programmed.
• If there is a probtem with your Timer Recording, the Timer icon
wilt flash and a Timer Error appears on the TV screen; see page
61.
• The VCR will automatically turn on when the Timer Recording
begins.
If there is a problem with your Timer Recording, the Timer icon
will flash on the Front Panel Display and an error message will
appear on the On-Screen Display. Once you correct the error, the
event will begin if there is still time remaining for that event. You
can also clear the event in the Event Summary screen.
Tape Missing
There is no videotape in the VCR deck.
• Insert a videotape in the VCR deck.
Tape Missing Tab
The videocassette is missing the Record Safety Tab.
• Insert a video cassette with the Record Safety Tab intact, or
place a small piece of adhesive tape over the opening to permit
recording
Not Ready
The VCR deck is not in Stop mode (e.g., it is playing rewinding,
etc.).
• PressStop to stop the VCR deck
Overlapping Events
Two or more events are programmed to occur at the same time:
• When you program a new event, the DVD-VCR checks all timer
events for conflicts. If two events overtap, you will be prompted to
either delete one of the events, or allow them to overlap.
• If events overlap, the first event will be completely recorded, then
the next event will start and the remainder of that event will be
recorded.
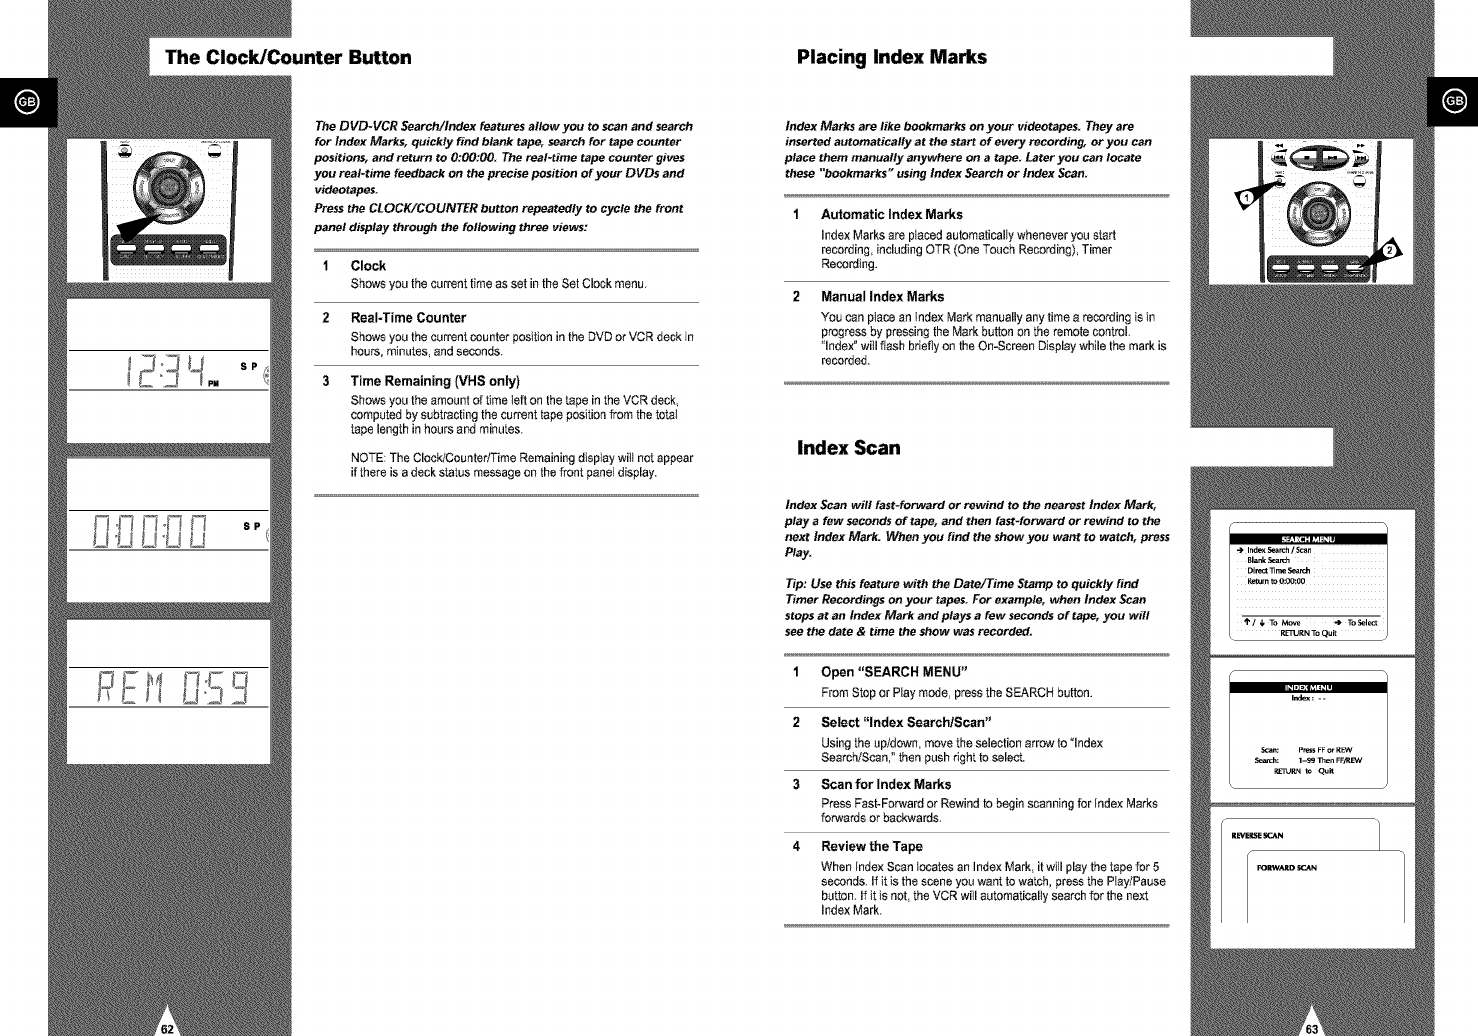
The Clock/Counter Button Placing Index Marks
The DVD-VCR SearctVIndex features allow you to scan and search
for Index Marks, quickly find blank tape, search for tape counter
positions, and return to 0:00:00. The real-time tape counter gives
you real-time feedback on the precise position of your DVDs and
videotapes.
Press the CLOCK/COUNTER button repeatedly to cycle the front
panel display through the following three views:
1Clock
Shows you the current time as set in the Set Clock menu.
2 Real-Time Counter
Shows you the current counter position in the DVD or VCR deck in
hours, minutes, and seconds.
3 Time Remaining (VHS only)
Shows you the amount of time teft on the tape in the VCR deck,
computed by subtracting the current tape position from the total
tape length in hours and minutes.
NOTE: The Clock/Counter/Time Remaining disptay will not appear
if there is a deck status message on the front panel display.
Index Marks are like bookmarks on your videotapes. They are
inserted automatically at the start of every recording, or you can
place them manually anywhere on a tape. Later you can locate
these "bookmarks" using Index Search or Index Scan.
Automatic Index Marks
Index Marks are ptaced automatically whenever you start
recording, including OTR (One Touch Recording), Timer
Recording.
Manual Index Marks
You can place an Index Mark manually any time a recording is in
progress by pressing the Mark button on the remote control.
"Index ° will ftash briefly on the On-Screen Display while the mark is
recorded.
Index Scan
Index Scan will fast-forward or rewind to the nearest Index Mark,
play a few seconds of tape, and then fast-forward or rewind to the
next Index Mark: When you find the show you want to watch, press
Play.
Tip: Use this feature with the Date/Time Stamp to quickly find
Timer Recordings on your tapes. For example, when Index Scan
stops at an Index Mark and plays a few seconds of tape, you will
see the date & time the show was recorded.
1Open "SEARCH MENU"
From Stop or Play mode, pressthe SEARCH button.
2 Select "Index Search/Scan"
Using the up/down,move theselection arrow to "Index
Search/Scan," then push right toselect.
3Scan for Index Marks
Press Fast-Forwardor Rewind to beginscanning for Index Marks
forwards or backwards.
4 Review the Tape
When index Scan locates an Index Mark, it wiII play thetape for 5
seconds. If it isthe scene you want to watch,press the Play/Pause
button. If it is not the VCR will automaticallysearch for the next
Index Mark.
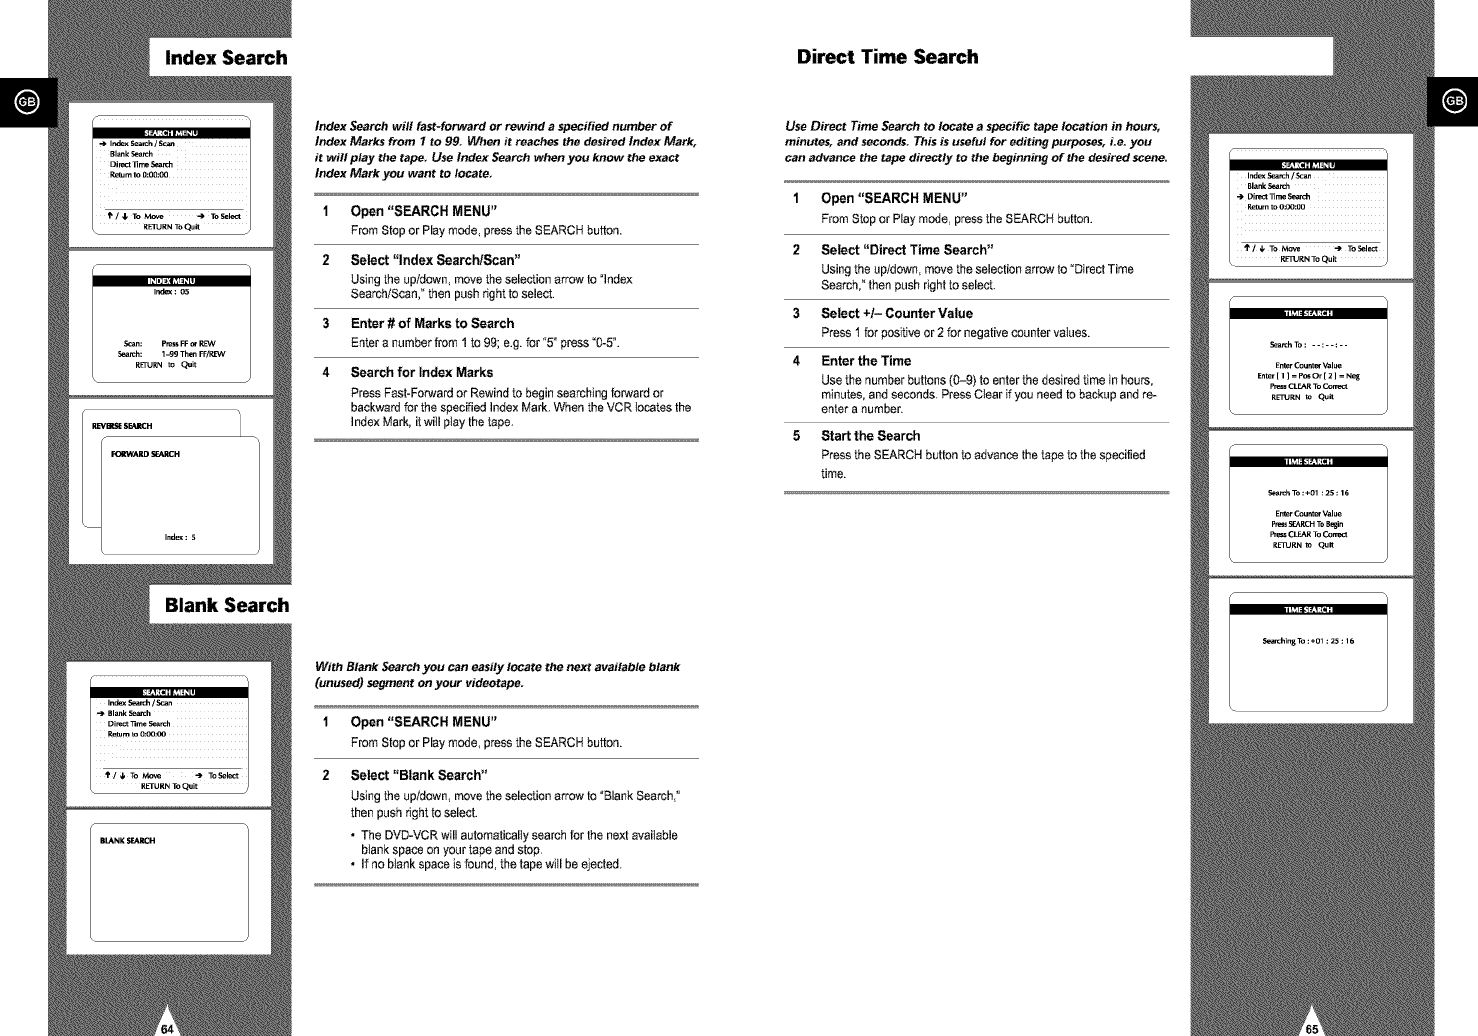
Index Search Direct Time Search
Blank Search
Index Search will fast-forward or rewind a specified number of
Index Marks from I to 99. When it reaches the desired Index Mark,
it will play the tape. Use Index Search when you know the exact
Index Mark you want to locate
1Open "SEARCH MENU"
From Stopor Play mode, pressthe SEARCHbutton.
2 Select "Index Search/Scan"
Using the up/down_movethe selection arrow to "index
Search/Scan," then push right to select.
3 Enter # of Marks to Search
Enter a numberfrom 1 to 99; e.g.for "5" press "0-5".
4Search for Index Marks
Press Fast-Forwardor Rewind to begin searching forward or
backwardfor the specified IndexMark. When the VCR locates the
Index Mark, it will ptay thetape.
With Blank Search you can easily locate the next available blank
(unused) segment on your videotape.
1Open "SEARCH MENU"
From Stop or Play mode, pressthe SEARCH button.
2Select "Blank Search"
Using the up/down, move the selection arrow to "Blank Search,"
then push dght to select.
• The DVD-VCR will automatically search for the next available
blank space on your tape and stop.
• If no blank space is found, the tape will be ejected.
Use Direct Time Search to locate a specific tape location in hours,
minutes, and seconds. This is useful for editing purposes, Le. you
can advance the tape directly to the beginning of the desired scene.
1Open "SEARCH MENU"
From Stop or Play mode, pressthe SEARCH button.
2 Select "Direct Time Search"
Using the up/down,move theselection arrow to "DirectTime
Search," thenpushright to select.
3Select +/- Counter Value
Press1 for positiveor 2 for negativecounter values.
4 Enter the Time
Use the numberbuttons (0-9) to enter thedesired time in hours,
minutes, and seconds. PressClearif you needto backupand re-
enter a number.
5Start the Search
Pressthe SEARCHbutton to advancethe tape to thespecified
time.
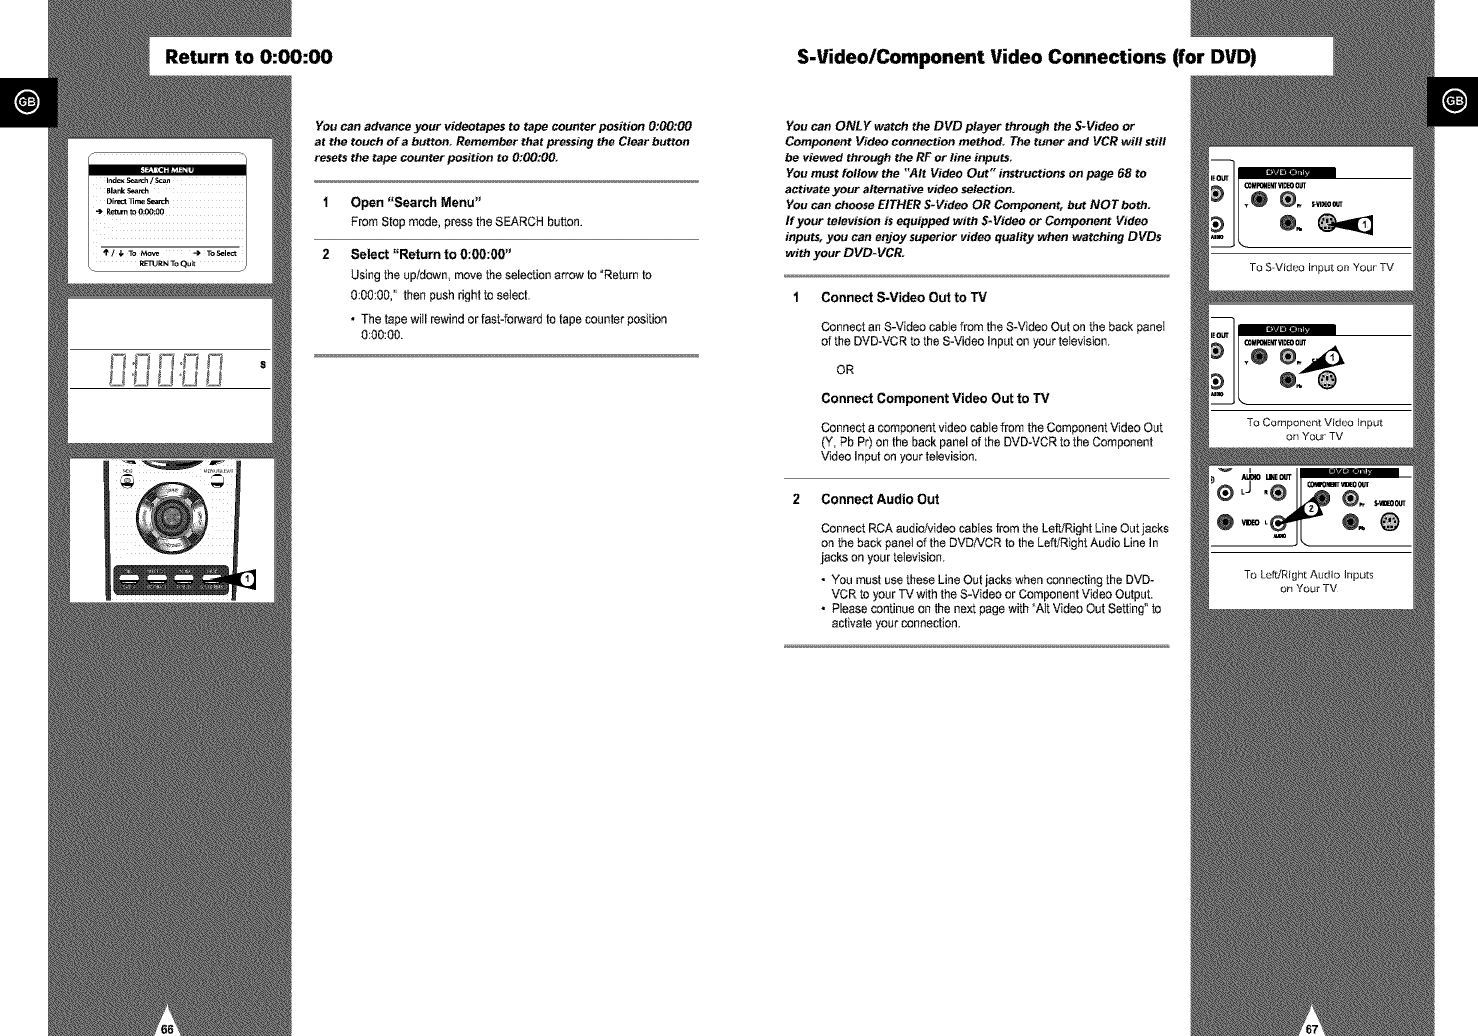
Return to 0:00:00 S-Video/Component Video Connections (for DVD)
You can advance your videotapes to tape counter position 0:00:00
at the touch of a button. Remember that pressing the Clear button
resets the tape counter position to 0:00:00.
1Open "Search Menu"
From Stop mede, pressthe SEARCH button.
2 Select "Return to 0:00:00"
Using the up/down, movethe selection arrow to "Returnto
0:00:00," thenpush rightto seIecL
•The tape will rewindor fast-forwardto tapecounter position
0:00:00.
You can ONLY watch the DVD player through the S-Video or
Component Video connection method. The tuner and VCR will still
be viewed through the RE or line inputs.
You must follow the "Air Video Out" instructions on page 68 to
activate your alternative video selection.
You can choose EITHER S-Video OR Component, but NOT both.
If your television is equipped with S-Video or Component Video
inputs, you can enjoy superior video quality when watching DVDs
with your DVD-VCR.
Connect S-Video Out to TV
Connect an S-Videocablefrom the S-VideoOut on the back panel
of the DVD-VCRto the S-VideoInput on your television,
OR
Connect Component Video Out to TV
Connect acomponent videocable from the Component VideoOut
(Y, PbP0 on the backpanel of the DVD-VCRto the Component
Video Inputon your television.
2 Connect Audio Out
Connect RCA audio/video cables from the Left/Right Line Out jacks
on the back paneI of the DVDiVCR to the Left/Right Audio Line In
jacks on your television,
• You must use these Line Out jacks when connecting the DVD-
VCR to your "IV with the S-Video or Component Video Output.
•Please continue on the next page with "Air Video Out Setting" to
activate your connection.
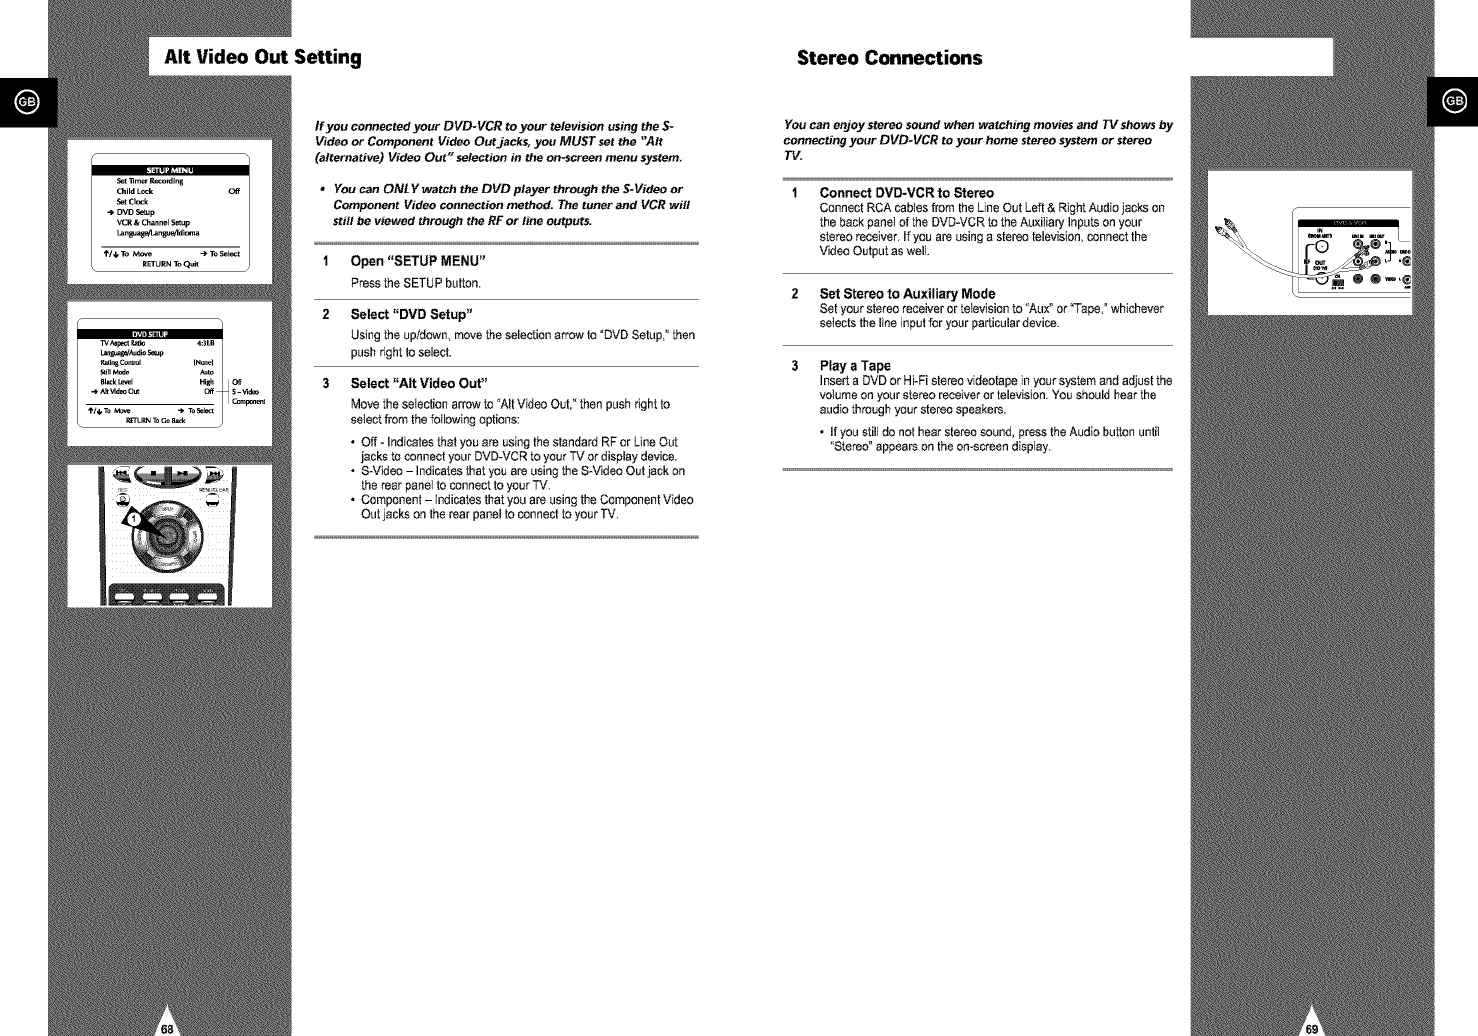
AIt Video Out Setting Stereo Connections
If you connected your DVD-VCR to your television using the S-
Video or Component Video Out jacks, you MUST set the "Air
(alternative) Video Out" selection in the on-screen menu system
* You can ONLY watch the DVD player through the S-Video or
Component Video connection method. The tuner and VCR will
still be viewed through the RF or line outputs.
1Open "SETUP MENU"
PresstheSETUP button.
2 Select "DVD Setup"
Using the up/down, movethe selection arrow to "DVDSetup," then
push right to select.
3Select "AIt Video Out"
Move theselection arrow to "AItVideo Out,"then push right to
select from the followingoptions:
•Off - Indicates that you are using the standard RF or LineOut
jacks to connect your DVD-VCRto your TV or display device.
• S-Video - Indicatesthat you are usingthe S-VideoOut jack on
the rear panel to connect to your TV.
• Component - Indicates that you are using the ComponentVideo
Out jacks onthe rear panel to conned to your TV.
Youcanenjoystereo sound when watching movies and TV shows by
connecting your DVD-VCR to your home stereo system or stereo
TV.
Connect DVD-VCR to Stereo
Conned RCA cabtes from the Line Out Left & Right Audio jacks on
the back panet of the DVD-VCR to the Au×itiary Inputs on your
stereo receiver. If you are using a stereo television, connect the
Video Output as well.
2 Set Stereo to Auxiliary Mode
Set your stereo receiver or television to "Au×" or Tape, ° whichever
selects the line input for your particular device.
Play a Tape
Insert a DVD or Hi-Fi stereo videotape in your system and adjust the
votume on your stereo receiver or television. You should hear the
audio through your stereo speakers.
• If you stilt do not hear stereo sound, press the Audio button untit
"Stereo ° appears on the on-screen disptay.
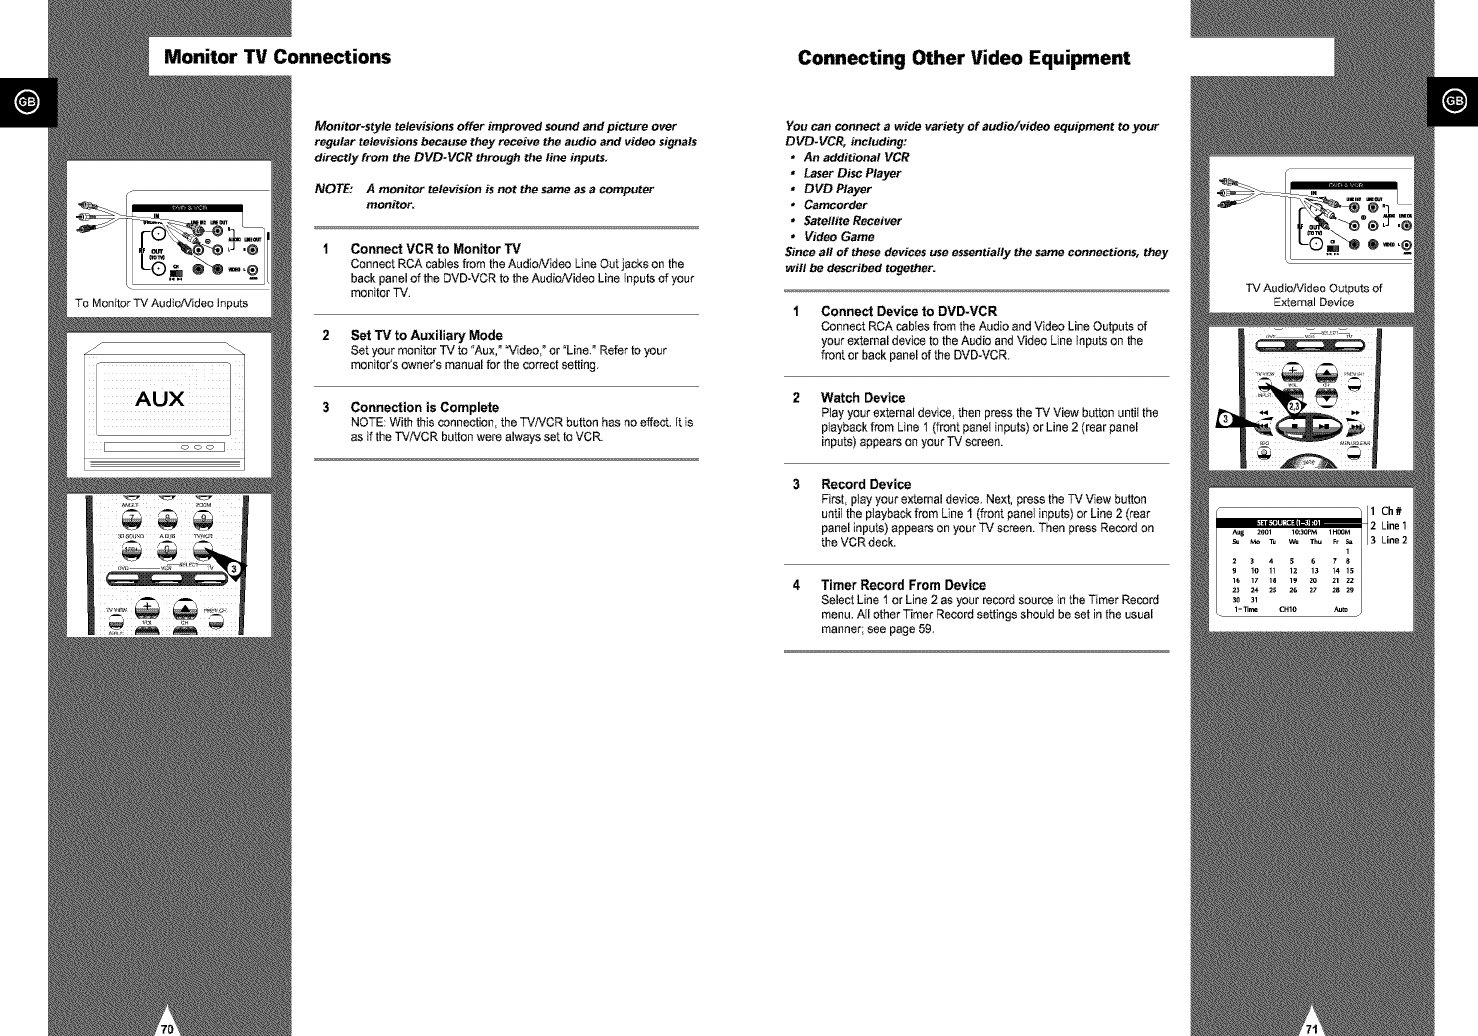
Monitor TV Connections Connecting Other Video Equipment
Monitor-style televisions offer improved sound and picture over
regular televisions because they receive the audio and video signals
directly from the DVD-VCR through the line inputs.
NOTE: A monitor television is not the same as acomputer
monitor.
Connect VCR to Monitor TV
Connect RCA cabtes from the AudioMdeo Line Out jacks on the
back panel of the DVD-VCR to the Audio/Video Line Inputs of your
monitor TV.
Set TV to Auxiliary Mode
Set your monitor TV to "Aux,°"Video,°or "Line.° Refertoyour
monitor's owner's manual for the correctsetting.
Connection is Complete
NOTE: With this connection, the TViVCR button has no effect. It is
as if the TVNCR button were always set to VCR.
You can connect a wide variety of audio/video equipment to your
DVD-VCI_ including:
* An additional VCR
* Laser Disc Player
* DVD Player
* Camcorder
* Satellite Receiver
* Video Game
Since all of these devices use essentially the same connections, they
will be described together.
Connect Device to DVD-VCR
Connect RCA cables from the Audio and Video Line Outputs of
your external device to the Audio and Video Line Inputs on the
front or back panel of the DVD-VCR.
Watch Device
Play your external device, then press the "IV View button until the
playback from Line t (front paneI inputs) or Line 2 (rear panel
inputs) appears on your TV screen.
Record Device
First, ptay your external device. Next, pressthe TV View button
unfitthe ptayback from Line I (front panet inputs) or Line2 (rear
panel inputs) appears on your TV screen. Thenpress Recordon
the VCR deck.
Timer Record From Device
Select Line t or Line 2 as your record source in the Timer Record
menu. All other Timer Record settings shouId be set in the usual
manner; see page 59.
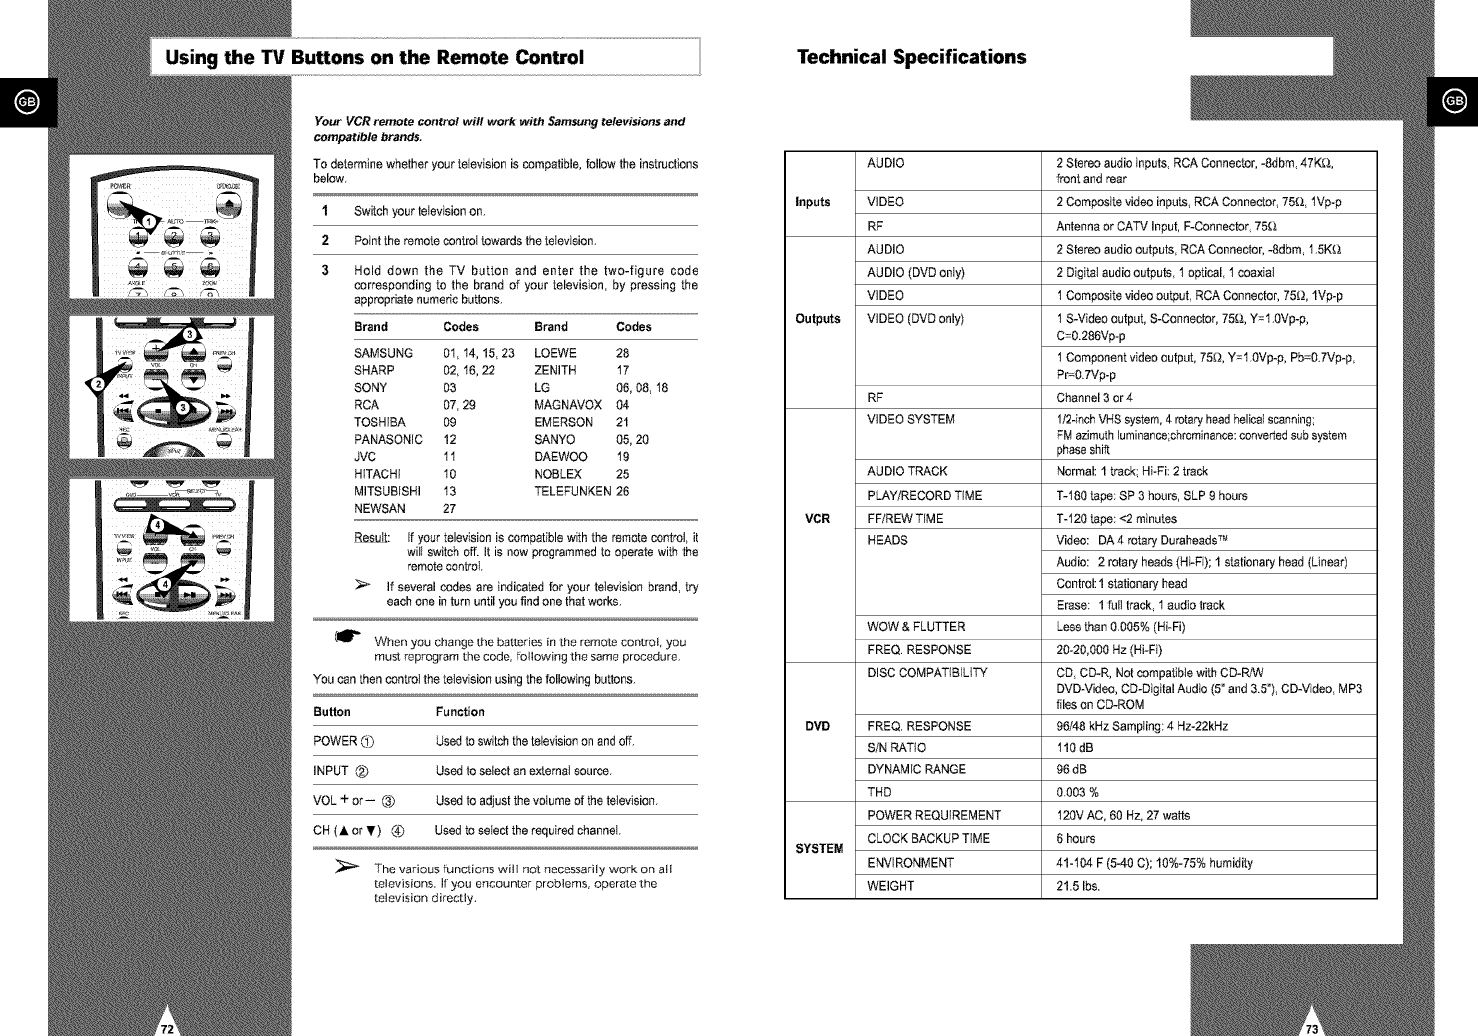
Using the TV Buttons on the Remote Control Technical Specifications
Your VCR remote control will work with Samsung televisions and
compatible brands.
To determinewhether your television is compatible,follow the instructions
below.
1Switch your television on.
2Point the remote control towards the television.
3 Hold down the TV button and enter the two-figure code
corresponding to the brand of your television, by pressing the
appropriate numeric buttons.
Brand Codes Brand Codes
SAMSUNG 0t, 14, 15, 23 LOEWE 28
SHARP 02, 16, 22 ZENITH 17
SONY 03 LG 06, 08, 18
RCA 07, 29 MAGNAVOX 04
TOSHIBA 09 EMERSON 21
PANASONIC 12 SANYO 05, 20
JVC 11 DAEWOO 19
HITACHi 10 NOBLEX 25
MITSUBISHI 13 TELEFUNKEN 26
NEWSAN 27
Result: If your television is compatible with the remote control, it
will switch off. It is now programmed to operate with the
remote control
> If several codes are indicated for your television brand, try
each one in turn until you find one that works.
(_P" When you change the batteries in [he remote control, you
must reprogram the code, following [he same procedure.
YOU can then control the television using the following buttons.
Button Function
POWER C_) Used to switch the television on and off.
INPUT {2") Used to select an e×temat source.
VOL +or-- (3_ Used to adjust the volume of the television.
CH (A or T) _) Used to select the required channel.
The various functions wi!l no[ necessarily work on all
televisions. Ir you encounter problems, operate the
television directly.
AUDIO
Inputs
Outputs
VIDEO
RF
AUDIO
AUDIO (DVD only}
VIDEO
VIDEO (DVD only)
RF
VIDEO SYSTEM
AUDIO TRACK
PLAY/RECORD TIME
VCR FF/REW TIME
HEADS
WOW & FLUTTER
FREQ. RESPONSE
DISC COMPATIBILITY
DVB FREQ. RESPONSE
S/N RATIO
DYNAMIC RANGE
THD
POWER REQUIREMENT
CLOCK BACKUP TIME
SYSTEM
ENVIRONMENT
WEIGHT
2 Stereo audio inputs, RCA Connector, -Sdbm, 47K_&,
front and rear
2 Composite video inputs, RCA Connector, 75_;&,lVp-p
Antenna or CATV Input, F-Connector, 75_;&
2 Stereo audio outputs, RCA Connector, -8dbm, 1.5K_&
2 Digital audio outputs, 1 optical, 1 coaxial
1 Composite video output, RCA Connector, 75_:;t, lVp-p
t S-Video output, S-Connector, 75_;&,Y=1.0Vp-p,
C=0.286Vp-p
t Component video output, 75_:;t,Y=1.0Vp-p, Pb=0.7Vp-p,
Pr=0.7Vp-p
Channel 3 or 4
1/2-inch VHS system, 4 rotary head helical scanning;
FM azimuth luminance;chrominance: converted sub system
phase shift
Normal: 1 track Hi-Fi: 2 track
"1"-180tape: SP 3 hours, SLP 9 hours
T-120 tape: <2 minutes
Video: DA 4 rotary Duraheads TM
Audio: 2 rotary heads (Hi-Fi}; 1 stationary head (Linear)
Control: 1 stationary head
Erase: 1 full track, 1 audio track
Less than 0.005% (Hi-Fi)
20-20,000 Hz (Hi-Fi}
CD, CD-R, Not compatible with CD-R/W
DVD-Video, CD-Digital Audio (5" and 3.5"), CD-Video, MP3
files on CD-ROM
96/48 kHz Sampling: 4 Hz-22kHz
110dB
96 dB
0.003 %
120V AC, 60 Hz, 27 watts
6 hours
4%104 F (5-40 C); 10%-75% humidity
21.5 Ibs.
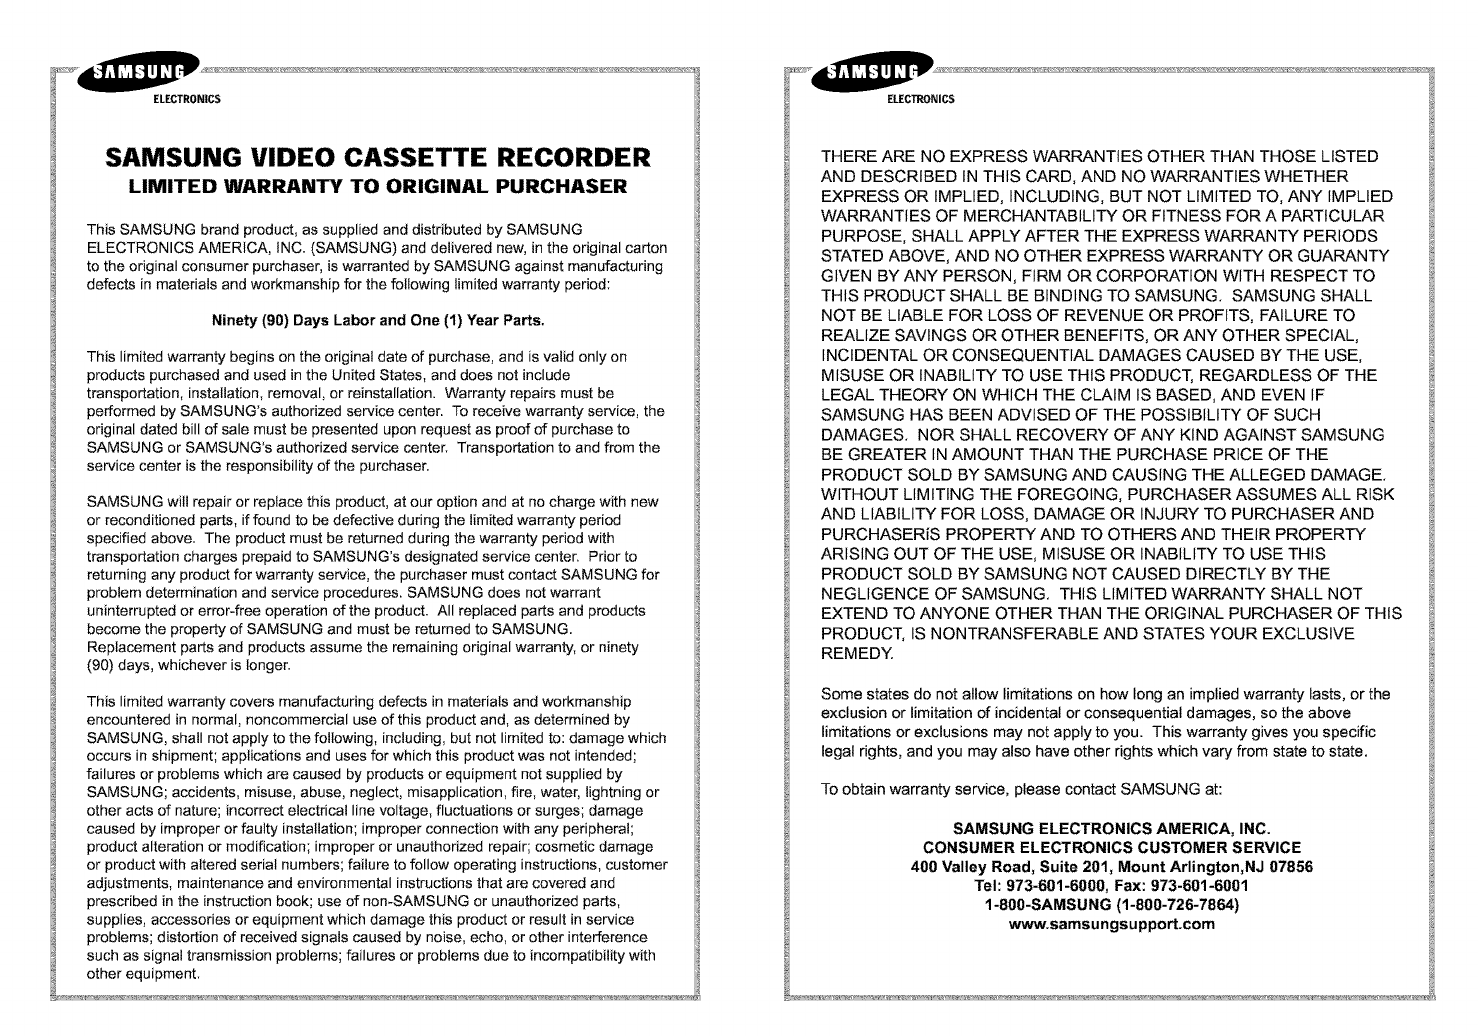
ELECTRONICS
SAMSUNG VIDEO CASSETTE RECORDER
LIMITED WARRANTY TO ORIGINAL PURCHASER
This SAMSUNG brand product, as supplied and distributed by SAMSUNG
ELECTRONICS AMERICA, INC. (SAMSUNG) and delivered new, in the original carton
to the original consumer purchaser, is warranted by SAMSUNG against manufacturing
defects in materials and workmanship for the following limited warranty period:
Ninety (90) Days Labor and One (1) Year Parts.
This limited warranty begins on the original date of purchase, and is valid only on
products purchased and used in the United States, and does not include
transportation, installation, removal, or reinstallation. Warranty repairs must be
performed by SAMSUNG's authorized service center. To receive warranty service, the
original dated bill of sale must be presented upon request as proof of purchase to
SAMSUNG or SAMSUNG's authorized service center. Transportation to and from the
service center is the responsibility of the purchaser.
SAMSUNG will repair or replace this product, at our option and at no charge with new
or reconditioned parts, if found to be defective during the limited warranty period
specified above. The product must be returned during the warranty period with
transportation charges prepaid to SAMSUNG's designated service center. Prior to
returning any product for warranty service, the purchaser must contact SAMSUNG for
problem determination and service procedures. SAMSUNG does not warrant
uninterrupted or error-free operation of the product. All replaced parts and products
become the property of SAMSUNG and must be returned to SAMSUNG.
Replacement parts and products assume the remaining original warranty, or ninety
(90) days, whichever is longer.
This limited warranty covers manufacturing defects inmaterials and workmanship
encountered in normal, noncommercial use of this product and, as determined by
SAMSUNG, shall not apply to the following, including, but not limited to: damage which
occurs in shipment; applications and uses for which this product was not intended;
failures or problems which are caused by products or equipment not supplied by
SAMSUNG; accidents, misuse, abuse, neglect, misapplication, fire, water, lightning or
other acts of nature; incorrect electrical line voltage, fluctuations or surges; damage
caused by improper or faulty installation; improper connection with any peripheral;
product alteration or modification; improper or unauthorized repair; cosmetic damage
or product with altered serial numbers; failure to follow operating instructions, customer
adjustments, maintenance and environmental instructions that are covered and
prescribed in the instruction book; use of non-SAMSUNG or unauthorized parts,
supplies, accessories or equipment which damage this product or result in service
problems; distortion of received signals caused by noise, echo, or other interference
ELECTRONICS
THERE ARE NO EXPRESS WARRANTIES OTHER THAN THOSE LISTED
AND DESCRIBED IN THIS CARD, AND NO WARRANTIES WHETHER
EXPRESS OR IMPLIED, INCLUDING, BUT NOT LIMITED TO, ANY IMPLIED
WARRANTIES OF MERCHANTABILITY OR FITNESS FOR A PARTICULAR
PURPOSE, SHALL APPLY AFTER THE EXPRESS WARRANTY PERIODS
STATED ABOVE, AND NO OTHER EXPRESS WARRANTY OR GUARANTY
GIVEN BY ANY PERSON, FIRM OR CORPORATION WITH RESPECT TO
THIS PRODUCT SHALL BE BINDING TO SAMSUNG. SAMSUNG SHALL
NOT BE LIABLE FOR LOSS OF REVENUE OR PROFITS, FAILURE TO
REALIZE SAVINGS OR OTHER BENEFITS, OR ANY OTHER SPECIAL,
INCIDENTAL OR CONSEQUENTIAL DAMAGES CAUSED BY THE USE,
MISUSE OR INABILITY TO USE THIS PRODUCT, REGARDLESS OF THE
[ LEGAL THEORY ON WHICH THE CLAIM IS BASED, AND EVEN IF
SAMSUNG HAS BEEN ADVISED OF THE POSSIBILITY OF SUCH
DAMAGES. NOR SHALL RECOVERY OF ANY KIND AGAINST SAMSUNG
BE GREATER IN AMOUNT THAN THE PURCHASE PRICE OF THE
PRODUCT SOLD BY SAMSUNG AND CAUSING THE ALLEGED DAMAGE.
WITHOUT LIMITING THE FOREGOING, PURCHASER ASSUMES ALL RISK
AND LIABILITY FOR LOSS, DAMAGE OR INJURY TO PURCHASER AND
PURCHASERiS PROPERTY AND TO OTHERS AND THEIR PROPERTY
ARISING OUT OF THE USE, MISUSE OR INABILITY TO USE THIS
PRODUCT SOLD BY SAMSUNG NOT CAUSED DIRECTLY BY THE
NEGLIGENCE OF SAMSUNG. THIS LIMITED WARRANTY SHALL NOT
EXTEND TO ANYONE OTHER THAN THE ORIGINAL PURCHASER OF THIS
PRODUCT, IS NONTRANSFERABLE AND STATES YOUR EXCLUSIVE
REMEDY.
Some states do not allow limitations on how long an implied warranty lasts, or the
exclusion or limitation of incidental or consequential damages, so the above
limitations or exclusions may not apply to you. This warranty gives you specific
legal rights, and you may also have other rights which vary from state to state.
To obtain warranty service, please contact SAMSUNG at:
SAMSUNG ELECTRONICS AMERICA, INC,
CONSUMER ELECTRONICS CUSTOMER SERVICE
400 Valley Road, Suite 201, Mount Arlington,NJ 07856
Tel: 973-601-6000, Fax: 973-601-6001
1-800-SAMSUNG (1-800-726-7864)
www.samsungsupport,com
SAMSUNG ELECTRONICS AMERICA, INC.
HEADQUARTERS
105 Challenger Road, Ridgefield Park, N.J.
07660-0511
TEL: 1-800-SAMSUNG
SERVICE DIVISION
400 ValleyRoad, Suite 201, MountArlington, NJ 07856
1-800-SAMSUNG(1-800-726-7864)
ELECTRONICS
AC68-0 t547A
