Samsung HP S4253 User Manual PLASMA TELEVISION` Manuals And Guides L0605025
SAMSUNG Plasma Television Manual L0605025 SAMSUNG Plasma Television Owner's Manual, SAMSUNG Plasma Television installation guides
User Manual: Samsung HP-S4253 HP-S4253 SAMSUNG PLASMA TELEVISION` - Manuals and Guides View the owners manual for your SAMSUNG PLASMA TELEVISION` #HPS4253. Home:Electronics Parts:Samsung Parts:Samsung PLASMA TELEVISION` Manual
Open the PDF directly: View PDF ![]() .
.
Page Count: 141 [warning: Documents this large are best viewed by clicking the View PDF Link!]
Owner's Instructions
HP-$4253
HP-$5053
ImportantWarrantyInformation
RegardingTelevisionFormatViewing
Wide screen format PDP Displays (16:9, the aspect ratio of the screen width to height) are primarily
designed to view wide screen format full-motion video. The images displayed on them should primarily
be in the wide screen 16:9 ratio format, or expanded to fill the screen if your model offers this feature
and the images are constantly moving. Displaying stationary graphics and images on screen, such as
the dark side-bars on nonexpanded standard format television video and programming, should be
limited to no more than 5% of the total television viewing per week.
Additionally, viewing other stationary images and text such as stock market reports, video game
displays, station Iogos, web sites or computer graphics and patterns, should be limited as described
above for all televisions. Displaying stationary images that exceed the above guidelines
can cause uneven aging of PDP Displays that leave subtle, but permanent burned-in
ghost images in the PDP picture. To avoid this, vary the programming and images,
and primarily display full screen moving images, not stationary patterns or dark
bars.
On PDP models that offer picture sizing features, use these controls to view different formats as a full
screen picture.
Be careful in the selection and duration of television formats used for viewing. Uneven PDP aging as a
result of format selection and use, as well as burned-in images, are not covered by your Samsung
limited warranty.
U.S.A Only
The product unit accompanying this user manual is licensed under certain intellectual property
rights of certain third parties. In particular, this product is licensed under the following US patents:
5,991,715, 5,740,317, 4,972,484, 5,214,678, 5,323,396, 5,539,829, 5,606,618,
5,530,655, 5,777,992, 6,289,308, 5,610,985, 5,481,643, 5,544,247, 5,960,037,
6,023,490, 5,878,080, and under US Published Patent Application No. 2001-44713-A1.
This license is limited to private non-commercial use by end-user consumers for licensed contents.
No rights are granted for commercial use. The license does not cover any product unit other than
this product unit and the license does not extend to any unlicensed product unit or process
conforming to ISO/IEC 11172-3 or ISO/IEC 13818-3 used or sold in combination with this
product unit. The license only covers the use of this product unit to encode and/or decode audio
files conforming to the ISO/IEC 11172-3 or ISO/IEC 13818-3. No rights are granted under this
license for product features or functions that do not conform to the ISO/IEC 11172-3 or ISO/IEC
13818-3.
Other countries
The product unit accompanying this user manual is licensed under certain intellectual property
rights of certain third parties. This license is limited to private non-commercial use by end-user
consumers for licensed contents. No rights are granted for commercial use. The license does not
cover any product unit other than this product unit and the license does not extend to any
unlicensed product unit or process conforming to ISO/IEC 11172-3 or ISO/IEC 13818-3 used or
sold in combination with this product unit. The license only covers the use of this product unit to
encode and/or decode audio files conforming to the ISO/IEC 11172-3 or ISO/IEC 13818-3.
No rights are granted under this license for product features or functions that do not conform to the
ISO/IEC 11172-3 or ISO/IEC 13818-3.
UserInstrucfions
@
@
@
@
@
@
@
@
@
ScreenImageretention
Do not display a still image (such as on a video game) on the plasma display panel for more than
several minutes as it can cause screen image retention. This image retention is also known as
"screen burn". To avoid such image retention, refer to page 53 of this manual to reduce the
degree of brightness and contrast of the screen when displaying a still image.
Altitude
The PDP can only operate normal]y at heights under 65OOft.
HeatonthetopofthePDPTV
The top side of the product may be hot after Iongperiods of use as heat dissipates from the panel
through the vent hole in the upper part of the product.
This is normal and does not indicate any defect or operation failure of the product.
However, children should be prevented from touching the upper part of the product.
Theproductis makinga 'cracking'noise.
A 'cracking' noise may occur when the product contracts or expands due to a change of
surrounding environment such as temperature or humidity. This is normal and not a defect of the
unit.
CellDefects
The PDP uses a panel consisting of 1,230,O00(SD-level) to 3,150,OO0(HD-leve]) pixels which
require sophisticated technology to produce. However, there may be a few bright or dark pixels on
the screen. These pixels will have no impact on the performance of the product.
Avoidoperatingthe TV at temperaturesbelow 5°C (41°F)
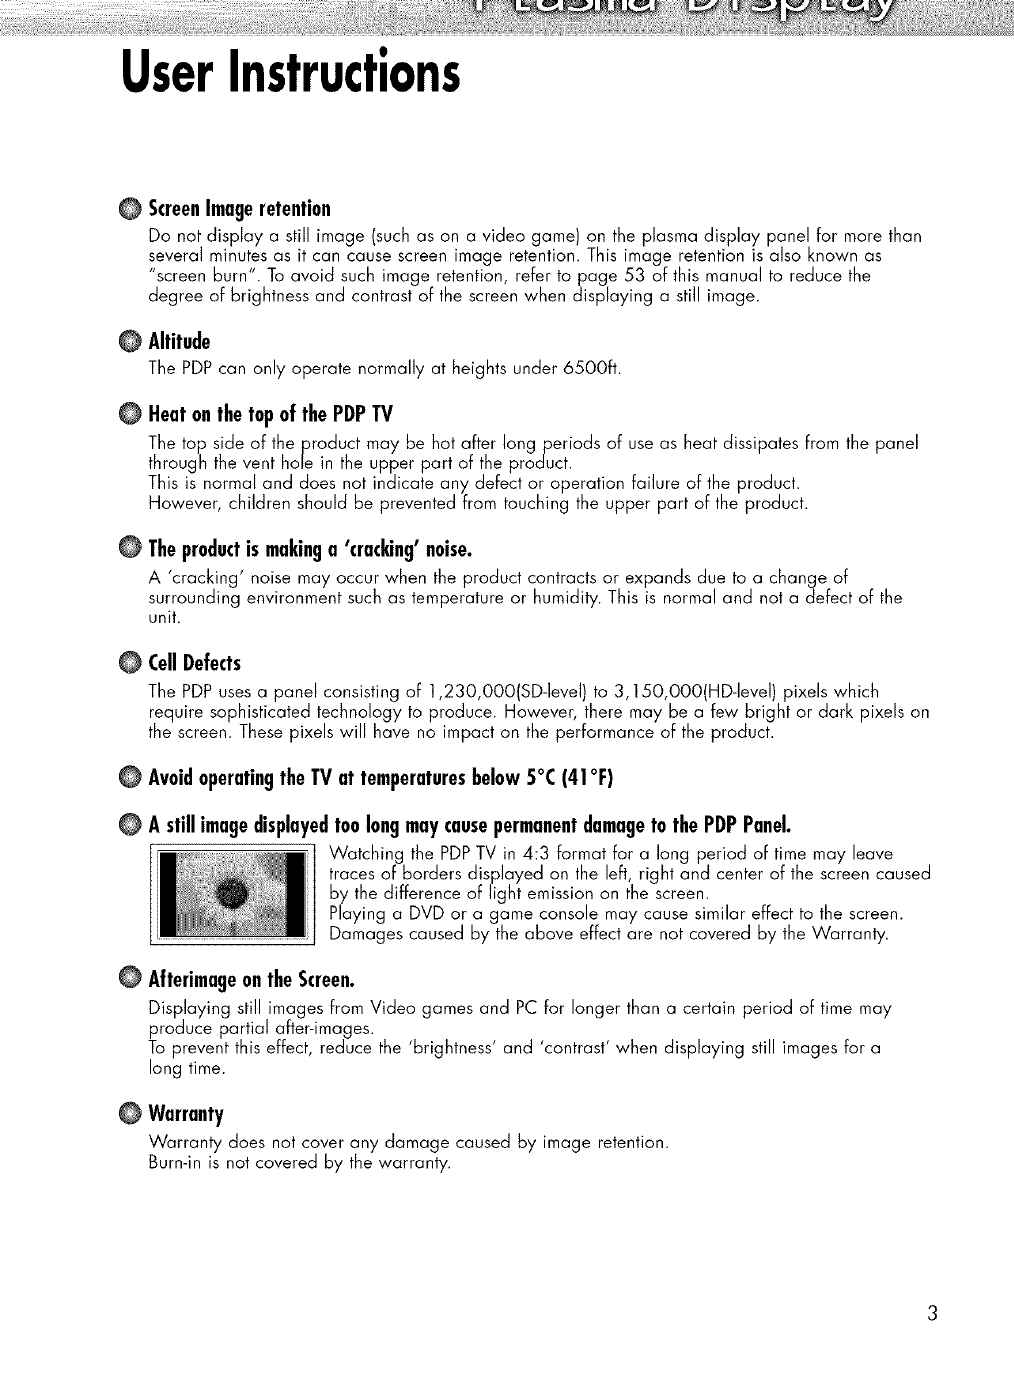
A stillimagedisplayedtoolongmaycausepermanentdamagetothePDPPanel.
Watching the PDPTV in 4:3 format for a long period of time may leave
traces of borders displayed on the left, right and center of the screen caused
by the difference of light emission on the screen.
Playing a DVD or a game console may cause similar effect to the screen.
Damages caused by the above effect are not covered by the Warranty.
AfterimageontheScreen.
Displaying still images from Video games and PC for longer than a certain period of time may
produce partial after-images.
To prevent this effect, reduce the 'brightness' and 'contrast' when displaying still images for a
long time.
Warranty
Warranty does not cover any damage caused by image retention.
Burn-in is not covered by the warranty.
TableofContents
GeneralInformation
Your New Plasma Display Panel ...................... 8
Remote Control Buttons ................................ 11
Wall Installation Instructions .......................... 13
How to assemble the Stand-Base .................. 17
Connections
Connecting VHF and UHF Antennas .............. 20
Connecting Cable TV .................................. 21
Connecting a VCR ...................................... 23
Connecting a Camcorder ............................ 24
Connecting a DVD Player (480i, 480p) ........ 25
Connecting a DTV Receiver (480p, 720p,
1080i) ...................................................... 26
Connecting to HDMI (High Definition
Multimedia Interface) (480p, 720p, 1080i) ..27
Connecting a Digital TV Set-Top Box (480p,
720p, 1080i) ............................................ 28
Connecting a Digital Audio System .............. 29
Connecting to an Analog Amplifier .............. 30
Operation
Turning the TV On and Off .......................... 32
Viewing the Menus and Displays .................. 36
Memorizing the Channels ............................ 37
Setting Up Your Remote Control .................... 41
Viewing an External Signal Source ................ 48
PictureControl
Changing the Picture Standard .................... 52
Customizing the Picture Settings .................... 53
DNle (Digital Natural Image engine) ............ 55
Changing the Screen Size ............................ 56
Viewing the Picture-in-Picture ......................... 58
Selecting the Sound Source ......................... 64
SoundControl
Customizing the Sound .............................. 66
Using Automatic Sound Settings ................... 67
Setting the TruSurround XT............................ 68
Choosing a Multi-Channel Sound (MTS) track
- Digital ...................................................... 69
Choosing a Multi-Channel Sound (MTS) track
- Analog .................................................... 70
Using the Auto Volume ................................ 71
Setting the On/Off Melody .......................... 72
Selecting the Internal Mute .......................... 73
Sound Reset................................................ 74
ChannelControl
Selecting the Antenna .................................. 76
Selecting Your Favorite Channels .................. 77
Viewing the Channel Lists ............................ 79
Editing the Channel Lists .............................. 80
Default List mode ........................................ 82
Labeling the Channels .................................. 83
Fine Tuning Analog Channels ...................... 84
Checking the Digital-Signal Strength .............. 85
LNA (Low Noise Amplifier) .......................... 86
Connectinga PCandOperation
Connecting a PC ........................................ 88
Changing the Position of the Image .............. 92
Picture Quality Adjustment ............................ 93
Image Reset................................................ 95
TimeSetting
Setting the Clock ........................................ 98
Setting the On/Off Timer ............................ 1OO
Setting the Sleep Timer .............................. 1O1
FunctionDescription
Selecting a Menu Language ...................... 104
Digital Noise Reduction .............................. 105
Selecting the Film Mode ............................ 106
Setting the Blue Screen .............................. 107
Using Game Mode .................................... 108
Viewing Closed Captions (On-Screen
Text Messages) - Analog ............................ 109
Viewing Closed Captions (On-Screen
Text Messages) - Digital .............................. 110
Menu Transparency Level .......................... 112
Using the Energy Saving Feature ................ 113
Preventing Screen Burn-in .......................... 114
Reducing the Effects of Screen Burn ............ 115
Setting the Function Help ............................ 116
Setting the Blue Eye .................................. 117
Using the V-Chip (for USA) ........................ 118
Using the V-Chip (for Canada) .................... 124
Appendix
Troubleshooting ........................................ 134
Care and Maintenance .............................. 135
Specifications ............................................ 136
Dimensions (HP-$4253) .............................. 137
Dimensions (HP-$5053) .............................. 139
/C0te
• The information contained in these Owner's
Instructions is subject to change without prior
notice for improvement, and may vary
depending on the version of the TV's software
and the regional conditions.

P L ASM A D I S P L AY PA N E L
GeneralInformation
Your New Plasma Display Panel ...................................................... 8
Remote Control Buttons ................................................................ 11
Wall Installation Instructions ............................................................
How to assemble the Stand-Base .................................................... 17

YourNewPlasmaDisplayPanel
OSOURCEbutton
Pressto display all of the available video
sources(TV,AV1, AV2, S-Video1, S-Video2,
Component1, Component2, PC, HDMI1,
and HDMI2).
0MENUbutton
Displays the main on-screenmenu.
0VOL +, - buttons
Pressto increase or decrease the volume.
Also used to selector adjust itemson the
on-screenmenu.
OCH(A,V) buttons
PressCHA or CHV to change channels.
Also used to move up or down in the on-screen
menu.
0 _ (Enter)button
Pressto confirm a selection.
OPowerbutton
Pressto turn the TV on and off.
Power indicator
- Power Off : Blue
- Power On : Off
ORemoteControlSensor
Aim the remotecontrol towards this spot on
the TV.
QSpeakers
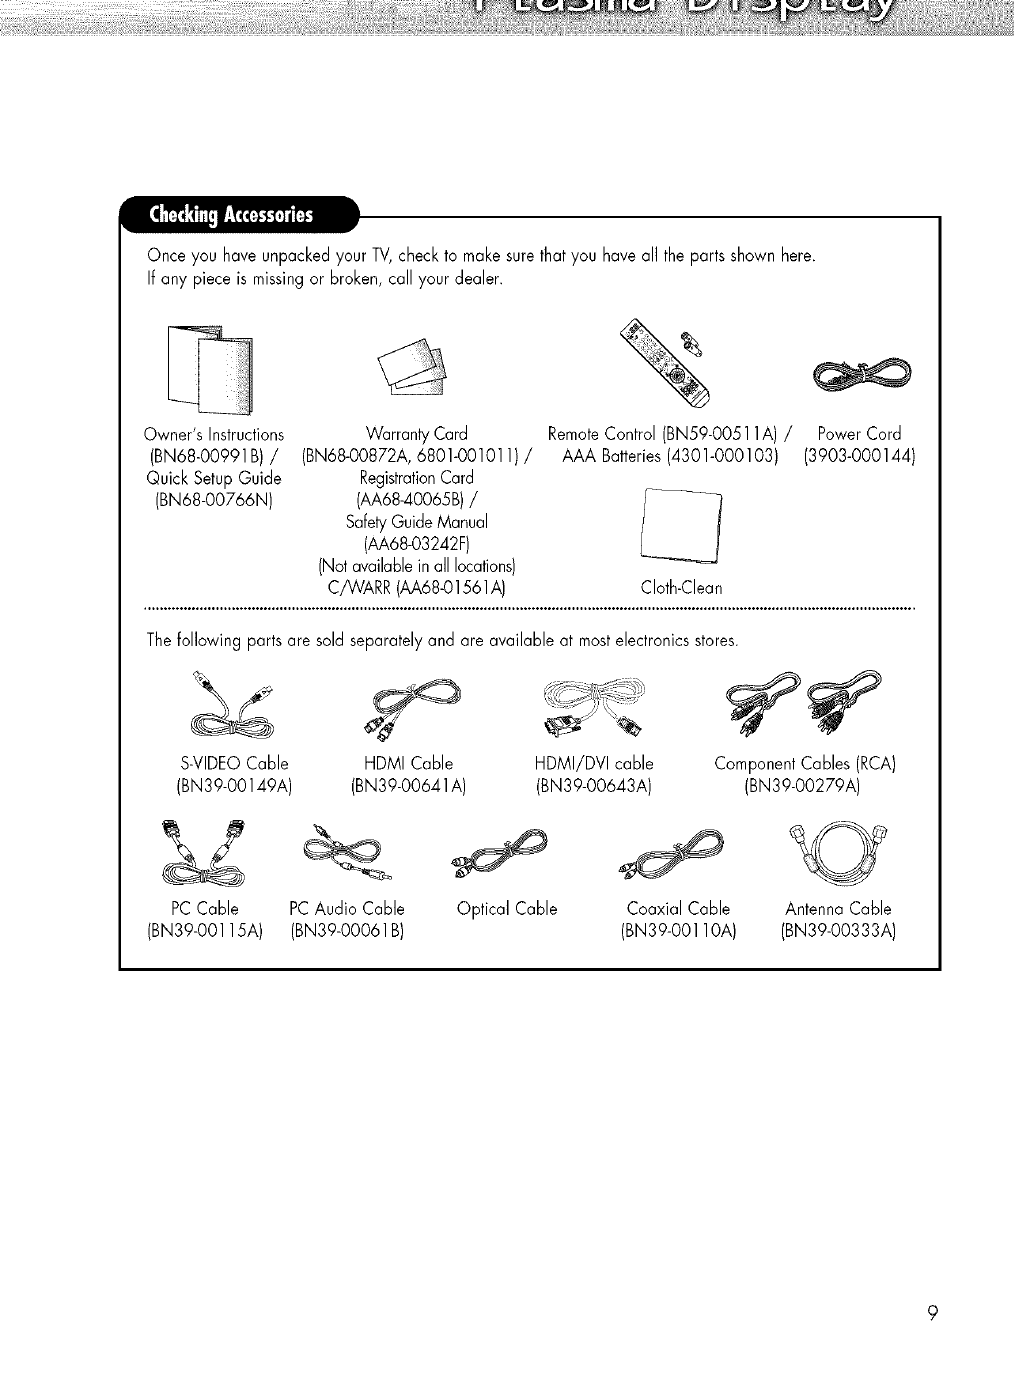
Once you have unpacked your TV,check to make sure that you have all the parts shown here.
If any piece is missingor broken, call your dealer.
Owner's Instructions Warranty Card RemoteControl (BN59-OO511A)/Power Cord
(BN68-00991B) /(BN68-00872A, 6801-001011) /AAA Batteries(4301-000103) (3903-000144)
Quick SetupGuide RegistrationCard
(BN68-00766N) (AA68-40065B)/
SafetyGuide Manual
(AA68-03242F)
(Not available in all locations)
C/WARR (AA68©1561A) CIoth-Clean
Thefollowing parts are sold separatelyand are available at mostelectronics stores.
S-VIDEOCable
(BN 39-00149A)
HDMI Cable HDMI/DVI cable Component Cables (RCA)
(BN39-00641A) (BN39-00643A) (BN39-00279A)
PCCable
(BN39-001 lSA)
PCAudio Cable
(BN39-00061 B)
Optical Cable Coaxial Cable
(BN39-00110A)
Antenna Cable
(BN39-00333A)
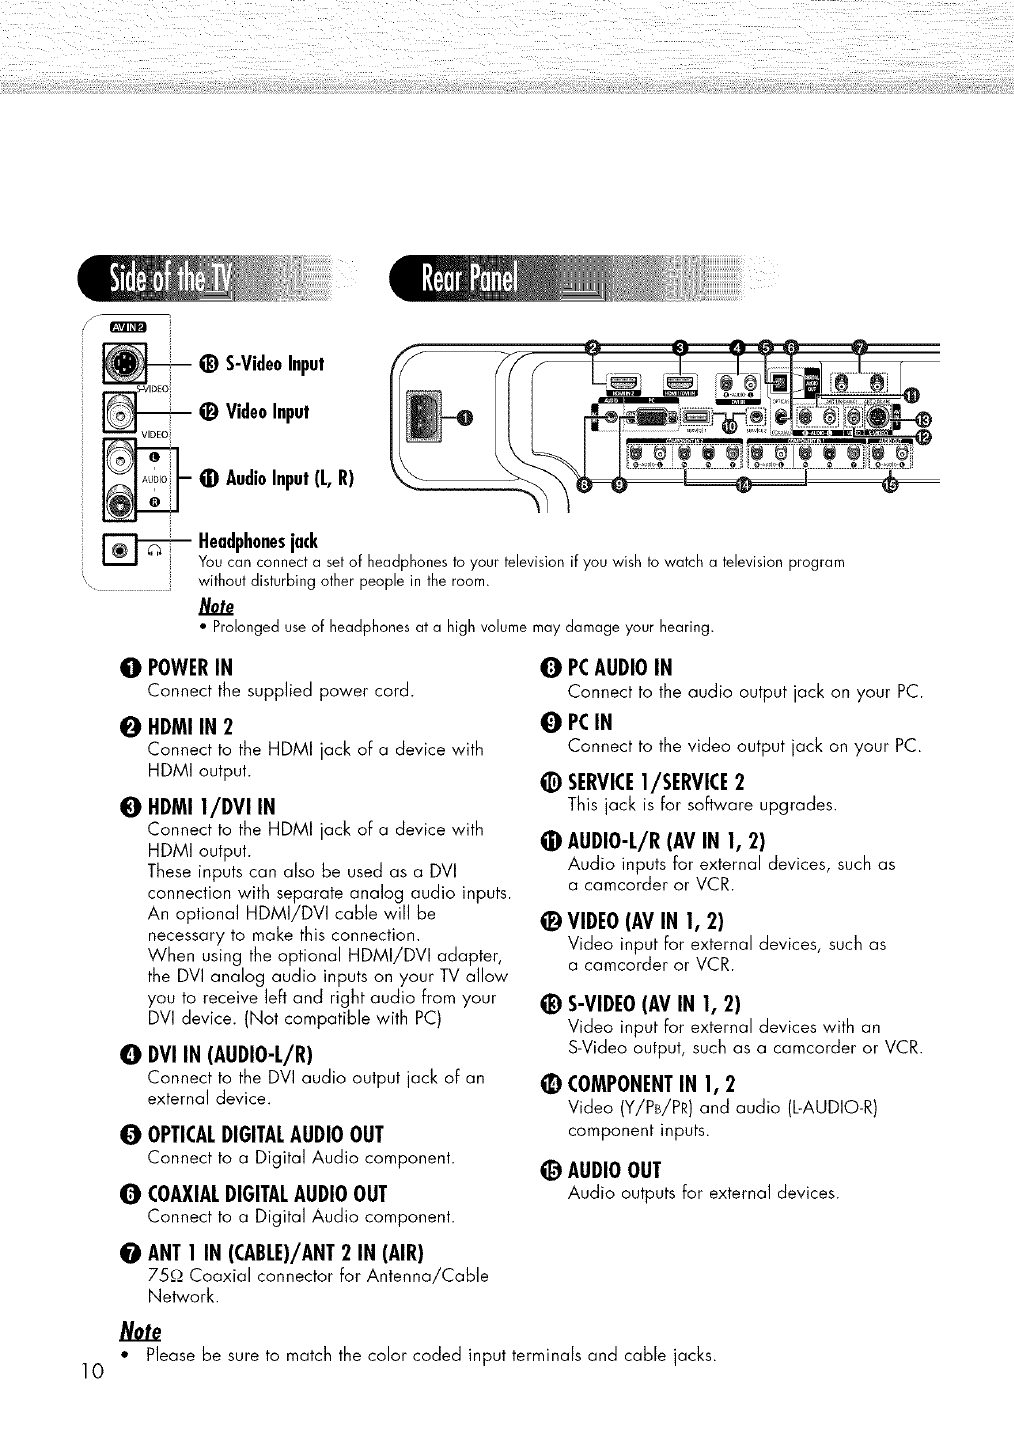
VIDEO
@ S-VideoInput
_) VideoInput
0 AudioInput(L,R)
Headphonesjack
Youcan connecta setof headphonesto your televisionif you wishto watch a televisionprogram
withoutdisturbingother peoplein the room.
• Prolongeduseof headphonesat a high volumemaydamageyour hearing.
0POWERIN
Connect the supplied power cord.
0HDMI IN 2
Connect to the HDMI jack of a device with
HDMI output.
0
0
HDMI 1/DVI IN
Connect to the HDMI jack of a device with
HDMI output.
These inputs can also be used as a DVI
connection with separate analog audio inputs.
An optional HDMI/DVI cable will be
necessary to make this connection.
When using the optional HDMI/DVI adapter,
the DVI analog audio inputs on your TV allow
you to receive left and right audio from your
DVI device. (Not compatible with PC)
DVIIN (AUDIO-L/R)
Connect to the DVI audio output jack of an
external device.
OOPTICALDIGITALAUDIOOUT
Connect to a Digital Audio component.
OCOAXIALDIGITALAUDIOOUT
Connect to a Digital Audio component.
OANT1 IN (CABLE)/ANT2 IN (AIR)
75,Q Coaxial connector for Antenna/Cable
Network.
0
0
@
@
@
PCAUDIOIN
Connect to the audio output jack on your PC.
PCIN
Connect to the video output jack on your PC.
SERVICEI/SERVICE 2
This jack is for software upgrades.
AUDIO-L/R(AVIN 1, 2)
Audio inputs for external devices, such as
a camcorder or VCR.
VIDEO(AVIN 1, 2)
Video input for external devices, such as
a camcorder or VCR.
S-VIDEO(AVIN 1, 2)
Video input for external devices with an
S-Video output, such as a camcorder or VCR.
COMPONENTIN 1, 2
Video (Y/PB/PR) and audio (L-AUDIO-R)
component inputs.
@ AUDIOOUT
Audio outputs for external devices.
Note
• Please be sure to match the color coded input terminals and cable jacks.
10
RemoteControlButtons
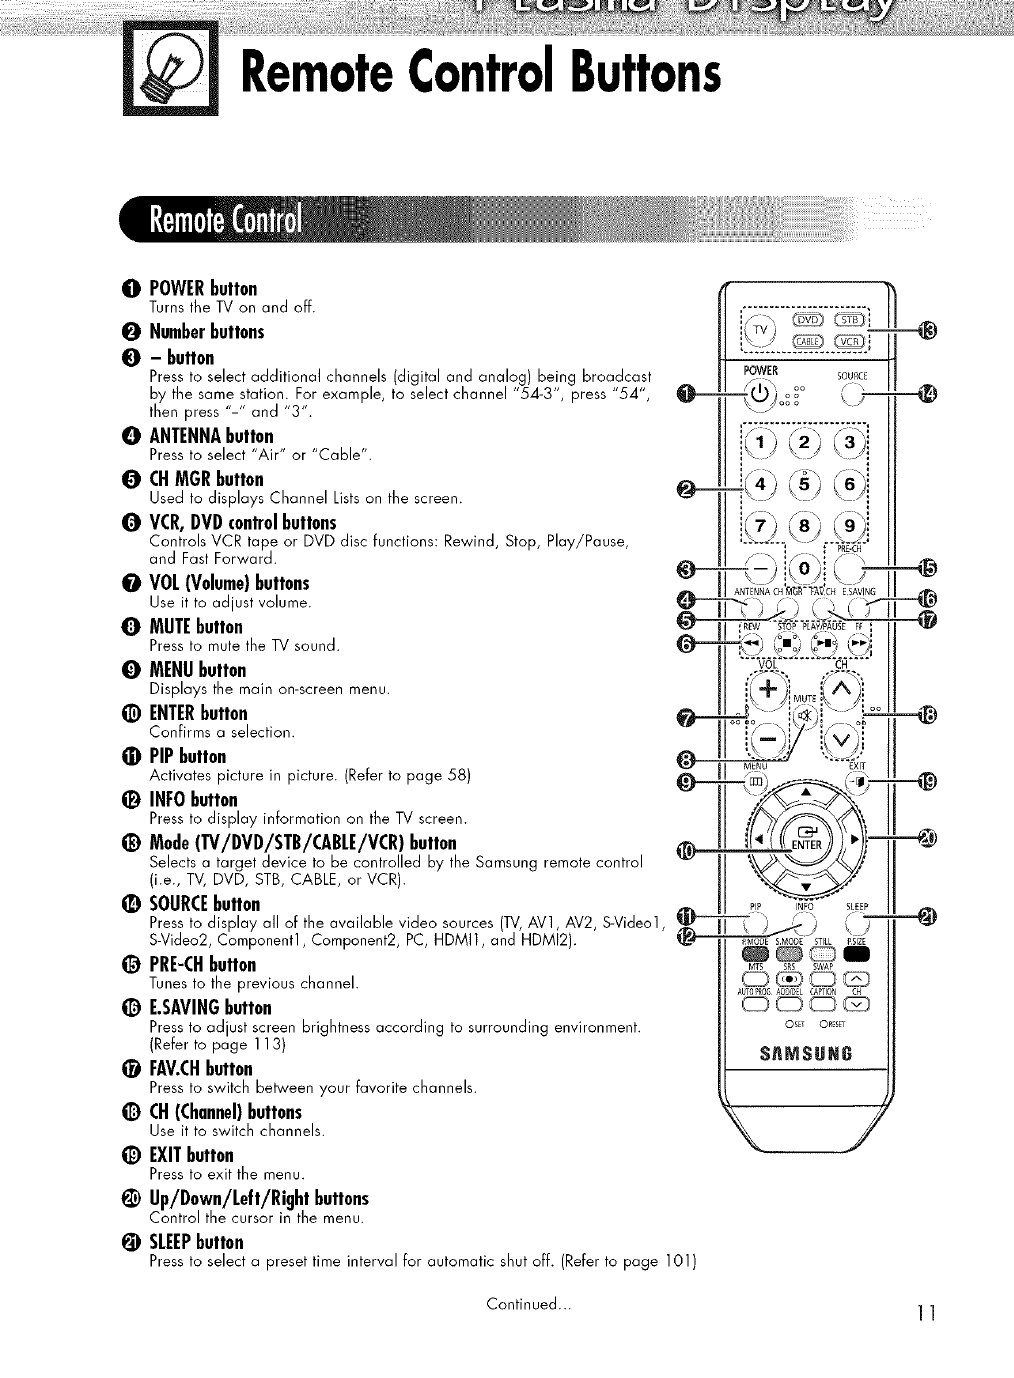
0 POWERbutton
Turns the TV oil and off.
0Numberbuttons
0- button
Press to select additional channels (digital and analog) being broadca,st
by the same station. For example, to select channel "54-3", press "54 ',
then press "-" and "3".
OANTENNAbutton
Press to select "Air" or "Cable".
0CHMGRbutton
Used to displays Channel Listson the screen.
QVCR,DVDcontrolbuttons
Controls VCR tape or DVD clisc functions: Rewind, Stop, Play/Pause,
and Fast Forward.
OVOL(Volume)buttons
Use it to adjust volume.
QMUTEbutton
Press to mute the TV sound.
OMENUbutton
Displays the main on-screen menu.
@ENTERbutton
Confirrns a selection.
•PIPbutton
Activates picture in picture. (Refer to page 58)
_) INFO button
Press to display information on the TV screen.
_) Mode(TV/DVD/STB/CABLE/VCR)button
Selects a target device to be controlled by the Sarnsung remote control
(i.e., TV, DVD, STB, CABLE, or VCR).
_) SOURCEbutton
Press to display all of the available video sources (TV,AV1, AV2, S-Video1,
S-Video2, Component1, Component2, PC, HDMI1, and HDMI2).
_) PRE-CHbutton
Tunes to the previous channel.
@E.SAVINGbutton
Press to adjust screen brightness according to surrounding environment.
(Refer to page 113)
_) FAV.CHbutton
Press to switch between your favorite channels.
CH(Channel)buttons
Use it to switch channels.
_) EXIT button
Press to exit the menu.
¢Up/Down/Left/Rightbuttons
Control the cursor in the menu.
@SLEEPbutton
@
PIP INFO SLEEP
L)
PMODE SMODE STILL PSIZE
_®_I
MTS SRS SWAP
AUTO?R_AD_EL EA_ION CH
OSET ORESET
SAMSUH6
Press to select a preset time interval for automatic shut off. (Refer to page 101)
Continued... 11
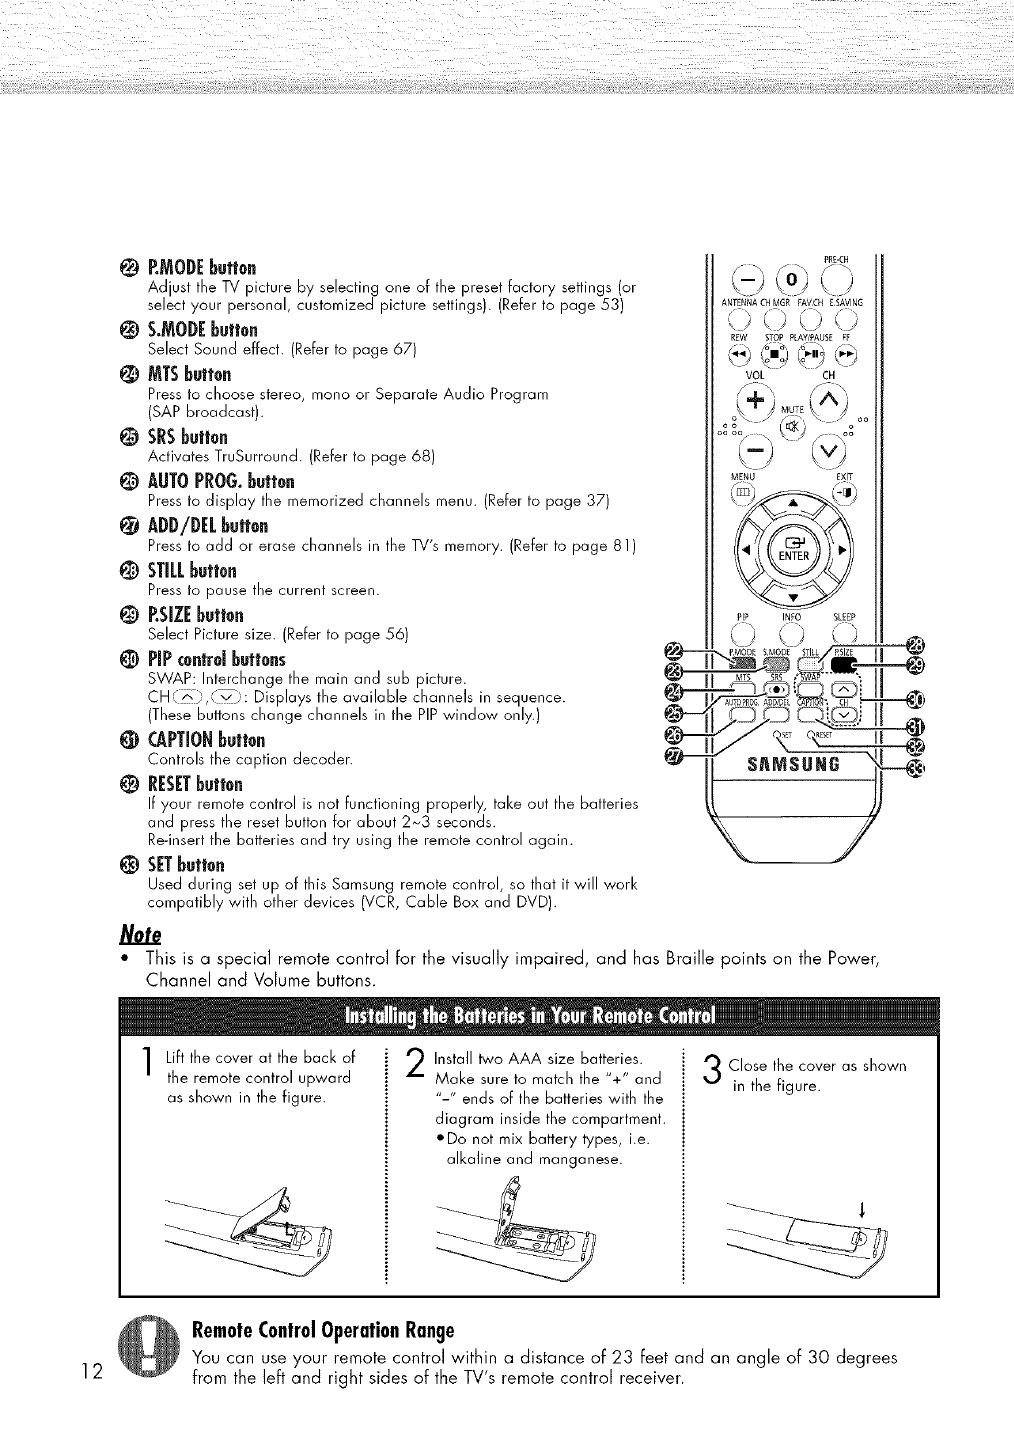
P.MODEbutton
Adjust the TV picture by selecting one of the preset factory settings (or
select your personal, customized picture settings). (Refer to page 53)
@S.MODEbutton
Select Sound effect. (Refer to page 67)
MTSbutton
Press to choose stereo, rnono or Separate Audio Prograrn
(SAP broadcast).
@SRSbutton
Activates TruSurround. (Refer to page 68)
@AUTOPROG.button
Press to display the rnernorized channels menu. (Refer to page 37)
ADD/DELbutton
Press to add or erase channels ill the TV's rnernory. (Refer to page 81)
@STILLbutton
Press to pause the current screen.
@P.SIZEbutton
Select Picture size. (Refer to page 56)
PIPcontrd buttons
SWAP: Interchange the rnain and sub picture.
CH,., .........._. Displays the available channels in sequence.
(These buttons change channels in the PIPwindow only.)
CAPTIONbutton
Controls the caption decoder.
RESETbutton
If your rernote control is not functioning properly, take out the batteries
and press the reset button for about 2_3 seconds.
Re-insert the batteries and try using the remote control again.
SETbutton
Used during set up of this Sarnsung rernote control, so that it will work
compatibly with other devices (VCR, Cable Box and DVD).
Note
o
@--
@__,
@--
@-
PRDCH
ANTENNA CHMSR EAVCH ESAVING
, J <) .;
REW STOP PLAYIPAUSE FE
VOL CH
MENU EXIT
PIP INEO SLEEP
(_/" / ,,
"_._MODE SMODE STILL/PSZE I |
This is a special remote control for the visually impaired, and has Braille points on the Power,
Channel and Volume buttons.
Lift the cover at the back of
the remote control upward
as shown in the figure.
Install _o AAA size batteries.
Make sure to match the "+" and
"-" ends of the batteries with the
diagram inside the compartment.
ODo not mix battery types, i.e.
alkaline and manganese.
Close the cover as shown
in the figure.
12
RemoteControlOperationRange
You can use your remote control within a distance of 23 feet and an angle of 30 degrees
from the left and right sides of the TV's remote control receiver.
WallInstallationInstructions
Refer to the installation guide supplied with your wall bracket.
InstallationNotes
1
2
3
4
5
Contact a professional installation service to install the wall bracket.
Samsung Electronics is not responsible for any damages to the product or harm to
customers when the installation is done by the customer.
This product is for installing on cement walls. The product may not stay in place when
installed on plaster or wood.
Connect all external devices prior to installing the wall bracket.
The package contents and parts supplied for the wall mount are subject to change without
prior notice.
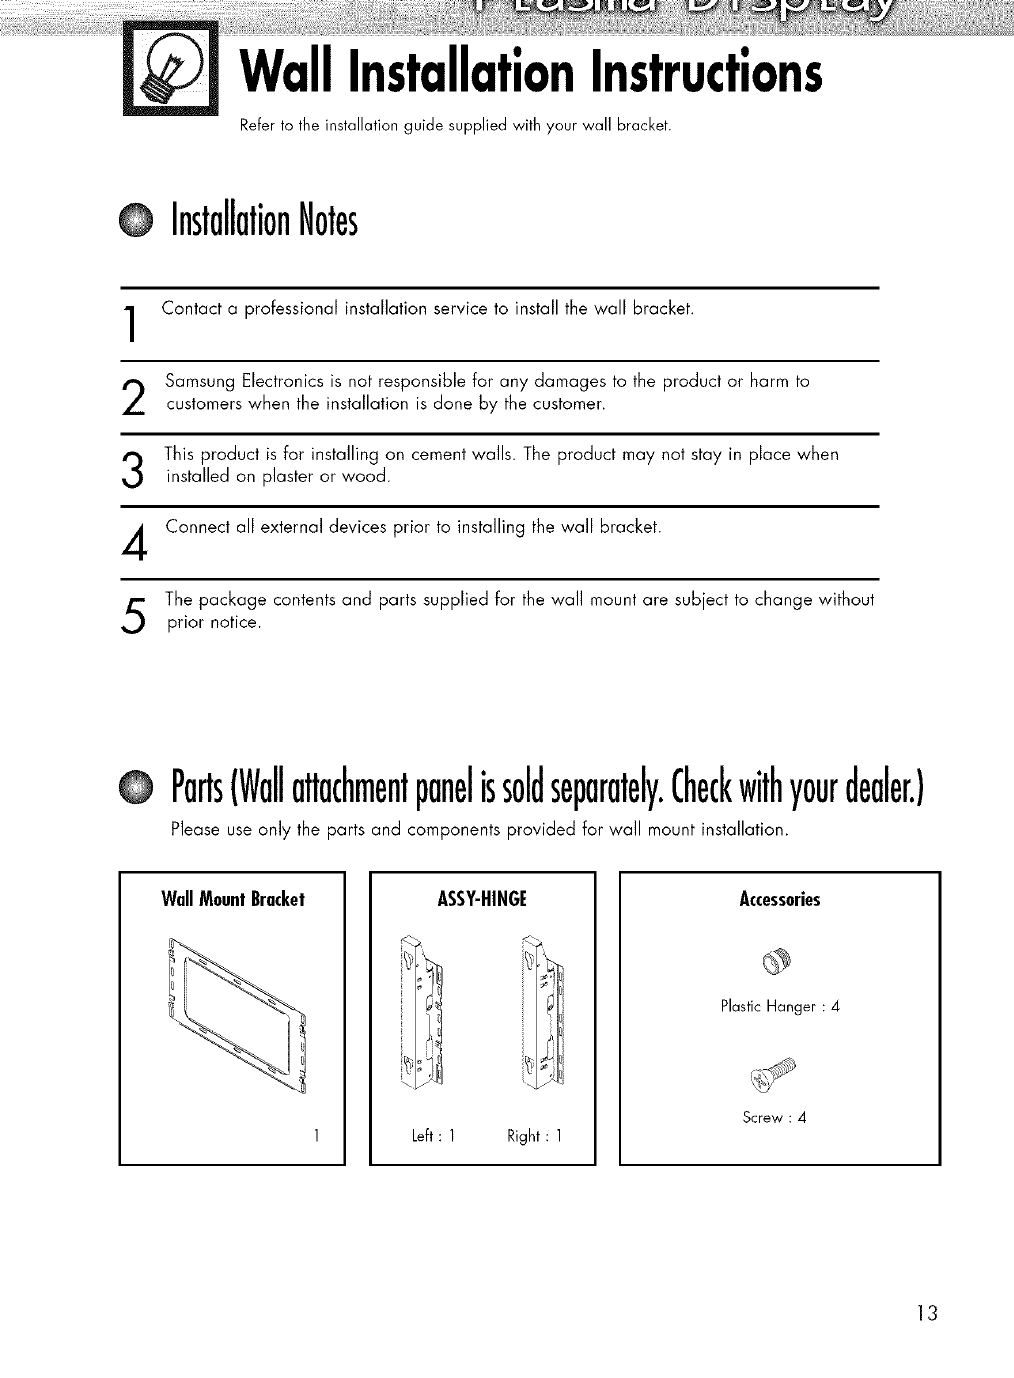
OParts(Wallattachmentpanelissoldseparately.Checkwithyourdealer.)
Please use only the parts and components provided For wail mount installation.
WallMountBracket ASSY-HINGE
k
k_ _]11
]H/I
Left : 1 Right : 1
Accessories
Plastic Hanger : 4
Screw : 4
13
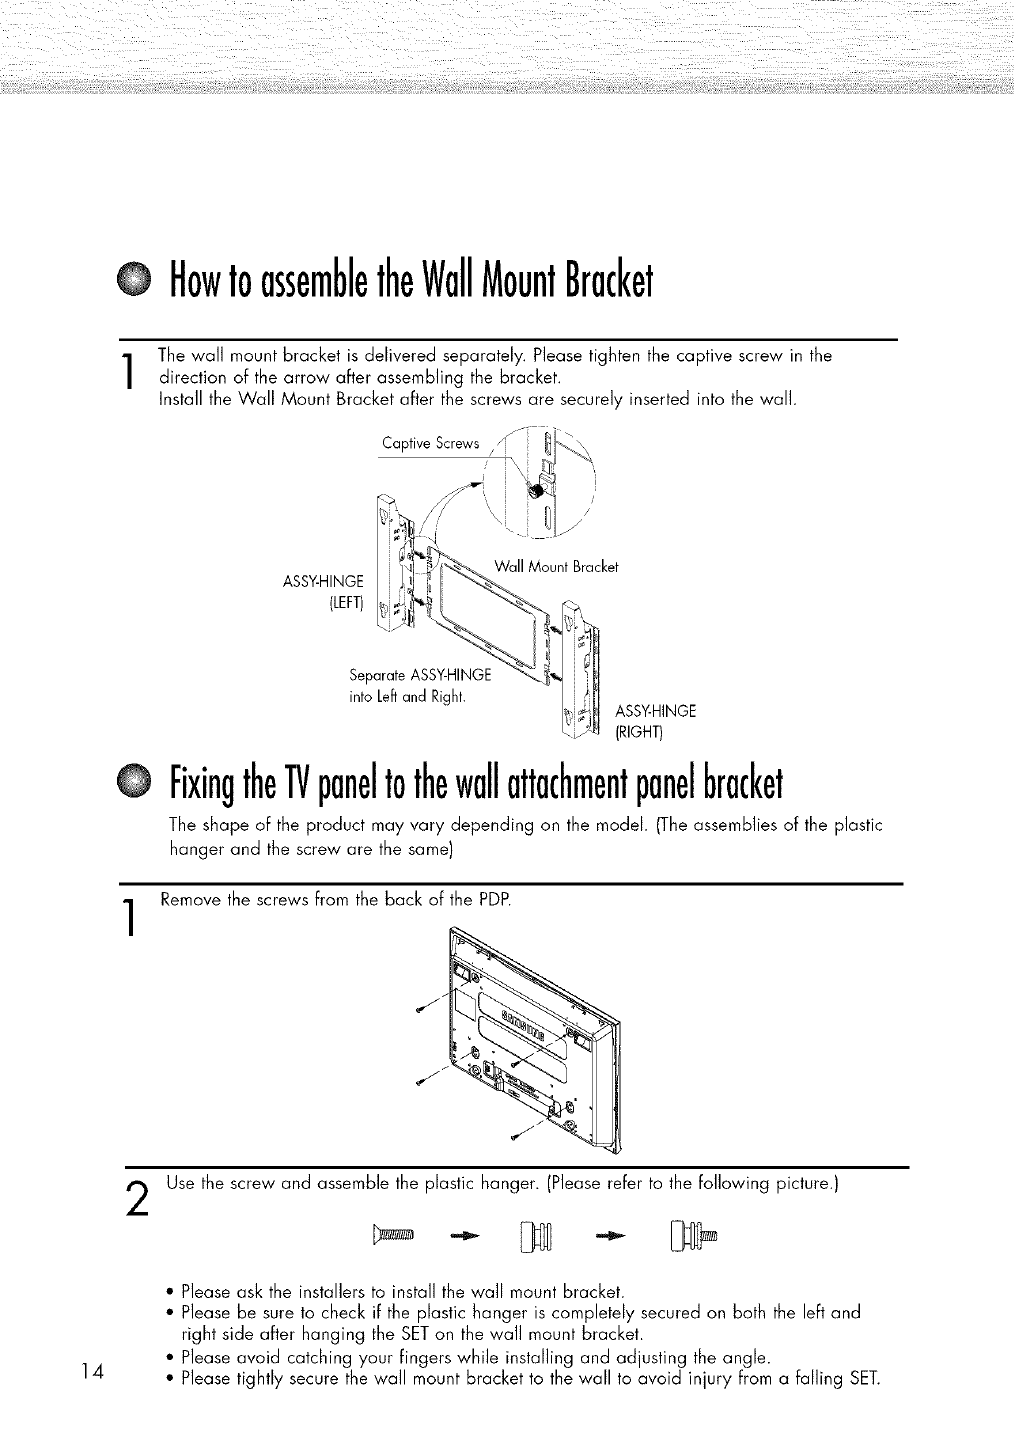
HowtoassembletheWallMountBracket
The wall mount bracket is delivered separately. Please tighten the captive screw in the
direction of the arrow after assembling the bracket.
Install the Wall Mount Bracket after the screws are securely inserted into the wall.
ASSY-HINGE
(LEFT)
Wall Mount Bracket
14
1
Separate ASSY-HINGE
into Left and Right. ASSY-HINGE
(RtGHT)
FixingtheTVpaneltothewallattachmentpanelbracket
The shape of the product may vary depending on the model. (The assemblies of the plastic
hanger and the screw are the same)
Remove the screws from the back of the PDP.
2Use the screw and assemble the plastic hanger. (Please refer to the following picture.)
• Please ask the installers to install the wall mount bracket.
• Please be sure to check if the plastic hanger is completely secured on both the left and
right side after hanging the SET on the wall mount bracket.
• Please avoid catching your fingers while installing and adjusting the angle.
• Please tightly secure the wall mount bracket to the wall to avoid injury from a falling SET.
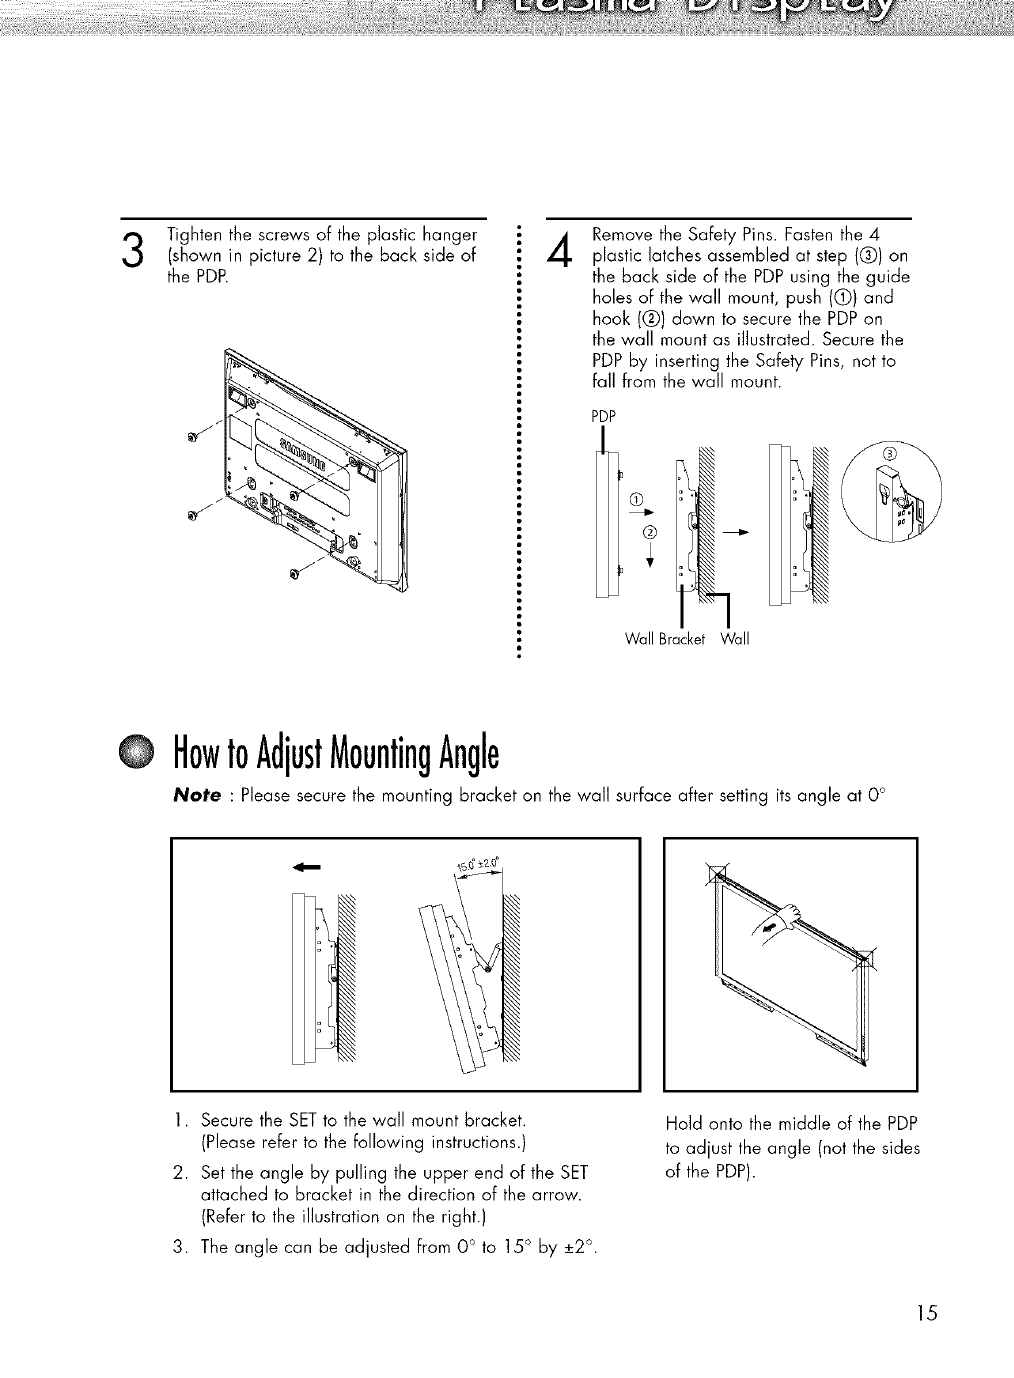
Tightenthescrews of the plastic hanger
(shown in picture 2) to the back side of
the PDP. 4Remove the Safety Pins. Fasten the 4
plastic latches assembled at step (Q) on
the back side of the PDP using the guide
holes of the wall mount, push (0) and
hook (Q) down to secure the PDPon
the wall mount as illustrated. Secure the
PDP by inserting the Safety Pins, not to
fall from the wall mount.
PDP
Wall Bracket Wall
OHowtoAdjustMountingAngle
Note : Please secure the mounting bracket on the wall surface after setting its angle at O°
1. Secure the SETto the wall mount bracket.
(Please refer to the following instructions.)
2. Set the angle by pulling the upper end of the SET
attached to bracket in the direction of the arrow.
(Refer to the illustration on the right.)
3. The angle can be adjusted from 0 ° to 15 ° by +2 °.
Hold onto the middle of the PDP
to adjust the angle (not the sides
of the PDP).
15
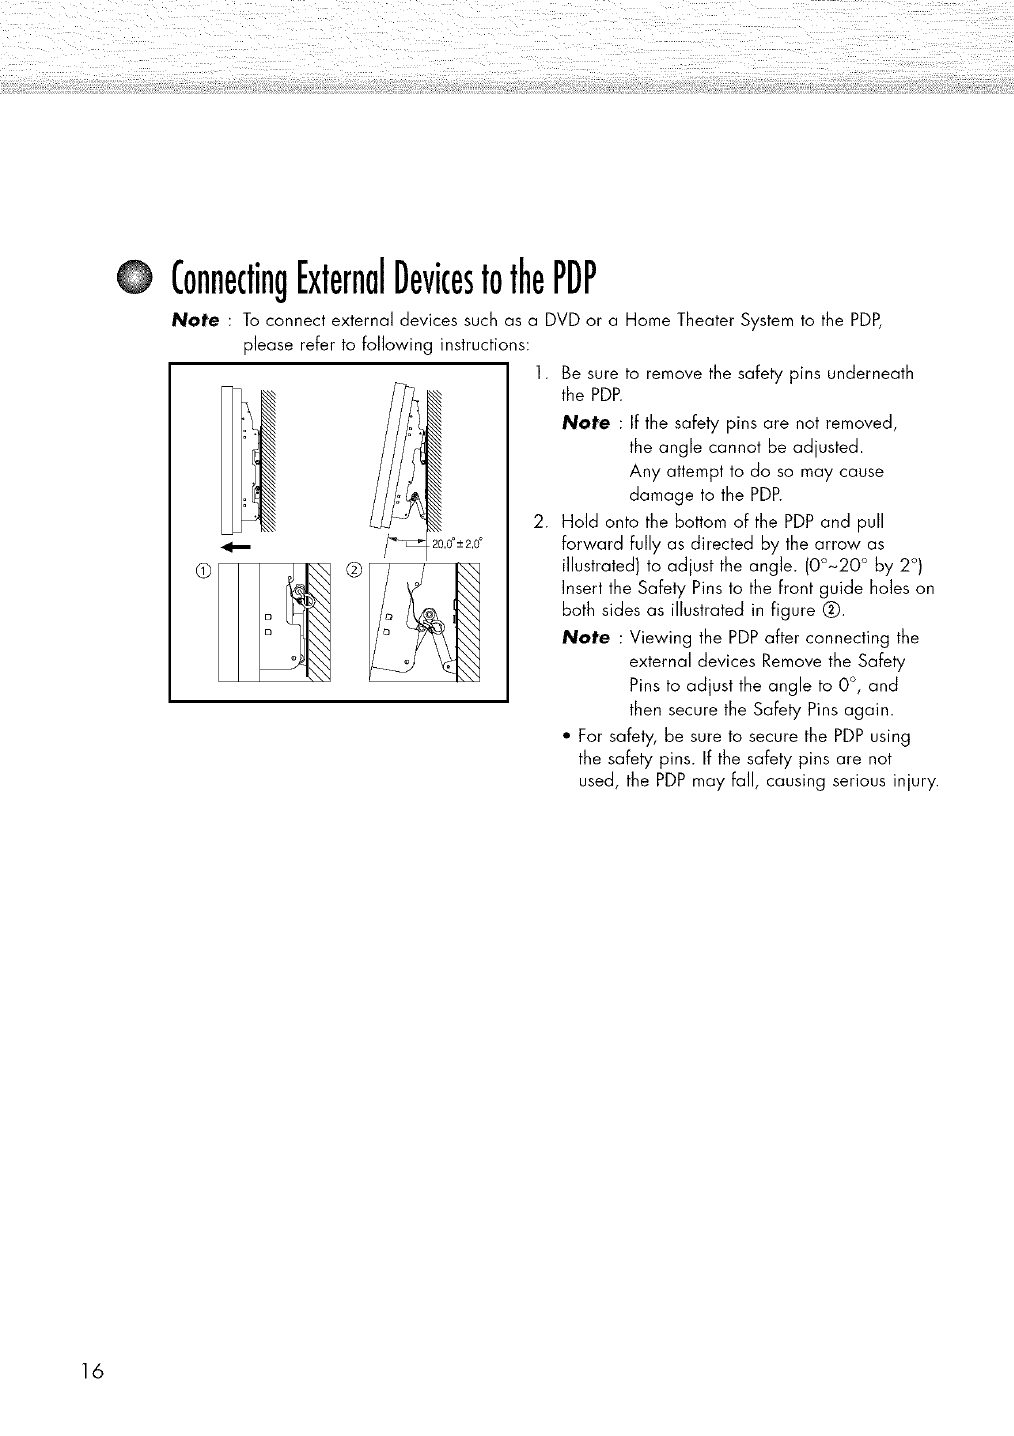
ConnectingExternalDevicestothePDP
Note : To connect external devices such as a DVD or a Home Theater System to the PDP,
please refer to Following instructions:
,,0°_+2,0°
®
1. Be sure to remove the safety pins underneath
the PDFL
Note : If the safety pins are not removed,
the angle cannot be adjusted.
Any attempt to do so may cause
damage to the PDP.
2. Hold onto the bottom of the PDP and pull
forward Fullyas directed by the arrow as
illustrated) to adjust the angle. (00~20 ° by 2°)
Insert the Safety Pins to the front guide holes on
both sides as illustrated in Figure Q.
Note : Viewing the PDP after connecting the
external devices Remove the Safety
Pins to adjust the angle to 0 °, and
then secure the Safety Pins again.
• For safety, be sure to secure the PDP using
the safety pins. If the safety pins are not
used, the PDP may Fall, causing serious injury.
16
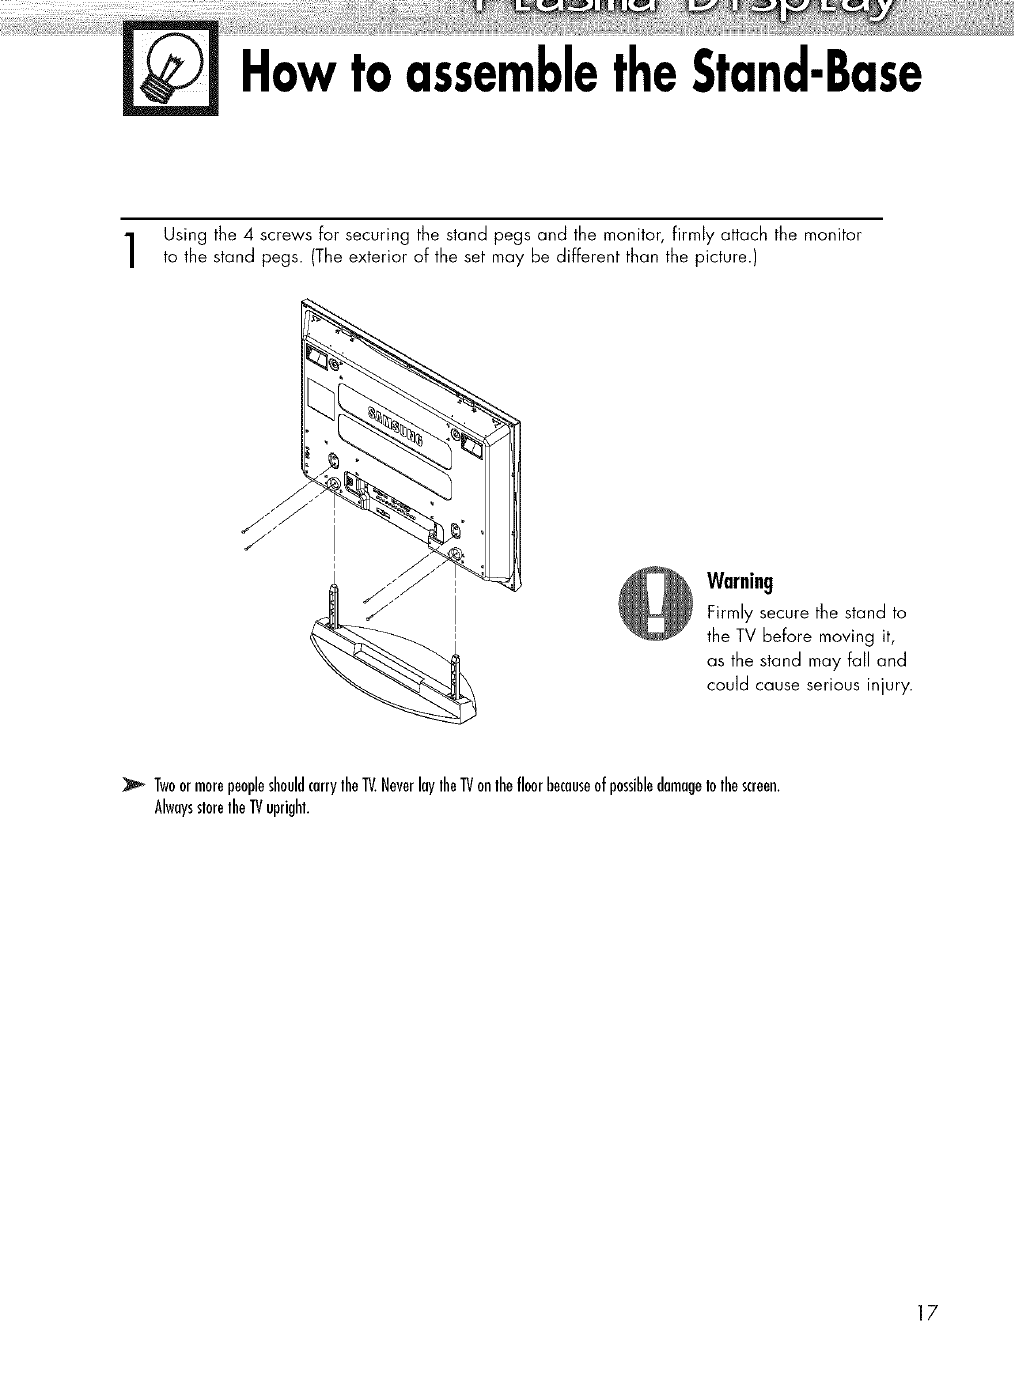
HowtoassembletheStand-Base
Using the 4screws for securing the stand pegs and the monitor, firmly attach the monitor
to the stand pegs. (The exterior of the set may be different than the picture.)
Warning
Firmly secure the stand to
the TV before moving it,
as the stand may fall and
could cause serious injury.
TwoormorepeopleshouldcarrylheIV.NeverlaylheIVonlhefloorbecauseofpossibledamageIolhescreen.
AlwaysslorelheIV upright.
17

PLASMA DISPLAY PANEL
Connections
Connecting VHF and UHF Antennas .............................................. 20
Connecting Cable TV.................................................................... 21
Connecting a VCR ........................................................................ 23
Connecting a Camcorder .............................................................. 24
Connecting a DVD Player (480i, 480p) .......................................... 25
Connecting a DTV Receiver (480p, 720p, 1080i) .......................... 26
Connecting to HDMI (High Definition Multimedia Interface)
(480p, 720p, 108Oi) .................................................................. 27
Connecting a Digital TV Set-Top Box (480p, 720p, 108Oi) .............. 28
Connecting a Digital Audio System ................................................ 29
Connecting to an Analog Amplifier ................................................ 30
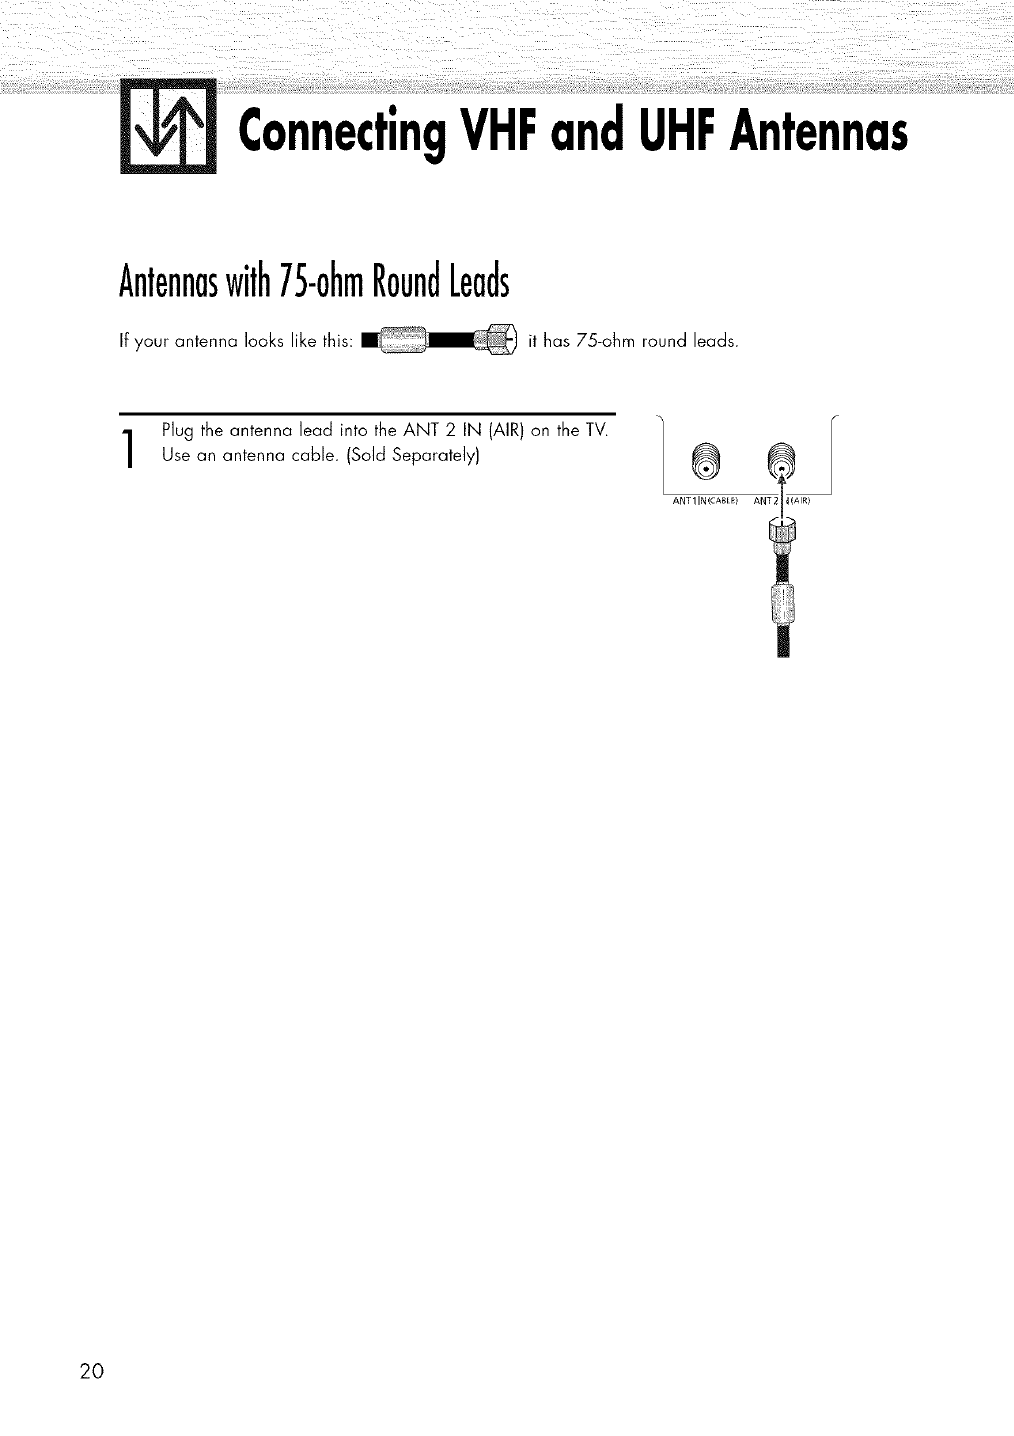
ConnectingVHFandUHFAntennas
Antennaswith75-ohmRoundLeads
If your antenna looks like this: it has 75-ohm round leads.
Plug the antenna lead into the ANT 2 IN (AIR) on the TV.
Use an antenna cable. (Sold Separately) ®
ANT 1IN (CABLE) ANT2 4(AIR)
20
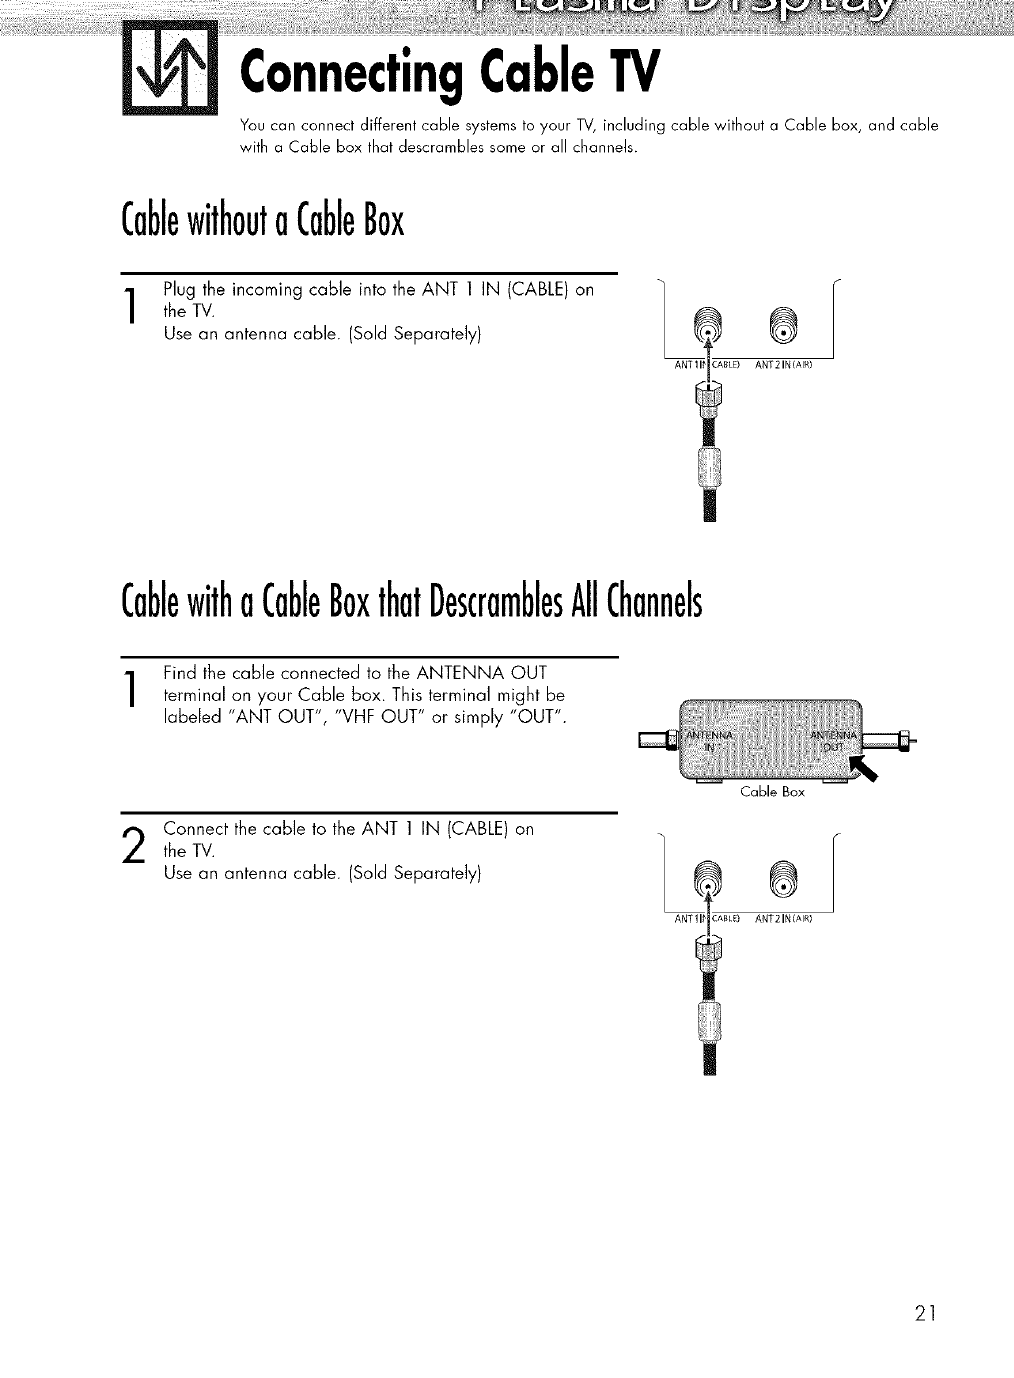
ConnectingCableTV
You can connect different cable systems to your TV, including cable without a Cable box, and cable
with e Cable box that descrombles some or all channels.
CablewithoutaCableBox
Plug the incoming cable into the ANT 1 IN (CABLE) on
the TV.
Use an antenna cable. (Sold Separately) ®
ANTII_ CABLE) ANT 2 IN(AIR)
CablewithaCableBoxthatDescramblesAllChannels
Find the cable connected to the ANTENNA OUT
terminal on your Cable box. This terminal might be
labeled "ANT OUT", "VHF OUT" or simply "OUT".
Connect the cable to the ANT 1 IN (CABLE) on
the TV.
Use an antenna cable. (Sold Separately)
Cable Box
®
ANTII# CABLE) ANT 2 IN (AIR)
21
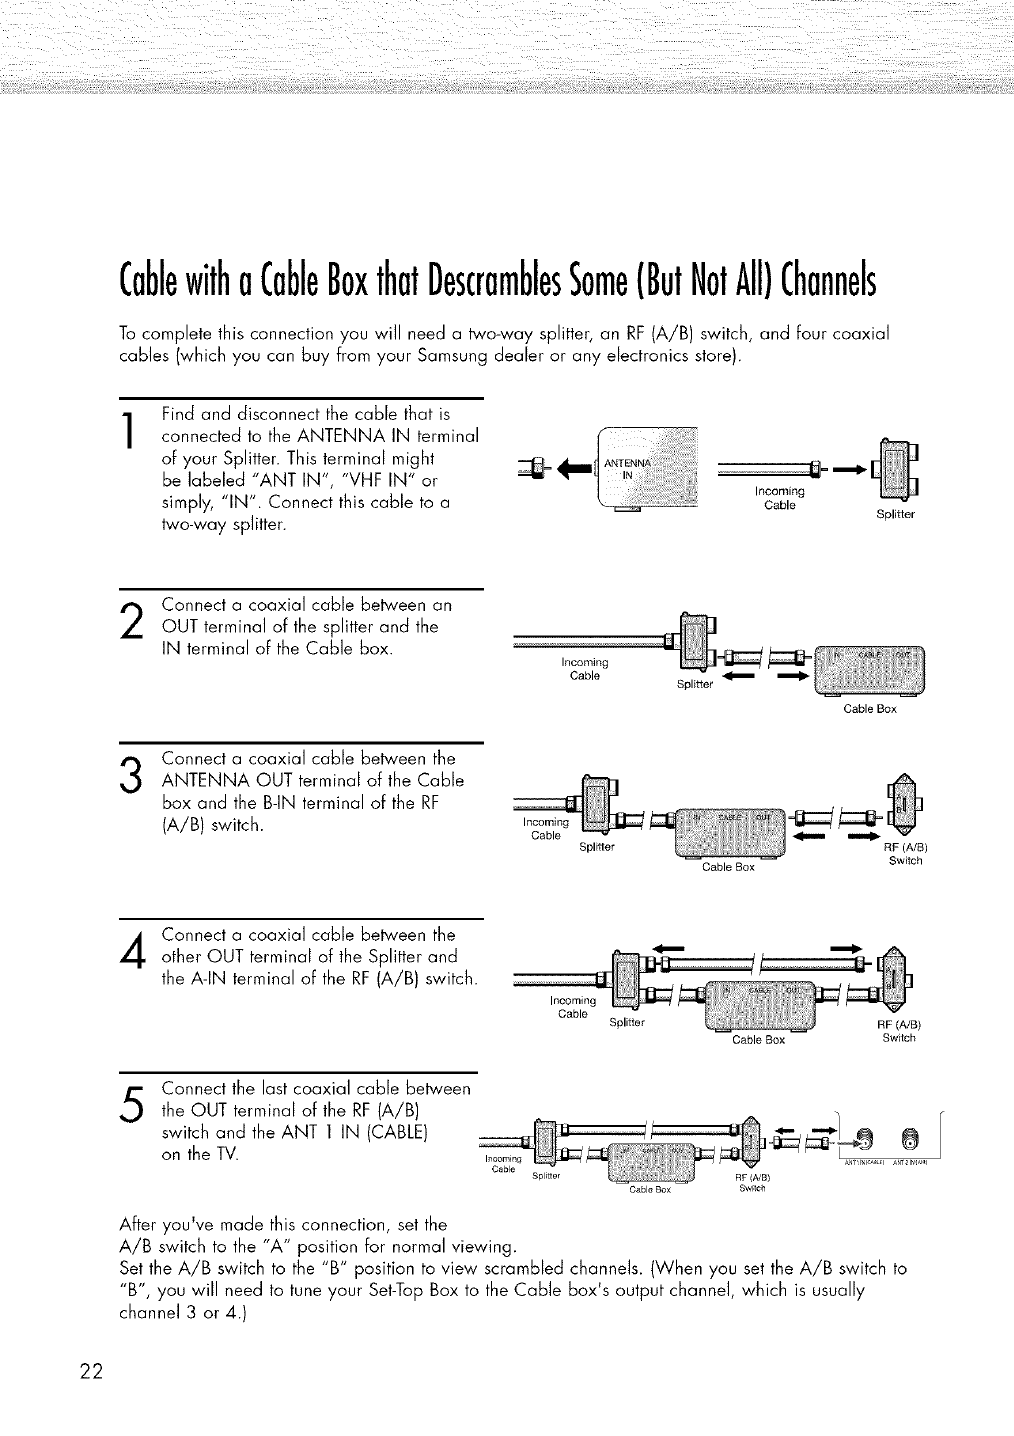
CablewithoCableBoxthatDescramblesSome(ButNotAll)Channels
To complete this connection you will need a two-way splitter, an RF (A/B) switch, and four coaxial
cables (which you can buy from your Samsung dealer or any electronics store).
1Find and disconnect the cable that is
connected to the ANTENNA IN terminal
of your Splitter. This terminal might
be labeled "ANT IN", "VHF IN" or
simply, "IN". Connect this cable to a
two-way splitter.
_1_ ANTENN_:]
Incoming
Gable Splitter
Connect a coaxial cable between an
OUT terminal of the splitter and the
IN terminal of the Cable box.
Incoming
Cable Splitter
Cable Box
3Connect a coaxial cable between the
ANTENNA OUT terminal of the Cable
box and the B-IN terminal of the RF
(A/B) switch. Incoming
Cable Splitter
Cable Box
RF (A/B)
Switch
Connect a coaxial cable between the
other OUT terminal of the Splitter and
the A-IN terminal of the RF (A/B) switch.
Incoming
Cable Splitter RF (A/B)
Cable Box Switch
5Connect the last coaxial cable between
the OUT terminal of the RF (A/B)
switch and the ANT 1 IN (CABLE)
on the TV.
Spl_tter
Cable Box
ANT21 AI_
RF (A/B)
Swf_ch
After you've made this connection, set the
A/B switch to the "A" position for normal viewing.
Set the A/B switch to the "B" position to view scrambled channels. (When you set the A/B switch to
"B", you will need to tune your Set-Top Box to the Cable box's output channel, which is usually
channel 3 or 4.)
22
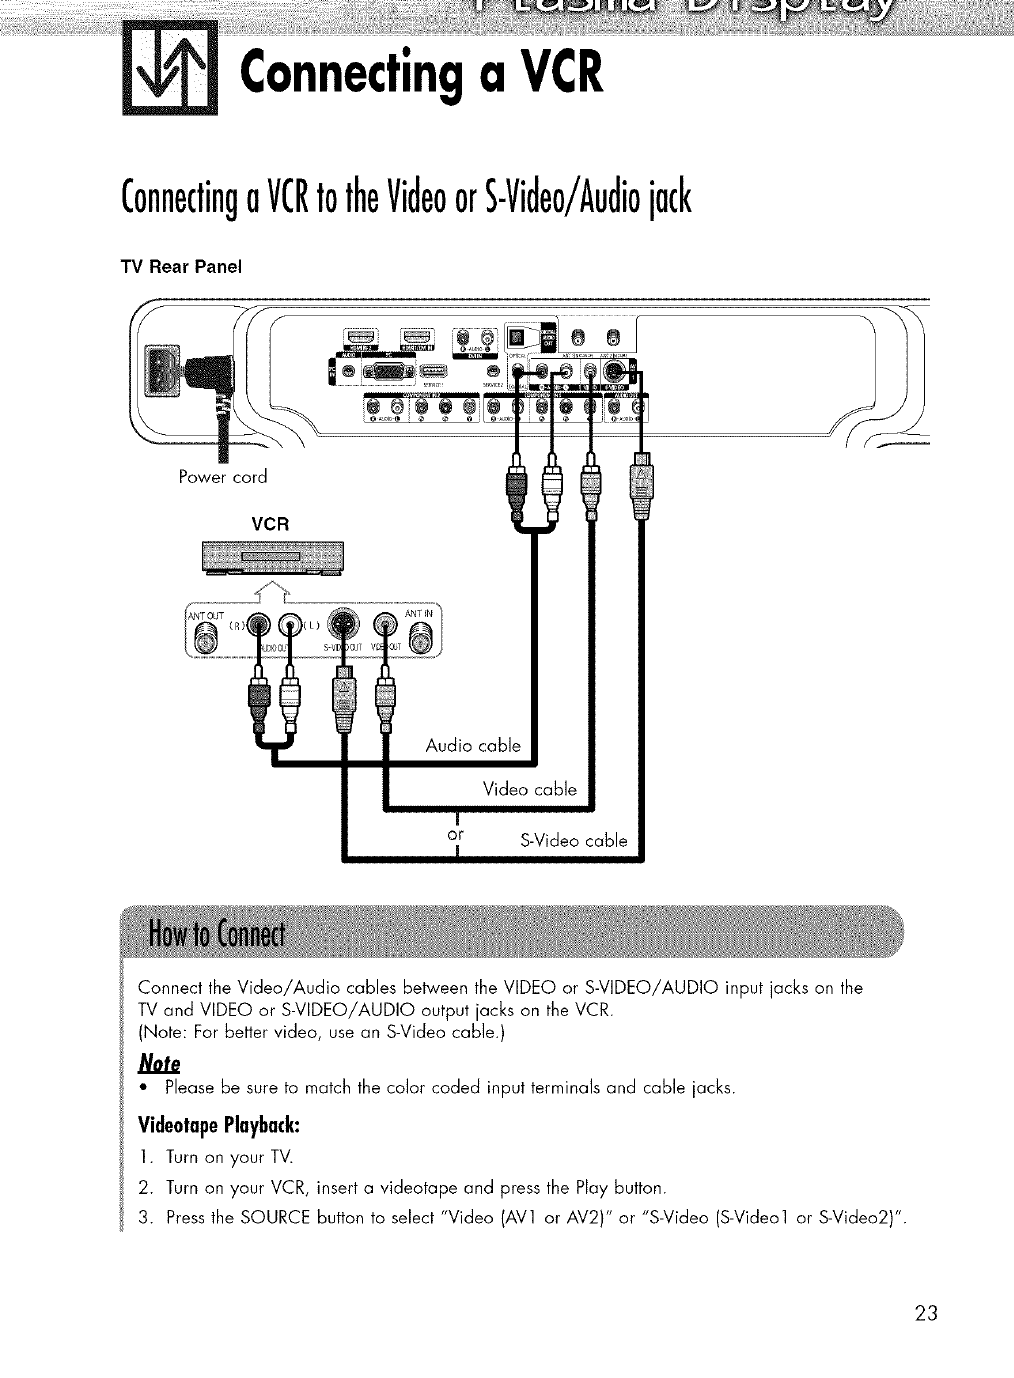
Connectinga VCR
ConnectingaVCRtotheVideoorS-Video/Audiojack
TV Rear Panel
Power cord
VCR
®
IAudio cable
Video cable
J
or S-Video cable
R
Connect the Video/Audio cables between the VIDEO or S-VIDEO/AUDIO input jacks on the
TV and VIDEO or S-VIDEO/AUDIO output jacks on the VCR.
(Note: For better video, use an S-Video cable.)
• Please be sure to match the color coded input terminals and cable jacks.
VideotapePlayback:
1. Turn on your TV.
2. Turn on your VCR, insert a videotape and press the Play button.
3. Press the SOURCE button to select "Video (AV1 or AV2)" or "S-Video (S-Video1 or S-Video2)".
23
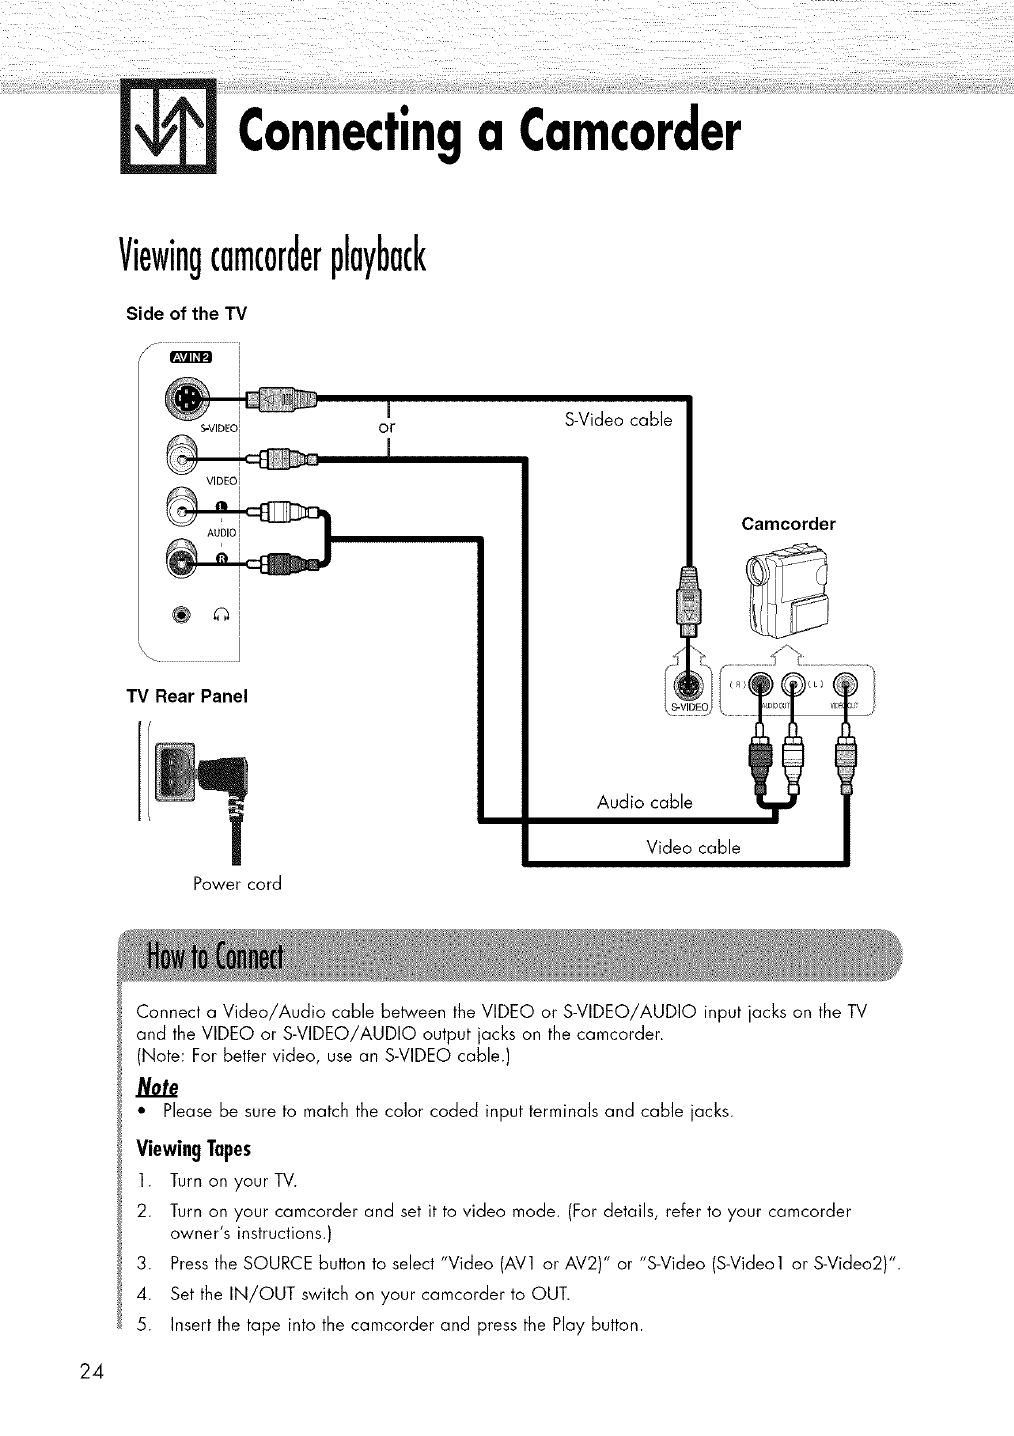
Connectinga Camcorder
Viewingcamc0rderplayback
Side of the TV
/f ............................................
S'VIDEOI
VIDEO I
AUDIO i
TV Rear Panel
Power cord
I
or
m
S-Video cable
Camcorder
Audio cable
Video cable
Connect a Video/Audio cable between the VIDEO or S-VIDEO/AUDIO input jacks on the TV
and the VIDEO or S-VIDEO/AUDIO output jacks on the camcorder.
(Note: For better video, use an S-VIDEO cable.)
• Please be sure to match the color coded input terminals and cable jacks.
Viewing Tapes
l. Turn on yourTV.
2. Turn on your camcorder and set it to video mode. (For details, refer to your camcorder
owner's instructions.)
3. Press the SOURCE button to select "Video (AV1 or AV2)" or "S-Video (S-Video1 or S-Video2)".
4. Set the IN/OUT switch on your camcorder to OUT.
5. Insert the tape into the camcorder and press the Play button.
24
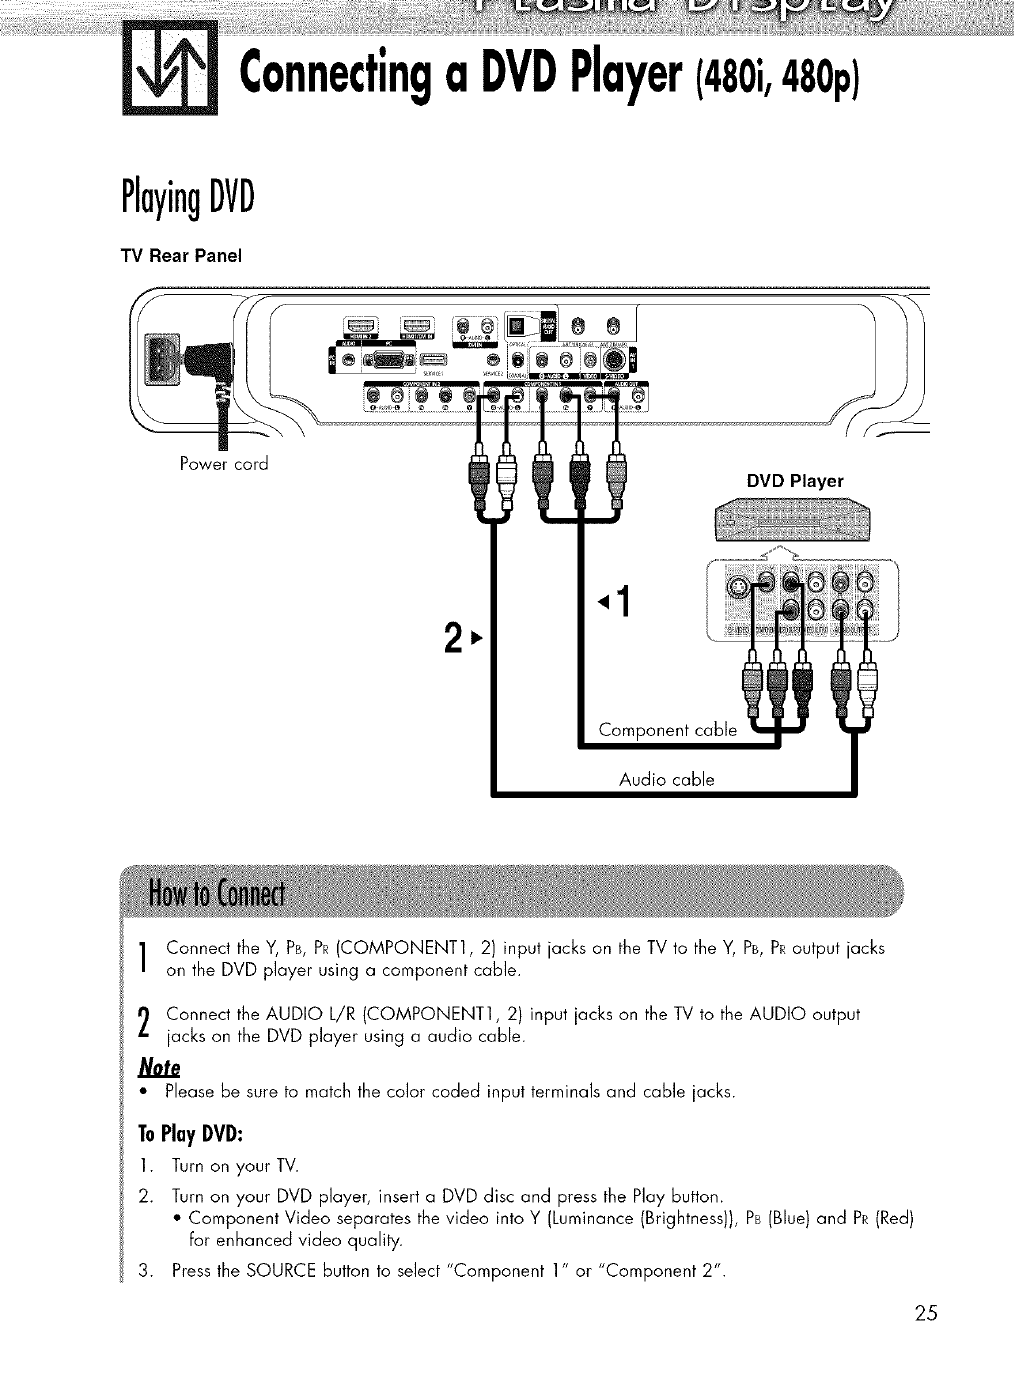
Connectinga DVDPlayer(480i,480p)
PlayingDVD
TV Rear Panel
Power cord
2
Audio cable
Connect the Y, PB,PR(COMPONENT1, 2) input jacks on the TV to the Y, PB,PRoutput jacks
on the DVD player using a component cable.
Connect the AUDIO L/R (COMPONENT1, 2) input jacks on the TV to the AUDIO output
jacks on the DVD player using a audio cable.
Note
• Please be sure to match the color coded input terminals and cable jacks.
ToPlayiVi:
1. Turn on your TV.
2. Turn on your DVD player, insert a DVD disc and press the Play button.
• Component Video separates the video into Y (Luminance (Brightness)), PB(Blue) and PR(Red)
For enhanced video quality.
3. Press the SOURCE button to select "Component 1" or "Component 2".
25
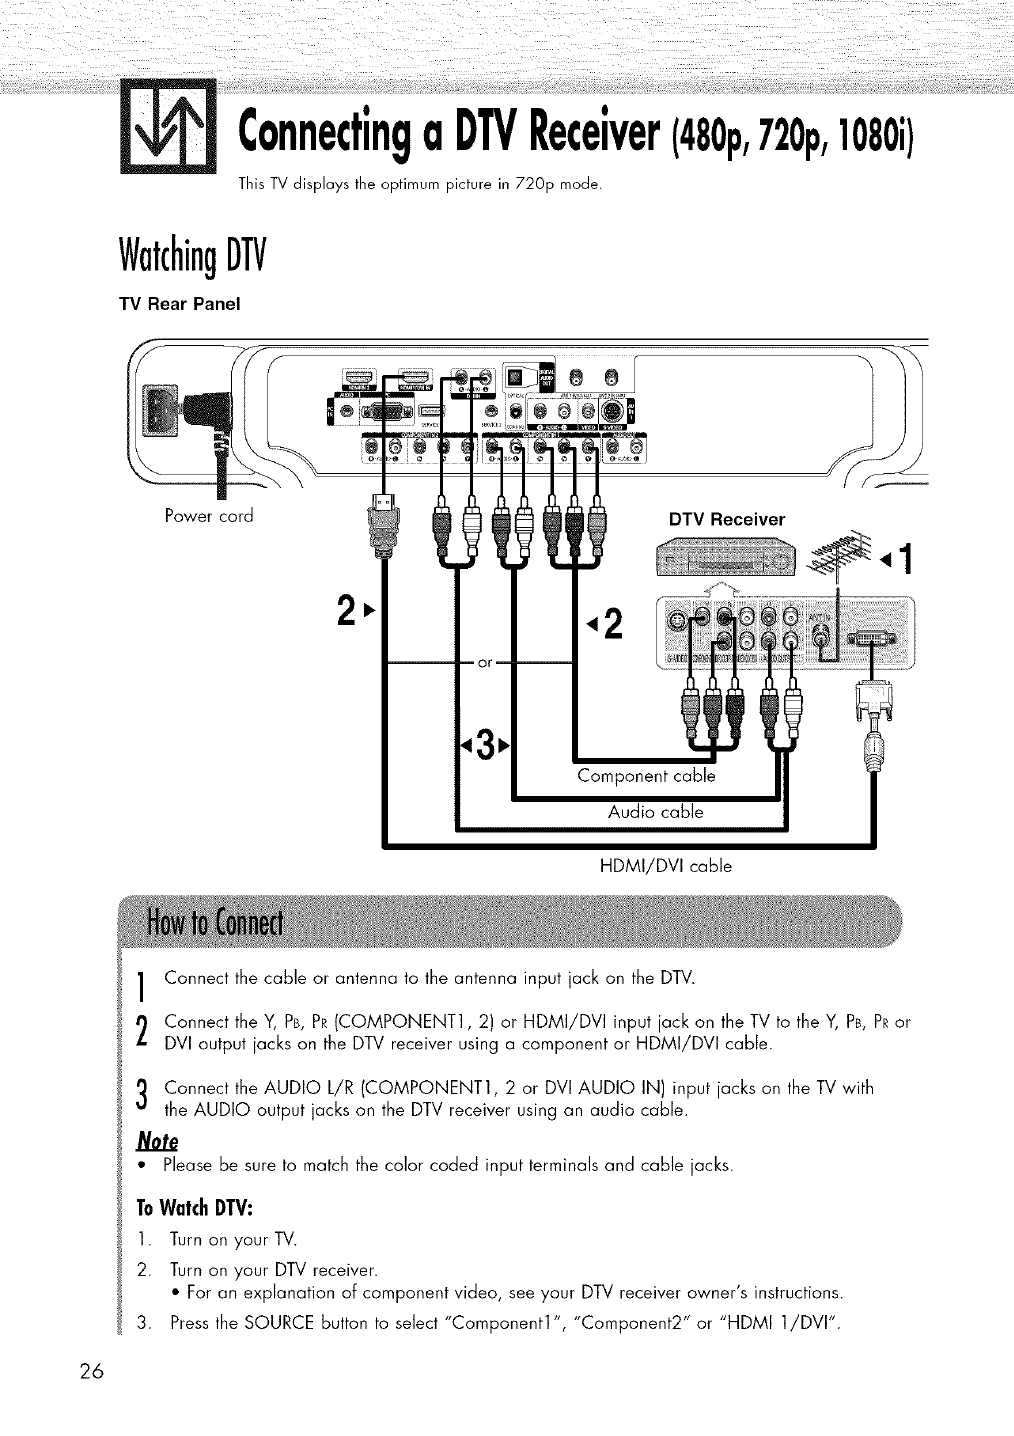
ConnectingaDTVReceiver(480p,720p,1080i)
This TV displays the optimum picture in 720p mode.
WatchingDTV
TV Rear Panel
Power cord DTV Receiver
HDMI/DVI cable
26
Connect the cable or antenna to the antenna input jack on the DTV.
Connect the ¥, PB,PR(COMPONENT1, 2) or HDMI/DVi input jack on the TV to the ¥, PB,PRor
DVI output jacks on the DTV receiver using a component or HDMI/DVI cable.
Connect the AUDIO L/R (COMPONENT1, 2 or DVI AUDIO IN) input jacks on the TV with
the AUDIO output jacks on the DTV receiver using an audio cable.
• Please be sure to match the color coded input terminals and cable jacks.
ToWatchDTV:
1. Turn on your TV.
2. Turn on your DTV receiver.
• For an explanation of component video, see your DTV receiver owner's instructions.
3. Press the SOURCE button to select "Component1", "Component2" or "HDMI 1/DVI'.

ConnectingtoHDMI(HighDefinition
MultimediaInterface)(480p,720p,1080i)
WatchingDTV
TV Rear Panel
Power cord
DTV Set-Top Box
Connect the cable or antenna to the antenna input jack on the DTV.
Connect the HDMI input jack on the TV with the HDMI output jack on the DTV Set-Top Box
using an HDMI cable.
Note
•Please make sure the HDMI source's (Set-TopBox) power is on before selecting HDMI from
the "Source List" on the TV.
ToWatchDTV:
1. Turn on your TV.
2. Turn on your DTV receiver.
• For an explanation of HDMI video, see your DTV receiver owner's instructions.
3. Press the SOURCE button to select "HDMI 1 or HDMI 2".
27
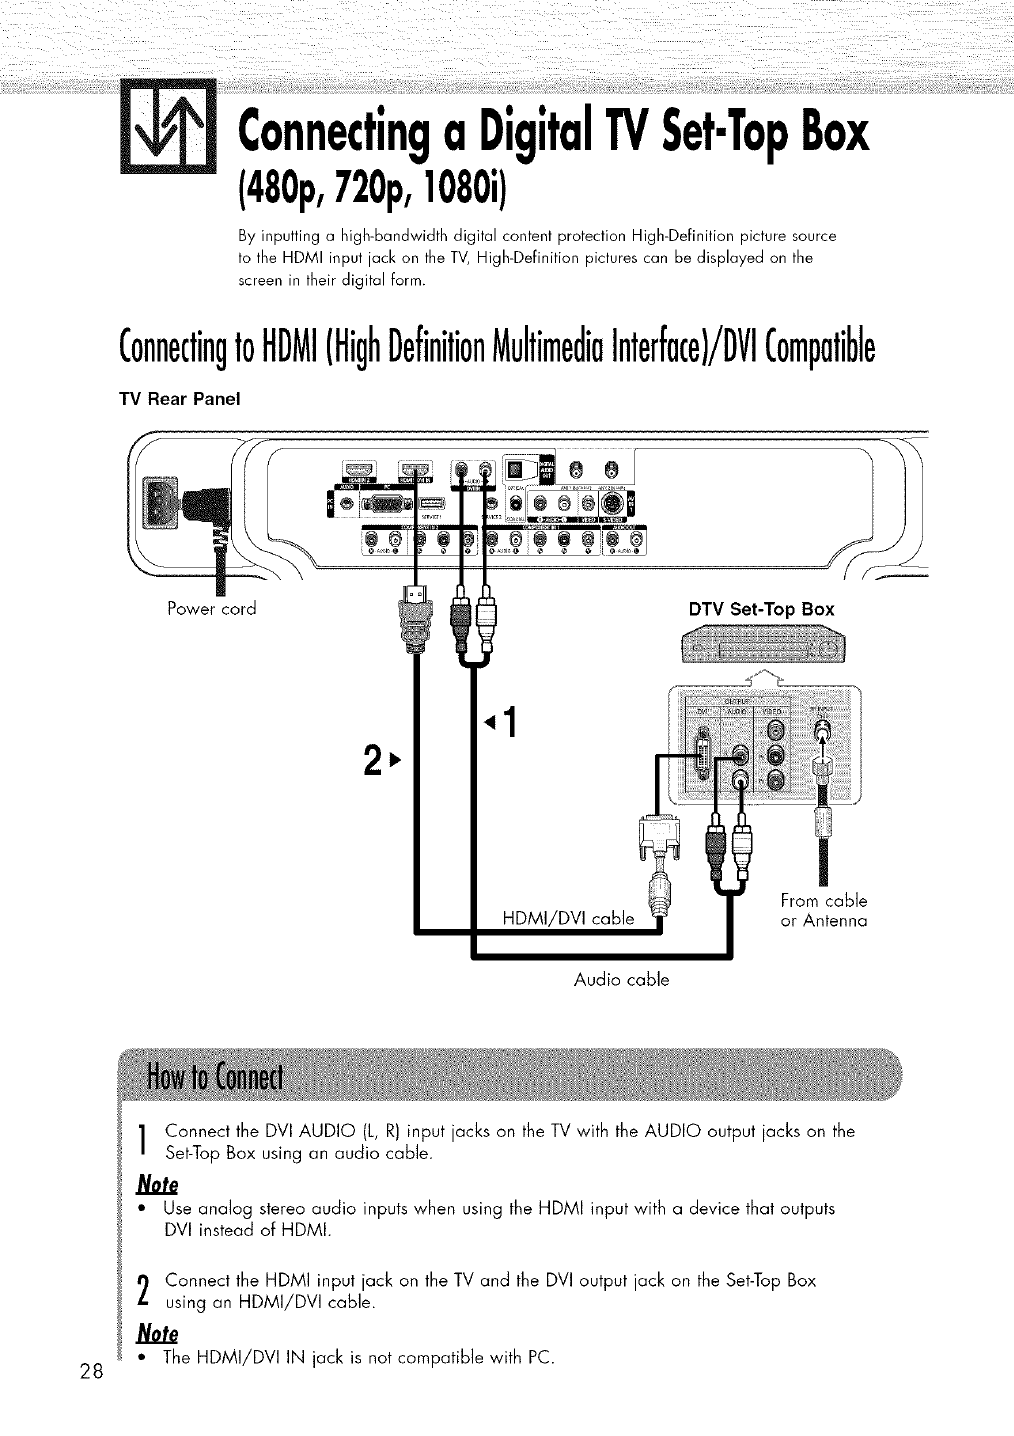
TV Box
By inputting a high-bandwidth digital content protection High-Definition picture source
to the HDMI input jack on the TV, High-Definition pictures can be displayed on the
screen in their digital form.
ConnectingtoHDMI(HighDefinitionMultimediaInterface)/DVICompatible
TV Rear Panel
Power cord
11
1,.
11
]
DTV Set-Top Box
.,1
HDMI/DVI cable From cable
or Antenna
Audio cable
28
Connect the DVI AUDIO (L, R) input jacks on the TV with the AUDIO output jacks on the
Set-Top Box using an audio cable.
Note
• Use analog stereo audio inputs when using the HDMI input with a device that outputs
DVI instead of HDMI.
Connect the HDMI input jack on the TV and the DVI output jack on the Set-Top Box
using an HDMI/DVI cable.
Note
• The HDMI/DVI IN jack is not compatible with PC.
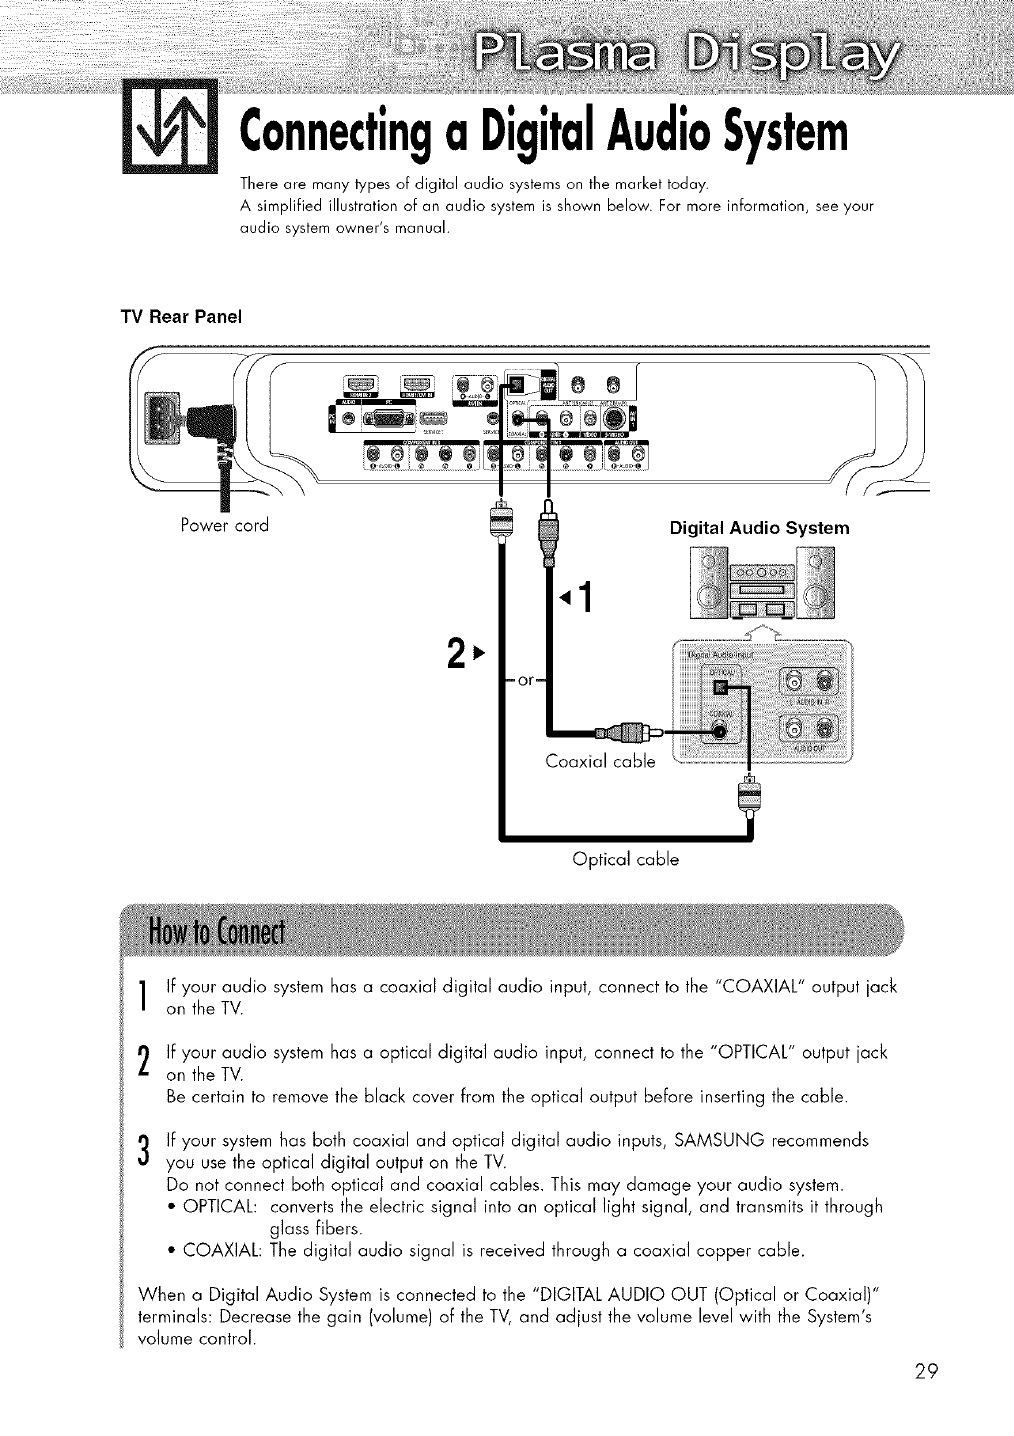
ConnectingaDigitalAudioSystem
There are many types of digital audio systems on the market today.
A simplified illustration of an audio system is shown below. For more information, see your
audio system owner's manual.
TV Rear Panel
Power cord
1,.
or
Optical cable
Digital Audio System
?
If your audio system has a coaxial digital audio input, connect to the "COAXIAL" output jack
on the TV.
If your audio system has a optical digital audio input, connect to the "OPTICAL" output jack
on the TV.
Be certain to remove the black cover from the optical output before inserting the cable.
3If your system has both coaxial and optical digital audio inputs, SAMSUNG recommends
you use the optical digital output on the TV.
Do not connect both optical and coaxial cables. This may damage your audio system.
•OPTICAL: converts the electric signal into an optical light signal, and transmits it through
glass fibers.
• COAXIAL: The digital audio signal is received through a coaxial copper cable.
When a Digital Audio System is connected to the "DIGITAL AUDIO OUT (Optical or Coaxial)"
terminals: Decrease the gain (volume) of the TV, and adjust the volume level with the System's
volume control.
29
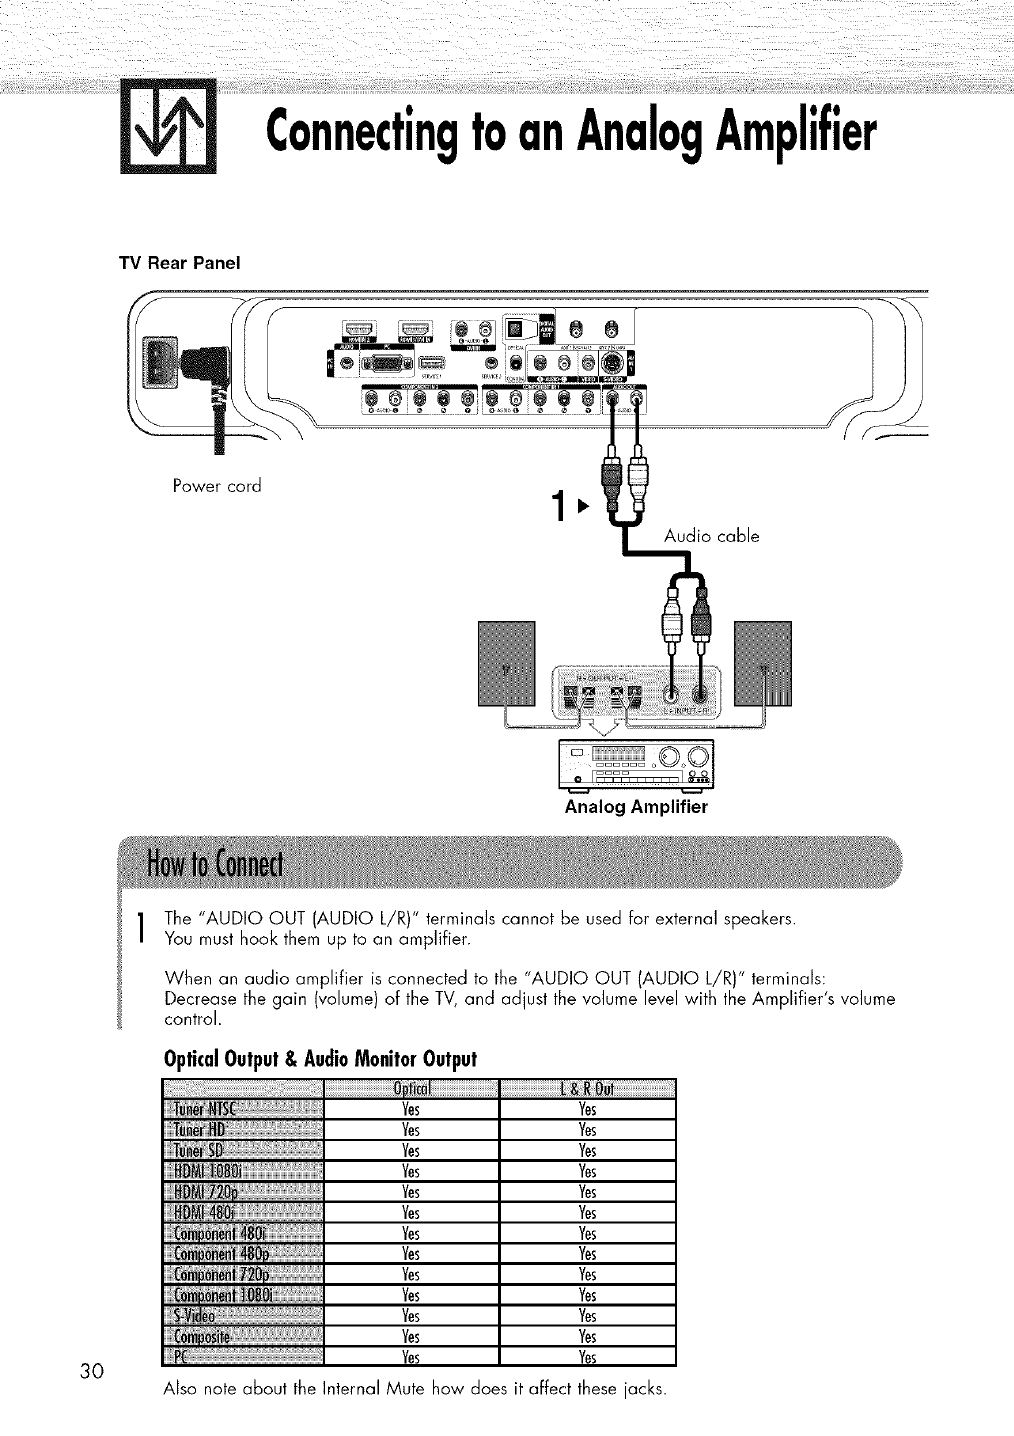
ConnectingtoanAnalogAmplifier
TV Rear Panel
Power cord
•
Audio cable
Analog Amplifier
30
The "AUDIO OUT (AUDIO L/R)" terminals cannot be used for external speakers.
You must hook them up to an amplifier.
When an audio amplifier is connected to the "AUDIO OUT (AUDIO L/R)" terminals:
Decrease the gain (volume) of the TV, and adjust the volume level with the Amplifier's volume
control.
OpticalOutput& AudioMonitorOutput
j_llli!ll_l_l_l_l_l_l;l_!llll!lljjj_ljlllllllllllllllllllllllllllllllllllllllllllllllllllll'i!iiiiiiiiiijjjiiiiiiiiiiiiiiiiiiiii!i!jii!il_I
Tunef_SD
DMi720
48O
,72O
:I08_
ii_llililii_ilii_ilii_ilii_ilii_ilii_ilii_ilii_ilii_ilii_ilii_ilii_ilii_ilii_ilii_ilii_ilii_ilii_ilii_ilii_ilii_i_li....
Also note about the
Ms
Ms
Ms
Ms
Ms
Ms
Ms
Ms
Ms
Ms
Ms
Ms
Ms
Internal Mute
Yes
Yes
Yes
Yes
Yes
Yes
Yes
Yes
Yes
Yes
Yes
Yes
Yes
how does it affect these jacks.
PLASMA DISPLAY PANEL
Operation
Turning the TV On and OFf ............................................................ 32
Viewing the Menus and Displays .................................................. 36
Memorizing the Channels ............................................................ 37
Setting Up Your Remote Control .................................................... 41
Viewing an External Signal Source ................................................ 48
i! i i i )/): :i!)! _ii!i !ili iii flail_!_!!!i!ili!i!_!_iii!!!i_!_!i!i_i!iii!i!i!
TurningtheTVOnandOff
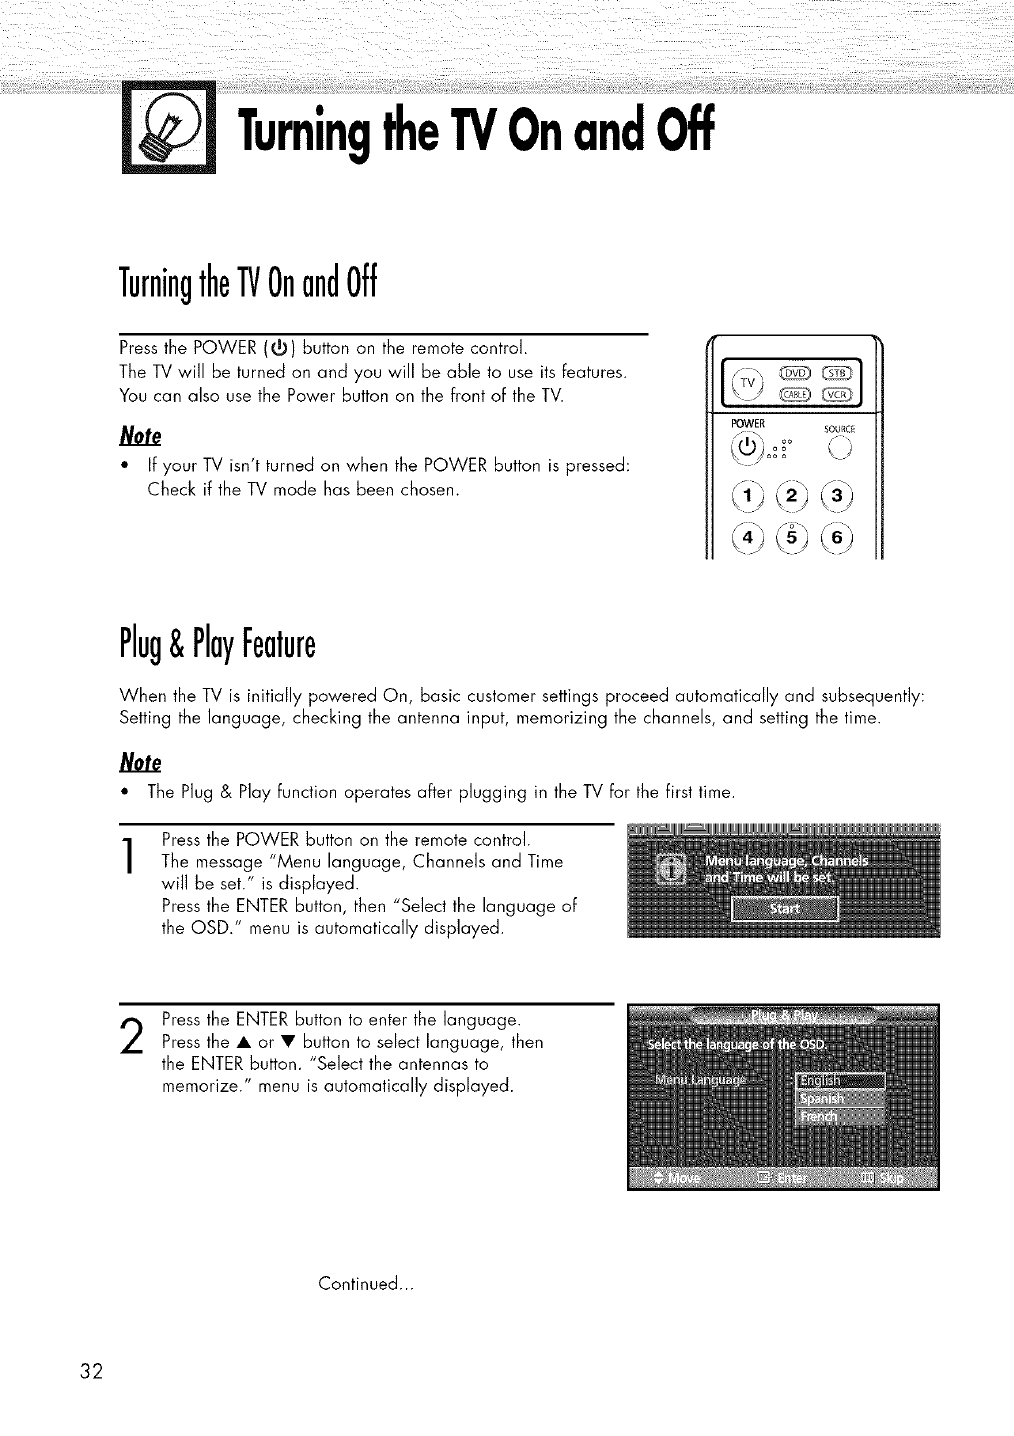
TurningtheTVOnandOff
Press the POWER (5) button on the remote control.
The TV will be turned on and you will be able to use its features.
You can also use the Power button on the front of the TV.
Note
" If your TV isn't turned on when the POWER button is pressed:
Check if the TV mode has been chosen.
POWER sou_c_
Plug&PlayFeature
When the TV is initially powered On, basic customer settings proceed autamafically and subsequently:
Setting the language, checking the antenna input, memorizing the channels, and setting the time.
/Vote
" The Plug & Play Function operates after plugging in the TV for the first time.
1Press the POWER button on the remote control.
The message "Menu language, Channels and Time
will be set." is displayed.
Press the ENTER button, then "Select the language of
the OSD." menu is automatically displayed.
2Press the ENTER button to enter the language.
Press the • or • button to select language, then
the ENTER button. "Select the antennas to
memorize." menu is automatically displayed.
Continued...
32
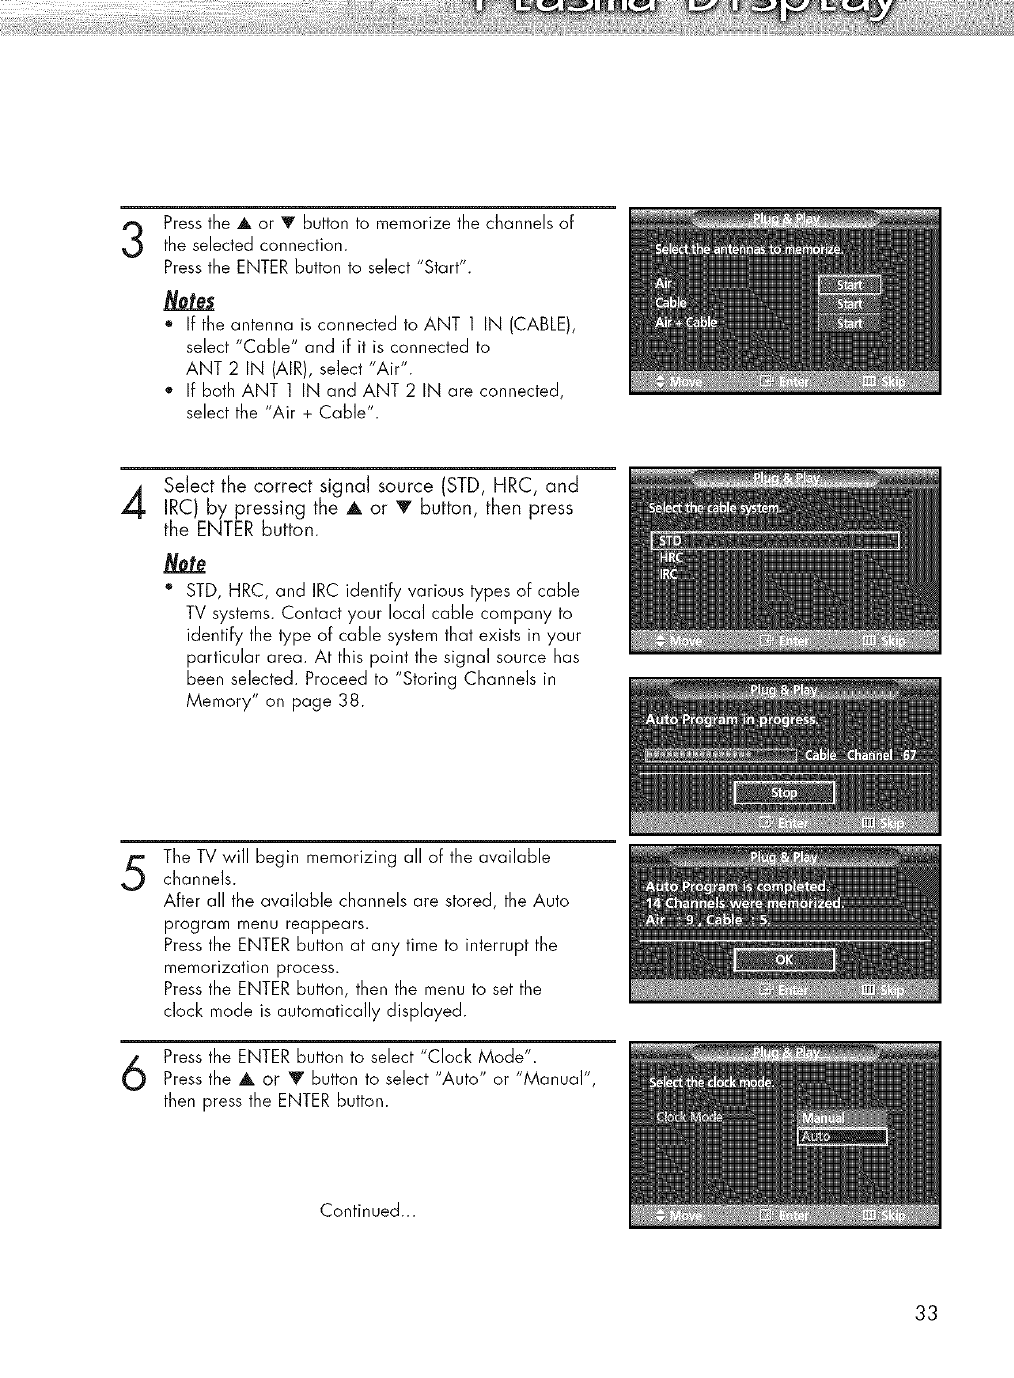
3Pressthe A or V button to memorize the channels of
the selected connection.
Pressthe ENTER button to select "Start".
o If the antenna is connected to ANT 1 IN (CABLE),
select "Cable" and iF it is connected to
ANT 2 IN (AIR), select "Air".
o If both ANT 1 IN and ANT 2 IN are connected,
select the "Air + Cable".
Select the correct signal source (STD, HRC, and
IRC) by pressing the A or T button, then press
the ENTER button.
oSTD, HRC, and IRC identify various types of cable
TV systems. Contact your local cable company to
identify the type of cable system that exists in your
particular area. At this point the signal source has
been selected. Proceed to "Storing Channels in
Memory" on page 38.
5The TV will begin memorizing all of the available
channels.
AFter all the available channels are stored, the Auto
program menu reappears.
Press the ENTER button at any time to interrupt the
memorization process.
Press the ENTER button, then the menu to set the
clock mode is automatically displayed.
Press the ENTER button to select "Clock Mode".
Press the A or Y button to select Auto" or 'Manual',
then press the ENTER button.
Continued...
33
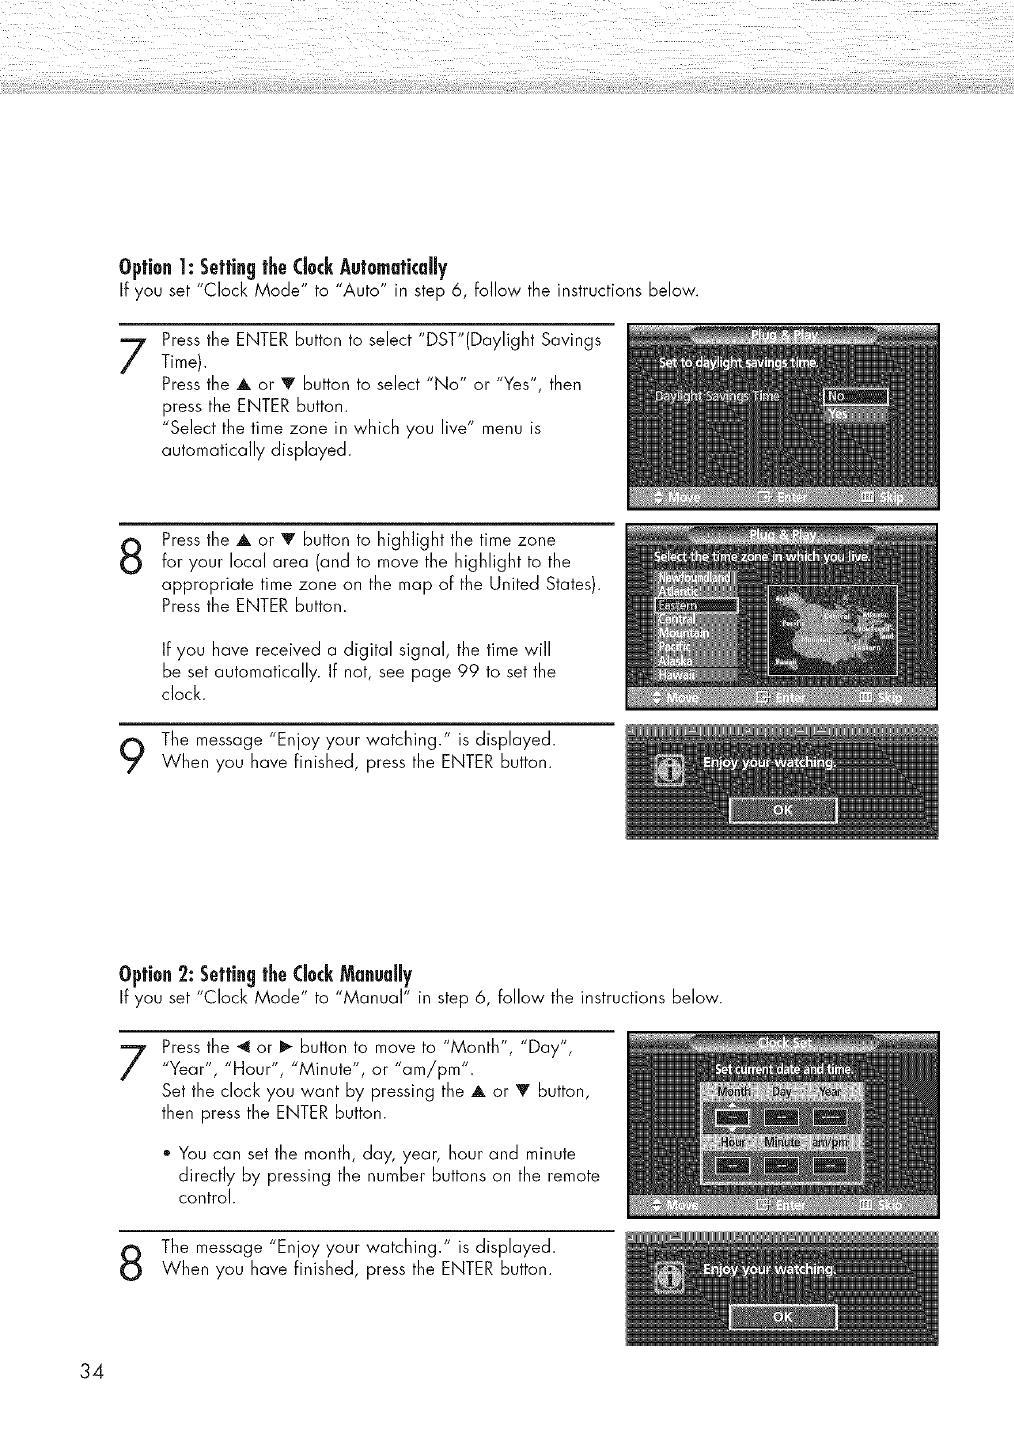
Option1: SettingtheClockAutomatically
If you set "Clock Mode" to "Auto" in step 6, follow the instructions below.
7Press the ENTER button to select "DST"(Daylight Savings
Time).
Press the A or V button to select "No" or "Yes", then
press the ENTER button.
"Select the time zone in which you live" menu is
automatically displayed.
8Press the A or V button to highlight the time zone
for your local area (and to move the highlight to the
appropriate time zone on the map of the United States).
Press the ENTER button.
If you have received a digital signal, the time will
be set automatically. If not, see page 99 to set the
clock.
The message "Enjoy your watching." is displayed.
When you have finished, press the ENTER button.
Option2: SettingtheClockManually
If you set "Clock Mode" to "Manual" in step 6, follow the instructions below.
7Press the "_ or _ button to move to "Month", "Day",
"Year", "Hour", "Minute", or ' am/pm".
Set the clock you want by pressing the A or _r button,
then press the ENTER button.
o You can set the month, day, year, hour and minute
directly by pressing the number buttons on the remote
control.
The message "Enjoy your watching." is displayed.
When you have finished, press the ENTER button.
34
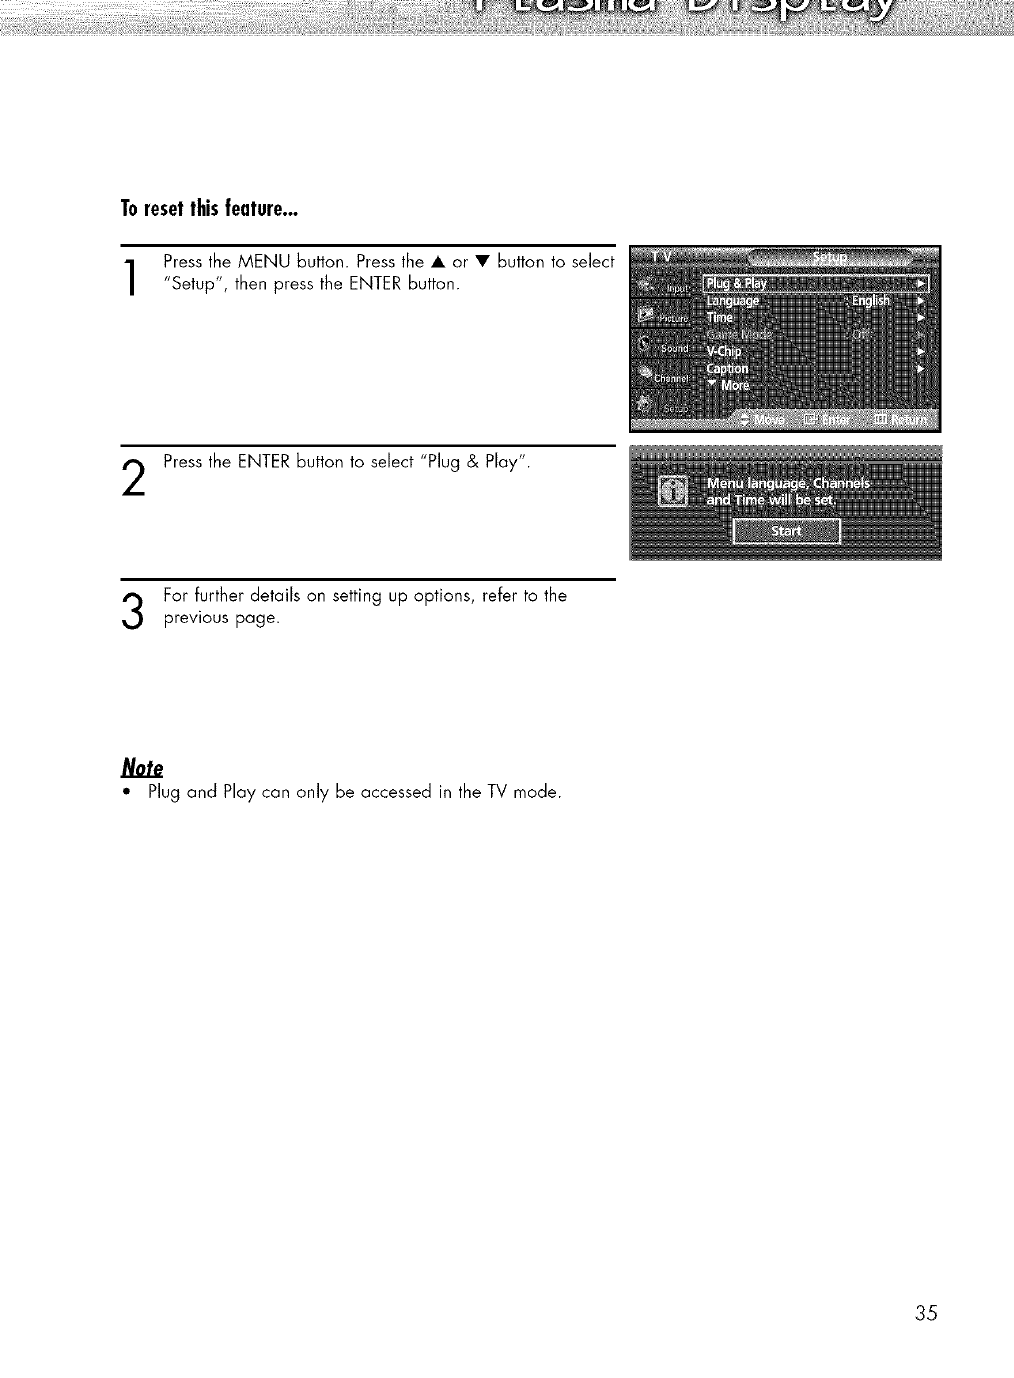
Toreset thisfeature...
Press the MENU button. Press the • or • button to select
"Setup", then press the ENTER button.
Press the ENTER button to select "Plug & Play".
For further details on setting up options, refer to the
previous page.
Note
• Plug and Play can only be accessed in the TV mode.
35
ViewingtheMenusandDisplays
Your TV has a simple, easy-to-use menu system that appears on the TV screen.
This system makes it convenient and fast to use features on the TV.
Your TV also lets you display the status of many of your TV's features.
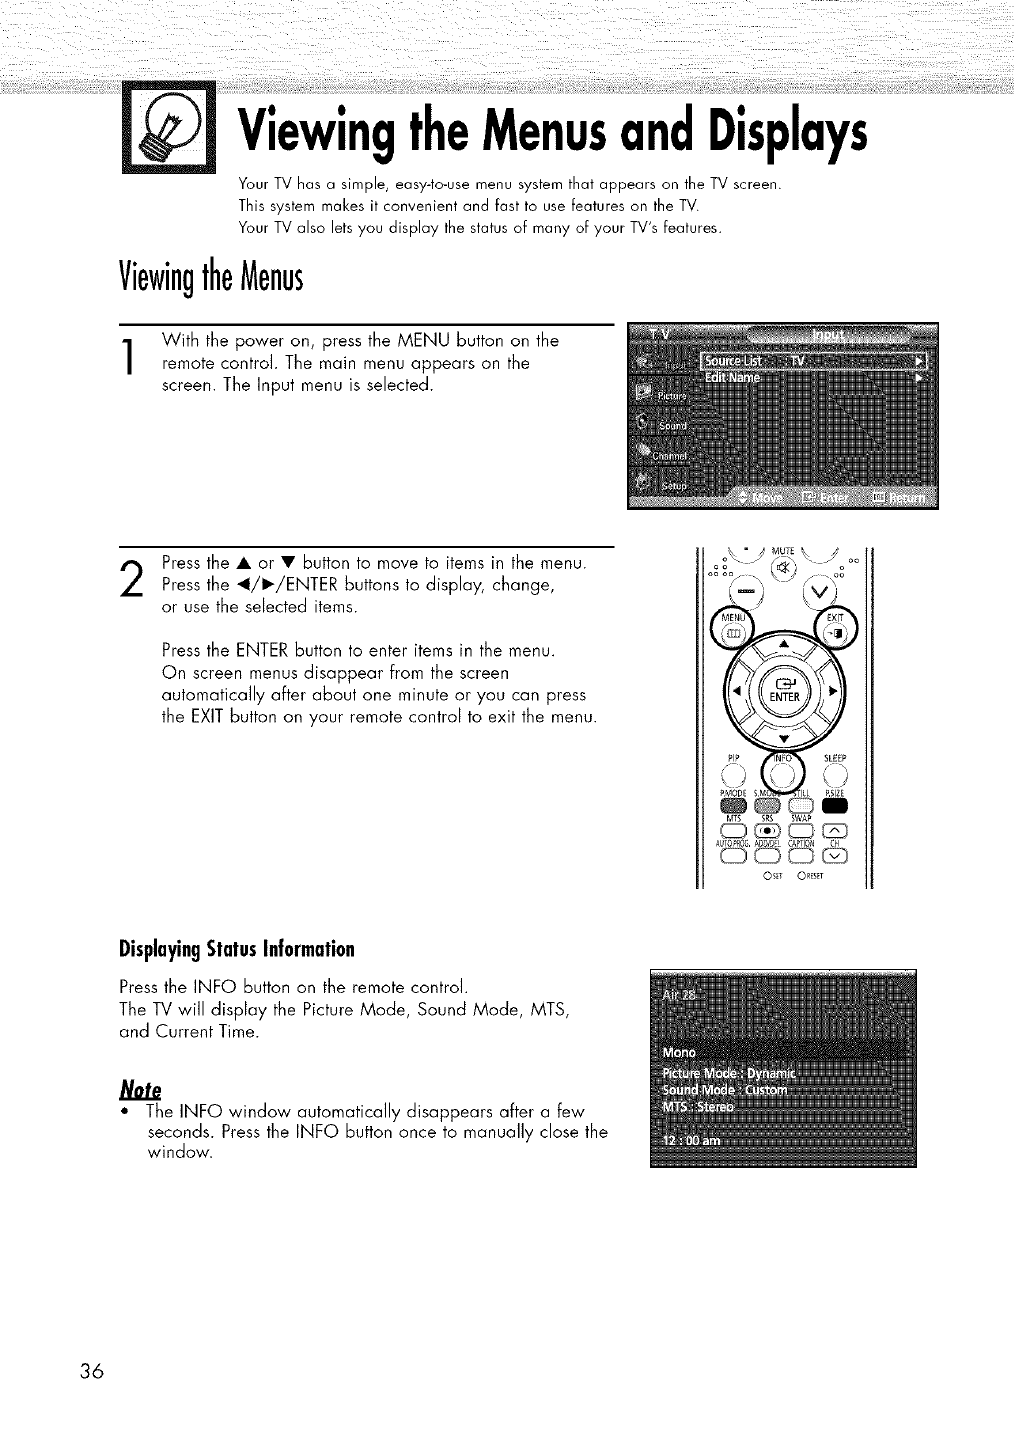
ViewingtheMenus
With the power on, press the MENU button on the
remote control. The main menu appears on the
screen. The Input menu is selected.
Press the • or • button to move to items in the menu.
Press the _I/I_/ENTER buttons to display, change,
or use the selected items.
Press the ENTER button to enter items in the menu.
On screen menus disappear from the screen
automatically after about one minute or you can press
the EXIT button on your remote control to exit the menu.
oo°\. Muq_\ j oo
C _,ci,
MTS SRS SWAP
AUTOPRO_ AD_/_EL CAPTION CH
_ _ ,_,
Os_r OR;_ET
DisplayingStatusInformation
Press the INFO button on the remote control.
The TV will display the Picture Mode, Sound Mode, MTS,
and Current Time.
Note
• The INFO window automatically disappears after a few
seconds. Press the INFO button once to manually close the
window.
36
MemorizingtheChannels
Your TV can memorize and store all of the available channels for both "off-air" (antenna) and cable
channels. After the available channels are memorized, use the CH A and CH v buttons to scan
through the channels. This eliminates the need to change channels by entering the channel digits.
There are three steps for memorizing channels: selecting a broadcast source, memorizing the
channels (automatic) and adding and deleting channels (manual).
Selectingabroadcastsource
Before your television can begin memorizing the available channels, you must specify the type of signal
source that is connected to the TV (i.e., an antenna or a cable system).
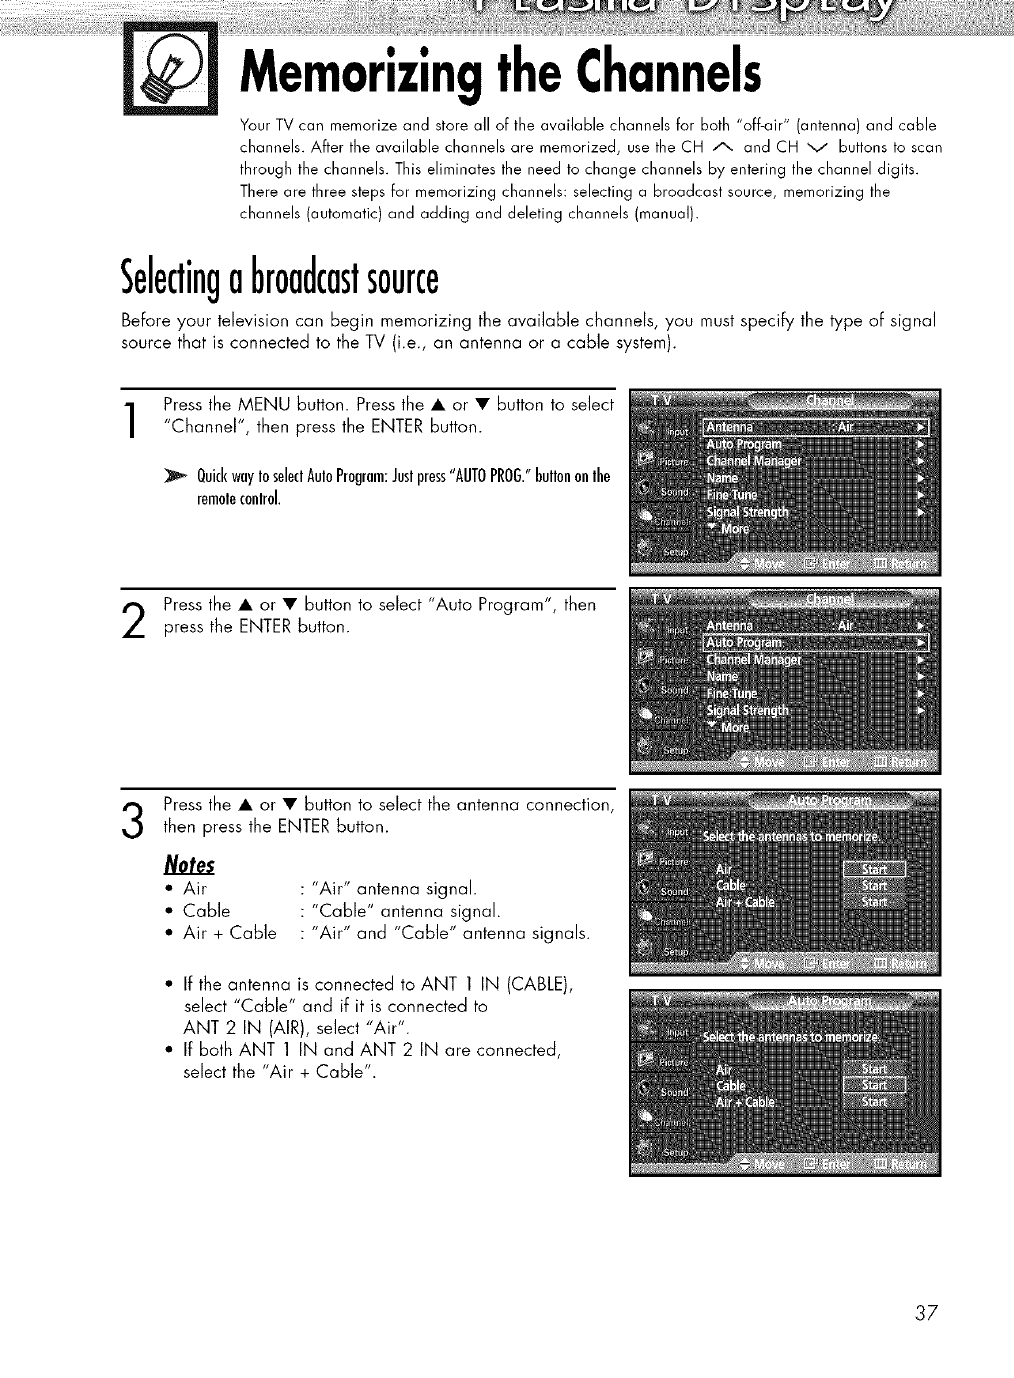
Press the MENU button. Press the • or • button to select
"Channel", then press the ENTER button.
QuickwayIoseleclAuloProgram:Juslpress"AUTOPROG."bullononlhe
remoleconlrol.
Press the • or • button to select "Auto Program", then
press the ENTER button.
3Press the • or • button to select the antenna connection,
then press the ENTER button.
Notes
• Air "Air" antenna signal.
• Cable "Cable" antenna signal.
• Air + Cable "Air" and "Cable" antenna signals.
•If the antenna is connected to ANT 1 IN (CABLE),
select "Cable" and if it is connected to
ANT 2 IN (AIR), select "Air".
• If both ANT 1 IN and ANT 2 IN are connected,
select the "Air + Cable".
37
StoringChannelsinMemory
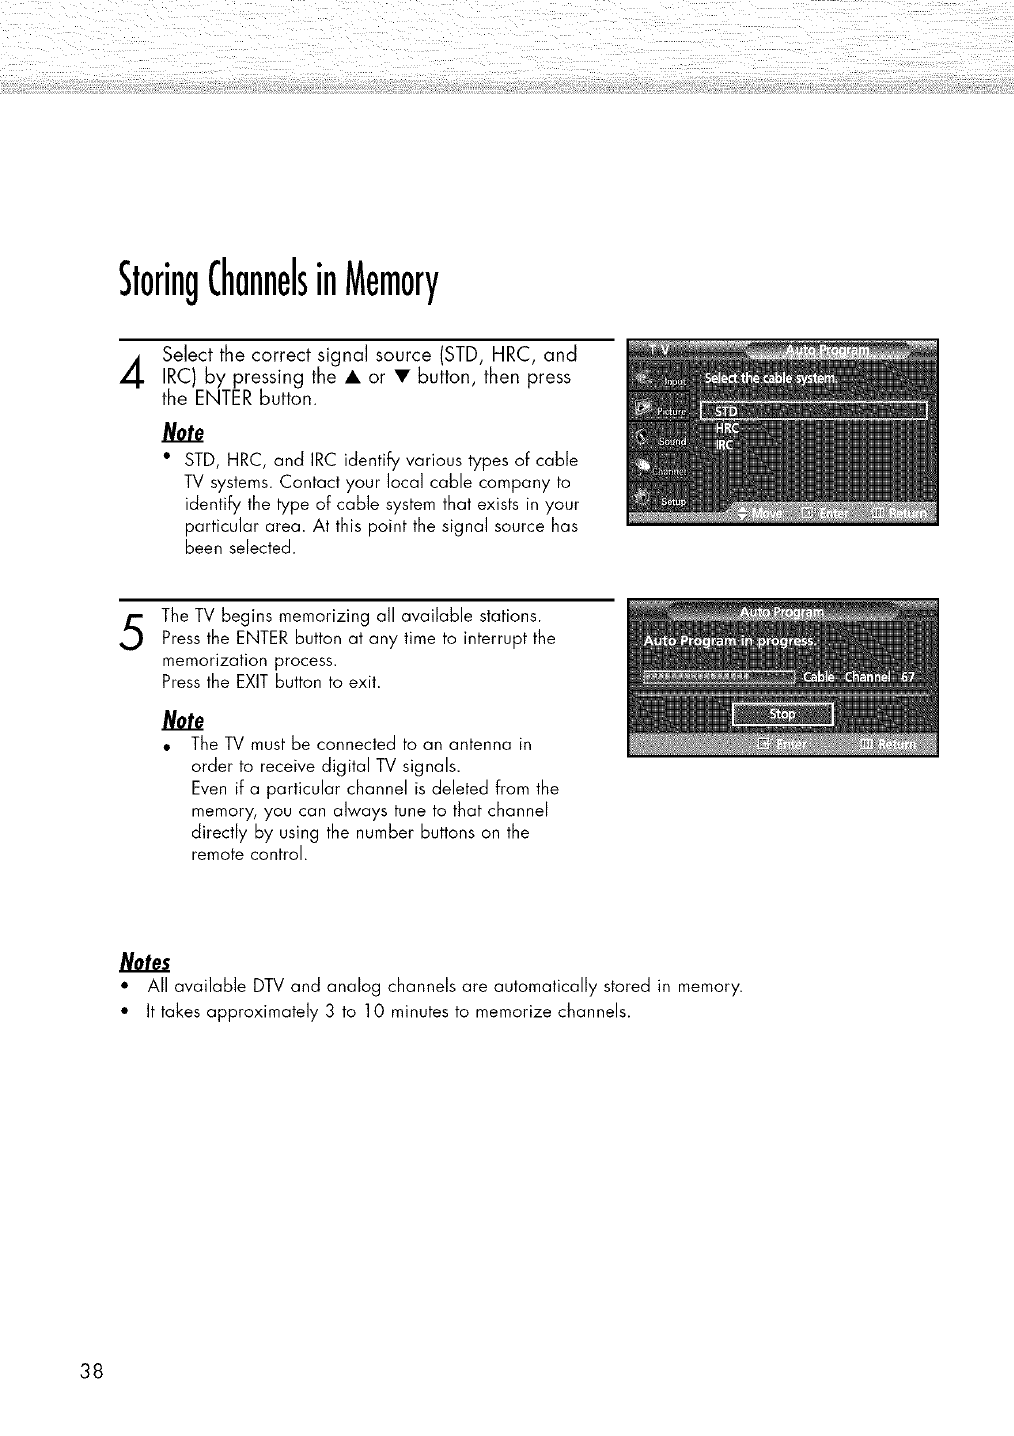
Sebct the correct signal source (STD, HRC, and
IRC) by pressing the • or • button, then press
the ENTER button.
•STD, HRC, and IRC identify various types of cable
TV systems. Contact your local cable company to
identify the type of cable system that exists in your
particular area. At this point the signal source has
been selected.
5The TV begins memorizing all available stations.
Press the ENTER button at any time to interrupt the
memorization process.
Press the EXIT button to exit.
• The TV must be connected to an antenna in
order to receive digital TV signals.
Even if a particular channel is deleted from the
memory, you can always tune to that channel
directly by using the number buttons on the
remote control.
•All available DTV and analog channels are automatically stored in memory.
• It takes approximately 3 to 10 minutes to memorize channels.
38
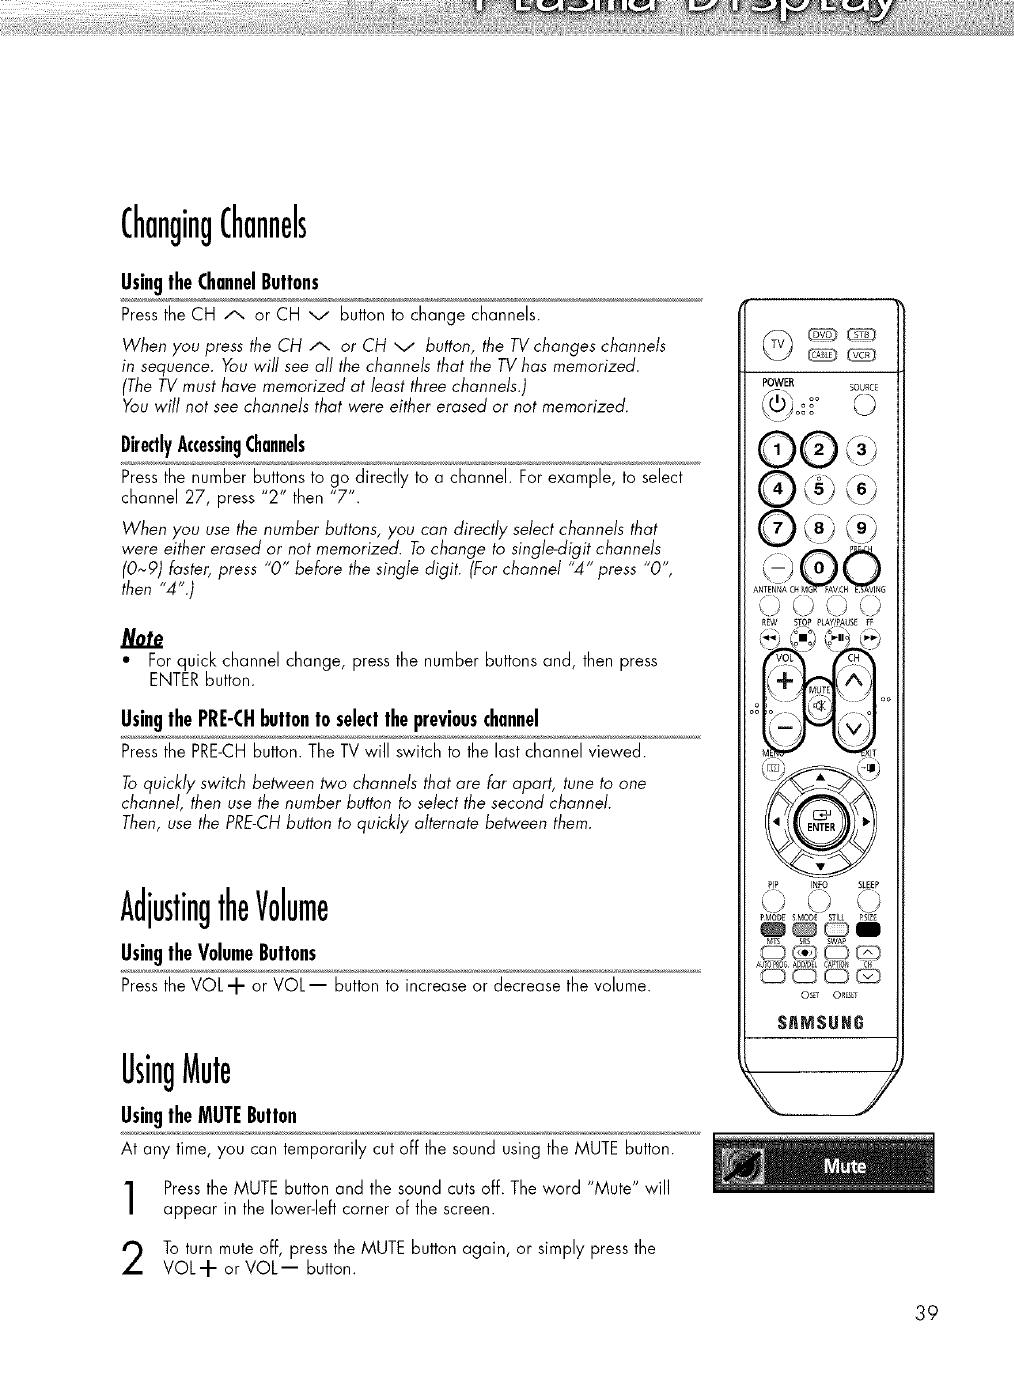
ChangingChannels
UsingtheChannelButtons
Pressthe CH A or CH v button to change channels.
When you press the CH A or CH v button, the TVchanges channels
in sequence. You will see all the channels that the TVhas memorized.
(The TV must have memorized at bast three channels.)
You will not see channels that were either erased or not memorized.
DirectlyAccessingChannels
Pressthe nurnber buttons to go directly to a channel. Far exarnple, to select
channel 27, press "2" then "7".
When you use the number buttons, you can directly select channels that
were either erased or not memorized. Tochange to single-digit channels
(0~9) faster, press "0" before the single digit. (For channel "4" press "0",
then "4".)
*For quick channel change, press the number buttons and, then press
ENTERbutton.
UsingthePRE-CHbuttonto selectthepreviouschannel
Pressthe PRE-CHbutton. The TV will switch to the last channel viewed.
Toquickly switch between two channels that are far apart, tune to one
channel, then use the number button to select the second channel.
Then, use the PRE-CHbutton to quickly alternate between them.
AdjustingtheVolume
UsingtheVolumeButtons
Pressthe VOL-I- or VOL-- button to increase or decrease the volume.
REW STOP ?LAY/PAUS_ FF
(_j '_ma ,%,_;;:,
o,___°°
PIP INFO SLE[P
PMODESMOD[
A_TOP_O6AODID_L C_TIO_ C_
©s_r ORESE_
UsingMute
UsingtheMUTEButton
At any time, you can temporarily cut off the sound using the MUTE button.
Pressthe MUTE button and the sound cuts off. The word "Mute" will
appear in the lower-left corner of the screen.
To turn mute off, press the MUTE button again, or simply press the
VOL-'I- or VOL-- button.
39
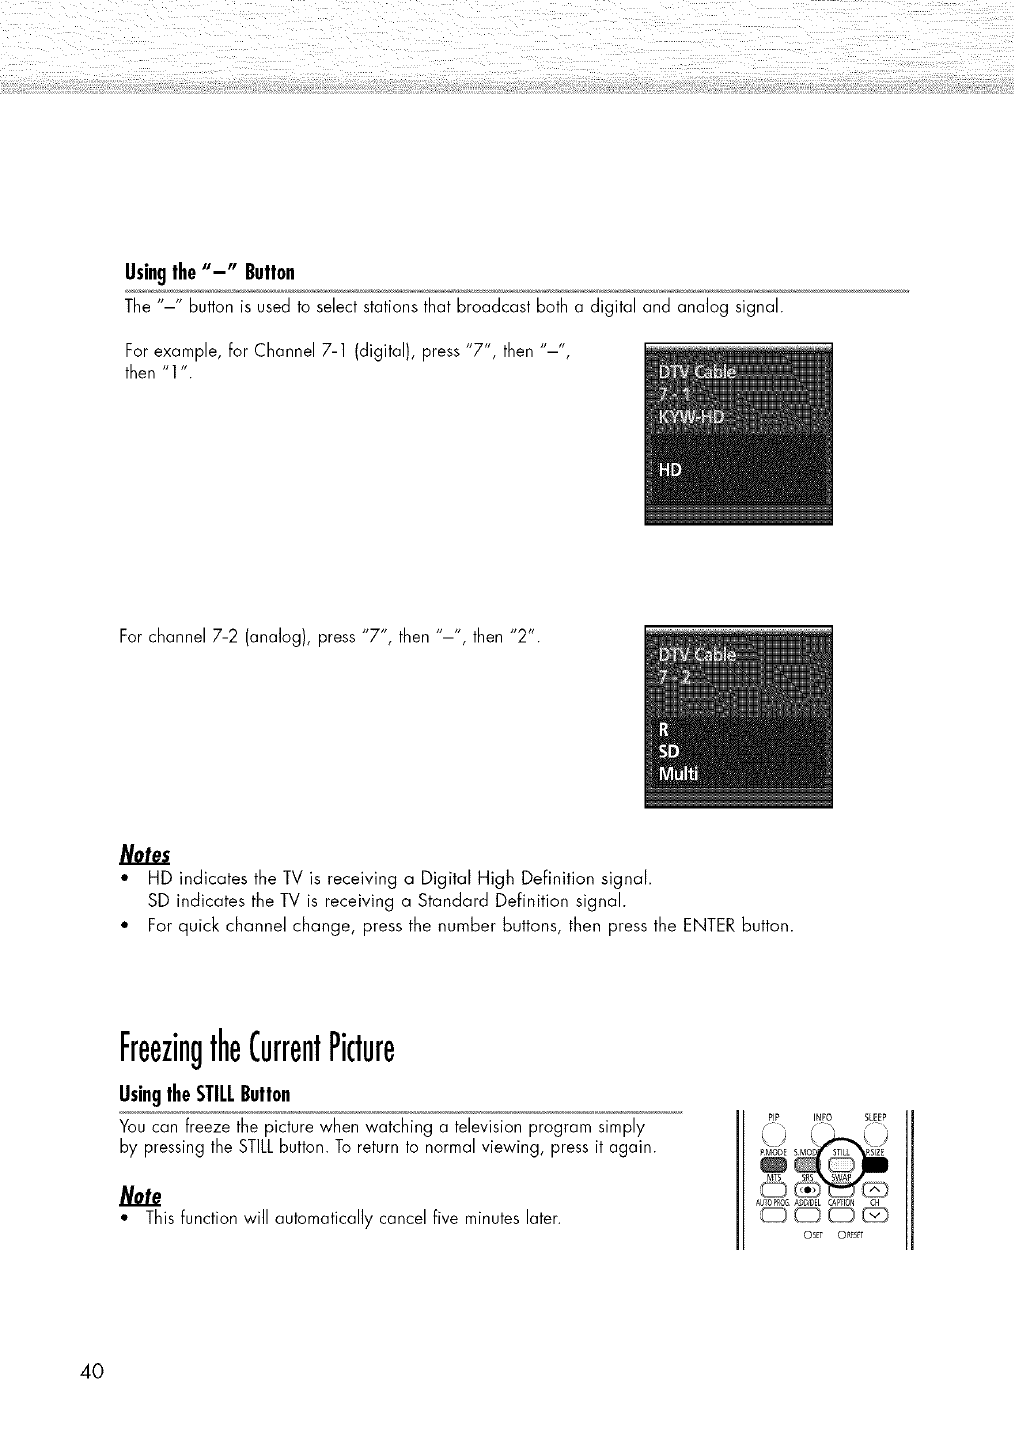
Usingthe"-" Button
The "-" button is used to select stations that broadcast both a digital and analog signal.
For example, for Channel 7-1 (digital), press "7", then "-"
then "1 ".
For channel 7-2 (analog), press "7", then "-', then "2".
• HD indicates the TV is receiving a Digital High DeFinition signal.
SD indicates the TV is receiving a Standard Definition signal.
• For quick channel change, press the number buttons, then press the ENTER button.
FreezingtheCurrentPicture
UsingtheSTILLButton
You can freeze the picture when watching a televisionprogram simply
by pressing the STILLbutton. To return to normal viewing, press it again.
• This function will automatically cancel five minutes later.
PIP INFO SLEEP
/ \
SMOD SIZE
MTS $8S
NL_OPRO_ A_D/OEL CA_FION CH
OSET O_ESFT
40

SettingUpYourRemoteControl
After it has been set up properly, your remote control can operate in five different modes: TV, VCR,
Cable, DVD, or Set-Top Box.
Pressing the corresponding button on the remote control allows you to switch between these modes,
and control whichever piece of equipment you choose.
Note : •The remote control might not be compatible with all DVD Players, VCRs, Cable boxes,
and Set-Top Boxes.
SettingUptheRemoteto OperateYourVCR
Turn off your VCR.
Press the VCR button on your TV's remote control.
Press the SET button on your TV's remote control.
4Using the number buttons on your remote control, enter
three digits of the VCR code listed on page 45 of this
manual for your brand of VCR. Make sure you enter three
digits of the code, even if the first digit is a "0". (If more
than one code is listed, try the first one.)
Press the POWER (5) button on the remote control.
Your VCR should turn on if your remote is set up correctly.
If your VCR does not turn on after set-up, repeat steps 2, 3
and 4, but try one of the other codes listed for your brand
of VCR. If no other codes are listed, try each VCR code,
000 through 080.
Note on Using Remote Control Modes: VCR
When your remote control is in "VCR" mode, the volume buttons still
control your TV's volume.
POWER SOURCE
_ oo
:7) (o)
ANTENNACHMGP, FAVCH ESAVING
<),,,j <J
_EW STOP PLAY/_AUSE FF
VOL CH
M[NU EXIT
PIP I_FO SLEEP
PMODE 5MODE STILL P$1Z_
MT5 _S _WAP
0_0_
•When your remote control is in "VCR', "CABLE", or "DVD"
mode, the VCR control buttons (REW, STOP, PLAY/PAUSE, and
FF)still operate your VCR.
41
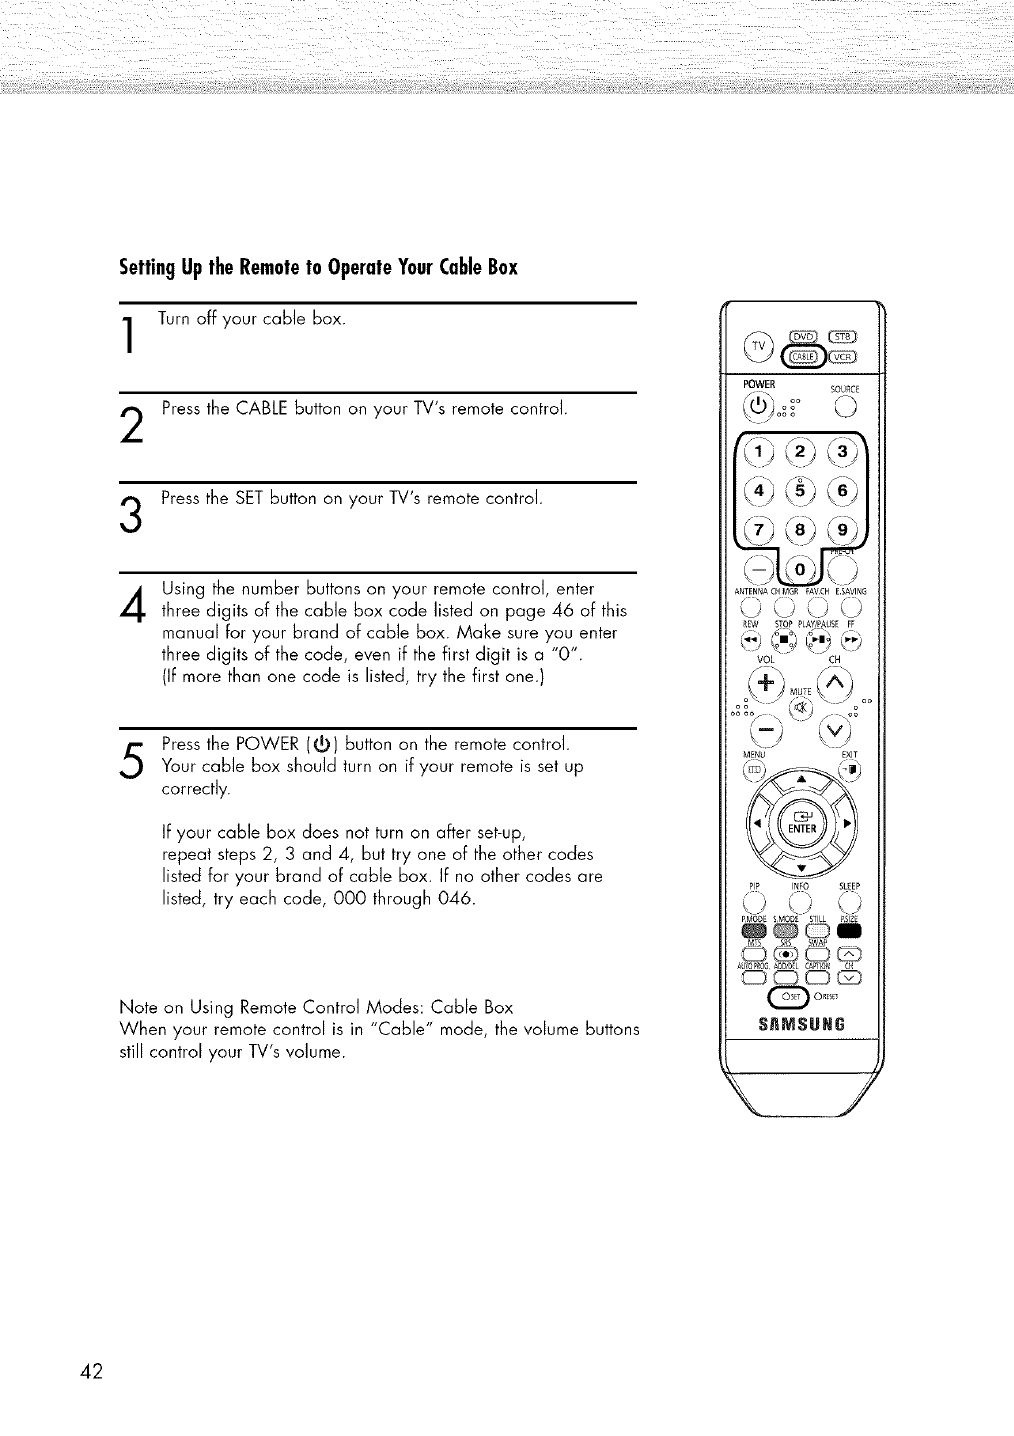
SettingUptheRemoteto OperateYourCableBox
Turn off your cable box.
Press the CABLE button on your TV's remote control.
Press the SET button on your TV's remote control.
4Using the number buttons on your remote control, enter
three digits of the cable box code listed on page 46 of this
manual for your brand of cable box. Make sure you enter
three digits of the code, even if the first digit is a "0".
(If more than one code is listed, try the first one.)
Press the POWER (@) button on the remote control.
Your cable box should turn on if your remote is set up
correctly.
If your cable box does not turn on after set-up,
repeat steps 2, 3 and 4, but try one of the other codes
listed for your brand of cable box. If no other codes are
listed, try each code, 000 through 046.
Note on Using Remote Control Modes: Cable Box
When your remote control is in "Cable" mode, the volume buttons
still control your TV's volume.
POWER SOURC_
/i_ oo
x]'x,-"_ x x_
/k .... .... /
ANTENNACHMGR FAVCH ESAVING
() 0 0 (
REW S_OP ?LAY/PAUSE FF
VOL CH
MENU EXIT
PIP INFO SLEEP
\J
PMODE SMOD_ STILL ?SIZ[
MTS SRS SWAP
0_,_
42
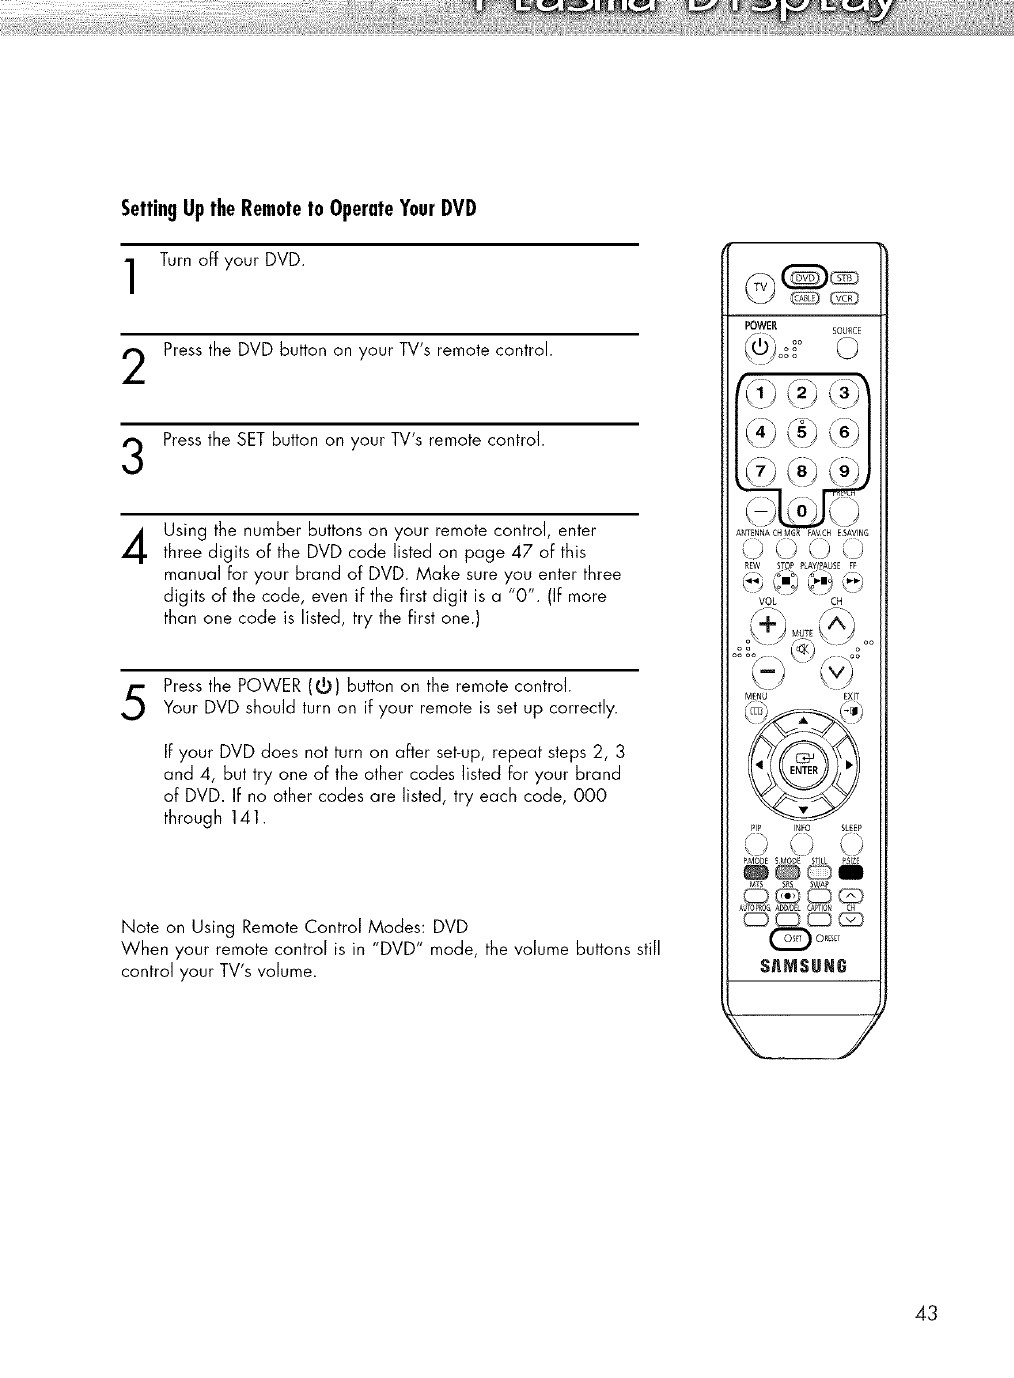
SettingUptheRemoteto OperateYourDVD
Turn off your DVD.
Press the DVD button on your TV's remote control.
Press the SET button on your TV's remote control.
4Using the number buttons on your remote control, enter
three digits oFthe DVD code listed on page 47 oF this
manual For your brand of DVD. Make sure you enter three
digits of the code, even if the first digit is a "0". (IFmore
than one code is listed, try the Firstone.)
Press the POWER (5) Button on the remote control.
Your DVD should turn on if your remote is set up correctly.
IFyour DVD does not turn on after set-up, repeat steps 2, 3
and 4, but try one oF the other codes listed Foryour brand
of DVD. IFno other codes are listed, try each code, 000
through 141.
Note on Using Remote Control Modes: DVD
When your remote control is in "DVD" mode, the volume buttons still
control your TV's volume.
POWER SOURCE
\WJoo°_
(-)tj()
ANTENNACHMGR FAVCH ESAVING
/\,
__j <) _.j.......<j
REW STOP PLAY/PA_SEFF
VOL CH
MENU EXIT
PIP INFO SLEEP
\J\J
PMO_)E SMODE STILL ?51Z_
_i
MTS SRS SWAP
$_MSUNG
43
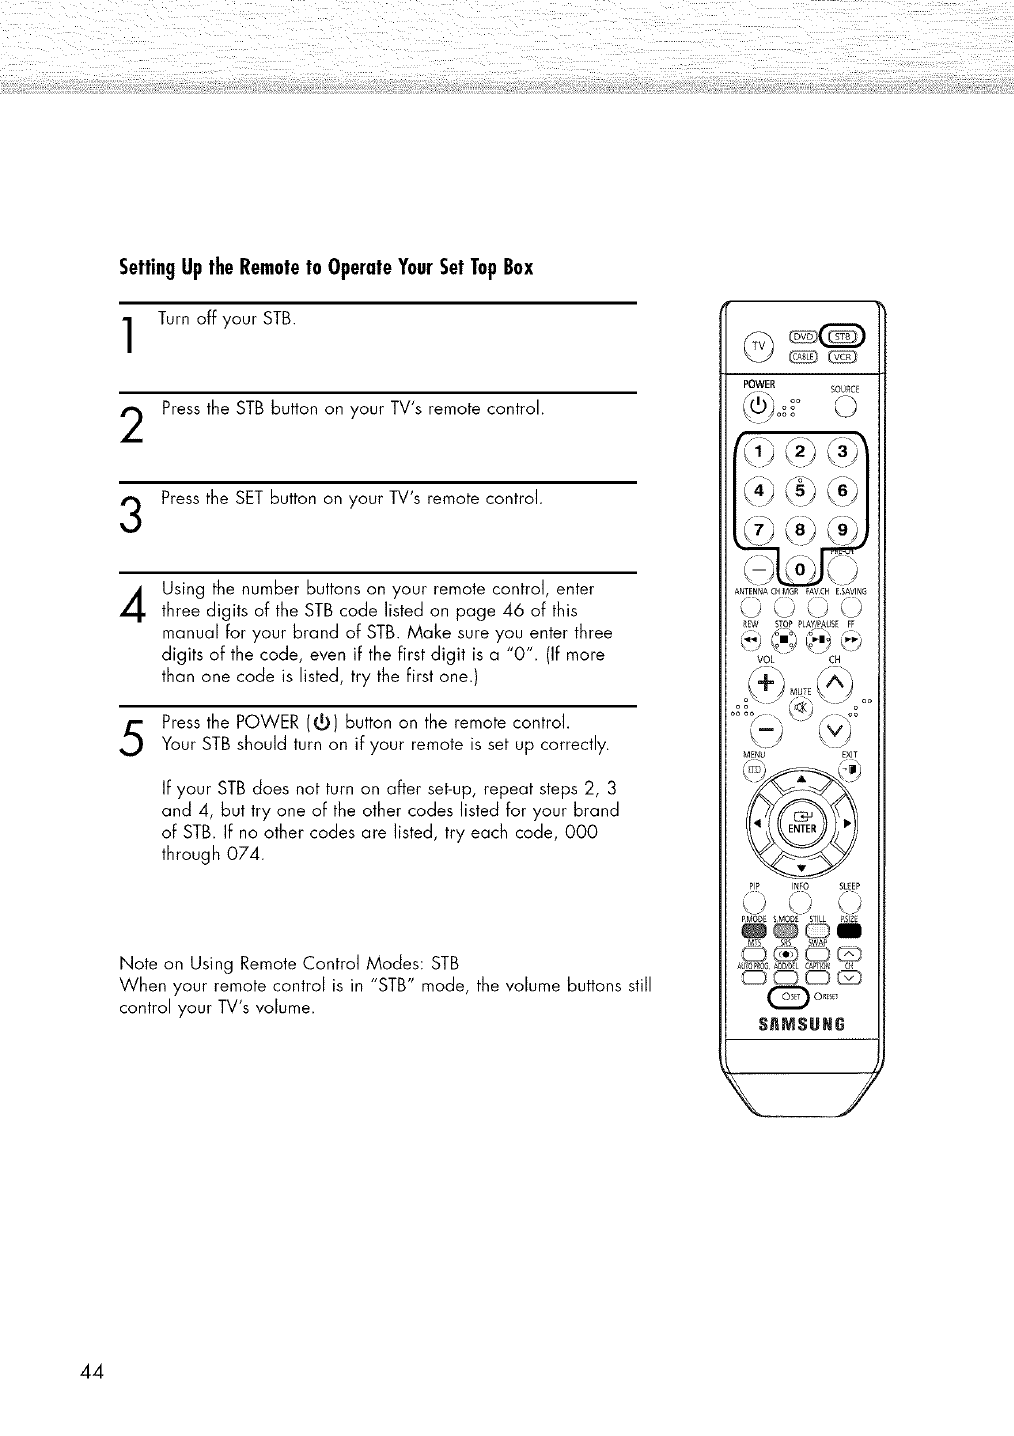
SettingUptheRemoteto OperateYourSetTopBox
Turn off your STB.
Press the STBbutton on your TV's remote control.
Press the SET button on your TV's remote control.
4Using the number buttons on your remote control, enter
three digits of the STBcode listed on page 46 of this
manual For your brand of STB. Make sure you enter three
digits of the code, even iF the Firstdigit is a "0". {IFmore
than one code is listed, try the Firstone.)
Press the POWER (r_) button on the remote control.
Your STB should turn on if your remote is set up correctly.
IFyour STB does not turn on after set-up, repeat steps 2, 3
and 4, but try one oFthe other codes listed for your brand
oF STB. IFno other codes are listed, try each code, 000
through 074.
Note on Using Remote Control Modes: STB
When your remote control is in "STB" mode, the volume buttons still
control your TV's volume.
POWER SOURCE
fi" oo ©
Ik .... .... I
ANTENNACHMGR FAVCH ESAVING
_EW STOP ?L_I_USE FF
VOL CH
MENU EXIT
PiP INFO SLEEP
\)
PMODE SMOD_ STILL ?SIZ[
MTS s_s SWAP
_,_
44
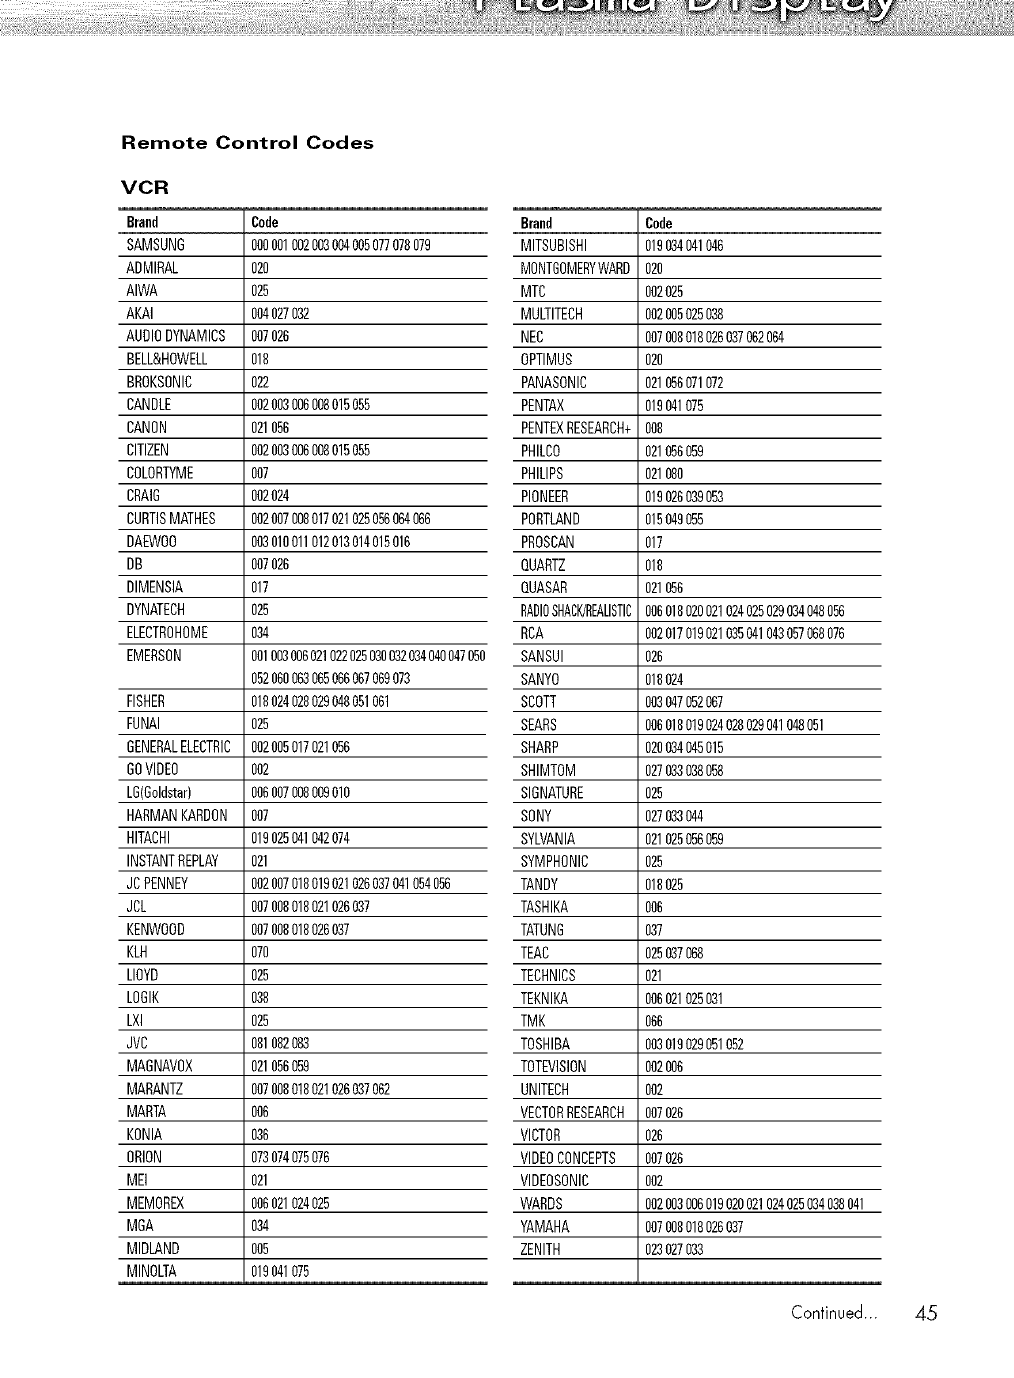
Remote Control Codes
VCR
Brand
SAMSUNG
ADMIRAL
AIWA
AKAI
AUDIODYNAMICS
BELL&HOWELL
BROKSONIC
CANDLE
CANON
CITIZEN
COLORTYME
CRAIG
CURTISMATHES
DAEWO0
DB
DIMENSIA
DYNATECH
ELECTROHOME
EMERSON
Code
003001002003004005077078079
02O
025
004027032
007026
018
022
002003006008015055
021056
002003006038015055
007
002024
002007008017021025056064066
003010011012013014015016
007026
017
025
O34
001003006021022025030032034040047050
052060063065066067069073
FISHER 018024028029048051061
FUNAI 025
GENERALELECTRIC002005017021056
GOVIDEO 002
LG(Goldstar) 006007008009010
HARMANKARDON 007
HITACHI 019025041042074
INSTANTREPLAY 021
JCPENNEY 002007018019021026037041054056
JCL 007008018021026037
KENWOOD 007008018026037
KLH 070
LLOYD 025
LOGIK 038
LXI 025
JVC 081082083
MABNAV0X 021056059
MARANTZ 007008018021026037062
MARTA 006
KONIA 036
ORLON 073074075076
MEI 021
MEMOREX 006021024025
MGA 034
MIDLAND 005
MINOLTA 019041075
Brand Code
MITSUBISHI 019034041046
MONTGOMERYWARD020
MTC 002025
MULTITECH 002005025038
NEC 007008018026037062064
OPTIMUS 020
PANASONIC 021056071072
PENTAX 019041075
PENTEXRESEARCH+008
PHILDO 021056059
PHILIPS 021080
PIONEER 019026039053
PORTLAND 015049055
PROSCAN 017
QUARTZ 018
QUASAR 021056
RADI0SHACK/REALISTIC006018020021024025029034048056
RCA 002017019021035041043057068076
SANSUI 026
SANYO 018024
SCOTT 003047052067
SEARS 006018019024028029041048051
SHARP 020034045015
SHIMTOM 027033038058
SIGNATURE 025
SONY 027033044
SYLVANIA 021025056059
SYMPHONIC 025
TANDY 018025
TASHIKA 006
TATUNG 037
TEAC 025037068
TECHNICS 021
TEKNIKA 006021025031
TMK 066
TOSHIBA 003019029051052
TOTEVISION 002006
UNITECH 002
VECTORRESEARCH007026
VICTOR 026
VIDEOCONCEPTS 007026
VlDEOSONIC 002
WARDS 002003006019020021024025034038041
YAMAHA 007038018026037
ZENITH 023027033
Continued... 45
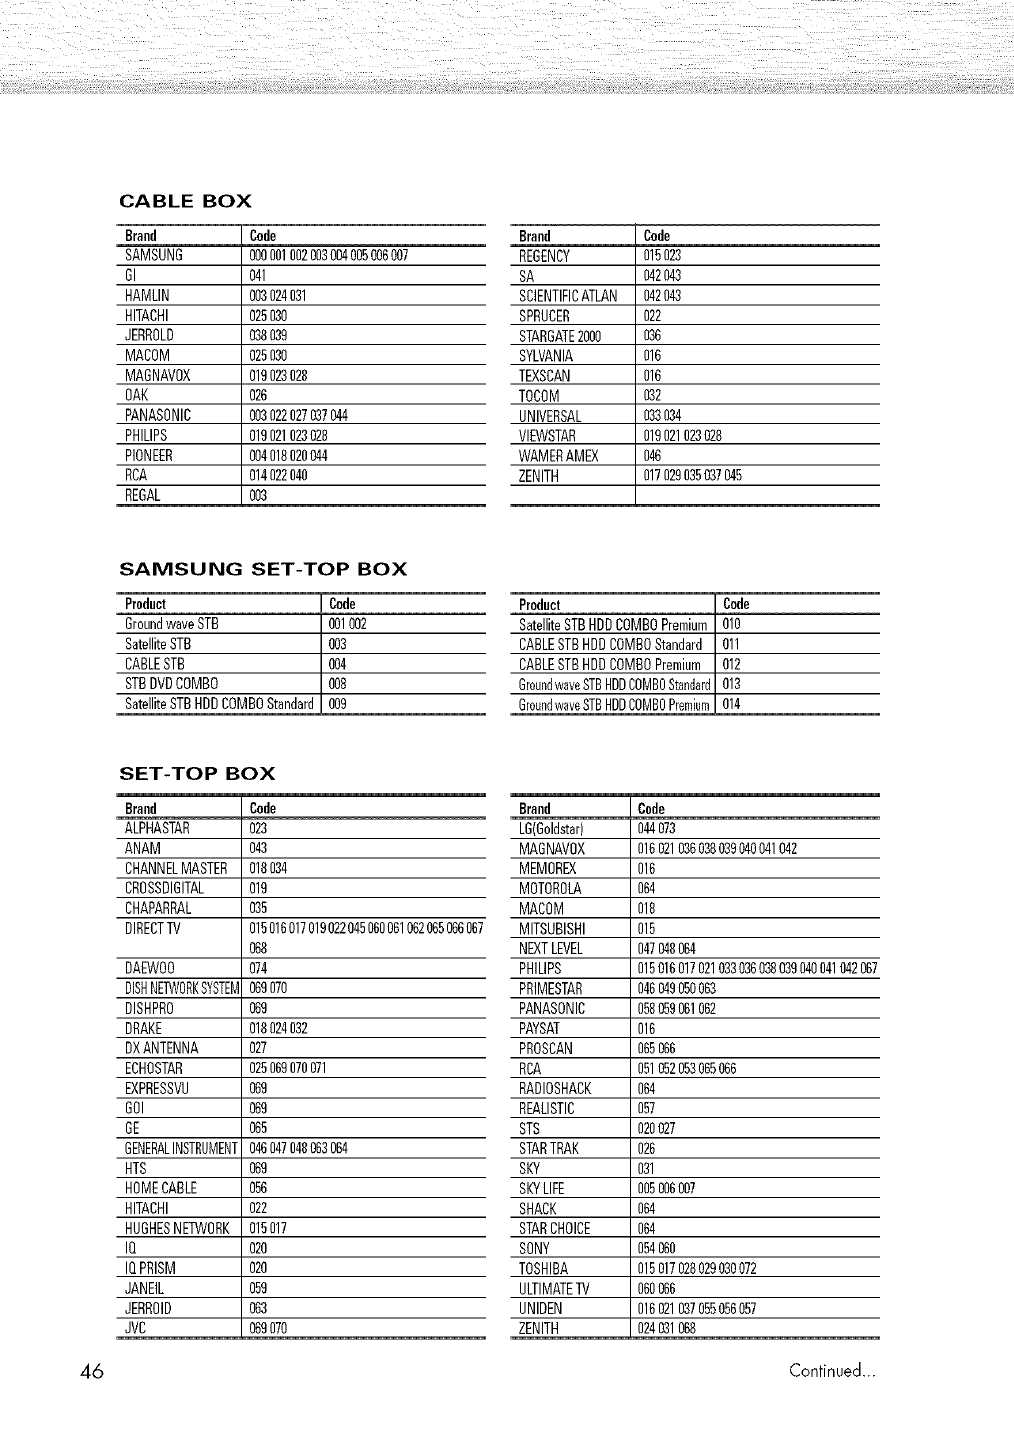
CABLE BOX
Brand Code
SAMSUNG 000001002003004005006007
GI 041
HAMLIN 003024031
HITACHI 025030
JERROLD 038039
MACOM 025030
MAGNAV0X 019023028
OAK 026
PANASONIC 003022027037044
PHIUPS 019021023028
PIONEER 004018020
RCA 014022040
REGAL 003
SAMSUNG SET-TOP BOX
Product Code
GroundwaveSTB 001002
SatelliteSTB 003
CABLESTB 0(_
STBDVDCOMBO 008
SatelliteSTBHDDCOMBOStandard 009
SET-TOP BOX
Brand Code
ALPHASTAR 023
ANAM 043
CHANNELMASTER 018034
CROSSDIGITAL 019
CHAPARRAL 035
DIRECTTV 015016017019022045060061062065066067
068
DAEWO0 074
DISHNETW0RKSYSTEM069070
DISHPRO 069
DRAKE 018024032
DXANTENNA 027
ECHOSTAR 025069070071
EXPRESSVU 069
GOI 069
GE 065
GENERALINSTRUMENT046047048063064
HTS 069
HOMECABLE 056
HITACHI 022
HUGHESNE]3NORK015017
IQ 020
IQPRISM 020
JANEIL 059
JERROID 063
JVC 069070
Brand Cede
REGENCY 015023
SA 042043
SCENTIFICATLAN 042043
SPRUCER 022
STARGATE2000 036
SYLVANIA 016
TEXSCAN 016
TOCOM 032
UNIVERSAL 033034
VIEWSTAR 019021023028
WAMERAMEX 046
ZENITH 017029035037045
Product i Code
SatelliteSTBHDDCOMBOPremium 010
CABLESTBHDDCOMBOStandard 011
CABLESTBHDDCOMBOPremium 012
GroundwaveSTBHDDCOMB0Standard013
GroundwaveSTBHDDCOMBOPremium[ 0 4
Brand Code
LG(Goldstar) 044073
MAGNAV0X 016021036038039(_0041042
MEMOREX 016
MOTOROLA 064
MACOM 018
MITSUBISHI 015
NEXTLEVEL 047(_8064
PHILIPS 015016017021033036038039040041042067
PRIMESTAR 046049050063
PANASONIC 058059061062
PAYSAT 016
PROSCAN 065066
RCA 051052053065066
RADIOSHACK 064
REALISTIC 057
STS 020027
STARTRAK 026
SKY 031
SKYLIFE 005006007
SHACK 064
STARCHOICE 064
SONY 054060
TOSHIBA 015017028029030072
ULTIMATETV 060066
UNIDEN 016021037055056057
ZENITH 024031068
46 Continued...
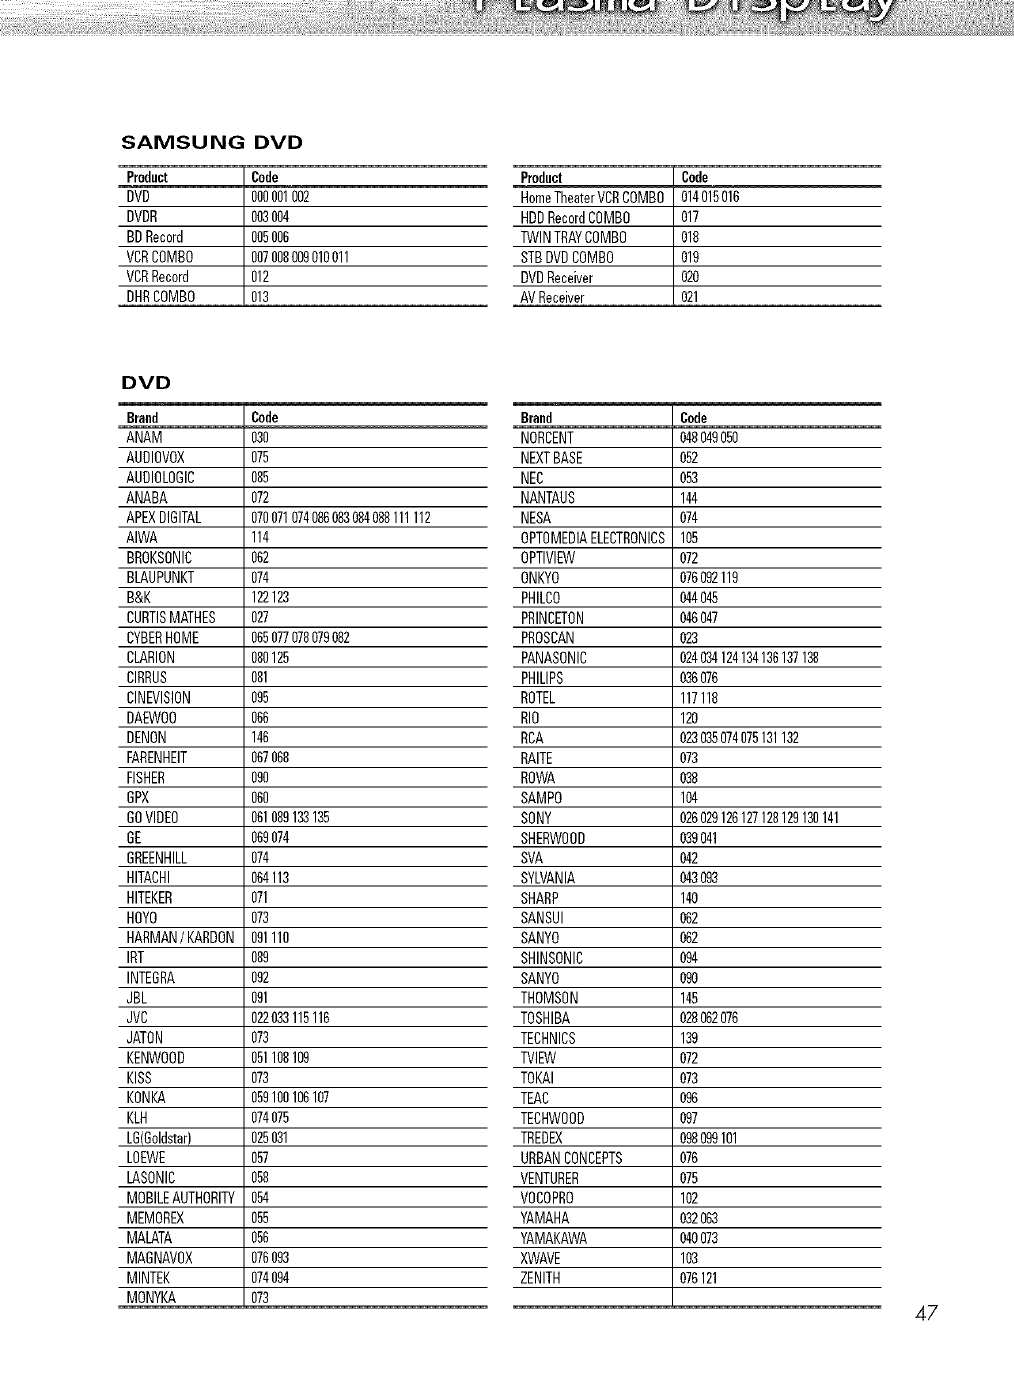
SAMSUNG DVD
Product Code
DVO 000001002
DVOR 003004
BDRecord 005006
VCRCOMBO 007008009010011
VCRRecord 012
DHRCOMBO 013
DVD
Brand Code
ANAM 030
AUDIOVOX 075
AUDIOLOGIC 085
ANABA 072
APEXDIGITAL 070071074086083084088111112
AIWA 114
BROKSONIC 062
BLAUPUNKT 074
B&K 122123
CURTISMATHES 027
CYBERHOME 065077078079082
CLARION 080125
CIRRUS 081
CINEVISION 095
DAEWO0 066
DEMON 146
FARENHEIT 067068
FISHER 090
GPX 060
GOVIDEO 061089133135
GE 069074
GREENHILL 074
HITACHI 064113
HITEKER 071
HOYO 073
HARMAN/KARDON091110
IBT 089
INTEGRA 092
JBL 091
JVC 022033115116
JATON 073
KENWOOO 051108109
KISS 073
KONKA 059100106107
KLH 074075
LG(Goldstar) 025031
LOEWE 057
LASONIC 058
MOBILEAUTHORITY054
MEMOREX 055
MALATA 056
MABNAV0X 076093
MINTEK 074094
MONYKA 073
Product i Code
HomeTheaterVCRCOMB0 014015016
HDDRecordCOMBO 017
TWINTRAYCOMBO 018
STBDVOCOMBO 019
DVOReceiver I 020
i
AVReceiver
Brand Code
NORCENT (_8049050
NEXTBASE 052
NEC 053
NANTAUS 144
MESA 074
OPTOMEDIAELECTRONICS105
OPTIVIEW 072
ONKYO 076092119
PHILCO _,4045
PRINCETON 046047
PROSCAN 023
PANASONIC 024034124134136137138
PHILIPS 036076
ROTEL 117118
RIO 120
RCA 023035074075131132
RAITE 073
ROWA 038
SAMPO 104
SONY 026029126127128129130141
SHERWOOD 039041
SVA (_2
SYLVANIA (_3093
SHARP 140
SANSUI 062
SANYO 062
SHINSONIC 094
SANYO 090
THOMSON 145
TOSHIBA 028062076
TECHNICS 139
TVlEW 072
TOKAI 073
TEAC 096
TECHW00D 097
TREOEX 098099101
URBANCONCEPTS 076
VENTURER 075
V0COPRO 102
YAMAHA 032063
YAMAKAWA 040073
XWAVE 103
ZENITH 076121
47
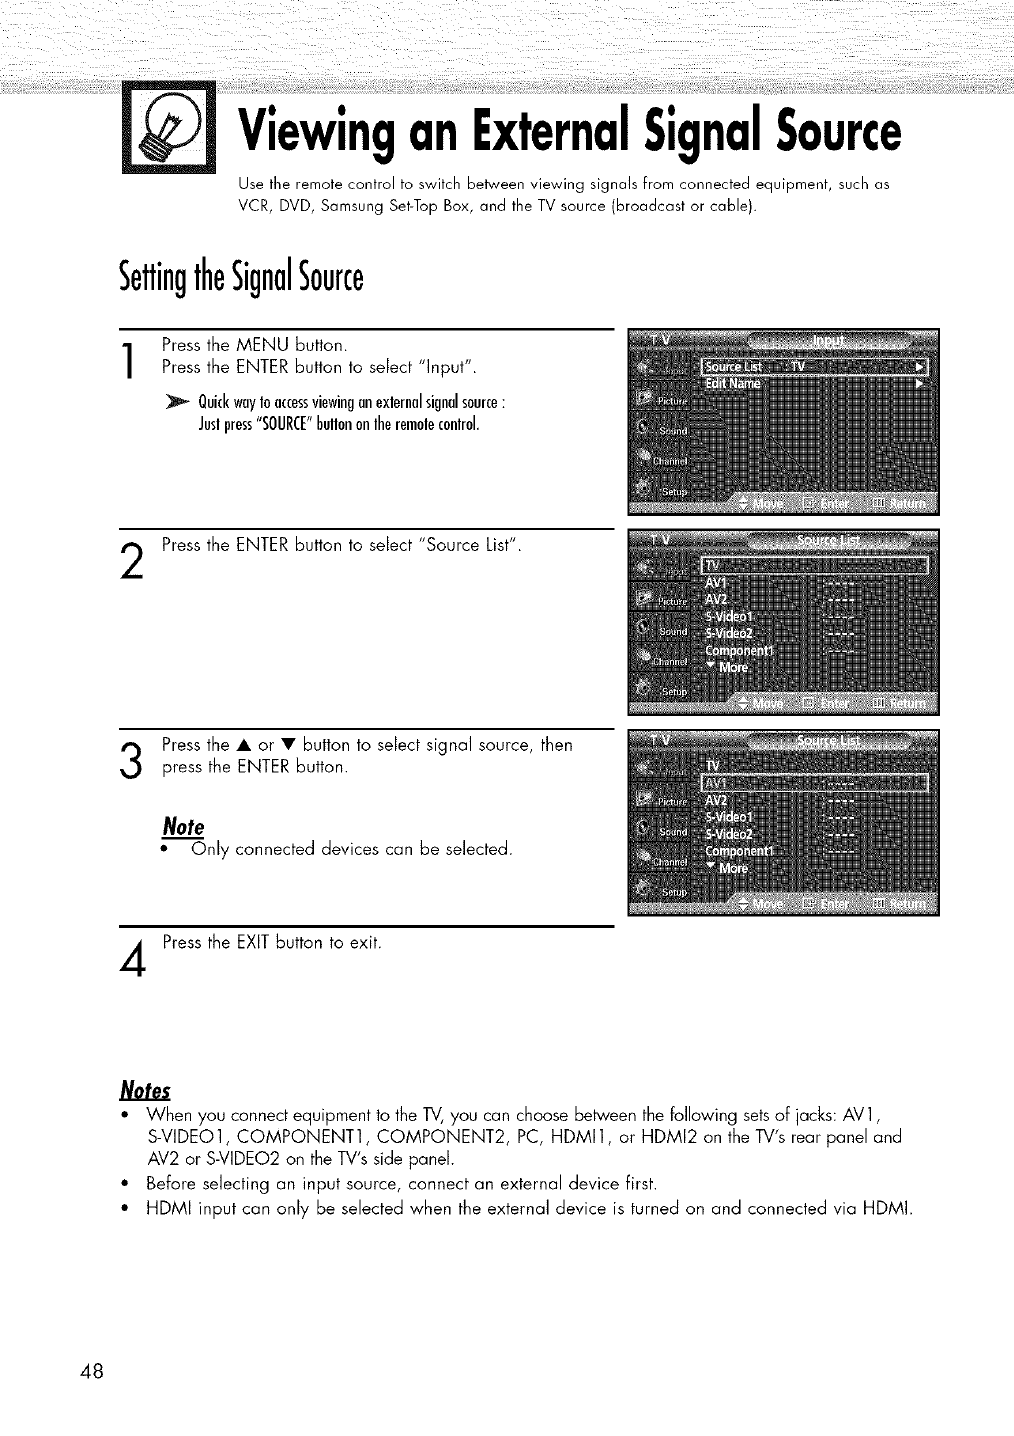
ViewinganExternalSignalSource
Use the remote control to switch between viewing signals from connected equipment, such as
VCR, DVD, Samsung Set-Top Box, and the TV source (broadcast or cable).
SettingtheSignalSource
1Press the MENU button.
Press the ENTER button to select "Input".
QuickwayIoaccessviewinganexlernalsignalsource:
Jeslpress"SOURCE"bellononlheremolecontrol.
Press the ENTER button to select "Source List".
Press the • or • button to select signal source, then
press the ENTER button.
Note
"Only connected devices can be selected.
Press the EXIT button to exit.
Notes
• When you connect equipment to the TV,you can choose between the following sets of jacks: AV1,
S-VIDEO1, COMPONENT1, COMPONENT2, PC, HDMI1, or HDMI2 on the TV's rear panel and
AV2 or S-VIDEO2 on the TV's side panel.
• Before selecting an input source, connect an external device first.
• HDMI input can only be selected when the external device is turned on and connected via HDMI.
48
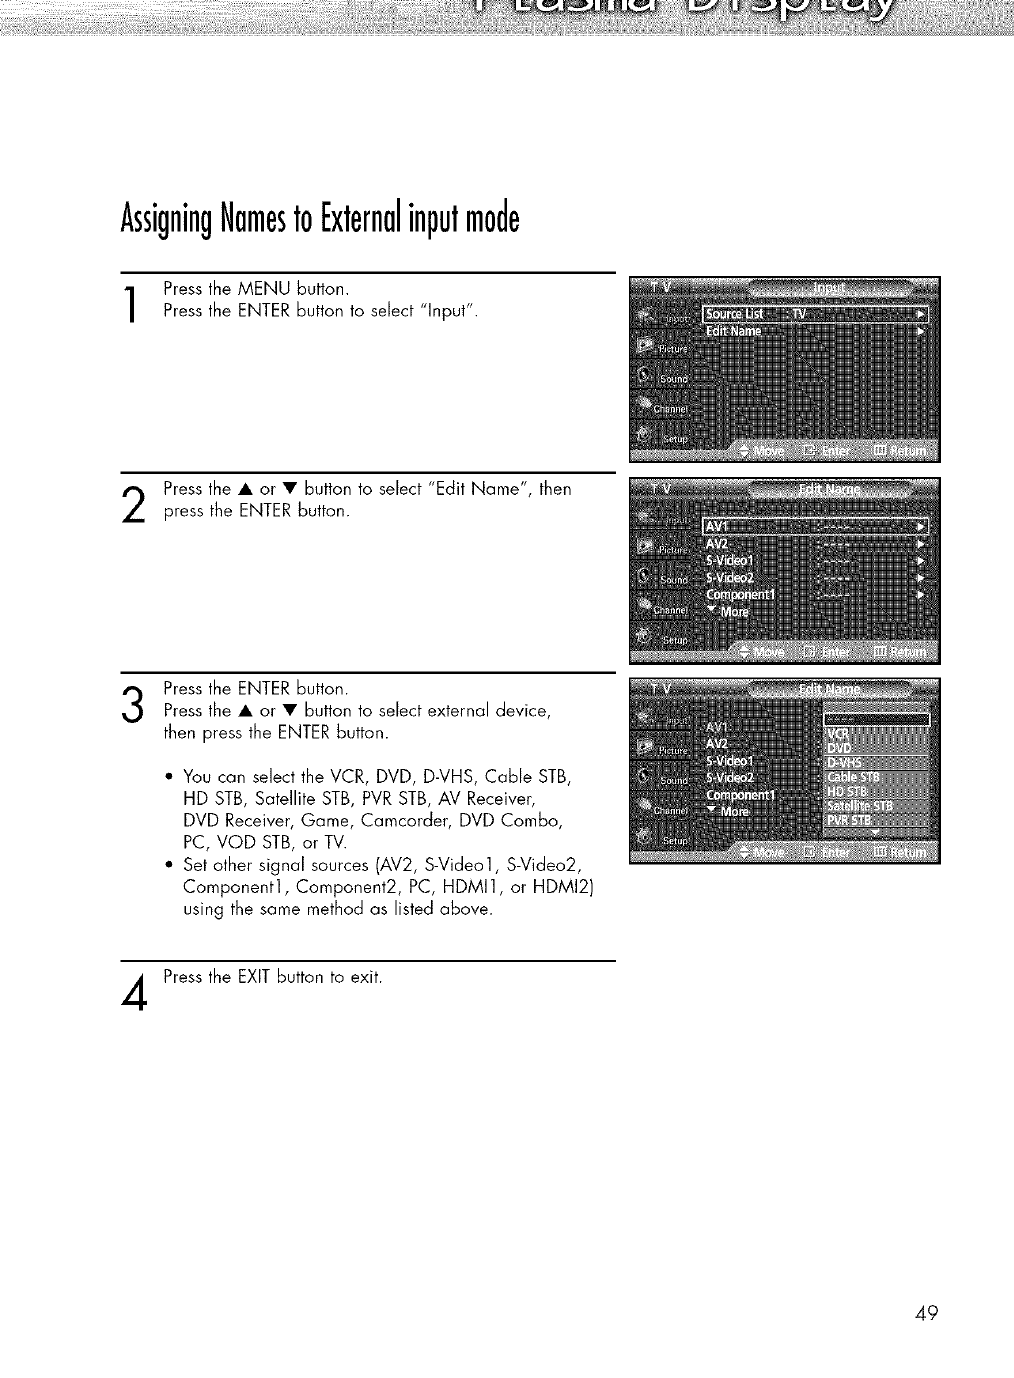
AssigningNamestoExternalinputmode
Press the MENU button.
Press the ENTER button to select "Input".
Press the • or • button to select "Edit Name", then
press the ENTER button.
Press the ENTER button.
Press the • or • button to select external device,
then press the ENTER button.
*You can select the VCR, DVD, D-VHS, Cable STB,
HD STB, Satellite STB, PVR STB, AV Receiver,
DVD Receiver, Game, Camcorder, DVD Combo,
PC, VOD STB, or TV.
• Set other signal sources (AV2, S-Video1, S-Video2,
Component1, Component2, PC, HDMI1, or HDMI2)
using the same method as listed above.
Press the EXIT button to exit.
49

PLASMA DISPLAY PANEL
PictureControl
Changing the Picture Standard ...................................................... 52
Customizing the Picture Settings .................................................... 53
DNle (Digital Natural Image engine) .............................................. 55
Changing the Screen Size ............................................................ 56
Viewing the Picture-in-Picture.......................................................... 58
Selecting the Sound Source .......................................................... 64

ChangingthePictureStandard
You can select the type of picture which best corresponds to your viewing requirements.
Press the MENU button. Press the • or • button to select
"Picture", then press the ENTER button.
QuickwayIoaccesslhepiclureselling:Juslpress"P.MODE"bellon
onlheremolecontrol.
Press the ENTER button again to select "Mode".
3Press the ENTER button.
Press the • or • button to select the desired picture
mode (Dynamic, Standard, Movie, Custom), then press
the ENTER button.
Press the EXIT button to exit.
• Choose Dynamic for viewing the TV during the day or when
there is bright light in the room.
• Choose Standard for the standard factory settings.
• Choose Movie when viewing the movie.
• Choose Custom if you want to adjust the settings according to
personal preference (see "Customizing the Picture Settings",
page 53).
PIP INFO SLEEP
() ()
A TOPRO_ ADD_EL CAPTION CH
OS_T ORSEr
SnMSUN8
52
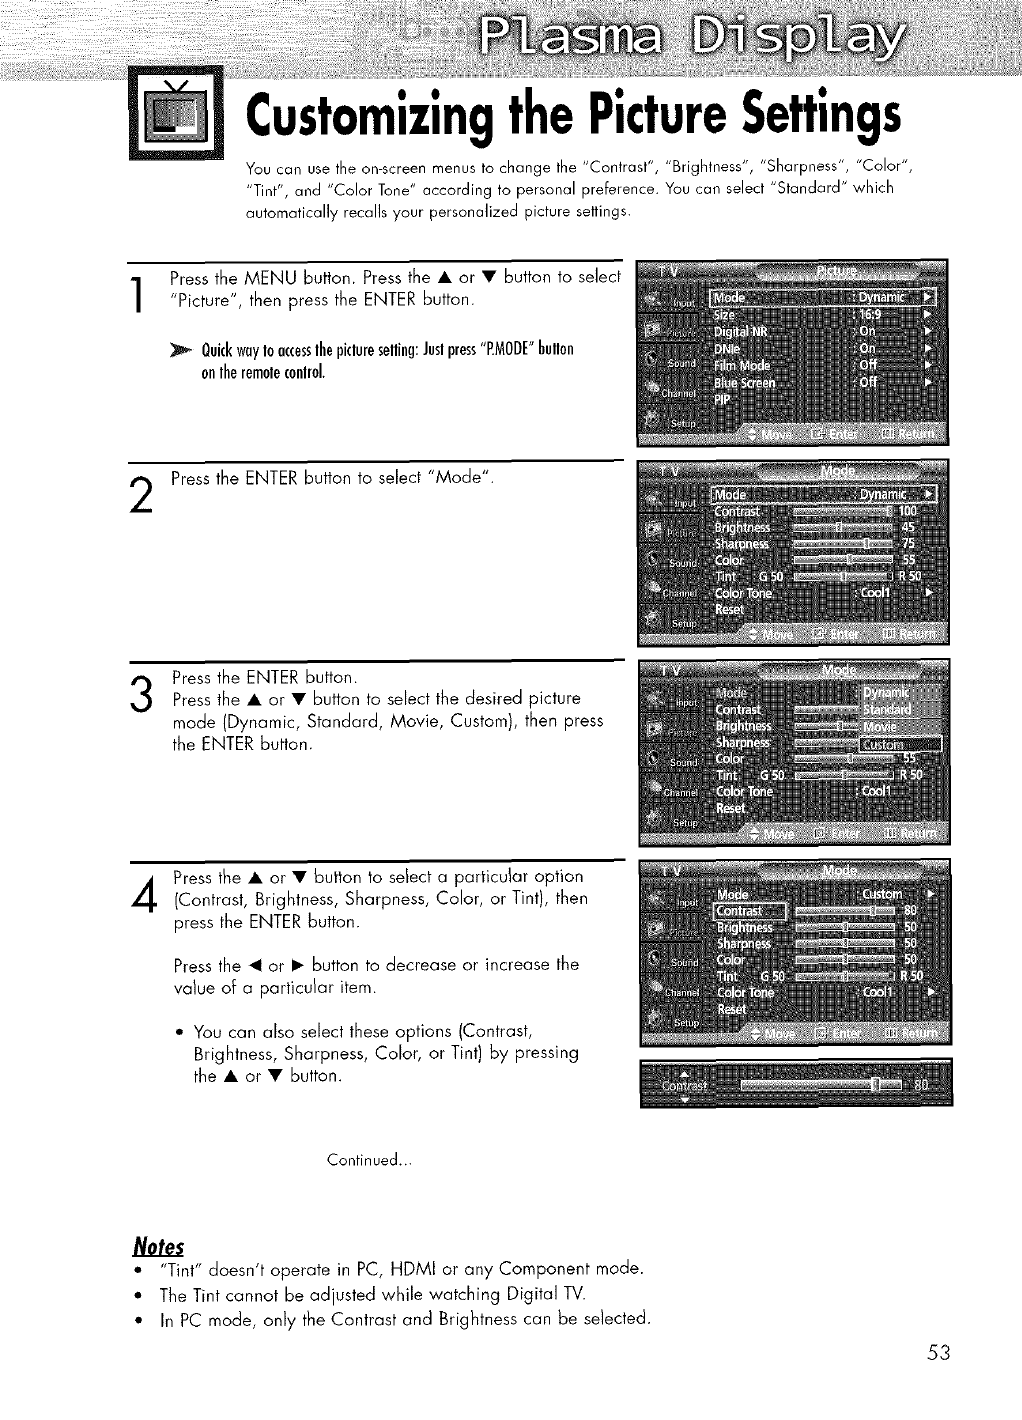
CustomizingthePictureSettings
You can use the on-screen menus to change the "Contrast", "Brightness", "Sharpness", "Color",
"Tint", and "Color Tone" according to personal preference. You can select '_Standard" which
automatically recalls your personalized picture settings.
Press the MENU button. Press the • or • button to select
"Picture", then press the ENTER button.
QuickwayIo accesslhepiclureselling:Juslpress"P.MODE"bullon
onlherernoleconlrol.
Press the ENTER button to select "Mode".
3Press the ENTER button.
Press the • or • button to select the desired picture
mode (Dynamic, Standard, Movie, Custom), then press
the ENTER button.
Press the • or • button to select a particular option
(Contrast, Brightness, Sharpness, Color, or Tint), then
press the ENTER button.
Press the _1or • button to decrease or increase the
value of a particular item.
• You can also select these options (Contrast,
Brightness, Sharpness, Color, or Tint) by pressing
the • or • button.
Continued...
Notes
•"Tint" doesn't operate in PC, HDMI or any Component mode.
• The Tint cannot be adjusted while watching Digital TV.
• In PC mode, only the Contrast and Brightness can be selected.
53

Press the ENTER button to return to "Mode".
Press the • or • button to select "Color Tone", then
press the ENTER button.
Press the • or • button to select a particular option
(Cool2, Coo11, Normal, Warm1, or Warm2), then press
the ENTER button.
ResettingthePictureSettingstotheFactoryDefaults
To return the factory defaults, select "Reset" by pressing
the • or • button.
Press the ENTER button.
• The previously adjusted settings will be reset to the
factory defaults.
Press the EXIT button to exit.
54

DNle(DigitalNaturalImageengine)
This TV includes the DNle function so as to provide a high visual quality.
If you set DNle to On, you can view the applied DNle and normal pictures on the screen,
for demonstration purposes. Using this function, you can view the difference in the visual quality.
Press the MENU button. Press the • or • button to select
"Picture", then press the ENTER button.
Press the • or • button to select "DNle", then press
the ENTER button.
Press the • or • button to select "Off", "Demo" or
"On", then press the ENTER button.
4
• Off : Switches off the DNle mode.
• Demo : The screen before applying DNle appears
on the left and the screen after applying
DNle appears on the right.
• On : Switches on the DNle mode.
Press the EXIT button to exit.
•DNId M (Digital Natural Image engine)
This feature brings you a more detailed image with 3D noise reduction and detail,
contrast and white enhancement.
• The DNle function is not supported in the Movie mode. (It is inactivated.)
55
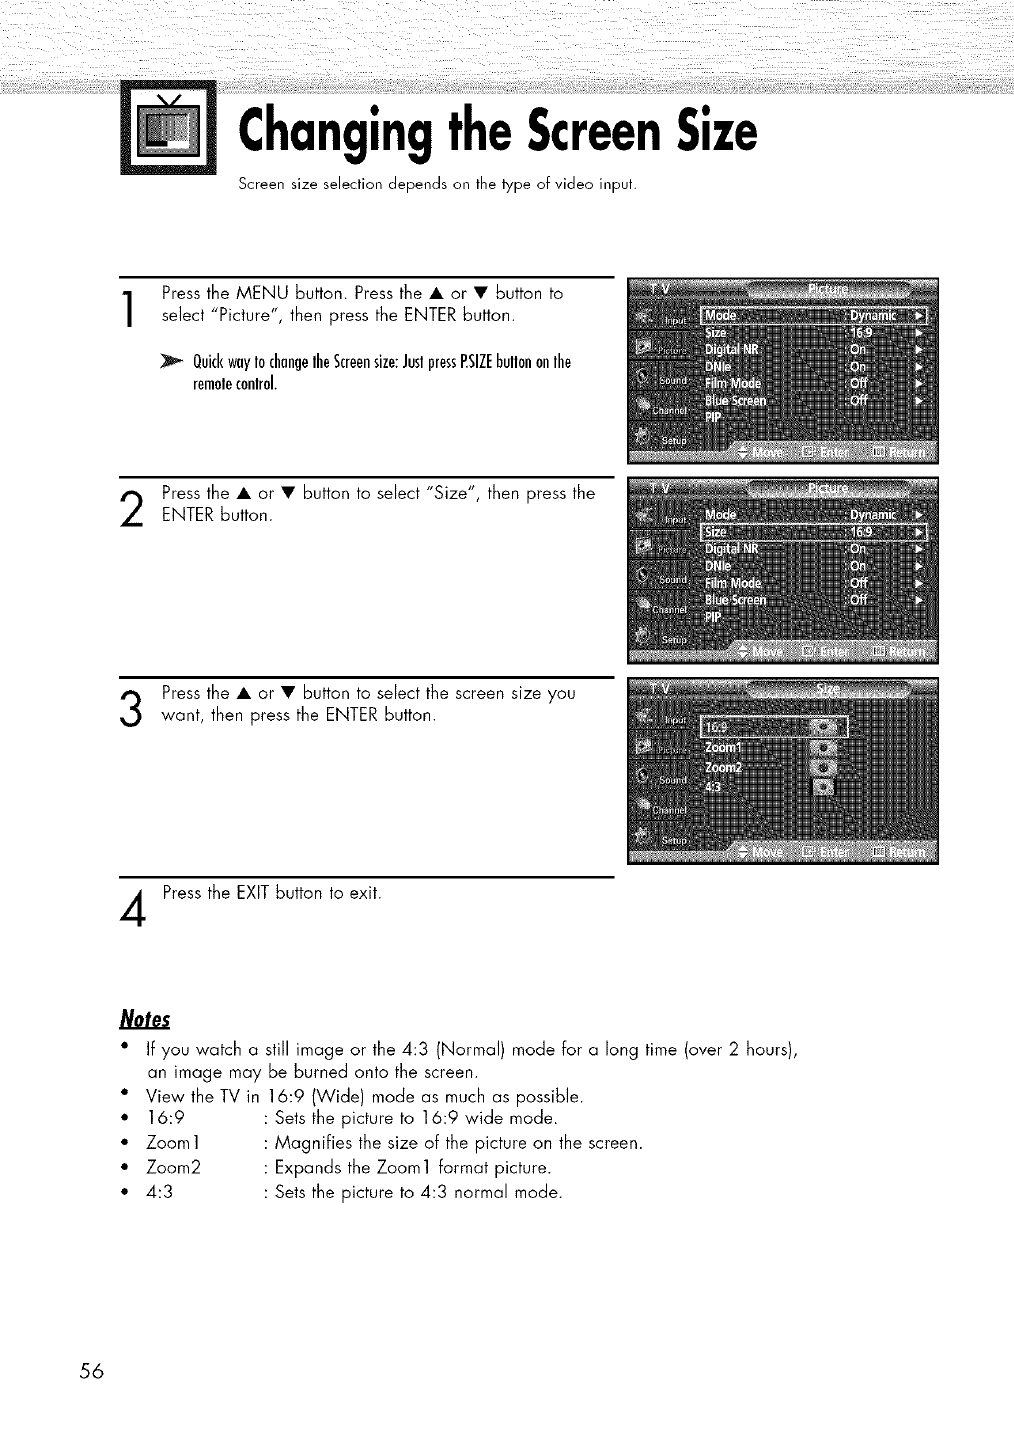
ChangingtheScreenSize
Screen size selection depends on the type of video input.
Press the MENU button. Press the • or • button to
select "P'cture ', then press the ENTER button.
QuickwayIochangelheScreensize:JustpressRSIZEbultononlhe
remolecontrol
Press the • or • button to select "Size", then press the
ENTER button.
Press the • or • button to select the screen size you
want, then press the ENTER button.
Press the EXIT button to exit.
*If you watch a still image or the 4:3 (Normal) mode for a long time (over 2 hours),
an image may be burned onto the screen.
• View the TV in 16:9 (Wide) mode as much as possible.
• 16:9 Sets the picture to 16:9 wide mode.
• Zoom1 Magnifies the size of the picture on the screen.
• Zoom2 Expands the Zoom1 format picture.
• 4:3 Sets the picture to 4:3 normal mode.
56

When you press the P.SIZE button on the remote control, the TV's screen mode should appear in
sequence. The screen displays in this order: 16:9, Zoom1, Zoom2, 4:3.
Note
• If you watch a still image or the 4:3 mode for a long time (over 2 hours), an image may be burned
onto the screen. View the TV in 16:9 mode as much as possible.
16:9
Setsthe pictureto 16:9 wide mode.
Zoom2
The screen size when the Zoom1 screen is
vertically enlarged.
o CI:::>o
Zooml
The screen size when Wide screen is
vertically enlarged.
4:3
Setsthe picture to 4:3 normal mode.
Notes
• In TV, VIDEO, S-VIDEO, and COMPONENT(480i, 480p) modes, all screen modes can be selected.
(16:9 -, Zoom1 -"* Zoom2 -, 4:3).
• In TV(DTV), COMPONENT(720p, 1080i), PC, HDMI modes, only 16:9 & 4:3 modes can be selected.
• In Zoom1 and Zoom2 modes, you can move the picture on screen by pressing the • or • button.
57
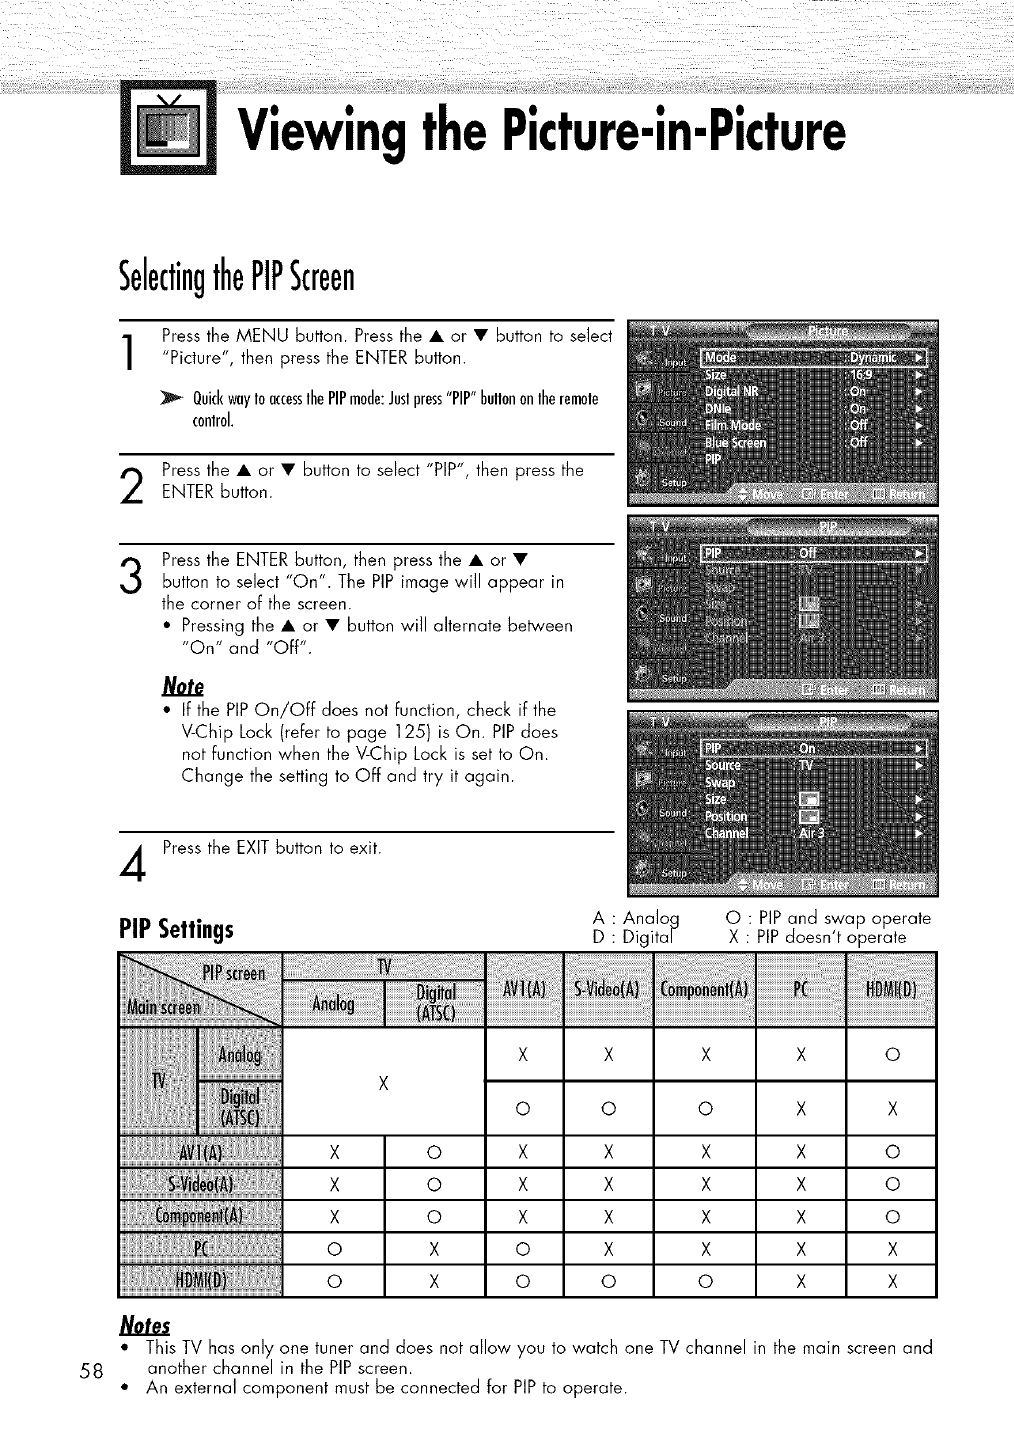
ViewingthePicture-in-Picture
SelectingthePIPScreen
Press the MENU button. Press the • or • button to select
"P'cture ', then press the ENTER button•
QuickwayIoaccesslhoPIPmode:Jeslpress"PIP"bellononlhoremolo
control.
Press the • or • button to select "PIP", then press the
ENTER button•
3Press the ENTER button, then press the • or •
button to select "On". The PIPimage will appear in
the corner of the screen•
• Pressing the • or • button will alternate betv,,'een
"On" and "Off".
Note
• If the PIPOn/Off does not function, check if the
V-Chip Lock (refer to page 125) is On. PIPdoes
not function when the V-Chip Lock is set to On.
Change the setting to Off and try it again.
Press the EXIT button to exit.
PIPSettings A ! Analo_
• Digital O: PiP and swap operate
X PIPdoesn't operate
58
Xo o o x x
x o x x x x o
x o x x x x o
x o x x x x o
o x o x x x x
o x o o o x x
•This TV has only one tuner and does not allow you to watch one TV channel in the main screen and
another channel in the PiP screen.
•An external component must be connected for PiP to operate.
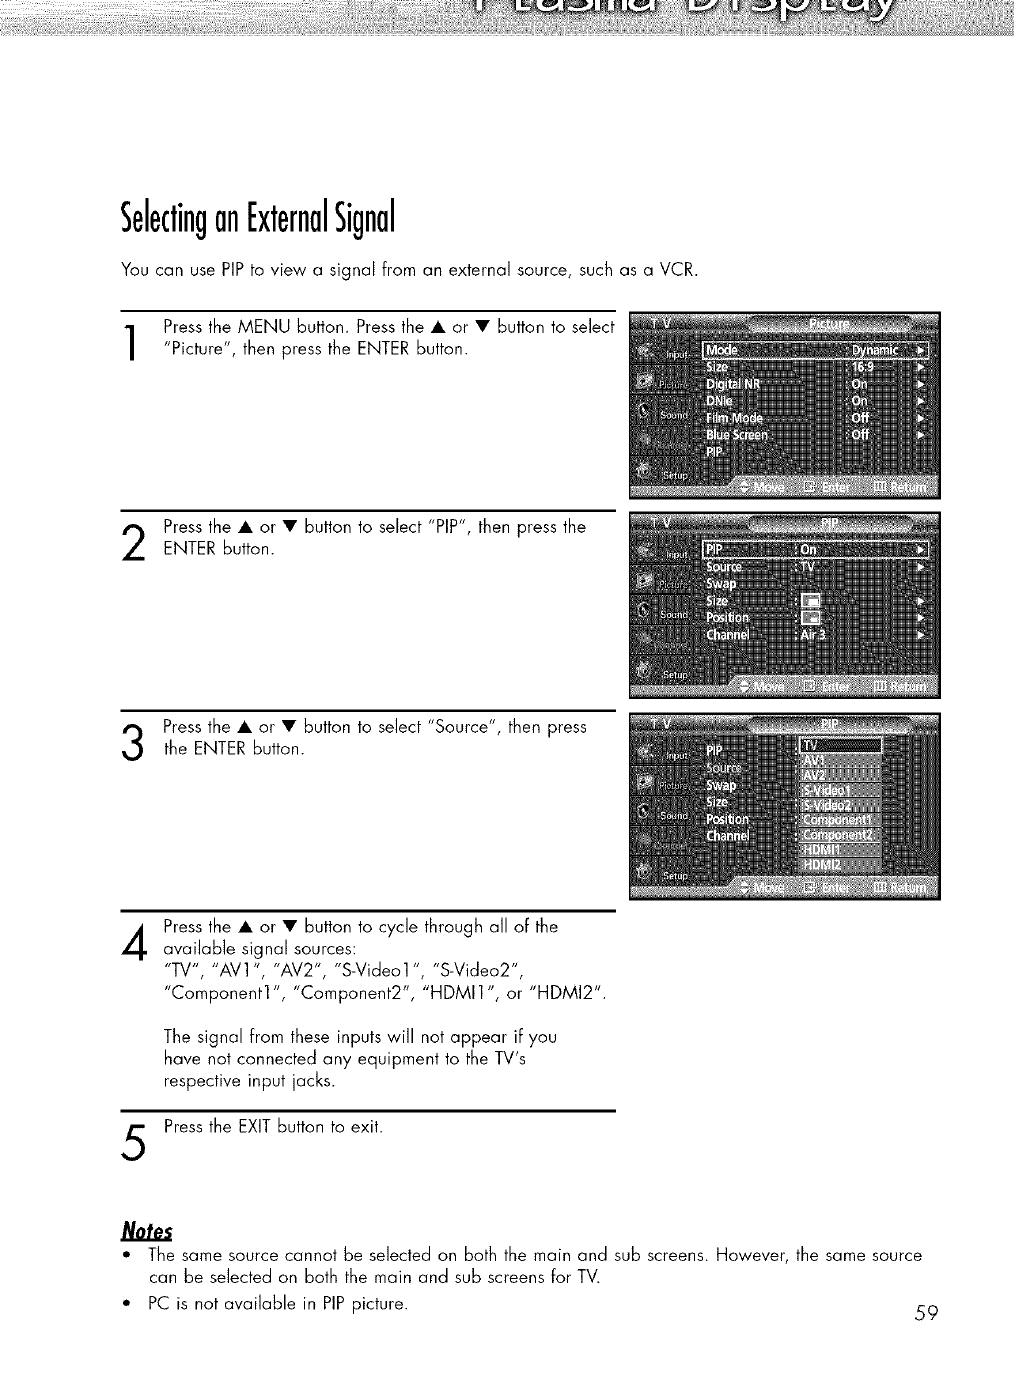
SelectinganExternalSignal
You can use PIP to view a signal from an external source, such as a VCR.
Press the MENU button. Press the • or • button to select
"Picture", then press the ENTER button.
Press the • or • button to select "PIP", then press the
ENTER button.
Press the • or • button to select "Source", then press
the ENTER button.
4
5
Press the • or • button to cycle through all of the
available signal sources:
"TV", "AV 1", "AV2", "S-Video 1", "S-Video2",
"Component1 ", "Component2", "HDMI1 ", or "HDMI2".
The signal from these inputs will not appear if you
have not connected any equipment to the TV's
respective input jacks.
Press the EXIT button to exit.
• The same source cannot be selected on both the main and sub screens. However, the same source
can be selected on both the main and sub screens for TV.
• PC is not available in PIP picture. 59
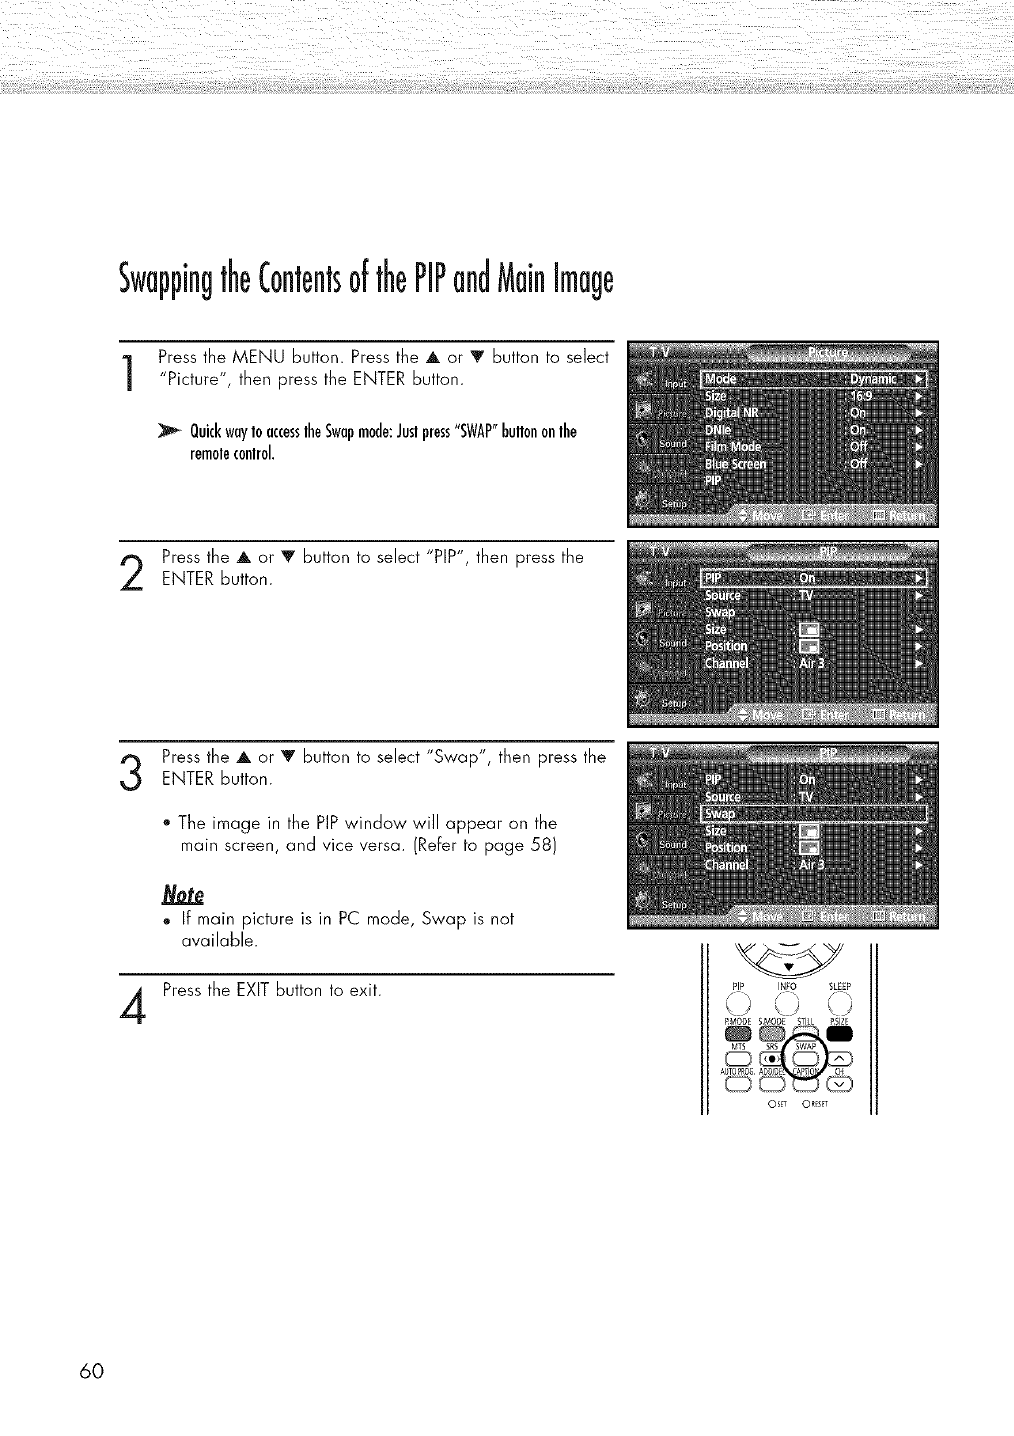
SwappingtheContentsofthePIPandMainImage
Press the MENU Button. Press the A or V Button to select
"Picture", then press the ENTER Button.
QuickwayIo accesslheSwapmode:Juslpress"SWAP"bultononlhe
remolecontrol.
Press the A or V Button to select "PIP", then press the
ENTER Button.
Press the A or V Button to select "Swap", then press the
ENTER button.
4
• The image in the PIP window will appear on the
main screen, and vice versa. (Refer to page 58)
,, If main picture is in PC mode, Swap is not
available.
Press the EXIT Button to exit. PIP INFO SLEEP
PMODE SM0£3[ STILL PSIZE
OS! _ ORESET
60
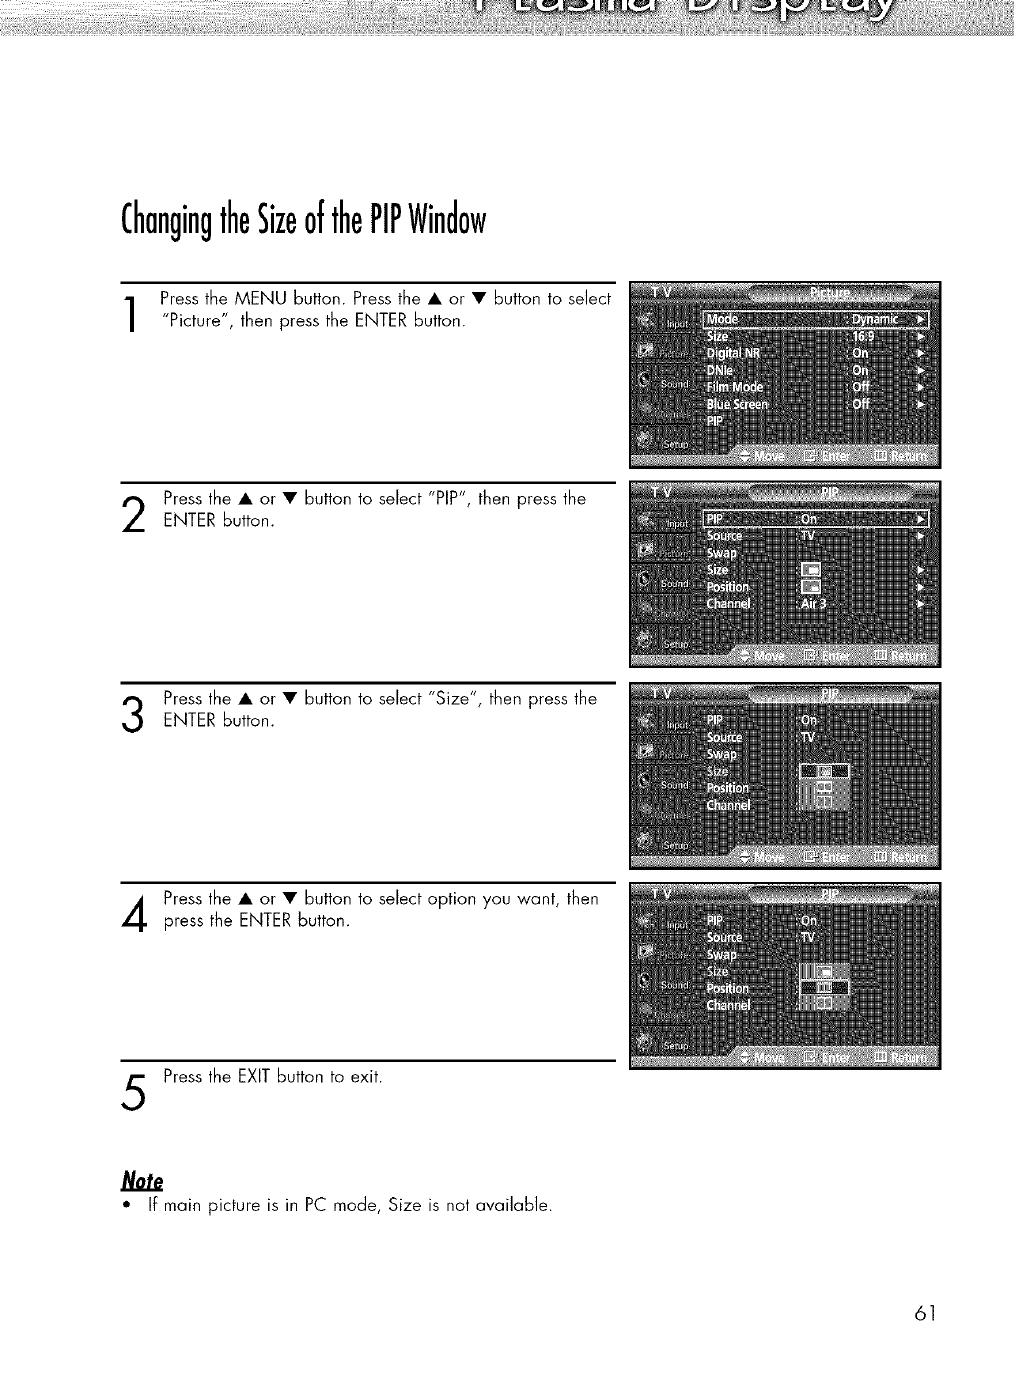
ChangingtheSizeofthePIPWindow
Press the MENU button. Press the • or • button to select
"Picture", then press the ENTER button.
Press the • or • button to select "PIP", then press the
ENTER Button.
Press the • or • button to select "S'ze', then press theENTER Button.
Press the • or • button to select option you want, then
press the ENTER button.
Press the EXIT button to exit.
• If main picture is in PC mode, Size is not available.
61
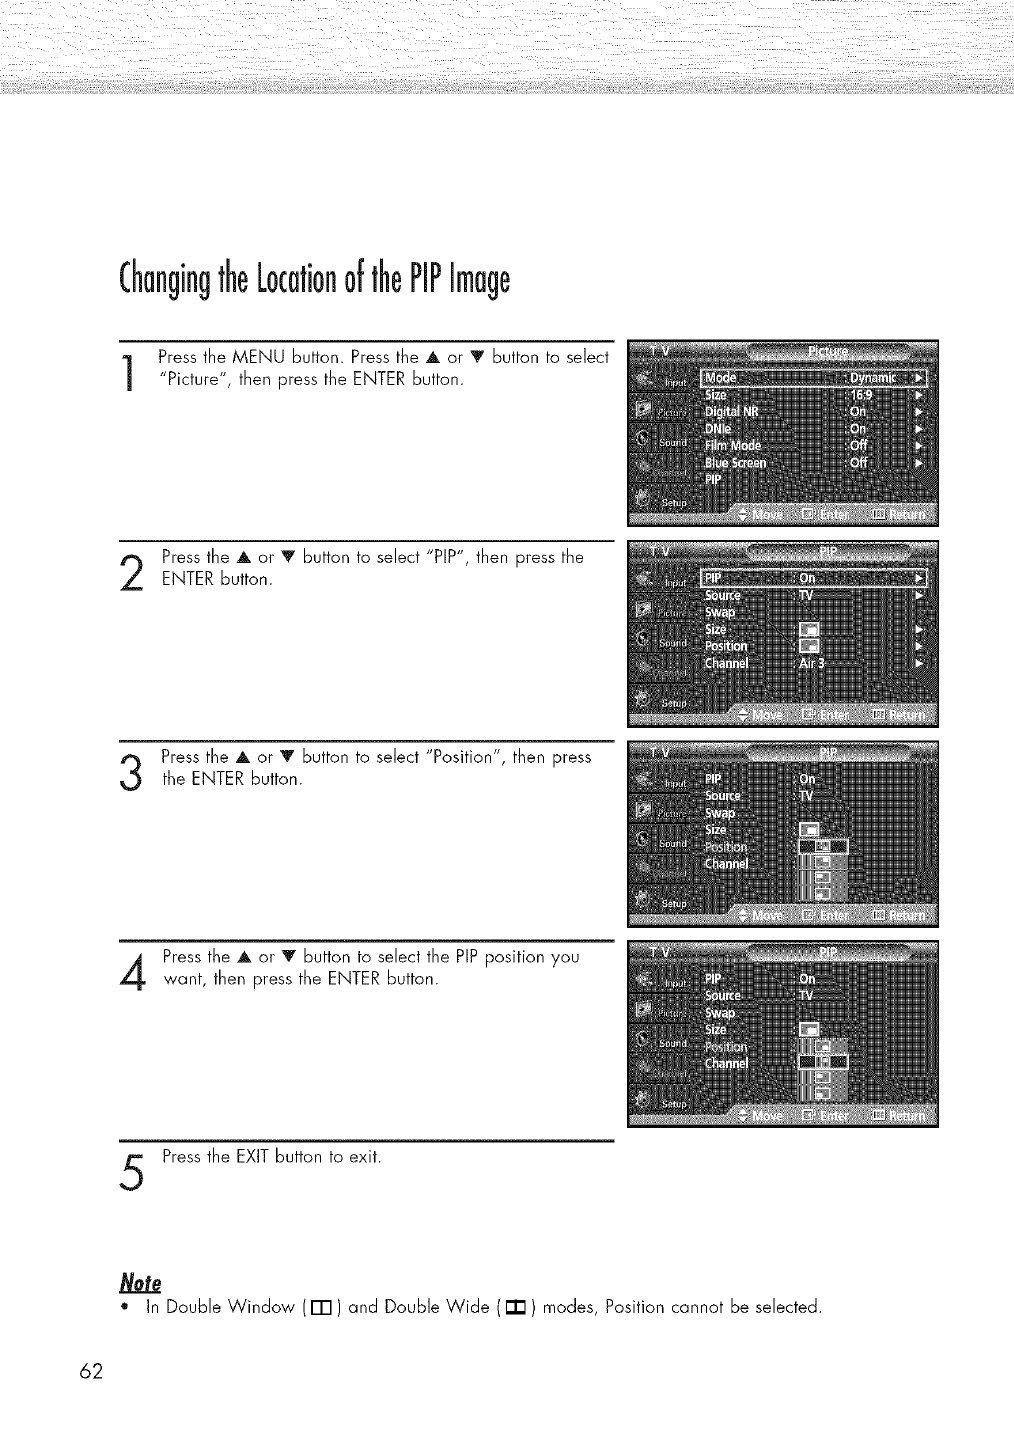
ChangingtheLocationofthePIPImage
Press the MENU button. Press the A or V button to select
"Picture", then press the ENTER button.
Press the A or V button to select "PIP", then press the
ENTER button.
Press the A or V Button to select "Pos't'on', then pressthe ENTER button.
Press the A or V button to select the PIPposition you
want, then press the ENTER Button.
Press the EXITbutton to exit.
*In Double Window (ITI) and Double Wide ( [] ) modes, Position cannot be selected.
62

ChangingthePIPChannel
Press the MENU button. Press the • or • button to select
"Picture", then press the ENTER button.
QuickwayIochangelhe PIPchannel:JustpresslhePIP"(H (_)" or
"CH¢v ) "bultonallheboltomoflheremolecontrol.
Press the • or • button to select "PIP", then press theENTER button.
Press the • or • button to select "Channel', then pressthe ENTER button.
Press the • or • button to change the channel that
appears in the PIPwindow.
Press the EXIT button to exit.
63
SelectingtheSoundSource
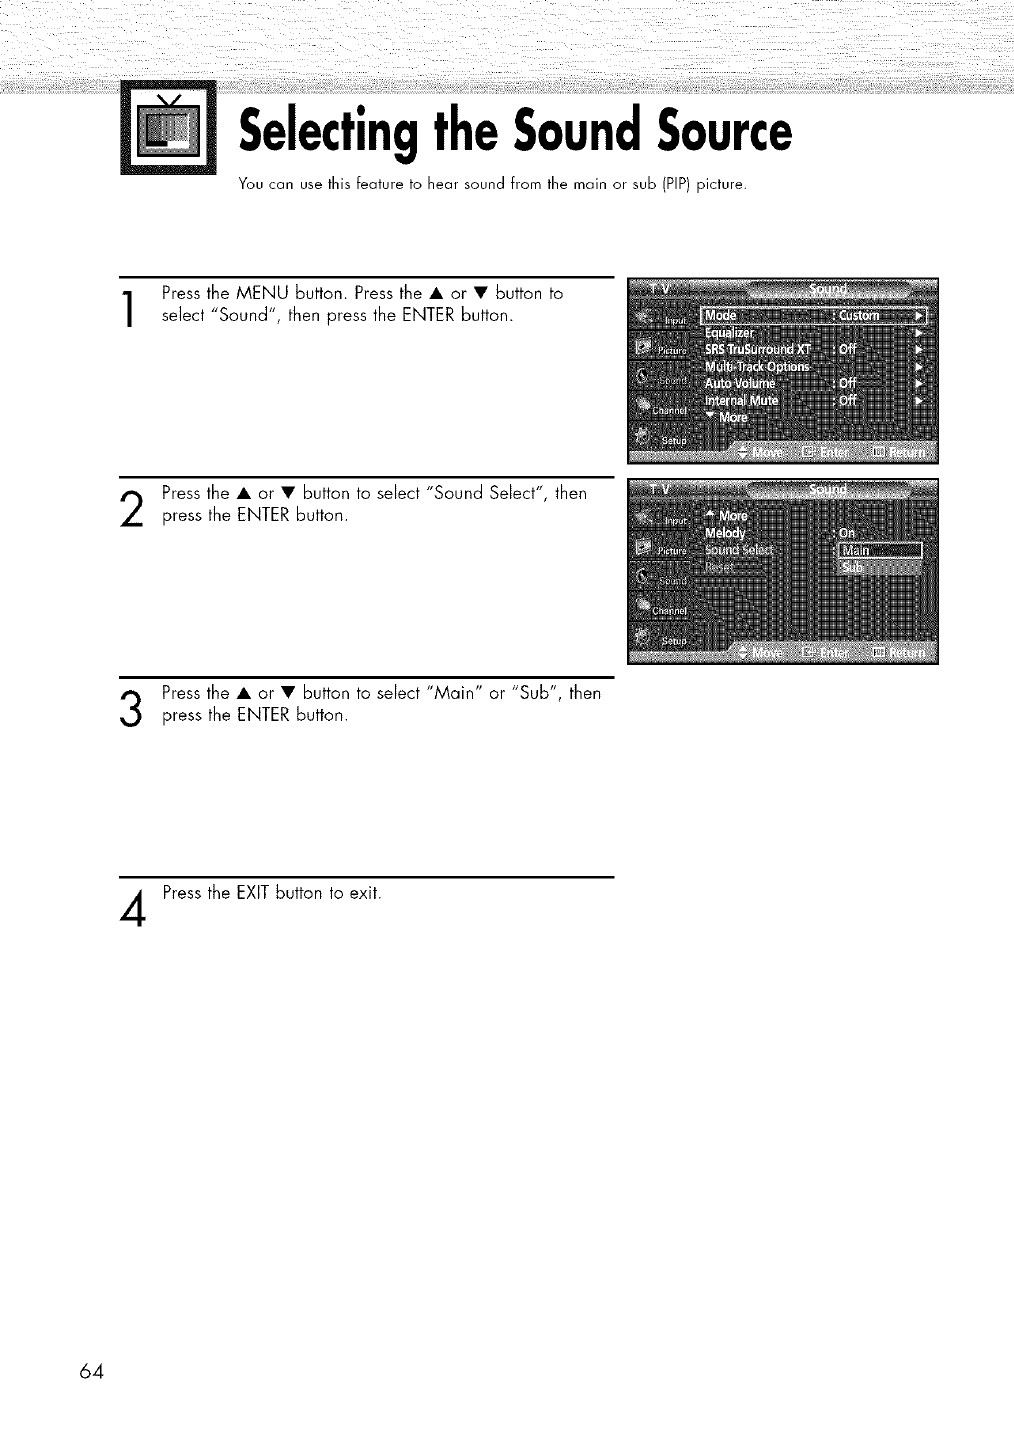
You can use this feature to hear sound from the main or sub (PIP) picture.
Press the MENU button. Press the • or • button to
select "Sound", then press the ENTER button.
Press the • or • button to select "Sound Select", then
press the ENTER button.
Press the • or • button to select "Main" or "Sub", then
press the ENTER button.
Press the EXIT button to exit.
64
PLASMA DISPLAY PANEL
SoundControl
Customizing the Sound ................................................................ 66
Using Automatic Sound Settings .................................................... 67
Setting the TruSurround XT ............................................................ 68
Choosing a Multi-Channel Sound (MTS) track- Digital ...................... 69
Choosing a Multi-Channel Sound (MTS) track- Analog .................... 70
Using the Auto Volume .................................................................. 7]
Setting the On/OFF Melody .......................................................... 72
Selecting the Internal Mute ............................................................ 73
Sound Reset ................................................................................ 74
CustomizingtheSound
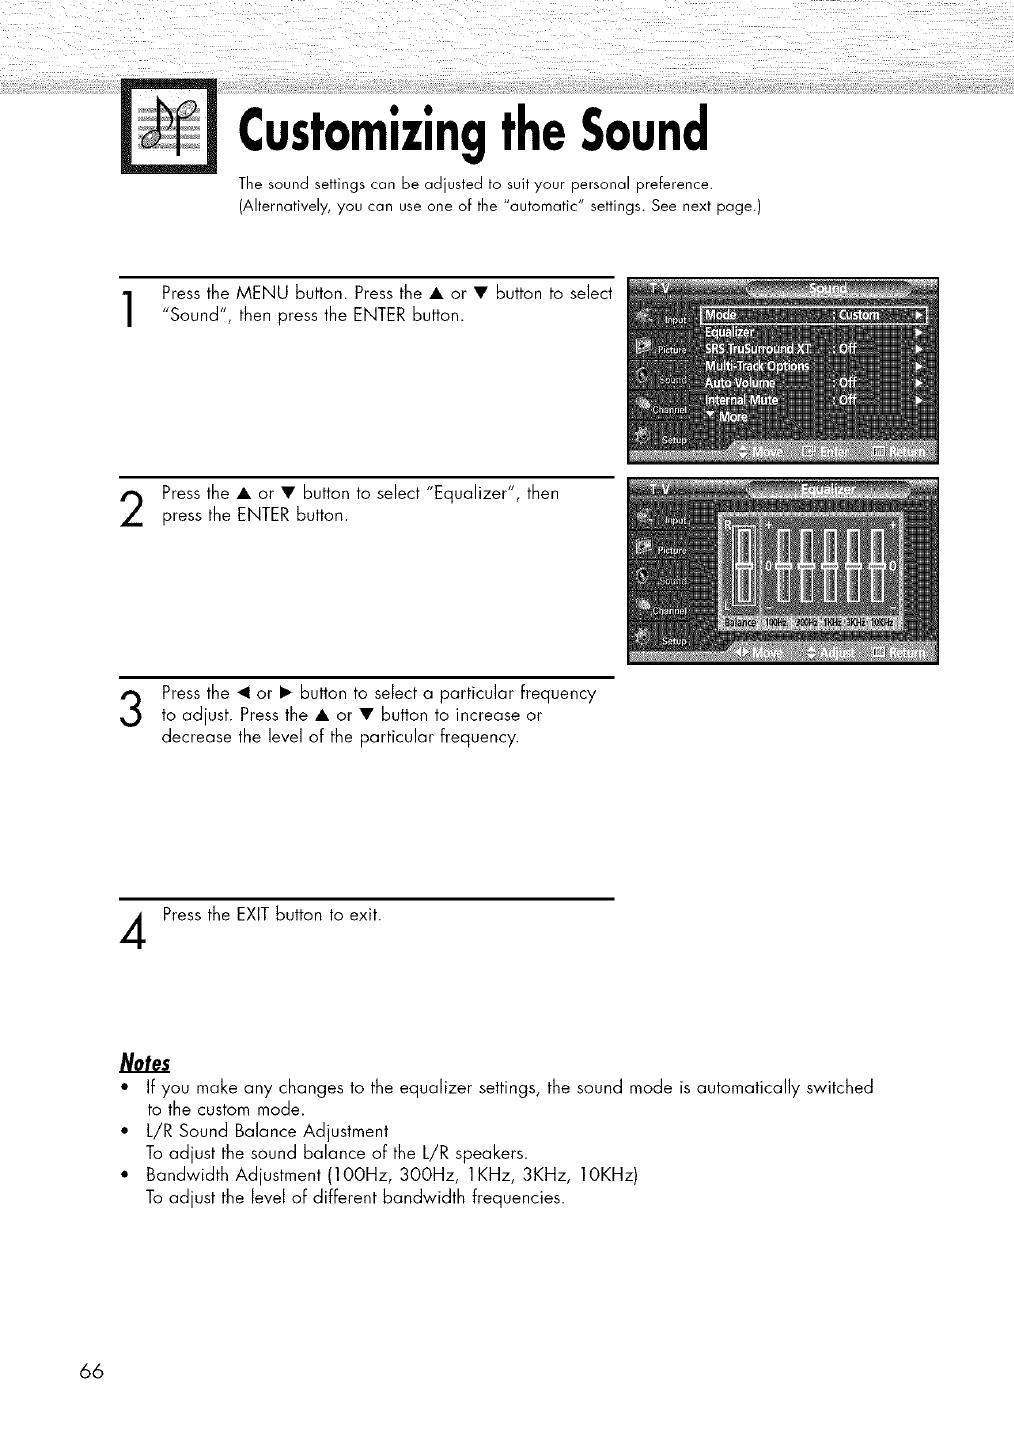
The sound settings can be adjusted to suit your personal preference.
(Alternatively, you can use one of the "automatic" settings. See next page.)
Press the MENU button. Press the • or • button to select
"Sound", then press the ENTER button.
Press the • or • button to select "Equalizer", then
press the ENTER button.
Press the _1 or • button to select a particular frequency
to adjust. Press the • or • button to increase or
decrease the ]eve] of the particular frequency.
Press the EXIT button to exit.
Notes
• If you make any changes to the equalizer settings, the sound mode is automatically switched
to the custom mode.
• L/R Sound Balance Adjustment
To adjust the sound balance of the L/R speakers.
• Bandwidth Adjustment (lOOHz, 300Hz, 1KHz, 3KHz, IOKHz)
To adjust the level of different bandwidth frequencies.
66
UsingAutomaticSoundSettings
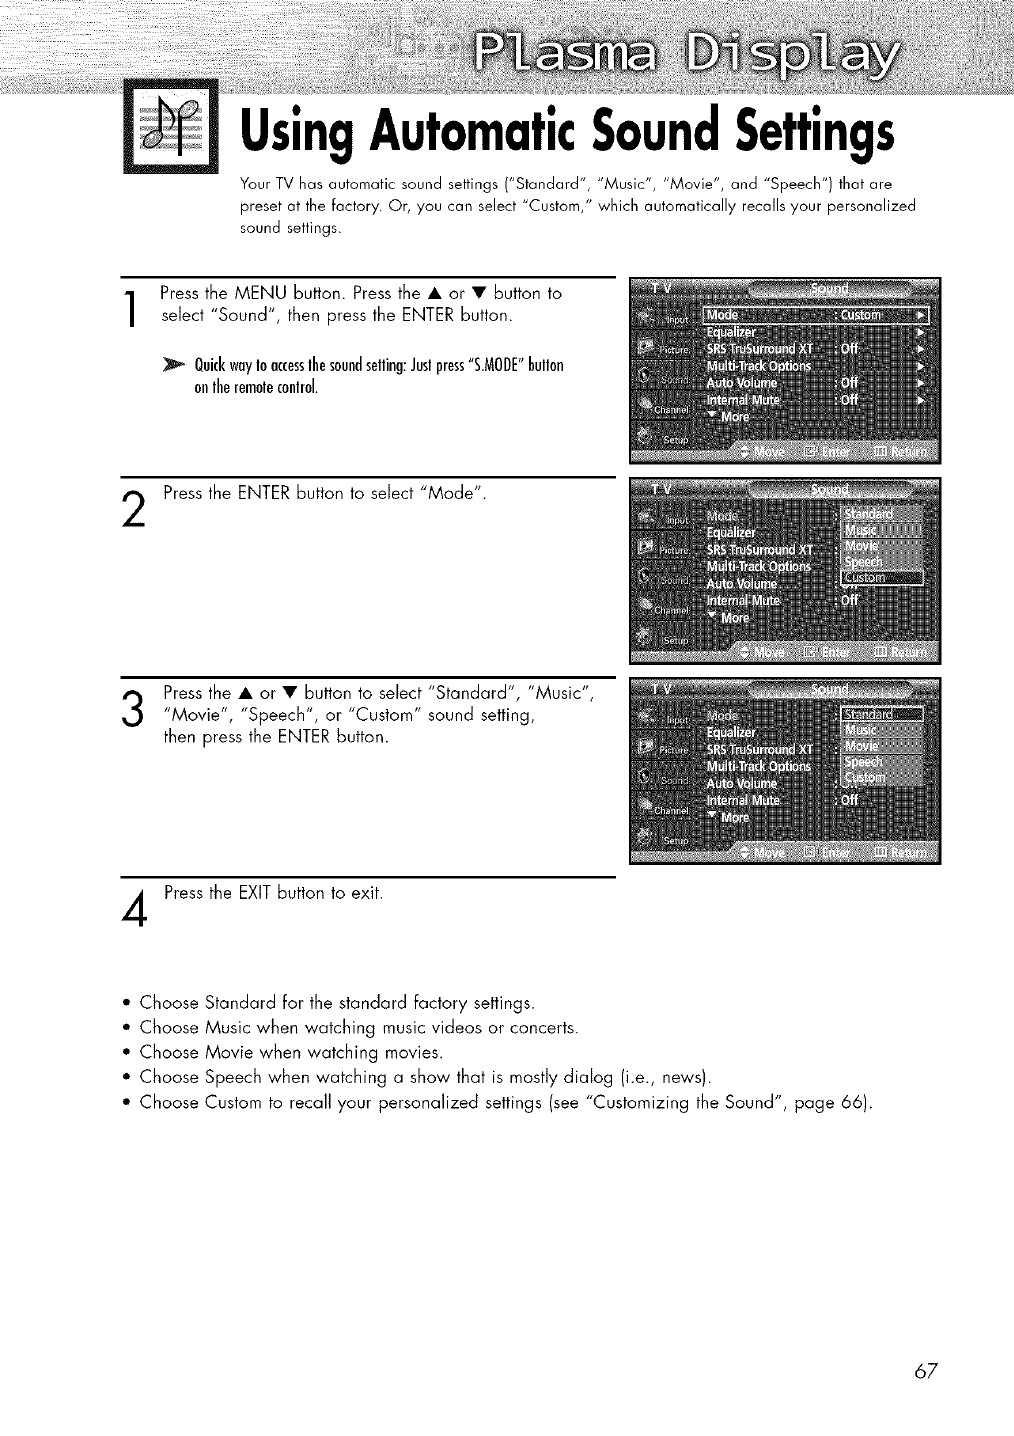
Your TV has automatic sound settings ("Standard", "Music", "Movie", and "Speech") that are
preset at the factory. Or, you can select "Custom," which automatically recalls your personalized
sound settings.
Press the MENU button. Press the • or • button to
select "Sound", then press the ENTER button.
QuickwayIoaccesslhesoundselling:Juslpress"S,MODE"bullon
onlheremoleconlrol.
Press the ENTER button to select "Mode".
Press the • or • button to select "Standard", "Music",
"Mov'e ', "Speech", or "Custom" sound setting,
then press the ENTER button.
Press the EXIT button to exit.
• Choose Standard for the standard factory settings.
• Choose Music when watching music videos or concerts.
• Choose Movie when watching movies.
• Choose Speech when watching a show that is mostly dialog (i.e., news).
• Choose Custom to recall your personalized settings (see "Customizing the Sound", page 66).
67
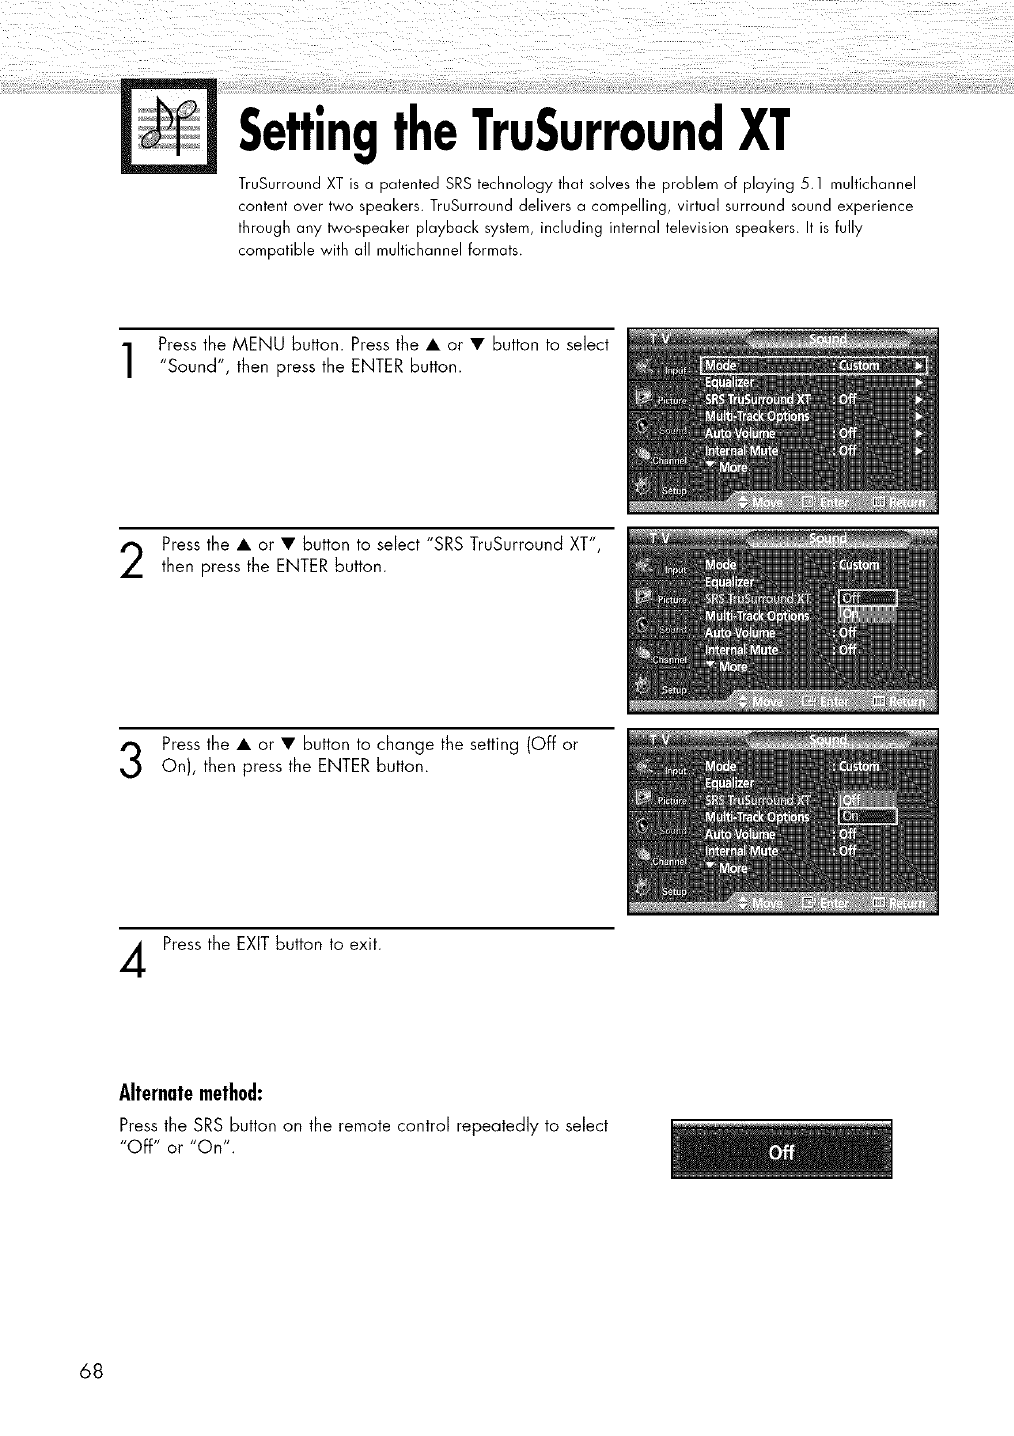
SettingtheTruSurroundXT
TruSurround XT is a patented SRS technology that solves the problem of playing 5.1 multichannel
content over two speakers. TruSurround delivers a compelling, virtual surround sound experience
through any _o-speaker playback system, including internal television speakers. It is fully
compatible with all multichannel formats.
Press the MENU button. Press the • or • button to select
"Sound", then press the ENTER button.
Press the • or • button to select "SRS TruSurround XT",
then press the ENTER button.
Press the • or • button to change the setting (Off or
On), then press the ENTER button.
Press the EXIT button to exit.
Alternatemethod:
Press the SRS button on the remote control repeatedly to select
"Off" or "On".
68
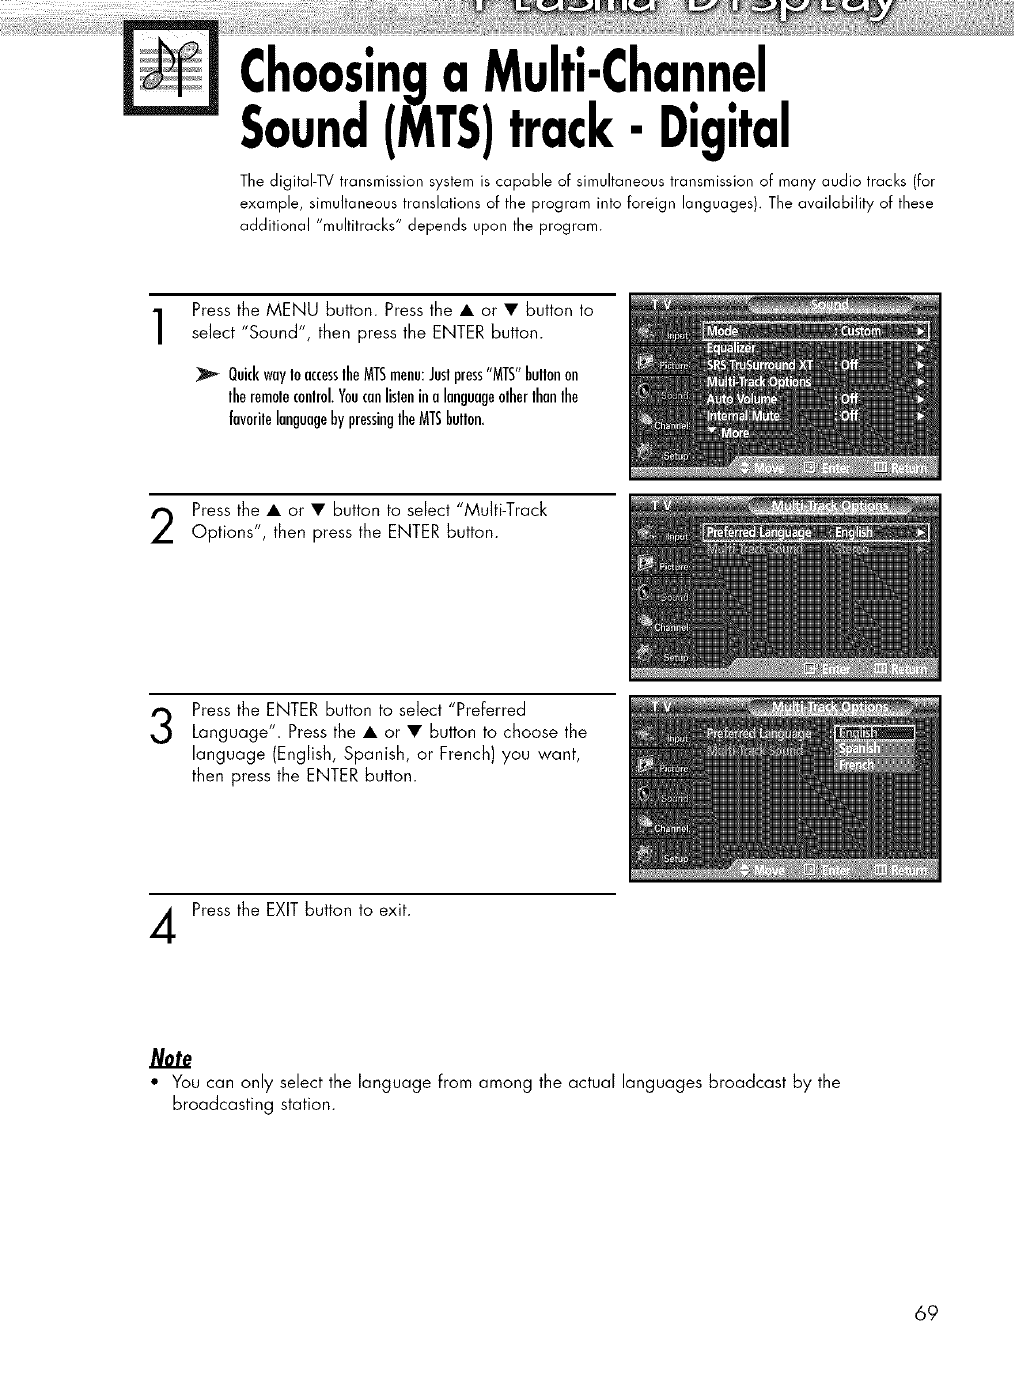
Choosinga Multi-Channel.
Sound(MTS)track-Digital
The digitaI-TV transmission system is capable of simultaneous transmission of many audio tracks (for
example, simultaneous translations of the program into foreign languages). The availability of these
additional "multitracks" depends upon the program.
Press the MENU button. Press the • or • button to
select "Sound", then press the ENTER button.
QuickwayIoaccesslheMTSmenu:Justpress"MTS"bullonon
lheremoleconlrol.Youcanlislenina languageolherlhanlhe
favorilelanguagebypressinglheMTSbulton.
Press the • or • button to select "Multi-Track
Options", then press the ENTER button.
Press the ENTER button to select "Preferred
Language". Press the • or • button to choose the
language (English, Spanish, or French) you want,
then press the ENTER button.
Press the EXIT button to exit.
Note
• You can only select the language from among the actual languages broadcast by the
broadcasting station.
69

Choosinga Multi-Channel
Sound(WITS)track-Analog
Depending on the particular program being broadcast, you can listen to Mono, Stereo or SAP.
Press the MENU button. Press the A or V button to select
"Sound", then press the ENTER button.
QuickwayIoaccesstheMTSmenu:Juslpress"MTS"bullononlhe
remoteconlrolrepealedlyIoselecloneoflheseltings.
Press the A or Y button to select "Multi-Track Options",
then press the ENTER button.
Press the ENTER button to elect Mult-Track Sound".
S ' "
Press the A or V button to select a setting you want,
then press the ENTER button.
Press the EXIT button to exit.
*Choose "Mono" for channels that are broadcasting in mono, or if you are having difficulty
receiving a stereo signal.
o Choose "Stereo" for channels that are broadcasting in stereo.
. Choose "SAP" to listen to the Separate Audio Program, which is usually a foreign-language
translation.
70
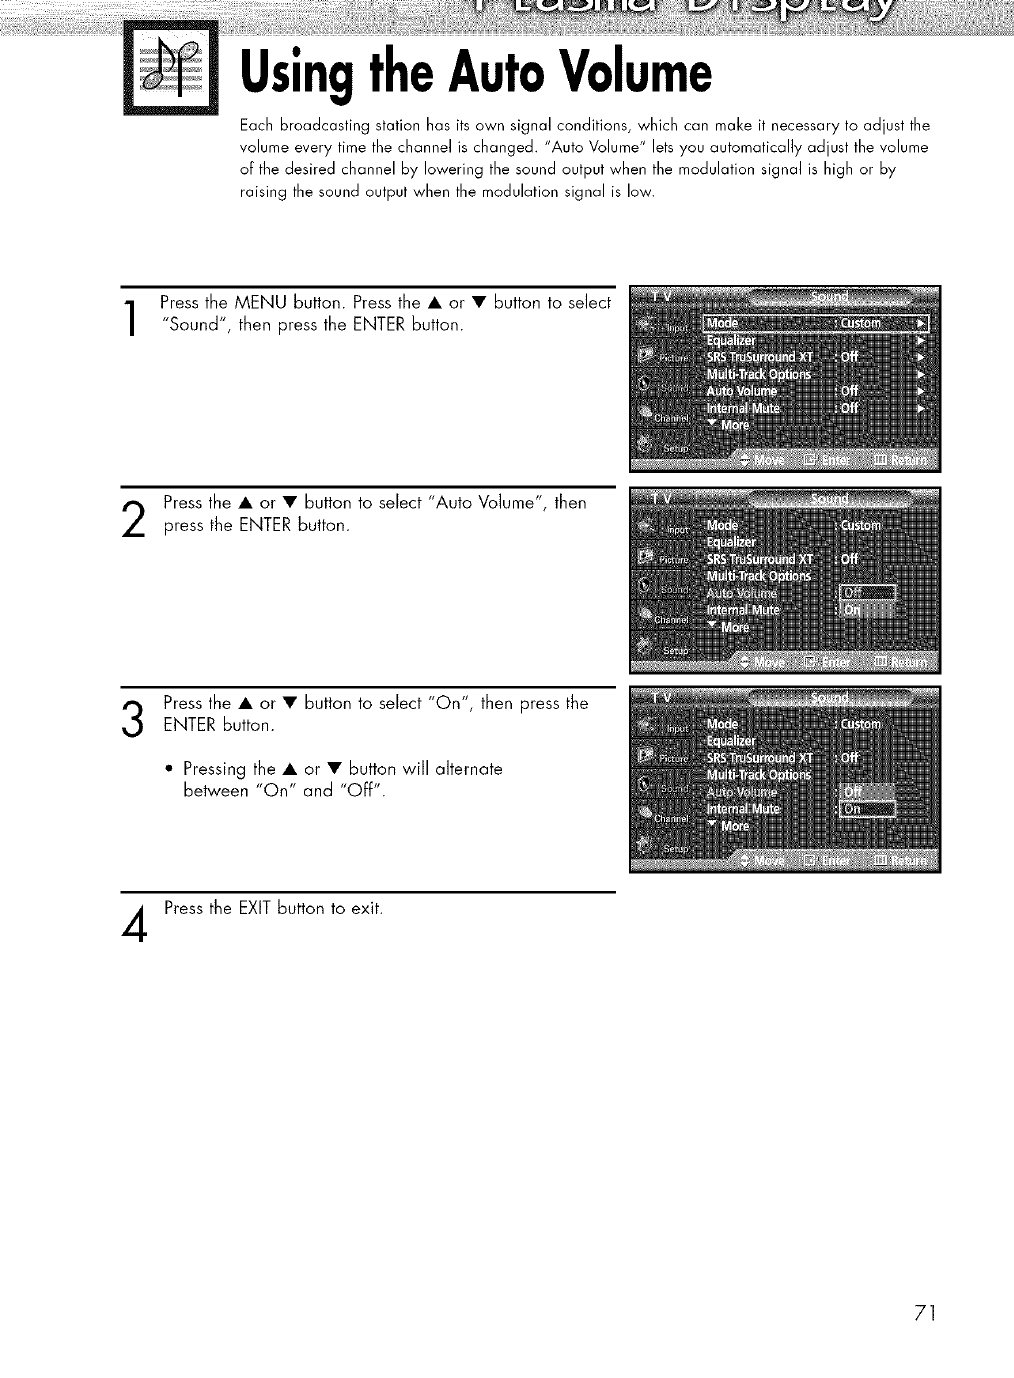
UsingtheAutoVolume
Each broadcasting station has its own signal conditions, which can make it necessary to adjust the
volume every time the channel is changed. "Auto Volume" lets you automatically adjust the volume
of the desired channel by lowering the sound output when the modulation signal is high or by
raising the sound output when the modulation signal is low.
Press the MENU button. Press the • or • button to select
"Sound", then press the ENTER button.
Press the • or • button to select "Auto Volume", then
press the ENTER button.
Press the • or • button to select "On", then press the
ENTER Button.
• Pressing the • or • button will alternate
between "On" and "Off".
Press the EXIT button to exit.
71
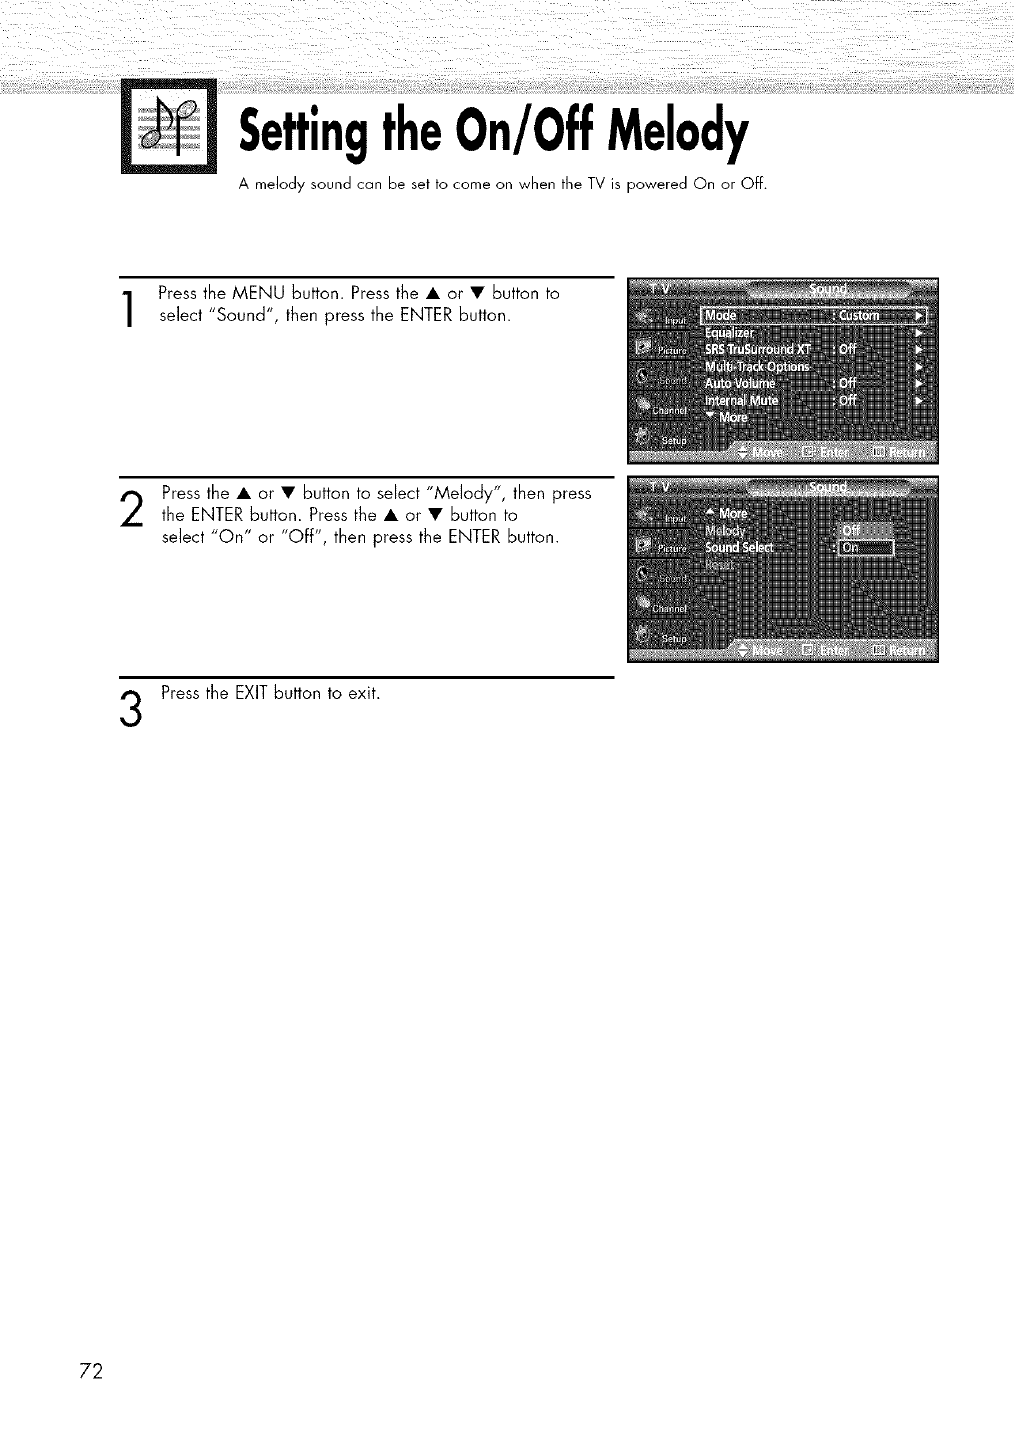
SettingtheOn/OffMelody
A melody sound can be set to come on when the TV is powered On or Off.
Press the MENU button. Press the • or • button to
select "Sound", then press the ENTER button.
Press the • or • button to select "Melody", then press
the ENTER button. Press the • or • button to
select "On" or "Off", then press the ENTER button.
Press the EXIT button to exit.
72

SelectingtheInternalMute
Sound output from the TV speakers is muted.
Press the MENU button. Press the • or • button to select
"Sound", then press the ENTER button.
Press the • or • button to select "Internal Mute", then
press the ENTER button.
Press the • or • button to select "On", then press the
ENTER button.
• Pressing the • or • button will alternate between
"On" and "OFf".
Press the EXIT button to exit.
Notes
• When Internal Mute is set to "On", Sound menus except Multi-track Options cannot be adjusted.
• The left/right audio outputs and digital audio outputs (Optical, Coaxial) remain enabled.
• The VOL +, VOL - and Mute buttons do not operate when the Internal Mute is set to On.
• When Internal Mute is On, only MTS is selectable for the Sound.
73
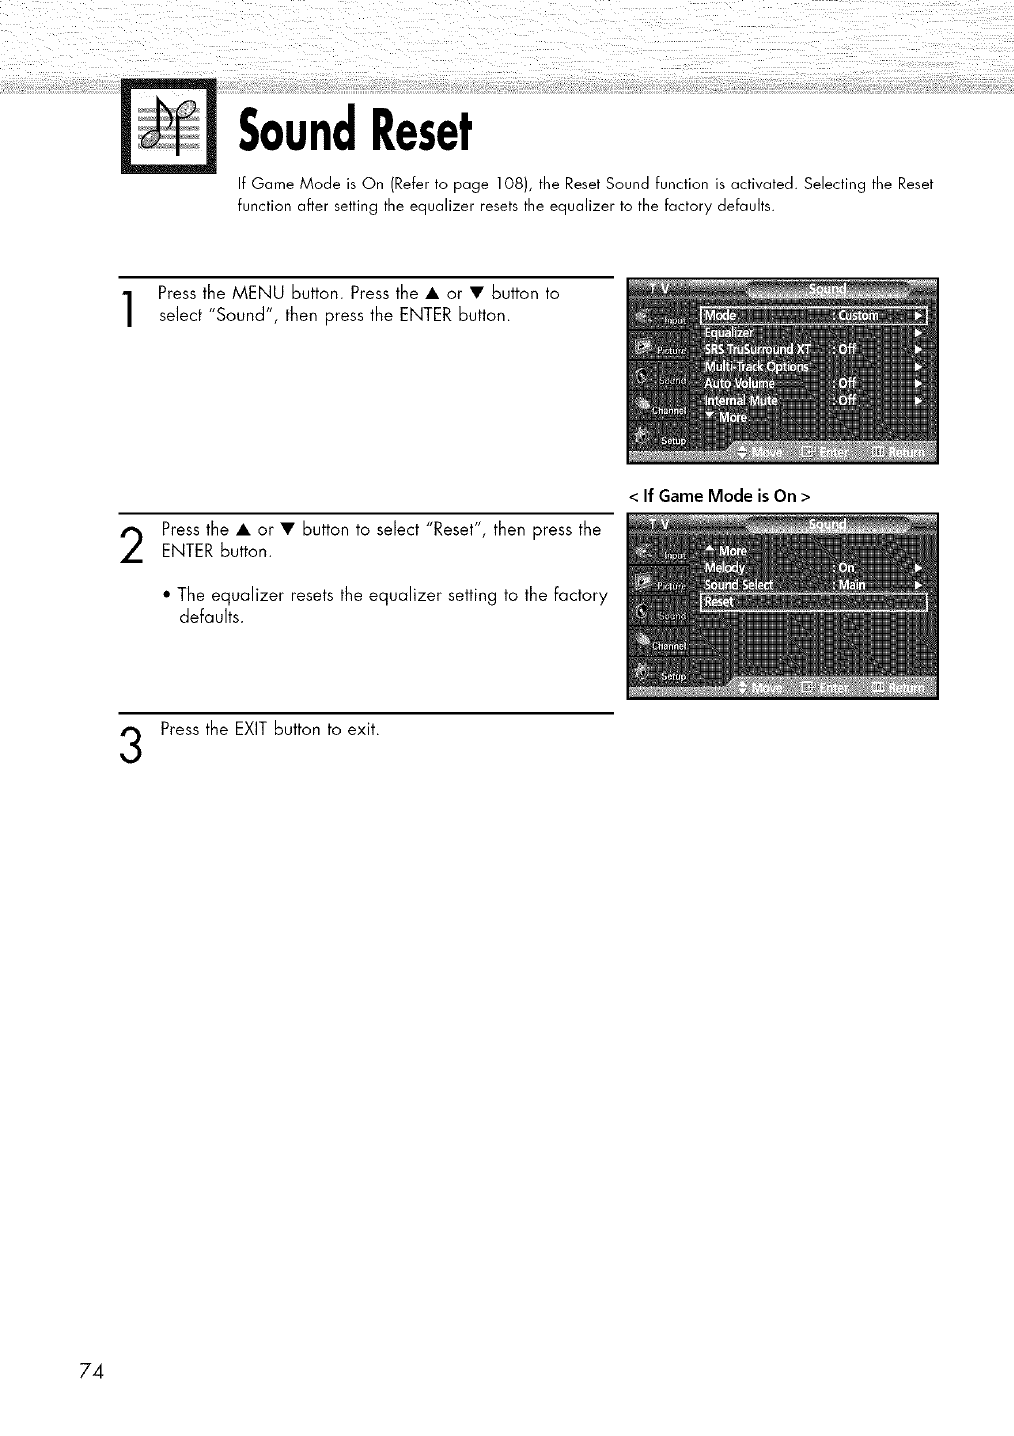
SoundReset
If Game Mode is On (Refer to page 108), the Reset Sound function is activated. Selecting the Reset
function after setting the equalizer resets the equalizer to the factory defaults.
Press the MENU button. Press the • or • button to
select "Sound", then press the ENTER button.
Press the • or • button to select "Reset", then press the
ENTER button.
• The equalizer resets the equalizer setting to the factory
defaults.
<If Game Mode is On >
Press the EXIT button to exit.
74
PLASMA DISPLAY PANEL
ChannelControl
Selecting the Antenna .................................................................. 76
Selecting Your Favorite Channels .................................................. 77
Viewing the Channel Lists.............................................................. 79
Editing the Channel Lists .............................................................. 80
Default List mode .......................................................................... 82
Labeling the Channels .................................................................. 83
Fine Tuning Analog Channels ........................................................ 84
Checking the Digital-Signal Strength .............................................. 85
LNA (Low Noise Amplifier) ............................................................ 86
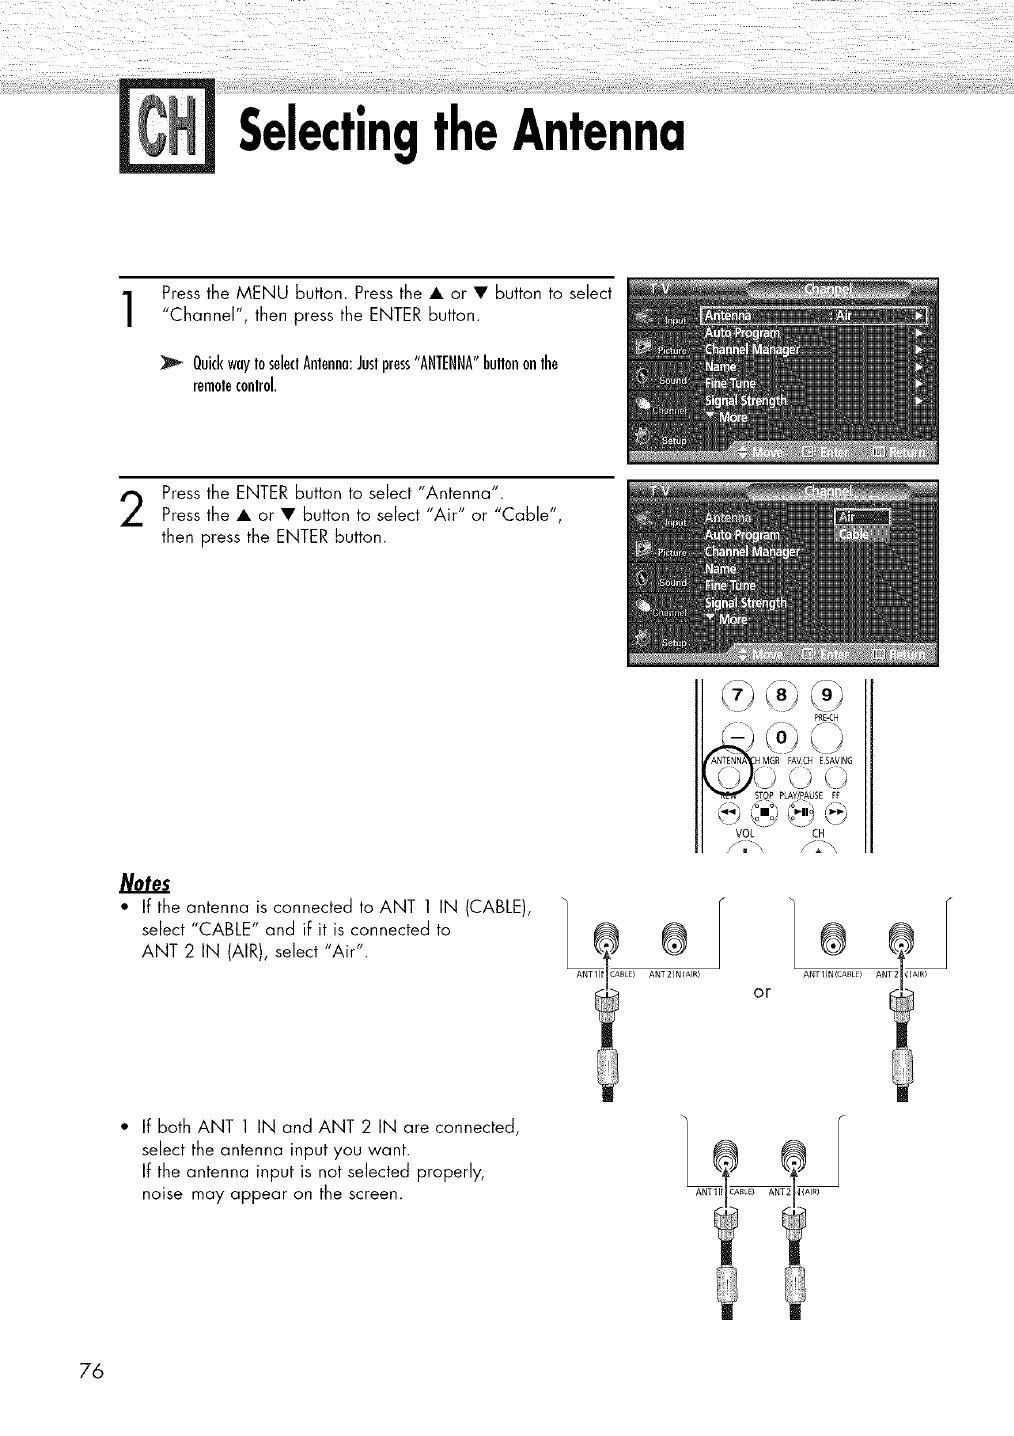
SelectingtheAntenna
Press the MENU button. Press the • or • button to select
"Channel", then press the ENTER button.
QuickwayIoseleclAnlenna:Juslpress"ANTENNA"bullononlhe
remoleconlrol.
Press the ENTER button to select "Antenna".
Press the • or • button to select "Air" or "Cable",
then press the ENTER button.
Notes
•If the antenna is connected to ANT 1 IN (CABLE),
select "CABLE" and if it is connected to
ANT 2 IN (AIR), select "Air".
ANTIll CABLZ) ANT21N(AIR)
PRE-CH
_'i ¸
VOL CH
ANTIIN(CABLE) ANT2 _(AIR)
or
If both ANT 1 IN and ANT 2 IN are connected,
select the antenna input you want.
If the antenna input is not selected properly,
noise may appear on the screen. ANTlll _(AIR}
76
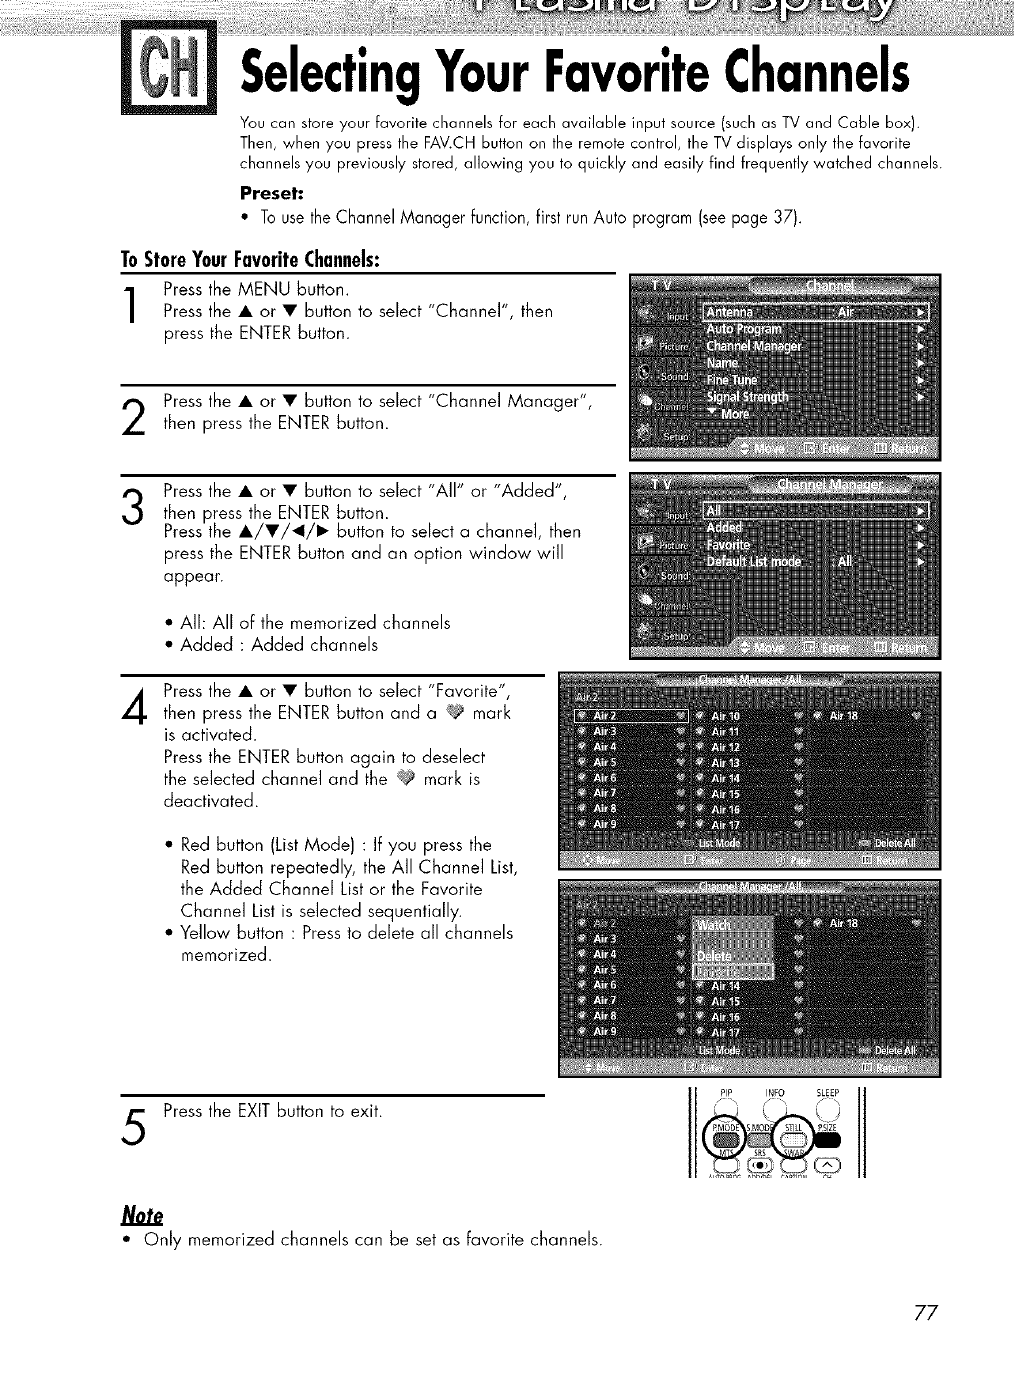
SelectingYourFavoriteChannels
You can store your favorite channels for each available input source (such as TV and Cable box).
Then, when you press the FAV.CH button on the remote control, the TV displays only the favorite
channels you previously stored, allowing you to quickly and easily find frequently watched channels.
Preset:
•TousetheChannelManagerfunction,firstrunAuto program(seepage37).
To StoreYour FavoriteChannels:
Press the MENU button.
Press the • or • button to select "Channel", then
press the ENTER button.
Press the • or • button to select "Channel Manager",
then press the ENTER button.
3
4
Press the • or • button to select "All" or "Added",
then press the ENTER button.
Press the •/•/_1/1_ button to select a channel, then
press the ENTER button and an option window will
appear.
• All: All of the memorized channels
• Added : Added channels
Press the • or • button to select "Favorite",
then press the ENTER button and a _ mark
is activated.
Press the ENTER button again to deselect
the selected channel and the _ mark is
deactivated.
• Red button (List Mode) : If you press the
Red button repeatedly, the All Channel List,
the Added Channel List or the Favorite
Channel List is selected sequentially.
• Yellow button : Press to delete all channels
memorized.
Press the EXIT button to exit.
•Only memorized channels can be set as favorite channels.
77
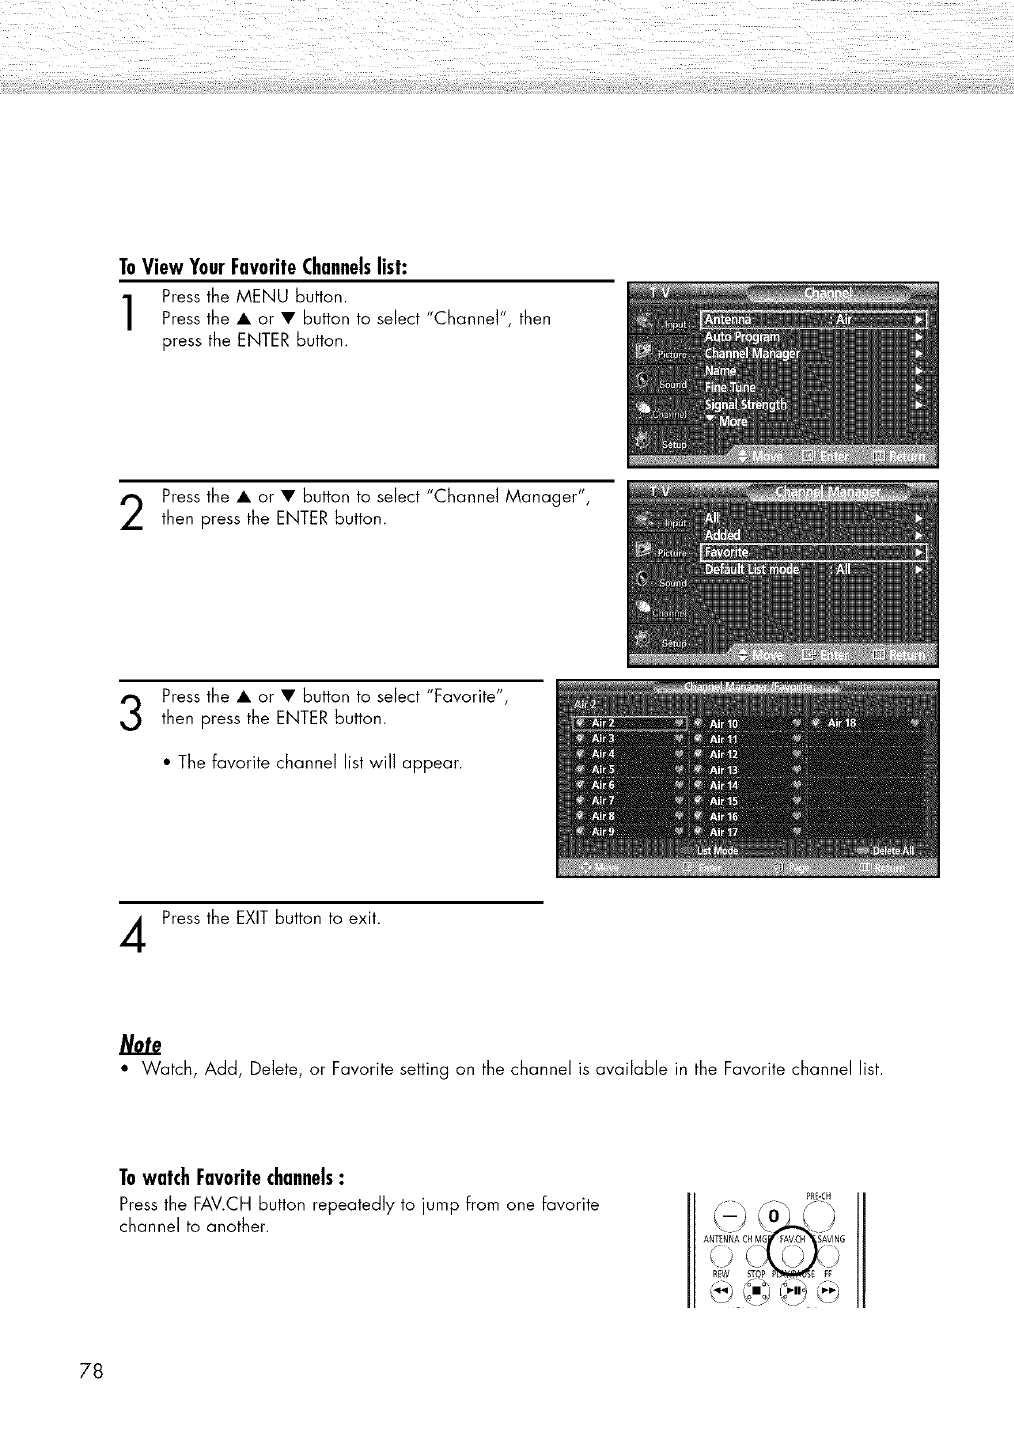
ToViewYourFavoriteChannelslist:
Press the MENU button.
Press the • or • button to select "Channel", then
press the ENTER button.
Press the • or • button to select "Channel Manager",
then press the ENTER button.
Press the • or • button to select "Favorite",
then press the ENTER button.
• The favorite channel list will appear.
Press the EXIT button to exit.
Note
• Watch, Add, Delete, or Favorite setting on the channel is available in the Favorite channel list.
TowatchFavoritechannels:
Press the FAV.CH button repeatedly to jump from one favorite
channel to another.
PRE-CH
78
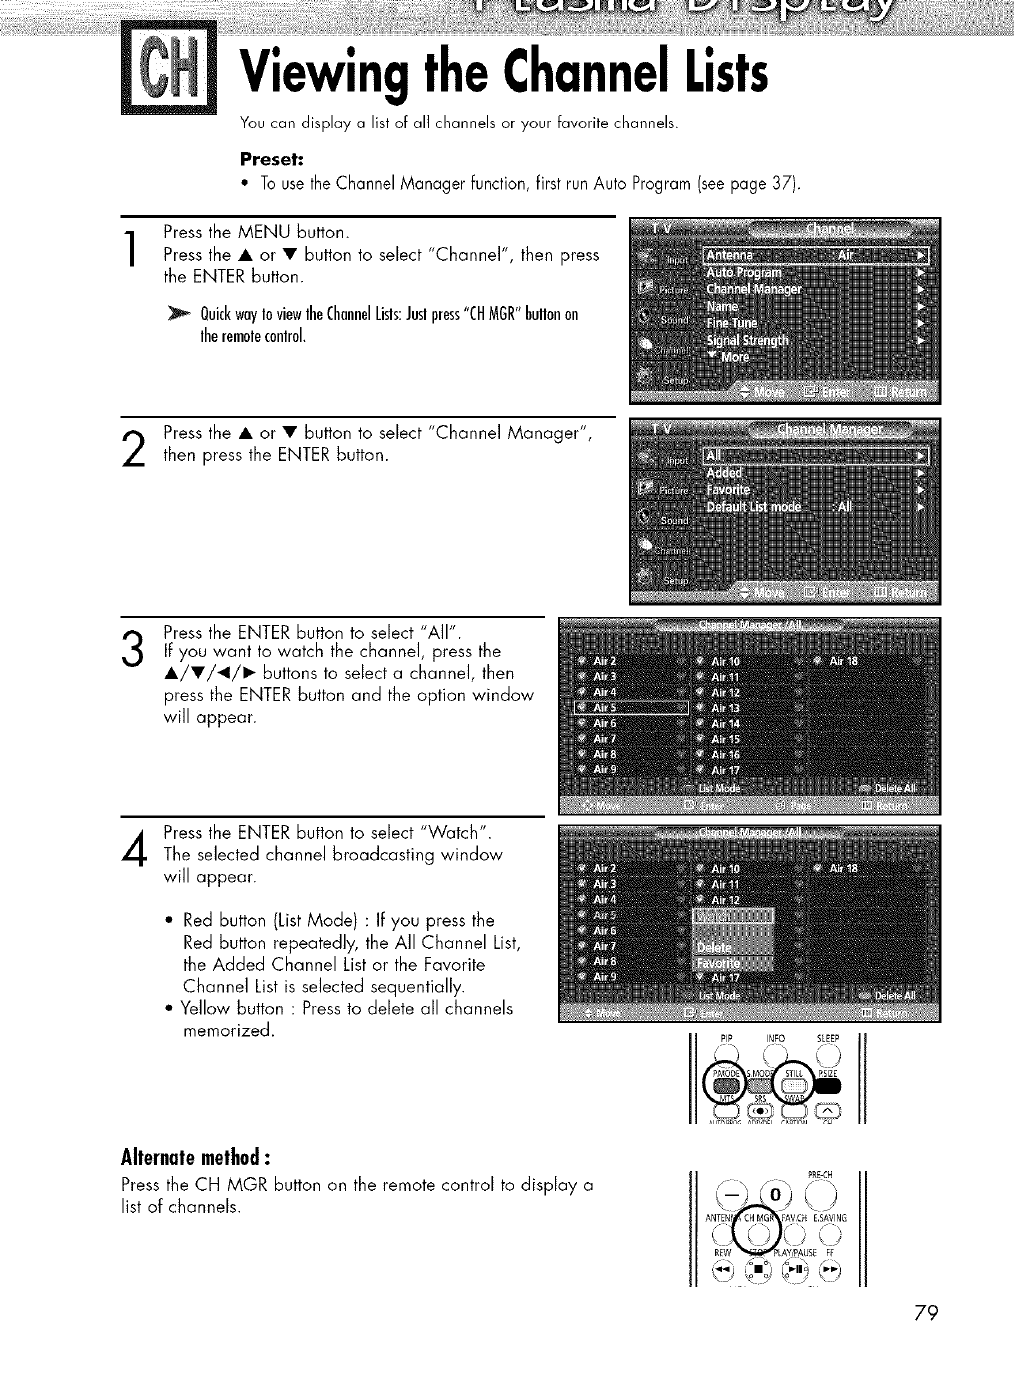
ViewingtheChannelLists
Youcan display a list of all channelsor your favorite channels.
Preset:
• To use the Channel Manager function, first run Auto Program (seepage 37).
Press the MENU button.
Press the • or • button to select "Channel', then press
the ENTER button.
QuickwayIoviewlheChannelLisls:Juslpress"CHMGR"hullonon
lheremolecontrol.
Press the • or • button to select "Channel Manager",
then press the ENTER button.
3Press the ENTER button to select "All".
If you want to watch the channel, press the
•/•/_1/1_ buttons to select a channel, then
press the ENTER button and the option window
will appear.
Press the ENTER button to select "Watch".
The selected channel broadcasting window
will appear.
" Red button (ListMode) : If you press the
Red button repeatedly, the All Channel List,
the Added Channel List or the Favorite
Channel List is selected sequentially.
• Yellow button : Press to delete all channels
memorized.
Alternatemethod:
Press the CH MGR button on the remote control to display a
list of channels.
PIP INFO SLEEP
P_[-CH
79
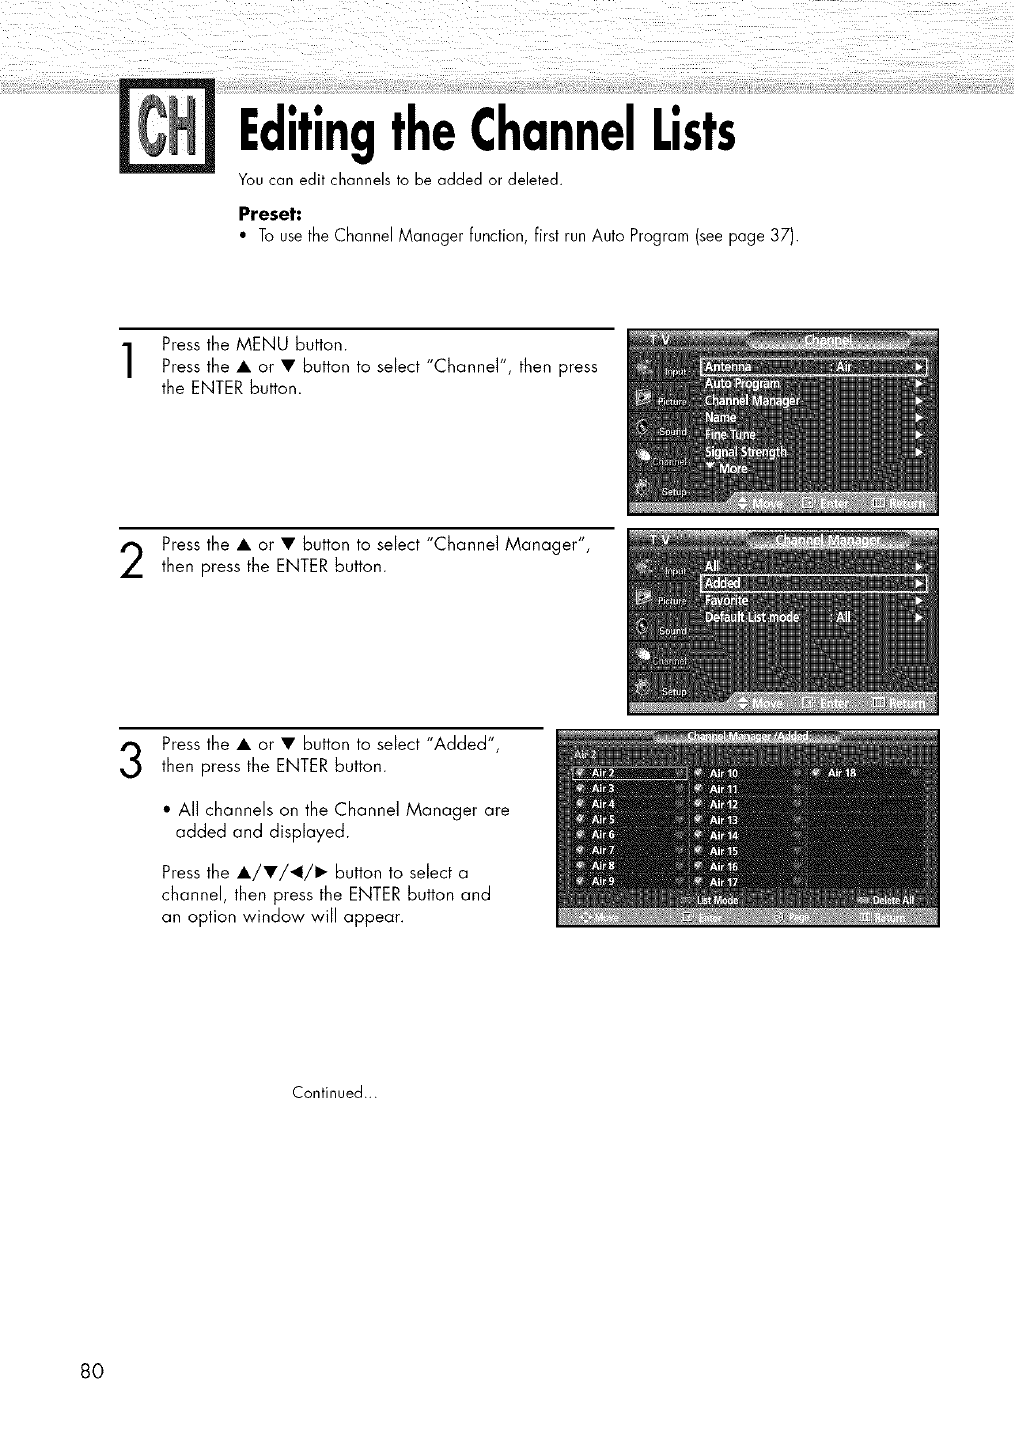
EditingtheChannelLists
You can edit channels to be added or deleted.
Preset:
• To use the Channel Manager function, first run Auto Program (see page 37).
Press the MENU button.
Press the • or • button to select "Channel", then press
the ENTER button.
Press the • or • button to select "Channel Manager",
then press the ENTER button.
Press the • or • button to select "Added",
then press the ENTER button.
•All channels on the Channel Manager are
added and displayed.
Press the •/•/_1/1_ button to select a
channel, then press the ENTER button and
an option window will appear.
Continued...
80
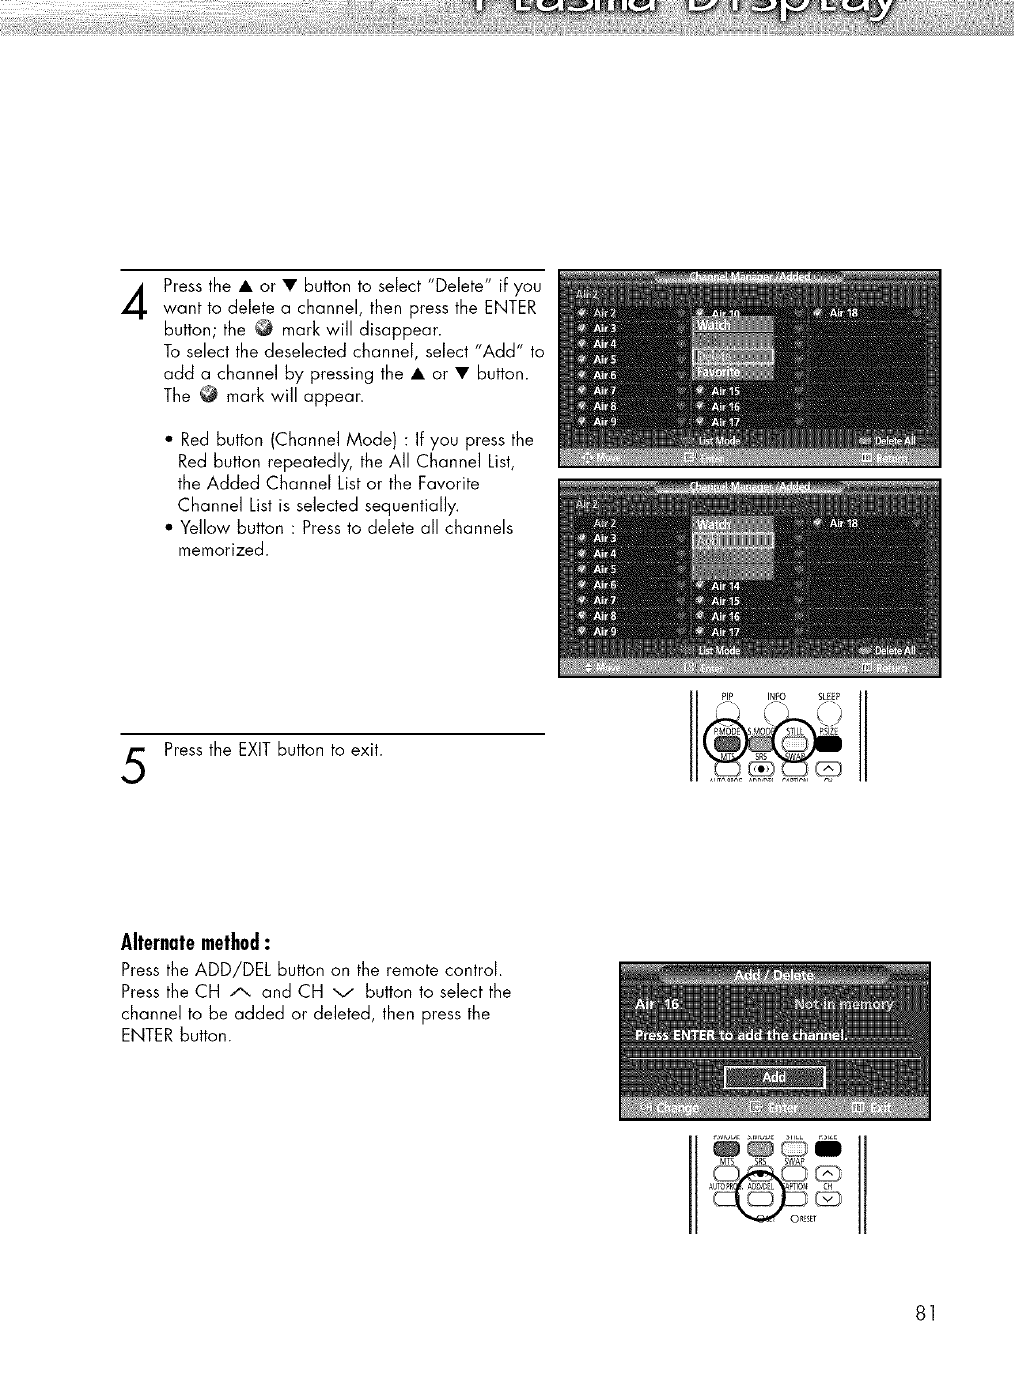
4Press the • or • button to select "Delete" if you
want to delete a channel, then press the ENTER
button; the _ mark will disappear.
To select the deselectecl channel, select "Add" to
acld a channel by pressing the • or • button.
The _ mark will appear.
• Red button (Channel Mode) : If you press the
Red button repeatedly, the All Channel List,
the Added Channel List or the Favorite
Channel List is selected sequentially.
• Yellow button : Press to delete all channels
memorized.
5Press the EXIT button to exit.
Alternatemethod:
Press the ADD/DEL button on the remote control.
Press the CH A and CH v button to select the
channel to be added or deleted, then press the
ENTER button.
I
81
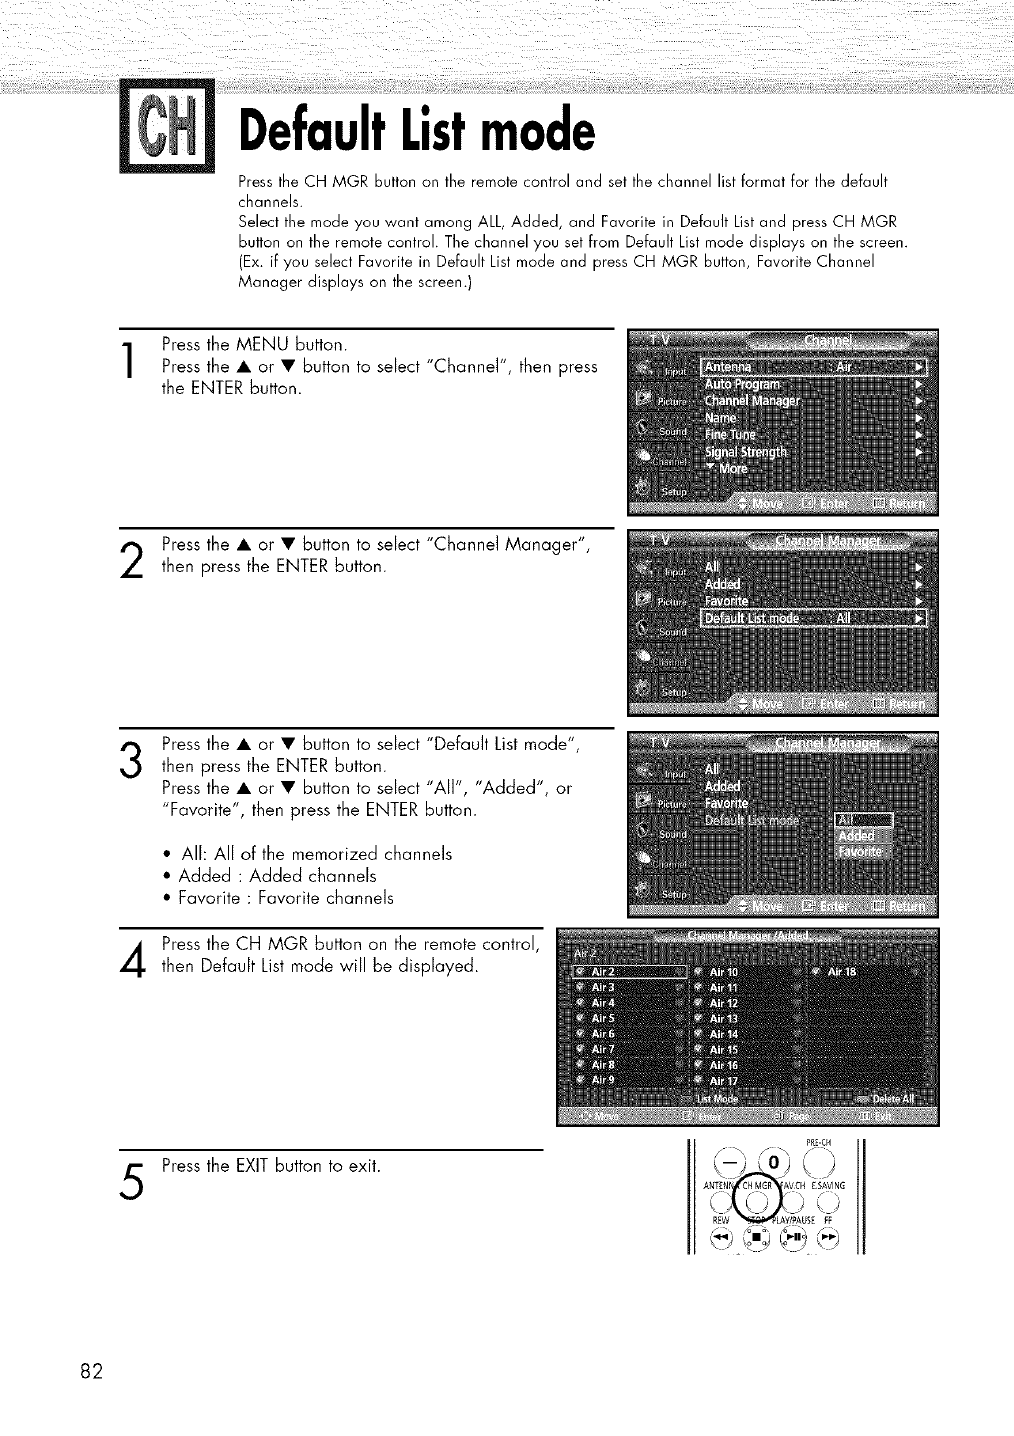
DefaultListmode
Press the CH MGR button on the remote control and set the channel list format for the default
channels.
Select the mode you want among ALL, Added, and Favorite in Default List and press CH MGR
button on the remote control. The channel you set from Default List mode displays on the screen.
(Ex. if you select Favorite in Default List mode and press CH MGR button, Favorite Channel
Manager displays on the screen.)
Press the MENU button.
Press the • or • button to select "Channel", then press
the ENTER button.
Press the • or • button to select "Channel Manager",
then press the ENTER button.
3Press the • or • button to select "Default List mode",
then press the ENTER button.
Press the • or • button to select "All", "Added", or
"Favorite", then press the ENTER button.
*All: All of the memorized channels
•Added : Added channels
* Favorite : Favorite channels
Pressthe CH MGR button on the remotecontrol,
then Default Listmode will be displayed.
5Press the EXIT button to exit.
PRE-CH
82
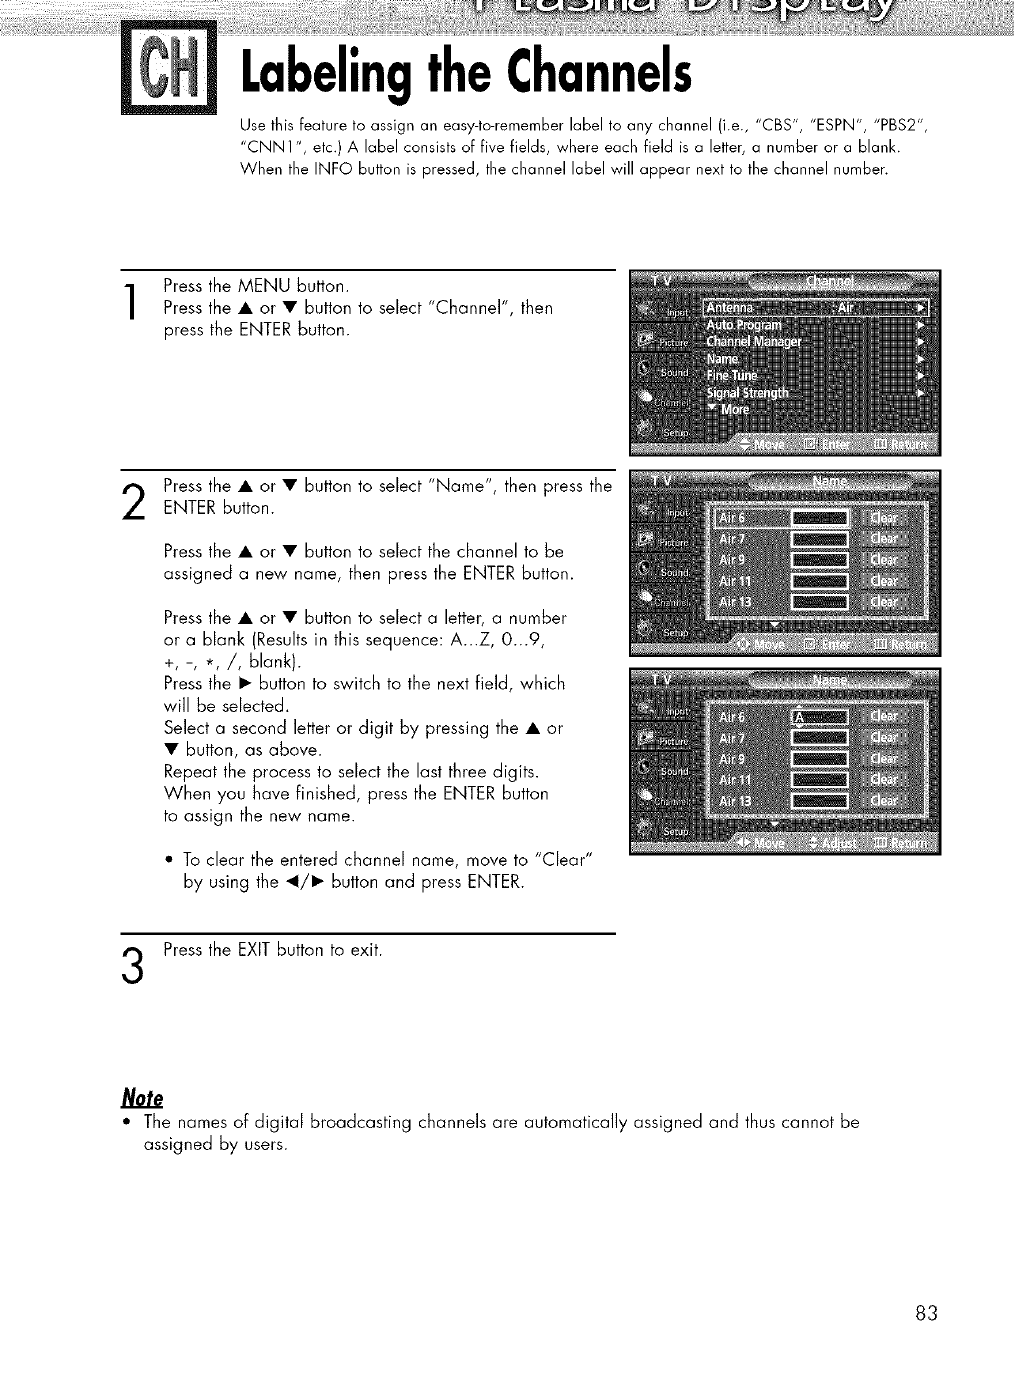
LabelingtheChannels
Use this feature to assign an easy-to-remember label to any channel (i.e., "CBS", "ESPN", "PBS2",
"CNN1 ", etc.) A label consists of five fields, where each field is a letter, a number or a blank.
When the INF© button is pressed, the channel label will appear next to the channel number.
Press the MENU button.
Press the • or • button to select "Channel', then
press the ENTER button.
Press the • or • button to select "Name", then press theENTER button.
Press the • or • button to select the channel to be
assigned a new name, then press the ENTER button.
Press the • or • button to select a letter, a number
or a blank (Results in this sequence: A...Z, 0...9,
+, -, *,/, blank).
Press the • button to switch to the next field, which
will be selected.
Select a second letter or digit by pressing the • or
• button, as above.
Repeat the process to select the last three digits.
When you have finished, press the ENTER button
to assign the new name.
"To clear the entered channel name, move to "Clear"
by using the _1/• button and press ENTER.
Press the EXIT button to exit.
Note
• The names of digital broadcasting channels are automatically assigned and thus cannot be
assigned by users.
83
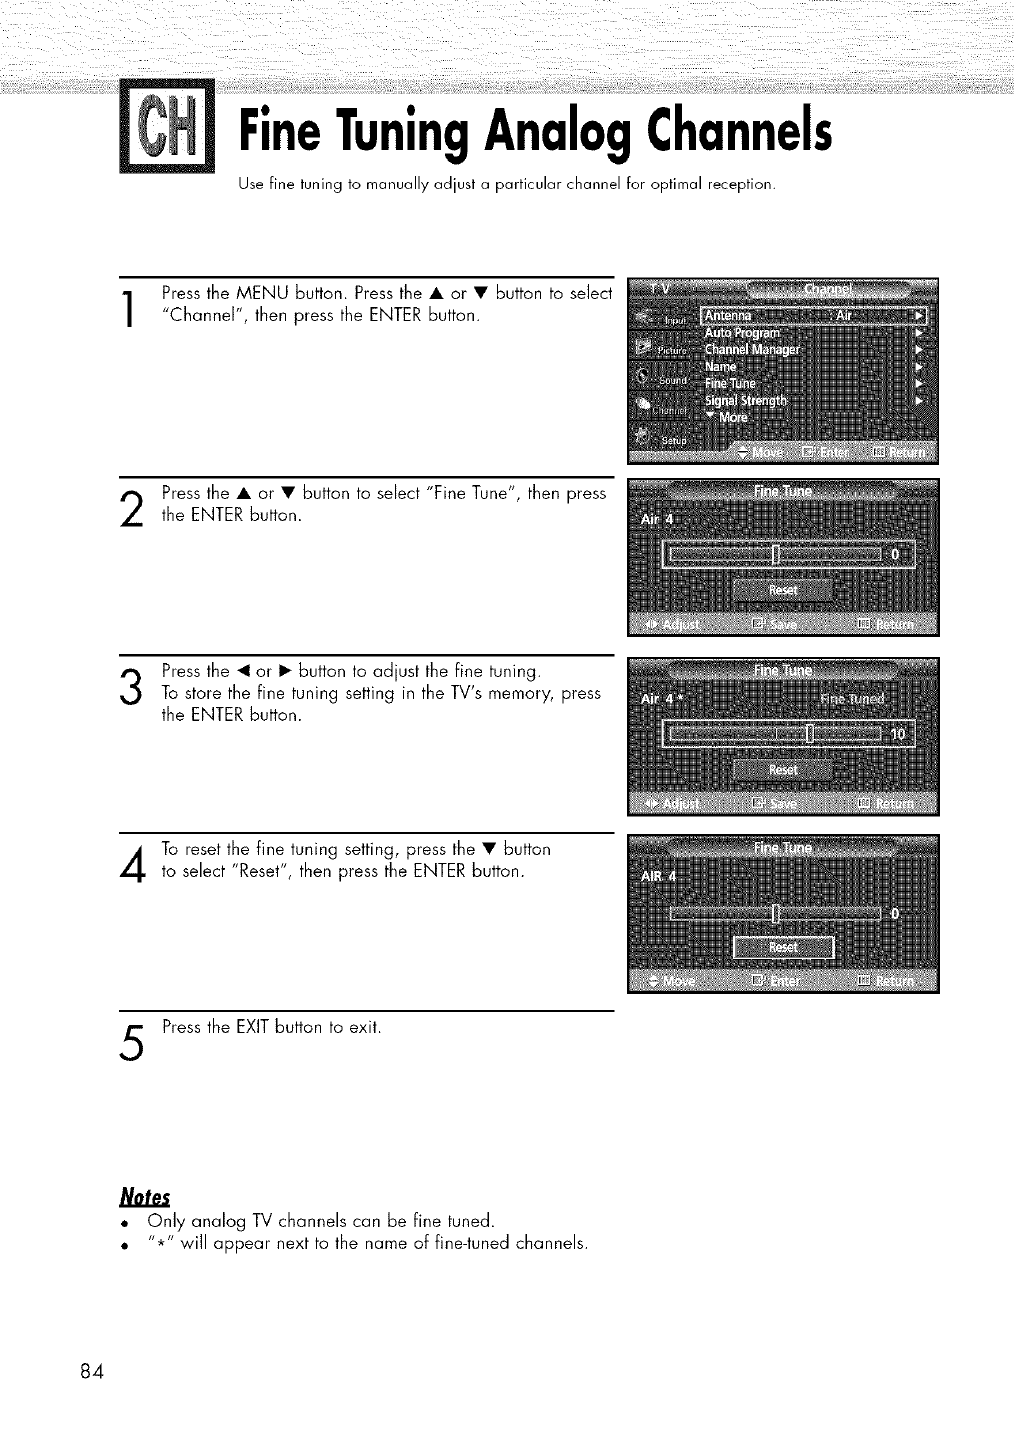
FineTuningAnalogChannels
Use fine tuning to manually adjust a particular channel for optimal reception.
Press the MENU button. Press the • or • button to select
"Channel", then press the ENTER button.
Press the • or • button to select "Fine Tune", then press
the ENTER button.
Press the <1or • button to adjust the fine tuning.
To store the fine tuning setting in the TV's memory, press
the ENTER button.
To reset the fine tuning setting, press the • button
to select "Reset", then press the ENTER button.
Press the EXIT button to exit.
Notes
•Only analog TV channels can be fine tuned.
11_r"
• will appear next to the name of fine-tuned channels.
84
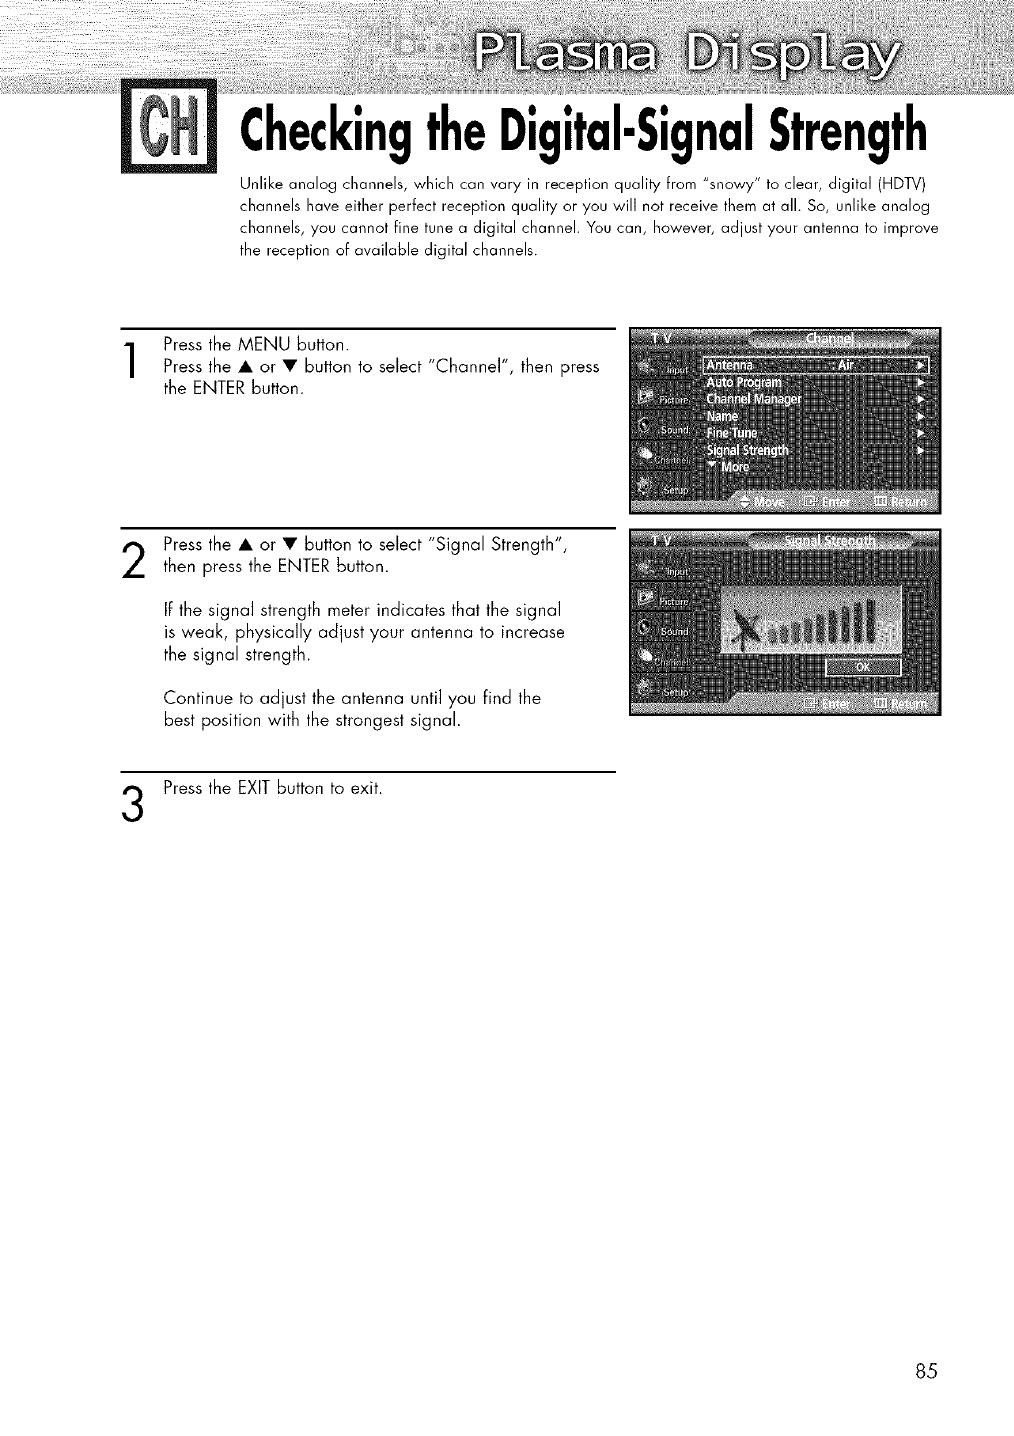
CheckingtheDigital-SignalStrength
Unlike analog channels, which can vary in reception quality from "snowy" to clear, digital (HDTV)
channels have either perfect reception quality or you will not receive them at all. So, unlike analog
channels, you cannot fine tune a digital channel. You can, however, adjust your antenna to improve
the reception of available digital channels.
Press the MENU button.
Press the • or • button to select "Channel", then press
the ENTER button.
Press the • or • button to select "Signal Strength",
then press the ENTER button.
If the signal strength meter indicates that the signal
is weak, physically adjust your antenna to increase
the signal strength.
Continue to adjust the antenna until you find the
best position with the strongest signal.
Press the EXIT button to exit.
85
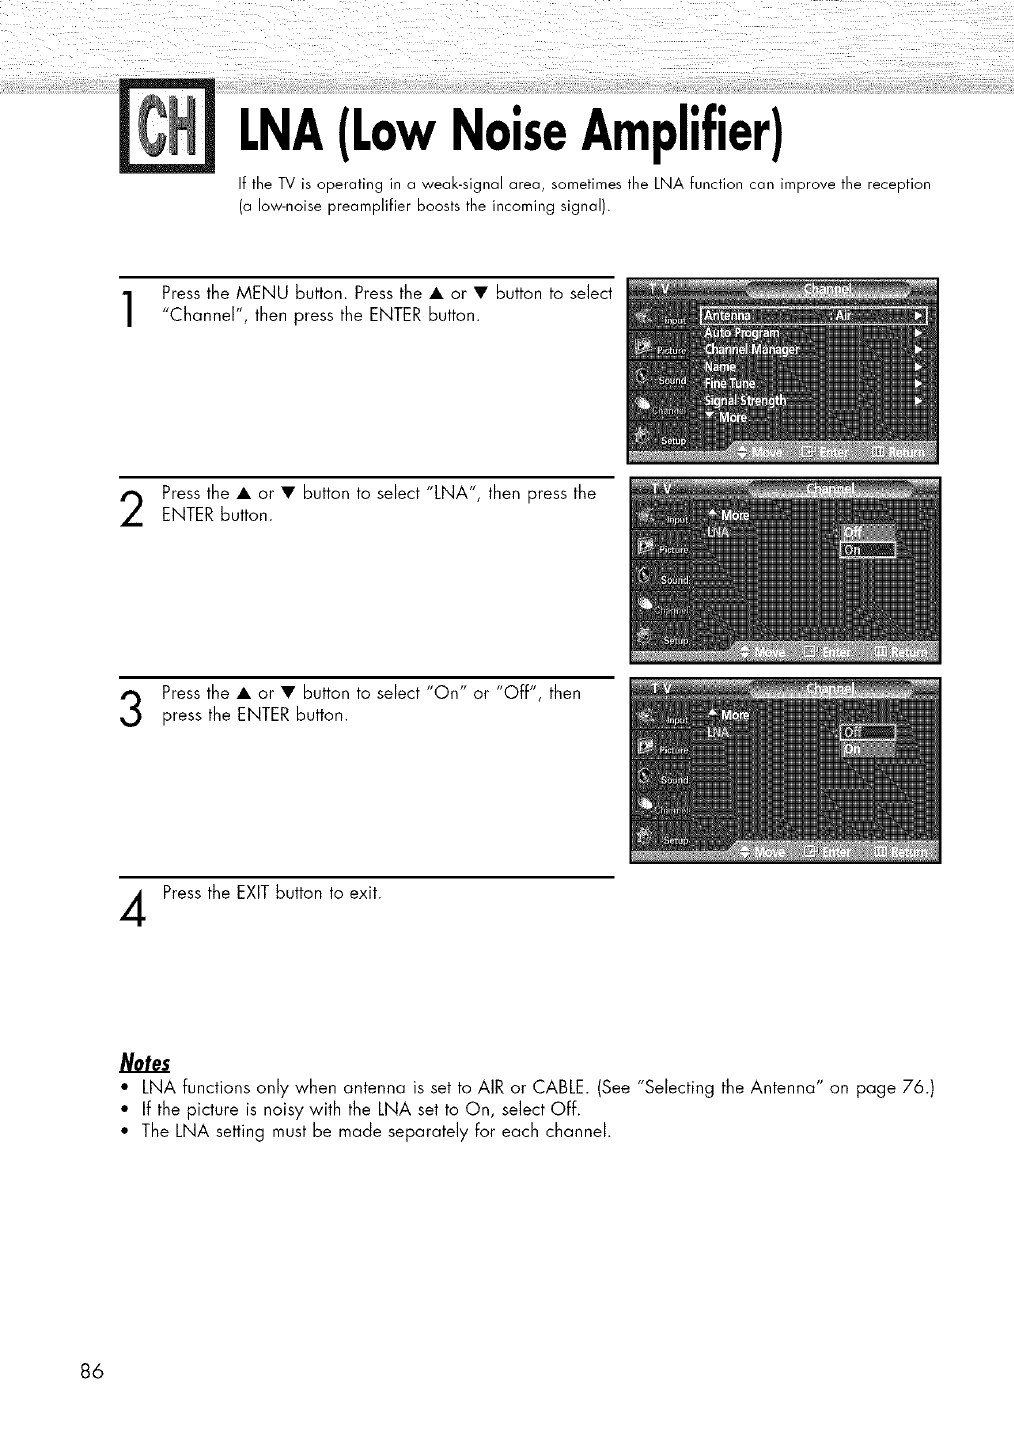
LNA(LowNoiseAmplifier)
If the TV is operating in a weak-signal area, sometimes the LNA function can improve the reception
(o low-noise preamplifier boosts the incoming signal).
Press the MENU button. Press the • or • button to select
"Channel", then press the ENTER button.
Press the • or • button to select "LNA", then press the
ENTER button.
Press the • or • button to select "On" or "Off", then
press the ENTER button.
Press the EXIT button to exit.
• LNA functions only when antenna is set to AIR or CABLE. (See "Selecting the Antenna" on page 76.)
• If the picture is noisy with the LNA set to On, select Off.
• The LNA setting must be made separately for each channel.
86
PLASMA DISPLAY PANEL
ConnectingaPCandOperation
Connecting a PC.......................................................................... 88
Changing the Position of the Image ................................................ 92
Picture Quality Adjustment ............................................................ 93
Image Reset ................................................................................ 95
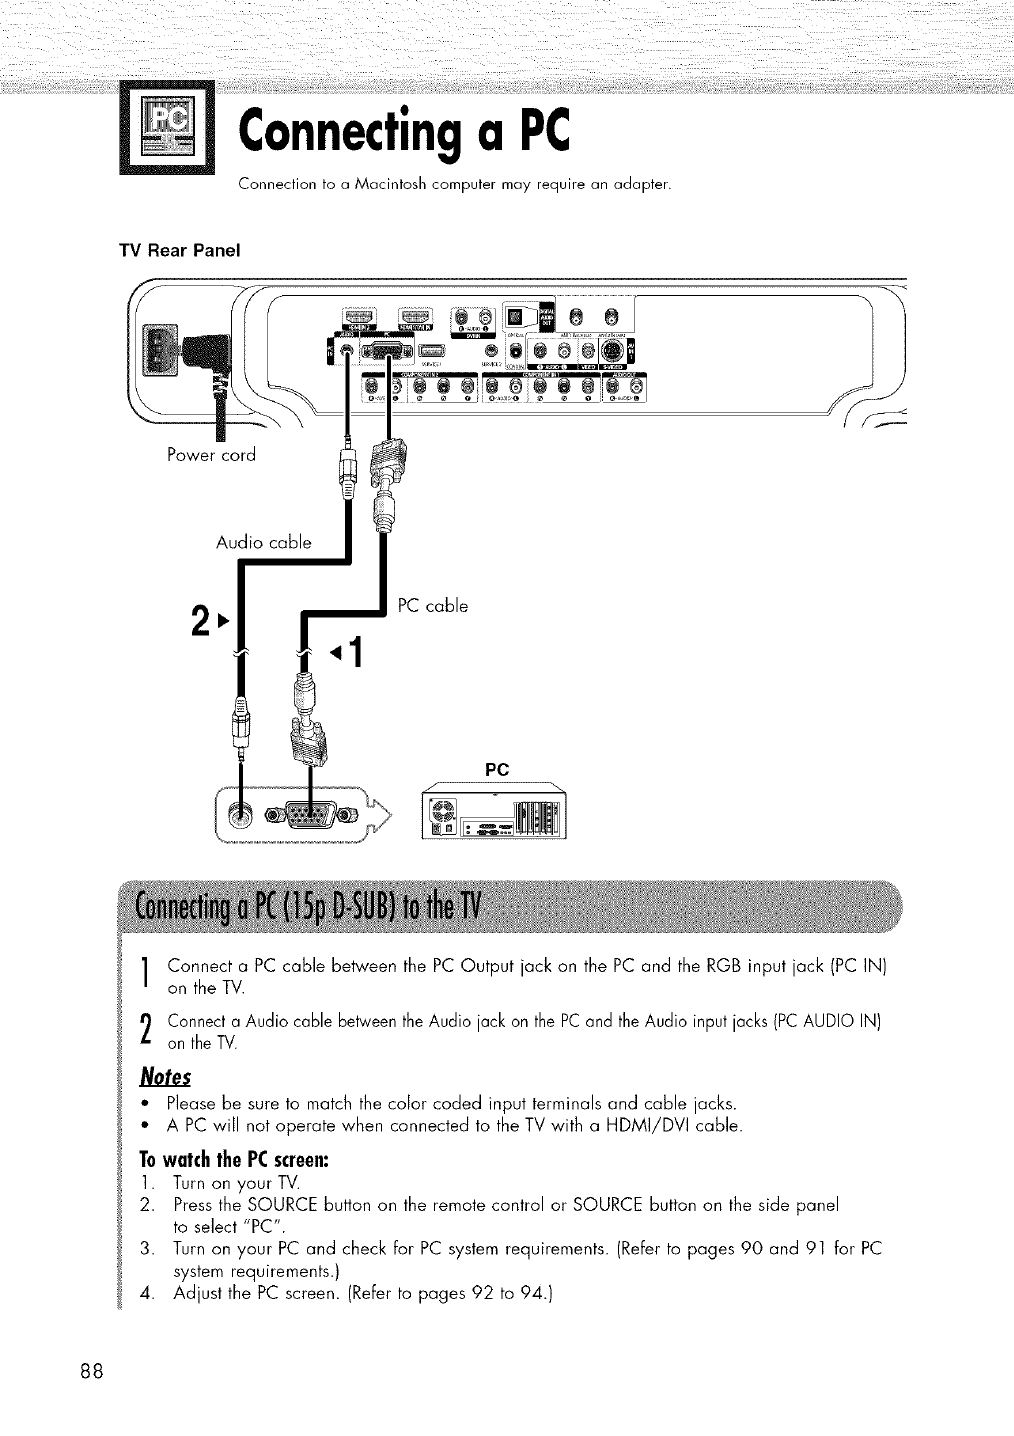
Connectinga PC
Connection to a Macintosh computer may require an adapter.
TV Rear Panel
Power cord
Audio cable
2PC cable
PC
Connect a PC cable between the PC Output jack on the PC and the RGB input jack (PC IN)
on the TV.
Connecta Audio cable between the Audio jack on the PCand the Audio input jacks (PCAUDIO IN)
on the TV.
Notes
• Please be sure to match the color coded input terminals and cable jacks.
• A PC will not operate when connected to the TV with a HDMI/DVI cable.
To watch the PCscreen:
1. Turn on your TV.
2. Press the SOURCE button on the remote control or SOURCE button on the side panel
to select "PC".
3. Turn on your PC and check for PC system requirements. (Refer to pages 90 and 91 for PC
system requirements.)
4. Adjust the PC screen. (Refer to pages 92 to 94.)
88

SettingupYourTV(PlugandPlay)
Our adoption of the new VESA® Plug and Play solution eliminates complicated and time consuming
setup. It allows you to install your monitor in a Plug and Play compatible system, without the usual setup
hassles and confusion. Your PC system can easily identify and configure itself for use with your TV.
This TV automatically tells the PC system its Extended Display Identification data (EDID) using Display
Data Channel (DDC) protocols.
89
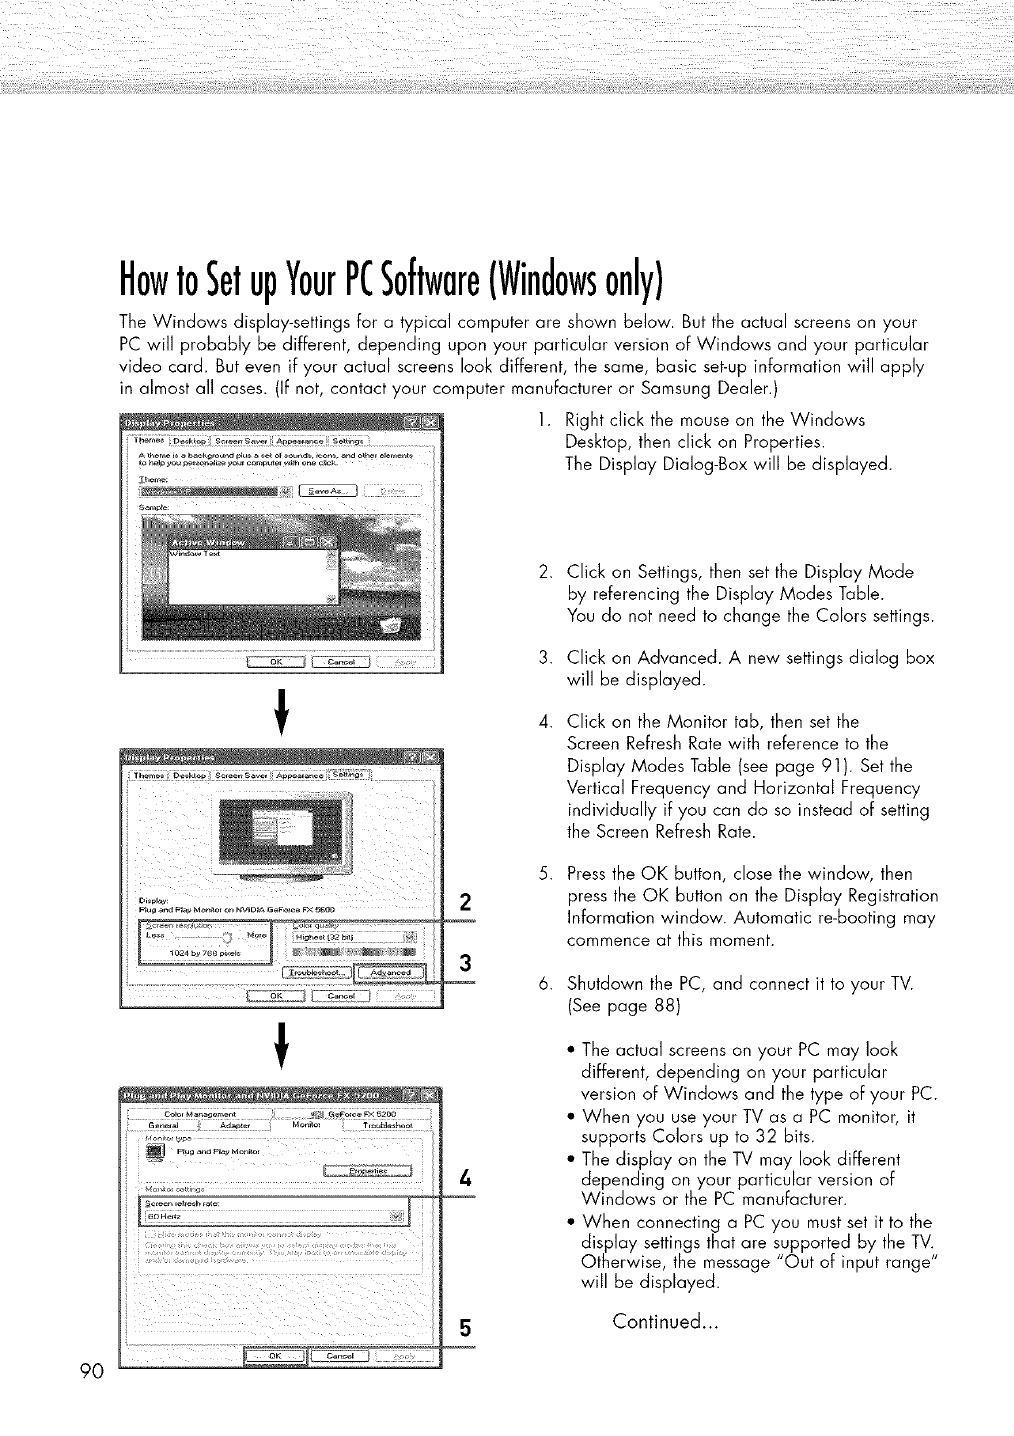
90
HowtoSetupYourPCSoftware(Windowsonly)
The Windows display-settings for a typical computer are shown below. But the actual screens on your
PC will probably be different, depending upon your particular version of Windows and your particular
video card. But even if your actual screens look different, the same, basic set-up information will apply
in almost all cases. (If not, contact your computer manufacturer or Samsung Dealer.)
1. Right click the mouse on the Windows
Desktop, then click on Properties.
The Display Dialog-Box will be displayed.
!
!
i_ii!!!!;:_!!i!i!:!_i_!i!!,i!i:!_!_;i_!i!i_¸_i!!!!_i!ii!¸!ii_:!!!i!!i!;!!!ii,
!_i__ii!_ii _i!_i_iii_il_ii__iiii__iii_!!i___ii __ii_I_ iI
3
4
2. Click on Settings, then set the Display Mode
by referencing the Display Modes Table.
You do not need to change the Colors settings.
4.
Click on Advanced. A new settings dialog box
will be displayed.
Click on the Monitor tab, then set the
Screen Refresh Rate with reference to the
Display Modes Table (see page 91 ). Set the
Vertical Frequency and Horizontal Frequency
individually if you can do so instead of setting
the Screen Refresh Rate.
Press the OK button, close the window, then
press the OK button on the Display Registration
Information window. Automatic re-booting may
commence at this moment.
Shutdown the PC, and connect it to your TV.
(See page 88)
*The actual screens on your PC may look
different, depending on your particular
version of Windows and the type of your PC.
" When you use your TV as a PC monitor, it
supports Colors up to 32 bits.
" The display on the TV may look different
depending on your particular version of
Windows or the PC manufacturer.
" When connecting a PC you must set it to the
display settings that are supported by the TV.
Otherwise, the message "Out of input range"
will be displayed.
Continued...
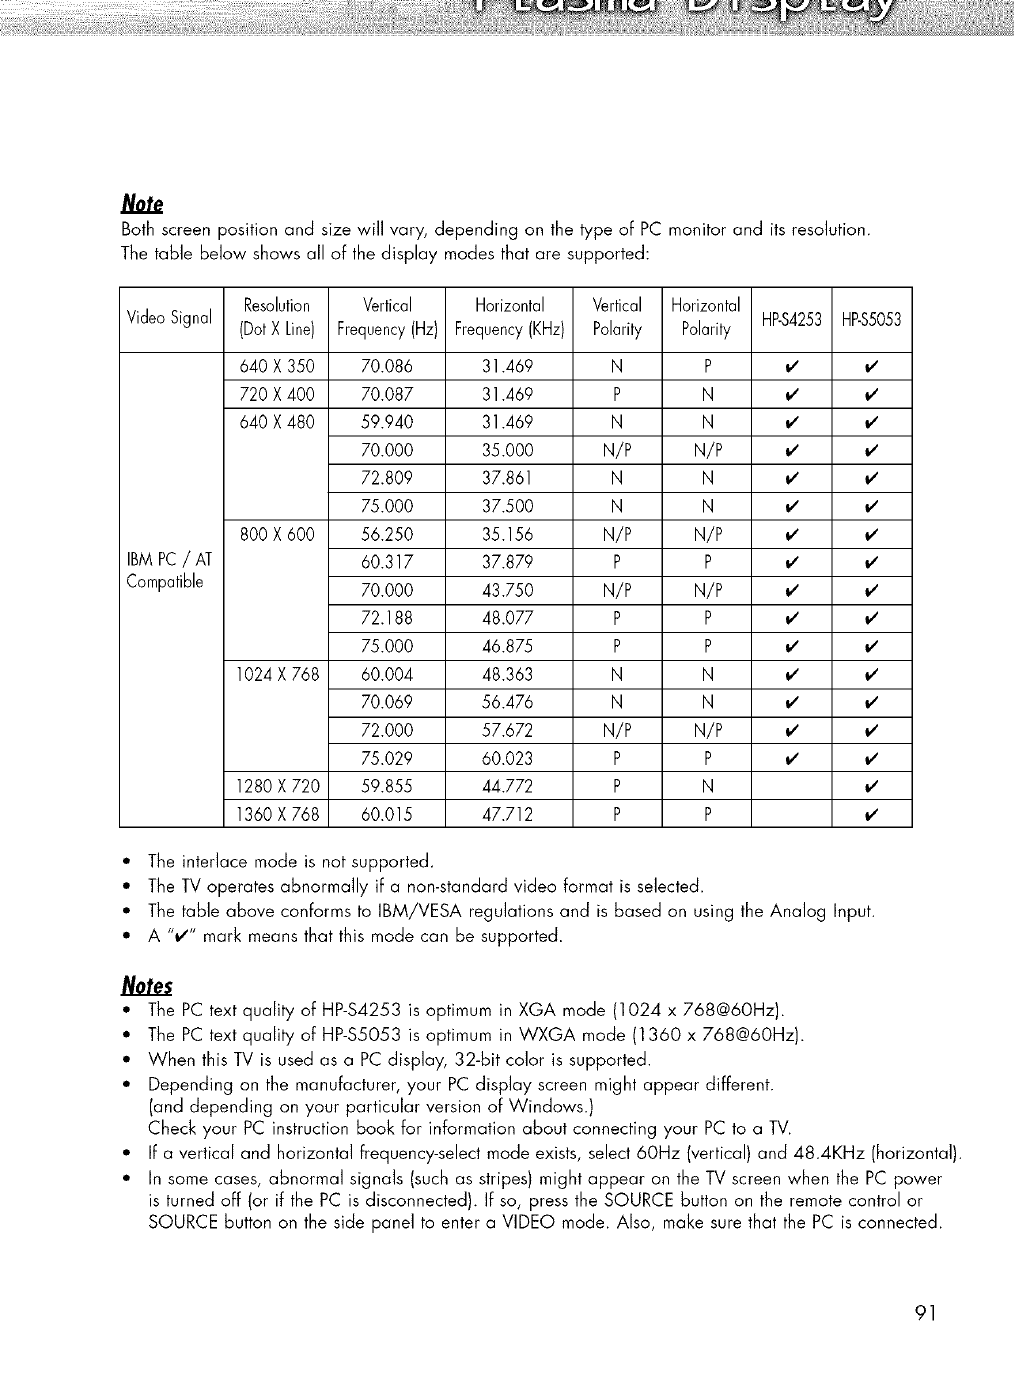
Both screen position and size will vary, depending on the type of PC monitor and its resolution.
The table below shows all of the display modes that are supported:
Resolution
Video Signal (DotX Line) HBS4253 HBS5053
640 X 350
720 X 400
640 X 480
BMPC/AT
Compatible
800 X 600
1024 X 768
1280 X 720
1360 X 768
Vertical
Frequency(Hz)
70.086
70.087
59.940
70.000
72.809
75.000
56.250
60.317
70.000
72.188
75.000
60.004
70.069
72.000
75.029
59.855
60.015
Horizontal
Frequency(KHz)
31.469
31.469
31.469
35.000
37.861
37.500
35.156
37.879
43.750
48.077
46.875
48.363
56.476
57.672
60.023
44.772
47.712
Vertical
Polarity
N
P
N
N/P
N
N
N/P
P
N/P
P
P
N
N
N/P
P
P
P
Horizontal
Polarity
P v' v'
N _,' _,'
N _,' _,'
N/P v' v'
N #
N _,' _,'
N/P v' v'
Pv' v'
N/P _
Pv' v'
P _
N _,' _,'
N _,' _,'
N/P v' v'
Pv' v'
Nv'
P
• The interlace mode is not supported.
• The TV operates abnormally if a non-standard video format is selected.
• The table above conforms to IBM/VESA regulations and is based on using the Analog Input.
• A %z" mark means that this mode can be supported.
Notes
• The PC text quality of HP-$4253 is optimum in XGA mode (1024 x 768@6OHz).
• The PC text quality of HP-$5053 is optimum in WXGA mode (1360 x 768@60Hz).
• When this TV is used as a PC display, 32-bit color is supported.
• Depending on the manufacturer, your PC display screen might appear different.
(and depending on your particular version of Windows.)
Check your PC instruction book for information about connecting your PC to a TV.
• If a vertical and horizontal frequency-select mode exists, select 60Hz (vertical) and 48.4KHz (horizontal).
• In some cases, abnormal signals (such as stripes) might appear on the TV screen when the PC power
is turned off (or if the PC is disconnected). If so, press the SOURCE button on the remote control or
SOURCE button on the side panel to enter a VIDEO mode. Also, make sure that the PC is connected.
91
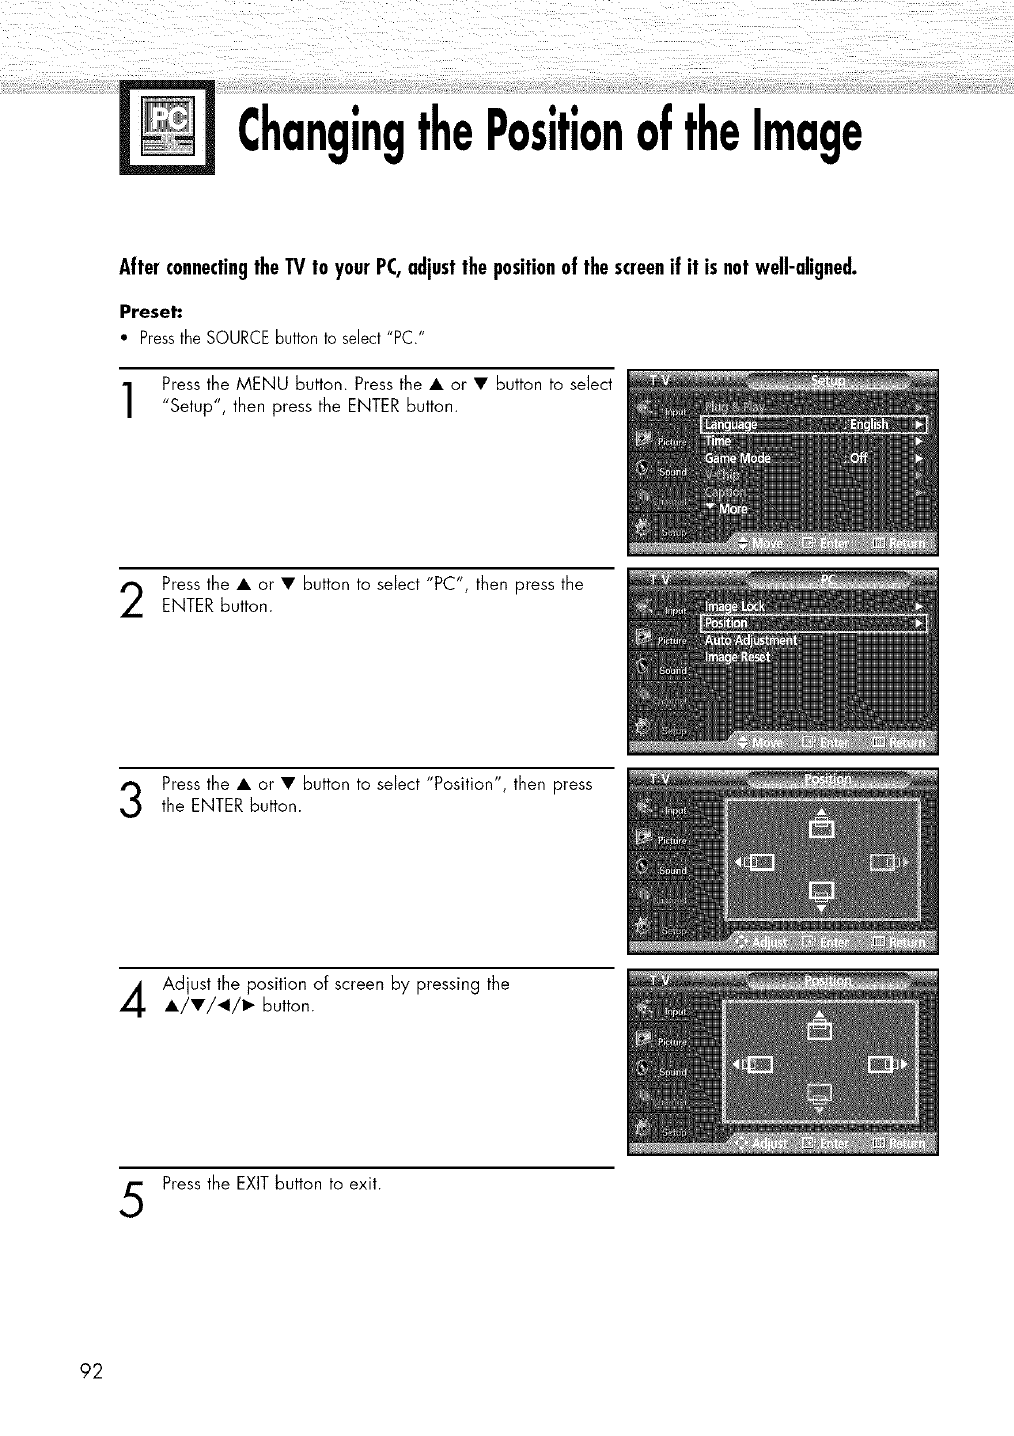
ChangingthePositionoftheImage
AfterconnectingtheTVto your PC,adjustthepositionof thescreenif it isnotwell-aligned.
Preset:
•Pressthe SOURCEbutton to select"PC."
Press the MENU button. Press the • or • button to select
"Setup", then press the ENTER button.
Press the • or • button to select "PC", then press the
ENTER button.
Press the • or • button to select "Position", then pressthe ENTER button.
Adjust the position of screen by pressing the
•/•/_1/1_ button.
Press the EXIT button to exit.
92
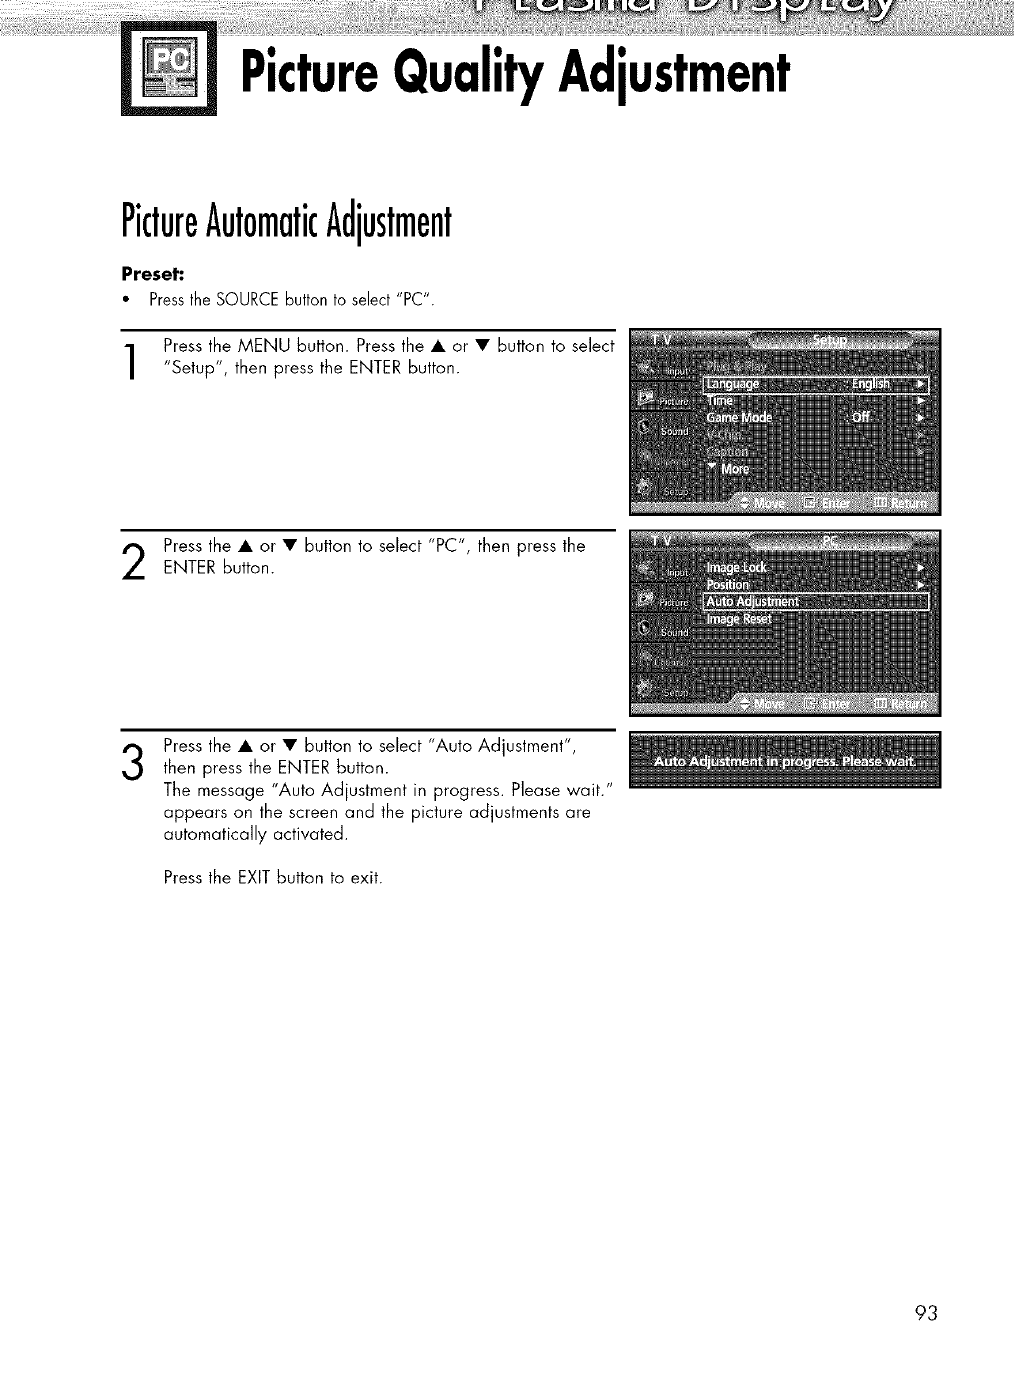
PictureQualityAdjustment
PictureAutomaticAdjustment
Preset"
•Pressthe SOURCEbutton to select "PC".
Press the MENU button. Press the • or • button to select
"Setup", then press the ENTER button.
Press the • or • button to select "PC", then press theENTER button.
3Press the • or • button to select "Auto Adjustment",
then press the ENTER button.
The message "Auto Adjustment in progress. Please wait."
appears on the screen and the picture adjustments are
automatically activated.
Press the EXIT button to exit.
93
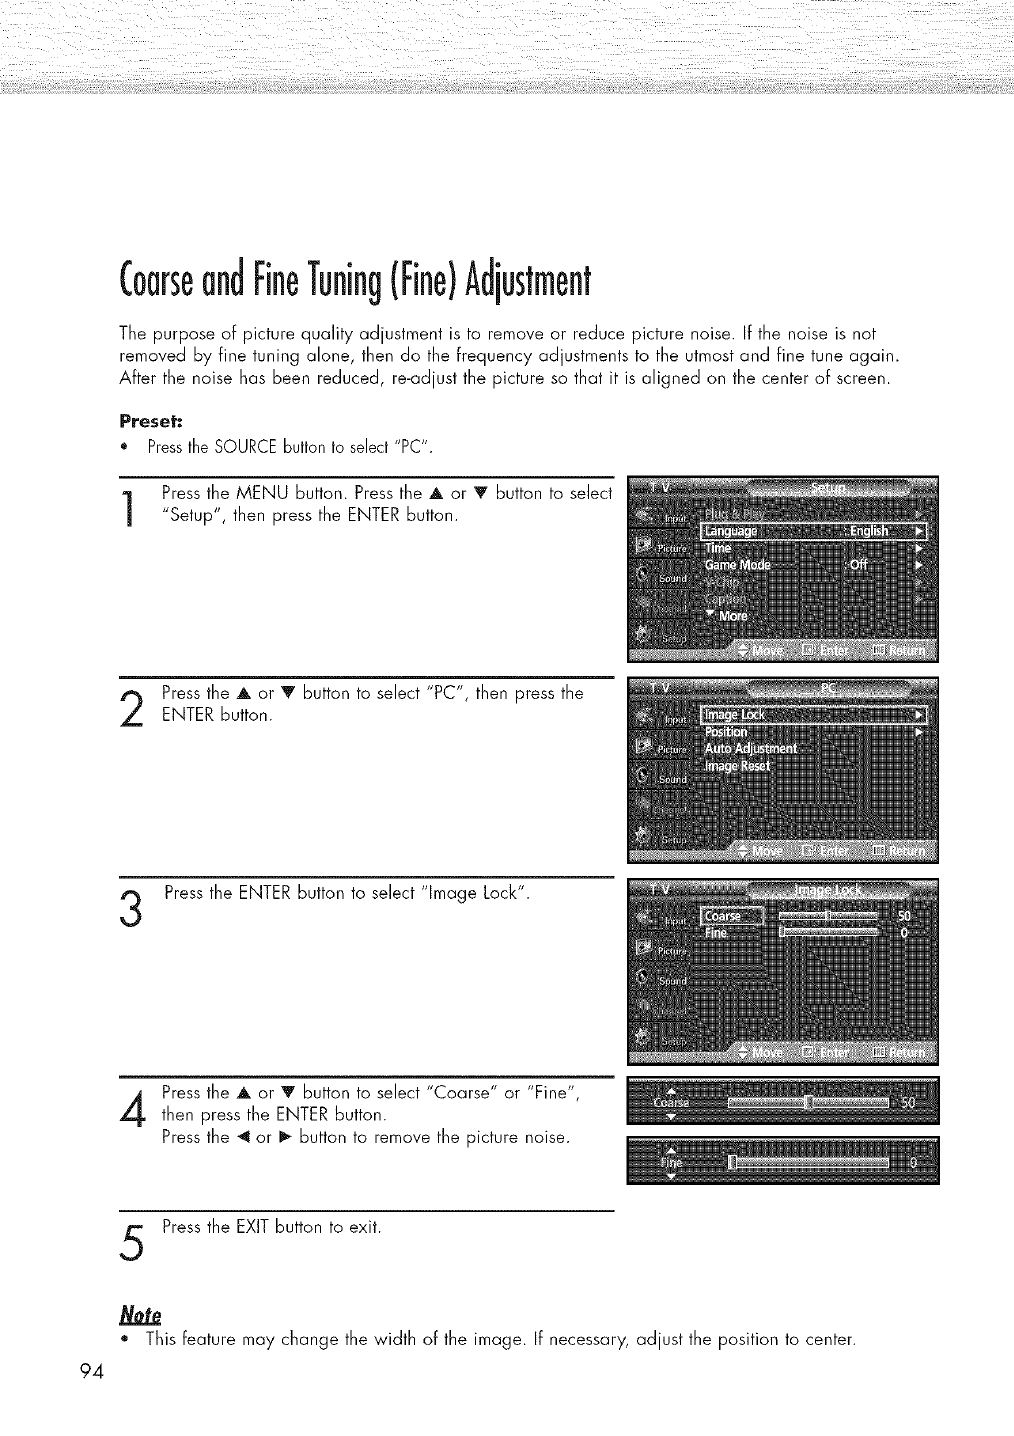
CoarseandFineTuning(Fine)Adjustment
The purpose of picture quality adjustment is to remove or reduce picture noise. If the noise is not
removed by fine tuning alone, then do the frequency adjustments to the utmost and fine tune again.
After the noise has been reduced, re-adjust the picture so that it is aligned on the center of screen.
Preset:
*PresstheSOURCEbuttonto select"PC".
Press the MENU button. Press the A or V button to select
"Setup", then press the ENTER button.
Press the A or V button to select "PC", then press theENTER button.
Press the ENTER button to select "Image Lock".
Press the A or V button to select "Coarse" or "Fine",
then press the ENTER button.
Press the _ or I_ button to remove the picture noise.
Press the EXIT button to exit.
. This feature may change the width of the image. If necessary, adjust the position to center.
94
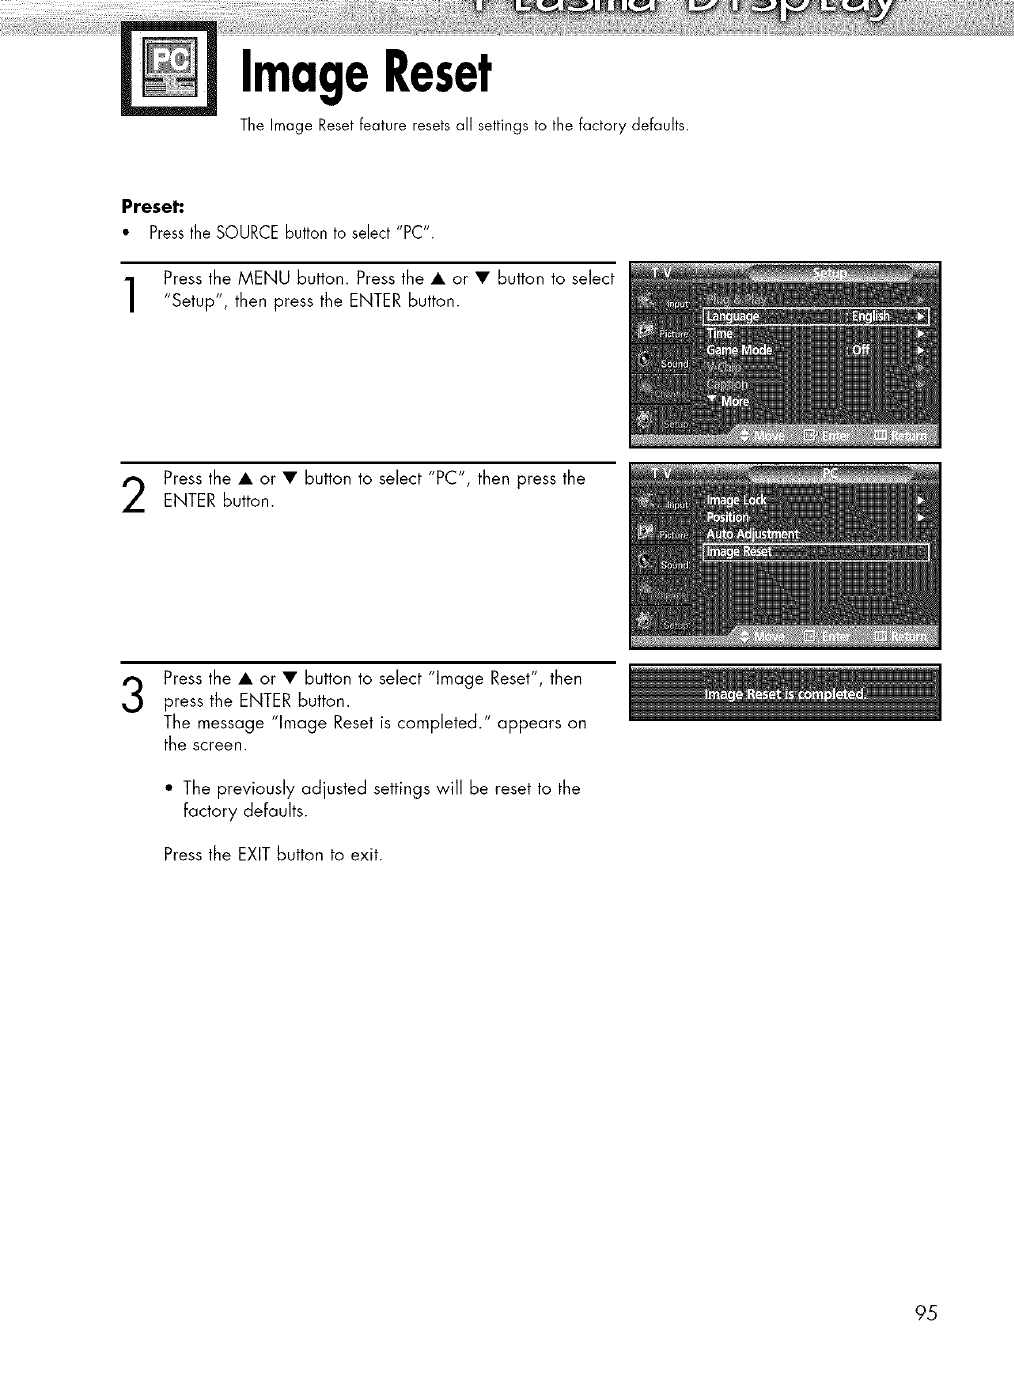
ImageReset
The Image Reset feature resets all settings to the factory defaults.
Preset:
•Pressthe SOURCEbutton to select "PC".
Press the MENU button. Press the • or • button to select
"Setup", then press the ENTER button.
Press the • or • button to select "PC", then press the
ENTER button.
3Press the • or • button to select "Image Reset", then
press the ENTER button.
The message "Image Reset is completed." appears on
the screen.
• The previously adjusted settings will be reset to the
factory defaults.
Press the EXIT button to exit.
95

PLASMA DISPLAY PANEL
TimeSetting
Setting the Clock ....................................................................... 98
Setting the On/Off Timer ......................................................... 100
Setting the Sleep Timer ............................................................ 101
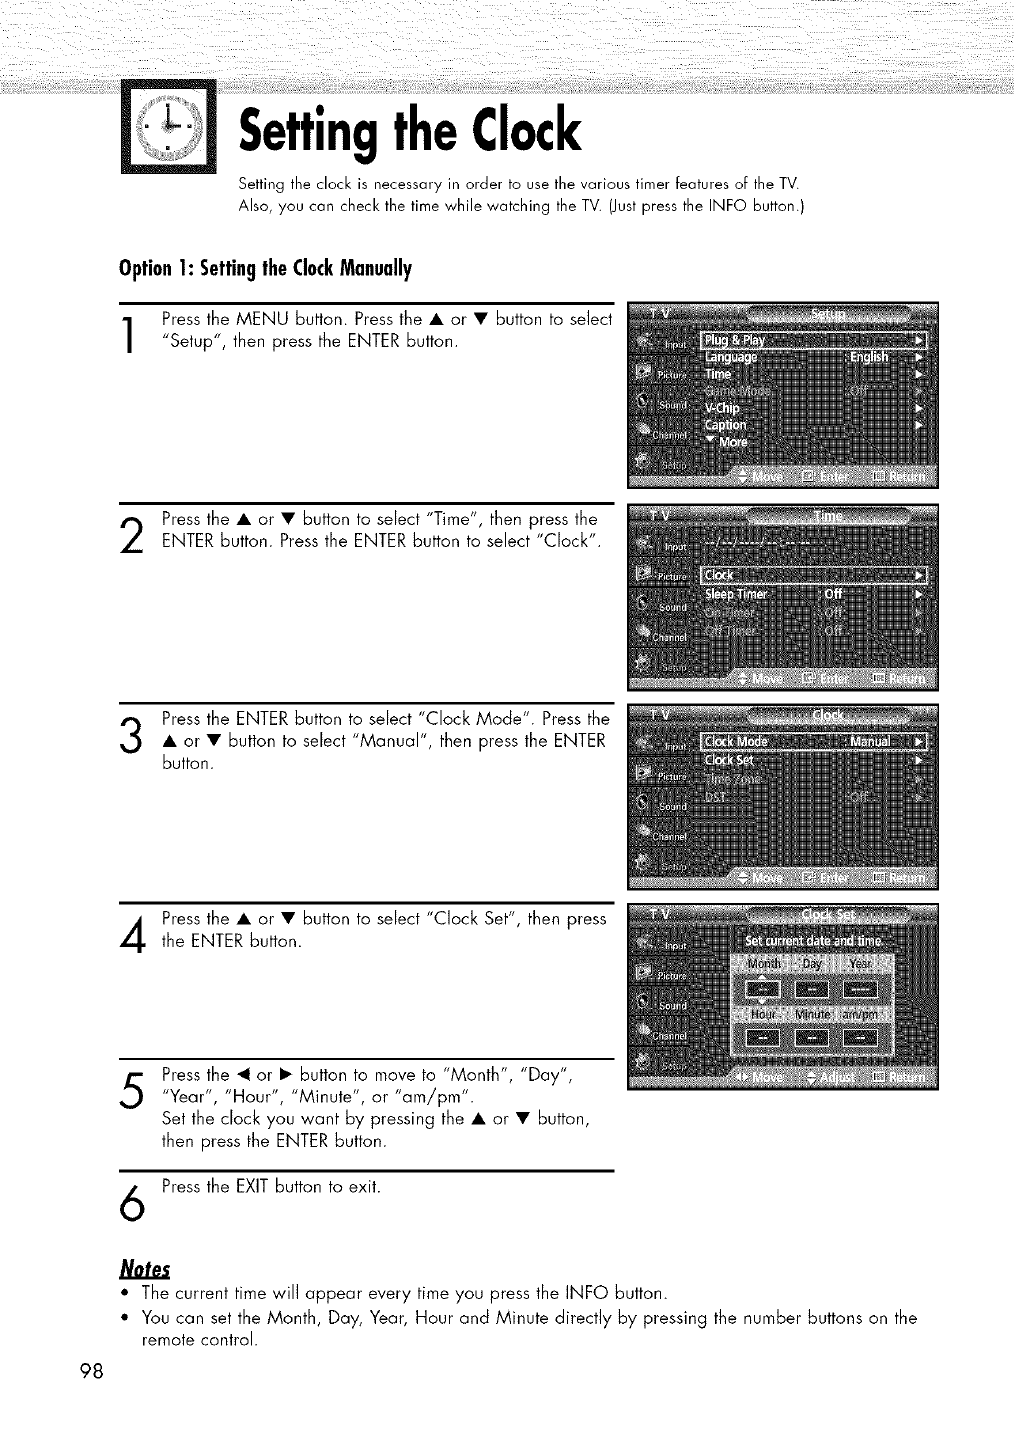
SettingtheClock
Setting the clock is necessary in order to use the various timer features of the TV.
Also, you can check the time while watching the TV. (Just press the INFO button.)
Option1: SettingtheClockManually
Press the MENU button. Press the • or • button to select
"Setup", then press the ENTER button.
Press the • or • button to select "Time", then press the
ENTER button. Press the ENTER button to select "Clock".
Press the ENTER button to select "Clock Mode". Press the
• or • button to select "Manual", then press the ENTER
button.
Press the • or • button to select "Clock Set", then press
the ENTER button.
5
6
Press the _1 or • button to move to "Month", "Day",
"Year", "Hour", "Minute", or "am/pm'.
Set the clock you want by pressing the • or • button,
then press the ENTER button.
Press the EXIT button to exit.
98
• The current time win appear every time you press the INFO button.
• You can set the Month, Day, Year, Hour and Minute directly by pressing the number buttons on the
remote control.
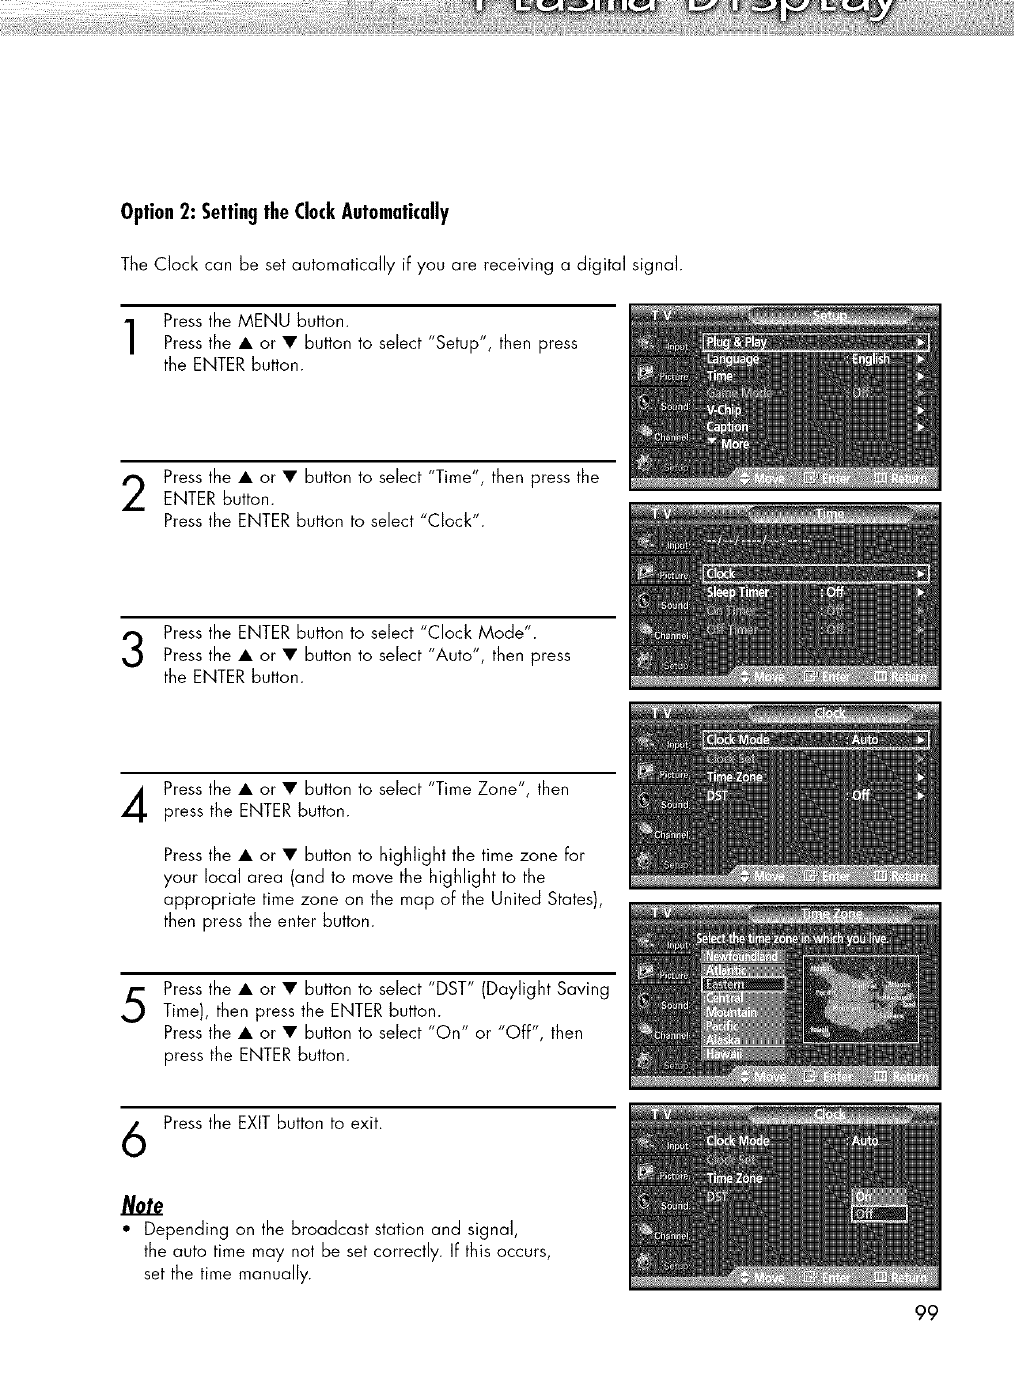
Option2: SettingtheClockAutomatically
The Clock can be set automatically if you are receiving a digital signal.
Press the MENU button.
Press the • or • button to select "Setup", then press
the ENTER button.
Press the • or • button to select "T'me', then press the
ENTER button.
Press the ENTER button to select "Clock".
Press the ENTER button to select "Clock Mode".
Press the • or • button to select "Auto", then press
the ENTER button.
Press the • or • button to select "Time Zone", then
press the ENTER button.
Press the • or • button to highlight the time zone for
your local area (and to move the highlight to the
appropriate time zone on the map of the United States),
then press the enter button.
Press the • or • button to select "DST" (Daylight Saving
Time), then press the ENTER button.
Press the • or • button to select "On" or "OFF", then
press the ENTER button.
Press the EXIT button to exit.
Note
• Depending on the broadcast station and signal,
the auto time may not be set correctly. If this occurs,
set the time manually.
99
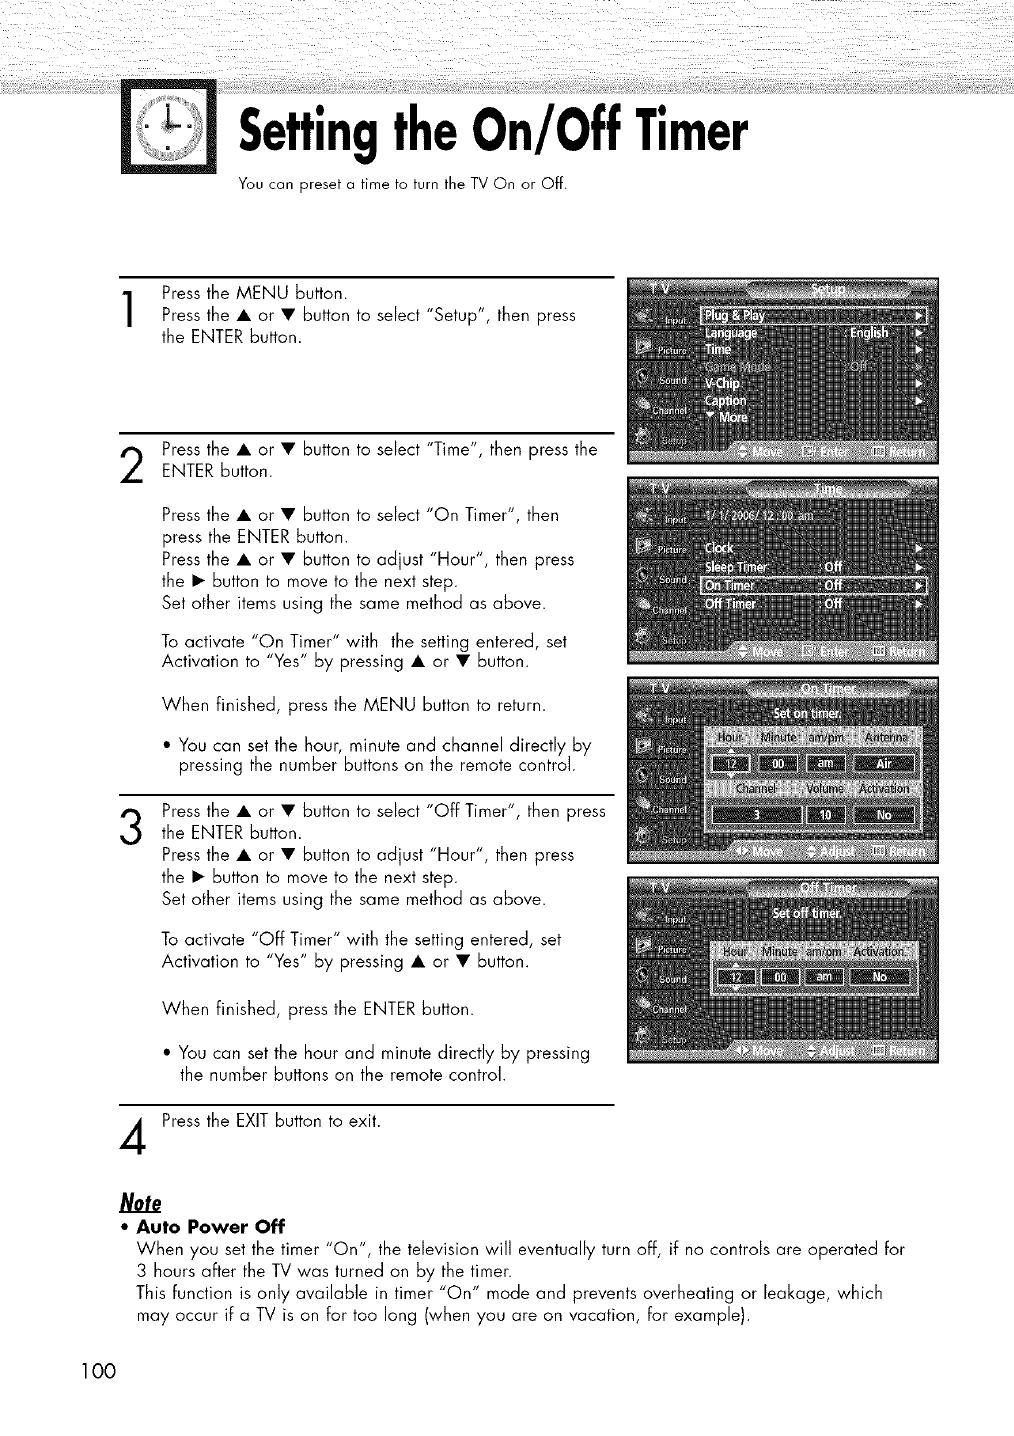
SettingtheOn/OffTimer
You can preset a time to turn the TV On or Off.
Press the MENU button.
Press the • or • button to select "Setup", then press
the ENTER button.
Press the • or • button to select "T'me', then press the
ENTER button.
3
4
Press the • or • button to select "On Timer", then
press the ENTER button.
Press the • or • button to adjust "Hour", then press
the • button to move to the next step.
Set other items using the same method as above.
To activate "On Timer" with the setting entered, set
Activation to "Yes" by pressing • or • button.
When finished, press the MENU button to return.
• You can set the hour, minute and channel directly by
pressing the number buttons on the remote control.
Press the • or • button to select "Off Timer", then press
the ENTER button.
Press the • or • button to adjust "Hour", then press
the • button to move to the next step.
Set other items using the same method as above.
To activate "Off Timer" with the setting entered, set
Activation to "Yes" by pressing • or • button.
When finished, press the ENTER button.
• You can set the hour and minute directly by pressing
the number buttons on the remote control.
Press the EXIT button to exit.
Note
•Auto Power Off
When you set the timer "On", the television will eventually turn off, if no controls are operated for
3 hours after the TV was turned on by the timer.
This function is only available in timer "On" mode and prevents overheating or leakage, which
may occur if a TV is on for too long (when you are on vacation, for example).
100
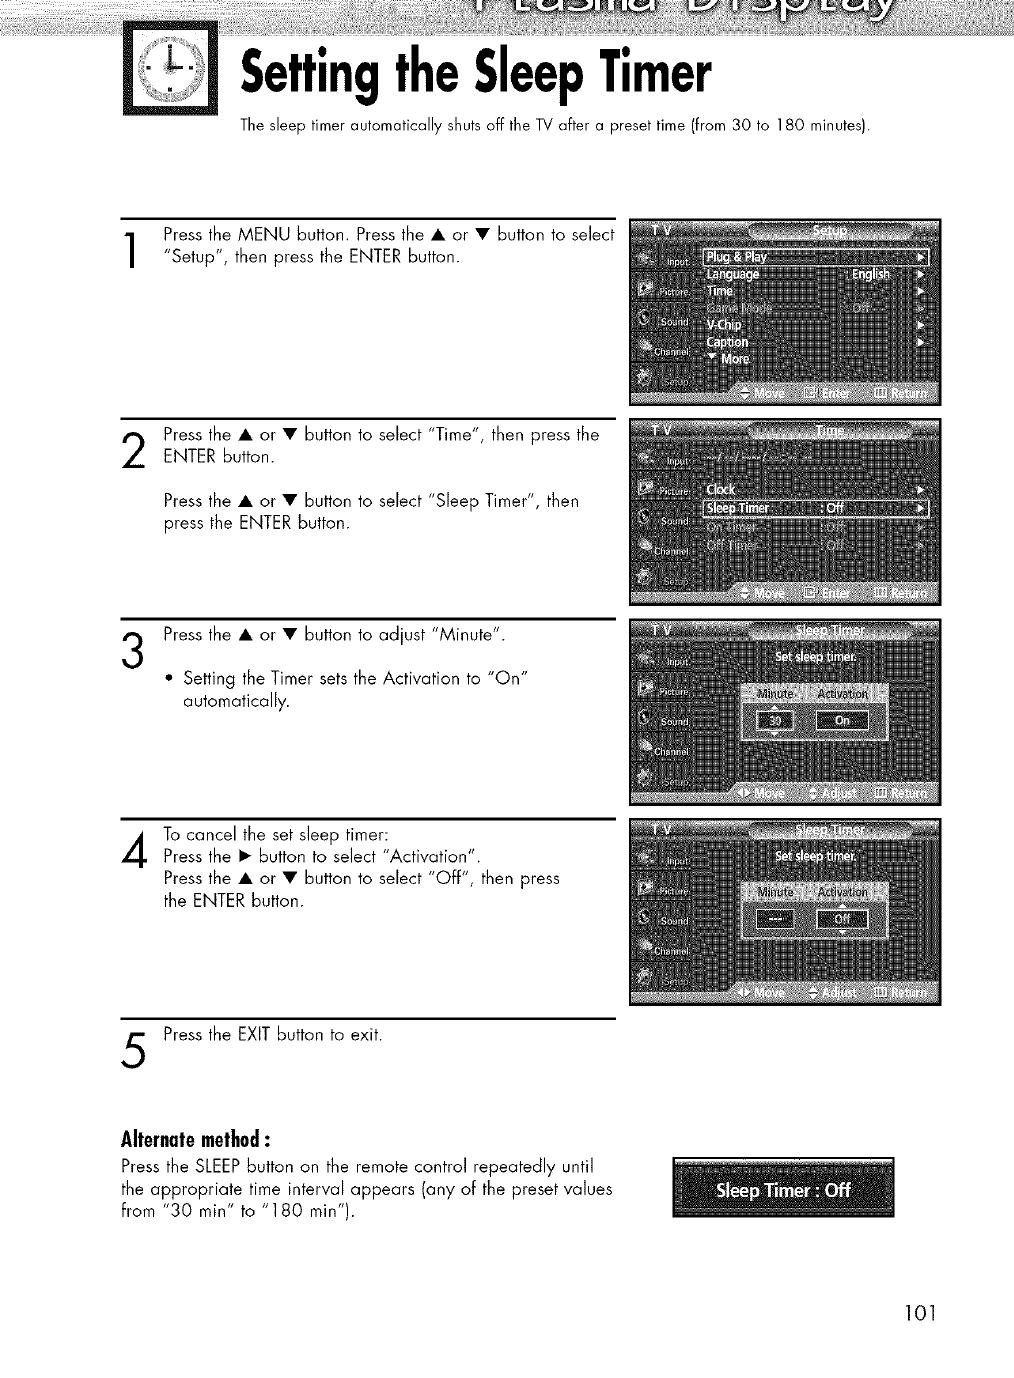
SettingtheSleepTimer
The sleep timer automatically shuts off the TV after a preset time (from 30 to 180 minutes).
Press the MENU button. Press the • or • button to select
"Setup", then press the ENTER button.
2Press the • or • button to select "T'me', then press the
ENTER button.
Press the • or • button to select "Sleep Timer", then
press the ENTER button.
Press the • or • button to adjust "Minute".
• Setting the Timer sets the Activation to "On"
automatically.
To cancel the set sleep timer:Press the • button to select "Activation".
Press the • or • button to select "Off", then press
the ENTER button.
Press the EXIT button to exit.
Alternatemethod:
Press the SLEEPbutton on the remote control repeatedly until
the appropriate time interval appears (any of the preset values
from "30 min" to "180 min").
101

PLASMA DISPLAY PANEL
FunctionDescription
Selecting a Menu Language ................................................... 104
Digital Noise Reduction ......................................................... 105
Selecting the Film Mode ......................................................... 106
Setting the Blue Screen .......................................................... 107
Using Game Mode ................................................................ 108
Viewing Closed Captions (On-Screen Text Messages)-Analog... 109
Viewing Closed Captions (On-Screen Text Messages) - Digital....110
Menu Transparency Level ....................................................... 112
Using the Energy Saving feature ............................................. 113
Preventing Screen Burn-in ....................................................... 114
Reducing the Effects of Screen Burn......................................... 115
Setting the Function Help ....................................................... 116
Setting the Blue Eye ............................................................... 117
Using the V-Chip (for USA) ..................................................... 118
Using the V-Chip (for Canada) ................................................ 124
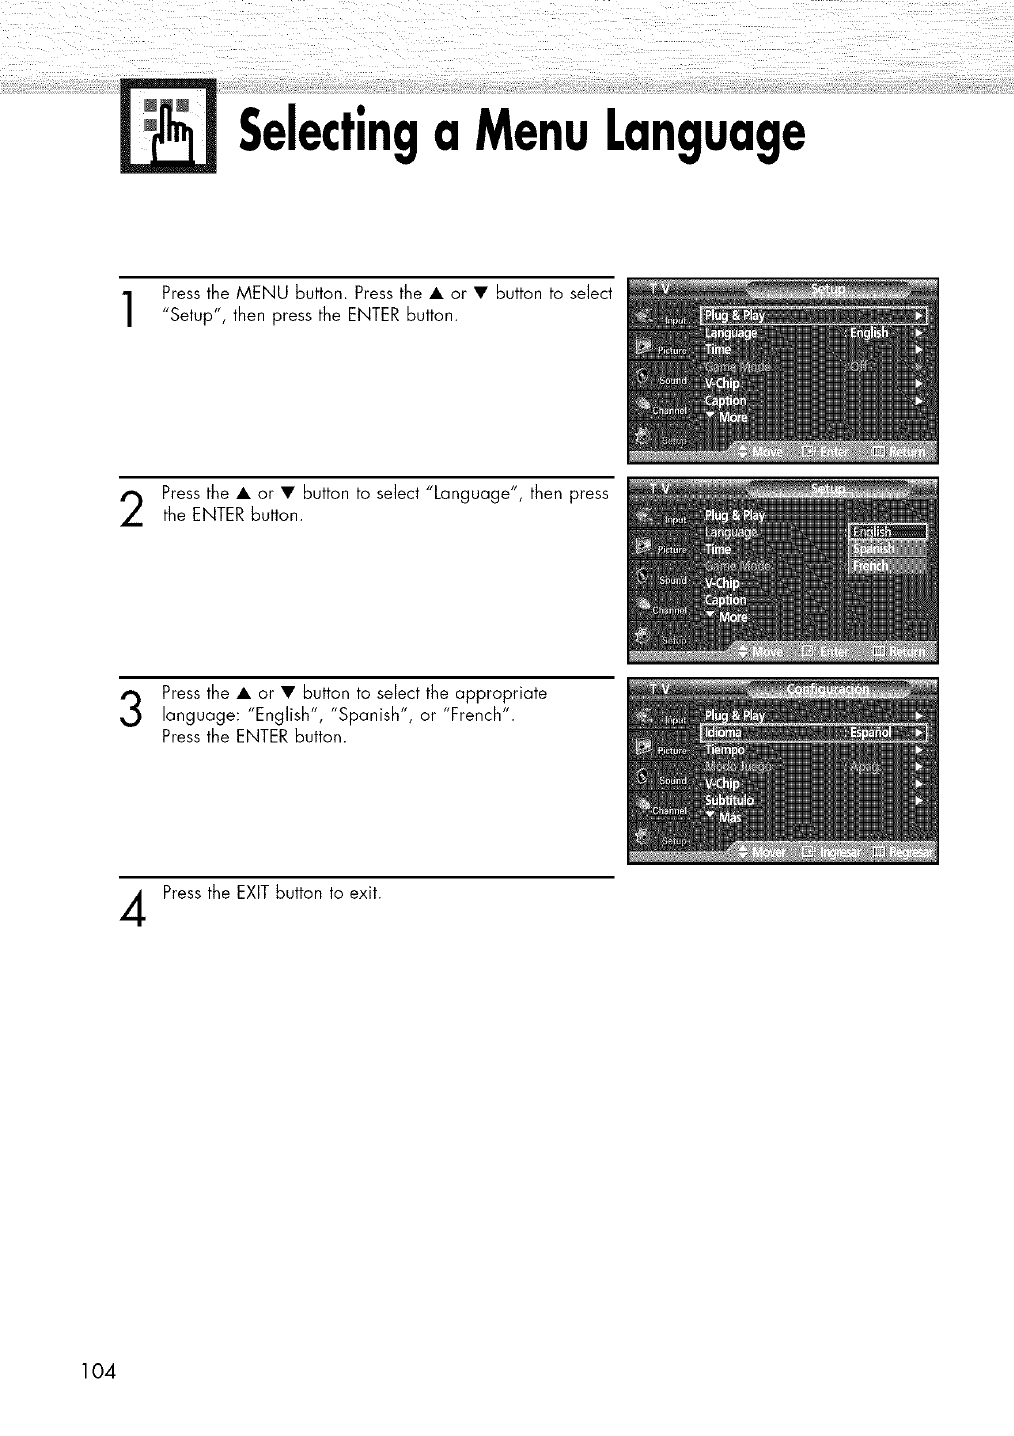
Selectinga MenuLanguage
Press the MENU button. Press the • or • button to select
"Setup", then press the ENTER button.
Press the • or • button to select "Language", then press
the ENTER button.
Press the • or • button to select the appropriate
language: "English", "Spanish", or "French".
Press the ENTER button.
Press the EXIT button to exit.
104
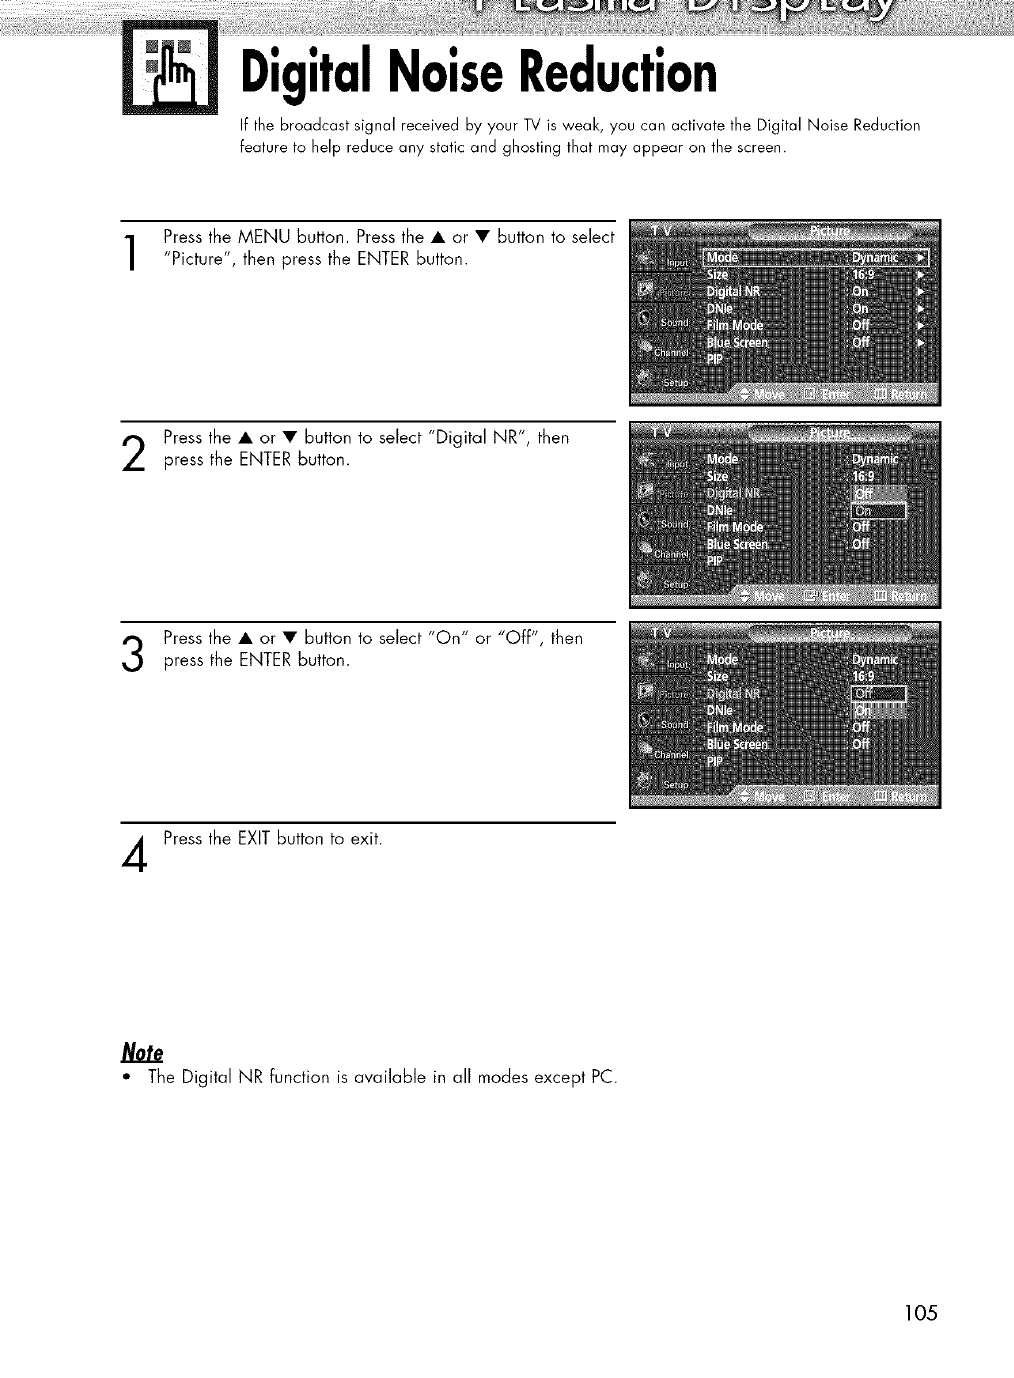
DigitalNoiseReduction
If the broadcast signal received by your TV is weak, you can activate the Digital Noise Reduction
feature to help reduce any static and ghosting that may appear on the screen.
Press the MENU button. Press the • or • button to select
"Picture", then press the ENTER button.
Press the • or • button to select "Digital NR", then
press the ENTER button.
Press the • or • button to select "On" or "Off", then
press the ENTER button.
Press the EXIT button to exit.
Note
"The Digital NR function is available in all modes except PC.
1O5
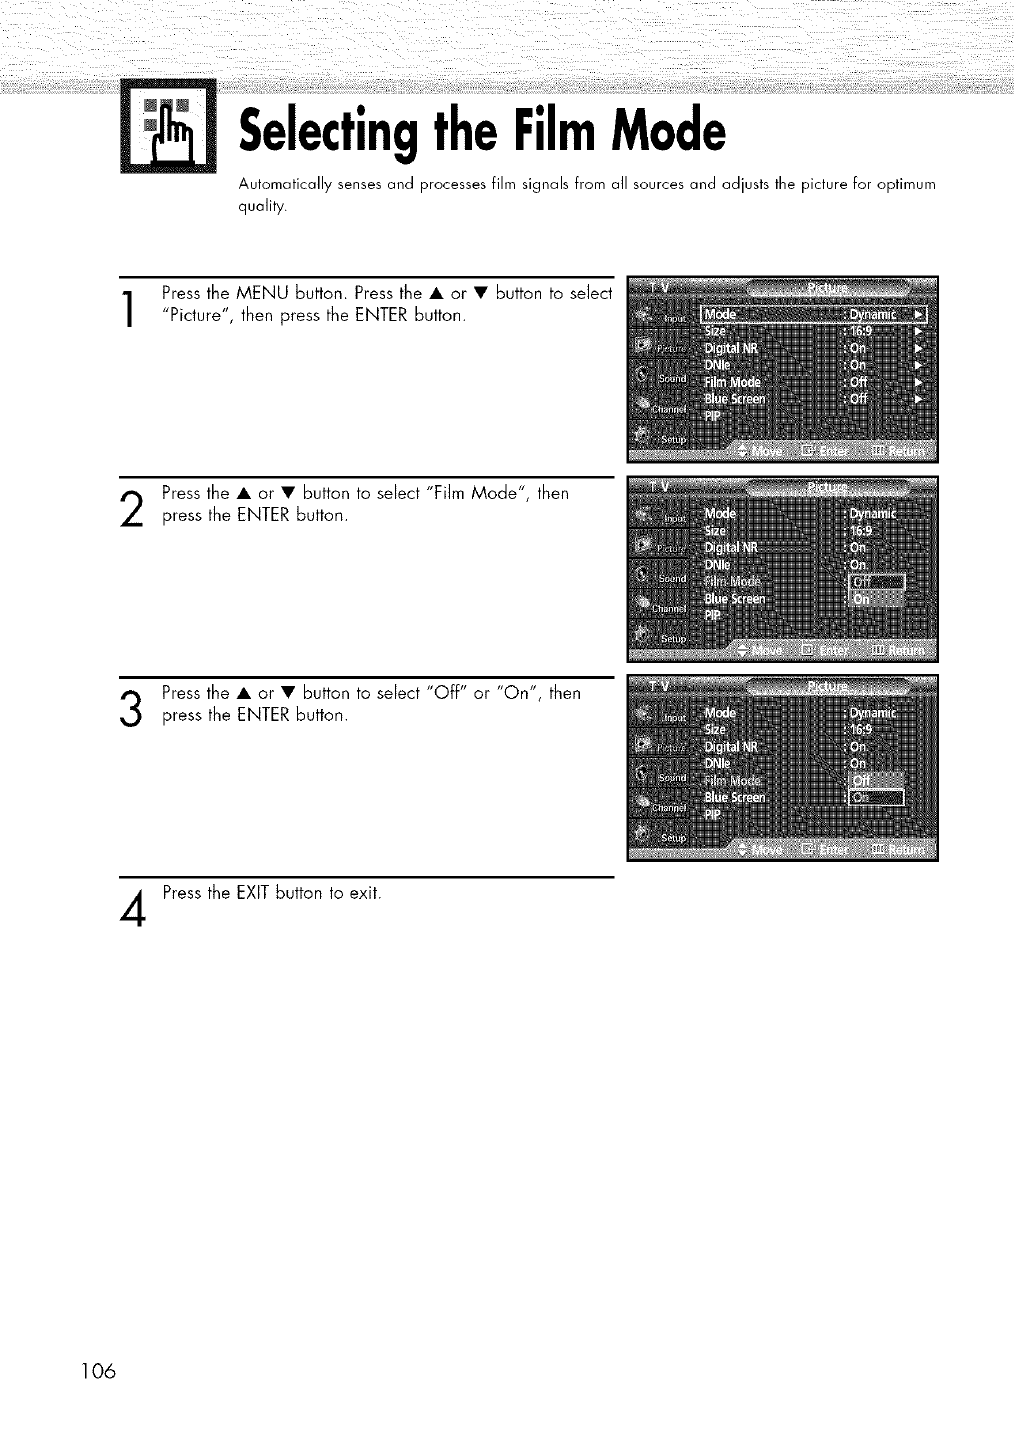
SelectingtheFilmMode
Automatically senses and processes film signals from all sources and adjusts the picture for optimum
quality.
Press the MENU button. Press the • or • button to select
"Picture", then press the ENTER button.
Press the • or • button to select "Film Mode", then
press the ENTER button.
Press the • or • button to select "Off" or "On", then
press the ENTER button.
Press the EXIT button to exit.
106
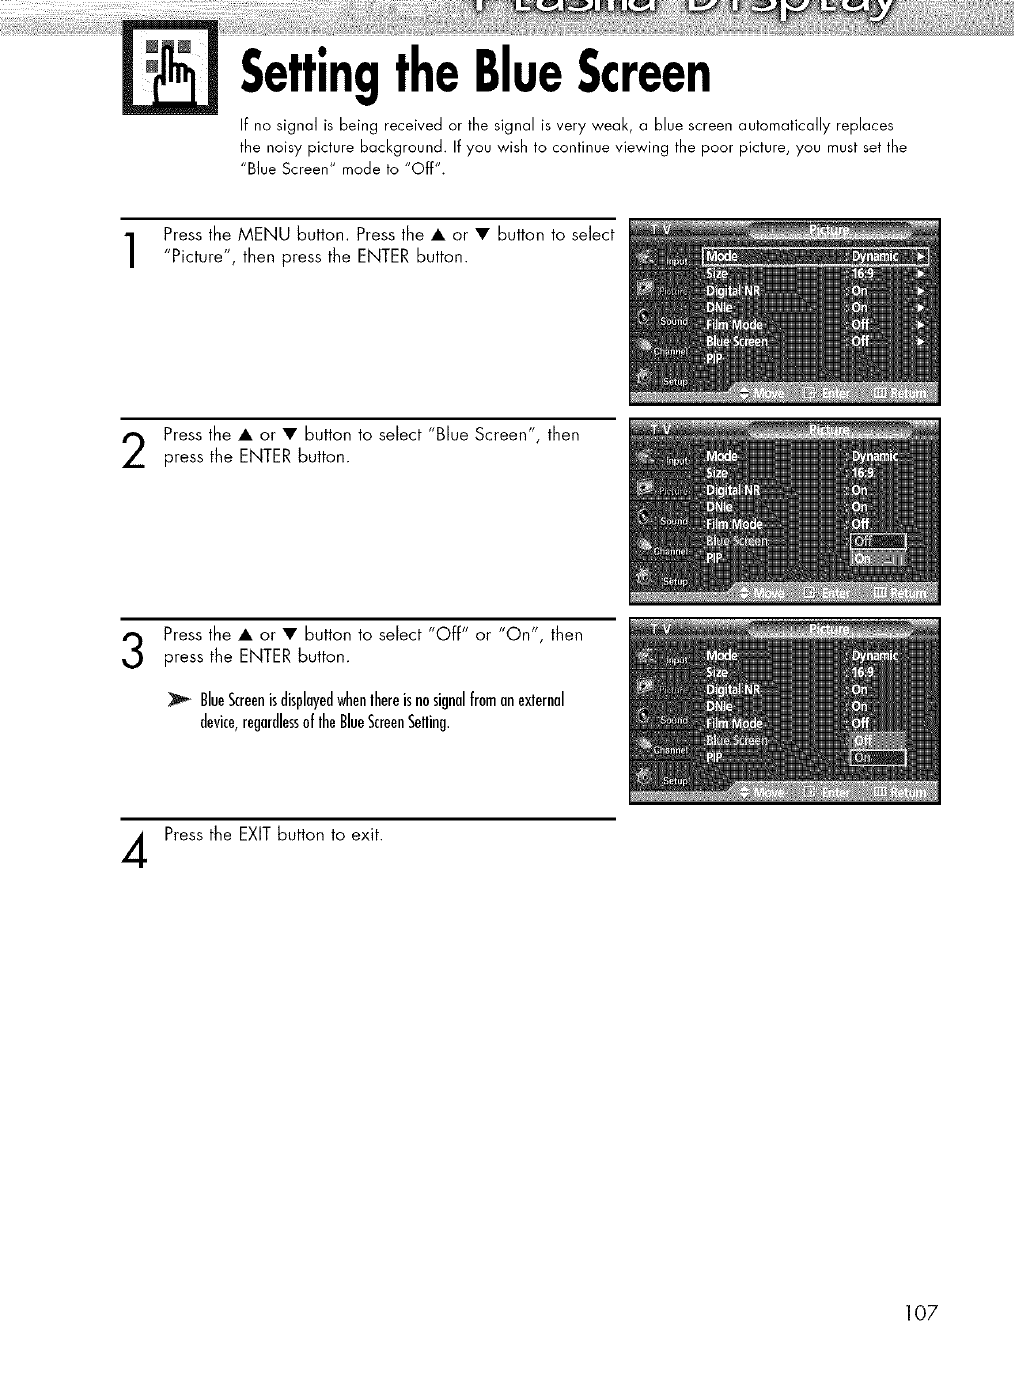
SettingtheBlueScreen
If no signal is being received or the signal is very weak, a blue screen automatically replaces
the noisy picture background. If you wish to continue viewing the poor picture, you must set the
"Blue Screen" mode to "Off".
Press the MENU button. Press the • or • button to select
"Picture", then press the ENTER button.
Press the • or • button to select "Blue Screen", then
press the ENTER button.
Press the • or • button to select "Off" or "On", then
press the ENTER button.
BlueScreenisdisplayedwhenlhereisnosignalfromanexternal
device,regardlessoflheBlueScreenSelling.
Press the EXIT button to exit.
107
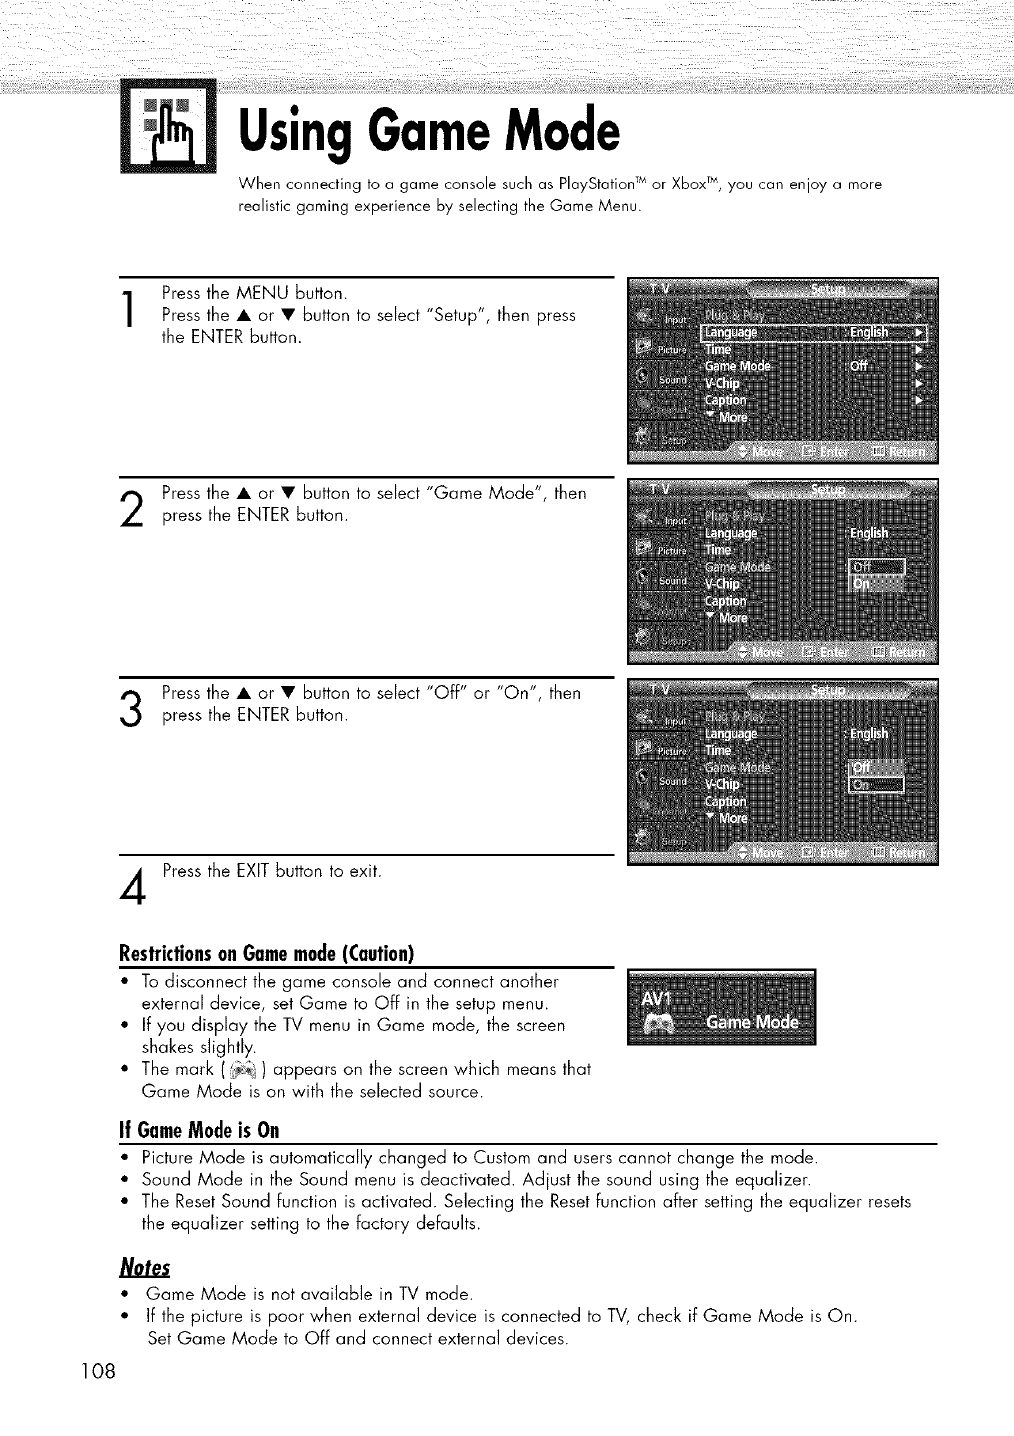
UsingGameMode
When connecting to a game console such as PlayStation T_or XboxTM,you can enjoy a more
realistic gaming experience by selecting the Game Menu.
Press the MENU button.
Press the • or • button to select "Setup", then press
the ENTER button.
Press the • or • button to select "Game Mode", then
press the ENTER button.
Press the • or • button to select "Off" or "On", then
press the ENTER button.
Press the EXIT button to exit.
RestrictionsonGamemode(Caution)
• To disconnect the game console and connect another
external device, set Game to Off in the setup menu.
• If you display the TV menu in Game mode, the screen
shakes slightly.
• The mark ((_) appears on the screen which means that
Game Mode is on with the selected source.
If GameModeis On
• Picture Mode is automatically changed to Custom and users cannot change the mode.
• Sound Mode in the Sound menu is deactivated. Adjust the sound using the equalizer.
• The ResetSound function is activated. Selecting the Reset function after setting the equalizer resets
the equalizer setting to the factory defaults.
Notes
• Game Mode is not available in TV mode.
• If the picture is poor when external device is connected to TV, check if Game Mode is On.
Set Game Mode to Off and connect external devices.
108

VeiewingClosedCaptions(On-Screen
xtMessages)-Analog
The Analog Caption function operates in either analog RF channel mode or external signal mode.
1Press the Menu button. Press the • or • button to select
"Setup", then press the ENTER button.
QuickwayIoseleclCoplion:Juslpress"CAPTION"bullononlhe
remolecontrol.
Press the • or • button to select "Caption", then pressthe ENTER button.
Press the ENTER button to select "Caption".
Press the • or • button to select "On", then press the
ENTER button.
Press the • or • button to select "Caption Mode", then
press the ENTER button.
Press the • or • button to select submenu
(CC1~CC4 or Text1~Text4) you want, then press
the ENTER button.
• The default is "CC1 ".
CC1 : The Primary Synchronous Caption Service.
These are captions in the primary language
that must be in sync with the sound, preferably
matched to a specific frame.
CC2 : The Special Non-Synchronous Use Captions.
This channel carries data that is intended to
augment information carried in the program.
CC3 : Secondary Synchronous Caption Service.
Alternate program-related caption data,
typically second language captions.
CC4 : Special Non-Synchronous Use Captions.
Similar to CC2.
Text1 : First Text Service. This may be various
non-program related data.
Text2 : Second Text Service. Additional data,
usually not program related.
Text3/Text4 : Third and Fourth Text Services. These
data channels should be used only if
Text1 and Text2 data bandwidth is not
sufficient.
Press the EXIT button to exit.
• The Caption feature doesn't work in COMPONENT, PC, HDMI(DVI) modes.
• The availability of captions depends on the program being broadcast.
109
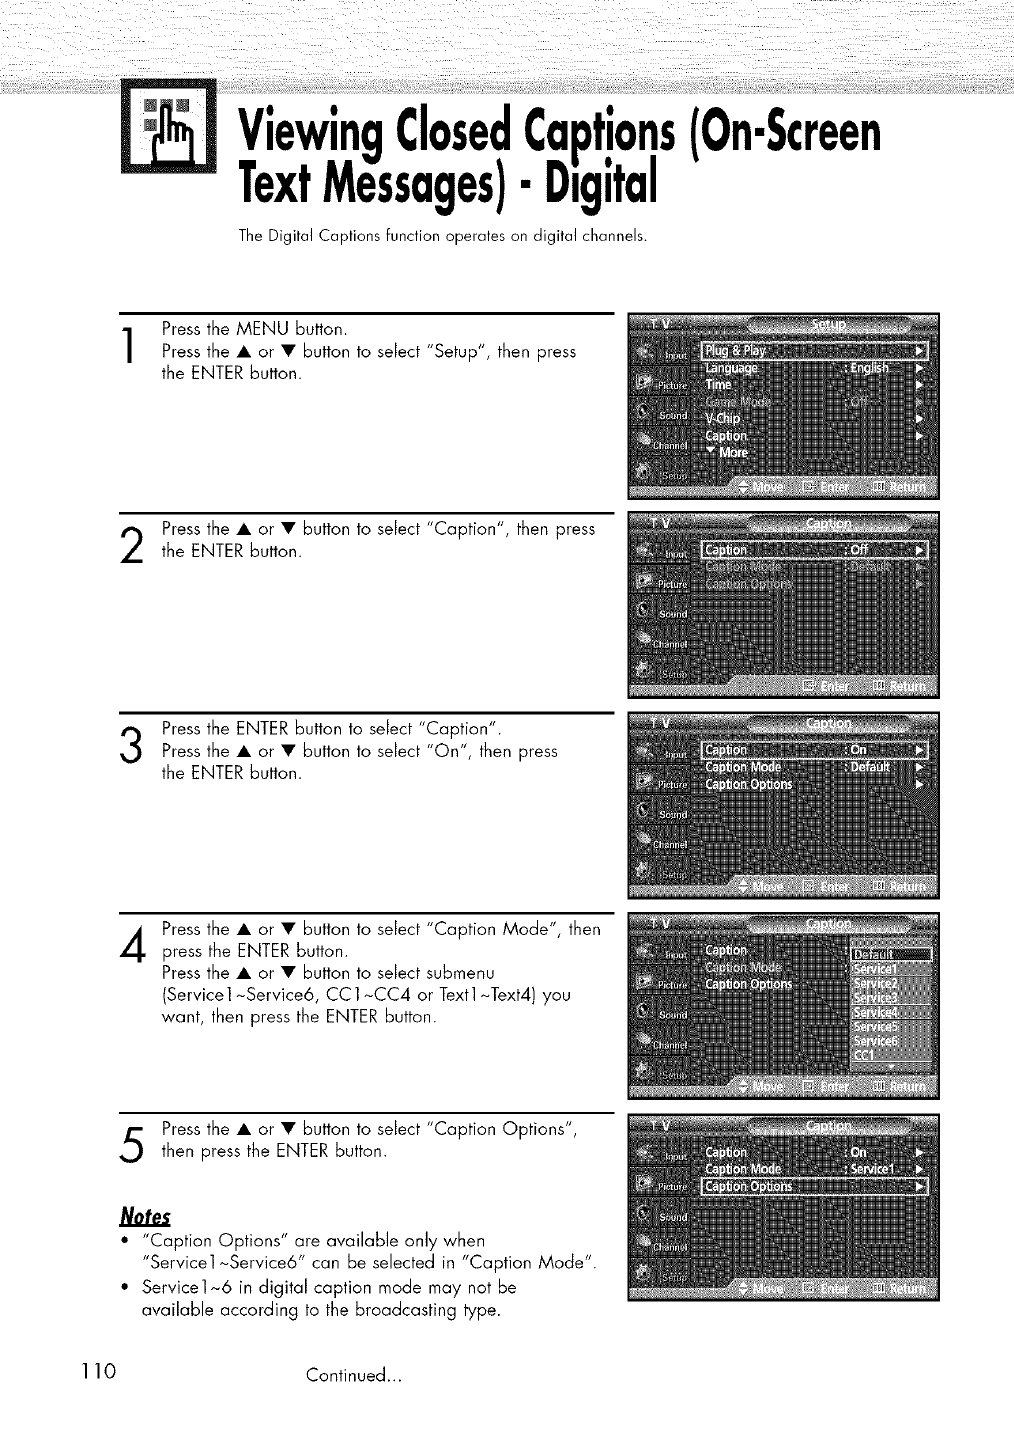
VeiewingClosedCaptions(On-Screen
xtMessages)-Digital
The Digital Captions function operates on digital channels.
Press the MENU button.
Press the • or • button to select "Setup", then press
the ENTER button.
Press the • or • button to select "Caption", then press
the ENTER button.
Press the ENTER button to select "Caption".
Press the • or • button to select "On", then press
the ENTER button.
4Press the • or • button to select "Caption Mode", then
press the ENTER button.
Press the • or • button to select submenu
(Servicel~Service6, CC1~CC4 or Text1~Text4)you
want, then press the ENTER button.
Press the • or • button to select "Caption Options",
then press the ENTER button.
Notes
•"Caption Options" are available only when
"Service1 ~Service6" can be selected in "Caption Mode".
• Service1~6 in digital caption mode may not be
available according to the broadcasting type.
110 Continued...
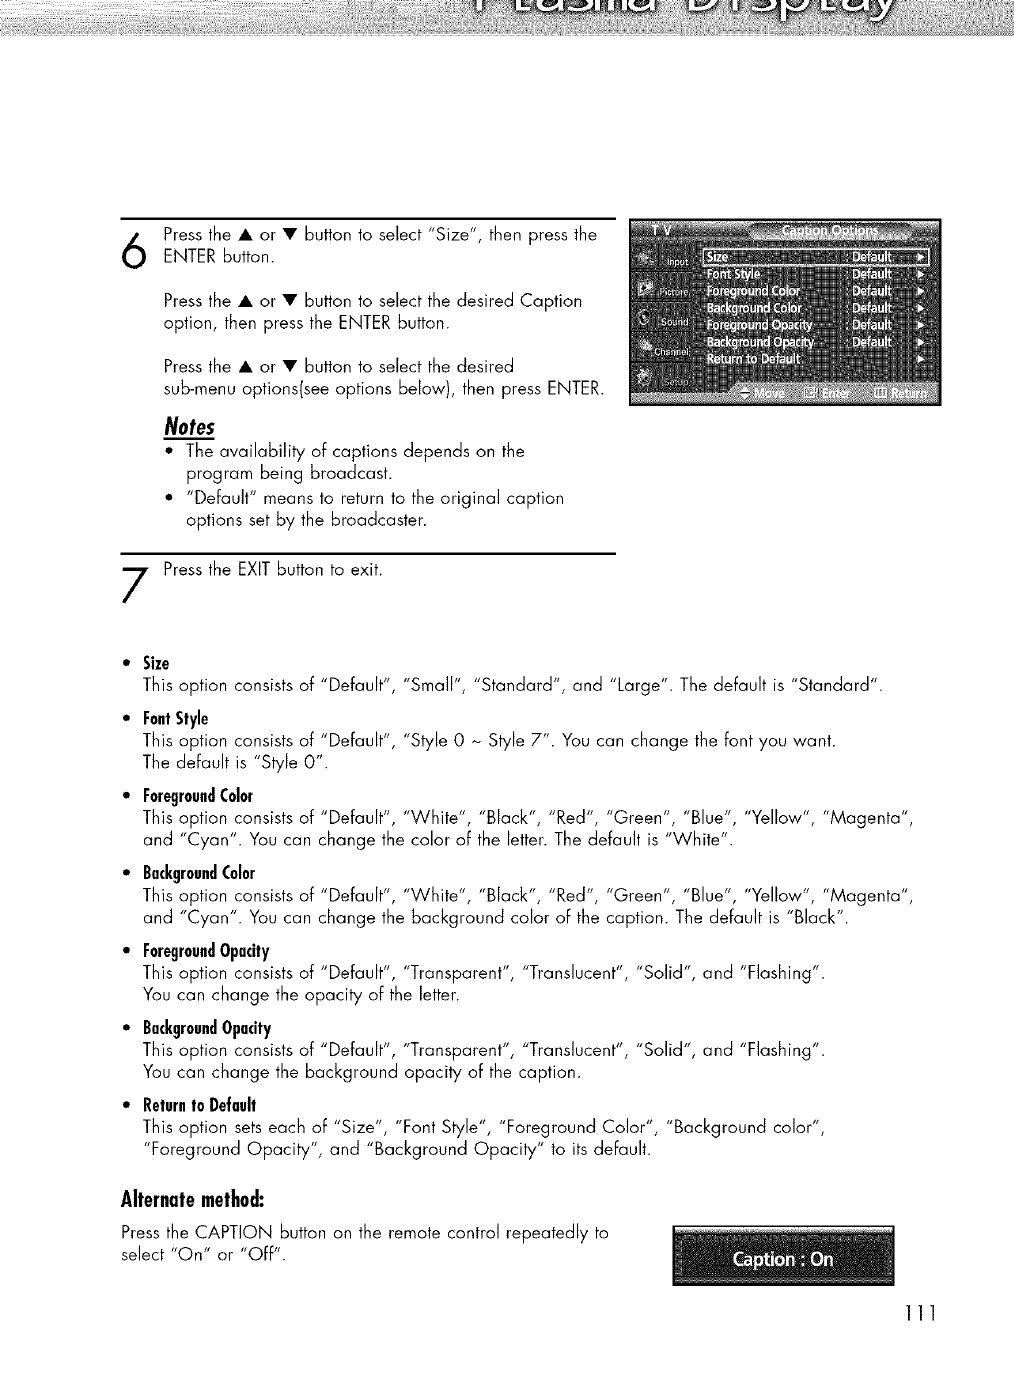
Press the • or • button to select "Size", then press the
ENTER button.
Press the • or • button to select the desired Caption
option, then press the ENTER button.
Press the • or • button to select the desired
sub-menu options(see options below), then press ENTER.
Notes
• The availability of captions depends on the
program being broadcast.
• "Default" means to return to the original caption
options set by the broadcaster.
Press the EXIT button to exit.
•Size
This option consists of "Default", "Small", "Standard", and "Large". The default is "Standard".
•FontStyle
This option consists of "Default", "Style 0 ~ Style 7". You can change the font you want.
The default is "Style 0".
•ForegroundColor
This option consists of "Default", "White", "Black", "Red", "Green", "Blue", "Yellow", "Magenta",
and "Cyan". You can change the color of the letter. The default is "White".
•BackgroundColor
This option consists of "Default", "White", "Black", "Red", "Green", "Blue", "Yellow", "Magenta",
and "Cyan". You can change the background color of the caption. The default is "Black".
•ForegroundOpacity
This option consists of "Default", "Transparent", "Translucent", "Solid", and "Flashing".
You can change the opacity of the letter.
•BackgroundOpacity
This option consists of "Default", "Transparent", "Translucent", "Solid", and "Flashing".
You can change the background opacity of the caption.
•Returnto Default
This option sets each of "Size", "Font Style", "Foreground Color", "Background color",
"Foreground Opacity", and "Background Opacity" to its default.
Alternatemethod:
Press the CAPTION button on the remote control repeatedly to
select "On" or "Off".
111
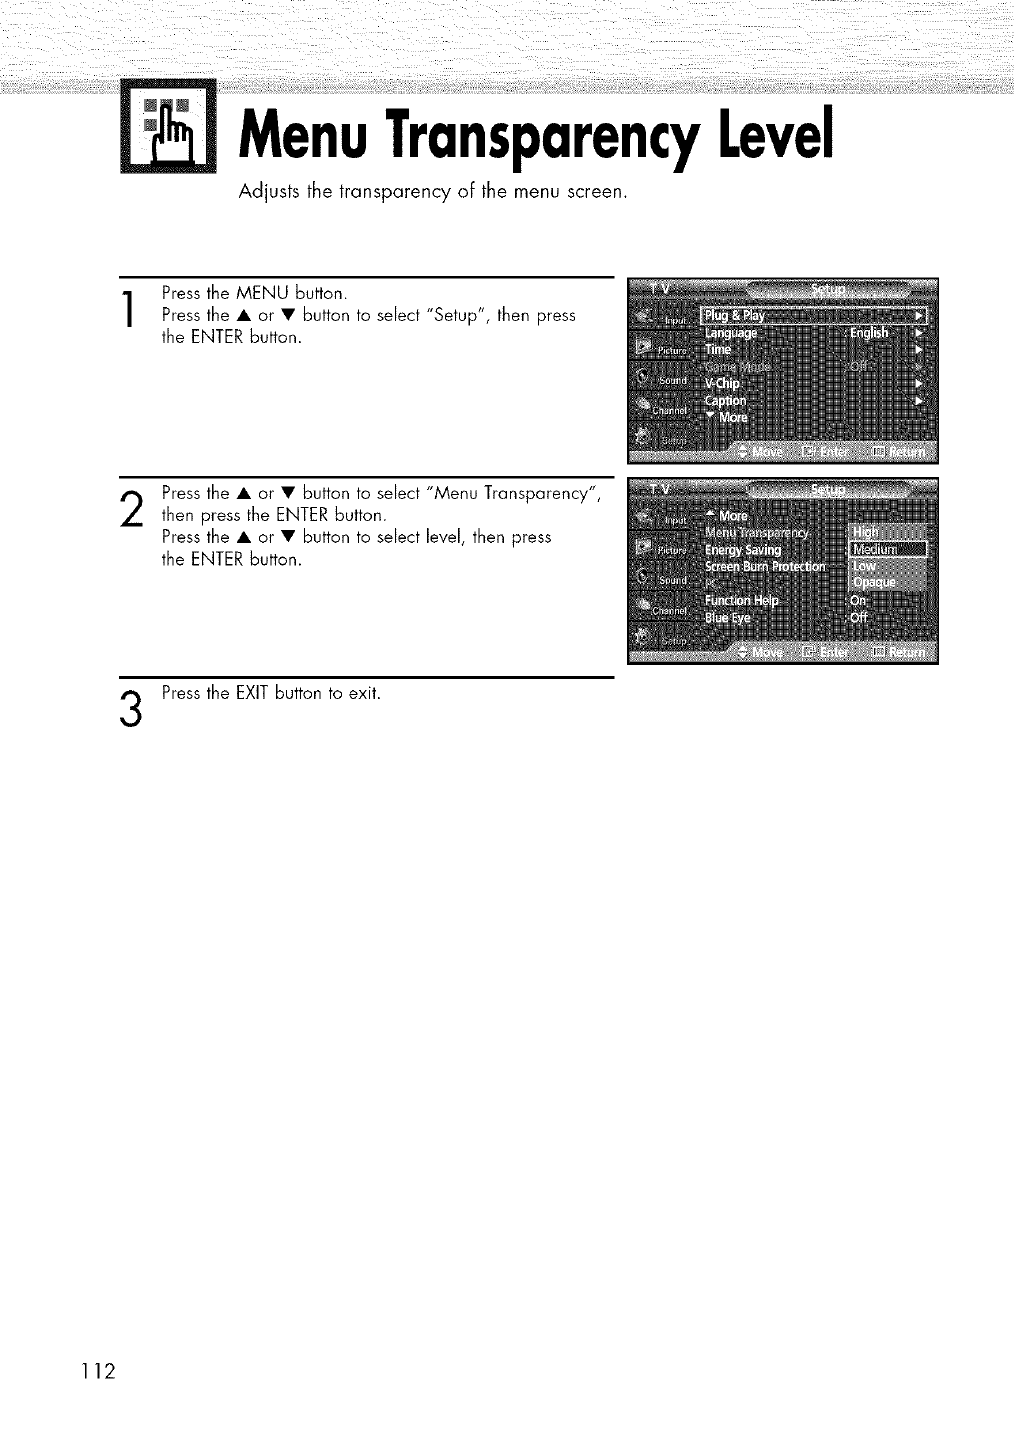
MenuTransparencyLevel
Adjusts the transparency ot: the menu screen.
Press the MENU Button.
Press the • or • Button to select "Setup", then press
the ENTER Button.
2Press the • or • Button to select "Menu Transparency",
then press the ENTER Button.
Press the • or • Button to select level, then press
the ENTER Button.
Press the EXIT Button to exit.
112
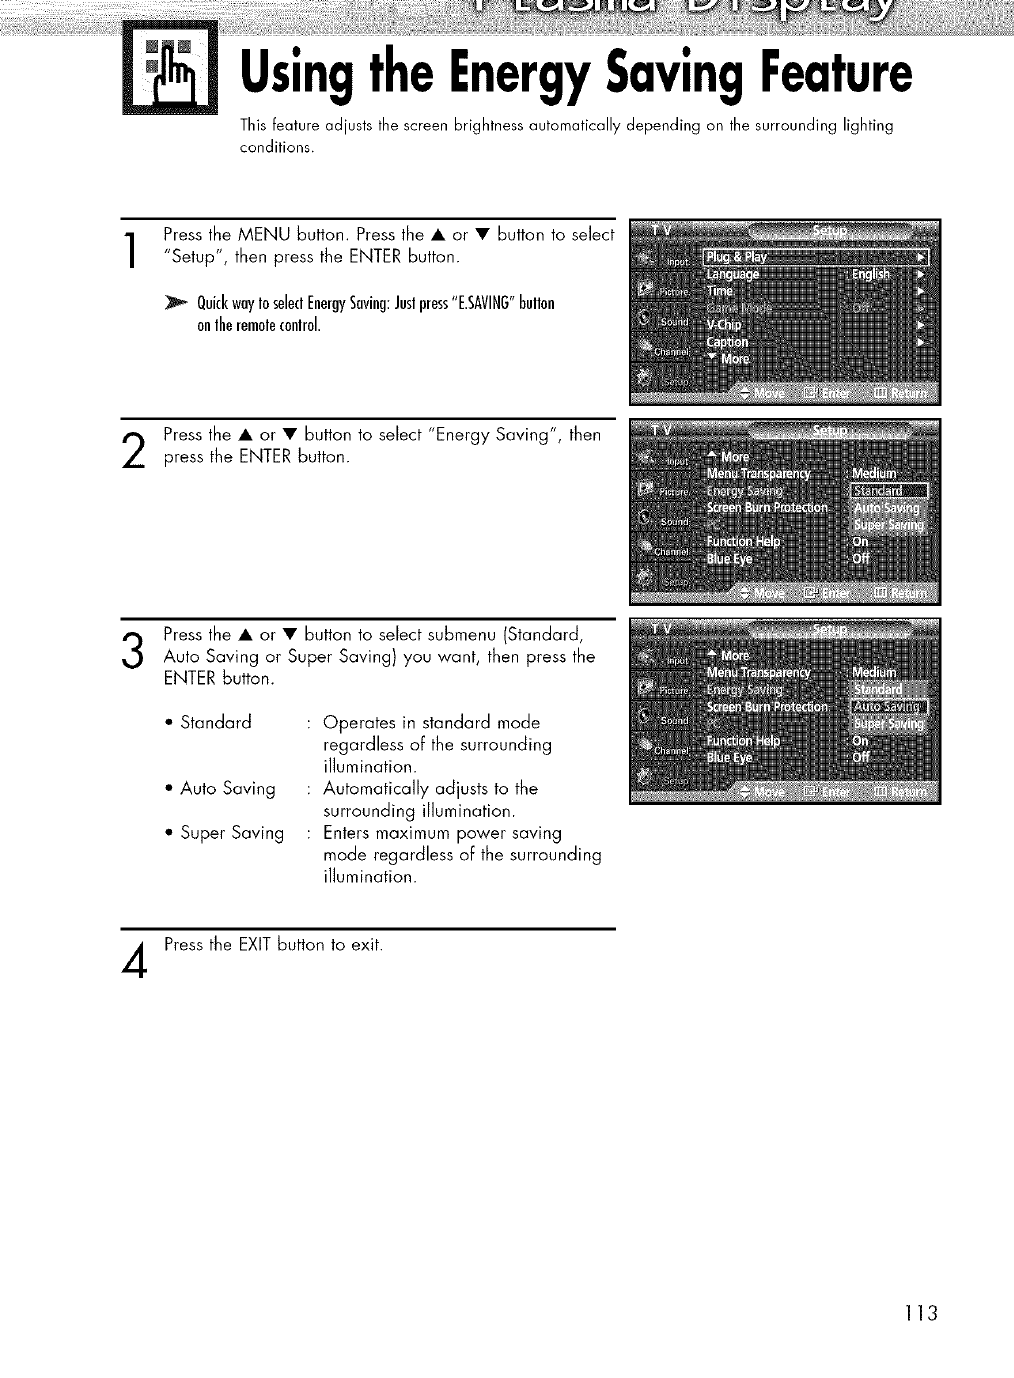
UsingtheEnergySavingFeature
This feature adjusts the screen brightness automatically depending on the surrounding lighting
conditions.
Press the MENU button. Press the • or • button to select
"Setup", then press the ENTER button.
QuickwayIoseleclEnergySaving:Jnslpress"E.SAVII_G"bnllon
onlheremolecontrol.
Press the • or • button to select "Energy Saving", then
press the ENTER button.
Press the • or • button to select submenu (Standard,
Auto Saving or Super Saving) you want, then press the
ENTER button.
*' Standard
• Auto Saving
• Super Saving
Operates in standard mode
regardless of the surrounding
illumination.
Automatically adjusts to the
surrounding illumination.
Enters maximum power saving
mode regardless of the surrounding
illumination.
Press the EXIT button to exit.
113
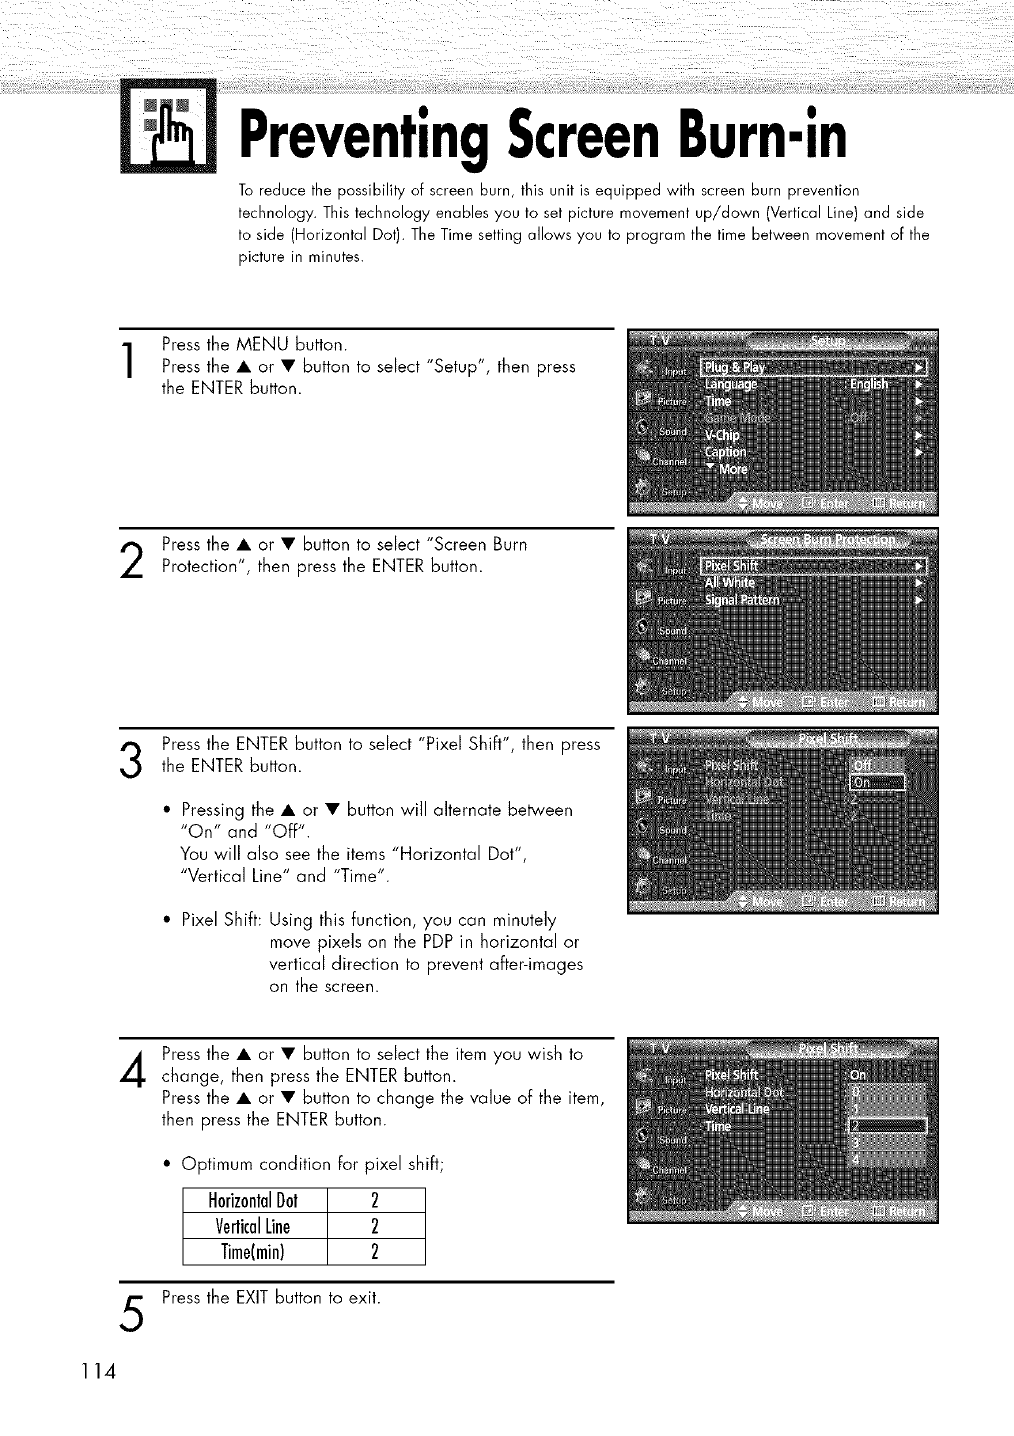
PreventingScreenBurn-in
To reduce the possibility of screen burn, this unit is equipped with screen burn prevention
technology. This technology enables you to set picture movement up/down (Vertical Line) and side
to side (Horizontal Dot). The Time setting allows you to program the time between movement of the
picture in minutes.
Press the MENU button.
Press the • or • button to select "Setup", then press
the ENTER button.
Press the • or • button to select "Screen Burn
Protection", then press the ENTER button.
Press the ENTER button to select "Pixel Shift", then pressthe ENTER button.
•Pressing the • or • button will alternate between
"On" and "Off".
You will also see the items "Horizontal Dot",
"Vertical Line" and "Time".
• Pixel Shift: Using this function, you can minutely
move pixels on the PDP in horizontal or
vertical direction to prevent after-images
on the screen.
4
5
Press the • or • button to select the item you wish to
change, then press the ENTER button.
Press the • or • button to change the value of the item,
then press the ENTER button.
• Optimum condition for pixel shift;
HorizontalDot 2
VerticalLine 2
Time(rain) 2
Press the EXIT button to exit.
114
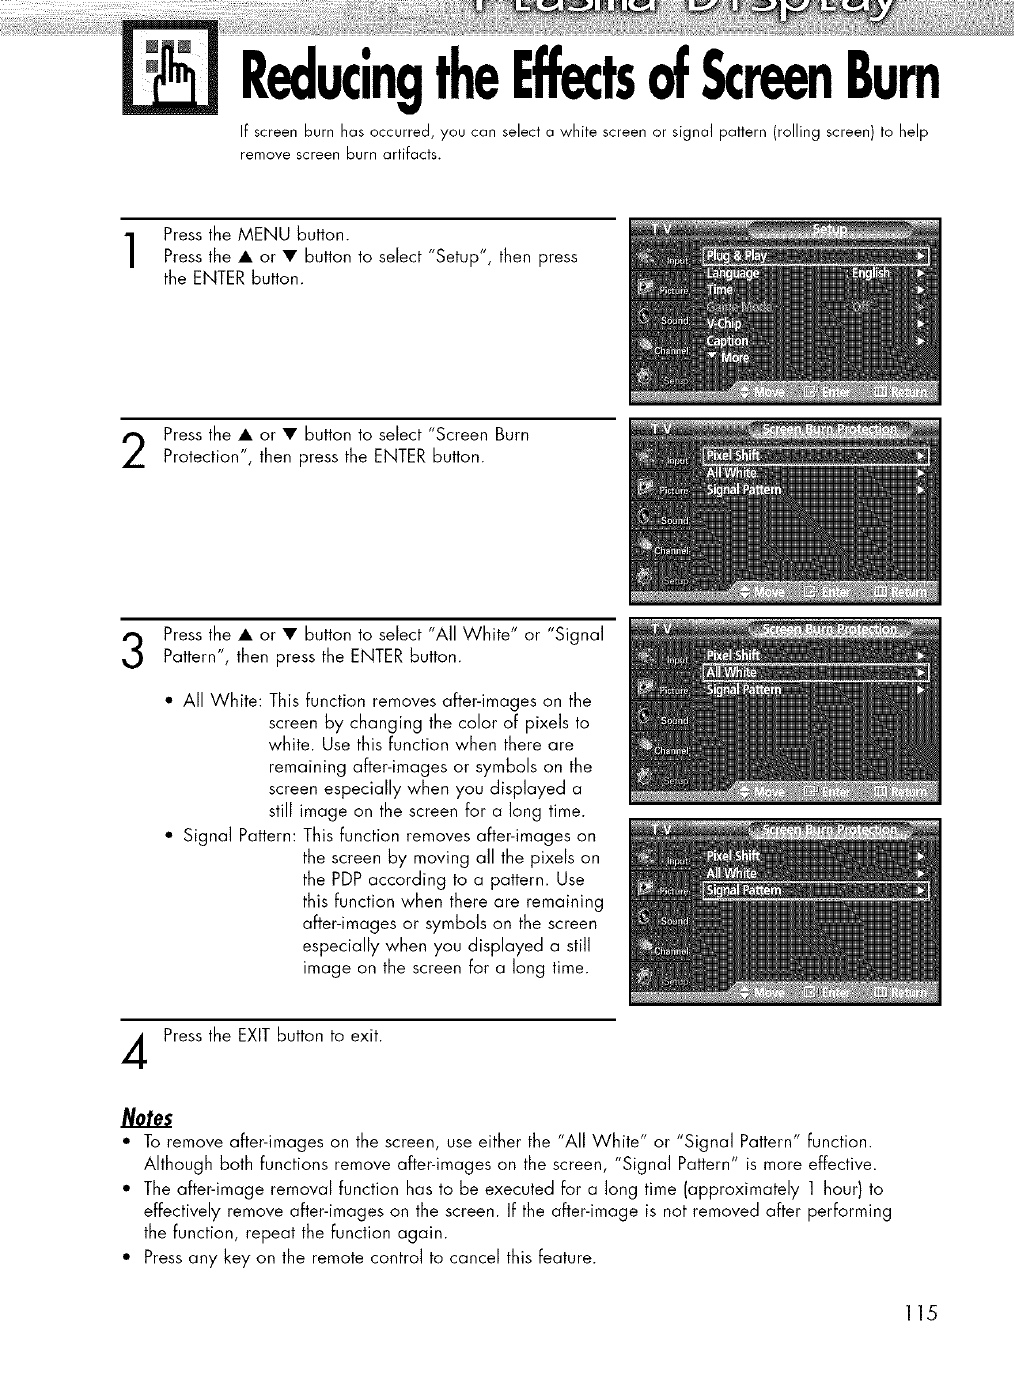
ReducingtheEffectsofScreenBurn
If screen burn has occurred, you can select a white screen or signal pattern (rolling screen) to help
remove screen burn artifacts.
Press the MENU button.
Press the • or • button to select "Setup", then press
the ENTER button.
Press the • or • button to select "Screen Burn
Protection", then press the ENTER button.
Press the • or • button to select "All Wh'te' or "S'gnal
Pattern", then press the ENTER button.
• All White: This function removes after-images on the
screen by changing the color of pixels to
white. Use this function when there are
remaining after-images or symbols on the
screen especially when you displayed a
still image on the screen for a long time.
• Signal Pattern: This function removes after-images on
the screen by moving all the pixels on
the PDP according to a pattern. Use
this function when there are remaining
after-images or symbols on the screen
especially when you displayed a still
image on the screen for a long time.
Press the EXIT button to exit.
• To remove after-images on the screen, use either the "All White" or "Signal Pattern" function.
Although both functions remove after-images on the screen, "Signal Pattern" is more effective.
• The after-image removal function has to be executed for a long time (approximately 1 hour) to
effectively remove after-images on the screen. If the after-image is not removed after performing
the function, repeat the function again.
• Press any key on the remote control to cancel this feature.
115

SettingtheFu
Displays help on the menu functions.
',n Help
Press the MENU button.
Press the • or • button to select "Setup", then press
the ENTER button.
Press the • or • button to select "Function Help", then
press the ENTER button.
Press the • or • button to select "Off" or "On", then
press the ENTER button.
Press the EXIT button to exit.
Note
• The Function Help default setting is On.
116
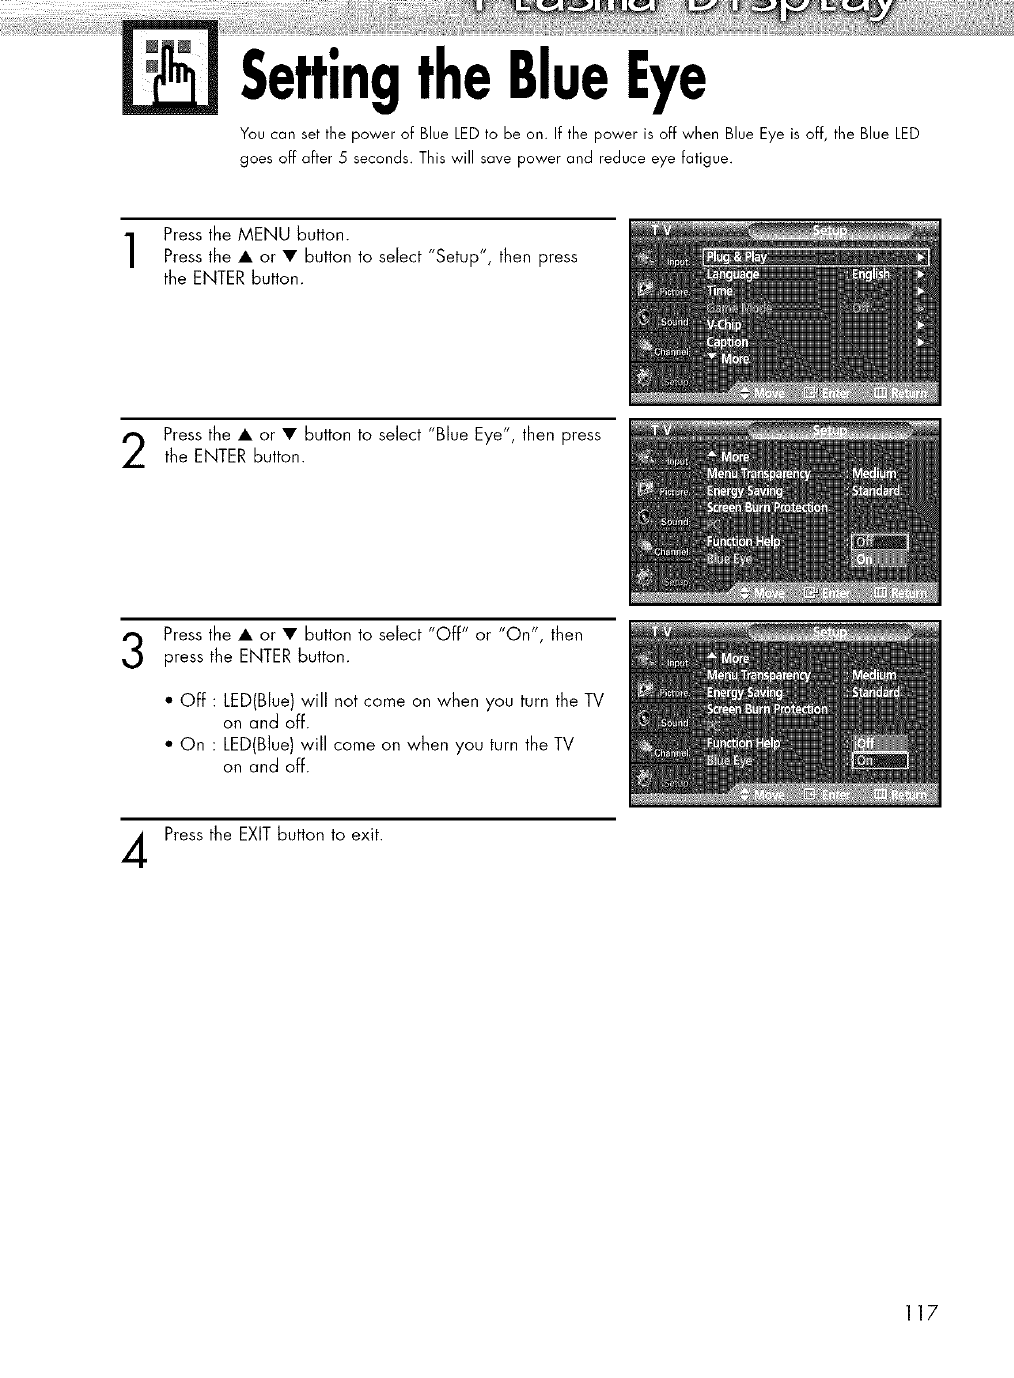
SettingtheBlueEye
You can set the power of Blue LED to be on. If the power is off when Blue Eye is off, the Blue LED
goes off after 5 seconds. This will save power and reduce eye fatigue.
Press the MENU button.
Press the • or • button to select "Setup", then press
the ENTER button.
Press the • or • button to select "Blue Eye", then press
the ENTER button.
Press the • or • button to select "Off" or "On", then
press the ENTER button.
*Off:LED(Blue) will notcome on when you turn the TV
on and off.
oOn :LED(Blue) will come on when you turn the TV
on and off.
Press the EXIT button to exit.
117
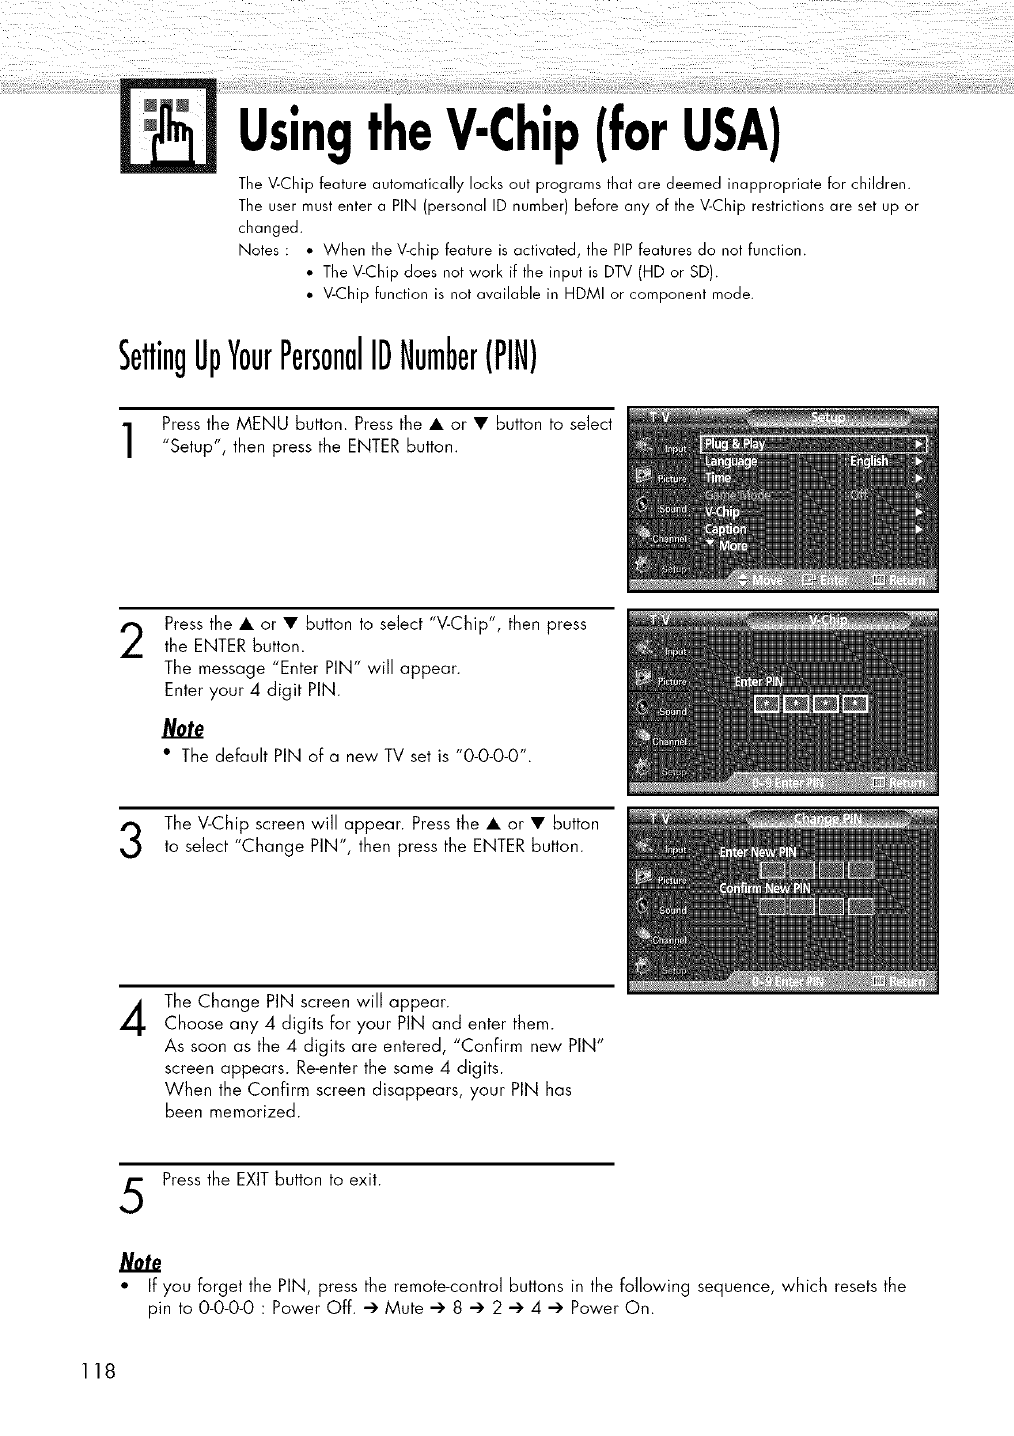
UsingtheV-Chip(forUSA)
The V-Chip feature automatically locks out programs that are deemed inappropriate for children.
The user must enter a PIN (personal ID number) before any of the V-Chip restrictions are set up or
changed.
Notes : • When the V-chip feature is activated, the PIPfeatures do not function.
• The V-Chip does not work if the input is DTV (HD or SD).
• V-Chip function is not available in HDMI or component mode.
SettingUpYourPersonalIDNumber(PIN)
Press the MENU button. Press the • or • button to select
"Setup", then press the ENTER button.
2Press the • or • button to select "V-Chip", then press
the ENTER button.
The message "Enter PIN" will appear.
Enter your 4 digit PIN.
/V0te
•The default PIN of a new TV set is "0-0-0-0".
The V-Chip screen will appear. Press the • or • button
to select "Change PIN", then press the ENTER button.
4The Change PIN screen will appear.
Choose any 4 digits for your PIN and enter them.
As soon as the 4 digits are entered, "ConFirm new PIN"
screen appears. Re-enter the same 4 digits.
When the Confirm screen disappears, your PIN has
been memorized.
Press the EXIT button to exit.
• If you forget the PIN, press the remote-control buttons in the following sequence, which resets the
pin to 0-0-0-0 : Power Off. _ Mute _' 8 _ 2 _ 4 _' Power On.
118
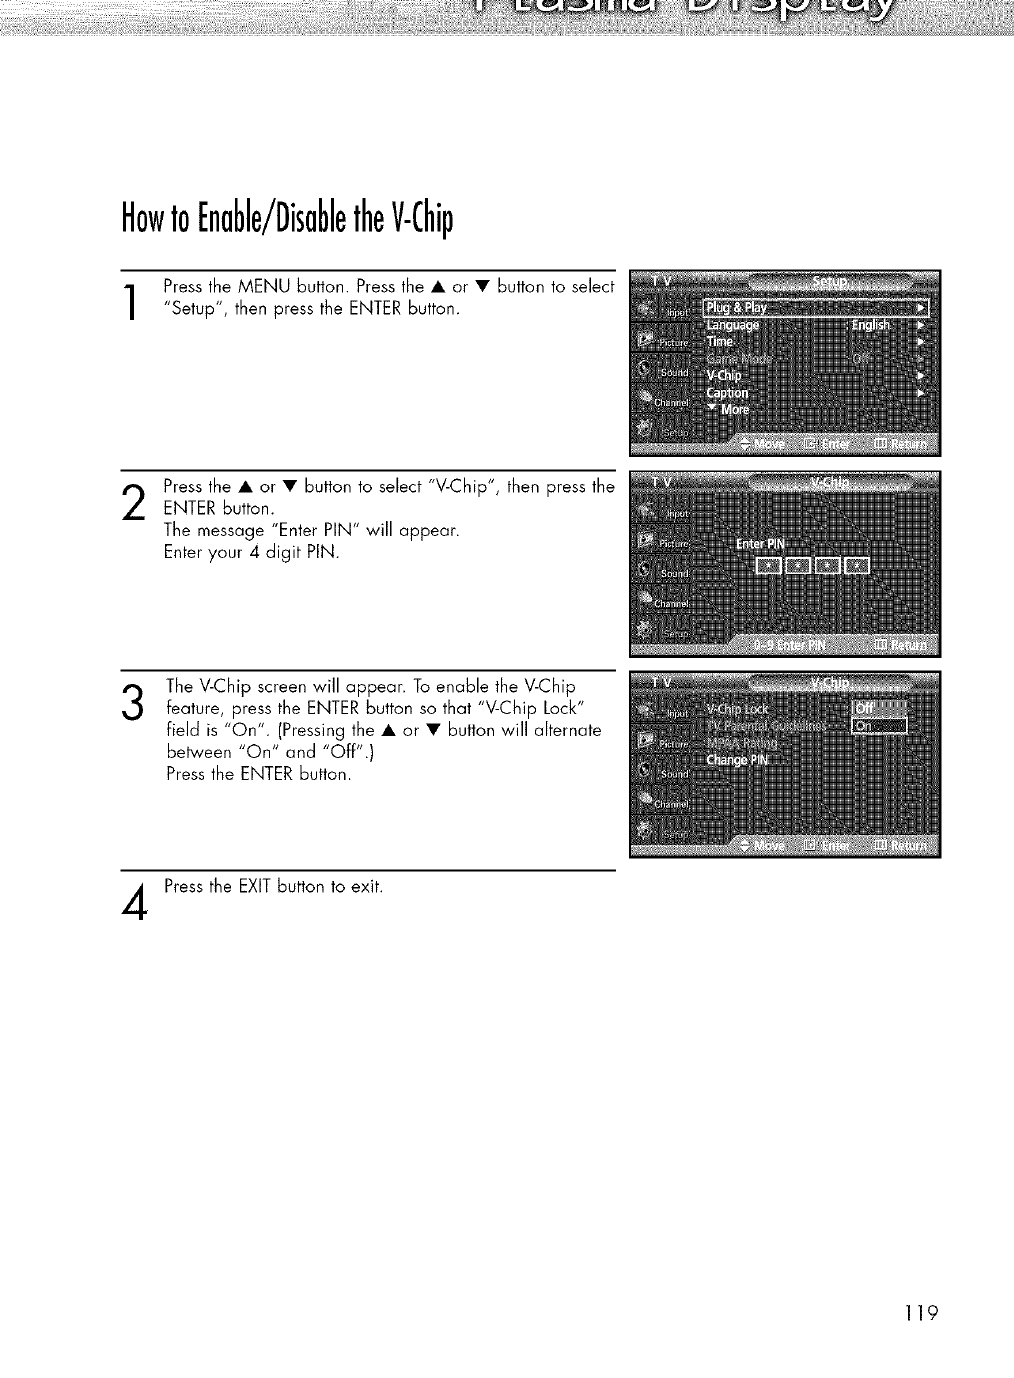
HowtoEnable/DisabletheV-Chip
Press the MENU button. Press the • or • button to select
"Setup", then press the ENTER button.
Press the • or • button to select "V-Chip", then press theENTER Button.
The message "Enter PIN" will appear.
Enter your 4 digit PIN.
3The V-Chip screen will appear. To enable the V-Chip
feature, press the ENTER button so that "V-Chip Lock"
field is "On". (Pressing the • or • button will alternate
between "On" and "Off".)
Press the ENTER button.
Press the EXIT button to exit.
119
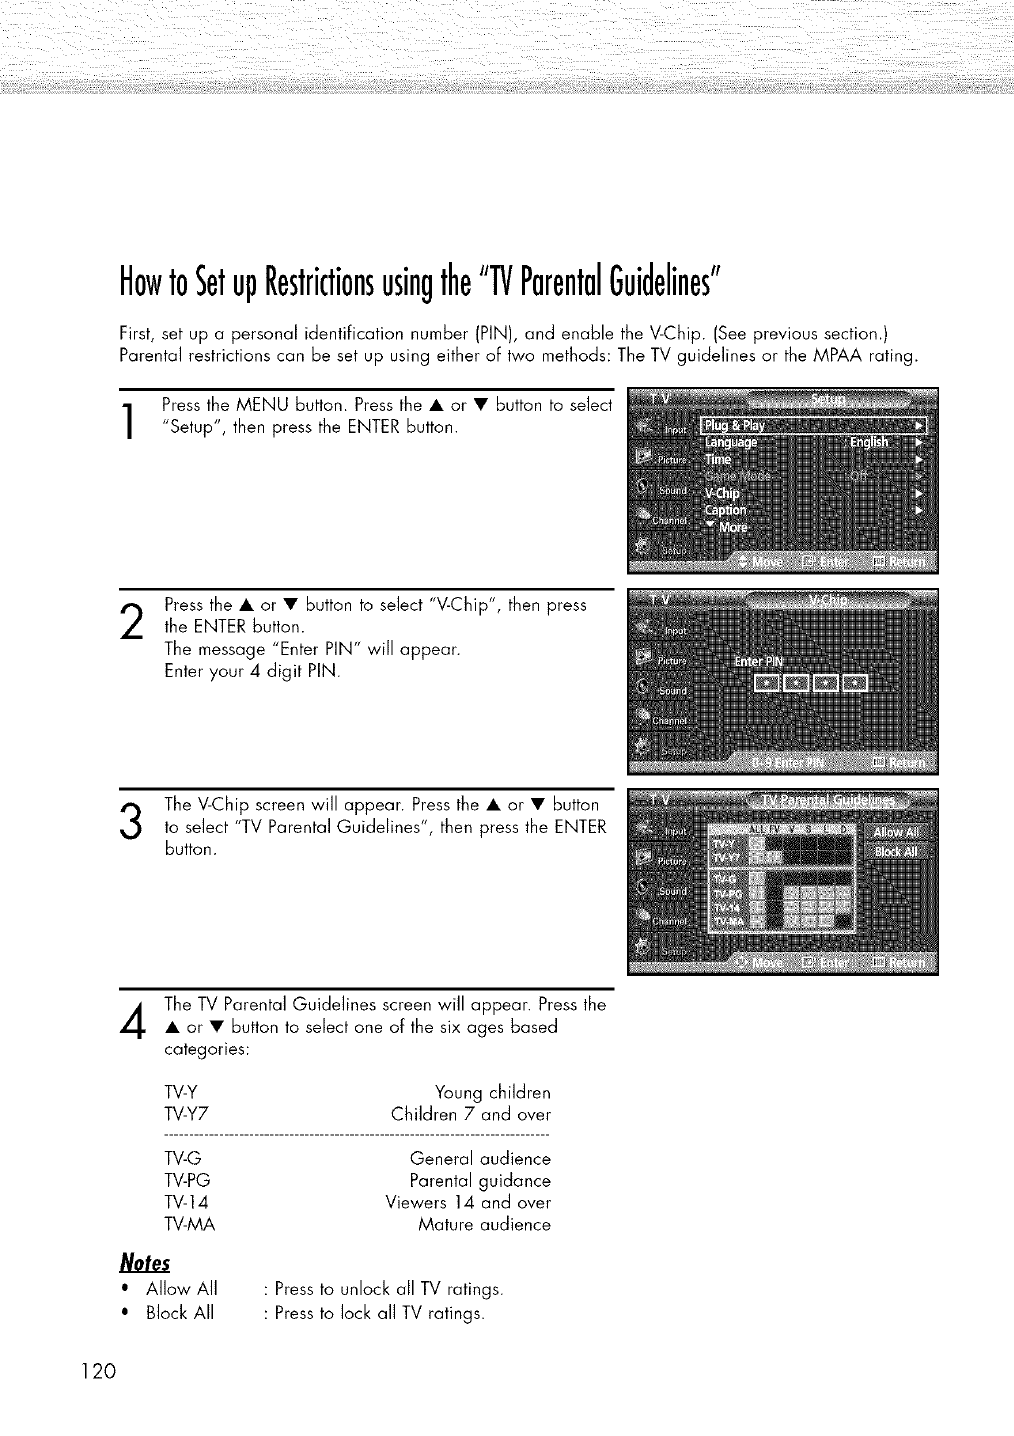
HowtoSetupRestrictionsusingthe"TVParentalGuidelines"
First, set up a personal identification number (PIN), and enable the V-Chip. (See previous section.)
Parental restrictions can be set up using either of two methods: The TV guidelines or the MPAA rating.
Press the MENU button. Press the • or • button to select
"Setup", then press the ENTER button.
2Press the • or • button to select "V-Chip", then press
the ENTER button.
The message "Enter PIN" will appear.
Enter your 4 digit PIN.
The V-Chip screen will appear. Press the • or • button
to select "TV Parental Guidelines", then press the ENTER
button.
The TV Parental Guidelines screen will appear. Press the
• or • button to select one of the six ages based
categories:
TV-Y Young children
TV-Y7 Children 7and over
TV-G General audience
TV-PG Parental guidance
TV-14 Viewers 14 and over
TV-MA Mature audience
Notes
•Allow All
• Block All
: Press to unlock all TV ratings.
: Press to lock all TV ratings.
120

5At this point, one of the TV-Ratings is selected.
Press the ENTER button. Depending on your existing
setup, a _ symbol will be selected.
(Blank = Unblocked, _= Blocked)
While "_" is selected, press the ENTER button to
block or unblock the category.
To select a different TV-Rating, press the • or •
button and then repeat the process.
Note 1: The TV-Y,TV-Y7, TV-G, TV-PG, TV-14 and TV-MA have additional options.
See the next step to change any of the following sub-ratings:
FV: Fantasy violence
D: Sexually Suggestive Dialog
L: Adult Language
S: Sexual situation
V: Violence
Note 2: The V-Chip will automatically block certain categories that are "more restrictive".
For example, if you block "TV-Y" category, then TV-Y7 will automatically be blocked.
Similarly, if you block the TV-G category, then all the categories in the "young adult" group will
be blocked (TV-G, TV-PG, TV-14, and TV-MA). The sub-ratings (D, L, S, V) work together similarly.
(See next section.)
How to set the FV, D, L, S and V sub-ratings.
First, select one of these TV-Ratings: TV-Y, TV-Y7, TV-G, TV-PG, TV-14, or TV-MA (See Step 4,
on previous page), and press the • button.
A :_ symbol will be displayed for each sub-rating.
While _ _sselected, press the ENTER button to go to a sub rating.
Press ENTER to block the sub rating. To select a different TV-Rating, press the • or • button
and then repeat the process.
Note: The V-chip will automatically block certain categories that are "More restrictive".
For example, if you block "L" sub-rating in TV-PG, then the "L" sub-ratings in TV-14 and TV-MA
will automatically be blocked.
Press the EXIT button to clear all the screens. (Or proceed to the next section, and set up
additional restrictions based on the MPAA codes.)
Notes
*These categories consist of two separate groups: TV-Y and TV-Y7 (young children through
age 7), and TV-G through TV-MA (everybody else).
The restrictions for these two groups work independently: If a household includes very young
children as well as young adults, the TV guidelines must be set up separately for each age group.
(See next step.)
• Allow All : Press to unlock all TV ratings.
Block All : Press to lock all TV ratings. ] 2 ]
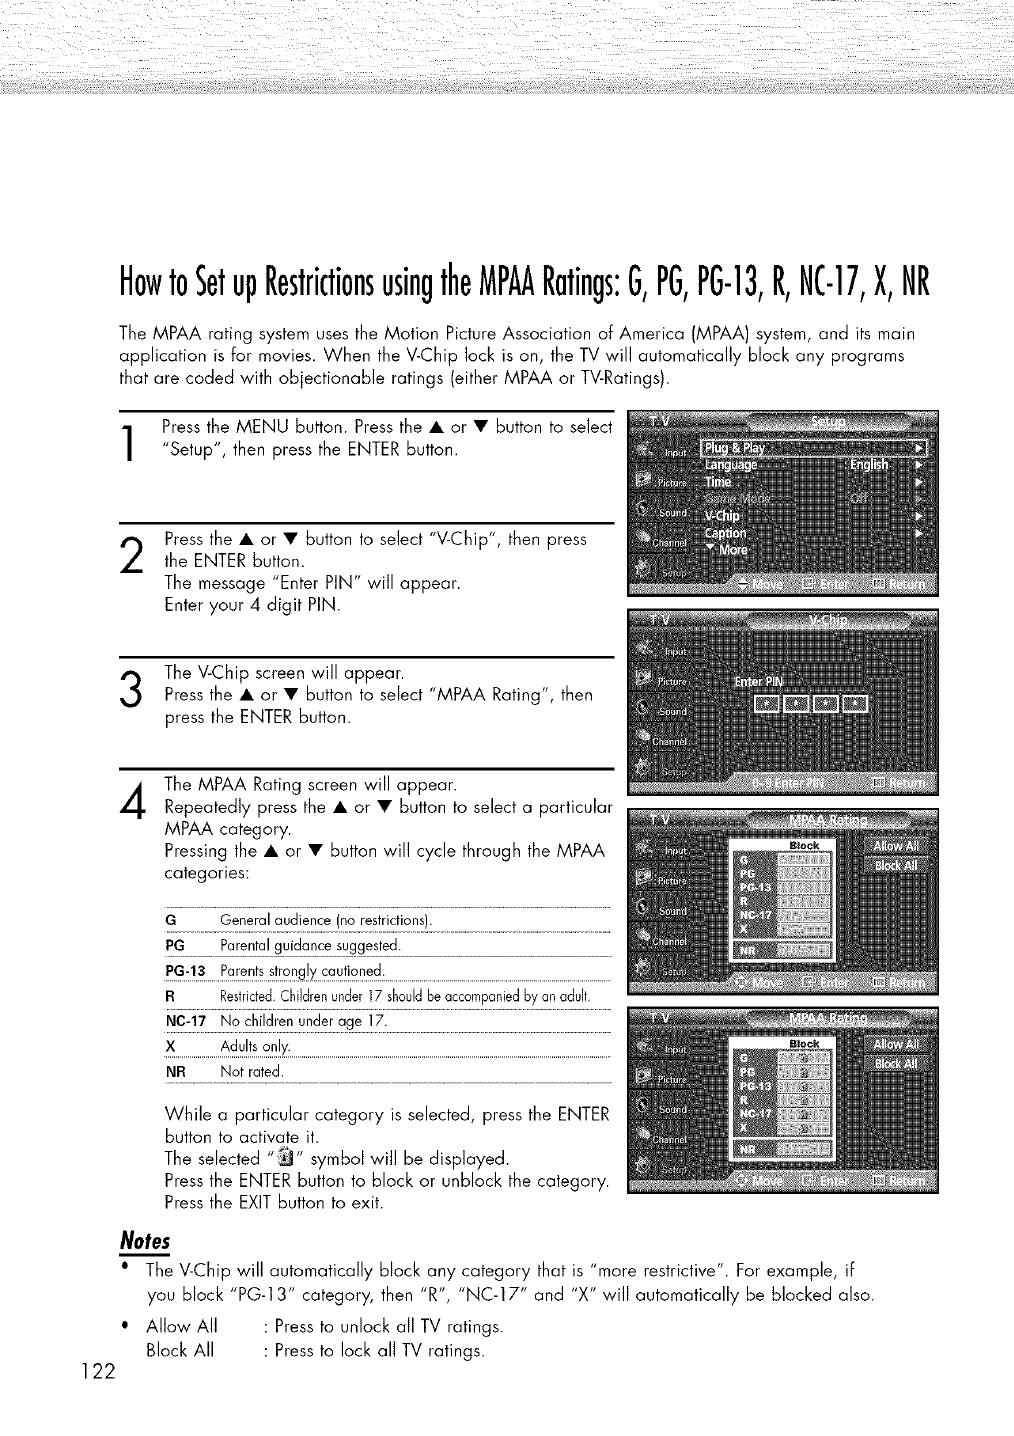
HowtoSetupRestrictionsusingtheMPAARatings:G,PG,PG-13,R,NC-17,X,NR
The MPAA rating system uses the Motion Picture Association of America (MPAA) system, and its main
application is for movies. When the V-Chip lock is on, the TV will automatically block any programs
that are coded with objectionable ratings (either MPAA or TV-Ratings).
Press the MENU button. Press the • or • button to select
"Setup", then press the ENTER button.
2Press the • or • button to select "V-Chip", then press
the ENTER button.
The message "Enter PIN" will appear.
Enter your 4 digit PIN.
The V-Chip screen will appear.
Press the • or • button to select "MPAA Rating", then
press the ENTER button.
4
122
The MPAA Rating screen will appear.
Repeatedly press the • or • button to select a particular
MPAA category.
Pressing the • or • button win cycle through the MPAA
categories:
GGeneralaudience(norestrictions).
PG..................F_ar_q!a!g.u!da_e_%ges!_d:.........................................................................................................
BRestricted.Childrenunder17shouldbeaccompaniedbyanadult.
N_:._.7.___.N.___!!.!._.d._'__._.'!.d.e.Lag_._!.._:.................................................................................................................
:_.......................A_u!!se.qk:................................................................................................................................................................
NF{ Not rated.
While a particular category is selected, press the ENTER
button to activate it.
The selected "_" symbol wi]] be displayed.
Press the ENTER button to block or unblock the category.
Press the EXIT button to exit.
Notes
•The V-Chip will automatically block any category that is "more restrictive". For example, if
you block "PG-1 3" category, then "R", "NC-17" and "X" will automatically be blocked also.
• Allow All : Press to unlock all TV ratings.
Block All : Press to lock all TV ratings.
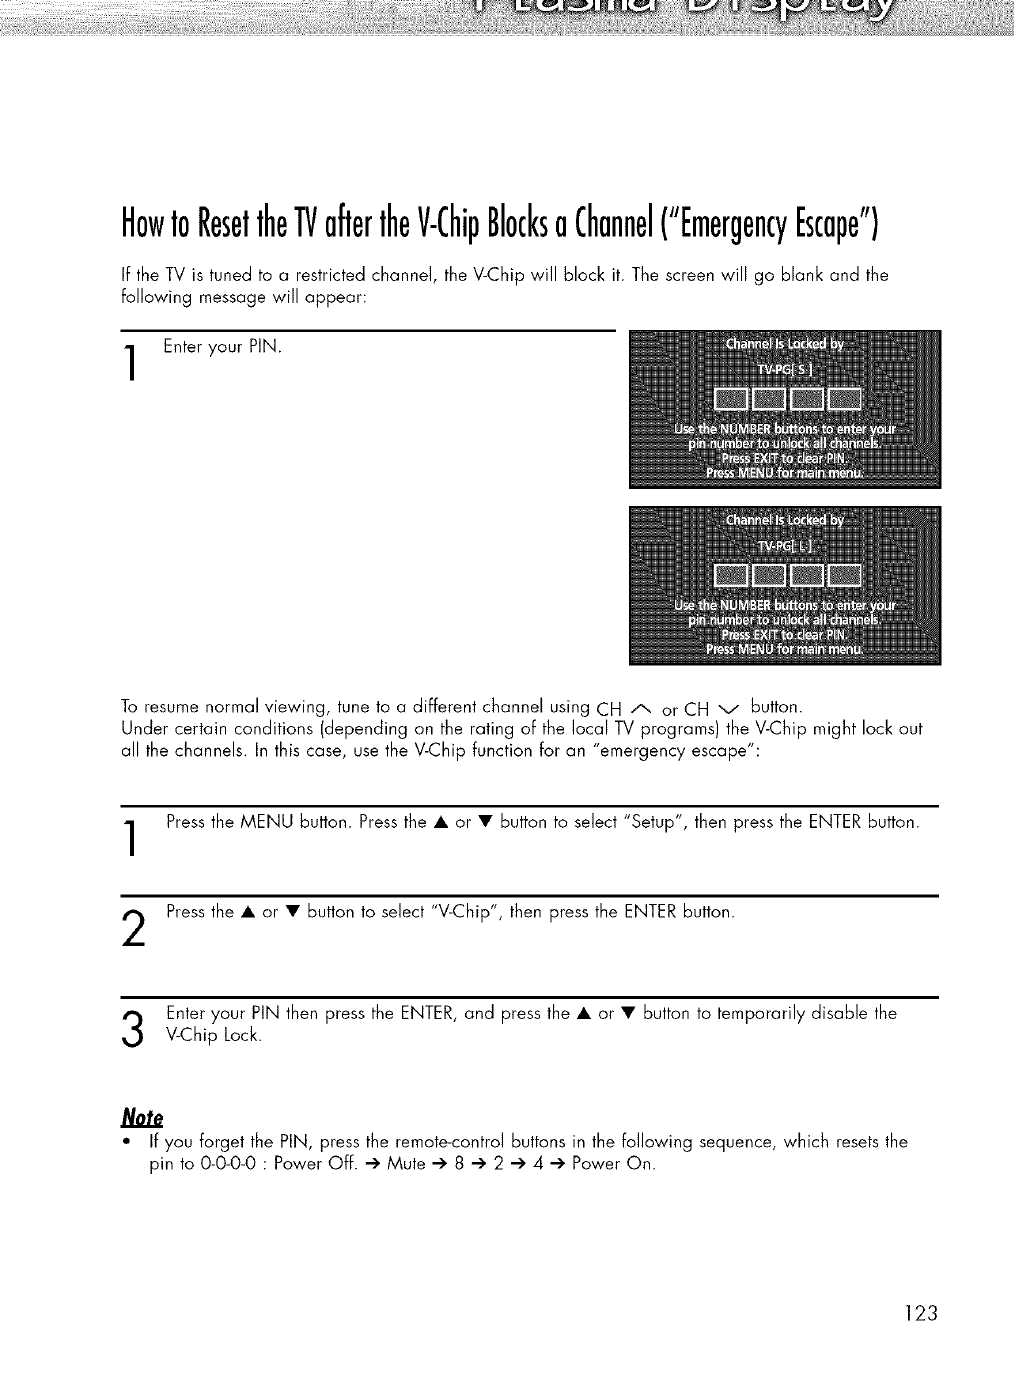
HowtoResettheTVaftertheV-ChipBlocksaChannel("EmergencyEscape")
If the TV is tuned to a restricted channel, the V-Chip will block it. The screen will go blank and the
following message will appear:
Enter your PIN.
To resume normal viewing, tune to a different channel using CH A or CH v button.
Under certain conditions (depending on the rating of the local TV programs) the V-Chip might lock out
all the channels. In this case, use the V-Chip function for an "emergency escape":
Press the MENU button. Press the • or • button to select "Setup", then press the ENTER button.
Press the • or • button to select "V-Chip", then press the ENTER button.
Enteryour PiN then pressthe ENTER,and pressthe • or • button to temporarily disable the
V-Chip Lock.
" If you forget the PIN, press the remote-control buttons in the following sequence, which resets the
pin to 0-0-0-0 : Power Off. -> Mute -> 8 -> 2 -> 4 -> Power On.
123
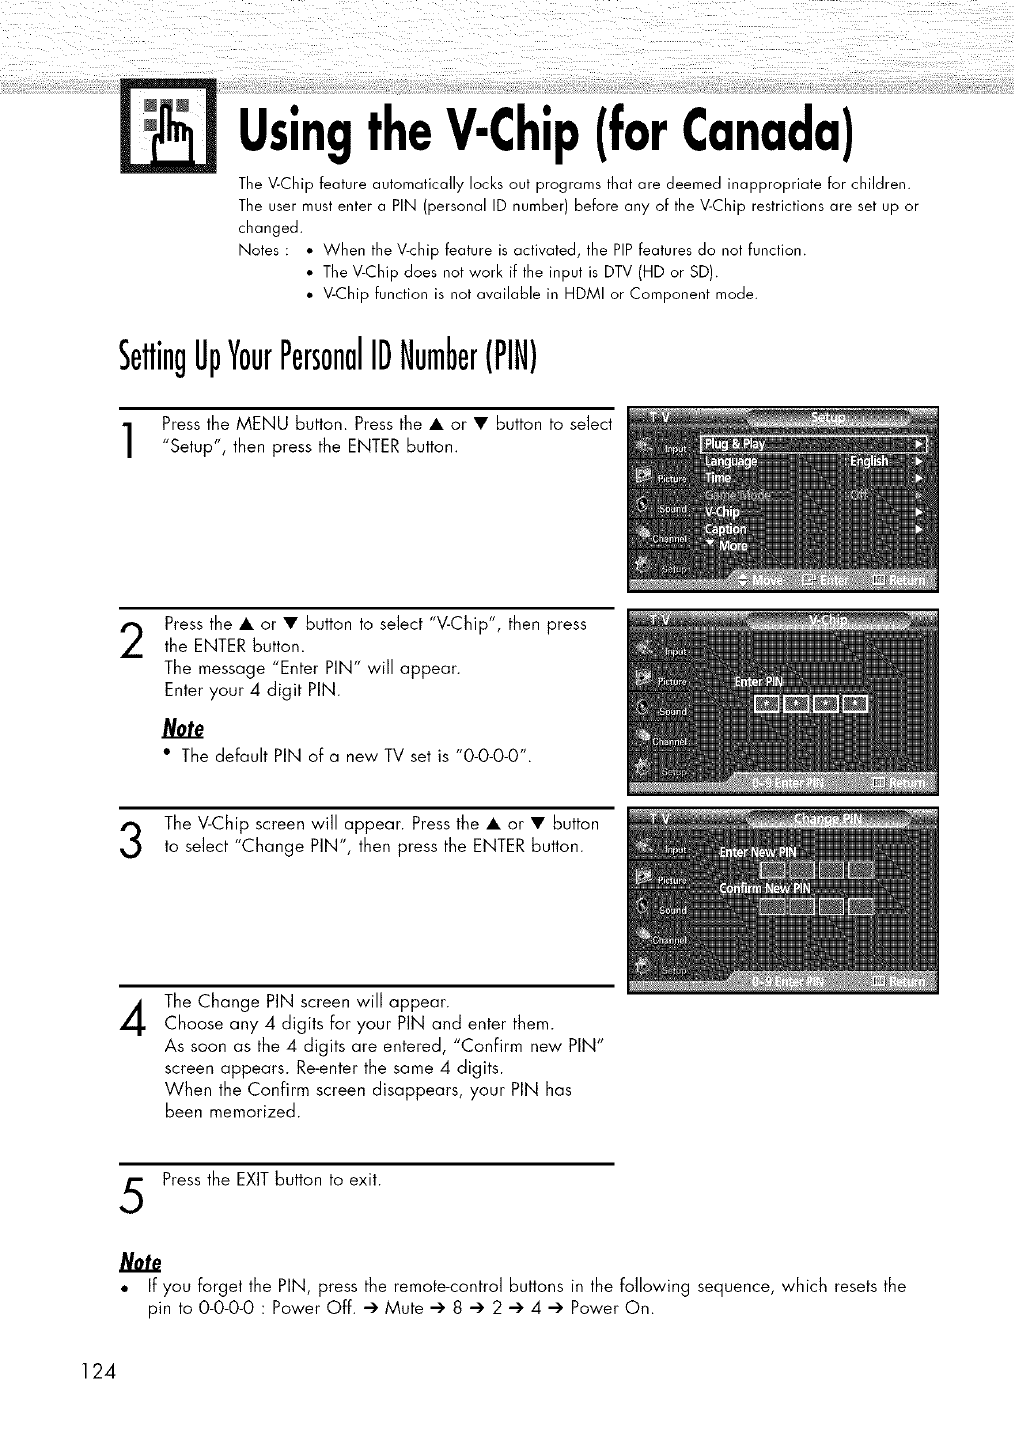
UsingtheV-Chip(forCanada)
TheV-Chip feature automatically locksout programs that are deemed inappropriate for children.
Theuser mustentera PIN (personal ID number) before any of theV-Chip restrictionsare set up or
changed.
Notes : • When the V-chip feature is activated, the PIPfeaturesdo not function.
• TheV-Chip does not work if the input is DTV(HD or SD).
• V-Chip function is not available in HDMI or Componentmode.
SettingUpYourPersonalIDNumber(PIN)
Press the MENU button. Press the • or • button to select
"Setup", then press the ENTER button.
2Press the • or • button to select "V-Chip", then press
the ENTER button.
The message "Enter PIN" will appear.
Enter your 4 digit PIN.
/V0te
•The default PIN of a new TV set is "0-0-0-0".
The V-Chip screen will appear. Press the • or • button
to select "Change PIN", then press the ENTER button.
4The Change PIN screen will appear.
Choose any 4 digits for your PIN and enter them.
As soon as the 4 digits are entered, "ConFirm new PIN"
screen appears. Re-enter the same 4 digits.
When the Confirm screen disappears, your PIN has
been memorized.
Press the EXIT button to exit.
• If you forget the PIN, press the remote-control buttons in the following sequence, which resets the
pin to 0-0-0-0 : Power Off. _ Mute _' 8 _ 2 _ 4 _' Power On.
124
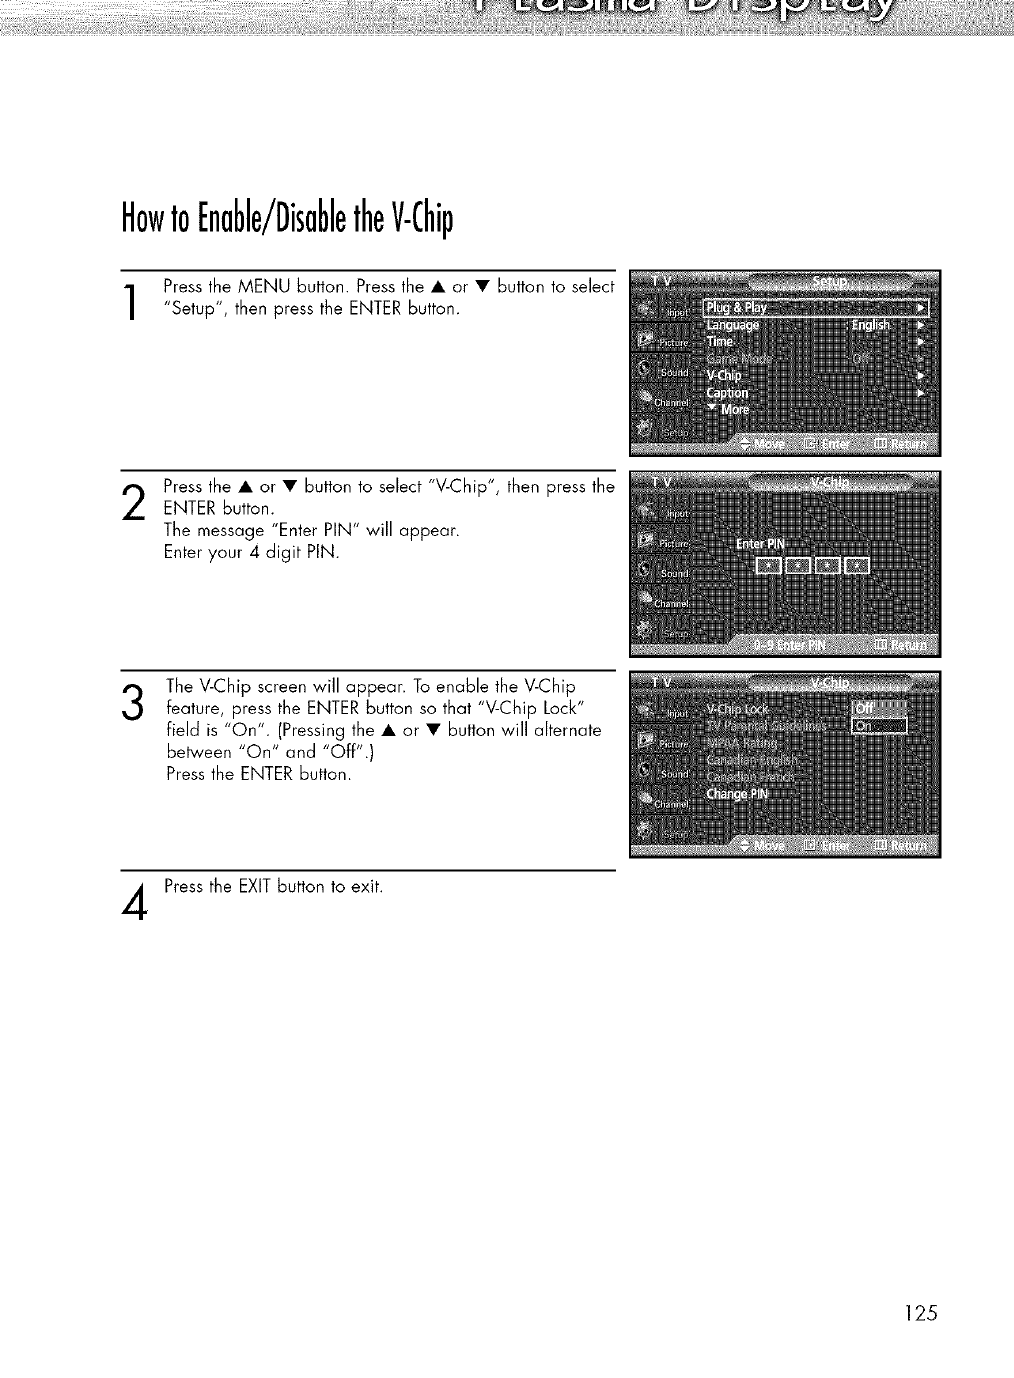
HowtoEnable/DisabletheV-Chip
Press the MENU button. Press the • or • button to select
"Setup", then press the ENTER button.
Press the • or • button to select "V-Chip", then press theENTER Button.
The message "Enter PIN" will appear.
Enter your 4 digit PIN.
3The V-Chip screen will appear. To enable the V-Chip
feature, press the ENTER button so that "V-Chip Lock"
field is "On". (Pressing the • or • button will alternate
between "On" and "Off".)
Press the ENTER button.
Press the EXIT button to exit.
125
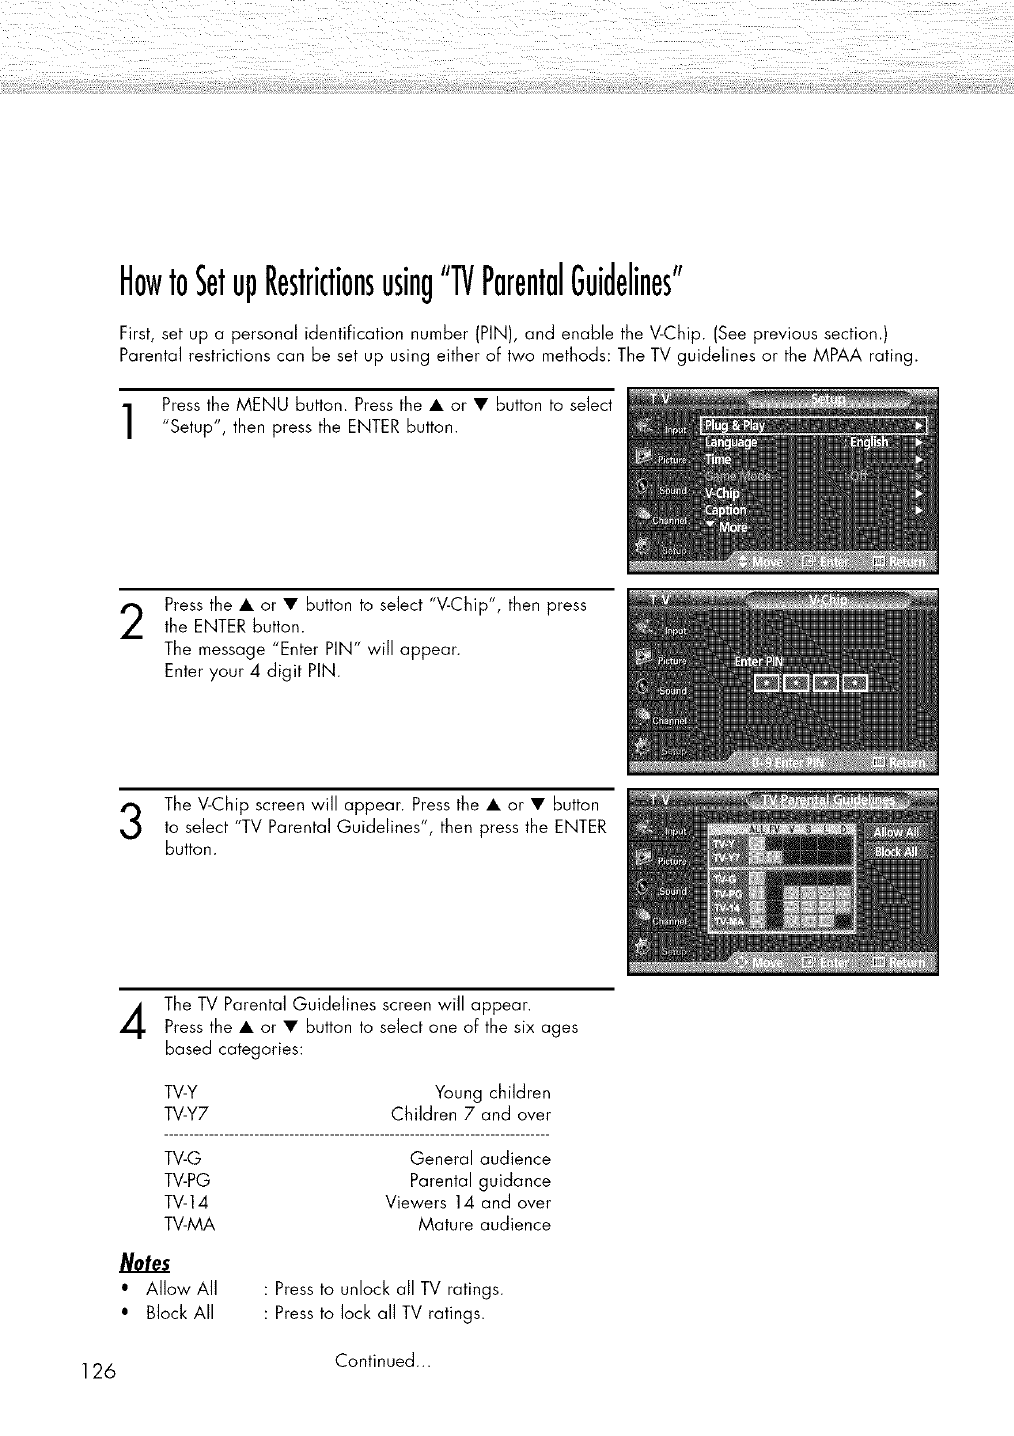
HowtoSetupRestrictionsusing"TVParentalGuidelines"
First, set up a personal identification number (PIN), and enable the V-Chip. (See previous section.)
Parental restrictions can be set up using either of two methods: The TV guidelines or the MPAA rating.
Press the MENU button. Press the • or • button to select
"Setup", then press the ENTER button.
2Press the • or • button to select "V-Chip", then press
the ENTER button.
The message "Enter PIN" will appear.
Enter your 4 digit PIN.
The V-Chip screen will appear. Press the • or • button
to select "TV Parental Guidelines", then press the ENTER
button.
The TV Parental Guidelines screen will appear.
Press the • or • button to select one of the six ages
based categories:
TV-Y Young children
TV-Y7 Children 7and over
TV-G General audience
TV-PG Parental guidance
TV-14 Viewers 14 and over
TV-MA Mature audience
Notes
•Allow All
• Block All
: Press to unlock all TV ratings.
: Press to lock all TV ratings.
Continued...
126
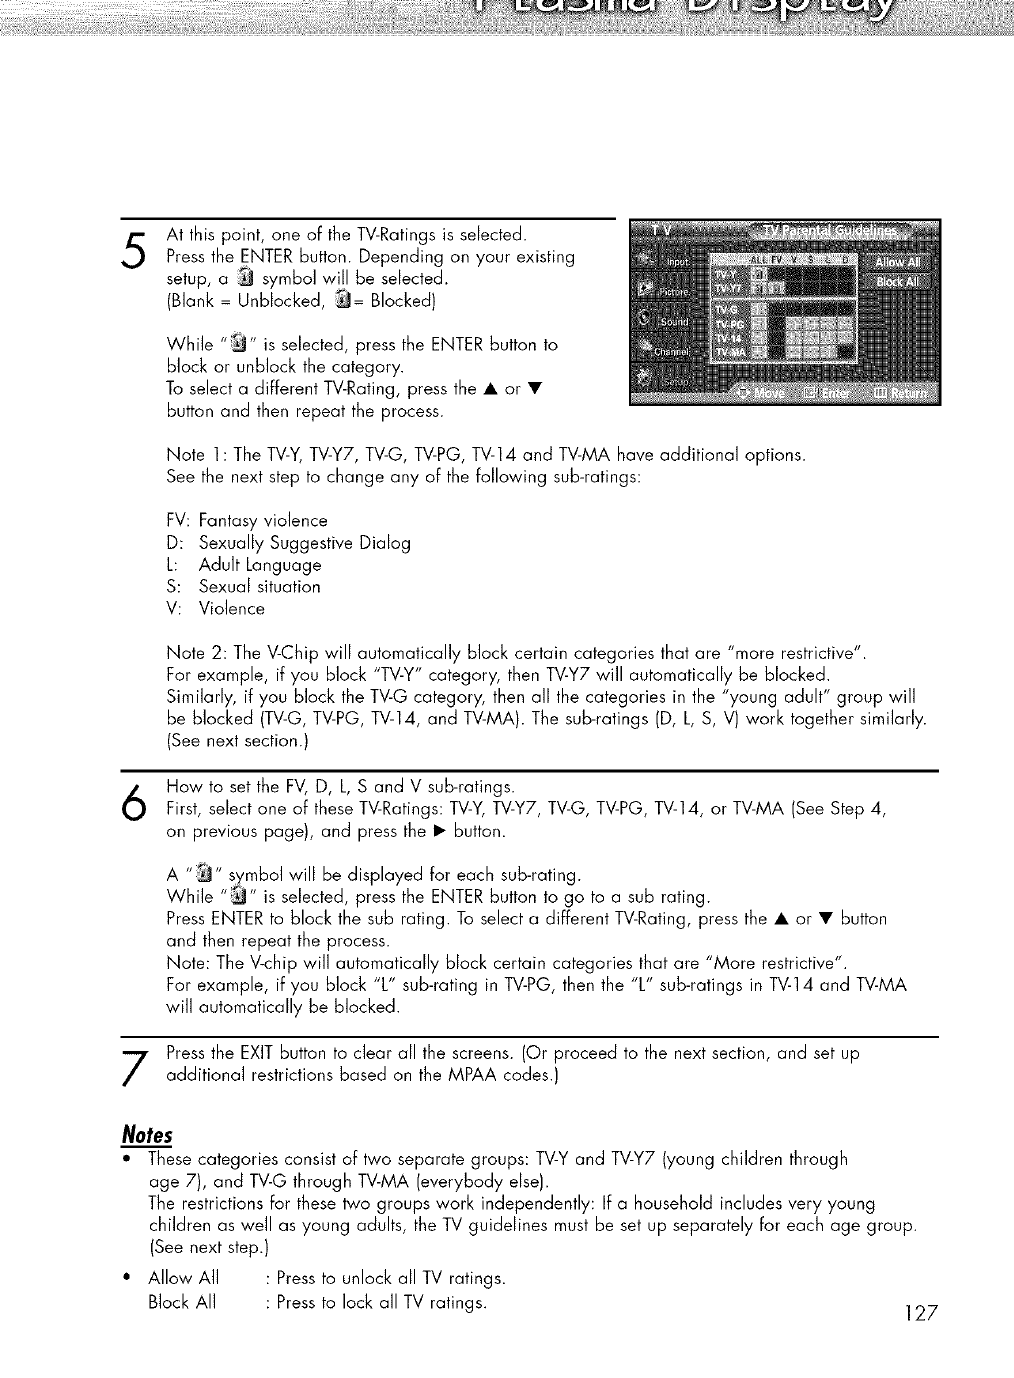
5At this point, one of the TV-Ratings is selected.
Press the ENTER button. Depending on your existing
setup, a _ symbol will be selected.
(Blank = Unblocked, _= Blocked)
While "_" is selected, press the ENTER button to
block or unblock the category.
To select a different TV-Rating, press the • or •
button and then repeat the process.
Note 1: The TV-Y,TV-Y7, TV-G, TV-PG, TV-14 and TV-MA have additional options.
See the next step to change any of the following sub-ratings:
FV: Fantasy violence
D: Sexually Suggestive Dialog
L: Adult Language
S: Sexual situation
V: Violence
Note 2: The V-Chip will automatically block certain categories that are "more restrictive".
For example, if you block "TV-Y" category, then TV-Y7 will automatically be blocked.
Similarly, if you block the TV-G category, then all the categories in the "young adult" group will
be blocked (TV-G, TV-PG, TV-14, and TV-MA). The sub-ratings (D, L, S, V) work together similarly.
(See next section.)
How to set the FV, D, L, S and V sub-ratings.
First, select one of these TV-Ratings: TV-Y, TV-Y7, TV-G, TV-PG, TV-14, or TV-MA (See Step 4,
on previous page), and press the • button.
A :_ symbol will be displayed for each sub-rating.
While _ _sselected, press the ENTER button to go to a sub rating.
Press ENTER to block the sub rating. To select a different TV-Rating, press the • or • button
and then repeat the process.
Note: The V-chip will automatically block certain categories that are "More restrictive".
For example, if you block "L" sub-rating in TV-PG, then the "L" sub-ratings in TV-14 and TV-MA
will automatically be blocked.
Press the EXIT button to clear all the screens. (Or proceed to the next section, and set up
additional restrictions based on the MPAA codes.)
Notes
*These categories consist of two separate groups: TV-Y and TV-Y7 (young children through
age 7), and TV-G through TV-MA (everybody else).
The restrictions for these two groups work independently: If a household includes very young
children as well as young adults, the TV guidelines must be set up separately for each age group.
(See next step.)
• Allow All : Press to unlock all TV ratings.
Block All : Press to lock all TV ratings. ] 27

HowtoSetupRestrictionsusingtheMPAARatings:G,PG,PG-13,R,NC-17,X,NR
The MPAA rating system uses the Motion Picture Association of America (MPAA) system, and its main
application is for movies. When the V-Chip lock is on, the TV will automatically block any programs
that are coded with objectionable ratings (either MPAA or TV-Ratings).
Press the MENU button. Press the • or • button to select
"Setup", then press the ENTER button.
2Press the • or • button to select "V-Chip", then press
the ENTER button.
The message "Enter PIN" will appear.
Enter your 4 digit PIN.
The V-Chip screen will appear.
Press the • or • button to select "MPAA Rating", then
press the ENTER button.
4
128
The MPAA Rating screen will appear.
Repeatedly press the • or • button to select a particular
MPAA category.
Pressing the • or • button win cycle through the MPAA
categories:
GGeneralaudience(norestrictions).
PG..................F_._.q!_.!_.g._.!d_._.__.%g_!_d.:..........................................................................................................
PG.:._.S___.Pa._e!_.!_..._.!._.%.!_.._._!!._.'_d:.................................................................................................................
F{ Restricted.Childrenunder]7 shouldbeaccompaniedbyanadult.
:_.......................A_.u!.!.L_.q.k:.................................................................................................................................................................
NF{ Not rated.
While a particular category is selected, press the ENTER
button to activate it.
The selected "_" symbol wi]] be displayed.
Press the ENTER button to block or unblock the category.
Press the EXIT button to exit.
Notes
•The V-Chip will automatically block any category that is "more restrictive". For example, if
you block "PG-1 3" category, then "R", "NC-17" and "X" will automatically be blocked also.
• Allow All : Press to unlock all TV ratings.
Block All : Press to lock all TV ratings.
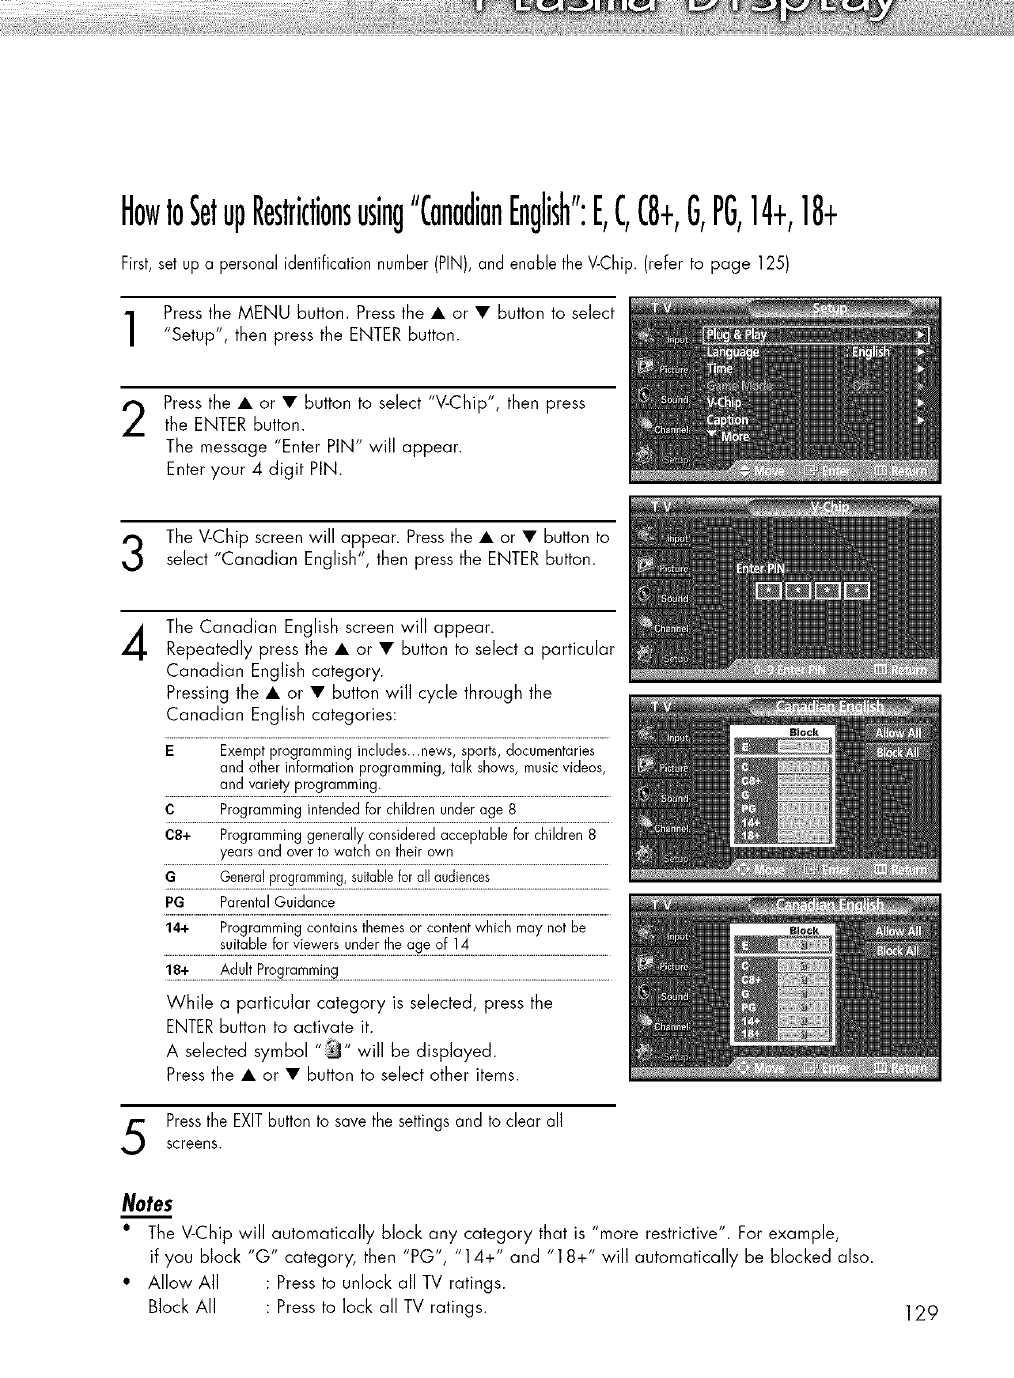
HowtoSetupRestrictionsusing"CanadianEnglish":E,C,C8+,G,PG,14+,18+
First,set up a personal identification number (PIN), and enable the V-Chip. (refer to page 125)
Press the MENU button. Press the • or • Button to select
"Setup", then press the ENTER Button.
Press the • or • button to select "V-Chip", then press
the ENTER Button.
The message "Enter PIN" will appear.
Enter your 4 digit PIN.
The V-Chip screen will appear. Press the • or • button to
select "Canadian English", then press the ENTER Button.
4The Canadian English screen will appear.
Repeatedly press the • or • button to select a particular
Canadian English category.
Pressing the • or • button will cycle through the
Canadian English categories:
E Exempt programming includes...news, sports, documentaries
andotherinformationprogramming,talk shows,musicvideos,
andvarietyprogramming.
C Programmingintendedfor childrenunderage 8
C8+ Programminggenerallyconsideredacceptablefor children8
yearsandoverto watchontheirown
GGeneralprogramming_suitableforallaudiences
PG Parental Guidance
14+ Programmingcontainsthemesor contentwhichmaynotbe
18-_................. ..................................................................................................................................................
While a particular category is selected, press the
ENTERbutton to activate it.
will be displayed.
A selected symbol "_ "
Press the • or • button to select other items.
PresstheEXITbutton to save thesettingsand to clear all
screens.
Notes
•The V-Chip will automatically block any category that is "more restrictive". For example,
if you block "G" category, then "PG", "14+" and "18+" will automatically be blocked also.
• Allow All : Press to unlock all TV ratings.
Block All : Press to lock all TV ratings. 129
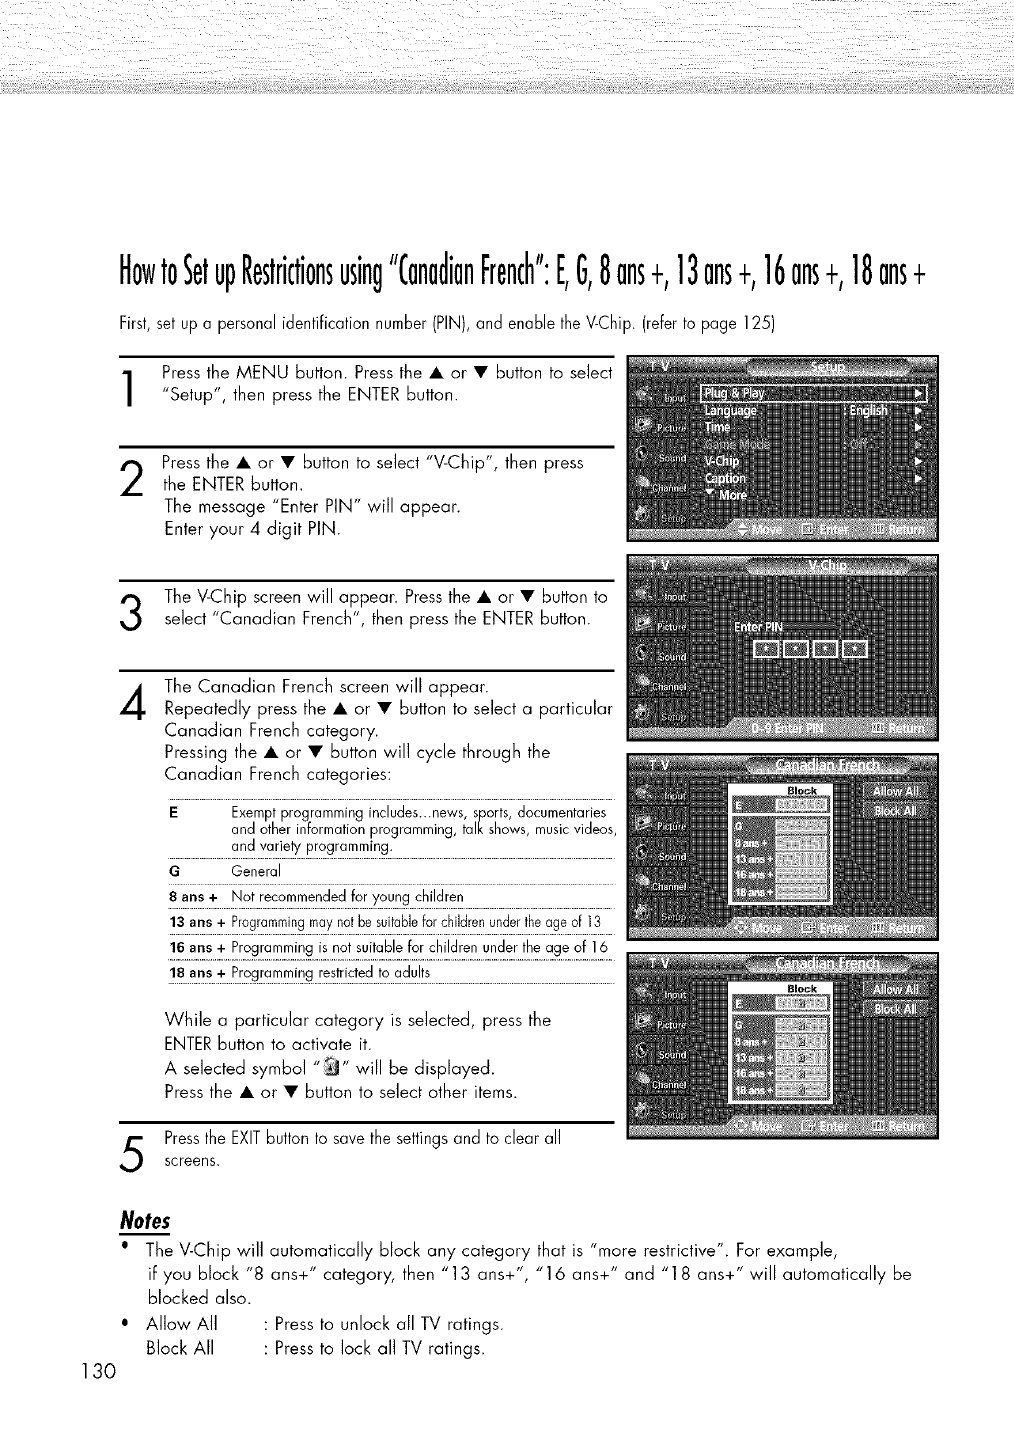
HowtoSetupRestrictionsusing"CanadianFrench":E,G,8ans+,13ans+,16ans+,18ans+
First,set up a personal identification number(PIN), and enable file V-Chip. (refertopage 125)
Press the MENU button. Press the • or • button to select
"Setup", then press the ENTER button.
2Press the • or • button to select "V-Chip", then press
the ENTER button.
The message "Enter PIN" will appear.
Enter your 4 digit PIN.
The V-Chip screen will appear. Press the • or • button to
select "Canadian French", then press the ENTER button.
4The Canadian French screen will appear.
Repeatedly press the • or • button to select a particular
Canadian French category.
Pressing the • or • button will cycle through the
Canadian French categories:
E Exemptprogrammingincludes...news,sports,documentaries
and otherinformationprogramming,talkshows,musicvideos,
andvarielyprogramming.
GGeneral
8 ans+ Notrecommendedfor youngchildren
13ans+ Programmingmaynotbesuitableforchildrenundertheageof 13
16arts+ Programmingis notsuitablefor childrenundertheage of 16
While a particular category is selected, press the
ENTERbutton to activate it.
Aselected symbol _ will be displayed.
Press the • or • button to select other items.
Pressthe EXITbutton to save the settingsand to clear all
screens.
130
Notes
•The V-Chip will automatically block any category that is "more restrictive". For example,
if you block "8 ans+" category, then "13 ans+", "16 ans+" and "18 ans+" will automatically be
blocked also.
• Allow All : Press to unlock all TV ratings.
Block All : Press to lock all TV ratings.

HowtoResettheTVaftertheV-ChipBlocksaChannel("EmergencyEscape")
If the TV is tuned to a restricted channel, the V-Chip will block it. The screen will go blank and the
following message will appear:
Enter your PIN.
To resume normal viewing, tune to a different channel using CH A or CH v button.
Under certain conditions (depending on the rating of the local TV programs) the V-Chip might lock out
all the channels. In this case, use the V-Chip function for an "emergency escape":
Press the MENU button. Press the • or • button to select "Setup", then press the ENTER button.
Press the • or • button to select "V-Chip", then press the ENTER button.
Enteryour PiN then pressthe ENTER,and pressthe • or • button to temporarily disable the
V-Chip Lock.
" If you forget the PIN, press the remote-control buttons in the following sequence, which resets the
pin to 0-0-0-0 : Power Off. -)' Mute -)' 8 -)' 2 -)' 4 -)' Power On.
131

PLASMA DISPLAY PANEL
Appendix
Troubleshooting .......................................................................... 134
Care and Maintenance .............................................................. 135
Specifications ............................................................................ 136
Dimensions (HP-$4253) .............................................................. 137
Dimensions (HP-$5053) .............................................................. 139
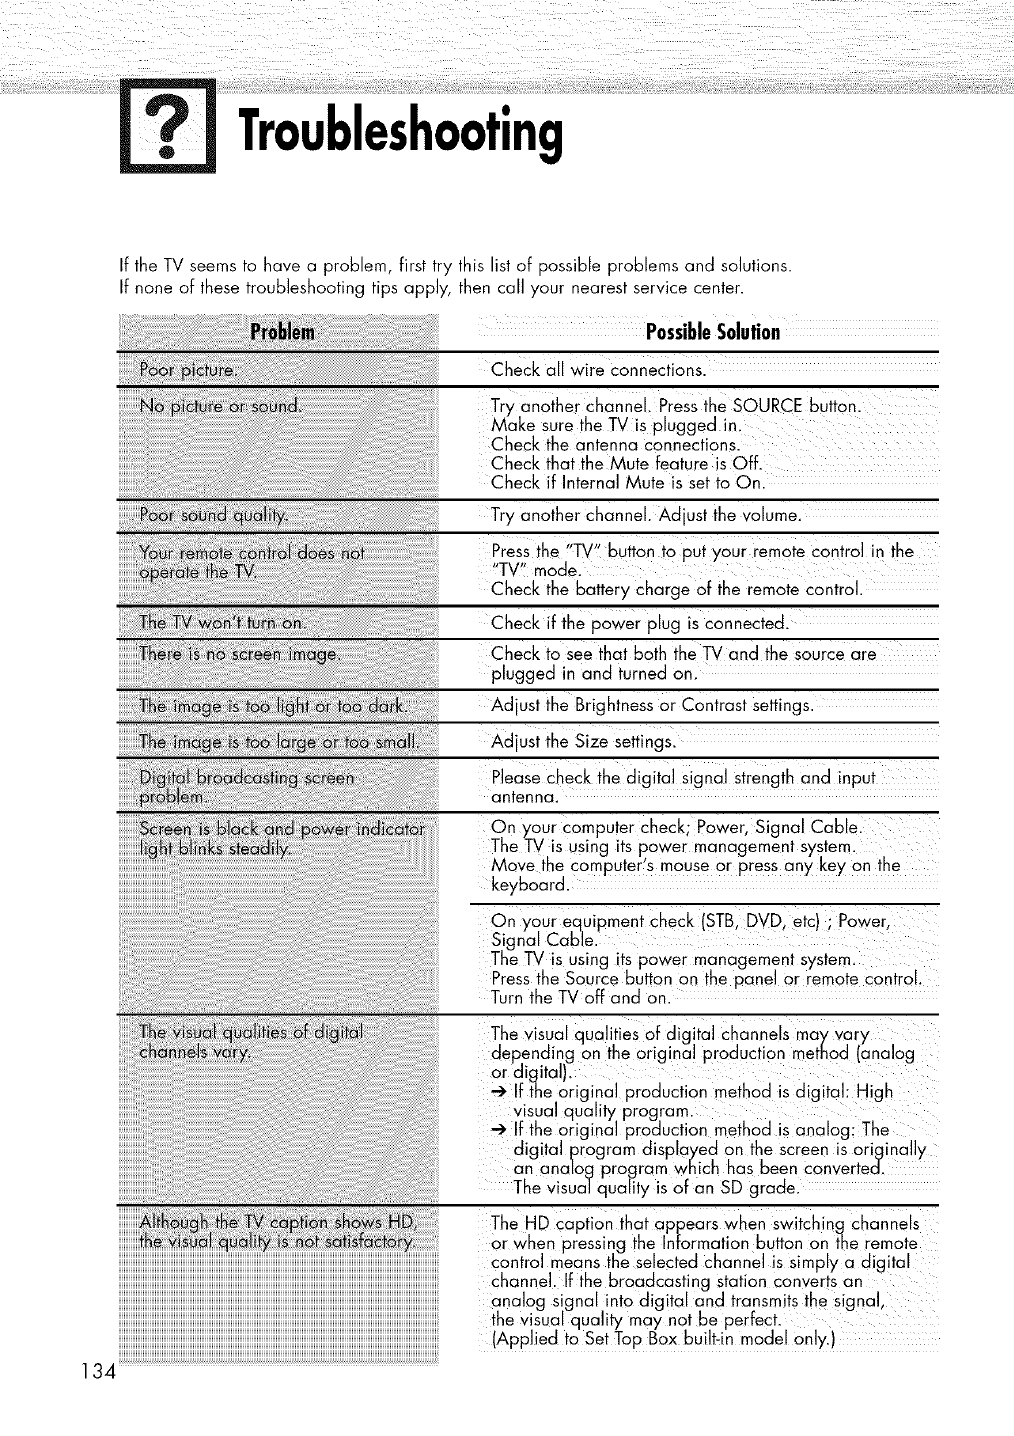
Troubleshooting
If the TV seems to have a problem, first try this list of possible problems and solutions.
If none of these troubleshooting tips apply, then call your nearest service center.
!!!!!!!!!!!!!!!!!!!!!!!!!!!!!!!!!!!!!!!!!!!!!!!!!!!!!!!!!!!!!!!!!!!!!!!!!!!!!!!!!!!!!!!!!!!!!!!!!!!!!!!!!!!!!!!!!!!!!!!!!!!!!!!!!!!!!!!!!!!!!!!!!!!!!!!!!!!!!!!!!!!!!!!!!!!!!!!!!!!!!!!!_
134
Check all wire Connections.
Try anothei channel: Press the SOURCE button.
Make sure the TVis plugged in,
Check the antenna connections.
Check that the Mute feature is Off.
Check if Internal Mute is set to On.
Try another channel. Adjust the Volume.
Press the "TV'button to put your remote Control in the
"TV!' mode.
Check the battery charge of the remote control.
Check if the power plug is connected.
Check to See that both the TVand the source are
plugged in and turned on.
Adjust the Brightness or Contrast settings.
Adjust the Size settingsl
Please Check the digital Signal Strength and input
antenna.
On your Computer Check; Power, Signal Cablel
The TVis using its power management system.
Move the computer's mouse Or press any key on the
keyboard.
On your equipment Check STBI DVD, etc ; P0werl
Signal Cable.
The TV is using its power management System.
Press the Source button on the pane! or remote control,
Turn the TVoff and on.
The visual qualities Of digital channels may vary
depending on the original production method (analog
or digital).
If the original production method is digital: High
Visual quality program.
_lf the Original production method is analog:The
digital program displayed on the screen is originally
an analog program which has been Canvertecl.
The Visual _tuality is Of an SD gradel
The HD caption that appears When Switchin_t channels
or when pressing the Information button on the remote
control means the selected channel is simply a digital
channel. If the broadcasting Station converts an
analog Signal into digital and transmits the signal,
the Visual quality may not be perfect.
(Applied to Set Top Box built-in model only.)
CareandMaintenance
Please follow these guidelines to get the maximum performance from your TV.
Identifying Problems
" Do not put the TV near extremely hot, cold, humid or dusty places.
" Do not put the TV near appliances that create magnetic fields.
"Keep the ventilation openings clear.
•Do not place the TV on a rough and slanted surface, such as cloth or paper.
Liquids
" Do not place liquids near or on the TV.
Cabinet
" Never open the cabinet or touch the parts inside.
" Wipe your TV with a clean, dry cloth. Never use water, cleaning fluids, wax, or chemicals.
" Do not put heavy objects on top of the cabinet.
Temperature
•If your TV is suddenly moved from a cold to a warm place, unplug the power cord for at least two
hours so that moisture that may have formed inside the unit can dry completely.
135
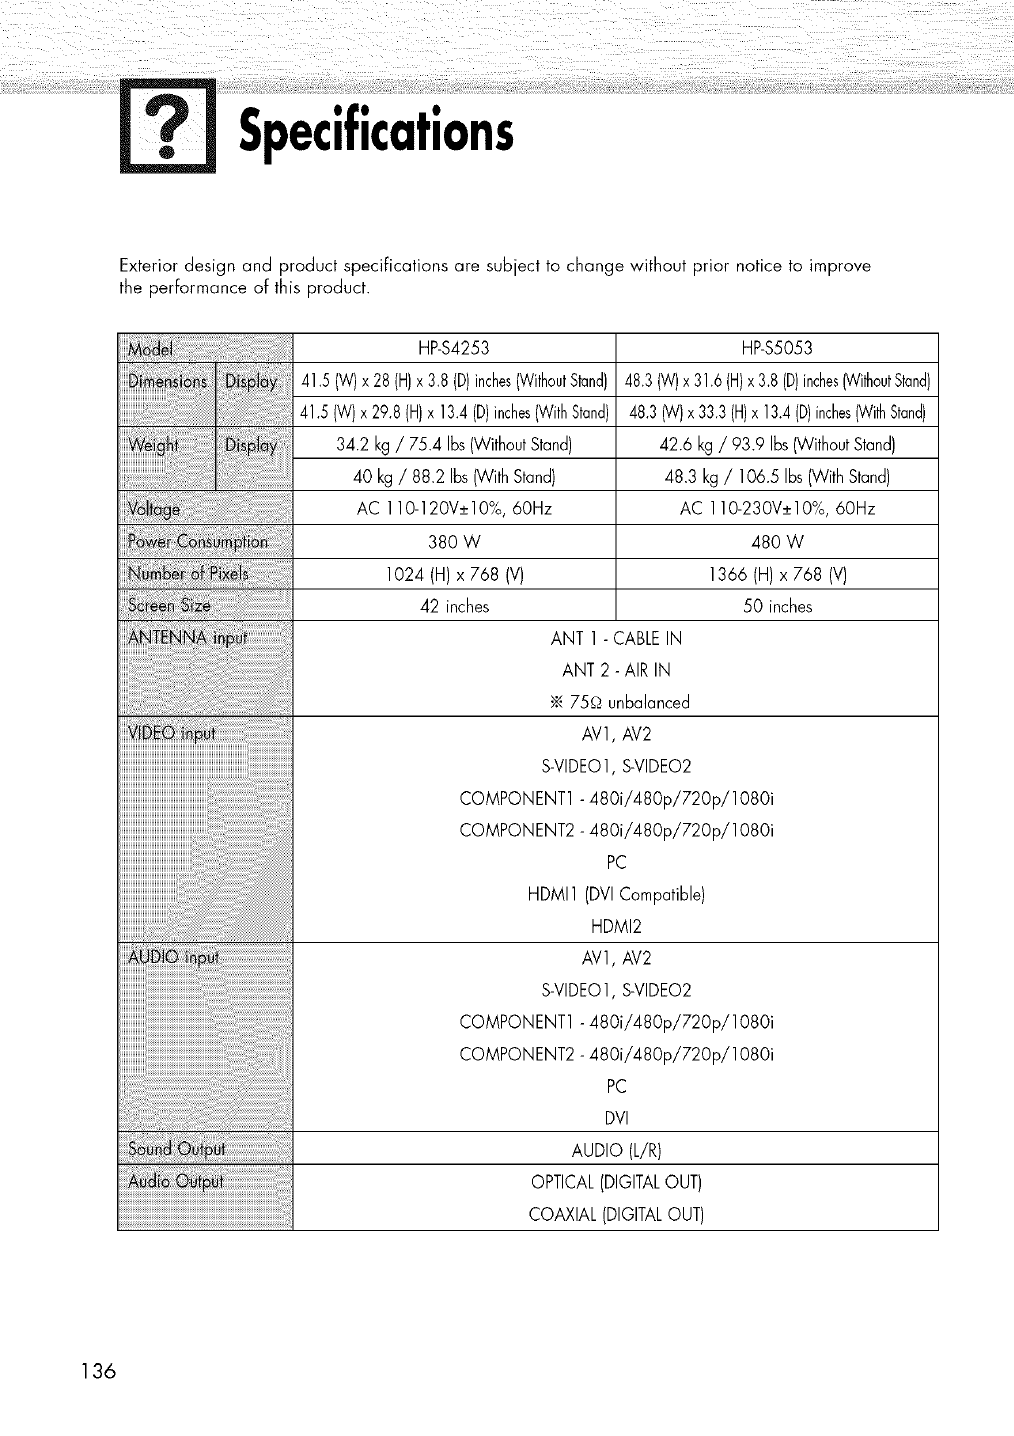
Specifications
Exterior design and product specifications are subject to change without prior notice to improve
the performance of this product.
HP-$4253
41.5 (W)x 28 (H)x3.8 (D)inches(WithoutStand)
41.5 (W)x 29.8 (H)x 13.4(D)inches(WithStand)
34.2 kg / 75.4 Ibs (WithoutStand)
40 kg /88.2 Ibs (WithStand)
AC 110-120V±10%, 60Hz
380 W
1024(H)x 768(V)
42 inches
HP-$5053
48.3(W)x 31.6(H)x3.8(D)inches(withoutStand)
48.3 (W)x 33.3(H)x 13.4(D)inches(WithStand)
42.6 kg /93.9 Ibs(Without Stand)
48.3 kg /106.5 Ibs (With Stand)
AC 110-230V±10%, 60Hz
480 W
1366(H)x 768 (V)
50 inches
ANT 1 - CABLEIN
ANT 2 - AIR IN
•_.75_ unbalanced
AV1, AV2
S-VIDEO1,S-VIDEO2
COMPONENT1 - 480i/480p/720p/1080i
COMPONENT2 - 480i/480p/720p/1080i
PC
HDMI1 (DVICompatible)
HDMI2
AV1, AV2
S-VIDEO1,S-VIDEO2
COMPONENT1 - 480i/480p/720p/1080i
COMPONENT2 - 480i/480p/720p/1080i
PC
DVI
AUDIO (L/R)
OPTICAL(DIGITALOUT)
COAXIAL (DIGITALOUT)
136
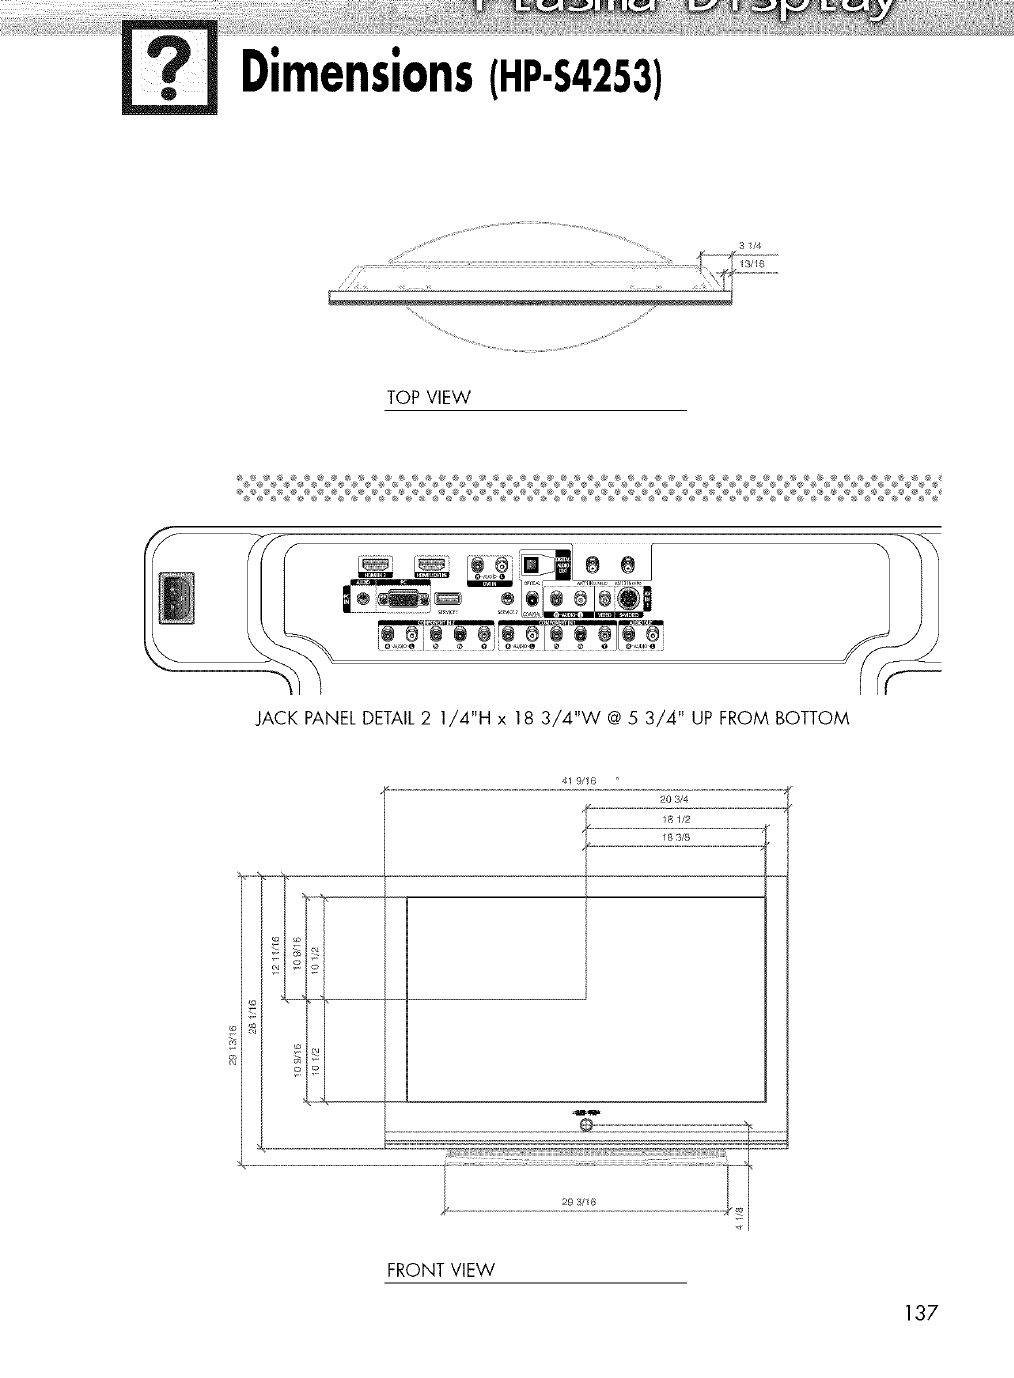
Dimensions(HP-$4253)
TOP VIEW
31/4
JACK PANEL DETAIL2 1/4"H x 18 3/4"W @ 5 3/4" UP FROM BOTTOM
41 9/16 '
20 3/4
18 1/2
o
m_
_F
FRONT VIEW
137
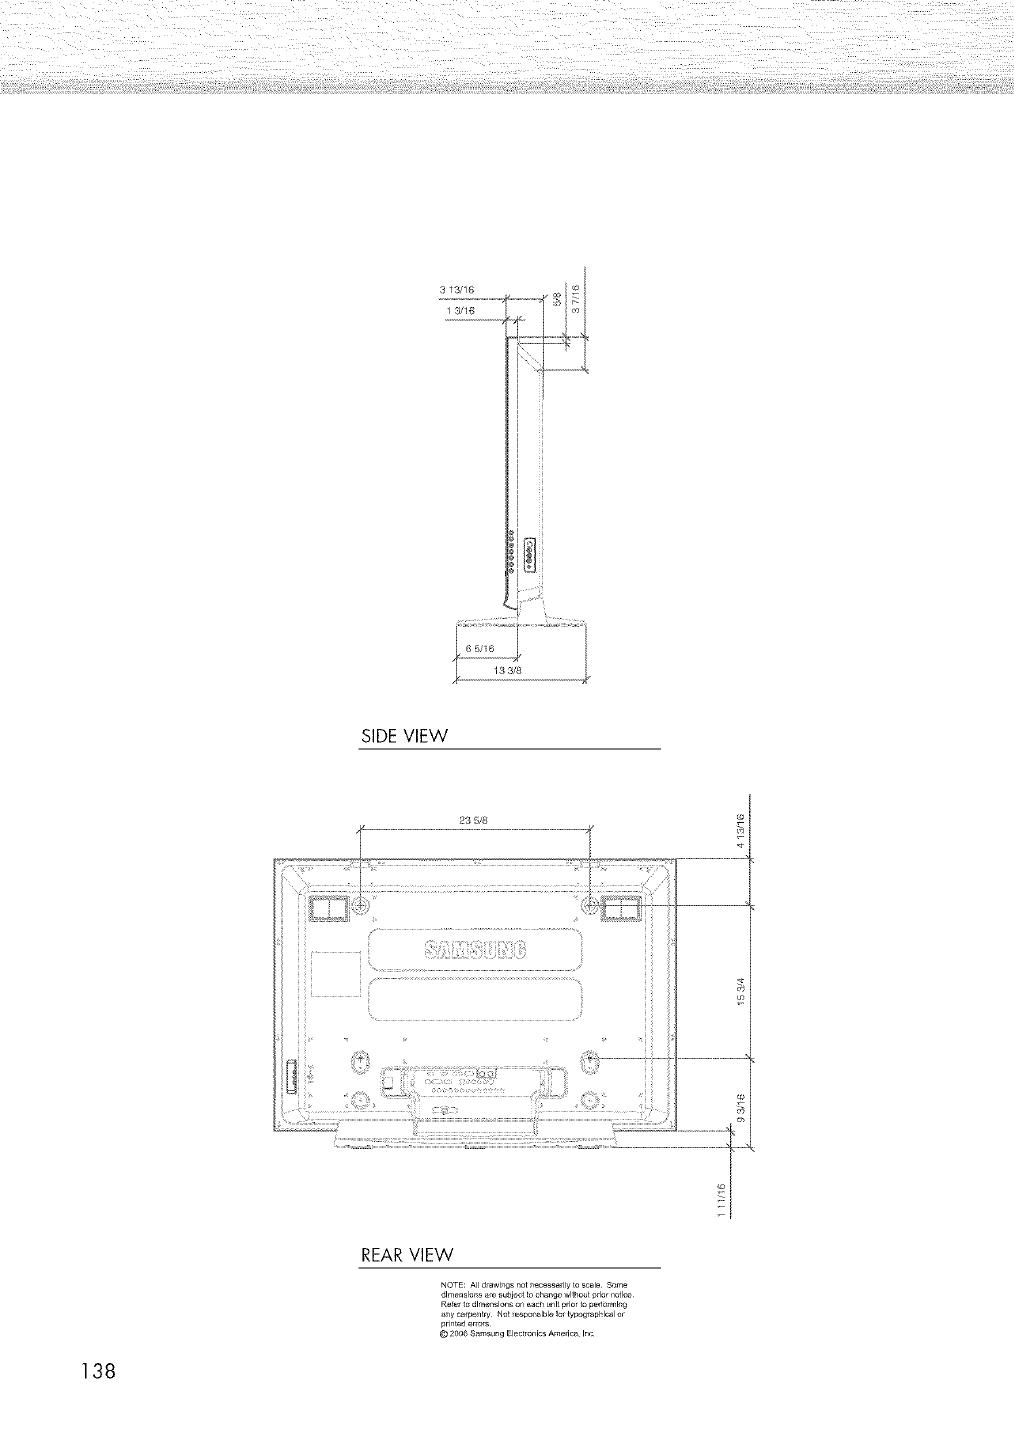
3 1"_/16
1 3/16
SIDE VIEW
23 518
REARVIEW
NOTE; All drawings not ne_ssarlly to scale Some
dlm_nslu_s a_ subject lo ch_ge wl_hu_t prior natlce
Rd_r to dl_nslons an each u_lt prior Wpe_brml_g
a_y _arp_,_ Not _spo_slbl_ _r typograpr,lcal or
printed e_o_
© 2006 Samsung Elec_ro_icsAme,ica Inc
138
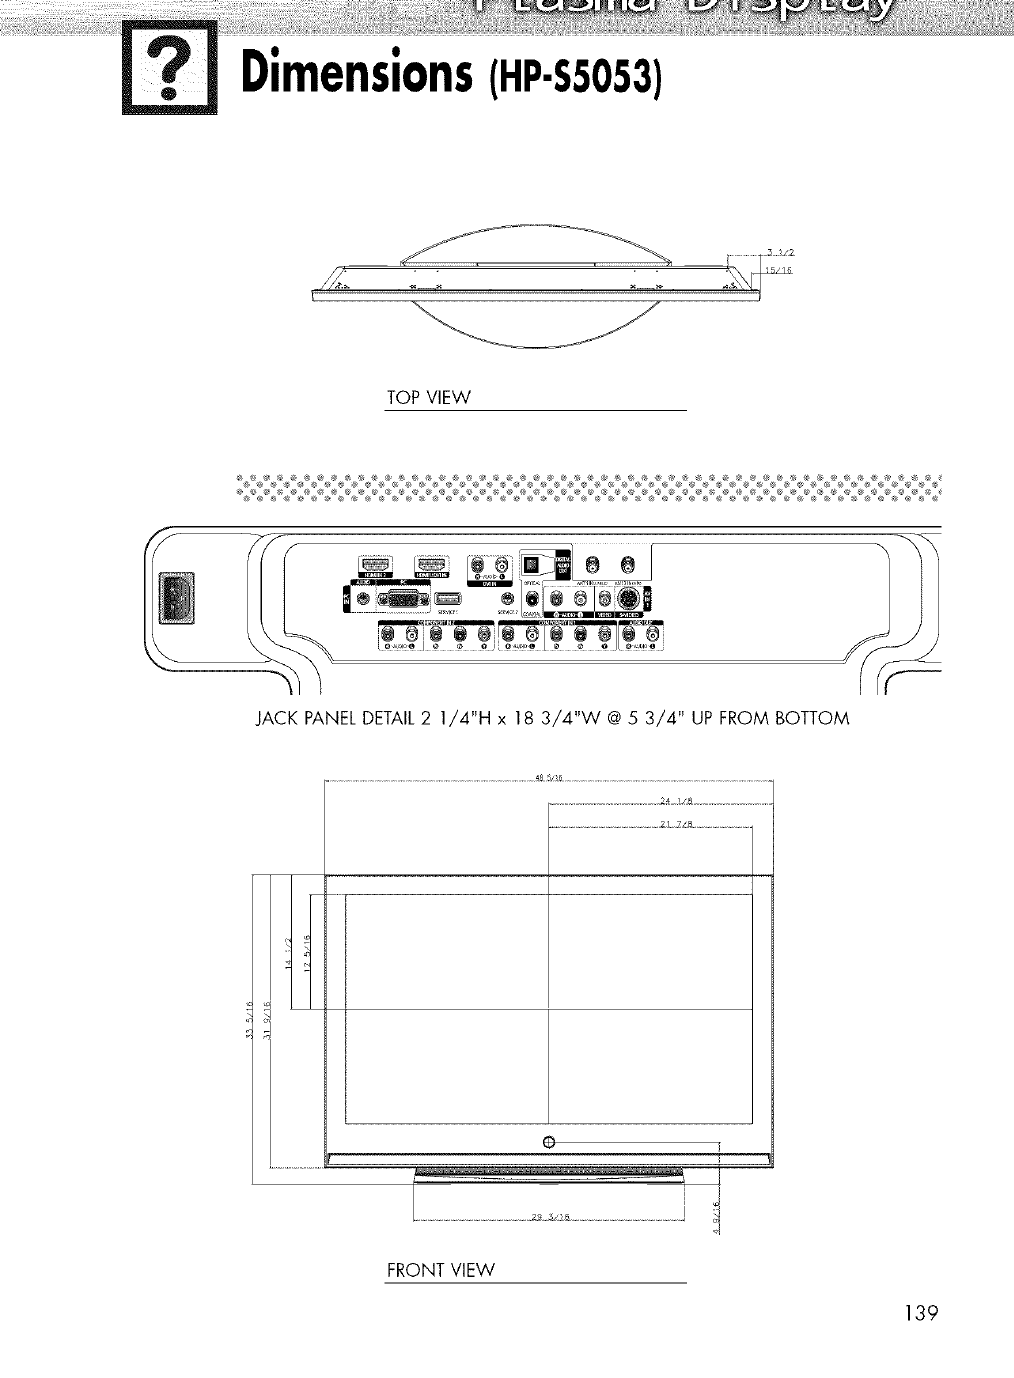
Dimensions(HP-SSOS3)
TOP VIEW
JACK PANEL DETAIL2 1/4"H x 18 3/4"W @ 53/4" UP FROM BOTTOM
.............................................. 2]ZL_ ..........................
0
FRONT VIEW
139
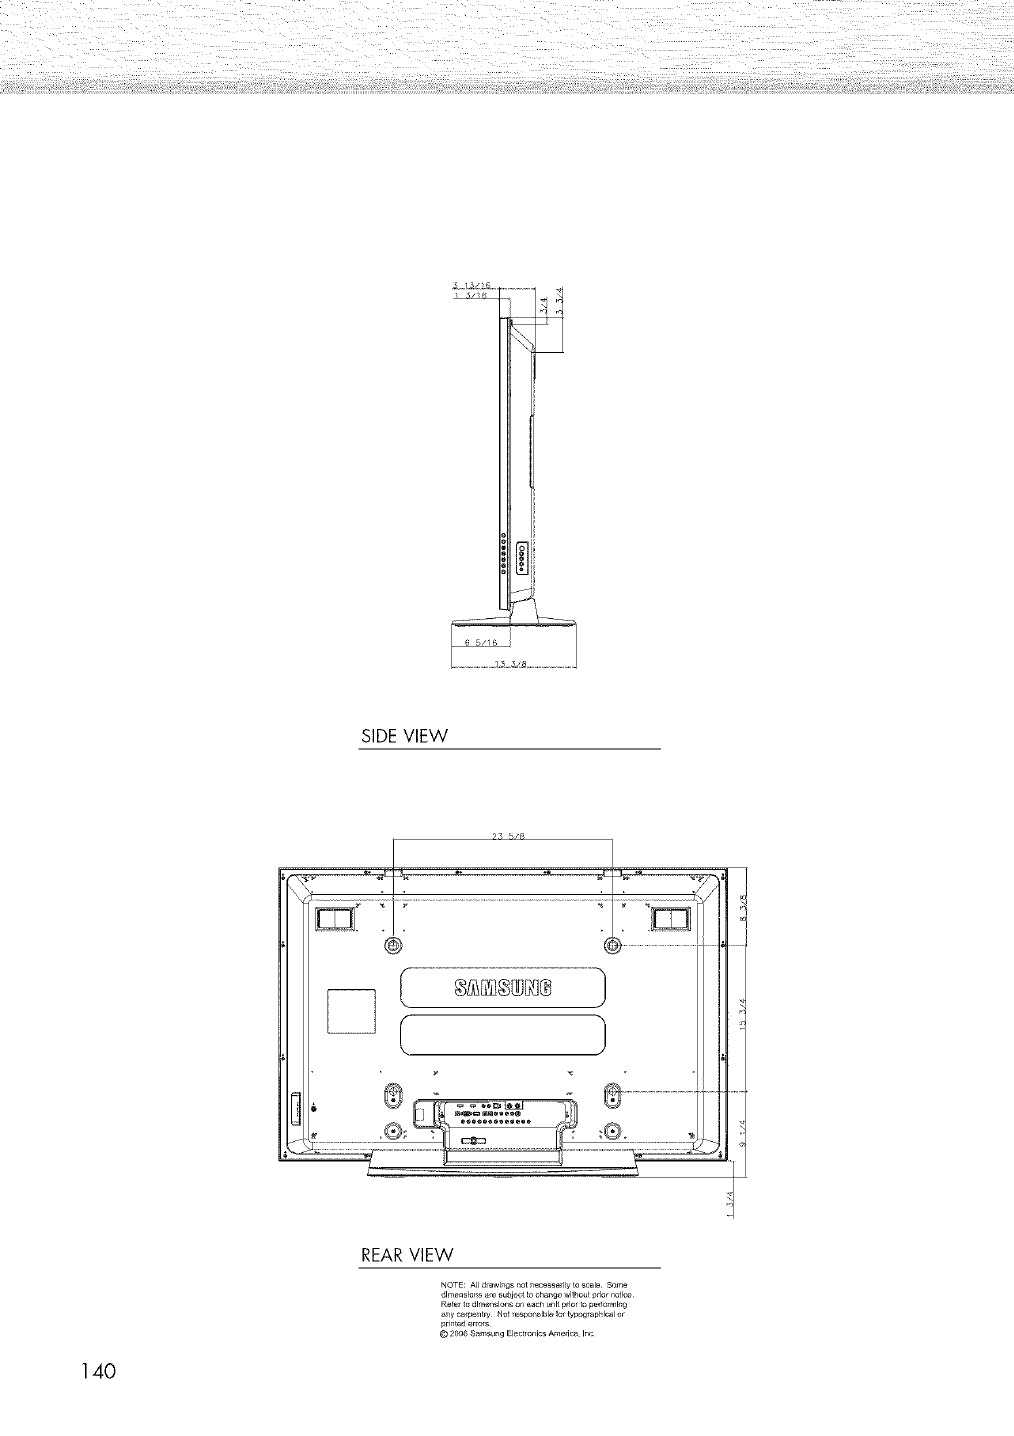
SIDE VIEW
@
REARVIEW
NOTE: Alldrawings not ne_ssarlly to scale Some
_lm_nslons _e subject 1_cha_ge without _rlar notice
Rer_ t_ dl_nslons on _ach u_lt prlar _ pe_rn_l_g
printed e_o_
© 20g_ _amsung Elec_ro_icsAmerica¸ Inc
140
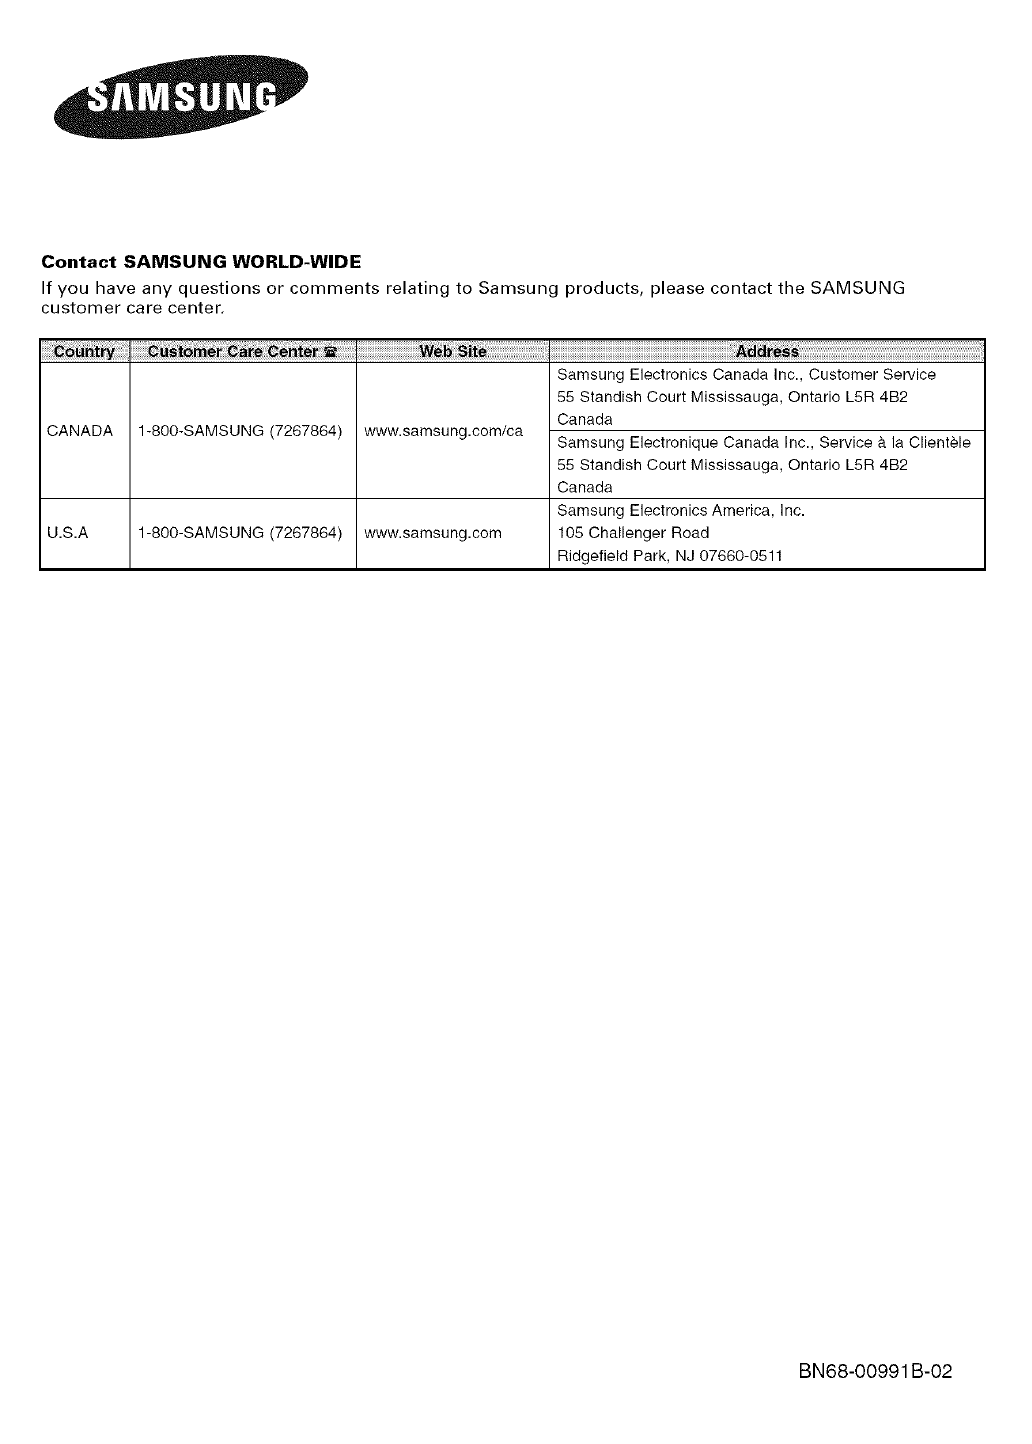
Contact SAMSUNG WORLD-WIDE
If you have any questions or comments relating to Samsung products, please contact the SAMSUNG
customer care center.
CANADA www.samsung.com/ca1-800-SAMSUNG (7267864)
U.S.A 1-800-SAMSUNG (7267864) www.samsung.com
Samsung Electronics Canada Inc., Customer Service
55 Standish Court Mississauga, Ontario L5R 4B2
Canada
Samsung Electronique Canada Inc., Service & la Clientele
55 Standish Court Mississauga, Ontario L5R 4B2
Canada
Samsung Electronics America, Inc.
105 Challenger Road
Ridgefield Park, NJ 07660-0511
BN68-OO991B-02
