Samsung HP T4254 User Manual PLASMA TELEVISION Manuals And Guides L0704198
SAMSUNG Plasma Television Manual L0704198 SAMSUNG Plasma Television Owner's Manual, SAMSUNG Plasma Television installation guides
User Manual: Samsung HP-T4254 HP-T4254 SAMSUNG PLASMA TELEVISION - Manuals and Guides View the owners manual for your SAMSUNG PLASMA TELEVISION #HPT4254. Home:Electronics Parts:Samsung Parts:Samsung PLASMA TELEVISION Manual
Open the PDF directly: View PDF ![]() .
.
Page Count: 142 [warning: Documents this large are best viewed by clicking the View PDF Link!]

........._Own
Istructi
Register your product at www.samsung.com/global/register
Record your Model and Serial number here for future reference,
- Model - Serial No.
I ImportantWarrantyInformationRegardingTelevisionFormatViewing
Wide screen format PDP Displays (16:9, the aspect ratio of the screen width to height) are primarily designed to view wide
screen format full-motion video. The images displayed on them should primarily be in the wide screen 16:9 ratio format,
or expanded to fill the screen if your model offers this feature and the images are constantly moving. Displaying stationary
graphics and images on screen, such as the dark side-bars on nonexpanded standard format television video and
programming, should be timited to no more than 5% of the total television viewing per week.
Additionally, viewing other stationary images and text such as stock market reports, video game displays, station Iogos,
web sites or computer graphics and patterns, should be limited as described above for all televisions. Displaying stationary
images that exceed the above guidelines can cause uneven aging of PDP Displays that leave subtle, but permanent
burned-in ghost images in the PDP picture. To avoid this, vary the programming and images, and primarily display
full screen moving images, not stationary patterns or dark bars.
On PDP models that offer picture sizing features, use these controls to view different formats as a full screen picture.
Be careful in the selection and duration of television formats used for viewing. Uneven PDP aging as a result of format
selection and use, as well as burned-in images, are not covered by your Samsung limited warranty.
U.S.A Only
The product unit accompanying this user manual is licensed under certain intellectual property rights of certain
third parties. In particular, this product is licensed under the following US patents: 5,991,715, 5,740,317, 4,972,484,
5,214,678, 5,323,396, 5,539,829, 5,606,618, 5,530,655, 5,777,992, 6,289,308, 5,610,985, 5,48t,643, 5,544,247,
5,960,037, 6,023,490, 5,878,080, and under US Published Patent Application No. 2001-44713-A1.
This license is limited to private non-commercial use by end-user consumers for licensed contents. No rights are
granted for commercial use. The license does not cover any product unit other than this product unit and the license
does not extend to any unlicensed product unit or process conforming to ISO/IEC 11172-3 or ISO/IEC 13818-3 used or
sold in combination with this product unit. The license only covers the use of this product unit to encode and/or decode
audio files conforming to the ISO/IEC 11172-3 or ISO/IEC 13818-3. No rights are granted under this license for product
features or functions that do not conform to the ISO/IEC 11172-3 or ISO/IEC 13818-3.
Other countries
The product unit accompanying this user manual is licensed under certain intellectual property rights of certain third
parties. This license is limited to private non-commercial use by end-user consumers for licensed contents. No rights
are granted for commercial use. The license does not cover any product unit other than this product unit and the license
does not extend to any unlicensed product unit or process conforming to ISO/tEC 11172-3 or ISO/IEC 13818-3 used or
sold in combination with this product unit. The license only covers the use of this product unit to encode and/or decode
audio files conforming to the ISO/IEC 11172-3 or ISO/IEC 13818-3. No rights are granted under this license for product
features or functions that do not conform to the ISO/IEC 11172-3 or ISO/IEC 13818-3.
© 2007 Samsung Electronics Co., Ltd. All rights reserved.
iUser instructions
O Screen Image retention
Do not display a still image (such as on a video game) on the plasma display panel for more than several minutes as it can
cause screen image retention. This image retention is also known as "screen burn". To avoid such image retention, refer to
page 26 of this manual to reduce the degree of brightness and contrast of the screen when displaying a still image.
Altitude
The PDP can only operate normally at heights under 6500ft.
Heat on the top of the PDP TV
The top side of the product may be hot after tong periods of use as heat dissipates from the panel through the vent hole in
the upper part of the product.
This is normal and does not indicate any defect or operation failure of the product.
However, children should be prevented from touching the upper part of the product.
The product is making a 'cracking' noise.
A 'cracking' noise may occur when the product contracts or expands due to a change of surrounding environment such as
temperature or humidity. This is normal and not a defect of the unit.
Cell Defects
The PDP uses a panel consisting of 1,230,000(SD-levet) to 3,150,000(HDqevel) pixels which require sophisticated
technology to produce. However, there may be a few bright or dark pixets on the screen. These pixels will have no impact
on the performance of the product.
Avoid operating the TV at temperatures below 5°0 (41°F}
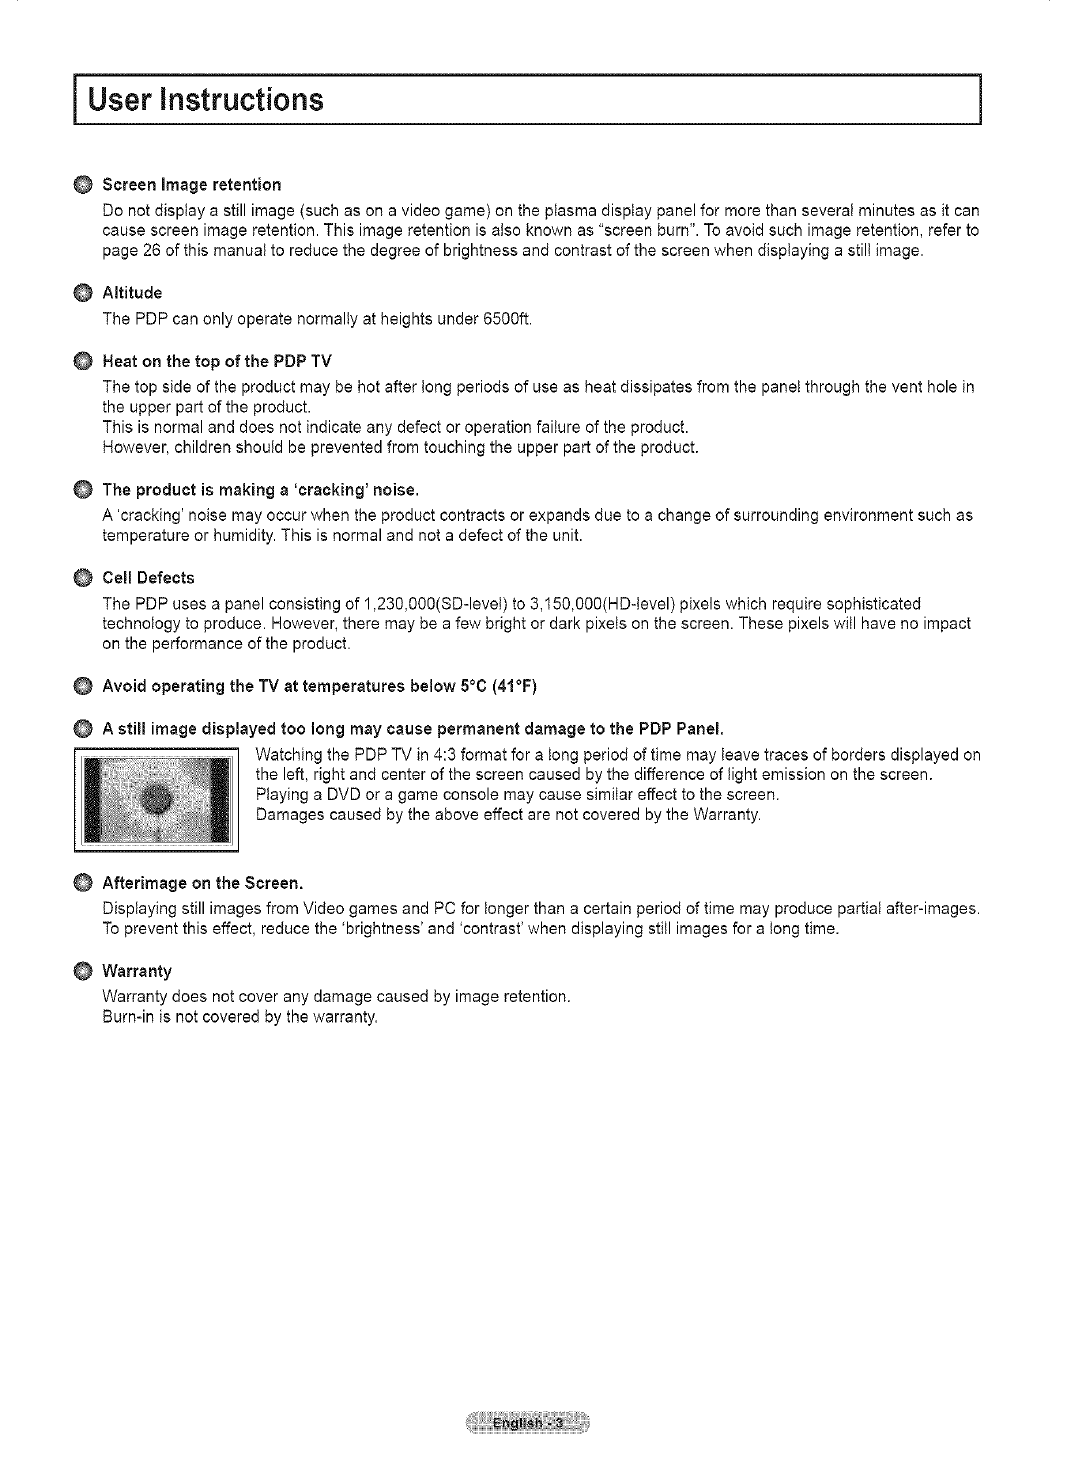
Astill image displayed too long may cause permanent damage to the PDP Panel.
Watching the PDP TV in 4:3 format for a tong period of time may leave traces of borders displayed on
the left, right and center of the screen caused by the difference of light emission on the screen.
Playing a DVD or a game console may cause similar effect to the screen.
Damages caused by the above effect are not covered by the Warranty.
Afterimage on the Screen.
Displaying still images from Video games and PC for longer than a certain period of time may produce partial after-images.
To prevent this effect, reduce the 'brightness' and 'contrast' when displaying still images for a tong time.
Warranty
Warranty does not cover any damage caused by image retention.
Burn-in is not covered by the warranty.
IContents
R List of Features .............................................................. 5
m Accessories .................................................................... 5
m Viewing the Control Panel ............................................. 6
m Viewing the Connection Panel ....................................... 7
m Remote Control .............................................................. 8
R Installing Batteries in the Remote Control ..................... 9
m Connecting VHF and UHF Antennas ............................. 9
m Connecting Cable TV ................................................... 10
m Connecting a VCR ....................................................... 11
m Connecting a Camcorder ............................................. 12
m Connecting a DVD Player/Set-Top Box ....................... 12
m Connecting a DVD Player/Set-Top Box via HDMI ....... 13
m Connecting a DVD Player/Set-Top Box via DVl ........... 13
m Connecting a Digital Audio System .............................. 14
m Connecting an AmplifieriDVD Home Theater .............. 14
R Connecting a PC .......................................................... 14
m Turning the TV On and Off ........................................... 15
m Plug & Play Feature ..................................................... 15
m Changing Channels ..................................................... 17
m Adjusting the Volume ................................................... 18
m Viewing the Display ..................................................... 18
m Viewing the Menus ...................................................... 18
m Memorizing the Channels ............................................ 19
m Setting Up Your Remote Control .................................. 20
m To Select the Source .................................................... 25
R To Edit the input Source Name .................................... 25
m Using Automatic Picture Settings ................................. 26
m Digital Noise Reduction ............................................... 27
m Changing the Screen Size ........................................... 28
m Making Detailed Picture Settings ................................. 29
m Active Color .................................................................. 30
m DNle (Digital Natural Image engine) ............................ 30
m Selecting the Film Mode .............................................. 31
m Setting the Blue Screen Mode ..................................... 31
m Setting the HDMI Black Level ...................................... 31
m Viewing Picture-in-Picture ............................................ 32
R Freezing the Current Picture ........................................ 33
m Using Automatic Sound Settings ................................. 34
m Customizing the Sound ................................................ 34
m Setting the TruSurround XT ......................................... 35
m Choosing a Multi-Channel Sound (MTS) Track - Digital.. 35
m Choosing a Multi-Channel Sound (MTS) Track - Analog,. 36
m Automatic Volume Control ........................................... 36
m Selecting the Internal Mute .......................................... 36
m Adjusting the Melody Sound ........................................ 37
R Listening to the Sound of the Sub (PIP) Picture .......... 37
[] Selecting the Antenna .................................................. 38
[] Adding and Erasing Channels ..................................... 38
[] Setting Your Favorite Channels ................................... 39
[] Viewing the Channel Lists ........................................... 40
[] Setting the Default Channel List Mode ........................ 40
[] Labeling Channels ....................................................... 41
[] Fine Tuning Analog Channels ...................................... 41
[] Checking the Digital-Signal Strength ........................... 42
[] LNA (Low Noise Amplifier) ........................................... 42
[] Using Your TV as a Computer (PC) Display ................ 43
[] Display Modes ............................................................ 43
[] Setting up the TV with your PC .................................... 44
[] Setting the Home Theater PC ...................................... 45
[] Setting the Time ........................................................... 46
[] Selecting a Menu Language ........................................ 49
[] Using the Game Mode ................................................. 49
[] Viewing Closed Captions(On-ScreenText Messages)- Digital.,,.50
[] Viewing Closed Captions(On-ScreenText Messages)- Analog.. 51
[] Menu Transparency Level ........................................... 52
[] Setting the Light Effect ................................................. 52
[] Using the Energy Saving Feature ................................ 53
[] Preventing Screen Burn-in ........................................... 53
[] Reducing the Effects of Screen Burn ........................... 54
[] Setting the Function Help ............................................ 54
[] Wall- mount adjustment (Sold separately) ................... 55
[] Upgrading the Software ............................................... 56
[] Using the V-Chip .......................................................... 56
[] What isAnynet+? ......................................................... 62
[] Connecting Anynet+ Devices ....................................... 62
[] Setting Up Anynet+ ...................................................... 63
[] Scanning and Switching between Anynet+ Devices.... 63
[] Recording .................................................................... 64
[] Listening through a Receiver (Home theater) .............. 65
[] Check Points before Requesting Service .................... 65
[] Troubleshooting ........................................................... 66
[] Installing the Wall Mount Kit......................................... 67
[] How to assemble the Stand-Base
(depending on the model) ........................................... 68
[] Specifications ............................................................... 68
[] Dimensions (HP-T4254) .............................................. 69
[] Dimensions (HP-T5054) .............................................. 70
Symbols ,,,,,
Press One-Touch Note
Button
iGeneral information
List of Features
. Adjustable picture settings that can be stored in the TV's memory.
. Automatic timer to turn the TV on and off.
. A special sleep timer.
. V-Chip function.
. Excellent Digita! interface & Networking :
With a built-in HD digita! tuner, nomsubscription HD broadcasts can be viewed with no Set-Top Box needed.
. Remote Controt
The supplied remote can be used to operate the TV as well as most DVD players, Set-top boxes, Cable Boxes and VCRs.
. Excellent Picture Quality
- DNle technology provides life-like clear images.
. SRS TruSurround XT
- SRS TruSurround XT provides a virtual Dolby surround system.
Accessories
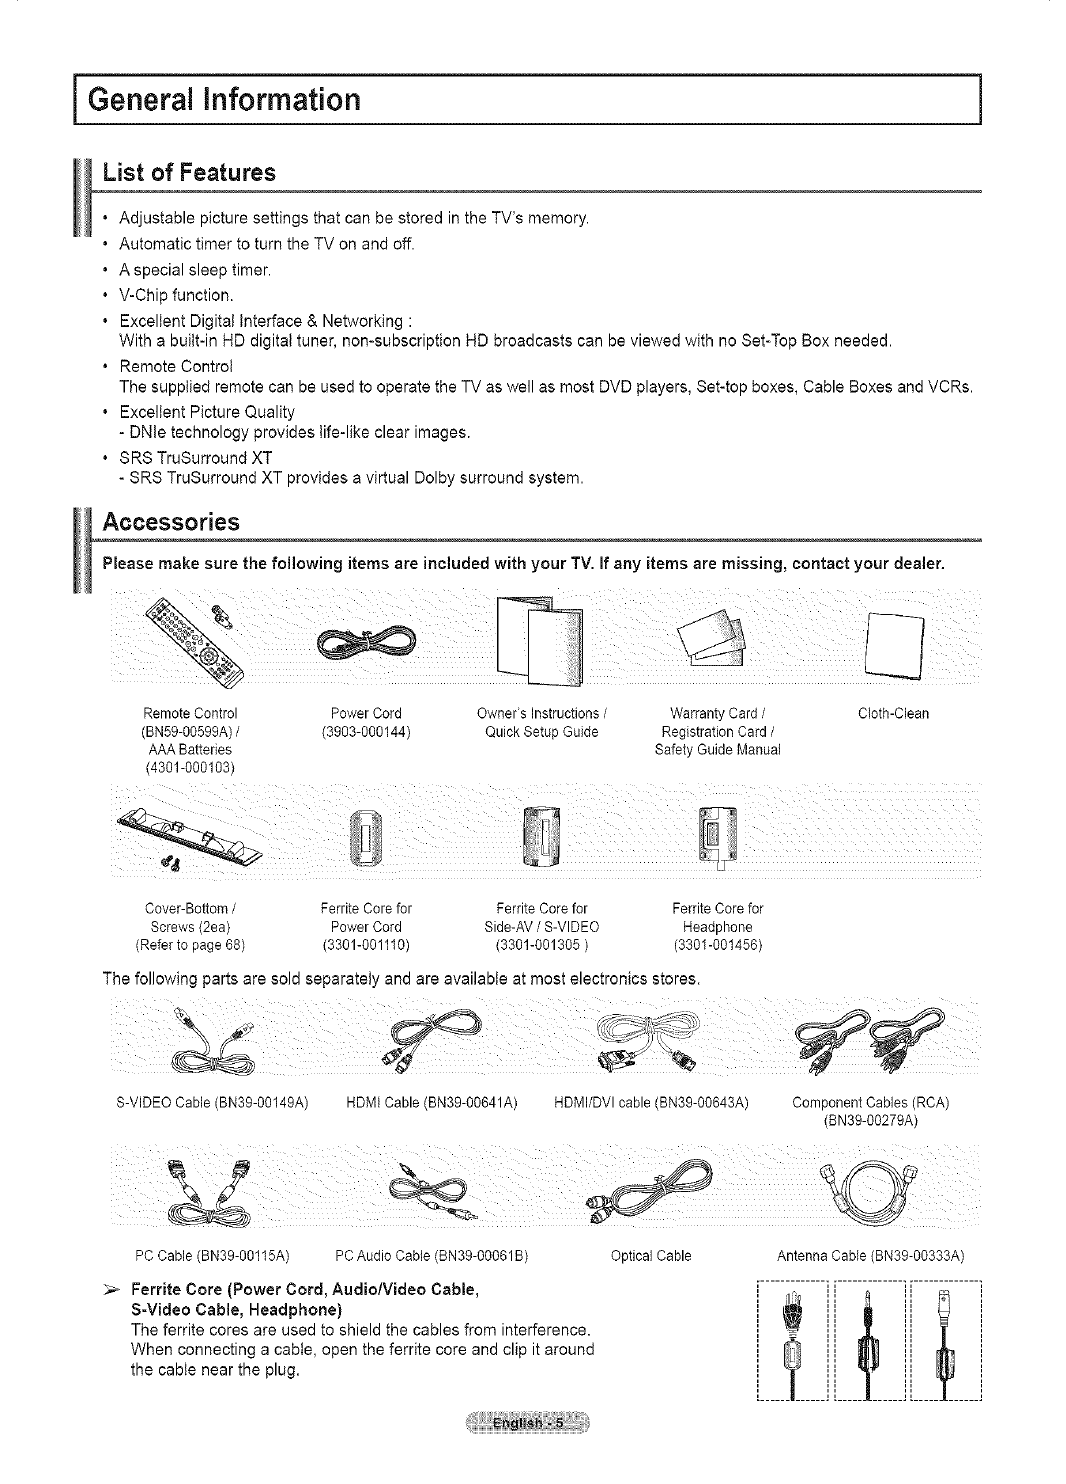
Please make sure the following items are included with your TV, if any items are missing, contact your dealer.
RemoteControl Power Cord Owner's Instructions/Warranty Card/Cloth-Clean
(BN59-00599A)/(3903-000144 Quick Setup Guide RegistrationCard /
AAA Batteries Safety Guide Manual
(4301-000103)
Cover-Bottom/FerriteCorefor FerriteCorefor FerriteCorefor
Screws (2ea) Power Cord Side-AV/S-VIDEO Headphone
(Refer to page68) (3301-001110) (3301-001305) (3301-001456
The following parts are sold separately and are available at most electronics stores.
S-VIDEO Cable (BN39-00149A) HDMI Cable(BN39-O0641A) HDMI/DVI cable (BN39-00643A) Component Cables (RCA)
(BN39-00279A)
PC Cable (BN39-00115A) PC Audio Cable (BN39-00061B)
Ferrite Core (Power Cord, Audio/Video Cable,
S-Video Cable, Headphone)
The ferrite cores are used to shield the cables from interference.
When connecting a cable, open the ferrite core and clip it around
the cable near the plug.
Optical Cable AntennaCable (BN39-00333A)
.............. ] [ ............. ] [ ..............
Viewing the Control Panel
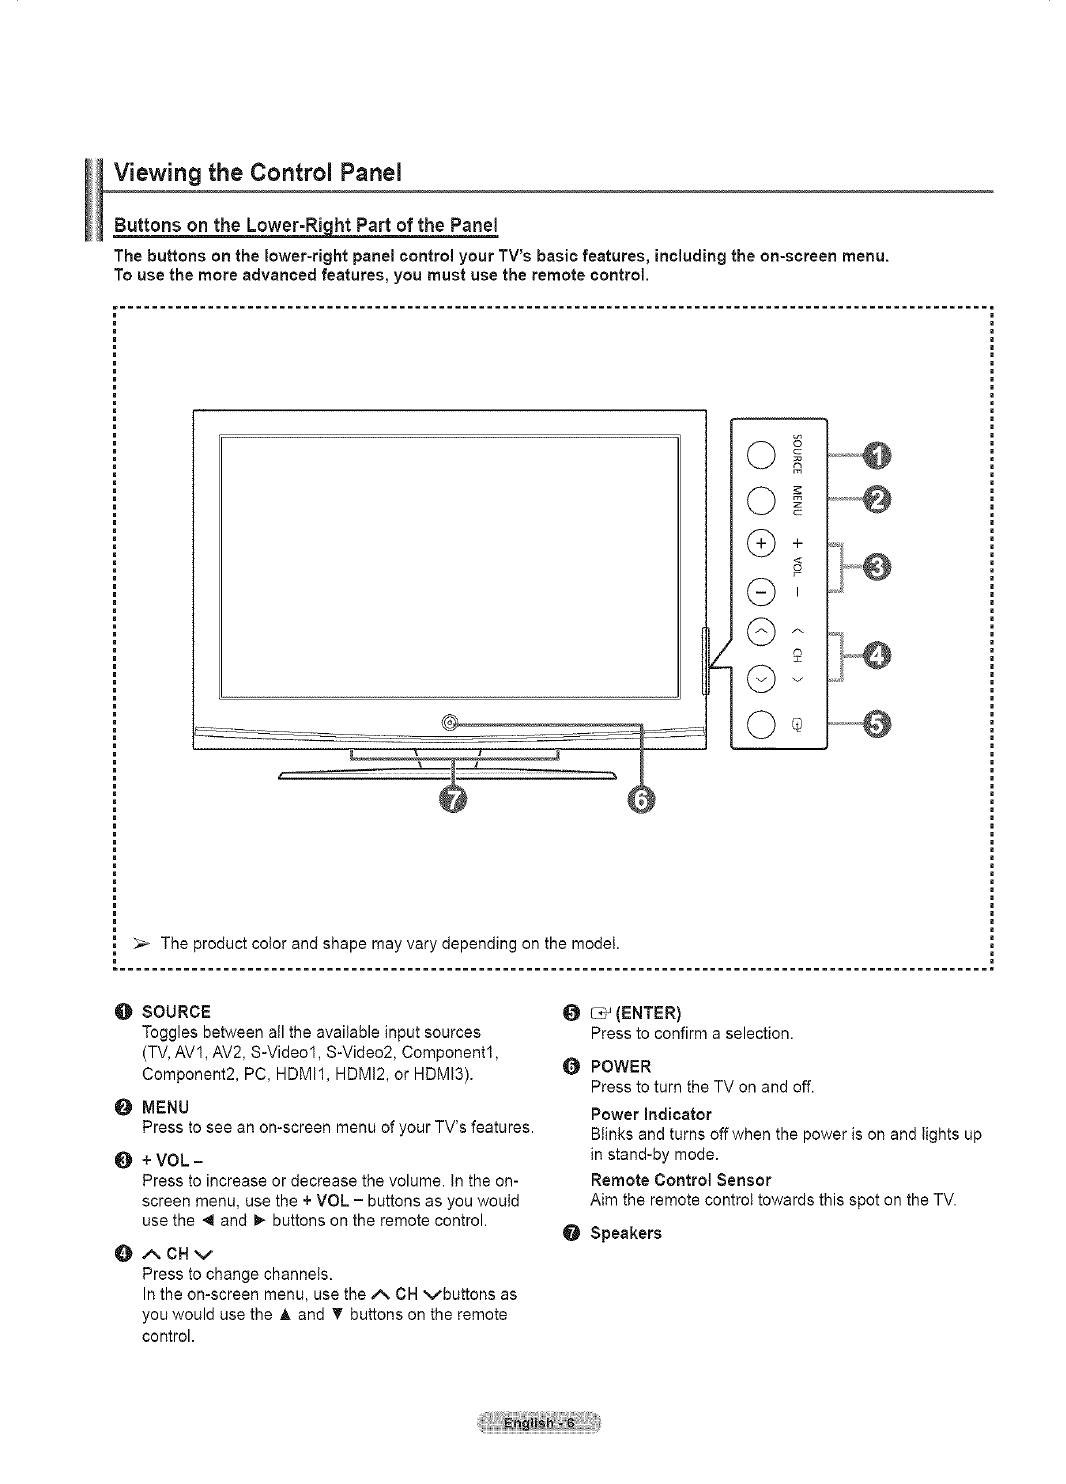
Buttons on the Lower-Right Part of the Panel
The buttons on the lower-right panel control your TV's basic features, including the on=screen menu.
To use the more advanced features, you must use the remote control.
............................................................................................................. i
A
+
<
o
G'
©A
C) v
00
O SOURCE
Toggles between atl the available input sources
(TV, AVl, AV2, S-Video1, S-Video2, Component1,
Component2, PC, HDMI1, HDMI2, or HDMI3).
eMENU
Press to see an on-screen menu of your TV's features.
0+VOL-
Press to increase or decrease the volume. In the on-
screen menu, use the + VOL - buttons as you would
use the 4 and _ buttons on the remote control.
ACHv
Press to change channels.
In the on-screen menu, use the/'_ CH vbuttons as
you would use the A and _' buttons on the remote
control.
O [-C*_ (ENTER)
Press to confirm a selection.
QPOWER
Press to turn the TV on and off.
Power indicator
Blinks and turns off when the power is on and lights up
in stand-by mode.
Remote Control Sensor
Aim the remote control towards this spot on the TV.
Speakers
Viewing the Connection Panel
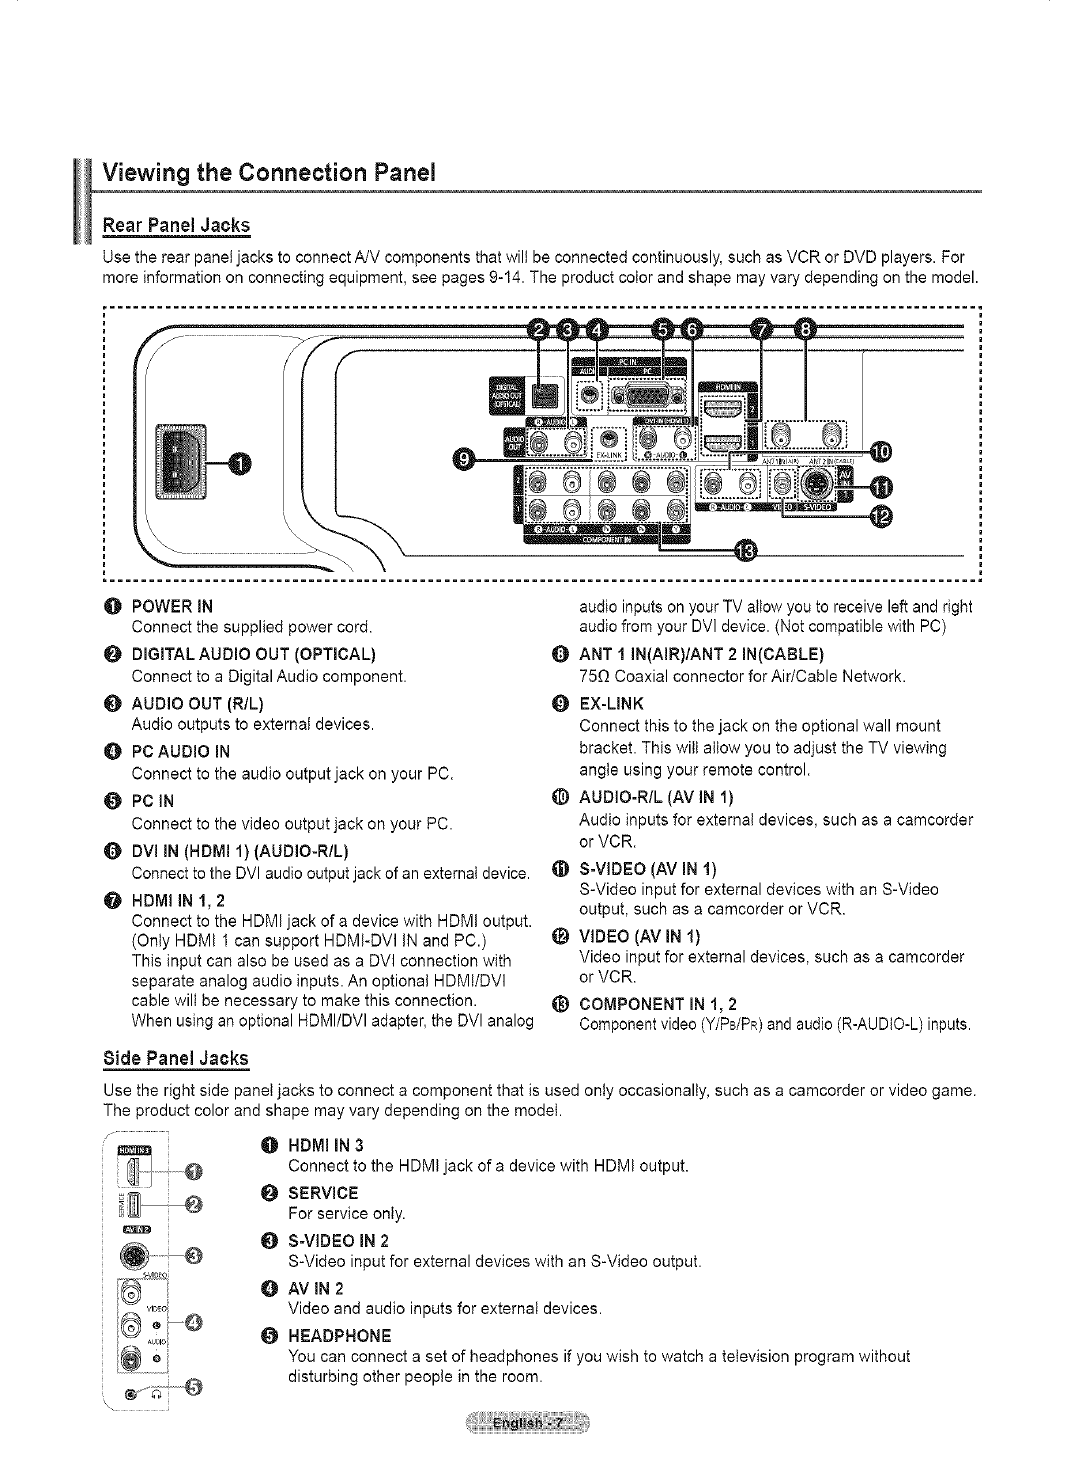
Rear Panel Jacks
Use the rear panel jacks to connect A/V components that wilt be connected continuously, such as VCR or DVD players. For
more information on connecting equipment, see pages 9-14. The product color and shape may vary depending on the model.
®
O POWER IN
Connect the supplied power cord.
DIGITAL AUDIO OUT (OPTICAL)
Connect to a Digital Audio component.
O AUDIO OUT (RIL)
Audio outputs to external devices.
PC AUDIO IN
Connect to the audio output jack on your PC.
OPC_N
Connect to the video output jack on your PC.
@OVl IN (HDMI I)(AUDIO-RIL)
Connect to the DVl audio output jack of an external device.
HDMI IN 1, 2
Connect to the HDMI jack of a device with HDM! output.
(Only HDMI 1 can support HDMI-DVl IN and PC.)
This input can also be used as a DVl connection with
separate analog audio inputs. An optional HDM!/DVl
cable will be necessary to make this connection.
When using an optional HDMI/DVI adapter, the DVl analog
Side Panel Jacks
audio inputs on your TV allow you to receive left and right
audio from your DVI device. (Not compatible with PC)
ANT I IN(AIR)IANT 2 IN(CABLE)
75_ Coaxial connector for Air/Cable Network.
Q EX-LINK
Connect this to the jack on the optional wall mount
bracket. This will allow you to adjust the TV viewing
angle using your remote control.
@AUDIO-R/L (AV IN 1)
Audio inputs for externa{ devices, such as acamcorder
or VCR.
_) S-VIDEO (AV IN 1)
S-Video input for external devices with an S-Video
output, such as a camcorder or VCR.
_) VIDEO (AV IN 1)
Video input for external devices, such as a camcorder
or VCR.
_) COMPONENT iN 1, 2
Component video (Y/PdPR) and audio (R-AUDIO-L) inputs.
Use the right side panel jacks to connect a component that is used only occasionally, such as a camcorder or video game.
The product color and shape may vary depending on the model.
HDMI IN 3
Connect to the HDMI of device with HDMI
jack aoutput.
SERVICE
For service only.
_]) S-VIDEO IN 2
S-Video input for external devices with an S-Video output.
O AVIN2
Video and audio inputs for external devices.
HEADPHONE
You can connect a set of headphones if you wish to watch atelevision program without
disturbing other people in the room.
Remote Control
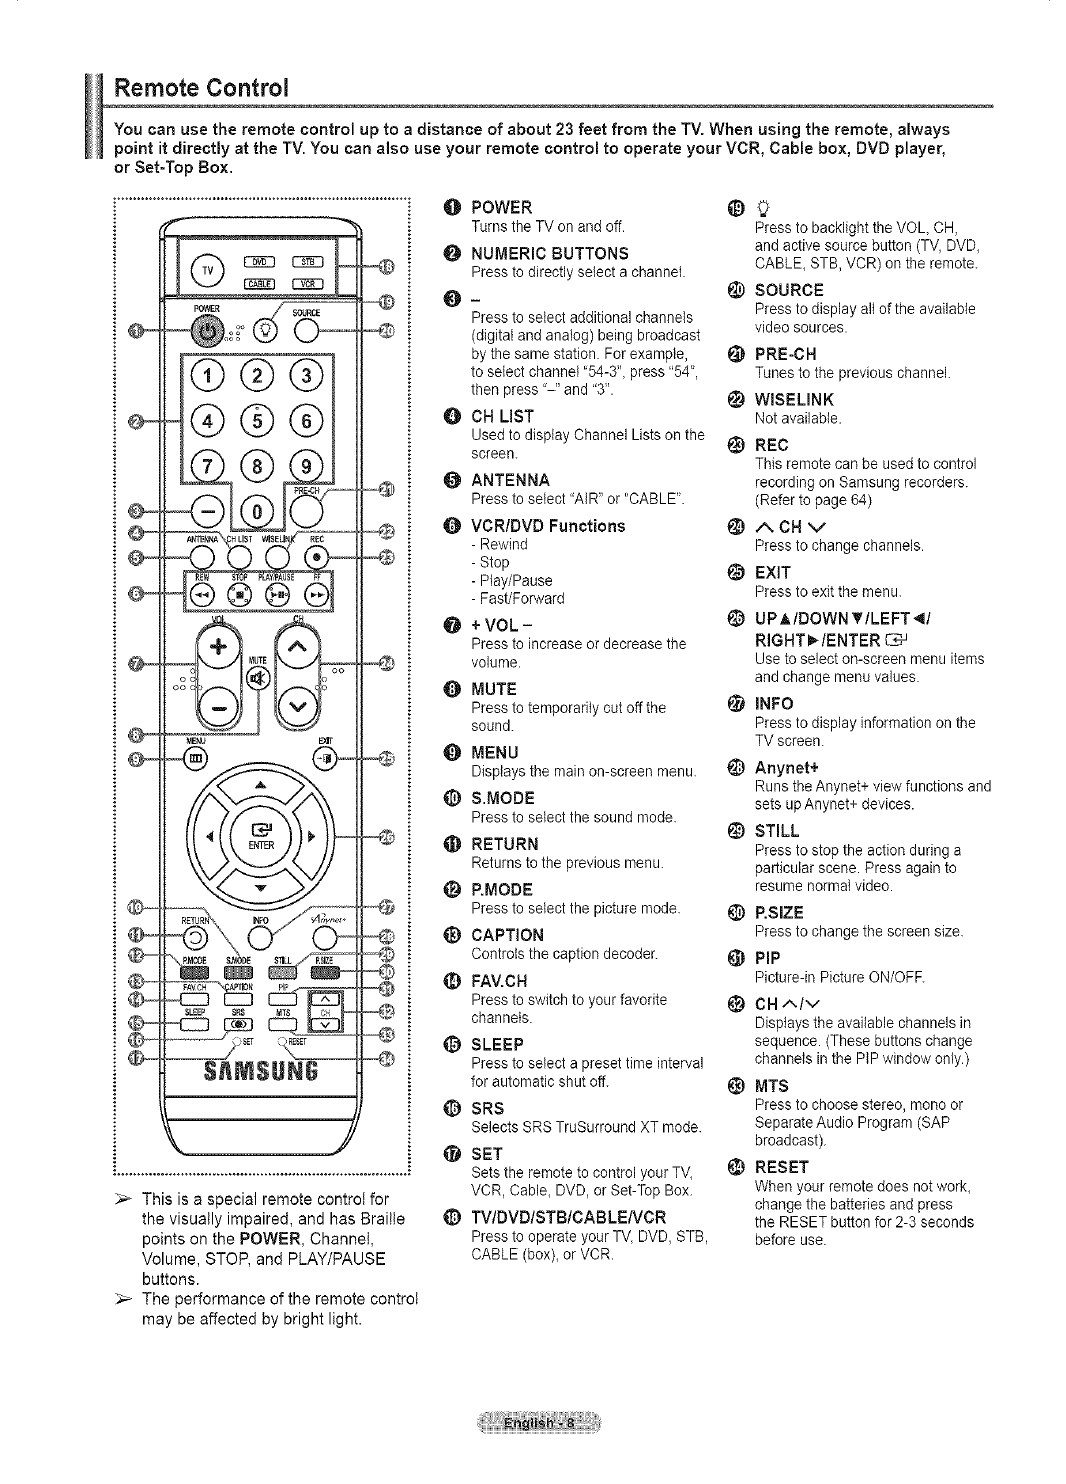
You can use the remote control up to a distance of about 23 feet from the TV. When using the remote, always
point it directly at the TV.You can also use your remote control to operate your VCR, Cable box, DVD player,
or Set-Top Box.
q}@@
®@@
®®®®
MUTE
Eqr
SLEEP $_
=@
This is a special remote control for
the visually impaired, and has Braille
points on the POWER, Channel,
Volume, STOP, and PLAY/PAUSE
buttons.
The performance of the remote control
may be affected by bright light.
@ POWER @
Turns the TV on and off. Press to backlight the VOL CH,
NUMERIC BUTTONS and active source button (TV, DVD,
Press to directly select a channel. CABLE, STB, VCR) on the remote.
@SOURCE
O- Presstodisplayalloftheavailable
Press to select additional channels
(digital and analog) being broadcast video sources.
by the same station. For example, _) PRE-CH
to select channel '54-3", press "54", Tunes to the previous channel.
then press '-" and "3". t_ WISEUNK
CH LIST Net available.
Used to display Channel Lists on the _) REC
screen. This remote can be used to control
ANTENNA recording on Samsung recorders.
Press to select "AIR" or "CABLE". (Refer to page 64)
VCR/DVD Functions (_) /',, OH V
- Rewind Press to change channels.
- Stop
- Play/Pause I_ EXIT
- Fast/Forward Press to exit the menu.
+VOL -I_) UPA/DOWN _'/LEFT4/
Press to increase or decrease the RIGHTly/ENTER C_
volume. Use to select on-screen menu items
and change menu values.
O MUTE
Press to temporarily cut off the _ INFO
sound. Press to display information on the
TV screen.
QMENU
Displays the main on-screen menu. @) Anynet+
Runs the Anynet+ view functions and
_) S.MODE sets upAnynet+ devices.
Press to select the sound mode. _) STILL
_) RETURN Press to stop the action during a
Returns to the previous menu. particular scene. Press again to
_) P.MODE resume normal video.
Press to select the picture mode. _) P.SIZE
_) CAPTION Press to change the screen size.
Controls the caption decoder. _} PIP
FAV.CH Picture-in Picture ON/OFF.
Press to switch to your favorite _) CH ^Iv
channels. Displays the available channels in
SLEEP sequence. (These buttons change
Press to select a preset time interval channels in the PIP window only.)
for automatic shut off. _) MTS
_) SRS Press to choose stereo, mono or
Selects SRS TruSurround XT mode. Separate Audio Program (SAP
broadcast).
@ SET
Sets the remote to control your TV, _) RESET
VCR, Cable, DVD, or Set-Top Box. When your remote does not work,
change the batteries and press
_) TVlDVDISTBICABLENCR the RESET button for 2-3 seconds
Press to operate your TV, DVD, STB, before use.
CABLE (bex), or VCR.
Installing Batteries in the Remote Control
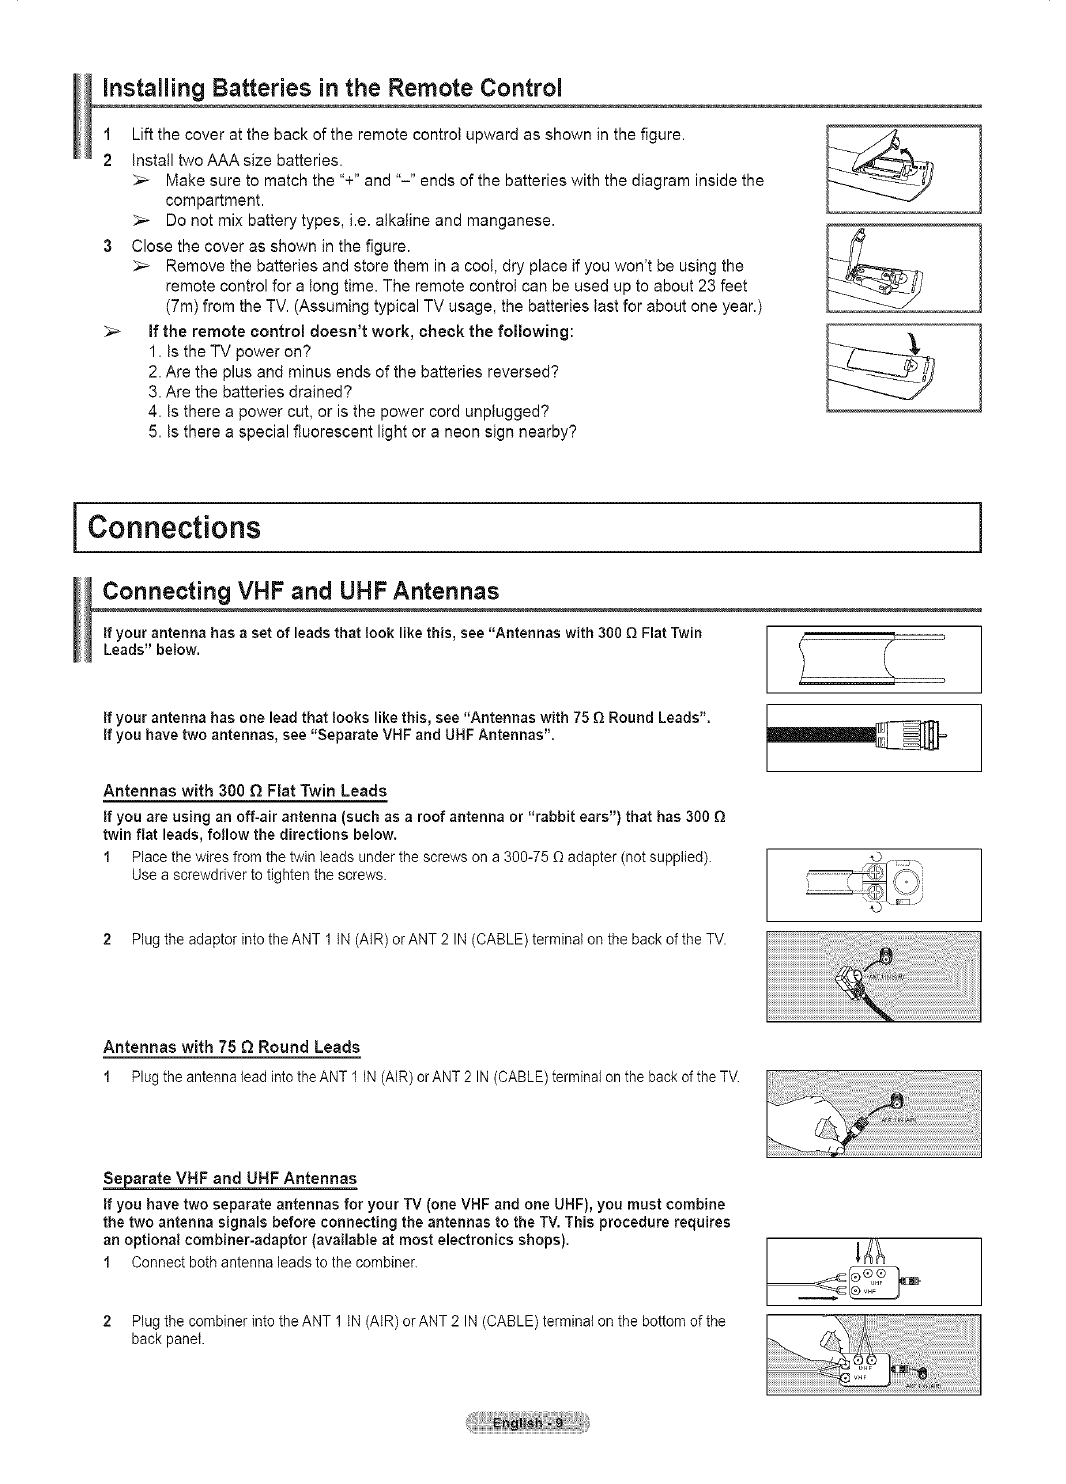
1 Lift the cover at the back of the remote control upward as shown in the figure.
2 Install twoAAAsize batteries.
_-- Make sure to match the "+" and "-" ends of the batteries with the diagram inside the
compartment.
_-- Do not mix battery types, i.e. alkaline and manganese.
3 Close the cover as shown in the figure.
_,_ Remove the batteries and store them in a cool, dry place if you won't be using the
remote control for a tong time. The remote control can be used up to about 23 feet
(7m) from the TV. (Assuming typical TV usage, the batteries last for about one year.)
_,_ if the remote control doesn't work, check the following:
1. Is the TV power on?
2. Are the plus and minus ends of the batteries reversed?
3. Are the batteries drained?
4. Is there a power cut, or is the power cord unplugged?
5. Is there a special fluorescent light or a neon sign nearby?
i Connections
Connecting VHF and UHF Antennas
If your antenna has a set of leads that look like this, see "Antennas with 300 Q Flat Twin
Leads" below.
If your antenna has one lead that looks like this, see "Antennas with 75 Q Round Leads".
If you have two antennas, see "Separate VHF and UHF Antennas".
Antennas with 300 Q Fiat Twin Leads
if you are using an off-air antenna (such as a roof antenna or "rabbit ears") that has 300 Q
twin flat leads, follow the directions below.
1 Place the wires from the twin leads under the screws on a 300-75 _ adapter (not supplied).
Use a screwdriver to tighten the screws.
2 Plug the adaptor into the ANT 1 IN (AIR) orANT 2 IN (CABLE) terminai on the back of the TV.
Antennas with 75 _ Round Leads
1 PlugtheantennaleadintotheANT1 IN (AIR)orANT2 IN(CABLE)terminalon thebackof theTV
Separate VHF and UHF Antennas
If you have two separate antennas for your TV (one VHF and one UHF), you must combine
the two antenna signals before connecting the antennas to the TV. This procedure requires
an optional combiner-adaptor (available at most electronics shops).
1 Connect both antenna leadsto the combiner.
2 Plug the combiner into the ANT 1 IN (AIR) or ANT 2 IN (CABLE) terminal on the bottom of the
back panel.
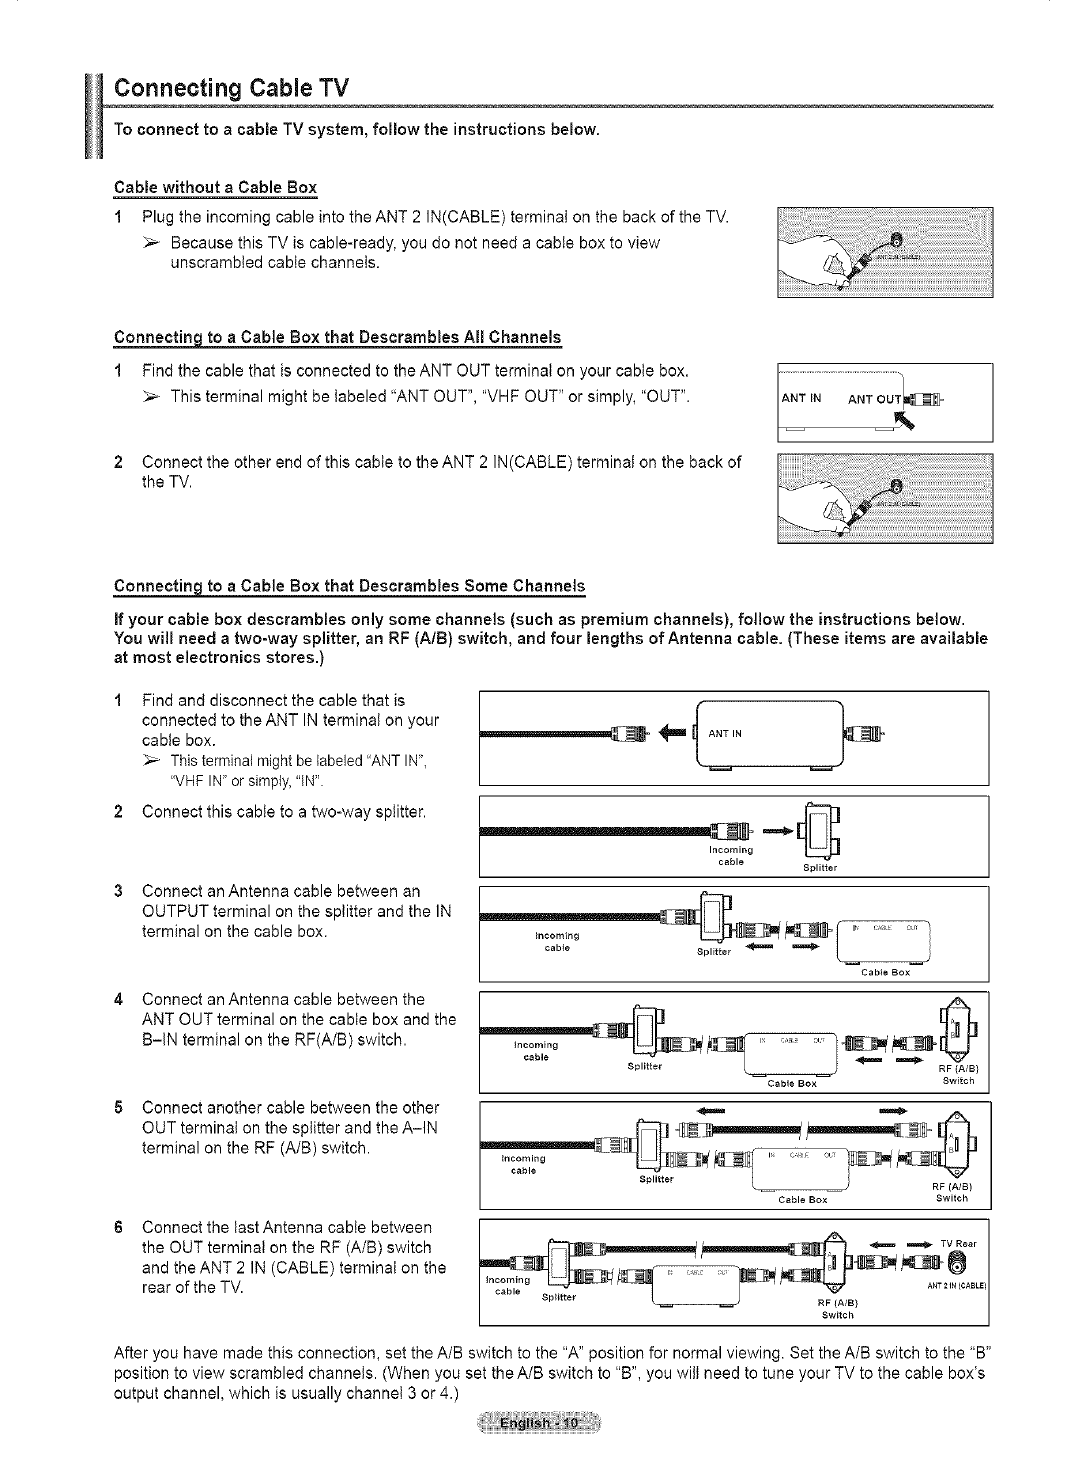
Connecting Cable TV
To connect to a cable TV system, follow the instructions below.
Cable without a Cable Box
1Plug the incoming cable into the ANT 2 IN(CABLE) terminal on the back of the TV.
_-- Because this TV is cable-ready, you do not need acable box to view
unscrambled cable channels.
to a Cable Box that Descrambles All Channels
1Find the cable that is connected to the ANT OUT terminal on your cable box.
_-- This terminal might be labeled "ANT OUT", "VHF OUT" or simply, "OUT".
2 Connect the other end of this cable to the ANT 2 IN(CABLE) terminal on the back of
the TV.
to aCable Box that Descrambles Some Channels
If your cable box descrambles only some channels (such as premium channels), follow the instructions below.
You will need atwo-way splitter, an RF (A/B) switch, and four lengths of Antenna cable. (These items are available
at most electronics stores.)
1 Find and disconnect the cable that is
connected to the ANT IN terminat on your
cable box.
This terminal might be tabeled 'ANT IN_',
'VHF IN" or simply, "IN".
2 Connect this cable to a two-way splitter.
Connect an Antenna cable between an
OUTPUT terminal on the splitter and the IN
terminal on the cable box.
Connect an Antenna cable between the
ANT OUT terminal on the cable box and the
B-IN terminal on the RF(A/B) switch.
Connect another cable between the other
OUT terminal on the splitter and the A-IN
terminal on the RF (A/B) switch.
Connect the last Antenna cable between
the OUT terminal on the RF (A/B) switch
and the ANT 2 IN (CABLE) terminal on the
rear of the TV.
Incoming
cable
Splitter
Incoming
cabte Splitter _/
Cabte BOX
Incoming
cable
Splitter RF (A/B)
Cable BOX Switch
sp,tter L J RFIA_8)
Cable Box Switch
_ A
_____ _ _ mv ___r
Switch J
After you have made this connection, set the A/B switch to the "A" position for normal viewing. Set the A/B switch to the "B"
position to view scrambled channels. (When you set the A/B switch to "B", you wilt need to tune your TV to the cable box's
output channel, which is usually channet 3 or 4.)
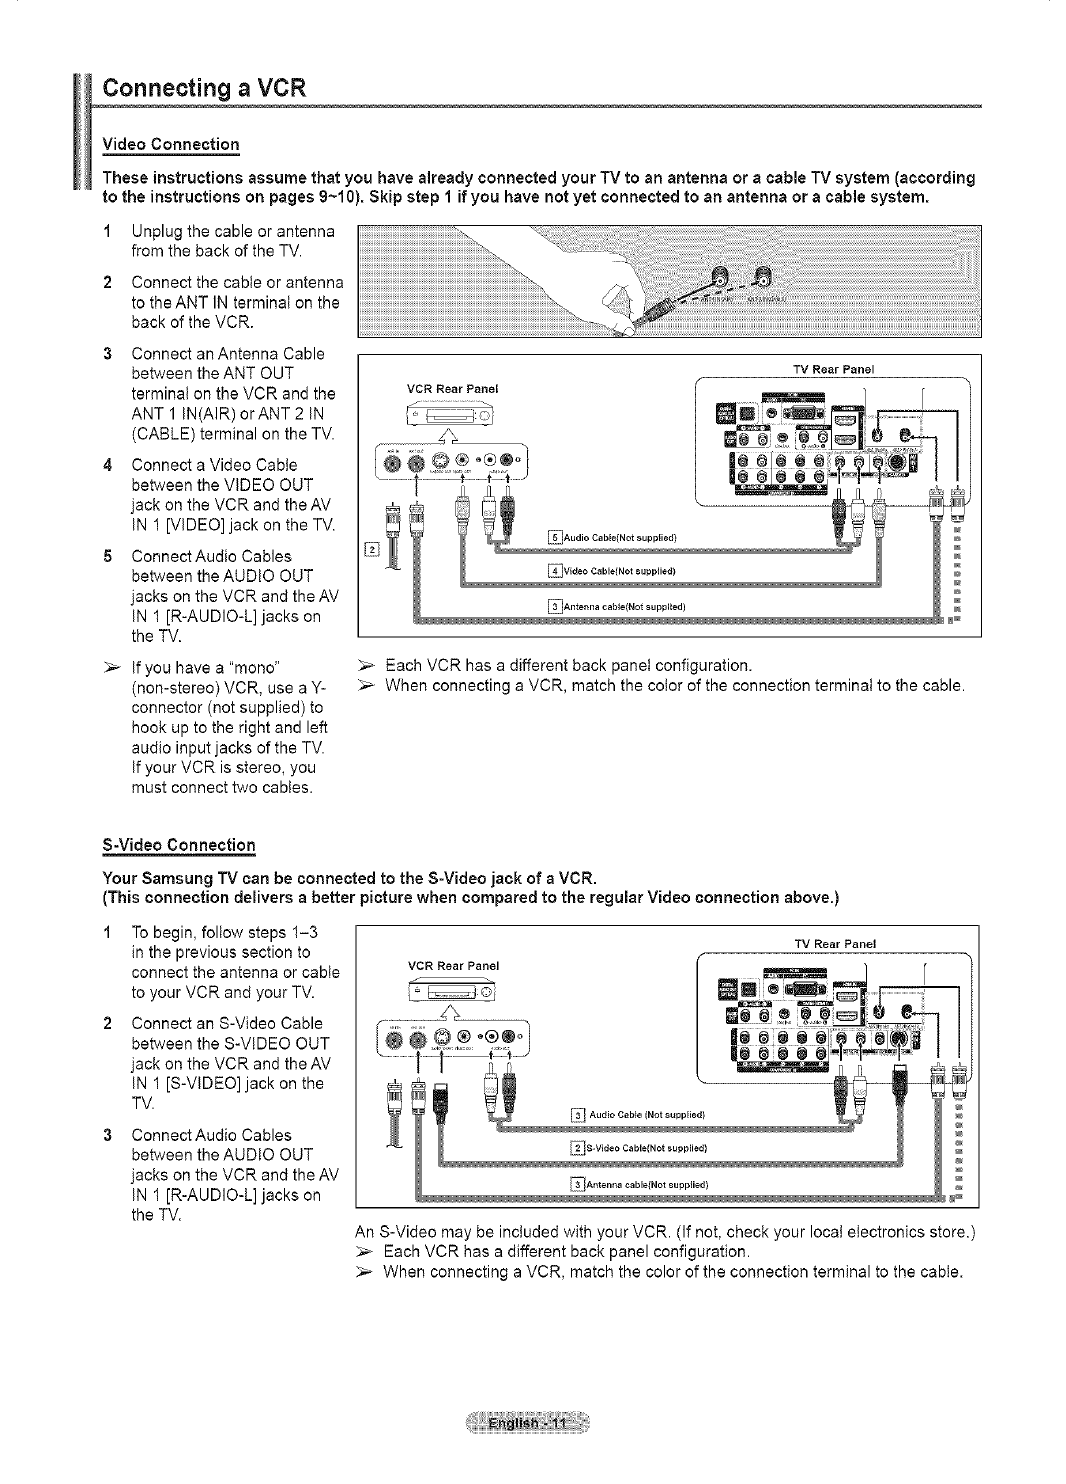
Connecting a VCR
Video Connection
These instructions assume that you have alreadyconnected your TV to an antenna or a cable TV system (according
to the instructions on pages 9~10). Skip step 1 if you have not yet connected to an antenna or a cable system.
1Unplug the cable or antenna
from the back of the TV.
2Connect the cable or antenna
to the ANT IN terminal on the
back of the VCR.
3Connect anAntenna Cable
between the ANT OUT
terminal on the VCR and the
ANT 1 IN(AIR) orANT 2 iN
(CABLE) terminal on the TV.
4 Connect a Video Cable
between the VIDEO OUT
jack on the VCR and the AV
iN 1 [VIDEO] jack on the TV.
5 ConnectAudio Cables
between the AUDIO OUT
jacks on the VCR and the AV
IN 1 [R-AUDIO-L] jacks on
the TV.
_-- If you have a "mono"
(non-stereo) VCR, use a Y-
connector (not supplied) to
hook up to the right and left
audio input jacks of the TV.
if your VCR is stereo, you
must connect two cables.
!!!iiii i i i !i ii i ii i!i ! ! i i iiiiiiiiiiiiiiiiiiiiiiiiiiiiiiiiiiiiiiiiiiiiiiiiiiiiiiiiiiiiiiiiiiiiiiiiiiiiiiiiiiiiiiiiiiiiiiiiiiiiiiiiiiiiiiiiiiiiiiiiiiiiiiiiiiiiiiiiiiiiiiiiiiiiiiiiiiiiiiiiiiiiiiiiiiiiiiiiiiiiiiiiiiiiiiiiii ii J
VCR Rear Panel
TV Rear Panel
_Audio Cable(Not supplied)
_,_ Each VCR has a different back panel configuration.
_,_ When connecting a VCR, match the color of the connection terminal to the cable.
S-Video Connection
Your SamsungTV can be connected to the S-Video jack of a VCR.
(This connection delivers a better picture when compared to the regular Video connection above.)
1 To begin, follow steps 1-3
in the previous section to
connect the antenna or cable
to your VCR and your TV.
2 Connect an S-Video Cable
between the S-VIDEO OUT
jack on the VCR and the AV
IN 1 [S-VIDEO] jack on the
TV.
Connect Audio Cables
between the AUDIO OUT
jacks on the VCR and the AV
IN 1 [R-AUDIO-L] jacks on
the TV.
VCR Rear Panel
TV Rear Panel
_] Audio Cable (Not supplied)
An S-Video may be included with your VCR. (If not, check your local electronics store.)
Each VCR has a different back panel configuration.
_-- When connecting a VCR, match the color of the connection terminal to the cable.

Connecting a Carncorder
The side panel jacks on your TV make it easy to connect acamcorder to your TV.
They allow you to view the camcorder tapes without using aVCR
Connect a Video Cable
(or S-Video Cable) between
the AV IN 2 [VIDEO]
(or S-VIDEO) jack on the TV
and the VIDEO OUT jack on
the Camcorder.
Connect Audio Cabtes
between the AV IN 2
[UAUDIO-R] jacks on the TV
and the AUDIO OUT jacks on
the Camcorder.
TV Side Panel
/
_ J
Camcorder Io_ _ Cable (Not supplied)
O(-e" " _TI] _ NAudio Cable Not supplied _ IT_ ,_ _1_ _1;,/
[®
Each Camcorder has a different back panel configuration.
_-- When connecting a Camcorder, match the color of the connection terminal to the cable.
Connecting a DVD PlayedSet-Top Box
The rear panel jacks on your TV make it easy to connect a DVD Player/Set-Top Box to your TV.
1 Connect Component Cables
between the COMPONENT
IN 1 [Y, Pm PR] (or
COMPONENT IN 2 [Y, PB,
PR])jacks on the TV and the
COMPONENT OUT [Y, pm
PR]jacks on the DVD Player/
Set-Top Box.
2 ConnectAudio Cables
between the COMPONENT
IN 1 [R-AUDIO-L](or
COMPONENT IN 2
[R-AUDIO-L]) jacks on the TV
and the AUDtO OUT jacks on
the DVD Player/Set-Top Box.
DVO Player /Set-Top Box TV Rear Panel
_IAudio Cable (Not supplied)
[_] Component Cable (Not supplied)
Component video separates the video into Y (Luminance (brightness)), PB
(Blue) and PR (Red) for enhanced video quality. Be sure to match the component
video and audio connections. For example, if connecting the video cable to
COMPONENT IN, connect the audio cable to COMPONENT IN also.
_-- Each DVD Player/Set-Top box has a different back panel configuration.
_-- When connecting a DVD Player/Set-Top box, match the color of the connection
terminal to the cable.
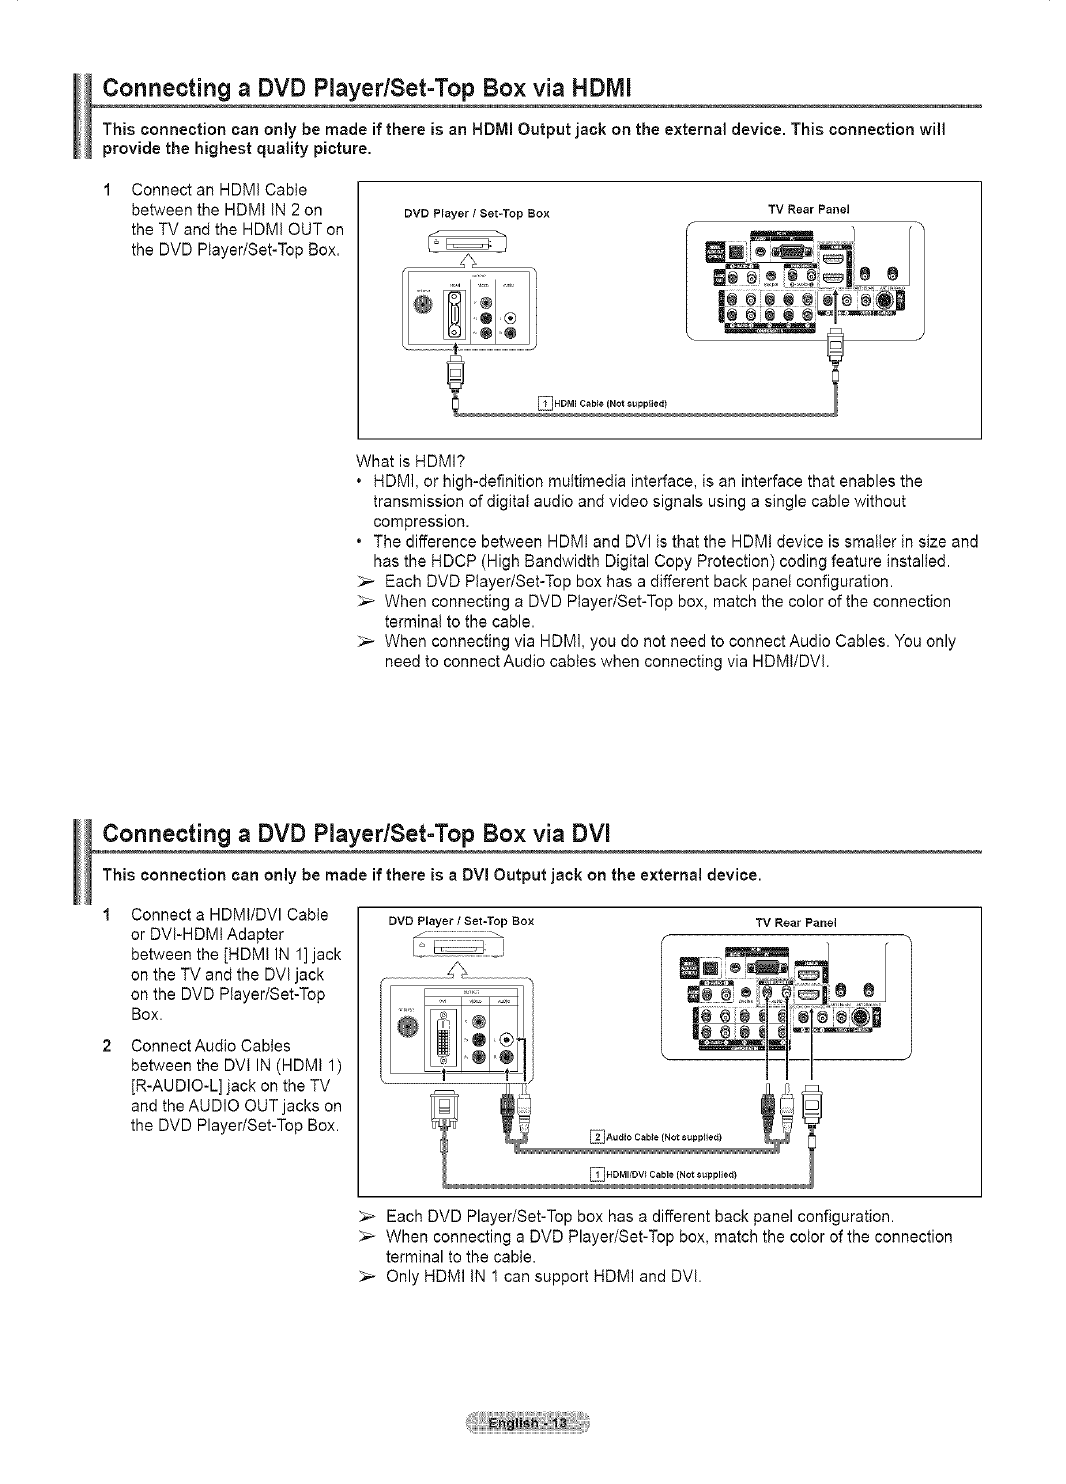
Connecting a DVD PlayedSet-Top Box via HDIVll
This connection can only be made if there is an HDMI Output jack on the external device. This connection will
provide the highest quality picture.
Connect an HDMI Cable
between the HDMI IN 2 on
the TV and the HDMI OUT on
the DVD Player/Set-Top Box.
DVD Player /Set=Top Box TV Rear Panel
EIHDMI Cable (Not supplied)
What is HDMI?
•HDMI, or high-definition multimedia interface, is an interface that enables the
transmission of digital audio and video signals using a single cable without
compression.
•The difference between HDMt and DVI is that the HDM! device is smaller in size and
has the HDCP (High Bandwidth Digital Copy Protection) coding feature installed.
_,_ Each DVD Player/Set-Top box has a different back panel configuration.
_,_ When connecting a DVD Player/Set-Top box, match the color of the connection
terminal to the cable.
_,_ When connecting via HDMI, you do not need to connect Audio Cables. You only
need to connect Audio cables when connecting via HDMI/DVl.
Connecting a DVD Player/Set-Top Box via DVI
This connection can only be made if there is aDVI Output jack on the external device.
Connect a HDMI/DVl Cable
or DVI-HDMt Adapter
between the [HDMI IN 1] jack
on the TV and the DVl jack
on the DVD Player/Set-Top
Box.
Connect Audio Cables
between the DVI IN (HDMI 1)
JR-AUDIO-L] jack on the TV
and the AUDIO OUT jacks on
the DVD Player/Set-Top Box.
DVD Player /Set=Top Box TV Rear Panel
_lAudio Cable (Not supplied}
EIHDMIfDVI Cable (Not supplied}
Each DVD Player/Set-Top box has a different back panel configuration.
_-- When connecting a DVD Player/Set-Top box, match the color of the connection
terminal to the cable.
_-- Only HDMI IN 1 can support HDMI and DVl.
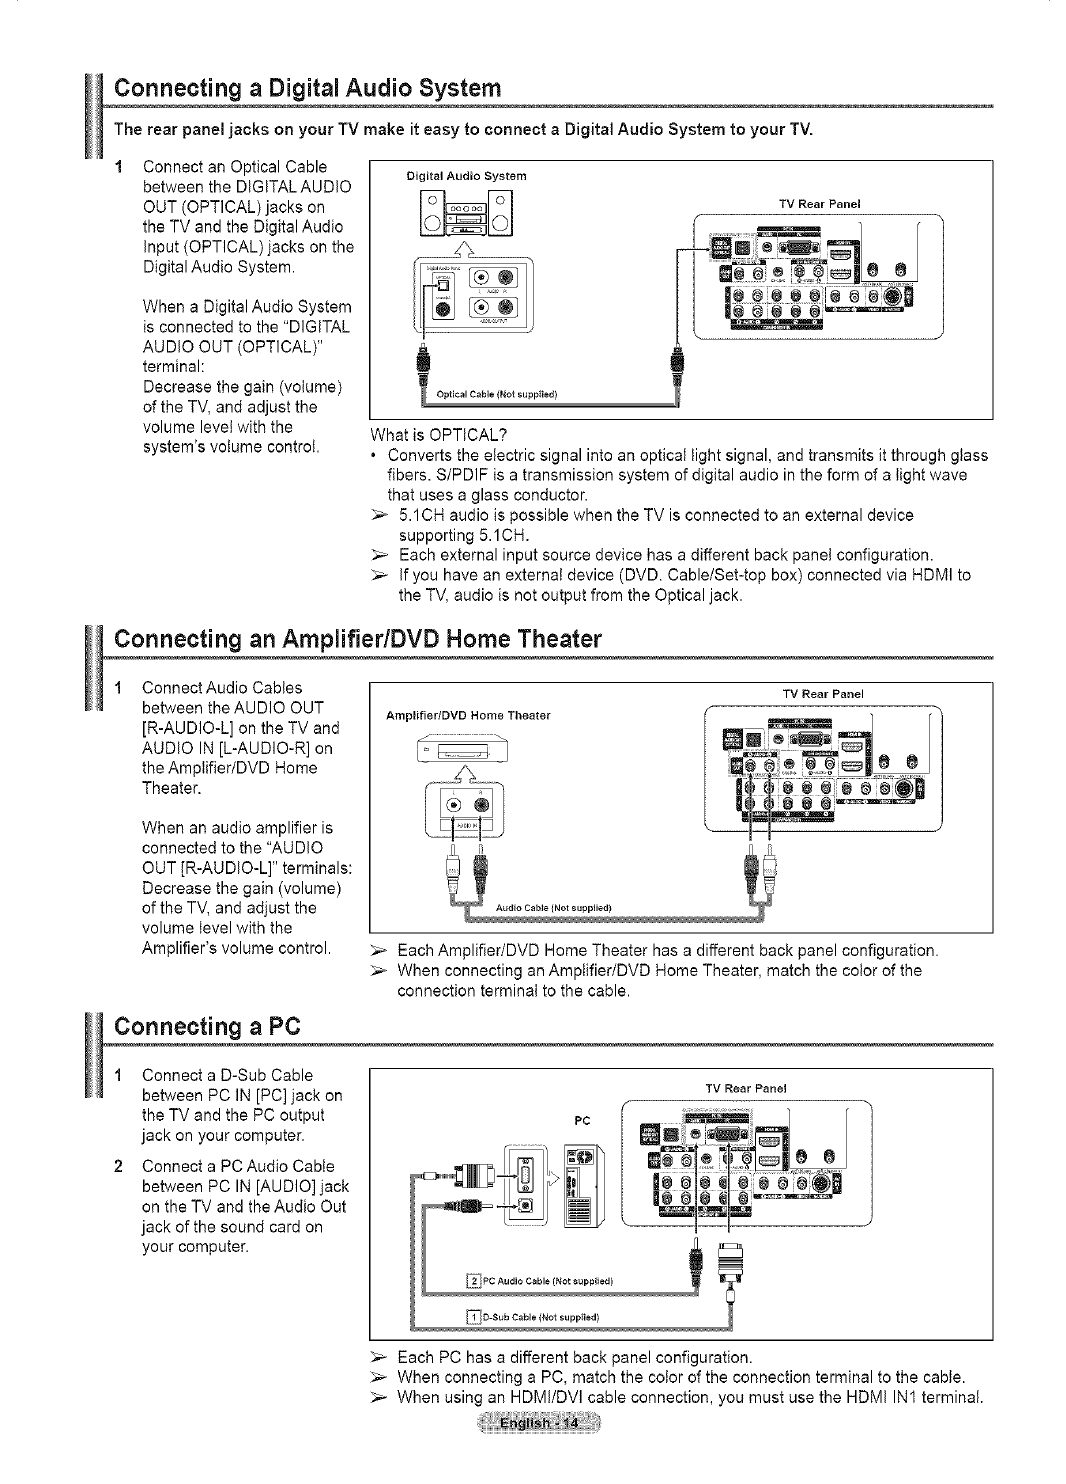
Connecting aDigital Audio System
The rear panel jacks on your TV make iteasy to connect a Digital Audio System to your TV.
Connect an Optical Cable
between the DIGITAL AUDIO
OUT (OPTICAL) jacks on
the TV and the Digital Audio
Input (OPTICAL)jacks on the
Digital Audio System.
When a Digital Audio System
is connected to the "DIGITAL
AUDIO OUT (OPTICAL)"
terminal:
Decrease the gain (volume)
of the TV, and adjust the
volume level with the
system's volume control.
Digital Audio System
TV Rear Panel
_l Optical Cable (Not supplied)
What is OPTICAL?
. Converts the electric signal into an optical light signal, and transmits it through glass
fibers. S/PDIF is a transmission system of digital audio in the form of a light wave
that uses a glass conductor.
_,_ 5.1CH audio is possible when the TV is connected to an external device
supporting 5.1CH.
_,_ Each external input source device has a different back panel configuration.
_-- If you have an external device (DVD. Cable/Set-top box) connected via HDMI to
the TV, audio is not output from the Optical jack.
Connecting an Amplifier/DVD Home Theater
Connect Audio Cables
between the AUDIO OUT
[R-AUDIO-L] on the TV and
AUDIO IN [L-AUDIO-R] on
the Amptifier/DVD Home
Theater.
When an audio amplifier is
connected to the "AUDIO
OUT JR-AUDIO-L]" terminals:
Decrease the gain (volume)
of the TV, and adjust the
volume level with the
Amplifier's volume control.
Connecting aPC
Amplifier/DVD Home Theater
TV Rear Panel
........iiii ,
{Not supplied)
_-- Each Amplifier/DVD Home Theater has a different back panel configuration.
_,_ When connecting an Ampiifier/DVD Home Theater, match the color of the
connection terminal to the cable.
1 Connect a D-Sub Cable
between PC IN [PC] jack on
the TV and the PC output
jack on your computer.
2 Connect a PCAudio Cable
between PC IN [AUDIO] jack
on the TV and the Audio Out
jack of the sound card on
your computer.
PC
TV Rear Panel
_-- Each PC has a different back panel configuration.
_,_ When connecting a PC, match the coIor of the connection terminal to the cable.
_-- When using an HDMI/DVl cable connection, you must use the HDMI IN1 terminal.
i Operation
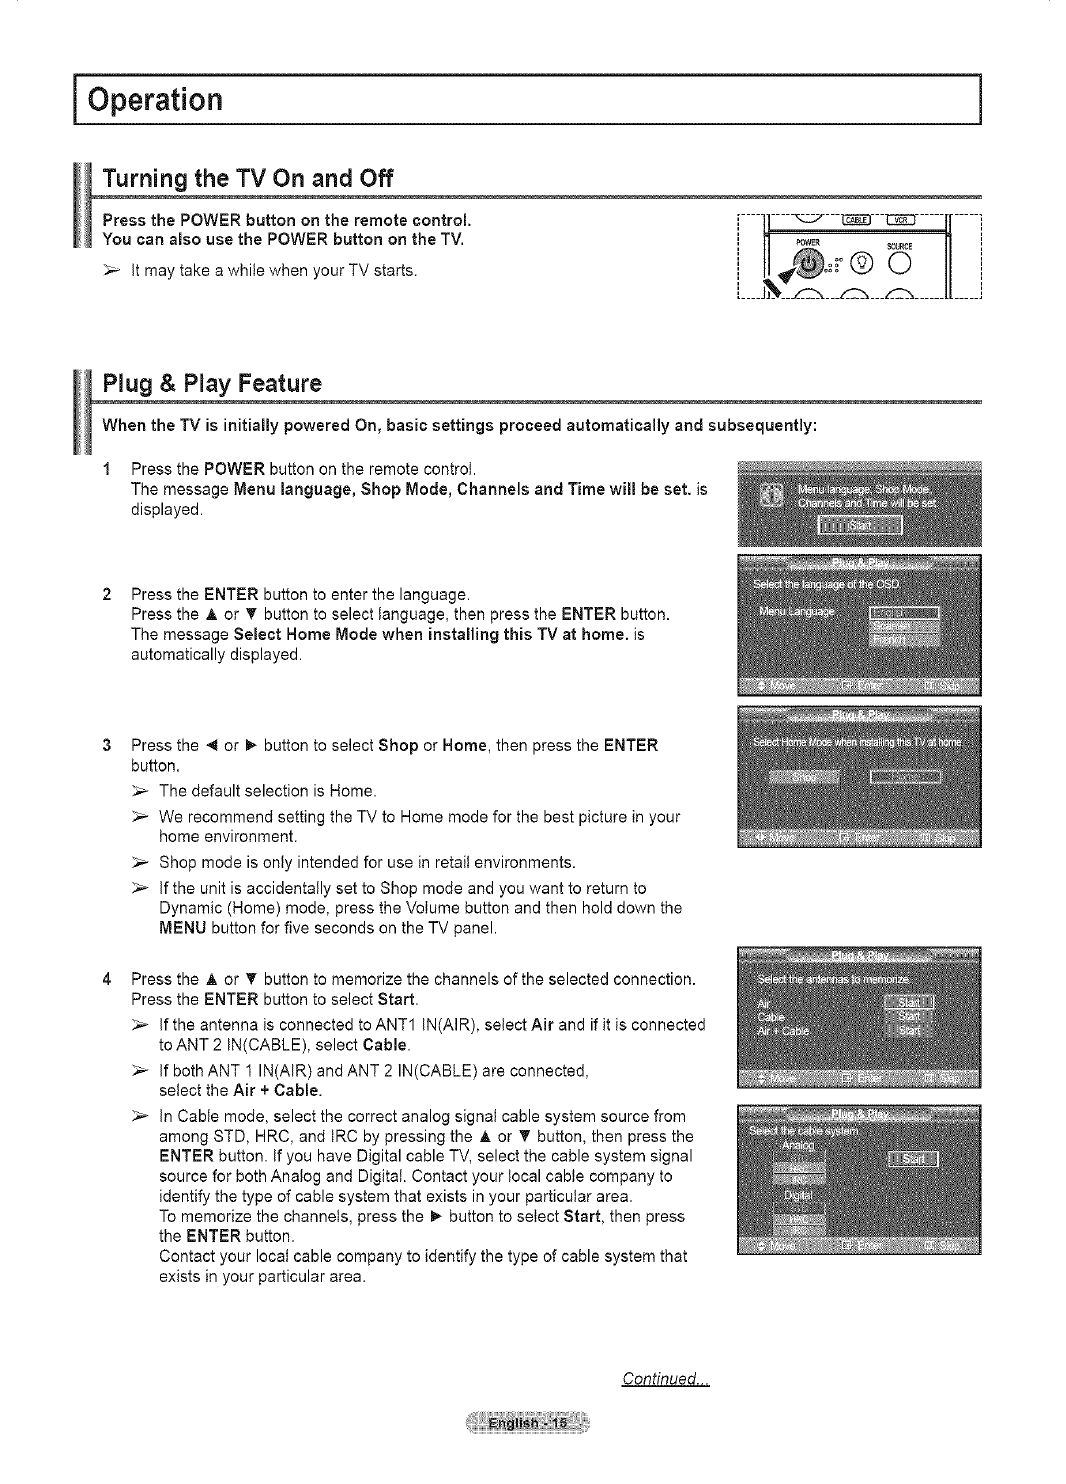
Turning the TV On and Off
Press the POWER button on the remote control.
You can also use the POWER button on the TV.
It may take a while when your TV starts.
Plug & Play Feature
When the TV is initially powered On, basic settings proceed automatically and subsequently:
1 Press the POWER button on the remote control.
The message Menu language, Shop Mode, Channels and Time will be set. is
displayed.
Press the ENTER button to enter the language.
Press the A or T button to select language, then press the ENTER button.
The message Select Home Mode when installing this TV at home. is
automatically displayed.
Press the 4 or I_ button to select Shop or Home, then press the ENTER
button.
_,_ The default selection is Home.
_,_ We recommend setting the TV to Home mode for the best picture in your
home environment.
_,_ Shop mode is only intended for use in retail environments.
_,_ If the unit is accidentally set to Shop mode and you want to return to
Dynamic (Home) mode, press the Volume button and then hold down the
MENU button for five seconds on the TV panel.
Press the A or _' button to memorize the channels of the selected connection.
Press the ENTER button to select Start,
_,_ If the antenna is connected to ANT1 IN(AIR), select Air and if it is connected
to ANT 2 IN(CABLE), select Cable.
_-- If both ANT 1 IN(AIR) and ANT 2 IN(CABLE) are connected,
select the Air + Cable.
_,_ In Cable mode, select the correct analog signal cable system source from
among STD, HRC, and tRC by pressing the A or _' button, then press the
ENTER button. If you have Digital cable TV, select the cable system signal
source for both Analog and Digital. Contact your local cable company to
identify the type of cable system that exists in your particular area.
To memorize the channels, press the _ button to select Start, then press
the ENTER button.
Contact your local cable company to identify the type of cable system that
exists in your particular area.
Continued...
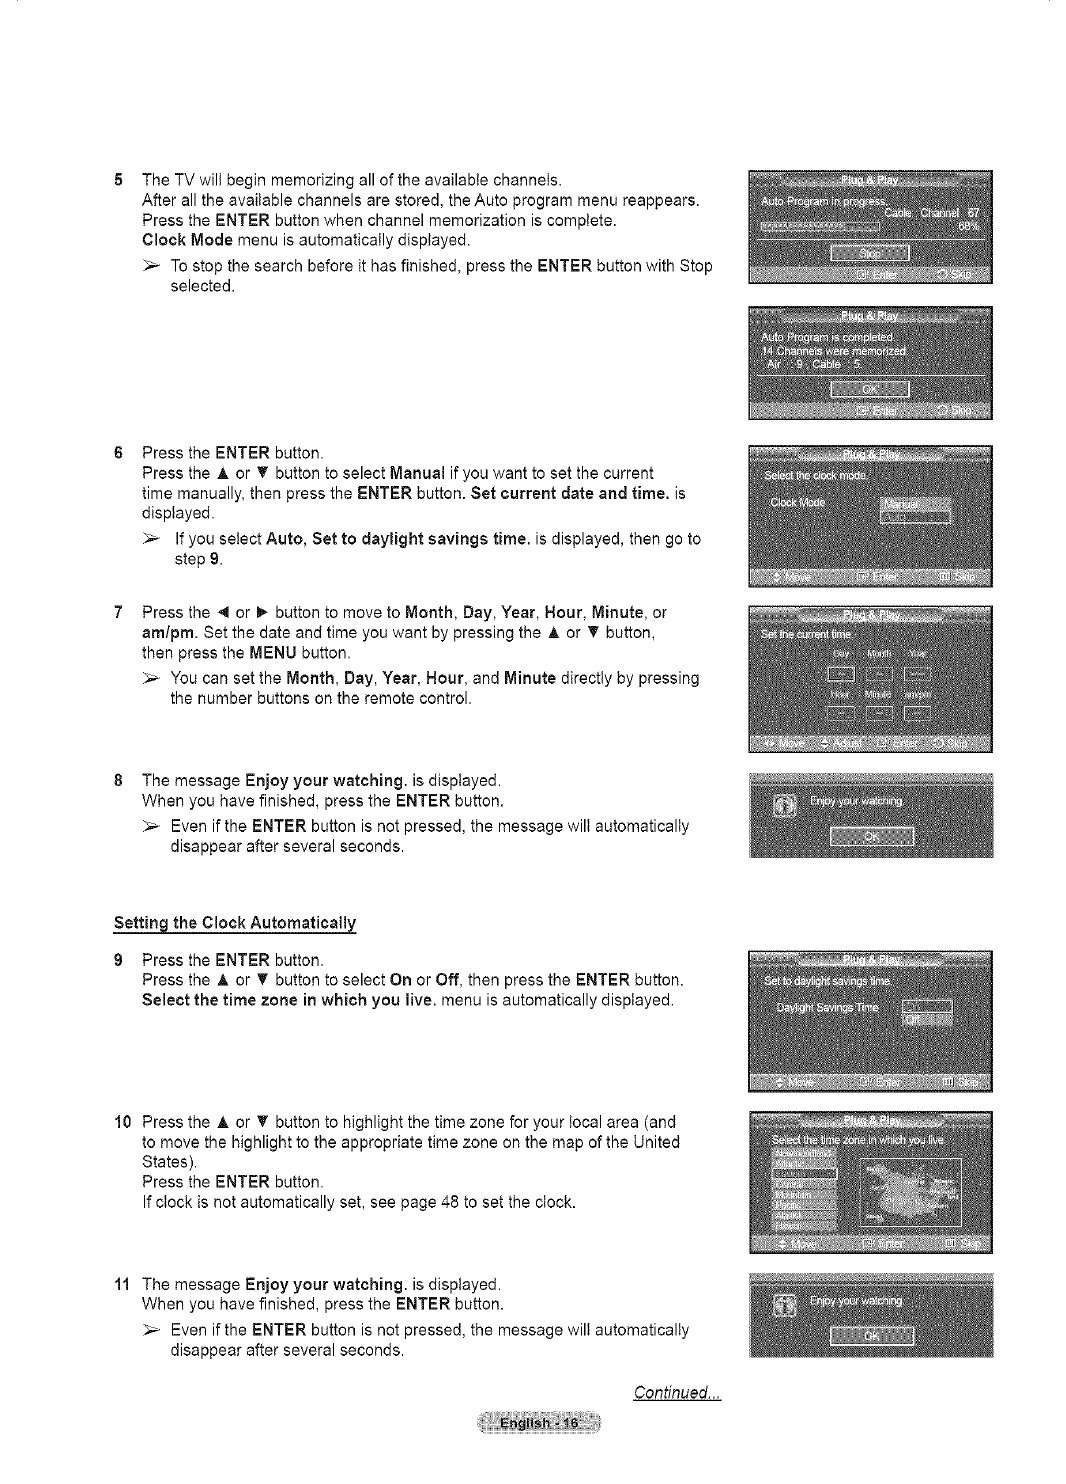
The TV wilt begin memorizing all of the available channels.
After all the available channels are stored, the Auto program menu reappears.
Press the ENTER button when channel memorization is complete.
Clock Mode menu is automatically displayed.
_-- To stop the search before it has finished, press the ENTER button with Stop
selected.
Press the ENTER button.
Press the A or _' button to select Manual if you want to set the current
time manually, then press the ENTER button. Set current date and time. is
displayed.
_-- If you select Auto, Set to daylight savings time. is displayed, then go to
step 9.
Press the 4 or _ button to move to Month, Day, Year, Hour, Minute, or
am/pro. Set the date and time you want by pressing the A or _' button,
then press the MENU button.
_,_ You can set the Month, Day, Year, Hour, and Minute directly by pressing
the number buttons on the remote control.
The message Enjoy your watching, is displayed.
When you have finished, press the ENTER button.
_-- Even if the ENTER button is not pressed, the message wilt automatically
disappear after several seconds.
Settin the CIockAutomaticall
9 Press the ENTER button.
Press the &or _' button to select On or Off, then press the ENTER button.
Select the time zone in which you live. menu is automatically displayed.
10 Press the A or _" button to highlight the time zone for your local area (and
to move the highlight to the appropriate time zone on the map of the United
States).
Press the ENTER button.
If clock is not automatically set, see page 48 to set the clock.
11 The message Enjoy your watching, is displayed.
When you have finished, press the ENTER button.
_,_ Even if the ENTER button is not pressed, the message wilt automatically
disappear after several seconds.
Continued...
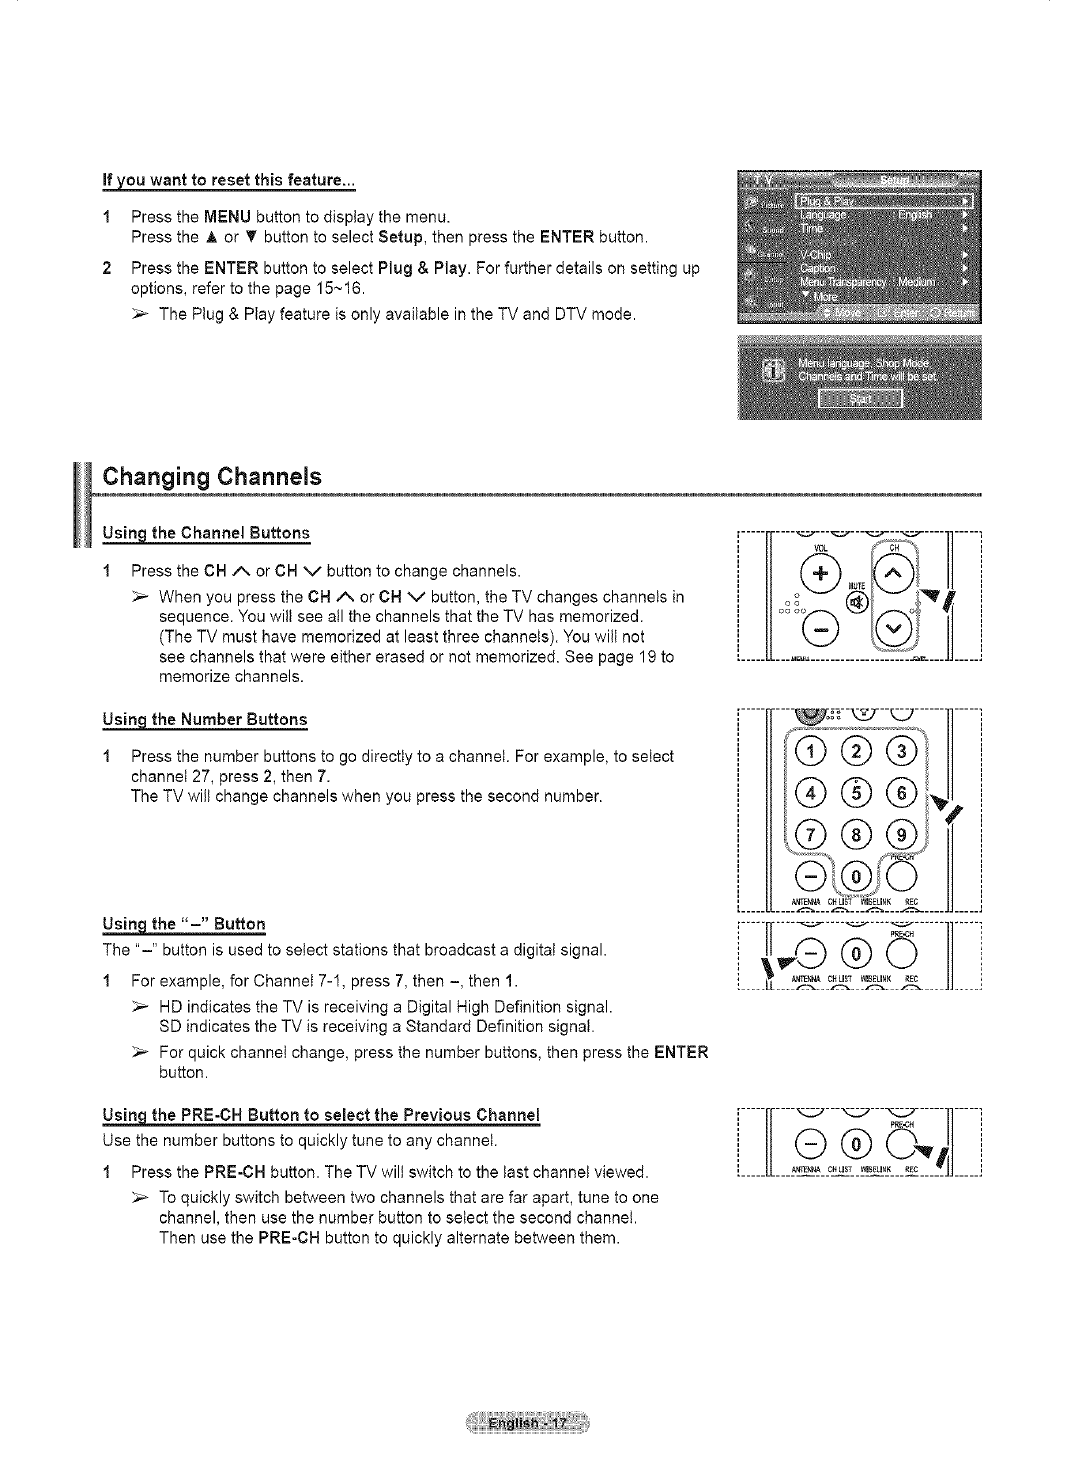
_ou want to reset this feature...
1 Press the MENU button to display the menu.
Press the _, or T button to select Setup, then press the ENTER button.
2 Press the ENTER button to select Plug & Play. For further details on setting up
options, refer to the page 15~16.
_-- The Plug & Play feature is only available in the TV and DTV mode.
Changing Channels
_the Channel Buttons
Press the CH/_. or CH v button to change channels.
_,_ When you press the CH A or CH v button, the TV changes channels in
sequence. You will see all the channels that the TV has memorized.
(The TV must have memorized at least three channels). You wilt not
see channels that were either erased or not memorized. See page 19 to
memorize channels.
_the Number Buttons
1 Press the number buttons to go directly to a channel. For example, to select
channel 27, press 2, then 7.
The TV wilt change channels when you press the second number.
Usin9 the "-" Button
The "-" button is used to select stations that broadcast a digital signal.
1 For example, for Channel 7-1, press 7, then -, then 1.
_,_ HD indicates the TV is receiving a Digital High Definition signal.
SD indicates the TV is receiving a Standard Definition signal.
_-- For quick channel change, press the number buttons, then press the ENTER
button.
ii'-----,-------------------- (_ VOL _ _CH"_' %_ ......... 11 !]i
l[oo %t",' j]'
i......................=&_........i
.......... ......11-----i
.........
pRE.CH
the PRE-CH Button to select the Previous Channel
Use the number buttons to quickly tune to any channel.
1Press the PRE-CH button. The TV will switch to the last channel viewed.
To quickly switch between two channels that are far apart, tune to one
channel, then use the number button to select the second channel.
Then use the PRE-CH button to quickly alternate between them.
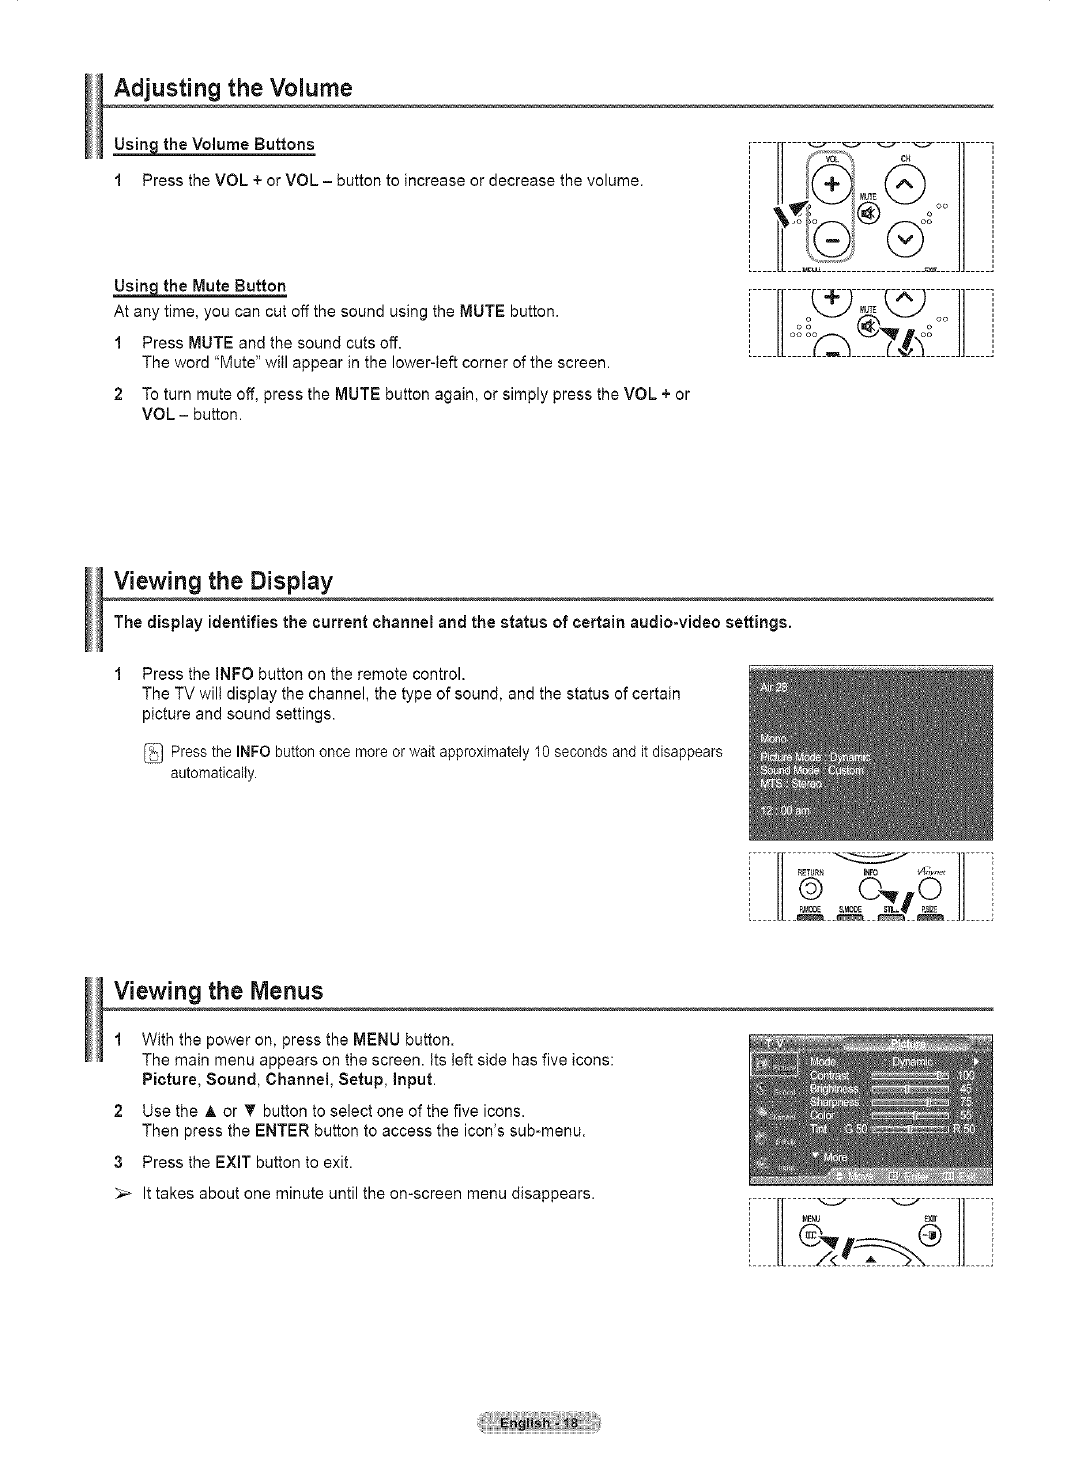
Adjusting the Volume
Usi_the Volume Buttons
1Press the VOL +or VOL - button to increase or decrease the volume.
Usin_the Mute Button
At any time, you can cut off the sound using the MUTE button.
1 Press MUTE and the sound cuts off.
The word "Mute" witl appear in the lower-left corner of the screen.
2 To turn mute off, press the MUTE button again, or simply press the VOL + or
VOL - button.
.........,o"., ,"
, _o_o__ _oo // ,
' _
......................
.....H__________......]]_____J
Viewing the Display
The display identifies the current channel and the status of certain audio-video settings.
Press the INFO button on the remote control.
The TV will display the channel, the type of sound, and the status of certain
picture and sound settings.
Press the INFO button once more or wait approximately 10 seconds and it disappears
automatically.
'I......° " il
.......2_2z.,_2.......
Viewing the Menus
1With the power on, press the MENU button.
The main menu appears on the screen, tts left side has five icons:
Picture, Sound, Channel, Setup, Input.
2 Use the h, or T button to select one of the five icons.
Then press the ENTER button to access the icon's sub-menu.
3 Press the EXIT button to exit.
_-- It takes about one minute until the on-screen menu disappears.
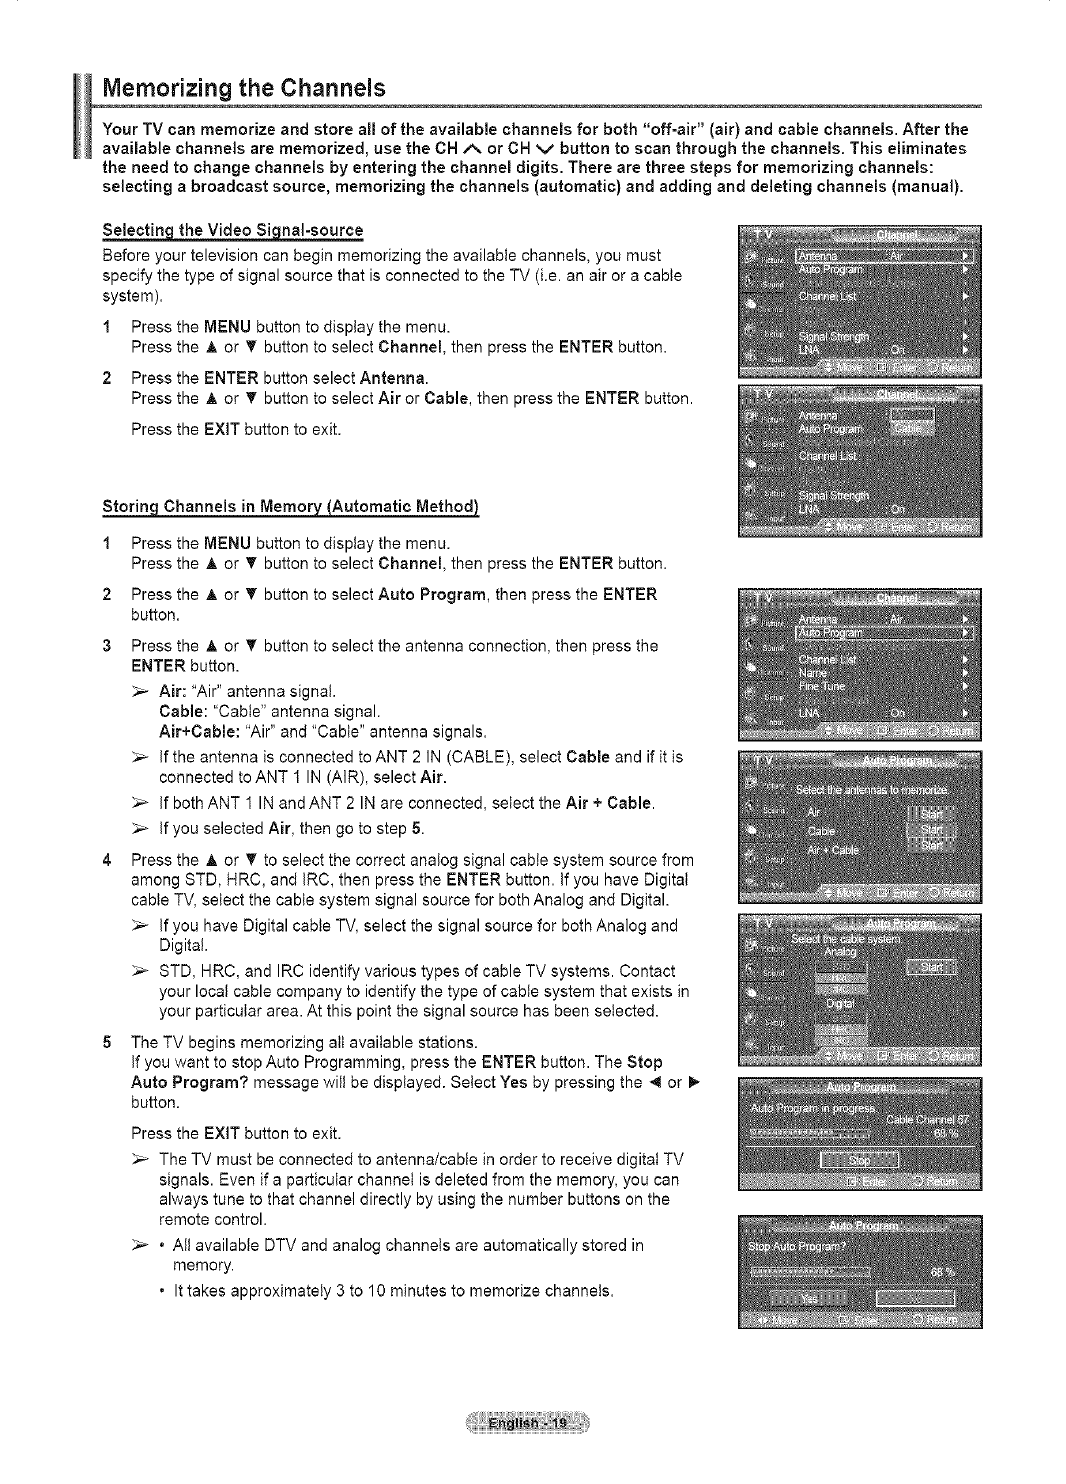
Memorizing the Channels
Your TV can memorize and store all of the available channels for both "off-air" (air) and cable channels. After the
available channels are memorized, use the CH/_ or CH v button to scan through the channels. This eliminates
the need to change channels by entering the channel digits. There are three steps for memorizing channels:
selecting a broadcast source, memorizing the channels (automatic) and adding and deleting channels (manua!).
Selectin_ the Video Signal-source
Before your television can begin memorizing the available channels, you must
specify the type of signal source that is connected to the TV (i.e. an air or a cable
system).
1 Press the MENU button to display the menu.
Press the _, or _' button to select Channel, then press the ENTER button.
2 Press the ENTER button select Antenna.
Press the _, or T button to select Air or Cable, then press the ENTER button.
Press the EXiT button to exit.
_Channels in Memory(Automatic Method)
1Press the MENU button to display the menu.
Press the _, or _' button to select Channel, then press the ENTER button.
2 Press the _, or _' button to select Auto Program, then press the ENTER
button.
3Press the ,A or T button to select the antenna connection, then press the
ENTER button.
_-- Air: "Air" antenna signal.
Cable: "Cable" antenna signal.
Air+Cable: "Air" and "Cable" antenna signals.
_-- If the antenna is connected to ANT 2 IN (CABLE), select Cable and if it is
connected to ANT 1 IN (AIR), select Air.
_,_ If both ANT I IN and ANT 2 IN are connected, select the Air + Cable.
_-- If you selected Air, then go to step 5.
4 Press the A or T to select the correct analog signal cable system source from
among STD, HRC, and IRC, then press the ENTER button. If you have Digital
cable TV, select the cable system signal source for both Analog and Digital.
_-- If you have Digital cable TV, select the signal source for both Analog and
Digital.
_,_ STD, HRC, and IRC identify various types of cable TV systems. Contact
your local cable company to identify the type of cable system that exists in
your particular area. At this point the signal source has been selected.
5The TV begins memorizing all available stations.
If you want to stop Auto Programming, press the ENTER button. The Stop
Auto Program? message wilt be displayed. Select Yes by pressing the 4 or
button.
Press the EXiT button to exit.
_-- The TV must be connected to antenna/cable in order to receive digitat TV
signals. Even if a particular channel is deleted from the memory, you can
always tune to that channel directly by using the number buttons on the
remote control.
_,_ • All available DTV and analog channels are automatically stored in
memory.
•It takes approximately 3 to 10 minutes to memorize channels.
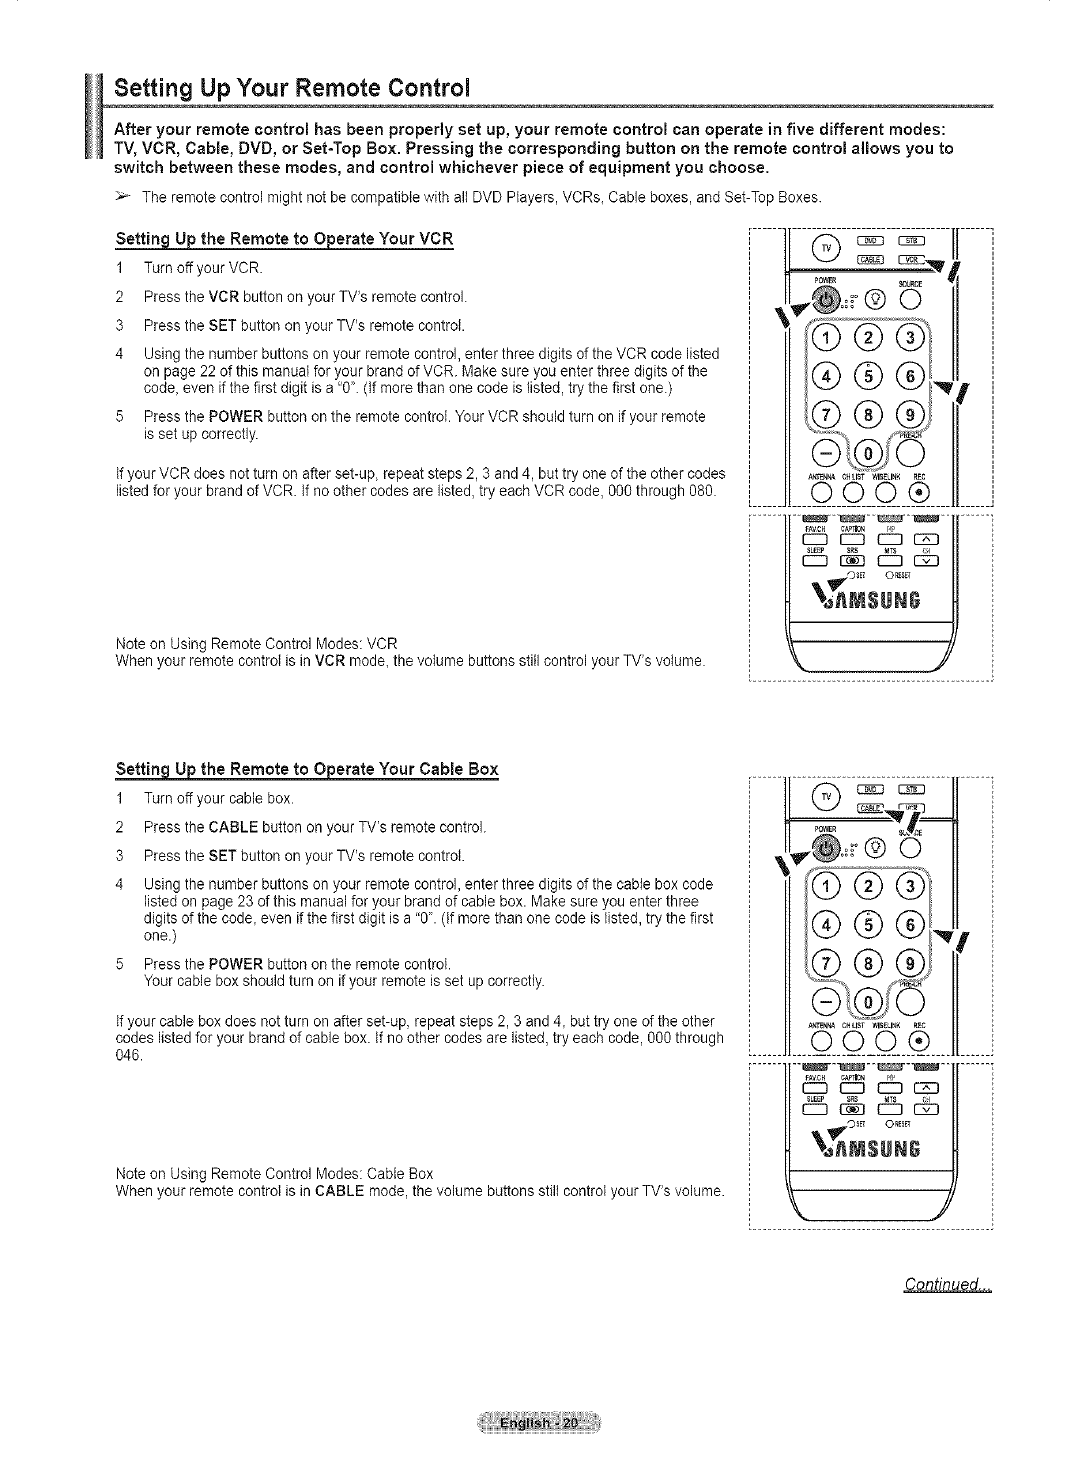
Setting Up Your Remote Control
After your remote control has been properly set up, your remote control can operate in five different modes:
TV,VCR, Cable, DVD, or Set-Top Box. Pressing the corresponding button on the remote control allows you to
switch between these modes, and control whichever piece of equipment you choose.
_-- The remote control might not be compatible with all DVD Players, VCRs_Cable boxes, and Set-Top Boxes.
Setting _ the Remote to _erate Your VCR
1 Turn off your VCR.
2 Press the VCR button on your TV's remote control.
3 Press the SET button on your TV's remote control.
4 Using the number buttons on your remote control, enter three digits of the VCR code listed
on page 22 of this manual for your brand of VCR. Make sure you enter three digits of the
code_even if the first digit is a "0'. (tf more than one code is listed, try the first one.)
5 Press the POWER button on the remote control. Your VCR should turn on if your remote
is set up correctly.
If your VCR does not turn on after set-up, repeat steps 2, 3 and 4, but try one of the other codes
listed for your brand of VCR If no other codes are listed, try each VCR code, 000 through 080.
Note on Using Remote Control Modes: VCR
When your remote control is in VCR mode_the volume buttons still control your TV's volume.
AkSENN_ ¢HLIST WISEIN_ REC
000®
r-7 r-7 _ r-_7
_AMSIIBIG
J
Setting U the Remote to O erate Your Cable Box
1 Turn off your cable box.
2 Press the CABLE button on your TV's remote control.
3 Press the SET button on your TV's remote control.
4 Using the number buttons on your remote control, enter three digits of the cable box code
listed on page 23 of this manual for your brand of cable box. Make sure you enter three
digits of the code, even if the first digit is a "0". (tf more than one code is listed, try the first
one.)
5 Press the POWER button on the remote control.
Your cable box should turn on if your remote is set up correctly.
If your cable box does not turn on after set-up, repeat steps 2, 3 and 4_but try one of the other
codes listed for your brand of cable box. If no other codes are listed, try each code, 000 through
046.
Note on Using Remote Control Modes: Cable Box
When your remote control is in CABLE mode, the volume buttons still control your TV's volume.
oo0
A_NNA CHUS? WlSELI_K REC
000®
_AVC_ c_l_
c-n d5
_Os_ ORESEf
_I_NSUNI;
,J
Continued...
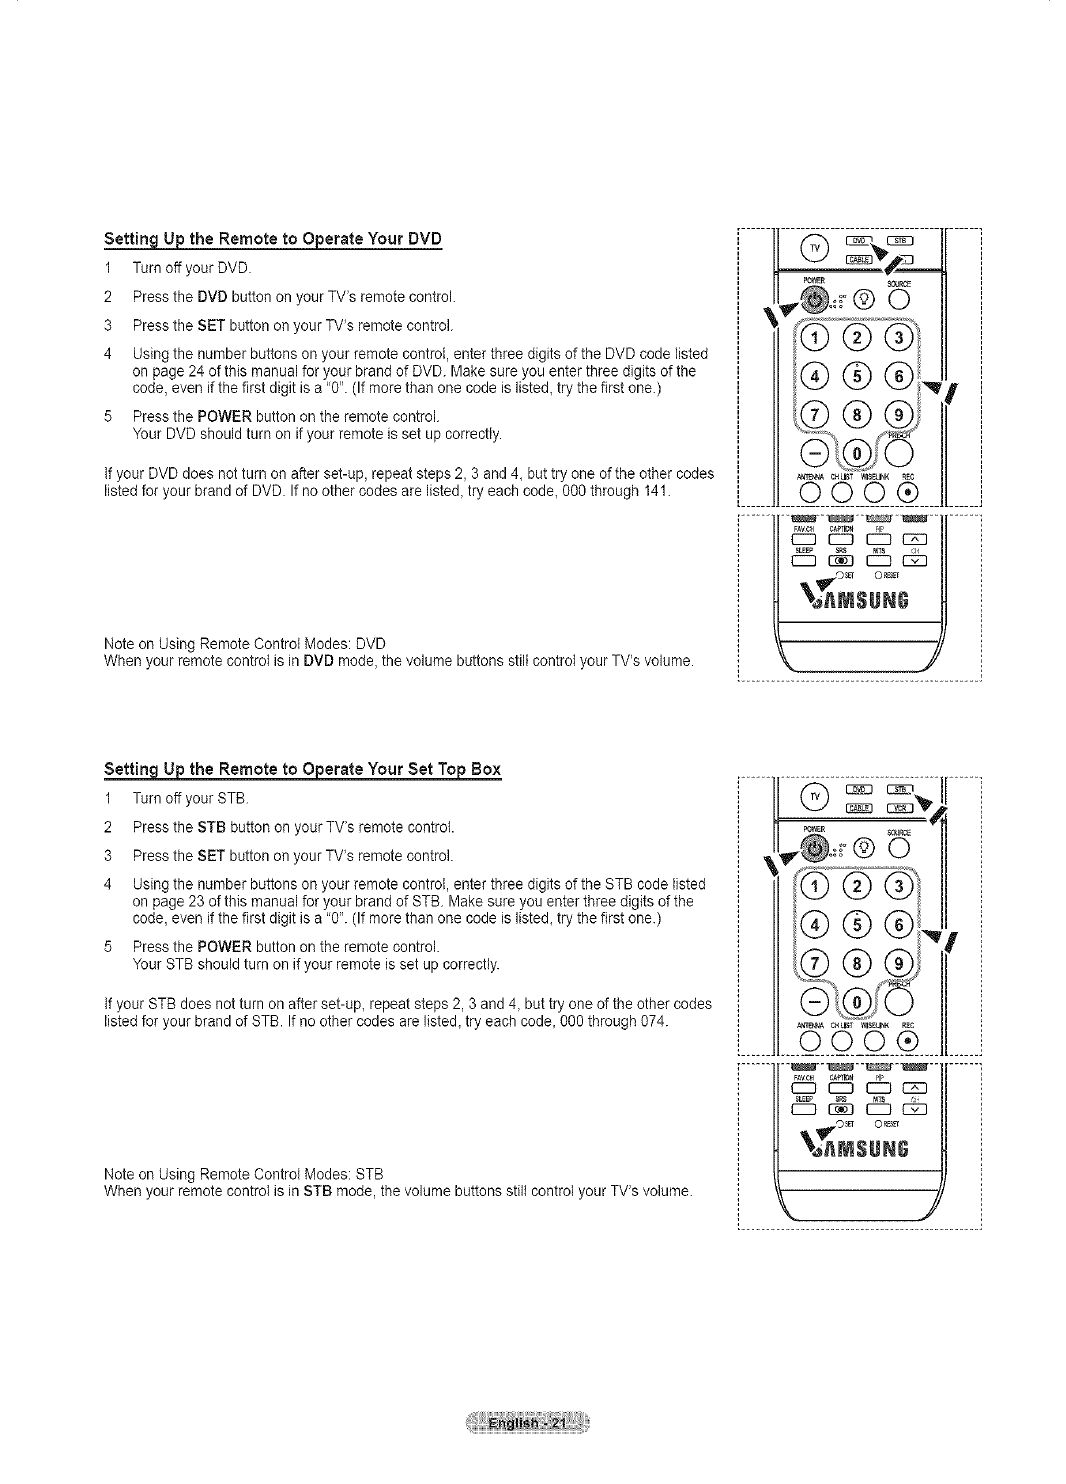
Settin_LUj3 the Remote to Operate Your DVD
1 Turn off your DVD.
2 Press the DVD button on your TV's remote control.
3 Press the SET button on your TV's remote control.
4 Using the number buttons on your remote controI, enter three digits of the DVD code listed
on page 24 of this manual for your brand of DVD. Make sure you enter three digits of the
code, even if the first digit is a '0". (If more than one code is listed, try the first one.)
5 Press the POWER button on the remote control.
Your DVD should turn on if your remote is set up correctly.
If your DVD does not turn on after set-up, repeat steps 2, 3 and 4, but try one of the other codes
listed for your brand of DVD. If no other codes are listed, try each code, 000 through 141.
Note on Using Remote Control Modes: DVD
When your remote control is in DVD mode, the volume buttons still control your TV's volume.
idi
FAVCH CA_IO_
d5
%_ANSUNG
,J
Settin_LUp the Remote to Operate Your Set Top Box
1 Turn off your STB.
2 Press the STB button on your TV's remote control.
3 Press the SET button on your TV's remote control.
4 Using the number buttons on your remote control, enter three digits of the STB code listed
on page 23 of this manual for your brand of STB. Make sure you enter three digits of the
code, even if the first digit is a '0". (If more than one code is listed, try the first one.)
5 Press the POWER button on the remote control.
Your STB should turn on if your remote is set up correctly.
If your STB does not turn on after set-up, repeat steps 2, 3 and 4, but try one of the other codes
listed for your brand of STB. If no other codes are listed, try each code, 000 through 074.
Note on Using Remote Control Modes: STB
When your remote control is in STB mode, the volume buttons still control your TV's volume.
i C)(_)(_) H ::
i II !
M®®®4,"i
FA_CH CAf_I_ _'
_ r--q EZD C2E3
,l_ll_© SET O_S_F
%_AM$SNG
J
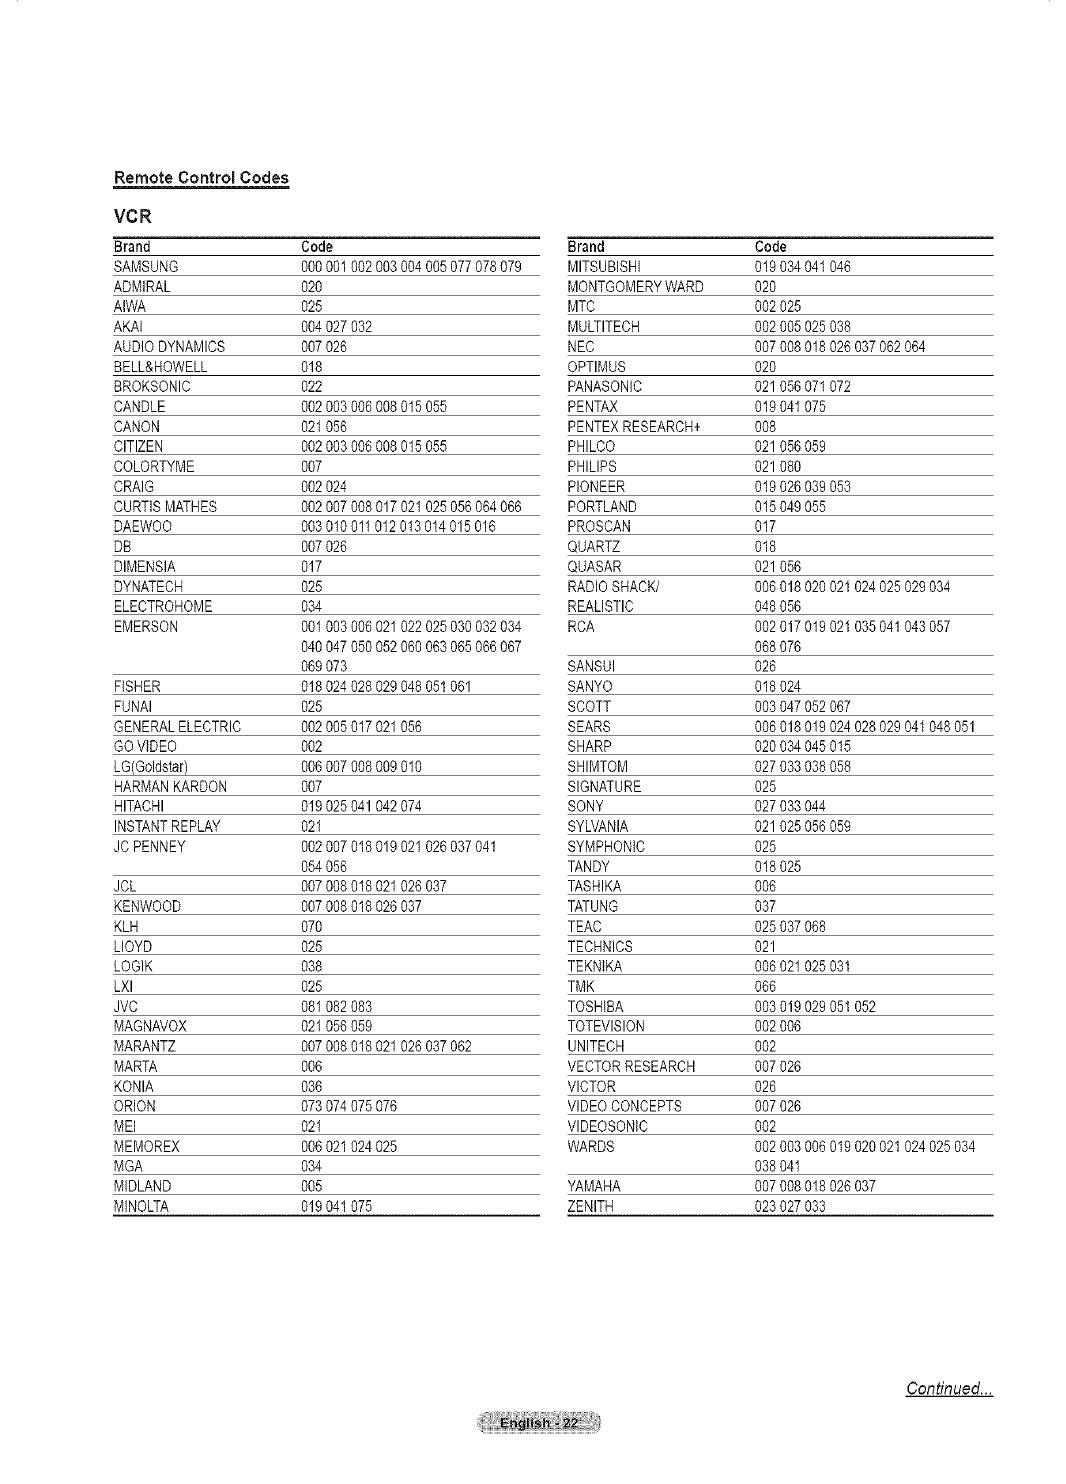
Remote Control Codes
VCR
Brand Code Brand Code
SAMSUNG %0 001002003 004005 077078079 MITSUBISHI 019034 041046
ADMIRAL 020 MONTGOMERYWARD 020
AIWA 025 MTC 002025
AKAI 004 027032 MULTITECH 002005 025038
AUDIODYNAMICS 007 026 NEC 007008 018026 037062064
BELL&HOWELL 018 OPTIMUS 020
BROKSONIC 022 PANASONIC 021056 071072
CANDLE 002 003006008 015055 PENTAX 019041 075
CANON 021 056 PENTEXRESEARCH+ 008
CITIZEN 002 003006008 015055 PHILCO 021056 059
COLORTYME 007 PHILIPS 021080
CRAIG 002 024 PIONEER 019026 039053
CURTISMATHES 002 007008017 021025 056064066 PORTLAND 015049 055
DAEWOO 003 010011012013 014015 016 PROSCAN 017
DB 007 026 QUARTZ 018
DIMENSIA 017 QUASAR 021056
DYNATECH 025 RADIOSHACK/ 006018 020021 024025029 034
ELECTROHOME 034 REALISTIC 048056
EMERSON 001 003006021 022025 030032034 RCA 002017 019021 035041043 057
040 047050052 060063 065066067 068076
069 073 SANSUI 026
FISHER 018 024028029 04805t 061 SANYO 018024
FUNAI 025 SCOTT 003047 052067
GENERALELECTRIC 002 005017021 056 SEARS 006018 019024 028029041 048051
GOVIDEO 002 SHARP 020034 045015
LG(Goldstar) 006 007008009 010 SHIMTOM 027033 038058
HARMANKARDON 007 SIGNATURE 025
HITACHI 019 025041042 074 SONY 027033 044
INSTANTREPLAY 021 SYLVANIA 021025 056059
JC PENNEY 002 0070t8 019 021026 037041 SYMPHONIC 025
054 056 TANDY 018025
JCL 007 008018021 026037 TASHIKA 006
KENWOOD 007 008018026 037 TATUNG 037
KLH 070 TEAC 025037 068
LLOYD 025 TECHNICS 021
LOGIK 038 TEKNIKA 006021 02503t
LXl 025 TMK 066
JVC 081 082083 TOSHIBA 003019 02905t 052
MAGNAVOX 021 056059 TOTEVlSION 002006
MARANTZ 007 008018021 026037 062 UNFECH 002
MARTA 006 VECTORRESEARCH 007026
KONIA 036 VICTOR 026
ORION 073 074075076 VIDEOCONCEPTS 007026
MEI 021 VlDEOSONIC 002
MEMOREX 006 021024025 WARDS 002003 006019 020021024 025034
MGA 034 038041
MIDLAND 005 YAMAHA 007008 018026 037
MINOLTA 019 04t 075 ZENITH 023027 033
Continued...
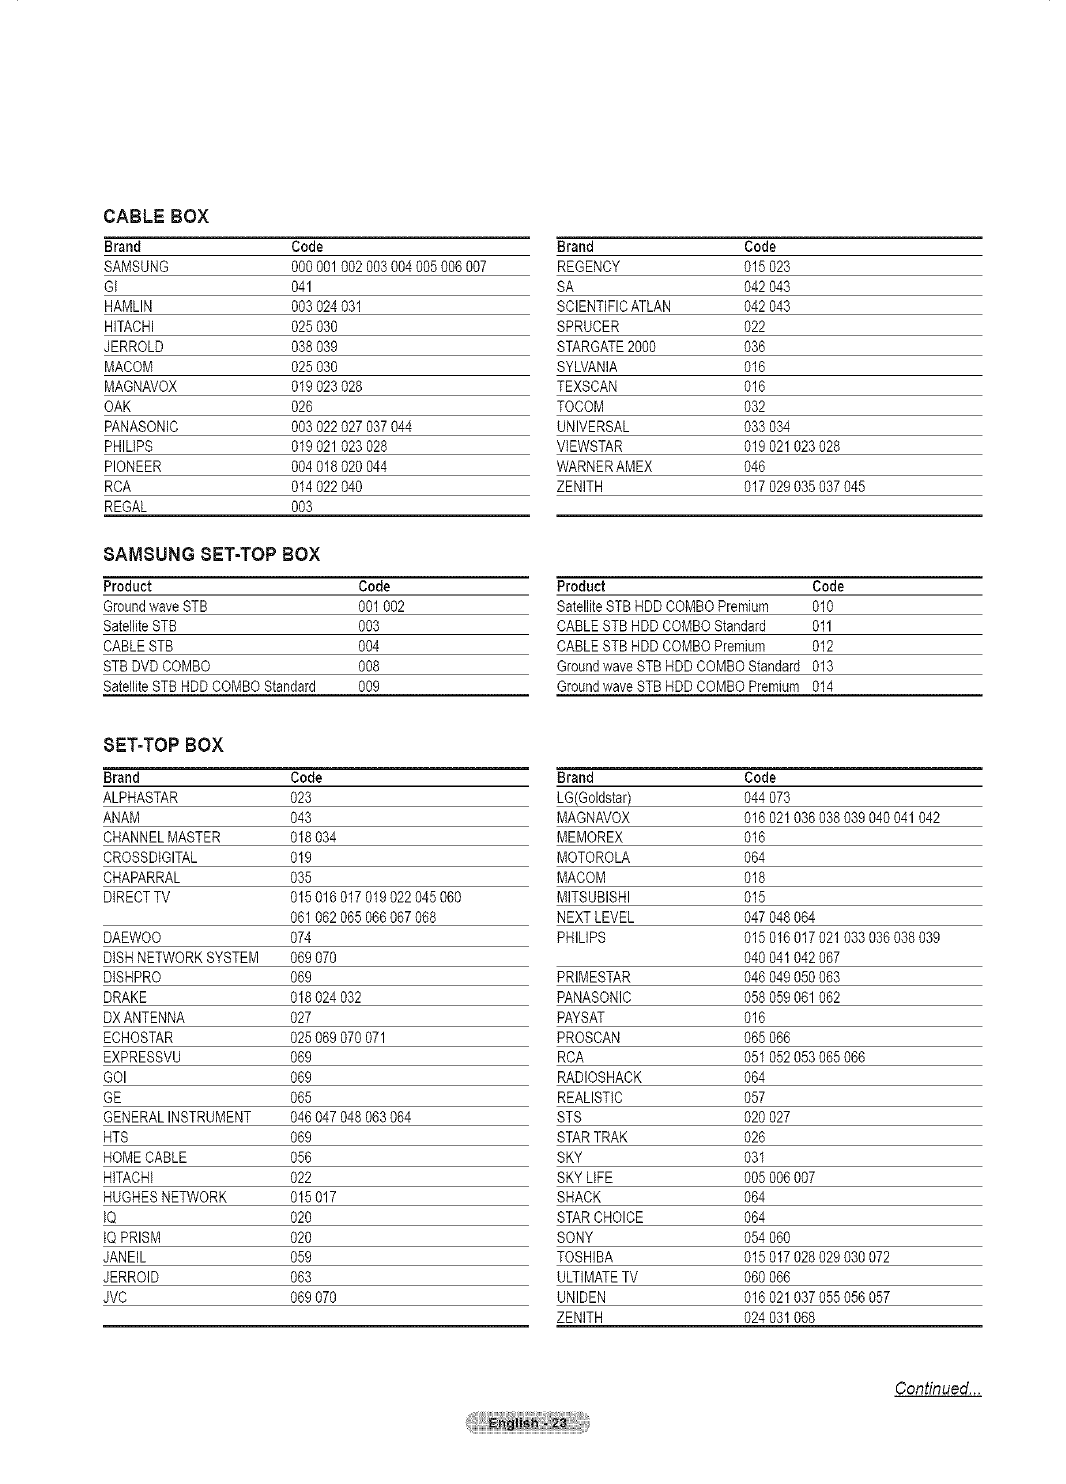
CABLE BOX
Brand Code
SAMSUNG 0% 001002 003004005 006007
GI 041
HAMLIN 003 024031
HITACHI 025 030
JERROLD 038 039
MACOM 025 030
MAGNAVOX 019 023028
OAK 026
PANASONIC 003 022027 037044
PHILtPS 019 021023 028
PIONEER 004 018020 044
RCA 014 022040
REGAL 003
8AMBUNG BET-TOP BOX
Product Code
GroundwaveSTB 001002
SatelliteSTB 003
CABLESTB 004
STBDVD COMBO 008
SatelliteSTBHDDCOMBOStandard 009
BET-TOP BOX
Brand Code
ALPHASTAR 023
ANAM 043
CHANNELMASTER 018034
CROSSDtGITAL 019
CHAPARRAL 035
DIRECTTV 015016 017019022 045 060
061062 065066067 068
DAEWOO 074
DiSHNETWORKSYSTEM 069070
DtSHPRO 069
DRAKE 018024 032
DXANTENNA 027
ECHOSTAR 025069 070071
EXPRESSVU 069
GOI 069
GE 065
GENERALINSTRUMENT 046047 048063064
HTS 069
HOMECABLE 056
HITACHI 022
HUGHESNETWORK 015017
IQ 020
tQ PRISM 020
JANEIL 059
JERROID 063
JVC 069070
Brand Code
REGENCY 015 023
SA 042 043
SCIENTIFICATLAN 042 043
SPRUCER 022
STARGATE2000 036
SYLVANIA 016
TEXSCAN 016
TOCOM 032
UNIVERSAL 033 034
VIEWSTAR 019 021023 028
WARNERAMEX 046
ZENITH 017 029035 037045
Product Code
SatelliteSTB HDDCOMBOPremium 010
CABLESTBHDDCOMBOStandard 011
CABLESTBHDDCOMBOPremium 012
GroundwaveSTBHDDCOMBOStandard 013
GroundwaveSTBHDDCOMBOPremium 014
Brand Code
LG(Goldstar) 044 073
MAGNAVOX 016 021036 038039 040041 042
MEMOREX 016
MOTOROLA 064
MACOM 018
MITSUBISHI 015
NEXTLEVEL 047 048064
PHILIPS 015 016017 021033 036038 039
040 041042 067
PRIMESTAR 046 049050 063
PANASONIC 058 059061 062
PAYSAT 016
PROSCAN 065 066
RCA 051 052053 065066
RADIOSHACK 064
REALISTIC 057
STS 020 027
STARTRAK 026
SKY 031
SKYLIFE 005 006007
SHACK 064
STARCHOICE 064
SONY 054 060
TOSHIBA 015 017028 029030 072
ULTIMATETV 060 066
UNIDEN 016 021037 055056 057
ZENITH 024 031068
Continued...
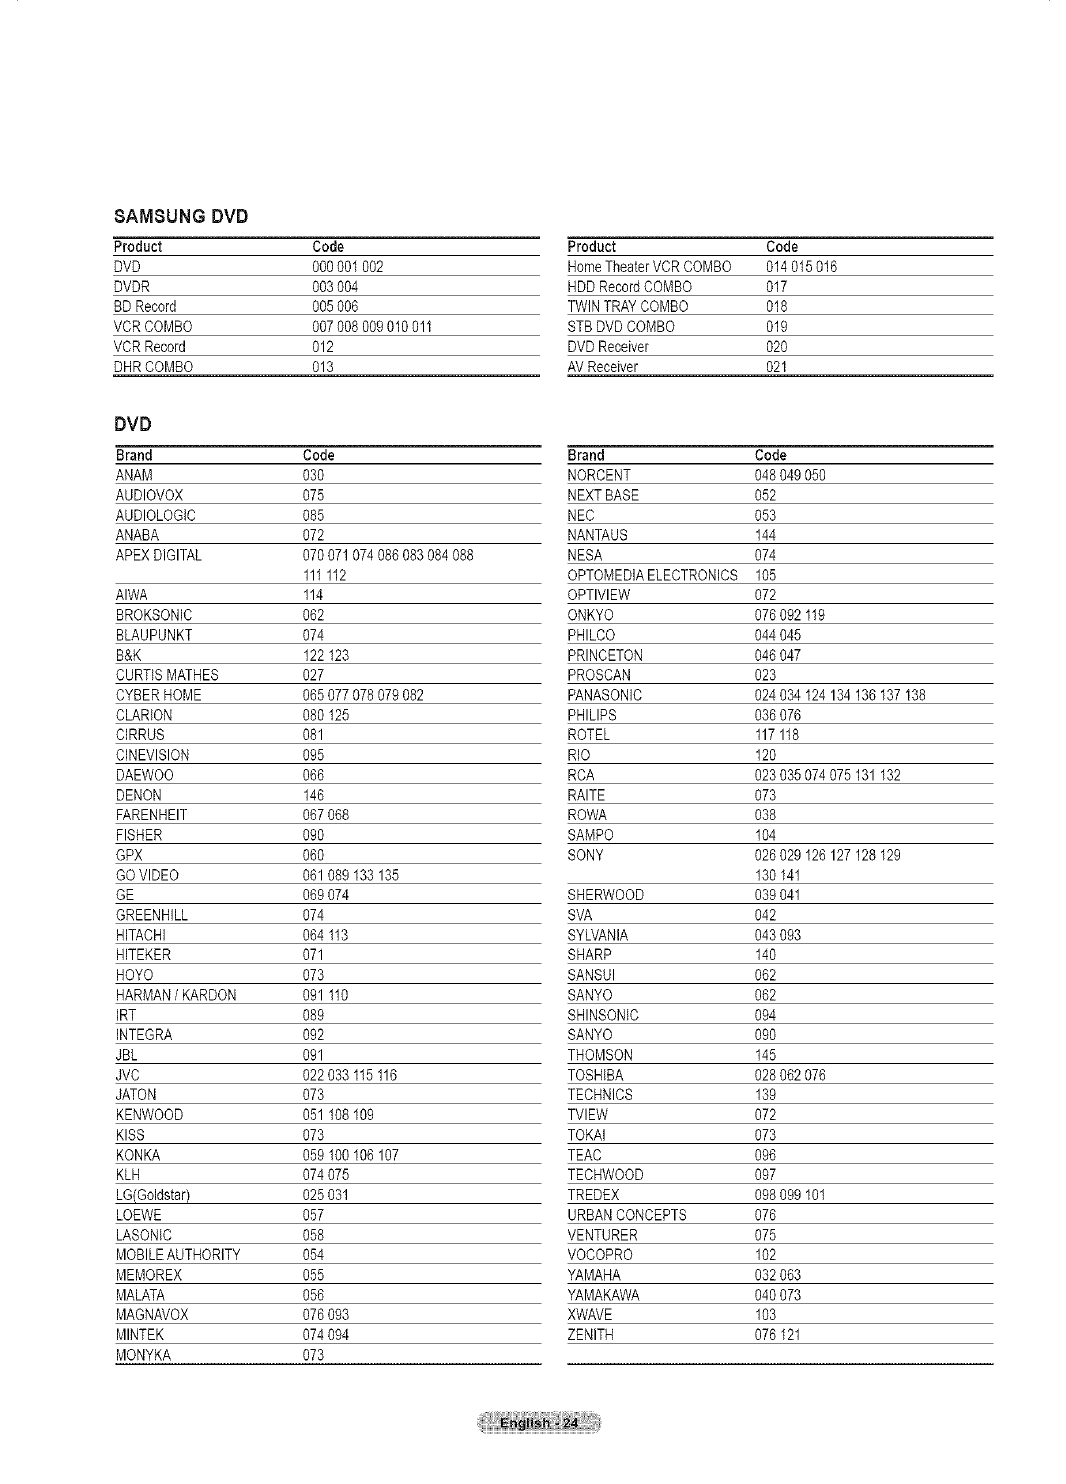
8AMSUNG DVD
Product Code
DVD 0% 001 002
DVDR 003004
BDRecord 005006
VCR COMBO 007008 009010011
VCR Record 012
DHRCOMBO 013
DVD
Brand Code
ANAM 030
AUDIOVOX 075
AUDIOLOGIC 085
ANABA 072
APEXDIGITAL 070071 074086 083084 088
111112
AIWA 114
BROKSONIC 062
BLAUPUNKT 074
B&K 122 123
CURTISMATHES 027
CYBERHOME 065077 078079 082
CLARION 080 125
CIRRUS 081
GINEVlSlON 095
DAEWOO 066
DENON 146
FARENHEIT 067068
FISHER 090
GPX 060
GO VIDEO 061089 133 135
GE 069074
GREENHILL 074
HITACHI 064 113
HITEKER 071
HOYO 073
HARMAN/KARDON 091 110
IRT 089
INTEGRA 092
JBL 091
JVC 022033 115116
JATON 073
KENWOOD 051 108109
KISS 073
KONKA 059 100106 107
KLH 074075
LG(Goldstar) 025031
LOEWE 057
LASONIC 058
MOBILEAUTHORITY 054
MEMOREX 055
MALATA 056
MAGNAVOX 076093
MINTEK 074094
MONYKA 073
Product Code
HomeTheaterVCRCOMBO 014015016
HDDRecordCOMBO 017
TWINTRAYGOMBO 018
STB DVDCOMBO 019
DVD Receiver 020
AVReceiver 021
Brand Code
NORCENT 048049 050
NEXTBASE 052
NEC 053
NANTAUS 144
NESA 074
OPTOMEDIAELEGTRONICS 105
OPTIVlEW 072
ONKYO 076092 119
PHILCO 044045
PRINCETON 046047
PROSCAN 023
PANASONIC 024034 124 134136 137138
PHILIPS 036076
ROTEL 117118
RIO 120
RCA 023035 074075131 132
RAITE 073
ROWA 038
SAMPO 104
SONY 026029 I26 127128 129
130 141
SHERWOOD 039041
SVA 042
SYLVANIA 043093
SHARP 140
SANSUI 062
SANYO 062
SHINSONIC 094
SANYO 090
THOMSON 145
TOSHIBA 028062 076
TECHNICS 139
TVIEW 072
TOKAI 073
TEAC 096
TECHWOOD 097
TREDEX 098099 101
URBANCONCEPTS 076
VENTURER 075
VOGOPRO 102
YAMAHA 032063
YAMAKAWA 040073
XWAVE 103
ZENITH 076 121
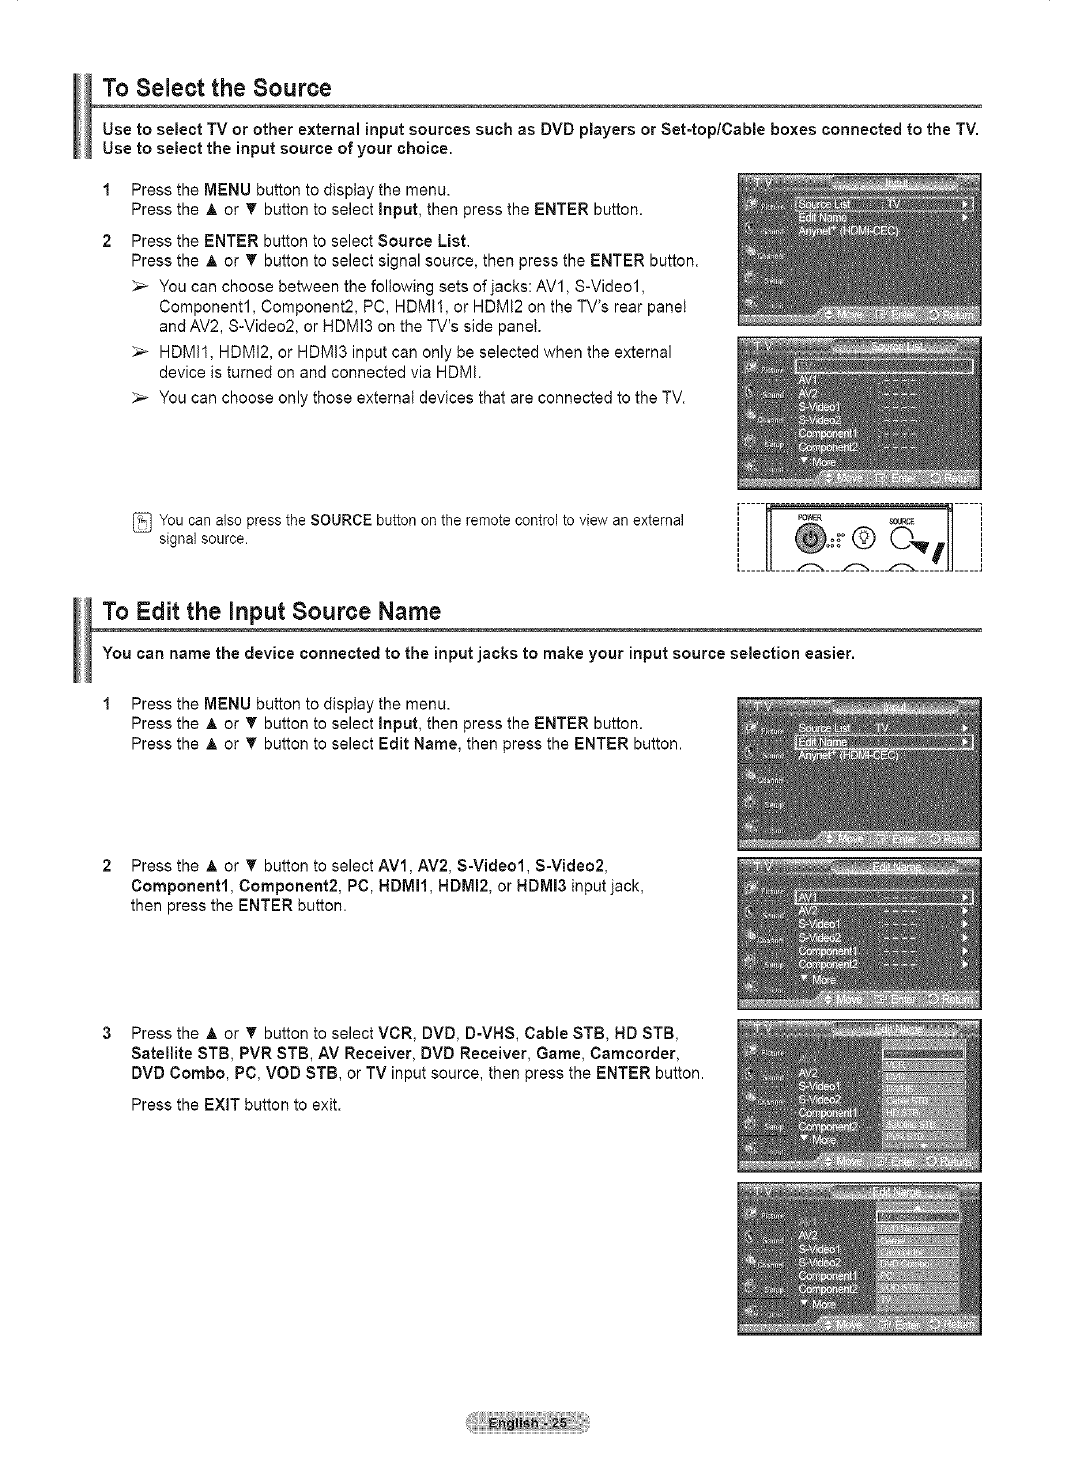
To Select the Source
Use to select TV or other external input sources such as DVD players or Set-top/Cable boxes connected to the TV.
Use to select the input source of your choice.
1
2
Press the MENU button to display the menu.
Press the _, or T button to select Input, then press the ENTER button.
Press the ENTER button to select Source List.
Press the ,A or T button to select signal source, then press the ENTER button.
_-- You can choose between the following sets of jacks: AV1, S-Video1,
Component1, Component2, PC, HDMil, or HDMi2 on the TV's rear panel
and AV2, S-Video2, or HDMI3 on the TV's side panel.
_-- HDMil, HDMI2, or HDMi3 input can only be selected when the external
device is turned on and connected via HDMi.
_-- You can choose only those external devices that are connected to the TV.
You can also press the SOURCE button on the remote control to view an external
signal source.
To Edit the input Source Name
You can name the device connected to the input jacks to make your input source selection easier.
1 Press the MENU button to display the menu.
Press the A or T button to select Input, then press the ENTER button.
Press the _, or T button to select Edit Name, then press the ENTER button.
2 Press the ,A or T button to select AVl, AV2, S-Video1, S-Video2,
Component1, Component2, PC, HDMII, HDMI2, or HDMI3 input jack,
then press the ENTER button.
Press the A or T button to select VCR, DVD, D-VHS, Cable STB, HD STB,
Satellite STB, PVR STB, AV Receiver, DVD Receiver, Game, Camcorder,
DVD Combo, PC, VOD STB, or TV input source, then press the ENTER button.
Press the EXIT button to exit.

i Picture Control j
Using Automatic Picture Settings
Your TV has three automatic picture settings ("Dynamic", "Standard", and "Movie") that are preset at the factory.
You can activate either Dynamic, Standard, or Movie by making aselection from the menu.
1Press the MENU button to display the menu.
Press the A or _' button to select Picture, then press the ENTER button.
Press the ENTER button to select Mode.
Press the ,& or _' button to select the Dynamic, Standard, or Movie picture
setting, then press the ENTER button.
* Choose Dynamic to increase the clarity and sharpness of the picture.
*Choose Standard for general TV watching mode.
Choose Movie when watching movies.
Press the P.MODE button on the remote control to select one of the standard picture
settings. [_____r[____......_ .......,c.7__11_____i
JJ.....
3Press the &or • button to select Contrast, Brightness, Sharpness, Color,
or Tint, then press the ENTER button.
Press the 4 or _ button to decrease or increase the value of a )articular item.
Press the ENTER button.
_,_ •Tint doesn't operate in PC mode.
• In PC mode, only the Contrast and Brightness can be selected.
• Each adjusted setting will be stored separately according to its input mode.
• When you make changes to Contrast, Brightness, Sharpness, Color, or
Tint. OSD color will also be adjusted accordingly.
Continued...
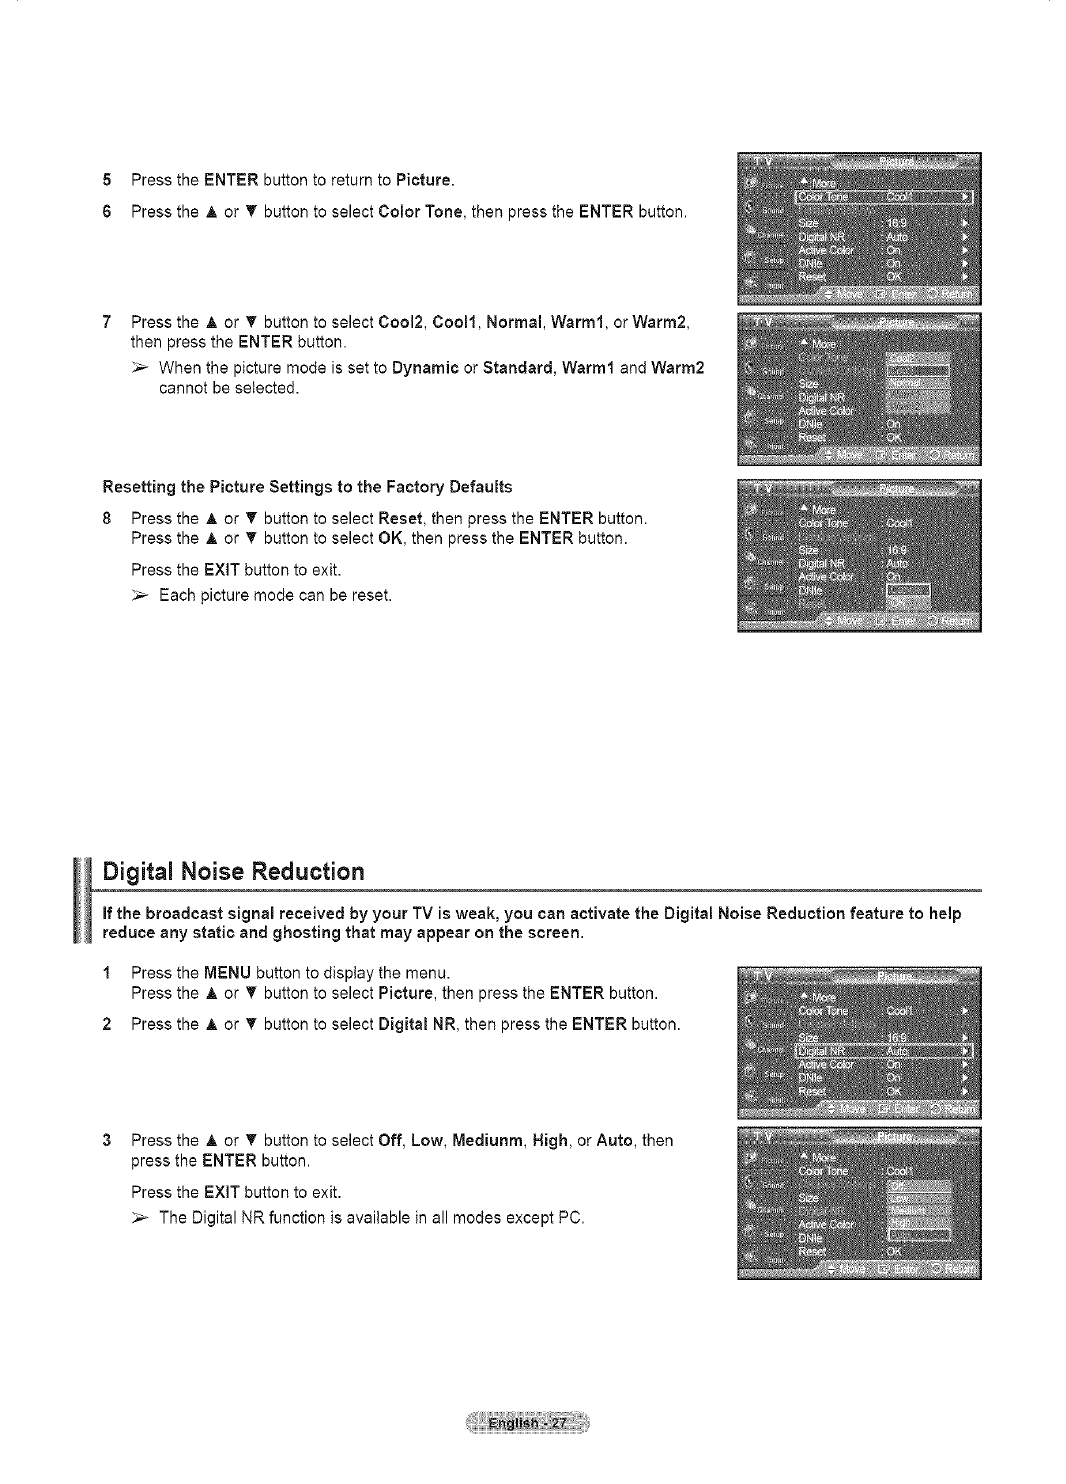
5Press the ENTER button to return to Picture.
6Press the _, or T button to select Color Tone, then press the ENTER button.
Press the ,A or T button to select Cool2, Cool1, Normal, Warm1, or Warm2,
then press the ENTER button.
_,_ When the picture mode is set to Dynamic or Standard, Warm1 and Warm2
cannot be selected.
Resetting the Picture Settings to the Factory Defaults
8 Press the A or T button to select Reset, then press the ENTER button.
Press the _, or _' button to select OK, then press the ENTER button.
Press the EXIT button to exit.
_,_ Each picture mode can be reset.
Digital Noise Reduction
If the broadcast signal received by your TV is weak, you can activate the Digital Noise Reduction feature to help
reduce any static and ghosting that may appear on the screen.
1 Press the MENU button to display the menu.
Press the _, or _' button to select Picture, then press the ENTER button.
2 Press the _, or _' button to select Digital NR, then press the ENTER button.
Press the _, or T button to select Off, Low, Mediunm, High, or Auto, then
press the ENTER button.
Press the EXIT button to exit.
_-- The Digital NR function is available in all modes except PC.
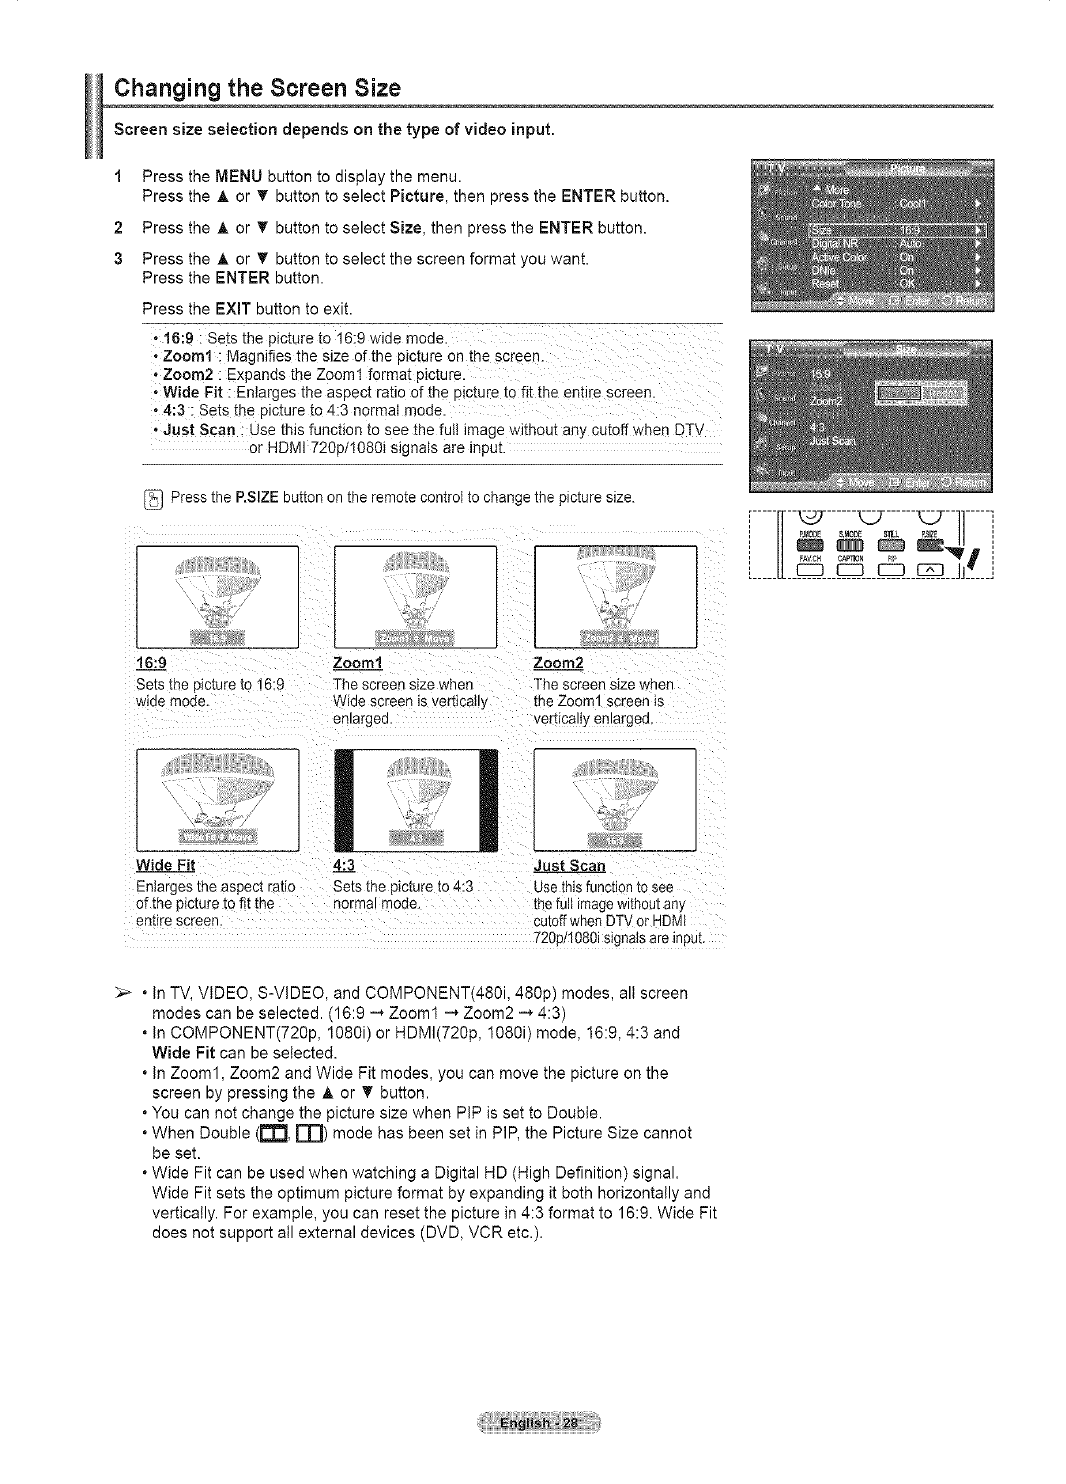
Changing the Screen Size
Screen size selection depends on the type of video input.
1 Press the MENU button to display the menu.
Press the A or _' button to select Picture, then press the ENTER button.
2 Press the A or T button to select Size, then press the ENTER button.
3 Press the A or _' button to select the screen format you want.
Press the ENTER button.
Press the EXiT button to exit.
•16:9 : Sets the picture to i@9 wide mode.
Zoom1 _Magnifies the size of the picture on the screen.
! Zoom2 : Expands the Zoom1 format picture.
•Wide Fit :Enlarges the aspect ratio of the picture tofit the entire screen.
,4:3 : Sets the picture to 4:3 normal mode.
•Just Scan : Use this function to see the full image without any cutoff when DTV
or HDMI 720p11080i signals are input.
Press the P.SlZEbutton on the remote controI to change the picture size.
16:9_ Zoom1 Zoom2.
Sets the picture to 16:9 The screen size when The screen size _vnen
w_demode, Nae screen _sverttca _ the Zoom1 screen is
en_argea, veRJcaHyen_argea.
Wide FiJ
Enlarges tne aspec_rauo
of the picture to fit the
an[ire screer
4:3_
Sets the 3_cture[o 4:3
norma qqoue.
Just Scan
Usethis function1osee
[nefull imagew_thOUtan_
cutoffwhen DTVor HDMI
720p/I080i signals are inpu[.
......-c_7......
: u P_o_Es.Mo_ s_ _.s_Ejj :
lFA_ZCH C,_ilON I×_> l
L___IJ
. In TV, VIDEO, S-VIDEO, and COMPONENT(480i, 480p) modes, all screen
modes can be selected. (16:9 --, Zoom1 _ Zoom2 _ 4:3)
. In COMPONENT(720p, 1080i) or HDMI(72Op, 1080i) mode, 16:9, 4:3 and
Wide Fit can be selected.
. In Zoom1, Zoom2 and Wide Fit modes, you can move the picture on the
screen by pressing the A or T button.
. You can not change the picture size when PiP is set to Double.
. When Double (r'r'[ rT]) mode has been set in PIP, the Picture Size cannot
be set.
. Wide Fit can be used when watching a Digital HD (High Definition) signal.
Wide Fit sets the optimum picture format by expanding it both horizontally and
vertically. For example, you can reset the picture in 4:3 format to 16:9. Wide Fit
does not support atl external devices (DVD, VCR etc.).
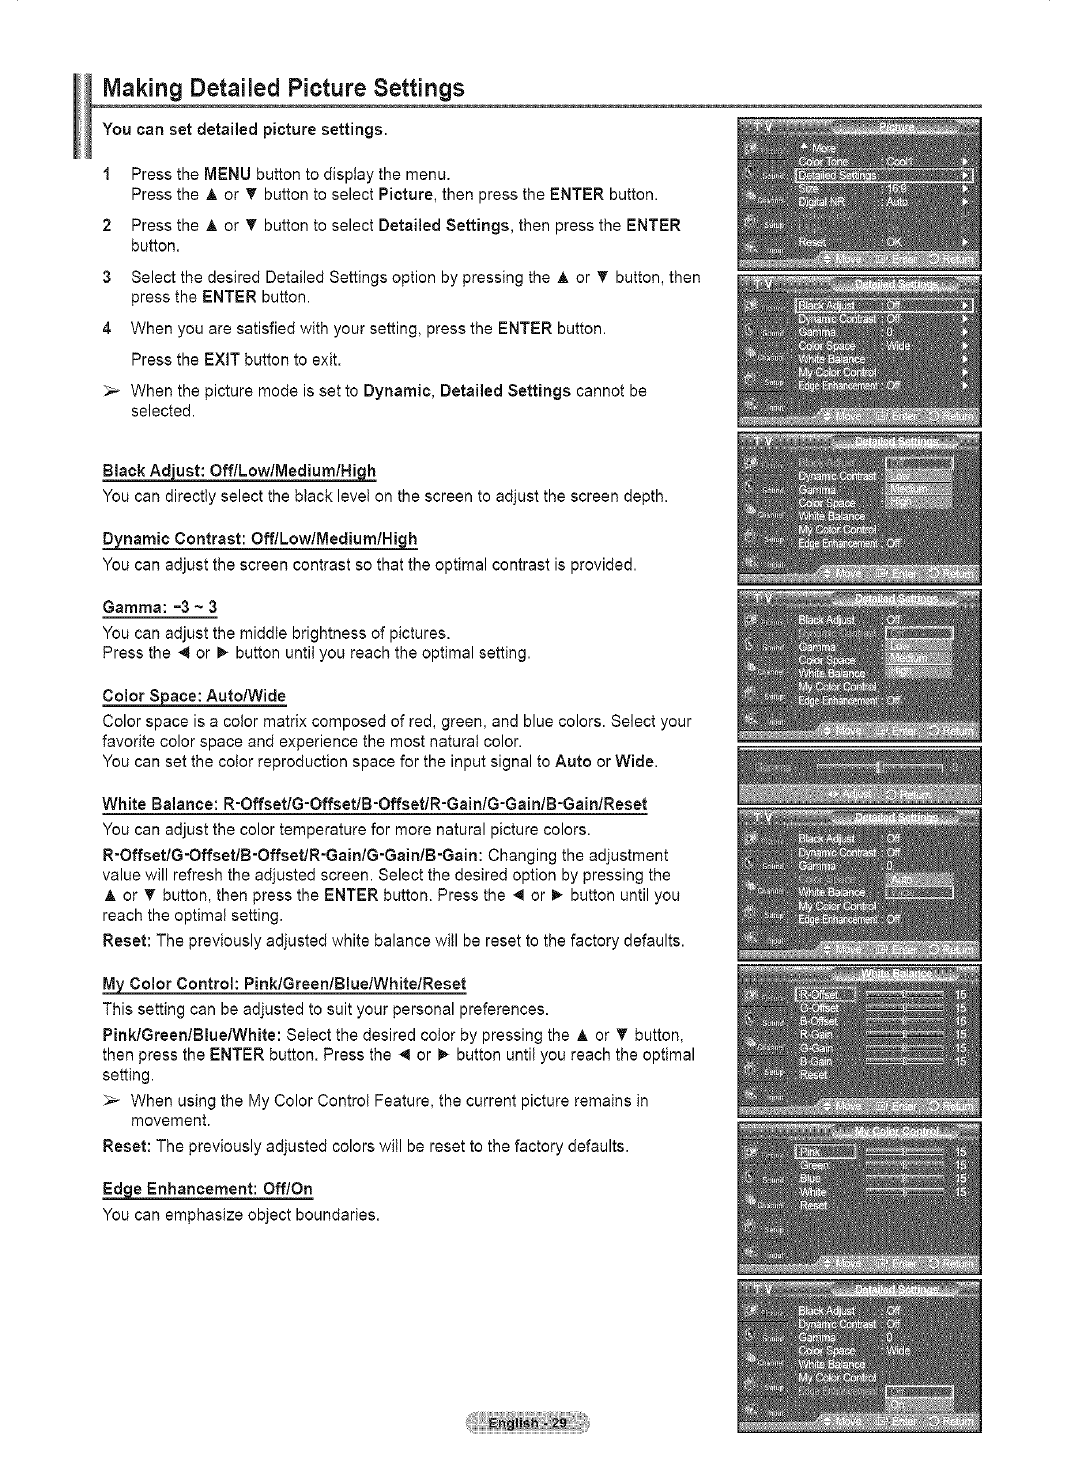
Making Detailed Picture Settings
You can set detailed picture settings.
1 Press the MENU button to display the menu.
Press the _, or T button to select Picture, then press the ENTER button.
2 Press the _, or T button to select Detailed Settings, then press the ENTER
button.
3 Select the desired Detailed Settings option by pressing the A or _' button, then
press the ENTER button.
4 When you are satisfied with your setting, press the ENTER button.
Press the EXIT button to exit.
_-- When the picture mode is set to Dynamic, Detailed Settings cannot be
selected.
Black Adjust: OfflLowlMediumlHisLh
You can directly select the black level on the screen to adjust the screen depth.
Dnamic Contrast: Off/Low/Medium/Hi h
You can adjust the screen contrast so that the optimal contrast is provided.
Gamma: -3 ~ 3
You can adjust the middle brightness of pictures.
Press the 4 or _ button until you reach the optimal setting.
Color Space: Auto/Wide
Color space isa color matrix composed of red, green, and blue colors. Select your
favorite color space and experience the most natural color.
You can set the color reproduction space for the input signal to Auto or Wide.
White Balance: R-OffsetlG-OffsetlB-OffsetlR-GainlG-GainlB-GainlReset
You can adjust the color temperature for more natural picture colors.
R-OffsetlG-OffsetlB-OffsetlR-GainlG-GainlB-Gain: Changing the adjustment
value will refresh the adjusted screen. Select the desired option by pressing the
A or T button, then press the ENTER button. Press the 4 or _ button until you
reach the optima! setting.
Reset: The previously adjusted white balance will be reset to the factory defaults.
Color Control: PinklGreenlBluelWhitelReset
This setting can be adjusted to suit your personal preferences.
PinklGreenlBluelWhite: Select the desired color by pressing the _, or T button,
then press the ENTER button. Press the 4 or I_ button until you reach the optimal
setting.
_-- When using the My Color Control Feature, the current picture remains in
movement.
Reset: The previously adjusted colors will be reset to the factory defaults.
_e Enhancement: Off/On
You can emphasize object boundaries.
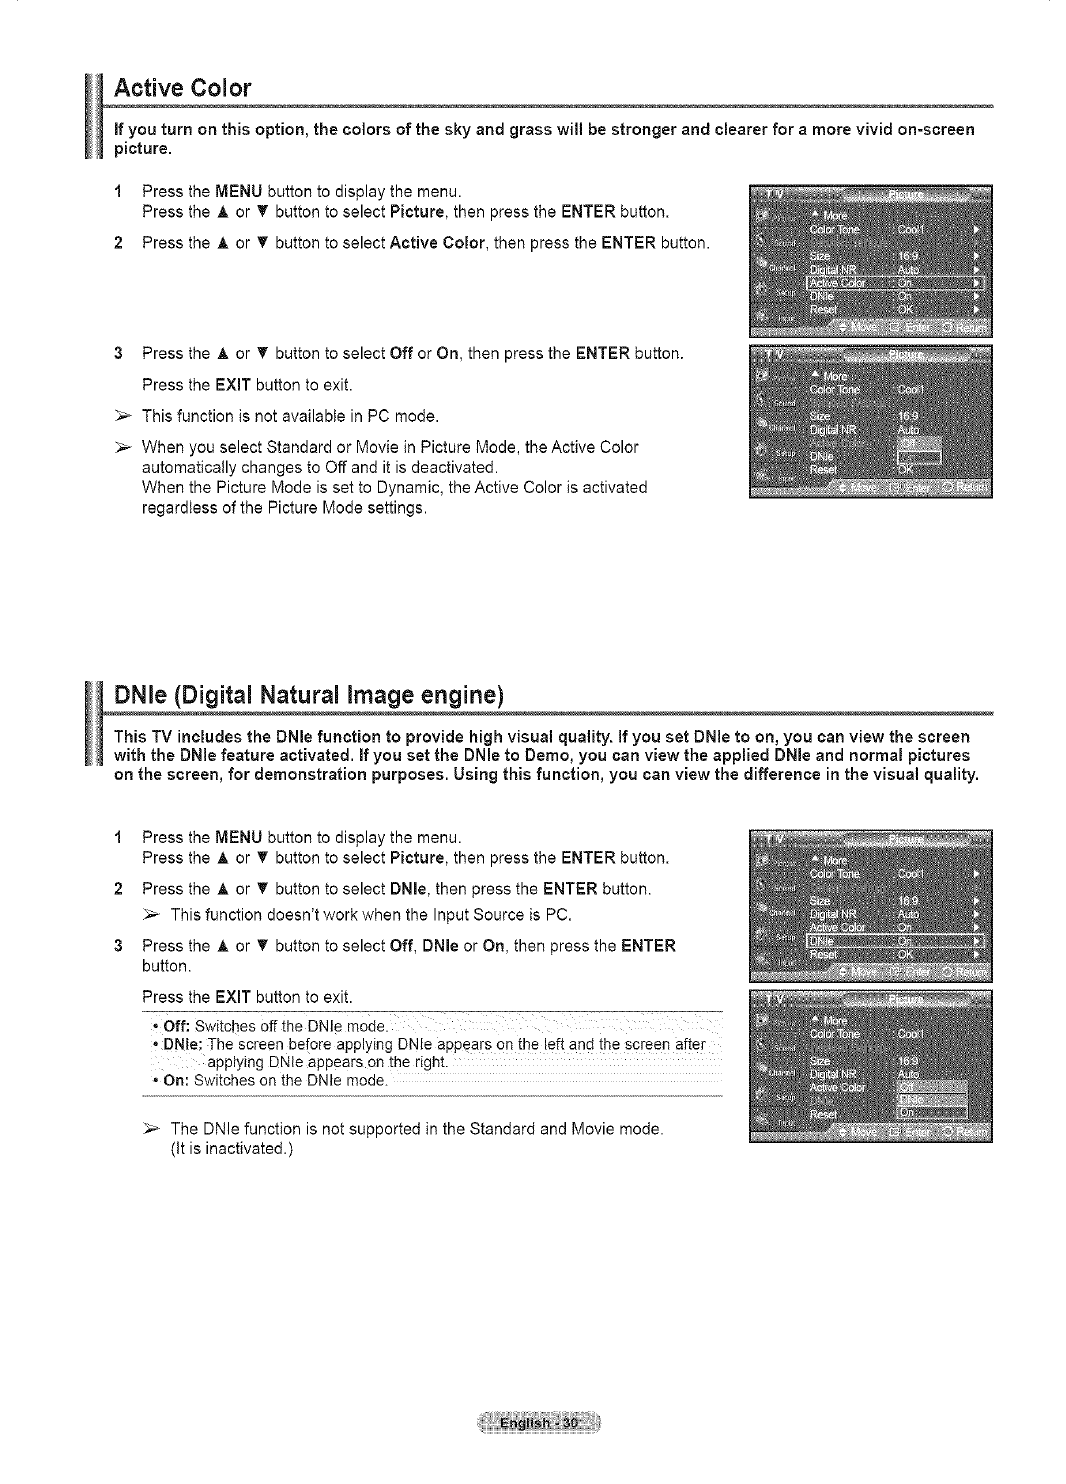
Active Color
if you turn on this option, the colors of the sky and grass will be stronger and clearer for a more vivid on=screen
picture.
1 Press the MENU button to display the menu.
Press the A or T button to select Picture, then press the ENTER button.
2 Press the A or _' button to select Active Color, then press the ENTER button.
3Press the A or _' button to select Off or On, then press the ENTER button.
Press the EXIT button to exit.
_,_ This function is not available in PC mode.
_-- When you select Standard or Movie in Picture Mode, the Active Color
automatically changes to Off and it is deactivated.
When the Picture Mode is set to Dynamic, the Active Color is activated
regardless of the Picture Mode settings.
DNle (Digital Natural image engine)
This TV includes the DNle function to provide high visual quality. If you set DNle to on, you can view the screen
with the DNle feature activated. If you set the DNle to Demo, you can view the applied DNle and normal pictures
on the screen, for demonstration purposes. Using this function, you can view the difference in the visual quality.
1 Press the MENU button to display the menu.
Press the A or T button to select Picture, then press the ENTER button.
2 Press the A or V" button to select DNme,then press the ENTER button.
_,_ This function doesn't work when the Input Source is PC.
3 Press the A or _' button to select Off, DNle or On, then press the ENTER
button.
Press the EXiT button to exit.
-Off: Switches off the DNle mode.
,DN!e: The screen be[ore applying DNle appears o n the left and the screen after
applying DNle appears on the right.
•On: Switches on the DNIe mode.
_,_ The DNle function is not supported in the Standard and Movie mode.
(It is inactivated.)
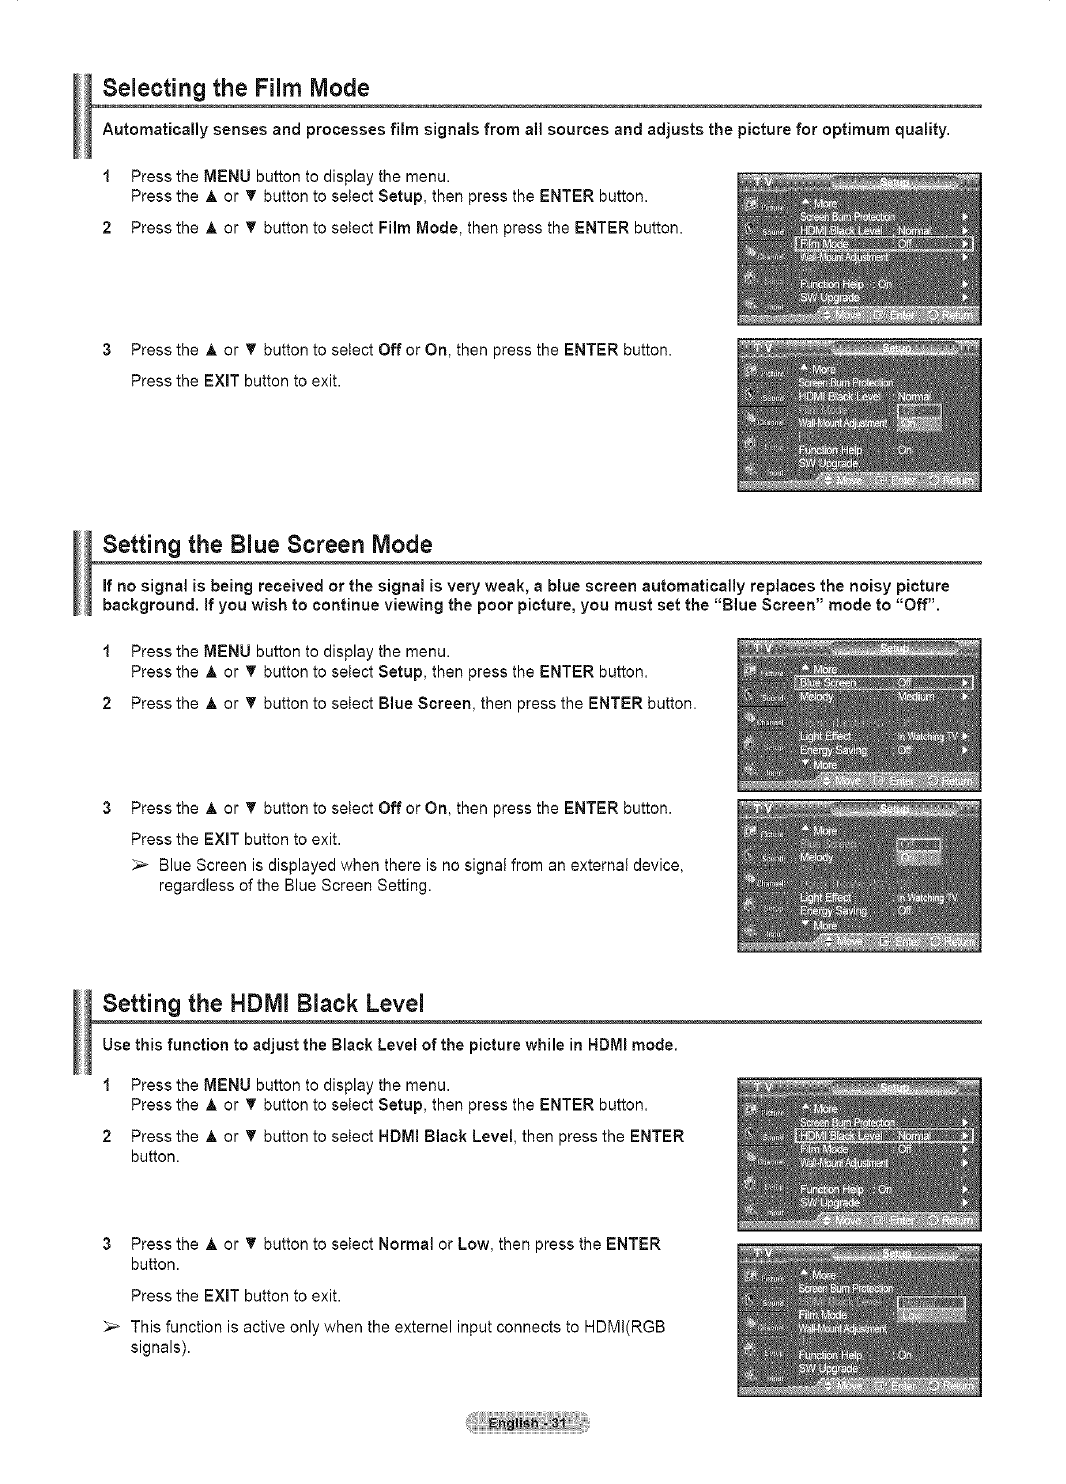
Selecting the Film Mode
Automatically senses and processes film signals from al! sources and adjusts the picture for optimum quality.
1 Press the MENU button to display the menu.
Press the A or _' button to setect Setup, then press the ENTER button.
2 Press the A or _' button to setect Film Mode, then press the ENTER button.
3Press the A or _' button to select Off or On, then press the ENTER button.
Press the EXIT button to exit.
Setting the Blue Screen Mode
if no signal is being received or the signal is very weak, a blue screen automatically replaces the noisy picture
background, if you wish to continue viewing the poor picture, you must set the "Blue Screen" mode to "Off".
1 Press the MENU button to display the menu.
Press the &or _' button to select Setup, then press the ENTER button.
2 Press the &or _' button to select Blue Screen, then press the ENTER button.
Press the A or _' button to select Off or On, then press the ENTER button.
Press the EXiT button to exit.
Blue Screen is displayed when there is no signal from an external device,
regardless of the Blue Screen Setting.
Setting the HDMI Black Level
Use this function to adjust the Black Level of the picture while in NDMI mode.
1 Press the MENU button to display the menu.
Press the A or _' button to select Setup, then press the ENTER button.
2 Press the A or _' button to select HDMI Black Level, then press the ENTER
button.
3Press the A or _' button to select Normal or Low, then press the ENTER
button.
Press the EXiT button to exit.
This function is active only when the extemel input connects to HDMI(RGB
signals).
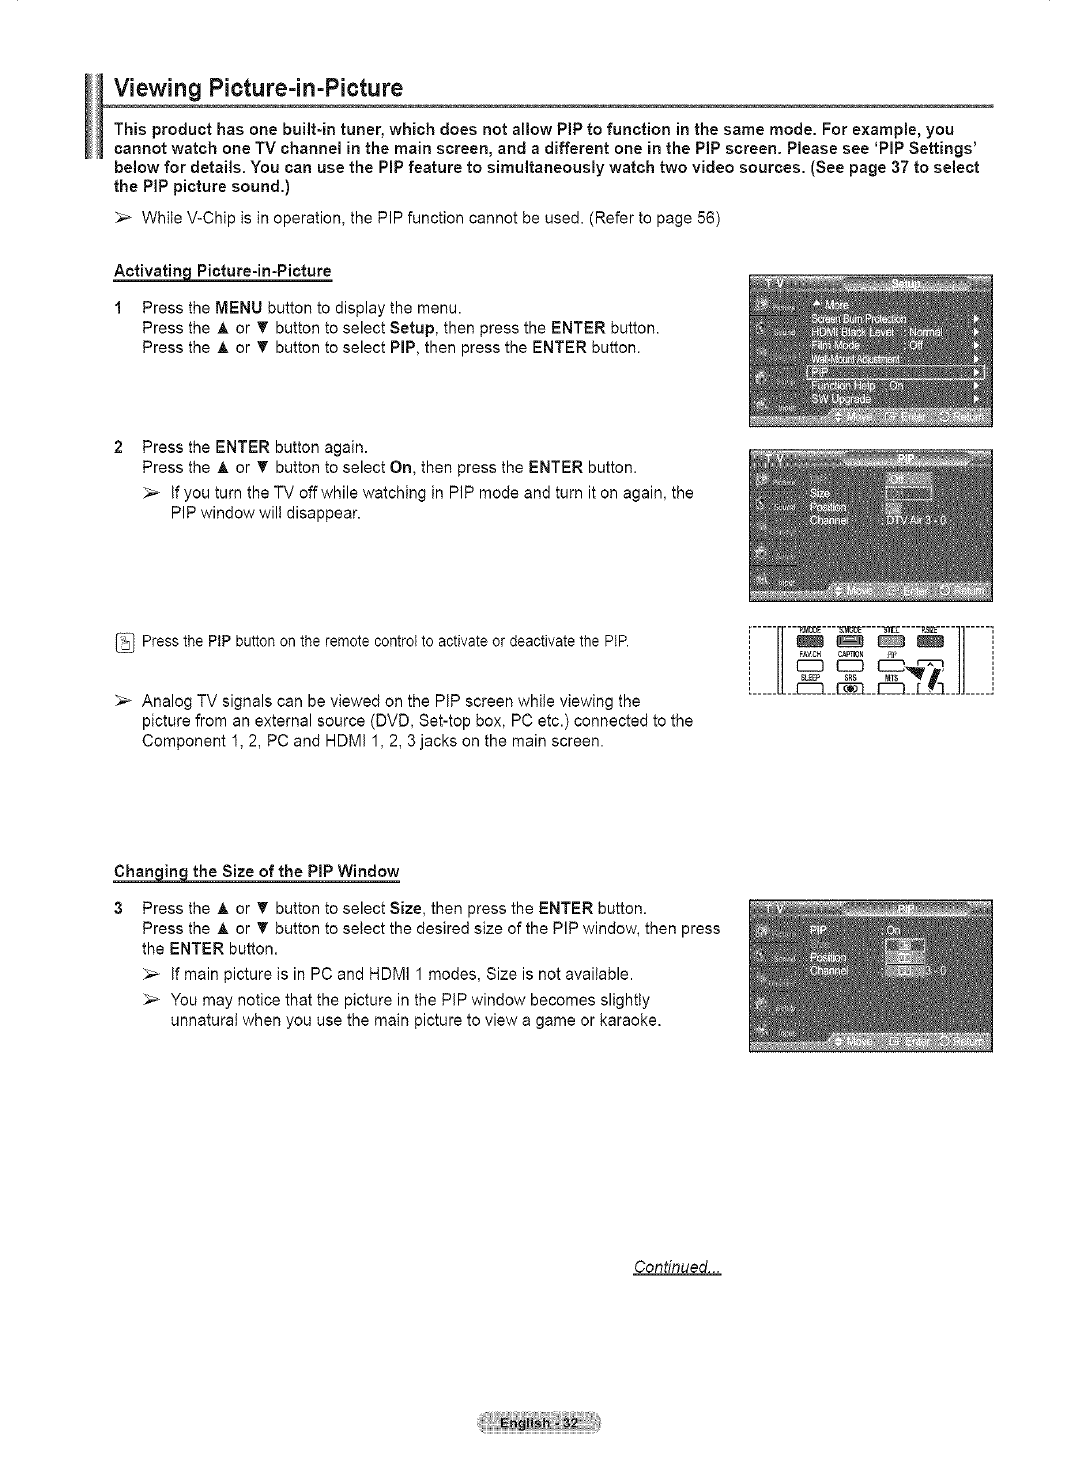
Viewing Picture-in-Picture
This product has one built-in tuner, which does not allow PiP to function in the same mode. For example, you
cannot watch one TV channel in the main screen, and a different one in the PiP screen. Please see 'PiP Settings'
below for details. You can use the PiPfeature to simultaneously watch two video sources. (See page 37 to select
the PiP picture sound.)
While V-Chip is in operation, the PIP function cannot be used. (Refer to page 56)
Picture-in-Picture
1 Press the MENU button to display the menu.
Press the A or _' button to select Setup, then press the ENTER button.
Press the A or _' button to select PiP, then press the ENTER button.
Press the ENTER button again.
Press the A or _' button to select On, then press the ENTER button.
if you turn the TV off while watching in PIP mode and turn it on again, the
PIP window wilt disappear.
Press the PIP button on the remote control to activate or deactivate the PIP.
>- Analog TV signals can be viewed on the PiP screen while viewing the
picture from an external source (DVD, Set-top box, PC etc.) connected to the
Component 1, 2, PC and HDMI 1, 2, 3 jacks on the main screen.
', FA_ZC_ ChP310N Y_F ',
= =
', _P SRS MTS"_ ',
L___[[__c:::u_______::______JJ______
Chan_ the Size of the PiP Window
Press the A or _' button to select Size, then press the ENTER button.
Press the A or T button to select the desired size of the PIP window, then press
the ENTER button.
_,_ if main picture is in PC and HDMI 1 modes, Size is not available.
_,_ You may notice that the picture in the PiP window becomes slightly
unnatural when you use the main picture to view a game or karaoke.
Continued...
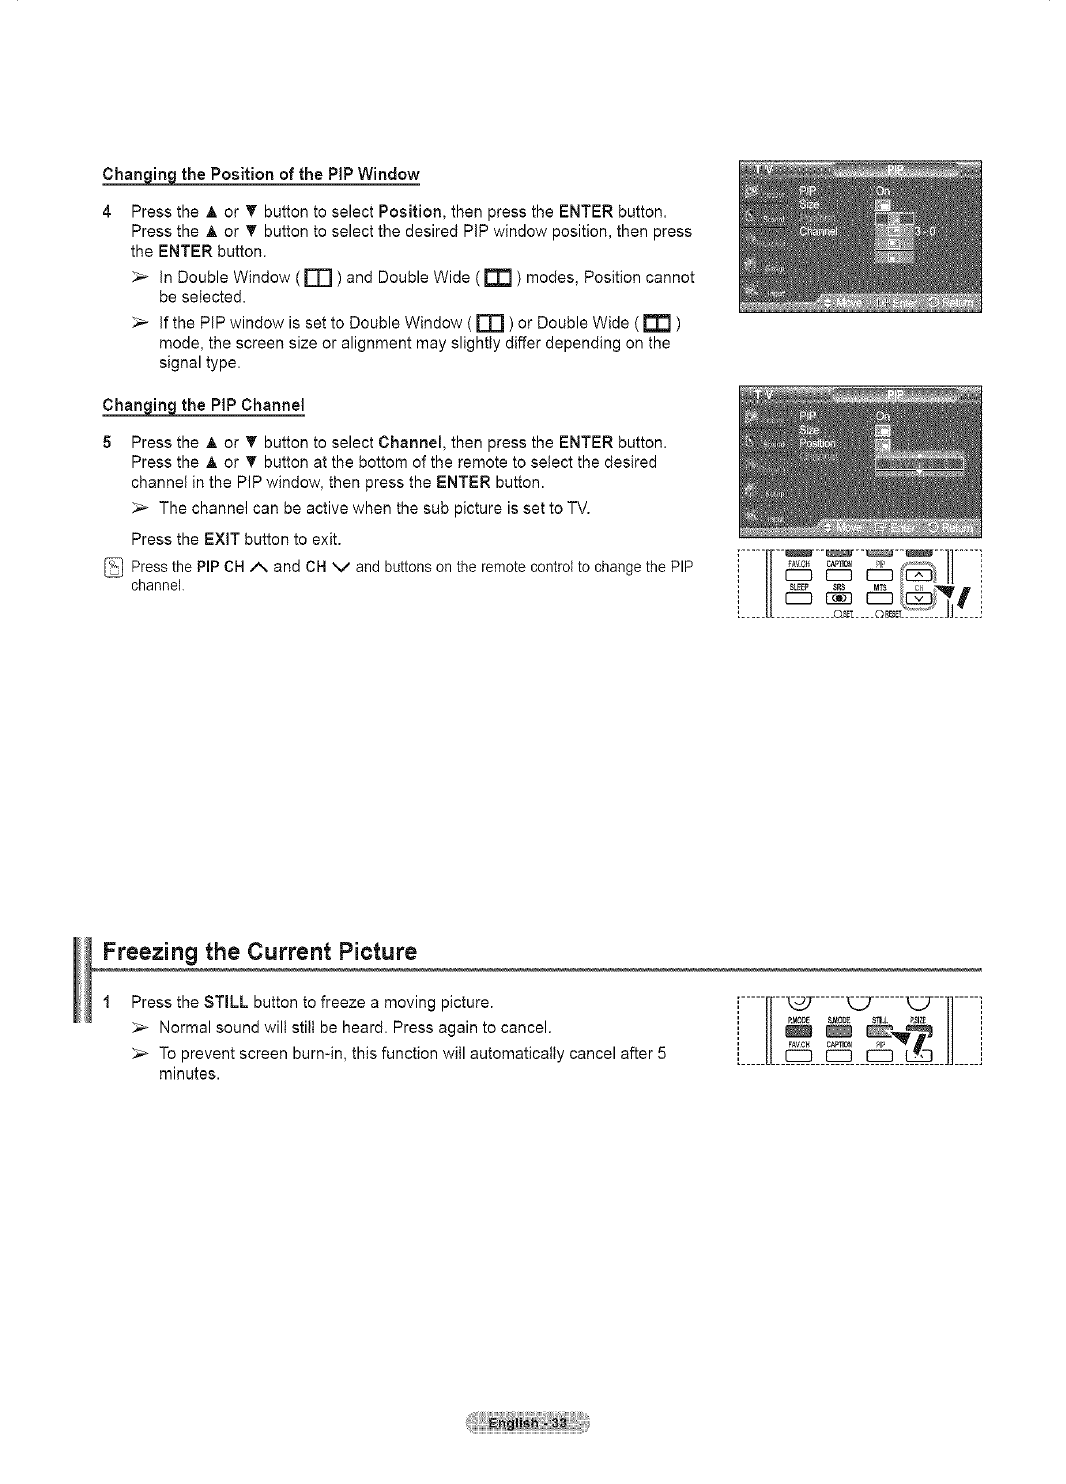
_the Position of the PiPWindow
Press the &or T button to select Position, then press the ENTER button.
Press the A or T button to select the desired PIP window position, then press
the ENTER button.
_-- In Double Window ( n] ) and Double Wide ( _ ) modes, Position cannot
be selected.
If the PIP window is set to Double Window ( n-I ) or Double Wide ( _ )
mode, the screen size or alignment may slightly differ depending on the
signal type.
_the PiP Channel
5Press the A or T button to select Channel, then press the ENTER button.
Press the A or T button at the bottom of the remote to select the desired
channel in the PIP window, then press the ENTER button.
The channel can be active when the sub picture is set to TV.
Press the EXIT button to exit.
Press the PIP CH/X and CH V and buttons on the remote control to change the PIP
channel. '-----,,------------------,,-----':_FA_C_EZ}C_mEZ}_' _ i:
Freezing the Current Picture
Press the STILL button to freeze a moving picture.
_-- Normal sound will still be heard. Press again to cancel.
To prevent screen burn-in, this function will automatically cancel after 5
minutes.
[-----rl---,:_......_- ......_--11-----i
i // @-,,@// J
,, FAVC_ CA_T_N _ ,,
iSound Control }
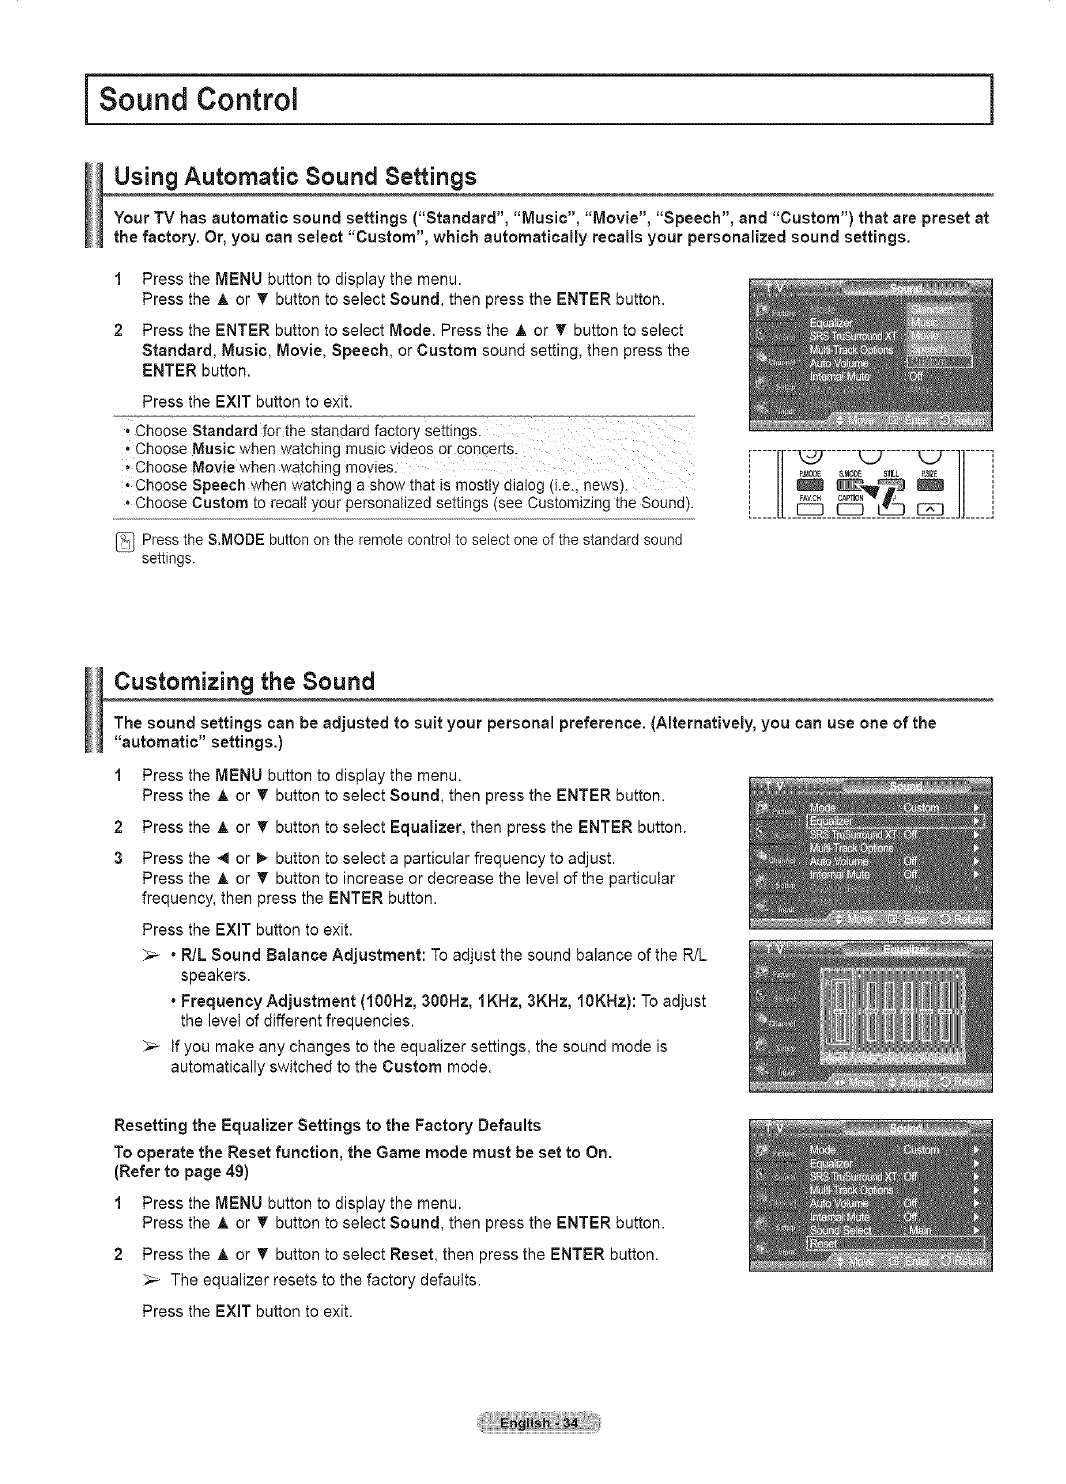
Using Automatic Sound Settings
Your TV has automatic sound settings ("Standard", "Music", "Movie", "Speech", and "Custom") that are preset at
the factory. Or, you can select "Custom", which automatically recalls your personalized sound settings.
1 Press the MENU button to display the menu.
Press the A or _' button to select Sound, then press the ENTER button.
2 Press the ENTER button to select Mode. Press the A or T button to select
Standard, Music, Movie, Speech, or Custom sound setting, then press the
ENTER button.
Press the EXiT button to exit.
,, Choose Standard for the standard factory sei
,Choose Music when watching music videos or conoerts.
,, Choose Movie when watching movies.
j Choose Speech when watching a show that is mostly dialog (i.e.i news).
• Choose Custom to recall your personalized settings (see Customizing the Sound).
Press the S.MODE button on the remote control to select one of the standard sound
settings.
...... ......
iI FA_ZC_t CAPON _iI
Customizing the Sound
The sound settings can be adjusted to suit your personal preference. (Alternatively, you can use one of the
"automatic" settings.)
1 Press the MENU button to display the menu.
Press the &or T button to select Sound, then press the ENTER button.
2 Press the A or T button to select Equalizer, then press the ENTER button.
3 Press the 4 or _ button to select a particular frequency to adjust.
Press the A. or T button to increase or decrease the level of the particular
frequency, then press the ENTER button.
Press the EXIT button to exit.
_-- •R/L Sound Balance Adjustment: To adjust the sound balance of the R/L
speakers.
• Frequency Adjustment (100Hz, 300Hz, 1KHz, 3KHz, 10KHz): To adjust
the level of different frequencies.
_-- If you make any changes to the equalizer settings, the sound mode is
automatically switched to the Custom mode.
Resetting the Equalizer Settings to the Factory Defaults
To operate the Reset function, the Game mode must be set to On.
(Refer to page 49)
1 Press the MENU button to display the menu.
Press the A or T button to select Sound, then press the ENTER button.
2 Press the A or _' button to select Reset, then press the ENTER button.
_-- The equalizer resets to the factory defaults.
Press the EXIT button to exit.
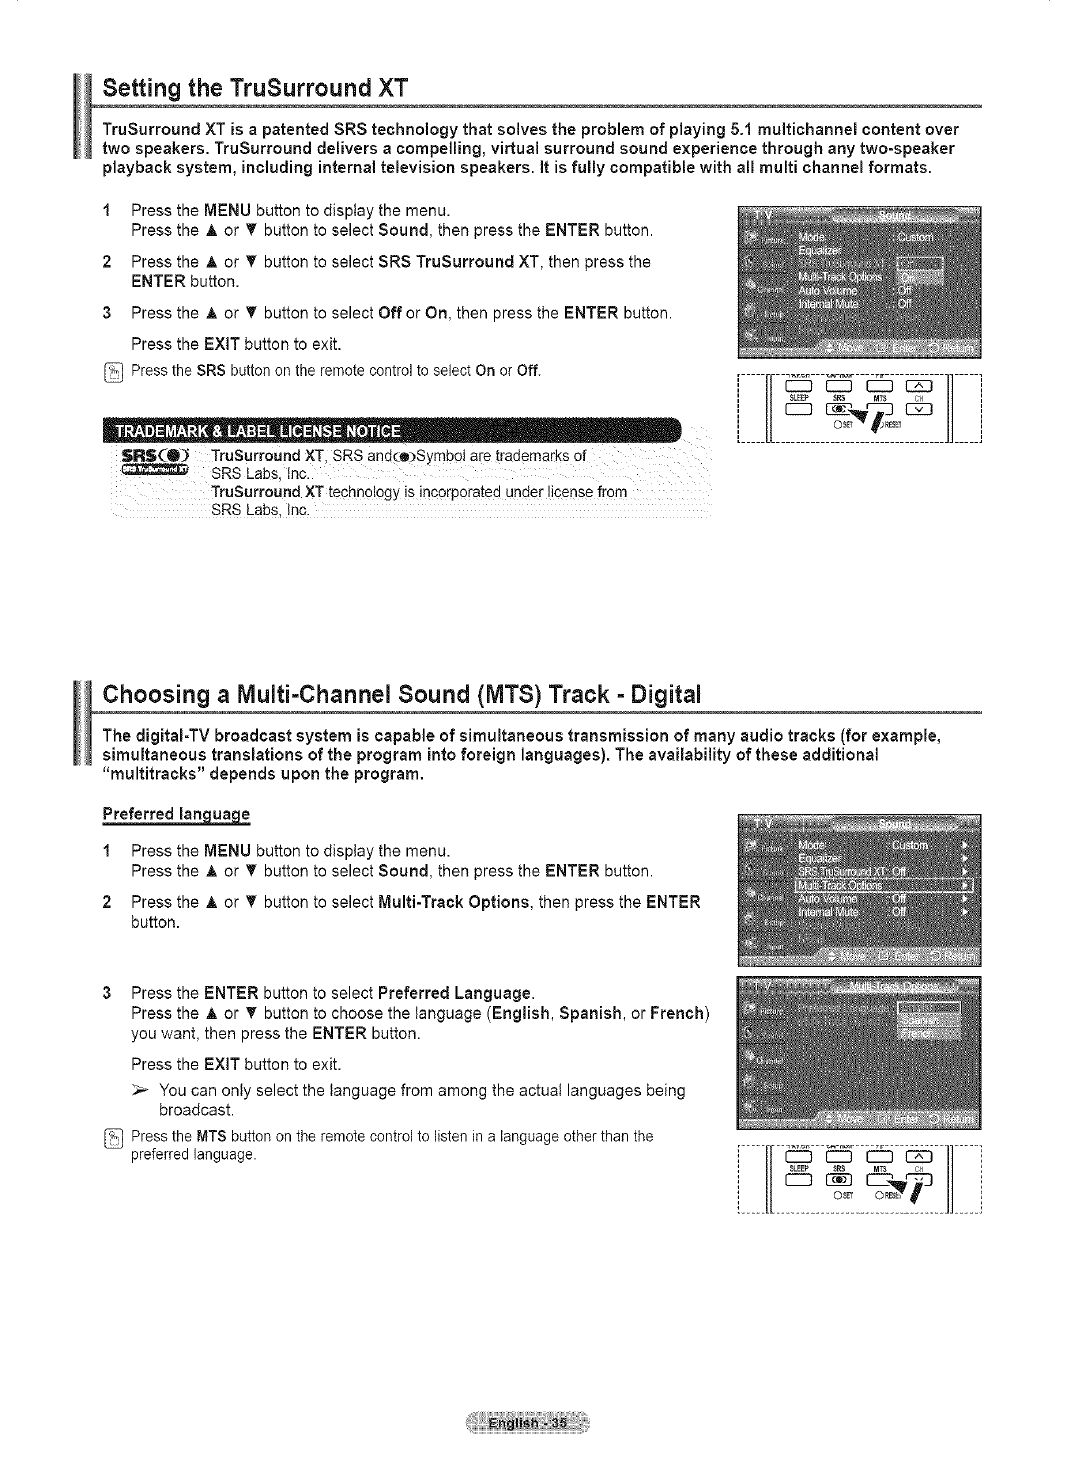
Setting the TruSurround ×T
TruSurround XT is a patented SRS technology that solves the problem of playing 5.1 multichannel content over
two speakers. TruSurround delivers a compelling, virtual surround sound experience through any two-speaker
playback system, including internal television speakers, it is fully compatible with all multi channel formats.
1
2
Press the MENU button to display the menu.
Press the A or T button to select Sound, then press the ENTER button.
Press the ,A or _' button to select SRS TruSurround XT, then press the
ENTER button.
3Press the A or T button to select Off or On, then press the ENTER button.
Press the EXIT button to exit.
Press the SRS button on the remote control to select On or Off.
$R$(O_ TruSurround XT, SRS and(e#SymboI are trademarks of
SRS Labs, tnc.
TruSurround XT techn01ogy is incorporated under license from
SRS Labs, Inc.
[_____[[o.T H_____J
Choosing a IVlulti-Channel Sound (MTS) Track =Digital
The digitaI-TV broadcast system is capable of simultaneous transmission of many audio tracks (for example,
simultaneous translations of the program into foreign languages). The availability of these additional
"multitracks" depends upon the program.
Preferred Inn ua •
1Press the MENU button to display the menu.
Press the A or _' button to select Sound, then press the ENTER button.
2 Press the A or _' button to select Multi-Track Options, then press the ENTER
button.
3Press the ENTER button to select Preferred Language.
Press the A or T button to choose the tanguage (English, Spanish, or French)
you want, then press the ENTER button.
Press the EXiT button to exit.
_-- You can only select the tanguage from among the actual languages being
broadcast.
Press the MTS button on the remote control to listen ina language other than the
preferred language.
o,oooze,ILJ
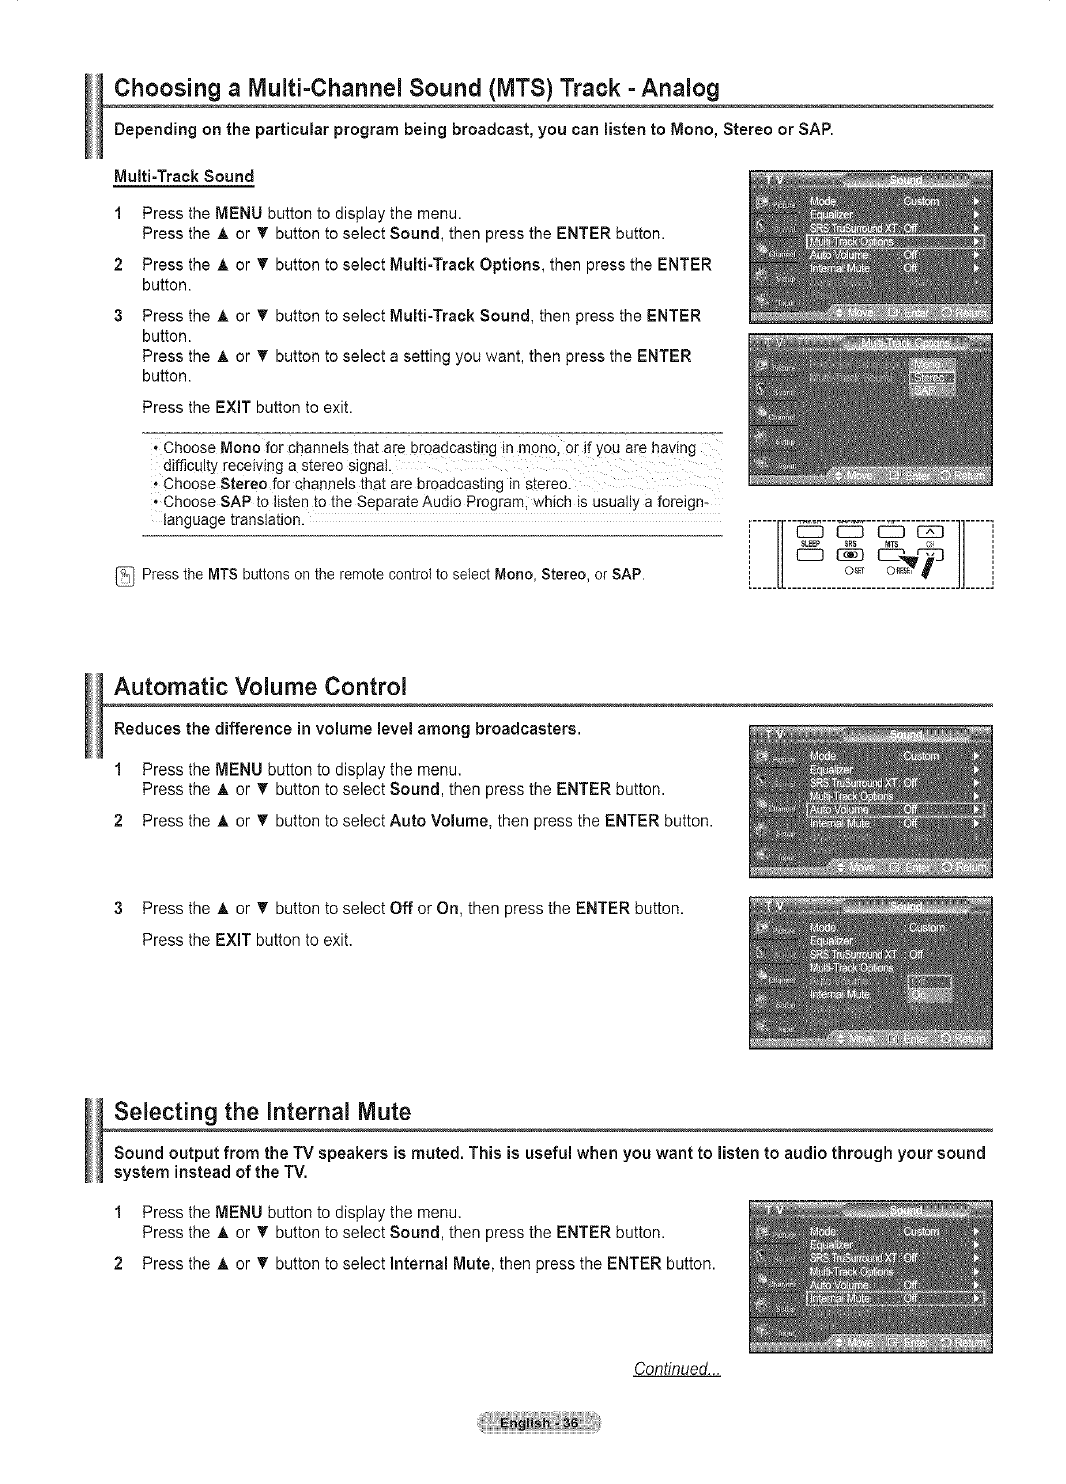
Choosing a Multi-Channel Sound (MTS) Track =Analog
Depending on the particular program being broadcast, you can listen to Mono, Stereo or SAP.
Multi-Track Sound
1 Press the MENU button to display the menu.
Press the A or T button to select Sound, then press the ENTER button.
2 Press the A or _' button to select Multi-Track Options, then press the ENTER
button.
Press the A or _' button to select Multi-Track Sound, then press the ENTER
button.
Press the A or _' button to select a setting you want, then press the ENTER
button.
Press the EXiT button to exit.
' Choose Mono for channels that are broadcasting in mon-olor if you are having
difficulty receiving a stereo signal.
i Choose Stereo for channels that are broadcasting in stereo
•Choose SAP to listen to the Separate Audio Programl which is usually a foreign-
language translation. [-----[[--1_---_.--_--_--]]-----]
_ Press the MTS buttons on the remote control to select Mone, Stereo, or SAP. [i.........._ ._ o_s_- _ ]J ii
Automatic Volume Control
Reduces the difference in volume level among broadcasters.
1 Press the MENU button to display the menu.
Press the A or _' button to select Sound, then press the ENTER button.
2 Press the A or _' button to select Auto Volume, then press the ENTER button.
3Press the A or V button to select Off or On, then press the ENTER button.
Press the EXiT button to exit.
Selecting the internal Mute
Sound output from the TV speakers is muted. This is useful when you want to listen to audio through your sound
system instead of the TV.
1 Press the MENU button to display the menu.
Press the A or _r button to select Sound, then press the ENTER button.
2 Press the A or _' button to select Internal Mute, then press the ENTER button.
Continued...
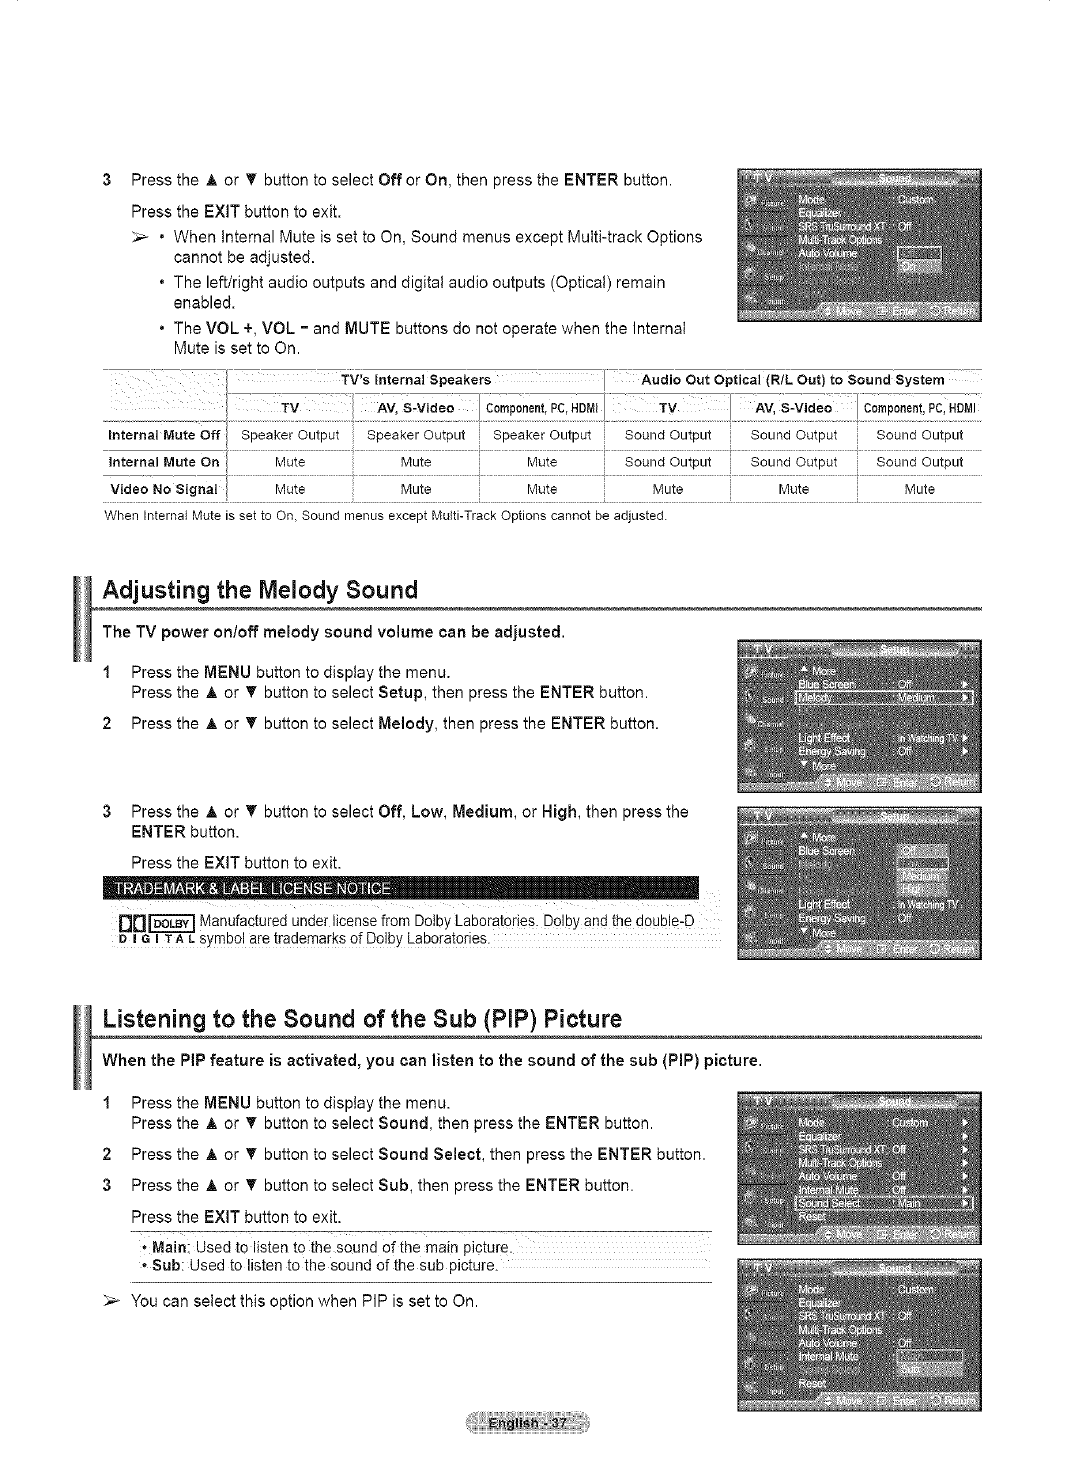
Press the _, or _' button to select Off or On, then press the ENTER button.
Press the EXIT button to exit.
_,_ • When Internal Mute is set to On, Sound menus except Multi-track Options
cannot be adjusted.
• The left/right audio outputs and digital audio outputs (Optical) remain
enabled.
• The VOL +, VOL - and MUTE buttons do not operate when the Internal
Mute is set to On.
TV AM,S,Video Component,PC,HDMI
Audio Out Optical (R/L Out) to Sound System
AV, S-Video Componen!,PC,HDMI
Sound Output Sound Output
When Internal Mute is set to On, Sound menus except Multi-Track Options cannot be adjusted.
Adjusting the Melody Sound
The TV power on/off melody sound volume can be adjusted.
1 Press the MENU button to display the menu.
Press the _, or _' button to select Setup, then press the ENTER button.
2 Press the _, or _' button to select Melody, then press the ENTER button.
3Press the ,A or T button to select Off, Low, Medium, or High, then press the
ENTER button.
Press the EXiT button to exit.
DD_ Manufactured under license from Dolby Laboratories_ Dolby and the d0ub!e:D
e I e I TA _.symbol are trademarks of Dolby Laboratories.
Listening to the Sound of the Sub (PIP) Picture
When the PiP feature is activated, you can listen to the sound of the sub (PIP) picture.
1 Press the MENU button to display the menu.
Press the _, or _' button to select Sound, then press the ENTER button.
2 Press the _, or _' button to select Sound Select, then press the ENTER button.
3 Press the _, or _' button to select Sub, then press the ENTER button.
Press the EXIT button to exit.
•Main: Used to listen tothe sound of the main picture.
, Sub: Used to listen to the sound of the sub picture.
_-- You can select this option when PIP is set to On.
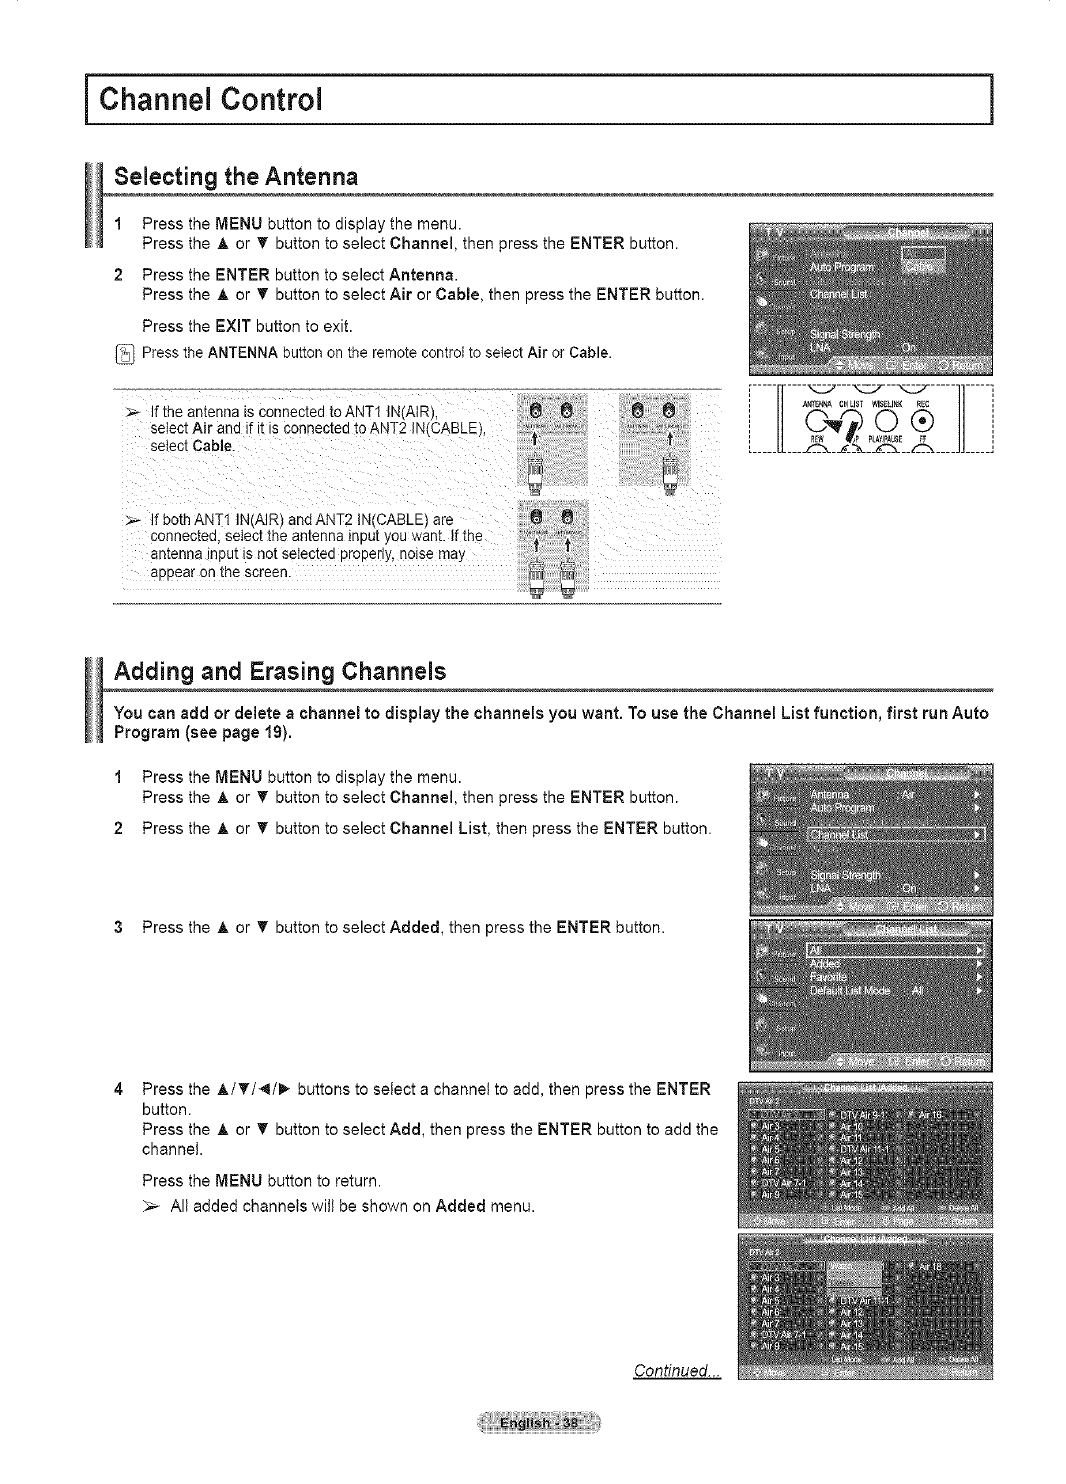
i Channel Control ]
Selecting the Antenna
1 Press the MENU button to display the menu.
Press the A or _' button to select Channel, then press the ENTER button.
2 Press the ENTER button to select Antenna.
Press the A or _' button to select Air or Cable, then press the ENTER button.
Press the EXIT button to exit.
Press the ANTENNA button on the remote control to select Air or Cable.
_-. If the antenna B connectedtoANT1 IN AtR), _ _ _ i_
select Air and if it is connected to ANT2 IN_CABLE_. _ ' '_ i'_" _°'
select Cable. ,,
> f both ANTI IN(AIR) and ANT2 IN(CABLE) are
connected, select the antenna input you want. If the '_:'_'_"_'_:'_'
antenna input is not selected properly noise may '_
appear on the screen. _
,-----,----__---__--__-----,,-----,
i II A_NA G_T WlS_,I_KRE_ U i
.....U2-r IIi
Adding and Erasing Channels
You can add or delete achannel to display the channels you want. To use the Channel List function, first run Auto
Program (see page 19).
1 Press the MENU button to display the menu.
Press the A or _' button to select Channel, then press the ENTER button.
2 Press the A or _' button to select Channel List, then press the ENTER button.
3Press the A or _' button to select Added, then press the ENTER button.
Pressthe A/T/4/_ buttonsto selecta channetto add, then pressthe ENTER
bu_on.
Pressthe A or T button to select Add, then pressthe ENTER button to add the
channel.
Press the MENU button to return.
_-- All added channels wilt be shown on Added menu.
Continued...
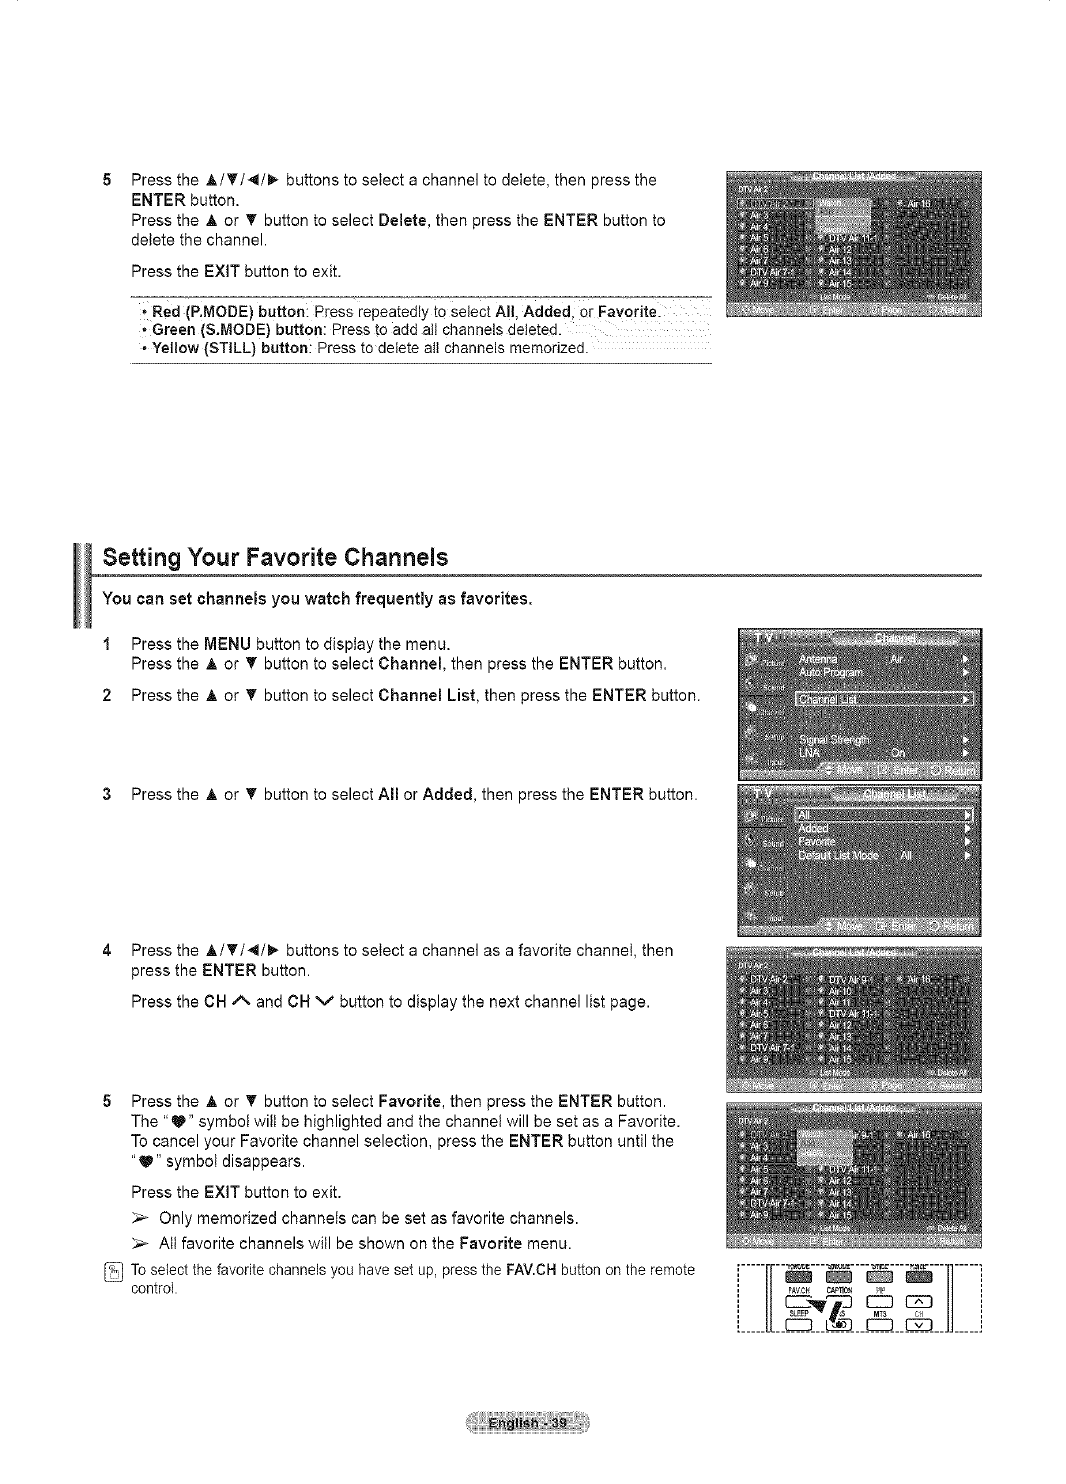
Press the A/T/4/_ buttons to select a channel to delete, then press the
ENTER button.
Press the A or T button to select Delete, then press the ENTER button to
delete the channel.
Press the EXIT button to exit.
, Red (P.MODE) button: Press repeatedly to select All, Added, Or Favoritel
,, Green (S.MODE) button: Press to add all channels deleted.
• Yellow (ST_LL) button: Press to delete all channels memorized.
Setting Your Favorite Channels
You can set channels you watch frequently as favorites.
1 Press the MENU button to display the menu.
Press the _, or T button to select Channel, then press the ENTER button.
2 Press the _, or T button to select Channel List, then press the ENTER button.
3Press the _, or T button to select All or Added, then press the ENTER button.
4 Press the A/T/4/_ buttons to select a channel as a favorite channel, then
press the ENTER button.
Press the CH/_ and CH v button to display the next channel list page.
5Press the A or T button to select Favorite, then press the ENTER button.
The "_" symbol wilt be highlighted and the channel will be set as a Favorite.
To cancel your Favorite channel selection, press the ENTER button until the
"_" symbol disappears.
Press the EXIT button to exit.
_-- Only memorized channels can be set as favorite channels.
_,_ AIt favorite channels will be shown on the Favorite menu.
To select the favorite channels you have set up, press the FAV.CH button on the remote
control. _FAVC_ CAF110_ _ ',
[_____[[ d:b JJ_____j
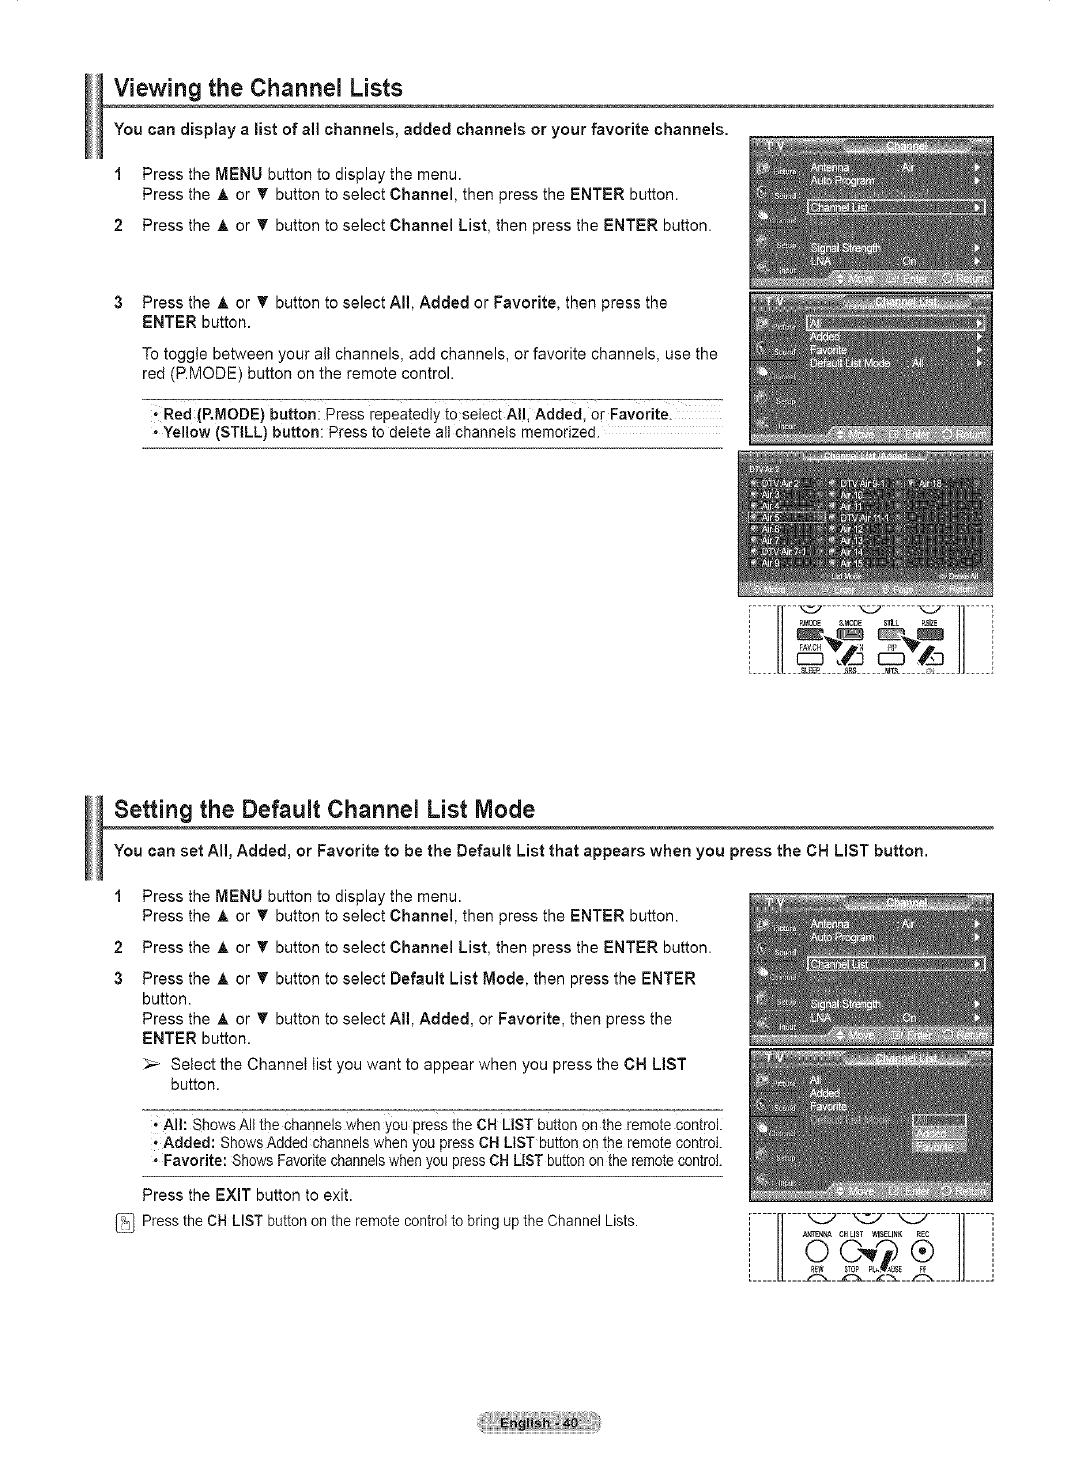
Viewing the Channel Lists
You can display alist of al! channels, added channels or your favorite channels.
1 Press the MENU button to display the menu.
Press the A or T button to select Channel, then press the ENTER button.
2 Press the A or _' button to select Channel List, then press the ENTER button.
Press the A or _' button to select All, Added or Favorite, then press the
ENTER button.
Totoggle between your all channels, add channels, or favorite channels, use the
red (P.MODE)button on the remote control.
;Red (P.MODE) button: Press repeatedly to select All, Added, or Favoritel
• Yellow (STILL) button: Press to delete all channels memorized.
iHp_ODE_MODE _L p.SlZE i
] FAVCH "V ;_ _l _ ,
L____ _LL__ _,_e ___ __,_ ...... e&_____c£____JJ_ ____Z
Setting the Default Channel List Mode
You can set All, Added, or Favorite to be the Default List that appears when you press the CH LiST button.
1
2
3
Press the MENU button to display the menu.
Press the A or _' button to select Channel, then press the ENTER button.
Press the A or T button to select Channel List, then press the ENTER button.
Press the A or _' button to select Default List Mode, then press the ENTER
button.
Press the • or _' button to select All, Added, or Favorite, then press the
ENTER button.
Select the Channet list you want to appear when you press the ON LiST
button.
, All: Shows AII the channels when you press the CH LIST button on the remote control.
• Added: Shows Added channels when you press CH LIST button on the remate control.
• Favorite: ShowsFavorite channels when you press CH LIST button on the remote control.
Press the EXiT button to exit.
PresstheCH LISTbuttonontheremotecontrolto bringup theChannelLists. r----r[----_.zT-_--_-----]l-----i
iANTENna. CH LIST WlSELINK REC i
::11o ®//::
] R_ STOP Pb, _[}SE _F ]
______IL____<:-____-'____,__',___,-::_____JJ_____:
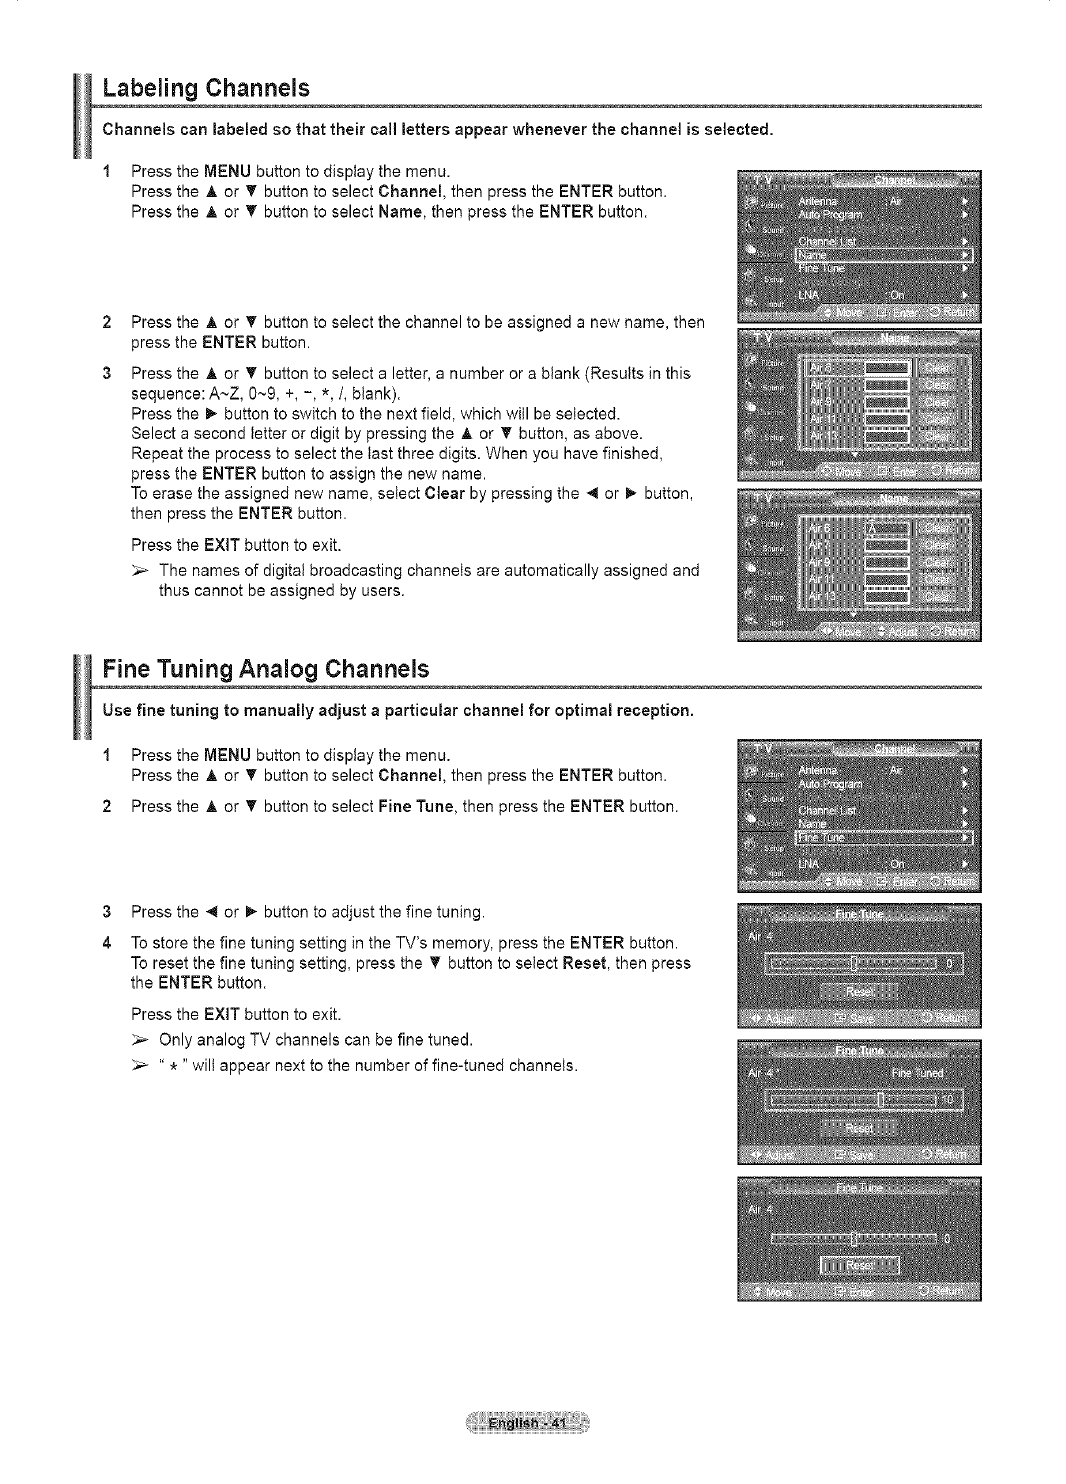
Labeling Channe(s
Channels can labeled so that their cal! letters appear whenever the channel is selected.
1Press the MENU button to display the menu.
Press the A or T button to select Channel, then press the ENTER button.
Press the _, or T button to select Name, then press the ENTER button.
2
3
Press the A or T button to select the channel to be assigned a new name, then
press the ENTER button.
Press the A or T button to select a letter, a number or a blank (Results in this
sequence: A~Z, 0~9, +, -, *,/, blank).
Press the _ button to switch to the next field, which will be selected.
Select a second letter or digit by pressing the A or T button, as above.
Repeat the process to select the last three digits. When you have finished,
press the ENTER button to assign the new name.
To erase the assigned new name, select Clear by pressing the 4 or m.,button,
then press the ENTER button.
Press the EXIT button to exit.
_-- The names of digital broadcasting channels are automatically assigned and
thus cannot be assigned by users.
Fine Tuning Ana(og Channels
Use fine tuning to manually adjust a particular channel for optimal reception.
1 Press the MENU button to display the menu.
Press the _, or _' button to select Channel, then press the ENTER button.
2 Press the _, or _' button to select Fine Tune, then press the ENTER button.
3
4
Press the 4 or I_ button to adjust the fine tuning.
To store the fine tuning setting in the TV's memory, press the ENTER button.
To reset the fine tuning setting, press the _' button to select Reset, then press
the ENTER button.
Press the EXIT button to exit.
Only analog TV channels can be fine tuned.
" * "wilt appear next to the number of fine-tuned channels.
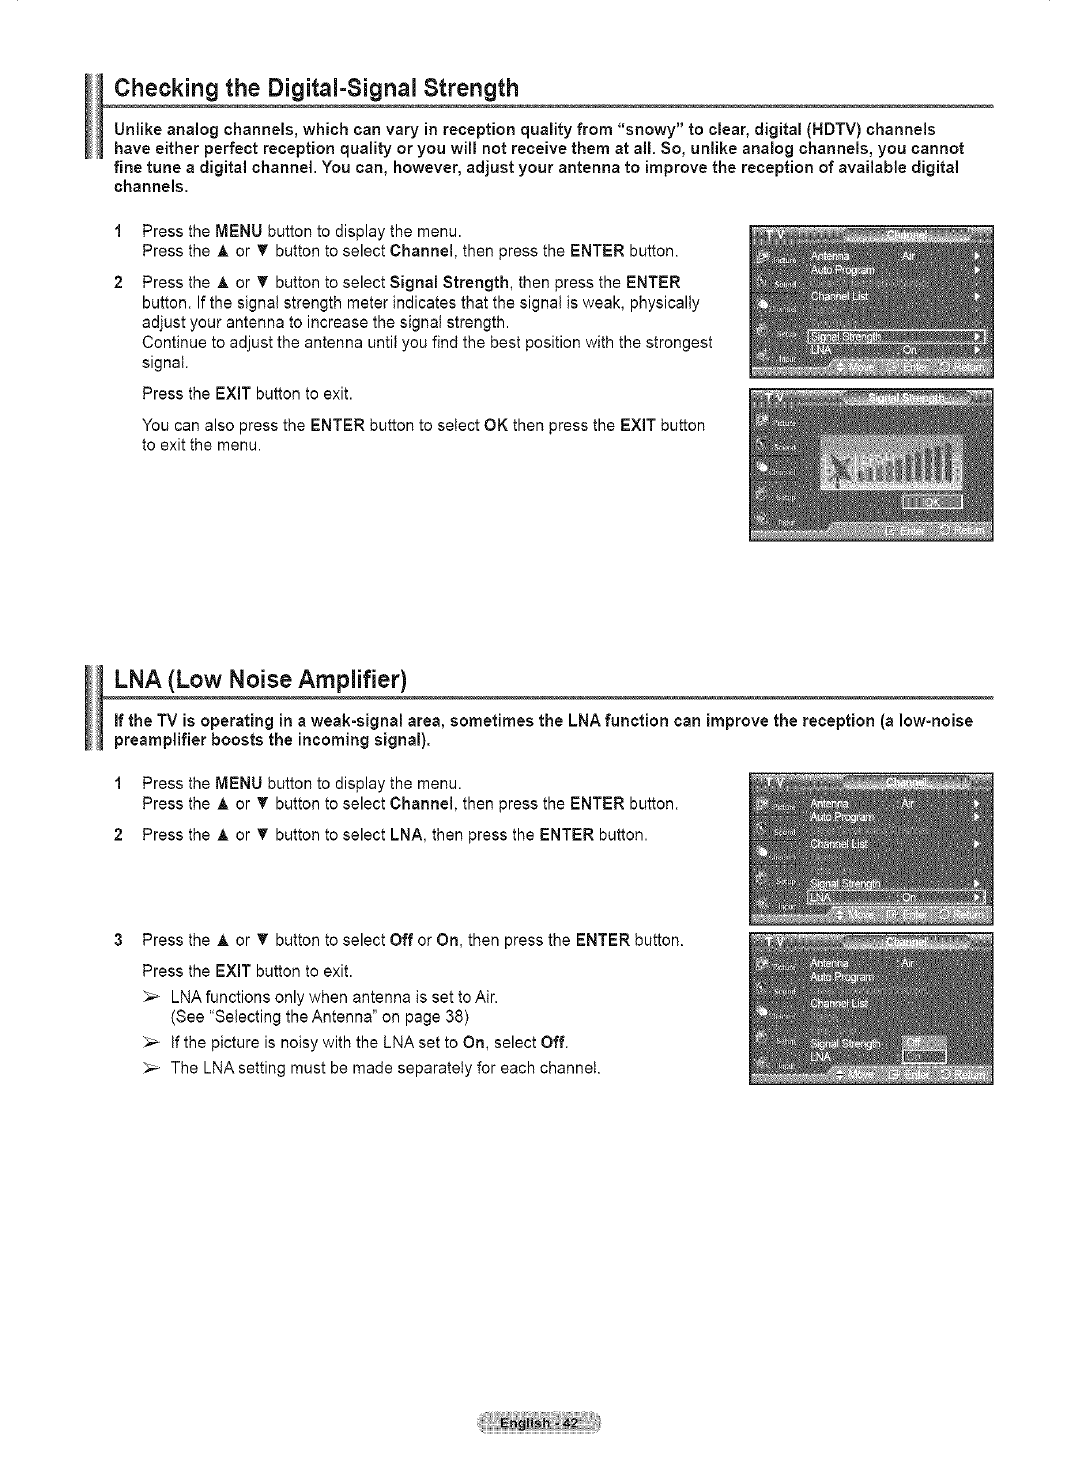
Checking the Digital-Signal Strength
Unlike analog channels, which can vary in reception quality from "snowy" to clear, digital (NDTV) channels
have either perfect reception quality or you will not receive them at all. So, unlike analog channels, you cannot
fine tune a digital channel. You can, however, adjust your antenna to improve the reception of available digital
channels.
1
2
Press the MENU button to display the menu.
Press the A or _' button to select Channel, then press the ENTER button.
Press the A or _' button to select Signal Strength, then press the ENTER
button. If the signal strength meter indicates that the signal is weak, physically
adjust your antenna to increase the signal strength.
Continue to adjust the antenna until you find the best position with the strongest
signal.
Press the EXIT button to exit.
You can also press the ENTER button to setect OK then press the EXIT button
to exit the menu.
LNA (Low Noise Amplifier)
if the TV is operating in aweak-signal area, sometimes the LNA function can improve the reception (a low-noise
preamplifier boosts the incoming signal).
1 Press the MENU button to display the menu.
Press the A or T button to select Channel, then press the ENTER button.
2 Press the A or _' button to select LNA, then press the ENTER button.
Press the A or _' button to select Off or On, then press the ENTER button.
Press the EXIT button to exit.
_-- LNA functions only when antenna is set to Air.
(See "Selecting the Antenna" on page 38)
If the picture is noisy with the LNA set to On, select Off.
_-- The LNA setting must be made separately for each channet.
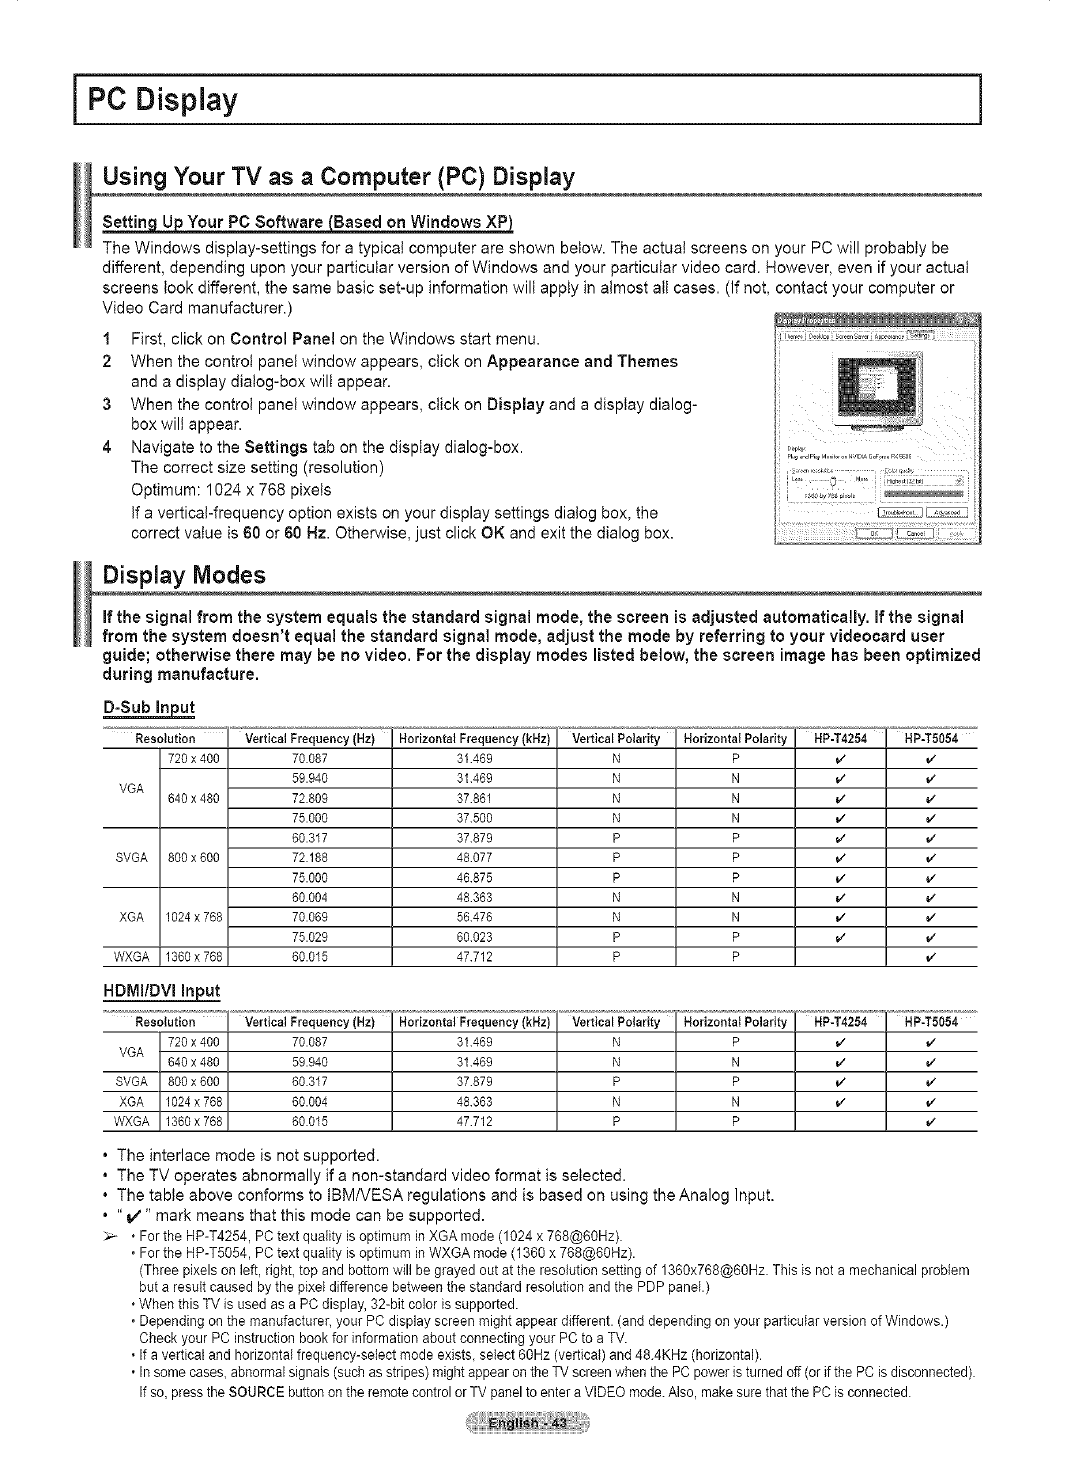
PC Display
Using Your TV as a Computer (PC) Display
Your PC Software (Based on Windows XP)
The Windows display-settings for a typical computer are shown below. The actual screens on your PC will probably be
different, depending upon your particular version of Windows and your particular video card. However, even if your actual
screens took different, the same basic set-up information will apply in almost alt cases. (If not, contact your computer or
Video Card manufacturer.)
1 First, click on Control Panel on the Windows start menu.
2 When the control panel window appears, click on Appearance and Themes
and a display dialog-box will appear.
3 When the control panel window appears, click on Display and a display dialog-
box will appear.
4 Navigate to the Settings tab on the display dialog-box.
The correct size setting (resolution)
Optimum: 1024 x 768 pixets
If a vertical-frequency option exists on your display settings dialog box, the
correct value is 60 or 60 Hz. Otherwise, just click OK and exit the dialog box.
Display Modes
If the signal from the system equals the standard signal mode, the screen is adjusted automatically. If the signal
from the system doesn't equal the standard signal mode, adjust the mode by referring to your videocard user
guide; otherwise there may be no video. For the display modes listed below, the screen image has been optimized
during manufacture.
Resolution Vertical
720x400 70.067
59.940
VGA 640x460 72.809
751000
60.317
SVGA 800x600 72.188
75.000
60.004
XGA 1024x768 70.069
75.029
WXGA 1360x768 60.015
Horizontal Frequency (kHz)
31469
31469
37861
37500
37879
48077
46875
48363
56476
60023
47712
Vertical Polarity
N
N
N
N
P
P
P
N
N
P
P
Horizontal Polarity
P
N
N
N
P
P
P
N
N
P
P
HP-T4254
v'
v'
v'
v'
v'
HP-T5054
v"
v"
v"
v"
v"
v"
HDIVlI/DVI Input
Resolution Vertical Fre_e cVy(Hzi
720x400 70.087
VGA 640x480 59.940
SVGA 800x600 60.317
XGA 1024x768 60.004
WXGA 1360x768 60.015
Horizontal Frequency (kHz)
31469
31469
37879
48363
47712
Vertical Polarity
N
N
P
N
P
Horizontal Polarity
P
N
P
N
P
HP-T4254 HP-T5054
v" v"
v" v"
v"
. The interlace mode is not supported.
, The TV operates abnormally if a non-standard video format is selected.
, The table above conforms to IBM/VESA regulations and is based on using the Analog Input.
. "_" mark means that this mode can be supported.
• For the HP-T4254, PC text quality is optimum in XGA mode (1024 x 768@60Hz).
• For the HP-T5054, PC text quality is optimum in WXGA mode (1360 x 768@60Hz).
(Three pixels on left, right, top and bottom will be grayed out at the resolution setting of 1360x768@60Hz. This is not a mechanical problem
but a result caused by the pixel difference between the standard resolution and the PDP panel.)
• When this TV is used as a PC display, 32-bit color is supported.
• Depending on the manufacturer, your PC display screen might appear different. (and depending on your particular version of Windows.)
Check your PC instruction book for information about connecting your PC to a TV.
• If a vertical and horizontal frequency-select mode exists, select 60Hz (vertical) and 48.4KHz (horizontal).
• In some cases, abnormal signals (such as stripes) might appear on the TV screen when the PC power is turned off (or if the PC is disconnected).
If so, press the SOURCE button on the remote control or TV panel to enter a VIDEO mode. Also, make sure that the PC is connected.
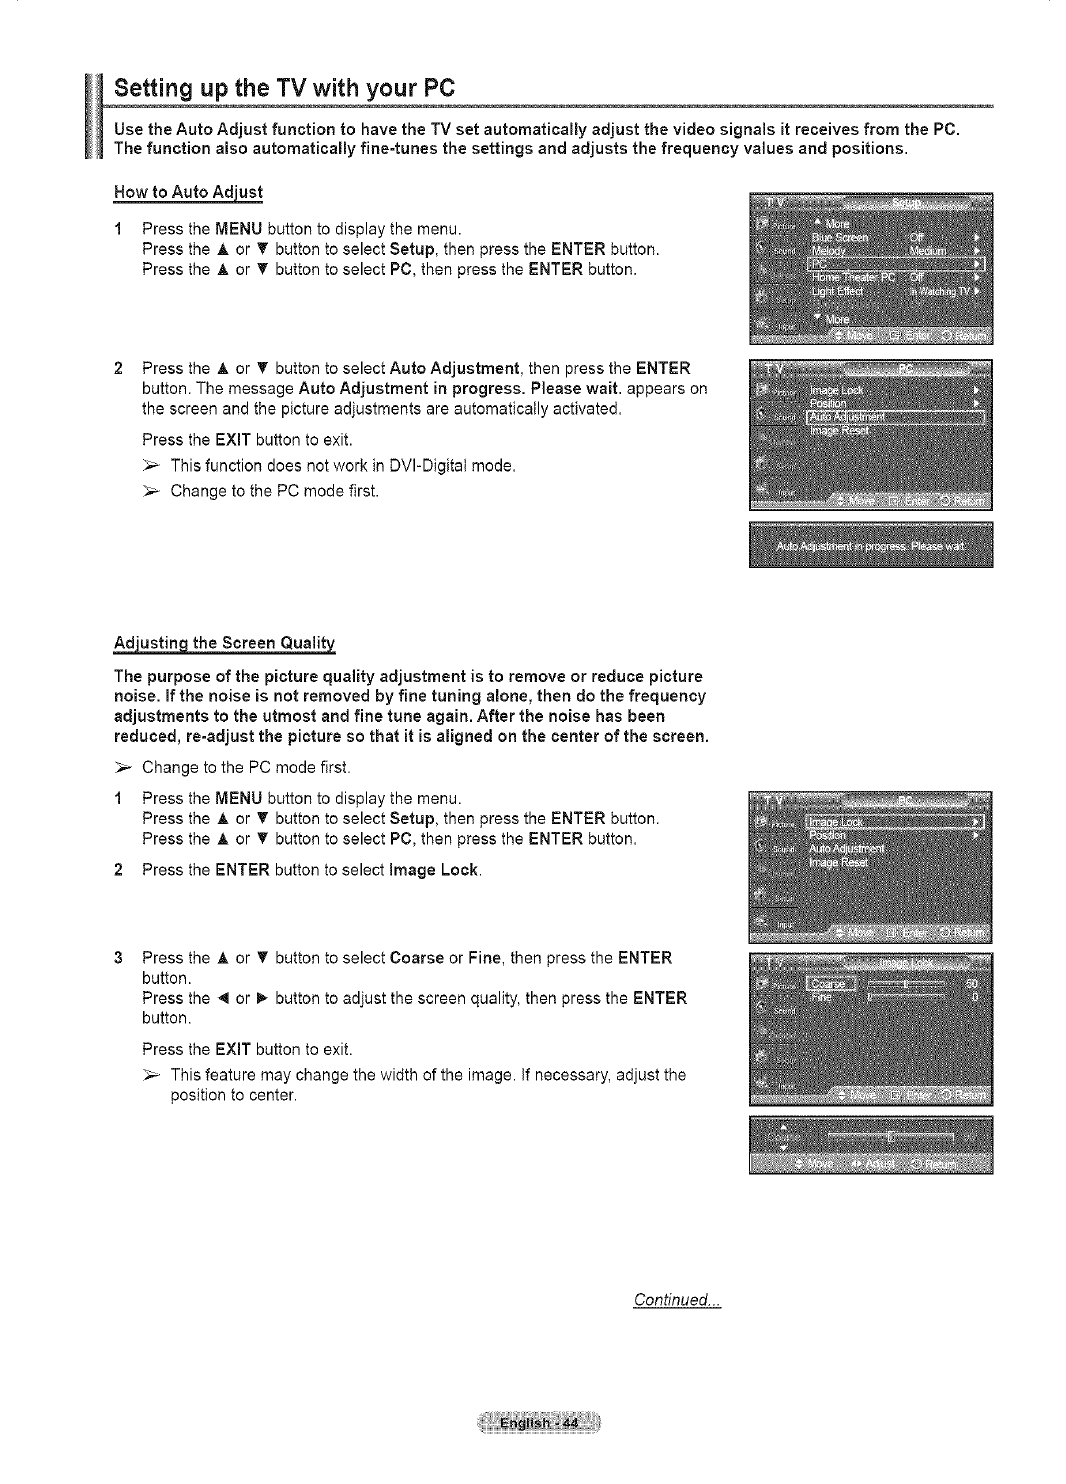
Setting up the TV with your PC
Use the Auto Adjust function to have the TV set automatically adjust the video signals it receives from the PC.
The function also automatically fine-tunes the settings and adjusts the frequency values and positions.
Now to Auto Adjust
1Press the MENU button to display the menu.
Press the A or T button to select Setup, then press the ENTER button.
Press the A or _' button to select PC, then press the ENTER button.
Press the A or T button to select Auto Adjustment, then press the ENTER
button. The message Auto Adjustment in progress. Please wait. appears on
the screen and the picture adjustments are automatically activated.
Press the EXiT button to exit.
_,_ This function does not work in DVI-Digitai mode.
_-- Change to the PC mode first.
Adustina the Screen Qualit
The purpose of the picture quality adjustment is to remove or reduce picture
noise. If the noise is not removed by fine tuning alone, then do the frequency
adjustments to the utmost and fine tune again. After the noise has been
reduced, re-adjust the picture so that it is aligned on the center of the screen.
_-- Change to the PC mode first.
1Press the MENU button to display the menu.
Press the A or T button to select Setup, then press the ENTER button.
Press the A or _' button to select PC, then press the ENTER button.
2Press the ENTER button to select image Lock.
Pressthe A or T buttonto select Coarse or Fine, then pressthe ENTER
bu_on.
Pressthe 4 or _ buttonto adjustthe screen quality, then pressthe ENTER
bu_on.
Press the EXIT button to exit.
_-- This feature may change the width of the image. If necessary, adjust the
position to center.
Continued...
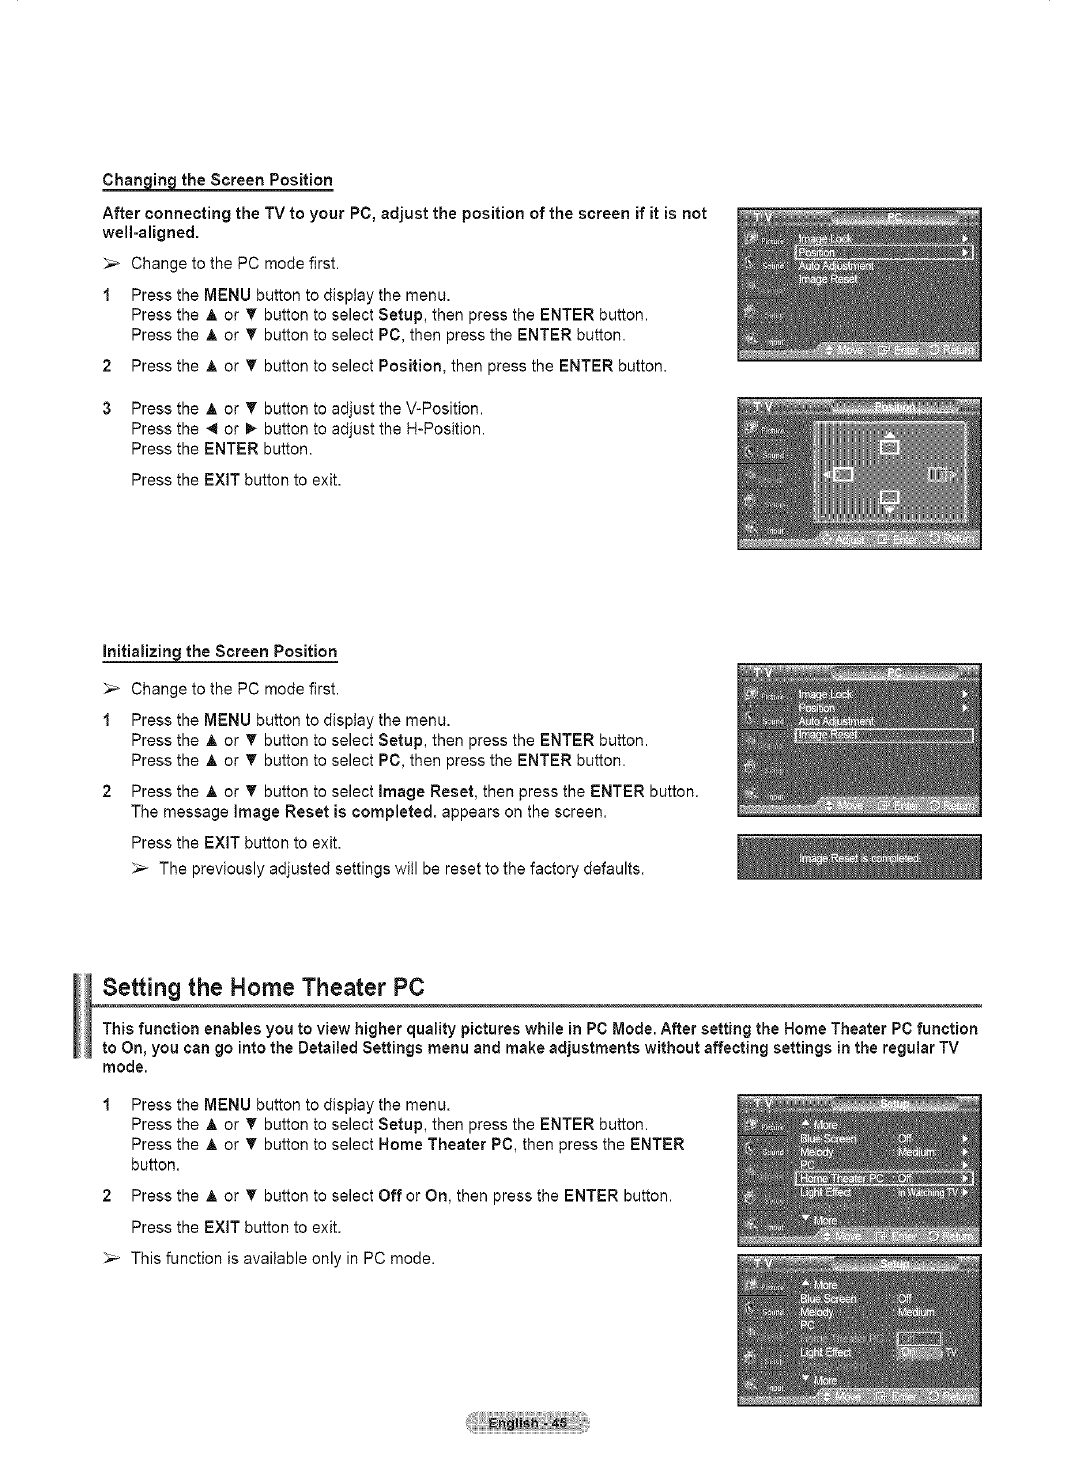
_the Screen Position
After connecting the TV to your PC, adjust the position of the screen if it is not
well=aligned.
_,_ Change to the PC mode first.
1 Press the MENU button to display the menu.
Press the A or T button to select Setup, then press the ENTER button.
Press the _, or T button to select PC, then press the ENTER button.
2Press the _, or T button to select Position, then press the ENTER button.
3 Press the A or T button to adjust the V-Position.
Press the _ or _ button to adjust the H-Position.
Press the ENTER button.
Press the EXIT button to exit.
_the Screen Position
_,_ Change to the PC mode first.
1 Press the MENU button to display the menu.
Press the A or _ button to select Setup, then press the ENTER button.
Press the A or T button to select PC, then press the ENTER button.
2 Press the ,A or T button to select Image Reset, then press the ENTER button.
The message Image Reset is completed, appears on the screen.
Press the EXIT button to exit.
_,_ The previously adjusted settings will be reset to the factory defaults.
Setting the Home Theater PC
This function enablesyou to view higher quality pictureswhile in PC Mode.After setting the Home TheaterPC function
to On, you can go into the DetailedSettingsmenu and make adjustmentswithout affecting settings in the regularTV
mode.
Press the MENU button to display the menu.
Press the A or T button to select Setup, then press the ENTER button.
Press the _, or T button to select Home Theater PC, then press the ENTER
button.
2 Press the _, or _' button to select Off or On, then press the ENTER button.
Press the EXIT button to exit.
_-- This function is available only in PC mode.
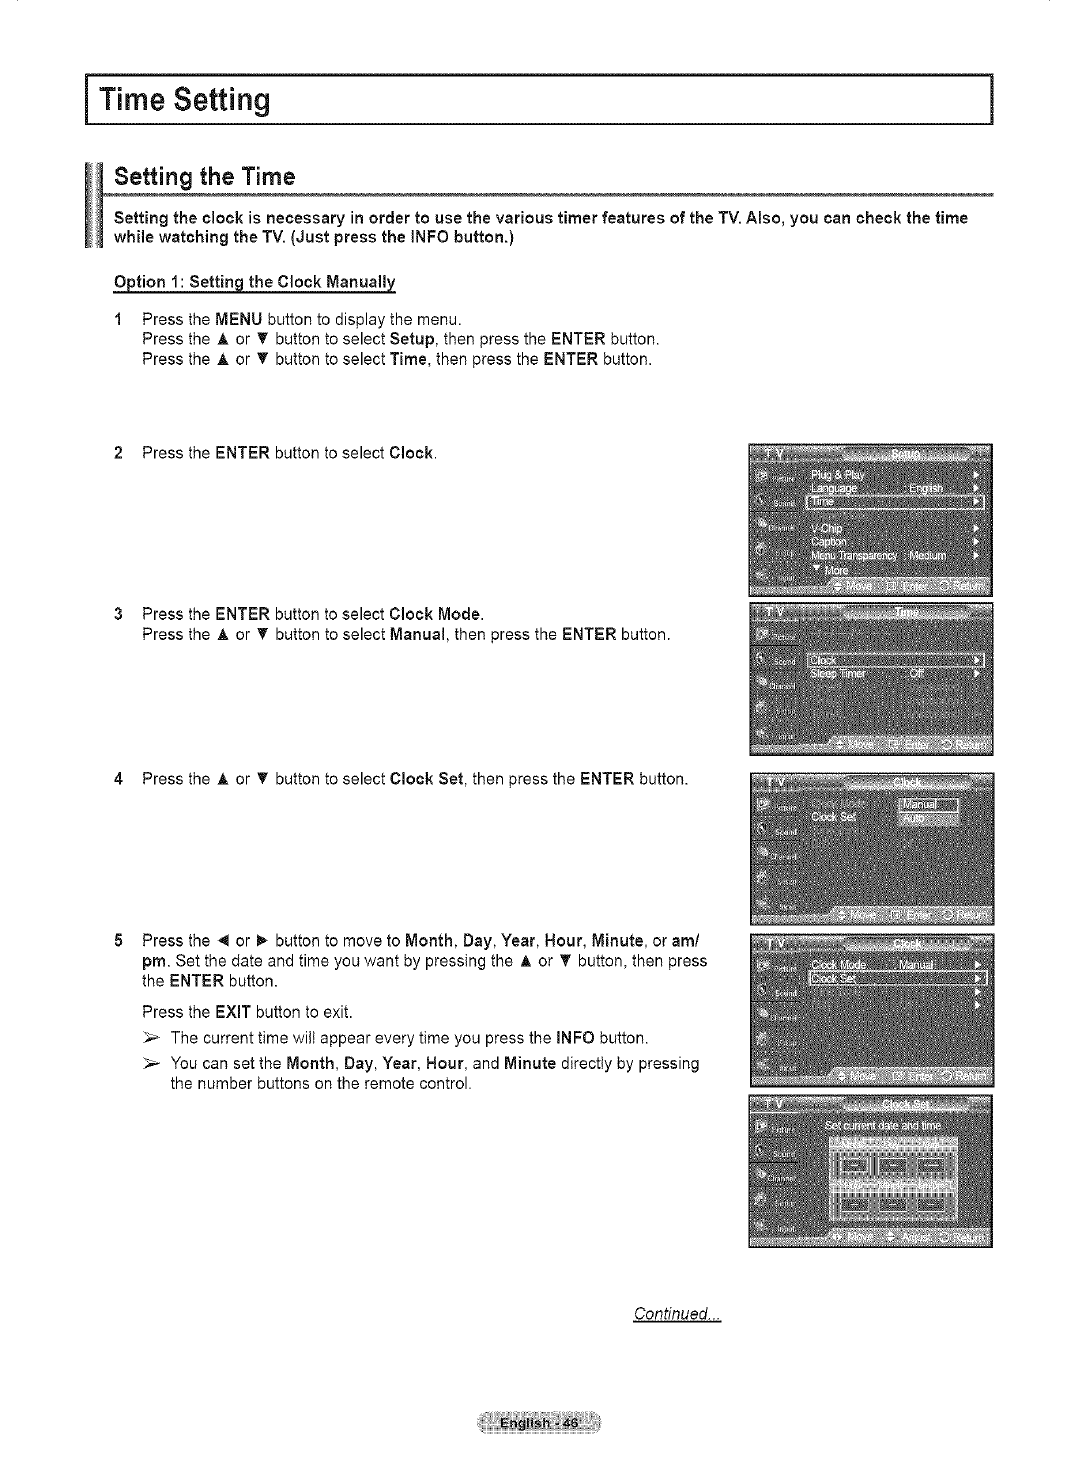
iTime Setting ]
Setting the Time
Setting the clock is necessary in order to use the various timer features of the TV. Also, you can check the time
while watching the TV. (Just press the INFO button.)
Option 1: Setting the Clock Manually
1 Press the MENU button to display the menu.
Press the A or T button to select Setup, then press the ENTER button.
Press the A or _' button to select Time, then press the ENTER button.
2 Press the ENTER button to select Clock.
3Press the ENTER button to select Clock Mode.
Press the A or _' button to select Manual, then press the ENTER button.
4 Press the A or _' button to select Clock Set, then press the ENTER button.
Press the 4 or _ button to move to Month, Day, Year, Hour, Minute, or am/
pro. Set the date and time you want by pressing the _, or T button, then press
the ENTER button.
Press the EXIT button to exit.
_,_ The current time will appear every time you press the INFO button.
_-- You can set the Month, Day, Year, Hour, and Minute directly by pressing
the number buttons on the remote control.
Continued...
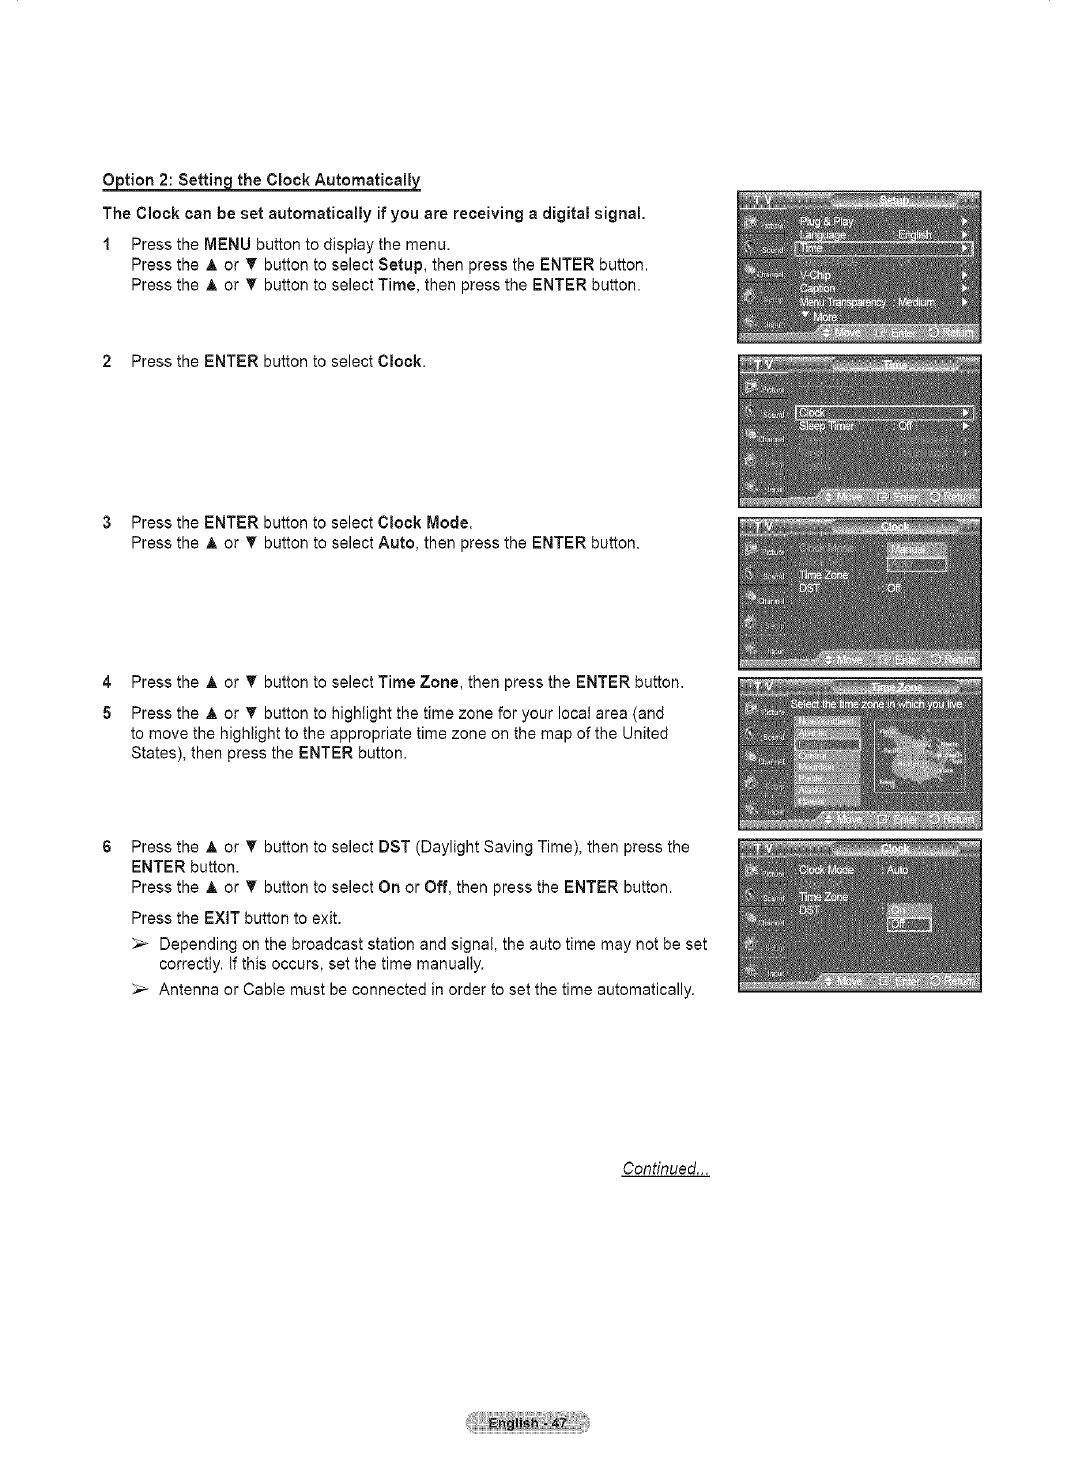
Otion 2: Settin the Clock Automatically
The Clock can be set automatically if you are receiving adigital signal.
1 Press the MENU button to display the menu.
Press the A or T button to select Setup, then press the ENTER button.
Press the _, or _' button to select Time, then press the ENTER button.
2 Press the ENTER button to select Clock.
3Press the ENTER button to select Clock Mode.
Press the _, or _' button to select Auto, then press the ENTER button.
4 Press the A or 'V button to select Time Zone, then press the ENTER button.
5 Press the A or T button to highlight the time zone for your local area (and
to move the highlight to the appropriate time zone on the map of the United
States), then press the ENTER button.
Press the &or _' button to select DST (Daylight Saving Time), then press the
ENTER button.
Press the _, or _' button to select On or Off, then press the ENTER button.
Press the EXIT button to exit.
_-- Depending on the broadcast station and signal, the auto time may not be set
correctly. If this occurs, set the time manually.
_,_ Antenna or Cable must be connected in order to set the time automatically.
Continued...
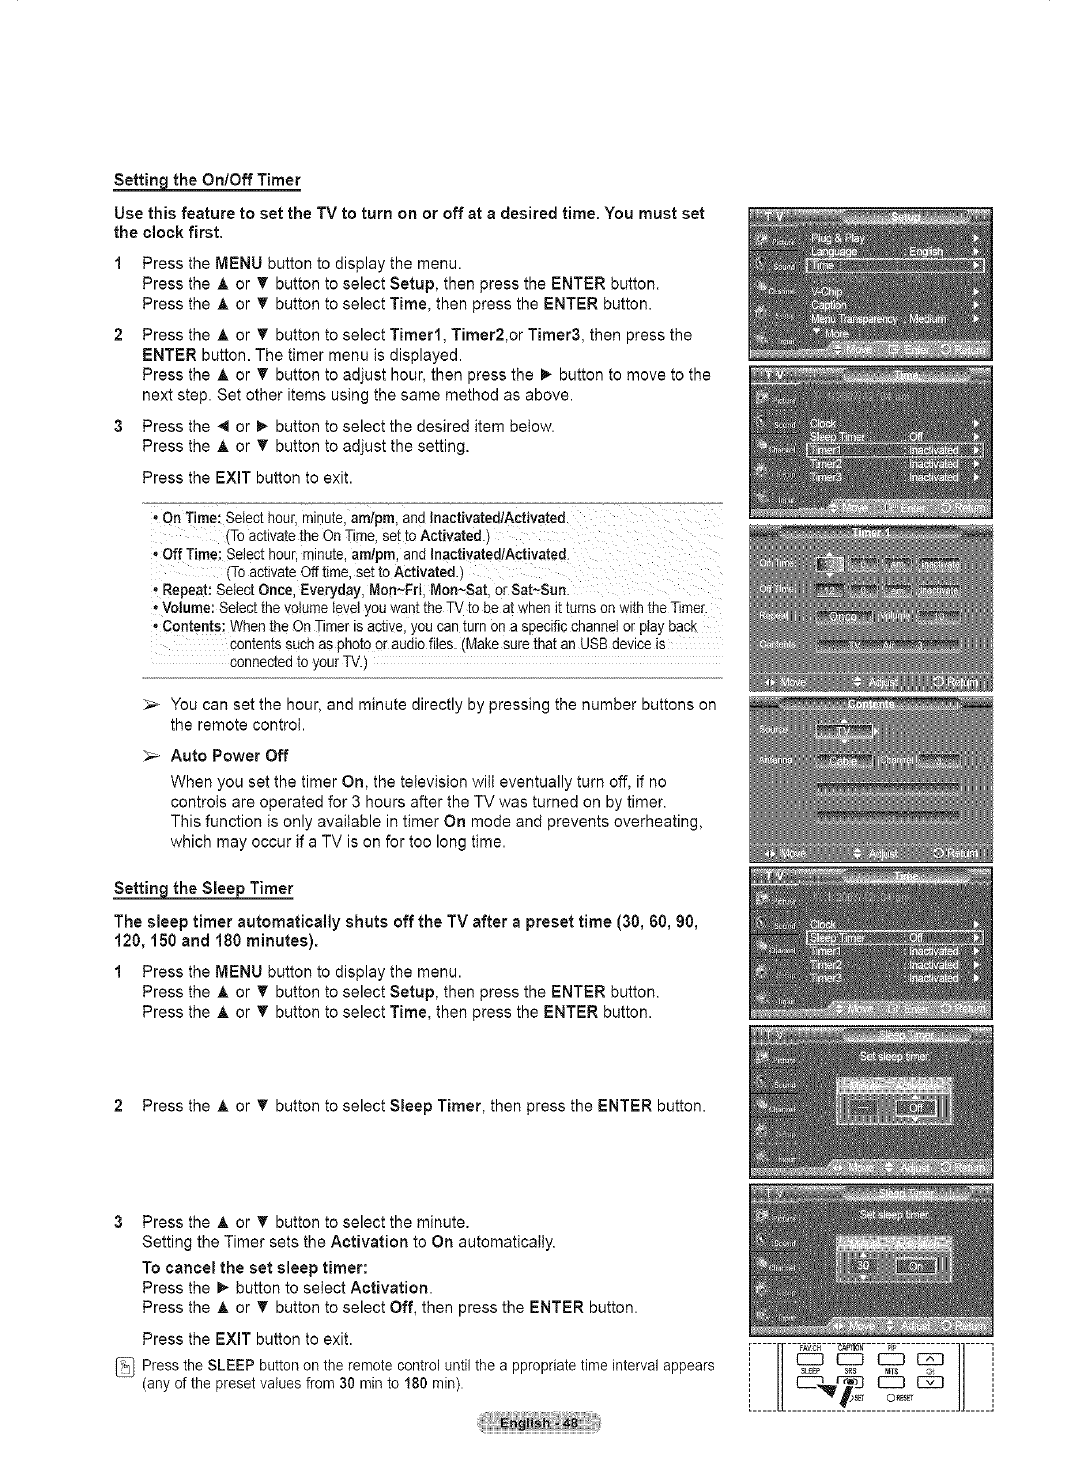
Settin_q the On/Off Timer
Use this feature to set the TV to turn on or off at a desired time. You must set
the clock first.
1 Press the MENU button to display the menu.
Press the A or T button to select Setup, then press the ENTER button.
Press the A or T button to select Time, then press the ENTER button.
2 Press the A or _' button to select Timer1, Timer2,or Timer& then press the
ENTER button. The timer menu is displayed.
Press the A or T button to adjust hour, then press the _ button to move to the
next step. Set other items using the same method as above.
3 Press the 4 or _ button to select the desired item below.
Press the A or _' button to adjust the setting.
Press the EXiT button to exit.
•On Time: Select hour minute,am/pro, and Inactivated/Activated
(To activatethe On Time set to Activated.
•Off Time: Select hour re=hale,amlpm, and Inactivated/Activated.
(Toactivate Off lime. set to Activated
•Repeat: Select Once Everyday. Mon~Fd. Mort~Sat or Sat~Sun.
• Volume: Select the volume level/ou warn [ne TVto be at t_henit turns on with the Timer
•Contents: When the O_ Timer tsactive /ou can [urn on a seecific channel or play back
contents such as photo or audio files. [Make sure that an USBdevice is
connectea to your TV.)
_,> You can set the hour, and minute directly by pressing the number buttons on
the remote control.
_-- Auto Power Off
When you set the timer On, the television will eventually turn off, if no
controls are operated for 3 hours after the TV was turned on by timer.
This function is only available in timer On mode and prevents overheating,
which may occur if a TV is on for too long time.
Settin the Slee Timer
The sleep timer automatically shuts offthe TV after a preset time (30, 60, 90,
120, 150 and 180 minutes).
1 Press the MENU button to display the menu.
Press the A or T button to select Setup, then press the ENTER button.
Press the A or _' button to select Time, then press the ENTER button.
2 Press the A or _' button to select Sleep Timer, then press the ENTER button.
3 Press the A or _' button to select the minute.
Setting the Timer sets the Activation to On automatically.
To cancel the set sleep timer:
Press the _ button to select Activation.
Press the A or _' button to select Off, then press the ENTER button.
Press the EXiT button to exit.
Press the SLEEP button on the remote control until the a ppropriate time intervalappears
(any of the preset vataes from 30 min to 180 min). i_____u ll_____i
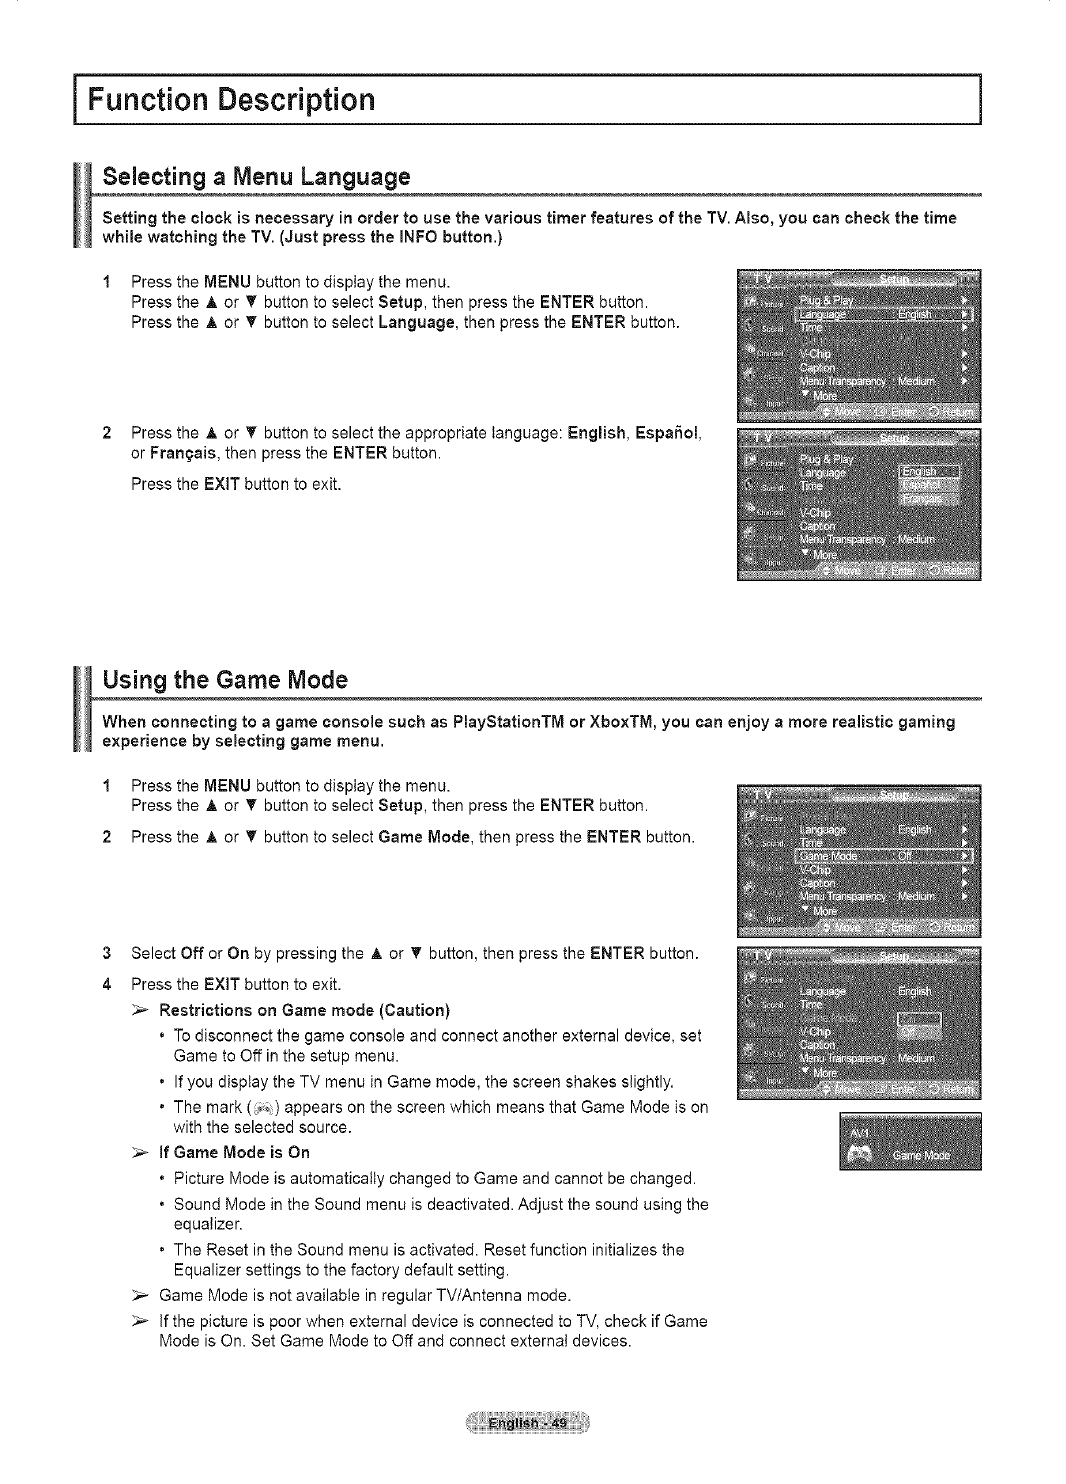
i Function Description
Selecting aMenu Language
Setting the clock is necessary in order to use the various timer features of the TV. Also, you can check the time
while watching the TV. (Just press the INFO button.)
1Press the MENU button to display the menu.
Press the A or T button to select Setup, then press the ENTER button.
Press the A or T button to select Language, then press the ENTER button.
2 Press the &or T button to select the appropriate language: English, EspaSol,
or Frangais, then press the ENTER button.
Press the EXIT button to exit.
Using the Game Mode
When connecting to a game console such as PlayStationTM or XboxTM, you can enjoy a more realistic gaming
experience by selecting game menu.
1 Press the MENU button to display the menu.
Press the A or _' button to select Setup, then press the ENTER button.
2 Press the A or T button to select Game Mode, then press the ENTER button.
3
4
Select Off or On by pressing the A or T button, then press the ENTER button.
Press the EXiT button to exit.
Restrictions on Game mode (Caution)
• To disconnect the game console and connect another external device, set
Game to Off in the setup menu.
• If you display the TV menu in Game mode, the screen shakes slightly.
• The mark (_;) appears on the screen which means that Game Mode is on
with the selected source.
if Game Mode is On
• Picture Mode is automatically changed to Game and cannot be changed.
•Sound Mode in the Sound menu is deactivated. Adjust the sound using the
equalizer.
• The Reset in the Sound menu is activated. Reset function initializes the
Equalizer settings to the factory default setting.
Game Mode is not available in regular TV/Antenna mode.
If the picture is poor when external device is connected to TV, check if Game
Mode is On. Set Game Mode to Off and connect external devices.

Viewing Closed Captions (On-Screen Text Messages) - Digital
The Digital Captions function operates on digital channels.
5,
6
1Press the MENU button to display the menu.
Press the A or _' button to select Setup, then press the ENTER button.
2 Press the A or _' button to select Caption, then press the ENTER button.
3 Press the ENTER button to select Caption.
Press the A or _r button to select On, then press the ENTER button.
4 Press the A or T button to select Caption Mode, then press the ENTER button.
Press the A or _' button to select submenu (Default, Servicel~ServioeB,
CO1 ~CC4 or Textl~Text4) you want, then press the ENTER button.
Press the A or _' button to select Caption Options, then press the ENTER
button.
Press the A or _' button to select Size, then press the ENTER button.
Press the A or T button to select the desired caption option, then press the
ENTER button.
Press the &or _' button to select the desired sub-menu options (see options
below), then press the ENTER button.
Press the EXiT button to exit.
_-- The availability of captions depends on the program being broadcast.
_-- Default means to follow the standard set by the broadcaster.
_,_ Foreground and Background cannot be set to have the same color.
_,_ Foreground Opacity and Background Opacity cannot be both set to
Transparent.
•Size: Thisc 3tionconsistsof Default.Small. Standard, and Large. The default is Default.
=Font Style: This option consistsof Default,Style0 ~ Style7. Youcan cnangethe fon[ you
want. Thedefault isDefault.
• Foreground Color: Thisoption consistsof Default. White. Black. Red. Green. Blue
Yellow, Magenta,and Cyan. Youcan change me color of the letter
]-hedefaultis Default.
• Background Color: This ootion consists of Default. White. Black. Red Green. Blue.
Yellow Magenta,and Cyan. You canchange me backgroundcolorof
the caefion.Thedefault is Default
• Foreground Opacity: This optionconsistsof Default. TransparenL Translucent. Solid.
and Flashing. Youcan cnange [ne opacEyof the leEer.
•Background Opacity: This optionconsistsof Default. Transparent. Translucent. Solid.
and Flashing. Youcan change the backgroundopacl[y of the
cap[Ion.
° Return to Default: This option se[s eacn of Size. Font Style, Foreground Color.
Background Color, Foreground Opacity, and Background Opacity
to itsdefault.
_Q Press the CAPTION button on the remote control to select On or Off.
L_
r-rr- J 1]-i
i i
i_____U JJ_____J

Viewing Closed Captions (On-Screen Text Messages) -Analog
The Analog Caption function operates in either analog TV channel mode or external signal mode. (Depending on
the broadcasting signal, the Analog Caption function may operate on digital channels.)
1Press the MENU button to display the menu.
Press the _, or _' button to select Setup, then press the ENTER button.
2 Press the _, or _' button to select Caption, then press the ENTER button.
3Press the ENTER button to select Caption.
Press the _, or T button to select On, then press the ENTER button.
Press the A or T button to select Caption Mode, then press the ENTER
button. Press the A or T button to select submenu (C01~C04 or Textl~Text4)
you want, then press the ENTER button.
Press the EXIT button to exit.
*The Jefault isDefault.
*CCl: The Primary SynchronousCap13nService.These are captions m the primary
anguagethat must be in sync w_ththe sound, preferablymatched to a specificframe.
*CC2:The Special Non-SynchronousUse Caetions.Thiscnannelcarriesaararna[ is tmenaea
to augmentinformationcarnea {n[ne program
. CC3:SecondarySynchronousCaptionService
Alternate program-reta[eacaptiondata, typically secondlanguage cautions.
. CC4: SpecialNon-Syncnronoususe Captions. Similarto CC2.
. Text1: First TextService.This ma. Devarious non-programrelated data.
*Text2: SecondText Service.Additional data Jsuattynot program related.
*Text3/Text4: Third and FourthTextServices.Thesedata channelsshould Deusedonly if
Text1and Text2are not sufficient.
•The Caption feature doesn't work in COMPONENT, PC, HDMI(DVI)
modes.
• The availability of captions depends on the program being broadcast.
You can also press the CAPTION button on the remote control to select Captions
On or Off. i
i // c:::D _L_',-_X_-3_ C2D // i
i_____[[ lJ_____J

Menu Transparency Level
Adjusts the transparency of the menu screen.
1 Press the MENU button to display the menu.
Press the A or T button to select Setup, then press the ENTER button.
2 Press the A or _' button to select Menu Transparency, then press the ENTER
button.
3Press the A or _' button to select level, then press the ENTER button.
Press the EXiT button to exit.
Setting the Light Effect
You can turn the blue LED on the front of TV on/off.
1Press the MENU button to display the menu.
Press the A or _' button to select Setup, then press the ENTER button.
2 Press the A or _' button to select Light Effect, then press the ENTER button.
Press the A or _' button to select Off, In Standby, In Watching TV, or Always,
then press the ENTER button.
Press the EXiT button to exit.
•Off: The LEDis always off.
•mnStandby:The LEDlightswhile in Standbymodeand it turns off when yourTV isturnedon.
•In Watching TV: The LED lights when watchingTV and itturns off when your TV iSturnedoff.
Always: TheLED is alwayslit.
_-- Set the Light Effect to Off to reduce the power consumption.

Using the Energy Saving Feature
This feature adjusts the power consumption of the unit in order to save energy.
1 Press the MENU button to display the menu.
Press the A or T button to select Setup, then press the ENTER button.
2 Press the _, or T button to select Energy Saving, then press the ENTER
button.
Press the ,A or T button to select Off, Low, Medium, or High, then press the
ENTER button.
Press the EXIT button to exit.
off: Switchesoffthe EnergySaving mode.
,Low: Operatesin standardmode.
•Medium: Entersmedium power savingmode.
• High: Enters maximumpower savingmode.
Preventing Screen Burn-in
To reduce the possibility of screen burn, this unit is equipped with screen burn prevention technology. This
technology enables you to set picture movement up/down (Vertical Line) and side to side (Horizontal Dot).
The Time setting allows you to program the time between movement of the picture in minutes.
1Press the MENU button to display the menu.
Press the A or T button to select Setup, then press the ENTER button.
2 Press the A or _' button to select Screen Burn Protection, then press the
ENTER button.
Press the ENTER button to select Pixel Shift, then press the ENTER button.
Pressing the A or _' button will alternate between On and Off.
You will also see the items Horizontal Dot, Vertical Line and Time.
• Pixel Shift: Using this function,you can minutely movepixeis on the PDP in horizontalor
vertical directionto preventafter-imageson the screen.
Press the A or V button to select the item you wish to change, then press the
ENTER button.
Press the _, or v button to change the value of the item, then press the ENTER
button.
.Optimum condition for pixel shift;
.......................................i:c ......
Horizontal Dot 1 2
Vertical Line 1 2
..............T!me(min) .................2 ........................................................2.................................................
Press the EXIT button to exit.
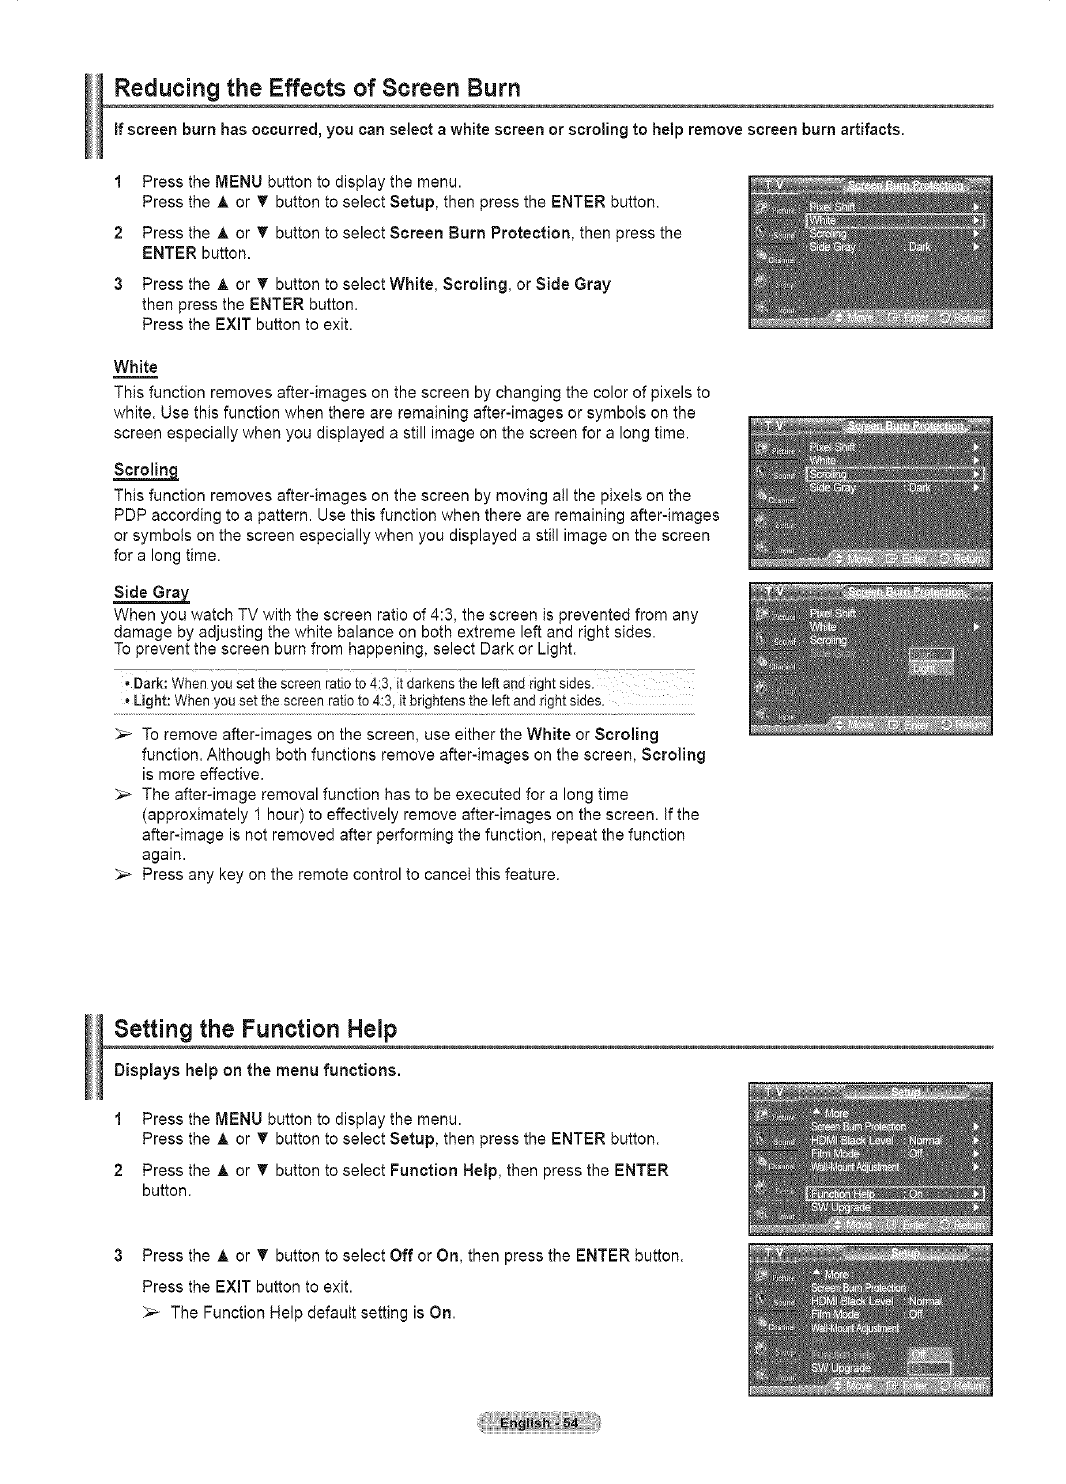
Reducing the Effects of Screen Burn
if screen burn has occurred, you can select awhite screen or scroling to help remove screen burn artifacts.
1
2
3
Press the MENU button to display the menu.
Press the A or _' button to select Setup, then press the ENTER button.
Press the &or _' button to select Screen Burn Protection, then press the
ENTER button.
Press the A or _' button to select White, Scroling, or Side Gray
then press the ENTER button.
Press the EXiT button to exit.
White
This function removes after-images on the screen by changing the color of pixels to
white. Use this function when there are remaining after-images or symbols on the
screen especially when you displayed a still image on the screen for a long time.
Scrolin£
This function removes after-images on the screen by moving all the pixels on the
PDP according to a pattern. Use this function when there are remaining after-images
or symbols on the screen especially when you displayed a still image on the screen
for along time.
Side Gray
When you watch TV with the screen ratio of 4:3, the screen is prevented from any
damage by adjusting the white balance on both extreme left and right sides.
To prevent the screen burn from happening, select Dark or Light.
JDark:When you setthe screenratio to 4:3, it darkensthe left and right sides.
, Light: Whenyou set the screen ratioto 4:3, it brightens the left and right sides.
_-- To remove after-images on the screen, use either the White or Scroling
function. Although both functions remove after-images on the screen, Scroling
is more effective.
;,_ The after-image removal function has to be executed for a long time
(approximately 1 hour) to effectively remove after-images on the screen. If the
after-image is not removed after performing the function, repeat the function
again.
_-- Press any key on the remote control to cancel this feature.
Setting the Function Help
Displays help on the menu functions.
1
2
Press the MENU button to display the menu.
Press the A or _' button to select Setup, then press the ENTER button.
Press the A or _' button to select Function Help, then press the ENTER
button.
3 Press the A or _' button to select Off or On, then press the ENTER button.
Press the EXIT button to exit.
_-- The Function Help default setting is On.
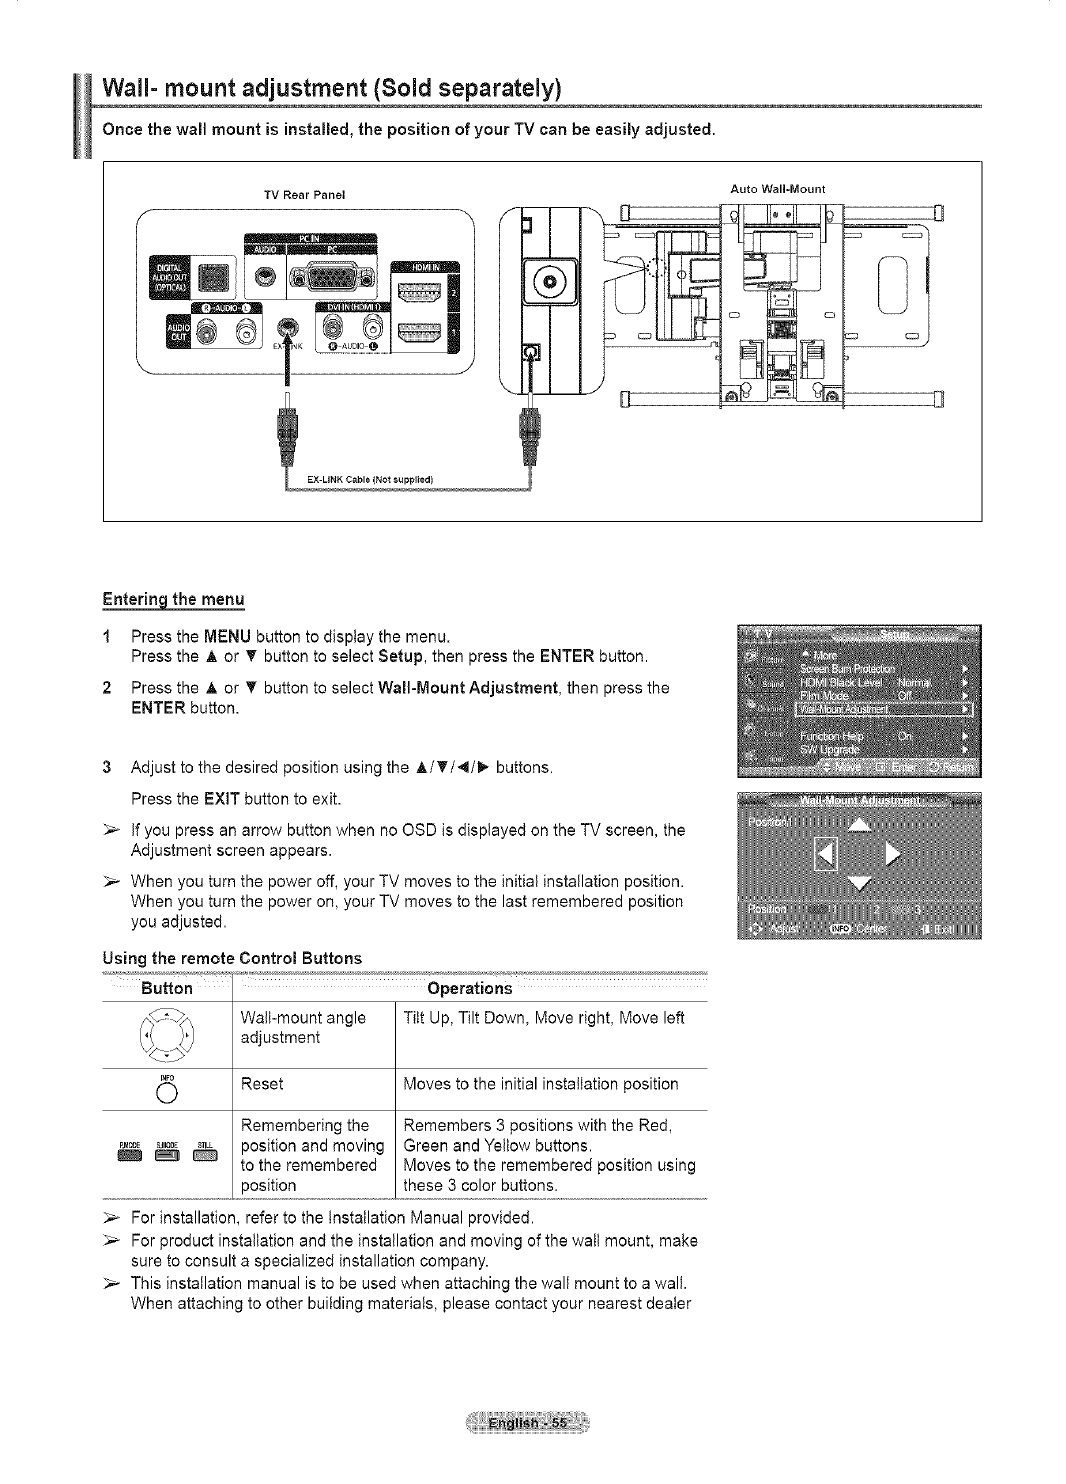
Wall- mount adjustment (Sold separately)
Once the wall mount is installed, the position of your TV can be easily adjusted.
Auto Wall-Mount
TV Rear Panel
EX-UNK Cable (Not supplied)
Entering the menu
1Press the MENU button to display the menu.
Press the A or T button to select Setup, then press the ENTER button.
2 Press the A or T button to select Wall-Mount Adjustment, then press the
ENTER button.
3Adjust to the desired position using the A/_'/4/I_- buttons.
Press the EXiT button to exit.
_-- If you press an arrow button when no OSD is displayed on the TV screen, the
Adjustment screen appears.
_-- When you turn the power off, your TV moves to the initial installation position.
When you turn the power on, your TV moves to the last remembered position
you adjusted.
Using the remote Control Buttons
Wall-mount angle Tilt Up, Tilt Down, Move right, Move left
adjustment
Reset Moves to the initial installation position
Remembering the Remembers 3 positions with the Red,
P._=E,.,,o_E_,,_. position and moving Green and Yellow buttons.
to the remembered Moves to the remembered position using
position these 3 color buttons.
_-_ For installation, refer to the Installation Manual provided.
:,_ For product installation and the installation and moving of the watt mount, make
sure to consult a specialized installation company.
_-- This installation manual is to be used when attaching the wall mount to a wall.
When attaching to other building materials, please contact your nearest dealer
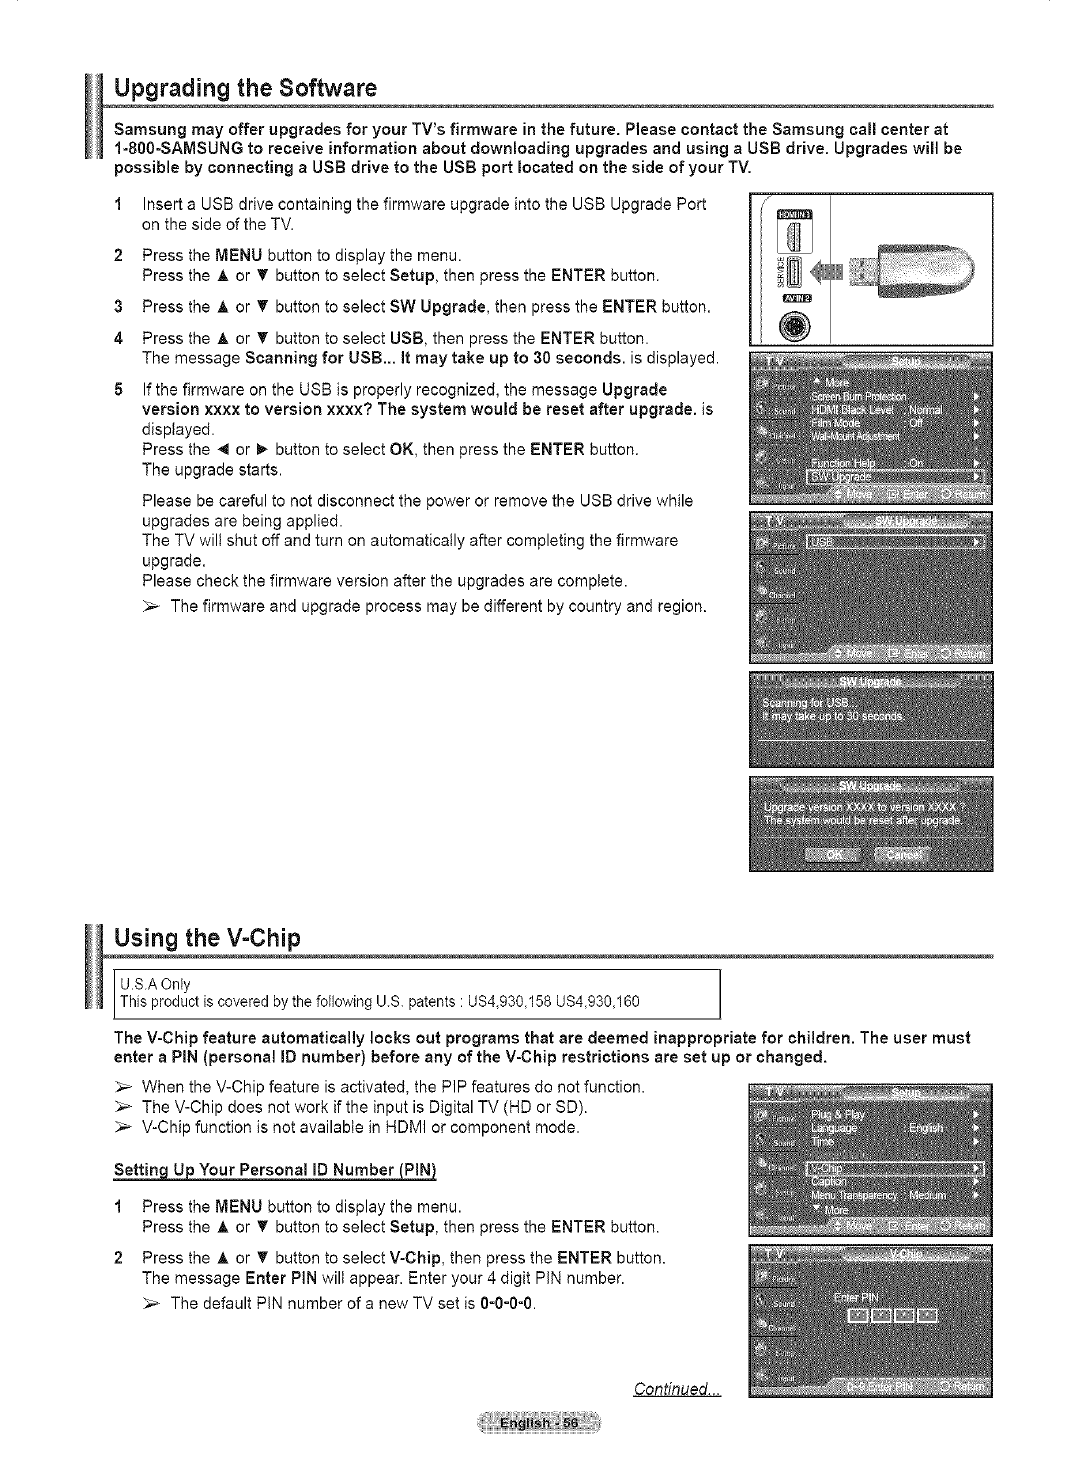
Upgrading the Software
Samsung may offer upgrades for your TV's firmware in the future. Please contact the Samsung call center at
1-800-SAMSUNG to receive information about downloading upgrades and using aUSB drive. Upgrades will be
possible by connecting a USB drive to the USB port located on the side of your TV.
1
2
3
4
5
Insert a USB drive containing the firmware upgrade into the USB Upgrade Port
on the side of the TV.
Press the MENU button to display the menu.
Press the A or _' button to select Setup, then press the ENTER button.
Press the A or _' button to select SW Upgrade, then press the ENTER button.
Press the A or T button to select USB, then press the ENTER button.
The message Scanning for USB... it may take up to 30 seconds, is displayed.
If the firmware on the USB is properly recognized, the message Upgrade
version xxxx to version xxxx? The system would be reset after upgrade, is
displayed.
Press the 4 or _ button to select OK, then press the ENTER button.
The upgrade starts.
Please be careful to not disconnect the power or remove the USB drive while
upgrades are being applied.
The TV will shut off and turn on automatically after completing the firmware
upgrade.
Please check the firmware version after the upgrades are complete.
_-- The firmware and upgrade process may be different by country and region.
Using the V=Chip
I U.S.A OnlyThis product is covered by the following U.S. patents : US4,930,158 US4,930,160
The V-Chip feature automatically locks out programs that are deemed inappropriate for children. The user must
enter aPiN (personal ID number) before any of the V-Chip restrictions are set up or changed.
_,_ When the V-Chip feature is activated, the PIP features do not function.
The V-Chip does not work if the input is Digital TV (HD or SD).
V-Chip function is not available in HDMI or component mode.
Settin U Your Personal ID Number PIN
1Press the MENU button to display the menu.
Press the A or _' button to select Setup, then press the ENTER button.
2 Press the &or _' button to select V-Chip, then press the ENTER button.
The message Enter PIN wilt appear. Enter your 4 digit PIN number.
_,_ The default PIN number of a new TV set is 0-0-0-0.
Continued...

The V-Chip screen will appear.
Press the A or T button to select Change PIN, then press the ENTER button.
The Change PIN screen wilt appear. Choose any 4 digits for your PIN and
enter them. Re-enter the same 4 digits. When the message PiN is changed
successfully, is displayed, your PIN has been memorized.
Press the EXIT button to exit.
If you forget the PIN, press the remote-control buttons in the following
sequence, which resets the pin to 0-0-0-0 : Power Off. _ MUTE _ 8
2 _ 4 _ Power On.
Now to Enable/Disable the V-Chip
1 Press the MENU button to display the menu.
Press the A or T button to select Setup, then press the ENTER button.
2 Press the A or T button to select V-Chip, then press the ENTER button.
The message Enter PIN will appear. Enter your 4 digit PIN number.
3 The V-Chip screen wilt appear.
To enable the V-Chip feature, press the ENTER button so that the V-Chip Leek
field is On. (Pressing the A or _' button will alternate between On and Off.)
Press the ENTER button.
While V-Chip is in operation, the Still function cannot be used.
Press the EXIT button to exit.
Now to Set up Restrictions Usin_q "TV Parental Guidelines"
First, set up a personal identification number (PIN), and enable the V-Chip.
(See previous section.) Parental restrictions can be set up using either of two
methods: The TV guidelines or the MPAA rating.
1 Press the MENU button to display the menu.
Press the _, or _' button to select Setup, then press the ENTER button.
2 Press the ,A or T button to select V-Chip, then press the ENTER button.
The message Enter PIN will appear. Enter your 4 digit PIN number.
Condnued...
<for USA models only>
<for Canada models only>
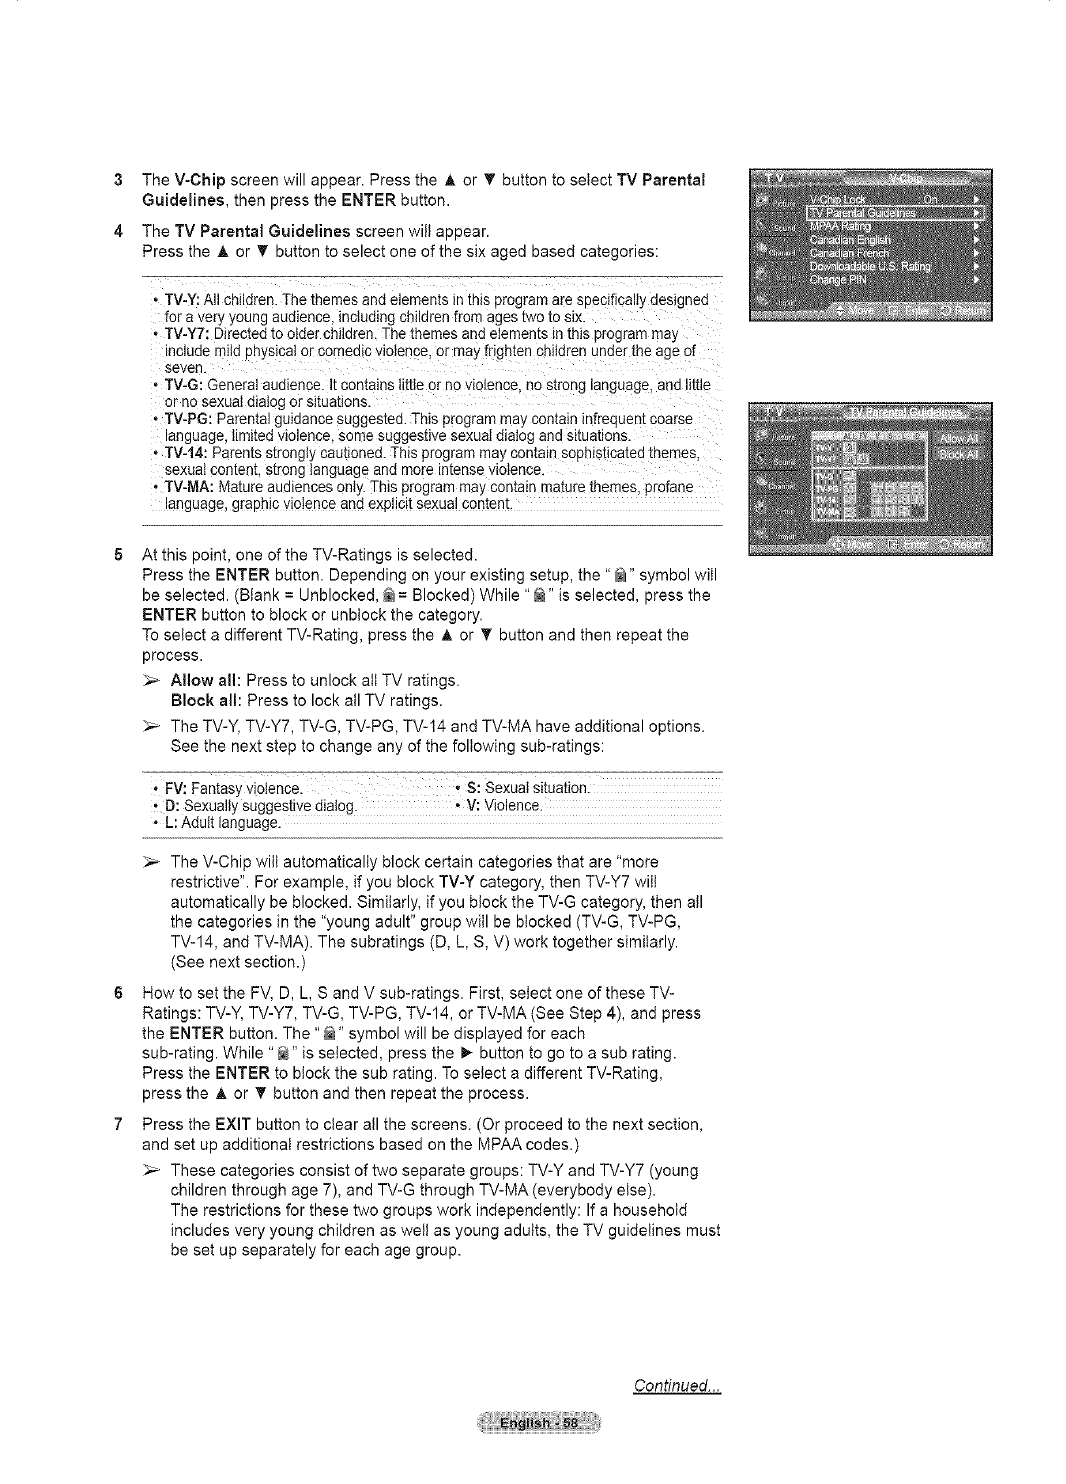
3The V-Chip screen will appear. Press the A or _' button to select TV Parental
Guidelines, then press the ENTER button.
4 The TV Parental Guidelines screen will appear.
Press the A or _' button to select one of the six aged based categories:
,TV-Y: All children. The themes and elements in this program are SDecltcally designed
for a very young audience, mctudmg children from ages two to six.
•TV-YT: Directed to older children. The themes and elements in this program may
[ncluae mild physical or comedic violence, or may frighten cnHdrenunder the age of
seven
•TV-G: General audience. It contains little or no violence no s[reng language, and httle
or no sexuaI alaiog or situations
• TV-PG: Parental gu_aancesuggested. This program may contain infrequen[ coarse
language limited nolence, some suggestive sexual dialog aria st[uauons.
, TV-14: Parents strongi_ cautioned. This program may con[am so_qtstlcarea memes
sexual content, s[rong language ana more intense violence.
• TV-MA: Mature audiences only. This program may contain mature themes, profane
language, graphic violence and explicit sexual comenr.
At this point, one of the TV-Ratings is selected.
Press the ENTER button. Depending on your existing setup, the "@" symbol will
be selected. (Blank = Unblocked, _ = Blocked) While "_" is selected, press the
ENTER button to block or unblock the category.
To select a different TV-Rating, press the _, or _' button and then repeat the
process.
> Allow al!: Press to unlock all TV ratings.
Block all: Press to lock all TV ratings.
_-- The TV-Y, TV-Y7, TV-G, TV-PG, TV-14 and TV-MA have additional options.
See the next step to change any of the following sub-ratings:
•FV: Fantasy Violence. i S: Sexuat situationl
• D: Sexually suggestive diatog. , V: Violence.
• L: Adult language.
_-- The V-Chip will automatically block certain categories that are "more
restrictive". For example, if you block TV-Y category, then TV-Y7 wilt
automatically be blocked. Similarly, if you block the TV-G category, then all
the categories in the "young adult" group will be blocked (TV-G, TV-PG,
TV-14, and TV-MA). The subratings (D, L, S, V) work together similarly.
(See next section.)
How to set the FV, D, L, S and V sub-ratings. First, select one of these TV-
Ratings: TV-Y, TV-Y7, TV-G, TV-PG, TV-14, or TV-MA (See Step 4), and press
the ENTER button. The "_" symbol will be displayed for each
sub-rating. While "@" is selected, press the _- button to go to a sub rating.
Press the ENTER to block the sub rating. To select a different TV-Rating,
press the A or _' button and then repeat the process.
Press the EXIT button to clear all the screens. (Or proceed to the next section,
and set up additional restrictions based on the MPAA codes.)
These categories consist of two separate groups: TV-Y and TV-Y7 (young
children through age 7), and TV-G through TV-MA (everybody else).
The restrictions for these two groups work independently: If a household
includes very young children as welt as young adults, the TV guidelines must
be set up separately for each age group.
Continued...
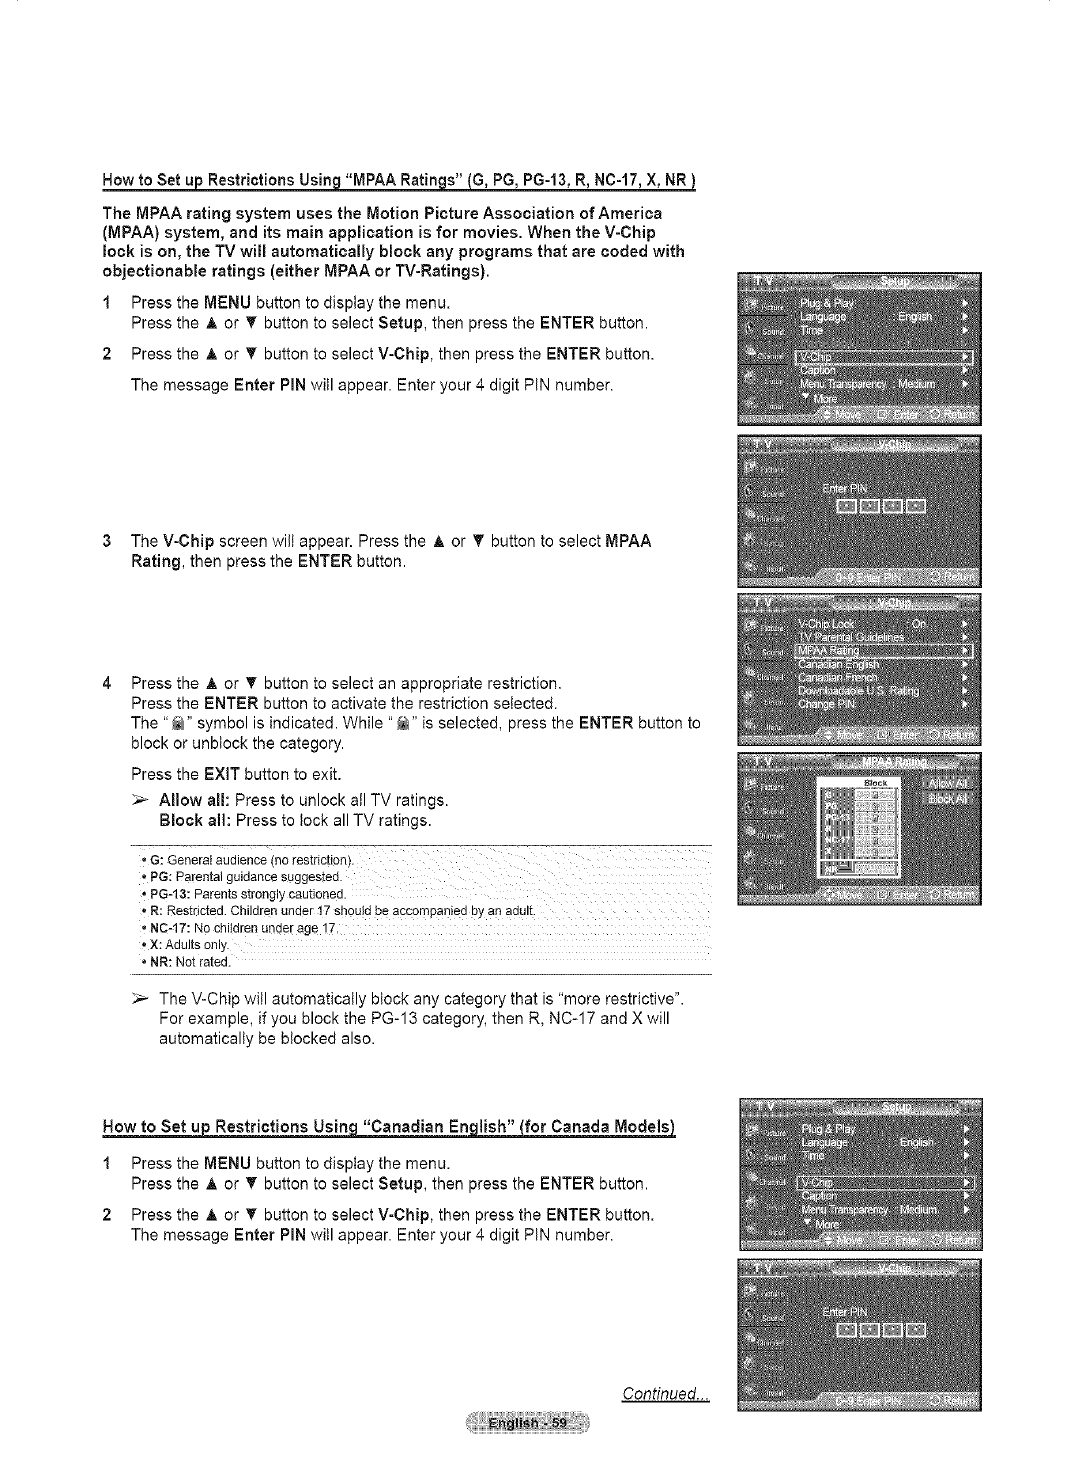
Howto Set u_ RestrictionsUsing"MPAA Ratin s" G, PG, PG-13,R, NC-17,X, NR
The MPAA rating system uses the Motion Picture Association of America
(MPAA) system, and its main application is for movies. When the V-Chip
lock is on, the TV will automatically block any programs that are coded with
objectionable ratings (either MPAA or TV-Ratings).
1Press the MENU button to display the menu.
Press the A or T button to select Setup, then press the ENTER button.
2 Press the A or _' button to select V-Chip, then press the ENTER button.
The message Enter PIN will appear. Enter your 4 digit PIN number.
3The V-Chip screen will appear. Press the A or T button to select MPAA
Rating, then press the ENTER button.
Press the A or _' button to select an appropriate restriction.
Press the ENTER button to activate the restriction selected.
The "_" symbol is indicated. While "_" is selected, press the ENTER button to
block or unblock the category.
Press the EXIT button to exit.
_-- Allow all: Press to unlock all TV ratings.
Block al!: Press to lock all TV ratings.
G: Generai audience no restriction.
• PG: Parental guidance suggested.
-PG-13: Parents strongly cautioned.
-R: Restricted. Children under 17 sh0u!d be accompanied bYan adu!t_
NC-17: No children under age !7,
•x: Adults only.
•NR: Not rated.
;_ The V-Chip will automatically block any category that is "more restrictive".
For example, if you block the PG-13 category, then R, NC-17 and X will
automatically be blocked also.
How to Set u Restrictions Usin "Canadian _for Canada Models)_
1 Press the MENU button to display the menu.
Press the A or T button to select Setup, then press the ENTER button.
2 Press the A or T button to select V-Chip, then press the ENTER button.
The message Enter PIN will appear. Enter your 4 digit PIN number.
Continued...
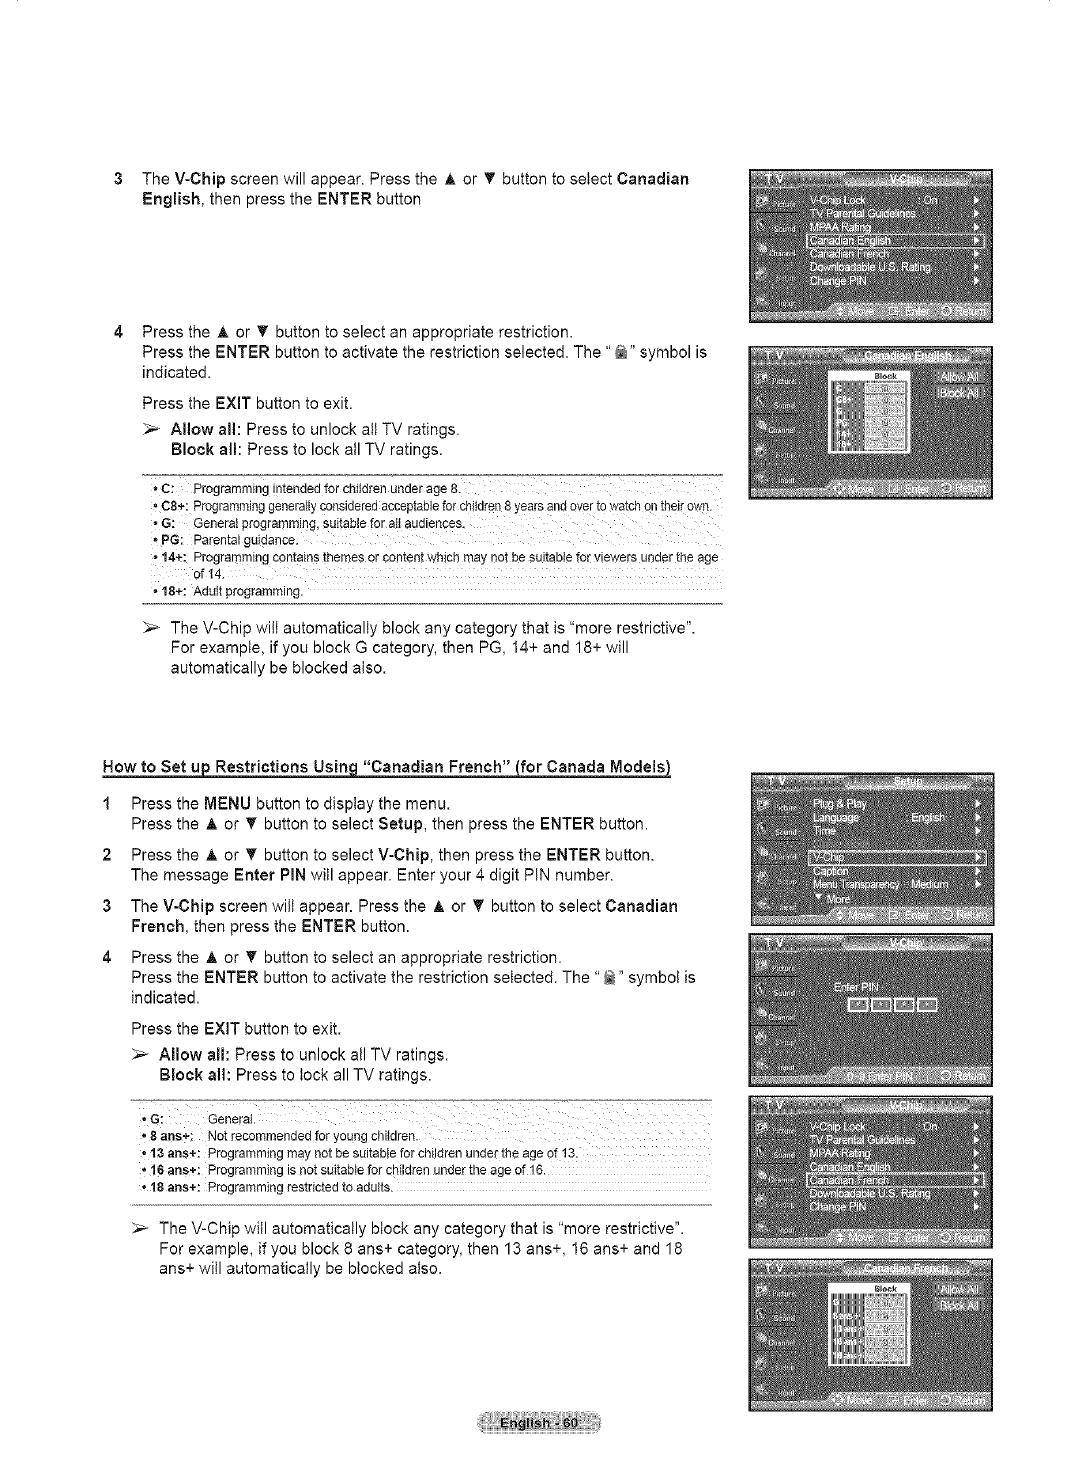
3The V-Chip screen will appear. Press the A or _' button to select Canadian
English, then press the ENTER button
Press the A or _' button to select an appropriate restriction.
Press the ENTER button to activate the restriction selected. The "_" symbol is
indicated.
Press the EXIT button to exit.
>- Allow all: Press to unlock all TV ratings.
Block all: Press to lock all TV ratings.
,,C: Programmingintendedfor childrenunderage 8.
,, C8÷: Programminggenerallyconsideredacceptableforchildren8 yearsandeverto watchon theirown.
* G: Generatprogramming,suitablefor aitaudiences.
oPG: Parentalguidance.
,, 14+; Programmingcontainsthemesor contentwhichmay notbe suitableforviewersunderthe age
of 14.
,18+: Adultprogramming.
:,_ The V-Chip wilt automatically block any category that is "more restrictive".
For example, if you block G category, then PG, 14+ and 18+ will
automatically be blocked also.
How to Set up Restrictions Usin_["Canadian French" [for Canada Models_
1 Press the MENU button to display the menu.
Press the A or T button to select Setup, then press the ENTER button.
2 Press the A or T button to select V-Chip, then press the ENTER button.
The message Enter PIN will appear. Enter your 4 digit PiN number.
3 The V-Chip screen will appear. Press the _, or T button to select Canadian
French, then press the ENTER button.
4 Press the A or T button to select an appropriate restriction.
Press the ENTER button to activate the restriction selected. The "_" symbol is
indicated.
Press the EXIT button to exit.
_-- Allow all: Press to unlock all TV ratings.
Block al!: Press to lock all TV ratings.
*1Sarts+: Programming may not be suitable for children under the age of ! 3:
,16 arts÷: Programming is not suitable for chi!dren under the age of 16.
-18 arts+: Programming restricted to adults.
_-- The V-Chip will automatically block any category that is "more restrictive".
For example, if you block 8 ans+ category, then 13 ans+, 16 ans+ and 18
ans+ will automatically be blocked also.

U_ for Di ital channels
Parental restriction information can be used while watching DTV channels.
1 Press the MENU button to display the menu.
Press the A or T button to select Setup, then press the ENTER button.
2 Press the A or T button to select V-Ohip, then press the ENTER button.
The message Enter PIN will appear. Enter your 4 digit PIN number.
3 The V-Chip screen wilt appear. Press the A or !!' button to select
Downloadable U.S. Rating, then press the ENTER button.
:,_ If information is not downloaded from the broadcasting station, the
Downloadable U.S. Rating menu is deactivated.
_-- Parental restriction information is automatically downloaded while watching
DTV channels. It may take several seconds.
_-- The Downloadable U.S. Rating menu is available for use after information
is downloaded from the broadcasting station. However, depending on the
information from the broadcasting station, it may not be available for use.
4 Press the A or !!' button to select an appropriate restriction
Press the ENTER button to activate the restriction selected.
The "@" symbol is indicated.
Press the EXIT button to exit.
_-- Allow all: Press to unlock all TV ratings.
Block all: Press to lock all TV ratings.
:,_ Parental restriction levets differ depending on the broadcasting station.
_-- The default menu name and downloadable US rating changes depending on
the downloaded information.
:,_ Even if you set the on-screen display to your desired language, the
Downloadable U.S. Rating menu will appear in English only.
_-- The rating will automatically block certain categories that are more
restrictive.
_-- The rating titles (for example: Humor Level..etc) and TV ratings (for
example: DH,MH,H..etc) may differ depending on the broadcasting station.
H_terth_nel "Emer eric Esca e"_
If the TV is tuned to a restricted channel, the V-Chip will block it. The screen
will go blank and the following message will appear:
Enter your PiN.
To resume normal viewing, tune to a different channel using CH A or
OH v button. Under certain conditions (depending on the rating of the local TV
programs) the V-Chip might lock out alt the channels. In this case, use the
V-Chip function for an "emergency escape":
1 Press the MENU button. Press the _, or !!' button to select Setup, then press
the ENTER button.
2
3
Press the A or T button to select V-Chip, then press the ENTER button.
Enter your PiN, then press the ENTER button, and press the A or _' button to
temporarily disable the V-Chip Lock.
_-- if you forget the PiN, press the remote-control buttons in the following
sequence, which resets the pin to O-O-O-O: Power Off. _ MUTE -+ 8 _ 2 -_
4 _ Power On.
The number of-
Rating title current rating
information
The number of
all the rating
information
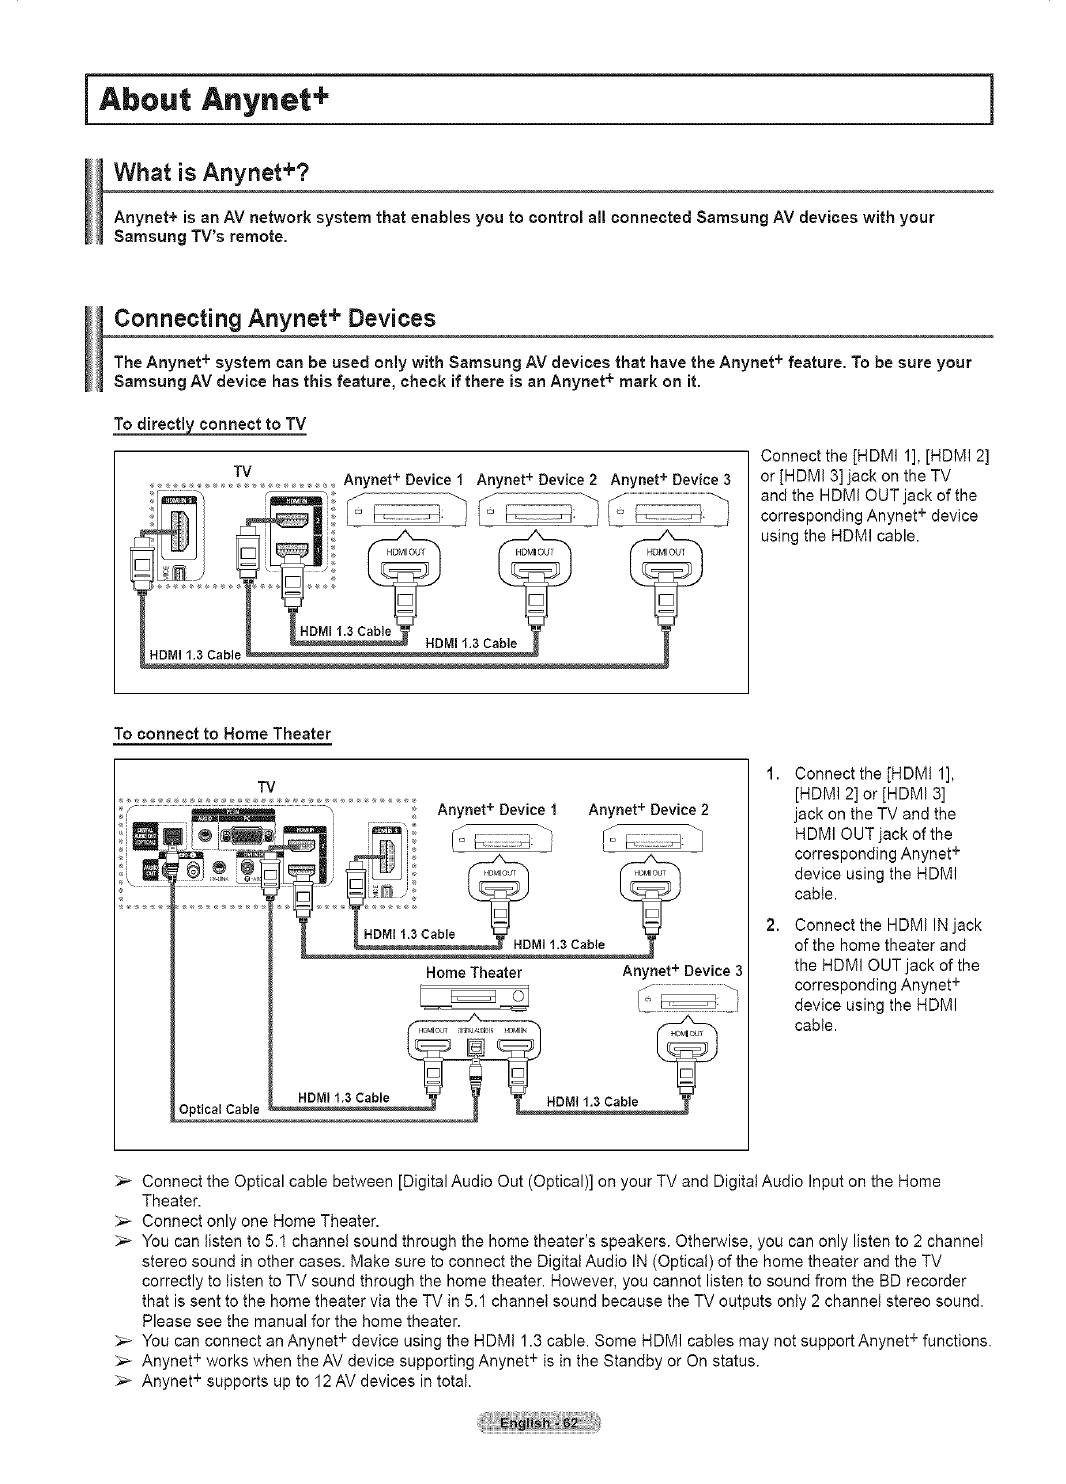
iAbout Anynet+ ]
What is Anynet+?
Anynet+ is an AV network system that enables you to control all connected Samsung AV devices with your
Samsung TV's remote.
Connecting Anynet + Devices
The Anynet+ system can be used only with Samsung AV devices that have the Anynet + feature. To be sure your
Samsung AV device hasthis feature, check if there is an Anynet+ mark on it.
To directly connect to TV
TV Anynet + Device 1 Anynet + Device 2 Anynet + Device 3
Connect the [HDMI 1], [HDMI 2]
or [HDMI 3] jack on the TV
and the HDMI OUT jack of the
corresponding Anynet + device
using the HDMI cable.
Toconnect to Home Theater
TV
Optical Cable
Home Theater Anynet + Device 3
1. Connect the [HDMt 1],
[HDMI 2] or [HDMI 3]
jack on the TV and the
HDMI OUT jack of the
corresponding Anynet +
device using the HDMI
cable.
Connect the HDMI IN jack
of the home theater and
the HDMI OUT jack of the
corresponding Anynet +
device using the HDMI
cable.
_-- Connect the Optical cable between [Digital Audio Out (Optical)] on your TV and Digital Audio Input on the Home
Theater.
Connect only one Home Theater.
_-- You can listen to 5.1 channel sound through the home theater's speakers. Otherwise, you can only listen to 2 channel
stereo sound in other cases. Make sure to connect the Digital Audio IN (Optical) of the home theater and the TV
correctly to listen to TV sound through the home theater. However, you cannot listen to sound from the BD recorder
that is sent to the home theater via the TV in 5.1 channel sound because the TV outputs only 2 channel stereo sound.
Please see the manual for the home theater.
_-- You can connect an Anynet + device using the HDMI 1.3 cable. Some HDMI cables may not support Anynet + functions.
;,_ Anynet + works when the AV device supporting Anynet + is in the Standby or On status.
;,_ Anynet + supports up to 12 AV devices in total.
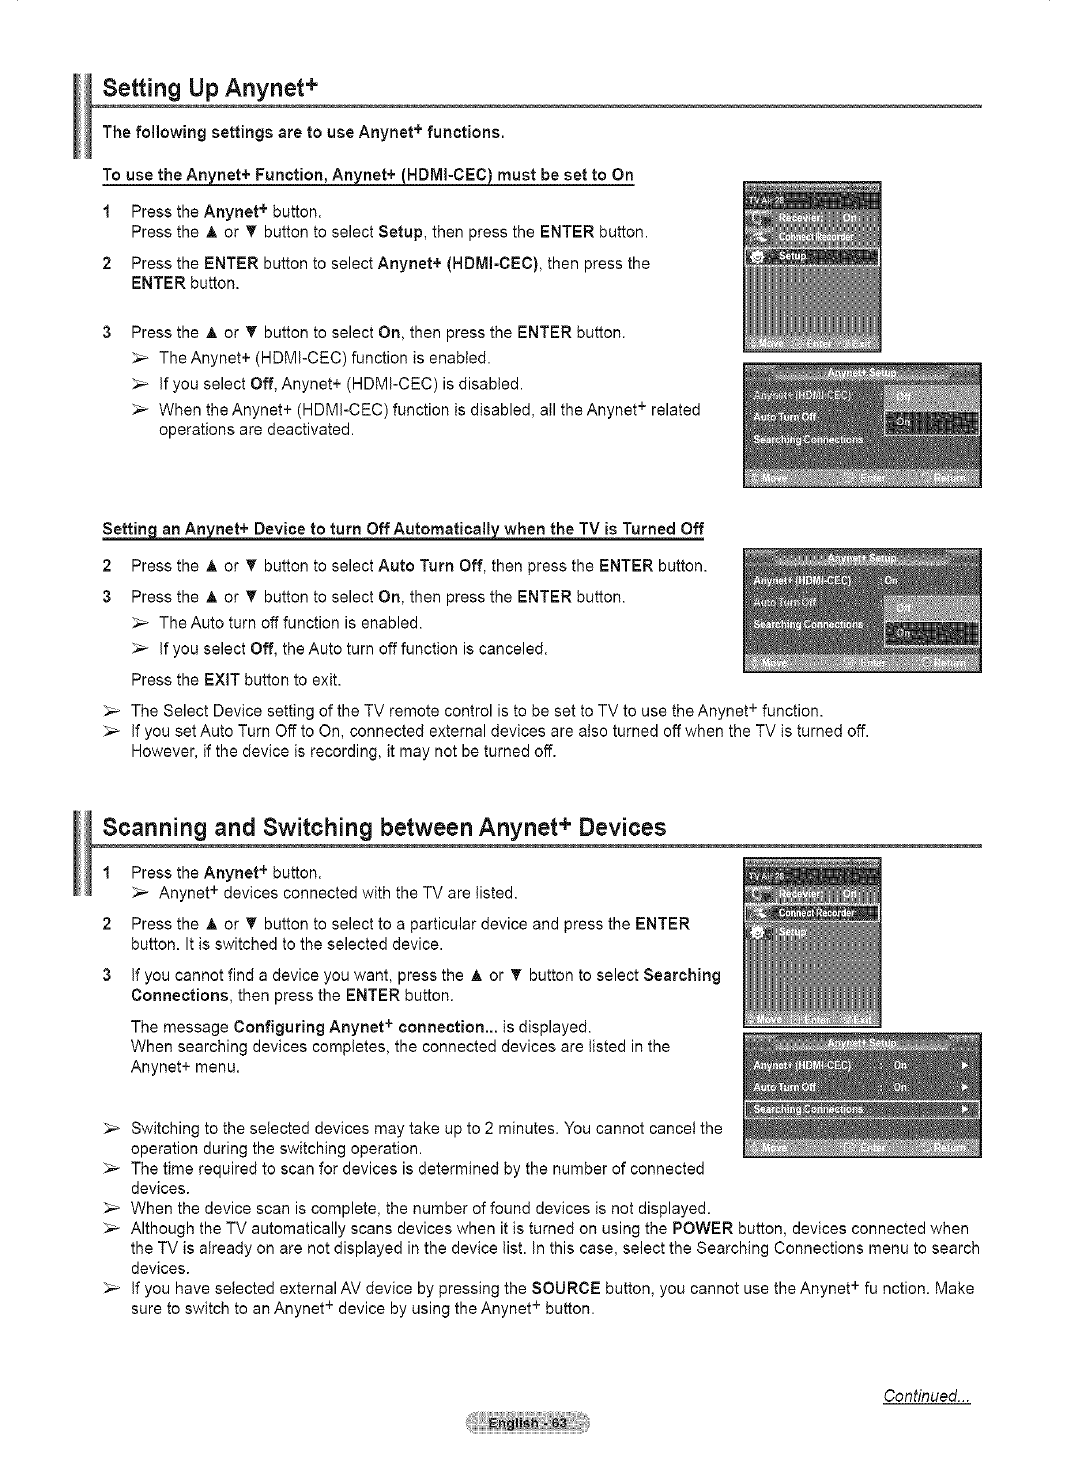
Setting Up Anynet +
The following settings are to use Anynet + functions.
To use the Anynet+ Function, Anynet+_HDMl-CEC_ must be set to On
1Press the Anynet +button.
Press the A or _' button to select Setup, then press the ENTER button.
2 Press the ENTER button to select Anynet+ (HDMI-CEC), then press the
ENTER button.
Press the &or T button to select On, then press the ENTER button.
The Anynet+ (HDMI-CEC) function is enabied.
_-_ if you select Off, Anynet+ (HDMI-CEC) is disabled.
_-- When the Anynet+ (HDMFCEC)function is disabled, all the Anynet + related
operations are deactivated.
_net+ Device to turn OffAutomaticall¥ when the TV is Turned Off
2 Press the A or T button to select Auto Turn Off, then press the ENTER button.
3 Press the A or T button to select On, then press the ENTER button.
The Auto turn off function is enabled.
if you select Off, the Auto turn off function is canceled.
Press the EXiT button to exit.
_-- The Select Device setting of the TV remote control is to be set to TV to use the Anynet + function.
if you set Auto Turn Off to On, connected external devices are aiso turned off when the TV is turned off.
However, if the device is recording, it may not be turned off.
Scanning and Switching between Anynet + Devices
1
2
3
Press the Anynet + button.
Anynet + devices connected with the TV are tisted.
Press the A or T button to select to a particular device and press the ENTER
button. It is switched to the selected device.
If you cannot find a device you want, press the A or _' button to select Searching
Connections, then press the ENTER button.
The message Configuring Anynet + connection.., is displayed.
When searching devices completes, the connected devices are listed in the
Anynet+ menu.
_,_ Switching to the selected devices may take up to 2 minutes. You cannot cancel the
operation during the switching operation.
_-- The time required to scan for devices is determined by the number of connected
devices.
When the device scan is complete, the number of found devices is not displayed.
_-- Although the TV automatically scans devices when it is turned on using the POWER button, devices connected when
the TV is already on are not displayed in the device list. In this case, select the Searching Connections menu to search
devices.
_-- If you have selected external AV device by pressing the SOURCE button, you cannot use the Anynet + function. Make
sure to switch to an Anynet + device by using the Anynet + button.
Continued...
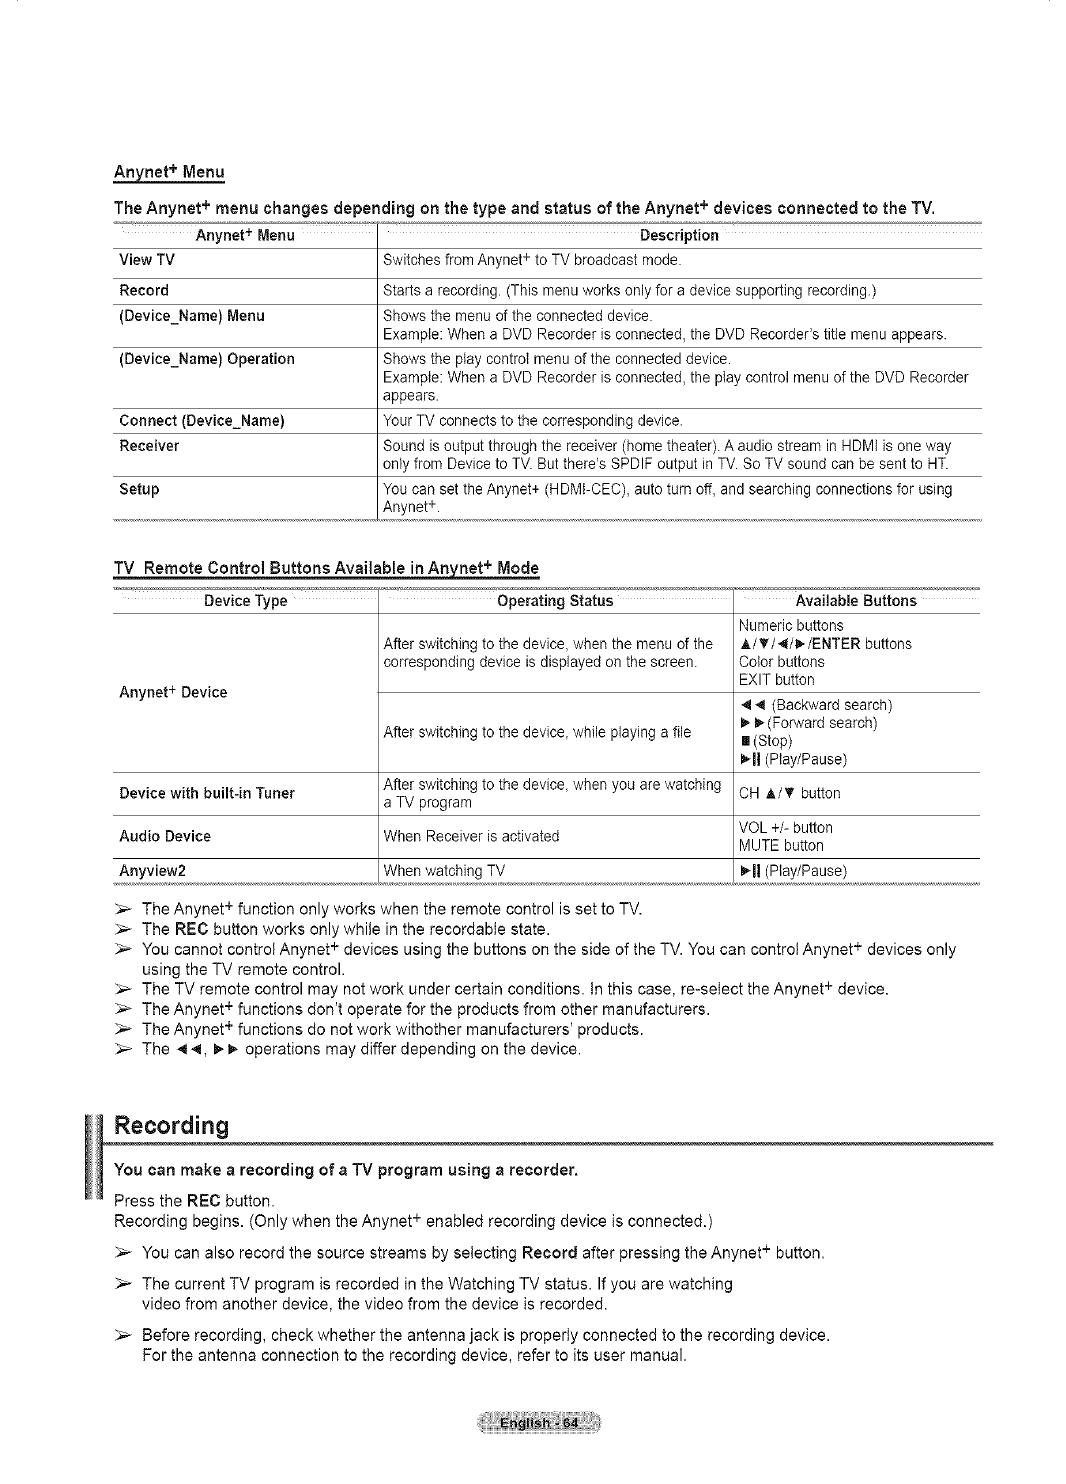
Anj/net + Menu
The Anynet + menu changes depending on the type and status of the Anynet + devices connected to the TV.
Anynet + Menu Description
View TV Switches from Anynet + to TV broadcast mode.
Record Starts a recording. (This menu works only for a device supporting recording.)
(Device_Name) Menu Shows the menu of the connected device.
Example: When a DVD Recorder is connected, the DVD Recorder's title menu appears.
(Device_Name) Operation Shows the play control menu of the connected device.
Example: When a DVD Recorder is connected, the play control menu of the DVD Recorder
appears.
Connect (Device_Name) Your TV connects to the corresponding device.
Receiver Sound is output through the receiver (home theater). A audio stream in HDMI is one way
only from Device to TV. But there's SPDIF output in TV. So TV sound can be sent to HT.
Setup You can set the Anynet+ (HDMI-CEC), auto turn off, and searching connections for using
Anynet+.
TV Remote Control Buttons Available in Anynet + Mode
Device Type Operating Status Available Buttons
Numeric buttons
Anynet + Device
After switching to the device, when the menu of the
corresponding device is displayed on the screen.
After switching to the device, while playing a file
A./T/4/I_/ENTER buttons
Color buttons
EXIT button
44 (Backward search)
_ (Forward search)
[] (Stop)
_-II (Play/Pause)
Device with built-in Tuner After switching to the device, when you are watching CH A/_' button
a TV program
VOL +/- button
Audio Device When Receiver is activated MUTE button
Anyview2 When watching TV _'ll (Play/Pause)
_-- The Anynet + function only works when the remote control is set to TV.
;,_ The REC button works only while in the recordable state.
;,_ You cannot control Anynet + devices using the buttons on the side of the TV. You can control Anynet + devices only
using the TV remote control.
;,_ The TV remote control may not work under certain conditions, in this case, re-select the Anynet + device.
_,_ The Anynet + functions don't operate for the products from other manufacturers.
_-- The Anynet + functions do not work withother manufacturers' products.
;,_ The 44, _. operations may differ depending on the device.
Recording
You can make arecording of aTV program using a recorder.
Press the REC button.
Recording begins. (Only when the Anynet + enabled recording device is connected.)
_-- You can also record the source streams by selecting Record after pressing the Anynet + button.
_-- The current TV program is recorded in the Watching TV status. If you are watching
video from another device, the video from the device is recorded.
_-- Before recording, check whether the antenna jack is properly connected to the recording device.
For the antenna connection to the recording device, refer to its user manual.
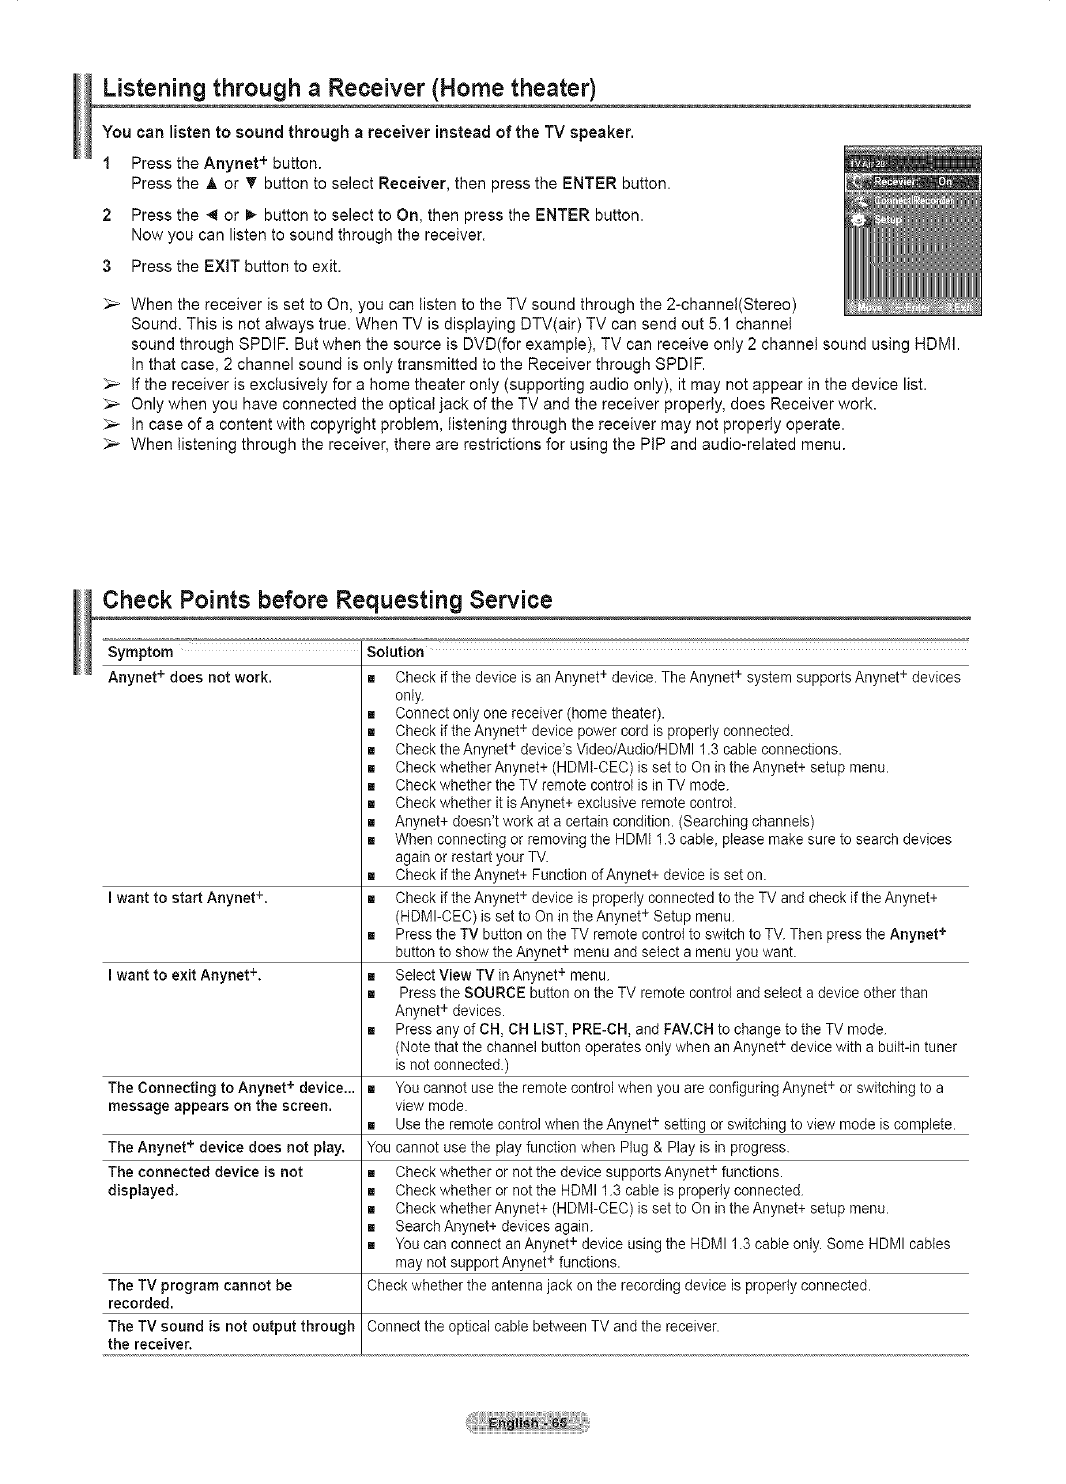
Listening through aReceiver (Home theater)
You can listen to sound through areceiver instead of the TV speaker.
1Press the Anynet + button.
Press the A or T button to select Receiver, then press the ENTER button.
2 Press the 4 or I_ button to select to On, then press the ENTER button.
Now you can listen to sound through the receiver.
3 Press the EXIT button to exit.
When the receiver is set to On, you can listen to the TV sound through the 2-channel(Stereo)
Sound. This is not always true. When TV is displaying DTV(air) TV can send out 5.1 channet
sound through SPDIF. But when the source is DVD(for example), TV can receive only 2 channel sound using HDMI.
In that case, 2 channel sound is only transmitted to the Receiver through SPDIF.
_-- If the receiver is exclusively for a home theater only (supporting audio only), it may not appear in the device list.
Only when you have connected the optical jack of the TV and the receiver properly, does Receiver work.
In case of a content with copyright problem, listening through the receiver may not properly operate.
_-- When listening through the receiver, there are restrictions for using the PIP and audio-related menu.
Check Points before Requesting Service
Symptom Solution
Anynet +does not work. [] Check ifthe device is an Anynet+ device. The Anynet+ system supports Anynet+ devices
only.
[] Connect only one receiver (home theater).
[] Check if the Anynet+ device power cord is properly connected.
[] Check theAnynet + device's Video/Audio/HDMI 1.3 cable connections.
[] Check whether Anynet+ (HDMI-CEC) is set to On in the Anynet+ setup menu.
[] Check whether the TV remote control is in TV mode.
[] Check whether it isAnynet+ exclusive remote control
[] Anynet+ doesn't work at a certain condition. (Searching channels)
[] When connecting or removing the HDMI 1.3 cable, please make sure to search devices
again or restart your TV.
[] Check if the Anynet+ Function of Anynet+ device is set on.
I want to start Anynet +. [] Check if the Anynet+ device is properly connected to the TV and check if the Anynet+
(HDMI-CEC) is set to On in the Anynet + Setup menu.
[] Press the TV button on the TV remote control to switch to TV. Then press the Anynet +
button to show the Anynet + menu and select a menu you want.
I want to exit Anynet +. [] Select View TV in Anynet+ menu.
[] Press the SOURCE button on the TV remote control and select a device other than
Anynet + devices.
[] Press any of CH, CH LIST, PRE-CH, and FAV.CH to change to the TV mode.
(Note that the channel button operates only when an Anynet + device with a built-in tuner
is not connected.)
The Connecting to Anynet + device... [] You cannot use the remote control when you are configuring Anynet + or switching to a
message appears on the screen, view mode.
[] Use the remote control when the Anynet + setting or switching to view mode is complete.
The Anynet + device does not play. You cannot use the play function when Plug & Play is in progress.
The connected device is not [] Check whether or not the device supports Anynet + functions.
displayed. [] Check whether or not the HDMI 1.3 cable is properly connected.
[] Check whether Anynet+ (HDMI-CEC) is set to On in the Anynet+ setup menu.
[] SearchAnynet+ devices again.
[] You can connect an Anynet+ device using the HDMI 1.3 cable only. Some HDMI cables
+
may not support Anynet functions.
Check whether the antenna jack on the recording device is properly connected.
Connect the optical cane between TV and the receiver.
The TV program cannot be
recorded.
The TV sound is not output through
the receiver.
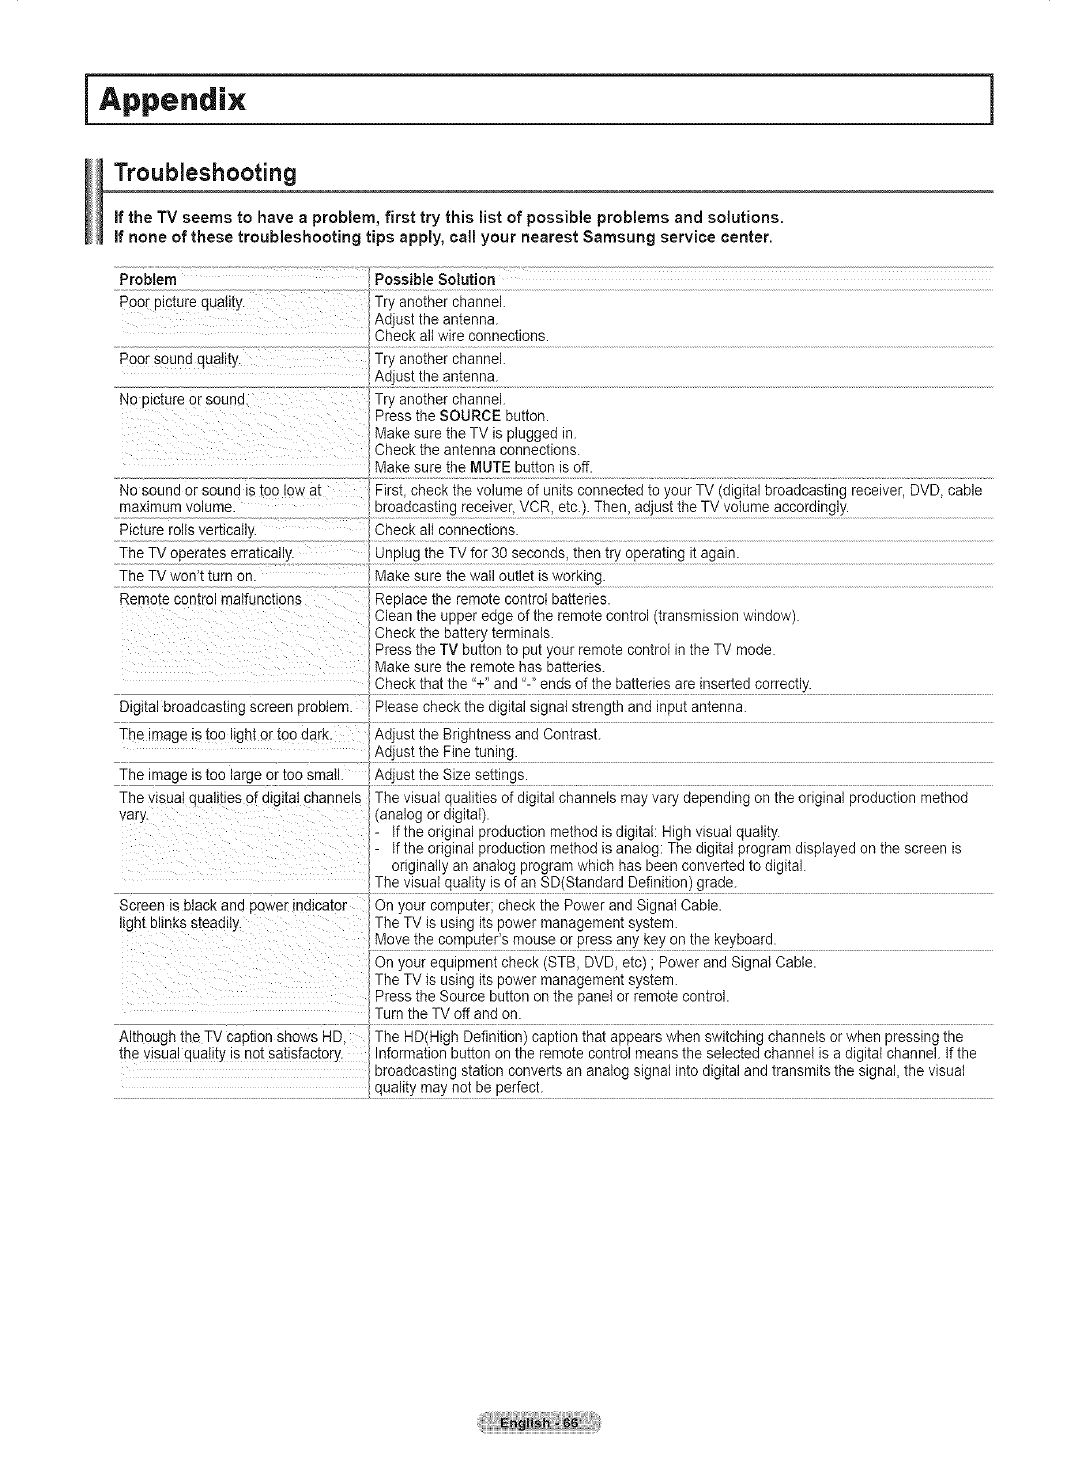
iAppendix ]
Troubleshooting
ifthe TV seems to have aproblem, first try this list of possible problems and solutions.
if none of these troubleshooting tips apply, call your nearest Samsung service center.
Problem Possible Solution
Poor D_c_ureouat_ty. Try another channel.
Adjust the antenna.
Check alt wire connections.
Poor sound cJaIity. Try another channel.
,_diust }:hear_!enn_-
No u_cwreor sound. Try another channel.
Press the SOURCE button.
Make sure the TV is plugged in.
Check the antenna connections.
Make sure the MUTE button is off.
No sound or sound is too low at Firsl check the volume of units connected to your TV (digital broadcasting receiver, DVD, cable
maximum volume, broadcasting receiver, VCR, etc.). Then, adjust the TV volume accordingly.
Picture rolls vertically. Check all connections.
The TV operates erratma y. unp!ug thf TVf°[ 30 sec°nd s then t_ operating it again:
The TV won't turn on. Make su(f !hew_a!!0u!let iSwet[king:
Remote comrol malfunctions Replace the remote control batteries.
},lean the upper edge of the remote control (transmission window).
Check the battery terminals.
Press the TV button to put your remote control in the TV mode.
Make sure the remote has batteries.
Check that the 't'i and':' encis °f !be ba!te[ie s ale !nse[tfd 9fY[ec!!y ..........................................................
Digital broadcasting screen problem Please check the digital signal strength and input antenna.
The image is too light or too darK. Adjust the Brightness and Contrast.
AdiL_s!thf F!n_ttup!ng•
The image is too large or too smatl. AdiUst !bf size se!!ir]g9. ..................................................................................................
The visua_qualities of digital channels The visua qualities of digital channels may vary depending on the original production method
vary. (analog or digital).
- Fthe original production method is digital: High visual quality.
- Fthe original production method is anatog: The digital program displayed on the screen is
originally an analog program which has been converted to digital.
The visuaI quality is of an SD(Standard Definition) grade.
Screen is ulacK and power indicator On your computer; check the Power and Signal Cable.
light blinks steadily The TV is using its power management system.
Mo}!e !he cc,mpute[' _ mouse fir press a?y key tn}he keyb£ard. ....
}n your equipment check (STB, DVD, etc) • Power and Signal Cable.
The TV is using its power management system.
Press the Source button on the panel or remote control.
Turn the TV off and on
Although the TV capuon snows HD The BD(High Definition) caption that appears when switching channels or when pressing the
[he visual quality is not satisfactory Information button on the remote control means the selected channel is a digital channel. If the
broadcasting station converts an analog signal into digital and transmits the signal, the visual
,quality may n°t be Perfect-
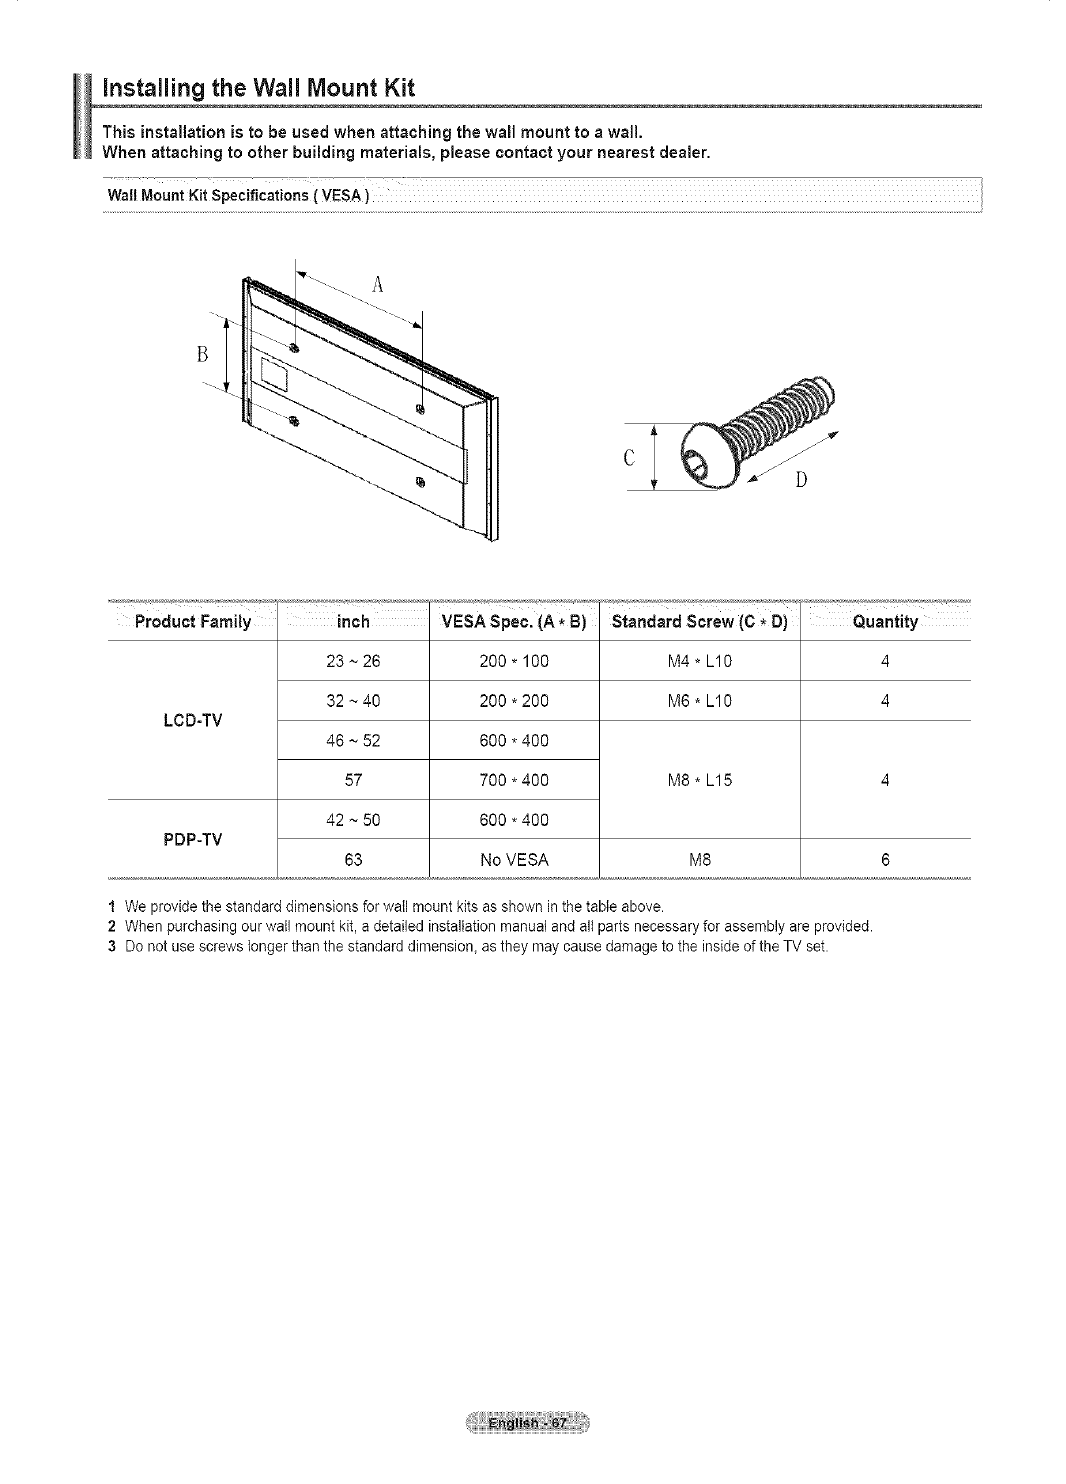
D
Quantity
M4 * L10 4
M6 * L10 4
LCD-TV
23 ~ 26
32 ~40
46 ~ 52
57
42 ~ 50
63
200.100
200*200
600*400
700*400
600*400
No VESA
M8 * L15
PDP-TV
M8 6
1 We provide the standard dimensions for wail mount kits as shown in the table above.
2 When purchasing our wall mount kit, a detailed installation manual and all parts necessary for assembly are provided.
3 Do not use screws longer than the standard dimension_ as they may cause damage to the inside of the TV set.
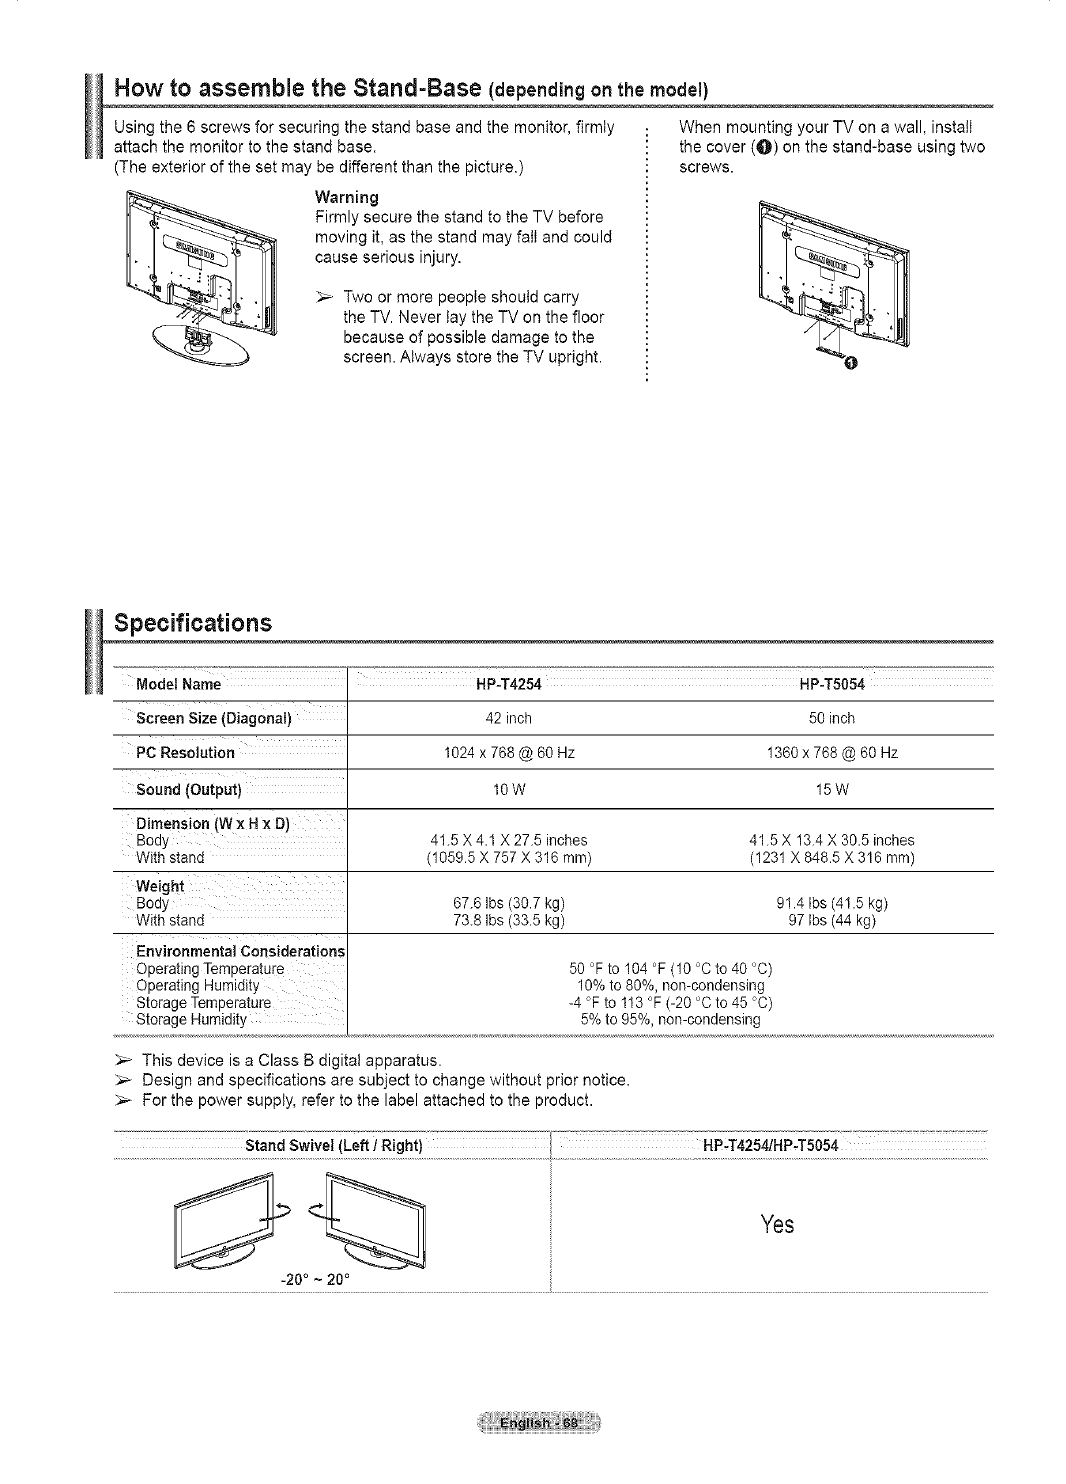
How to assemble the Stand=Base (dependingonthe model)
Using the 6 screws for securing the stand base and the monitor, firmly
attach the monitor to the stand base.
(The exterior of the set may be different than the picture.)
Warning
Firmly secure the stand to the TV before
moving it, as the stand may fail and could
cause serious injury.
;,_ Two or more people should carry
the TV. Never lay the TV on the floor
because of possible damage to the
screen. Always store the TV upright.
When mounting your TV on a wall, install
the cover (O) on the stand-base using two
screws.
Specifications
Model Name
Screen Size (Diagonal)
PC Resolution
Sound (Output)
Dimension (W x H x D)
Bod_ 41.5 X 4.1 X 27.5 inches 41.5 X 13.4 X 30.5 inches
With stand (1059.5 X 757 X 316 ram) (1231 X 848.5 X 318 mm)
Weight
Bodj 67.6 Ibs (30.7 kg) 91.4 Ibs (41.5 kg)
With stand 73.8 Ibs (33.5 kg) 97 Ibs (44 kg)
Environmental Considerations
Operating Temperature
Operaung Humidity
Storage Temperature
Storage Humidity,
HP-T4254 HP-T5054
42 inch 50 inch
1024 x 768 @ 60 Hz 1360 x 768 @ 60 Hz
10W 15W
50 °F to 104 °F (10 °C to 40 °C)
10% to 80%, non-condensing
-4 °F to 113 °F (-20 °C to 45 °C)
5% to 95%, non-condensing
_-- This device is a Class B digital apparatus.
)_- Design and specifications are subject to change without prior notice.
_-- For the power supply, refer to the label attached to the product.
Stand Swivel (Left/Right) HP-T4254/HP-T5054
Yes
.20 ° ~ 20 °

Dimensions (HP-T4254)
\/
TOP ViEW FRONT VIEW
12 4..e..® '
JACK PANEL DETAIL 2 1/4"H x 18 3/4"W @ 5 3/4" UP FROM BOTTOM
', :€}
( _!A@8$gfl®
SIDE VIEW REAR VIEW
NOTE; Alldrawings not necessarily b scale Some
dimensions are subiec_to cha_ge without prlo, notlc_
Refer to dimensions o_ each unit p,ie, _operforming
_ny carpentry NO1responsiblefor typographical o_
printed erro,_
© 2OO7Samsun_ Eleo_ro_icsAmerica, I_c
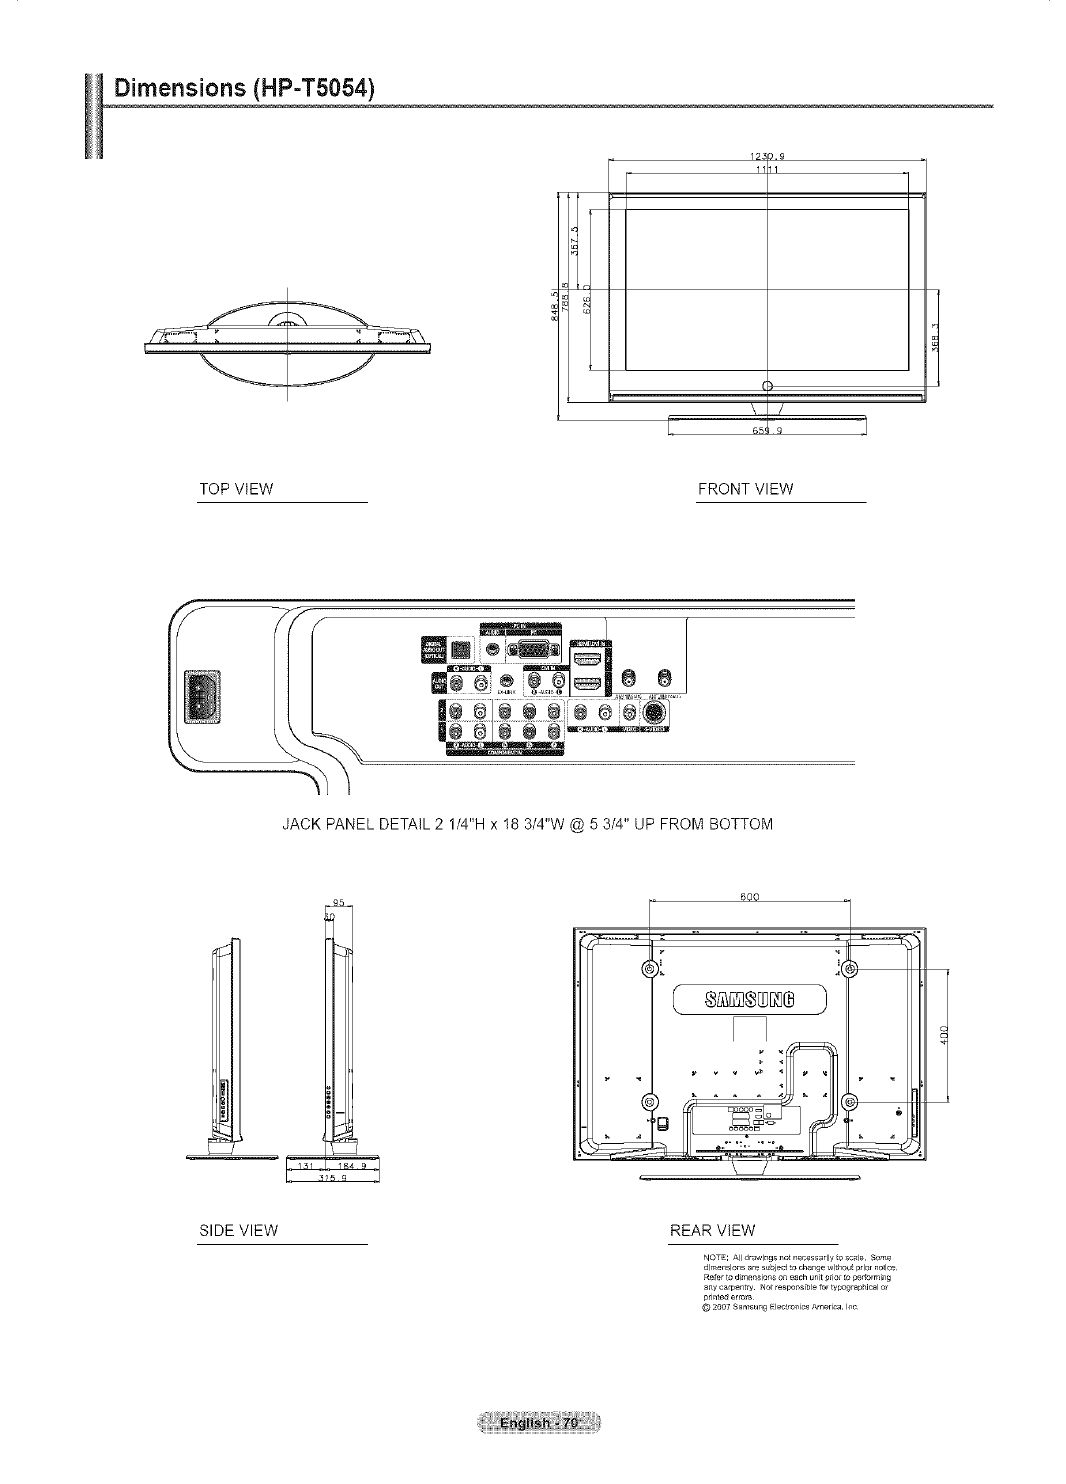
Dimensions (HP-T5054)
125
1111
\!
TOP ViEW FRONT VIEW
12=o<..e..® ,
JACK PANEL DETAIL 2 1/4"H x 18 3/4"W @ 5 3/4" UP FROM BOTTOM
600
SIDE VIEW REAR VIEW
NOTE_ Alldrawings sol necessarily b scale Some
dimensions are subiec_to cha_ge without prlo, notlc_
Refer to dimensions o_ each unit p,ie, _operforming
_ny carpentry NO1responsiblefor typographical o_
printed erro,_
© 2OO7Samsun_ Eleo_ro_icsAmerica, I_c


Registre el producto en www.samsung.com/global/register
Apunte aqui los nQmeros de serie y modelo para consultas futuras.
- Modelo - N.° de serie
I Informaci6nimportantesobrelagarantiarelativaalformatodevisualizaci6ndeltelevisorI
Las pantallas PDP con formato de pantalla panoramica (16:9, ta relacion de aspecto ancho:alto de ta pantalla) estan
disefiadas principalmente para visualizar videos
de movimiento de formato panoramico. En estas pantallas debe ver las imagenes en el formato 16:9 de pantalta panoramica
o ampliadas para Itenar la pantalla si et modelo tiene esta opcion, yen movimiento constante. La visualizaci6n de imagenes
y graficos estaticos en ta pantalla, como las barras oscuras taterales en programaci6n y videos de tetevisi6n en formato
estandar no
amptiados, debe limitarse a no mas del 5% del tiempo total de visualizaci6n det televisor por semana.
Adem&s, la visualizaci6n de otras imagenes estaticas y texto, como los informes de bolsa, pantallas de videojuegos, Iogotipos
de emisoras, sitios Web o graficos y dibujos de ordenador, debera limitarse en todos los televisores como ya se ha descrito.
La visualizaci6n de im_genes
est_iticasque supere los IJmitesde las instrucciones anteriores puede producir un envejecimiento desigual de las
pantallas PDP,
Io que provocar_luna reproducciSn superpuesta sutil pero permanente de la imagen. Para evitarlo, varJe la
programaci6n y las ira&genesy, sobre todo,
visualice im_lgenes en movimiento a toda pantalla, no gr_lfieos est_ticos ni barras oscuras.
En modelos de PDP que ofrezcan opciones para ettamaSo de la imagen, utilice estos controtes para ver los distintos formatos
como imagen a toda pantalla.
Tenga cuidado en ta seleccion y duracion de los formatos de tetevisi6n utitizados para la visualizaci6n. La garantia limitada de
Samsung no cubre el envejecimiento desigual de la PDP
como resultado de la selecci6n y uso de formatos, asi como otras imagenes retenidas.
SSIo EE.UU.
La unidad dei producto que se incluye con este manual det usuario se suministra con licencia bajo derechos de
propiedad intelectual de otras empresas. En concreto, este producto se suministra con licencia bajo tas siguientes
patentes de EE.UU.: 5,991,715, 5,740,317, 4,972,484, 5,214,678, 5,323,396, 5,539,829, 5,606,618, 5,530,655,
5,777,992, 6,289,308, 5,610,985, 5,481,643, 5,544,247, 5,960,037, 6,023,490, 5,878,080 y bajo el nOmero de
aplicaci6n de patentes pubticadas de EE.UU. 2001-44713-A1.
Esta licencia esta limitada al uso no comercial privado de consumidores que sean usuarios finales para contenido con
ticencia. No se otorga ningOn derecho para uso comercial. La licencia no cubre a ninguna unidad del producto que
no sea esta y la licencia no se extiende a ninguna unidad del producto o proceso sin licencia en conformidad con el
ISO/IEC 11172-3 o ISO/IEC 13818-3 utilizada o vencida en combinacion con esta unidad del producto. La licencia solo
cubre el uso de esta unidad para codificar y/o descodificar archivos de audio en conformidad con et ISO/IEC 11172-3 o
ISO/IEC 13818-3. No se otorga ningQn derecho bajo esta licencia para caracteristicas o funciones det producto que no
esten conformes con el ISO/IEC 11172-3 o ISO/IEC 13818-3.
Otros paJses
La unidad dei producto que se incluye con este manual dei usuario se suministra con ticencia bajo derechos de
propiedad intelectual de otras empresas. Esta licencia est& timitada al uso no comercial privado de consumidores
que sean usuarios finales para contenido con licencia. No se otorga ningQn derecho para uso comercial. La licencia
no cubre a ninguna unidad del producto que no sea esta y la ticencia no se extiende a ninguna unidad del producto o
proceso sin licencia en conformidad con el ISO/IEC 11172-3 o ISO/IEC 13818-3 utilizada o vencida en combinaci6n
con esta unidad del producto. La licencia solo cubre et uso de esta unidad para codificar y/o descodificar archivos de
audio en conformidad con el ISO/IEC 11172-3 o ISO/IEC 13818-3. No se otorga ningOn derecho bajo esta ticencia para
caracteristicas o funciones del producto que no esten conformes con et ISO/IEC 11172-3 o ISO/IEC 13818-3.
© 2007 Samsung Electronics Co., Ltd. Reservados todos los derechos.
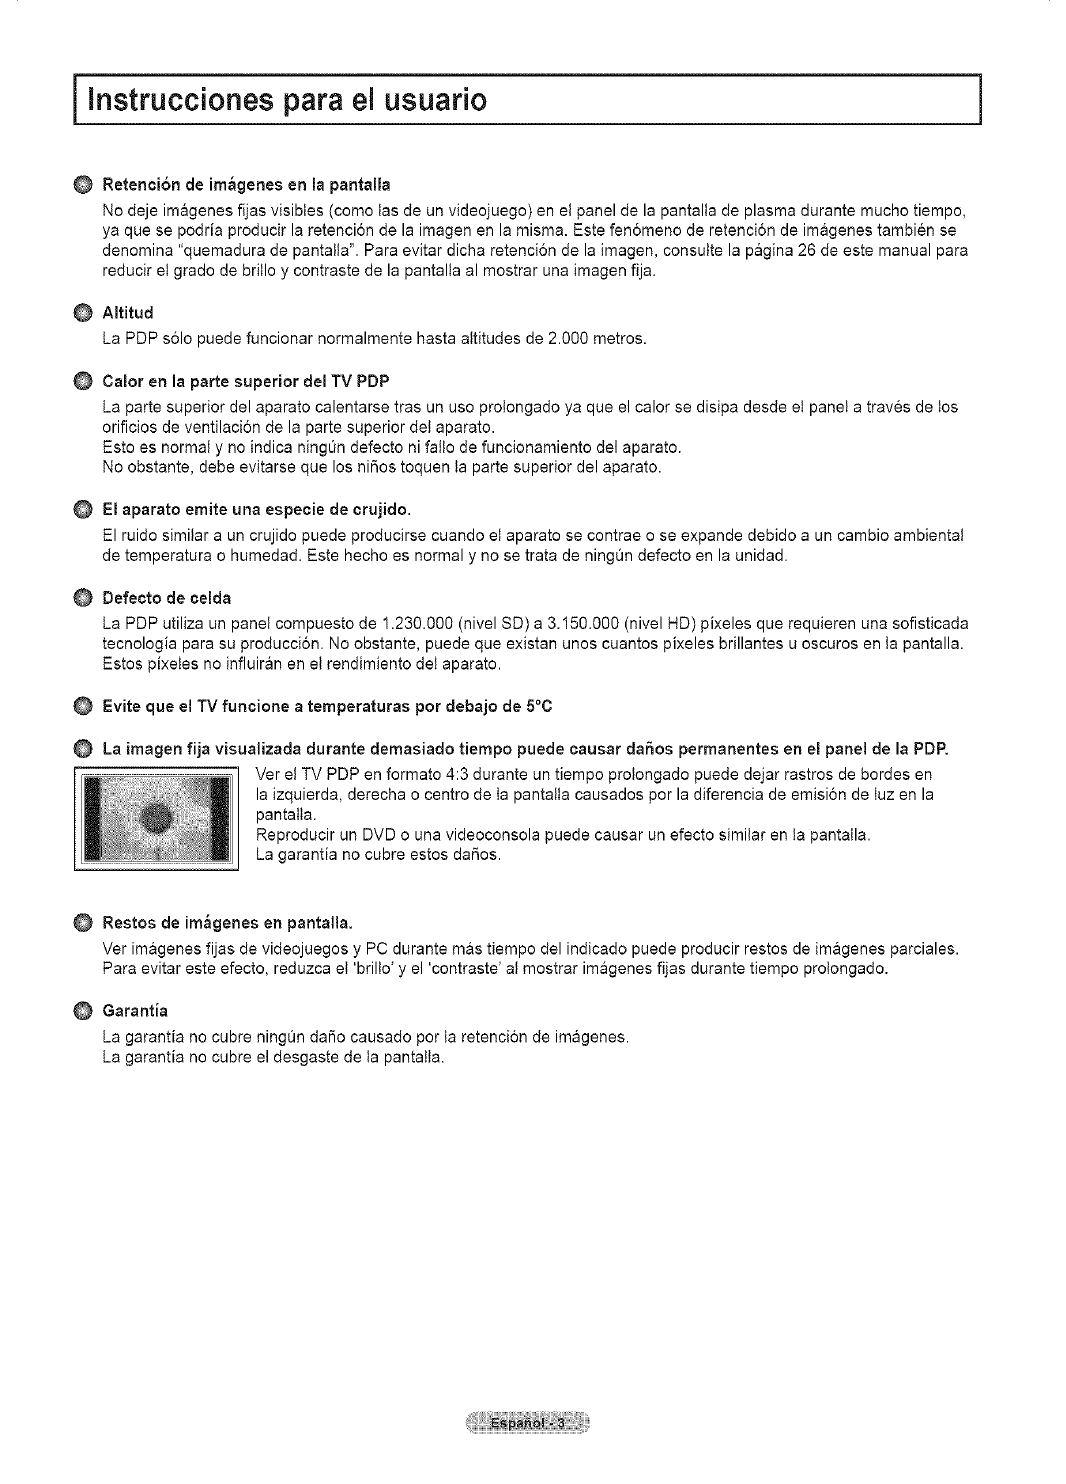
ilnstrucciones para el usuario
O Retenci6n de imageries en la pantalla
No deje imageries fijas visibles (como tas de un videojuego) en et panel de la pantalla de plasma durante mucho tiempo,
ya que se podria producir la retencion de la imagen en la misma. Este fen6meno de retenci6n de imageries tambien se
denomina "quemadura de pantalla". Para evitar dicha retencion de la imagen, consutte la pagina 26 de este manual para
reducir et grado de britlo y contraste de la pantalla al mostrar una imagen fija.
AItitud
La PDP s61o puede funcionar normalmente hasta altitudes de 2.000 metros.
Calor en la parte superior del TV PDP
La parte superior del aparato calentarse tras un uso protongado ya que el calor se disipa desde et panel a traves de los
orificios de ventilacion de la parte superior del aparato.
Esto es normal y no indica ningOn defecto ni fatto de funcionamiento del aparato.
No obstante, debe evitarse que los niSos toquen ta parte superior del aparato.
I=l aparato emite una especie de crujido.
El ruido similar a un crujido puede producirse cuando et aparato se contrae o se expande debido a un cambio ambientai
de temperatura o humedad. Este hecho es normal y no se trata de ningOn defecto en la unidad.
Defecto de celda
La PDP utiliza un panel compuesto de 1.230.000 (nivel SD) a 3.150.000 (nivel HD) pixeles que requieren una sofisticada
tecnologia para su producci6n. No obstante, puede que existan unos cuantos pixeles brillantes u oscuros en ta pantalla.
Estos pixetes no influiran en el rendimiento det aparato.
Evite que el TV funcione a temperaturas pot debajo de 5°C
La imagen fija visualizada clurante demasiado tiempo puede oausar claSos permanentes en el panel de la PDR
Ver el TV PDP en formato 4:3 durante un tiempo protongado puede dejar rastros de hordes en
la izquierda, derecha o centro de ta pantalta causados por la diferencia de emision de tuz en la
pantalla.
Reproducir un DVD o una videoconsola puede causar un efecto similar en ta pantalla.
La garantia no cubre estos dar_os.
Restos de imageries en pantalla.
Ver imagenes fijas de videojuegos y PC durante m&s tiempo del indicado puede producir restos de imagenes parciales.
Para evitar este efecto reduzca et 'brilto' y el 'contraste' at mostrar imagenes fijas durante tiempo protongado.
Garantia
La garantia no cubre ningQn daSo causado por la retencion de imageries.
La garantia no cubre el desgaste de ta pantalta.
Iindice ]
[] Caracteristicas ............................................................... 5
[] Accesorios ..................................................................... 5
[] Aspecto general det panel de control ............................. 6
[] Aspecto general det panel de conexiones ..................... 7
[] Mando a distancia .......................................................... 8
[] Instalacion de tas pilas en et mando a distancia ............ 9
[] Conexi6n de tas antenas VHF y UHF ............................ 9
[] Conexion de TV por cable ........................................... 10
[] Conexi6n de un aparato de video ................................ 11
[] Conexion a una camara de video ................................ 12
[] Conexi6n de un reproductor de DVD/decodificador.... 12
[] Conexion a un reproductor de DVD/decodificador a
traves de HDMI ........................................................... 13
[] Conexion a un reproductor de DVD/decodificador a
traves de DVi .............................................................. 13
[] Conexion de un sistema de audio digital ..................... 14
[] Conexion de un amplificador/DVD para Home Cinema ... 14
[] Conexion de un ordenador .......................................... 14
[] Encendido y apagado del televisor .............................. 15
[] Funci6n Plug & Play .................................................... 15
[] Cambio de canales ...................................................... 17
[] Ajuste det volumen ....................................................... 18
[] Visualizaci6n de la pantalla ......................................... 18
[] Visualizacion de los men0s ......................................... 18
[] Memorizacion de los canales ...................................... 19
[] Configuracion dei mando a distancia ........................... 20
[] Para seleccionar la fuente ........................................... 25
[] Para editar el hombre de ta fuente de entrada ............ 25
[] Utilizaci6n de los ajustes de imagen automaticos ....... 26
[] Reducci6n digital del ruido ........................................... 27
[] Cambio del tamarSo de la pantalla ............................... 28
[] Configuracion detallada de los valores de ta imagen ..29
[] Color activo .................................................................. 30
[] DNte (motor digital de imageries naturales) ................ 30
[] Setecci6n del Modo pelicula ........................................ 31
[] Ajuste dei modo Pantalla Azul ..................................... 31
[] Configuracion dei Nivel de negro HDMI ...................... 31
[] Visualizacion de imagen sobre imagen ....................... 32
[] Congelacion de la imagen actual ................................. 33
[] Utilizaci6n de los parametros de sonido automaticos ...... 34
[] Personalizaci6n det sonido .......................................... 34
[] Ajuste de TruSurround XT ........................................... 35
[] Seleccion de una pista de sonido multicanal (MTS) - Digital,.., 35
[] Seieccionde una pistade sonido muiticanal(MTS)-Anal6gico,..,36
[] Control automatico de volumen ................................... 36
[] Selecci6n del sitencio interno ...................................... 36
[] Ajuste det sonido de ta melodia ................................... 37
[] Audicion del sonido de la imagen secundaria (PIP) ,..,37
[] Selecci6n de la antena ................................................ 38
[] Adici6n y supresi6n de canales ................................... 38
[] Ajuste de los canales favoritos .................................... 39
[] Visualizaci6n de las listas de canales .......................... 40
[] Configuraci6n del modo Lista de canales predeterminada.... 40
[] Etiquetado de canales ................................................. 41
[] Sintonizaci6n fina de los canales anal6gicos .............. 41
[] Comprobaci6n de ta potencia de ta sei_al digital ......... 42
= LNA (Low Noise Amplifier - Amplificador de ruido bajo) ... 42
[] Uso det televisor como pantalta det PC ....................... 43
= Modos de visuatizaci6n ............................................... 43
= Ajuste del televisor con et ordenador ........................... 44
= Configuracion de PC para Home Cinema ................... 45
= Configuracion de la hora .............................................. 46
= Selecci6n det idioma de los ment;_s ............................. 49
= Uso dei Modo Juego .................................................... 49
= Visi6nde subtitulos (mensajesde texto en pantalla) - Digital.......50
= Visi6nde subtitulos (mensajesde texto en panta)la)- Ana(6gico 51
= Nivel de transparencia de los men0s ........................... 52
= Cofiguraci6n det LED azui ........................................... 52
= Uso de la funci6n de ahorro de energia ...................... 53
= Prevenci6n dei desgaste de la panta!la ....................... 53
= Reducci6n de los efectos de una pantalla quemada ... 54
= Ajuste de Funci6n de Ayuda ........................................ 54
= Ajuste de montaje en la pared (se vende par separado).... 55
= Actualizaci6n del software ........................................... 56
= Uso det V-Chip ............................................................. 56
Que es Anynet? ........................................................... 62
= Conexion de dispositivos Anynet+ .............................. 62
= Configuracion de Anynet+ ........................................... 63
= BQsqueda y cambio de dispositivosAnynet+ .............. 63
= Grabacion .................................................................... 64
= Escucha a traves de un receptor ................................. 65
= Compruebe estos puntos antes de solicitar servicio tecnico..... 65
= Identificaci6n de problemas ......................................... 66
= Instalaci6n del equipo de montaje en la pared ............ 67
= Como montar el soporte base (segQn el modeto) ........ 68
= Especificaciones .......................................................... 68
= Dimensiones (HP-T4254) ............................................ 69
= Dimensiones (HP-T5054) ............................................ 70
Symbols ,m
Press One-Touch Note
Button

ilnformaci6n general
Caracteristicas
. Valores ajustables de la imagen que se pueden almacenar en la memoria del televisor.
. Temporizador automatico para encender o apagar el televisor.
. Temporizador de desconexion especial.
. Funcion V-chip.
. Excelente interfaz digital y capacidad de trabajo en red:
Et sintonizador digital HD incorporado permite ver tas emisiones HD que no exigen una suscripcion sin que sea
necesario disponer de un decodificador.
. Mando a distancia
Con et mando a distancia suministrado se puede controlar et televisor, ta mayoria de los reproductores de DVD, los
receptores de televisi6n digita! y de cable y los aparatos de video.
. Catidad excelente de la imagen.
- La tecnologia DNle proporciona imageries completamente reales.
. SRS TruSurround XT
- SRS TruSurround XT proporciona un sistema surround Dotby virtual.
Accesorios
Cornpruebe que los articulos siguientes vengan incluidos con su televisor.
Si falta alguno, p6ngase en contacto con au distribuidor.
Mando a distancia Cable de atimentacidn Manualdel usuario/ Tarjetade garantia/ PaSode limpieza
(BN59-00599A)/ (3903-000144) Guia rapida de la Tarjeta de registro/
PilasAAA (4301-000103) configuracidn Manual de seguridad
Cubierta inferior/Tornillos (2) N_cleo de ferrita para NQcleo de ferrita para NQcleo de ferrita para
(Consulte la pagina 68) cable de alimentaci6n cable de AV lateral /cable de Auriculares
(3301-001110) S-VIDEO (3301-001305) (3301-001456)
Las piezas siguientes se venden per separado y estan disponibles en la mayoria de tiendas de etectr6nica.
Cable S-VIDEO (BN39-00149A) Cable HDMI (BN39-00641A) Cable HDMI/DVl
(BN39-00643A)
Cables de componentes (RCA)
(BN39-00279A)
Cable PC (BN39-00115A) Cable de audio PC (BN39-00061B)
>N_cleo de ferrita (cable de alirnentaci6n, cable de audio/video,
cable de S-Video, auriculares)
Los nt_cleos de ferrita se utilizan para proteger tos cables de tas
interferencias. Cuando conecte un cable, abra el nOcteo de
ferrita y fijeto alrededor del cable cerca del conector.
Cable 6ptico Cablede antena(BN39-00333A)
......................_i_.....
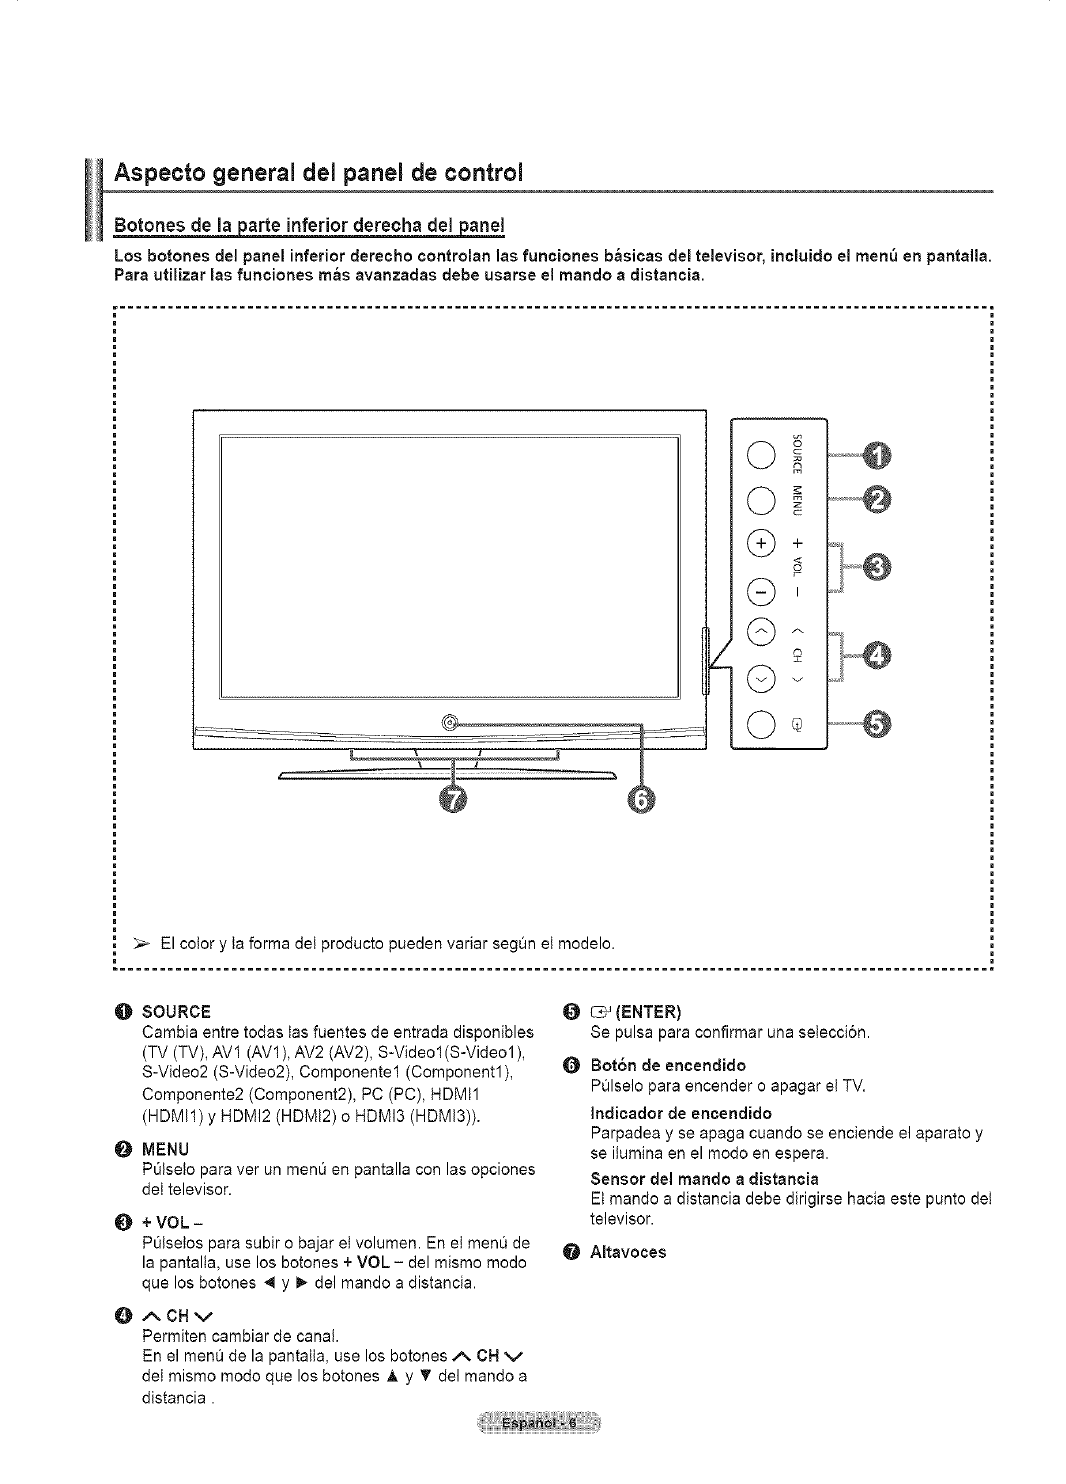
Aspect© general del panel de control
Botone$ de la arte inferior derecha del anel
Los botones del panel inferior clerecho controlan las funciones b_sicas del televisor, inoluiclo el menu en pantalla.
Para utilizar las funoiones m_s avanzadas debe usarse el mando a clistancia.
............................................................................................................. i
A
+
<
o
G'
©A
C) v
00
O SOURCE
Cambia entre todas las fuentes de entrada disponibles
(TV (TV), AVl (AV1), AV2 (AV2), S-Video1 (S-Video1),
S-Video2 (S-Video2), Componentel (Component1),
Componente2 (Component2), PC (PC), HDMtl
(HDMI1) y HDMI2 (HDMI2) o HBMI3 (mUMI3)).
@MENU
POlseto para ver un menO en pantalla con las opciones
del televisor.
O+VOL-
P01setos para subir o bajar et volumen. En el men0 de
la pantalla, use los botches + VOL - del mismo modo
que los botches _ y m.,del mando a distancia.
OACNv
Permiten cambiar de canal.
En el menQ de la pantaiia, use los botones A CN v
del mismo rood© que los botones A y _' del mando a
distancia.
O
Q
@
_÷ (ENTER)
Se pulsa para confirmar una setecci6n.
Bot6n de encenclido
POlselo para encender o apagar el TV.
Inclicador de encendido
Parpadea y se apaga cuando se enciende el aparato y
se iiumina en el modo en espera.
Sensor del mando a distancia
El mando a distancia debe dirigirse hacia este punt© det
televisor.
AItavoces

Aspecto general dei panel de conexiones
Tomas del_osterior
Use tas tomas del panel posterior para conectar componentes de A/V que estaran disponibles permanentemente, como un
video o un reproductor de DVD. Si desea mas informacion sobre ta conexion del equipo, consulte tas paginas 9~14. El color
ta forma del producto pueden variar, seg0n et modelo.
®
OBot6n de encendido QANT 1IN(AIR)/ANT 2 IN(CABLE)
Conexion para el cable de alimentacion suministrado.
DIGITAL AUDIO OUT (OPTICAL)
Se conecta al componente de audio digital.
O AUDIO OUT (R/L)
Salidas de audio para dispositivos externos.
PC AUDIO IN
Conexion para ta toma de salida de audio det PC.
O PC_N
Conexi6n para la salida de video del PC.
Q DVI IN (HDMI I)(AUDIO-R/L)
Conectelas con la toma de salida de audio DVI de un
dispositivo extemo.
HDMI iN 1, 2
Conexion HDMI de un dispositivo que tenga salida HDMI.
($61o HDMI 1 admite HDMI-DV! IN y PC.)
Esta entrada se puede utilizar tambien como una
conexion DVl con entradas de sei_ales de audio
anal6gicas independientes. Para realizar esta conexi6n
se requiere un cable opciona! HDMI/DVt.
Cuando se usa un adaptador HDMI/DVl, las entradas de
seSales de audio anal6gicas DVl del televisor permiten
recibir sei_ales de audio por {as entradas derecha e izquierda
desde un dispositivo DVl. (No es compatible con un PC)
Conector coaxial de 75 Opara antena o red por cable.
Q EX-MNK
Toma de canexi6n para un soporte de montaje mura!
apcional. Permite ajustar el angula de visualizaci6n det
televisor mediante el manda a distancia.
_) AUDIO-R/L (AV IN 1)
Entradas de audio para dispositivos externos, como
una videocamara o un aparata de video.
t[_ S-VIDEO (AV IN 1)
Entrada de S-Video para dispesitivos externos con
saJlda de B-Video, como una v{deocamara aun aparato
de video.
(_) VIDEO (AV iN I)
Entrada de video para dispositivos externos, como una
videoc&mara oun aparato de video.
_) COMPONENT iN 1, 2
Entradas de video de componentes (Y/PB/PR) y audio
(R-AUDIO-L).
Tomas del panel lateral
Utilice las tomas del panel lateral derecho para conectar un componente que s6to se use ocasionalmente, como una
camara de video ouna consola de videojuegos. El color y la forma det producto pueden variar seg0n et modelo.
_m O HDMI IN 3
Conexion HDMI de un dispositivo que tenga salida HDMI.
@ SERWCE
Esta toma es solo para servicio tecnico.
m_ S-VIDEO IN 2
Entrada de S-Video para dispositivos externos con salida de S-Video.
AVIN2
Entradas de audio y video para dispositivos extemos.
0 AURICULAR
Puede conectar unos auriculares si desea ver un programa de tetevisi6n sin molestar alas
personas que estan en ta misma habitaci6n.
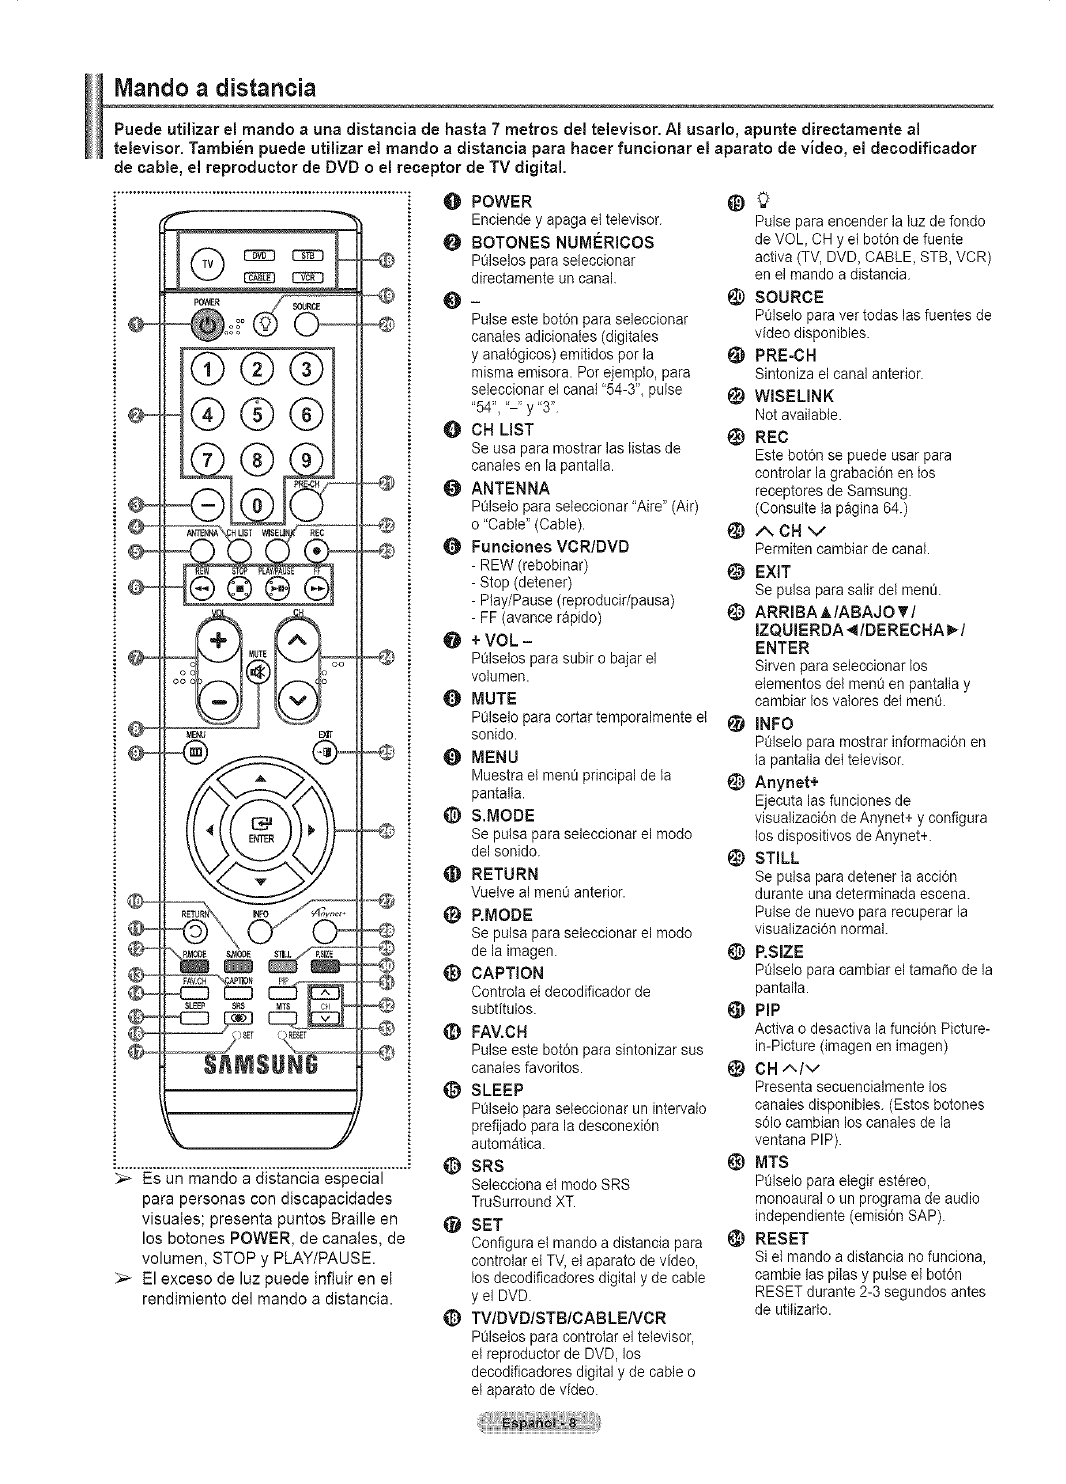
Mando a distancia
Puede utilizar el mando a una distancia de hasta 7 metros del televisor. AI usarlo, apunte directamente al
televisor. Tambi6n puede utilizar el mando a distancia para hacer funcionar el aparato de video, el decodificador
de cable, el reproductor de DVD o el receptor de TV digital.
)
>- Bs un mando a distancia especial
para personas con discapacidades
visuales; presenta puntos Braille en
los botones POWER, de canales, de
volumen, STOP y PLAY/PAUSE.
:,_ El exceso de luz puede influir en et
rendimiento del mando a distancia.
O POWER
Enciende y apaga e{televisor.
O BOTONES NUMERICOS
Pt_lselospara seleccionar
directamente un canal.
@
0- @
Pulse este bot6n para seleccionar
canates adicionates (digitales
y anat6gicos) emitidos per la
misrna emisora. Per ejempto, para
seleccionar el canal "54-3"_ pulse
"54", "-' y "3".
O CH LIST @
Se usa para mostrar las listas de
canates en la pantalla.
O ANTENNA
Pt_lselo para seleccionar "Aire" (Air)
o "Cable" (Cable).
Funciones VCR/DVD
- REW (rebobinar)
- Stop (detener)
- Play/Pause (reproducir/pausa)
- FF (avance r@ido)
O+VOL-
Pt_lselospara subir o bajar el
volumen.
O MUTE
Pt_iselo para cortartemporalmente el _1
sonido.
QMENU
Muestra el menQprincipal de la
pantalla.
@S,MOOE
Se pulsa para seleccionar el mode
del sonido, t_)
@ RETURN
Vuelve al ment_anterior.
@P.MODE
Se pulsa para seleccionar el mode
de la imagen. _)
_]) CAPTION
Controta et decodificador de
subtitulos. _)
@FAV.CH
Pulse este bot6n para sintonizar sus
canales favorites. _)
@SLEEP
Pt_iselo para seleccionar un Jntervalo
prefijado para la desconexi6n
automatica.
SRS @
Selecciona el mode SRS
TruSurround XT.
SET
Configura el mando a distancia para _)
controlar e{ TV, el aparato de video,
los decodificadores digital y de cable
y el DVD.
@D TVIDVDISTBICABLENCR
Pt_lselospara controlar el televisor,
e{ reproductor de DVD, los
decodificadores digital y de cable o
el aparato de video.
Pulse para encender la luz de fondo
de VOL CH y el bot6n de fuente
activa (TV, DVD, CABLE, STB, VCR)
en el mando a distancia.
SOURCE
Pt_lselo para ver todas las fuentes de
video disponibles.
PRE-CH
Sintoniza el canal anterior.
WlSEUNK
Not available.
REC
Este bot6n se puede usar para
controlar la grabaciOn en los
receptores de Samsung.
(CensuRe ta pagina 64.)
ACHv
Permiten cambiar de canal.
EXIT
Se pulsa para salir del men&
ARRIBA A/ABAJ 0 T /
IZQUIERDA_/DERECHA_/
ENTER
Sirven para seleccionar los
elementos det ment_en pantalta y
cambiar los vatores dei men&
INFO
PQIselopara mostrar informaci6n en
la pantaHadel televisor.
Anynet+
Ejecuta las funciones de
visualizaci6n de Anynet+ y configura
los dispositivos de Anynet+.
STILL
Se pulsa para detener la acci6n
durante una determinada escena.
Pulse de nuevo para recuperar la
visualizaci6n normal.
RSIZE
Pt_lselo para cambiar el tamale de la
pantalta.
PIP
ActJvao desactiva la funcidn Picture-
in-Picture (imagen en imagen)
CH A/V
Presenta secuencialmente los
canales disponibles. (Estos botones
s61ocambian los canales de la
ventana PIP).
MTS
Pt_lselopara etegir estereo,
monoaural o un programa de audio
independiente (emisi6n SAP).
RESET
Si el mando a distancia no funciona,
cambie las pilas y pulse el bot6n
RESET durante 2-3 segundos antes
de utitizarlo.
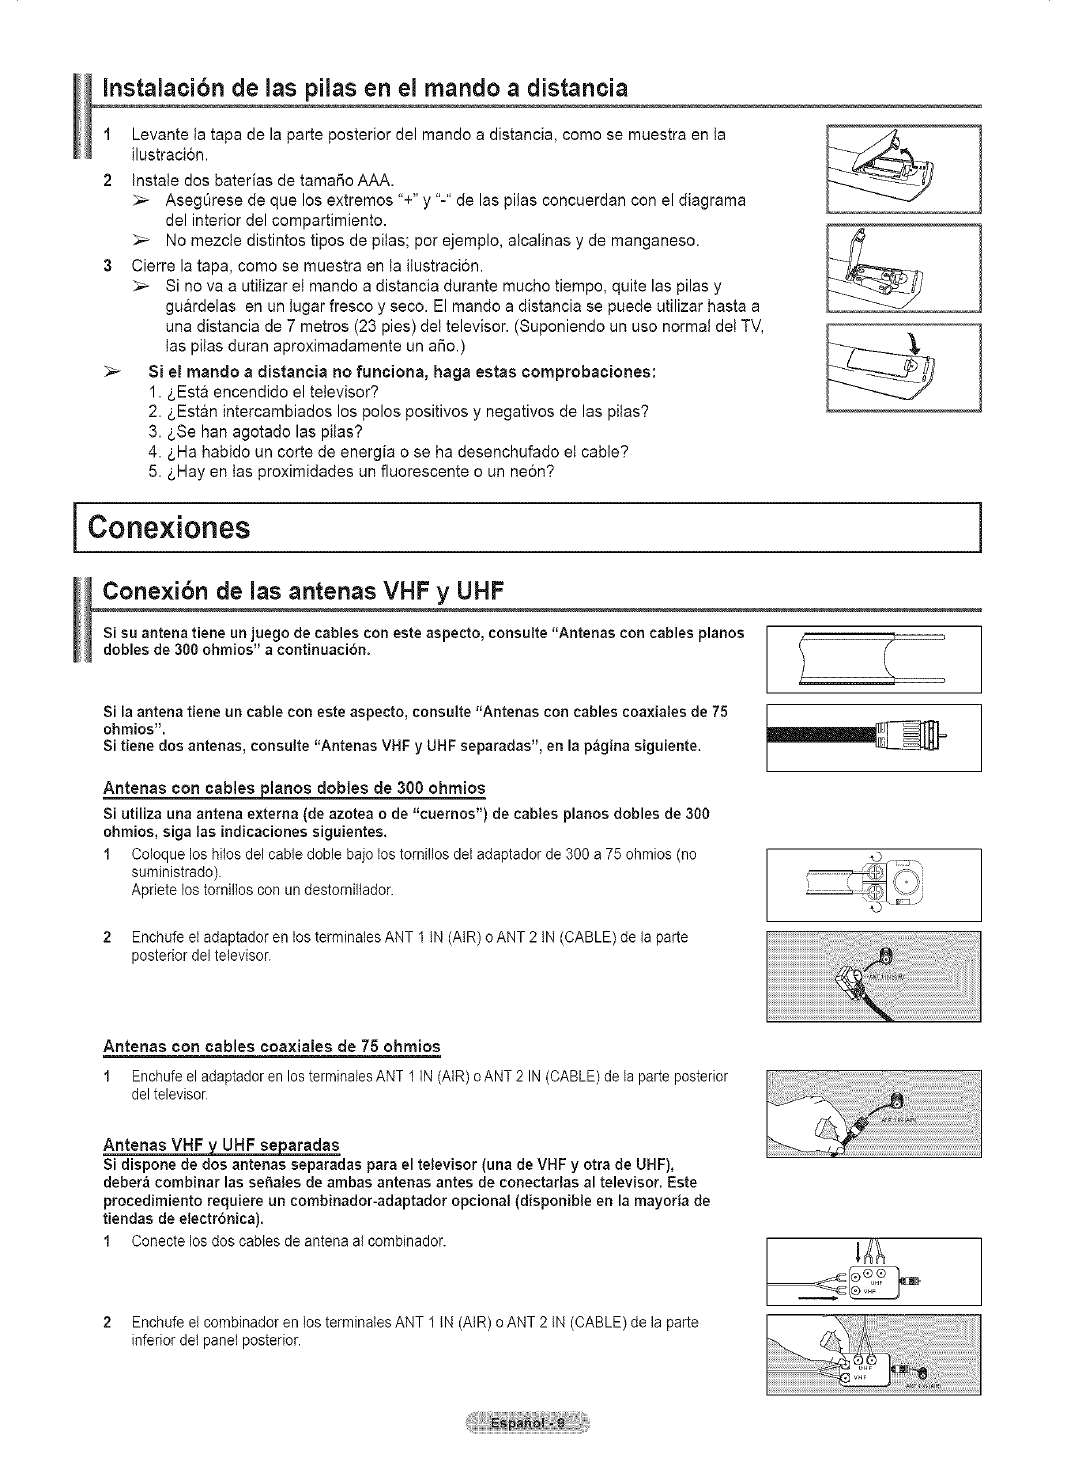
Instalacibn de las pilas en el mando a distancia
1 Levante ta tapa de la parte posterior del mando a distancia, como se muestra en ta
ilustracion.
2 Instale dos baterias de tamai_o AAA.
:,_ AsegOrese de que los extremos "+" y"-" de las pilas concuerdan con el diagrama
del interior del compartimiento.
_-- No mezcle distintos tipos de pitas; por ejemplo, alcalinas y de manganeso.
3 Cierre la tapa, como se muestra en ta ilustraci6n.
_-- Si no va a utitizar el mando a distancia durante mucho tiempo, quite las pilas y
guardelas en un tugar fresco y seco. El mando a distancia se puede utilizar hasta a
una distancia de 7 metros (23 pies) det televisor. (Suponiendo un uso normal det TV,
tas pitas duran aproximadamente un a_o.)
>Si el mando adistancia no funciona, haga estas comprobaciones:
1. _.Esta encendido el televisor?
2. _.Estan intercambiados los polos positivos y negativos de las pitas?
3. _.Se hart agotado las pilas?
4. _.Ha habido un corte de energia o se ha desenchufado et cable?
5. _.Hay en tas proximidades un fluorescente o un ne6n?
i Conexiones
Conexibn de las antenas VHF yUHF
Si su antena tiene un juego de cables con este aspecto, consulte "Antenas con cables pianos
dobles de 300 ohmios" a continuacion.
Si la antena tiene un cable con este aspecto, consulte "Antenas con cables coa×iales de 75
ohmios'.
Si tiene dos antenas, consulte "Antenas VHF y UHF separadas", en la pagina siguiente.
Antenas con cables jolanos dobles de 300 ohmios
Si utiliza una antena externa (de azotea ode "cuernos") de cables pianos dobles de 300
ohmios, siga las indicaciones siguientes.
1 Coloque los hitos del cable doble bajo los tornillos del adaptador de 300 a 75 ohmios (no
suministrado).
Apriete los tornilIos con un destorniltador.
2 Enchufe el adaptador en los terminates ANT 1 IN (AIR) o ANT 2 IN (CABLE) de la parte
posterior del televisor.
Antenas con cables coaxiales de 75 ohmios
1 Enchufe el adaptador en los terminalesANT 1 IN (AIR) o ANT 2 IN (CABLE) de la parte posterior
del televisor
Antenas VH_ UHF se aradas
Si dispone de dos antenas separadas para el televisor (una de VHF y otra de UHF),
deber_ combinar las sehales de ambas antenas antes de conectarlas al televisor. Este
procedimiento requiere un combinador-adaptador opcional (disponibte en la mayoria de
tiendas de electr6nica).
1 Conecte los dos cabtes de antena al combinador.
2 Enchufe el combinador en los terminates ANT 1 IN (AIR) o ANT 2 IN (CABLE) de la parte
inferior del panel posterior.
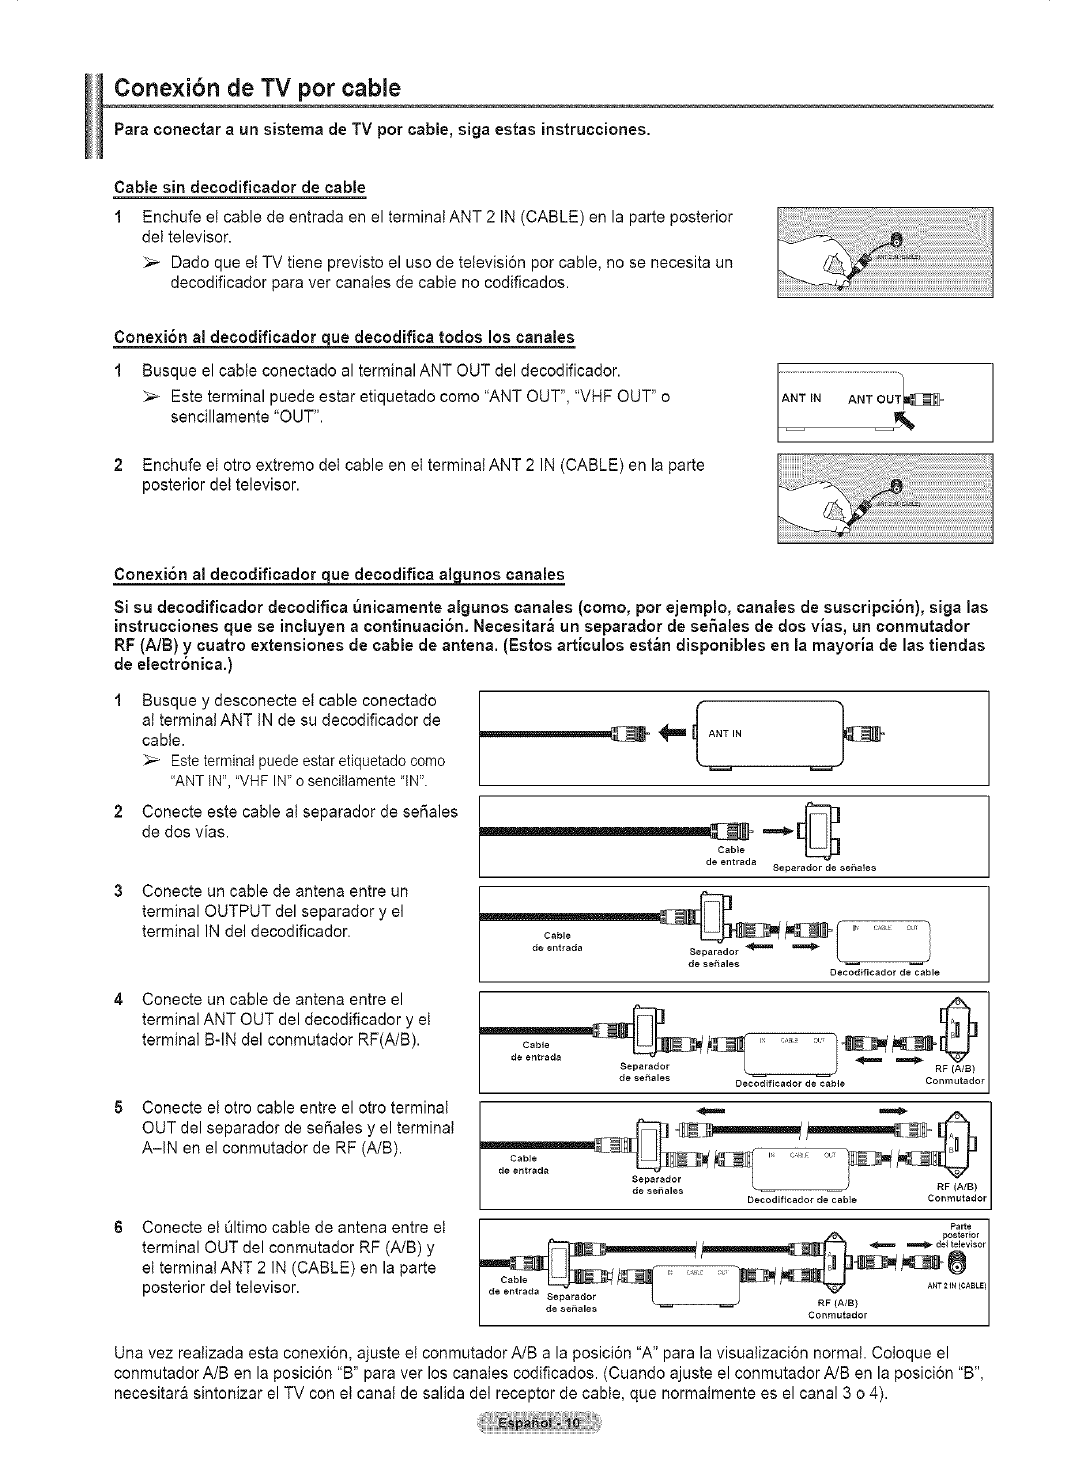
Cone×ibn de TV per cable
Para conectar a un sistema de TV per cable, alga estas instru¢ciones.
Cable sin decodificador de cable
1 Enchufe et cable de entrada en el terminal ANT 2 IN (CABLE) en la parte posterior
del televisor.
_,_ Dado que ei TV tiene previsto el use de televisi6n per cable, no se necesita un
decodificador para ver canales de cable no codificados.
Conexibn al decodificador clue decodifica todos los canales
1 Busque el cable conectado al terminal ANT OUT del decodificador.
_-- Este terminal puede estar etiquetado come "ANT OUT", "VHF OUT" o
sencillamente "OUT".
2 Enchufe et otro extreme det cable en et terminal ANT 2 IN (CABLE) en la parte
posterior det televisor.
Cone×i6n al de¢odificador que de¢odifica aqlunos canales
Si su decodificador deoodifica _nioamente algunos oanales (come, per ejemplo, canales de suscripci6n), siga las
instrucciones que se incluyen aoontinuaci6n. Necesitar_ un separador de se_ales de dos vias, un eonmutador
RF (A/B) y cuatro extensiones de cable de antena. (Estos articules est_n disponibles en la mayoria de las tiendas
de electr6nica.)
1 Busque y desconecte ei cable conectado
al terminat ANT IN de su decodificador de
cable.
Este terminal puede estar etiquetado come
"ANT IN", "VHF IN_ o senciIlamente "iN".
2 Conecte este cable ai separador de set, ales
de dos vias.
Conecte un cable de antena entre un
terminal OUTPUT del separador y el
terminal IN del decodificador.
Conecte un cable de antena entre el
terminal ANT OUT del decodificador y et
terminal B-IN del conmutador RF(A/B).
Conecte el otro cable entre el otro terminal
OUT del separador de set, ales y el terminat
A-IN en el conmutador de RF (A/B).
Conecte el Oltimo cable de antena entre et
terminal OUT del conmutador RF (A/B) y
el termina! ANT 2 IN (CABLE) en la parte
posterior det televisor.
Cable
de entrada
Separador de sehales
Cable
de entrada J
Decodificador de cable
Cable i c,_ ,L,
de entrada
Separador RF (A/B)
Conrnutador
Cable ir c_,_ o,
Separador
de seiiales _ RF (A/B)
Decodificador de cable Conmutador
Parte
_==== _ del televisor
de entrada v
Separ_dor _ ] RFIAIB)
de senales Conmutador
Una vez realizada esta conexion, ajuste et conmutador A/B a la posici6n "A" para la visualizaci6n normal. Coloque el
conmutador A/B en la posici6n "B" para ver los canales codificados. (Cuando ajuste el conmutador A/B en la posicion "B",
necesitara sintonizar el TV con el canal de salida del receptor de cable, que normalmente es el canal 3 o 4).
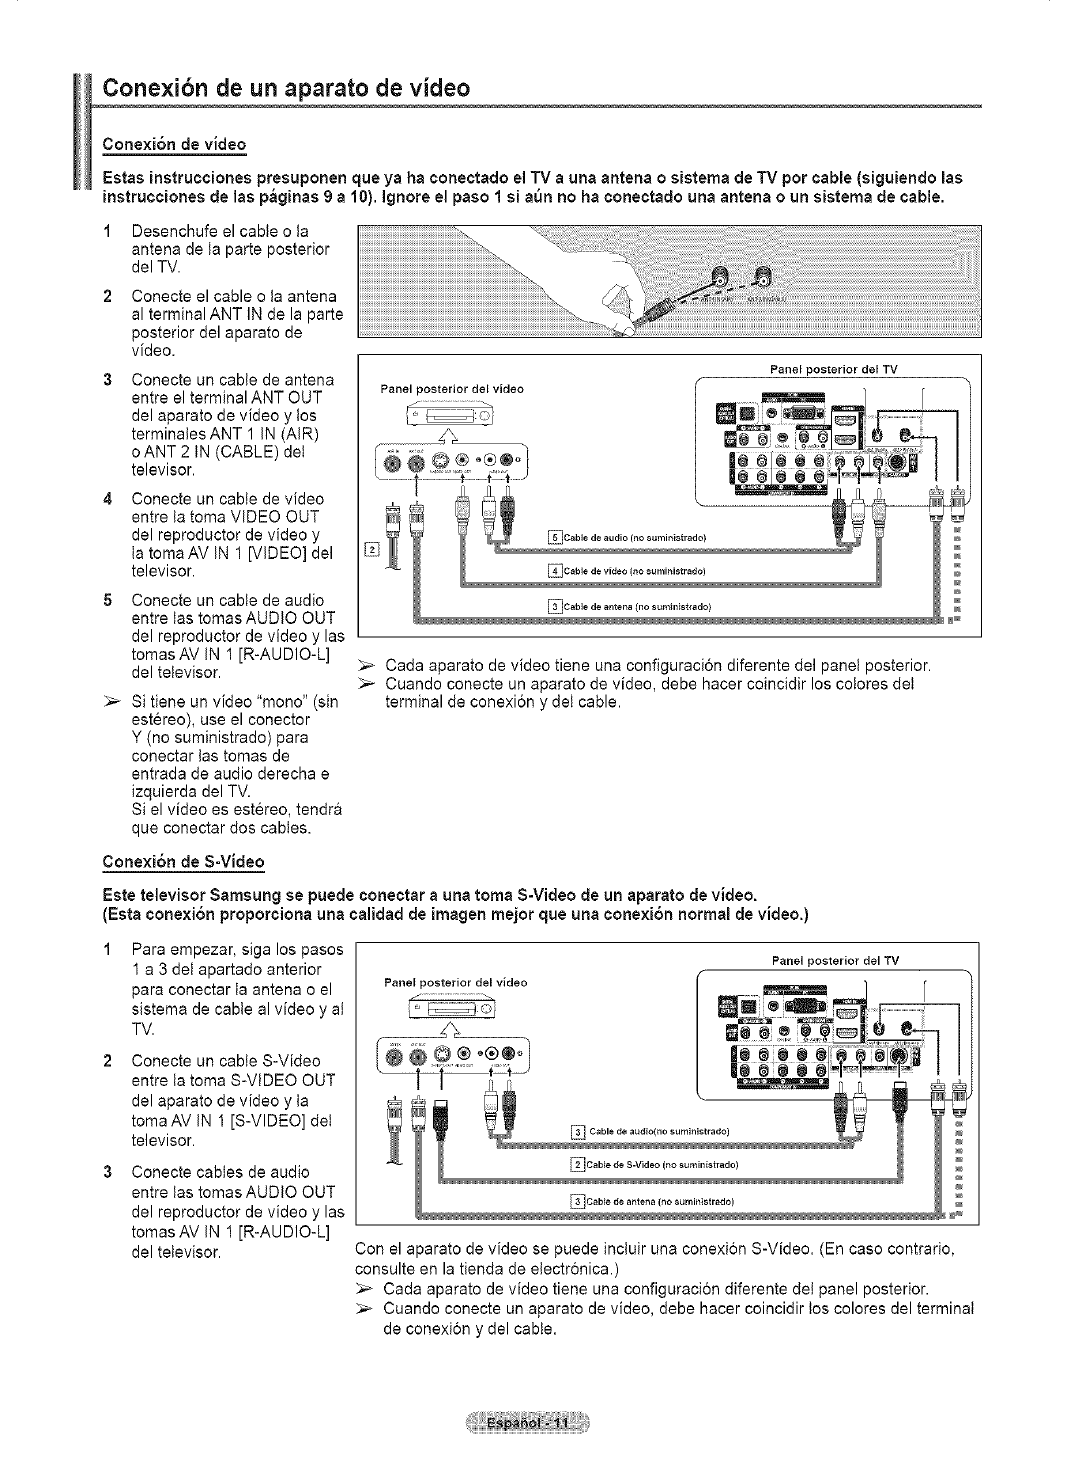
Conexi6n de un aparato de video
Conexi6n de video
Estas instrucciones presuponenque ya ha conectado el TV a una antena osistema de TV por cable (siguiendo las
instrucciones de las p_ginas 9 a 10). ignore el paso 1 si ann no ha conectado una antena o un sistema de cable.
1 Desenchufe el cable o la
antena de ta parte posterior
del TV.
Conecte el cable o ta antena
al terminal ANT IN de la parte
posterior del aparato de
video.
Conecte un cable de antena
entre el terminal ANT OUT
del aparato de video y tos
terminales ANT 1 IN (AIR)
o ANT 2 IN (CABLE) det
televisor.
Conecte un cable de video
entre la toma VIDEO OUT
del reproductor de video y
ta toma AV IN 1 [VIDEO] del
televisor.
Conecte un cable de audio
entre las tomas AUDIO OUT
del reproductor de video y las
tomas AV IN 1 [R-AUDIO-L]
del televisor.
_,_ Si tiene un video "mono" (sin
estereo), use el conector
Y (no suministrado) para
conectar las tomas de
entrada de audio derecha e
izquierda del TV.
Si el video es estereo, tendr&
que conectar dos cables.
Cone×ibn de S-Video
!!!iiii i i i !i ii i ii i!i ! ! i i iiiiiiiiiiiiiiiiiiiiiiiiiiiiiiiiiiiiiiiiiiiiiiiiiiiiiiiiiiiiiiiiiiiiiiiiiiiiiiiiiiiiiiiiiiiiiiiiiiiiiiiiiiiiiiiiiiiiiiiiiiiiiiiiiiiiiiiiiiiiiiiiiiiiiiiiiiiiiiiiiiiiiiiiiiiiiiiiiiiiiiiiiiiiiiiiii ii J
Panel posterior del TV
Panel posterior del video
_Cable de audio (no surnir_istrado)
Cada aparato de video tiene una configuraci6n diferente del panel posterior.
_-- Cuando conecte un aparato de video, debe hacer coincidir los cotores det
terminal de conexion y det cable.
Estetelevisor Samsung se puede conectar a una toma S-Video de un aparato de video.
(Esta conexibn proporciona una calidad de imagen mejor que una conexi6n normal de video.)
Para empezar, siga los pasos
1 a 3 det apartado anterior
para conectar ta antena o el
sistema de cable al video y ai
TV.
Conecte un cable S-Video
entre ta toma S-ViDEO OUT
del aparato de video y la
toma AV IN 1 iS-VIDEO] det
televisor.
Conecte cables de audio
entre las tomas AUDIO OUT
del reproductor de video y las
tomas AV IN 1 [R-AUDIO-L]
del televisor.
Panel posterior del video
Panel posterior del TV
Con el aparato de video se puede inctuir una conexion S-Video. (En caso contrario,
consulte en la tienda de electr6nica.)
Cada aparato de video tiene una configuracion diferente del panel posterior.
_-- Cuando conecte un aparato de video, debe hacer coincidir los colores del terminal
de conexi6n y del cable.
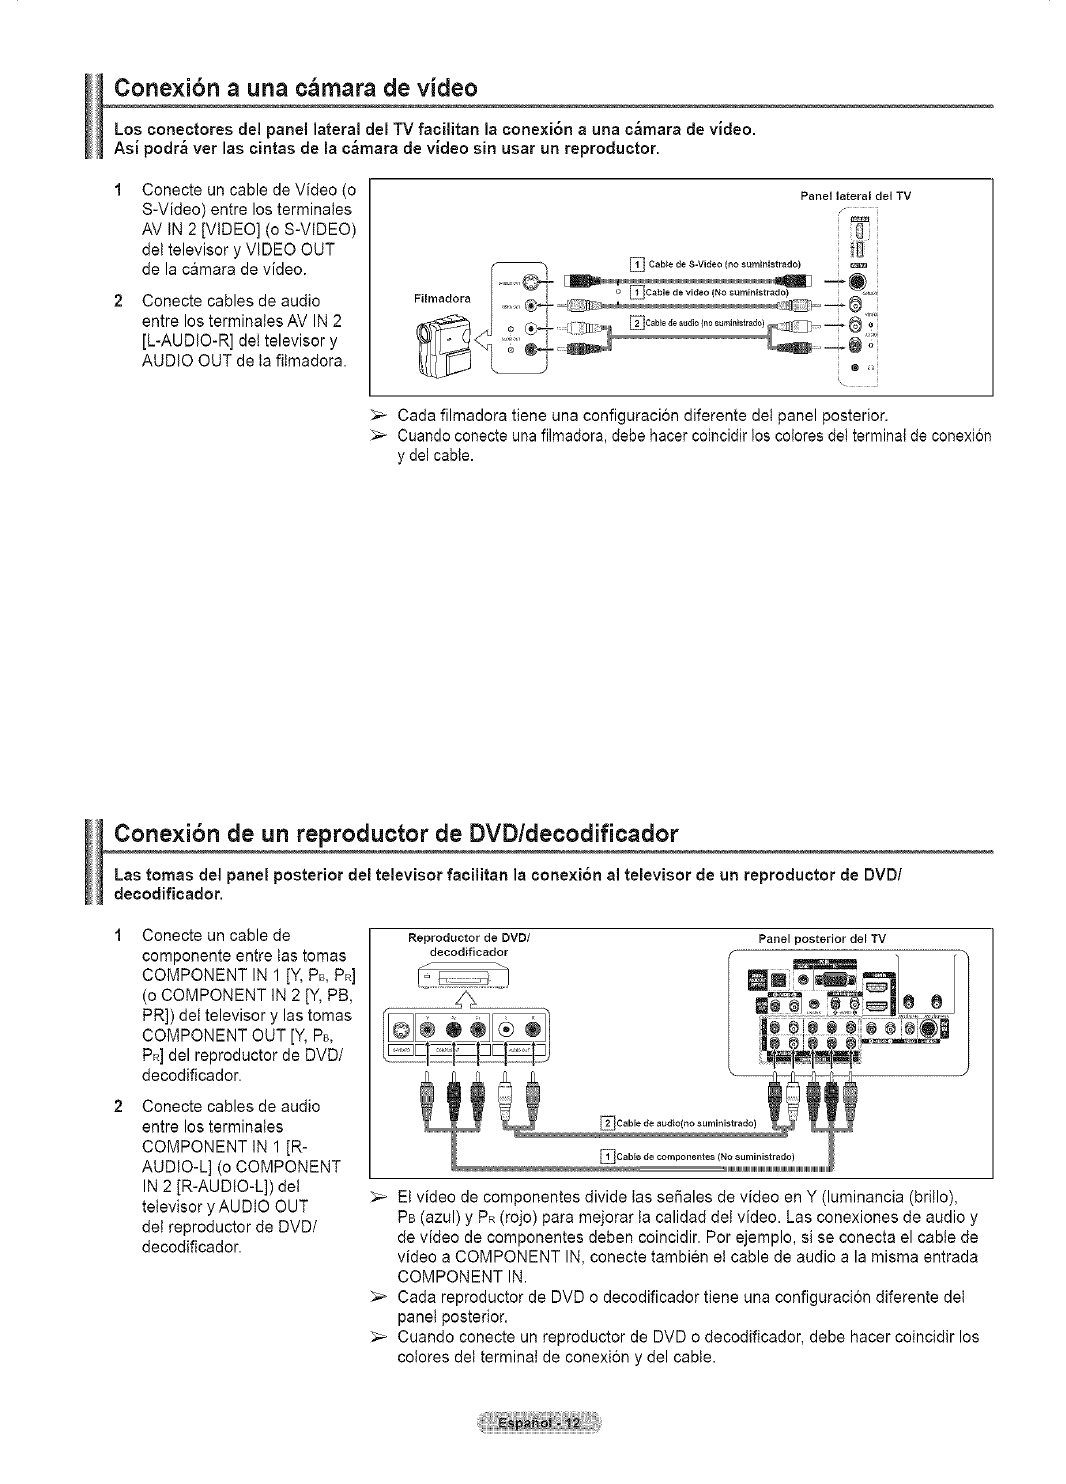
Conexibn auna cbrnara de video
Los conectores del panel lateral del TV faoilitan la conexi6n auna c_mara de video.
Asi podr_ vet las cintas de la c_mara de video sin usar un reproductor.
Conecte un cable de Video (o
S-Video) entre los terminales
AV IN 2 [VIDEO] (o S-VIDEO)
det televisor y VIDEO OUT
de la camara de video.
Conecte cables de audio
entre los terminales AV IN 2
[L-AUDIO-R] det televisor y
AUDIO OUT de ta fitmadora.
Panel lateral del TV
/
i i
EICob"d'SV'd'o'......'O'O"O00 --
.hma_ora _ ....
[®
_-- Cada filmadora tiene una configuracion diferente del panel posterior.
_,_ Cuando conecte una filmadora, debe hacer coincidir los cotores del terminal de conexi6n
y del cable.
Conexibn de un reproductor de DVD/decodificador
Las tomas del panel posterior del televisor fa¢ilitan la conexi6n al televisor de un reproductor de DVD/
decodificador.
Conecte un cable de
componente entre las tomas
COMPONENT IN 1 [Y, PB, PR]
(o COMPONENT IN 2 [Y, PB,
PR]) det televisor y las tomas
COMPONENT OUT [Y, PB,
PR] del reproductor de DVD/
decodificador.
Conecte cables de audio
entre los terminales
COMPONENT IN 1 [R-
AUDIO-L] (o COMPONENT
IN 2 JR-AUDIO-L]) del
televisor y AUDIO OUT
det reproductor de DVD/
decodificador.
Reproductor de DVD/
decodificador
ICabie de audio(no suministrado)
_] Cable de componerttes (No suministrado)
_-- El video de componentes divide tas sefiales de video en Y (luminancia (britlo),
PB (azul) y PR(rojo) para mejorar la calidad del video. Las conexiones de audio y
de video de componentes deben coincidir. Por ejemplo, si se conecta el cable de
video a COMPONENT IN, conecte tambien et cable de audio a la misma entrada
COMPONENT IN.
_,_ Cada reproductor de DVD o decodificador tiene una configuracion diferente det
panet posterior.
_,_ Cuando conecte un reproductor de DVD o decodificador, debe hacer coincidir los
cotores det terminat de conexion y del cable.

Cone×ibn aun reproductor de DVD/decodificador a trav_s de HDMI
Eata conexi6n s61o se puede realizar si hay una toma de salida de HDMI en el diapoaitivo externo. Esta ¢onexi6n
proporeiona una imagen de la mayor calidad.
1 Conecte un cable de HDMI
entre ta toma de entrada
HDMI tN 2 del televisor y
ta toma de salida HDMI
OUT det reproductor DVD/
decodificador.
Reproductor de DVD/
decodificador Panel posterior del TV
_ICable HDMi (No suministrado}
sQu6 es HDMI?
• HDMI, o interfaz multimedia de alta definici6n, es una interfaz que permite la
transmisi6n de sei_ales dig!tales de audio y de video reed!ante un solo cable sin
compresion.
• La diferencia entre los dispositivos HDMI y DVI es que el HDMI es mas pequei_o y
tiene instalada ta funci6n de codificaci6n HDCP (protecci6n alta de ta copia digital
del ancho de banda).
_-- Cada reproductor de DVD o decodificador tiene una configuraci6n diferente det
panel posterior.
_,_ Cuando conecte un reproductor de DVD o decodificador, debe hacer coincidir los
colores det terminal de conexion y del cable.
_,_ AI conectarse a traves de un HDMI, no necesita conectar cables de audio. $61o
necesita conectar cables de audio al conectarse a traves de un HDMI/DVI.
Conexi6n aun reproductor de DVD/decodificador atrav6s de DVI
Esta conexi6n s61o se puede realizar si hay una toma de salida de DVI en el diapositivo externo.
Conecte un cable HDMI/DVI
o un adaptador de DV!-HDMI
entre ta toma de entrada
[HDMI IN 1] del televisor y la
toma DVl det reproductor de
DVD/decodificador.
Conecte cables de audio
entre ta toma de entrada DVI
IN (HDMI 1) [R-AUDIO-L] det
televisor y la toma de salida
AUDIO OUT del reproductor
de DVD/decodificador.
Reproductor de eve/decodifieador
L_ _ I
Panel posterior del TV
_,_ Cada reproductor de DVD o decodificador tiene una configuracion diferente del
panel posterior.
_,_ Cuando conecte un reproductor de DVD o decodificador, debe hacer coincidir los
colores del terminal de conexi6n y det cable.
_-- $6to HDMI IN 1 admite HDMI y DVl.
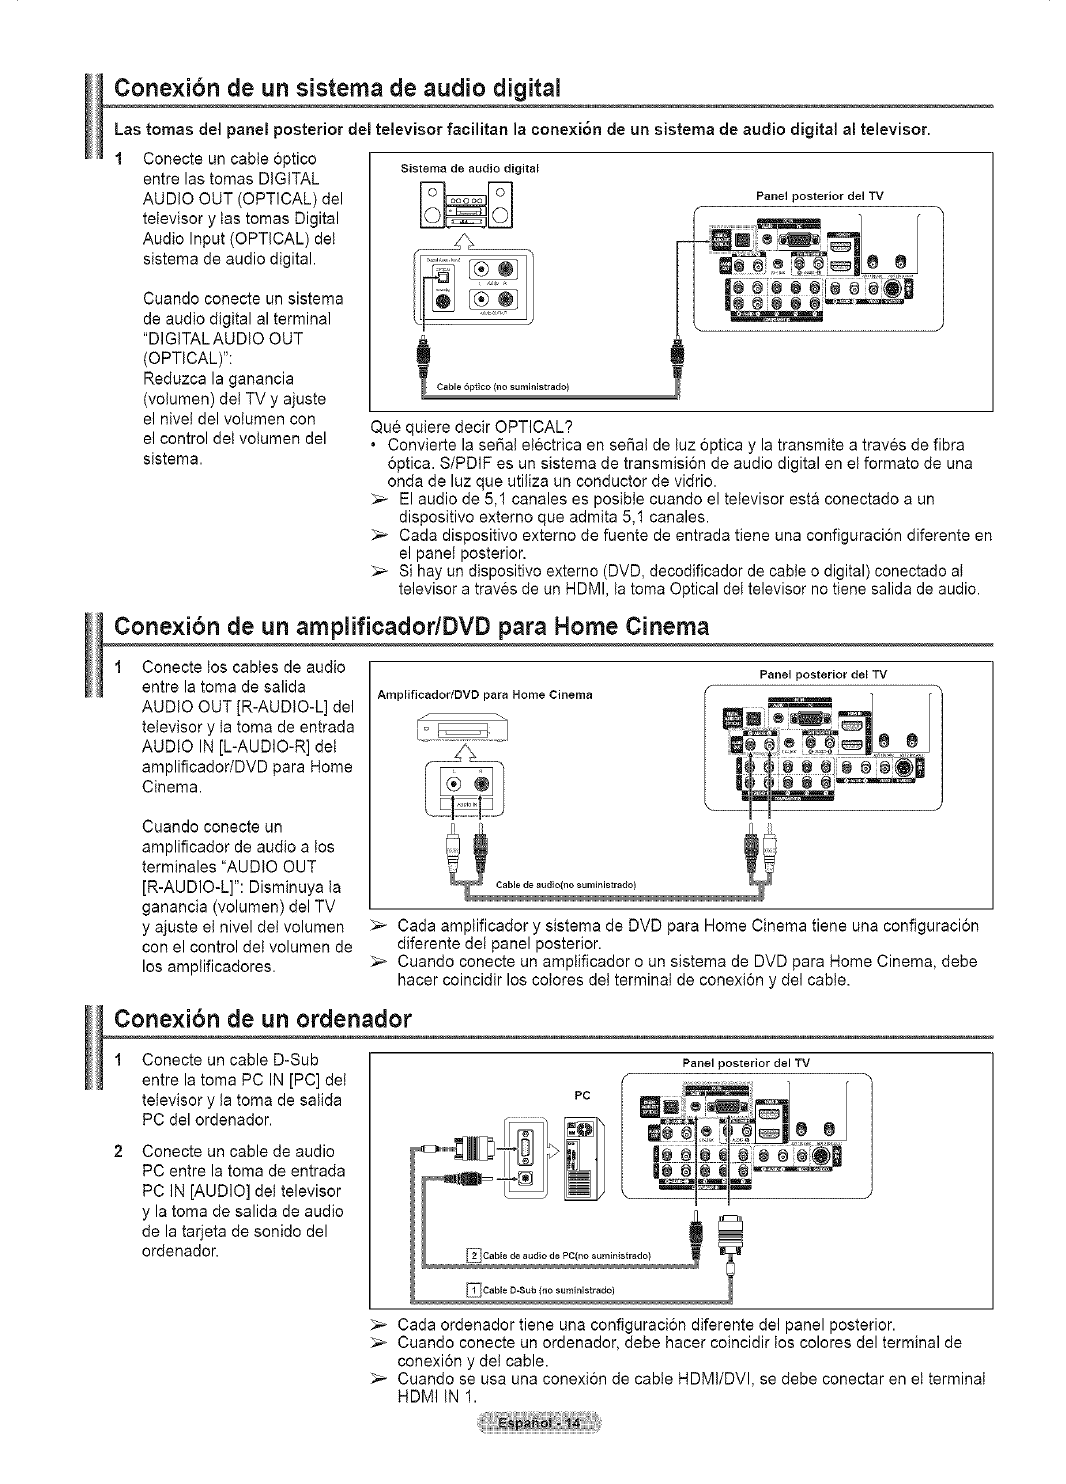
Cone×ibn de un sistema de audio digital
Lastomas del panel posterior del televisor faoilitan la conexi6n de un sistema de audio digital al televisor.
Conecte un cable optico
entre las tomas DIGITAL
AUDIO OUT (OPTICAL) del
televisor y las tomas Digital
Audio Input (OPTICAL) det
sistema de audio digital.
Cuando conecte un sistema
de audio digital al terminal
"DIGITAL AUDIO OUT
(OPTICAL)":
Reduzca la ganancia
(volumen) det TV y ajuste
el nivei del volumen con
el control det votumen del
sistema.
Sistema de audio digital
Panel posterior del TV
Cable 6ptico (no suministrado)
Que quiere decir OPTICAL?
. Convierte la serial et6ctrica en serial de luz optica y la transmite a traves de fibra
optica. S/PDIF es un sistema de transmision de audio digital en et formato de una
onda de luz que utiliza un conductor de vidrio.
_-- El audio de 5,1 canales es posible cuando el televisor esta conectado a un
dispositivo extemo que admita 5,1 canales.
_-- Cada dispositivo extemo de fuente de entrada tiene una configuracion diferente en
el panel posterior.
Si hay un dispositivo extemo (DVD, decodificador de cable o digital) conectado al
televisor a traves de un HDMI, ta toma Optical del televisor no tiene salida de audio.
Conexi6n de un amplificador/DVD para Home Cinema
Conecte los cables de audio
entre la toma de salida
AUDIO OUT JR-AUDIO-L] del
televisor y ta toma de entrada
AUDIO IN [L-AUDIO-R] del
amplificador/DVD para Home
Cinema.
Cuando conecte un
amplificador de audio a los
terminales "AUDIO OUT
[R-AUDIO-L]": Disminuya ta
ganancia (volumen) del TV
y ajuste et nivel del volumen
con el control del volumen de
los amplificadores.
Amplificador/eve para Home Cinema
Panel posterior del TV
_-- Cada amplificador y sistema de DVD para Home Cinema tiene una configuraci6n
diferente del panel posterior.
Cuando conecte un amplificador o un sistema de DVD para Home Cinema, debe
hacer coincidir los colores det terminal de conexion y del cable.
Conexi6n de un ordenador
Conecte un cable D-Sub
entre la toma PC IN [PC] dei
televisor y ta toma de salida
PC del ordenador.
Conecte un cable de audio
PC entre la toma de entrada
PC IN [AUDIO] del televisor
y la toma de salida de audio
de la tarjeta de sonido del
ordenador.
Panel posterior del TV
_-- Cada ordenador tiene una configuracion diferente del panel posterior.
Cuando conecte un ordenador, debe hacer coincidir los colores del terminal de
conexi6n y del cable.
Cuando se usa una conexion de cable HDMI/DVI, se debe conectar en et terminal
HDMI IN 1.
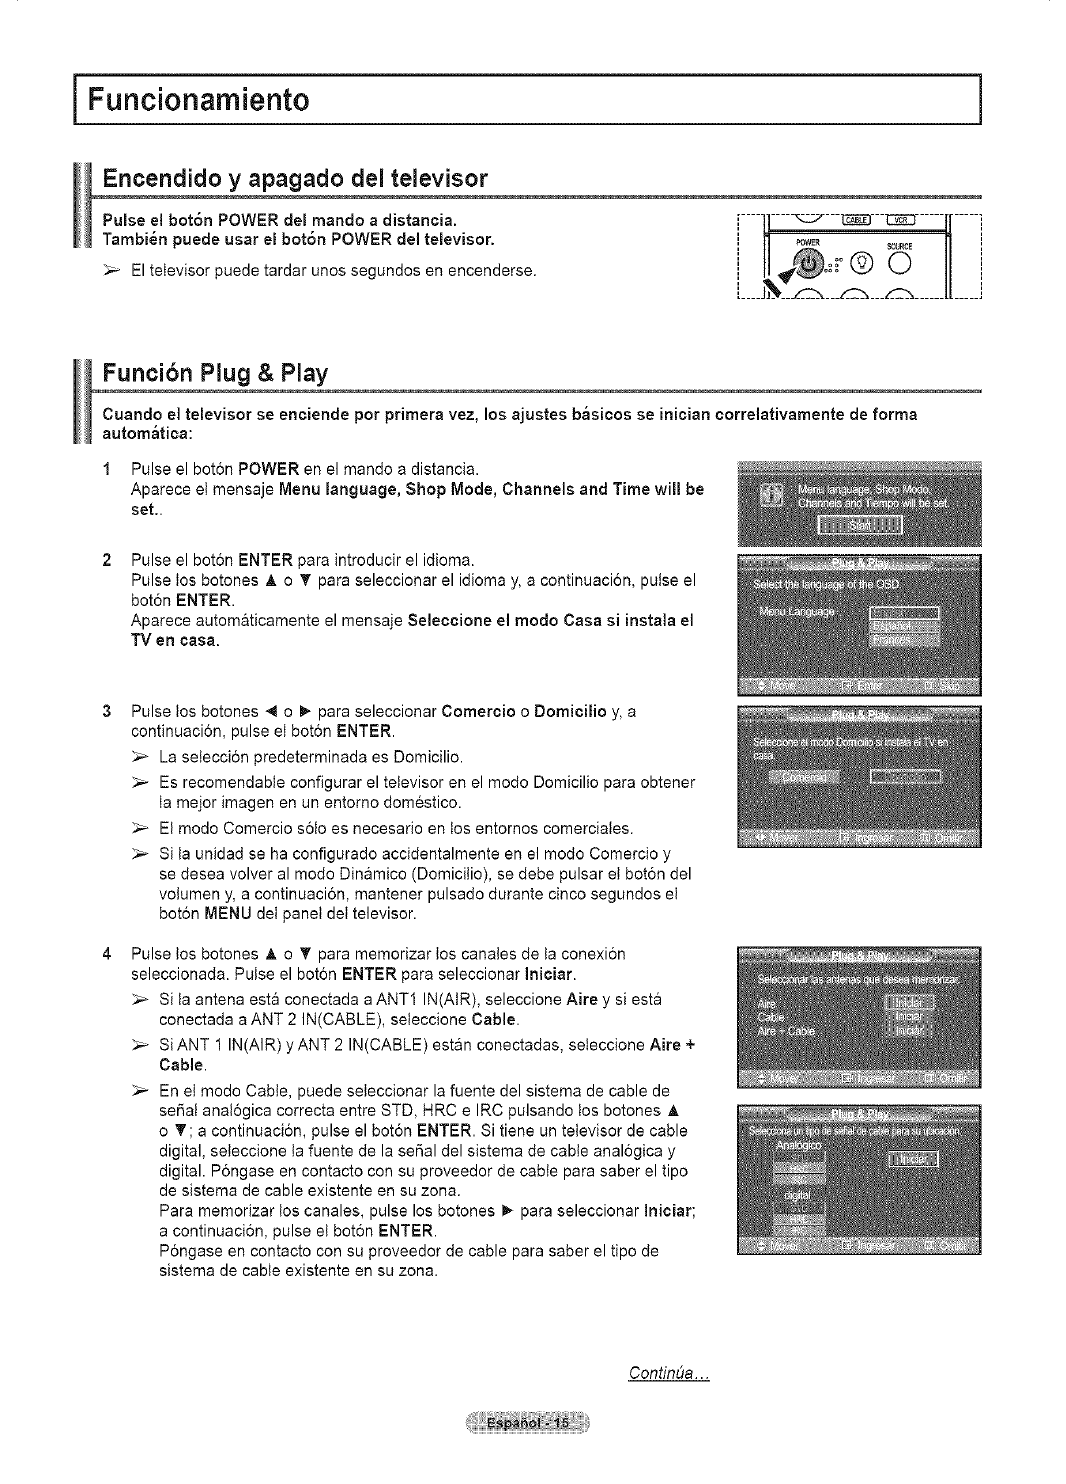
iFuncionamiento
Encendido y apagado del televisor
Pulse el bot6n POWER del mando a distancia.
Tambi_n puede usar el bot6n POWER del televisor.
_-_ El televisor puede tardar unos segundos en encenderse.
Funcibn Plug & Play
Cuando el televisor se enciende pot primera vez, los ajustes b_sicos se ini¢ian ¢orrelativamente de forma
autom_tica:
1 Pulse el bot6n POWER en el mando a distancia.
Aparece et mensaje Menu language, Shop Mode, Channels and Time will be
set..
Pulse el bot6n ENTER para introducir el idioma.
Pulse los botones A o T para seleccionar el idioma y, a continuaci6n, pulse el
bot6n ENTER.
Aparece autom&ticamente el mensaje Seleecione el modo Casa si instala el
TV en casa.
Pulse los botones -,_o _- para seleccionar Comereio o Domicilio y, a
continuacion, pulse et bot6n ENTER.
La selecci6n predeterminada es Domicilio.
_-_ Es recomendable configurar el televisor en el modo Domicilio para obtener
ta mejor imagen en un entorno domestico.
El mode Comercio s61o es necesario en los entornos comerciales.
_-_ Si ta unidad se ha configurado accidentalmente en el mode Comercio y
se desea volver al modo Dinamico (Domicitio), se debe pulsar et bot6n del
votumen y, a continuacion, mantener pulsado durante cinco segundos el
bot6n MENU det panel det televisor.
Pulse los botones A o T para memorizar los canales de la conexion
seleccionada. Pulse el boton ENTER para seleccionar Iniciar.
Si la antena esta conectada a ANT1 IN(AIR), seleccione Aire y siesta
conectada a ANT 2 IN(CABLE), seteccione Cable.
_-_ Si ANT 1 IN(AIR) y ANT 2 IN(CABLE) estan conectadas, seteccione Aire +
Cable.
_,_ En el modo Cable, puede seteccionar la fuente del sistema de cable de
serial analogica correcta entre STD, HRC e IRC pulsando los botones A
o _' ; a continuaci6n, pulse el bot6n ENTER. Si tiene un televisor de cable
digital, seteccione ta fuente de la seSal del sistema de cable analogica y
digital. Pongase en contacto con su proveedor de cable para saber el tipo
de sistema de cable existente en su zona.
Para memorizar los canales, pulse los botches I_ para seleccionar Inieiar;
acontinuaci6n, pulse el bot6n ENTER.
P6ngase en contacto con su proveedor de cable para saber el tipo de
sistema de cable existente en su zona.
ConfinDa...
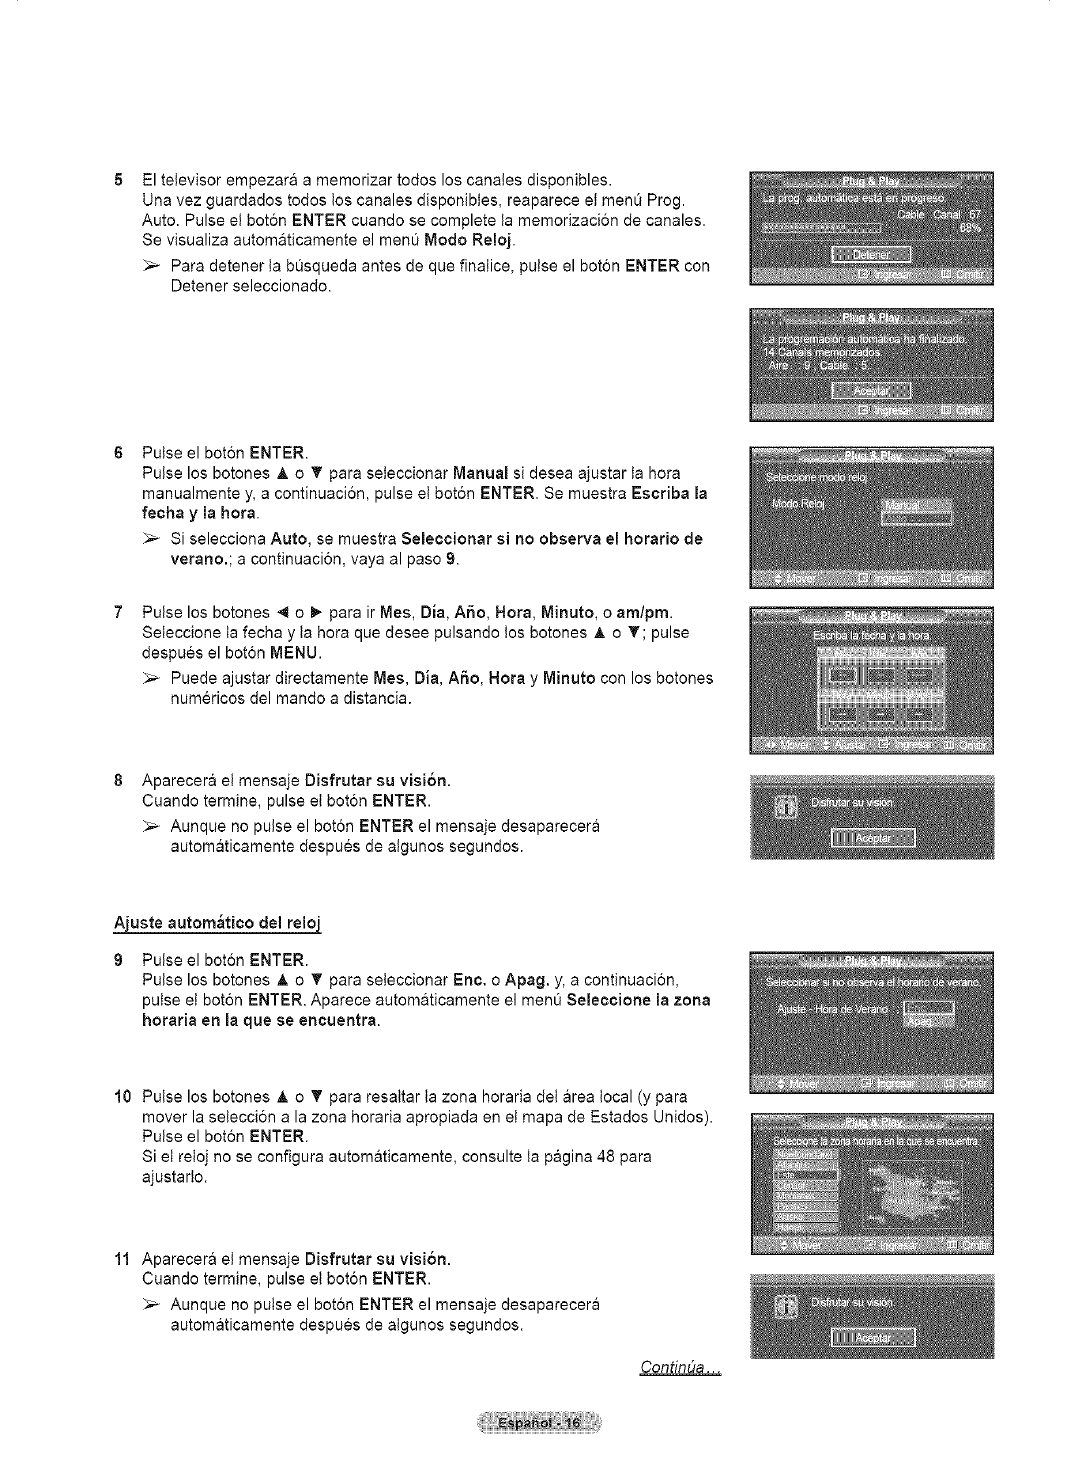
El televisor empezara a memorizar todos los canales disponibles.
Una vez guardados todos tos canales disponibies, reaparece el menQ Prog.
Auto. Pulse el bot6n ENTER cuando se complete ta memorizaci6n de canales.
Se visualiza automaticamente el ment_ Modo Reloj.
_-- Para detener ta bQsqueda antes de que finaiice, pulse el bot6n ENTER con
Detener seleccionado.
Pulse el bot6n ENTER.
Pulse los botones A o _' para seleccionar Manual si desea ajustar la hora
manualmente y, a continuaci6n, pulse et bot6n ENTER. Se muestra Esoriba la
fecha y la hora.
_-- Si selecciona Auto, se muestra Selecoionar si no observa el horario de
verano.; a continuaci6n, vaya al paso 9.
Pulse los botones _ o _ para ir Mes, Dia, A6o, Hora, Minuto, o am/pro.
Seteccione la fecha y ta hora que desee pulsando los botones _, o T; pulse
despues el boron MENU.
Puede ajustar directamente Mes, Dia, A6o, Nora y Minuto con los botones
numericos del mando a distancia.
Aparecer& el mensaje Disfrutar su visi6n.
Cuando termine, pulse el boton ENTER.
_-- Aunque no pulse el boron ENTER el mensaje desaparecera
automaticamente despues de atgunos segundos.
Ajuste autom_tico del reloj
Pulse el bot6n ENTER.
Pulse los botones &o _' para seteccionar Eric. o Apag. y, a continuacion,
putse ei bot6n ENTER. Aparece automaticamente el menQ Seleccione la zona
horaria en la que se encuentra.
10 Pulse los botones A o _' para resaltar la zona horaria dei area local (y para
mover la selecci6n a la zona horaria apropiada en et mapa de Estados Unidos).
Pulse el boton ENTER.
Si el retoj no se configura automaticamente, consulte ta pagina 48 para
ajustarto.
11 Aparecera el mensaje Disfrutar su visi6n.
Cuando termine, pulse el boton ENTER.
_-- Aunque no pulse el boton ENTER el mensaje desaparecera
automaticamente despues de aIgunos segundos.
ContinDa. ..
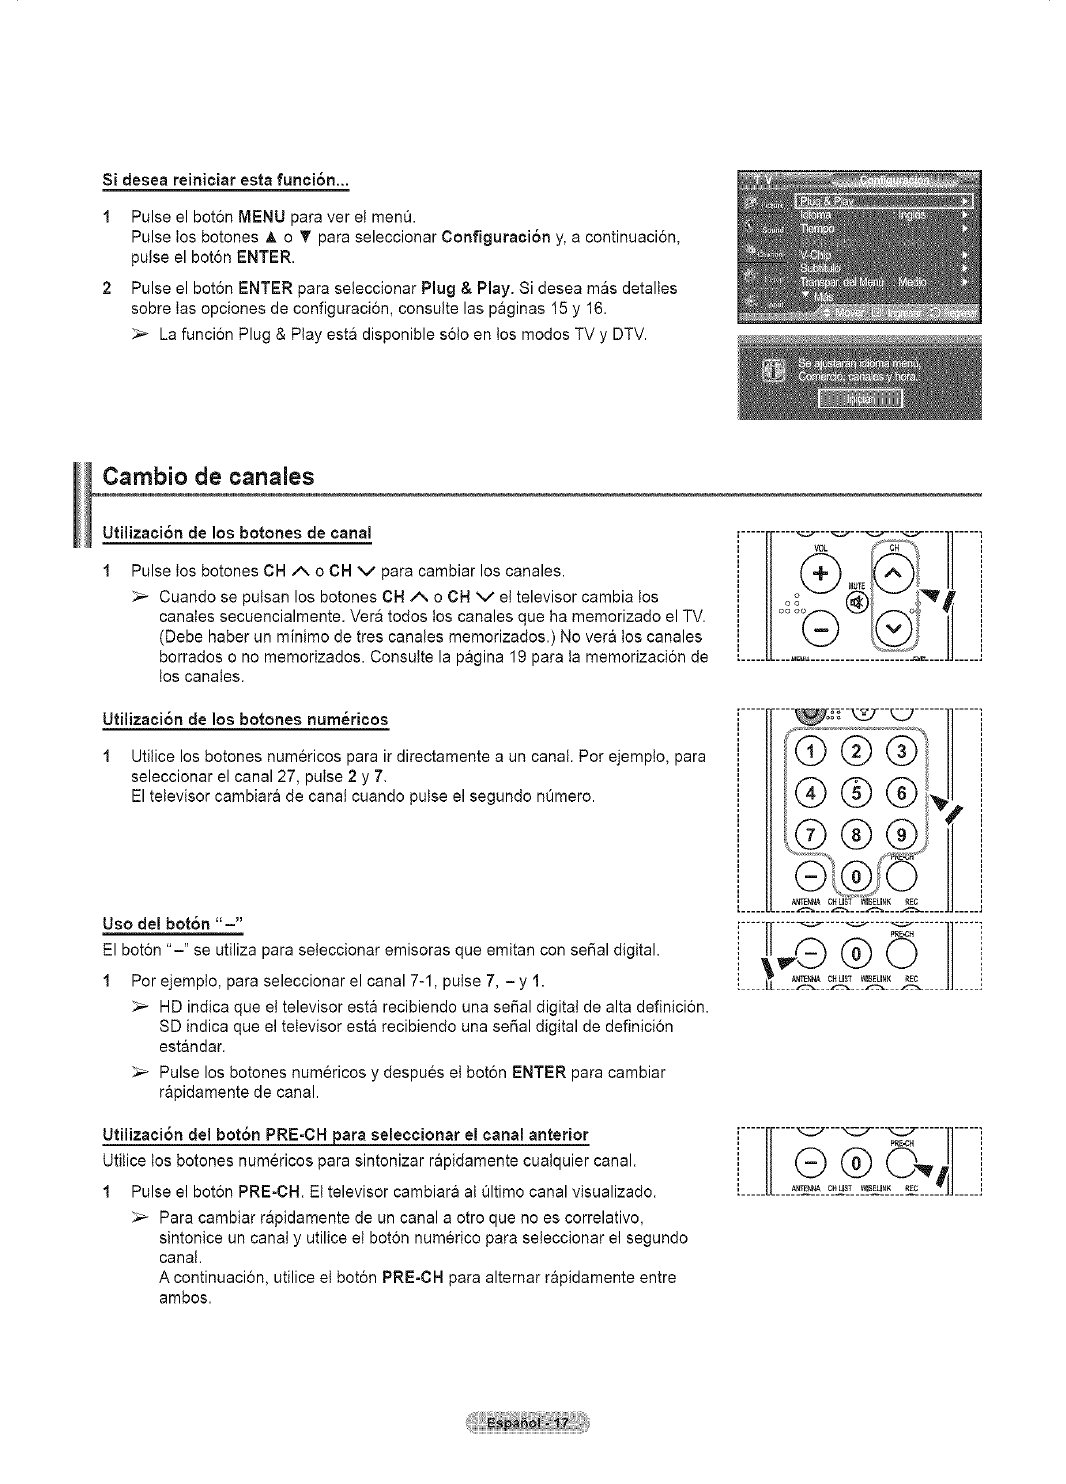
Si desea reiniciar esta funci6n...
1 Pulse el bot6n MENU para ver et men&
Pulse los botches _, o T para seleccionar Configuraci6n y, a continuaci6n,
pulse el botch ENTER.
2 Pulse el bot6n ENTER para seleccionar Plug & Play. Si desea mas detaltes
sobre tas opciones de configuraci6n, consulte las paginas 15 y 16.
La funcion Plug & Play esta disponible soto en los modos TV y DTV.
Cambio de canales
Utilizaci6n de los botches de canal
Pulse tos botones CH A o CH V para cambiar los canales.
Cuando se putsan los botones CH A o OH v el televisor cambia tos
canales secuencialmente. Ver& todos tos canales que ha memorizado el TV.
(Debe haber un minimo de tres canales memorizados.) No ver& los canales
borrados o no memorizados. Consutte la pagina 19 para ta memorizaci6n de
los canales.
Utilizaci6n de los botches nurn_ricos
1Utilice los botones numericos para ir directamente a un canal. Per ejempto, para
seleccionar el canal 27, pulse 2 y 7.
El televisor cambiara de canal cuando pulse el segundo nQmero.
Uso del bot6n "-"
El boton "-" se utiliza para seteccionar emisoras que emitan con serial digital.
1 Per ejemplo, para seleccionar el canal 7-1, pulse 7, = y 1.
_,_ HD indica que et televisor esta recibiendo una sepal digital de alta definicion.
SD indica que el televisor esta recibiendo una serial digital de definicion
estandar.
_,_ Pulse los botones numericos y despues et boton ENTER para cambiar
rapidamente de canal.
Utilizaci6n del bot6n PRE-CH para seleccionar el canal anterior
Utitice los botones numericos para sintonizar rapidamente cualquier canal.
1 Pulse el bot6n PRE-CN. Et televisor cambiara al Qltimo canal visualizado.
_,_ Para cambiar rapidamente de un canal a otro que no es correlative,
sintonice un canal y utilice et boton num@ico para seleccionar el segundo
canal.
A continuacion, utilice et bot6n PRE-CH para altemar rapidamente entre
ambos.
i'i'-----'------------------'--oo°°o°o_ _i_!,VOL _ _'_ ......... ]il
'H® II'
[......................:_:::::..........]
.........]_"_-_--_" ......11-----i
......... ___
[-----[r----'_---'_---_,"_z-----Jl-----i
i // (E)@ ',
L___[L_____c___:___________]]_____]
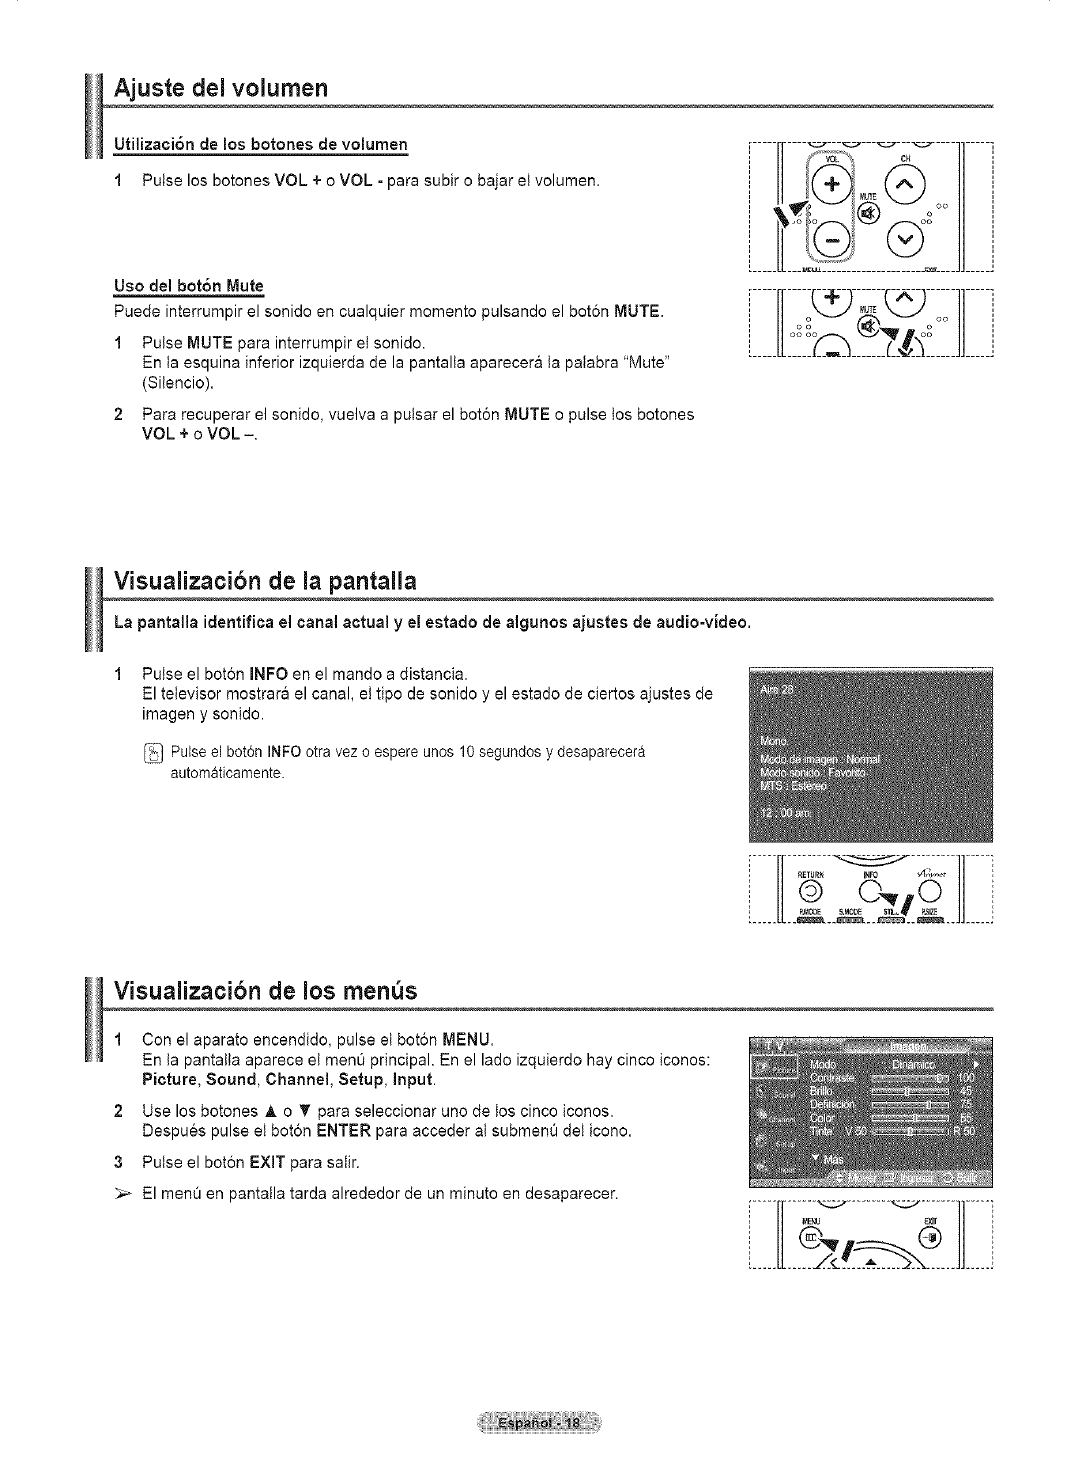
Ajuste del volumen
Utilizaci6n de los botones de voiumen
1Pulse los botones VOL +o VOL - para subir o bajar el volumen.
Uso del bot6n Mute
Puede interrumpir el sonido en cualquier momento pulsando el boton MUTE.
1 Pulse MUTE para interrumpir et sonido.
En ta esquina inferior izquierda de la pantalta aparecer& ta palabra "Mute"
(Silencio).
2 Para recuperar el sonido, vuelva a pulsar el bot6n MUTE o pulse los botones
VOL + o VOL -.
.........Mo ,"
' _
......................
.....H__________......]1i
Visualizacibn de la pantalla
La pantalla identifica el canal actual y e[ estado de algunos ajustes de audio-video.
Pulse el boron INFO en el mando a distancia.
El televisor mostrara el canal, el tipo de sonido y el estado de ciertos ajustes de
imagen y sonido.
Pulse el bot6n INFO otra vez o espere unos 10 segundos y desaparecera
automaticamente.
i-----r[........._=_ ........1]----q
......ii
Visualizacibn de los menus
1Con el aparato encendido, pulse el bot6n MENU.
En la pantalta aparece el ment_ principal. En el lado izquierdo hay cinco iconos:
Picture, Sound, Channel, Setup, input.
2 Use los botones A o T para seleccionar uno de los cinco iconos.
Despues pulse et bot6n ENTER para acceder ai submenQ det icono.
3 Puise el boton EXIT para saiir.
_-- El menQ en pantalla tarda alrededor de un minuto en desaparecer.
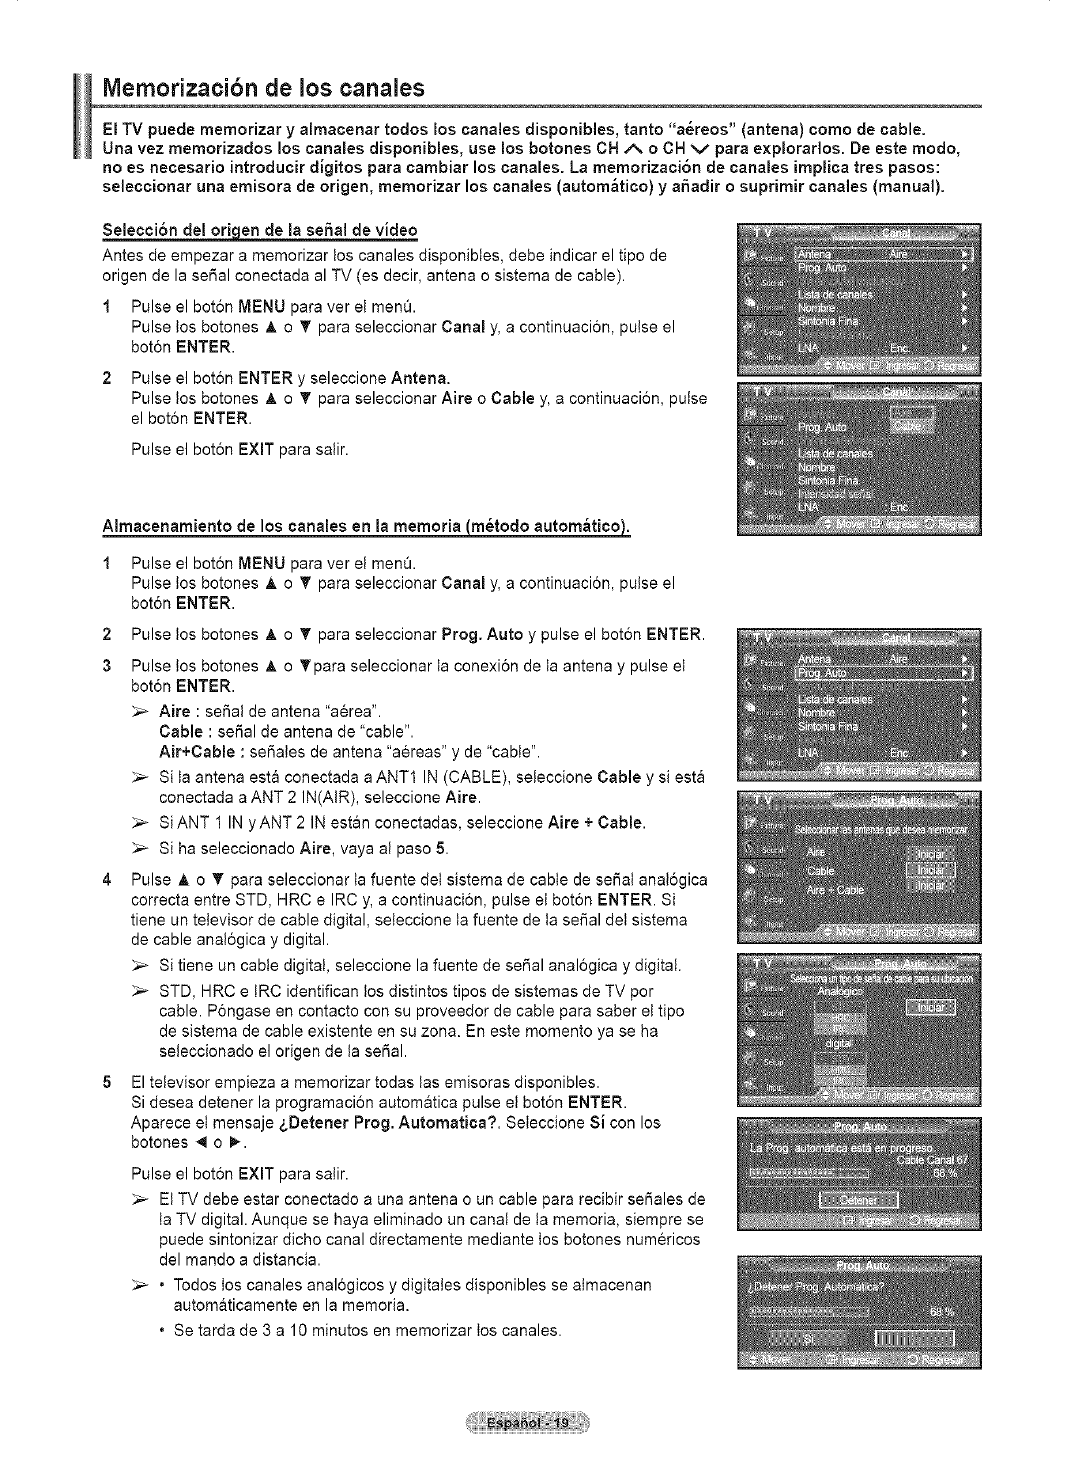
Memorizacibn de los canales
El TV puede memorizar y almacenar todos los canales disponibles, tanto "a_reos" (antena) como de cable.
Una vez memorizados los canales disponibles, use los botches OHA o CH Vpara e×plorarlos. De este modo,
no es necesario introducir digitos para cambiar los canales. La memorizaci6n de canales !replica tres pasos:
seleccionar una emisora de origen, memorizar los canales (automat!co) y a_adir osuprimir canales (manual).
Selecci6n del or! en de la seSal de video
Antes de empezar a memorizar los canales disponibtes, debe indicar el tipo de
origen de la serial conectada al TV (es dec!r, antena o sistema de cable).
1 Pulse el bot6n MENU para ver et men&
Pulse los botones _, o T para seleccionar Canal y, a continuacion, pulse el
bot6n ENTER.
2 Pulse el bot6n ENTER y seleccione Antena.
Pulse los botones _, o T para seleccionar Aire o Cable y, a continuacion, pulse
el boron ENTER.
Pulse el bot6n EXIT para salir.
AImacenamiento de los canales en la memoria (m_todo automat!co).
1 Pulse el bot6n MENU para ver el men&
Pulse los botones A o T para seleccionar Canal y, a continuaci6n, pulse el
bot6n ENTER.
2 Pulse los botches _, o T para seleccionar Prog. Auto y pulse el bot6n ENTER.
3 Pulse los botones _, o _'para seleccionar ta conexion de ta antena y pulse et
boton ENTER.
Aire : serial de antena "aerea".
Cable : serial de antena de "cable".
Air+Cable : set, ales de antena "aereas" y de "cable".
Si la antena esta conectada a ANT1 IN (CABLE), seleccione Cable y siesta
conectada a ANT 2 IN(AIR), seleccione Aire.
_-- SLANT 1 IN yANT 2 IN estan conectadas, seleccione Aire + Cable.
_-- Si ha seleccionado Aire, vaya a! paso 5.
4 Pulse A o T para seleccionar la fuente del sistema de cable de serial ana!6gica
correcta entre STD, HRC e IRC y, a continuacion, pulse el bot6n ENTER. Si
tiene un televisor de cable digital, seteccione ta fuente de ta serial det sistema
de cable ana!6gica y digital.
_-- Si tiene un cable digital, seleccione la fuente de serial analog!ca y digital.
_-- STD, HRC e IRC identifican los distintos tipos de sistemas de TV por
cable. Pongase en contacto con su proveedor de cable para saber el tipo
de sistema de cable existente en su zona. En este momento ya se ha
seleccionado el origen de ta serial.
5El televisor empieza a memorizar todas tas emisoras disponibles.
Si desea detener la programacion automat!ca pulse el boton ENTER.
Aparece el mensaje &Detener Prog. Automat!ca?. Seteccione Si con los
botones 4 o I_.
Pulse el bot6n EXIT para salir.
_-- Et TV debe estar conectado a una antena o un cable para recibir set, ales de
ta TV digital. Aunque se haya eliminado un canal de ta memoria, siempre se
puede sintonizar dicho canal directamente reed!ante los botones numericos
del mando a distancia.
•Todos tos canales analog!cos y dig!tales disponibles se almacenan
automaticamente en la memoria.
• Se tarda de 3 a 10 minutos en memorizar los canales.
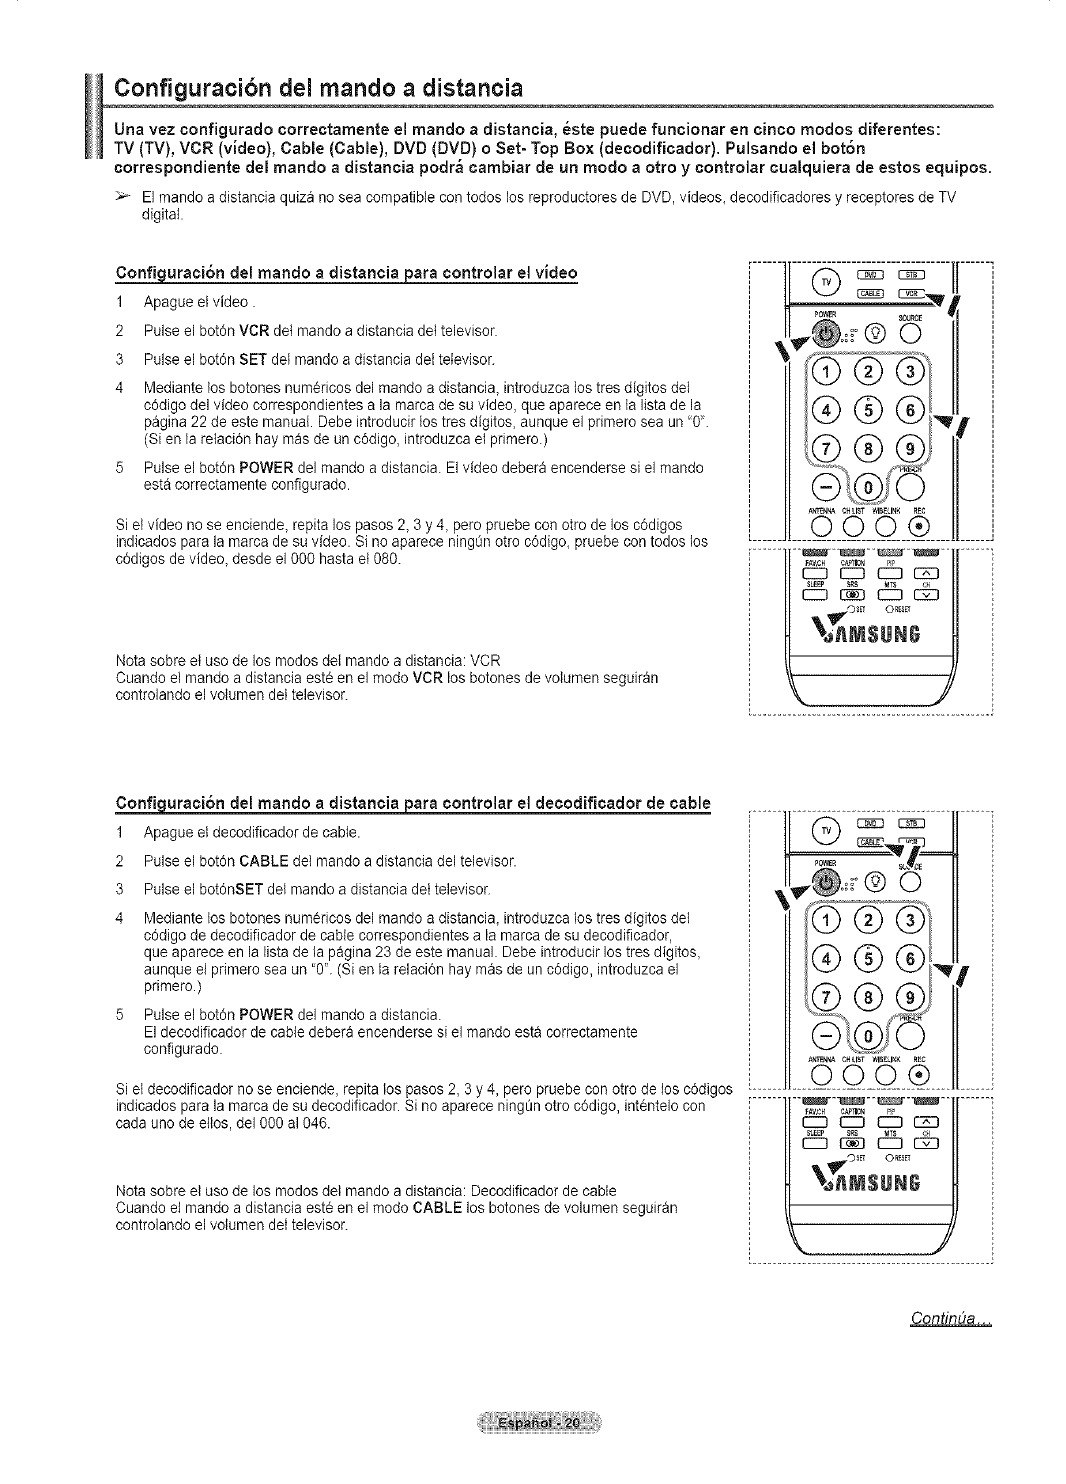
Configuracibn del mando a distancia
Una vez configurado correctarnenteel rnandoadistancia, _ste puede funcionar en cinco modos diferentes:
TV (TV), VCR (video), Cable (Cable), DVD (DVD) o Set- Top Box (decodificador). Pulsando el bot6n
correspondiente del mando a distancia podr_ cambiar de un modo a otto y controlar cualquiera de estos equipos.
:,'..'- El mando a distancia quiza no sea compatible con todos los reproductores de DVD, videos_decodificadores y receptores de TV
digital.
_uraci6n del rnando adistanciapara controlar el video
1 Apague elvideo.
2 Pulse el bot0n VCR det mando a distancia det televisor.
3 Pulse el bot0n SET det mando a distancia de{ televisor.
4 Mediante los botones numericos del mando a distancia_introduzca los tres digitos deI
c6digo del video correspondientes a la marca de su video, que aparece en la lista de la
pagina 22 de este manual. Debe introducir tos tres digitos, aunque el primero sea un '0".
(Si en la relaci6n hay mas de un c6digo, introduzca el primero.)
5 Pulse el bot6n POWER del mando a distancia. El video debera encenderse si el mando
esta correctamente configurado.
Si el video no se enciende_ repita los pasos 2_3 y 4_pero pruebe con otro de los c6digos
indicados para la marca de su video. Si no aparece ningt3notro c6digo_pruebe con todos los
c0digos de video_ desde el 000 hasta et 080.
Nota sobre et uso de los modos deI mando a distancia: VCR
Cuando el mando a distancia este en el modo VCR los botones de volumen seguiran
controlando el volumen del televisor.
A_ENNA C_LIST WlS_LIN_ REC
000®
_AMSUNG
_uraci6n del mando a distanciapara controlar el decodificador de cable
1 Apagueetdecodificadorde cable.
2 Pulse el bot6n CABLE det mando a distancia del televisor.
3 Pulse el bot0nSET del mando a distancia det televisor.
Mediante los botones numericos del mando a distancia_introduzca los tres digitos del
c6digo de decodificador de cable correspondientes a la marca de su decodificador,
que aparece en la lista de la pagina 23 de este manual. Debe introducir los tres digitos_
aunque el primero sea un '0". (Si en la relaci6n hay mas de un c6digo, introduzca el
primero.)
5 Pulse el bot0n POWER del mando a distancia.
El decodificador de cable debera encenderse si el mando esta correctamente
configurado.
Si el decodificador no se enciende, repita los pasos 2, 3 y 4, pero pruebe con otro de los c6digos _.......
indicados para la marca de su decodificador. Si no aparece ning_n otro c6digo, intentelo con
cada uno de eltos, del 000 al 046.
Nota sobre el uso de los modos del mando a distancia: Decodificador de cable
Cuando et mando a distancia este en el modo CABLE los botones de volumen seguiran
controlando el votumen dei televisor.
At_cNNA ¢I_LIST WlS£LI_K RE€
OOO®
cs c2s
uANSUNG
Contin(la.. .

Configuraci6n del mando a clistancia para controlar el DVD
1 Apagueel DVD.
2 Pulse el bot6n DVD del mando a distancia del televisor.
3 Pulse el bot6nSET del mando a distancia del televisor.
4 Mediante los botones num_ricos det mando a distancia, introduzca los tres digitos del
c6digo del DVD correspondientes a la rnarcade su DVD, que aparece en la listade la
pagina 24 de este manual. Debe introducir los tres digitos, aunque el primero sea un "0".
(Si en la retaci6n hay mas de un c6digo, introduzca ei primero.)
5 Pulse el bot6n POWER dei mando a distancia.
El DVD debera encenderse si el rnando esta correctamente configurado.
Si el DVD no se enciende, repita los pasos 2, 3 y 4, pero pruebe con otro de los c6digos
indicados para la rnarca de su DVD. Si no se enurneran otros c6digos, pruebe con cada c6digo,
de sde 000 hasta 141.
Nota sobre el use de los modes del mando a distancia: DVD
Cuando el rnando a distancia este en el mode DVD los botones de volurnen seguiran controlando
et volumen del televisor.
i i
i
_AV.Cll ct*_lOt
EZZ] r7 _ C2E]
_AtVtSUNG
, J
...........................................
Configuraci6n clel mando a clistancia para utilizarlo con el decoclificador
1 Apague el decodificador.
2 Pulse el bot6nSTB del rnando a distancia del televisor.
3 Pulse el bot6nSET del mando a distancia del televisor.
4 Mediante los botones num6ricos det mando a distancia, introduzca los tres digitos del
c6digo del decodificador correspondientes a la rnarca de su decodificador, que aparece
en [a lista de la pagina 23 de este manual. Debe introducir los tres digitos, aunque el
prirnero sea un "0". (Si en la relaci6n hay rnas de un c6digo, introduzca et primero.)
5 Pulse el bot6n POWER deI mando a distancia.
El decodificador debera encenderse si el rnando esta correctamente configurado.
Si et decodificador no se enciende, repita los pasos 2, 3 y 4, pero pruebe con otro de los c6digos
indicados para la rnarcade su decodificador. Si no aparece ning0n otto c6digo, int_ntelo con
cada uno de eltos, del 000 al 074.
Nota sobre el uso de los modos del rnando a distancia: Decodificador
Cuando el rnando a distancia este en el mode STB los botones de volurnen seguiran controlando
et volumen del televisor.
i II / "z" ,..s, !
[....1ooo® .....i
_ r7 EZZ] t:2Z]
%_M$1IBI_
, ,J
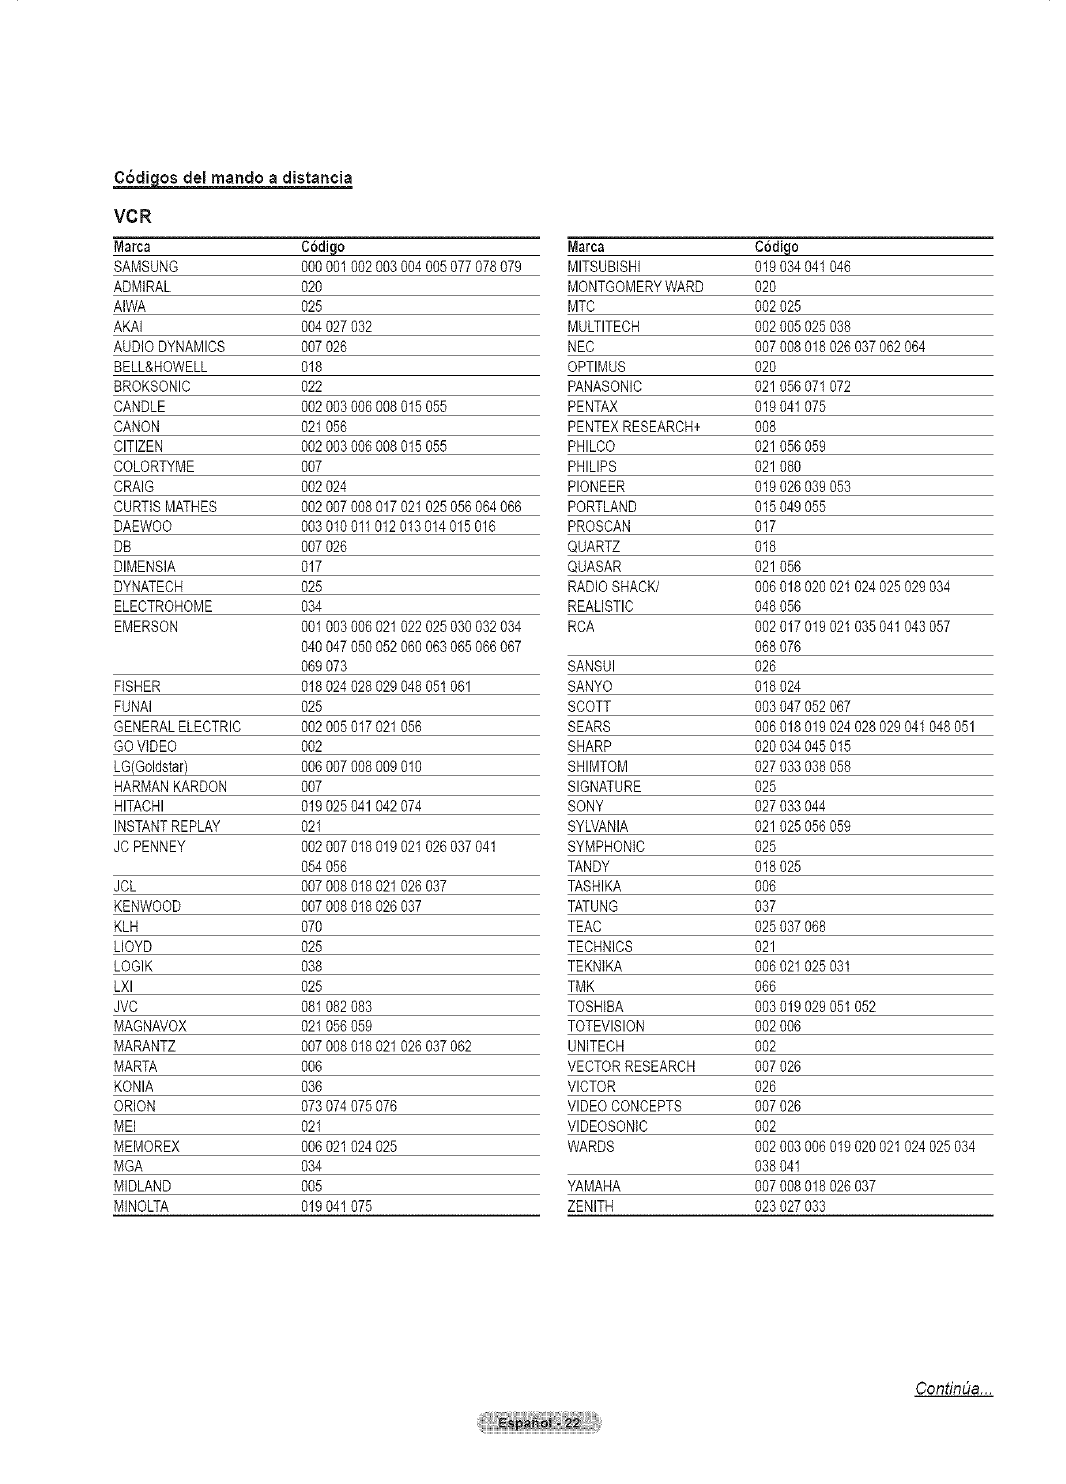
C6digos del mando a distan¢ia
VCR
Marca
SAMSUNG
ADMIRAL
AIWA
AKAI
AUDIODYNAMICS
BELL&HOWELL
BROKSONIC
CANDLE
CANON
CITIZEN
COLORTYME
CRAIG
CURTISMATHES
DAEWOO
DB
DIMENSIA
DYNATECH
ELECTROHOME
EMERSON
FISHER
FUNAI
GENERALELECTRIC
GOVIDEO
LG(Goldstar)
HARMANKARDON
HITACHI
INSTANTREPLAY
JC PENNEY
JCL
KENWOOD
KLH
LLOYD
LOGIK
LXl
JVC
MAGNAVOX
MARANTZ
MARTA
KONIA
ORION
MEI
MEMOREX
MGA
MIDLAND
MINOLTA
C6digo
%0 001002003 004005 077078079
O2O
O25
004 027032
007 026
018
O22
002 003006008 015055
021 056
002 003006008 015055
007
002 024
002 007008017 021025 056064066
003 010011012013 014015 016
007 026
017
O25
O34
001 003006021 022025 030032034
040 047050052 060063 065066067
069 073
018 024028029 04805t 061
025
002 005017021 056
002
006 007008009 010
007
019 025041042 074
021
002 0070t8 019 021026 037041
054 056
007 008018021 026037
007 008018026 037
O7O
O25
O38
O25
081 082083
021 056059
007 008018021 026037 062
006
036
073 074075076
021
006 021024025
O34
005
019 04t 075
Marca
MITSUBISHI
MONTGOMERYWARD
MTC
MULTITECH
NEC
OPTIMUS
PANASONIC
PENTAX
PENTEXRESEARCH+
PHILCO
PHILIPS
PIONEER
PORTLAND
PROSCAN
QUARTZ
QUASAR
RADIOSHACK/
REALISTIC
RCA
SANSUI
SANYO
SCOTT
SEARS
SHARP
SHIMTOM
SICNATURE
SONY
SYLVANIA
SYMPHONIC
TANDY
TASHIKA
TATUNG
TEAC
TECHNICS
TEKNIKA
TMK
TOSHIBA
TOTEVlSION
UNITECH
VECTORRESEARCH
VICTOR
VIDEOCONCEPTS
VlDEOSONIC
WARDS
YAMAHA
ZENITH
Codiqe
019034 041046
O2O
002025
002005 025038
007008 018026 037062064
020
021056 071072
019041 075
008
021056 059
021080
019026 039053
015049 055
017
018
021056
006018 020021 024025029 034
048056
002017 019021 035041043 057
068076
026
018024
003047 052067
006018 019024 028029041 048051
020034 045015
027033 038058
025
027033 044
021025 056059
025
018025
0O6
O37
025037 068
021
006021 02503t
066
003019 02905t 052
002006
002
007026
026
007026
002
002003 006019 020021024 025034
038041
007008 018026 037
023027 033
Contint_a...
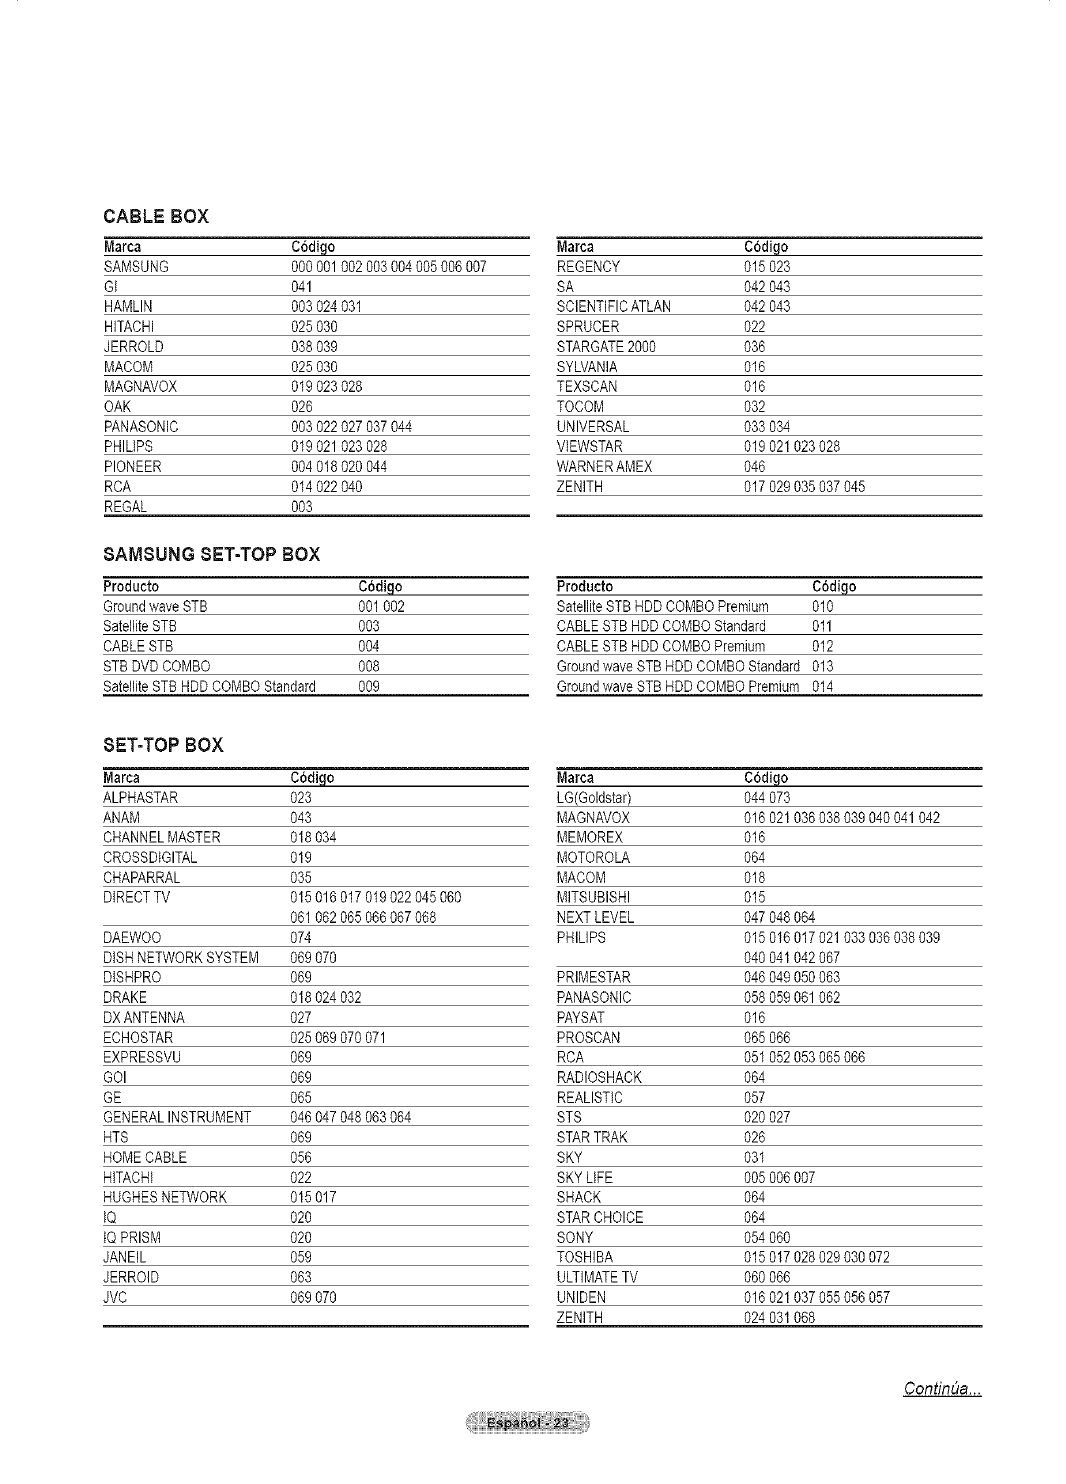
CABLE BOX
Marca Codigo Marca CCdigo
SAMSUNG 0% 001002 003004005 006007 REGENCY 015 023
GI 041 SA 042 043
HAMLIN 003 024031 SCIENTIFICATLAN 042 043
HITACHI 025 030 SPRUCER 022
JERROLD 038 039 STARGATE2000 036
MACOM 025 030 SYLVANIA 016
MAGNAVOX 019 023028 TEXSCAN 016
OAK 026 TOCOM 032
PANASONiC 003 022027 037044 UNIVERSAL 033 034
PHILtPS 019 021023 028 VIEWSTAR 019 021023 028
PIONEER 004 018020 044 WARNERAMEX 046
RCA 014 022040 ZENITH 017 029035 037045
REGAL 003
8AMBUNG BET-TOP BOX
Producto CCdiqo
GroundwaveSTB 001002
SatelliteSTB 003
CABLESTB 004
STBDVD COMBO 008
SatefliteSTBHDDCOMBOStandard 009
BET-TOP BOX
Marca CCdicjo
ALPHASTAR 023
ANAM 043
CHANNELMASTER 018034
CROSSDtGITAL 019
CHAPARRAL 035
DIRECTTV 015016 017019022 045 060
061062 065066067 068
DAEWOO 074
DISHNETWORKSYSTEM 069070
DtSHPRO 069
DRAKE 018024 032
DXANTENNA 027
ECHOSTAR 025069 070071
EXPRESSVU 069
GOI 069
GE 065
GENERALINSTRUMENT 046047 048063064
HTS 069
HOMECABLE 056
HITACHI 022
HUGHESNETWORK 015017
iQ 020
tQ PRISM 020
JANEIL 059
JERROID 063
JVC 069070
Producto CCdigo
SatelliteSTB HDDCOMBOPremium 010
CABLESTBHDDCOMBOStandard 011
CABLESTBHDDCOMBOPremium 012
GroundwaveSTBHDDCOMBOStandard 013
GroundwaveSTBHDDCOMBOPremium 014
Marca CCdigo
LG(Goldstar) 044 073
MAGNAVOX 016 021036 038039 040041 042
MEMOREX 016
MOTOROLA 064
MACOM 018
MITSUBISHI 015
NEXTLEVEL 047 048064
PHILIPS 015 016017 021033 036038 039
040 041042 067
PRIMESTAR 046 049050 063
PANASONIC 058 059061 062
PAYSAT 016
PROSCAN 065 066
RCA 051 052053 065066
RADIOSHACK 064
REALISTIC 057
STS 020 027
STARTRAK 026
SKY 031
SKYLIFE 005 006007
SHACK 064
STARCHOICE 064
SONY 054 060
TOSHIBA 015 017028 029030 072
ULTIMATETV 060 066
UNIDEN 016 021037 055056 057
ZENITH 024 031068
ContinUa...

8AMSUNG DVD
Producto
DVD
DVDR
BDRecord
VCR COMBO
VCR Record
DHRCOMBO
C6diqo
000%1 002
003004
005006
007008 009010011
012
013
DVD
Marca
ANAM
AUDIOVOX
AUDIOLOGIC
ANABA
APEXDIGITAL
AIWA
BROKSONIC
BLAUPUNKT
B&K
CURTISMATHES
CYBERHOME
CLARION
CIRRUS
CINEVlSlON
DAEWOO
DENON
FARENHEIT
FISHER
GPX
GOVlDEO
GE
GREENHILL
HITACHI
HITEKER
HOYO
HARMAN/KARDON
IRT
INTEGRA
JBL
JVC
JATON
KENWOOD
KISS
KONKA
KLH
LG(Goldstar)
LOEWE
LASONIC
MOBILEAUTHORITY
MEMOREX
MALATA
MAGNAVOX
MINTEK
MONYKA
Codiqo
030
O75
085
O72
070071 074086 083084 088
111112
114
062
O74
122 123
027
065077 078079 082
080 125
081
095
066
146
067068
090
06O
061089 133 135
069074
074
064 113
071
073
091 110
089
092
091
022033 115116
073
051 108109
073
059 100106 107
074075
025031
O57
058
054
O55
056
076093
074094
073
Producto C6digo
HomeTheaterVCRCOMBO 014015016
HDDRecordCOMBO 017
TWINTRAYCOMBO 018
STB DVDCOMBO 019
DVD Receiver 020
AVReceiver 021
Marca C6diqo
NORCENT 048049 050
NEXTBASE 052
NEC 053
NANTAUS 144
NESA 074
OPTOMEDIAELECTRONICS 105
OPTIVlEW 072
ONKYO 076092 119
PHILCO 044045
PRINCETON 046047
PROSCAN 023
PANASONIC 024034 124 134136 137138
PHILIPS 036076
ROTEL 117118
RIO 120
RCA 023035 074075131 132
RAITE 073
ROWA 038
SAMPO 104
SONY 026029 I26 127128 129
130 141
SHERWOOD 039041
SVA 042
SYLVANIA 043093
SHARP 140
SANSUI 062
SANYO 062
SHINSONIC 094
SANYO 090
THOMSON 145
TOSHIBA 028062 076
TECHNICS 139
TVIEW 072
TOKAI 073
TEAC 096
TECHWOOD 097
TREDEX 098099 101
URBANCONCEPTS 076
VENTURER 075
VOCOPRO 102
YAMAHA 032063
YAMAKAWA 040073
XWAVE 103
ZENITH 076 121
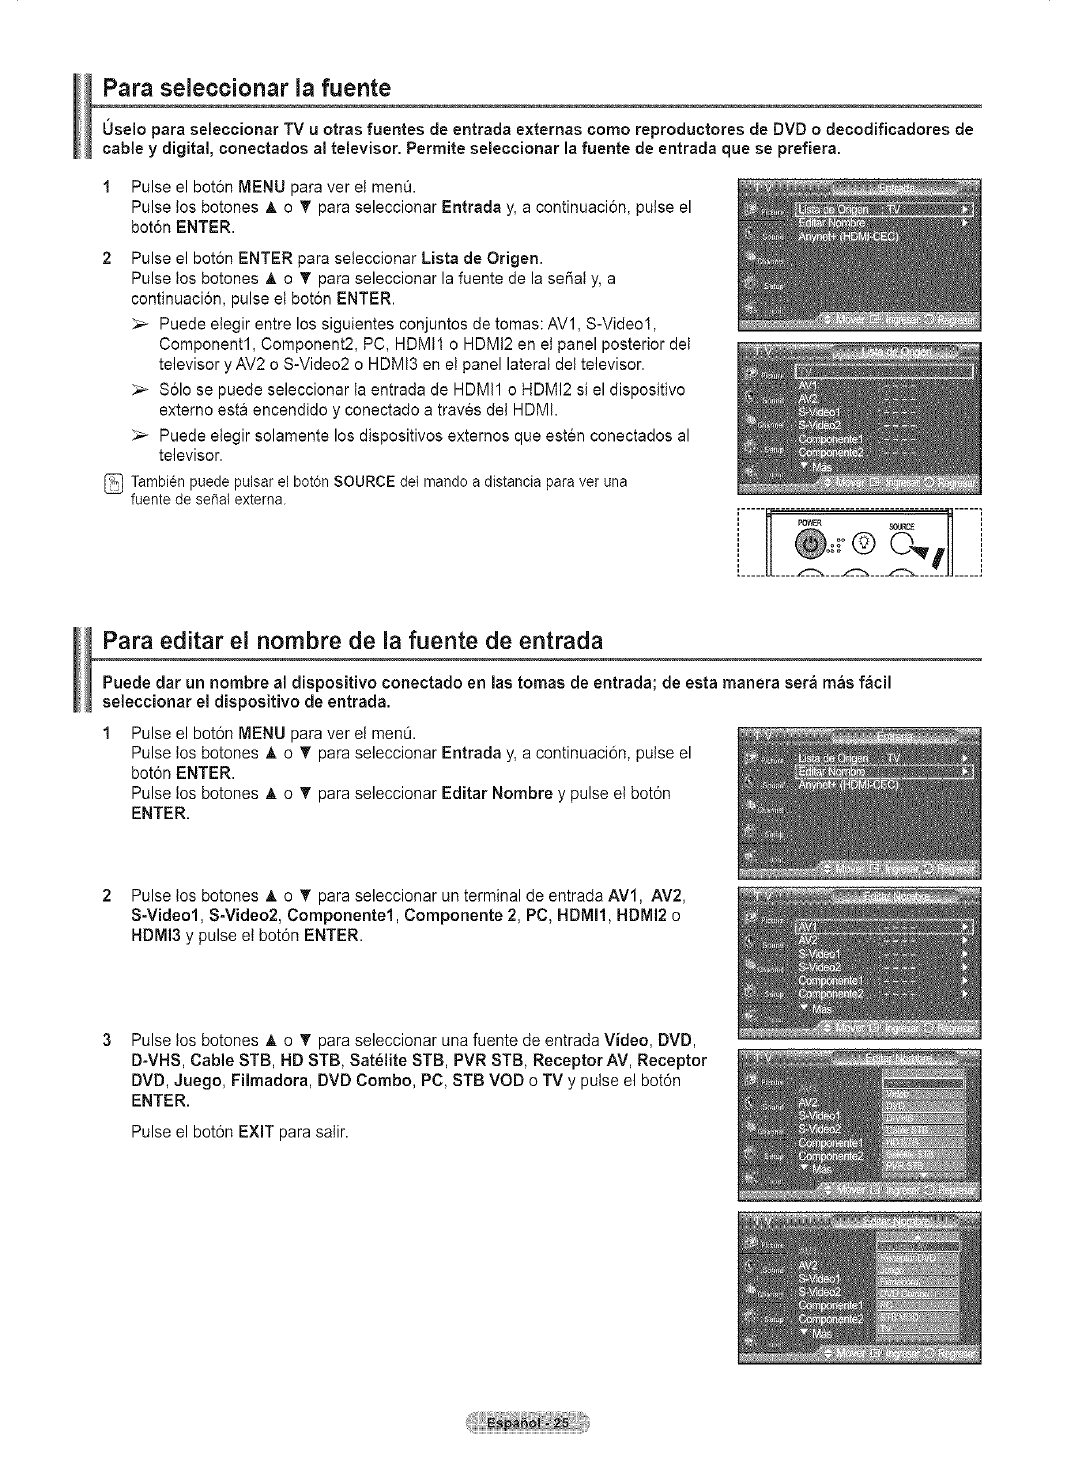
Para seleccionar la fuente
Uaelo para seleccionar TV uotras fuentea de entrada externas como reproductorea de DVD odecodificadores de
cable y digital, conectados al televisor. Permite seleccionar la fuente de entrada que se prefiera.
1 Pulse el bot6n MENU para ver et men&
Pulse los botones _, o T para seleccionar Entrada y, a continuaci6n, pulse el
bot6n ENTER.
2 Pulse el bot6n ENTER para seleccionar Lista de Origen.
Pulse los botones A o T para seleccionar la fuente de la serial y, a
continuacion, pulse el boron ENTER.
_-- Puede elegir entre los siguientes conjuntos de tomas: AV1, S-Video1,
Component1, Component2, PC, HDMtl o HDM!2 en el panel posterior det
televisor y AV2 o S-Video2 o HDMI3 en el panel lateral del televisor.
_-- Solo se puede seleccionar ta entrada de HDMI1 o HDMI2 si el dispositivo
externo esta encendido y conectado a traves del HDMI.
_,_ Puede elegir solamente los dispositivos externos que esten conectados al
televisor.
Tambien puede pulsar el bot6n SOURCE dei mando a distancia para ver una
fuente de serial extema.
- @.;.®
Para editar el hombre de la fuente de entrada
Puede dar un hombre al dispositivo conectado en las tomas de entrada; de esta manera ser_ mas f_cil
seleccionar el dispositivo de entrada.
1 Pulse el boton MENU para ver el men&
Pulse los botones A o T para seleccionar Entrada y, a continuacion, pulse el
boton ENTER.
Pulse los botones A o T para seleccionar Editar Nombre y pulse et boton
ENTER.
2 Pulse tos botones &o T para seleccionar un terminal de entrada AVl, AV2,
S-Video1, S-Video2, Componentel, Componente 2, PC, HDMI1, HDMI2 o
HDMI3 y pulse et bot6n ENTER.
Pulse tos botones A o T para seleccionar una fuente de entrada Video, DVD,
D-VHS, Cable STB, HD STB, Sat61ite STB, PVR STB, Receptor AV, Receptor
DVD, Juego, Fimadora, DVD Combo, PC, STB VOD o TV y pulse el bot6n
ENTER.
Pulse el boton EXiT para salir.
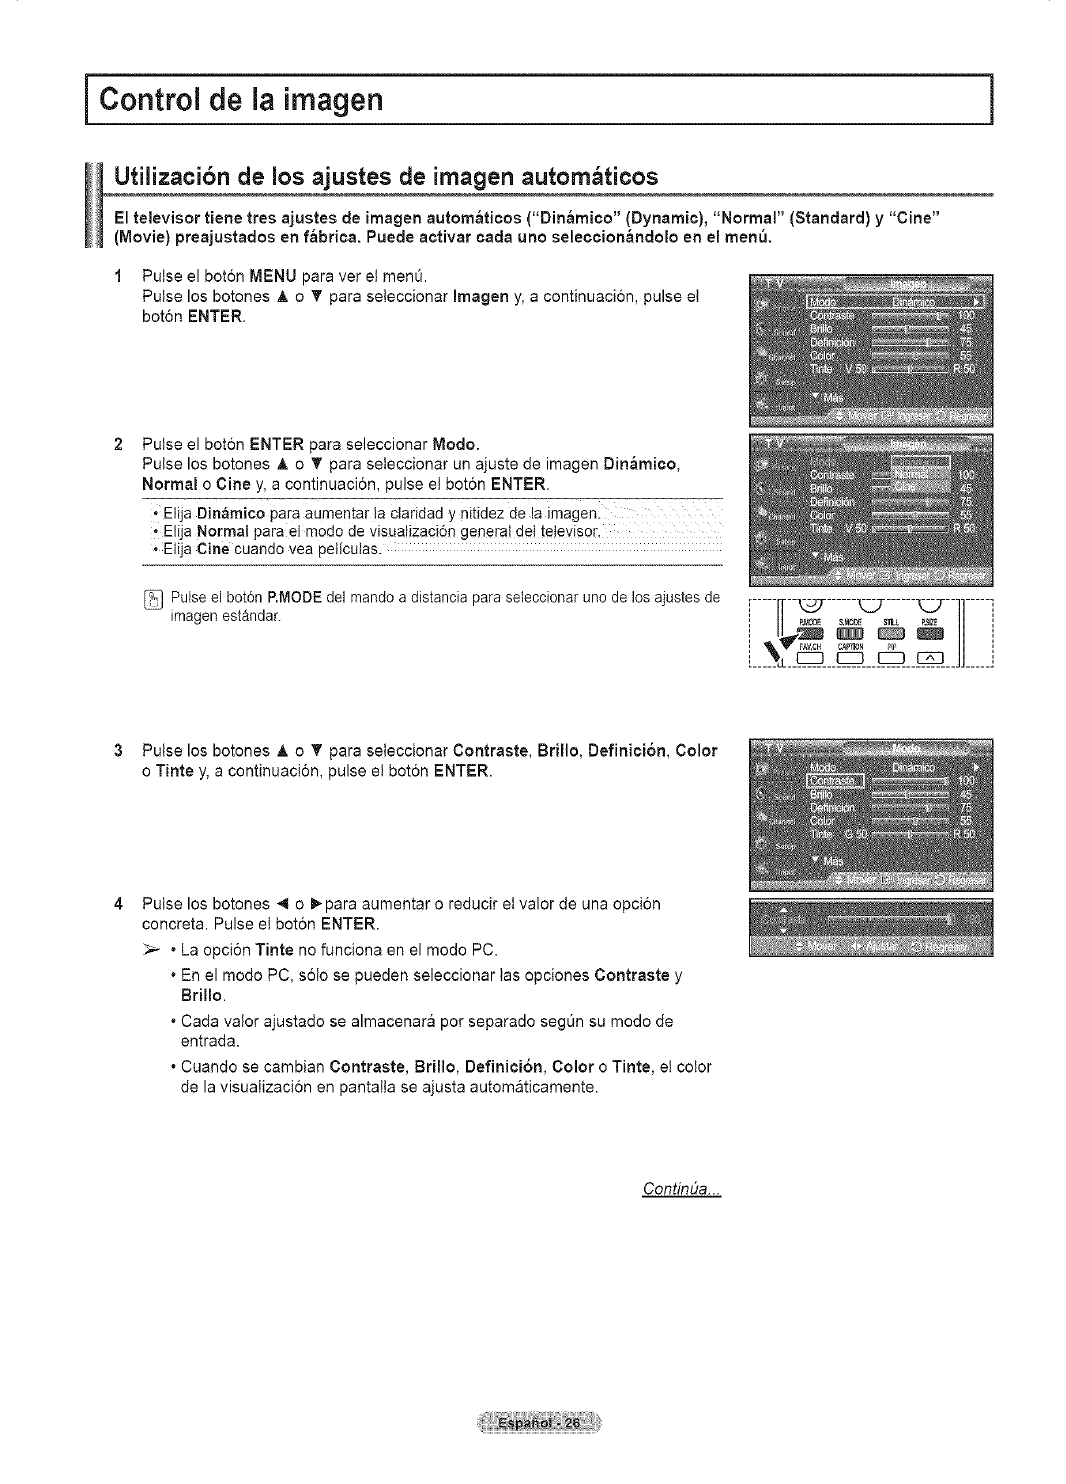
iControl de la imagen ]
Utilizacibn de los ajustes de imagen autombticos
El televisor tiene tres ajustes de imagen autom_ticos ("Din_mico" (Dynamic), "Normal" (Standard) y "Cine"
(Movie) preajustados en f_lbrica. Puede activar cada uno seleccion_ndolo en el menlO,
1Pulse el bot6n MENU para ver et menO.
Pulse los botones _, o _' para seteccionar Imagen y, a continuaci6n, pulse et
bot6n ENTER.
Pulse el boton ENTER para seleccionar Modo.
Pulse los botones _, o _' para seteccionar un ajuste de imagen Din_mico,
Normal o Cine y, a continuaci6n, pulse el bot6n ENTER.
, Etija Din_mico para aumentar !a claridad y nitidez de la imagen.
, Eiija Normal para el modo de visua!izaci6n genera! de! te!evisor.
•Elija Cine cuando yea peliculas.
Pulse el bot6n P.MODE del mando a distancia para seleccionar uno de los ajustes de [-----[[-- -_._T...... _ ...... "_2---1]----- ]
imagen estandar. ,, P_0DES.M0_ S_ P_ ',
3Pulse los botones A o _' para seleccionar Contraste, Brillo, Definici6n, Color
oTinte y, a continuaci6n, pulse el bot6n ENTER.
Pulse los botones 4 o P para aumentar o reducir et valor de una opci6n
concreta. Pulse el bot6n ENTER.
_-- •La opci6n Tinte no funciona en el mode PC.
•En el modo PC, s6to se pueden seleccionar tas opciones Contraste y
Brillo.
•Cada valor ajustado se almacenara per separado seg_n su modo de
entrada.
• Cuando se cambian Contraste, Brillo, Definici6n, Color o Tinte, et color
de la visualizaci6n en pantalta se ajusta automaticamente.
ContinUa...
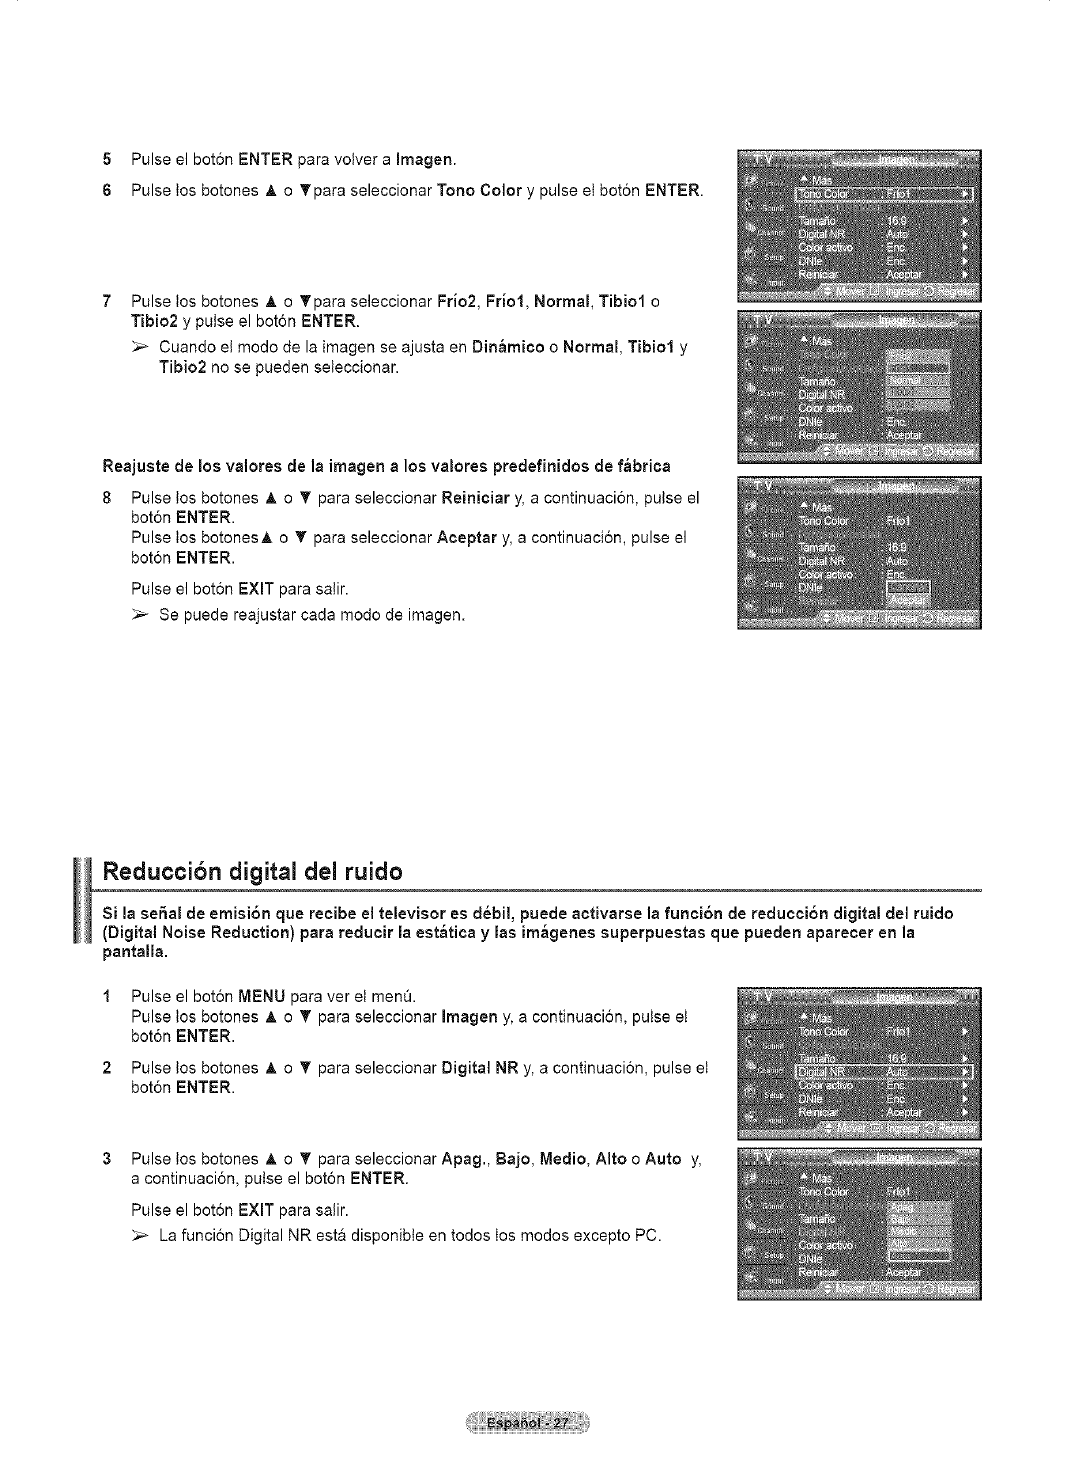
5Pulse el bot6n ENTER para votver a Imagen.
6 Pulse los botones _, o _'para seleccionar Tono Color y pulse et bot6n ENTER.
Pulse los botones A o Tpara seleccionar Frio2, Friol, Normal, Tibiol o
Tibio2 y puise el boton ENTER.
Cuando et modo de la imagen se ajusta en Din_mico o Normal, Tibiol y
Tibio2 no se pueden seteccionar.
Reajuste de los valores de la innagen a los valores predefinidos de f_brica
8 Pulse tos botones _, o _' para seleccionar Reiniciar y, a continuaci6n, pulse el
bot6n ENTER.
Pulse los botonesA o T para seleccionar Aceptar y, a continuaci6n, pulse el
bot6n ENTER.
Pulse el bot6n EXIT para salir.
_-- Se puede reajustar cada modo de imagen.
Reduccibn digital del ruido
Si la se6al de emisi6n que recibe el televisor es d6bil, puede activarse la funci6n de reducci6n digital del ruido
(Digital Noise Reduction) para reducir la est_tica y las im_genes superpuestas que pueden aparecer en la
pantalla.
Pulse el bot6n MENU para ver et men&
Pulse los botones _, o T para seleccionar Imagen y, a continuaci6n, pulse et
bot6n ENTER.
Pulse los botones _, o T para seleccionar Digital NR y, a continuaci6n, pulse et
bot6n ENTER.
Pulse los botones &o T para seleccionar Apag., Bajo, Medio, Alto o Auto y,
a continuaci6n, pulse el boron ENTER.
Pulse el bot6n EXIT para salir.
_,_ La funci6n Digital NR esta disponibte en todos los modes excepto PC.
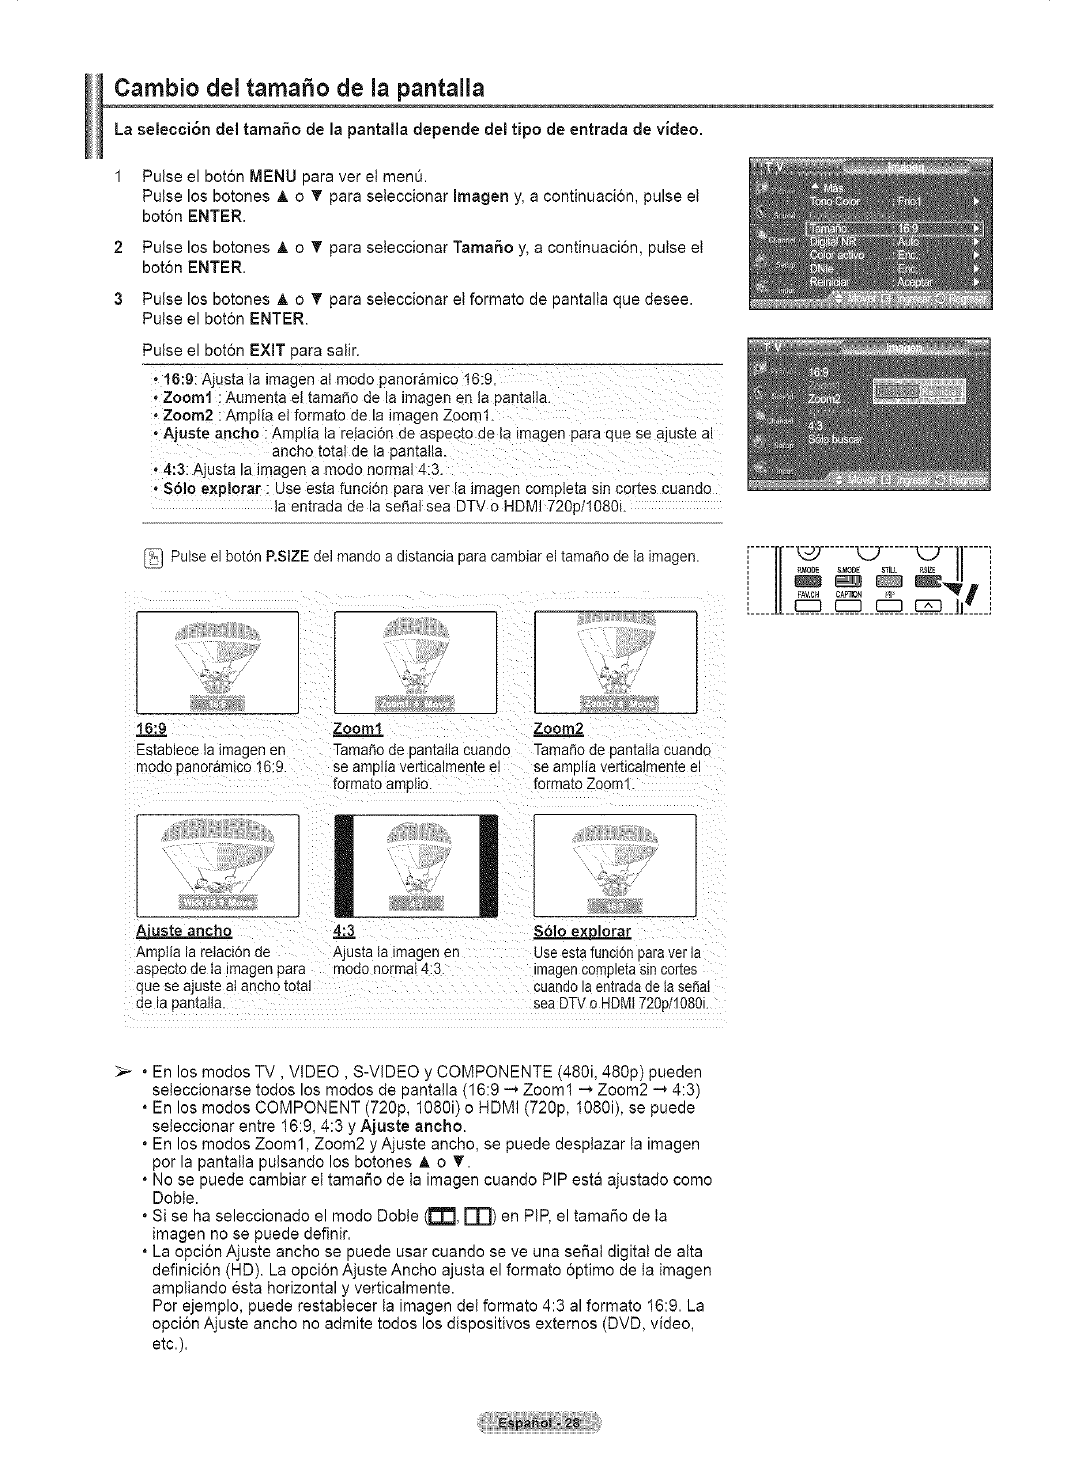
Cambio del tama o de la pantalla
La selecci6n del ramada de la pantalla depende del tipo de entrada de video.
2
3
Pulse el bot6n MENU para ver et menQ.
Pulse los botones _, o _' para seteccionar Imagen y, a continuaci6n, pulse et
bot6n ENTER.
Pulse los botones _, o _' para seteccionar Tama6o y, a continuaci6n, pulse et
bot6n ENTER.
Pulse los botones _, o _' para seteccionar et formato de pantalta que desee.
Putse el bot6n ENTER.
Pulse el bot6n EXIT para salir.
,16:9: Ajusta la imagen at modo panoramic0 t6:9,
,Zoom1 : Aumenta el tamar_o de la imagen en la Pantatta.
,Zoom2 : Ampl{a el formato de la imagen Zoom1.
, Ajuste anche ; Amplia la relaci6 n de aspect o de la imagen para que se aJuste al
ancho tota! de la pantalla,
' 4:3: Ajusta la imagen a modo normal 4:3 .
* S61o expbrar : Use esta funci6n para ver !a imagen completa sin cortes cuando
la entrada de la seSal sea DTV o HDMI 720p11080i.
Pulse el bot6n P.SIZEdel mando a distancia para cambiar el tama_o de ta imagen. [-----[[--...... ......
', U P_ &MODE STILL _SlZE /I ',
', FAV,CH CAPIION _ ',
h____[[
16:9 Zoom1 Zoom2
Establece la imagen en Tamaho de 3antatla cuando TamaSo de uantaiia cuando
moao panoramico 16:9. se amc ia vertlcalmente ei se amDlia vertlca meme el
formato amotio, formato Zoom"
A[uste ancho 4:.._3 $61o ex_c_lorar
Amplia la reIacidn de Ajusta la imagen en use es[afuncb_ aaraver ia
aspeoto de ta imagen para moao normal 4:3 magencomple[asin cortes
_ue se ajuste at ancho total cuandola entrada de la seSai
de la pantalla sea DTV o HDM1720p/1080i.
_-- . En los modos TV, VIDEO, S-VIDEO y COMPONENTE (480i, 480p) pueden
seteccionarse todos los modos de pantalla (16:9 .-, Zoom1 --, Zoom2 .-* 4:3)
. En los modos COMPONENT (720p, 1080i) o HDMI (720p, 1980i), se puede
seleccionar entre 16:9, 4:3 y Ajuste ancho.
. En los modos Zoom1, Zoom2 y Ajuste ancho, se puede desptazar ta imagen
par la pantalta pulsando los botones A o _'.
. No se puede cambiar et tamario de ta imagen cuando PIP esta ajustado coma
Doble.
. Si se ha seleccionado el modo Dobte (r'[_, r-n) en PiP, el tamario de ta
imagen no se puede definir.
. La opci6n Ajuste ancho se puede usar cuando se ve una serial digital de atta
definicion (HD). La opcion Ajuste Ancho ajusta el formato 6ptimo de ta imagen
ampliando esta horizontal y verticalmente.
Par ejemplo, puede restablecer ta imagen del formate 4:3 al formate 16:9. La
opci6n Ajuste ancho no admite todos los dispositivos extemos (DVD, video,
etc.).
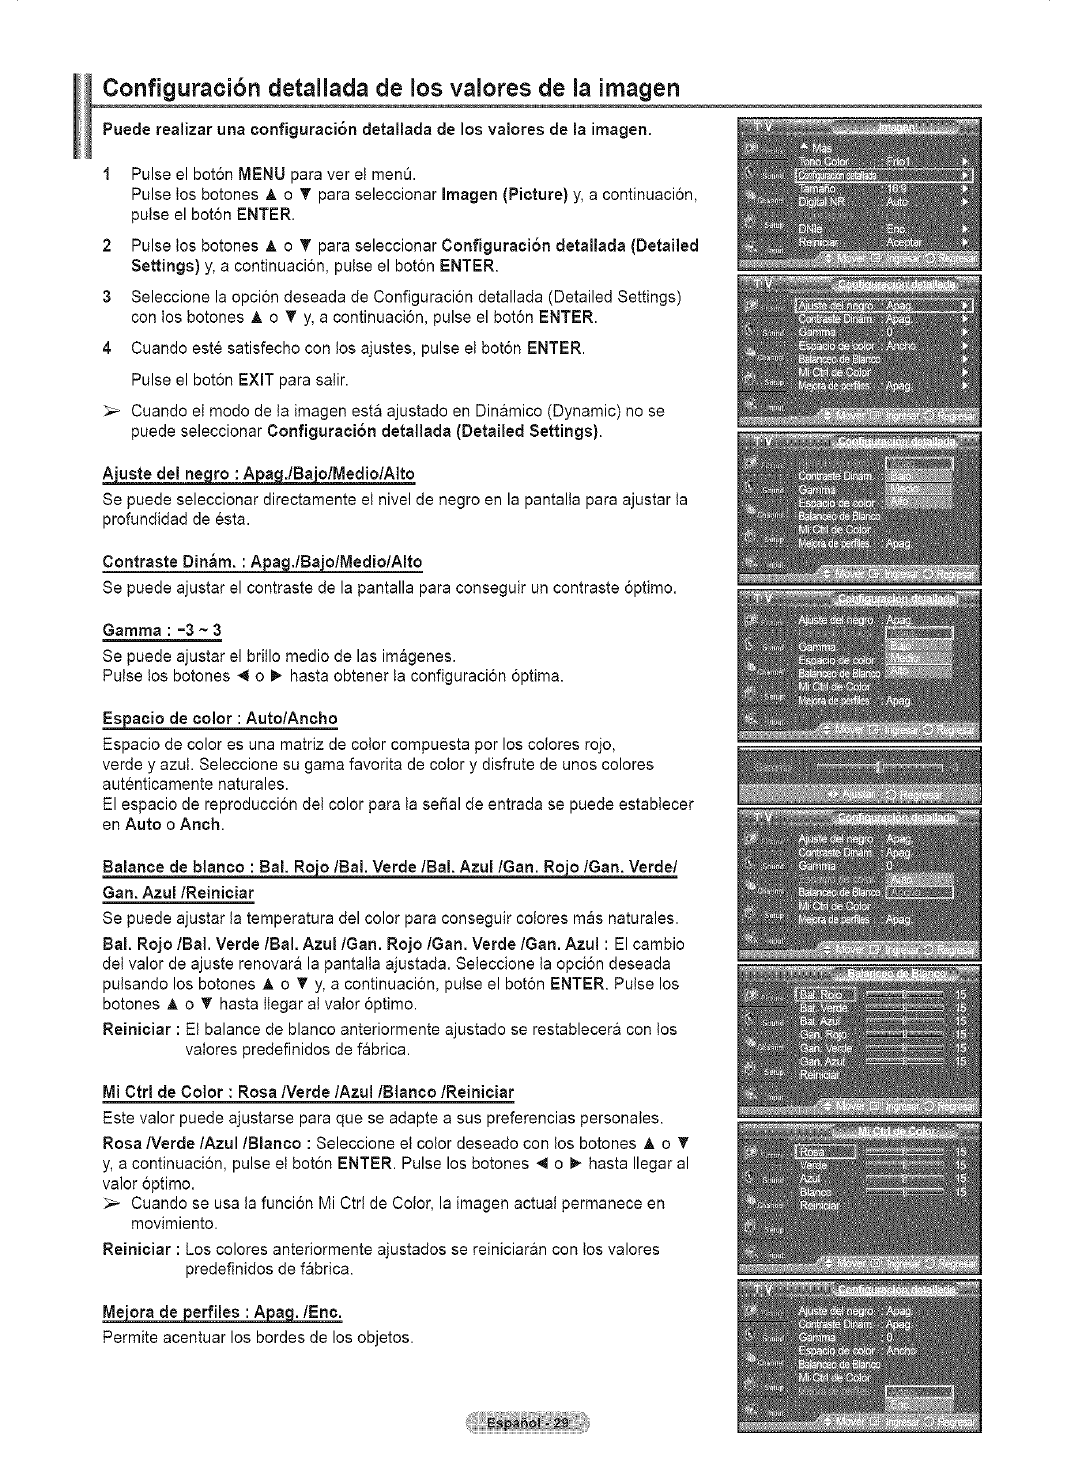
Configuracibn detallada de los valores de la imagen
Puede realizar una configuraci6n detallada de los valores de la imagen.
1 Pulse el bot6n MENU para ver et men&
Pulse los botones _, o T para seleccionar Imagen (Picture) y, a continuacion,
pulse el boton ENTER.
2 Pulse los botones A o T para seleccionar Configuraci6n detallada (Detailed
Settings) y, a continuacion, pulse el boton ENTER.
3Seleccione la opcion deseada de Configuracion detallada (Detailed Settings)
con los botones A o T y, a continuacion, pulse el bot6n ENTER.
4 Cuando este satisfecho con los ajustes, pulse et boton ENTER.
Pulse el boton EXiT para salir.
_,_ Cuando el modo de la imagen est& ajustado en Din&mico (Dynamic) no se
puede seleccionar Configuraci6n detallada (Detailed Settings).
AhJste delne ro :A a JBaolNled_lAIto
Se puede seleccionar directamente et nivel de negro en la pantalta para ajustar ta
profundidad de esta.
Contraste Din_m. : A_o/Medio/AIto
Se puede ajustar el contraste de la pantalla para conseguir un contraste optimo.
Gamma:-3~3
Se puede ajustar el brillo medio de las imagenes.
Pulse los botones 4 o _ hasta obtener ta configuracion optima.
Espacio de color : Auto/Ancho
Espacio de color es una matriz de color compuesta por los colores rojo,
verde y azut. Seleccione su gama favorita de color y disfrute de unos colores
autenticamente naturales.
El espacio de reproduccion det color para ta seSal de entrada se puede estabtecer
en Auto o Anch.
Balance de blanco : 8al. Rojo/Bal. Verde/Bal. Azul/Gan. Roj_o/Gan. Verde/
Gan. Azul/Reiniciar
Se puede ajustar ta temperatura del color para conseguir colores mas naturales.
Bal. Rojo/Bal. Verde/Bal. Azul IGan. Rojo/Gan. Verde IGan. Azul : El cambio
del valor de ajuste renovara la pantalta ajustada. Seleccione la opcion deseada
putsando los botones ,& o V y, a continuacion, pulse el boton ENTER. Pulse los
botones _, o _' hasta ttegar al valor optimo.
Reiniciar : Et balance de blanco anteriormente ajustado se restablecer& con los
valores predefinidos de fabrica.
IVliCtrl de Color : Rosa/Verde/Azul/Blanco/Reiniciar
Este valor puede ajustarse para que se adapte a sus preferencias personales.
Rosa/Verde/Azul/Blanco : Seleccione el color deseado con los botones A o _'
y, a continuacion, pulse et boton ENTER. Pulse los botones 4 o I_ hasta Ilegar al
valor optimo.
Cuando se usa ta funci6n Mi Ctrt de Color, la imagen actual permanece en
movimiento.
Reiniciar : Los colores anteriormente ajustados se reiniciar&n con los valores
predefinidos de f&brica.
Meora de erfiles : A a ./Eric.
Permite acentuar los bordes de los objetos.
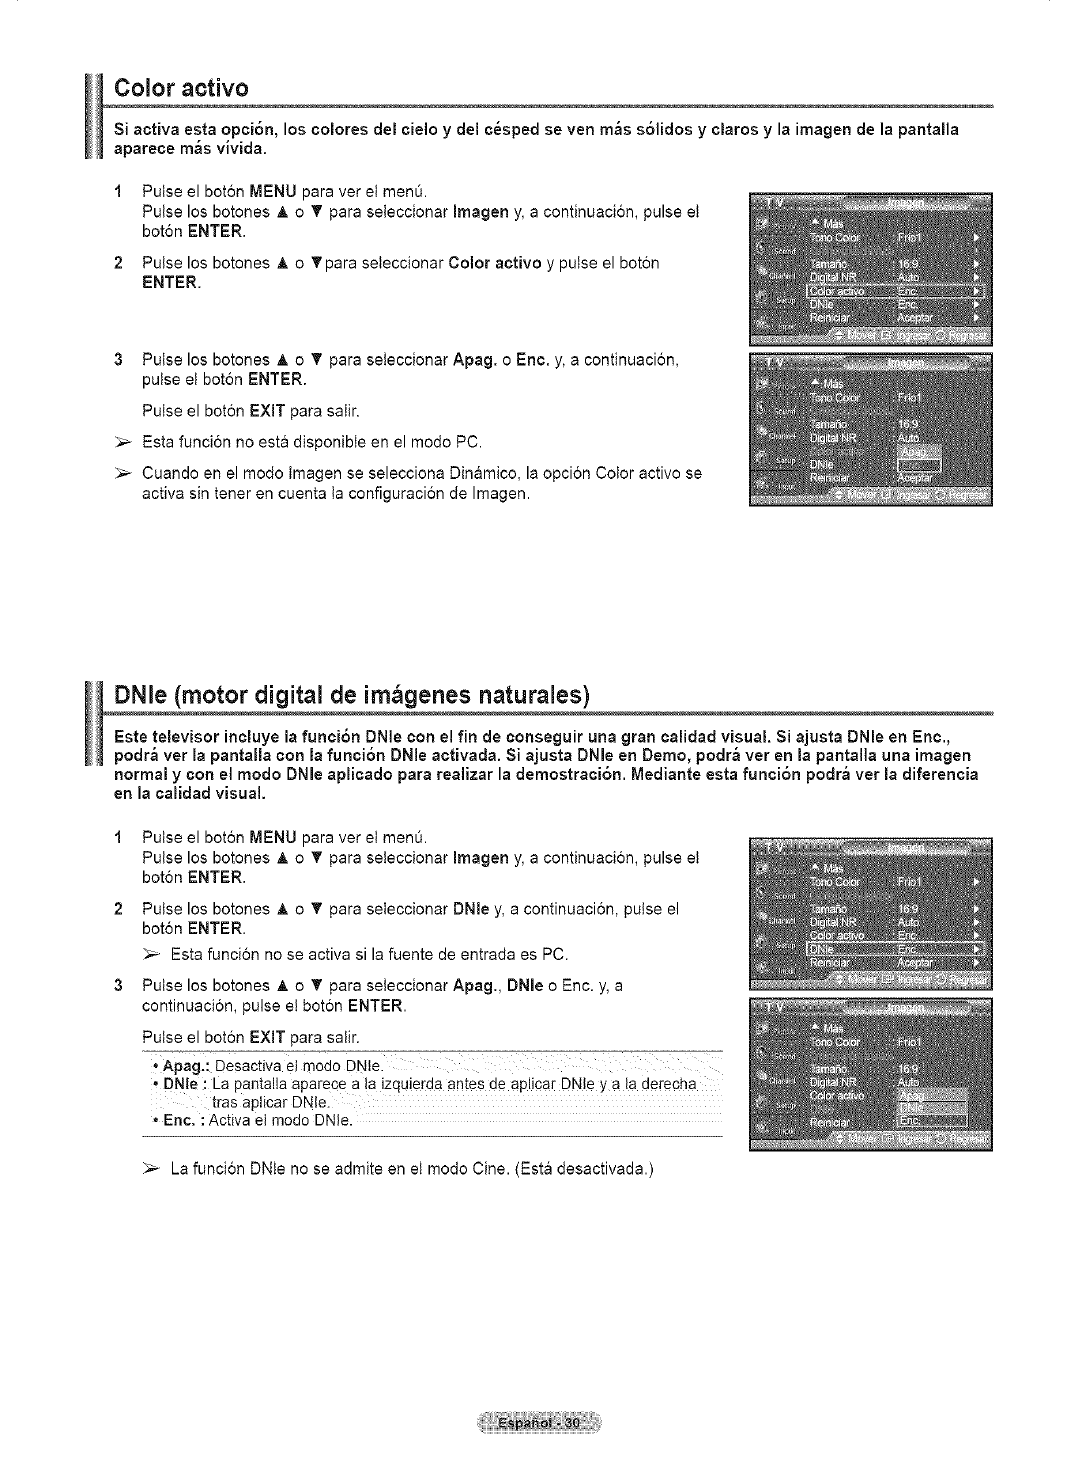
Color activo
Si aotiva esta opci6n, los oolores del cielo y del c_sped se ven m_s s61idos y claros y la imagen de la pantalla
apareoe m_s vJvida.
Pulse el bot6n MENU para ver et menO.
Pulse los botones A o _' para seteccionar Imagen y, a continuaci6n, pulse et
bot6n ENTER,
Pulse los botones A o _'para seteccionar Color aotivo y pulse el bot6n
ENTER.
3Pulse los botones A o _' para seteccionar Apag. o Erie. y, a continuacion,
pulse et boton ENTER.
Putse el boton EXIT para satir.
_,_ Esta funcion no esta disponibte en el modo PC.
_,_ Cuando en el mode Imagen se selecciona Dinamico, la opci6n Color activo se
activa sin tener en cuenta ta configuracion de Imagen.
DNle (motor digital de im genes naturales)
Este televisor incluye la funci6n DNle con el fin de ¢onseguir una gran calidad visual. Si ajusta DNle en Eric.,
podr_ ver la pantalla con la funoi6n DNle activada. Si ajusta DNle en Demo, podr_ vet en la pantalla una imagen
normal y con el modo DNle aplicado para realizar la demostraci6n. Mediante esta funci6n poclr_ver la diferencia
en la calidad visual.
Pulse el bot6n MENU para ver et menQ.
Pulse los botones A o _' para seteccionar Imagen y, a continuacion, pulse et
bot6n ENTER.
Pulse los botones A o _' para seteccionar DNle y, a continuacion, pulse el
boton ENTER.
_-- Esta funcion no se activa si la fuente de entrada es PC.
Pulse los botones A o _' para seteccionar Apag., DNle o Enc. y, a
continuaci6n, pulse el boton ENTER.
Pulse el boton EXIT para salir.
,Apag.: Desactiva el modo DNte.
. DNIe : La pantalla aparece a !a izquierda antes de aplicar DNle y a la derecha
tras apticar DNle.
Eric. : Activa el modo DNle.
_-- La funci6n DNte no se admite en et modo Cine. (Esta desactivada.)
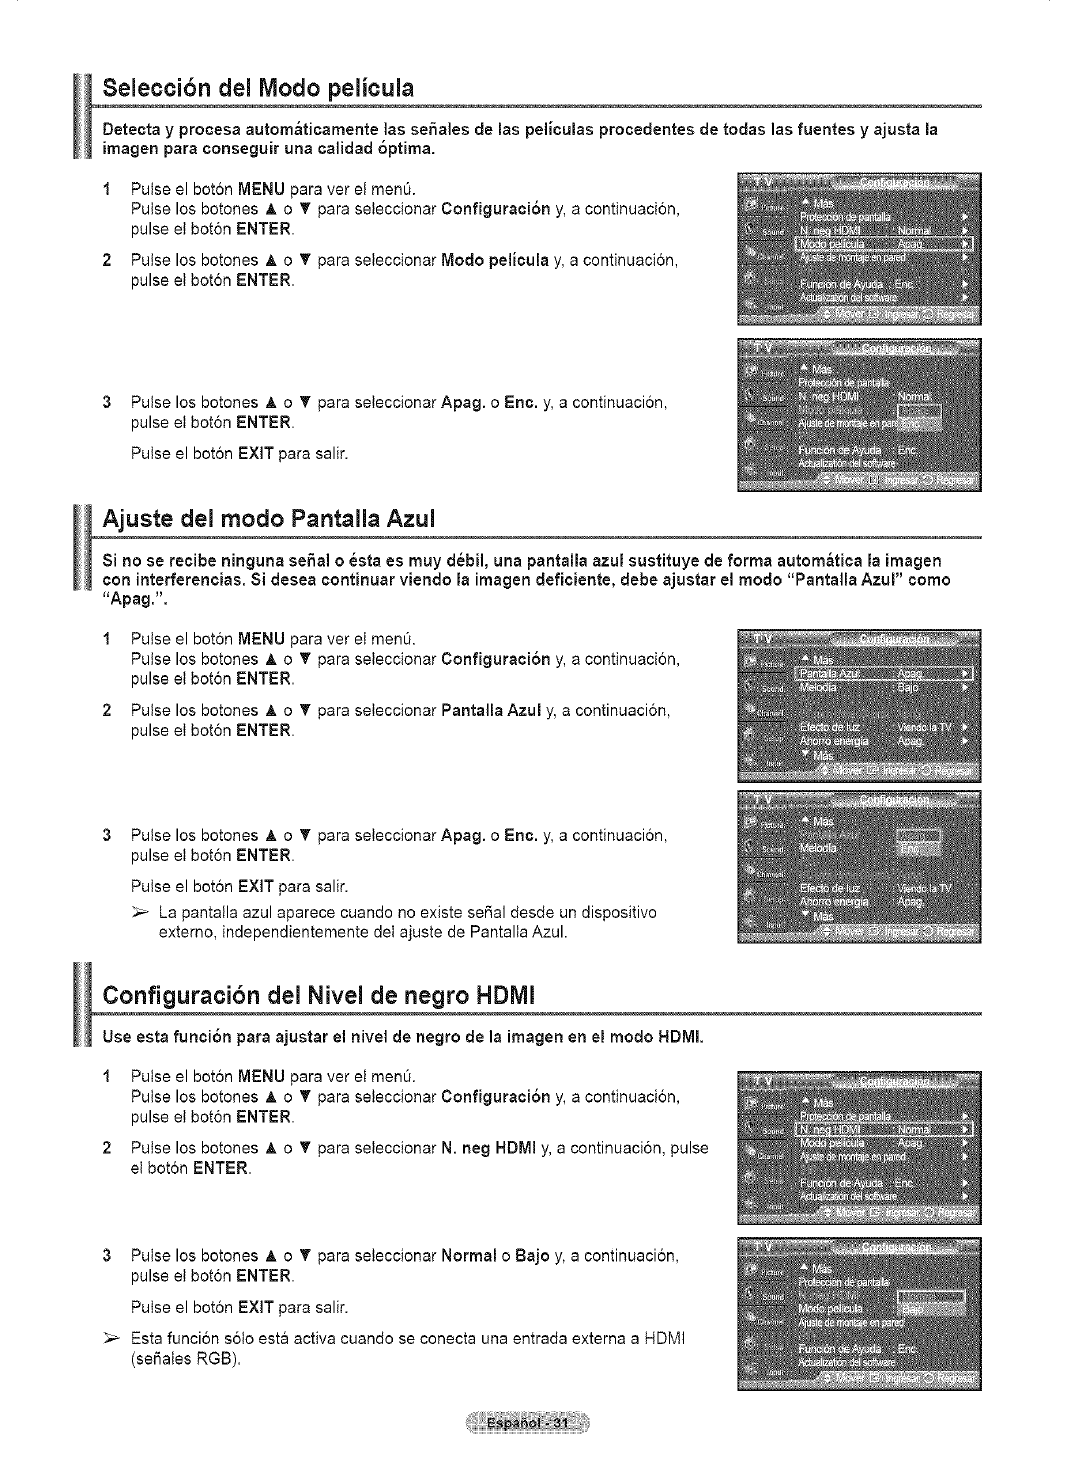
Seleccibn del Modo pelicula
Detecta y procesa autorn_ticamente las se6ales de las peliculas procedentes de todas las fuentes y ajusta la
imagen para conseguir una calidad 6ptima.
1 Pulse el bot6n MENU para vet el men&
Pulse los botones A o _' para seleccionar Configuraci6n y, a continuaci6n,
pulse el bot6n ENTER.
2 Pulse los botones A o _' para seleccionar Modo pelicula y, a continuaci6n,
pulse et bot6n ENTER.
3Pulse los botones A o _' para seleccionar Apag. o Eric. y, a continuaci6n,
pulse et bot6n ENTER.
Putse el bot6n EXIT para salir.
Ajuste del modo Pantalla Azul
Si no se recibe ninguna se6al o _sta es muy d_bil, una pantalla azul sustituye de forma autom&tica la imagen
con interferencias. Si desea continuar viendo la imagen deficiente, clebe ajustar el modo "Pantalla Azul" como
"Apag.".
Pulse el bot6n MENU para vet el men&
Pulse los botones A o _' para seleccionar Configuraci6n y, a continuaci6n,
pulse el boron ENTER.
Pulse los botones A o _' para seleccionar Pantalla Azul y, a continuaci6n,
pulse et boton ENTER.
Pulse los botones A o _' para seleccionar Apag. o Eric. y, a continuaci6n,
pulse et bot6n ENTER.
Pulse el bot6n EXiT para salir.
La panta!la azul aparece cuando no existe se6al desde un dispositivo
extemo, independientemente det ajuste de Pantalta Azul.
Configuracibn del Nivel de negro HDMI
Use esta funci6n para ajustar el nivel de negro de la imagen en el modo NDMI.
1Pulse el bot6n MENU para vet el men&
Pulse los botones A o _' para seleccionar Configuraci6n y, a continuaci6n,
pulse et bot6n ENTER.
2 Pulse los botones A o _' para seleccionar N. neg HDMI y, a continuaci6n, pulse
elbot6n ENTER.
3Pulse los botones A o _' para seleccionar Normal o Bajo y, a continuaci6n,
pulse et bot6n ENTER.
Pulse el bot6n EXiT para salir.
Esta funci6n s6to esta activa cuando se conecta una entrada externa a HDMI
(se_ales RGB).

Visualizaci6n de imagen sobre imagen
Este producto Ileva un sintonizador incorporado que no permite la funci6n PiP en el mismo modo. Pot ejemplo,
no es posible mirar un canal de televisi6n en la pantalla principal y otro en la pantalla PiP. En el apartado
'Configuraci6n de PiP' encontrar_ m_s cletalles.Para mirar dos fuentes simult_neamente, puede utilizar la funci6n
PiP.(Consulte la p_gina 37 para seleccionar el sonido de la imagen PIP.)
Cuando V-Chip esta funcionando, no se puede utilizar la funcion PIP. (Consutte la pagina 56.)
Activaci6n del modo de ima en sobre ima en
Pulse el boton MENU para ver et menQ.
Pulse los botones A o _' para seteccionar Configuraci6n y, a continuacion,
pulse el boton ENTER.
Pulse los botones A o _' para seteccionar PIP y, a continuaci6n, pulse el boton
ENTER.
2 Pulse de nuevo ei bot6n ENTER.
Pulse los botones A o _' para seteccionar Eric. y, a continuaci6n, pulse el
bot6n ENTER.
_-- Si, mientras mira la televisi6n en el modo PiP, apaga el televisor y vuetve a
encenderto, la ventana PIP desaparecera.
Las se5ales de televisi6n anal6gicas se pueden ver en la panta!la PIP mientras
en la pantalla principal se ve una imagen procedente de una fuente externa
(DVD, decodificador, PC, etc.) conectada a las tomas Component 1, 2, PC y
HDMI 1,2, 3.
Pulse ei bot6n PIP del mando a distancia para activar o desactivar la funci6n PIP.
Cambio del tamaSo de la ventana PiP
Pulse los botones A o _' para seteccionar Tama6o y, a continuacion, pulse et
boton ENTER.
Pulse los botones _, o _' para seleccionar et tama_o deseado de la ventana de
PIP y, a continuacion, putse el boton ENTER.
_-- Si la imagen principal esta en los modos PC y HDMI 1, TamarSo no esta
disponible.
Cuando utilice ta pantalta principal para visualizar un juego o un karaoke,
puede que la imagen en la ventana PIP no resulte det todo natural.
ContinDa...
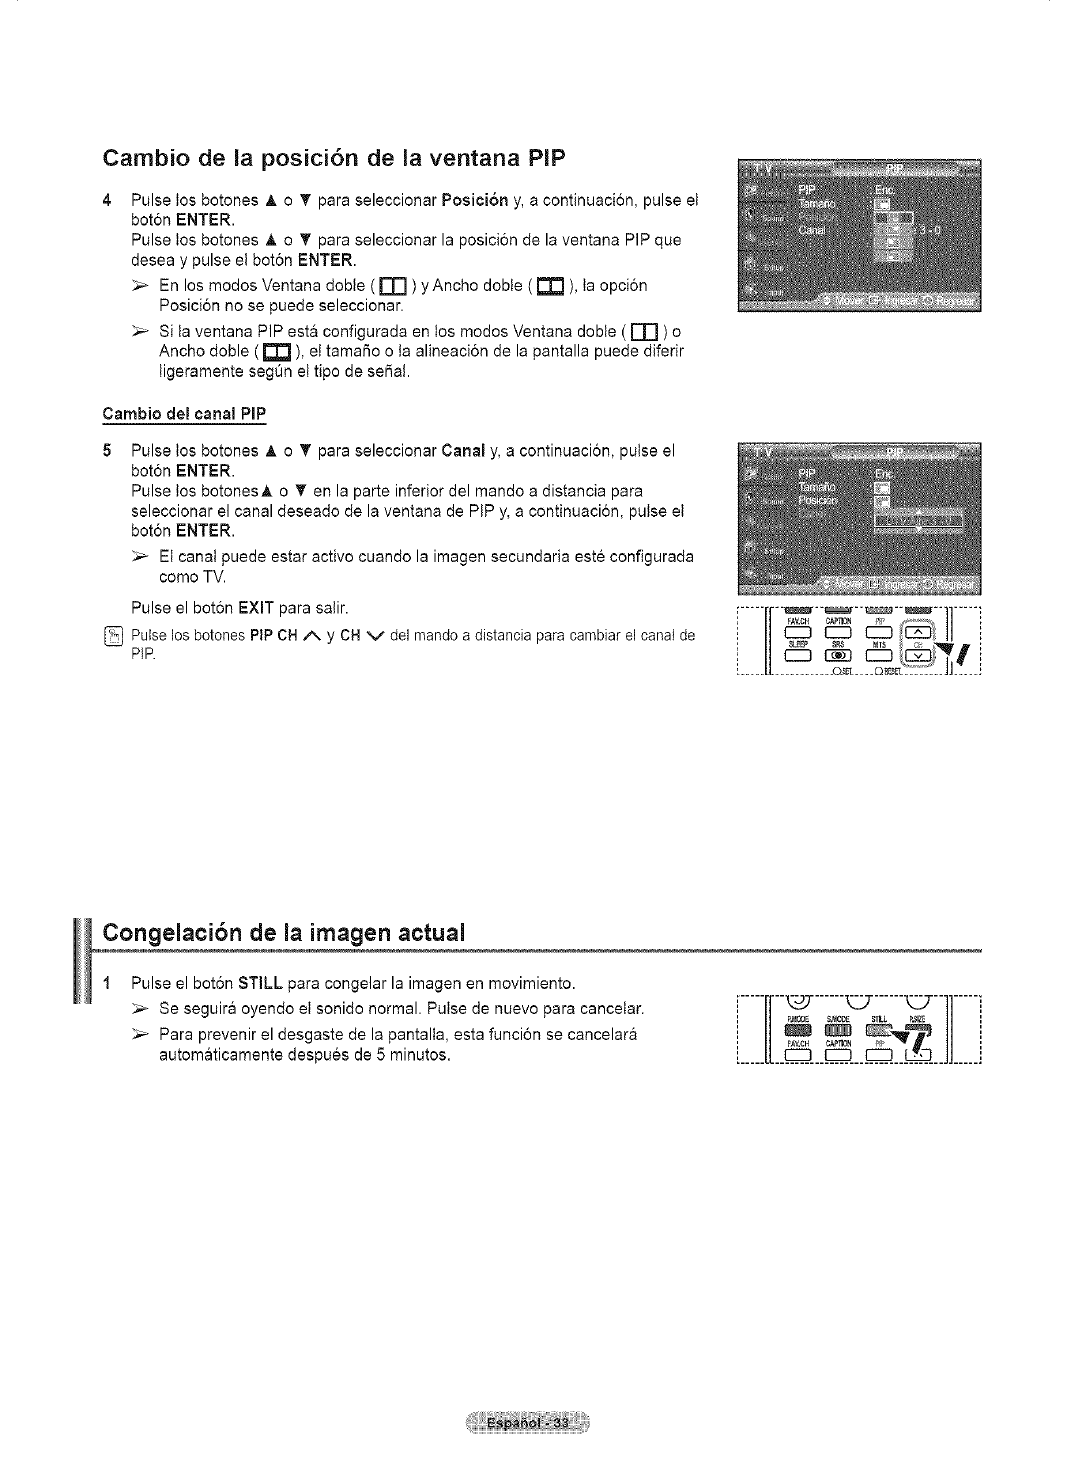
Cambio de la posici6n de la ventana PiP
Pulse los botones _, o T para seleccionar PosiciSn y, a continuacion, pulse et
bot6n ENTER.
Pulse los botones _, o T para seleccionar la posicion de la ventana PIP que
desea y pulse el boton ENTER.
_,_ En los modos Ventana doble ( rT'] ) y Ancho doble ( _ ), ta opci6n
Posici6n no se puede seleccionar.
_-- Si la ventana PIP esta configurada en los modos Ventana doble ( rr] ) o
Ancho doble ( [I1 ), el tamaSo o la alineacion de la pantalla puede diferir
tigeramente segtJn et tipo de seSat.
Cambio del canal PiP
Pulse los botones A o T para seleccionar Canal y, a continuacion, pulse el
bot6n ENTER.
Pulse los botonesA o Ten la parte inferior del mando a distancia para
seleccionar el canal deseado de la ventana de PIP y, a continuacion, pulse et
bot6n ENTER.
_,_ Et canal puede estar activo cuando la imagen secundaria este configurada
como TV.
Pulse el boton EXiT para salir.
Putse los botones PIP CH _, y CH V del mando a dJstancia )ara cambiar el canal de
PIP.
i c::3c::Dc::D i
1'_L_EP 8R8 NT$ @ _
[_____[[............O_t ____C)_Er_['[:_t"__U J_[____
Congelaci6n de la imagen actual
Pulse el boton STILL para congelar la imagen en movimiento.
_,_ Se seguira oyendo et sonido normal. Pulse de nuevo para cancelar.
_,_ Para prevenir el desgaste de la pantalla, esta funcion se cancelar&
automaticamente despues de 5 minutos.
[_____rl_____......_ ......_.T__11_____i
11 FAV.CH CAPTION _l> ,
L_J_I_ U_____J
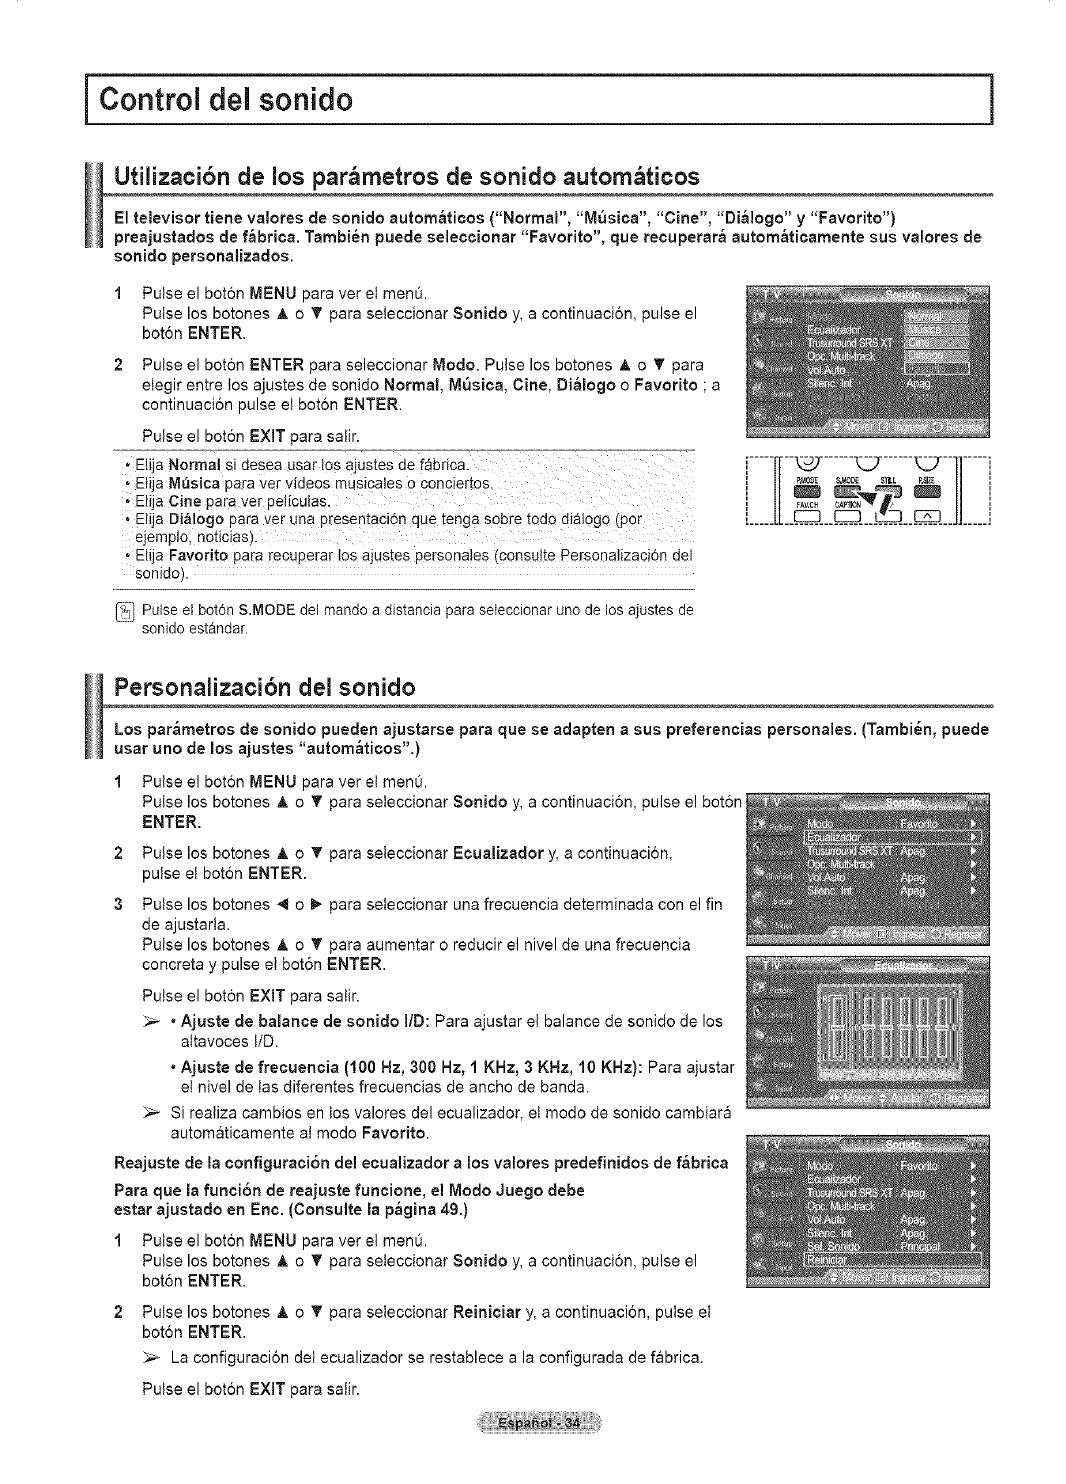
i Control del sonido ]
Utilizacibn de los par metros de sonido autom ticos
El televisor tiene valorea de sonido autom_ticos ("Normal", "M_sica", "Cine", "Di_logo" y"Favorito")
preajuatados de f_brica. Tambi_n puede seleccionar "Favorito", que recuperar_ autom_ticamente sus valores de
soniclopersonalizados.
1 Pulse el bot6n MENU para ver et men&
Pulse los botones A o _' para seteccionar Sonido y, a continuaci6n, pulse el
bot6n ENTER.
2 Pulse el boton ENTER para seleccionar Modo. Pulse los botones _. o T para
etegir entre los ajustes de sonido Normal, M6sica, Cine, Di_logo o Favorito ; a
continuaci6n pulse et bot6n ENTER.
Pulse el bot6n EXIT para salir.
. Elija Normal si desea usar los ajustes de fabrica.
*Etija M_sica para vet videos musicales o c0nciertos.
; Eiija Cine para ver pelicutas.
,Elija Di_logo para ver una presentaci6n que tenga sobre redo dialogo (par
ejemplo, noticias).
*Elija Favorito para recuperar lOSajustes persona!es (consulte Personalizaci6n det
sonido).
J 711 J
[_____[[ IJ_____]
Pulse eI bot6n S.MODE del mando a distancia para seleccionar uno de los ajustes de
sonido estandar.
Personalizaci6n del sonido
Los par&metros de sonido pueden ajustarse para que se adapten asus preferencias personales. (Tambi_n, puede
usar uric de los ajustes "autom_ticos".)
1 Pulse el boron MENU para ver et men&
Pulse los botones _, o _' para seteccionar Sonido y, a continuaci6n, pulse el boton
ENTER.
2 Pulse los botones &o _' para seteccionar Ecualizador y, a continuacion,
pulse et boton ENTER.
3Pulse los botones 4 o _ para seteccionar una frecuencia determinada con el fin
de ajustarla.
Pulse los botones A o _' para aumentar o reducir el nivel de una frecuencia
concreta y pulse el boton ENTER.
Putse el boton EXIT para salir.
•Ajuste de balance de sonido I/D: Para ajustar et balance de sonido de los
attavoces I/D.
• Ajuste de frecuencia (100 Nz, 300 Hz, 1 KHz, 3 KHz, 10 KHz): Para ajustar
et nivel de tas diferentes frecuencias de ancho de banda.
Si realiza cambios en los valores del ecualizador, et modo de sonido cambiara
automaticamente ai mode Favorito.
Reajuste de la configuraci6n del ecualizador alos valores predefinidos de f_brica
Para que la funci6n de reajuste funcione, e! Modo Juego debe
estar ajustado an Eric. (Consulte la p_gina 49.)
1 Pulse el boron MENU para ver et menO.
Pulse los botones _, o _' para seteccionar Sonido y, a continuaci6n, pulse el
boron ENTER.
2 Pulse los botones A o _' para seteccionar Reiniciar y, a continuacion, pulse et
boton ENTER.
La configuraci6n det ecualizador se restablece a la configurada de fabrica.
Pulse el bot6n EXIT para salir.
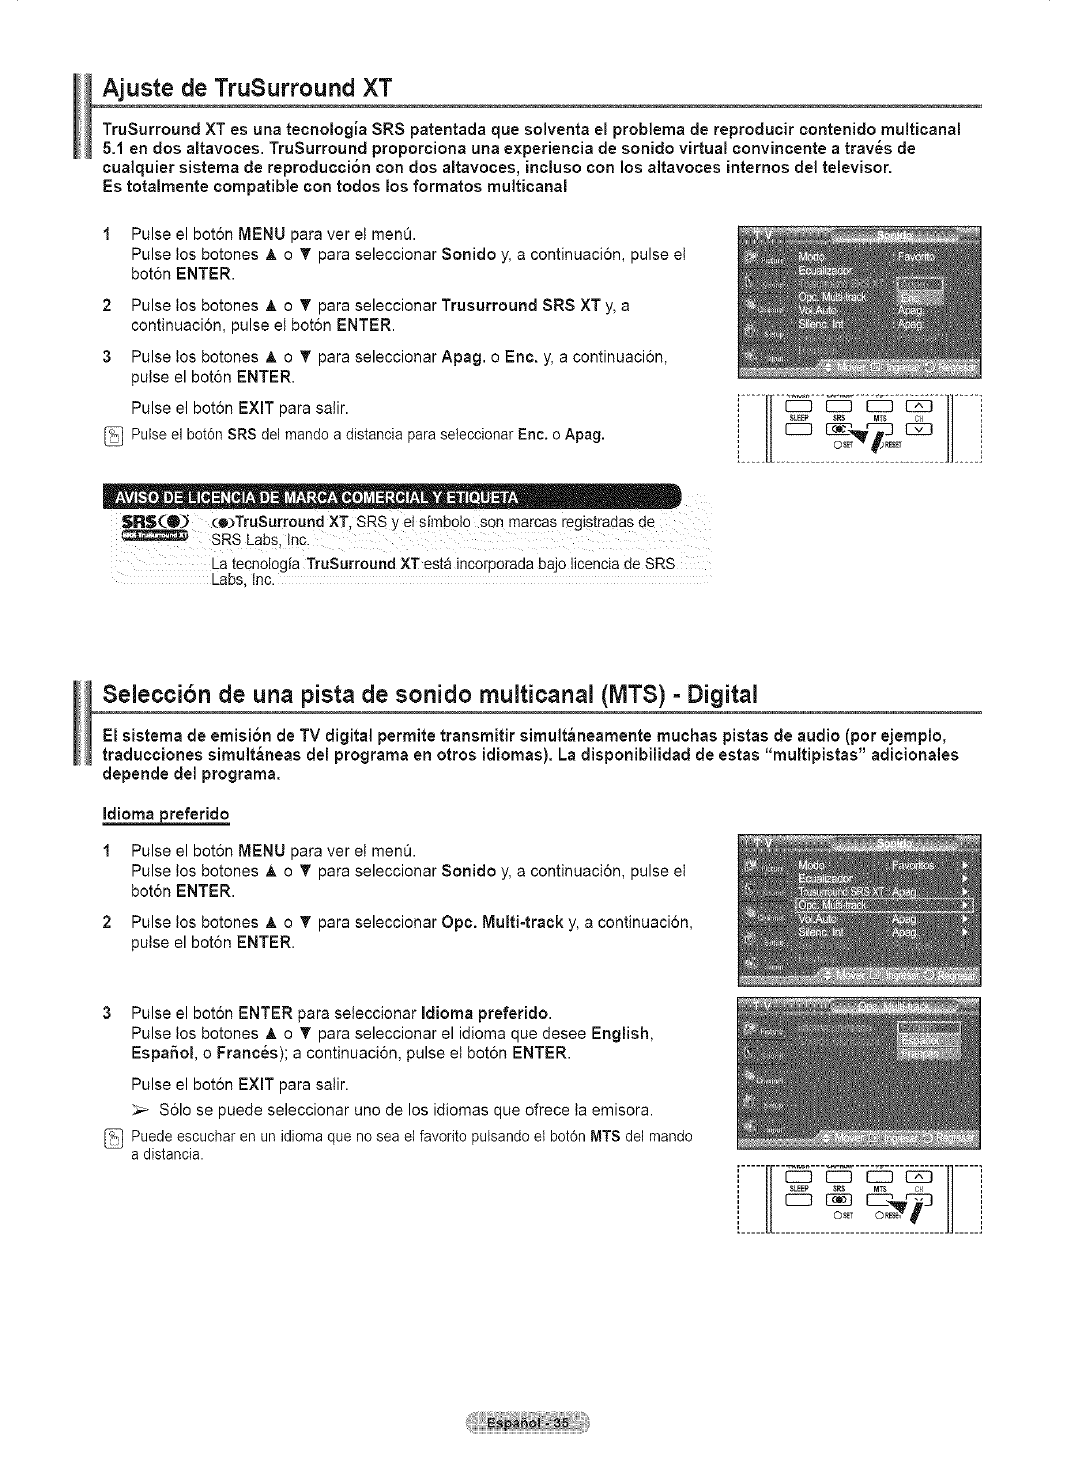
Ajuste de TruSurround ×T
TruSurround XT es una tecnoiogia SRS patentada que solventa el problema de reproducir contenido multicanal
5.1 en dos altavoces. TruSurround proporciona una experiencia de sonido virtual convincente atrav_s de
¢ualquier sistema de reproducci6n con dos aitavoces, inciuso con los altavoces infernos del televisor.
Es totaimente compatible con todos los formatos multicanal
1 Pulse el bot6n MENU para ver et men&
Pulse los botones A o T para seleccionar Sonido y, a continuaci6n, pulse et
bot6n ENTER.
2 Pulse los botones A o _' para seleccionar Trusurround SRS XT y, a
continuacion, pulse et boton ENTER.
3 Pulse tos botones A o T para seleccionar Apag. o Enc. y, a continuacion,
pulse el boton ENTER.
Pulse el bot6n EXiT para salir.
Pulse el bot6n SRS del mando a distancia para seieccionar Enc. o Apag.
SR$(O} (o)TruSurround XT SRS y et sirnbolo son marcas registradas de
SRS Labs Inc.
La tecnologfa TruSurround XT esta incorporada bajo licencia de SRS
Labs, Inc.
Seieccibn de una pista de sonido muiticanal (MTS) =Digital
Ei sistema de emisi6n de TV digital perrnite transmitir simult_neamente muchas pistas de audio (por ejemplo,
traducciones simult_neas del programa en otros idiomas). La disponibilidad de estas "multipistas" adicionales
depende del programa.
Idioma zoreferido
1 Pulse el bot6n MENU para ver et men&
Pulse los botones A o T para seleccionar Sonido y, a continuaci6n, pulse et
bot6n ENTER.
2 Pulse tos botones A o T para seleccionar Opc. Multi-track y, a continuaci6n,
putse el boron ENTER.
3Pulse el bot6n ENTER para seleccionar Idioma preferido.
Pulse los botones A o _' para seleccionar el idioma que desee English,
EspaSol, o Franc_s); a continuaci6n, pulse et bot6n ENTER.
Pulse el boton EXiT para salir.
_- Solo se puede seleccionar uno de los idiomas que ofrece la emisora.
Puede escuchar en un idioma que no sea et favorito pulsando eI bot6n MTS del mando
a distancia.
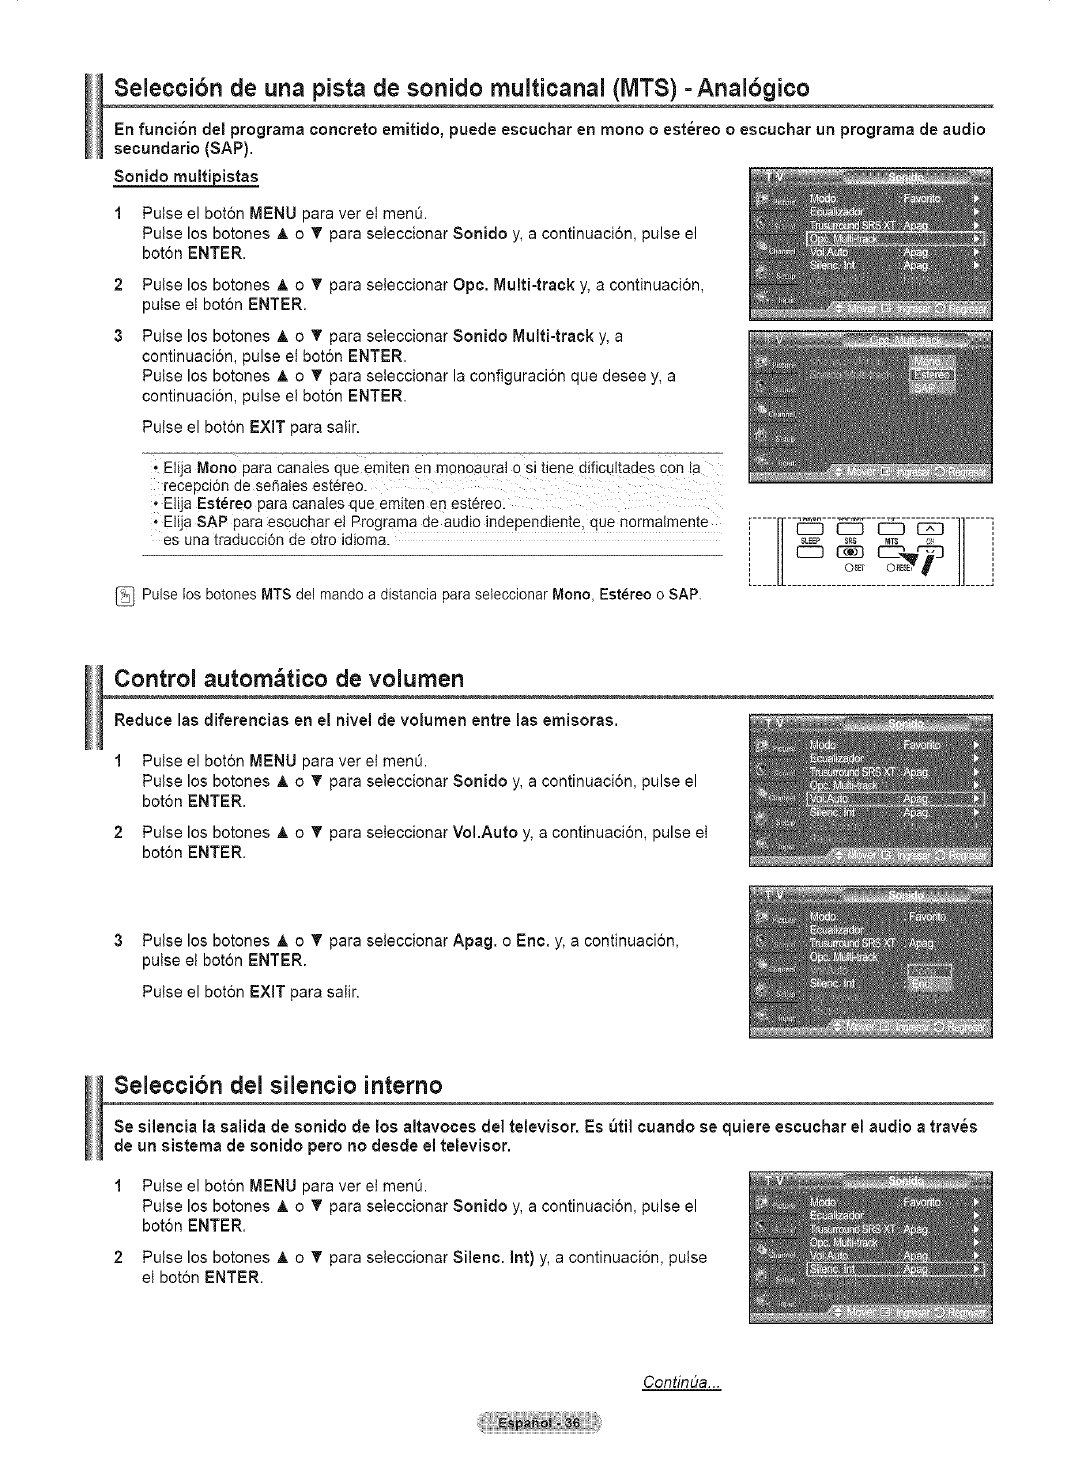
Seleccibn de una pista de sonido multicanal (IVlTS)=Analbgico
En funci6n del programa oonoreto emitido, puede esouohar en mono o est_reo o escuohar un programa de audio
seoundario (SAP}.
Sonido multipistas
1 Pulse el bot6n MENU para ver et menO.
Pulse los botones _, o _' para seteccionar Sonido y, a continuaci6n, pulse el
bot6n ENTER.
2
3
Pulse los botones A o _' para seteccionar Opc. Multi-track y, a continuaci6n,
pulse et bot6n ENTER.
Pulse los botones A o T para seteccionar Sonido Multi-track y, a
continuaci6n, pulse el boton ENTER.
Pulse los botones A o _' para seteccionar la configuracion que desee y, a
continuacion, pulse el bot6n ENTER.
Pulse el bot6n EXiT para saiir.
Elija Mono para canales que emiten en monoaural o si tiene dificultades con la
recepcidn de se_ates est6reo.
Elija Est6reo para canales que emiten en est6reo:
•Elija SAP para escuchar et Programa de audio independiente, que normalmente ,-----,,--.---.'--.--.--,,-----,
es una traducoidn de otro idioma. == II _ _ _, r-_ // ==
i IJ o,,, o_,_! jj j
Pulse los botones MTS del mando a distancia para seleccionar Mono, Est_reo o SAP.
Control autom_tico de volumen
Reduce las diferenoias en el nivel de volumen entre las emisoras.
Pulse el boton MENU para ver et menO.
Pulse los botones _, o _' para seteccionar Sonido y, a continuaci6n, pulse el
boton ENTER.
Pulse los botones _, o _' para seteccionar VoI.Auto y, a continuacion, pulse et
boton ENTER.
3Pulse los botones &o _' para seteccionar Apag. o Eno. y, a continuacion,
pulse et boton ENTER.
Pulse el bot6n EXiT para saiir.
Selecci6n del silencio interno
Se silenoia la salida de sonido de los altavooes del televisor. Es _til ouando se quiere escuchar el audio a trav_s
de un sistema de sonido pero no desde el televisor.
1Pulse el boton MENU para ver et men_.
Pulse los botones _, o _' para seteccionar Sonido y, a continuaci6n, pulse el
bot6n ENTER.
2 Pulse los botones _, o _' para seieccionar Sileno. Int) y, a continuaci6n, pulse
et bot6n ENTER.
Contin(Ja...
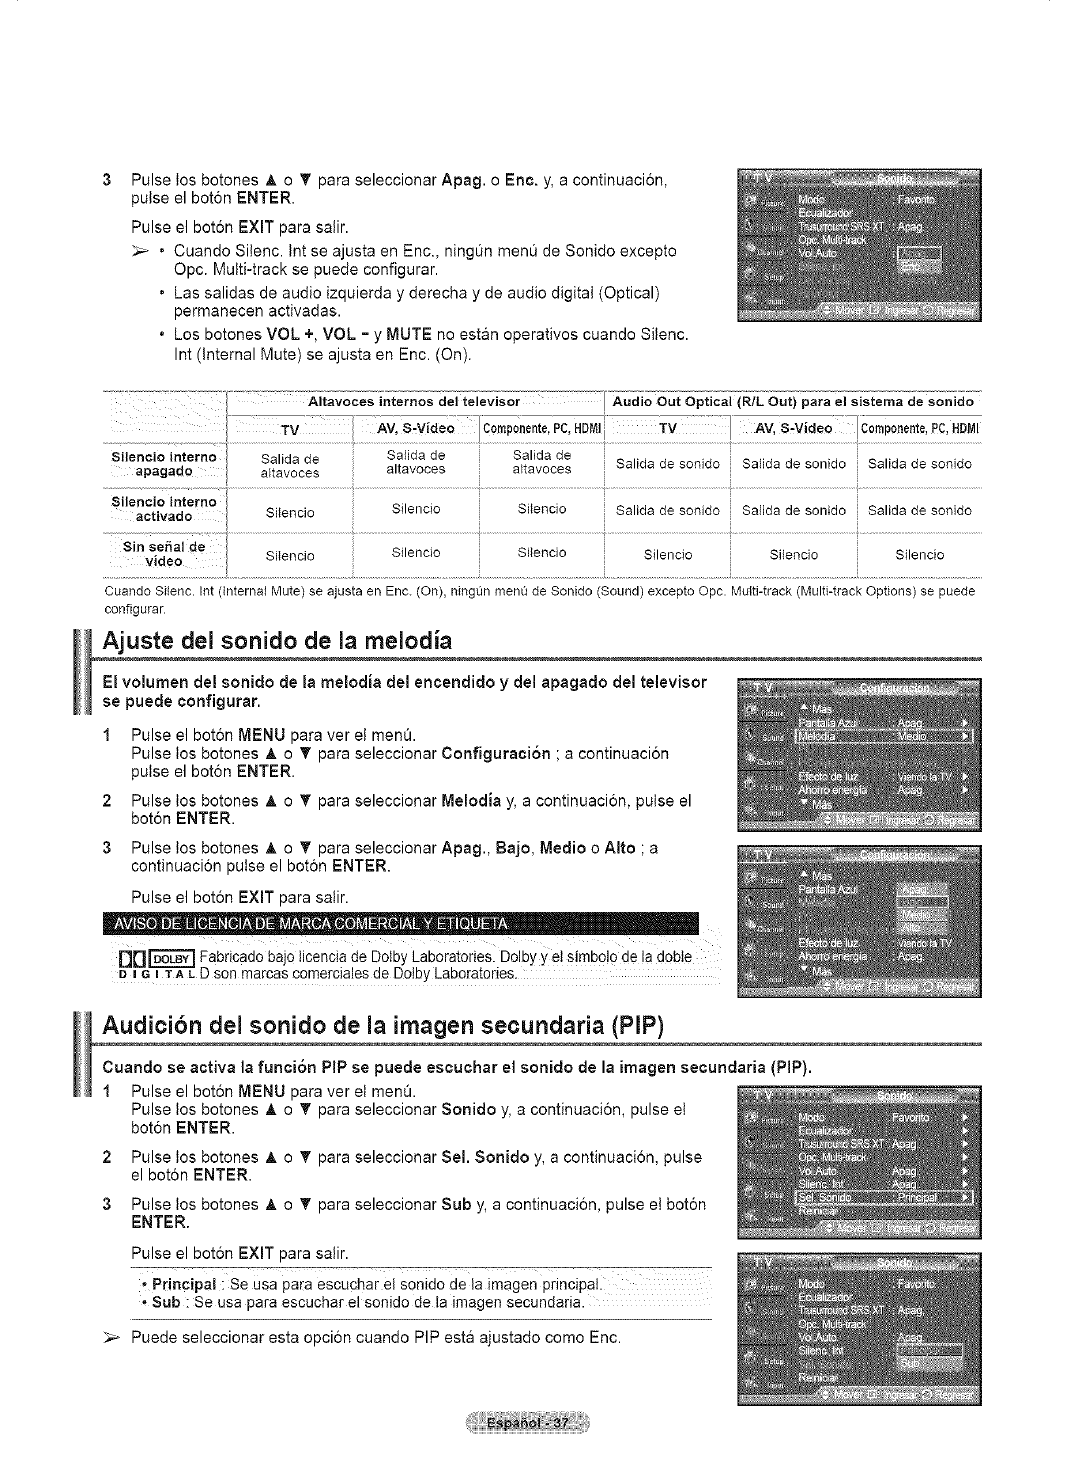
Pulse los botones _, o T para seleccionar Apag. o Erie. y, a continuaci6n,
pulse el boron ENTER.
Pulse el bot6n EXIT para salir.
_,_ • Cuando Silenc. Int se ajusta en Enc., ning0n men0 de Sonido excepto
Opc. Multi-track se puede configurar.
• Las salidas de audio izquierda y derecha y de audio digital (Optical)
permanecen activadas.
• Los botones VOL +, VOL - y MUTE no estan operativos cuando Sitenc.
Int (internal Mute) se ajusta en Enc. (On).
Altavoces internos del televisor Audio Out Optical (R/L Out) para el sistema de sonido
TV AV. S-VJde'o
Salida ee Salida de
al_avoces altavoces
Sileneio internoapagado aftavocesSalidadeii Salida de sonido ! Salida de sonido Salida de sonido
............. i.......
Sileneio interno
activado SHencio Silencto SHencio Salida de sonido Salida de sonido Salida de sonido
i ..................
Sin sei_al de Silencio Silencio Silencio SHencio i Silencio
Silencio
video
CuandoSilenc. Int (InternalMute) se ajusta en Eric. (On),ningunmenude Sonido (Sound)excepto Opc. Multi-track(Multi-trackOptions)se puede
configurar.
Ajuste del sonido de la rnelodia
El volumen del sonido de la melodJa del encendido y del apagado del televisor
se puede configurar.
1 Pulse el bot6n MENU para ver el men&
Pulse los botones _, o T para seleccionar Configuraci6n ; a continuacion
pulse el boton ENTER.
2 Pulse los botones A o T para seleccionar Melodia y, a continuacion, pulse el
bot6n ENTER.
3Pulse los botones A o T para seleccionar Apag., Bajo, Medio o Alto ; a
continuacion pulse el boton ENTER.
Pulse el bot6n EXIT para salir.
DD_ Fabricado bajo ticencia de Dolby Laboratories. Dolby yet simb0!0 de !a d0bte
=G=TA LD son marcas comerciales de Dolby Laborataries.
Audicibn del sonido de la irnagen secundaria (PIP)
Cuando se activa la funci6n PIP se puede escuchar el sonido de la imagen secundaria (PIP).
1 Pulse el bot6n MENU para ver et men&
Pulse los botones A o T para seleccionar Sonido y, a continuacion, pulse et
bot6n ENTER.
2 Pulse los botones _, o T para seleccionar Sel. Sonido y, a continuacion, pulse
el boton ENTER.
3 Pulse los botones _, o T para seleccionar Sub y, a continuacion, pulse el bot6n
ENTER.
Pulse el bot6n EXIT para salir.
i Principal : Se Usa para escuchar el sonido dela imagen principal.
Sub : Se usa para escuchar el sonido de la imagen secundaria.
_-- Puede seleccionar esta opcion cuando PIP esta ajustado como Enc.
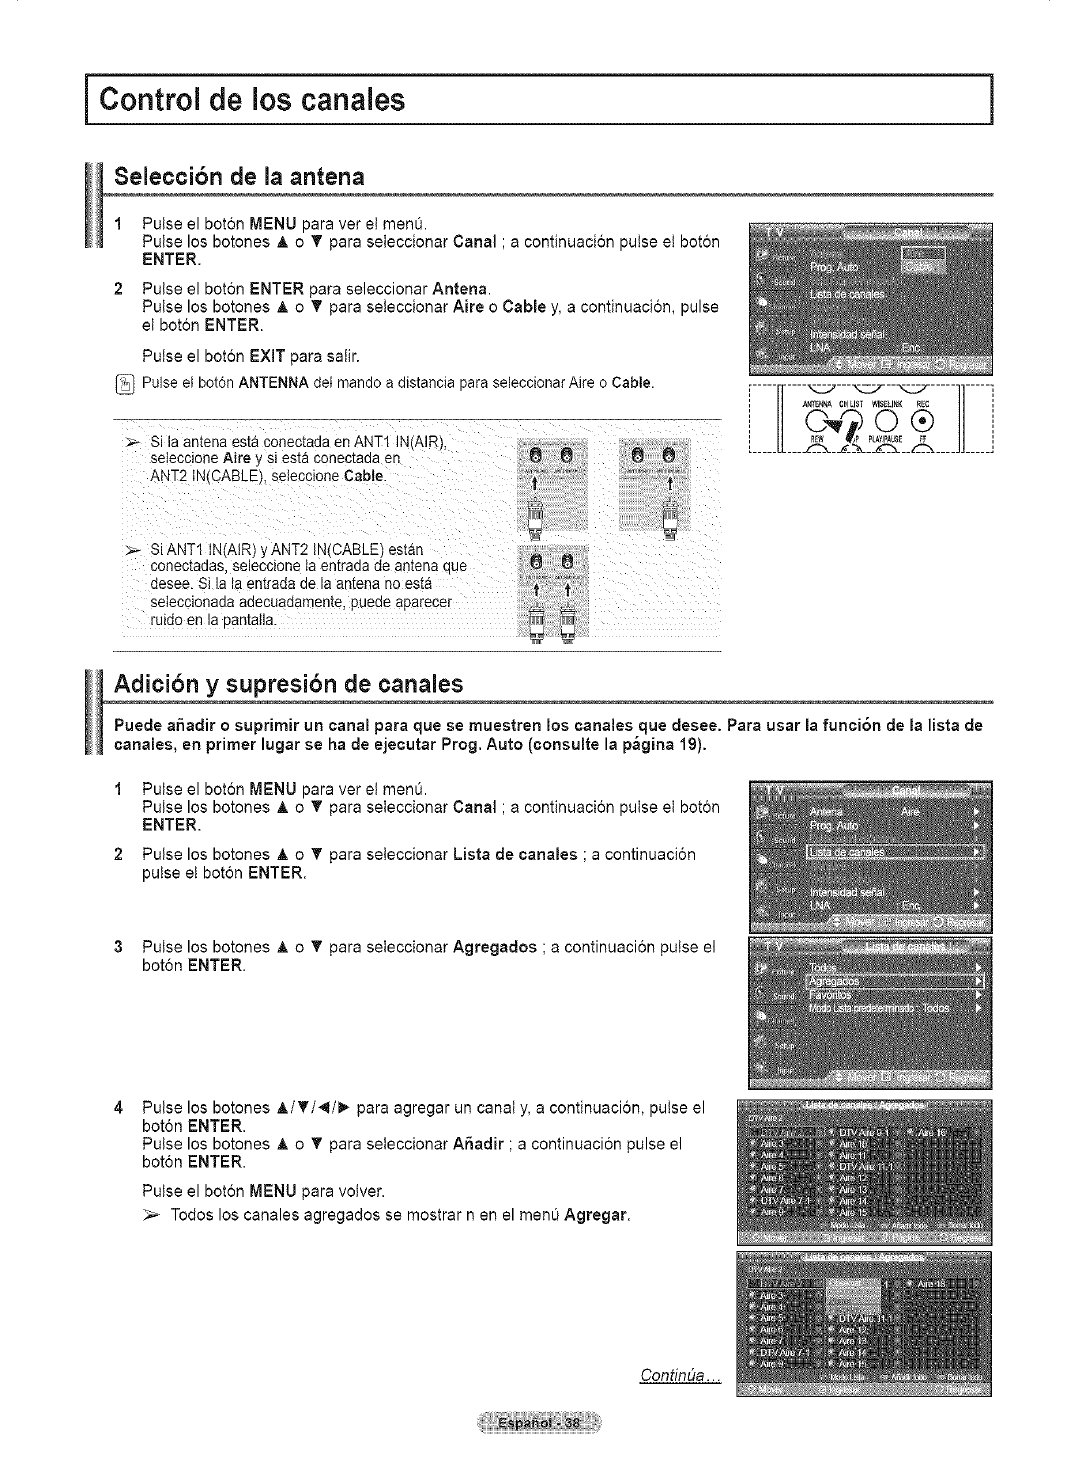
i Control de los canales i
Seleccibn de la antena
1Pulse el bot6n MENU para ver et ment_.
Pulse los botones _, o _' para seteccionar Canal ; a continuaci6n pulse et boton
ENTER.
Pulse el bot6n ENTER para seleccionar Antena.
Pulse los botones _, o _' para seteccionar Aire o Cable y, a continuaci6n, pulse
elboton ENTER.
Pulse el bot6n EXIT para salir.
Pulse el bot6n ANTENNA det mando a distancia para seleccionar Aire o Cable.
Si la antena esta conectada en ANT1 INtAIR_.
selecclone Aire y st es_aconec_aoa en
ANT2 NfCABLB. seleccione Cable.
,-----,----__---__--__-----,,-----,
i H AN%_NNA CH_LIST WIS_,INK REC || i
.....U2-r IIJ
:_ SLANT1 IN(AIR) yANT2 IN,CABLE es[an
conec[aoas seleoclone ta entrada de an[ena cue _
desee. Si ia la en[rada ae la an[ena no es[a ""!'.°*__'_"
selecclonada.uldoen la oantaila.adecuadamente'puede aparecer _
Adici6n y supresibn de canales
Puede aSadir osuprimir un canal pare que se muestren los canales que desee. Pare user la funci6n de la lista de
canales, en primer lugar se ha de ejecutar Prog. Auto (consuite la p_gina 19).
Pulse el bot6n MENU para ver et menO.
Pulse los botones _, o _' para seteccionar Canal ; a continuacion pulse et boton
ENTER.
Pulse los botones A o _' para seteccionar Lista de canales ; a continuaci6n
pulse et boton ENTER.
3Pulse los botones _, o V para seteccionar Agregados ; a continuacion pulse el
boton ENTER.
Pulse los botones _,/T/4/m,. para agregar un canal y, a continuacion, pulse el
bot6n ENTER.
Pulse los botones _, o _' para seteccionar A6adir ; a continuacion pulse el
bot6n ENTER.
Pulse el bot6n MENU para volver.
_,_ Todos los canales agregados se mostrar nen el menQ Agregar.
Contint_a. ..
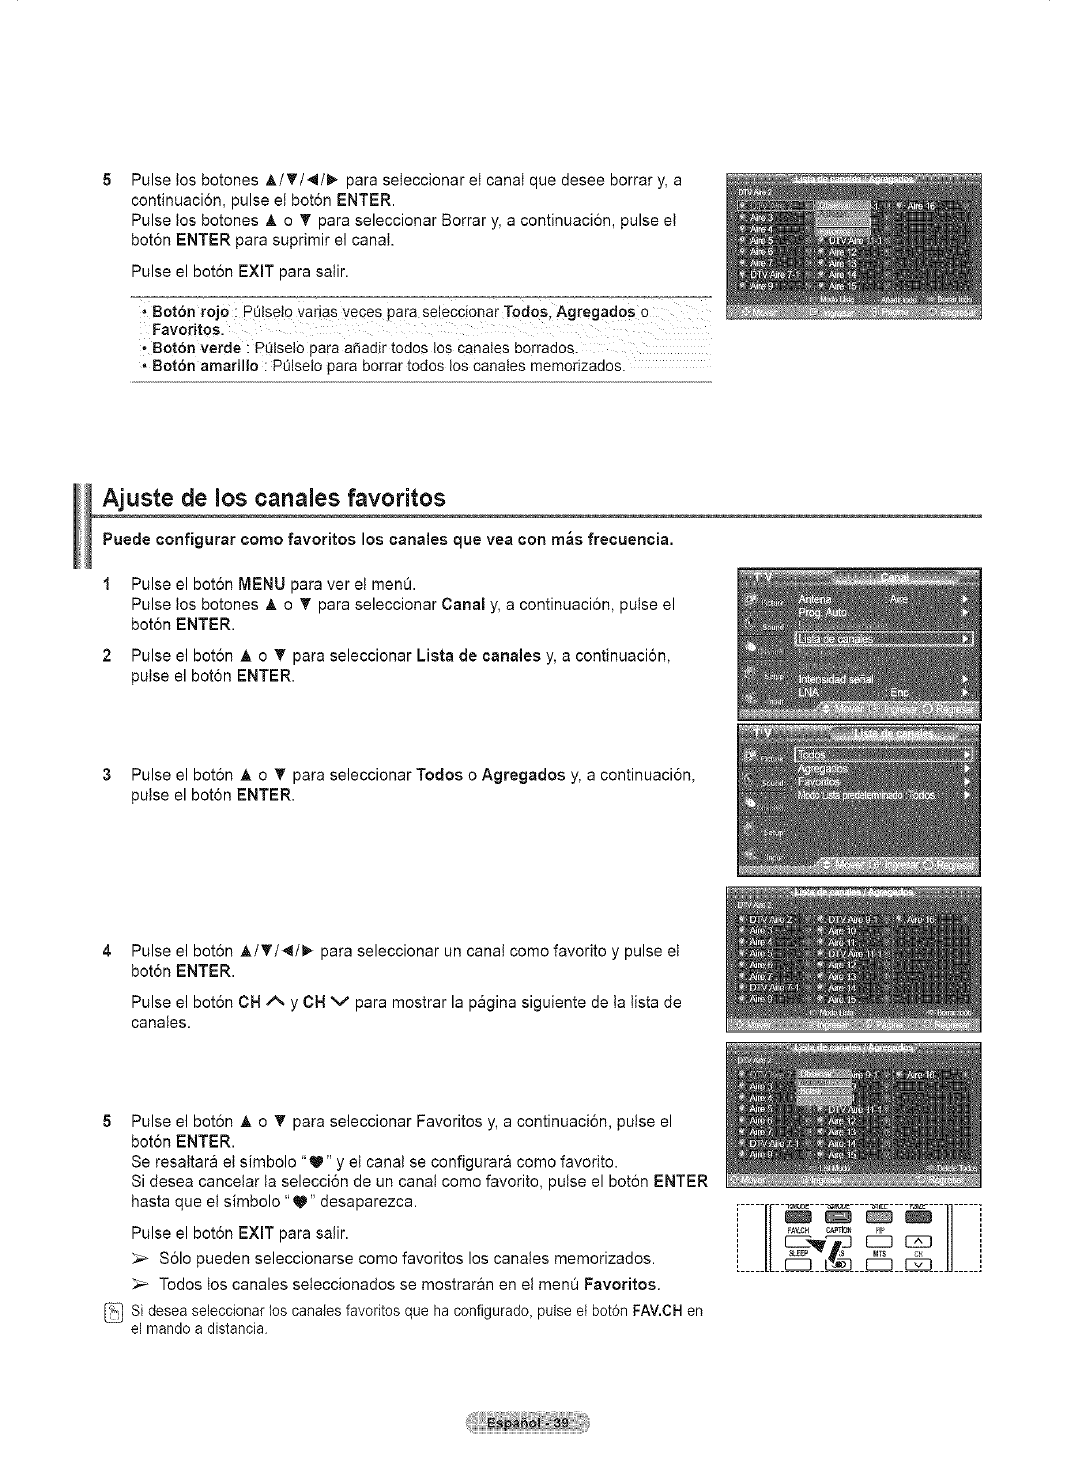
Pulse los botones A/_'/4/_ para seteccionar et canal que desee borrar y, a
continuacion, pulse el bot6n ENTER.
Pulse los botones A o T para seleccionar Borrar y, a continuacion, pulse el
bot6n ENTER para suprimir el canal.
Pulse el boton EXiT para salir.
' Bet6n rojo: pt)tsele vadas yeces para seleccionar Todos, Ag[egad0s o
Favoritos.
• Boron verde: Pt2tselo para a_adir todos los canales borrados.
• Bot6n amarillo : Pt21selopara borrar todos los canates memorizados.
Ajuste de los canales favoritos
Puede configurar como favoritos los canales que yea con rn_s frecuencia.
Pulse el bot6n MENU para ver et men&
Pulse los botones _, o T para seleccionar Canal y, a continuacion, pulse el
bot6n ENTER.
Pulse el bot6n A o _' para seleccionar Lista de canales y, a continuacion,
pulse el boton ENTER.
3 Pulse el bot6n A o T para seleccionar Todos o Agregados y, a continuaci6n,
pulse el boton ENTER.
Pulse el boton A/_'/4/I_ para seleccionar un canal come favorito y pulse et
bot6n ENTER.
Pulse el bot6n ON/_ y ON v para mostrar la pagina siguiente de ta tista de
canales.
5 Pulse el boton A o T para seleccionar Favorites y, a continuaci6n, pulse el
bot6n ENTER.
Se resattara el simbolo "_" y el canal se configurara come favorite.
Si desea cancelar ta selecci6n de un canal como favorito, pulse el boton ENTER
hasta que el simbolo "_" desaparezca.
Pulse el bot6n EXIT para salir.
Solo pueden seleccionarse come favoritos los canales memorizados.
Todos los canales seteccionados se mostraran en el menQ Faveritos.
Si desea seleccionar los canales favoritos que ha configurado_ pulse et bot6n FAV.CH en
el mando a distancia.
', _AV.¢£ _ I_ ',
'_____"__'___'___'__'__"_____'
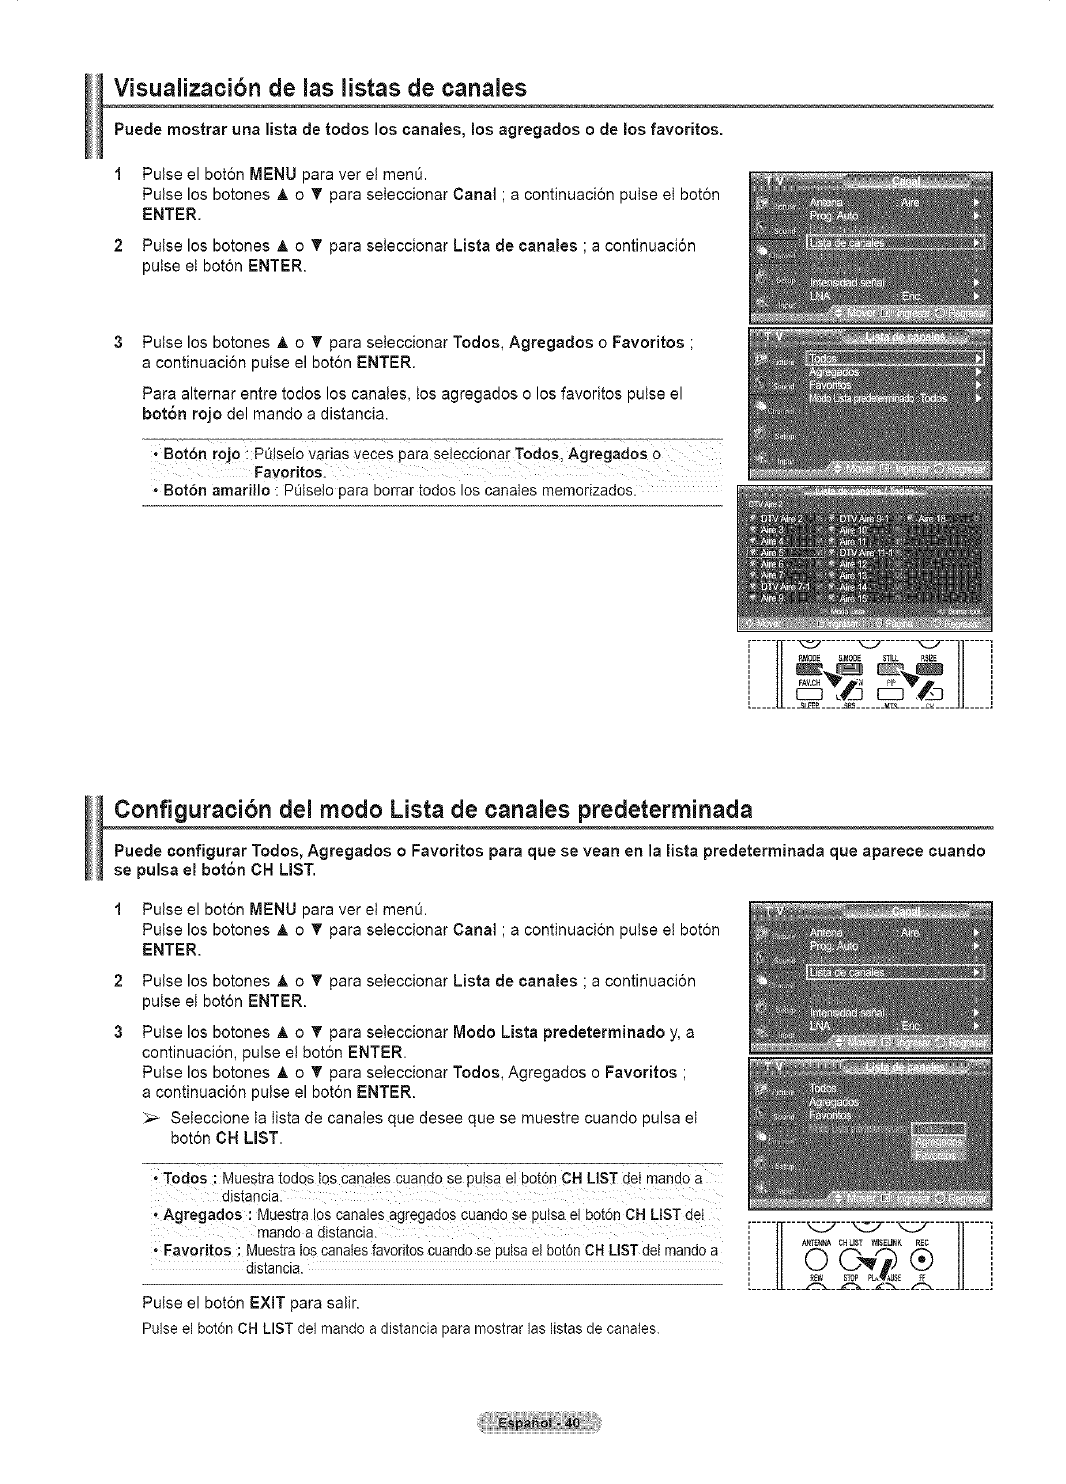
Visualizacibn de JasJistasde canales
Puede mostrar una lista de todos los ¢anales, los agregados ode los favoritos.
Pulse el bot6n MENU para ver et menQ.
Pulse los botones _, o _' para seteccionar Canal ; a continuaci6n pulse et bot6n
ENTER.
Pulse los botones A o _' para seteccionar Lista de canales ; a continuaci6n
pulse et boton ENTER.
Pulse los botones A o T para seteccionar Todos, Agregados o Favoritos ;
a continuaci6n pulse el bot6n ENTER.
Para altemar entre todos los canales, tos agregados o los favoritos pulse el
bot6n rojo del mando a distancia.
t Boton rojo : Pt_!selo varias veces para Se!eccionar Todos, Agregados 0
Favoritosl
Botbn amarillo : Pulselo para borrar todos los canates memorizados.
F----IT--%_ ....... _' ....... _-_- ....... I
÷.÷11
' FAV.CH_ ;_ _ _ '
[_____LL___LEEL____ ...... .._____,,____,,_____'
Configuracibn deJ modo Lista de canales predeterminada
Puede ¢onfigurar Todos, Agregados o Favoritos para que se vean en la lista predeterminada que aparece ¢uando
se pulsa el bot6n CH LIST.
2
3
Pulse el bot6n MENU para ver el men&
Pulse los botones _, o _' para seteccionar Canal ; a continuaci6n pulse el bot6n
ENTER.
Pulse los botones &o _' para seteccionar Lista de canales ; a continuaci6n
pulse et boton ENTER.
Pulse los botones A o _' para seieccionar Modo Lista predeterminado y, a
continuaci6n, pulse el bot6n ENTER.
Pulse los botones A o T para seieccionar Todos, Agregados o Favoritos ;
a continuaci6n pulse el bot6n ENTER.
Seleccione ta tista de canales que desee que se muestre cuando pulsa el
bot6n CN LIST.
; Todos ; Muestra todos tQsc_s cuando se pu!sa el bot6n CH LlSTdelmando a
distancial
Agregades : Muestra los canales agregados cuando Se pulsa e! bot6n CH LtST det
mando a distancia. '-----'-------------'-----"-----'
•', AKrfEN_ CHLIST WISEUNK REC ',
•Favontos : Muestralos canatesfavontos cuando se pulsa el boton CH LIST dei mando a ', II f'm f--. ,_) _ H ',
distancia, i II _ k_.,'_f LZ_ /I i
', _W STOP Pb,_U_E _F ',
L____II ____.=-___::-.___:____._._____JJ_____:
Putse el boton EXIT para salir.
Pulse el botdn CH LIST del mando a distancia para mostrar las listas de canates.
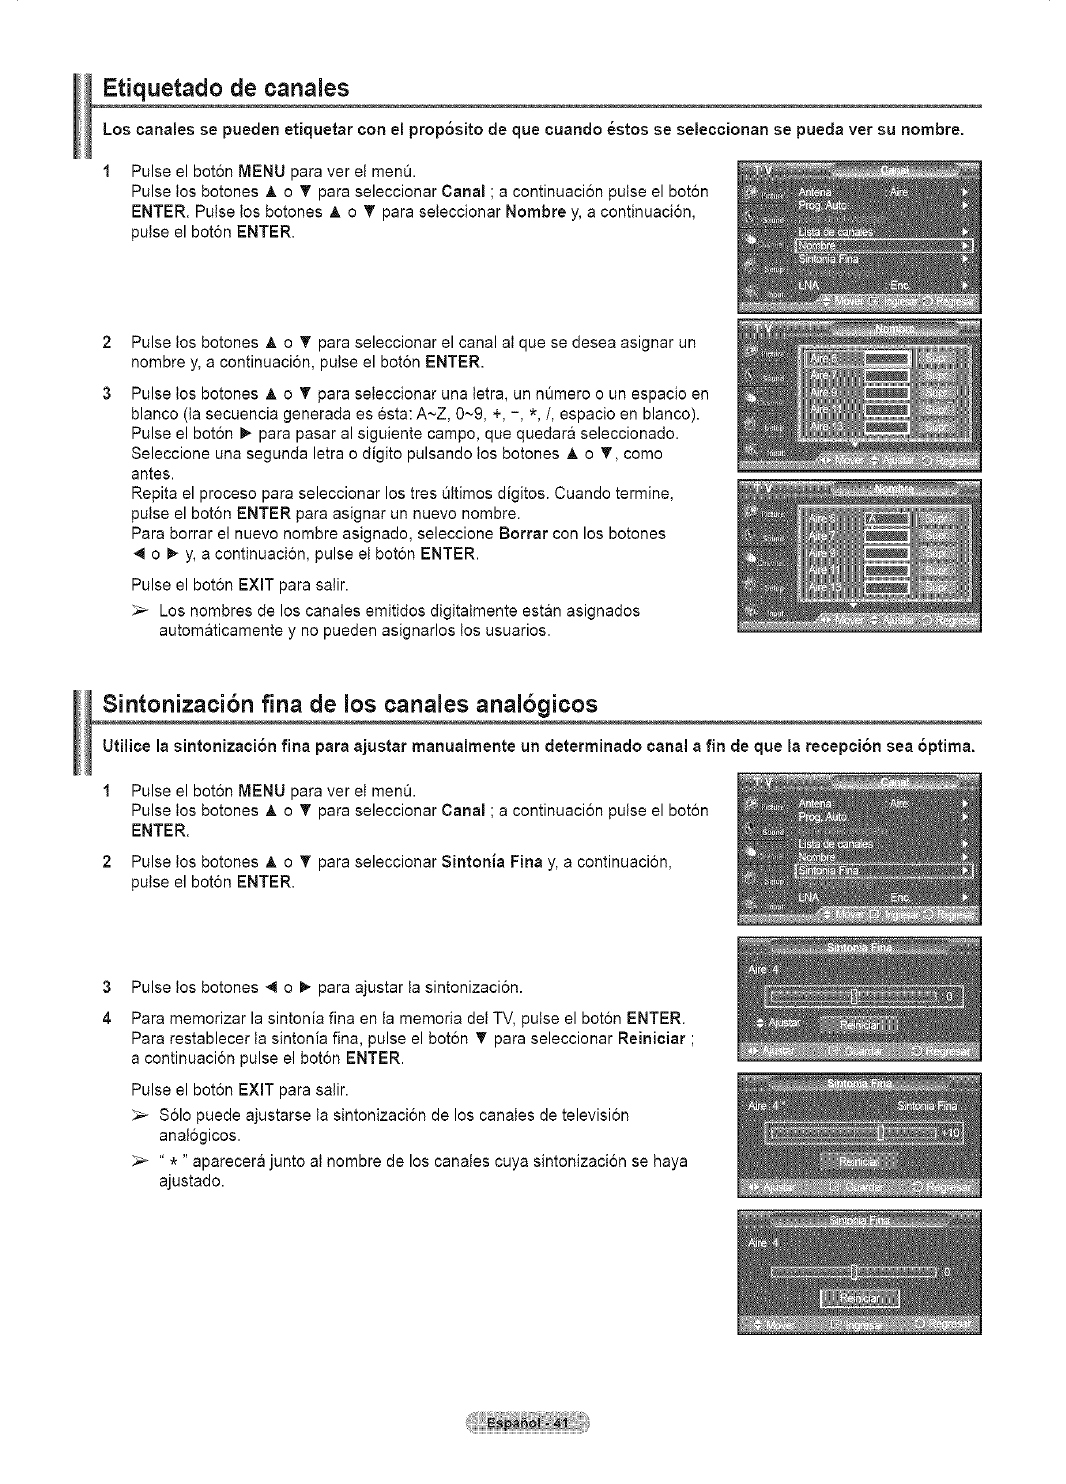
Etiquetado de canales
Los canales se pueden etiquetar con el prop6sito de que cuando _stos se seleccionan se puecla vet su hombre.
Pulse el bot6n MENU para ver el menQ.
Pulse los botones A o T para seleccionar Canal ; a continuacion pulse el boton
ENTER. Pulse los botones _, o T para seteccionar Nombre y, a continuacion,
pulse el boton ENTER.
2
3
Pulse los botones A o _' para seleccionar el canal aI que se desea asignar un
hombre y, a continuacion, pulse el boton ENTER.
Pulse los botones A o T para seteccionar una letra, un nQmero o un espacio en
blanco (la secuencia generada es esta: A~Z, 0~9, +, -, *,/, espacio en blanco).
Pulse el bot6n _ para pasar al siguiente campo, que quedara seleccionado.
Seleccione una segunda letra o digito pulsando los botones A o T, come
antes.
Repita el proceso para seleccionar los tres Ottimos digitos. Cuando termine,
pulse el boton ENTER para asignar un nuevo nombre.
Para borrar el nuevo hombre asignado, seleccione Borrar con los botones
4 o I_ y, a continuacion, pulse et boton ENTER.
Pulse el boton EXIT para salir.
_,_ Los hombres de los canales emitidos digitalmente estan asignados
automaticamente y no pueden asignarlos los usuarios.
Sintonizacibn fina de los canales analbgicos
Utilice la sintonizaci6n fina para ajustar manualmente un determinado canal a fin de que la recepci6n sea 6prima.
1Pulse el bot6n MENU para ver et menO.
Pulse los botones _, o T para seleccionar Canal ; a continuaci6n pulse el boton
ENTER.
2 Pulse los botones _, o _' para seleccionar Sintonia Fina y, a continuacion,
pulse el boton ENTER.
3
4
Pulse los botones 4 o I_ para ajustar ta sintonizacion.
Para memorizar la sintonia fina en la memoria det TV, pulse el boton ENTER.
Para restablecer ta sintonia fina, pulse el boton _' para seleccionar Reiniciar ;
a continuaci6n pulse el bot6n ENTER.
Pulse el bot6n EXIT para salir.
_-- Solo puede ajustarse ta sintonizacion de los canales de television
ana!6gicos.
_,_ " *" aparecera junto aI hombre de los canales cuya sintonizacion se haya
ajustado.
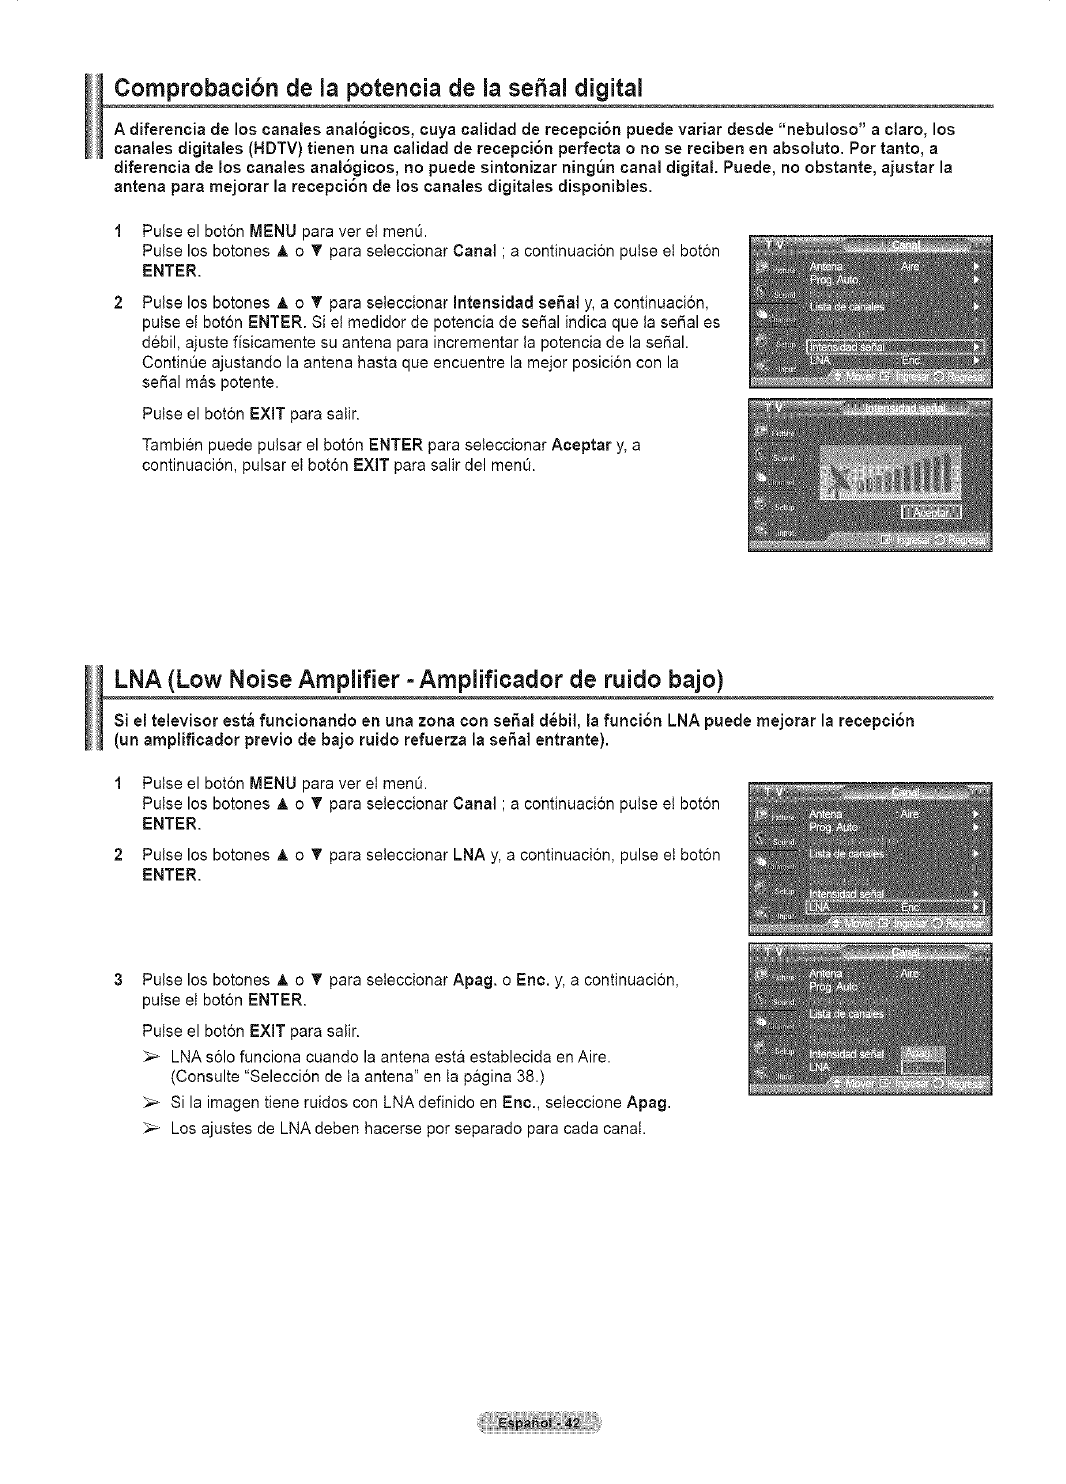
Comprobacibn de la potencia de la sepal digital
Adiferencia de los canales anal6gicos, cuya calidad de recepci6n puede variar desde "nebuloso" a claro, los
canales digitales (HDTV) tienen una calicladde recepci6n perfecta o no se reciben en absoluto. Por tanto, a
diferencia de los canales anal6gicos, no puede sintonizar ning_n canal digital. Puede, no obstante, ajustar la
antena para mejorar la recepci6n de los canales digitales disponibles.
Pulse el bot6n MENU para ver et men0.
Pulse los botones _, o _' para seteccionar Canal ; a continuaci6n pulse et bot6n
ENTER.
Pulse los botones A o _' para seleccionar Intensidad seSal y, a continuaci6n,
pulse el boton ENTER. Si et medidor de potencia de serial indica que ta serial es
debil, ajuste fisicamente su antena para incrementar la potencia de la serial.
Contin0e ajustando la antena hasta que encuentre la mejor posici6n con la
seSal mas potente.
Pulse el boton EXIT para salir.
Tambien puede pulsar el bot6n ENTER para seteccionar Aceptar y, a
continuacion, pulsar et boton EXIT para salir del menO.
LNA (Low Noise Amplifier =Amplificador de ruido bajo)
Si el televisor est_ funcionanclo en una zona con seSal cl_bil, la funci6n LNA puede mejorar la recepci6n
(un amplificador previo de bajo ruido refuerza la seSal entrante).
Pulse el boton MENU para ver et menQ.
Pulse los botones _, o _' para seteccionar Canal ; a continuacion pulse et boton
ENTER.
Pulse los botones _, o _' para seleccionar LNA y, a continuacion, pulse et boton
ENTER.
Pulse los botones &o _' para seteccionar Apag. o Eric. y, a continuacion,
pulse et boton ENTER.
Putse el boton EXIT para salir.
_-- LNA solo funciona cuando la antena est& establecida en Aire.
(Consulte "Selecci6n de ta antena" en ta pagina 38.)
_-- Si la imagen tiene ruidos con LNA definido en Eric., seleccione Apag.
_-- Los ajustes de LNA deben hacerse por separado para cada canal.
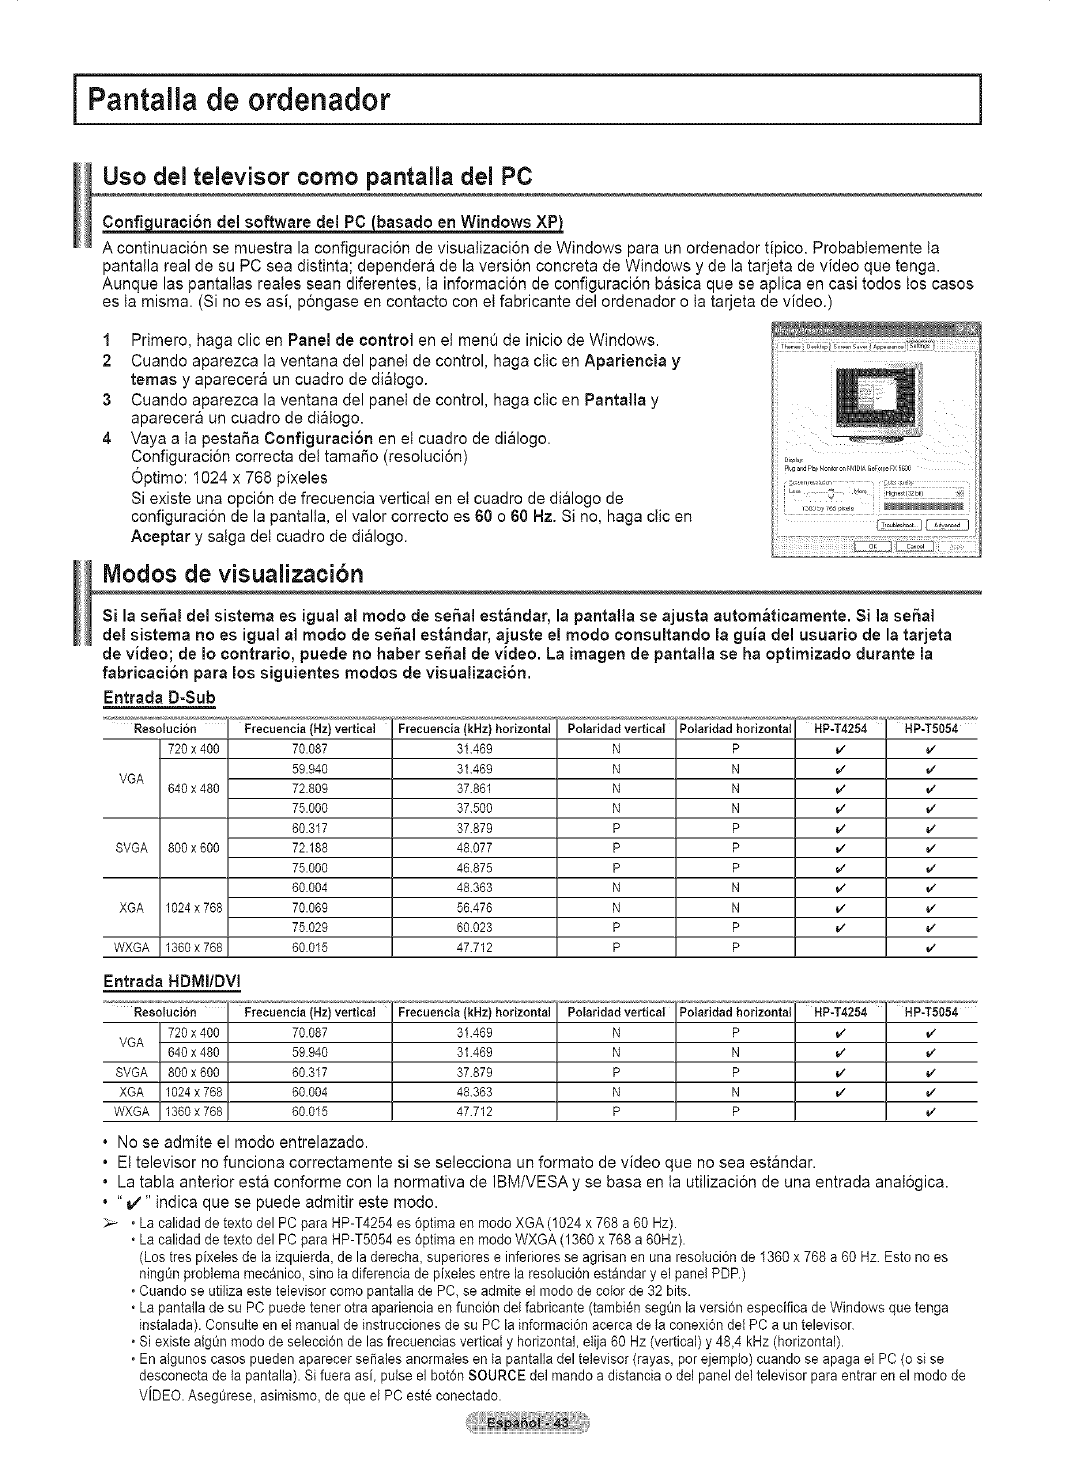
iPantalla de ordenador
Uso del televisor como pantalla del PC
_uraci6n del software del PC J_basado en Windows
A continuacion se muestra la configuraci6n de visualizaci6n de Windows para un ordenador tipico. Probabtemente la
pantalla real de su PC sea distinta; dependera de la version concreta de Windows y de la tarjeta de video que tenga.
Aunque las pantallas reales sean diferentes, ta informacion de configuracion basica que se aplica en casi todos los casos
es ta misma. (Si no es asi, p6ngase en contacto con et fabricante del ordenador o ta tarjeta de video.)
1 Primero, haga clic en Panel de control en el menQ de inicio de Windows.
2 Cuando aparezca la ventana del panel de control, haga ciic en Apariencia y
temas y aparecera un cuadro de dialogo.
3 Cuando aparezca la ventana del panel de control, haga ctic en Pantalla y
aparecera un cuadro de dialogo.
4 Vaya a ta pestaba Configuraci6n en el cuadro de dialogo.
Configuraci6n correcta del tamabo (resoluci6n)
Optimo: 1024 x 768 pixeles
Si existe una opci6n de frecuencia vertica! en et cuadro de dialogo de
configuracion de la pantalta, el valor correcto es 60 o 60 Hz. Si no, haga ctic en
Aceptar y salga det cuadro de dialogo.
Modos de visualizacibn
Si la sepal del sistema es igual al modo de se6al est_ndar, la pantalla se ajusta autom_ticamente. Si la se6al
del sistema no es igual al modo de se6al est_ndar, ajuste el modo consultando la guia del usuario de la tarjeta
de video; de Io contrario, puede no haber sepal de video. La imagen de pantalla se ha optimizado durante la
fabricaci6n para los siguientes modos de visualizaci6n.
Entrada D-Sub
Resoluci6n Frecuencia (Hz)vertical Frecuencia (kHz} horizontal Polaridad ve_ica] Polaridad horizontal HP-T4254 HP-Tb054
720 x 400 70.087 31469 N P v" v"
59.940 31469 N N _/ _/
VGA 640 x 480 72.809 37861 N N _/ _/
75.000 37500 N N v" v"
60.317 37879 P P v" v"
SVGA 800 x 600 72.188 48077 P P v" v"
75.000 46875 P P _/ _/
60.004 48363 N N _/ _/
XGA 1024 x 768 70.069 56476 N N v" v"
75.029 60023 P P v" v"
WXGA 1360 x 768 60.015 47712 P P _/
Entrada HDMI/DVI
Resoluci6n Frecuencia (Hz)vertical Frecuencia (kHz} horizontal Polaridad ve_ica] Polaridad horizontal HP-T4254 HP-Tb054
720 x 400 70.087 31469 N P _/ _/
VGA 640 x 480 59.940 31469 N N _/ _/
SVGA 80Ox6OO 60.317 37879 P P v" v"
XGA 1024x768 60.004 48363 N N v" v"
WXGA 1360 x 768 60.015 47712 P P v"
, No se admite el modo entrelazado.
. Et televisor no funciona correctamente si se selecciona un formato de video que no sea estandar.
. La tabla anterior esta conforme con la normativa de IBM/VESA y se basa en ta utilizaci6n de una entrada anal6gica.
' "v'" indica que se puede admitir este modo.
• La calidad de texto del PC para HP-T4254 es 6ptima en modo XGA (1024 x 768 a 60 Hz).
•La calidad de texto del PC para HP-T5054 es 6ptima en modo WXGA (1360 x 768 a 60Hz).
(Los tres pixeles de la izquierda, de la derecha, superiores e inferiores se agrisan en una resoluci6n de 1360 x 768 a 60 Hz Esto no es
ningQn problema mec_nico, sino la diferencia de pixeles entre la resoluci6n est_ndar y el panel PDP.)
• Cuando se utiliza este televisor como pantalla de PC, se admite el modo de color de 32 bits.
•La pantalla de su PC puede tener otra apariencia en funci6n del fabficante (tambi_n segQn la versi6n especifica de Windows que tenga
instalada). Consulte en el manual de instrucciones de su PC la informaci6n acerca de la conexi6n del PC a un televisor
• Si existe algQn modo de selecci6n de las frecuencias vertical y horizontal, elija 60 Hz (vertical) y 48,4 kHz (horizontal).
• En algunos casos pueden aparecer senaies anormales en la pantalla del televisor (rayas, pot ejemplo) cuando se apaga el PC (o si se
desconecta de la pantalla). Si fuera asi, pulse el bot6n SOURCE del mando a distancia o del panel del televisor para entrar en el modo de
VIDEO. Asegtirese, asimismo, de que el PC est_ conectado.
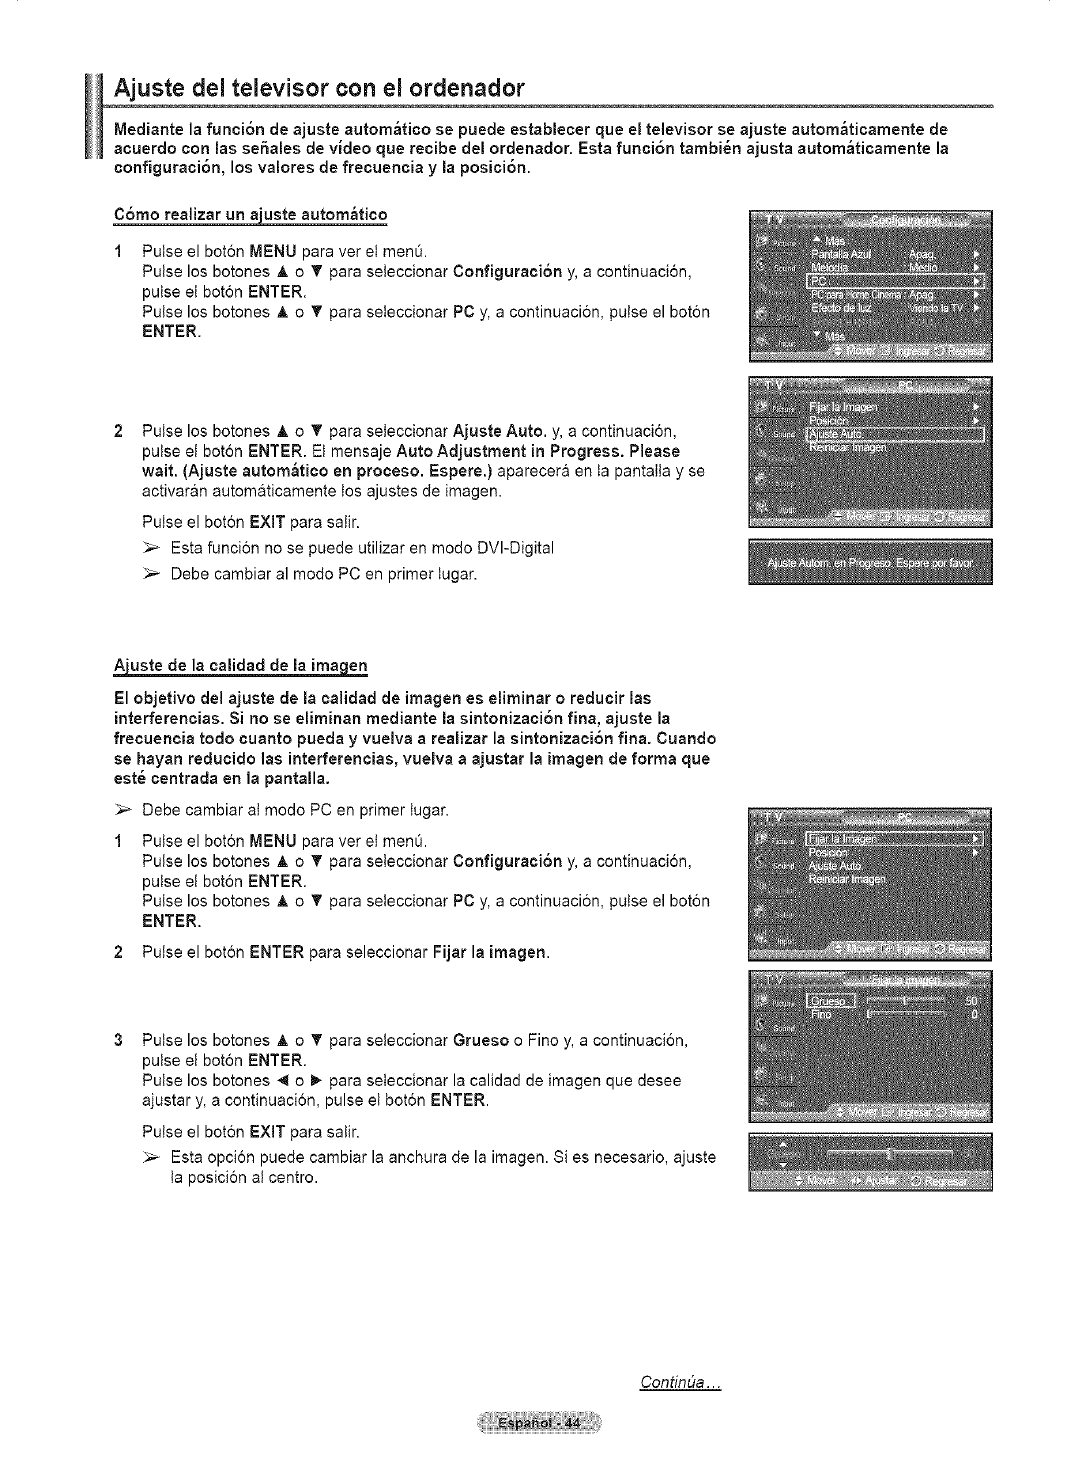
Ajuste del televisor con el ordenador
Mediante la funci6n de ajuste autom_tico se puede establecer que el televisor se ajuste autom_ticamente de
acuerdo con las se6ales de video que reoibe del ordenador. Esta funoi6n tambi_n ajusta autom_ticamente la
oonflguraoi6n, los valores de freouencia y la posioi6n.
C6mo realizar un _uste autom_tico
Pulse el bot6n MENU para ver et menQ.
Pulse los botones &o _' para seteccionar Configuraci6n y, a continuaci6n,
pulse el bot6n ENTER.
Pulse los botones _, o _' para seteccionar PC y, acontinuaci6n, pulse el bot6n
ENTER.
Pulse los botones A o _' para seteccionar Ajuste Auto. y, a continuacion,
pulse el boton ENTER. El mensaje Auto Adjustment in Progress. Please
wait. (Ajuste autom_tico en proceso. Espere.) aparecer& en ta pantalta y se
activaran autom&ticamente tos ajustes de imagen.
Putse el boton EXIT para salir.
_-- Esta funcion no se puede utilizar en modo DVI-Digital
_,_ Debe cambiar al modo PC en primer tugar.
Auste de la calidad de la ima en
El objetivo de! ajuste de la calidad de imagen es eliminar o reducir las
interferencias. Si no se eliminan mediante la sintonizaci6n fina, ajuste la
frecuencia todo ¢uanto pueda y vuelva arealizar la sintonizaci6n fina. Cuando
se hayan reduoido las interferencias, vuelva a ajustar la imagen de forma que
est_ centrada en la pantalla.
_,_ Debe cambiar at modo PC en primer tugar.
Pulse el boton MENU para ver et menQ.
Pulse los botones &o _' para seteccionar Configuraci6n y, a continuacion,
pulse el boton ENTER.
Pulse los botones _, o _' para seteccionar PC y, a continuacion, pulse el boton
ENTER.
2 Pulse el bot6n ENTER para seleccionar Fijar la imagen.
Pulse los botones A o _' para seteccionar Grueso o Fino y, a continuacion,
pulse el boton ENTER.
Pulse los botones _ o _- para seleccionar la calidad de imagen que desee
ajustar y, a continuacion, pulse et bot6n ENTER.
Pulse el boton EXIT para salir.
_,_ Esta opcion puede cambiar la anchura de la imagen. Si es necesario, ajuste
ta posicion at centro.
Contint_a. ..
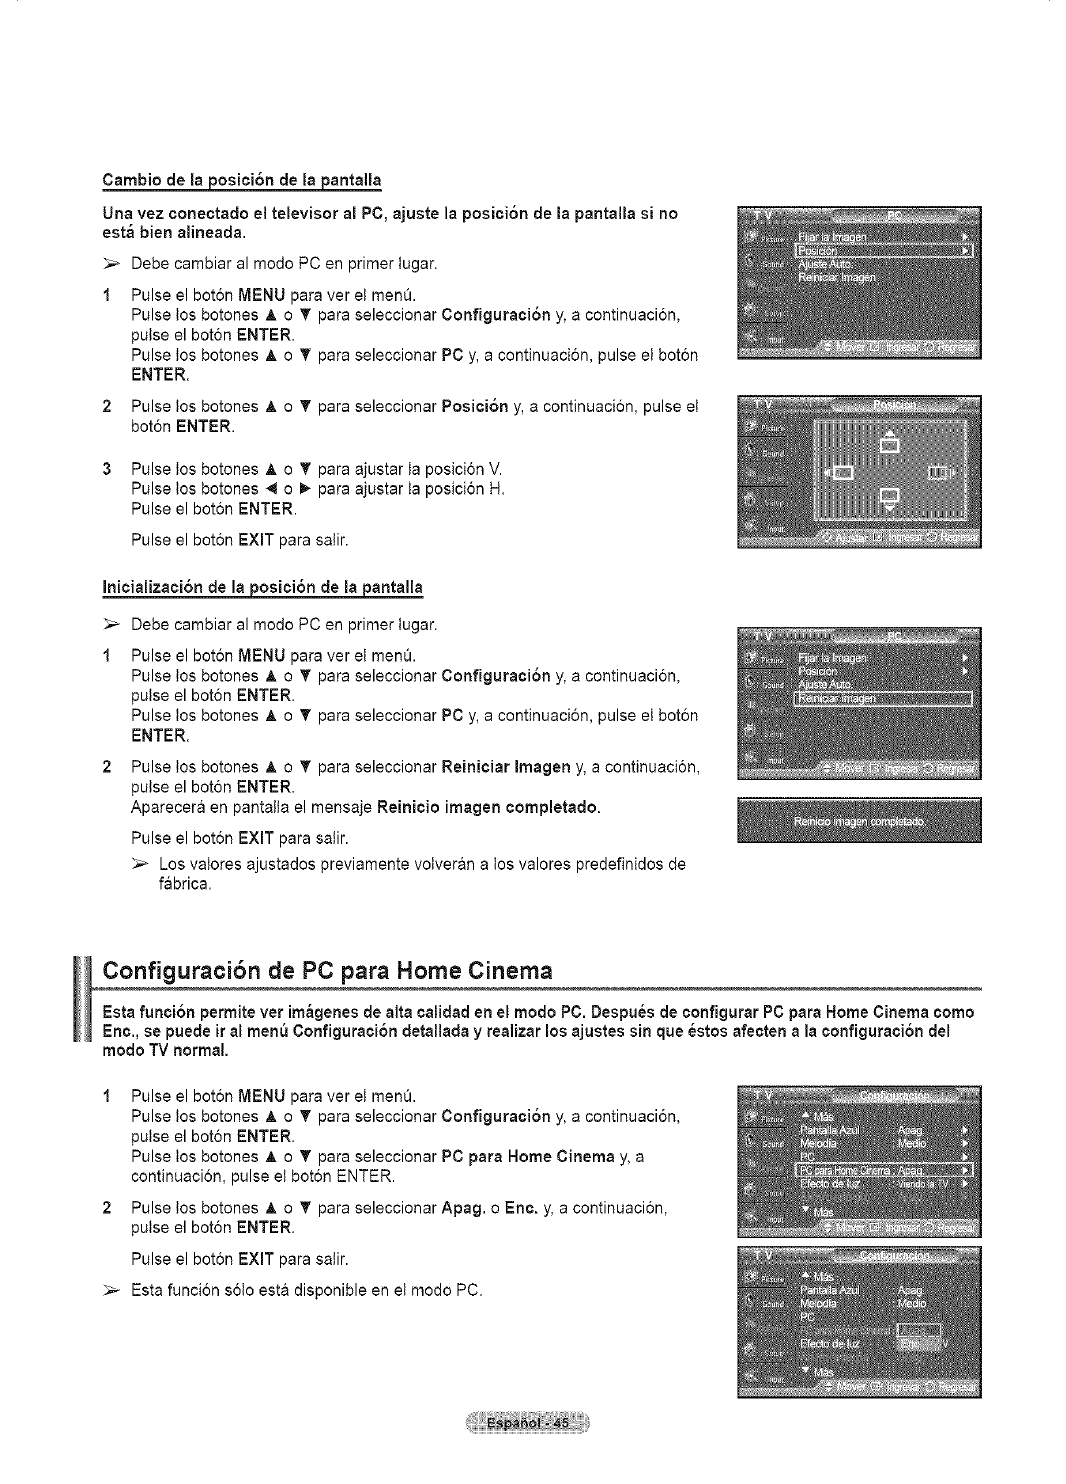
Cambio de la posici6n de lapantalla
Una vez conectado el televisor al PC, ajuste la posici6n de la pantalla si no
est_ bien alineada.
_,_ Debe cambiar al modo PC en primer tugar.
1 Pulse el bot6n MENU para ver et men&
Pulse tos botones _, o T para seleccionar Configuraci6n y, a continuaci6n,
pulse el bot6n ENTER.
Pulse tos botones _, o _' para seleccionar PC y, a continuaci6n, pulse el bot6n
ENTER.
2 Pulse los botones _, o T para seleccionar Posici6n y, a continuaci6n, pulse et
bot6n ENTER.
Pulse tos botones A o _f para ajustar ta posici6n V.
Pulse los botones 4 o I_ para ajustar ta posici6n H.
Pulse el bot6n ENTER.
Pulse el bot6n EXiT para salir.
Inicializaci6n de la posici6n de lapantalla
_,_ Debe cambiar al modo PC en primer tugar.
Pulse el bot6n MENU para ver et men&
Pulse tos botones _, o T para seleccionar Configuraci6n y, a continuaci6n,
pulse el bot6n ENTER.
Pulse tos botones _, o _' para seleccionar PC y, a continuaci6n, pulse el bot6n
ENTER.
Pulse los botones _, o T para seleccionar Reiniciar Imagen y, a continuacion,
pulse el boton ENTER,
Aparecera en pantalta el mensaje Reinioio imagen ¢ompletado.
Pulse el boton EXIT para salir.
_,_ Los valores ajustados previamente votveran a los valores predefinidos de
fabrica.
Configuracibn de PC para Home Cinema
Esta funci6n permite vet im_genes de alta calJdad en el modo PC. Despu6s de configurar PC para Home Cinema como
Enc., se puede ir al men_ Configuraci6n detallada y realizar los ajustes sin que _stos afecten a la configuraci6n del
modo TV normal.
Pulse el boton MENU para ver et men&
Pulse los botones _, o T para seleccionar Configuraci6n y, a continuacion,
pulse el boton ENTER,
Pulse los botones &o T para seleccionar PC para Home Cinema y, a
continuacion, pulse et boton ENTER.
2 Pulse los botones _, o T para seleccionar Apag. o Eric. y, a continuaci6n,
pulse el boron ENTER.
Pulse el bot6n EXIT para salir.
_-- Esta funcion s6to esta disponible en et modo PC.
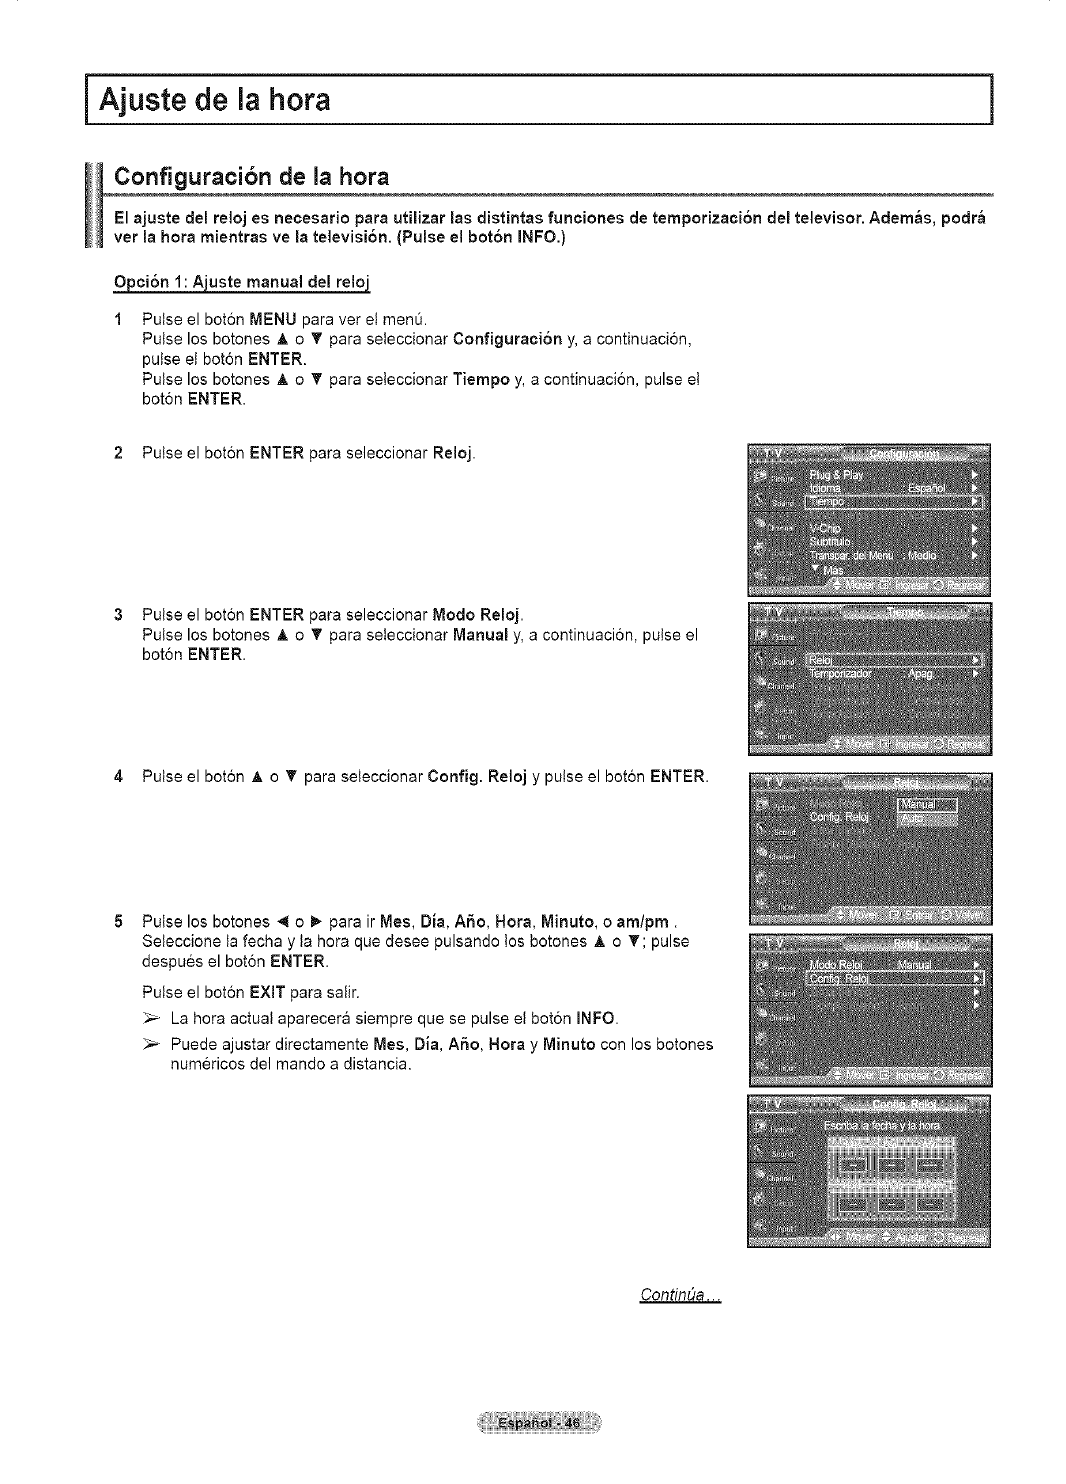
i Ajuste de la hora ]
Configuracibn de la hora
El ajuste del raloj es necesado para utilizar las distintas funoiones de temporizaci6n del televisor. Aclem_s, podr_
ver la hora mientras ve la talevisi6n. (Pulse el bot6n INFO.)
O ci6n 1'.Auste manual del ralo
Pulse el bot6n MENU para ver et menQ.
Pulse los botones A o _' para seteccionar Configuraci6n y, a continuaci6n,
pulse el bot6n ENTER.
Pulse los botones A o _' para seteccionar Tiempo y, a continuaci6n, pulse et
bot6n ENTER.
2 Pulse el boton ENTER para seleccionar Reloj.
3Pulse el bot6n ENTER para seleccionar Modo Reloj.
Pulse los botones _, o _' para seteccionar Manual y, a continuaci6n, pulse el
bot6n ENTER.
4 Pulse el bot6n A o _' para seteccionar Config. Reloj y pulse el bot6n ENTER.
Pulse los botones _1 o _ para ir Mes, Dia, A6o, Hora, Minuto, o am/pro.
Seteccione la fecha y ta hera que desee pulsando los botones _, o T; pulse
despues el boron ENTER.
Putse el boron EXIT para satir.
La hera actual aparecera siempre que se pulse el boton INFO.
_-- Puede ajustar directamente Mes, Dia, A6o, Nora y Minuto con los botones
numericos del mando a distancia.
ContinUa...

_uste autom_tico del reloj
El reloj puede ajustarse autom_ticamente cuando se recibe una sepal digital.
1 Pulse el bot6n MENU para ver et men&
Pulse los botones _, o T para seleccionar Configuraci6n y, a continuaci6n,
pulse el boton ENTER.
Pulse los botones _, o _' para seleccionar Tiempo y, a continuacion, pulse el
boton ENTER.
2 Pulse el bot6n ENTER para seleccionar Reloj.
3Pulse el bot6n ENTER para seleccionar Modo Reloj.
Pulse los botones _, o T para seleccionar Auto y, a continuaci6n, pulse el
bot6n ENTER.
4 Pulse los botones _, o T para seleccionar Zona Tiempo y, a continuacion,
pulse el boton ENTER.
5Pulse los botones A o T para resaltar ta zona horaria del &rea local (y para
mover la setecci6n a la zona horaria apropiada en el mapa de Estados Unidos)
y despues pulse el boton ENTER.
Pulse los botones A o T para seleccionar Tiempo Verano (DST) y pulse et
bot6n ENTER.
Pulse los botones _, o T para seleccionar Apag. o Eric. y, a continuacion,
pulse el boron ENTER.
Pulse el bot6n EXiT para saiir.
_-- SegQn ta estacion emisora y la sei_ai, puede que et ajuste automatico
de la hora no se reaiice correctamente. En este caso, ajuste la hera
manuaimente.
_-- La recepcion mediante antena o cable debe estar conectada para poder
ajustar la hora automaticamente.
ConfinOa...

desactivaci6ndel temporizador
Utilice esta funci6n para que el televisor se encienda o apague a una hora
concreta. Debe ajustar el reloj en primer lugar.
1 Pulse el boton MENU para ver el men_.
Pulse los botones A o _' para seteccionar Configuraci6n y, a continuacion,
t_ulse el boton ENTER.
ulse los botones A o _' para seteccionar Hora y, a continuaci6n, pulse el
bot6n ENTER.
2 Pulse los botones _, o T para seleccionar Temporizador 1, Temporizador 2 o
Temporizador 3 y, a continuaci6n, pulse el boron ENTER. Aparece el menO det
temporizador.
Pulse los botones Ao _' para ajustar lahora y pulse et boton _- para ir at paso
siguiente. Ajuste otras opciones utilizando este mismo metodo.
3 Pulse los botones 4 o _,-para seteccionar el elemento deseado.
Pulse los botones _, o _' para ajustar et valor.
Putse el bot6n EXiT para salir.
*Hora eric,: Seleccione la hera. los minutes,am/pro y Inactivo/Activar.
Para activar la opcion Hera enc establ6zcala en Activar
. Apag. Tiempo: Seleccionela nora. los minutes,amtpm y lnactivo/Activar.
IPara activar la opci6nApag. Tiempo es[aol6zcalaen Activar.
. Repetir: Seleccione Unavez Coda dia. Lun~Vie Lun~S&b o S_b~Dorn
*Volumen: Seleccionecon ia opci6n Temporizadorei n_velde_Volumenque oesea due et
televisortenga cuanao se enclenae.
oContenido: Cuando ta opclon de la nora ee encenuluoesta actlva, se pueae encenaer un
canal determinado o reoroaac{rcontenidoscomo arcn]vos de fotos o de aua_o.
(Compruebeque naya un dtspositlvo USB conectado al televisor.
_-- Puede austar lahora y los minutos directamente pulsando los botones
numer cos de mando a d stanca.
Apagado autom_tico
Si active el temporizador, el televisor se apagara si no se pulsa ning0n bot6n
durante 3 horas, despues queet temporizador to haya puesto en marcha.
Esta funcion s61o esta disponible en et modo Enc. del temporizador y evita
el recalentamiento que se puede producir si el televisor esta encendldo
durante demasiado tiempo.
Ajuste del temporizador de deseonexi6n
El temporizador de desconexi6n apaga autom_ticamente el televisor despu6s
de un periodo prefijado (30, 60, 90, 120, 150 y 180 minutos).
1 Pulse el boton MENU para ver el menQ.
Pulse los botones A o _' para seteccionar Configuraci6n y, a continuacion,
t_ulse el boton ENTER.
ulse los betones _, o _' para seteccionar Tiempo y, a continuacion, pulse et
boton ENTER.
2 Pulse los botones A o _' para seteccionar Temporizador y, a continuaci6n,
pulse et boton ENTER.
Pulse los botones A o _' para seleccionar los minutos.
AI ajustar el temporizador, la opci6n Aetivaei6n se ajusta en Enc.
automaticamente.
Para canceler el temporizador:
Pulse el boron _ para seteccionar Activaci6n.
Pulse los botones _, o _' para seteccionar Apag. y, a continuaci6n, pulse el
boton ENTER.
Pulse el bot6n EXIT pare salir.
Paise varies veces el bot6n SLEEP del monde a distancia haste que aparezca ei
intervalo de tiempo deseado
(cualquiera de los vatores preestabtecidos desde 30 a 180 minutos). 'U '11'
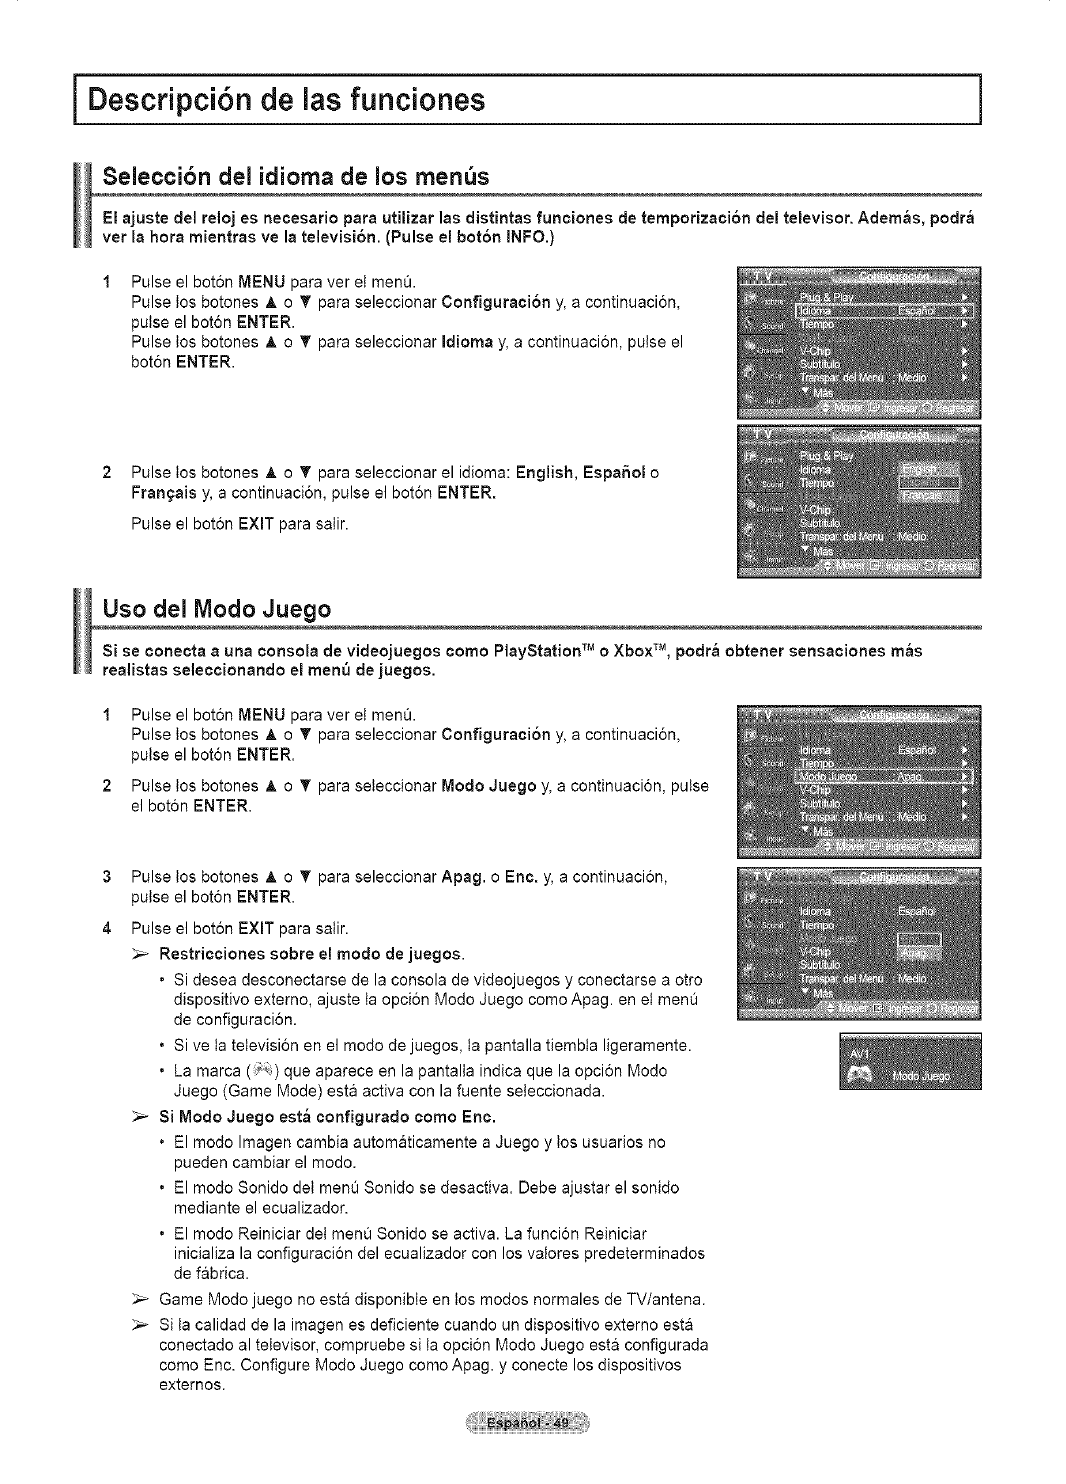
iDescripci6n de las funciones
Seleccibn dei idioma de los men s
El ajuste del reloj es necesario para utilizar las distintas funciones de temporizaci6n del televisor. Adem_s, podr_
vet la hora mientras ve la televisi6n. (Pulse el bot6n INFO.)
Pulse el bot6n MENU para ver et menO.
Pulse tos botones _, o T para seleccionar Configuraci6n y, a continuacion,
pulse el boton ENTER.
Pulse los botones _, o T para seleccionar Idioma y, a continuaci6n, pulse el
bot6n ENTER.
2 Pulse los botones A o T para seleccionar el idioma: English, EspaSol o
Frangais y, a continuacion, pulse el bot6n ENTER.
Pulse el bot6n EXIT para salir.
Uso del Modo Juego
Si se conecta auna ¢onsola de videojuegos como PlayStation TM o Xbox TM, podr_ obtener sensaciones m_s
realistas seleccionando el menu de juegos.
1Pulse el bot6n MENU para ver et men0.
Pulse los botones _, o T para seleccionar Configuraci6n y, a continuaci6n,
pulse el boton ENTER.
2 Pulse tos botones _, o _' para seteccionar Modo Juego y, a continuacion, pulse
el boton ENTER.
3
4
Pulse tos botones _, o _' para seleccionar Apag. oEnc. y, a continuaci6n,
pulse el boton ENTER.
Pulse el bot6n EXIT para salir.
_-- Restricciones sobre el modo de juegos.
•Si desea desconectarse de la consola de videojuegos y conectarse a otro
dispositivo externo, ajuste ta opci6n Modo Juego como Apag. en et menO
de configuracion.
• Si ve ta tetevisi6n en el modo de juegos, ta pantalla tiembta ligeramente.
• La marca (>_) que aparece en la pantalla indica que la opci6n Mode
Juego (Game Mode) esta activa con la fuente seteccionada.
Si Modo Juego est_ configurado como Eric.
• El modo Imagen cambia automaticamente a Juego y los usuarios no
pueden cambiar el mode.
• El modo Sonido del menQ Sonido se desactiva. Debe ajustar el sonido
mediante el ecualizador.
• El modo Reiniciar det menO Sonido se activa. La funcion Reiniciar
inicializa la configuracion del ecualizador con los valores predeterminados
de f&brica.
_,_ Game Modo juego no esta disponible en tos modos normales de TV/antena.
_-- Si ta calidad de la imagen es deficiente cuando un dispositivo externo esta
conectado al televisor, compruebe si ta opci6n Modo Juego est& configurada
como Enc. Configure Modo Juego como Apag. y conecte los dispositivos
extemos.
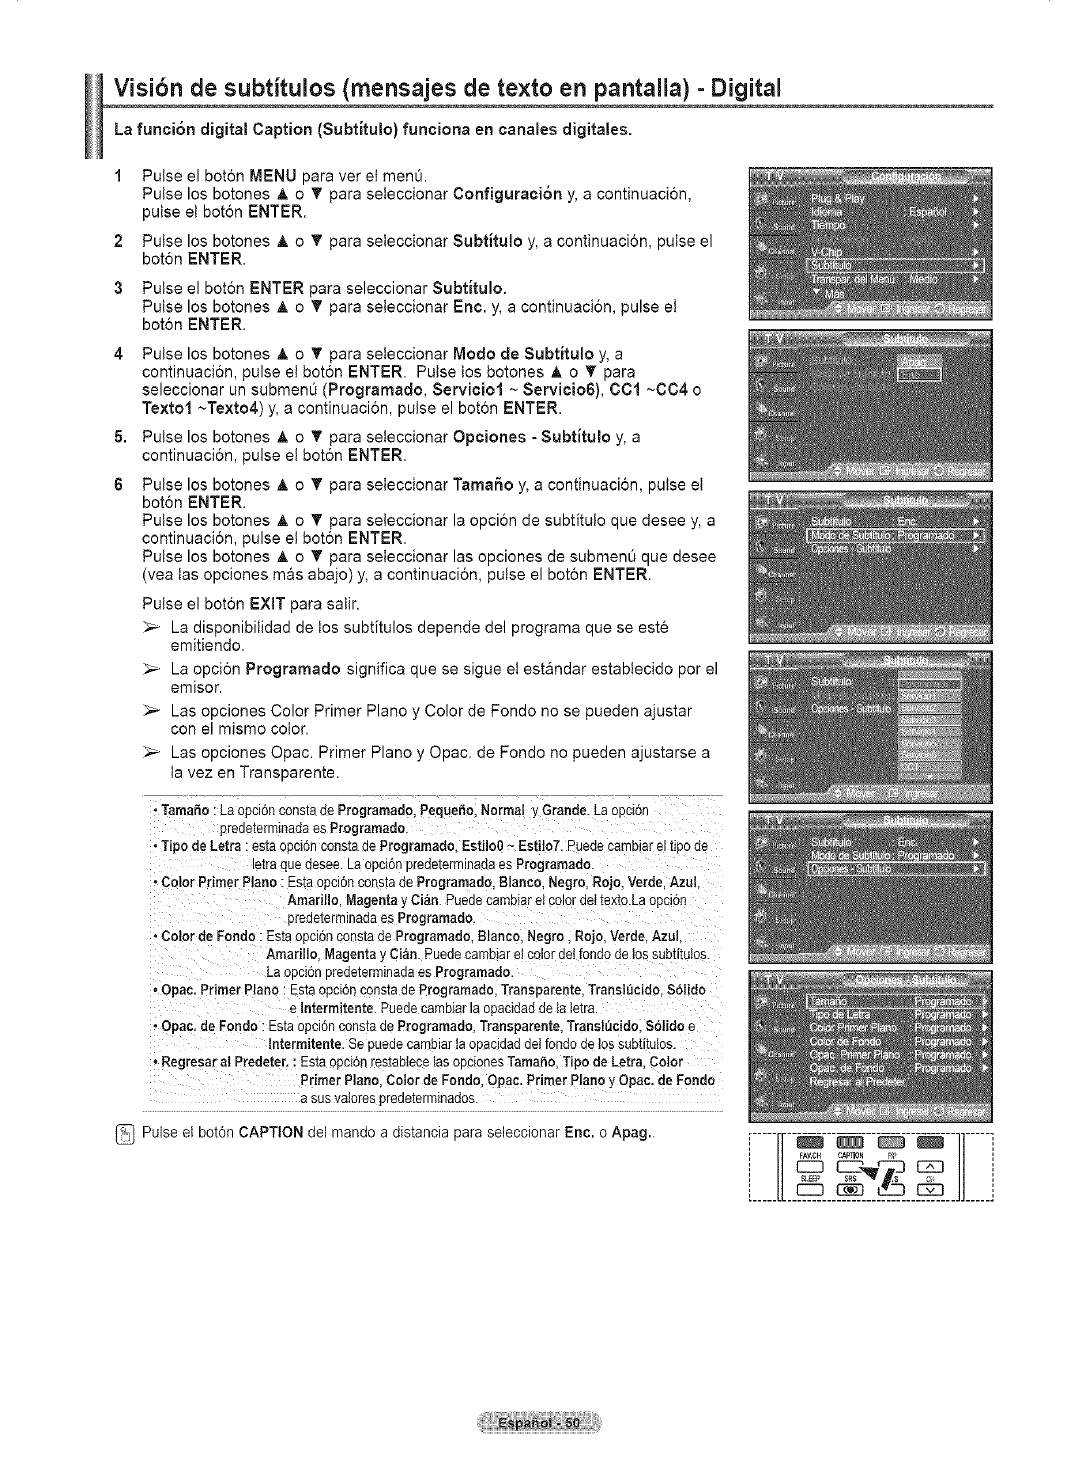
Visibn de subtitulos (mensajes de te×to en pantalla) - Digital
La funci6n digital Caption (Subtitulo) funciona en ¢anales digitales.
2
3
Pulse el boton MENU para ver et men&
Pulse los botones A o _' para seteccionar Configuraci6n y, a continuacion,
pulse et boton ENTER.
Pulse los botones _, o _' para seteccionar Subtitulo y, a continuacion, pulse el
bot6n ENTER,
Pulse el bot6n ENTER para seleccionar Subtitulo.
Pulse los botones A o _' para seteccionar Enc. y, a continuaci6n, pulse et
bot6n ENTER.
4 Pulse los botones &o T para seteccionar Modo de Subtitulo y, a
continuaci6n, pulse el bot6n ENTER. Pulse los botones A o T para
seleccionar un subment_ (Programado, Servioiol ~ Servicio6), CCl ~CC4 o
Textol ~Texto4) y, a continuaci6n, pulse el bot6n ENTER.
5. Pulse los botones A o T para seteccionar Opciones -Subtitulo y, a
continuaci6n, pulse et bot6n ENTER.
6Pulse los botones _, o _' para seteccionar Tama6o y, a continuaci6n, pulse et
bot6n ENTER.
Pulse los botones A o _' para seteccionar la opci6n de subtitulo que desee y, a
continuaci6n, pulse el bot6n ENTER.
Pulse los botones A o _' para seteccionar las opciones de submenO que desee
(yea los opciones m&s abajo) y, a continuaci6n, pulse el bot6n ENTER.
Pulse el bot6n EXiT para salir.
_-- La disponibilidad de los subtitulos depende del programa que se este
emitiendo.
La opcion Programado significa que se sigue et estandar establecido por el
emisor.
Las opciones Color Primer Piano y Color de Fondo no se pueden ajustar
con el mismo color.
Los opciones Opac. Primer Piano y Opac. de Fondo no pueden ajustarse a
ta vez en Transparente.
• TamaSo: LaopcJonconstade Programado,Peque_o.Normal y Grande. Laobc{on
_redeterminadaes Programado.
•Tipo de Letra:estaopci6nconstade Programado.Estilo0 ~ Estito7.Puedecarnbiareinpode
ezraquaoesee.La oncior Dreae[ermlnaaaes Programado.
• Color Primer Piano: Estaopclonconstade Programado.Blanco.Negro,Rojo.Verde.Azul
Amarillo Magenta} Ci&n.PuedecamDlarel COlOrael(ex[o.LaopcJon
predeterrn=nadae,_Programado.
-Color de Fondo: Estaopclonconstade Programado.Blanco,Negro, Rojo.Verde.Azul
AmarilloMagenta_ Ci&n. Puedecambiaret color delfondodelos subtitutos.
_aoenioneredetermlnadaes Programado
•Opac. Primer Piano : Estaopclonnonstade Programado,Transparente.Tranel_eido. S61ido
alntermitente.Puedecared_rlaopanidadde laletra
•Opac.de Fondo: Estao; ;ion nons[aae Programado.Transparente.Transl_cido. S61idoe
lntermitente. Se Duedenarnblarta ooacidaddelrondodeJossubtituios.
,Regresar al Predator.:EstaopcionrestaDtecelasonnionesTamahn Tipo deLetra,Color
Primer Piano Color deFondo Opac, Primer Piano y Opac.de Fondo
a sus va_orespredeterminados.
Pulse et bot6n CAPTION del mando a distancia para seleccionar Eric. o Apag.. ,-----,--.---.---.--.--,,-----,
[_____U JJ_____J
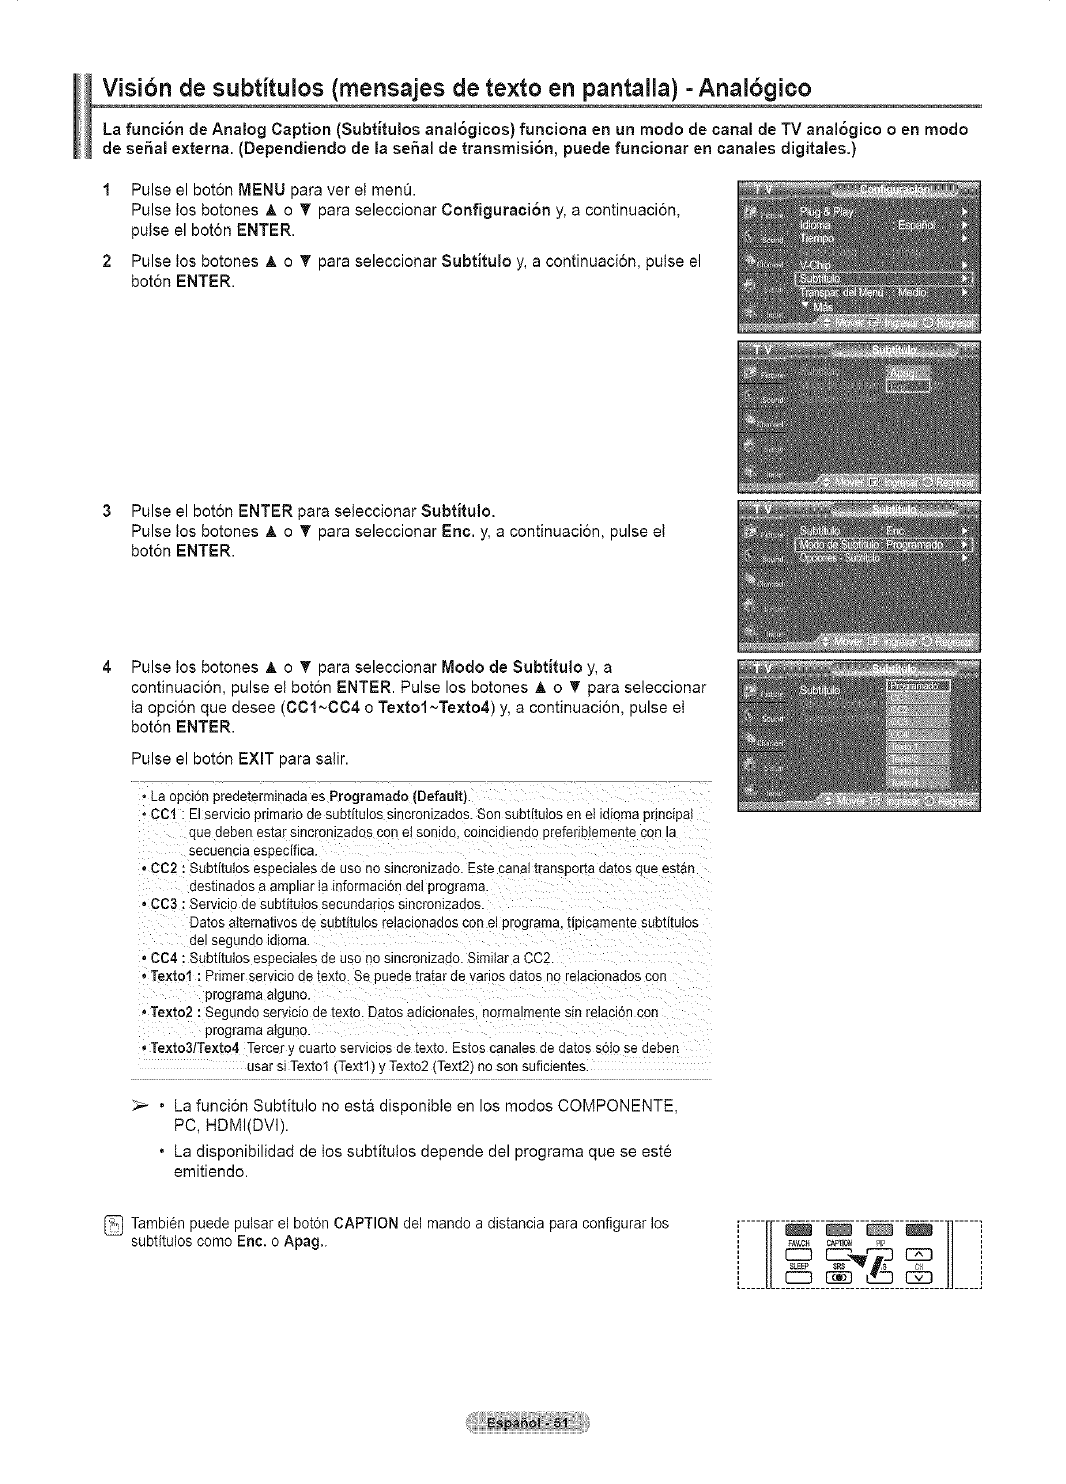
Visibn de subtitulos (mensajes de te×to en pantalla) - Analbgico
La funci6n de Analog Caption (Subt[tulos anal6gicos) funciona en un modo de canal de TV anal6gico o en modo
de sepal e×terna. (Depenclienclode la sepal de transmisi6n, puede funcionar en canales digitales.)
1Pulse el bot6n MENU para ver et menO.
Pulse los botones _, o _' para seleccionar Configuraci6n y, a continuacion,
pulse el baton ENTER.
2 Pulse los botones _, o T para seleccionar Subtituio y, a continuaci6n, pulse el
bot6n ENTER.
3Pulse el bot6n ENTER pars seleccionar Subtitulo.
Pulse los botones _, o _' para seleccionar Enc. y, a continuaci6n, pulse et
bot6n ENTER.
Pulse los botones A o T para seleccionar Modo de Subt[tu_o y, a
continuaci6n, pulse et bot6n ENTER. Pulse los botones A o _' para seleccionar
ta opci6n que desee (001~C04 o Textol~Texto4) y, a continuaci6n, pulse et
bot6n ENTER.
Pulse el bot6n EXIT para salir.
°La opcton preaeTermmaaa e5 Programado (Default)
• CCl : El servicio pnmano de subtitulas sJncron zados. Son subtituios en ei laioma pnncipa_
que aeDen es[ar slncroeizados con el son 30. coincldieedo Drefenbiemer :e con la
secuencla especifica.
• CC2 : Subtitulos especlaies ae usa no slncromzado. Este canal transporta dabs sae es[an
dest_nados a arr plJar ta mformaci6n del programa.
•CC3 : Servicio ae sue[l[uios secunaanos sincronizaaos.
Datos alternativos de subtltulos relaclonaaos con el programa, uDicamen[e subtitulos
del sac Jnao latoma.
• CC4 :Subtitulos especiabs de usa no slncrontza_Jo. Similar a .?.C2.
°Textof :Primer servicio de texts. Se puede tratar ae vanos aa[os no reiaclonados coe
programa aigunc
°Texts2 :Segdnao servlclo de [exto. Datos adicionaies, normalmee[e sin relaclon con
programa aigunc
, Texta3/Texto4 Tercery cuar[o servlctos ae [ex[o. Estos canales de datos s61o se deben
usar si Texts! (Text1) y Texts2 (Text2) no son suficientes.
_,_ • La funci6n Subtitulo no esta disponibte en los modos COMPONENTE,
PC, HDMI(DVI).
• La disponibilidad de los subtitulos depende del programa que se este
emitiendo.
Tambien puede pulsar el bot6n CAPTION del mando a distancia para configurar los
subtitulos coma Eric. o Apag..
1_____[[ JJ_____]
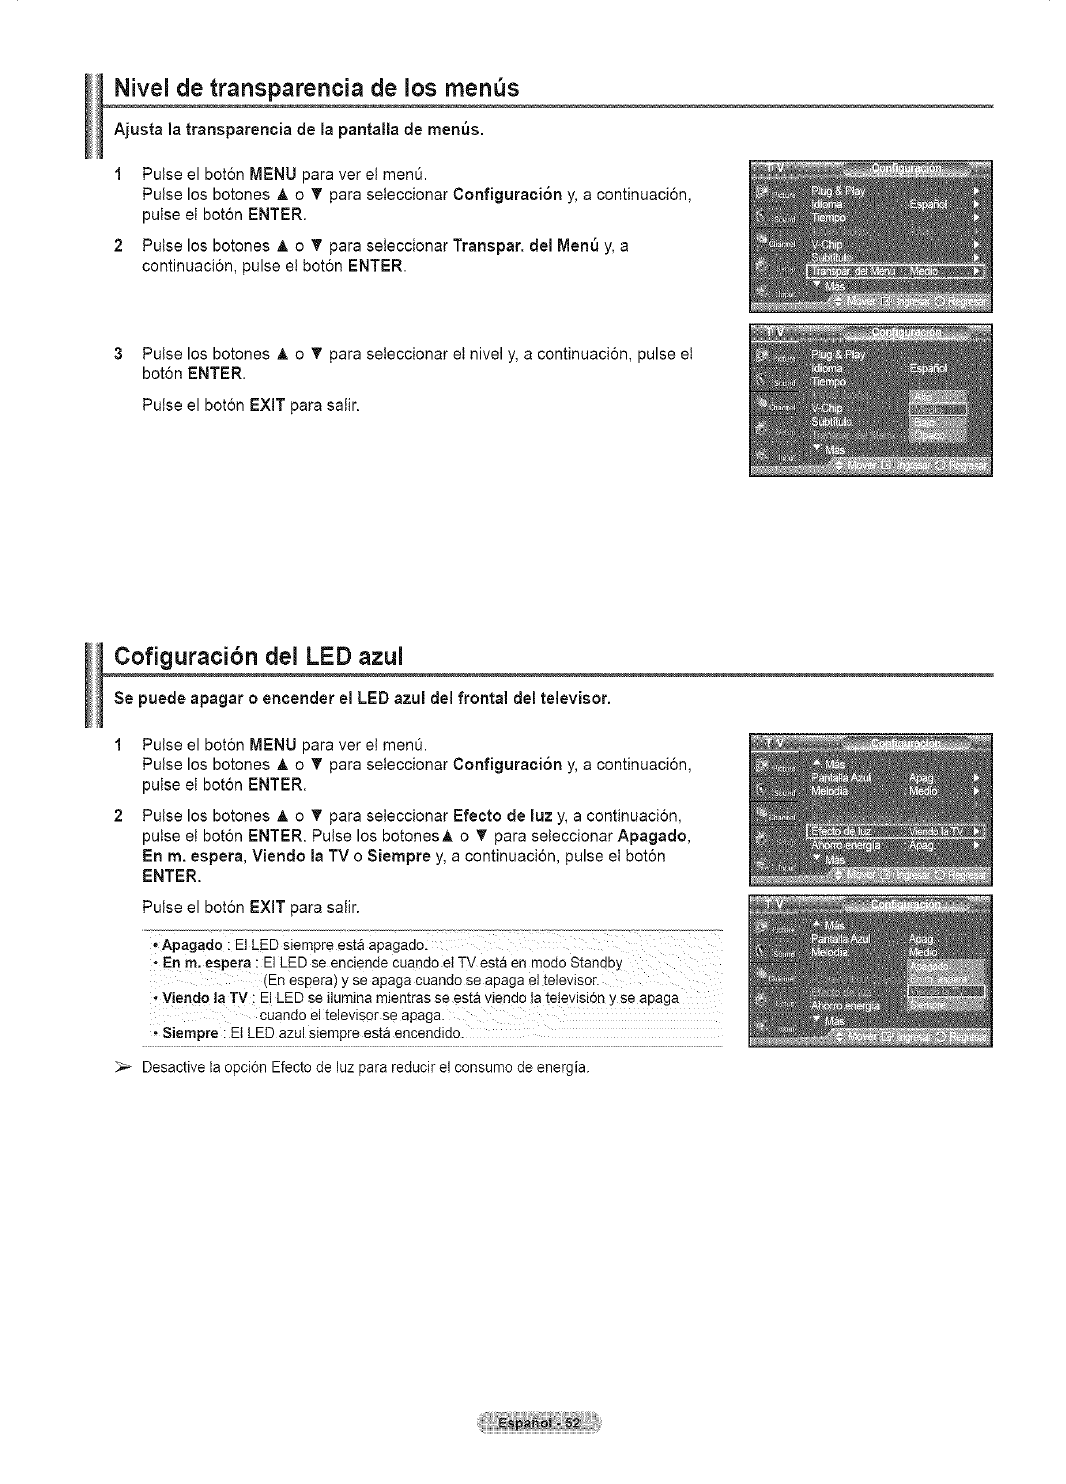
Nivel de transparencia de los rnen s
Ajusta la transparencia de la pantalla de men(Js.
1 Pulse el bot6n MENU para ver et men0.
Pulse los botones A o _' para seteccionar Configuraci6n y, a continuaci6n,
pulse et bot6n ENTER.
2 Pulse los botones A o _' para seteccionar Transpar. del Men_ y, a
continuaci6n, pulse el bot6n ENTER.
3 Pulse los botones _, o _' para seteccionar et nivel y, a continuaci6n, pulse et
bot6n ENTER.
Pulse el bot6n EXiT para saiir.
Cofiguraci6n del LED azul
Se puede apagar oencender el LED azul del frontal del televisor.
1Pulse el boton MENU para ver et men0.
Pulse los botones A o _' para seteccionar Configuraci6n y, a continuaci6n,
pulse et bot6n ENTER.
2 Pulse los botones A o _' para seieccionar Efeeto de luz y, a continuaci6n,
pulse et bot6n ENTER. Pulse los botonesA o _' para seieccionar Apagado,
En m. espera, Viendo la TV o Siempre y, a continuaci6n, pulse et bot6n
ENTER.
Pulse el boton EXiT para salir.
•Apagado : El LED siempre est_ apagado.
" En m. espera : El LED se enciende cuando el TV esta en rnodo Standby
(En espera) y se apaga cuando se apaga el televisor.
, Viendo la TV : El LED se ilurnina mJentras se est_ viendo ta teievisidn y se apaga
cuando el televisor se apaga.
Siempre : Ei LED azul siempre esta encendido.
_-- Desactive la opci6n Efecto de luz para reducir el consumo de energia.
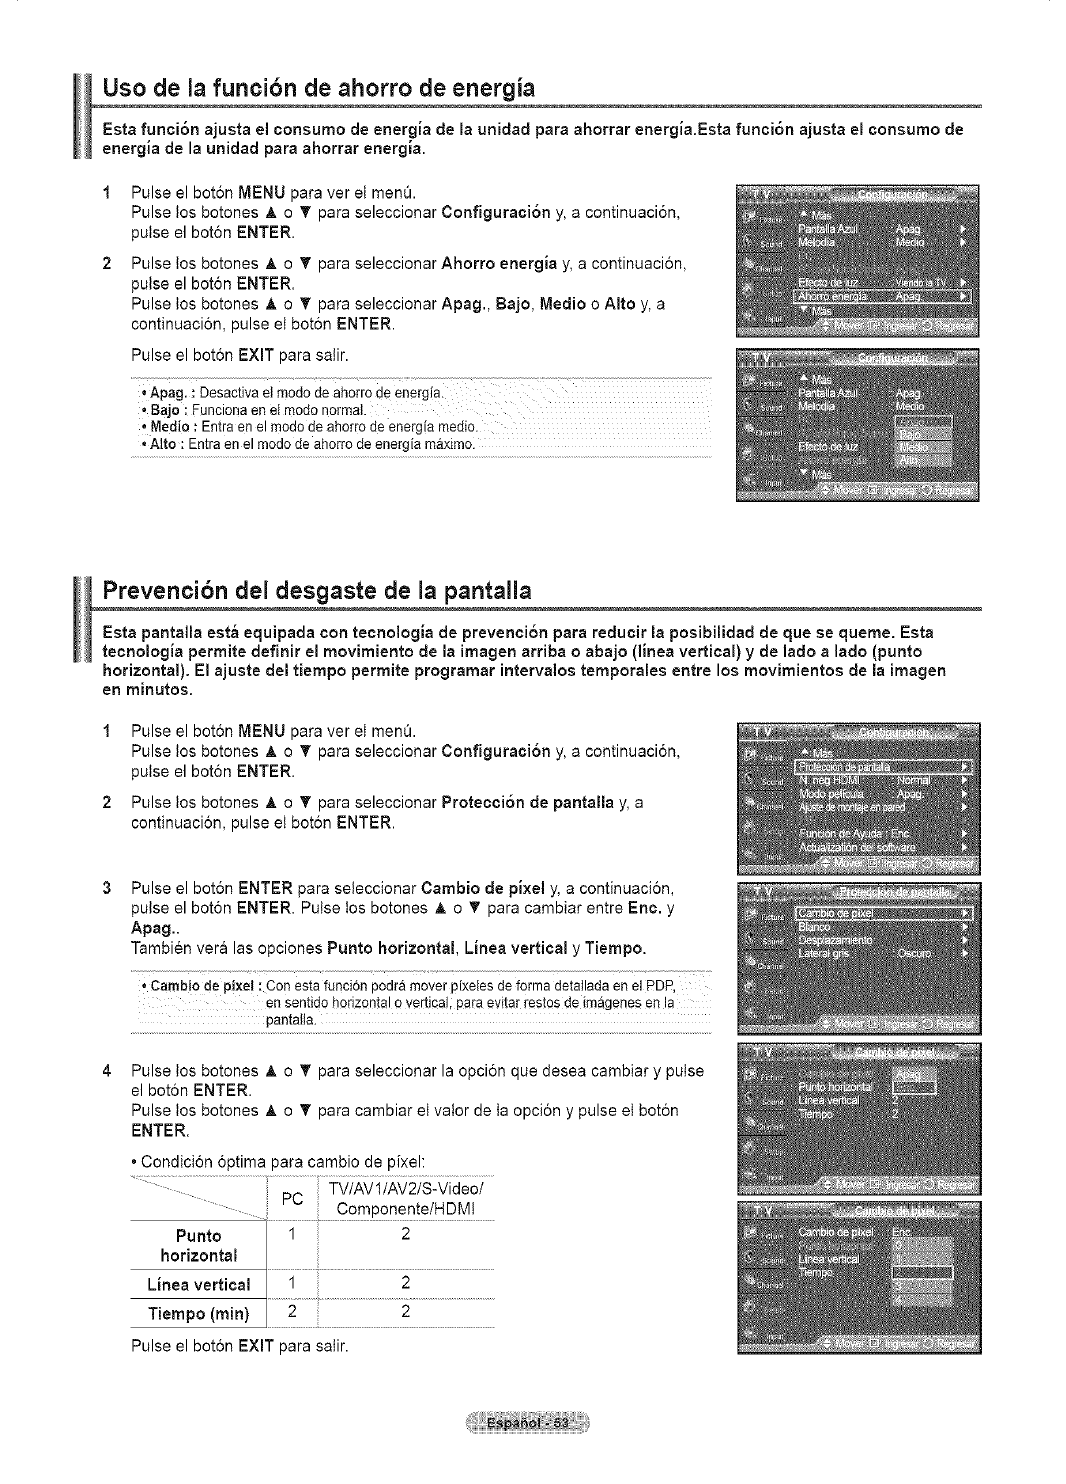
Use de la funcibn de ahorro de energia
Esta funci6n ajusta el eensurne de energia de la unidad para ahorrar energia.Esta funci6n ajusta el consume de
energia de la unidad para aherrar energia.
Pulse el bot6n MENU para ver el men&
Pulse los botones _, o _' para seleccionar Configuraci6n y, a continuaci6n,
pulse el boton ENTER.
Pulse los botones _, o T para seleccionar Ahorro energia y, a continuaci6n,
pulse el bot6n ENTER.
Pulse los botones _. o T para seleccionar Apag., Bajo, Mealie o Alto y, a
continuaci6n, pulse et bot6n ENTER.
Pulse el bot6n EXIT para salir.
*APag. :Desactiva el mode de ahorro_
* Bajo : Funcionaen el modenormal.
Medic :Entraen el mode de ahorrode energ!a medio.
, Alto : Entra en el mode de ahorro de energ[a maximo.
Prevencibn del desgaste de la pantalla
Esta pantalla est_ equipada con tecnologia de prevenci6n para reducir la posibilidad de que se queme. Esta
tecnelogia permite definir el mevimiento de la imagen arriba e abaje (linea vertical) y de lade a lade (punto
horizontal). El ajuste del tiempo permite pregramar intervalos temporales entre los mevimientos de la imagen
en minutes.
1Pulse el bot6n MENU para ver et men&
Pulse los botones _, o _' para seleccionar Configuraci6n y, a continuaci6n,
pulse el bot6n ENTER.
2 Pulse los botones _. o T para seleccionar Pretecci6n de pantalla y, a
continuaci6n, pulse et bot6n ENTER.
Pulse el bot6n ENTER para seleccionar Cambio de pixel y, a continuaci6n,
pulse el bot6n ENTER. Pulse los botones _, o _' para cambiar entre Eric. y
Apag..
Tambien vera las opciones Punto horizontal, Linea vertical y Tiempo.
• Cambio de Pixe! : Con estafunci6n podra mover pixeles de forma detalladaen el PDP,
ee senfido horizontalo vertica!; pa_-aevitartestes de im_genesen la
pantalta.
Pulse los botones _, o T para seleccionar la opci6n que desea cambiar y pulse
el bot6n ENTER.
Pulse los botones _, o _' para cambiar et valor de ta opci6n y pulse et bot6n
ENTER.
,Condici6n 6ptima para cambio de pixel:
Punto
horizontal
Linea vertical
Tiempo (rain)
Pulse el bot6n EXIT para salir.
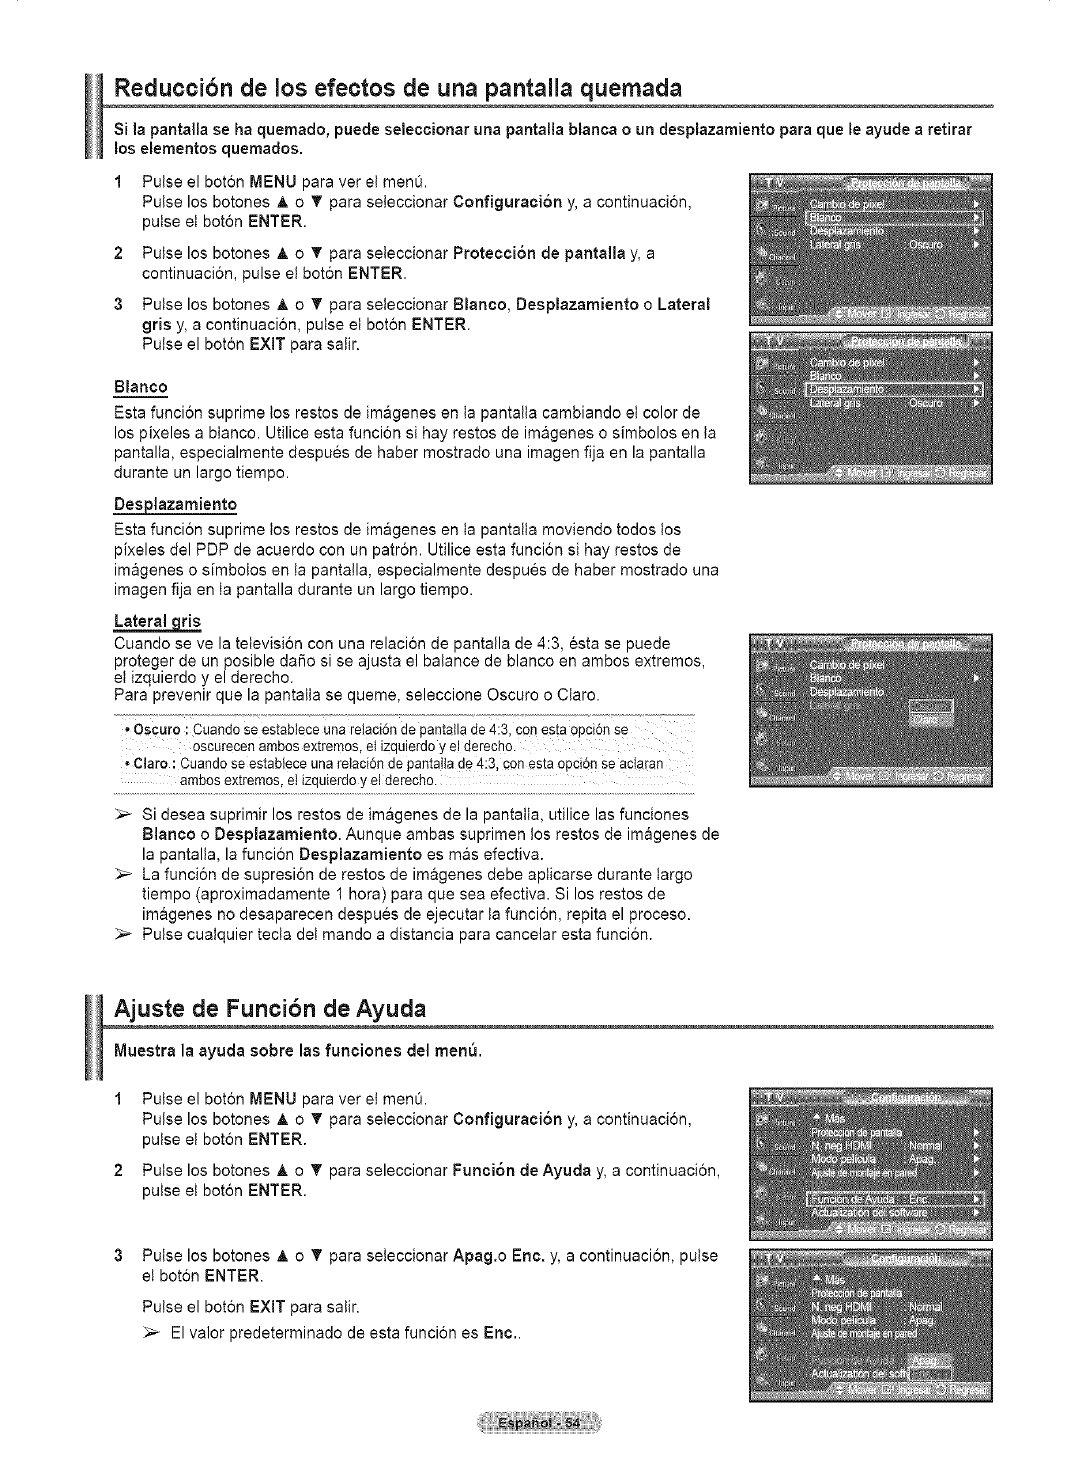
Reduccibn de los efectos de una pantalla quemada
Si la pantallase ha quemado, puede seleccionarunapantalla blancao un desplazamientopara que le ayude a retirar
los elementosquemados.
1Pulse el boton MENU para ver et menO.
Pulse los botones A o • para seteccionar Configuraci6n y, a continuacion,
pulse et boton ENTER.
2 Pulse los botones A o T para seteccionar Protecci6n de pantalla y, a
continuaci6n, pulse et boton ENTER.
3Pulse los botones A o _' para seleccionar Blan¢o, Desplazamiento oLateral
gris y, a centinuacion, pulse et boton ENTER.
Putse el beton EXIT para salir.
Blanco
Esta funci6n suprime los restos de imagenes en ta pantalla cambiando el color de
los pixeles a blanco. Utilice esta funcion si hay restos de im&genes o simbolos en ta
pantalla, especialmente despues de haber mostrado una imagen fija en la pantalla
durante un largo tiempo.
Desplazamiento
Esta funcion suprime los restos de imageries en la pantalta moviendo todos los
pixeles del PDP de acuerdo con un patr6n. Utilice esta funcion si hay restos de
imagenes o simbolos en ta panta!la, especialmente despues de haber mostrado una
imagen fija en ta pantalla durante un largo tiempo.
Cuando se ve la tetevisi6n con una relacion de panta!la de 4:3, esta se puede
proteger de un posible da_o si se ajusta el balance de blanco en ambos extremos,
et izquierdo y el derecho.
Para prevenir que la pantalla se queme, seleccione Oscuro o Claro.
•Oscuro :Cuandose estabiece Unarelaci6n de pantalla de 4i3, con esta opci6nse
oscurecenambosextremos,ei izquierdoy el derecho.
•Claro : Cuandose estableceuna relacidnde pantallade 4:3, conesta opcidn se acla[an
ambos extremos, et izquierdo yel derecho.
Si desea suprimir los restos de imageries de la pantalta, utilice las funciones
Blanco o Desplazamiento. Aunque ambas suprimen los restos de imagenes de
la pantalia, la funcion Desplazamiento es m&s efectiva.
La funcion de supresi6n de restos de imagenes debe apticarse durante largo
tiempo (aproximadamente 1 hora) para que sea efectiva. Si los restos de
imagenes no desaparecen despues de ejecutar ta funci6n, repita el proceso.
Pulse cuaIquier tecta det mando a distancia para cancelar esta funci6n.
Ajuste de Funcibn de Ayuda
Muestra la ayuda sobre las funciones del menU.
1 Pulse el boton MENU para ver et menQ.
Pulse los botones &o T para seteccionar Configuraci6n y, a continuacion,
pulse et boton ENTER.
2 Pulse los botones &o T para seleccionar Funci6n de Ayuda y, a continuacion,
pulse et boton ENTER.
Pulse los botones _, o _' para seteccionar Apag.o Eric. y, a continuacion, pulse
et bot6n ENTER.
Pulse el boton EXIT para salir.
El valor predeterminado de esta funcion es Eric..
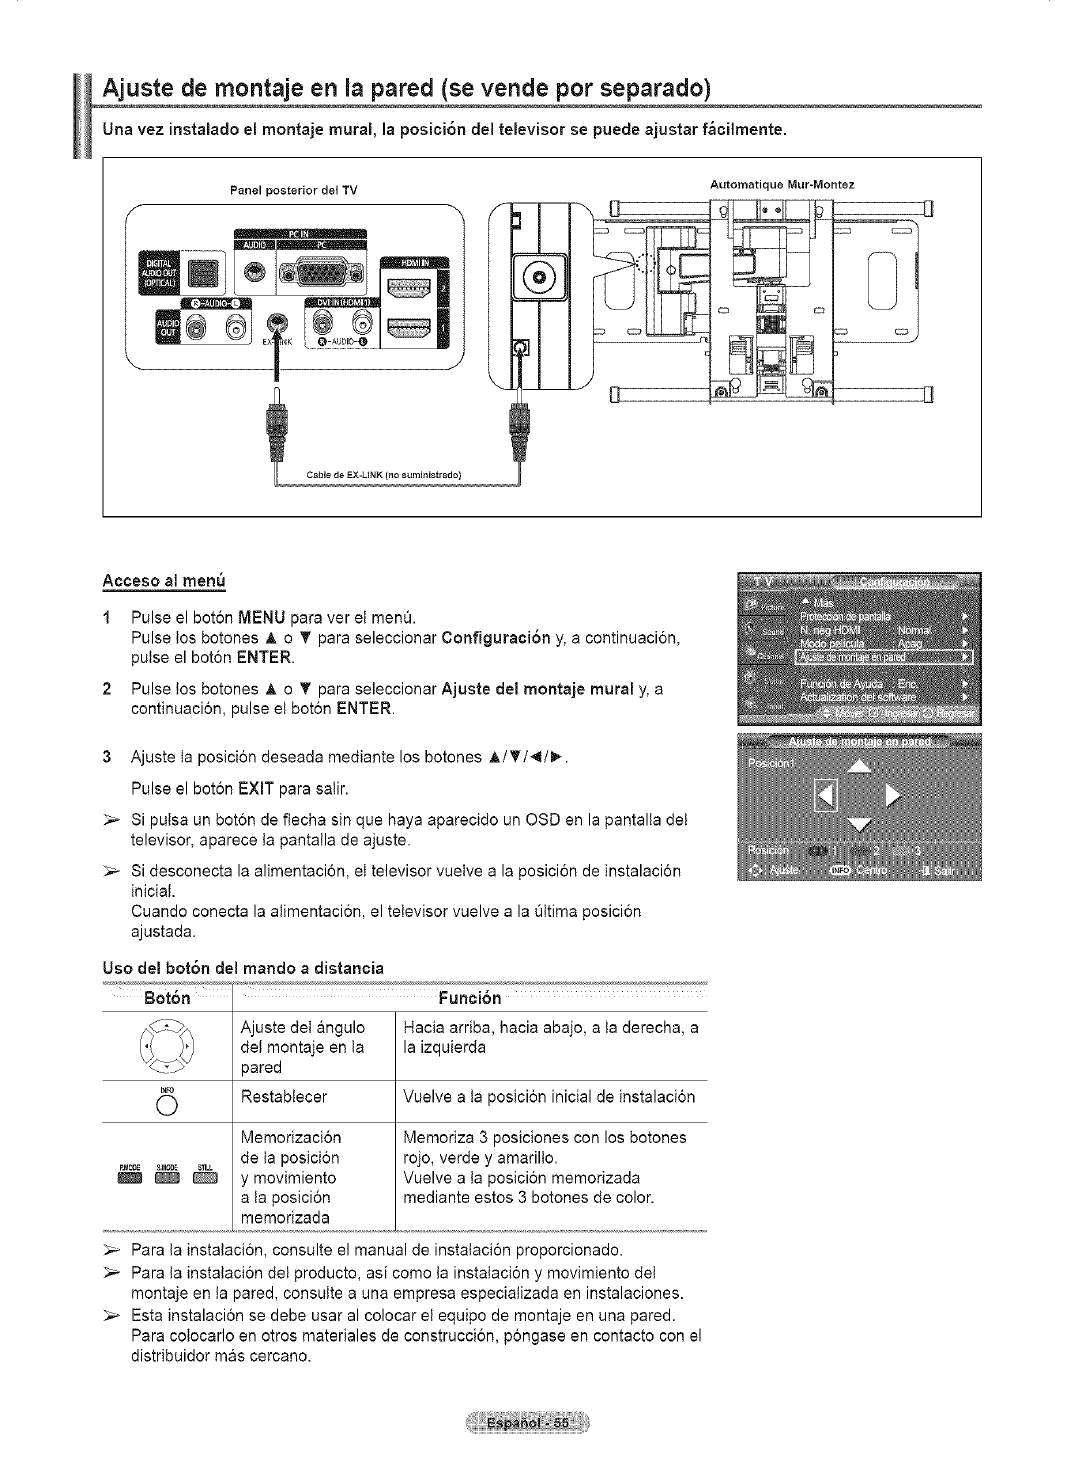
Ajuste de montaje en la pared (se vende por separado)
Una vez instalado el montaje mural, la posici6n del televisor se puede ajustar f_cilmente.
Panel posterior del TV
I
J
Cable de EX-UNK (no surninistrado}
J
m
Automatique Mur-Montez
C27 CO
Acceso al menu
Pulse el bot6n MENU para ver et men&
Pulse tos botones _, o T para seleccionar Configuraci6n y, a continuaci6n,
pulse el boton ENTER.
Pulse los botones A o T para seleccionar Ajuste del montaje mural y, a
continuaci6n, pulse et bot6n ENTER.
3Ajuste ta posici6n deseada mediante los botones _,/_'/4/_.
Pulse el bot6n EXiT para salir.
_,_ Si putsa un bot6n de fiecha sin que haya aparecido un OSD en la pantalta del
televisor, aparece ta panta!la de ajuste.
_-- Si desconecta la alimentaci6n, et televisor vuetve a la posici6n de instalaci6n
inicial.
Cuando conecta la alimentaci6n, el televisor vuelve a la Qttima posici6n
ajustada.
Uso del bot6n del mando a distancia
BotSn Funci6n
Ajuste det angulo Hacia arriba, hacia abajo, a ta derecha, a
det montaje en ta la izquierda
>ared
Restabtecer Vuelve a ta posicion inicial de instalacion
Memorizacion Memoriza 3 posiciones con los botones
de la posicion rojo, verde y amarillo.
_0OE &f,IODE
_ _ y movimiento Vuelve a ta posicion memorizada
a la posici6n mediante estos 3 botones de color.
memorizada
_-- Para la instalaci6n, consulte el manual de instataci6n proporcionado.
_,_ Para la instalaci6n del producto, asi como la instalaci6n y movimiento del
montaje en la pared, consutte a una empresa especializada en instalaciones.
_-- Esta instalacion se debe usar al colocar el equipo de montaje en una pared.
Para cotocarlo en otros materiales de construcci6n, pongase en contacto con el
distribuidor mas cercano.
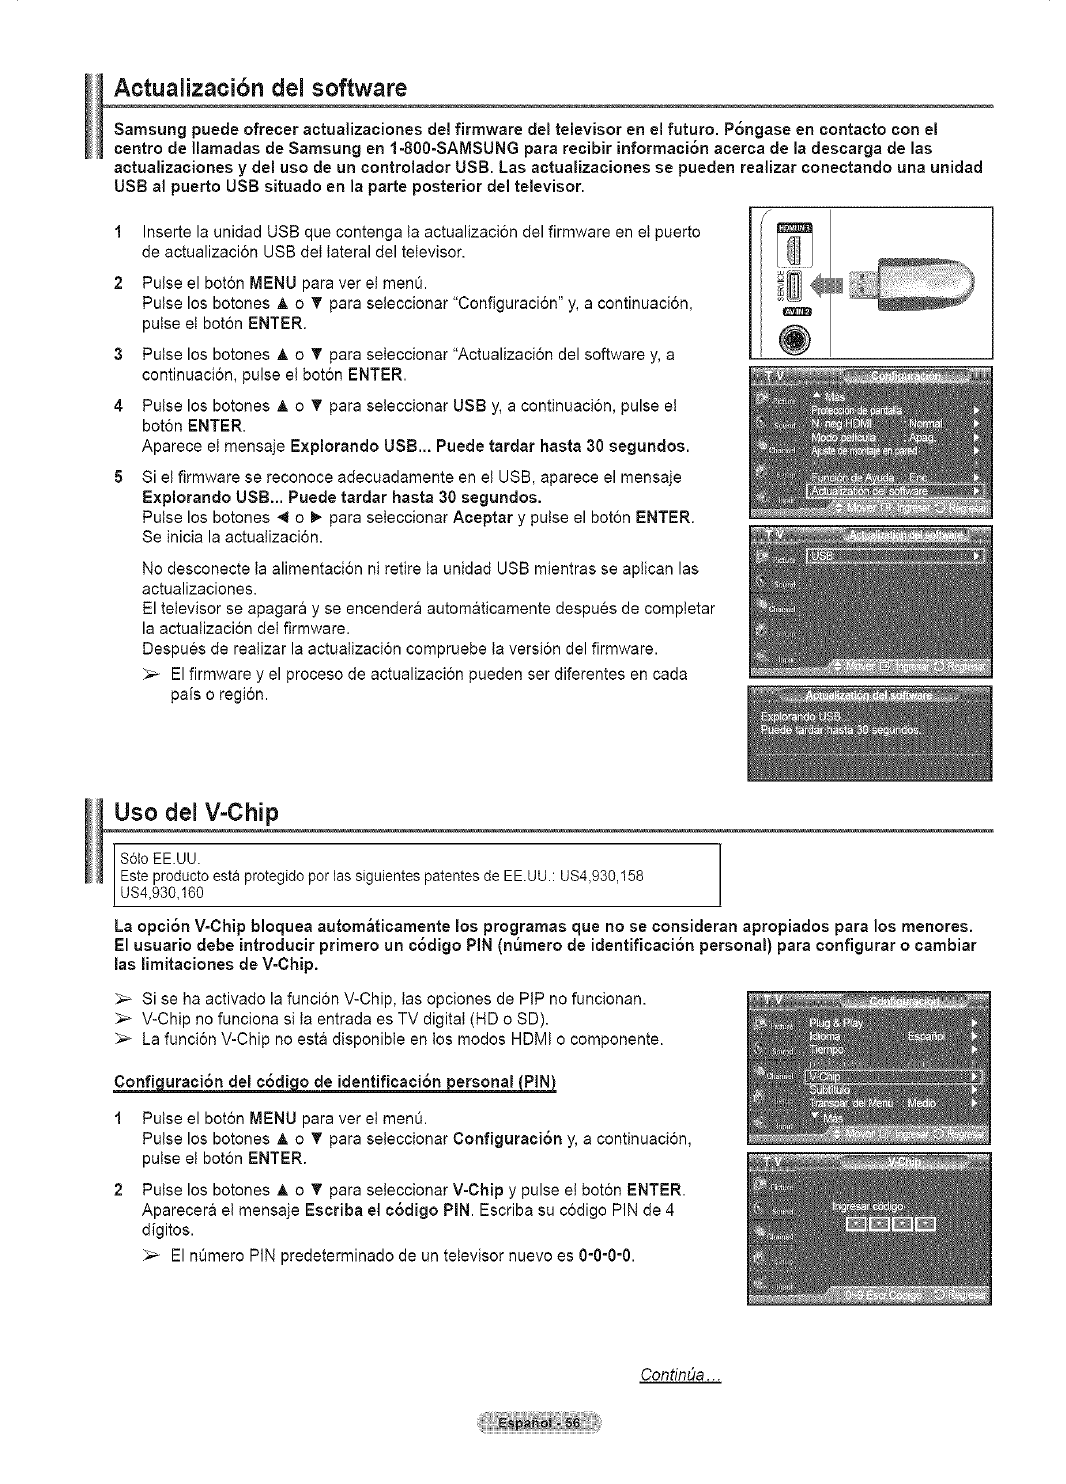
Actualizacibn del software
Samsung puede ofreoer actualizaoiones del firmware del televisor en el futuro. P6ngase en contacto con el
oentro de llamadas de Samsung en 1-800-SAMSUNG para reoibir informaci6n acerca de la desoarga de las
actualizaciones y del uso de un oontrolador USB. Las actualizaciones se pueden realizar coneotando una unidad
USB al puerto USB situado en la parte posterior del televisor.
1
2
Inserte la unidad USB que contenga la actualizacion del firmware en et puerto
de actualizaci6n USB det lateral del televisor.
Pulse el boton MENU para ver et menO.
Pulse los botones A o _' para seteccionar "Configuraci6n" y, a continuaci6n,
pulse et boton ENTER,
3 Pulse los botones A o T para seteccionar "Actualizaci6n del software y, a
continuaci6n, pulse el bot6n ENTER.
4 Pulse los botones A o _' para seteccionar USE} y, a continuaci6n, pulse et
bot6n ENTER,
Aparece el mensaje Explorando USB... Puede tardar hasta 30 segundos.
5Si et firmware se reconoce adecuadamente en et USB, aparece el mensaje
Explorando USB... Puede tardar hasta 30 segundos.
Pulse los botones _ o P para seteccionar Aoeptar y pulse el bot6n ENTER.
Se inicia la actualizaci6n.
No desconecte ta alimentaci6n ni retire ta unidad USB mientras se aplican las
actualizaciones.
El televisor se apagara y se encendera automaticamente despues de completar
la actualizaci6n det firmware.
Despues de realizar la actualizaci6n compruebe ta versi6n del firmware.
_-- El firmware y el proceso de actualizaci6n pueden ser diferentes en cada
pais o regi6n.
Uso del V-Chip
S6to EE.UU.
Este producto esta protegido por las siguientes patentes de EE.UU.: US4_930,158
US4_930_160
La opoi6n V-Chip bloquea autom_ticamente los programas que no se oonsideran apropiados para los menores.
El usuario debe introduoir primero un o6digo PIN (n6mero de identifioaci6n personal) para configurar ooambiar
las limitaoiones de V-Chip.
_- Si se ha activado la funci6n V-Chip, tas opciones de PIP no funcionan.
_-- V-Chip no funciona si ta entrada es TV digital (HD o SD).
La funci6n V-Chip no esta disponibte en los modos HDMI o componente.
Confi uraci6n del o6di o d_caci6n ersonal PiN
Pulse el bot6n MENU para ver et menO.
Pulse los botones A o _' para seteccionar Configuraci6n y, a continuaci6n,
pulse et boton ENTER.
Pulse los botones A o _' para seieccionar V-Chip y pulse ei bot6n ENTER.
Aparecera el mensaje Esoriba el o6digo PIN Escriba su c6digo PIN de 4
digitos.
El nQmero PIN predeterminado de un televisor nuevo es 0-0-0-0.
Contin(Ja. ..
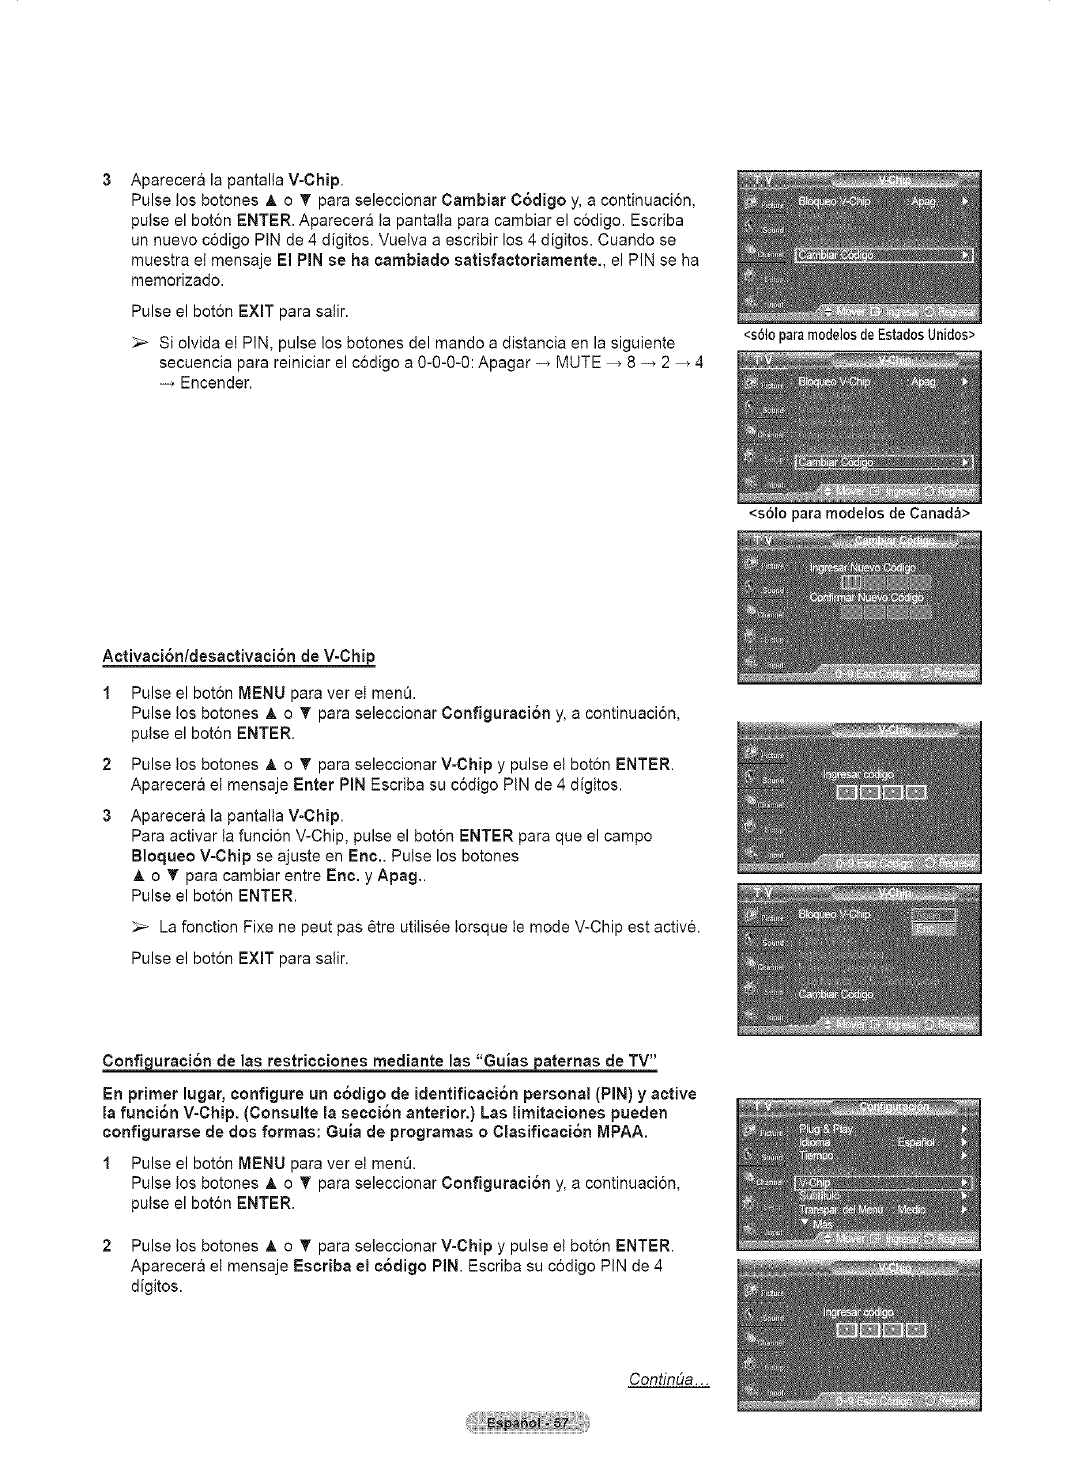
Aparecera la pantalla V-Chip.
Pulse los botones _, o T para seleccionar Cambiar COdigo y, a continuacion,
pulse el botch ENTER. Aparecera ta pantalta para cambiar el codigo. Escriba
un nuevo codigo PIN de 4 digitos. Vuetva a escribir los 4 digitos. Cuando se
muestra el mensaje El PIN se ha cambiado satisfactoriamente., el PIN se ha
memorizado.
Pulse el bot6n EXIT para salir.
_-_ Si olvida el PIN, pulse los botches del mando a distancia en la siguiente
secuencia para reiniciar el codigo a 0-0-0-0: Apagar -_ MUTE _ 8 -_ 2 _ 4
-_ Encender.
Activaci6n/desactivaci6n de V-Chip
1Pulse el bot6n MENU para ver et menO.
Pulse los botones _, o _' para seleccionar ConfiguratiOn y, a continuaci6n,
pulse el bot6n ENTER.
2 Pulse los botches A o T para seleccionar V-Chip y pulse el bot6n ENTER.
Aparecera et mensaje Enter PiN Escriba su c6digo PiN de 4 digitos.
3 Aparecera la pantalta V-Chip.
Para activar ta funci6n V-Chip, pulse el bot6n ENTER para que el campo
Blcquec V-Chip se ajuste en Enc.. Pulse los botones
A o T para cambiar entre Enc. y Apag..
Pulse el bot6n ENTER.
_,_ La fonction Fixe ne peut pas _tre utitisee torsque te mode V-Chip est active.
Pulse el bot6n EXiT para salir.
_uraciOn de las restricciones mediante las "Guiaspaternas de TV"
En primer lugar, configure un ¢6digo de identificaci6n personal (PIN) yactive
la funci6n V-Chip. (Consulte la secci6n anterior.) Las limitaciones pueden
¢onfigurarse de dos formas: Guia de programas oClasificaci6n MPAA.
1 Pulse el bot6n MENU para ver et menO.
Pulse los botches _, o _' para seleccionar ConfiguratiOn y, a continuacion,
pulse el botch ENTER.
2 Pulse los botches _. o T para seleccionar V-Chip y pulse el botch ENTER.
Aparecera et mensaje Escriba el c6digc PIN. Escriba su codigo PiN de 4
digitos.
ConfinDa...
<s61oparamodelosde EstadosUnidos>
<sOlo para modelos de Canada>
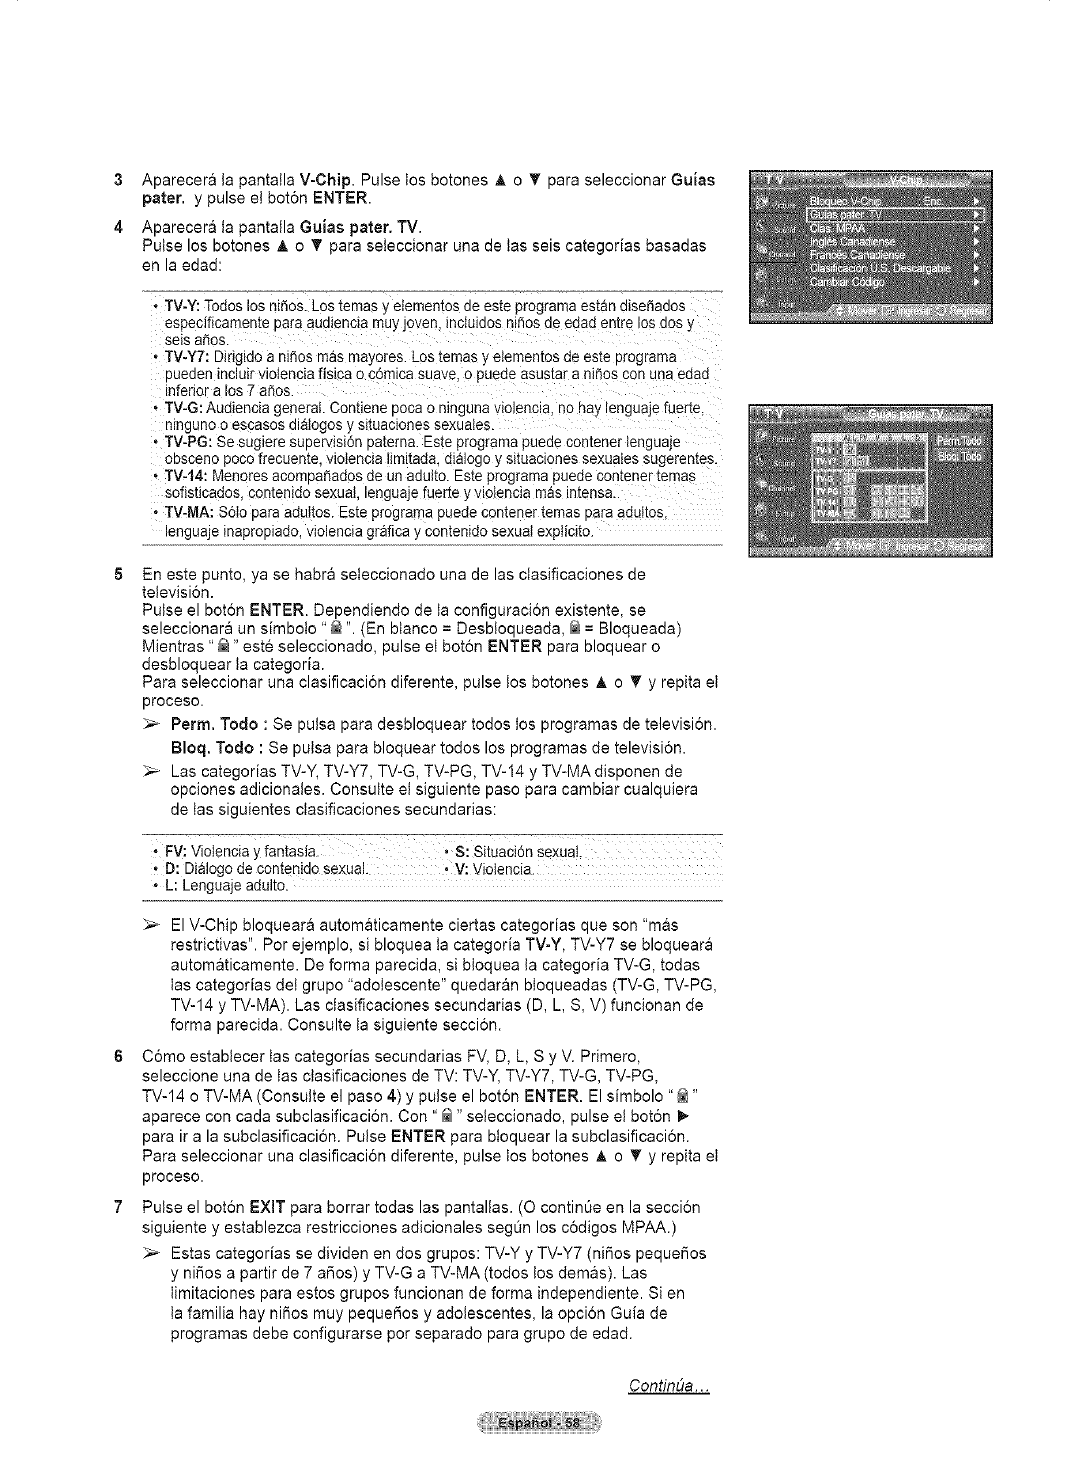
3Aparecera ta pantalla V-Chip. Pulse los botones _, o T para seleccionar GuJas
pater, y pulse el bot6n ENTER.
4 Aparecer& la pantalla Guias pater. TV.
Pulse los botones _, o _' para seteccionar una de tasseis categorias basadas
en la edad:
• TV-Y: Todos los niSos. Los temas y elementos de este 3rograma estan dlse_ados
especificamente oara audlencta muy joven, ncIuJdos ni_os ae eaaa entre los aos y
sels argos.
• TV-YT: Dirig_doa n_nosmas mayeres. LOStemas y elementes de este programa
uueden mcluir vleIencia fisica o com_casuave, o puede asustar a nlf_es con una eaad
Enferiara los 7 aSos.
• TV-G: Audiencia general. Contiene poca o nmguna vlolencla no nay lenguaje fuerte,
nlnguno o escasos dlatogos y sl[uaclones sexuales.
•TV-PG: Se suglere super_tsl6n Daterna.Este pragrama pueae comener lenguaje
oesoeno pOOO frecuente Vlolenola ilmltaaa, dialogo y sltuaolones sexuales sugeremes.
• TV-14: Menores acen'oa_ades de un adulto. Este programa _ Jeae cemener temas
sofisticados con[enlao sexual lenguaje fuerte y vlolencla mas ln[ensa.
•TV-MA: S6to oara adultos. Este programa pueae contener temas Da_aaaui[os
_enguajemaproplado, vtolencla grafica y contenldo sexual expticito.
En este punto, ya se habra seteccionado una de las ctasificaciones de
television.
Pulse el boton ENTER. Dependiendo de la configuracion existente, se
seleccionara un simbolo "@ ". (En blanco = Desbloqueada, _ = Bloqueada)
Mientras "_" este seleccionado, pulse et boton ENTER para bloquear o
desbloquear la categoria.
Para seleccionar una clasificacion diferente, pulse los botones _, o T y repita et
proceso.
_-_ Perm. Todo : Se putsa para desbloquear todos los programas de televisi6n.
Bloq. Todo : Se putsa para bloquear todos los programas de televisi6n.
_-_ Las categorias TV-Y, TV-Y7, TV-G, TV-PG, TV-14 y TV-MA disponen de
opciones adicionales. Consulte el siguiente paso para cambiar cualquiera
de tas siguientes ctasificaciones secundarias:
D: Dialogo de contenido sexual: ,V: Violencia.
•L: henguaje adulto.
:_ El V-Chip bloqueara automaticamente ciertas categorias que son "mas
restrictivas". Por ejemplo, si bloquea ta categoria TV-Y, TV-Y7 se bloqueara
automaticamente. De forma parecida, si bloquea la categoria TV-G, todas
tas categorias del grupo "adolescente" quedar&n btoqueadas (TV-G, TV-PG,
TV-14 y TV-MA). Las clasificaciones secundarias (D, L, S, V) funcionan de
forma parecida. Consulte ta siguiente secci6n.
C6mo establecer tas categorias secundarias FV, D, L, S y V. Primero,
seleccione una de tas ctasificaciones de TV: TV-Y, TV-Y7, TV-G, TV-PG,
TV-14 o TV-MA (Consulte el paso 4) y pulse el bot6n ENTER. El simbolo "@"
aparece con cada subclasificacion. Con "@" seleccionado, pulse et boton I_
para ira la subclasificaci6n. Pulse ENTER para btoquear la subclasificacion.
Para seleccionar una clasificaci6n diferente, pulse los botones _, o T y repita et
proceso.
Pulse el boton EXIT para borrar todas las pantallas. (O contin0e en la seccion
siguiente y establezca restricciones adicionales seg0n los codigos MPAA.)
:_ Estas categorias se dividen en dos grupos: TV-Y y TV-Y7 (niSos pequefios
y niSos a partir de 7 aSos) y TV-G a TV-MA (todos los demas). Las
timitaciones para estos grupos funcionan de forma independiente. Si en
ta familia hay niSos muy pequeSos y adotescentes, la opcion Guia de
programas debe configurarse por separado para grupo de edad.
ConfinOa...
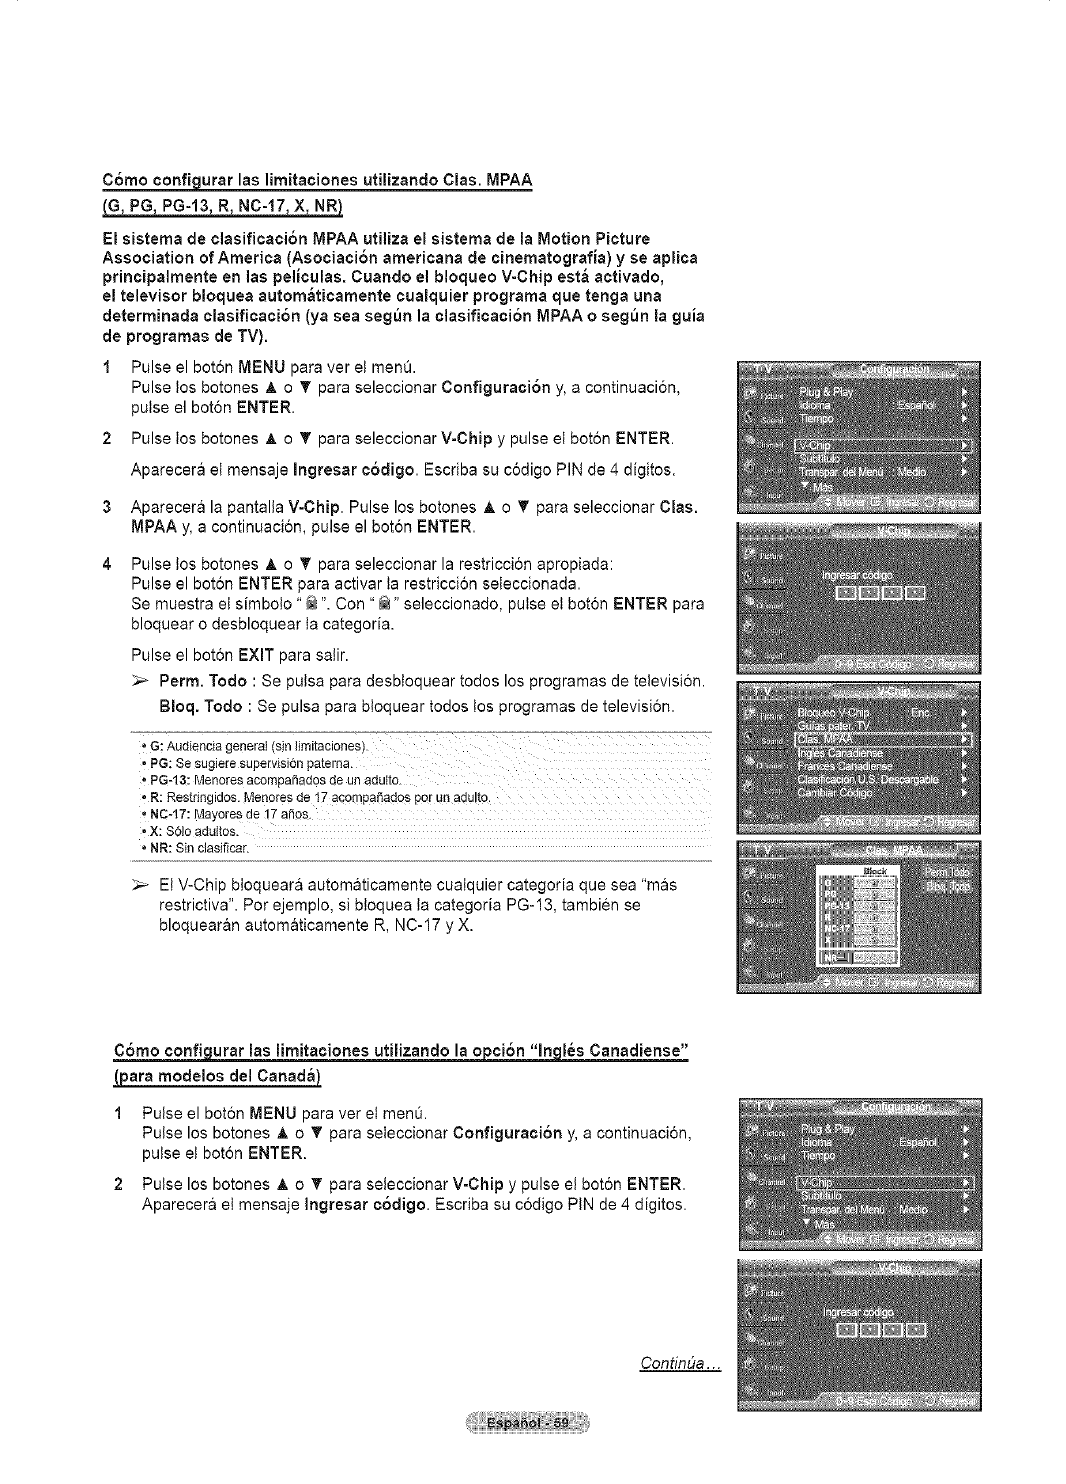
C6mo confi_qurarlas limitaoiones utilizando Clas. MPAA
GPG PG-13 R NC-17 X NR
El sistema de clasificaci6n MPAA utiliza el sistema de la Motion Picture
Association of America (Asociaci6n americana de cinematografia) y se apJica
principalmente en las pelJoulas. Cuando el bloqueo V-Chip est& aotivado,
el televisor bloquea autom&ticamente cualquier programa que tenga una
determinada olasifioaciSn (ya sea segdn la olasificaoiSn MPAA o segdn la guia
de programas de TV).
1Pulse el bot6n MENU para ver et men&
Pulse tos botones _, o _' para seleccionar Configuraoi6n y, a continuaci6n,
pulse el bot6n ENTER.
2 Pulse los botones A o T para seleccionar V-Chip y pulse et bot6n ENTER.
Aparecera et mensaje Ingresar c6digo. Escriba su c6digo PIN de 4 digitos.
3Aparecera la pantalla V-Chip. Pulse los botones A o T para seleccionar Clas.
MPAA y, a continuaci6n, pulse el boton ENTER.
Pulse los botones _, o _ para seleccionar la restricci6n apropiada:
Pulse el bot6n ENTER para activar ta restriccion seteccionada.
Se muestra el simboto "@ ". Con "@" seleccionado, pulse et boton ENTER para
bloquear o desbloquear ta categoria.
Pulse el bot6n EXIT para salir.
_,_ Perm. Todo : Se putsa para desbtoquear todos los programas de television.
Bloq. Todo : Se pulsa para btoquear todos los programas de televisi6n.
"G; Audiencia generai (sin limitaciones).
* PG: Se sugiere supervisJ6n patema.
-PG-13: Menores acompaSados de un adulto.
*R: Restringidos. Menores de 17 acornpa6adQs pot Unadu!to,
, NC-17: Mayore s de 17 a_os!
*X: S6lo adultos.
*NR: Sin ciasificar.
_-- El V-Chip bloqueara automaticamente cualquier categoria que sea "mas
restrictiva". Por ejemplo, si bloquea la categoria PG-13, tambien se
bloquearan automaticamente R, NC-17 y X.
Cbmo configurar las limitaciones utiiizando la o_ "l_16s Canadiense"
(para modelos del Canada)
Pulse el boton MENU para ver et men&
Pulse los botones A o T para seteccionar Configuraci6n y, a continuacion,
pulse et boton ENTER.
Pulse los botones A o _' para seleccionar V-Chip y pulse el boton ENTER.
Aparecer& el mensaje Ingresar c6digo. Escriba su c6digo PiN de 4 digitos.
Contim_a. ..

3Aparecera la pantalla V-Chip. Pulse los botones _, o _' para seleccionar Ingl6s
Canadiense y, a continuaci6n, pulse el boton ENTER.
Pulse los botones A o T para seleccionar la restriccion apropiada:
Pulse el boton ENTER para activar la restriccion seleccionada. Se muestra et
simbolo "@ ".
Pulse el boton EXIT para salir.
_,_ Perm. Todo : Se putsa para desbloquear todos los programas de television.
Bloq. Todo : Se pulsa para bloquear todos los programas de televisi6n.
•C8+: Programaci6n generalmente considerada aceptabie para niSos mayores de 8 aSossin
acompaSamiento de aduitos.
•G: Programacion general, ideal para todas tas audiencias.
• PG: Supervisi6n paterna.
•14÷: La programaci6n contiene temas ycontenidos que puede que no sean adecuados para
menores de 14 aSos.
-18÷: Programacion para adultos.
_-- El V-Chip bloqueara automaticamente cualquier categoria que sea "mas
restrictiva". Por ejemplo, si bloquea la categoria G, automaticamente
tambien se btoqueara PG, 14+ y 18+.
_urar las limitaciones utilizanclola opcibn "Franc_s Canacliense"
(para modelos del Canada)
2
3
4
Pulse el boton MENU para ver et menO.
Pulse los botones A o _' para seteccionar Configuraci6n y, a continuacion,
pulse et boton ENTER.
Pulse los botones A o _' para seleccionar V-Chip y pulse el bot6n ENTER.
Aparecera el mensaje Ingresar c6digo. Escriba su c6digo PiN de 4 digitos.
Aparecer& ta pantalla V-Chip. Pulse los botones A o T para seleccionar
Franc_s Canadiense y, a continuacion, pulse et boton ENTER.
Pulse los botones A o T para seleccionar la restriccion apropiada:
Pulse el boton ENTER para activar la restriccion seleccionada. Se muestra et
simbolo "_ ".
Pulse el boton EXIT para satir.
_,_ Perm, Todo : Se putsa para desbloquear todos los programas de television.
Bloq. Todo : Se pulsa para bloquear todos los programas de televisi6n.
,13 arts+: Es posible que ta programacion no sea adecuada para ni_os menores de "13aSos.
* ! 6 arts÷: Es posible que ta programacion no sea adecuada para ni_os menores de 16 amos.
*t8 arts÷: Programacion restringida para adultos.
_,_ El V-Chip bloqueara automaticamente cualquier categoria que sea "mas
restrictiva". Por ejemplo, si bloquea la categoria 8 ans+, tambien se
bloquearan autom&ticamente 13 arts+, 16 arts+ y 18 arts+.
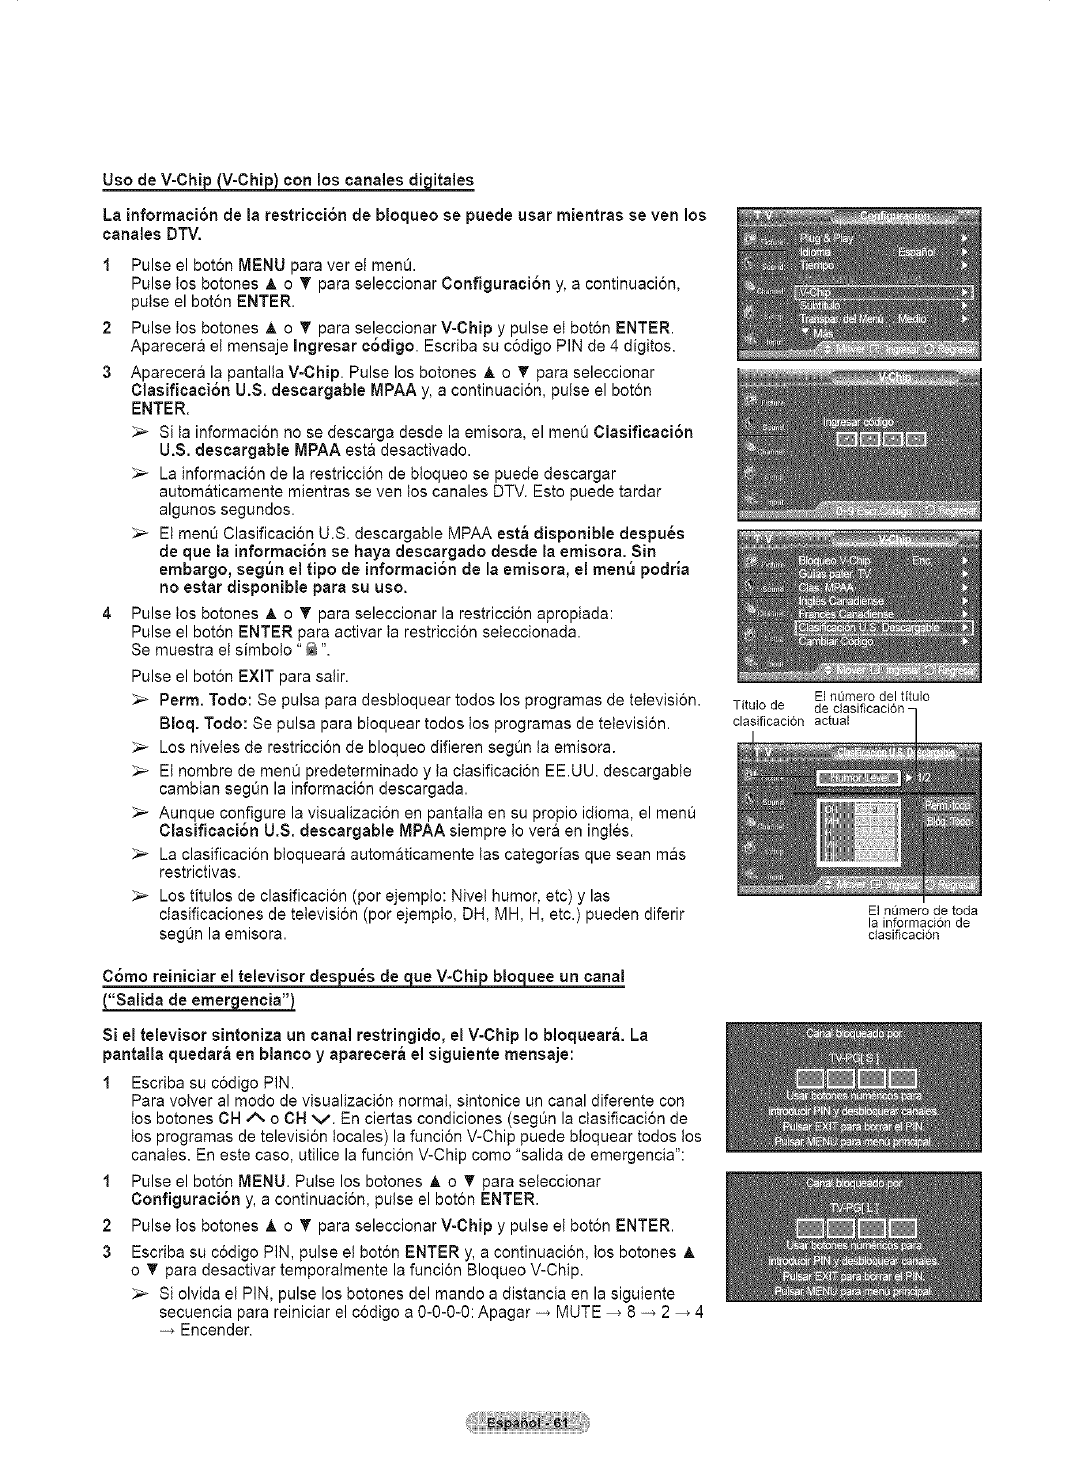
Uso de V-Chip V-Chi con los canales di itaies
La informaci6n de la restricci6n de bloqueo se puede usar mientras seven los
canales DTV.
1 Pulse el bot6n MENU para ver el menO.
Pulse los botones _, o T para seleccionar Configuraci6n y, a continuaci6n,
pulse el bot6n ENTER.
2 Pulse los botches A o T para seleccionar V-Chip y pulse et bot6n ENTER.
Aparecera el mensaje Ingresar ¢6digo. Escriba su c6digo PIN de 4 digitos.
3 Aparecera la pantalla V-Chip. Pulse los botches &o T para seleccionar
Clasificaci6n U.S. deseargable MPAA y, a continuaci6n, pulse el bot6n
ENTER.
_,_ Si la informaci6n no se descarga desde la emisora, el menQ Clasificaci6n
U.S. deseargable MPAA est& desactivado.
_,_ La informaci6n de la restricci6n de bloqueo se puede descargar
autom&ticamente mientras seven los canales DTV. Esto puede tardar
algunos segundos.
_,_ Et menO Clasificaci6n U.S. descargable MPAA est_ disponible despu_s
de que la informaci6n se haya descargado desde la emisora. Sin
embargo, seg_n el tipo de informaci6n de la emisora, el menu podria
no estar disponible para su uso.
4Pulse los botches _, o T para seleccionar la restricci6n apropiada:
Pulse el bot6n ENTER para activar ta restriccion seteccionada.
Se muestra et simboto "_ ".
Pulse el bot6n EXIT para salir.
_-- Perm. Todo: Se pulsa para desbloquear todos los programas de tetevisi6n.
Bioq. Todo: Se pulsa para btoquear todos los programas de tetevisi6n.
_,_ Los niveles de restriccion de bloqueo difieren seg0n ta emisora.
_-- Et hombre de men0 predeterminado y ta clasificaci6n EE.UU. descargabte
cambian segOn la informacion descargada.
_-- Aunque configure la visualizaci6n en pantalta en su propio idioma, el menQ
Clasificaci6n U.S. clescargable MPAA siempre to vera en ingles.
_-- La clasificacion bloqueara autom&ticamente tas categorias que sean mas
restrictivas.
_,_ Los titulos de clasificacion (por ejempto: Nivet humor, etc) y las
ciasificaciones de television (por ejempto, DH, MH, H, etc.) pueden diferir
seg0n la emisora.
Titulo de
clasificacidn actual
El numero del titulo
de clasiflcaci6n -
El n8mero de toda
la informacidn de
ciasificacbn
C6mo reiniciar _e V-Chi blo uee un canal
"Salida de emer encia"
Si el televisor sintoniza un canal restringido, el V-Chip Io bloquear_. La
pantalla queclar& en blanco yaparecer_ el siguiente mensaje:
1 Escriba su c6digo PIN.
Para votver al modo de visualizaci6n normal, sintonice un canal diferente con
tos botches CH ,_. o CH v. En ciertas condiciones (segQn la ctasificaci6n de
los programas de televisi6n locales) la funci6n V-Chip puede b!oquear todos los
canates. En este caso, utilice la funci6n V-Chip como "salida de emergencia":
1 Pulse el bot6n MENU. Pulse los botones A o _' para seleccionar
Configuraci6n y, a continuaci6n, pulse el bot6n ENTER.
2 Pulse los botches A o T para seleccionar V-Chip y pulse et bot6n ENTER.
3 Escriba su c6digo PiN, pulse et bot6n ENTER y, a continuaci6n, los botches _,
o _' para desactivar temporalmente la funci6n Bloqueo V-Chip.
_-- Si olvida el PIN, pulse los botches del mando a distancia en la siguiente
secuencia para reiniciar el c6digo a 0-0-0-0: Apagar _ MUTE _ 8 _ 2 _ 4
Encender.
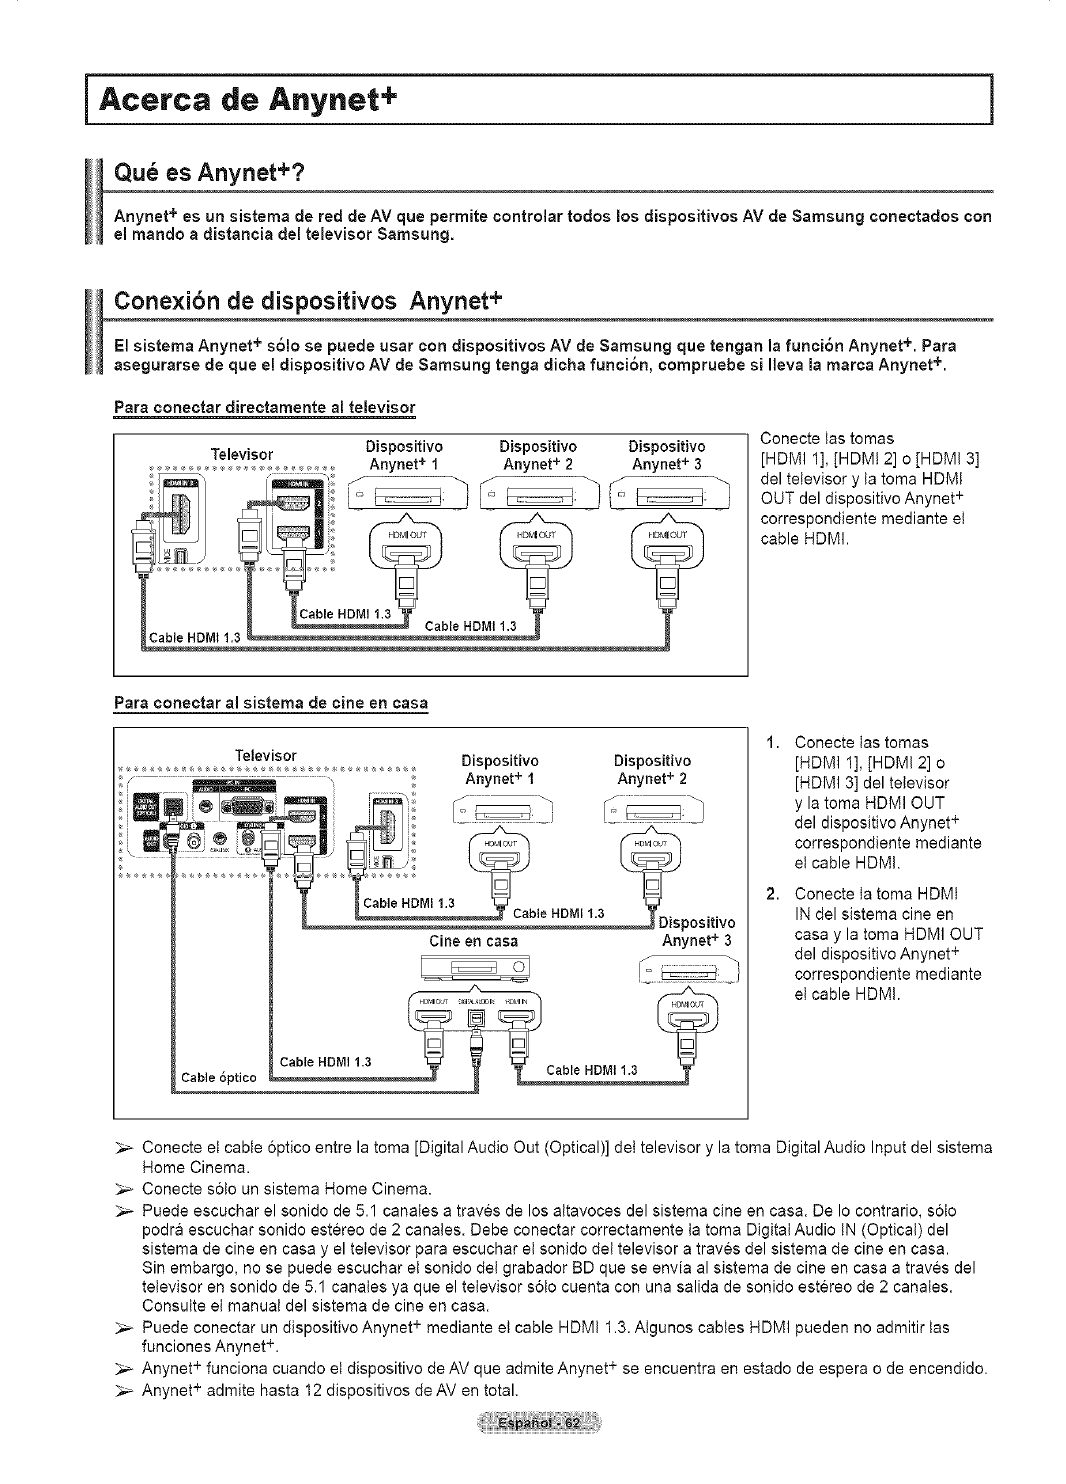
iAcerca de Anynet+ ]
es Anynet+?
Anynet + es un aistema de red de AV que permite controlar todos los dispositivos AV de Samsung conectados con
el mando adistancia del televisor Samsung.
Conexibn de dispositivos Anynet +
El sistema Anynet + s61o se puede usar con dispositivos AV de Samsung que tengan la funci6n Anynet +. Para
asegurarse de que el dispositivo AV de Samsung tenga dicha funci6n, compruebe si Ileva la marca Anynet +.
Para conectar directamente al televisor
Televisor Dispositivo Dispositivo Dispositivo
.............................. Anynet +1 Anynet +2 Anynet +3
Conecte tas tomas
[HDMI 1], [HDM! 2] o [HDMI 3]
del televisor y la toma HDM!
OUT del dispositivo Anynet +
correspondiente mediante et
cable HDMI.
Para conectar al sistema de cine en casa
Televisor Dispositivo Dispositivo
Anynet +1 Anynet +2
Cable HDMI 1.3
Cine en casa
_positivo
Anynet +3
Cable 6ptico
1. Conecte tas tomas
[HDMI 1], [HDMI 2] o
[HDMI 3] del televisor
y la toma HDMI OUT
del dispositivo Anynet +
correspondiente mediante
et cable HDMI.
2. Conecte la toma HDMt
IN del sistema cine en
casa y la toma HDMI OUT
del dispositivo Anynet +
correspondiente mediante
et cable HDMI.
Conecte et cable optico entre la toma [Digital Audio Out (Optical)] det televisor y la toma Digital Audio Input del sistema
Home Cinema.
Conecte s61o un sistema Home Cinema.
Puede escuchar el sonido de 5.1 canales a traves de los altavoces del sistema cine en casa. De Io contrario, s6to
podra escuchar sonido estereo de 2 canales. Debe conectar correctamente la toma Digital Audio IN (Optical) del
sistema de cine en casa y el televisor para escuchar et sonido det televisor a traves del sistema de cine en casa.
Sin embargo, no se puede escuchar et sonido del grabador BD que se envia al sistema de cine en casa a traves del
televisor en sonido de 5.1 canales ya que el televisor s6to cuenta con una salida de sonido estereo de 2 canales.
Consulte el manual del sistema de cine en casa.
Puede conectar un dispositivo Anynet + mediante et cable HDMI 1.3. Atgunos cables HDMI pueden no admitir tas
funciones Anynet +.
Anynet + funciona cuando et dispositivo de AV que admite Anynet + se encuentra en estado de espera o de encendido.
Anynet + admite hasta 12 dispositivos de AV en total.
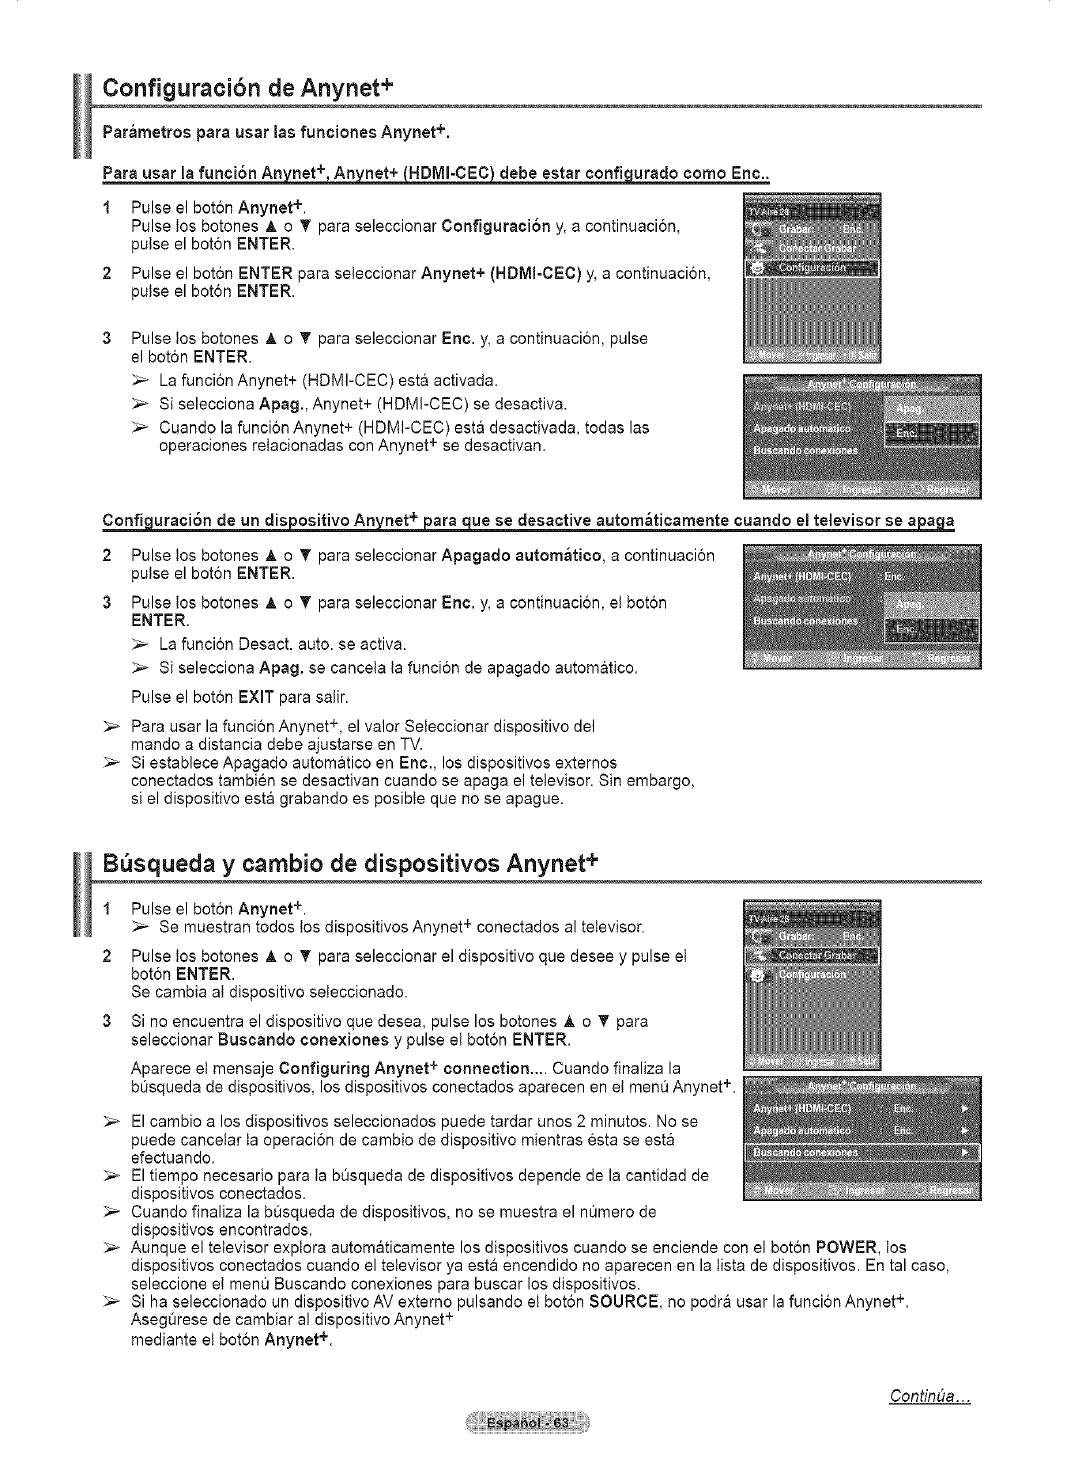
Configuracibn de Anynet +
Par_metros para usar las funciones Anynet+.
Para usar la funci6n An net+,An net+ HDMI-CEC debe estar confi urado como Enc..
1 Pulse el bot6n Anynet +.
Pulse tos botones A o _' para seleccionar Configuraci6n y, a continuaci6n,
pulse el bot6n ENTER.
2 Pulse el bot6n ENTER para seleccionar Anynet+ (HDMI-CEC) y, acontinuaci6n,
pulse el bot6n ENTER.
Pulse los botones _, o T para seleccionar Eric. y, a continuacion, pulse
el boton ENTER.
_,_ La funcion Anynet+ (HDMI-CEC) esta activada.
_-- Si selecciona Apag., Anynet+ (HDMI-CEC) se desactiva.
_,_ Cuando la funcion Anynet+ (HDMI-CEC) esta desactivada, todas las
operaciones retacionadas con Anynet + se desactivan.
Configuraei6n de un dispositivo An_ue se desactive autom_ticamente cuando el televisor sea apAga_
2Pulse los botones _, o _' para seleccionar Apagado autom_tico, a continuacion
pulse el boton ENTER.
Pulse los botones _, o _' para seleccionar En¢. y, a continuacion, et boton
ENTER.
_-- La funcion Desact. auto. se activa.
_,_ Si selecciona Apag. se canceta ta funci6n de apagado autom&tico.
Pulse el bot6n EXIT para salir.
_,_ Para usar la funcion Anynet +, el valor Seleccionar dispositivo del
mando a distancia debe ajustarse en TV.
_,_ Si establece Apagado automatico en Eric., los dispositivos externos
conectados tambien se desactivan cuando se apaga el televisor. Sin embargo,
si el dispositivo esta grabando es posibte que no se apague.
B squeda ycambio de dispositivos Anynet +
1
2
Pulse el bot6n Anynet +.
_-- Se muestran todos los dispositivos Anynet + conectados al televisor.
Pulse los botones A o _' para seleccionar el dispositivo que desee y pulse et
boton ENTER.
Se cambia al dispositivo seteccionado.
Si no encuentra el dispositivo que desea, pulse los botones A o _' para
seleccionar Buseando conexiones y pulse el bot6n ENTER.
Aparece et mensaje Configuring Anynet + connection.... Cuando finaliza la
b0squeda de dispositivos, los dispositivos conectados aparecen en et men0 Anynet +.
_,_ El cambio a los dispositivos seleccionados puede tardar unos 2 minutos. No se
puede cancetar ta operaci6n de cambio de dispositivo mientras esta se est&
efectuando.
_,_ El tiempo necesario para ta bOsqueda de dispositivos depende de la cantidad de
dispositivos conectados.
_,_ Cuando finaliza la bt]squeda de dispositivos, no se muestra el nQmero de
dispositivos encontrados.
_-- Aunque el televisor explora automaticamente los dispositivos cuando se enciende con el bot6n POWER, los
dispositivos conectados cuando el televisor ya esta encendido no aparecen en la tista de dispositivos. En tal case,
seleccione et menQ Buscando conexiones para buscar los dispositivos.
_,_ Si ha seleccionado un dispositivo AV externo pulsando et bot6n SOURCE, no podr& usar la funcion Anynet +.
AsegQrese de cambiar al dispositivo Anynet +
mediante et boton Anynet +.
Contint_a. ..
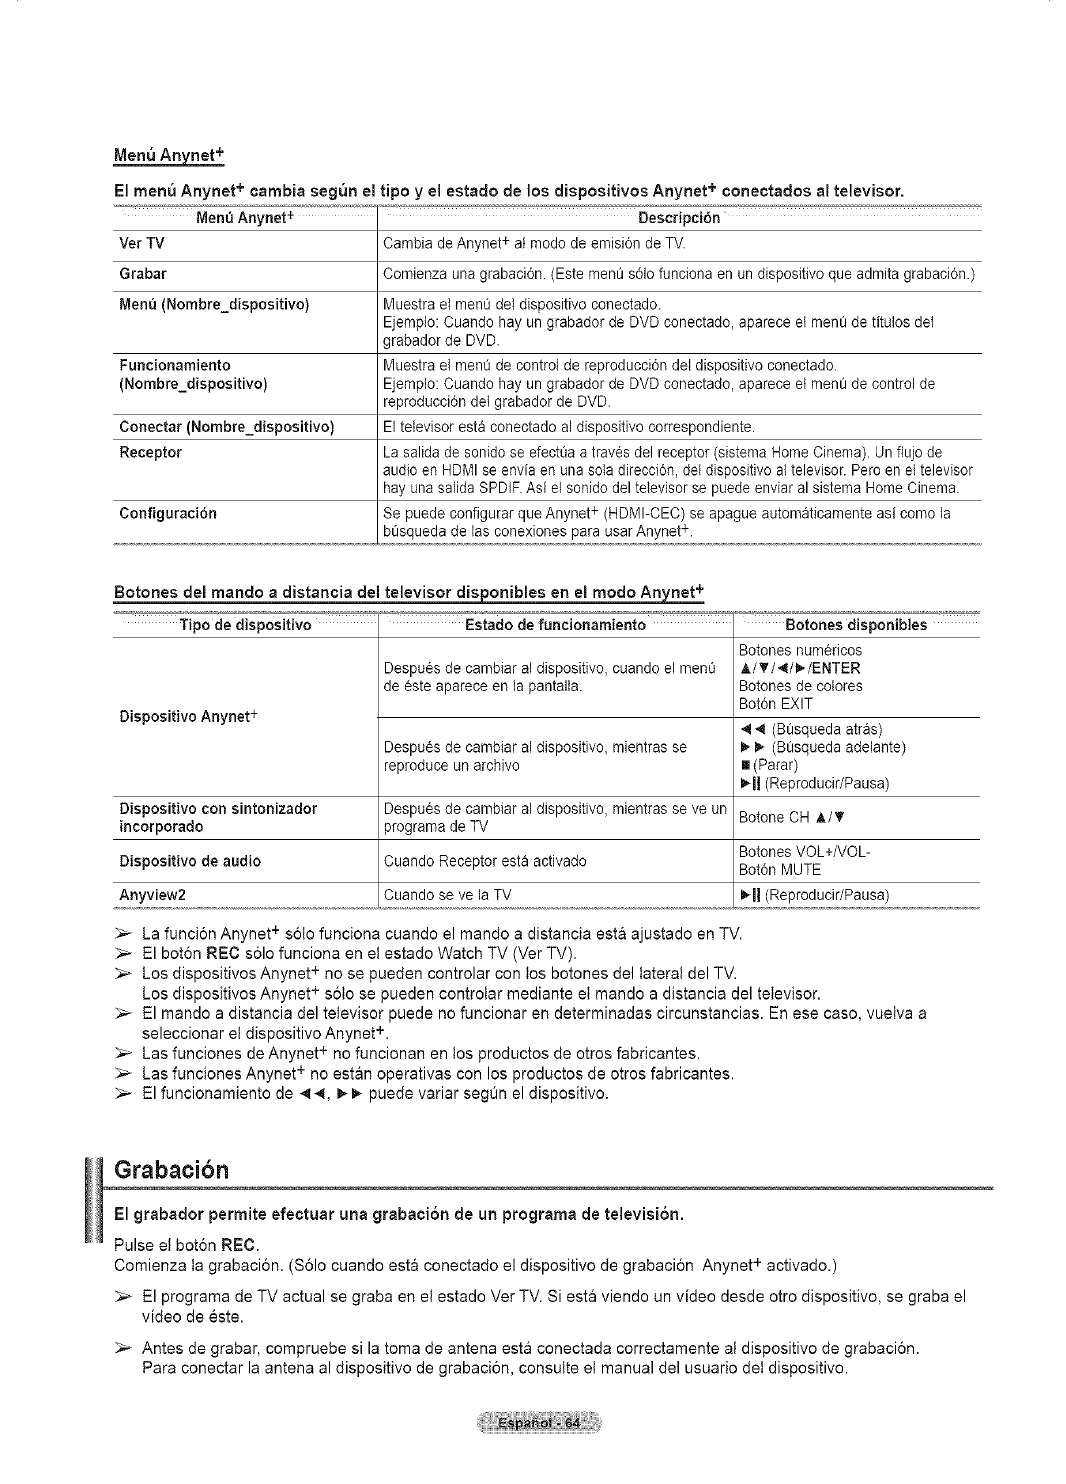
El menu Anynet + cambia seg_n el tipo y el estado de los dispositivoa Anynet + conectados al televisor.
Menu Anynet + Descripci6n
Ver TV Cambia de Anynet+ at modo de emisi6n de TV.
Grabar Comienza una grabaci6n. (Este menfl s61ofunciona en un dispositivo que admita grabaci6n.)
Men_3(Nombre_dispositivo) Muestra et ment_del dispositivo conectado.
Ejempto: Cuando hay un grabador de DVD conectado, aparece el menfl de titulos dei
grabador de DVD
Funcionamiento Muestra el menOde control de reproducci6n del dispositivo conectado.
(Nombre_dispositivo) Ejemplo: Cuando hay un grabador de DVD conectado, aparece el menL)de control de
reproducci6n dei grabador de DVD
Conectar (Nombre_dispositivo) El televisor esta conectado al dispositivo correspondiente.
Receptor La salida de sonido se efect0a a traves del receptor (sistema Home Cinema). Un flujo de
audio en HDMI se envia en ana sola direcciOn, del dispositivo al televisor. Pero en el televisor
hay una salida SPDIF Asi el sonido del televisor se puede enviar al sistema Home Cinema
Configuraci6n Se puede configurar que Anynet + (HDMI-CEC) se apague automaticamente asi como la
bflsqueda de las conexiones para usar Anynet +.
Botones del mando adistancia del televisor disponibles en el modo An_
Tipo de dispositivo
Dispositivo Anynet +
Estado de funcionamiento
Despues de cambiar al dispositivo, cuando el ment3
de _ste aparece en la pantalta.
Despu6s de cambiar al dispositivo, mientras se
reproduce an archivo
...................Botones disponibles ,v_._._,
Botones numericos
A/T/4/_,./ENTER
Botones de cotores
Bot6n EXIT
4 41 (B0squeda atras)
_ (B0squeda adelante)
[] (Parar)
_11(Reproducir/Pausa)
Dispositivo con sintonizador Despues de cambiar al dispositivo, mientras se ve un Botone CH A/_'
incorporado programa de TV
Botones VOL+/VOL-
Dispositivo de audio Cuando Receptor esta activado Bot0n MUTE
Anyview2 Cuando se ve la TV _11(Reproducir/Pausa)
_-- La funci6n Anynet + solo funciona cuando el mando a distancia est& ajustado en TV.
:_- El boton REC solo funciona en et estado Watch TV (Ver TV).
_-- Los dispositivos Anynet + no se pueden controlar con los botones del lateral del TV.
Los dispositivos Anynet + s61o se pueden controlar mediante et mando a distancia del televisor.
El mando a distancia del televisor puede no funcionar en determinadas circunstancias. En ese caso, vuelva a
seleccionar el dispositivo Anynet +.
_-- Las funciones de Anynet + no funcionan en los productos de otros fabricantes.
:_- Las funciones Anynet + no estan operativas con los productos de otros fabricantes.
_-- El funcionamiento de 4 _1, _ _ puede variar segOn el dispositivo.
Grabacibn
El grabador permite efeotuar una grabaci6n de un programa de televisi6n.
Pulse el boton REC.
Comienza ta grabacion. (Solo cuando est& conectado el dispositivo de grabaci6n Anynet + activado.)
_,_ El programa de TV actual se graba en el estado Ver TV. Siesta viendo un video desde otro dispositivo, se graba el
video de este.
_-- Antes de grabar, compruebe si la toma de antena esta conectada correctamente a! dispositivo de grabacion.
Para conectar la antena al dispositivo de grabaci6n, consulte et manual del usuario det dispositivo.
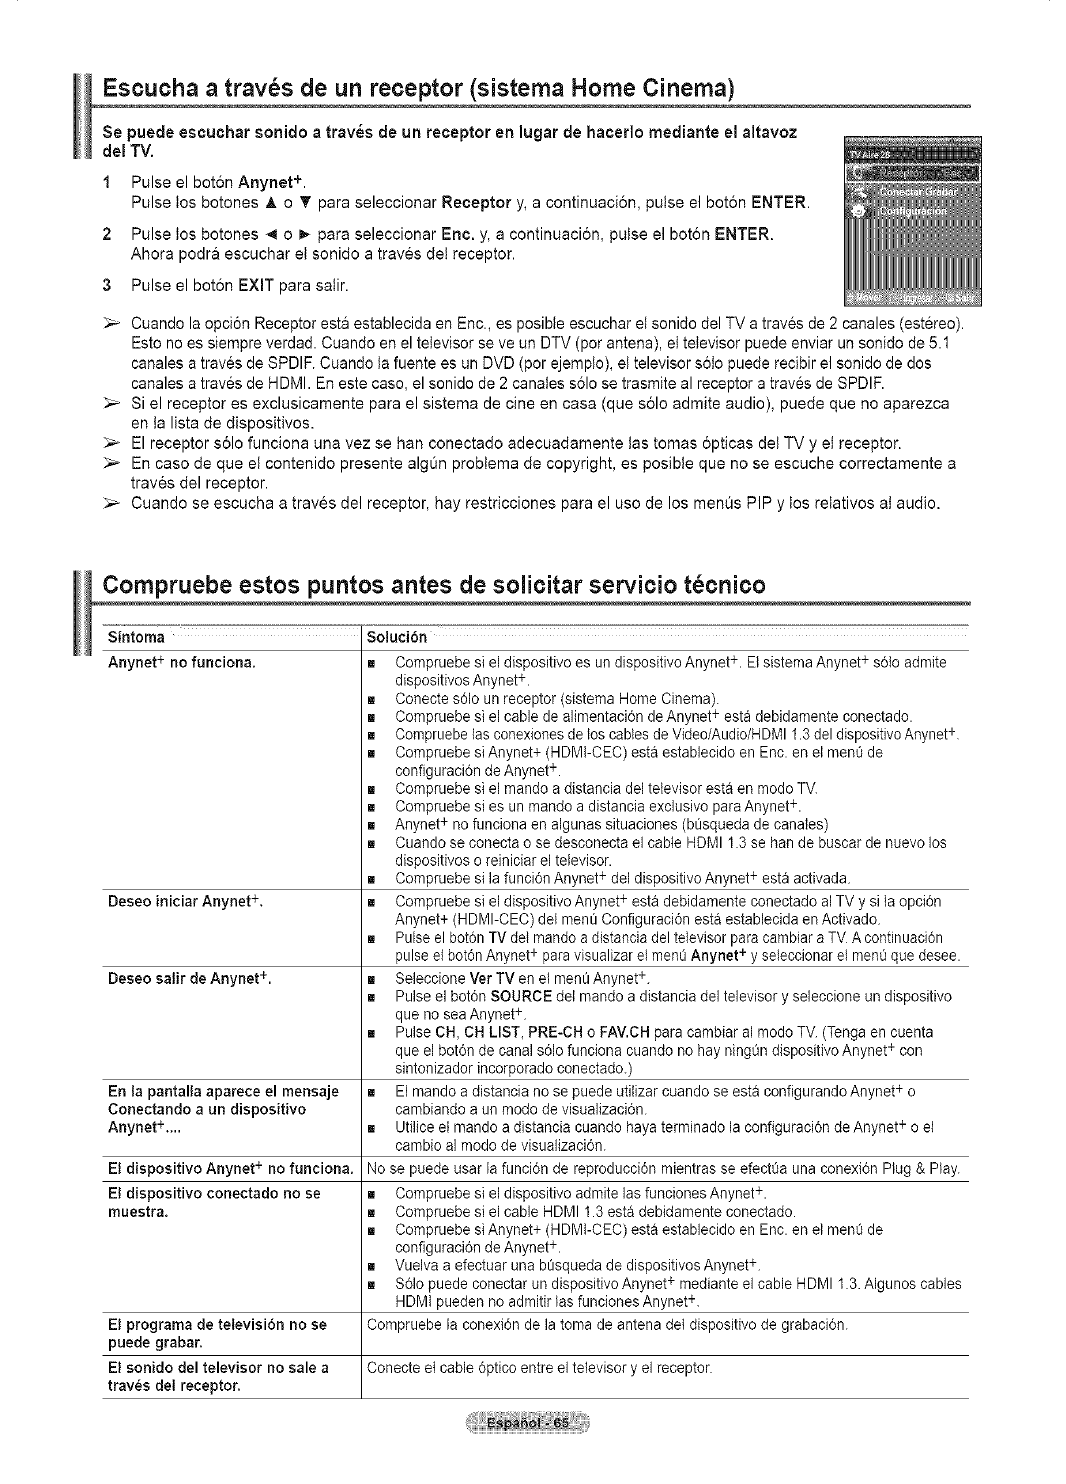
Escucha a trav s de un receptor (sistema Home Cinema)
Se puede escuchar sonido a trav_s de un receptor en lugar de hacerlo rnediante el altavoz
del TV.
1 Pulse el bot6n Anynet +.
Pulse los botones A o Vf para seleccionar Receptor y, a continuacion, pulse el bot6n ENTER.
2 Pulse los botones 4 o I_ para seleccionar Eric. y, a continuacion, pulse el boton ENTER.
Ahora podra escuchar et sonido a traves det receptor.
3 Pulse el boton EXIT para salir.
_-- Cuando la opcion Receptor esta establecida en Enc., es posible escuchar et sonido del TV a traves de 2 canales (estereo).
Esto no es siempre verdad. Cuando en el televisor se ve un DTV (per antena), el televisor puede enviar un sonido de 5.1
canales a traves de SPDIF. Cuando la fuente es un DVD (por ejemplo), el televisor s6to puede recibir el sonido de dos
canales a traves de HDMI. En este case, el sonido de 2 canales solo se trasmite al receptor a traves de SPDIF.
Si el receptor es exclusicamente para el sistema de cine en casa (que s61o admite audio), puede que no aparezca
en la lista de dispositivos.
_-- El receptor s61o funciona una vez se han conectado adecuadamente tas tomas 6pticas det TV y ei receptor.
En caso de que ei contenido presente algOn probtema de copyright, es posible que no se escuche correctamente a
traves del receptor.
Cuando se escucha a traves del receptor, hay restricciones para el uso de los menQs PIP y los retativos at audio.
Compruebe estos puntos antes de so(icitar servicio t cnico
Sintoma Solucibn
Anynet + no funciona. [] Compruebe si el dispositivo es un dispositivo Anynet+. El sistema Anynet + s6to admite
dispesitivos Anynet+.
[] Conecte s61oun receptor (sistema Home Cinema).
[] Compruebe si el cable de alimentacidn de Anynet + esta debidamente conectado.
[] Cempruebe las conexienes de los cables deVideo/Aud)e/HDMI 1.3 del dispesitivo Anynet+
[] Compruebe siAnynet+ (HDMI-CEC) esta establecido en Enc. en et ment3de
cenfiguracidn de Anynet +.
[] Compruebe si el mando a distancia del televisor esta en modo TV.
[] Compruebe si es un mando a distancia exclusivo para Anynet +.
[] Anynet + no funciona en algunas situaciones (b_squeda de canales)
[] Cuando se conecta o se descenecta el cable HDMI 1.3 se han de buscar de nuevo los
dispositivos e reiniciar el televisor,
[] Cempruebe si la funci6n Anynet + del dispesitivo Anynet+ esta activada.
Deseo iniciar Anynet +, [] Compruebe si el dispositivo Anynet+ esta debidamente conectado al TV y si ta opcidn
Anynet+ (HDMI-CEC) del mene Configuracidn esta establecida en Activado.
[] Pulse el botdn TV del mando a distancia del televisor para cambiar a TV A continuaci6n
+ +
pulse el botdn Anynet para visualizar el mentJ Anynet y seleccionar el men0 qae desee.
Deseo salir de Anynet +. [] Seleccione Ver TV en el menQAnynet+.
[] Pulse el bot0n SOURCE det mando a distancia del televisor y seleccione an dispositivo
que no sea Anynet +.
[] Pulse CH, CH LIST, PRE-CH o FAV.CH para cambiar al mode TV. (Tenga en cuenta
que el botdn de canal s61ofunciona cuando no hay ningOndispositivo Anynet + con
sintonizador incorporado conectado.)
En la pantalla aparece el mensaje [] El mando a distancia no se puede utilizar cuando se esta configurando Anynet + o
Conectando a un dispositivo cambiando a un mode de visualizaci6n.
Anynet +.... [] Utilice el mando a distancia cuando haya terminado la configuraci6n de Anynet+ o et
cambio al mode de visualizaci6n.
El dispositivo Anynet + no funciona. No se puede usar la funci6n de reproduccidn mientras se efectt3a una conexi6n Plug & Play.
El dispositivo conectado no se [] Compruebe si el dispositivo admite las funciones Anynet +.
muestra. [] Compruebe si el cable HDMI 1.3 esta debidamente conectado.
[] Compruebe siAnynet+ (HDMI-CEC) esta establecido en Enc. en el ment3de
configuraci6n de Anynet +.
[] Vuelva a efectaar ana b_squeda de dispositivos Anynet +.
+
[] S61opuede conectar un dispositivo Anynet rnediante el cable HDMI 1.3. Algunos cables
HDMi pueden no admitir las funciones Anynet+.
Compruebe la conexi0n de la toma de antena del dispositivo de grabaci6n.
Conecte el cable 6ptico entre el televisor y el receptor.
El programa de televisiSn no se
puede grabar.
El sonido del televisor no sale a
trav6s del receptor.
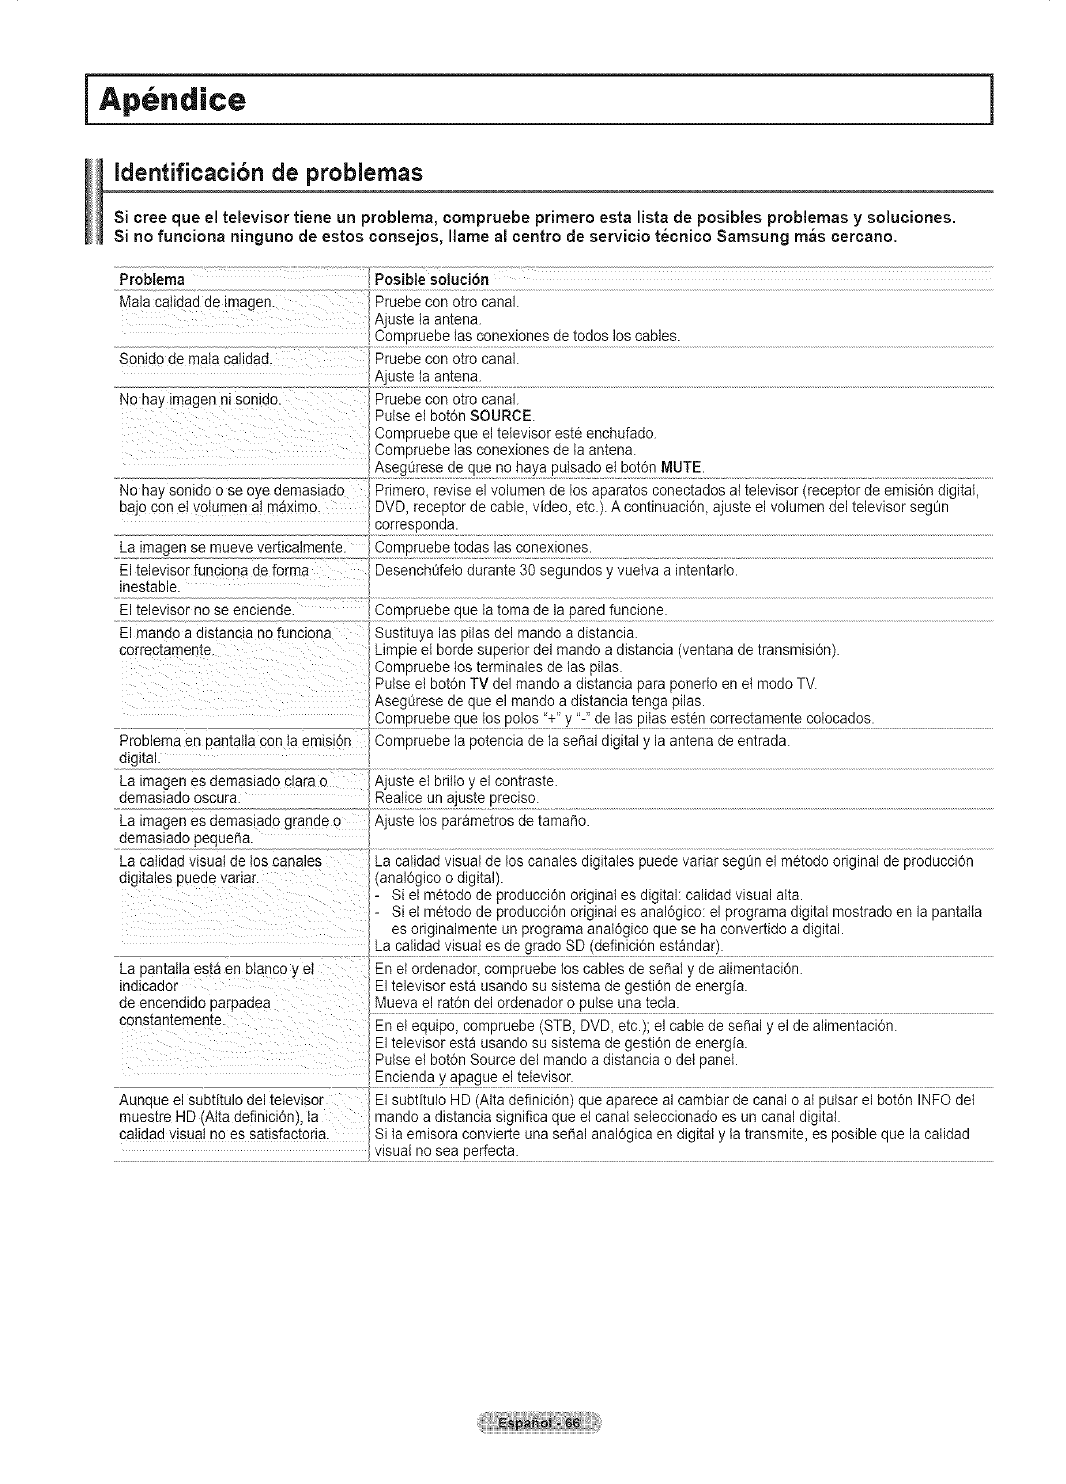
iApendice ]
Identificacibn de problemas
Si cree que el televisor tiene un problema, compruebe primero esta lista de posibles problemas y soluciones.
Si nofunciona ninguno de estos consejos, llame al centro de servicio t_cnico Samsung m_s cercano.
Problema
Mala caIidaa de _magen.
Sonido de maIa cahdad.
No ha:, magen nt sontao.
No haj sonlao o se eye demaslado
eajo con eI voIumen at maximo.
La tmagen se mueve verucalmen.re.
El televisor funclona de forma
iRes[able.
El televisor no se enciende.
El mando a dlstancia no funciona
correctamente.
Posible sotuci6n
Pruebe con otro canal.
Ajuste la antena.
Pruebe con otro canal.
Pruebe con otro canal.
Pulse el bot6n SOURCE.
Compruebe que el televisor este enchufado.
Compruebe tas conexiones de ta antena.
AsegOresede que no haya puIsado el bot6n MUTE.
Primero, revise el volumen de los aparatos conectados al televisor (receptor de emisi6n digital,
DVD. receetor de cable, video, etc.). A continuaci0n, ajuste el volumen del televisor segen
corresponda.
2,omDruebetodas las conexiones.
Desencht_fetodurante 30 segundos y vuetva a intentarlo.
),ompruebe que la toma de la pared funcione.
Sustituya las pilas del mando a distancia.
Limpie el borde superior del rnando a distancia (ventana de transmisi6n).
Compruebe los terminales de las pilas.
Pulse et bot6n TV del mando a distancia para ponedo en et modo TV.
Asegt_resede que el rnando a distancia tenga pilas.
),ompruebe que los polos "+" y "-" de las piIas esten correctamente colocados.
Problema en oantalla con ta emisi6n Compruebe la potencia de la serial digital y la antena de entrada.
digital.
A.justeeibiiiioyelcon{rasie.
demasiado oscura. Realice un ajuste precise.
Ajusie ios pai0me{ros de iama;_o:
demasiado peque_a.
La catidad visual de los canales I La cai]clad visuai cielog canales cligitales puede vaiiar seg_n el mStodooriginal de pgcluccign
digitales puede vat at. (analdgico o digital).
- Si el metodo de produccidn original es digital: calidad visual atta.
- Si el metodo de produccidn original es anal6gico: el programa digital mostrado en la pantalla
es originalmente un programa anatdgico que se ha convertido a digital.
}La catidad visual es de grado SD (definici6n estandar).
................ .................................................................
La pantalla esta en btanco yet ,En el ordenador_ compruebe los cables de se_at y de alimentaci0n.
indicador }El televisor esta usando su sistema de gesti6n de energia.
de encendido parpadea Mueva el rat6n del ordenador o pulse una tecla.
constantemente ............................................... ................... : .................. :....
-En et equlpe, compruebe (STB, DVD, etc.), el cable de senal y el de ahmentaclon.
El televisor esta usande su sistema de gesti6n de energia.
Pulse el bot6n Source del mando a distancia o det panel,
Enc enda y apague e te ev sor
Aunque el subtitulo del televisor El subfitulo HD (Alta definici0n) que aparece al cambiar de canal o al pulsar el bot0n INFO del
muestre HD (Atta definici6n), ta mando a distancia significa que el canal seteccionado es un canal digital,
calidad visual no es satisfacteria. Si la emisora cenvierte una sepal anal6gica en digital y la transmite, es posible que la calidad
v!sual n? sea Perfecta-
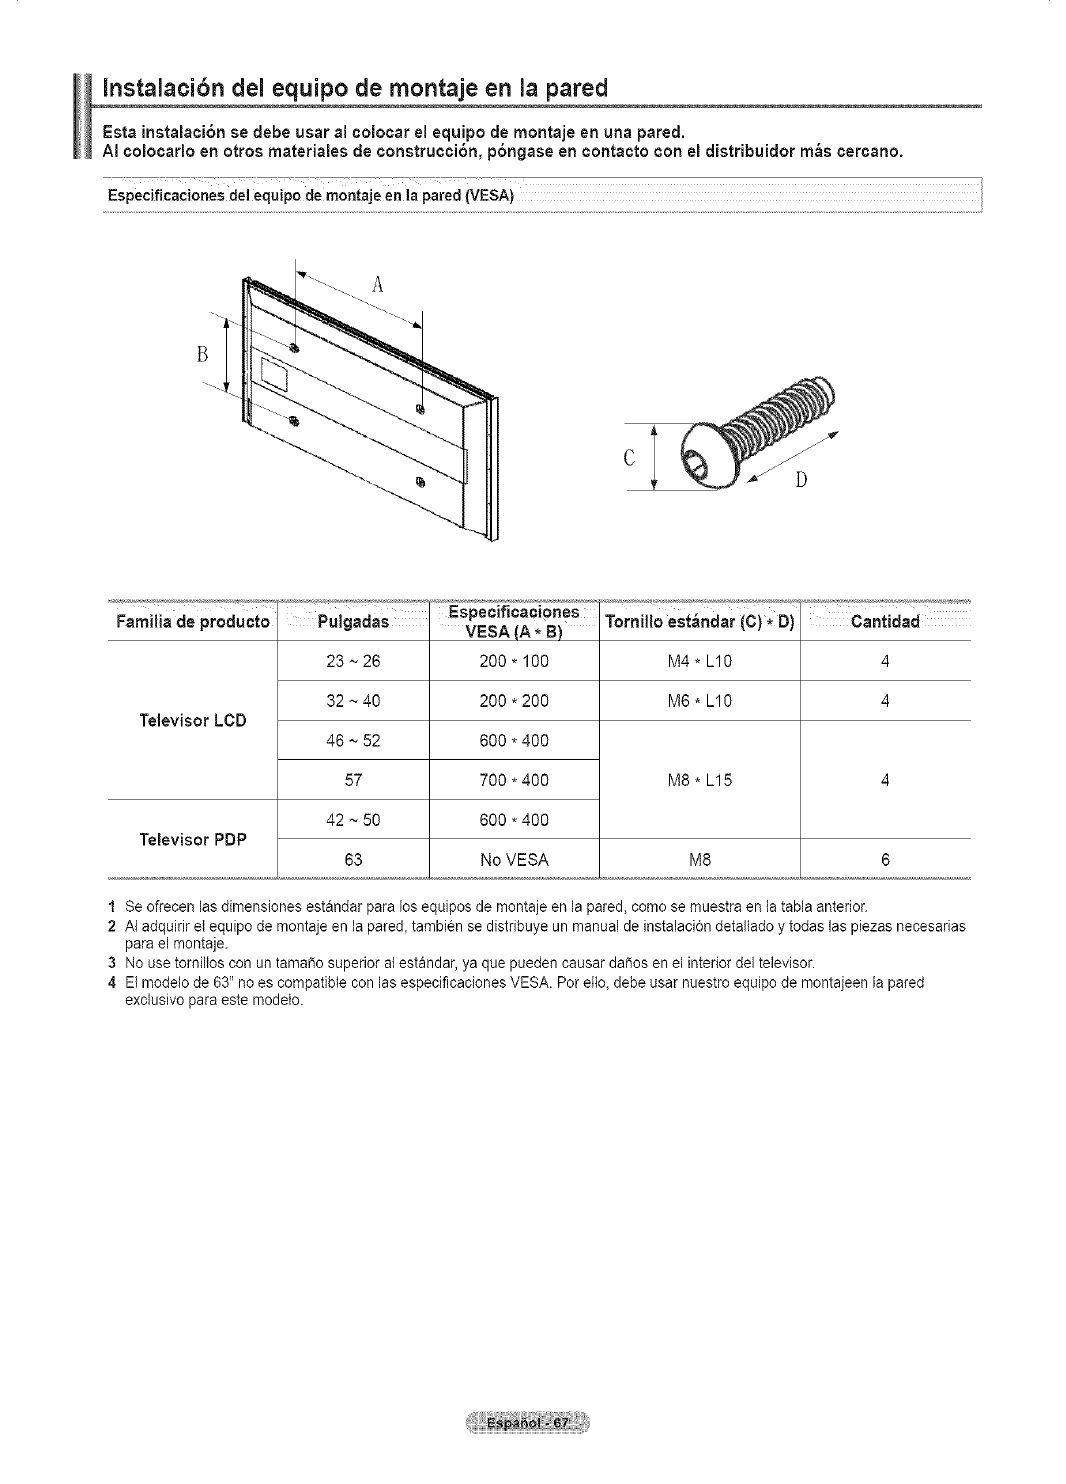
Instalacibn del equipo de rnontaje en la pared
Esta instalaci6n se debe usar al oolooar el equipo de montaje en una pared.
AI oolooarlo en otros materiales de construcoi6n, p6ngase en contacto con el distribuidor m_s oeroano.
ipa;;dIVESAi 1
D
Televisor LCD
M4 * L10
M6 * L10
23 ~ 26
32 ~40
46 ~ 52
57
42 ~ 50
63
Especificaoi0nes
VESA (A *B)
200.100
200*200
600*400
700*400
600*400
No VESA
M8 * L15
Cantidad
4
4
Televisor PDP
M8 6
1 Se ofrecen las dimensiones estandar para los equipos de montaje en la pared, come se muestra en {a tabla anterior.
2 AI adquirir el equipo de rnontajeen la pared_tambien se distribuye un manualde instalaci6n detaltado y todas las piezas necesarias
para el rnontaje.
3No use torniltos con un tama_o superior al estandar, ya que pueden causar da_os en el interior del televisor.
4 El modelo de 63" no es compatible con las especificaciones VESA. Per etto_debe usar nuestro equipo de montajeen la pared
exclusive para este modelo.

Cbmo montar el soporte base (seg nelrnodelo)
Utilizando los 6 tomillos para asegurar et soporte y el monitor, fije
firmemente el monitor al soporte.
Es posible que el exterior det EQUIPO sea diferente det que se
muestra en ta imagen.
Advertencia
Sujete firmemente et soporte al televisor
antes de moverlo, ya que el soporte
puede caer y podria causar lesiones
graves.
_,_ El televisor lo deben transportar dos o
mas personas. Nunca deje el televisor
en el suelo ya que la pantalla puede
sufrir dai_os. Mantenga siempre el
televisor en su posicion vertical.
Cuando instale el televisor en una pared,
fije ta tapa (O)) del soporte con dos
tornitlos.
Especificaciones
'qombredeI modelo
Tamaho de pantalla {diagonal)
Resolueibn del PC
Sonido(Salida}
Dimensiones (AL x An. x Pr,)
HP-T4254 HP-T5054
42 pulgadas 50 pulgadas
1024 x 768 a 60 Hz 1360 x 768 a 60 Hz
10W 15W
Cuerpo principal
Con sooor[e
Peso
Cuerpo pnnclpal
Con soooRe
Consideraciones
medioambientales
Temperatura de funcionamiento
Humedad de funcienamiento
Temoera_uraae almacenamten[o
Humedad en almacenamiento
41,5 x 4,1 x 27,5 puigadas 41,5 x 13,4 x 30,5 pulgadas
(1059,5 x 757 x 316 mm) (1231 x 848,5 x 316 ram)
67,6 Ibs (30,7 kg) 91,4 Ibs (41,5 kg)
73,8 Ibs (33,5 kg) 97 ibs (44 kg)
Entre 10 °C y 40 °C
10% a 80%, sin condensaci6n
Entre -20 °C y 45 °C)
5% at 95%, sin condensaci6n
_-- Este dispositivo es un aparato digital de ta Ctase B.
_,_ El disei_o y tas especificaciones pueden cambiar sin previo aviso.
_-- Para conocer la fuente de atimentaci6n, consulte la etiqueta pegada al producto.
Giro del soporte (izquierda/derecha) HP-T4254/HP.T5054
.20°~ 20°
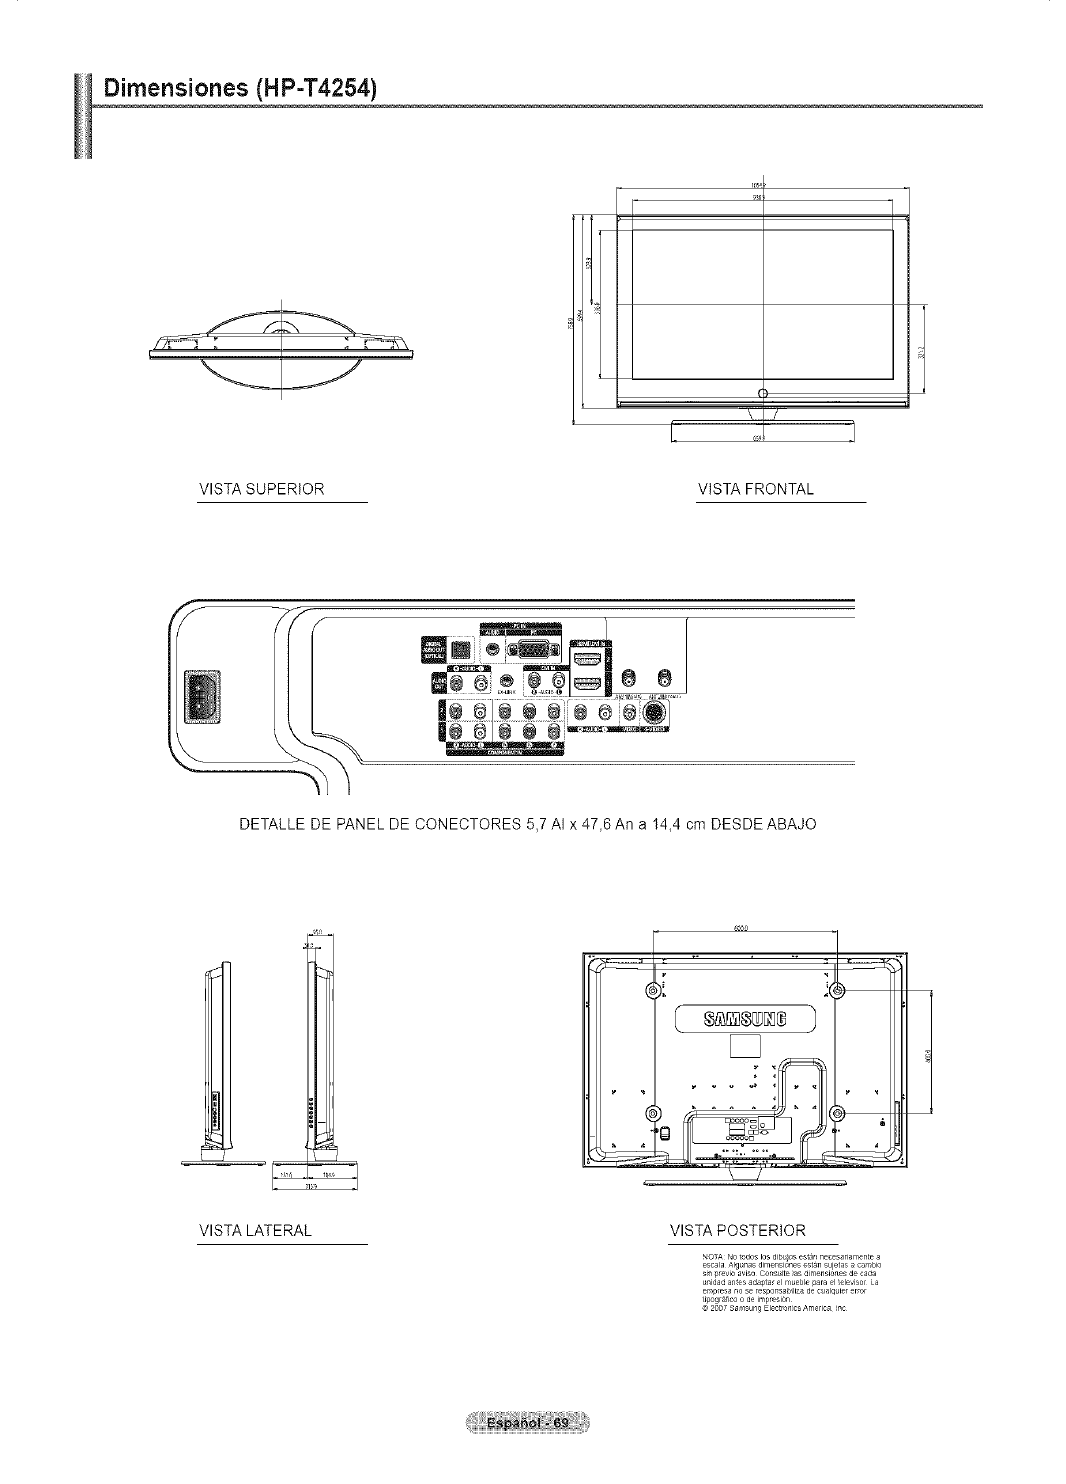
Oimensiones (HP-T4254)
\/
VISTA SUPERIOR VISTA FRONTAL
12 4..e..® '
DETALLE DE PANEL DE CONECTORES 5,7 AI x 47,6 An a 14,4 cm DESDE ABAJO
', :€}
VISTA LATERAL VISTA POSTERIOR
_OTA NOtorJoslOSdibuiOSestannecesar_amentea
escalaAIg_as dimens_o_esesta_sujetas a c_mrJ_o
s4_]_revioaviso Co_s_ltelas dimensiones de carla
_nidada_tesada_tar el m_eblepara el tele,<isorLa
empresano se responsab_lizade cua_qmererror
ti_ografico o de imp_si6_
© 2OO7Sal_sungElectronicsAmerica !no

Dimensiones (HP-T5054)
125
1111
\/
i
VISTA SUPERIOR VISTA FRONTAL
12=o<..e..® ,
DETALLE DE PANEL DE CONECTORES 5,7 AI x 47_6 An a 14_4 cm DESDE ABAJO
600
VISTA LATERAL VISTA POSTERIOR
NOTA NOtodos _osdJbu_osestan necesar_amestea
escala Algunas d_mensJonesestan sujetas a cambJo
s_n_rev_oa_JsoOonsu_te_as_mensJonesde carla
un_dadan_esadaptarel mueble para el tele_JsorLa
emp_esano se responsab_zade c_al_ulererror
t_po_rarJcoo {SeJm_res_6_
©2OO7SamsungElectmnJcsAmerJcaInc
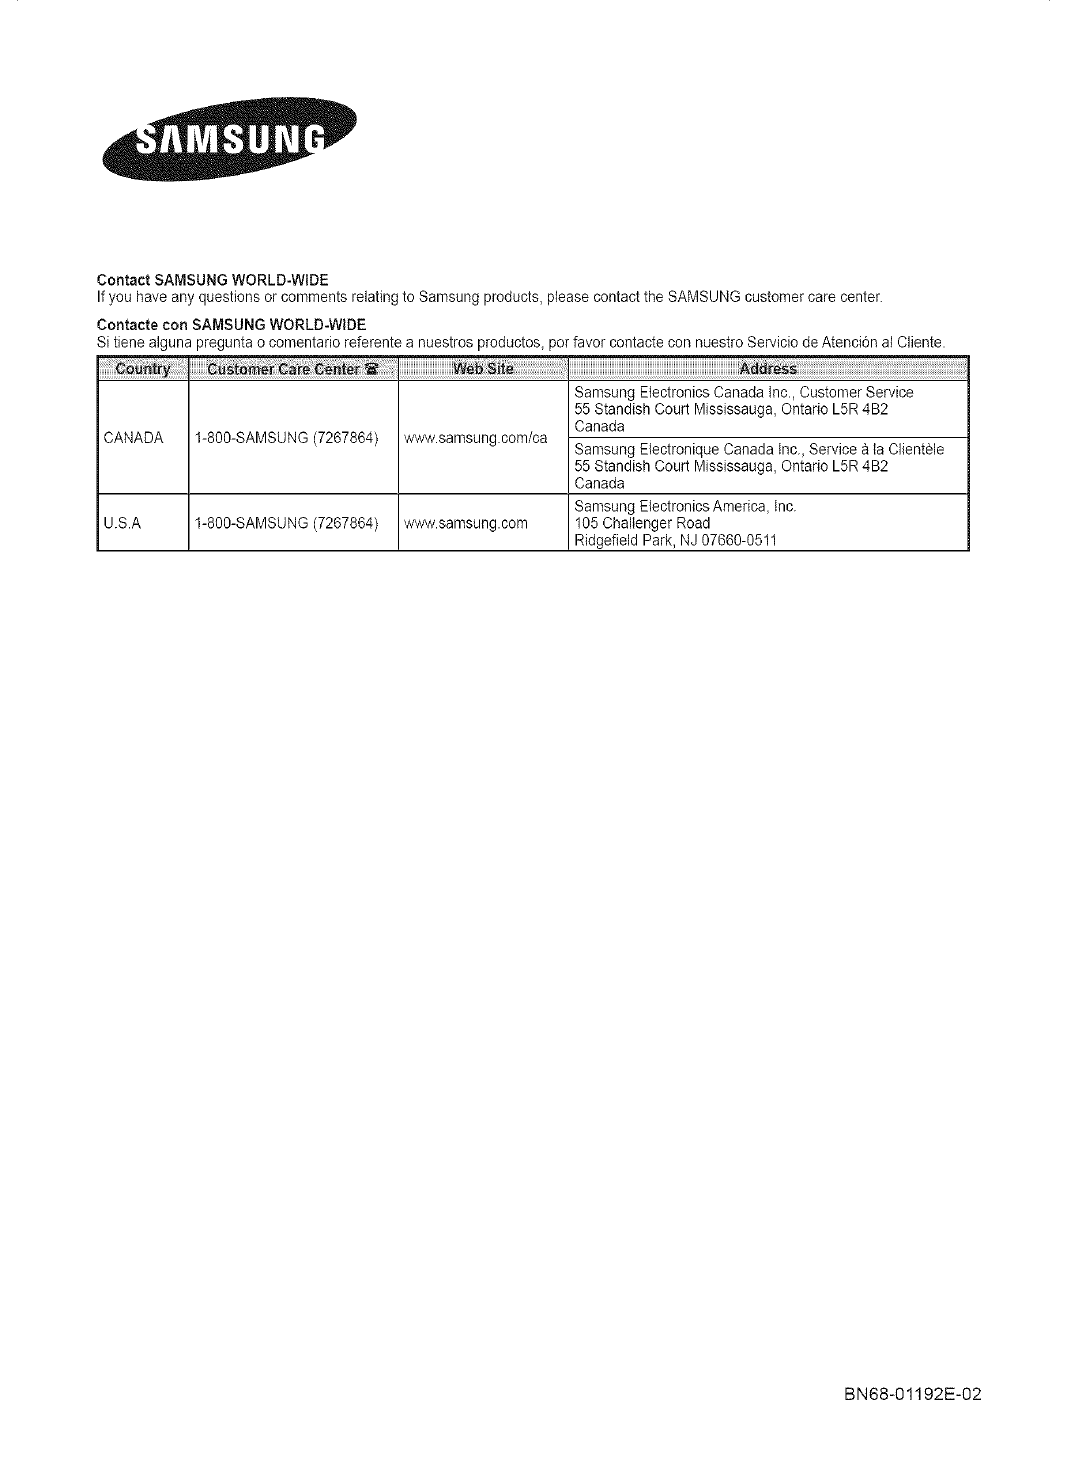
Contact SAMSUNG WORLD-WIDE
If you have any questions or comments relating to Samsung products, ptease contact the SAMSUNG customer care center.
Contacte con SAMSUNG WORLD-WIDE
Si tiene alguna pregunta o comentario referente a nuestros productos, per favor contacte con nuestro Servicio de Atencidn al Cliente.
1-800-SAMSUNG (7267864) www.samsung.com/ca
CANADA
U.S.A 1-800-SAMSUNG (7267864) www.samsung.com
Samsung Electronics Canada inc., Customer Service
55 Standish Court Mississauga, Ontario L5R 4B2
Canada
Samsung Electronique Canada inc. Service & ia Clientele
55 Standish Court Mississauga, Ontario L5R 4B2
Canada
Samsung Electronics America_ inc.
105 Challenger Road
Ridgefleld Park, NJ 07660-0511
BN68-01192E-02
