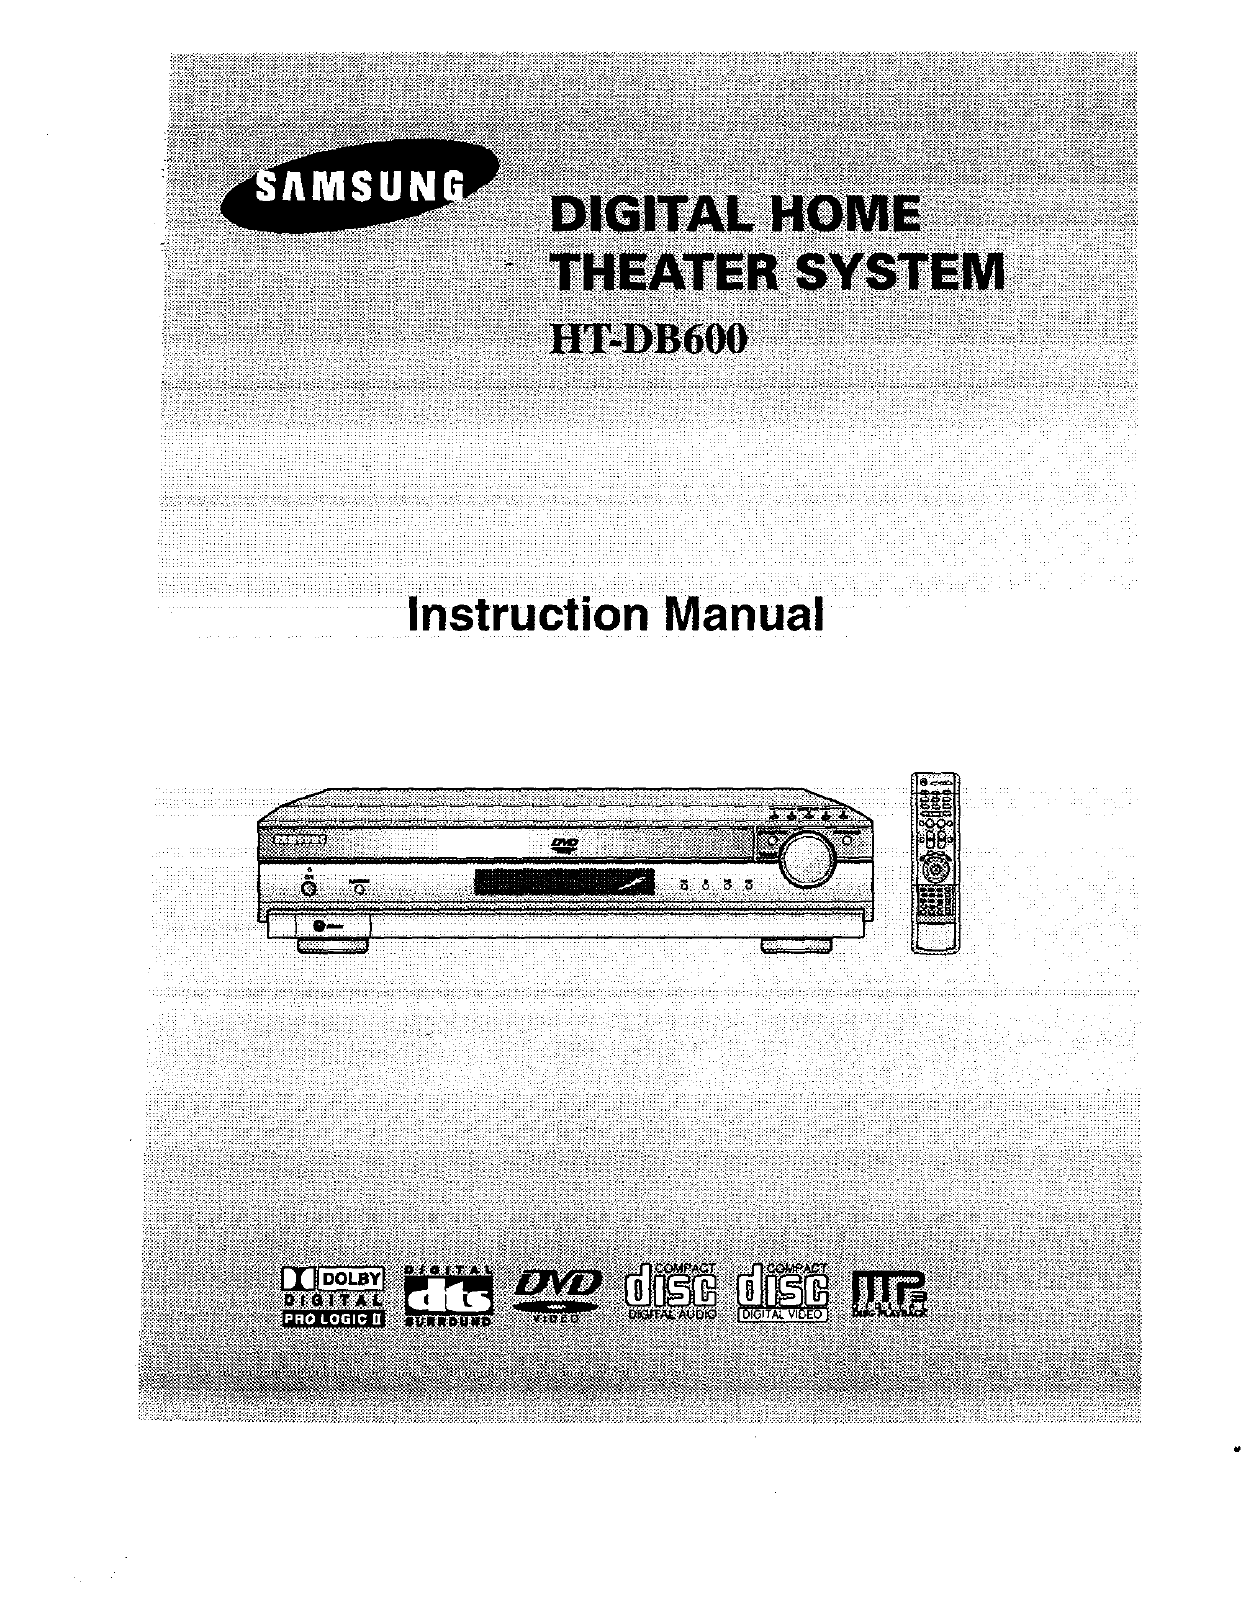
Samsung HT DB600 User Manual HOME THEATER Manuals And Guides L0306024
SAMSUNG Home Theatre Manual L0306024 SAMSUNG Home Theatre Owner's Manual, SAMSUNG Home Theatre installation guides
User Manual: Samsung HT-DB600 HT-DB600 SAMSUNG HOME THEATER - Manuals and Guides View the owners manual for your SAMSUNG HOME THEATER #HTDB600. Home:Electronics Parts:Samsung Parts:Samsung HOME THEATER Manual
Open the PDF directly: View PDF ![]() .
.
Page Count: 37
Warnings
CLASS 1 LASER PRODUCT
KLASSE1 LASER PRODUKT
LUOKAN 1 LASER LAITE
KLASS 1 LASER APPARAT
PRODUCTO LASER CLASE 1
CAUTION:
TO REDUCE THE RISK OF ELECTRIC
SHOCK, DO NOT REMOVE REAR COVER.
NO USER SERVICEABLE PARTS INSIDE.
REFER SERVICING TO QUALIFIED
SERVICE PERSONNEL,
Note to CATV system installer :
This reminder is provided to call the CATV system
installer's attention to Section 820~40 of the NEC
which provides guidelines for proper grounding and,
in particular, specifies that the cable ground shall be
connected to the grounding system of the building,
as close to the point of cable entry as practical
CLASS 1 LASER PRODUCT
This Compact Disc player is classified as a CLASS 1
LASER product.
Use of controls, adjustments or performance of
procedures other than those specified herein may result
in hazardous radiation exposure.
Ensure that the AC power supply in your house complies with the identification sticker located on the back of your player. Install your
player horizontally, on a suitable base (furniture), with enough space around it for ventilation (3~4inches). Make sure the ventilation slots
are not covered. Do not stack anything on top of the player. Do not place the player on amplifiers or other equipment which may become
hot. Before moving the player, ensure the disc tray is empty. This player is designed for continuous use, Switching off the DVD player to
the stand-by mode does not disconnect the electrical supply, In order to disconnect the player completely from the powersupply,
remove the main plugfrom the wall outlet, especially when left unused for a long period of time.
Iii
i I
CAUTION-INVISIBLE LASER RADIATION WHEN OPEN
AND INTERLOCKS DEFEATED, AVOID
EXPOSURE TO BEAM.
This symbol indicates that dangerous voltage which can cause electric shock is present inside
this unit.
During thunderstorms, disconnect AC main plugfrom the
wall ouUet.
Voltage peaks due to lightning could damage the unit.
Do not expose the unit to direct sunlight or other heat
sources.
This could lead to overheating and malfunction of the unit.
This symbol alerts you to important operating and maintenance instructions accompanying
the unit.
WARNING: To reduce the risk of fire or electric shock, do not expose thisappliance to rain or moisture.
CAUTION: TO PREVENT ELECTRIC SHOCK, MATCH WIDE BLADE OF PLUG TO WIDE SLOT, FULLY
INSERT.
Protectthe playerfrommoist_re(Le,vases), end excess
heet(e.g.fireplace)or equipmentcreatingstrongmagneticor electric
fields (Le.speakers..<)<Disconnectthe powercablefromthe ACsupply
the playermalfunctions.Yourplayeris not intendedforindustrialuse.
Useof this productisfor personaluseonly.
Condensationmayoccurifyour playerordisc havebeenstoredincold
temperatures.
If transportingtheplayerdudngthe winter,waitapproximately2 hours
untilthe unithasreachedroomtemperaturebeforeusing.
The battery used with this product contain chemicals that
are harmful to the environment.
Do not dispose of batteries in the general household trash.
Instructions
READ INSTRUCTIONS
All the safety and operating instructions should be
read before the appliance is operated.
RETAIN INSTRUCTIONS
The safety and operating instructions should be
retained for future reference.
HEED WARNINGS
All warnings on the appliance and in the operating
instructions should be adhered to.
FOLLOW INSTRUCTIONS
All operating and use instructions should be
followed.
WATER AND MOISTURE
DO not use this video product near water-
forexample, near a bathtub, wash bowl,
kitchen sink, or laundry tub, in a wet basement,
or near a swimming pool, and the like.
OVERLOADING
Do not overload wall outlets and extension cords as
this can result in the risk of fire
or electric shock.
VENTILATION
Slots and openings in the cabinet are provided
for ventilation and to ensure reliable operation of the
video product and to protect it from overheating
these openings must not be blocked or covered.
The openings should never be blocked
by placing the video product on a bed, sofa, rug, or
other similar surface. This video product
should never be placed near or over a radiator or
heat register.
This video product should not be placed
in a built-in installation such as a bookcase
or rack unless proper ventilation is provided
or the manufacturer's instructions have been
followed.
POWER CORD PROTECTION
Power-supply cords should be routed so that
they are not likely to be walked on or pinched
by items placed upon or against them paying
particular attention to cords at plugs,
convenience receptacles, and the point where
they exit from the appliance.
CLEANING
Unplug this video product from the wall outlet
before cleaning. Do not use liquid cleaners
or aerosol cleaners. Use a damp cloth for cleaning.
LIGHTNING
For added protection of this video product
receiver during a lightning storm, or when
it is left unattended and unused for long
periods of time, unplug it from the wall outlet
and disconnect the antenna or cable system.
This will prevent damage to the video product
due to lightning and power-line surges.
OBJECT AND LIQUID ENTRY
Never push objects of any kind into this
product through openings as they may touch
dangerous voltage points or shod-out parts
that could result in a fire or electric shock.
Never spill liquid of any kind on the video
product.
ACCESSORIES
Do not place this video product on an unstable cart,
stand, tripod, bracket, or table.
The video product may fall, causing serious injury to
a child or adult, and serious damage
to the appliance.
Use only with a cart, stand, tripod, bracket,
or table recommended by the manufacturer,
or sold with the video product. Any mounting
of the appliance should follow the manufacturer's
instructions and should use a mounting accessory
recommended by the manufacturer.
CART
An appliance and cart combination should be moved
with care. Quick stops, excessive force, and uneven
surfaces may cause the appliance and cart
combination to overturn.
POWER SOURCES
This video product should be operated only from the
type of power source indicated
on the marking label. If you are not sure
of the type of supply to your home, consult your
appliance dealer or local power company.
For video products intended to be operated from
battery power, or other sources, refer
to the operating instructions.
POWER LINES
An outside antenna system should not be located in
the vicinity of overhead power lines or other electric
light or power circuits,
or where it can fall into such power lines
or circuits. When installing an outside antenna
system, extreme care should be taken to keep from
touching such power lines or circuits as contact with
them might be fatal.
POLARIZATION
This video product is equipped with a polarized
alternating current line plug (a plug having one blade
wider than the other.) This plug will fit into the power
outlet only one way.
This is a safety feature. If you are unable
to insert the plug fully into the outlet, try reversing the
plug. If the plug should still fail to fit, contact your
electrician to replace your obsolete outlet. Do not
defeat the safety purpose of the polarized plug.
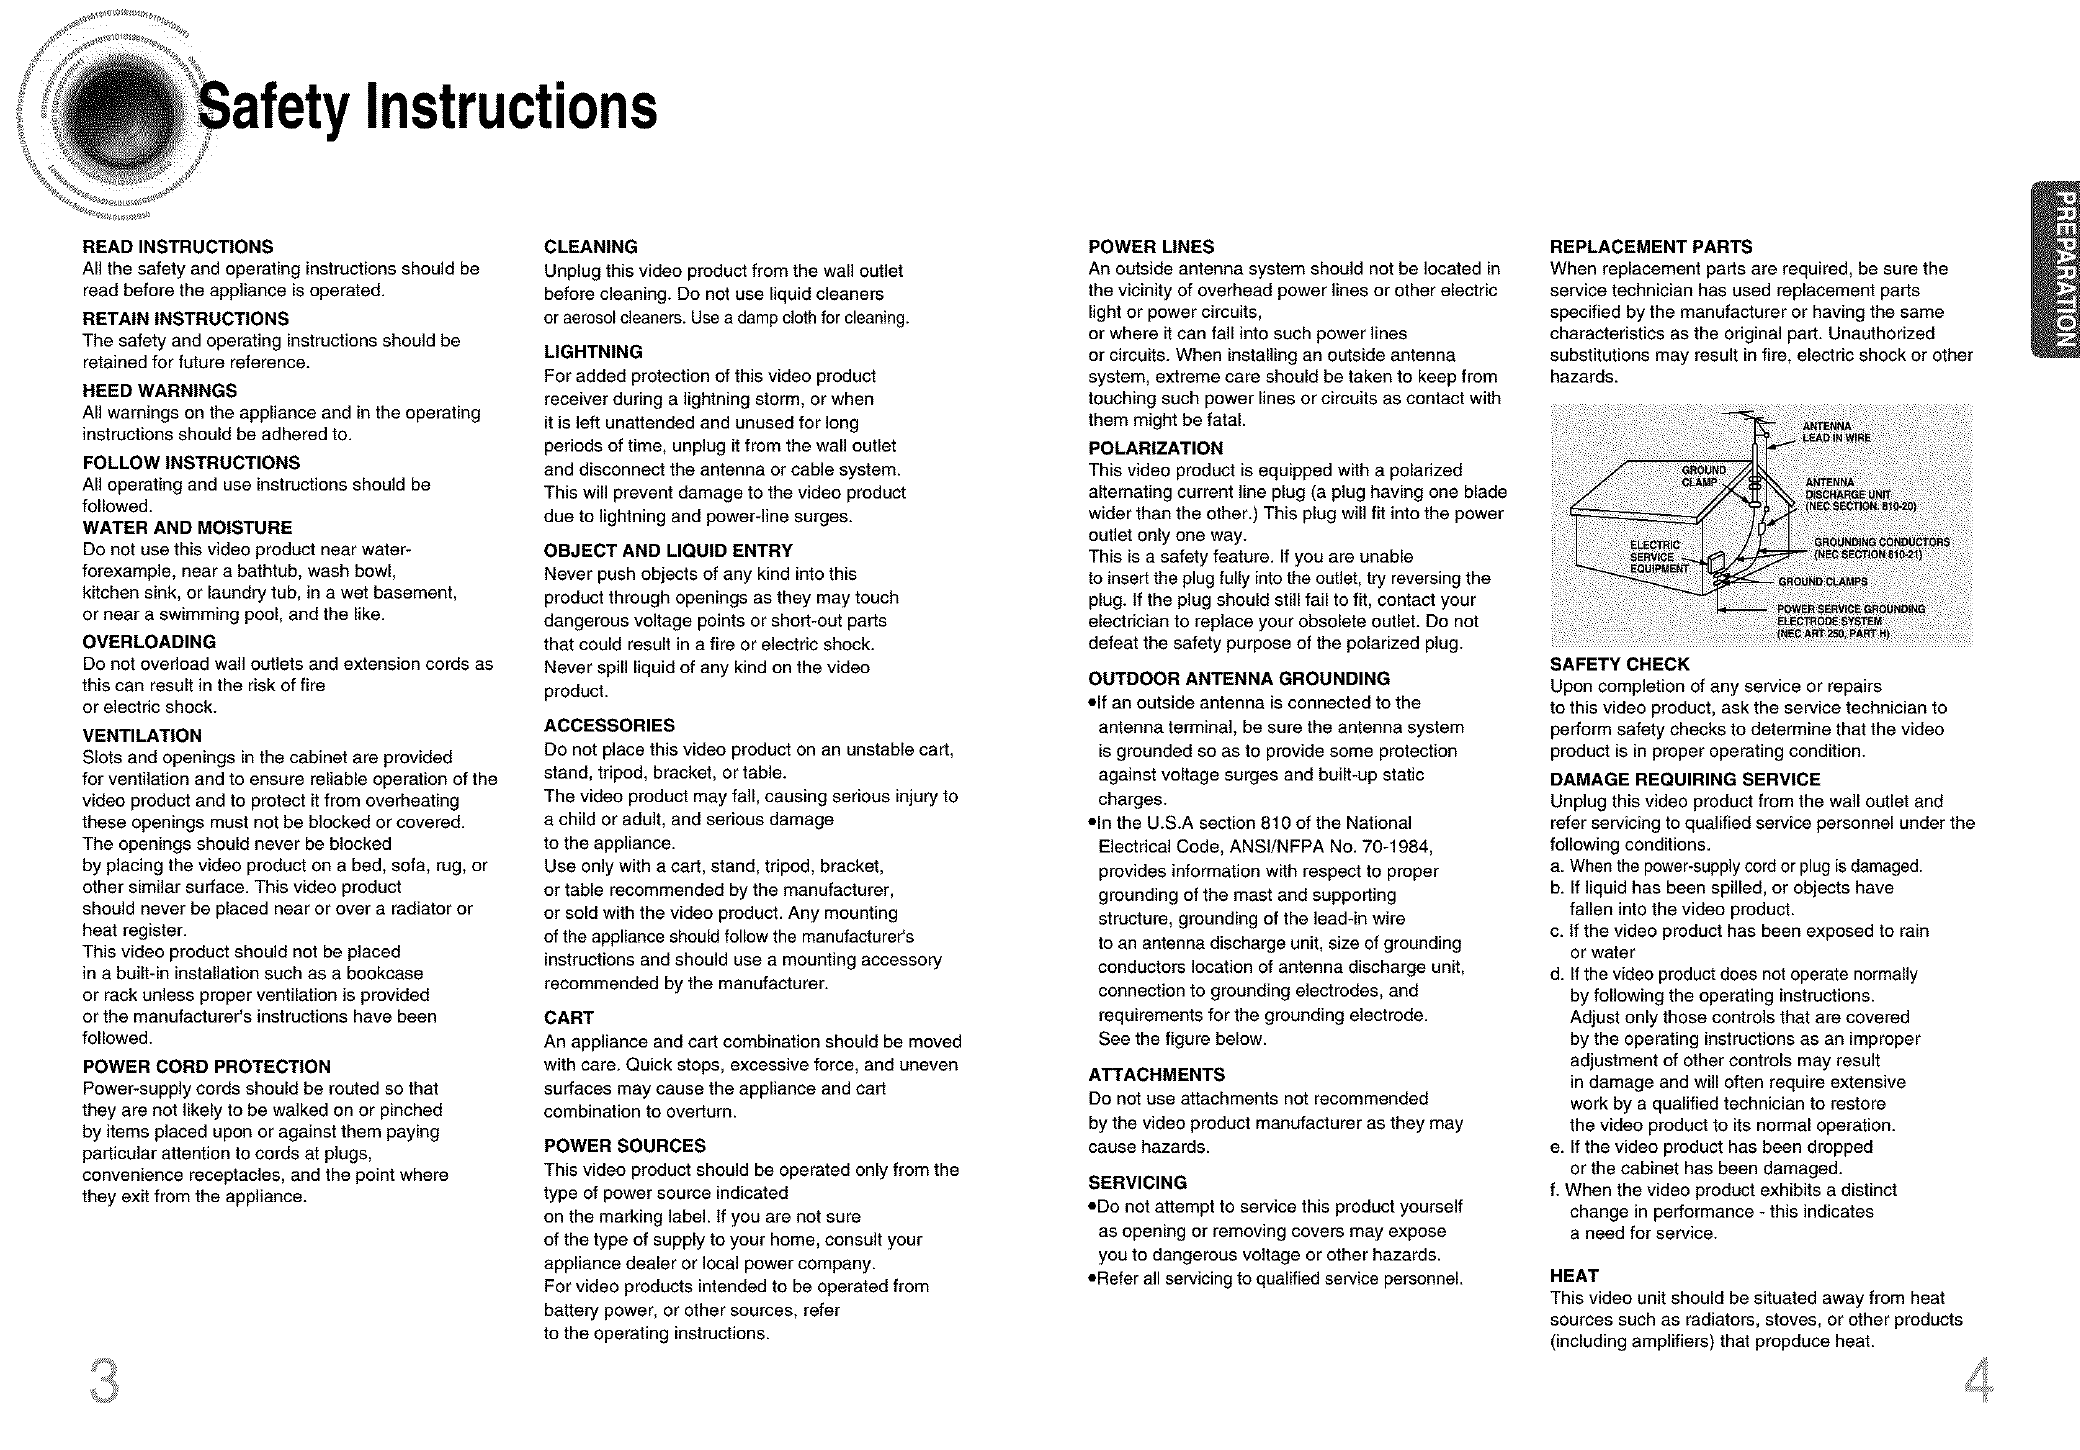
OUTDOOR ANTENNA GROUNDING
olf an outside antenna is connected to the
antenna terminal, be sure the antenna system
is grounded so as to provide some protection
against voltage surges and built-up static
charges.
oln the U.S.A section 810 of the National
Electrical Code, ANSI/NFPA No. 70-1984,
provides information with respect to proper
grounding of the mast and supporting
structure, grounding of the lead-in wire
to an antenna discharge unit, size of grounding
conductors location of antenna discharge unit,
connection to grounding electrodes, and
requirements for the grounding electrode.
See the figure below.
ATTACHMENTS
Do not use attachments not recommended
by the video product manufacturer as they may
cause hazards.
SERVICING
oDo not attempt to service this product yourself
as opening or removing covers may expose
you to dangerous voltage or other hazards.
oRefer all servicing to qualified service personnel.
REPLACEMENT PARTS
When replacement parts are required, be sure the
service technician has used replacement parts
specified by the manufacturer or having the same
characteristics as the original part. Unauthorized
substitutions may result in fire, electric shock or other
hazards.
SAFETY CHECK
Upon completion of any service or repairs
to this video product, ask the service technician to
perform safety checks to determine that the video
product is in proper operating condition.
DAMAGE REQUIRING SERVICE
Unplug this video product from the wall outlet and
refer servicing to qualified service personnel under the
following conditions.
a. Whenthe power-supply cordor plug is damaged.
b. If liquid has been spilled, or objects have
fallen into the video product.
c. If the video product has been exposed to rain
or water
d. If the video product does not operate normally
by following the operating instructions.
Adjust only those controls that are covered
by the operating instructions as an improper
adjustment of other controls may result
in damage and will often require extensive
work by a qualified technician to restore
the video product 1o its normal operation.
e. If the video product has been dropped
or the cabinet has been damaged.
f. When the video product exhibits a distinct
change in performance - this indicates
a need for service.
HEAT
This video unit should be situated away from heat
sources such as radiators, stoves, or other products
(including amplifiers) that propduce heat.
OMulti-Disc Playback & AM/FM Tuner
The HT-DB600combinesthe convenienceofmulti-disc
includingDVD,VCD,CD, MP3-CD
sophisticated AM/FM tuner, all in a single player.
<,,,_Built-in5.1-Channel Amplifier
The HT-DB600 comes with a bun
allowing you to enjoy
Dolby Pro Logic II ::
Dolby Pro Logic II is a new fo£r
signal decoding technology tha
Dolby Pro Logic.
0DTS (Digital Theater
DTS is an audio compression
Systems Inc. It delivers full-free
-channel amplifier,
,,nei
}0_ existidg
ped by Digital Theater
annel sound.
OTV Screen Saver Function
The HT-DB600 automatically brightens and darkens the brightness of
the TV screen after 2 minutes in the stop or pause mode,
The HT-DB600 automatically switches itself into the power saving mode
after 20 minutes in the screen saver mode.
C_Power Saving Function
The HT-DB600automatically shuts itselfoffafter20 minutes
in the stop or pause mode.
_o,,Customized TV Screen Display
The HT-DB600 allows you to select your favorite image during JPEG,
DVD, or VCD playback and set it as your background wallpaper.
....... @
!!i Safel
...................................... 24
26
.......................................... 29
..................................... 30
......31
32
33
34
............................... 35
38
................................................................................................................................. 39
TV Screen type................................................................................................................................................... 41
Setting Parental Cont[ols (Rating Leve ............................................................................................................................ 43
Setting the Password .......................................................................................................................................................... _.5
Setting the Wallpaper .......................................................................................................................................................... 47
Setting the Speaker Mode .................................................................................................................................................. 49
Setting the Test Tone .......................................................................................................................................................... 50
Setting the Delay Time ........................................................................................................................................................ 51
Settingthe Audio Quality........................................................................................................................................................................53
Setting the DRC (Dynamic Range Compression) ............................................................................................................... 55
Sound Field (DSP)/EQ Function ......................................................................................................................................... 56
Selby Pro Logic II Mode...................................................................................................................................................... 57
Selby Pro Logic II Effect ..................................................................................................................................................... 58
......Listening to Radio ............................................................................................................................................................... 59
Prese_ing Stations .............................................................................................................................................................. 60
Convenient Functions ......................................................................................................................................................... 61
Operating the TV with the Remote Control ......................................................................................................................... 63
Before Calling for Service ................................................................................................................................................... 65
Cautions on Handling and Storing Discs ............................................................................................................................ 67
Specifications ...................................................................................................................................................................... 68
Notes on Terminology ......................................................................................................................................................... 69
Warranty ............................................................................................................................................................................. 70
on Discs
oV_DEO
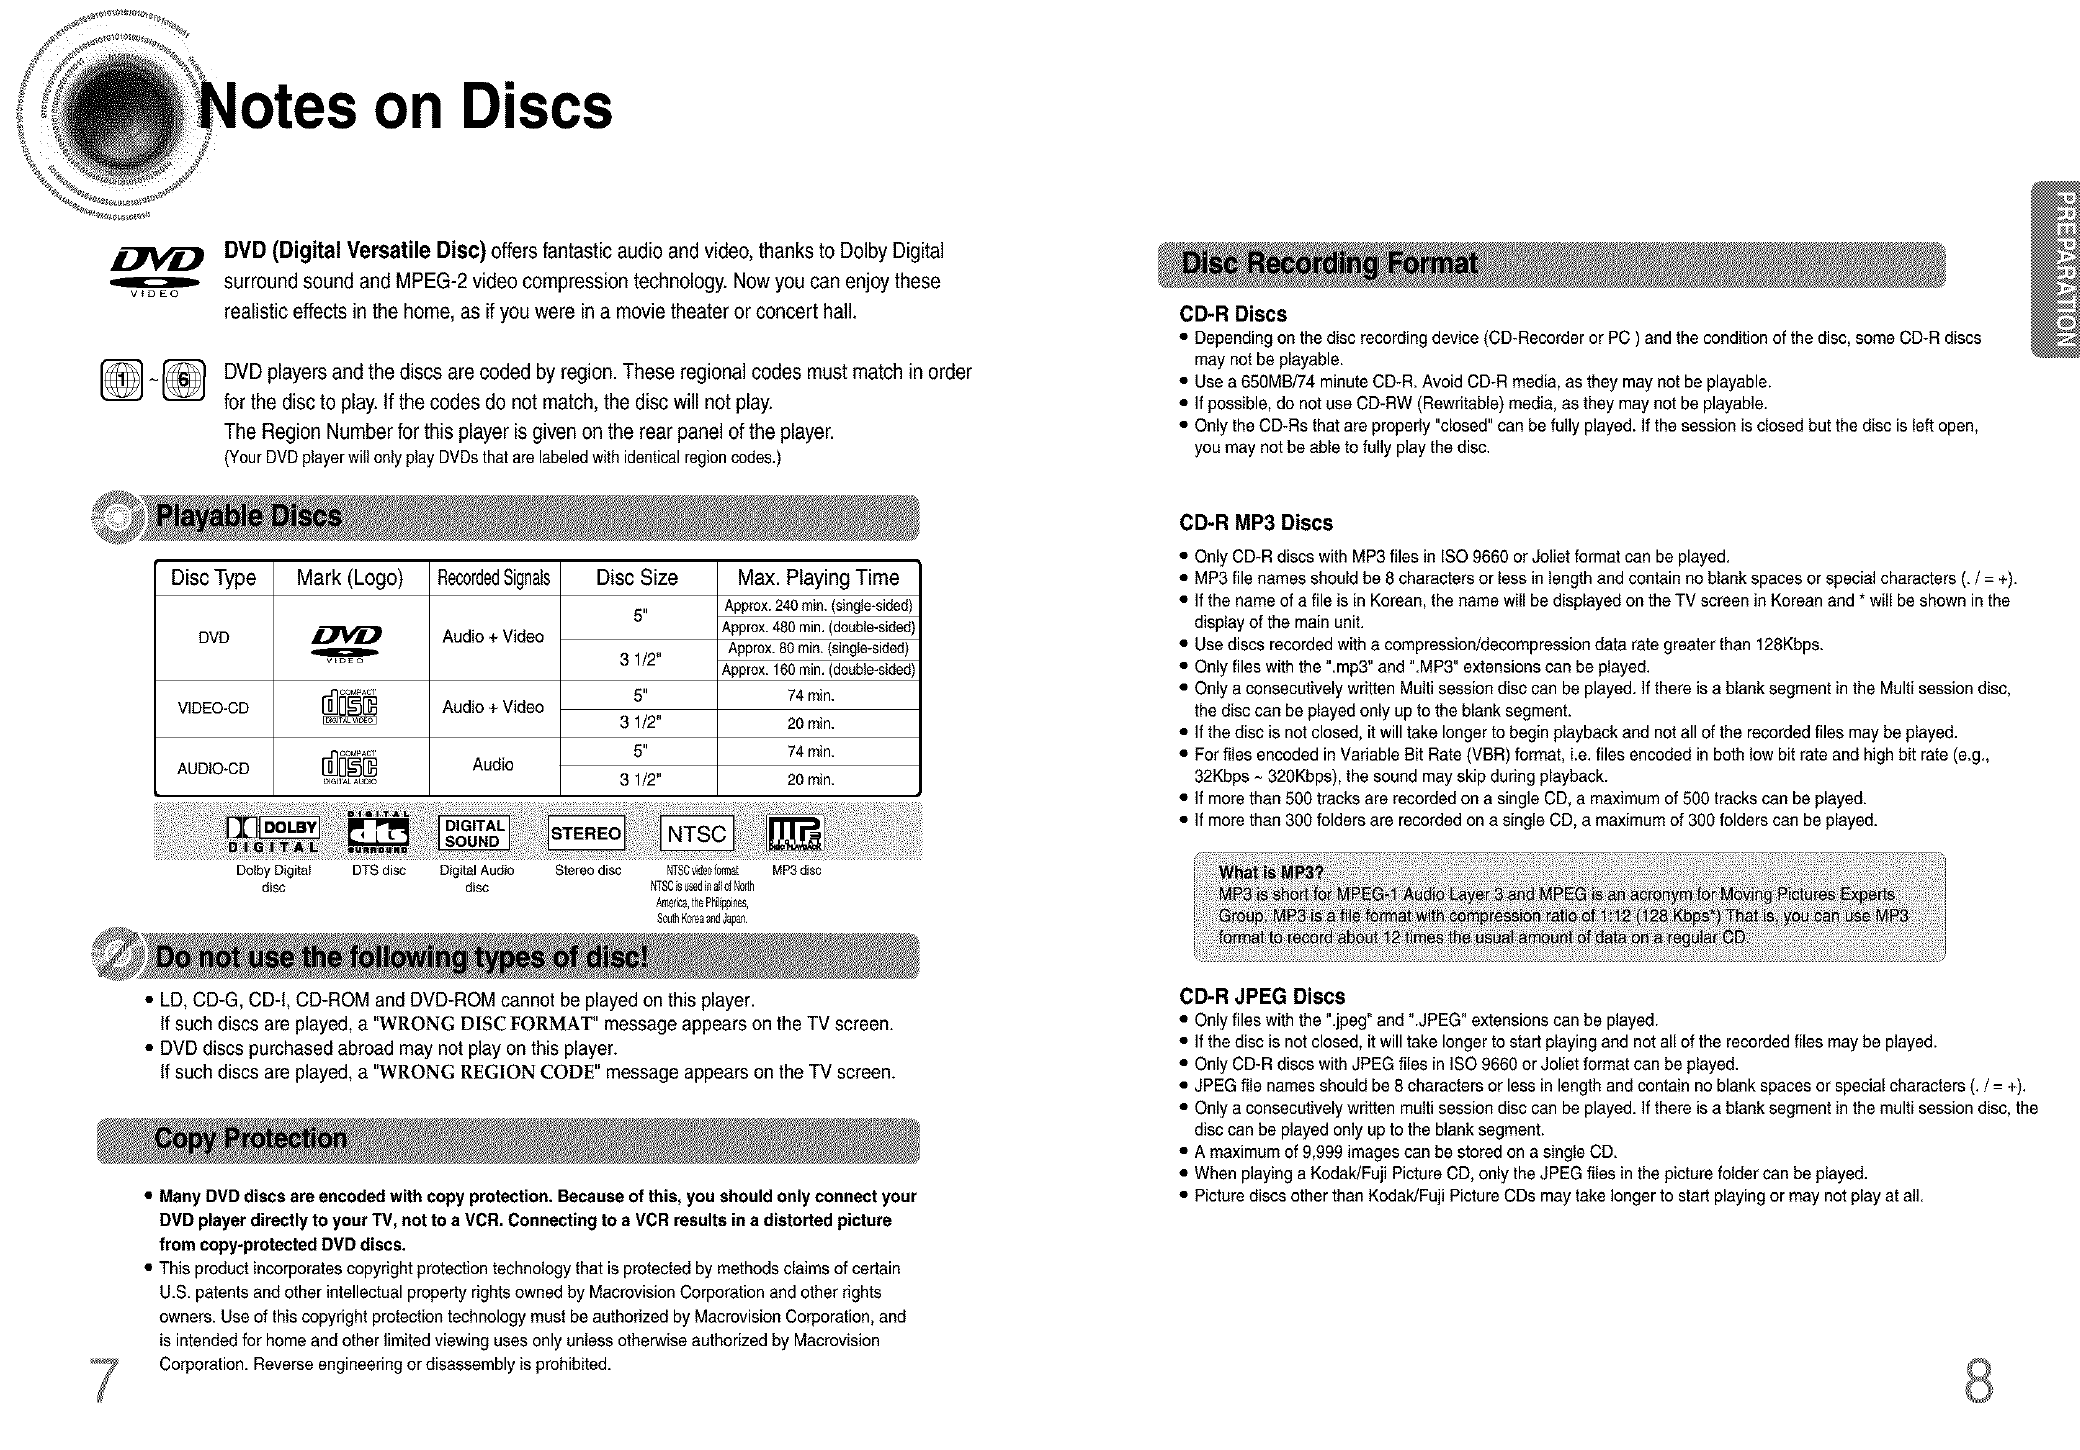
DVD (Digital Versatile Disc) offers fantastic audio and video,thanks to Dolby Digital
surround sound and MPEG-2 video compression technology. Now you can enjoy these
realistic effects in the home, as if you were in a movie theater or concert hall.
[_ ~_] DVD playersand the discs are coded by region. These regional codes must match in order
for the disc to play.If the codes do not match, the disc will not play.
The Region Number for this player is given on the rear panel of the player.
(Your DVD playerwil only play DVDsthatarelabeledwithidenticalregioncodes.)
Disc Type
DVD
VIDEO-CD
AUDIO*CD
Mark (Logo)
Ow_Eo
_I_I_AL AUO_O
RecordedSignals
Audio+ Video
Audio + Video
Audio
Disc Size
6"
3 1/2"
6 ,I
31/2"
6"
31/2"
Max. Playing Time
Approx.240min.(single-sided)
Approx.480min.(double-sided)
Approx.80min.(single-sided)
Approx.160min.(double-sided)
74min.
20 min.
74 min.
20 min.
Dolby Digital DTS disc Digital Audio Stereo disc NTSOvi@010rmat MP3disc
disc disc NTSCisusedi_a_loiNorth
America,thePhilippine,
S0ut_Korea_ndJa0an
• LD, CD-G, CD-I, CD-ROM and DVD-ROM cannot be played on this player.
If such discs are played, a "WRONG DISC FORMAT" message appears on the TV screen.
• DVD discs purchased abroad may not play on this player.
If such discs are played, a "WRONG REGION CODE" message appears on the TV screen.
•Many DVD discs are encoded with copy protection. Because of this, you should only connect your
DVD player directly to your TV, not to a VCR. Connecting to a VCR results in a distorted picture
from copy-protected DVD discs.
• This product incorporates copyright protection technology that is protected by methods claims of certain
U.S. patents and other intellectual property rights owned by Macrovision Corporation and other rights
owners. Use of this copyright protection technology must be authorized by Macrovision Corporation, and
is intended for home and other limited viewing uses only unless otherwise authorized by Macrovision
Corporation. Reverse engineering or disassembly is prohibited.
CD-R Discs
• Depending on the disc recording device (CD-Recorder or PC ) and the condition of the disc, some CD-R discs
may not be playable.
• Use a 650MB/74 minute CD-R. Avoid CD-R media, as they may not be playable.
• If possible, do not use CD-RW (Rewritable) media, as they may not be playable.
• Only the CD-Rs that are properly "closed" can be fully played. If the session is closed but the disc is left open,
you may not be able to fully playthe disc.
CD-R MP3 Discs
• Only CD-R discs with MP3 files in ISO 9660 or Joliet format can be played.
• MP3 file names should be 8 characters or less in length and contain no blank spaces or special characters (. /= +).
• If the name of a file is in Korean, the name will be displayed on the TV screen in Korean and * will be shown in the
display of the main unit.
• Use discs recorded with a compression/decompression data rate greater than 128Kbps.
• Only files with the ".mp3" and ".MP3" extensions can be played.
• Only a consecutively written Multi session disc can be played. If there is a blank segment in the Multi session disc,
the disc can be played only up to the blank segment.
• If the disc is not closed, it will take longer to begin playback and not all of the recorded files may be played.
• For files encoded in Vadable Bit Rate (VBR) format, i.e. files encoded in both low bit rate and high bit rate (e.g.,
32Kbps ~ 320Kbps), the sound may skip during playback.
• If more than 500 tracks are recorded on a single CD, a maximum of 500 tracks can be played.
• If more than 300 folders are recorded on a single CD, a maximum of 300 folders can be played.
CD-R JPEG Discs
• Only files with the".jpeg" and ".JPEG" extensions can be played.
• If the disc is not closed, it will take longer to start playing and not all of the recorded files may be played.
• Only CD-R discs with JPEG files in ISO 9660 or Joliet format can be played.
• JPEG file names should be 6 characters or less in length and contain no blank spaces or special characters (. /= +).
• Only a consecutively written multi session disc can be played. If there is a blank segment in the multi session disc, the
disc can be played only up to the blank segment.
• A maximum of 9,999 images can be stored on a single CD.
• When playing a Kodak/Fuji Picture CD, only the JPEG files in the picture folder can be played.
• Picture discs other than Kodak/Fuji Picture CDs may take longer to start playing or may not play at all.
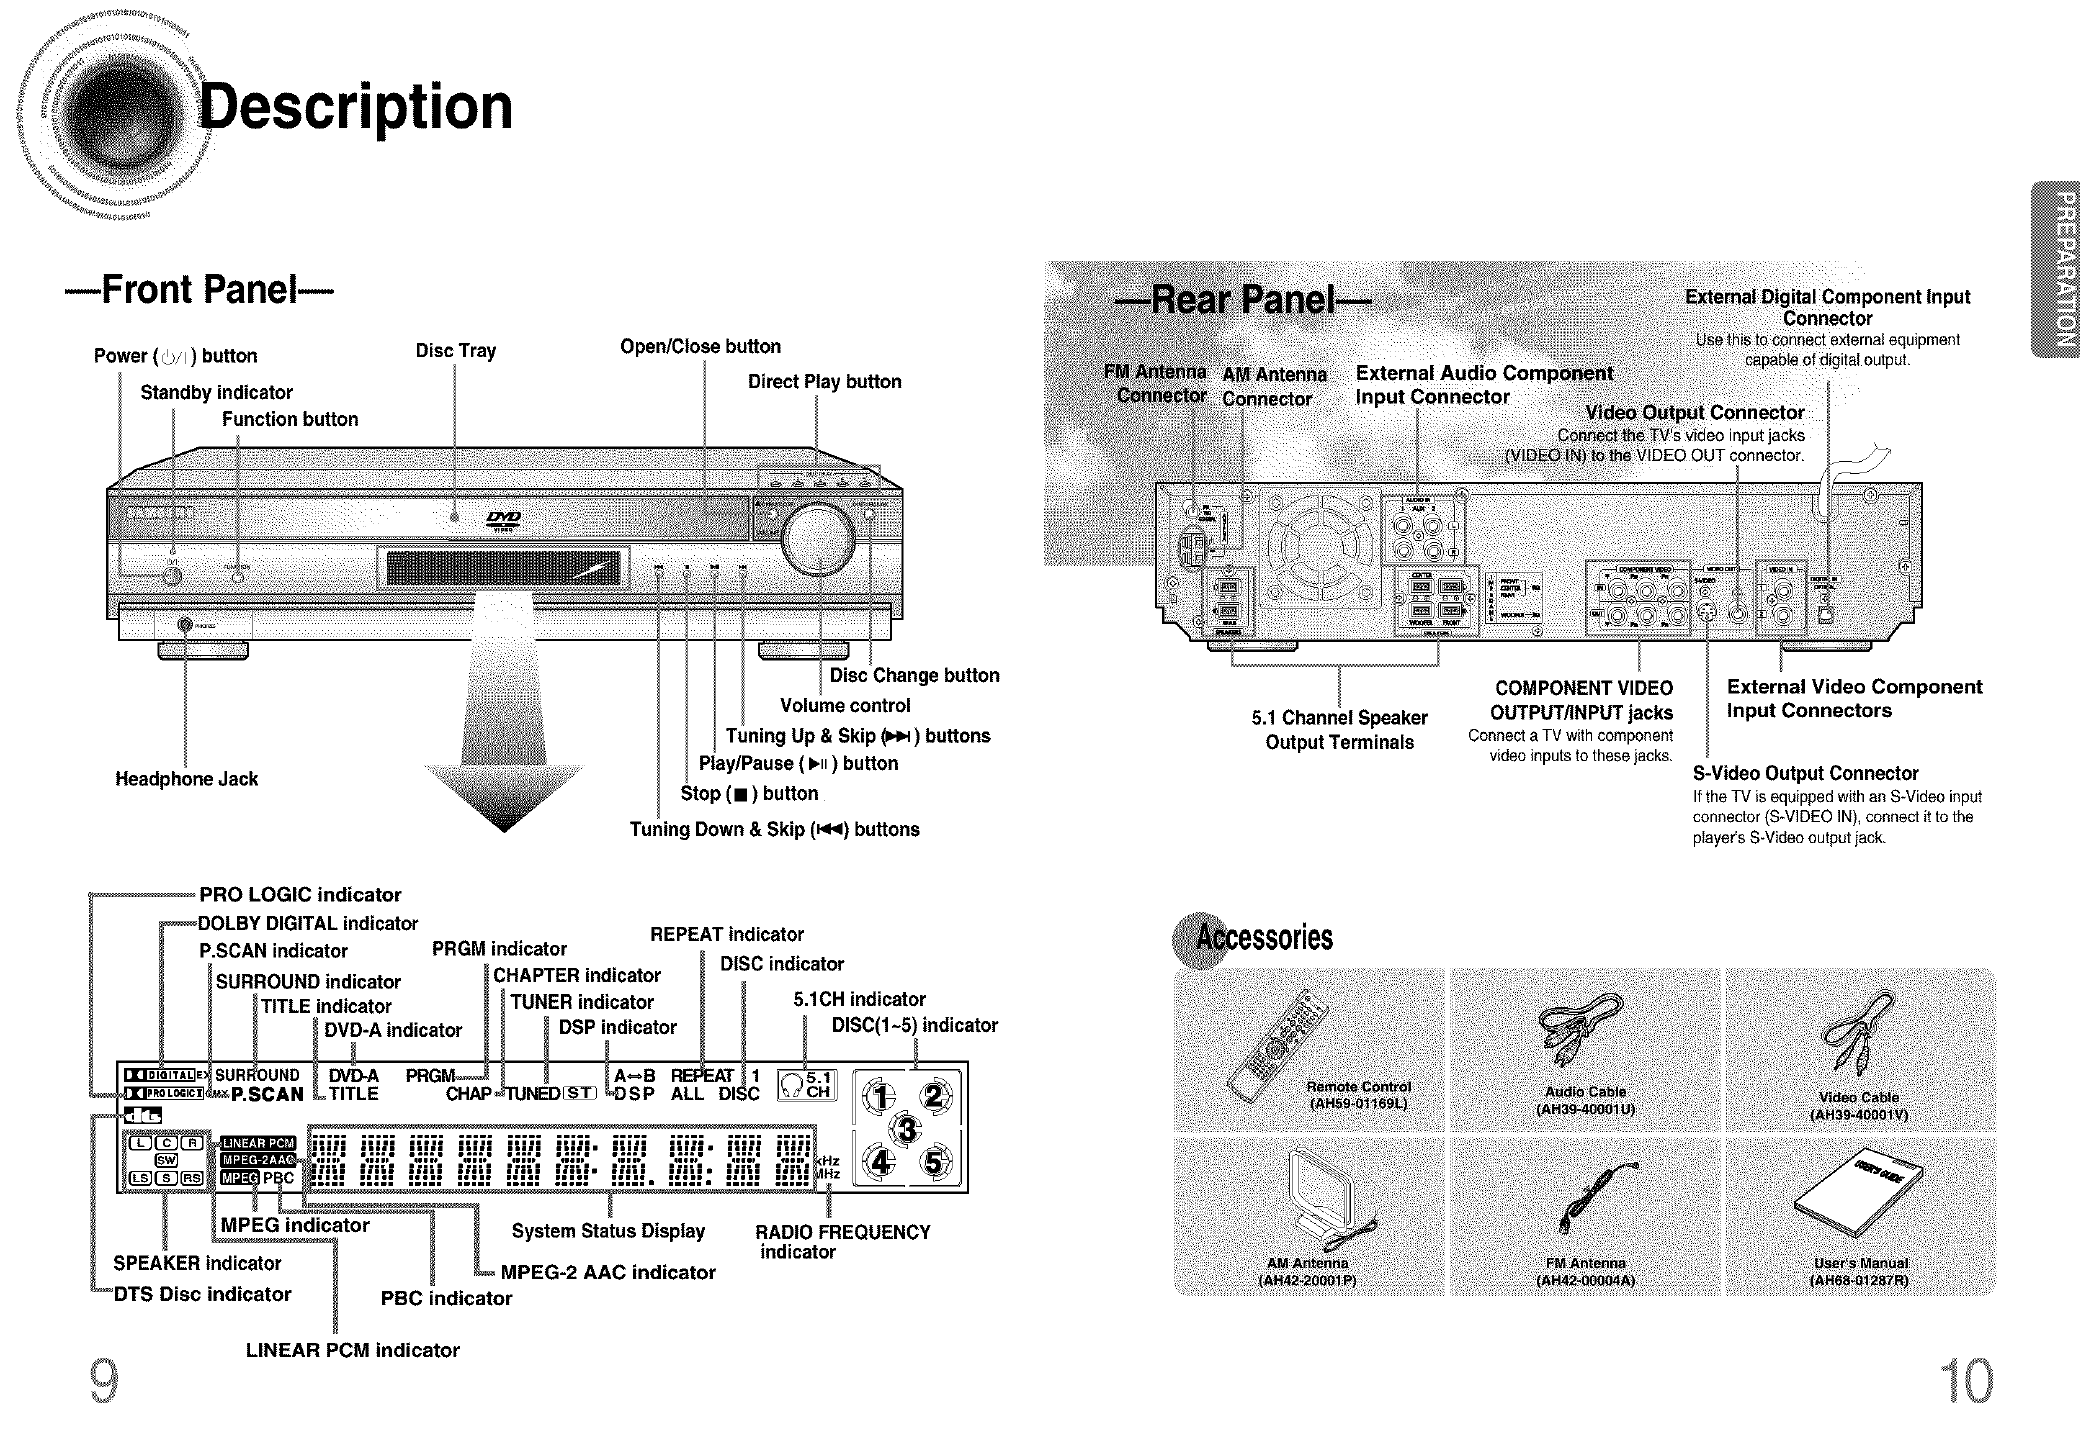
--Front Panel--
Power (_/I) button
Standby indicator
Function button
DiscTray Open/Close button
Direct Play button
Headphone Jack
Disc Change button
Volume control
Tuning Up & Skip (_) buttons
Play/Pause ( I_ll) button
Stop (m) button
Tuning Down & Skip (_4<)buttons
PRO LOGIC indicator
_DOLBY DIGITAL indicator REPEAT indicator
P.SCAN indicator PRGM indicator o
_........... _ DISC indicator
SURROUND indicator _t;NAeP'H malcator _
I _TITLE indicator _ I TUNER indicator _ _ 5.1CH indicator
_ _DVD-A indicator H _ DSP indicator _ _ _ DISC(I-5)indicator
a%
__ Sattus Display RADIO FREQUENCY
.... _....... _ _ _ indicator
_indicator ........
DTS Disc indicator PBC indicator
LINEAR PCM indicator
5.1 Channel Speaker
Output Terminals
COMPONENT VIDEO
OUTPUT/INPUT jacks
Connecte TV with component
video inputsto these jacks,
Component Input
External Video Component
Input Connectors
S-Video Output Connector
If the TV isequippedwithan S-Videoinput
connector(S-VIDEOIN), connectit to the
player'sS-Videooutput iack,
10
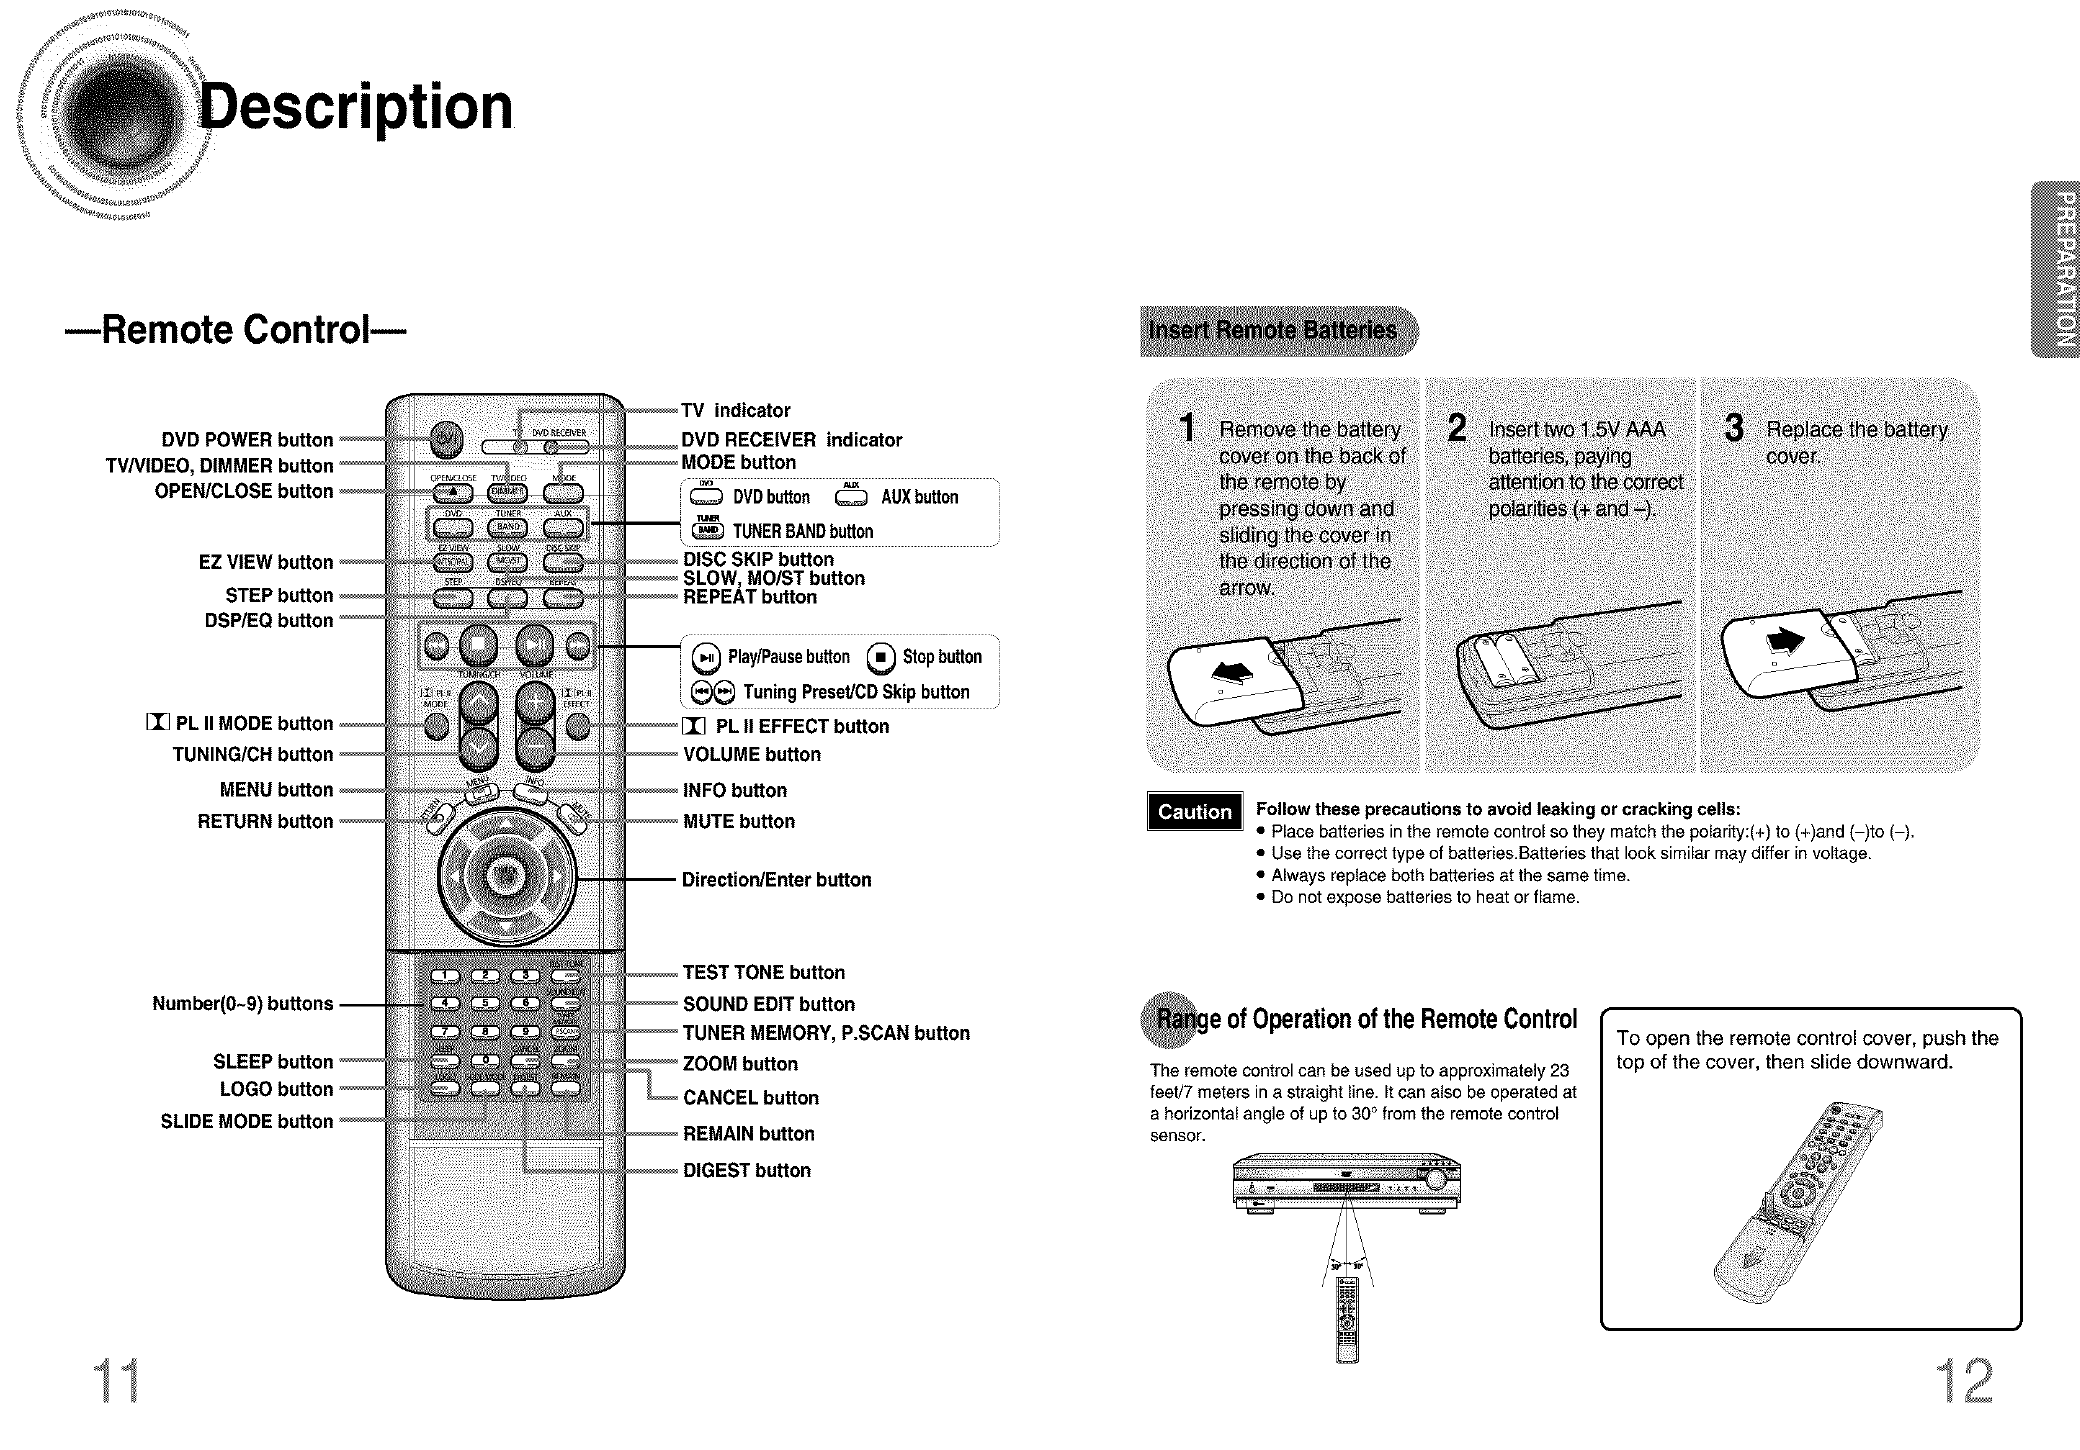
--Remote Control--
DVD POWER button
TV/VIDEO, DIMMER bu
EZ VIEW [
I_ PL II
MENt
Number(O~9)
SLIDE
indicator
DVD RECEIVER indicator
DVDbutton _AUXbutton
TUNERBANDbutton
\
SKIP button
MOIST button
/•
(_ Play/Pausebutton _Stopbutton
,(_ Tuning Preset/CD Skip button
PL II EFFECT button
button
ection/Enter button
button
INDEDIT button
INER MEMORY, P.SCAN button
Follow these precautions to avoid leaking or cracking cells:
•Place batteries in the remote controlso they match the polarity:(+) to (+)and (-)to (-).
•Use the correcttype of batteries.Batteries that looksimilar may differ involtage.
• Always replace both battedes at the same time.
• Do not expose batteries to heat or flame.
ofOperationoftheRemoteControl
The remote control can be used up to approximately 23
feet/7 meters in a straight line, It can also be operated at
a horizontal angle of up to 30° from the remote control
sensor.
To open the remote control cover, push the
top of the cover, then slide downward.
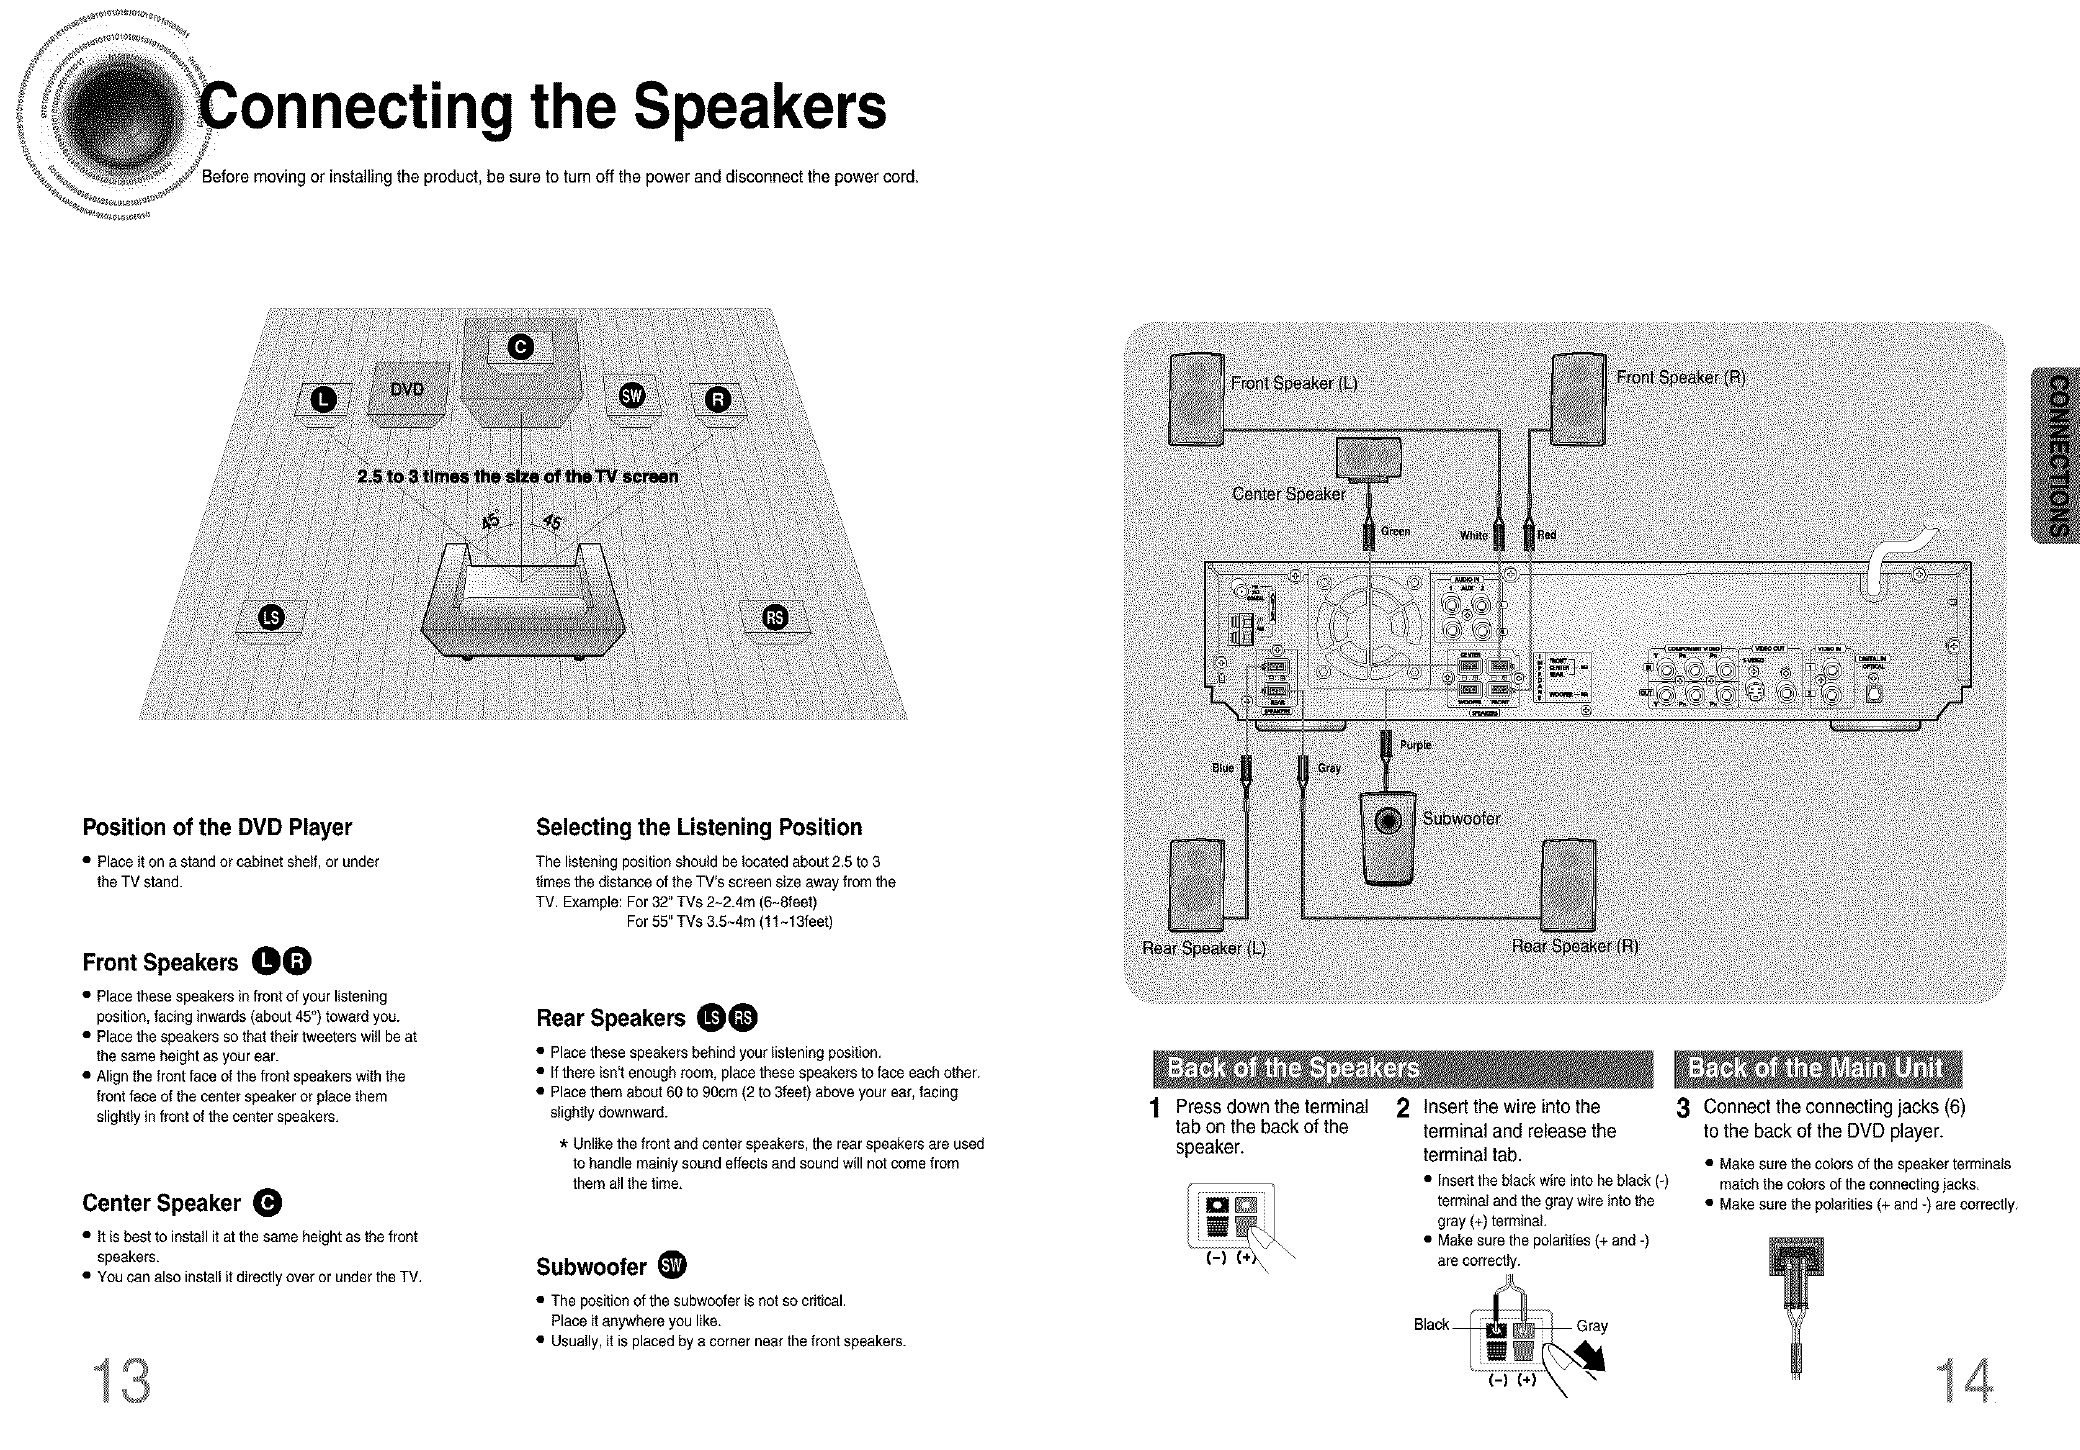
necting the Speakers
or installing the product, be sure to turn off the power and disconnect the power cord.
Position of the DVD Player
•Place it on a stand or cabinet shelf, or under
the TV stand.
Front Speakers 00
• Place these speakers infront of your listening
position, facing inwards(about 45°) towardyou.
• Place the speakers so that their tweeters will be at
the same height as your ear.
• Align the front face of the front speakers with the
front face of the center speaker or place them
slightly in front of the center speakers.
Center Speaker
• It is best to install it at the same heightas the front
speakers.
• You can also install it directly over or under the TV.
13
Selecting the Listening Position
The listening position should be located about 2.5 to 3
times the distance of the TV's screen size away from the
TV. Example: For 32" TVs 2~2.4m (6-Sleet)
For 55" TVs 3.5-4m (11-13feet)
Rear Speakers 00
• Place these speakers behind your _isteningposition.
• If there isn'tenough room, place these speakers to face each other.
• Place them about 60 to 90cm (2 to 3feet) above your ear, facing
slightly downward.
*Unlike the front and center speakers, the rear speakers are used
to handle mainly sound effects and sound will not come from
them all the time.
Subwoofer (_
• The position of the subwoofer is not so critical.
Place it anywhere you like.
• Usually, it is placed by a corner near the front speakers.
Press down the terminal
tab on the back of the
speaker.
\
\
2Insert the wire into the
terminal and release the
terminal tab.
• Inserttheblackwireinto heblack(-)
termicalandthe graywireintothe
gray(+)terminal.
• Makesurethepolarities(+and-)
arecorrectly.
3Connect the connecting jacks (6)
to the back of the DVD player.
• Make sure the colors of the speaker terminals
match the colors of the connecting jacks.
• Make sure the polarities (+ and -) are correctly.
14
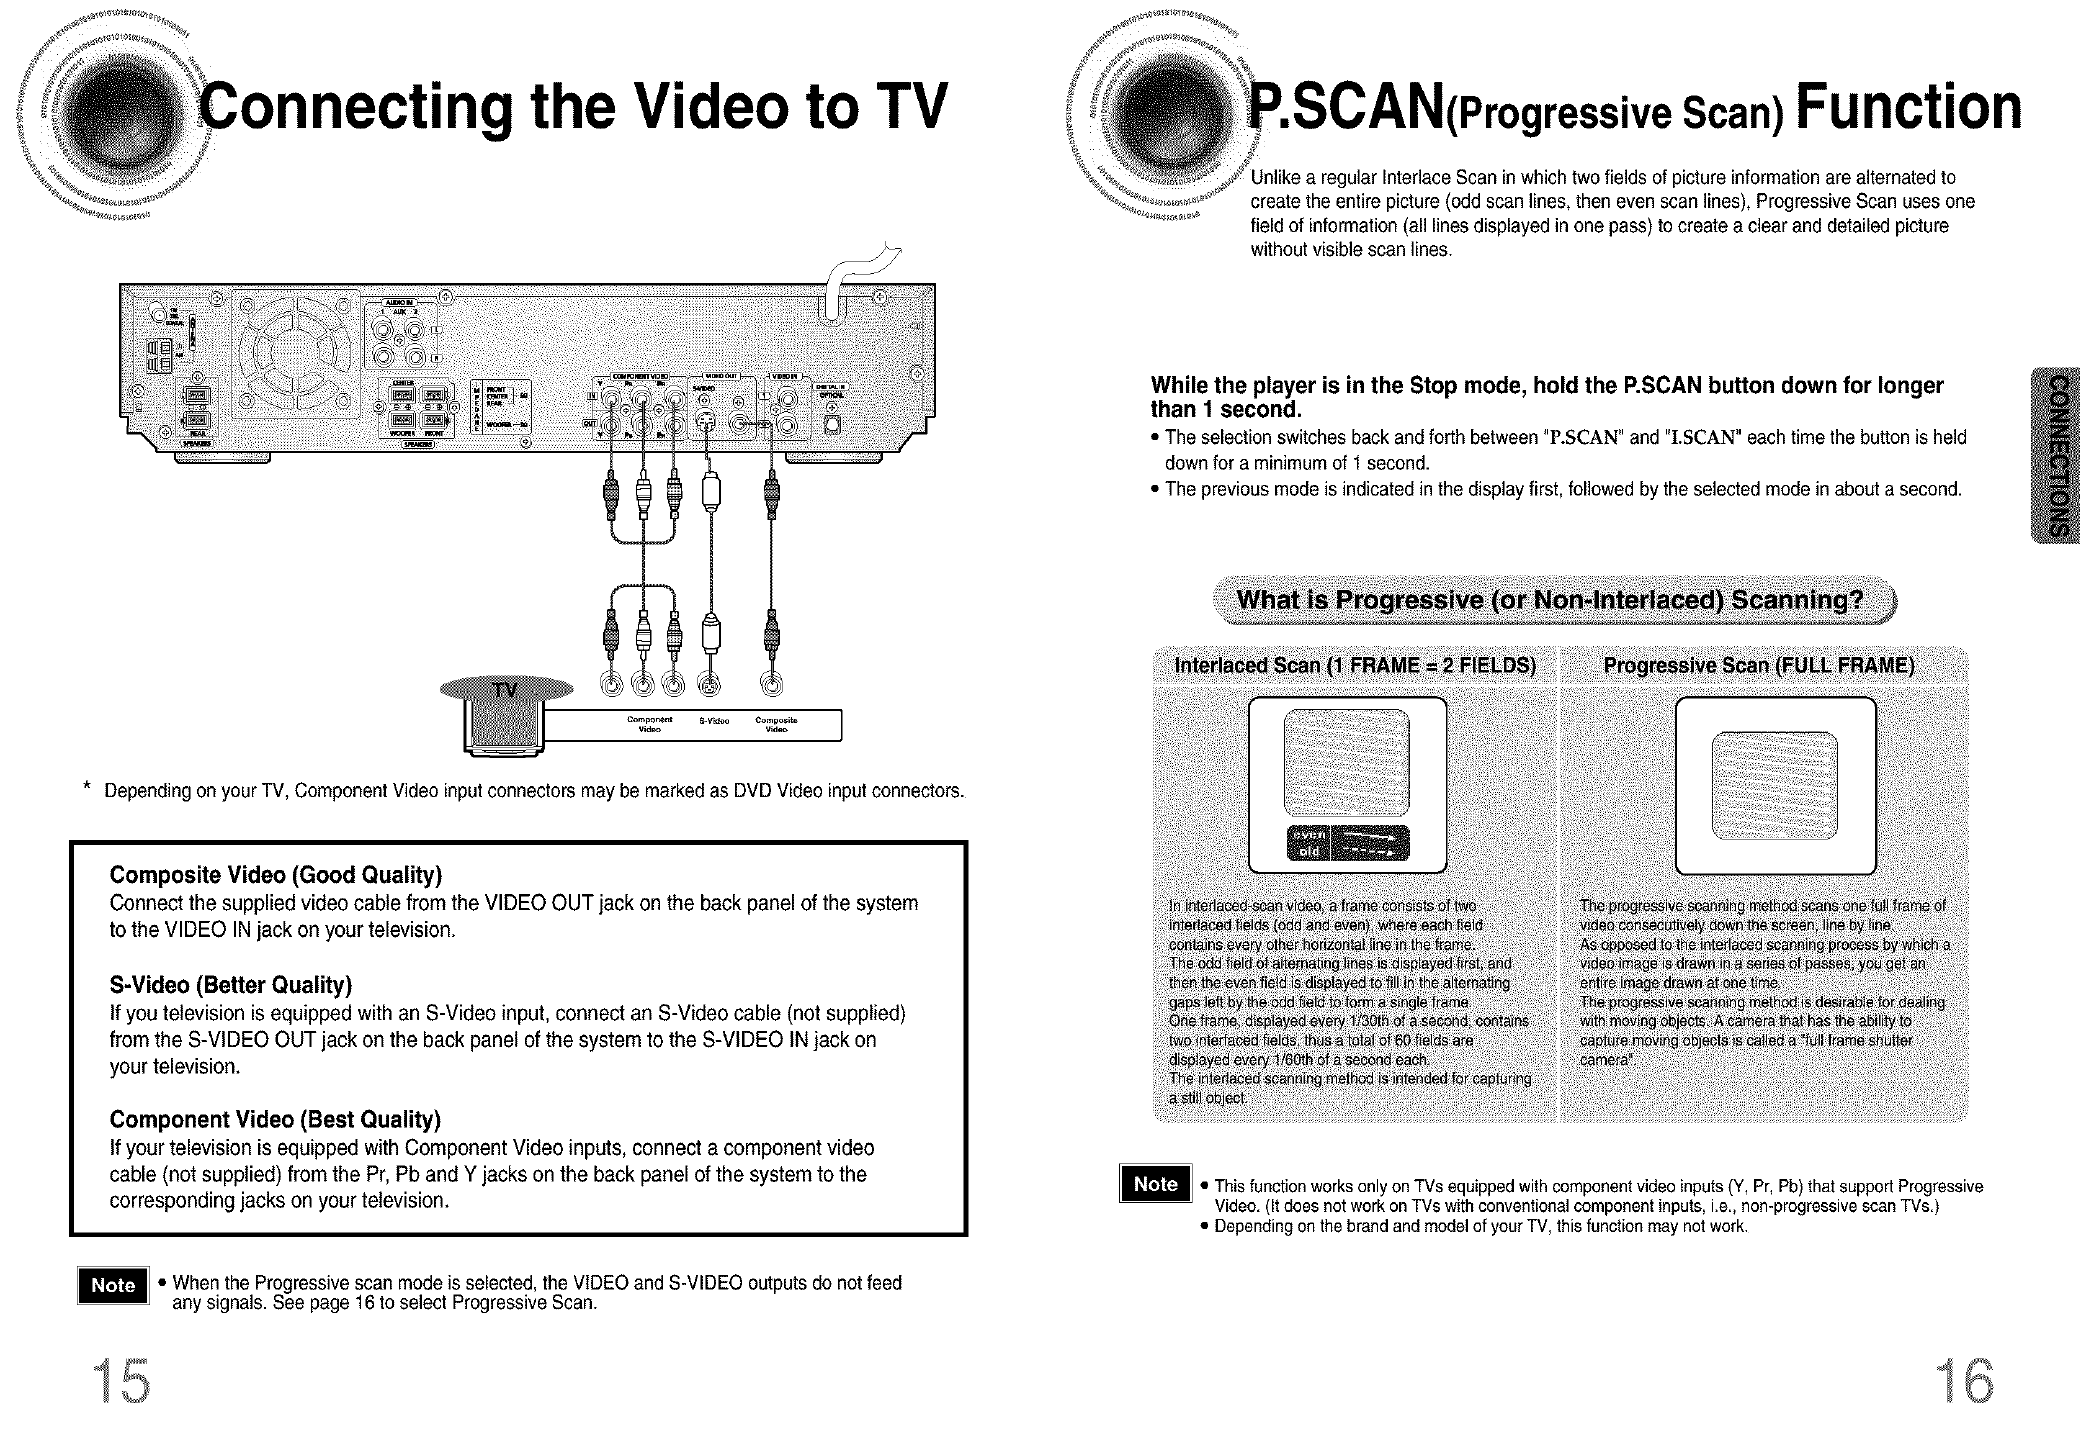
necting the Video to TV ;IressiveScan)Function
gular Interlace Scan inwhich two fields of picture informationare alternated to
create the entire picture (odd scan lines, then even scan lines), Progressive Scan uses one
field of information(all lines displayed in one pass)to create a clear and detailed picture
without visible scan lines.
While the player is in the Stop mode, hold the P,SCAN button down for longer
than 1 second.
• The selection switches back and forth between "P.SCAN" and "I.SCAN" each time the button is held
down for a minimum of 1 second.
• The previous mode is indicated in the display first, followed by the selected mode in about a second.
Component 8.V_O Composits ]
vleeo Vld_
*Depending on your TV, Component Video inputconnectors may be marked as DVD Video inputconnectors.
Composite Video (Good Quality)
Connect the supplied video cable from the VIDEO OUT jack on the back panel of the system
to the VIDEO IN jack on your television.
S-Video (Better Quality)
If you television is equipped with an S-Video input, connect an S-Video cable (not supplied)
from the S-VIDEO OUT jack on the back panel of the system to the S-VIDEO IN jack on
your television.
Component Video (Best Quality)
If your television is equipped with Component Video inputs, connect acomponent video
cable (not supplied) from the Pr, Pb and Y jacks on the back panel of the system to the
corresponding jacks on your television.
• When the Progressive scan modeis selected, the VIDEO and S-VIDEO outputs do not feed
any signals. See page 16 to select Progressive Scan.
• This function works only on TVs equipped with component video inputs(Y, Pr, Pb) that support Progressive
Video. (It does not work on TVs with conventional component inputs,i.e., non-progressive scan TVs.)
• Depending on the brand and model of your TV, this function may not work.
15 16
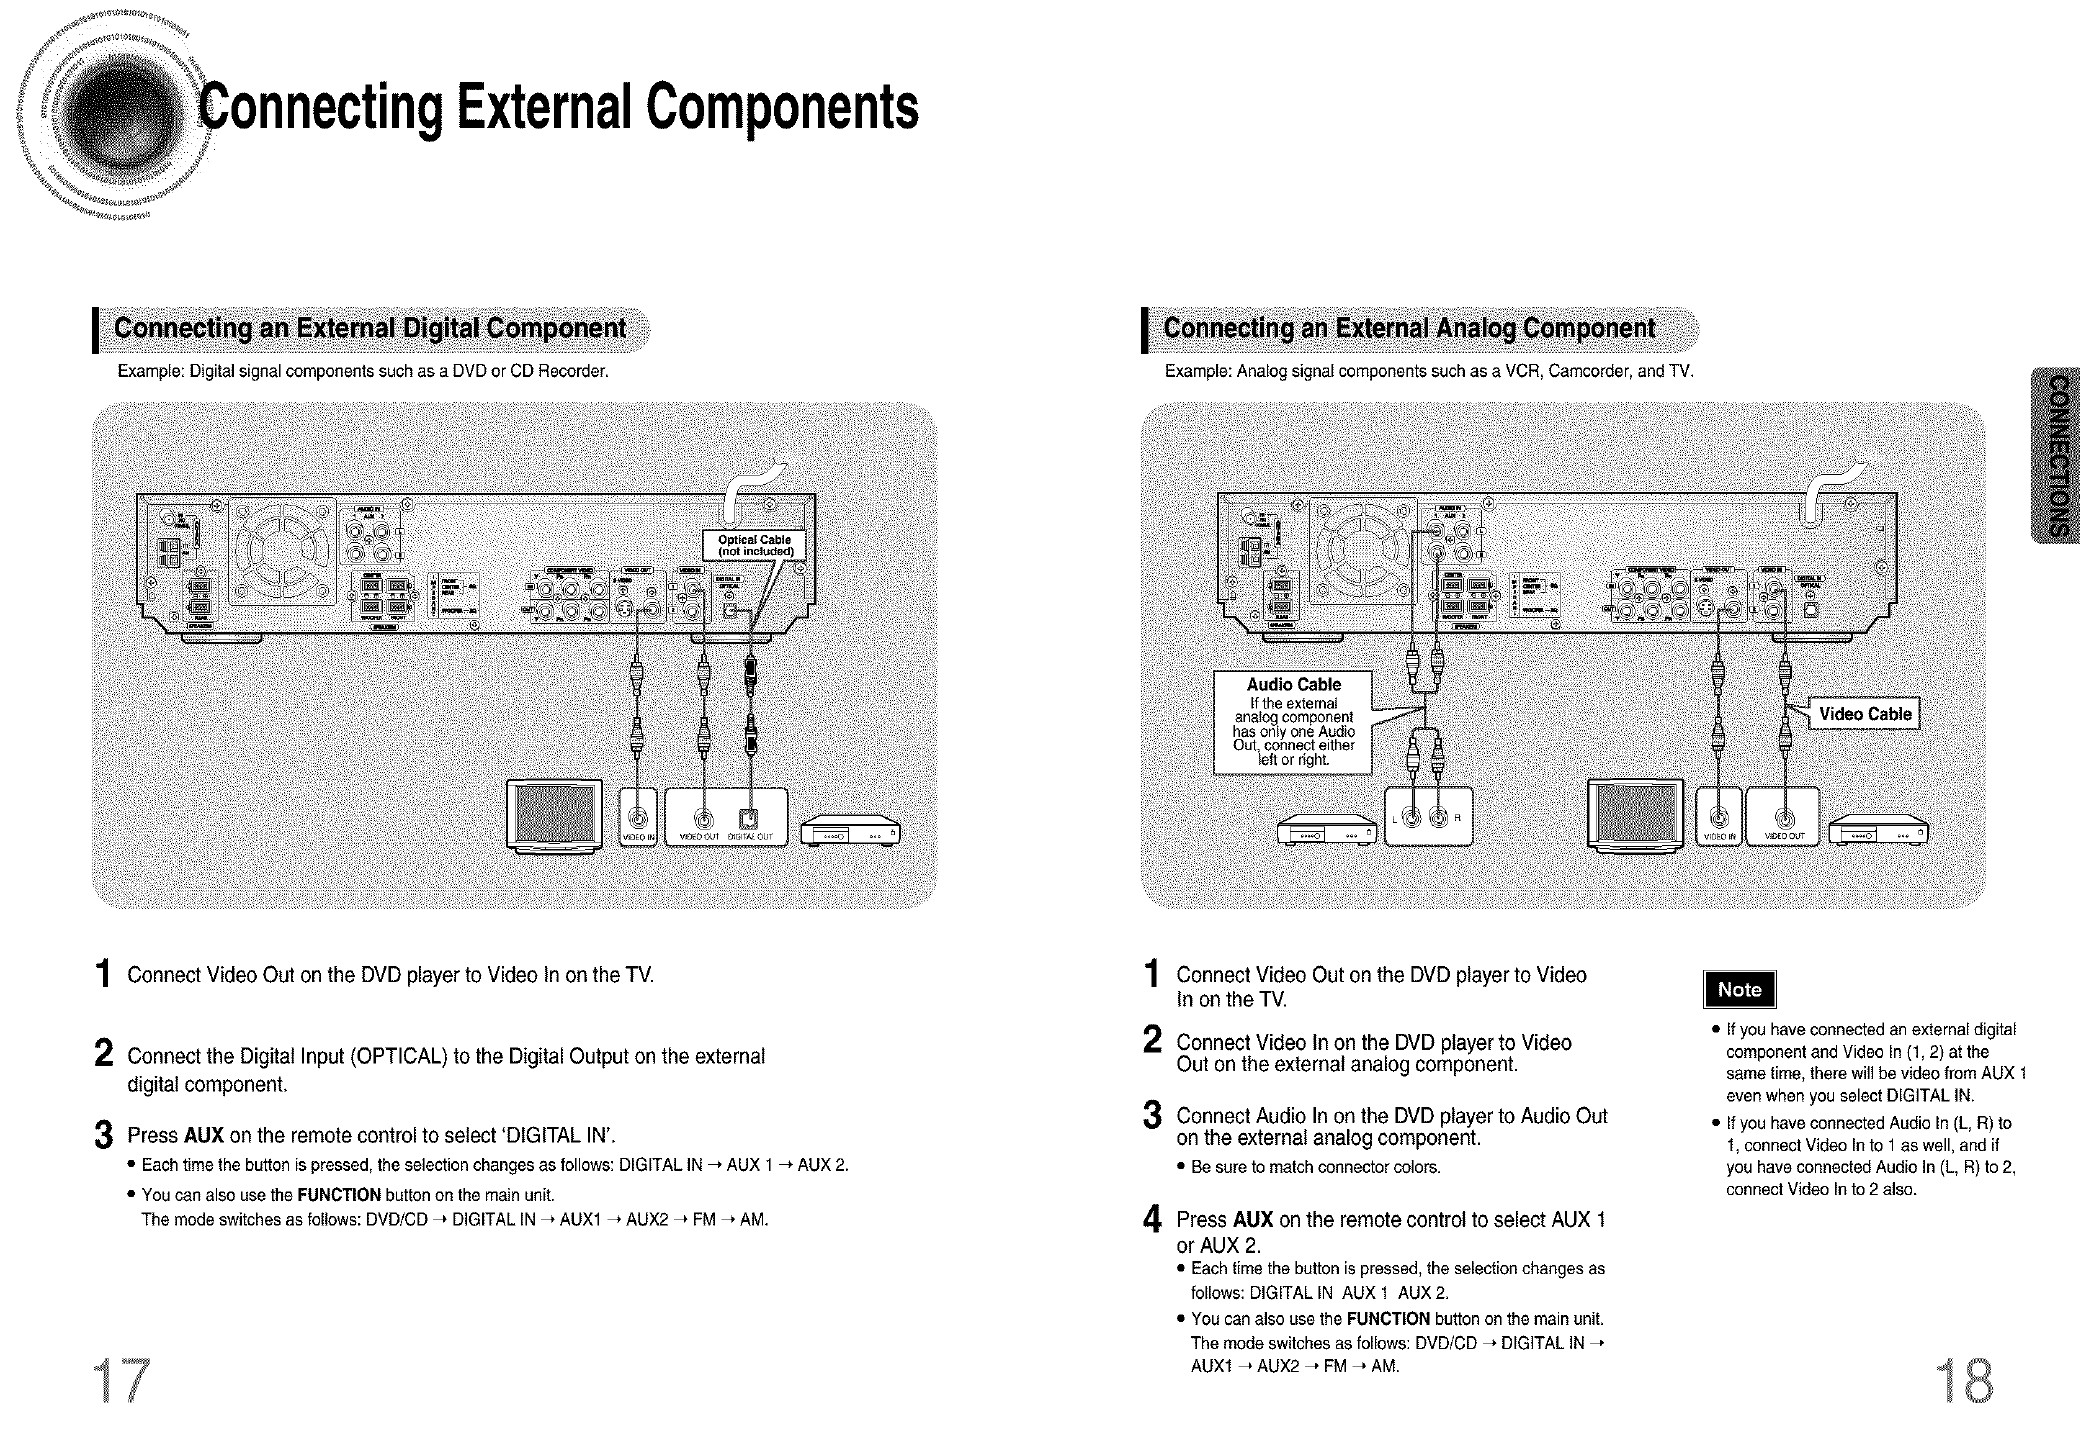
ngExternalComponents
Example: Digital signal components such as a DVD or CD Recorder.
1Connect Video Out on the DVD player to Video In on the TV.
2 Connect the Digital Input (OPTICAL) to the Digital Output on the external
digital component.
3Press AUX on the remote control to select 'DIGITAL IN'.
• Eachtimethebuttonis pressed,the selectionchangesas follows:DIGITALIN_ AUX1 _ AUX2.
• Youcanalso usethe FUNCTIONbuttononthe mainunit.
The modeswitchesas follows:DVD/CD_ DIGITALIN_ AUX1_ AUX2_ FM_ AM.
17
1
2
3
4
Example: Analog signal components such as a VCR, Camcorder, and TV.
Connect Video Out on the DVD player to Video
In on the TV.
Connect Video In on the DVD player to Video
Out on the external analog component.
Connect Audio In on the DVD player to Audio Out
on the external analog component.
• Besureto matchconnectorcolors.
Press AUX on the remote control to select AUX 1
or AUX 2.
• Each time the button is pressed, the selection changes as
follows: DIGITAL IN AUX 1 AUX 2.
• You can also use the FUNCTION button on the main unit.
The mode switches as follows: DVD/CD _ DIGITAL IN _,
AUX1 _ AUX2 _, FM _ AM.
•Ifyou have connected an external digital
component and Video In (1,2) at the
same time, there will be video from AUX 1
even when you select DIGITAL IN.
• If you have connected Audio In (L, R) to
1, connect Video In to 1 as well, and if
you have connected Audio In (L, R) to 2,
connect Video In to 2 also.
18

nectingtheAnten
1
2
Connect the FM antenna supplied to the FM 75£_ COAXIAL terminal as a
temporary measure.
Slowly move the antenna wire around until you find a location where reception
is good, then fasten it to a wall or other rigid surface,
1
2
Connect the AM loop antenna supplied to the AM and _terminals.
If reception is poor, connect an outdoor single vinyl-covered wire to the AM
terminal. (Keep the AM loop antenna connected).
: COOii_ Fa_ The coolingfan dissipatesthe heatgeneratedinsidethe unit sothat the unit can beoperated
...................................................normally.Thecoolingfan is activatedautomaticallyto supplycoolairto the unit.
Please observe the following cautions for your safety.
• Makesure the unit iswell-ventilated. If the unit has poor ventilation, the temperature insidethe unitcould rise
and may damageit.
• Do not obstructthe coolingfan orventilationholes, (If the cooling fan or ventilation holes are covered with a
newspaperor cloth, heat may build up insidethe unitand fire may result.)
19
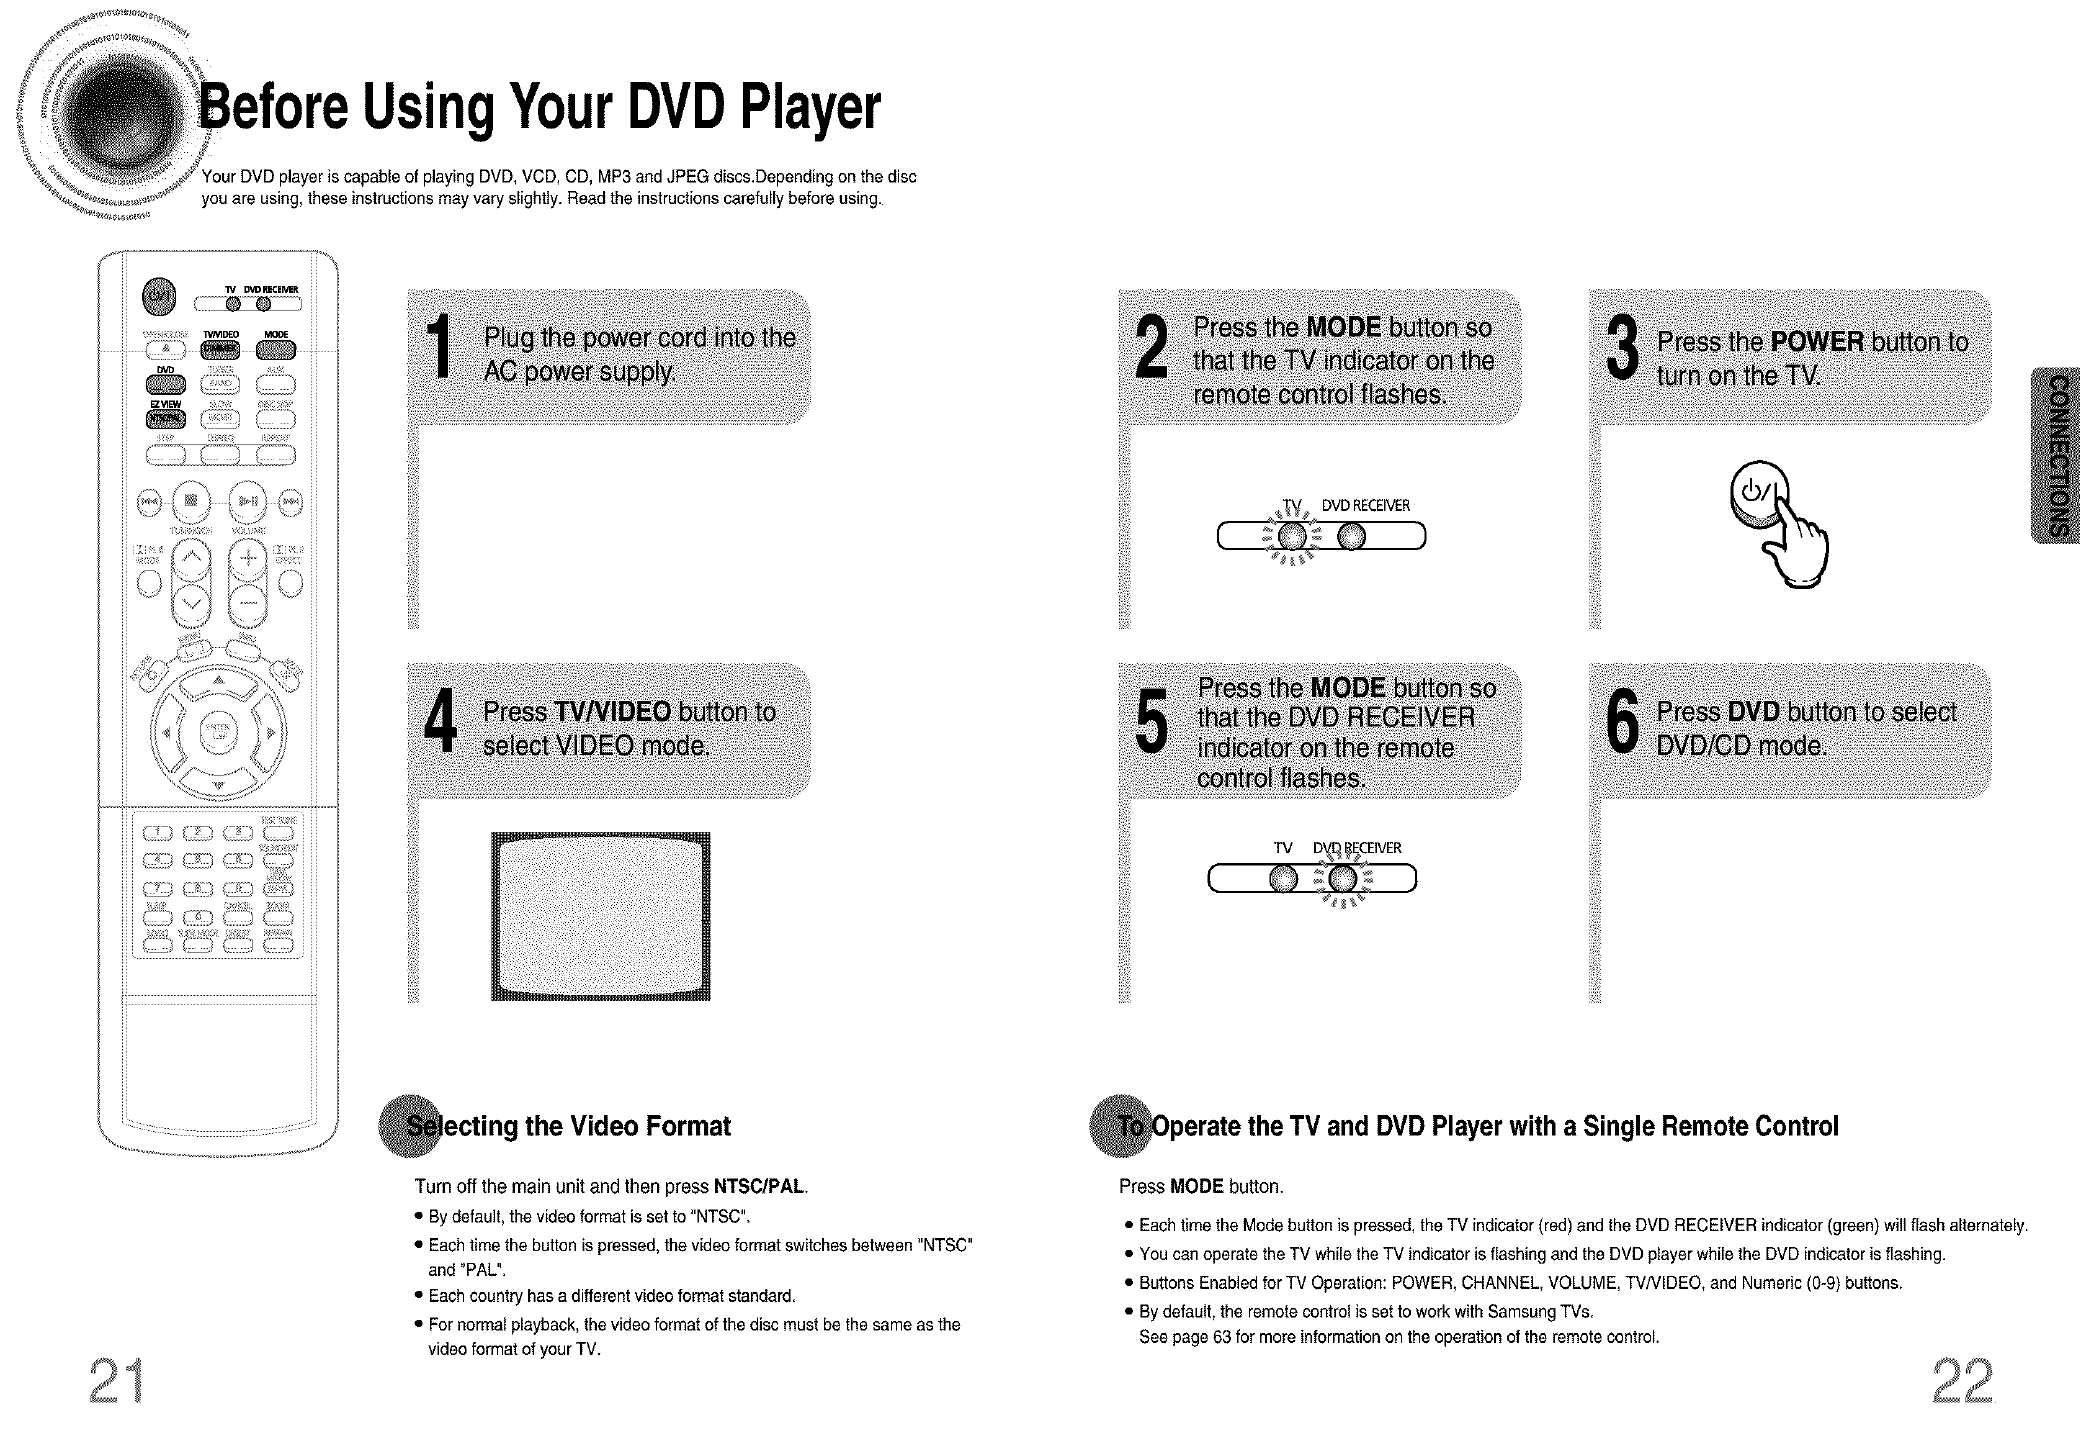
UsingYourDVDPlayer
player is capable of playing DVD, VCD, CD, MP3 and JPEG discs.Dependingon thedisc
you are using, these instructions may vary slightly. Read the instructions carefully before using.
¢: : d
C_ ::.) CZ:) CZ:)
the Video Format
%
and DVD Player with a Single Remote Control
Turn off the main unit and then press NTSC/PAL
• By default, the video format is set to "NTSC".
• Each time the button is pressed, the video format switches between "NTSC"
and "PAL".
• Each country has a different video format standard.
• For normal playback, the video format of the disc must be the same as the
video format of your TV.
Press MODE button.
• Each time the Mode button is pressed, the TV indicator (red) and the DVD RECEIVER indicator (green) will flash alternately.
• You can operate the TV while the TV indicator is flashing and the DVD player while the DVD indicator is flashing.
• Buttons Enabled for TV Operation: POWER, CHANNEL, VOLUME, TV/VlDEO, and Numeric (0-9) buttons.
• By default, the remote control is set to work with Samsung TVs.
See page 63 for more information on the operation of the remote control.
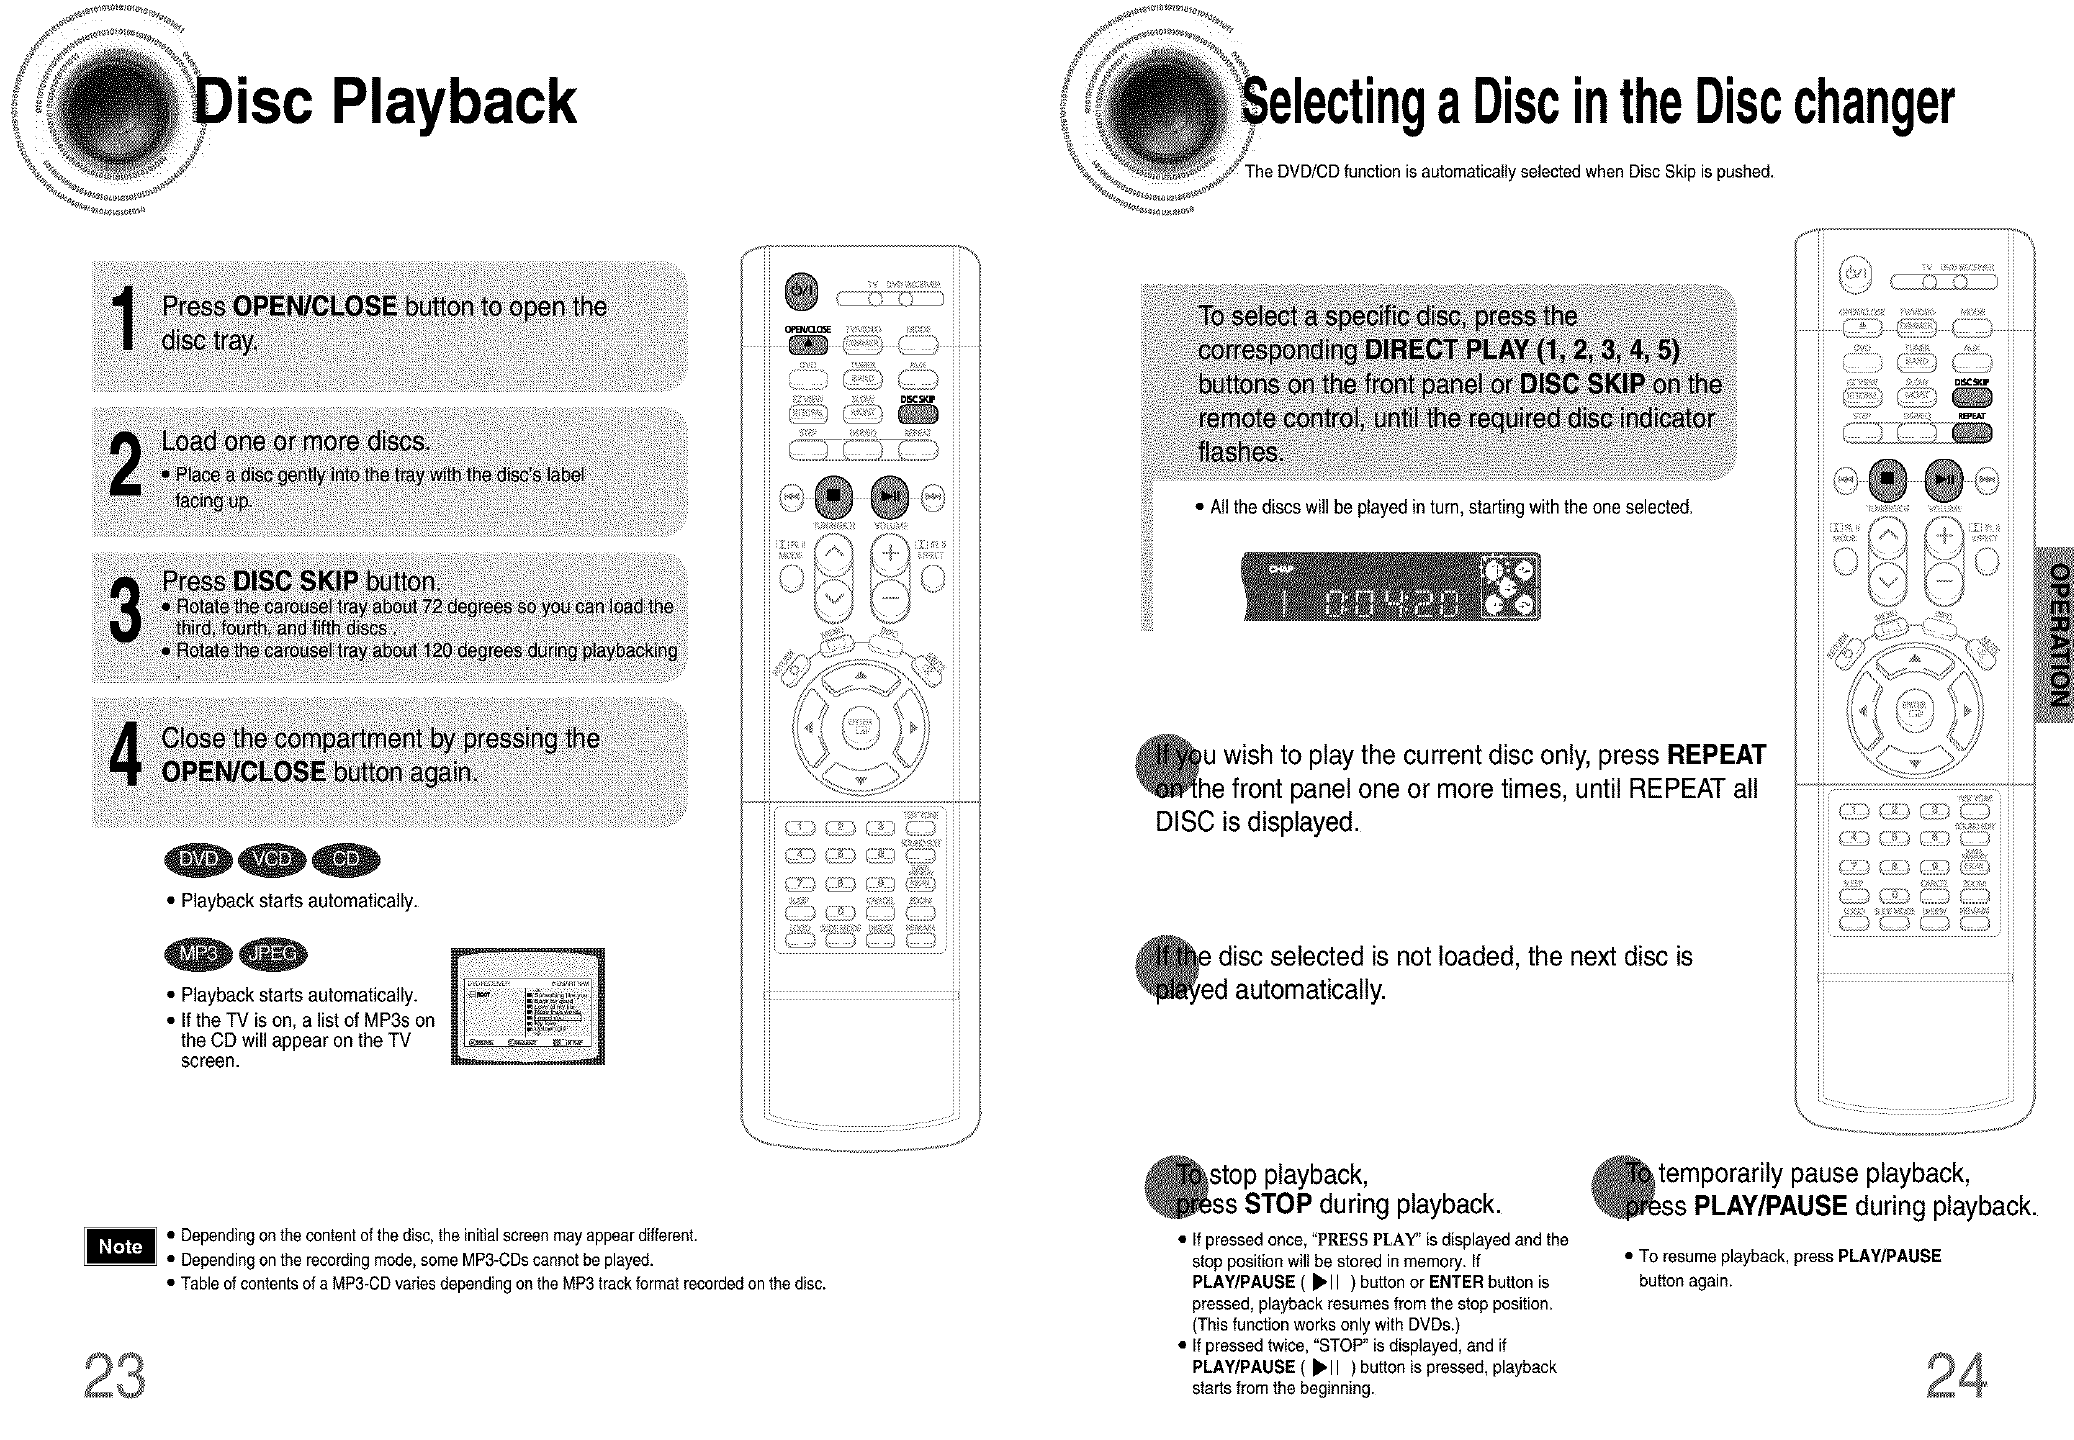
Playback aDiscintheDiscchanger
is automatically selected when Disc Skip is pushed.
• Playback starts automatically.
• Playback starts automatically.
• Ifthe TV is on, a list of MP3s on
the CD will appear on the TV
screen.
• Allthe discswill beplayed inturn, startingwiththe oneselected.
Oh u wish to the current disc REPEAT
play only, press
e front panel one or more times, until REPEAT all
DISC is displayed.
_e disc selected is not the next disc is
loaded,
d automatically.
i i ,/ ...............
,W[{%
• Dependingon the contentof the disc, the initialscreenmay appeardifferent.
on the recordingmode,some MP3-CDscannotbe played.
• Tableof contentsof a MP3-CDvariesdepending onthe MP3 trackformat recordedonthe disc.
stop playback,
STOP during playback.
• If pressed once, "PIESS PLAY" is displayed and the
stop position will be stored in memory. If
PLAY/PAUSE ( _'11 )button or ENTER button is
pressed, playback resumes from the step position.
(This function works only with DVDs.)
• If pressed twice, "STOP" is displayed, and if
PLAY/PAUSE ( _'11 ) button is pressed,playback
starts from the beginning.
temporarily pause playback,
PLAY/PAUSE during playback.
• To resume playback, press PLAY/PAUSE
button again.
O
O
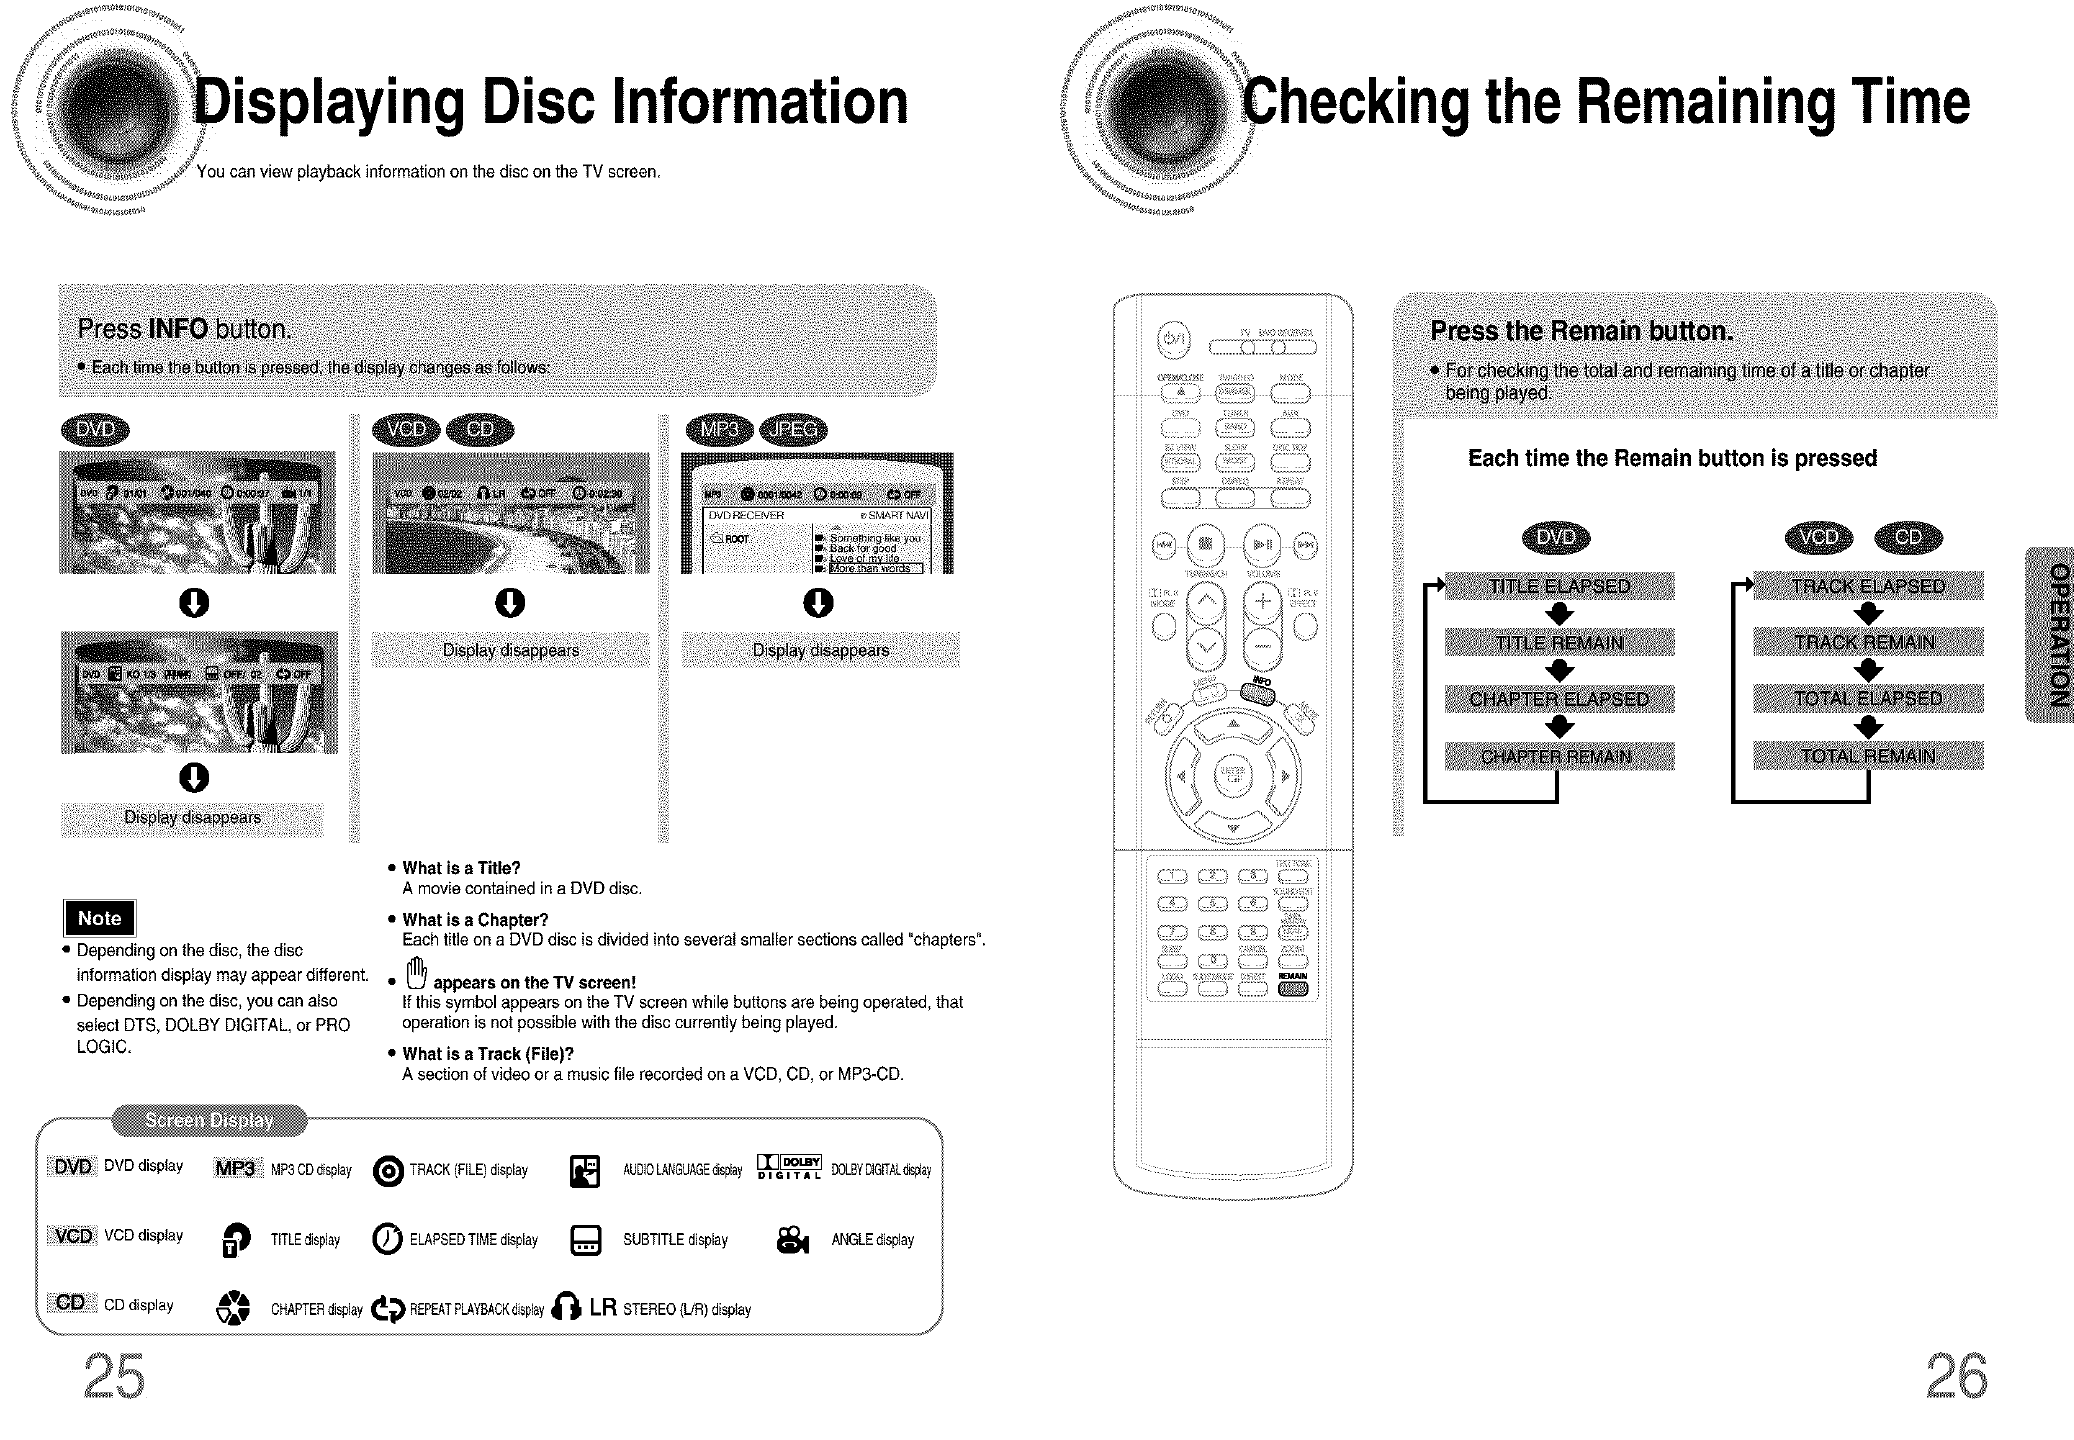
• Disc Information
playbackinformation on the disc on the TV screen.
O
theRemainingTime
iiiiii_
i!iiiii_
!iiiiiii
• Depending on the disc, the disc
information display may appear different.
• Depending on the disc, you can also
select DTS, DOLBY DIGITAL, or PRO
LOGIC.
DVD DVD display MP3CDdisplay
i!iiiii_
!iiiiiii
•What is a Title?
A movie contained in a DVD disc.
O
•What is a Chapter?
Each titleon a DVD disc is dividedinto several smaller sections called "chapters".
• _ appears on the 13/screen!
If this symbol appears on the TV screen while buttons are being operated, that
operation is not possiblewith the disc currently being played.
•Whatis aTrack(File)?
A sectionof videoora musicfile recordedon aVCD,CD,or MP3-CD.
_ TRACK(FILE)display ] AUDIOLANGUAGEdisplay[_[_ DOLBYDIGITAL_sp]ay
DIGITAL
.....................................C_
iti!
Each time the Remain button is pressed
41-
,e,
VCDdisplay TITLEdisplay Q ELAPSEDTIMEdisplay {_ SUBTITLEdisplay _ ANGLEdisplay
Playback
_._. Fast Playback,
iti!
,o.
,o.
,o.
,o.
_._. Slow Playback
'41,
'O"
,O"
'O"
1__
'41,
• Reverse slow playback does not work with VCDs.
"pping Scenes/Songs
,,,il
When watchinga VCD with a track
longer than 15 minutes, each time
_ is pressed playback
will sk,pb_eko,,er_,d_minu,es
,0,
Playback
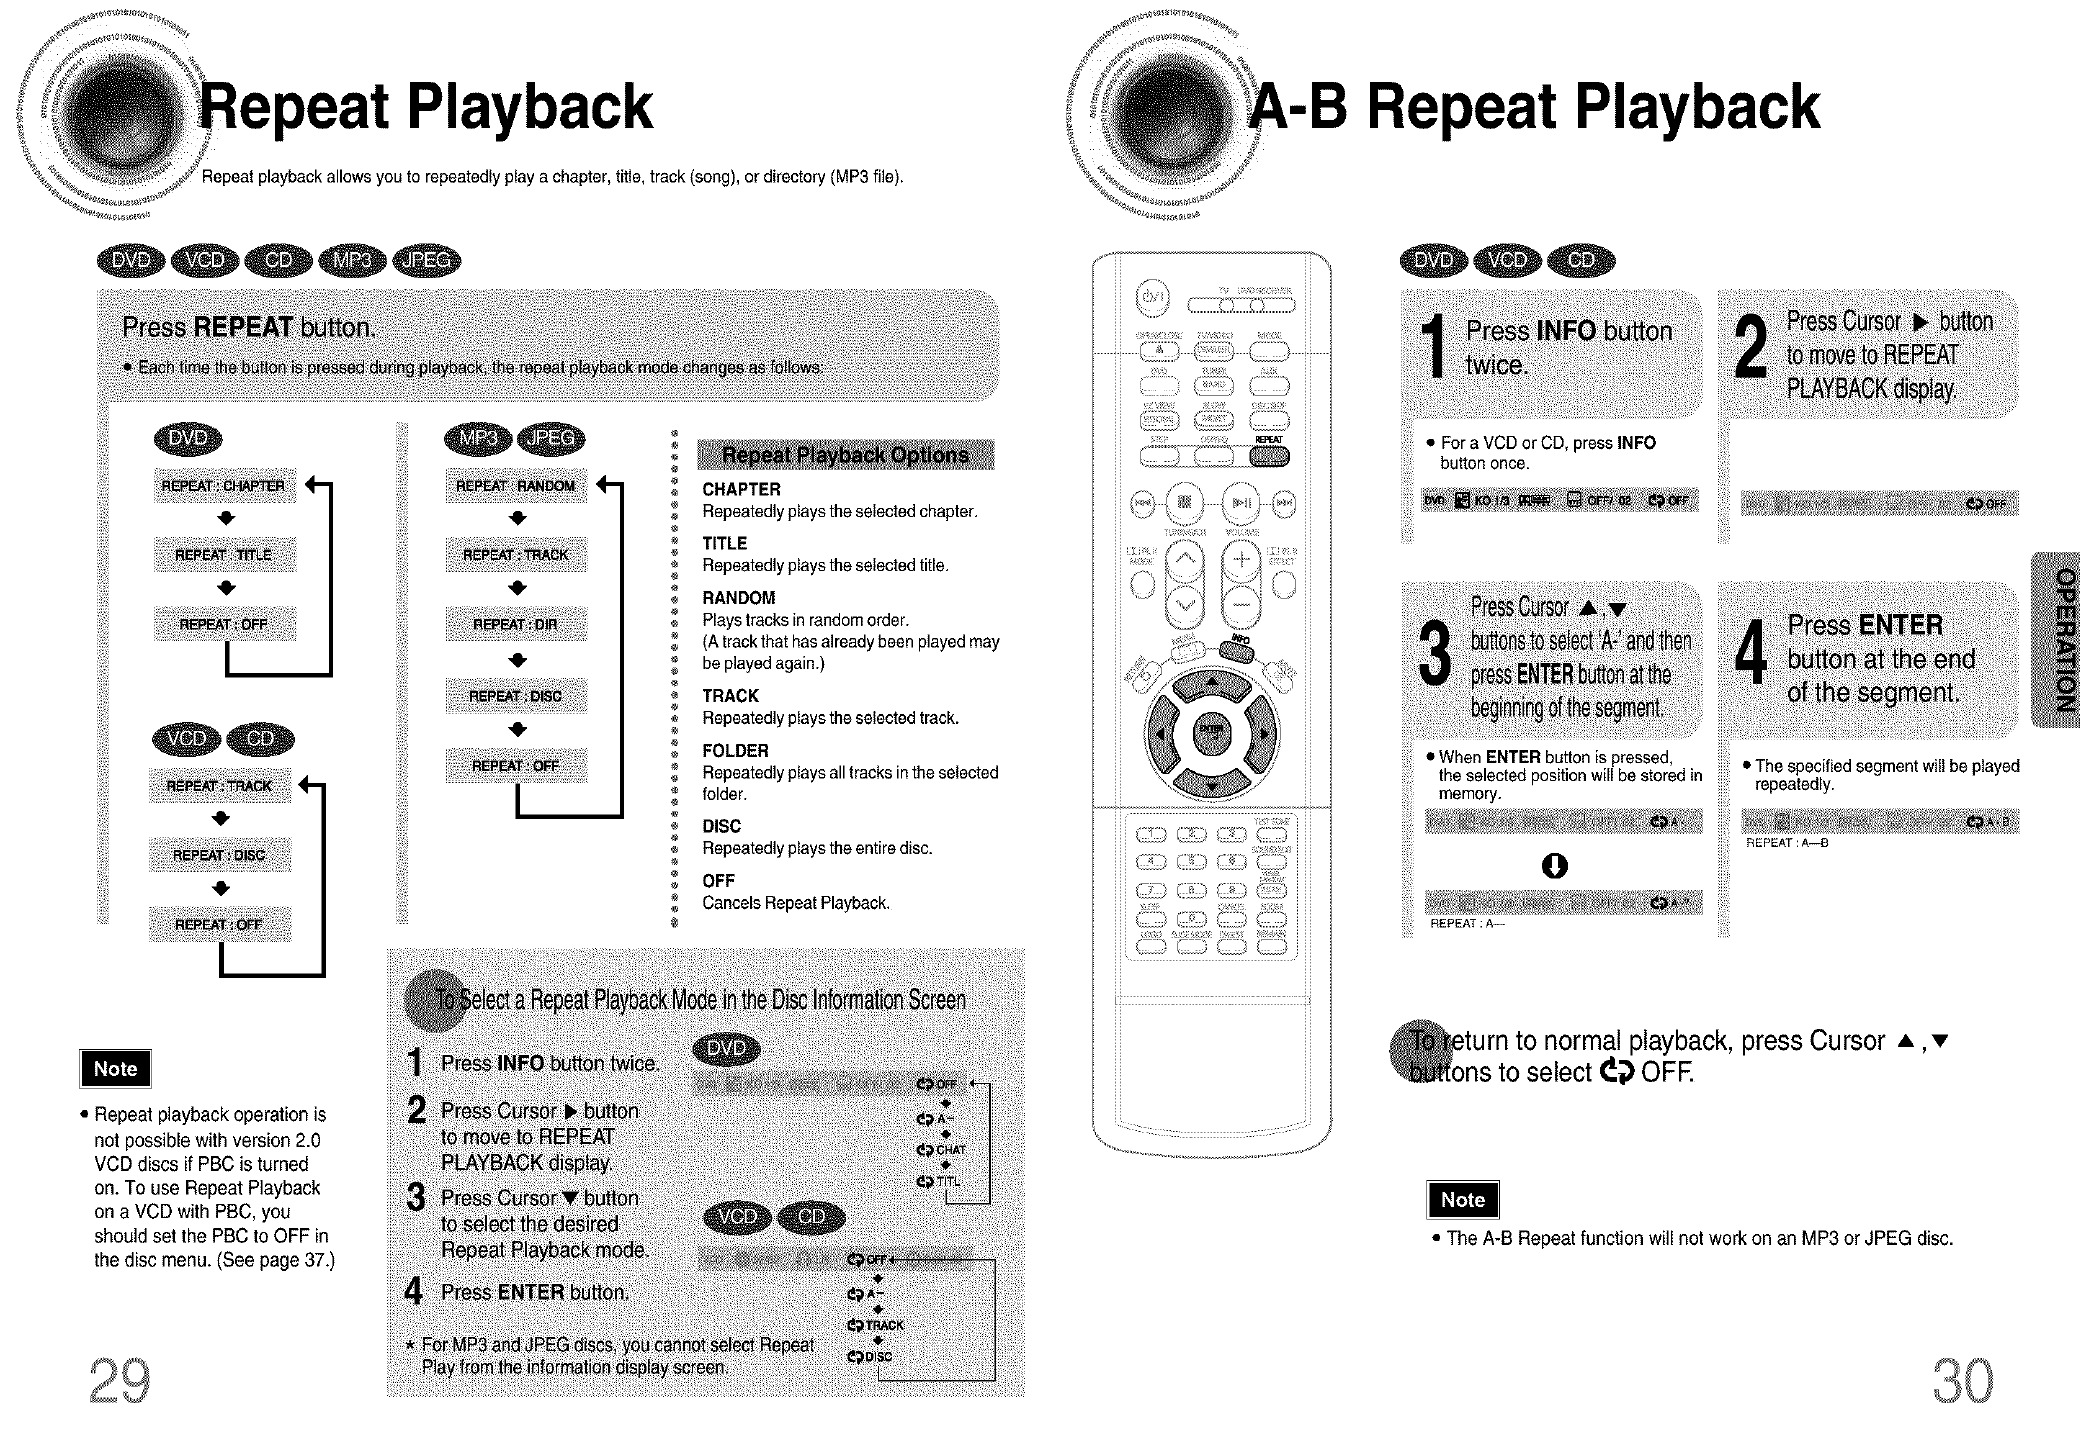
you to repeatedly playa chapter, title, track (song), or directory (MP3 file).
Repeat Playback
ill!
•Repeat playback operation is
not possible withversion 2.0
VCD discs if PBC is turned
on. To use Repeat Playback
on a VCD with PBC, you
should set the PBC to OFF in
the disc menu. (See page 37.)
CHAPTER
Repeatedly playsthe selected chapter.
TITLE
Repeatedly playsthe selected title.
RANDOM
Plays tracks in random order.
(A track that has already been played may
be played again.)
TRACK
Repeatedly playsthe selected track.
FOLDER
Repeatedly playsall tracks inthe selected
folder.
@DISC
Repeatedly playsthe entire disc.
OFF
Cancels Repeat Playback.
ii ii
,k i i i
? g <; :
¢°°_? C) c ,
2g_ 5{({i g*
(-?r,i _@(_
• For a VCD or CD, press INFO
button once.
• When ENTER button is pressed, • The specified segment will be played
memory.theselected position willbe stored in repeatedly.
REPEAT : A--_
Oii!_!
REPEAT :A--
to normal playback,press Cursor A, •
to select _{) OFE
• The A-B Repeat function will not work on an MP3 or JPEG disc.
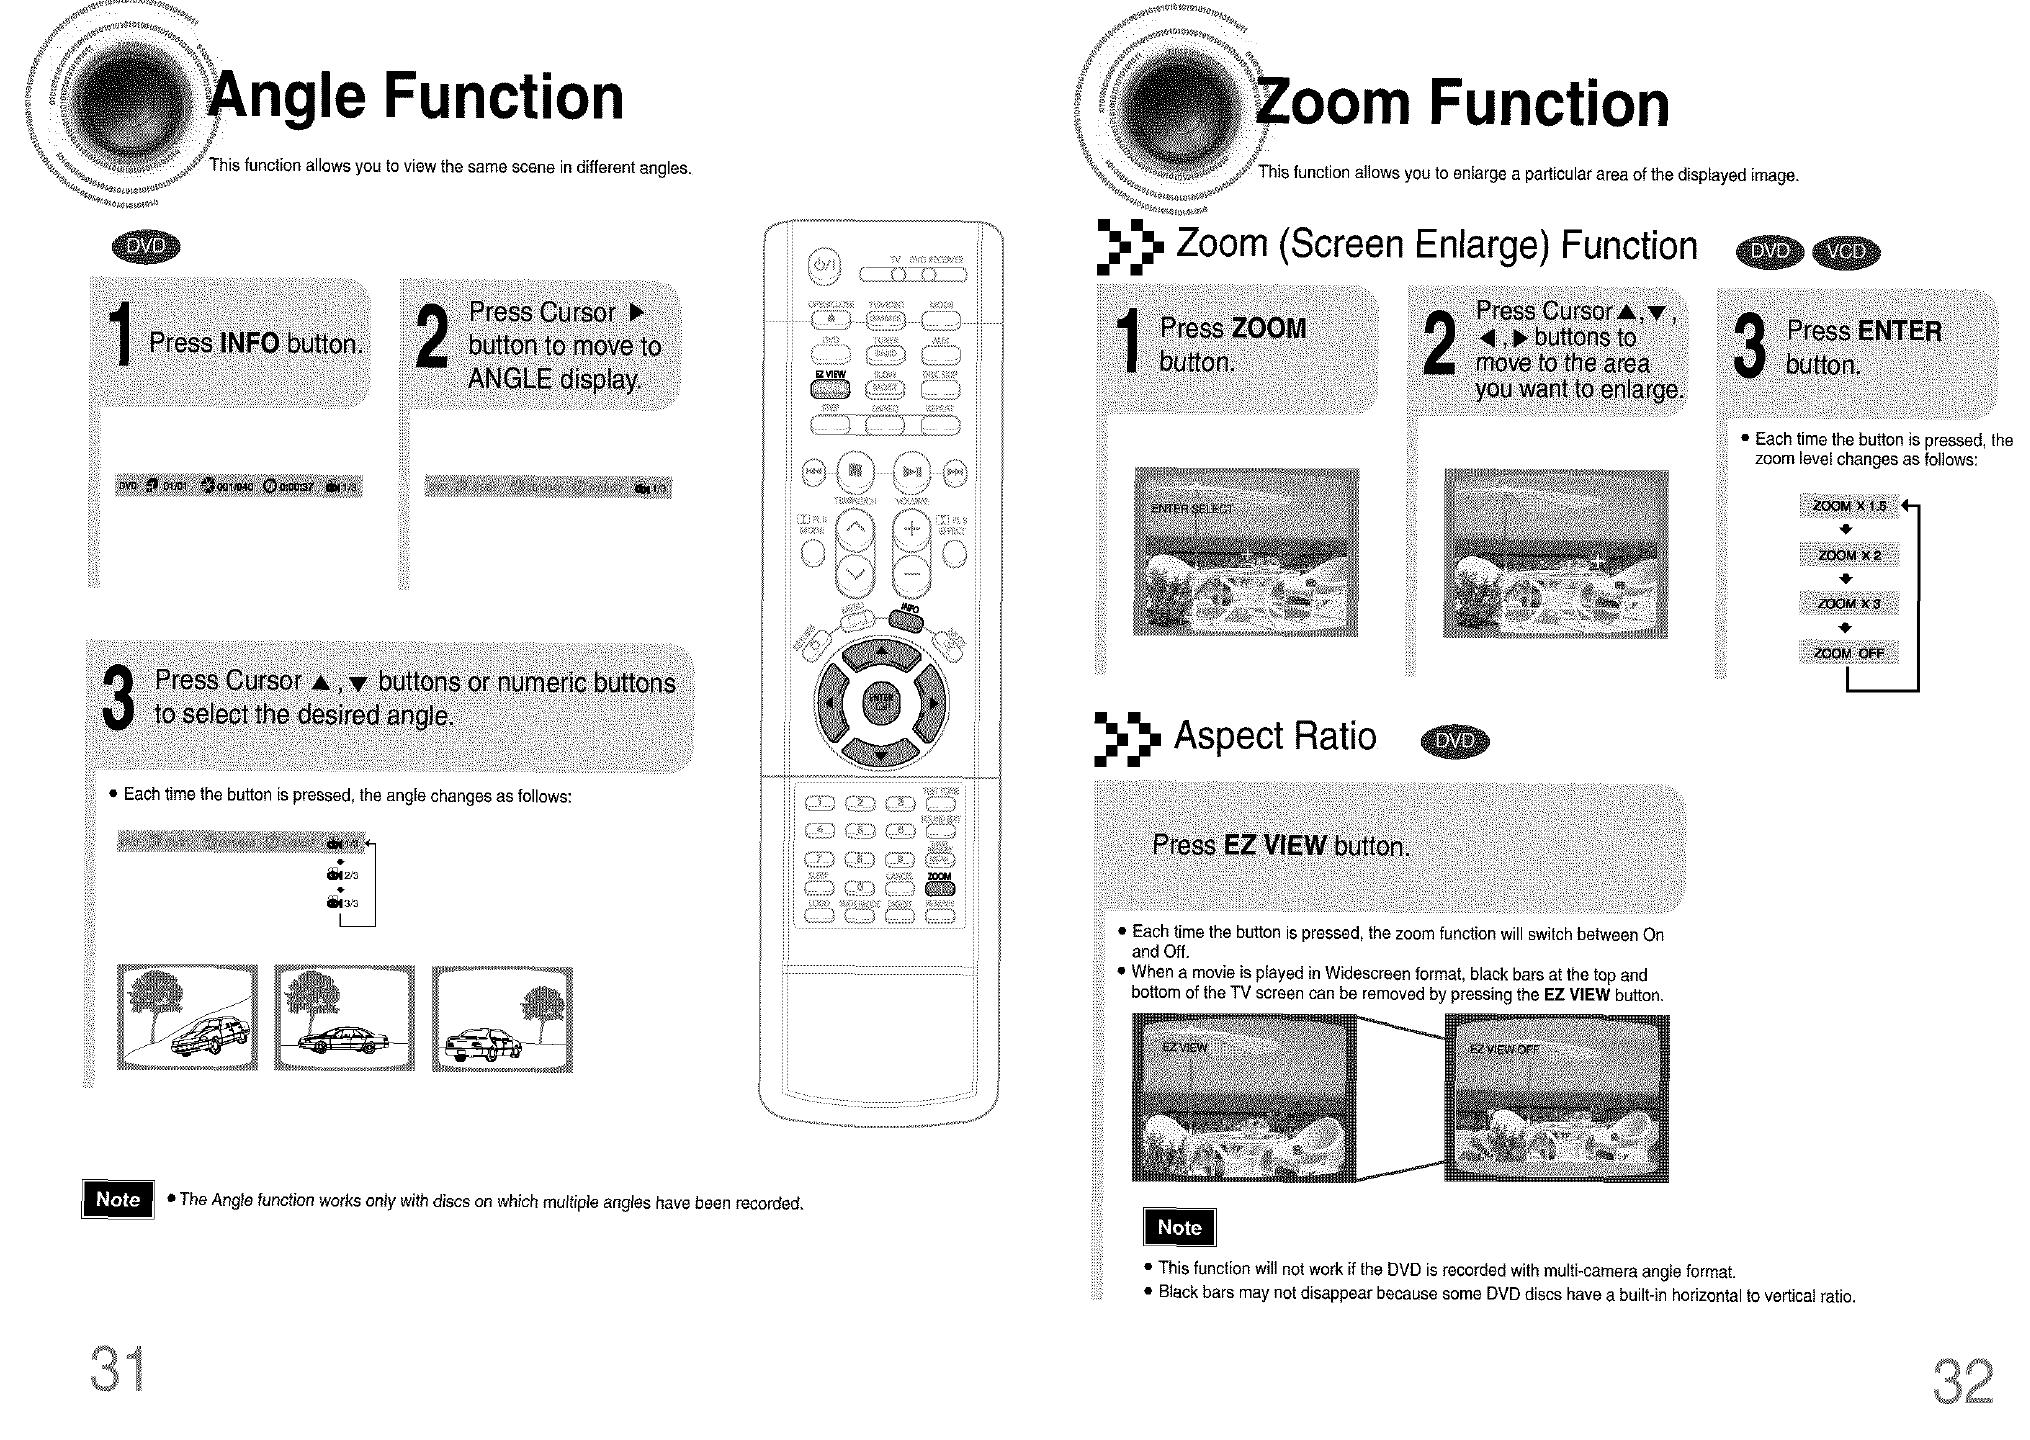
Function Function
This function allows you to view the same scene in different angles.
¢
function allows you to enlarge a particular area of the displayed image.
iiiii!ii
iiiiii_ii_il
• Each time the button is pressed,the angle changes as follows:
ili!!i!
_ !>:,, (-i)
Zoom (Screen Enlarge) Function
ililili
Aspect Ratio
• Each time the button is pressed, the zoom function will switch between On
and Off.
• When a movie is played inWidescreen format, black bars at the top and
bottom of the TV screen can be removed by pressing the EZ VIEW button.
• Each time the button is pressed, the
zoom level changes as follows:
iiiii!ii
41-
• The Angle function works only with discs on which multiple angles have been recorded.
iii!iiJ_!i
iiii_iii
• This function willnot workif the DVD is recorded with multi-camera angle format.
• Black bars may not disappear because some DVD discs have a built-in horizontal to vertical ratio.
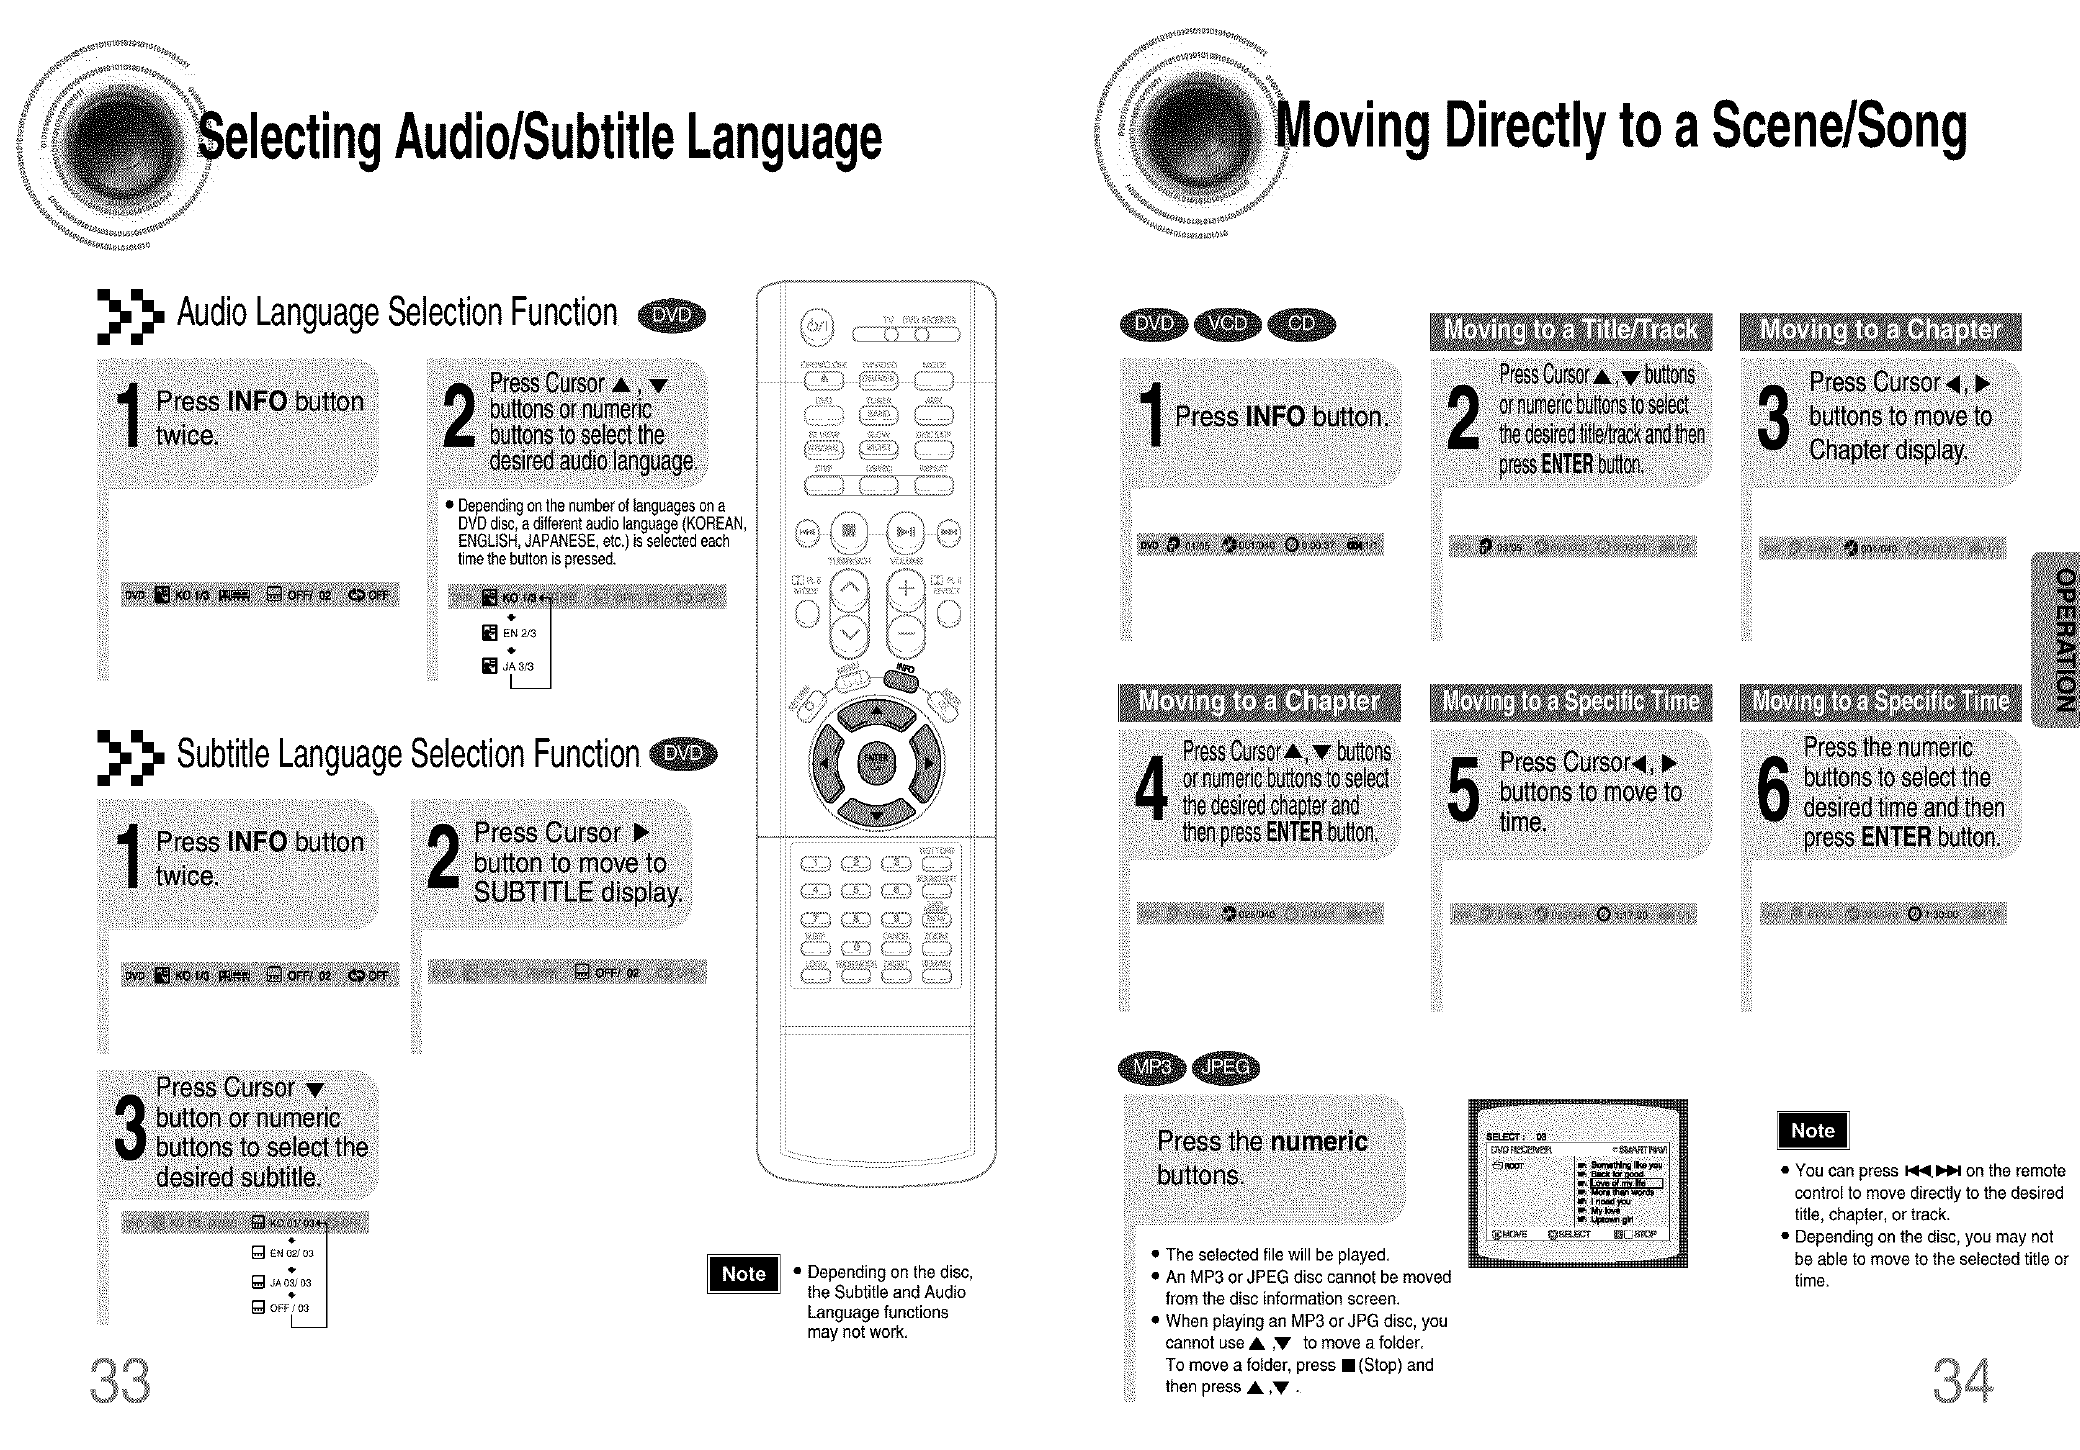
Audio/SubtitleLanguage DirectlytoaScene/Song
_._. AudioLanguageSelectionFunction
iiiiiiil
• Dependingonthenumberof languagesona
DVDdisc,adifferentaudiolanguage(KOREAN,
ENGLISH,JAPANESE,etc.)is selectedeach
timethebuttonis pressed.
"}1!
_._. SubtitleLanguageSelectionFunctionq
!!ii!iii
_:i_-) /¸_¸) _Z_ /_--_ i
• Depending on the disc,
the Subtitle and Audio
Language functions
may not work.
iiiiiiil
• The selected file will be played.
• An MP3 or JPEG disc cannot be moved
from the disc information screen.
• When playing an MP3 or JPG disc, you
cannot use• ,'V to move a folder.
To move a folder, press ==(Stop) and
then press • ,V •
ii!iiii
ii!i_i!iiii
• You can press _1_1.1_1_on the remote
control to move directly to the desired
title, chapter, or track.
• Depending on the disc, you may not
be able to move to the selected title or
time.
File Playback
with a digital camera or camcorder, or JPEG files on a PC can be
stored on a CD and then played back with this DVD player.
_._. Slide Mode
• Each image is shown for 5 seconds before another image is displayed.
• Each time the button is pressed, the image makes the transition as follows:
From top to bottom
From bottom to top
Rectangular shape in the center
Vertical curtain shape
Eachtimea new image is displayed, slide modes
(1~11) will be randomly and automatically be applied.
Cancels the slide mode.
I_ I_ to skip to the next slide.
• Each time the button is pressed, the slide moves backward or forward.
_._. Digest Function
You can view 9 JPEG images on the TV screen.
• JPEGf,,esw,,,beehown,n
9 windows.
iiliii
: • The selected image is played for 5 seconds before moving to
the next image.
iigi
iiiJ!'i!
!_!!ii;
iiii!iil
i_i!i!_iii
O
iew the previous or next image with 9 windows, press _t_ I_.
_._. Rotate/Flip Function
• button: Flip Vettically
Original image
• button: Rotate 90°
Counterclockwise
• button: Rotate 90 ° Clockwise
• button: Flip Horizontally
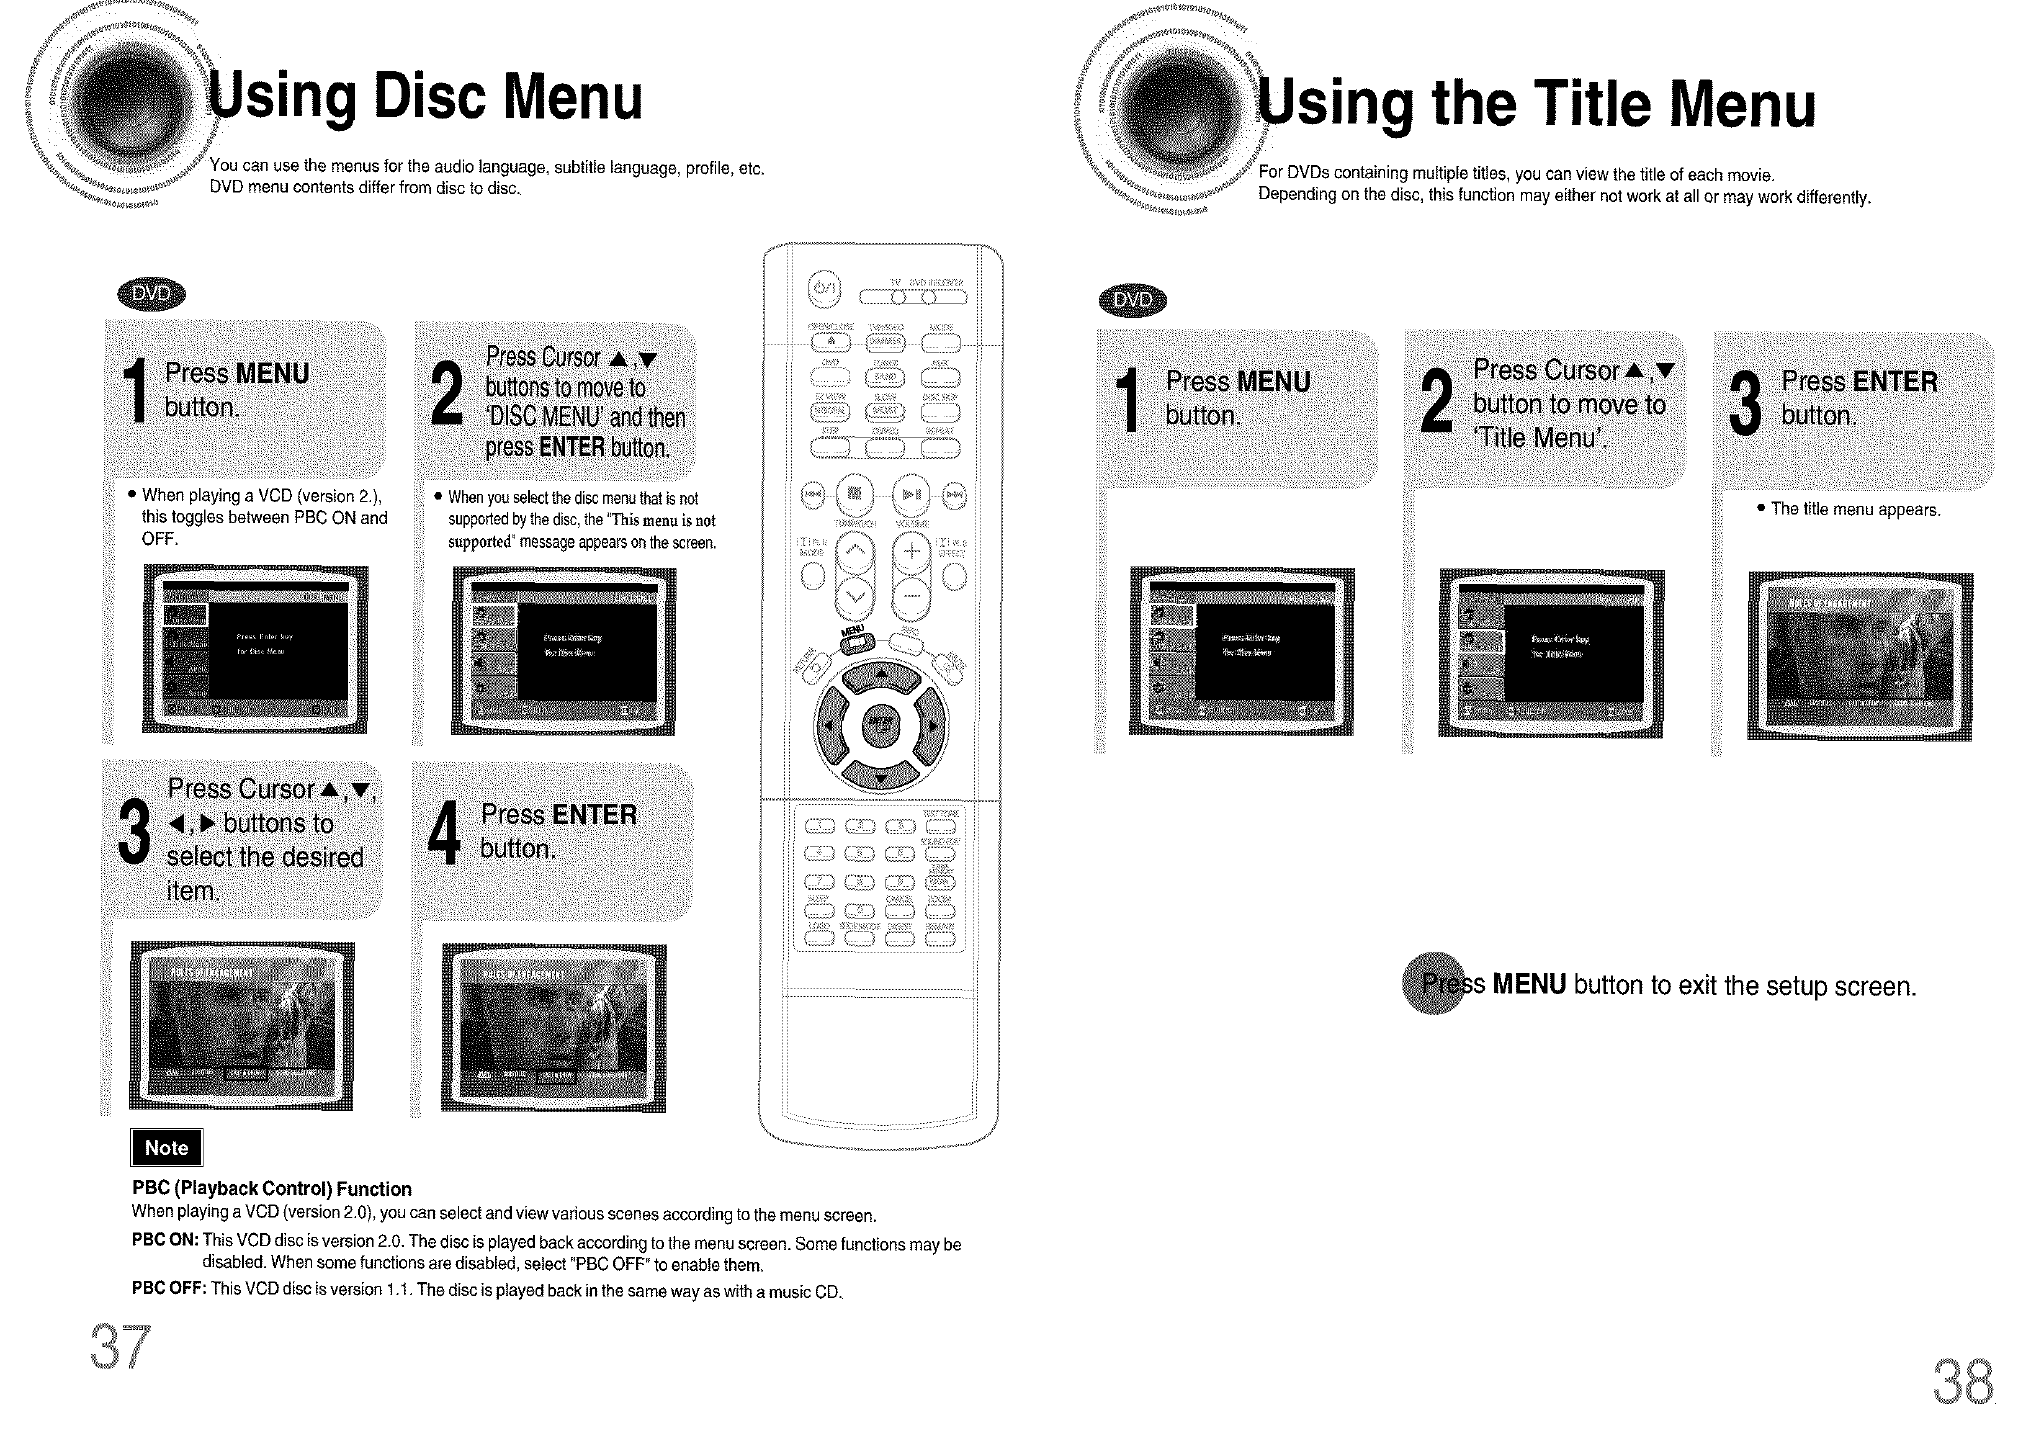
• DiscMenu " theTitle Menu
You can use the menus for the audio language,subtitle language, profile, etc.
DVD menu contents differ from disc to disc.
• When playing a VCD (version 2.),
this toggles between PBC ON and
OFF. iiii!!
• Whenyouselectthediscmenuthatisnot
supportedbythedisc,the"Thismenub not
supported"messageappearsonthescreen.
....................¢,_ i) J
PBC (Playback Control) Function
Whenplayinga VCD (version2.0), youcanselectand viewvariousscenesaccording tothemenu screen.
PBCON: ThisVCD discis version2.0. Thediscis playedback according tothe menu screen. Somefunctions may be
disabled. When some functions are disabled, select "PBC OFF"to enable them.
PBC OFF: This VCD disc isversion 1.1. The disc is playedback in the same way as with a music CD.
iiii!i'i!
jii!i!_!>i_
containing multiple titles, you can view the title of each movie.
Depending on the disc, this function may either not work at all or may work differently.
!ii!!;i
iiiiiiil
• The title menu appears.
L
MENU button to exit the setup screen.
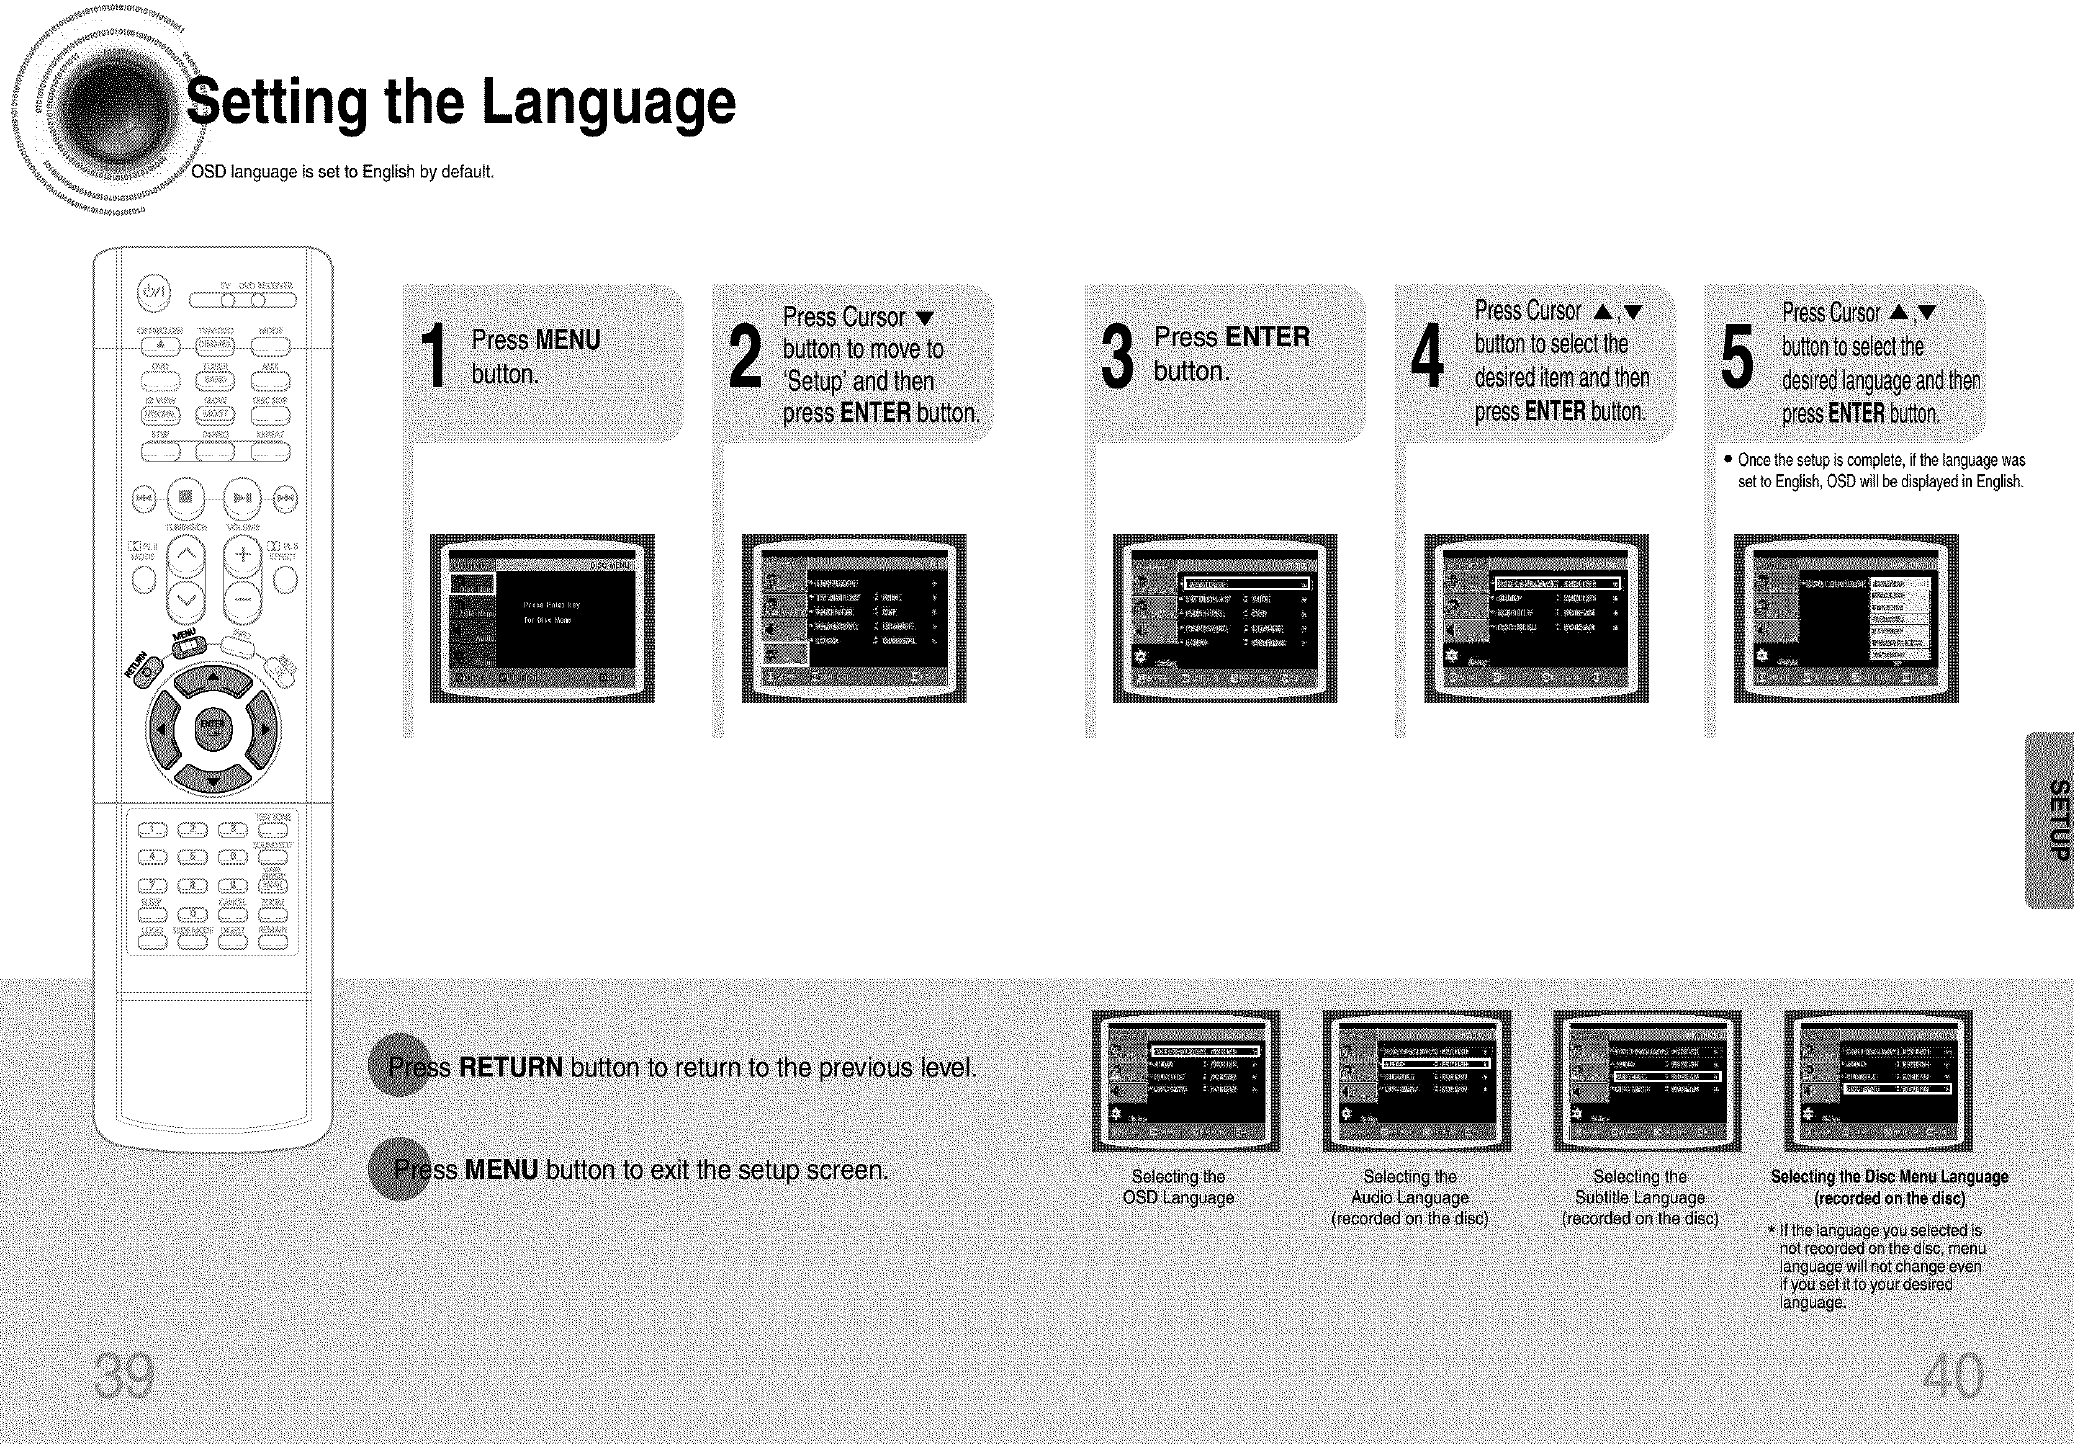
"ngthe Language
eis set to English by default.
ii!?i
iiiiii!!
iiiiii!! iiiii!i'i!
i_i!i!_iii
• Oncethesetupiscomplete,ifthelanguagewas
setto English,OSDwillbedisplayedinEnglish.
iiii!ili
ii!!i{ii
iiiii!!i_i!!
!if!ill'
_9_4__ _y_ _ i i
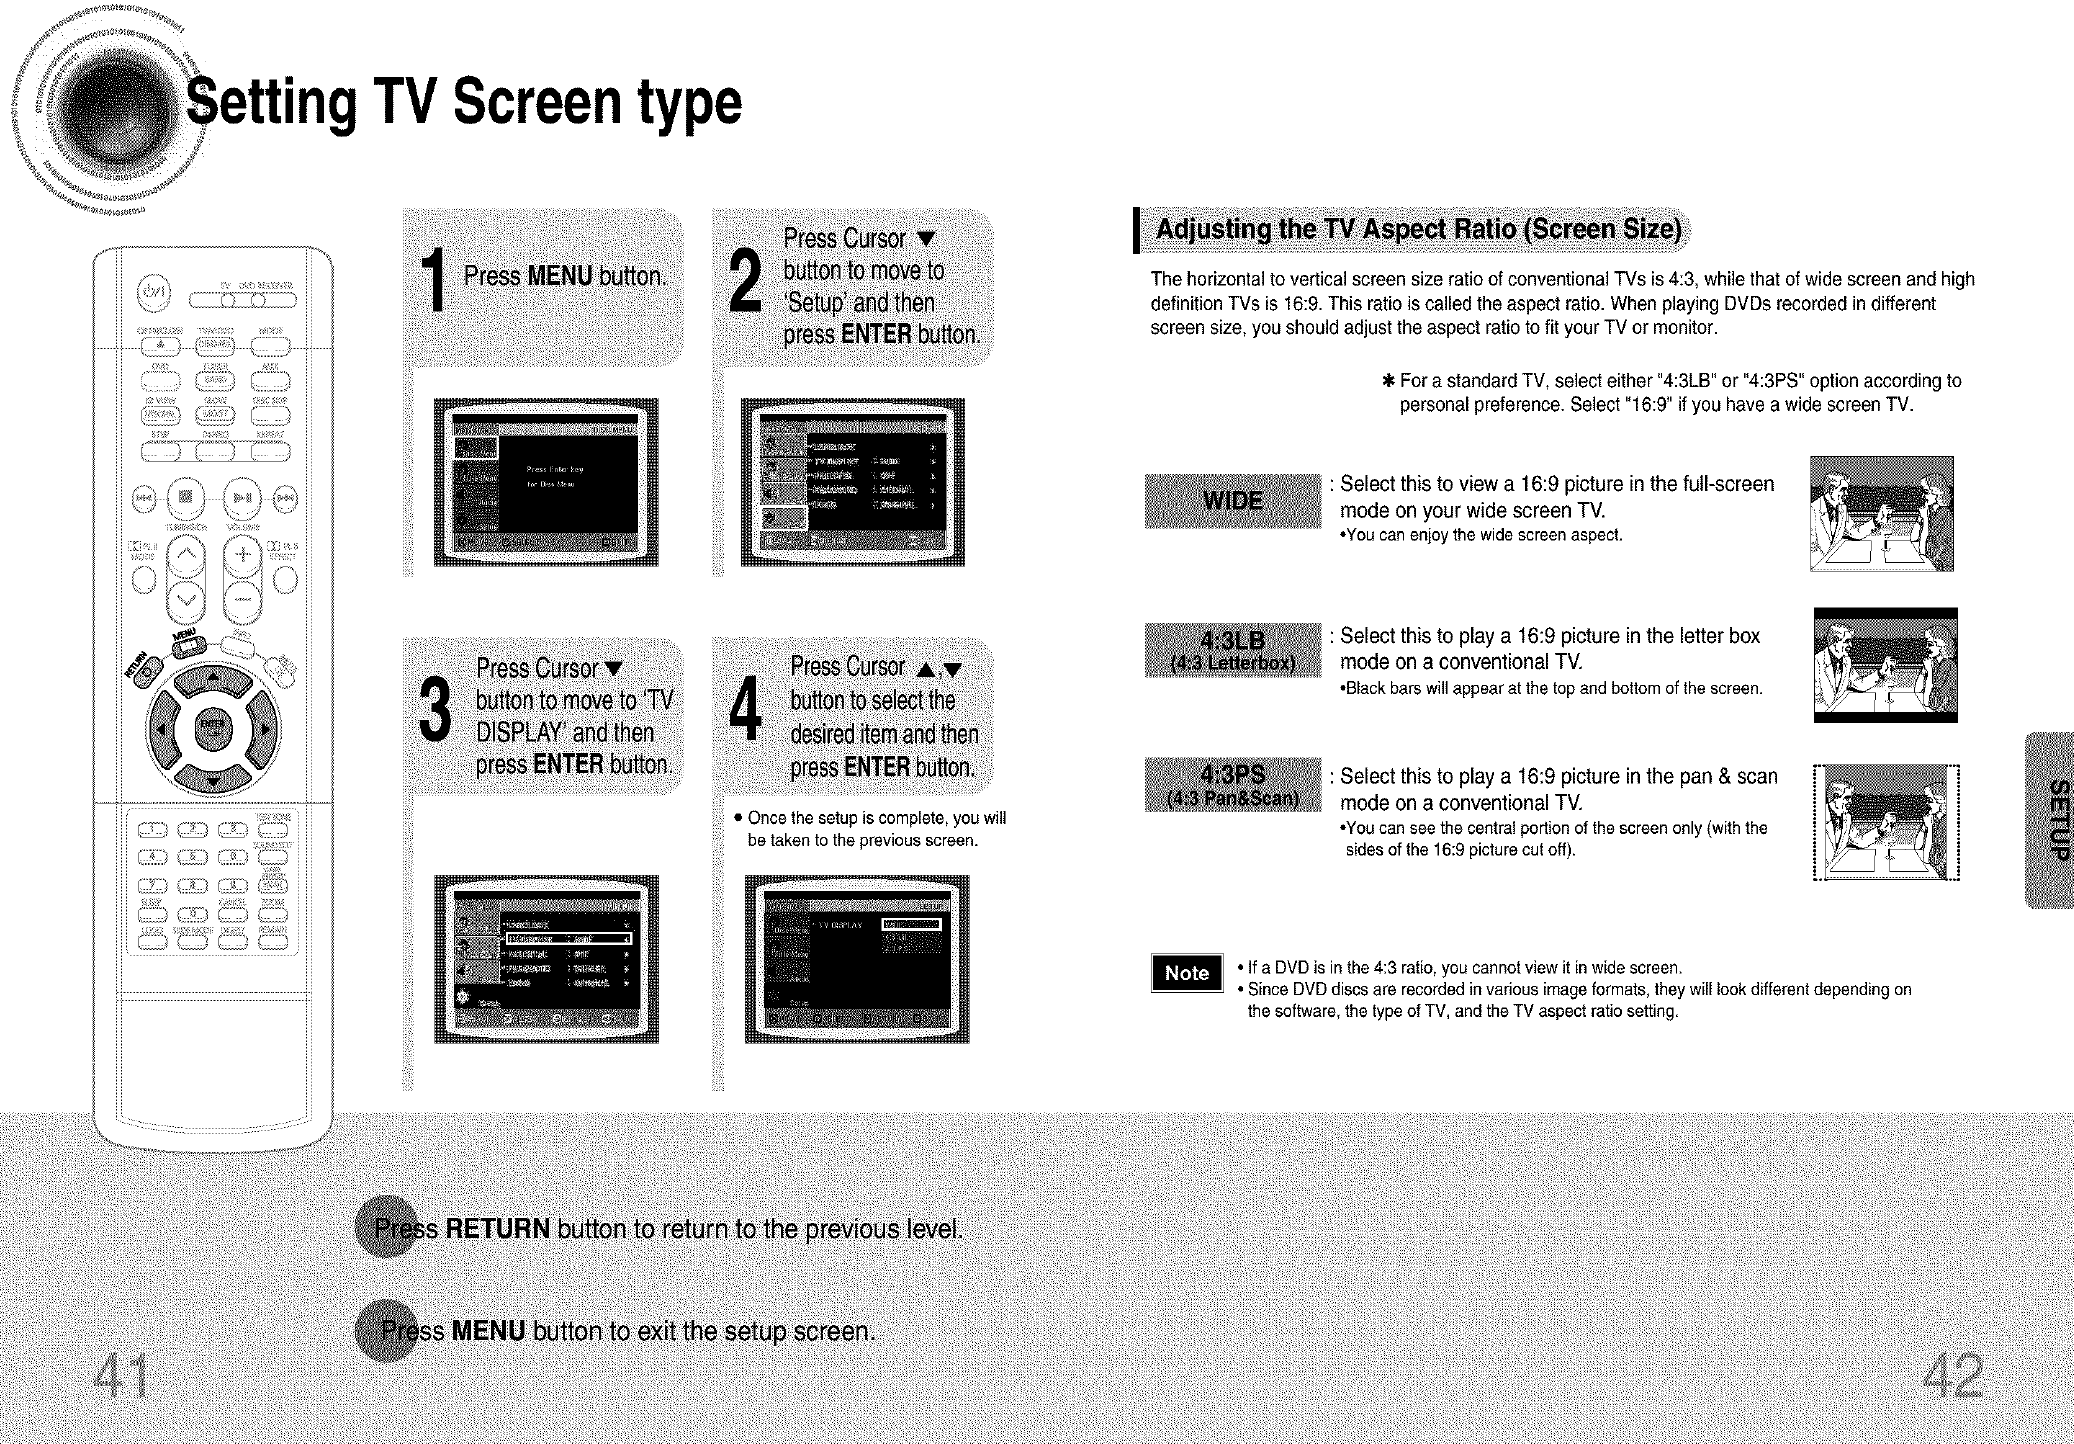
TVScreentype
• Once the setup is complete, you will
be taken to the previousscreen.
iiii_iiii
The horizontal to vertical screen size ratio of conventional TVs is 4:3, while that of wide screen and high
definition TVs is 16:9.This ratio is called the aspect ratio. When playingDVDs recorded in different
screen size, you should adjust the aspect ratio to fit your TV or monitor.
For a standard TV, select either "4:3LB" or "4:3PS" option according to
personalpreference.Select "16:9" if you have a wide screen TV.
: Select this to view a 16:9 picture in the full-screen
mode on your wide screen TV.
•Youcanenjoythe widescreenaspect.
: Select this to play a 16:9 picture in the letter box
mode on a conventional TV.
•Blackbarswill appearat the topandbottomof the screen.
: Select this to play a 16:9 picture inthe pan & scan
mode on a conventional TV.
•You can see the central portion of the screen only (with the
sides of the 16:9 picture cut off).
• If a DVD is in the 4:3 ratio, you cannot view it in wide screen.
• Since DVD discs are recorded in various image formats, they will look different depending on
the software, the type of TV, and the TV aspect ratio setting.
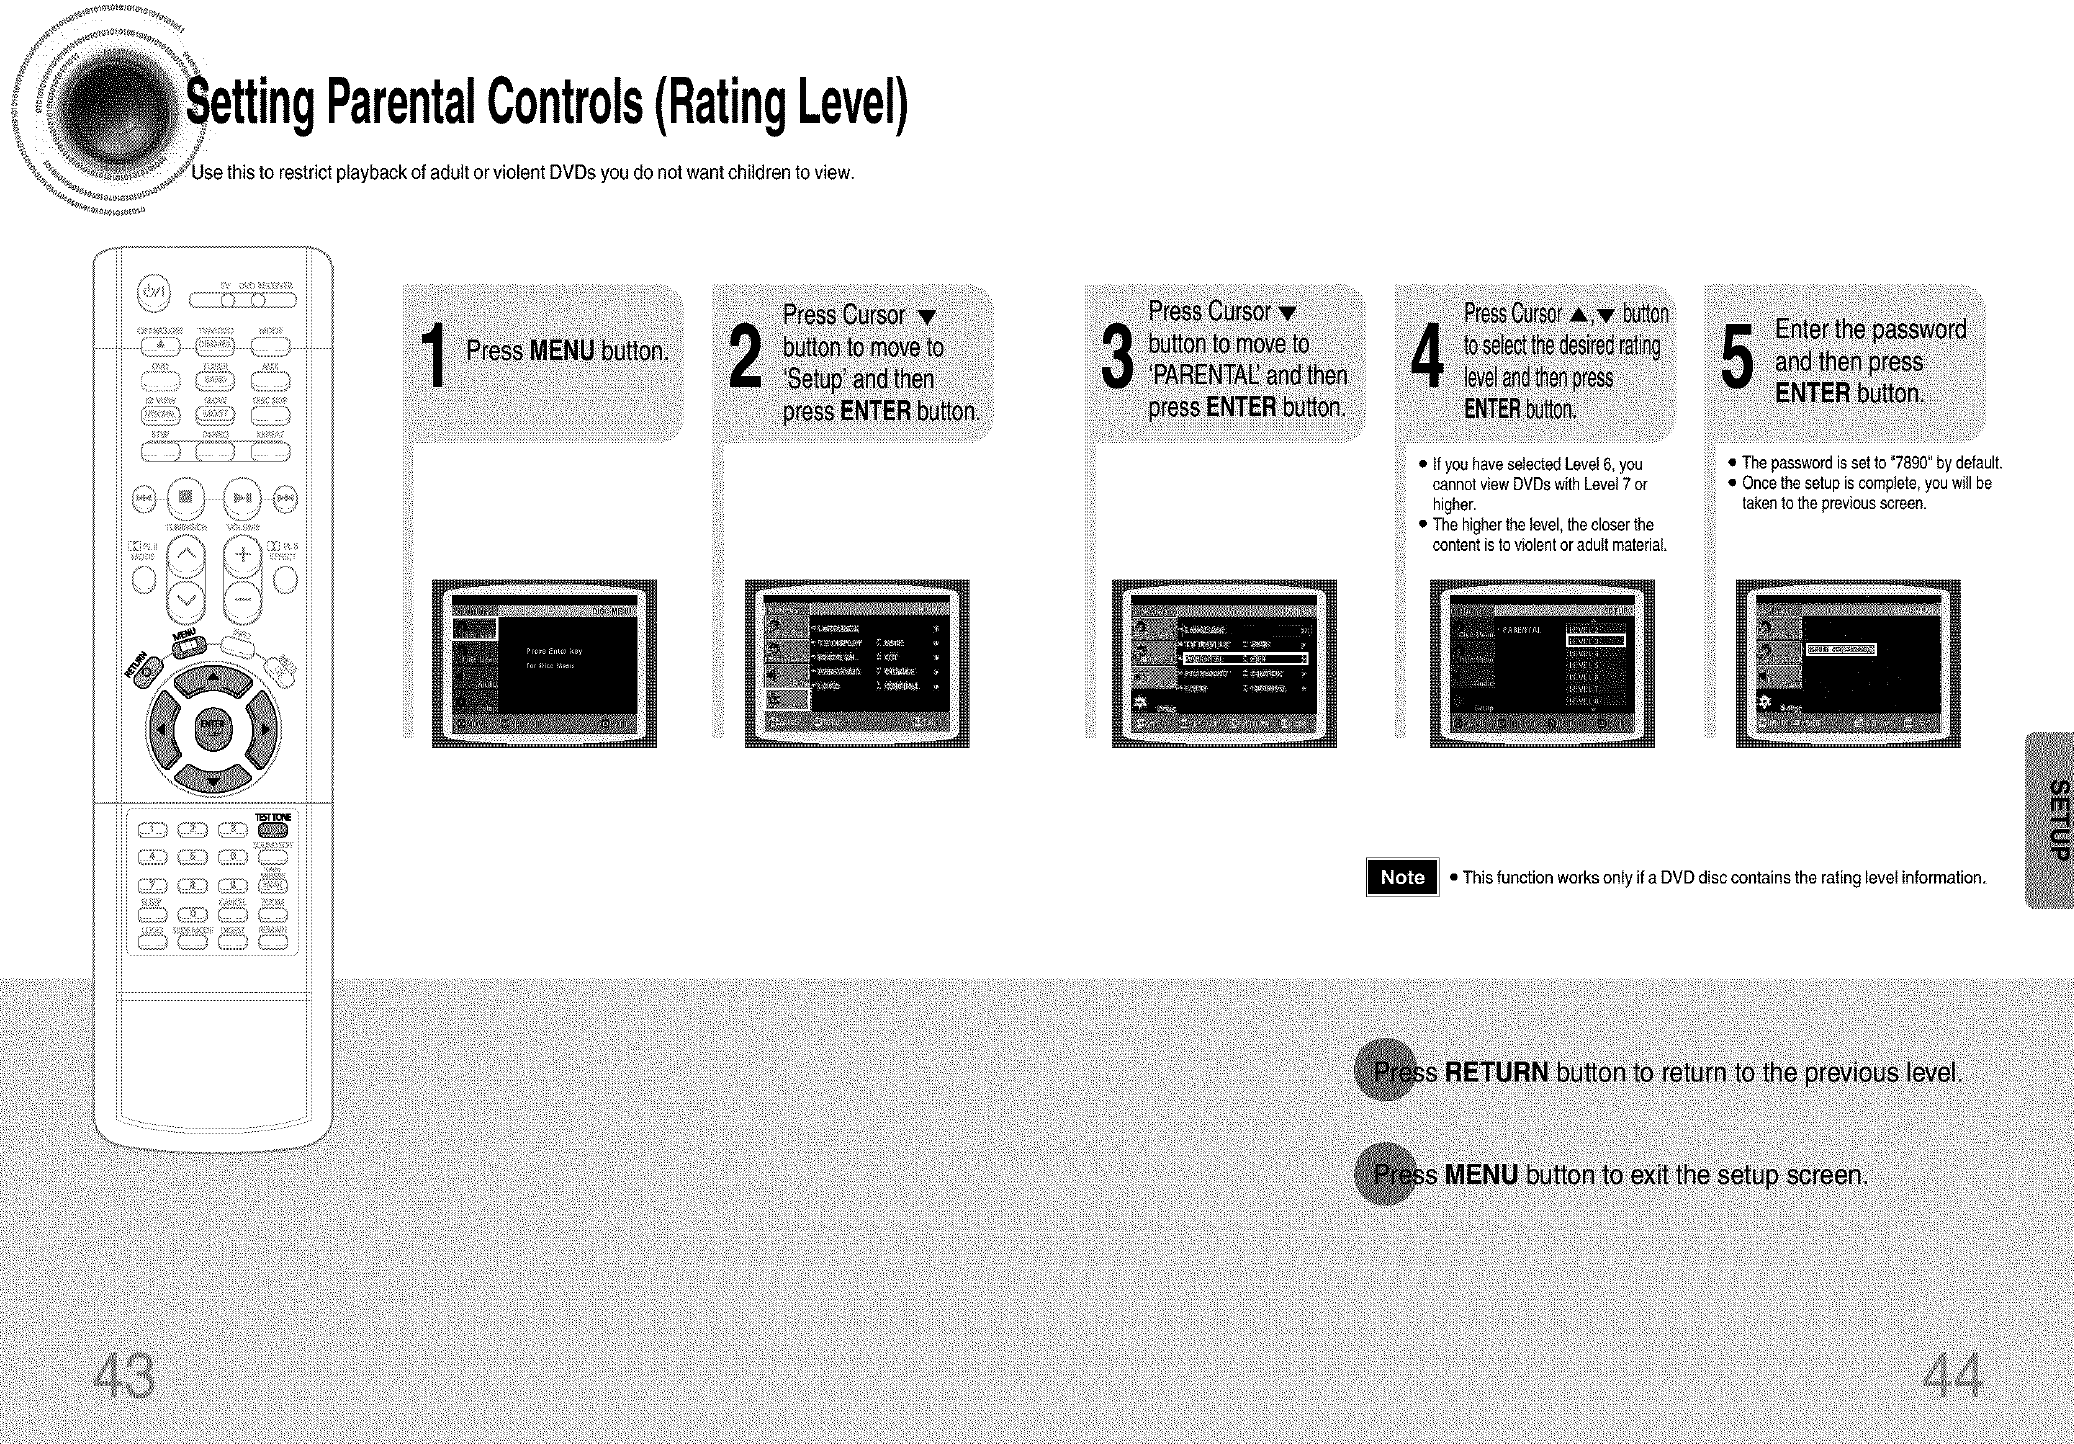
ParentalControls(RatingLevel)
playback of adult or violent DVDs you do notwantchildren to view.
iiiiii!!
iiiiii!! iiiii!i'i!
'_j_,_:_.,fyouhavese,ectedLevel6.you
cannotviewDVDswithLevel7 or
higher.
•The higherthe level,the closer the
content is to violentor adult material,
• Thepasswordis set to "7890"bydefault.
• Oncethesetupis complete,youwill be
takento thepreviousscreen.
ii!i!_iii
• This function works only if a DVD disccontains the rating level information.
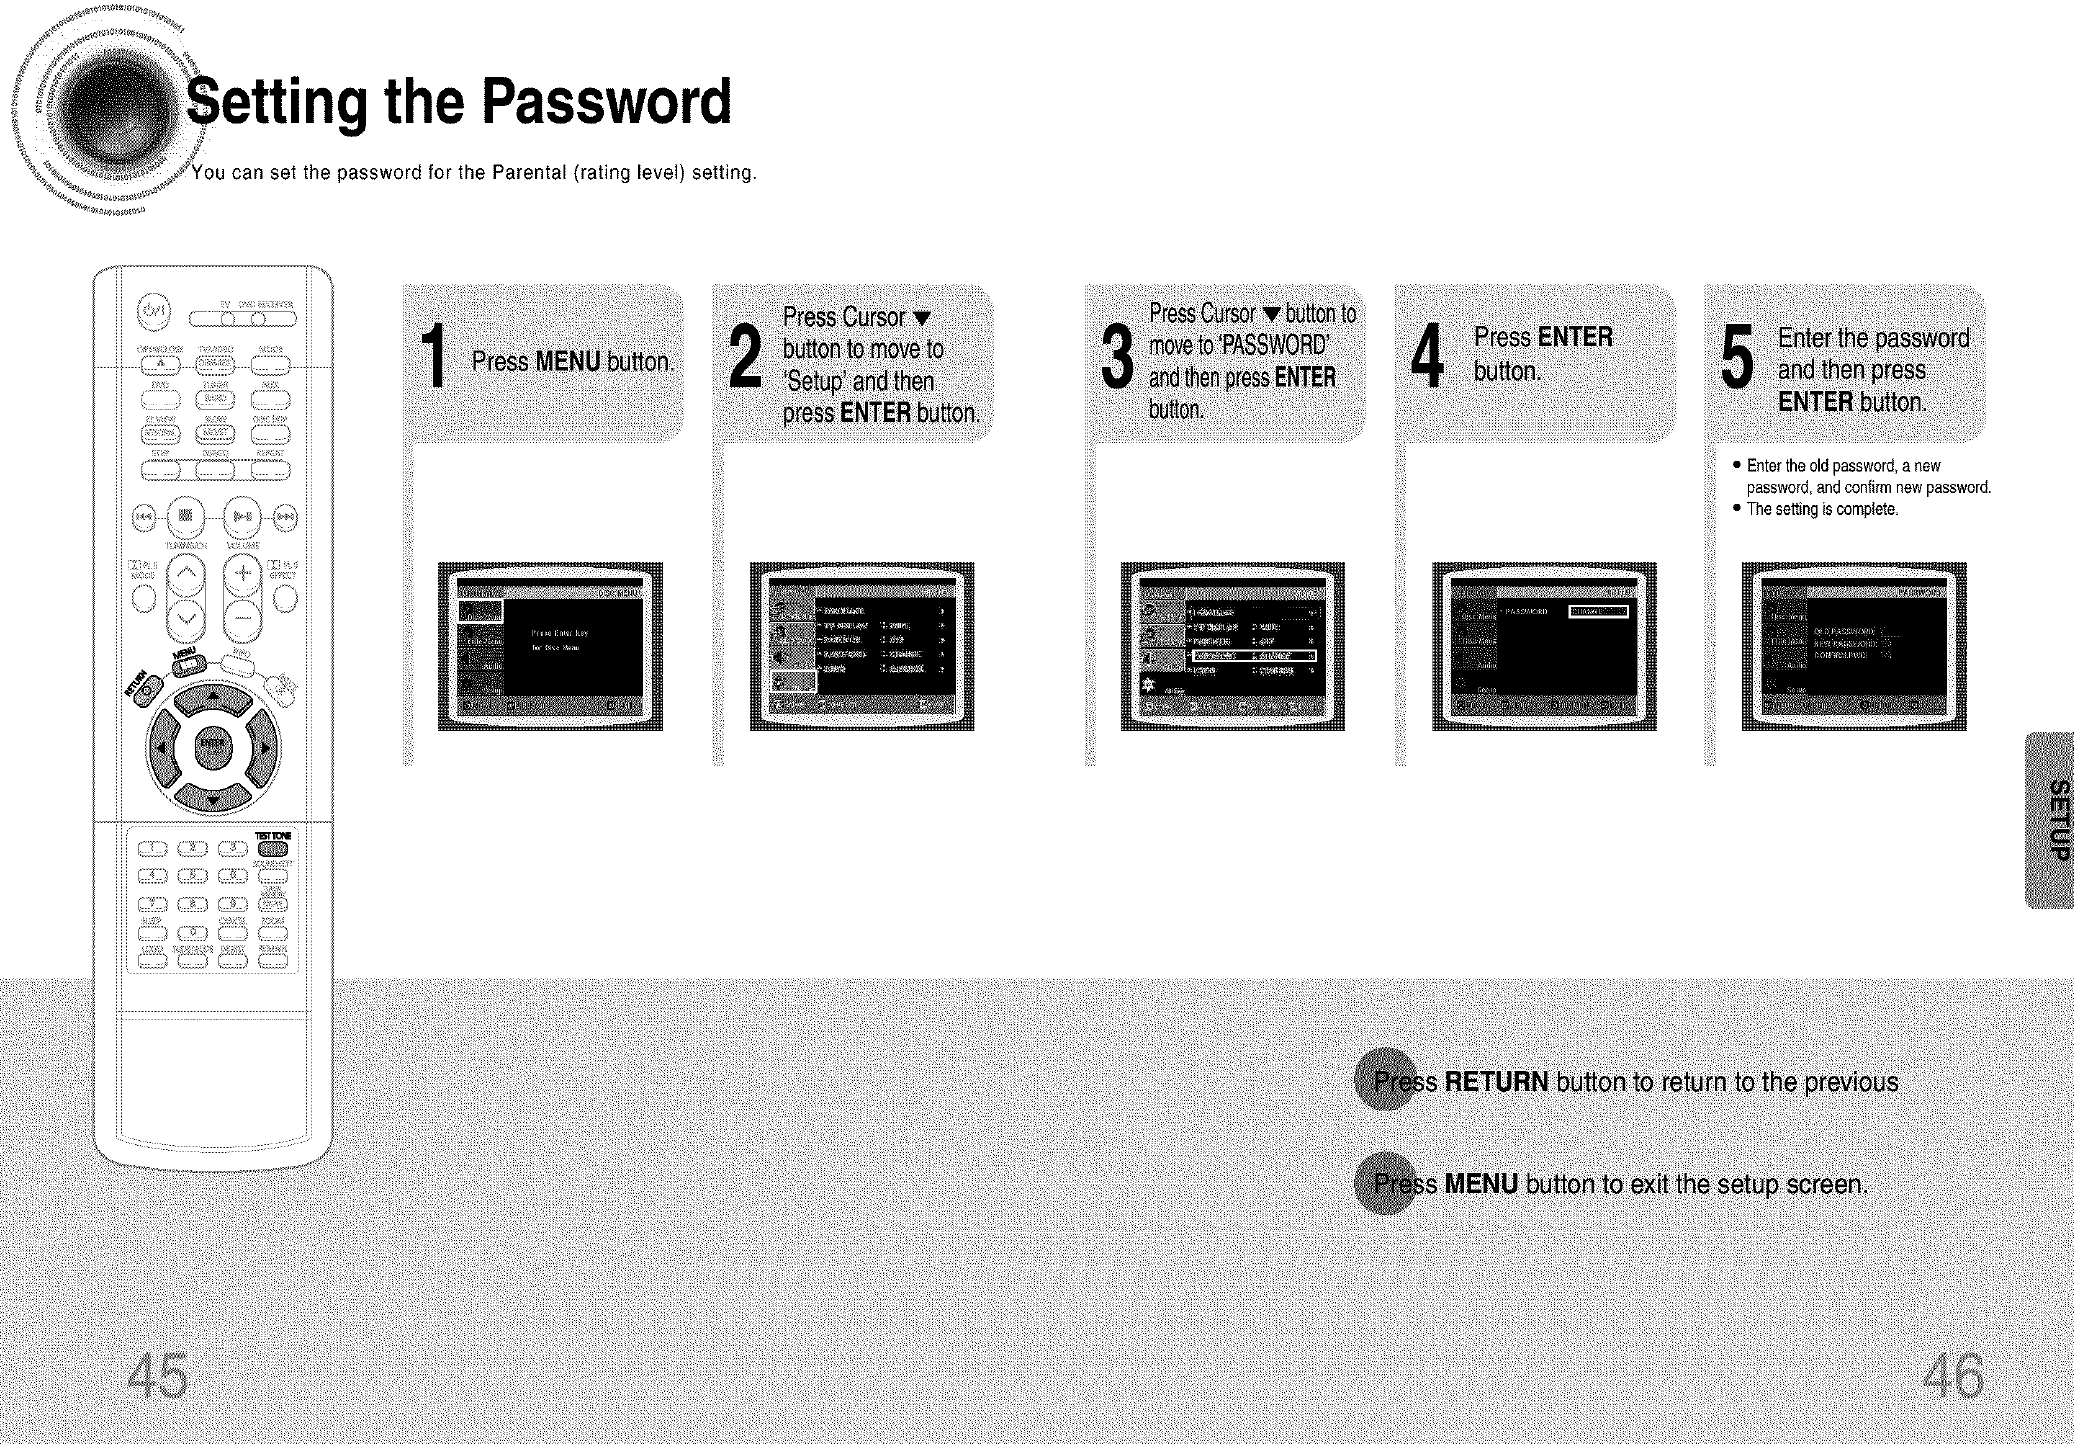
• the Password
can set the password for the Parental (rating level) setting.
_;IIIIIDt_
• Entertheold password,_,new
password,andconfirmnewpassword.• Thesettingiscomplete.

H
"ngthe Wallpaper
=ga DVD, VCD, or JPEG CD, you can set the image you like as a wallpaper.
iii(il
iiiii!
• "LOGOCOPYING"willbedisplayedonthe
!iiii
iii_i!iiii
iiiiii!!
i!iill iiiii
iiiii!
iiiii!
TVscreenfollowedby "LOGOCOPIED".
iiili
iiii!
ii(_!iiiiill
iilii
i!i,ii!ii!i
RETURN button to return to the previous level.
MENU button to exit the setup screen.
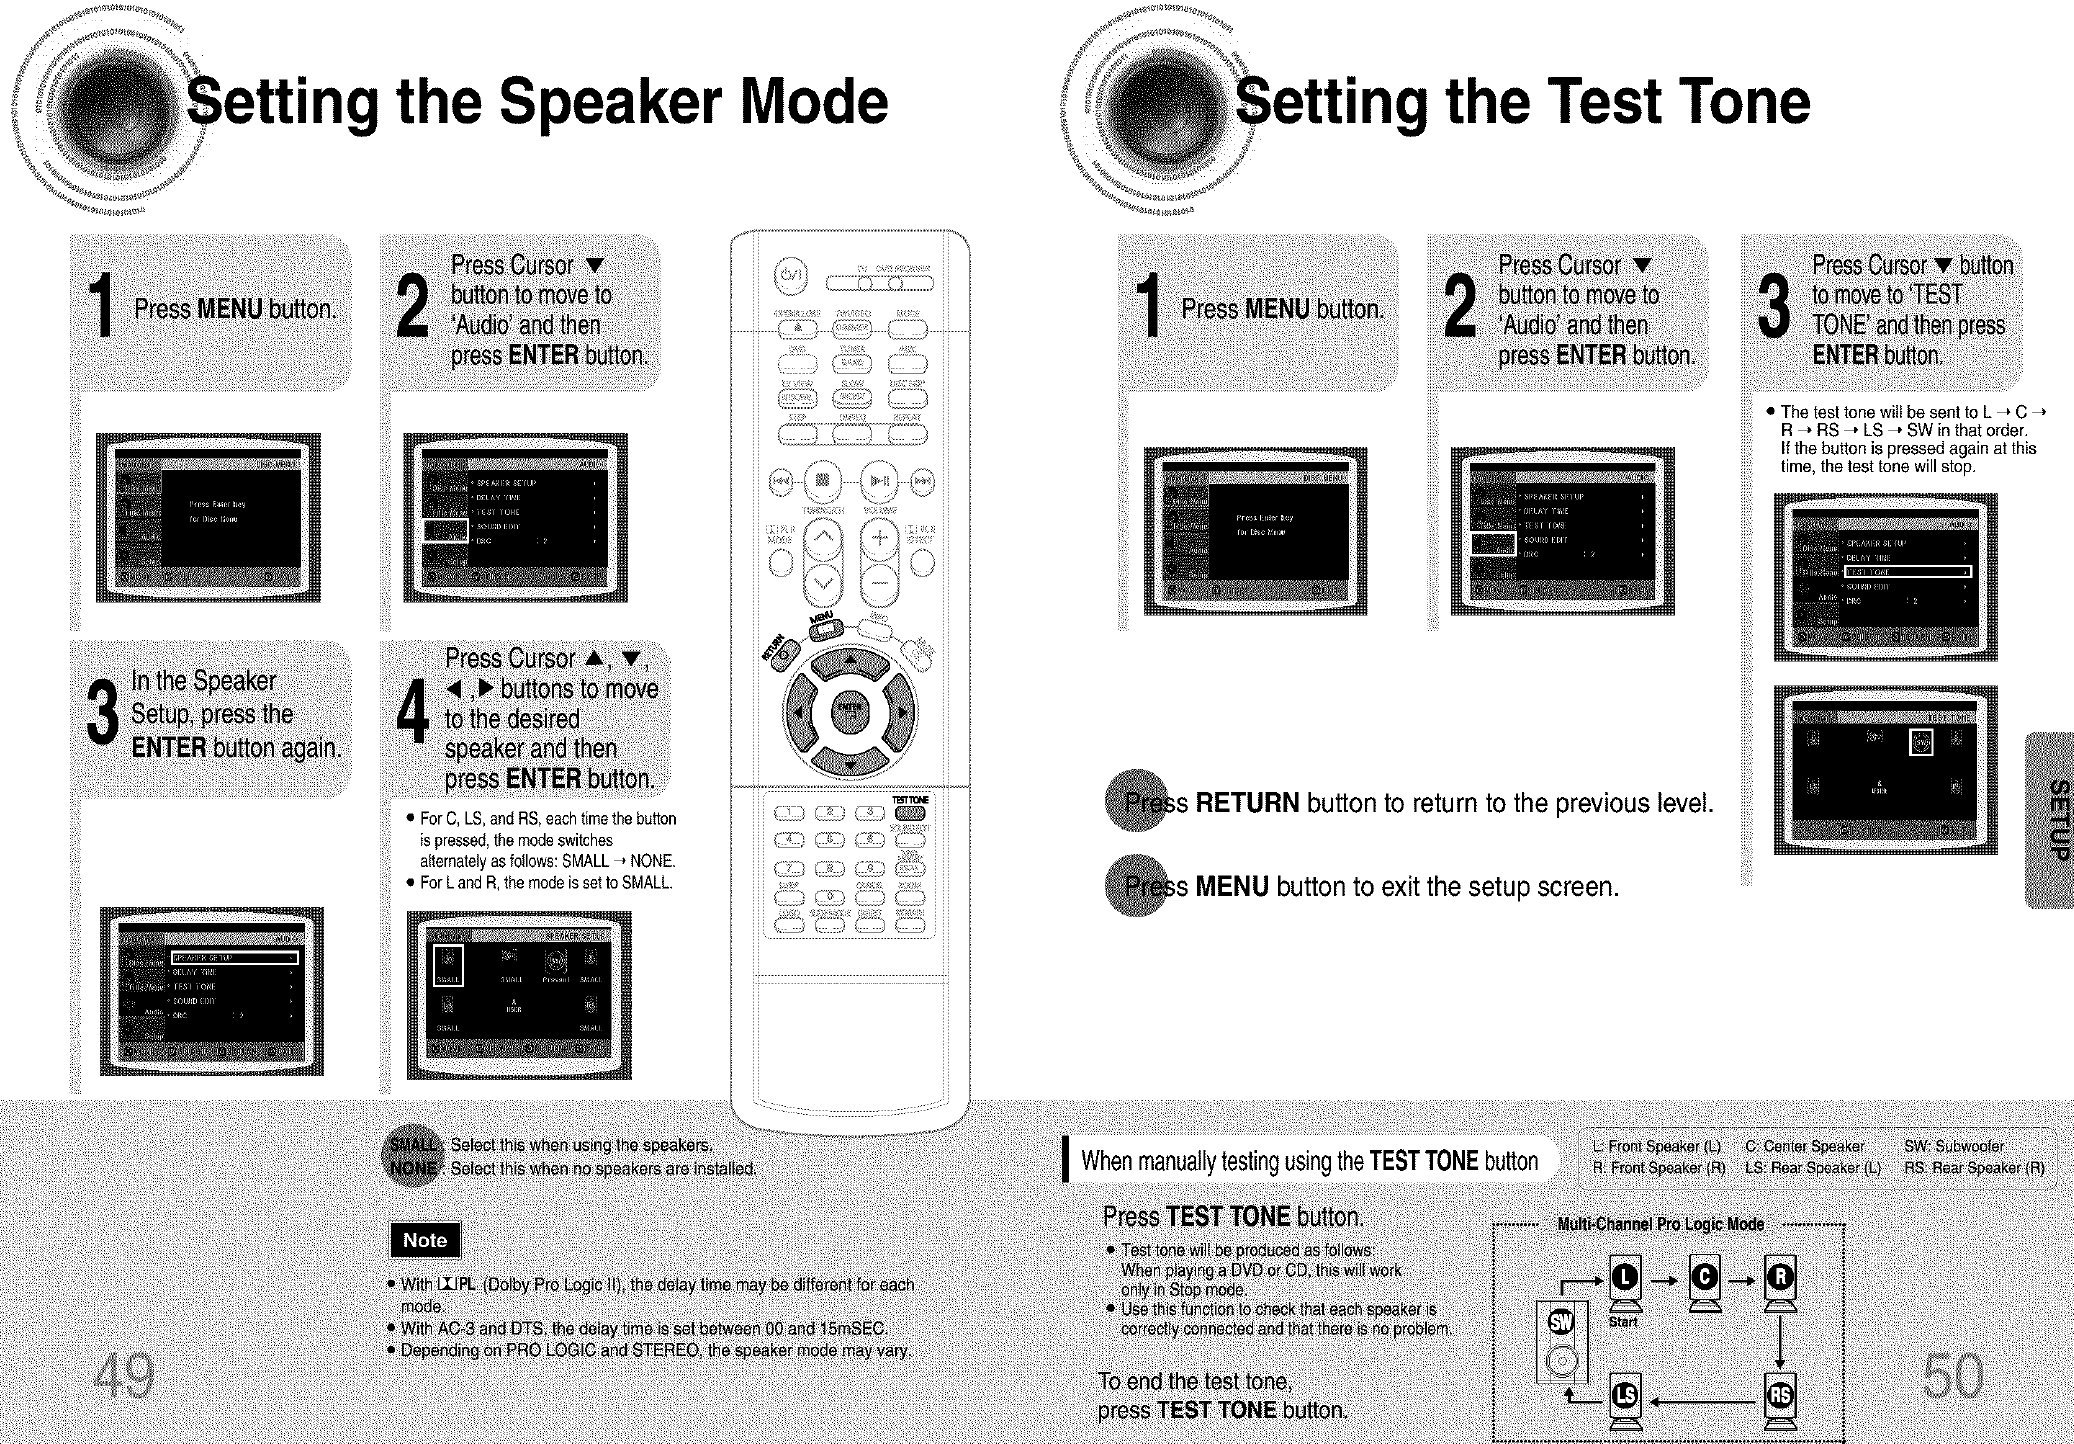
the Speaker Mode the Test Tone
•ForOLS,andRS.eacht,metheha.on
ispressed,the modeswitches
alternatelyasfollows:SMALL-, NONE.
• ForLand R,themodeis setto SMALL.
!!iiii
button to return to the previous level.
;s MENU button to exit the setup screen.
• The test tone will be sent to L _ C
R_ RS ," LS ," SW in that order.
If the button is pressed again at this
time, the test tone will stop.
WhenmanuallytestingusingtheTESTTONEbutton
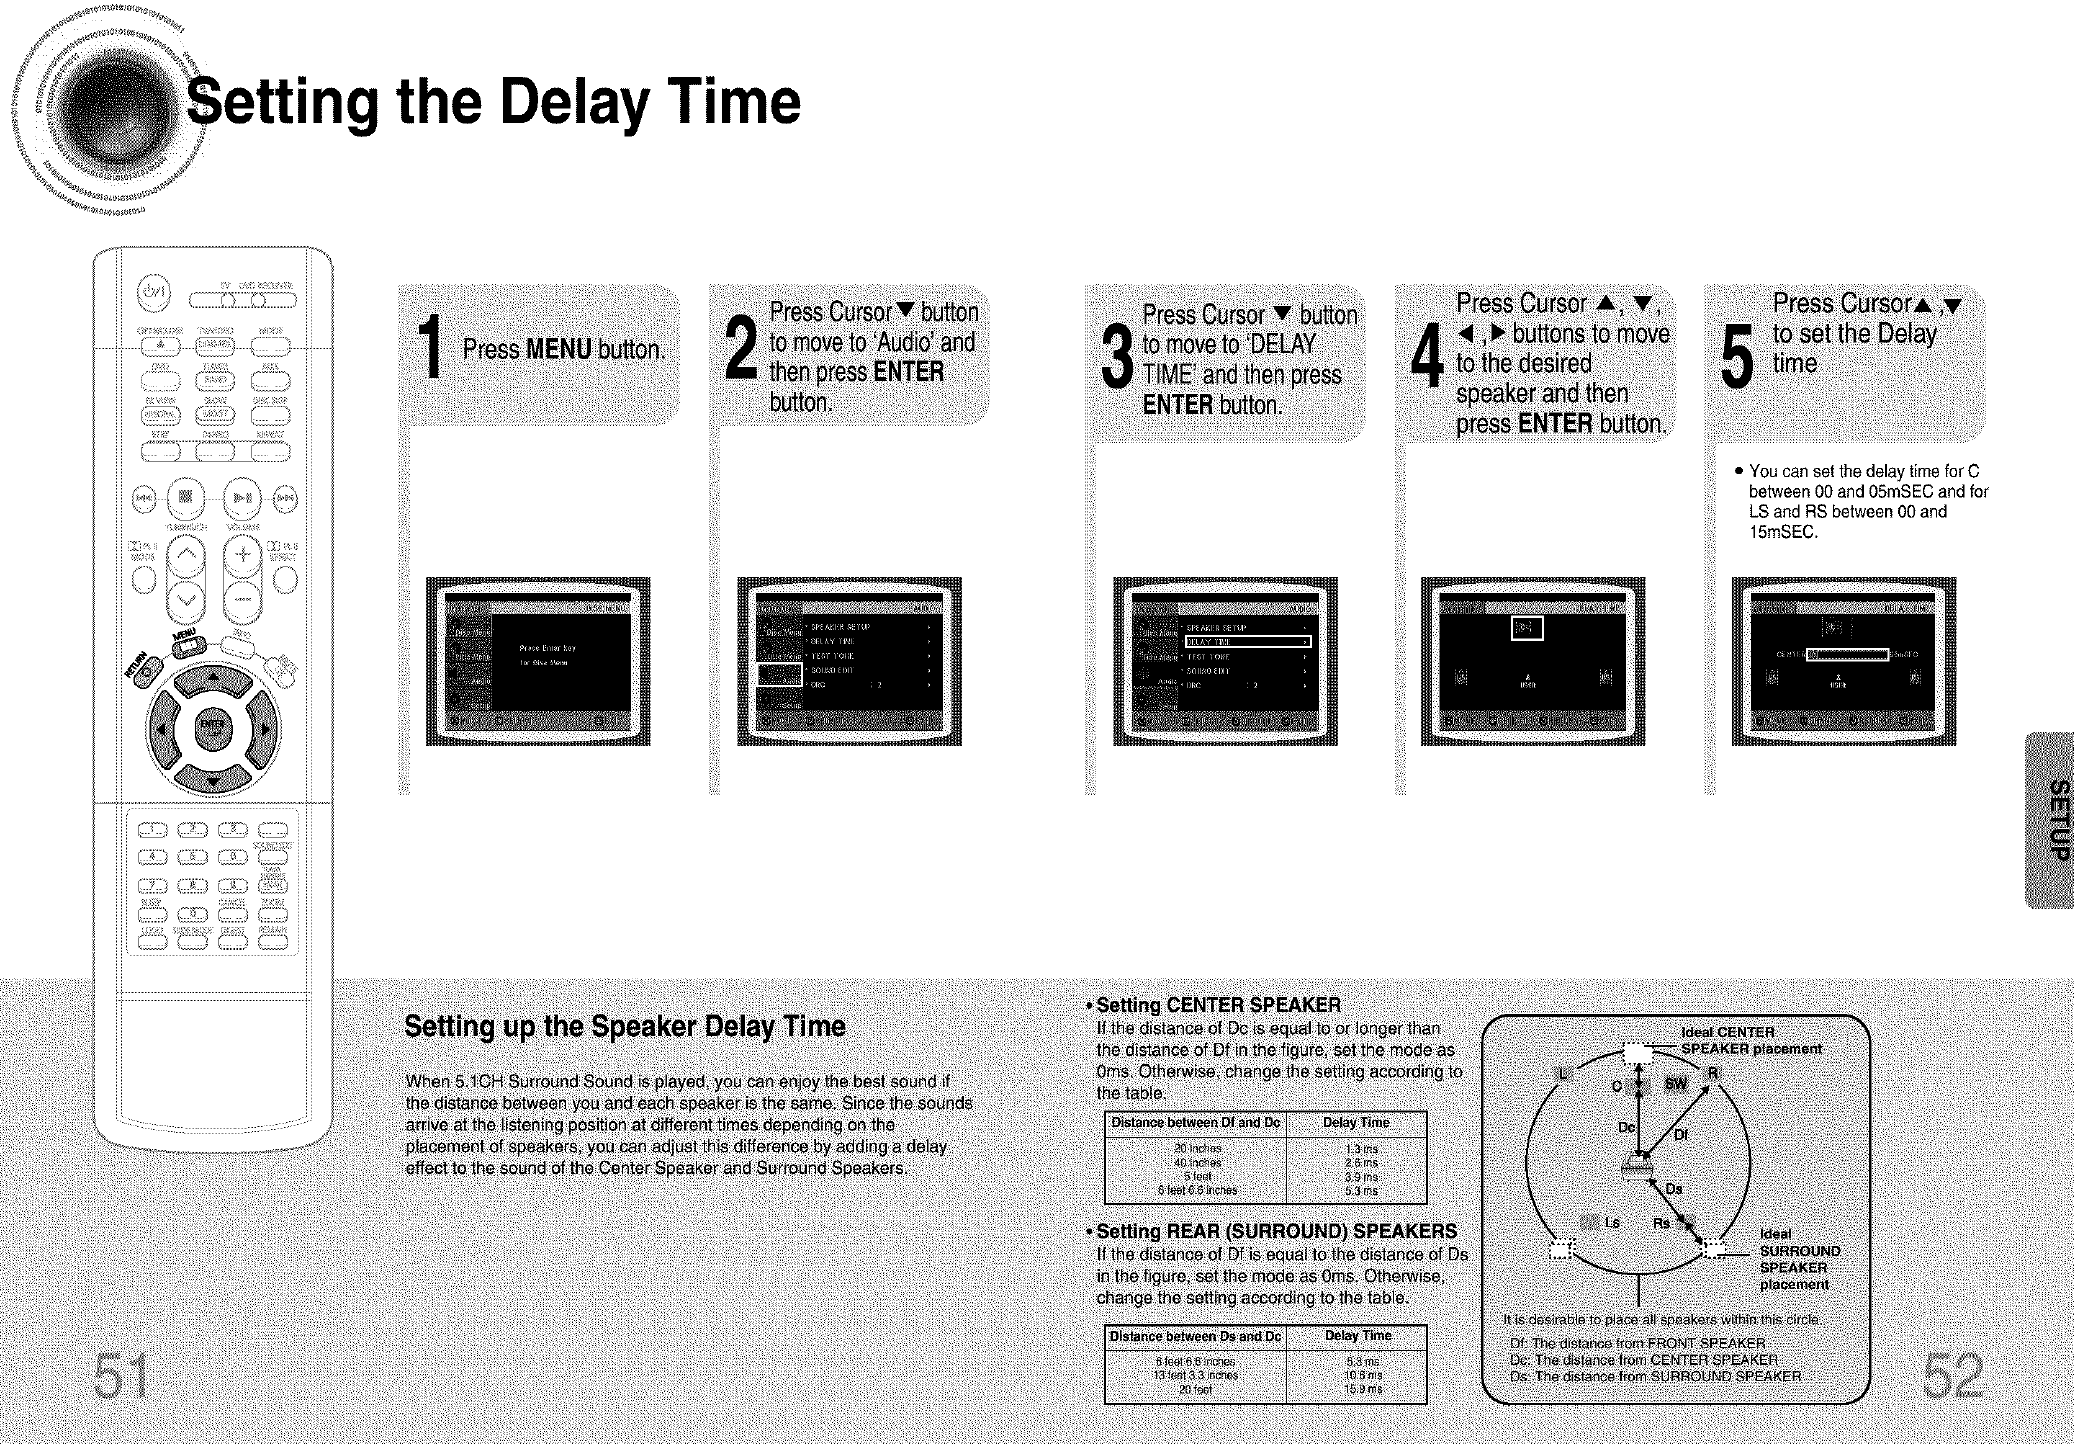
the DelayTime
i!!!i!i!i
ii_iiiiii_
!@!ii
ii!i_i!iiii
ii@ii
ii@_!
¸¸8¸¸¸¸
iii!ii!i_'
• You can set the delay time for C
between 00 and 05mSEC and for
LS and RS between 00 and
15mSEC.

"ngthe AudioQuality
can adjust the balance and level for each speaker.
iii_ili!!
' theDRC(DynamicRangeCompression)
can use this function to enjoy Dolby Digital sound when watching movies at
low volume at night.
Field (DSP)/EQ Function
Processor)DSP modes havebeen designed to simulate differentacoustic environments.
EQ:Youcan selectfrom ROCK,POP, orCLASSIC,dependingon thegenre of music.
• ThelongertheCursorA buttonishelddown,the greaterthe
effect,andthelongerCursor• buttonishelddown,the
smallertheeffect.
• Oncethesetupiscomplete,youwillbe takento theprevious
screen.
!;i_ _ _ i_i_i
J
• "DSP" appears on the display panel.
• Each time the button is pressed, the selection changes as follows:
,e,
,e,
,e,

ProLogicII Mode
can select the desired Dolby Pro Logic 11audio mode.
,0,
ProLogicII Effect
yin Dolby Pro Logic MUSIC mode.
• When selecting Pro Logic II mode, connect your external device to the
AUDIO INPUT jacks(L and R) on the player.If you connect to only one of
the inputs (L or R),you cannot listen to 5.1 channel surround sound.
.CC_
G:
<_:7::/ 9
5 ,
i!iiiii_
!iiiiiii
• You can select between Oand 7.
• You can select either 0 or 1.
• When playing aDVD disc encoded with two or more channels, multi-channel mode will be
selected automatically and [I]PL II (Dolby Pro Logic II) button does not work.

• to Radio
(FM, AM broadcast stations) by using either
the automatic or manual tuning operation.
• The selection togglesback
•15 FM stations
•15 AM stations
Stations
up to:
•FM ..........................FrequencyModulation
•AM(MW) ................MediumWave
and forth between "FM" and
"AM" each time the
TUNER(BAND) button is
pressed.
_When _.,i i,,_ is pressed,a
presetbroadcaststationis
selected. _.,._
Pressandhold(_(v_ t°
automaticallysearchfor
activebroadcastingstations.
Br,ef,ypress --Oto
increaseordecreasethe
frequencyincrementally.
_Press the STOP (m)
buttonto select
PRESETand then press_
button to selectthe presetstation.
_Press the STOP(.)button
_to select"MANUAL"and
then pressand hold I<1_1INH button to
automaticallysearchthe band.
_Press STOP (11)to select
_MANUAL and then briefly
press _ _ to tune into a lower or
higherfrequency.
\v
H
H
H
Example: Presetting FM 89.1 inthe memory
iii!i!il!
iii!i!!ill•Eachtimethebutton_spressed,
iiiiiiiiiiiilandthebandA_,sw_fehesbefween'F_'
iiii_i_iii_i_•¥oucanselectbe_eentand
15.
• Refer to Step 2 on page 59 to
automatically or manually tune in
to a station.
• PresstheTUNERMEMORYbuttonbefore
'PRGM'disappearsfromthedisplay.
• 'PRGM'disappearsfromthedisplayand
thestationisstoredinmemory.
• "PRGM" flashes in the display.
iii_il;
• Functions
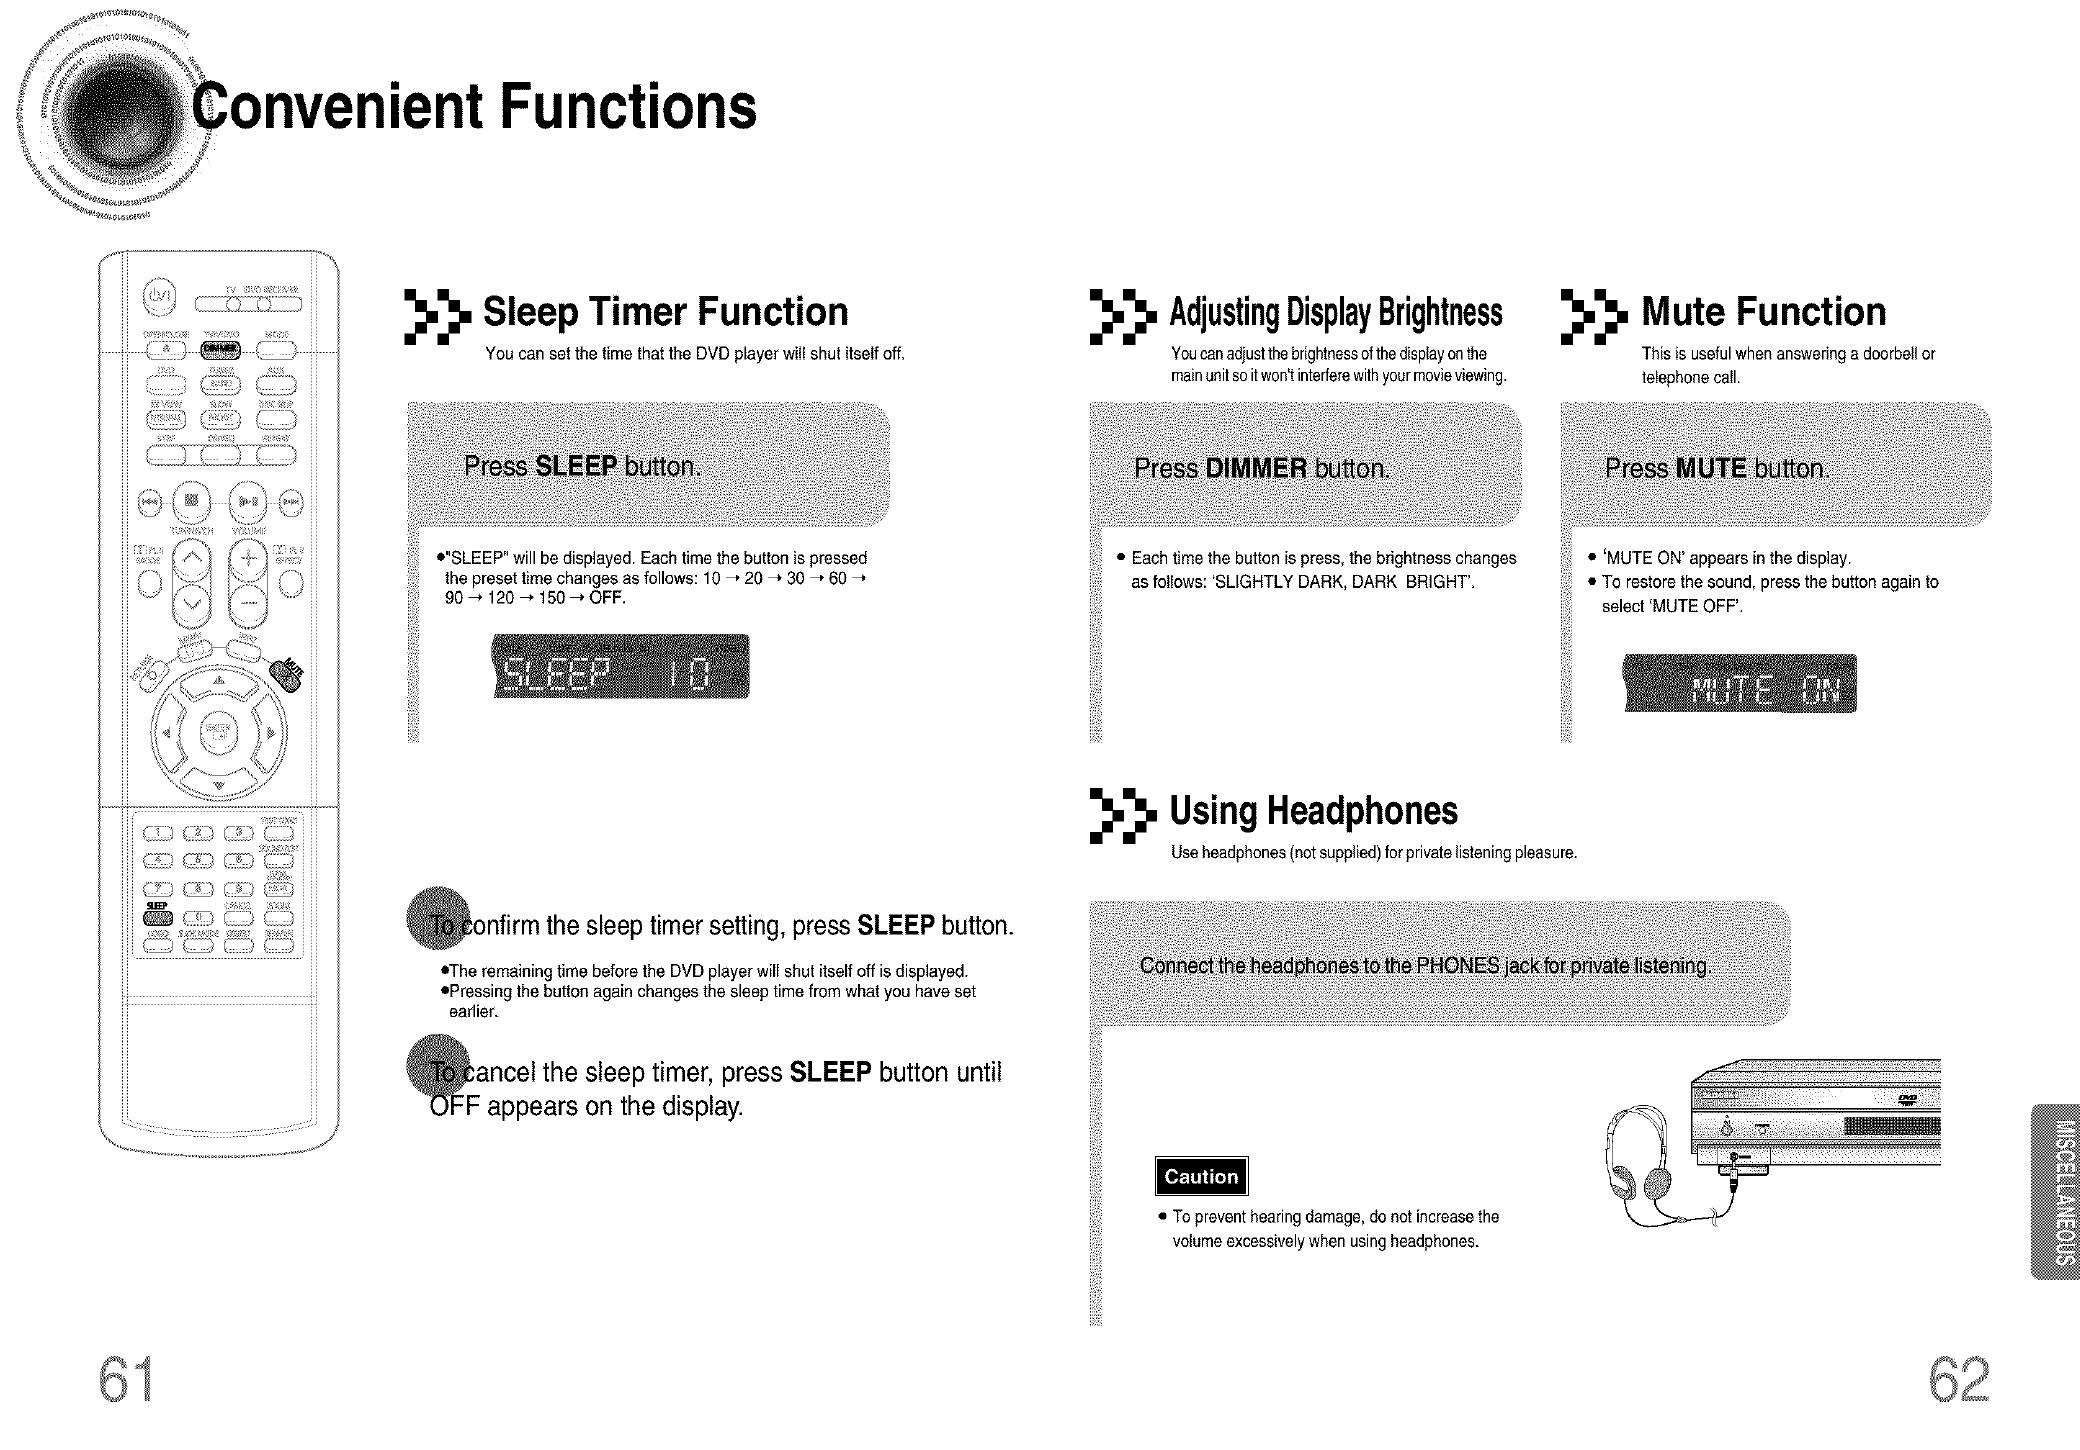
_,_, Sleep Timer Function
You can set the time that the DVD player will shut itself off.
•"SLEEP" willbe displayed. Each time the button is pressed
the preset time changes as follows: 10 ," 20 _ 30 ," 60
90 _ 120 _ 150 _ OFF.
i!liiii_
!iiiiiii
,nfirmthe sleep timersetting, press SLEEP button.
•The remaining time before the DVD player will shut itself off is displayed.
oPressing the button again changes the sleep time from what you have set
earlier.
Fancel the sleep timer, press SLEEP button until
appears on the display.
_,_, AdjustingDisplayBrightness
Youcanadjustthebrightnessofthedisplayonthe
mainunitso itwon'tinterferewithyourmovieviewing.
_,_, Mute Function
This is usefulwhenansweringa doorbellor
telephonecall.
• Each timethe button is press, the brightness changes
as follows: 'SLIGHTLY DARK, DARK BRIGHT'.
• 'MUTE ON' appears in the display.
• To restore the sound, press the button again to
select 'MUTE OFF'.
i!liiii_
!iiiiiii
_._. UsingHeadphones
Useheadphones(not supplied)for privatelisteningpleasure.
• To preventhearing damage,do not increasethe
volumeexcessivelywhen usingheadphones.
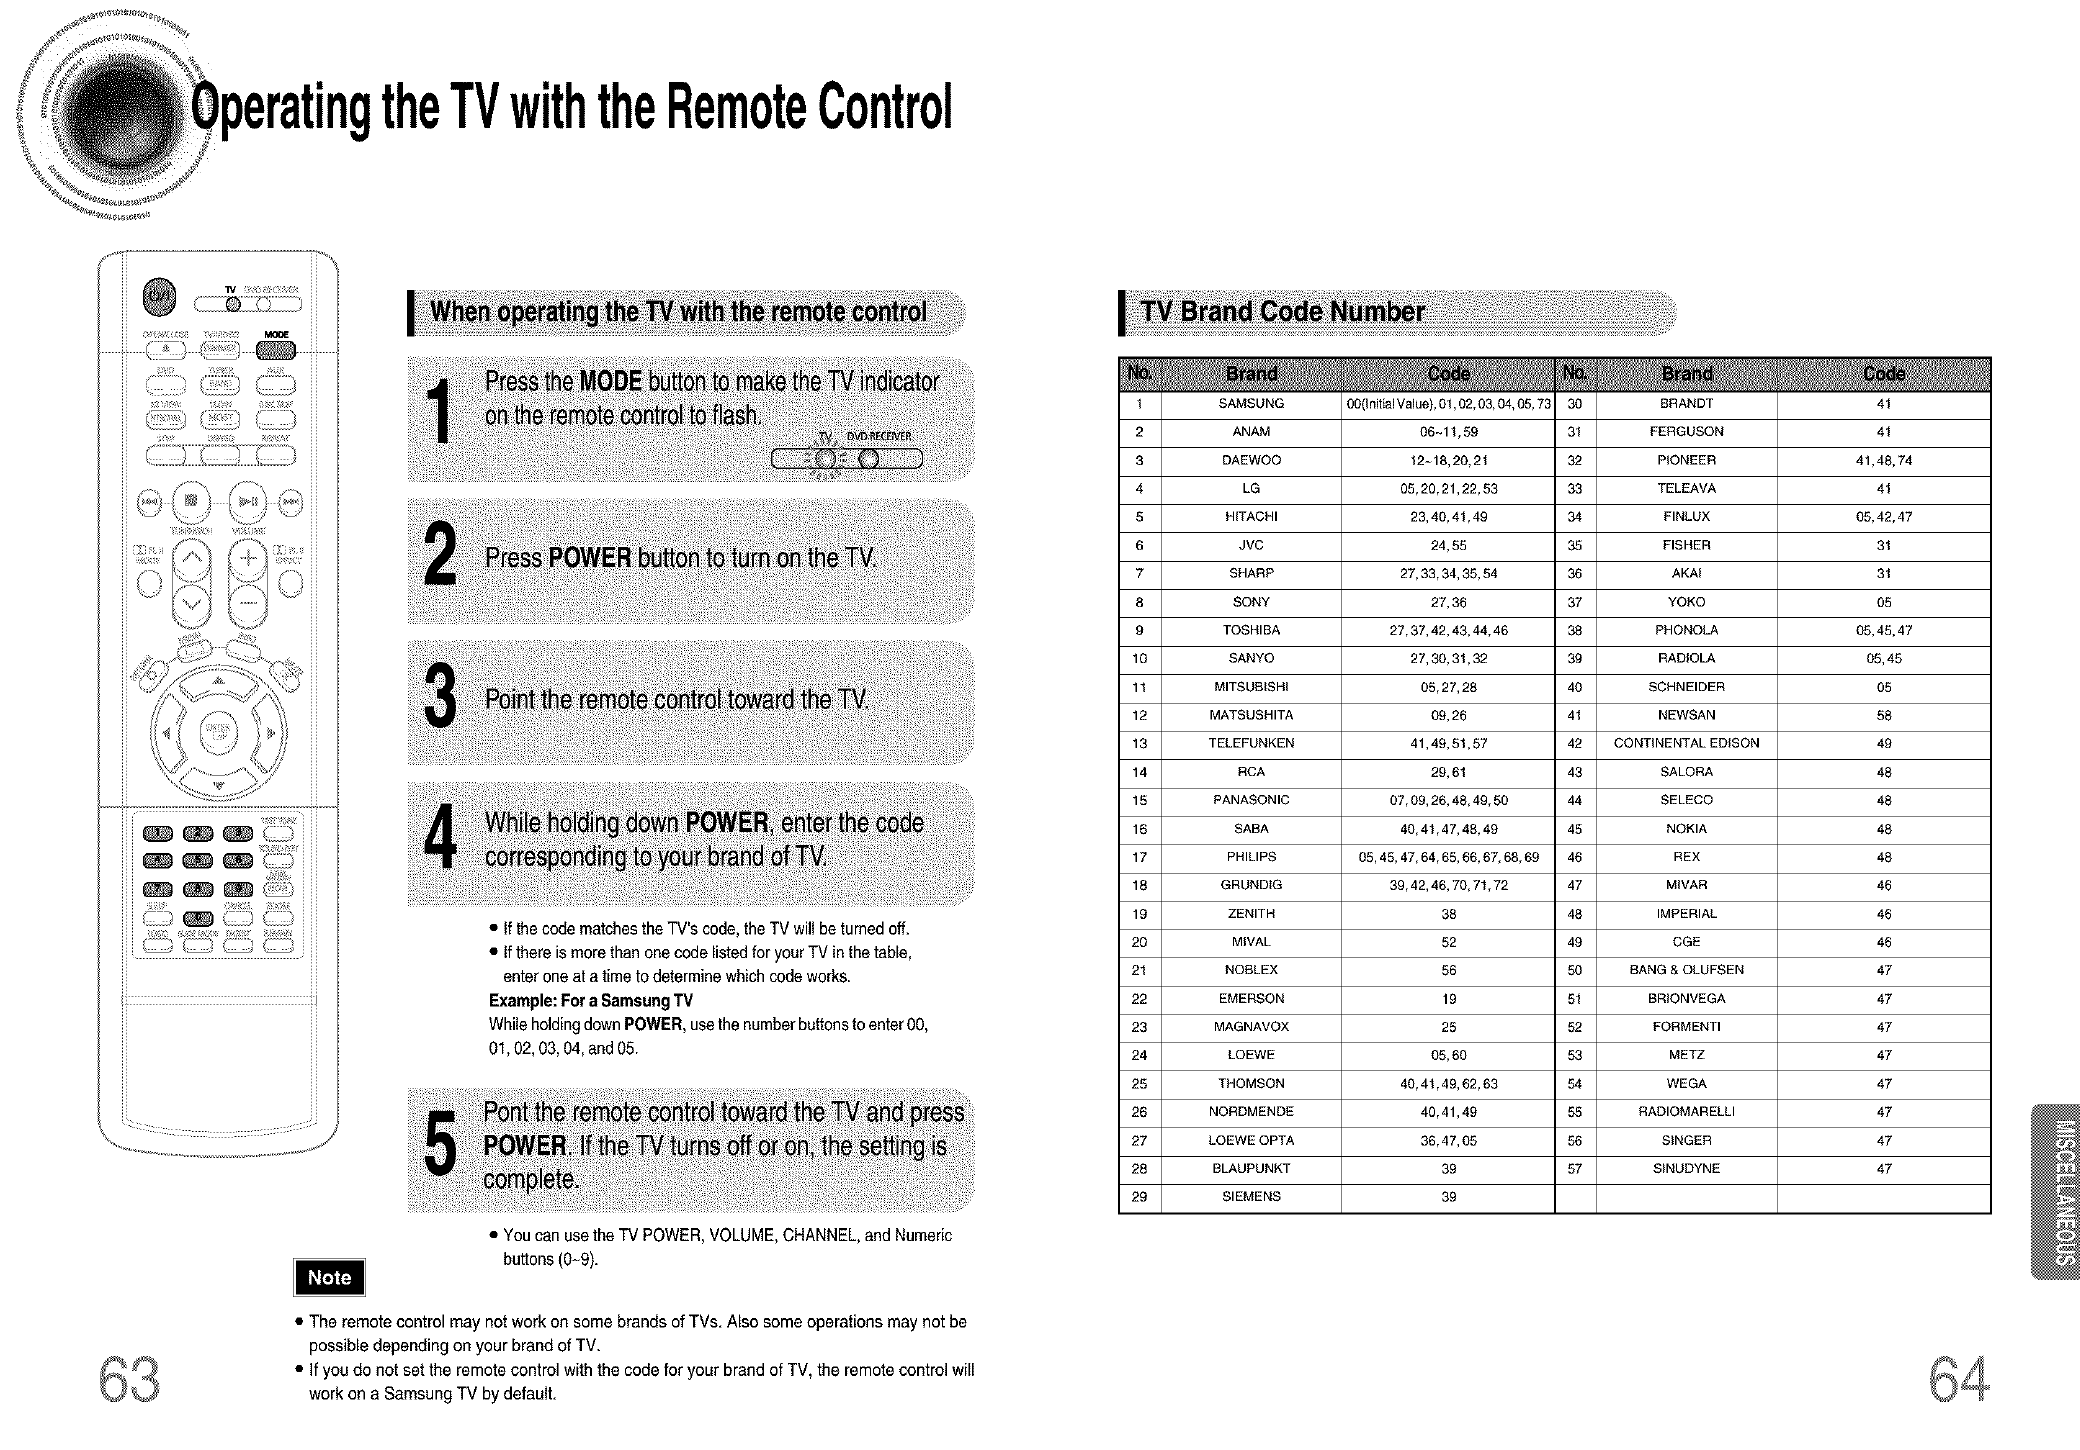
theTVwiththeRemoteControl
iII}i!! ii]_i ] ]i !ii11
j; 1[[_][ .............
ii I_iI X Q IT!II *
_ _>_tz,_ _b_)_ ¸ _ •If thecode matchesthe TV's code,the TV wil be turned off.
• Ifthere is morethan onecode listedfor yourTV in thetable,
enter one at a time to determinewhich code works.
Example:Fora SamsungTV
Whileholdingdown POWER,usethe numberbuttonsto enter00,
01,02, 03,04, and05.
• You can usethe TV POWER,VOLUME,CHANNEL,and Numeric
buttons (0-9).
1
2
3
4
S
6
7
8
9
10
11
12
13
14
15
16
17
18
19
20
21
22
23
24
25
26
27
28
29
SAMSUNG 00(Initial Value), 01,02, 03, 04, 05, 73 30 BRANDT
ANAM 06--11,59 31 FERGUSON
DAEWOO 12~18, 20, 21 32 PIONEER
LG 05, 20, 21,22, 53 33 TELEAVA
HITACHI 23, 40, 41,49 34 FINLUX
JVC 24, 55 35 FISHER
SHARP 27, 33, 34, 35, 54 36 AKAI
SONY 27, 36 37 YOKO
TOSHIBA 27, 37, 42, 43, 44, 46 38 PHONOLA
SANYO 27, 30, 31,32 39 RADIOLA
MITSUBISHI 05,27,28 40 SCHNEIDER
MATSUSHITA 09, 26 41 NEWSAN
TELEFUNKEN 41,49, 51,57 42 CONTINENTAL EDISON
RCA 29, 61 43 SALORA
PANASONIC 07, 09, 26, 48, 49, 50 44 SELECO
SABA 40, 41,47, 48, 49 45 NOKIA
PHILIPS 05,45,47,64,65,66,67,68,69 46 REX
GRUNDtG 39, 42, 46, 70, 71,72 47 MWAR
ZENITH 38 48 IMPERIAL
MIVAL 52 49 CGE
NOBLEX 56 50 RANG & OLUFSEN
EMERSON 19 51 BRIONVEGA
MAGNAVOX 25 52 EORMENTI
LOEWE 05, 60 53 METZ
THOMSON 40, 41,49, 52, 63 54 WEGA
NORDMENDE 40, 41,49 55 RADIOMARELLI
LOEWE OPTA 36, 47, 05 56 SINGER
BLAUPUNKT 39 57 SINUDYNE
SIEMENS 39
41
41
41,48,74
41
05,42,47
31
31
05
05,45,47
05, 45
05
58
49
48
48
48
48
46
46
46
47
47
47
47
47
47
47
47
• The remote control may not work on some brands of TVs. Also some operations may not be
possible depending on your brand of TV.
• if you do not set the remote control with the code for your brand of TV, the remote control will
work on a Samsung TV by default.
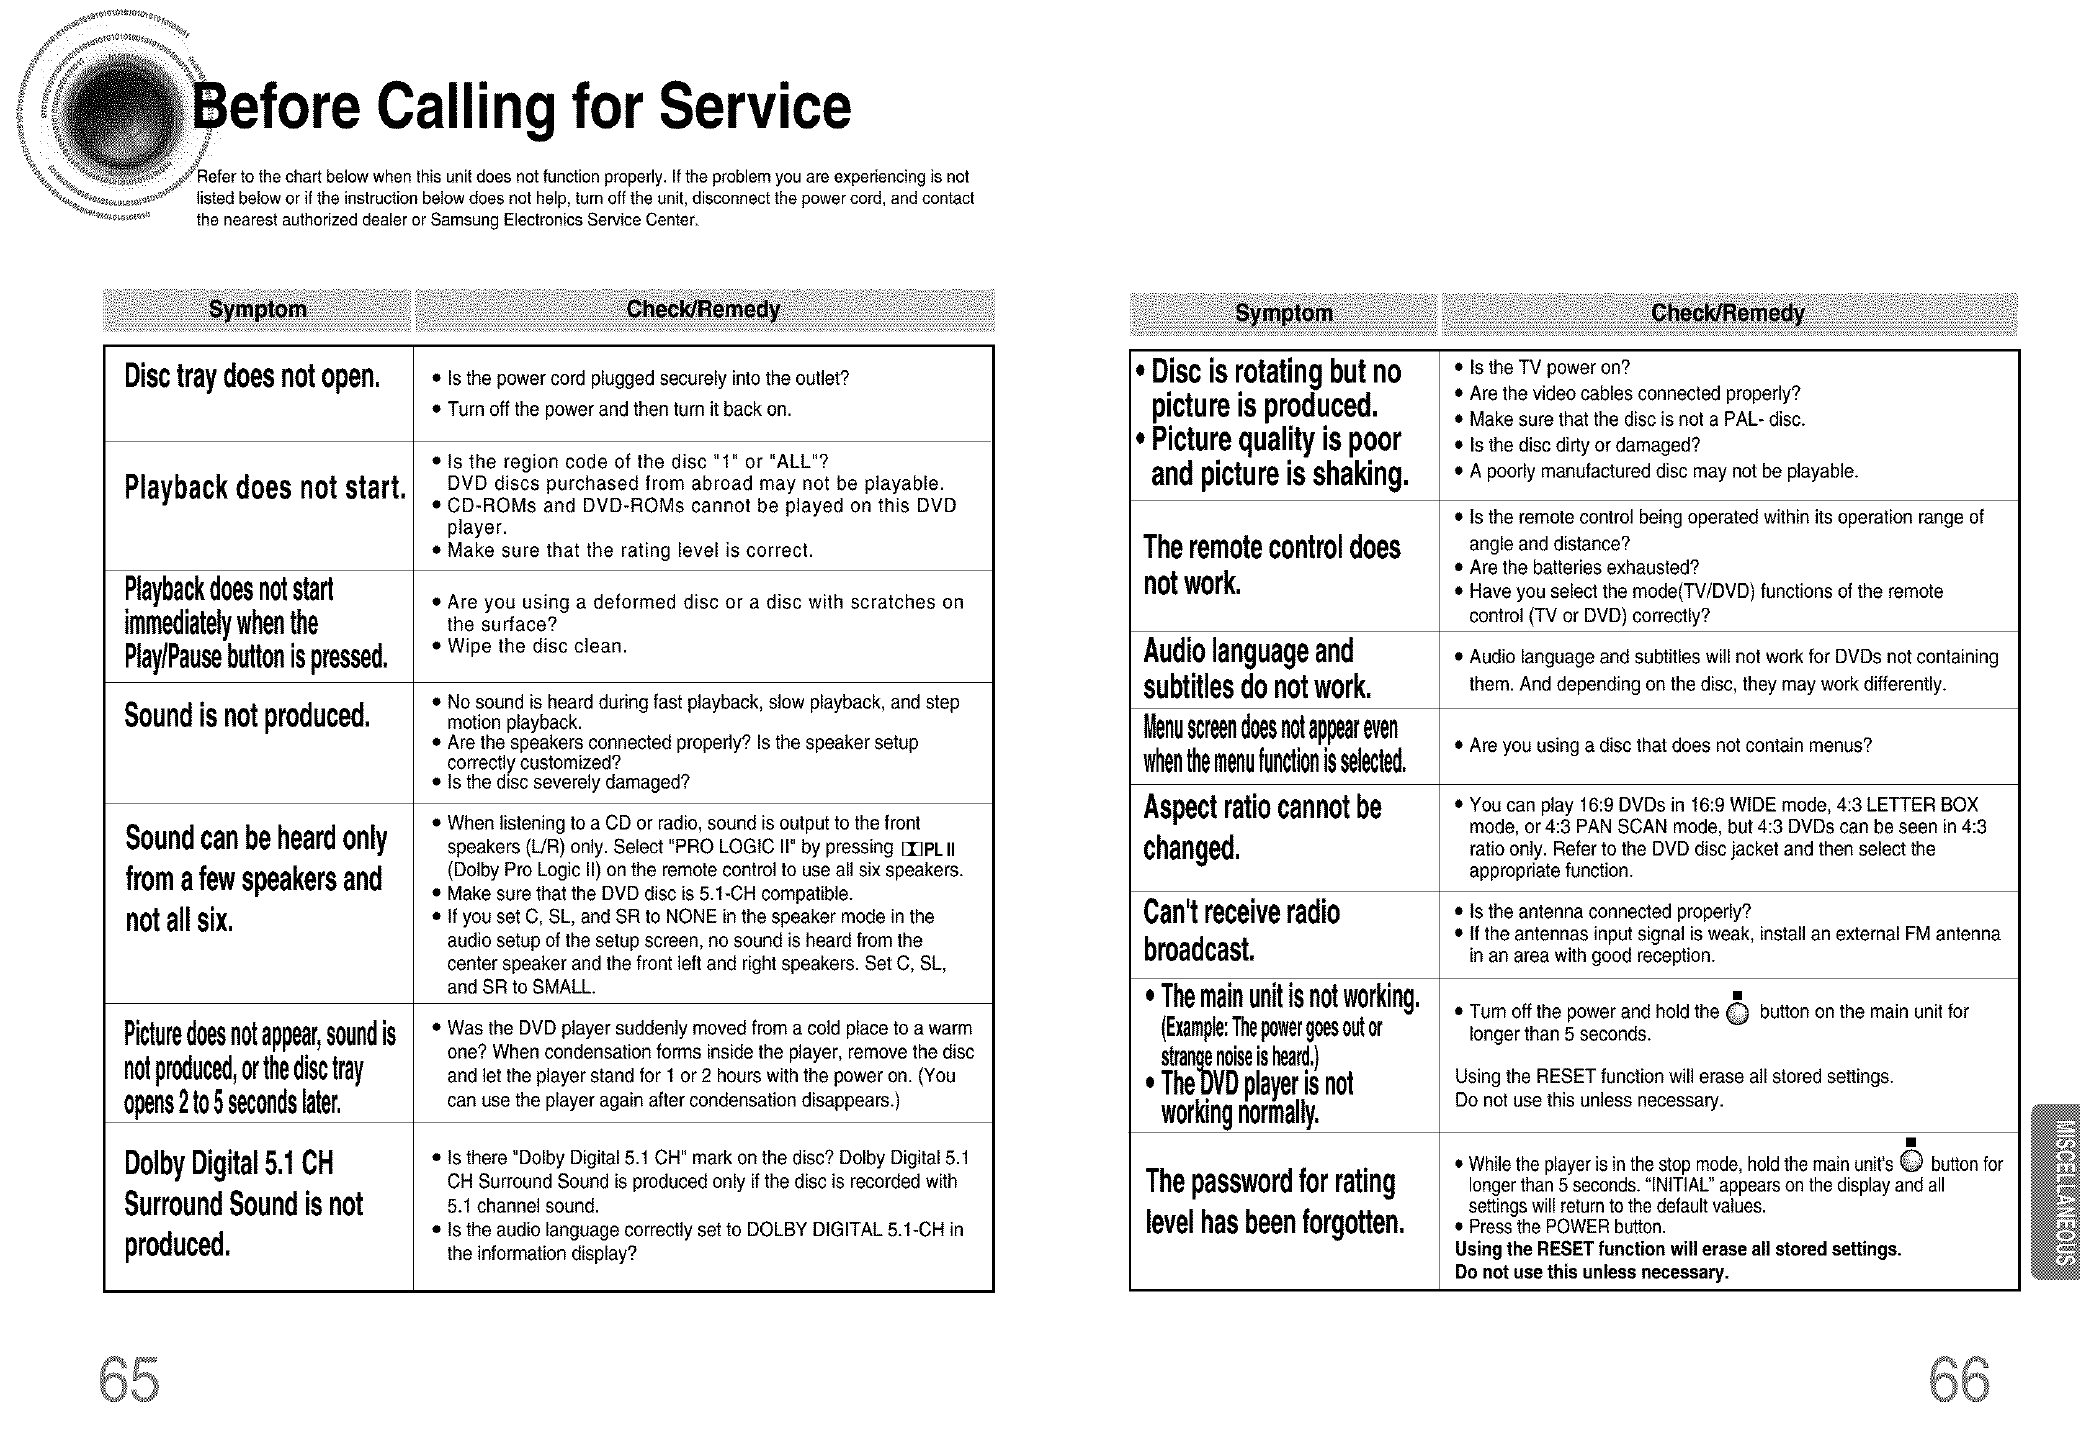
Call" for Service
properly.It the problemyou are experiencing is not
listedbelow or if the instruction below does not help, turn off the unit,disconnect the powercord, and contact
the nearest authorized dealer or Samsung Electronics Service Center.
Disctraydoesnotopen.
Playbackdoesnotstart.
Playbackdoesnotstart
immediatelywhenthe
Play/Pausebuttonispressed.
Soundisnotproduced.
Soundcanbeheardonly
fromafewspeakersand
notallsix.
Picturedoesnotappear,soundis
notproduced,orthedisctray
opens2to5secondslater,
DolbyDigital5.1OH
SurroundSoundisnot
produced.
•Isthe powercord plugged securely intothe outlet?
•Turn off the power and then turn it back on.
•is the region code of the disc "1" or "ALL"?
DVD discs purchased from abroad may not be playable.
•CD-ROMs and DVD-ROMs cannot be played on this DVD
player.
•Make sure that the rating level is correct.
•Are you using a deformed disc or a disc with scratches on
the surface?
•Wipe the disc clean.
•No sound is heard during fast playback,slow playback, and step
motion playback.
•Are the speakers connected properly? Is the speaker setup
correctly customized?
•Is the disc severely damaged?
•When listening to a CD or radio, sound is output to the front
speakers (L/R) only. Select "PRO LOGIC I1"by pressing 113PLII
(Dolby Pro Logic II) on the remote control to use all six speakers.
•Make sure that the DVD disc is 5.1-CH compatible.
•If you set C, SL, and SR to NONE inthe speaker mode in the
audio setup of the setup screen, no sound is heard from the
center speaker and the front left and rightspeakers. Set C, SL,
and SR to SMALL.
•Was the DVD playersuddenly moved from a cold place to a warm
one? When condensation forms insidethe player, remove the disc
and let the playerstand for 1 or 2 hours with the poweron. (You
can use the player again after condensation disappears.)
•Is there "Dolby Digital 5.1 CH" mark on the disc? Dolby Digital 5.1
CH Surround Sound is produced only ifthe disc is recorded with
5.1 channel sound.
•Is the audio language correctly set to DOLBY DIGITAL 5.1-CH in
the information display?
iDiscisrotatingbutno • istheTVpoweron?
pictureis produced. • Are the video cables connected properly?
•Make sure that the disc is not a PAL- disc.
Picturequalityispoor • is the disc dirty or damaged?
andpictureisshaking. • A poorly manufactured disc may not be playable.
• Is the remote control being operated within its operation range of
Theremotecontroldoes angle anddistance?
notwork. ° Are the batteries exhausted?
• Have you select the mode(TV/DVD) functions of the remote
control (TV or DVD)correctly?
Audiolanguageand • Audio language and subtitles will not work for DVDs not containing
subtitlesdonotwork. them And depending on the disc, they may work differently.
Menuscreendoesnotappeareven
whenthemenufuncti0nisselected,• Are you usinga disc that does notcontainmenus?
Aspectratiocannotbe •Youcan play 16:9 DVDs in 16:9 WIDE mode, 4:3 LETTER BOX
mode, or4:3 PANSCAN mode, but 4:3 DVDs can be seen in4:3
changed, ratio only.Referto the DVD disc jacketand thenselect the
appropriate function.
Can'treceiveradio •is the antenna connectedproperly?
• If the antennasinput signal is weak, installan externalFM antenna
broadcast. _nan area with good reception.
.Themainunitisnotworking. •
(Example:Thepowergoesoutor •Tum off the power and hold the O button on the main unit for
longer than5 seconds.
strangenoiseisheard.)
. The.DVDplayerisnot Using the RESET function will erase all stored settings.
w0rkmgnormally. Do not use this unless necessary.
•Whilethe playeris inthe stopmode,holdthe main unit's O buttonfor
Thepasswordforrating _ongerthan5 seconds."INITIAL"appearsonthe displayandall
settingswill returnto the defaultvalues.
levelhasbeenforgotten. •PressthePOWERbutton.
Usingthe RESETfunctionwill erase all storedsettings.
Do notuse this unlessnecessary.
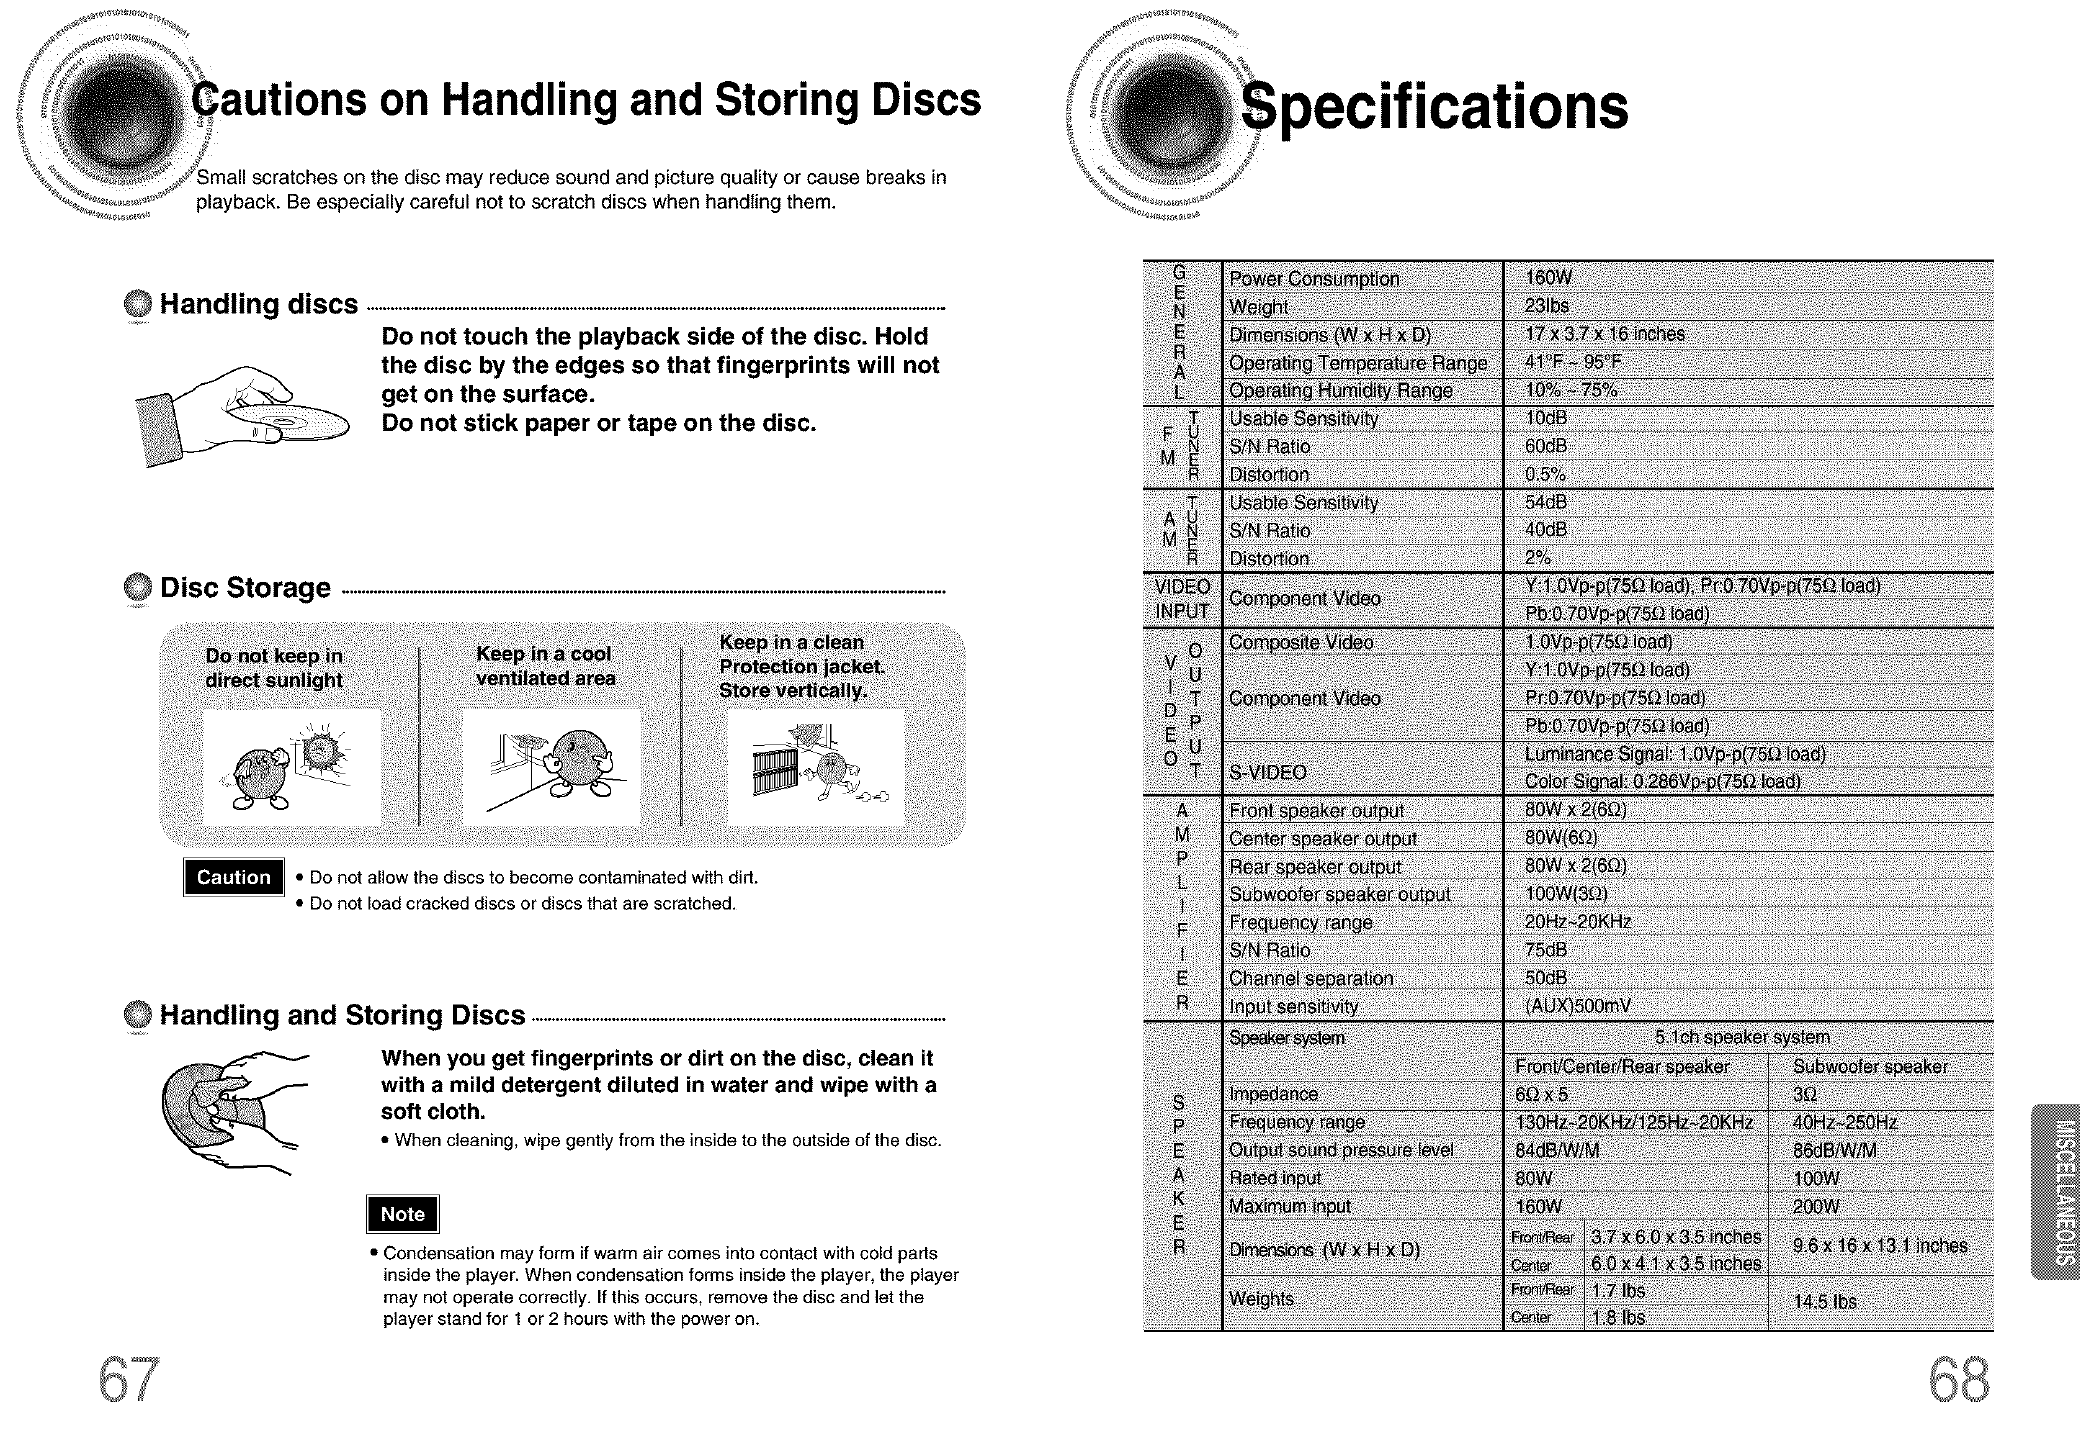
:autions on Handling and Storing Discs
disc may reduce sound and picture quality or cause breaks in
playback. Be especially careful not to scratch discs when handling them.
OHandling discs .................................................................................................................................................
Do not touch the playback side of the disc. Hold
the disc by the edges so that fingerprints will not
get on the surface.
Do not stick paper or tape on the disc.
Disc Storage .......................................................................................................................................................
• Do not allow the discs to become contaminated with did.
• Do not load cracked discs or discs that are scratched.
Handling and Storing Discs .......................................................................................................
When you get fingerprints or dirt on the disc, clean it
with a mild detergent diluted in water and wipe with a
soft cloth.
• When cleaning, wipe gently from the inside to the outside of the disc.
• Condensation may form if warm air comes into contact with cold parts
inside the player. When condensation forms inside the player, the player
may not operate correctly. If this occurs, remove the disc and let the
player stand for 1 or 2 hours with the power on.
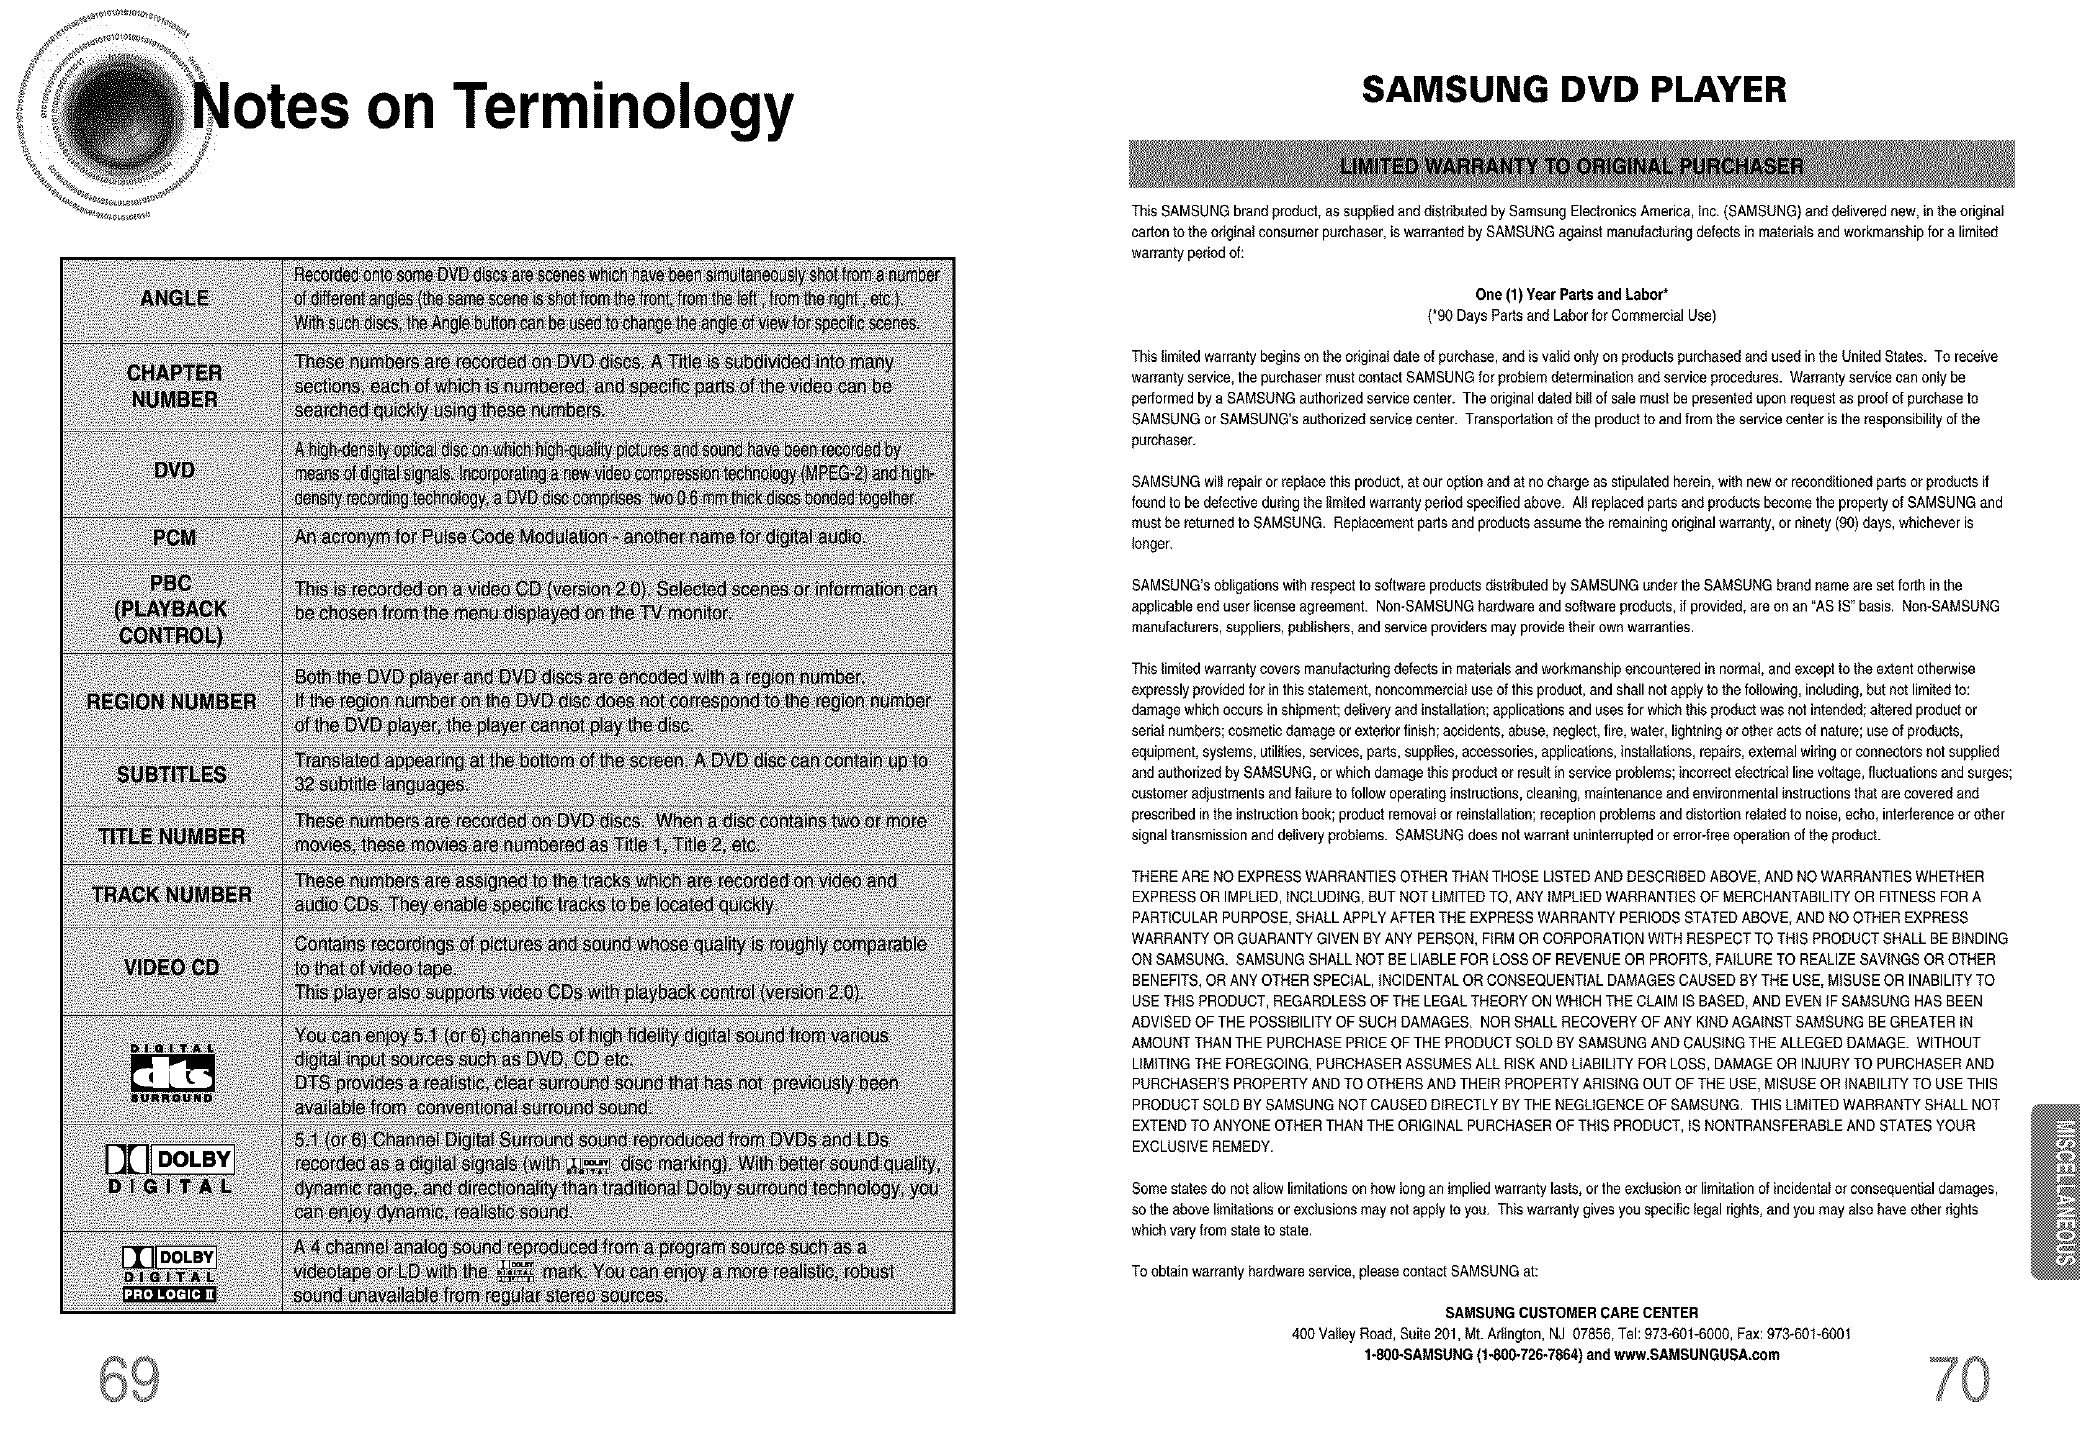
on Terminology SAMSUNG DVD PLAYER
This SAMSUNGbrand product,as supp{iedand distributed by Samsung ElectronicsAmerica, Inc. (SAMSUNG)and de{iveradnew, inthe original
carton to the originalconsumer purchaser, is warrantedby SAMSUNGagainst manufacturingdefects in materialsand workmanshipfor a limited
warranty period of:
One (1) Year Parts and Labor*
(*90 DaysPartsand Laborfor CommercialUse)
This limitedwarrantybeginsonthe original date of purchase,and is valid only on productspurchasedand used in the United States. To receive
warranty service,the purchasermustcontact SAMSUNGfor problem determinationand service procedures. Warrantysarv{cecan on_ybe
performedby a SAMSUNGauthorized servicecenter. The original dated bill of sale must be presentedupon request as proofof purchaseto
SAMSUNGor SAMSUNG'sauthorized servicecenter. Transportationof the productto and from the servicecenter is the responsibilityof the
purchaser.
SAMSUNGwillrepair or rep{acethisproduct,at our option and at no chargeas stipulated herein,with new orreconditionedparts or productsif
found to be defective during the {imitadwarranty periodspecified above. AI_replaced parts and productsbecome the propertyof SAMSUNGand
must be returnedto SAMSUNG. Replacementparts and productsassume the remaining originalwarranty, or ninety (96)days, whichever is
longer.
SAMSUNG'sobligations with respect tosoftware productsdistributedby SAMSUNG under the SAMSUNGbrand nameare set forth in the
applicableend user license agreement. Non-SAMSUNGhardwareand softwareproducts, ifprovided, are on an "AS iS" basis, NomSAMSUNG
manufacturers,suppliers,publishers,and service providers mayprovide their own warranties,
This limitedwarranty covers manufacturingdefects in materials and workmanshipencountered in normal,and except to theextentotherwise
expressly providedfor in this statement, noncommercialuse of this product,and shall not apply to the following, including,but not limited to:
damagewhich occurs in shipment;deliveryand installation;applications and uses for which this productwas not intended;altered product or
serial numbers;cosmetic damage or exteriorfinish; accidents,abuse, neglect,fire, water, lightning or otheracts of nature; useof products,
equipment, systems, utilities,services, parts, supplies,accessories, applications,installations,repairs,external wiringor connectorsnot supplied
and authorized by SAMSUNG,or which damage this product or result in service problems; incorrectalectdcel line voltage,fltJctuationsand surges;
customer adjustmentsand failureto follow operatinginstructions,cleaning, maintenanceand environmentalinstructionsthat are covered and
prescribed in the instruction book; product removalorrainstallation;reception problems and distortion relatedto noise, echo, interferenceorother
signal transmissionand delivery problems. SAMSUNGdoes not warrant uninterruptedorerror-free operation of the product.
THERE ARE NO EXPRESSWARRANTIESOTHER THAN THOSE LISTEDAND DESCRIBEDABOVE, AND NO WARRANTIESWHETHER
EXPRESSOR IMPLIED,iNCLUDING, BUT NOT LIMITED TO, ANY iMPLiED WARRANTIESOF MERCHANTABILITYOR FITNESSFOR A
PARTICULARPURPOSE,SHALL APPLYAFTERTHE EXPRESSWARRANTY PERIODS STATEDABOVE, AND NOOTHER EXPRESS
WARRANTY OR GUARANTY GIVEN BYANY PERSON,FiRM OR CORPORATIONWiTH RESPECTTO THiS PRODUCT SHALL BE BINDING
ON SAMSUNG. SAMSUNG SHALLNOT BE LIABLE FOR LOSS OF REVENUEOR PROFITS,FAILURETO REALIZE SAVINGSOR OTHER
BENEFITS,OR ANY OTHER SPECIAL, INCIDENTALOR CONSEQUENTIALDAMAGESCAUSEDBY THE USE,MISUSE OR INABILITYTO
USE THiS PRODUCT,REGARDLESSOF THE LEGAL THEORYON WHICH THECLAIM IS BASED,AND EVENIF SAMSUNGHAS BEEN
ADVISED OF THE POSSIBILITYOF SUCH DAMAGES. NORSHALL RECOVERYOF ANY KiND AGAINST SAMSUNGBE GREATER IN
AMOUNTTHAN THE PURCHASEPRICE OF THE PRODUCTSOLD BY SAMSUNGAND CAUSING THE ALLEGED DAMAGE. WITHOUT
LiMiTING THE FOREGOING, PURCHASERASSUMESALL RISK AND LIABILITYFOR LOSS, DAMAGEOR INJURYTO PURCHASERAND
PURCHASER'S PROPERTYAND TO OTHERS AND THEIR PROPERTYARISING OUT OF THE USE, MISUSEOR iNABILiTY TO USETHIS
PRODUCT SOLDBY SAMSUNGNOT CAUSEDDIRECTLYBY THE NEGLIGENCEOF SAMSUNG, THIS LIMITEDWARRANTY SHALL NOT
EXTEND TO ANYONEOTHER THANTHE ORIGINAL PURCHASEROF THiS PRODUCT,iS NONTRANSFERABLEAND STATESYOUR
EXCLUSIVEREMEDY.
Some states do not allow limitationson howlongan implied warranty lasts,or theexclusion or limitationof incidentalor consequentialdamages,
so the above limitationsor exclusions may not apply to you. This warranty givesyou specific legal rights, and you mayalso have other rights
which vary from state to state,
To obtain warranty hardware service,pleasecontact SAMSUNGat:
SAMSUNGCUSTOMER CARE CENTER
400 Valley Road, Suite201, Mt. Arlington, NJ 07856, Tel:973-601-6000, Fax:973-601-6001
1.800-SAMSUNG (1.800.726-7864)and wvP,v.SAMSUNGUSA.com

I.-800.,SAMSUNG (
ELEGTRONIGS
H
