Samsung LT P1545 User Manual TFT LCD TELEVISION Manuals And Guides L0406430
SAMSUNG LCD Television Manual L0406430 SAMSUNG LCD Television Owner's Manual, SAMSUNG LCD Television installation guides
User Manual: Samsung LT-P1545 LT-P1545 SAMSUNG TFT - LCD TELEVISION - Manuals and Guides View the owners manual for your SAMSUNG TFT - LCD TELEVISION #LTP1545. Home:Electronics Parts:Samsung Parts:Samsung TFT - LCD TELEVISION Manual
Open the PDF directly: View PDF ![]() .
.
Page Count: 67

÷
..............-Owner's
Instructions
This device _sa Class B digital apparatus.
I
®2222222pdf 2004 04 10
Contents. qxd. q
2_ 3:36:43
4/9/04 5:55 AM Page 3
÷
÷
Do not display a still image (such as on a vdeo game or when hooking up a DVD to this LCD TV} on the Coot
1F CD (thin Film [ransister Liquid Crysta Display) panel for a long time as it can cause screen image retention.
This image retention is also known as 'screen burn" .To avoid such image retention, educe the degree of brightness
and contrast of this screen when displaying a still image
Ne faites pes afficher par votre 6cran couleur 1FF LCD (6cran _ raatrice active a affichage 8 cfistaux liquides) dar@t
sur image (comme il peut y en avor dans des jeux vid6o ou Iors d'une connexion dun Eecteur de DVD a cette t6 6v sion LOD)
pendant trop Iongteraps car cea pour@it c@er un fantOrae d' raage _ I 6cran. Ce fantOme est ega eraent connu sous le nora
de "br@ure d'6cran". Pour eviter tout risque de fantOme, @d@sez le niveau de luminosit_ et de centraste de cet 6cren Iorsqu'il
affiche une image fixe.
® ÷
÷
@
Contents_qxd.q 4/8/04 4:43 AM Page 1
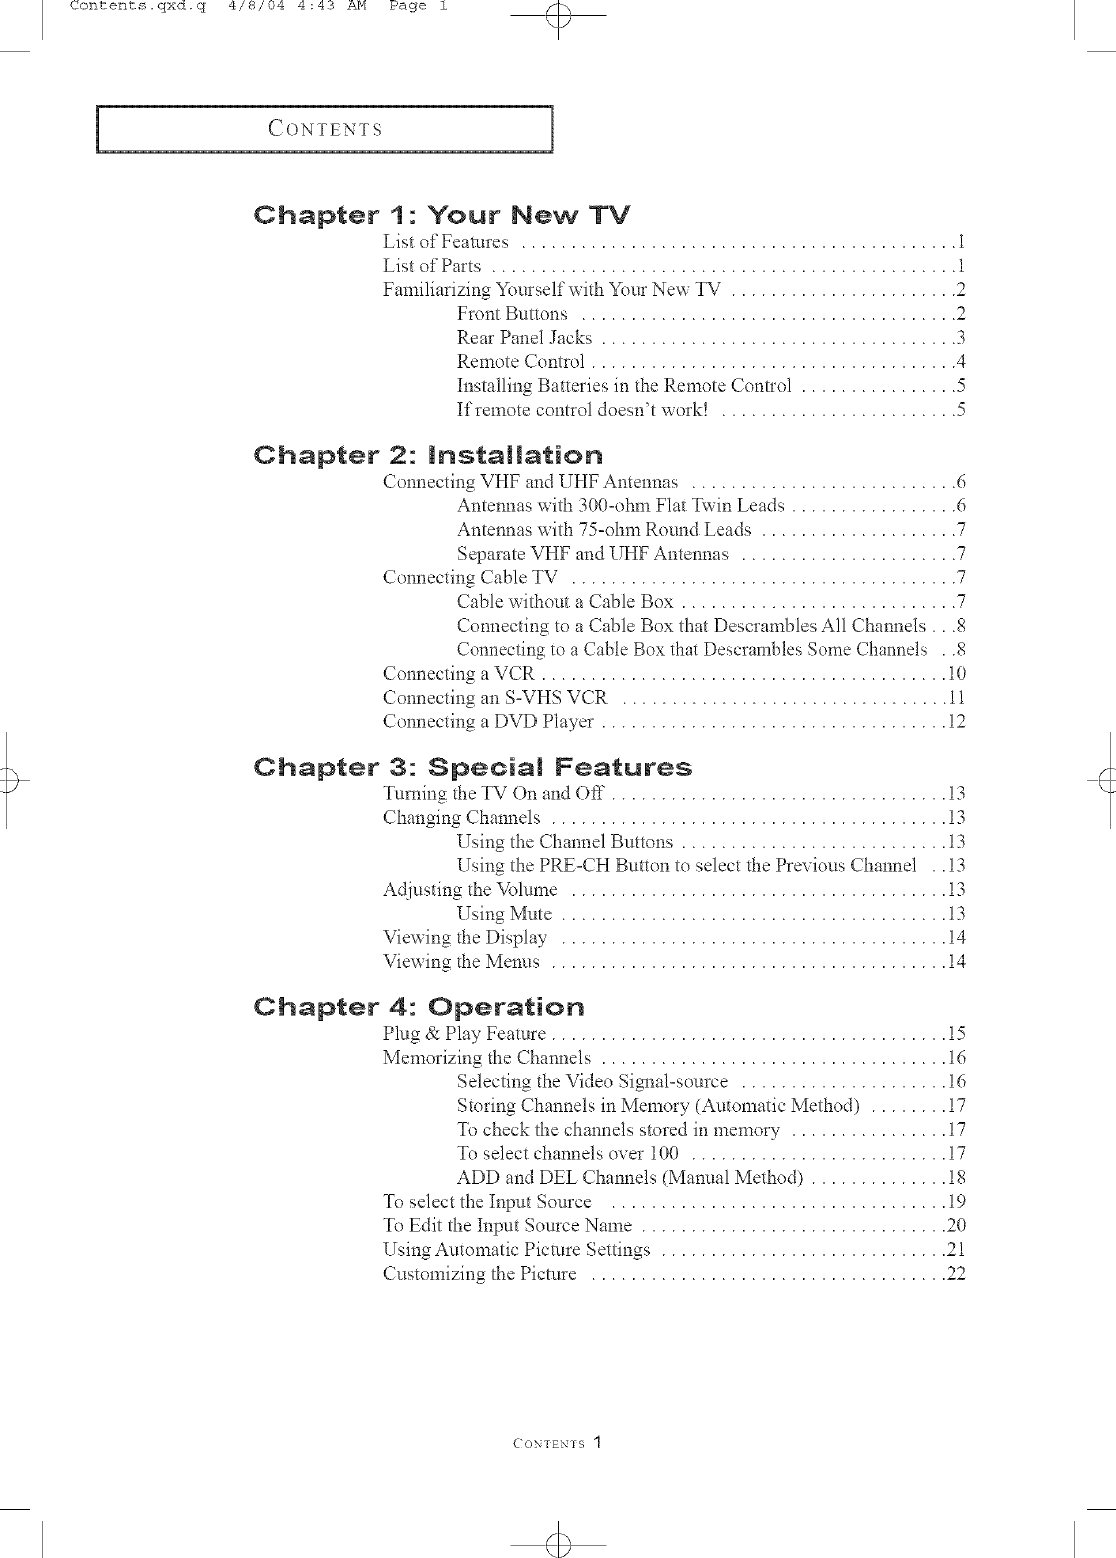
CONTENTS
Chapter 1 : Your New TV
List of Featm'es ............................................ i
List of Parts ............................................... 1
Familiarizing Yottrself with Yore New TV ....................... 2
Front Buttons ...................................... 2
Rear Panel Jacks .................................... 3
Remote Comrol ..................................... 4
h_stalling Batteries in the Remote Control ................ 5
If remote control doesn't work! ........................ 5
Chapter 2- Installation
Connecting VHF and UHF Antennas ........................... 6
Antennas with 300=ohm Flat T'_xin Leads ................. 6
Antennas vxith 75=ohm Rotmd Leads .................... 7
Separate VHF and UHF Amemm s ...................... 7
C@mecting Cable TV ....................................... 7
Cable v,ithottt a Cable Box ............................ 7
Connecting to a Cable Box that Descrambles All Chalmels...8
Connecting to a Cable Box that Descrambles Some Channels . .8
Connecting a VCR ......................................... i0
Connecting an S=VHS VCR ................................. i 1
C@mecting a DVD Player ................................... i2
Chapter 3" 8peoial Features
Tinting the TV On and Off .................................. i3
Changing Chmmels ........................................ 13
Using the Chalmel Bt_ttons ........................... i3
Using the PRE=CH Button to select the Previotts Chalmel .. i3
Adjusting the Volmne ...................................... i3
Using Mute ....................................... i3
Viewing the Display ....................................... i4
Viewing the Melms ........................................ i4
Chapter 4: Operation
Plug & Play Feature ........................................ 15
Memorizing @e Chalmels ................................... i6
Selecting the Video Signal=source ..................... i6
Storing Channels in Memory (Automatic Method) ........ i7
To check the cham_els stored in memory ................ i7
To select chfmnels over 100 .......................... i7
ADD and DEE Channels (Manual Method) .............. i8
To select the Ii_put Sottrce .................................. i9
To Edit @e Inpttt Sot_rce Name ............................... 20
Using At_tomatic Picture Set@_gs ............................. 21
Ctlstomizing the Pictme .................................... 22
( ONTEN-I $ J

Contents.qxd.q.q b/I/04 I:4U PM Page 2
ICONTENTS I
Using Automatic Sound Settings .............................. 23
To select the Sound option .................................. 24
Selecting a Menu Language ................................. 25
Setting the Blue Screen Mode ................................ 26
Adjusting the Color Tone ................................... 27
Automatic volmne control ................................... 28
Setting the Clock ......................................... 29
Option l: Setting the Clock Manually .................. 29
Option 2: Using the Local PBS Channel to Automatically
Set the TV Clock .......................... 30
Setting the On/Off Timer ................................... 32
Setting the Sleep Timer .................................... 34
Viewing Closed Captions ................................... 35
Using the V-Chip .......................................... 36
Setting Up Your Personal ID Number (PIN) ............. 36
How to Enable/Disable the V-Chip ..................... 37
How to Set up Restrictions Using the 'TV guidelines' . .... 38
How to Set up Restrictions Using the MPAA Ratings:
G, PG, PG-l 3, R, NC-l 7, X .......................... 40
How to Reset the TV afler the V-Chip
Blocks a Channel ('Emergency Escape') ................ 41
Chapter 5: PC Display
Using Your TV as a Computer (PC) Display ..................... 42
How to Set up Your PC Sotiware (Windows only) ........ 42
Adjusting the Screen Quality ......................... 43
Changing the Screen Position ......................... 44
To Initialize the Screen Position or Color Settings ......... 45
How to Auto Adjust ................................ 46
Using Automatic Picture Settings ...................... 47
Customizing the Picture ............................. 48
Adjusting the Color Tone ............................ 49
Customizing the color ............................... 50
Chapter 6: Troubleshooting
Identifying Problems ....................................... 51
Appendix
Using the Anti-Theft Kensington Lock ......................... 53
Relractable Stand .......................................... 54
Installing VESA compliant mounting devices .................... 55
Installing the Wall Mount Kit (sold separately) .................. 56
Cleaning and Maintaining Your TV ........................... 60
Using Your TV in Another Country ............................ 60
Display Mode ............................................ 61
Specifications ............................................ 62
CONTENTS 2

BN6_-00633A-06Eng l.qxd°q b/12/04 6:31 PM Page@
YOUR NEW TV
List of Features
Your TV was desif;ned with the latest tecl'mology.
This TV is a high-perik)rmance unit that includes the ikJlowing special features:
• Easy-to-use remote contro!
• Easy-to-use on-screen Fnenu system
o Automatic timer to turn the TV on and oil"
o Ac[justable picture and sound settings that can be stored in the TV's memory
o Automatic channel tuning tk_rup to !94 channels.(Air : 69 , STD : 125 )
• A special filter to reduce or eliminate reception problems
• Fine tuning control tk_rthe sharpest picture possible
o A built-in multi-channel sound decoder tk_rstereo and bilingual listening
o Built-ira dua! channel speakers
• Headphone .jack tbr private listening
List of Parts
Please make sure the folk)wing items are included with your LCD TV.
If any items are missing, contact your dealer.
!5"/20" 15" /!7" 20"
Remote Control Power Cord Wall Mount kit
(BN59-00429A) & 17" :3903-000144 15717": BN96-01270A
Batteries (AAA x 2) 15"/20": 3903-000085 20": BN96-01271A
Owner's
Instructions
English- 1

BN6_-00633A-06Eng l.qxd.q b/12/04 6:31 PM Page@
IYOUR NEW TV I
Familiarizing Yourself with Your New TV
Front Panel Buttons
The buttons on the front panel control your TV's basic features, including the on-screen
menu. To use the more advanced features, you must use the remote control.
SOURCE [9 MENU -- VOL + v CH A (_ POWER
t_ SOURCE_
Displays a menu of all of the available
input sources (TV, VIDEO, S-VIDEO,
Component, PC)
_' You can also use the SOURCE({_a)
button on the TV's control
panel to make selections.
i_ MENU
Press to see an on-screen menu of
your TV's features.
_) -- VOL +
Press to decrease or increase the volume,
Press to see an on-screen menu on the screen.
i_ _/CHA
Press to change channeIs AIso press to
highlight various items on the on-screen menu.
i_ 0 POWER
Press to turn the TV on and off.
t_ HEADPHONE JACK
Connect a set of external headphones to
this jack for private listening.
i_ SPEAKERS
O
O
REMOTE CONTROL SENSOR
Aim the remote control towards this spot
on the TV.
POWER INDICATOR
Lights up when you turn the power off.
(Red light shows in stand-by mode, Red
shows when you turn the power on, and light
is off after the power is on. Green shows
when you set Timer on or off.)
English-2

BN6_-00633A-06Eng l.qxd.q b/12/04 6:31 PM Page_
YOUR NEW TV
Rear Panel Jacks
Use the rear panel jacks to connect an A/V component that will be connected
continuously, such as a VCR or a DVD player.
For more information on connecting equipment, see pages 6~ 12.
< LT-P1745> < LT-P1545 /LT-P2045 /LT-P2045U >
!;! !! i;i
i!! i i'ii
0@
@POWER INPUT
OPC AUDIO IN (STEREO)
_]) PC VIDEO INPUT
Connect to the video output port on your PC.
_]) VIDEO INPUT
Connect a video signal from a
camcorder or VCR.
AUDIO INPUT
Connect an audio signal(L/R) from a
camcorder or VCR.
O S-VIDEO INPUT
Connect an S-Video signal from a
camcorder or VCR,
@TV ANTENNA
Connect to an antenna or to a cable
TV system.
_) COMPONENT
Connect a component video/audio.
_1 KENSINGTON LOCK
(See page 53)
English-3
BN6_-00633A-06Eng l.qxd.q b/12/04 6:31 PM Page@
Youk NEw TV
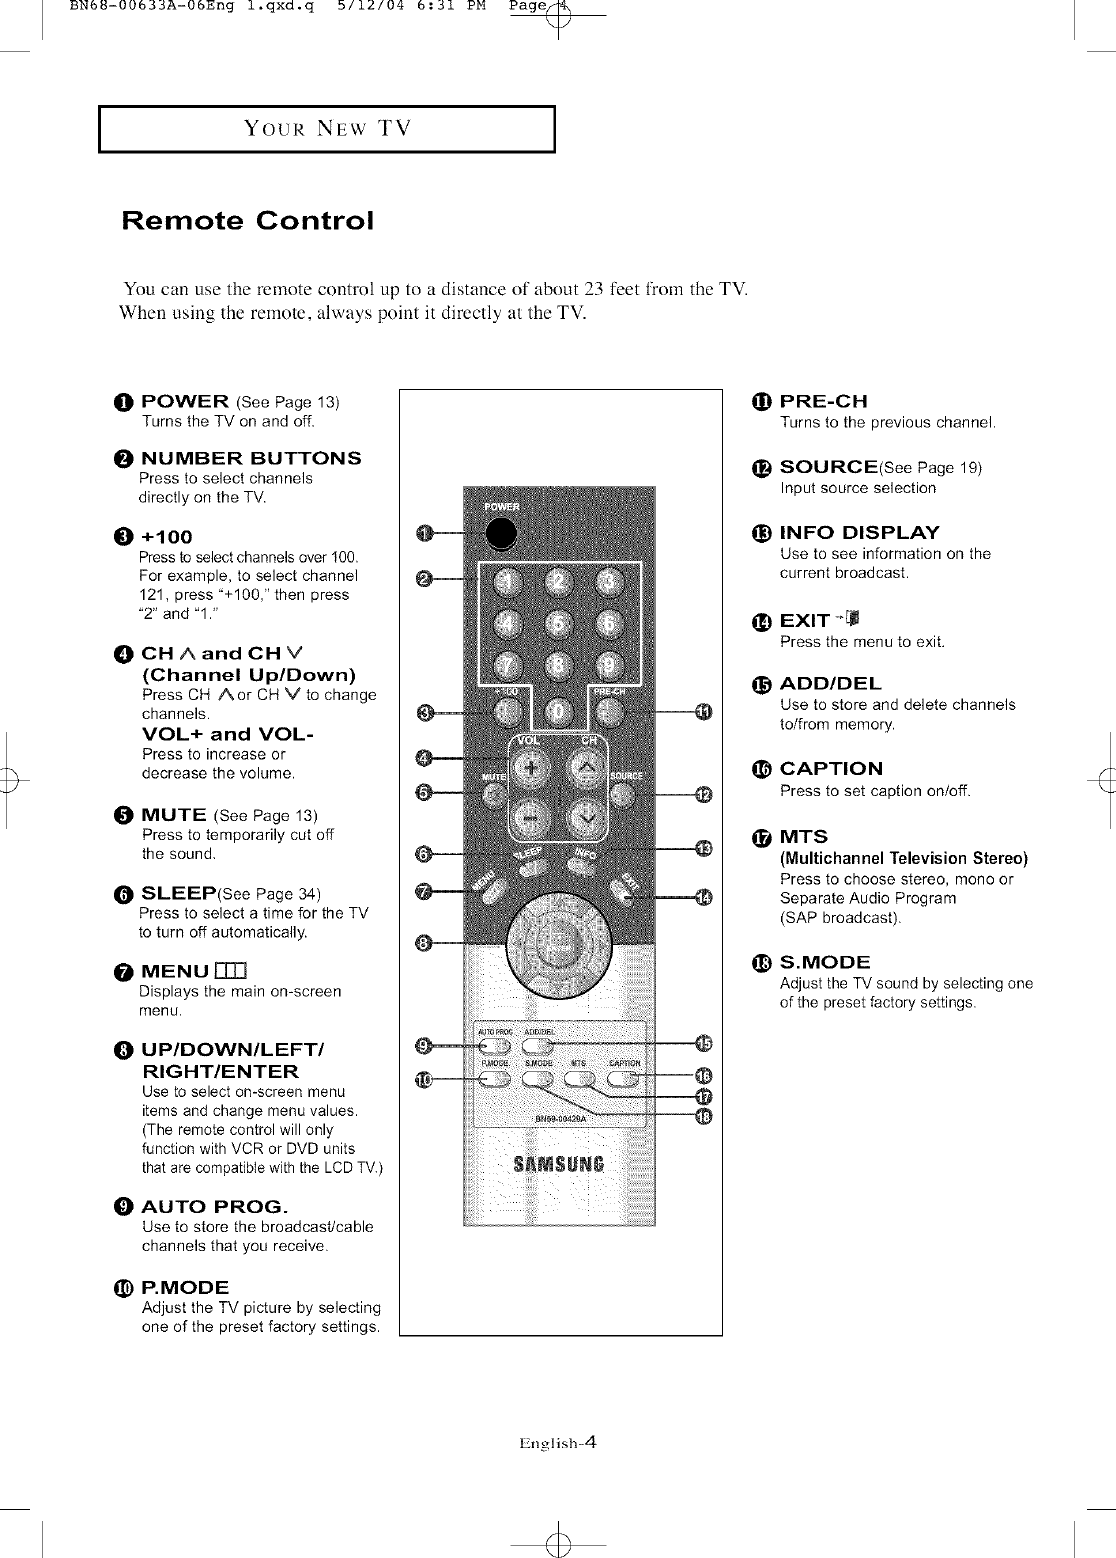
Remote Control
You can use the remote control up to a distance of about 23 feet from the TV.
When using the remote, always point it directly at the TV.
t1
O
O
O
O
O
@
O
O
@
POWER (See Page 13)
Turns the TV on and off.
NUMBER BUTTONS
Press to select channels
directly on the TV.
+100
Press to select channels over I00.
For example, to select channel
121, press "+100," then press
"2" and '1."
CH A and CH V
(Channel Up/Down)
Press CH Aor CH V to change
channels.
VOL+ and VOL-
Press to increase or
decrease the volume.
MUTE (See Page 13)
Pressto temporarily cut off
the sound,
SLEEP(See Page 34)
Press to select a time for the TV
to turn off automatically.
MENU[][][]
Displays the main on-screen
menu.
UPIDOWNILEFTI
RIGHT/ENTER
Use to select on-screen menu
items and change menu values.
(The remote control will only
function with VCR or DVD units
that are compatible with the LCD TV.)
AUTO PROG.
Use to store the broadcast/cable
channels that you receive.
P.MODE
Adjust the TV picture by selecting
one of the preset factory settings.
_) PRE-CH
Turns to the previous channel.
_) SOURCE(See Page 19)
Input source selection
_) INFO DISPLAY
Use to see information on the
current broadcast.
_) EXIT-'[J
Press the menu to exit.
_) ADD/DEL
Use to store and delete channels
to/from memory.
_) CAPTION
Press to set caption on/off.
OMTS
(Multichannel Television Stereo)
Press to choose stereo, mono or
Separate Audio Program
(SAP broadcast).
_) S.MODE
Adjust the TV sound by selecting one
of the preset factory settings.
English-4
<b

BN6_-00633A-06Eng l.qxd.q b/12/04 6:31 PM Page@
IYOUR NEW TV I
Installing Batteries in the Remote Control
Slide the cover out
i_iiiiIiiiii!ili!iii_ii_ii_i_i_
_i i ii i i I
i i
lMake sure to match the "+" and
"--" ends of the batteries with the
diagram inside the compartment.
Remove the batteries and store them
in a cool, dry place if you won't be
using the remote control for a long
time.
The remote control can be used
up to about 23 feet fl'om the TV.
(Assumi% t3pical TV usa=e,
the batteries last for about one year.)
If remote control doesn't work
Check the iollowing:
1. Is the TV power switch on?
2. Are the plus and minus ends of the batteries reversed?
3. Did the batteries run out?
4. Is the power out, or is the power cord unplugged?
5. Is there a special fluorescent light or a neon sign nearby?
Lnglish-5

BN6_-00633A-06Eng l.qxd.q b/12/04 6:31 PM Page@
INSTALLATION
Connecting VHF and UHF Antennas
If your antenna has a set of leads that
look like lhis, see "Amennas wilh
300-ohm Flat Twin Leads" below.
If your antenna has one lead thal looks
like this, see _'Amennas with 75-ohm
Round Leads" on page 7.
ff you have two antennas, see "'Separate
VHF and UHF Amennas'" on page 7.
Antennas with 300-ohm Flat Twin Leads
If you are using an off-air antenna (such as a roof antenna or '*rabbit ears") that has
300-ohm twin fiat leads, folh)w the directions below.
1
=lace the wires from
the twin leads under
the screws on a 300-
75 ohm adaptor (not
supplied). Use a
screwdriver to tighten
the screws
Plug the adaptor into
the TV ANTENNA
terminal on the
bpOtntOLof the back
English-6
4>

BN6U-00633A-06Eng l.qxd.q b/12/04 6:31 PM Page@
IINS TALLATION I
Antennas with 75-ohm Round Leads
1
Plug the antenna
lead into the TV
ANTENNA terminal
on the bottom of the
back panel.
Separate VHF and UHF Antennas
If you have two separate antennas for your TV (one VHF and one UHF), you must
combine the two antenna signals before connecting the antennas to the TV. This
procedure requires a an optional combiner-adaptor (available at most electronics shops).
Connect both antenna _ _/_(_j
leads to the combiner.
2
Plug the combiner
into the TV
ANTENN I
on the
the rear panel.
Connecting Cable TV
To connect to a cable TV system, follow the instructions below.
Cable without a Cable Box
you do not need a cable box to
Plug the incoming view unscrambled cable channels.
cable into the TV
ANTENNA terminal
on back of the TV.
Ignglish-7
BN6_-00633A-06Eng l.qxd.q b/12/04 6:31 PM Page@
IIN STALLATION I
Connecting to a Cable Box that Descrambles All Channels
Find the cabJe that is
connected to the
ANTENNA OUT
termina! on your cable
Z I ZZZ /
4This terminal might be labeled
"ANT OUT", "VHF OUT", or
simply, "OUT".
Connect the other end
of this cable to the_
ANTENNA termina! on
the back o{ the Tv.
Connecting to a Cable Box that Descrambles Some Channels
If your cable box descrambles only some channels (such as premium channels), tollow the
instructions below. You will need a two-way splitter, an RF (A/B) switch, and four lengths
of coaxial cable. (These items are available at most eleclronics stores.)
1
Find and disconnect
the cable that is
connected to the
ANTENNA IN terminal
on },our cable box.
IThis terminal might be labeled
"ANT IN", "VHF IN", or simply,
"IN".
2
Connect this cable
to a two-way splitter.
3
Connect a coaxial
cable between an
OUTPUT terminal on
the splitter and the IN
terminal on the cable
box.
Incoming
cable
Cable Box
English-8

BN6_-00633A-06Eng l.qxd.q b/12/04 6:31 PM Page@
IINSTALLA/I'ION I
Connect a coaxial
Cable between the ..........................................................-M-41 I_
ANTENNA OUT n_ _
terminal on the SNifter RF (A/B)
cable box and the CaNe Box Switch
B=IN terminal on the
AIB switch.
Connect another _
cable between the
other OUT terminal Incoming
on th e sp!itter and cane
the A-IN terminal on SNitter RF (AIB)
Cable Box Switch
the RF (A/B) switch.
Connect the last
coaxial cable
between the OUT
terminal on the RF macoming
(A/B) switch and the cane
VHF/UHF terminal
on the rear of the
TV.
Splitter
Cable Box
TV ANTENNA
' _ TV Rear
RF (AIB)
Switch
After you've made this connection, set the A/B switch to the "A" position for normal
viewing. Set the A/B switch to the "B" position to view scrambled channels.
(When you set the A/B switch to "B ," you will need to tune your TV to the cable box's
output channel, which is usually channel 3 or 4.)
Ignglish-9
BN6U-00633A-06Eng l.qxd.q b/12/04 6:31 PM Page_0
IIN STALLATION I
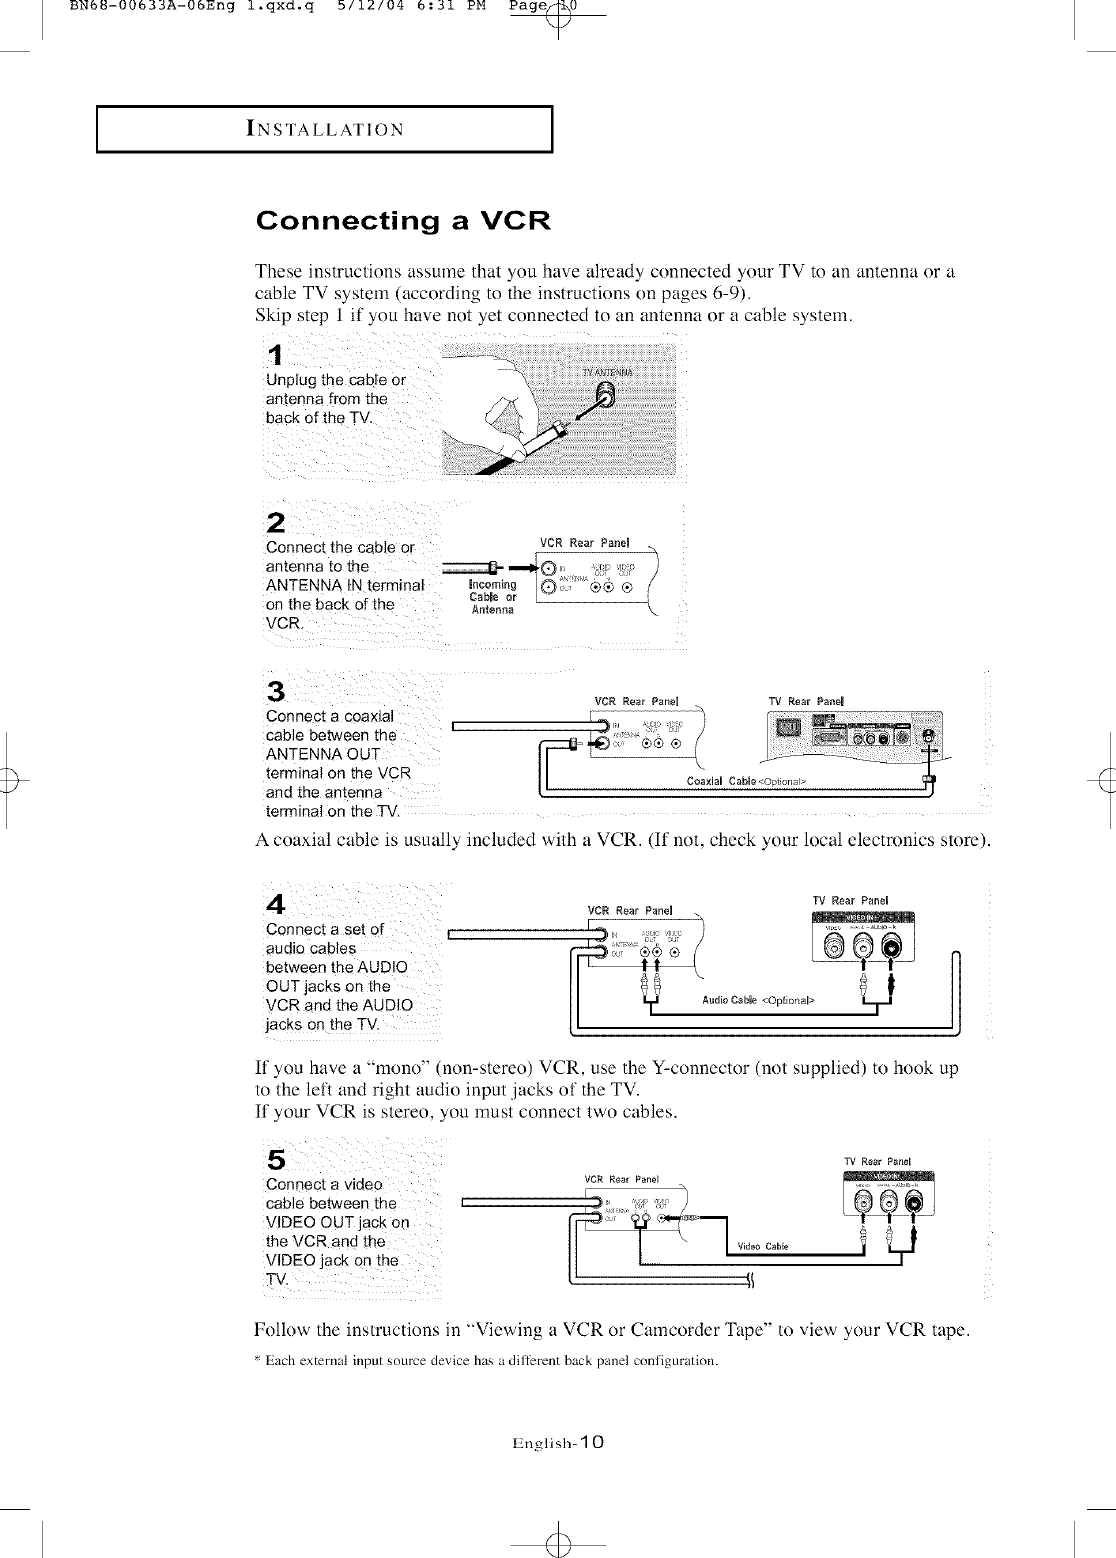
Connecting a VCR
These instructions assmne that you have already connected your TV to an antenna or a
cable TV system (according to the instructions on pages 6-9).
Skip step I if you have not yet connected to an antenna or a cable system.
1
Unplugthe cable or
antenna fromthe
back of the TV.
2
Connect the cable or VCR Rear Panel
amenna to the _ ""_0 . 'c:: ":__ )
ANTENNA IN terminal Incoming O_ "<®4) ® /
Cable or L
on the back of the Antenna
VCR.
3
Connect a coaxial
cable between the
ANTENNA OUT
terminal on the VCR
ane the amenna
terminal on the TV.
VCR Rear PaneU TV Rear Panel
A coaxial cable is usually included with a VCR. (Ii not, check your local electronics store).
Connect a set of L
audiocables L
between theAUDIO
OUT]acks on the
VCR and the AUDIO
jacks on the TV,
TV Rear PaneH
VCR Rear PaneU m .o,
If you have a "mono" (non-stereo) VCR, use the Y-connector (not supplied) to hook up
to the left and right audio input ,jacks of the TV.
If your VCR is stereo, you must connect two cables.
Connect a video
cable between the
VIDEO OUTjack on
the VCR an d the
VIDEO jack on the
TV, F
TV Rear Panel
Folk)w the instructions in "Viewing a VCR or Camcorder Tape" to view your VCR tape.
_:Each external input source device has a ditTerent back panel coniiguration.
English- 10

BN6U-00633A-06Eng l.qxd.q b/12/04 6:31 PM Page_l
IINSTALLATION
Connecting an S-VHS VCR
Your Samsung TV can be connected to an S-Video signal from an S-VHS VCR.
(This connection delivers a better picture as compared to a standard VHS VCR.)
1
To begin, follow
s[eps "-3 in the
previous secbon to
connect the antenna
or cable to your
VCR and your TV.
VCR Rear PaneU TV Rear P_neU
!_,, ...... .,0E0
2
Connect a set of audio
cables between the
AUDIO OUT jacks on
the VCR and the
AUDIO INPUT jacks
on the TV
/
3
Connect an S-video
cable between the
S-V DEO OUT jack on
the VCR and the
S-VIDEO INPUTlack
on the TV,
VCR Rear Panel TV Rear Panel
E J_ ol _'u
ii \
TV Rear I_anel
51
I?
!_ S=Video CaNe <Optional>
VCR Rear Panel
An S-video cable is usually included with an S-VHS VCR.
(If not, check your local electronics store.)
Each external input source device has a dillerent back panel configuration.
IZnglish- 1 1

BN6U-00633A-06Eng l.qxd.q b/12/04 6:31 PM Page_2
IIN STALLATION I
Connecting a DVD Player
The rear panel ,jacks on your TV make it easy to connect a DVD player to your TV.
1
Connect a set of audio
cables between me
_:>.AUDIO INPUT
jacks on the TV and
the AUDIO OUT acks
on the DVD player.
DVD Player Rear P_nN TV Rear Penn
®e6® l
Audio Cable <OptionN>
TV Rear Panem
the TV and lhe Y. Pb(Y'COMPONENTbetweenc°nnec'a videocablepb,pr)thejackson __I¢ ¢ '_' _"_']_ _ 1 _}],l
Pr jacks on the DVD Video Cabme<OptlonN>
player, n }
Note : For an explanation of Component vide(), see your DVD player owner's manual.
The component terminal of this set only supports 480i/480p resolution.
* Each external input source device has a different back panel configuration.
12,nglish- 1 2

BN6_-00633A-06Eng l.qxd.q b/12/04 6:31 PM Page_d
SPECIAL FEATURES
Turning the TV On and Off
Press the POWER button on the remote control,
You can also use the Power button on the front panel.
Changing Channels
Using the Channel Buttons
When you press the CH ^ /vbuttons, the TV changes channels in sequence.
You will see all the channels that the TV has nlemorized. (The TV must have menlorized at
least three channels.) You will not see channels that were either erased or not memorized.
Using the PRE-CH Button to select the Previous Channel
The TV will switch to the last channel viewed.
To quickly switch between two channels that are far apart, tune to one channel, then use
the number button to select the second channel. Then use the PRE-CH button to quickly
alternate between them.
Adjusting the Volume
1To Control Speaker votunie.
When a headphone is connected, the Volume Control OSD screen changes automatically as
in number 2.
Press the VOL +/- buttons to increase or decrease the volume.
Using Mute
At any time, you can temporarily cut off the sound using the Mute button.
To turn mute off, press the MUTE button again, or simply press the VOL +/. buttons.
English- 1 3

BN6_-00633A-06Eng l.qxd.q b/12/04 6:31 PM Page_4
ISPECIAL FEATURES I
Viewing the Display
The display identifies the current channel and the status of certain
audio-video settings.
on the remote control. i
TheTV Will display the
channel, the type of
sound, and the status
of certain picture an d
4The on-screen displays
disappear after about ten seconds.
4Press the button once more or
wait approximately 10 seconds
and it disappears auton]atically.
IAllows the user to adjust the
settim,s_.accordin_ to his/her
preference and shows the
sound settings, current settings.
Viewing the Menus
With the power on, _ in_
press the MENU button, _:_
The main menu appears
on the screen, It's left
side has five icons:
Input, Picture, Sound _ '_ _ _.... _ _o_u
Channel, and Setup,
4The on-screen menus
disappear fl'om the screen after
about two minutes.
2
Use the UP/DOWN Aw buttons to select one of the
five icons, Then press ENTERL_ _ to access the
con s sub-menu.
3
Press the EXIT button to exit.
4You can also use the
SOURCE buttons
on the control panel of the TV
to make selections.(See page 19)
IZnglish- 14
BN6_=00633A=06Eng 2.qxdoq b/12/04 6:22 PM Page_
OPERATION
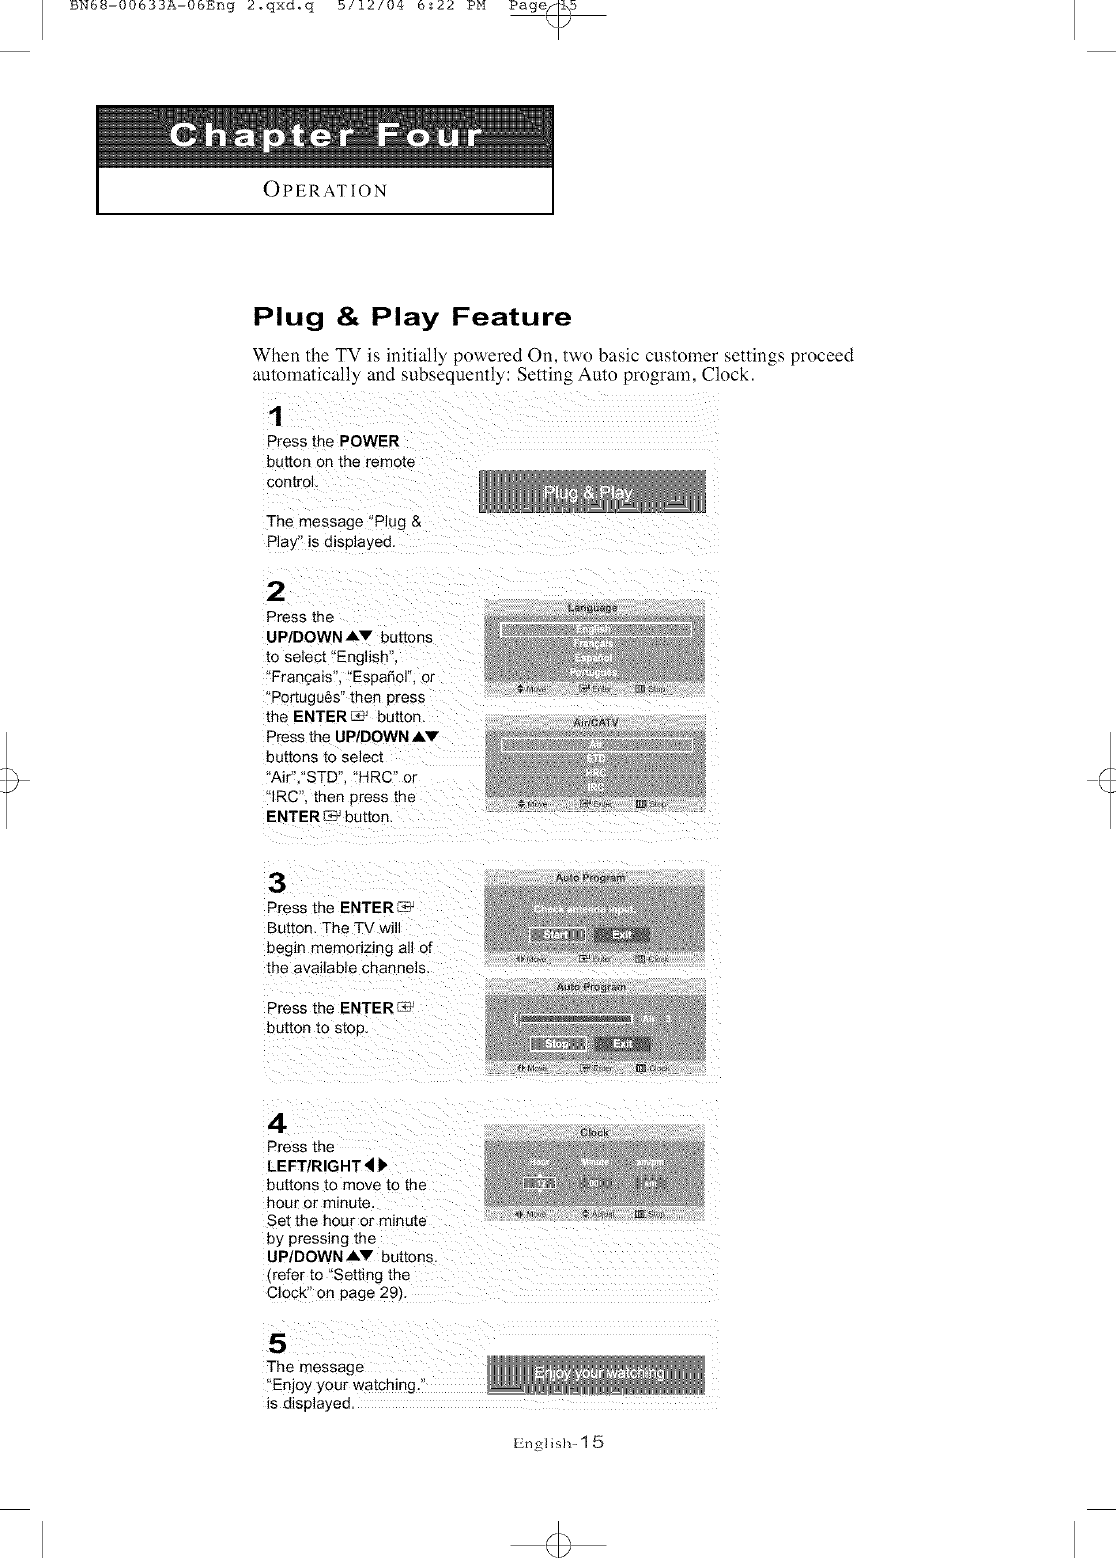
Plug & Play Feature
When lhc TV is initially powered On. two basic cuSlOlYler senings proceed
automalically and subsequently: Selling Auto prograln. Clock.
1
Press the POWER
button on the remote
control,
The message "Plug &
Play" is displayed
2
Press the
UP/DOWN AV buttons
to select "English",
'Frangais, "Espafiol". or
"Portugu6s" then press
the ENTER_ button.
Press the LIP/DOWN AV
buttons to select
"AiP,"STD", 'HRC" or
'IRC", then press the
ENTER _ button,
La#9_aSe
[m a_u
3
Press the ENTERK4;
Button, The TV will
begin memorizing all of
the available channels,
Press the ENTER
button to stop,
A_o Pro#fa[#
_v r_
4
Press the
LEFT/RIGHT4
buttons to move to the
hour or minute,
Set the hour or minute
by pressing the
UP/DOWN AV buttons.
frefer to "Setting the
Clock" on page 29/,
5
The message
"Enjoy your watching."
is displayed.
English- 1 5

BN6B-00633A-06Eng 2.qxd.q b/12/04 5:22 PM Page_6
IOPERATION I
Memorizing the Channels
Your TV can memorize and store all of the available channels lk)rboth "off-air" (antenna)
and cable channels. A0er the available channels are memorized, use the CH/', and CH v
buttons to scan through the channels. This eliminates the need to change channels by
entering the channel digits. There are three steps for memorizing channels: selecting a
broadcast source, memorizing the channels (automatic) and adding and deleting channels
(manual).
Selecting the Video Signal-source
Before your television can begin memorizing the awdlable channels, you must specify the
type ot signal source that is connected to the TV (i.e., an antenna or a cable system).
Press the MENU button
to display the men u`
Press the
UP/DOWN AV 5uttons
to select _'Channer', then
!i!iii
2
Repeatedly press the
ENTER_ button to
cycle through these
choices:
Air, STD. HRC or IRC
all cable TVL
Ghanr_J
Press the
UP/DOWN AV
buttons to select the
Video signal source,
then press the
ENTER_ button.
Press the EXIT button
to exit.
Note :STD, HRC _mdIRC identify,various types of cable
TV systems. Contact your local cable company to identify,
the type of cable system that exists in your particular area.
At this point, the signal source has been selected.
Pr(x:eed to "Storing Ch_mnels in Memou" (next page).
English- 16
4>
BN6_-00633A-06Eng 2.qxd.q b/12/04 5:22 PM Page@/
IOPERATION I
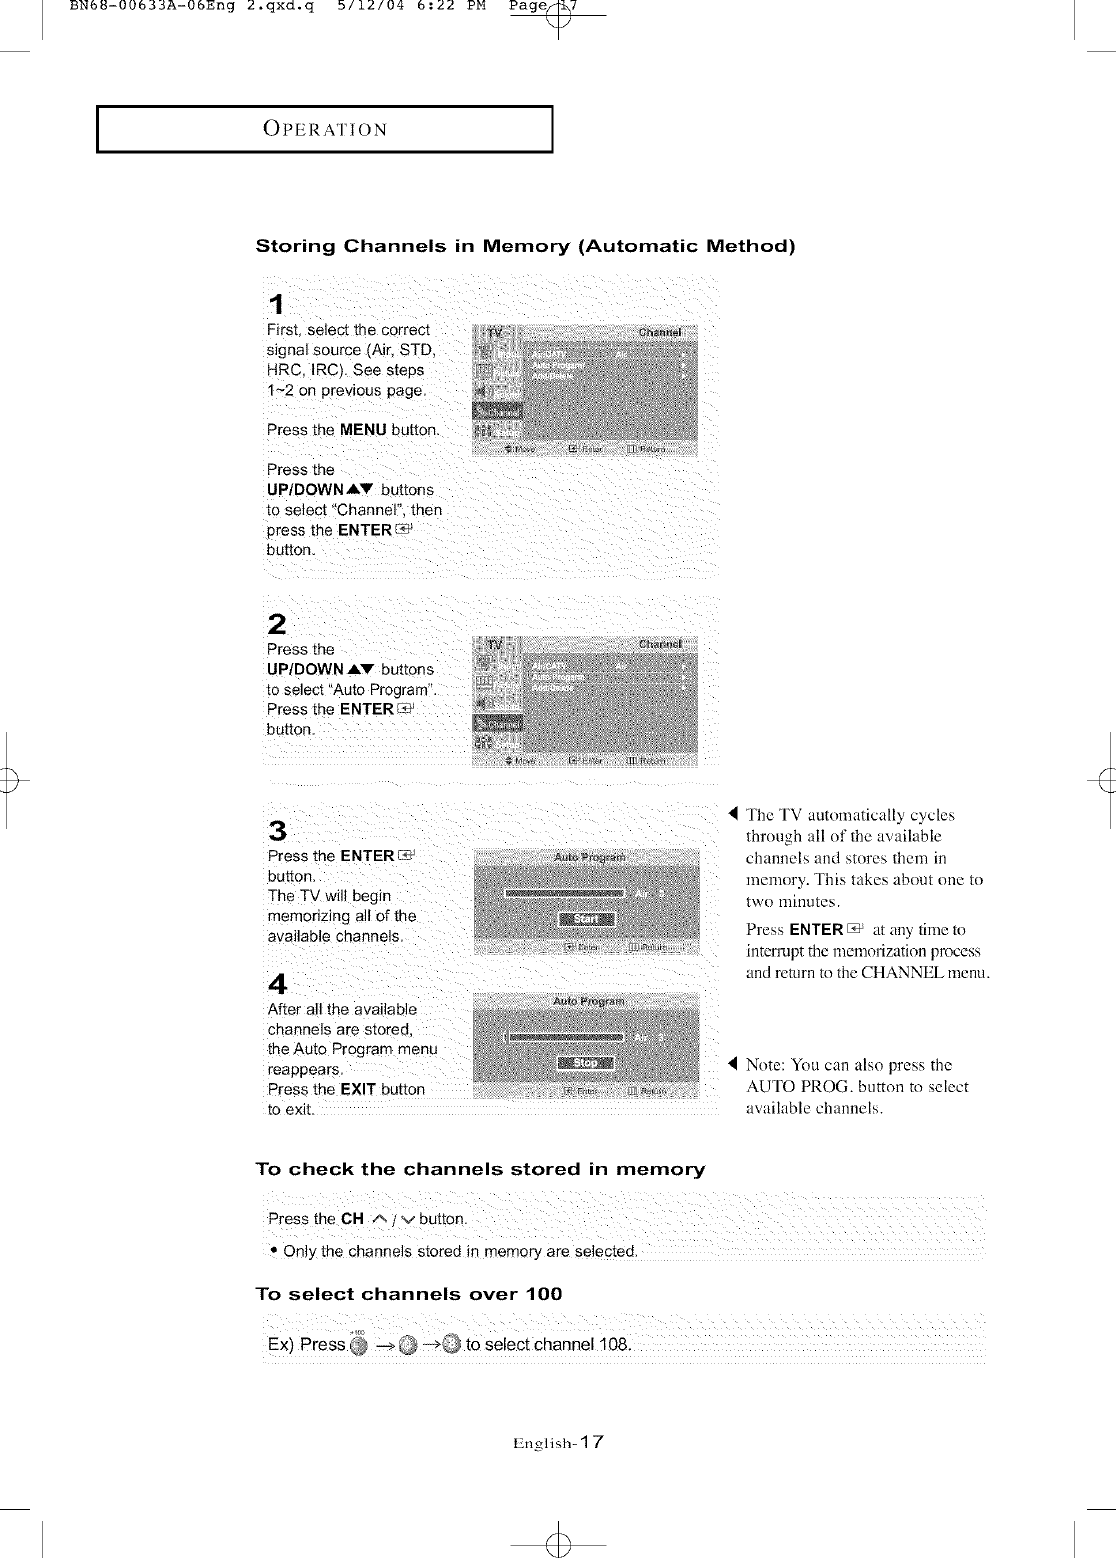
Storing Channels in Memory (Automatic Method)
1
First. select the correct W e{_an,e_
@
signal source (Air, STD, - !_
HRcIRC,Seesteps
1~2 on previous page
Press the MENU button
Press the
UP/DOWN AV buttons
to select "Channel". then
Dress the ENTER r_
bu[ton
UP/DOWN AV buttons
[o select "Auto Program".
Press the ENTER
button
3
Press the ENTERL_ j
button
The TV will begin
memonzing all of the
available channels
4
After all the available
channels are stored
the Auto Program menu
reappears
Press the EXIT button
4 The TV automatically cycles
through all of the awlilable
channels and stores them in
memory. This takes about one m
[WO llll nufes.
Press ENTER C_ a_ any rune _o
interrupt the memorization process
and return to the CHANNEL menu.
I Note: You can also press the
AUTO PROG. button u_ select
to exit. available channels.
To check the channels stored in memory
" Only the channels stored in memory are selected.
To select channels over 100
English- 1 7

BN6_-00633A-06Eng 2.qxd.q b/12/04 5:22 PM P_
IOPERATION I
ADD and DEL Channels (Manual Method)
1
Use the number buttons to directly
select the channel to Add or Delete.
Press the MENU button to display
the menu,
Press the UP/DOWNIkV
buttons to select "Channel"
then press the ENTER E9 button
Press the UPIDOWNAV
buttons 1o select "Add/Delete",
Press the ENTER _* button.
Press the ENTER_ _ button to select
Add" or "Delete",
3tess the EXIT button
2(Alternate method) :
RepeatedlypressingE.TER_W,Ia_iernatebetween'Add'and'Delete,
PreSS the EXIT button :
YOu can view any channel (including an erased channel) by using the number
buttons on the remote control.
English- 1 8

BN6U-00633A-06Eng 2.qxd.q b/12/04 6:22 PM Page_9
IOPERATION I
To select the Input Source
Use to select TV or other external input sources connected to the TV.
Use to select the screen ot your choice.
1
Press the MENU button
to displa!, the on-screen
menu
Press the ENTERI_J _
button [%-=J_uts [] Retu
2
Press the ENTER c_c_
button to select "TV",
then press the
ENTER T.£-button.
3
Press the
UPIDOWN ,I_V
buttons to select the
Input source, then
press ENTER
So_rce Li_t
Note: You can also press the SOURCE button on the remote to
choose the Input source.
English-] 9

BN6_-00633A-06Eng 2.qxd.q b/12/04 5:22 PM Page_0
IOPERATION I
To Edit the Input Source Name
Name tile input device connected to tile input jacks to make your input somce selection easier.
Press the MENU
b_tton to displaY ibe
menu.
button.
Al!' buttons to select
UP/DOWN AV buttons
repeatedly unti! the
appropriate source
After the source is
Selected_ press the,
Press the EXIT button
Note: DHR = DVD HDD Receiver
English-20

BN6_-00633A-06Eng 2.qxd.q b/12/04 5:22 PM Page_l
IOPERATION I
Using Automatic Picture Settings
Your TV has lour autematic picture settings ("Dynamic", "Standard", "Mevie", and
"Custom") that are preset at the factory. You can activate either Dynamic, Standard, or
Movie by pressing P.MODE (or by making a selection from the menu). Or, you can
select "Custom" which automatically recalls your personalized picture settings.
PreSs the MENU buR0n
to display the menu,
UP/DOWN AV buttons
to select i'Picture", then
z
i i i i i iii i
2
Press the
UP/DOWN AV buttons
to select the
"Dynamic", "Standard",
"Movie" or "Custom"
picture setting
Press the
ENTER _ button.
Press the EXIT button
to exit.
Alternate method:
Simply press the P.MODE button on the remote
control to select one of the standard picture settings,
•Choose Drt_amic to increase the clarity and sharpness of the picture.
* Choose St_mdmd for the standard factory settings.
* Choose Movie when viewing a Movie.
* Choose Cuslom if you want to adjust the settings according to personal
preference (see "Customizing the Picture"_ page 22).
English-21
+

BN6_-00633A-06Eng 2.qxd.q b/12/04 5:22 PM Page_2
IOPERATION I
Customizing the Picture
You can use the on-screen menus to change the contrast, brightness, sharpness,
color and tint according to personal preference.
(Alternatively, you can use one of the "automatic" settings. See the previous page.)
Press the MENU button
to display the menu.
Press the
UPIDOWN AV Buttons
to select 'Picture", then
press the ENTER_
UPIDOWN Av buttons
to select Custom", then I
press the ENTERE_ _
Press the ENTER _
button to select a
particular item .
Press the
UP/DOWN
buttons to select .......
Color, or Tint.
Press the
LEFT!RIGHT _
buttons to
For example f you Select
,coatrast_:, press ng RIGHT
increases it
Press the EXIT button to exit,
Note: The Tint feature does not work in component mode.
English-22
4>

BN6U-00533A-05Eng 2.qxd.q b/12/04 5:22 PM Page_3
IOPERATION I
Using Automatic Sound Settings
Your TV has two automatic sound settings ("Standard", and "Speech") that are preset at the
factory. You can activate either of them by pressing the S.MODE button (or by making a
selection from the on-screen menu). Or, you can select "Custom Sound", which automati-
cally recalls your personalized sound settings.
1
Press the MENU button
to display the menu.
Press the
UP/DOWN AV buttons
to select 'Sound", then
press the ENTER_
button,
S_u_d
w _ _nter [I13R_t_
Press the
ENTER L_;_button
to select 'Mode"
Press the
UP/DOWN ,LV buttons
repeatedly to selept the
'!Standard", or '_Speech"
Press the EXIT button
Alternate method:
Simply Press the S.MODE button on the remote control to
select one of the standard sound settings.
•Choose Standard for the standard factory settings.
•Choose Speech when watching a show that is mostly dialogue (i.e., news).
English-23

BN6B-00633A-0bEng 2.qxd.q b/12/04 5:22 PM Page_4
IOPERATION I
To select the Sound option
The sound settings can be adjusted to suit your personal preference.
(Alternatively, you can use one of the "automatic" settings. See the previous page.)
Depending on the particular program being broadcast, you can listen to stereo,
mono, or a Separate Audio Program. (SAP audio is usually a foreign-language
translation. Sometimes SAP has unrelated information like news or weather.)
Press the MENU button
to disp ay the menu.
Press the
UP/DOWN _,V buttons
to select 'Sound" then
press the ENTERL_Sj
button.
Press the
UP/DOWN Ai,v
buttons to SeleCt
!MTS", then press
the ENTER I:_ button.
Press the
buttons to select
"Mono'!, "Stereo" or
"SAP", then press the
ENTEREN' button.
Press the EXIT button
to exit.
• Choose Mono for channels that are broadcasting in mono, or
it_you are having difficulty receiving a stere() signal.
• Choose SteJ_,o for channels that am broadcasting in stereo.
• Choose SAP to listen to the Separate Audio Program, which is
usually a [breign-language lranslation.
You can also change the MTS setting by pressing the "MTS" button
on the remote control. (When you change channels, MTS is set to "Stereo"
automatically. To listen in 'SAP' or 'Mono', change the MTS setting.)
In other modes except RF, only Mono and Stereo can be selected.
English=24

BN6_-00633A-06Eng 2.qxd.q b/12/04 5:22 PM Page_b
IOPERATION I
Selecting a Menu Language
Press the MENU button
to display the menu.
Press the
UP!DOWN AV button s I
to select tlSetup", then
Press the
UP/DOWN AV buttons
to selec t Language.
Press the ENTER-F£Y
button.
Press the
UP/DOWN AV buttons
to select 'tEnglish";
_'Francais'!, !!Espaho I', 0r
t'Portugu6s".
Press the EXIT button
to exit
English-25

BN6_-00633A-06Eng 2.qxd.q b/12/04 5:22 PM Page_6
IOPERATION I
Setting the Blue Screen Mode
If no signal is being received or the signal is very weak, a blue screen automatically
replaces the noisy picture background.
If you wish to continue viewing the poor picture, you must set the "Blue screen"
mode to "Off".
PreSS the MENU button
to dis#lay the menu,
UP/DOWN AV buttons
to select !'Setup", then
Press the
UPIDOWN AV buttons
to select "Blue Screeff!,
then press the
ENTE RK'2 butto n. !
3+ Pressing the UP/DOWN A--
buttons will alternate between
Press the "O,Y' and "Oft'".
UP/DOWN AV buttons
to set Blue Screen
,on,,Or,+off,,
PresS the EXITbutton to i
exit.
English=26

BN6_=00633A=06Eng 3.qxdoq b/12/04 b:23 PM Page_
OPERATION
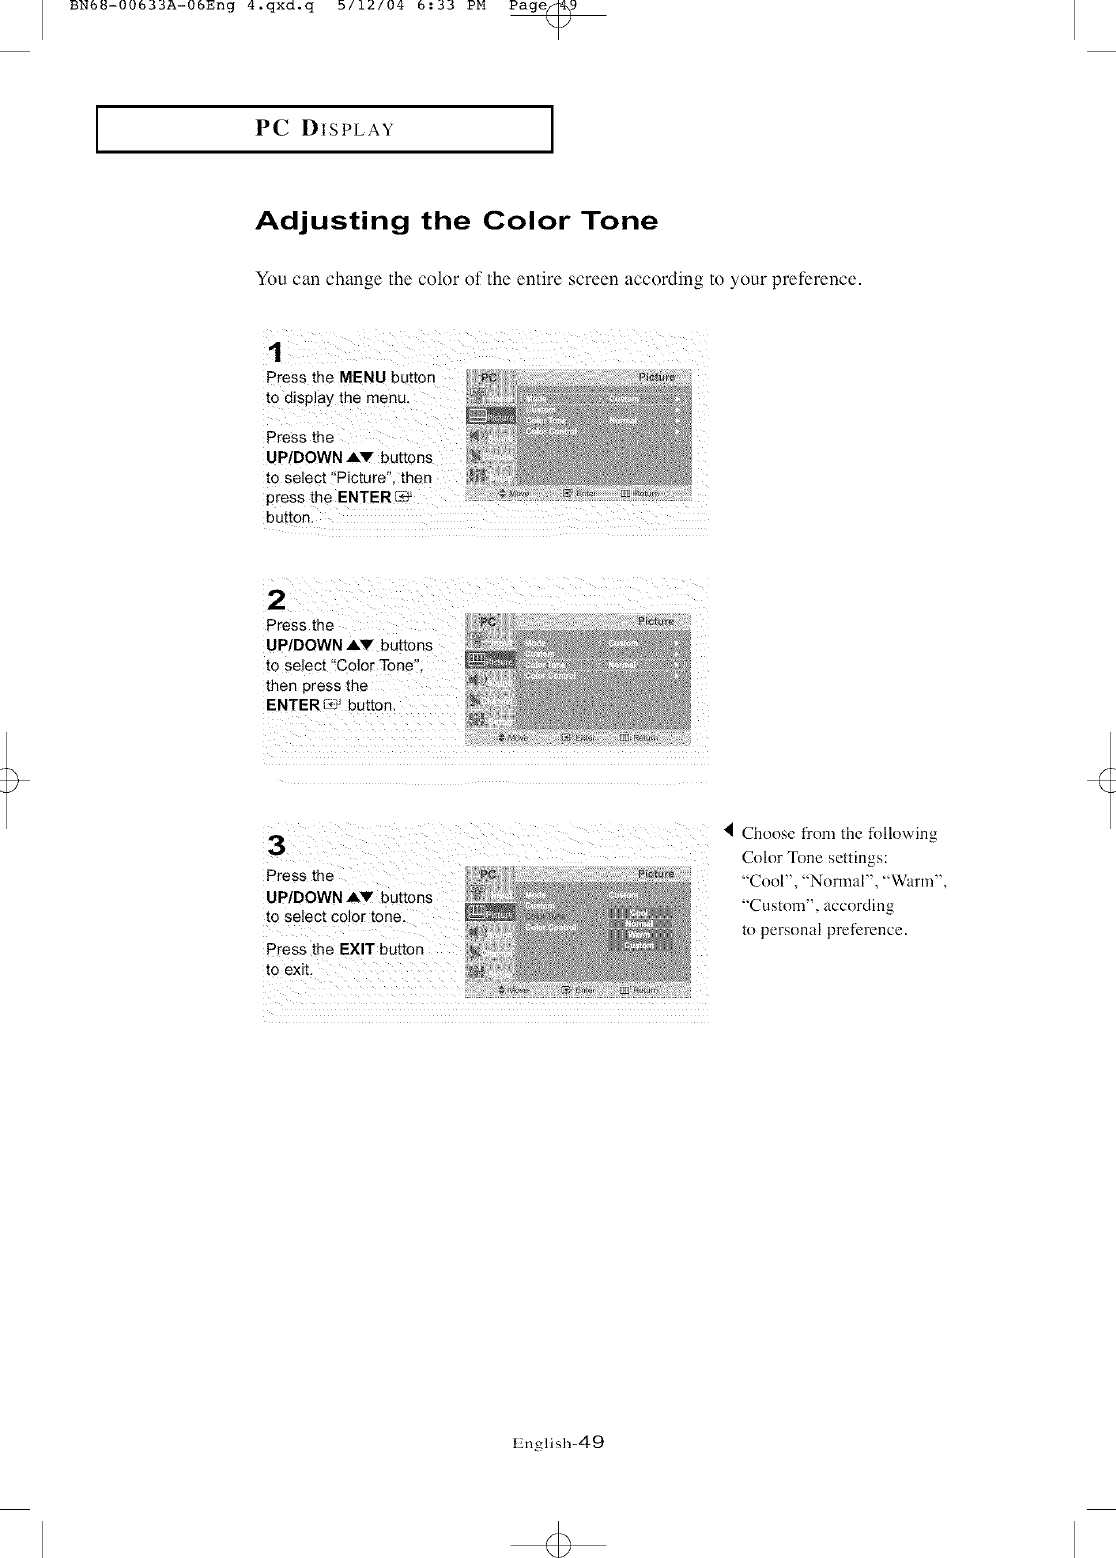
Adjusting the Color Tone
Yon can change the color of the entire screen according to your preference,
Press the MENU button
to d sPlay the menu. I
Press the
UP/DOWN AV buttons
to select !'Picture'; then
press the ENTER
button.
Press the
UP/DOWN AV buttons
to select "Color Tone',
then press the
ENTERS}' button
Press the
UP/DOWN AV buttons
to select Color Tone,
Press the EXIT button
to exit.
Choose from the following
Color 'lbne settings:
"Cool 2", "Cool 1", "Nomml",
"Warm 1", "Warm 2" according
to personal preference.
English-27

BN6_-00633A-06Eng 3.qxd.q b/12/04 5:23 PM Page_
IOPERATION I
Automatic Volume Control
Reduces the differences in volume level among broadcasters.
Press the MENU button
to display the menu.
Press the
UP/DOWN AV buttons
to select !!Sound"i then
press the ENTER_
Press the
UP/DOWN AV buttons
to select "Auto Volume",
then press the
ENTER_ button.
i
Press the
UP/DOWN AW buttons
to set Auto volume ,,off,!
Or _!On'!.
Press the EXIT button
to exit.
English-28
BN6_-00633A-06Eng 3.qxd.q b/12/04 5:23 PM Page_9
IOPERATION I
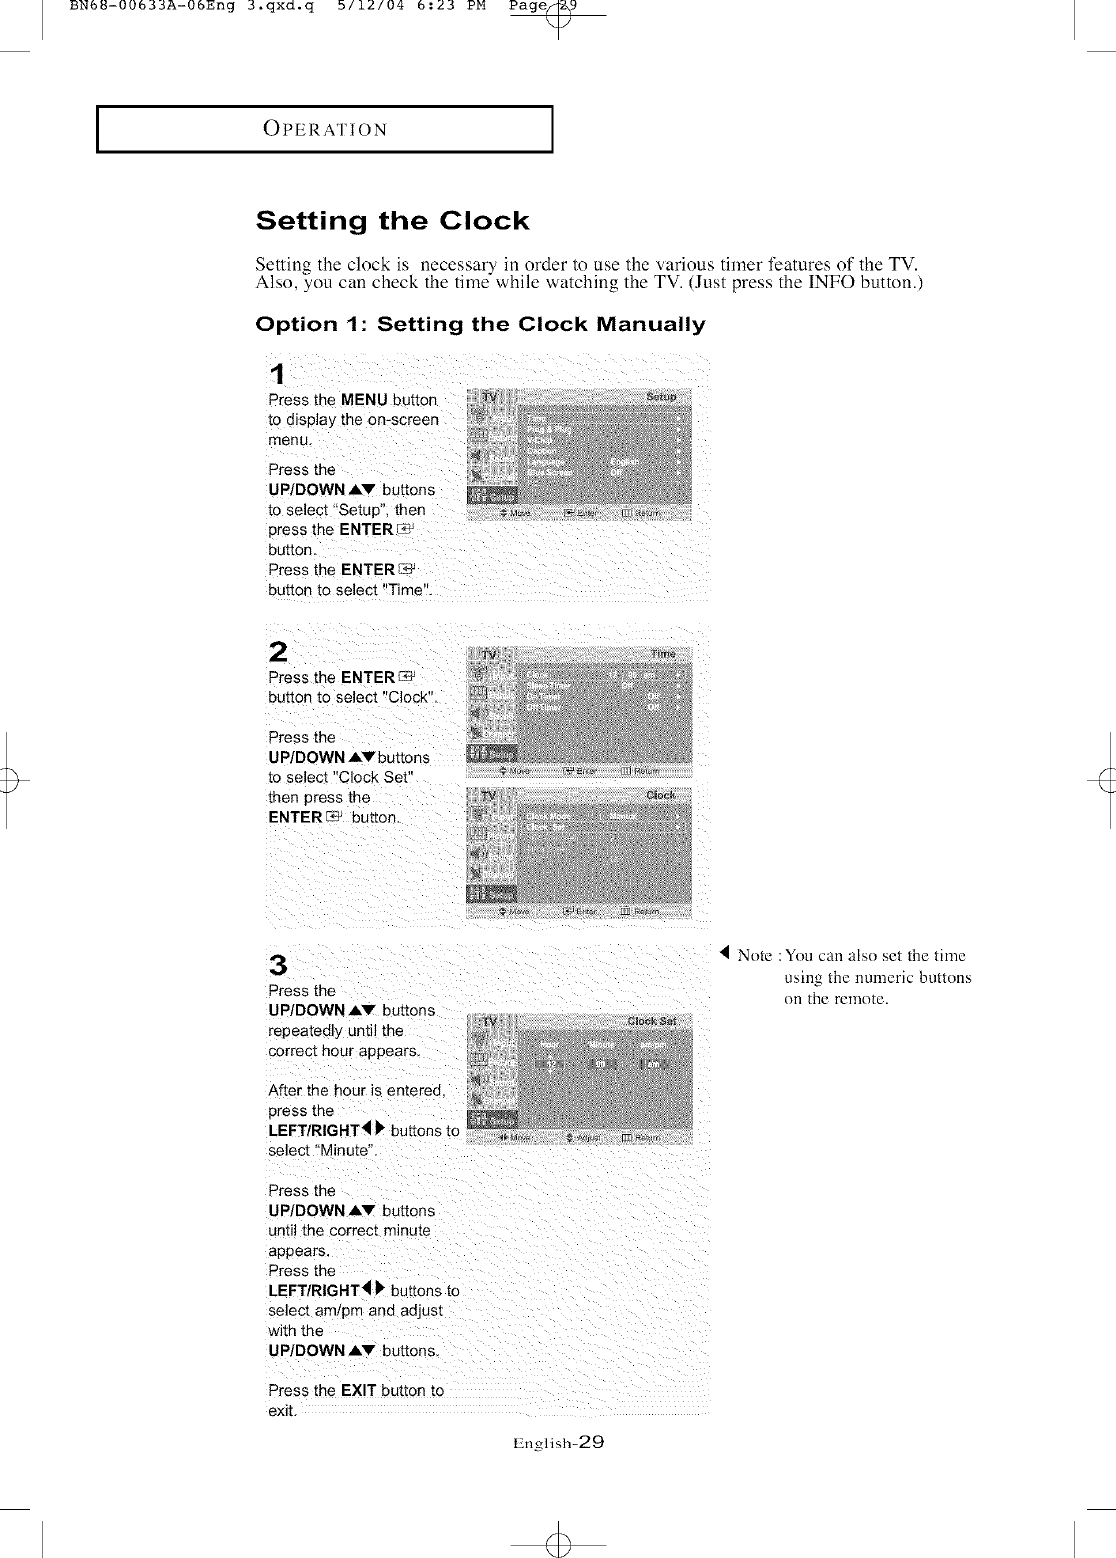
Setting the Clock
Setting the clock is necessary in order to use the various timer features of the TV.
Also, you can check the time while watching the TV. (Just press the INFO button.)
Option 1: Setting the Clock Manually
1
Press me MENU button
to display the on-screen
menu.
Press the
UP/DOWN AV buttons
to select "Setup" then
press the ENTER
button,
Press the ENTER F4_
button to select "Time".
s_p
_e,urn
2
Press the ENTER F_
button to select "Clock",
Press the
UP/DOWN AV buttons
to select "Clock Set"
then press the
ENTER F_ button.
T_me
Clerk
_#_ K4J_ feJ lI_Retum
3
Press the
UP/DOWN AV buttons
repeatedly until the
correct hour appears.
After the hour is entered.
press the
LEFT/RIGF
select "Minute
Press the
UP/DOWN AV buttons
until the correct minute
appears
Press the
LEFT/RIGHT4 _ buttons to
select amtprr and adjust
with the
UP/DOWN AV buttons,
Press the EXIT button to
exit,
English-29
4 Note : You can also set the time
using the numeric buttons
on the remote.

BN6_-00633A-06Eng 3.qxd.q b/12/04 5:23 PM Page_0
IOPERATION I
Option 2: Using the Local PBS Channel to Automatically
Set the TV Clock
1
Press the MENU button
to display the on-screen
menu,
Press the
UPIDOWN AV buttons
to select Setup", then
press the ENTER r_
button
Press the ENTERL_
button to select "Time",
Press the ENTER _:
button to select "Clock"
Se_tf4#
_+me
2
Press the
UPIDOWN AV buttons to
select "Clock Mode"
then press the
ENTER/_:} _ button.
Clo_k
3
Press the UP/DOWN Aw
buttons to select "Auto"
then press the
ENTER L__ button,
4
Press the UP/DOWN AV
buttons to select "PBS
Channel"then press the
ENTER _ button,
,e
Cloe_
5
Press the UP/DOWN AV
buttons to select your
local "PBS Channel" then
press the ENTER l_:J-'
button
English-30
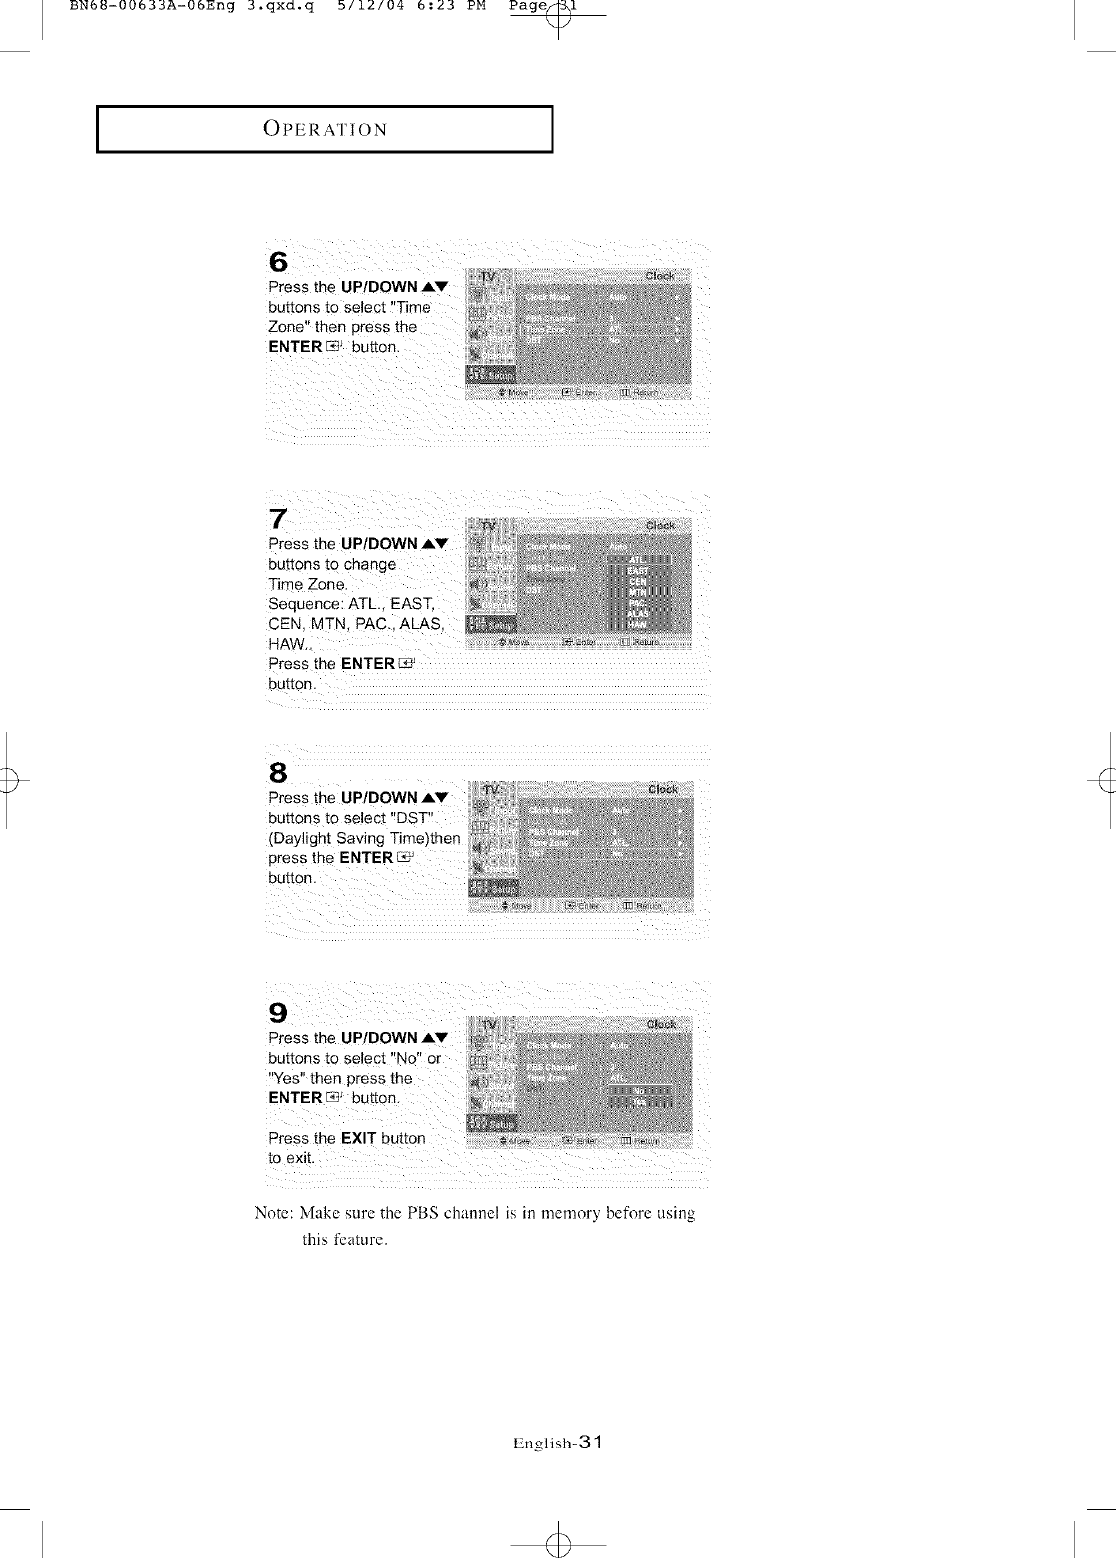
BN6_-00633A-06Eng 3.qxd.q b/12/04 5:23 PM Page_l
IOPERATION I
Press the UPIDOWN AV
button:
Zone" then
ENTER_ _ button.
Press the UP/DOWN J,V
buttons to change
Sequence: ATL:I EAST,
CEN, MTN, PAC.IA_S, I
HAW.
Press the ENTER
button.
8
Press the UP/DOWN A,V
buttons to select
(Daylight Saving Time)then
press the ENTER_J
button.
buttons to select "No'! 0 r
,Yes" then press the
ENTER_ ' button.
Press the EXIT b!
tO exit.
Note: Make sure the PBS channel is in inemory before using
this feature.
English-31
4>

BNb_-00533A-05Eng 3.qxd.q b/12/04 5:23 PM Page_2
IOPERATION I
Setting the On/Off Timer
set the TV's clock.Before using the tin'_er, you must
Press the MENU button (See "Setting the Clock" on page 29)
to display the 0n-screen
menu,
Press the
UP/DOWNAV I
buttons to Select
t'Setup", then press the
Press the ENTER F*2
2
Press the UP/DOWN At
buttons to select "On
Timer", then press the
ENTER _.._button.
Time
,I When you set the hours, make sure
the correct time of day (am or pro)
appears to the right of the time.
select the appropriate
hour,
After the hour is entered,
press the
LEFT/RIGHT4 b' bretons
to select 'Minute",
Press the
UP/DOWN AW buttons
until the correcI minute
appears.
Press the
LEFT/R GHT_ _' buttons ,_
to select "am/pm" and
adjust with the
UPIDOWN A.V buttons
English-32

BN6_-00633A-06Eng 3.qxd.q b/12/04 5:23 PM Page_3
IOPERATION I
Press the
LEFT/RIGHT_ _ bUttons
to select "ChanneF and
adjust with the
UP!DOWN AV buttons.
LEFT/RtGHT'I )' buttons
to select '!Volume" and
adjust with the
UPIDOWN Av buttons.
Press the
Press the
UP/DOWN AV buttons
to set the "On".
(Repeatedly pressing
the UPIDOWN AV
buttons will alternate
between On and Off.)
When finished, press the
ENTER _ button.
To deactivate the "On time",
select "Off" during this step.
4Title
To set the Off time _
press the UP/DOWN AV
buttons to select _) _ I
'Off Timer
Press the ENTERC_ _,_,_ _ _,_
button and set the hours
ane minutes _£ollow the
same procedure as m
steps 2~3 above, t
5
When finished setting the timer, press the EXIT
button to exit.
Whm_you set1hetimer on, your televiskm wm oe mined
_rfif youuo no[ eperate mg conV,_)lstot 3 h _ursafter
the TV has beenrimmedon withthe q"imerOn' function
English-33
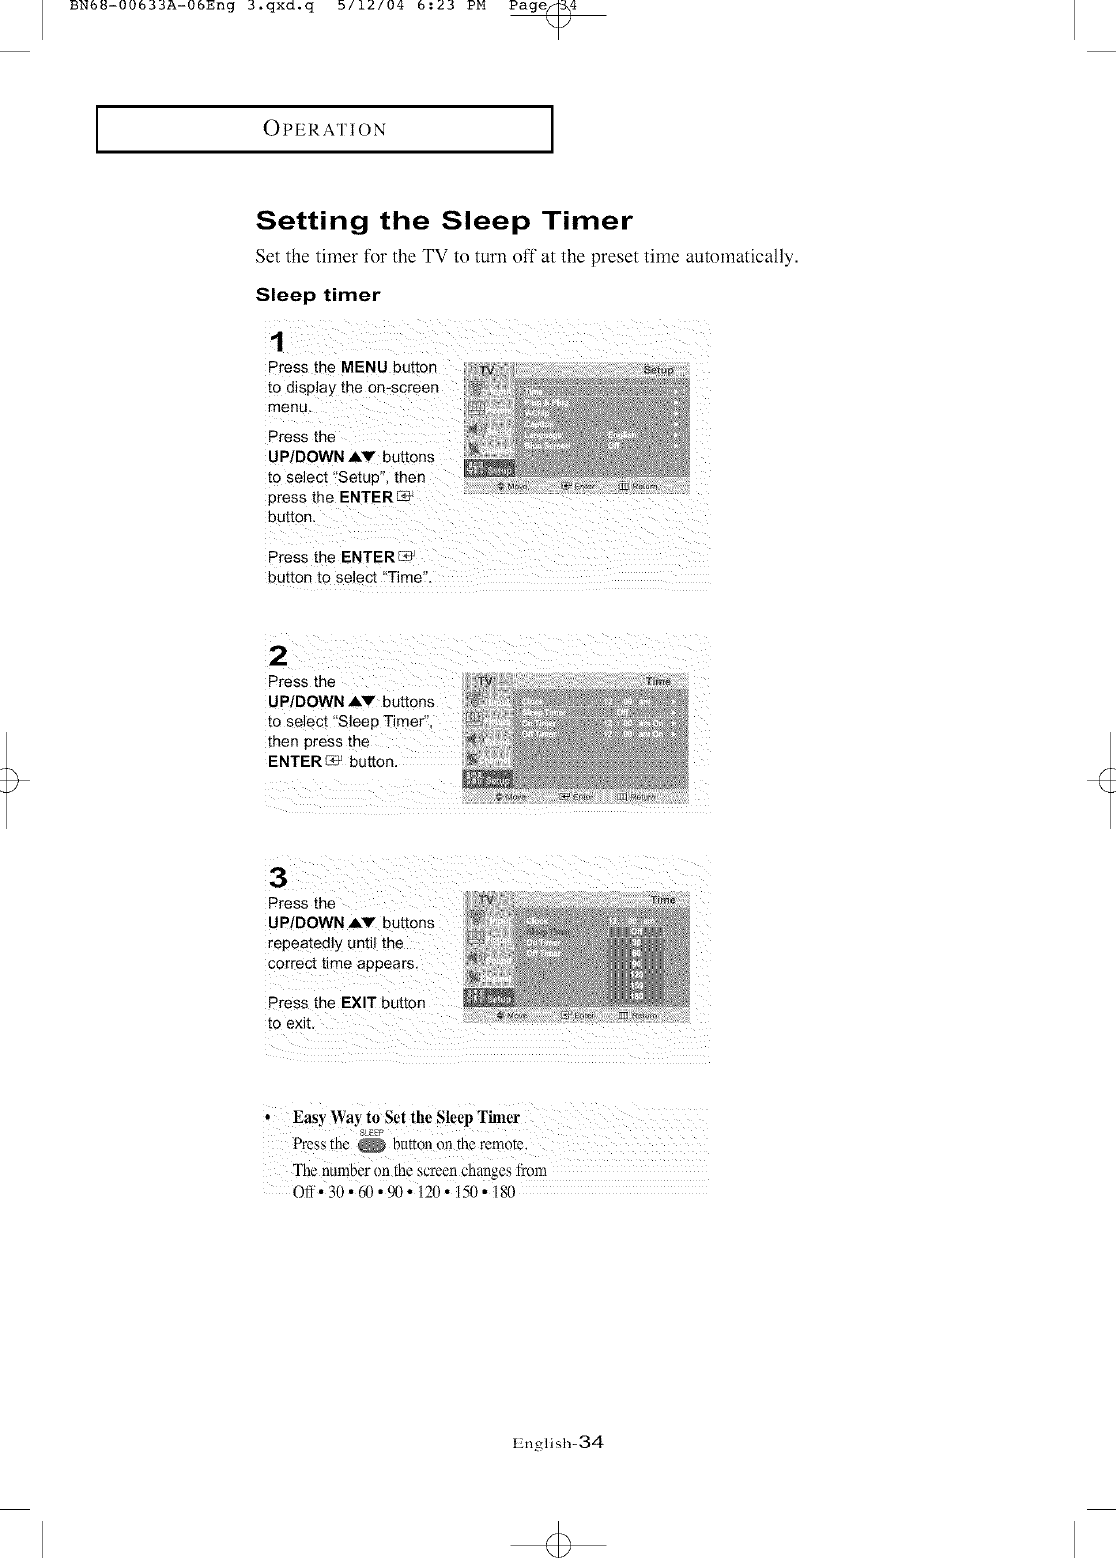
BN6_-00633A-06Eng 3.qxd.q b/12/04 5:23 PM Page_4
IOPERATION I
Setting the Sleep Timer
Set the timer for the TV to turn off at the preset time automatically.
Sleep timer
Press the MENU button
to display the on-screen
menu.
Press the H
Press the
to select ?Sleep Timer'!,
then press the
ENTER_ j button.
UP/DOWN AV t;
repeatedly unti!
Correct time appears.
Press the EX T button
/¸¸2/¸¸¸¸¸¸ /// ;/; i:/
Press the _ button ontheremote.
The numberen the Screenchanges fh_ln
off. 30 • 60• 90. 120• 150 • 180
English-34

BNb_-00533A-05Eng 3.qxd.q b/12/04 5:23 PM Page_b
IOPERATION I
Viewing Closed Captions
Your TV decodes and displays the closed captions that are broadcast with certain TV shows.
These captions are usually subtitles for the hearing impaired or foreign-language translations•
All VCRs record the closed caption signal from television programs, so home-recorded
video tapes also provide closed captions• Most pre-recorded commercial video tapes provide
closed captions as well. Check Ibr the closed caption symbol in your television schedule and
on the tape's packaging '
• E_"
1
Press the MENU button
to display the on-screen
menu,
Press the
UP/DOWN _,V buttons
to select "Setup", then
press the ENTER
button.
• •
Press the
UP/DOWN AV buttons
to select "Caption". then
press [he ENTERCL_"
buRon.
Se_
3
Press the ENTER_
button to selecl
"Caption",
Note: You can also press the
CAPTION button on the remote
control to set tip caption.
4
Press the
UP/DOWN AW buttons
to set caption "Off" or
'On ', then press the
ENTER C_ butto_q
Press [he EXIT
button to exit.
_F
5IDifferent channels and fields
display different infimnation:
Depending on the pamcular broadcast it might be Field 2 carries additional
necessary to nake changes to "Channel" and "Field". information that supplements the
Press the EXIT button to exit. information in Eield l.
(For example. Cbannel 1 may
have subtitles in English. while
Channel 2 has subtitles in Spanish.)
ILngl ish-35
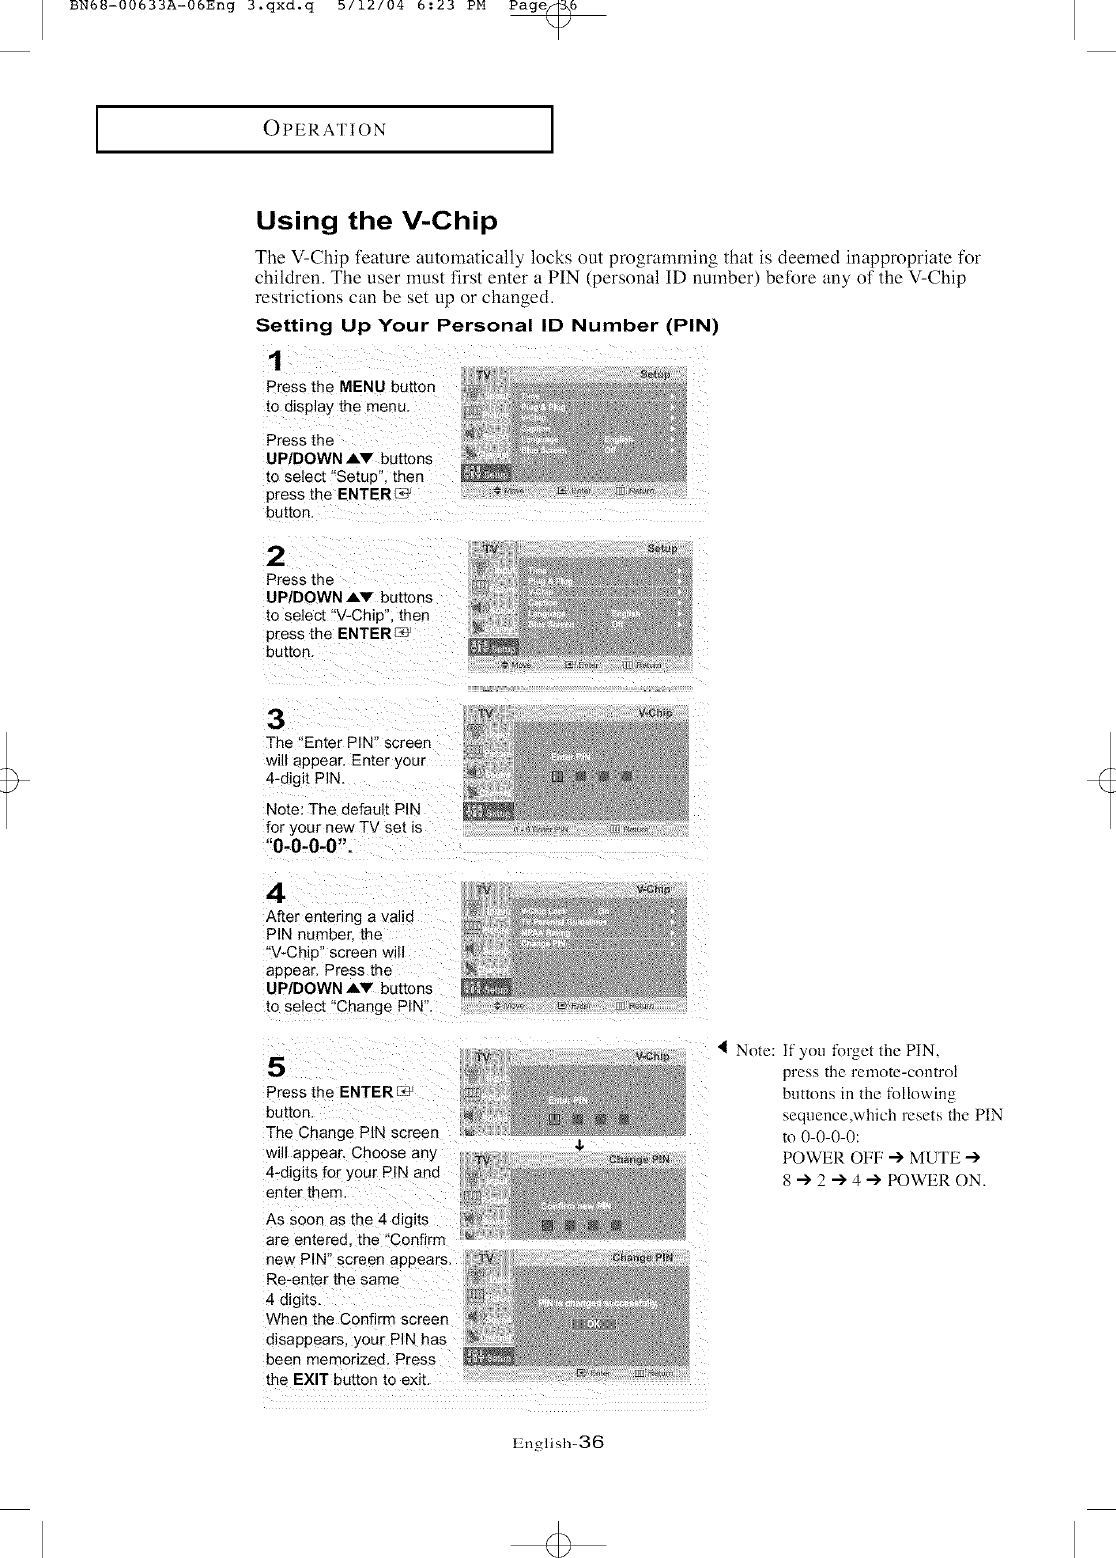
BN6_-00633A-06Eng 3.qxd.q b/12/04 5:23 PM Page_6
IOPERATION I
Using the V-Chip
The V-Chip feature aulolnatically locks oul programlning thai is deemed inappropriale for
children. The user lllUSl firm enter a PIN (personal ID number) belore tiny of lhe V-Chip
reslrictions can be sel up or changed.
Setting Up Your Personal ID Number (PIN)
1Set_
Press the MENU button
to display the menu,
Press the
button.
2
Press the :
UP/DOWN AV buttons
to select "V-Chip", then
press the ENTER/_ _ :
button
3
The "Enter PIN" screen
will appear, Enter your
4-digit PIN.
Note: The default PIN
for your new TV set is
"0-0-0-0".
4
After entering a valid
PIN number, the
"V-Chip" screen will
appear, Press the
UPIDOWN AV buttons
to select "Change PIN",
V-Chi=
•
Press the ENTERE_
button,
The Change PIN screen
will appear, Choose any
4-digits for your PIN and
enter them,
As soon as the 4 digits
are entered, the "Confirm
new PIN" screen appears,
Re-enter the same
4 digits.
When the Confirm screen
disappears, your PIN has
been memorized. Press
the EXIT button to exit.
V=Ch_g
English-36
4Note: If you forget the PIN,
press the remote-control
buttons in the following
sequence,which resets the PIN
to 0-0-0-0:
POWER OFF "-) MUTE
8 ") 2 ") 4 _ POWER ON.
BN6_-00633A-06Eng 3.qxd.q b/12/04 5:23 PM Page,/
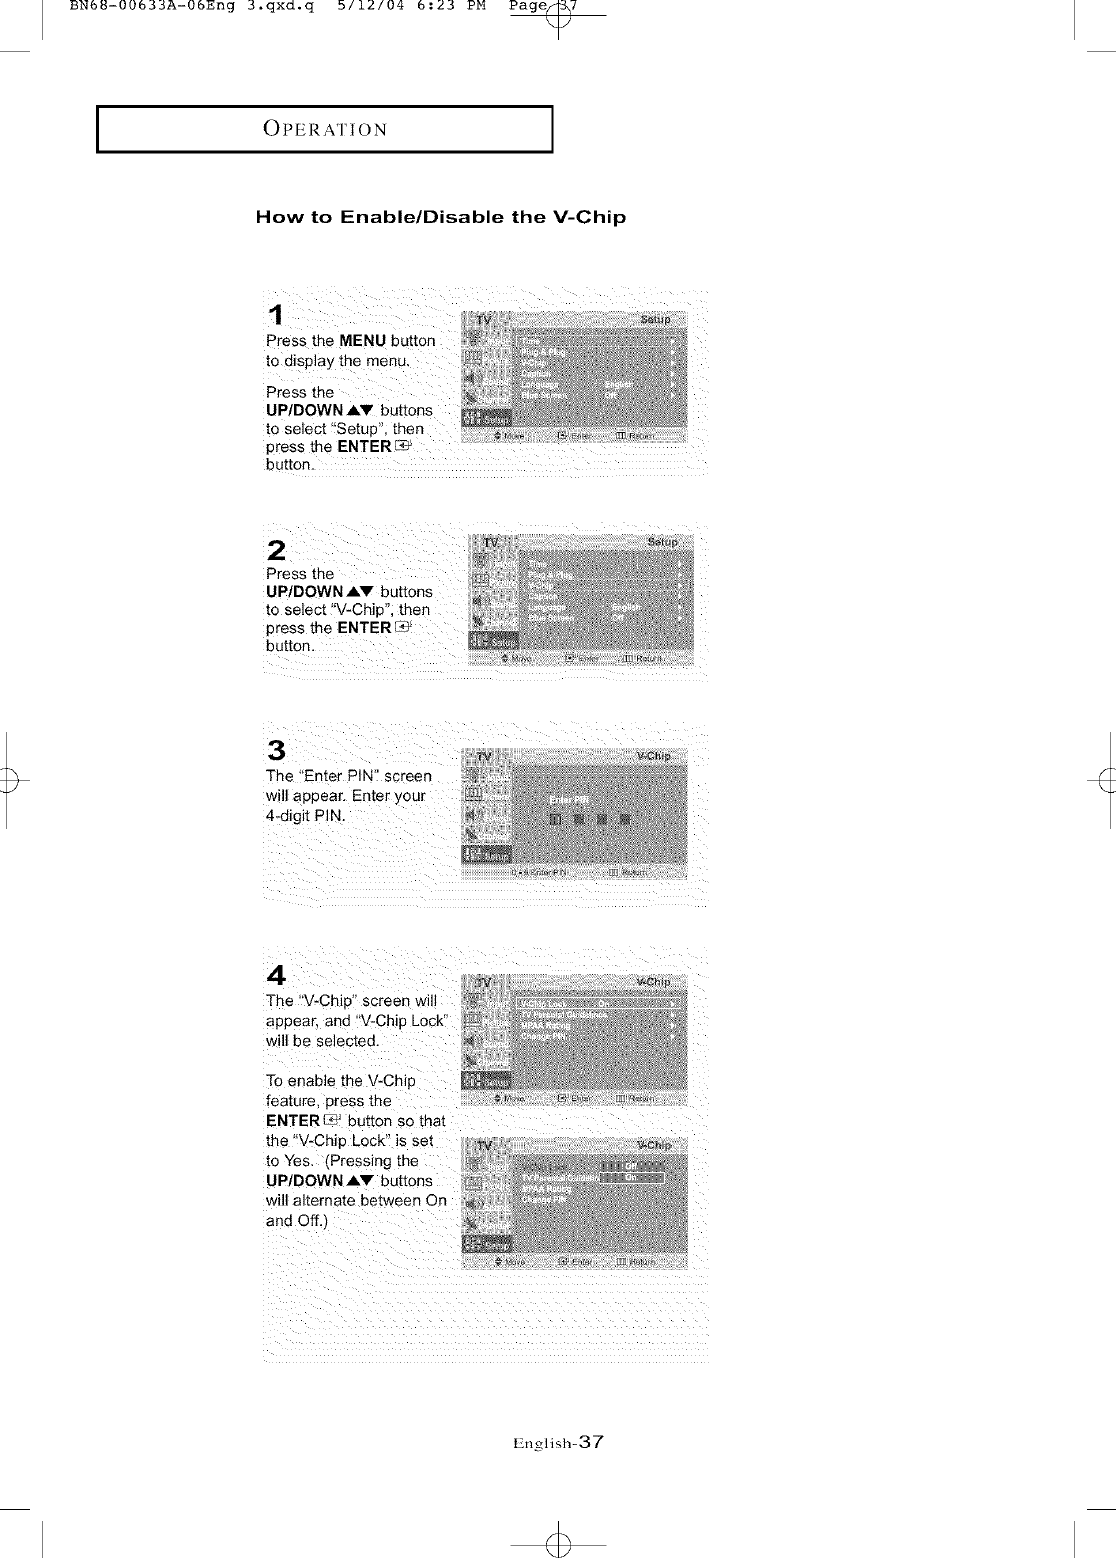
IOPERATION I
How to Enable/Disable the V-Chip
Press the MENU button
to display th e menu
UP/DOWN ,&V buttons
to select '!Setup"; then
Press the
UP/DOWN AV buttons
to select !'V-Chip"; then
press the ENTER_
button. [
The "Enter PIN'I screen
wil! appear. Eater your
4
The "V-Chip' screen will
appear, and "V-Chip Lock"
will be selected.
To enable the V-Chip
feature press the
ENTER r_ button so thai
the "V-Chip Lock" is set
to Yes, (Pressing the
UP/DOWN Aw buttons
will alternate between On
and Off,_
English-37

BN6_-00633A-06Eng 3.qxd.q b/12/04 5:23 PM Page_
IOPERATION I
How to Set up Restrictions Using the 'TV guidelines'
First, set up a personal identification number (PIN), and enable the V-Chip.
(See previous section.) Parental restrictions can be set up using either of two methods:
The TV guidelines or the MPAA rating.
Press the MENU button
to display the menu.
Press the
Up/DOWN AW buttons [
to select "Setup", then
UP/DOWN AV buttons
to select "V-Chip _:,then
press the ENTERC_
button.
The "Enter PIN'! screen
wi!l appear. Enter you[
4-digit P!N.
press the UP/DOWN
buttons to select
"IV Parenta! Guidelines'!,
then press the ENTER_
button.
The _'TVParenta! Guidelines'!
screen wil! appear.
Press the UpIDOWN AV
buttons to select one
of the SiX age--based
categories:
Note: These categories consist of
two separate groups : TVY and
TVY7 (young children through
age 7), and TV-G through TV-MA
(everybody else).
1"he restrictions lbr these two
groups work independently:
If a household includes very young
children as well as young adults,
TV-Y Young children the TV guidelines nmst be set up
TV-Y7 Children 7and over separately for each age group.
.... ,'---- ...... _-,:r ....... - (See next step.)
TV-G General audience
TV-PG Parental guidance
TV-14 Viewers 14 and over
TV-MA Mature audience
English-38

BN6_-00633A-06Eng 3.qxd.q b/12/04 6:23 PM Page_9
IOPERATION I
Press the ENTER( C:_)button: Depending on your existing setup the color of the letter 'U'! or "B!'will be
highlighted. (U= Unblocked, B= Blocked)
When the color of the !'u:' or "B" is highIighted press the ENTER( _J)button t° btock 0[ unbtock the category`
A TV-Rating will be highlighted. To exit this screen, press MENU again. To select adifferent TV-Rating, press
the UP/DOWN AV buttons and then repeat the process.
Note 1: The TV-Y7, TV-PG, TV-I4 and TV-MA have additional options.
Note 21 The V-Chip will automatically block certain categories that are "more restrictive.[' For example,
if you block _'TV-Y'! category, then TV-Y7 will automatically be blocked. Similarly, if you block
the TV-G category, then all the categories in the !young adult" group will be blocked
(TV-G, TV-PG, TV-14 and TV-MA)_ The sub-ratings (D,L; S,V) work together similarly.
(See next section. )
(See Step 4, on previous page).
Next, while the TV_Rating is selected, repeatedly press the ENTER(r_ )butt0n.
This wil! CYClethrough ihe avai able sub-ratings (EV,LI S, D 0r V)I
A highlighte d letter ('tU!' or "B") will be displaYed for each subTrating While the _IU'!Or !'B'_is
h ghlighted press the ENTER(_)buttons to Change the sub'rating.
Press MENU once to save the TV guidelines. A TV-Rating will be selected, and no letters
t'Ui' or !tB" wi!! be changed to yellow.
To exit this screen press the MENU button again. To select a different TV-Rating press the
UP!DOWN AW butt0ns an d the£ repeat the process
Note: The V-chip will automatically block certain Categories that are :'More restrictive"
For example, if yo u block the "L" Sub-rating in TV-PG, then the !%, SUb,ratings in TV:!4
andTV-MA will automatica!!y be b!ocked
(or proceed to the next section, and set up additional restrictions based on the MPAA codes).
English-39
BN6_-00633A-06Eng 3.qxd.q b/12/04 5:23 PM Page_0
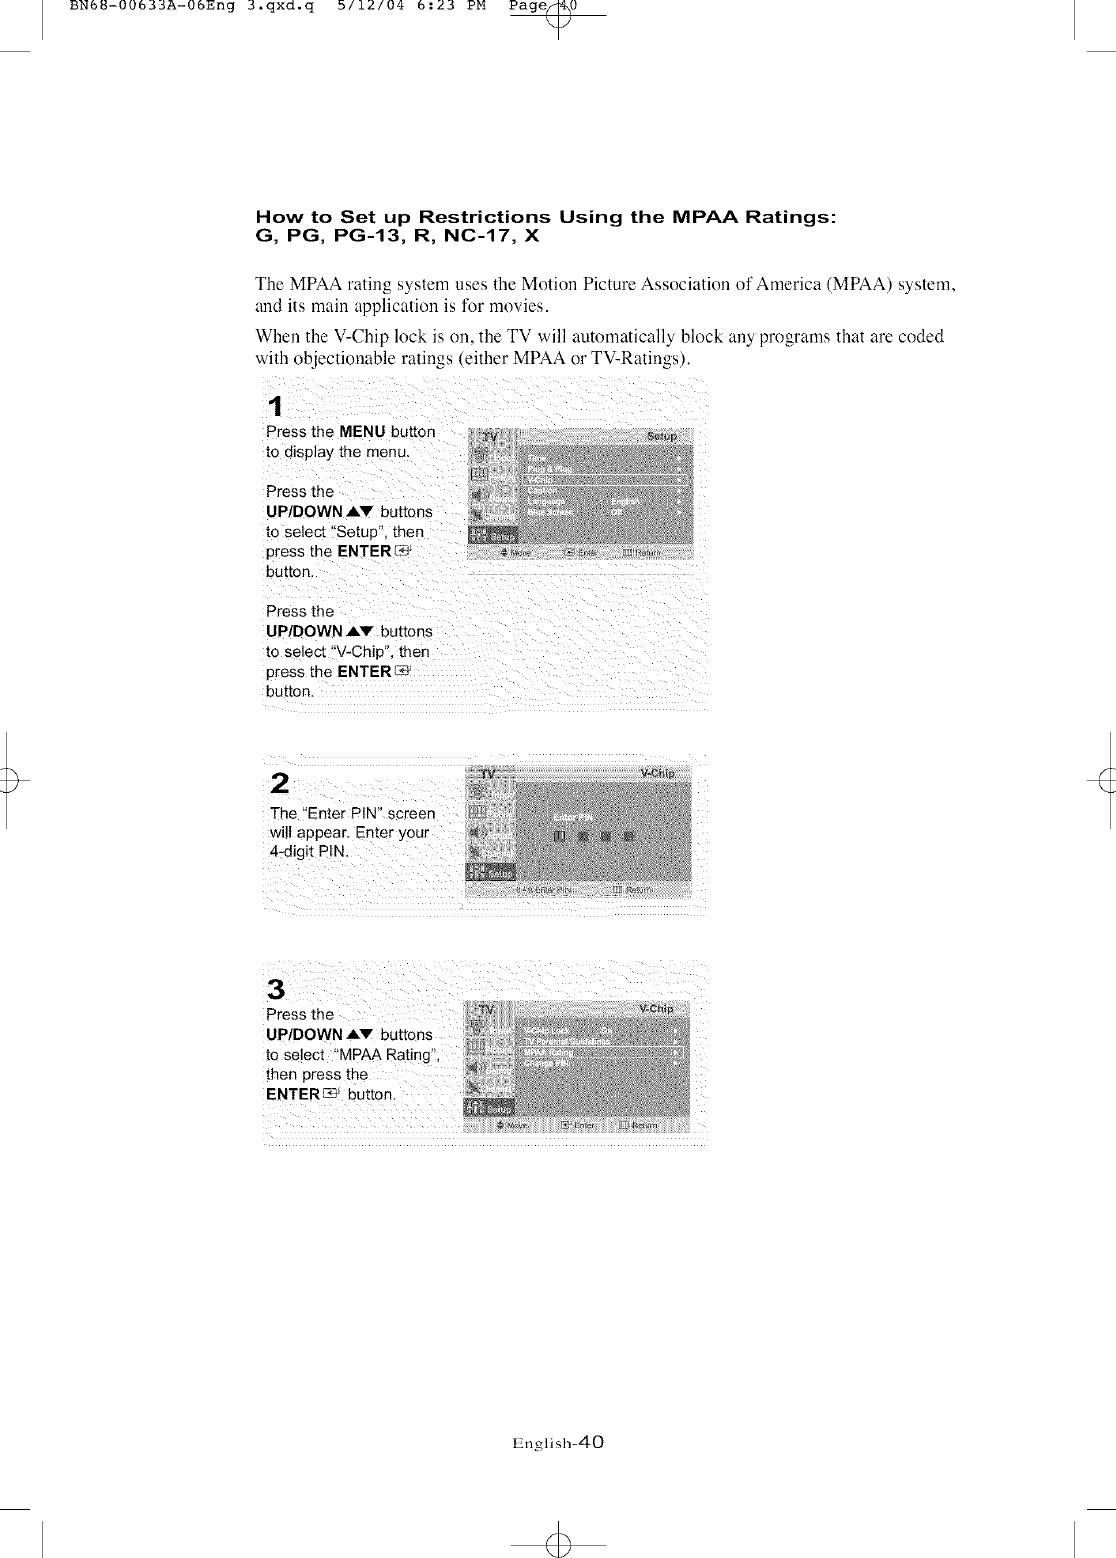
How to Set up Restrictions Using the MPAA Ratings:
G, PG, PG-13, R, NC-17, X
The MPAA rating system uses the Motion Picture Association of America (MPAA) system,
and its main application is for movies.
When the V-Chip lock is on, the TV will automatically block any programs that are coded
with objectionable ratings (either MPAA or TV-Ratings).
1
Press the MENU button
to display the menu,
Press the
UP/DOWN A.V buttons
to select "Setup", then
press the ENTERE'_)'
button,
8e_up
[] Return
Press the
UP/DOWN AV buttons
to select "V-Chip", then
press the ENTERC_
button
The i'Enter PIN" screen
4-digit PIN.
i
Press the
UP/DOWN AV buttons
to select "MPAA Ratin!!!,
then press the
ENTERC_ button.
English-dO

BN6_-00633A-06Eng 3.qxd.q b/12/04 6:23 PM Page_l
Repeatedly press the PG
UPIDOWN AV buttons PG-13
to select aparticul_
MPAA category, R
(When a category is
selected, its color
changes to yellow.)
NC-17
Pressing the
UP/DOWN A,v buttons X
will cycle through the NR
MPAA categories:
General audience
(no restrictions).
Parental guidance suggested.
PG-13 (Parents strongly
cautioned).
R (Restricted. Children
under 17
should be accompanied by
an adult).
No children under age 17.
X (Adults only).
Not rated.
Press tile UP/DOWN A.V buttons to select a category.
Press tile ENTER( c?_)buttons to select "U" or "B".
Press tile EXIT button to save the settings and to clear all screens.
Note: 'File V-Chip will automatically block any catego Uthat is "more restrictive". For example, if you block the
"PG-13" categoU, then "R," "NC-17," and "X"will automatically be blocked also.
How to Reset the TV after the V-Chip
Blocks a Channel ('Emergency Escape')
If the TV is tuned to a restricted channel, the V-Chip will block it. The screen will go blank and the
following message will appear: "Excessive rating",
To resume normal viewing, tune to a different channel using the number buttons Under certain
conditions (depending on the rating of the local TV programs) the V-Chip might lock out all the
channels
n this case. use the Menu button for an emergency escape";
Select the V-Chip on the Menu. Enter your PIN number, and Dress the ENTER([_) button to
temporarily disable the V-Chip Lock
English-41
<b

BN6_=O0633A=06Eng 4.qxd°q b/12/04 6:33 PM Page_
PC DISPLAY
Using Your TV as a Computer (PC) Display
How to Set up Your PC Software (Windows only)
The Windows display-settings tor a typical computer are shown below.
However, the actual screens on your PC will probably look different, depending upon
your particular version of Windows and your particular vide() card. Even if your actual
screens look different, the same, basic set-up information will apply in most cases.
(If not, contact your computer manufacturer or Samsung Dealer.)
0
O
First, click on "Settings" on the
Windows start menu.
While "Settings" is highlighted,
move the cursor so that "Control
Panel" is highlighted.
When the control panel screen
appears, click on "Display" and a
display dialog-box will appear.
Navigate to the "settings" tab on
the display dialog-box.
The two key variables that apply to
the TV-PC interface are "resolution"
and "colors." The correct settings
for these two variables are:
* Size (sometimes called "resolution"):
15" 1024 x 768 pixels
17" 1280 x 1024 pixels
20" 640 x 480 pixels
If a vertical-frequency option exists
on your display settings dialog box,
the correct value is "60" or "60 Hz".
Otherwise, just click "OK" and exit
the dialog box.
English-42

BN6U-00633A-06Eng 4.qxd.q b/12/04 5:33 PM Page_3
iPC DISPLAY
Adjusting the Screen Quality
The purpose of the picture quality adjustment is to remove or reduce picture noise.
If the noise is not removed by fine tuning alone, then do the frequency adjustments to
the utmost and fine tune again. After the noise has been reduced, re-adjust the picture
so that it is aligned to the center of the screen.
Press the MENU button
to display the menu,
Press the
UP/DOWN Av
buttons io select
"setup '_,then press the
Press the
buttons to select
"PC", then press
the ENTERC-_ button.
Pc
Press the
ENTER_ button to
select "Image Lock".
3
Press the
UP/DOWN ,_V
buttons [o select
'Coarse" or "Fine,
then press the
ENTERC_ button,
Press the
LEFT/RIG HT _
buttons to adjust the
screen quality, vertical
s[ripes may appear or
the picture may De
blurry.
Jma&l_ L#_
<Adjusting Coarse>
<Adjusting Fine>
When you are satisfied with the settings, press the
MENU button repeatedly to return to normal viewing.
English-43

IPC DISPLAY I
Changing the Screen Position
Press the MENU button
:to displ:ay the menu.
:Press the
UP/DOWNAV
buttons tO select i
_tsetup", then press
ENTER c_ button.
Press the
buttons to select
"PC'!, then press
the ENTER_ button.
Press the
UPIDOWNAV
buttons to adjusting
Press the EXIT button
to exit. :
English_44
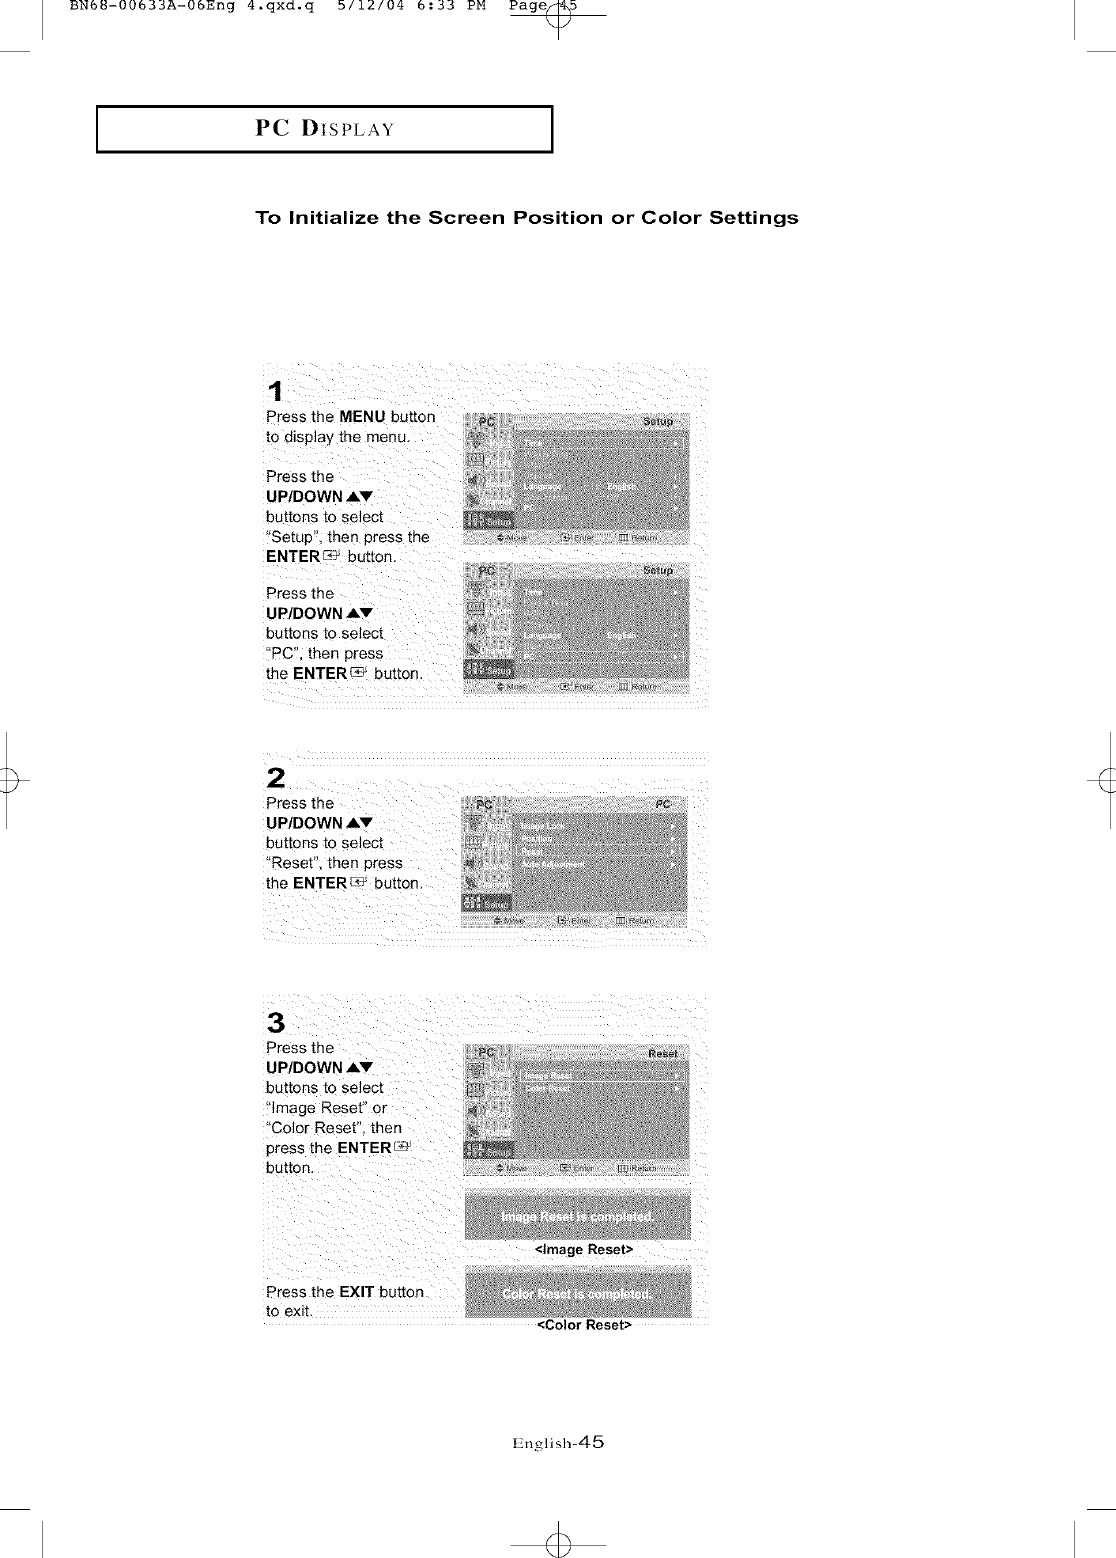
IPC DISPLAY ]
To Initialize the Screen Position or Color Settings
Press the MENU button
to display the menu.
UPIDOWN AV
buttons to select
"Setup", then press the
ENTER_ button.
Press the
UP/DOWN Av
buttons to se!ect
"pc'l, then press
the ENTER_ ' button.
_i i i i i i i
Press the
UP/DOWN Av
buttons to Select
"Reset"; then press
the ENTERS' button .
Press the
UP/DOWN Av
buttons to Select
_qmage Reset' Or
"Color Reset', then
press the ENTER _
button.
to exit, <Color Reset>
Englist'_-45
+
BNb_-00633A-05Eng 4.qxd.q b/12/04 5:33 PM Page_6
IPC DISPLAY I
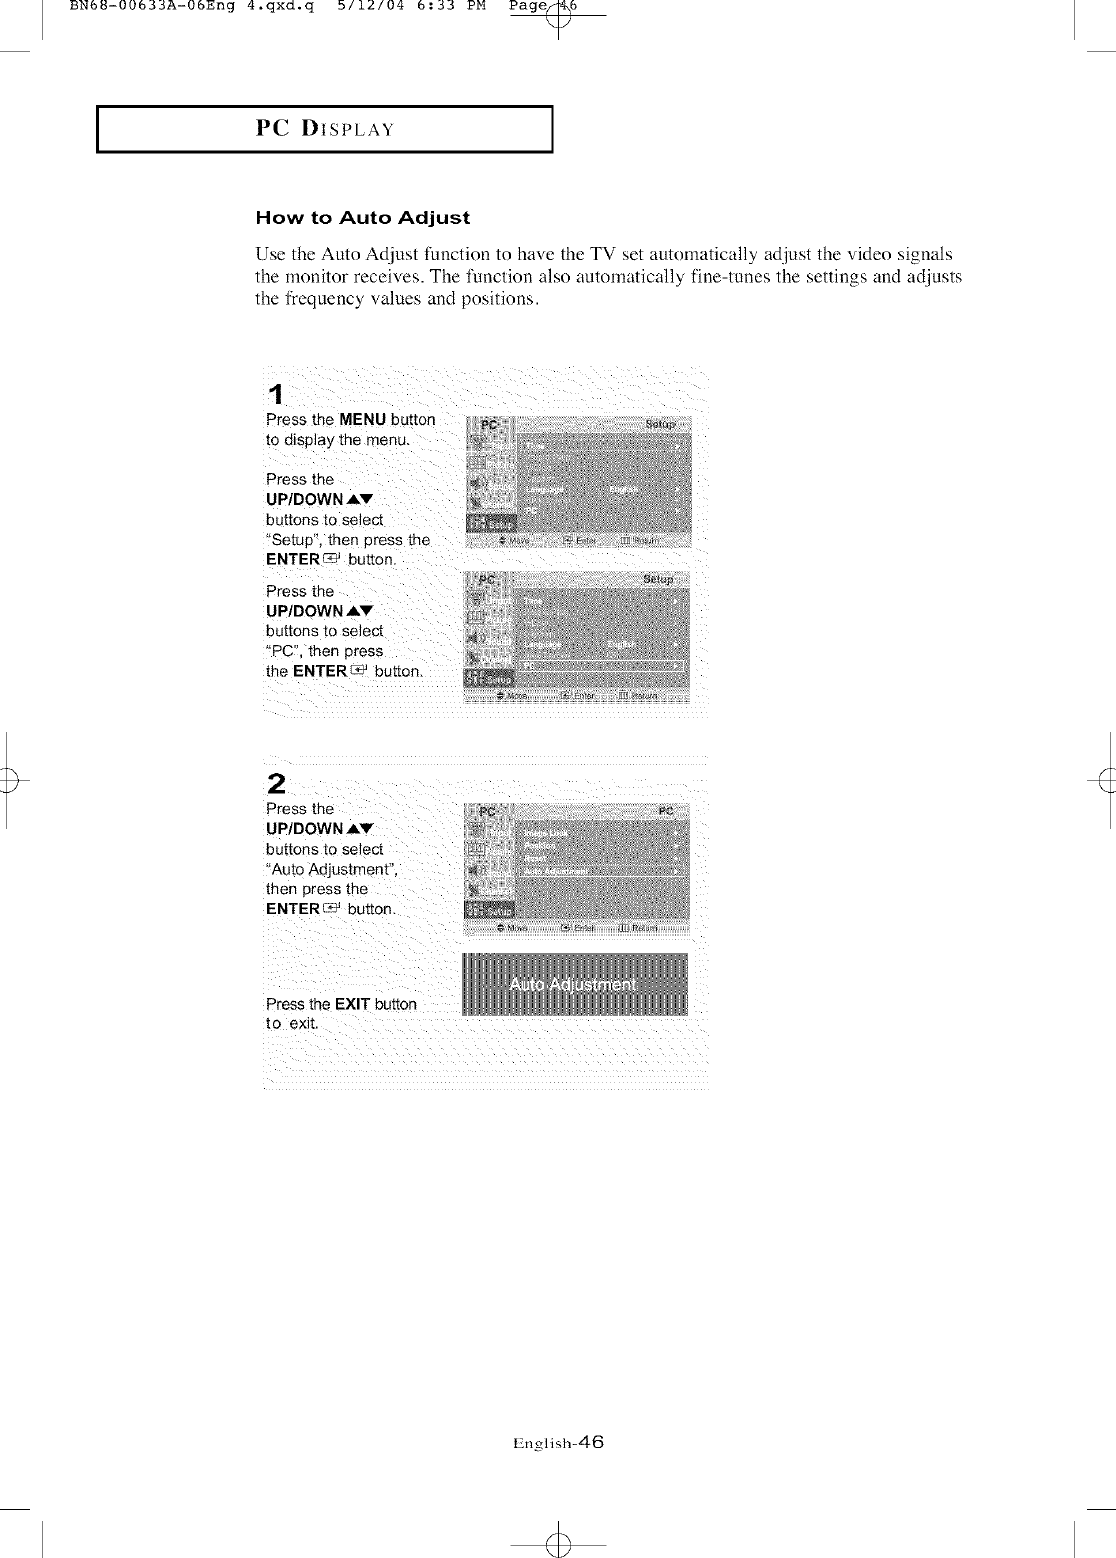
How to Auto Adjust
Use the Auto Adjust function to have the TV set automatically adjust the vide() signals
the monitor receives. The function also automatically fine-tunes the settings and adjusts
the frequency values and positions.
Press the MENU button
to display the menu.
Press the
buttons to select
"Setup", then press the
ENTERC_ button.
Press the
UP/DOWN Av
buttons to select
"PC!!, then press
the ENTER_ j button.
2
Press the
UP/DOWN ,,l,V
buttons to select
"Auto Adjustment",
then press the
ENTER -F-P2button,
:P_O PC
M_,ve E_, _:g_er [] Retutr
Press the EXIT button
to exit
Ignglish-46
BN6_-00633A-06Eng 4.qxd.q b/12/04 5:33 PM Page,/
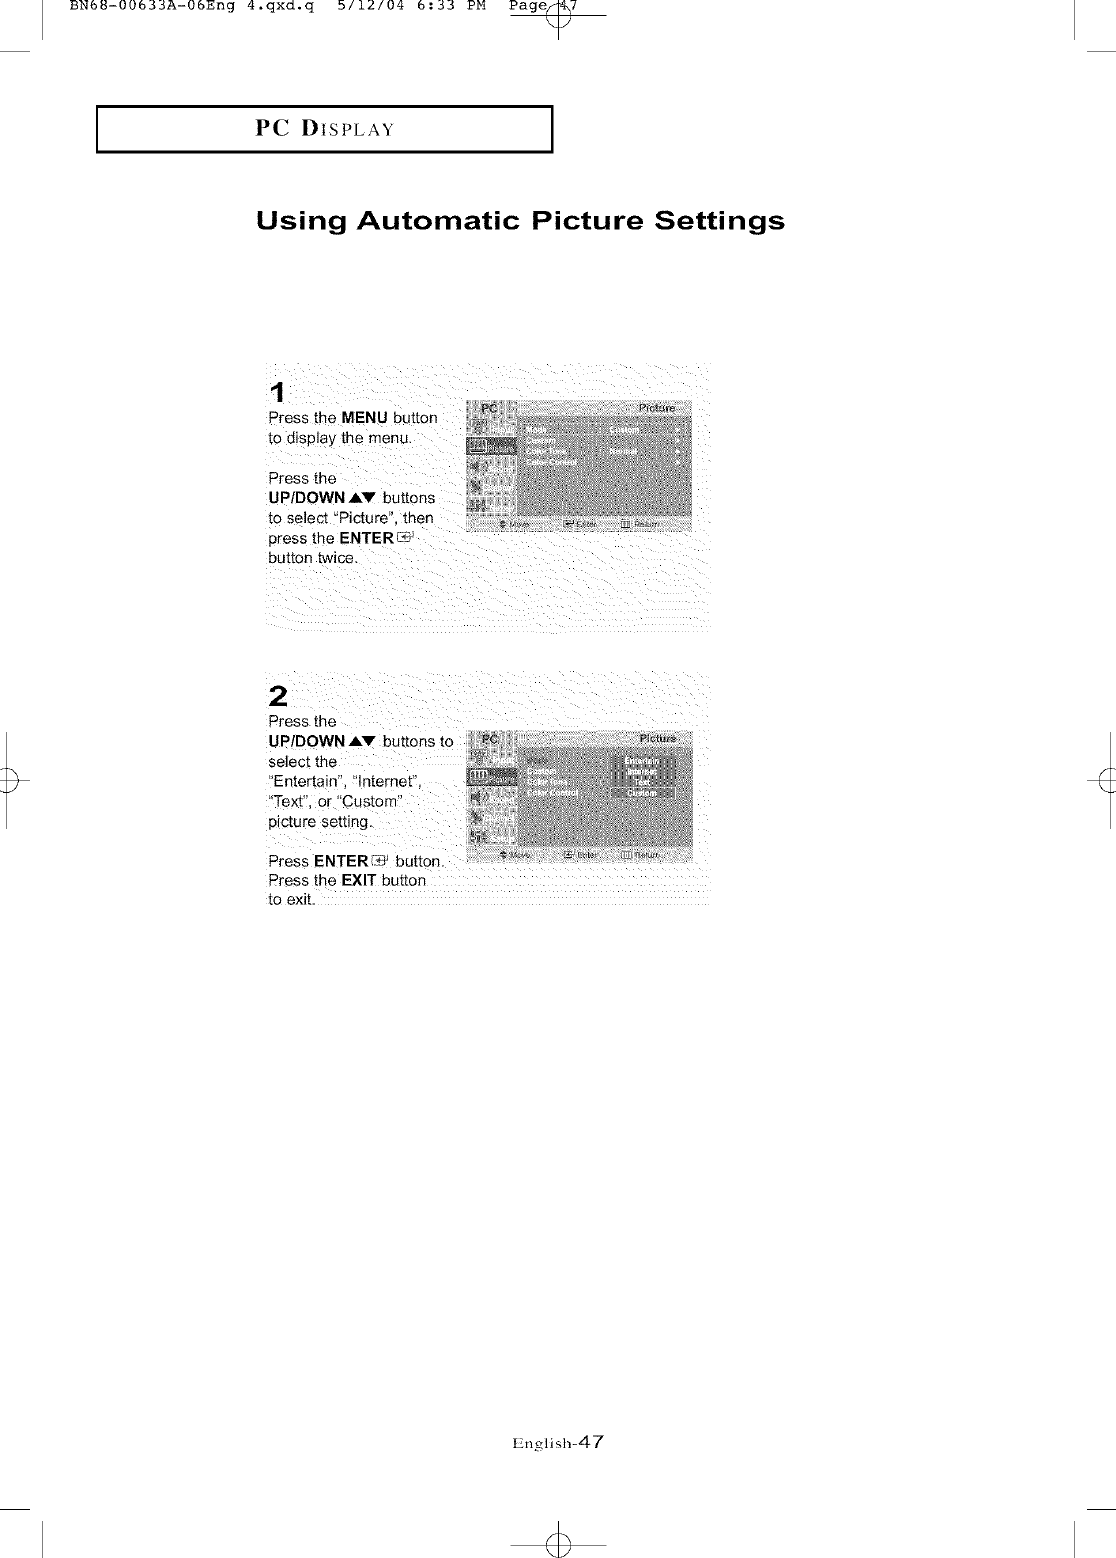
IPC DISPLAY I
Using Automatic Picture Settings
1
Press the MENU button
to displa_ the menu
Press the
UP/DOWN ,&V buttons
to select "Picture". then
press the ENTER_ _
button twice.
UP!DOWN AV buttons to
select the
"Entertain", lnternet'!,
'_Text'!, or .custom?
pictu[e setting.
Press ENTE R E:_ button
Press the EXIT button
to exit.
English-47
+

BNb_-00633A-05Eng 4.qxd.q b/12/04 5:33 PM Page_
IPC DISPLAY I
Customizing the Picture
You can use the on-screen menus to change the contrast, brightness,and sharpness
according to personal preference.
(Alternatively, you can use one of the "automatic" settings.)
Press the
to display the menu.
Press the
UPIDOWN A,V buttons
to select "Picture", then
press the ENTER_ _
button,
Press the
U P/DOWN AV button s
to select i'Custom!', then
press the ENTER [_
Press the UP/DOWN •
buttons to select
"Contrast" or 'Brightness::.
Press the
increases it
Press the EXIT
button to exit.
English-48
<b
IPC DISPLAY I
Adjusting the Color Tone
Yon can change the color of the entire screen according to your preference.
to display the menu, ::
Press the
UP/DOWN _v buttons
to select !Picture", then i
press the EN'FER_ ........
button :
2
Press t e Ii
UP/DOWN ,AV buttons
to Select '!Color Tone";
then press the
ENTER[_ button.
:
::
Press the ....
UP/DOWN AV buttons
to select color tone.
Press the EXIT button
<Choose from the following
Color "lkme settings:
"Cool", "Normal", "Warm",
"Custom", according
to personal preference.
Ignglish-49

BN6_-00633A-06Eng 4.qxd.q b/12/04 6:33 PM Page_0
IPC DISPLAY
Customizing the color
press the MENU button
to display the menu.
UPIDOWN AV buttons
t° select !_Picture",then
pressth eEN'FER_ i .... :
Press the
UP/DOWN.AV button:
to select ilColor Control";
then press the ENTERItiS!
button.
z zzzzzzzzzzz zzzz zz
Press the ENTER[3_
button to Select a
particular item. [
Press the
button_
Press the EXIT
button to exit.
English-50
BN6_-00633A-06Eng 4.qxd.q b/12/04 5:33 PM Page_l
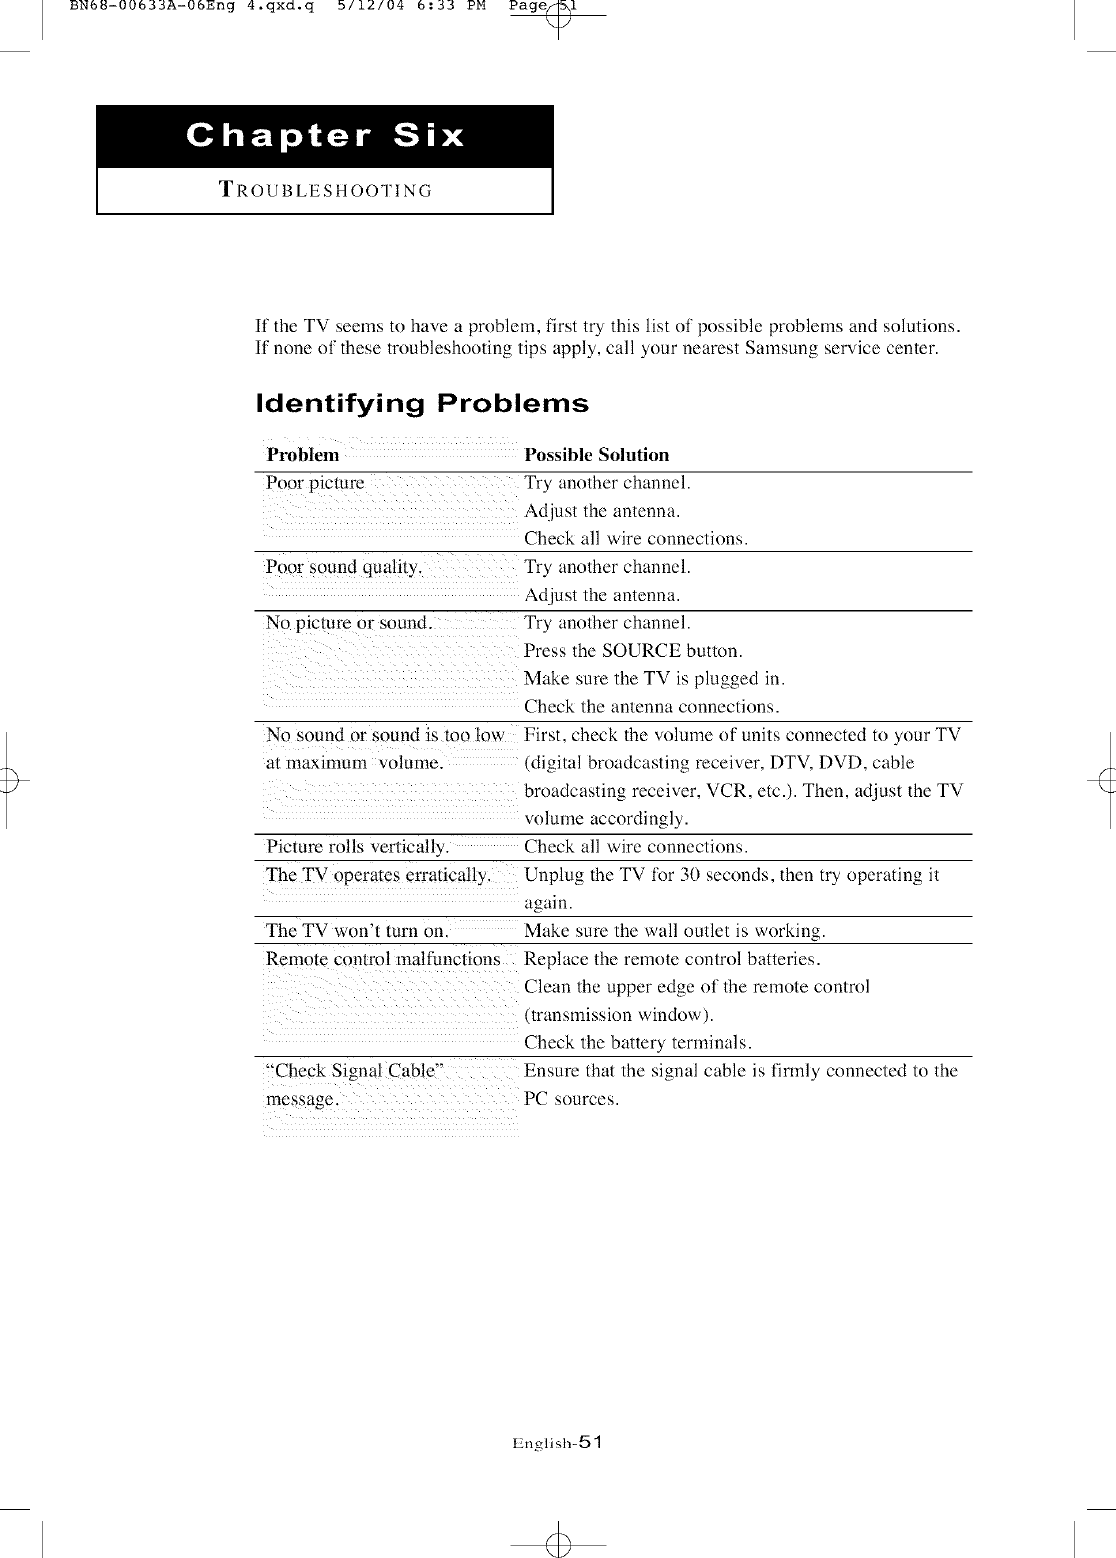
TROUBLESHOOTING
If the TV seems to have a problem, first try this list of possible problems and solutions.
If none of lhese troubleshooting tips apply, call your nearest Samsung service center.
Identifying Problems
Problem
Poor picture
Poor sound quality.
No picture or sound.
Possible Solution
Try another channel.
Adjust the antenna.
Check all wire connections.
Try another channel.
Adjust the antenna.
Try another channel.
Press the SOURCE button.
Make sure the TV is plugged in.
Check the antenna connections.
No sound or sound is too low First. check the volume of units connected 1oyour TV
al maxinmm volume. (digital broadcasting receiver, DTV, DVD, cable
broadcasting receiver, VCR, etc.). Then, adjust the TV
volume accordingly.
Picture rolls verticatl'_ Check all wire connections.
The TV operates erratically. Unplug the TV for 30 seconds, then tUoperating it
again.
The TV won'l turn on. Make sure the wall outlet is working.
Remote control malfunctions Replace the remote control batteries.
Clean the upper edge of the remote control
translnission window).
Check the bauery terminals.
"Check Signal Cable" Ensure that the signal cable is firmly connected to the
message. PC sources.
Lnglish-51
+
BN6_-00633A-06Eng 4.qxd.q b/12/04 5:33 PM Page_2
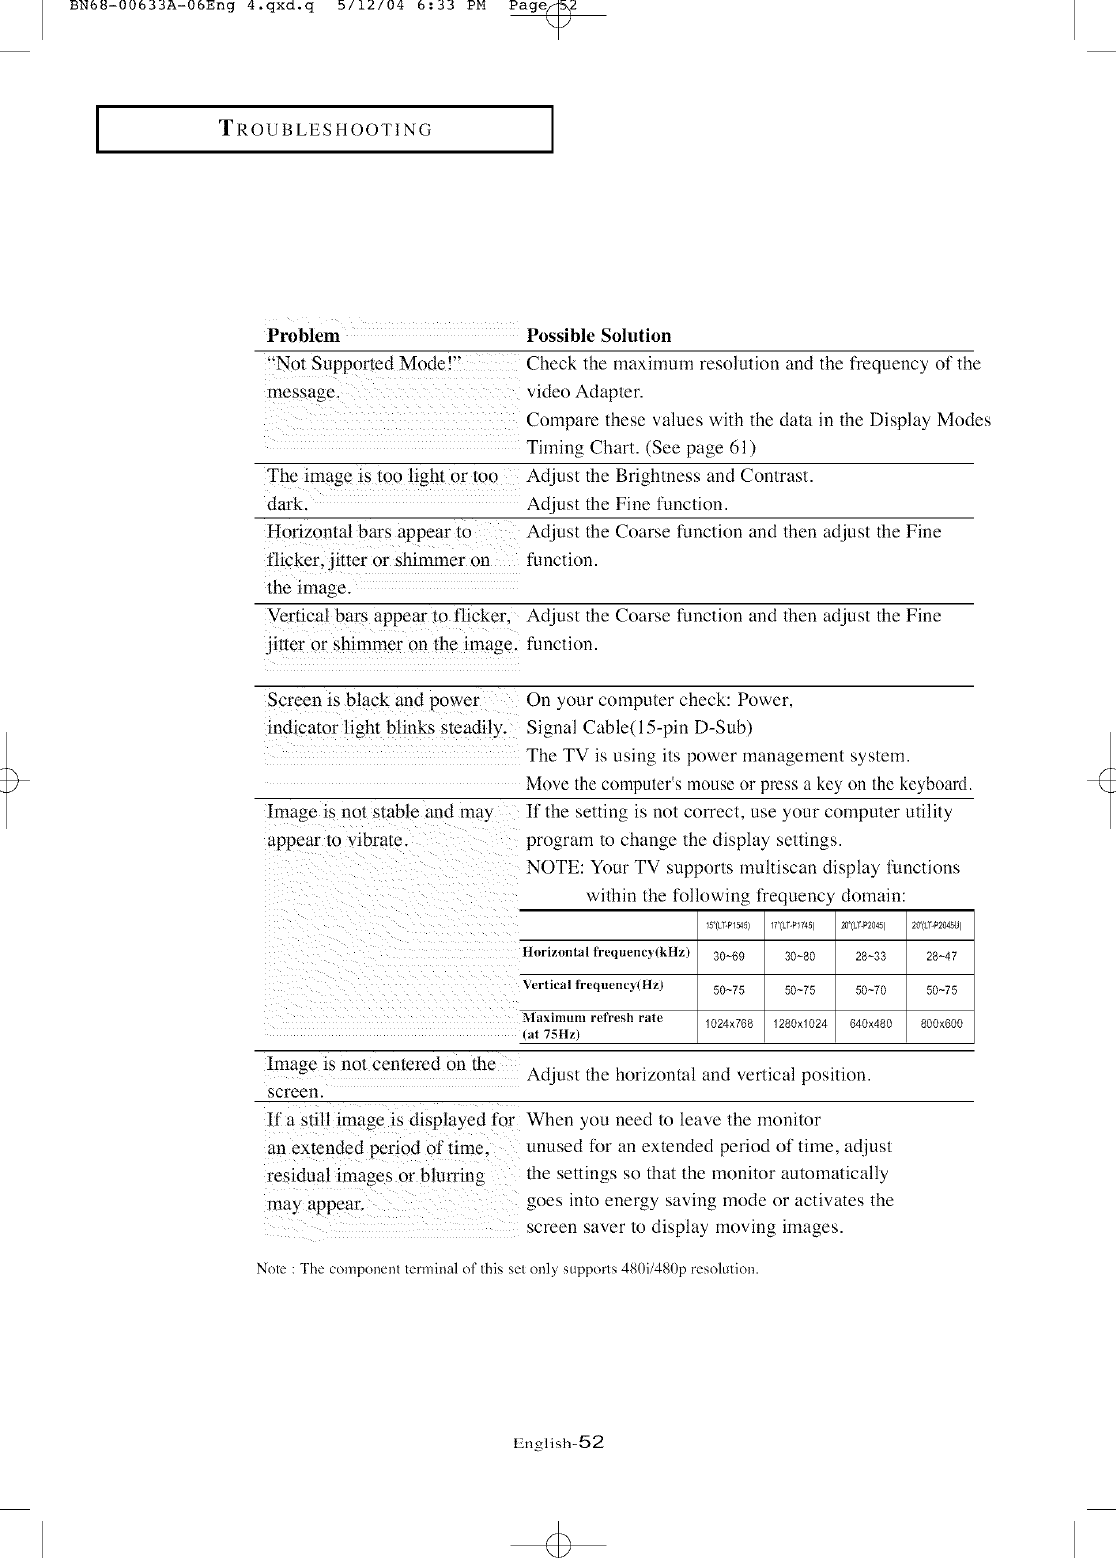
ITROUBLESHOOTING I
Problem Possible Solution
" r P_
Not Suppo ted Mode. Check lhe maximutn resolution and lhe frequency of the
message, video Adapter.
Compare these values with lhe dala in the Display Modes
Timing Charl. (See page 61)
The image is too light or too Adjusl the Brighlness and Conmtst.
dark. Adjusl the Fine function.
Horizontal bars appear to Adjusl the Coarse funclion and then adjusl the Fine
flicker, .jitter or shimmer on function.
the image.
Vertical bars appear to flicker, Adjusl the Coarse function and then adjusl the Fine
jitter or shimmer on the image, function.
Screen is black and power On your compuler check: Power,
indicator light blinks steadily. Signal Cable(15-pin D-Sub)
The TV is using ils power managelnent syslem.
Move lhe compuler's mouse or press a key on the keyboard.
Image is nol stable _md may If lhe selling is not correcl, use your compuler ulilily
appear to vibrate, program to change the disphty sellings.
NOTE: Your TV supporls multiscan disphty funclions
wilhin lhe following frequency domain:
ls_{Lr-Plsas) 17(Lr-Plr4s) m(LY-P20_) 20_{Lr-P20_U)
Horizontal frequent) (kHz) 30-69 30-80 28-33 28-47
Vertical frequenc}(Hz} 50-75 50-75 50-70 50-75
Maxinmm refresh rate 1024x768 1280x1024 640x480 800x600
(at 7_Hz)
Image is not centered on the
screen.
If a still image is displayed for
an extended period of time.
residual images or blurring
may appear.
Adjust the horizontal and vertical position.
When you need to leave the monitor
unused tor an extended period of time, adjust
lhe settings so that the monitor automatically
goes into energy saving mode or actiwttes the
screen saver to display moving images.
Note : The component terminal of this set only supports 480i/480p resolution.
English-52
BN6_-00633A-06Eng 4.qxd.q b/12/04 6:33 PM Page_3
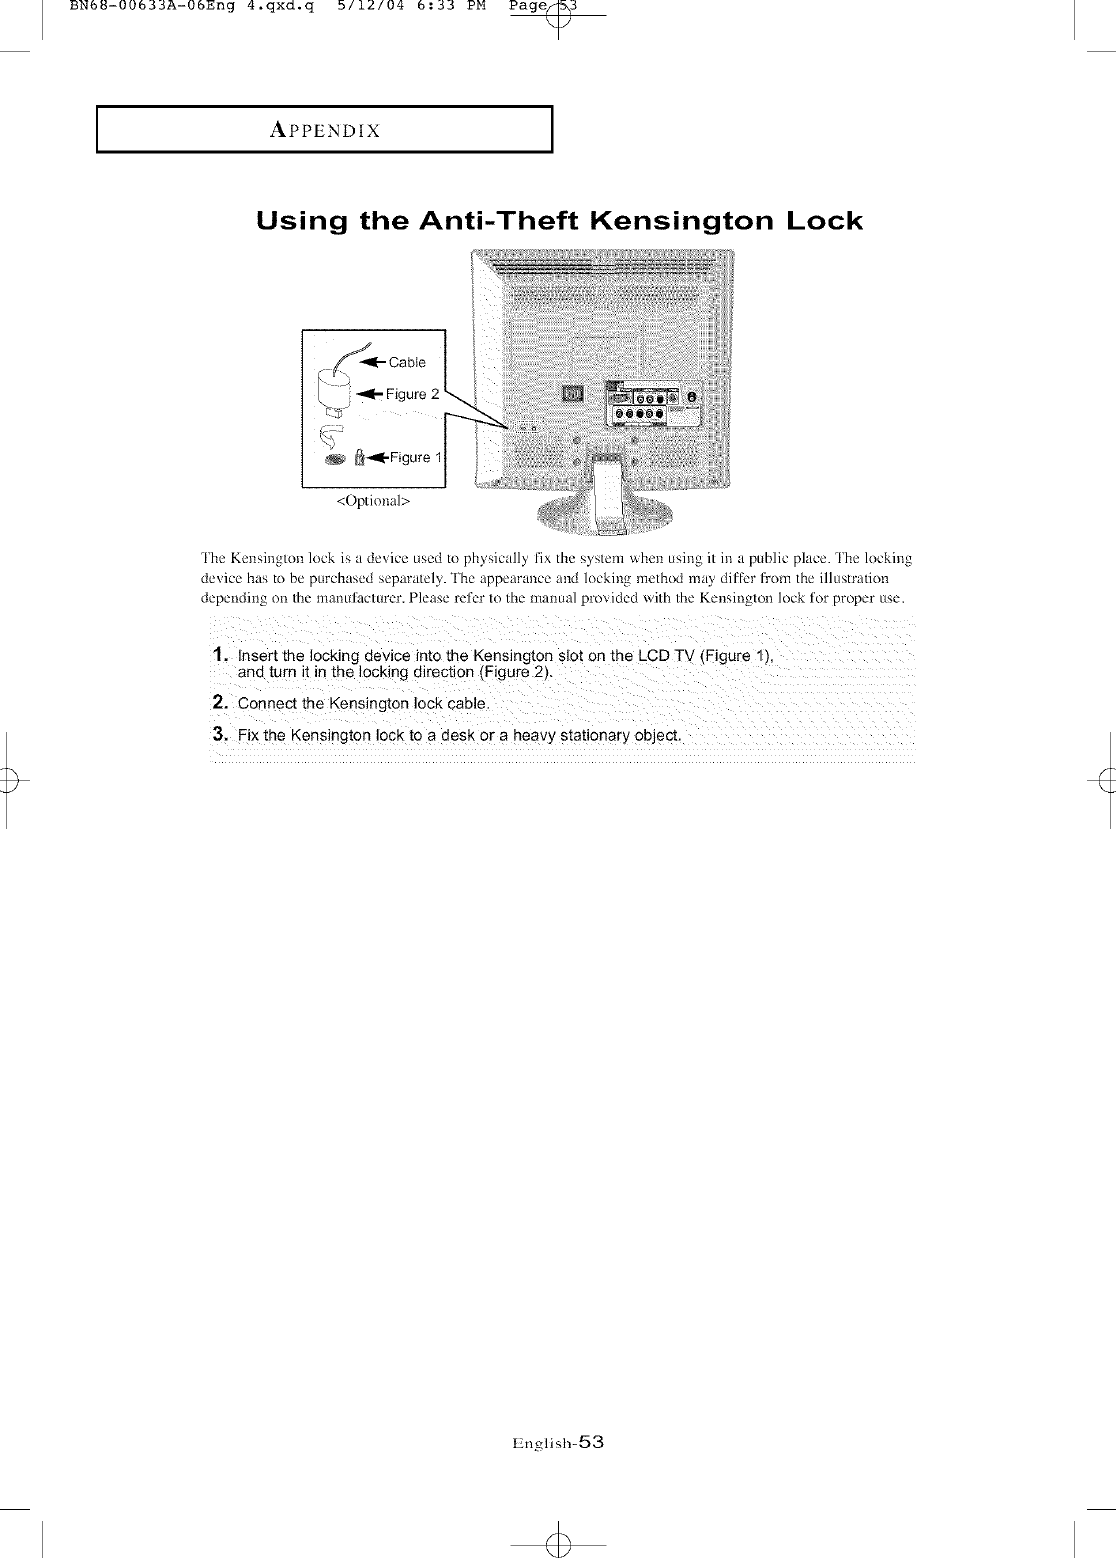
IAPPENDIX I
Using the Anti-Theft Kensington Lock
_fJ_._-- Cable
I ÷F,0u e2k
_=11-Figure lj
<Optional>
The Kensington lock is a de_ice used to physically lix the system ,ahen using it in a public place. The lecking
device has to be purchased separately. The appearance and locking method may differ lronl the illustration
depending on the manulacturer. Please refer to the manual provided with the Kensington lock ter preper use.
1. Insert the locking device into the Kensington slot on the LCD TV (Figure 1'_.
and turn it in the locking direction (Figure 2),
2. Connect the Kensington lock cable,
3, Fix the Kensington lock to a desk or a heavy stationary objecL
English-53
<b

BNbB-00633A-05Eng 4.qxd.q b/12/04 5:33 PM Page_4
IAPPENDIX I
Retractable Stand
Note: The maximmn tilt angle is 13 degrees in the backward direction.
Please do not tilt the TV outside the specified range. Using excessive ibrce
to tilt the TV may cause permanent damage to the mechanical part of the stand.
The 20" model swivels lefl and right.
< LT-P1545 /LT-P1745 >
......
< LT-P2045 /LT-P2045U >
13.0 °
12nglish-54

BN6_-00633A-06Eng 4.qxd.q b/12/04 5:33 PM Page_b
IAPPENDIX I
Installing VESA compliant mounting devices
Mounting pad
< LT-P1545 /LT-P1745 > < LT-P2045 /LT-P2045U >
Align the mounting interface pad with the holes in the rear cover mounting pad and secure it with the
four screws that come with the arm-type base, wall mount hanger or other bases.
Wall Mount Instructions
The following instructions apply to a hollow sheet-rock wall only. Tools/Hardware needed -Philips
screwdriver, four toggle bolts, 5/8in dia. Drill bit and drill, Contact Ergotron at (800) 888-8458 to
purchase the triple pivot direct mount adapter and wall mount bracket kit,
.LT-P1545(15"):
.LT-P1745(17"):
.LT-P2045(20"):
• L%P2045U (20"):
No. 47 - 007 - 099 (Pivot direct mount adapter)
No. 97 - 101 - 003 (Wall mount bracket kit)
No. 47 - 007 - 099 (Pivot direct mount adapter)
No. 97 - 101 -003 (Wall mount bracket kit)
No. 47 - 007 - 099 (Pivot direct mount adapter)
No. 97 - 101 - 003 (Wall mount bracket kit)
No. 47 - 007 - 099 (Pivot direct mount adapter)
No. 97 - 101 - 003 (Wall mount bracket kit)
Align the wall mount bracket on the wall at the desired height, making sure that the bracket will be
mounted between the wall studs. Mark the four corner openings and drill four 5/8-diameter holes.
Assemble the wall mount kit according to the instructions provided with it. Securely attach Ergotron's
flat panel, triple pivot direct mount adapter to the back of the TV using the four 4mm,
.7 pitch x 10mm screws provided with the arm. Secure the assembly to the wall using four 3/16 by
3-inch long toggle bolts.
English-55
BN68-00633A-06Eng 4.qxd.q b/12/04 5:33 PM Page_6
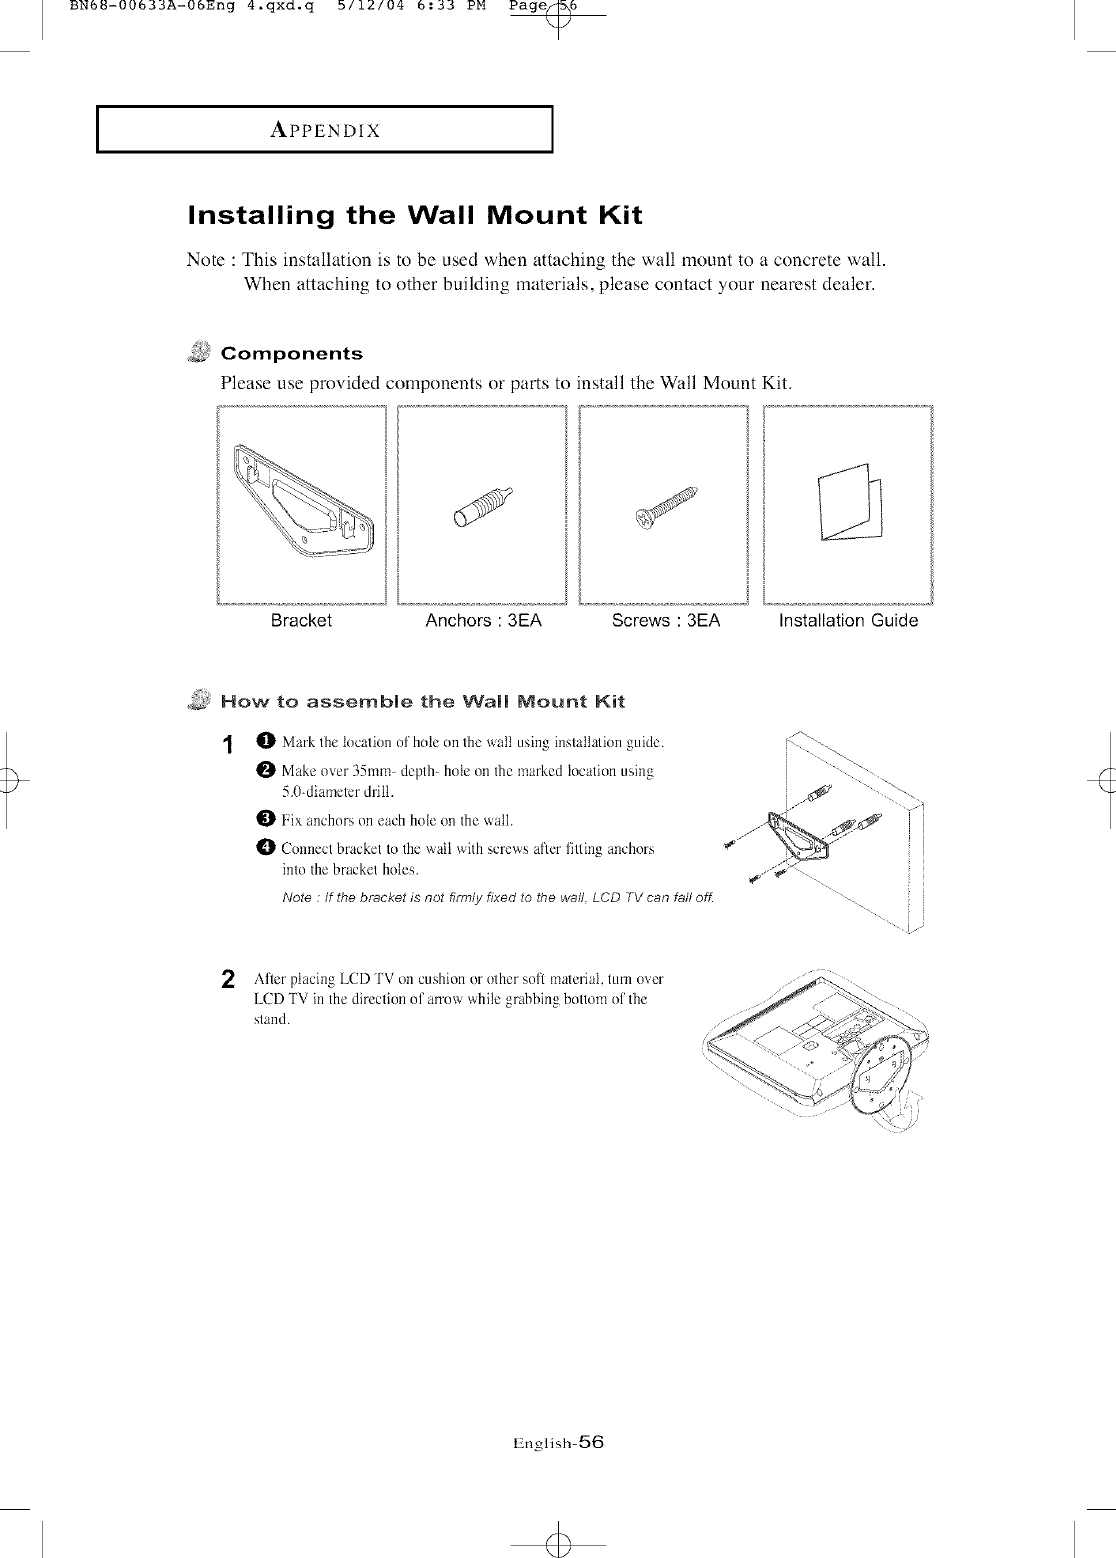
IAPPENDIX I
Installing the Wall Mount Kit
Nete : This installation is te be used when attaching the wall mount to a concrete wall.
When attaching te other building materials, please contact your nearest dealer.
Components
Please use previded cemponents or parts te install the Wall Mount Kit.
Bracket Anchors : 3EA Screws : 3EA Installation Guide
_,_, How to assemble the Wail Mount Kit
I[_ Mark the location of hole on the wall using installation guide.
!_ Make over 35mm- depth- hole on the marked location using
5.0-diameter drill.
_]1 Fix anchors on each hole on the wall.
O Connect bracket to the walt with screws after fitting anchors
into the bracket holes.
Note : If the bracket is not firmly fixed to the wall, LCD TV can fall oft: [
f
2After placing LCD T\ on cushion or other soft material, turn over
LCD TV in the direction of ano_' v_'hilegrabbingoo bottom of the
stand.
12,nglish-56
<b

BN6_-00633A-06Eng 4.qxd.q b/12/04 5:33 PM Page@/
IAPPENDIX I
Installing the Wall Mount Kit
3,\¢ustLCD TV to the hook on tbe bracket and move in the direction of tbe arrow(Left) so that LCI) TV can be com-
pletely fixed to the bracket.
/
Whenbracketisassembledonthewall Howto hangmonitorup on a hook Wheninstallationis completed
4Remove Installation Guide after completing setup of LCD TV on the wall.
5Push the LCD TV up and shift to the right to detach it from bracket.
When in() ing or transferring to other areas, reverse No. 3 procedure st) as to disconnect LCD TV with ease.
dii!%,
How to adjust an angle
(1) Angle adjustment section of (2) Angle abjustment section
general stand-besd LCD TV while converting the form
(1->3, 3->1)
0~13 _
(3) Angle adjustment section of
waN-mounted LCD TV
I_ Picture (1) shows the adjustment angle (0°~ 13°) when you use LCD TV in its general form (stand-based
LCD TV).
Excessi_'e tilting<-can lurn LCD TV ever which might cause damage to LCD TV.
0Picture (2) shows the adjustment angle (13°_ 80°) when you convert stand-based LCD TV into wall-mounted
one.
l_ Picture (3) shows the adjustment angle (0°~ 10°) when you use watt mounted LCD TV after fixing it to wail.
Note .'Picture (2) shows the angle adjustment section while LCD TV is being converted from stand-based
one to wall-mounted one or vice versa.
- Click" sound indicates section change from I to 2or 3 to 2(1->2, 3->2).
English-57
<5

BN68-00633A-06Eng 4.qxd.q b/12/04 6:33 PM Page_
IAPPENDIX I
Installing the Wall Mount Kit
Nete : This installation is te be used when attaching the wall mount to a concrete wall.
When attaching te other building materials, please contact your nearest dealer.
i_iiii:J_!i
Components
Please use previded cemponents or parts te install the Wall Mount Kit.
Bracket Anchors : 4EA Screws : 4EA Installation Guide
How to assemble the Wall Mount Kit
O Mark the location of hole on the wall using instaltaion guide.
Make over 35mm- depth- hole on the marked location using
5.0-diameter drill.
Fix anchors on each hole on the wall.
Connect bracket to the wall with screws after fitting anchors
into the bracket holes.
Note : If _hebracket is not firmly fixed to the wall, LCD TV can fall oft
2Yuu may use LCD T\: right after fixing it to the wall since stand is
wrapped already' turned over as shown in the picture
When using LCD TV in stand based tbrm, place the in the picture
below.product on a cushion or other soft materials. Then turn over
stand tbltowing the arrow direction below only after pressing button
on lhe connected part where LCD TV is attached to stand.
(Turn over stand in the opposite direction after pressing button when
using LCD TV in wall-mounted tbrm as well.)
12,nglish-58
<b

BN6_-00633A-06Eng 4.qxd.q b/12/04 5:34 PM Page_9
IAPPENDIX I
Installing the Wall Mount Kit
4Adjust LCD TV to the hook on the bracket and move in the direction of the arrow(Left) so that LCD TV can be
completely fixed to the bracket.
i;o_ o @o
Whenbracketisassembledonthewall Howto hangmonitorup on a hook Wheninstallationis completed
5 Remove Installation Guide after completing setup of LCD TV on the wall.
6 Push the LCD TV up and shift to the right to detach it from bracket.
When moving or transferring to other areas, reverse No. 4 procedure so as to disconnect LCD TV with ease.
dii!%,
How to adjust an angle
(1) Angle adjustment section of
general stand-besd LCD TV
(2) Angle abjustment section
while converting the form
(1->3 3->1)
(3) Angle adjustment section of
waIi-mounted LCD TV
8(_-90 °
O Picture (1) shows the adjustment angle (0 °_ 13 °) when you use LCD TV in its general tbrm (stand-based LCD
TV).
E×cessive tilting can turn LCD TV over which might cause damage to LCD TV.
Picture (2) shows the adjustment angle (13 °- 80 °) when you convert stand-based LCD TV into wall-mounted one.
Picture (3) shows the adjustment angte (0 °_ 10 °) when you use watt mounted LCD TV after fixing it to wail.
Note : Picture (2) shows the angle adjustment section while LCD TV is being converted from stand-based
one to wall-mounted one or vice versa.
12,nglish-59
BN6B-00533A-06Eng 4.qxd.q b/12/04 5:34 PM Page_0
IAPPENDIX I
Cleaning and Maintaining Your TV
Please follow these guidelines to get the maximum performance from your TV.
Placement
• Do not place the TV near extremely hot, cold, humid or dusty places.
• Do not place the TV near appliances with electric motors that create magnetic fields,
such as vacumn cleaners.
• Keep the ventilation openings clear; do not place the TV on a sot? surface,
such as cloth or paper.
• Place the TV in a vertical position only.
Liquids
• Do not handle liquids near or on the TV.
Liquids that spill into it can cause serious damage.
Cabinet
• Never ()pen the cabinet or touch the parts inside.
• Wipe your TV with a clean, dry cloth. Never use water, cleaning fluids, wax, or
chemicals.
• Do not put heavy objects on top of the cabinet.
Temperature
• If your TV is suddenly moved from a cold to a warln place, unplug the power cord,
and allow at least two hours lor moisture that may have tormed inside the unit to dry
completely.
Using Your TV in Another Country
If you plan to take your TV with you to a toreign country, please be aware of the
different television systems that are in use around the world. A TV designed for one
system may not work properly with another system due to differences in the TV channel
frequencies.
Engtish-60

BN6B-00633A-06Eng 4.qxd.q b/12/04 5:34 PM Page(_l
IAPPENDIX I
Display Mode
If the signal from the system equals the standard signal mode, the screen is adjusted
automatically. If the signal from the system doesn't equal the standard signal mode,
adjust the mode by referring to your Videocard user guide; olherwise there may be no
vide(). For the display modes listed below, the screen image has been optimized during
manufacture.
LT-P1545
1745
2045
2045U
VGA
LT-P1545
1745
2045U
SVGA
121"-P1545, 1745, 2045U
XGA
121"-P1545, 1745
SXGA
I21"-P1745
720X400
640X480
640X480
800X600
800X600
1024X768
1024X768
1280X1024
1280X1024
31.469
31.469
37.500
46.875
37.879
48.363
60.023
63.981
79.976
70.087
59.940
75.000
75.000
60.317
60.004
75.029
60.020
75.025
28.322
25.175
31.500
49.500
40.000
65.000
78.750
108.000
135.000
-/+
/
iii
+/+
+/+
/
+/+
+/+
English-61

BN6_-00633A-06Eng 4.qxd.q b/12/04 5:34 PM Page_2
IAPPENDIX
Specifications
I
Mode_ Name
Panel
Size
Diseiay Size
Type
Pixel Pitch
Viewing Angle
Frequency
Horizontal
Vertical
Display Color
Resolution
Optimum
Maximum
Input Signal
Sync
Video Signal
Video
Color System
Video System
Component
Video Inout
Audio ]nuut
1305(H)x 1003(V)inch
331.6(H) x 254.9(V)rnm
1197(H) x 8 98(V)inch
304.1(H) x 228.1(V)rnrn
a-si TFTactivematrix
0.297(H) x 0.297(V)mm
140/115
1509(H) x 1173(V)inch
383.5(H) x 298.0(V)mm
1330(H) x 1064(V)inch
337.9(H) x 270.3(V)mrn
a-siTFT activematrix
0.264(H) x 0.264(V)mm
140/120
1625(H) x 1224(V)inch
413.0(H) x 311.0(V)mm
1606(H) x 1205(V)inch
408.0(H) x 306.0(V)rnrn
a-si TFTactivematrix
0.6375(H) x 0.6375(V)mm
160/150
16 25(H)x 1224(V)inch
413.0(H) x 311.0(V)mm
16 06(H)x 12.05(V)inch
408.0(H) x 306.0(V)mm
a-siTFT activematrix
0.51(H) x 0.51(V)mm
160/120
30 ~ 69kHz 30 ~80kHz 28 ~ 33kHz 28 ~47kHz
50 ~ 75Hz 50 ~ 75Hz 50 ~ 70Hz 50 ~ 75Hz
16.2 MiIIion 16.2 Million 16.7 Million 16.7 Million
1024 x 768@60Hz 1280 x 1024@60Hz 640 x 480@60Hz 800 x 600@60Hz
1024 x 768@75Hz 1280 x 1024@75Hz 640 x 480@70Hz 800 x 600@75Hz
H/V Separate, TTL, P or N
0,7 Vp-p @75 O
NTSC
CVBS, S-VHS, RGB
500mVrms
PowerSupply
]haUl
Ou'[put
Power Consumption
Maximum
Power Saving
Dimension (W x DxH)
TV Body
With stand
Weight
With stand
EnvironmentalConsiderations
Operating Temperature
Operating Humidity
Storage Temperature
Storage Humidity
Audio Characteristics
Audio nuut
PC Audio Inuut
Audio Outuut
Headphone Outpu_
Frequency
Response
AC 120V ~ 60Hz
40W
<3W
14.18x2.53x13.33inch
(360.2x64.2x 338.6mm)
14.18x7.59x15.61inch
(360.2x 192.9x396.5mm)
3.6 kg (7.94 Ibs) 4.95 kg (10.91 Ibs)
16.40x 2.82x 15.46inch 18.86x2.94x 17.18inch
(416.7x71.8x392.9mm) (479.0x 74.7x 436.4mm)
16.40x 7.59x 16.68inch 18.86x8.90x 18.23inch
(416.7x 192.9x 423.8mm) (479.0x226.0x463.0mm)
45W 55W 55W
<3W <3W <3W
18.86x 2.94x17.18inch
(479.0x74.7x436.4mm)
18.86x 8.90x 18.23inch
(479.0x 226.0x463.0mm)
7.15 kg (15.76 Ibs) 7.45 kg (16.42 Ibs)
50°F to 104°F (10°C to 40°C)
10%to 80%, non-condensing
-4°F to 113°F (-20°C to 45°C)
5%t0 95%, non-condensing
RCA Jack Red@, White(L), O.5Vrms(-9dB)
3.5e Stereo Jack, 0.5Vrms(-9dB)
2.5W x 2
Max.10mW Output(3.5p Stereo Jack 32)
RF : 80Hz ~15kHz at -3dB
A/V : 80Hz ~20kHz at -3dB
English-62

COVER qxo q q 5/12/04 4 35 PM Page 1
ELECTRONICS
1-800-SAMSUNG(1-800-726-7864)
U.S.A
Samsung Electronics America
Service Division
400 Valley Road, Suite 201
Mount Arlington, NJ 07856
www.samsungusa.eom
Canada
Sam_ung Electrgnics _, da Inc.
Samsung _tmtomer _ "
7037 Financial Drive
Missi_unga, Ontario
LSN 6R3
www.samsung,ca
BN68-00633A-05
