Samsung LTP326W User Manual TV LCD Manuals And Guides L0411263
SAMSUNG LCD Television Manual L0411263 SAMSUNG LCD Television Owner's Manual, SAMSUNG LCD Television installation guides
User Manual: Samsung LTP326W LTP326W SAMSUNG TV LCD - Manuals and Guides View the owners manual for your SAMSUNG TV LCD #LTP326W. Home:Electronics Parts:Samsung Parts:Samsung TV LCD Manual
Open the PDF directly: View PDF ![]() .
.
Page Count: 91
This device is a Class B digital apparatus.
I CON_l ENT S
Chapter 1- Your New TV
List of Features ........................................ 1
List of Parts ........................................ 1
Familiarizing Yourself with Your New TV .................... 2
Right-side Panel Buttons .............................. 2
Rear Panel Jacks .................................... 3
Remote Control .................................... 4
Installing Batteries in the Remote Control .................... 6
If' remote control doesn't work ............................. 6
Chapter 2: installation
Connecting VHF and UHF Antennas ....................... 7
Antennas with 300-ohm Flat Twin Leads ................. 7
Antennas with 75-ohm Round Leads .................... 8
Separate VHF and UHF Antennas ....................... 8
Connecting Cable TV .................................... 8
Cable without a Cable Box ......................... 8
Connecting to a Cable Box that Descrambles All Channels .... 9
Connecting to a Cable Box that Descrambles Some Channels . . 9
Connecting HDMI ..................................... 11
How to connect Core ................................... 11
Connecting a VCR ..................................... 12
Connecting an S-VHS VCR .............................. 13
Connecting a DVI-D Cable ............................... 13
Connecting a DVD Player ............................... 14
Connecting a Digita! TV Set-Top Box ...................... 14
Connecting a PC ....................................... 14
ANYNET ............................................ 16
What is the Anynet ................................. 16
Anynet ......................................... 17
Connecting TV + DVD/VCR Combo:
Connectinp, AV Signa! Cables ..................... 18
Connecting TV + DVD Receiver: Connecting AV Signal Cables . 19
Connecting TV + DVD Combo + DVD Receiver:
Connecting AV Signa! Cables ......................... 20
Chapter 3: Operation
Turning the TV On and Off .............................. 21
Changing Channels ..................................... 21
Using the Channe! Buttons ........................... 21
Using the Pre-CH Button to select the Previous Channel ..... 21
Ac[justing the M_lume ................................... 21
Using Mute ....................................... 21
Viewing the Display .................................... 22
Viewing the Menus ..................................... 22
Setting Up Your Remote Control .......................... 23
Remote Control Codes .................................. 26
Chapter 4: Special Features
Plug & Play Feature .................................... 27
Memorizing the Channels ................................ 28
Selecting the Video Signal-source ...................... 28
Storing Channels in Memory (Automatic Method) ......... 29
Adding and Erasing Channels (Manual Method) ........... 30
Labeling Channels .................................... 30
_{k_set-up your Favorite Channels .......................... 31
_{_)Select Source ....................................... 31
To Edit the Input Source Name ............................ 32
C'ontents ]
I CONTENTS
Using Amomatic Picture Senin#,s .......................... 33
Cuslomizing lhe Piclure ................................. 34
Using Aulomalic Sound Senings .......................... 35
Cuslomizing lhe Sound .................................. 36
Selecting a Menu Language .............................. 37
Selling (he Blue Screen Mode ............................. 38
Fine Tuning Channels ................................... 39
LNA (Low Noise Amplifier) .............................. 40
Viewing Piclum-in-Piclure ............................... 41
Activating Picture-in-Piclure .......................... 41
Selecting a Signal Soume (Exlemal A/V) Ik)r PIP .......... 42
Swapping lhe Conlems of lhe PIP and Main image ......... 42
Changing lhe PIP Channel ........................... 42
Changing lhe Location of lhe PIP Window ............... 42
Changing lhe Size of lhe PIP Window ................... 42
DNIe(Digilal Natural Image engine) ........................ 43
MCC (My Color Comrol) ................................ 44
Easy Comrol ...................................... 44
Delail Conlrol ..................................... 45
I2C (Inlelligenl Image Conlrol) ........................... 46
IBC (Inlelligenl Brightness Conlrol) ........................ 47
Changing lhe Screen Size ................................ 48
Freezing lhe Piclure .................................... 48
Adjusting lhe Color Tone ................................ 49
Selling lhe TruSurround XT(SRS TSXT) .................... 50
Automalic Volmne Comml .............................. 51
Special Sound Oplions .................................. 52
Adjusling lhe Headphone Sound .......................... 53
Selecting lhe Main or Sub Sound .......................... 54
Sub Woofer .......................................... 55
Selling lhe Clock ..................................... 56
Selling lhe On/Off Timer ................................ 57
Selling lhe Sleep Timer ................................. 59
Viewing Closed Caplions ................................ 60
Using (he V-Chip ...................................... 62
Color Weakness ....................................... 68
Selecting lhe Melody ................................... 69
Chapter 5: PC Display
Using Your TV as a Computer (PC) Display .................. 70
How m Set up Your PC Soflwa,_ (Windows on!>) ......... 70
How m Aura Adjust ................................ 71
Adjusting the Sc)cen Qnalit_y ......................... 72
Changing lhe Scleen Position ......................... 73
_[b Initialize the Screen Position or Color Settings .......... 74
Chapter 6: Troubleshooting
[dentifyin_ Problerls ................................... 75
_nstalling the Stand ..................................... 82
Wal! Mount Installation Guide ............................ 83
Cleaning and Maintaining Your TV ......................... 85
Using Your TV in Anmher Country ........................ 85
Specifications ......................................... 86
Display Modes ........................................ 87
Col/tell [N 2
YOUR NEW TV
List of Features
o MCC (My Color Control):
Users can adjust colors to their preference by adjusting skin,sky and grass
tones.
®[2C (Intelligent Image Contro]):
Automatically detects the input visua] signa] and at[justs to creat optimum
contrast.
• [BC (Inte!ligent Brightness Control):
Adjusts the screen brightness automatically depending on the brightness of
the surrounding environment.
®Color Weakness :
This feature enable those with a color weakness to view images as those
with norma!vision.
®JBL high peribrmance built-in speakers:
Enables reproduction of broadband i?'equency sound.
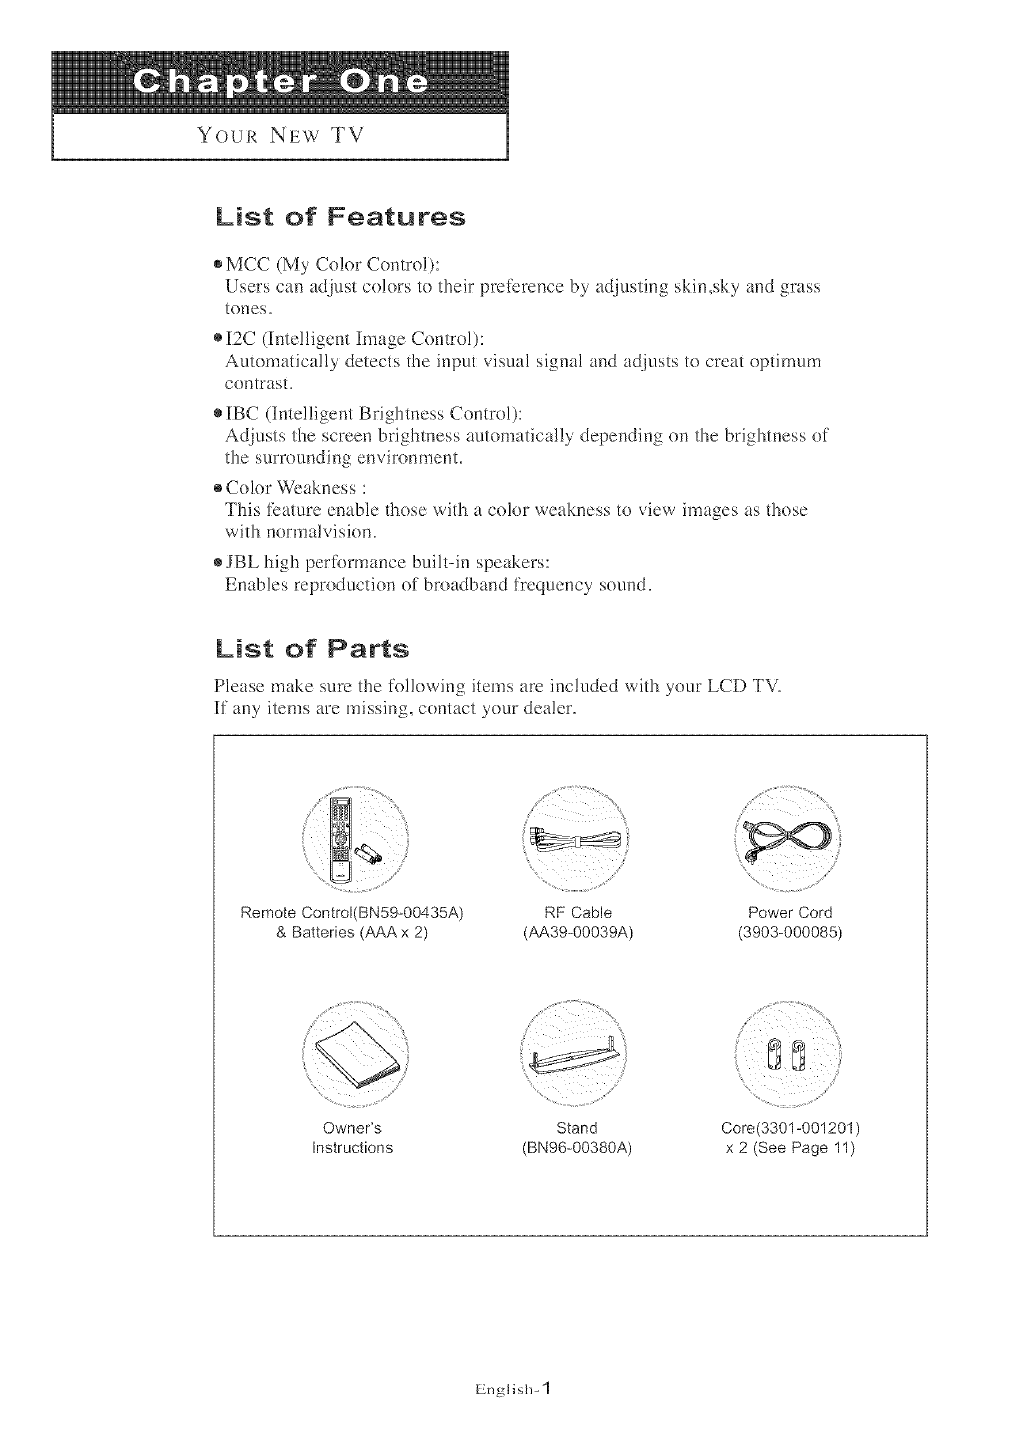
List of Parts
Please make sure the following items are included wifl_your LCD TV.
ff any items are missing, contact your dealer.
Remote Control(BN59-00435A)
& Batteries (AAA x 2)
%¸¸¸<.......................;;/
RF Cable
(AA39-00039A)
...............L,I,,,;;..........
Power Cord
(3903-000085)
Owner's
Instructions
Stand
(BN96-00380A)
Core(3301-001201 )
x 2 (See Page 11)
gngllsll-1
YOUR NEW TV 1
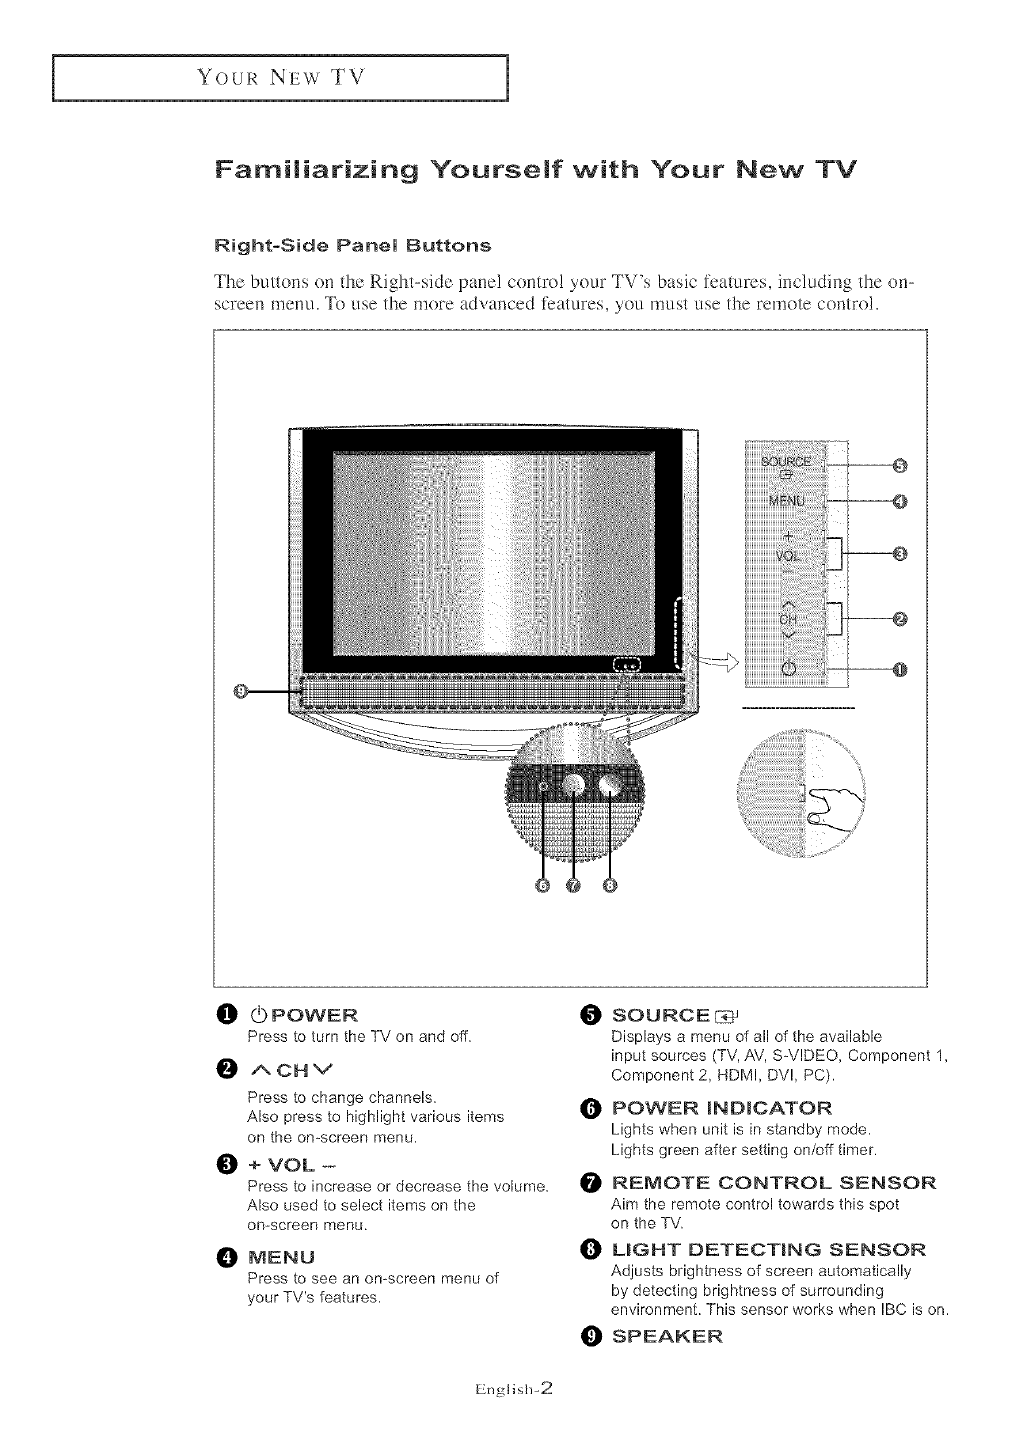
Familiarizing Yourself with Your New TV
Right-Side Pane[ Buttons
The butt(ms (m the Right-side panel control your TV's basic featmves, including the (m-
screen mellLl. _[_)use file more advanced features, you ITILISI ElSefile remote control.
[
00POWER
Press to turn the TV on and off.
O
O
/'. OH v
Press to change channels.
Also press to highlight various items
on the on-screen menu.
+ VOL --
Press to increase or decrease the volume.
Also used to select items on the
omscreen menu,
_t MENU
Press to see an omscreen menu of
your TV's features,
O SOURCE E_
Displays a menu of all of the available
input sources (TV, AV, S-VIDEO, Component 1,
Component 2, HDMI, DV!, PC).
POWER INDICATOR
Lights when unit is in standby mode,
Lights green after setting on/off timer,
REMOTE CONTROL SENSOR
Aim the remote control towards this spot
on the TV.
_I LIGHT DETECTING SENSOR
Adjusts brightness of screen automatically
by detecting brightness of surrounding
erwironment. This sensor works when IBC is on.
1_t SPEAKER
Engllsh-2
Your NEW TV
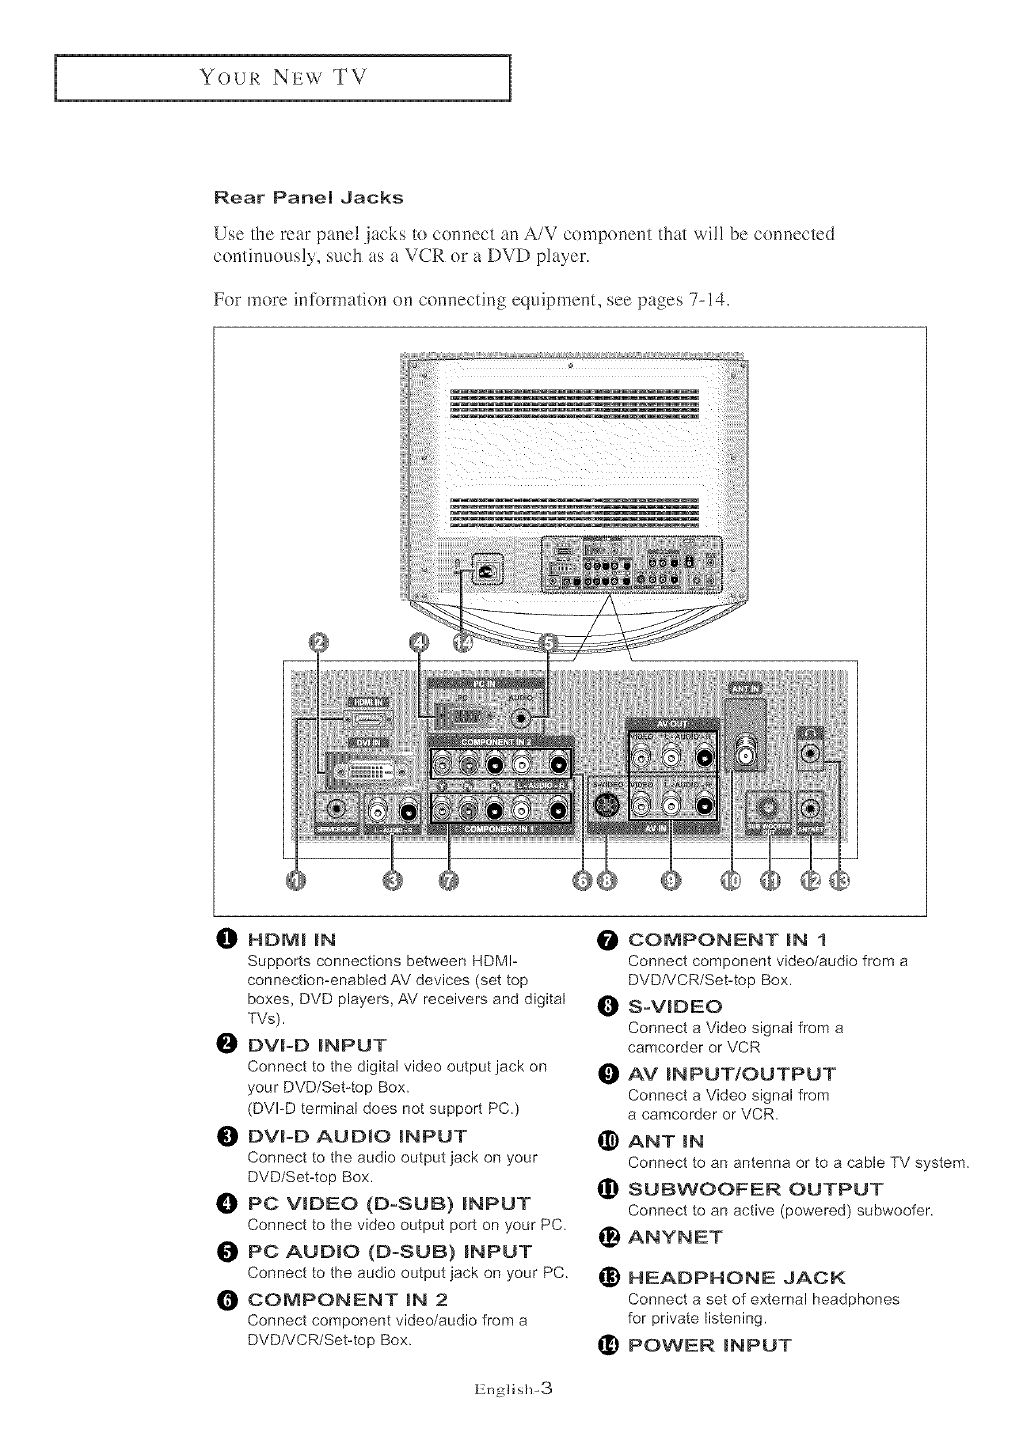
Rear Panem Jacks
Use the rear panel jacks to connect an A/V componem that will be connected
continuously, such as a VCR or a DVD player.
For more infbrmation (m c(mnecting equipmem, see pages 7-14.
_[]) HDMI IN O
Supports connections between HDMI-
connectiomenabled AV devices (set top
boxes, DVD players, AV receivers and digital
TVs).
DVI-D INPUT
Connect to the digital video output jack on
your DVD/Setqop Box.
(DVI-D terminal does not support PC.)
DVI-D AUDIO INPUT _)
Connect to the audio output jack on your
DVD/Set4op Box. ®
PC VIDEO (D-SUB) INPUT
Connect to the video output port on your PC. _)
PC AUDIO (D-SUB) INPUT
Connect to the audio output jack on your PC. _}
COMPONENT IN 2
Connect component video/audio from a
DVDA/CR/Set-top Box. _}
CONPONENT IN 1
Connect component video/audio from a
DVD/VCR/SeMop Box.
S-VIDEO
Connect a Video signal from a
camcorder or VCR
AV INPUT/OUTPUT
Connect a Video signal from
a camcorder or VCR.
ANT IN
Connect to an antenna or to a cable TV system.
SUBWOOFER OUTPUT
Connect to an active (powered) subwoofer.
ANYNET
HEADPHONE JACK
Connect a set of external headphones
for private listening.
POWER INPUT
EngliMi-3
Your NEW TV
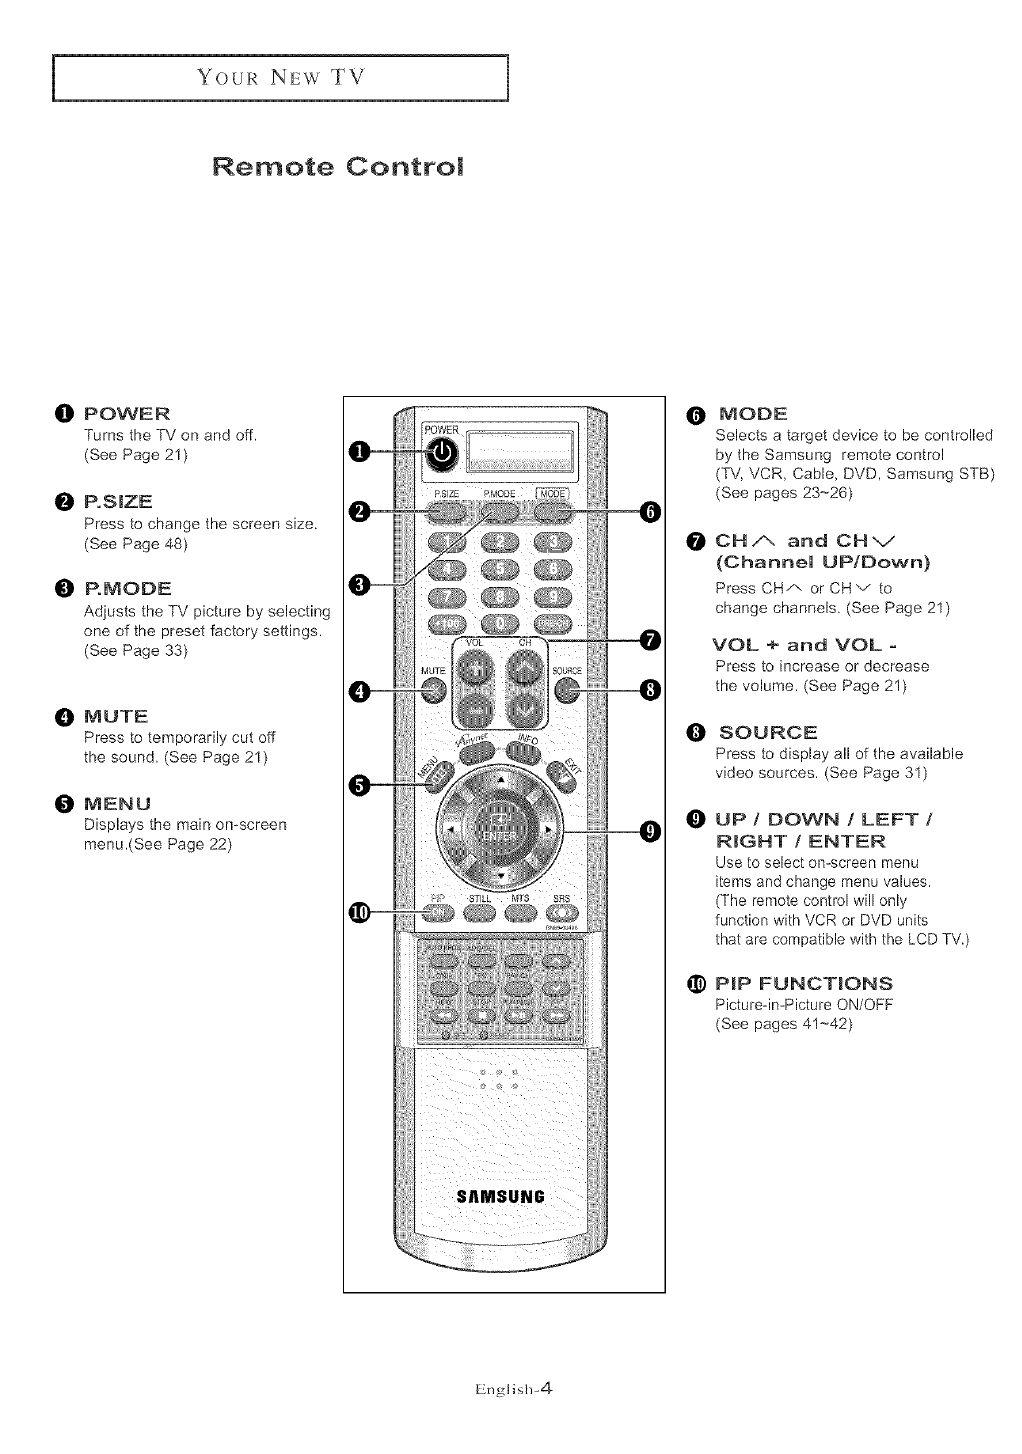
Remote Control
O POWER
Turns the TV on and off.
(See Page 21 )
O P.SIZE
Press to change the screen size.
(See Page 48)
O P.MODE
Adjusts the TV picture by selecting
one of the preset factory settings.
(See Page 33)
O MUTE
Press to temporarily cut off
the sound. (See Page 21)
MENU
Displays the main on-screen
menu.(See Page 22)
O
OMODE
Selects a target device to be controlled
by the Samsung remote control
(TV, VCR, Cable, DVD, Samsung STB)
(See pages 23-26)
@CHA and CHv
(Channel UP/Down)
Press CH/-, or CHv to
change channels. (See Page 21)
VOL + and VOL -
Press to increase or decrease
the volume. (See Page 21)
SOURCE
Press to display all of the available
video sources. (See Page 31)
OUP / DOWN /LEFT /
RIGHT /ENTER
Use to select on-screen menu
items and change menu values.
(The remote control will only
function with VCR or DVD units
that are compatible with the LCD TV.)
_) PIP FUNCTIONS
Pictureoin-Picture ON/OFF
(See pages 41--42)
En_Hsh-4
Your NEW TV
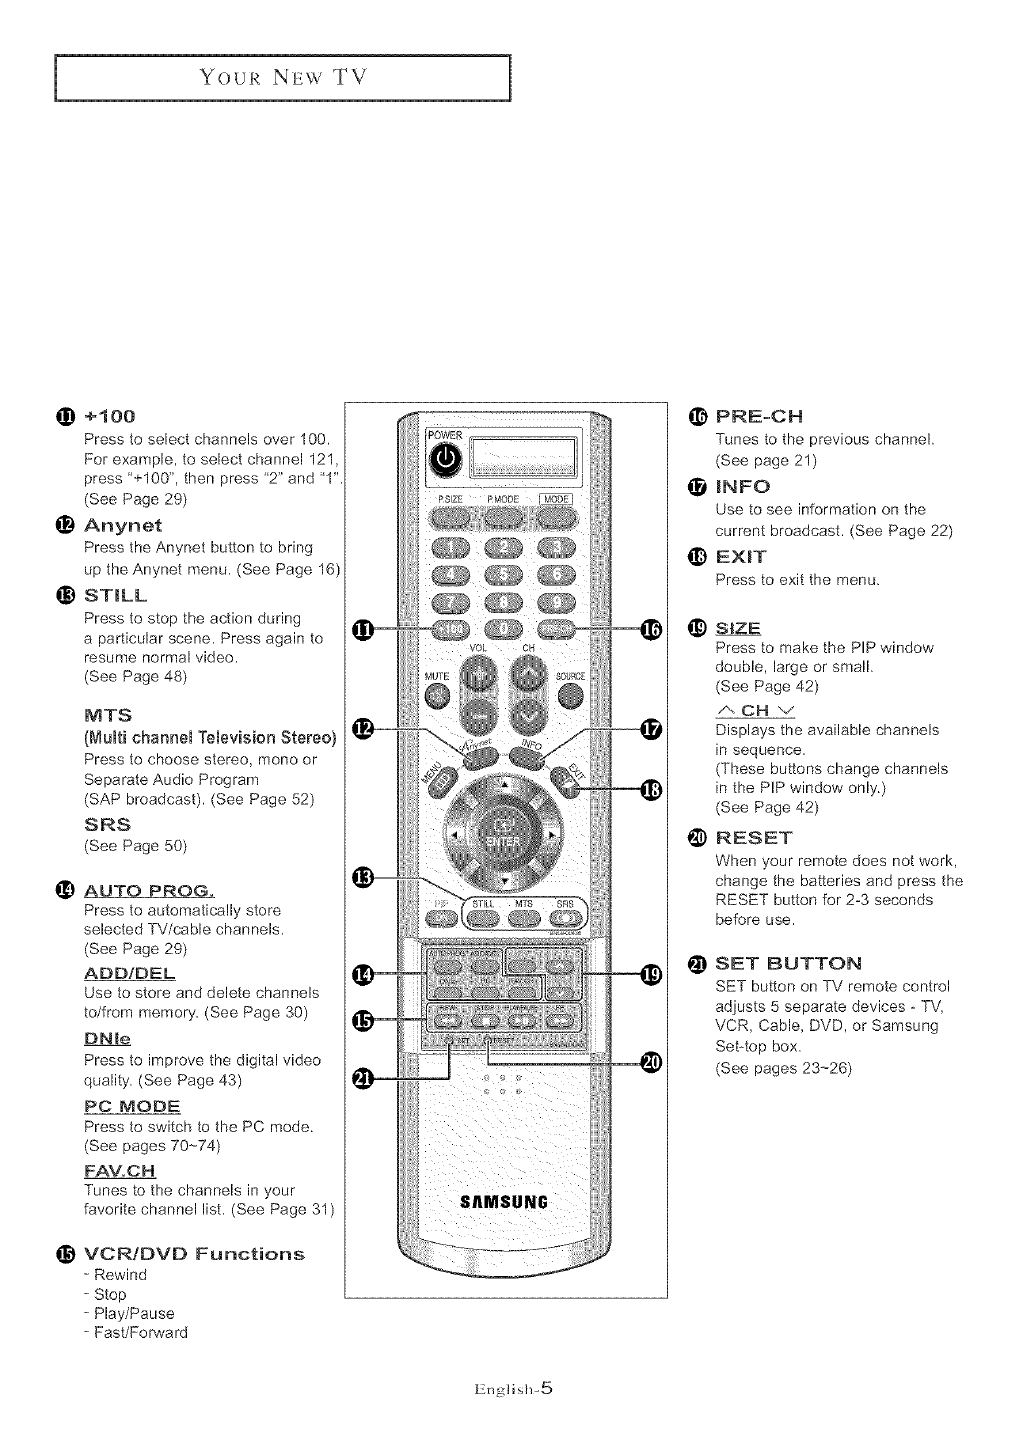
_) +100
Press to select channels over 100.
For example, to select channel 121,
press '+100", then press '2" and '1"
(See Page 29)
_) Anynet
Press the Anynet button to bring
up the Anynet menu. (See Page 16)
_) ST_LL
Press to stop the action during
a particular scene. Press again to
resume normal video.
(See Page 48)
MTS
(Multi channem TemeviMon Stereo)
Press to choose stereo, mono or
Separate Audio Program
(SAP broadcast). (See Page 52)
SRS
(See Page 50)
_) AUTO PROG.
Press to automatically store
selected TV/cable channels.
(See Page 29)
ADDIDEL
Use to store and delete channels
to/from memory. (See Page 30)
DNle
Press to improve the digital video
quality. (See Page 43)
PC MODE
Press to switch to the PC mode.
(See pages 70-74)
FAV.CH
Tunes to the channels in your
favorite channel list. (See Page 31 )
_) VCR/DVD Functions
- Rewind
- Stop
- Play/Pause
- Fast/Fopward
PRE-CH
Tunes to the previous channel.
(See page 21)
_NFO
Use to see information on the
current broadcast. (See Page 22)
_) EXiT
Press to exit the menu.
_) S{ZE
Press to make the PIP window
double, large or small.
(See Page 42)
/', OH "-/
Displays the available channels
in sequence.
(These buttons change channels
in the PIP window only.)
(See Page 42)
@ RESET
When your remote does not work,
change the batteries and press the
RESET button for 2-3 seconds
before use.
SET BUTTON
SET button on TV remote control
adjusts 5 separate devices - TV,
VCR, Cable, DVD, or Samsung
Set-top box.
(See pages 23--26)
English-5
Your NEW TV ]
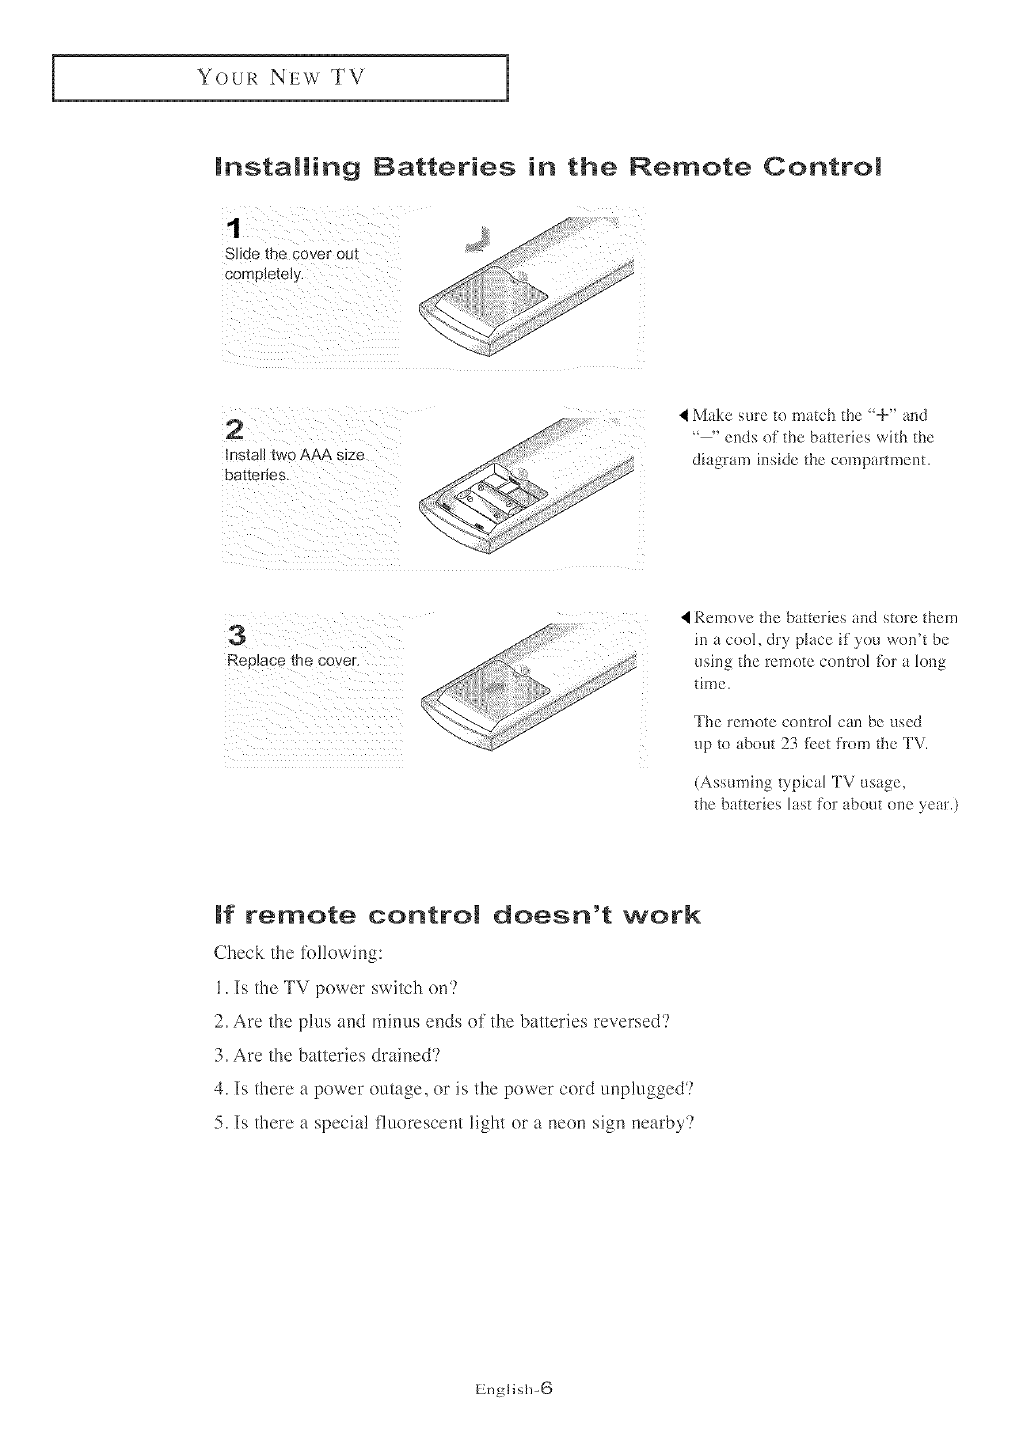
Installing Batteries in the Remote Control
Completely ....
2
i_-_stalltwoAAASize
batteries. ......q_!!{i _i_ ¸
...... _, _i_i:__¸'¸¸¸¸¸¸¸
Make sure to match the "÷" aid
.... ends of the batteries with the
diagram inside the compartment.
4Remove the batteries and store them
in a cool, dry phce if you won't be
using the remote control fk)r a lo_g
time.
The remote control can be used
up to about 23 feet from the TV.
(Assuming typical TV usage,
the batterie_ last for about one year.)
If remote control doesn't work
Check the tbl!owing:
1. Is the TV power switch on?
2. Are the plus and minus ends of the batteries reversed'?
3. Are the batteries drained'?
4. Is there a power outage, or is the power cord u_Tlugged?
5. Is there a special fluorescent light or a neon sign nearby?
EnglM>6
_N STALLATION
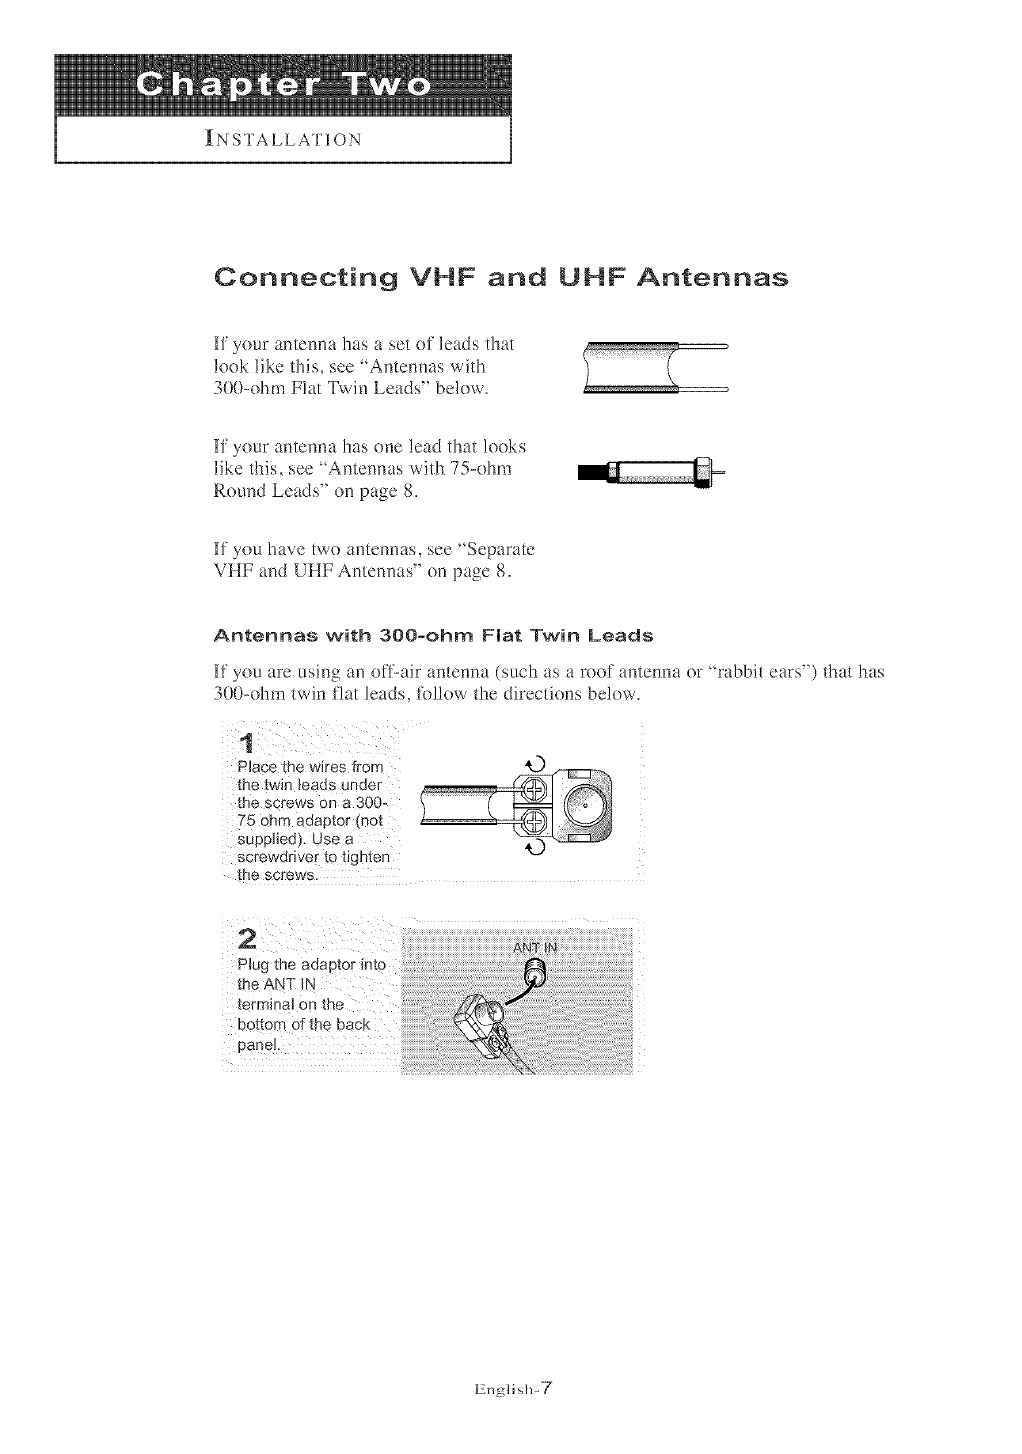
Connecting VHF and UHF Antennas
I1' your antenna has a set of leads that
look like tMs, see 'Antennas with
300-ohm Flat Twin Leads" below.
II' your antenna lms one lead fl-mt looks
like this, see ' Antennas with 75-ohm
Round Leads" on page 8.
If yon have two antennas, see "Separate
VHF and UHF Antennas" on page 8.
Antennas with 300-ohm Flat Twin Leads
It yon are using an off-air amenna (such as a roof antenna or "rabbit cars") that has
300-ohm twin flat leads, tollow the directions below.
1
Place.the wires fron
the twin leads unaer
the €crews on a 300-
75 onm aoap[or _,no_
SUDDlied;Use a
screwdriver to ughter
:he screws.
English-7

_N STALLATION ]
Antennas with 75-ohm Round Leads
Plug the antenna
lead into the
ANT IN te_:minal
on the bottom of the
back pane]
Separate VHF and UHF Antennas
_[fyou have two separate antennas R)r your TV (one VHF and one UHF), you mtmt
combine the two antenna signals before connecting the antennas to the TV. This
procedure requires a an optional combine>adaptor (available at most electronics shops),
Connect both antenna ,L
Plug the combiner
terminN on the
bottom of the
rear panel.
Connecting Cable TV
_{b connect to a cable TV system, fol!ow the instructions be!ow.
Cable without a Cable Box
ii
P!ug £he incoming}
cable into the
ANT!N terminal
or, back of the TV.
4Because this TV is cable-ready,
you do not lieed a cable box tn
view unscrambled cable channels.
Engllsh-8
_N STALLATION
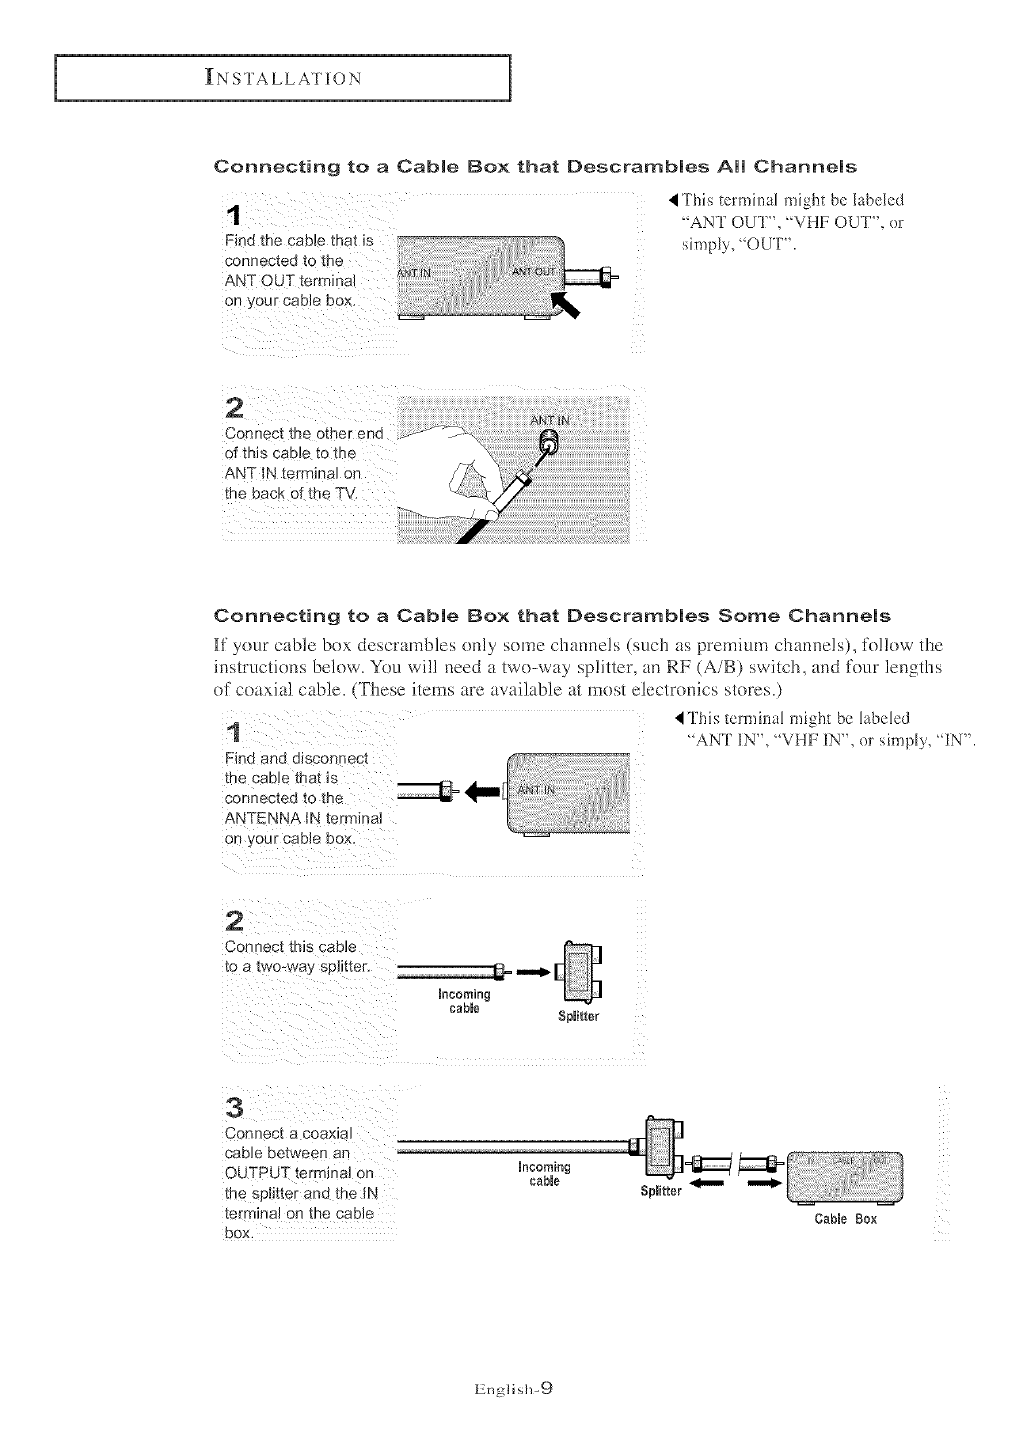
Connecting to a Cabme Box that Descrarnbmes AH Channems
4 This terminal might be labeled
"ANT OUT", "VHF OUT", er
Find the cable tbat is simply, "OUT".
Connected to the
ANT OUT termma
On your Cable box.
Connect the other end
of this cable tothe
ANTIN £erminal on
the back of tbe TV•
Connecting to a Cable Box that Descrambles Some Channels
][ yotu"cable box descrambles only some channels (such as premium channels), follow the
ins/rucfions below. You will need a two-way splitter, an RF (A/B) switch, and four lengths
of coaxial cable. ,'These i_ems are available at most eledronics stores.)
This termin:_l might be labeled
1 "'AN']' IN", "'VHF IN", or ,,imply, "'IN".
Find ano olsconnect ...................................
[he cable that ,s
conn_cte__oth_ _ _"_'_
ANTENNA JR [erminal
or y'our cable box,
2
Connect thB Cable
[0 a two- _ay sphtter
Incoming
cable Splitter
3
Connect a coax_a_
canle be[ween an
OUTPUT termlr sJ on
me sehtter and [re IN
[enTana] on [ne Cabl_
DOX,
Incoming
cable Splitter
CabmeBox
English-9
]N STALLATION 1
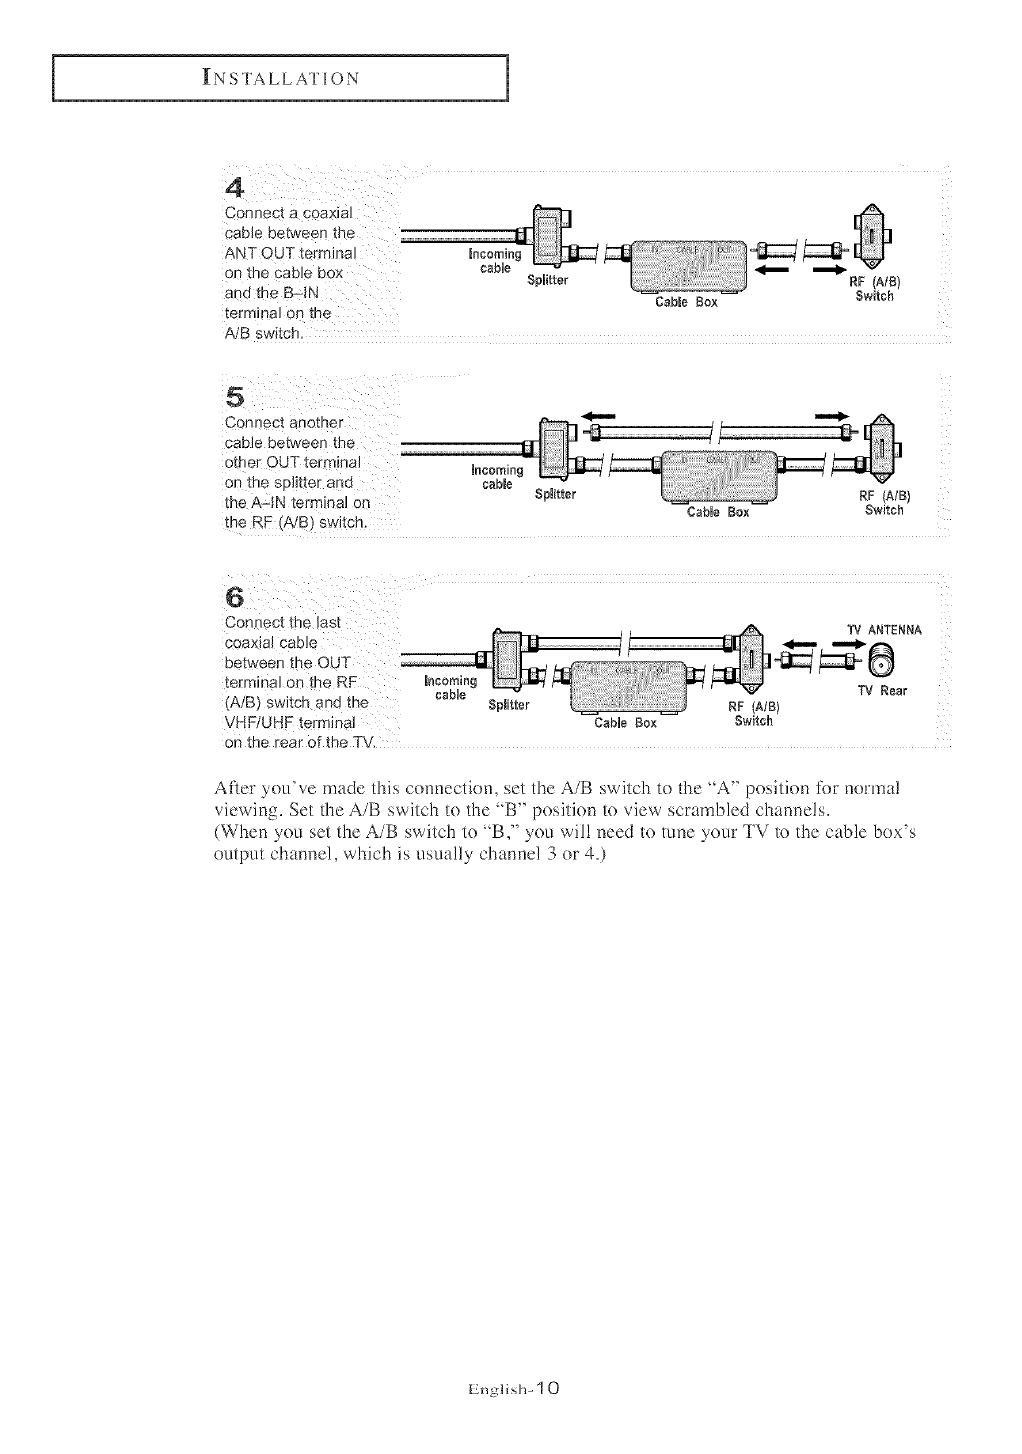
z
on the cane box SNitter _'_I_RF (AIBI
CaNe Box Switch
terminN on the
AiB switch.
Connect another
cane between the
other OUT terminN
the A-IN terminal or}
Incoming
cane Splitter RF (A/B)
coaxial came TV ANTENNA
terminal on the RE Incoming
(A/B) switch and the cane Splitter RF (A/B) TV Rear
VHFiUHE terminal CaNe Box Switch
on the rear Of the TV.
After you've made this connection, set the A/B switch to the "A" position tot norma!
viewing. Set the A/B switch to the 'B" position to view scrambled channels.
(When you set the A/B switch to 'B," you will need to tune your TV to the cable box's
output channel, which is usua!ly channel 3 or 40
English- 1 0

_N STALLATION
Connecting HDM!
Seppo!ls connections between HDMI-connectioe-enabled AV devices (Set Top boxes, DVD
players, AV receivers and digital TVs).
1
Connect HDMI cal,le DVD Player Rear Panel
/
[rorr the TV to the Input / lie
termm_Jof the HDMI L
device,
TV Rear Panem
,*l_t .....................
HDMI Cable
<Optional>
What is HDMI?
-HDML or high-definition multimedia interface, is a next-generation interface that enables the
transmission of digital audio and video signals using a single cable without compression.
-HDNI allows muRiNe
channels of digital audio (5.1 channels).The difference between HDNll and DW is that the
HDNI device is smaller in size, has the HDCP{High Definition Content Protection)
coding feature installed, and supports multi - channel digital audio.
How to connect Core
Core provided reduces EM][(E Iectromagnetic ]interference) m)ises ii'om electrica!
or electronic products aud prevents magnetic impact from ambient environment.
After connecting AV cable of TV or Component cable, install Core as shown in the picture.
English- 1 1

]N STALLATION
Connecting aVCR
These instructions assume that you have already connected your TV to an antenna or a
cable TV system (according to the instructions on pages 7-10L
Skip step I if you have no/yet connected to an antenna or a cable system,
1
Unplug the cable or
antenna from the
back of the TV.
2VCR Rear Panel
Connect [ne ca[He el _ m
ANT IN termma Incoming i {_ c ®@
CaNe Qr [
on tNe Dac_v of the Antenna
VCR.
VCR Rear Panel TV Rear Panel
Connect a coaxial
cable between _he
ANT OUT terminal q_)
on [he VCR and _ coaxiamC_bb
the antenna terminal 11
on me TV.
A coaxial can _"is usually irlcluded with a VCR. (lf uot, check your local electrordcs store).
Connect a set of .
audk) cables
between the AUD!O
VCR Rear Panel TV Rear PeneH
VCR and the AUDIQ
jacks on the TV.
If you have a "mono" (non-stereo) VCR, use the Y-connector (not supplied) to heel<
up to the left and tright audio input jacks of the TV. If your VCR is stere(), you must
eounect two cables.
Connect a video
cable between the
VIDEO OUT jack on
the VCR and the
VIDEO jack on the
VCR Rear Panel Tq Rear Panel
Follow the instructions in "Viewing a VCR or Camcorder Tape" to view your VCR tape.
4 Each extern tI input source device has a different back panel conliguration.
English- 1 2

_N STALLATION 1
Connecting an S=VHS VCR
Your Samsung TV can be connected to fin S-Video signa! flrom fin S-VHS VCR.
(This connection delivers a better picture as compared to a standard VHS VCR.)
VCRRear Panel TVRear Parcel
To begin, follow I _ r. % ,_,p_o;
stens 1-3 mthe _@i'_ "®_@@ kDrewous section to
_nnect tr ear tenna CoaxialCable
or cable to your
VCR ana your TV.
VCR Rear Panem
Connect a set o1 audio % " *_° "> '_° )
cables between Erie I_"_ @ QS__" "" ".....
AUDIO OUT jacks on _] _ _
lhe VCR and the
AUDIO INPUT JACKS
on [ne TV
Audio CabJe
TV Rear Panel
VCR Rear Panel
Connect an S- Jdeo
cable between me
S-_i IDEO OUT jack on
the VCR ana the
S-VIDEO INPUT jack
on the TV
$=Vide0 Cable
An S-video cable is usually included with fin S-VHS VCR.
(If not, check your local electronics store.)
4 Each extem/t input source device his l diiferent back panel conJigurition.
Connecting a DVI-D Cable
TV Rear Panel
Note:]if you are using a DVI-D cable to connect
I .Be sure to connect the audio cable (sold separately)as shown above to get normal TV sound.
2.See Appendix "Display Modes "lor supported resolutions.
3.The screen may hwe sbil_tedto the right or to the Ielt after connecting the cable.
The screen must be adjusted on the source(Set-top box}.
4.Each extern tI input source device has a difi'erent back panel configuration.
English- 13

]N STALLATION
Connecting aDVD Player
The rear panel jacks (m yore TV make it easy to com_ect a DVD player to your TV.
Connect a set of audio
canes between the
COMPONENT1 or
COMPONENT2 L, R
jacks on the TV and
tbe AUDIO OUT jacks
DVD PlayerRear Panel TV Rear Panel
" .......................
Audio CaNe
Connect a video cam e
between the
COMPONENT1 or
COMPONENT2
(Yi Pa, pa) jacks on
the ZV and the Y, Re,
Pa jacks on the DVD
player. ...........
Note: For tin explanation of Component video, see your DVD player owner's manua!.
4 Each extern/l input source dexice Ires a different back panel conliguration.
Connecting a Digital TV Set-Top Box
The co,mectio,_s tora typical set-top box are shown below.
!1 (:
Connect a set of aud!o
canes between the
L,R COMPONENT1
or COMPONENT2
AUD!Q iNPUT _acks
on the TV and the
TV Rear Panel
AUDIO OUT jacks on _ Audio CaNe
the SetrTop Box.
Connect a video cane
between the
COMPONENT1 o_
COMPONENT2
(Y, pe, p_)jacks on ....
the TV and the Y, Pe,
Pa jacks on the
Set-Top Box,
Note: For tin explanation of Component video, see your Set/l[k)p Box owner's manual.
4 Each extern xlinput source dexice has a different back panel conliguration.
English- 14

_N STALLATION
Connecting aPC
Note: This figure shows the Standard Connector-jack paneL.
The actuar configuration on your TV may be different.
-Connect the D- Sub cable to "PC (PC IN)" on the rear of your set.
- Connect the stereo audio cable to "AUDmO (PC RN)"on the rear of your set
and the other end to "Audio Out" of the sound card on your computer.
Englisl> 15
_N STALLATION
Please refer to ' Anynet AV Owner's Instructions' that is provided separately ibr the detailed
infbrmation on Anynet.
1.What is the Anynet?
Anynet is an AV network system that enMes you to easily control Samsung audio-video (AV)
devices from your through the Anynet menu via a Samsung TV.
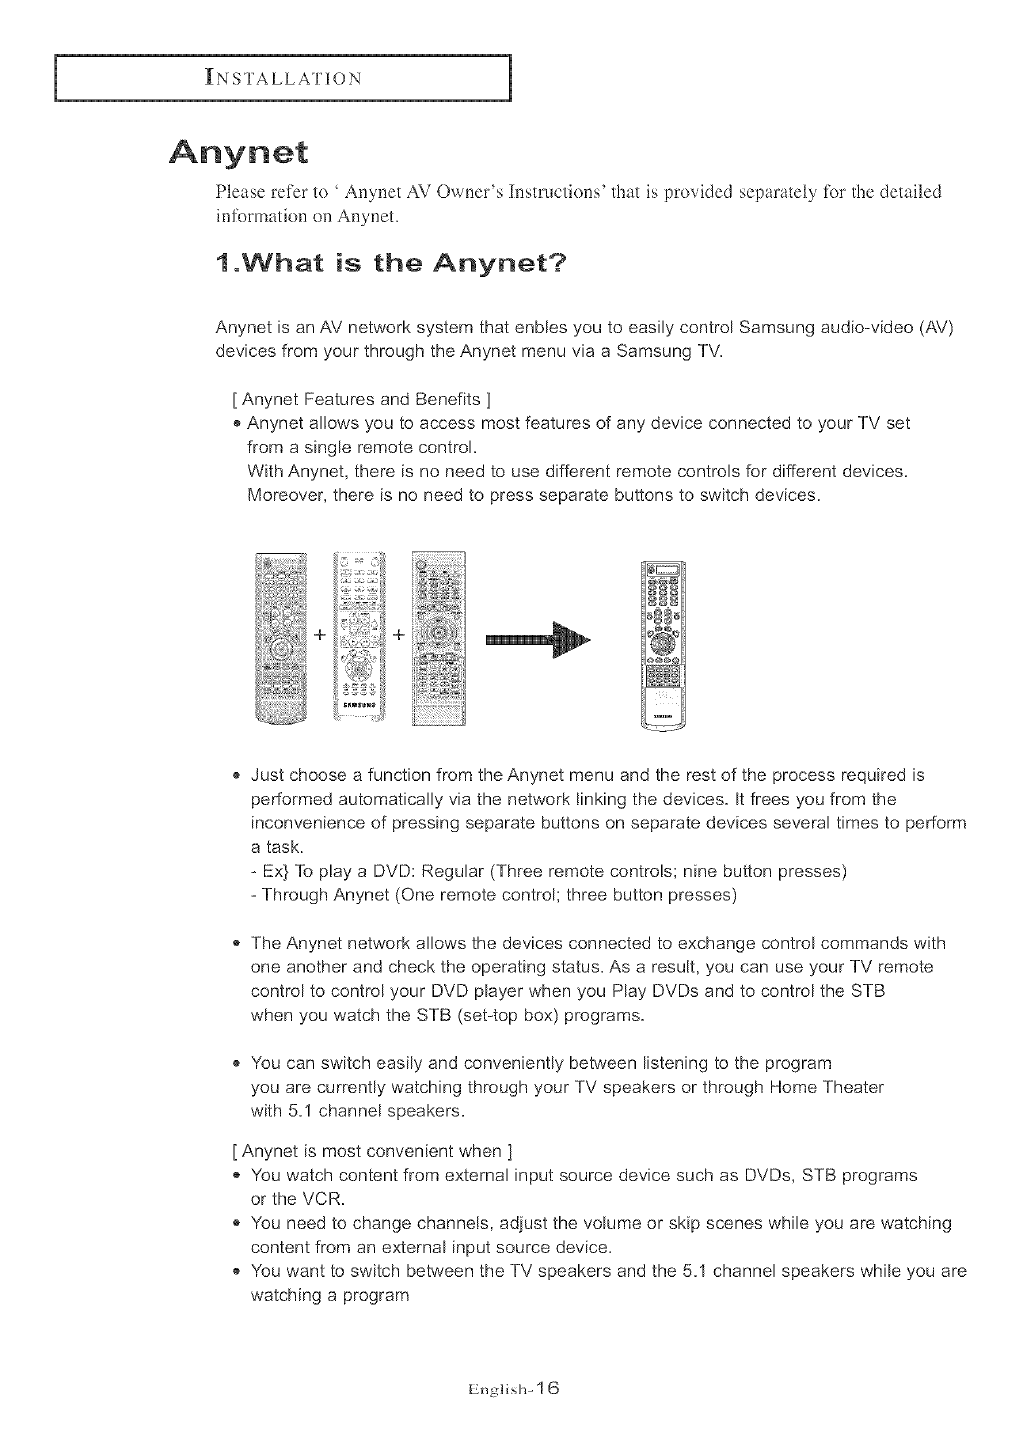
[ Anynet Features and Benefits ]
,, Anynet ar!ows you to access most features of any device connected to your TV set
from a single remote control.
With Anynet, there is no need to use different remote contrors for different devices.
Moreover, there is no need to press separate buttons to switch devices.
/+
f;
Just choose a function from the Anynet menu and the rest of the process required is
performed automatically via the network linking the devices. It frees you from the
inconvenience of pressing separate buttons on separate devices several times to perform
a task.
- Ex} To play a DVD: Regular (Three remote controls; nine button presses)
- Through Anynet (One remote control; three button presses)
The Anynet network allows the devices connected to exchange control commands with
one another and check the operating status. As a result, you can use your TV remote
control to contro! your DVD player when you Play DVDs and to control the STB
when you watch the STB (set-top box) programs.
,, You can switch easily and conveniently between listening to the program
you are currently watching through your TV speakers or through Home Theater
with 5.1 channel speakers.
[ Anynet is most convenient when ]
,, You watch content from external input source device such as DVDs, STB programs
or the VCR.
,, You need to change channels, adiust the volume or skip scenes while you are watching
content from an external input source device.
,, You want to switch between the TV speakers and the 5.1 channel speakers while you are
watching a program
English- 1 6
I _N STALLATION
2.Anynet
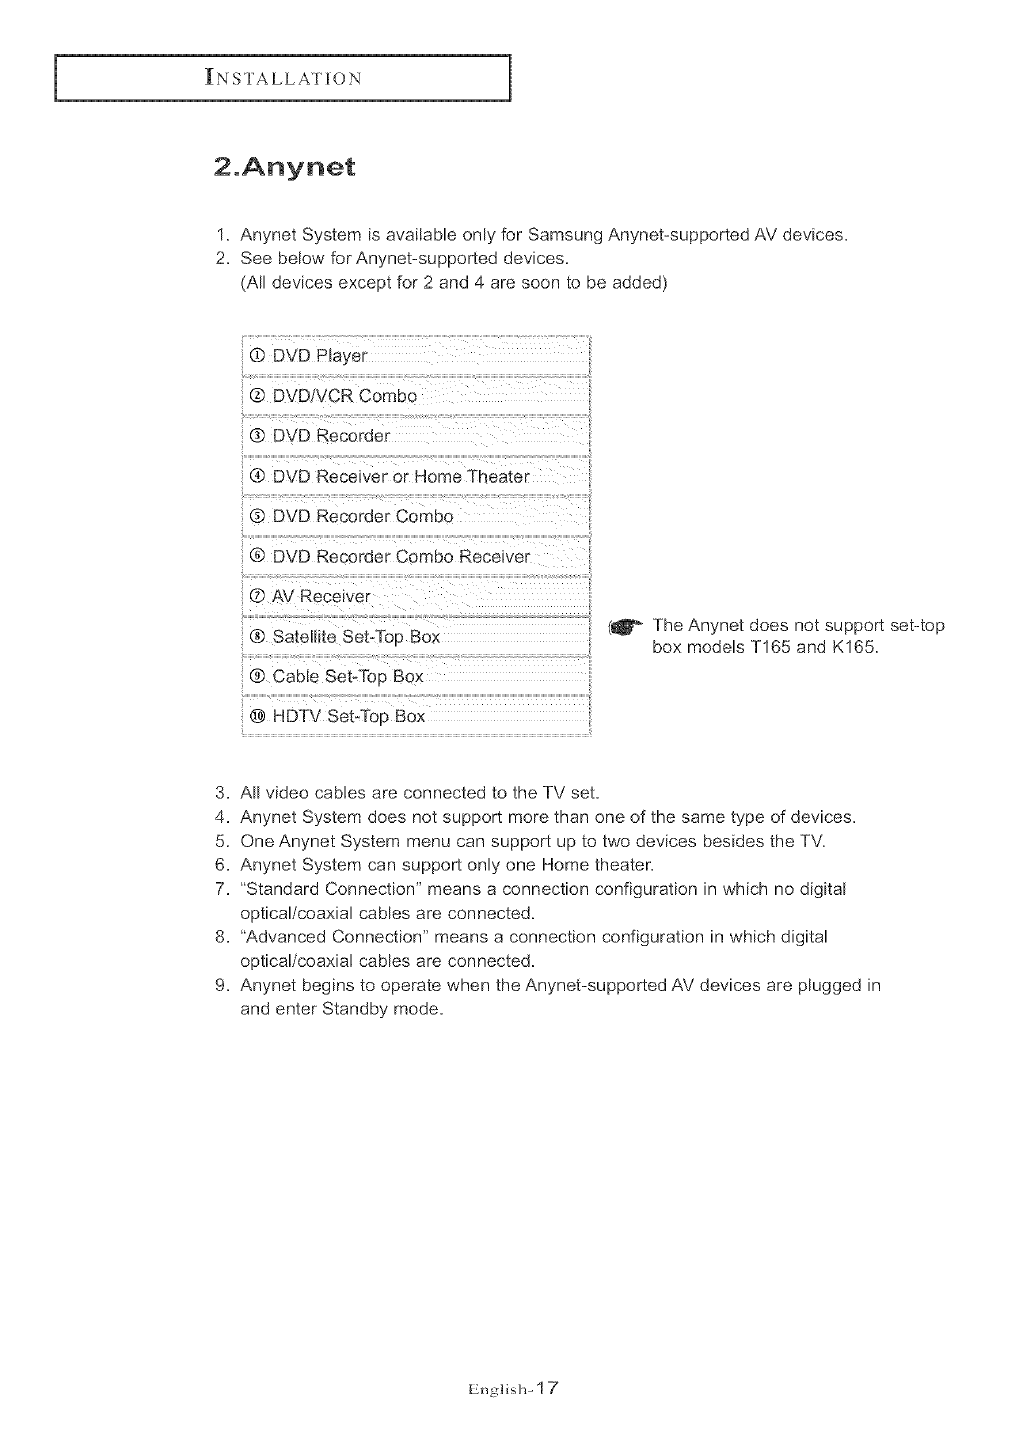
1. Anynet System is avaiEable only for Samsung Anynet-supported AV devices,
2, See below for Anynet-supported devices.
(All devices except for 2 and 4 are soon to be added)
® DVD Player
@ DVD/VCR Combo
® DVD Recoraer
® DVD Receiver or Home Theamr
@ DVD Recorder Combo
® DVD Recorder Combo Receiver
® AV Receiver
® Satellite SetoToo Box
® CaMe SebTop Box
@ HDTV Set-Too Box
(_ The Anynet does not support set-top
box models T165 and K165,
3, All video cabbs are connected to the TV set,
4, Anynet System does not support more than one of the same type of devices,
5. One Anynet System menu can support up to two devices besides the TV,
6, Anynet System can support only one Home theater.
7, "Standard Connection" means a connection configuration in which no digital
optical/coaxial cables are connected.
8, "Advanced Connection" means a connection configuration in which digital
optica!/coaxia! cables are connected,
9, Anynet begins to operate when the Anynet-supported AV devices are plugged in
and enter Standby mode,
English- 17
_N STALLATION
3° Connecting TV + DVD/VCR Combo:
Connecting AV Signal Cables
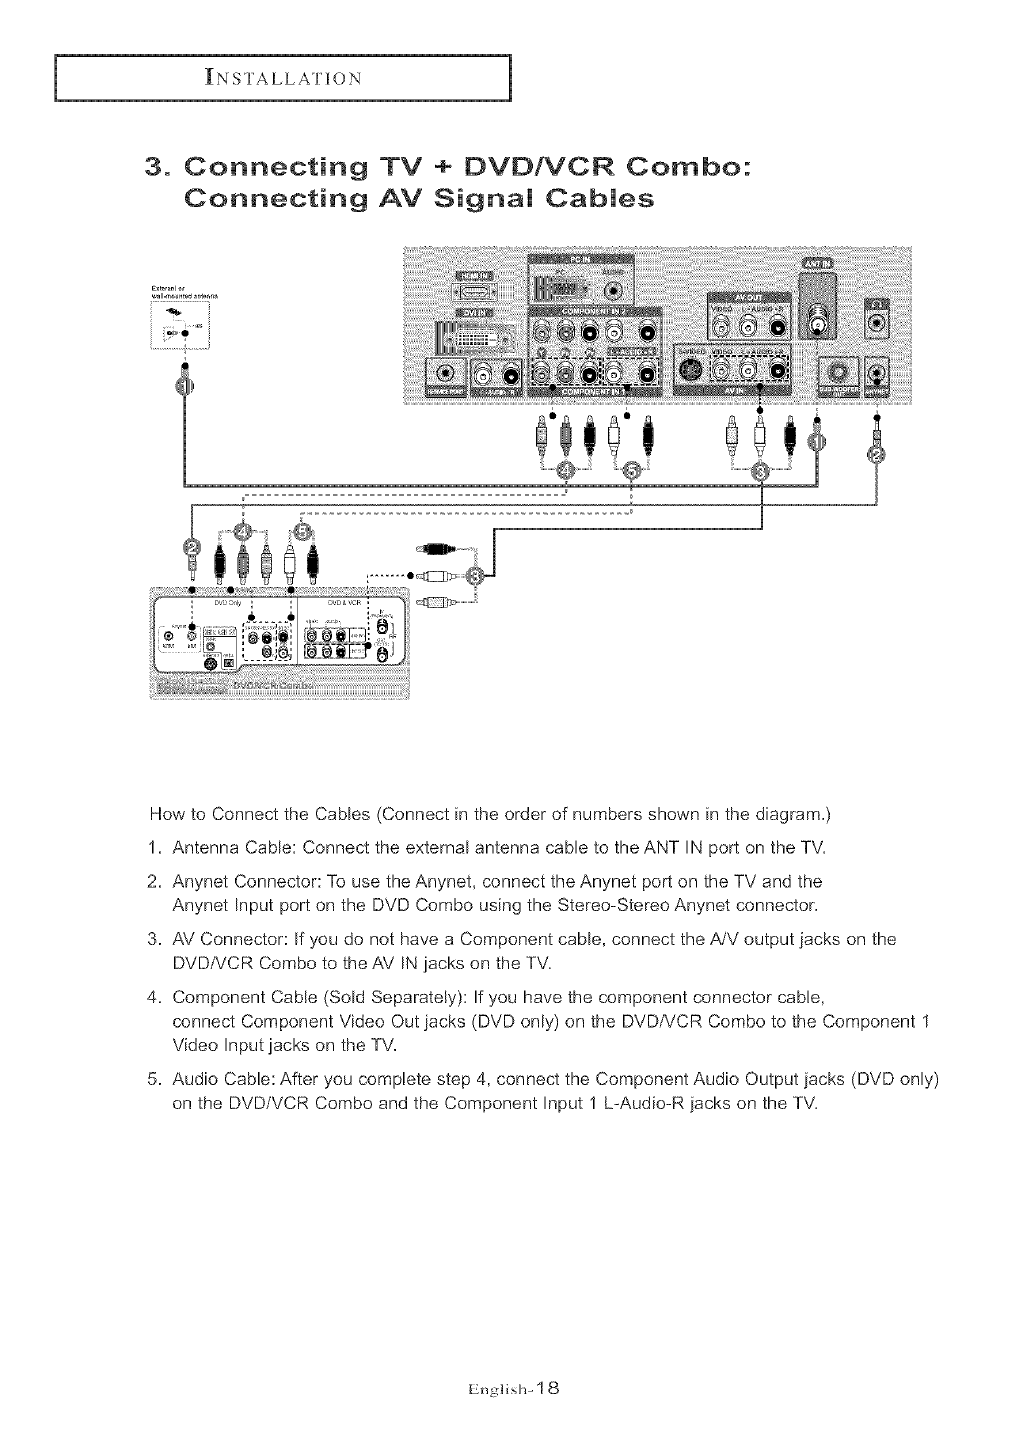
How to Connect the Cables (Connect in the order of numbers shown in the diagram.)
1. Antenna Cable: Connect the external antenna cable to the ANT IN port on the TV.
2. Anynet Connector: To use the Anynet, connect the Anynet port on the TV and the
Anynet Input port on the DVD Combo using the Stereo-Stereo Anynet connector.
3. AV Connector: rf you do not have a Component cable, connect the A/V output jacks on the
DVD/VCR Combo to the AV IN jacks on the TV.
4. Component CaMe (SoM Separately): If you have the component connector cable,
connect Component Video Out jacks (DVD only) on the DVD/VCR Combo to the Component 1
Video Input jacks on the TV.
5. Audio CabLe: After you compEete step 4, connect the Component Audio Output jacks (DVD only)
on the DVD/VCR Combo and the Component Input 1 L-Audio-R jacks on the TV.
English- 1 8
IN STALLATION
4. Connecting TV + DVD Receiver:
Connecting AV Signal Cables
i_,e,
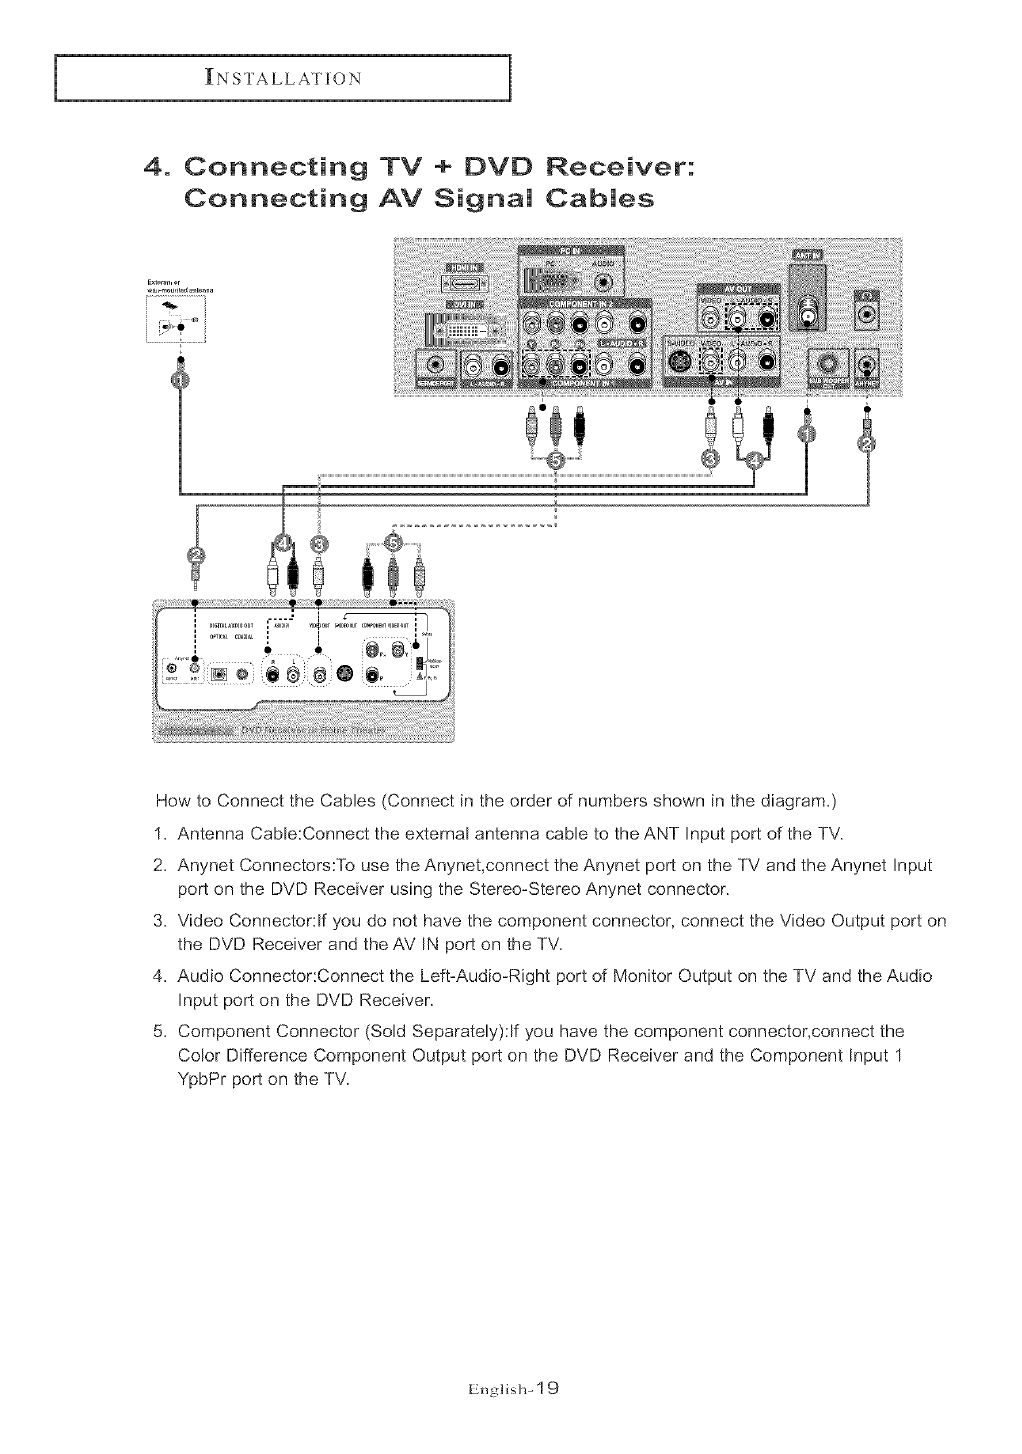
How to Connect the Cables (Connect in the order of numbers shown in the diagram.)
1. Antenna Cable:Connect the external antenna cable to the ANT Input port of the TV.
2. Anynet Connectors:To use the Anynet,connect the Anynet port on the TV and the Anynet Input
port on the DVD Receiver using the Stereo-Stereo Anynet connector.
3. Video Connector:If you do not have the component connector, connect the Video Output port on
the DVD Receiver and the AV IN port on the TV.
4. Audio Connector:Connect the Left-Audio-Right port of Monitor Output on the TV and the Audio
Input port on the DVD Receiver.
5. Component Connector (Sold Separately):lf you have the component connector,connect the
Color Difference Component Output port on the DVD Receiver and the Component Input 1
YpbPr port on the TV.
English- 19
IN STALLATION
5° Connecting TV +DVD Combo + DVD Receiver:
Connecting AV Signa[ Cab[es
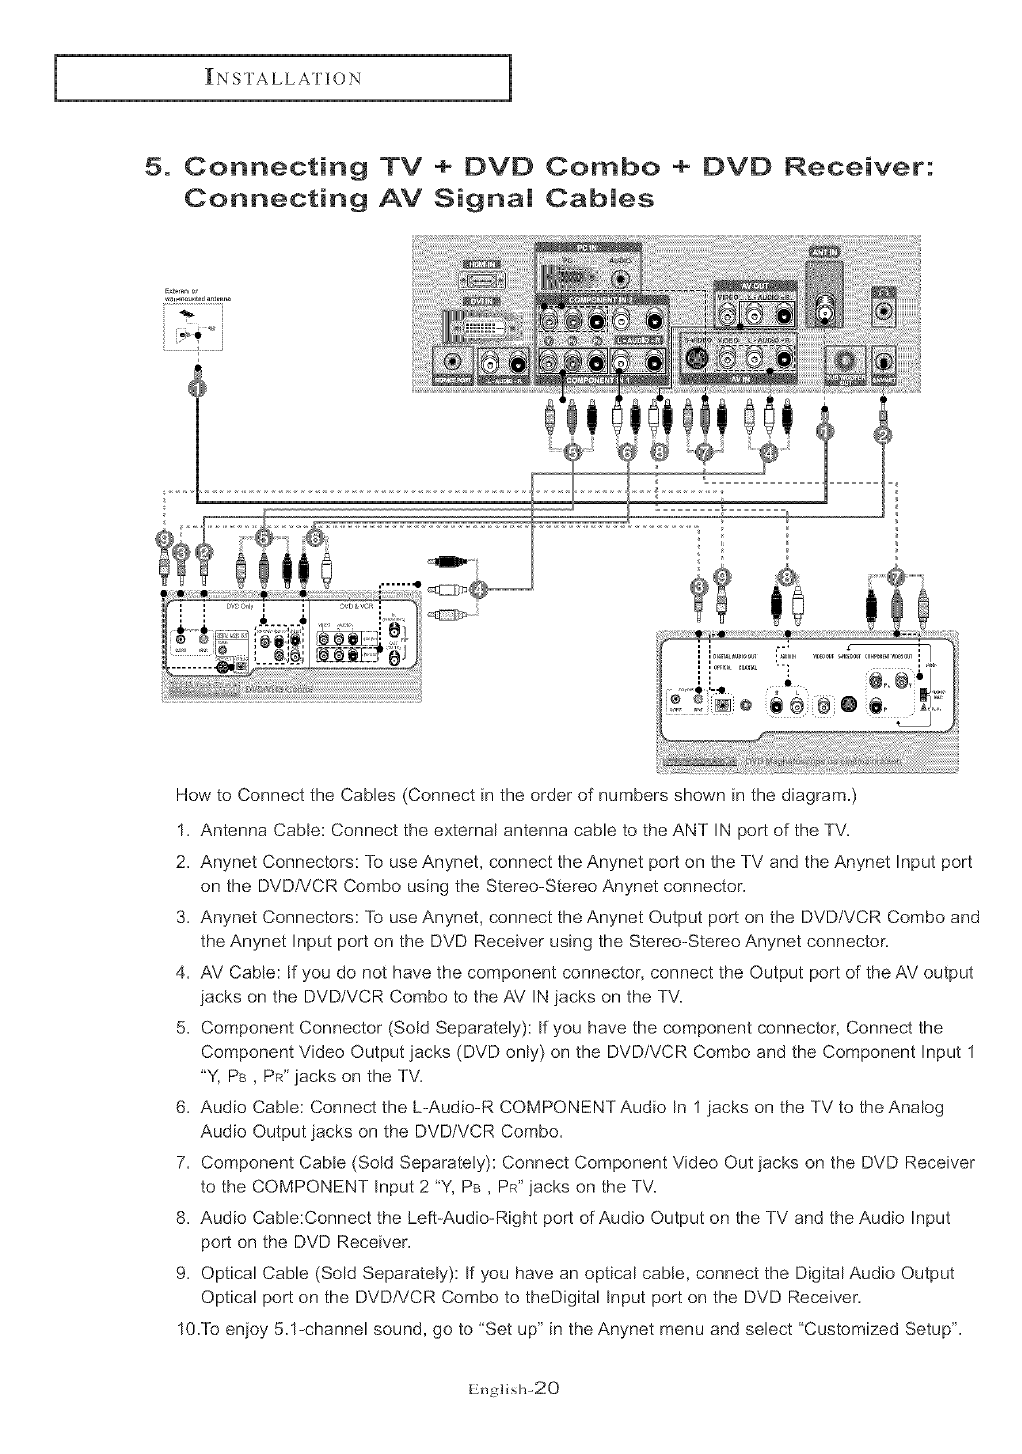
How to Connect the Cables (Connect in the order of numbers shown in the diagram.)
1. Antenna Cable: Connect the external antenna cable to the ANT IN port of the TV.
2. Anynet Connectors: To use Anynet, connect the Anynet port on the TV and the Anynet Input port
on the DVD/VCR Combo using the Stereo-Stereo Anynet connector.
3. Anynet Connectors: To use Anynet, connect the Anynet Output port on the DVD/VCR Combo and
the Anynet Input port on the DVD Receiver using the Stereo-Stereo Anynet connector.
4. AV Cable: If you do not have the component connector, connect the Output port of the AV output
jacks on the DVD/VCR Combo to the AV IN jacks on the TV.
5. Component Connector (Sold Separately): If you have the component connector, Connect the
Component Video Output jacks (DVD only) on the DVD/VCR Combo and the Component Input 1
"Y, PB , DR"jacks on the TV.
6. Audio Cable: Connect the L-Audio-R COMPONENT Audio In 1 jacks on the TV to the Analog
Audio Output jacks on the DVD/VCR Combo.
7. Component Cable (Sold Separately): Connect Component Video Out jacks on the DVD Receiver
to the COMPONENT Input 2 "Y, PB ,PR"iacks on the TV.
8. Audio Cable:Connect the Left-Audio-Right port of Audio Output on the TV and the Audio Input
port on the DVD Receiver.
9. Optical Cable (Sold Separately): If you have an optical cable, connect the Digital Audio Output
Optical port on the DVD/VCR Combo to theDigital Input port on the DVD Receiver.
10.To enjoy 5.1-channel sound, go to "Set up" in the Anynet menu and select "Customized Setup".
English-20

OPERATION
Turning the TV On and Off
Press the POWER button.
You can also use the Power button on the front panel.
Changing Channels
Using the Channel Buttons
Press the CH A /V buttons to change channels.
When you press the CH A /v butto!_s, the TV changes channels in sequence.
YOUwill see all the chamlels that the TV hits memorized. (The TV must have
memorized at least three channels). You will eet see channels that were effher
erased or eet memorized.
Using the PRE=CH Button to select the Previous Channel
Press the PRE.CH button.
The TV wi!l switch to the last channel viewed.
_]o q_._ickly switch between twe channels that are t_tr apart, tune to o_e chan_-_el,
then use the number buttol_ to select the second channel. Then use the PRE-CH
button to quicMy akernate between them.
Adjusting the Volume
Using Mute
At any time, you can temporarily cut off the sound using the Mute button.
Press MUTE and the sound cuts
The word
the _owerqeft corner of the screen.
To turn mute off, press the MUTE button again, or simply
press the VOL ÷/- buttons.
English-21
OPERATION
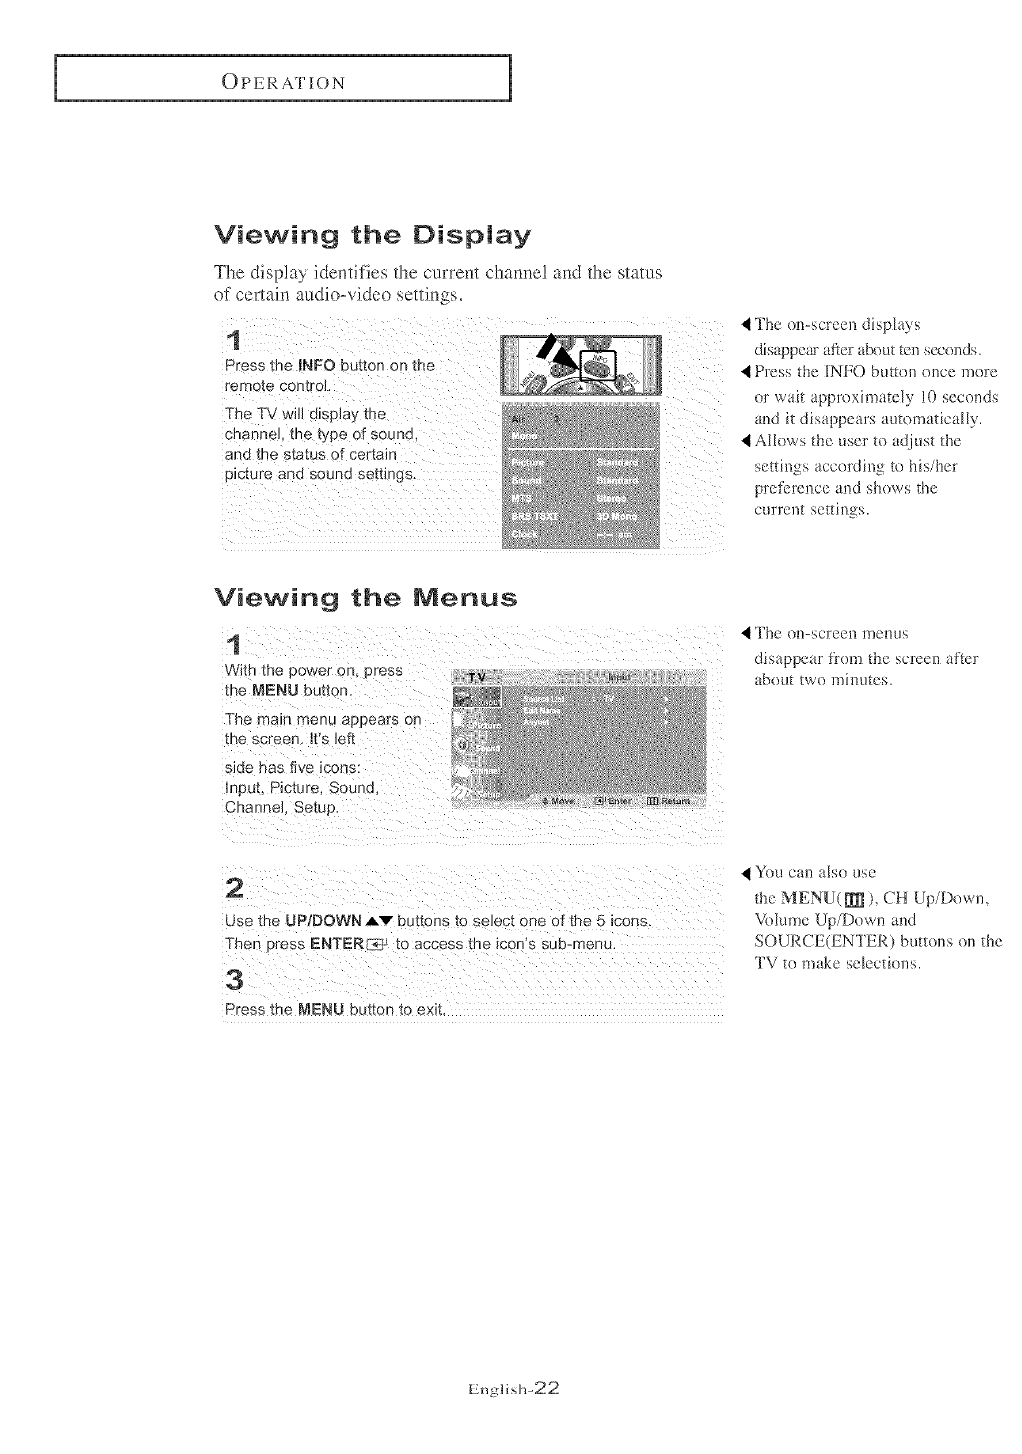
Viewing the Display
The display identifies the current channe! and the status
of certain audio-video settings.
Press the mNFObutton on the
channel the type of sound
and the status of certain
Pic!ure and sound settings.
Viewing the Menus
1
With the Dower on. Dress
[he MENU butter
The rr ale menu appears or
me screen. It's left
side nas five mons:
_nput Picture. Sound
Channel. Setup.
The on-screen displays
disappegH"aRer about ten seconds.
Press the [NFO button once ruore
or wait approximately 10 seconds
and it disappears uutetl_atically.
Allows the user te adjust tbe
settings according to his/her
preference and shows the
current setthlgs.
]_be on-screell ulenus
disappear fl'om the screen after
about two minutes.
2
Use me UP/IDOWN _V buttons to salect:, one of the 5 icons
Then ")tess ENTER _ _o access the men's sub-menu.
:3
Press the NENU button to exit.
You canalsouse
the MENU(R_ ), CH Up/Down,
Volume Up/Down and
SOURCE(ENTER) buttons on the
TV to make selections.
Englisl>22
Setting Up Your Remote Control
A_tier it hits been set up properly,, your remote control can operate in five different modes:
TV, VCR, Cable, DVD or Samsung Set-top box. Pressing tile corresponding button on tile
remote control allows you to switch between these modes, and control whichever piece of
equipment you choose_
Note
The remote control might not be compatible with a!! DVD Players, VCRs and Cable boxes.
This remote control is only compatible with Samsung Set-top boxes.
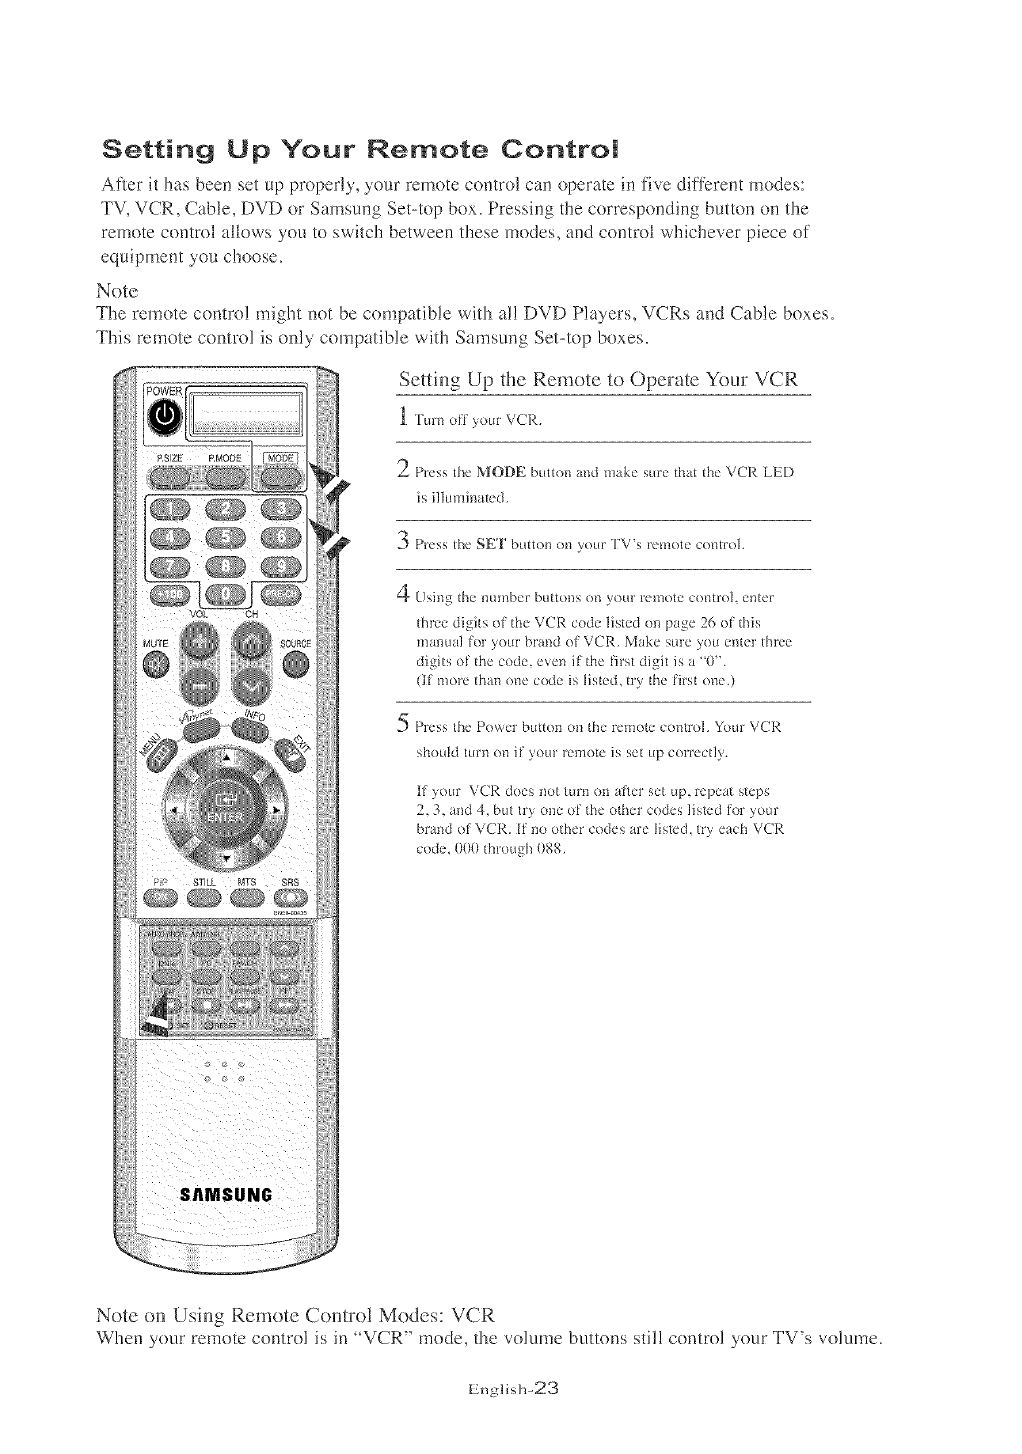
Setting Up the Remote to Operate Your VCR
I Turr_ oH your VCR.
2Press the MODE button and make sure that the VCR LED
is illuminated.
3 Press the SET button on your TV's remote control.
4 Using the n_mber b_ttons on your remote control, enter
three digits of the VCR code listed on page 26 of this
manual for your brand of VCR. Make sure you enter three
digits of the code, even if the Hrst digit is a '0".
(If more than one code is listed, try the firt one.)
5 Press the Power button on the remote control. Your VCR
should turn on if your remote is set up correctly.
If your VCR does *lot turn on a_ier set up, repeat steps
2, 3, and 4, but try one of the otller codes listed for your
brand of VCR. if no othel codes are lismd, t_y each VCR
code. 000 through 088,
Note on Using Remote Control Modes: VCR
When your remote control is in ' VCR" mode, the volume buttons stil! control your TV's volume,
English-23
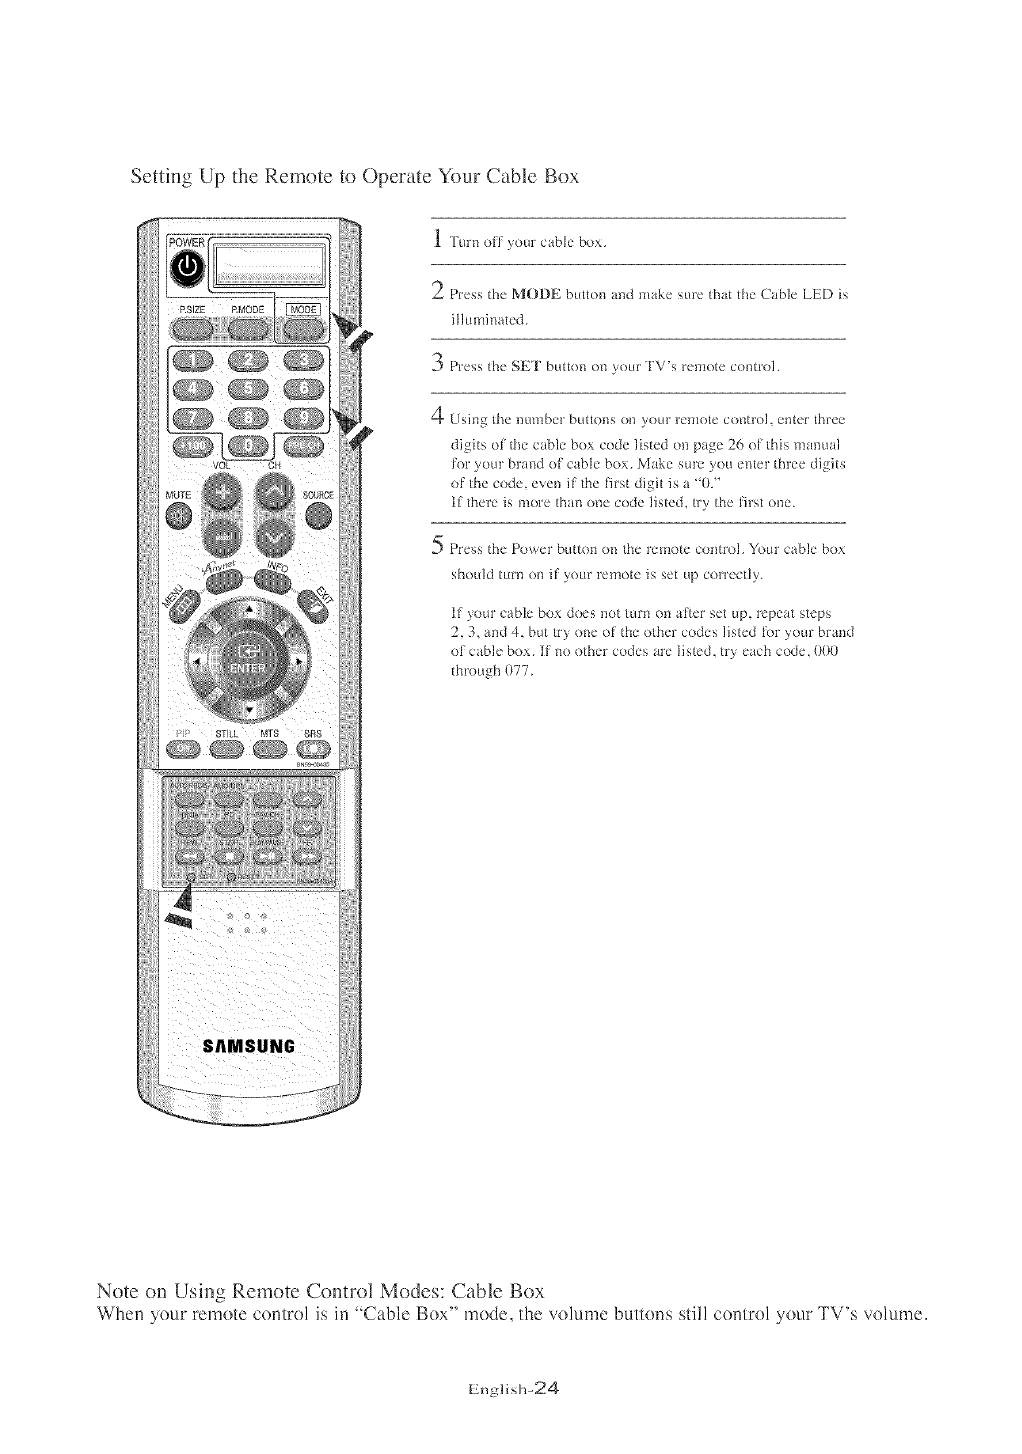
Setting Up the Remote to Operate Your Cable Box
1 Turn oil your ctble box.
2Press the MODE button and make sure that the Cable LED is
illuminated.
3 Press the SET button on your TV's remote control,
4 Usi_g the n_nnber buttons on your remote c<mtrol, er_tc'rthree
digits of the cable box code listed on page 26 of this manual
for your brand of cable box, Make sure you enter three digits
of the code, even if the t_rst digit is a '0.'
If there is more than one code listed, uy the J_rst one,
5 Press the Power button on the remote control, Your cable box
should turn on if yore remote is set up correctly,
If your cable box does not turn on atter set up, repeat steps
2, 3, and 4, but try one of the other codes listed tbr your brand
of cable box. If no othel codes are listed, t_y each code. 000
through 077,
Note on Using Remote Control Modes: Cable Box
When your remote control is in 'Cable Box" mode, the volume buttons still control your TV's volume,
English-24
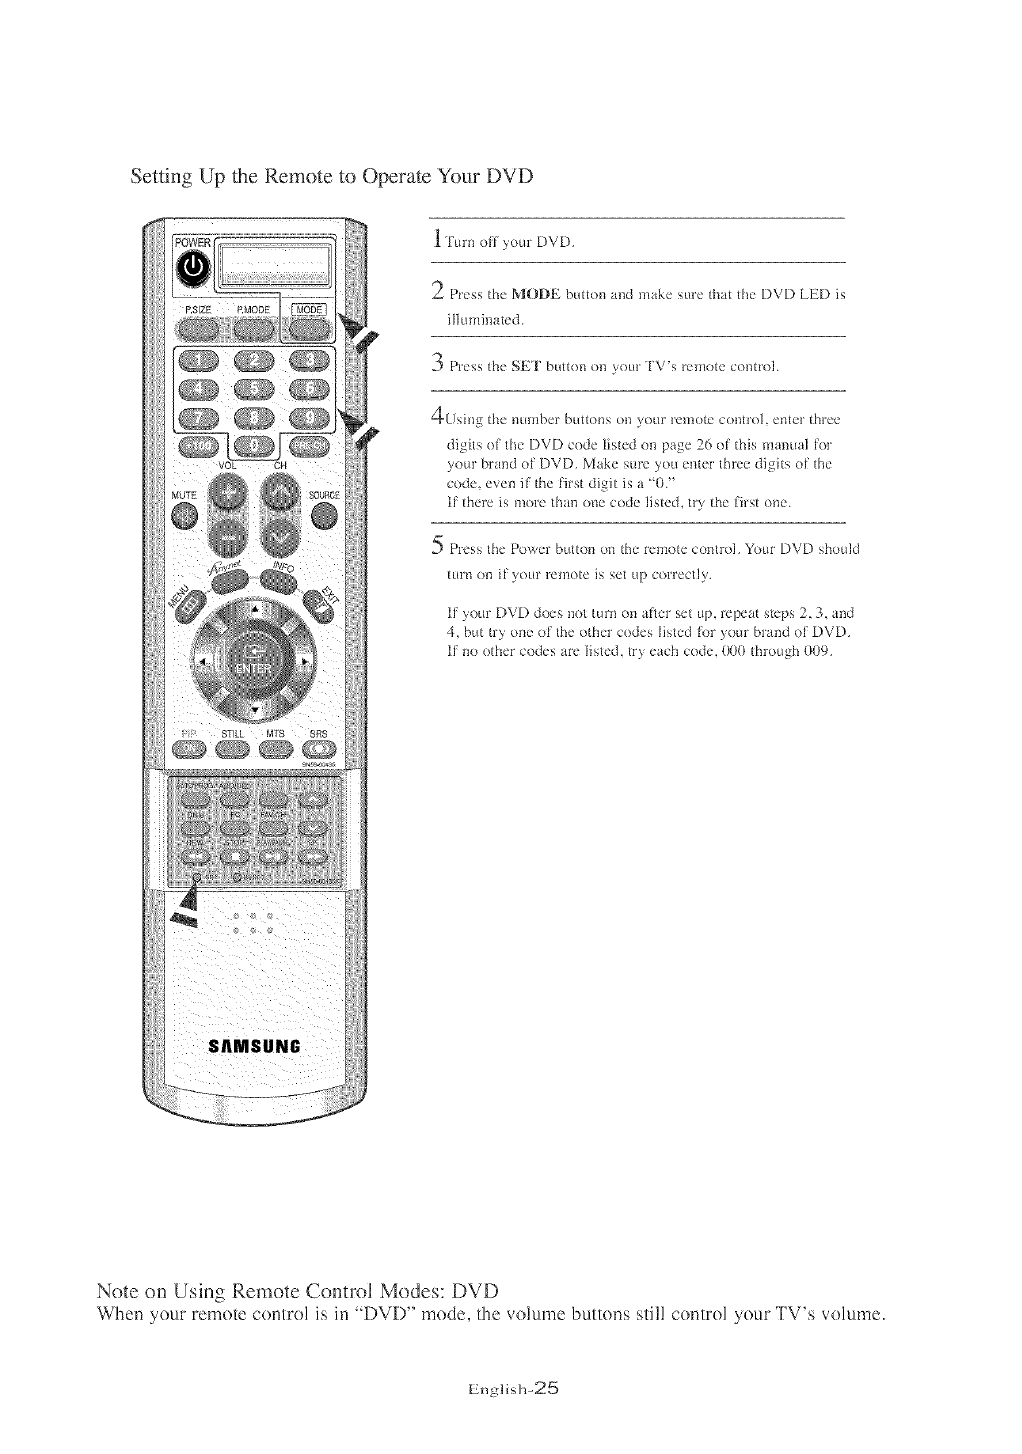
Setting Up the Remote to Operate Your DVD
VOL CH
1 Turn off your DVD.
2P,,,ss the MODE button a_ld make sure that the DVD LEE) is
illumi_mted.
3 Press the SET button on your TV's remote control,
[_)sirlgthe _L{mber buttol_s on youF Feli']ote control, ef_ter three
digits ol the DVD code listed (m page 20 ol this :iqamml k;r
your brand of DVD. Make sm'e you emer three digits oJ the
code. e_ml it the First digit is a _()?'
lJ there is more thm_ o_e code listed, try the Jirst ol_e.
pl-ess the Power button (m the remote control, YOLIF DVD should
t{ll_t_ot_ i[)'oLir 1-el_()te is set L_[)correctly,
IJ your DVD d(_s not turn on alter set up, repeat step>,2, 3_ and
4, but try o_le of the other codes listed R)r yore"brand of DVD.
II _o other codes are listed, try each code. (}0(}through 009.
Note on Using Remote Control Modes: DVD
When your remote comro] is in "I)VD" mode, the volume buttons sti!l comrol your TV's volume.
English-25

Remote Control Codes
VCR Codes
Admiral 015,088
Aiwa 024
Audio Dynamics 022,025
Akai 026031032
Bell&Howell 011
Broksonic 019
Candle 016,018,022,054,055061
Canon 017,062
Citizen 016,018,022,054,055,061
Colortyme 023
Craig 016,021
Cur6s-Mathes 009,016,017,023,024,055,062,073,076
Daewoo 003004005 008007008022054,085
kenwood
KLH
LG
Lloyd
_ogik
LXI
Magnavox
Marantz
Vlarta
MEI
Memorex
MGA
_lidland
011,023,025,039,055
082
001,002,007
024
040
024
017,038,062,065
011,017,023,025,038,039,055,070
DB 025,023 Minota
Dimensia 009 Mitsubishi
Dynatech 024 Montgomery ward
Electrohome 036 MTC 016,024
Emerson 017,018,019,022,024,029,032,036,%3, Mul6tech 016.024,040041
050,051,056,058066071074076077079 ',IEC 011,023,025,039,055,070073
Fisher 011,021,027,028,052,057,067Optimus 015
Funai 024 Panasonic 017 062 084,086
RCA 009,014,016,017,037,044,046,063,078
Samsung 000,016,022,031,041,051
Sansui 025
Sanyo 011,021
Scott 022,050,058,077
Sears 011,014,018,021,027,028,044,052,057
Sharp 015036,048,054
Shintom 026,035,040,064
Signature 024
Sony 026,035,047
Sylvania 017,024,038,062,065
Symphonic 024
Tandy 011,024
Tashiko
"latung 039
lbac 024,039,078
Technics
lemika
Teknika 018,030
TMK 076
Toshiba 014,022,028,057,058
GE
Go Video 016
Goldstar 018,023,055,069
General Electric 009,016,017,041,062
Harman Kardon 023
Hitach 014,024,044,045
Instant Replay 017
JC Penny
JCL
JVC
Pentax
_entex Reserch+
_hilco
Philips
_ioneer
iPortland
ProScan
011014 016017023,025,039044060062 Quartz
011,017,023,025,039,055Quasar
Radio Shack/Realistics
014,044
055
017,038,062,065
017,038
014,025,042,059
053,054,061
009
011
017,053
011,015,017,018,021,
024,028,036,052,062
lbshiko
]btevision
Unitech
Vector Research
Victor
Video Concepts
Videosonic
Wards
'Yamaha
Zenith
018
016,018
Cable Box Codes
Anvision
Cable star
DeaRyung
DongKuk
DaeHan
Eagle
Eastrm Int,
Eastern International
GenerN Instrument
GI
015,016
015,016
003
004
005
015,016
Hamlin
Hitachi 0d5,051,054
Jerrold 012,013,023,031,032,033,038,0d4,05t 070,073
LG 006
Macom 045,051
Magnavox 015016027029034036937040041048049
',lawoo 001
\ISC 017
Oak 024,046
Osk Sigma 024
_anasonic 011,035,047,069
020 Philips 015,016,027,029,034,0%,037,0d0,041,048,049
SAEWOO 007
Signature 054
Sprucer 035
Starcom 054
Stargate 2000 066
Sylvania 019,067
TaePyungYang 002
Texscan 019,067
054 Pioneer
012,013,023,031,032,Randtek
033,038,044,075076,077 RCA
011,012,020,021,042,056Regal
Regency
SA
Samsung
026,028,052
015,016
008,035,074
011,020,021
010,04I
000,011,030,052,071,072
]ocom 025,029,057,058,063
Unika 039,040,049
Universal 059,060
Viewstar 015016027029034036037040,041048049
Warner Amex 052
Zenith 022,050,065,069
DVD Codes
CurtisMathes
JVC
LG
Philips
Proscan
RCA
009 ]bshiba
003 Panasonic
001 iSony
007 iSamsung
008 iSharp
008
002
006
004
0%
005
English-26
SPECIALFEATURES
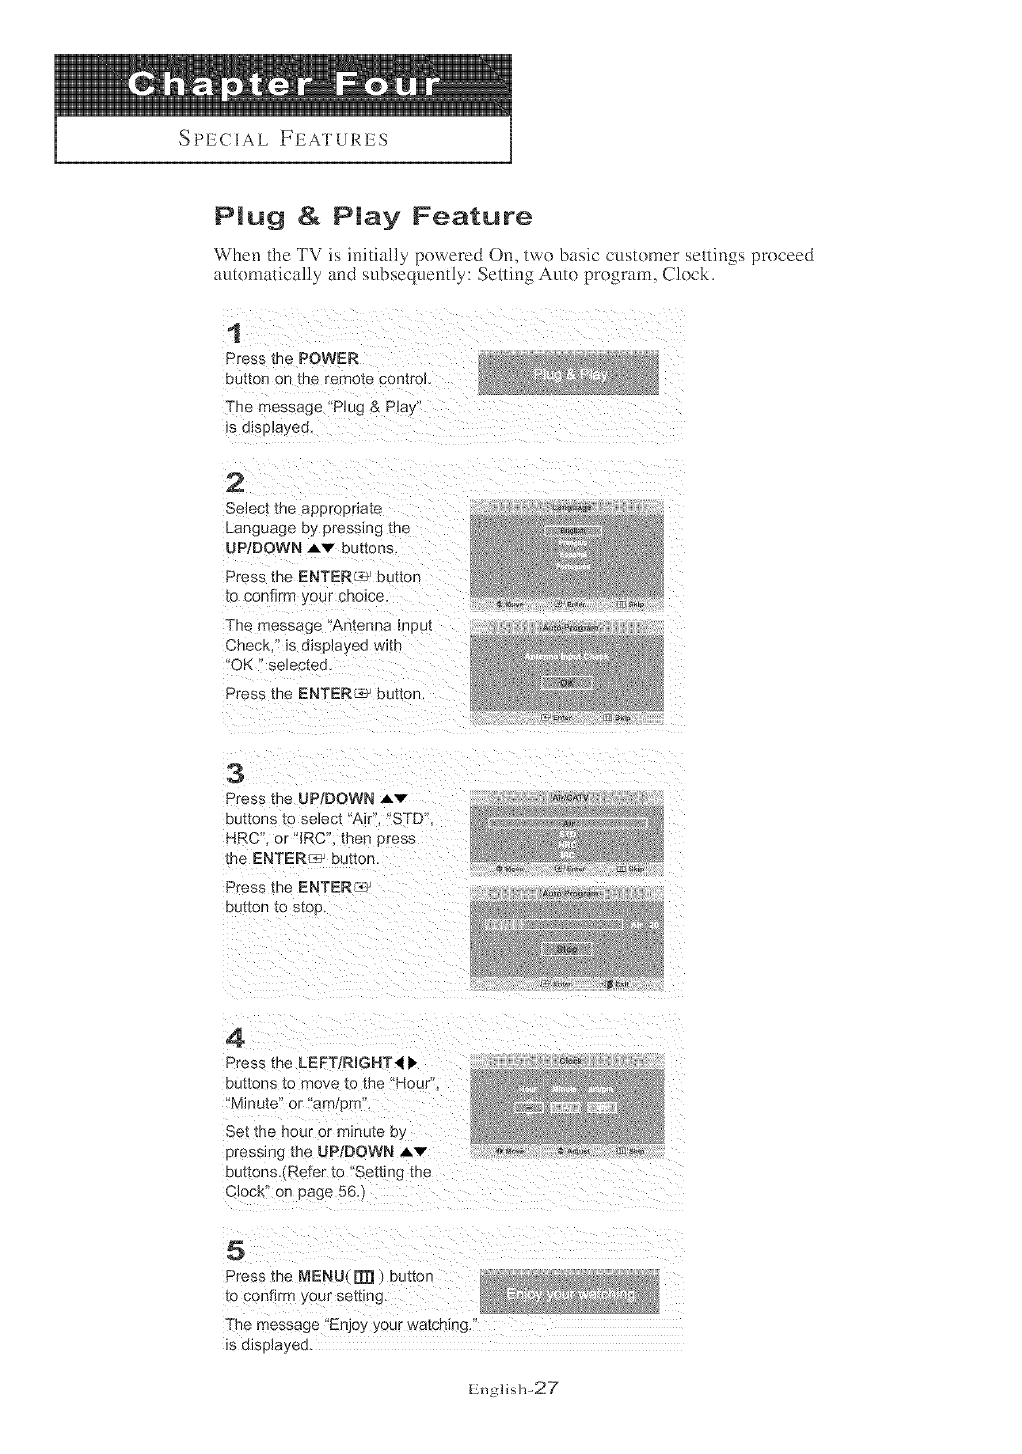
PMug &Play Feature
When the TV is initially powered On, two basic cnstomer settings proceed
automatically and subsequently: Setting Anto program, Clock.
1
Press the POWER
button on _:ee remote control,
The message "Plug & Pla,
is displayeD.
2
Select me appropriate
Language o /pressing me
UPtDOWN .Av buttons
Press the ENTER _' button
to confirm ,.our CROlCe
The message Antenna Input
Check/' is dise_aved w_th
OK " selc:cted.
Press [r _ ENTER_ _button
3
Press the UP/DOWN ,_v
buttons to select "Air". "STD".
NRC" or "IRC". then Dress
the ENTER ._._ button,
Press the ENTER_
button to stop.
_rI_CATV
4
Press me LEFTtRIGHTI _,
buttons _o move to the 'Hour'
"Minute" or am/oft
Set me Dour or minute b)
pressing the UPtDOWN Av
Dtmons.tReler to '*Setting the
Clock" on page 56A
5
Press the MENU(m:I button
to confirm your sethng.
The message 'Enjoy your watching
is displayea.
English-27
OPERATION
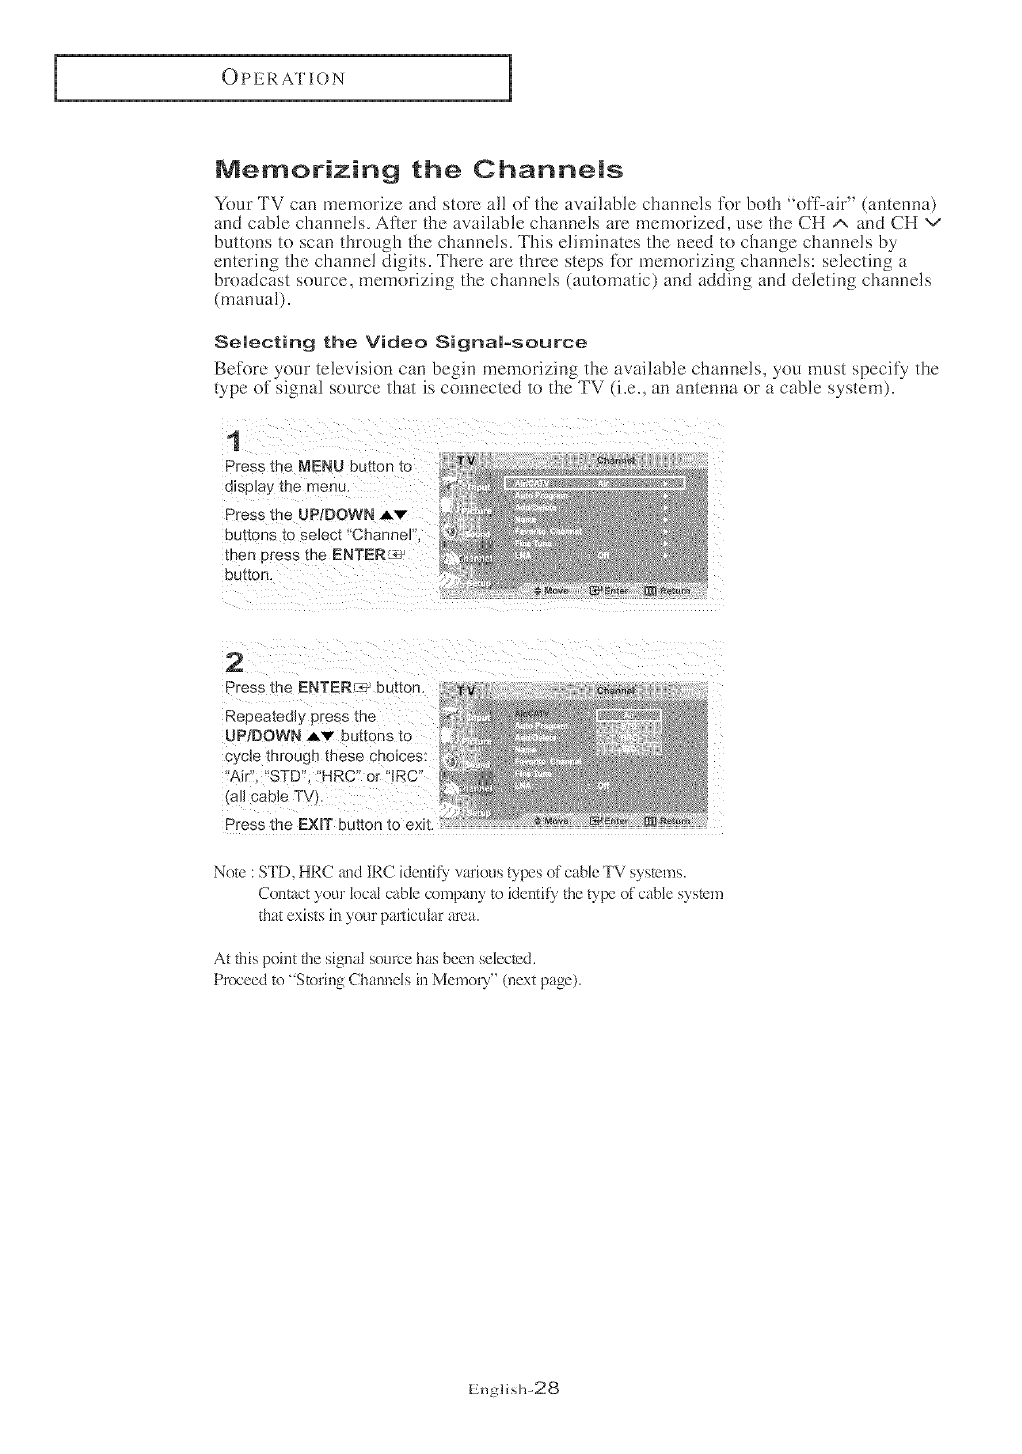
Memorizing the Channels
Your TV can memorize and store a]! of the available channels for both 'off-air" (antenna)
and cable channels. After the available channels are memorized, use the CH ^ and CH v
buttons to scan through the channels. This eliminates the need to change channels by
entering the channel digits. There are three steps for memorizing channels: selecting a
broadcast source, memorizing the channels (automatic) and adding and deleting channels
(manua!).
Selecting the Video Signamosource
Before your television can begin memorizing the available channels, you must specify flte
b'pe of signal source that is counected to the TV (i.e., an antenna or a cable system).
1
Press the MENU buRon to
display tr _ menu.
Press the UPtDOWN Av
Buttons to select "Channel
men _ress the ENTERs'
DUttOn.
_h_]_
2
Press the ENTERr_ button.
Repeatedly press me
UPtDOWN Av buttons to
cvc_e mrougn these choices:
"Air""STD"."HRC"or "IRC
all cable TVL
Press the EXIT button to exit.
Note : STD, HRC _mdIRC identity,'various b,'pes of cable TV systems.
Cn]lt_tctyour lncal cable company to identify the t3'tyeof cable system
that exists hi your palX[culararea.
At tiffspei_t the signal source has been selected.
Pr_.'eed to "Storillg Channels in Memou" (next page).
Englis]>28
0 PE114.ATI0N
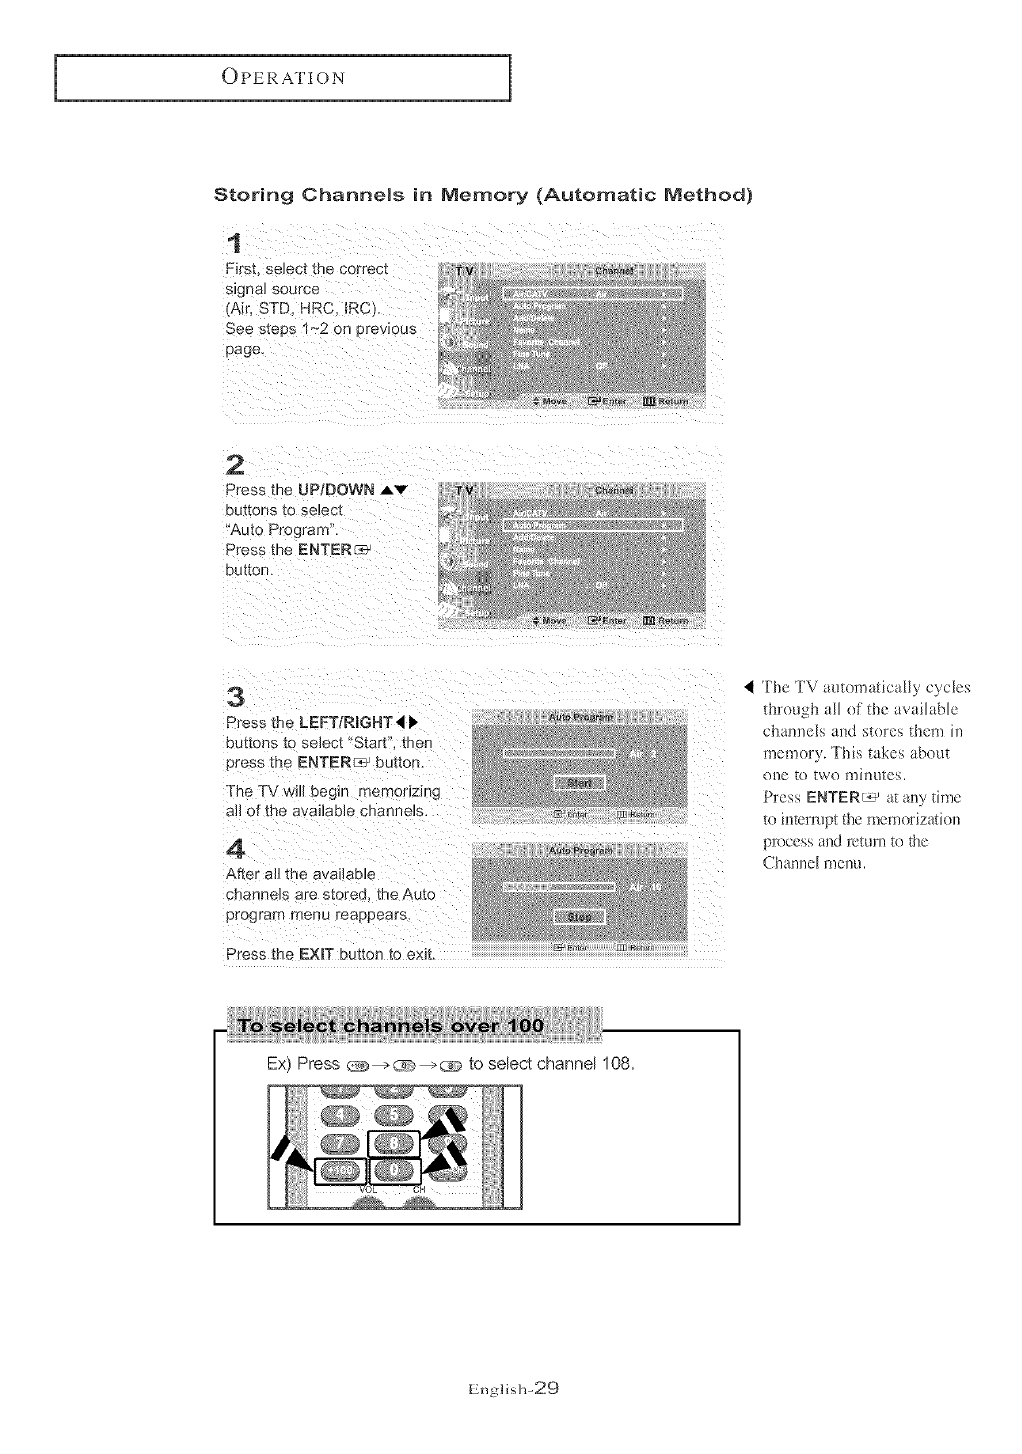
Storing Channels in Memory (Automatic Method)
1
First, selec[ me c0rrecl
signal sou FC6,
Air. STD. HRC, _RC).
See stees 1~2 on erewous
page
2
Press the UP/DOWN Av
buttons }:oselect
"Auto Program'
Press the ENTER_
DuKon,
3
Press tl"e LEFT/RmGHT4 ),
buttons to select 'Start". ther-
Dress the ENTER_ _ h Jttoo.
The TV will Degin memonzJng
all of me a !affable channels.
4
After a]_tr_e avm ame
channels are stored me,_u[o
program menu reappears.
Press the EXIT button to emt
Z_R_um
The TV automatically cycles
through all of the available
charnels and stores them in
memory. This takes about
one to two minmes.
Press ENTER_ at any time
to i]_termpt the memorization
process and return to the
Channel menu.
Ex) Press __)_-->_:> to select channel 108,
English-29

OPERATION
Adding and Erasing Channems (Manuam Method)
Use the number buttons to oJrecuy
select the channel to Add or Delete.
Press Ihe MENU button to
display me menu.
Press me UPIDOWN Av buttons € _o_e r,_._ _ _:_.,,
[o select "Channel". men Dress
me ENTER_ _button,
Press the UP/DOWN Av buttons
[o select "Add/Delete'.
Press [n_::ENTER_ r)tmon.
Press the ENTERC_ to select
"Add" or "Delete tpressmg
ENTERF_q: toggles between the
[WO _,
Press the EXmTbutton to exit.
Alternate method:
Use the number buttons to dFectlv select the channeJ (hat wdl be added o_
erased. Press the "ADD/DEL" button.
J
Repeatedly pressing ENTERIc3 w_Halternate between "Add"and"DeJe[e
Press the EXmTbutton to ex{t.
You can view any cham_el (iDch/ding an erased CtmDDCJ) by USiDg _hc mm]bcr
bum)]> on the ]-c111etecontyol,
Labeling Channels
to select 'Channel", then press
the ENTER_ button.
Press the UP/DOWN Av buttons
Press the UP/DOWN _v buttons
You can assign a name to a channel.
Repeat this procedure to enter up to
Press the EXmTbutton to exit.
English-30
OPERATION
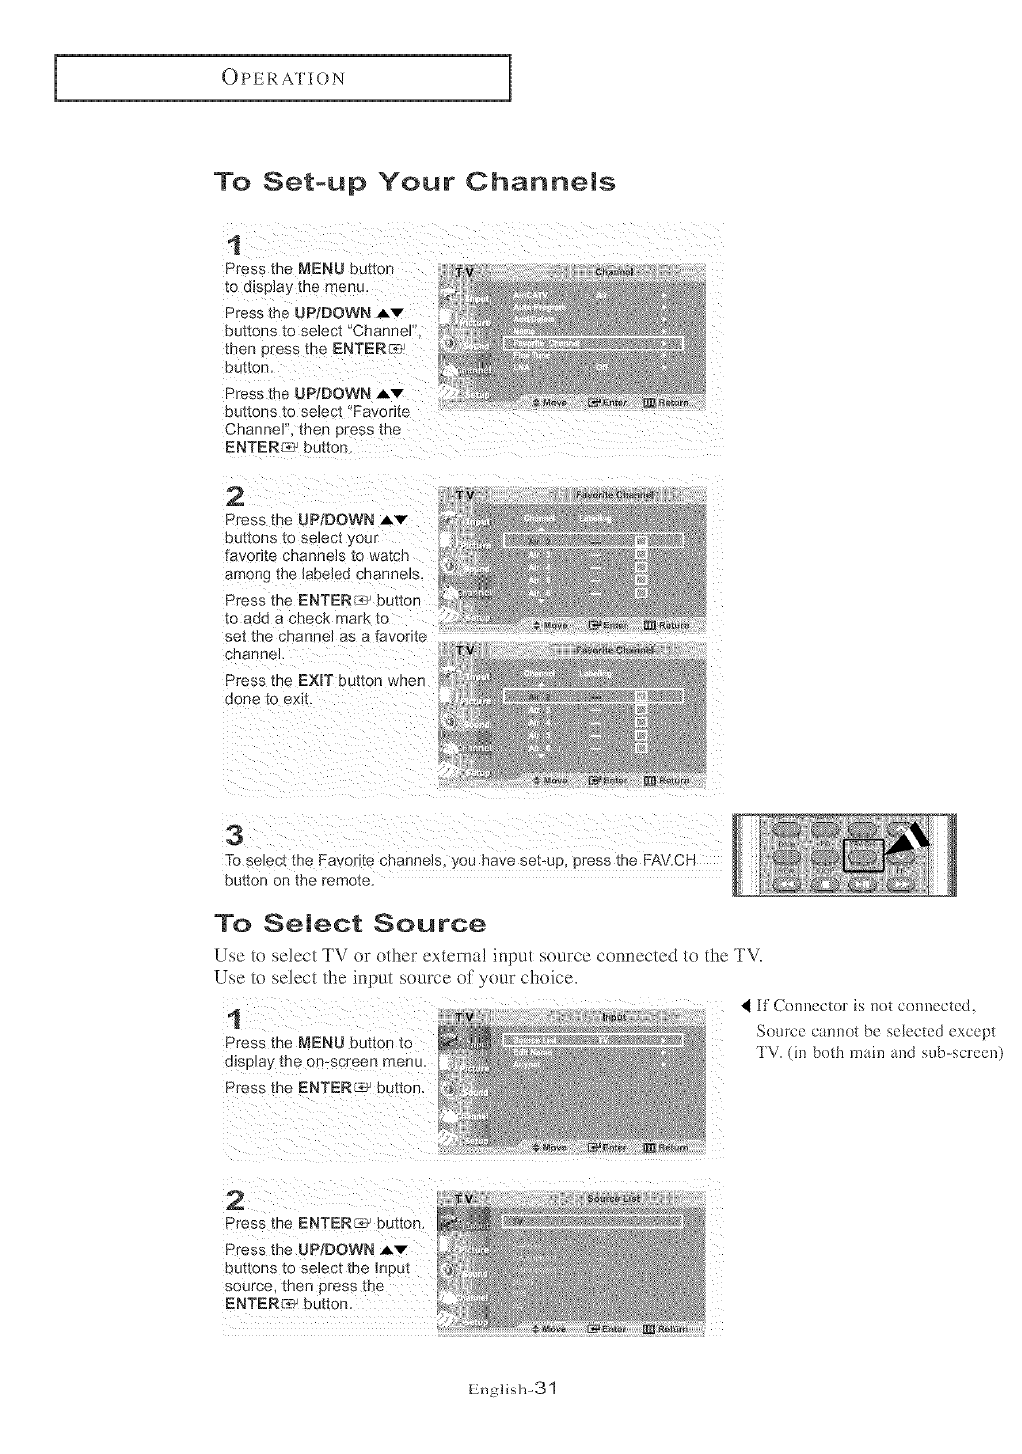
To Set-up Your Channels
1
Press the MENU buttor Tv
to a_spJa} tee menu,
Press the UPgDOWN JAr _i ';*_
buttons to select "Channel
men Dress me ENTER_ _
button
Press t le UPtDOWN Av
buttons to select "Favorite
Channel men Dress me
ENTER_ button
2
Press the UP/DOWN _,v
buttons to seleci your
[avorite channels to watch
among tee labeled cnanneis,
Press me ENTER!2 button
[o add a check mark to
set tee Channel as a favorite
cnanrlel,
Press me EXiT button when
done tc exit.
3
To seJec[ the Favorite cnanneB, you nave set-up, Dress the FAV.CH
DUt[OR On _Re remote,
To Select Source
Use to select TV or other e×terna! input source connected to the TV.
Use to select the input source ol your choice.
1 I if Cennector is not ce,mected,
Se_.lrce camlDt be selected except
Press the NENU button to _g
display the onrscreen menu. TV. (in beth main and ,rob-screen)
}
Press the ENTERs' button,
Pres,<
English-31

OPERATION
To Edit the input Source Name
Name the input device cennected to the input jacks te make your input source selection easier,
Press the ENTER_ button
to S_lect !f!nput"
Press the UP/DOWN A'v"
buttons to select
'Edit Narne" then tess [
,P
the ENTERs, button.
Press the UP!DOWN ,6,v
butloes to select
"Component2'!, 'HDMt',
then press the ENTER_
button.
Press the UP/DOWN Av
buttons to se!ect 'VCR'!,
Recc
'Camcorder"
DHR(DVD HDD Re_oder)'!, ............
or tPC:' input source, _hen
Press the EXmTbutton to
English-32
OPERATION
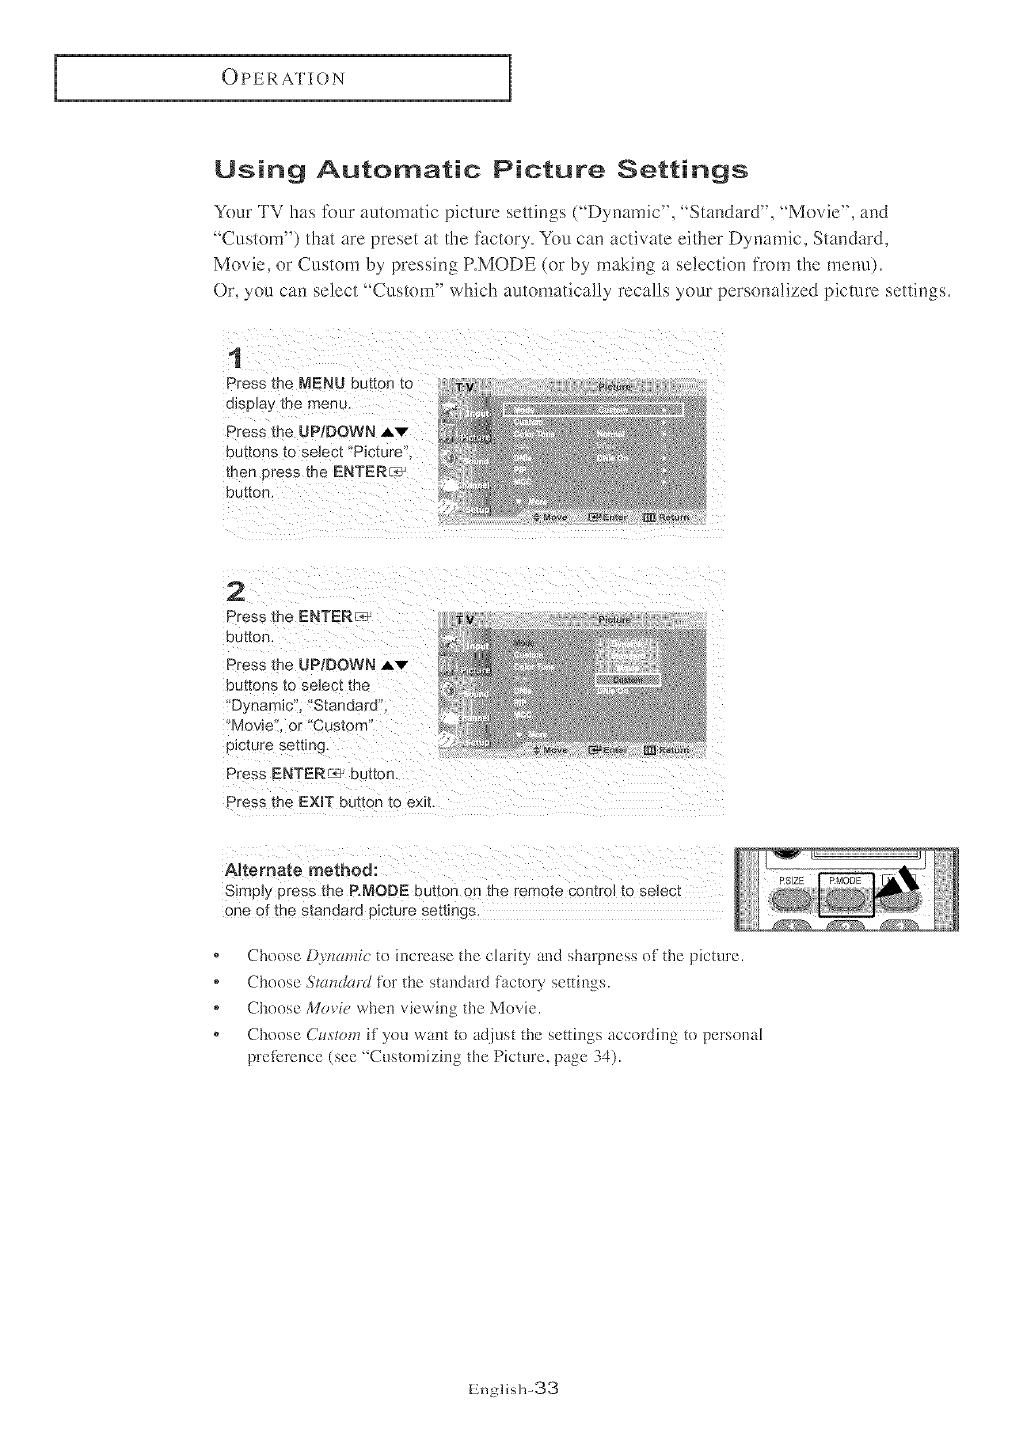
Using Automatic Picture Settings
Your TV has tbur automatic picture settings ("Dynamic", "Standard", "Movie", and
"Custom") that are preset at the fi_ctory. You can activate either Dynamic, Standard,
Movie, or Custom by pressing P.MODE (or by making a selection from the menu).
Or, you can select "Custom" which automatically recalls your personalized picture settings.
1
Press the MENU button [o
o]spla'_ [ne menu,
Press the UP/DOWN ,_,v
buttor s [o select 'Picture _
mer rress me ENTERI._
DU_tOr
2
Press the ENTERs:
DU[_OO
Press the UP/DOWN Av
buttons to select me
"Dynamic". "Standard
"Movie". or Custom"
eJcture setting
Press ENTER_ button
Press me EXmTbutton to exit
Alternate method:
SimDy press the P.MODE button o_ me remote control to seMct
one of the standard olcture settings.
* Choose Dynamic to increase the clarity and sharpness of the picture.
* Choose St_mdmd fl)r the standard factory settings.
* Choose Movie when viewing the Movie.
* Choose CtLvlom if you want to adjust the settings according to personal
p!:eference (see "Customizing the Picture, page 34).
English-33
OPERATION
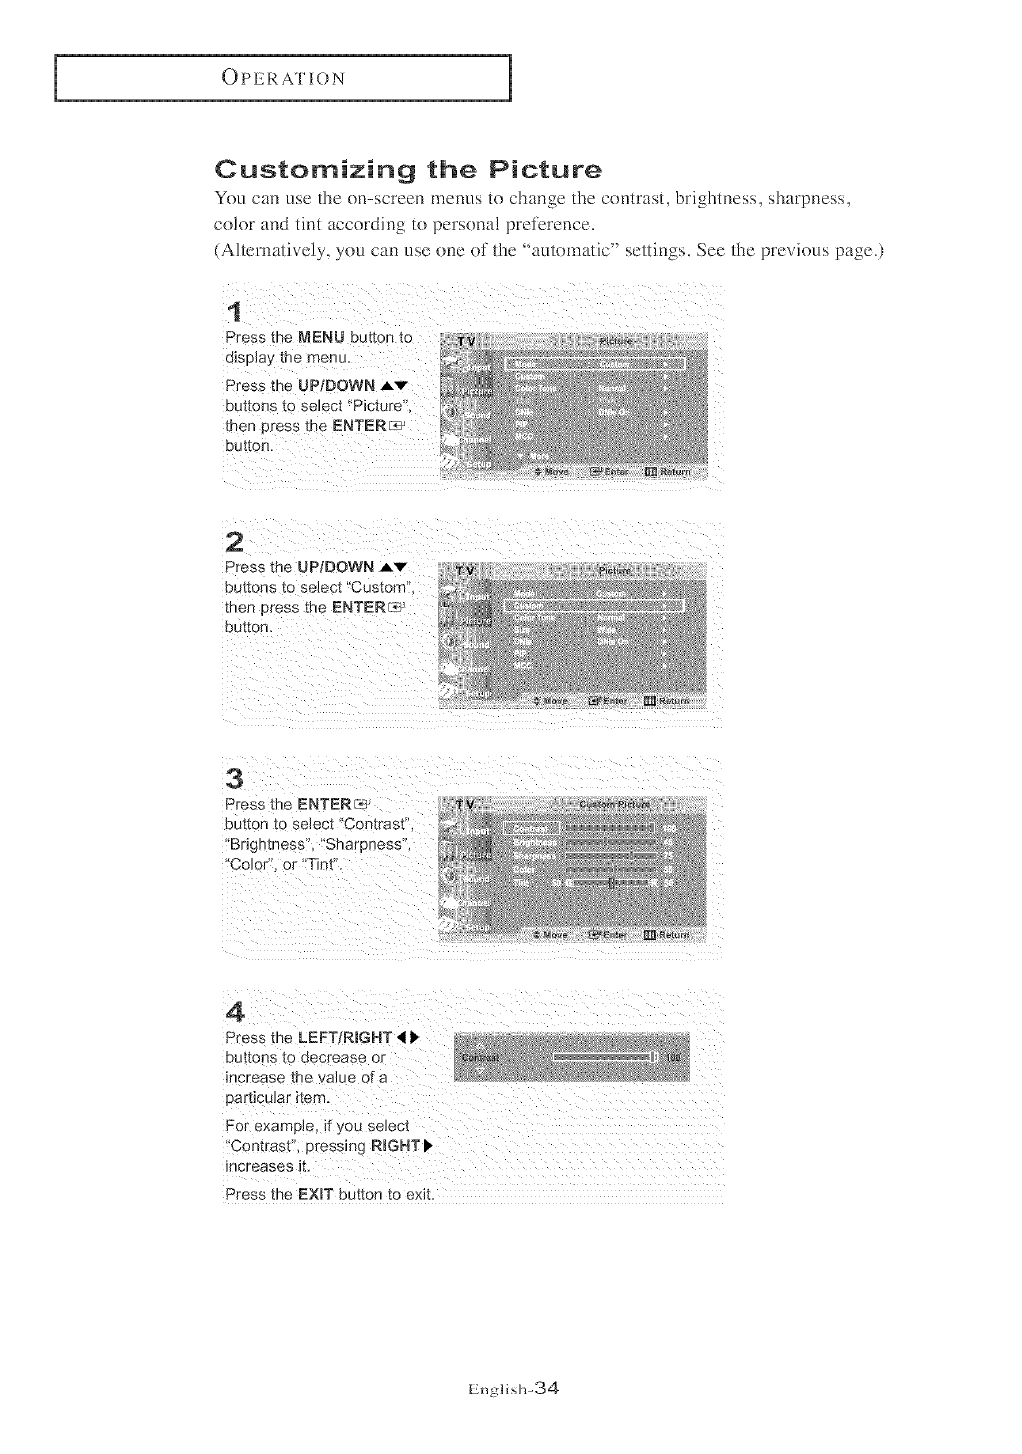
Customizing the Picture
You can use the on-screen metals to change the contrast, brightness, sharpness,
co!or and tim according to persona! preference.
(Alternatively, you can use one of the 'automat'c" sett'ngs. See the previous page.)
Press SheMENU button to
display the menu.
Press the UP!DOWN Av
butDns t0 select 'Picture'!,
Press the UP/DOWN J.v
button.
Press the LEFT/R!GHT 4
'Contrasf'; pressing RIGHT I_
increases ib
Press the EXIT button to exit.
English-34
OPERATION
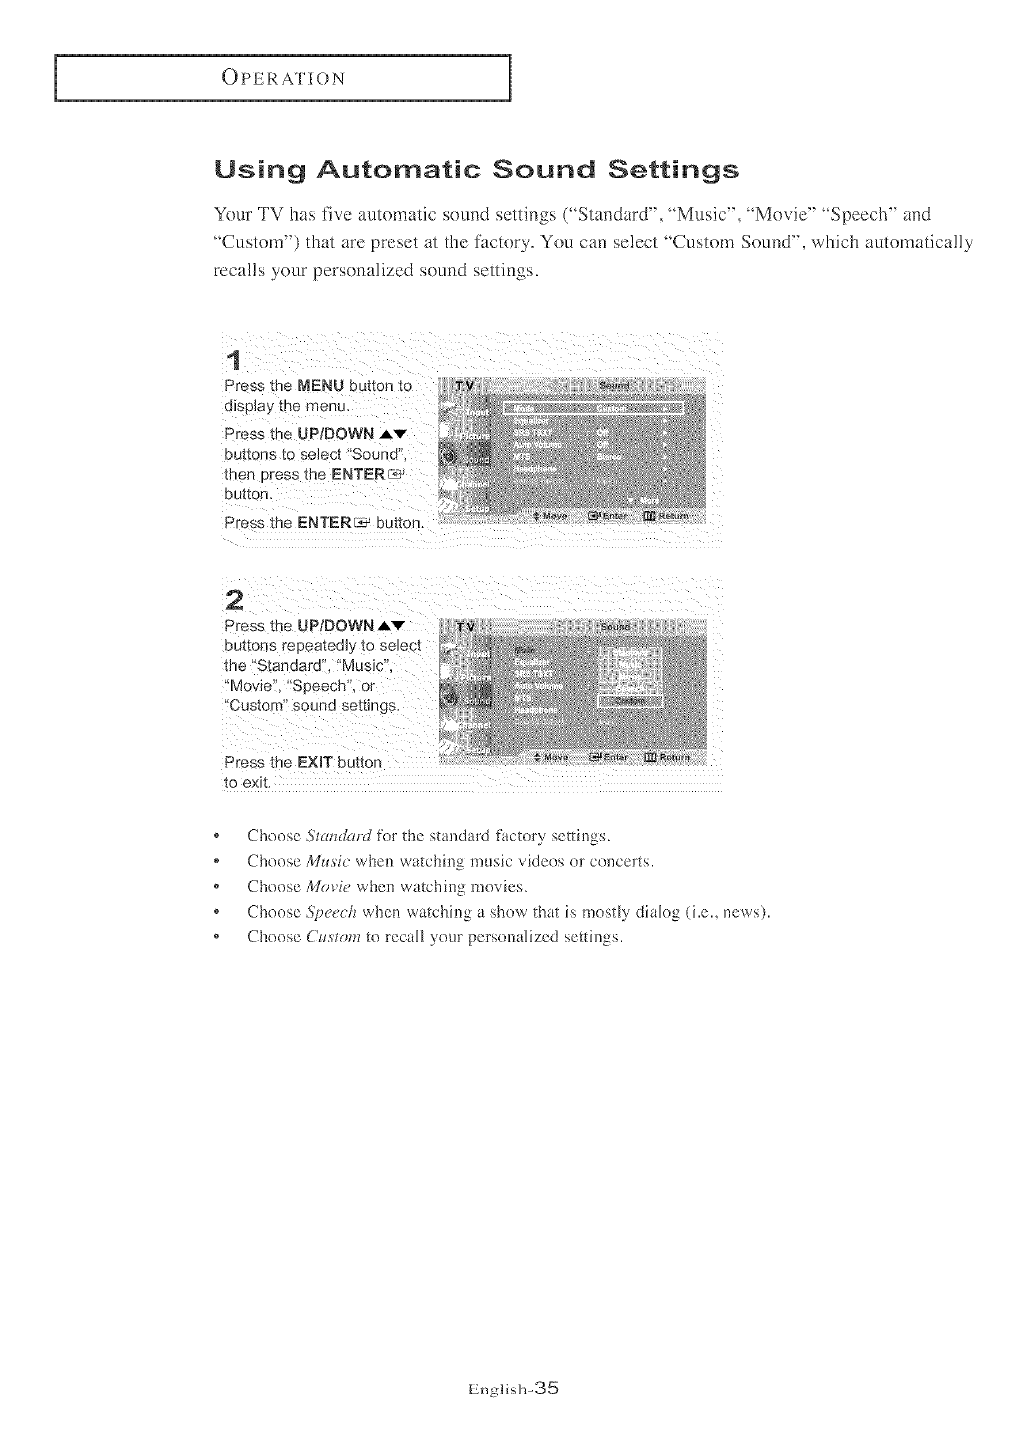
Using Automatic Sound Settings
Your TV has five automatic sound settings ("Standard", "Music", "Movie" "Speech" and
"Custom") that are preset at the factory. You can select 'Custom Sound", which automatically
recalls your personalized sound settings.
1
Press the MENU button to
disela, me menu
Press the UPIDOWN J,v
buttons to select Sound'
men oress me ENTER_ '
button,
Press trle ENTER_ Din[on.
2
Press the UP;DOWNA'v"
buttor_srepeatedly [o se_ec_
the Standard, "Music".
Mcvie" 'Sreecn 3r
Custom"sound settings,
Press the EXIT button
to exit.
*Choose SratMmff i%r the standard btctory settings.
* Choose Mz_sic wl_en watching music videos or concerts.
* Choose Movie when watching movies.
* Choose &Jeech when watching a show that is mostly dialog (i.e., news).
* Choose C**.vzomto recall your personalized settings.
English-35
OPERATION
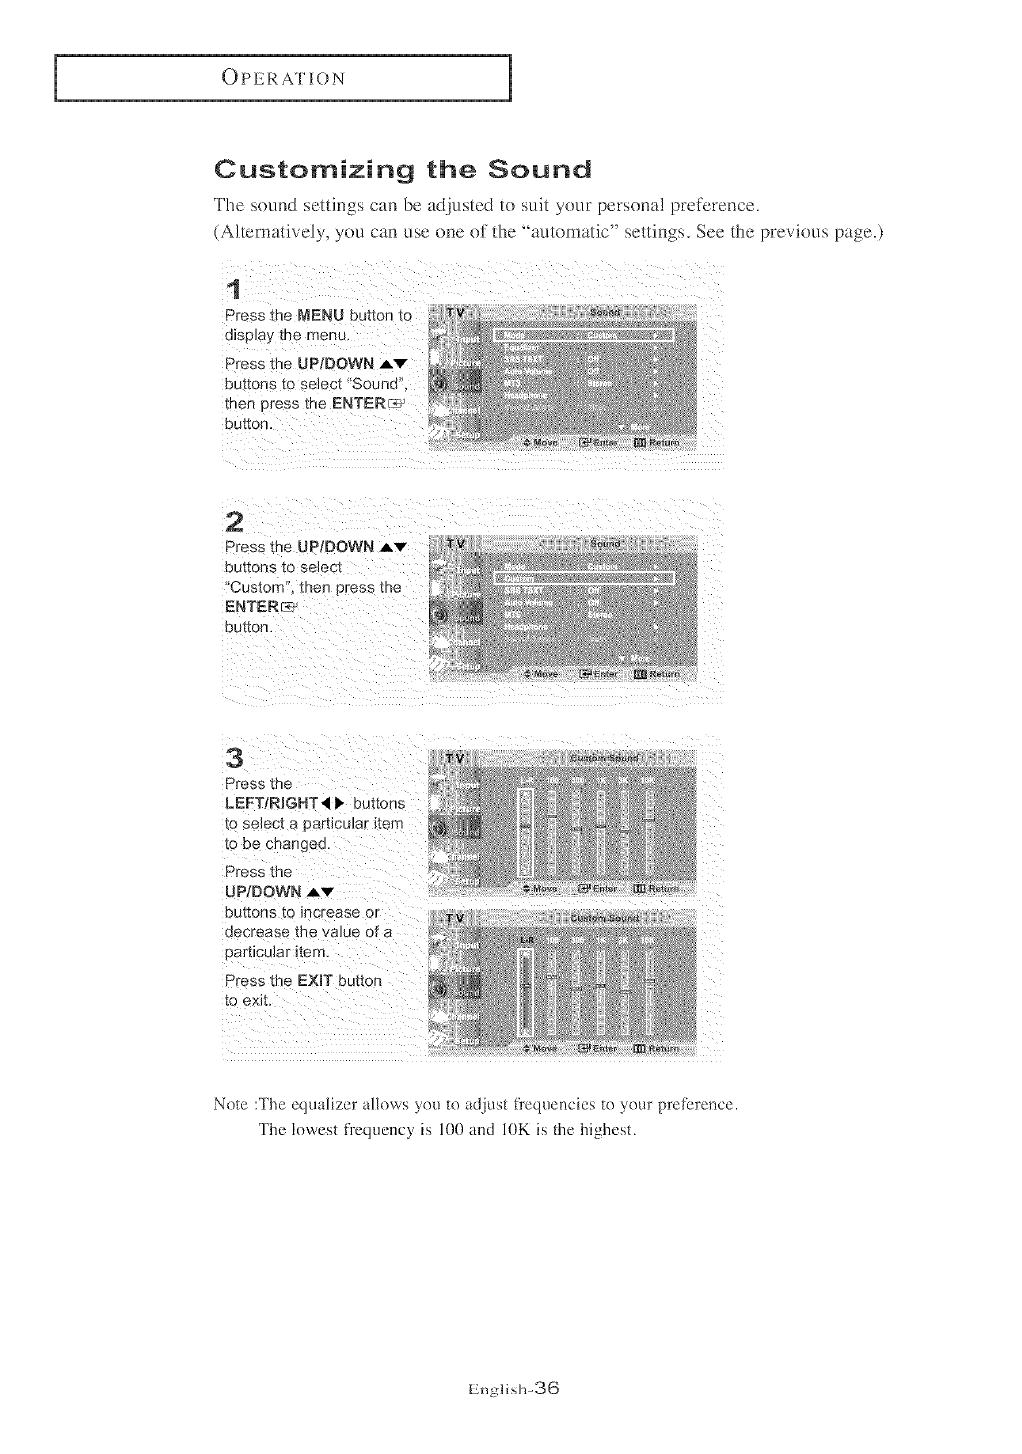
Customizing the Sound
The sound settings can be adjusted to suit your persona! preference.
(Alternatively, you can use one of the "automatic" settings. See the previous page.)
1
Press the MENU Put[on }:C
displa, the menu.
Press the UP/DOWN Av
buttons _o seJect "Sound'
men Dress the ENTERr<
button.
2
Press the UP/DOWN Av
buttons to se_ec_
'Custorr . men Dress the
ENTERr_
button.
3
Press th_
LEFTIRIGHT_ ). buttons
[o select a eartJcular item
1o be changeD.
Press the
UPtDOWN ,_,v
buttons tO increase O[
Decrease [he vsJue of
particular _terr
Press the EXIT button
to exit.
Note :The equalizer allows you to adjust frequencies to your preference.
The lowest frequency is 100 and ]OK is the highest.
English-36

OPERATION
Selecting a Menu Language
display the menu.
Press the UP/DOWN Av
buttons to select 'Setup '_,
2
Press the UP/DOWN Av
buttons to se]ec_ 'Language.
Press the ENTER 3' button.
3
Press the UP/DOWN Av
buttons [o select "Er #hsh',
Fraooais", "EspafioF, or
"Po_tugu#s".
Press the EXIT button
1o exit.
English-37

OPERATION
Setting the Blue Screen Node
If no signal is being received or the signa! is veUweak, a blue screen automatically
replaces the noisy picture background,
If you wish to continue viewing the poor picture, you must set the 'Blue screen"
mode to 'Of't_'.
1
Press me MENU button to T_
oBpJay me menu. H'
Press the UP/DOWN A'_" _,_:g
DU_[OnS_o select "Setue ,l_}_
men press the ENTERC_
Button,
N_ve r_KnNi _ R_um
2
Press me UP;DOWN Av
buttons to select "Blue
Screen men Dress the
ENTERr_' kutto_]
4 Pressh_+, the UP/DOWN _v
3buttenswiHalternatebetween
Press the UP/DOWN Av "Off' and "Off".
buttons to get Blue Screen
English-38
OPERATION
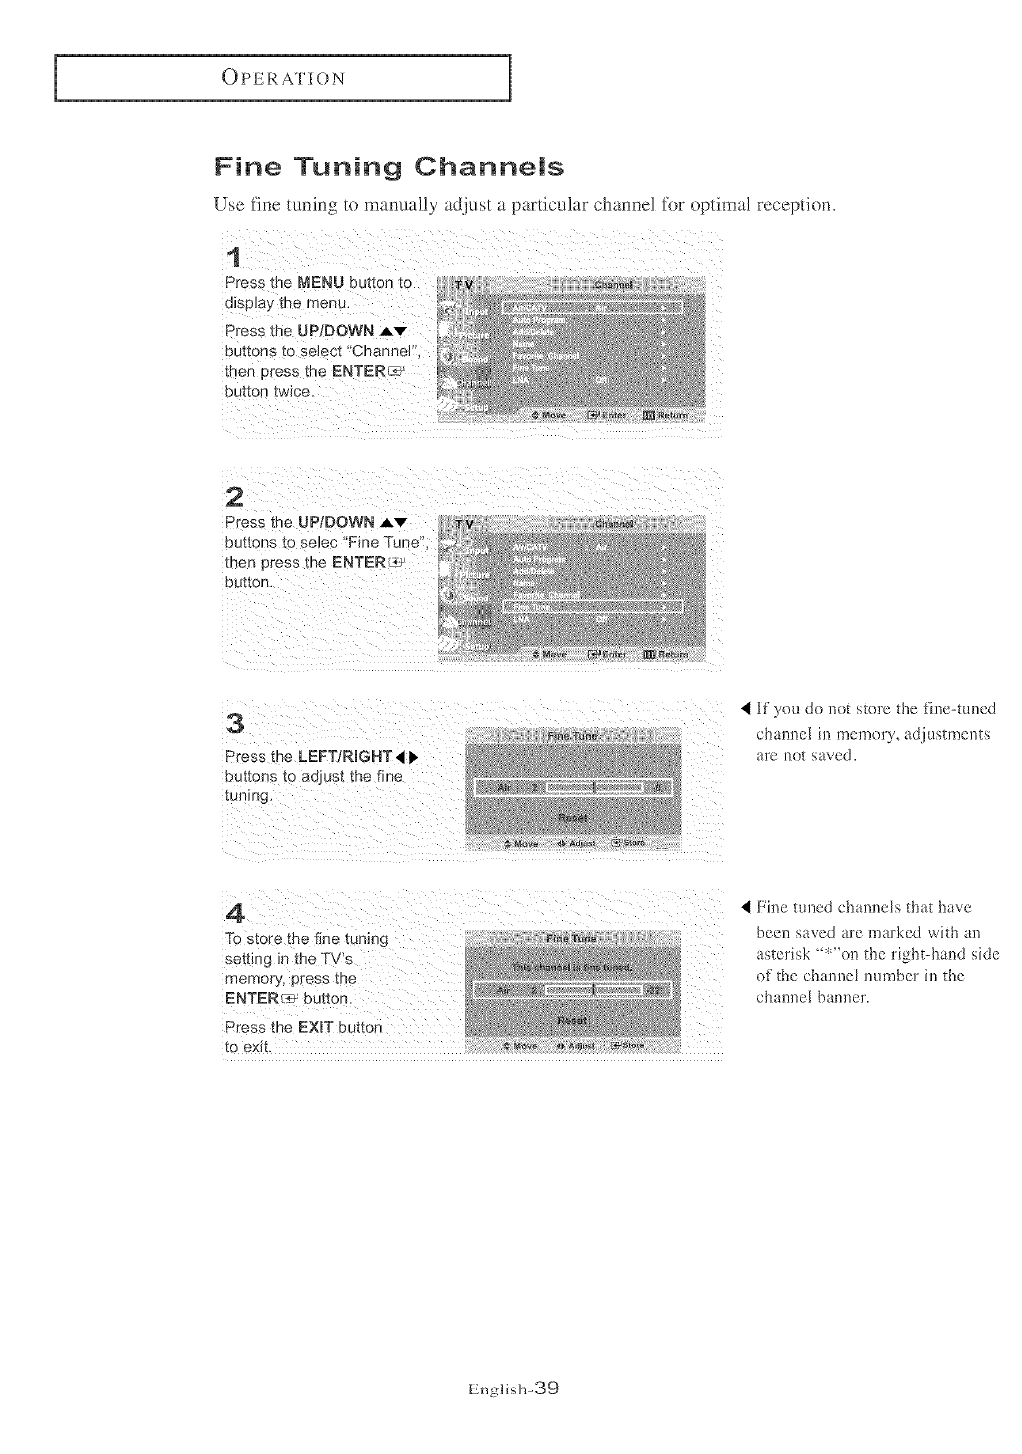
Fine Tuning Channels
Use fine luffing To marmally adiust _ particular channel for oo|imal reception.
1
Press the MENU button :o _v
dispJa,_me menu :_
Press the UP/DOWN A'v" ,¢
Dut[ons [o select "Channel _
[hen _ress the ENTERI_ _
Dutm_ twice,
2
Press the UPtDOWN Av T_i,
buttons _o se_ec "Fine Tune i
button.metDress the ENTER_ /_::
F_ne T*a_
Press the LEFT/RmGHT 4 •
DU_[OeSto adjust the fine
tuning.
<if you do net stere the fine-tuned
channel in memory, ad,justments
are net saved.
4
To store the fine tuning
setting in the TV's
memory, press me
ENTER_ buttor
Press tqe EXIT button
_o exit.
'4 Fine tuned channels that have
been saved are marked with an
asterisk "_"on the right-hand side
of the channel number in the
channel banner.
English-39
OPERATION
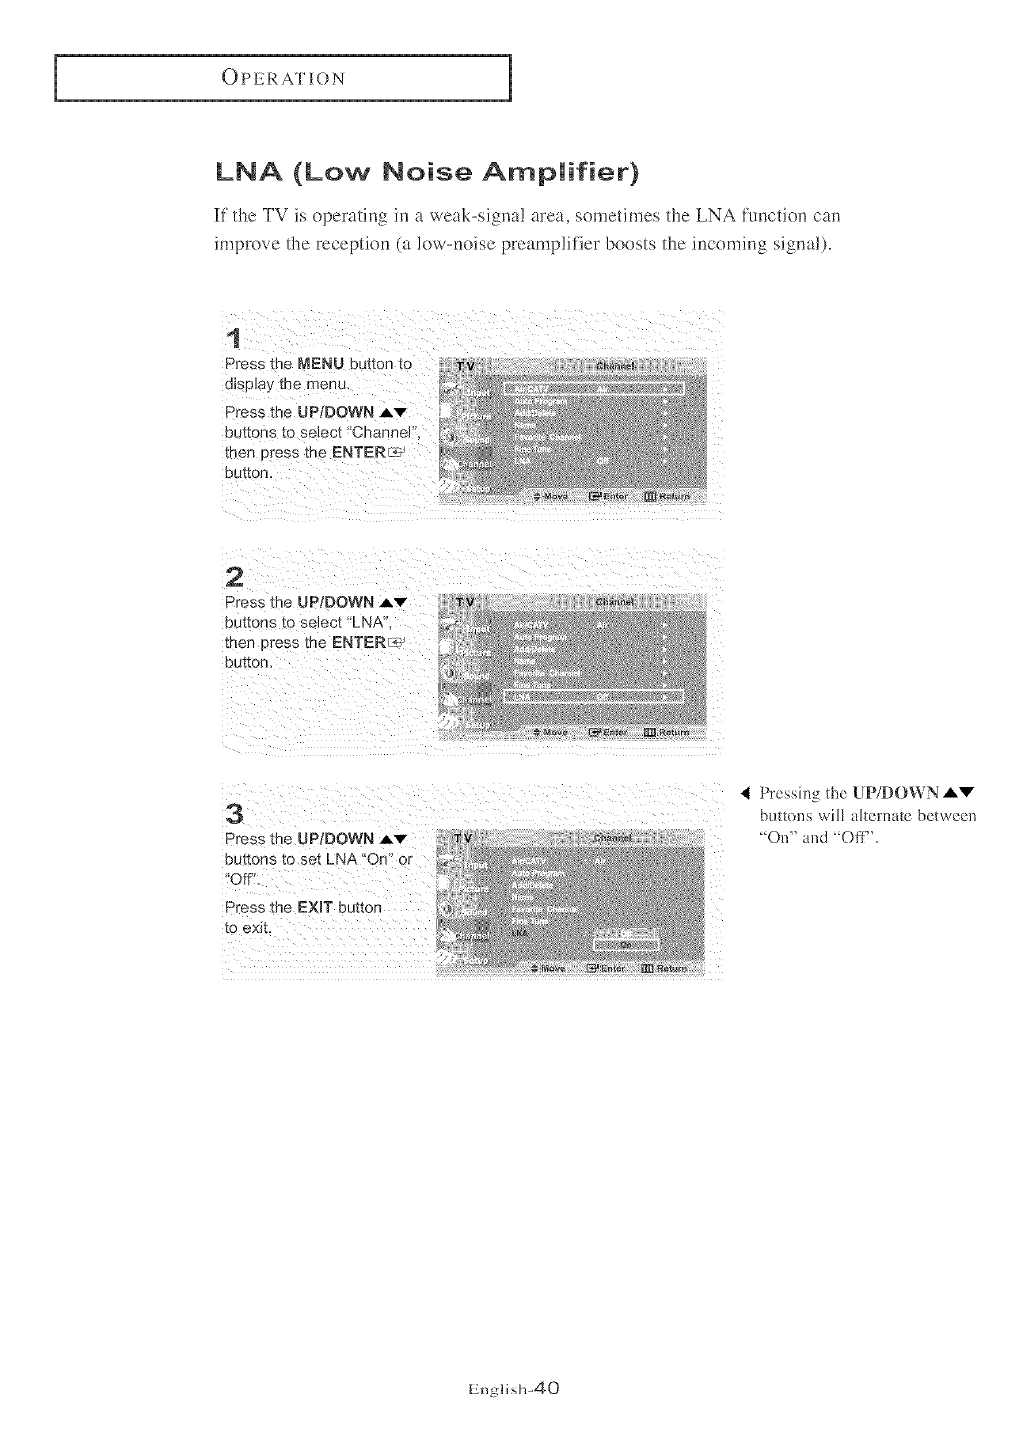
LNA (Low Noise Amplifier)
If the TV is operating in a weak-signa! area, sometimes the LNA function can
improve the reception (a low-noise preamplifier boosts the incoming signa!),
1
Press the MENU but[on [o
o_sp_a}! the menu,
Press tl__, UP/DOWN Av
out[on _ to select "Channel",
then )tess the ENTERL_
button.
2
Press me UP/DOWN A'v
buttons to select "LNA
men press the ENTER_
DU[tOn,
3
Press the UP,DOWN Av
buttons to set LNA"On or
'Off'
Press the EXIT button
to exit.
'I Pressin,, the UP/DOWN A'_"
butt(ms ,,viHakernate between
_011" and "Off_'.
English-40
OPERATION
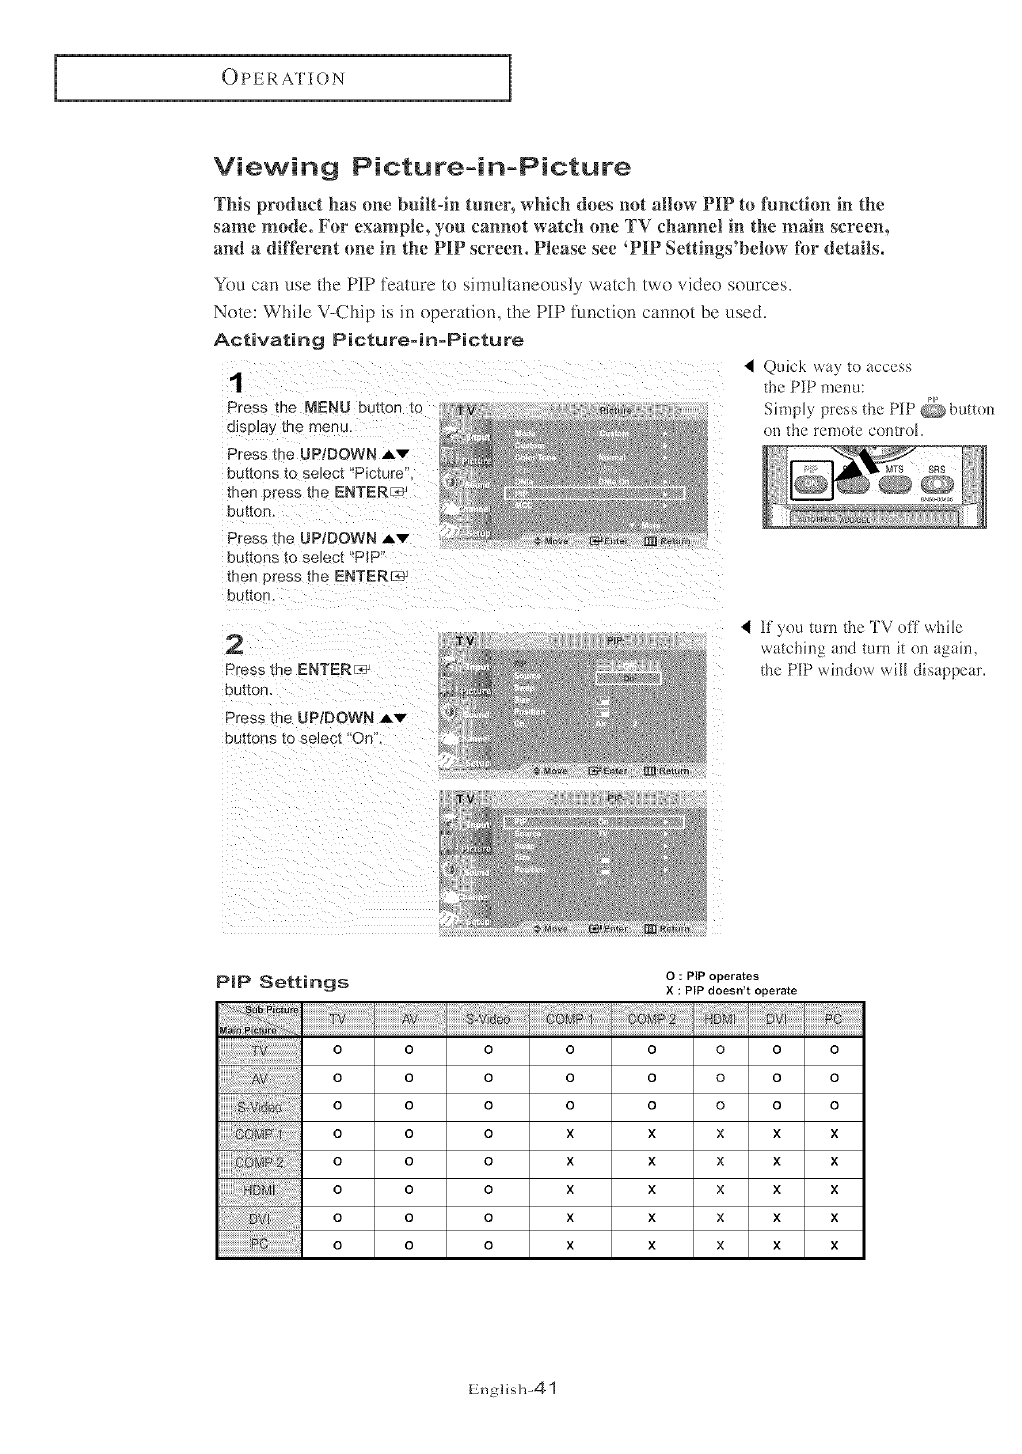
Viewing Picture=in=Picture
This product has one built:in tuner, which does not allow' P][1+to function in the
same mode. For e×ampte, you cannot watch one TV channel in the main screen,
and a different one in the PIP screen. Please see _PIP Settings'below ibr details.
Y0o can use the PIP feature to simultaneously watch two vide<) sources.
Note: While V-Chip is in operatkm, the PIP fanction cannot be used.
Activating Picture-in-Picture
1
Press che MENU put[on [o
display me menL
Press the UP, DOWN ,_,'v"
buttons _o select "Picture"
men press me ENTER_
button.
Press me UP/DOWN A'v
buttons to select "PIP'
then press me ENTER
button.
_J_ure
4 Quick way tn access
the PiP menu:
Simply press the PIP _ button
on the remote control
@ M#ye _Ente* _ Re.,
2
Press the ENTER_
button,
Press Ehe UP/DOWN Av
buttons [o se]ect "On".
if you turn the TV off while
watching and turn it on again,
the PIP window wii[ disappear.
P|P Settings
_l_ve _En_r [m Re_*rn
O : PIP operates
X : PIP doesn't operate
o
o
o
o
o
o
o
o
o o
o o
o o
o o
o o
o o
o o
o o
o
o
o
x
x
x
x
x
o
o
o
x
x
x
x
x
o
o
o
x
x
x
x
x
o o
o o
o o
x x
x x
x x
x x
x x
Englisll-41
OPERATION
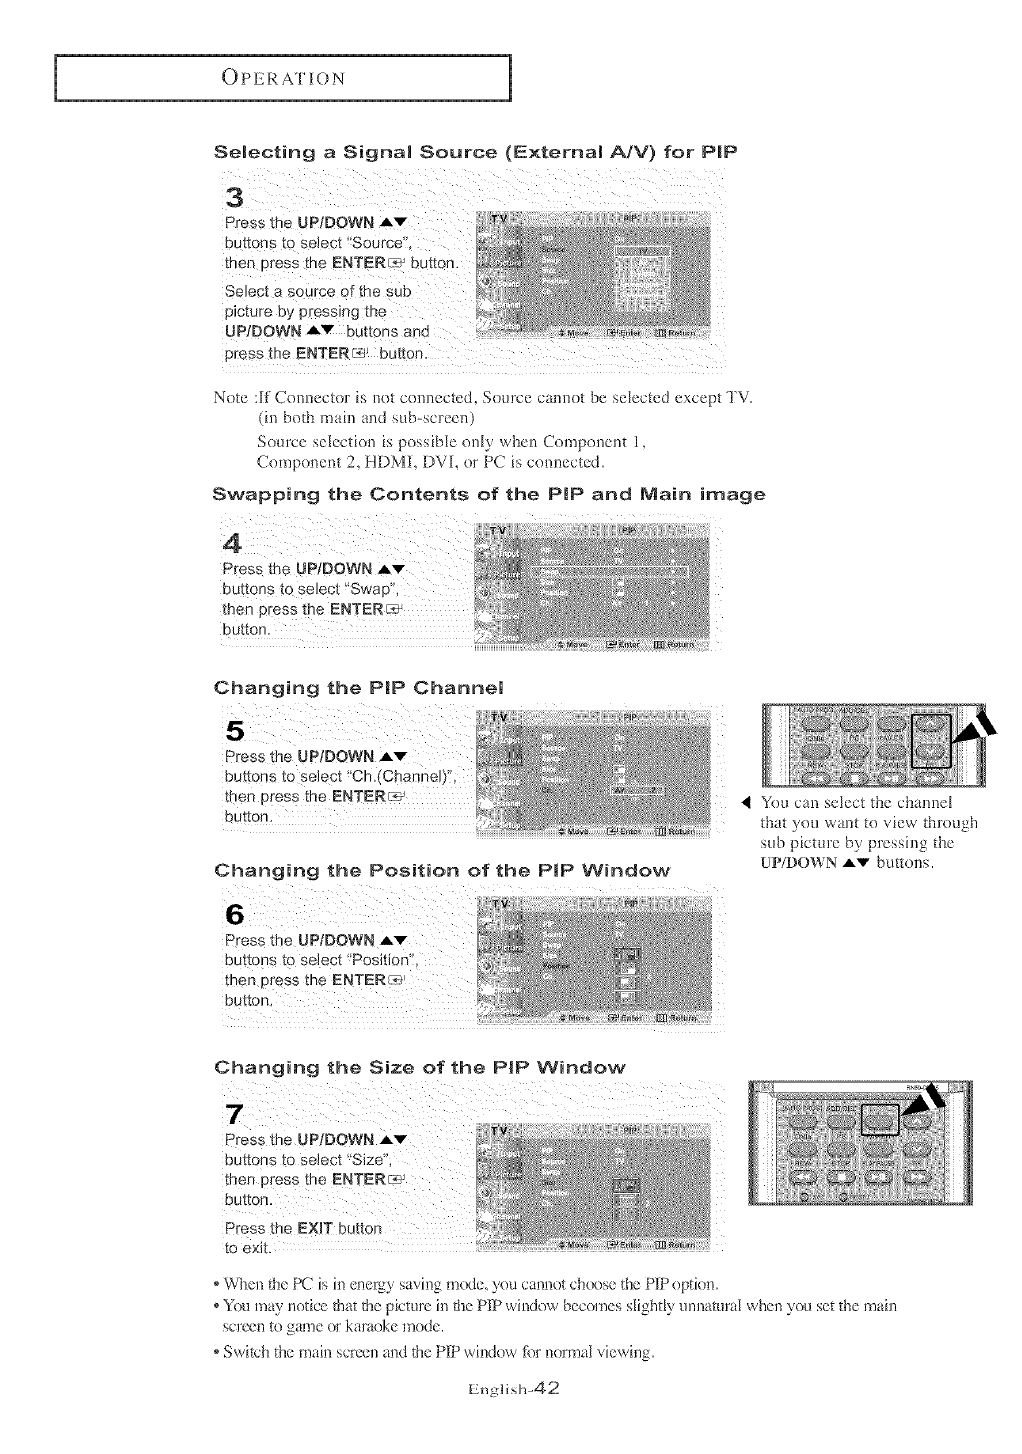
SeJecting a Signal Source (ExternaJ _V) for PiP
buttonb to select tSourceL
Select a source of t
picture by pressing the
UP/DOWN AY buttons an d
Note :If Com_ector is not com_ected, Source cannot be selected except TV.
(in both mah_ and sub-screen)
Source selection is possible only when Component 1,
Component 2, HDML DVI, or PC is com-_ected.
Swapping the Contents of the PiP and Main image
Press the UP/DOWN Av
buttons to select 5'Swap'!;
then press the ENTERc_
Changing the PiP Channel
Press the UP/DOWN .v
buttons to select _'Ch.(Channe0";
then press the ENTERF*J
button.
Changing the Position of the PiP Window
Press the UP/DOWN Av
then press the ENTERs'
You can select the chalmel
that you want to view through
sub picture by pressing the
UP/DOWN Av b_lttons.
Changing the Size of the PiP Window
Press the UP/DOWN Av
Press the EXIT button
to exit.
', When the PC is in energy saving m(_e, you canner ch_se the PIP option.
', You may notice tbat the picture in the PIP window becomes slightly unnatur_l when you set the main
screen to gar?e or kamoke mode.
', Switch the main screen and tbe PIP wh-_dowtbr normal viewing.
English-42
OPERATION
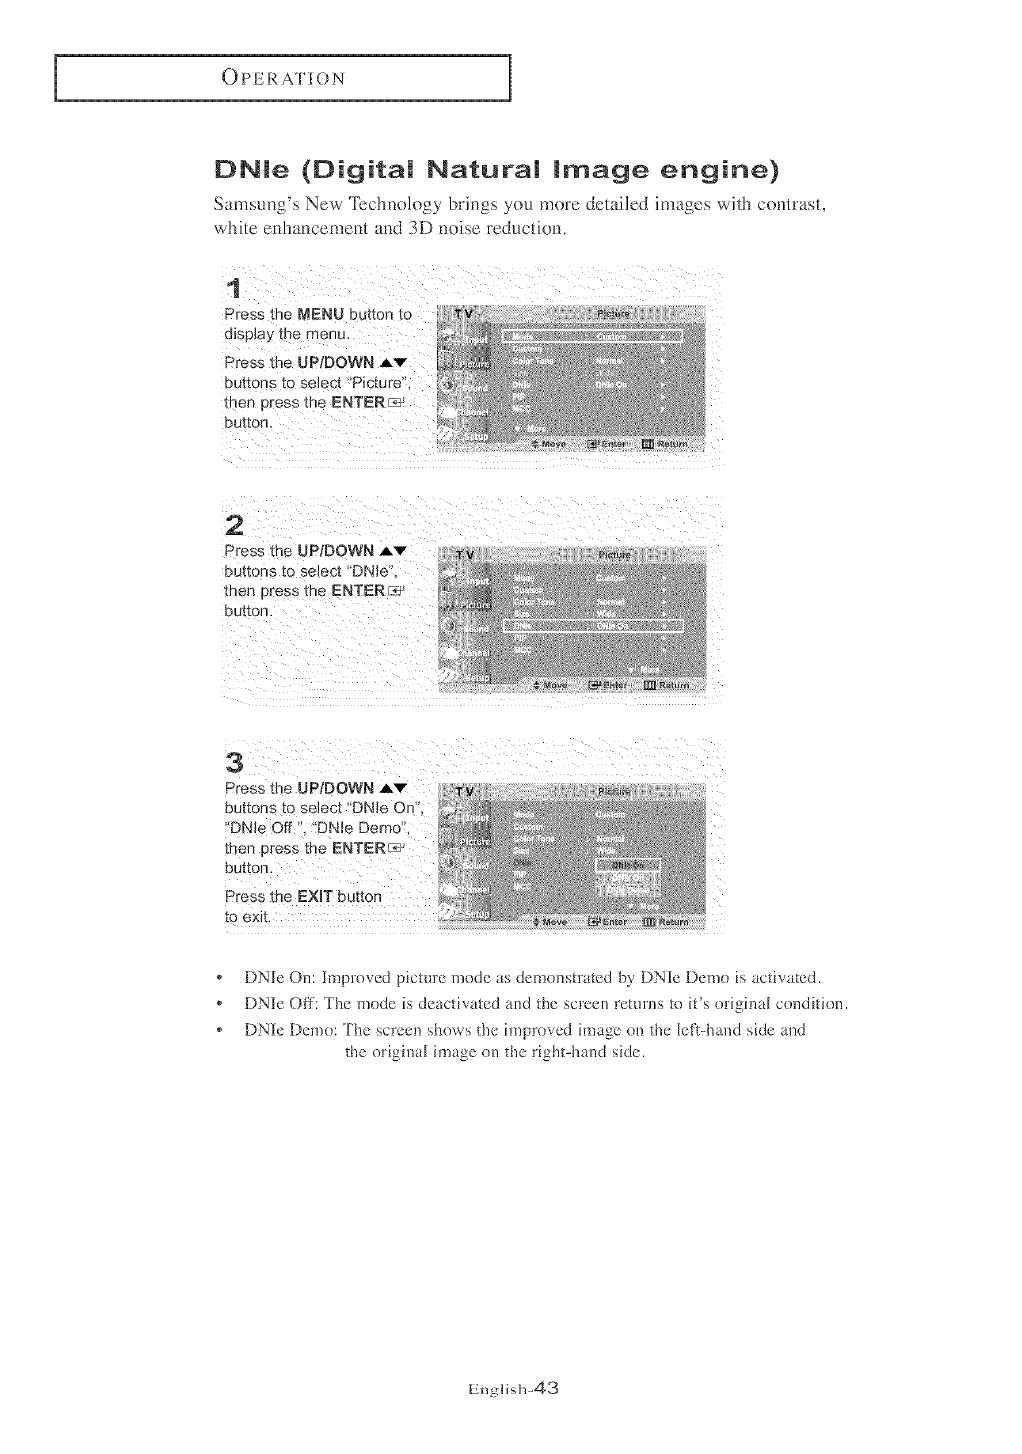
DNle (Digital Natural image engine)
Samstmg's New Tcclmo!ogy brings you more detailed images with contrast,
white enhancement and 3D noise reducdom
1
Press the MENU button to
u_spJayme menu.
Press the UP;DOWN Av
buttons _oselect "Picture",
_henpress the ENTER_
button.
2
Press the UP/DOWN A'v
buttons _ose]ec[ 'DNle
men press me ENTER{z#J
button.
Press the UP/DOWN A'v"
buttons to select 'DNle On",
'DNle Off ", 'fDNle Demo'S,
then press the ENTER_
* DNIe On: Improved picture mode as demonstrated by DNIe Demo is activated.
* DNIe Off: The mode is deactivated and the screen returns to it's origilml condition.
* DNIe Demo: The screen shows the improved image (m the left-hand side and
the original image on the right-hand side.
English-43

OPERATION
NCC (My Color Control}
MCC allows users to adjust colors to their preference, by adjusting skim sky and
grass tones using the predefined settings(Standard, Custom, Turkish Blue, Emerald
Green, and indian Pink) without aft)cting other colors on the screen,
Easy eontrom
Press the UP/DOWN AV
buttons to select "Picture",
then press the ENTIERL_
button,
buttons to select 'MCC? then
Press the ENTERra-_! button,
Press the LEFT/R!GHTY _"
buttons to select among the
vadous picture settings, then
press ENTERs÷ _
adjustment ) is shown on the
]eft side, while the selected
mode is shown on the right
ii
*'Fhe sources m'edisplayed i_ the feJlowing order :
Turkish Blue - Emerald Green - Indlan Pink - S_mdard - Custom
English-44

OPERATION
Detail Contro!
display the menu.
Press the UP/DOWN Av
buttons to select 'Picture':,
You can adjust skin, sky and
grass tones without using the
predefined settings in custom
mode.
press the ENTER_ button.
2
'Detail controF, then
press the ENTER_
'I This flmctiol_ doesn't work
,,vhel_the Snurce is in PC mode,
or DNIe is in off"mode.
iiii i i i iii i i i i i i i i i i i i
Press the UP,*DOWN Av
buttons to select t
buttons to increase o_
decrease the va!ue Of a
particular item.
*'Fhe sources are displayed h_the tb[[owhlg order :
Skin Tone - Green Grass - Blue Sky- Reset
English-45

OPERATION
12C (Intelligent image Control)
I2C (Intelligent ]image Control) automatica!ly detects the inputted
visua! sigBa] and adjusts to create optimum contrast.
1
Press the MENU button
[odispJa_ the menu,
Press me UP/DOWN,_w
Dtmons to seJect "Picture
met 3tess the ENTER_
button.
2
Press the
UP/DOWN Av buttons
to select "12C". then Dress
tt)e ENTERt_ button,
4This flmctinn deesn't work
when the Source is in PC mode,
or DNIe is in <)ft"mode.
English-46
OPERATION
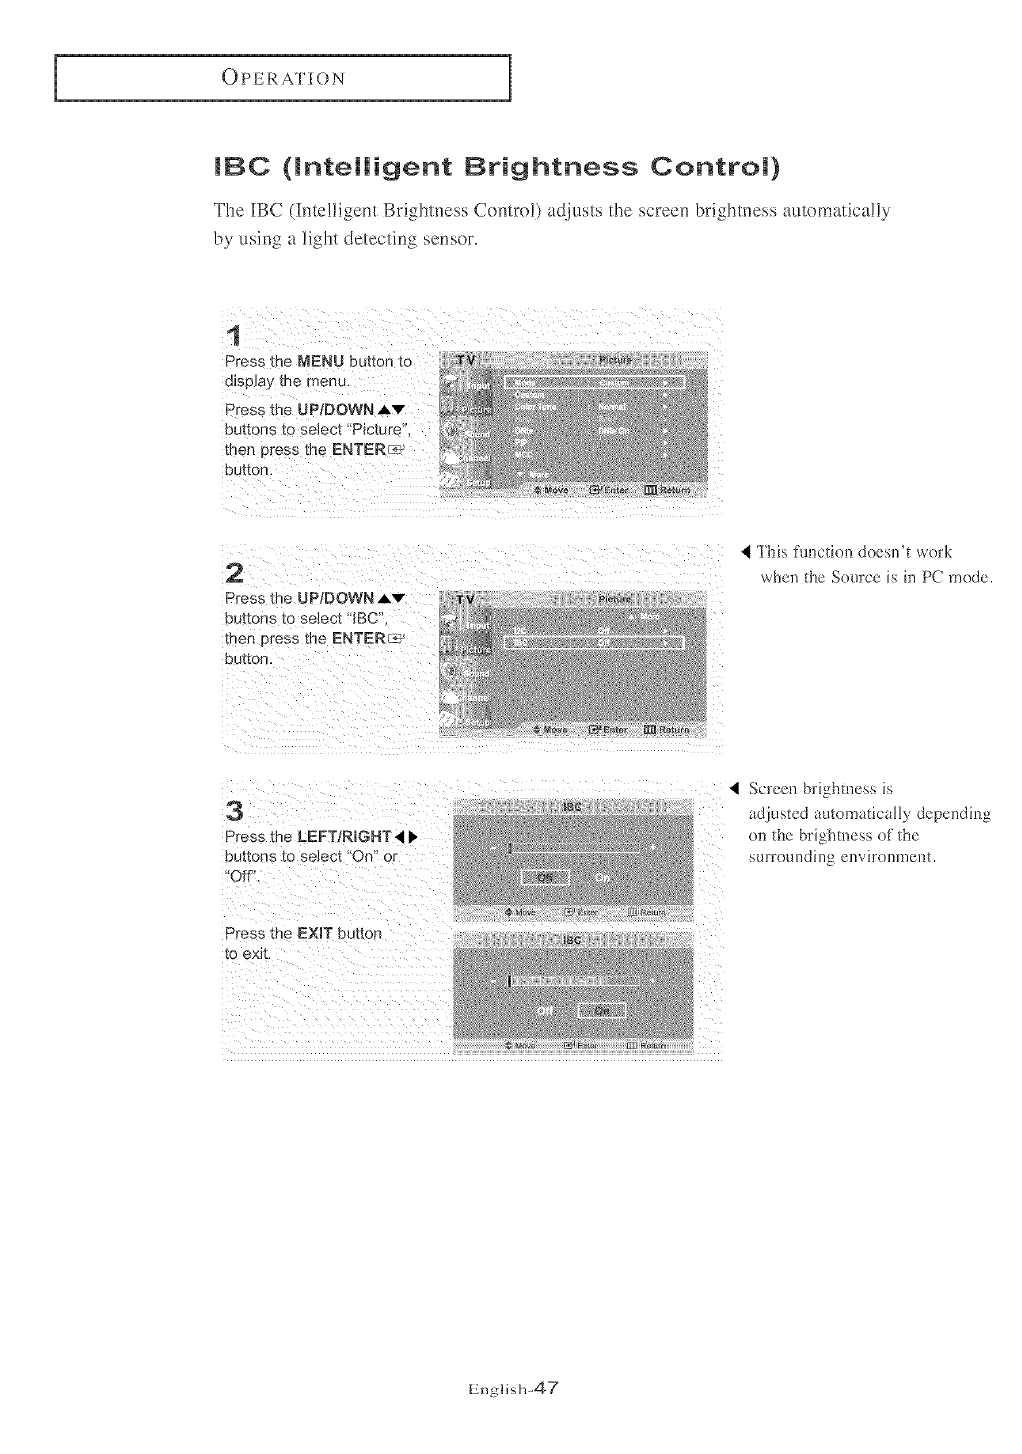
IBC (intelligent Brightness Control)
The IBC (Intelligent Brightness Contro!) at[justs the screen brightness automatically
by using a light detecting sensor.
1
Press ]he NENU button to
display me menu.
Dress the UP!DOWN Av
buttons to seJect "Picture
thee D__ss the ENTERr_-
button.
2
Press the UPtDOWN ,_.v
button _ ]o select 'IBC'
then Dress me ENTER_
button,
4 ']']]is ftmctien doesn't work
when the Source is in PC mnde.
3
Press the LEFT;RIGHT • I_
DU[tOnS tO selec_ 'On el
'Oft
BBC ScrceH brighmess is
adjusted automatically depending
on the brightness of the
surroundh]g environment.
Press the EXIT button
[o exit, J_C
English-47

OPERATION
Changing the Screen Size
Press the RSIZE button to change the screen size.
Note :Only wide and size of 4:3
can be selected for PC
Source.
ga
Wide : Sets the picture to 16:9 wide mode.
Pal_orama : Use this mode fk)rthe wide aspect ratio of a panoramic picture.
Zoom 1.2 : Magnifies the size of the picture on screen.
4:3 : Sets the picture to 4:3 normal mode.
This is the standard TV screen size.
Freezing the Picture
Press the ST!LL bu!ton to freeze a moving picture.
Normal sound will still be heard.
Press again t0 cance!,
English-48
OPERATION
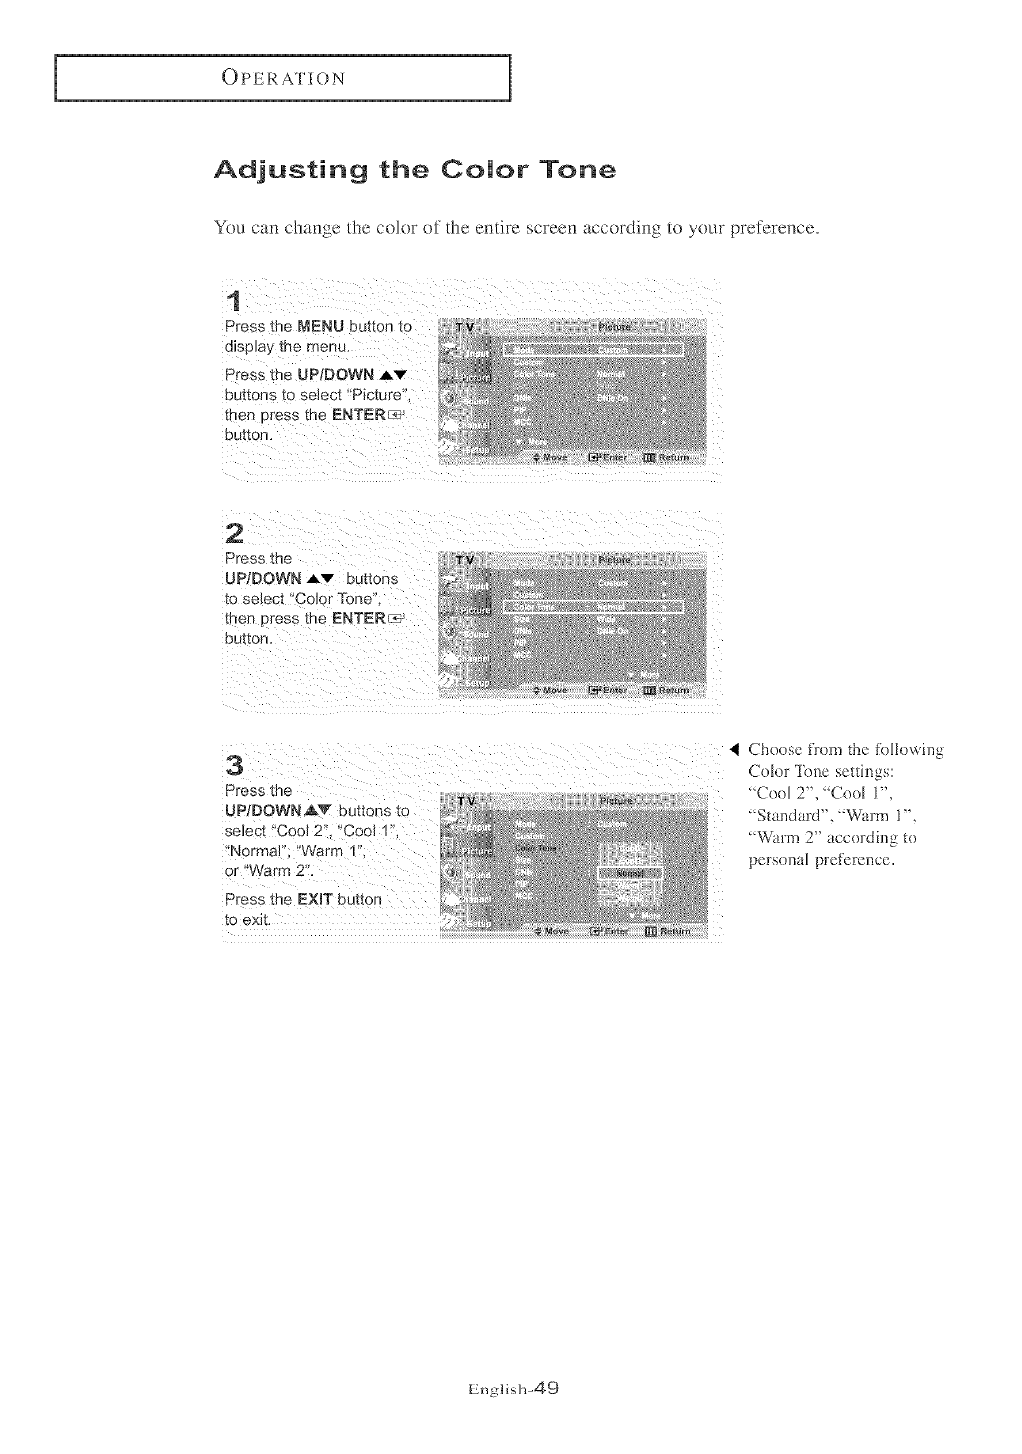
Adjusting the Color Tone
YOUcan change the color of the entire screen according to your preference,
1
Press the MENU button to
dJsp]ayme menu
Press _he UP/DOWN AV
buttons _o select "Picture
men ")ress me ENTER_
Dutton.
2
Press the;
UP/DOWN Av buttons
to select "Color Tone
men press the ENTER_
ou[[on,
3 ¸¸¸/( / !:: : (:/ / //: _Ce,o,CbeeSCTo,_c_r°'_ct_n,_:_b__,,,o,,_,l,_
Press the 'Ceel 2", _Coel 1",
UP/DOWNA'V' buttons to ':Stancla!:d","Warni 1",
or "Warm 2'!:
Press the EXIT button
to exit.
_Warm 2" accordh_g to
pets(real preference.
English-49
OPERATION
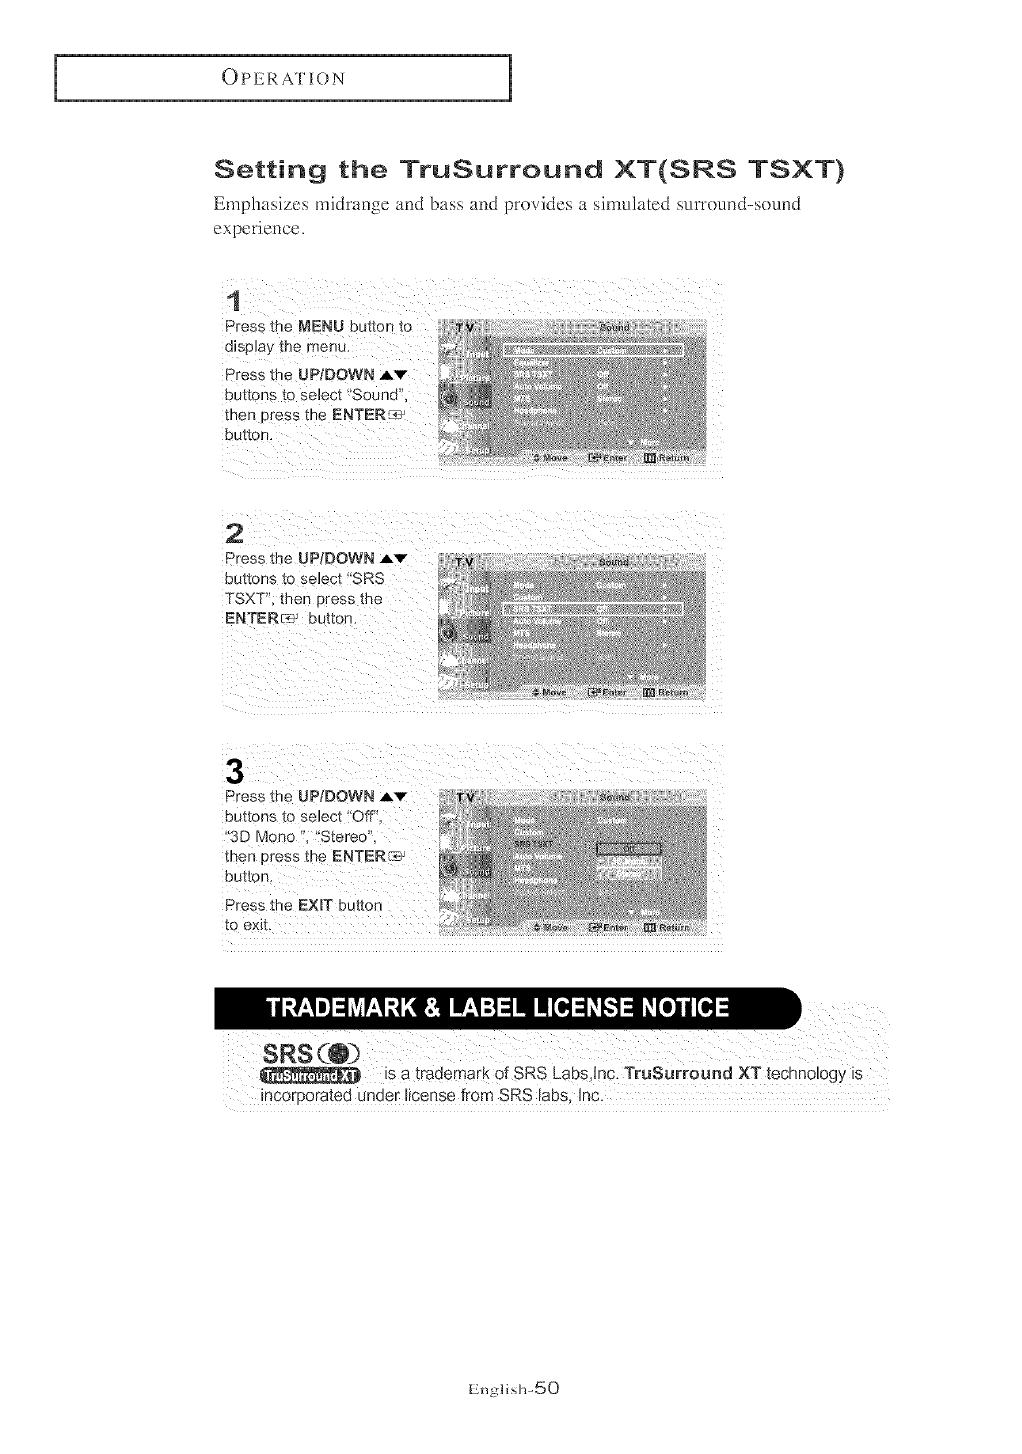
Setting the TruSurround XT(SRS TSXT)
Emphasizes midrange and bass and provides a simulated surround-sound
experience.
Press the
dispJay the menu.
Press the UP/DOWN _,v
buttons to seJect _'Sound'_,
Press the UPtDOWN Av
buttons to select 'Off'!,
then pres s the ENTER_ _
Press £he EXIT button
to exit.
is a trademark of SRS Labs,Inc. TruSurround XT technology is
incorporated under license from SRS labs, Inc.
English-50
OPERATION
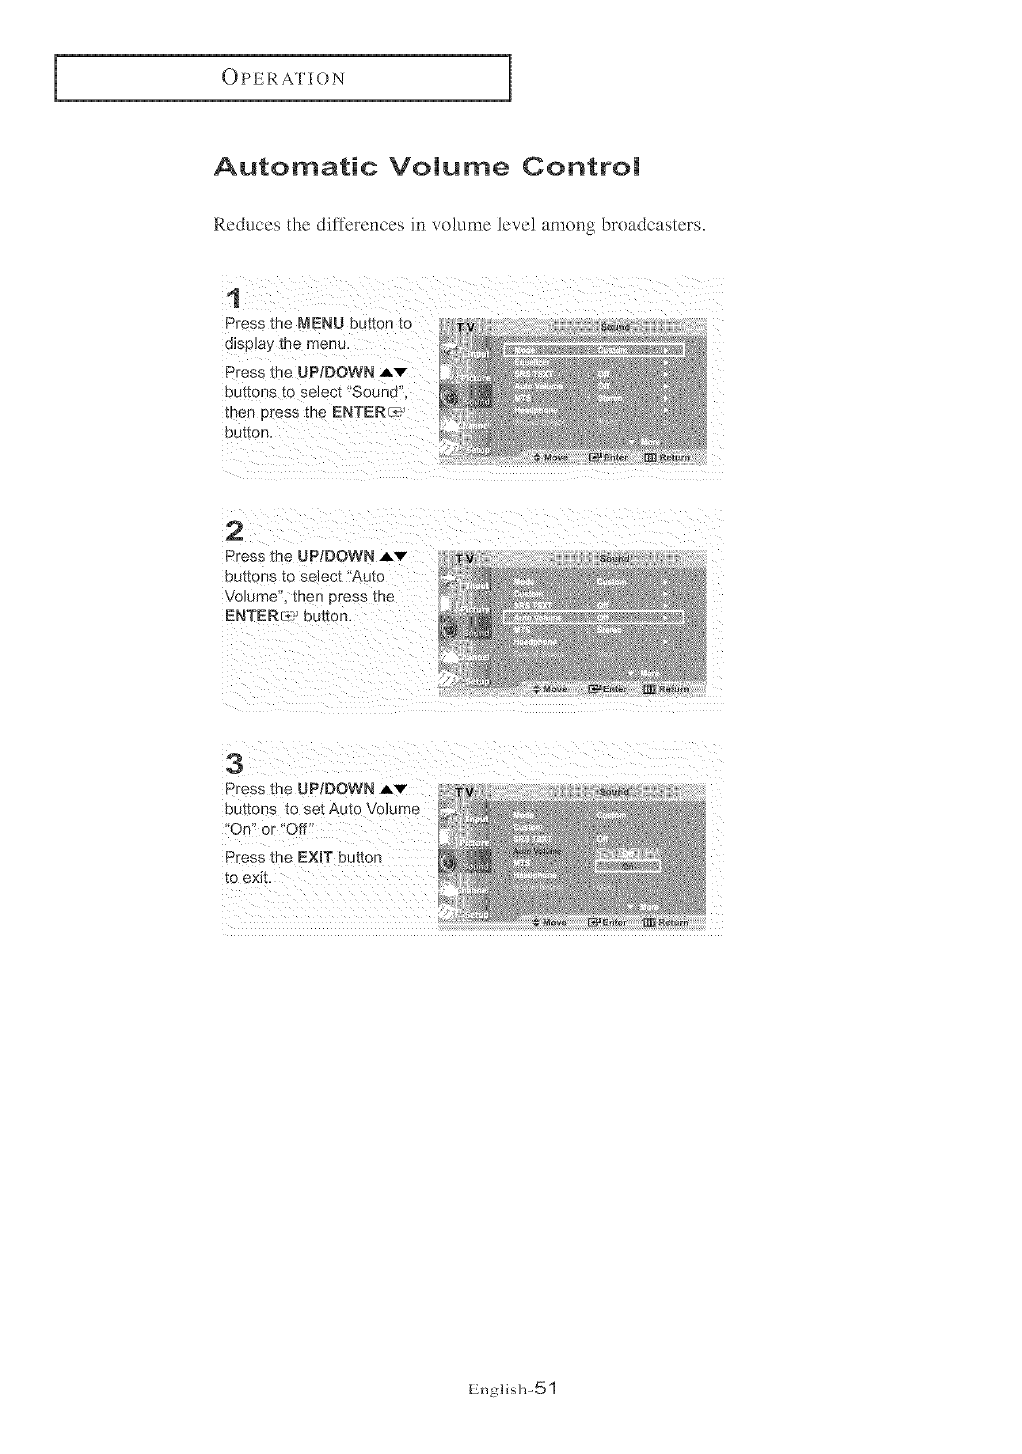
Automatic Volume Control
Reduces the differences in volume leve! among broadcasters.
1
Press me MENU button [o
disp]a_ the menu.
Press the UP/DOWN A'v"
Du[[ons to select "Sound"
men press the ENTER_
button.
2
Press the UP/DOWN _v
buttons [o select "Au[o
Volume' men press me
ENTER[_ button.
Se_d
3
Press the UP;DOWN Av
butter, s to set Auto Volume
'On" or "Off"
Press the EXmTbutton
1o exit.
English-51
OPERATION
Special Sound Options
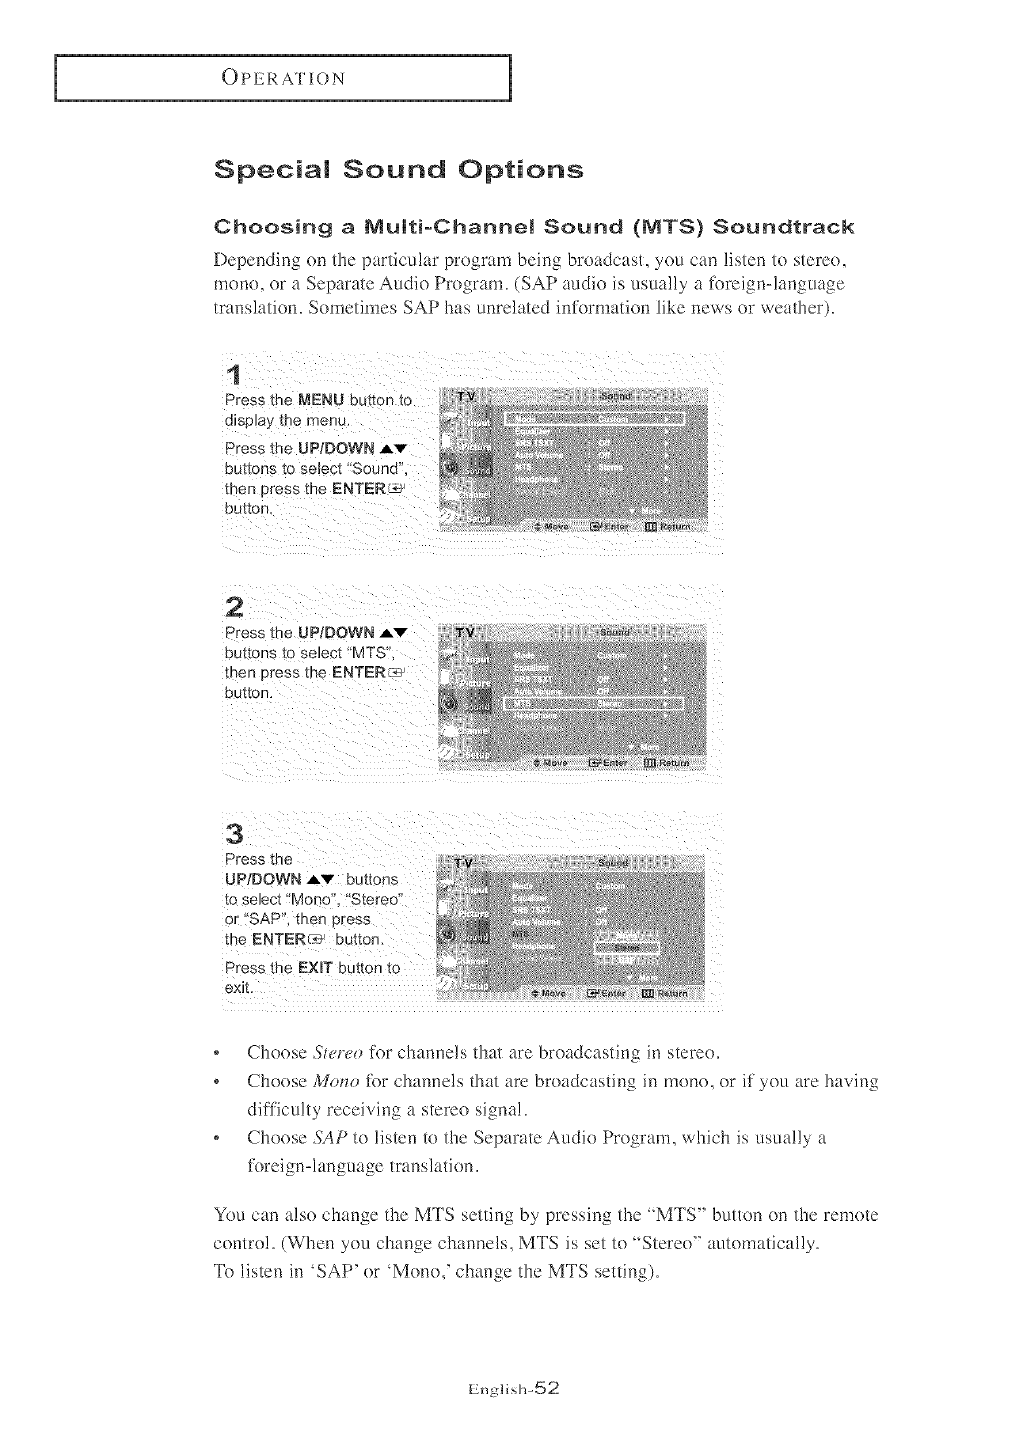
Choosing a Multi-Channel Sound (MTS) Soundtrack
Depending on the particular program being broadcast, you can listen to stereo,
mono, or a Separate Audio Program. (SAP audio is usually a {breign-language
translation. Sometimes SAP has unrelated information like news or weather).
1
Press me MENU button co
d{spJa_ me menu.
Press the UP/DOWN Av
buttons to select "Sound'
men 3ress the ENTER_ _
DU[IOn.
2
Press the UP/DOWN Av
buttons [o select "MTS
men "_ress the ENTERs],
button.
3
Press me
UPtDOWN _v buttons
[o se_ec_ Mono", "Stereo'
or"SAP men Dress
the ENTER_ button
Press the EXIT eutton to
exit
, Choose Stereo %r channels that are broadcasting in stereo.
, Choose Mm_o tbr channels that are broadcasting in mono, or if you are having
difficulty receiving a stereo signal.
* Choose £AP to listen to the Separate Audio Program, which is usually a
tk)reign-language translation.
You can also change the MTS se_ting by pressing the "MTS" button on the remote
contro!. (When you change channels, MTS is set to 'Stere()" automatically.
_[b listen in 'SAP' or 'Mono,' change fi_e MTS setting).
English-52
OPERATION
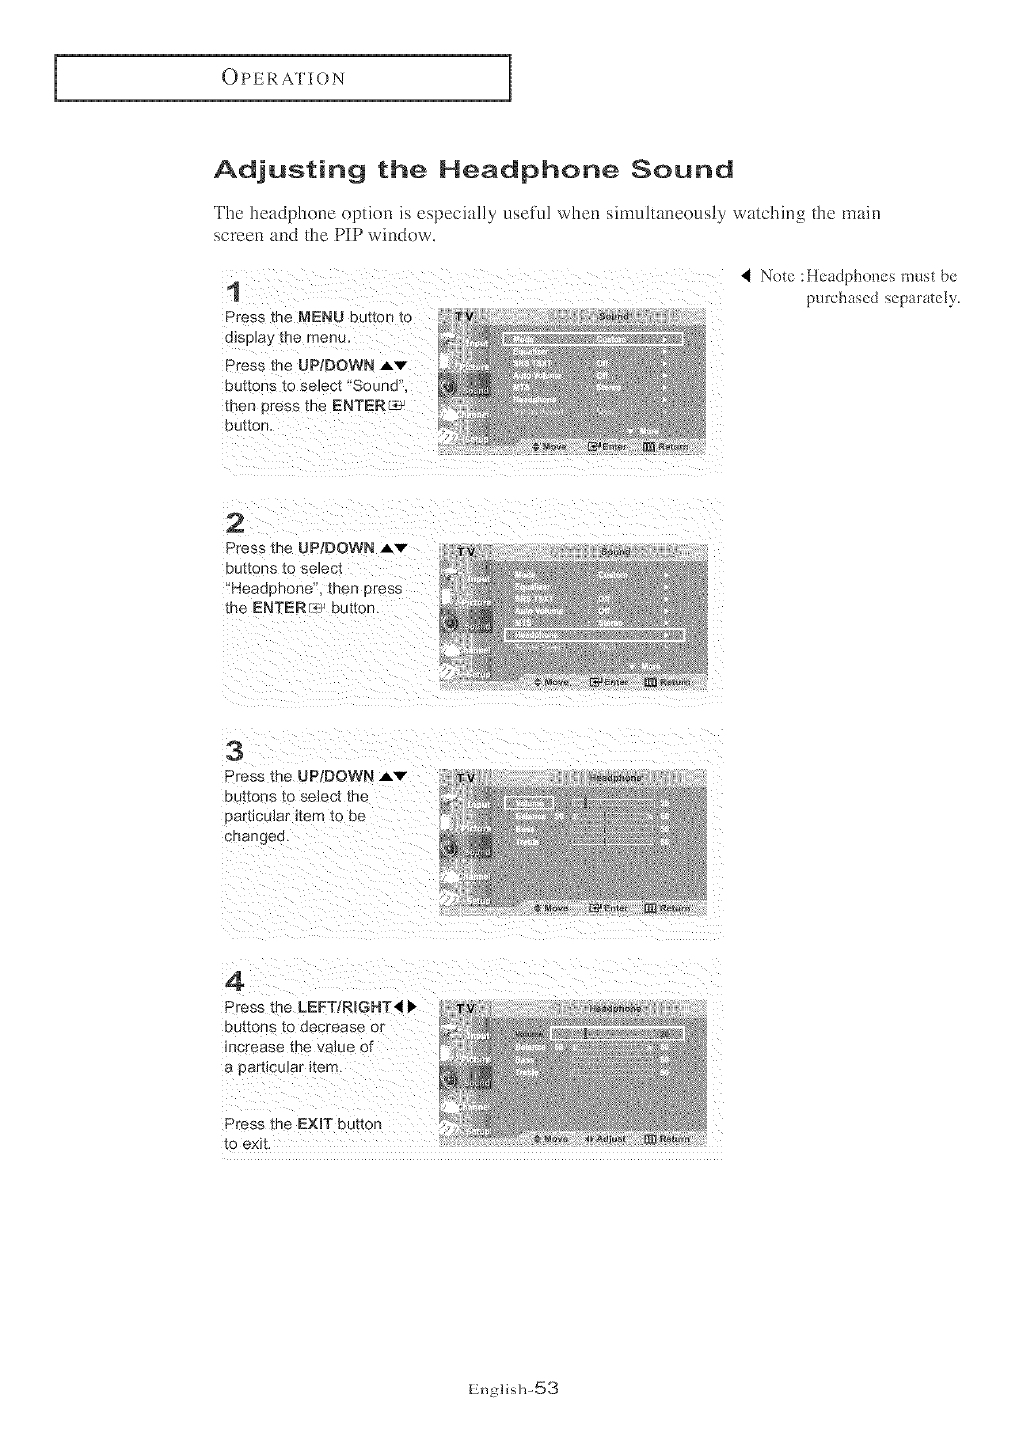
Adjusting the Headphone Sound
The headphone optkm is especially useful when simultaneously watching the main
screen and the PIP window.
1
Press the MENU button to
display the menu,
Press me UP/DOWN Av
bub:oes to select "Sound*
[r_en nl _ss me ENTER _J_
DU[[On,
Note :Headpho_es must be
purchased separately.
2
Press me UP/DOWN Av
buttons [o se]ecl
"Headonone .men eress
the ENTERr_:_' button,
3
Press the UPiDOWNAv
Du[[ons_o selectthe
DartlcJlarttemtc De
cnangee.
4
Press t/Le LEFT/RIGNT_ l_ u._d._*_
buttoes [o eecrease or
increase me value of
a parhcu_er _terr
Press me EXIT button
English-53
OPERATION
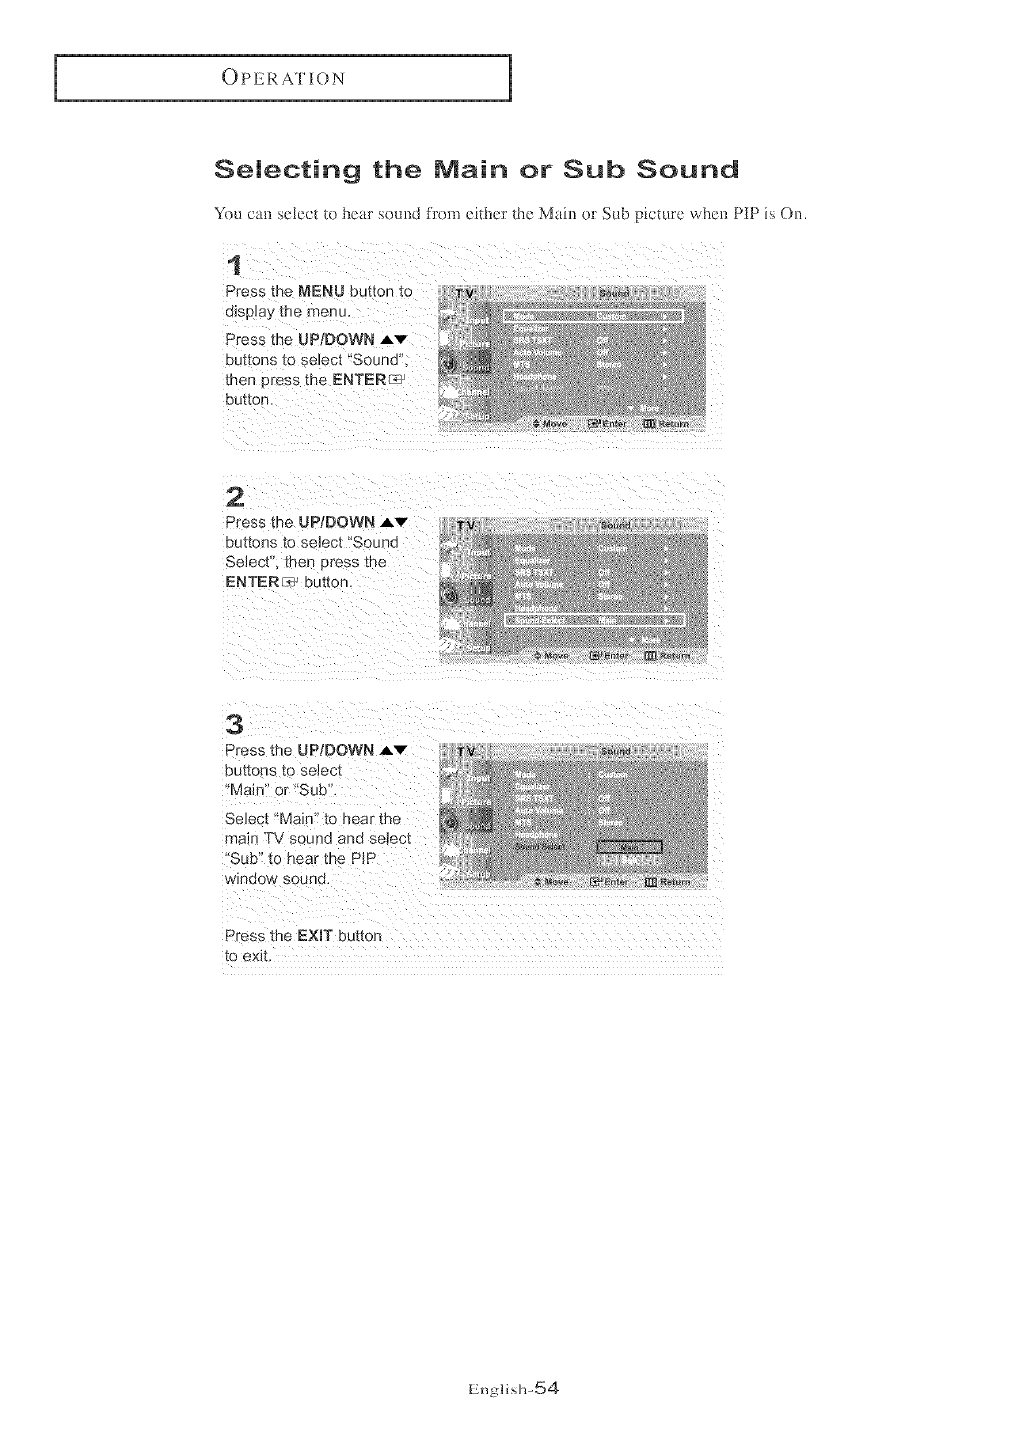
Selecting the Main or Sub Sound
YOUCaD select to hear SOUDd flora either tile Mahl o_ Sub picture whel_ PIP is On.
1
Press the MENU button to
OISPlay [ne menu,
Press the UPIDOWN ,Av
buttons to select "Sound'
met press me ENTERIng'
DU[_Dr]
2
Press the UP/DOWN ,Av
DUt_DnS10 select Bound
Select' men Dress the
ENTERP. Din[Dr
3
Press the UP/DOWN Av
DU[[C_S[D seJeDl
'Main' 9r "Sub".
Select "h lain [o near me
13a!n TV sc _nu ana seleD[
Sub" to hear the PIP
window sound.
Press me EXIT button
[o exit
Englis]>54
OPERATION
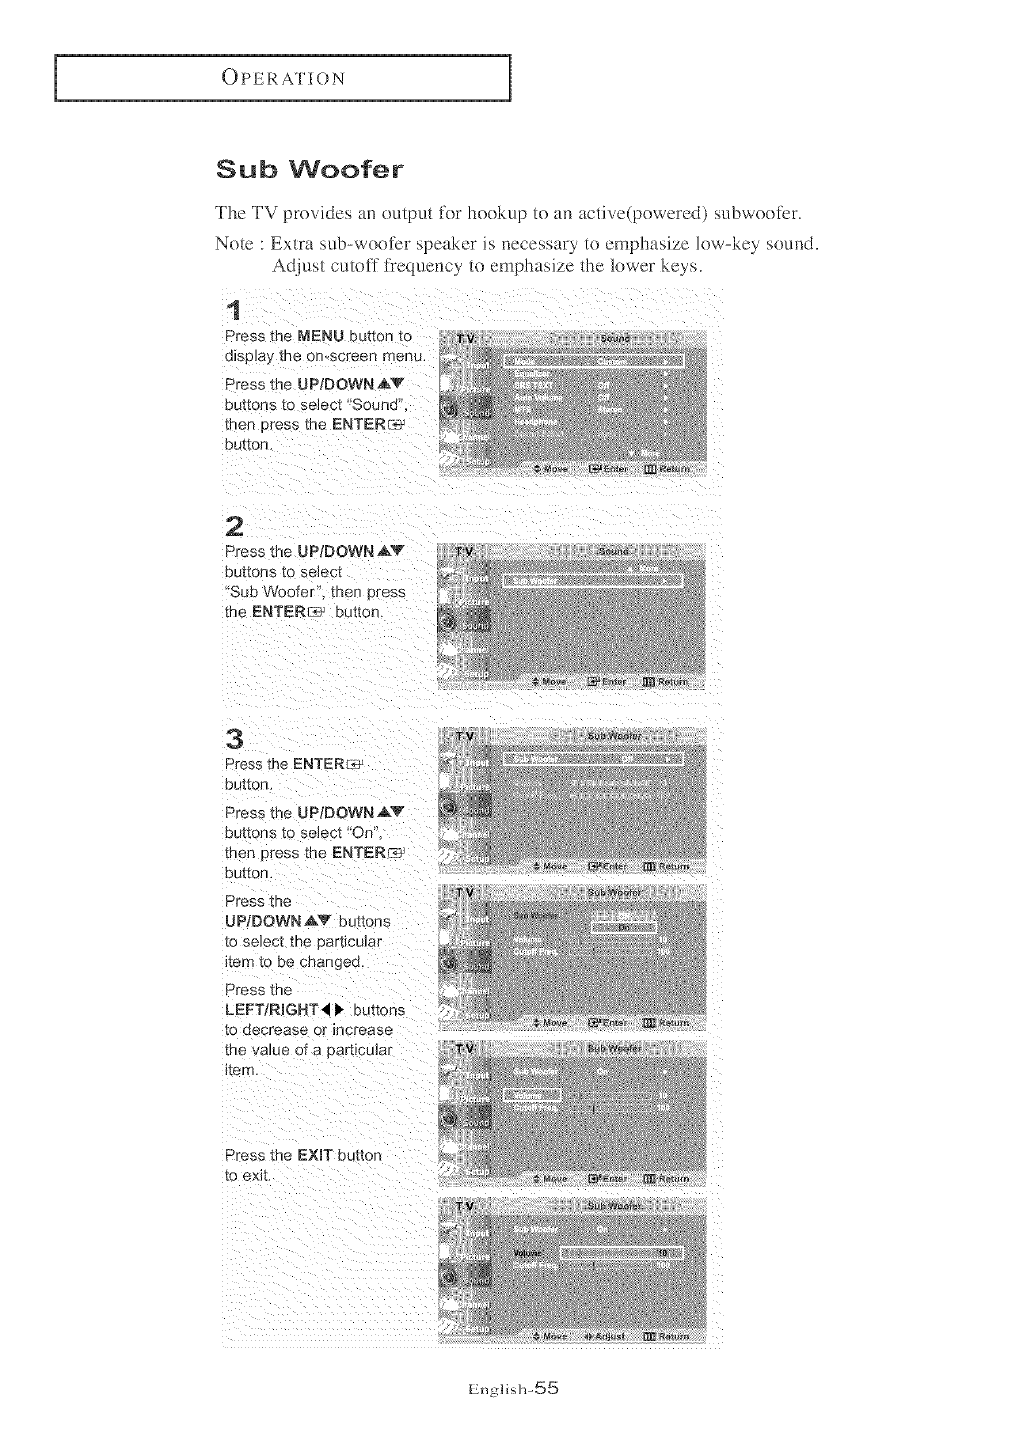
Sub Woofer
The TV provides an output for hookup to an active(powered) subwoofcr.
Note : Extra sub-woofer speaker is necessary to emphasize low-key sound.
Adjust cutoff frequency to emphasize the lower keys.
1
Press [he MENU button to
dispJa} [ne on-screen menu
Press t/Le UP/DOWN A'V
Buttons _o select "Sound'
men press the ENTERr:_
Dutton
2
Press [he UPIDOWNAV
DU[[ORS [0 selecl
'Sub Woofer. men Dress
the ENTER_ button.
3
Dress the ENTERr_,
button.
Press the UP/DOWN ,_"
buttons [o select "On"
then 3"ess the ENTERc_
button.
Press the
UP/DOWN _.V buttons
[o select me particular
_tem to be changea.
Press the
LEFT/RIGHT _11, buttons
[o decrease or increase
me value of a nart_cular
_tem,
Press the EXIT button
to exit.
Englis]l-55

OPERATION
Setting the Clock
Selting the c!ock is necessary in order to use the wu'ious timer features of the TV
Also, you can check the lime while walching *heTV. (Just press the INFO button),
1
Press the MENU button to
o_sp_ayme on-screen menu,
Press the UP/DOWN Av
buttons to select "Setup.
t_en Press the ENTERs'
DIS[Ion.
2
Press the ENTERed3 buttor
to select "Time men Dress
me ENTER_ _ button to
select "CIocr,.
•
Press the UP/DOWN Av
buttons repeatedly until the
correct "Hour" appears.
After me nour _s emereu
Dress the LEFT/RIGHT4 I,
_u_cns to seJect "Minute.
Press the UP/DOWN ,,L'v"
buttons until the correct
"Minute" appears.
Press the LEFT/RIGHT,I 1,
PUt, OnS _0 se]ec_ am;Din
anu adjust wRb the
UP/DOWN Av Mmons.
Note : YOucan also set the
time using the numeric
buttons on the remote.
Press the EXIT button to exit.
English-56
OPERATION
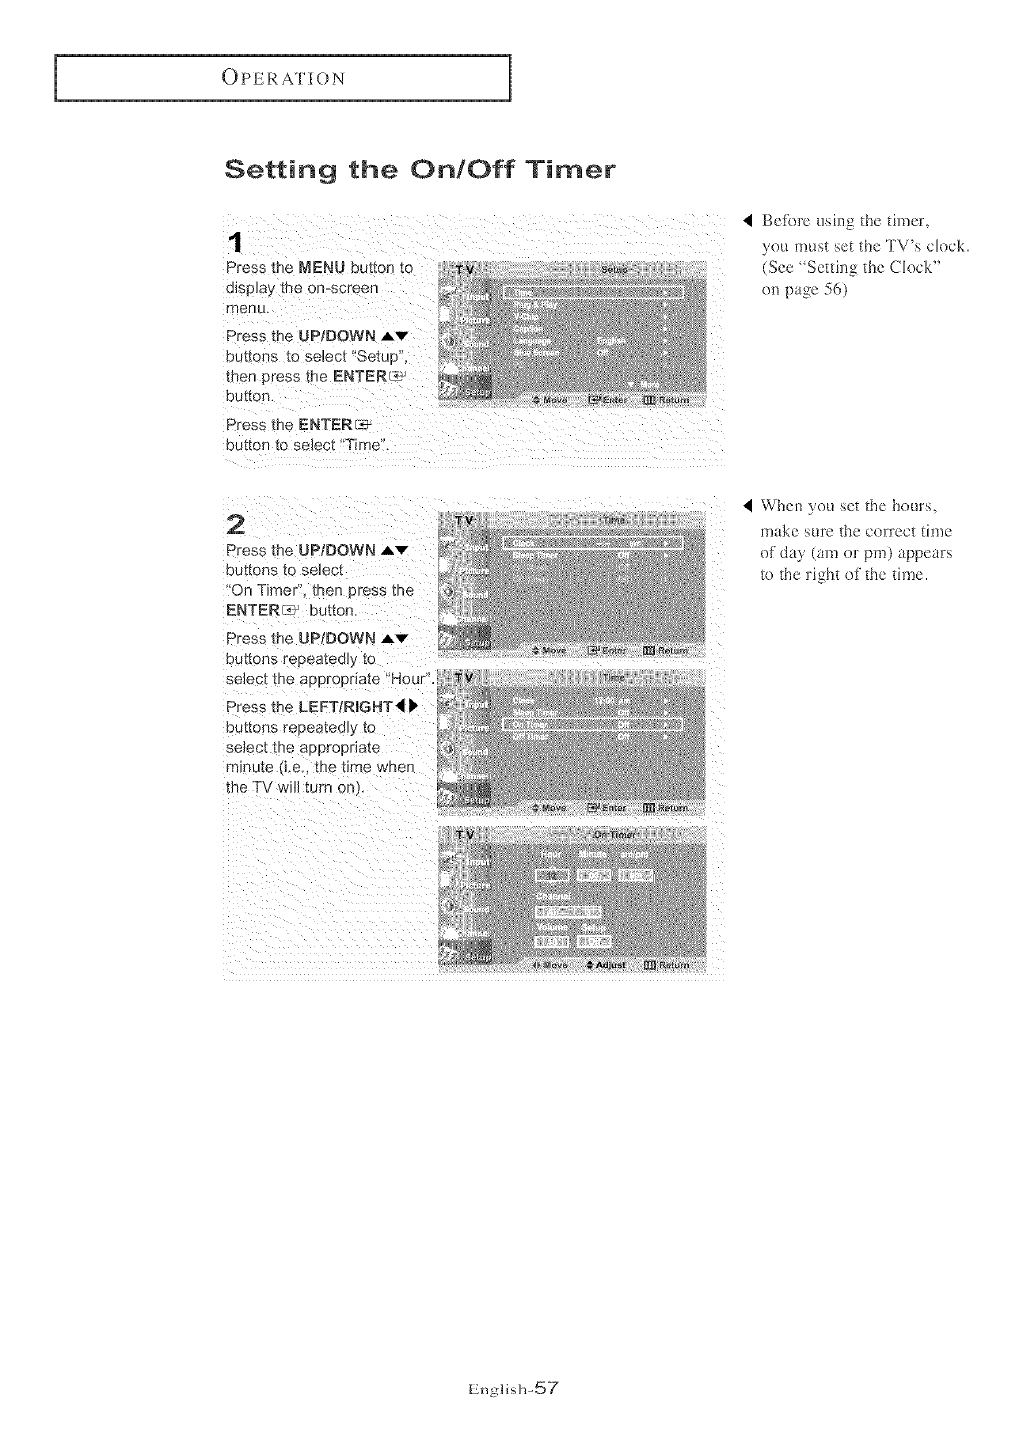
Setting the On/Off Timer
1
Press me MENU button tc !"v,_y_j_
o_spJay_ne on-screen 4 _
@
menu
Press t_ eUP,DOWN Av i_
DUEtOnS 1_OseJect "Setuu "_
tt_er press the ENTERL_
butvon
Press the ENTERI_
button to select "Time'
M_Ve _ En_e_ _ Re_em
<Be%re using the timer,
you must set the TV's clock.
(See "Setting the Clock"
on page 56)
2
Press tne UPtDOWN A_"
buttons }:o selec[
"On Timer' men cress me
ENTERS' button.
Press the UP/DOWN _v
buttons repeatedl} 1o
select the apDroeriate "HouK'
Press the LEFTiRmGHT_
buttons reeeatedJy to
seJec[ me a[0propnate
m_nute e.. mebme wnen
the TV will turn on
Mere [_a _rl¢_ [_ Rel,_am
<When you set the hours,
make sure the correct time
of day (am or pro} appears
1othe right of the time.
English-57
OPERATION 1
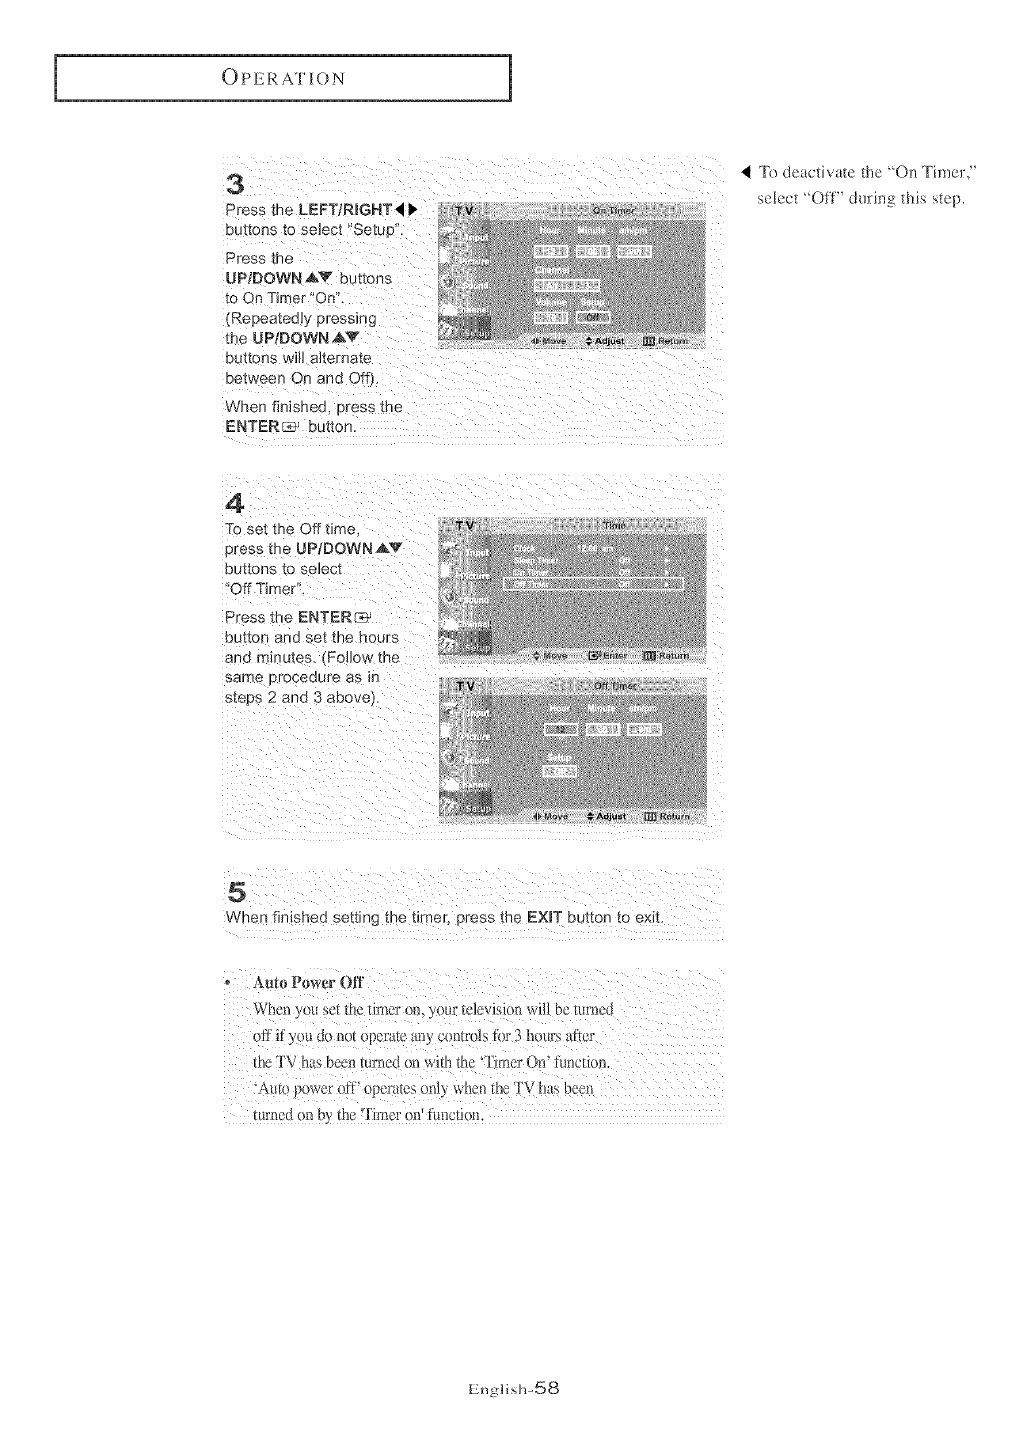
3
Dress the LEFTIRmGHT _ P"
buttons to select "Setuc
Press the
UP,DOWN ,&V buttons
to On Timer "On
(Repeatedly pressing
the UPtDOWN _v
eut[ons will allernale
oe_ween On and OffL
When fiNshed. Dress me
ENTER_ _ buttor
Te deactivate the 'On Timer,"
select "Oft"' during this step.
4
To set me Off time.
Dress the UP/DOWN,AV
buttons to se]ec[
Off Timer
Press the ENTERr_
button ano set the hours
an(] minutes. (Follow the
sarne )roceaure as in
s_eps 2 and 3 above
g N_va [_a Er_*ar _ _,_lum
When finished sett!ng the timer, press the EXiT butt0n to exit.
turned on by the 'Timer on function.
English-58
OPERATION
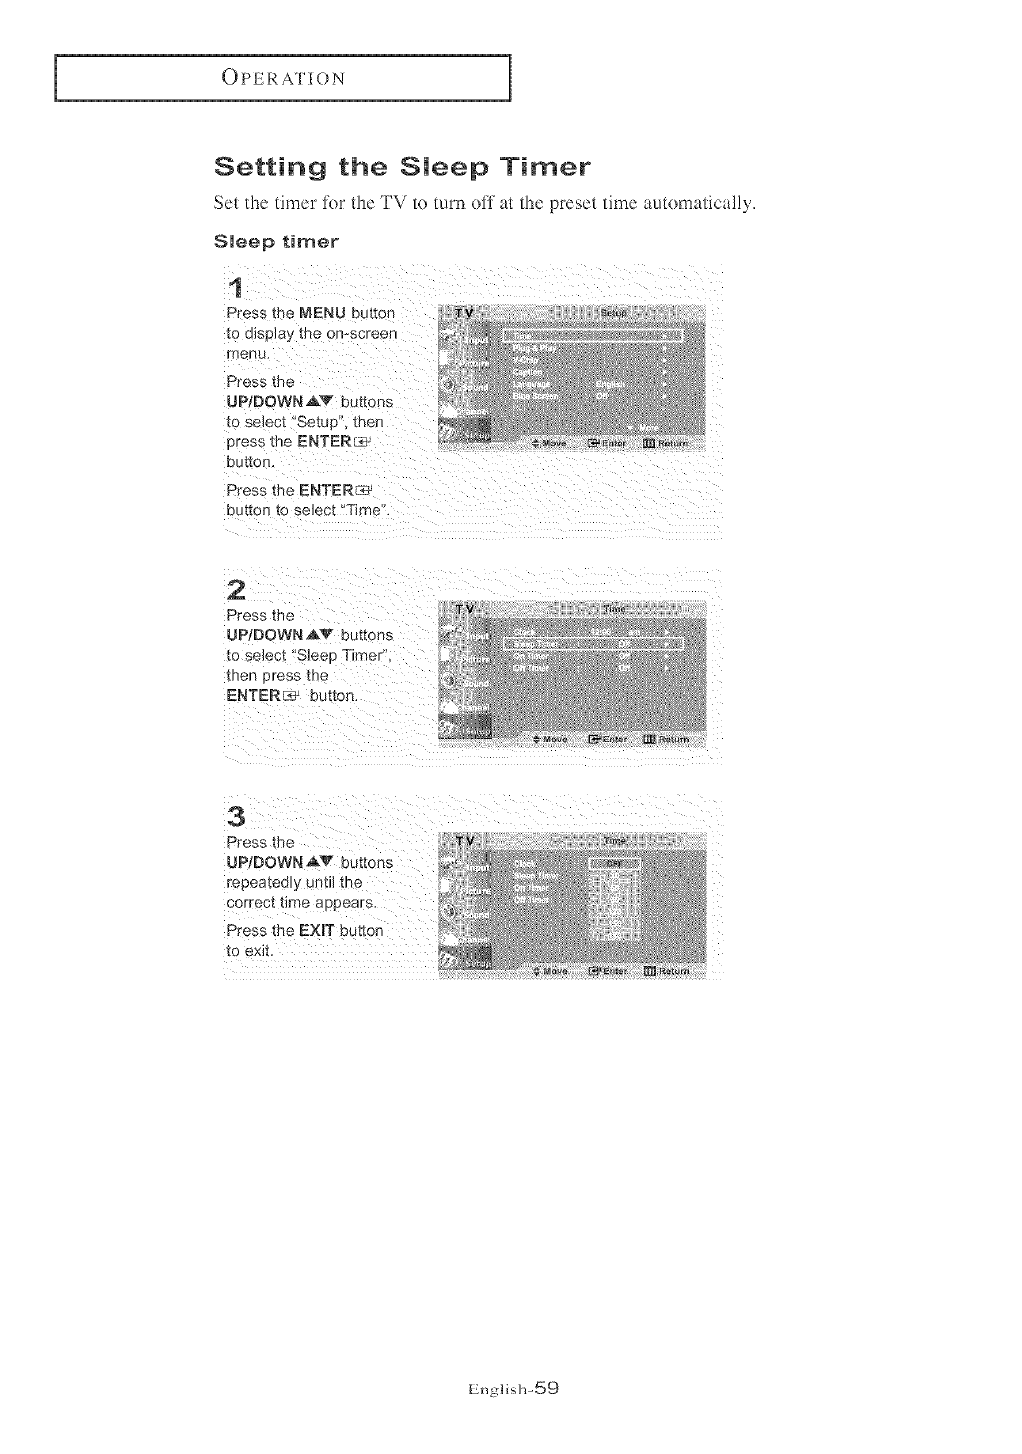
Setting the Sleep Timer
Set the timer tbr the TV to turn off at the preset time automatically,
Smeep timer
Press the MENU button
menu.
UP/DOWN AV buttons
Press the ENTER[_
_o se]÷ct !:sleep Timer '_,
then press the
repeatedly until the
to exit.
English-59
OPERATION
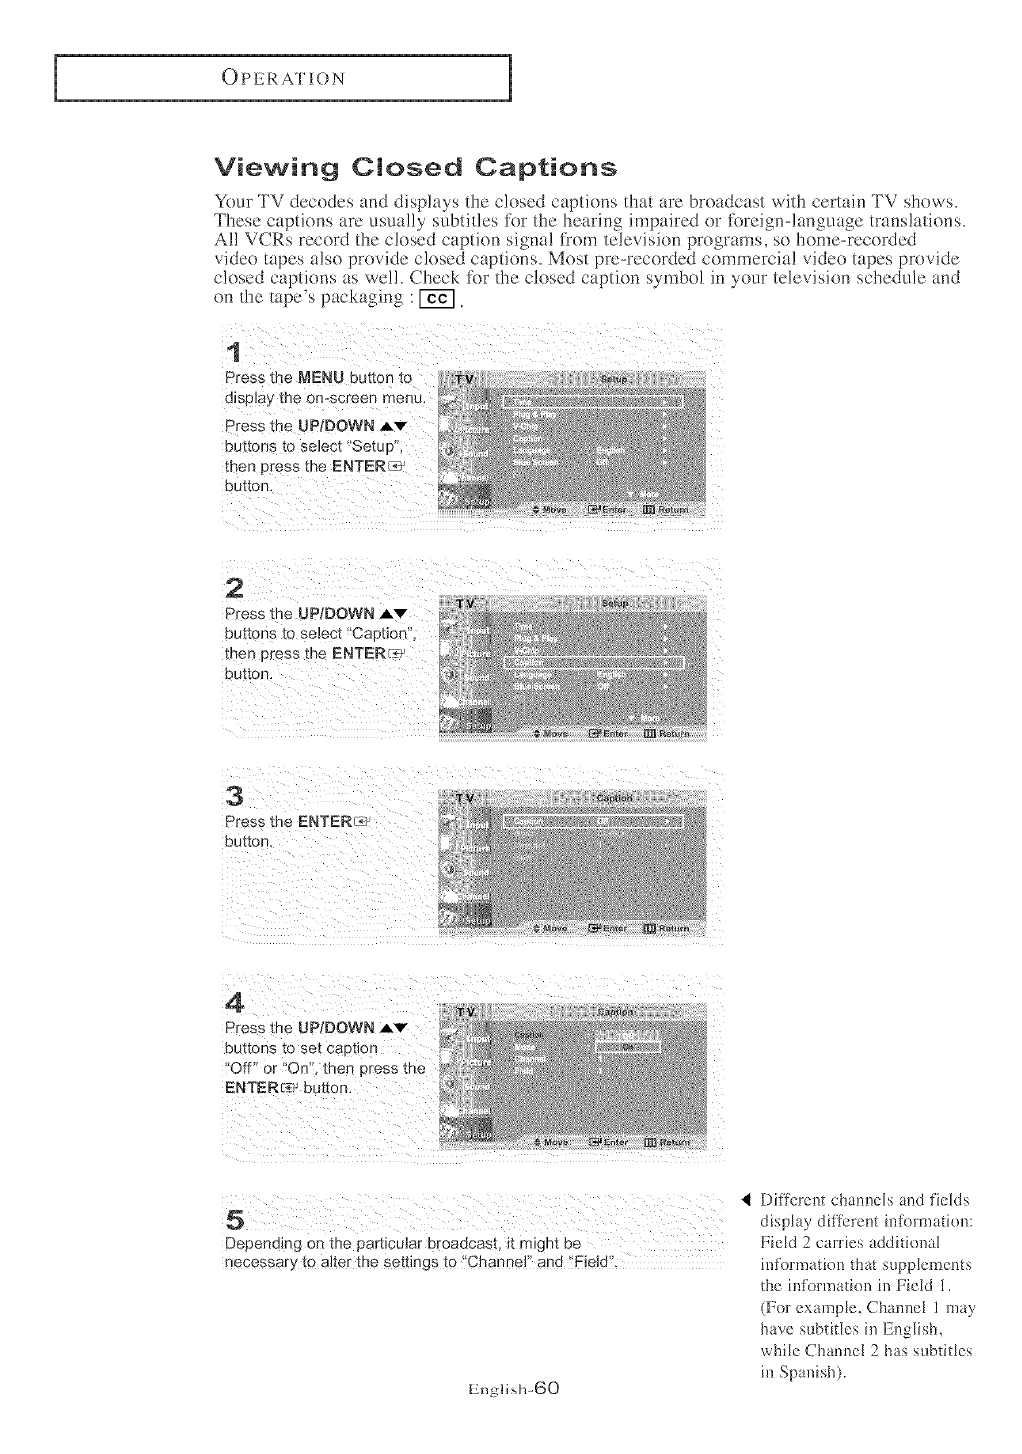
Viewing CJosed Captions
Your TV decodes and displays the closed captions that are broadcast with certain TV shows.
These captions are usually subtitles tk)rthe hearing impaired or toreign-language translations.
Al! VCRs record the closed caption signal liom television programs, so home-recorded
video tapes also provide closed captions. Most pre-recorded commercial video tapes provide
closed captions as wel!. Check tk_rthe closed caption symbol in your television schedule and
on the tape's packaging : _.
Press the MENU button to
display the omsc[een menu.
buttons tO select _'Setup'!;
Press the UP/DOWN A'v"
buttons _o select *Caption",
then press the ENTERs< _
Different channels and t'idds
display different int'ormation:
Depending on the particular broadcast, it might be Field 2carries addit[or4t[
necessary to alter the settings to _'Channe]"and 'FieldL [llfo]:Hlatk)ll that supplements
the mfo!:nlation in Jl'ieJd 1.
(For exampJe, ChamleJ 1 may
have subtitJes ill English,
while Channel 2 has subtitles
ill Spanish).
English-B0

OPERATION
6
Press the UP/DOWN Av
buttons to select "Mode
men press the ENTER_
butIon,
Press the UP/DOWN _v
buttons to set "Cation o_
'Text thee oress me
ENTERr_ button,
7
Press the UPtDOWN Av
buttons [o select "Channel'
met Dress the ENTER_
buttor
Press the UP/DOWN Av
buttons to select "1" or "2"
men Dress the ENTER _L_
butte r
8
Press the JPiDOWN A'v
PUt[on -stO select "Field
men 3ress me ENTER{_
button.
Press [he UP/DOWN ,Av
DUttons [o select "1" or "2"
men :)ross the ENTERL_ -
button.
Press the EXIT button to
exit
Englisl>61
OPERATION
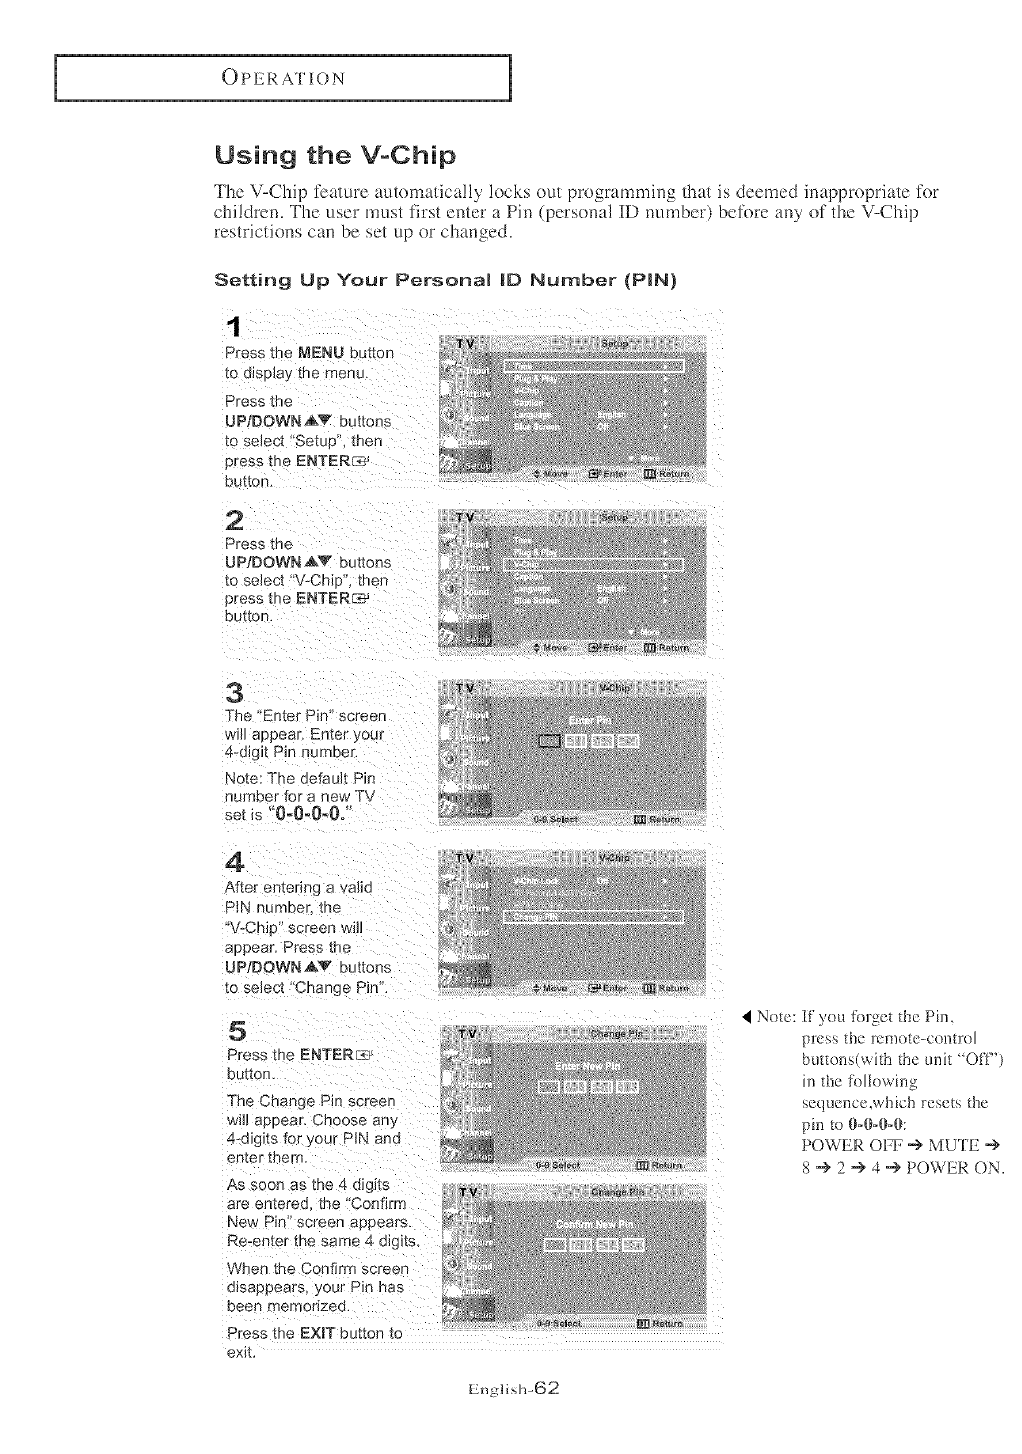
Using the V-Chip
The V-Chip feature automatically !ocks out programming that is deemed inappropriate for
children, The user must first enter a Pin (persomfl ID mm_ber) betbre aW of the V-Chip
restrictions can be set up or changed,
Setting Up Your Personal JD Number (PIN)
1
Press me MENU Duller
[o a_spJa_the menu.
Press the
UPJDOWN AV buttons
[o select "Setue"_ then
r_ress the ENTERC-__.'
DL [(on.
2
Press the
UP/DOWN akV buttons
to select "V-C_- 3 then
oress the ENTERC-_
button.
3
The 'E _ter Pin" screen
w_Happear. Enter you*
4-d_gJtPin number.
Note: The default Pin
numeer for a new T\*
set is "O_O-O-Oo
4
After entedng a vahd
PIN r ameer, me
°V-Cmo screen will
appear. Press the
UP/DOWN AV Duttons
[0 select "Change Pin".
5
Press the ENTERC_b
but[on.
The Change Pin screen
Nill aeeear. Choose any
4-digits for your PIN and
eerie f _ee[r/,
As soon as me 4 digits
are entered the "Confirm
New Pin" screen aeeears.
Re-enter the same 4 digits.
Whee me Confirm screen
o_sappears, your Pin has
eeen memorized.
Press the EXmTbutton to
exit
<Note: If you %rget the Pin,
press the remote-cont]ol
b{_ttons(with the unit "OFF')
in the tbllowing
sequence,wMch resets the
pin to 0-0-0-0:
POWER OFF ..€ MUTE "->
8 -'> 2 -'> 4 -->POWER ON.
English-62

OPERATION
How to EnabmeiDisabme the V°Chip
Note : PIP operation is disabled when the V-chip is on.
1
Press the MENU button _'r NI _*_
to o_spJa_me menu,
Press the _ ,
UP/DOWNeY buttons _ _,_
to se_ect"Setue men
Dross me ENTER_
button,
2
Press the
UP/DOWN AV buttons
[o select "V-CI- J men
Dress the ENTERCT_
button
•
The "Enter Pin" screen
will aeeear. Enter gou_
4-dLqit Pin numeer.
Note: The default Pit
numeer for a new T\/
set is "0-0-0-0]'
4
The "V-Chic screen will _._
appear, and "V-Chic
Lock" will be selected.
To enable the V-Chie
[eature, press me
UP/DOWN _,'V buttons
so that the "V-Chip _ M tm_e_,_
Lock" is set to Yes.
(Pressing me
OP/DOWN _,_V buttons
will alternate between
_On" and "Off".
Press the EXmTbutton
to exit.
English-63
OPERATION
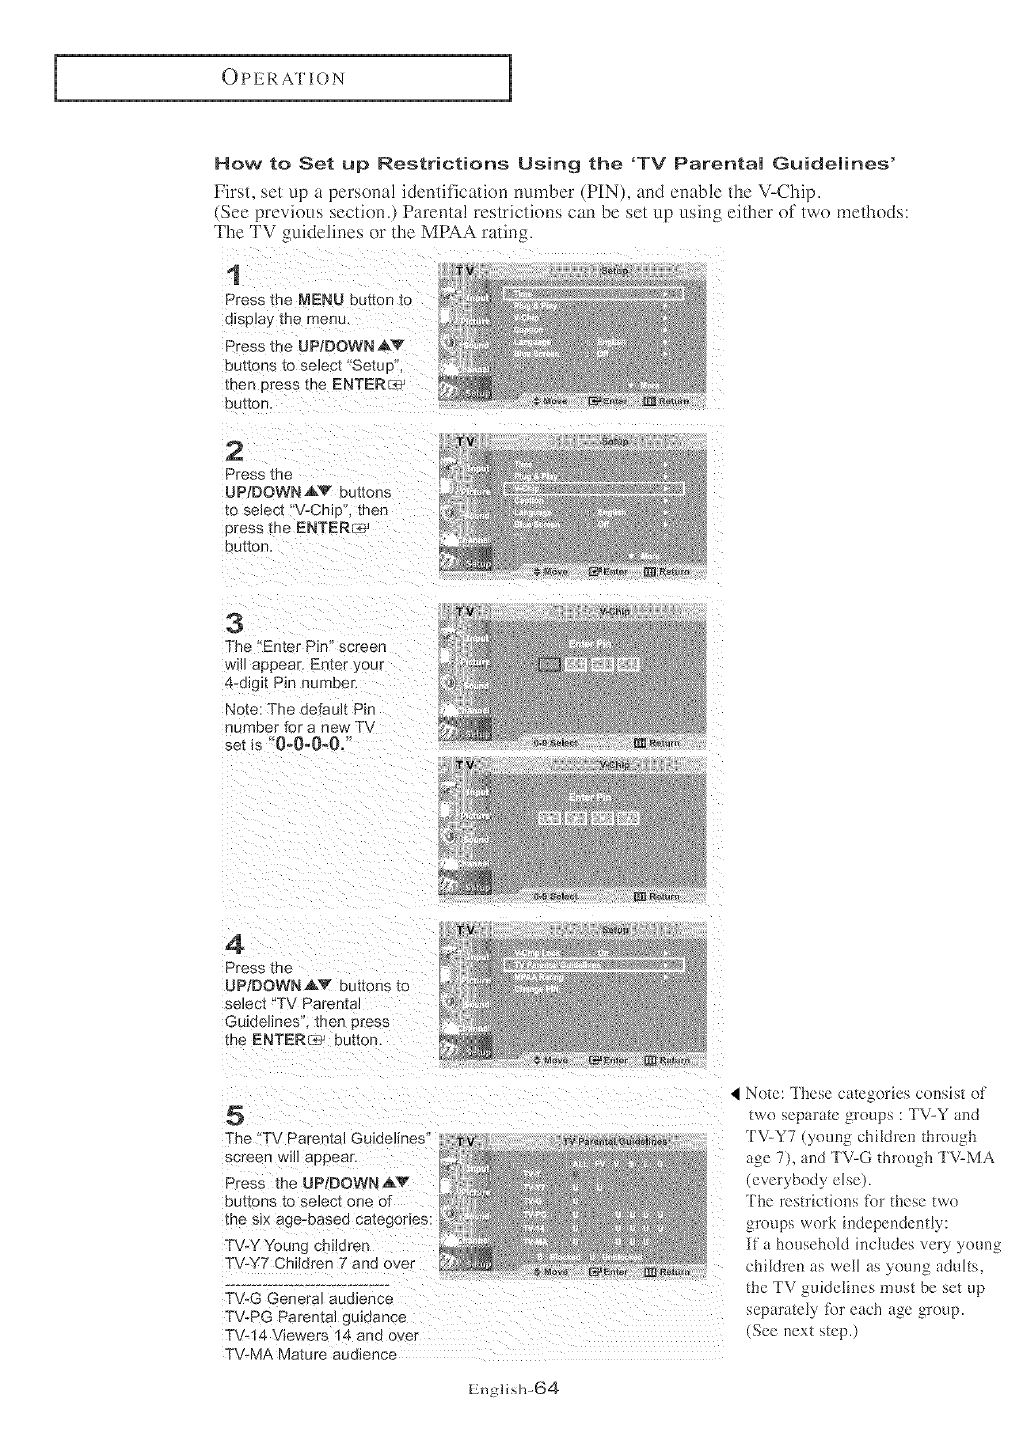
How to Set up Restrictions Using the 'TV Parental Guidelines'
First, set up a persona! identification number (PIN), and enable the V-Chip.
(See previous section.) Parental restrictions can be set up using either of two methods:
The TV guidelines or the MPAA rating.
1
Press the MENU button to
displa)_ me menu.
Press toe UPiDOWN,AY
buttons to select "Setup
men press the ENTER_ _
DU[_on,
2
Press the
UPIDOWN AV buttons
to select "V-C]- ": then
Dress _le ENTER_
DU[IOn,
3
The "Enter Pin" screen
will appear, Enter you_
4-d_git Pin number.
Note: The default Pin
_umber lot a new TV
set _s '0_0-0-0,':
4
Press the
UPtDOWNAV buttons to
select "TV Parenta]
Guidehnes men press
me ENTER_ _ button.
8_te_
5
The TV Paren_aJGuidelines"
screen w_ll appear,
Press the UP/DOWN A'_g
outruns _o se_ec_one of
{he six age-based categories:
TV-Y Young children
TV-Y7 Shildren 7 and over
...............................
TV-G Genera_ aumence
TWPG Parental guidance
TV-14 Viewers "4 aria over
TV-MA Mature auolence
Englis]>64
• Note: These categories consist of
two separate groups : TV-Y and
TV-Y7 (young children through
age 7), and TV-G through TV-MA
(everybody else).
The restrictions tbr these two
groups work independently:
if a household includes very young
cMldren as well as young adults,
the TV guidelines must be set up
separately ff)r each age group.
(See next step.)
I OPERATION
5
At this point, one of me TV_Ratings is se_ec[ed.
Depending on your existing setuE me coJor of the _e_er "U" or "B" will be hlg_-lighted
[cnaegeu _o ye.o Jr)._U= Unblocked. B= Blocked
When me co,or of tne U" or "B" is cnangea, press the ENTER(_ab _b£[on _:oDtOCKor une_ock the
category,
To select a different TV-Rating. press the UP/DOWN _.v buttons and then repeat _ne brocess.
To EXIT this screen oress MENU(M' again
Note I: The TV-Y7. TV-PG. TV-14 and TV-MA 7ave additional oetlons.
See the next step _o change any of the f011owing sub-ratings:
FV : Fantasy Violence
D :Sexua] suggestive Dialog
_ : Ad_J_ Language
S SexuaJ s_tuabon
: Violence
Note 2: The V_ChID w_llautomat_caJly block certain categories that are "more "estr_ctwe.
For exame_e, if you Mock "TV-Y' camgery, men TV-Y7 will auto naticall:y be b_ocKec
Similarly, if you o_ocKme TWG category, men a]l the categories in the "young adult'
groul: will be b]ockeo t TV_G. TV-PG. TV-14 ana TV-MA'L The sub-ratings (D, L, S V}
work together sJm_ladv. _'See next secuon.
6
_tow to set the FV. D. h S and V sub-ratings
First. seJecl one of these TV-Ratings: TV-Y7. TV-PG. TV-14 or TV-MA See Stee 4 on erewous
page,L
Next. while the TV-Rating is selected, repeatedly eress the LEFT or RIGHT buttons.
This w_/] cycle {nrougn me available sub-rabngs _'FV.L S. D or v.
A highJighted letter ("U" or "B"I will be displayed lot each sub-rating. While the "U" or "B' _s
hJghhghted, press me ENTER{L_ } button to change the sub-rating.
Press MENU{ [] ) once _o save _he TV g JJdel_nes
To select a different T\/-Rating, press me UPtDOWN Av buttons and then repeal me erocess.
To exit thiS screen cress MENU, R:_) once again.
Note: The V-ch_) w_l automat_caW block certain categories that are 'More restnctwe'
For exert o_, if you b_oc_me -L suD-raung in TV-PG. then the "L sub-ratings m TV-14
andTV-MA will automatica ly be b]OcKee
Press the I_{IENUbutton to clear all the screens.
(0r Proceed to the next sectio n, and set up addit!0na I restrictions based on the MPAA codes),
English-65
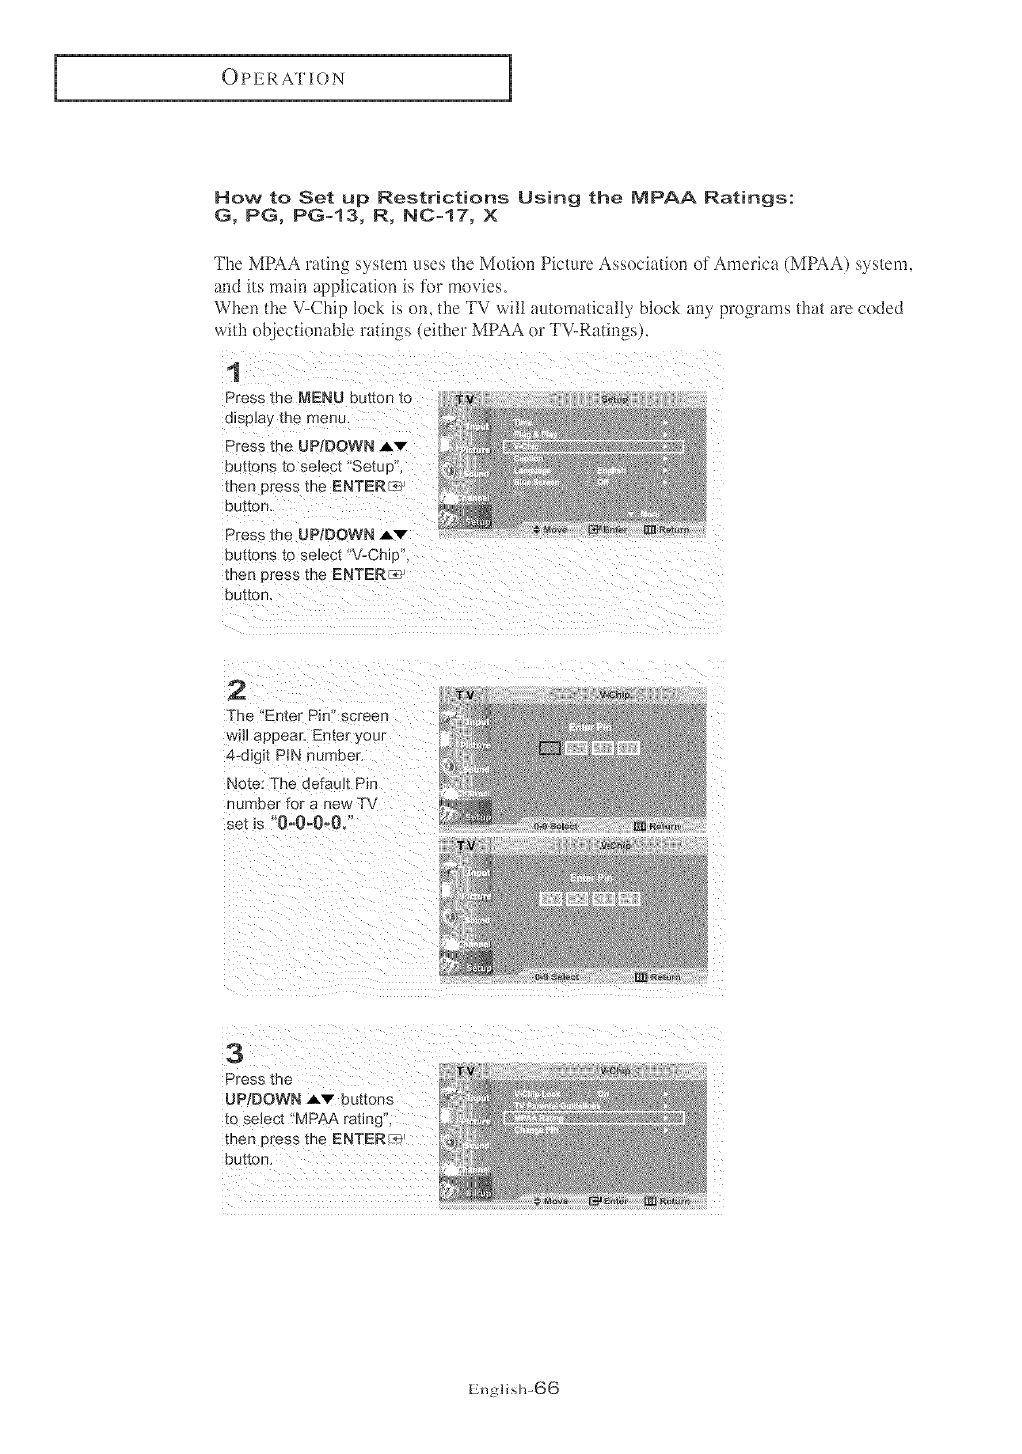
OPERATION
How to Set up Restrictions Using the MPAA Ratings:
G, PG, PG-13, R, NC-17, X
The MPAA rating system uses the Motion Picture Association of America (MPAA) system,
and its main application is for movies_
When the V-Chip lock is on, the TV will automatically block any programs that are coded
with obiectionable ratings (either MPAA or TV-Ratings).
1
Press the MENU button to
displa_ me menu.
Press the UPtDOWN AV
DUttOnS tO select "Setup'
met oress me ENTERS'
DU[[on,
Press the UP/DOWN Av
DtJ_ons io seJect "V-Chip",
men r)ress me ENTER_ j
DU_[On,
2
The "Enter Pin" screen
will apDea_ Enter your
4-d_g_t P_N number.
Note: The default Pin
number for a new TV
se_ is "0-0-0o0. "
UP/DOWN Av buttons
to se!ect "MPAA rating",
button.
English-66
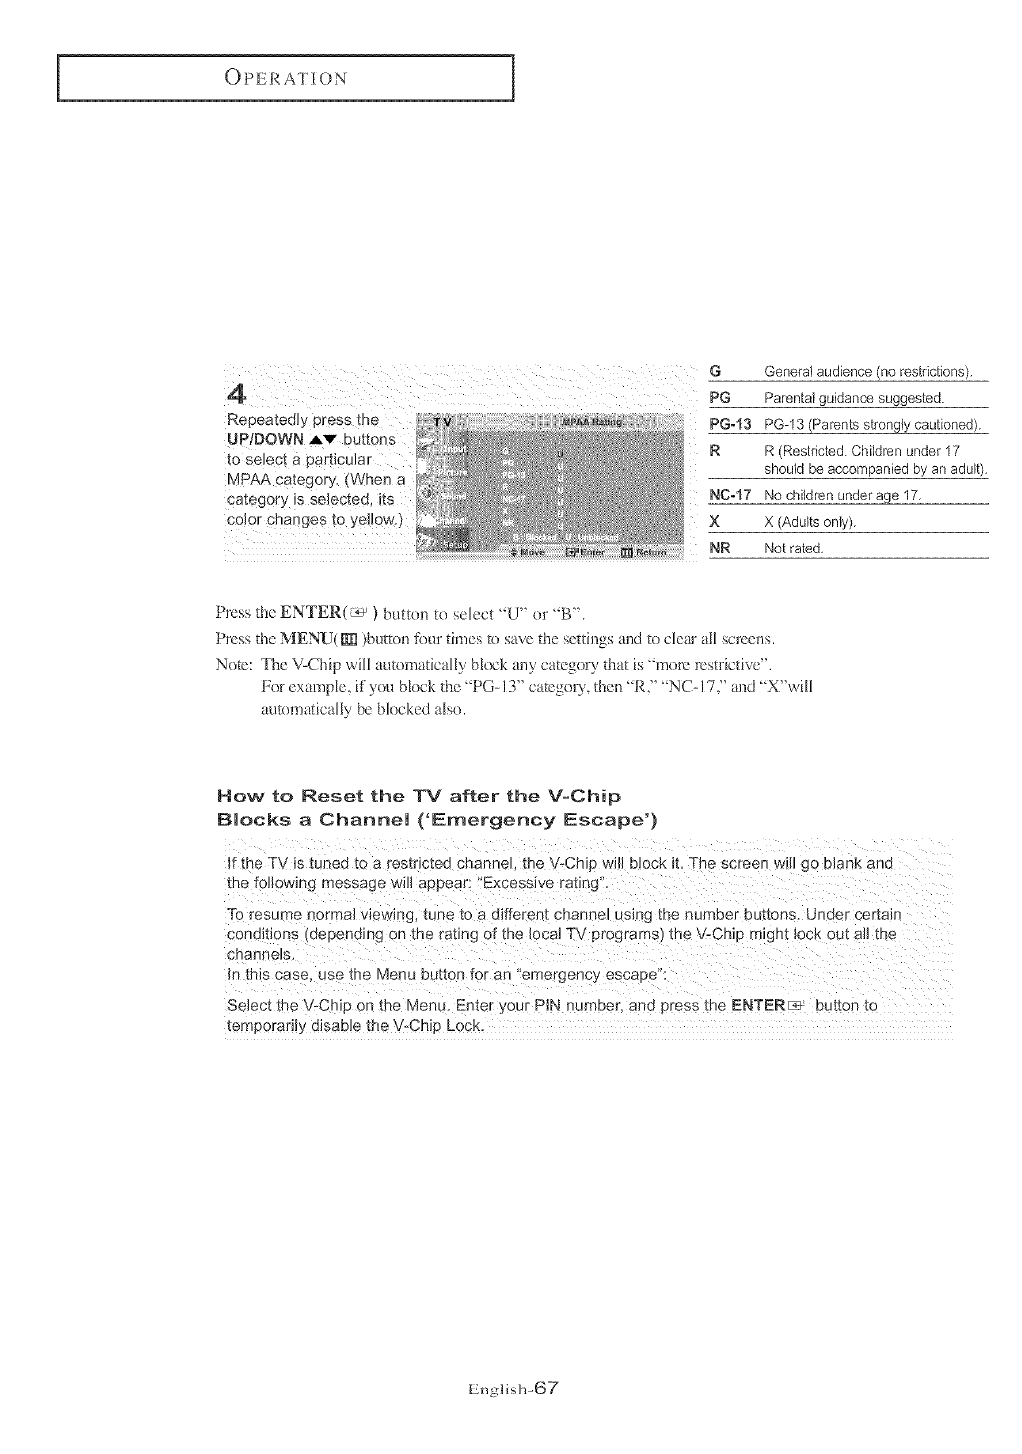
OPERATION
Repeatedly press the
UP[DOWN Av buttons :
t0 select a particular
MPAA c#tegory. (When a
color changes to yellow.)
G General audience (no restrictions).
PG Parental guidance suggested.
PG=t3 PG-13 (Pa rents strongly cautioned).
R R (Restricted. Children under 17
should be accompanied by an adult),
NC=17 No children underage 17,
X X (Adults only),
: NR Not rated,
Press the ENTER(_ ) button to select "U" or "B".
Press the MENIU(RII)button four times _e save the sc_thngsand to dear a[[ screens.
No_c: The V-Chip wHIautomatically Neck any category that is "mere restrictive".
For example, ifyou Neck the "PG- 13" ca_cgoU, then "R 2' 'NC-172' and "X"wil[
m_tema{cally be blocked abx_.
How to Reset the TV after the V-Chip
Blocks a Channel ('Emergency Escape')
If the TV _stuned tc a resmc[ea channel the V-Chic will block _t,The screen w_ll go blank aria
the {ollowmg message will appear: '*Excessive rating
To resume normal wewJng, rune [oa different channel using the number buttons. Under certain
cond_hons meeendmg on tne rating of the local TV programs the V-Chip m_ght lock out aH me
chart elS,
In this case. use the Menu button for an "emergency escape :
Select the \]_Ch_o on the Menu. Emer your PIN numoer, ann press the ENTER_ button to
mmporanl_ d_sable the V-Chi[ LOCK.
English-67

OPERATION m
Color Weakness
This feature enables those with a color weakness to view hna_,_esas
those with normal color vision do.The feature provides nine different color adjustment
layers fl_r red, green and blue.
Press the MENU button to :
d sp ay the or>screen menu.
:Press the UP/DOWN .AV
:buttons to select Setup", then
:press the ENTER_ _ button.
2
Press the UPIDOWN _.v
buttor _ to seCect
'*Color Weakness", then press
me ENTERC* button,
3
Press the ENTER_
DuKon ano "[nen Dress
the UPiDOWN,&V
DuKons to selec(
*On . tflen ores8
the ENTER_ _ button,
4
Press the UP/DOWN ,_v
DuKons [O selecl
"Red". "Green' Blue".
Press the LEFT/RmGHT4
eu_t2ons [o oecresse oF
fflcgease [ne value o_
a particular item.
Press me EXmTbutter
to exit
41This function doesn't work
when the Source is in PC mode,
o37DNIe is in off mode.
English-68

OPERATION
Selecting the Melody
YOUcan hear a melody sound when the te]evisio_ is powered (m or off.
Press the MENU button to
buttons to select _'Setup'_,
the ENTER_ j button.
Press the UP!DOWN Av
Press the EXiT button
English-69
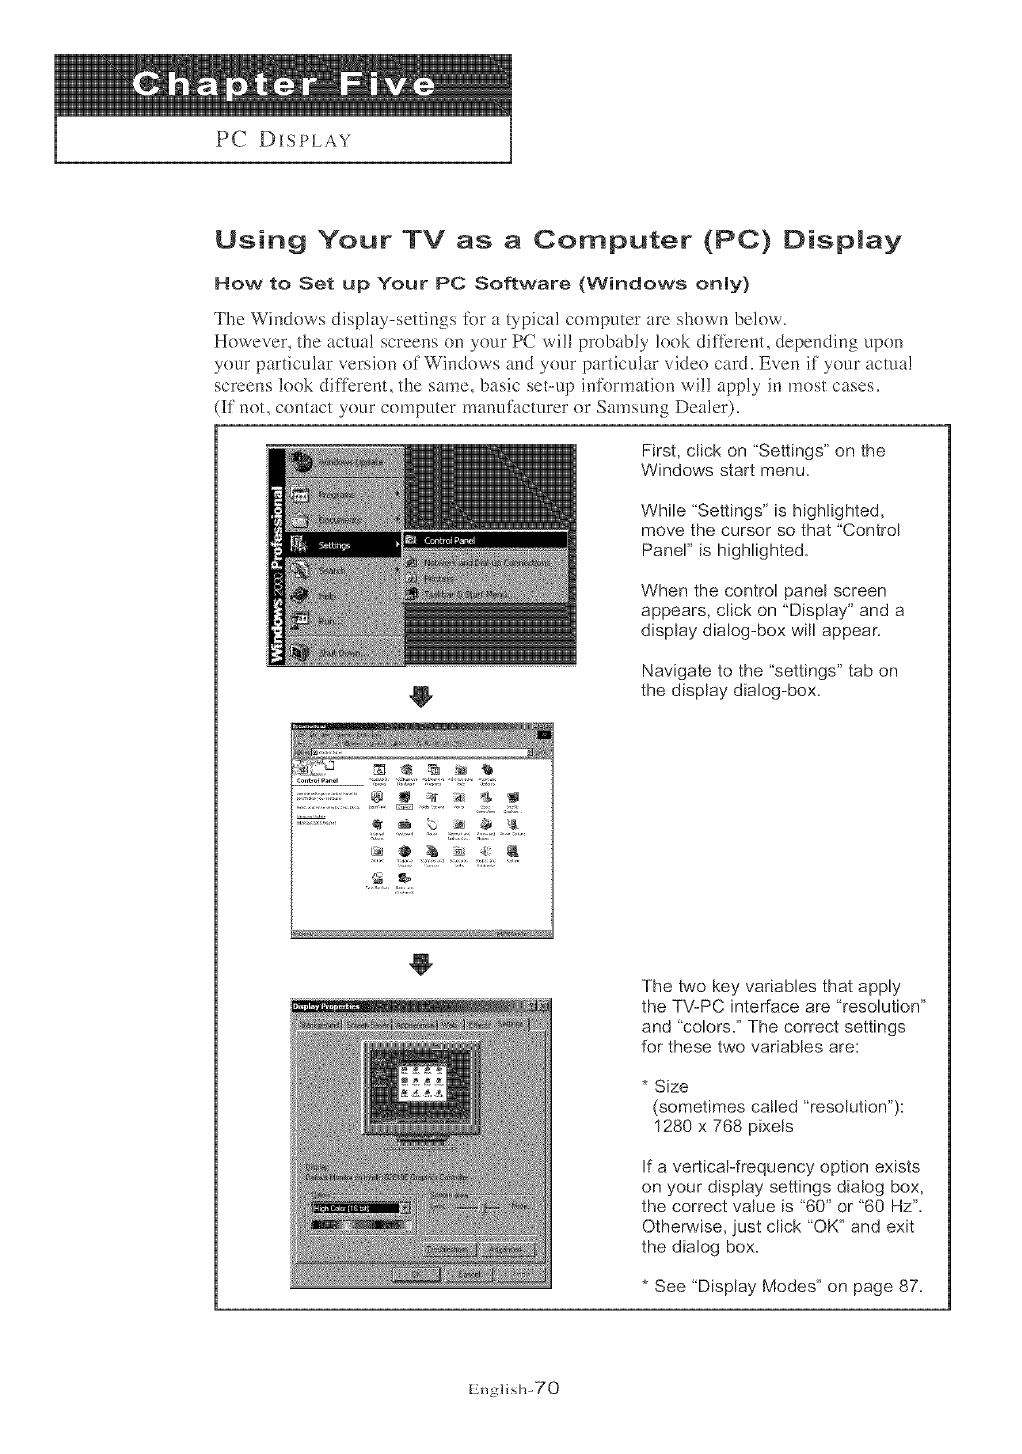
PC DISPLAY
Using Your TV as a Computer (PC) Display
How to Set up Your PC Software (Windows only)
The Windows display-settings ik)r a typica! computer are shown below.
However_ the actual screens on your PC will probably look different, depending upon
your particular version of Windows and your particular video card. Even if your actua!
screens look different, the same, basic set-up information will apply in most cases.
If not, contact your computer manufilcturer o1:Samsung Dealer).
0
First, dick on "Settings" on the
Windows start menu.
While "Settings" is highlighted,
move the cursor so that "Control
Panel" is highlighted.
When the control panel screen
appears, click on "Display" and a
display dialog-box will appear.
Navigate to the "settings" tab on
the display dialog-box.
The two key variables that apply
the TV-PC interface are "resolution"
and "colors." The correct settings
for these two variables are:
* Size
(sometimes cNled "resolution"):
1280 x 768 pixels
If a vertical-frequency option exists
on your display settings dialog box,
the correct value is "60" or "60 Hz".
Otherwise, iust click "OK" and exit
the dialog box.
* See "Display Modes" on page 87.
English-70
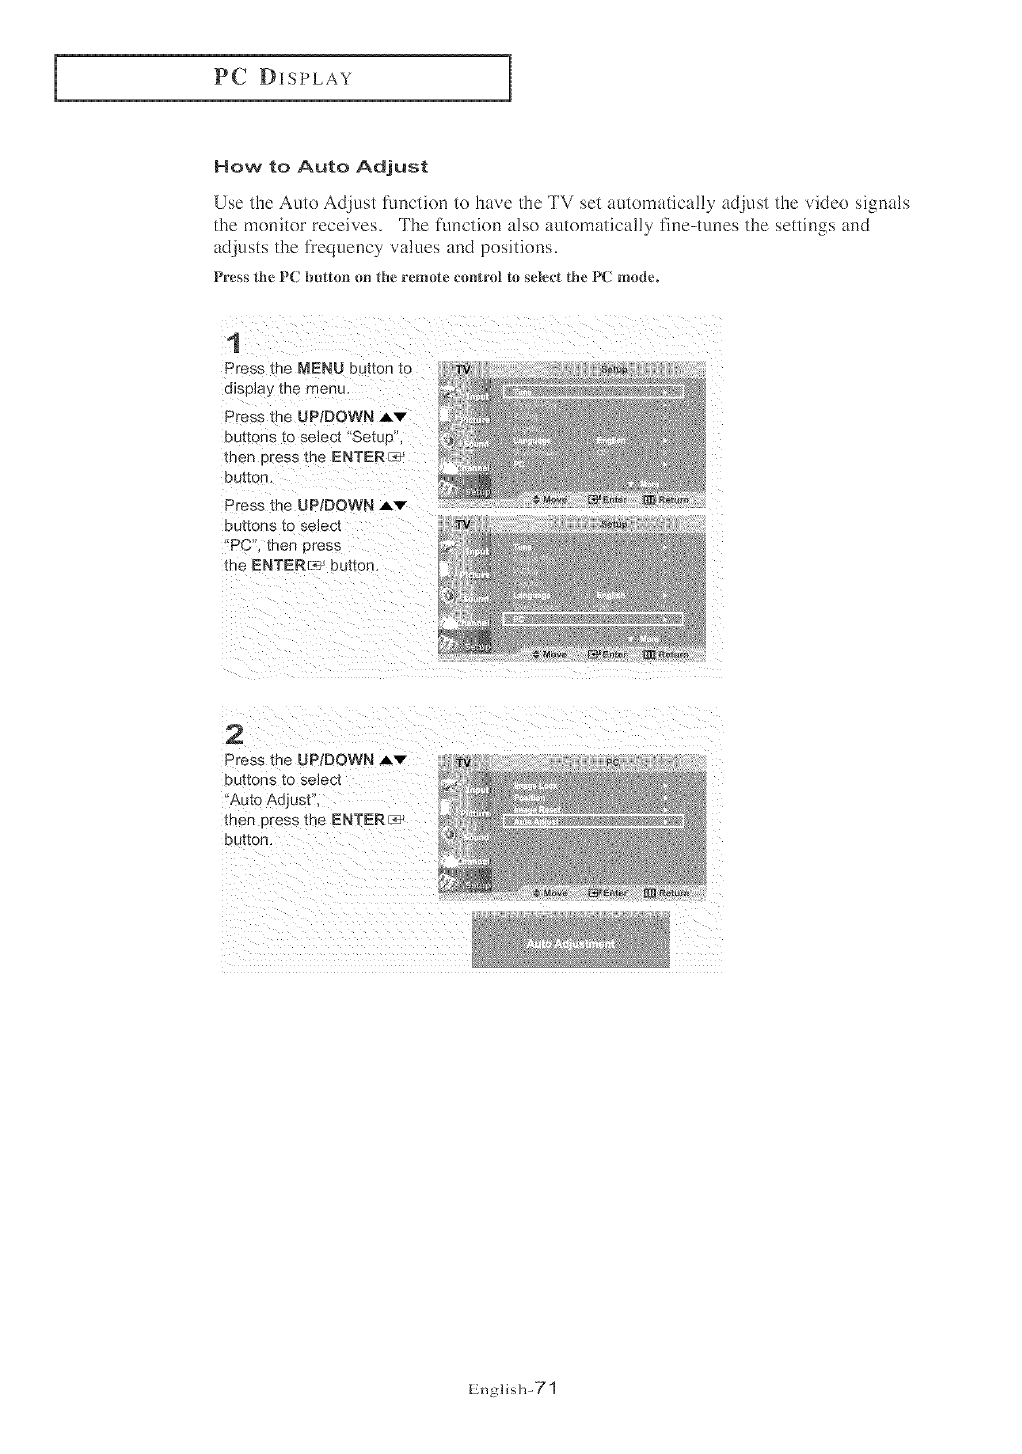
PC DISPLAY
How to Auto Adjust
Use the Auto Adjust fnncti(m to have the TV set automatically adjust the video signals
the momtor receives. The function also automatically fine-tunes file settings and
adjusts the flequency values and positions.
Press the PC button on the rerno_e ce_ltrol to select the PC mode,
1
Press [he MENU button to
display me menu,
Press the UPIDOWN Av
buttons _0 se_ec_"Setup",
then Dress the ENTER_._
button.
Press the UP;DOWN Av
out[el _ to seJect
PC', _nen press
me ENTER;_ ou[ton.
2
Press the UP/DOWN _v
buttons IO se]ec_
'Auto Adjust'
then _re.ss [re ENTER_
DU[[OR.
Englisll-71

PC DISPLAY
Adjusting the Screen Quality
Tile purpose of the picture quality adjustment is to remove or 1educe picture noise.
[f the ]_eise is not removed by fine tmfimg alone, then do the fi'equency adjustments to
the utmost and fine tune agairl. AAer the noise has been reduced, le-a4just the picture
so that it is aligned on the center of scleen.
Press the PC button on the remote control to sek,rt the PC mode.
Note:This function does not work in DVI-Digitat mode.
1
Press the MENU button to
display toe menu.
Press the UP[DOWN Av
Barrens [o select "Setue
men press the ENTKRr-;_'
button,
Press the UP/DOWN AV
DU[[OnS [O selecl
'PC" the - DreSS the
ENTER_ button
_v_ _ Ea_r [m RetUrn
_leve _ Enter rm _t_rr
2
Press the ENTERc_J
button to select
image Lock".
3
Press the UP/DOWN ,_v
buttons to select
Coarse" or "Fine'
men Dress me
ENTER :_-_'button,
Press the
LEFT/RmGHT 41•
bution _ [0 aajust toe
seree-- aua_ty vertica
stripes may appear or me
alcture may be blurry
Press tl- _¢EXIT button to
exit.
<Adjastin£ Coarse>
<Adjusting Fine>
English-72

PC DISPLAY
Changing the Screen Position
Press the PC b_lt{on oll {he remote cont_'o] {o select the PC mode.
Press the MENU button to
dis@By the menu.
press the UP!DOWN .........
buttons to se!ect 'Setup'!,
button.
2
Press the UP/DOWN ,Lv
Duttons to selecz
"PC' men press
me ENTER_ button.
Press [he UP;DOWN ,_,v
buttons to select
'Posltloe . [nen Dress
the ENTERL_3 DU[IOR,
t4ow
3
Press the UPtDOWN Av
buttons [o a(]jus_
the V-Position.
Press the LEFT/RIGHT< ! _
but[oris re aous_
me H-Positior
Press the EXIT button
[o exit
English-73
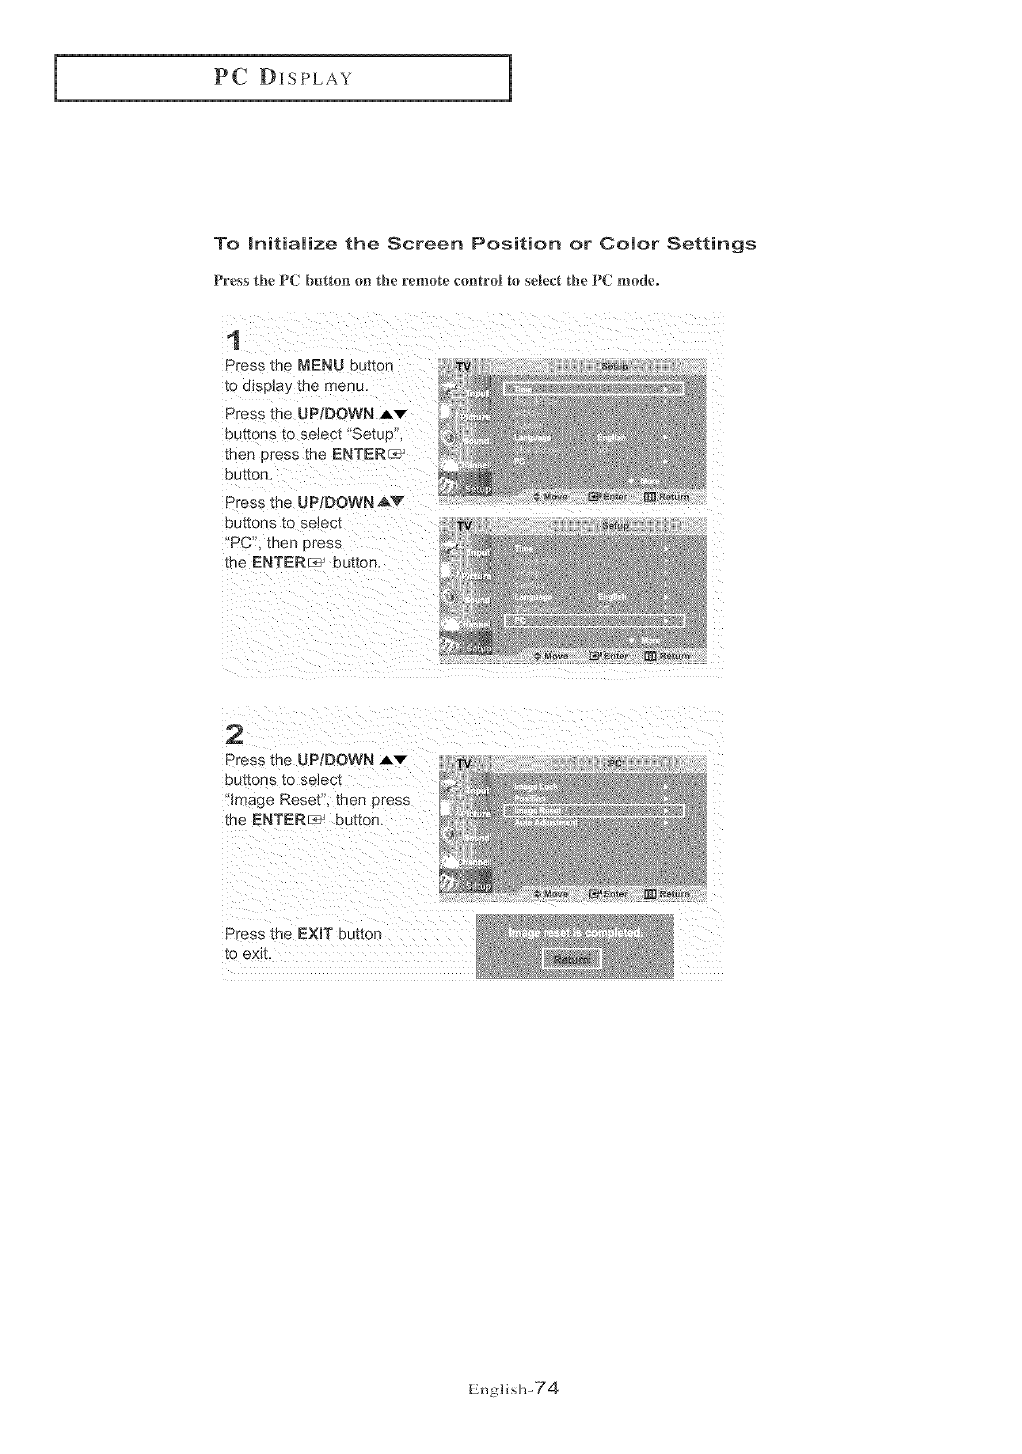
PC DISPLAY
To Initialize the Screen Position or Color Settings
Press the PC button on the remote control te select the PC mode°
1
Press th_ MENU DL[ton se*o_
to d_splay the menu.
Press the UP/DOWN Av
buttons to select "Setup',
then Dress the ENTER_
button.
Press the UP/DOWN _,v I_ _o_,_
buttons _o sn_ec_ ,_,o
PC'. met nress
Ehe ENTER[*) button,
2
Press the UP/DOWN ,_,v
buttons to seJec_
}mage Reset". then Dress
me ENTER_ button.
Press me EXIT button
_o exit. _
English-74
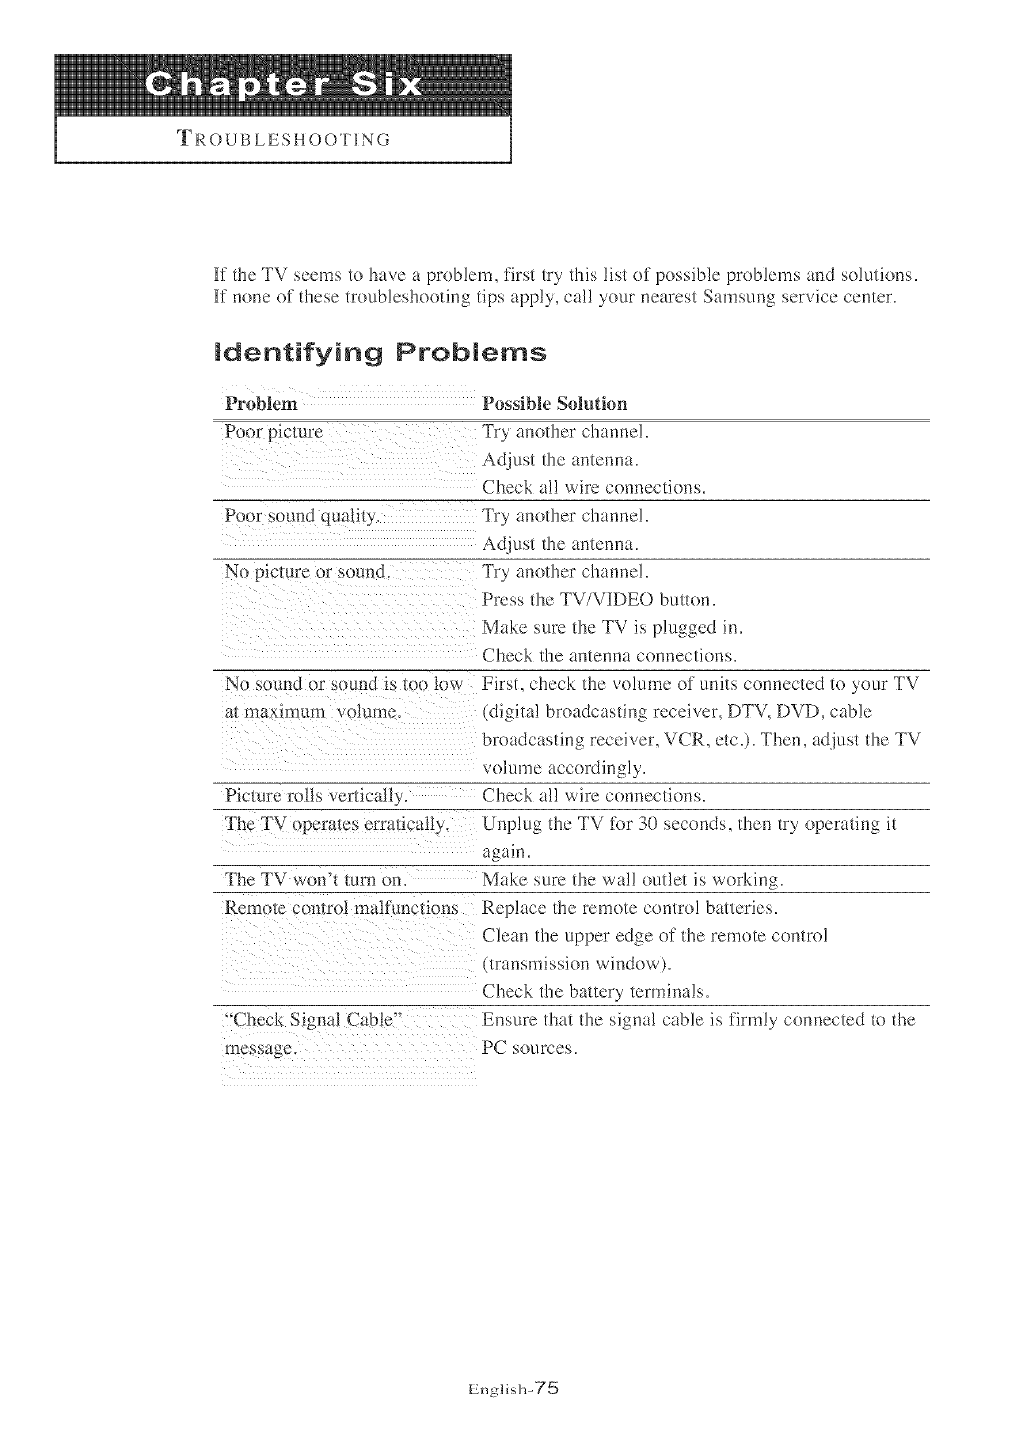
TROUBLESHOOTING
If the TV seems to have a problem, first try this list of possible problems and solutions.
If none of these troubleshooting tips apply, call your nearest Samsung service center.
Identifying Problems
Problem
Poor picture
Poor _mnd quail:>
No picture or _ound.
No sound or sound is too low
m ma_;lmtlrrI volume.
Picture rolls ver:icall',
The TV opera:es erraficall>
The TV won't turn on
Remora control mallimclions
"Check Signal Cable"
message
Possible Snlutinn
:Dy another channel.
Adjust the antenna.
Check a!! wire connections.
:Dy another channel.
Adjust the antenna.
Fry another channel.
Press the TV/VIDEO button.
Make sure the TV is plugged in.
Check the antenna connections.
First, check the volume of units connected to your TV
(digim! broadcasting receiver, DTV, DVD, cable
broadcasting receiver, VCR, etc.). Then, adjust the TV
volume accordingly.
Check a!! wire connections.
Unplug the TV ti)r 30 seconds, then try operating it
again.
Make sure the wall outlet is working.
Replace the remote control batteries.
Clean the upper edge of the remote control
transmission window),
Check the battery terminals,
Ensure that the signal cable is firmly connected to the
P( sources.
English-75
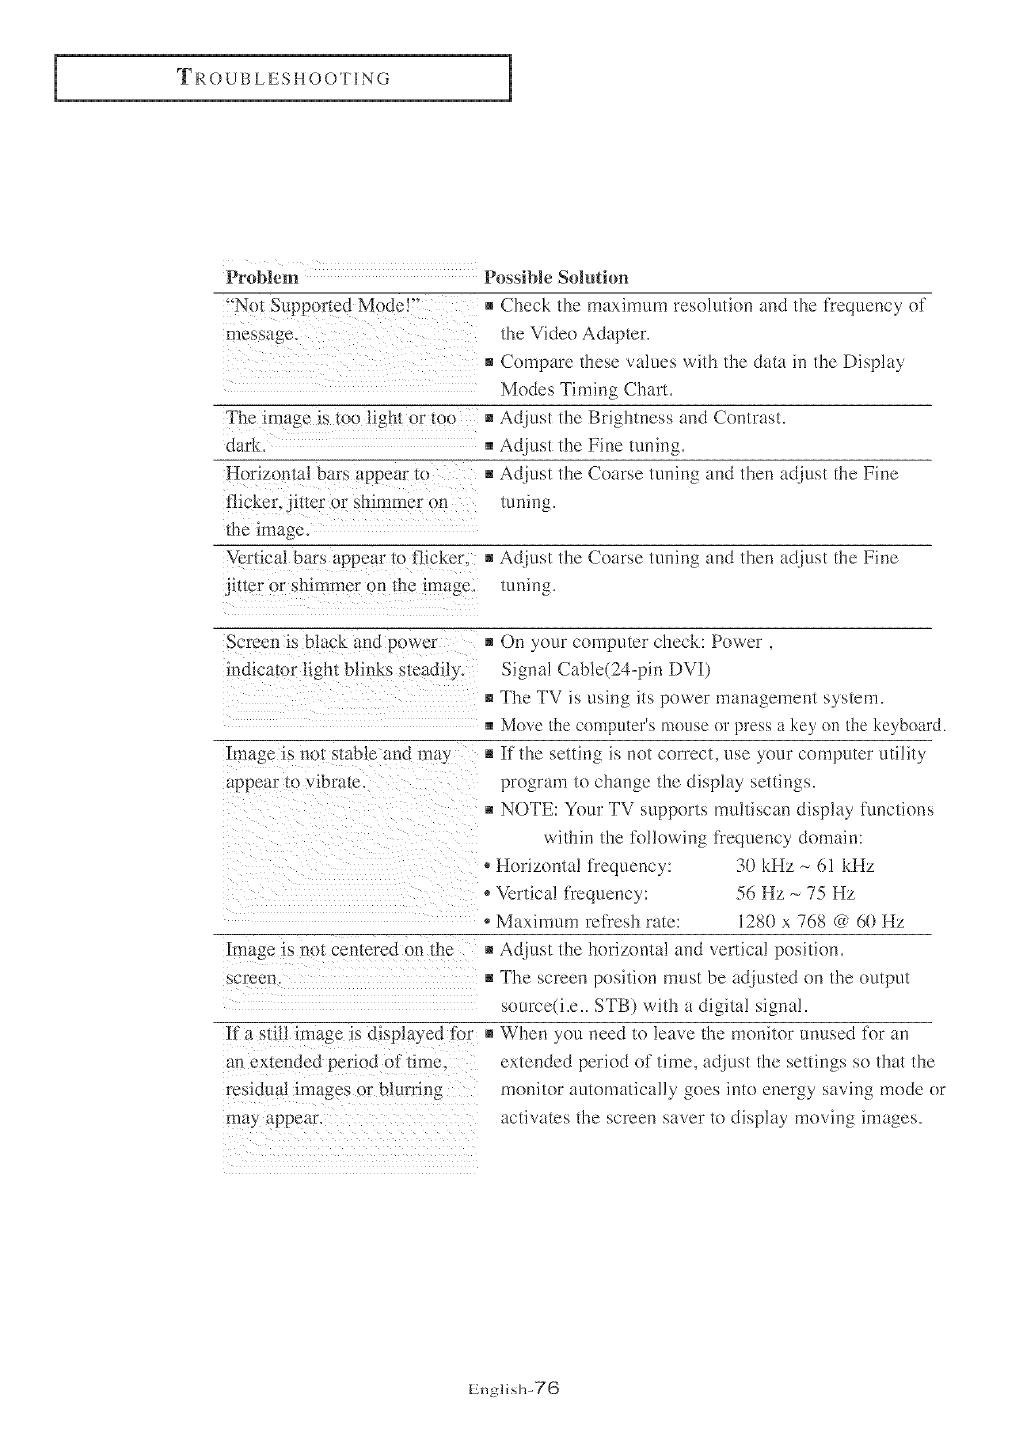
TROUBLESHOOTING
Problem
message.
The ima.ge is toolighlorIoo
dark.
flicker, }iucr or shimmer on
the image.
Vertical bars appear to llicker
iiuer or shimmer on the imz_ge
Possible Solution
m Check the nmximum resolution and the fl'equency of
the Video Adapter.
[] Compare these values with the data in the Display
Modes Timing CharL
[] Adjust the Brightness and Contrast.
[] Adjust the Fine tuning.
[] Adjust the Coarse tuning and then adjust the Fine
tnning.
[] Adjust the Coarse tuning and then adjust the Fine
tuning.
Screen is black and power
indicalor light blinks slemJ ily.
Image i> n<_tstable and may
appear _o vibrate
bereeF!.
Ira siilI image is displa2 eu a_r
an exlended period of limeo
residual images or blurring
may appear.
[] On yore: computer check: Power,
Signa! Cable(24-pin DVI)
[] The TV is using its power management system.
[] Move the computer's mn_lse or press a key on the keyboard.
[] If the setting is not correct, use your computer utility
program to change the display settings.
[] NOTE: Your TV supports mu!iiscan display functions
within the tb!!owing fl'equency domain:
* Horizonta! frequency: 30 kHz _ 61 kHz
, Vertical frequency: 56 Hz ~ 75 Hz
- Maximum reti_esh rate: 128(i} x 768 @ 60 Hz
[] Adiust the horizontal and vertical position.
[] The screen position must be adjusted on the output
source(i.e.. STB) with a digital signa!.
[] When you need to leave the monitor unused tbr an
extended period of time, adjust the settings so that the
monitor automatically goes into energy saving mode or
activates the screen saver to display moving images.
English-76
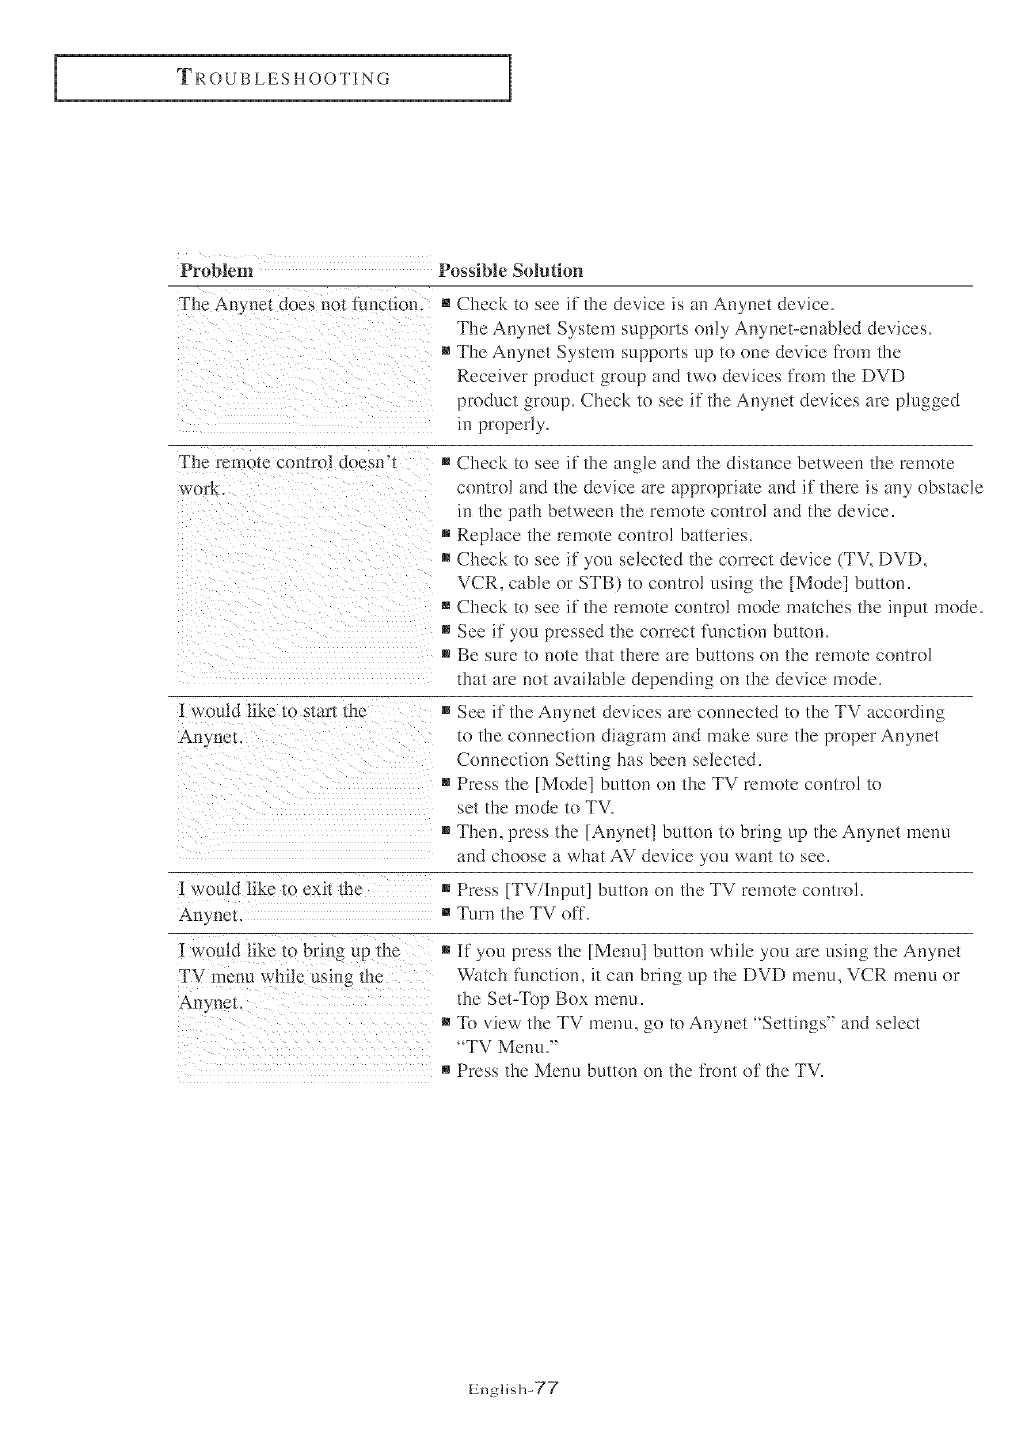
I TROUBLESHOOTING
Problem Possible Sohttion
The An3net does aol function. mCheck to see if the device is an Anynet device.
The Anynet System supports only Anynet-enabled devices.
mThe Anynet System supports up to one device flom the
Receiver product group and two devices flom the DVD
product group. Cheek to see if the Anynet devices are plugged
in properly.
The remole con{to1 doesn't_ [] Check to see if the angle and the distance between the remo!e
work. torer!! and the device are appropriate and if there is any obstacle
in the path between the remote control and the device.
[] Replace the remo/e control batteries.
m Check to see if you selected the turret| device (TV, DVD,
VCR, cable or STB) to comrol using the [Mode] button.
[] Check to see if the remote contro! mode ma*ches the input mode.
m See if you pressed the correct function buNon.
m Be sure to m)te that there are bultons on the remote control
that are not available depending on the device mode.
[would like lo s*arl the m See if the An)met devices are connected to the TV according
Anvne< to the connection diagram and make sure the proper Anynet
Connection Setting has been selected.
m Press the [Mode] but/on on the TV remote control to
set the mode to TV.
[] Then, press the [Anynet] but/or_ to bring up the Anynet menu
and choose a what AM device _r'OLIwant to see.
[ would like {o exit {he m Press [TV/Input] button on the TV remote controh
Anyne_. [] Turn the TV off.
TV menu while using me
AnvneL
B If you press the [Menu] button while you are using the Anynet
Watch function, it can bring up the DVD menu, VCR menu or
the Set-Top Box menu.
[] To view the TV menu, go to Anynet "Settings" and select
"TV Menu."
[] Press the Menu button on the fiont of the TV.
English-T7
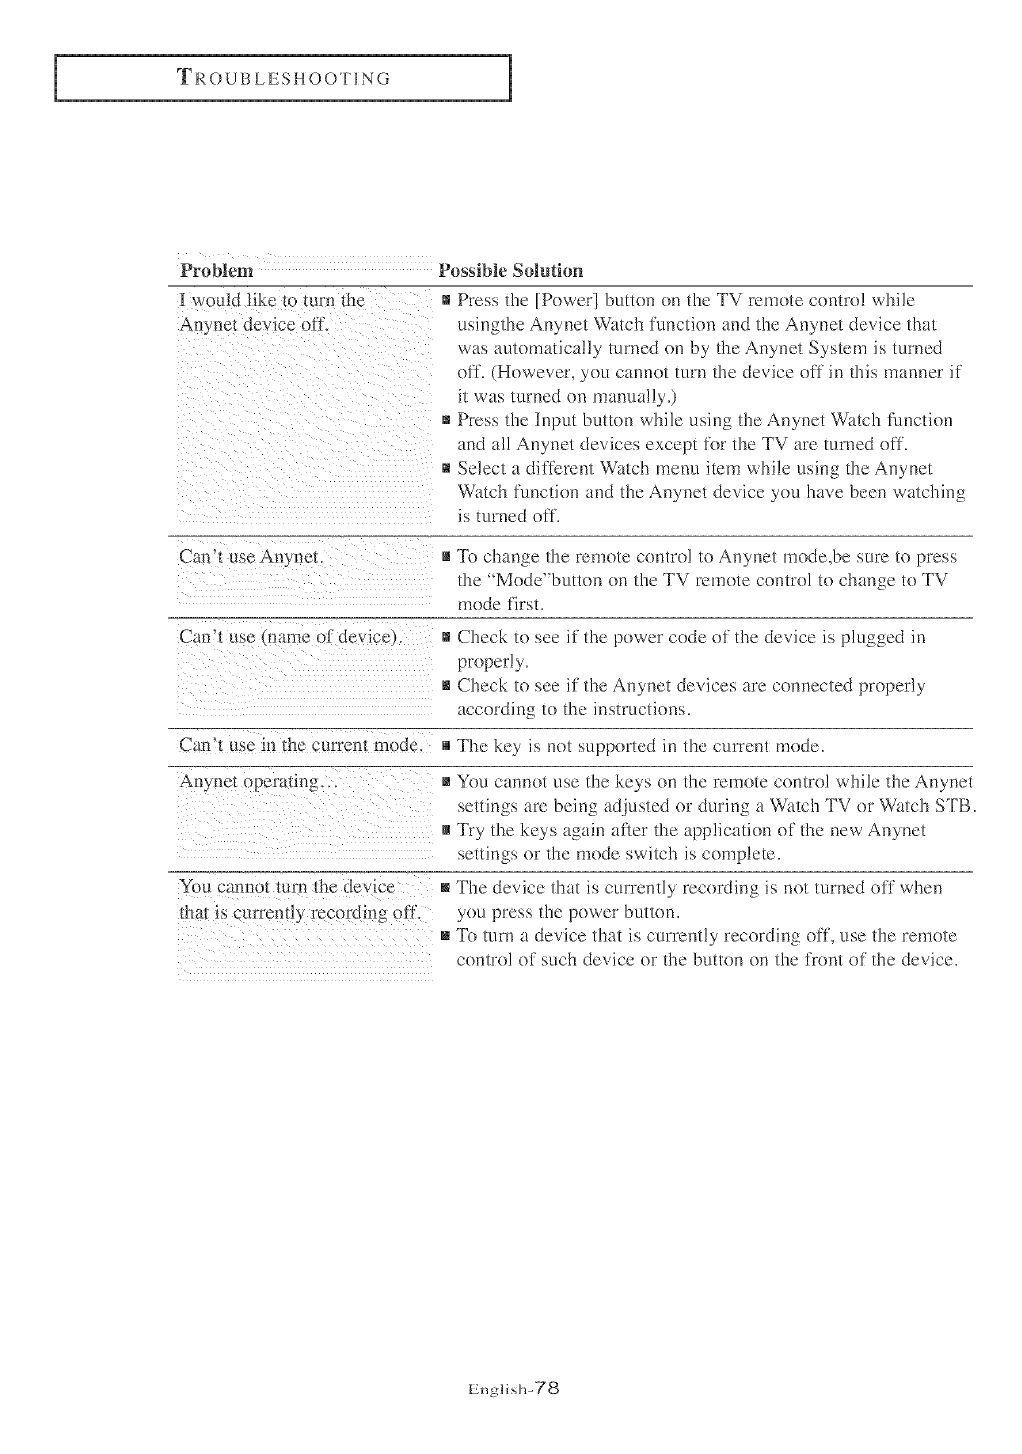
I TROUBLESHOOTING
Problem
[ w,_uld like to turn the
Possible Solution
[] Press the [Power] button on the TV remote contro! while
usingthe Anynet Watch function and the Anynet device that
was automatically mined on by the Anynet System is turned
off. (However, you cannot turn the device off in this manner if
it was turned on manually.)
[] Press the Input button while using the Anynet Watch function
and al! Anynet devices except ior the TV are turned off.
[] Select a different Watch menu item while using the Anynet
Watch function and the Anynet device you have been watching
is turned off.
Can'l use An} nel:. [] To change the remote control to Anynet mode,be surc to press
the '_Mode"button on the TV remote control to change to TV
mode first.
Can't use marne of dc vice [] Check/o see if the power code of the device is plugged in
properly.
[] Check to see if the Anynet devices are connected properly
according to the instructions.
Can'! use in the currem mode. [] The key is not supported in the current mode.
Anyne_ operaling .. [] You cannot use the keys on the remote con|rol while the Anynet
settings are being adjusted or during a WaIch TV or Watch STB.
[] Try/he keys again after the application of the new An2rnet
settings or the mode switch is complete.
5'ira cannot mrn the device [] The device thai is currcntl2y recording is not turned off when
tha_ is ctmvml_ recol_ling off, you press the power button.
[] "Ib turn a device that is currently recording off, use the remote
control of such device or the button on the i?'ont of the devicc.
English-T8
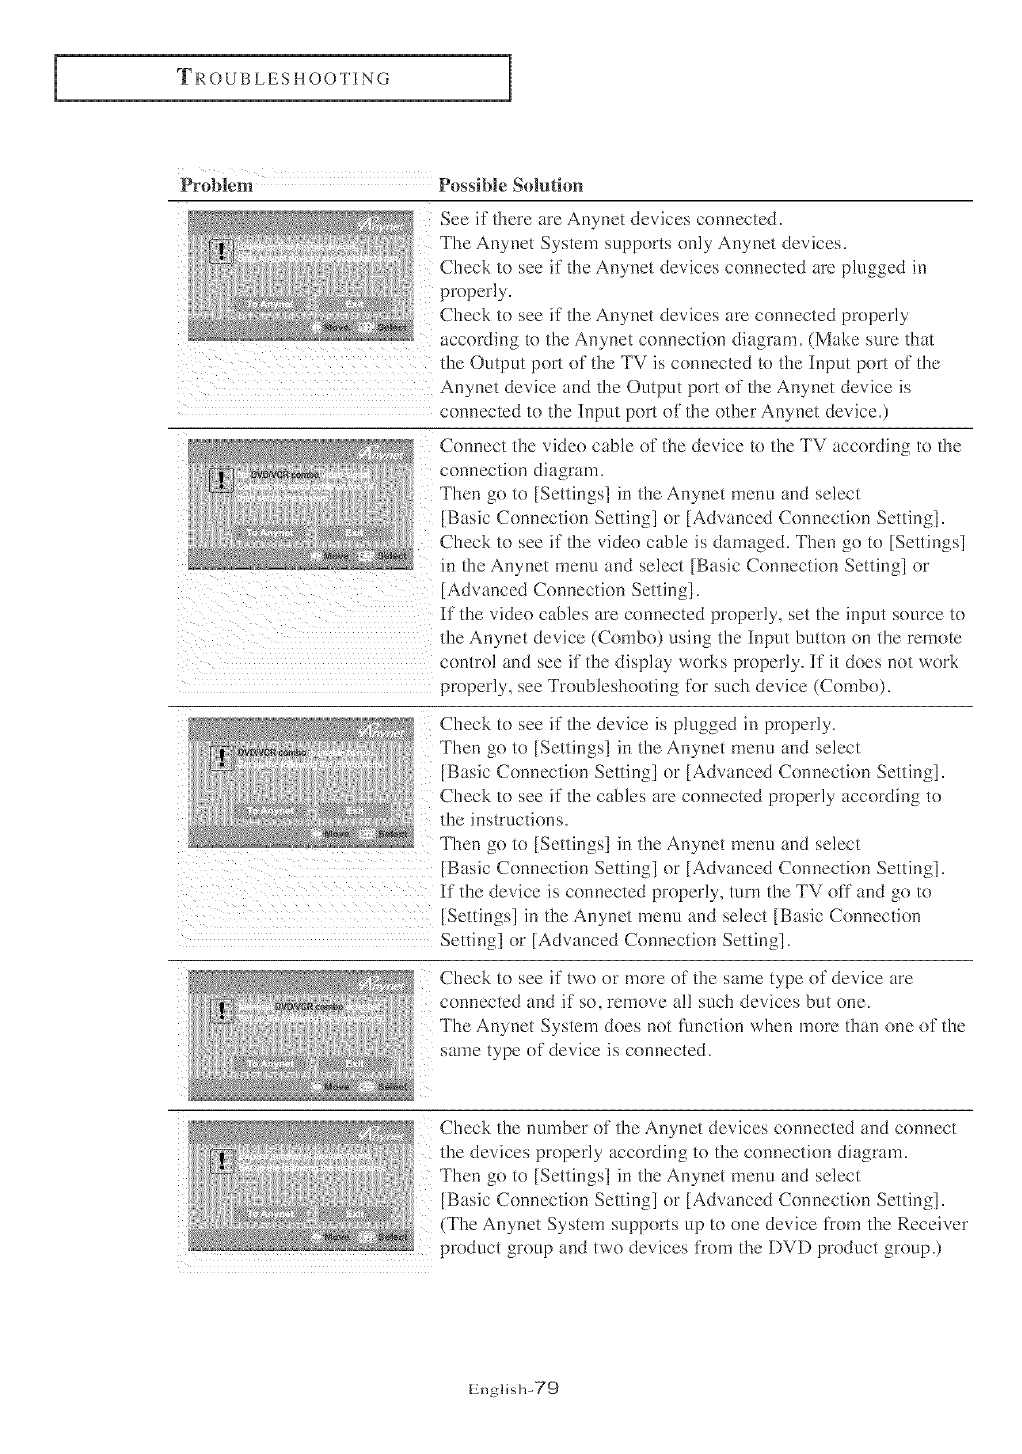
= TROUBLESHOOTING
lh:oblem Possible Solution
See if there are Anynet devices connected.
The Anynet System supports only Anynet devices.
Check to see if the Anynet devices connected fire plugged in
properly.
Check to see if' the Anynet devices are connected properly
according to the A_ynet connection diagram. (Make sure that
the Output port of the TV is connected to the Input port of the
Anynet device find the Output port of the Anynet device is
connected to the Input port of the other Anynet device.)
Connect the video cable of the device to the TV according to the
connection diagram.
Then go to [Settings] in the Anynet menu and select
[Basic Connection Setting] or [Advanced Connectkm Setting].
Check to see if the video cable is damaged. Then go to [Settings]
in the Anynet menu and select [Basic Connectk)n Setting] or
[Advanced Connection Setting].
If the video cables are connected properly, set the input source to
the Anynet device (Combo)using the Input button on the remote
contro! and see if the display works properly. If it does not work
properly, see Troubleshooting for such device (Combo).
Check to see if the device is plugged in properly.
Then go to [Settings] in the Anynet menu find select
[Basic Connection Setting] or [Advanced Connection Setting].
Check to see if the cables fire connected properly according to
the instrnctions.
Then go to [Settings] in the Anynet menu and select
[Basic Connection Setting] or [Advanced Connection Setting].
If the device is connected properly, turrl the TV off and go to
[Settings] in the Anynet menu and select [Basic Connection
Setting] or [Advanced Connectkm Setting].
Check to see if two or more of the same type of device are
connected and if so, remove a!! such devices but one.
The Anynet System does hot function when more than one of the
same type of device is connected.
Check the number of the Anynet devices connected and connect
the devices properly according to the connection diagram.
Then go to [Settings] in the Anynet menu and select
[Basic Connection Setting] or [Advanced Connection Setting].
(The Anynet System supports up to one device from the Receiver
product group and two devices frolll the DVD product group.)
English-Z9

TROUBLESHOOTING
15coblem Possible Solution
Make sure that the devices connected support [he Anynet.
Remove devices from the new Anynet product groups that
are not supported by the Anynet version currently running on
your TV.
Then go to [Settings] in the Anynet menu find select
[Basic Connection Setting] or [Advanced Connection Setting].
Connect the video cable of the device to the TV according to the
connection diagram betbre use.
Check to see if the video cable is connected to the same place
now as it was fit the time you selected the Connection Setting.
To re-connect the video cable to a different location, re-select the
Connection Setting and choose a device to watch.
If the TV is in VCR mode, see if the tape has any noise.
The device may not be able to detect tl_e vide(} signa! if the noise
level is high.
Connect tlle video cables of the VCR properly according to the
connection diagram.
Then go to [Anynet Settings] in the Anynet menu find select
[Basic Connection Setting] or [Advanced Connection Setting].
(After selecting the connection settings, make sure that the
Anynd device is selected ik)r VCR viewing in the pop-up
window.)
If the cables f/re connected properly, see if the video cable of the
VCR is damaged.
Check to see if the power cord of the device is plugged
in operly.
Check to see if the Anynet devices are connected properly
according to the instructions,
See if there are Anynet devices connected.
The Anynet System supports only the Anynet devices.
If you have Anynet devices to connect, connect the devices
properly according to the connection diagram.
Then go to [Anynet Settings] in the Anynet menu and select
[Basic Connection Setting] or [Advanced Connection Setting].
You cannot use the " Play DVD " or "Play VCR " functions
while the device is recording, Stop the recording before you use
the "Play" functions,
Englis]l-80

TROUBLESHOOTING
The Anynet System A system that allows controlling Samsung AM devices from the TV.
Watch TV Broadcast When selected, this Anynet menu item automatically executes the steps
involved in watching TV broadcasts on TV.
Play DVD When selected, this Anynet menu item automatically executes the steps involved
in watching DVD titles on TV.
Watch Satellite When selected, this Anynet menu item automatically executes the steps involved
in watching satellite programs on TV.
Switch to TV Remote Select this menu item to switch the mode of the remote control to TV mode.
Control Mode
Basic Connection Setting A menu item to configure the system setting before using the Anynet System.
(In setting up the Anynet System, use the connectors provided with the
purchase of the products or buy separate video connectors to connect the
devices.)
Advanced Connection A menu item to configure the system setting before using the Anynet System.
Setting (Choose this menu item when you use optical connectors to connect the
Anynet devices.)
Select Audio Input Port Use this menu item to select the port on the TV or the Receiver to which
you connected the audio input port of the device during the Anynet system
configuration.
RS2320 cable Used to transmit signals to the TV and other peripheral devices.
OPTICAL Optical digital output port. The simple connection helps protect the device
from electric interference, reducing the loss of electricity. It also allows
accurate sound reproduction.
COAXIAL Coaxial digital output port. Allows high capacity data transmission with
minimum data loss and the resulting strong noise reduction capability allows
accurate sound reproduction.
Subwoofer Complements the low-sound reproduction capability of the front speakers.
English-81
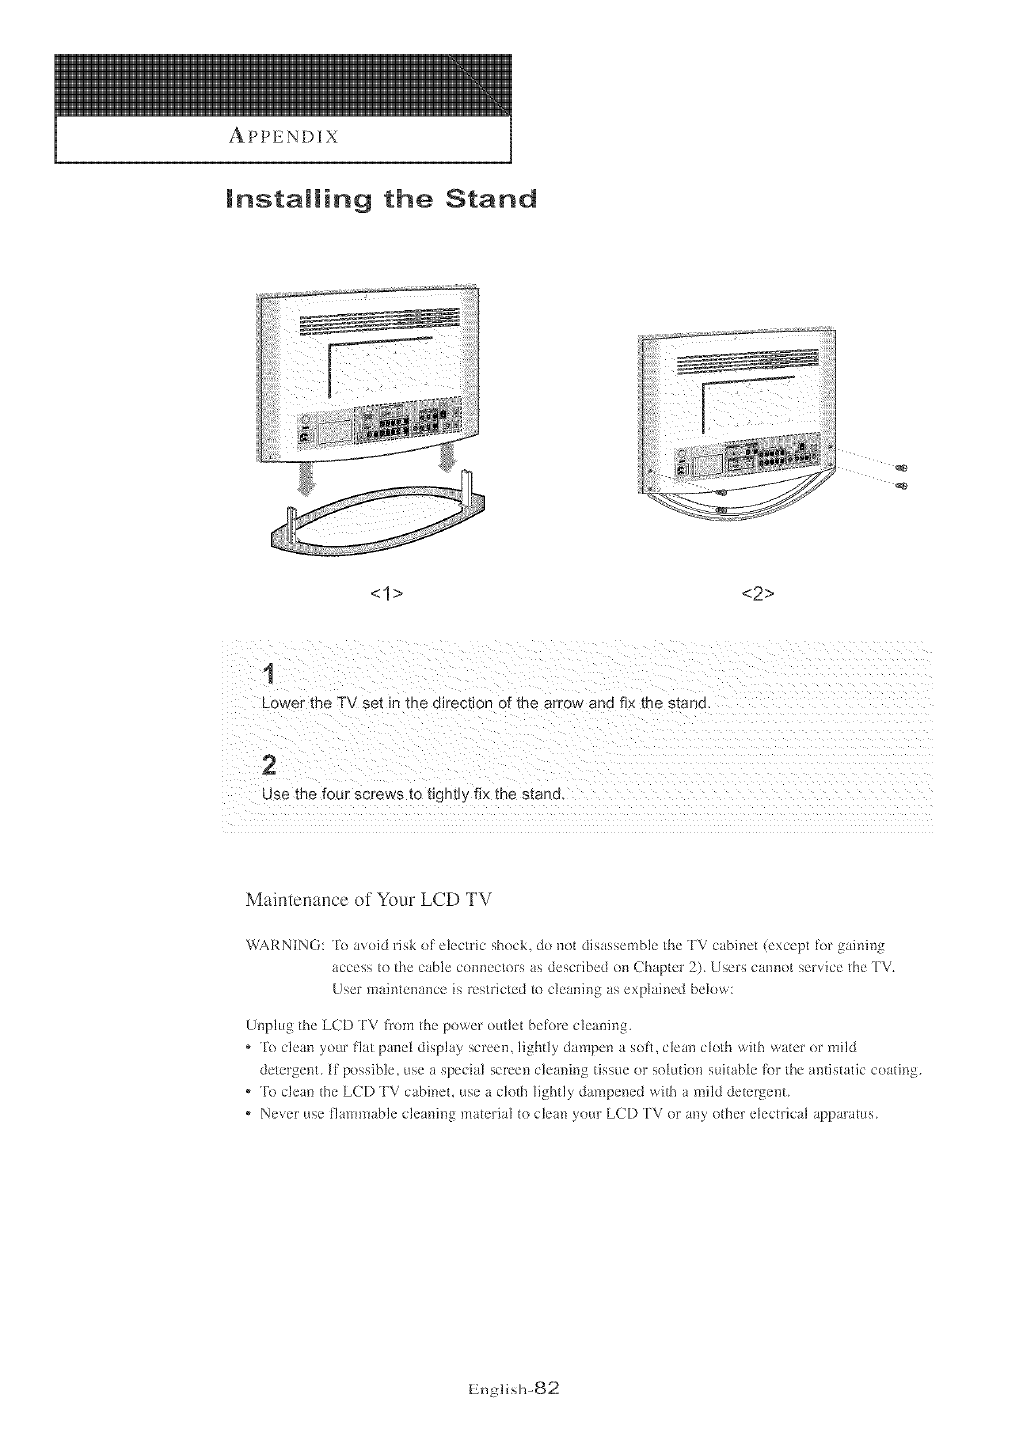
APPENDIX
JnstaJJing the Stand
<1> <2>
1
Lower me TV set in me direction of me arrow and fix the stand
2
Use the four screws to tlghtl5 fix the stand
Maintenance of Your LCD TV
WARNING: To avoid risk of electric shock, do not dis tssemble the TV cabinet (except R_r gaining
acces to the cable c('mnectors as described on Chapter 2). User cmmot service the TV.
User maintm_ance is restricted to clem_i_g as explai*led below:
Unpk_g the LCD TV _}om the power outlet beR'_rccleaning.
* To cleat_ your flat panel display screem lightly dampen a soit. clean cloth with water or mild
detergent. If possible, use a q?ecial screen cleaning tissue or solution suitable lbr the antistatic coating.
* To clean the LCD TV cabinet, use a cloth lightly dampm_ed with a mild dete*gent.
* Never use flammable cleaning matelial to clean you*"LCD TV or any othel electlical apparatus.
English-82
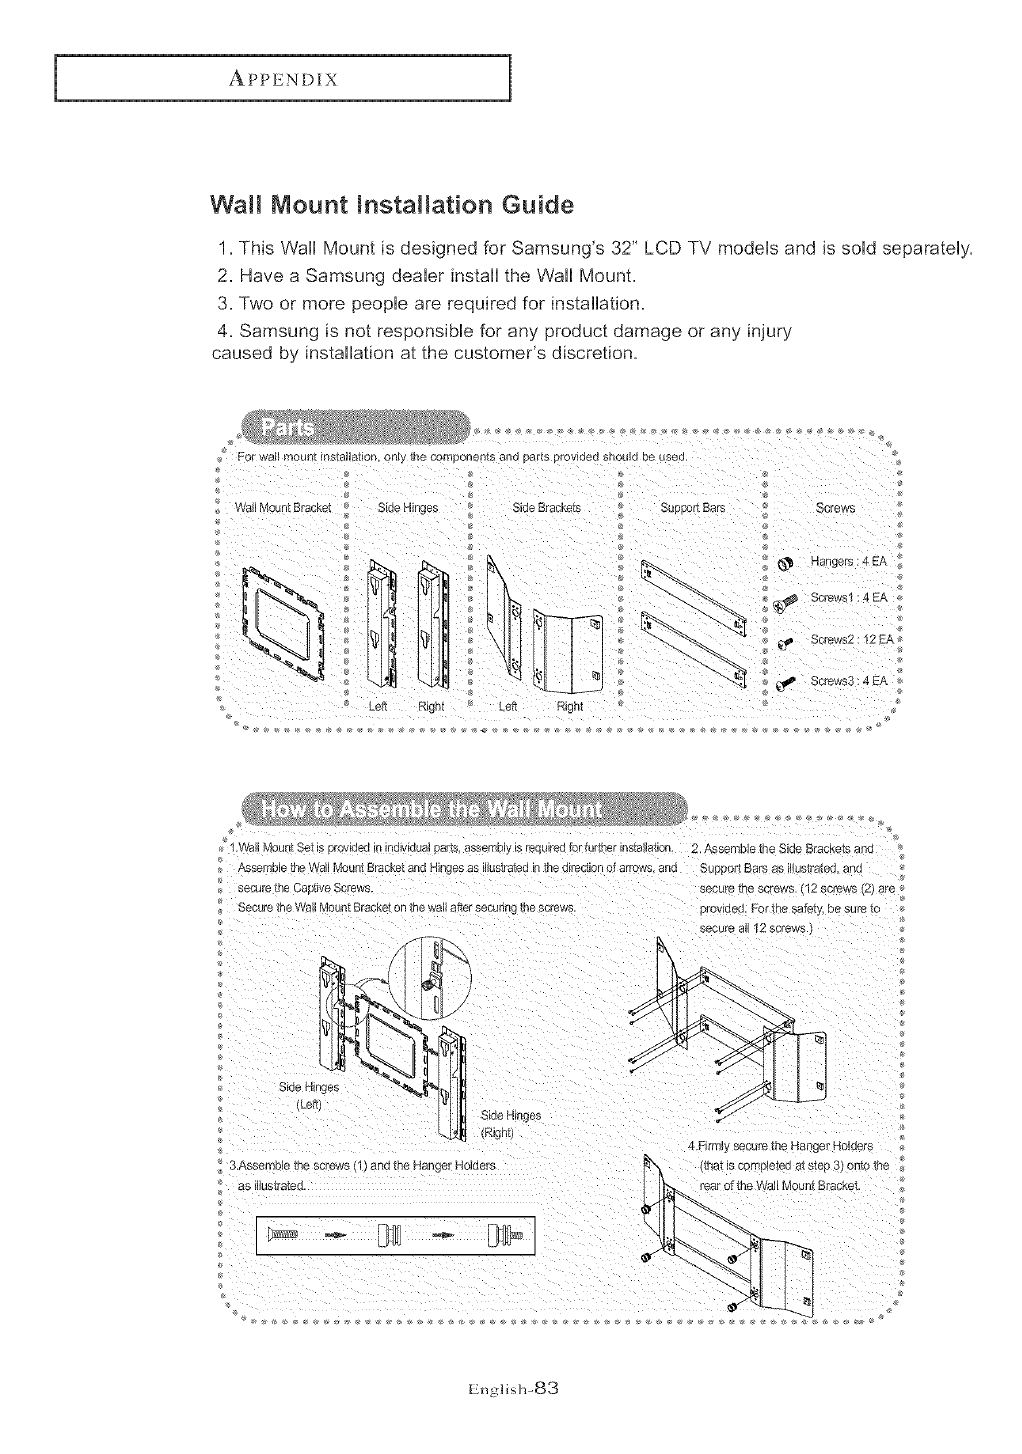
APPENDIX
Walm Mount JnstaJJation Guide
1. This Wall Mount is designed for Samsung's 32" LCD TV models and is sold separately.
2. Have a Samsung dealer install the Wall Mount.
3. Two or more people are required for installation.
4. Samsung is not responsible for any product damage or any injury
caused by installation at the customer's discretion.
_ _ Hangers : 4 EA
S.Wall Mount Set is Dr{ _aea_n_nqlv_aual Darts. asserr:r_y _srequlre3 br fuOe islallat_oR. 2. Assemble the Side. Brackets aria
Aese ble the Wall Mount Bracket and Hinges as _lustrafea in zne direction 3f arrows, and Suoeort Bars as illuOated. _ _a
_ecure ne Cae_ve Scre vs. secure the screws. _12 screws (2; are
Secure lhe Wall O Jnt Bracket 3nthe waJJafter secunng _le screw._ provided. For the safety, 3e sure [o
._ecure all 12 screws
Side r
Side Hinges
R_Jht)
4,Firmly secure the hanger MoJ;4er._
S;.Asselr _le _qe screws 11) and the Hange_ HoJeers _'_ _na[ is cornplezea at step 3) onto the
as iiius[ra_ecl I _l'_e Wall Mou rf[ Brackel
English-83

APPENDIX ]
rear side of the 7V set and oesure the screws(3) and then push the Haagera downwards to mount the B/set _
firmly. Be sure that the Hangers are firmly fixed onto the Wall _
¢
®
¢
English-84

I APPENDIX
Cleaning and Maintaining Your TV
With proper care, your TV unit wi!! give you many years of service.
Please %!!ow these guidelines to get the maximum performance from your TV.
Placement
•Do not phtce the TV near extremely hot, cold, humid or dusty places.
•Do not place the TV near appliances with electric motors that create magnetic fields,
such as vacuum cleaners.
o Keep the ventilation openings clear; do not place the TV on a soft surface,
such as cloth or paper.
o Place the TV in a vertical position only.
Liquids
• Do not handle liquids near or on the TV.
Liquids that spill into it can cause serious damage.
Cabinet
Never ()pen the cabinet or touch the parts inside.
• Wipe your TV with a clean, dry cloth.
Never use water, cleaning fluids, wax, or chemicals.
,, Do not put heavy objects on top of the cabinet.
Tern De ratu re
o If your TV is suddenly moved from a cold to a warm place, unplug the power cord,
and allow at least two hours ibr moisture that may have tbrmed inside the unit to dU
completely.
Using Your TV in Another Country
If you phm to rake your TV with you to a foreign country, please be aware of the
different television systems that are in use around the world. A TV designed %r one
system may not work properly with another system due to differences in the TV channel
fl'equencies.
English-85
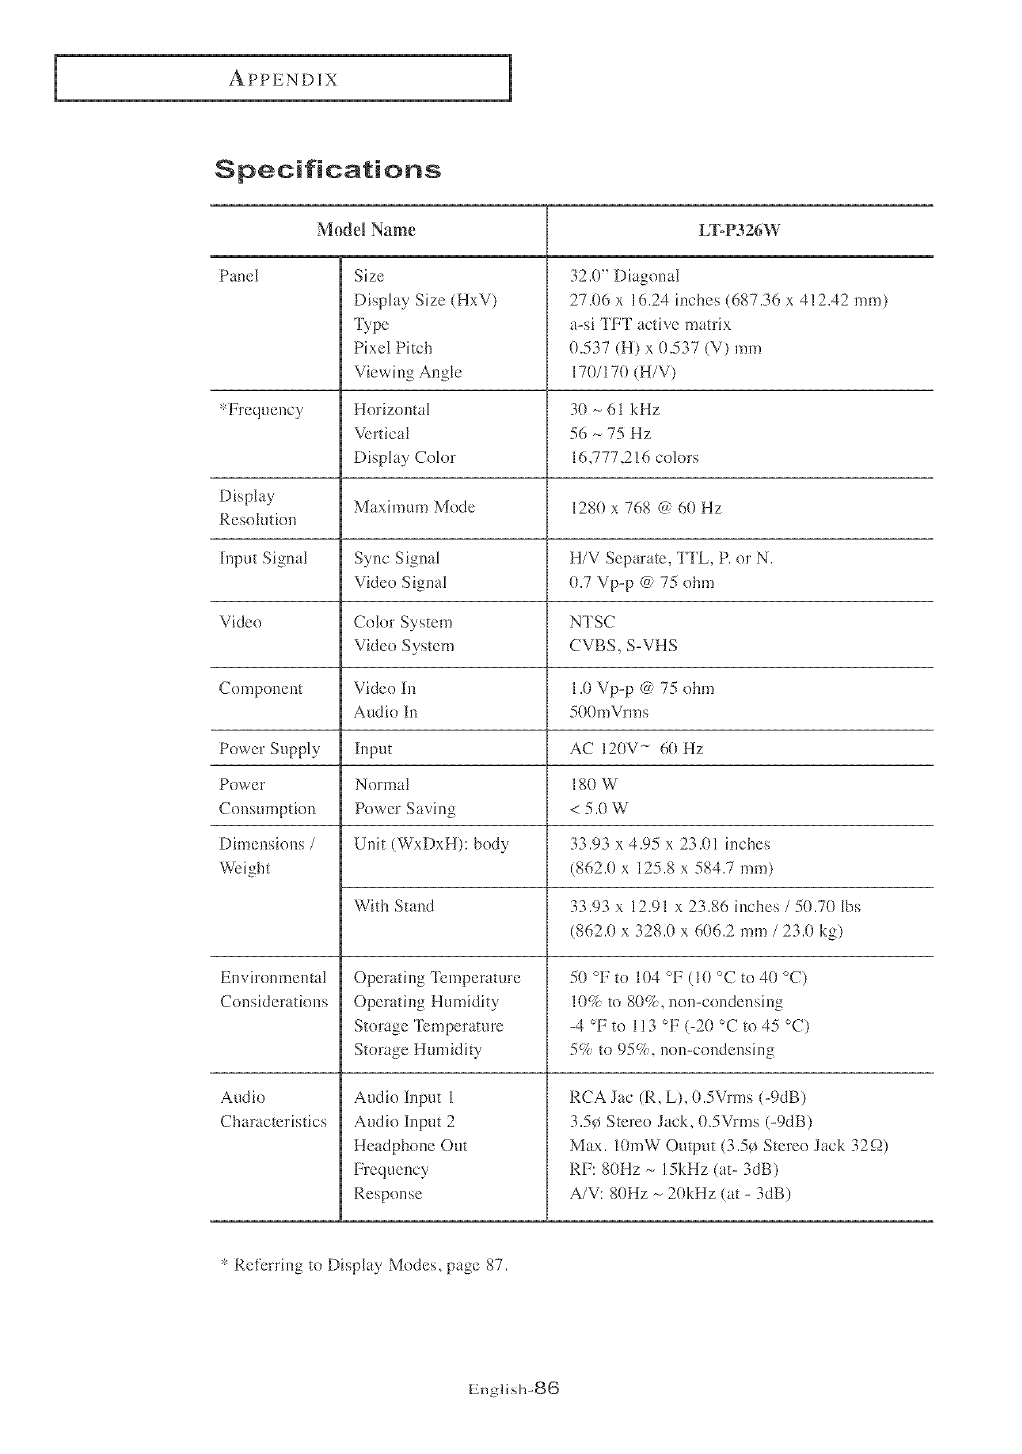
aPPENDIX
Specifications
Model Name LToP326W
Panel Size
Display Size (HxV)
Pixel Pitch
Viewing Angle
Horizontal
Vertical
Display CoLor
*Frequency
Display Maximum Mode 1280 x 768 @ 60 Hz
Resolution
Input Signal Sync Signal H/V Separate, TTL, P. or N.
Video Signal 0.7 Vp-p @ 75 ohm
Video Color System NTSC
Video System CVBS_ S-VHS
Component Video In 1.0 Vp-p @ 75 ohm
Audio in 500mVrms
Power SuppLy Input AC 120V *_ 60 Hz
Power Normal 180 W
Consumption Power Saving < 5.0 W
Dimensions /Unit (WxDxH): body 33.93 x 4.95 x 23.01 incbes
Weight (862.0 x 125.8 x 584.7 ram)
With Stand 33.93 x 12.91 x 23.86 inches /50.70 lbs
(862.0 x 328.0 x 606.2 mm/ 23.0 kg)
El_viromnental Operating Temperature 50 °F to 104 oF (10 °C to 40 °C)
Considerations Operating Humidity 10% to 80%, nol>condensing
Storage Temperature -4 °F to 113 °F (-20 °C to 45 °C)
Storage Humidity 5% to 95%, non-condenshlg
Audio
Characteristics
Audio Input 1
Audio Input 2
Headphone Out
Frequency
Response
32.0" Diagonal
27.06 x 16.24 inches (687.36 x 412.42 ram)
a-si TH' active matrix
0,537 (H) x 0,537 (V) mm
170/170 (H/V)
30 -_61 kHz
56 -_75 Hz
16,777,2 ! 6 coMrs
RCA Jac (R, L), 0.5Vrms (-9dB)
3.5¢ Stereo Jack, 0.5Vrms (-9dB)
Max. 10mW Output (3.5¢ Stereo Jack 3%2)
RF: 80Hz -- 15kHz (at- 3dB)
A/V: 80Hz -_ 20kHz (at - 3dB)
* Referring to Display Modes, page 87.
English-B@
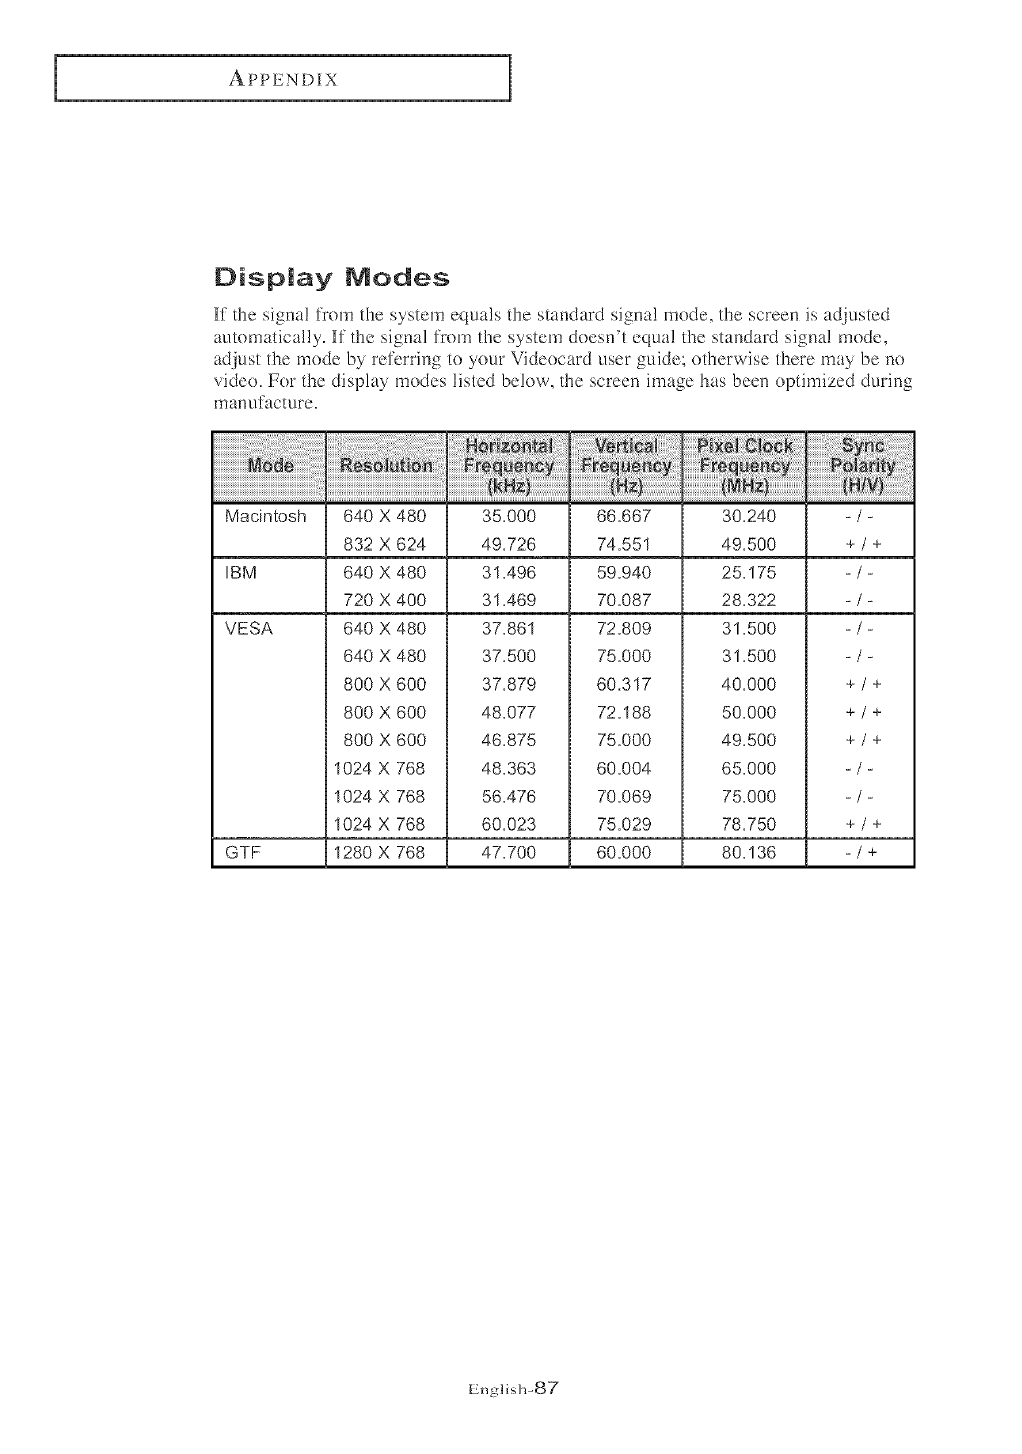
aPPENDIX
Display Modes
If the signa! from the system equals the standard signa! mode, the screen is adjusted
automatically, ]ff the signal from the system doesn't equal the standard signa! mode,
adjust the mode by referring to your Videocard user guide; otherwise there may be no
video, For the display modes listed below, the screen image has been optimized during
manufacture,
Macintosh
IBM
VESA
GTF
640 X 480
832 X 624
640 X 480
720 X 400
640 X 480
640 X 480
800 X 600
800 X 600
800 X 600
1024 X 768
1024 X 768
1024 X 768
1280 X 768
35,000
49,726
31,496
31,469
37,861
37,500
37,879
48.077
46,875
48.363
56.476
60,023
47,700
66,667
74,551
59,940
70,087
72,809
75,000
60.317
72,188
75,000
60,004
70,069
75,029
60,000
30.240
49,500
25.175
28,322
31.500
31,500
40,000
50.000
49,500
65,000
75,000
78,750
80,136
+/+
+/+
+/+
+/+
+/+
-/+
English-87

BN68o00653A@1
