Samsung SCH 411 411(E Ta) User Manual To The F1b5872d C26f 49fe 94c2 6c3e8b7718ac
User Manual: Samsung SCH-411 to the manual
Open the PDF directly: View PDF ![]() .
.
Page Count: 42

Owner’s Manual
Please read this manual before operating the phone,
and keep it for future reference.
SCH-411
Series CDMA
DIGITAL PORTABLE
CELLULAR TELEPHONE
SCH-411(E-Ta) 4/8/99 5:23 PM Page ii

3
Introduction
2
Introduction Table of ContentsPrecautions
Getting Started
Features 6
Description of Your Phone 7
Screen Display 8
Key Functions 9
Status Indicators 10
Display Messages 11
Battery 12
Call Quality 15
Basic Operations
Basic Operations of Your Phone 16
Turn On/Off 17
Placing Calls 18
Receiving Calls 19
The Menu
Menu Organization 21
Calls Options 24
Sounds Options 26
Display Options 31
Analog Call Option 33
Setup Options 34
Phone Book
Overview of the Phone Book 36
Storing Phone Numbers 37
Viewing Stored Entries 38
Important Information
This manual is based on the production version of the
included portable cellular telephone. Software
changes may have occurred after this printing.
Safety Precaution
For more detailed safety information,see “Safety”on
page 62.
• Do not use your phone while driving;park the
vehicle first.
• Do not use your phone when near medical
equipment.
• Do not use your phone at any time while traveling
on board a plane.
• Do not use your phone where a blasting operation
is in progress.
• Do not use your phone at a refueling point.
FCC/IC Notice
This device complies with part 15 of the FCC rules.
Operation is subject to the following two condition:
(1) This device may not cause harmful interference,
and (2) this device must accept any interference
received,including interference that may causing
undesired operation.
SCH-411(E-Ta) 4/8/99 5:23 PM Page 2

54
Electronic Devices 63
Aircraft 63
Blasting Areas 63
Other Dangerous Areas 64
Accessories
Batteries 65
Dual-Slot Desktop Charger 65
Cigarette Lighter Adapter 65
Travel Charger 65
Hands-Free Car Kit 65
Earbud Microphone 65
Glossary of Terms 67
Index 70
Displaying Your Phone Number 39
Dialing from the Phone Book 39
Editing Phone Book Entries 40
Erasing Phone Book Entries 41
Storing Secret Numbers 42
Voice Dial
Voice Dialing 43
Training the Phone 43
Checking Recorded Name 44
Activation 45
Using Voice Dialing 46
Security Options
Security Menu 48
Lock Mode 49
Call Restriction 51
Emergency Numbers 52
Other Options 53
Message Services
Short Message Services and Voicemail 56
Reviewing Messages 57
Transmitting Messages 60
Safety
Compliance with Safety Standards 62
Driving 62
SCH-411(E-Ta) 4/8/99 5:23 PM Page 4
Getting Started
7
Getting Started
6
Features
Congratulations on the purchase of your SAMSUNG
Phone. Using the latest digital technology,the phone
operates in a similar manner to other wireless phones,
while providing superior resonance and tone quality.
The following options make your phone both fun and
easy to use:
• Active Flip
• Variable Character Display
• Phone Book Memory - 79 Locations
• Voice Dialing - 20 Locations
• Programmable Lock Code
• Short Message Services (SMS) and Voicemail
• 9 Ring Types,4 Melody Tones,Vibrator Alert
• Call Logs - 9 Locations Each:Outgoing and
Incoming Calls
• Pause Dialing
• Ringer Mute During Incoming Call
• Remind Call
• EVRC
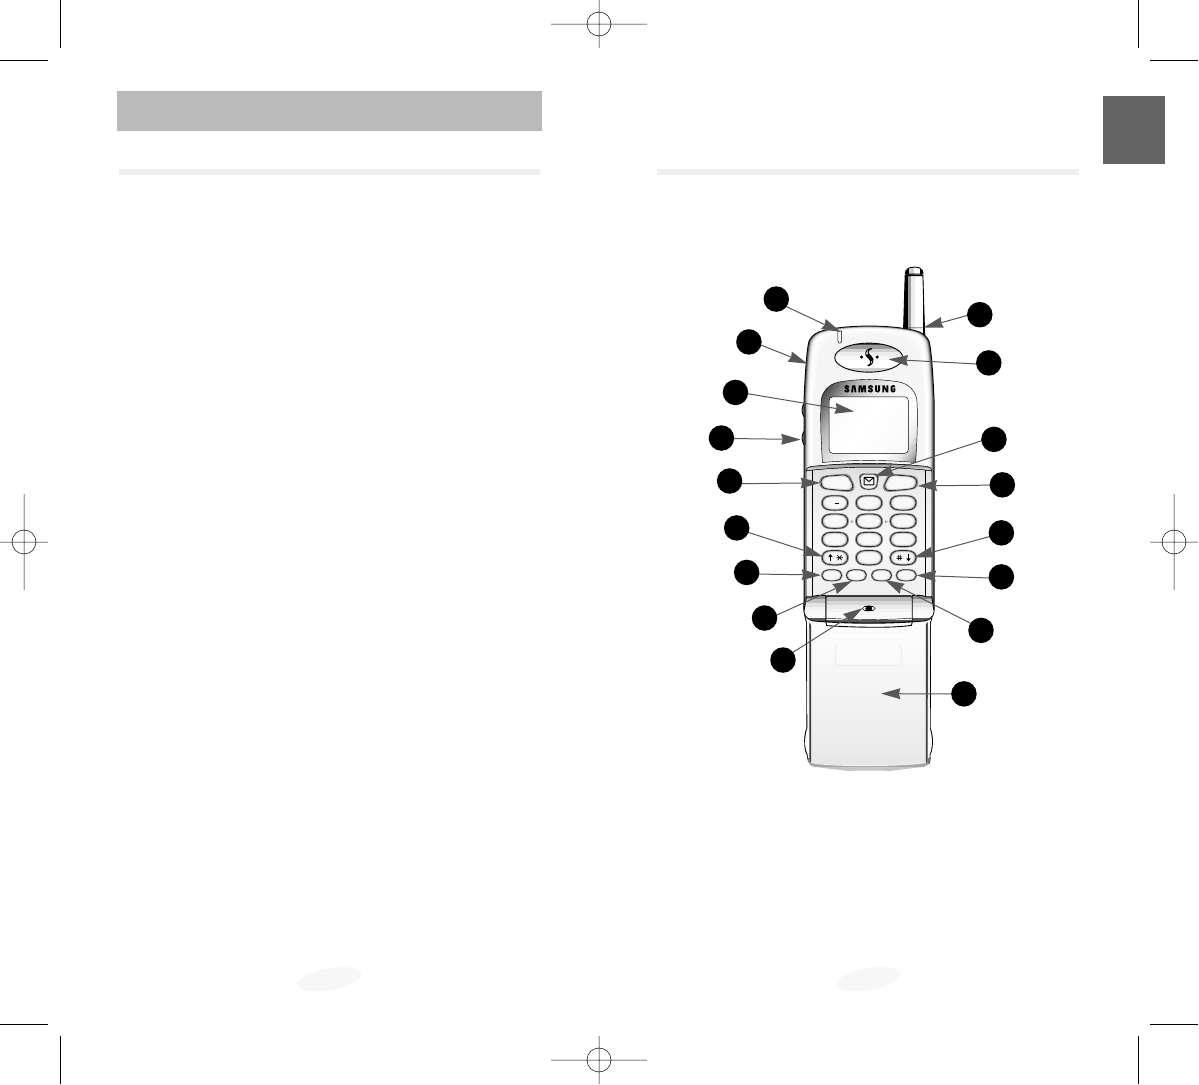
Description of Your Phone
Function keys and other controls activate the features
of your phone. The following illustration identifies the
function keys,controls,and indicators:
1) Power On Light
2) Earphone Mic Jack
3) LCD Screen
4) Volume Control
5) SEND Key
6) Scroll Keys
7) Power Key
8) Clear Key
9) Microphone
10) Flip
11) OK (Store) Key
12) Menu Key
13) End Key
14) Messages Key
15) Earpiece
16) Antenna
SEND END
1.
'
2
ABC
3
DEF
45
JKL
GHI
6
MNO
78
TUV
9
WXYZ
0
OPER
PWR CLR OK MENU
PQRS
1
2
3
4
5
6
7
8
911
10
12
6
13
14
15
16
(not actual size)
SCH-411(E-Ta) 4/8/99 5:24 PM Page 6
9
Getting Started
8
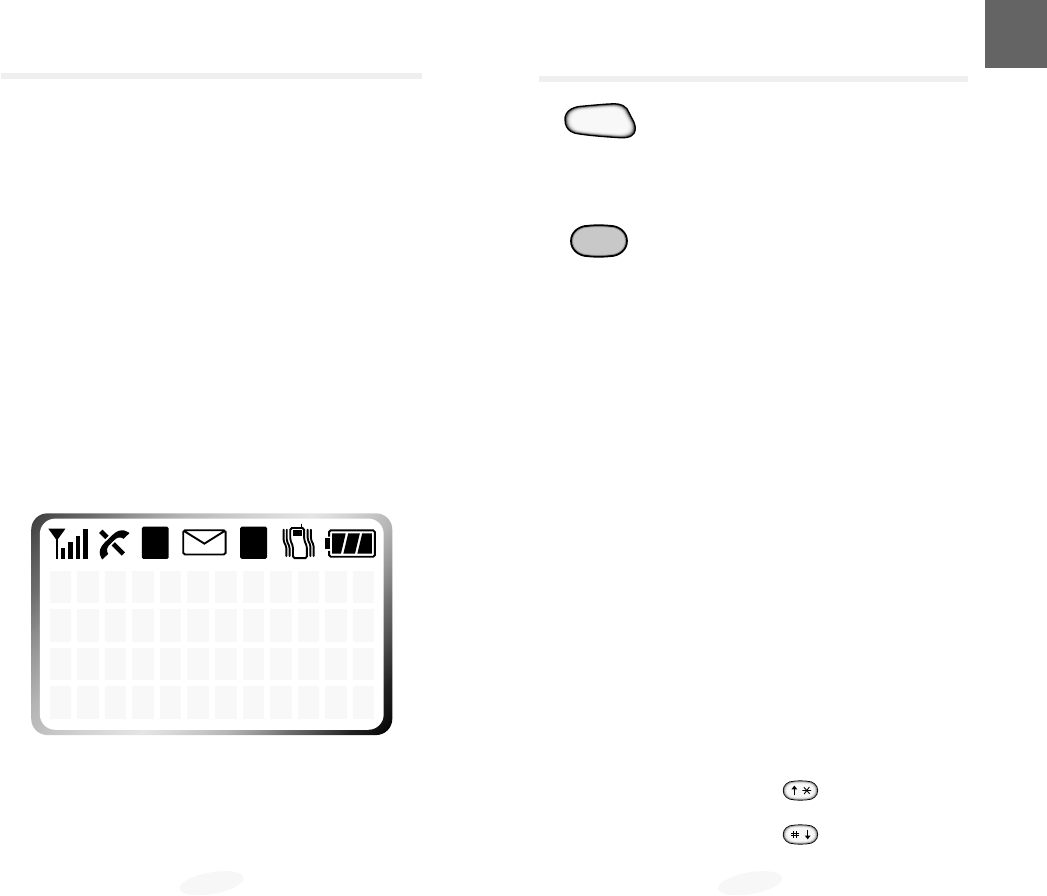
Screen Display
This phone features dynamic character sizing,which
enables the screen to display from 12 to 16 characters
per line. The five-line screen includes four text lines
and one icon line,which displays active options and
selected menu items.
During conversation,the screen displays the call timer
and the name and number of the other party,if
available.Active in-use options,such as Mute and Call
Waiting,also display during conversation.
The following icons display at power-on:
Key Functions
Press SEND to:
• place a call after dialing the number,
• answer an incoming call,
• initiate Three-way calling,
• access Call Logs.
Press CLR to:
• erase one character at a time while
entering names and numbers,
• go back one menu level at a time while
viewing menu options,
Press and hold CLR to:
• erase all displayed characters while
entering names and numbers,
• return to Standby mode while viewing
menu options.
Press END to:
• end a call,
• exit the current menu and return to
Standby mode.
• mute the ringer during an incoming call.
Press MENU to:
• display the Main Menu,
• scroll through menus,
• enter a pause while entering numbers.
Press MESSAGES to access messages.
Press OK to save menu option settings.
Press the arrow keys to scan menu
options.
Press and hold to:
•
initiate Voice Dialing when the flip is open.
Press and hold to:
•
switch between bell and vibrator setting.
R D
-
-
SEND
11
Getting Started
10
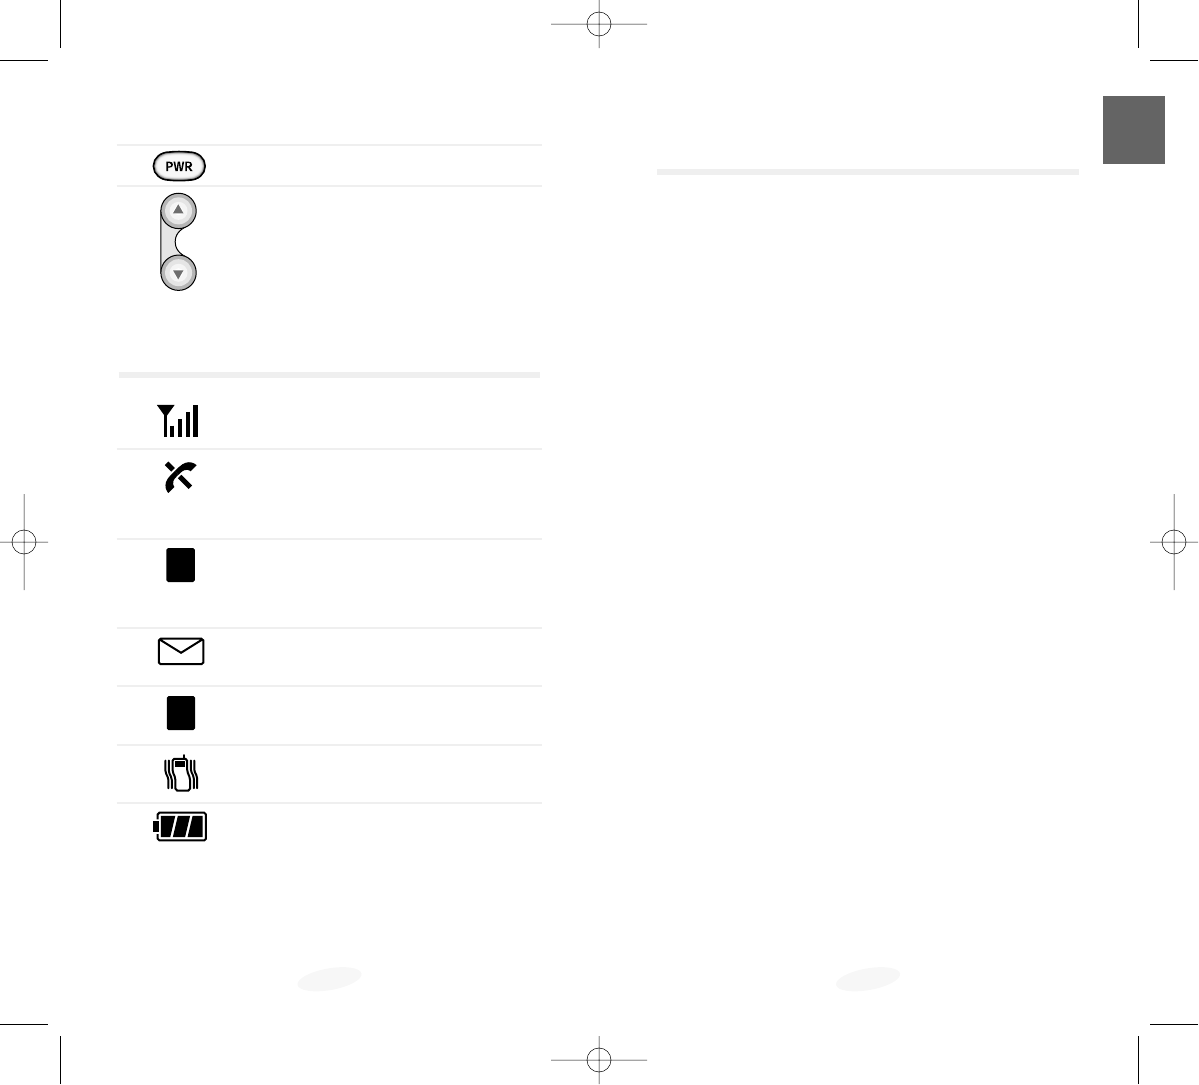
Press PWR to turn the phone on and off.
Press the Volume button to:
• adjust voice volume during
conversation.
• adjust key beep volume in Standby
mode,
• scroll Call Logs and Phone Book
entries.
Status Indicators
Signal Strength
Indicates a current signal strength.
No Service
Indicates that the phone is outside a
service area and cannot send or receive
calls.
Roaming
Displays when the phone is outside the
home service area but within the
network.
Message
Indicates messages.
Digital
Indicates a Digital mode.
Vibrate
Indicates a Vibrate mode.
Battery Charge
Indicates a battery charge level.
R
D
Display Messages
MAINTENANCE The phone number is not registered in
REQUIRED the base station.
PHONE BOOK You have tried to access the memory
RESTRICTED while the phone is in the memory
restricted mode.
New Entry will A phone number is already stored in
replace selected memory location.
OK:Replace
MATCHING ENTRY The phone number you are trying to
NOT FOUND recall does not exist.
NO INCOMING You have not received any incoming
CALL LOG calls.
NO OUTGOING You have not made any outgoing
CALL LOG calls.
NO SERVICE The phone is out of the service area.
INCOMING CALL IS While the phone is restricted,
RESTRICTED you have tried to answer a call.
OUTGOING CALL IS While the phone is restricted,
RESTRICTED you have tried to make a call.
REDIAL CALL The call cannot be made completely
FAILED even after automatic redialing.
SCH-411(E-Ta) 4/8/99 5:24 PM Page 10

13
Getting Started
12
Charging the Battery
To charge the battery using the Dual-Slot Desktop
Charger:
1.Plug the power cord of the charger into a wall
outlet.
2.Select one of the following options:
• Insert the entire phone with battery attached
into the front compartment of the charger.
•
Insert a single battery (alone,not attached to the
phone) into the rear compartment of the charger.
When two batteries are in the charger,the batteries
charge simultaneously. If you charge the battery while
it is attached to your phone,the Battery Charge
Indicator activates. A green LED indicates a full
battery charge.
Note: Use only the SAMSUNG-approved Dual-Slot
Desktop Charger with your phone by Samsung. Using
the wrong charger could damage the battery.
Battery Charge Indicator
The Battery Charge Indicator displays in the upper
right corner of the screen and indicates three levels of
charge. Three solid bars indicate a fully charged
battery. When the battery charge level is low or
empty,a clear Battery Charge Indicator (no bars
displayed) flashes on the screen.
Battery
Your phone package includes a partially charged
rechargeable battery so that you can use the phone
immediately after it is activated.
Installing the Battery
To attach the battery to your phone:
1.Hold the battery so that the metal contacts on the
base of the battery line up with the metal
contacts on the base of the phone.
2.Place the battery on the back of the phone with
the top of the battery about a quarter of an inch
from the latch.
3.Gently slide the battery toward the top of the
phone until it snaps into place.
Removing the Battery
Make sure to turn the power off before removing
the battery. Then press the battery release button
while sliding the battery out of position.
Dual-Slot Desktop Charger
The Dual-Slot Desktop Charger contains:
• Front compartment for charging the battery while
attached to the phone
• Rear compartment for charging the battery alone
(not attached to the phone)
• Red light to indicate that the battery is charging
(A yellow light indicates that the battery is
operating at a temperature that is too high or too
low,or that the battery is misaligned in the
charger.Please check the charger and battery.)
• Green light to indicate that the battery is fully
charged
SCH-411(E-Ta) 4/8/99 5:24 PM Page 12

15
Getting Started
14
Call Quality
For optimum call quality with your phone,please
follow these guidelines:
• Fully extend the antenna. While it may be possible
to place calls with the antenna retracted,the
phone operates best with the antenna fully
extended.
• Hold the phone as you would hold any other
telephone handset. Speak directly into the
microphone,and position the antenna up and over
your shoulder while talking.
• Do not hold the antenna while using the phone,as
this may affect call quality.
Table 1: Phone and Battery Specifications
Phone Type: Dual Mode CDMA/AMPS 800MHz
Graphic LCD: 5 Lines (4 Text Lines,1 Icon Line)
Battery Type: Standard: 1000mAh Li-Ion
Extended:1600 mAh Li-Ion
Long-Life:2700 mAh Li-Ion
Phone with: Standard Battery Extended Battery Long-Life Battery
Dimensions (H✕W✕D): 114✕50✕24 mm 114✕50✕28 mm 114✕50✕36.5 mm
Weight: 145g 161g 189g
Talk Time: up to 2.5 hours up to 4 hours up to 6.6 hours
or or or
Standby Time: up to 40 hours up to 60 hours up to 74 hours
Caring for the Battery
Use only SAMSUNG-approved batteries,Desktop and
Travel chargers. These chargers maximize battery life
and performance. Using other batteries or chargers
may invalidate your warranty and may damage the
battery.
For proper battery care,please follow these guidelines:
• To avoid damage,charge the battery in
temperatures that range from 32˚F to 104˚F
(O˚C to 40˚C).
• Do not use the battery charger in direct sunlight
or in high humidity areas (such as a bathroom).
• Never dispose of the battery by incineration (fire).
• Keep the metal contacts at the battery base clean.
• Do not attempt to disassemble or short-circuit the
battery,as injuries or burns may result.
• Replace the battery when it no longer provides
acceptable performance.
• Do not store the battery in high-temperature
areas for a long time.
• Do not allow metal objects or liquids to contact or
short-circuit the battery terminals,as injuries or
burns may result.
Battery Disposal and Recycling
Please be aware of the following guidelines when
disposing of or recycling the battery:
• Do not dispose of the battery in a fire;the cell
may explode. Check the regulations in your area
for special disposal instructions.
• Do not open or puncture the battery;the released
electrolyte is corrosive and may cause damage to
the eyes and skin. This substance also can be
toxic if swallowed.
• Charge the battery in accordance with the
instructions specified in this manual.
SCH-411(E-Ta) 4/8/99 5:24 PM Page 14
17
Basic Operations
Basic Operations
16
Turn On/Off
Turning On
To power on your phone,press and hold .
The red light flashes,an alert sounds. The display
updates to reflect the following conditions:
• When the system locates service,the greeting
message displays,along with the date and time.
You can now place and receive calls.
• If the system cannot locate service,only the
greeting message displays without the date and
time. In this case,you cannot place and receive
calls.Power off the phone,and then try again later
when service is available.
• If your phone is locked,“Locked”displays. Press
,and enter the four-digit lock code to unlock
the phone.
Turning Off
To power off your phone,press and hold .
When your power is off,nothing displays on the
screen.
Standby Mode
When your phone is on but no call is in progress,the
phone is in standby mode.
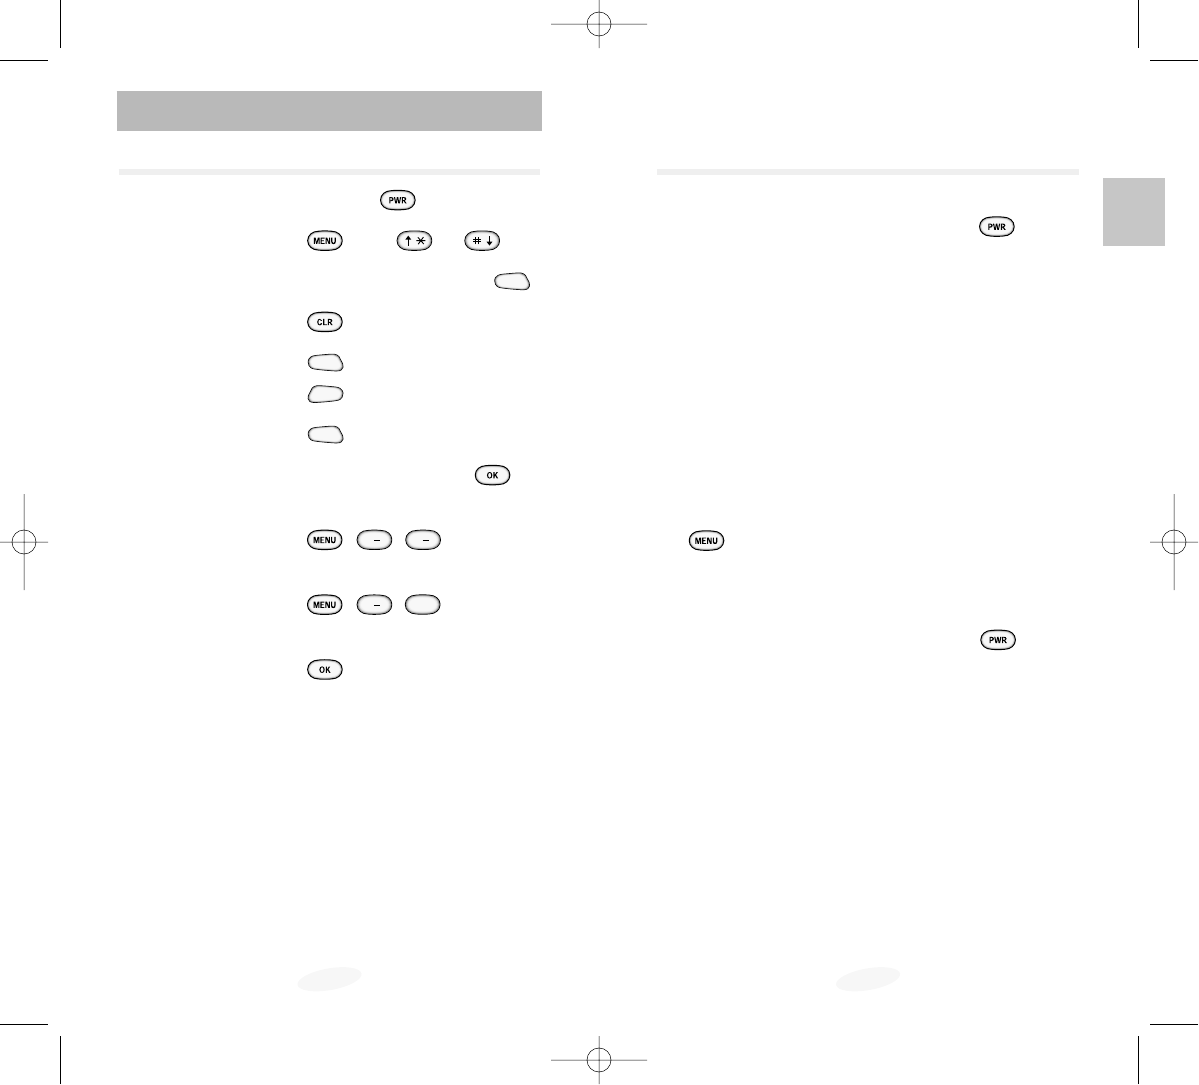
Basic Operations of Your Phone
Power On/Off Press and hold .
Menu Scrolling Press ,then or .
Make Calls Enter number,and then press .
Correct Mistakes
Press .
Redial Call Press twice.
End Call Press ,or close flip.
Answer Call Press ,or open flip.
Save Numbers Enter phone number,press ,
and then follow screen prompts.
Outgoing Call Press , , ,to review
the last 9 outgoing calls.
Incoming Call Press , , ,to review
the last 9 incoming calls.
Name Search Press in Standby Mode.
2
ABC
1.
'
1.
'
1.
'
SEND
END
SEND
SEND
SCH-411(E-Ta) 4/8/99 5:24 PM Page 16

19
Basic Operations
18
To prepend existing phone numbers in the Phone
Book or Call Logs:
1.Access the phone number entry.
2.When the phone number displays,press to
display context-specific options.
3.Press for prepend.
4.Enter the area code or feature code.
5.Press to call the number.
Correcting a Misdialed Number
To correct a misdialed number:
• Press to erase the digit,and then enter the
correct dlgit.
• Press and hold to erase the entire entry,and
then enter the correct phone number.
Receiving Calls
Answering a Call
To answer an incoming call,press ,or open the
flip.
Ending a Call
To end a call,press ,or close the flip.The call
time displays,along with the name/number of the
called party (if available). The phone returns to
Standby mode automatically.
END
SEND
SEND
3
DEF
Placing Calls
Placing a Call
To place a call:
1.Press and hold to power on your phone. An
active screen display indicates that the phone is
on.(No dial tone sounds.)
2.Enter the phone number,up to 36 digits,by
pressing the digit keys. The phone number
displays on the screen.
3.Press . The phone places the call to the
entered phone number.
Emergency Dialing
You can place calls to one of the three emergency
numbers that are in your emergency number list even
if your phone is locked.
Prepend Dialing
The prepend option enables you to add up to three
digits,such as area codes and network feature
activation codes,to a phone number of up to 10 digits.
You can prepend a phone number before dialing,or
prepend an existing entry in the Phone Book or Call
Logs.
To use prepend,select one of the following options:
• Enter the area code or feature activation code,and
then enter the phone number.
• Access a phone number stored in the Phone Book
or Call Logs,and then prepend the number.
SEND
SCH-411(E-Ta) 4/8/99 5:25 PM Page 18

The Menu
21
The Menu
20
Menu Organization
The Main Menu in Standby mode contains 8 primary
options,many of which contain sub-menus with more
specific options.
The In Use Menu options are available in Conversation
mode:
1.Calls
2.Phone Book
3.(Un) mute
4.Silent Key
5.Version
6. Send Tel #
SND.Send DTMF
To access a menu option,press ,and then press
the associated digit key to select the desired option.
As an alternative to pressing the digit keys,access the
menu,and then press the scroll keys to scan options.
Pressing the scroll keys highlights each option in
sequence. Press to select the highlighted option.
Call Waiting
Call Waiting enables you to receive a second call
during conversation. When a Call Waiting call comes
in,the incoming call alert sounds,and a text notifica-
tion displays.
Contact your service provider to activate Call Waiting.
To answer a Call Waiting call:
1.To answer the call,press . The phone
connects the calling party,and the places the
current party on hold.
2.Press again to switch between the two
parties.
Three-Way Calling
Three-Way Calling enables you to conduct conference
calls with two separate parties at the same time. You
are billed airtime for each outgoing call separately.
Contact your service provider to activate Three-Way
Calling.
To place a Three-Way Call:
SEND
SEND
1.During conversation,press ,enter
the phone number for the third party,and then
press again. The phone places the other
party on hold.
2.When the third party answers,press again
to connect with the original party.
Call Forwarding
This phone provides the option of forwarding
incoming calls to another phone number,even while
your phone is off. Activating Call Forwarding does not
affect outgoing calls made from this phone. Contact
your service provider to activate Call Forwarding.
SEND
SEND
SEND
SCH-411(E-Ta) 4/8/99 5:25 PM Page 20

23
The Menu
22
SCH-411 Standby Menu (Continued)
Main Menu Menu Level 1 Menu Level 2
5.Analog Call
6.Voice Dial ➪1.Record
2.Rev/Erase
3. Erase All
4. Set Active
7. Setup ➪1.Auto Retry
2.Auto Recv
3.AutoHyphen
4.Anykey Ans
5.ToneLength
6.Tone ➪1.Rls.Tone
2.Conn.Tone
7. Set Time
0. Security ➪1.Lock
2.Restrict ➪1.Phone Book
2.Incoming
3.Outgoing
3.Lock Code
4.Emergency #
5.Send PIN
6.Clr Memory
7.NAM Mode ➪1.Manual NAM
2.Auto NAM
8.Block Own #
9.System Sel ➪1.FM
2.CDMA
0.ResetPhone
Table 2: Main Menu Structure
SCH-411 Standby Menu
Main Menu Menu Level 1 Menu Level 2
1.Calls ➪1.Outgoing
2.Incoming
3.Erase Logs ➪1.Outgoing
2.Incoming
3.All
4.Air Time ➪1.Last Call
2.Total
3. Erase Total
2.Phone Book ➪1.Find Name
2.My Phone #
3.Add Entry
4.Find Entry
3.Sounds ➪1.Ring ➪1. Ring Vol
2. Ring Type
3. Ring Tone
2.Key Beep
3.Alert ➪1.MinuteBeep
2. Svc Area
4.Alarm ➪1.Set
2.Release
5.Diff.Ring
4.Display ➪1.Backlight
2.Greeting
3.Version
4.Language
SCH-411(E-Ta) 4/8/99 5:25 PM Page 22
25
The Menu
24
Erasing Call Logs
You can erase phone numbers stored in the Call Logs.
To erase call logs:
1.Press to display the Main Menu.
2.Press for Calls.
3.Press for erase logs. Additional options
display.
4.Press the associated digit key to select one of the
following context-specific options:
• Press for Outgoing calls.
• Press for Incoming calls.
• Press for All calls.
5.When the screen prompts for confirmation,
press to confirm erasing the call logs,or
press to cancel the operation.
Reviewing Airtime
You can review the airtime of the most recent call,as
well as total airtime for all calls since the last reset
action.
To review airtime:
1.Press to display the Main Menu
2.Press for Calls
3.Press for Airtime
4.Press the associated digit key to display airtime
for the selected calls:
• Press for Last Call.
• Press for Total.
5.Press to return to the previous screen.
2
ABC
1.
'
4
GHI
1.
'
3
DEF
2
ABC
1.
'
3
DEF
1.
'
Calls Options
Tracking Calls Through Call Logs
The Call Logs store up to nine incoming calls and nine
outgoing calls. Each log stores the name and phone
number (if available),as well as the date/time stamp.
In case of duplicate entries back to back,the system
consolidates those entries and stores only the most
recent call from the same phone number.
To review call logs:
1.Press to display the Main Menu.
2.Press for Calls.
3.Press the associated digit key to select an option:
• Press for Outgoing calls.
• Press for Incoming calls.
4.When the list of calls displays,press the scroll
keys to select an entry to view,and then press
or the associated digit key to view the
date/time stamp for the selected entry. If there is
a Phone Book match,the name displays. If there
is not a Phone Book match,only the phone
number displays.
5.Press to display context-specific options:
• Press for Talk.
• Press for Show Entry (or Store if the
phone number is not currently stored in the
Phone Book).
• Press for Prepend,and then add an area
code or feature code to the number before
calling or saving the number.
6.Press to exit the Call Logs and return to the
previous screen.
3
DEF
2
ABC
1.
'
2
ABC
1.
'
1.
'
SCH-411(E-Ta) 4/8/99 5:25 PM Page 24

27
The Menu
26
Ring Tone
When you select BELL as your ring type,you can set
ring tone from nine tones and four melodies.
To set ring tone:
1.Press to display the Main Menu.
2.Press for Sounds.
3.Press for Ring.
4.Press for Ring Tone.
5.Press the scroll keys to scan ring tones.Each tone
sounds as you scan the options.
6.When the desired option displays,press to
save the setting.
Key Beep
The Key Beep sounds in response to digit key presses.
You can set key beep in Standby mode from the Main
Menu or by pressing the Volume buttons on the side
of the phone.
To set key beep volume:
l.Press to display the Main Menu.
2.Press for Sounds.
3.Press for Key Beep.
4.Press the Volume buttons to scan eight volume
options and to keep silent.
5.When the desired option displays,press to
save the setting.
2
ABC
3
DEF
3
DEF
1.
'
3
DEF
Sounds Options
Your phone receives incoming calls and provides call
notification only when it is on. Notification type
depends on the selected setting.
Ring Volume
You can set ring volume in Standby mode from the
Main Menu.During an incoming call,press to
mute the ringer.
To adjust ring volume in Standby mode:
1.Press to display the Main Menu.
2.Press for Sounds.
3.Press for Ring.
4.Press for Ring Volume.
5.Press the Volume buttons to scan volume options.
6.When the desired volume level displays,
press to save the setting.
Ring Type
You can set ring type from three types to signal an
incoming call:a bell,a lamp,or a vibrator.
To set ring type:
1.Press to display the Main Menu.
2.Press for Sounds.
3.Press for Ring.
4.Press for Ring Type.
5.Press the Volume buttons to scan ring types.
6.When the desired option displays,press to
save the setting.
2
ABC
29
The Menu
28
5.Press or to choose the alarm mode.
• One Time:Alarm will be activated one time.
• Daily:Alarm will be activated on a specified time
every day unless you release the alarm fea-
ture.
6.Press to save the alarm mode.
7.Enter the time (in 24-hour clock) by pressing the
digit keys. To correct a digit entered incorrectly,
press or and then enter the correct
digit.
• If the current time is already set,you can specify
the alarm time.
• If the courrent time is not set,enter the time
duration your phone has to wait in minutes.
8.Press to save the setting. At the set time,the
alert sounds and the ‘-ALARM-’is blinked.
9.To cancel alarm at any time,access the Alarm
option (step 1,2 and 3),Press to cancel the
setting,and then press to confirm the
action.
2
ABC
31
The Menu
30
Display Options
Your phone provides several display options.
Backlight Control
When the phone is attached to the Hands-free Car Kit,
the backlight remains on. At other times,you can
select backlight options.
To select backlight options:
1.Press to display the Main Menu
2.Press for Display.
3.Press for Backlight.
4.Press the scroll keys to scan menu options:8
Seconds (after last keypress),Off.
5.When the desired option displays,press to
save the setting.
Personal Greeting
You can create a 12-character personal greeting that
displays at power-on and in Standby mode.
To create a personal greeting:
1.Press to display the Main Menu.
2.Press for Display.
3.Press for Greeting.
4.Enter your personal greeting by pressing the
alphanumeric keys on the keypad.
5.Press to save the setting.
2
ABC
4
GHI
1.
'
4
GHI
Differential Ring
The Differential Ring option enables you to activate a
unique ring to signal an incoming call by a stored
caller number.
To set Differential ring Volume:
1.Press to display the Main Menu.
2.Press for Sounds.
3.Press for Differential Ring.
4.Press the corresponding digit key (1~5) to select
the desired caller.
5.Enter the phone number by pressing the digit
keys.
6.To store the phone number,press .
7.Press the scroll keys to scroll the list of ring tones
and melody tones. Each tone sounds as the
options.
8.When the desired option displays,press to
save the setting.
5
JKL
3
DEF
SCH-411(E-Ta) 4/8/99 5:26 PM Page 30

33
The Menu
32
Version Display
You can view the software version of your phone
during conversation or in Standby mode.
To view the version in Standby mode:
1.Press to display the Main Menu.
2.Press for Display.
3.Press for Version.
4.Press to return to the previous screen.
To view the version in Conversation mode:
• Press ,.
Selecting Display Language
You can select the display language on your phone.
To set the language:
1.Press to display the Main Menu.
2.Press for Display.
3.Press for Language Select.
4.Press the scroll keys to toggle between
Hebrew/English.
5.Press to save the setting.
4
GHI
4
GHI
5
JKL
3
DEF
4
GHI
Analog Call Option
Your phone is preset to Digital mode. If you want to
place a call in Analog mode,use this feature.But if
your system supplier does not provide AMPS service,
this function is unavailable.
To make a call in Analog mode:
1.Press to display the Main Menu.
2.Press for Analog Force Call.
3.Press to set to Analog mode,or press
to return to the previous screen.
4.If you end the Analog call or do not make a call
within 5 minutes,your phone returns to Digital
mode automatically.

35
The Menu
34
Any Key Answer
Activate Any Key Answer to answer incoming calls by
pressing any key on the keypad,except and
.
Tone Length
Some phones you call can recognize only longer
tones. You may have to change the length to LONG
for some calls.When calling a paging system,your
phone should be in the SHORT mode.
Release Tone
You can set your phone to sound the release tone
when a call is released or dropped.
Connect Tone
You can set your phone to sound the connect tone
when your call is connected to the system.
Setting Current Time
You can set the time and date on your phone.
To set the time:
1.Press to display the Main Menu.
2.Press for Setup.
3.Press for Set Time.
4.Enter the time and date. The current time,if set,
displays. The month,day,hour and minute must
be entered with 2 digits. The year requires all
four digits. If you don’t input the time or you
input the wrong time,“Invalid Time”displays.
5.Press to set the time.
7
PQRS
7
PQRS
END
Setup Options
Your phone contains many setup features that make
communication easier and more efficient. Using them
saves time and makes yours even more fun to use.
To set setup options:
1.Press to display the Main Menu.
2.Press for Setup.
3.Press the corresponding digit key to select the
desired option:
• Press for Automatic Retry.
• Press for Automatic Receiving.
• Press for Automatic Hyphenation.
• Press for Any Key Answer.
• Press for Tone Length.
• Press for Tone,and then select (1) Release
Tone or (2) Connect Tone.
• Press for Set time.
4.Press the scroll keys to toggle,except Set Time.
5.Press to save the setting.
Automatic Retry
When you place a call and the call does not connect,
your phone continue to place the call to the entered
phone number.
Automatic Receiving
When a call comes in,your phone will answer the call
automatically after 2 rings. This feature does not work
if you have chosen Vibrate or Off as your ring volume.
Automatic Hyphenation
Automatic Hyphenation hyphenates numbers as follows:
• 123-456-7890
Digits following a pause are not hyphenated.
7
PQRS
6
MNO
5
JKL
4
GHI
3
DEF
2
ABC
1.
'
7
PQRS
SCH-411(E-Ta) 4/8/99 5:27 PM Page 34

37
Phone Book
Phone Book
36
Storing Phone Numbers
Storing Phone Numbers/Names
To store phone numbers/names:
1.Press to display the Main Menu.
2.Press for Phone Book.
3.Press for Add Entry. The screen prompts for
a new phone number.
4.Enter the phone number by pressing the digit
keys.
5.To store the phone number,press . The first
available location displays.
6.To accept the displayed location,press .
To select another location,press the scroll keys to
scroll to the desired location,and then press .
7.To include a name with the phone number entry,
respond to the screen prompt by entering the
name.
8.After entering the name,press .
Storing Phone Numbers at Call End
To store a phone number following conversation:
1.Press to end the call. The call time and the
phone number display.
2.To store the phone number,press . The first
available location displays.
3.To finish this process,follow above-mentioned
steps (step 6,7 and 8).
END
3
DEF
2
ABC
Overview of the Phone Book
The Phone Book provides the following features:
• 79 memory locations
• Optional name entry
• Text notification when overwriting or erasing
entries
• Automatic scrolling to the next available location,
with manual location selection option
• Adding/Editing entries by name or location
• Direct access of entries by name or location
• Searching entries by name or location
• One-touch/Two-touch Dialing
• Placing a call to the displayed Phone Book entry
• Secret number calling
• Prepending phone numbers
• Name/Number display when entry includes name
SCH-411(E-Ta) 4/8/99 5:27 PM Page 36
39
Phone Book
38
Displaying Your Phone Number
You can check your own phone number.
To display your phone number:
1.Press to display the Main Menu.
2.Press for Phone Book.
3.Press for My Phone Number. The phone
number of your phone displays. If you have more
than one own phone number,press the scroll
keys to check the next number.
4.Press to return to the previous screen.
Dialing from the Phone Book
Dialing By Memory Location
Your phone enables you to place calls quickly by
pressing and holding the associated digit key(s) for
the Phone Book memory location of the phone num-
ber you are calling.
The following table outlines dialing shortcuts:
Table 3: Memory Dialing Shortcuts
ACTIVITY SHORTCUT
One-touch Dialing: Press and hold the associated
digit key for the location.
Two-touch Dialing: Press the first associated digit
key,and then press and hold the
second digit key.
2
ABC
2
ABC
Viewing Stored Entries
Finding Entries by Location
To find an entry by location:
1.Press to display the Main Menu
2.Press for Phone Book.
3.Press for Find Entry. The screen prompts for
a location.
4.Enter the location by pressing the associated digit
key,or press the scroll keys to scroll to the
desired location,and then press to display
the selected entry.
5.When the desired entry displays,press to
place a call.
Finding Entries by Name
You can locate Phone Book entries quickly when the
phone is in Standby mode:Press to access the
Phone Book in one step and then press the scroll keys
to scan entries.
To find Phone Book entries from the Main Menu;
1.Press to display the Main Menu.
2.Press for Phone Book.
3.Press for Find Name.Stored names display
in an alphabetical list.
4.Press the scroll keys to scroll to the desired name.
You can also enter the first letter of the name by
pressing the associated alphanumeric key. Using
this method,the phone searches for the names in
the list beginning with that letter,and then
displays the first name in that section of the list.
If desired,you can also enter the second letter in
the name by pressing the associated
alphanumeric key.
5.when the desired entry displays,press to
place a call.
SEND
1.
'
2
ABC
SEND
4
GHI
2
ABC
SCH-411(E-Ta) 4/8/99 5:27 PM Page 38

41
Phone Book
40
Erasing Phone Book Entries
To erase Phone Book entries:
1.Press to display the Main Menu.
2.Press for Phone Book.
3.Access the desired entry using one of the search
methods described under “Viewing Stored
Entries”on page 38.
4.When the desired entry displays,press for
context-specific options.
5.Press for Erase. The screen prompts for
confirmation.
6.Press to erase the displayed entry. The
“Erased”notification displays,along with the
name,number,and location.
4
GHI
Voice Dial
43
Voice Dial
42
Voice Dialing
Your phone features Smartspeak®,the new Voice
Dialing system from Advanced Recognition
Technology.You can call up to 20
stored entries by speaking the
name into the microphone.
Using the Voice Dialing option requires that you first
train the phone to recognize the name.
Training the Phone
To train the phone for Voice Dialing:
1.Press to display the Main Menu.
2.Press for Voice Dial.
3.Press for Record. The system provides voice
prompts and screen displays to guide you through
the recording process.
4.Respond to the prompt by saying the name you
want to save. The phone stores the name as a first
sample,and then prompts for the name again.
5.Respond to the prompt by repeating the name
after the beep. The phone stores the name as a
second sample,and then requests the phone
number.
6.Enter the phone number by pressing the digit
keys.
7.To store the phone number,press . The
name (if matched up to Phone Book) and number
display,along with the notification “Recorded”.
The screen then returns to the Voice Dialing
menu.
1.
'
6
MNO
Storing Secret Numbers
You can select the Secret option to prevent dialed
phone numbers from displaying on the screen.
To store a secret number in the Phone Book:
1.Press to display the Main Menu.
2.Press for Phone Book.
3.Store the phone number as described under
“Storing Phone Numbers”on page 37,or access
an existing entry as described under “Viewing
Stored Entries”on page 38.
4.When the phone number displays,press for
context-specific options.
5.Press for Edit.Additional options display.
6.Press for Secret. The screen prompts for
confirmation.
7.Press the scroll keys to toggle between No/Yes.
8.Press to save the setting.
4
GHI
2
ABC
2
ABC
SCH-411(E-Ta) 4/8/99 5:28 PM Page 42
45
Voice Dial
44
Activation
Voice Dialing is always active once you have trained
the phone to accept Voice Dialing entries. To place
calls using Voice Dialing,simply press and hold ,
and then say the name into the phone after you hear
the prompt.
You can also initiate a Voice Dialing call just by
opening the flip,when you select this option through
the Main Menu.
To change Voice Dialing setup options:
1.Press to display the Main Menu.
2.Press for Voice Dial.
3.Press for Set Active.
4.Press the scroll keys to toggle between options:
• [ ] only:Enables Voice Dialing by pressing and
holding .
• [ ] / FLIP:Enables Voice Dialing by pressing
and holding ,or by opening the
flip.
5.When the desired option displays,press to
save the setting.
4
GHI
6
MNO
Tips on Recording Name
◆Avoid recording similar names phonetically. If you
record a similar name to the one already in
memory,the phone requests another name.
◆Avoid recording in a noisy place.
◆Speak clearly and natural.
◆The person who will use the phone should record
the name. The phone does not recognize the name
if the voice sounds differently.
◆Avoid too long or short name. It is recommended
to contain 2 to 5 syllables.
◆Voice dial feature is available only in CDMA mode.
◆If this feature does not work properly,erase the
name,and record with another name.
◆It is recommended to practice several times to
obtain best result.
◆You can record up to 20 names. If you record more
than 20,the phone announces ‘Memory is full.’
Checking Recorded Name
1.Press to display the Main Menu.
2.Press for Voice Dial.
3.Press for Review. A list of entries displays.
4.Press the digit key to select the desired entry,or
press the scroll keys to scan entries. Your phone
plays the recorded name.
2
ABC
6
MNO
SCH-411(E-Ta) 4/8/99 5:28 PM Page 44
47
Voice Dial
46
Erasing Voice Dialing Entries
To erase an individual Voice Dialing entry:
1.Press to display the Main Menu.
2.Press for Voice Dial.
3.Press for Review. A list of entries displays.
4.Press the digit key to select the desired entry,or
press the scroll keys to scan entries. The recorded
names play audibly as you scroll through the list.
5.When the desired entry displays,press to
select that entry.
6.Press to erase the selected entry.
To erase all Voice Dialing entries:
1.Press to display the Main Menu.
2.Press for Voice Dial.
3.Press for Erase All.
4.Press to erase all Voice Dialing entries.
3
DEF
6
MNO
2
ABC
6
MNO
Using Voice Dialing
Placing a Call
To place a call using Voice Dialing:
1.To place the call,press and hold ,or open
the flip,depending on the setting.
2.At the voice prompt,say the name into the phone.
• If the phone recognizes the name,the phone
attempts a connection.
• If the phone does not recognize the name,the
screen prompts for the name again.
• If the phone is unable to recognize the name
after two attempts,the message “Cannot
Recognize Name.Please check name.”displays.
Try the call again later,or check the recorded
name.
Reviewing Voice Dialing Entries
To review Voice Dialing entries:
1.Press to display the Main Menu.
2.Press for Voice Dial.
3.Press for Review. A list of entries displays.
4.Press the digit key to select the desired entry,or
press the scroll keys to scan entries. The recorded
names play audibly as you scroll through the list.
5.Press to return to Standby mode.
END
2
ABC
6
MNO
SCH-411(E-Ta) 4/8/99 5:28 PM Page 46
49
SecurityOptions
Security Options
48
Lock Mode
Locking the phone restricts outgoing calls to
emergency numbers.
To place an outgoing call in Lock mode:
• To call an emergency number,enter the number
and then press .
• To place normal outgoing calls,press to
display the Lock Code screen,and then enter the
lock code. When the Standby screen displays,
enter the phone number,and then press .
Lock Code Setting
The default lock code for your phone is 0000
depending on activation. You can enter a personal
lock code,and then change the lock code as often as
you like.
To enter a new lock code:
1.Press to display the Main Menu.
2.Press for Security.
3.Press for Lock Code.
4.Enter a new,four-digit lock code by pressing the
desired digit keys.
5.Press to save the new lock code.
3
DEF
0
OPER
SEND
SEND
Security Menu
Your phone provides many security options,including
a user-programmable lock code,and call restriction
features. To access the Security menu in Standby
mode,press , . Press the associated digit
key to access one of the Security options.
You must enter the four digit lock code to see any
options in this menu. The default lock code is 0000.
0
OPER
SCH-411(E-Ta) 4/8/99 5:28 PM Page 48
51
SecurityOptions
50
Call Restriction
Restricting Calls
Your phone provides the following Call Restriction
options in the Security menu:
• Phone Book Use
• Limit Incoming Calls
• Limit Outgoing Calls
To restrict calls:
1.Press to display the Main Menu.
2.Press for Security.
3.Press for Restrict.
4.Press the associated digit key to select an option:
• Press to restrict Phone Book.
• Press to restrict Incoming calls.
• Press to restrict Outgoing calls.
5.Press the scroll keys to toggle between
Unrestrict/Restrict.
6.Press to save the setting.
3
DEF
2
ABC
1.
'
2
ABC
0
OPER
Locking the Phone
To lock the phone:
1.Press to display the Main Menu.
2.Press for Security.
3.Press for Lock Phone.
4.Press the scroll keys to select an option:
• Off:The phone remains unlocked.
• Now:The phone locks immediately.
• On Power-Up:The phone locks automatically at
the next power-up.
5.Press to save the setting.
1.
'
0
OPER
SCH-411(E-Ta) 4/8/99 5:29 PM Page 50
53
SecurityOptions
52
Other Options
Send PIN
If your system supplier provides this service and you
have a PIN assigned by the system supplier,you can
set your phone to send the PIN when you make a call.
This feature prevents the phone from being used by
unauthorized persons. For information on this service
in detail,contact your service provider.
Clear Memory
You can erase all numbers in memory at the Phone
Book. The screen displays “All memories are cleared.”
To erase all numbers in memory:
1.Press to display the Main Menu.
2.Press for Security.
3.Press for clear Memory.
4.Press the corresponding key to select
context-specific options.
• press to erase.
• Press to cancel.
6
MNO
0
OPER
Emergency Numbers
Special numbers (100,101,*166) are progrmmed into.
The Security menu provides the option of storing
three emergency numbers.
You can place calls to emergency numbers when the
phone is locked or when “Restrict Outgoing Calls”is
active.
Storing Emergency Numbers
To store emergency numbers:
1.Press to display the Main menu.
2.Press for Security.
3.Press for Emergency Numbers.
4.Press the associated digit key to select a location
for the special number.
5.Enter the number by pressing the digit keys.
6.Press to save the number.
Dialing Emergency Numbers
To dial emergency numbers in Lock mode:
1.Enter the emergency number by pressing the digit
keys.
2.Press to place the call.
SEND
4
GHI
0
OPER
SCH-411(E-Ta) 4/8/99 5:29 PM Page 52
55
SecurityOptions
54
System Selection
The system setection feature of your phone enables
you to choose which of the system providers you will
use.
To select system:
1.Press to display the Main Menu.
2.Press for Securtry.
3.Press for System Selection.
4.Press the corresponding digit key to select the
desired option.
• Press FM and then select system modes:A
Only,A Pref,B Only,B Pref,Home Only.
• Press CDMA and then select system
modes:A Only,A Pref,B Only,B Pref,Home Only.
5.When the desired option displays,press to
save the setting
Reset Phone
If you want to reset all of your phone’s features to the
manufacturer’s defaults,you can do so with this feature.
But this feature doesn’t affect the Phone Book,Call Logs,
and SMS messages.
To reset the phone:
1.Press to display the Main Menu.
2.Press for Security.
3.Press for Reset Phone.
4.Press the corresponding key to select
context-specific options.
• Press to reset.
• Press to cancel.
0
OPER
0
OPER
2
ABC
1.
'
9
WXYZ
0
OPER
NAM Selection
The NAM (Number Assignment Module) enables you
to subscribe to one or more service networks. Your
phone has a Manual and an Automatic mode for
selecting the network. In the Manual mode,you set
the phone to the network you want to use. In the
Automatic mode,the phone selects the network
automatically based on system information for the
area you are in.
To set NAM mode:
1.Press to display the Main Menu.
2.Press for Security.
3.Press for NAM Mode.
4.Press the corresponding digit key to select the
desired option:
• Press for Manual NAM,and then select a
NAM:NAM-1,NAM-2 (if available).
• Press for Automatic NAM,and then to
toggle between On/Off.
5.Press to save the setting.
Block Own Number
This feature allows you to block your own number
display. If you turn this feature on,the message
“Blocked for phone number”displays when ‘My Phone
#’function is accessed by pressing , , .
To set the blocking:
1.Press to display the Main Menu.
2.Press for Security.
3.Press for Block Own Number.
4.Press the scroll keys to toggle between On/Off.
5.Press to save the setting.
8
TUV
0
OPER
2
ABC
2
ABC
2
ABC
1.
'
7
PQRS
0
OPER
SCH-411(E-Ta) 4/8/99 5:29 PM Page 54
57
Message Services
Message Services
56
Reviewing Messages
Your phone accepts incoming messages in both
Standby and Conversation modes. When a new
message arrives,an alert sounds,and the message
header displays. The message header includes the
type of message (Text,Page,Voicemail Notification)
and the name/phone number,if available.
You can review the message upon notification or
store the message for later review. The Messages
menu provides options for reviewing the name/phone
number of the sender,date/time stamp,priority,and
the message.
Your phone can store up to 20 pages and text
messages,depending on the length of the message.
You can erase an individual message after reviewing it,
or erase all stored messages at one time.
Reviewing Voicemail Messages
To review voicemail messages:
1.Press to dispiay the Messages Menu.
2.Press for RX Message. The number of new
messages displays next to the associated message
type in the menu.
3.Press for Voicemail. The screen displays
“Voicemail”,the time,date,and the number of
new,unread messages.
4.Press for context-specific options:
• Press to Listen to voicemail messages.
• Press to Reset the counter for voicemail
messages,if desired.(The system resets the
counter automatically after you listen to all new
messages).
2
ABC
1.
'
1.
'
1.
'
Short Message Services and Voicemail
Your phone receives voicemail notification,text
messages,and pages. And your phone transmits text
messages and pages (if your system supplier provides
this service). When the phone receives a message,an
alert sounds,and a text notification displays. The
message indicator ( ) remains on the screen until
you read the pending text messages or until you listen
to the voicemail notification messages.
When message memory reaches 75 percent capacity,
the screen displays a text notification and a prompt to
erase old messages. At 100 percent capacity,the screen
displays a text notification and rejects additional
incoming messages until you erase some of the stored
messages.
The phone automatically adjusts the incoming
message alert volume to the lowest setting when the
phone is in Conversation mode.
Incoming voicemail notification and text messages
transmit even when the phone is in Lock mode. To
access a message,or to return a call other than an
emergency number,enter the lock code.
* Contact your service provider to activate Message Service.
Not currently available in all markets.
* Voicemail notification and page message service may not be
supported according to the service provider.
SCH-411(E-Ta) 4/8/99 5:29 PM Page 56
59
Message Services
58
Choosing Alert Type for Message Receiving
The phone alerts you when a message is received.
You can choose how frequently this happens. The
three options are:EVERY 2 MIN,OFF,ONCE.
To set the frequency:
1.Press to display the Message menu.
2.Press for RX Message.
3.Press to select SMS Alert.
4.Press the scroll keys until you find your desired
type.
5.Press to save the setting.
Erasing Messages
You can erase all stored message.
To erase messages:
1.Press to display the Message Menu.
2.Press for RX Message.
3.Press for Erase All.
4.Press to confirm erasing,or press to
cancel.
5
JKL
1.
'
4
GHI
1.
'
Reviewing Page and Text Messages
To review page and text messages:
1.Press to display the Messages Menu.
2.Press for RX Message. The number of new
messages displays next to the associated message
type in the menu.
3.Press for Page,or press for Text. An
indexed list of page or text messages displays. An
exclamation point next to an entry indicates an
urgent message. A check mark next to an entry
indicates that you have read and stored the
message.
4.Press the scroll keys to highlight a message,and
then press to select the highlighted message
for review.(You can also press the associated
digital key to select a message by its entry
number.)
5.When the message displays,press to review
the message.
6.After reviewing the message,press for
context-specific options:
• Press for Talk (to call the phone number).
• Press to Save the number (if there is no
Phone Book match).
• Press to Erase the message.
• Press to review the Next message.
• Press to review the Previous message.
7.Press to return to the previous screen.
5
JKL
4
GHI
3
DEF
2
ABC
1.
'
3
DEF
2
ABC
1.
'
SCH-411(E-Ta) 4/8/99 5:30 PM Page 58
61
Message Services
60
Transmission Using Stored Messages
To transmit using Message logs:
1.Press to display the Message Menu.
2.Press for TX Message.
3.Press for TX Box.
4.Press for Stored Messages.
5.When the list of messages displays,press the scroll
keys to select an entry.
• Press . Your phone confirms that the
Destination phone number will be used. You can
enter other number as a message destination.
• Press to erase the selected entry.
6.Press . The phone processes a transmission.
Erasing Messages
To erase messages:
1.Press to display the Message Menu.
2.Press for TX Message.
3.Press for TX Box.
4.Press for Erase All.
5.Press to confirm erasing,or press to
cancel.
2
ABC
3
DEF
2
ABC
SEND
1.
'
3
DEF
2
ABC
Transmitting Messages
Your phone transmits text messages and pages. Your
phone can store up to 10 outgoing messages. And you
can store the message for later sending.
Transmitting Page and Text Messages
To transmit page and text messages:
1.Press to display the Messages Menu.
2.Press for TX Message.
3.Press for Page,or press for Text.
4.The screen displays to guide you through the
process. If you choose to transmit a Text,press
the associated alphanumeric key to enter a letter.
Press to end a typing.
5.Your phone requests the Destination phone
number. The phone uses the number to process
later.
6.Enter the desired phone number.
7.Press . The phone requests the Call Back
number.This number may be your phone number,
office number or home number.
8.Enter the desired phone number.
9.Press .You can set text messages’priority,if
available. Priority options are:NORMAL,URGENT,
EMERGENCY.
10.Press . The phone processes a transmis-
sion. If the processing is finished successfully,
you can store the message.
2
ABC
1.
'
2
ABC
SCH-411(E-Ta) 4/8/99 5:30 PM Page 60

63
Safety
Safety
62
Electronic Devices
Your wireless telephone is a radio transmitter and
receiver. When the power is on,the phone receives
and sends out RF energy.Most modern electronic
equipment,such as equipment in hospitals and cars,
contains an RF signal shield. RF energy may affect
some inadequately shielded electronic equipment.
Turn off your phone in health care facilities,and
always request permission berore using the phone
near medical equipment.
Consult the manufacturer of any personal medical
devices,such as pacemakers and hearing aids,to
determine if they are shielded adequately from
external RF signals.
Note if there are any regulations posted in the area
regarding the operation of wireless phones,and learn
where you can use them safely within the facility.
Aircraft
Turn off your phone belore boarding any aircraft. The
Federal Aviation Administration (FAA) requires that
you have prior permission from the crew to use your
phone while the plane is on the ground.FCC
regulations prohibit using your phone while the plane
is in the air. Do not use your phone at any time while
traveling on board a plane.
Blasting Areas
Construction crews often use remote-control RF
devices to set off explosives. To avoid interfering with
blasting operations,turn off your phone when you are
in a blasting area or in any area with signs posted that
read “Turn off two-way radio.”
For a variety of safety reasons,it is important to
consider where you will be using your phone. When
using your phone and its accessories,please follow
these guidelines:
Compliance with Safety Standards
The SAMSUNG phone meets all standards and
recommendations for the protection of the public
from exposure to radio frequency (RF)
electromagnetic
energy established by governmental bodies and other
qualified organizations. To reduce the risk of fire,
electric shock,serious personal injury,or property
damage,please follow these guidelines:
Driving
Using a wireless phone while driving is illegal in some
states and countries. Know the laws and regulations
for your area,and pull off the road and park if you
need to make a call.If you must use the phone while
driving,purchase and install the optional Hands-Free
Car Kit.
SCH-411(E-Ta) 4/8/99 5:30 PM Page 62

Accessories
65
Accessories
64
Batteries
Three types of Li Ion batteries are available for use
with your SAMSUNG phone:
• Standard Battery
• Extended Battery
• Long - Life Battery
Dual - Slot Desktop Charger
The Dual - Slot Desktop Charger charges the battery at
your home or office.
The Socket - outlet shall be installed near the equip-
ment and shall be easily accesible.
Cigarette Lighter Adapter
The Cigarette Lighter Adapter charges your SAMSUNG
phone in a vehicle while you drive and enables you to
operate the phone from a vehicle cigarette lighter
socket.
Travel Charger
The Travel Charger plugs into a wall outlet and
enables you to charge a single battery at your home or
office or while traveling.
Hands-Free Car Kit
The Hands-Free Car Kit provides safety,freedom and
convenience in your vehicle.(Kit includes Cradle and
Microphone.)
Ear-Microphone
The Ear-Microphone includes both the earpiece and
microphone in a convenient,lightweight unit.
Other Dangerous Areas
Turn off your phone in any area with a potentially
explosive atmosphere. It is rare,but your phone or its
accessories could generate sparks,which could cause
explosion or fire. Areas with a potentially explosive
atmosphere may not always be clearly marked. These
areas may include:
• Fueling areas,such as gas stations
• Below deck on boats
• Fuel or chemical transfer or storage facilities
• Areas where the air contains chemicals or
particles
such as grain,dust,or metal powders
• Any other area where you would normally be
advised to turn off your vehicle engine
Do not transport or store flammable gas,liquid,or
explosives in the compartment of a vehicle containing
your phone or accessories.
SCH-411(E-Ta) 4/8/99 5:30 PM Page 64

Glossary of Terms
Glossary of Terms
6766
Airtime
- Actual time spent talking on the wireless
phone. Most carriers bill customers based
on how many minutes of airtime they use
each month.
Antenna
- A device for transmitting or receiving
signals. The size and shape of antennas is
determined,in part,by the frequency of the
signal they receive. Wireless phones and
the base station must have antennas.
Base Station
- The fixed radio transmitter/receiver
that maintains communications with
mobile radio telephones within a given
area.(Typically seen as cell or cell site.)
CDMA
- (Code Division Multiple Access) A spread-
spectrum approach to digital transmission.
With CDMA,each conversion is digitized and
then tagged with a code. The mobile phone
deciphers only a particular code to pick the
right conversation off the air. The transmitted
signal is just above noise level across the avail-
able bandwidth.
Channel
- Communications signals transmit along
paths called channels.
Codec
- COmpression & DECompression.
Deactivation
- The process of rendering a wireless
phone inactive.
DTMF
- (Dual-tone Modulated Frequency) You send
DTMF signals when you enter numbers by
pressing the digit keys.
Charging Times with Accessories
Standard Extended Long-Life
Battery Battery Battery
Dual-Slot Desktop Charger 3.5 hrs. 4.5 hrs. 7.5 hrs.
Travel Charger 2.5 hrs. 3.0 hrs. 5.5 hrs.
Hands-Free Car Kit 4.0 hrs. 6.0 hrs. 8.0 hrs.
Cigarette Lighter Adapter 4.0 hrs. 4.5 hrs. 7.5 hrs.
SCH-411(E-Ta) 4/8/99 5:30 PM Page 66

Glossary of Terms
6968
Roaming - The ability to use a wireless phone to make
and receive calls in places outside of the
home service area.
Service Charge - The amount paid each month to
receive wireless service.
SMS -
(Short Message Seryices) The variety o
f
messaging services available on the SAMSUNG
phone,
including voicemail,numeric paging and
text messaging.
Standby Time - The amount of time a fully charged
wireless portable or transportable
phone can be on and idle without
being in use.(SeeTalk Time.)
Talk Time - The length of time a person can talk on a
portable or transportable wireless phone
without recharging the battery.
Vocoder - Voice Coder. A device used to convert
speech into digital signals.
Voicemail -
A computerized answering service that
answers a call,plays a greeting and records
a message. Depending on the sophistica-
tion of the service,it can notify the sub-
scriber,via a pager,of an incoming call or
message.(Also called voice messaging.)
Wireless -
Radio-based Systems that allow tannsmission
of telephone or data signals through the air
without a physical connection,such as a
metal wire (copper) or fiber optic cable.
EVRC - (Enhanced Variable Rate Codec) EVRC is a
new global standard for compressing and
decompressing voice signals.EVRC uses a
lower bit rate (the number of bits sent per
second) than existing CDMA vocoders,while
providing significant improvements in voice
quality. This technology enables your phone
to provide superb voice quality while
benefiting from the ability to process more
cellular voice calls using less bandwidth than
the voice codecs in CDMA networks today.
Frequency - A measure based on time,as one or
more waves per second,in an electrical
or lightwave information signal. A sig-
nal’s frequency is stated in cycles-per-
second or Hertz (Hz).
Hands-Free - A feature that permits a driver to use a
wireless phone without lifting or hold-
ing the handset - an important safety
feature for automobiles,tractors and
most other motorized vehicles.
LCD -
(Liquid Crystal Display) Commonly used to refer to
the screen display on the wireless phone.
LED - (Light Emitting Diode) Commonly used to refer
to a small light on the wireless phone or on the
Desktop Charger. The LED lights on the phone
to indicate an incoming call. The LED lights on
the charger to indicate that battery charging is
taking place.
Prepend - The addition of a prefix,such as an area
code,to a phone number.
RF - Radio Frequency
SCH-411(E-Ta) 4/8/99 5:30 PM Page 68

71
Index
Index
70
Calls Options 24
Checking Recorded Name 44
Call Restriction 51
Clear Memory 53
Choosing Alert Type for Message Receiving 59
Compliance with Safety Standards 62
Cigarette Lighter Adapter 65
Charging Times with Accessories 66
D
Description of Your Phone 7
Display Messages 11
Dual-Slot Desktop Charger 12
Differential Ring 30
Display Options 31
Displaying Your Phone Number 39
Dialing from the Phone Book 39
Dialing Emergency Numbers 52
Driving 62
Dual-Slot Desktop Charger 65
E
Emergency Dialing 18
Ending a Call 19
Erasing Call Logs 25
Editing Phone Book Entries 40
Erasing Phone Book Entries 41
A
Answering a Call 19
Alert 28
Alarm 28
Analog Call Option 33
Aircraft 63
Accessories 65
B
Battery 12
Battery Charge Indicator 13
Battery Disposal and Recycling 14
Basic Operations 16
Basic Operations of Your Phone 16
Backlight Control 31
Block Own Number 54
Blasting Areas 63
Batteries 65
C
Charging the Battery 13
Caring for the Battery 14
Call Quality 15
Correcting a Misdialed Number 19
Call Waiting 20
Call Forwarding 20
SCH-411(E-Ta) 4/8/99 5:30 PM Page 70

73
Index
72
M
Menu Organization 21
Main Menu Structure 22
Memory Dialing Shortcuts 39
Message Services 56
N
NAM Selection 54
O
Overview of the Phone Book 36
Other Options 53
Other Dangerous Areas 64
P
Placing Calls 18
Prepend Dialing 18
Personal Greeting 31
Phone Book 36
Placing a Call (using Voice Dialing) 46
R
Removing the Battery 12
Receiving Calls 19
Reviewing Airtime 25
Erasing Voice Dialing Entries 47
Emergency Numbers 52
Erasing Messages 61
Electronic Devices 63
Earbud Headset 65
F
Features 6
Finding Entries by Location 38
Finding Entries by Name 38
G
Getting Started 6
Glossary of Terms 67
I
Installing the Battery 12
Index 70
K
Key Functions 9
Key Beep 27
L
Lock Mode 49
Lock Code Setting 49
Locking the Phone 50
SCH-411(E-Ta) 4/8/99 5:30 PM Page 72

75
Index
74
T
Turn On/Off 17
Three-Way Calling 20
The Menu 21
Tracking Calls Through Call Logs 24
Tips on Recording Name 44
Transmitting Messages 60
Transmitting Page and Text Messages 60
Transmission Using Stored Messages 61
U
Using Voice Dialing 46
V
Version Display 32
Viewing Stored Entries 38
Voice Dial 43
Voice Dialing 43
Ring Volume 26
Ring Type 26
Ring Tone 27
Reviewing Voice Dialing Entries 46
Reset Phone 55
Reviewing Messages 57
Reviewing Voicemail Messages 57
Reviewing Page and Text Messages 58
S
Screen Display 8
Status Indicators 10
Standby Mode 17
Sounds Options 26
Selecting Display Language 32
Setup Options 34
Setting Current Time 35
Storing Phone Numbers 37
Storing Phone Numbers at Call End 37
Storing Secret Numbers 42
Security Options 48
Security Menu 48
Storing Emergency Numbers 52
System Selection 55
Short Message Services and Voicemail 56
Safety 62
SCH-411(E-Ta) 4/8/99 5:30 PM Page 74
MEMOMEMO
SCH-411(E-Ta) 4/8/99 5:30 PM Page 76

MEMO
Licensed by QUALCOMM lncorporated under one or more of
the following Patents.
U.S. Patent No. 4,901,307 5,056,109 5,099,204
5,101,501 5,103,459 5,107,225
5,109,390
SCH-411(E-Ta) 4/8/99 5:30 PM Page 78

SCH-411(E-Ta) 4/8/99 5:30 PM Page 80
ELECT
SCH-411
ELECTRONICS
Owner’s Manual
SCH-411
Series CDMA
DIGITAL PORTABLE
CELLULAR TELEPHONE
SCH-411(E-Ta) 4/8/99 5:30 PM Page 82
