Samsung SCH I201 User Manual To The 7c9d85c1 Aa3d 4d8b 8b6e 0f610d42c25b
User Manual: Samsung SCH-i201 to the manual
Open the PDF directly: View PDF ![]() .
.
Page Count: 215 [warning: Documents this large are best viewed by clicking the View PDF Link!]

Samsung Smartphone
SCH-i201
User’s Guide

Contents
Getting Started
Unpacking ................................................... 1
Your Phone ................................................. 2
Phone Layout ......................................... 2
Installing the Battery ................................. 4
Attaching the Battery Pack ................... 4
Removing the Battery Pack ................... 5
Charging the Battery Pack ......................... 6
Turning the Phone On/Off .......................... 8
Backlight ................................................ 8
Viewing the Remaining Battery
Power.................................................. 8
Using the Touchscreen ............................... 9
Using the Stylus ..................................... 9
Calibrating the Screen ......................... 10
Adjusting Screen Contrast ................... 11
Using as a Phone
Making a Call ........................................... 13
Making a Call ....................................... 13
Advanced Calling Features ...................... 15
Using Voice Dial .................................. 15
Using Speed Dial ................................. 17
Redialing the Last Number .................. 18
Using the Phone Book ......................... 19
Using Call History ................................ 20
Using Four-digit Dial ............................ 22
Answering Calls ....................................... 23
Answering a Call ................................. 23
Viewing Missed Calls .......................... 24
In-Call Options .......................................... 25
Using In-Call Options ........................... 25
Setting Basic Features ............................. 28
Adjusting the Volume .......................... 28
Easy Access to Applications
During Calls ......................................... 29
Selecting Bell/Vibrate ......................... 29
One-Touch Ringer Selection ................ 30
Viewing Air Time ................................. 31
Automatic Hyphenation ....................... 32
Answering Mode ...................................... 33
Turning On the Answering Mode ........ 33
Listening to a Caller Message ............ 35
Recording Your Own OGM
Message .............................................. 37
Playing or Selecting the OGM
Message .............................................. 39
i

Contents
Learning to Use the
Applications
Working with Applications ...................... 41
Opening an Application ....................... 41
Displaying Applications ....................... 41
Brief Description on Applications ....... 44
Entering Text, Numbers or Symbols .... 46
Help Writing Characters ...................... 55
Using Application Controls .................. 55
Using Menus ........................................ 56
Finding Data on Your Phone ................ 59
Customizing Your Phone .......................... 61
Opening Control Application ............... 61
Bell ....................................................... 62
Sound ................................................... 62
Display ................................................. 64
Security ................................................ 65
Battery ................................................. 67
System ................................................. 68
Network ............................................... 68
Storage ................................................ 70
Owner Information ............................... 70
Calibration ........................................... 71
Contrast ............................................... 71
PC Synchronization ................................... 72
Synchronizing Data .............................. 72
Data Communication ........................... 75
Address Book
Address Book ........................................... 79
Creating an Address Book Entry .......... 80
Viewing Address Book Entries ............ 91
Editing an Address Book Entry ............ 95
Deleting an Address Book Entry .......... 98
Address Book Setup Options ............... 99
Personal Information
Manager
Memo ..................................................... 103
Creating a New Memo ...................... 103
Viewing a Memo ............................... 105
Attaching an Image in a Memo ........ 109
Sending a Memo as a SMS
Message (network dependent) .......... 112
Configuring Categories ...................... 113
Scheduler ............................................... 114
Recording a New Appointment ......... 114
Viewing Scheduled Appointments .... 118
Editing Details of a Selected
Appointment ...................................... 122
Removing a Selected Appointment ... 122
ToDo ....................................................... 124
Creating a ToDo Item ......................... 124
Viewing the ToDo List ........................ 127
Editing a ToDo Item ........................... 128
Deleting a Task in the List ................. 129
Continued
ii

Contents
Communication Applications
SMS (Short Message Service) ............... 131
Sending a Short Message ................. 131
Receiving Messages .......................... 134
Deleting a SMS Message ................. 137
Internet ................................................... 138
Accessing GoNext ............................. 138
Navigating the Internet ..................... 139
Using Bookmarks ............................... 141
Internet Settings ................................ 144
E-mail ..................................................... 146
Accessing E-mail Service .................. 146
Mail Settings ..................................... 147
Reading an E-mail .............................. 149
Sending an E-mail .............................. 153
Writing a Signature ........................... 157
Additional Setup Options .................. 158
Chatting .................................................. 162
Using Chat Service ............................ 162
Creating a New Chat Room ............... 167
Person to Person Talking ................... 169
Sending a Chat Memo ....................... 170
Using Chat Book ................................ 171
Using Bulletin Board .......................... 173
Additional Chat Menu Options .......... 175
Extra
Clock ....................................................... 179
Setting Home Time ............................ 179
Setting Alarm ..................................... 181
Viewing World Time .......................... 183
Calculator ............................................... 184
Opening the Calculator ...................... 184
Using the Calculator .......................... 185
Error Message Display ...................... 189
Othello .................................................... 190
Accessing Othello Game ................... 190
Playing One Player Game .................. 191
Playing Two Player Game .................. 192
Playing Network Game ...................... 192
Viewing Your Play Records ................ 197
Appendix
Accessories............................................. 199
Care and Safety Guidelines ................... 200
Caring for Your Smartphone .............. 200
Antenna Care ..................................... 201
Battery Care ....................................... 201
Safety Precautions ............................. 203
Continued
iii

Getting Started
Congratulations on your purchase of the Samsung
Smartphone. This phone combines a digital phone,
personal information managers, communication
applications and games in a single handset.
In this chapter, the topics included are:
• Unpacking
• Your Phone
• Installing the Battery
• Charging the Battery Pack
• Turning the Phone On/Off
• Using the Touchscreen
Unpacking
1
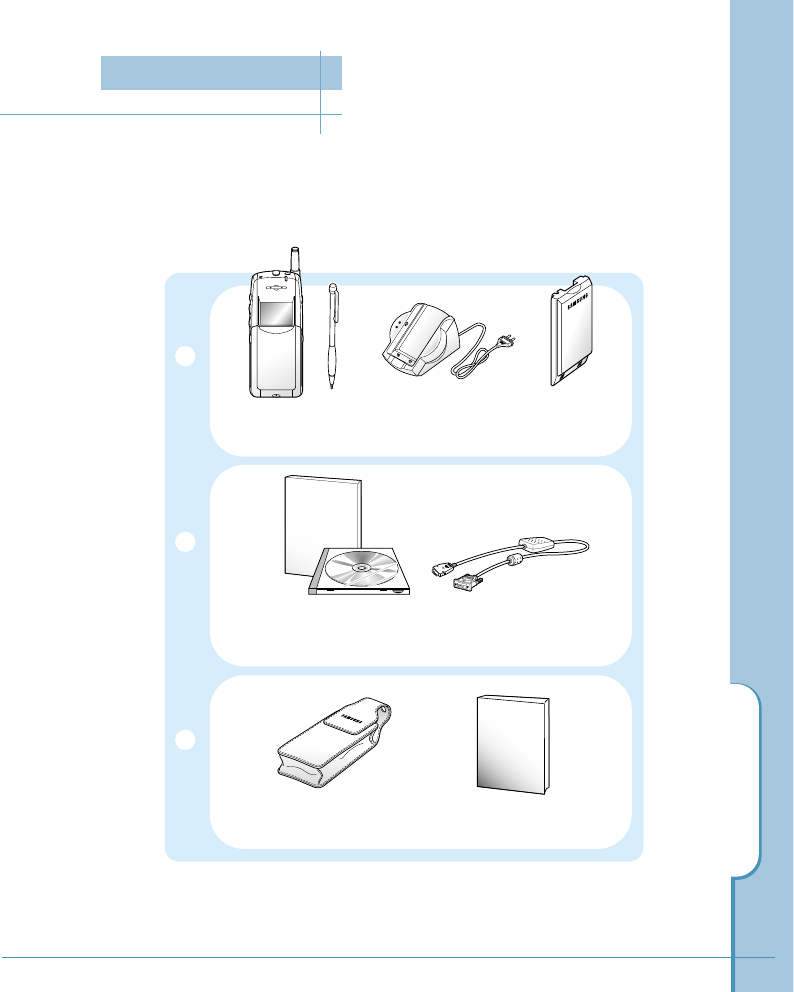
Check to make sure that all of the following items are included in the box when
you unpack it.
The phone with a stylus Desktop
charger Standard
battery
Data cable
CD-ROM for data synchronization
and the instruction guide
Leather case This guide
Unpacking

Home
Menu
Cont
Input
WWW
2
Auto answer button
Volume buttons
Ear microphone jack
Earpiece
Microphone
Press and hold to turn the
answering mode on or off.
Adjust the volume.
Antenna
Lamp
Touchscreen
Flip
Hard icon panel
Hard icon panel
Phone Layout
Launches
applications.
Opens text input
screen when you are
asked to enter
information on the
screen.
Opens a set of menu
options available in
the application you
are in.
Adjusts the contrast
of the screen.
Application buttons
Application buttons
Opens the associated
applications.
Phone Address GoNext
a
WWW
The following illustrations show the main elements of your phone.
Your Phone
Home
Menu
Cont
Input
WWW
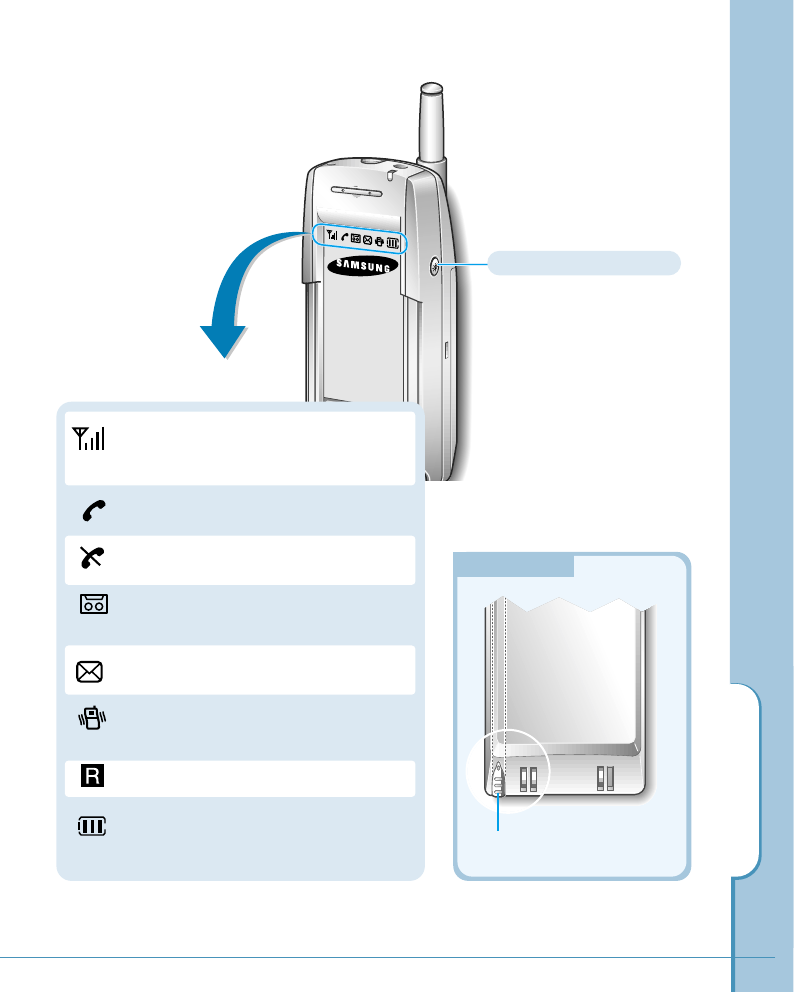
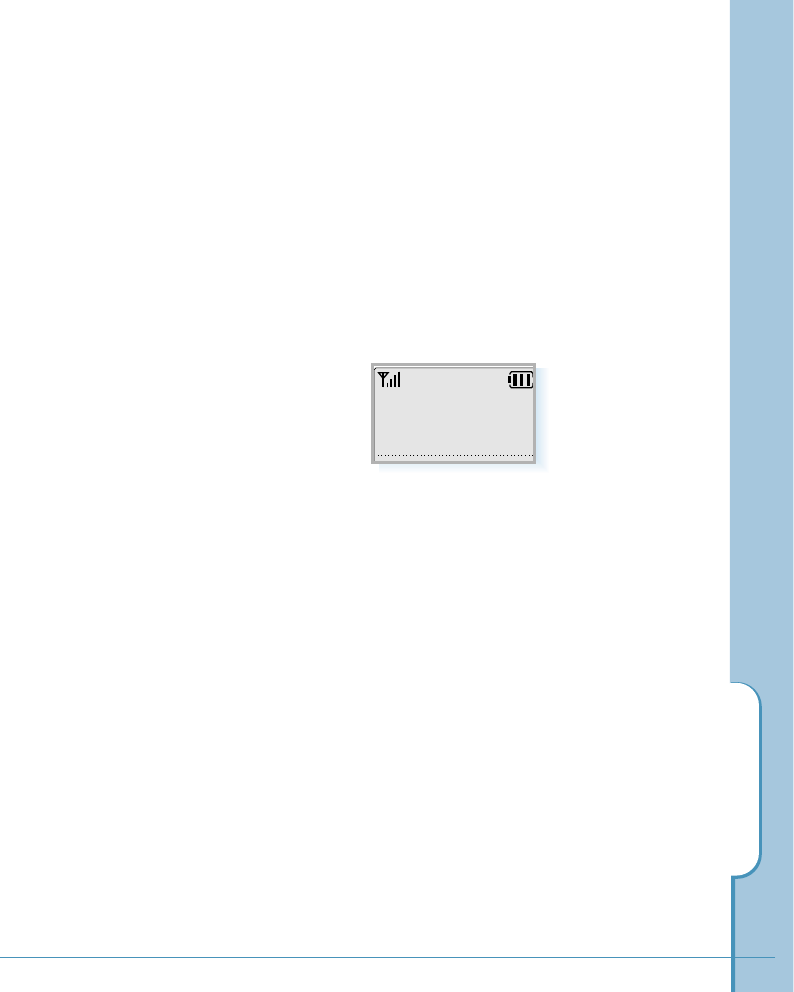
Shows the received signal strength.
The greater the number of bars, the
better the signal strength.
Appears when a call is in progress.
Appears when the phone is out of
service area.
Appears when a caller message has
been recorded.
Appears when a new message has
been received.
Appears when the vibrate mode is
activated.
Appears when you are roaming.
Shows the level of your battery. The
more bars you see, the more power you
have left.
Rear View
Rear View
Your Phone
3
Icons in the top strip
Power/Backlight button
Turns the phone on/off. Also,
turn the backlight of the
screen on/off.
Stylus
4
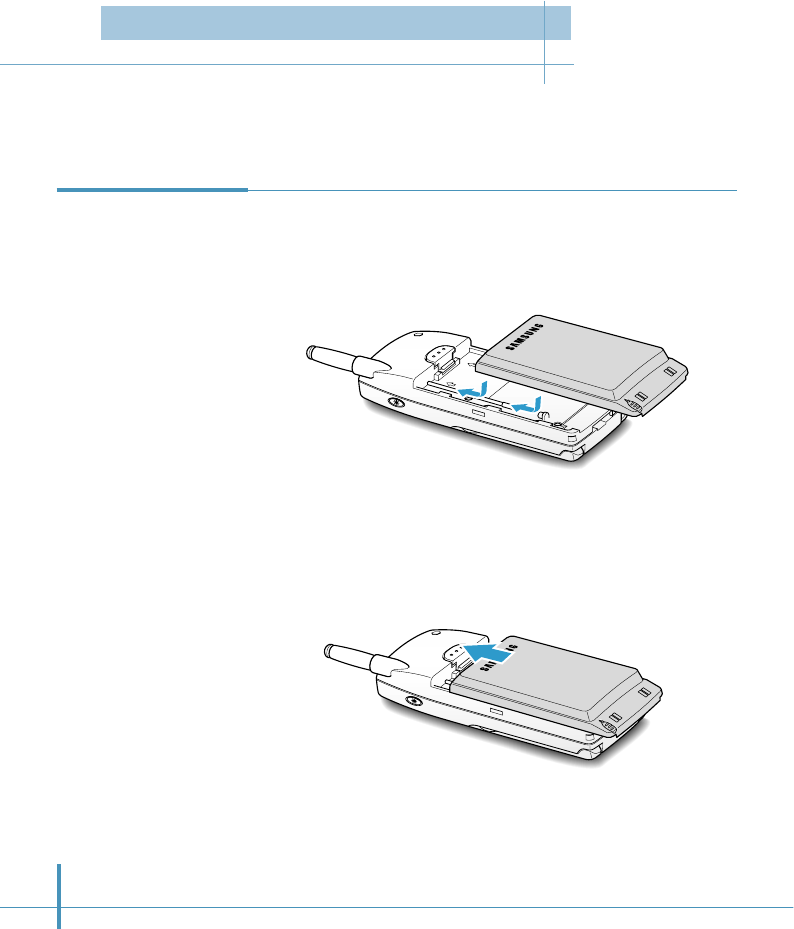
Your phone comes with an rechargeable standard battery. An extended-life battery is
available as an option.
1. To attach the battery pack, align it with the phone so that the
two arrows labeled on the back of the phone are seen, the
battery charge contacts pointing downward.
2. Slide the battery pack upwards until it clicks firmly into
position.
Attaching the
Battery Pack
Installing the Battery

Removing the
Battery Pack 1. Release the battery pack by pressing the latch on the rear
of the phone.
2. Slide the battery pack downward and lift it away from the
phone.
Installing the Battery
5
Latch
P
B
6
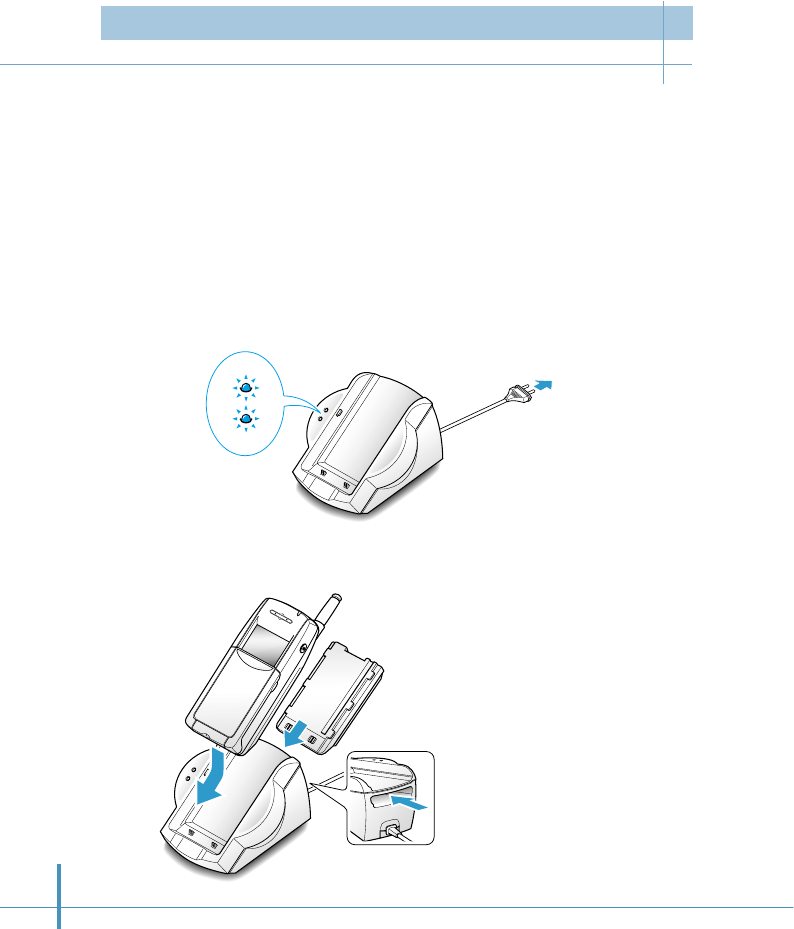
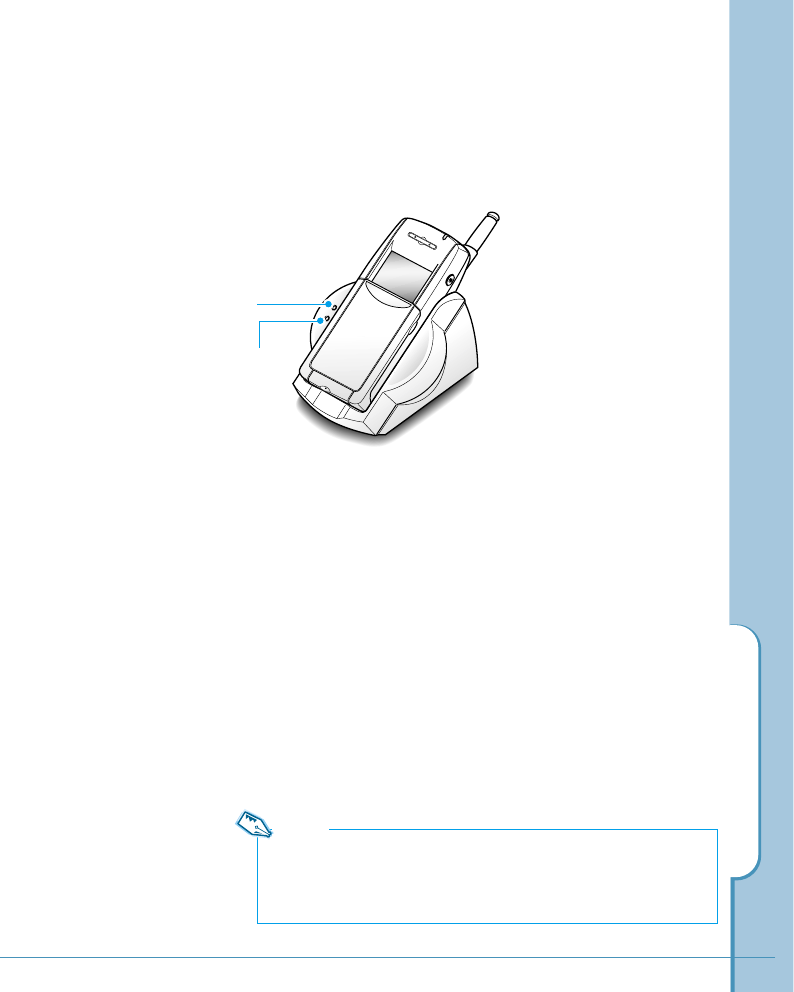
2. Select one of the following options:
• Insert the entire phone with battery
attached into the front compartment of
the charger.
• Insert a single battery (alone, not
attached to the phone) into the rear
compartment of the charger.
Charge
indicator lights
When you purchase the phone, the battery pack is not fully
charged. Please charge the battery fully before you operate
your phone.
You must fully charge the battery before using your phone for
the first time. A discharged battery is fully recharged in
approximately 8-12 hours.
1. Plug the power cord of the charger into a standard AC outlet.
When the power is connected properly, the battery charge
indicator lights on the left side of the charger blink once.
Charging the Battery Pack
3. The battery charge indicators on the left side of the
charger come on.
The light is red while the batteries are charging. It turns
green when the batteries are fully charged. Charging the
main battery completely takes two to three hours.
4. When the indicator light turns green, remove the phone
from the charger by gently pulling it straight up.
Once the battery is charged, you can use the phone in the
charger or out of the charger for all functions. If you have
purchased an extra battery, you can charge it in the
charger while you are using the phone.
Charging the Battery Pack
7
Charge indicator light
Red=The battery is charging.
Green=The battery is fully charged.
Yellow=The battery is waiting to be
charged.
Phone’s battery (on the
front compartment)
indicator light
Battery (on the rear
compartment) indicator light
Note:
Leaving the battery in the charger once it is fully charged does not
harm the battery. For more information on battery safety, see page
201.
8
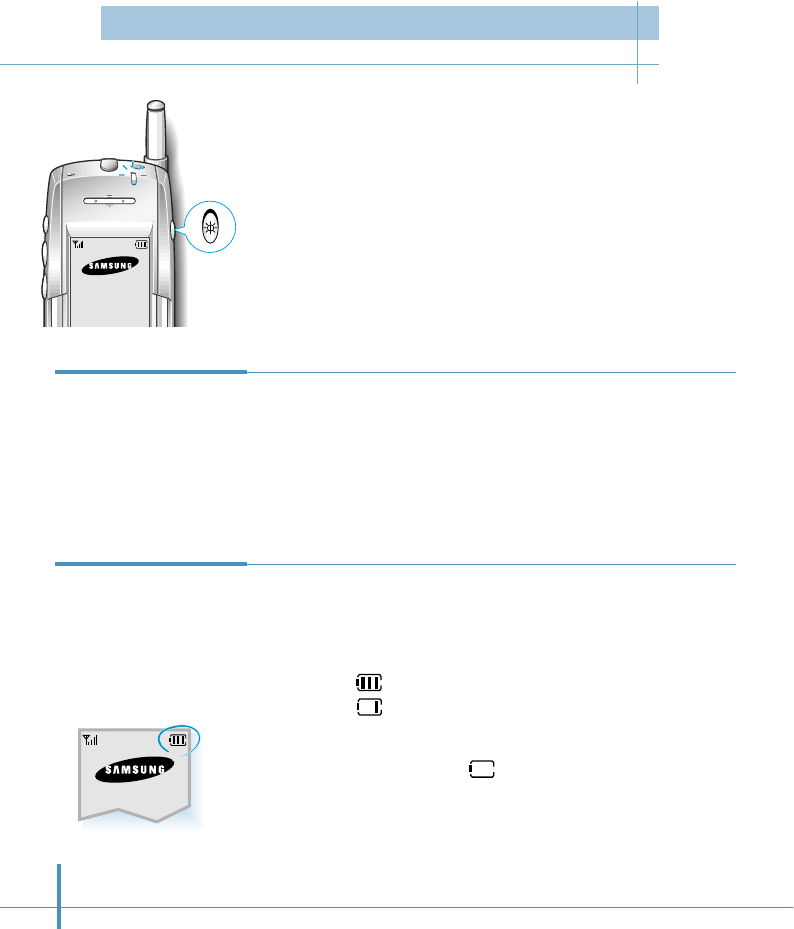
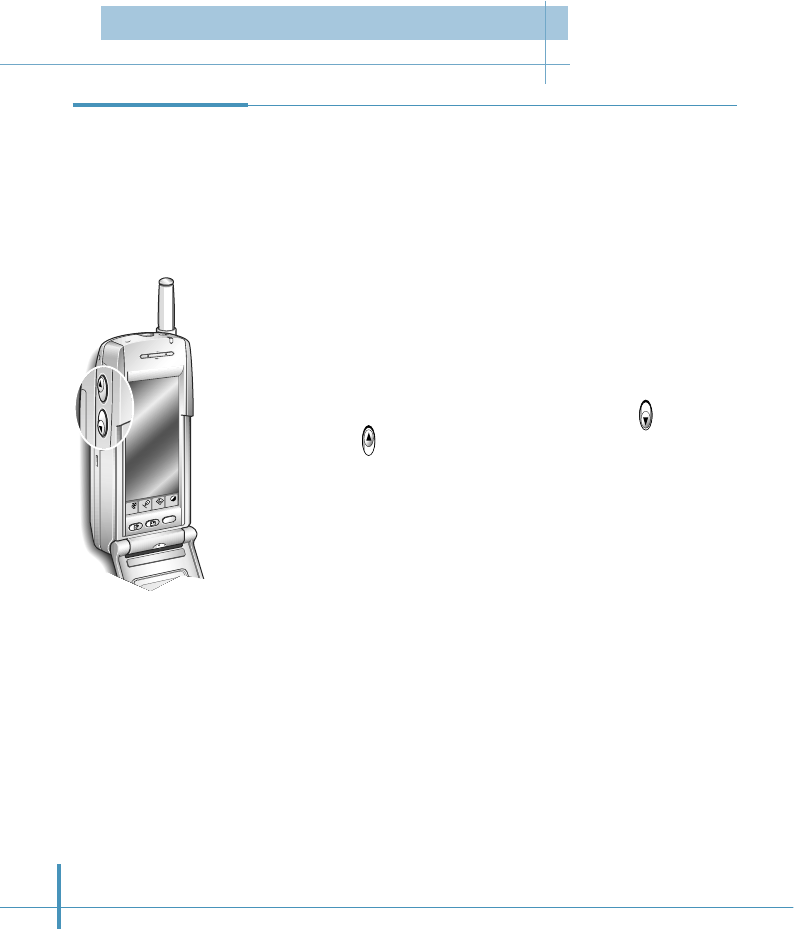
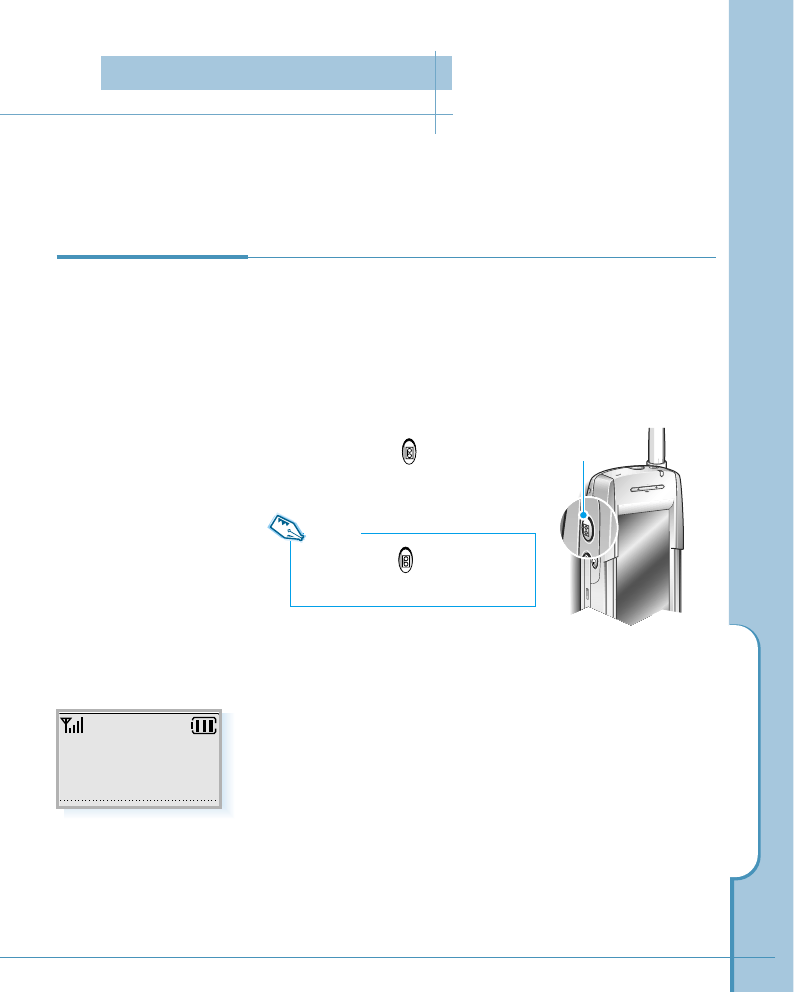
1. Hold down the Power button on the right side of the phone
for more than one second to switch the phone on.
The phone beeps and displays the greeting message, current
date and time.
2. To turn off the phone, press the button again until you hear a
beep tone.
The backlight comes on when you open the flip or receive a call
and switches off 8 seconds after the last input. If you want to
turn on the backlight manually, press the Power button briefly.
Backlight
Viewing the
Remaining
Battery Power
Power
button
• The battery charge level is displayed at the right corner of the
LCD display, when the phone is powered on.
• The number of blocks represent the battery charge level.
Example: Battery fully charged
Battery low
• When the battery drops to a low level, the phone beeps and
the battery icon turns to .
• When the battery is fully discharged, a warning tone sounds
three times and the power turns off.
Turning the Phone On/Off
Using the Touchscreen
9
Your phone is equipped with a large, sensitive touchscreen.
The screen provides on-screen number keyboard you would
expect on a normal phone and has versatile menu functions.
To prevent scratches, never use an actual pen, pencil or
other sharp object to tap or write on the screen.
With the stylus, you can:
• write, type, and draw on the screen.
• tap on the screen, which opens the selected application
and select an item or button in the application.
• drag across words to select them.
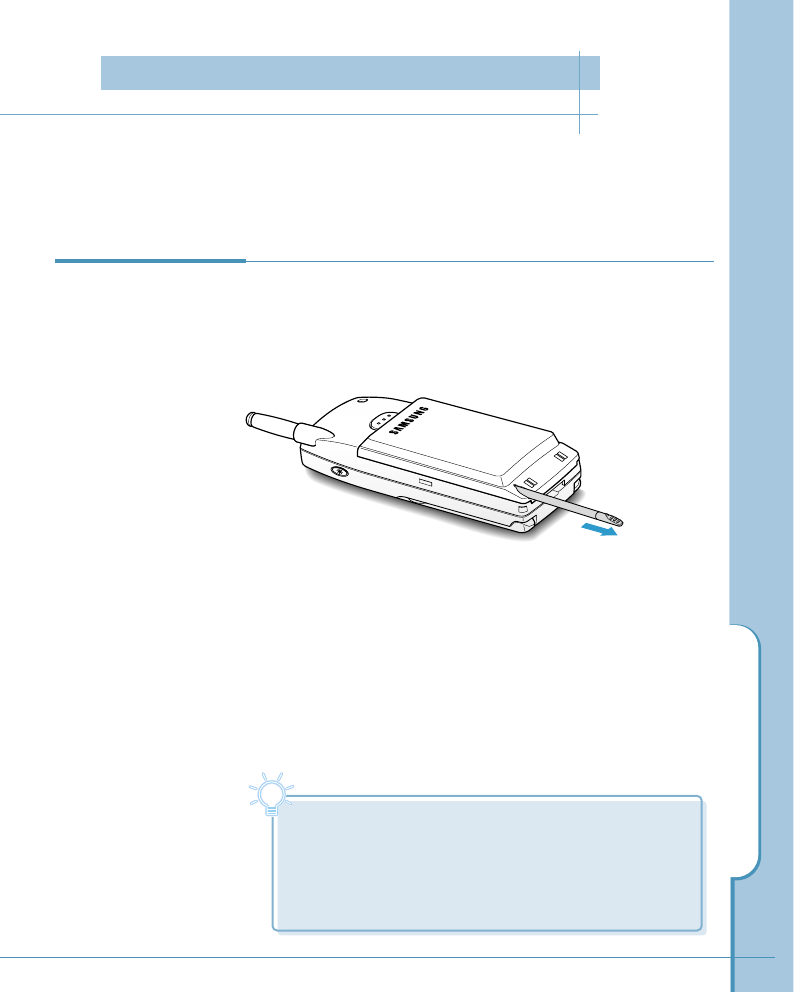
Use the stylus provided with your phone to make selection
on the touch screen. When the stylus is stored in a slot on
the back side of your phone, to use the stylus, remove it
from the slot and hold it as you would with pen or pencil.
Using the Stylus
Tip
Tip
• Tap means to touch the screen and lift the stylus off
the screen.
•Drag means to touch and slide the stylus. When you
are finished dragging, lift the stylus off the screen.
The selected words or text turns highlighted.
Using the Touchscreen
10
Use stylus to tap
center of target.
4. Tap the Calib icon.
5. Tap the exact center of each target that appears
on the screen. After you have aligned four
targets, the Control screen reappears.
Control
Bell Sound Disp
Secur Batt Sys
Net Stor
Contr
Owner
Calib
To make the screen respond correctly to the stylus tap, calibrate
the screen with the stylus before using your phone.
1. Tap the icon on the hard icon panel to launch
applications.
2. Drag the slider to scroll to the next page.
3. Tap the Ctrl icon to open the Control screen.
Calibrating the
Screen
Home
SMS
PCsync
Calc Ctrl
Cont
Menu
Input
All
Clock
Find
Home
Chat
Othello
Slider
Tap to launch
applications
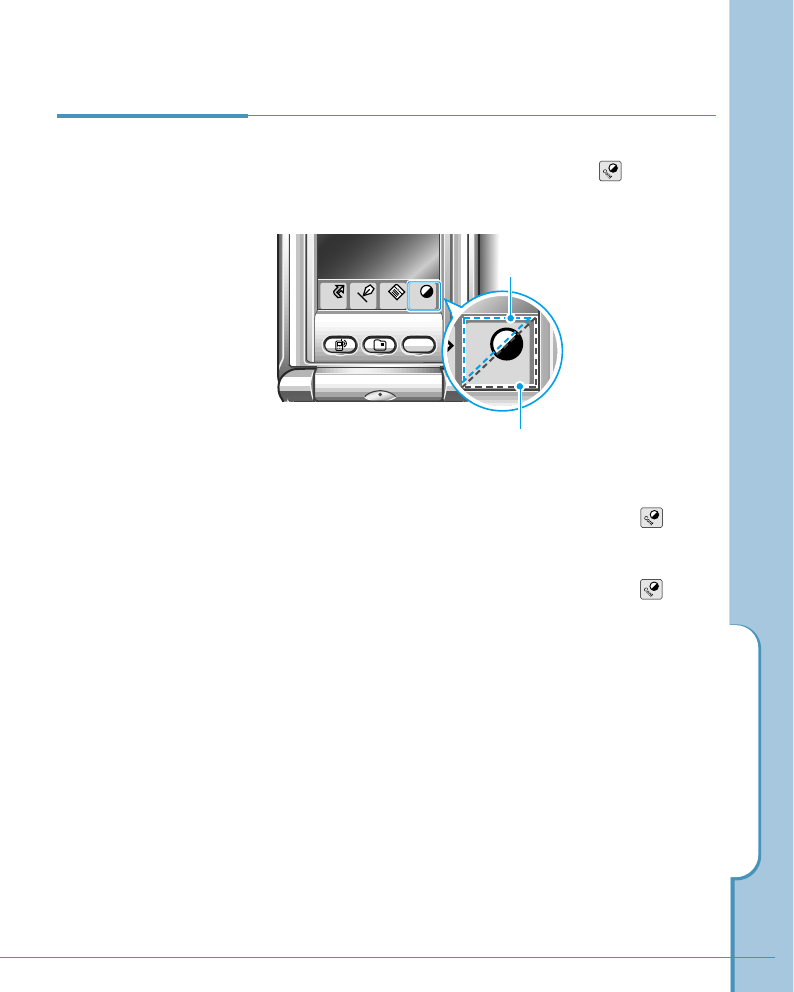
You can adjust the screen contrast at any time, without
accessing the Contrast menu, by tapping the icon on the
hard icon panel.
Adjusting
Screen Contrast
Using the Touchscreen
11
tap this lower triangle
to darken the screen
To lighten the screen, tap the upper triangle of the icon
until you get the desired lightness.
To darken the screen, tap the lower triangle of the icon
until you get the desired darkness.
Home
Menu
Cont
Input
WWW
a
Cont
tap this upper triangle
to lighten the screen

Using as a Phone
Samsung Smartphone gives you advanced phone
capabilities.
This chapter explains how to use the Samsung
Smartphone to make and receive a call.
Topics included in this chapter are:
• Making a Call
• Advanced Calling Features
• Answering Calls
• In-Call Options
• Setting Basic Features
• Answering Mode
13
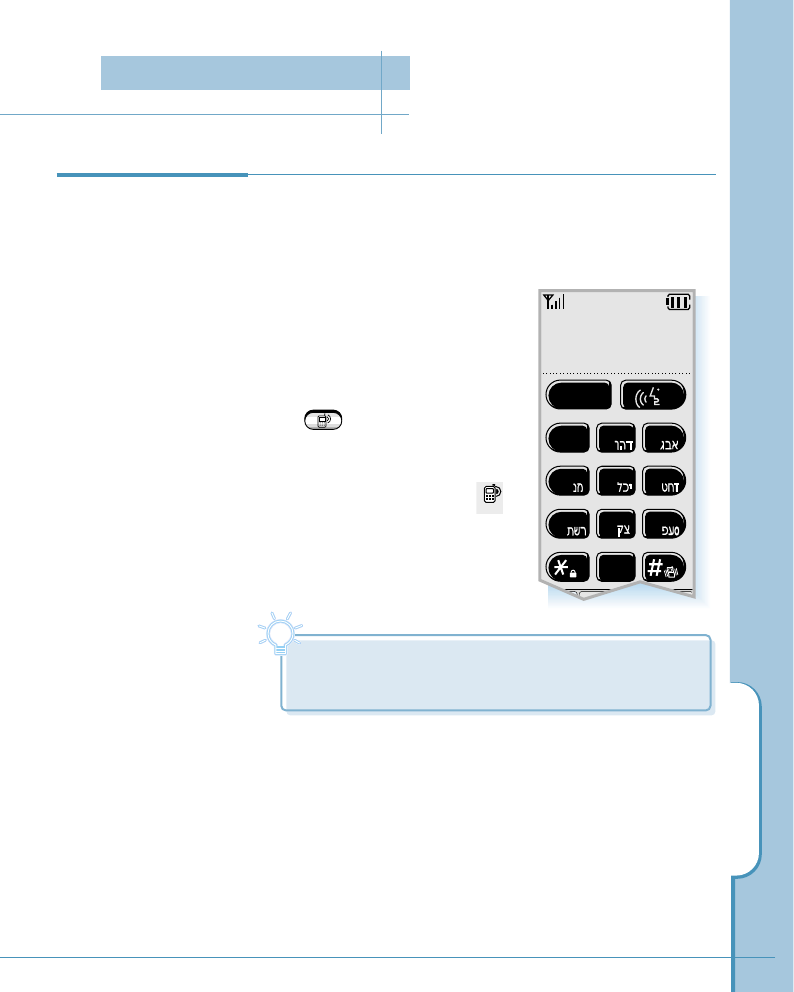
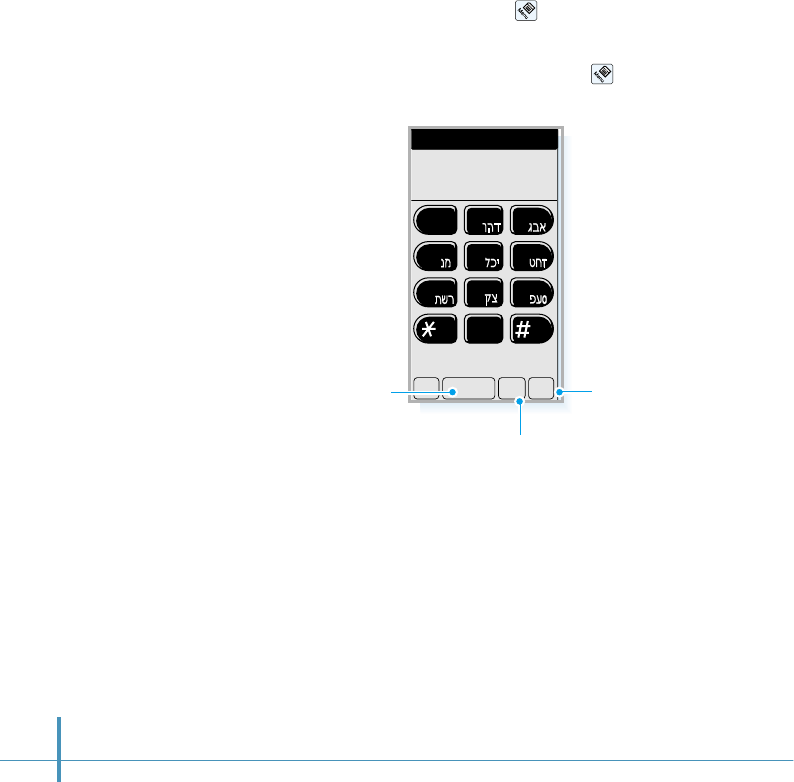
1. Open the Phone screen which allows you to dial a phone
number.
There are several ways to open the Phone screen:
• When the phone is powered
on or when the flip is open,
the Phone screen displays.
• When you have worked with
other application, press the
button below the screen
to open the Phone screen.
• You can also open the Phone
screen by selecting the
icon from the Home screen.
Making a Call
Phone
Making a Call
Tip
Tip
If the Phone screen disappears before you tap a
number, just touch on the screen to wake up the phone.
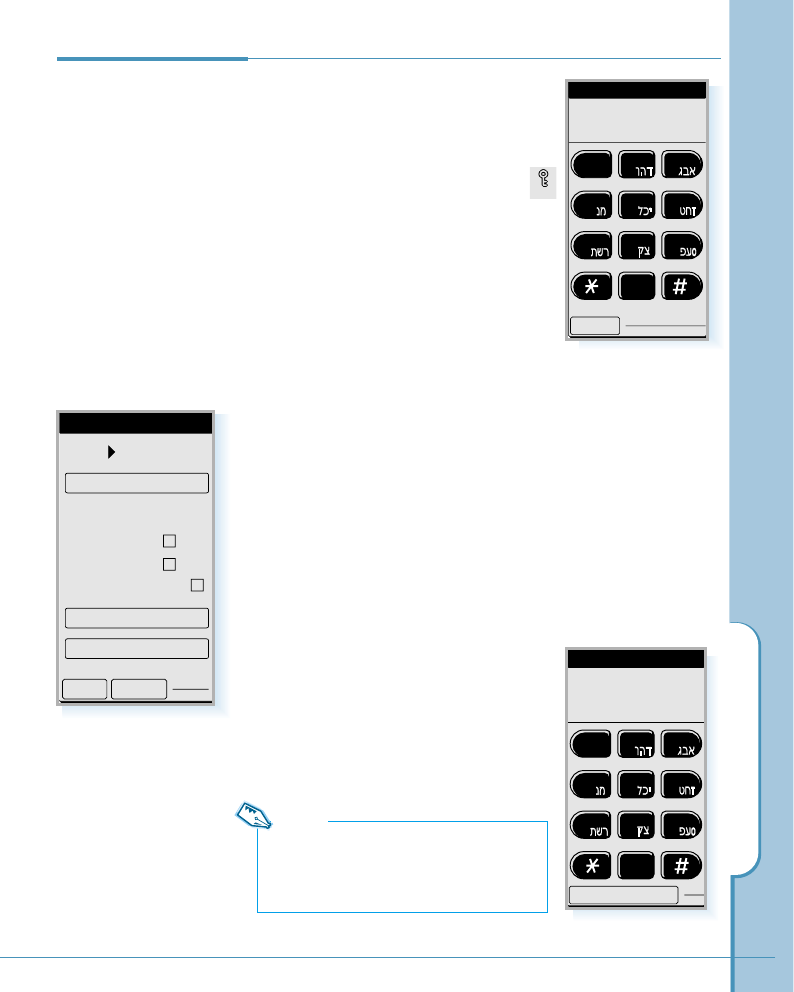
2. Key in the area code and the phone number by tapping the
number digits in the Phone screen with the stylus.
The number displays on the top of the screen as you tap
them.
SEND
1
abc def
jklghi mno
tuv
pqrs wxyz
23
456
789
0
May 25 THU
10 : 30
Phone screen ❿
Making a Call
3. When the number is correctly displayed, tap the SEND
button to dial the number.
You can also start dialing by holding down the last digit of
the phone number without tapping the SEND button.
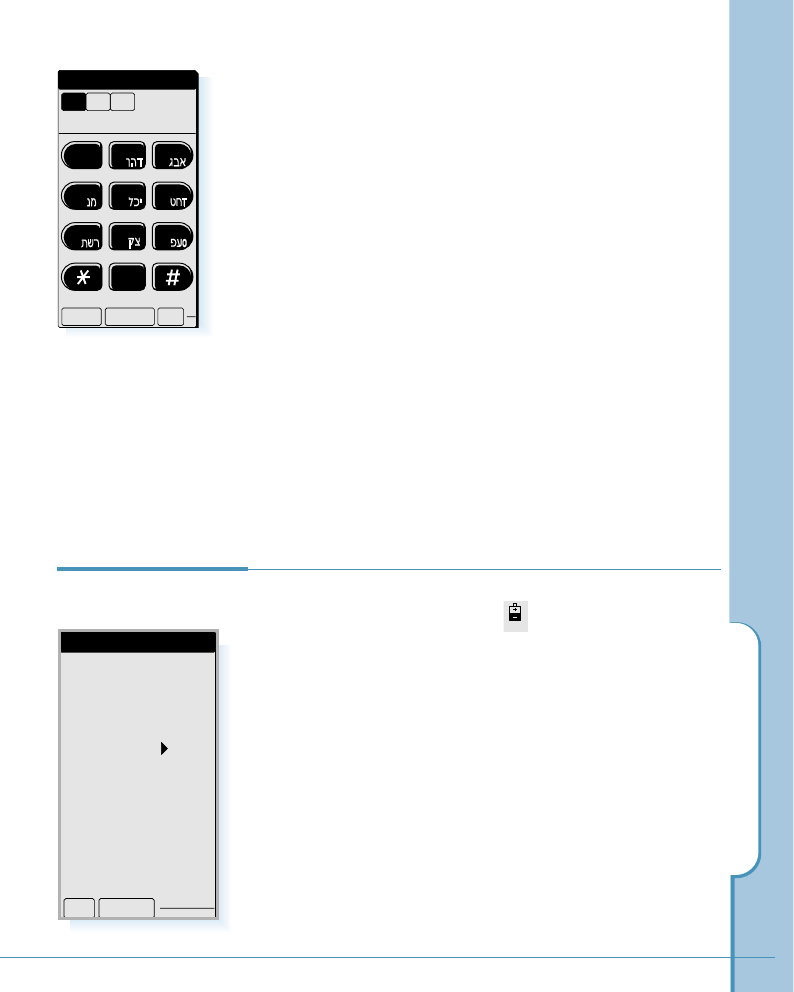
Correcting the Number
When you key in the number button on
the screen, the button (or END
button) is replaced with the CLR
button.
To clear the last digit displayed, tap
the CLR button briefly.
To clear the whole display, touch and
hold down the CLR button for more than
one second.
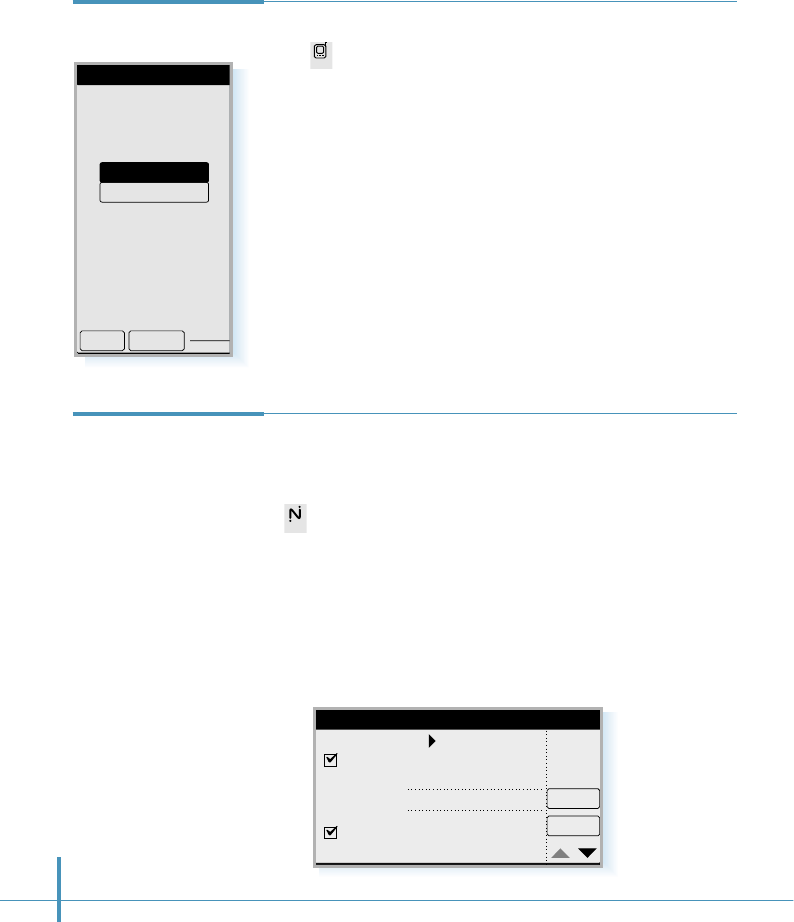
Ending a Call
When you have finished your call, tap the END button or close
the flip.
14
Tip
Tip
If you make an international call and need to find the country code,
use the following steps:
In the Phone screen, tap the icon, and select Country Code from
the Calls menu. The country code list appears. Tap the desired code,
and tap the OK button. The selected country code is displayed in the
number field on the Phone screen.
SEND
1
abc def
jklghi mno
23
456
00-182
Advanced Calling Features
15
If you have set voice dial for the number you want to call
(see page 83), you can use voice to make a call.
To set a voice dial:
To use voice dial, you first set the phone to recognize the
name of the person you are calling.
You can record up to 20 names using the Address
application. See page 87 for information on how to record
name.
To place voice dialing calls:
1. In the Phone screen, tap the button on the screen.
2. At the voice prompt, say the name into the phone.
• If the phone recognizes the name, the phone attempts
a connection.
• If the phone does not recognize the name, the screen
prompts for the name again.
• If the phone does not recognize the name after two
attempts, the message ‘Could Not Recognize Name’
displays. Try the call again later, or check the recorded
name.
Using Voice Dial
Note:
If the phone is set to the Auto Voice Dial mode, you do not need
to tap the button in the phone screen. See page 17.
Advanced Calling Features
16
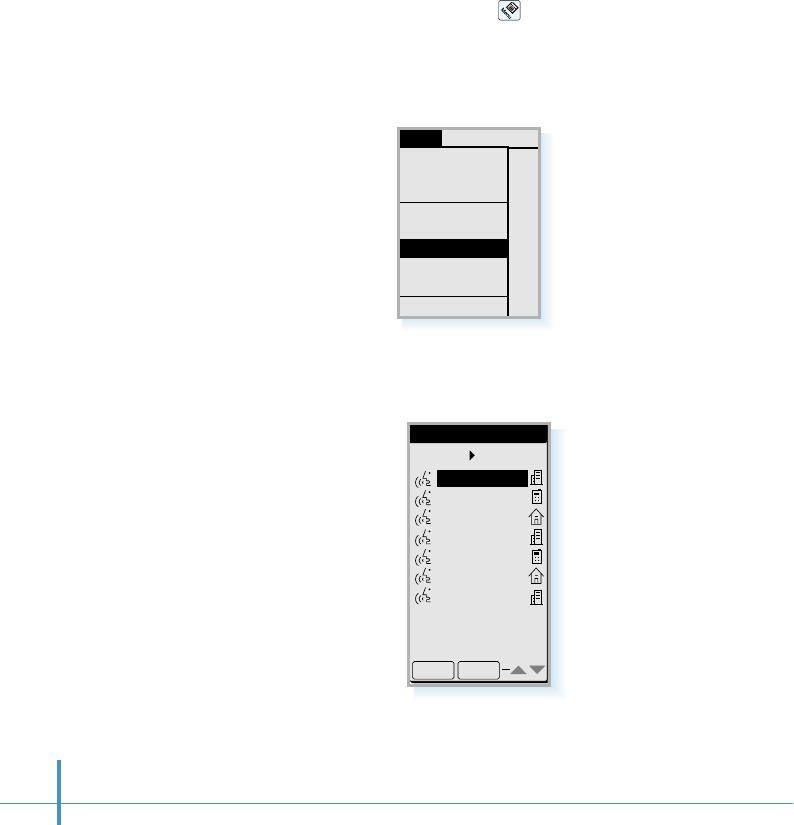
To search, then make a call:
You can scan through the voice dial list you have recorded.
1. In the Phone screen, tap the icon on the hard icon
panel. The phone menu list appears.
2. Tap Voice Dial from the Calls menu. The Phone Book list
which shows the voice dial names appears.
4. Tap the desired name you want to call. To dial the selected
name, tap the SEND button.
Phone Book
Voice Dial7
OK SEND
ABC co.
Bayer
Cooper chr..
John
Katherine
Moore Davi..
Russel Jack
3. To scroll through the list if necessary, tap ❷!or $in the
lower right corner of the screen.
SMS SetupCalls
Outgoing
Incoming
Air Time
Outgoing
Incoming
Air Time
Country Code
Phone Book
Speed Dial
Voice Dial
Send DTMF
Auto Answering
Advanced Calling Features
17
To set Auto Voice Dial:
You can initiate a voice dialing call by opening the flip, when
you select this option through the phone menu.
1. In the Phone screen, tap the icon on the hard icon
panel. The phone menu list appears.
2. Tap the Setup tab on the top of menu screen, and select
Auto Voice Dial. This option enables voice dialing by
opening the flip.
If you access the same menu next time, you will find
Hand Voice Dial instead of Auto Voice Dial. The Hand
Voice Dial enables voice dialing only by tapping the
button on the Phone screen.
3. When the desired option displays, tap the OK button.
1
abc def
23
Calls SMS Setup
Ring/Vibrate
Sounds
Display
Security
System
About Phone
Auto Voice Dial
Your phone enables you to place calls quickly by entering the
speed dial code you specified when you have stored the
phone number in your internal Address Book. For information
on setting Speed Dial, see page 85.
To make a call using speed dial:
In the Phone screen, touch and hold the speed number.
If the number contains more than one digit, tap briefly the
first digit(s) and touch and hold the last digit.
Using Speed Dial
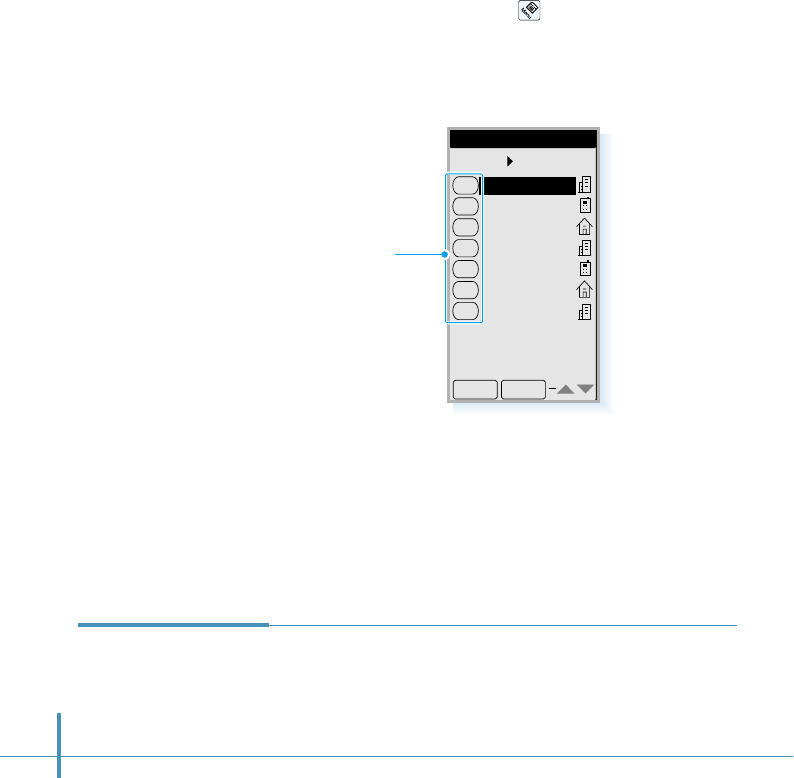
18
To search, then speed dial:
If you do not remember the speed dial number for someone
you want to call, follow these steps to select it from the
Speed Dial list.
1. In the Phone screen, tap the icon on the hard icon
panel. The phone menu list appears.
2. Select Speed Dial from the Calls menu. The Phone Book
list which shows the speed dial codes appears.
3. To scroll through the list if necessary, tap ❷!or $in the
lower right corner of the screen.
4. Tap the desired entry you want to call. To dial the selected
entry, tap the SEND button.
Phone Book
Speed Dial7
OK SEND
1
2
3
5
6
10
11
Bayer
Cooper chr..
Katherine
Moore Davi..
Russel Jack
John
ABC co.
Speed code
The phone stores the last number dialed. To redial the
number, just touch and hold down the SEND button in the
Phone screen.
Redialing the
Last Number
Advanced Calling Features
19
3. To scroll through the list if necessary, tap ❷!or $in the
lower right corner of the screen.
4. Select the desired number highlighted. To dial the selected
number, tap the SEND button. To exit, tap the OK button.
Phone Book
All
ABC co.
Bayer..
Coope..
John
Kathe..
Moore..
Russe..
44123456..
01198765..
44543210..
44876543..
01112345..
55161509..
44987654..
OK
AII P
SEND
Tap letter to find the name
and number beginning with
the specified letter quickly.
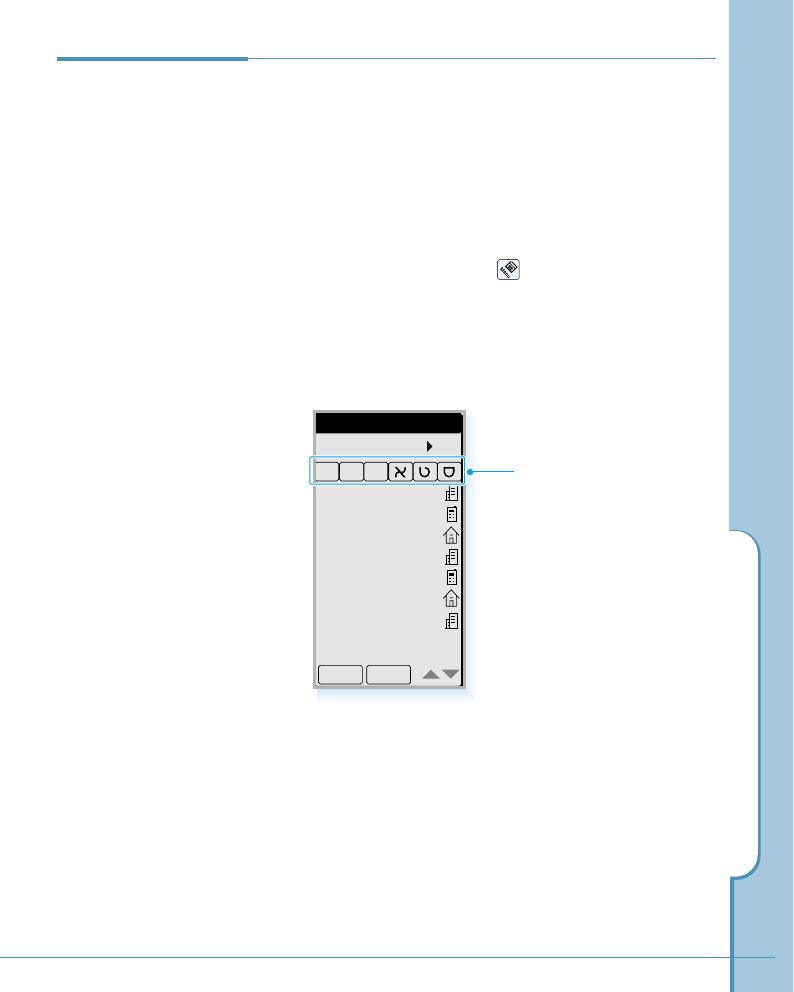
You can store the phone numbers called regularly in memory,
called the Address Book. You then simply recall the number
to dial. For further information on Address Book, see page
79.
To make a call from the Address Book:
1. In the Phone screen, tap the icon on the hard icon
panel. The phone menu list appears.
2. Select Phone Book from the Calls menu. The Phone
Book list appears in alphabetic order.
Using the Phone
Book
Your phone stores up to 20 numbers you either called or
received calls from. It identifies callers, and the date and
time they called.
You can view the incoming and outgoing calls list
independently and dial a number from the list.
To make a call from the calls list:
1. In the Phone screen, tap the icon on the hard icon
panel. A menu list appears.
2. From the Calls tab on the top of the menu screen, select
Outgoing for outgoing calls and Incoming for incoming
calls .
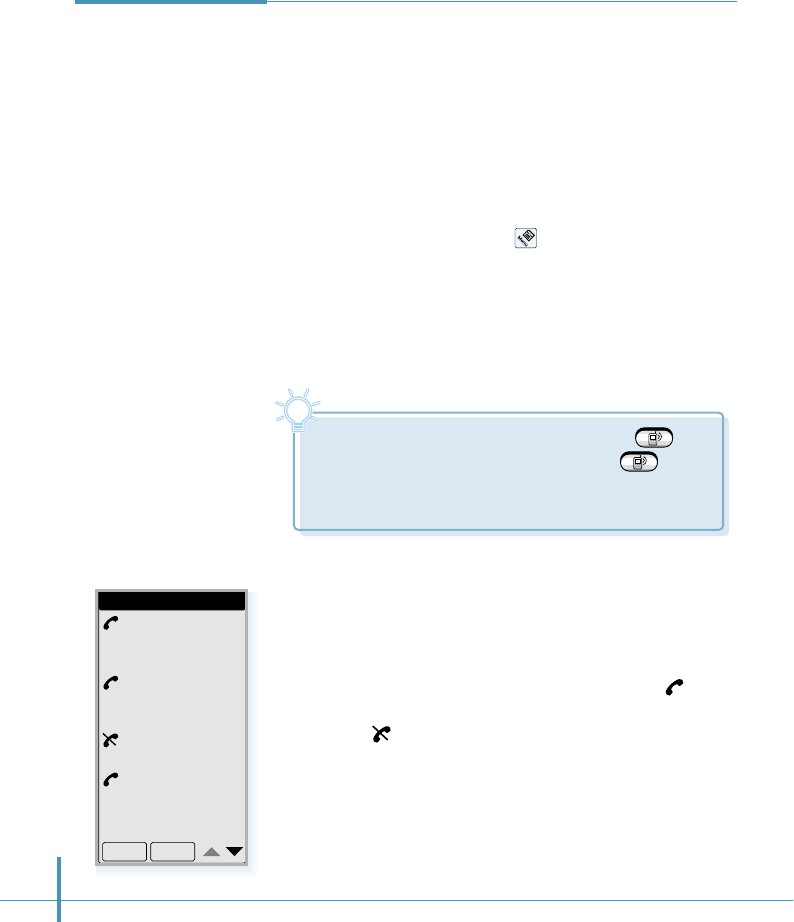
3. The selected calls list appears. The date/time stamp
displays for each log.
If there is an internal Address Book match, the name
displays. If not, only the phone number displays.
symbol indicates you have successfully dialed or received
the call. symbol indicates you have not connected or
missed the call.
Tip
Tip
You can also open the calls list by pressing
button below the screen. If you press the button
in the Phone screen, the Outgoing Calls list, then the
Incoming Call list appears.
20
Using Call History
Outgoing Calls
Catherine
441234567
12/15 12:17P
Moore
449876543
12/15 12:03P
448768765
12/15 10:15A
David
447654321
12/15 10:09A
OK SEND
Advanced Calling Features
21
4. To scroll through the list if necessary, tap ❷!or $in the
lower-right corner of the screen.
5. To dial the selected number highlighted, tap the SEND
button.
To save a number in the Address Book:
After selecting one from the outgoing calls list, you can
save the number in the phone’s Address Book. Tap the
icon on the hard icon panel in the outgoing calls list
screen. From the List menu, select Save. The Address
New screen opens which allows you to create a new
address book entry.
To delete one or all numbers from the outgoing calls
list:
The phone automatically replaces older calls with newer
ones. However, if you want to delete a selected number
or all numbers from the outgoing calls list immediately,
tap the icon in the outgoing calls list screen. From the
List menu, select Delete or Delete All.
Note:
In case of duplicate entries, the phone stores the number with each
time and date in which the call arrives.
SEND
1
abc def
jklghi mno
23
456
44-123-4567
01/03
Catherine
22
Using Four-digit
Dial
Name
(if stored in the
Address Book)
Phone number matching
your input
Your phone provides the option of four-digit dialing of
numbers stored in the internal Address Book or the outgoing
calls list. This allows you to enter the last four consecutive
digits of someone’s phone number, have your phone
remember the rest, and then dial it for you.
To place a call using four-digit dialing:
1. In the Phone screen, key in the last four consecutive digits
of a phone number that you have stored in your Address
Book or you have dialed before.
2. The phone displays the number matching your input.
3. If the phone contains more than one phone number in
which the last four consecutive digits are the same, it
displays the number of the phone numbers matching your
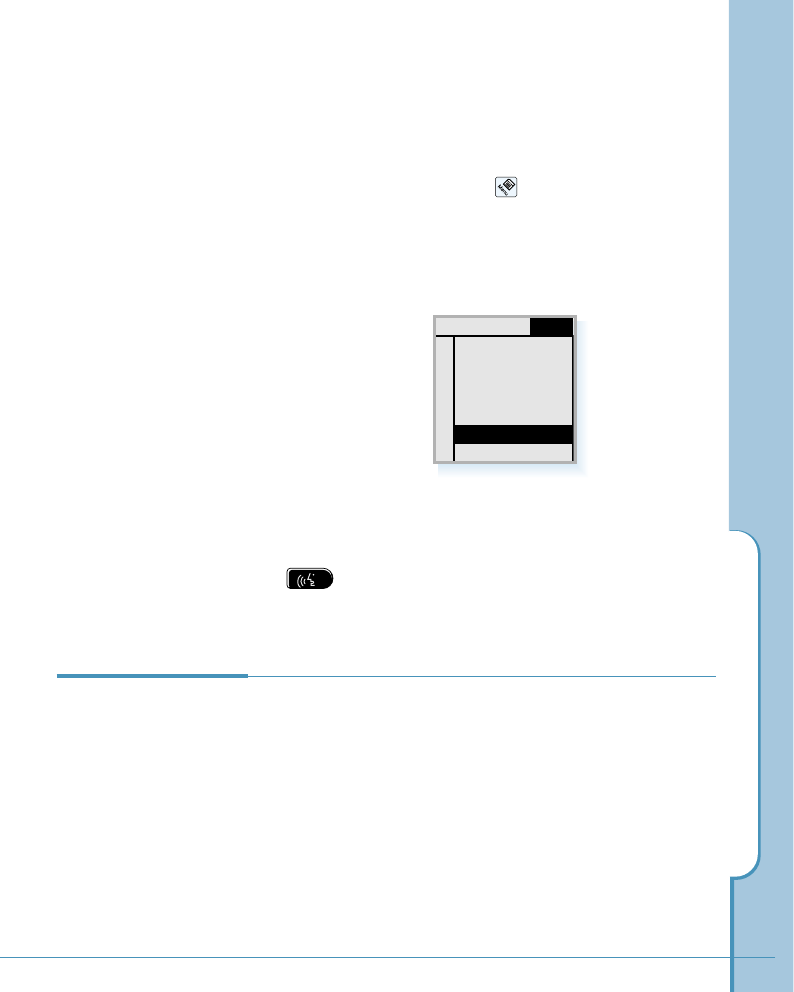
input either from the outgoing calls list or Phone Book list
in the upper right corner of the screen.
Select the desired number by pressing the up/down button
on the left side of the phone.
4. To dial the number, tap the SEND button.
The number of total
numbers matching your
input
Answering Calls
23
When somebody calls you, the phone rings. If the caller can
be identified, the caller’s phone number (or name if pre-
stored in your Address Book) is displayed. If the caller cannot
be identified, only the message ‘Phone Call’ is displayed.
To answer the call:
Open the flip to answer the call. If the flip is already open,
tap any button on the Phone screen (except END), any
application button ( , , ), or any icon
( , , , ) on the hard icon panel.
You can adjust the volume of the ringer for that call with the
volume buttons on the left side of the phone.
Note:
You can answer a call while using a menu feature. The screen alerts you
with the incoming call message. Tap Yes to answer the call, or No to reject
the call. If rejected, the call will be forwarded to your voice mailbox. If no
mailbox is available, the call will be disconnected. If you tap button,
the Answering feature is activated.
Answering a Call
a
WWW
Incoming Call
You've got an incoming call.
Do you want to answer it?
No
Yes
Answering Calls

24
If you are unable to answer a call, you can find out who was
calling you, if this service is available on your network. You
can call the person back, if necessary.
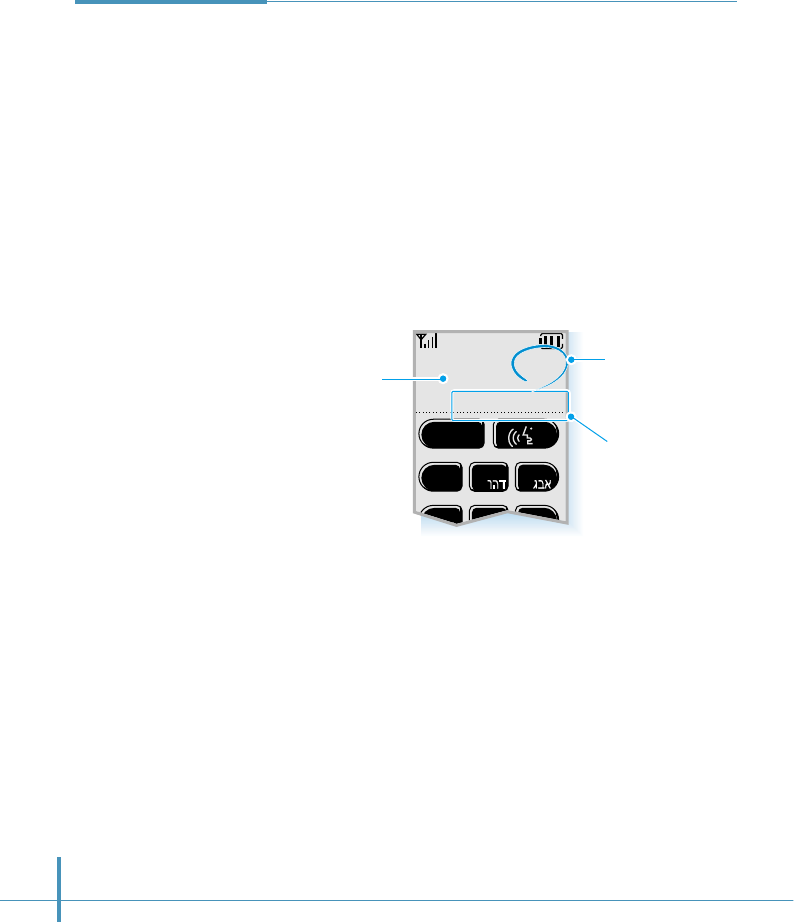
The number of missed calls is displayed on the top of the
idle screen and the last caller name (if stored in the internal
Address Book) or the Phone number is displayed on the
bottom of the screen immediately after the call was missed.
If you tap the SEND button on this screen, you’ll be
connected to the last caller you have not answered. If you
press any other keys on this screen, the missed call
notification screen disappears.
To view the missed calls, refer to the incoming calls list on
page 20.
Viewing Missed
Calls
SEND
1
abc def
jklghi mno
23
456
May 25 THU
Catherine
Missed Call 03
Answering Calls
25
Your phone provides a number of functions that you can use
during a call. You may not utilize all of these functions at all
times. Many of the in-call options are network services.
Tap the icon on the hard icon panel
during a call. The Busy menu appears on
the screen which allows you to access the
following options.
Mute Your Voice
This option allows you to switch your phone’s microphone off, so
that the other party cannot hear you. *Mute* displays on the
screen.
To resume, tap the icon and select this option again in the
Busy menu.
No Key Volume
This option does not transmit the key tones. It allows you to tap
buttons without hearing annoying key tones during a call.
Send My Phone Number
Selecting this option sends DTMF (Dual Tone Multi Frequency)
tones of your phone number. Use this option when you leave
your phone number for the person to return your call.
Send DTMF
This option allows you to send DTMF tones of the numbers you
have previously stored in the Send DTMF list. DTMF tones can
be used to control electronic phone services, such as a bank
account or voice mail system.
Using In-Call
Options
Mute Your Voice
No Key Volume
Send My Phone#
Send DTMF
Busy...
In-Call Options
26
To use this option, you should store the numbers you want to
send as DTMF tones, for example, the bank account number
and password.
To register DTMF numbers:
1. In the Phone screen, tap the icon and select Send
DTMF from the Calls menu.
2. The Send DTMF screen opens. Tap the icon again, and
select New from the Setup menu.
3. Enter the desired number, then tap the OK button.
To use the DTMF number during a call:
1. After you call the service, select this option from the Busy
menu when the service asks to enter the DTMF code.
2. Select the desired number in the Send DTMF list.
3. Tap the SEND button.
Register DTMF
OK Clr PCancel
1
abc def
jklghi mno
tuv
pqrs wxyz
23
456
789
0
Cancels
registering. Inserts a pause.
Clears the last entry.
Call Waiting
You can answer an incoming call while you have a call in
progress, if this service is supported by the network. Contact
your service provider to activate Call Waiting.
During a call in progress, an incoming alert sounds for
another incoming call and a Call Waiting message appears
on the screen. The caller’s name (if stored in the internal
Address Book) or phone number is also displayed if the caller
identification feature is supported on your network.
The call waiting message disappears after 15 seconds or if
you tap SEND.
To answer a waiting call:
1. Tap the SEND button. The phone connects the calling
party, and places the current party on hold.
2. Tap the SEND button again to switch between the two
parties.
In-Call Options
27
Catherine
Call waiting
Air Time 1:14
28
Ringer Volume
When a call comes in and the phone rings, you can adjust the
ringer volume with the volume buttons on the left side of the
phone. This volume setting affects only that call. To adjust ringer
volume for all calls, use the Volume function in the Sound
screen. See page 62.
Adjusting the
Volume
Key Volume
In the idle mode, you can adjust the key tone volume using the
volume buttons on the phone.
You can also adjust key volume using the Volume function in the
Sound screen. See page 62.
Home
Menu
Cont
Input
WWW
Voice Volume
During a call, if you want to adjust the earpiece volume, use the
volume buttons on the left side of the phone. Press to
increase and to decrease the volume. You can also adjust the
voice volume using the Volume function in the Sound screen.
See page 62.
Setting Basic Features
Setting Basic Features
29
You can set your phone to signal an incoming call or
message in the following ways:
• the ringer sounds.
• the phone vibrates.
• the red LED on the top of the phone flashes.
• the phone vibrates and the ringer also sounds if you do not
answer the call.
To select the ring type:
1. In the Phone screen, tap the icon on the hard icon
panel. A menu list appears.
2. Tap the Setup tab on the top of the menu screen.
3. Select Ring/Vibrate from the Setup menu.
4. Select the desired ring type, then tap the OK button.
Selecting
Bell/Vibrate
If you’re talking on the phone and need to check information
in any of your applications (such as the Scheduler or Memo),
simply open the application you want to use. Your call is not
affected by opening any of the applications on your phone.
You can use the on-screen keyboard or the stylus to add or
change information (such as appointments, addresses, or
memos) during the call.
Easy Access to
Applications
During Calls
jklghi mno
tuv
oper
pqrs
wxyz
456
789
0
Ring Type
OK Cancel
Vib + Bell
Lamp
Vibrate
Bell
30
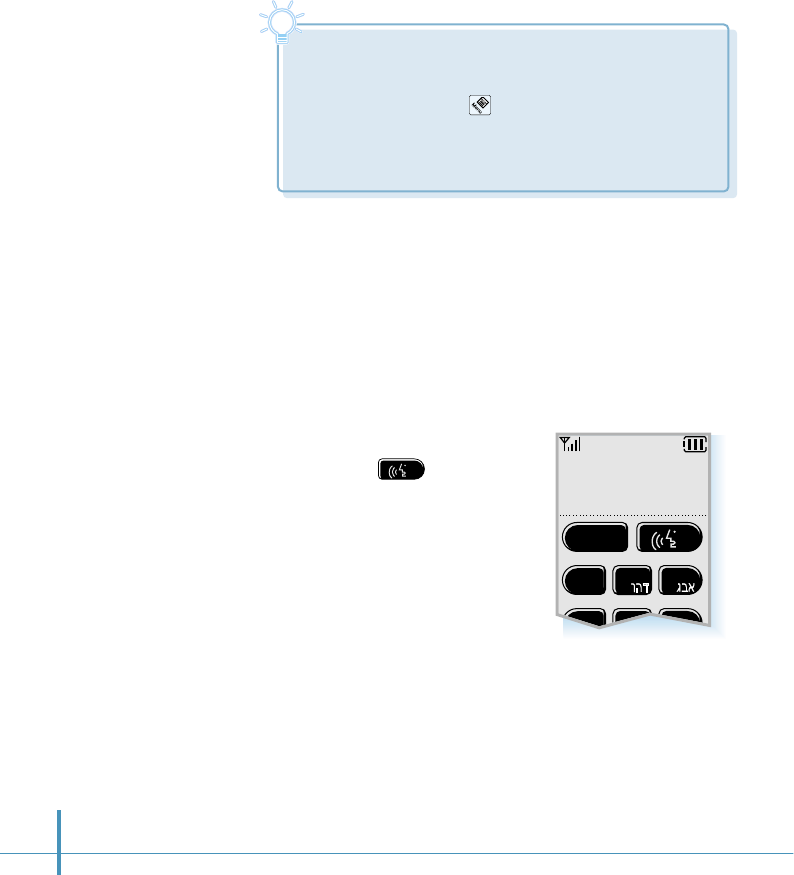
One-Touch Ringer
Selection You can quickly select the ring type between Vibrate and
Bell without accessing menu commands.
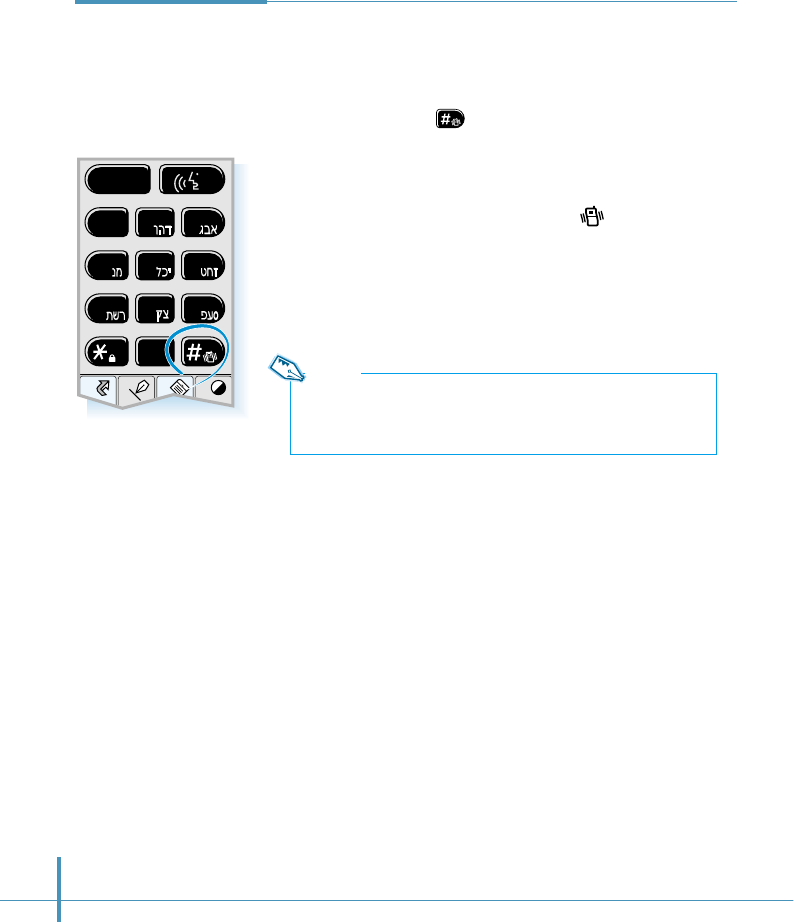
Touch and hold the button on the Phone screen. Each
time you tap the button, your pone goes to the vibration
mode or bell mode alternatively.
When the vibrate mode is selected, the icon appears in
the top strip.
SEND
Home
Cont
Menu
Input
1
abc def
jklghi mno
tuv
pqrs wxyz
23
456
789
0
Note:
Your phone provides a variety of ringer options. To select another
type of ring, see page 29.
Setting Basic Features
31
Air Time
Last Call
051123456
02min 11sec
Total Calls
Voice Calls
Total 6 Calls
02hr 10min 34sec
Data Calls
Total 2 Calls
00hr 58min 12sec
OK Reset
3. The Air Time screen appears. You can review the last call
time, the total number of calls and the air time for all
voice calls and data calls, independently, since the last
reset action.
4. If you want to reset the call timer, tap the Reset button,
then the OK button.
To exit, tap the OK button.
Viewing Air Time You can review the air time of the most recent call, as well
as total air time for all calls since the last reset action. You
can also reset the call timer.
To review the air time:
1. In the Phone screen, tap the icon on the hard icon
panel. A menu list appears.
2. Select Air Time from the Calls menu.
32
4. Find the Auto-Hyphen checkbox in the screen. Tap the
box to turn the feature on ( ) and tap again to turn the
feature off ( ).
5. To exit, tap the OK button.
Display
Initial Display
972-312-3456
Auto-Hyphen
OK Cancel
Greeting
Big Clock
World Time
My Phone#
Automatic
Hyphenation
Your phone automatically hyphenates numbers as follows:
(area code)-(number). Digits following a pause are not
hyphenated.
To turn this feature off or turn it back on:
1. In the Phone screen, tap the icon on the hard icon
panel. The phone menu list appears.
2. Tap the Setup tab on the top of the menu screen.
3. Select Display from the Setup menu. The Display screen
appears.
Answering Mode
33
You can set your phone to answer calls when you do not want to answer the call. The
caller can leave a message at a voice prompt.
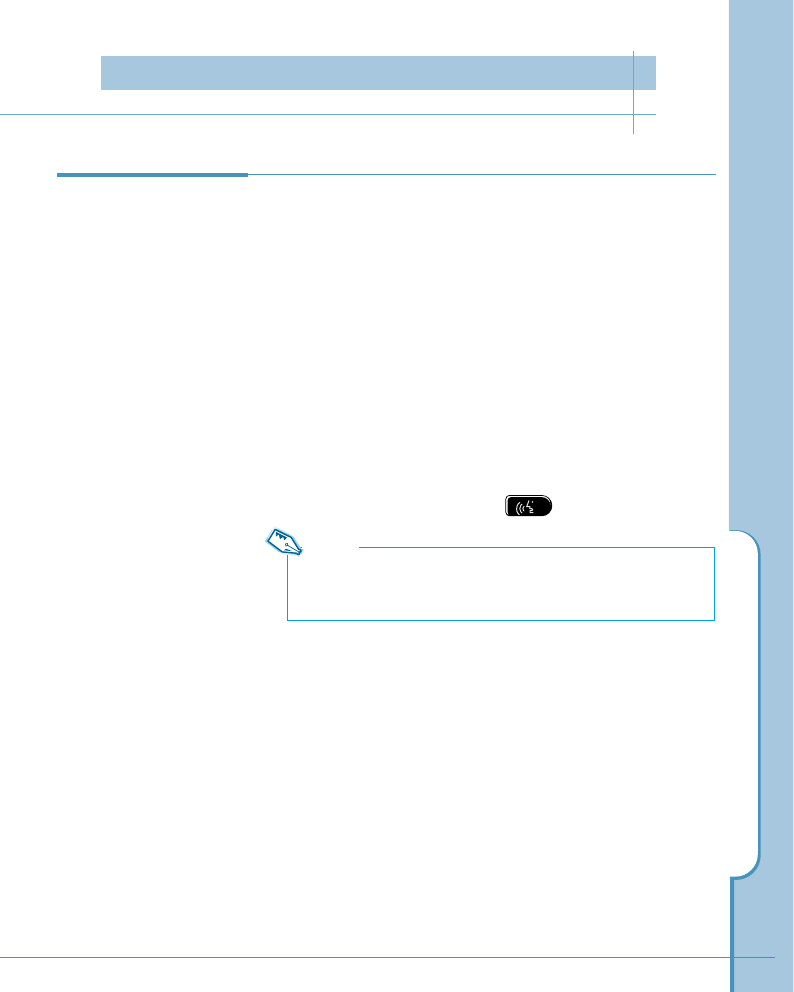
You can turn on or off the answering mode either using the
Answer button on the left side of the phone or accessing
the Answer menu after launching applications.
To set with the Answer button:
1. Press and hold button until
Answering Mode On displays.
Turning On the
Answering Mode
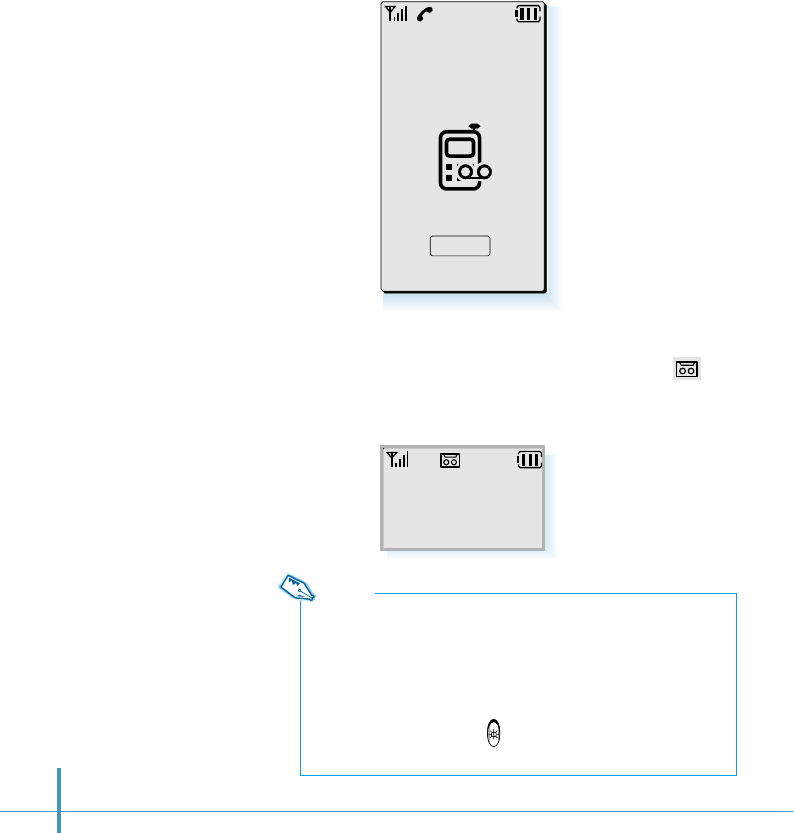
2. Your phone goes to the answering mode.
3. When a call comes in, your phone answers with a
specified OGM message.
You can use the default OGM message preset on your
phone, or record your own OGM message. For details on
recording your own message, see page 37.
Answer button
Note:
Pressing down button repeatedly
turns the answering mode on and off.
May 25 THU
10 : 50
-Answering Mode-
Answering Mode
34
Receive
-Answering Mode-
Recording...
OGM Play
-Answering Mode-
2 New Messages
May 25 THU
4. After sounding a beep, your phone begins recording the
caller’s message up to one minute.
5. When a message has been successfully recorded, icon
appears in the top strip and the display shows the number
of newly recorded messages.
Notes:
• Your phone can record up to 12 caller messages.
• While recording a caller message, you can get an incoming call by
opening the flip, then tapping Receive on the screen. The message
already recorded is saved automatically.
• While recording, only the following options are available: Receive
button on the screen, the button on the right side of the phone
or the volume buttons on the left side of the phone.
Answering Mode
35
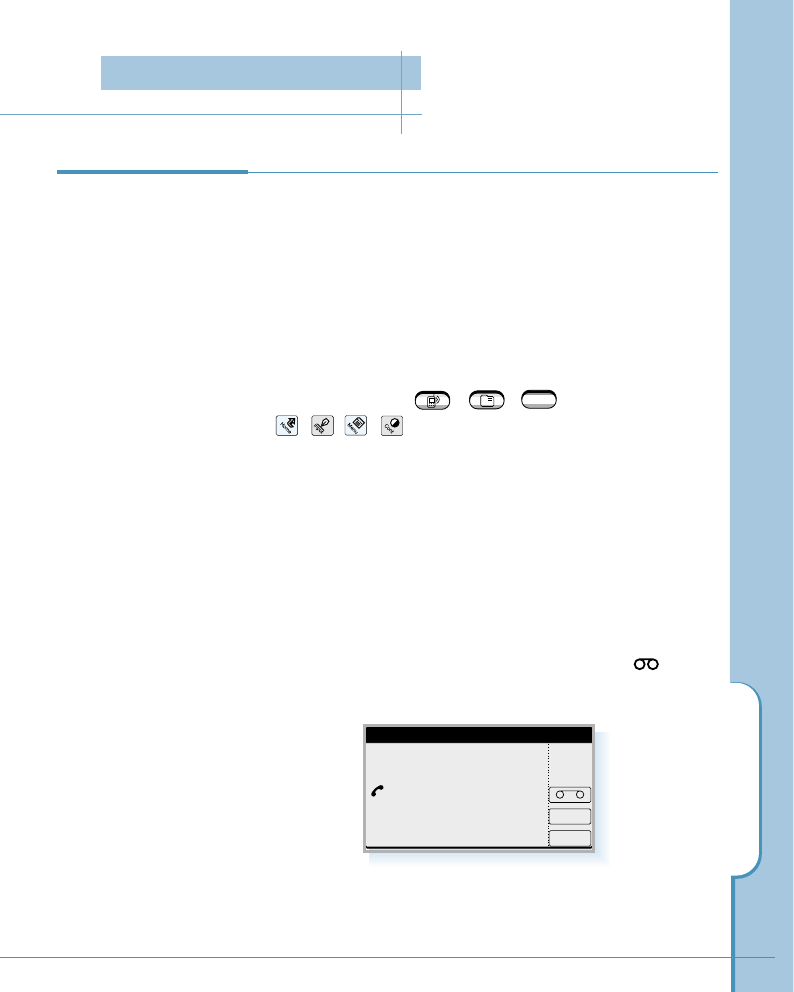
Listening to a
Caller Message
AutoAnswer
OGM
Delete
Review
ON
2/12 recorded
2000.02.18.Fri. 14:50 25sec V
2000.02.18.Fri. 13:22 30sec V
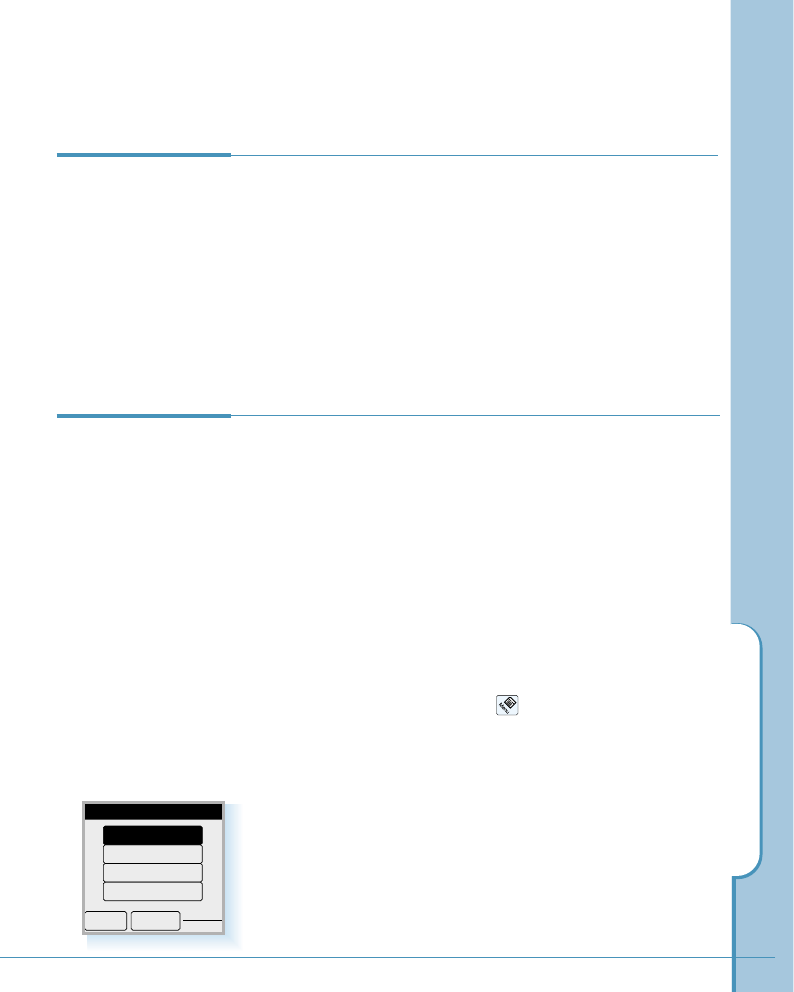
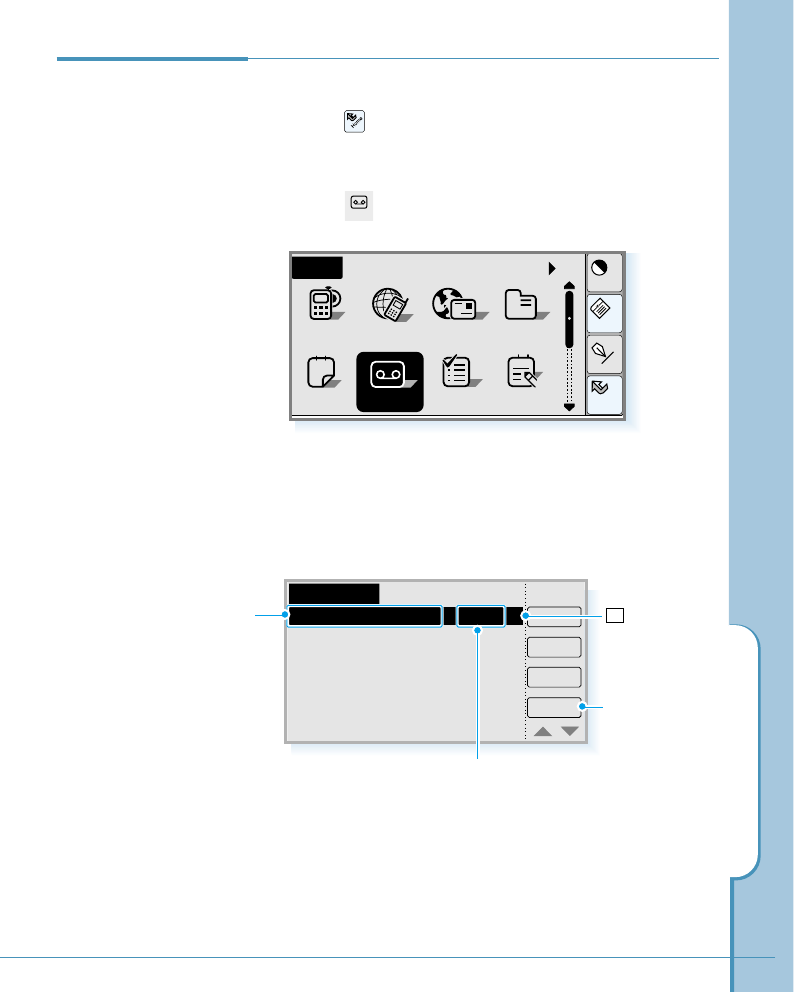
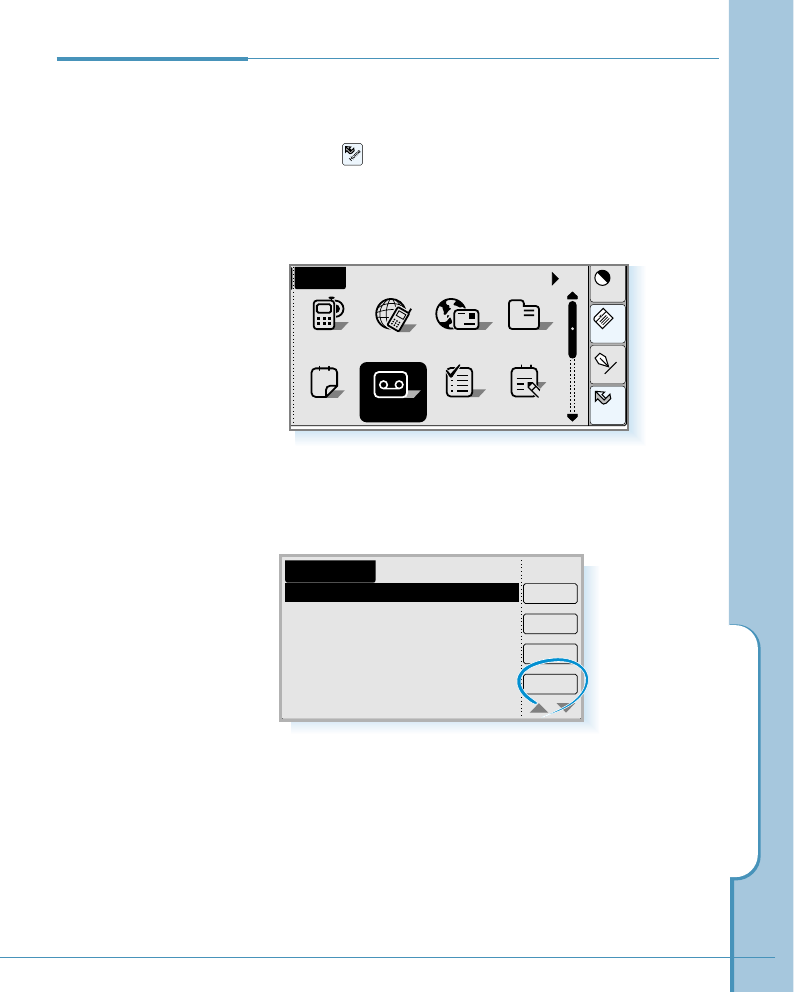
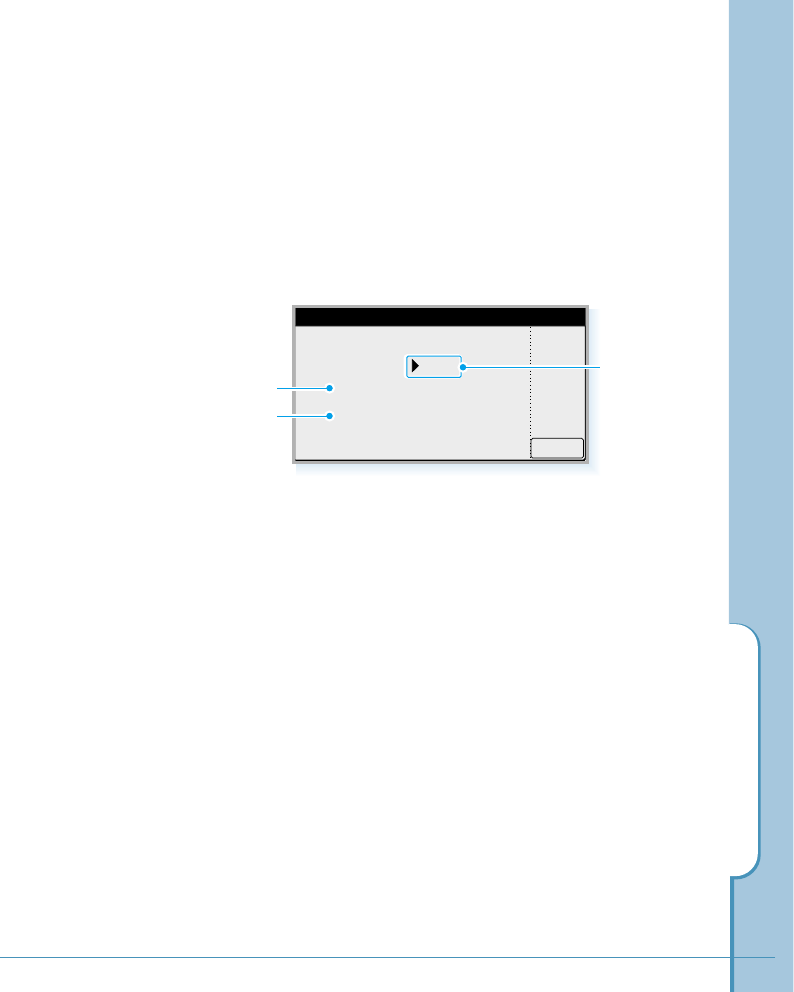
To listen to the caller message:
1. Tap the icon on the hard icon panel to launch
applications.
2. Tap the icon to open the AutoAnswer screen.
3. Select the message you want to listen to, and tap the
Review button.
Answer
The recording time
Indicates that
the message has
not been reviewed.
Allows you to
record or play
OGM messages.
V
Home
Cont
Menu
Input
All
Sched ToDo Memo
Home
12
AddressEmailGoNextPhone
a
Answer
The time and date
when the message
was recorded.
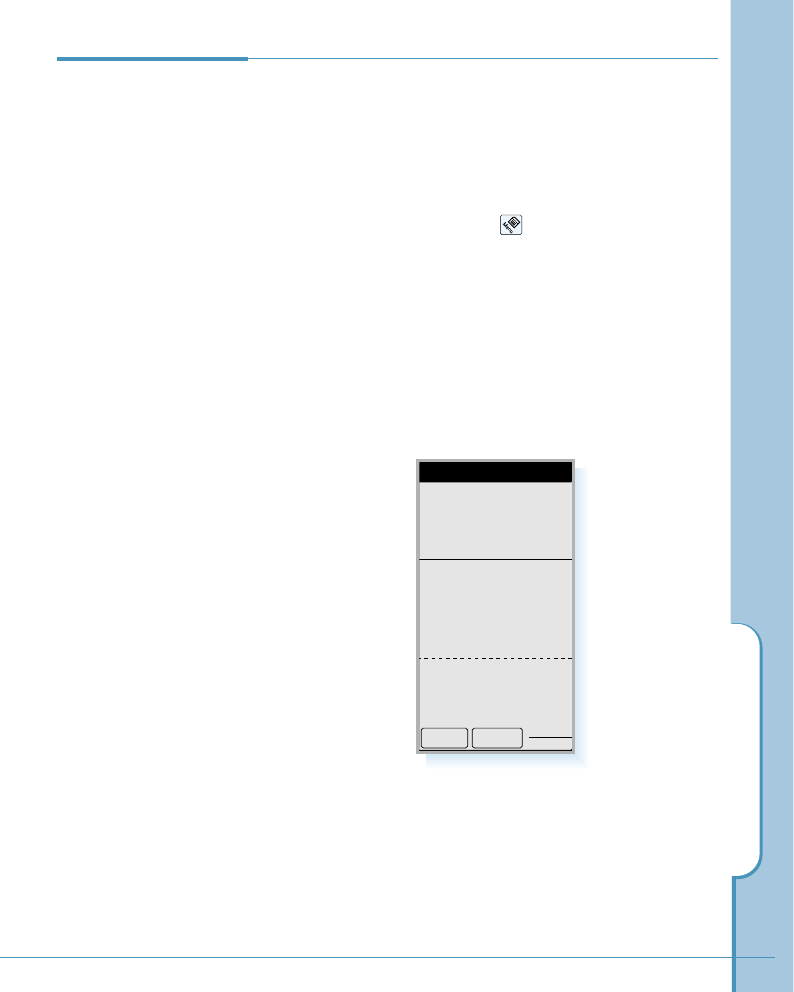
36
OK
Delete
stop
play pause
2000.02.18 Fri 13:22 02/12
Name : ABC
Num : 051-123-456
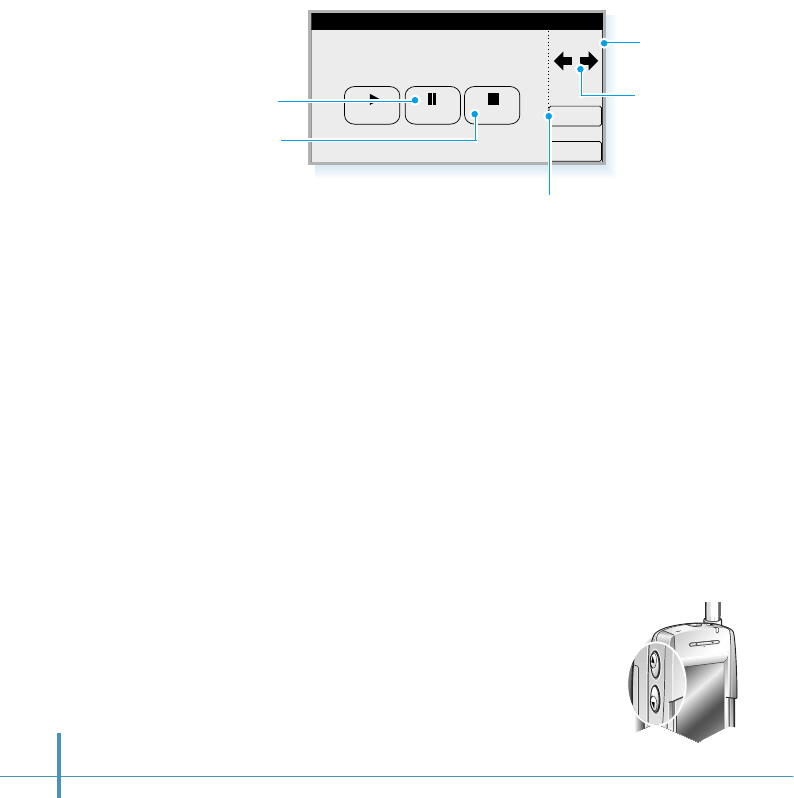
Review
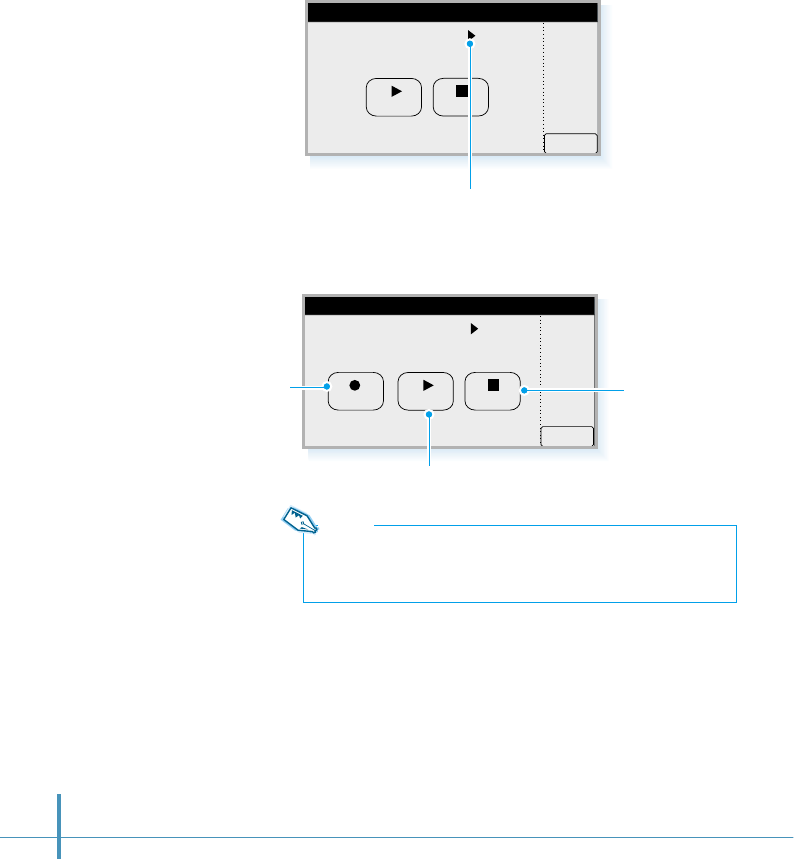
4. You can find the caller’s name (if stored Address Book) and
number in the Review screen.To listen to the message, tap
the play button. Your phone plays back the message.
Cancels playback.
To pause the playback, tap
pause. To resume the play
back, tap Play again. Tap the arrows
to skip to the
next/previous
message.
The current
message number
of all messages
received.
Tap to delete the current message.
5. When you are done, tap the OK button to return to the
Answering screen.
To turn off or on the answering mode:
In the AutoAnswer screen, tap the ON or OFF button. The
button toggles each time you tap it.
To delete a message:
When you review the message, tap the Delete button to
delete the current message. You can also delete a message in
the message list screen. Select a message you want to delete
in the AutoAnswer screen, then tap the Delete button.
To adjust the speaker volume:
When you are listening to a message,
press the volume buttons on the left side
of the phone to increase or decrease the
volume.
Answering Mode
37
Recording Your
Own OGM
Message
You can record your own OGM message which will be played
when a call comes in.
1. Tap the icon on the hard icon panel to launch
applications.
2. Tap the Answer icon to open the AutoAnswer screen.
Home
Cont
Menu
Input
All
Sched ToDo Memo
Home
12
AddressEmailGoNextPhone
a
Answer
3. The AutoAnswer screen displays the caller message list, if
recorded. To record an OGM message, tap the OGM button.
AutoAnswer
OGM
Delete
Review
ON
2/12 recorded
2000.02.18.Fri. 14:50 25sec V
2000.02.18.Fri. 13:22 30sec V
38
4. Tab the OGM Message pick list, then select Custom.
OK
Default(H) Mode Setting
OGM Message Default(H)
stop
play
5. Tap the record button and record your own OGM
message.
6. If you want to finish recording, tap the Stop button.
7. Tap the OK button to return to the AutoAnswer screen.
Tap the pick list to select Custom.
OK
Default(H) Mode Setting
OGM Message Custom
stop
play
record
If you want to listen to the message
you have recorded, tap Play.
To stop listening,
tap Stop.
Note:
You can record the OGM message up to 1 minute. If the recording
time is over than 1 minute, the recording will automatically stop.
Tap to record your
own message.

Answering Mode
39
Playing or
Selecting the
OGM Message
You can select the OGM message to be played when a call
comes in from the available default messages and your own
message.
1. In the AutoAnswer screen, tap the OGM button.
OK
Default(H) Mode Setting
OGM Message Default(H)
stop
play
3. If you want to listen to the selected OGM message, tap
the play button. To stop listening, tap the stop button.
4. To save your selection, tap the OK button.
2. Tap the OGM Message pick list, and select the message.
AutoAnswer
OGM
Delete
Review
ON
2/12 recorded
2000.02.18.Fri. 14:50 25sec V
2000.02.18.Fri. 13:22 30sec V
Default(H)
Default(E)
Custom
Tap the pick list.
Default OGM
message in Hebrew
Default OGM
message in
English
Your OGM message

Learning to Use the
Applications
This chapter explains how to open applications, use
the on-screen keyboard, and use common features on
the applications.
Topics included in this chapter are:
• Working with Applications
• Customizing Your Phone
• PC Synchronization
Working with Applications
41
Displaying
Applications
By default, the phone displays each application as an icon.
If you prefer, you can display applications as a list of names.
Your phone is equipped with a variety of applications. All the applications available on
your phone appear in the Home screen.
Bring up the Home screen to open any application. You can also open the three main
applications – Phone, Address and GoNext – with the application buttons below the
screen.
Home
Cont
Menu
Input
All
AnswerSched ToDo Memo
Home
Calc Clock
SMS
12
Ctrl
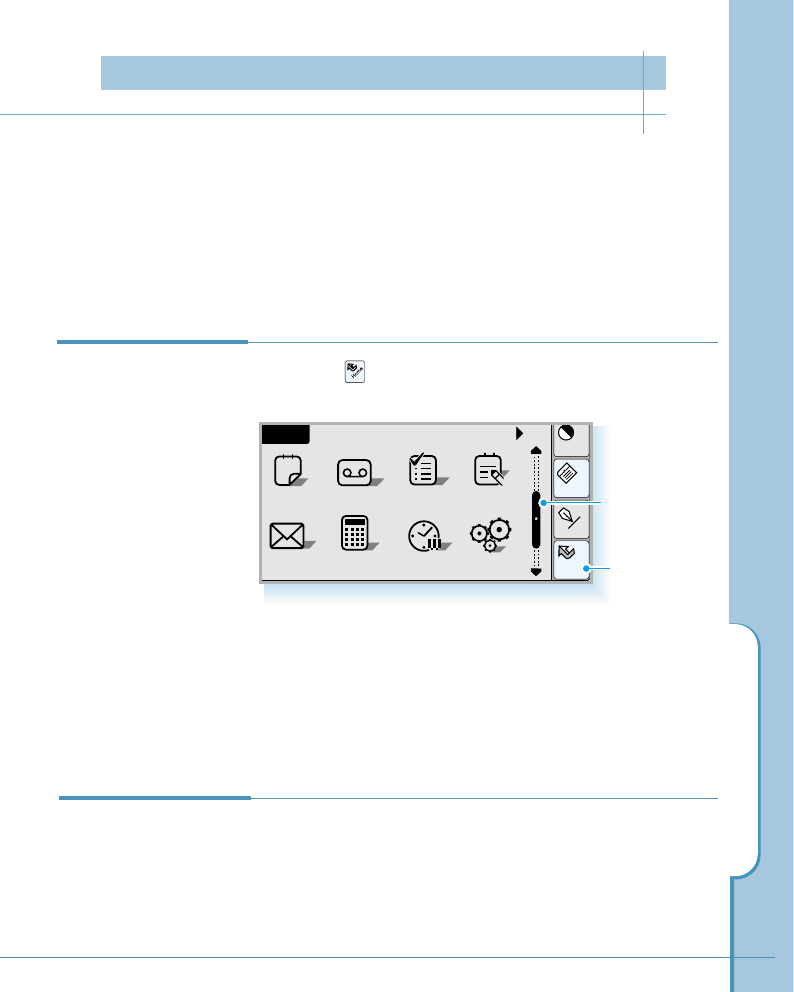
1. Tap the icon on the hard icon panel to launch
applications.
2. Tap the icon of the application that you want to open. If
necessary, slide the scroll bar or press ❷(or #) on the
scroll bar to move between screens.
#Home screen
Opening an
Application
Slide the scroll bar
to move between
screens.
Tap to launch
applications.
Working with Applications
42
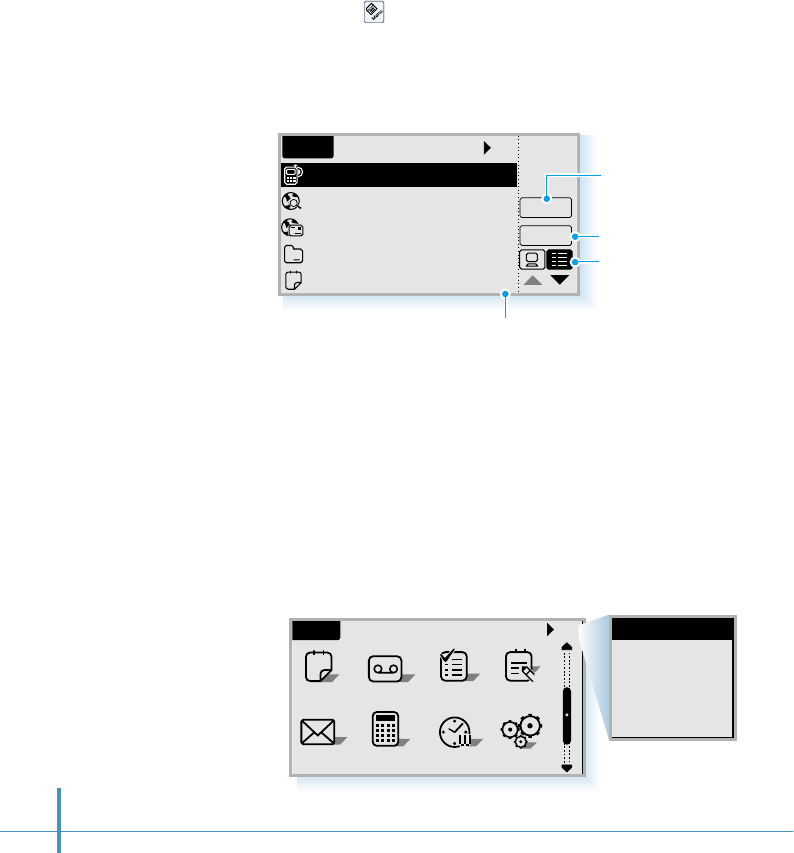
Listing Applications by Name
1. Tap the icon on the hard icon panel when the
applications are displayed as icons.
2. From the View menu on the top of the screen, select List
to display the applications in list format.
Displaying Applications by Category
The category feature enables you to group applications of
the same nature. You can choose to display a single category
or all your applications.
To display applications by category:
Tap the pick list in the upper-right corner of the screen and
select the application category you want to display.
All
Home
Open
Detail
Phone
GoNext
Email
Address
Sched
–
–
–
12
5
12
a
Displays the details on
the selected application
All
AnswerSched ToDo Memo
Home
Calc Clock
SMS
12
Ctrl
Tap the pick list to
select category.
Opens the selected
application
Changes the display
format.
The number of entries stored in
the application
All
Basic
Communication
Game
PIM
Unfiled
Working with Applications
43
Displaying Application Details
You can use the Application Details dialog to display
information about the selected application. You can also
change the application category in this Details dialog.
1. In the list view of the applications, tap the Detail button to
open the Application Details dialog.
2. To change the category, tap the Category pick list, and
select one from the list.
3. Tap the OK button to return to the Home screen.
OK
Application Details
Title
Category
Version
Records
Address
PIM
1.0
4
Software version Category
pick list
The number of entries
stored in the application
44
Brief Description
on Applications Phone
Used for managing voice calls. In the Phone screen, you can
access many Calls options, SMS and Setup options by
tapping the icon on the hard icon panel.
GoNext
You can surf the Internet with the built-in web browser. Also,
you can enjoy GoNext network service, which enables you to
easily access Web-based, interactive information and
services, such as news, stock trading, weather, and web
based e-mail.
Email
Enables you to send and receive e-mails on your phone.
Address
Stores names, addresses, and telephone numbers.
Sched(Scheduler)
Keeps track of important dates and events, and helps
manage your schedule.
Answer
You can set the phone to answer calls automatically and
record your messages.
ToDo
Keeps track of to-do lists. Allows you to set an alarm or a
reminder.
Working with Applications
45
Memo
Allows you to write a memo (including a graphic image) on
the screen. You can send the memo on the phone.
SMS
You can send and receive voice, text or paging messages.
Calc (Calculator)
Performs complex mathematical calculations on-screen.
Clock
Use this menu to set the system clock for your phone and to
keep track of the time and date around the world.
Ctrl (Control)
Contains security and other system-related feature settings.
PCsync(PC Synchronization)
Use this menu to synchronize data between your phone and
PC (with the supplied Datasync CD-ROM).
Find
Searches for keywords throughout the phone.
Othello
You can enjoy the Othello game.
Chat
You can use the on-line chatting service.
46
Entering
Text,
Numbers or
Symbols
There are two ways to enter text, numbers or symbols into your
phone. You can use the on-screen keyboard or you can write
directly on the screen. Both of these methods use the stylus.
You can open the text input screen any time you need to enter
text or numbers.
Opening the Text Input Screen
1. When you are asked to enter information in any application,
tap the icon on the hard icon panel to open the text input
screen.
Home
Cont
Menu
Input
abc
123
ABC
OK
Cancel
E1$
#!Text input screen
Select the input method.
Note:
Before you open the text input screen, make sure that you have
properly selected the field you want to enter information. Cursor
blinks in the selected field. If not, just tap the field to place a cursor
on the field. When you finish entering text and close the text input
screen, you will find the field displays the information you just
entered.
2. Select the input method. Tap to use the writing mode, or
to select the on-screen keyboard mode.
Tap to open
the text input
window.
Working with Applications
47
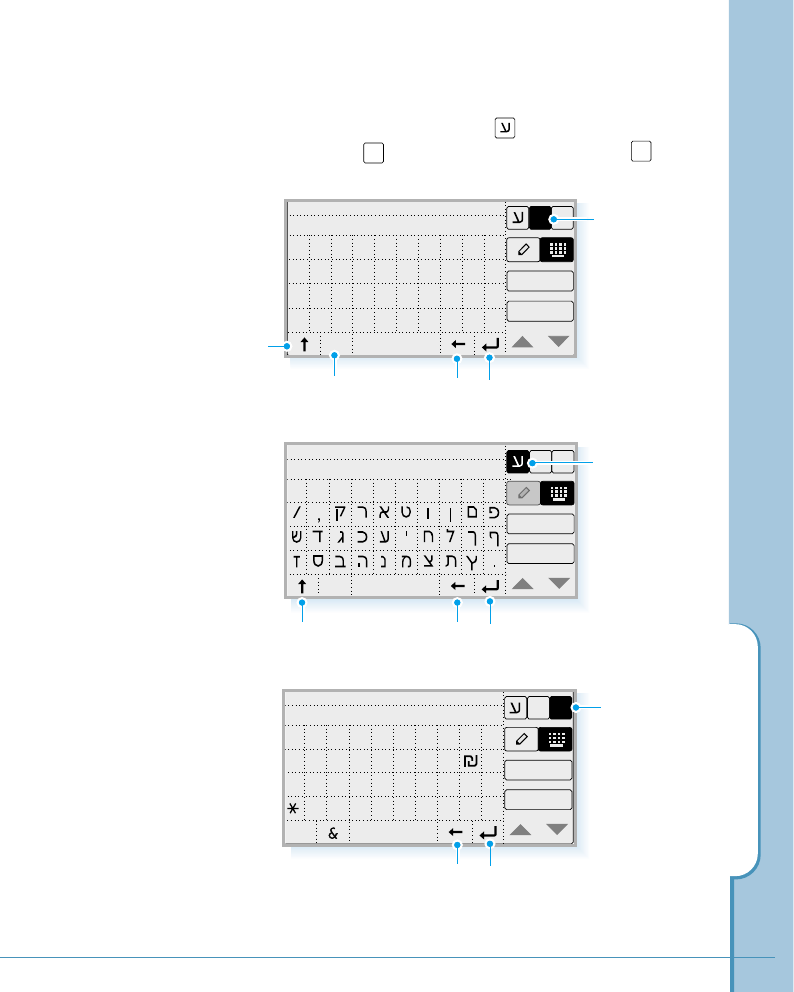
Using the On-Screen Keyboard
1. In the text input screen, tap to open the Hebrew
keyboard, to open the English keyboard, or to open
the symbol keyboard.
OK
Cancel
1$
E
1234567890
space
cap
qwe r t yu i op
asdf gh j kl ;
zxcvbnm, . /
English ❿
keyboard
Hebrew ❿
keyboard
Symbol ❿
keyboard
Backspace Carriage return
E1$
Tap to open the
English keyboard.
Displays more
available characters. Caps shift
OK
Cancel
1$
E
1234567890
space
Carriage return
Tap to open the
Hebrew keyboard.
Displays more
available characters.
OK
Cancel
E
123( ) { } [ ] _
space
45 6– ~<> ^ ?
789. , $%' " |
0
000
#/ +=: ; `@
1$
Backspace Carriage return
Tap to open the
Symbol keyboard.
Backspace
48
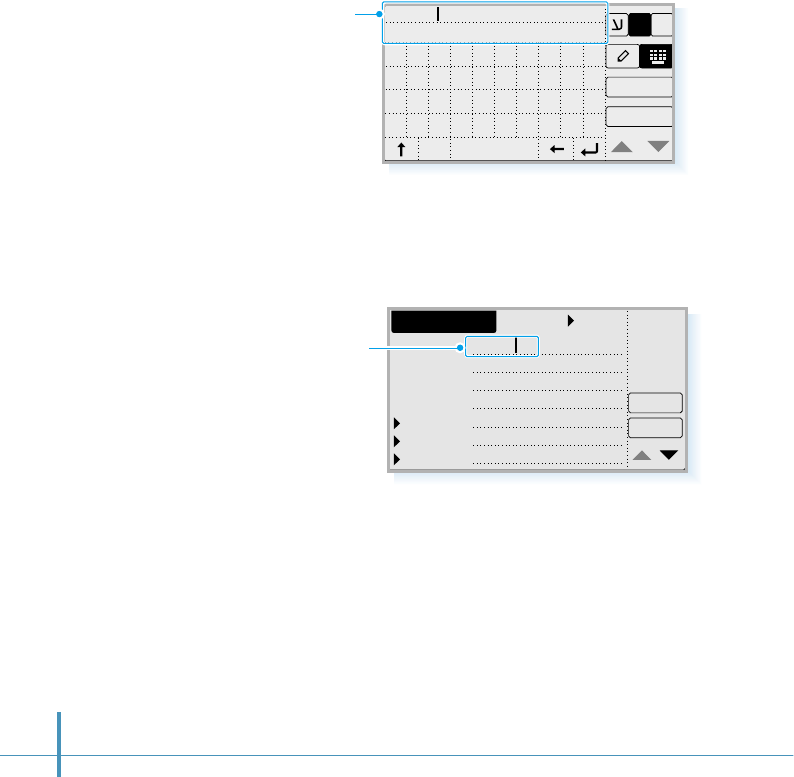
3. When you close the on-screen keyboard, you will find the
characters are inserted in the previonsly selected
information field.
OK
Cancel
1$
E
1
David
234567890
space
cap
qwe r t yu i op
asdf gh j k l ;
zxcvbnm, . /
Characters you just
entered are displayed
in the selected field
Unfiled
Details
L. Name David
F. Name
Title
Company
Work
Home
Fax
OK
Address New
2. Tap the characters on the on-screen keyboard to enter
text, numbers and symbols. The selected characters
display in the text field on the top of the screen. When the
desired text is displayed, tap the OK button.
Text field. Characters
are displayed as you
tap them.
Working with Applications
49
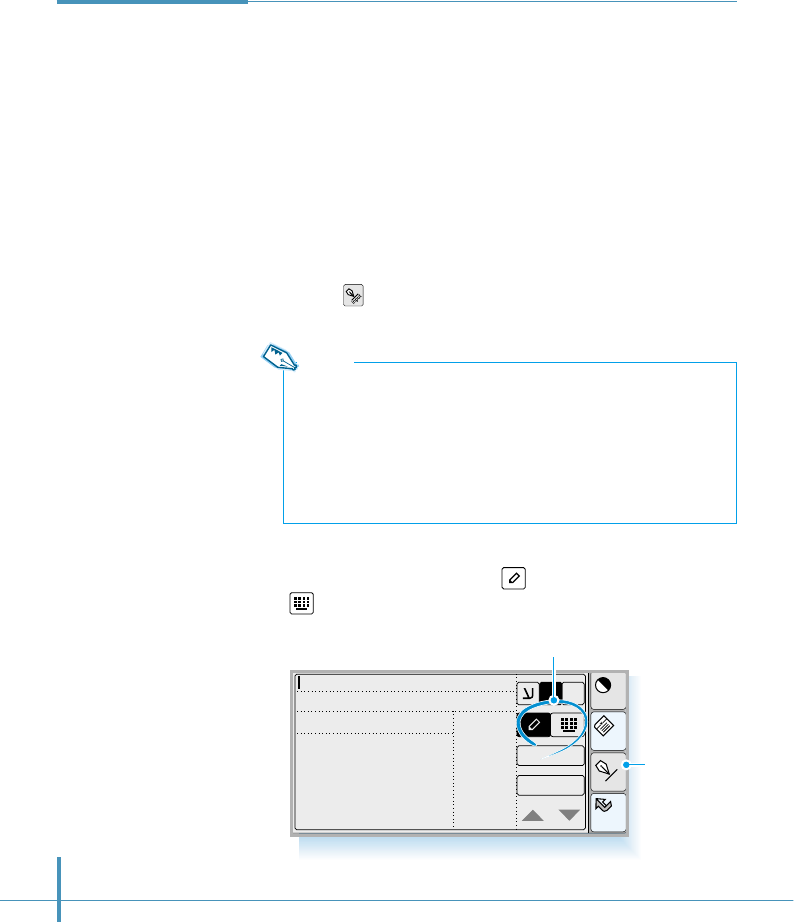
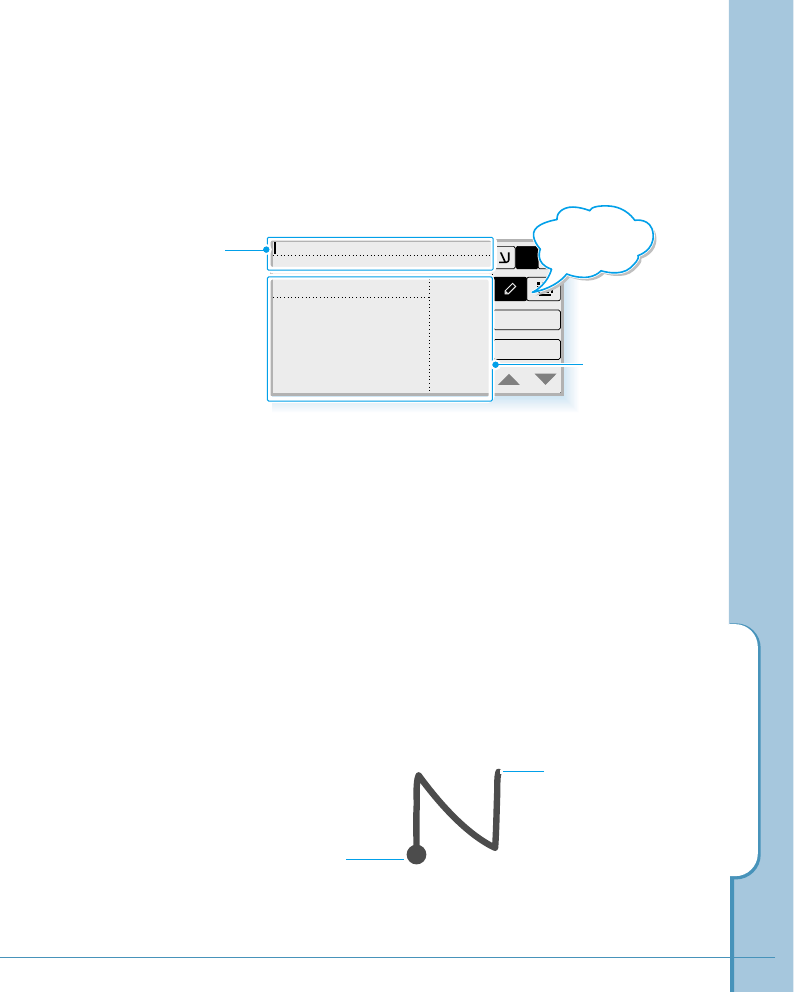
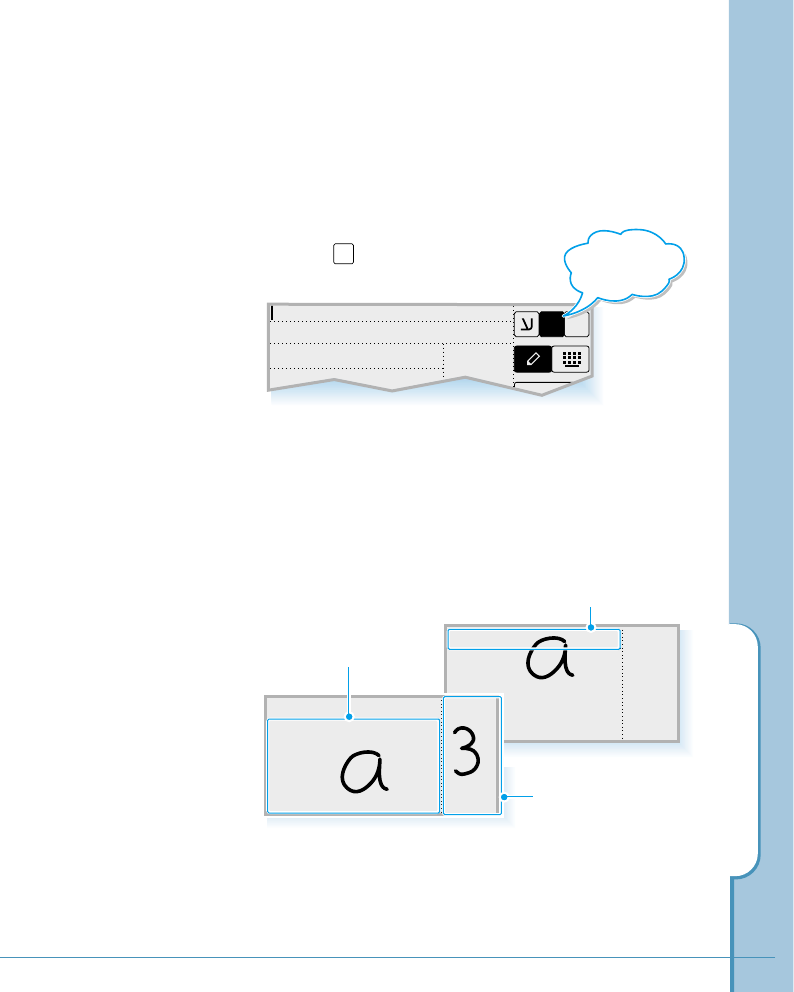
Writing Directly on the Screen (English & Symbol only)
Using your stylus, write a character in the text input screen.
Each character you write is translated into typed text and
displayed on the text field at the top of the text input screen.
Write a character in the writing area, one character at a
time, as you normally would on paper. Some characters must
be written in a particular way to be recognized. For details
on how to write characters, see the tables on page 51.
To reduce the chance for an unrecognizable letter, take the
following steps when you write letters on the screen:
1. Use the table on page 53 to find the stroke shape for the
letter you want to write. For example, the stroke below
creates letter “n”.
Text field:
Characters are
displayed as you write
them in the writing
area.
Writing area:
Write characters
here.
abc
123
ABC
OK
Cancel
E1$
Start the stroke
at the heavy dot.
Lift the stylus here.
Tap to
write directly on
the screen.
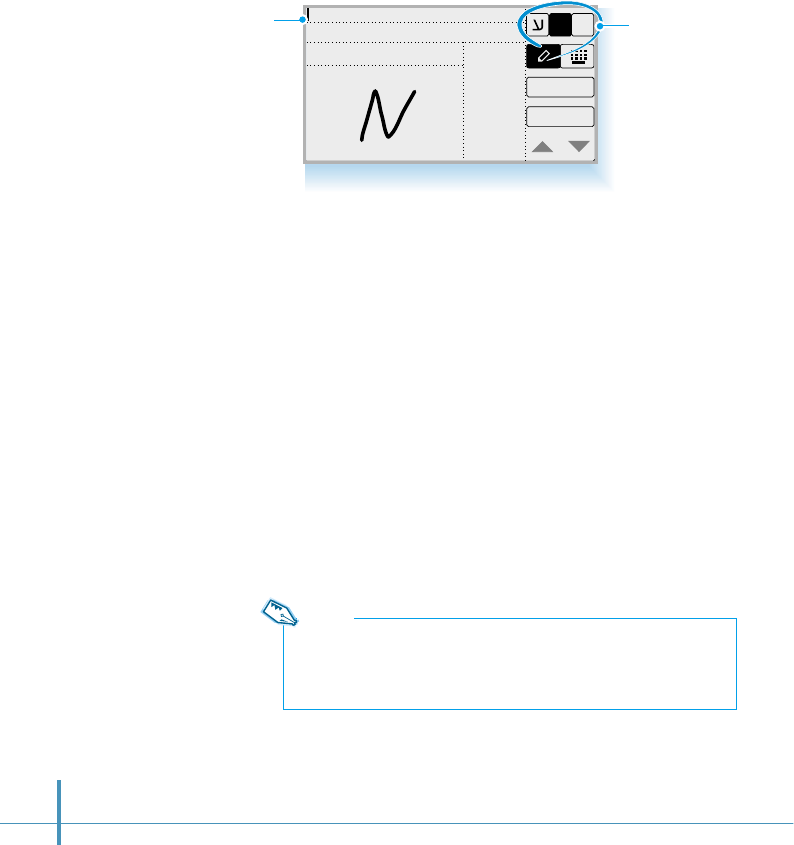
50
2. Select appropriate writing mode.
3. Position the stylus on the writing area, then start at the
heavy dot. Draw the shape as it appears in the table.
Don’t try to draw the dot itself. The dot is only there to
show the starting point of the stroke.
4. Lift the stylus from the screen at the end of the stroke
shape.
When you lift the stylus from the screen, the letter
appears in the text field on the top of the screen. You can
immediately begin the stroke for the next character.
abc
123
ABC
OK
Cancel
E1$
#!Writing area for English letters
Note:
You must begin the character strokes in the writing area. If you do not
make strokes in the writing area, your phone does not recognize them
as text characters. For details on the writing areas, see page 51.
Select the writing
mode according to
the text you want
to write.
Text field
Working with Applications
51
Writing Areas of the Text Input Screen
When you write a character on the text input screen, you
first select the writing mode.
To write English letters and numbers:
First tap to activate the writing area
for English and numbers.
You can write English in either uppercase or lowercase. How
the letter is interpreted and displayed depends on where you
write it in the writing area. For example, you can write a
letter in lowercase or uppercase, and it will appear in
lowercase if you write it in the lowercase letter area (abc) as
shown in the figure.
You can write numbers in the number area (123).
E
abc
123
ABC
Cancel
E1$
Tap to
write English
letters.
abc
123
ABC
To write in uppercase, write here.
To write in lowercase,
write here.
abc
123
ABC
Write number here.
52
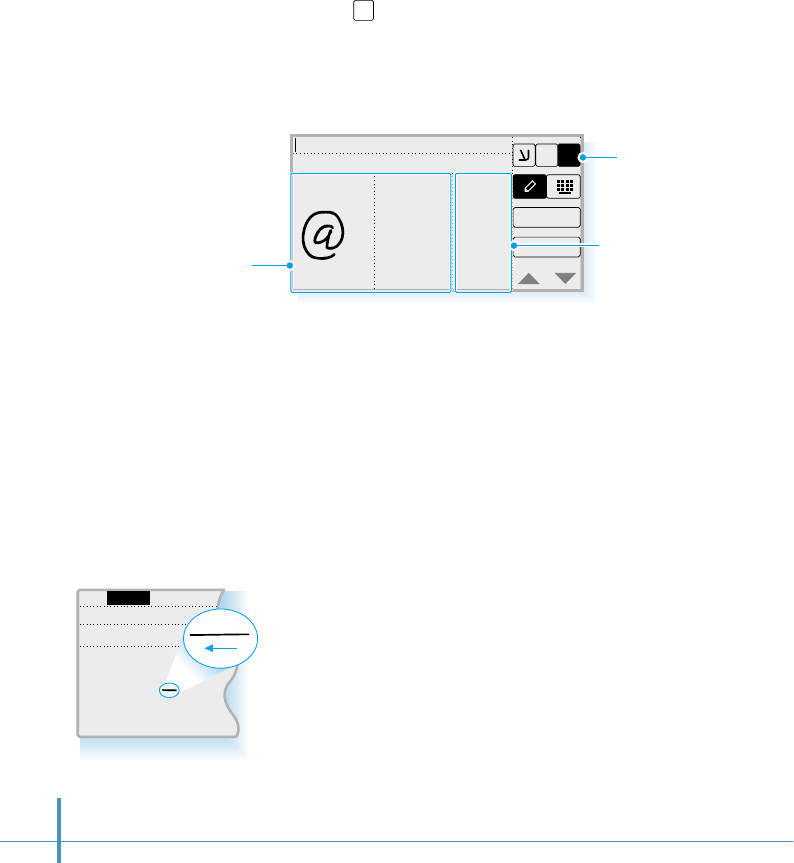
To write symbols and punctuation marks:
First tap to activate the writing area for symbols and
punctuation marks.
Write symbols and punctuation in the symbol writing area
(Sym1 or Sym2) and write numbers in the number area (123).
Sym1 Sym2 123
OK
Cancel
E1$
To write symbol
marks and
punctuation,
write here.
Tap to write
symbol marks.
When writing, keep these tips in mind:
• If you draw the character, following the shape exactly as
shown in the tables on page 53. You can achieve 100%
accuracy.
• You can add or delete space in the writing area. First tap
the stylus to place the cursor to the right of the character
you want to delete or insert a space in the text field and
make the backspace stroke (a horizontal line from right to
left) or the space stroke (a vertical line from bottom to top)
in the writing area. See the tables on page 53 for details.
• To select the text you want to edit or delete in the text
field, tap the stylus to place the cursor to the right of the
last character and drag your stylus over the text. The
selected text will be highlighted. Then write correct
characters in the writing area to edit the text, or draw a
line from right to left (backspace stroke) to delete it.
• Write at natural speed. Writing too slowly can cause
recognition errors.
abc
ABC
call David
1$
Write numbers here.
#Backspace stroke
Working with Applications
53
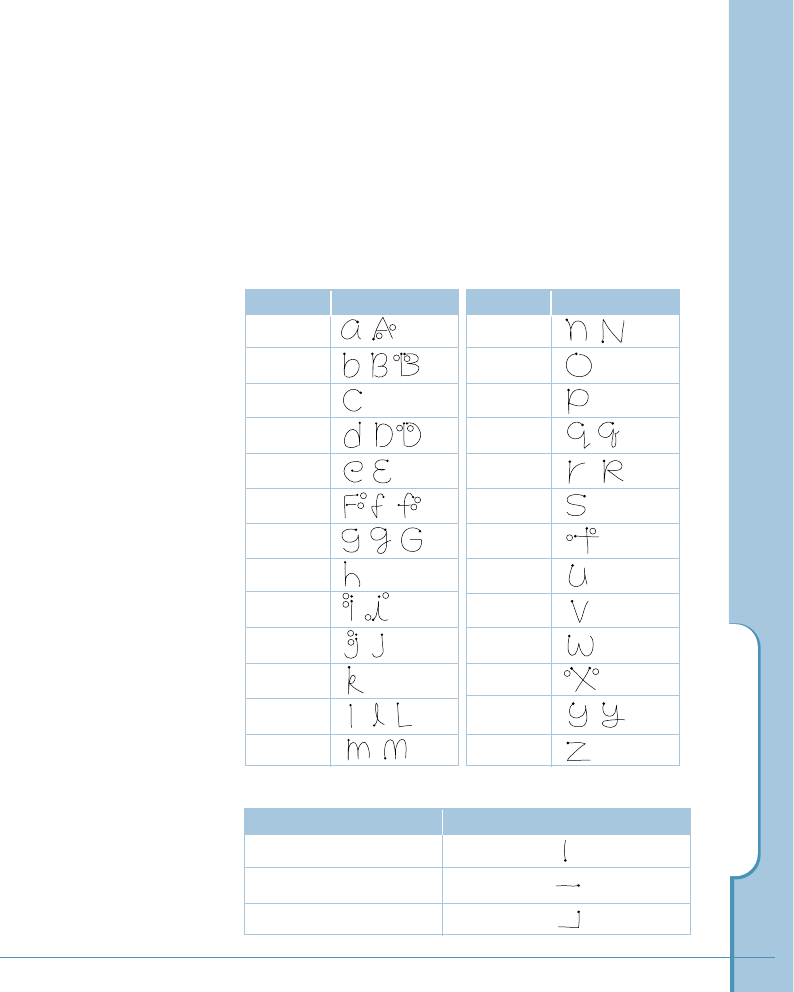
Character Set
These tables show how to write letters, numbers, symbols and
editing marks. For each character, the table shows alternatives
for writing characters. Use the one that is easiest for you.
The dots indicate where the strokes begins. Where appropriate,
the stroke sequence is indicated by numbers.
English Letters
Character Stroke options
a
b
c
d
e
f
g
h
i
j
k
l
m
Character Stroke options
n
o
p
q
r
s
t
u
v
w
x
y
z
1
2
1
2
1
2
12
12
1
21
2
1
2
1
2
1
2
Editing marks
To enter Stroke options
space
back space (back delete)
carriage return (next line)
54
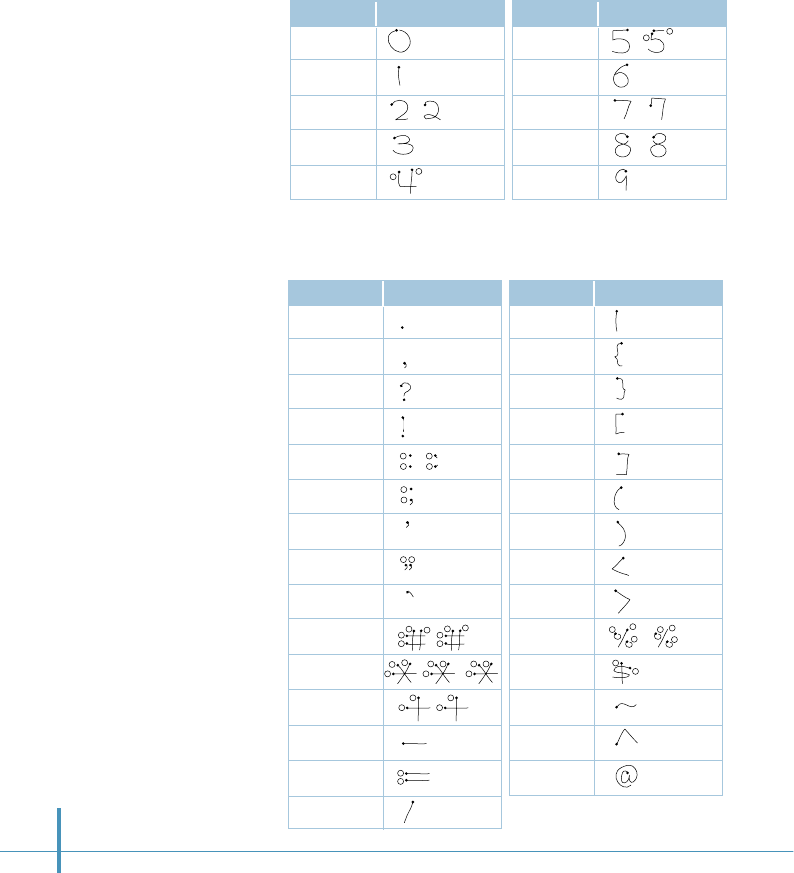
Numbers
Symbols
Character Stroke options
0
1
2
3
4
12
Character Stroke options
5
6
7
8
9
12
Character Stroke options
. (period)
, (comma)
?
!
:
;
‘ (single quote)
“ (double quote)
`
#
*
+
–
=
/
*1 These punctuation marks
must be written inside
lower one-third area.
*2 These marks must be
written inside upper
one-third area.
Character Stroke options
|
{
}
[
]
(
)
<
>
%
$
~
^
@
1
2
1
2
1
2
21
1
3
4
1
2
234
3 1
3 2
21
3
1 2
2
1
1
2
1
2
21
3
12
3
2
1
*1
*1
*2
*2
Working with Applications
55
Using Application
Controls
The applications on your phone use standard controls for
moving around the screen. Once you become familiar with
them, you can easily select options and navigate through
applications.
Checkbox – Tap an empty checkbox to put a check mark on
the box to select that option. Tap it again to remove the
check mark.
Scroll arrows – Tap #to display the previous page.
Tap ❷to display the next page.
Pick list – Tap the arrow to display a list of choices. From
the pick list, tap an item to select it.
button – Tap this button to perform a command. In most
cases, tapping this button opens or closes a dialog, a screen
where you enter information or change settings. A dialog
always contains an OK or Cancel button for closing the
dialog.
Scroll bar – Drag the slider to scroll the display one line at
a time. To scroll to the previous page, tap the arrow at the
top of the scroll bar. To scroll to the next page, tap the arrow
at the bottom of the scroll bar.
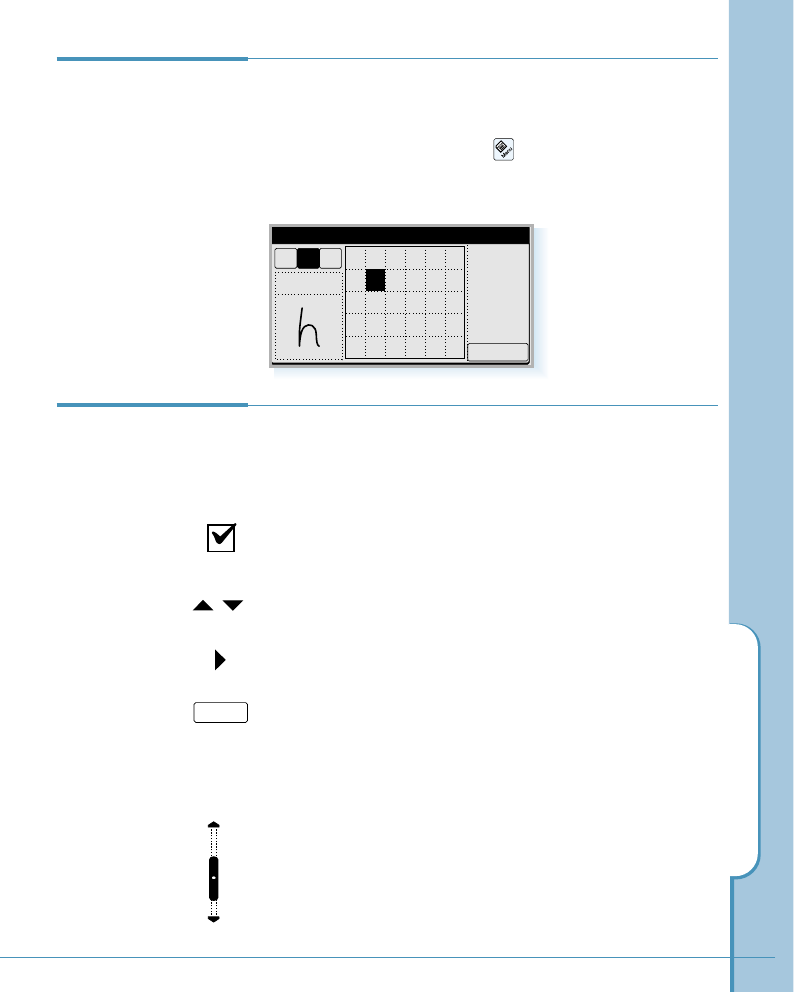
Help Writing
Characters
The software recognizes several alternative ways of writing
a character. If a character you are writing is misinterpreted,
You can use Input Help to see an animated demonstration of
how to write the letter. Tap the icon on the hard icon
panel on the text input screen. Select the character you want
to see. To return to the text input screen, tap the OK button.
Input Help
OK
1$
Aaabcdef
gijkl
mn o pq r
stuvwx
yz
h
OK
56
Memo Edit
Delete
OK
Unfiled
Design meeting
Mr. Kim
14:30, Dec.12
1st, I.hotel
Delete
OK
Options SetupEdit
Design meeting
Mr. Kim
14:30, Dec.12
1st, I.hotel
Delete Memo
Delete Attachment
New Memo
Send to SMS
Record
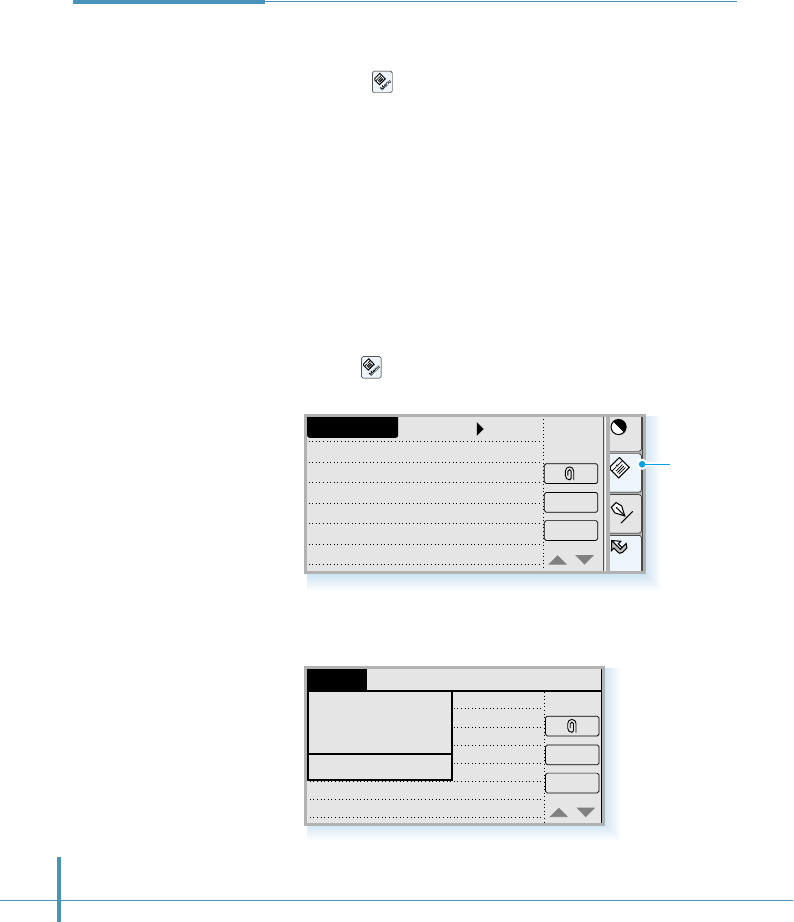
A menu is a set of commands for actions you can use in the
open application. You open the menus on your phone by
tapping the icon on the hard icon panel.
Some menu commands are common to all applications.
Others are specific to the application you are using (For
example, menus in the Memo have different options than
those in the Sched application).
To open the menus:
1. Open any application (such as the Memo).
2. Tap the icon on the hard icon panel to open the menus
for that application.
Using Menus
#Sample screen-Memo Edit
#Menu screen
Home
Cont
Menu
Input
Tap to open
menus.
◗

Working with Applications
57
In this example, there are three menus–Record, Edit, Options,
and Setup. The Record menu, which is open, contains four
commands–Delete Memo, Delete Attachment, New Memo,
and Send to SMS.
To choose a menu:
After you open the menus for an application, tap the menu that
contains the command you want to use.
The menus and menu commands you can see depend not only on
the application that is running, but also on which part of the
application is currently on the screen. For example, in the Memo
application, the menus for the Memo List screen are different
from those for the New Memo screen.

58
Using the Edit Menu
The Edit menu is available with any screen where you enter or
edit text. In general, these commands apply to text that you select
in an application.
To select text in an application:
1. Tap the beginning of the text that you want to select.
2. Drag the stylus over the text to highlight it (in black). Drag
across the text to select additional words, or drag down to
select a group of lines.
The following commands may appear in an Edit menu:
Undo – Reverses the action of the last Edit command. For
example, if you used Cut to remove text, the Undo command
replaces the text.
Cut – Removes text and stores it in memory. You can paste
this text into another area of the application or into a different
application.
Copy – Copies text and stores it temporarily in memory. You
can paste this text into another area or into a different
application.
Paste – Inserts text you cut or copied at the selected point. If
you did not previously cut or copy text, the Paste command
does nothing.
Select All – Select all the text on the current record or
screen. Use this command to cut or copy all of the text and
paste it elsewhere.
Delete – Deletes text you cut or item you selected.

Working with Applications
59
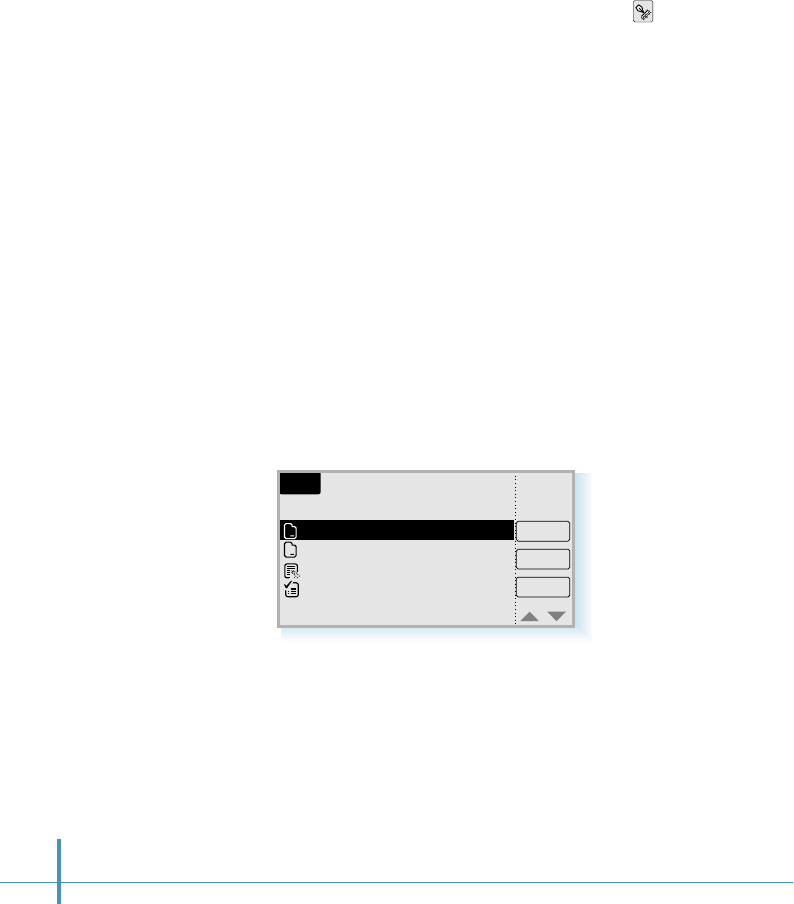
3. You can search for information in any application. Tap the
desired application icon or tap All.
Finding Data on
Your Phone
Cont
Menu
Input
All
Home
Calc Clock
SMS Ctrl
PCsync Othello Chat
Find
Home
Cancel
OK
All
12
a
Find
All
a
12
Launches applications.
After using your phone for a while, you may have a large
amount of information stored on it. To locate specific data,
you can run the Find application.
To open the Find application:
1. Tap the icon on the hard icon panel to launch
applications.
2. Tap the Find icon. If necessary, slide the scroll bar to
display the next screen.
Address
Scheduler
ToDo
Memo
SMS
60
4. To enter text or number in the search line, tap the icon on
the hard icon panel. The text input screen opens.
5. Enter the text or number you want to search for, then tap the
OK button. Note that the Find command is not case-sensitive.
You can search for whole words or just the beginning letters of
a word. For details on entering information on the screen, see
page 46.
6. The text or number you entered displays in the search line.
7. Tap the OK button. The results of your search appears.
8. If there are multiple entries, tap the correct one.
If you tap the Open button, you can open the
corresponding entry and see the information that you
searched for.
Find
`David´ – 4 found
Cancel
Open
Repeat
a
a
David Jr.
P. david
ign conf: david
call david
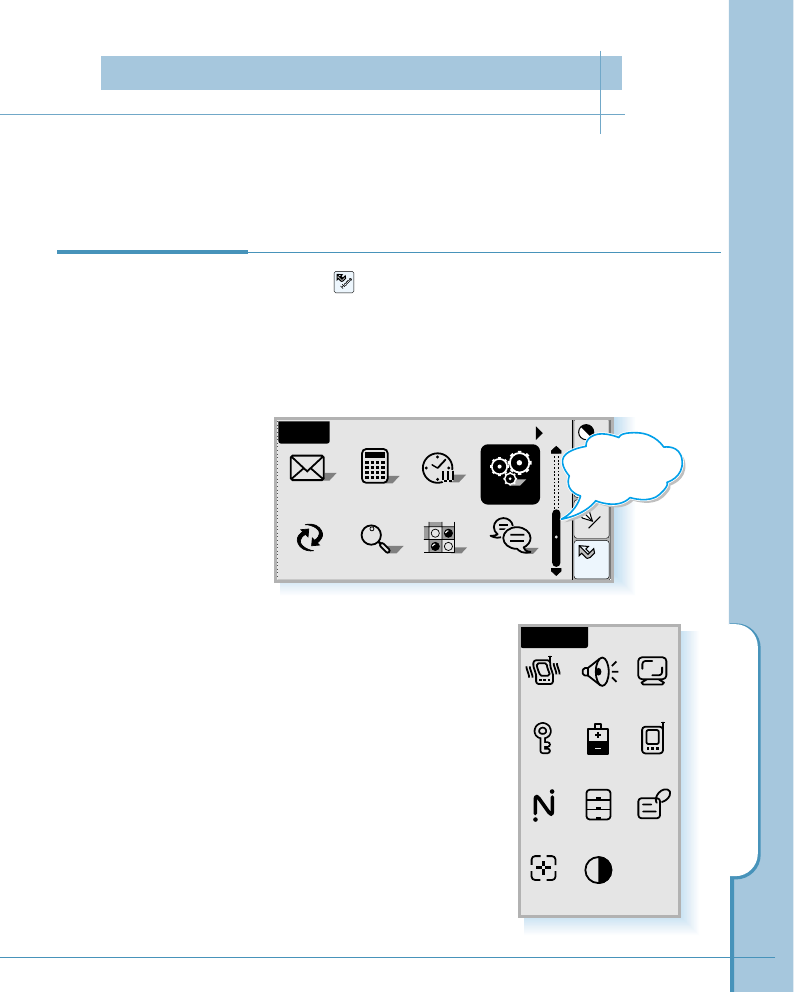
Customizing Your Phone
61
You can personalize and customize your phone by adjusting bell and sounds, display, and
setting security menu options in the Control application.
1. Tap the icon on the hard icon panel to launch
applications.
2. Tap the Ctrl icon. If necessary, slide the scroll bar to find
this icon in the Home screen.
Opening Control
Application
Home
SMS
PCsync
Calc Ctrl
Cont
Menu
Input
All
Clock
Find
Home
Chat
Othello
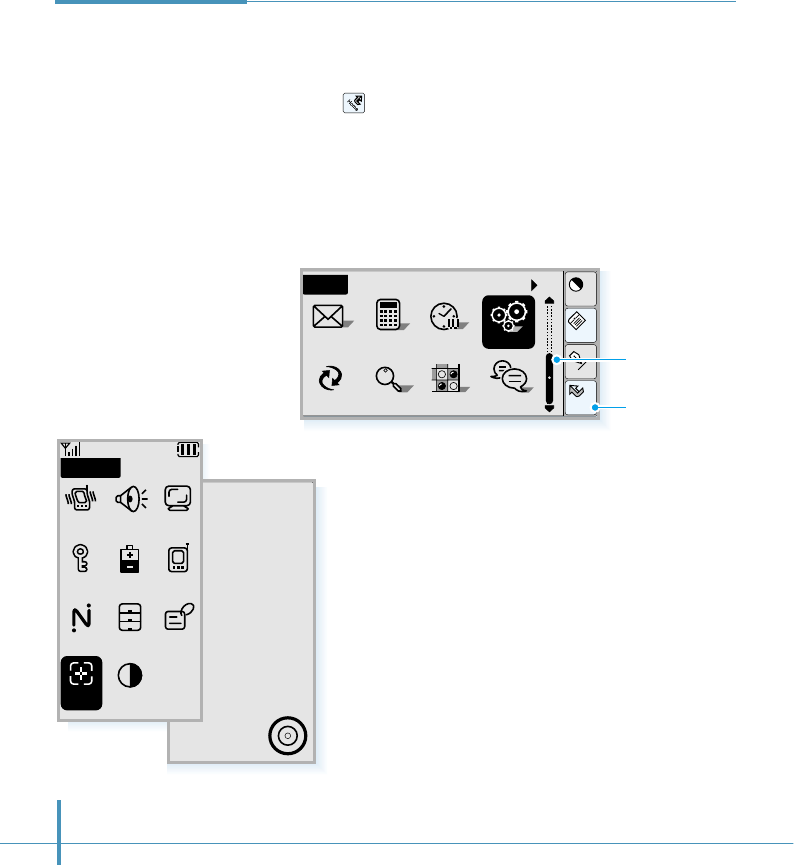
3. The Control screen opens. The
following menu options are
available in the screen. Select
the desired menu icon. For
details on each menu option,
see the corresponding page.
Control
Bell Sound Disp
Secur Batt Sys
Net Stor
Calib Contr
Owner
Slide scroll
bar to move
the screen.
Customizing Your Phone

62
To select the ring type, tap the icon in the Control screen
to open the Ring Type screen. Bell, Vibrate, Lamp, Vib+Bell
options are available. For details on each ring type, see
“Selecting Bell/Vibrate” on page 29.
When you select the desired type, tap the OK button.
Bell
Tap the icon in the Control screen to open the Sounds
screen. In this screen, you can adjust volumes and tones.
Volume
You can set the volume level for the ringing, voice volume and
key beep tone.
You can adjust the Ring Volume, earpiece Voice Volume,
and Key Volume. To increase the volume, tap the block on
the right side, and to decrease the volume, tap the left block.
The selected volume level sounds.
To save setting, tap the OK button.
Sound
Note:
You can also adjust volume using the volume keys on the left side of
the phone. See page 28.
jklghi mno
tuv
oper
pqrs
wxyz
456
789
0
Ring Type
OK Cancel
Vib + Bell
Lamp
Vibrate
Bell
Sounds
Ring Volume
Voice Volume
Key Volume
OK Cancel
ToneVolume
Bell
Sound

Customizing Your Phone
63
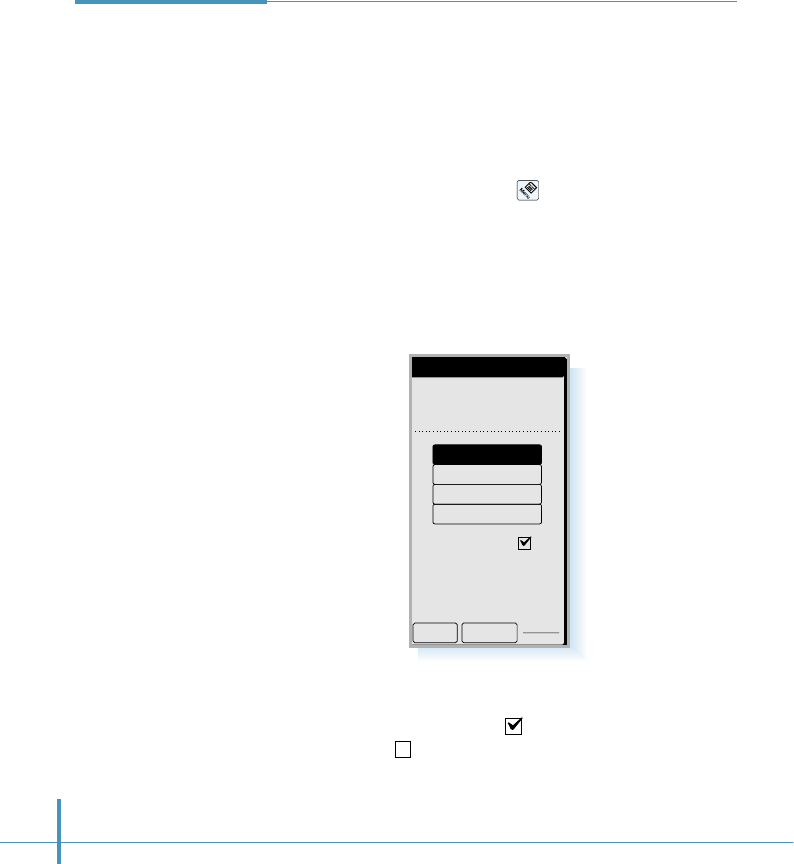
Tone
In the Sounds screen, two tabs are available: Volume and
Tone. Tap Tone. The following tone menus are displayed. Use
the "or ❷key in the bottom right corner to see the tone
menus not displayed in this screen.
• Ring Tone and Alarm Tone : You can change the ring
tone and alarm tone to the desired type from the list that
appears when you tap the corresponding pick list marked
with ❿. Each time you select a tone, it sounds for a few
seconds.
• Message Alert : This alert tone sounds Once or Every 2
Minutes when a new message comes in. To disable the
alert, select None from the pick list.
• Tone Length : Some phones you call can recognize only
longer tones. You may have to change the length to Long
for some calls. When calling a paging system, your phone
should be in the Short mode.
• Call Connected : If you put a check mark on this checkbox,
an alert tone sounds when a call is connected. Each time
you tap the box, check symbol appears and disappears.
• Call Disconnected : If you put a check mark on this
checkbox, an alert tone sounds when a call is disconnected.
• Service Area : If you put a check mark on this checkbox,
the phone beeps when you exit service area or when you
return to a service area.
• Power On : If you put a check mark on this checkbox, the
phone beeps when you turn the power on.
• Power Off : If you put a check mark on this checkbox, the
phone beeps when you turn the power off.
Sounds
Volume
Ring Tone
Bell 1
Alarm Tone
Bell 1
Message Alert
Once
Tone Length Short
Call Connected
Call Disconnected
OK Cancel
Tone

64
Tap the icon in the Control screen to open the Display
screen.
You can select the initial display that you see in the idle mode
of the Phone screen. You can select your phone number,
greeting message, world time or big clock. The selected item
will be displayed with the current date and time. Selecting Big
Clock makes the time in the idle mode displayed larger.
Select the desired item. You will see the contents at the top
of the window. For Greeting, you can change the contents. See
below.
You can also turn the Auto-Hyphen feature on or off in the
Display screen. To turn the Auto-Hyphen feature on, put a check
mark on the box. For information on the Auto-Hyphenation, see
page 32.
To save the setting, tap the OK button.
To change the greeting:
1. Select the words or name displayed on the top of screen
by dragging the stylus over the text.
2. Tap the icon on the hard icon
panel. The on-screen keyboard
appears on the bottom of the
screen.
3. Tap the letters you want to display
on the Phone screen, then tap the
OK button. You can enter up to 9
characters. For details on
entering a text,
see page 46.
Display
Display
Initial Display
972-312-3456
Auto-Hyphen
OK Cancel
Greeting
World Time
Big Clock
My Phone#
Display
Initial Display
Be happy day
OK
My Phone#
Greeting
0123456789
qwer t yu i op
asdfghj kl ;
zx
cap space
cvbnm, . /
OK Cancel
1$E
Display
Initial Display
World Time
Big Clock
My Phone#
Greeting
SAMSUNG
Home
Cont
Menu
Input
OK Cancel
Characters are
displayed as you
write or tap them on
the text input panel.
On-screen
keyboard
Tap to open the text input screen
Disp
Your phone provides many security
options, including a user-programmable
password and call restriction features.
To access the Security menu, tap the
icon in the Control screen. You must
enter the four-digit password. It is preset
to 0000 . The Security screen opens. The
following menu options are available in
the Security screen.
Mode
When the phone is locked, you cannot access most of your
phone’s memory and menu features or make phone calls
without entering the lock code. You can only answer
incoming calls. The following options are available:
Unlock: the phone remains unlocked.
AutoLock: the phone locks automatically at the next power-
up and stays locked until the lock code is entered.
When the phone is locked, you can dial only pre-specified
emergency numbers if registered. To
place an emergency call, tap Emergency
Call button on the Locked screen, then
dial the registered number.
Enter Password
????
Cancel
1
abc def
jklghi mno
tuv
pqrs wxyz
23
456
789
0
Locked
4 : 13
May 26 FRI
Emergency Call
1
abc def
jklghi mno
tuv
pqrs wxyz
23
456
789
0
Customizing Your Phone
65
Security
Note:
The numbers 100, 101, 102 and *166 are
preset as emergency numbers and can be
dialed in lock mode.
Security
Mode Unlock
Security
Incoming
Outgoing
International
OK Cancel
Change Password
Reset Phone
Enter Emergency#
Secur

66
To place a normal call in lock mode or use your phone’s
functions, enter the lock code. The phone is unlocked.
Change Password
You can change your current password to a new one. The
password is preset to 0000 at factory.
Tap Change Password in the Security screen. The Change
Password screen opens. Tap the desired 4-digit number, then
tap the OK button. The phone asks to enter the password
again. Re-enter the password for confirmation, then tap the
OK button.
Security
This feature allows you to restrict your calls. Call restriction
can be set up in the following ways:
• Incoming: If you put a check mark on this box, calls can not
be received.
• Outgoing: If you put a check mark on this box, all calls
except to emergency call numbers cannot be
made.
• International: If you put a check mark on this box,
international calls cannot be made. The
prefixes 00, 012, 013 and 014 are recognized
as international numbers.
Customizing Your Phone
67
Enter Emergency Number
This feature allows you to call pre-specified emergency
numbers when the phone is locked or when outgoing calls
are restricted. You can store up to three emergency numbers.
Tap Enter Emergency # in the Security screen. When the
Enter Emergency # screen appears, tap a location in the top
of the screen and enter the desired number, then tap the OK
button.
Reset Phone
This menu enables you to reset the phone to its default
configuration. Also, all phone memories are cleared.
Tap Reset Phone in the Security screen. The display asks if
you are sure you want to initialize the memory. Tap the OK
button.
Enter Emergency#
OK
#2 #3
ClrCancel
#1
1
abc def
jklghi mno
tuv
pqrs wxyz
23
456
789
0
To save battery power, the screen blanks out (sleeps) after a
few minutes of non-use. Tap the icon in the Control
screen, and you can set the time period to 1, 2, 3, 4 or 5
minutes.
Select the length of idle time before your phone sleeps from
the pick list, then tap the OK button.
To “wake up” the phone, just tap the screen. You can also
“wake up” by closing and opening the flip.
Battery
Power Saving
Power-save Timer
1min
OK Cancel
Batt
68
If you have subscribed to more than one service network, tap
the icon in the Control screen to select the desired
NAM(Number Assignment Module).
You must enter the four-digit password to access the System
menu. This password is the same as the security password,
it is preset at the factory to 0000 (for further information
please refer to page 66 “Change Password”).
The System screen opens and your phone number, in the
selected NAM, displays in the top of the screen.
To save setting, tap the OK button.
System
System
My Phone #
972-312-3456
Set NAM
OK Cancel
NAM2
NAM1
Sys
To connect to an Internet service provider or other networked
computer to receive and send e-mail and explore the Internet,
the network of your phone has to be set correctly a using the
icon in the Control screen.
The correct network information must be set up before you
can use the Email, GoNext, or Chat applications.
Before you begin, contact your network service operator. The
network service operator provides the information on the
network settings.
Network
Net
Cancel
OK
Account
User authentication
Name :
#1
Password :
Network Setup
Number
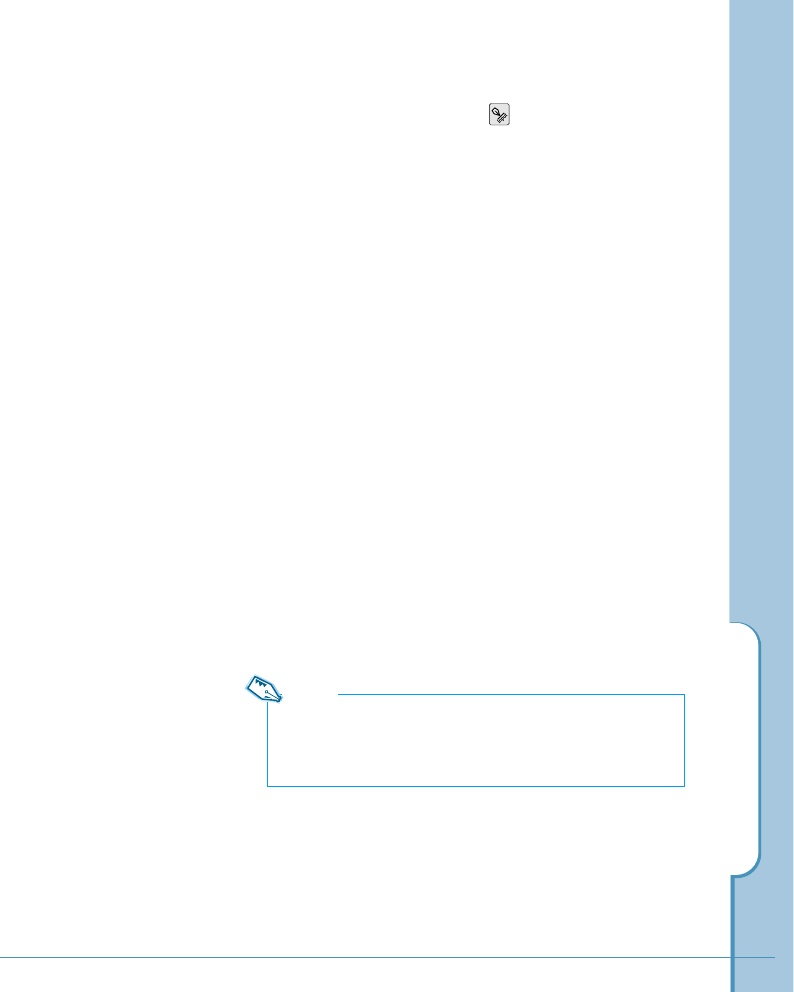
Customizing Your Phone
69
To enter information on each field, tap the desired field to
position a cursor, then tap the icon on the hard icon panel
to open the text input screen and enter the correct
information.
Enter information on the following fields:
Account - It is preset by your service provider.
Put a check mark on the User authentication checkbox and fill
in the Name and Password fields.
Name - Enter the login name for your account.
Password - Enter your account password.
Number - Enter the phone number you use to connect with
your ISP or dial-in server.
Extra AT - It is preset by your network service operator. Do
not change the setting unless the service provider instructs
you to do so.
Time Out(MIN) - Timeout sets how long the phone waits
before dropping the connection with your service provider or
dial-in server after an application closes.
DNS - Enter the IP addresses of the Domain Name Server
given to you by your service provider.
Note:
Your phone comes pre-configured with your GoNext account
information. If you change the settings, you may not be able
to use your account.
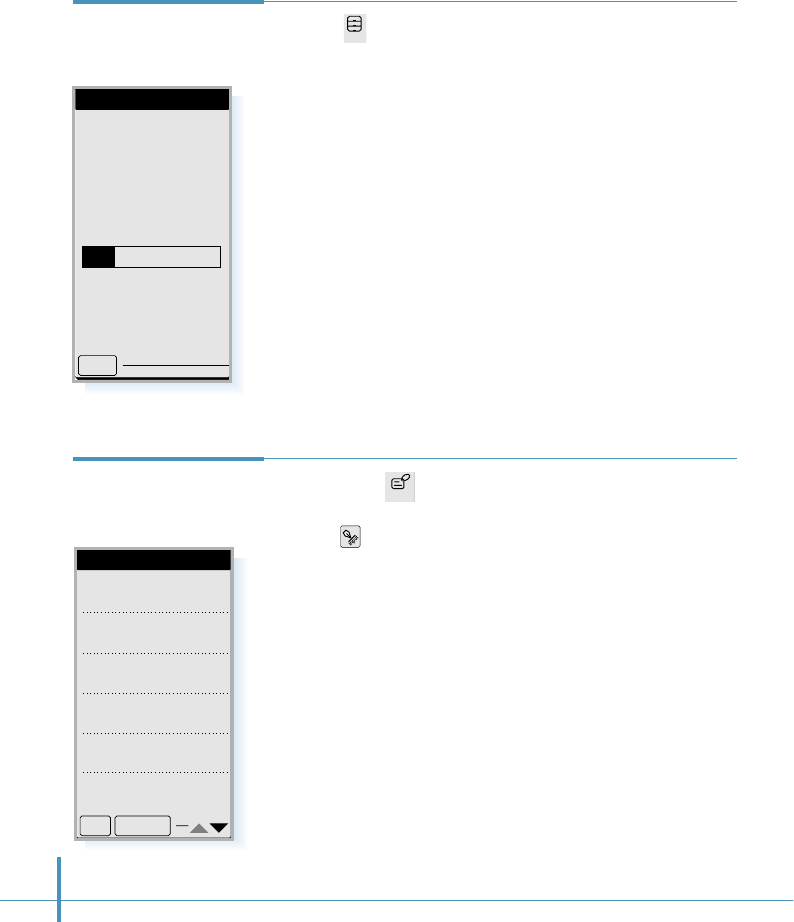
70
If you tap the icon in the Control screen, you can record
all the owner information. To enter information on each field,
tap the icon on the hard icon panel. For details on
entering information, see page 46.
To save settings, tap the OK button.
Owner
Information
Tap the icon in the Control screen. The Storage screen
appears. In this screen, you can see the amount of total
memory and the amount of available free memory for storing
data.
Storage
Storage
Total 1024K
896K Free
128K used
1024K
128K
OK
Owner
Name
Position
Company
Work
Home#
Cellular
OK Cancel
Stor
Owner
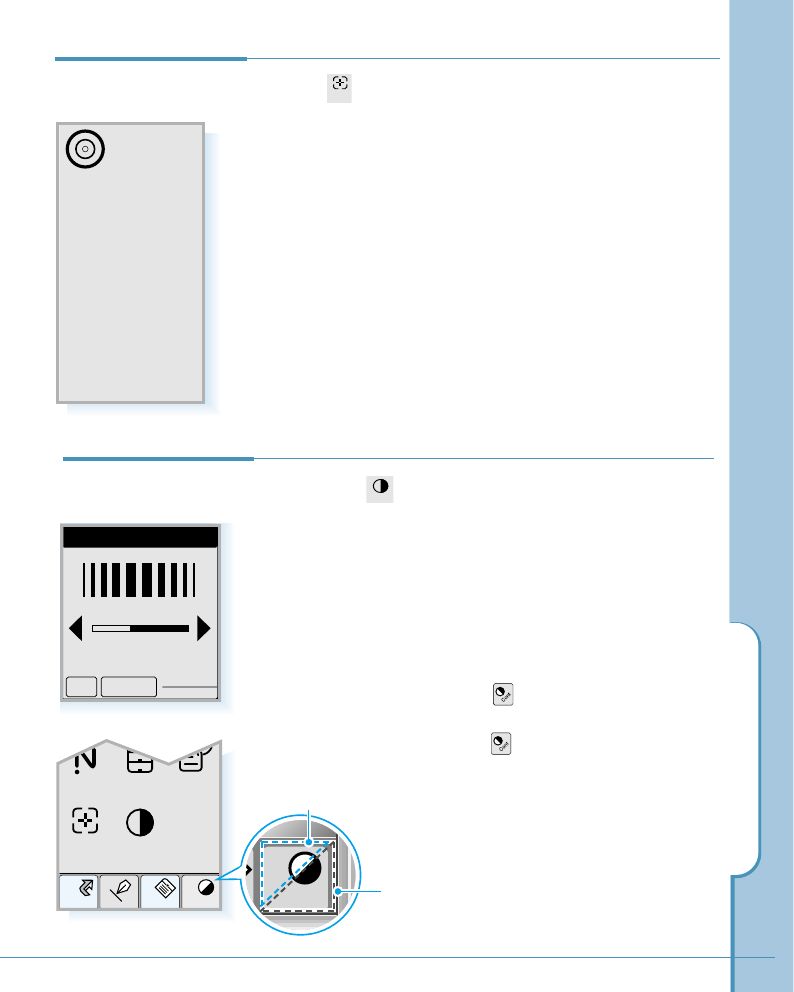
Customizing Your Phone
71
Tap the icon in the Control screen to open the calibration
screen.
The first time you start your phone, or when the screen
accuracy diminishes over time, calibrate the screen with the
stylus to make the screen respond correctly to a stylus tap.
Carefully press and briefly hold the stylus on the center of
the target that appears on the calibration screen. Repeat as
the target moves around the screen.
Calibration
Use stylus to tap
center of target.
Calib
If you tap the icon in the Control screen, you can adjust
the screen contrast. Each time you tap the Bright arrow, the
screen becomes lighter. When tapping the Dark arrow, the
screen becomes darker. To save the setting, tap the OK
button.
You can also adjust the screen contrast at any time without
going to this Control menu by:
• Tapping the light side on the icon on the hard icon
panel to lighten the screen.
• Tapping the dark side on the icon on the hard icon
panel to darken the screen.
Contrast
Contrast
Bright Dark
OK Cancel
Home
Cont
Memo
Input
Net Stor
Calib Contr
Owner
Contr
Tap to darken.
Cont
Tap to lighten.
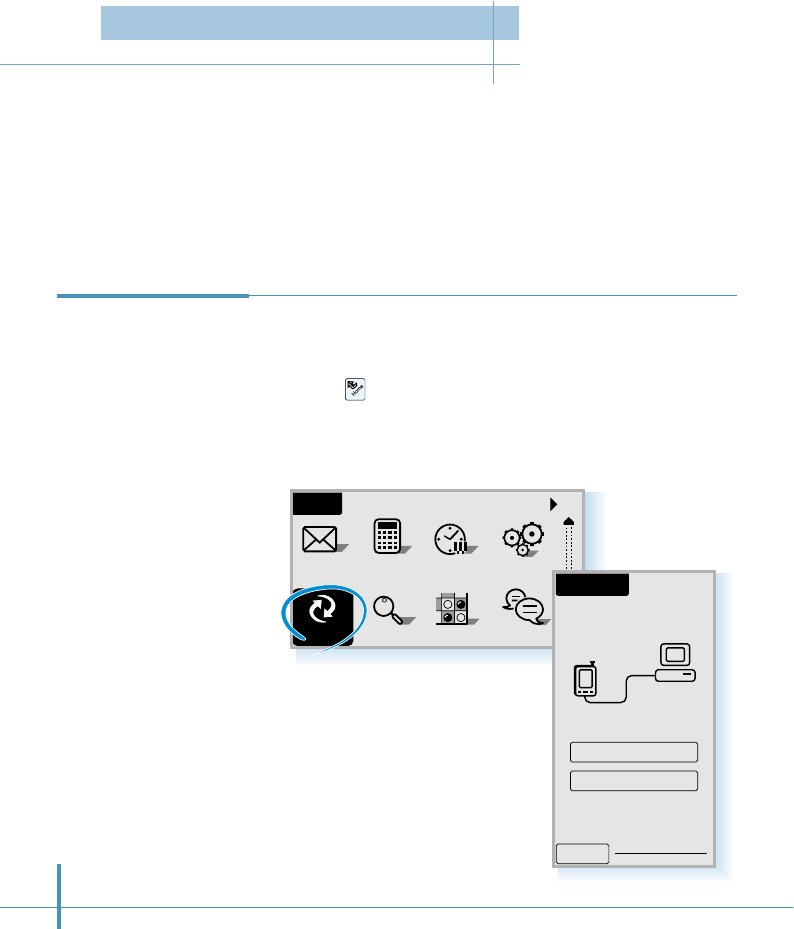
72
PCsync technology enables you to synchronize data between your phone and the DataSync
software on your computer. To synchronize data, you must install the DataSync software
with the supplied CD-ROM and connect your phone to the PC with the supplied data cable.
For information on the DataSync software and PC connection, refer to the instruction guide
which comes with the CD-ROM.
1. Connect your phone to the PC with the supplied data
communication cable.
2. Tap the icon on the hard icon panel to launch
applications.
3. Tap the PCsync icon in the Home screen.
4. Tap the DataSync button.
Synchronizing
Data
All
Home
Calc Clock
SMS Ctrl
Othello Chat
Find
PCsync
PC Sync
Setup
DataCom
DataSync
PC Synchronization
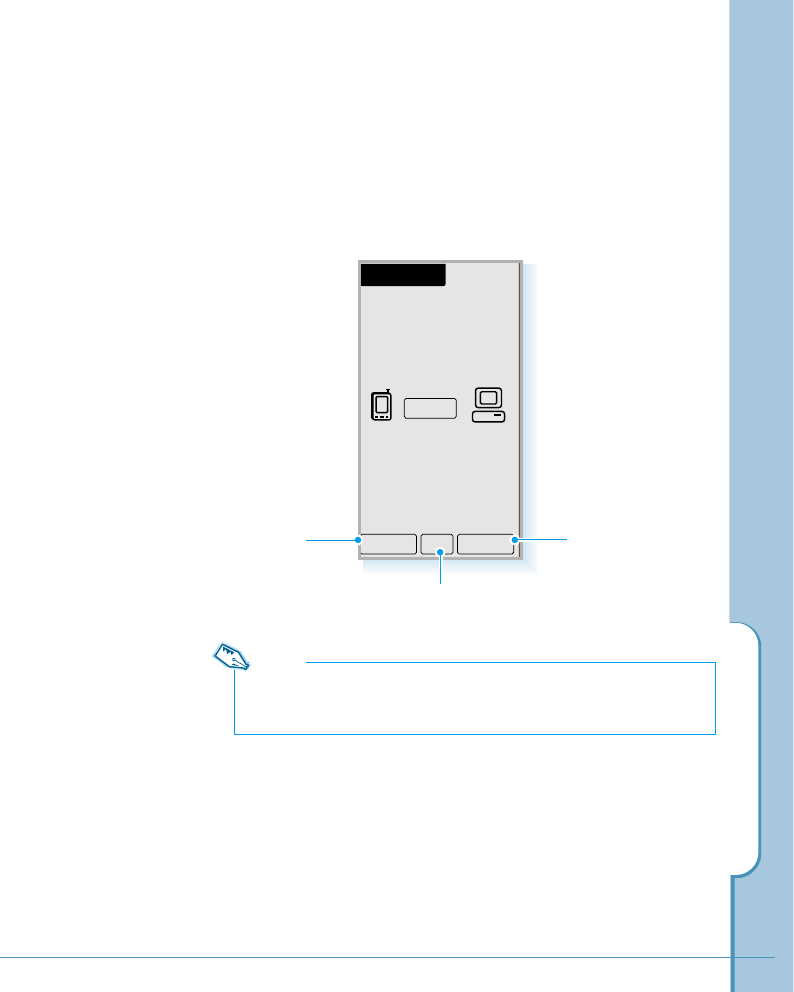
PC Synchronization
73
5. The DataSync screen opens. To start synchronization, tap the
Start button. A connection is established, and the data is
transferred between your phone and the PC.
Cancels synchronization
Allows you to register
the user name and
password.
DataSync
Cancel H Setup
Start
Shows the data synchronization
history in a separate screen.
Note:
You should register the same user information you entered in the Datasync
application on your PC.
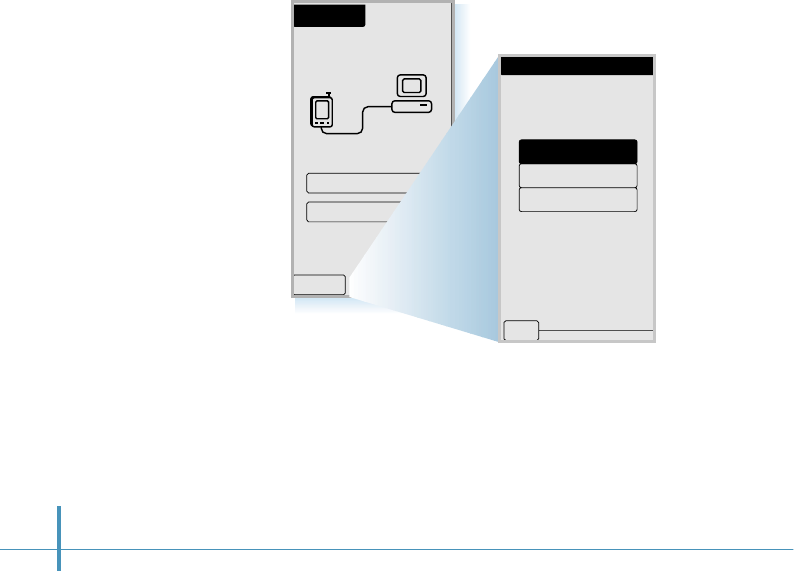
74
Automatic Synchronization
You can set your phone to synchronize automatically each time
you connect the phone to your desktop PC.
To setup automatic synchronization:
1. In the PC Sync screen, tap the Setup button on the bottom of
the screen.
2. In the Auto Start screen, tap the DataSync button, then tap
the OK button. If you want to cancel the automatic
synchronization, tap Auto Start(Off) in the same screen.
PC Sync
Setup
DataCom
DataSync
Auto Start
DataCom
Auto Start(Off)
OK
DataSync
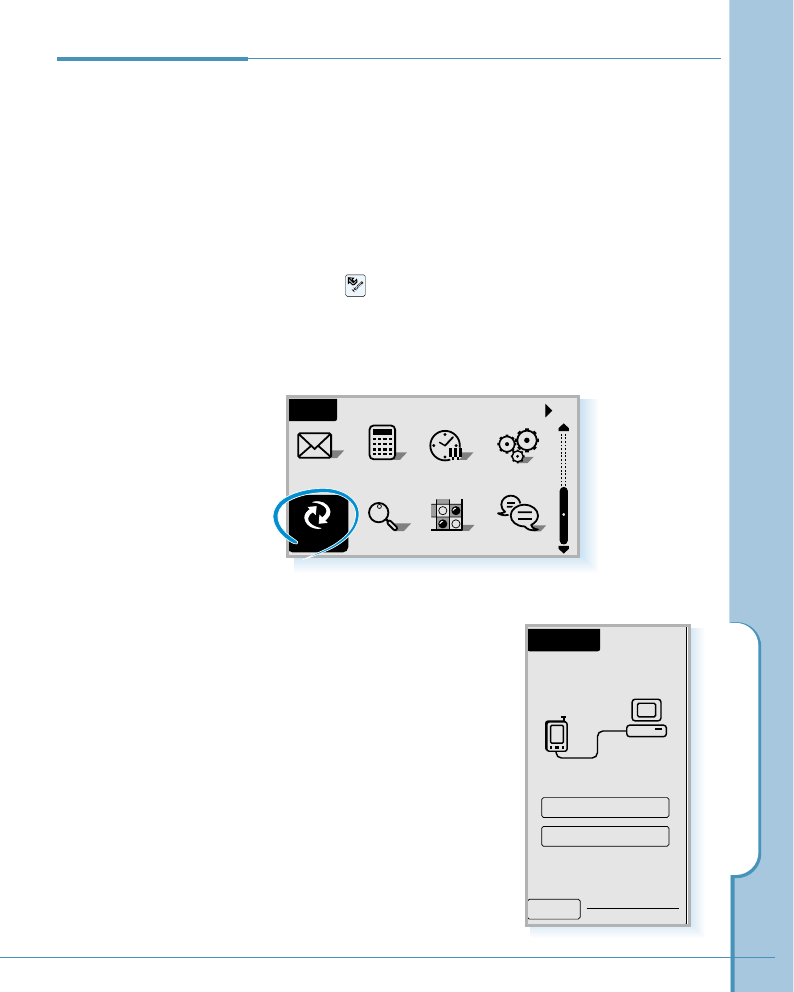
PC Synchronization
75
When your phone is connected to your PC with the supplied
data cable, you can use the phone as a modem to access the
Internet or send and receive data and fax (with third party
software).
1. Connect your phone to the PC with the supplied data
communication cable.
2. Tap the icon on the hard icon panel to launch
applications.
3. Tap the PCsync icon in the Home screen.
Data
Communication
4. Tap the DataCom button in
the PC Sync screen.
All
Home
Calc Clock
SMS Ctrl
Othello Chat
Find
PCsync
PC Sync
Setup
DataCom
DataSync
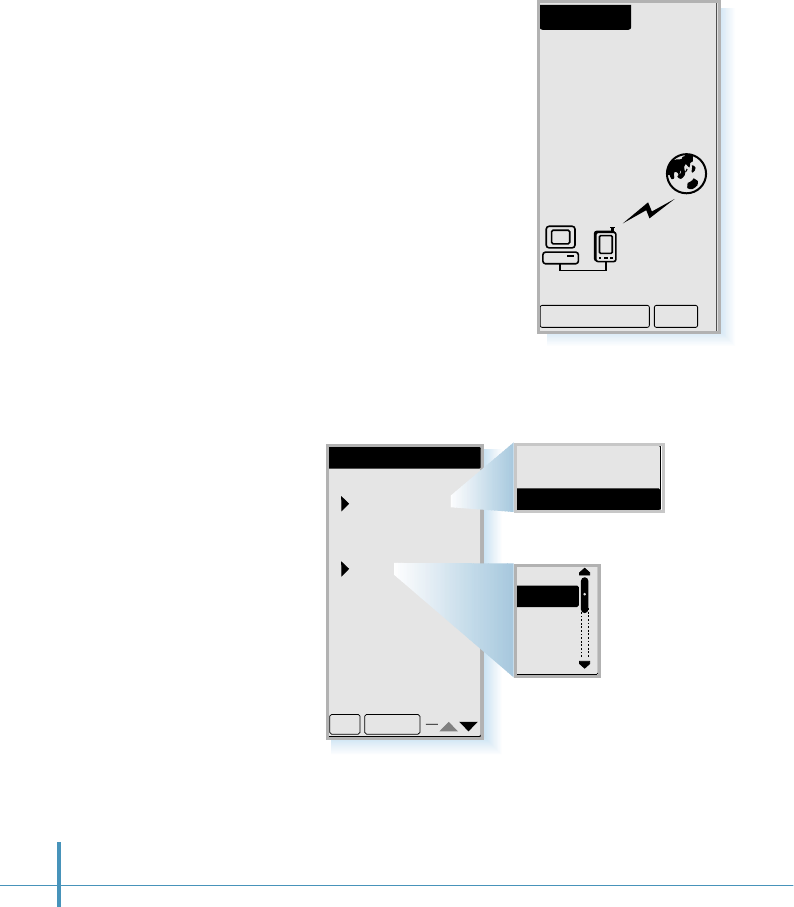
76
• To set the incoming mode or the bell sound, tap the Set
Incoming button.
• If you want to cancel Data Communication, tap the Exit
button.
5. Your phone will be connected
to the Internet.
DataCom
Data Service
Call Only
Set Incoming Exit
Set Data Service
Set Incoming Mode:
VOICE CALL
On Incoming Call
Set Bell Sound:
Bell 2
Data Roaming
OK Cancel
FAX CALL ONLY
DATA CALL ONLY
VOICE CALL ONLY
Tap the pick list and select the
desired call type.
Bell 1
Bell 2
Bell 3
Bell 4
Bell 5
Tap the pick list and
select the desired bell
type for incoming
calls.

PC Synchronization
77
Memo

Address Book
The Address Book enables you to keep names,
addresses, phone numbers and other information
about your personal or business contacts.
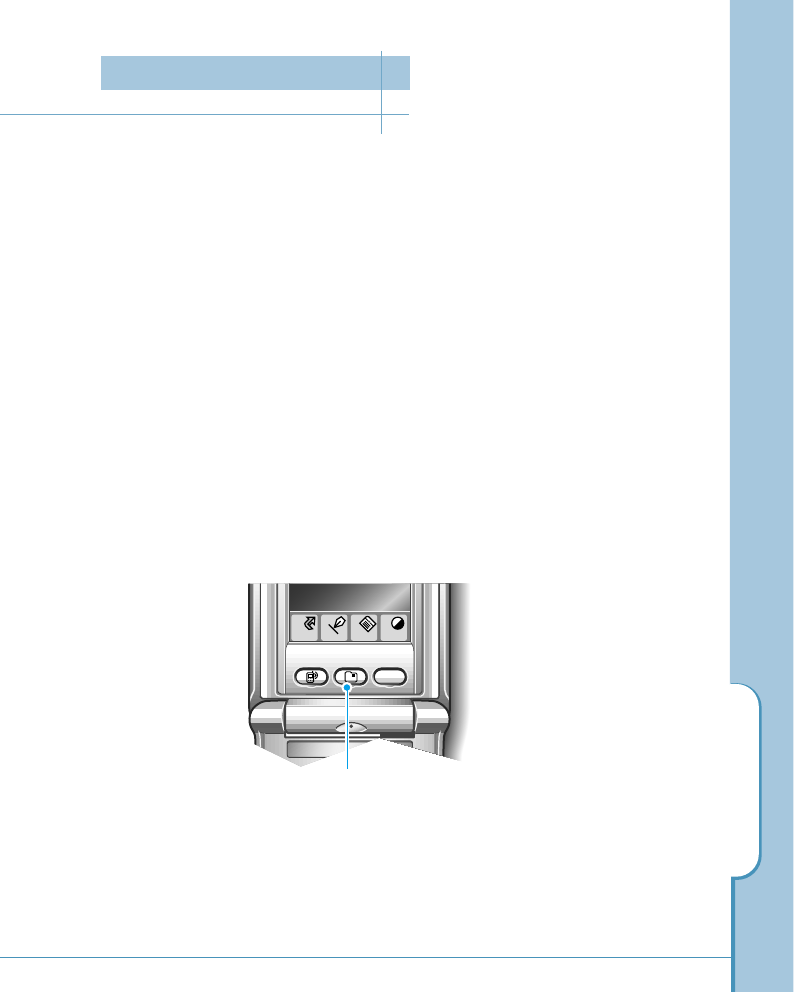
Address Book
79
With the Address Book, you can:
■Quickly look up or enter names, addresses, phone numbers and other information.
■Enter up to six phone numbers (home, work, fax, mobile, pager, other) or e-mail address
for each name.
■Define which phone numbers appear in the Address List screen for each Address Book
entry.
■Attach a note to each Address Book entry where you can enter additional information
about the entry.
■Assign categories to your Address Book entries, so you can quickly sort and view your
entries in logical groups.
To open the Address Book:
■Press the Address button on the front panel of the phone to display the Address Book
on the screen.
Home
Menu
Cont
Input
WWW
a
Address button
Address Book
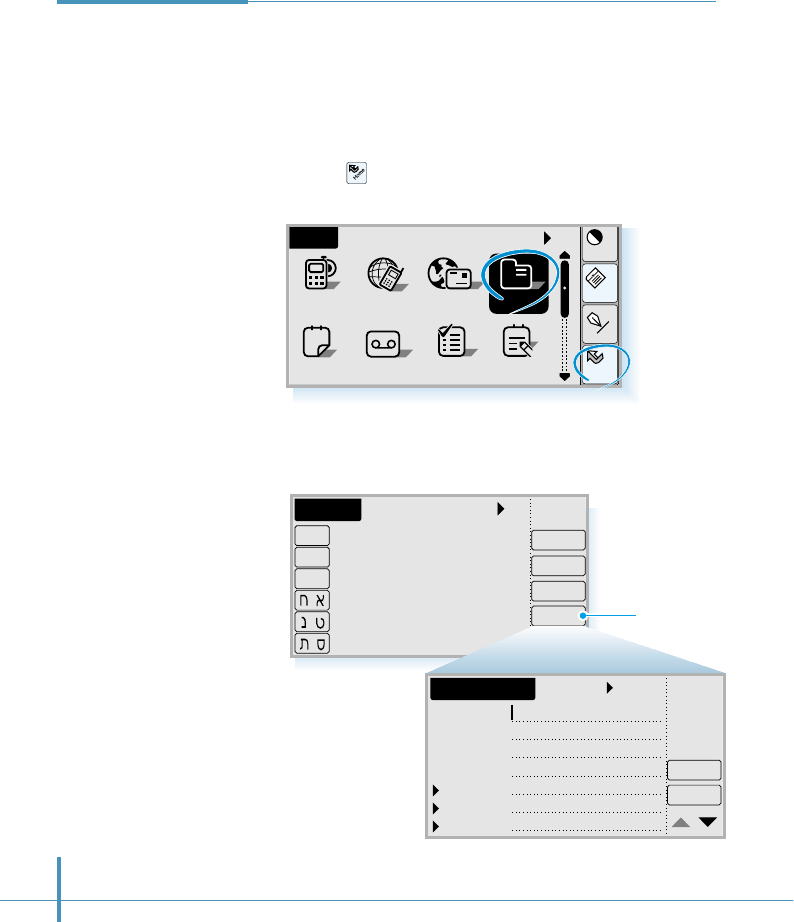
80
Home
Cont
Menu
Input
All
AnswerSched ToDo Memo
Home
12
AddressEmailGoNextPhone
a
1. Tap the icon on the hard icon panel to launch
applications, and tap the Address icon.
An Address Book entry is where you store name and address
information about people or businesses. Your phone makes it
easy to create, edit and delete Address Book entries.
To create a new Address Book entry :
Creating an
Address Book
Entry
2. Tap the New button to display the Address New screen.
All
Edit
New
Address
View
Call
A
-
H
I
-
O
P
-
Z
-
-
-
Tap New.
Unfiled
Details
L. Name
F. Name
Title
Company
Work
Home
Fax
OK
Address New
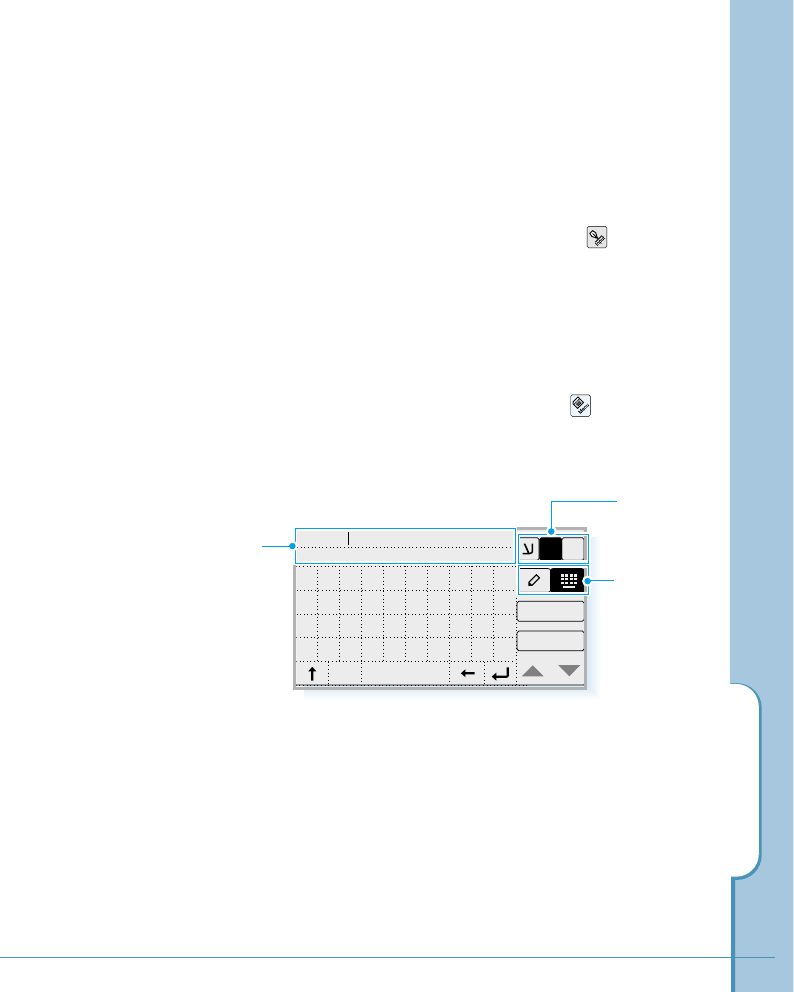
Address Book
81
3. An Address Book contains various information fields.
To select the field you want to enter information, just tap
the field so that a cursor blinks on the field.
4. To enter information on the field, tap the icon on the
hard icon panel to open the text input screen.
5. Type or write letters or numbers. Letters or numbers
display in the text field.
You can use Edit option by tapping the icon, which
allows you to cut, copy, and paste a selected text and
number.
For details on entering information on the screen,
see page 48.
Text field.
Letters are displayed
as you tap them.
Select Hebrew,
English or
Symbol mode.
Select the input
mode.
OK
Cancel
1$
E
1
David
234567890
space
cap
qwe r t y u i op
asdf gh j k l ;
zxcvbnm, . /

6. When the name or number appears correctly in the text field
of the text input screen, tap the OK button.
7. The information you entered is displayed in the selected
field.
8. Repeat steps 3 through 7 to enter other information you want
to include in this Address Book entry.
9. Tap ▲or ▼in the lower-right corner of the screen to move
to the next page of information.
The three custom fields on the Address Book enable you to
customize the labels of the fields, for example, home page
address, birthday, etc. To rename custom fields, see page 96.
10. After you finish entering information, tap the OK button to
return to the Address screen.
82
Unfiled
Details
L. Name David
F. Name
Title
Company
Work
Home
Fax
OK
Address New
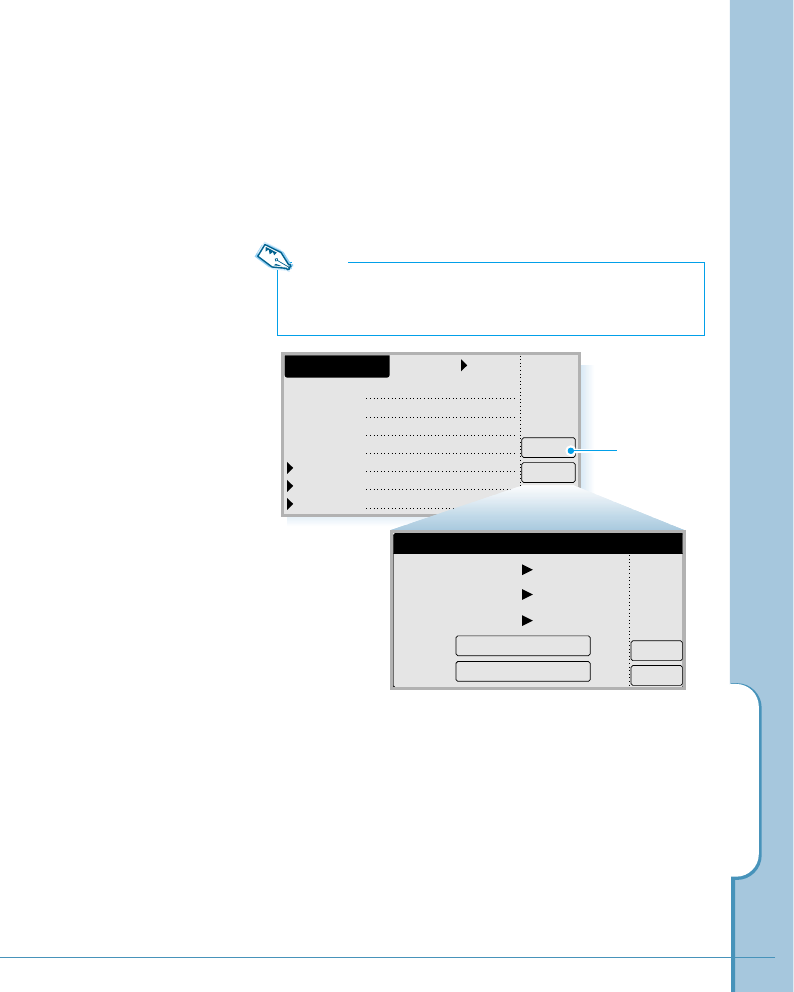
Address Book
83
Setting Address Details
When you tap the Details button in the Address New or
Address Edit screen, the Address Details screen opens. The
Address Details screen provides a variety of options that you
can associate with the Address entry.
Unfiled
Details
L. Name David
abc tech.
1234567
9876543
F. Name
Title
Company
Work
Home
Fax
OK
Address New
Tap Details.
In the Address Details screen, you can set any of the
following settings.
Note:
If no information is given in the Address New or Address Edit screen,
the Address Details screen does not open.
OK
Delete
Address Details
Category Unfiled
OK
Show Work
Ring Default
Set Speed Dial
Set Voice Dial
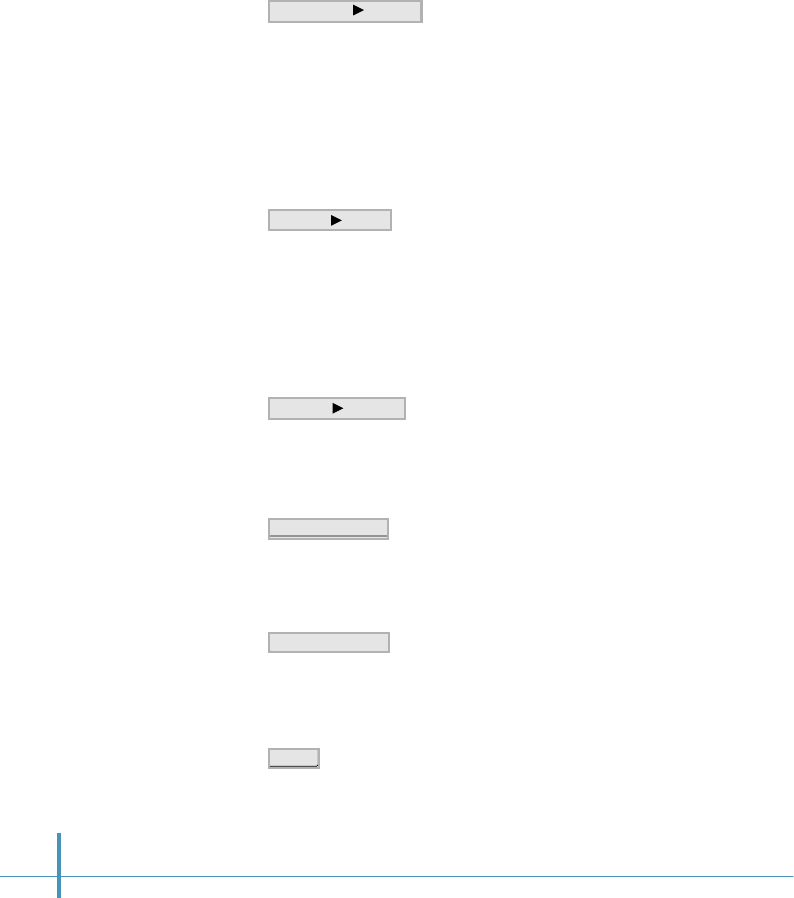
84
• Categories can help you file individual Address Book entries
into groups for easy review. To assign a category to an
Address Book entry, tap the category pick list and tap the
category that you want to assign to the Address Book entry.
You can select Personal, Business, and Unfiled.
If you want to add or rename the categories, see page 99.
• If you have stored several different numbers (e.g. Work,
Home, Mobile Phone, Fax) in the Address Book entry, you can
select one of them to be displayed on the Address screen.
You can see another phone number by tapping the Show pick
list and select the desired number from the pick list.
• Set a unique ring type for incoming calls from the numbers in
the current entry. Select one from the Ring pick list.
• Set speed dial codes for the numbers in the current entry. For
information on setting speed dial, see page 85.
• Set a voice dial for a selected number. For information on
setting voice dial, see page 87.
• Delete the entry.
Ring Default
S
et
S
pee
d Di
a
l
Set Voice Dial
D
elete
Show Work
Category Unfiled
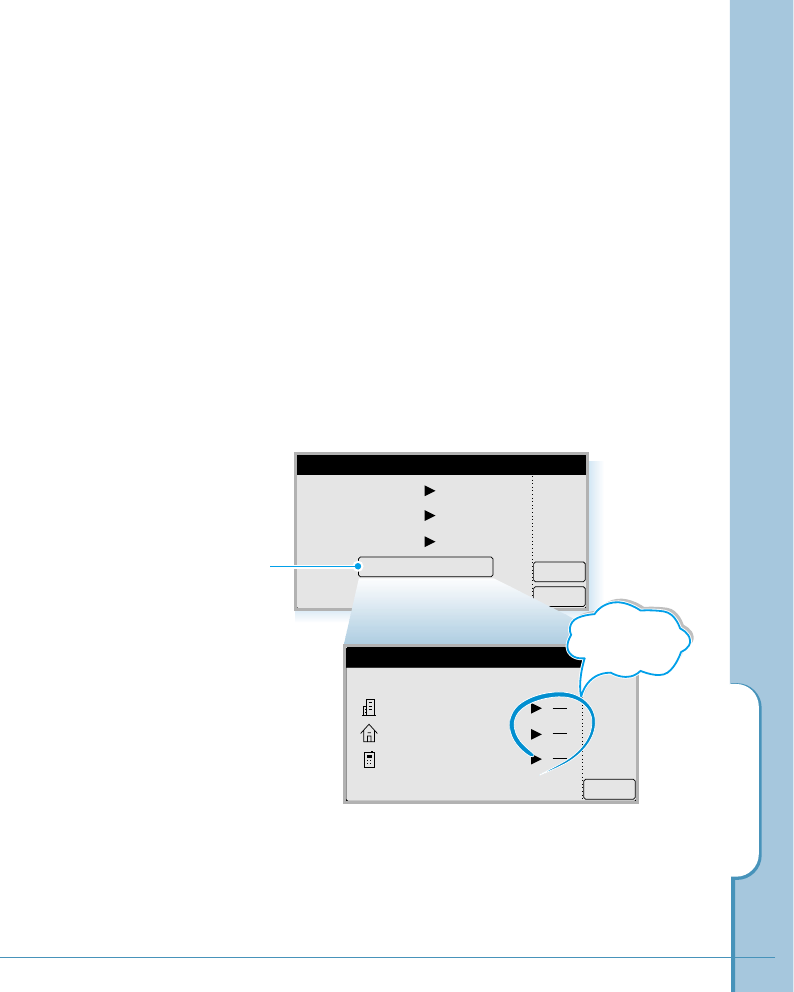
Address Book
85
Setting Speed Dial
Speed dialing is a quick way to call frequently used phone
numbers. You can assign a speed dial code to each phone
number. For information on how to make a call using speed
dial, see page 17.
1. When you create or edit the address entry, after you filled
in the fields on the Address New or the Address Edit
screen, tap the Details button. The Address Details
screen opens.
2. Tap the Set Speed Dial button. All the phone number
fields for that entry appear.
3. Select the number to which you want to assign a speed
dial by tapping ❿at the right side of the number.
OK
Delete
Address Details
Category Unfiled
OK
Show Work
Ring Default
Set Speed Dial
Set Voice Dial
Tap Set Speed Dial.
OK
Set Speed Dial
David Moore
OK
441234567
449876543
0119876543
Tap the pick
lists to select
the field.
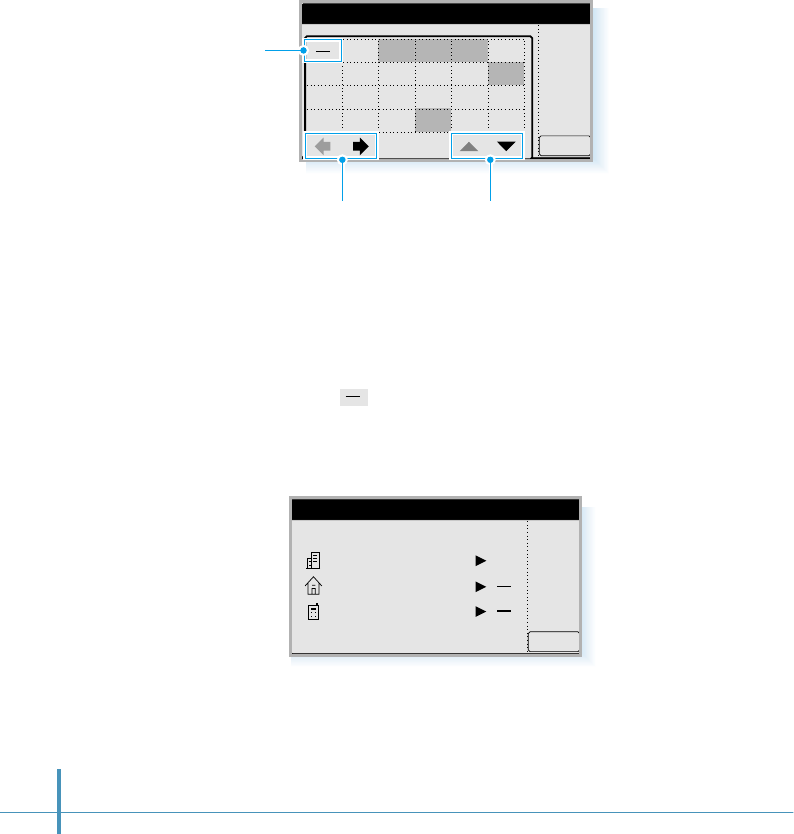
4. The Speed Dial code table appears. To select the desired
speed code in the table, tap the code.
Speed dial codes that have already been assigned for other
phone numbers have dark backgrounds and cannot be
selected.
To release the speed dial setting for the selected number,
select in the upper-left corner on the table.
5. You will find the selected code at the right of the number in
the Set Speed Dial screen.
6. Repeat steps 3 through 5 to set speed code for other
numbers, if necessary.
After you finish, tap the OK button to return to the Address
Details screen.
86
OK
Set Speed Dial
OK
01234
6578910
1211 13 14 15 16
1817 19 20 21 22
OK
Set Speed Dial
David Moore
OK
15
441234567
449876543
0119876543
Tap to delete
speed dial code.
Tap to see next or previous numbers
screen by increments of 100. Tap to see next or previous numbers
screen by increments of 23.
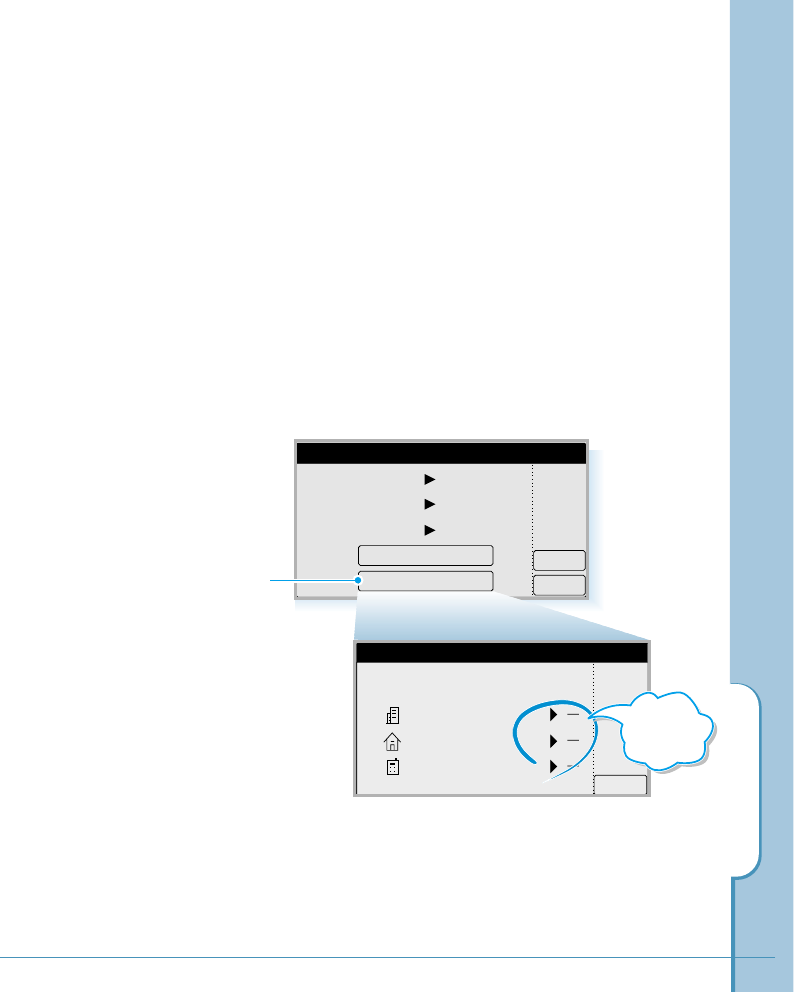
Address Book
87
Setting Voice Dial
Voice dialing feature requires that you first set the phone to
recognize the name of the person you are calling. You can
add voice tags for up to 20 numbers.
1. When you create or edit the address book entry, after you
filled in the information fields on the Address New or the
Address Edit screen, tap the Details button. The Address
Details screen opens.
2. Tap the Set Voice Dial button. All the phone number
fields for that entry appear.
OK
Delete
Address Details
Category Unfiled
OK
Show Work
Ring Default
Set Speed Dial
Set Voice Dial
Tap Set Voice Dial.
OK
441234567
449876543
0119876543
David Moore
Set Voice Dial
Tap to select
the field.
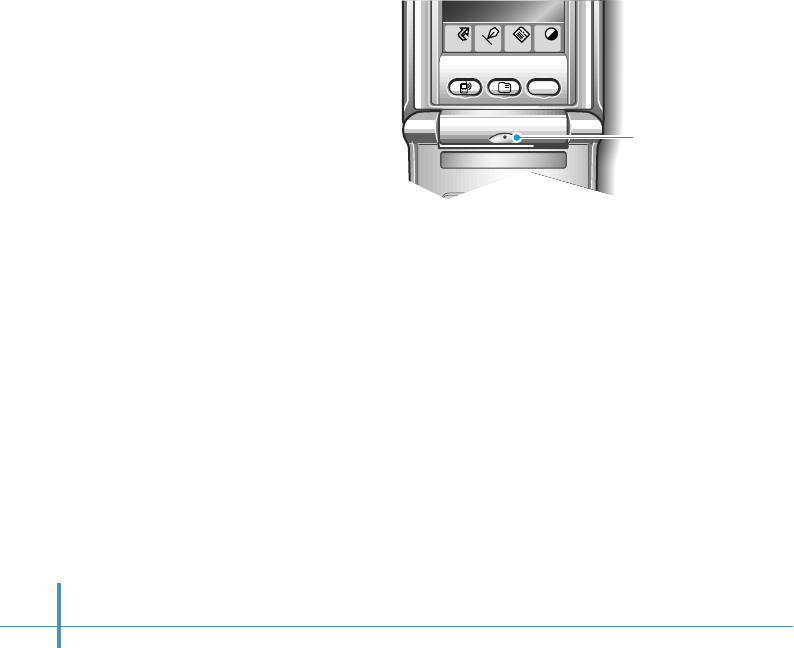
Home
Menu
Cont
Input
WWW
a
88
3. Select the number to which you want to add a voice tag by
tapping ❿at the right side of the number.
4. The phone will guide you with voice prompt to say the name
you want to record.
5. Say the name you want to record as a voice tag. The phone
stores the name as a first sample, and then prompts to say
the name again.
6. Respond to the prompt by repeating the name. The phone
stores the name as a second sample.
When the name is recorded successfully, you will be guided
with voice prompt and message on the screen.
Microphone
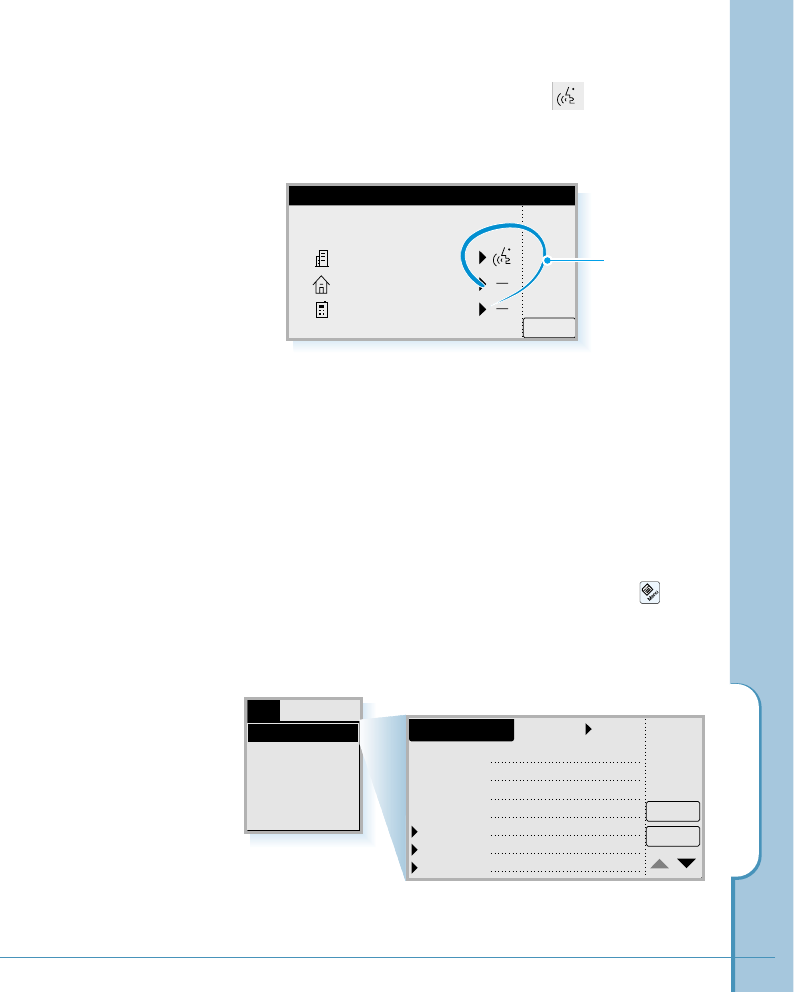
Address Book
89
7. Tap the OK button. You will find the mark at the right
side of the number.
If you want to record other names, repeat steps 3 through 6.
OK
441234567
449876543
0119876543
David Moore
Set Voice Dial
Shortcut to Storing Phone Numbers
You can store a phone number quickly without opening the
Address screen.
Enter the number in the Phone screen, and tap the icon
on the hard icon panel. Then select Store from the Dial
menu. The Address New screen opens with the number
already entered in the first number field.
Dial
Store
Find
Pause
Send DTMF
Country Code
Voice tag is
added to the
number.
Unfiled
Details
L. Name
051123456
F. Name
Title
Company
Work
Home
Fax
OK
Address New

90
Tips on recording names
• Avoid recording names phonetically similar. If you record a
similar name to one that is already in memory, the phone
requests another name.
• Avoid recording in a noisy place.
• Speak clearly and naturally.
• The person who will use the phone should record the
name. The phone does not recognize anyone else’s voice.
• Avoid very long or very short names. Names with two to
five syllables are recommended.
• If a voice dial entry does not properly connect, you may
need to record the name again.
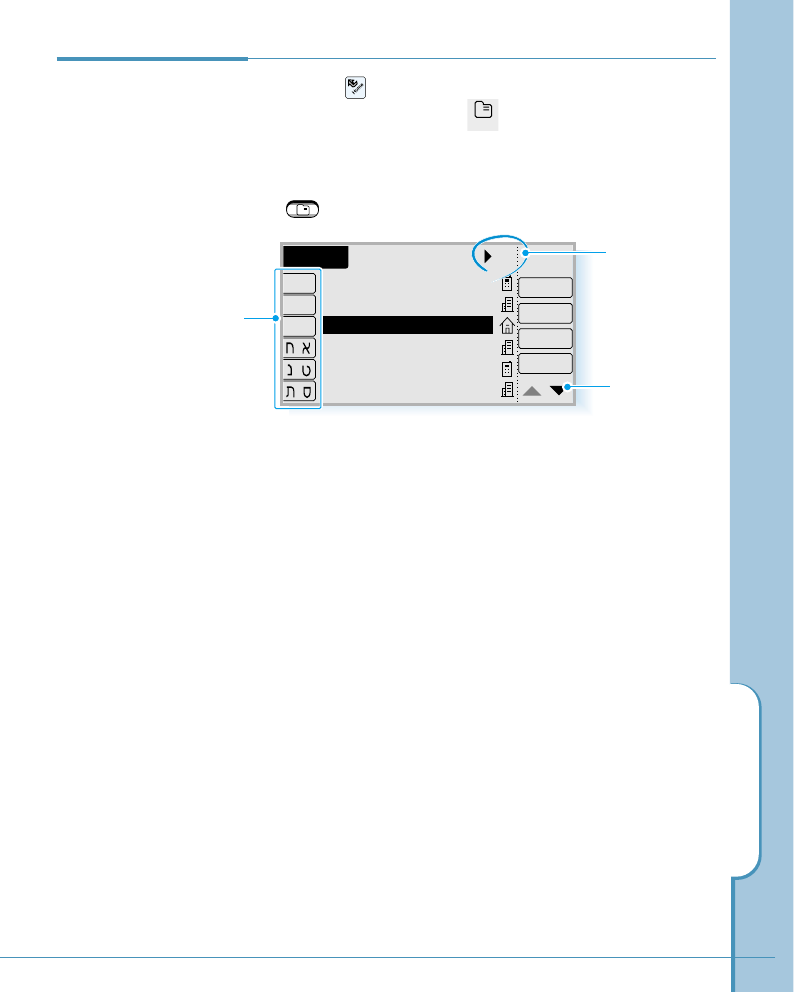
Address Book
91
2. If you tap the letter button at the left column on the
screen, the list scrolls to the first entry that begins with
that letter. Tap the same button again to scroll to the
entries beginning with the next letter.
After you have assigned categories to your Address
entries, you can easily view the entries by category.
Tap the pick list in the upper-right corner of the screen,
then tap the category you want to view.
The Address list now shows only entries in that category.
1. Tap the icon on the hard icon panel to launch
applications, and tap the icon to open the Address
screen.
You can also access the Address screen by pressing the
button below the screen.
Viewing Address
Book Entries
a
Address
a
All
Edit
New
Address
View
Call
I-O
-
A
-
H
P
-
Z
-
-
-
Alfred
Coope..
David..
Fuji
Golden..
KimY..
0119876543
441234567
449876543
8221234567
0161234567
8229876543
Tap to scroll to the first
entry that begins with
that letter.
Category pick
list.
Tap to move to
the next page.
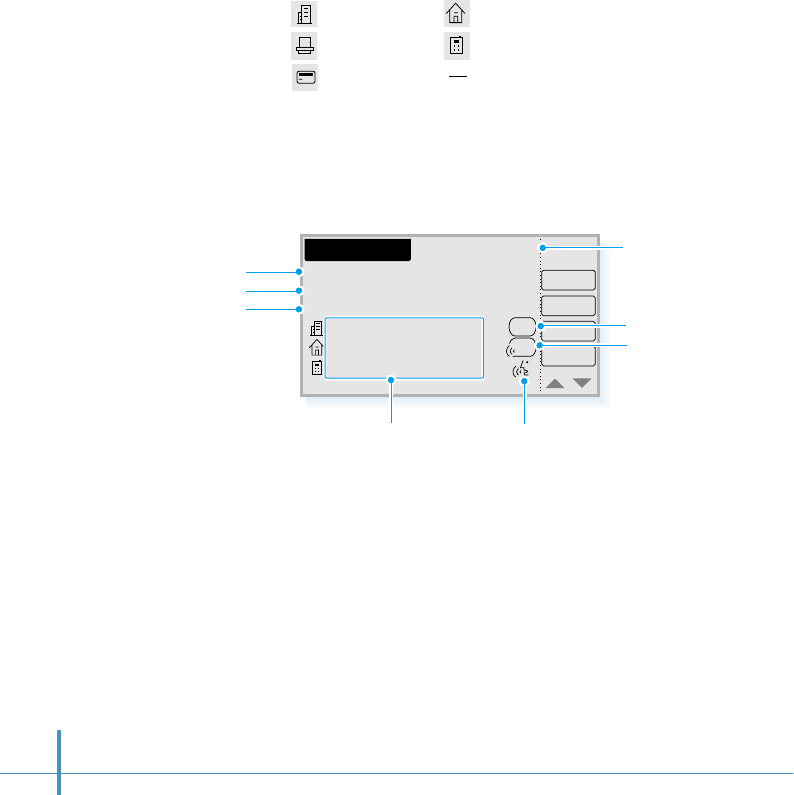
92
3. Tap any entry to select.
If the selected entry has several phone numbers, you will see
the following icons at the right side of the phone number:
Work place Home
Fax number Mobile phone number
Pager Others
Selecting the icon displays the corresponding number.
In the Address View screen, you can:
• Place a call to the selected number. Tap the desired
number, then tap the Call button.
• Open the Address Edit screen which allows you to edit the
information. Tap the desired number, then tap the Edit
button.
• Open the Address New screen which allows you to create
a new Address Book entry. Tap the desired number, then
tap the New button.
• Close the Address View screen and return to the Address
screen. Tap the OK button.
4. Tap the View button to view the contents of the selected
entry.
Business
New
OK
Address View
Edit
Call
David Moore
Chief manager
ABC Co.
Work: 441234567
Home: 449876543
Mobile: 0119876543
1!6
1!5
Name Category
Title
Company
Phone numbers Voice tag attached
Speed dial code
Voice dial/Speed
dial code
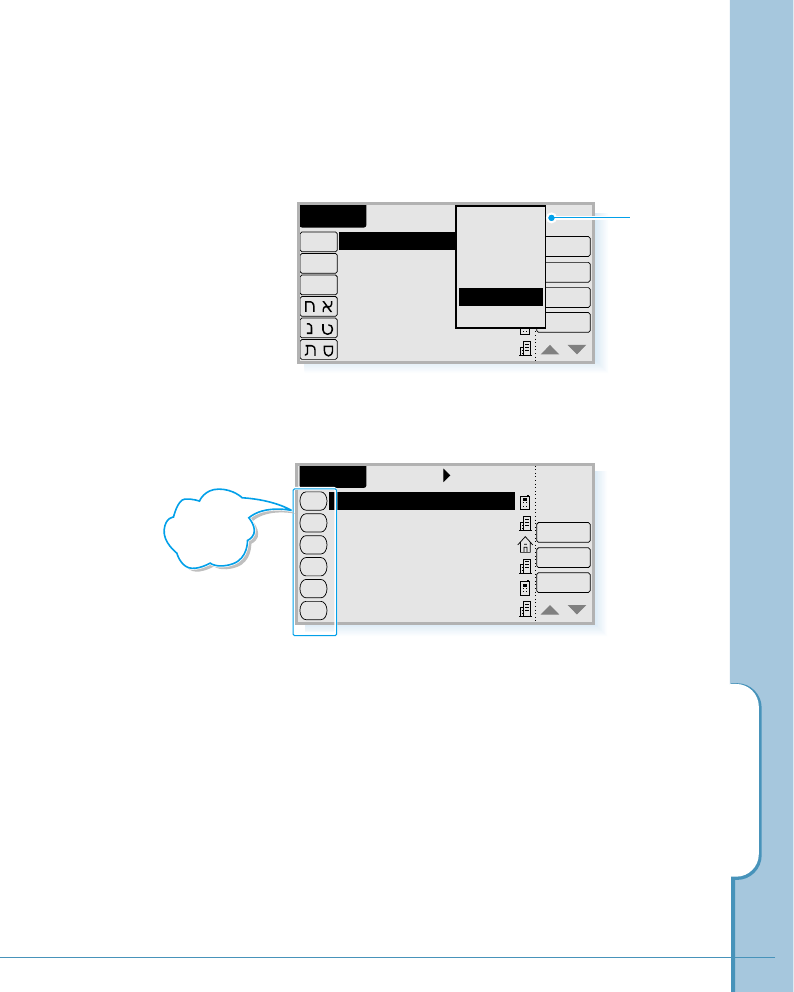
Address Book
93
Viewing Speed Dial List
1. In the Address screen, tap the category pick list in the
upper-right corner and select Speed Dial from the list.
2. The Address screen shows only the Speed Dial list.
3. Scroll through the list by tapping ❷or $in the lower
right corner of the screen.
4. Tap the desired entry. The selected entry is highlighted.
Then:
• To change the speed dial code, tap the Edit button.
• To release the speed dial code, tap the Release button.
• To call the number, tap the Call button.
All
Edit
New
Address
View
Call
Alfred
Coope..
David..
Fuji
Golden..
KimY..
0119876543
441234567
449876543
8221234567
0161234567
8229876543
All
Business
Personal
Unfiled
Speed Dial
Voice Dial
A-H
I-O
P-Z
-
-
-
Speed Dial
Edit
Release
Call
Alfred
Coope..
David..
Fuji
Golden..
KimY..
0119876543
441234567
449876543
8221234567
0161234567
8229876543
1
2
3
4
10
12
Address
speed dial
codes
Category
pick list
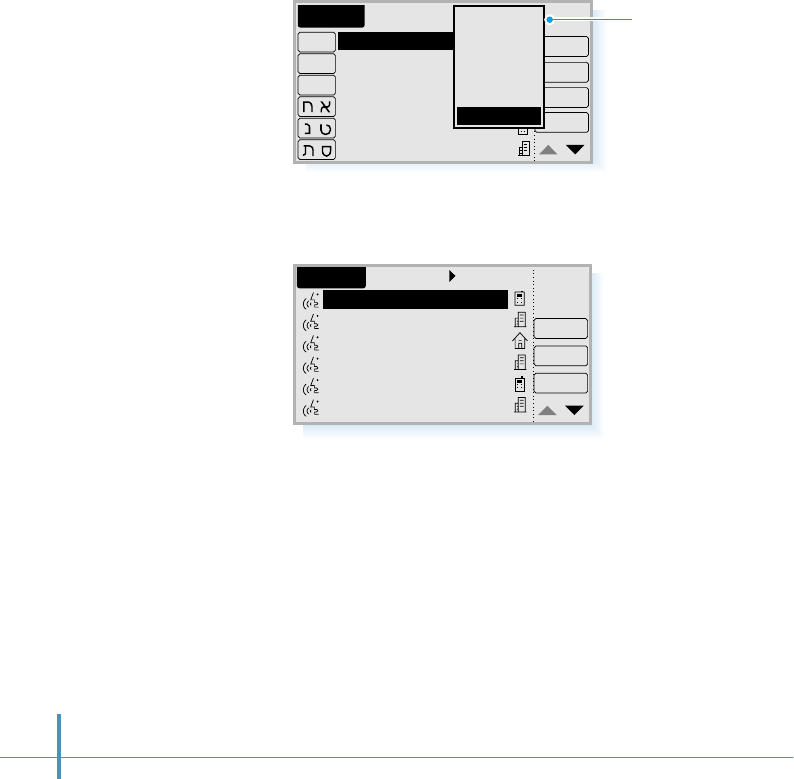
94
Viewing Voice Dial List
1. In the Address screen, tap the category pick list in the upper
right corner and select Voice Dial from the list.
2. The Address screen shows only the Voice Dial list.
3. Scroll through the list by tapping $or ❷in the lower-right
corner of the screen.
4. Tap the desired entry. The selected entry is highlighted.
Then:
• To call the selected number, tap the Call button.
• To play back the recorded name, tap the Review button.
• To remove the voice tag, tap the Release button.
All
Edit
New
Address
View
Call
Alfred
Coope..
David..
Fuji
Golden..
KimY..
0119876543
441234567
449876543
8221234567
0161234567
8229876543
All
Business
Personal
Unfiled
Speed Dial
Voice Dial
A-H
I-O
P-Z
-
-
-
Voice Dial
Review
Release
Address
Call
Alfred
Coope..
David..
Fuji
Golden..
KimY..
0119876543
441234567
449876543
8221234567
0161234567
8229876543
Category pick
list
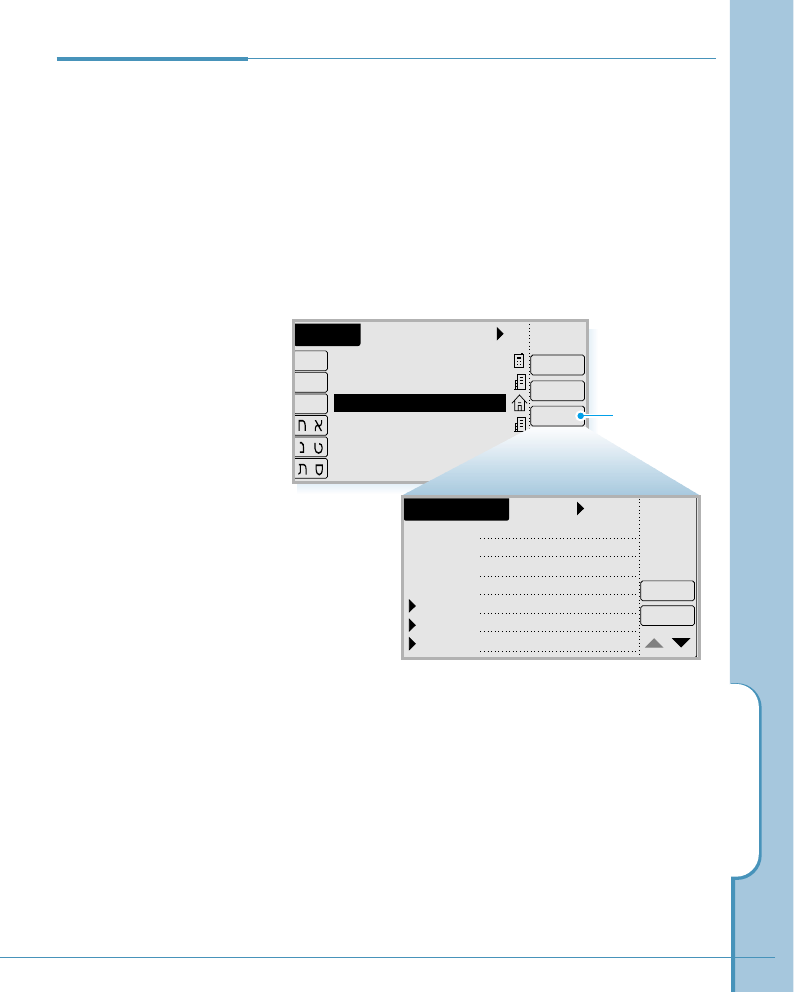
Address Book
95
All
Edit
New
Address
View
Call
I-O
-
A
-
H
P
-
Z
-
-
-
Alfred
Coope..
David..
Fuji
Golden..
KimY..
0119876543
441234567
449876543
8221234567
0161234567
8229876543
Tap Edit.
After you create an Address Book entry, you can update it or
enter additional information any time.
Editing an Address Book Entry
1. Tap the Address Book entry that you want to change in
the Address screen to display the Address Edit screen for
that entry.
2. Tap any field you want to change.
Editing an
Address Book
Entry
Unfiled
Details
OK
Address Edit
L.Name
F.Name
Title
Company
Work
Home
Fax
David
Moore
Chief manager
ABC Co.
441234567
449876543
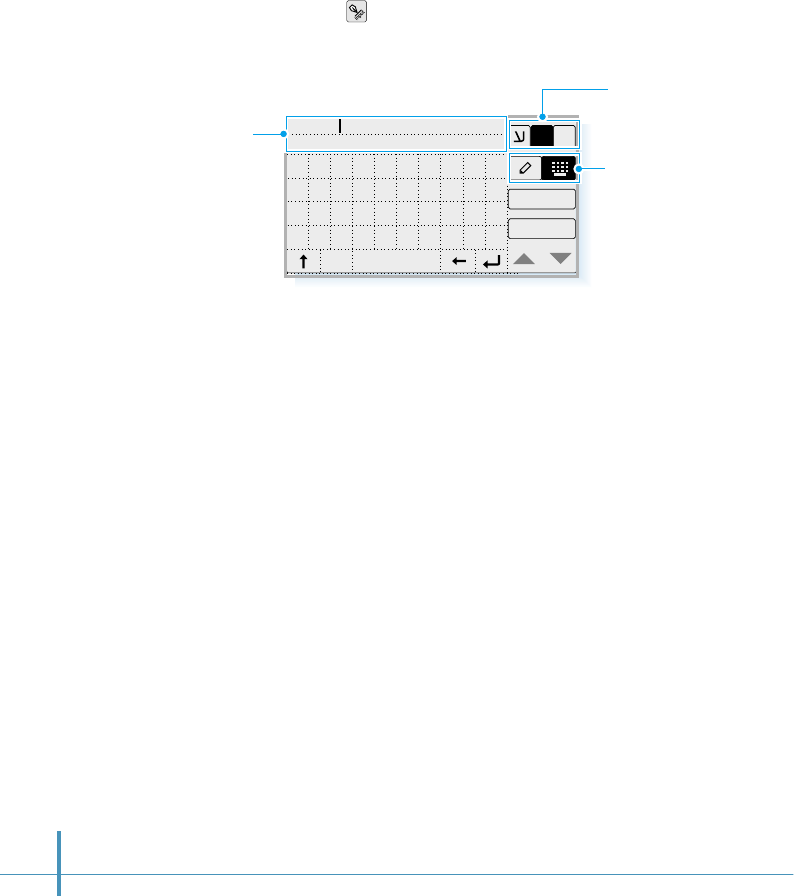
96
4. Enter or change the information, then tap the OK button to
close the text input screen.
For details on entering information, see page 46.
5. You can see the selected field containing the information you
just entered.
6. Repeat steps 2 through 5 to change other fields.
7. If you want to edit the Address details, tap the Details
button, and edit the field you want.
8. After you finish, tap the OK button to return to the Address
screen.
3. Tap the icon on the hard icon panel to open the text
input screen. You’ll find the selected field information
appears on the top of the text input screen.
Text field.
Letters are displayed
as you tap them.
Select Hebrew,
English or
Symbol mode.
Select the input
mode.
OK
Cancel
1$
E
1
David
234567890
space
cap
qwe r t y u i op
asdf gh j k l ;
zxcvbnm, . /
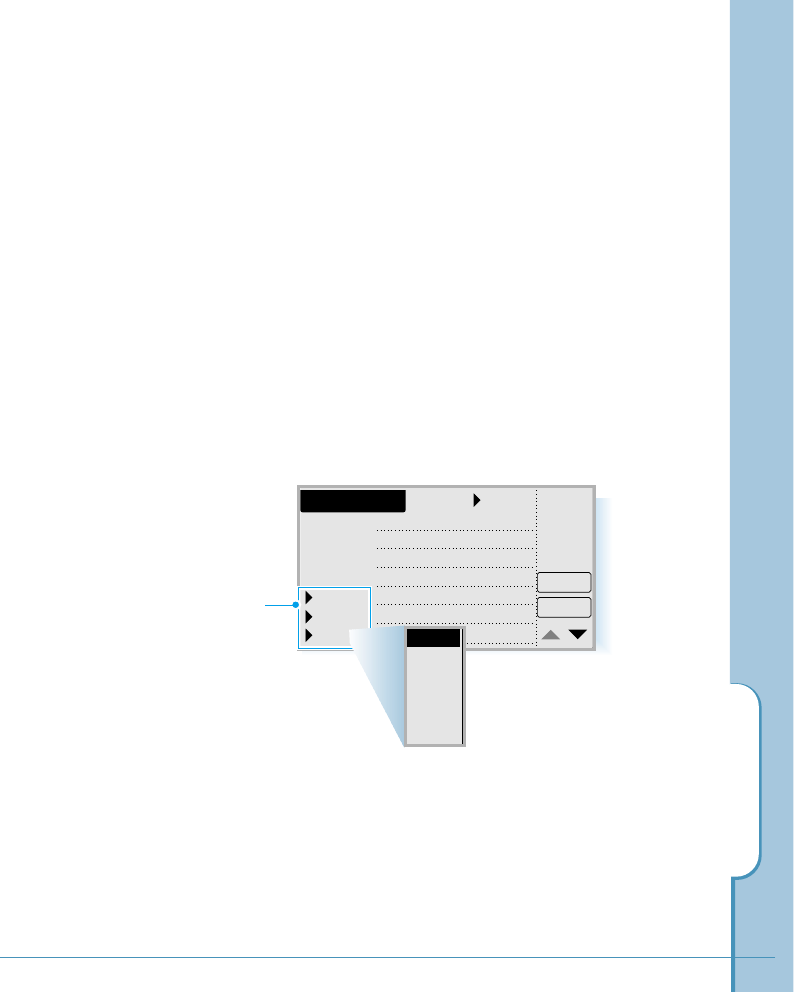
Address Book
97
Choosing Types of Phone Numbers
Your phone enables you to choose the types of information
that you associate with an Address Book entry. Any changes
you make will apply only to the current Address Book entry.
To choose others type of phone numbers in an Address
Book entry:
1. Tap the Address Book entry that you want to change to
display the Address Edit or the Address New screen for
that entry.
2. Tap the pick list next to the label you want to change.
3. Tap the new label you want to use.
Unfiled
Details
OK
Address New
L.Name
F.Name
Title
Company
Work
Home
Fax
David
Moore
Chief manager
ABC Co.
441234567
449876543
pick lists
L.Name
F.Name
Title
Compan
Work
Home
Fax
Work
Home
Fax
Mobile
Pager
Other
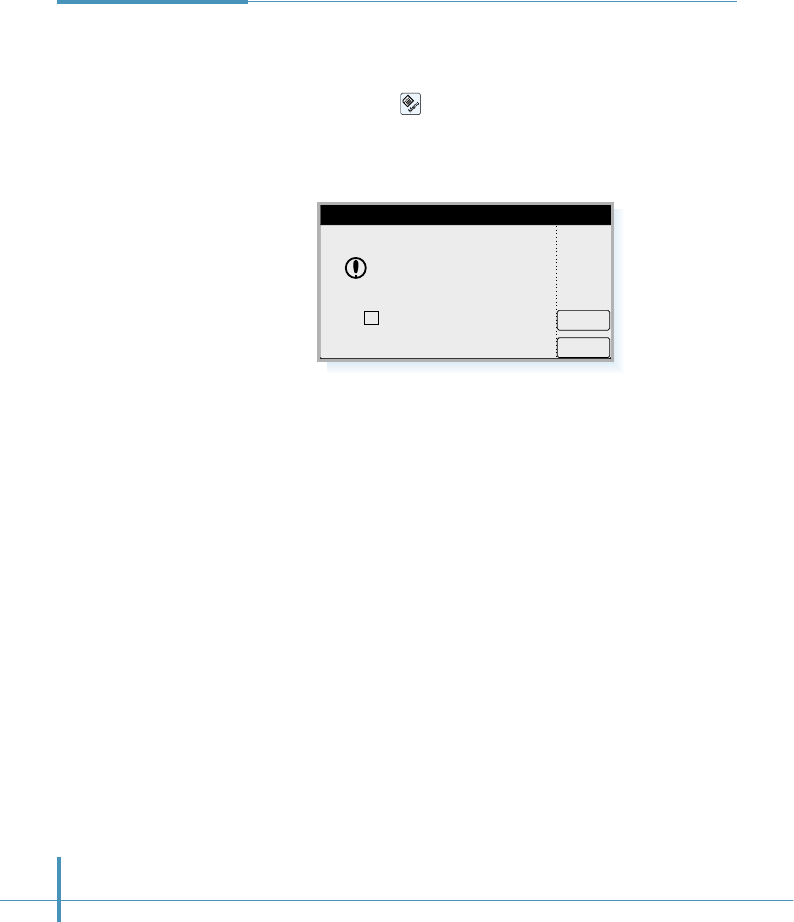
98
There are two ways to delete an entry:
• In the Address screen, tap the desired number to delete,
then tap the icon on the hard icon panel, and select
Delete Entry from the List menu tab.
• In the Address Details screen, tap the Delete button.
Deleting an
Address Book
Entry
If you put a check mark in the Make a backup on PC
box, your phone retains a copy of the entry and transfers it
to your computer the next time you perform PC sync
operation. To remove the entry completely, remove the
check mark in the checkbox.
Tap the OK button to confirm you want to delete the entry.
Cancel
OK
Delete Selected
Address Entry?
Make a backup on PC
Delete Entry
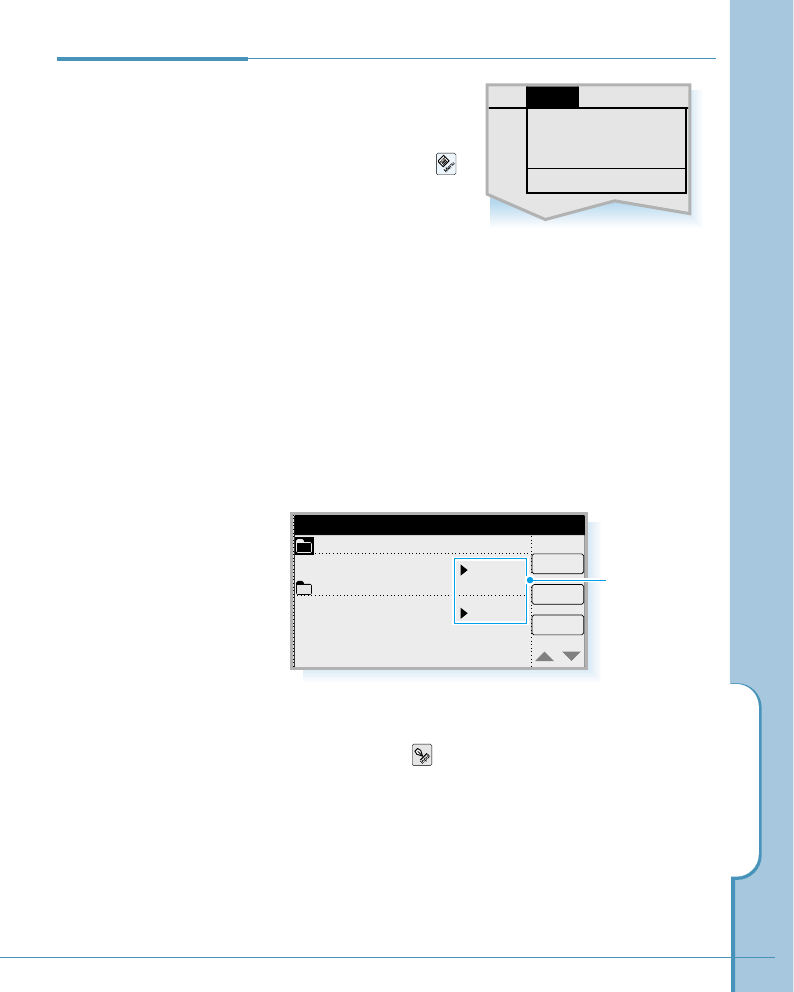
Address Book
99
When you create or edit
your Address Book entry,
you will use the following
setup options. Tap the
icon on the hard icon panel
in the Address screen, then
tap the Setup tab.
Edit Categories
The categories used in your Address Book are preset to
Business and Personal. This option enables you to delete
or add new categories. You can also set a unique ring type
for incoming calls from the category.
1. Select Edit Categories from the Setup menu.
2. To add a new category, tap the New button. To name the
category, tap the icon on the hard icon panel and enter
the desired name. For details on entering name, see page
46.
To delete a selected item, tap the desired category, then
tap the Del button.
To exit, tap the OK button.
Address Book
Setup Options
New
OK
Del
Category Edit
Business
Personal
Default
Default
Tap to set a
ring type for the
category.
Edit Categories
Edit Custom Field
Hide Number
About Address
List Setup

100
Edit Custom Field
This menu option enables you to define custom field names.
Each Address Book entry contains three “custom fields” that
you can rename. Any changes you make to the names of the
custom fields appear in all of your Address Book entries.
To customize the labels of the fields:
1. Select Edit Custom Field from the Setup menu.
Hide Number (or Show Number)
This option enables you to hide or show numbers for Address
Book entries in the Address screen.
This menu toggle between Hide Number or Show Number.
2. Select the desired custom field, then to rename the
custom field, tap the icon on the hard icon panel and
enter the desired name (e.g. Homepage, Birthday).
3. To exit, tap the OK button.
Cancel
OK
Edit Custom Field
Custom1
Custom2
Custom3

Address Book
101
Memo

You can use your phone as a personal
information manager.
In this chapter, the following applications
are described:
• Memo
• Scheduler
• ToDo
Personal
Information Manager
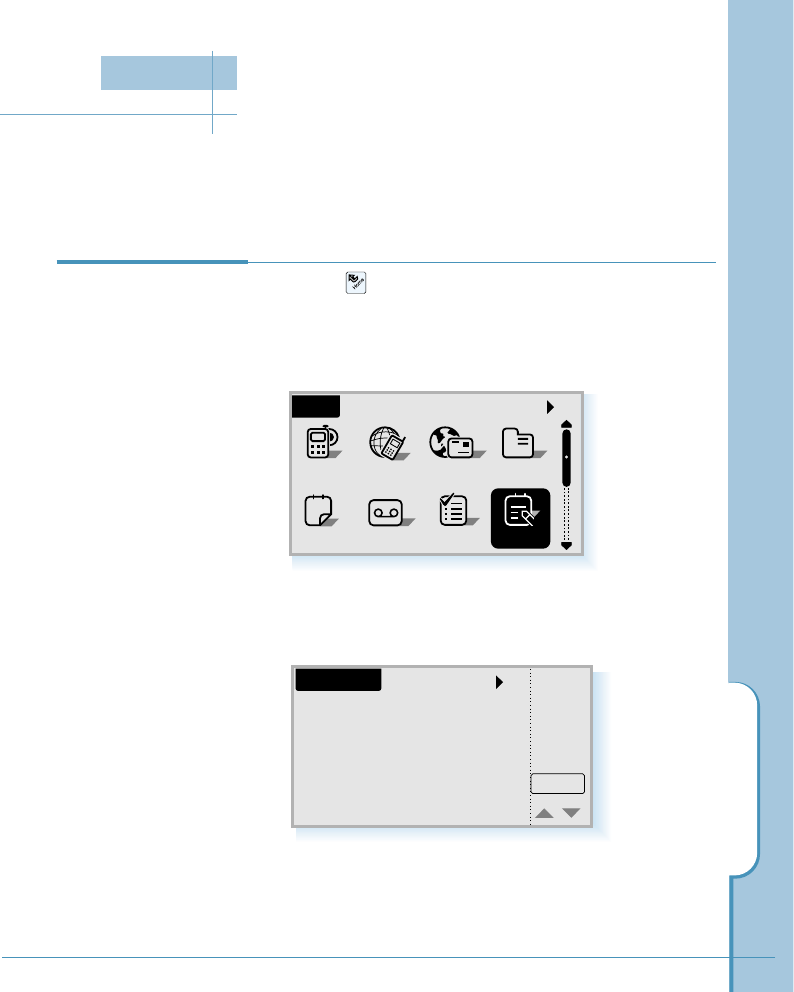
Memo
103
Answer Memo
All
Sched ToDo
Home
12
AddressEmailGoNextPhone
a
A memo is where you enter, review and modify the individual Memo pad entries. With
the memo, you can take notes or write any kind of messages on your phone.
New
All
Memo List
3. Tap the New button.
Creating a New
Memo
1. Tap the icon on the hard icon panel to launch
applications.
2. Tap the Memo icon to open the Memo List screen.
Memo
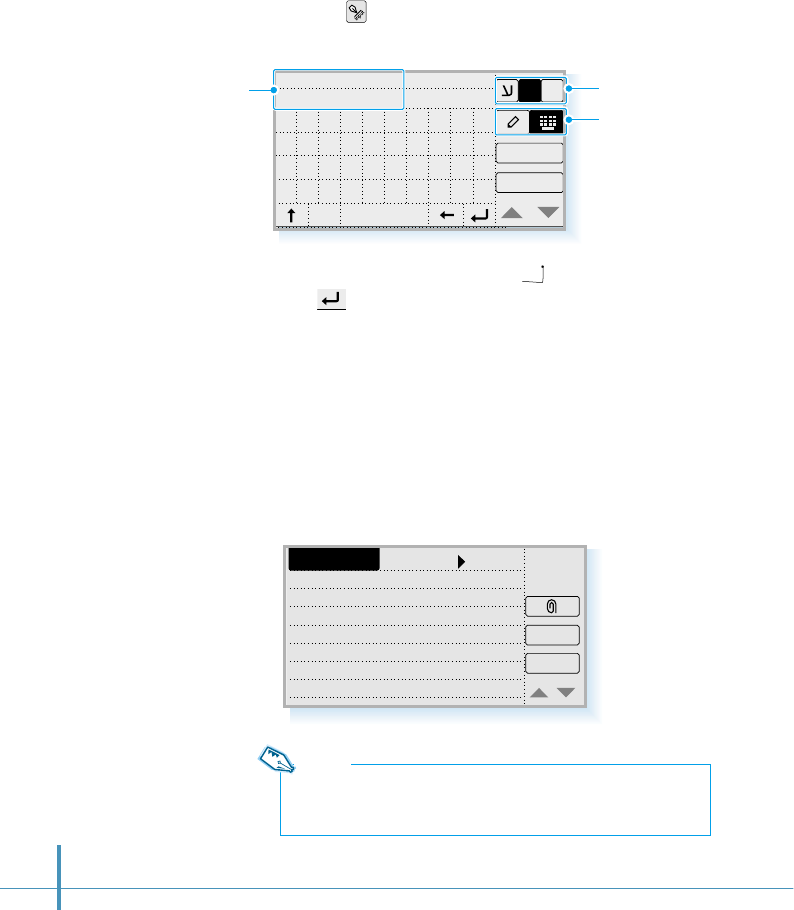
Use the carriage return stroke ( ) in the writing mode or
tap in the on-screen keyboard to move down to new
lines in the memo.
For details on entering information, see page 46.
After you finish, tap the OK button.
5. You can find the memo you entered in the New Memo
screen.
104
OK
Cancel
1
14:30, Dec.12
1st. I.hotel
234567890
space
cap
qwe r t yu i op
asdf gh j k l ;
zxcvbnm, . /
1$
E
4. Tap the icon on the hard icon panel to open the text input
screen, and enter the text you want to appear in the memo.
New Memo
Delete
OK
Unfiled
Design meeting
Mr. Kim
14:30, Dec.12
1st, I.hotel
Note:
The contents you enter on the first line will be the title of the memo
which appears on the Memo List.
Select Hebrew, English,
or Symbol mode.
Select the input mode:
Writing mode, on-screen
keyboard mode.
Letters and numbers are
displayed as you tap or write
them in the writing area.
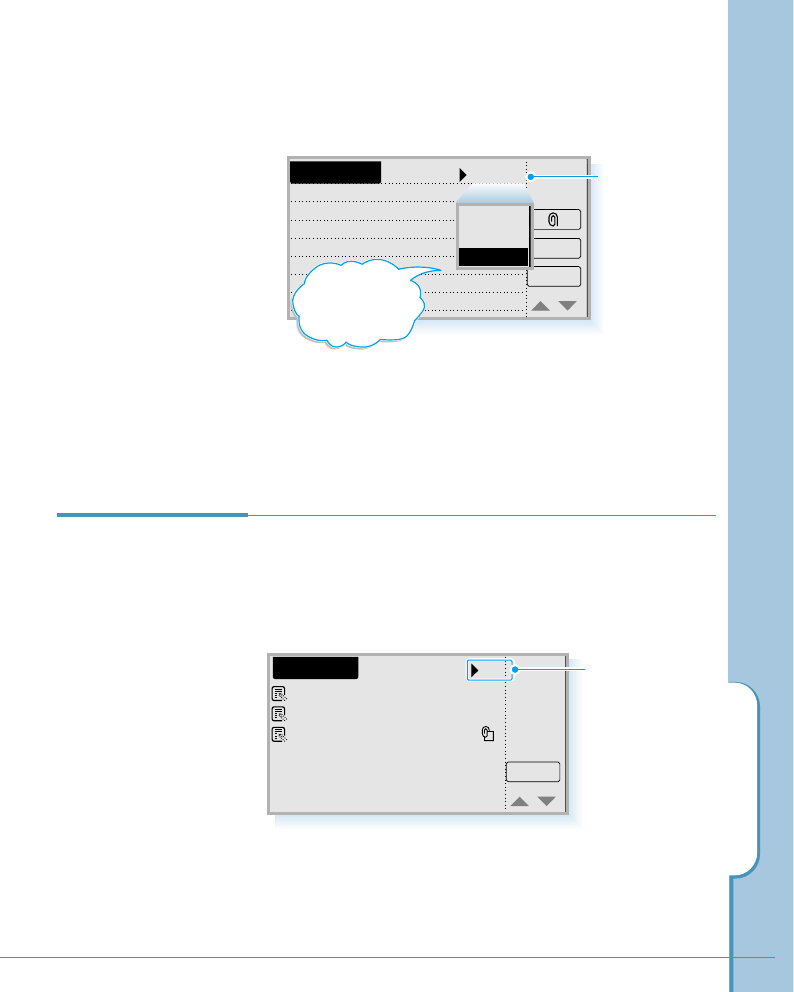
Memo
105
6. If needed, you can assign a category to the memo. Tap the
pick list at the top of the screen, then select the desired
category from the list.
7. After you finish, tap the OK button to return to the Memo
List screen.
New Memo
Delete
OK
Unfiled
Design meeting
Mr. Kim
14:30, Dec.12
1st, I.hotel
Tap the pick list to
assign a category.
You can add or
delete categories.
See page 113.
Business
Private
Unfiled
Viewing a Memo 1. Tap the Memo icon in the Home screen.
2. The Memo List screen opens to show you the list of
memos.
Each time you create a memo, the first line of the memo
appears in the Memo List screen. This makes it easy to
locate and review your memos.
Tunable Technology
Marketing Plan
Design meeting
New
All
Memo List
Tap this pick list to
view the memo list
by category.
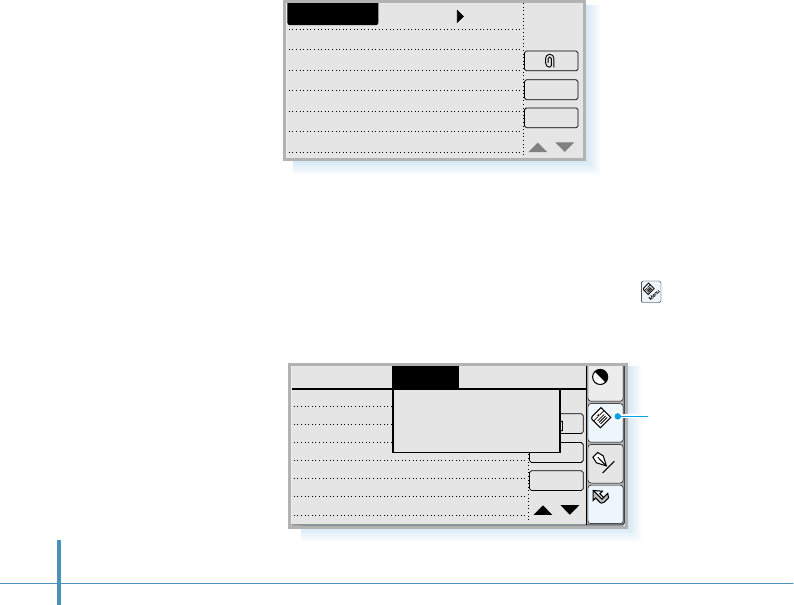
106
3. After you have assigned categories to your memo entries,
you can easily view the entries by category. Tap the pick list
in the upper-right corner of the screen and tap the category
of entries you want to view.
The Memo List screen now shows only memo entries in that
category.
4. Tap the text of the memo that appears in the Memo List
screen. The Memo Edit screen opens to show you the
contents of the memo.
Tap to open
the menu
screen.
If not at all text is shown, you can scroll the pages by
tapping ▲or ▼in the bottom right corner of the screen.
You can also use Go to Top of Page or Go to Bottom of
Page menu option. To use these option, tap the icon
on the hard icon panel and select the Options tab.
Home
Cont
Menu
Input
Delete
OK
Record Edit SetupOptions
Meet 1
Mr. Carter
10:00, Dec.20
2nd, P.center
Go to Top of Page
Go to Bottom of Page
Edit Category
Marketing
Data1 (research)
Data2 (price)
Memo Edit
Delete
OK
Unfiled
Design meeting
Mr. Kim
14:30, Dec.12
1st, I.hotel
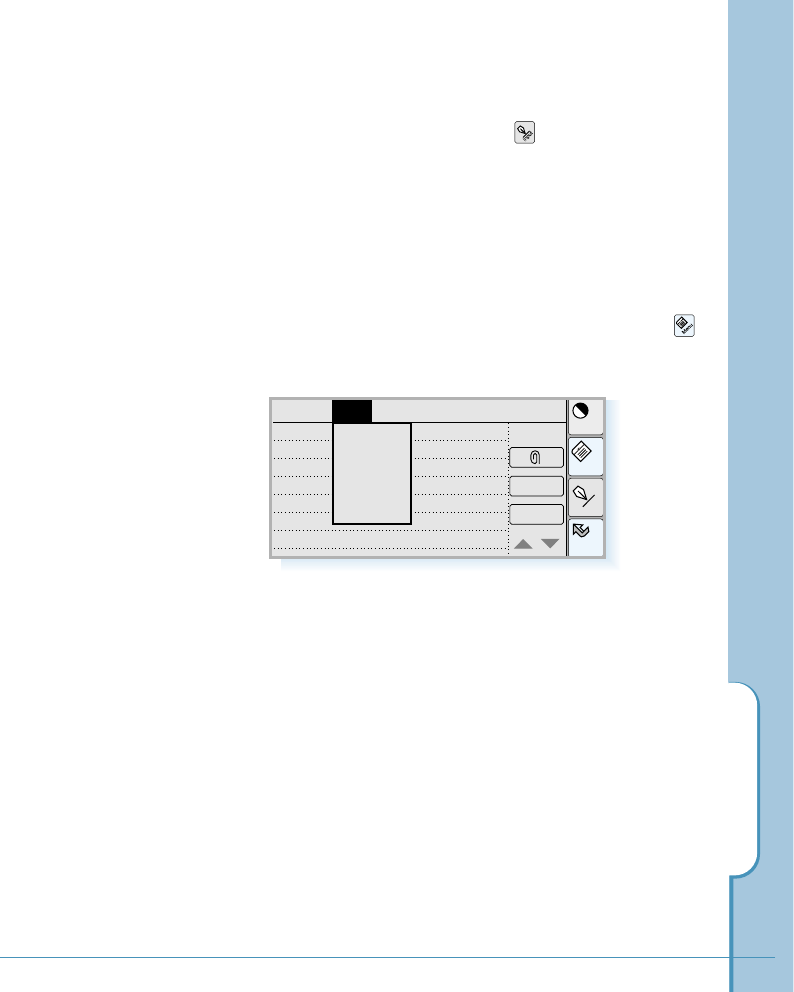
Memo
107
Editing a Memo
In the Memo Edit screen, tap the icon on the hard icon
panel to open the text input screen. The memo contents
appear in the top of the the text input screen.
Edit the memo by deleting or entering new text. For details
on entering letters or numbers, see page 46.
You can use the edit menu commands, such as Undo, Cut,
Copy, and Paste. From the Memo Edit screen, tap the
icon, select the Edit menu, then select the command you
need.
To save your changes to the memo, tap the OK button.
Home
Cont
Menu
Input
Delete
OK
Record Options SetupEdit
Design meeting
Mr. Kim
14:30, Dec.12
1st, I.hotel
Undo
Cut
Copy
Paste
Select All

Deleting a Memo
Tap the Delete button in the Memo Edit screen. Your phone
asks you to confirm your selection. Tap the OK button to delete
the memo.
If you want to cancel your selection, tap the Cancel button.
Deleting All Memos
In the Memo List screen, tap the icon on the hard icon
panel. Select Delete All from the Options menu tab.
When you are asked to confirm the deletion, tap the OK button.
Cancel
OK
Delete selected memo?
Make a backup on PC
Delete Memo
If you want
to make a backup copy of
the memo, tap the checkbox
to put a check mark. You can
see the backup file on the
PC the next time you run
PC Sync.
108
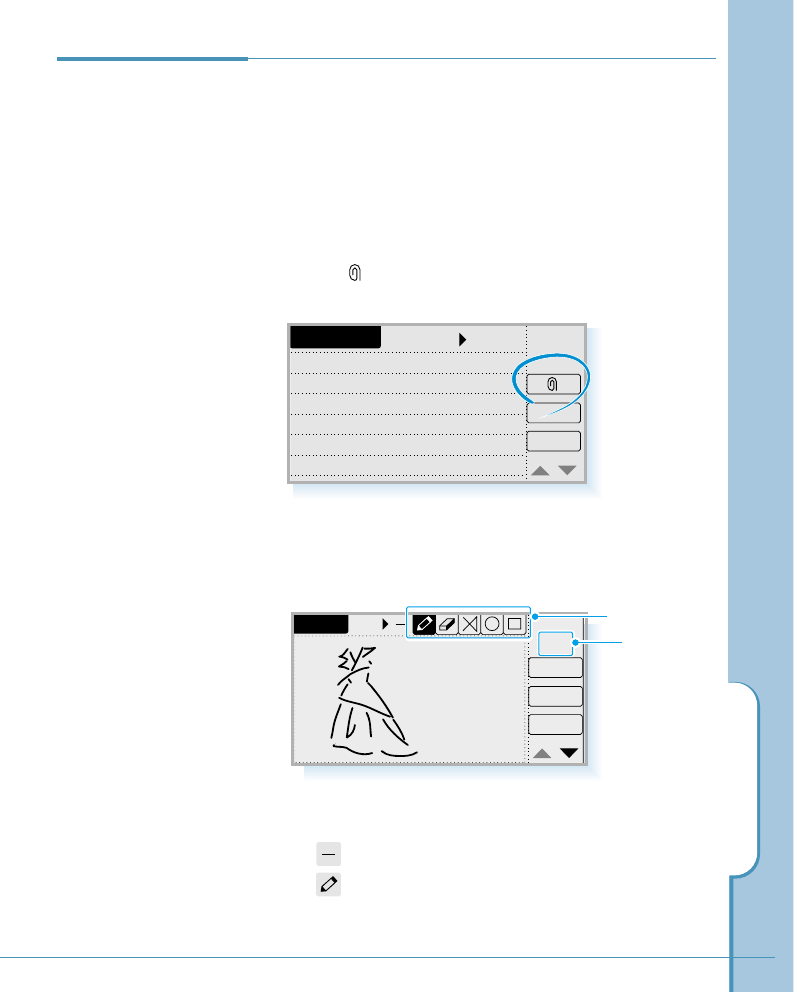
Memo
109
Attach
New
Delete
1/1
OK
Attaching an
Image in a Memo This feature allows you to create an image memo and attach
it to a text memo, if needed.
Creating an Image Memo
1. Create or open the memo entry, to which you want to
attach an image memo.
2. Tap the button in the New Memo or the Memo Edit
screen.
3. Select the tool you need from the tool palette, and create
the desired image. To draw, simply touch the screen and
drag the stylus.
Memo Edit
Delete
OK
Unfiled
Design meeting
Mr. Kim
14:30, Dec.12
1st, I.hotel
indicates the
current page
number of the
total pages
number.
The following are brief descriptions for each tool.
• : Selects line width.
• : Draws a freehand line.
Tool palette
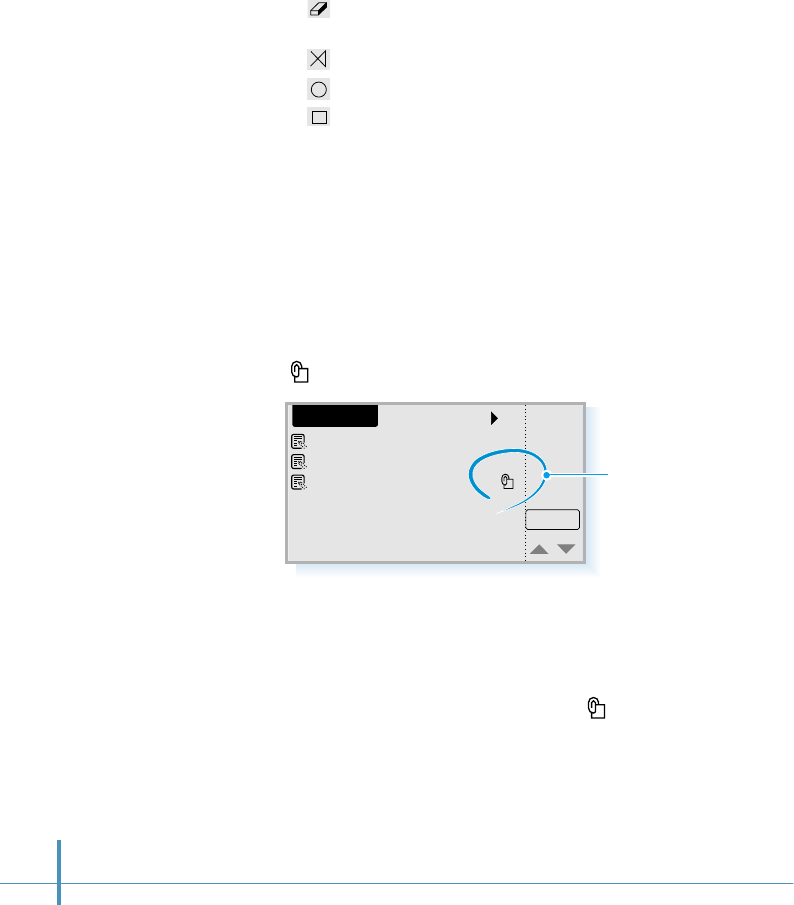
Tunable Technology
Marketing Plan
Design meeting
New
All
Memo List
• : Erases objects as you move this tool. The size of the
eraser varies depending on the line width.
• : Draws a straight line.
• : Draws a circle.
• : Draws a rectangle.
• To add more pages, tap the New button.
• To delete the current page, tap the Delete button.
• To scroll the pages back and forth, tap "!or ❷.
4. When you are done, tap the OK button until you see the
Memo List screen. The image is attached to the memo.
The Memo List indicates the attached image memo by the
icon at the right side of the memo entry.
110
indicates that
the memo has an
attached image.
Viewing the Attached Memo
To view the image memo attached, tap the icon at the right
side of the memo title. The Attach screen opens to show the
image.
If necessary, tap ▲or ▼to scroll through the pages.
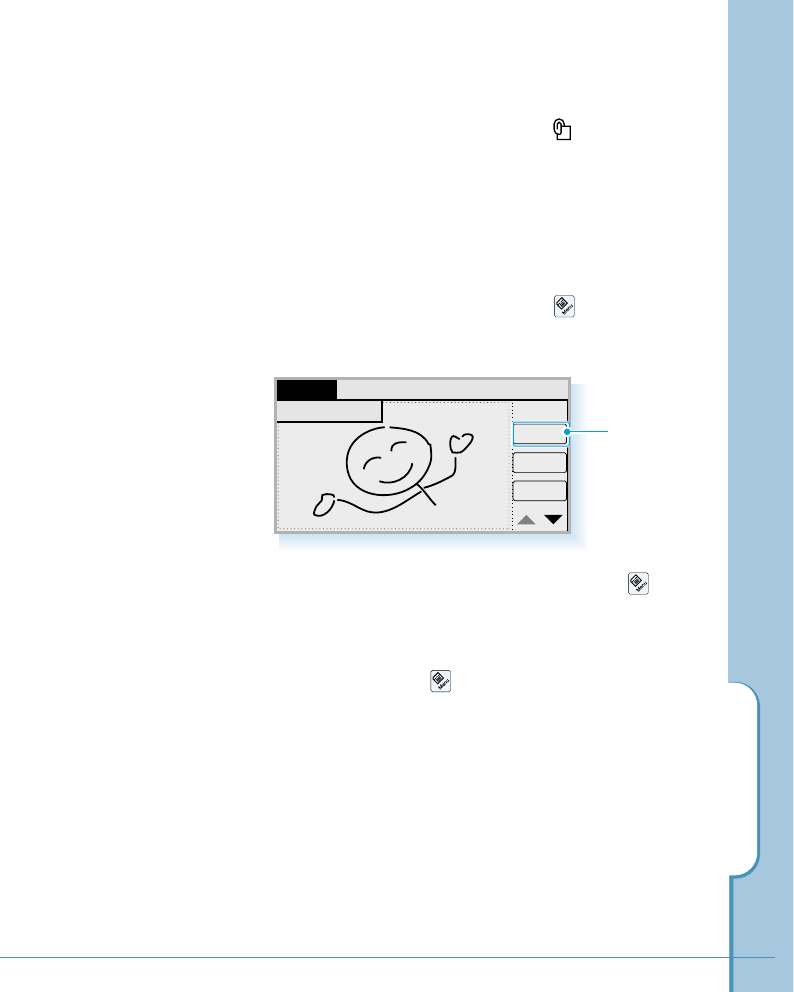
Memo
111
If you want to erase all attached images, tap the icon,
and select Erase All from the Edit menu.
You can also delete the attached memo in the Memo Edit
screen by tapping the icon, and selecting Delete
Attachment from the Record menu.
New
Delete
1/5
OK
Edit
Delete Attach
Record
Tap to delete
only the
current page.
Editing the Attached Memo
If you want to edit the image, tap the icon at the right
side of the memo entry. When the Attach screen opens, edit
the image the same way you created it.
Deleting the Attached Memo
To delete the attached image, tap the icon on the hard
icon panel in the Attach screen and select Delete Attach
from the Record menu.
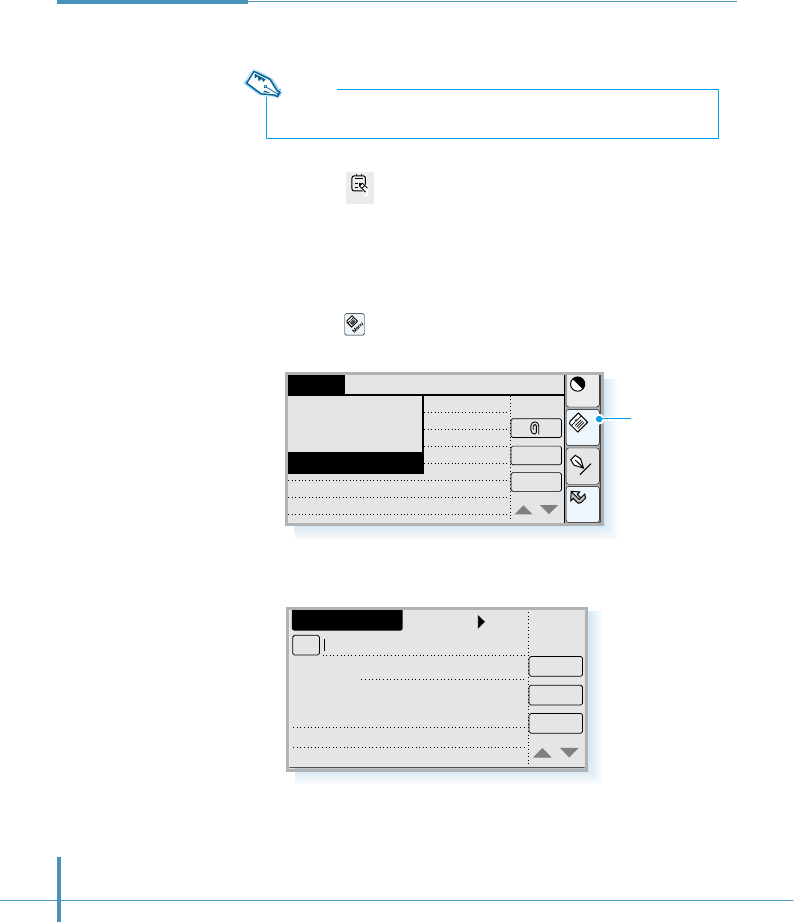
You can send a text memo to a remote phone as an SMS
message.
1. Tap the icon in the Home screen to open the Memo List
screen.
2. Tap the memo entry you want to send in the Memo List
screen.
3. Tap the icon on the hard icon panel and select Send to
SMS from the Record menu.
112
4. The New Message screen opens.
5. For details on sending or storing an SMS message, see page
131.
New Message
Send
To
Store
Cancel
No..
Callback#
25/120
Contents
Design meeting
14:30 Dec.12
Mr.Kim
Sending a Memo
as an SMS
Message
(network
dependent)
Home
Cont
Menu
Input
Delete
OK
Options SetupEditRecord
Delete Memo
Delete Attachment
New Memo
Send to SMS
Note:
You cannot send the attached image.
Tap to open
the menu
screen.
Memo
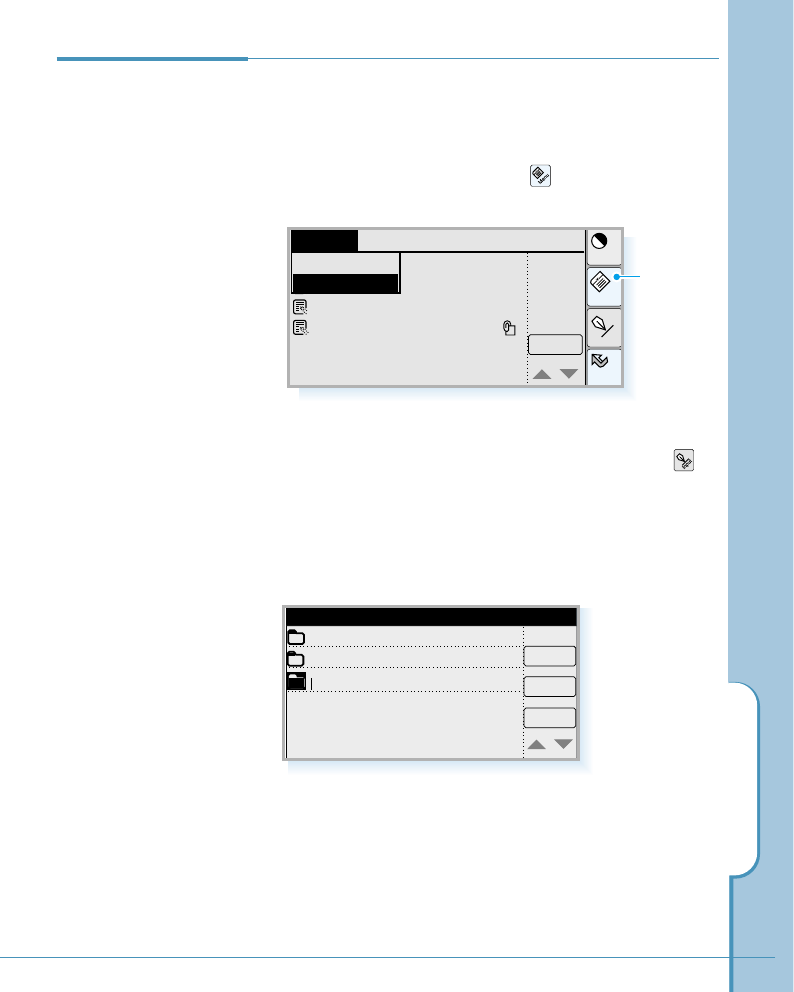
Memo
113
Configuring
Categories
Your phone comes with two default categories: Business
and Personal. You can rename the default categories or add
new categories to suit your needs.
1. In the Memo List screen, tap the icon, and select Edit
Category from the Options menu.
2. To add a new category, tap the New button. Tap the
icon on the hard icon panel to enter the name of the new
category. For details on entering letters, see page 46.
To delete a category, tap it to select, and tap the Del
button.
3. When you are done, tap the OK button.
Home
Cont
Menu
Input
New
Options Setup
Delete All
Edit Category
Maketing plan
Design meeting
New
OK
Del
Category Edit
Business
Private
Tap to open
the menu
screen.
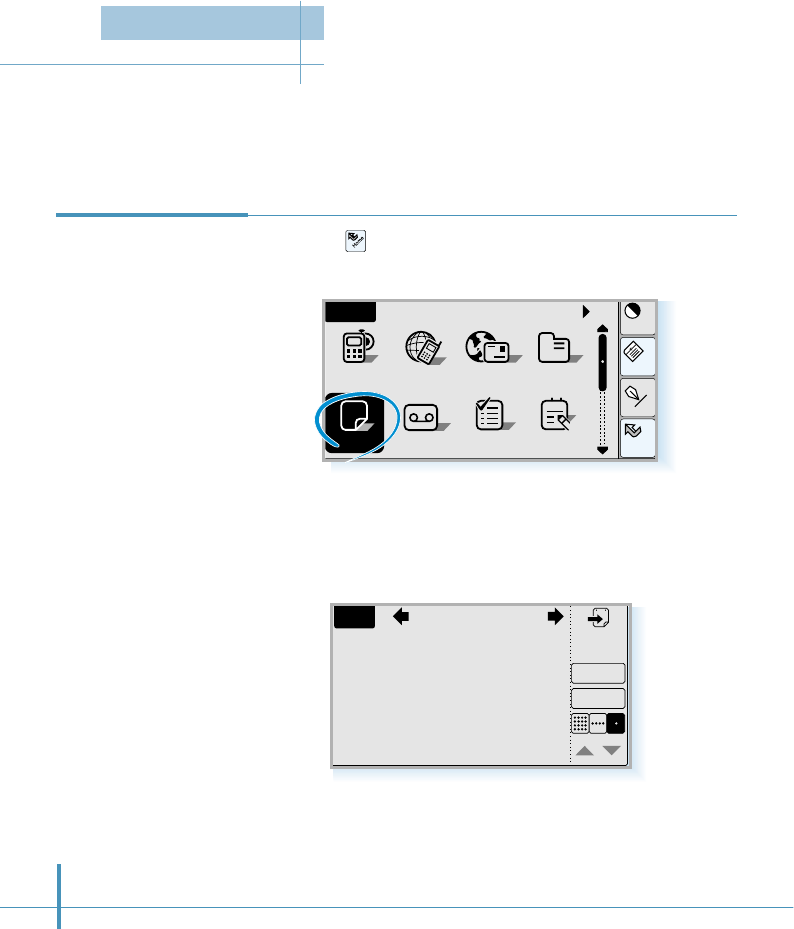
114
1. Tap the icon on the hard icon panel to launch
applications, and tap the Sched icon.
2. When the Date screen first appears, it shows the current
date.
Launch the Scheduler application to keep track of your schedule. You can schedule
appointments and even have the phone remind you automatically of an upcoming
commitment. You can display your appointments for a day, week, or month.
Recording a New
Appointment
12
Sched
Home
Cont
Menu
Input
All
Answer ToDo Memo
Home
AddressEmailPhone
a
GoNext
Day
Details
New
Wed. 4. 5. 2000
Scheduler

Scheduler
115
3. Tap the New button to record a new appointment. The
New Appointment screen opens.
Home
Cont
Menu
Input
Cancel
OK
New Appointment
Subject:|
Date: 2000. 4. 26. Wed
Time: 8:00 – 9:00
Set Repeat None
Set Alarm None
4. Tap the icon to open the text input screen and enter
the contents for the subject. For details on entering
characters, see page 46. When the subject is entered, tap
the OK button.
5. To select a date, tap the Date pick list. The Select Date
screen opens.
Today
Cancel
OK
Select Date
2000
2
9
16
23
30
4
11
18
25
5
12
19
26
6
13
20
27
7
14
21
28
1
8
15
22
29
Apr
3
10
17
24
Tap the arrows to
select the year.
Tap the arrows
to select the
month.
Tap to select
current date.
Tap to select the day.
Tap to input
characters.

116
6. Tap the arrow keys at the top of the screen to see the next or
previous year and month, then select the desired date. The
selected date is highlighted with dark background.
When the desired date is selected, tap the OK button to
return to the New Appointment screen.
7. To set the time, tap the Time pick list.
If you select Select Time in the list, a separate Time Setting
screen opens in which you can set the date and time when
the event starts and ends.
Tap the lower half of the button
to decrease the number.
800
900
1000
Cancel
OK
Time Setting
From 2000/4/24
To 2000/4/24
Day(s)
800
Tap the upper half of the button
to increase the number.
8. The repeat function enables you to schedule events that
recur at regular intervals. To define how often the event
repeats, tap the Set Repeat pick list, and tap Daily, Weekly,
Monthly or Yearly in the list.
Set the time interval details in the Set Repeat screen. Enter a
number that corresponds to how often you want the event to
repeat in the “Every” area. For example, if you select
Monthly and enter the number “2”, the event repeats every
other month.
The duration of
the event
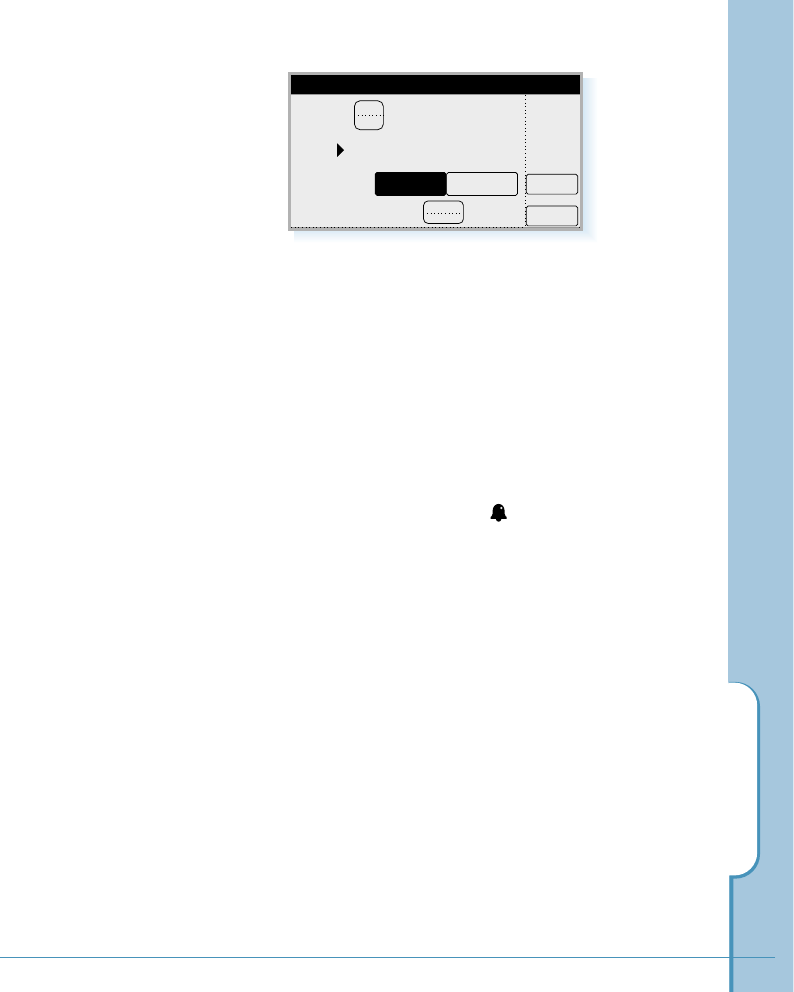
Scheduler
117
If you want to specify an ending date for the repeating
event, tap the End pick list and tap Choose Date. Select
the end date in the Select Date screen.
9. If you want to set an alarm for an appointment (to trigger
on a chosen time or a specified time before the scheduled
time of the appointment), tap the Set Alarm pick list, and
select the desired time from the list.
When you set an alarm, an icon appears at the far
right of the event in the daily schedule view. When the
alarm tone sounds, a reminder message also appears on
the Phone screen.
10. Tap ❷in the lower-right side of the screen to move to
the next page, which allows you to enter information on
the Place field and the Memo field, if necessary.
11. When you filled in all fields, tap the OK button.
2
Cancel
OK
Set Repeat
Every Month(s)
End No End Date
Select
Every Day
30th
Day Week
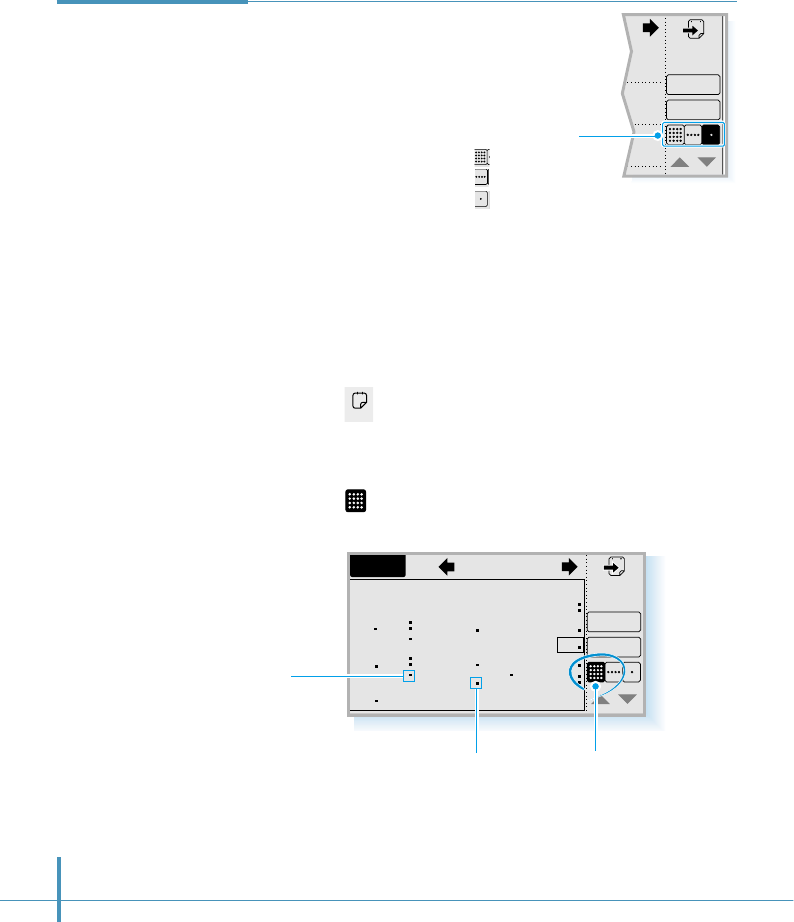
Details
New
0
118
Dot in lower side indicates
appointment(s) scheduled in PM.
Dot in upper side
indicates appointment(s)
scheduled in AM.
Month view button
Month 2000. 4
S
2
9
16
23
30
M
3
10
17
24
T
4
11
18
25
W
5
12
19
26
T
6
13
20
27
F
7
14
21
28
S
1
8
15
22
29
Go
New
Month View
The Month screen shows which days have events scheduled.
Dots in the Month screen indicate appointments.
1. Tap the icon in the Home screen. When the Day screen
first appears, it shows the current date.
2. Tap the icon in the lower-right side of the screen which
opens. The monthly schedule of the current month appears.
You can check your appointments in one of
several views (Day, Week, Month). Switch
among the views by tapping the
corresponding icon.
Viewing
Scheduled
Appointments
Sched
12
Tap to toggle through
the different views:
Month view
Week view
Day view
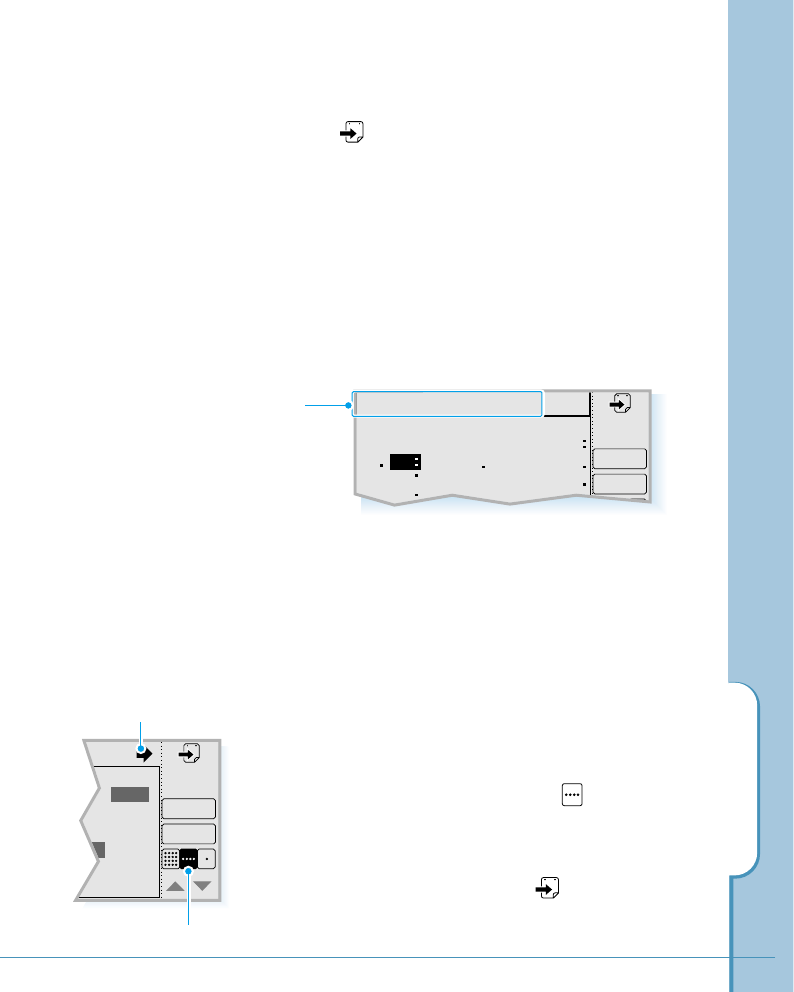
Monthly 2000. 1
S
2
9
16
T
4
11
18
W
5
12
19
T
6
13
20
F
7
14
21
S
1
8
15
22
Go
New
Meeting Lesson Party
M
3
10
17
Scheduler
119
Today’s date is shown in a frame (in the figure, April 15).
Use the arrow keys to see the next or the previous month.
Or tap to select another date in a separate Select
Date screen.
Dates that have scheduled appointments are marked with
dots next to the day.
3. Tap the desired date that has scheduled appointments.
The selected date has a dark background with white
digit(s). The scheduled appointment(s) is displayed in the
top of the screen.
Tapping the Go button on the screen opens the daily
screen of the selected date.
Week View
The Week view shows a chart of your events for an entire
week. This view lets you quickly review your appointments
and available time slots.
1. With the Sched menu accessed, tap icon on the
screen. The Week screen opens.
Use the arrow keys in the top of the screen to see the
next or the previous week. Or tap to select another
date in a separate Select Date screen.
– 1.15
Go
New
Tap to see the next or
previous week.
Week view button
Scheduled
appointments on
the chosen day
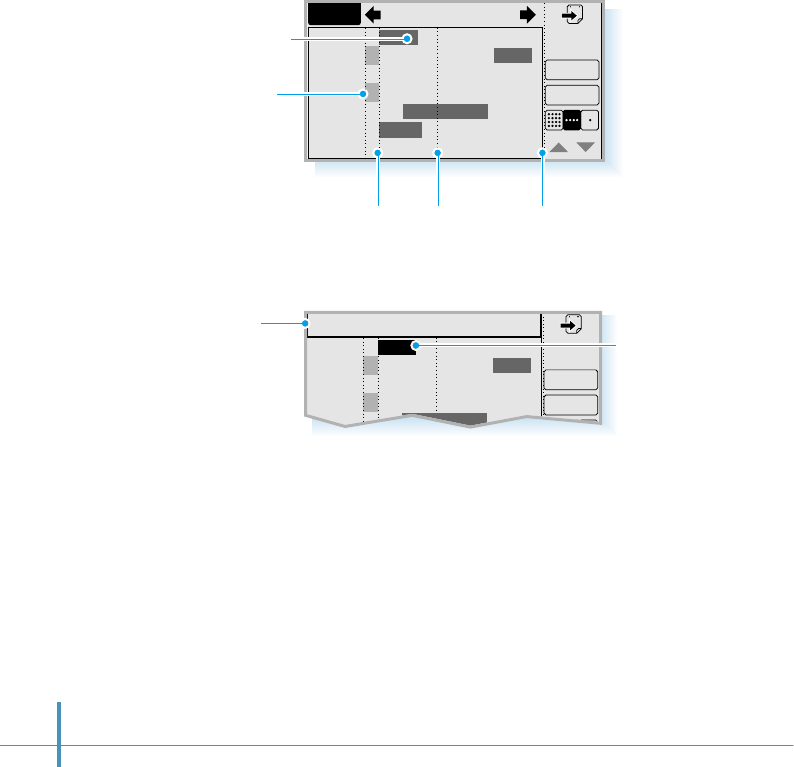
120
2. In the Week screen, the scheduled appointments are marked
with gray bars according to their start and end times. The time
box covers from 8 AM to 7 PM.
If a whole day has been reserved for the appointment, the left
column next to the date is marked with a light gray bar.
Week 2000.1.9 – 1.15
Sun
Mon
Tue
Wed
Thu
Fri
Sat
9
10
11
12
13
14
15
Go
New
Whole day
reserved
07:00 PMNoon08: 00 AM
The gray bars
indicate scheduled
appointments.
Tap any of your events to show a description of the event in
the top of the screen.
Tap the Go button. The screen opens the daily schedule
screen of the selected date.
Week 2000.1.9 – 1.15
Sun
Mon
Tue
Wed
Thu
9
10
11
12
13
Go
New
8:00–11:00 Demonstration
Event
details Tap to show
Event details.
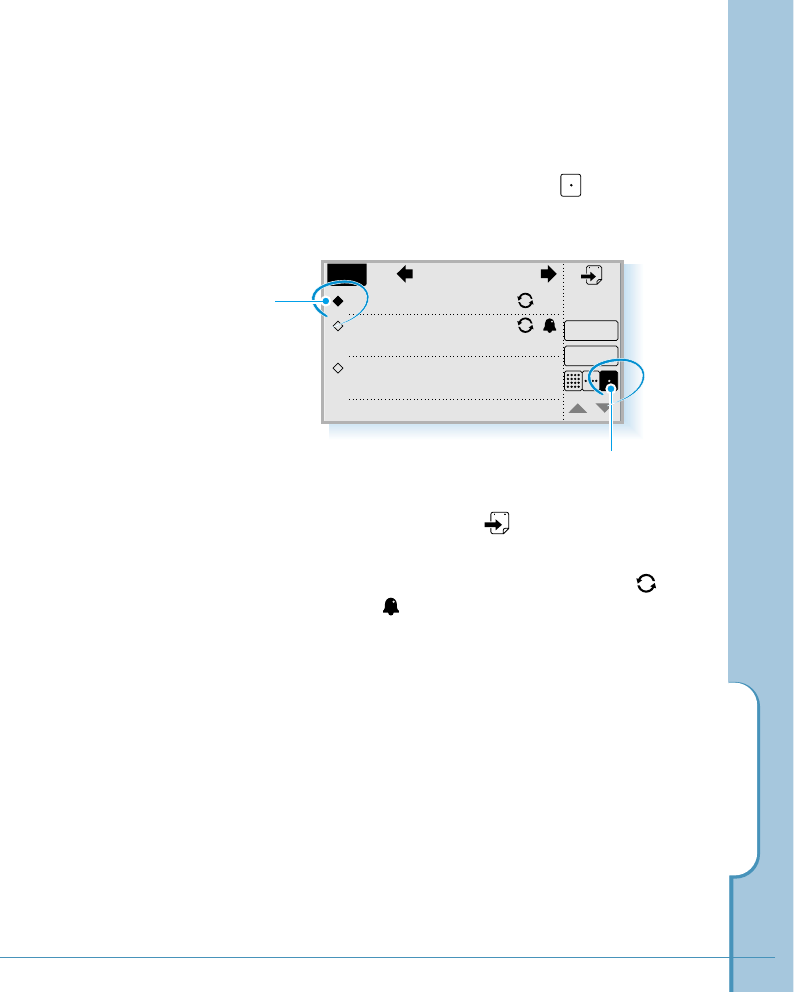
Scheduler
121
Daily View
The daily view shows the schedule for a selected date.
1. With the Sched menu accessed, tap icon in the lower
right side the screen, if necessary. The daily schedule list
appears.
Daily view icon
Day
Presentation of iMax
Details
New
AM 10:00 – 12:00
Call Conference
PM 15:00 – 17:00
Meeting with Jane
Apr. 5. 2000
Currently selected
appointment
Use the arrow keys at the top of the screen to see the next
or the previous day. Or tap to select another date in a
separate Select Date screen.
You will see the contents for the selected date.
symbols and symbols at the right side of the
appointment description indicate recurring events and
attached alarm, respectively.
If the contents are long, tap ❷or "in the lower-right
corner of the screen to see the next or the previous
contents.
2. To see the details of a selected appointment, select the
desired appointment. The currently selected appointment
is indicated with a black diamond at the far left of the
appointment. Then tap the Details button.
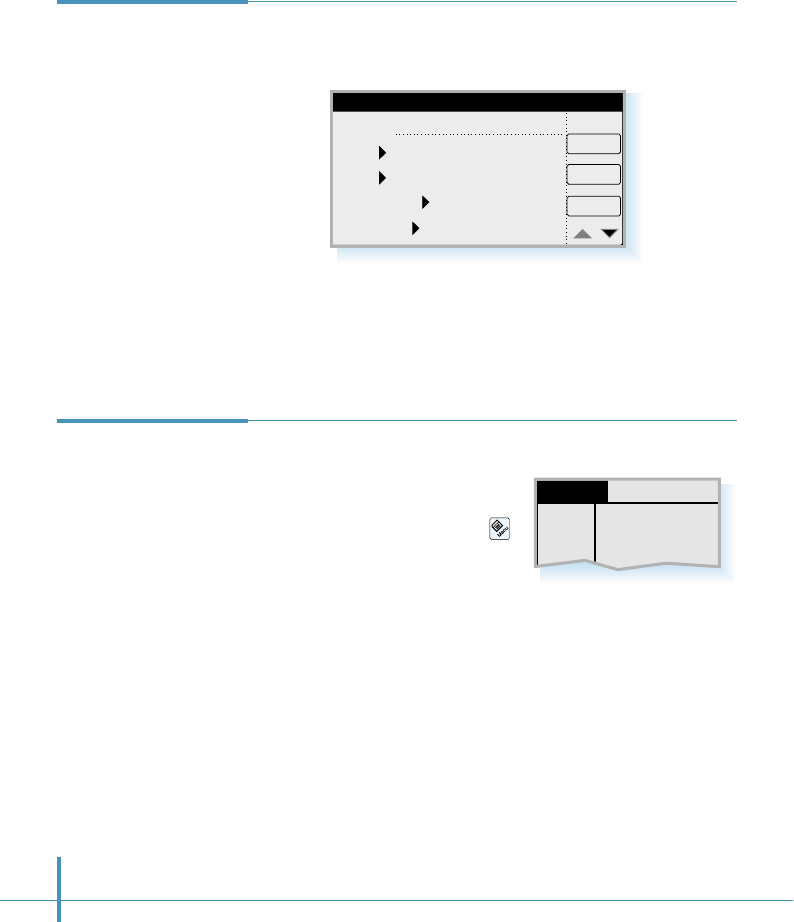
122
1. To adjust the details of a selected appointment, select the
desired appointment in the Day screen and tap the Details
button. The Appointment Details screen opens.
2. You can edit in the same way as described in ‘Recording a
New Appointment’ on page 114.
Editing Details
of a Selected
Appointment
Appointment Details
Subject: Design Conference
Date: 2000.4.10. Mon
Time: 10:00 – 11:00
Set Repeat Weekly
Set Alarm 30 minutes bef..
Cancel
Delete
OK
To remove a selected appointment:
To remove appointments you have
scheduled, select the appointment
in the Day screen and tap the
icon on the hard icon panel.
Select Delete from the Records menu. You will be asked if
you really want to delete the selected appointment. Tap the OK
button.
Or
Select the appointment you want to delete in the Day screen
and open the Appointment Details screen. Then, tap the Delete
button at the right side of the screen. You will be asked if you
really want to delete the selected appointment. Tap the OK
button.
Removing a
Selected
Appointment
New
Delete
Purge
Records Edit Setup
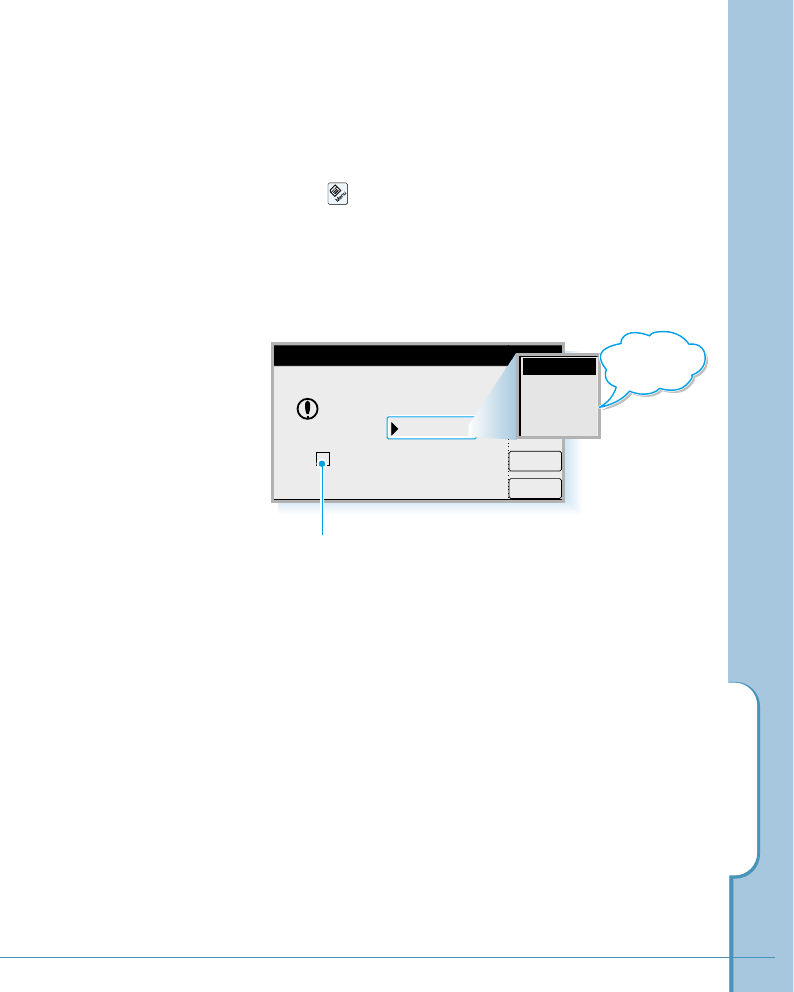
Scheduler
123
To purge the selected appointment:
You can clear all records older than a certain time period –
based on the current date.
1. Tap the icon on the hard icon panel in the Day screen,
and select Purge from the Records menu.
2. Tap the time pick list and select the desired time from the
list.
3. After you select, tap the OK button.
If you put a check mark on this box, your phone
removes events from the Scheduler but retains a
copy and transfers it to your PC during the next
synchronizing operation.
Cancel
OK
Clear all appointments
older than 2 Weeks
Make a backup on PC
Purge
2 Weeks
1 Month
2 Months
6 Months
Time pick list
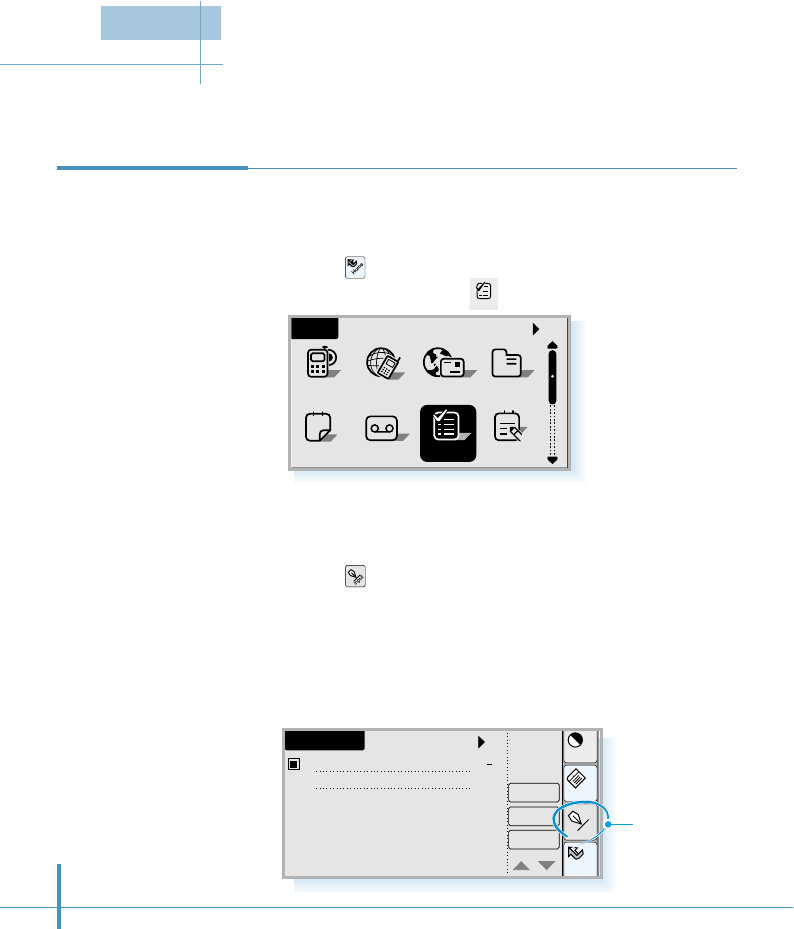
124
A ToDo item is a reminder of some tasks that you have to
complete.
1. Tap the icon on the hard icon panel to launch
applications, and tap the icon.
The ToDo list is a list of tasks which must be completed eventually, but are not connected to
any specific time or day.
Creating a ToDo
Item
Answer ToDo
All
Sched Memo
Home
12
AddressEmailGoNextPhone
a
ToDo
Home
Cont
Menu
Input
ToDo List
3
Delete
Details
New
All
Pay the electricity
bill.
2. Tap the New button in the ToDo List screen.
3. Tap the icon and enter the text you want to appear in the
ToDo item. For details on entering a text, see page 46.
4. When you have finished, tap the OK button to save and
return to the ToDo List screen. The first line of typed text
appears in the ToDo List screen.
Tap to enter
the contents.
ToDo
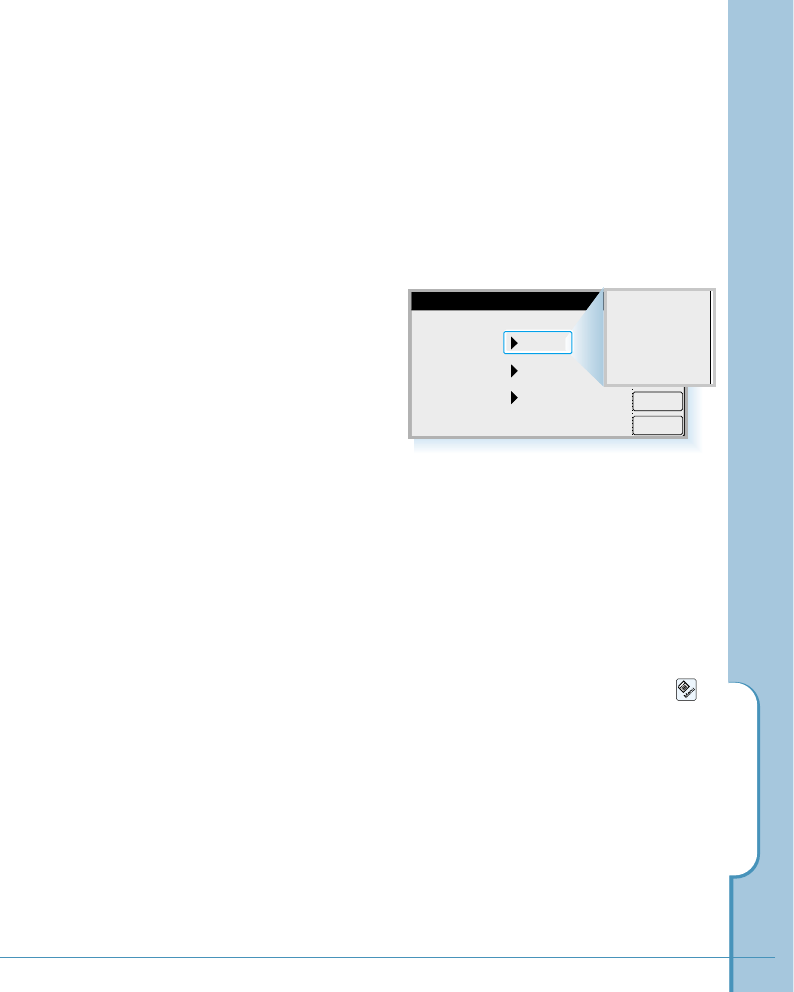
Setting ToDo Details
When you create a new ToDo item, its priority is automatically set
to level “3”, the medium level. You can change the priority level,
assign category and associate a due date with any ToDo item by
opening the ToDo Details screen.
1. In the ToDo List screen, tap the ToDo item you want to set
details.
2. Tap the Details
button.
To Do
125
3. To associate a due date with the ToDo item, tap the Due Date
pick list, and select one from the list. If you select Choose
Date from the list, you can choose any due date.
4. Categories can help you file individual ToDo items into groups
for easy review. To assign or edit category, tap the Category
pick list, and select one from the list.
You can customize the categories by adding a new one or
renaming the category. To customize the categories, tap the
icon on the hard icon panel when you are in the ToDo List
screen and select Edit Categories from the Setup menu.
5. You can select the priority number that you want to set for the
ToDo item (1 is most important and 5 is least important). To
select a priority, tap the Priority pick list and select one from
the list.
6. To save the settings and close the ToDo Details screen, tap the
OK button.
OK
Cancel
ToDo Details
Due Date
Category
Priority
None
Unfiled
3
None
Today
Tomorrow
End of this week
End of this month
Choose Date
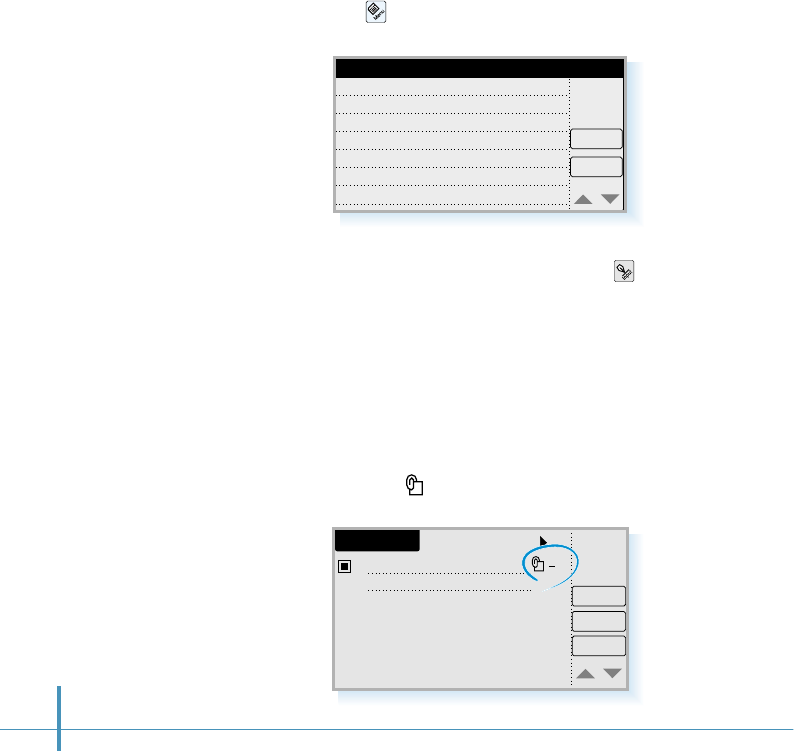
126
Attaching a Memo to a Selected Task
1. In the ToDo List screen, tap the ToDo item to attach a
memo. The selected item is indicated by a black box in
front of the task description.
2. Tap the icon on the hard icon panel and select Attach
from the Event menu.
3. The Attached Note screen opens. Tap the icon on the
hard icon panel to open the text input screen and enter
the desired note. For information on entering text, see
page 46.
4. When you have finished, tap the OK button to return to
the ToDo List screen.
5. You will find symbol at the right side of the task
description.
Delete
OK
Attached Note
ToDo List
3
Delete
Details
New
All
Pay the
electricity bill
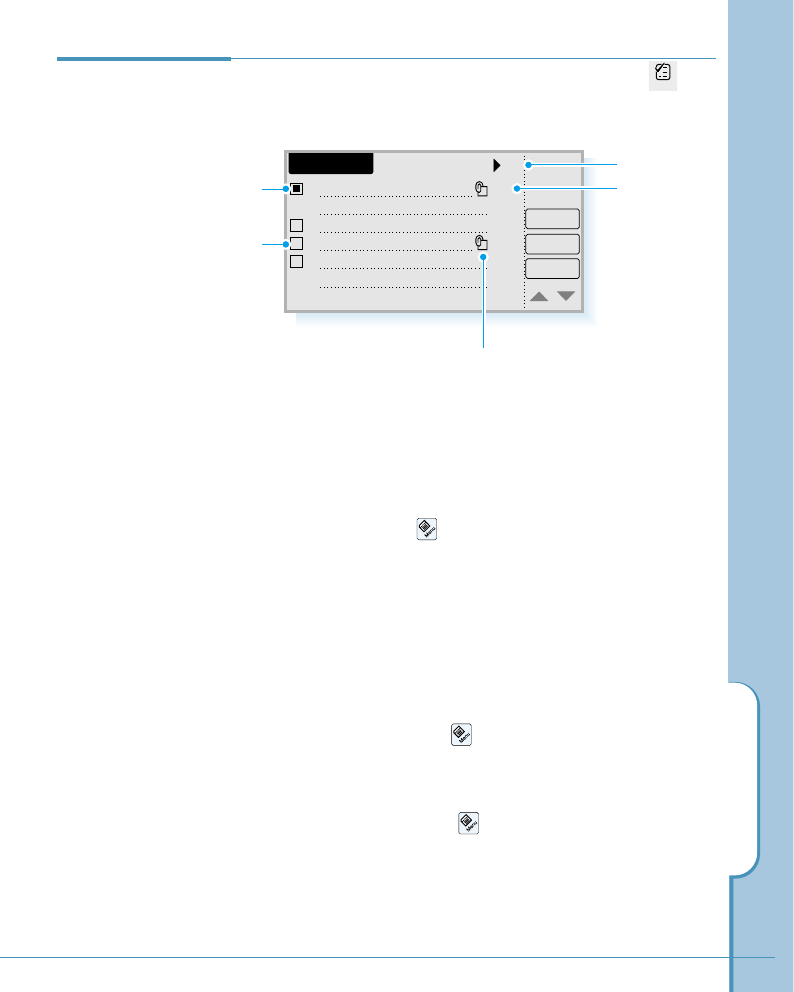
To Do
127
When you open the ToDo List screen by tapping the icon
in the Home screen, you will see the ToDo tasks already
defined in the ToDo list.
You can view the list by a selected category. To view the
items by category, tap the pick list in the upper-right corner of
the screen and select the desired category from the list.
You can arrange the list to put the ToDo items in a selected
order by tapping the icon on the hard icon panel and
selecting one of the the following ways from the Sort menu:
• Done: The list is arranged by order of tasks not yet done.
• Priority: The list is arranged in descending priority order.
• Due Date: The list is arranged in ascending due date order
(nearest dates first).
If the list is too long, you can go to the bottom or to the top
of the list by tapping the icon and selecting the
corresponding menu option from the Setup menu.
You can hide or display the priority or due date in the ToDo
List screen by tapping the icon and selecting the
corresponding menu option from the Setup menu.
Due date
Attached note. To see the contents of
the note, tap this icon.
Tap the checkbox to
check off the item.
Viewing the
ToDo List
ToDo List
3
Delete
Details
New
All
Pay the
electricity bill 1/18
1/20
1/15
1/25
1Call Pamela
2Buy the ABC
3Reserve a table at th
e seafood restaurant
Category pick list
V
ToDo
Currently
selected task
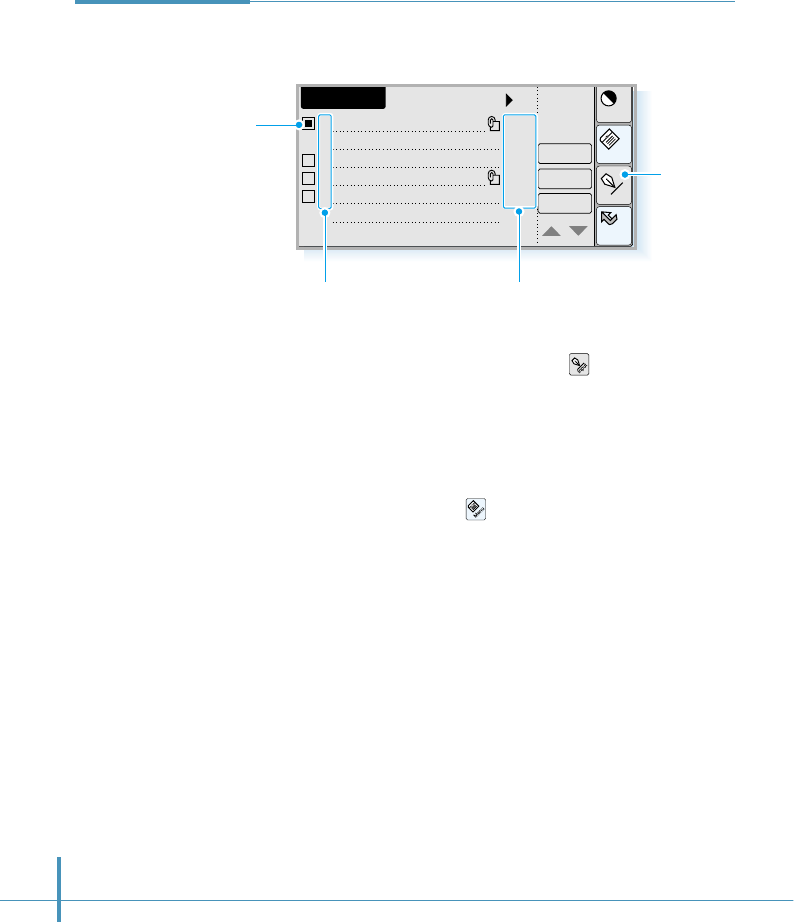
128
1. To edit any ToDo item in the ToDo List screen, tap the
desired ToDo item.
2. To edit the task description, tap the icon on the hard
icon panel and edit the text. For information on entering a
text, see page 46.
3. You can use the edit menu options such as Copy, Cut, or
Paste, by tapping the icon on the hard icon panel.
To change the priority, tap the priority field, and select
another priority level from the pick list.
To change the due date, tap the due date field and select
another due date from the pick list.
To mark the ToDo item as you complete it, tap the
checkbox in front. Each time you tap the box, you can put
or remove the check mark in the checkbox alternatively.
If you access the ToDo Details by tapping the Details
button, you can also change the priority, category, and due
date.
Editing a
ToDo Item
Home
Cont
Menu
Input
ToDo List
3
Delete
Details
New
All
Pay the
electricity bill 1/18
1/20
1/15
1/25
1Call Pamela
2Buy the ABC
3Reserve a table at th
e seafood restaurant
Due date fieldPriority field
Selected item
Tap to input
text.
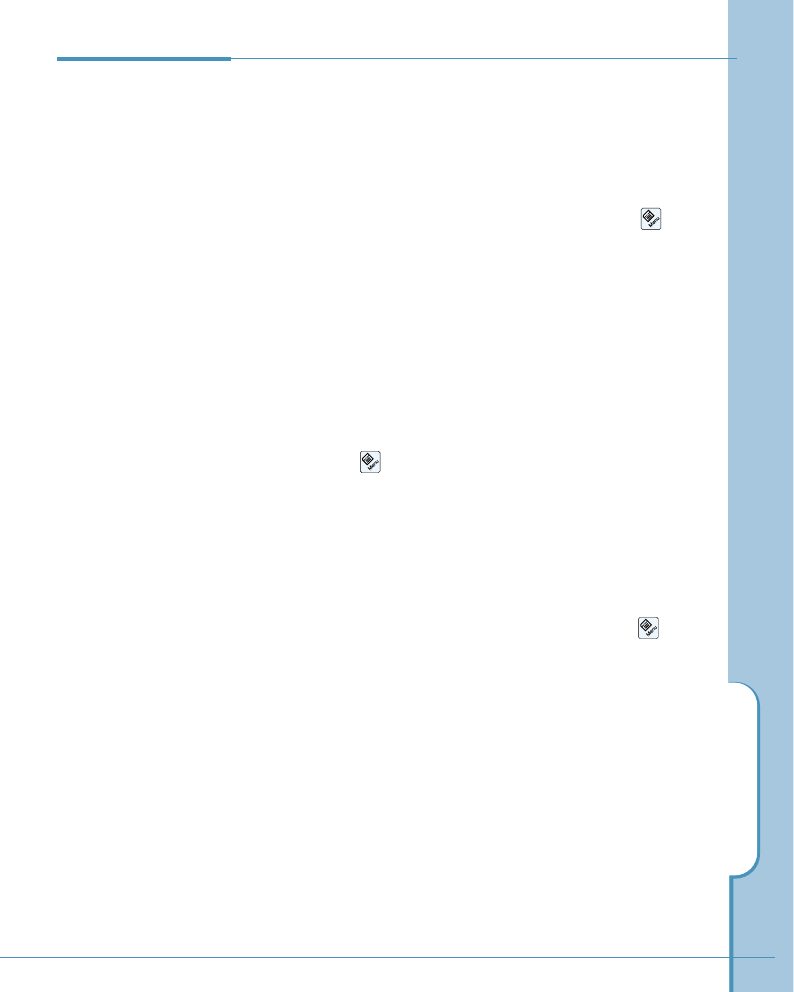
To Do
129
To delete a selected item:
Tap the desired item you want to delete in the ToDo List
screen, then tap the Delete button. You are asked to delete
the selected item. Tap the OK button.
You can also delete a selected task by tapping the icon
on the hard icon panel and selecting Delete Event from the
Event menu. You are asked to delete the selected item. Tap
the OK button.
To delete the note attached to a selected item:
To delete the note attached to a selected item in the ToDo
List, tap the icon and select Delete Attachment from
the Event menu.
To delete a ToDo item already done:
To delete all the ToDo items already done, tap the icon
and select Delete done event from the Event menu. You
are asked to delete all the selected items. Tap the OK
button.
Deleting a Task
in the List

Communication
Applications
Your phone is capable of connecting wirelessly
to network services for e-mail and Internet
access. For this communication purpose, the
following applications are provided:
• SMS
• Internet
• E-mail
• Chatting

SMS
131
The Short Message Service enables you to send and receive short messages. You can
also receive voice mails. To send and receive short messages, the SMS must be
supported by the network you are using. Contact your home service provider for details.
To write and send a new short message:
1. Tap the icon on the hard icon panel to launch
applications.
2. Tap the SMS icon to open the SMS screen.
3. When the SMS screen opens, tap the New button.
The New Message screen opens.
Sending a Short
Message
Home
Cont
Memo
Input
New Message
Send
To
Callback#
Contents Store
Cancel
No..0/108
Tap to select a
number from the
Address Book. Tap to enter
number or text.
This counter shows the number of characters used out
of the total number of characters that can be entered.
SMS
All
Home
Calc Clock Ctrl
Othello Chat
Find
PCsync
Slide the scroll
bar to display this
screen.
SMS (Short Message Service)
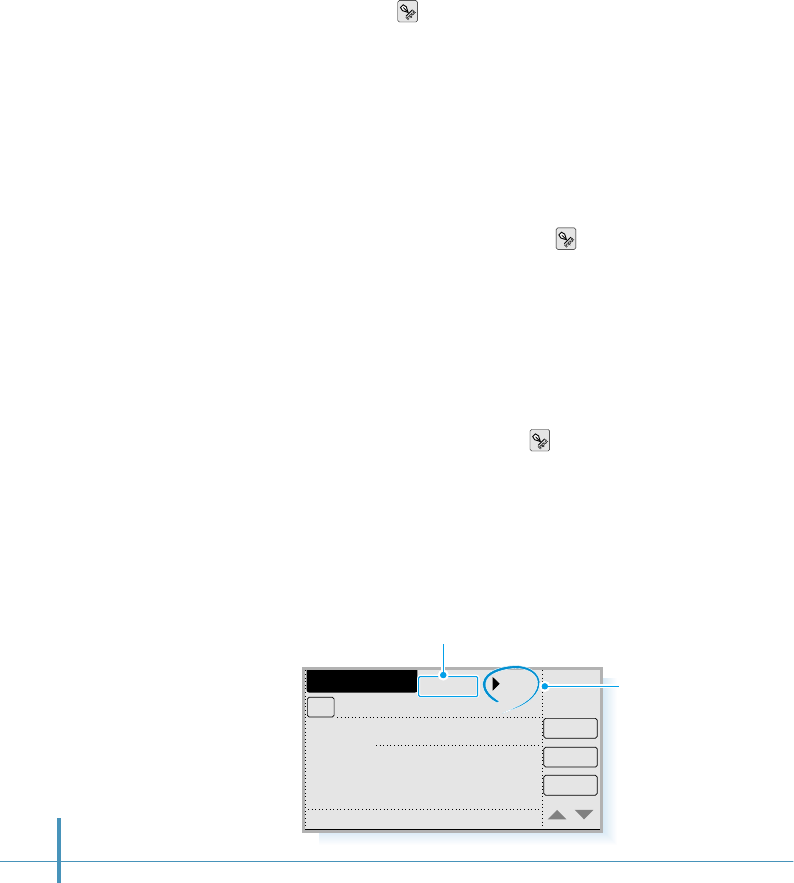
132
4. To enter the recipient's mobile phone number in the To
field, tap the icon on the hard icon panel, enter the
number then tap the OK button. For details on entering
numbers, see page 46.
If you already stored the number in your phone’s Address
Book, you can select it by tapping the To button. For details
on Address Book, refer to page 79.
5. To enter the callback number, tap the Callback number field
to position the cursor, then tap the icon, type in the
desired numbers, and tap the OK button.
You can enter up to 108 characters. The character counter
shows how many characters you have typed at the top of
the screen.
6. To enter the contents, tap the Contents field to position the
cursor in the field, then tap the icon, type the desired
message, and tap the OK button.
7. If you want to set the message’s priority, tap the pick list in
the upper-right corner. You can select either Normal,
Urgent, or Emergent from the pick list.
New Message
Send
To
Callback# 051987653
051123456
Contents
Happy birthday to you!
Store
Cancel
No..22/108
Message priority
pick list
Character counter shows how many characters
you have typed in.
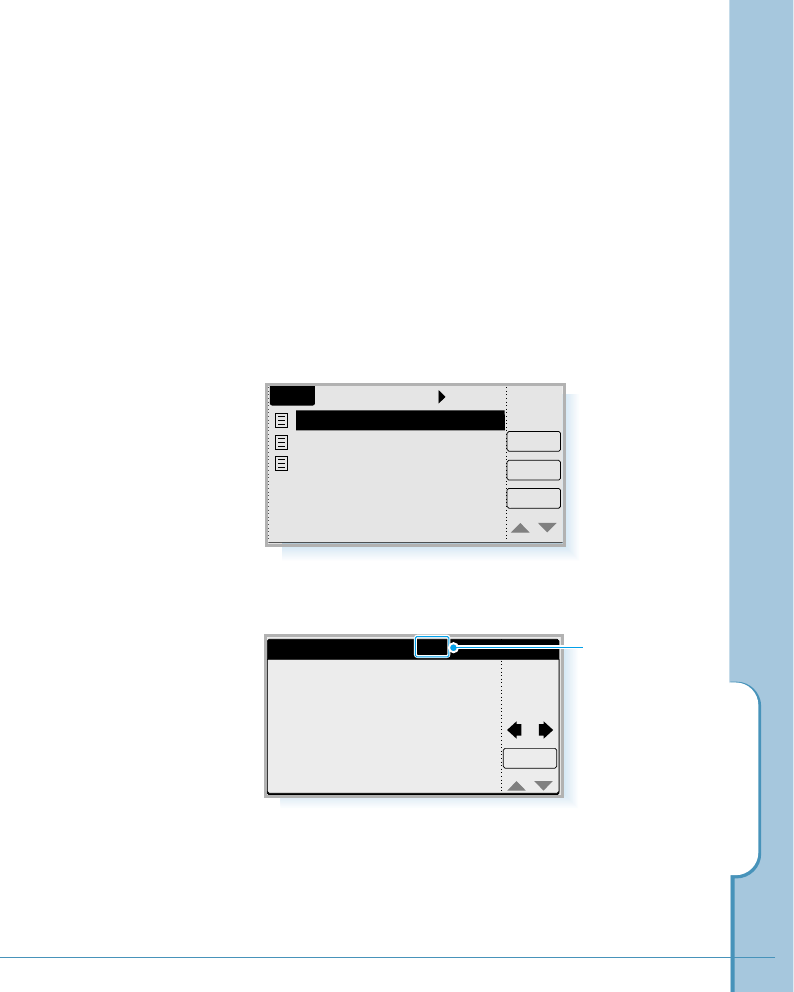
SMS
133
SMS
View
Let me know if you can c..
03 messages
Delete
New
OutBox
happy birthday to you ^,^..
I am afraid I am tied up o..
8. If you want to store the message in the OutBox for use at a
later time, tap the Store button.
To send the message, tap the Send button. The remote phone
should have SMS capability to receive your message. All sent
messages are stored in the Outbox.
To view messages you wrote:
1. Once you are in the SMS screen, select OutBox after tapping
the pick list in the upper-right corner of the SMS screen.
2. Tap the desired message, then tap the View button.
3. To exit, tap the OK button.
Message 2/3
OK
I am afraid I am tied up on
the 25th. Would Tuesday the
26th be convenient?
Priority : Normal
To : 051123456
From : 051654321
Sent Time : 05/25 11:33A
current message
number of total
messages.
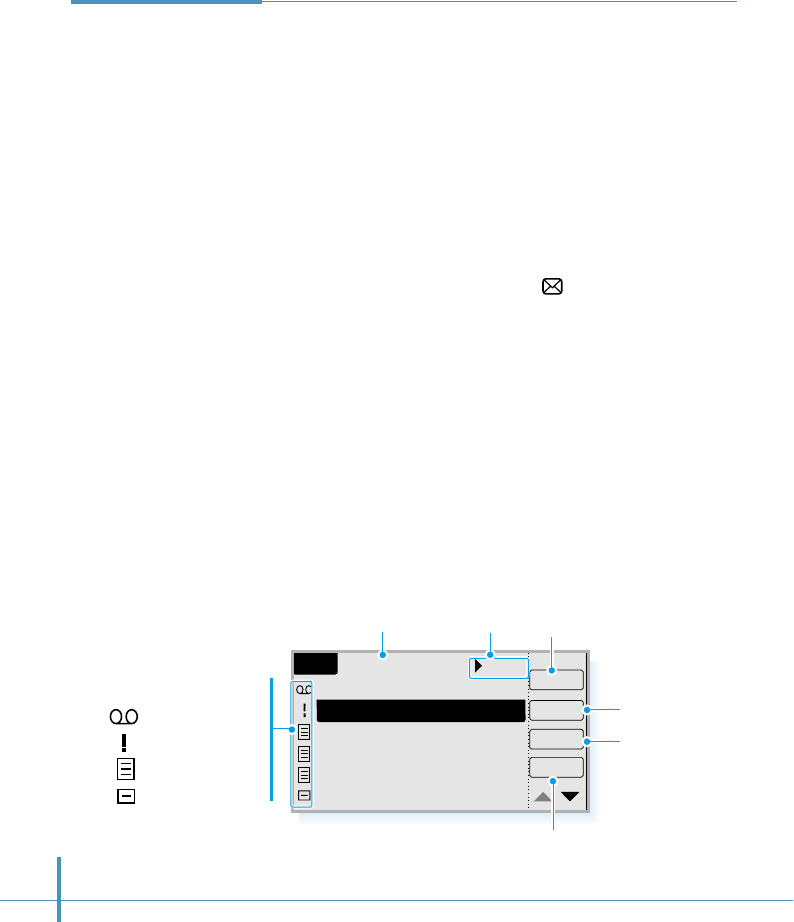
134
Short messages are received automatically, provided that
this service is available and that the phone is on and within
cellular coverage area. All received messages are stored in
the InBox folder.
A received short message can be a normal short message,
paging message or notification of a voice message in your
voice mailbox.
To read or listen to messages:
When a new message has arrived, icon appears at the
top of screen.
1. To read the message, tap the SMS icon on the Home
screen to open the SMS screen.
2. Tap the pick list in the upper-right corner of the screen,
and tap InBox.
3. The messages you received are displayed. An icon next to
the message indicates the message type.
Receiving
Messages
SMS
Call
View
[Voice Mail] 3 messages
At the front of the main g
Have a nice day!
You can but the good pro
Happy Birthday!
08 messages
Delete
New
InBox
[Pager] 051123456
Message Types
Voice mail
Urgent text message
Text message
Pager
Total number of
messages received Tap to open the
InBox folder. Opens the selected message
in a separate screen.
Opens the New Message screen which
allows you to send a new message.
Makes a call to the
sender.
Deletes the
selected message.
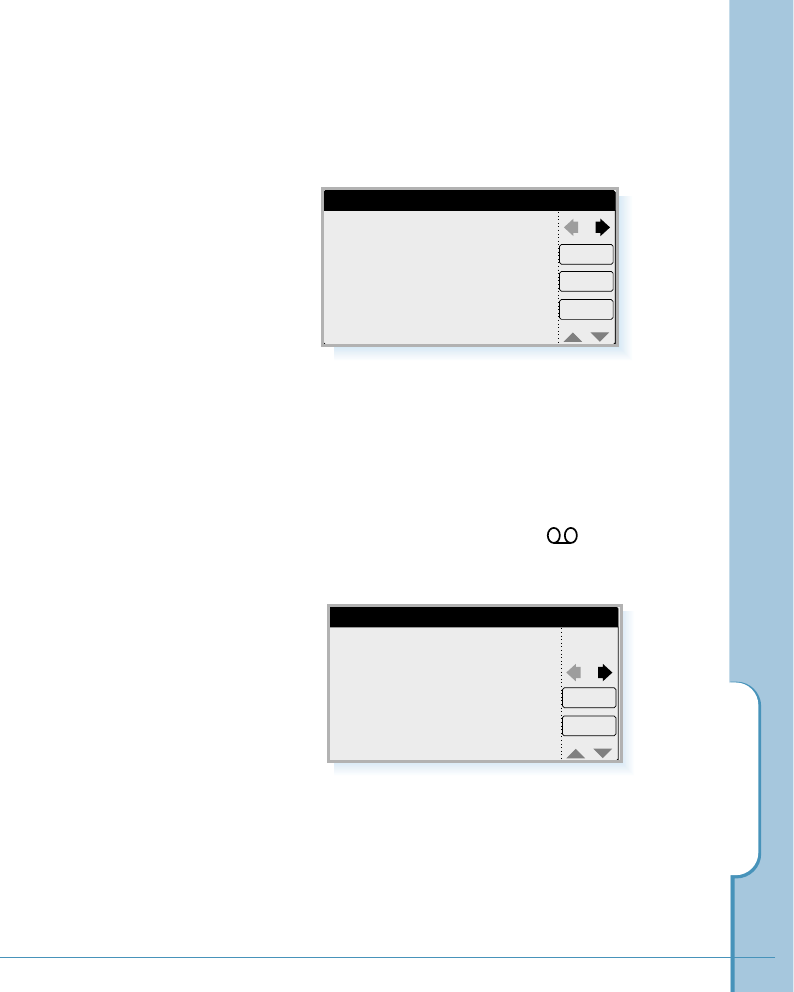
SMS
135
4. Select the desired message from the list, then tap the View
button.
5. The selected message contents are displayed.
To reply to a received message, tap the Reply button.
To make a call to the sender, tap the Call button.
To exit, tap the OK button.
Message 1/3
Call
Reply
OK
Happy birthday to you.
Best wishes.
Priority : Normal
To : 051456789
From : 051234567
Received Time : 06/04 11:33A
Voice Mail
Listen
OK
From : 0513333333
Received Time : 06/02 09:36P
6. If you selected voice message marked in front, the
following screen opens and allows you to listen to the
voicemail.
To listen to the message, tap the Listen button. The phone
automatically calls your voice mailbox.
To exit, tap the OK button.

136
To store the received number in the Address Book:
1. After reading a message by following the steps on page
134, tap the OK button.
2. If the message contains the sender’s number, a dialog box
pops up and asks you to save the number in the Address
Book. To save the phone number, tap the Save button.
3. The Address New screen opens with the phone number
already in the first number field. Enter other fields as you
desire. For more information on the Address Book, refer to
page 79.
To sort the message list:
You can sort the message list by the date in ascending or
descending order.
1. When you see the messages list received in the InBox
folder or stored in the OutBox folder of the SMS screen,
tap the icon on the hard icon panel.
2. Select Sort (date asc.) or Sort (date des.) from the View
menu.
•Sort (date asc.): The screen sorts the messages list.
Older messages display first.
•Sort (date des.): The screen sorts the messages list
Newer messages display first.
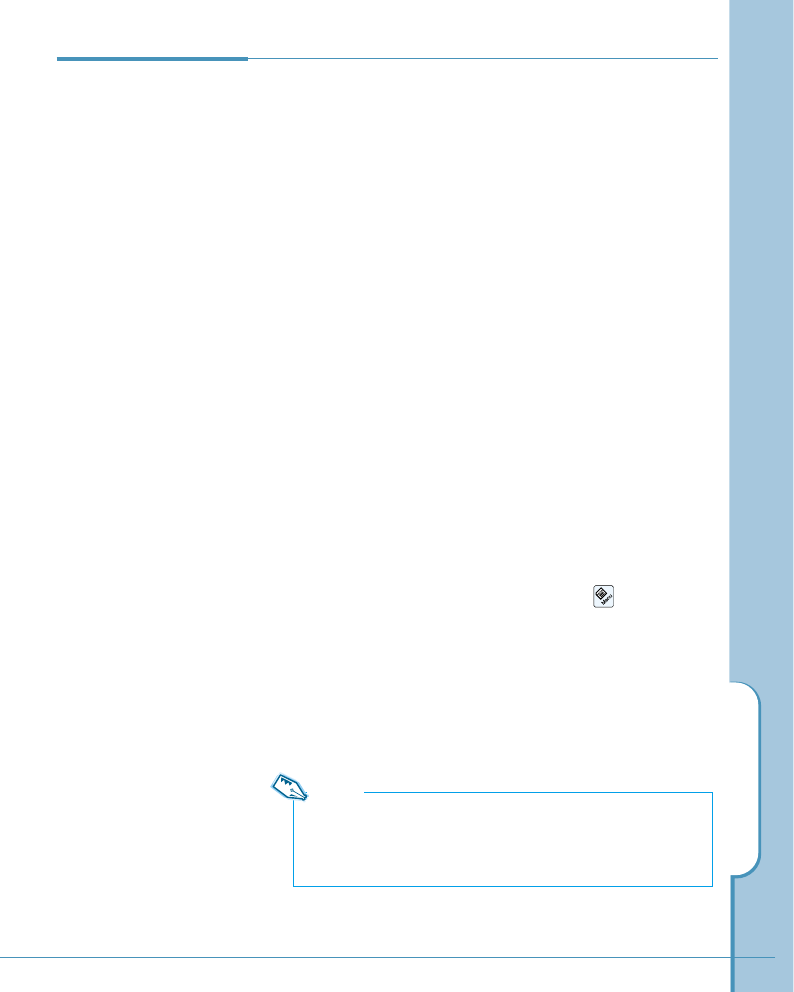
SMS
137
Deleting a
SMS Message
The InBox and OutBox folders can store up to 50 messages
each. When the inbox folder is full, you cannot receive any
more messages until you delete old messages. When the
Outbox folder is full, the oldest message is automatically
deleted when sending a new message.
To manually delete a message:
1. When you see the messages list received in the InBox
folder or stored in the OutBox folder of the SMS screen,
select the message you want to delete.
2. Tap the Delete button. You are asked to delete the
selected message.
3. Tap the OK button to confirm.
To delete all messages:
1. When you are in the SMS screen, tap the icon.
2. Tap the Setup tab, and select Delete All. You are asked
to confirm the deletion.
3. Tap the OK button to delete all messages.
Note:
Voicemail messages are automatically deleted after you listen to
the corresponding message in your voicemail box. Voicemail
messages cannot be deleted using phone menus.
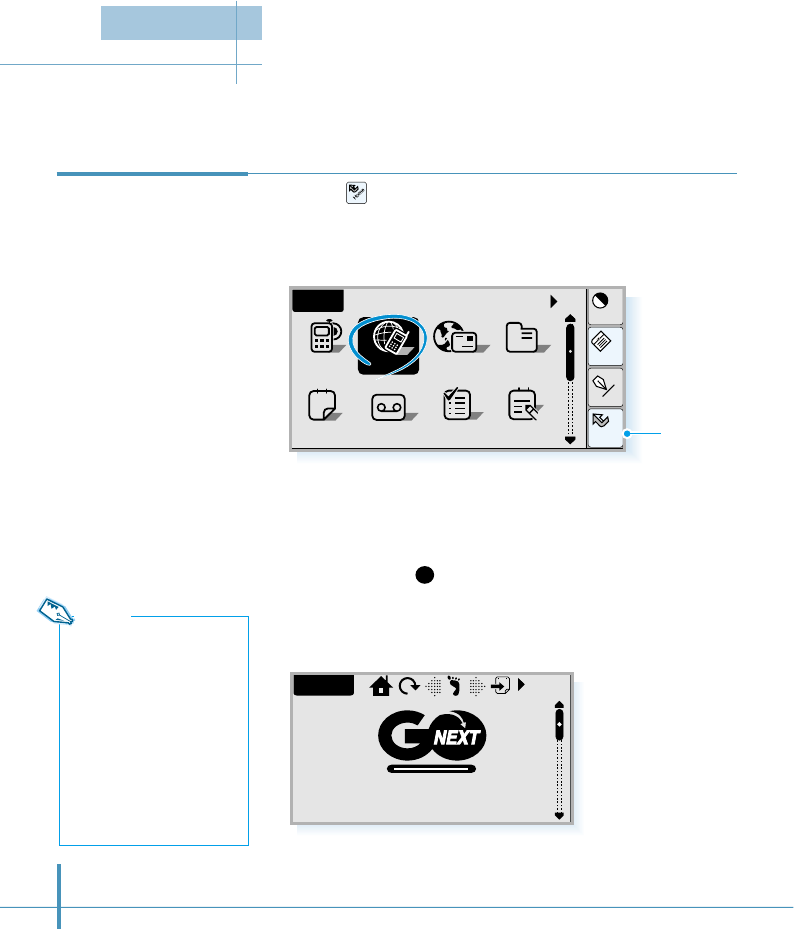
138
You can use your Smartphone to connect to the Internet and surf virtually any website. You
can also enjoy many specially designed sites for your Smartphone operated by GoNext.
1. Tap the icon on the hard icon panel to launch
applications.
2. Tap the GoNext icon in the Home screen.
3. Your phone automatically dials the specified PPP server, then
the GoNext homepage opens when it is connected.
If you want to hang up the data call before the specified site
is connected, tap
X
in the top right of the screen.
4. The GoNext home page opens and shows a variety of
services available.
For details on the GoNext services, contact the GoNext
service provider.
Accessing
GoNext
Home
Cont
Menu
Input
All
AnswerSched ToDo Memo
Home
12
AddressEmailPhone
a
GoNext
GoNext Web
Note:
The GoNext service that are
available may vary and
some services may have
access restrictions that
required a valid user name
and password. For details
on GoNext services and the
subscription, contact the
GoNext service provider.
Tap to launch
applications.
Internet
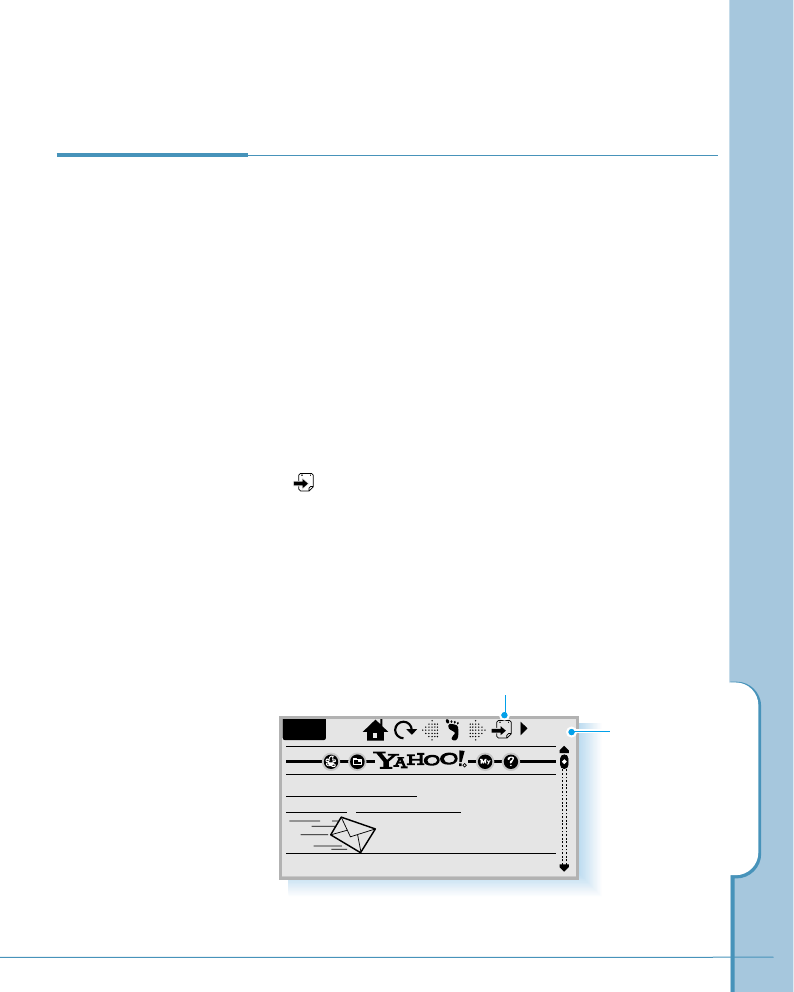
Internet
139
Connecting to the Internet
If there are hyperlinks or hotspots in the part of the document
shown in the Web screen, one will always be selected by
tapping the link.
Hyperlinks are links to other documents or images, used to
send or receive information from the World Wide Web.
Hotspots (such as selection list, text entry fields) enable you
to input information into the World Wide Web.
You can open any WWW page by entering a URL address.
Tap in the top right of the Web screen and enter the URL
address into the URL entry box.
If you have stored the URL address in the Bookmark list, you
can quickly open the web page by tapping the pick list in the
upper-right corner of the screen and selecting Bookmark
from the pick list. Then, select the desired web page from the
bookmark list.
Navigating
the internet
Web Web
Yahoo! Auctions
Yahoo! Mail
Pokemon, Britney Spears
Download Yahoo! Messenger
Instant Email Alerts
Tap to select
Bookmark to
view the
Bookmark list.
Opens a URL entry box.
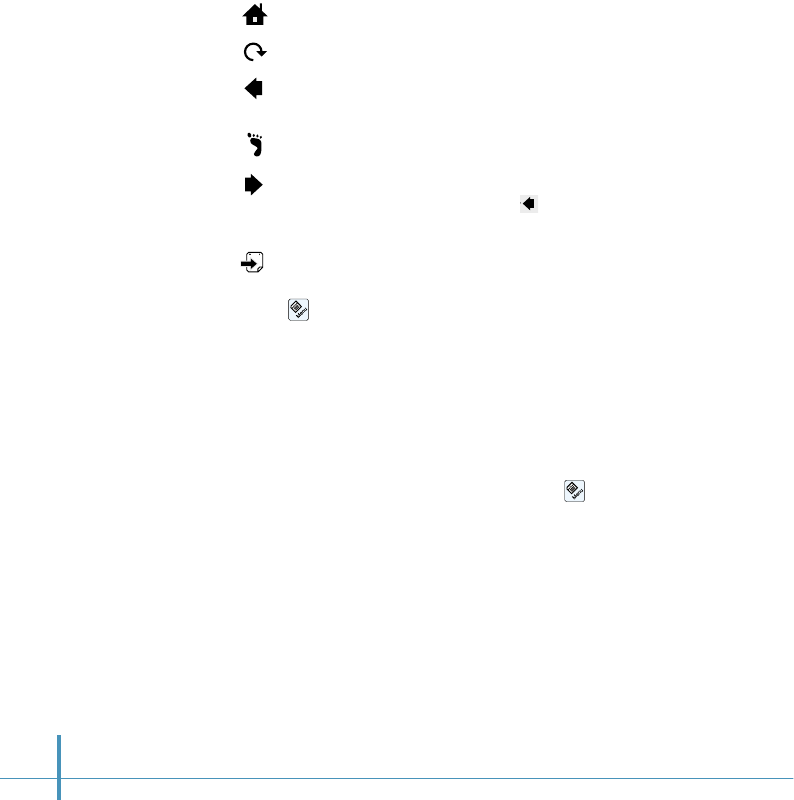
140
Using the Navigation Commands
After the web page has been fetched, the following commands
become available on the top of the screen:
– Goes back to the homepage.
– Reloads the current web page.
– If you have browsed through at least two web pages, use
this key to fetch the previous page.
– Shows a list of browsed documents.
– If you have browsed through at least two web pages, and
viewed the previous page with key, you can fetch the
next page by tapping this key.
– Allows you to open a web page by entering a URL address.
(You can also open the URL entry box by tapping the
icon on the hard icon panel and selecting Open
Location from the Setup menu.)
To scroll the page view, slide the scroll bar on the right side of
the screen.
Using the Page Options
When you have a web page open, tap the icon on the hard
icon panel, and the following Page options become available:
• View as Logical (Visual) – Allows you to view the web page
using logical or visual display methods.
• Information – Shows the current web page information; the
URL and the title of the open page.
• Add to bookmark – Adds the current web page address to
the Bookmark list.
• Save as Memo – Allows you to save the open page as a
memo. The first line of the web page will be the title of the
memo. For information on the memo feature, see page 103.

Internet
141
Bookmark Personal Bookmark
http://www.gonext.co.il
http://www.thrunet.com
http://www.yahoo.com
http://list.auctions.yahoo.com/27813-
http://www.samsungelectronics.com
Using
Bookmarks
Saving a URL address as a bookmark provides you with a
quick and easy way of accessing that web page next time.
Adding an Open Page to the Bookmarks
1. When you have a web page already open, tap the
icon on the hard icon panel.
2. Select Add to bookmark from the Page menu. The Add
URL screen opens.
3. Select the category for the address if necessary. You can
select Business,Personal or Unfiled. Then tap the OK
button.
Fetching a Web Page Using Bookmark
1. To open the Bookmark screen, tap the pick list in the
upper-right corner of the Web screen and select
Bookmark from the list. The Bookmark screen opens and
you see the list of URL addresses.
OK
Add URL
URL http://www.gonext.co.il
Title index Busi..
Cancel
Tap to select the
category if
needed.
2. Tap an entry in the bookmark list, and select Open from
the pop-up list.
Tap to select the
category for the
address.

142
Adding a New URL to the Bookmark List
1. In the Bookmark screen, tap the icon on the hard icon
panel.
2. Select New URL from the List menu. The Add URL screen
opens.
3. Tap the icon on the hard icon panel and enter the URL
address in the address field, enter the title, then tap the OK
button.
Editing or Deleting a URL in the Bookmark List
In the Bookmark screen, select an item to edit and tap the Edit
button from the pop-up list.
To delete, select Del from the pop-up list.
Arranging the Bookmark List View
You can arrange the bookmark list view by URL or title order.
1. In the Bookmark screen, tap the icon on the hard icon
panel.
2. Select View by URL or View by title from the List menu.
The Bookmark screen rearranges according to your selection.
3. You can select a category by tapping the category pick list.
The bookmarks in the selected category are displayed.

Internet
143
Configuring the Bookmark Categories
1. In the Bookmark screen, tap the icon on the hard
icon panel.
2. Select the Setup menu, then select Edit Folder. The
Category Edit screen opens.
3. If you want to delete, tap the category icon, then tap
the Del button. You are asked to delete the selected
category. Tap the OK button to confirm.
If you want to create a new category, tap the New
button. Enter the folder name. For details on entering
letters, see page 46.
To rename the existing category, position the cursor to
the folder you want to edit, then change the name.
4. When you are done, tap the OK button.
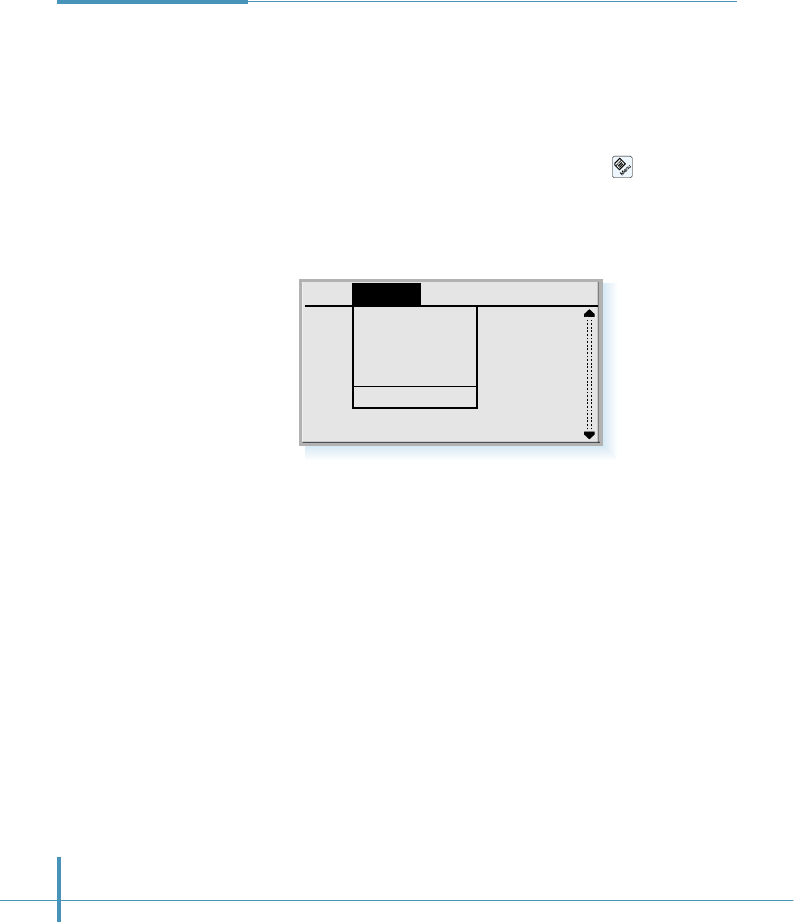
144
Internet
Settings
Your Smartphone has already been configured to access
Internet using the built-in Web browser. You do not need to
change the setting unless the network operator requests.
To view (or change) the setting, do as follows:
1. When you are in the GoNext screen, tap the icon on the
hard icon panel.
2. Select the Options tab. The following settings are available:
• Proxy Setup
Allows you to use a proxy. HTTP proxy server name and Proxy
port must be defined before using the proxy.
• Cache & Cookie
Deletes the saved cache and cookie information.
• Preference
The following sub options are available to suit your
preferences:
Cache Mode – Most recently fetched web pages are kept in
the phone’s temporary memory, the “cache”. If set to “Use
Cache”, the cache stores information. The maximum size of
the cache is 100 kbytes. If set to “Don’t use Cache”, the
cache does not store web pages.
Page Options
Proxy Setup
Cache & Cookie
Preference
Offline...
Network Setup
Setup

Internet
145
Images – Tap the check box. If the Autoload check
box is checked, inline (BMP, GIF) images on the web
page are fetched automatically. If the box is clear, web
pages are fetched without the images and shown
much faster.
Click Mode – When you click a link on the web page,
you can select whether the option menu pops up or the
link opens.
Cookie – Cookies are little pieces of information,
given by the server to you, to store session information
between the times you visit the same web site. When
you Accept cookies, the server is able to store and
use information about your actions on the visited web
site. Selecting Cancel disables the cookies
functionality. If you select Ask, the screen will prompt
you every time a server requests to store a cookie.
Show messages – Slide the scroll bar on the right
side of the screen to display this setting on the next
page. If you check this box, the browser will display
warning messages whenever error occurs.
Homepage – Allows you to select the opening page
to display when connecting to Internet.
• Offline – Ends the current session to the Internet and
allows offline browsing of cached pages.
• Network Setup – Views the network configuration
which has been pre-set at factory. For details, see page
68.
3. When completed, tap the OK button.

146
If you have an account with an Internet service provider, you can send and receive e-mail
messages all over the world using the Internet.
3. The Email screen opens. You can setup e-mail settings, send
and receive e-mails on this screen. For details, see the
corresponding pages.
Tap to select a folder; Inbox, Sent,
Outbox, Draft, Trash. You can create a
new folder or delete an existing one.
Accessing E-mail
Service 1. Tap the icon on the hard icon panel to launch applications.
2. Tap the Email icon in the Home screen.
You can sort the message
list by the date it was
sent, by the subject, or
by the file size.
Get received mail from
the remote server.
Creates a new
mail to send.
Home
Cont
Menu
Input
All
AnswerSched ToDo Memo
Home
12
AddressGoNextPhone
a
Email
Email
New
Get
Inbox Subj..
Let's have
Remember
Do you kno
Good news
Exam info
A great par
Jonathan
ipse8485@hot
David
Jean
Demi
Onecan@yah
Tap to launch
applications.
E-mail
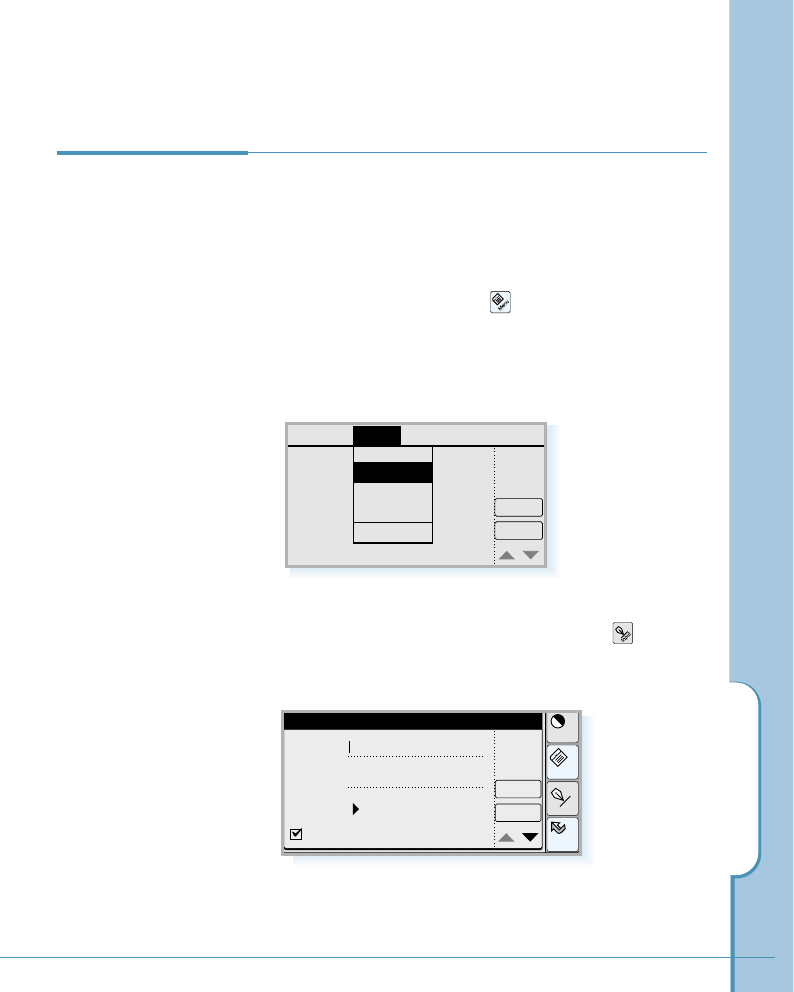
E-mail
147
New
Get
Filters
Signatures
Deletion
Option SetupMessage
SMTP
POP3
Before you send and receive e-mails, you must configure the
proper e-mail settings. Your Internet service provider will
give you the instructions on how to configure the mail
settings.
1. In the Email screen, tap the icon on the hard icon
panel, then select the Option tab.
2. To set up incoming mail server, select POP3 from the
Option menu.
Mail Settings
Home
Cont
Memo
Input
Cancel
Ok
POP3 Preferences
Leave mail on server
Server :
I ! D :
Passwd : Prompt
3. The POP3 Preferences screen opens. Tap the icon on
the hard icon panel to open the text input screen, then
enter the information on the following fields:
•Server – Enter the POP3 mail server address.
•ID – Enter the account name.
148
•Passwd – Select the password option; Prompt or
Assigned. If you must enter a new password every
time you log on to a server, or you do not want to save
the password, select Prompt.
• Tap Leave mail on server if necessary. If this box is
checked, the e-mail messages remain on the server
even after you fetch the e-mail messages.
4. When completed, tap the Ok button.
5. To set up the SMTP outgoing mail server, tap the
icon on the hard icon panel in the Email screen, then
select the Option tab.
6. Select SMTP from the Option menu. The SMTP
Preferences screen opens.
7. Tap the icon on the hard icon panel to open the text
input screen and enter the information on the following
fields:
• Server – Enter your outgoing server name.
• E-Mail – Enter your e-mail address.
• Name – Enter your name, which is delivered to the
person who receives your mail.
• Sign – Tap ❷at the lower right corner of the screen
to find this field on the next screen. If you tap
the Sign field, the stored signatures, if any,
are displayed. Select the desired signature. It
will be added to the end of your e-mail
message automatically each time you send e-
mail.
8. When completed, tap the Ok button.
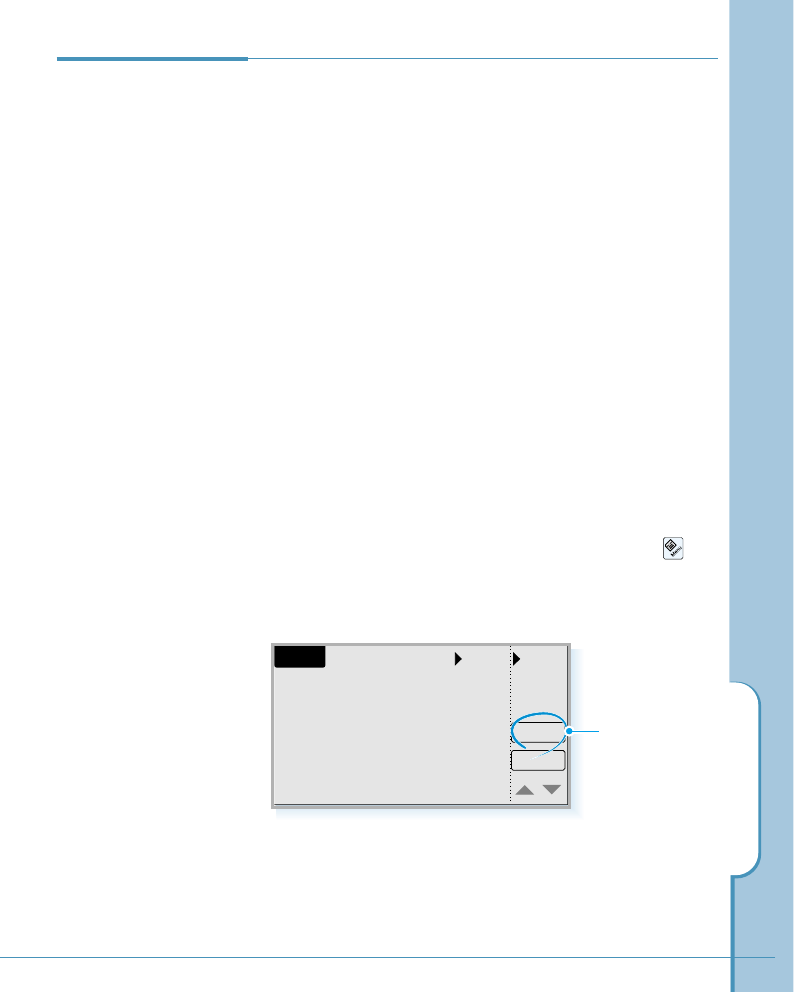
E-mail
149
Reading an
E-mail
Internet mail addressed to you is not automatically received
by your phone, but a remote mailbox. This is to let you
determine which messages you want to read and when. To
read your mail, you must first connect to your remote mailbox
and then select the messages you wish to fetch onto your
phone. Connection to the remote mailbox is established via a
data call.
External notification services are available to let you know
that new e-mail has been received. Visit the GoNext site for
more information.
Fetching Mail
You can get e-mail messages from the remote mailbox. Once
you have connected to the remote mailbox, you can fetch and
delete messages.
1. In the Email screen, tap the Get button. (Or tap the
icon on the hard icon panel, then select Retrieve from the
Message menu.)
Email
New
Get
Inbox Subj..
Tap to fetch mails.
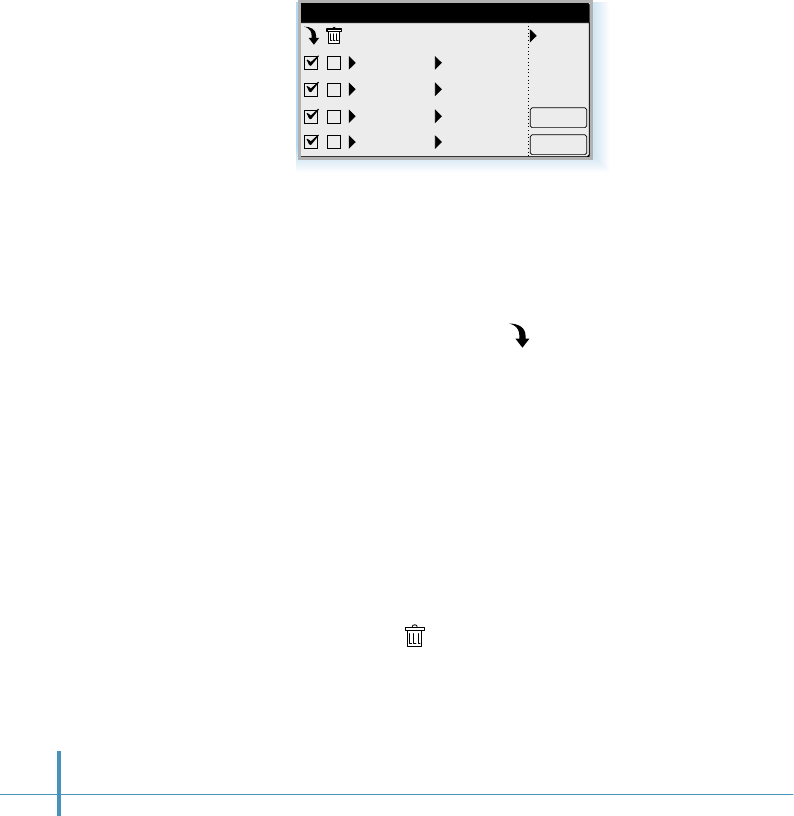
Cancel
OK
Mail Receive
"David"..
Sender
Internati..
Subj..
"Jonath.. Business..
"James.. [Re] Hote..
"Lemis".. Project M..
150
To fetch selected or all mail messages:
Select the mail message(s) you want to fetch and tap the box
in the download icon column to check it. If you want to fetch
all mails, tap the download icon ( ) at the top left of the
screen.
After the selected mail messages have been fetched, the
Report screen opens and tells you the number of mails left in
the remote mailbox and the number of mails fetched onto the
Inbox folder in your phone.
To delete selected or all mail messages:
Select the mail message(s) you want to delete and tap the
box in the trash column to be checked. To delete all mails,
tap the trash icon ( ) at the top left of the screen. The
messages will be deleted when you exit the remote mailbox.
2. The e-mail messages in the remote mailbox are displayed.
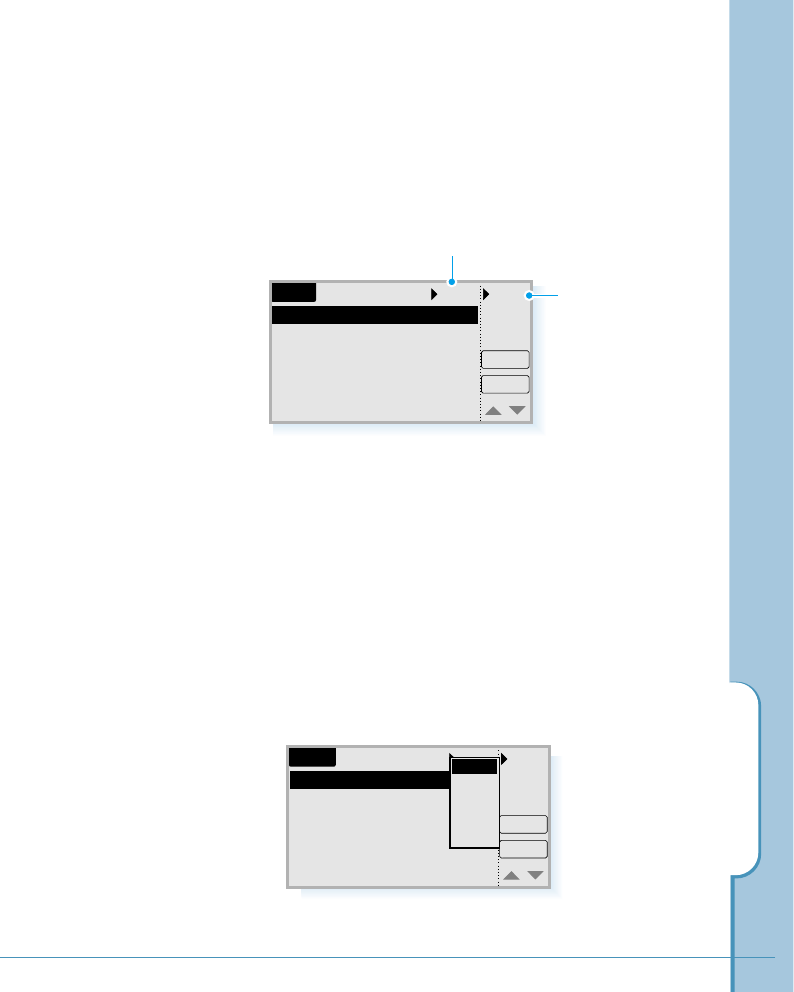
E-mail
151
Reading an E-mail Message
A mail that you fetch from the remote mailbox is stored in
the Inbox folder. To open the Inbox folder, tap the pick list
at the top right of screen and tap Inbox. You see the list of
incoming messages.
1. Select the message highlighted, and a pop-up box opens
up with the following options:
View – Displays the contents of the selected message.
Go to step 2.
Reply – Replies to the sender.
Fwd – Forwards the received message to a new number.
Move – Moves the selected message to the Outbox for
later use, for example, to send several messages
at the same data call.
Del – Deletes the selected message.
Tap to select the Inbox folder.
Email
New
Get
Inbox Subj..
Let's have
Remember
Do you kno
Good news
Exam info
A great par
Jonathan
ipse8485@hot
David
Jean
Demi
Onecan@yah
If you tap Subj.., the
list will be arranged
according to your
selection: Subject,
Date, or File Size.
Email
New
Get
Inbox Subj..
Let's have
Remember
Do you kno
Good news
Exam info
A great par
Jonathan
ipse8485@hot
David
Jean
Demi
Onecan@yah
View
Reply
Fwd
Move
Del
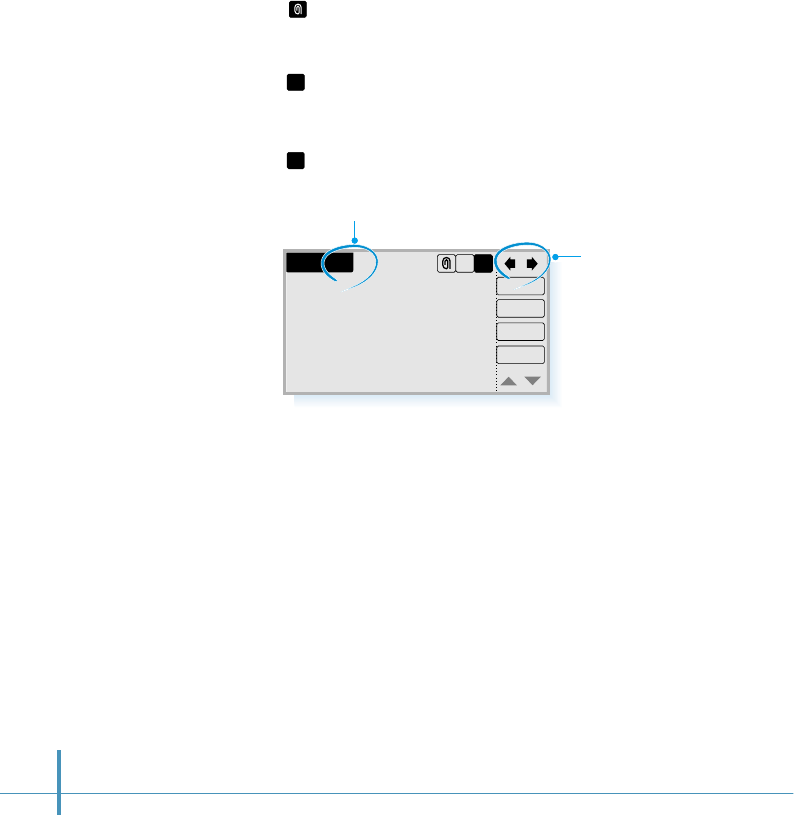
152
2. Tapping View displays the contents of the selected
message. You see the following command buttons at the
top right of the screen.
– Displays all attachments. If no attachments are
contained in the message, this command is dimmed.
The attached file must be a text file format (*.txt).
– Displays the header which is the information given at
the top of the e-mail message. If there is more than
one sender, the first sender information is displayed.
– Displays the message body contents.
3. After reading the contents, you can use the following
command buttons:
Del – Deletes the open mail message.
Fwd – Forwards the received mail and the possible mail
attachments.
Reply – Replies to the mail message.
Ok – Exit from this screen.
InBox 1/6
Please attend the
business conference.
Place:International Hotel
Date: 04.30/2000
Time: 12:00 AM
Have a great day!
Ok
Reply
Fwd
Del
HB
B
H
This indicates the first message of the total 6 messages.
Use this arrow keys to
scroll through the
messages.
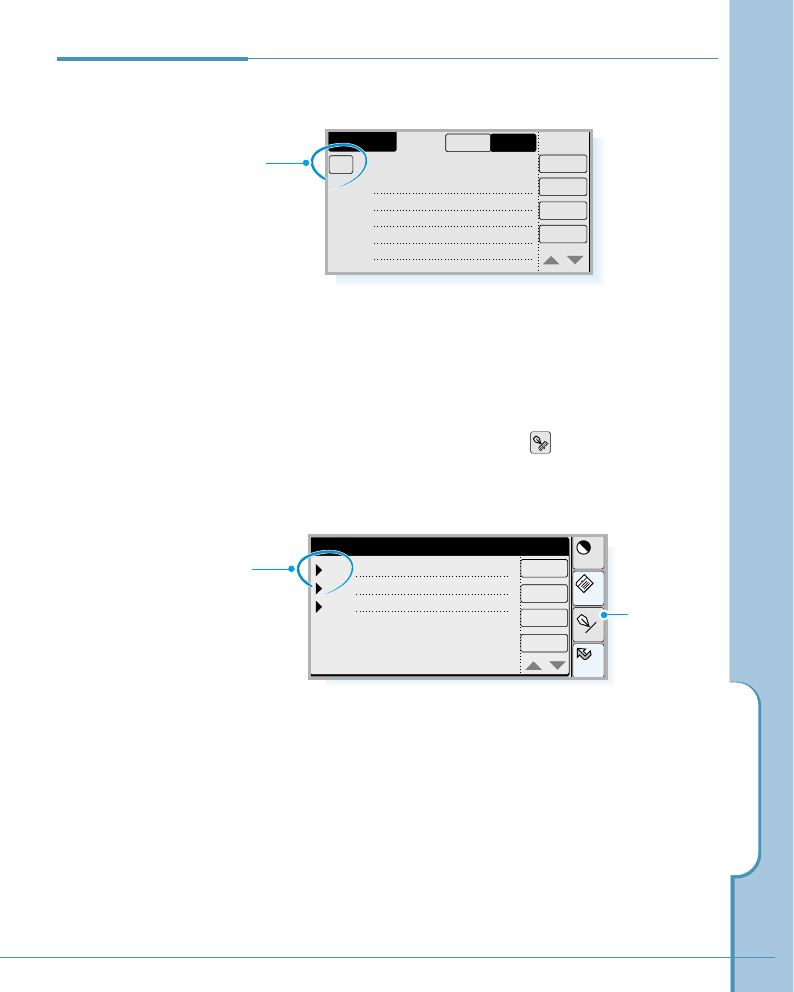
E-mail
153
Sending an
E-mail
1. In the Email screen, tap the New button on the right side.
The New Mail screen opens.
New Mail
Out
Draft
AllMemo
To
Title : Conference
Please attend the
business conference.
Have a great day!
Body : Send
Cancel
The Find button allows you to find the desired address from
the Address Book.
The Add button allows you to enter more than one
recipient. You can send a message up to 11 recipients at the
same time.
3. When completed entering the recipient(s), tap the OK
button.
Home
Cont
Memo
Input
OK
Recipient
To
Cc
Bcc
Cancel
Find
Add
Tap ❿to change
the category.
Tap to open
the Recipient
screen.
2. Tap the To button at the top left of the screen. The
Recipient screen opens and allows you to enter the
recipient addresses.
To enter the addresses in the address fields, tap the field
to position the cursor and tap the icon on the hard icon
panel to open the text input screen and enter the address.
Then tap the OK button. Repeat until you complete
entering addresses.
Tap to open
the text input
screen.
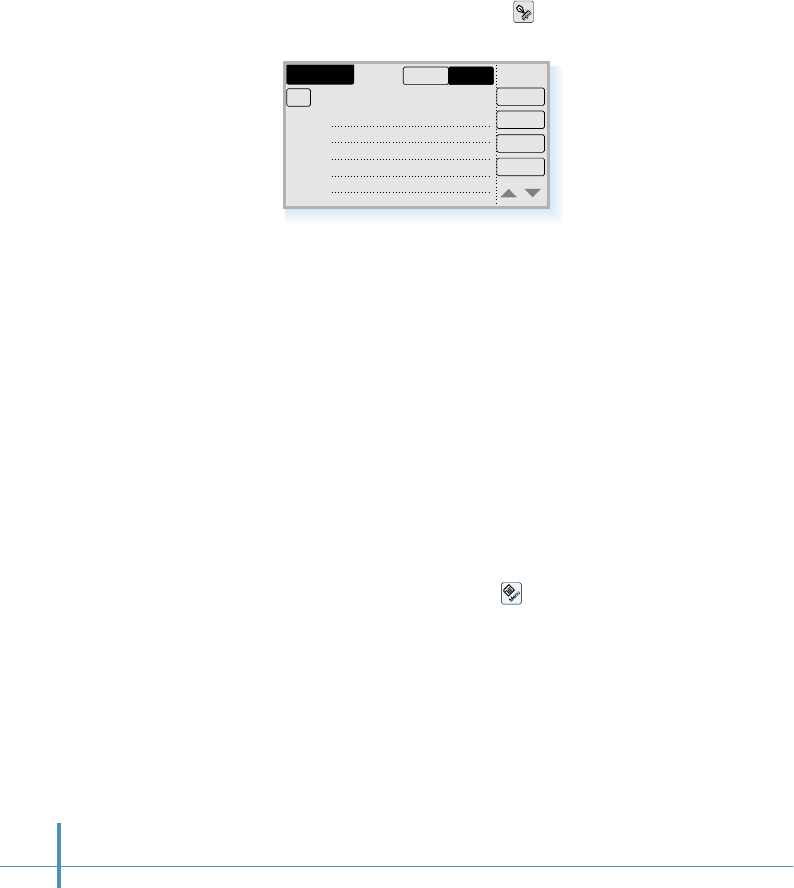
154
4. Fill in the Title and Body field. To write text, position the
cursor in the field, then tap the icon to open the text input
screen and enter a message.
5. Now you can select the following options by tapping the
buttons on the right side:
Draft – Moves the message to the Draft folder to
complete at a later time. You may want to add
additional information before sending it. When you
recall the message to view, it becomes a new
message again, which allows you to edit, copy,
move to the Outbox, or delete.
Out – Moves the message to the Outbox for later use, for
example, to send several messages at the same
data call by choosing Send All from the Message
menu after tapping the icon. Messages in the
Outbox may be edited, moved to the Draft folder, or
deleted.
Send – Sends the message.
Cancel – Cancels the message.
New Mail
Out
Draft
AllMemo
To
Title : Conference
abc@samsung.co.k.
Please attend the
business conference.
Have a great day!
Body : Send
Cancel
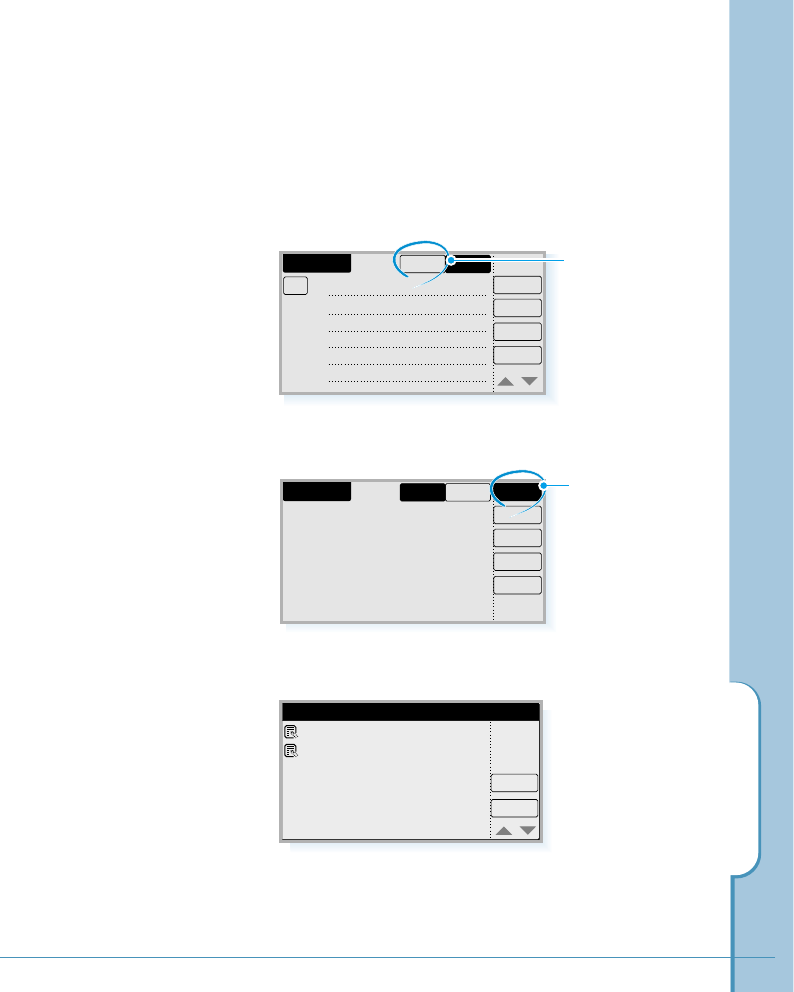
E-mail
155
Attaching a Memo to Your E-mail
If you have created a memo, and you want to attach it to
your e-mail, do as follows:
1. When you create a new mail, tap the Memo button at the
top right of the New Mail screen.
New Mail
Out
Draft
AllMemo
To
Title : Conference
abc@samsung.co.k..
Please attend the
business conference.
Have a great day!
Body : Send
Cancel
Tap to open the
memo screen.
2. New Memo button appears on the right side. Tap the
Memo button.
3. The Attachment List screen opens and displays the memos
available.
4. Select the desired memo from the list, then tap the Memo
button. The memo is attached to the mail immediately, and
you return to the New Mail screen.
Memo
ATTACHMENT LIST
Cancel
Meeting
Speech
New Mail
Out
Draft
Memo
AllMemo
Send
Cancel
Tap to open the
Attachment List
screen.
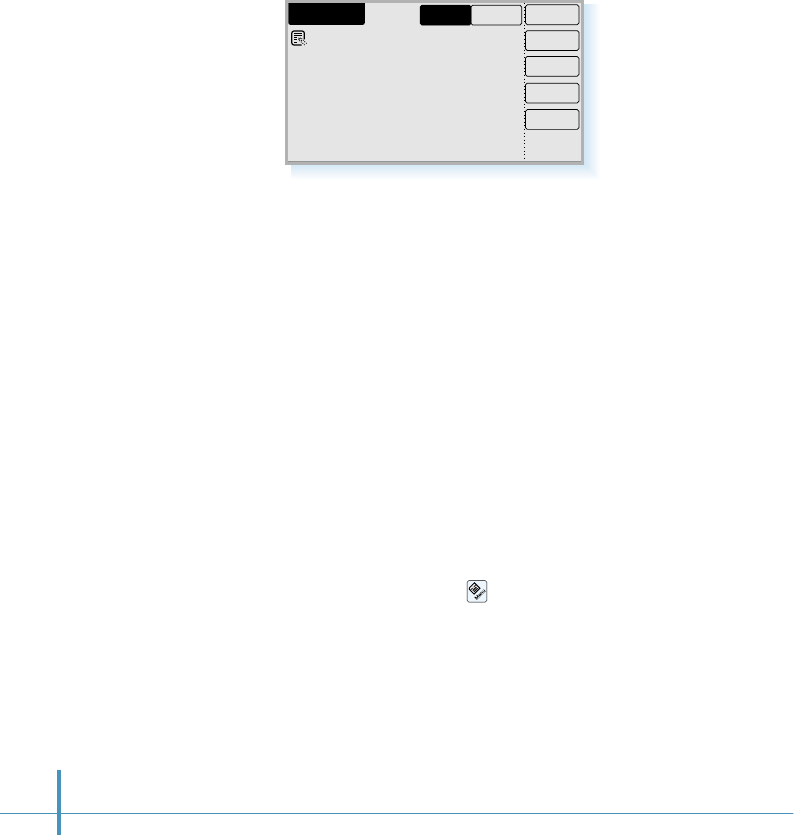
156
Deleting or Viewing the Attached Memo
Tapping the memo opens up an option menu list; View and
Del. Select Del from the pop-up list to delete the open
memo. If you select View, you can view the contents of the
memo.
Sending All Messages Stored in the Outbox
When you have several mail messages to send, send all the
mail during the same data call.
In the Email screen, tap the icon on the hard icon panel,
then select Send All from the Message menu. All
messages stored in the Outbox will be sent.
If you select Send All & Retrieve, all the messages will be
sent, then messages will be retrieved from the remote mail
box.
New Mail
Out
Draft
Memo
All
Conference
Memo
Send
Cancel
5. To send the e-mail message with the attachment, tap the
Send button.
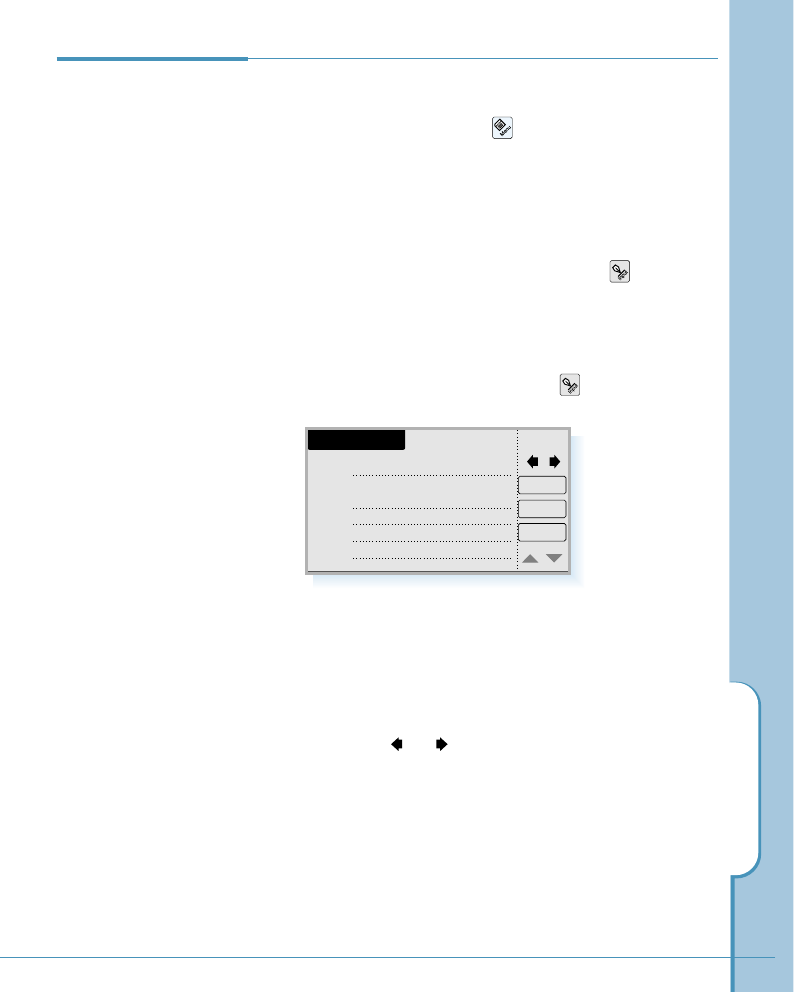
E-mail
157
Writing a
Signature To write a signature, proceed as follows:
1. In the Email screen, tap the icon on the hard icon
panel.
2. Select the Option tab, then select Signatures from the
Option menu.
3. The Edit Signature screen opens. Select the icon on
the hard icon panel to open the text input screen and
enter text for the title. For details on entering a text, see
page 46.
When the Title field is filled, tap the icon and enter
the contents.
4. Tap the Add button to save the signature. If you want to
create other signatures, repeat the above steps.
The total number of signatures saved are displayed at the
top right of the screen. To view other signatures, if
available, tap or .
Tapping the Del button deletes the selected signature.
Tapping the Change button allows you to change the
contents of the selected signature.
5. The stored signature will be added to the end of your
e-mail automatically whenever you send an e-mail. Up to
10 signatures can be saved.
Edit Signature
Del
0/0
Title : Bye
Have a nice day!
Body : Add
Cancel
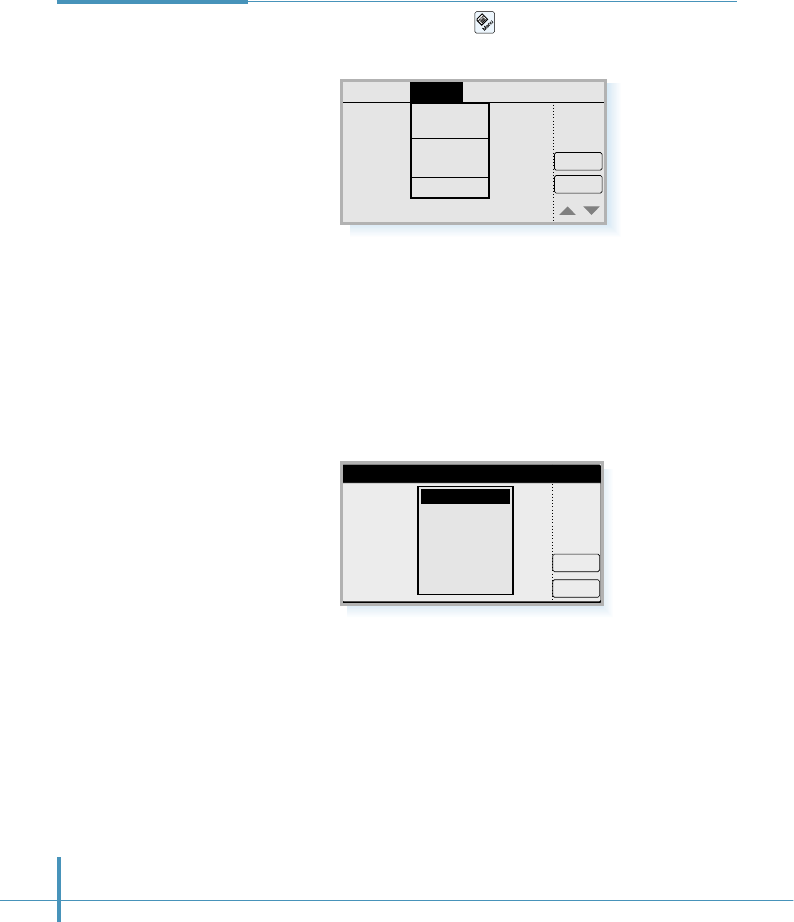
158
Additional
Setup Options In the Email screen, tap the icon on the hard icon panel,
then select the Option tab. The following options are available:
Filters
You can limit the size of the message which is fetched from the
server. Select the desired file size in the Setup Filter screen.
Selecting DEFINE allows you to define the size (up to 60kb).
OK
Setup Filter
Cancel
Size Limit: 10KB
20KB
30KB
40KB
50KB
DEFINE
Clock
New
Get
SMTP
POP3
Filters
Signatures
Option
Deletion
Message Setup

E-mail
159
Deletion
You can choose whether the selected files or folders for
deletion are erased immediately or put into the Trash folder
files stored in the trash can be restored.
The following options are available:
•When deleted – Allows you to set up the following
Delete options;
DEL – Erases the selected files or folders immediately.
In trash – Puts the selected files or folders into the Trash
folder which stores the deleted files and folders until the
system automatically removes them completely by
emptying the Trash folder.
•Empty trash – Allows you to set up the frequency to
empty the Trash. The following options are available;
None, When closed, Per 1 day, Per 3 days, Per 1 week,
Per 2 weeks.
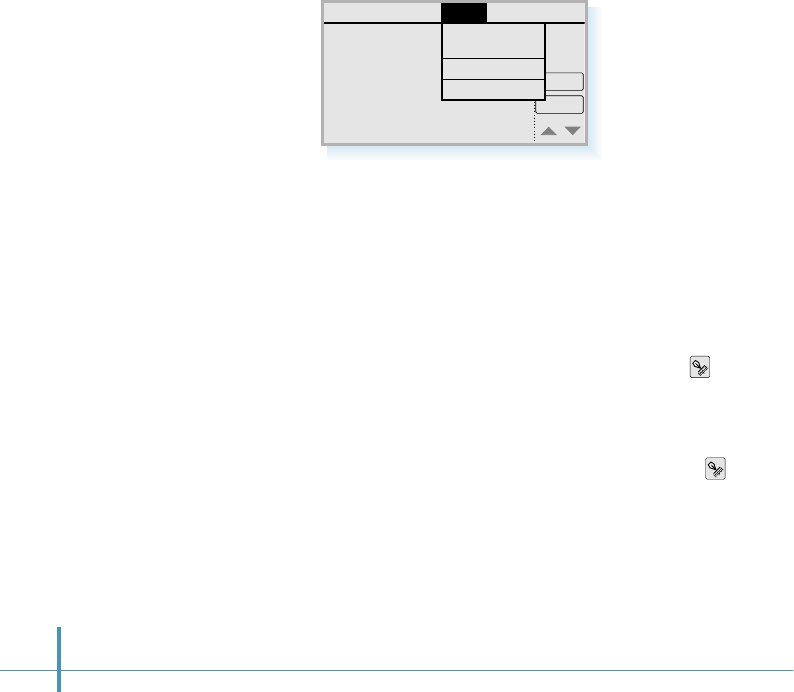
160
In the Edit Folder screen:
• To delete an existing folder:
Select the folder, then tap the Del button.
• To change a folder name:
Select the folder, then tap Change button. Place the cursor
in the position you want to edit or highlight the part you want
to change by dragging the stylus over the part. Tap the
icon and change the name. When the folder name is
changed, tap the Ok button in the Modify screen.
•To create a new folder:
Tap the Add button. To enter a new folder name, tap the
icon and enter the folder name. When the Folder Name field
displays the name you entered, tap the Ok button.
Editing Folder
You can create your personal folder to save your e-mail
messages. Up to 10 folders are available. You can also rename
and delete an existing folder.
To add, rename, or delete folder, select Edit Folder from the
Setup menu.
Clock
New
Get
Edit Folder
Clear Folder
Network Setup
Setup
About Email
Message Option
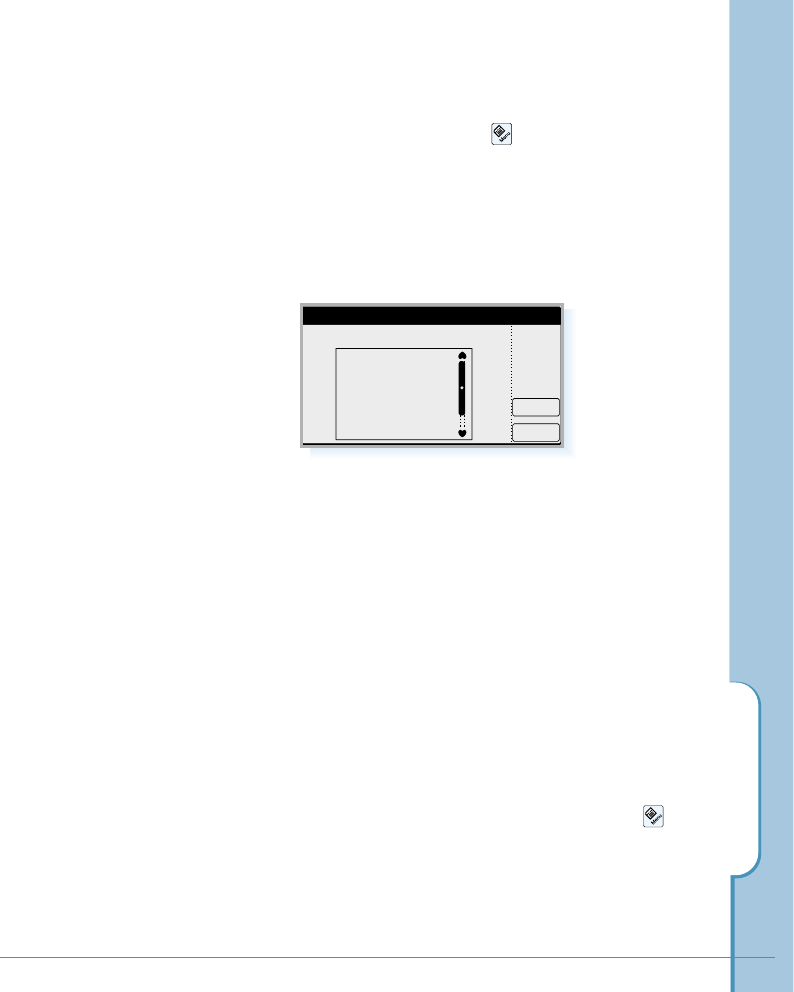
E-mail
161
Clearing Folder
1. In the Email screen, tap the icon on the hard icon
panel, then select the Setup tab.
2. Select Clear Folder from the Setup menu. The Empty
Folder screen opens and displays the folders available. If
available, the numbers of messages stored in the folder is
displayed.
3. Select the folder you want to clear then tap the Empty
button.
4. When you are asked to confirm deleting all mails in the
selected folder, tap the Yes button.
Network Setup
Before you use the e-mail application, you must set up the
network configuration properly. For details on the network
setting, see page 68.
To view the network setting, use the Network Setup
command under the Setup menu, after tapping the icon
in the Email screen.
You can also change the network setting using this menu.
The new setting will be automatically applied to the Internet
and Chat applications.
OK
Empty Folder
Empty
Folder to Empty
Inbox
Sent (3)
Outbox (1)
Draft (2)
Trash
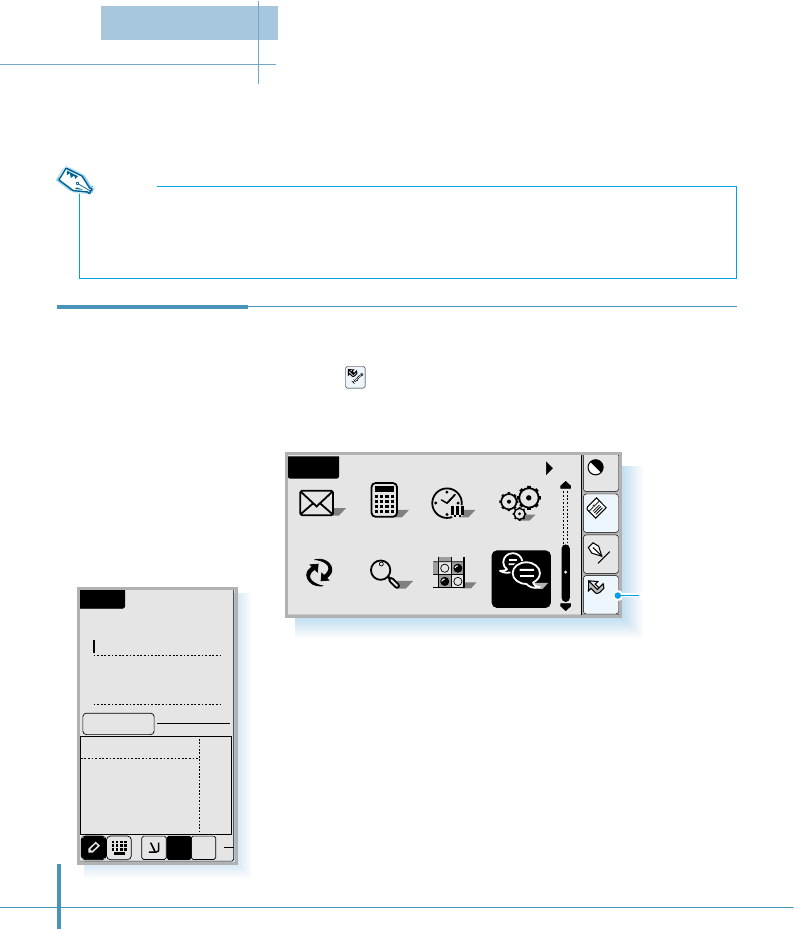
162
Cont
Menu
Input
All
Home
Calc Clock
SMS Ctrl
PCsync Othello
Find
Home
Chat
The Chat feature provides the easiest way to see your friends who are on line and to
communicate instantly with them.
Accessing Chat Service
1. Tap the icon to launch applications.
2. Tap the Chat icon to open the Chat screen.
Using Chat
Service
Chat
ID
:
:
Connect
Password
ABC 123
abc
1$E
3. Enter your registered ID and password. For details on
entering alphanumeric characters for name and message on
the Chat screen, see page 164.
Tap to launch
applications.
Notes:
• Chat service is available only for the registered members of Chat service.
• When you use the Chat service, if there is no input for a predefined time, you will be automatically
disconnected. Retry to connect to use the service.
Chatting
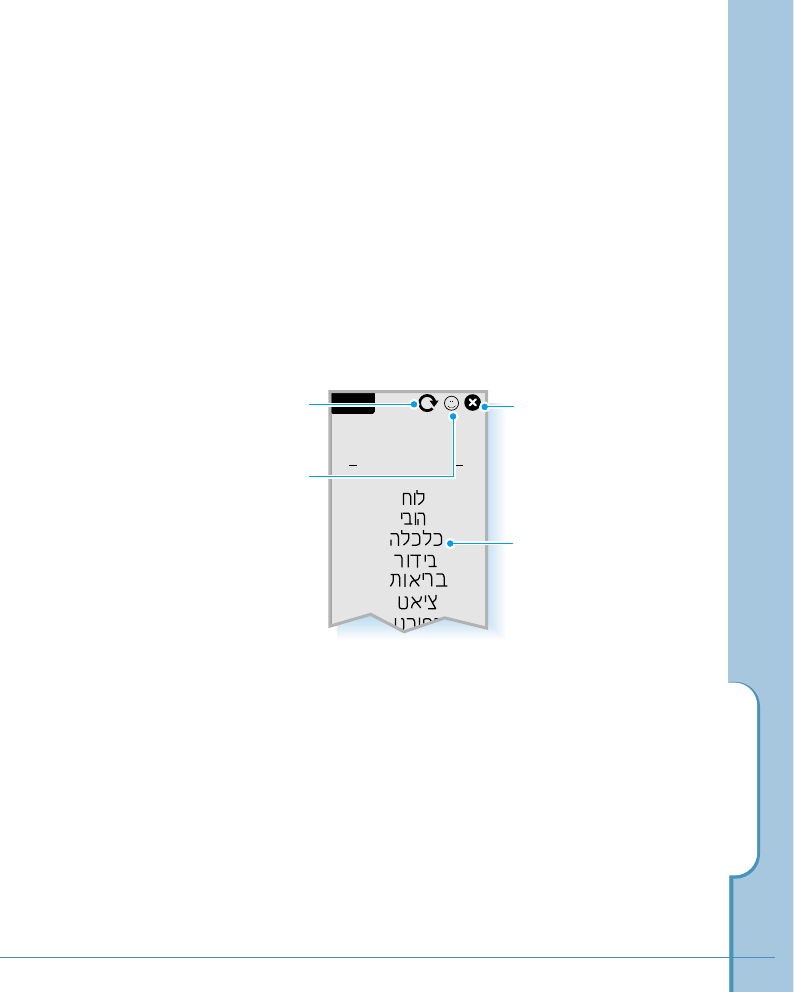
163
Chat
L o b b y
(12)
(2)
(2)
(4)
(0)
(3)
(2)
Chatting
4. After you fill in the ID and Password field, tap the
Connect button. You will be connected to the Chat server.
5. When the welcome screen appears, tap the OK button.
You are now successfully logged in to the Chat server.
6. The list of chat categories is displayed in the Lobby.
Select the chat category that interests you.
7. To join a chat room under the selected category, refer to
“Joining a Chat Room’ on page 165.
Refreshes the open screen
with the up-to-the-minute
information.
Allows you to see the
information on the users who
are on line.
The number of chat rooms
currently open.
Disconnects the chat service.
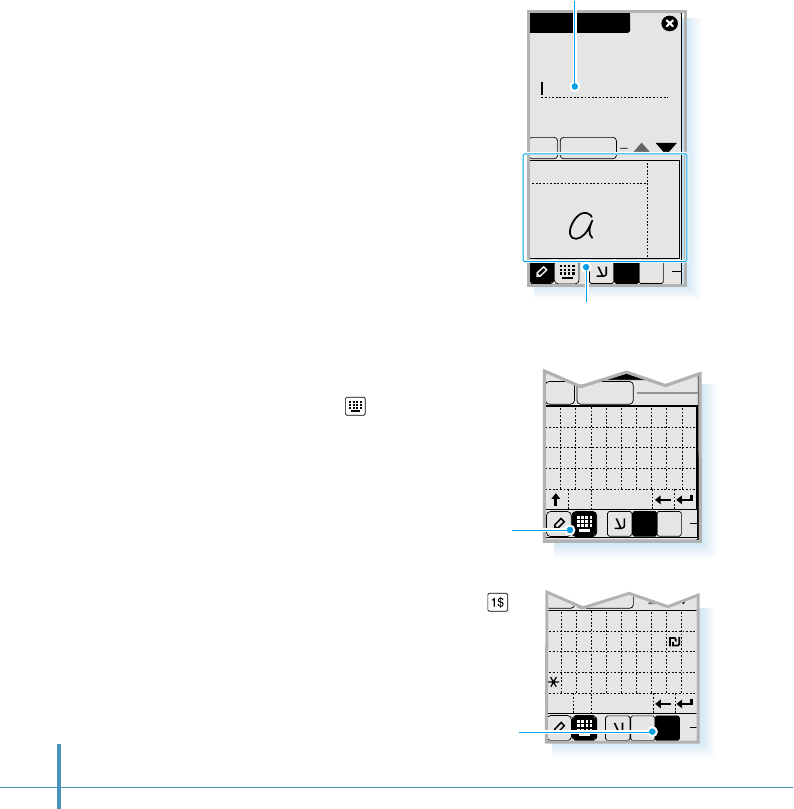
ABC 123
abc
New Channel
Channel
:
OK Cancel
E1$
164
Entering Alphanumeric Characters on Chat Screen
When you use the Chat service
and you are asked to enter ID,
password, or want to type text
messages, the text writing area
appears on the bottom of the
screen.
To fill in the desired field with
the alphanumeric text
information you enter, first tap
the desired field to position a
cursor, then write the characters
in the text writing area on the
bottom of the screen. For details
on writing characters on the text
writing area, see page 46.
You can change the text input
mode. Tap on the bottom of
the screen, and you can select
the desired characters from the
on-screen keyboard.
Text writing area:
Write the characters here.
Letters are displayed as you tap or
write them on the writing area.
Tap to bring up the
symbol input screen.
To enter a special symbol, tap .
Tap to bring up the
on-screen keyboard.
OK
Greeting
0123456789
qwer t yu i op
asdfghj kl ;
zx
cap space
cvbnm, . /
OK Cancel
1$E
OK Cancel
123(){}[]–
4
56
–
~<>
^?
789. ,
$
%
´˝|
0
space
#/+=: ;
`@
&
000
E1$

165
Joining a Chat Room
1. Select the chat category from the list in the Lobby.
2. The screen displays the chat rooms currently open under
the selected chat category.
Chatting
3. Select the desired chat room.
Two menu options pop up;
Join and Info.
To join the room, tap Join.
If you tap Info, you see the
information about the room.
If the selected chat room is
locked, you are asked to enter
password when you try to
enter the room.
Pet Chat
Close
Op. Sarah
:
Date :
2000.3.5 16:31
Topic My pet
:
Users 3
:Limit 4
:
Unlocked
Show Entrants
Join
Allows you to see the information on
the users who are on line.
Disconnects the Chat service.
Tap to see the entrants
who joined the chat.
Tap to join the room.
New
Pet Chat (3/4)
Test (1/7)
L o b b y
(12)
(2)
(2)
(4)
(0)
The number of persons currently in
the room and the total number of
members limited by the room operator
who opens the room.
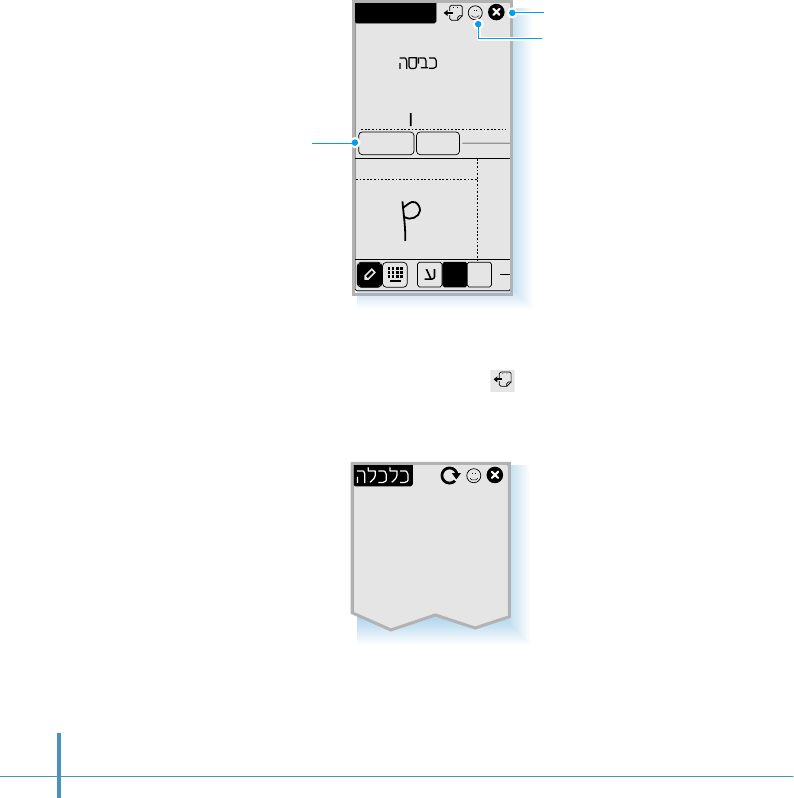
166
4. After you enter the chat room, enjoy chatting on the web
as you normally would on the PC. To enter your message,
tap or write the desired characters in the writing area on
the bottom of the screen, then tap the Send button.
Pet Chat
ABC
dyani>
was good
[buriri]
buriri>
hello out there
what's u
123
abc
CBook Send
E1$
If you want to use the pre-specified
messages in your Chat book, use this
button. For details on Chat book, refer
to “Using Chat Book” on page 171.
Allows you to see the user
information.
Disconnects the Chat service.
5. To leave the room, tap on the top of the screen. You
return to the selected chat category screen and see the
chat room list.
Pet Chat (3/4)
Test (1/7)
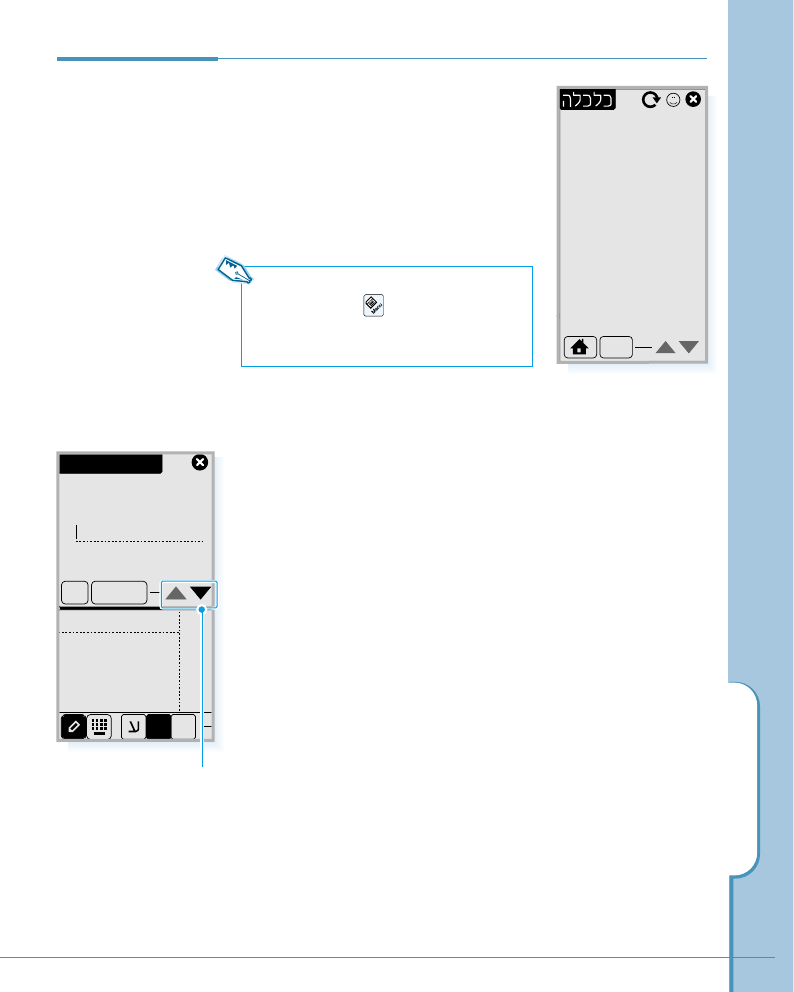
167
1. Select the chat category from the list
in the Lobby. The screen displays the
chat rooms currently open under the
selected chat category.
2. Tap the New button on the bottom
of the screen.
Note: You can also open a new chat room
by selecting the icon when you are in
Lobby or a chat room, then select Create
Chan. from the Tools menu tab.
Chatting
Use these keys to scroll
through the screen.
Creating a
New Chat
Room
New
Pet Chat (3/4)
Test (1/7)
ABC 123
abc
OK Cancel
Channel
:
New Channel
E1$
3. Fill in the following information fields. To fill in the
information field, first tap the desired field to place a cursor
on the selected field, then type the information in the text
writing area on the bottom of the screen. For details on
entering text, see page 164.
• Channel: Enters the name of the chat room.
• Topic: Enters a brief description on the chat topic. It will
be provided in the information on the chat room.
• Limit: Enter the total number of members acceptable for
the room. Tap the upper half to increase the number or the
lower half to decrease the number.
• Locked: If you check this box, the chat room will not open
in public and require password to join the room.
• Password: If you lock the room, enter the log-in password.
4. When you complete entering each field, tap the OK button.
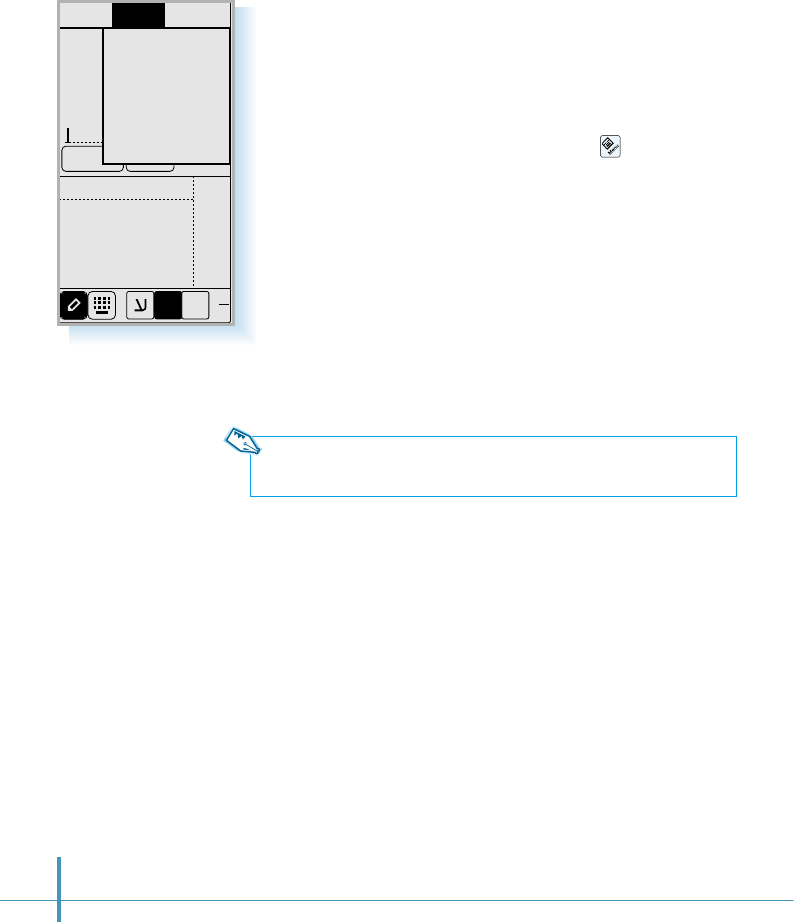
168
Users Config
ABC 123
abc
CBook Send
Use ChatBook
Talk
SendMemo
Invite
Lock Channel
Kick out
Close Channel
Tools
E1$
Using Room Operator Features
When you create a new chat room, you become the room
operator, and can use the following features:
1. To use the room operator features, tap the icon on the
hard icon panel when you are in the chat room.
2. Select the Tools tab on the menu bar. The last four menus in
the pull-down list are available only for the room operator.
Select the desired one.
Invite
With this menu, you can invite a specific person to join the chat
in progress. When the Invitation screen opens, enter the ID of
the person you want to invite to the chat, then tap the OK
button to send the invitation.
Note: You can only invite a person who is subscribed to the Chat service
and is currently logged on.
Lock Channel
With this menu, you can lock the channel while you are in the
chat room. When you select the Lock Channel menu, you are
asked to enter a password.
After you lock the channel, others must have the log-in
password to join the chat room.
Kick Out
With this menu, you can select a member to reject from the
chat room. Select the screen name of the person you want to
kick out from the room, then tap the OK button.
Close Channel
With this menu, you can close the channel.
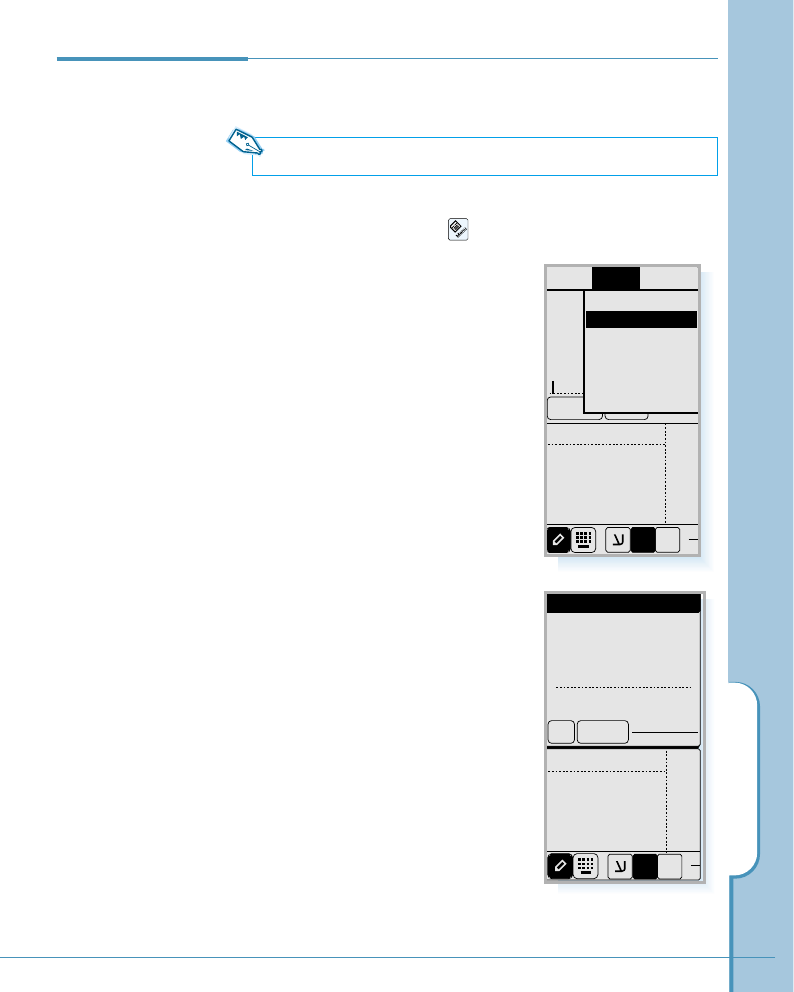
169
Using this menu feature, you can chat with the person you
specified if he or she accepts your request.
Note: Your chat partner must be currently logged in to the Chat server.
1. When you are in the Lobby or a chat room, open available
menus by tapping the icon on the hard icon panel.
2. Select the Tools tab from the
menu bar, and select Talk from
the Tools menu.
You can also access this menu
when you open the My Friend
list. For details, refer to “My
Friend” on page 176.
3. Enter the ID of the person you
want to chat with, and tap the
OK button.
4. When the person accepts your
request, the chat screen appears.
Chatting
Person to
Person Talking
Users Config
ABC 123
abc
CBook Send
Use ChatBook
SendMemo
Invite
Lock Channel
Kick out
Close Channel
Tools
Talk
E1$
Talk
OK
ID:
Cancel
A
BC 123
abc
E1$
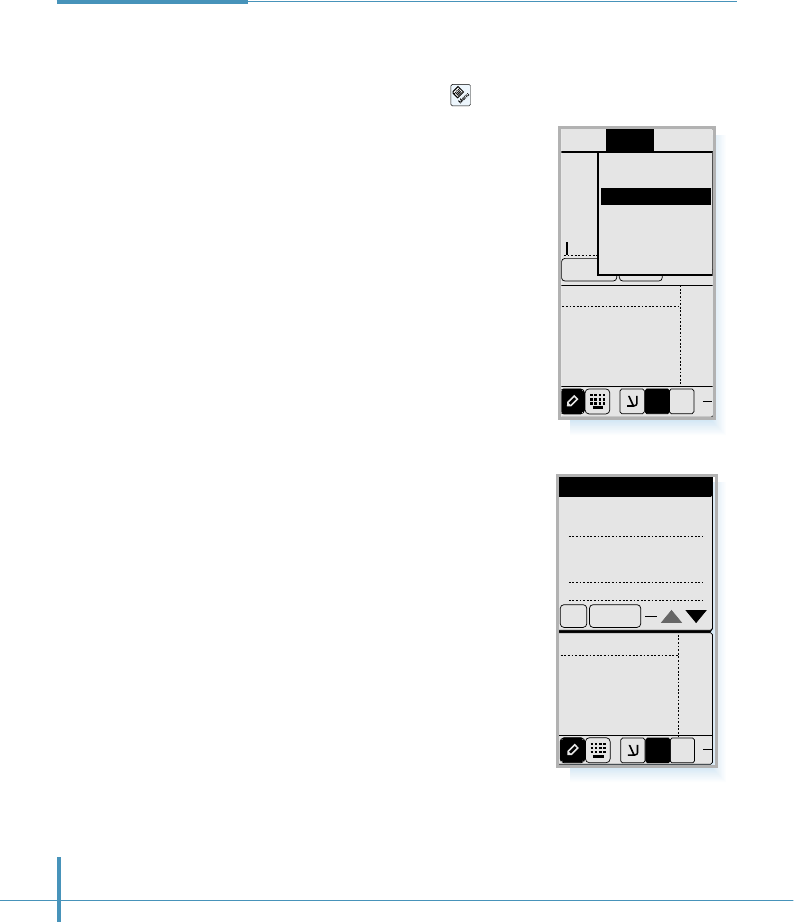
170
Sending a Chat
Memo
You can send a chat memo to a specified person who is on-line.
1. When you are in the Lobby or a chat room, open available
menus by tapping the icon on the hard icon panel.
2. Select the Tools tab on the menu
bar, and select SendMemo from
the Tools menu.
You can also access this menu
when you open the My Friend list.
For details, refer to “My Friend” on
page 176.
3. Enter the ID of the person you want
to send the memo to, then enter the
desired message in the text writing
area. When done, tap the OK button.
The person who received your
message can reply by tapping the
Answer button on the memo
screen.
Users Config
ABC 123
abc
CBook Send
Use ChatBook
Invite
Lock Channel
Kick out
Close Channel
Tools
Talk
SendMemo
E1$
Send Memo
OK
ID:
Cancel
Text :
ABC 123
abc
E1$
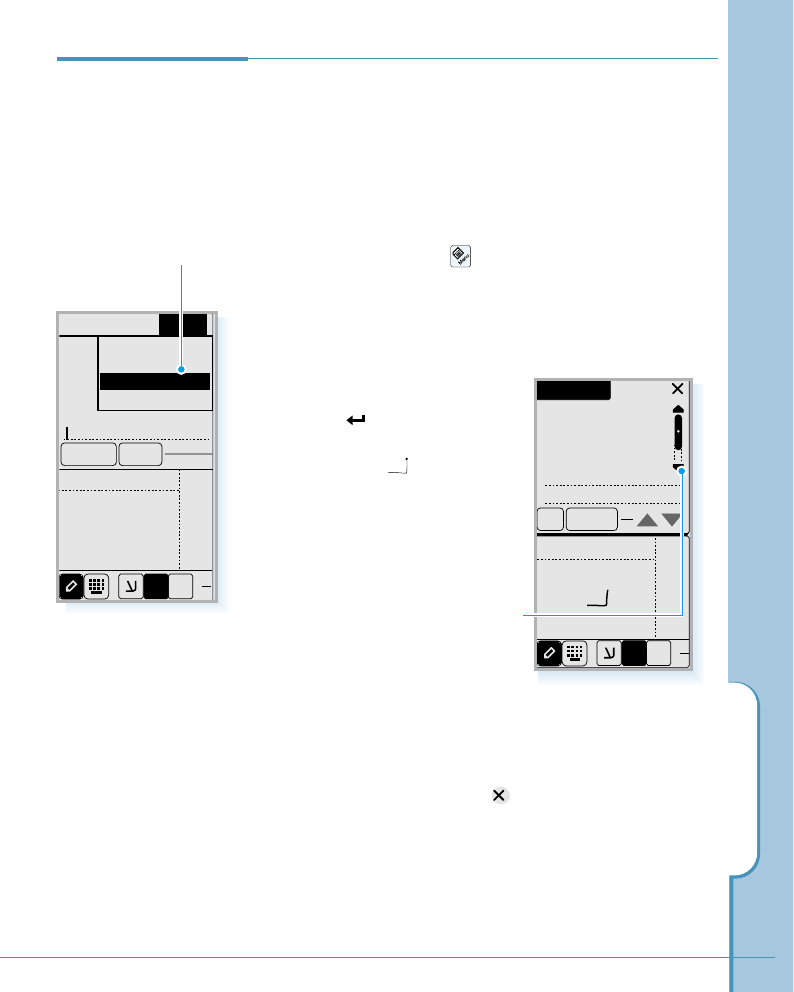
171
Chatting
If you store frequently used messages in your Chat Book, you
can use them easily in your message when you write a chat
message.
Creating Your Personal Chat Book
1. When you are in the Lobby or a chat room, open available
menus by tapping the icon on the hard icon panel.
2. Select the Config tab on the menu bar, then select Edit
ChatBook from the pull-down menu.
3. Write the message you want,
and tap on the on-screen
keyboard (or write a carriage
return stroke in the drawing
mode) to confirm and add the
message to the Chat book. The
entered message will appear in
the top of the Chat Book screen.
Using Chat Book
Tap to add the message to
the Chat Book.
Adjusts this on-screen scroll bar to
scroll through the screen.
4. Repeat step 3 until you complete adding messages in
the Chat Book.
5. To close the Chat Book, tap in the top right of the
screen.
You can also delete or modify a message with Chat Book
screen. Select a message to delete or modify from the
Chat Book list. The contents appear at the top of the
screen in the box. Tap the Del or Modify button.
Users
ABC 123
abc
CBook Send
Show LapTime
Set Recv.
Set Server
Tools Config
Edit ChatBook
E1$
Chat Book
Del Modify
A
BC 123
a
bc
hello
hi everyone ~
what's up
i was kidding
E1$
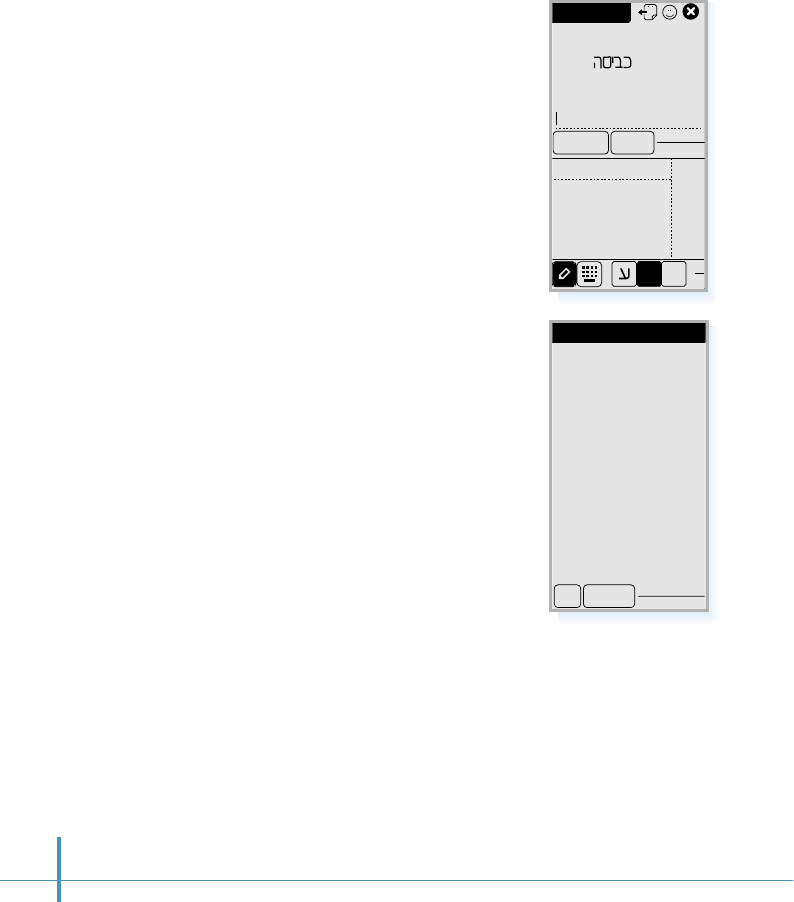
172
Using Chat Book
1. When you are in a chat room, you
find the CBook button on the
screen.
2. Tapping the button opens the
Chat Book you have created.
3. Select the desired message in
the Chat Book, and tap the OK
button. The selected message
appears in the text input field.
4. Tap the Send button to send the
message.
Pet Chat
ABC
dyani>
was good
[buriri]
buriri>
hello out there
123
abc
CBook Send
E1$
Chat Book
OK Cancel
hello
hi everyone ~
what's up
bye
i was kidding
not interest ~
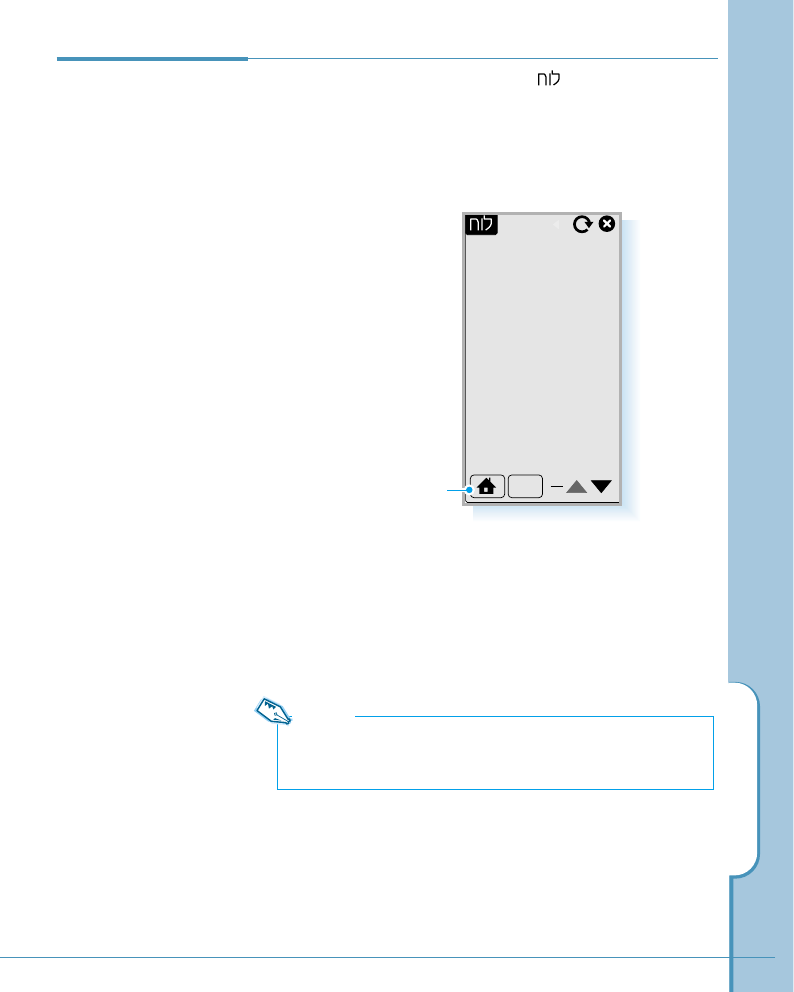
173
Chatting
Using Bulletin
Board
1. When you are in the Lobby, select .
2. When the welcome screen appears, tap the OK button.
Then the Bulletin screen opens and you see the bulletins
currently uploaded.
3. Select the desired message from the list. A menu showing
available options pops up. To see the contents, tap See
from the menu.
Tapping Del deletes the selected message.
4. If you want to write a new bulletin message, tap the New
button.
New
the beach em622
For 30s filz007
do not! pearl
1/1 Page(s)
Note:
Del menu is available only for the selected bulletin message
writer and the Chat sever administrator.
Returns to the Chat home.
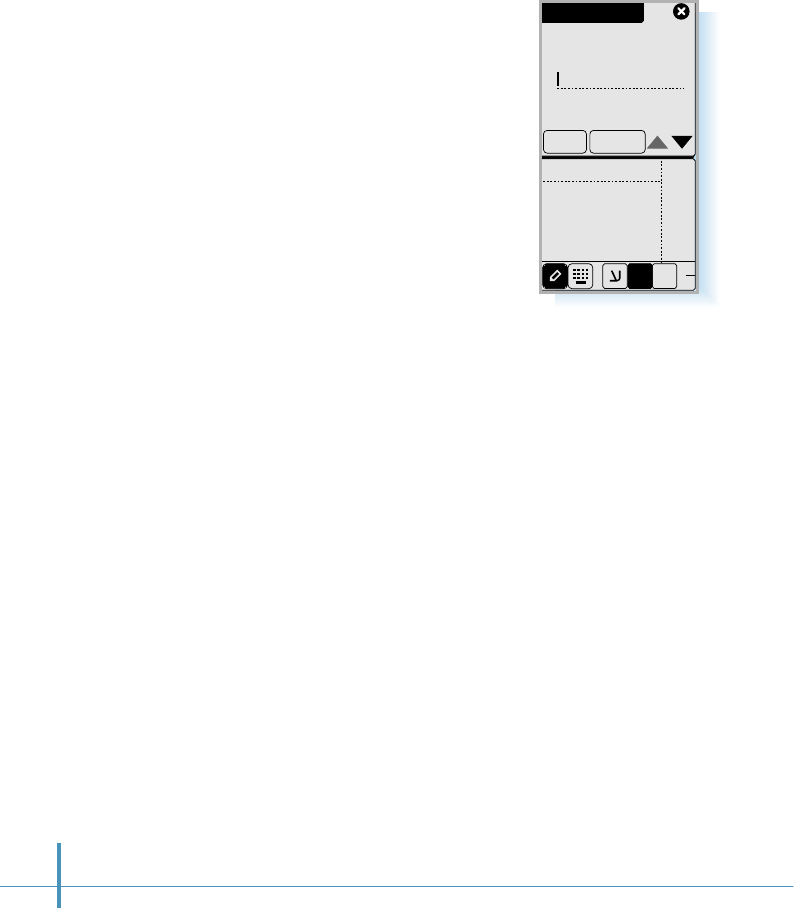
174
5. Fill in the following fields:
• Title: Enter the title for your
bulletin board.
•Text: Enter the contents.
• Link to Chan.: Check this box
to connect to the chat room
you select from the pick list.
• Channel: If you check the
Link to Chan. box, enter the
channel name you want to
link.
6. After you filled in the fields, tap the Write button.
7. When the Chat screen prompts you tap the OK button. Now,
you can see your message on the Bulletin board.
ABC 123
abc
CancelWrite
Title
:
Write Board
E1$
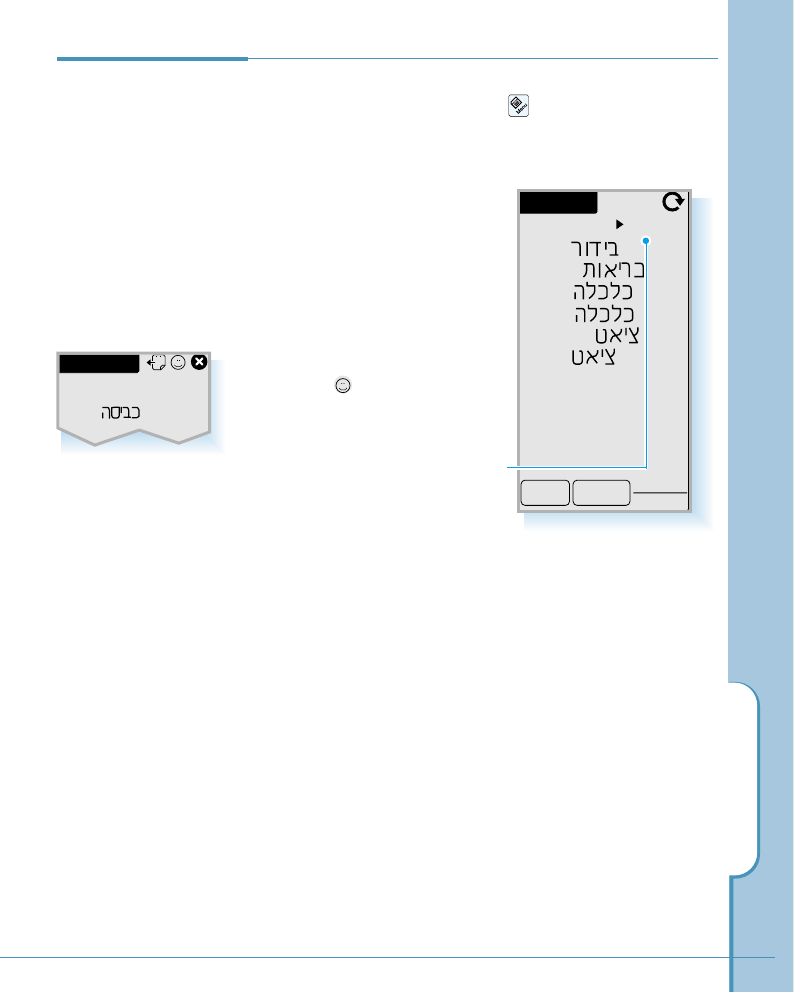
175
Chatting
Additional
Chat Menu
Options
When you are in the Chat screen, you are allowed to use the
following menu options. Tap the icon on the hard icon
panel and select the following menu options from the Users,
Tools, or Config menu tab.
User’s Info
This feature allows you to see
the information about the users
in the selected chat room or
selected category.
This menu is also accessible
with the icon at the top right
of the screen when you are in
the Lobby or a chat room.
If you select a user, the following option menu pops up.
• Info – to display the selected person’s information such as
e-mail ID, birth, and job. The user information was
registered when the user subscribed to the service.
• Talk – to invite the selected person to a chat room in
progress.
• SendMemo – to send a chat memo to the selected
person.
Category pick list. You can
select another category.
L o b b y
User Info.
Close Search
dyani[ ]
em622[ ]
Entire
sweet[ ]
drekid[ ]
neo1984[ ]
sarah[ ]
Pet Chat
dyani>
was good
[buriri]
buriri>
hello out there
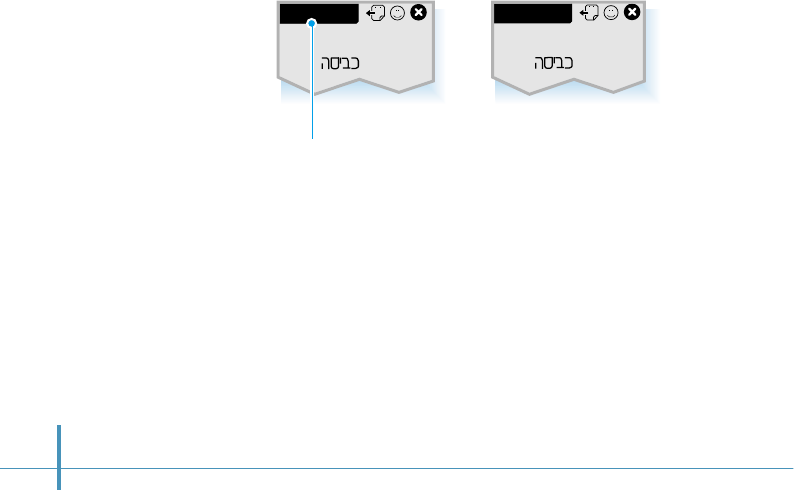
176
Search User
Allows you to search a specified user.
My Friend
Allows you to register your friends, family members, coworkers,
or other registered Chat users in the My Friend list. Use Add
button to add friends to the list. If added, you can talk or send a
memo directly to one of them when you open the My Friend
list.
Show LapTime
Displays the lap time you are connected to the Chat server
instead of the title in the top left of the screen.
If you select Show Title, you see the title in the top left of the
screen.
Tap here to toggle the lap time
and the title display.
Pet Chat
dyani>
was good
[buriri]
buriri>
hello out there
00:05:21
dyani>
was good
[buriri]
buriri>
hello out there
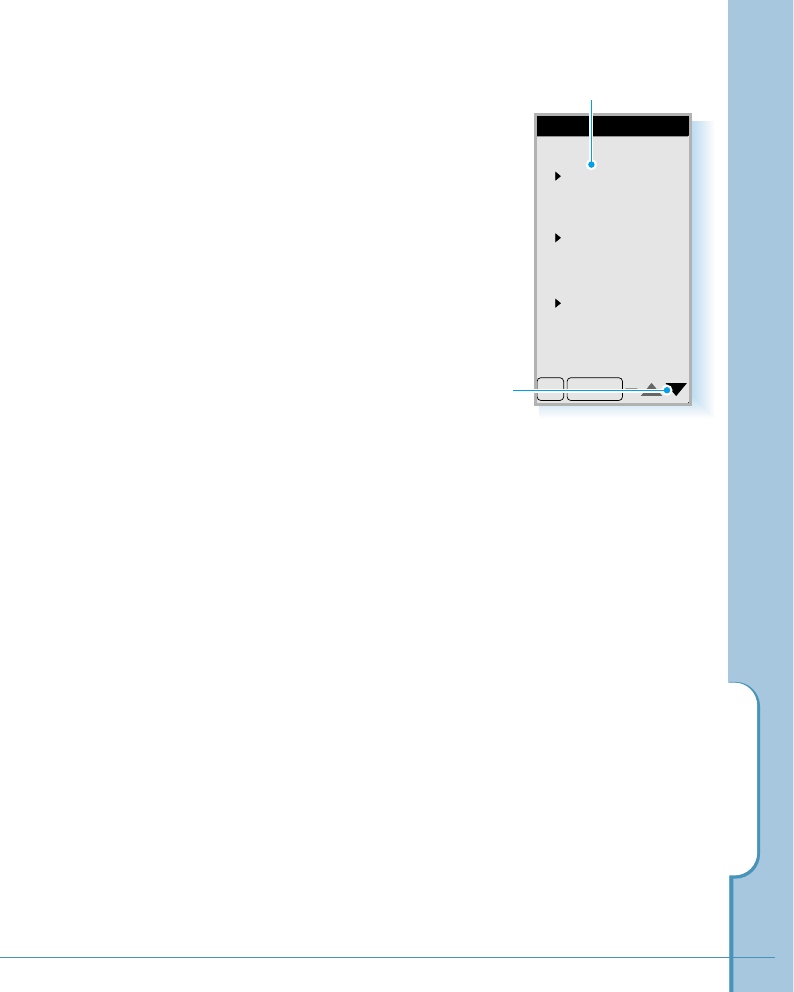
177
Chatting
Set Server
With this menu, you can change the Chat server setting. The
server is preset at factory, so you do not need to change it
under normal circumstances.
Set Recv.
Allows you to block any or all
Chat users from sending you the
person-to-person Talk, Memo, or
Invitation messages. This feature
is useful if you find someone’s
message offensive or if you
simply don’t want to receive
messages for a while.
The following options are available:
• Receive All – To allow everyone to send you messages.
• Reject All – To block everyone from sending you
messages.
• Reject by Ban List – To block specific users from
sending you a message.
If you want to add new IDs in the Ban List, tap the Add
button below the Ban List, and type the name of the user
you want to add in the Ban List. You can also delete one
from the list.
Option
1. Talk
2. Memo
3. Invitation
Receive All
Receive All
Receive All
OK Cancel
Use the keys to scroll
through the screen.
Tap the pick list to select the
mode.

Extra
This chapter provides information on the
following topics:
• Clock
• Calculator
• Othello
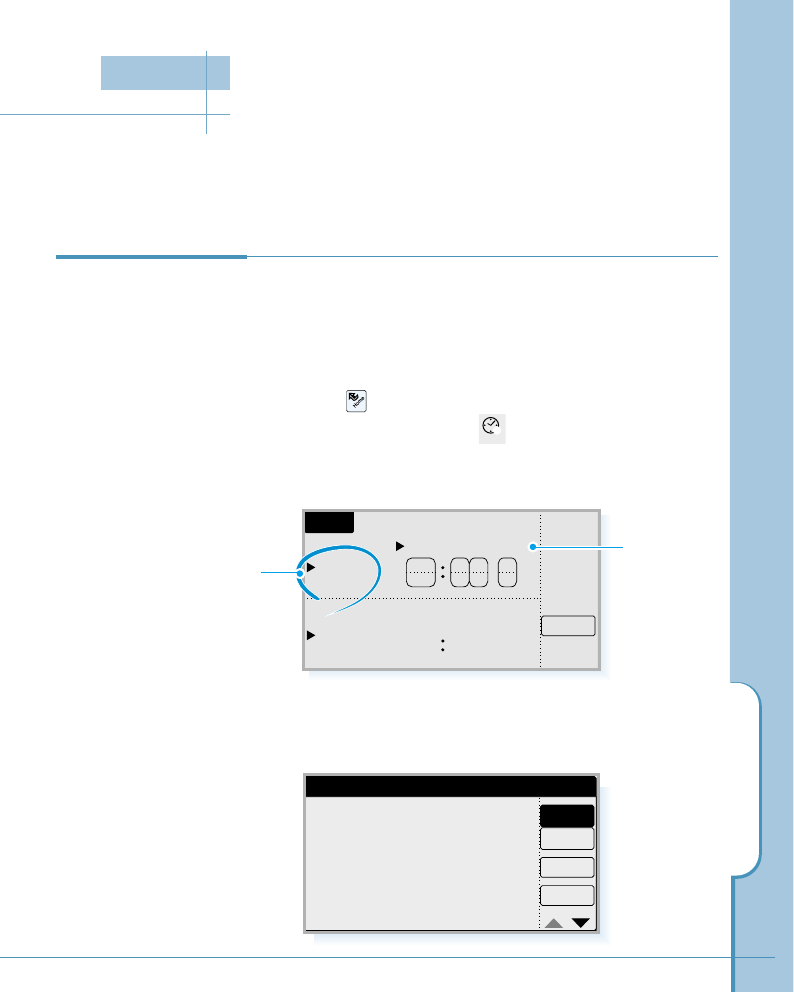
179
Clock
The clock shows the time and date in your home city and country, as well as in many
other cities and countries around the world. The clock also includes an alarm clock.
Clock
Home
World
Jerusale
Alarm
836
A
M
P
M
12 3 6
NewYork
2000.02.27.SUN
2000.02.26.SUN
When it is turned on, your phone reads the correct time over
the air and sets the applications to use this time. Therefore,
you don’t have to set the time, but you do have to specify
your home city.
1. Tap the icon on the hard icon panel to launch
applications, then tap the icon to open the Clock
screen.
2. Tap the Home pick list.
Setting Home
Time
3. When the Select Area screen opens, select your home
area. You can view the list by the city or country. After
selecting, tap the OK button.
Select Area
Country
City
Cancel
OK
Abudhabi
Addis-ababa
Algiers
Amman
Amsterdam
Anchorage
U.A.E
Ethiopia
Algeria
Jordan
Netherlands
U.S.A
Clock
W
Home pick list Date / time
pick list
Clock
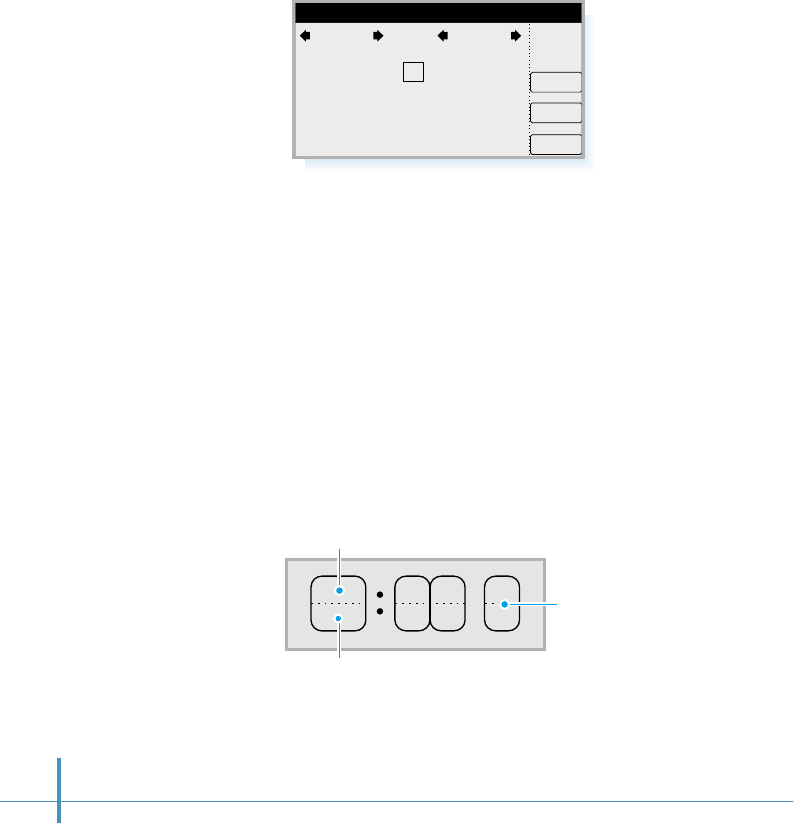
Today
Cancel
OK
Select Date
2
9
16
23
30
3
10
17
24
4
11
18
25
5
12
19
26
6
13
20
27
7
14
21
28
1
8
15
22
29
2000 Apr
5. Tap the arrows at the top of the screen to locate the year and
the month. Then tap the current day on the calendar.
If you tap the Today button, the clock sets the current date
automatically.
6. Tap the OK button.
7. Select the time. If you tap the upper half, the number
increases and if you tap the lower half, the number
decreases.
Tap the upper half to increase the number.
Tap the lower half to decrease
the number.
Tap to set AM or PM.
180
4. Tap the date/time pick list to change the date and time. The
Select Date screen opens.
836
A
M
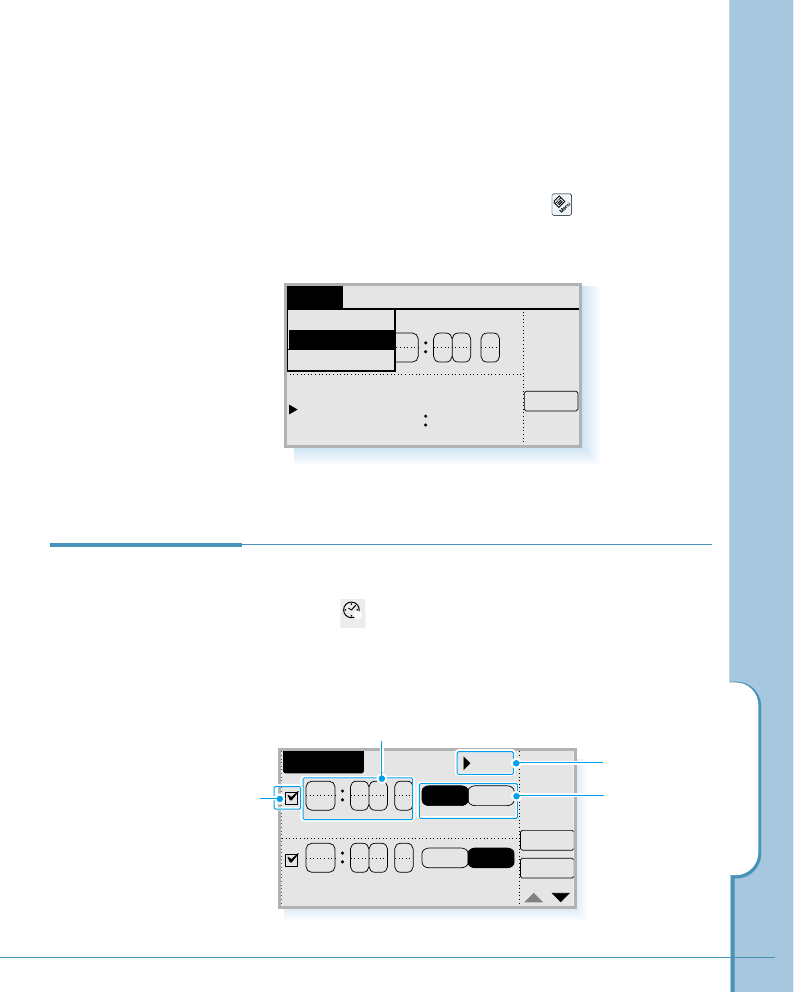
Clock
181
Setting the Base Station Time
You can sync the current time with the base station (cellular
network) time.
When the Clock screen opens, tap the icon on the hard
icon panel. Select System Time from the Setup menu as
shown below.
Clock
Home
World Alarm
836
A
M
P
M
12 3 6
About Clock
Setup
New York
Info
System Time
Setting Alarm You can set up to six different alarms.
1. Tap the icon in the Home screen to open the Clock
screen.
2. Tap the Alarm button to open the Set Alarm screen.
Set Alarm
600
A
M
600
P
M
Daily Once
Daily Once OK
Cancel
Bell 1
Enter the required time.
Clock
W
Check the box
to activate the
alarm
Alarm Tone
Frequency of the
alarm
Note:
Alarms will occur according to the home city time. When in a
different time zone, remember to change the home city.
To turn off the alarm sound
When the alarm sounds, press any key on the side of the phone
(except the Power key) or open & close the flip to silence it.
If you do not silence the ringing, the alarm will sound for 3
minutes.
When you silence the alarm, a dialog opens and shows the
message “The alarm is expired” and asks you to view more
details of your alarm setting. If you tap Yes, the Set Alarm
screen opens to allow you to view your alarm setting and to set
an alarm, if you wish.
182
3. Put a check mark in the checkbox to activate the alarm.
4. Enter the required time. If you tap the upper half, the number
increases and if you tap the lower half, the number
decreases.
5. Select the frequency of the alarm.
•Daily: The alarm rings everyday at the same time.
•Once: The alarm rings only once and is then deactivated.
6. Select the alarm tone from the pick list in the upper-right
corner. You can choose between 10 bells and 8 melodies.
7. If you want to set more alarms, tap ❷to move the next
screen, then repeat the above steps. You can set six alarms.
8. Tap the OK button to confirm.
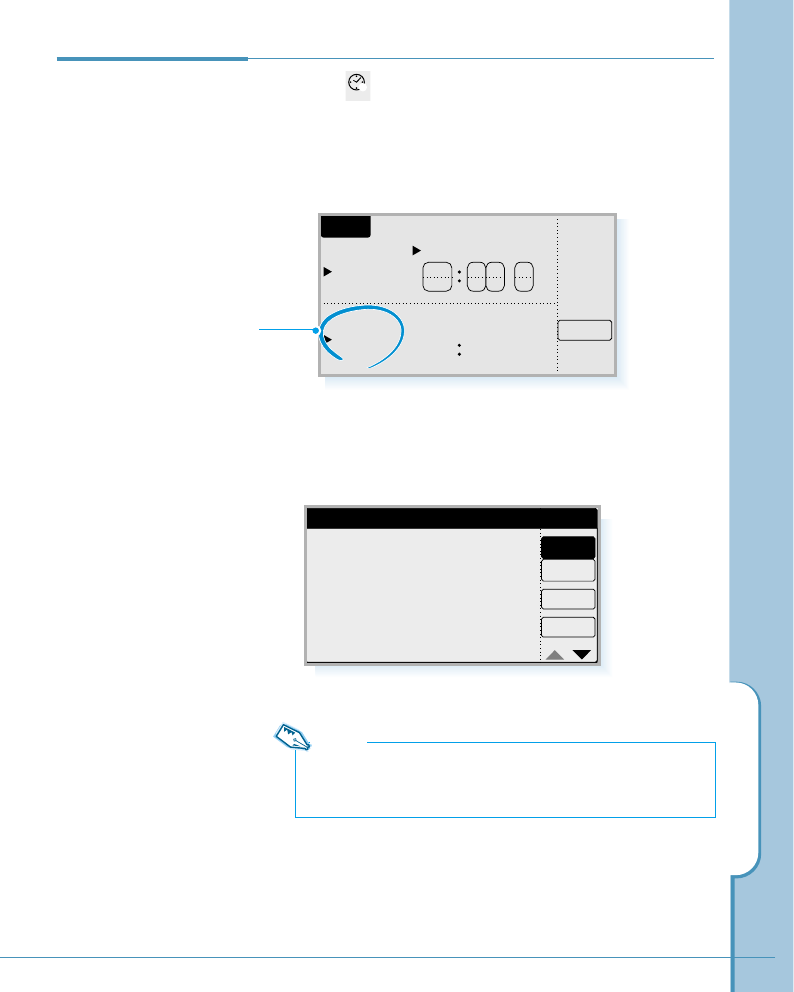
Clock
183
Clock
Home
World
Jerusale
Alarm
836
A
M
P
M
12 3 6
NewYork
2000.02.27.SUN
2000.02.26.SUN
1. Tap the icon in the Home screen to open the Clock
screen.
2. Tap the World pick list.
Viewing
World Time
Clock
W
World pick list
Note:
You can display the world time of the selected city or country in
the Phone screen. See page 64.
3. Select the desired city or country in the Select Area
screen, then tap the OK button.
Select Area
Country
City
Cancel
OK
Abudhabi
Addis-ababa
Algiers
Amman
Amsterdam
Anchorage
U.A.E
Ethiopia
Algeria
Jordan
Netherlands
U.S.A
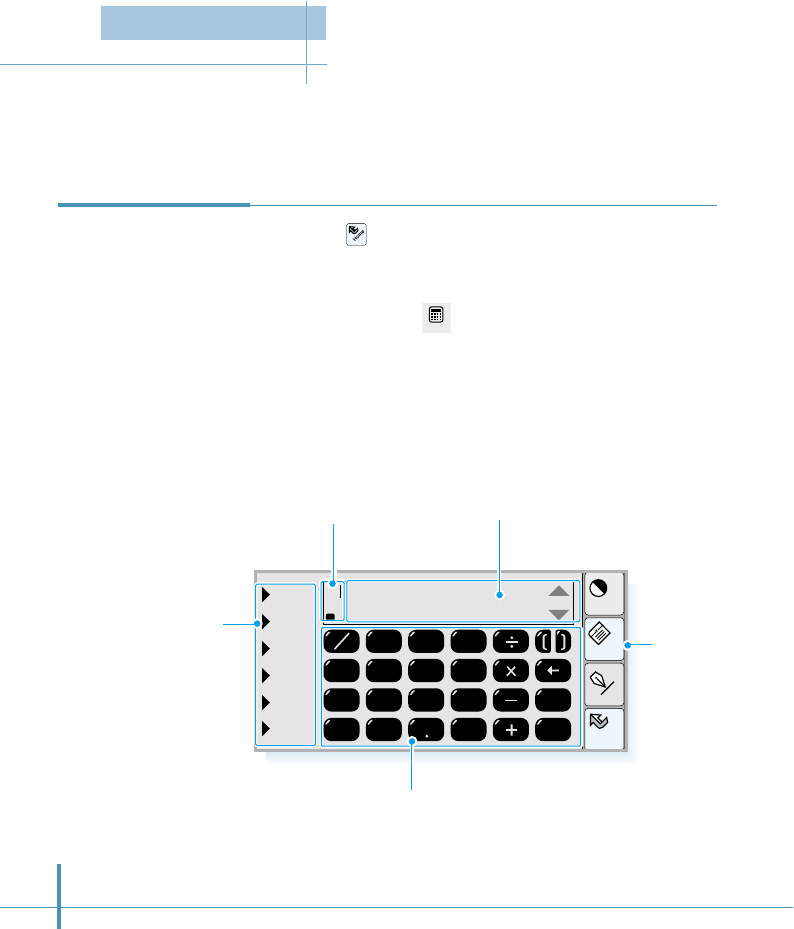
1. Tap the icon on the hard icon panel to launch
applications.
2. Tap the Calc icon to open the calculator screen.
Using the on-screen calculator, you can use the phone as a calculator. The calculator
provides the basic arithmetic functions (addition, subtraction, multiplication, division) and
complex engineering calculation features.
Home
Cont
Menu
Input
tri
exp
pow
stat
type
etc
R
B
M
D
789
456
1
0=
MS
C
MR
del
MC
+–
23
Opening the
Calculator
Function categories.
Tap one of the categories.
(tri=trigonometrical
exp=exponent
pow=power
stat=statistical)
You will see a list of
functions and you can
select the one you want. Use the keys as you would
with a normal calculator.
Currently selected mode.
•D– Statistical data.
•M– indicates that the memory function is
currently operating.
•B– Binary system. O(8) and H(16) are also
available.
•R– Currently selected trigonometrical mode.
Calculation field. Use ❷or #
key in the right corner to scroll
through the calculation list.
Tap to access
menus available
in the calculator
screen.
184
Calc
Calculator
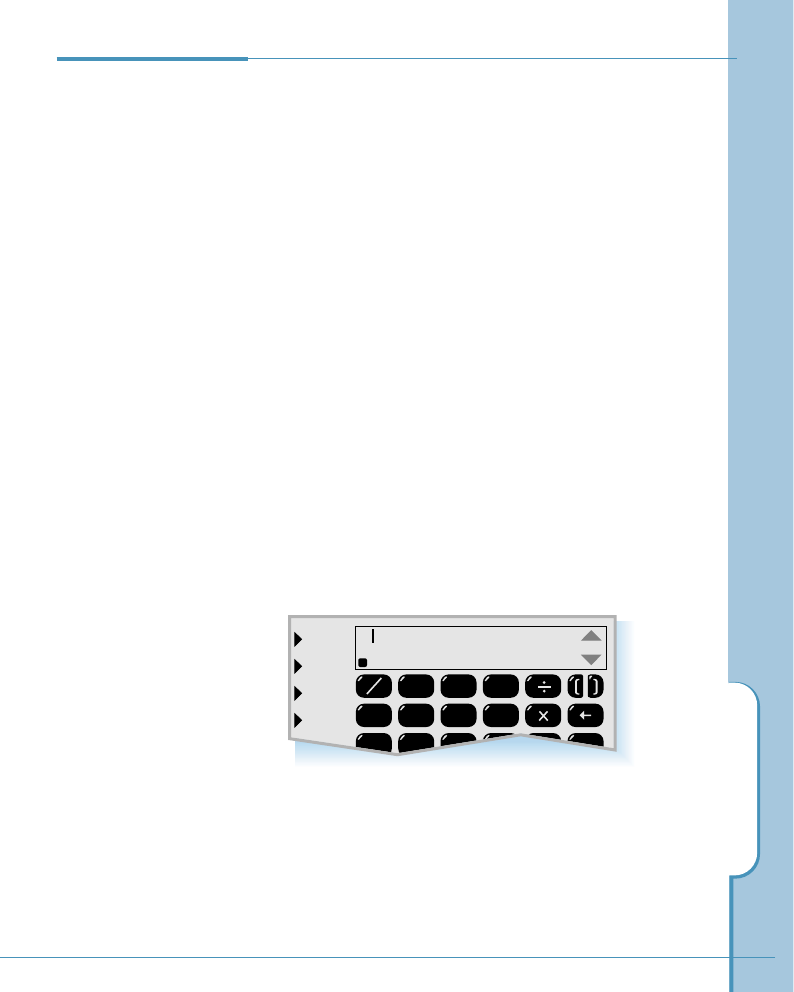
Calculator
185
1. Input the first number. The number appears at the top of
the calculation field.
2. Select the operator you want.
If you want to add functions, tap one of the available
categories, then select the one you want from the pop-up
list of functions.
3. Enter the second number.
4. Repeat these steps as many times as needed.
As long as you have not pressed =, you can move or
delete in the calculation string with the Edit menu. See
page 186.
5. Tap =. The results of the calculations appear in bold, in
the lower-right corner of the calculation field.
Using the
Calculator
tri
exp
pow
stat
type
R
B
M
D
789
456
1
MR
del
MC
+–
23
1822 x 0.23 + 20 – 18.2
=420.86
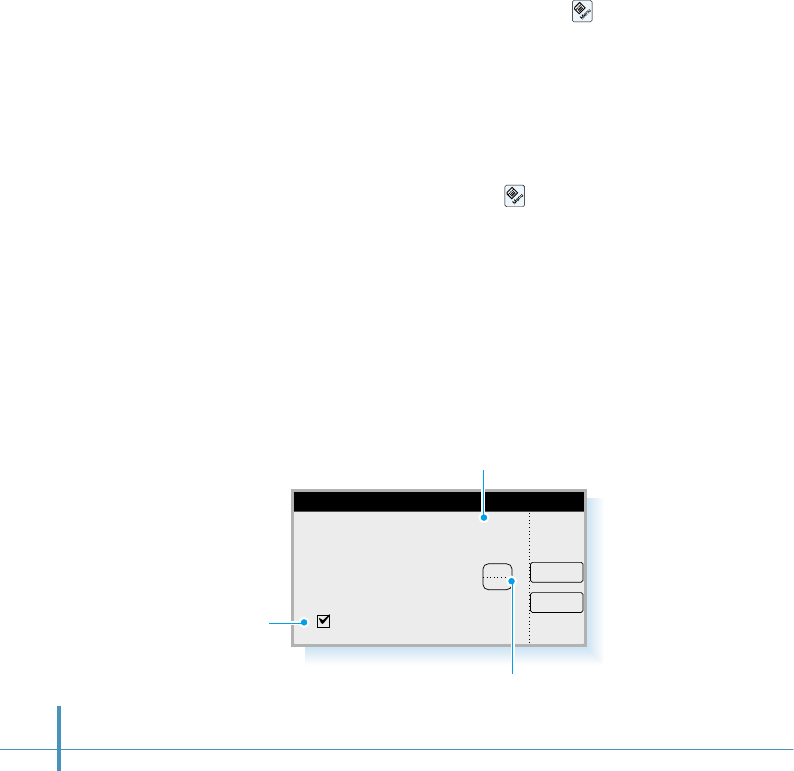
186
Changing the Number Format
1. In the calculator screen, tap the icon on the hard icon
panel.
2. Select the Config menu, then select Number Formats.
3. Set the number format you want in the Number Formats
screen.
4. When finished, tap the OK button.
If the box is checked,
commas are inserted to
separate thousands.
OK
Number Formats
Ex) 12,345,0 .. 0 (Auto)
Arbitrary base numbers
Commas for thousands
Cancel
0
Currently selected number
format
Tap the upper half to increase the number or
the lower half to decrease the number.
Editing
You can use the general editing features such as Cut, Copy and
Paste for modification or recalculation.
While using the calculation feature, tap the icon on the
hard icon panel. Then select the desired editing command from
the Edit menu.

Calculator
187
Changing the Trigonometric Mode
1. In the calculator screen, tap the icon on the hard icon
panel.
2. Select the Config tab, then select Trigonometric Mode
from the pull-down list.
3. Select either RAD (Radian), DEG (Degree), or GRAD (100),
then tap OK.
The selected mode is indicated as the initial letter in the
lower-left corner of the calculation field.
OK
Trigonometric Mode
Degree
Radian
Grad (100)
Cancel
DEG
GRAD
RAD
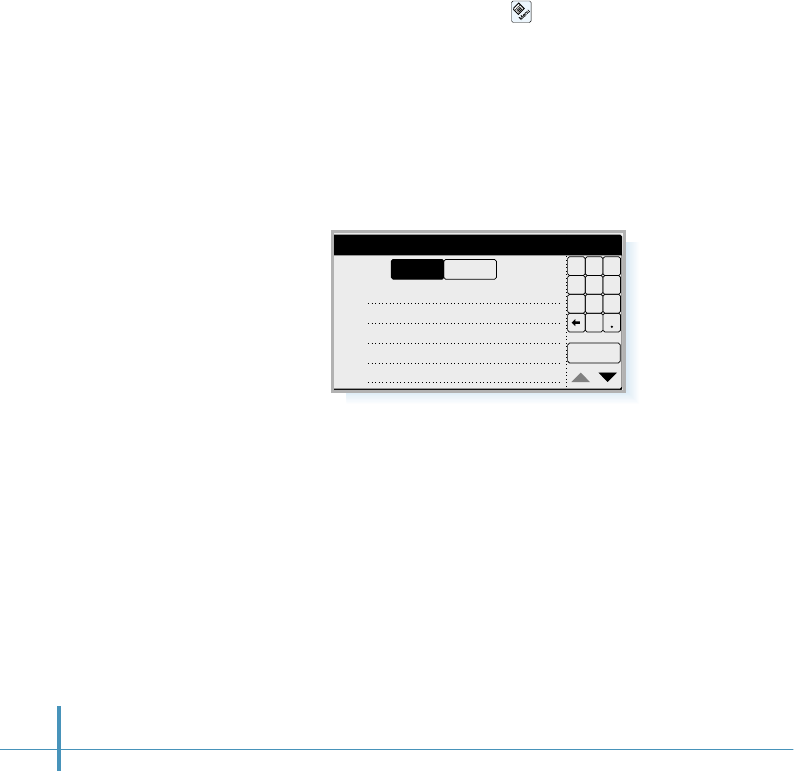
188
To Input Statistical Data
You can input up to 50 items individually in the xfield and y
field in the Statistical Data Input screen.
1. In the calculator screen, tap the icon.
2. Select the Config tab, then select Statistical Data Input.
The Statistical Data Input screen opens.
3. Tap the desired field to move the cursor in the field, then
enter the desired number, and tap the OK button.
OK
Statistical Data Input
01:
02:
03:
04:
05:
1 2 3
4 5 6
7 8 9
0
yx
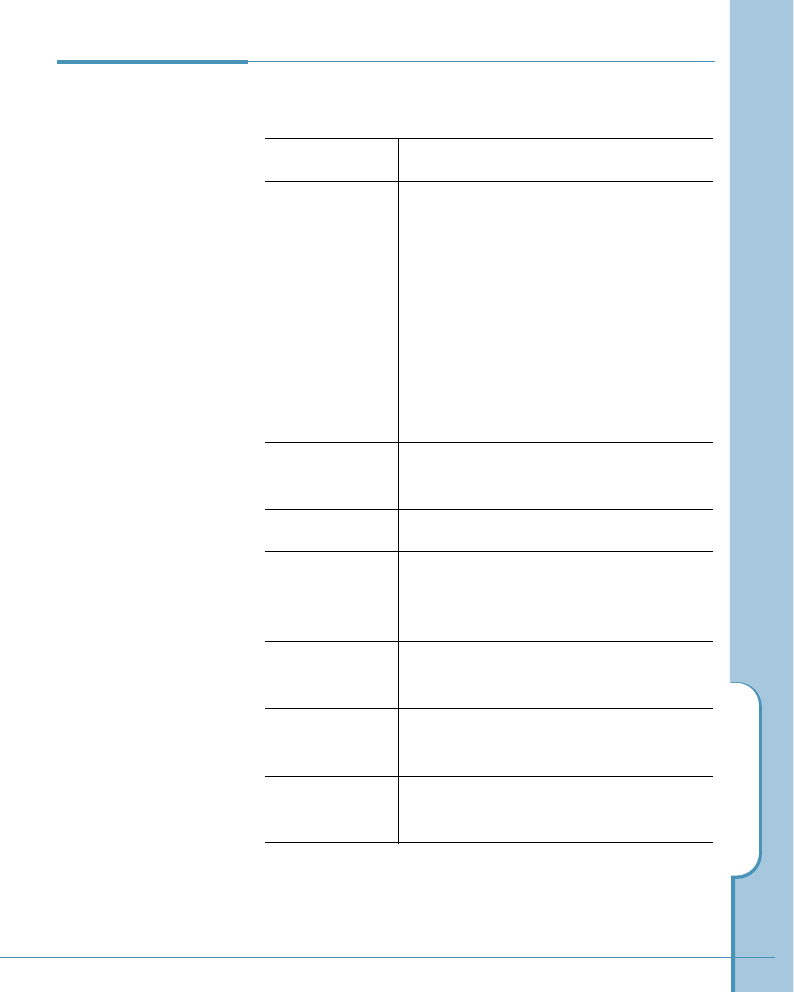
Calculator
189
Error Message
Display If you face an error during the calculation, refer to the
following:
Messages Causes & Solutions
No Value • When only operators (-, +, x, ÷) are
entered successively without entering
any number, this message is
displayed. Enter numbers.
• There may be no number in between
the brackets.
• There is no number next to a function
(sin, cos, tan, asin, acos, atan, sqrt,
3sqrt, log, in, 10x, ex, abs). Enter
numbers.
Invalid(-) Value When ‘-’ is required in the calculation,
this message is displayed.
No Operator Enter a desired operator.
Opening Brace • Brackets may not be placed in the
right location. Replace the brackets.
• A bracket may be required.
Cannot When you divide a number by 0, this
Calculate message appears.
Out Of Limit A result value is not in between
-1E199 and 1E199.
Cannot Convert When you change a type, it is out of type
limit.
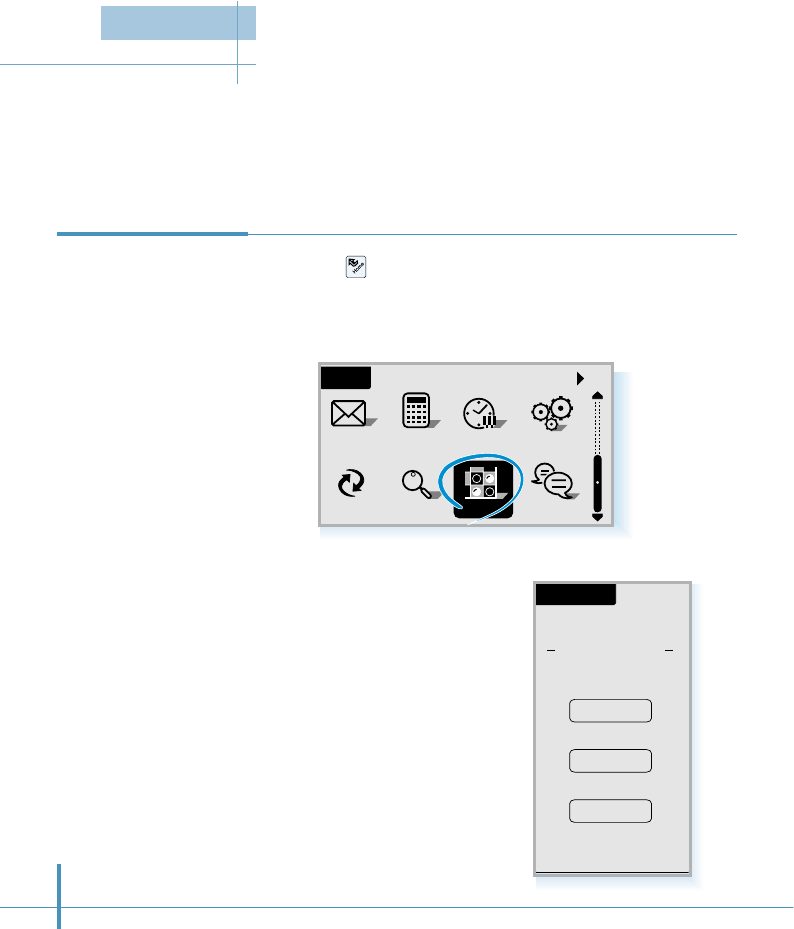
190
You can play the Othello game on your phone. In Othello, players place black and white stones on
the board, trying to captivate (engulf) the opposite color stone. The object of the game is to
conquer the most squares. Othello is simple, so it is easy to learn and enjoy.
Accessing
Othello Game
3. Select the desired game type
by tapping an appropriate
button.
• 1 Player: You can play with
your phone.
• 2 Players: You can enjoy
the game with another
person.
• NET GAME: You can
connect to the Internet to
play the game with a
person on-line.
All
Home
Calc Clock
SMS Ctrl
PCsync Find Chat
Othello
OTHELLO
SELECT GAME
1 Player
2 Players
NET GAME
1. Tap the icon on the hard icon panel to launch
applications.
2. Tap the Othello icon to open the Othello screen.
Othello
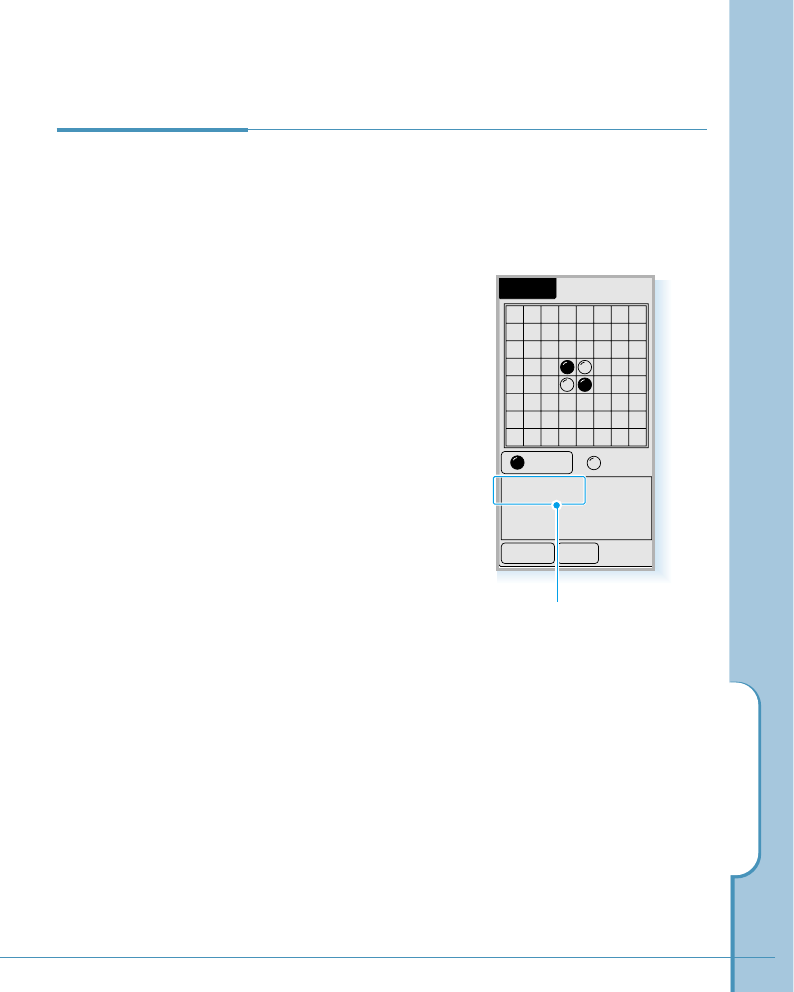
Othello
191
Playing One
Player Game
If you want to enjoy the Othello game alone, do as follows:
1. Tap the 1 Player button from the Othello screen.
2. The game board for 1
player appears. Move the
stone by tapping on the
desired square.
The game always starts
from the black player in
the one player game. You
and the phone take turns
placing the stone.
3. When the game is over, to play a game again, tap the
AGAIN button. The new game starts.
Tap the END button to quit the game.
1 Player
AGAIN
Black Stone
END
: 2 : 2
Shows the current turn.
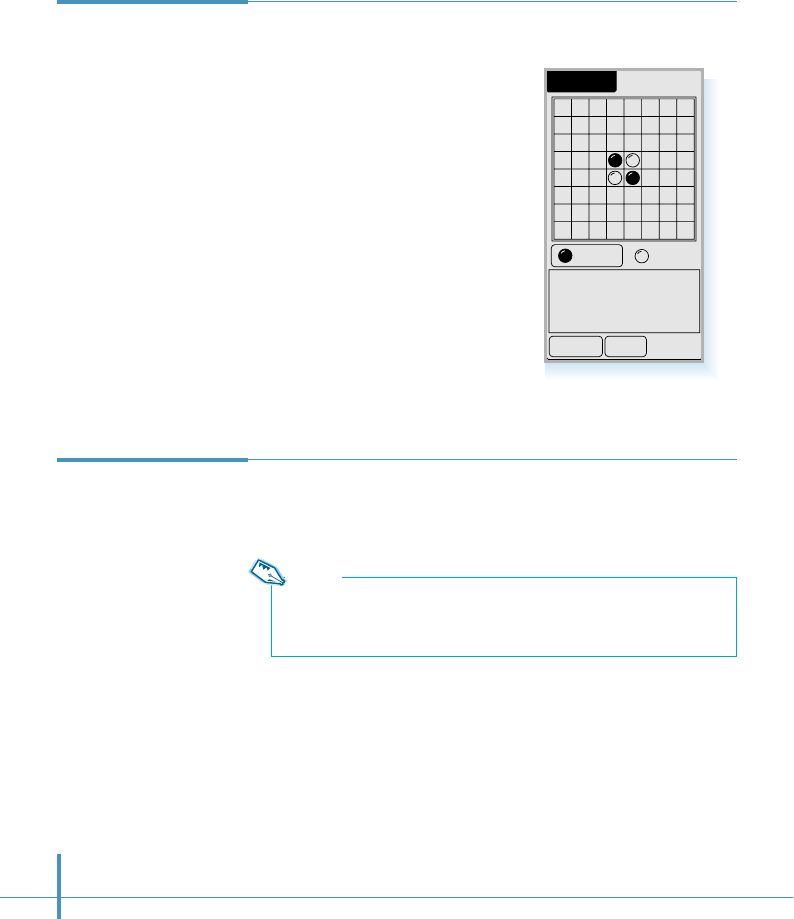
192
Playing Two
Player Game 1. Tap the 2 Players button from the Othello screen.
2. Start to play the game by tapping
on the desired square to place the
stone.
The way to play is the same as
that of the one player game,
except your opponent is the person
with you, not the phone.
2 Players
AGAIN
Black Stone
END
: 2 : 2
Playing
Network Game If you are subscribed to the GoNext service, you can play the
Othello game with another subscriber through the Internet.
Note:
The Othello service is preset at factory, so you do not need to change it
under normal circumstances.
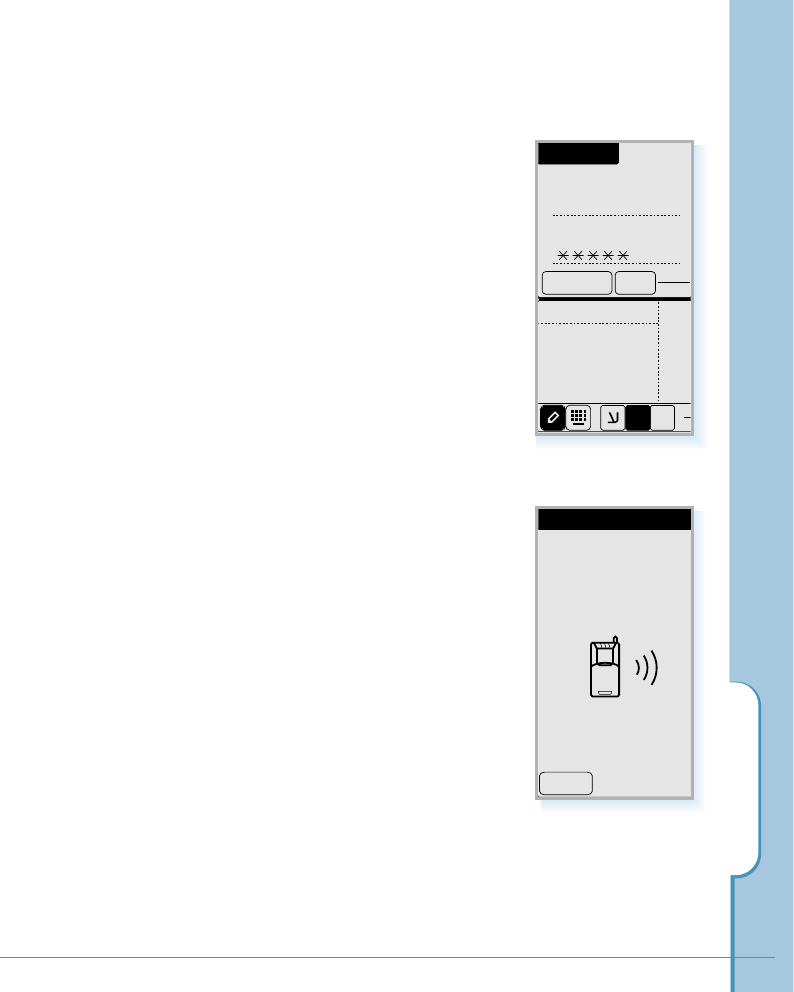
Othello
193
1. Tap the NET GAME button from the Othello screen.
2. Enter the game ID and password
on the bottom of the screen, then
tap the Connect button. See
page 46 for entering letters and
numbers.
The ID and password are
automatically saved for
next use.
If you do not want to connect
to the Internet, tap the END
button.
Net Game
ID
Park
Connect END
PASSWORD
ABC 123
abc
1$E
3. You are connected to the
Internet.
To stop connecting, tap the
Cancel button.
Net Join
Connecting
to the Server
Cancel
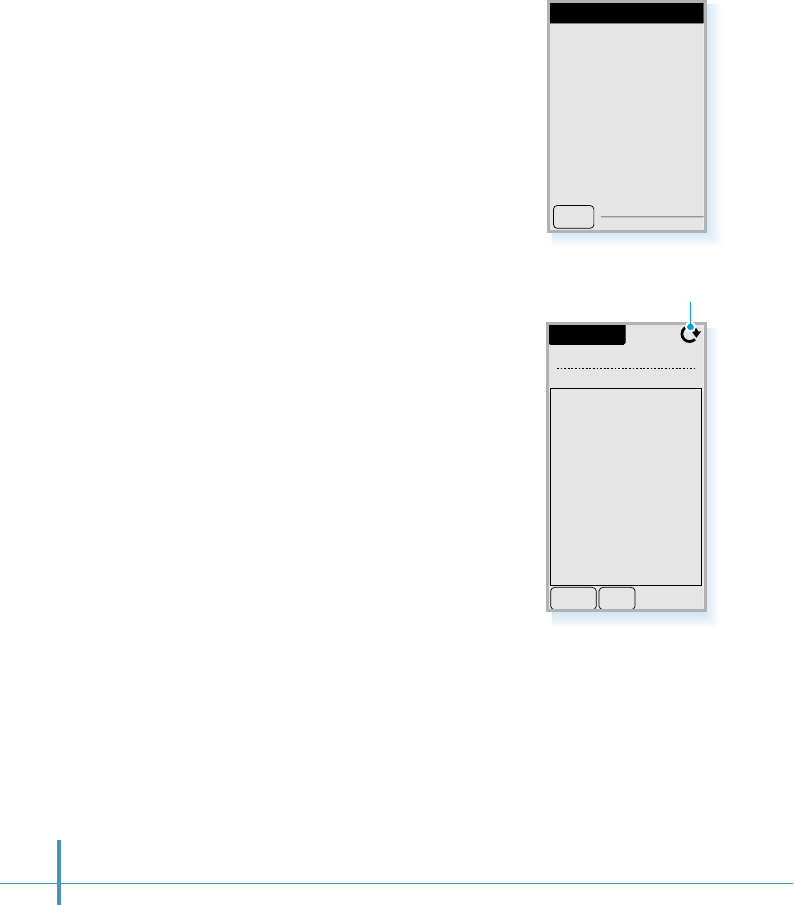
194
MESSAGE BOX
Welcome to the
Othello Network
Game Sever.
OK
5. The Game List screen opens.
If you want to disconnect, tap
the END button at any time.
4. When you are successfully
connected, the message box
opens. Tap the OK button.
Game List
6 Game Room(s)
OPEN END
top[1/2]
abcd[2/2]
iam[2/2]
ace[2/2]
go[2/2]
hamlet[1/2]
Refreshes the Game list.
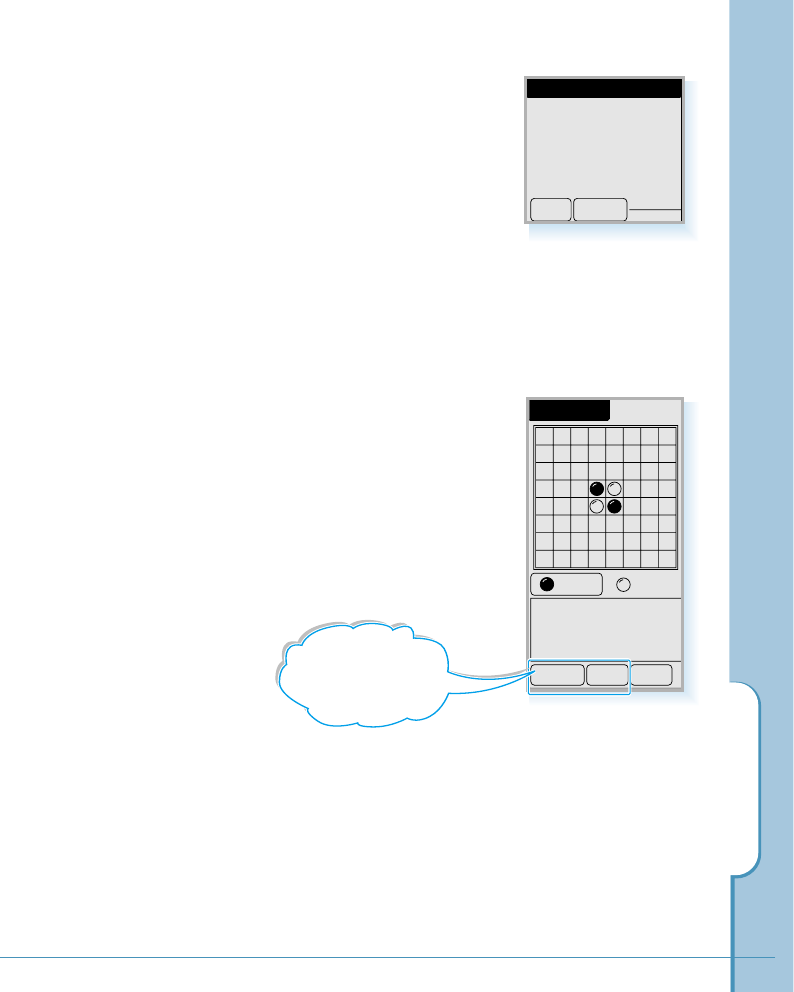
Othello
195
6. Select the wanted game
room from the list by tapping
it, and tap the OK button
from the message box to join
the game with the selected
player.
7. Start the game by tapping on
the desired square to place
the stone.
If you entered an existing
game room, you use the
black stone. If you opened a
new room, you use the white
stone.
Or, tap the OPEN button to open a new room for game
and wait until a player joins the game with you.
8. To quit the game, tap the END button. The screen returns
to the Game List screen.
NET GAME
AGAIN
Black Stone
TALK END
: 2 : 2
MESSAGE BOX
top[1/2] Selected
OK Cancel
You can talk with
your opponent or request to
play a game again. See the
next page.
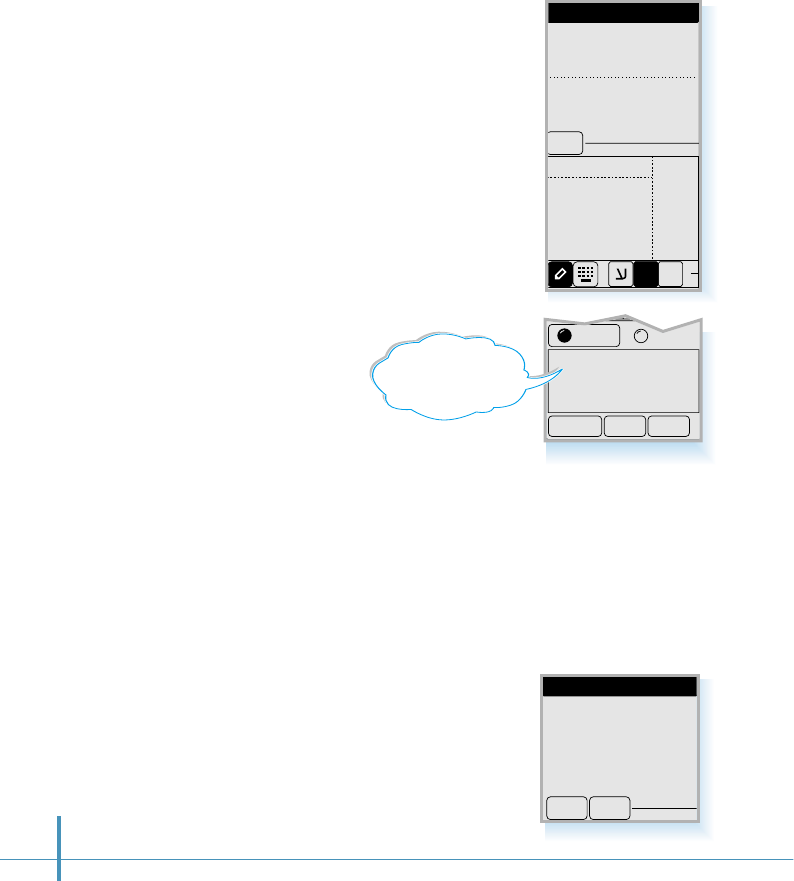
AGAIN
buriri > great done
TALK END
: 3 : 3
196
Talking with the Opponent
While playing, you can talk
with the person who is playing
with you. To send a message to
your opponent, tap the TALK
button, and write the message.
See page 46 for entering letters.
When entering is complete, tap
the OK button and the message
is transmitted.
You can also receive a
message from the opponent.
TALK BOX
great done
ABC
abc
123
OK
1$E
Restarting a Game
To play a new game with the same person, tap the AGAIN
button. If the opponent accepts your request, a new board
appears and you can start a new game.
If your opponent taps the AGAIN button to request you to play
again, you can see the message box below.
To accept the request, tap the OK
button and play a new game.
To refuse the request, tap the NO
button, then quit the game by
tapping the END button.
MESSAGE BOX
Play Game
Again
OK NO
You can see the
message you sent
or received.
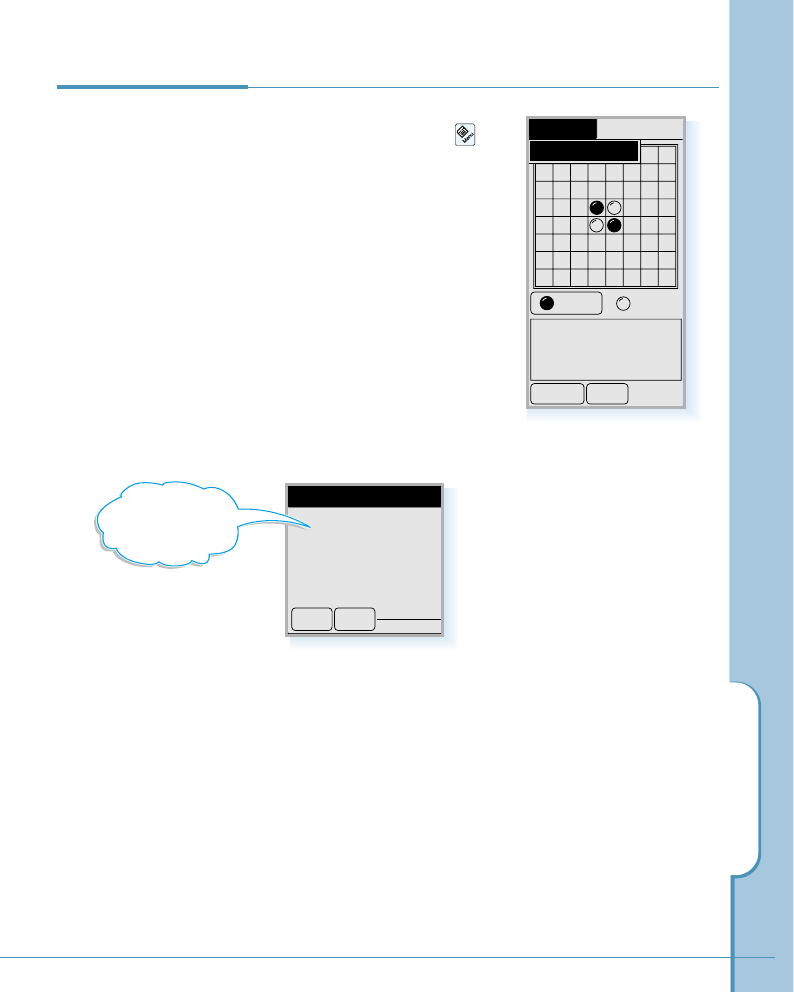
View Results
Net Game
0 W 2 L 2 D
INIT OK
W: Won games
L: Lost games
D: Drawn games
Othello
197
Viewing Your
Play Records 1. To view your record on the
network game, tap the
icon on the hard icon panel
and then View Results from
the pick list.
2. You can see how many
games you won or lost. To
exit, tap the OK button.
If you want to initiate the
record, tap the INIT button.
Setting(s)
AGAIN
Black Stone
END
: 2 : 2
View Results

Appendix
• Accessories
• Care and Safety Guidelines
• Index
199
Accessories
Hands-Free Kit
The hands-free kit provides safety, freedom and convenience in your
vehicle.
Travel Charger
The travel charger plugs into a wall outlet and enables you to charge
a single battery at your home or office.
Ear-Microphone
The ear-microphone includes both an earpiece and microphone in a
convenient, lightweight unit.
Cigarette Lighter Charger
The cigarette lighter charger offers the convenience of operating or
charging your phone’s battery from your vehicle cigarette lighter
socket.
Batteries
1000mAh lithium-Ion standard battery offers up to 160 minutes of
talk time or up to 95 hours of standby time.
1600mAh lithium-Ion extended battery offers up to 260 minutes of
talk time or up to 320 hours of standby time.
Accessories

• Take care not to scratch the screen of your smartphone. Always
use the stylus or a plastic-tipped pen intended for use with a
touch-sensitive screen.
• The smartphone is not waterproof and should not be exposed to
rain or moisture. Under extreme conditions, water may enter the
circuitry through the front panel buttons. In general, treat the
smartphone as you would a pocket calculator or other small
electronic instrument.
• The touch-sensitive screen contains a glass element. Take care
not to drop the smartphone or subject it to any strong impact. Do
not carry your smartphone in your back pocket. If you sit on it, the
glass may break.
• Protect the smartphone from temperature extremes. Do not leave
it on the dashboard of a car on a hot day, and keep is away from
heaters and other heat sources. Store it out of direct sunlight.
• Do not store or use the smartphone in any location that is
extremely dusty, damp, or wet.
• Use a soft, damp cloth to clean the smartphone. If the surface of
the screen becomes soiled, clean it with a soft cloth moistened
with a diluted window-cleaning solution.
• Do not let unauthorized personnel install or service your
smartphone or its accessories. Faulty installation or service may
be dangerous and will invalidate your warranty.
• Only use approved accessories with the smartphone. Using
unauthorized accessories may be dangerous and will invalidate
your warranty if the smartphone is damaged.
Caring for Your
Smartphone
200
Care and Safety Guidelines
Care and Safety Guidelines
201
Always extend the antenna fully when you place or receive a
call for best reception. Handle the antenna gently.
Antenna Care
The smartphone uses a lithium ion battery which is recharged
while the smartphone is in a charger. You can purchase an
additional battery, if you wish.
Tips for Conserving Battery Life
Follow these suggestions to maximize battery life.
• Select a shorter “Battery Power” time period on the Power
Saving screen. This feature blanks the screen after 1, 2, 3,
4, or 5 minutes of non-use. The shorter a time you select,
the more energy is conserved. (See “Battery” on page 67.)
• Minimize the use of the backlight.
Battery Care

202
Replacing the Battery
If you have to replace the battery in your smartphone, be aware of
the following considerations.
• If the empty battery icon appears at the top of the screen
describing the low battery condition.
• If the smartphone does not turn on when you press the
button on the right side of the phone, recharge the battery
immediately.
• Only remove the battery to replace it with another battery. Don’t
leave the battery out of the smartphone. For example, if your
battery becomes drained while you are traveling and you don’t
have a second battery or a charger to recharge it, it is better to
leave the drained battery in the smartphone than to remove it.

Care and Safety Guidelines
203
For a variety of safety reasons, it is important to consider
where you will be using your phone. When using your phone
and its accessories, please follow these guidelines:
Compliance with Safety Standards
The Samsung Smartphone meets all standards and
recommendations for the protection of the public from exposure
to radio frequency (RF) electromagnetic energy established by
governmental bodies and other qualified organizations. To
reduce the risk of fire, electric shock, serious personal injury, or
property damage, please follow these guidelines.
Driving
Using the Smartphone while driving is illegal in some states
and countries. Know the laws and regulations for your area,
and pull off the road and park if you need to make a call. If you
must use the phone while driving, purchase and install the
optional Hands-Free Car Kit.
Electronic Devices
Your phone is a radio transmitter and receiver. When the
power is on, the phone receives and sends out RF energy. Most
modern electronic equipment, such as equipment in hospitals
and cars, contains an RF signal shield. RF energy may affect
some inadequately shielded electronic equipment.
Turn off your phone in health care facilities, and always request
permission before using the phone near medical equipment.
Consult the manufacturer of any personal medical devices, such
as pacemakers and hearing aids, to determine if they are
shielded adequately from external RF signals.
Note if there are any regulations posted in the area regarding
the operation of phones, and learn where you can use them
safely within the facility.
Safety
Precautions

204
Aircraft
Turn off your phone belong boarding any aircraft. The Federal
Aviation Administration (FAA) requires that you have prior
permission from the crew to use your phone while the plane is
on the ground. FCC regulations prohibit using your phone while
the plane is in the air. Do not use your phone at any time while
traveling on board a plane.
Blasting Areas
Construction crews often use remote-control RF devices to set
off explosives. To avoid interfering with blasting operations,
turn off your phone when you are in a blasting area or in any
area with signs posted that read “Turn off two-way radio.”
Other Dangerous Areas
Turn off your phone in any area with a potentially explosive
atmosphere. It is rare, but your phone or its accessories could
generate sparks, which could cause explosion or fire. Areas
with a potentially explosive atmosphere may not always be
clearly marked.
These areas may include:
• Fueling areas, such as gas stations
• Below deck on boats
• Fuel or chemical transfer or storage facilities
• Areas where the air contains chemicals or particles such as
grain, dust, or metal powders
• Any other area where you would normally be advised to turn
off your vehicle engine
Do not transport or store flammable gas, liquid, or explosives in
the compartment of a vehicle containing your phone or
accessories.

Index
205
A
accessories 199
address book
create entry 80, 89
delete entry 98
edit category 99
edit custom field 100
edit entry 95
entry details 83
hide number 100
open 79
save number shortcut 21
select category 84
set incoming ring 84
set speed dial 85
set voice dial 87
show number 100
view entries 91
air time, view 31
alarm
set 181
tone, select 63
answering mode
adjust speaker volume 36
listen caller message 35
play OGM 39
record OGM 37
select OGM 39
turn on/off 33
applications
brief descriptions 44
controls 55
display details 43
display by category 42
display by name 42
launch 41
launch buttons 2
menus 56
appointment
details 122
record 114
remove 122
view 118
autolock 65
B
backlight 8
backup data 98
battery
care 201
charge 6
extended, option 199
install 4
remaining power 8
remove 5
save 67
bell/vibrate, select 29, 62
bookmark
add 141
arrange view 142
configure categories 143
delete 142
edit 142
fetch 141
brightness, screen 11, 71
Index

206
C
calculator
change number format 186
change trigonometric mode 187
edit 186
error message 189
input statistical data 188
use 185
calibrate, screen 10, 71
call
answer 23
correct number 14
end 14
four-digit dial 22
history 20
in-call options 25
make 13
redial 18
restrict 66
speed dial 17
voice dial 15
waiting 27
caller message
delete 36
listen 35
character recognition (how to write)
editing marks stroke 53
english letters stroke 53
numbers stroke 54
on-screen keyboard 47
symbols stroke 54
text input screen, open 46
writing directly on the screen 49
writing input help 55
chat
access 162
bulletin board 173
chat book 171
chat room information 165
chat memo 170
create a new chatroom 167
join 165
person-to-person talk 169
reject 177
room operator 168
search user 176
set server 177
show lap time 176
text input 164
user information 175
charge, battery 6
checkbox 55
cigarette lighter charger 199
contrast 11, 71
country code 14
D
data, communicate 75
display
big clock 64
greeting 64
my phone number 64
world time 64
DTMF
register 26
send 25

Index
207
E
ear-microphone, option 199
edit, command 58
emergency call 65, 67
e-mail
access 146
attach a memo 155
configure mail settings 147, 161
delete 150
fetch 149
filter, set 158
folder, clear 161
folder, edit 160
read 151
send 153
signature, write 157
F
find data 59
flip 2
G
game, othello 190
GoNext, access 138
greeting message
play 37
record 37
select 39
H
hands-free, option 199
handwriting, text 49
hard icon panel 2
help writing characters 55
home time, set 179
hyphenation, automatic 32
I
incoming calls list 20
Inbox, SMS 134
input method 46
Internet, navigate 139
K
key volume 25, 28, 62
L
lock 65
lower case, input 51
M
memo
attach image 109
configure category 113
create 103
delete 108
edit 107
send 112
view 105
memory, view 70
menu, bring 56
message alert 63
missed calls, view 24
mute 25
my phone number
display in idle mode 64
send 25

208
N
navigate WWW 139
network setup 68
O
OGM
play 39
record 37
select 39
one-touch ringer selection 30
on-screen keyboard 47
othello
network game 192
one-player game 191
restart game 196
talk with the opponent 196
two-player game 192
view records 197
ougoing calls list 20
Outbox, SMS 133
owner information 70
P
password, change 66
pick list 55
PIM 102
power on/off 8
power save 67
R
redial 18
reset phone 67
ringer
ring tone, select 63
ring type, select 29
volume, adjust 28, 62
S
safety information 204
save number in AddressBook 21
scheduler
edit 122
record 114
remove 122
view 118
scroll bar 55
search
application data 59
phone book 19
speed dial 18
voice dial 16
security features 65
signature for e-mail 157
SMS
delete 137
receive 134
send 131
view outbox 133
view, sort 136
write 131

Index
209
sound, adjust 62
speaker volume, adjust 36
speed dial
list view 93
set 85
use 17
stylus 9
system select 68
synchronize
set auto synchronization 74
start synchronization 72
T
text input
Hebrew character input 47
on-screen keyboard 47
writing on the screen 49
tone length, select 63
tone, select
alarm 63
call connected 63
call disconnected 63
message alert 63
power off 63
power on 63
ring 63
service area 63
to-do list
attach memo 126
create 124
details, set 125
delete 129
edit 128
view 127
touch screen 9
calibrate 10
contrast, adjust 11
travel charger, option 199
U
upper case, input 51
V
voice dial
list view 94
record 87
use 15
voice mail, listen 134
volume, adjust 28, 36
W
world time, view 183
write, on the screen 49
writing area 51
WWW
navigate 139
set 144

ELECTRONICS
Printed in Korea
Code No.:GH68-01025A
English. 06/00 Ver.1.0
