Samsung Hz25W Users Manual HZ25W_Ver1.2
HZ25W - User Manual HZ25W_English Free User Guide for Samsung Camera, Manual - page2
2015-08-20
: Samsung Samsung-Hz25W-Users-Manual-794545 samsung-hz25w-users-manual-794545 samsung pdf
Open the PDF directly: View PDF ![]() .
.
Page Count: 122 [warning: Documents this large are best viewed by clicking the View PDF Link!]

User Manual
Thank you for buying a Samsung Camera.
This manual will help you learn to capture
images, share or print your photos, and edit
photos with the accompanying software.
Please read this manual thoroughly.
HZ25W

001
Thank you for buying a Samsung Digital Camera.
Prior to using this camera, please read the user manual
thoroughly.
If you require After Sales service, please bring the camera and the
cause of the camera malfunction (such as battery, Memory card
etc.) to the A/S centre.
Please check that the camera is operating properly prior to when
you intend to use it (e.g. for a trip or an important event) to avoid
disappointment. Samsung takes no responsibility for any loss or
damage that may result from camera malfunction.
Keep this manual in a safe place.
If you use a card reader to copy the images on the memory card to
your PC, the images could be damaged. When transferring the
images taken with the camera to your PC, be sure to use the
supplied USB cable to connect the camera to your PC. Please note
that the manufacturer holds no responsibility for loss or damage of
images on the memory card due to the use of a card reader.
The contents and illustrations of this manual are subject to change
without prior notice for upgrading the camera functions.
Ä Microsoft, Windows and Windows logo are registered trademarks
of Microsoft Corporation incorporated in the United States and/or
other countries.
Ä Apple, Mac and QuickTime logo are registered trademarks of
Apple computer.
Ä Adobe and Reader are either trademarks or registered
trademarks in the United States and/or other countries.
Ä All brand and product names appearing in this manual are
registered trademarks of their respective companies.
Getting to Know your cameraInstructions
Setting up the applica-
tion software
Use this camera in the following order.
To use this camera with a PC, install
the application software ¿ rst. After
this has been done, the stored im-
ages in the camera can be moved
to the PC and can be edited by an
image editing program. (p.104-106)
Take a picture. (p.
21
)
Insert the supplied USB cable
into the PC’s USB port and the
camera’s USB connection
terminal. (p.
107
)
Check the camera’s power. If the
power is turned off, preset the
camera button to turn it on.
Open Windows’s EXPLORER
and search for [Removable Disk].
(p.
108
)
Take a picture
Insert the USB cable
Check the camera's
power
Check [Removable Disk]

002
Warning
WARNING indicates a potentially hazardous situation which, if not
avoided, could result in death or serious injury.
Do not use the À ash in close proximity to people or animals.
Positioning the À ash too close to your subject’s eyes may cause
eyesight damage.
For safety reasons keep this product and accessories out of reach
of children or animals to prevent accidents e.g.:
- Swallowing battery or small camera accessories. If an accident
should occur, please consult a doctor immediately.
- There is the possibility of injury from the camera’s moving parts.
Battery and camera may become hot during prolonged use and it
may result in camera malfunction. Should this be the case, allow
the camera to sit idle for a few minutes to allow it time to cool.
Do not leave this camera in places subject to extremely high tem-
peratures, such as a sealed vehicle, direct sunlight or other places
of extremes in temperature. Exposure to extreme
temperatures may adversely affect the camera’s internal
components and could cause a ¿ re.
When in use, do not cover the camera or Charger. This may cause
heat to build up and distort the camera body or cause a ¿ re. Always
use the camera and its accessories in a well-ventilated area.
Danger
DANGER indicates an imminently hazardous situation which, if not
avoided, will result in death or serious injury.
Do not attempt to modify this camera in any way. To do so may
result in ¿ re, injury, electric shock or severe damage to you or your
camera. internal inspection, maintenance and repairs should only
be carried out by your dealer or Samsung Camera Service centre.
Please do not use this product in close proximity to À ammable or
explosive gases, as this could increase the risk of explosion.
Should any form of liquid or a foreign object enter the camera, do
not use it. Switch off the camera, and then disconnect the power
source. You must contact your dealer or Samsung Camera Service
centre. Do not continue to use the camera as this may cause a ¿ re
or electric shock.
Do not insert or drop metallic or inÀ ammable foreign objects into
the camera through access points e.g. the memory card slot and
battery chamber. This may cause a ¿ re or electric shock.
Do not operate this camera with wet hands. This could pose a risk
of electric shock.

003
Caution Contents
READY
RECORDING
CAUTION indicates a potentially hazardous situation which, if not
avoided, may result in a minor or moderate injury.
Leaking, overheating, or damaged battery could result in ¿ re or injury.
- Use battery with the correct speci¿ cation for the camera.
- Do not short circuit, heat or dispose of battery in ¿ re.
- Do not insert the battery with the polarities reversed.
Remove the battery when not planning to use the camera for a
long period of time. Otherwise the battery may leak corrosive
electrolyte and permanently damage the camera’s components.
Do not ¿ re the À ash while it is in contact with hands or objects. Do
not touch the À ash after using it continuously. It may cause burns.
Do not move the camera while it is switched on, if you are using
the AC adapter. After use, always switch off the camera before
unplugging the cable from the wall socket. Then make sure that
any connector cords or cables to other devices are disconnected
before moving the camera. Failure to do so may damage the cords
or cables and cause a ¿ re or electric shock.
Take care not to touch the lens or lens cover to avoid taking an
unclear image and possibly causing camera malfunction.
Avoid obstructing the lens or the À ash when you capture an image.
When using this camera in low temperatures, you may experience
the following. These are not camera malfunctions and usually
recover at normal temperature.
- It takes longer to turn on the LCD monitor and the colour may
differ from the subject.
- When changing the composition, there may be an after image on
the LCD monitor.
Credit cards may be demagnetized if left near case. Avoid leaving
magnetic strip cards near the case.
Never connect the 20 pin connector to the USB port of a PC. This
carries a high risk of computer malfunction.
007 System chart
007 Package Contents
007 Sold Separately
008 Identification of features
008 Front & Top
009 Back
011 Bottom
011 Smart dial
012 Self-timer lamp
012 Camera Status Lamp
012 Mode icon
013 Connecting to a Power Source
015 Inserting the memory card
016 Instructions on how to use the memory
card
018 When using the camera for the first time
019 LCD monitor indicator
020 How to use the menu
021 Starting the recording mode
021 Selecting modes
022 How to use the Smart Auto mode
023 How to use the Program mode
023 How to use the Aperture. Shutter Priority
mode
024 How to use the Manual mode
024 How to use the User Setting shooting
mode
025 How to use the Nightscene modes
025 How to use the Beauty Shot mode
026 How to use the Scene modes

004
SETUP
Contents
047 Face Detection
049 Face Tone
049 Face Retouch
050 Image Size
050 Quality / Frame rate
051 Dynamic range
051 Metering
052 Drive mode
052 Setting AEB area
053 Auto Focus type
053 Flash Intensity
054 Photo Style Selector
055 Image Adjust
056 Image Stabilization
057 Key mapping
057 Voice Memo
058 Voice Recording
059 Recording the movie clip without voice
059 Distortion compensation
060 Setting user mode
060 Movie clip frame stabiliser
061 Sound menu
061 Sound
061 Volume
061 Start up sound
061 Shutter sound
061 Beep Sound
062 AF sound
062 Self Portrait
062 Setup menu
027 How to use the Movie clip mode
028 Recording HD (High De¿ nition) movie
clips
028 Recording the movie clip without sound
029 Things to Watch Out for When Taking
Pictures
030 Focus lock
030 Using the camera buttons to set the camera
030 POWER button
031 SHUTTER button
031 Zoom W/T Lever
033 Diopter adjustment lever
033 AEL/Image protection button
033 Flash pop-up button
034 Exposure compensation button
034 EVF/LCD button
035 MENU button
036 OK/AF point button
036 Info (DISP) / Up button
037 Macro / Down button
040 Flash / Left button
042 Self-timer / Right button
043 Functions
044 How to Enable Functions Using the MENU
Button
045 White balance
046 Fine-tuning the white balance
046 ISO

005
PLAY
Contents
075 Info (DISP) / Up button
075 Play & Pause / OK button
076 Left / Right / Down / MENU button
076 Delete button
077 Setting up the play back function using the
LCD monitor
079 Edit
079 Resize
080 Rotating an image
080 Photo Style Selector
081 Image Adjust
083 View
083 Starting the Multi Slide Show
083 Start the Multi Slide Show
084 Selecting Images
084 Con¿ gure Multi Slide show effects
085 Setting play interval
085 Setting Background Music
085 File Options
085 Deleting images
086 Protecting images
087 Registering faces
088 Recycle Bin
088 Voice memo
089 DPOF
091 Copy To Card
092 PictBridge
093 PictBridge : Picture Selection
093 PictBridge : Print Setting
062 Display
062 Language
063 Setting the Grid Line
063 Function Description
063 Start up image
063 Display Bright
064 Quick view
064 Display SAVE
065 Settings
065 Formatting a memory
065 Initialisation
066 Setting up the Date / Time / Date type
066 Time Zone
066 File name
067 Imprinting the recording date
067 Auto power off
068 Auto Focus lamp
068 Selecting Video out type
069 Setting the USB
070 Starting play mode
070 Playing back a still image
070 Playing back a movie clip
071 Movie clip capture function
071 Playing back a recorded voice
071 Playing back a voice memo
072 LCD monitor Indicator
073 Using the camera buttons to set the
camera
073 Thumbnail / Digital Zoom Lever
073 Smart Album

006
SOFTWARE
Contents
094 PictBridge : Reset
094 Important notes
096 Warning indicator
097 Before contacting a service centre
099 Specifications
101 Software Notes
102 System Requirements
102 QuickTime Player 7.6 : H.264(MPEG4.
AVC) playback Requirements
103 About the software
104 Setting up the application software
107 Starting PC mode
109 Removing the removable disk
110 Samsung Master
113 Using the Samsung RAW Converter
114 Correcting the exposure
115 Handling the JPEG/TIFF ¿ les as you edit
RAW ¿ les
115 Saving the RAW ¿ les into JPEG or TIFF
format
116 Setting up the USB Driver for MAC
116 Using the USB Driver for MAC
117 FAQ
007
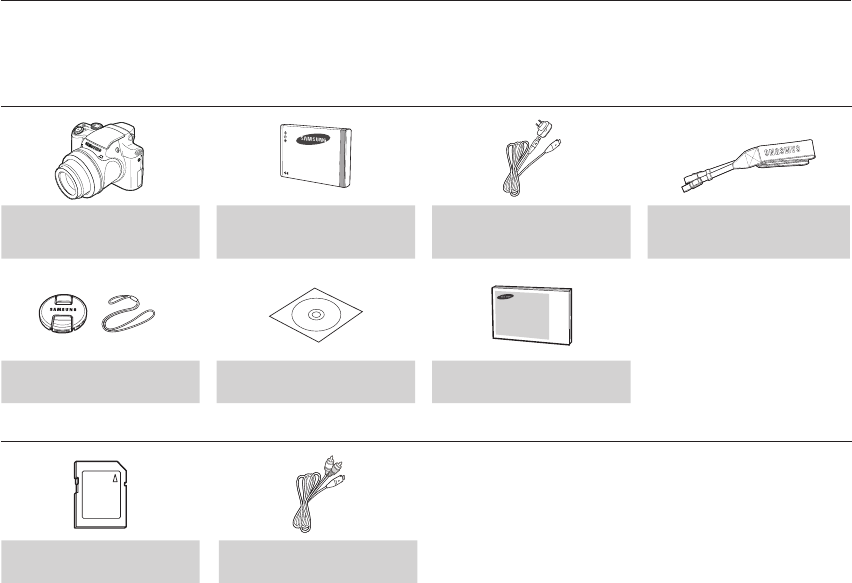
System chart
Please check that you have the correct contents before using this product. The contents can vary depending on the sales region. To buy the
optional equipment, contact your nearest Samsung dealer or Samsung service centre. Parts and accessories illustrated below may differ from
exact appearance.
Package Contents
Camera Rechargeable battery
(4302-001226)
AC adapter (AD44-00143A) /
USB cable (AD39-00165A)
Neck strap (AD63-04525A)
(see p.10)
Lens cap (AD67-01588A)
(see p.10)
Software CD (AD46-00286A)
(see p.103)
User manual (AD68-04425A),
Product warranty
Sold Separately
SD/SDHC memory card / MMC
(see p.16)
AV cable
(AD39-00146A)

008
Identi¿ cation of features
Front & Top
Microphone
AF sensor/
Self-timer lamp
Lens
Flash pop-up button
(p.33)
Built-in À ash (p.33)
Speaker
Hook for neck strap (p.10)
Diopter adjustment lever
(p.33)
Terminal cover
USB / AV / DC
terminal
Zoom T Lever
(Digital zoom)
Zoom W Lever (Thumbnail)
Shutter button
009
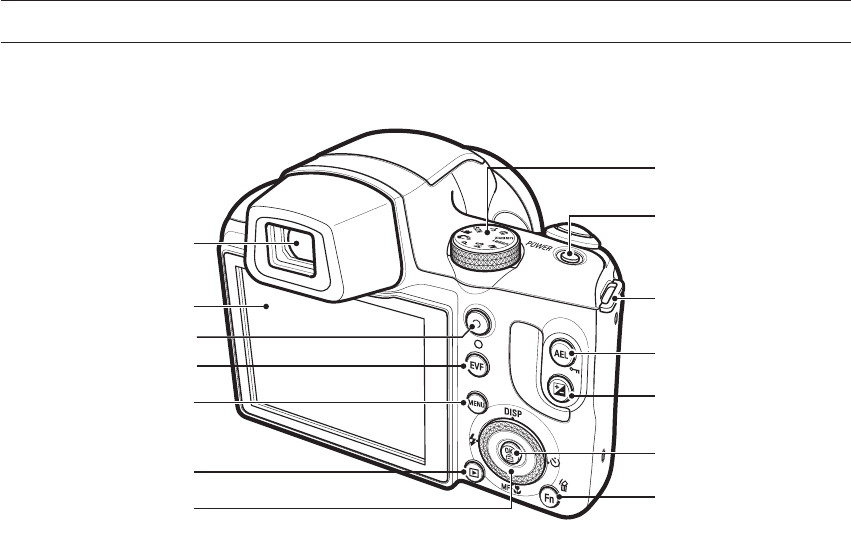
Back
Identification of features
LCD monitor
Electronic View¿ nder (EVF)
(p.35)
Play mode button
Smart dial (p.11)
EVF/LCD button
(p.34)
Video shooting button
MENU button
Mode Dial
POWER button
Fn / Delete button
Hook for neck strap
AE lock/image protection
button (p.33)
Exposure compensation
button (p.34)
OK/AF point button
(p.36)
010
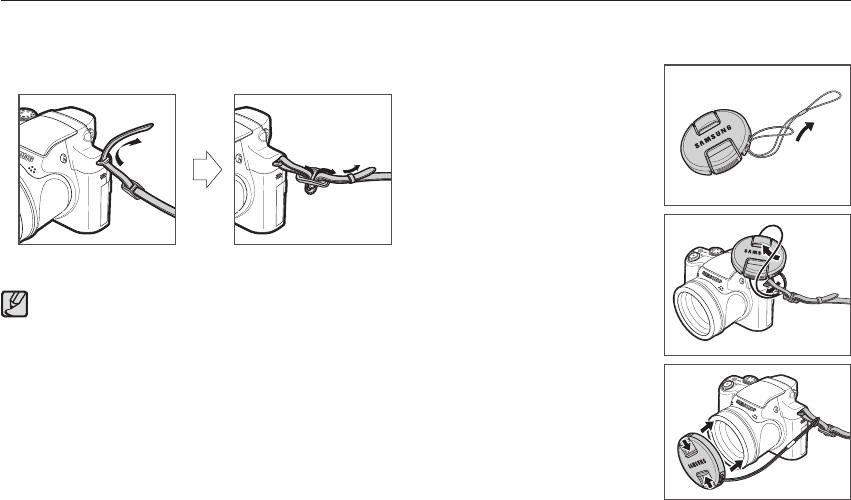
Identification of features
Ŷ Attaching a lens cap to the camera
1. Insert the lens cap string into the
hole in the lens cap.
2. Attach the lens cap to the neck
strap.
3. Attach the lens cap as shown in
the image.
Ŷ Attaching the neck strap
Attach the neck strap as shown below.
Ensure that the neck strap is attached correctly, or the camera may
fall.
011
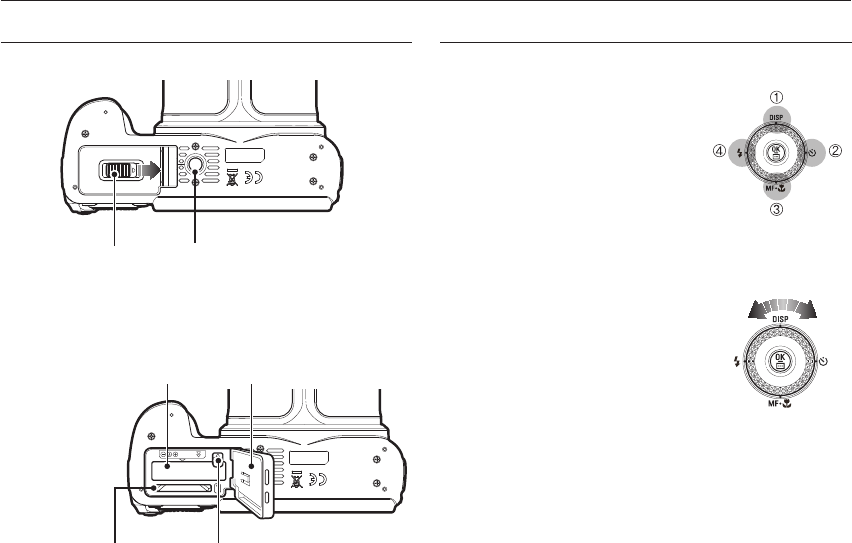
Bottom
Identification of features
Tripod socket
Battery chamber
cover lever
Push the battery chamber cover lever in the direction of the arrow to
open the battery chamber cover.
Battery holder
Battery chamber cover
Memory card slot
Battery chamber
Smart dial
Ŷ When pressing the Smart Dial
• Move UP/DOWN /LEFT/RIGHT
• Execute options in the shooting mode:
1 Change the display
2 Change the timer option
3 Change the close-up shooting option
4 Change the À ash option
Ŷ When turning the Smart Dial
• Move option or menu
• Adjust the shutter speed, aperture value,
exposure value and set the automatic
exposure bracketing (AEB) area in the
shooting mode.
• Search ¿ les in the playback mode.
012
Self-timer lamp
Icon Status Description
Blinking
- For the ¿ rst 8 seconds, the lamp blinks at 1 second
intervals.
- For the ¿ nal 2 seconds, the lamp blinks quickly at
0.25-second intervals.
Blinking For the 2 seconds, the lamp blinks quickly at
0.25-second intervals.
Blinking A picture will be taken after about 10 seconds and 2
seconds later a second picture will be taken.
Camera Status Lamp
Status Description
Power on The lamp turns on and off when the camera
is ready to take a picture
After taking a picture
The lamp blinks while saving the image data and
turns off when the camera is ready to take a picture
When À ash battery is charging
The lamp blinks
When the USB cable is
inserted to a PC
The lamp lights up
(LCD monitor turns off after initializing the device)
Transmitting Data with a PC
The lamp blinks (LCD monitor turns off)
When the USB cable is
inserted into a printer The lamp blinks
When the printer is printing
The lamp blinks
When the AF activates
The lamp turns on
(The camera focus on the subject)
The lamp blinks
(The camera doesn’t focus on the subject)
Identification of features
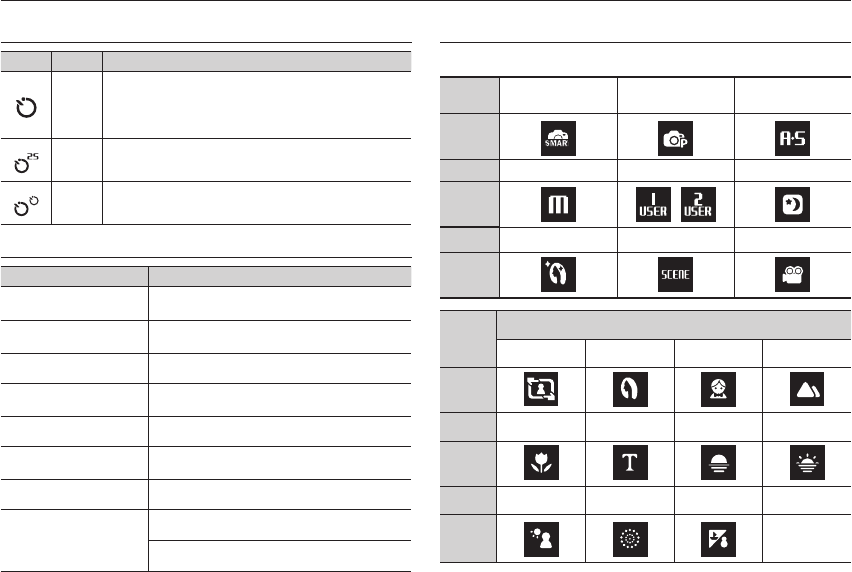
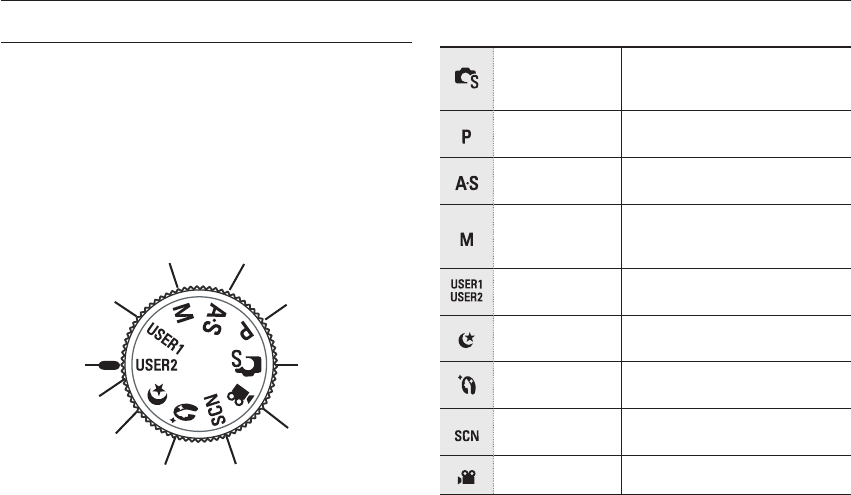
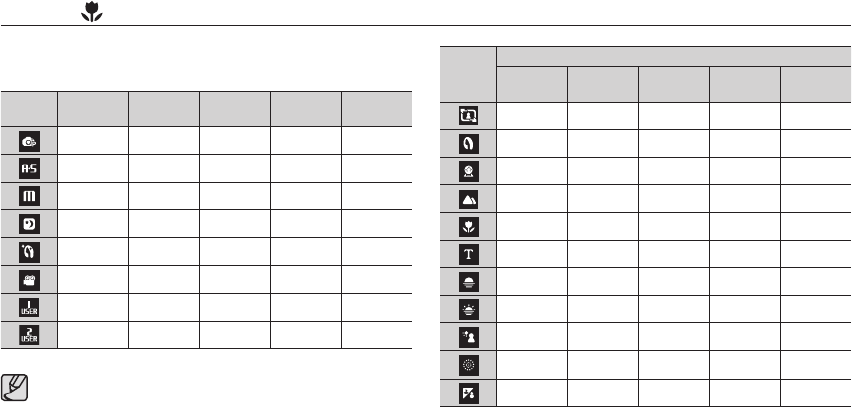
Mode icon
Refer to page 21 for more information about the camera mode setting.
MODE Smart Auto Program
Aperture. Shutter
Priority
ICON
MODE
Manual User Night
ICON
MODE
Beauty Shot Scene Movie
ICON
MODE
SCENE
Frame Guide
Portrait Children Landscape
ICON
MODE Close up Text Sunset Dawn
ICON
MODE Backlight Firework
Beach&Snow
ICON
013
Connecting to a Power Source
SLB-11A rechargeable battery Speci¿ cation
Model SLB-11A
Type Lithium lon
Capacity 1130mAh
Voltage 3.8V
C
harging time
Approximately 150 Minutes
You should use the rechargeable battery SLB-11A supplied with the
camera. Be sure to charge the battery before using the camera.
Number of images and battery life: Using the SLB-11A
Battery life /
Number of images Conditions
Still image Approx. 90 MIN /
Approx. 180 shots
Using the fully charged battery, Auto
mode, 12M image size, Fine image
quality, Shot to shot interval: 30Sec.
Changing the zoom position between
the Wide and the Tele after every shot.
Using the À ash on every second shot.
Using the camera for 5 minutes and
then powering it off for 1 minute.
Movie Approx. 70 MIN
Using the fully charged battery
640x480 image size
30fps frame rate
Ä These ¿ gures are measured under Samsung’s standard conditions
and shooting conditions and may vary depending on the user’s
methods.
Important information about battery usage.
When camera is not in use, turn off the power.
Please remove the battery if the camera will not be used
for long periods. Batteries can lose power over time and are
prone to leaking if kept inside the camera.
Low temperatures (below 0°C) can affect the performance of
the battery and you may experience reduced battery life.
Batteries will usually recover at normal temperatures.
During extended use of the camera, the camera body may
become warm. This is perfectly normal.
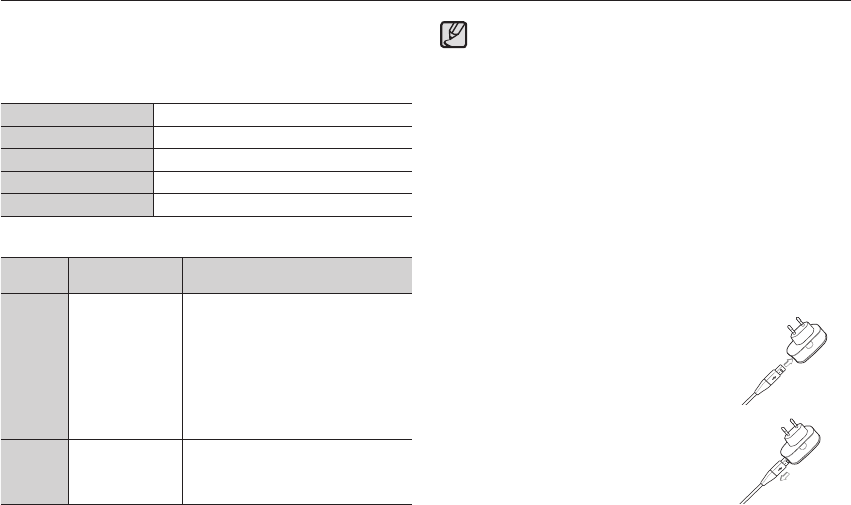
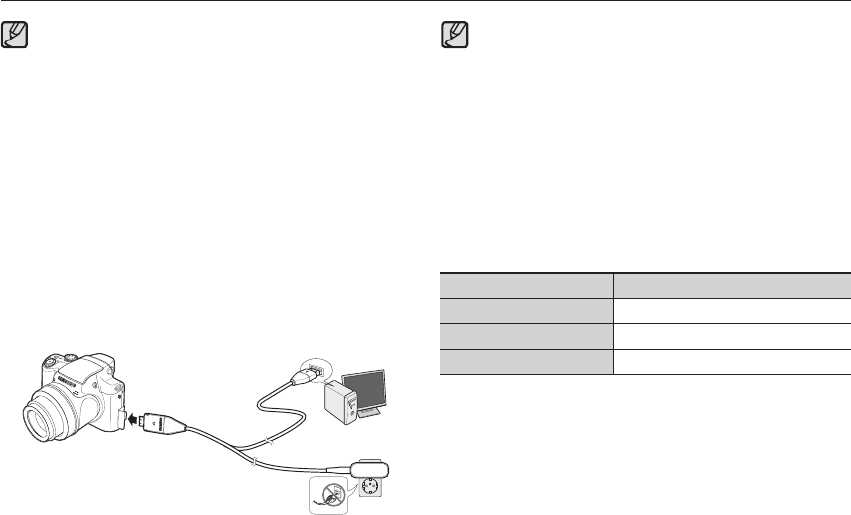
Ŷ Connecting the AC adapter with the USB cable can be used as an
AC cable, and you can charge the rechargeable battery with the
AC cable.
- Using an AC cable:
Connect the AC adapter to the USB
cable. It can be used as a power
cable.
- Using a USB cable:
Remove the AC adapter.
You can download stored images to
your PC (p.107) or supply the power to
your camera through the USB cable.
014
Connecting to a Power Source
Before inserting any cables or AC adapter, check the directions
and do not insert by force. It may cause breakage of cable or
camera.
If the charging LED of the AC Charger does not turn on or blink
after inserting the rechargeable battery, please check whether
the battery is inserted correctly.
If you charge the battery with the camera power on, the battery
won’t be fully charged. Turn the camera off while charging the
battery.
Important information about USB cable usage.
Use a USB cable with the correct speci¿ cation.
If the camera is connected to the PC through a USB hub :
connect the camera directly to the PC.
If the camera and other devices are connected to the PC at
the same time : remove other device.
Camera can not be detected using the front side USB port
of computer. In this case, use the back side USB port of
computer.
If the USB port of the PC doesn’t meet the Power output
standard (5V, 500mA), the camera may not be charged.
Charging LED of the AC Adapter
Charging LED
Being Charged Red LED is on
Charging is complete Green LED is on
Charging error Orange LED is off or blinking
If you insert the fully discharged battery to charge it, do not turn on
the camera at the same time. The camera may not be turned on
because of the low battery capacity. Charge the battery for more
than 10 minutes before using the camera.
Do not use the À ash frequently or take a movie clip with the fully
discharged battery charged for a short time. Even if the charger
is inserted, the camera power may be turned off because the
rechargeable battery is discharged again.
How to charge the rechargeable battery
015
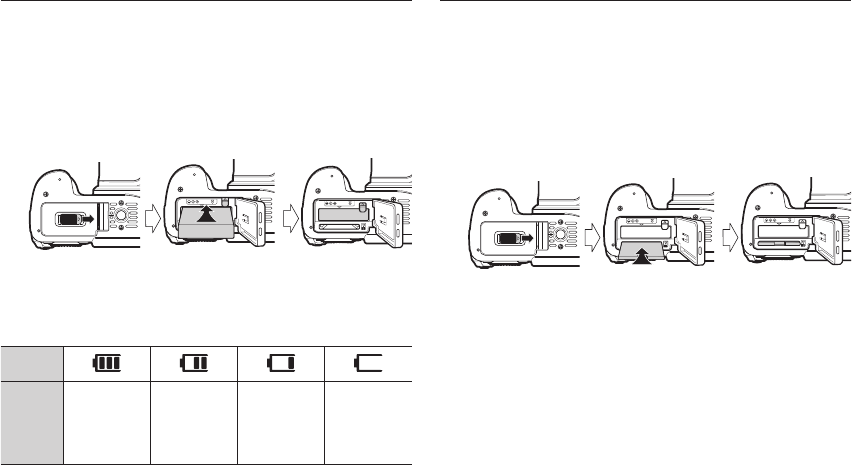
There are 4 indicators for battery condition that are displayed on
the LCD monitor.
Battery
indicator
Battery
status
The battery is
fully charged
Low battery
capacity
(Prepare to
recharge or use
spare battery)
Low battery
capacity
(Prepare to
recharge or use
spare battery)
Battery empty.
(Recharge or
use spare bat-
tery)
Ä When using the camera and the battery in a place that is excessively cold or hot,
the battery status on the LCD may be different from the actual battery status.
Insert the battery as shown
- If the camera does not turn on after you have inserted battery,
please check whether the battery (+ / -).
- When the battery chamber cover is opened, do not force it. This
may cause damage to the battery chamber cover.
Connecting to a Power Source
Insert the memory card as shown.
- Turn off the camera’s power before inserting the memory card.
- Have the front label of the memory card facing toward the front
of the camera (Lens) and the card pins toward the back of the
camera (LCD monitor).
- Do not insert the memory card the wrong way round.
Doing so may damage the memory card slot.
Inserting the memory card

016
Instructions on how to use the memory card
If the memory card is subjected to any of the following, the re-
corded data may become corrupted :
- When the memory card is used incorrectly.
- If the power is switched off or the memory card is removed while
recording, deleting (formatting) or reading.
Samsung cannot be held responsible for lost data.
It is advisable to copy important data onto other media as back-up
e.g. hard disks, CD etc.
If there is insuf¿ cient memory available :
A [Memory Full] message will appear and the camera will not
operate. To optimise the amount of memory in the camera, replace
the memory card or delete unnecessary images stored on the
memory card.
Don't remove the memory card when the camera status lamp is
blinking as this may cause damage to data in the memory card.
Be sure to format the memory card (see p.65) if you are using a
newly purchased memory card for the ¿ rst time, if it contains data
that the camera cannot recognise, or if it contains images captured
with a different camera.
Turn off the camera power whenever the memory card is being
inserted or removed.
Repeated use of the memory card will eventually reduce the mem-
ory card’s performance. Should this be the case, you will need to
purchase a new memory card. Wear and tear on the memory card
is not covered by the Samsung warranty.
The memory card is an electronic precision device.
Do not bend, drop or subject the memory card to any heavy
impact.
Do not store the memory card in an environment with strong
electronic or magnetic ¿ elds, e.g. near loud speakers or TV receiv-
ers.
Please do not use or store in an environment where there are
extremes in temperature.
Do not allow the memory card to become dirty or to come into con-
tact with any liquid. Should this happen, clean the memory card
with a soft cloth.
Please keep the memory card in its case when not in use.
During and after periods of extended use, you may notice that the
memory card is warm. This is perfectly normal.
Do not use a memory card that is used in another digital camera.
To use the memory card in this camera, format the memory card
using this camera.
Do not use a memory card formatted by another digital camera or
memory card reader.
017
Instructions on how to use the memory card
The camera can use SD/SDHC Memory Cards and MMC (Multi
Media Cards).
The SD/SDHC memory card has a write protect switch that
prevents image ¿ les from being deleted or formatted. By sliding
the switch to the bottom of the SD/SDHC memory card, the data
will be protected. By sliding the switch to the top of the SD/SDHC
memory card, the data protection will be cancelled.
Slide the switch to the top of the SD/SDHC memory card before
taking a picture.
The recording times can be changed by the zoom operation.
The Zoom W/T lever doesn’t function during the movie recording.
Several videos were recorded in succession to determine the total
recording time.
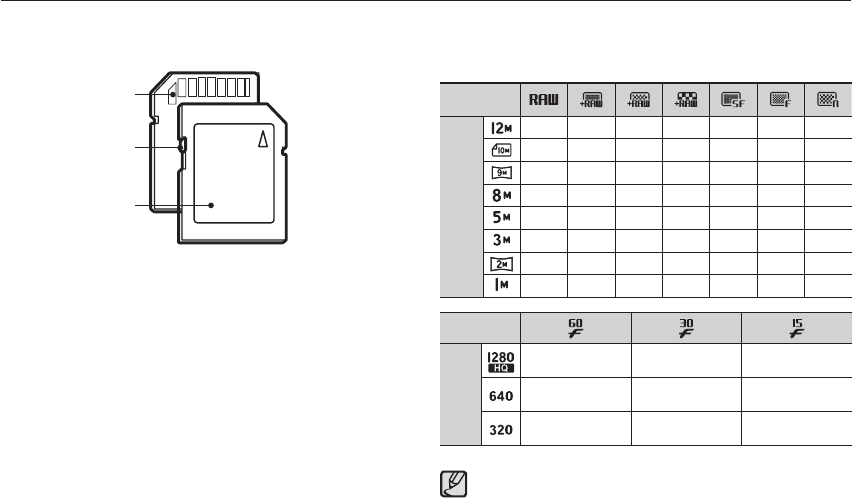
When using a 1GB SD memory, the speci¿ ed shooting capacity will be
as follows. These ¿ gures are approximate as image capacities can be
affected by variables such as subject matter and memory card type.
Recorded
image size
Still
image
45 33 37 39 134 222 333
----
152 250 375
----
179 295 442
----
201 331 494
----
318 519 769
----
502 820 1198
----
751 1198 1731
----
1833 2833 3896
Recorded
image size
Movie
clip
-
14'26'' 20'00''
-
41'31'' 110'46''
89'48'' 158'14'' 227'37''
Card pins
Write protect switch
Label
[SD (Secure Digital) memory card]
018
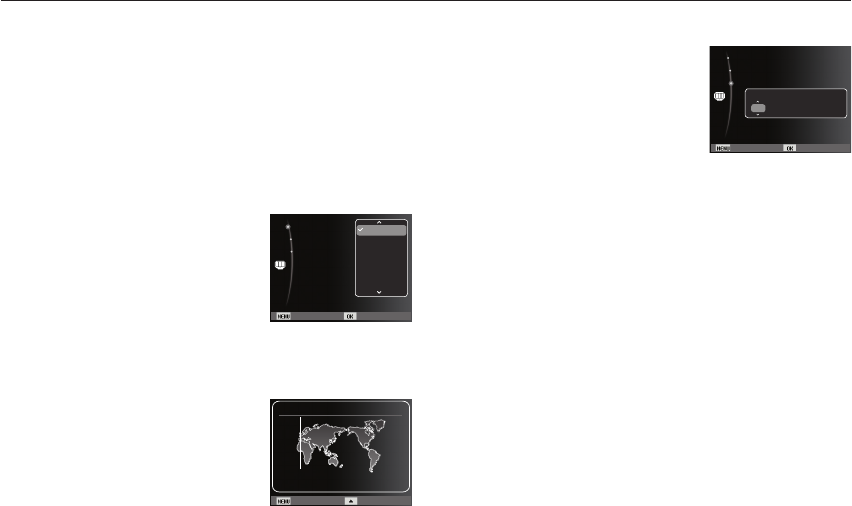
Setting up the date, time and date type
1. Select the [Date&Time] menu by
pressing the Up/Down button and press
the Right button.
2. Select the desired sub menu by
pressing the Up/Down/Left/Right
button and press the OK button.
Left/Right button : Selects world time/year/ month/ day/hour/
minute/ date type.
Up/Down button : Changes the value of each item.
When using the camera for the ¿ rst time
Charge the rechargeable battery fully before using the camera for
the ¿ rst time.
When the camera is turned on for the ¿ rst time, a menu will be
displayed in the LCD monitor to set date, time and language. This
menu will not be displayed again after setting up the date, time
and language. Set up the date, time and language before using
this camera.
Setting up the language
1. Select the [Language] menu by
pressing the Up/Down button and press
the Right button.
2. Select the desired sub menu by
pressing the Up/Down button and press
the OK button.
Setting up the Time Zone
1. Select the [Time Zone] menu by
pressing the Up/Down button and press
the Right button.
2. Press the Left/Right button to select the
desired mode.
Ä For more information about the World Time, refer to the page 66.
Back Set
Time Zone :London
Language :English
Date & Time :08/12/01
English
한국어
Français
Deutsch
Español
Italiano
Back Set
Time Zone :London
Language :English
Date & Time :09/01/01
2009 / 01 / 01 13:00 yyyy/mm/dd
yyyy mm dd
Back DST
London
[GMT +00:00] 2009/01/01 01:00 PM
Time Zone
019
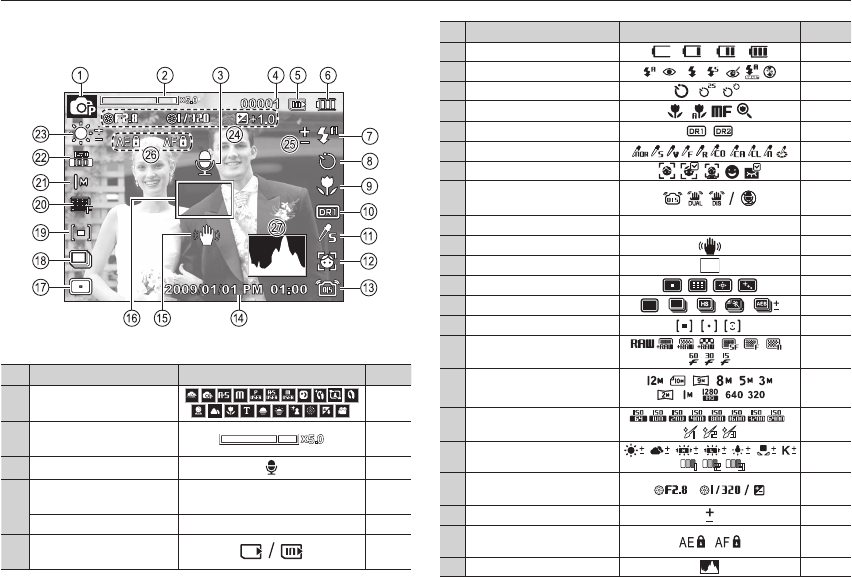
The LCD monitor displays information about the shooting
functions and selections.
LCD monitor indicator
[Image & Full Status]
No. Description Icons Page
1 Recording mode p. 21
2Optical / Digital Zoom bar
/ Digital Zoom rate p. 31
3
Voice Memo
p. 57
4
Number of available shots
remaining 00001 p. 17
Remaining time 00:00:00 p. 17
5Memory card icon /
Internal memory icon -
No. Description Icons Page
6Battery p. 15
7Flash p. 40
8Self-timer p. 42
9Macro p. 37
10 Dynamic Range p. 51
11 Photo Style Selector p. 54
12 Face Detection p. 47
13
Camera shake compensation /
Without Sound
p. 56/59
14 Date / Time 2009/01/01 PM 01:00 p. 66
15 Camera shake Warning p. 29
16 Auto Focus Frame p. 53
17 Auto Focus type p. 53
18 Drive mode p. 52
19 Metering p. 51
20 Image Quality /
Frame Rate
/ p. 50
21 Image Size p. 50
22 ISO / Face Retouch / p. 46/25
23 White Balance / Face Tone / p. 45/25
24
Aperture Value/Shutter Speed/
Exposure compensation
p. 23-24/
34
25 Flash EVC p. 53
26 Locking the Exposure/
Locking the Focus / p. 57
27 Histogram p. 37
020
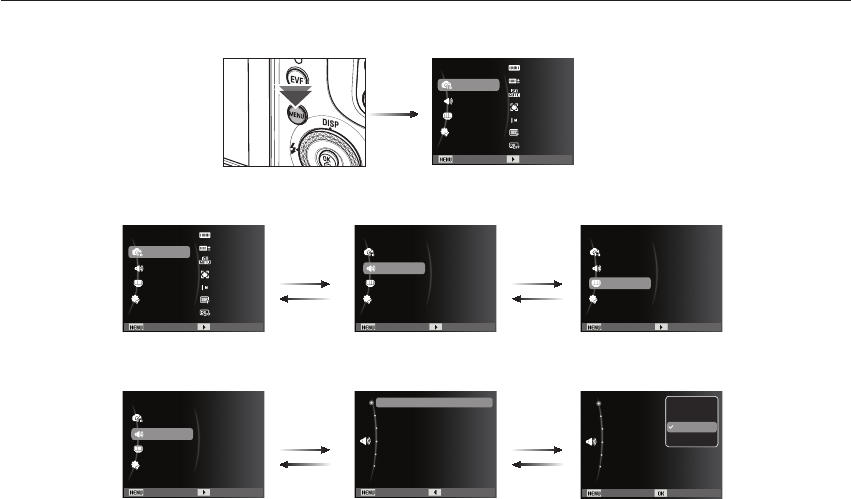
How to use the menu
1.
Turn on the camera and press the MENU button. A menu for each camera mode appears.
2. Use the up or down buttons to navigate through the menus.
3. Use the left or right buttons to select a sub menu.
4. Select a submenu and click the OK button to save settings and return to the previous window.
Press the
LEFT or
RIGHT button.
Press the
LEFT or
RIGHT button.
Press the
UP or DOWN
button.
Press the
UP or DOWN
button.
Voice
Back Set
Start Sound :Off
Shutter Sound :1
Beep Sound :1
AF Sound :On
Self-Portrait :On
Volume :Medium
Off
Low
Medium
High
Start Sound :Off
Shutter Sound :1
Beep Sound :1
AF Sound :On
Self-Portrait :On
Volume :Medium
Exit Back
Functions
Sound
Display
Settings
Start Sound
Shutter Sound
Beep Sound
AF Sound
Self-Portrait
Volume
Exit Change
Functions
Sound
Display
Settings
Function Description
Start Image
Display Brightness
Quick View
Power Save
Language
Exit Change
Functions
Sound
Display
Settings
Start Sound
Shutter Sound
Beep Sound
AF Sound
Self-Portrait
Volume
Exit Change
Grid Line
Functions
Sound
Display
Settings
WB Fine-tuning
ISO
Face Detection
Photo Size
Quality
White Balance
Exit Change
D-Range Exp.
Functions
Sound
Display
Settings
WB Fine-tuning
ISO
Face Detection
Photo Size
Quality
White Balance
Exit Change
D-Range Exp.
021
Starting the recording mode
Selecting modes
You can select the shooting modes by using the mode dial on the upper
of your camera.
How to use the mode dial
Select the shooting mode by turning the mode dial to the selection
point.
Ŷ Shooting modes
Smart Auto
The appropriate option can be set
automatically for a shooting scene by
recognizing shooting scenes.
Program Various shooting options can be set
manually.
Aperture. Shutter
Priority
Aperture values or shutter speed
can be set manually.
Manual
Various shooting options, including
the shutter speed and the aperture
values, can be set manually.
User Frequently used shooting options
can be preset.
Night This mode can be used at night or
in poor lighting conditions.
Beauty Shot The skin tone of a subject can be
corrected.
Scene The appropriate options for shooting
scenes are preset per scene.
Movie Movies can be recorded.
Scene
Program
Smart Auto
User1
User2
Select point
Manual
Movie
Beauty Shot
Night
Aperture. Shutter Priority
022
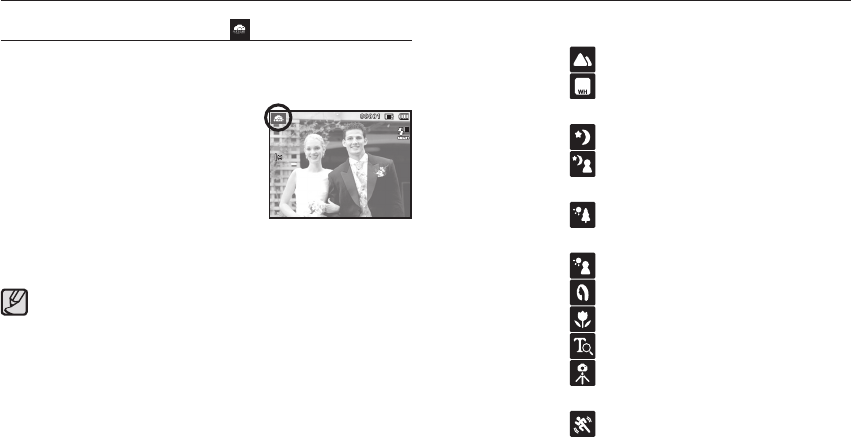
Starting the recording mode
The camera automatically chooses the appropriate camera settings
based on a detected type of scene. It will be helpful if you are not
familiar with the camera settings for various scenes.
1. Select Smart Auto mode by using the
Mode dial. (p.21)
2. Point the camera towards the subject
and compose the image by using the
LCD monitor.
3. Press the Shutter button to capture an
image.
How to use the Smart Auto mode( )
If the camera does not recognize a proper scene mode, the
default settings will be used.
Even if there is a face detected, the camera may not select a
portrait mode depending on the subject’s position or lighting.
The camera may not select the correct scene depending on
shooting environments, such as camera shake, lighting, and
distance to the subject.
The [Night] mode recognizes scenes only when the À ash is set
to off. The camera operates the [Tripod] mode after checking the
shooting condition on the tripod for a certain time.
Despite using a tripod, the camera may not select a tripod mode
depending on the subject’s movement.
Each scene is recognized in the following conditions;
[Landscape] ( ) : When shooting outdoor scenes
[White] ( ) : When shooting in a very bright
environment
[Night] ( ) : When shooting the nighttime scenes
[Night Portrait] ( ) : When shooting people in a dark outdoor
place
[Backlight] ( ) : When shooting a backlit scenery without
a portrait
[Backlight Portrait] ( ) : When shooting a backlit portrait
[Portrait] ( ) : When shooting a portrait
[Macro] ( ) : When shooting close-ups
[Macro Text] ( ) : When shooting texts in a close focus
[Tripod] ( ) : When shooting a subject without any
movement on the tripod
[Action] ( ) : When shooting a subject making frequent
movements
023
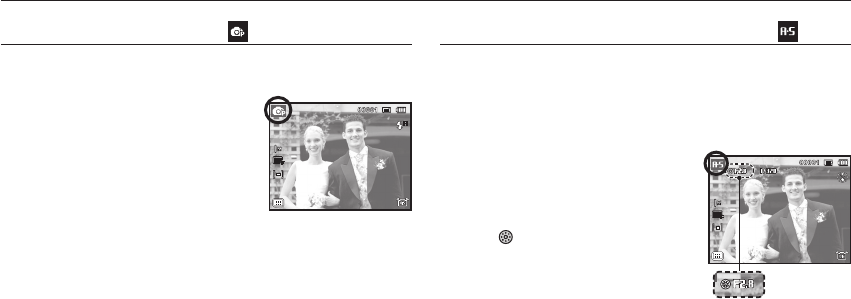
Selecting the Smart Auto mode will con¿ gure the camera with
optimal settings. You can still manually con¿ gure all functions.
1. Select the Program mode by using the
Mode dial. (p.21)
2. Press the Menu button to con¿ gure
advanced functions.
How to use the Program mode ( )
Starting the recording mode
How to use the Aperture. Shutter Priority mode ( )
When the user con¿ gures the aperture value or shutter speed, an ap-
propriate aperture value or shutter speed is con¿ gured automatically.
When the user con¿ gures an aperture value, the camera adjusts the
shutter speed automatically. When the user selects the shutter speed,
the camera selects an aperture value for optimal exposure.
1. Select the Aperture. Shutter Priority
mode by using the Mode dial. (p.21)
2. Select an aperture value or shutter
speed by turning the Smart Dial.
An " " icon will appear on the
selected item.
3. Select the aperture value or shutter
speed by pressing the left or right
button and then adjust a desired value
by turning the Smart Dial.
4. Point the camera towards the
subject and compose the image by
using the LCD monitor.
5. Press the Shutter button to capture
an image.
024
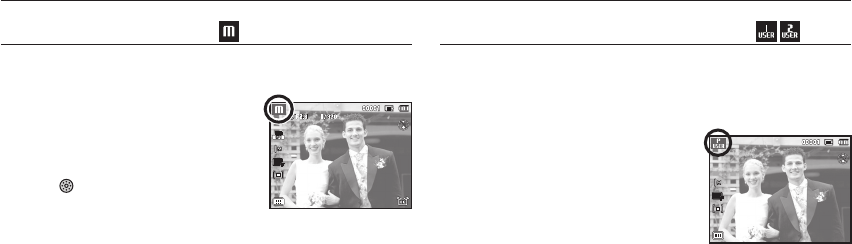
How to use the Manual mode ( )
The user can manually set both the aperture value and the shutter
speed.
1. Select the Manual mode by using the
Mode dial. (p.21)
2. Select an aperture value or shutter
speed by turning the Smart Dial.
An " " icon will appear on the
selected item.
3. Select the aperture value or shutter
speed by pressing the left or right
button and then adjust a desired value
by turning the Smart Dial.
4. Point the camera towards the subject
and compose the image by using the
LCD monitor.
5. Press the Shutter button to capture
an image.
Starting the recording mode
How to use the User Setting shooting mode ( )
The user’s own shooting mode can be used by saving the shooting
options which are con¿ gured in the [Program], [Aperture. Shutter
Priority] and [Manual] modes.
See page 60 to see how to set the User mode.
1. Set a User setting mode (User 1,
User 2) by turning the Mode Dial.
(p.21)
2. Point the camera towards the subject
and compose the image by using the
LCD monitor.
3. Press the Shutter button to capture
an image.
025
Select this mode at night or in low light conditions.
1. Select the Nightscene mode by using
the Mode dial. (p.21)
2. Point the camera towards the subject
and compose the image by using the
LCD monitor.
3. Press the Shutter button to capture an
image.
How to use the Nightscene modes ( )
Starting the recording mode
Take a photo of portraits by setting options to clear facial
imperfections.
1. Select the Beauty Shot mode by using
the Mode dial. (p.21)
2. Press the Up/Down button in
[Functions] menu to select [Face Tone]
or [Face Retouch].
3. Press the Left/Right button to select a
desired level of [Face Tone] or [Face
Retouch] features. And then press the
OK button.
4. Press the Shutter button to capture
images.
How to use the Beauty Shot mode ( )

026
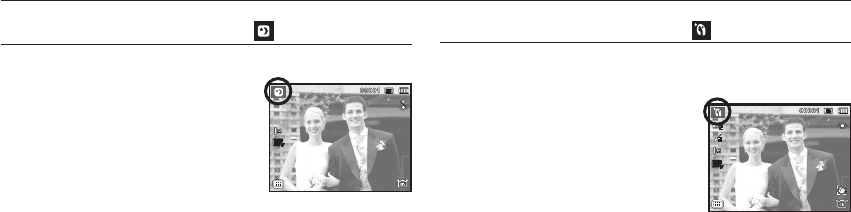
The scene modes are listed below.
[Frame Guide] ( ) : Use this mode when you want someone
else to take a picture for you from the
angle you choose.
[Portrait] ( ) : To take a picture of a person.
[Children] ( ) : To take a picture of fast moving
objects, for example, children.
[Landscape] ( ) : To take pictures of distant scenery.
[Close Up] ( ) : Close-up shooting for small objects such
as plants and insects.
[Text] ( ) : Use this mode to shoot a document.
[Sunset] ( ) : For taking pictures of sunsets.
[Dawn] ( ) : Daybreak scenes.
[Backlight] ( ) :
Portrait without shadows caused by backlight.
[Firework] ( ) : Firework scenes.
[Beach&Snow] ( ) : For ocean, lake, beach and snowscape
scenes.
Starting the recording mode
Use the menu to easily con¿ gure optimal settings for a variety of
shooting situations.
1. Select the Scene mode by using the
Mode dial. (p.21)
2. Press the Left/Right button to select
the desired mode.
3. Point the camera towards the subject
and compose the image by using the
LCD monitor.
4. Press the shutter button to capture an
image.
How to use the Scene modes ( )
Ä To change the Scene mode,
press the MENU button and select
a desired scene menu.
Exit Change
Scene
Functions
Sound
Display
Settings
Portrait
Children
Landscape
Close Up
Text
Frame Guide
Sunset
This mode is appropriate for shooting with
pre-composed scenes.
Frame Guide
027
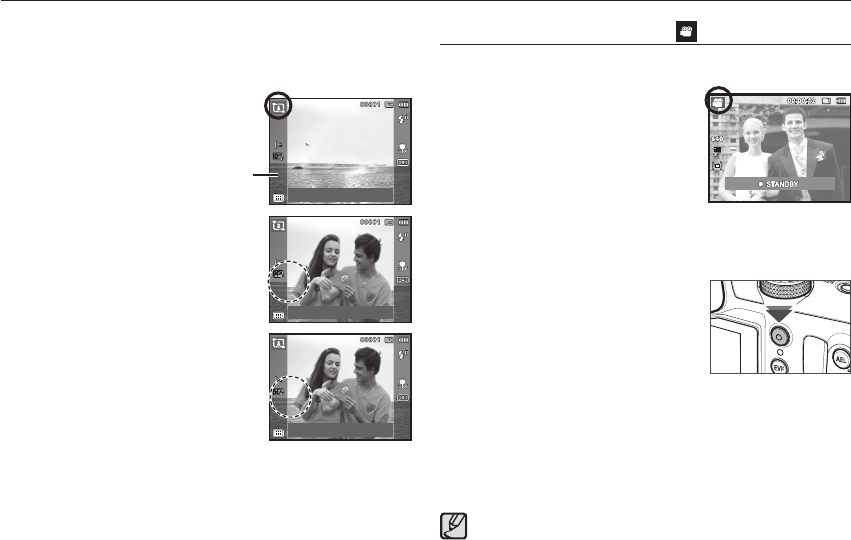
Starting the recording mode
How to use the [Frame Guide] mode
Set [Frame Guide] mode when you want someone else to take a
picture for you from the angle you choose.
1. Take a picture from the angle you
choose.
- A guide appears round the sides
of the picture.
2. Then another person can take the
picture by aligning the edge of the
picture to be taken with the guide
framing the sides of the window.
How to use the Movie clip mode ( )
A movie clip can be recorded for as long as the available recording
time(maximum 20 minutes at once) of the memory capacity allows.
1. Select the Movie clip mode by using
the Mode dial. (p.21)
2. Point the camera towards the subject
and compose the image by using the
LCD monitor.
3. Press the shutter button once and mov-
ie clips are recorded for as long as the
available recording time allows. Movie clips will still be recorded
if the shutter button is released. If you wish to stop recording,
press the shutter button again.
Ä The user can shoot movies when press-
ing the movie shooting button in the
shooting mode and the playback mode.
When the user presses the movie
shooting button once more, the function
for shooting a movie is disabled.
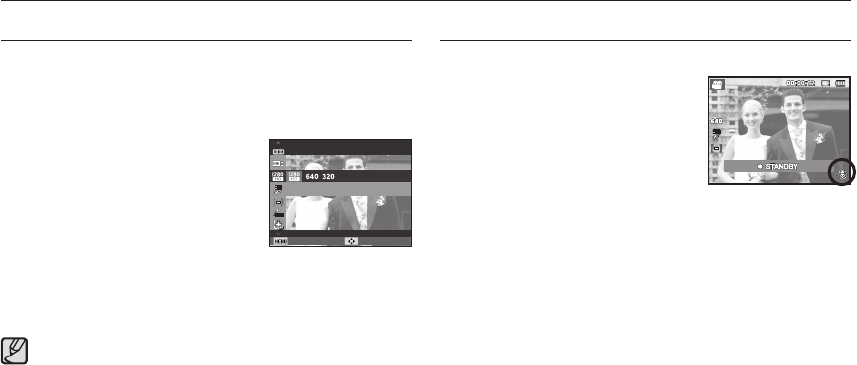
Ä Image size and type are listed below.
– Image size: 1280X720HQ, 640x480, 320x240 (1280X720HQ
are the settings for recording high-quality videos.)
– Movie clip ¿ le type: H.264(MPEG4.AVC)
– Frame Rate: 60FPS, 30FPS, 15FPS
Select [Zoom Mute] from the recording menu during video recording
to disable the recording of zoom sound.
Cancel Frame : OK
Guide
Cancel Frame : OK
Cancel Frame : OK
028
Starting the recording mode
You can record the movie clip without sound.
Steps from 1 -3 are the same as those for
MOVIE mode.
4. Press the Menu button.
5. Press the Up / Down button to select the
[Functions] menu and press the Right
button.
6. Select the [Voice] menu by pressing the
Up / Down button and press the OK button.
7. Select the [Off] menu by pressing the Left / Right button.
8. Press the OK bu tton. You can record a movie without sound.
Ä See p.59 for further details.
Recording the movie clip without sound
What is H.264(MPEG4 part10/AVC)?
With its high-compression rate and the small ¿ le size, it is a
standard for the digital video codec. It supports the recording
functions in a high resolution.
You can record HD (High De¿ nition) movie clips. (1280X720HQ, 30
fps)
H.264(MPEG4.AVC) is a standard for the digital video codec.
It supports a high quality movie clip in a small ¿ le size.
1. Select the Movie clip mode by using
the Mode dial. (p.21)
2. Press the Fn button to set the
resolution to [1280HQ].
3. Press the Shutter button to record
video for the available recording time.
Recording HD (High De¿ nition) movie clips
1280x720 HQ
Back Move

029
The available memory capacity may vary depending on shooting
conditions and camera settings.
When shooting a low lighting conditions, the camera shake
warning indicator ( Ã ) may appear on the LCD monitor. In
this case, use a tripod, support the camera on a solid surface or
change to À ash shot mode.
Shooting against the light
: It is best to take pictures with the sun in the
background. Taking pictures against the
sun may make the picture come out dark.
To take a picture against the light, please
use the [Backlight] in scene shooting mode
(see page 22), ¿ ll-in À ash (see page 41),
spot metering (see page 51), exposure
compensation (see page 34) or ACB (see
page 81) function.
Things to Watch Out for When Taking Pictures
Pressing the shutter button down half way.
Lightly press the shutter button to con¿ rm focus and À ash battery
charge. Press the shutter button all way down to take the picture.
Avoid obstructing the lens or the À ash when you capture an image.
Compose the image by using the LCD monitor.
Under certain conditions the auto focus system may not perform
as expected.
- When photographing a subject that has little contrast.
- If the subject is highly reÀ ective or shiny.
- If the subject is moving at high speed.
- When there is strong reÀ ected light, or when the background is
very bright.
- When the subject matter has only horizontal lines or the subject
is very narrow (such as a stick or À agpole).
- When the surroundings are dark.
[Lightly press the shutter button] [Press the shutter button]
030
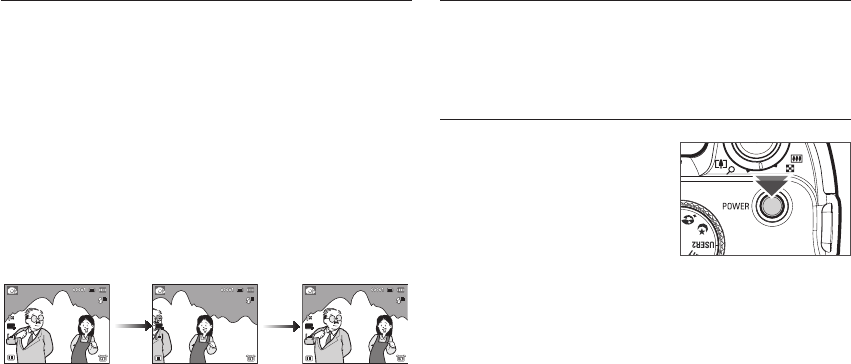
Using the camera buttons to set the camera
The recording mode function can be set up by using the camera buttons.
Used for turning the camera’s power
on / off. If there is no operation during
the speci¿ ed time, the camera's power
will be turned off automatically to save
battery life. Refer to page 67 for more
information about the auto power off
function.
POWER button
Focus lock
To focus on a subject not positioned in the centre of the picture, use
the focus lock function.
3. Recompose the picture
and fully depress the
SHUTTER button.
1. The image to be
captured.
2.
Press the SHUTTER
button halfway and
focus on the subject.
Using the Focus Lock
1. Ensure the subject is in the centre of the autofocus frame.
2. Press the SHUTTER button halfway. When the green auto focus
frame lights up, it means the camera is focused on the subject.
Be careful not to press the SHUTTER button all the way down to
avoid taking an unwanted picture.
3. With the SHUTTER button still pressed down only halfway, move
the camera to recompose your picture as desired, and then
press the SHUTTER button completely to take the picture. If you
release your ¿ nger from the SHUTTER button, the focus lock
function will be cancelled.
031
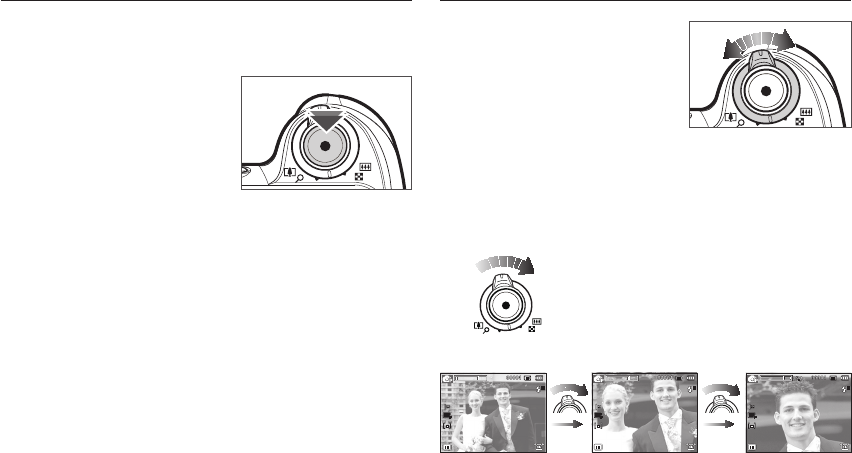
Zoom W/T Lever
If the menu is not displayed, this lever
works as the OPTICAL ZOOM or
DIGITAL ZOOM lever.
This camera has a 24X optical zoom
and a 5X digital zoom function. Using
both will offer a total zoom ratio of 120X.
TELE Zoom
Optical zoom TELE : Move the Zoom W/T lever to the right to see
the subject closer.
Digital zoom TELE : Move the Zoom W/T lever to the right once
again in optical 24x zoom mode to enable
digital zoom (software tele). Stop moving
the Zoom W/T lever to stop the operation of
digital zoom (tele). In digital 5x zoom mode,
digital zoom is disabled even if you operate
the Zoom W/T lever.
Used for taking an image or recording voice in the RECORDING
mode.
In MOVIE CLIP mode
Pressing the shutter button down
fully starts the process for record-
ing a movie clip. Press the shutter
button once and the movie clip is
recorded for as long as the available
recording time in the memory al-
lows. If you wish to stop recording, press the shutter button again.
In STILL IMAGE mode
Pressing the shutter button down halfway activates the autofocus
and checks the condition of the À ash. Pressing the shutter button
down fully takes and stores the image. If you select voice memo
recording, the recording will start after the camera has ¿ nished
storing the image data.
SHUTTER button
[WIDE zoom] [TELE zoom] [Digital zoom 5.0X]
032
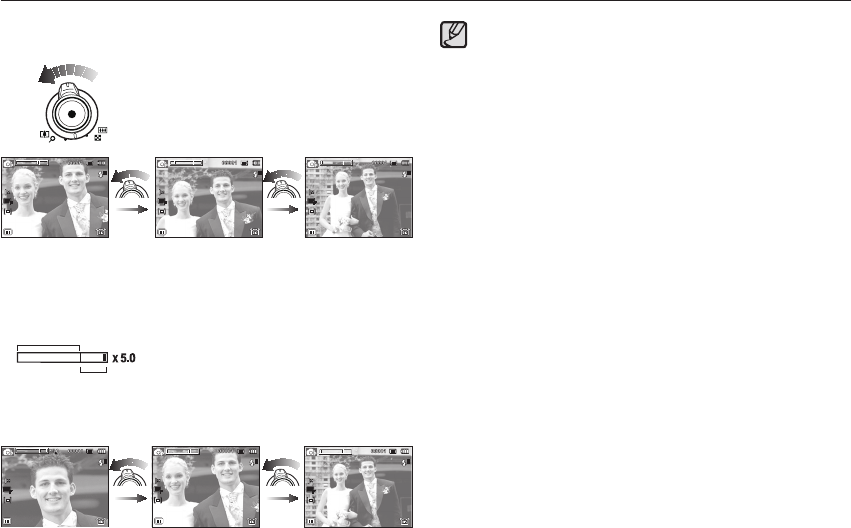
Zoom W/T Lever
WIDE Zoom
Optical zoom WIDE : Move the Zoom W/T lever to the left in
optical zoom mode to see subjects in the
distance. Continue to move the Zoom W/T
lever to the left to disable optical zoom.
Digital zoom WIDE : Move the Zoom W/T lever to the left in
digital zoom mode to enable digital zoom
(software wide). Stop moving the Zoom
W/T lever to stop the operation of digital
zoom. Continue to move the Zoom W/T
lever to the left when digital zoom is
disabled to disable optical zoom (optical
tele).
Digital zoom
Optical zoom
If the Zoom W/T lever is fully turned, the zoom adjusts quickly.
If the Zoom W/T lever is turned a little, the zoom adjusts slowly.
Images taken using the digital zoom may take a little longer for
the camera to process. Allow time for this to take place.
Zooming during video recording may record operation sound of
the Zoom W/T lever.
Select [Zoom Mute] from the recording menu during video
recording to disable the recording of zoom sound.
You may notice a decrease in image quality when using the digital
zoom.
To view a clearer digital zoom image, press the shutter button
halfway at the maximum optical zoom position and move the
Zoom W/T lever to the right again.
The digital zoom can’t be activated in the [Face Detection], [Beauty
Shot], [Smart Auto], [Movie] and some Scene modes.
Take care not to touch the lens to avoid taking an unclear image
and possibly causing camera malfunction. If the image is dim, turn
the camera power off and on again to modify the lens position.
Take care not to press the lens as this may cause a camera
malfunction.
When the camera is turned on, take care not to touch the camera’s
moving lens parts as this may cause the resulting image to be dim
and unclear.
Take care not to touch the lens while operating the Zoom W/T
lever.
[Digital zoom 5.0X] [TELE zoom] [WIDE zoom]
[TELE zoom] [Optical zoom 2X] [WIDE zoom]
033
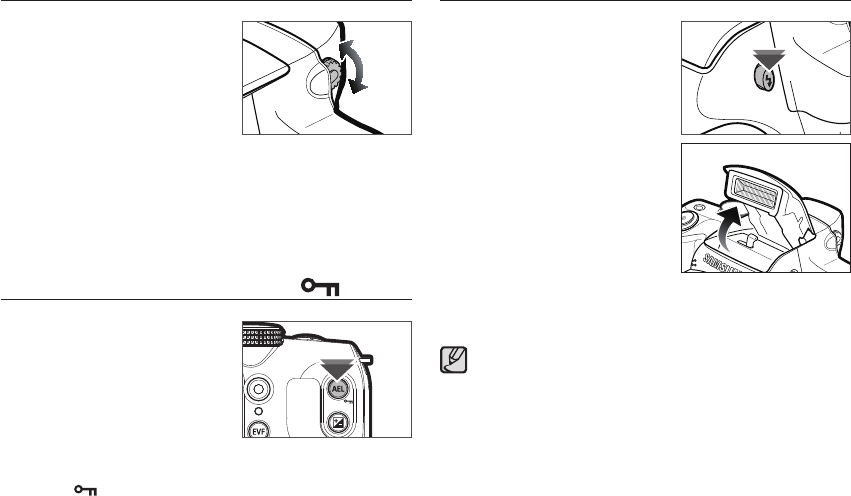
Diopter adjustment lever Flash pop-up button
When the electronic view¿ nder is out
of focus, the user can achieve the
clearest focus by turning the diopter
adjustment lever. (p.35)
AEL/Image protection button ( )
An exposure value can be saved prior
to shooting when the AEL button is
pressed. When a subject is too small
to obtain the appropriate exposure or
for backlight shots, this button can be
used.
The AEL button can be used for AFL,
AEL/AFL, and AF (see page 57 for setting procedure).
In the playback mode, this button can be used as an image protec-
tion button ( ) (p. 86).
When a background is brighter than a
subject, or when intentionally turning
on the À ash, e.g. backlight shooting or
shooting in poor lighting conditions, the
user must pop up the À ash by pressing
the À ash pop-up button.
See page 40 to set the desired À ash
mode for a shooting situation when
using the À ash.
Precautions when using built-in À ash
Ɣ Do not attempt to open the built-in À ash forcibly, as it may damage
the camera.
Ɣ Ensure that the À ash is always closed when it is not used.
If the À ash is pushed backwards, it may damage the À ash.
034
[Press the
EVF/LCD button.]
[LCD monitor]
[Electronic view¿ nder]
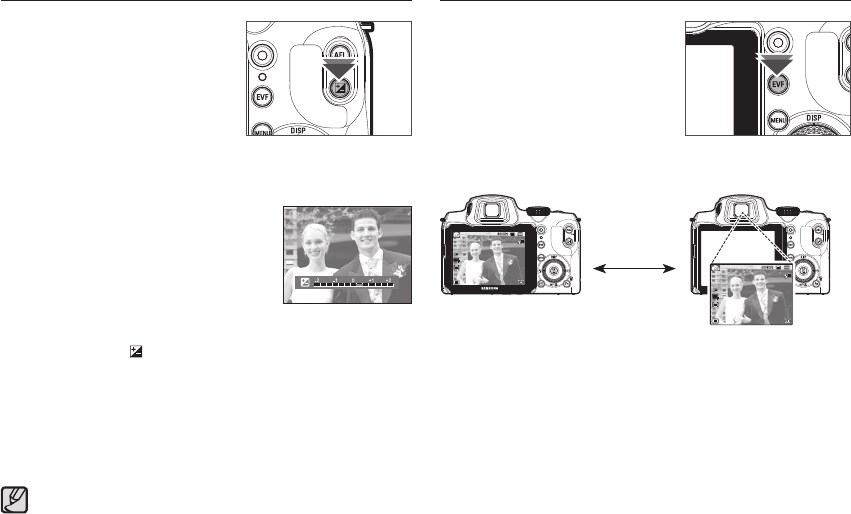
Exposure compensation setting is available in the [Program],
[Aperture. Shutter Priority] and [Movie] modes.
Exposure compensation button
This camera adjusts the appropriate
amount of exposure automatically for
a shooting situation. The user can use
the exposure compensation button to
shoot with excessive exposure (bright
images) or insuf¿ cient exposure (dark
images). The range of exposure com-
pensation is -2 to +2 (EV), and can be set with intervals of 1/3 EV.
How to set exposure compensation
1. Press the exposure compensation
button in the shooting mode.
2. Set a desired exposure compensation
value by using the LEFT/RIGHT but-
tons or the Smart Dial.
3. Press the OK button to save a con¿ gured value and the setting
for exposure compensation is complete. The exposure com-
pensation icon ( ) appears on the LCD monitor after setting
the exposure compensation, if the exposure compensation
value is not 0.0EV.
Ä Note that the LCD monitor looks blurry or good images can’t
be obtained if [+] exposure compensation is made. If [-] expo-
sure compensation is made, exposure becomes insuf¿ cient.
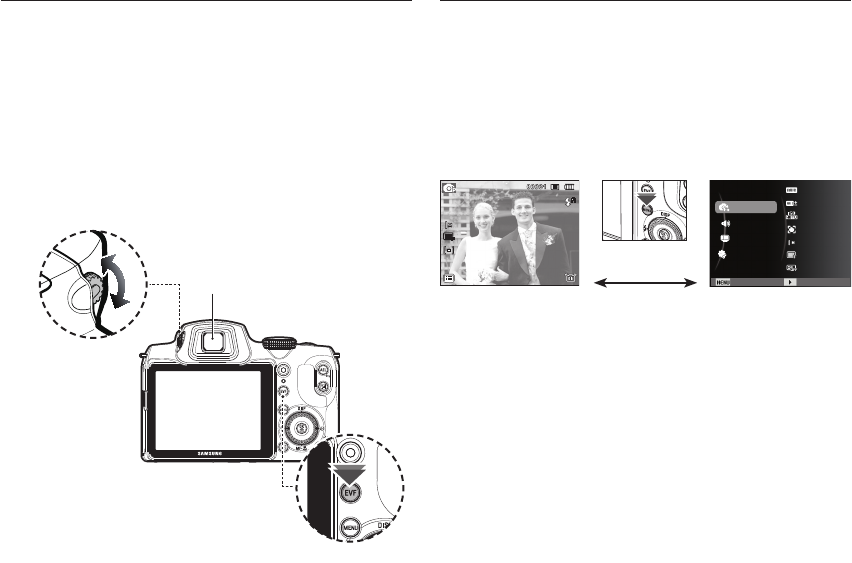
The user can shoot with the electronic
view¿ nder when it is dif¿ cult for the user
to see the LCD display due to bright
lighting.
The user can switch between EVF and
LCD by pressing the EVF/LCD button.
EVF/LCD button
035
MENU button
- When you press the MENU button, a menu related to each
camera mode will be displayed on the LCD monitor. Pressing it
again will return the LCD to the initial display.
- The menu screen is available in the [Smart Auto], [Program],
[Aperture. Shutter Priority], [Manual], [Night], [Beauty Shot],
[Scene] and [Movie] modes, but it is not available in the voice
recording function.
EVF/LCD button
Using the electronic view¿ nder (EVF)
The electronic view¿ nder shows the same display as the LCD
monitor, and is used when it is dif¿ cult for the user to see the
LCD monitor due to bright lighting. Pressing the EVF/LCD button
will switch between the electronic view¿ nder and the LCD moni-
tor. The display remains the same when the camera is turned off
or when the user selects another mode with the Mode Dial.
When the electronic view¿ nder is out of focus, turn the diopter
adjustment lever to obtain the clearest image.
Diopter adjustment lever
EVF/LCD button
Electronic view¿ nder (EVF)
[Menu off] [Menu on]
[Pressing the MENU button]
Functions
Sound
Display
Settings
WB Fine-tuning
ISO
Face Detection
Photo Size
Quality
White Balance
Exit Change
D-Range Exp.
036
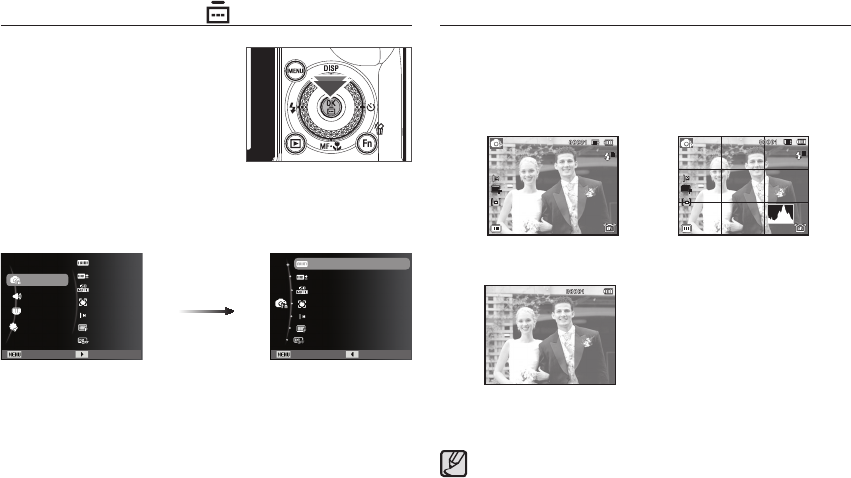
Info (DISP) / Up button
While the menu is showing, the Up button operates as a direction button.
In the recording modes or playback mode, pressing this button will display
the image information.
[Information screen]
[Filming screen]
When the menu is displayed on the LCD
monitor, this button is used for shift-
ing the cursor to the sub menu or for
con¿ rming data.
This button is used when moving to or
saving the changed data on the menu
screen.
Press the UP/DOWN/LEFT/RIGHT buttons to shift the AF points.
OK/AF point button ( )
[Histogram/Grid Window]
Histogram is not displayed when setting the [Face Detection]
function.
[Pressing the OK button]
Functions
Sound
Display
Settings
WB Fine-tuning
ISO
Face Detection
Photo Size
Quality
White Balance
Exit Change
D-Range Exp.
Exit Back
WB Fine-tuning
ISO
Face Detection
Photo Size
Quality
White Balance
D-Range Exp.
037
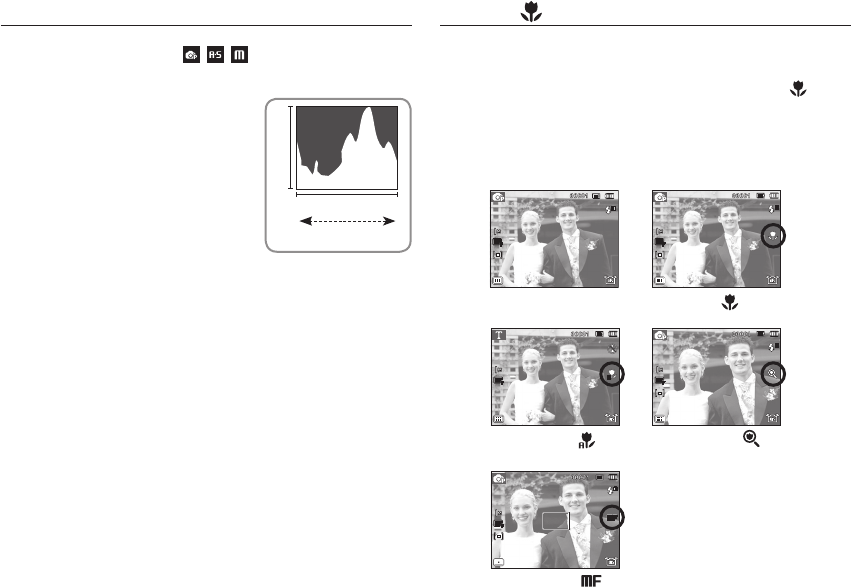
Macro ( ) / Down button
While the menu is showing, the
DOWN
button operates as a direction
button.
When the menu is not showing, you can use the MACRO ( ) /
DOWN button to take macro pictures.
The focus ranges are shown on the next page.
Press the Macro button until the desired macro mode indicator
appears on the LCD monitor.
[Auto Focus] [Macro ( )]
Info (DISP) / Up button
Histogram/Grid Window ( )
Histogram
Histogram shows you the distribution
of brightness in recorded images. If
the bars in the histogram are higher
towards the right, the image may be too
bright. If the bars are higher on the left,
the image may be too dark. If the light-
ing conditions are too bright to check
the subject by using the LCD, checking
the histogram will enable more precise
exposure control for the shots.
Grid
If you focus on the subject using a variety of horizontal or vertical
grids, you will be able to take pictures at better angles, checking
size, horizontality, or proportions. For information on types of grid
and how to set them, refer to Page 63.
[Auto Macro ( )]
Dark Bright
Pixel
Distribution of brightness
[Super Macro ( )]
[Manual Focus( )]
038
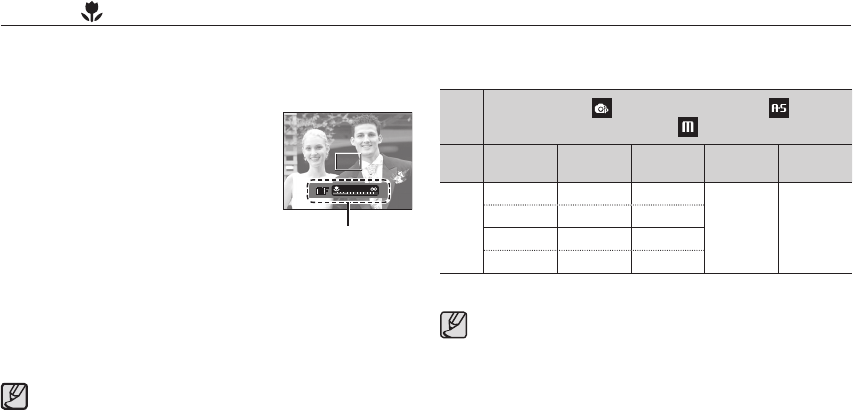
Types of focus mode and focus range
(Unit: cm)
When the macro mode is selected, be particularly careful to avoid
camera shake.
When using the Super Macro function, you cannot operate the zoom
and adjust the zoom magnifi cation rate.
Macro ( ) / Down button
Mode Program( )/Aperture. Shutter Priority( )/
Manual( )
Focus
Type Normal Auto Macro Macro Super
Macro
Manual
Focus
Focus
range
Wide Wide Wide
1 ~ 10 10 ~ Infi nity
80 ~ Infi nity 10 ~ Infi nity 10 ~ 80
Tele Tele Tele
170 ~ Infi nity 170 ~ Infi nity 80 ~ 150
Note that the picture may be blurred if manual focusing is not
performed properly.
How to Set Focus Manually
If it is diffi cult to get the automatic focus to work (for example in
low light), you can manually control the focus.
1. Press the Macro button to enable
manual focus.
- Then the control bar for manual focus
will appear.
2. Press the Left/Right button to control
the focus as you want.
Ä Set the manual focus to expand the center of the window to
the entire window. Press the shutter button halfway down to
return to the initial state.
Control Bar for Manual
Focus
039
Available focusing method, by recording mode
( o : Selectable, : In¿ nity focus range)
Macro ( ) / Down button
Mode Normal Auto Macro Macro Super
Macro
Manual
Focus
o ooo
o ooo
o ooo
o
o
ooo
oooo
oooo
Mode
SCENE
Normal Auto Macro Macro Super
Macro
Manual
Focus
o
o
o
o
o
o
o
o
o
o
Focus range is automatically selected in [Smart Auto] mode.
040
If you press the shutter button after selecting the fl ash, the fi rst
fl ash fi res to check the shooting condition (Flash range and Power
ratio of fl ash). Do not move the camera until the second fl ash
fi res.
Using the fl ash frequently will reduce the life of the battery.
Under normal operating conditions the re-charging time for the
fl ash is usually within 5 seconds. If the battery is weak, the charg-
ing time will be longer.
The camera fl ash does not operate in the [Movie] and some
Scene modes.
Take photographs within the fl ash range.
The image quality is not guaranteed if the subject is too close or
highly refl ective.
When taking an image in poorly lit conditions with the fl ash, there
may be a white speck in the captured image. The speck is caused
by the fl ash light refl ecting off atmospheric dust.
If fl ash doesn’t pop up, can not use the fl ash.
Flash ( ) / Left button
When the menu is displayed on the LCD monitor, pressing the LEFT
button makes the cursor shift to the left tab.
When the menu is not displayed on the LCD monitor, the fl ash ( )
/LEFT button operates as the fl ash ( ) button.
Selecting the fl ash mode
1. Press the Flash pop-up button to pop up the fl ash.
2. Select the desired Recording mode, except for the [Movie]
mode. (p.21)
3. Press the Flash button until the desired fl ash mode indicator is
displayed on the LCD monitor.
4. A fl ash mode indicator will be displayed on the LCD monitor.
Use the correct fl ash to suit the environment.
Ä You can control the fl ash intensity in the [Functions] menu. (p.53)
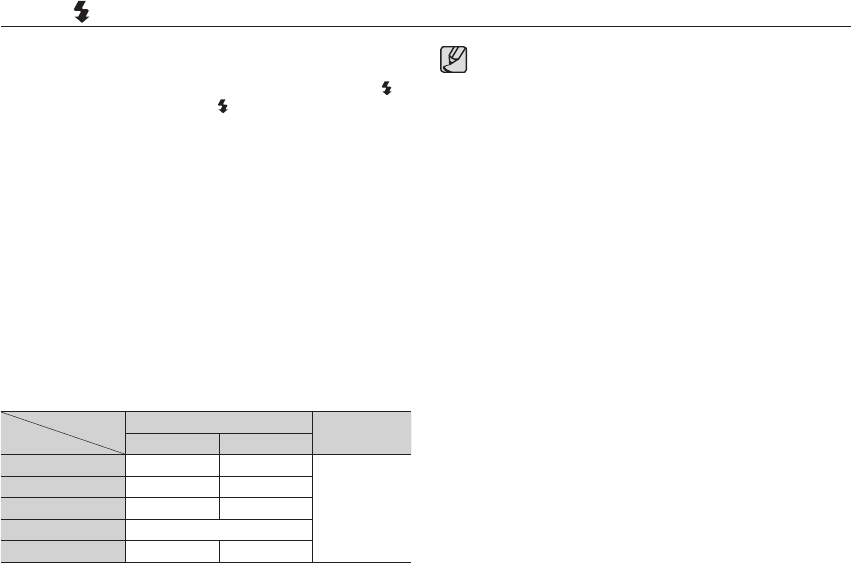
Flash range (Unit: m)
Shooting range ISO
Wide Tele
Normal 0.3 ~ 6.0 1.7 ~ 3.0
AUTO
Auto macro 0.3 ~ 6.0 1.7 ~ 3.0
Macro 0.3 ~ 0.8 0.8 ~ 1.5
Super Macro
-
Manual Focus 0.3 ~ 6.0 1.7 ~ 3.0
041
Flash ( ) / Left button
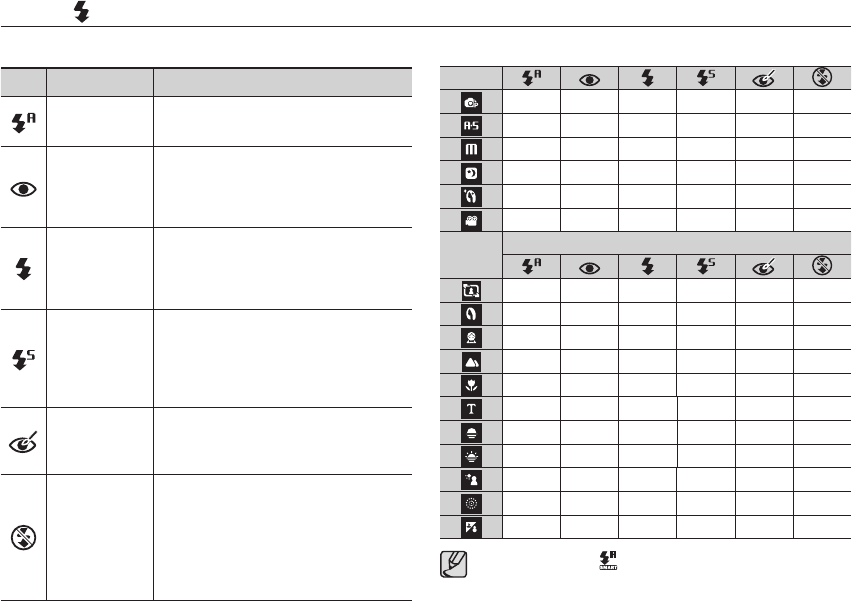
Flash mode indicator
Icon Flash mode Description
Auto À ash If the subject or background is dark, the
camera À ash will operate automatically.
Auto & Red eye
reduction
If a subject or background is dark, the
camera À ash will work automatically and will
reduce the red-eye effect by using the red-
eye reduction function.
Fill in À ash
The À ash ¿ res regardless of the avail-
able light. The intensity of the À ash will be
automatically controlled to suit the prevailing
conditions.
Slow synchro
The À ash operates with a slow shutter speed
to obtain a balanced correct exposure. In poor
lighting conditions the camera shake warning
indicator ( Ã ) will display on the LCD moni-
tor.
Red-eye reduction
When a shot with "red eye" is detected,
this mode will reduce the red-eye effect
automatically.
Flash off
The À ash does not ¿ re.
Select this mode when capturing images in
a place or situation where À ash photography
is prohibited. When you capture an image in
poorly lit conditions, the camera shake warn-
ing indicator ( Ã ) will appear on the LCD
monitor.
Available À ash mode, by recording mode ( o : Selectable)
Mode
oooooo
oo o
oo
ooo
ooo
o
Mode SCENE
ooo
ooo
oo
o
o
o
o
o
o
o
o
Smart Auto Flash ( ) icon will appear in [Smart Auto] mode.
042
When the menu is displayed on the LCD monitor, pressing the Right
button makes the cursor shift to the right tab.
When the menu is not displayed on the LCD monitor, the RIGHT
button operates as the Self-timer ( ) button. This function is used
when the photographer would also like to be in the image.
If you operate the Self-timer button during the self-timer
operation, the self-timer function is cancelled.
Use a tripod to prevent the camera from shaking.
In [Smart Auto], [Frame Guide], [Movie] mode, only the
10SEC self-timer will work.
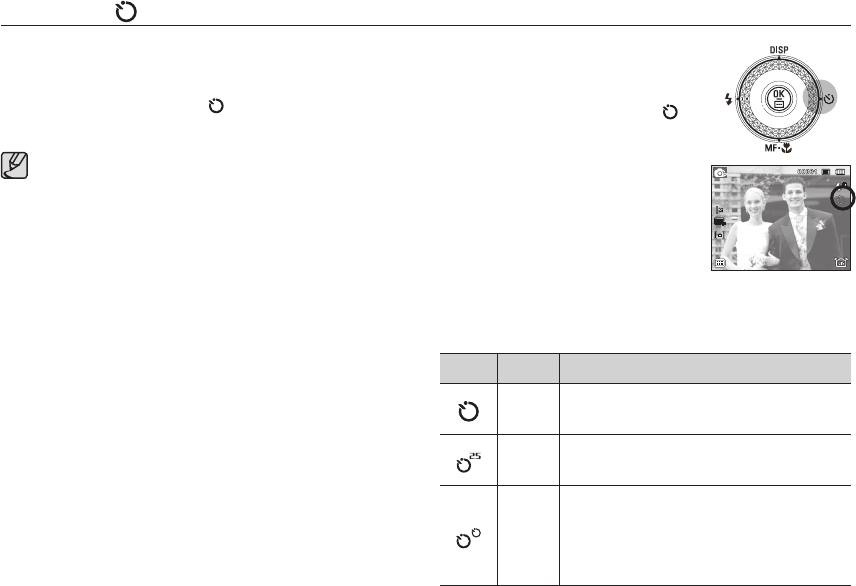
Self-timer ( ) / Right button
Selecting the self-timer
1.
Select a Recording mode with the
exception of Voice recording mode. (p.21)
2. Press the SELF-TIMER / RIGHT ( )
button until the desired mode indicator
displays on the LCD monitor.
A 10 second, 2 second or Double Self-
timer icon appears on the LCD monitor.
3. When you press the SHUTTER button,
the picture will be taken after the
speci¿ ed time has elapsed.
[Selecting the 10 SEC
self-timer]
Self-timer mode indicator
Icon Mode Description
10SEC
self-timer
Pressing the shutter button will allow an interval of
10 seconds before the image is taken.
2SEC
self-timer
Pressing the shutter button will allow an interval of
2 seconds before the image is taken.
Double
self-timer
A picture will be taken after about 10 seconds and
2 seconds later a second picture will be taken.
When using the À ash, the 2-second
self-timer may be delayed for longer than 2 sec-
onds depending on the À ash charging time.
043
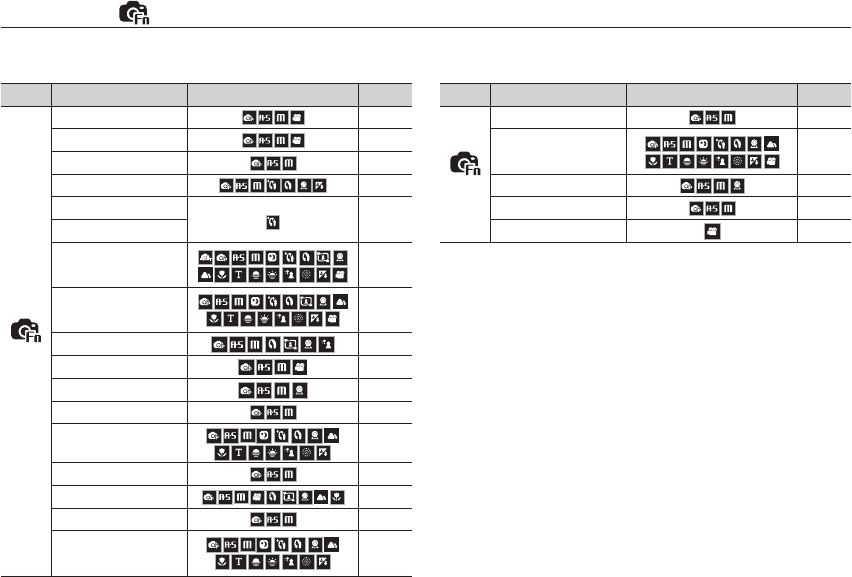
Use the menu that enables the functions, or the Fn button, to bring up the
menus below:
Mode Menu Available mode Page
(
Functions
)
White Balance p.45
WB Fine-tuning p.46
ISO p.46
Face Detection p.47-49
Face Tone p.49
Face Retouch
Photo Size / Movie Size
p.50
Quality / Frame Rate p.50
D-Range Exp. p.51
Metering p.51
Drive p.52
AEB Area p.52
Focus Area p.53
Flash EVC p.53
Photo Style Selector p.54
Image Adjust p.55
Image Stabiliser p.56
Functions ( )
Mode Menu Available mode Page
(
Functions
)
Key mapping p.57
Voice p.57-59
Distortion Control p.59
User Mode Set p.60
Stabilizer p.60
044
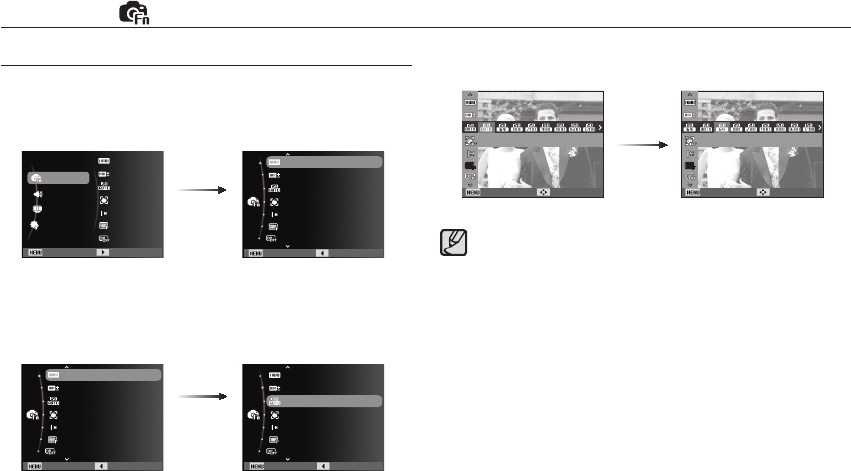
Functions ( )
3. Select a desired menu by pressing the Up / Down button and
then press the OK button.
1. Press the MENU button in an available mode.
2. Press the Up / Down button to select the [Functions] menu and
press the Right/OK button.
How to Enable Functions Using the MENU Button
Use the Fn button on the rear of the camera to bring up the menus
that enable frequently used functions faster.
4. Select a desired menu by pressing the Left / Right button and
then press the OK button.
Left / Right
button
Up / Down
button
Right/OK
button
WB Fine-tuning
ISO
Face Detection
Photo Size
Quality
White Balance
D-Range Exp.
Exit Back
WB Fine-tuning
ISO
Face Detection
Photo Size
Quality
White Balance
D-Range Exp.
Exit Back
WB Fine-tuning
ISO
Face Detection
Photo Size
Quality
White Balance
D-Range Exp.
Exit Back
Functions
Sound
Display
Settings
WB Fine-tuning
ISO
Face Detection
Photo Size
Quality
White Balance
Exit Change
D-Range Exp.
ISO
Back Move
ISO 64
Back Move
045
Functions ( )
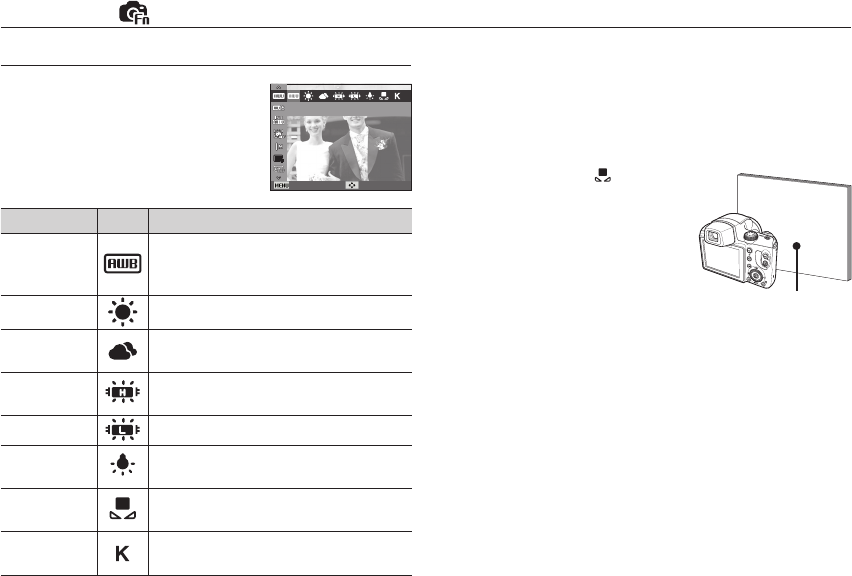
White balance
The white balance is a function that makes
adjustments in accordance with the lighting
conditions and colours of a scene so that
the white in the photograph appears white.
The white balance control allows you to
adjust the colours to appear more natural
depending on the lighting conditions.
Mode Icon Description
Auto WB
The camera automatically selects the ap-
propriate white balance settings, depending
on the prevailing lighting conditions.
Daylight For taking images outside.
Cloudy For taking images under a cloudy and over-
cast sky.
Fluorescent_H For shooting under daylight À uorescent types
of three-way À uorescent lighting.
Fluorescent_L Shooting under white À uorescent lighting.
Tungsten For shooting under tungsten (standard light
bulb) lighting.
Custom Set Allows the user to set the white balance ac-
cording to the shooting condition.
Color
Temperature
Allows the user to set the desired colour tem-
perature according to the shooting condition.
Ä Different lighting conditions may cause a colour cast on your images.
Using the Custom White Balance
White balance settings may vary slightly depending on the
shooting environment. You can select the most appropriate
white balance setting for a given shooting environment by setting
up the custom white balance.
1. Select the CUSTOM ( ) menu of
the White Balance and place a sheet
of white paper in front of the camera
so that the LCD monitor shows only
white.
2. OK button : selects previous
custom white balance.
Shutter button : saves new custom white
balance.
- The custom white balance value will be applied, starting with the
next picture you take.
- The user con¿ gured white balance will be remain effective until
it is overwritten.
White paper
White Balance
Back Move
046
ISO
[Auto] : The camera's sensitivity is automatically changed by
variables such as lighting value or subject brightness.
[ISO 64, 100, 200, 400, 800, 1600, 3200, 6400] :
You can increase the shutter speed while the same amount of light
is present, by increasing the ISO sensitivity. However, the image
may be saturated in high luminance.
The higher the ISO value, the higher the camera’s sensitivity to light
and therefore the greater its capacity to take pictures in dark condi-
tions. However, the noise level in the image will increase as the ISO
value increases, making the image appear coarse.
Ä When [Motion Capture] is set, ISO speed will be set to Auto.
Ä ISO setting is available in the [Program], [Aperture. Shutter
Priority] and [Manual] modes.
Ä ISO 3200 and ISO 6400 can be set below 5M and 3M respec-
tively.
You can select the ISO sensitivity when
taking pictures.The speed or speci¿ c
light-sensitivity of a camera is rated by
ISO numbers.
Functions ( )
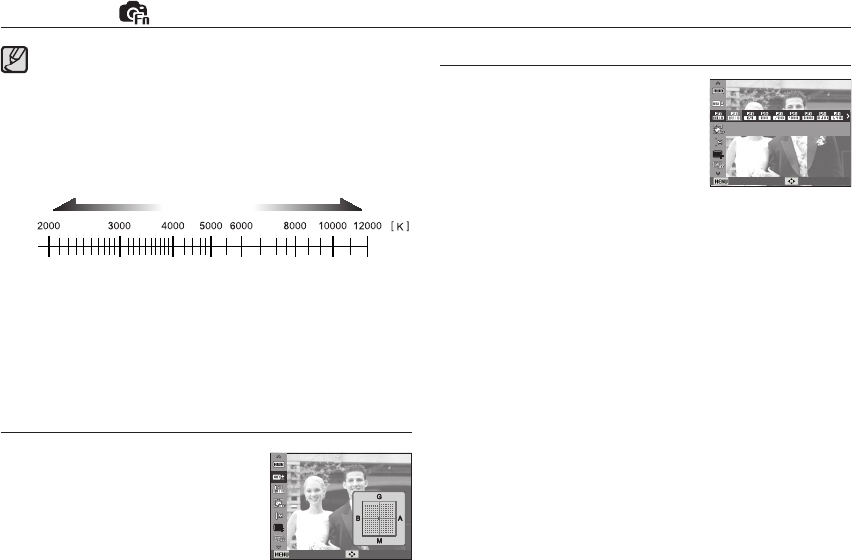
Fine-tuning the white balance
Press the UP/DOWN/LEFT/RIGHT buttons
to adjust the desired white balance.
Seven levels (196 patterns) are available on
the G-M and B-A axis.
• G: Green
• A: Amber
• M: Magenta
• B: Blue
Red light Blue light
Candle flame
Incandescent
Halogen
Warm-white (Fluorescent)
Daylight
Cloudy
Cool-white (Fluorescent)
Shade
Clear sky
Neutral-white (Fluorescent)
Flash
What is colour temperature?
The colour of the light changes to blue when the colour temperature
goes up, but it changes to red when the colour temperature goes
down. The change in the colour of the light is indicated in kelvins (K)
and is called the colour temperature. This camera allows the user
to set the white balance settings to shoot with natural colours in the
variety of lighting conditions.
ISO
Back Move
Back Move
047
Functions ( )
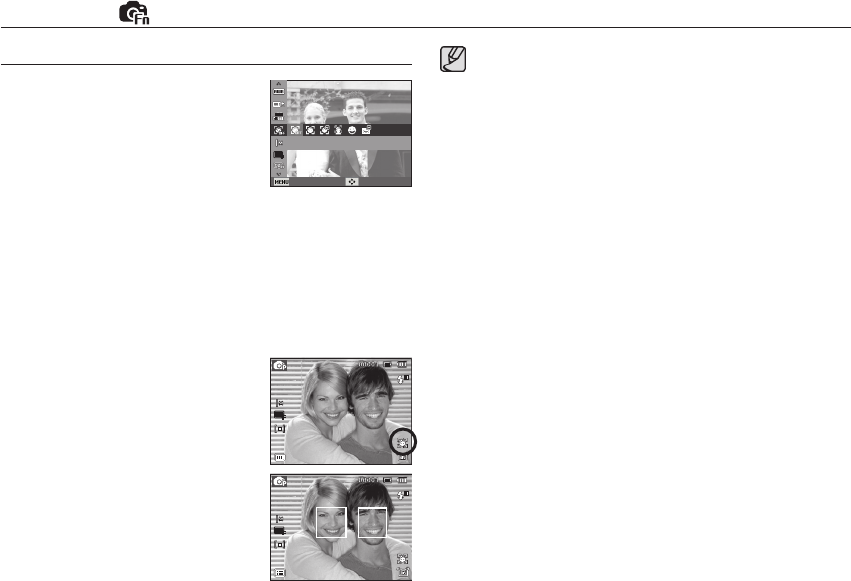
Face Detection
If you use face detection options, your
camera can detect a human face. When
focusing on a human face, the brightness
of the face is also adjusted. You can also
capture natural facial expressions by using
self portrait.
Ä Selectable modes: Program, Aperture. Shutter Priority, Manual,
Beauty Shot, Portrait, Children, Beach & Snow
Normal
This mode detects the face position of the subject automatically and
then sets the focus and exposure. Select this mode for quick and
easy face picture.
1. The size and position of the auto focus
frame is set at the face of the subject
automatically.
2. Press the shutter button halfway.
The focus frame turns to green when
the focus is activated.
3. Press the shutter button fully to take a
picture.
This function can detect up to 10 persons.
When the camera recognises many people at the same time,
it will focus on the nearest person.
The Digital zoom is not activated in this mode.
When the camera detects a target face, the white colour
focus frame will be displayed over the target face and the
grey colour focus frame appears over the remaining faces.
Press the shutter button halfway down to focus on the face
and the white focus frame turns green.
Return to previous AF mode if face detection was failure.
In some conditions this function cannot work properly.
- When a person wears dark glasses or some part of the face
is hidden.
- When the person being taken does not look at the camera.
- Camera doesn't detect a face as the brightness is too dark
or too bright.
- The distance between the camera and object are far.
The maximum available Face Detection range is 2.5m (Wide).
The nearer the subject, the faster the camera can recognize
the subject.
In [Beauty Shot], [Portrait], and [Children] mode, the [Face
Detection] function setting is set to its default value.
Face Detection
Back Move
048
Functions ( )
Self Portrait
When taking pictures of yourself, the area of your face is automatically
detected so that you can take self pictures more easily and quickly.
1. For self-¿ lming, set the camera lens
towards the face of the object.
It automatically detects the face of the
object, and emits a guiding sound.
2. Start ¿ lming by pressing the shutter
button.
When locating the face in the center of the screen, it repeatedly
emits a faster sound unlike the sounds that are emitted when
the face is not in the center.
The guiding sound can be set using the sound setting menu.
(p.62)
Ŷ Smart face detection
The camera registers the frequently
detected faces of up to 17 people. Focus
and exposure for the registered faces are
adjusted automatically in order of priority.
The order of priority for the registered
faces can be checked in graphs. However,
the smart face detection function is available
only when inserting an external memory card.
- When a registered face is not detected:
operates the same as with the face
detection function.
- When a registered face is detected:
a priority level is indicated on the
detected face.
- When more than two registered faces
are detected: order of priority is indicated
on the detected faces.
Ɣ The same person can be recognised as a different person and vice
versa depending on glasses, brightness, extreme change of pose or
facial expressions.
Ɣ If you register a new face when 17 faces are already registered, the
17th face with the lowest priority is switched with the newly added
face.
Ɣ A maximum of 3 people can be registered in a scene.
Ɣ If the camera doesn’t recognise a registered face, it detects the face regard-
less of the priority.
Ɣ Even though a face is not registered, a face detection graph may appear if
the face detection ratio is good.
Ɣ Categorizing pictures is available in the playback mode according to the
priority of faces (p. 73).
Ɣ Even though a face is recognised, it may not be categorized in the Smart
Album according to the priority.
Ɣ Faces can be registered manually in the playback mode (p. 87).
049
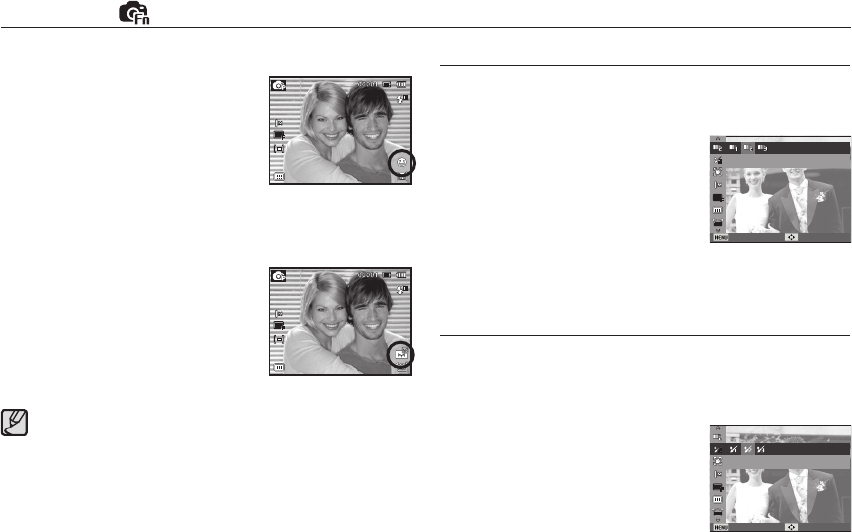
Functions ( )
Face Tone
This menu allows you to control the skin tone in images in beauty shot
mode. The higher the level you select, the brighter the skin tone.
1. Select [Face Tone] by pressing the
Up/Down button.
2. Select a desired face tone by pressing
the Left / Right button and then press
the OK button.
3. Press the Shutter button to take an
image.
Face Retouch
This menu allows you to make skin appear clear and beautiful before
recording in beauty shot mode. The higher the level selected, the
more effective the control.
1. Select [Face Retouch] by pressing the
Up/Down button.
2. Select a desired face retouch by
pressing the Left / Right button and
then press the OK button.
3. Press the Shutter button to take an
image.
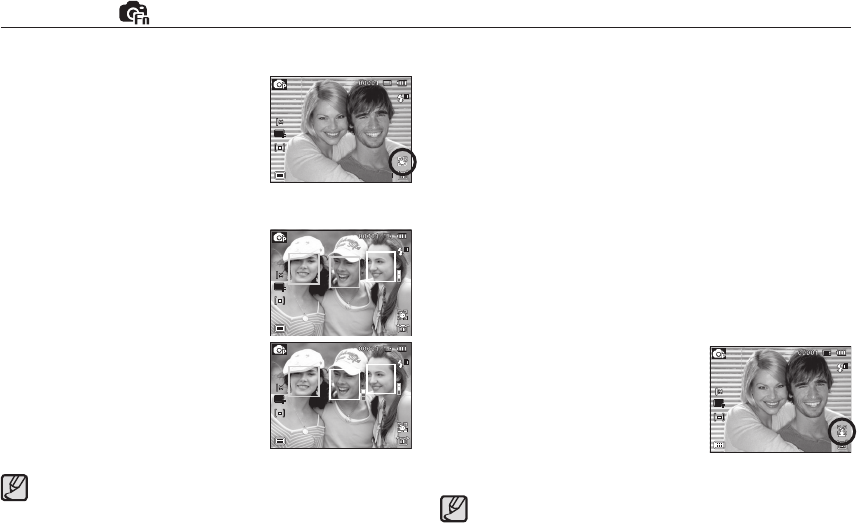
Smile Shot
The camera automatically takes a picture by
detecting the face of the subject although
you don’t press the shutter button. If you
press the Shutter button, the picture is taken
in the normal way. When taking a picture of
smile shot, showing teethes or keeping the
smiley face of your subject helps detecting
the smile face of the subject.
Blink Detection
If the eyes of the subject are closed when the
shutter button is pressed, the camera takes
2 continuous shots and then the images are
saved. The camera takes only one picture if
the eyes of the subject are open when the
Shutter button is pressed.
Detecting the smiling face or the blinking eyes may not be avail-
able if any of the following situations occurs:
- If the subject is wearing sunglasses.
- When the subject is not facing directly to the camera.
- If the environmental light is too bright or too dark to detect the
face of the subject.
- When the camera is far from the subject. (Orange colored
focusing mark)
- If there is reÀ ection of the light or the back light that are too
bright.
Face Tone
Back Move
Face Retouch
Back Move
050
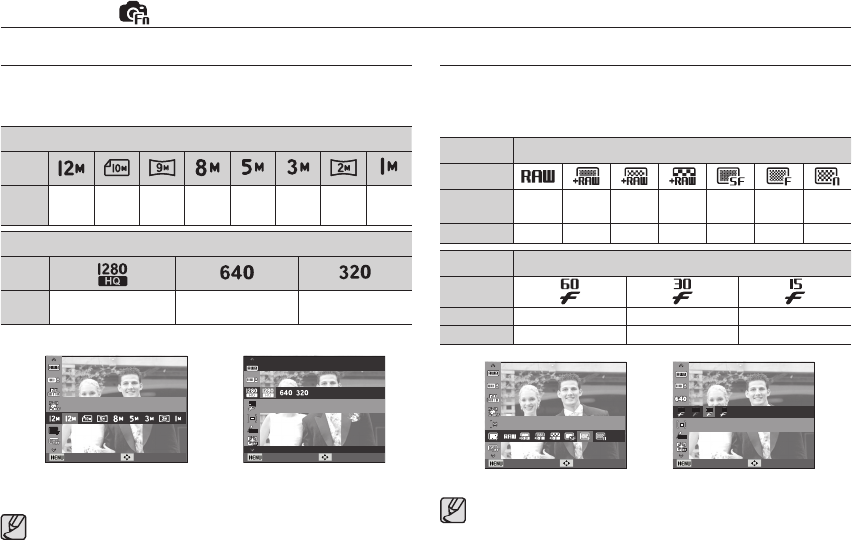
Functions ( )
The higher the resolution, the lower the number of shots
available because high resolution images require more memory.
Image Size
You can select the image size appropriate for your application.
[ STILL IMAGE mode ] [ MOVIE CLIP mode ]
This ¿ le format complies with the DCF (Design rule for Camera
File system).
JPEG (Joint Photographic Experts Group) :
JPEG is the image compression standard developed by the Joint
Photographic Experts Group. This type of compression is most
commonly used for compressing photos and graphics because it
can compress the ¿ les ef¿ ciently.
Quality / Frame rate
You can select the compression ratio appropriate for your application
of the captured images. The higher the compression ratio, the lower
the picture quality.
Mode STILL IMAGE mode
Icon
Sub menu RAW
RAW +
S.Fine
RAW +
Fine
RAW +
Normal
Super
Fine Fine Normal
File Format DNG
DNG+JPEG DNG+JPEG DNG+JPEG
jpeg jpeg jpeg
Mode MOVIE CLIP mode
Icon
Sub menu
60 FPS 30 FPS 15 FPS
File Format H.264 H.264 H.264
[ STILL IMAGE mode ] [ MOVIE CLIP mode ]
(Unit: pixel)
Still image mode
Icon
Size 4000x
3000
3984x
2656
3968x
2232
3264x
2448
2592x
1944
2048x
1536
1920x
1080
1024x
768
Movie clip mode
Icon
Size 1280x720HQ 640x480 320x240
Photo Size
Back Move
Movie Size
Back Move
Quality
Back Move
Frame Rate
Back Move
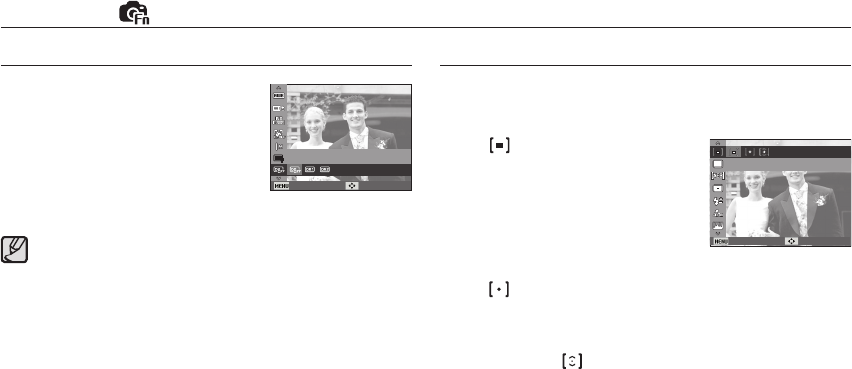
051
Functions ( )
Metering
If you cannot obtain suitable exposure conditions, you can change
the metering method to take brighter pictures.
[Multi] ( ) : Exposure will be calculated
based on an average of
the available light in the
image area. However, the
calculation will be biased
towards the centre of the
image area. This is suitable
for general use.
[Spot] ( ) : Only the rectangular area in the centre of the LCD
monitor will be metered for light. This is suitable when
the subject in the centre is exposed correctly, regard-
less of the back lighting.
[Center We ighted] ( )
: Exposure will be calculated based on an average of
the available light in the image area. However, the
calculation will be biased towards the centre of the im-
age area. This is suitable for taking a picture of small
object like a À ower or insects.
Ä If the subject is not the centre of the focus area, do not use the
spot metering as this may result in an exposure error. In this
circumstance, it is better to use exposure compensation.
Dynamic range
The dynamic range can be set to an image
for shooting. When you use the dynamic
range, detailed expressions of dark areas
and bright areas can be achieved. The level
of brightness adjustment of [D-Range Exp.2]
is set higher than [D-Range Exp.1]
Ɣ If the dynamic range is set too high, a noise may occur.
D-Range Exp.
Back Move
Metering
Back Move
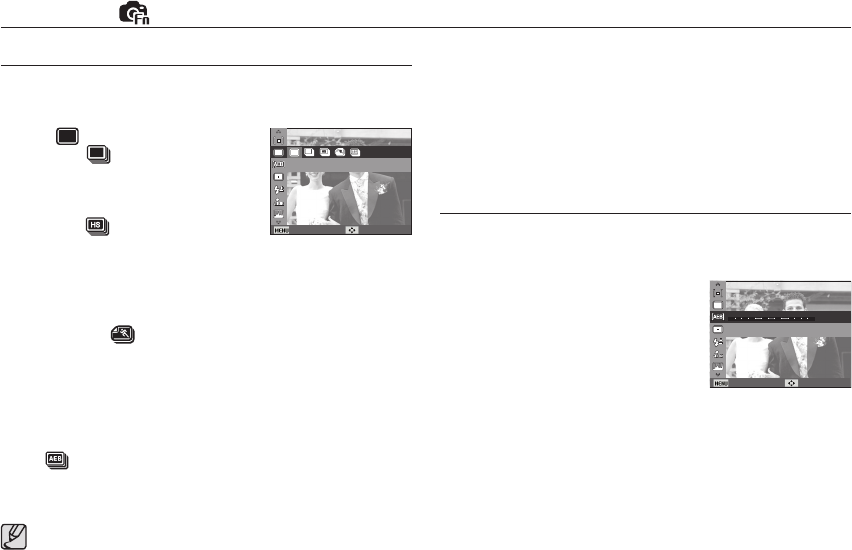
052
Functions ( )
Drive mode
You can select continuous shot, and AEB (Auto Exposure Bracketing).
[Single] ( ) : Take one picture only.
[Continuous] ( ) :
Images will be taken
continuously until the
shutter button is re-
leased.
[High-speed] ( )
:
Continuous shooting is
available while press-
ing and holding the Shutter button (About 5.5
frames per second). The shooting speed may
get slower depending on the shooting environ-
ment or the number of shots.
[Motion Capture] ( )
: This takes 11.5 shots per second, when the
shutter is pressed and held down. After com-
pleting the continuous shooting, images are
saved and the images play back on the Rear
LCD. The maximum number of shots is 20 and
the image size is ¿ xed as 640X480.
[AEB] ( ) :
Take three consecutive photos with varying
exposure values. Use this mode if it is hard to
decide exposure of the object.
High resolution and picture quality increases ¿ le saving time,
which increases stand-by time.
If the [Continuous], [High-speed], [Motion Capture], [AEB] sub
menu is selected, the À ash will be off automatically.
If less than 3 pictures are available in the memory, the AEB shooting is
not available.
It is best to use a tripod for the AEB shooting as the time to save each
image ¿ le is longer and blurring caused by camera shake may occur.
Setting AEB area
The ranges and intervals of three photos can be set during AEB
shooting.
- Set a standard for the exposure bracket
by pressing the LEFT/RIGHT buttons.
- Set a range for the left and right exposure
bracket by using the Smart Dial.
Drive
Back Move
-2 -1 0 +1 +2
AEB Area
Back Move
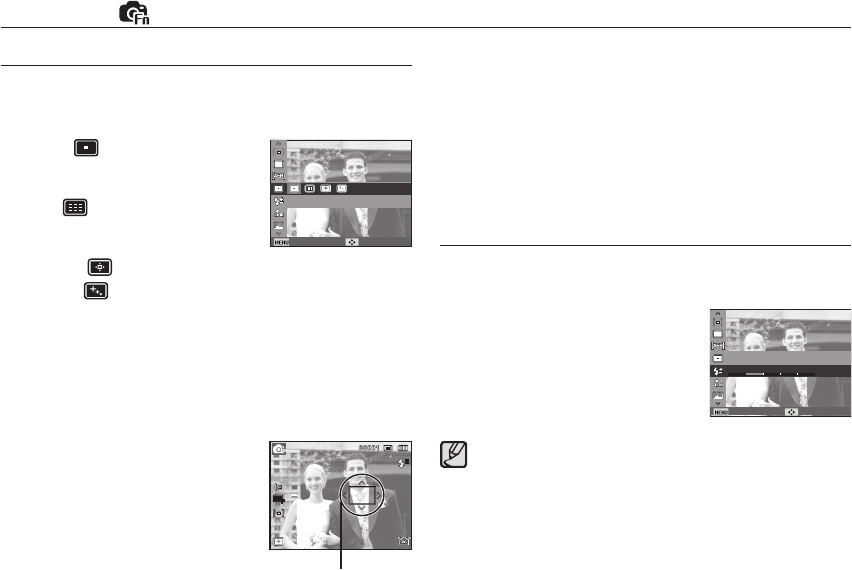
053
Auto Focus type
You can select your preferred Focus Area according to the shooting
conditions.
[Center AF] ( ) : The rectangular area in the
center of the LCD monitor
will be focused
[Multi AF] ( ) : This camera selects all of
available AF point from the 9
AF points.
[Selection AF] ( ) : Focus on the desired position of the LCD monitor.
[Tracking AF] ( ) : The focus moves along with the movements of a
subject.
Ä When the camera focuses on the subject, the auto focus frame
turns to green. When the camera doesn't focus on the subject, the
auto focus frame turns to red.
Functions ( )
Ŷ How to Enable Selection AF
After setting [Selection AF], press the OK
button and then the screen for setting the
location of a focus frame will appear.
Press the Up/Down/Left/Right button to
move the focus mark to the desired position.
Press the shutter button to enable Selection
AF. Once setting is complete, the focus mark
will be ¿ xed at the position set.
Press the OK button once again to change the location of the focus
frame and the focus frame will appear again.
Ä Even if you turn off the power and turn on it again, the previous set-
ting will be maintained.
Ä [Selection AF] is not available when operating the [Face Detection]
function.
Focus Mark
Flash Intensity
You can control À ash intensity. (You can set À ash intensity within the
range of +/- 2EV in intervals of 1EV.)
[-2], [-1], [0], [+1], [+2]
Ɣ The [Flash EVC] function is not available in the [Smart Auto],
[Beauty Shot], [Scene] and [Movie], [Night] modes.
Ɣ If the subject is too close or the sensitivity is too high, changing
the value to a negative value (-) may not have any effect.
Ɣ If the À ash intensity is out of the control range because the
exposure value is too high or low, the camera may not operate
properly.
Focus Area
Back Move
-2 -1 0 +1 +2
Flash EVC
Back Move
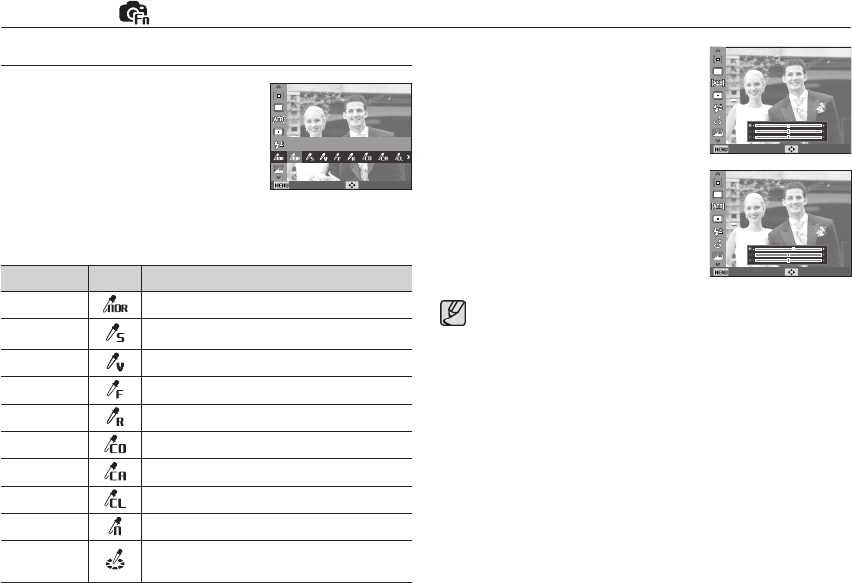
054
Functions ( )
Custom colour : You can change the
R (Red), G (Green)
and B (Blue) values
of the image.
- Up/Down button : Selects R, G, B
- Left/Right button : Changes the values
You can add various effects to the image
without using image editing software.
1. Select the desired Photo style selector by pressing the Left/Right
button and press the OK button.
2. Press the Shutter button to take an image.
Style mode Icon Description
Normal No style effect is applied.
Soft Soft style is applied.
Vivid Vivid style is applied.
Forest Forest style is applied.
Retro Sepia style is applied.
Cool Cool style is applied.
Calm Calm style is applied.
Classic Black & white effect is applied.
Negative Negative effect is applied.
Custom RGB
De¿ ne an RGB tone to create your own photo
style.
Photo Style Selector
When picture style is set, face detection is not available.
When Soft or Vivid in photo style is set, saturation is not
available.
When Negative in photo style is set, contrast is not available.
Back Move
Back Move
Photo Style Selector
Back Move
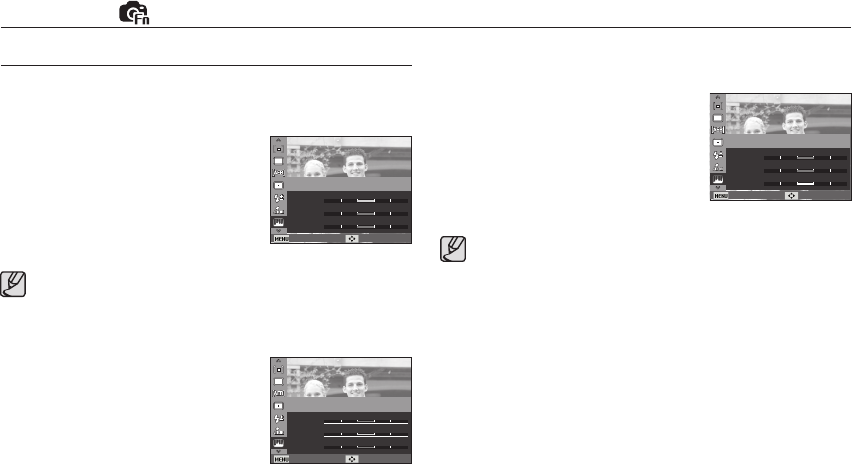
055
Functions ( )
Contrast
You can change the contrast of the image.
1. Select [Contrast] by pressing the
Up/Down button.
2. Change the contrast by pressing the
Left/Right button.
3. Press the Shutter button to take an
image.
Image Adjust
Sharpness
You can adjust the sharpness of the
picture you are about to take.
You cannot check the sharpness effect
on the LCD monitor before you take a
picture, because this function is applied
only when the captured image is stored
on the memory.
1. Select [Sharpness] by pressing the Up/Down button.
2. Change the Sharpness by pressing the Left/Right button.
3. Press the Shutter button to take an image.
When Negative in photo style is set, contrast is not available.
-2 -1 0 +1 +2
-2 -1 0 +1 +2
-2 -1 0 +1 +2
Back Move
Contrast
Sharpness
Saturation
Image Adjust
Saturation
You can change the saturation of the image.
1. Select [Saturation] by pressing the
Up/Down button.
2. Change the saturation by pressing the
Left/Right button.
3.
Press the Shutter button to take an
image.
When Soft or Vivid in photo style is set, saturation is not avail-
able.
-2 -1 0 +1 +2
-2 -1 0 +1 +2
-2 -1 0 +1 +2
Back Move
Contrast
Sharpness
Saturation
Image Adjust
-2 -1 0 +1 +2
-2 -1 0 +1 +2
-2 -1 0 +1 +2
Back Move
Contrast
Sharpness
Saturation
Image Adjust

056
Image Stabilization
This feature allows you to minimize camera
shake while taking a picture.
[OIS] ( ) : Performs optical image
stabilization.
[DUAL IS] ( ) : Performs optical image
stabilization and digital
image stabilization simultaneously.
[DIS] ( ) : Performs digital image stabilization.
Ŷ Things to watch out for using the DUAL IS/DIS mode
– The digital zoom will not operate in the DUAL IS/DIS mode.
– If the lighting conditions are brighter than À uorescent lighting condi-
tions, the DUAL IS/DIS will not activate.
– If the lighting conditions are darker than in À uorescent lighting condi-
tions, camera shake warning indicator ( ) will be displayed. For best
results only take pictures in situations where the camera shake warn-
ing indicator ( ) is not displayed.
– If the subject is moving, the captured image may be blurred.
– As the DUAL IS/DIS uses the camera’s digital signal processor, it may
take a little longer for the camera to process and save the images.
OIS function may not work suf¿ ciently in the following cases.
- To take pictures of a moving subject.
- To take pictures with higher zoom values.
- When camera shake is beyond the camera-shake correction
range.
- When the shutter speed is slow.
- When the battery is low.
If you operate OIS function using a tripod, the image can be
blurred by the vibration of the sensor of the OIS. Turn off the OIS
function when you use a tripod.
If the camera is subjected to an impact, the LCD monitor can be
affected. To make the camera function properly again, turn it on
and off.
Functions ( )
Image Stabiliser
Back Move
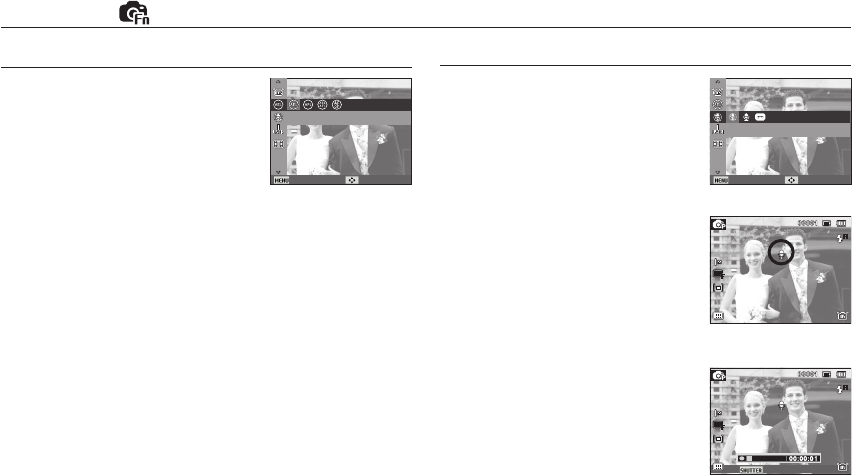
057
Functions ( )
Voice Memo
You can add your voice-over to a stored
still image. (Max. 10 sec.)
-
If the voice memo indicator is displayed
on the LCD monitor, the setting is
completed.
- Press the shutter button and take a
picture. The picture is stored on the
memory card.
- Voice memo will be recorded for ten
seconds from the moment the picture
is stored. In the middle of the sound
recording, pressing the shutter button
will stop the voice memo.
Key mapping
A desired AEL button can be set.
[AEL]: Shooting is available while the
exposure is being locked.
[AFL]: Shooting is available while the focus
is being locked.
[AEL + AFL]: Shooting is available while the
exposure and the focus are locked.
[AF-On]: This function is a replacement for pressing the shutter halfway
down (metering and autofocus).
Voice
Back Move
Key mapping
Back Move
Stop
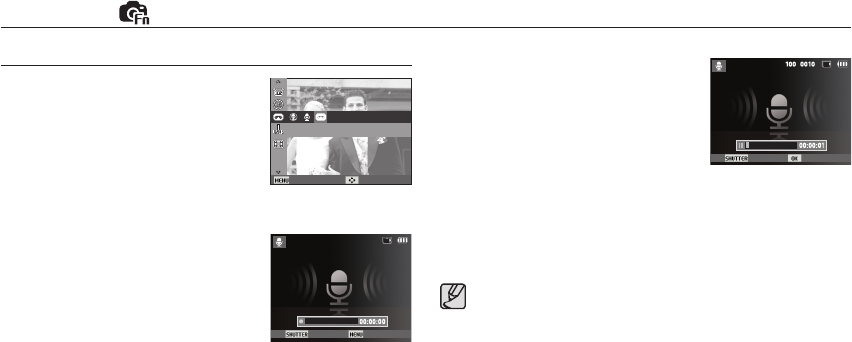
058
Voice Recording
A voice can be recorded for as long as
the available recording time (maximum 8
hours at once) allows.
Press the shutter button to record a voice.
- Press the shutter button once and voice
is recorded for as long as the available
recording time (maximum 8 hours at
once) allows.
The recording time will be displayed
on the LCD monitor. Voice will still be
recorded if the shutter button is released.
- If you wish to stop recording, press the
shutter button again.
- File type : *.wav
[Voice recording mode]
Functions ( )
Pausing while recording a voice
Using this function, you can record your
favourite voice clips into a voice recording
¿ le without having to create multiple voice
recording ¿ les.
1.
Press the OK button to pause recording.
2. Press the OK button again to resume
the recording.
3. If you wish to stop recording, press the shutter button again.
A distance of 40cm between you and the camera (microphone) is
the best distance to record sound.
If the camera power is turned off while the voice recording is
paused, the voice recording is cancelled.
[Voice recording mode]
Record
Back Move
Record Exit
Stop Record

059
Functions ( )
Recording the movie clip without voice
You can record the movie without voice.
Select [Off] of [Voice] menu in the Movie
clip mode. ( ) icon will appear on the
LCD monitor. Press the Shutter button
and a movie will record for as long as the
memory capacity allows without voice.
Distortion compensation
Distortion of the centre of an image due
to a wide-angle lens can be compensated
for. If you use the distortion compensation
function, the size of the photo will be smaller
than one taken with normal shooting.
[Off]: Distortion is not compensated for.
[On]: Distortion is compensated for.
Ɣ Even though the [Distortion Control] function is set, the [Blink
Detection] function is not available.
Off
Back Move
Distortion Control
Back Move
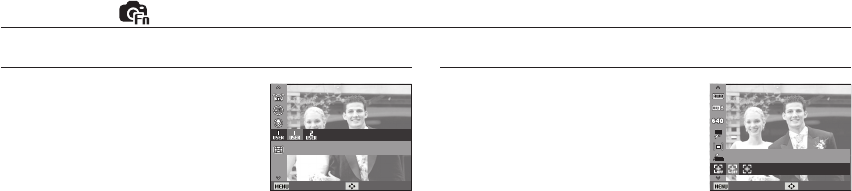
060
Functions ( )
Movie clip frame stabiliser
This function helps stabilize images captured
during movie recording.
You can select this menu only in the Movie
clip mode.
[Off]: Movie clip frame stabilizer function is
disabled.
[On]: Minimises camera shake during movie recording.
Ä The recording frame range becomes narrow when you select this menu.
Setting user mode
You can use your own shooting mode by
saving the shooting options which are set
in the [Program], [Aperture. Shutter Priority]
and [Manual] modes.
Set a desired option and save the setting
information.
Ŷ How to set the user mode
1. Select a mode from [Program], [Aperture. Shutter Priority] or [Manual]
modes.
2. Select the desired mode.
3. Select [User Mode Set] in the [Functions] menu.
4. Select [User Mode 1] or [User Mode 2] by pressing the LEFT/RIGHT
buttons and press the OK button to save the setting information.
User Mode Set
Back Move
Stabilizer
Back Move
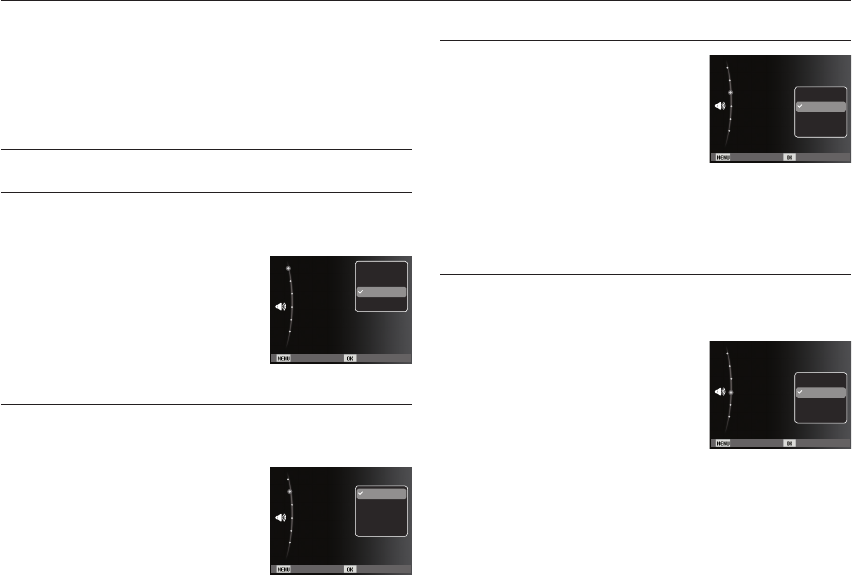
061
In this mode, you can set up sound settings. You can use the setup
menu in all camera modes, except Voice Recording mode.
The items indicated by * are default settings.
Ä Menus are subject to change without prior notice.
You can select a volume of start up sound, shutter sound, beep
sound and AF sound.
- [Volume] sub menu : [Off], [Low],
[Medium]*, [High]
Volume
You can select the sound that is activated whenever the camera is
turned on.
- Start up sound : [Off]*, [1], [2], [3]
- If the start up image is set to [Off], the
start up sound will not activate, even
though you may have set these to on.
Start up sound
You can select the shutter sound.
- Shutter sound : [Off], [1]*, [2], [3]
Shutter sound
Sound menu
If you set sound to ON, a beep will sound when buttons are pressed,
letting you know the camera operation status.
- [Beep Sound] sub menu : [Off], [1]*, [2], [3]
Beep Sound
Sound ( )
Back Set
Start Sound :Off
Shutter Sound :1
Beep Sound :1
AF Sound :On
Self-Portrait :On
Volume :Medium
Off
Low
Medium
High
Back Set
Start Sound :Off
Shutter Sound :1
Beep Sound :1
AF Sound :On
Self-Portrait :On
Volume :Medium
Off
1
2
3
Back Set
Start Sound :Off
Shutter Sound :1
Beep Sound :1
AF Sound :On
Self-Portrait :On
Volume :Medium
Off
1
2
3
Back Set
Start Sound :Off
Shutter Sound :1
Beep Sound :1
AF Sound :On
Self-Portrait :On
Volume :Medium
Off
1
2
3
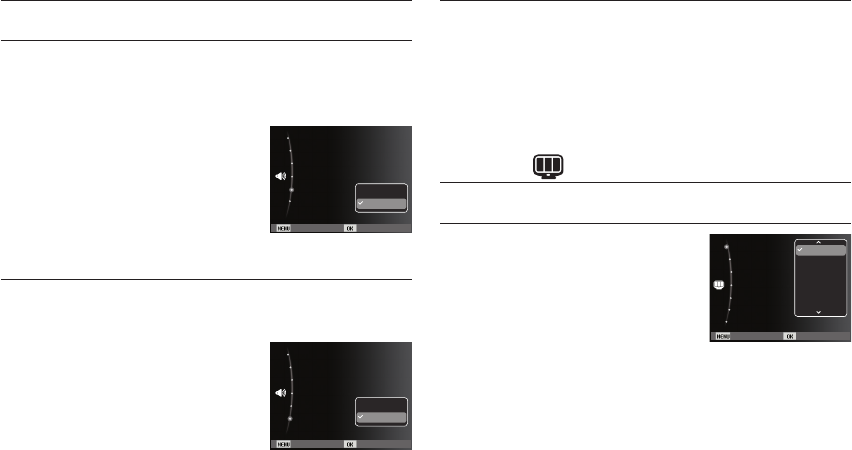
062
If you set AF sound to on, AF sound will be activated when the Shut-
ter button is pressed down half way so that you can be aware of the
camera operation status.
- [AF sound] sub menu : [Off], [On]*
AF sound
Self Portrait
This occurs when it automatically detects the location of the
subject’s face when taking a self-portrait.
- This feature can be set by using the [Off]
and [On]* buttons.
There is a choice of language that can be
displayed on the LCD monitor. Even if the
battery is removed and inserted again, the
language setting will be preserved.
Language
Setup menu
In this mode, you can set up basic settings. You can use the setup
menu in all camera modes, except Voice Recording mode.
The items indicated by * are default settings.
Ä Menus are subject to change without prior notice.
Display ( )
Sound ( )
Back Set
Start Sound :Off
Shutter Sound :1
Beep Sound :1
AF Sound :On
Self-Portrait :On
Volume :Medium
Off
On
Back Set
Start Sound :Off
Shutter Sound :1
Beep Sound :1
AF Sound :On
Self-Portrait :On
Volume :Medium
Off
On
Back Set
Function Description :On
Start Image :Off
Display Brightness :Auto
Quick View :0.5sec
Power Save :Off
Language :English
Grid Line :2 X 2
English
한국어
Français
Deutsch
Español
Italiano
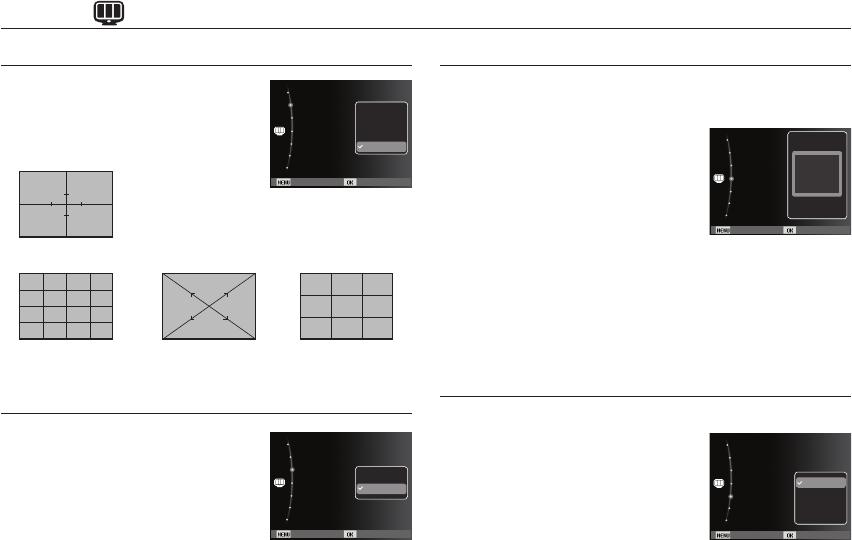
063
You can select whether the function de-
scription can be displayed on the window in
recording mode.
- Function Description sub menu
[Off] : The function description
function can’t be activated.
[On]* : The name and description of the
option is displayed.
Function Description
Display ( )
You can set the type of grid displayed on
the histogram/grid window. (p.36)
– [Grid Line] sub menus:
Setting the Grid Line
You can adjust the LCD brightness.
- Sub menus : [Auto]*, [Dark],
[Normal], [Bright]
Display Bright
You can select the image that is ¿ rst displayed on the LCD monitor
whenever the camera is turned on.
- Sub menus : [Off]*, [Logo], [User Image]
- Use a saved image for the start-up image
with the [Start Image] in the [Resize]
menu in the play mode.
- The start-up image will not be deleted by
[Delete] or [Format] menu.
- The User images will be deleted by
[Reset] menu.
Start up image
[+]:
[3 X 3]: [X]: [2 X 2]*:
Back Set
Function Description :On
Start Image :Off
Display Brightness :Auto
Quick View :0.5sec
Power Save :Off
Language :English
Grid Line :2 X 2
+
3 X 3
X
2 X 2
Back Set
Function Description :On
Start Image :Off
Display Brightness :Auto
Quick View :0.5sec
Power Save :Off
Language :English
Grid Line :2 X 2
Off
On
Back Set
Function Description :On
Start Image :Off
Display Brightness :Auto
Quick View :0.5sec
Power Save :Off
Language :English
Grid Line :2 X 2
OFF
Back Set
Function Description :On
Start Image :Off
Display Brightness :Auto
Quick View :0.5sec
Power Save :Off
Language :English
Grid Line :2 X 2
Auto
Dark
Normal
Bright
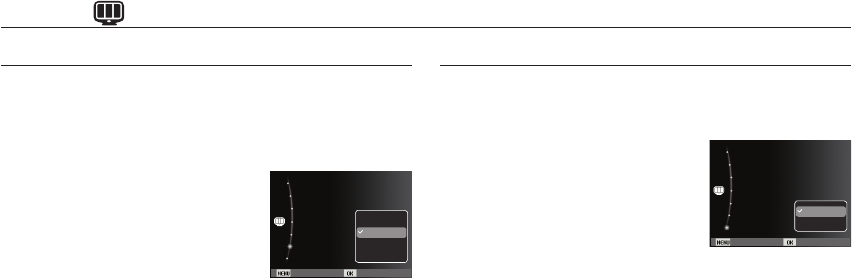
064
Display ( )
If you enable Quick View before capturing an image, you can view
the image you just captured on the LCD monitor for the duration
set in the [Quick View] setup. Quick view is possible only with still
images.
- Sub menus
[Off] : The quick view function can’t
be activated.
[0.5 sec]*, [1 sec], [3 sec]
: The captured image is brieÀ y
displayed during the selected
time.
Quick view
If you set the [Power Save] to On and the camera isn't operated
during the speci¿ ed time, the LCD monitor will be turned off
automatically.
- Sub menus
[Off]* :
The LCD monitor will not be turned off.
[On] :
If the camera isn't operated
during the speci¿ ed time (about 30
SEC.), the camera power will be
idle (Camera status lamp:Blinking)
automatically.
Ä You can’t set the [Power Save] menu of Playback Mode.
Display SAVE
Back Set
Function Description :On
Start Image :Off
Display Brightness :Auto
Quick View :0.5sec
Power Save :Off
Language :English
Grid Line :2 X 2
Off
0.5sec
1sec
3sec
Back Set
Function Description :On
Start Image :Off
Display Brightness :Auto
Quick View :0.5sec
Power Save :Off
Language :English
Grid Line :2 X 2
Off
On

065
Formatting a memory
Settings ( ” )
All camera menu and function settings will be restored to their
default values. However, values for DATE / TIME, LANGUAGE, and
VIDEO OUT will not be changed.
- Sub menus
[No]
*
: Settings will not be restored to
their defaults.
[Yes] : A window to con¿ rm the
selection will be displayed.
Select the [Yes] menu and
all settings will be restored
to their defaults.
Initialisation
This is used for formatting the memory. If you run [Format] on the
memory, all images, including the protected images, will be deleted.
Be sure to download important images to your PC before formatting
the memory.
- Sub menus
[No]
*
: The memory will not be formatted.
[Yes] : A window for con¿ rming the
selection displays. Select the
[Yes] menu. A [Formatting]
message appears and the
memory will be formatted.
If you run FORMAT in Play mode,
a [Format is completed] message
will appear.
Be sure to run [Format] on the following types of memory card.
- A new memory card, or an unformatted memory card
- A memory card that has a ¿ le this camera can't recognise or one
that has been taken from another camera.
- Always format the memory card using this camera. If you insert a
memory card that has been formatted using other cameras,
memory card readers, or PCs, you will get a [Card Error]
message.
Back Set
Reset
Date & Time :
2009/01/01
Time Zone :London
File No. :Series
Imprint :Off
Format
Auto Power Off :3 min
No
Yes
Back Set
Reset
Date & Time :Off
Time Zone :London
File No. :Series
Imprint :Off
Format
Auto Power Off :3 min
No
Yes
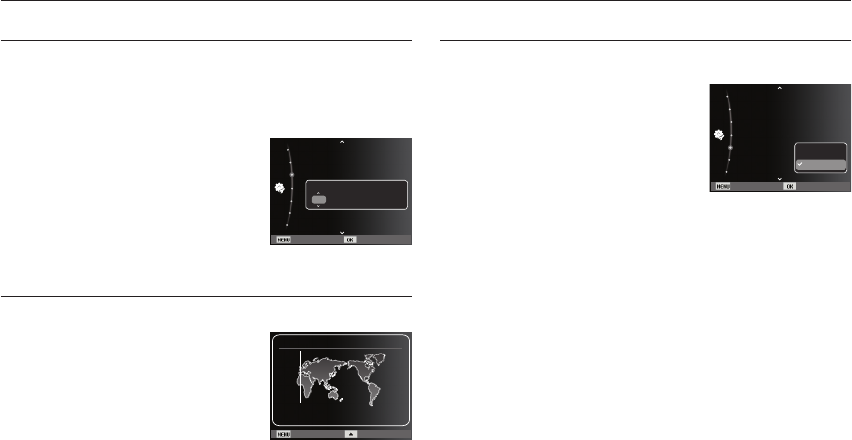
066
Settings ( ” )
This function allows the user to select the ¿ le naming format.
[Reset] : After using the reset function, the
next ¿ le name will be set from
0001 even after formatting, delet-
ing all or inserting a new memory
card.
[Series]*
: New ¿ les are named using num-
bers that follow the previous sequence, even when a new
memory card is used, or after formatting, or after deleting
all pictures.
- The ¿ rst stored folder name is 100PHOTO, and the ¿ rst ¿ le name
is SAM_0001.
- File names are assigned sequentially from SAM_0001
SAM_0002 ~ SAM_9999.
- The folder number is assigned sequentially from 100 to 999 as
follows: 100PHOTO 101PHOTO ~ 999PHOTO.
- Maximum numbers of ¿ les in a folder are 9999.
- The ¿ les used with the memory card conform to the DCF (Design
rule for Camera File systems) format. If you change the image ¿ le
name, the image may not play back.
File name
Available cities:
London, Cape Verde, Mid-Atlantic,
Buenos Aires, Newfoundland, Caracas,
La Paz, NewYork, Miami, Chicago,
Dallas, Denver, Phoenix, LA, San Fran-
cisco, Alaska, Honolulu, Hawaii, Samoa,
Midway, Wellington, Auckland, Okhotsk,
Guam, Sydney, Darwin Adelaide, Seoul,
Tokyo, Beijing, Hong Kong, Bankok, Jakarta, Yangon, Almaty,
Kathmandu, Mumbai, New Delhi, Tashkent, Kabul, Abu Dhabi,
Teheran, Moscow, Athens, Helsinki, Rome, Paris, Berlin
Ä DST : Daylight Saving Time
Setting up the Date / Time / Date type
You can change the date and time that will be displayed on the
captured images and set up the date type. Setting [Time Zone]
enables you to display the local date and time on the LCD monitor
when travelling overseas.
-
Date type : [yyyy/mm/dd], [mm/dd/yyyy],
[dd/mm/yyyy], [Off]*
Time Zone
Back DST
London
[GMT +00:00] 2009/01/01 01:00 PM
Time Zone
Back Set
Reset
Date & Time :
2009/01/01
Time Zone :London
File No. :Series
Imprint :Off
Format
Auto Power Off :3 min
Reset
Series
Back Set
Reset
Date & Time :
2009/01/01
Time Zone :London
File No. :Series
Imprint :Off
Format
Auto Power Off :3 min
2009 / 01 / 01 13:00 yyyy/mm/dd
yyyy mm dd

067
Settings ( ” )
There is an option to include DATE / TIME on still images.
- Sub menus
[Off]* : The DATE & TIME will not be
imprinted on the image ¿ le.
[Date] : Only the DATE will be
imprinted on the image ¿ le.
[Date & Time] : The DATE & TIME will be
imprinted on the image ¿ le.
Imprinting the recording date
Ä The Date & Time are imprinted at the bottom right side of the still
image.
Ä The imprint function is applied only to still images.
Ä Depending on the manufacturer and print mode, the date printed
on an image may not be printed correctly.
This function switches the camera off after a set amount of time in
order to prevent unnecessary battery drainage.
- Sub menus
[Off] : The power off function will not
operate.
[1 min], [3 min]*, [5 min], [10 min] :
The power will turn off automatically if
not used for the period of time speci¿ ed.
-
After replacing the battery, the power off
setting will be preserved.
- Note that the automatic power off function will not operate if the
camera is in the PC / Printer mode, slide show, playing back a
voice recording and playing back a movie clip.
Auto power off
Back Set
Reset
Date & Time :
2009/01/01
Time Zone :London
File No. :Series
Imprint :Off
Format
Auto Power Off :3 min
Off
Date
Date & Time
Back Set
Reset
Date & Time :Off
Time Zone :London
File No. :Series
Imprint :Off
Format
Auto Power Off :3 min
Off
1 min
3 min
5 min
10 min
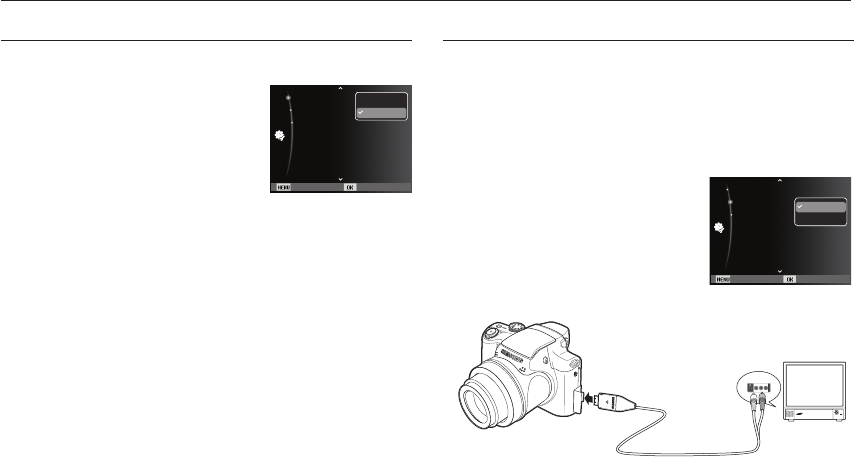
068
The Movie output signal from the camera can be NTSC or PAL.
Your choice of output will be governed by the type of device
(monitor or TV, etc.) to which the camera is connected. PAL
mode can support only BDGHI.
Connecting to an external monitor
When the camera is connected to an
external monitor, the image and menus
on the LCD monitor will be visible on the
external monitor and the LCD monitor of
the camera.
Selecting Video out type
Yellow - Video
White - Sound
You can turn on and off the Auto Focus lamp.
- Sub menus
[Off] : The AF lamp will not light up in
low light conditions.
[On]*
: The AF lamp will light up in low
light conditions.
Auto Focus lamp
Settings ( ” )
Back Set
Video Out :NTSC
USB :Auto
AF Lamp :On
NTSC
PAL
Back Set
Video Out :NTSC
USB :Auto
AF Lamp :On
Off
On

069
Settings ( ” )
- NTSC : U.S.A, Canada, Japan, South Korea, Taiwan, Mexico.
- PAL : Australia, Austria, Belgium, China, Denmark, Finland,
Germany, U.K., Holland, Italy, Kuwait, Malaysia, New
Zealand, Singapore, Spain, Sweden, Switzerland,
Thailand, Norway.
- When using a TV as an external monitor, you will need to select the
external or AV channel of the TV.
- There will be a digital noise on the external monitor, but it is not a
malfunction.
- If the image is not in the centre of the screen, use the TV controls
to centre it.
- When the camera is connected to an external monitor, some parts
of the image may not be displayed.
- When the camera is connected to an external monitor, the menu
will be visible on the external monitor and the menu functions are
the same as those indicated on the LCD monitor.
Setting the USB
If the camera is set to connect automatically to a PC or a printer using
a USB cable, you can manually set [Computer] or [Printer].
- [USB] sub menus:
[Auto]* : Automatically enables an ex-
ternal device connected with a
USB cable.
[Computer] : Sets computer connection
mode if the connected external
device cannot be recognized
automatically.
[Printer] : Sets printer connection mode if the connected external
device cannot be recognized automatically.
Back Set
Video Out :NTSC
USB :Auto
AF Lamp :On
Auto
Computer
Printer
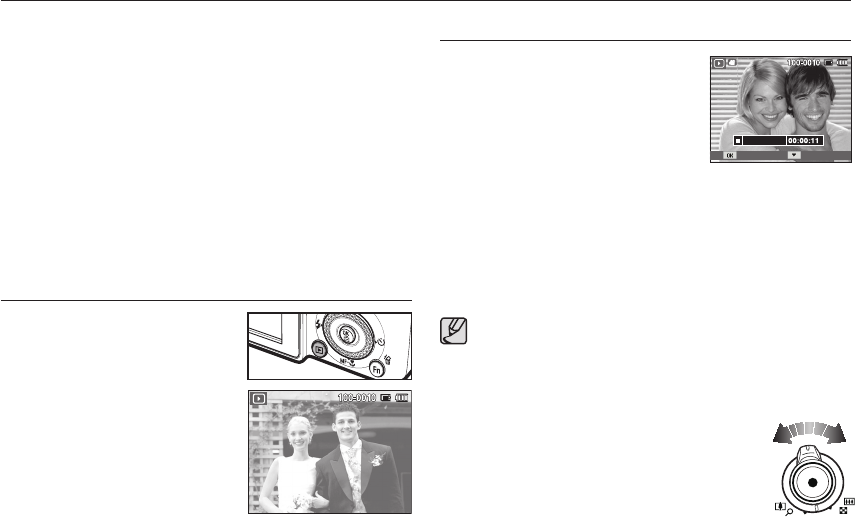
070
Starting play mode
2. The last image stored on the
memory is displayed on the
LCD monitor.
3. Select an image that you want to
view by pressing the Left/ Right
button.
Ä Press and hold the Left or Right
button to play back the images
quickly.
Turn the camera on and select Play mode by pressing the play mode
button ( Î ). The camera can now play back the images stored in
the memory. If the memory card is inserted in the camera, all the
camera functions apply only to the memory card.
If the memory card is not inserted in the camera, all the camera
functions apply only to the internal memory.
Manner mode
To select the Manner mode, press the Play mode button for more
than 3 seconds. In the Manner mode, Operating sound, Effect
sound, Start-up sound and Shutter sound will not be generated.
To cancel the Manner mode, turn on the camera by pressing the
POWER button.
Playing back a still image
1. Select the PLAY mode by pressing
the play mode button ( Î ).
Playing back a movie clip
1. Select the recorded movie clip that
you want to play back by using the
Left/Right button.
2. Press the OK button to play back a movie
clip file.
- To pause a movie clip file while playing
it back, press the OK button again.
- Pressing the OK button again will cause the movie clip file to
restart.
-
To rewind the movie clip while it is playing, press the Left button.
To fast forward the movie clip, press the Right button.
- To stop playback of the movie clip, press the OK button, and
then press the Left or Right button.
Video files (H.264 (MPEG4.AVC)) recorded with another
camera cannot be played back.
How to Control Volume While Playing Back Movie clip
While a movie clip is playing, if you turn the Zoom
W/T lever to the left, the volume turns down.
If you turn the Zoom W/T lever to the right, the
volume turns up.
Ä Even though voice memo, movie clip,voice
recording is playing, you can control the volume.
Play Capture
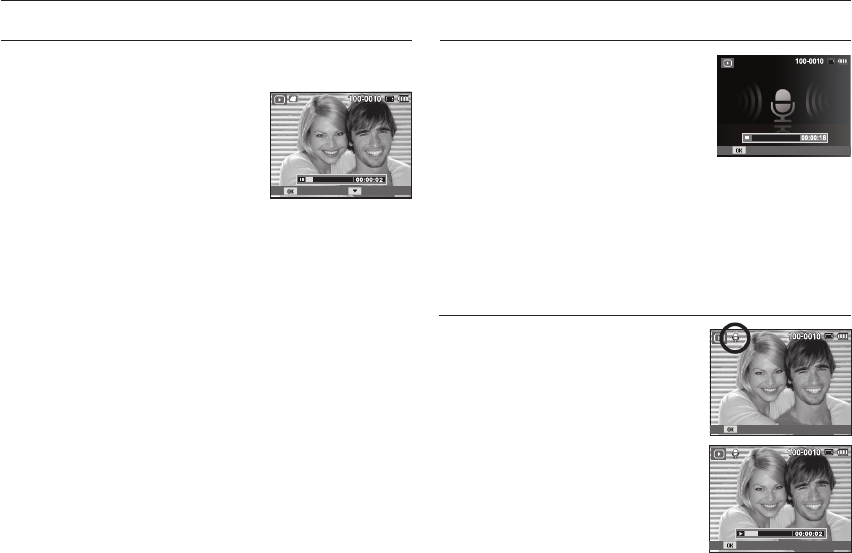
071
Playing back a voice memo
1. Select a still image that has the voice
memo.
2. Press the OK button to play back the
voice memo.
- To pause the voice memo, while
playing it back, press the OK button
again.
- To resume playback of the voice memo,
press the OK button.
Starting play mode
Movie clip capture function
You can capture still images from the movie clip.
How to capture the movie clip
1. Press the OK button while playing the
movie clip. Then press the Down button.
2. The paused movie clip is saved in a
new file name.
Ä The captured movie clip file is the
same size as the original movie clip
(1280x720HQ, 640x480, 320x240).
Ä
When you press the down button at
the beginning of the movie clip, the
first frame of the movie clip will be
saved as a still image.
Playing back a recorded voice
1.
Select the recorded voice that you want to
play back by using the Left/Right button.
2. Press the OK button to play back a
recorded voice file.
- To pause a recorded voice file, while
playing it back, press the OK button
again.
- To resume playback of the voice file, press the OK button.
- To rewind the voice file while it is playing, press the Left button.
To fast forward the voice file, press the Right button.
- To stop playback of the voice memo, press the Down button.
[Paused]
Pause
Play
Play Capture
Play
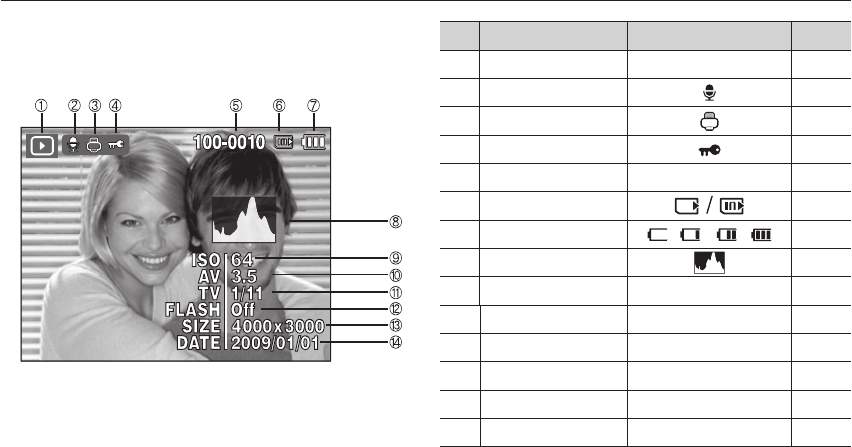
072
LCD monitor Indicator
The LCD monitor displays shooting information about the displayed image.
No. Description Icon Page
1 Playback mode Îp.70
2 Voice Memo p.88
3 DPOF p.89
4 Protect p.86
5 Folder name & File name 100-0010 p.66
6 Memory card indicator -
7 Battery p.15
8 Histogram p.37
9 ISO 64~6400 p.46
10 Aperture value F2.8 ~ F8.0 -
11 Shutter speed 16 ~ 1/2,000 -
12 Flash On/Off p.40
13 Image size 4000x3000 ~ 320x240 p.50
14 Recording date 2009/01/01 p.66
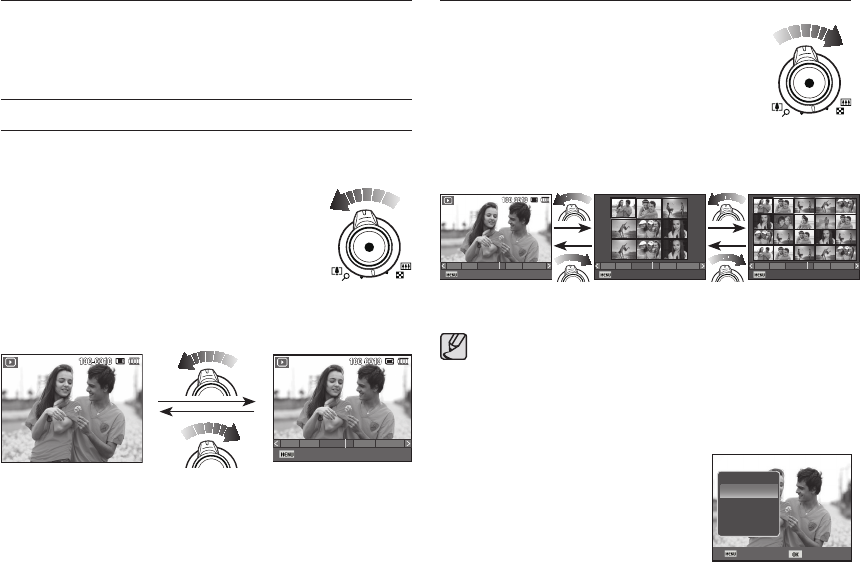
073
Smart Album
You can view multiple pictures, enlarge a selected picture, and crop
and save a selected area of an image.
Thumbnail ( º ) / Digital Zoom ( í ) Lever
Using the camera buttons to set the camera
In Play mode, you can use the buttons on the camera to conveniently
set up the Play mode functions.
1. Turn the lever to the left to enter the Smart
Album mode when a picture is displayed.
2. Move to the desired picture by using the
LEFT/RIGHT buttons.
3. Move to the normal playback screen by turn-
ing the digital zoom lever to the right.
Thumbnail ( º ) / Digital Zoom ( í ) Lever
Searching or Deleting Files
1. Turn the lever to the left when the Smart
Album screen is displayed.
2. Whenever you turn the lever, categories
and files are displayed on the Smart
Album screen.
3. Select the file by pressing the Up/Down/Left/Right buttons.
4. Press the Delete(Õ) button to delete the selected file.
[Highlighted image]
[9-Thumbnail Window] [20-Thumbnail Window]
When Smart Album feature runs or a category is selected, it
may take few seconds depends on recorded data volume.
However, it is not a malfunction please wait until Smart Album
screen appears.
Smart Album Filter
1. Press the MENU button in Smart
Album mode.
2. Selecting the desired category enables
to categorize and search the files by
using the Up/Down button.
[Smart Album Window]
2009/01/01분류
131211 5
Back Set
Type
Date
Colour
Week
Face
2009/01/01분류
131211 5
2009/01/01
Filter
131211 5
2009/01/01
Filter
131211 5
2009/01/01
Filter
131211 5
2009/01/01분류
131211 5
2009/01/01
Filter
131211 5
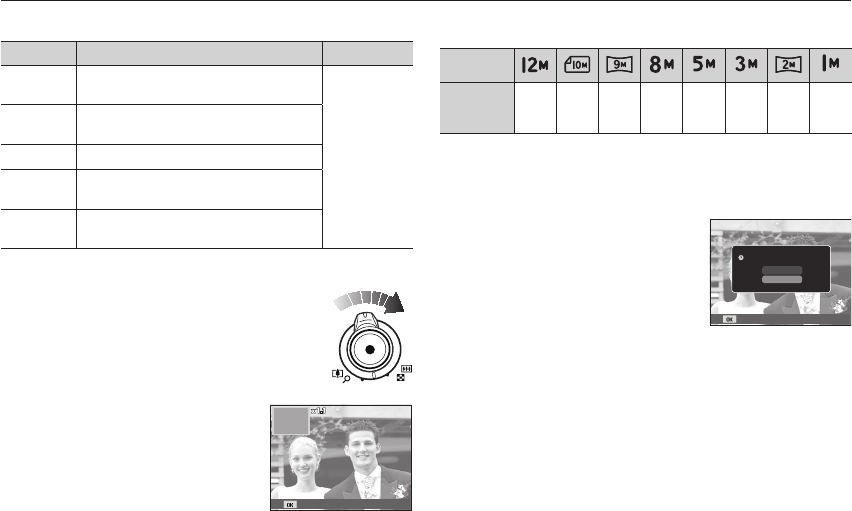
074
Trimming : You can extract part of the image that you want and
save it separately.
1.
Select an image that you want to en-
large and press the enlargement button.
Press the OK button and a message will
be displayed.
2. Select a desired sub menu by
pressing the Up / Down button
and press the OK button.
- [Yes] : The trimmed image will be saved as a new file name,
and appear on the LCD monitor.
- [No] : The trimming menu will disappear.
Ä If there is not enough memory space to save the trimmed
image, the image can’t be trimmed.
Image enlargement
1. Select an image that you want to enlarge
and press the enlargement button.
2. Different parts of the image can be
viewed by pressing the 5 function button.
3. Pressing the thumbnail button will zoom
back to the original full sized image.
- You can tell whether the image
displayed is an enlarged view by
checking the image enlargement
indicator shown at the top left of the
LCD monitor. (If the image is not an
enlarged view, the indicator will not
be displayed.) You can also check the
area of enlargement.
- Movie clips and WAV files can’t be enlarged.
- If an image is enlarged, a loss of quality may occur.
The maximum enlargement rate in proportion to the image size
Trim
Details of Each Category
Category Description File Format
Type Categorized depending on the ¿ le type (e.g.,
picture, video, or voice)
Pictures,
Videos, Voice
Date Categorized depending on the sequence of
recorded dates.
Colour Categorized depending on the main color.
Week Categorized depending on the sequence of
recorded weeks.
Face Categorized depending on the faces photo-
graphed in the Face Detection mode.
Thumbnail ( º ) / Digital Zoom ( í ) Lever
Image size
Maximum
enlarge-
ment rate
X12.5 X10.4 X10.4 X10.2 X8.1 X6.4 X5.0 X3.2
Confirm
Trimming?
Yes
No
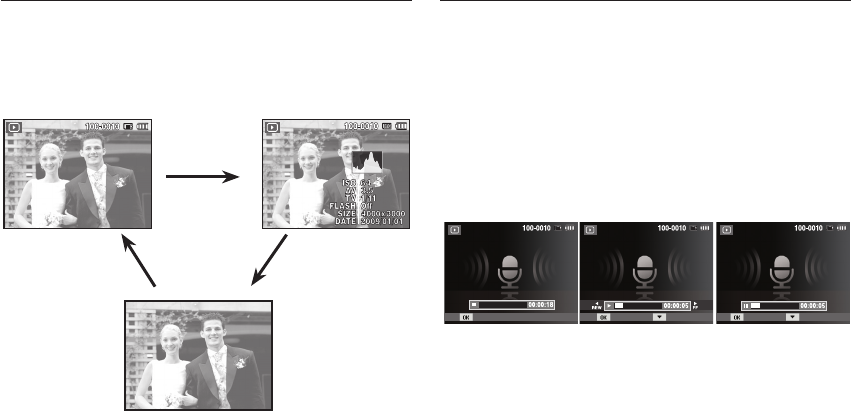
075
Play & Pause / OK button
In Play mode, the play & pause/ OK button works as follows:
-
When the menu is displayed on the LCD monitor, the OK button
is used for confirming data that is changed by using the 5 function
button.
- If a still image with a voice memo, a voice file, or a movie clip is
playing
·In Stop mode : Plays a still image with a voice memo, a voice
file, or a movie clip.
·During playback : Temporarily stops playback.
·In Pause mode : Resumes playback
Info (DISP) / Up button
When the menu is displayed on the LCD monitor, the UP button
operates as a direction button.
When the menu is not displayed on the LCD monitor, pressing the
Info button will display image information on the LCD monitor.
Info (DISP) button
Info (DISP) buttonInfo (DISP) button
[ Voice recording is stopped ] [ Voice recording is playing ] [ Voice recording is paused ]
Play StopPause StopPlay

076
Delete ( Õ ) button
This deletes images stored on the memory card.
1. Select an image that you want to delete by pressing the
Left / Right button and press the DELETE ( Õ ) button.
2. To add images to delete, select the [Multiple Delete] menu.
- Left/Right button : Selects images
- OK button :
checks for deletion
- Fn button : deletes the
selected images.
3. Select the submenu values by pressing the Up / Down button
and then press the OK button.
- If [Yes] is selected : deletes the selected images.
- If [No] is selected : cancels "Delete Image".
[Single Image] [Thumbnail Image]
Left / Right / Down / MENU button
LEFT / RIGHT / DOWN / MENU buttons activate the following.
- LEFT button : While the menu is showing, the LEFT button
operates as a direction button. While the menu is
not showing, press the LEFT button to select the
previous image.
- RIGHT button : While the menu is showing, the RIGHT button
operates as a direction button. While the menu is
not showing, press the RIGHT button to select the
next image.
- DOWN button :
If the menu is displayed Press the DOWN button
to move from the main menu to a sub menu, or to
move down the sub menu cursor.
- MENU button :
When you press the MENU button, the play mode
menu will be displayed on the LCD monitor. Pressing
it again will return the LCD to the initial display.
Prev Next
Select Delete
Select
Yes
Delete File?
Multiple Delete
No
131211 5
Yes
No
Delete File?
Multiple Delete
Select
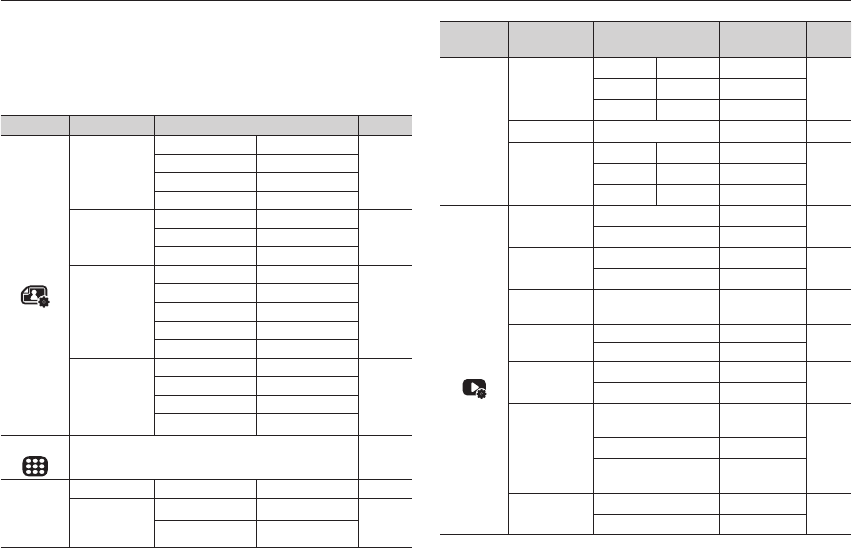
077
Setting up the play back function using the LCD monitor
Menu Tab Main Menu Sub Menu Secondary
Menu Page
Multi Slide
Show
( )
Effect
Off Calm -
p.84
Sweet Lively -
Shine - -
Interval 1, 3, 5, 10 sec - p.85
Music
Off Mist -
p.85
Muse Fall -
Drops Trip -
File
Options
( )
Delete Select - p.85
All Yes / No
Protect Select -p.86
All Unlock / Lock
Face
Registration No Yes p.87
Recycle Bin Off On p.88
Retrieve -
Voice memo Off - p.88
On -
DPOF
Standard Select / All /
Reset
p.89
Index Yes / No
Size Select / All /
Reset
Copy To Card
Yes -p.91
No -
PLAY mode functions can be changed by using the LCD monitor.
In the PLAY mode, pressing the MENU button displays the menu on
the LCD monitor. The menus you can set up in Play mode are as fol-
lows. To capture an image after setting up the play menu, press the
PLAY mode button or shutter button.
Menu Tab Main Menu Sub Menu Page
Edit
( )
Resize
2592x1944 2048x1536
p.79
1024X768 2592X1728
1800X1200 2592X1458
1920X1080 Start Image
Rotate
Right 90˚Left 90˚
p.80180˚Horizontal
Vertical -
Photo Style
Selector
Normal Soft
p.80
Vivid Forest
Retro Cool
Calm Classic
Negative Custom
Image Adjust
Off ACB
p.81
Red-eye Fix Face Retouch
Brightness Contrast
Saturation Add Noise
View
( ) Single, 9, 20 p.83
Multi Slide
Show
( )
Start Play / Repeat - p.83
Images
All Date
p.84
Select -

078
Menu Tab Main Menu Sub Menu Secondary Menu Page
❹
Images One Photo - p.93
All Photos -
Size
Auto -
p.93
PostCard -
Card -
4X6 -
L-
2L -
Letter -
A4 -
A3 -
Layout
Auto -
Full -
1-
2-
4-
8-
9-
16 -
Index -
This menu is available while the camera is connected to a PictBridge
supporting printer (direct connection to the camera, sold separately)
with a USB cable.
Setting up the play back function using the LCD monitor
Ä Menus are subject to change without prior notice.
Menu Tab Main Menu Sub Menu Secondary Menu Page
❹
Type
Auto -
p.93
Plain -
Photo -
FastPhoto -
Quality
Auto -
Draft -
Normal -
Fine -
Date
Auto -
Off -
On -
File Name
Auto -
Off -
On -
Reset Yes - p.94
No -
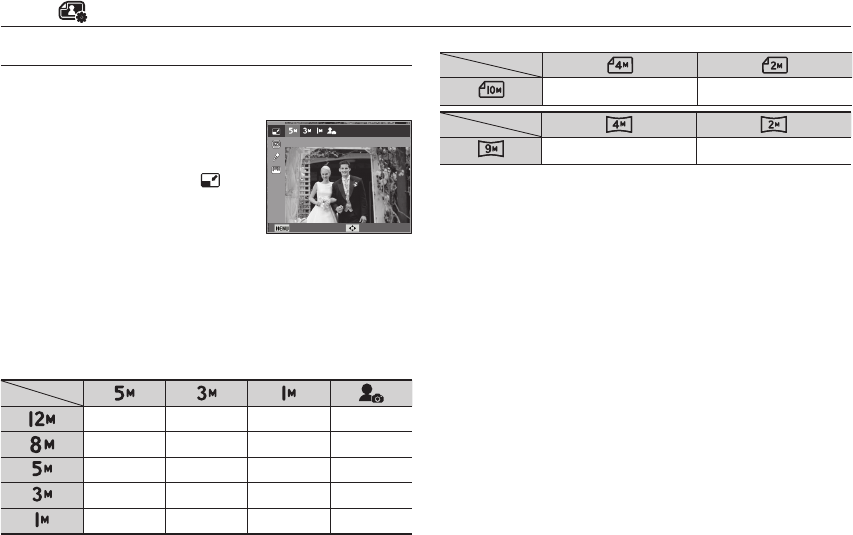
079
Edit ( )
Change the resolution (size) of pictures taken. Select [Start image]
to save an image to be the start-up image.
1. Press the play mode button and press
the MENU button.
2. Click the Up/Down button from the
Edit menu to select [Resize] ( )
menu tab and press the OK button.
3. Select a desired sub menu by
pressing the Left / Right button and
press the OK button.
Image Resize Types ( o : Selectable)
Resize
oo
oo
- A large sized image can be resized to a smaller sized image,
but not vice versa.
- Only JPEG images can be resized. Movie clip (H.264), Voice
recording (WAV) files can’t be resized.
- You can change the resolution of only those files compressed in
the JPEG 4:2:2 format.
- The resized image will have a new file name. The [Start
Image] image is stored not on the memory card but on the
internal memory.
- If a new user image is saved, one of the two user images will be
deleted in order.
- If the memory capacity is insufficient to store the resized image,
a [Memory Full] message will appear on the LCD monitor and the
resized image can't be stored.
oooo
oooo
ooo
oo
o
Back Move
Resize
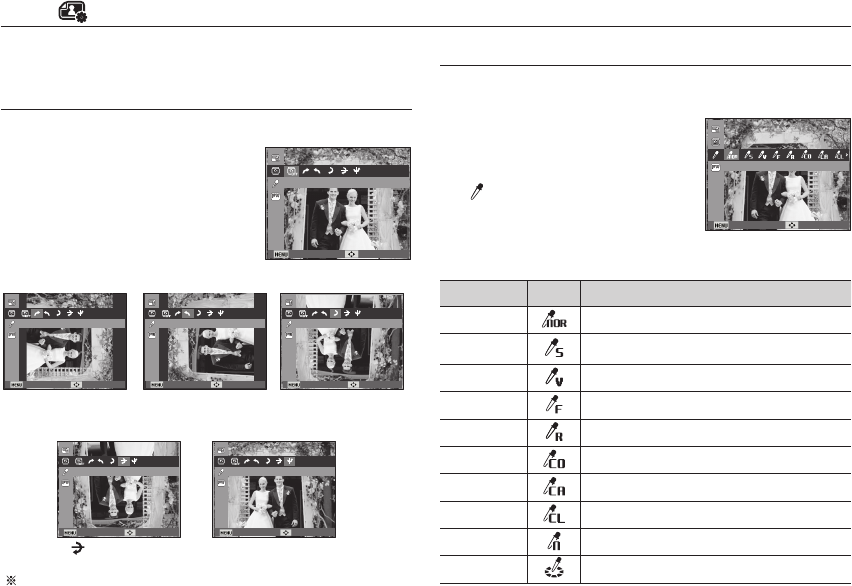
080
Edit ( )
You can rotate the stored images by various degrees.
1. Press the play mode button and press
the MENU button.
2.
Click the Up/Down button from the Edit
menu to select [Rotate] ( ò ) menu tab
and press the OK button.
3. Select a desired sub menu by pressing
the Left / Right button and press the
OK button.
If you display the rotated image on the LCD monitor, empty
spaces may appear to the left and right of the image.
[ : Horizontal]
:
Rotate picture horizontally
[
®
: Vertical]
: Rotate picture vertically
[
ô
: Right 90Û]
: Rotate picture in a
clock-wise direction
[ ó : Left 90Û]
: Rotate picture in a
counter-clock-wise direction
[
õ
: 180Û]
: Rotate picture 180
degrees
It is possible to add various effects to your images by using this function.
1. Press the play mode button and press
the MENU button.
2.
Click the Up/Down button from the Edit
menu to select [Photo Style Selector]
(
) menu tab and press the OK
button.
3. Select a desired sub menu by pressing
the Left / Right button and press the
OK button.
Rotating an image
Photo Style Selector
Style mode Icon Description
Normal No style effect is applied.
Soft Soft style is applied.
Vivid Vivid style is applied.
Forest Forest style is applied.
Retro Sepia style is applied.
Cool Cool style is applied.
Calm Calm style is applied.
Classic Black & white effect is applied.
Negative Negative effect is applied.
Custom RGB
De¿ ne an RGB tone to create your own photo style.
4. The changed image is saved as a new file name.
After using [Edit] feature, the edited image will be saved at a smaller
size than original image.
Back Move
Rotate
Back MoveBack MoveBack Move
180ÛLeft 90ÛRight 90Û
Back MoveBack Move
VerticalHorizontal
Back Move
Photo Style Selector

081
Edit ( )
Image Adjust
1. Press the play back button and press the MENU button.
2.
Click the Up/Down button from the Edit menu to select
[Image Adjust] ( ) menu tab and press the OK button.
ACB
You can automatically adjust the brightness of the dark area,
caused by under exposure to the light source.
1. Select ( ) by pressing the
Left/Right
button and press the OK button.
2. The [Making New Image] message is
displayed and the image is saved as a new
file name.
- OK button : Select / setup the Custom
Colour
- Up / Down button : Selects R, G, B
- Left / Right button : Change the values
Custom colour
You can change the R (Red), G (Green)
and B (Blue) values of the image.
Face Retouch
You can make the skin in an image appear clear and beautiful.
1. Select ( ) by pressing the Left/
Right button and press the OK but-
ton. Then a bar for selecting the face
retouch will be displayed.
2. Change the face retouch by pressing the
Left/Right button.
3. Press the OK button and the image will
be saved as a new file name.
Red eye Removal
Red eye effect can be removed from the captured image.
1. Select ( ) by pressing the Left/Right
button and press the OK button.
2. The [Making New Image] message is
displayed and the image is saved as a new
file name.
Back Move
Back Move
Back Move
ACB
Back Move
Red-eye Fix
Back Move
Face Retouch

082
Brightness control
You can change the brightness of the image.
1. Select ( ) by pressing the
Left/Right button and press the OK
button. Then a bar for selecting the
brightness will be displayed.
2. Change the brightness by pressing the
Left/Right button.
3. Press the OK button and the image will
be saved as a new file name.
Edit ( )
Saturation control
You can change the saturation of the image.
1. Select ( ) by pressing the Left/Right
button and press the OK button. Then
a bar for selecting the saturation will be
displayed.
2. Change the saturation by pressing the
Left/Right button.
3. Press the OK button and the image will be
saved as a new file name.
Contrast control
You can change the contrast of the image.
1. Select (
) by pressing the Left/Right
button and press the OK button. Then a bar
for selecting the contrast will be displayed.
2. Change the contrast by pressing the Left/
Right button.
3. Press the OK button and the image will be
saved as a new file name.
Noise effect
You can add noise to an image to add a more classic feel to your
photo.
1. Select ( ) by pressing the
Left/Right
button and press the OK button.
2 The [Making New Image] message is
displayed and the image is saved as a new
file name.
Back Move
Brightness
Back Move
Contrast
Back Move
Saturation
Back Move
Add Noise
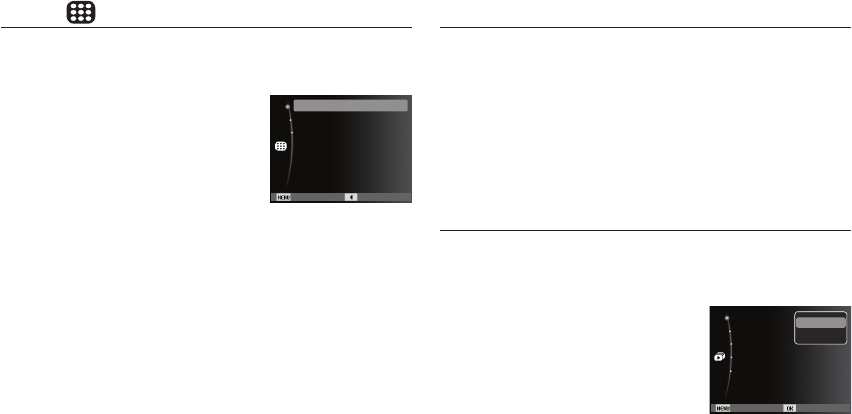
083
Starting the Multi Slide Show ( )
Images can be displayed continuously at pre-set intervals.
You can view the Multi Slide Show by connecting the camera to an
external monitor.
1. Press the play mode button and press the menu button.
2. Press the Up / Down button and select the [Multi Slide Show]
menu tab and press the OK button.
Start the Multi Slide Show
The Multi Slide Show can start only in the [Start] menu.
1. Use the Up / Down buttons to select the [Start] menu and press
the Right button.
2. Select a desired sub menu by pressing
the Up / Down button.
[Play] : The Multi Slide Show is
closed after one cycle.
[Repeat] : The Slide show is repeated
until cancelled.
3. Press the OK button and the slideshow will be started.
- To pause the slide shown while playing it back, press the OK
button again.
- Pressing the OK button again will cause the Multi Slide Show
restart.
- To stop playback of the Multi Slide Show, press the OK button,
and then press the Left or Right button.
View ( )
You can view the thumbnails and easily categorize or search a large
amount of content such as pictures and videos.
1. Press the MENU button in playback
mode.
2. Press the Up/Down button to select the
desired menu.
3. Press the OK button and selected
thumbnail screen will appear.
Back Set
Images :All
Effect :Off
Interval :1 sec
Music :Off
Start Play
Repeat
Exit Back
9
20
Single

084
Starting the Multi Slide Show ( )
You can select image to view
1. Use the Up / Down buttons to select the
[Images] menu and press the Right button.
2. Select a desired sub menu by pressing
the Up / Down button.
[All] : All images saved in the
Memory are played back.
Press the OK button and the settings are saved.
[Date] : Images taken in a specified date are played back.
Press the OK button and the settings are saved.
[Select] :
Play only the selected images. If you press the
Up /
Down
button, you can select the desired images to play
back. The selected image can be saved as [Select1],
[Select2] and [Select3]. If you save the selected image
with the [New Select] command, it will be saved as
[Select1]. But when a new image is saved again using
[New Select], the former image which had been saved
as [Select1] will be saved as [Select2] automatically.
You can change and cancel the images which were
saved as [Select1], [Select2] and [Select3].
Press the
Fn button and the settings are saved.
3. Select [Play] or [Repeat] in the [Start] menu to start the multi
slide show.
Selecting Images
Unique screen effects can be used for the Multi Slide Show.
1.
Select the [Effect] sub menu by pressing
the UP / DOWN button and press the
RIGHT button.
2. Use the Up / Down button to select
the type of effect.
3. Press the OK button to confirm the
setting.
Confi gure Multi Slide show effects
Back Set
Images :All
Effect :Off
Interval :1 sec
Music :Off
Start
All
Date
Select
Back Set
Images :All
Effect :Off
Interval :1 sec
Music :Off
Start Off
Calm
Sweet
Lively
Shine
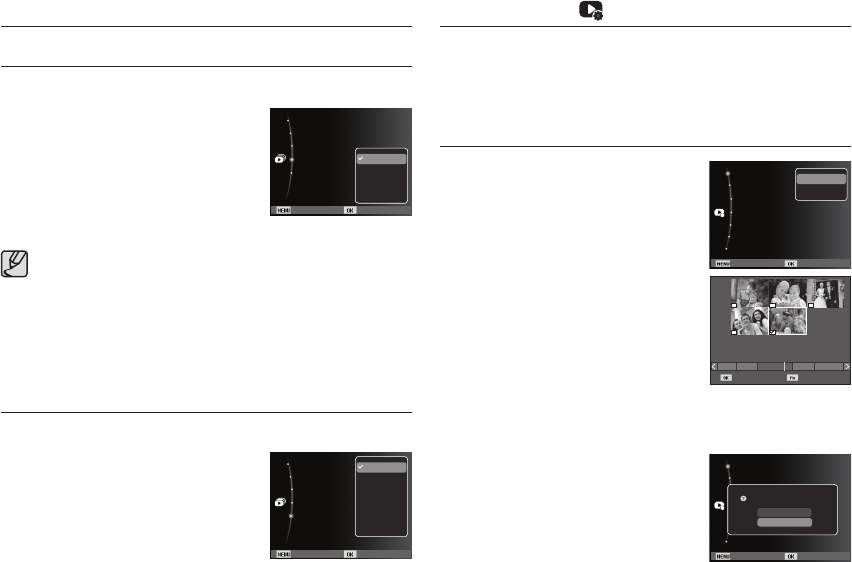
085
Set the Multi Slide Show music.
1. Select the [Music] sub menu by pressing
the UP / DOWN button and press the
RIGHT button.
2. Use the Up / Down buttons to select the
desired Music.
3. Press the OK button to save the
configuration.
Starting the Multi Slide Show ( )
Setting Background Music
File Options ( )
Deleting images
1. Press the Up / Down button and select
the [Delete] menu tab. And then press
the Right button.
2. Select a desired sub menu by pressing the
UP / DOWN button and press the OK button.
[Select] : Selection window for an image
to delete is displayed.
- Up/ Down/ Left/ Right : Select an image
- OK button : Select the image for
deletion. ( Ë mark)
- Fn Button : Press the Fn button to display
the confirmation message.
Select the [Yes] menu and
press the OK button to delete
marked images.
[All] :
Displays confirmation window.
Select the [Yes] menu and press the
OK button to delete all unprotected
images. If there aren’t protected im-
ages, all the images are deleted and
a [No Image] message will appear.
3. After deletion, the screen will be changed
to the play mode screen.
This deletes images stored on the memory.
1. Press the play mode button and press the menu button.
2. Press the Up / Down button and select the [File Options] menu tab
and press the OK button.
Setting play interval
Set the Multi Slide Show play interval.
1. Select the [Interval] sub menu by
pressing the UP / DOWN button and
press the RIGHT button.
2. Use the Up / Down buttons to select
the desired interval.
3. Press the OK button to save the
configuration.
The loading time depends on the image size and quality.
While the Multi Slide Show is playing, only the first frame
of a MOVIE file is displayed.
While the Multi Slide Show is playing, the voice recording file
will not display.
The interval menu functions in the [Off] menu only.
Back Set
Images :All
Effect :Off
Interval :1 sec
Music :Off
Start Off
Mist
Muse
Fall
Drops
Trip
Back Set
Images :All
Effect :Off
Interval :1 sec
Music :Off
Start
1 sec
3 sec
5
sec
10 sec
Select Delete
131211 5
Back Set
Protect
Face Registration
Recycle Bin :Off
Voice memo :Off
DPOF
Delete
Copy To Card
Select
All
Back Set
Protect
Face Registration
Recycle Bin :Off
Voice memo :Off
DPOF
Delete
Copy To Card
Delete All File(s)?
Yes
No
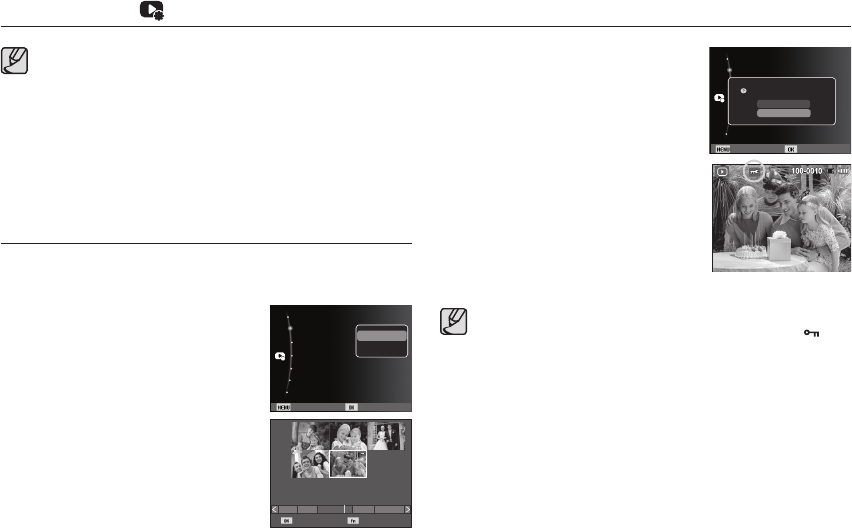
086
Of all the files stored in the memory card, the unprotected files
in the DCIM subfolder will be deleted. Remember that this
will permanently delete unprotected images. Important shots
should be stored on a computer before deletion takes place.
The startup image is stored in the camera's internal memory
(i.e., not on the memory card) and it will not be deleted even if
you delete all files on the memory card.
Protecting images
This is used to protect specific shots from being accidentally erased (Lock).
It also unprotects images that have been previously protected (Unlock).
1. Press the Up / Down button and select
the [Protect] menu tab. And then press
the Right button.
2. Select a desired sub menu by pressing the
UP / DOWN button and press the OK button.
[Select ] : Selection window for an
image to be protected /
released is displayed.
- Up / Down / Left / Right : Select an image
- OK button : Protect / release the
image
- Fn button : Your changes will be
saved and the menu will
disappear.
File Options ( )
[All] : Protect / release all saved images
- If you protect an image, the protect
icon will be displayed on the LCD
monitor. (An unprotected image has
no indicator)
- An image in LOCK mode will be
protected from the delete function
or [Delete] functions, but will NOT be
protected from the [Format] function.
Image protection is enabled when selecting an image in play-
back mode and pressing the image protection button. ( )
Select Set
131211 5
Back Set
Protect
Face Registration
Recycle Bin :Off
Voice memo :Off
DPOF
Delete
Copy To Card
Select
All
Back Set
Protect
Face Registration
Recycle Bin :Off
Voice memo :Off
DPOF
Delete
Copy To Card
Protect All?
Lock
Unlock
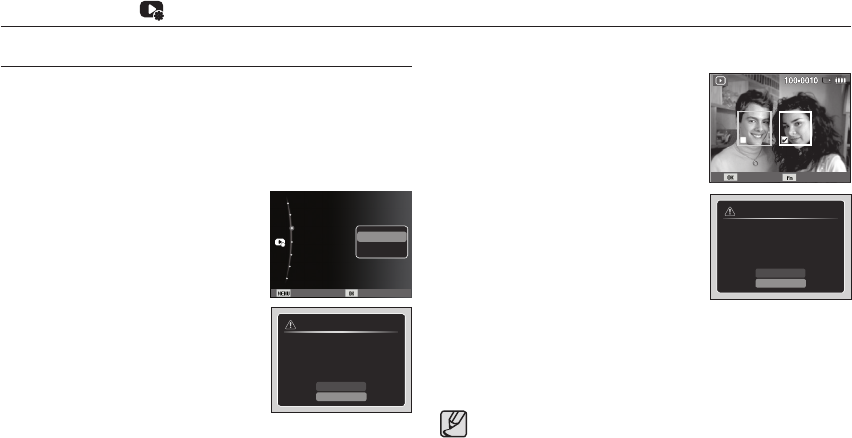
087
Registering faces
You can register faces amongst portrait shots. Registered faces can be
viewed by categorizing the priority in Smart Album. However, the face
registration function can be used only when inserting an external memory
card.
For a portrait shot
1. Select a portrait shot and press the
MENU button.
2. Select the [Face Registration] menu by
pressing the UP/DOWN buttons and
then press the RIGHT button.
3. Select the desired sub menu by press-
ing the UP/DOWN buttons.
[No]: The face registration function is
disabled.
[Yes]: The face registration function is
enabled.
4. A registration window for face detection
appears when pressing the OK button.
5. Select [Yes] by pressing the UP/DOWN
buttons.
6. A face is registered in order of priority
when pressing the OK button.
For a group shot
Steps 1 to 3 are identical to the proce-
dure for a portrait shot.
4. When using the OK button, a focus
frame and a check box appear on a
face which can be registered.
5. Select the desired face for registration
by pressing the LEFT/RIGHT buttons
and then press the OK button.
6. A registration window for face detection
appears when pressing the Fn button.
7. Select [Yes] by pressing the UP/DOWN
buttons.
8. A face is registered in order of priority
when pressing the OK button.
Face registration is available for up to 3 people in playback
mode. When the face registration exceeds the limitation, the
first registered face is cancelled and the new face is added.
File Options ( )
Back Set
Protect
Face Registration
Recycle Bin :Off
Voice memo :Off
DPOF
Delete
Copy To Card
No
Yes
Select Set
Yes
No
Face Registration
Do you want to register the face
manually?
Yes
No
Face Registration
Do you want to register the face
manually?
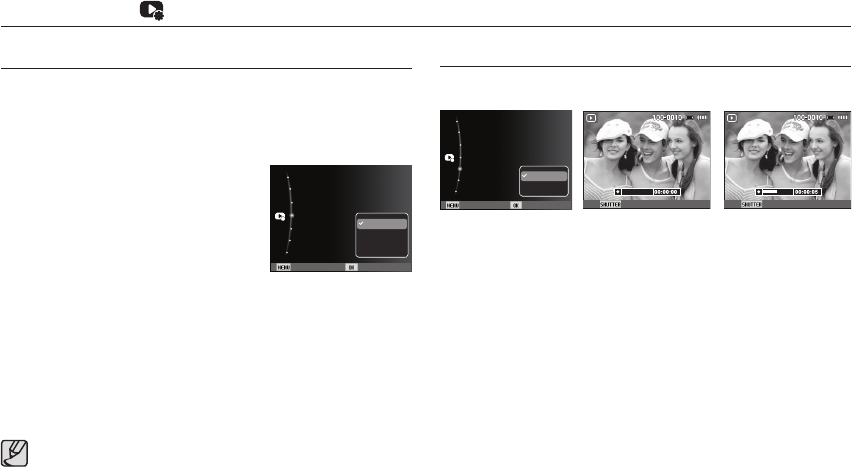
088
You can add your voice to a stored still image.
Voice memo
- Once you press the shutter button, the voice will record for 10
seconds.
- To stop the recording, press the shutter button.
[Ready for recording] [Voice is recording][Voice memo menu]
File Options ( )
Recycle Bin
You can activate the [Recycle Bin] function or restore photos saved
in the recycle bin. By turning on this function, you can temporar-
ily save photos up to a total 10MB capacity. You can also restore
photos from the recycle bin.
1. Select the [Recycle Bin] menu by
pressing the UP/DOWN buttons and
then press the RIGHT button.
2.
Select a desired sub menu by pressing
the UP/DOWN buttons and press the
OK button.
[Off]*: Do not want to use the Recycle Bin function.
[On]: Deleted photos are saved in the Recycle folder.
[Retrieve]: You can restore the deleted photos from the Recycle
folder.
3.
Press the OK button to save the changed setting.
The Recycle Bin function only works with photos.
When you delete all files at once, the files are not saved in the
Recycle Bin. When the Recycle bin is full of space, it removes
photos in sequence from the first deleted photo.
Although you turn off the Recycle function, the Recycle bin still
keeps the photos.
When you format the built-in/external memory, all photos in the
Recycle Bin are deleted.
Start Stop
Back Set
Protect
Face Registration
Recycle Bin :Off
Voice memo :Off
DPOF
Delete
Copy To Card
Off
On
Back Set
Protect
Face Registration
Recycle Bin :Off
Voice memo :Off
DPOF
Delete
Copy To Card
Off
On
Retrieve
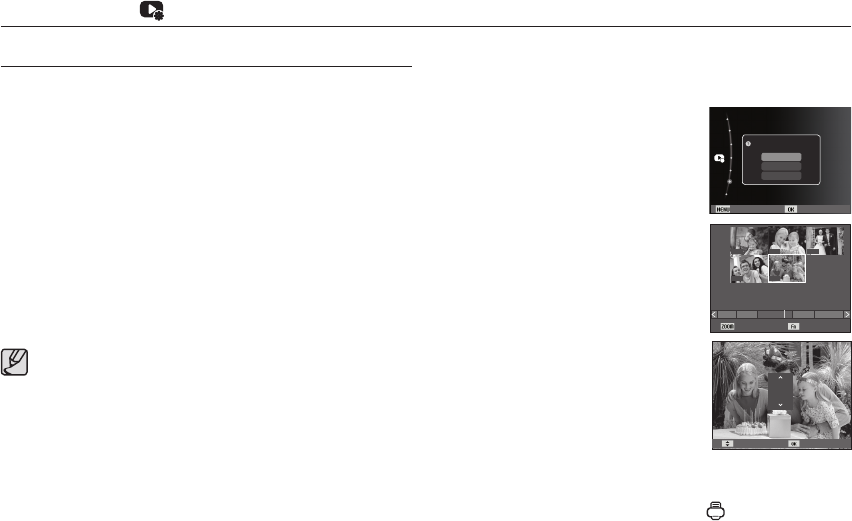
089
DPOF(Digital Print Order Format) allows you to embed printing
information on your memory card’s MISC folder. Select the
pictures to be printed and how many prints to make.
The DPOF indicator will display on the LCD monitor when an image
that has DPOF information plays back. Images can then be printed
on DPOF printers, or at an increasing number of photo labs.
This function is not available for Movie clips and Voice recording files.
When the wide angle image is printed as a wide angle print, 8%
of the left and right side of the image may not be printed. Check
that your printer can support the wide angle image when you print
the image. When you print the image at a photo lab, request that
the image is printed as a wide angle image. (Some photo labs
may not support the wide angle size print.)
DPOF Standard
This function allows you to embed printing quantity information on
a stored image.
1. Press the Up / Down button and select
the [DPOF] menu tab. And then press
the Right button.
2. Press the Right button again and
[Standard] sub menu will display.
3. Select a desired sub menu by pressing
the Up / Down button and press the OK
button.
[Select] : Selection window for an
image to print is displayed.
- Up / Down / Left / Right : Select an
image to print.
- Zoom button : Select the number of
prints.
[All] : Configure number of prints for all
pictures except movie and voice
files.
- Up / Down button : Select a number of
prints
[Reset] : Cancel the print setup.
4. Press the OK button to confirm the setting. If an image carries
DPOF instructions, the DPOF indicator ( ) will show.
Depending on the printer, the image saved in portrait orientation
may not be printed in portrait orientation.
File Options ( )
Quantity Set
01
02
0000
00
01
131211 5
Quantity Set
Back Set
Protect
Face Registration
Recycle Bin
Voice memo :Off
DPOF
Delete
Copy To Card
Select Image
Select
All
Reset
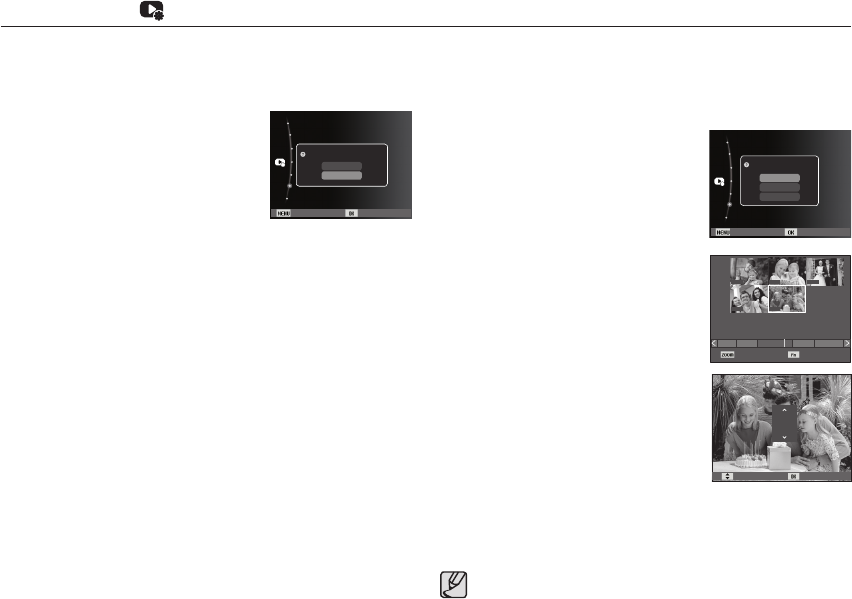
090
Index
Images (except for movie clips and voice file) are printed as index
type.
1. Press the Up / Down button and select
the [DPOF] menu tab. And then press
the Right button.
2. Select the [Index] menu and press the
Right button again. Sub menu will
display.
3. Select a desired sub menu by pressing the UP / DOWN button.
If [Yes] is selected : The image will be printed in index format.
If [No] is selected : Cancel the index print setting.
4. Press the OK button to confirm the setting.
File Options ( )
Print size
You can specify the print size when printing images stored on the
memory card. The [Size] menu is available only for DPOF 1.1
compatible printers.
1. Press the Up / Down button and select
the [DPOF] menu tab. And then press
the Right button.
2. Select the [Size] menu and press the
Right button again. Sub menu will
display.
3. Select a desired sub menu by pressing
the UP / DOWN button and press the
OK button.
[Select] : Selection window to change
the printed size of the image
is displayed.
- Up / Down / Left / Right : Select an image.
- Zoom W/T Button : Change the print size.
- Fn button : Your changes will be
saved and the menu will
disappear.
[All] : Change print size of all saved
images.
- Up / Down button : Select a print size
- OK button : Confirm the changed setting.
[Reset] : Cancel all of the print size settings.
Ä DPOF [Size] secondary menu : Cancel, 3X5, 4X6, 5X7, 8X10
Depending on the manufacturer and print model, cancelling the
printing may take a little longer for the printer to process.
Size Set
3X5
Cancel
Cancel CancelCancel
Cancel
131211 5
Size Set
Back Set
Protect
Face Registration
Recycle Bin
Voice memo :Off
DPOF
Delete
Copy To Card
Setting Index?
Yes
No
Back Set
Protect
Face Registration
Recycle Bin
Voice memo :Off
DPOF
Delete
Copy To Card
Select Image
Select
All
Reset

091
This enables you to copy image files, movie clips and voice recording
files to the memory card.
Copy To Card
1. Select the [Copy To Card] menu tab by
pressing the Up / Down button. And then
press the Right button.
2. Select a desired sub menu by pressing
the UP/ DOWN button and press the OK
button.
- [No] : Cancels "Copy to Card".
- [Yes] :
All images, movie clips and voice recording files saved in
the internal memory are copied to the memory card after
the [Copying] message is displayed. After copying has
been completed, the screen will return to play mode.
File Options ( )
If there is not enough space available in the memory card to
copy saved images in the internal memory (About 20MB), the
[Copy To Card] command will copy only some of the images and
display [Memory Full] message. Then the system will return to
the playback mode. Please be sure to delete any unnecessary
files to free up space before inserting the memory card into the
camera.
When you move the images that are stored in the internal
memory by doing [Copy To Card] to the card, the next number of
file names will be created in the card to avoid duplication of the
file name.
- When the [Reset] of the [File No.] setup menu is set : The cop-
ied file names start from after the last stored file name.
- When the [Series] of the [File No.] setup menu is set : The copied
file names start from after the last captured file name. After
completing [Copy To Card], the last stored image of the last copied
folder is displayed on the LCD monitor.
Back Set
Protect
Face Registration
Recycle Bin :Off
Voice memo :Off
DPOF
Delete
Copy To Card
No
Yes
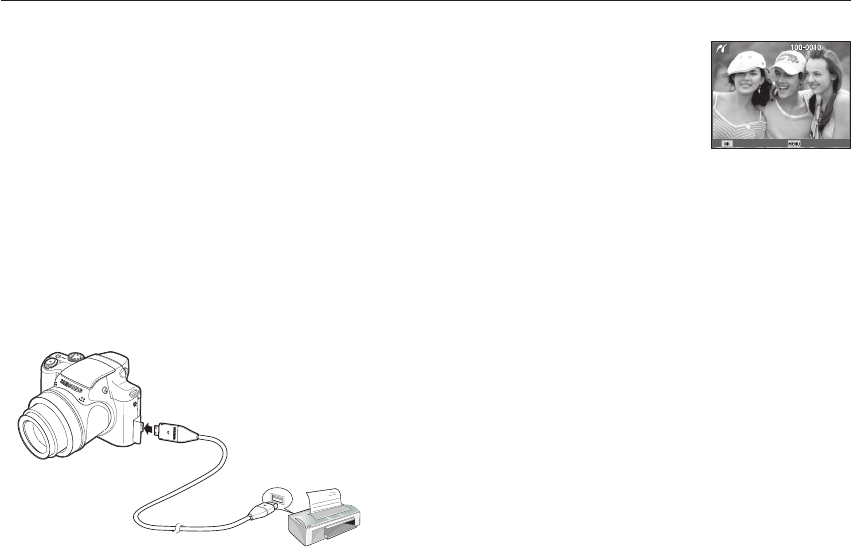
092
PictBridge
You can use the USB cable to connect this camera to a printer that
supports PictBridge (sold separately) and print the stored images
directly. Movie clips and voice files cannot be printed.
Connecting the Camera to a Printer
Setting up the camera for connection to the printer
1. Connect the camera and printer with USB cable.
2. Once the camera is turned on, the camera automatically recognizes
the printer and is connected to it.
Ä If automatic connection fails, set the [USB] menu to [Printer]. (p.69)
Ä For a printer that can enable removable disks, set the [USB] menu to
[Printer].
Easy printing
When you connect the camera to printer
in the Play back mode, you can print a
picture easily.
- Pressing the Left / Right button :
Selects a previous / next image.
- Pressing the OK button :
Currently displayed image will be
printed with the printer’s default setting.
Print Menu
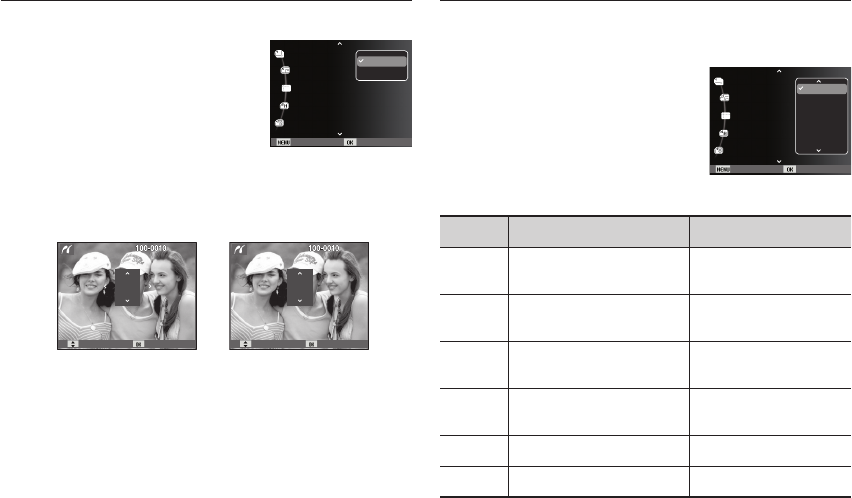
093
PictBridge : Picture Selection
You can select images you want to print.
Setting the Number of Copies to Print
1. Press the Menu button and the
PictBridge menu will display.
2. Use the Up / Down buttons to
select the [Images] menu and
press the Right button.
3. Use the Up / Down buttons to select a desired sub menu and
press the OK button.
- Select [One Photo] or [All Photos]. A screen where you can
set the number of copies to print will appear as shown below.
- Press the Up / Down button to select the number of prints.
- When [One Photo] is selected : Use the Left / Right button to
select another picture. After
selecting another picture, select
the number of prints for another
picture.
- After setting the number of prints, press the OK button to save.
- Press the Shutter button to return to the menu without setting
the number of prints.
4. Press the play mode button ( Î ) and images will be printed.
PictBridge : Print Setting
You can select the Paper Size, Print Format, Paper Type, Print Qual-
ity, Date Print, and File Name Print menus for printed pictures.
1. Press the Menu button and the
PictBridge menu will display.
2. Use the Up / Down buttons to select
the desired menu, and then press the
Right button.
3. Use the Up / Down buttons to select
the desired sub menu value, and then
press the OK button.
Ä Some menu options are not supported on all printers.
If not supported, the menus are still displayed in the LCD, but are not
selectable.
Menu Function Sub menu
Size Set the size of the printing
paper
Auto, PostCard, Card, 4X6, L,
2L, Letter, A4, A3
Layout Set the number of pictures to
be printed on a sheet of paper
Auto, Full, 1, 2, 4, 8, 9, 16,
Index
Type Set the quality of the printing
paper
Auto, Plain, Photo, Fast-
Photo
Quality Set the quality of the picture
to be printed Auto, Draft, Normal, Fine
Date Set whether to print the date Auto, Off, On
File Name
Set whether to print the file name
Auto, Off, On
[When [One Photo] is selected] [When [All Photos] is selected]
Quantity Set
1
Quantity Set
0
Back Set
Size :Auto
Layout :Auto
Type :Auto
Quality :Auto
Images :One Photo
One Photo
All Photos
Back Set
Size :Auto
Layout :Auto
Type :Auto
Quality :Auto
Images :One Photo
Auto
Postcard
Card
4x6
L
2L

094
PictBridge : Reset
Initialises user-changed configurations.
1. Use the Up / Down buttons to select
the [Reset] menu tab. And then press
the Right button.
2. Use the Up / Down buttons to select
the desired sub menu value, and then
press the OK button.
If [Yes] is selected : All print and image settings will be reset.
If [No] is selected : Settings will not be reset.
Ä Default print setting varies depending on the printer manufacturer.
For your printer’s default setting, refer to the user’s guide that
came with your printer.
Important notes
Be sure to observe the following precautions!
This unit contains precision electronic components. Do not
use or store this unit in the following locations.
- Areas exposed to severe changes in temperature and humidity.
- Areas exposed to dust and dirt.
- Areas exposed to direct sunlight or the inside of a vehicle in hot
weather.
- Environments where there is high magnetism or excessive vibration.
- Areas with high explosives or highly flammable materials.
Do not leave this camera in places subject to dust, chemicals
(like naphthalene and mothballs), high temperature and high
humidity. Keep this camera with silica gel in a hermetically
sealed box when not planning to use the camera for a long
period of time.
Sand can be particularly troublesome to cameras.
- Do not let sand get inside the camera when using it on beaches,
coastal dunes, or other areas where there is lots of sand.
- Doing so may result in failure or may permanently render the
camera unusable.
Handling the camera
- Never drop the camera or subject it to severe shocks or vibrations.
- Protect the large size LCD monitor from an impact. When this
camera is not used, keep it in the camera case.
- Avoid obstructing the lens or the flash when you capture an image.
- This camera is not waterproof.
To avoid dangerous electrical shocks, never hold or operate the
camera with wet hands.
- If you use this camera in wet places, such as beach or pool, do
not let water or sand get inside the camera. Doing so may result
in failure or may permanently damage the unit.
Back Set
File Name :Auto
Reset No
Date :Auto
Yes
No

095
Extremes in temperature may cause problems.
-
If the camera is transferred from a cold to a warm and humid
environment, condensation can form on the delicate electronic
circuitry. If this occurs, turn the camera off and wait for at least
1 hour until all moisture is dispersed. Moisture built up can also
occur on the memory card. If this happens, turn off the
camera and remove the memory card. Wait until the moisture
has dispersed.
Caution on Using the Lens
- If the lens is subjected to direct sunlight, it could result in the
discoloration and deterioration of the image sensor.
- Take care not to get fingerprints or foreign substances on the
surface of the lens.
If the digital camera is not used for a long period, an electric
discharge can occur. It is a good idea to remove the battery
and the memory card if you do not intend using the camera
for an extended period of time.
If the camera is exposed to an electronic interference, it will
turn itself off to protect the memory card.
Camera Maintenance
- Use a soft brush (available from photo stores) to gently clean the
lens and LCD assemblies. If this does not work, lens-cleaning
paper with lens cleaning fluid can be used.
Clean the camera body with a soft cloth. Do not allow this
camera to come into contact with solvent materials such as
benzol, insecticide, thinners etc. This may damage the body shell
of the camera and also affect its performance. Rough handling
can damage the LCD monitor. Take care to avoid
damage and keep the camera in its protective carry case at all
times when not in use.
Do not attempt to disassemble or modify the camera.
Under certain conditions, static electricity can cause the flash
unit to fire. This is not harmful to the camera and is not a
malfunction.
When images are uploaded or downloaded, the data transfer
may be affected by static electricity. In this case, disconnect
and re-connect the USB cable before trying the transfer again.
Before an important event or going on a trip, you should
check the camera condition.
- Take a picture for testing the camera condition and prepare extra battery.
- Samsung cannot be held responsible for camera malfunctions.
If the digital camera is not used for a long period, the date and
time may adopt the default settings by automatical battery
discharged. In this case, reset the date and time correctly before
the recording.
Important notes

096
Warning indicator
There are several warnings that may appear on the LCD display.
[Card Error]
Memory card error
Turn off the camera power and turn it on again
Insert the memory card again
Insert and format the memory card (p.65)
[Card Locked]
The memory card is locked
SD/SDHC memory card : Slide the write protect switch to the
top of the memory card
[Memory Full]
The memory card or internal memory is full.
Insert new memory card.
Delete the unnecessary image files
[No Image File]
There are no images stored on the memory
Take images
Insert a memory card that is holding some images
[File Error]
File error
Delete the file.
Memory card error
Contact a camera service centre.
[Low Battery]
There is low battery capacity
Insert fresh batteries.
[Power turns off automatically to prevent malfunction due to
high temperatures. Wait a minute before use.]
The power is automatically tuned off at a high temperature above
60ÛC.
If the camera is turned off because of the temperature
increase in the product, cool off the heat and turn it on again.
If the camera is turned off because of high temperature in the
surrounding air, turn on the power at less warm area.

097
Before contacting a service centre
The camera doesn’t switch on
There is low battery capacity
Insert fresh batteries. (p.15)
Battery is inserted incorrectly with the polarities reversed.
Insert the battery according to the polarity marks (+, -).
The camera power ceases while in use
The battery is exhausted
Insert fresh batteries.
The Camera is turned off automatically
Turn on the camera power again.
Operation has ceased in a low temperature outside of the camera
usage temperature range.
Make the camera and battery warm by placing them in your
pocket, etc. and then immediately before shooting, place the
battery in the camera and then shoot.
Please check the following Camera does not take images when pressing the Shutter button
There is insufficient memory capacity
Delete unnecessary image files
The memory card has not been formatted
Format the memory card (p.65)
The memory card is exhausted
Insert a new memory card
The memory card is locked
Refer to [Card Locked] error message
The camera's power is off
Turn the camera power on
The battery is exhausted
Insert fresh batteries (p.15)
Battery is inserted incorrectly with the polarities reversed.
Insert the battery according to the polarity marks (+, -)
The camera suddenly stops working while in use
The camera stopped due to a malfunction
Remove /re-insert battery and switch the camera on
The images are unclear
A picture was taken of the subject without setting an appropriate
macro mode
Select an appropriate macro mode to take a clear image.
Taking a picture beyond the flash range
Take a picture within the flash range
The lens is smudged or dirty
Clean the lens

098
Before contacting a service centre
The flash does not fire
Flash off mode has been selected
Dis-engage flash off mode
The camera mode can't use the flash
Refer to the FLASH instruction (p.40)
Incorrect date and time is displayed
The date and time have been set incorrectly or the camera has
adopted the default settings
Reset the date and time correctly
The camera buttons do not operate
Camera malfunction
Remove/re-insert battery and switch the camera on
A card error has occurred while the memory card is in the camera.
Incorrect memory card format
Re-format the memory card
The images don't play back
Incorrect file name (Violation of DCF format)
Do not change the image file name
Colour of image is different to the original scene
White balance or effect setting is incorrect
Select appropriate White balance and effect
Images are too bright
Exposure is excessive
Reset exposure compensation
No image on external monitor
The external monitor has not been connected properly with
the camera
Check the connection cables
There are incorrect files in the memory card
Insert a memory card that has correct files
When using the PC’s explorer, the [Removable Disk] file does not show
Cable connection is incorrect
Check the connection
The camera is off
Turn the camera on
The operating system is not Windows 2000, XP, Vista / Mac OS
10.4. Alternatively the PC does not support USB
Install Windows 2000, XP, Vista / Mac OS 10.4 to PC that sup-
ports USB
A part of the LCD screen does not occasionally turn on or a spot appears.
Although the LCD screen is manufactured with high precision
technology, the precision pixels are not occasionally lighted or the
red, white and blue spots appear.
ĺ
This phenomenon does not affect the quality of the recorded im-
age and it is not a malfunction.
A vertical line appears on the LCD screen when taking a picture of
a bright object.
If a subject is exposing bright lights, a gray, black, red or purple
vertical line may appear.
ĺ
This is a phenomenon called smear and it does not affect the
quality of the recorded image. This is not a malfunction.
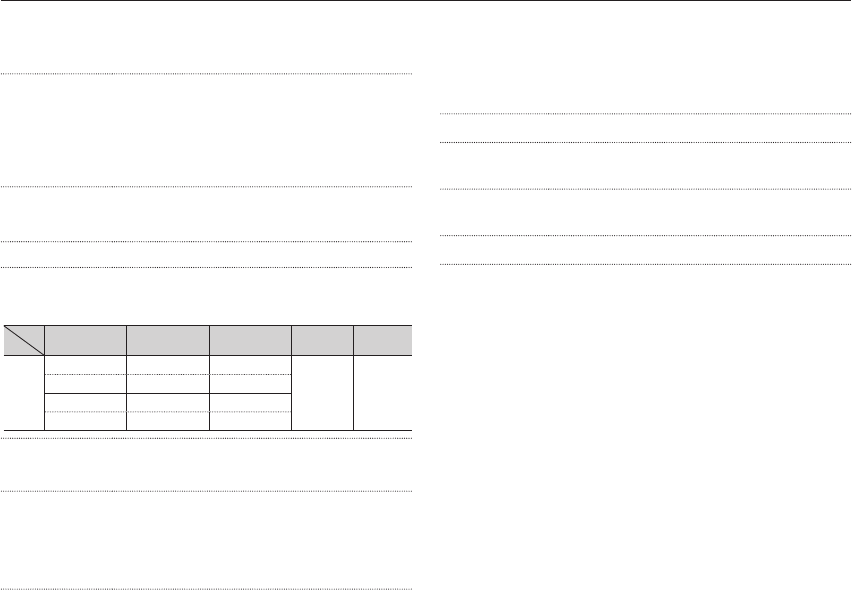
099
Specifi cations
Image Sensor - Type : 1/2.33" CCD
- Effective Pixel : Approx. 12.47 Mega-pixel
- Total Pixel : Approx. 12.7 Mega-pixel
Lens - Focal Length :
Schneider-Kreuznach Lens
f = 4.6 ~ 110.4mm
(35mm film
equivalent : 26 ~ 624mm), 24X Zoom
- F No. : F2.8(W) ~ F5.0(T)
- Digital Zoom : · Still Image mode :1.0X ~ 5.0X
· Play mode : 1.0X ~ 12.5X
(depends on image size)
Image Stabilization
- Dual IS (OIS + DIS), OIS, DIS
Ä OIS (Optical Image Stabilization),
DIS (Digital Image Stabilization)
LCD Monitor - 3.0"(7.62cm) color TFT LCD (230,000 dots)
Focusing - Type :
TTL auto focus (Multi AF, Center AF,
Selection AF, Tracking AF, Face Detection)
- Range
Normal Auto Macro Macro Super
Macro Manual
Focus
Focus
range
Wide Wide Wide
1cm ~ 10cm 10cm ~
Infinity
80cm ~ Infinity 10cm ~ Infinity 10cm ~ 80cm
Tele Tele Tele
170cm ~ Infinity 170cm ~ Infinity 80cm ~ 150cm
Shutter -
Program : 1/2 ~ 1/2,000 sec.,
A·S/Manual : 16 ~ 1/2,000 sec.
(Continuous, AEB : 1/4 ~ 1/2,000 sec.)
Exposure - Control : Program AE
- Metering : Multi, Spot, Center-Weighted,
Face Detection
- Compensation : ±2EV (1/3EV steps)
- ISO : Auto, 64, 100, 200, 400, 800, 1600,
3200(5M), 6400(3M)
Flash - Modes : Auto, Auto & Red-eye reduction, Fill-in
flash, Slow sync, Flash off, Red Eye Fix
- Range : Wide: 0.3 ~ 6.0 m, Tele: 0.8 ~3.0 m
(ISO Auto)
- Recharging Time : Approx. 5 sec
Sharpness - Soft+, Soft, Normal, Vivid, Vivid+
White Balance Auto, Daylight, Cloudy, Fluorescent_H,
Fluorescent_L, Tungsten, Custom
Voice Recording - Voice Recording (max. 4GB)
- Voice Memo in Still Image (max. 10 sec.)
Date Imprinting - Date, Date & Time, Off (user selectable)
Shooting - Still Image
·Mode : Smart Auto, Program, A·S, Manual, Night,
Beauty Shot, Scene, User1, User2
·Scene : Frame Guide, Portrait, Children,
Landscape, Close-up, Text, Sunset,
Dawn, Backlight, Firework, Beach &
Snow
·Smart Auto : Macro, Macro Text, White,
Landscape, Action, Tripod, Night,
Night Portrait, Backlight, Backlight
Portrait, Portrait
·Shooting : Single, Continuous, High Speed,
Motion Capture, AEB
·Self-timer : 10 sec., 2 sec., Double
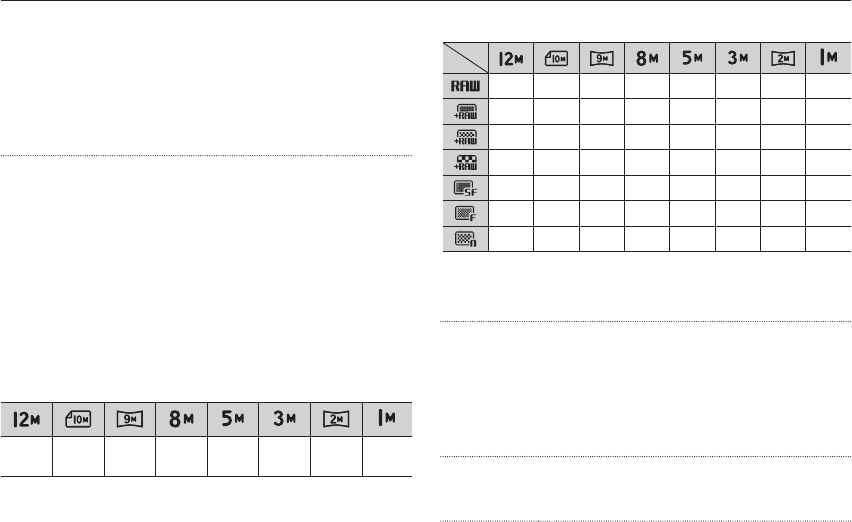
100
Specifications
- Movie Clip
·
With Audio or without Audio
(user selectable, recording time : max 20min)
·Size : 1280x720HQ(30FPS & 15FPS),
640x480(30FPS & 15FPS),
320x240(60FPS & 30FPS & 15FPS)
· Movie Editing (Embedded): Still Image Capture
Storage - Media
·Internal memory : About 20MB flash memory
· External memory (Optional) :
SD card (Up to 4GB guaranteed)
SDHC card (Up to 8GB guaranteed)
- File Format
·Still Image : JPEG (DCF), EXIF 2.21,
DPOF 1.1, PictBridge 1.0,
RAW (DNG1.1)
·Movie Clip : MP4 (H.264(MPEG4.AVC))
·Audio : WAV
- Image Size
- Capacity (1GB Size)
45
-------
33
-------
37
-------
39
-------
134 152 179 201 318 502 751 1833
222 250 295 331 519 820 1198 2833
333 375 442 494 769 1198 1731 3896
Ä These figures are measured under Samsung standard condi-
tions and may vary depending on shooting conditions and
camera settings.
Effect - Effect : Photo Style Selector, Image Adjust
(Sharpness, Contrast, Saturation),
Distortion Control
- Editing : Resize, Rotate, Photo Style Selector,
Image Adjust (ACB, Face Retouch, Red
Eye Fix, Brightness, Contrast, Saturation,
Add Noise), Face Registration
Image Play - Type : Single image, Thumbnails, Smart Album,
Multi slide show, Movie Clip
Ä Multi slide show : Slide show with Effect & Music
4000x
3000
3984x
2656
3968x
2232
3264x
2448
2592x
1944
2048x
1536
1920x
1080
1024x
768

101
Specifications
Interface - Digital output connector : USB 2.0
- Audio : Microphone: Stereo,
Internal Speaker: Mono
- Video output : NTSC, PAL (user selectable)
- DC power input connector : 4.4 V
Power Source - Rechargeable battery : SLB-11A, 3.8V
(1130mAh)
Ä Included battery may vary depending on
sales region.
Dimensions
(WxHxD)
- 116.1×82.8×91.1mm
(excluding protrusions)
Weight - Approx. 398g (without batteries and card)
Operating
Temperature - 0 ~ 40°C
Operating Humidity - 5 ~ 85%
Software - Samsung Master, Adobe Reader, QuickTime
Player, Samsung RAW Converter
Specifications are subject to change without prior notice.
All trademarks are the property of their respective owners.
Software Notes
Please ensure that you read the instruction manual carefully before
use.
- Under no circumstances should all or part of either the software or
the user manual be reproduced.
- Copyrights for software are licensed only for use with a camera.
- In the unlikely event of a manufacturing fault, we will repair or
exchange your camera.
We cannot, however, be held responsible in any way for damage
caused by inappropriate use.
- Using a Hand-made PC or a PC and OS that has not been
guaranteed by the manufacturer is not covered by the Samsung
warranty.
- Before reading this manual, you should have a basic knowledge of
computers and O/S (Operating Systems).

102
System Requirements
For Windows For Macintosh
USB
Connection
Speci¿ cations
PC with processor better
than Pentium III 500MHz
(Pentium III 800MHz recommended)
Windows 2000 / XP / Vista
Minimum 256MB RAM
(Over 512MB recommended)
250MB of available hard disk
space (Over 1GB recommend)
1024x768 pixels, 16bit color
display compatible monitor
(24bit color display recommended)
Microsoft DirectX 9.0c or later
Power Mac G3 or later
Mac OS 10.4 or later
Minimum 256MB RAM
(Over 512MB recommended)
110MB of available hard disk
space
Software
Support
Speci¿ cations
-
Ä It is not compatible with Windows XP and Vista 64-bit Edition.
Ä Samsung is not responsible for any defects or damages caused
by the use of unauthorized computer including an assembled PC.
For Windows For Macintosh
Intel Pentium 4, 3.2GHz or later /
AMD Athlon 64FX, 2.6GHz or later
1.8GHz Power Mac G5 or 1.83GHz
Intel Core Duo or later Macintosh
Windows XP service pack2/Vista
Mac OS 10.4.10 or later
Minimum 512MB RAM
(1GB recommended)
Minimum 256MB RAM
(1GB recommended)
nVIDIA Geforce 7600GT or later /
ATI X1600 series or later
64MB video card
QuickTime Player 7.6 : H.264(MPEG4.AVC) playback
Requirements
Software Notes

103
About the software
After inserting the CD-ROM provided with this camera into the
CD-ROM drive, the following window should automatically run.
Samsung Master : This is the all-in-one multi media software
solution.
You can download, view, edit and save your digital images and
movie clips with this software. This software is only compatible
with Windows.
QuickTime Player 7.6 : The movie viewing program
QuickTime Player is a movie viewing program and is provided for
the Windows OS only.
Samsung RAW Converter: RAW data editing program
Files in a RAW (*.dng) format can be converted to JPEG or TIFF
file formats.
You should allow 5 ~ 10 seconds for running the automatic setup
program according to the capability of your computer. If the frame
does not appear, run the [Windows Explorer] and select [Installer.
exe] in the CD-ROM Drive root directory.
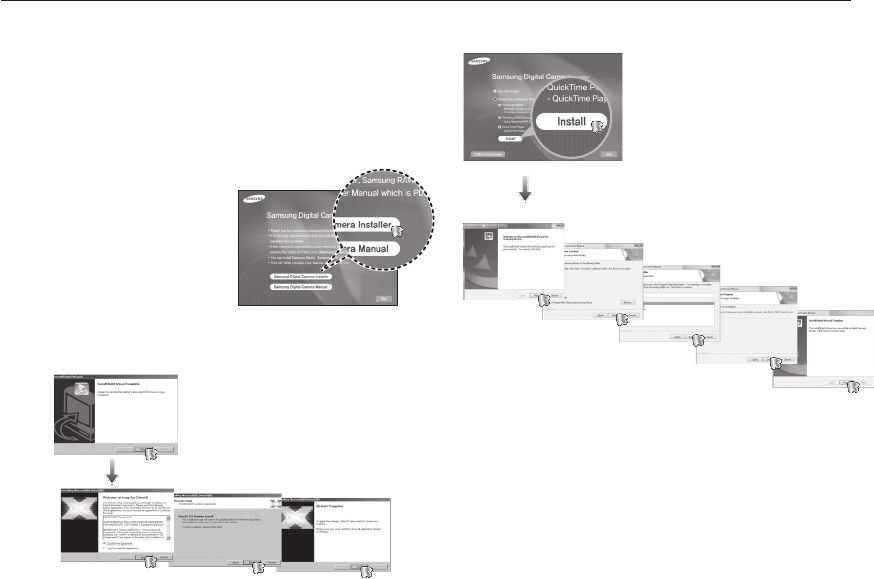
104
Setting up the application software
To use this camera with a PC, install the application software first.
After this has been done, the stored images in the camera can be
moved to the PC and can be edited by an image editing program.
You can visit the Samsung web-site through the internet.
1. The auto run frame will display.
Click the [Samsung Digital Camera
Installer] menu in the Auto run
frame.
2. Install the DirectX by selecting a button shown on the monitor. If a
latest version of DirectX was installed on your computer, DirectX
may not be installed.
3. Install the Samsung Master in the order shown.
http://www.samsung.com: English
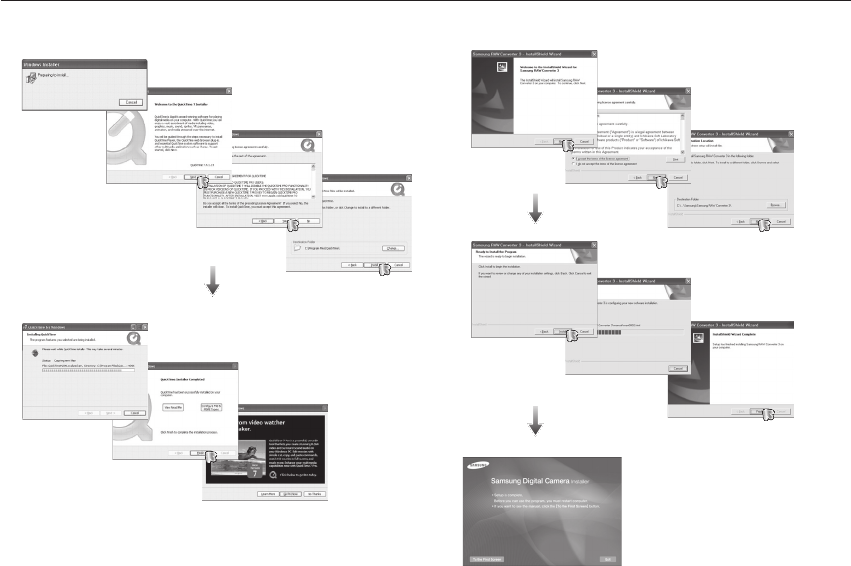
105
Setting up the application software
4. Install the QuickTime Player 7.6 in the order shown.
Ú
QuickTime Player 7.6 cannot be installed under Windows 2000.
5. Install the Samsung RAW Converter in the order shown.

106
6. After restarting the computer,
connect the PC to the camera
with the USB cable.
7. Turn on the camera power. The
[Found New Hardware Wizard]
will open and the computer will
recognise the camera.
Ú If your OS is Windows XP / Vista,
an image viewer program will open.
PDF documents of user manual are included in the Software
CD-ROM supplied with this camera. Search the PDF files with
Windows explorer. Before opening the PDF files, you must
install the Adobe Reader included in the Software CD-ROM.
Install Adobe Reader from the CD provided. If the Internet is
not enabled, install Adobe Reader by using the executable file
located in the CD.
To install the Adobe Reader 6.0.1 correctly, Internet Explorer
5.01 or later has to be installed. Visit "www.microsoft.com" and
upgrade the Internet Explorer.
Setting up the application software
SAM_0001
SAM_0002
SAM_0003
SAM_0004
SAM_0005

107
Starting PC mode
If you connect the USB cable to a USB port on your PC and then
turn on the power, the camera will automatically switch to "computer
connection mode". In this mode, you can download stored images to
your PC through the USB cable.
Camera settings for connection
1. Turn on the camera.
2. Connect the camera and computer with the supplied USB
cable.
3. Once the camera is turned on, the camera automatically
recognizes the computer and is connected to it.
Ä If automatic connection fails, set the [USB] menu to [Computer].
(p.69)
Connecting the camera to a PC
Disconnecting the camera and PC
Refer to page 109 (Removing the removable disk).
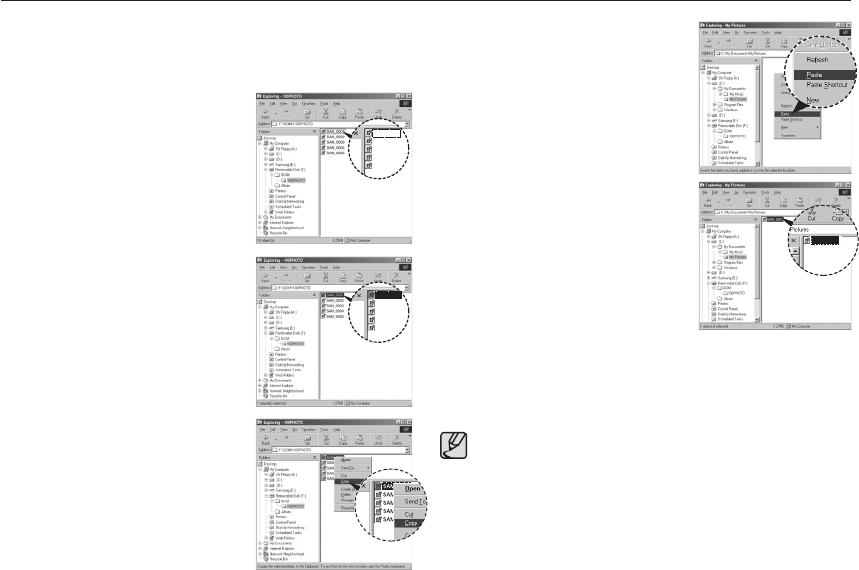
108
Starting PC mode
Downloading stored images
You can download the still images stored on the camera to your PC's
hard disk and print them or use a photo editing software to edit them.
1. Connect the camera to your PC
with the USB cable.
2. On your computer's desktop display,
select [My computer] and double
click [Removable Disk DCIM
100PHOTO].The image files will then
be displayed.
3. Select an image and press the right
mouse button.
4. A pop-up menu will open.
Click the [Cut] or [Copy] menu.
- [Cut] : cuts a selected file.
- [Copy] : copies files.
5. Click a folder where you want to
paste the file.
6. Press the right mouse button and a
pop-up menu will open.
Click [Paste].
7. An image file is transferred from the
camera to your PC.
- By using [Samsung Master], you can see the stored images in the
memory directly on the PC monitor and you can copy or move the
image files.
We recommend that you should copy the images to the PC to
view them. Opening images directly from the removable disk may
be subject to unexpected disconnection.
When you upload a file that is not taken by this camera to the
Removable Disk, the [File Error] message will be displayed on
the LCD monitor in the PLAY mode, and nothing is displayed in
THUMBNAIL mode.
SAM_0001
SAM_0002
SAM_0003
SAM_0004
SAM_0005
SAM_0001
SAM_0002
SAM_0003
SAM_0004
SAM_0005
SAM_0001
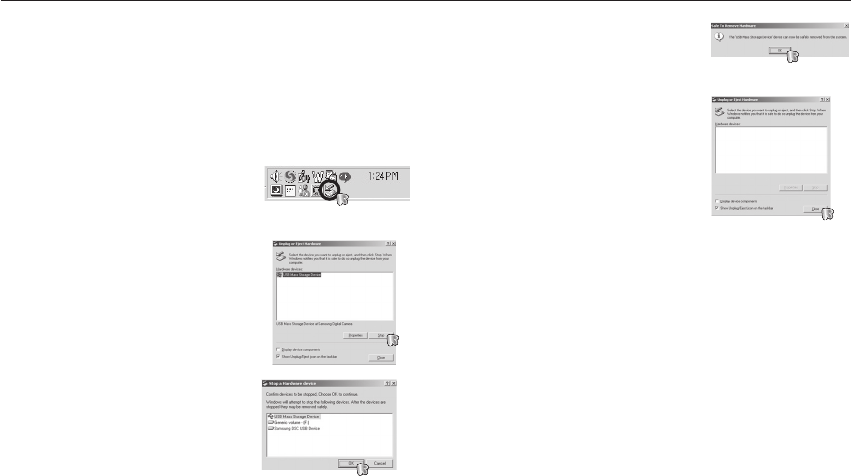
109
Removing the removable disk
6. A [Unplug or Eject Hardware] window
will open. Click the [Close] button and
the removable disk will be removed
safely.
7. Unplug the USB cable.
5. A [Safe to Remove Hardware] window
will open. Click the [OK] button.
Windows 2000/XP/Vista
(The illustrations may differ from those shown depending on the
Windows O/S.)
1. Check whether the camera and PC are transferring a file.
If the camera status lamp blinks, please wait until the lamp has
finished blinking and is constantly on.
4. The [Stop a Hardware device]
window will open. Select the [USB
Mass Storage Device] and click the
[OK] button.
3. The [Unplug or Eject Hardware]
window will open. Select the [USB
Mass Storage Device] and click the
[Stop] button.
2. Double-click the [Unplug or Eject
Hardware] icon on the task bar.
[Double-click!]
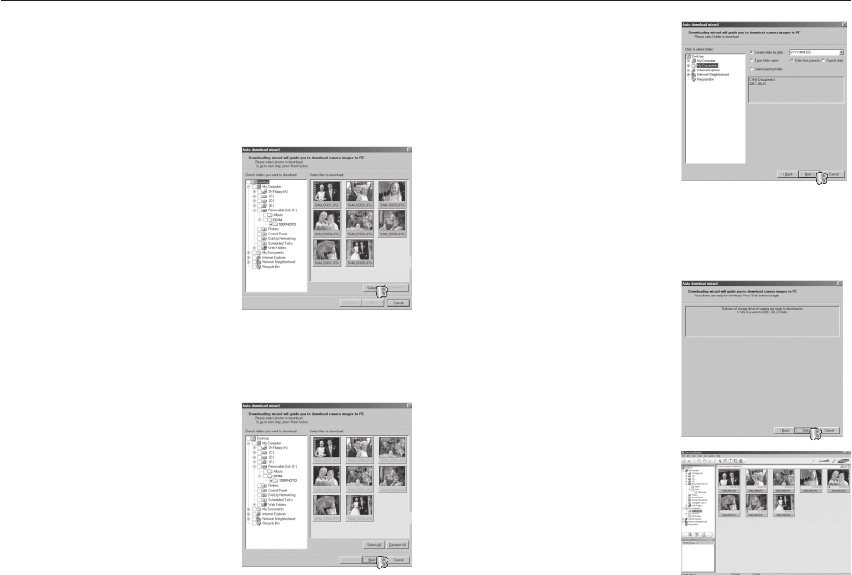
110
Samsung Master
4. Select a destination and make a
folder to save downloaded images
and folders.
- Folder names can be made in
order of date and images will be
downloaded.
- Folder name will be made as you
want and images will be down-
loaded.
- After selecting a folder that was
made before, images will be
downloaded.
5. Click [Next >] button.
6. A window will open as shown
alongside.
The destination of the selected
folder will be displayed on the
upper side of the window.
Click the [Start] button to
download the images.
7. Downloaded images will be
displayed.
You can download, view, edit and save your images and movies with
this software. This software is only compatible with Windows.
To start the program, click [Start Programs Samsung
Samsung Master].
3. Click [Next >] button.
Downloading images
1. Connect the camera to your PC.
2. A window for downloading images
will be displayed after connecting
the camera to your PC.
- To download the captured images,
select the [Select All] button.
- Select desired folder in the
window and click the [Select All]
button. You can save captured
images and selected folder.
- If you click the [Cancel] button, downloading will be cancelled.
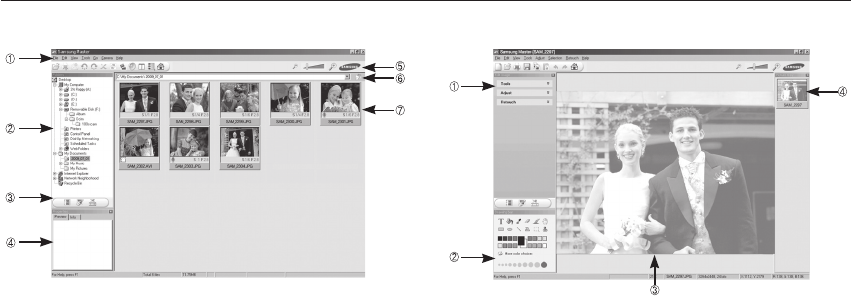
111
Samsung Master
Image viewer : You can view the stored images.
- Image viewer functions are listed below.
Ì Menu bar : You can select menus. File, Edit, View, Tools, Change
functions, Auto download, help, etc.
Í Image selection window : You can select the desired images
in this window.
Media type selection menu : You can select image viewer, image edit
and movie edit functions in this menu.
Preview window : You can preview an image or a movie clip and
check the multi media information.
Zoom bar : You can change preview size.
Folder display window : You can see the folder location of the
selected image.
Image display window : Images of the selected folder are displayed.
Ä Refer to the [Help] menu in Samsung Master for further information.
Image edit : You can edit the still image.
- Image edit functions are listed below.
Ì
Edit menu : You can select the following menus.
[Tools] : You can resize or crop the selected image. See the
[Help] menu.
[Adjust] : You can modify image quality. See the [Help] menu.
[Retouch] : You can change image or insert effects on the image.
See the [Help] menu.
Í
Drawing tools : Tools for editing an image.
Image display window : A selected image displays in this window.
Preview window : You can preview the changed image.
Ä A still image edited with Samsung Master can’t be played back on
the camera.
Ä Refer to the [Help] menu in Samsung Master for further information.
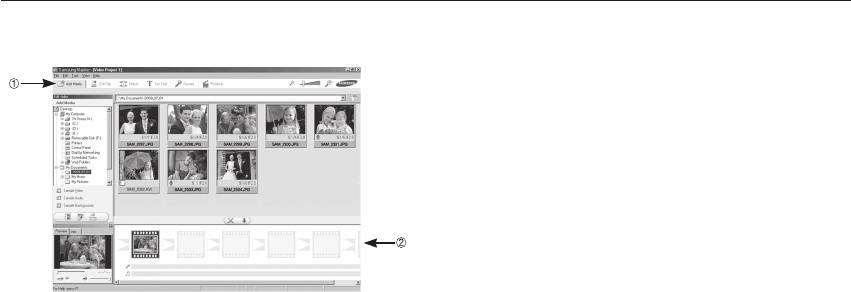
112
Samsung Master
- Movie clip edit functions are listed below.
Ì Edit menu : You can select the following menus.
[Add Media] : You can add other media elements to a movie.
[Edit Clip] : You can change the brightness, contrast, colour
and saturation.
[Effects] : You can insert an effect.
[Set Text] : You can insert texts.
[Narrate] : You can insert a narration.
[Produce] : You can save the edited multi media as a new file
name. You can select AVI, Windows media (wmv)
and Windows media (asf) file types.
Í Frame display window : You can insert multi media in this window.
Ä Some movie clips that were compressed with a codec that is not
compatible with the Samsung Master can’t play back in the Sam-
sung Master.
Ä Refer to the [Help] menu in Samsung Master for further information.
Movie edit : You can get the still image, movie clip, narration,
music files together in a movie clip.
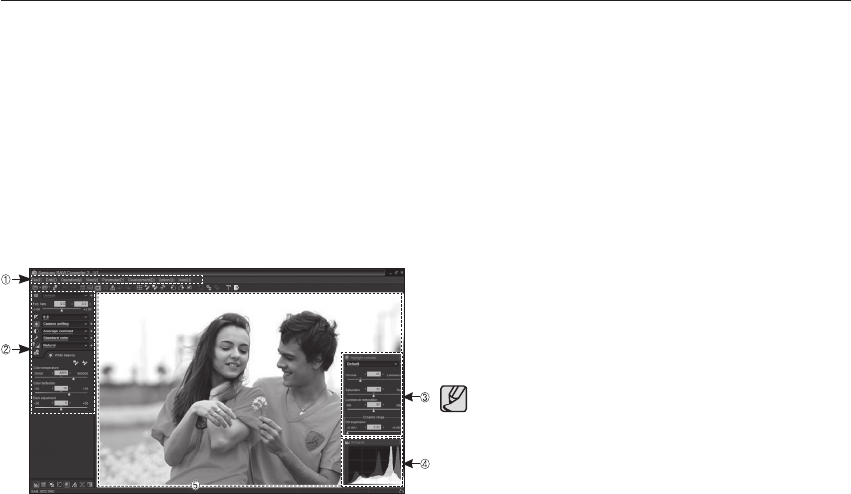
113
Using the Samsung RAW Converter
Using the Samsung RAW Converter, you can develop RAW files
after editing them as you like. You can also edit JPEG or TIFF files
in the same way you edit the RAW files. This software is only
compatible with Windows OS. This software is only compatible with
Windows XP and Vista. You can use this software using the Win-
dows 98SE, ME, 2000. However, the complete operation can not be
warranted for use.
To start the program, click [Start ĺ All Programs ĺ Samsung RAW
Converter ĺ Samsung RAW Converter]
Developing the RAW files
- Image edit functions are listed below.
Ì
Menu bar
Í
Image editing tools
[Exposure bias] Compensates the exposure value.
[White balance] Adjusts the white balance value.
[Tone] Adjusts the contrast.
[Colour] Changes the colour.
[Sharpness] Adjusts the sharpness.
[Development] Previewing is available for the final output.
Highlight controller
Adjusts the saturation and highlights of the selected image.
Histogram
Displays the colour layers of the selected image.
Preview window
Displays the selected image.
Refer to the [Help] menu in Samsung RAW Converter for further
information.
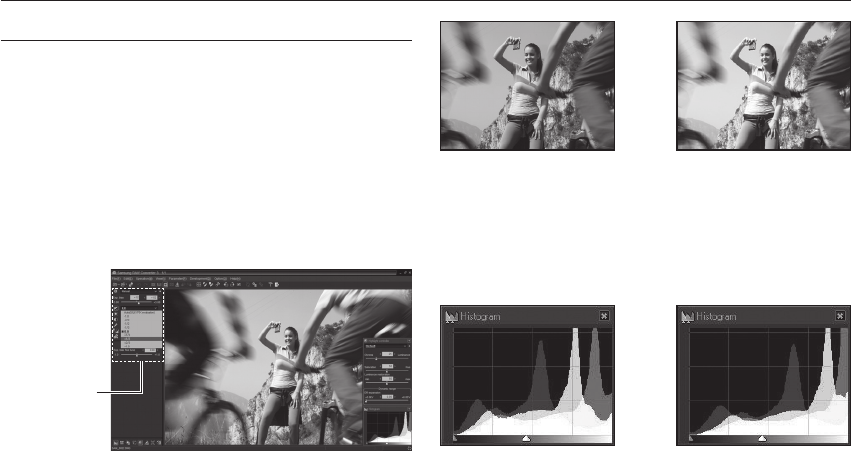
114
Using the Samsung RAW Converter
Correcting the exposure
The main feature of the Samsung RAW Converter is that you can
keep the best quality of the images as you make changes to the
RAW files while editing.
After making changes to the brightness or contrast, you can still
obtain the same result whichever you change first. The following
images show how you can change the exposure to the image using
the Samsung RAW Converter.
You can adjust the exposure by using the menu option as shown in
the picture.
Ÿ Original image
P Mode, Aperture: f = 8,
Shutter Speed: 1/15sec, ISO = 64
Ÿ Changed image after
correcting the exposure.
You can see the changed results in the histogram windows as shown
images:
Ÿ Original image Ÿ Changed image after
correcting the exposure.
Menu option for
adjusting the
exposure.

115
You can save the RAW files into JPEG or TIFF format using the
Samsung RAW Converter.
1. Choose the image
you want to edit and
then select [File(F)] ĺ
[Development...].
2. Select the type of file as
JPEG or TIFF and then
click [Save(S)].
- The selected file is
saved as JPEG or
TIFF format.
Using the Samsung RAW Converter
Handling the JPEG/TIFF ¿ les as you edit RAW ¿ les
Using the Samsung RAW Converter, you can handle the JPEG/TIFF
files as you edit RAW files. You can adjust the white balance, sharp-
ness, and reducing the noise is also available. The following images
show how the contrast was changed on the TIFF image using the
Samsung RAW Converter.
You can adjust the
contrast by using
the menu option
as shown in the
picture.
Menu option for
adjusting the
contrast
Saving the RAW ¿ les into JPEG or TIFF format
Ÿ Original image
P Mode, Aperture: f = 8,
Shutter Speed: 1/15sec, ISO = 64
Ÿ Changed image after
correcting the contrast.

116
Using the USB Driver for MACSetting up the USB Driver for MAC
1. A USB Driver for MAC is not included with the software CD as
MAC OS supports the camera driver.
2. Check the MAC OS version during start-up. This camera is com-
patible with MAC OS 10.4.
3. Connect the camera to the Macintosh and turn the camera power
on.
4. A new icon will be displayed on the desktop after connecting the
camera to the MAC.
1. Double click a new icon on the desktop and the folder in the
memory will be displayed.
2. Select an image file and copy or move it to MAC.
First complete uploading from computer to camera and then
remove the removable disk with the Extract command.

117
FAQ
Please check the following if the USB connection malfunctions. Case 6 When I open the Device Manager (by clicking Start
(Settings) Control Panel (Performance and Main-
tenance) System (Hardware) Device Manager),
there are Unknown Devices or Other Devices entries
with a yellow question mark(?) beside them or devices
with an exclamation mark(!) beside them.
Right-click on the entry with the question (?) or exclamation
(!) mark and select "Remove". Restart the PC and connect
the camera again.
Case 7 In some security programs (Norton Anti Virus, V3, etc.),
the computer may not recognise the camera as a remov-
able disk.
Stop the security programs and connect the camera to
the computer. Refer to the security program instructions
about how to temporarily disable the program.
Case 8 The camera is connected to the USB port located on
the front of the computer.
When the camera is connected to the USB port located
on the front of the computer, the computer may not
recognise the camera. Connect the camera to the USB
port located on the back of the computer.
Case 1 USB cable is not connected or it is not the supplied USB
cable.
Connect the supplied USB cable.
Case 2 The camera is not recognised by your PC.
Sometimes, the camera may appear under [Unknown
Devices] in Device Manager.
Turn off the camera, remove the USB cable, plug in the
USB cable again, and then turn on the camera.
Case 3 There is an unexpected error during file transfer.
Turn the camera power off and on again. Transfer the file
again.
Case 4 When using the USB hub.
There may be a problem in connecting the camera to the
PC through the USB hub if the PC and the hub are not
compatible. Wherever possible, connect the camera to
the PC directly.
Case 5 Are other USB cables connected to the PC?
The camera may malfunction when it is connected to the
PC at the same time as another USB cable. In this case,
disconnect the other USB cable, and connect only one
USB cable to the camera.

118
FAQ
When you can not playback the recorded movie clip on your computer.
Ä When you can not playback the recorded movie clip on your
computer, it is mostly caused by the video codec installed on the
computer.
[How to playback the H.264(MPEG4.AVC) movie clips]
• Using the QuickTime Player 7.6
Install the “QuickTime Player 7.6” provided in the CD.
(The QuickTime Player 7.6 supports the H.264(MPEG4.AVC)
compression for videos.)
ĺ Plays back using the “QuickTime Player 7.6”.
• How to use with installing United Codec
We recommend that install the latest United Codec. (Recom-
mendable Codec : K-Lite Codec Pack Full latest version)
ĺ Plays back using the “video player.”
(When installed K-lite codec with its full version, the Media
Player Classic or Windows Media Player 11 is recommended)
Ä
“QuickTime Player 7.6”, “K-lite United Codec full version” should
be installed in Windows ServicePack2 or later.
Ä
Although the computer is guaranteed as operated, the playback
might be intermittent depending on an user’s computer.
When the DirectX 9.0c or later is not installed
Install the DirectX 9.0c or later
1) Insert the CD provided with the camera
2) Run the windows explorer and select the [CD-ROM drive:\
DirectX] folder and click the DXSETUP.exe file.
The DirectX will be installed. Visit the following site for
downloading the DirectX.http://www.microsoft.com/directx
If a PC connected with the camera stops responding while
Windows is starting.
In this case, disconnect the PC and the camera and Windows
will start. If the problem happens continuously, set the Legacy
USB Support to disable and re-start the PC. The Legacy USB
Support is in the BIOS setup menu. (The BIOS setup menu
differs from the PC manufacturers and some BIOS menus don’
t have Legacy USB Support) If you can’t change the menu by
yourself, contact to the PC manufacturer or BIOS manufacturer.

119
FAQ
If the movie clip can’t be deleted, or the removable disk can’t be
extracted or an error message displays during the file transfer.
If you install only the Samsung Master, the problems mentioned
above occasionally happen.
- Close the Samsung Master program by clicking the Samsung
Master icon on the Taskbar.
- Install all the application programs included in the software CD.
When the screen ratio of movie player does not meet with monitor.
If the resolution of monitor is smaller than the resolution of
recorded movie clip, the screen ratio of movie player may not
meet with monitor.
Using the menu of movie player, you can adjust the screen
ratio.
NOTE:
This equipment has been tested and found to comply with the limits
for a
Class B digital device, pursuant to part 15 of the FCC Rules. These
limits are designed to provide reasonable protection against harmful
interference in a residential installation.
This equipment generates, uses and can radiate radio frequency
energy and, if not installed and used in accordance with the
instructions, may cause harmful interference to radio communications.
However, there is no guarantee that interference will not occur
in a particular installation. If this equipment does cause harmful
interference to radio or television reception, which can be determined
by turning the equipment off and on, the user is encouraged to try to
correct the interference by one or more of the following measures:
– Reorient or relocate the receiving antenna.
– Increase the distance between the equipment and receiver.
– Connect the equipment into an outlet on a circuit different from that
to which the receiver is connected.
– Consult the dealer or an experienced radio / TV technician for help.
CAUTION:
Changes or modi¿ cations not expressly approved by the manufacturer
responsible for compliance could void the user’s authority to operate
the equipment.
FCC notice

120
Declaration of Conformity
Trade Name :
SAMSUNG ELECTRONICS AMERICA, INC.
Model No. : Samsung HZ25W
Responsible Party
:
SAMSUNG ELECTRONICS AMERICA, INC.
Address : 105 Challenger Road Ridgefield Park NJ
Telephone No. : 1-800-SAMSUNG(726-7864)
This device complies with Part 15 of the FCC Rules. Operation
is subject to the following two conditions: (1) This device
may not cause harmful interference, and (2) this device must
accept any interference received, including interference that
may cause undesired operation.
FCC notice
Samsung Eco-mark
It is Samsung’s own symbol mark is used to
effectively communicate Samsung’s environmental
friendly product activities to the consumers. The
mark represents Samsung’s continuous effort on
development of environmental conscious products.