Sandmartin STT4-HDR Digital Video Broadcasting User Manual STT4 HDR V1 0
Sandmartin(Zhong Shan) Electronic Co., Ltd. Digital Video Broadcasting STT4 HDR V1 0
UserManual.wiki
>
Sandmartin
>
STT4 HDR User Manual
user manual
Navigation menu
Upload a User Manual
Namespaces
Wiki Guide
HTML
PDF
Info
Views
User Manual
Discussion / Help
Navigation

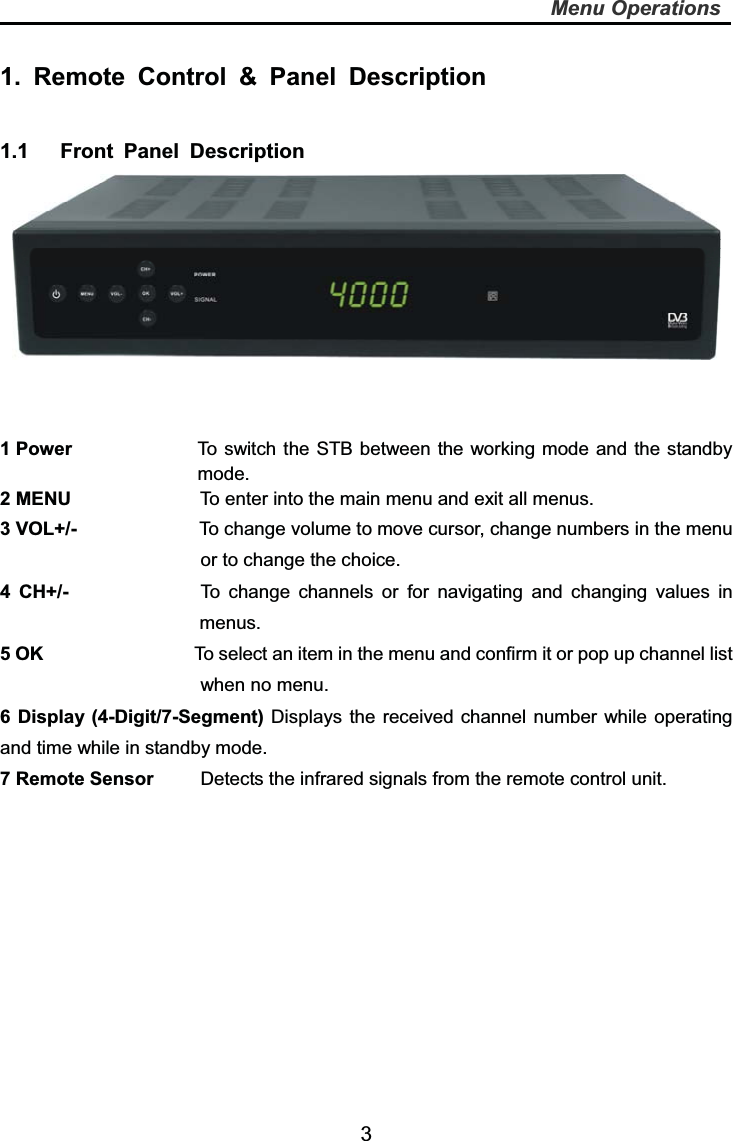
![7Menu Operations2. Basic Operation 2.1 Switch on the STB When the STB is first used it will display “Quick Setup” window. You can set Language, First Audio and Second Audio and Country. Also you can search here your channels in “Cable search”. Please press OK and you will see the window “Auto Scan”. 1. You have to set the parameters of “First Frequency”, therefore use the number buttons of the RCU. 2. You have to set the parameters of “Second Frequency”, therefore use the number buttons of the RCU. 3. You have to set the parameters of “Symbol Rate”, therefore use the number buttons of the RCU. 4. Scan Mode: Press [◄/►] to switch this function “16QAM”, “32QAM”, “64QAM”, “128QAM”, “256QAM”, “64QAMB” and “256QAMB”. 5. NIT Search: Press [◄/►] to switch this function “Yes” or “No”. 6. Moving the highlight to “Search” item and press [OK] key to start scanning. ? Frequently Asked Question Q: The power of my STB is on and it is running in TV mode but the TV screen shows nothing: A: Make sure the TV set has been set to the correct video input (not the TV channels). For example, if you have connected the unit to the video1 input of the TV set then you need to select the corresponding input of the TV. Mostly it is done with the AV button of the TVs remote control unit. Q: My STB is running in TV mode but the TV screen shows nothing except one ball and “No Signal”. A: The signal of current TV channel is too weak. You can try to change to other channels with a stronger signal. If the problems still exist, please consult your local dealer or installer for technical service.](https://usermanual.wiki/Sandmartin/STT4-HDR/User-Guide-1997241-Page-11.png)
![8Menu Operations2.2 Standby 1. Press power button to switch from TV/RADIO mode to standby mode 2. In standby mode press power button again to switch back to TV/ RADIO mode. The last active channel will be showed. 3. To switch off the STB complete disconnect the power supply on the back side of the STB. 2.3 MUTE 1. Press the [Mute] button to mute the sound. An icon will be displayed on the screen to indicate the sound has been muted. 2. Press the [Mute] button again to restore the sound. 2.4 TV/RADIO In TV mode, press [TV/RADIO] to switch to Radio mode. In Radio mode press [TV/RADIO] again to switch back to TV mode. 2.5 TXT Press [TXT] to display the Teletext data. 2.6 INFO Press the [INFO] button to open the information screen. This window will show the channel number being received, the channel ID, program description, and the current date and time. Press the button twice you will see the description from the current program, and tree times will open an information screen, which shows the parameters of current channel. 2.7 REW ◄◄Press [◄◄] button for fast rewind recording when you are playing a recorded channel. Selection: 2x, 4x, 8x speed.](https://usermanual.wiki/Sandmartin/STT4-HDR/User-Guide-1997241-Page-12.png)
![9Menu Operations2.8 PLAY/PAUSE ►II When you play a recorded program, press [►II] will stop the program, press [►II] again will play the program continually. Also Timeshift is started by this key. The Timeshift function allows you to interrupt a program in progress and continue viewing it at a later time. The receiver records the program on the USB storage device. The current screen will be paused, enabling you continue watching from this point onwards. This menu item must be enabled for you to use this function. Press the [►II] button once in normal mode and you will see a window with the question: “Start timeshift?”. Press [►II] again to start or [EXIT] to go back. When you want to continue viewing the program, press the [►II] button. You will now see the program starting from the point at which you started timeshift. 2.9 FFW ►►When you play a recorded channel press [►►] for fast forward the recording. Selection: 2x, 4x, 8x speed. 2.10 BACK Press the [BACK] button to toggle between the current channel and the selected channel. 2.11 STOP ■When you play a recorded program, press [■] button will stop the recorded channel playing and go back to the Record Management menu. When you are recording a program, press [■] button you will be asked: “Do you want to stop record?”.](https://usermanual.wiki/Sandmartin/STT4-HDR/User-Guide-1997241-Page-13.png)
![10Menu Operations2.12 REC ●In TV mode, press [●] button you will be asked to start record. 2.13 CH ▲/▼Press the [CH▲/▼] buttons to change the channel. 2.14 VOL ◄/►Press the [VOL◄►] buttons to adjust the volume. In the menu move the highlight bar. And if you play back a recording and you are in the REW/PLAY/FFW menu and press [VOL◄/►] you will jump 5 min. back or forward in your recording. This is set as default in the “Media Management” point 3.5 USB. 2.15 OK 1. In TV mode press [OK] button to open the Channel List window. 2. Press the red button to exchange screen. 3. Press [FAV] button to open FAV list. After selecting a Favorite Group the channel list will be reduced to the channels of this group. 4. Press blue button to open the Find window. You can use this feature to find channel by their names. 5. Press [OK] to change and display the marked channel. 2.16 Menu Press the [Menu] button to enter or exit the current menu. 2.17 Exit Press the [Exit] button to exit the current menu.](https://usermanual.wiki/Sandmartin/STT4-HDR/User-Guide-1997241-Page-14.png)
![11Menu Operations2.18 Audio 1. In TV mode, press the [Audio] button to open the Audio Track window. 2. Select the item you want to adjust with [CH▲/▼] and change the value with [VOL◄/►]. 2.19 EPG The STB supports Electronic Program Guides (EPG) to give you information about the actual programs of certain channels like event name, subtitle, description, start and finish time. This feature is depending on the service of the channel provider. Press [EPG] to open the EPG window. 1. You can move the highlighted channel with [CH▲/▼] and preview the highlighted program in the preview window with [VOL◄/►] and display the event’s detailed description. 2. Press the [INFO] button in the EPG menu to display the detailed information of the actual event in the selected channel. 3. Press the red button in the EPG menu to program a timer with the actual events data. 4. Press the [Green / Yellow] to select date. 5. To close the EPG menu press [EXIT / MENU].](https://usermanual.wiki/Sandmartin/STT4-HDR/User-Guide-1997241-Page-15.png)
![12Menu Operations2.20 SUB In “Subtitle Display” menu press [◄/►] to select “On” or “Off”. Press [◄/►] to select languages. If the current channel has subtitle information, it will be displayed if this function is “On”. If this function is “Off” subtitles won’t be displayed. 2.21 Channel Numbers In TV mode you can enter the channel number directly with your remote control unit and confirm the number with the [OK] button, to change to the desired channel. 2.22 ZOOM 1. The [Zoom] key allows you to magnify a certain area on the images and the current screen will show it. 2. Press [Zoom] key again, the image will enlarge rotate as x1, x2, x4, x6, x8, x12, x16. 3. In “x2 ~ x16” image, using [▲/▼ / ◄/►] keys to move the image centre area you want to see. 4. In zoom mode, press [Exit] to close the window. 2.23 FAV 1. In TV mode press the [FAV] button to display the Favorite Group window on the screen as the picture beside shows. 2. In the Favorite Group window you can select the desired favorite channel with [▲/▼] and confirm it with [OK] to switch to it. With [◄/►]. You can select different Favorite Groups. 3. Press [Exit] to close the Favorite Group window.? Frequently Asked Question Q: Why the screen displays “No favorite program!” after pressing the [Favorite] button? A: No channels have been assigned to a Favorite Group yet. You can do this in the channel menu.](https://usermanual.wiki/Sandmartin/STT4-HDR/User-Guide-1997241-Page-16.png)
![13Menu Operations3. ATSC Installation In “Antenna Connection” menu; 3.1 ATSC Channel Scan In “ATSC Channel Scan Search” menu; 1. In the “Satellite” item press [OK] to open the “satellite list” to select directly with [CH▲/▼], press [OK] to confirm it. 2. FTA Only: Press [Vol◄/►] to select to scan only free channels or even scrambled channels. If you select “Yes” it will scan free channels only. 3. Scan Channel: Press [Vol◄/►] to select to scan TV + radio, or just TV or just radio. 4. Network Search: Press [Vol◄/►] to select to scan Yes or No. 5. Scan Mode: You can select “Auto Scan” or “Preset Scan” to blind scan preset transponders or network transponders of the selected satellite. 6. Search: Press [OK] to start scanning. In the lower part of the window the progress of scanning and the found channels are displayed. 3.1.1 ATSC Auto Scan](https://usermanual.wiki/Sandmartin/STT4-HDR/User-Guide-1997241-Page-17.png)
![14Menu Operations3.2 Channel Press [Menu] in the TV/RADIO to enter the main menu. 1. Press [CHƷ/ͩ] to select the channel item. 2. Press [OK] to enter the selected item. Press [CHƷ/ͩ] to select the wanted menu item among TV Channel List, Radio Channel List, Channel setup, Favorite group list name and Delete All. Press [OK] to enter the selected item. 3.2.1 TV Channel List If you enter the channel list menu a window like the one beside will open. 1. You can move the highlighted channel with [CHƷ/ͩ] and press [OK] to preview the highlighted program in the preview window. 2. Press [VOL◄/►] to switch between the program groups. 3. Press [Menu] or [Exit] buttons to enter TV playing mode. 4. The color buttons offer further functions to manage the channel list. 3.2.2 Favorite 1. Press [FAV] to open the favorite window.2. You can select between 32 favorite groups with [CH▲/▼]. Press [OK] to assign the channel which you selected to the marked favorite group.](https://usermanual.wiki/Sandmartin/STT4-HDR/User-Guide-1997241-Page-18.png)
![15Menu Operations3. The channels of favorite groups are indicated with a favorite icon behind the name.4. Press [OK] again to remove the channel from the marked favorite group. 5. Press [Menu] button you will be asked “Are you sure to save?” current. Select “Yes” to save the marked favorite group. Select “No” to cancel the operation and return to the TV channel list. 3.2.3 Move Pressing the red button in the TV channel list will open another window where you can choose between move the actual channel and swap the actual channel to the desired position, press [OK] to confirm it. a) Move 1. Press red button to show a moving icon behind the channel name. 2. Move the channel to the desired position with [CH▲/▼]. Press [OK] to confirm the position. b) Swap 1. Press green button to show a moving icon behind the channel name. 2. Move the channel to the desired position with [CH▲/▼]. Press [OK], then the selected channel will immediately exchange positions with the channel currently occupying this position. 3.1.4 Sort Press green to open the sort window. Press [CH▲/▼] to select and [OK] to confirm your choice. The ways of sorting are: ♦ Name (A-Z): Sorting in Alphabetical order, ignoring “$” symbol. ♦ Name (Z-A): Sorting in Alphabetical order, ignoring “$” symbol. ♦ FTA: Sort channel by free and scrambled sequence. Free channels will be listed first and scrambled channels behind in the channel list. ♦ Lock: Unlocked channels are listed first end locked channels at the end. ♦ Default: Sort channel factory default.](https://usermanual.wiki/Sandmartin/STT4-HDR/User-Guide-1997241-Page-19.png)
![16Menu Operations3.2.5 Delete In channel edit menu press red button will open another window where you can choose between delete one channel or delete all channels. ♦Del One Press red button to mark a channel for deleting. Marked channel will be deleted after you confirm to save the changes when you leave this menu. ♦Del All a) Press green button to show a deleting icon behind all channel name. b) Press [MENU] button you will be asked “Are you sure to save?”. Select “OK” to delete all channels. Select “Cancel” to cancel the operation. 3.2.6 Edit Pressing the blue button in the TV channel list edit menu will open another window where you can choose between edit the actual channel and create a new channel. ♦Edit Press red button to edit the channel. 1. Selecting the name item with [OK] will display a button pad to show you how to edit the channel name. 2. On the “Video PID”, “Audio PID” and “PCR PID” items you can input numbers to modify the item’s value. 3. After modification select “Save” and press [OK] button to save the modified values and exit “Edit” mode. Or select “Exit” and press [OK] to leave edit mode without saving the modifications.3.2.7 Skip In channel edit menu, press green button to place a skip icon behind the name of the highlighted channel. Marked channels will be skipped when you change channels in TV mode after you confirm to save the changes when you leave this menu.](https://usermanual.wiki/Sandmartin/STT4-HDR/User-Guide-1997241-Page-20.png)
![17Menu Operations3.3 Radio Channel List Basically the operation of “Radio Channel List” is same as “TV Channel List”, except that in the small channel window the radio Logo will be displayed. 3.4 Delete All To delete all channels: 1. Enter the password. The default password is “0000”. 2. After entering the password correct a safety question will show up where you have to confirm first 3. Select “OK” to delete all channels or “Cancel” to cancel the operation and confirm with [OK]. 4. In step 1 and step 2, pressing [Menu] will exit the function directly without saving. ? Frequently Asked Question Q: IF I incautiously delete all channels, what should I do? A: there are two ways to restore: To research all channels in the “Installation” menu. Use “Factory Default” function to restore all channels in the “Tools” menu.](https://usermanual.wiki/Sandmartin/STT4-HDR/User-Guide-1997241-Page-21.png)
![18Menu Operations4. System Setup When you open the “System Setup” menu a window like the one beside will be opened. In “System Setup” menu: 1. Press [CH▲/▼] to select menu items among Language, TV System, Time & Timer setting, OSD Setting, Parental Lock, Power setting, TCP/IP Setting and MAC Setting. 2. Press [OK] to open the selected item. 4.1 Language After selecting the “Language” menu you will see a window as shown here: 1. Menu Language: Press [VOL◄/►] to select from the many available menu language include: English, German, French, Spanish, Italian, Portuguese, Turkish, Polish, Russian, Danish, Greek, Hungarian, Dutch, Arabic, Farsi, Kiswahili, Swedish, Bulgarian, and Slovakian. 2. First Audio: Some channels offer more than one audio language. This function allows you to set the preferred audio language for those channels. If a channel offers the same audio language as the “First Audio” you set the system will play this audio language as default. If the channel does not offer this audio language then the system will compare the offered languages with the second audio language. The selections of audio language include: English, German, French, Spanish, Italian, Portuguese, Turkish, Polish, Russian, Danish, Greek, Hungarian, Dutch, Arabic, Farsi Kiswahili, Swedish, Bulgarian, and Slovakian. 3. Second Audio: If the channel has no audio language that corresponds with “First Audio” but with “Second Audio” the system will play the second audio language as default. If no audio language corresponds with the “Second Audio” then the default language of the current channel will be played instead. The selections of audio language include: English, German, French, Spanish, Italian, Portuguese, Turkish, Polish, Russian, Danish, Greek, Hungarian, Dutch, Arabic, Farsi Kiswahili, Swedish, Bulgarian, and Slovakian. 4. Subtitle Language: In “OSD Setting” menu, use [VOL◄/►] to select “On” or “Off”. If the current channel has subtitle information, it will be displayed if this function is “On”. If this function is “Off” subtitles won’t be displayed. The selections of subtitle language include:](https://usermanual.wiki/Sandmartin/STT4-HDR/User-Guide-1997241-Page-22.png)
![19Menu OperationsEnglish, German, French, Italian, Spanish, Portuguese, Russian, Turkish, Polish, Arabic and Farsi. 5. Press [Menu/Exit] to return back from “Language” menu. 4.2 TV System When you enter the “TV System” menu you will see the screen like below: 1. In Display Mode you can switch between Auto, PAL, PAL-M, PAL-N and NTSC. In HD Mode, you can select from Auto / 720P_60 / 1080I_30. Press [VOL◄/►] to switch to the desired mode. 2. Aspect Mode is used to switch the screen aspect ratio mode. You can select between Auto / 4:3 PS / 4:3 LB / 16:9 using the [VOL◄/►]. 3. Video output is used for switching the screen aspect ratio mode. Now we provide below options: HD / SD. You can press [VOL◄/►] key to select. 4. Press [Menu/Exit] to return to the previous menu. 4.3 Display Setting In “Display Setting” menu; 1. Video Resolution: Press [OK] to select directly](https://usermanual.wiki/Sandmartin/STT4-HDR/User-Guide-1997241-Page-23.png)
![20Menu Operationswith [CH▲/▼] to switch between 0~100. 2. Contrast: Press [OK] to select directly with [CH▲/▼] to switch between 0~100. 3. Saturation: Press [OK] to select directly with [CH▲/▼] to switch between 0~100. 4. Hue: Press [OK] to select directly with [CH▲/▼] to switch between 0~100. 5. Sharpness: Press [OK] to select directly with [CH▲/▼] to switch between 0~10. 6. Press [Menu/Exit] to return to the previous menu. 4.4 Local Time Setting In “Local Time Setting” menu; 1. Region: Press [OK] to select directly with [CH▲/▼] to switch between UAE, Algeria, Bahrain, Djibouti, Egypt, Iraq, Iran Jordan, Kuwait, Libya, Mauritania, Morocco, Oman, Palestine, Qatar, Saudi, Somalia, Sudan, Syria, Tunisia, Lebanon, Yemen. 2. GMT Usage: This item is used to set the time by using the time signal from the satellite. Press [Vol◄/►] to change the setting. 3. The “GMT Offset” item is only available when “GMT Usage” is set to “On”. Press [Vol◄/►] to set the “GMT Offset” value. With every time you press the button the time offset will be increased /decreased by half an hour. 4. Summer Time: Press [Vol◄/►] to switch this function “On” or “Off”. 5. “Date” and “Time” items are only available when the “GMT Usage” is set to “Off”. Press [Vol◄/►] to select one item and use number buttons to input time and date directly. 6. NOTE: If the current channel provides the correct time information, you will see the current time after you entered “Local Time Setting” menu. If the channel doesn’t provide time information, you have to input the date and time information manually. The most channels support the time signal.](https://usermanual.wiki/Sandmartin/STT4-HDR/User-Guide-1997241-Page-24.png)
![21Menu Operations7. Press [Exit] to leave the “Local Time Setting” menu. 4.5 Time Setting In “Time Setting” menu; You can press [CH▲/▼] to switch the timer number. There are totally 8 timers. 1. Timer Mode: Select how often the timer is running: Once, Daily, Weekly, Monthly and Yearly, or switch the timer to off. 2. Timer Service: Select between TV Channel, Radio Channel and Message. 3. Wakeup Channel: Press [OK] to enter the channel list, and select the channel you want to see with [CH▲/▼], press [OK] to confirm it. 4. Wakeup Date: Use number buttons to input your wakeup date. 5. On Time: Use number buttons to input your wakeup time. If date and time are reached then no matter if the system is in standby mode or in playing mode, it will automatically switch to the channel you set and start to play. 6. Duration: Here you can set the time you want to see or play this channel. When the time is reached, whenever the system is in standby mode or playing a channel, the system will automatically switch to the channel you select and play the channel within the duration time you set. The minimum duration unit is one minute. After the duration time, the system will automatically switch to Standby mode. 7. PS Record: Press [Vol◄/►] to switch this function “No” or “Yes”. 8. Press [Save] to confirm it. Press [Cancel] to leave the “Time Setting” menu.](https://usermanual.wiki/Sandmartin/STT4-HDR/User-Guide-1997241-Page-25.png)
![22Menu Operations4.6 Parental Lock In “Parental Lock” menu; You can set a password for anyone who wishes to operate the “Installation” menu. You can also set the password to lock channels. Below you find how to set and change the password. 1. On “Parental Lock” press [OK] to open a dialogue box and input the password. After you entered the correct password, you will see a screen like beside: 2. Menu Lock: If Menu Lock is set to “Yes” then you need to enter the password every time you want to open the menu. If set to “No” then you can open the menu without entering the password first. 3. Channel Lock: If set to “Yes” then you need to enter the password before you can see those channels which have been marked as locked channels in the channel menu. If set to “No” then even those channels can be selected without entering the password first. 4. New Password: Here you can change the existing password. You should do this after you set up the receiver the first time and every time when you think that your password is known by unauthorized persons. To change the password enter the new password in the “New Password” item and repeat the same one in the “Confirm Password” item. If the passwords are not identically then you will see a warning message. If you entered the same new password in both fields then you will see the message “Saving Data, Please Wait…”. From now on you need to use the new password to open locked menus or locked channels. NOTE: The default password is 0000. 5. Press [Exit] to leave the “Parental Lock” menu.](https://usermanual.wiki/Sandmartin/STT4-HDR/User-Guide-1997241-Page-26.png)
![23Menu Operations4.7 OSD Setting In “OSD Setting” menu; 1. OSD Timeout: This setting determines the duration the info window is displayed on the screen when you change channels. Press [Vol◄/►] to set the time between 1 to 10 seconds. 2. OSD Transparency: With this parameter you can set the transparency of the menus. Press [Vol◄/►] select the value between 10%, 20%, 30%, 40% and “Off”(means no transparency function). 3. Press [Exit] button to leave the “OSD Setting” menu. 4.8 Favorite In “Favorite” menu; When you enter “Favorite” menu with 8 favorite group will be displayed, press [OK] on the RCU to rename favorite group. Use [CH▲/▼] /](https://usermanual.wiki/Sandmartin/STT4-HDR/User-Guide-1997241-Page-27.png)
![24Menu Operations[Vol◄/►] to select character, press [OK] to confirm it. After modification select “OK” of button bar and press [OK] on the RCU to rename the favorite group name and leave the edit mode. Press [Exit] on the RCU to exit the edit mode without saving the favorite group name. 4.9 Other In “Other” menu; 1. LNB Power: If your receiver is connected to the LNB directly then you need to set the LNB Power to “On”. If your receiver is connected to a multi switch (SMATV signal distribution system) then it may be that you don’t need to provide the power to the LNB. But since this is depending on the kind of installed distribution system we recommend you to contact your installer or to refer to the user manual of this system to get the correct information. You also just can change this setting and check if you still can receive the channels. If the LNB Power is off and you still can see all channels then we recommend this setting. 2. Channel Play Type: Press [Vol◄/►] to switch this function All, Free and Scambled. 3. Beeper: Press [Vol◄/►] to switch this function On or Off](https://usermanual.wiki/Sandmartin/STT4-HDR/User-Guide-1997241-Page-28.png)
![25Menu Operations5. Tools After Tools the Settings menu you can see the window like. In “Tools” menu; Press [CH▲/▼] to select menu items among Information, Factory Setting, S/W Upgrade by OTA. 5.1 Information When you select the “Information” menu you will see a screen like beside. On the right of the screen displays data about the current system. 5.2 Factory Default When you press [OK] on the “Factory Default” item:](https://usermanual.wiki/Sandmartin/STT4-HDR/User-Guide-1997241-Page-29.png)
![26Menu OperationsA dialogue box will occur where you need to enter the password. After you input the correct password a warning message will be displayed like the one beside. If you select “Yes” then all changes you made will be reset to default values. Make sure you really want to do this! Press [Exit] in both steps will close the window without resetting the receiver. NOTE: The default password is 0000. 5.3 S/W Upgrade by OTA This function can upgrade the software of your receiver through data sent by a satellite. This option is used by Operator to send you the updated S/W through satellite for your STB. 1. Select the satellite and TP or input the TP value and download PID. 2. Then mark “Start” and press [Enter] to begin the download of the upgrade. This may need up to 60 minutes. Therefore we suggest using of this function only if you don’t intent to watch TV during this time.](https://usermanual.wiki/Sandmartin/STT4-HDR/User-Guide-1997241-Page-30.png)
![27Menu Operations6. Rec In “Rec” menu; Press [CH▲/▼] to select menu items among PVR Storage Information, PVR Setting, Recorded Stream Manager, Remove USB device safely. 6.1 PVR Storage Information Press [Vol◄/►] to select the wanted item partition. When you select the “PVR Storage Information” menu you will see a screen like beside. The screen displays data about the current HDD. Press [Yellow] button, If you want to delete the hard disk totally, you can do it with the [OK] Button Format and the hard disk will be completely erased. Caution: This process will delete also saves you have made with Backup tools.](https://usermanual.wiki/Sandmartin/STT4-HDR/User-Guide-1997241-Page-31.png)
![28Menu Operations6.2 PVR Setting In “PVR Setting” menu; Time shift: Press [Vol◄/►] to switch between ON or OFF. Jump Step Value: Press [Vol◄/►] to switch between “1 mins / 5 Mins / 10 Mins / 30 Mins / 30 sec”. 6.3 Upgrade by USB This function can upgrade the software of your receiver through data sent by usb. 6.4 Media Management Insert a readable USB storage device into the USB port on the receiver. Important notes for the use of external hard drives and USB Stick's Your receiver has a USB 2.0 interface to plug any external storage media for data transfer such as an external hard drive or USB stick. This interface has a standard power output of 500mA. Please note that you will only connect external hard drives with a separate power supply. For hard drives without a separate power supply your receiver can not deliver a possible high inrush via USB to the](https://usermanual.wiki/Sandmartin/STT4-HDR/User-Guide-1997241-Page-32.png)
![29Menu Operationshard drive. If you want to transfer data (film / photo / music, etc.) with a USB stick start, please note when buying that you buy a USB flash drive with a high read transfer rate and high write transfer rate. These values should be 15-20 MB / sec. With these values, e.g. TV recording without the interference e.g. judder of the image possible. Please note that we will assume no liability for the specifications of the manufacturer of the USB sticks and the external hard drive. In storage capacity, please note details of the respective manufacturers. Please note the following guidelines: On a 2GB USB stick you can save about 35 hours of music, or about 500 songs or 2400 photos, at 3 Megapixels / or 1 hour movies in MPEG-2 format / and 1 hour and 30 minute films in MPEG-4 format. Please note that these targets dependent to data size which should be saved. Broadcast TV programs can differ significantly from the amount of data. This depends on the quality of each broadcast TV station. When you enter to “Media Management” menu, you will see a screen like beside: In “Media Management” menu: 1. Press [CH▲/▼] to select the Media List, Media Control and Disk Information. 2. Press [OK] to enter the selected item. 6.4.1 Media List Press [CH▲/▼] to select the desired item partition. Press red button to open the “Rename” window like showed beside. Press [CH▲/▼] / [VOL◄/►] to select the leading character of the channel name and press [OK] to confirm it.](https://usermanual.wiki/Sandmartin/STT4-HDR/User-Guide-1997241-Page-33.png)
![30Menu Operations6.4.2 All 1. Press [VOL◄/►] select the all, mp3, image, video, music list, picture list, video list, Record list. 2. You can move the highlighted Record with [CH▲/▼] to preview the highlighted program in the preview window. 3. Press [Menu] or [Exit] buttons to enter TV playing mode. 4. The color buttons offer further functions to manage. 6.4.3 Record Management If you select in “Media List” with [VOL◄/►] to group “Record list” a window like the one beside will open: The color buttons offer further functions to manage the list. Rename 1. Press red button to open the “Rename” window like showed beside. Press [CH▲/▼] / [VOL◄/►] to select the leading character of the channel name and press [OK] to confirm it. 2. After entering the character(s) highlight “OK” in the window and press [OK] on the RCU. 3. Press [Exit] button to close the find window and brings you back to the Record list. Lock In channel Record menu, press green button to place a lock icon behind the name of the highlighted Record. Marked Records will be locked and displayed only after password has been entered if you confirm to save the changes when you leave this menu.](https://usermanual.wiki/Sandmartin/STT4-HDR/User-Guide-1997241-Page-34.png)
![31Menu OperationsDelete In channel Record menu, press red button will open another window where you can choose between add one image and add all images. ♦Del One Press red button to mark an image for add. Marked image will be add after you confirm to save the changes when you leave this menu. ♦Del All a) Press green button to show a add icon behind all image name. b) Press [MENU] button you will be asked “Are you sure to save?”. Select “OK” to add all images. Select “Cancel” to cancel the operation. 6.5 Remove USB device safely In case you want to remove the USB device please always do this as follows: Press [OK] to select directly with [CH▲/▼] remove to select the wanted partition. Press [OK] to confirm it. Press [Cancel] and [Exit] button to leave the “Remove USB device safely” menu. This avoids any potential data loss in case of unauthorized remove of the USB device.](https://usermanual.wiki/Sandmartin/STT4-HDR/User-Guide-1997241-Page-35.png)