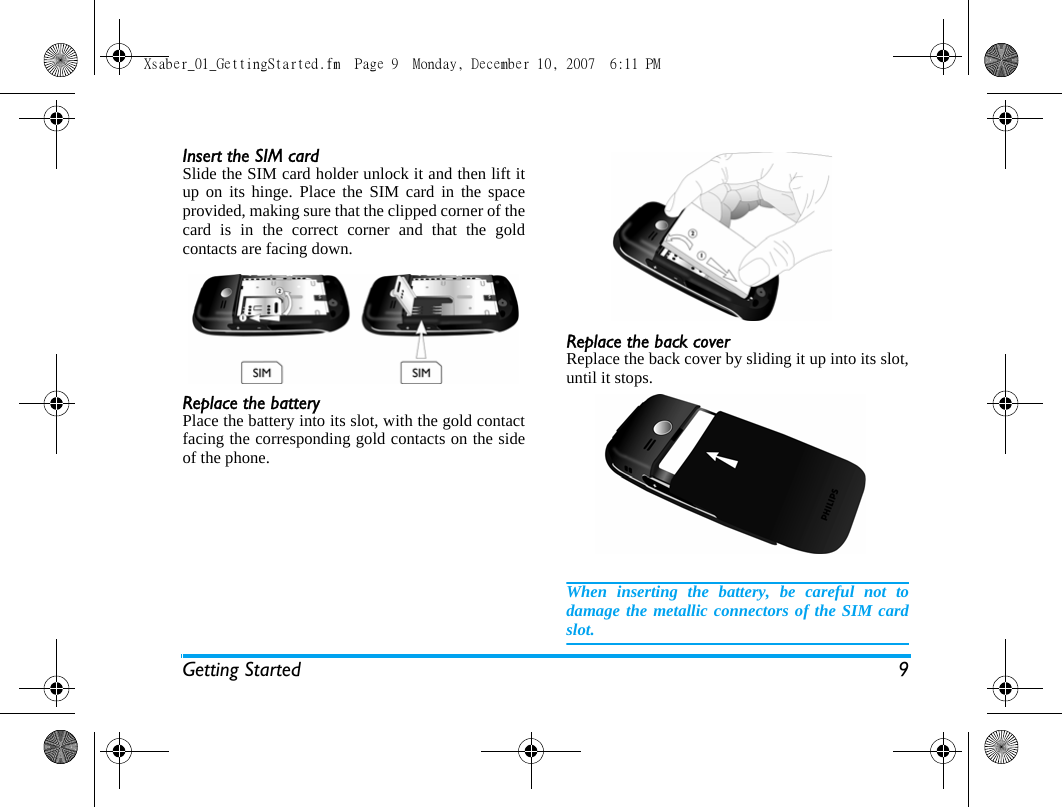
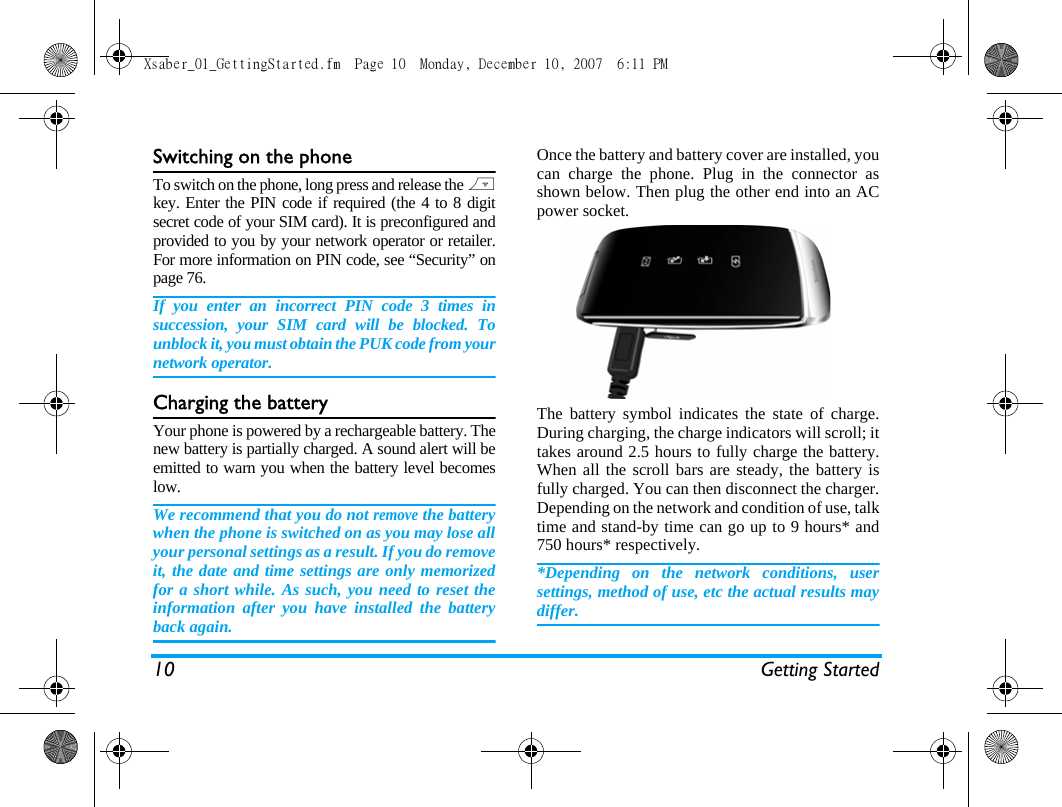
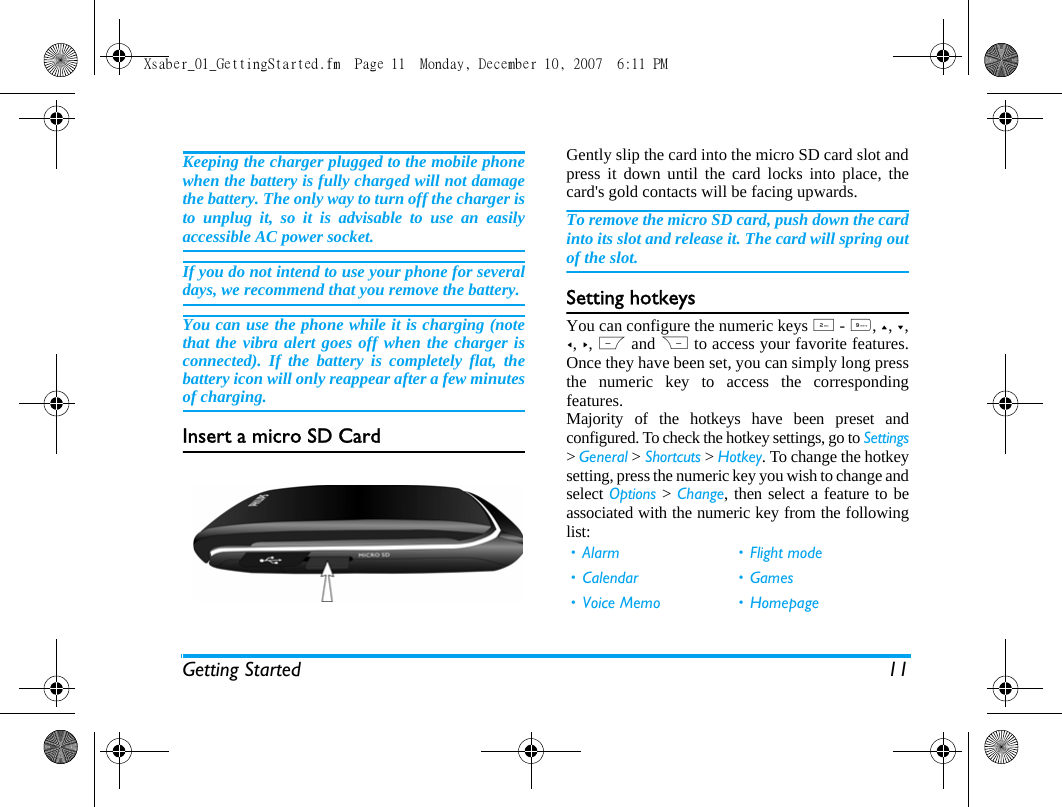
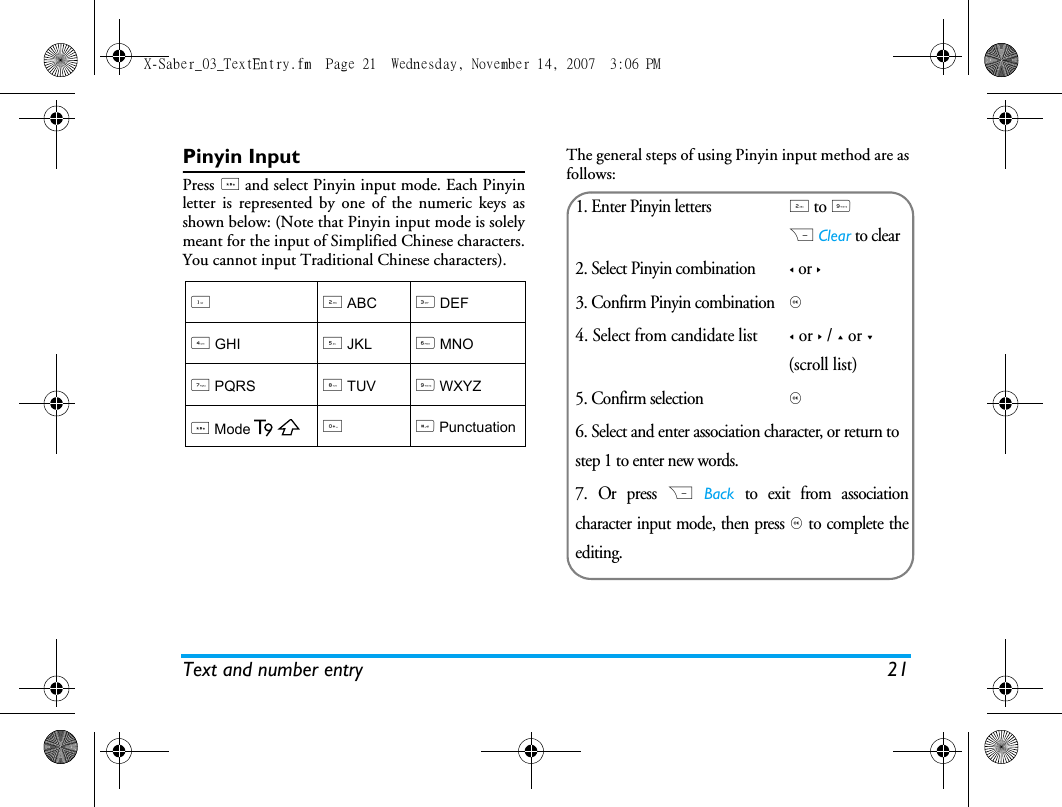
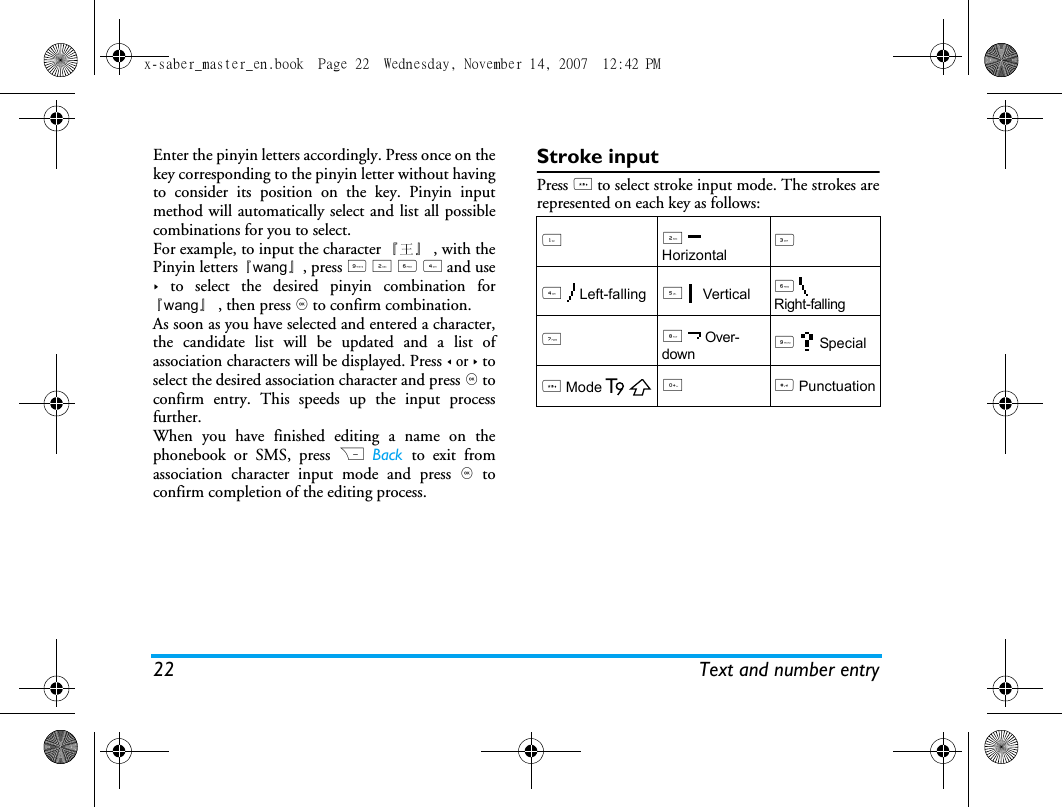
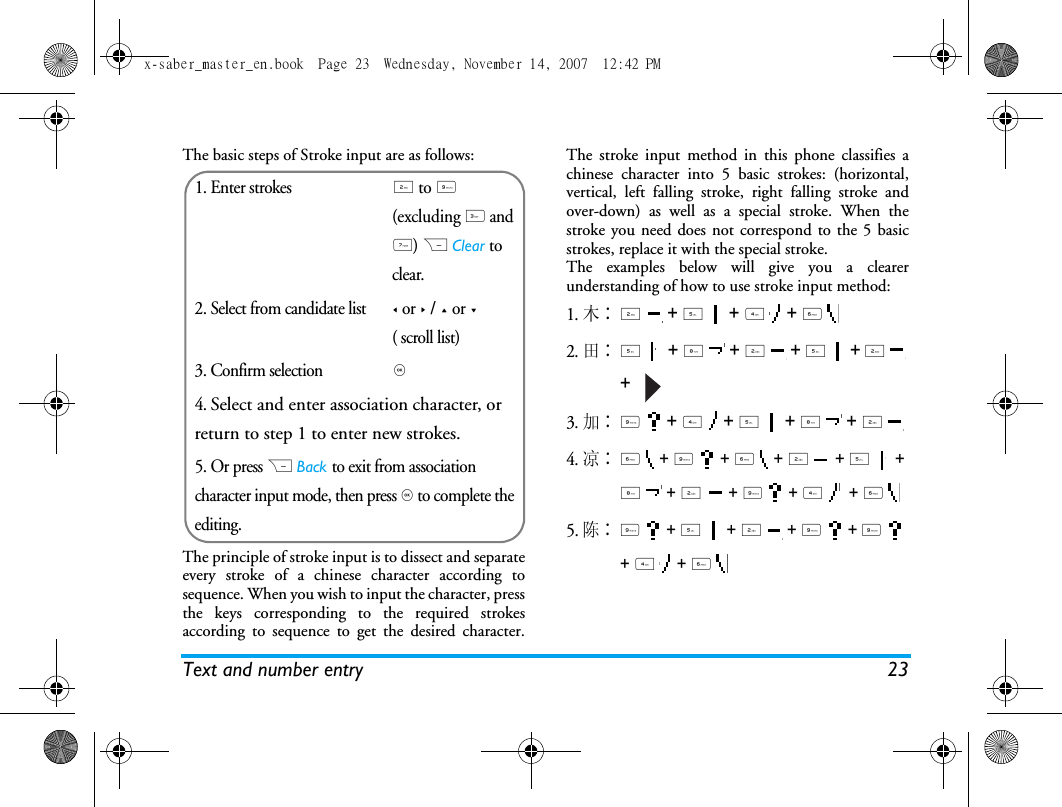
Sang Fei Consumer Communications CT9A9Q GSM/GPRS Mobile Phone with Bluetooth User Manual x saber master en

Shenzhen Sang Fei Consumer Communications Co., Ltd. GSM/GPRS Mobile Phone with Bluetooth x saber master en

Contents

User manual

Discover Your PhonePhilips continuously strives to improve itsproducts.Therefore, Philips reserves the rights torevise this user guide or withdraw it at any timewithout prior notice. Philips provides this userguide “as is” and does not accept, except asrequired by applicable law, liability for any error,omission or discrepancy between this user guideand the product described. The device is meant to beconnected to GSM/GPRS networks.How to ...Alphanumeric keypad 262K colourTFT LCDNavigation keysHang up andon/off keyLeft softkeyRight softkeyPick up keyBack of phone: Camera lensHeadset, charger,and data cableconnectorMicro SD card slotSwitch the phone On/Off Long press and release ).Enter your PIN code Enter your PIN code usingthe keypad and press , orL to confirm.Make a call Enter the phone numberusing the keypad and press(.End a call Press ).Answer a call When the phone rings, press(.Activate/deactivate handsfree modeIn idle mode, enter thephone number using thekeypad or select a contact inthe phonebook.Press  , or L Options,then select call handsfreeand press ,.During a call, press , orL Options  to access thehandsfree option.When there is an incomingcall, long press (.Xsaber_00_DiscoverYourPhone.fm  Page 0  Tuesday, December 11, 2007  10:25 AM
1External LEDThe LED icons show the status of messages, missedcalls, incoming calls and the battery. For autonomypurposes, LED icons will be asleep mode immediatelyevery time you close the clamshell cover. You canwake up phone by short press volume keys.Mute a call When the phone rings, pressR.Reject a call When the phone rings, press).Adjust conversation volumePress < and > keys to adjust thevolume during a call.Adjust ringer volumeWhen the phone is in idlemode, press , > Settings >Sounds > Ring volume toadjust the ring volume of anincoming call.Access all calls list Press ( in idle mode.Access WAP browserPress + in idle mode.Access Contacts Press - in idle mode.Access My Files Press < in idle mode.Access Write MessagePress > in idle mode.Access Main Menu Press , or L in idle mode.Access Music player Press R in idle mode.Go to previous menuPress R Back whenbrowsing menu or in editingmode.Quickly return to idle when browsing menusShort press ).X-Saber_00_DiscoverYourPhone.fm  Page 1  Wednesday, November 14, 2007  2:52 PM
2Message iconWhen a message (SMS or MMS) arrives, this icon willblink for 1 minute.Missed call iconWhen you have missed a phone call, this icon willblink for 1 minute.Incoming call iconWhen there is an incoming call from the callers in thecontact list, this icon will blink rapidly.When there is a call from an unknown caller, this iconwill blink slowly.If you using a headset and close the clamshell coverduring the call, this icon will stay on for 30 seconds toindicate the call is in progress.Battery iconIf you plug in the charger with clamshell cover closed,this icon will stay on continuously while charginguntil it is fully charged.When there is 15 minutes of battery left, this icon willflash to alert you.SoftkeysThe left and right soft keys (L and R) are locatedat the top of keypad area. Pressing the soft keys allowsyou to select the option displayed on the screendirectly above them, including options during a call.The functions of the soft keys change according to thecurrent context. Operations of the headsetThe following operations are applicable to headsetswith only one key. When you enter a phone number in idle mode, shortpress the headset key to dial the number. To stopdialling, long press the headset key. During a call, short press the headset key to record orstop recording; long press to hang up the phone. When there is an incoming call, press the headset keyto answer the call; long press to reject the call. Main MenuYou can access the different features of your Xenium9@9q phone from the main menu. The following tablesummarises the structure of the Main menu, what theicons represent and the page number on which you canobtain more information regarding the menu functions.x-saber_master_en.book  Page 2  Wednesday, November 14, 2007  12:42 PM
3Press , in idle mode to access the main menu and press+, -, < or > to navigate through the icons and lists, or press0 - 9 keys, and * or # keys to access the optionsand functions directly. When navigating through a list,the scrolling bar on the right of the screen will indicateyour current position in the list. Press L Select or , toaccess the corresponding options of the selected item inthe list. Press R Back to return to the previous menu. Menu without SIMIf you do not insert a SIM card, those menu itemswhose functions that cannot work without SIM willbe greyed out and not accessible.How to use this manualThis user manual strives to provide you with conciseand complete information regarding your Xenium9@9q phone. It includes the following:Entertainment Browser Music Playerpage 25 page 26 page 29Camera Messages My Filespage 33 page 38 page 48Tools Contacts Profilespage 52 page 57 page 61Connectivity Calls Settingspage 64 page 66 page 69Discover your phoneThis section presents an overview ofyour mobile phone and informationon the most commonly used features.Chapter 1: Getting startedInformation on how to set up yourmobile phone for the first time, such asinstallation of SIM card, battery, etc.Chapter 2: Main featuresHow to make and answer calls, aswell as some frequently used callfunctions. x-saber_master_en.book  Page 3  Wednesday, November 14, 2007  12:42 PM
4New EventsSome events may modify the idle screen (such asmissed calls, new SMS, new MMS, etc). Wheneverthere is a new event, the phone will emit an audiblealert (except for the reception of cell broadcastmessages). You can press L View to display themissed calls list, enter the list of unread SMS or MMS,etc. Press R Back to exit from the new events screen. At all times, you can only clear the new events from theidle screen by pressing R Back.Chapter 3: Text entryHow to enter text using thealphanumeric keypad.Chapters 4 to 15Description of the main features ofthis phone.Other sectionsIcons & Symbols, Precautions,Troubleshooting, Philips AuthenticAccessories, SAR information (ifavailable at the time of publication,otherwise included as a separatedocument), and finally the LimitedWarranty information.x-saber_master_en.book  Page 4  Wednesday, November 14, 2007  12:42 PM
5Table of contents1. Getting Started ............................................8Inserting the SIM card ......................................8Switching on the phone ................................ 10Charging the battery  ..................................... 10Insert a micro SD Card  ................................ 11Setting hotkeys  ............................................... 112. Calling ............................................................. 13Switch on the phone  ..................................... 13Switch off the phone  ..................................... 13Make a call  ....................................................... 13Options during a call  ..................................... 13Mute or unmute a call ................................... 14Adjust speaker/earpiece volume  ................ 14Call recording  ................................................. 14End a call  .......................................................... 14Make an international call  ............................ 14Make an emergency call  ............................... 14Make a second call (Network dependent) 15Make a Conference Call (Network dependent) ................................... 15Switch calls (Network dependent)  ............ 16Call Handsfree  ................................................ 16IP Dial (China & HK only) ............................ 16Answer a call  .................................................. 16Reject a call  ..................................................... 16Answer a second call (Network dependent)  .................................. 16Contact Picture .............................................. 173. Text and number entry ...................... 18Input method  .................................................. 18Entering texts and numbers  ........................ 18Entering symbols ............................................ 19Shift case  .......................................................... 19Delete ............................................................... 19T9® English input ........................................... 19Basic text input ............................................... 20Pinyin Input ...................................................... 21Stroke input  .................................................... 224. Entertainment ........................................... 25Games .............................................................. 25Java .................................................................... 255. Browser ........................................................ 26WAP ................................................................. 26Push Inbox ....................................................... 28x-saber_master_en.book  Page 5  Wednesday, November 14, 2007  12:42 PM
66. Media Player ............................................... 29Music Player  .................................................... 29Tracks ............................................................... 29Artists ............................................................... 29Playlists ............................................................. 30Last played  ....................................................... 30Now playing  .................................................... 30Settings ............................................................. 317. Camera .......................................................... 33Camera mode  ................................................. 33Video recorder ............................................... 358. Messages ....................................................... 38SMS .................................................................... 38MMS (network dependent)  ......................... 39Inbox ................................................................. 40Outbox ............................................................. 41My favourites ................................................... 42Draft .................................................................. 43SIM archive  ...................................................... 44Templates ........................................................ 44Voice mail  ........................................................ 44Cell broadcast ................................................. 45Message Settings ............................................. 459. My Files ......................................................... 48Pictures ............................................................ 48Videos ............................................................... 49Sounds .............................................................. 50Memory status ................................................ 51Memory card  .................................................. 5110. Tools ............................................................ 52Calendar ........................................................... 52Alarm ................................................................ 53Calculator ........................................................ 53Voice recorder ............................................... 54International clock ......................................... 54Stop watch ....................................................... 54Unit converter ................................................ 55Countdown ..................................................... 55Firewall ............................................................. 5511. Contacts .................................................... 57Create contacts .............................................. 57View group ...................................................... 58Special numbers  ............................................. 59Quick call ......................................................... 59Advanced ......................................................... 6012. Profiles ........................................................ 61Profile selection .............................................. 62Personalise settings  ....................................... 62x-saber_master_en.book  Page 6  Wednesday, November 14, 2007  12:42 PM
713. Connectivity ............................................ 64Bluetooth ......................................................... 64USB function  ................................................... 6514. Calls .............................................................. 66Call list .............................................................. 66Clear history  ................................................... 66Call settings  ..................................................... 6615. Settings ........................................................ 69General ............................................................. 69Display .............................................................. 70Sounds .............................................................. 71Connectivity .................................................... 71Icons & Symbols ............................................ 73Precautions ....................................................... 76Troubleshooting ............................................ 81Philips Authentic Accessories .............. 83Trademark Declaration ............................ 84Limited warranty .......................................... 87Xsaber_EnglishMasterTDM.fm  Page 7  Tuesday, December 11, 2007  11:23 AM
8 Getting Started1. Getting StartedPlease read the safety instructions in the"Precautions" section before use.Before you start using your phone, you must inserta valid SIM card supplied by your GSM operator orretailer. The SIM card contains your subscriptioninformation, your mobile telephone number, and asmall quantity of memory in which you can storephone numbers and messages (for moreinformation, see “Contacts” on page 62). You can also insert a memory card. This providesyou with expanded memory capability, whichallows you to store additional music, photo, andvideo files separate from the phone's built-inmemory.Inserting the SIM cardRemove the back coverMake sure that the phone is switched off. You needto remove the back cover of your phone before youcan insert the SIM card. Press on the back coverwith your thumb and slide the cover downwards asshown below. the release catch and lift up the backcover from its slot.Remove the batteryLift up the battery from the top to remove it..You may lose all your personal settings if youremove the battery when the phone is switched on.Xsaber_01_GettingStarted.fm  Page 8  Monday, December 10, 2007  6:11 PM
Getting Started 9Insert the SIM cardSlide the SIM card holder unlock it and then lift itup on its hinge. Place the SIM card in the spaceprovided, making sure that the clipped corner of thecard is in the correct corner and that the goldcontacts are facing down.Replace the batteryPlace the battery into its slot, with the gold contactfacing the corresponding gold contacts on the sideof the phone. Replace the back coverReplace the back cover by sliding it up into its slot,until it stops.When inserting the battery, be careful not todamage the metallic connectors of the SIM cardslot.Xsaber_01_GettingStarted.fm  Page 9  Monday, December 10, 2007  6:11 PM
10 Getting StartedSwitching on the phoneTo switch on the phone, long press and release the )key. Enter the PIN code if required (the 4 to 8 digitsecret code of your SIM card). It is preconfigured andprovided to you by your network operator or retailer.For more information on PIN code, see “Security” onpage 76.If you enter an incorrect PIN code 3 times insuccession, your SIM card will be blocked. Tounblock it, you must obtain the PUK code from yournetwork operator.Charging the batteryYour phone is powered by a rechargeable battery. Thenew battery is partially charged. A sound alert will beemitted to warn you when the battery level becomeslow. We recommend that you do not remove the batterywhen the phone is switched on as you may lose allyour personal settings as a result. If you do removeit, the date and time settings are only memorizedfor a short while. As such, you need to reset theinformation after you have installed the batteryback again.Once the battery and battery cover are installed, youcan charge the phone. Plug in the connector asshown below. Then plug the other end into an ACpower socket.The battery symbol indicates the state of charge.During charging, the charge indicators will scroll; ittakes around 2.5 hours to fully charge the battery.When all the scroll bars are steady, the battery isfully charged. You can then disconnect the charger.Depending on the network and condition of use, talktime and stand-by time can go up to 9 hours* and750 hours* respectively.*Depending on the network conditions, usersettings, method of use, etc the actual results maydiffer. Xsaber_01_GettingStarted.fm  Page 10  Monday, December 10, 2007  6:11 PM
Getting Started 11Keeping the charger plugged to the mobile phonewhen the battery is fully charged will not damagethe battery. The only way to turn off the charger isto unplug it, so it is advisable to use an easilyaccessible AC power socket. If you do not intend to use your phone for severaldays, we recommend that you remove the battery.You can use the phone while it is charging (notethat the vibra alert goes off when the charger isconnected). If the battery is completely flat, thebattery icon will only reappear after a few minutesof charging.Insert a micro SD CardGently slip the card into the micro SD card slot andpress it down until the card locks into place, thecard's gold contacts will be facing upwards.To remove the micro SD card, push down the cardinto its slot and release it. The card will spring outof the slot.Setting hotkeysYou can configure the numeric keys 2 - 9, +, -,<, >, L and R to access your favorite features.Once they have been set, you can simply long pressthe numeric key to access the correspondingfeatures.Majority of the hotkeys have been preset andconfigured. To check the hotkey settings, go to Settings> General > Shortcuts > Hotkey. To change the hotkeysetting, press the numeric key you wish to change andselect Options > Change, then select a feature to beassociated with the numeric key from the followinglist:• Alarm • Flight mode•Calendar •Games•Voice Memo •HomepageXsaber_01_GettingStarted.fm  Page 11  Monday, December 10, 2007  6:11 PM
12 Getting StartedNumeric keys 0, 1, # and * have beenpreconfigured as the default keys to enter “+”,access voice mailbox, activate Meeting profile andunlock the keypad respectively, and cannot bemodified.•Inbox • Menu• Bluetooth • Calculator• Firewall • Music• Languages • My Files• Call list • Profiles• Camera • Ringtones• Contacts • Shortcuts• Create message • Unit converter• Create SMS • Quick call• Create MMS • Sound recorderXsaber_01_GettingStarted.fm  Page 12  Monday, December 10, 2007  6:11 PM
Calling 132. CallingThis chapter describes the features and options relatedto making and receiving calls.Switch on the phoneLong press ) to switch on the phone.You may set a security code (PIN code) on yourphone to protect it from unauthorised use. When youhave set a security code, you will be prompted to enterthe corresponding security code when you switchedon the phone. 1. Enter the PIN code. For security reasons, thescreen will display “*” to represent the numbersyou have entered. If you have entered the wrongnumber, press R Clear to clear it.2. Press L OK. The phone will validate the PINcode and commence network registration. 3. Once a network name is displayed on the screen,you are ready to make or answer a call. If there isno network name on the screen, you need to re-register. If you enter a wrong PIN code 3 times in succession,your SIM card will be blocked. To unblock it, youmust request the PUK code from your operator. If youenter a wrong PUK code 10 times in succession, yourSIM card will be permanently blocked and cannot beused anymore. If this happens, please contact yournetwork operator.Switch off the phoneAt all times, you can long press ) to switch off thephone.Make a callYou can make a call only when the network nameappears on the screen. 1. Enter the phone number.2. Press ( to dial the number; or press LOptions to enter options menu, then select Dial >IP Dial, Handsfree dial, or IP Handsfree dial.Options during a callDuring a call, you can press L Options to carry outthe following operations:- Activate/cancel handsfree- Activate bluetooth headset (if applicable)- Mute/Unmute the call- Put the call on hold- Dial a new numberx-saber_master_en.book  Page 13  Wednesday, November 14, 2007  12:42 PM
14 Calling- End the current call-Send SMS- Record phone conversation (which includes 3sub-options: Record both, Record the oppositeparty and Record own)- Access Contacts listMute or unmute a callDuring a call, press L Options and select Mute orUnmute. If you select Mute, the microphone will bedeactivated.When you switch from one call to another, mutingwill be cancelled. Adjust speaker/earpiece volumeDuring a call, call on hold or call waiting, you canpress </> to increase or decrease the volume (if you arenot browsing the call options menu).When the volume has been set, the call volume willtake effect immediately and the settings will beapplied to your subsequent calls. Call recordingDuring a call, press L Options and select Record toaccess the 3 recording options; namely, Record both(default), Record the opposite party and Record own(applicable to two-party calls or multi-party calls).When you start recording, a recording icon willappear on the screen. When you end the call, therecording will stop and saved automatically in AMRformat under My Files > Sounds.There is no limit to the length of the recording; therecording will stop only when you press R key to stopthe recording, when there is insufficient memory, orwhen the call has ended. End a callPress R End or ) to end a call.Make an international call1. Long press 0 until "+"appears on the screen.2. Enter the country code.3. Enter the area code (normally without the 0 infront), followed by the phone number. 4. Press ( to call directly.Make an emergency callYou can make an emergency call anytime, irrespectiveof whether the mobile phone has been registered onthe network. x-saber_master_en.book  Page 14  Wednesday, November 14, 2007  12:42 PM
Calling 151. In idle mode, enter the emergency call number(specific number in the caller's country)2.  Press (.Note that an emergency call will not be stored in thecall record. 3. Alternatively, after switching on the mobilephone and entering the PIN number, press RSOS to go to the emergency call screen. If there isno SIM card, pressing R SOS can also bringyou to the emergency call screen, displaying thecall number. Then press ( or the OK softkey todirectly make an emergency call and the dialanimation will be displayed.Make a second call (Network dependent)You can make a second call by putting the current callon hold: 1. During a call with Party A, you can enter Party'sB number using the keypad. 2. Press ( to dial Party B's number. Party A willbe put on hold automatically. Make a Conference Call (Network dependent)Your phone supports multi-party call of up to fivemembers. The screen will display Conference callduring the multi-party call.When there is a call waiting while you are already onthe phone, you can carry out the following operationsto establish the multi-party call:1. Press ( to answer the second call. The first callwill be put on hold automatically. 2. Select Conference Call from the call menu. Thetwo calls will be combined and a conference call isestablished. During the multi-party call, you can answer a newincoming call or add a new member to the call bydialing the new member (the ongoing multi-party callwill be put on hold automatically). Once the call isestablished, select Establish conference call from thecall menu to add the new member to the multi-partycall (you can add up to five members).X-Saber_02_Calling.fm  Page 15  Wednesday, November 14, 2007  3:02 PM
16 CallingIf you wish to separate one member from the call, youcan select Split conference Call during the multi-partycall. To disconnect a member from the call, select Endcall in conference.Switch calls (Network dependent)When you have one active call and one call on hold,you can press L Options, then select Swap to switchbetween the 2 calls. Call HandsfreeDuring a call, press L Options and select Handsfree.When the headset is plugged into the phone, youcannot activate handsfree mode.IP Dial (China & HK only)You may select IP dial. When you select IP dial option,the mobile phone will automatically add the IP specialservice number preset by you in front of the phonenumber and then make IP dial. You can also longpress ( to activate IP dial.When you have entered several IP special servicenumbers, you will be prompted to verify them to avoidadding them repeatedly.Answer a callPress ( to answer a call.Reject a callPress ) to reject a call.Answer a second call (Network dependent) If you have activated Call waiting, you will be alertedwhen there is a second incoming call. You can: 1. Press ( to answer the second call. The currentcall will be put on hold automatically.2. Press ) to reject the second call and continuewith your current call.3. When there is one active call and one call onhold, you can press L Options to carry out thefollowing operations:• Swap • Establish conference call• Handsfree• Audio device (if applicable)• Mute • End held callsx-saber_master_en.book  Page 16  Wednesday, November 14, 2007  12:42 PM
Calling 17If you press the numeric keys, the notepad editor willopen under call waiting mode. Contact PictureThis feature allows you to link a contact in yourphonebook to a photo you have taken using theCamera function, or a picture you have downloadedvia WAP or data cable. During a call, if the otherparty's name card is linked to a picture, the incomingcall background will display the correspondingpicture. This feature is referred to as Contact picture.Contact picture is only available on the phone memory.The photo size should not be larger than 128 x 160pixels.• End active call • Send SMS • Record• View contactsX-Saber_02_Calling.fm  Page 17  Wednesday, November 14, 2007  3:03 PM
18 Text and number entry3. Text and number entryInput methodYour mobile phone supports several input methods,which include:*During text editing, you can press * to switchinput mode; the status bar on the screen will displayyour current input mode.   representsSimplified Chinese Pinyin input mode; represents Simplified Chinese stroke input mode; represents Traditional Chinese BoPoMoinput mode;   represents Traditional Chinesestroke input mode;  『en』represents T9 Englishinput mode;  『abc』represents English alphabetsinput mode; 『123』represents numeric input mode.In addition, you can press # to input punctuations.The text editor remembers the last input method youhave used before you exit the editing screen. Whenyou access the editor again, it will automatically selectthe last input method you have used. Entering texts and numbersYou can input text in the editor using: T9 Englishinput, English alphabets, Pinyin, Simplified ChineseStroke or Traditional Chinese Stroke. In addition,there are two input methods for you to enter numbersand punctuations. The icon displayed on the screenshows the current input method. You can press * toswitch from one mode to another. Long press toactivate or deactivate T9. Short press # to enterpunctuations or long press it to select input language.•  T9 Pinyin: Enter chinese characters with T9Pinyin;•  T9 Stroke: Enter Chinese characters with T9wubi and stroke components; •  T9 Traditional Chinese stroke: EnterTraditional Chinese characters with Wubi orstroke components;•  T9 English (T9eng/T9Eng): Enter Englishtext using T9 English;•  Multi-Tap (abc/Abc/ABC): Press the keysthat are marked with the corresponding letteryou wish to enter. Press once to get the firstletter on the key, press twice quickly to get thesecond letter and so on until the letter youwant is displayed on the screen.• 123: Enter numbersThis phone supports T9 Simplified Chineseassociation input method as well.x-saber_master_en.book  Page 18  Wednesday, November 14, 2007  12:42 PM
Text and number entry 19Entering symbolsIn any input mode, press # to open/close symbolsinput screen. If the symbols occupy more than onescreen, press +/- to scroll up/down the pages. Press ,to confirm the symbol input.Shift casePress * to shift case in the English input editor. DeleteWhen there are contents in the input row, press RClear to delete the rightmost character or symbol. Thecandidate area will be updated accordingly until theinput row is cleared. Long press R Clear to clear theinput row.When the input row is empty, press R Clear willdelete the character on the left of the cursor in the textarea. Long press R Clear to clear the contents in thetext area. T9® English inputWhat is it?T9® predictive Text Input is an intelligent editingmode for messages, which includes a comprehensivedictionary. It allows you to quickly enter text. Youneed to press only once on the key corresponding toeach letter needed to spell a word: keystrokes input areanalysed and the word suggested by T9® is displayedat the pop-up window. If there are more than 3candidates, a scroll bar is shown, press + or - to browsethe list and choose from those proposed by the T9®built-in dictionary (see example below). After youhave input the word, press , or L to confirm.How to use it?Alphabets and symbols represented by each key are asfollows:0 to 9To input letters.+ or -To browse the last or next candidate word. L OK To confirm the letter or word.R Clear Short press to clear a letter, long press toclear all entries.*Shift case, select input mode. Long pressto turn on/off T9 feature.#Short press to activate/deactivatepunctuation mode, long press to selectinput language.x-saber_master_en.book  Page 19  Wednesday, November 14, 2007  12:42 PM
20 Text and number entryExample: How to enter the word "Home"1. Press 4 6°6 3, the screen displays the firstword on the list: Good.2. Press - to browse and select Home.3. Press L OK to confirm Home.Basic text inputIf you wish to use basic text input mode, press * toselect "ABC" basic text input. This method requiresmultiple key presses to reach the desired character: theletter "h"is the second letter on the 4 key, so youmust press 4 twice to enter "h". Using this moderequires you to press a key as many times as is equal tothe order of the letter.To enter the word «Home» in basic text input mode,you should therefore key 4, 4 (GHI) 6, 6, 6(MNO), 6 (MNO), 3, 3 (DEF).Letters, numbers and symbols are located on each keyas follows:Key Letters and numbers1Space 1 @ _ # = < > ( ) & £ $ ¥ 2a b c 2 à ä å æ ç3d e f 3 é è ∆ Φ4g h i 4 Γ ì5j k l 5 Λ6m n o 6 ñ ò ö ø7p q r s 7 β Π Θ Σ8t u v 8 ü ù9w x y z 9 Ω Ξ Ψ0Input space*Switch text input mode#Input symbolx-saber_master_en.book  Page 20  Wednesday, November 14, 2007  12:42 PM
Text and number entry 21Pinyin InputPress * and select Pinyin input mode. Each Pinyinletter is represented by one of the numeric keys asshown below: (Note that Pinyin input mode is solelymeant for the input of Simplified Chinese characters.You cannot input Traditional Chinese characters).The general steps of using Pinyin input method are asfollows:12 ABC3 DEF4 GHI5 JKL6 MNO7 PQRS8 TUV9 WXYZ * Mode0# Punctuation1. Enter Pinyin letters2 to 9R Clear to clear2. Select Pinyin combination< or >3. Confirm Pinyin combination, 4. Select from candidate list< or > / + or - (scroll list)5. Confirm selection, 6. Select and enter association character, or return to step 1 to enter new words.7. Or press R Back to exit from associationcharacter input mode, then press , to complete theediting.X-Saber_03_TextEntry.fm  Page 21  Wednesday, November 14, 2007  3:06 PM
22 Text and number entryEnter the pinyin letters accordingly. Press once on thekey corresponding to the pinyin letter without havingto consider its position on the key. Pinyin inputmethod will automatically select and list all possiblecombinations for you to select. For example, to input the character 『王』 , with thePinyin letters『wang』, press 9 2 6 4 and use> to select the desired pinyin combination for『wang』, then press , to confirm combination. As soon as you have selected and entered a character,the candidate list will be updated and a list ofassociation characters will be displayed. Press < or > toselect the desired association character and press , toconfirm entry. This speeds up the input processfurther.When you have finished editing a name on thephonebook or SMS, press R Back  to exit fromassociation character input mode and press , toconfirm completion of the editing process. Stroke inputPress * to select stroke input mode. The strokes arerepresented on each key as follows: 12  Horizontal34  Left-falling5  Vertical6  Right-falling7 8  Over-down9  Special* Mode0 # Punctuationx-saber_master_en.book  Page 22  Wednesday, November 14, 2007  12:42 PM
Text and number entry 23The basic steps of Stroke input are as follows:The principle of stroke input is to dissect and separateevery stroke of a chinese character according tosequence. When you wish to input the character, pressthe keys corresponding to the required strokesaccording to sequence to get the desired character.The stroke input method in this phone classifies achinese character into 5 basic strokes: (horizontal,vertical, left falling stroke, right falling stroke andover-down) as well as a special stroke. When thestroke you need does not correspond to the 5 basicstrokes, replace it with the special stroke. The examples below will give you a clearerunderstanding of how to use stroke input method:1.木∶2  + 5  + 4  + 6  2.田∶5  + 8  + 2  + 5  + 2  +   3.加∶9  + 4  + 5  + 8  + 2 4.凉∶6  + 9  + 6  + 2  + 5  + 8  + 2  + 9  + 4   + 6 5. 陈∶9  + 5  + 2  + 9  + 9  + 4  + 6  1. Enter strokes2 to 9 (excluding 3 and 7) R Clear to clear.2. Select from candidate list< or > / + or -( scroll list)3. Confirm selection,4. Select and enter association character, or return to step 1 to enter new strokes.5. Or press R Back to exit from association character input mode, then press , to complete the editing.x-saber_master_en.book  Page 23  Wednesday, November 14, 2007  12:42 PM
24 Text and number entryGenerally, you will be able to find a desired characterbefore you finished entering all the strokes. After youhave entered the name of the phonebook or SMS,press R Back to exit from the association characterlist and press , to confirm completion of text editing. The input mode for Traditional chinese stroke andSimplified Chinese stroke are similar, with theexception of the character coding. x-saber_master_en.book  Page 24  Wednesday, November 14, 2007  12:42 PM
Entertainment 254. EntertainmentThis section describes the games and additional toolsinstalled on your mobile phone.Some of the features described here are dependent onthe configuration of your mobile phone, the country inwhich you purchased your mobile phone, and/or yourservice provider.GamesDefault gamesThis menu features games that are pre-installed inyour mobile phone. Press , to enter the main menufrom idle mode and select Entertainment > Games.Java Your mobile phone features a Java run-timeenvironment, which allows you to run Javaapplications, such as games downloaded from thenetwork. • Press  Java > Launch to launch a new applicationafter you download it into the phone. x-saber_master_en.book  Page 25  Wednesday, November 14, 2007  12:42 PM
26 Browser5. BrowserYour phone comes with a WAP browser. You canobtain news, sports and weather information, as wellas services from the internet via the WAP browser. This feature is available only if your subscriptionincludes WAP access services. The settings have beenpre-configured (depends on country variants) and youdo not need to modify them. For more information,please contact your network operator. WAP Normally, the phone would have been pre-configured.If you wish to add or modify the configurationparameters, you need to obtain the necessaryinformation from your network operator before youproceed. Philips is not liable to give prior notificationnor shall it bear any consequences for any failuresarising from changes of configuration made by you orby the network operator. Please check with yournetwork operator for the most updated information.HomepageSelect this menu to access the homepage directly. Youcan also set the homepage address in the settingsmenu. BookmarkYou can save the current web page or the web pagesthat you frequently visit to the Bookmark list, manageand organize them. When you enter the menu, a list of bookmark entriesis displayed. To connect to the web address of aparticular bookmark entry, select an entry using + or -and press ,.If there are no existing entries, you can select thefollowing options to add and manage yourbookmarks:Add bookmark Edit the title and web address. Manage bookmarks Delete or edit a bookmark entry. x-saber_master_en.book  Page 26  Wednesday, November 14, 2007  12:42 PM
Browser 27To add a new bookmark:To edit a bookmark:HistoryThis menu allows you to manage, organize andquickly access the last web page you have visited. 1. When you enter this menu, the last web pageyou have previously visited will be shown.2. Press L Options to access the following:Enter addressEnter the web address and press L or , to connect,press R Back to return to previous web page.SettingsThis menu allows you to configure the web settingsfor web browsing. Your phone may have been pre-configured with the settings of a specific networkoperator. If you are a subscriber of the networkoperator, you may start using your WAP browserimmediately. Otherwise, you need to re-configure thesettings. Go to Bookmark menu Press , to enter themain menu from idlemode and select Browser> Bookmark.Select Add Bookmark Press ,.Add a new bookmark  Enter  the  Address andTitle of the newbookmark and press LSave.Go to Bookmark menu Press , to enter themain menu from idlemode and select Browser> Bookmark.Select Manage bookmarksPress + or - and press ,. Select a bookmark youwish to editPress + or - and press ,.Select Edit Press + or - and press LSelect.Edit the bookmark  Edit the Address and Titleof the bookmark andpress L Save.Homepage Save asBack Send as MMSRefresh Save as homepageBookmark ExitEnter address Settingx-saber_master_en.book  Page 27  Wednesday, November 14, 2007  12:42 PM
28 BrowserPhilips is not liable to give prior notification nor shallit bear any consequences for failures arising fromchanges in configuration made by you or by thenetwork operator, or changes in WAP address orcontents made by the internet content provider. Pleasecheck with your network operator and your internetcontent provider for the most updated information.The following options are available:Push InboxAllows you to check your Push messages and configureyour Push settings, such as select whether or not toaccept Push messages, delete push messages, etc. Browser optionsAllows you to configure the browserparameters, such as Show images,Enable Refresh, etc.Cache Allows you to set the Cache modeand Clear cache. Cookies Allows you to Enable cookies or Clearcookies. x-saber_master_en.book  Page 28  Wednesday, November 14, 2007  12:42 PM
Media Player 296. Media PlayerMusic PlayerThis feature allows you to download music from thenetwork, save the audio files, edit your playlist, andplay music. The phone supports audio files in MP3,AAC and WMA format. However, only MP3 formatis supported with the bluetooth headset.TracksThis feature allows you to play downloaded music inyour Phone memory or Memory card. From the listedtracks, use +/- to select the music file you want to playand then press L Options.ArtistsA list of singer names is displayed on the screen. Youcan press +/- to select a certain artist and press L or, to display all tracks of the selected artist.From the listed tracks, use +/- to select the music fileyou want to play and then press L Options. Options DescriptionOpen Open the music player to play theselected track.Add to playlistOpen the playlist, select a playlist andadd the selected track to the playlist.Delete track Delete the selected track.Details View detailed information of theselected track.Options DescriptionOpen Open the music player to play theselected track.Add to playlistOpen the playlist, select a playlistand add the selected track to theplaylist.Delete track Delete the selected track.Delete artist Delete all tracks of the same artist.Details View detailed information of theselected track.x-saber_master_en.book  Page 29  Wednesday, November 14, 2007  12:42 PM
30 Media PlayerPlaylistsThe stored playlists are displayed on the screen. Tocreate a new playlist, select New playlist. Enter theplaylist name and press ,. Then use +/- to select aplaylist, press ,, and then press L Options, selectEdit playlist and select the tracks that you want to addto the playlist by pressing ,. You can press +/- tomove up or down. Then press L Done to confirmand store the songs in the playlist.You can create up to 10 playlist. The available optionsinclude: Last playedList the last 10 tracks you have played, and the lastplayed track is displayed at the top of the list. Now playingThe screen displays the last played song. This functionenables you to go on playing the last playlist you werelistening to.Keys operationThe keypad operations during music playback are asfollows: Options DescriptionOpen Open the music player to play thecurrently selected file.Edit playlist Edit the playlist.Rename playlistModify the playlist name.Delete playlistDelete the current playlist.Tracks sequenceModify the play sequence of thecurrent playlist.Details View detailed information of theselected file.Key Operation, key Short press to Start/Pause/resumemusic playback.Long press to stop playback. < or >Short press to select the previoussong/next song. Long press to fastrewind/fast forward the track duringplayback. + or - side keyAdjust volume. Once you have setthe volume, the settings will besaved until the next time you adjustit again. x-saber_master_en.book  Page 30  Wednesday, November 14, 2007  12:42 PM
Media Player 31Press L Options to carry out the followingoperations:SettingsThe available options include: L Options Open options menu.R Stop Stop playback.R Back Return to previous menu. Play/Pause Play/Pause the selected audio file.Add to playlistOpen the playlist, select a playlistand add the selected file to theplaylist.Play mode Shuffle: On or OffRepeat:  None,  Repeat Single orRepeat playlist.Equalizer Select  Bass boost,  Dance,  Hip-hop,Pop, R&B or Rock.3D surround To activate the 3D surround sound(only available on applicable audiodevice).Detail Display detailed information of theselected audio file.Flip exit Select  On  or Off (default). If youselect  On, once you close the flip,you will exit from the music player. Options DescriptionEqualizer Select Bass boost,  Dance,  Hip-hop,Pop, R&B or Rock.3D surround To activate the 3D surround sound(only available on applicable audiodevice).Play mode Shuffle: On or OffRepeat:  None,  Repeat Single orRepeat playlist.Help Display descriptions on how to usethe music player.Refresh list All tracks stored in the phonememory and the memory Card willbe refreshed.x-saber_master_en.book  Page 31  Wednesday, November 14, 2007  12:42 PM
32 Media Playerx-saber_master_en.book  Page 32  Wednesday, November 14, 2007  12:42 PM
Camera 337. CameraYour mobile phone features a digital camera thatallows you to take pictures and record videos, storethem in your phone and memory card, use them aswallpaper or send them to your friends.Please ensure that the camera lens is clean before youtake pictures, as small dust particles can strongly affectthe picture quality.Camera modeConsult the table below on how to carry out somecommon operations with your camera.How to ...At any point in time, you can press ) key tocancel the current operation and return to idlemode.Camera option menuWhen the camera mode is activated and before apicture is taken, you can change a number of settingsby pressing L Options.Launch Camera Press , to enter the mainmenu from idle mode andselect Camera.Zoom in/out  Press </>.Only available for pictureresolution of 480*640 at x1.6,and 176*220 at x1.9.Adjust brightness Press +/-.Brightness level is -3 to +3.Default level is 0. Take a picture Press ,.The picture will beautomatically saved and storedin My Files > Pictures. Exit from Camera and return to idle modePress ) key or R Backtwice.Options DescriptionSwitch to videoExit from Camera mode and switch toVideo mode.PictureresolutionSelect image size: 1280x1024,768x1024, 480x640 and 176x220.x-saber_master_en.book  Page 33  Wednesday, November 14, 2007  12:42 PM
34 CameraPhoto preview option menuOnce you have activated the camera, simply press ,to take a picture. The picture is automatically savedand displayed on the screen. You can press LOptions to carry out the following operations: When there is not enough memory space, you will notbe able to save the picture and you will be promptedwtih a warning message. You have to delete existingpictures before you can store new ones. Picture QualitySelect image quality: Super fine, Fineand Normal.The last selected value will remainactive until you change it again.ViewpictureEnter My Files > Pictures to view thepictures taken.Mode Color effect:  Off  (default),  B & W,Sepia or Blue. The selected color effect will bedisplayed on the screen in real time. Night mode: On or OffSelf-timer: On or OffThe time limit is 8 seconds. Multishot: On or OffThree pictures can be taken at thesame time.Advanced Storage location:  Phone memory orMemory cardDefault name: modify the defaultname of the photo Anti-flicker: 50HZ or 60HZOptions DescriptionSend Send the picture:Via Bluetooth or Via MMS.Delete Delete the current picture.Capture Return to the viewfinder screen to takea new picture.Set as contact pictureLink the picture to a contact in yourmobile phone so that the picture will bedisplayed when the contact calls you.Available for picture resolution of 176x 220 only.Set as wallpaperSet the picture as a wallpaper in idlescreen.x-saber_master_en.book  Page 34  Wednesday, November 14, 2007  12:42 PM
Camera 35Video recorderThis option allows you to record short videos. Youcan play the video, store it in your phone or in thememory card. You can also send the video to yourfriends via MMS or Bluetooth. How to ...Video option menuWhen the video mode is activated and before you startrecording, you can change a number of settings bypressing L Options.Launch Video Camera Press , to enter the mainmenu in idle mode, selectCamera and press > toshift to the video recordertab.Zoom in/out  Press </>.Adjust brightness Press +/-.Brightness level is -3 to+3. Default level is 0. Record a video Press , key once. Pressagain to stop recording.The video will beautomatically saved andstored in My Files >Videos. Exit from Video mode and return to idle modePress ) key or RBack twice.Options DescriptionSwitch to cameraExit from Video mode and switchto Camera mode.Video Quality Select video quality: Fine or NormalThe last selected value will remainactive until you change it again.ViewvideosEnter My Files > Videos to view therecorded videos.Mode Color effect: Off (default), B & W,Sepia or BlueThe selected color efffect will bedisplayed on the screen. Video format: MPEG-4 or H263FPS: 5, 10 or 15 frame per secondx-saber_master_en.book  Page 35  Wednesday, November 14, 2007  12:42 PM
36 CameraVideo PlaybackOnce you have activated the video mode, simply press, to start recording. Press again to stop recording.The video is automatically saved and the last recordedscene is displayed on the screen. You can press LOptions to carry out the following operations:Advanced Storage location: Phone memory orMemory cardDefault name: modify the defaultname of the videoMute: On or OffIf you select On, sound will not berecorded.Video length:  MMS (default) orUnlimited.If you select MMS, the size of therecorded video will be smaller thanthe currently specified maximumMMS size. Recording will stopwhen reaching the maximumMMS size and the video will bestored automatically. If you selectUnlimited, there will be norestrictions on the size of therecorded video. The maximum sizeshall be determined by the memorycapacity of your mobile phone orthe memory card.Options DescriptionPlayback Play the recorded video.During playback, you can:Pause playback by pressing , Pauseor L Full to enlarge the displayscreen. Resume playback by pressing , orL Play. Adjust volume by pressing +/-.Fast rewind by pressing and holding <.Fast forward by pressing and holding >.Go to previous menu level by pressingR.Return to idle screen by pressing ).Send Send the recorded video:Via Bluetooth and Via MMS.Delete Delete the recorded video.x-saber_master_en.book  Page 36  Wednesday, November 14, 2007  12:42 PM
Camera 37When there is not enough memory space, you will notbe able to save the recorded video and you will beprompted wtih a warning message. Record new Return to video mode to record a newvideo clip.x-saber_master_en.book  Page 37  Wednesday, November 14, 2007  12:42 PM
38 Messages8. MessagesSMSSMS enables you to send text messages to the otherparty, which is a convenient and affordable mode ofcommunication. You can use the SMS menu to sendmessages to another handphone or a device that iscapable of receiving SMS. Your phone can store up to 1000 messages. Once youhave reached 1000 messages, the screen will flash anicon to alert you. You need to delete some messages inorder to receive new ones. Create, edit and send SMSYou need to enter the correct message centre numberbefore you can send SMS. The number can beobtained from your network operator. 1. In idle mode, press , to enter the main menu. 2. Select  Messages  >  Create Message >  SMS andpress ,. The SMS editing screen will appear. 3. Enter the SMS content in the SMS editor andpress L Options to carry out the followingoperations: If your SMS is not sent successfully, you can resend it.If your SMS cannot be sent successfully after severalattempts, please check if your SMS centre number hasbeen set correctly. When editing SMS, for certain reasons (such as anincoming call, out of battery), you are forced to exitfrom the SMS editing screen before you managed tosend or save your message successfully, the editedmessage will be saved automatically. The next timeyou enter the SMS editor, the message will bedisplayed on the screen. Continue Enter the phone number of therecipient by selecting Phone number.You can also select it from Contactslist or Groups. Press , to send theSMS.Save as draft Save the SMS as draft.Save as template         Save the SMS as template.x-saber_master_en.book  Page 38  Wednesday, November 14, 2007  12:42 PM
Messages 39MMS (network dependent)Your phone allows you to send and receivemultimedia messages, known as MMS, which featurestexts, pictures, sound and video clips. MMS cancomprise one or several slides. Whether you send it toan e-mail address or to another mobile phone, theMMS will be played as a slide show. Your phone can support 50 MMS (maximum100KB). When the maximum of 50 MMS is reached,the screen will display a MMS icon to alert you. Youwill need to delete some old MMS in order to receivenew ones.Before you can send MMS, you need to enter thecorrect MMS Center number and ensure that thenetwork profile of your MMS has been correctlyconfigured. You can obtain such information fromyour network operator. Create, edit and send MMS1. In idle mode, press , to enter the main menu.2. Select Messages > Create Message >  MMS andpress ,. The MMS editing screen will appear. 3. Enter the MMS content in the MMS editor andpress L Options to carry out the followingoperations: Continue Enter details for the MMS:To: Select L Add to enter the phonenumber of the recipient, you canselect it from Contacts or Groups list.Subject: Enter a subject for themessage.Cc: Send a courtesy copy to otherrecipients.Bcc:  Send a blind courtesy copy toother recipients.Insert objectInsert picture, video, melody, page orobject. Only a picture, a melody and a videocan be inserted on one page. If 3 ofthem exist at the same time, only onecan be saved.Change objectIt appears after you have insertedobjects. You can change these insertedobjects. Remove object Delete inserted objects.x-saber_master_en.book  Page 39  Wednesday, November 14, 2007  12:42 PM
40 MessagesWhen there is more than one page, you can press </> toview the different pages of the MMS. At the sametime, the title bar at the top of the screen will displaythe current page you are viewing and the total numberof pages in your MMS. InboxThe Inbox stores the messages you have received. 1. In idle mode, press , to enter the main menu.2. Select Messages > Inbox and press ,.3. If there are messages in the Inbox, they will belisted on the screen in the order they werereceived (the most recent message will appear atthe top of the list).4. Press +/- to select a message. When a message isselected, its contents will be displayed on thescreen. Press L Options to carry out thefollowing operations:Preview Preview the current MMS.Page timing Set play time of the MMS slides. Thedefault value is 3 seconds.Save as draft Save the MMS as Draft.Save to templateSave the MMS as Templates.View View the selected message.Reply The sender's number will be used asthe destination number automaticallyand the message editor will beactivated. Enter your reply and sendthe message.Forward When you select Forward, thecontents of the selected message willappear in the message editor. Youmay edit the message before sending. Delete Delete the message from the Inbox.Delete all Delete all the messages in the Inbox.Archive to SIM Add the selected message to the SIMcard.Move to my favouriteMove the selected message to MyFavourites.Details View information of the messagesuch as date, time and sender.x-saber_master_en.book  Page 40  Wednesday, November 14, 2007  12:42 PM
Messages 415. Press , to enter the next screen whereby themessage details will be displayed. Press LOptions to carry out the following operations:OutboxThe Outbox allows you to save the messages you havesent successfully and which you have chosen to savebefore sending. 1. In idle mode, press , to enter the main menu.2. Select Messages > Outbox and press ,.3. If there are messages in the Outbox, they will belisted on the screen. Dial Extract the sender's number fromthe message and dial the number.Select multipleYou can select several messages oneby one or all at once. You can press, to select/cancel the operations onmultiple messages. Checkboxes willbe marked on the left of the selectedmessage. Press L Options to deletethe selected messages, or you canmove them to My Favourites.Reply The sender's number will be used asthe destination number automaticallyand you can select reply by SMS orMMS. Enter your reply in the editorand send the message.Forward When you select Forward, thecontents of the selected message willappear in the message editor. Youmay edit the message before sending. Delete Delete the message from the Inbox.Extract numbersOpens the list of numbers availablein the message. In this list, the Loption opens a pop-up windowshowing the following options:•Save •Dial •Send message Archive to SIM Add the selected message to the SIMcard.Move to my favouriteMove the selected message to MyFavourites.Details View information of the messagesuch as date, time and sender.Dial Extract the sender's number fromthe message and dial the number.x-saber_master_en.book  Page 41  Wednesday, November 14, 2007  12:42 PM
42 Messages4. Press +/- to select a message. When a message isselected, its contents will be displayed on thescreen. When you press L Options, you cancarry out the following operations:5. Press , to enter the next screen whereby thedetails will be displayed. My favouritesThis menu contains all the messages received and savedin the phone memory via Move to my favourite option. 1. In idle mode, press , to enter the main menu. 2. Select Messages > My Favourites and press ,.3. If there are messages in My Favourites, they willbe listed on the screen. 4. Press +/- to select a message. When a message isselected, its content will be displayed on thescreen. Press L Options to carry out thefollowing operations:View View the selected message.Resend  Resend the message to the recipient. Forward When you select Forward, the contentsof the selected message will appear onthe message editor. You may edit themessage before sending. Delete Delete the message from the Outbox.Delete all Delete all the messages in Outbox.Details View information of the message suchas date and time.Select multipleYou can select several messages one byone or all at once. You can press , toselect/cancel the operations onmultiple messages. Checkboxes will bemarked on the left of the selectedmessage. Press L Options to deletethe selected messages, or you can movethem to My Favourites.Resend  Resend the message to the recipient. Forward When you select Forward, the contentsof the selected message will appear onthe message editor. You may edit themessage before sending. Delete Delete the message from the Outbox.Details View information of the message suchas date and time.x-saber_master_en.book  Page 42  Wednesday, November 14, 2007  12:42 PM
Messages 435. Press , to enter the next screen whereby thedetails will be displayed. Press L Options tocarry out the following operations:DraftList the messages that were created and saved but werenot sent, and messages that were automatically savedbefore you were able to save or send them when youexit from the message editor. View View the selected message.Reply The sender's number will be used as thedestination number automatically andthe message editor will be activated.Enter your reply and send the message.Forward When you select Forward, the contentsof the selected message will appear inthe message editor. You may edit themessage before sending. Delete Delete the message from My Favourites.Delete all Delete all the messages in My Favourites.Details View information of the message suchas date, time and sender.Dial Extract the sender's number from themessage and dial the number.Select multipleYou can select several messages one byone or all at once. You can press , toselect/cancel the operations on multiplemessages. Checkboxes will be marked onthe left of the selected message. PressL Options to delete the selectedmessages.Reply The sender's number will be used as thedestination number automatically andthe message editor will be activated.Enter your reply and send the message.Forward When you select Forward, the contentsof the selected message will appear inthe message editor. You may edit themessage before sending. Delete Delete the message from My Favourites.Details View information of the messagesuch as date, time and sender.Dial Extract the sender's number from themessage and dial the number.x-saber_master_en.book  Page 43  Wednesday, November 14, 2007  12:42 PM
44 MessagesSelect a message from the Draft box and press LOptions to: View, Send, Edit, Delete, Delete all, Details,Select multiple. If you select View, the subsequentprocedures would be similar to the Inbox operations.SIM archiveIn the menu, you can see the read and unreadmessages saved in the SIM Card. The availableoptions include:TemplatesIf you have save message as a template in create MMS,this menu allows you to send, modify and delete yourpreset messages.Voice mailThis menu allows you to set your voice mailboxnumber and listen to voice messages yourcorrespondents have left for you.You can forward your calls to your voice mailbox (thephone number for callers to leave a message) via theCall forwarding feature. Call voice mailWhen you receive a voice mail, the phone will sendyou an alert. You can then call your voice mailboxnumber to retrieve your voice mail. Options DescriptionView Open the current message and viewthe detailed contents of the message.Reply Reply the message.Forward Forward the message to other recipients.Delete Delete the message.Delete all Delete all messages.Details View information of the message,such as date, time and sender, etc.Dial Call the sender of the message.Select mutipleYou can press , to select/cancel theoperations on multiple messages.Checkboxes will be marked on the leftof the selected message. You candelete the selected messages.x-saber_master_en.book  Page 44  Wednesday, November 14, 2007  12:42 PM
Messages 45In idle mode, long press 1 to call your voice mailboxdirectly. If the number is empty, you will be promptedto enter the number. Voice mail numberGenerally, you can obtain two sets of numbers fromyour network provider: •  number for the caller to leave a message (thisnumber can also used for Call Forwarding)•  number for you to retrieve your voice messagesCell broadcastThis is a network service which allows you to receivetext messages of various contents, such as news, traffic,etc. These messages are provided by the network tothe subscribers within a certain network area. If thisservice is available, the network will provide you withthe broadcast channel numbers. It gives you access tothe options listed below.ReceptionYou can set the reception of broadcast messsages On orOff. If you select Off, you will not receive anybroadcast messages, even if you have set thecorresponding channel numbers. When you received a broadcast message, the messagecontent will be displayed on the screen until you pressR Back. Broadcast messages will not be saved on yourmobile phone or your SIM card. Once you exit fromthe message screen, you will not be able to read it again. To obtain the codes corresponding to the differenttypes, you must contact your operator.Message SettingsSMSSelect Messages > Settings > SMS to open the list ofSMS accounts. Press L Options > Edit to edit theSMS settings:Options DescriptionReception Select to turn on/off the reception ofnew cell broadcast messages.Topics Add, change or delete channels.<Add new>: Press L Add to add a newchannel.Change: Edit a channel number.Delete: Delete a channel in the channellist. x-saber_master_en.book  Page 45  Wednesday, November 14, 2007  12:42 PM
46 MessagesService center numberThis menu allows you to save and edit the SMS servicecenter number of your home network. If the servicecenter number is empty, you will not be able to sendany SMS.Validity periodAllows you to select the duration by which yourmessages will be stored in the service center. You canselect from: 1 hour,  12 hours,  1 day, 1 week andMaximum (default). Press + / - to select a value. This option is useful when your recipient is notconnected to the network and is not able to receiveyour messages immediately. This feature is subscription dependent. Delivery reportYou can select L On or Off. This option allows youto set whether or not to notify you the send status ofyour messages: successfully sent to the recipient, ornot sent successfully. This feature is subscription dependent. SignatureYou can select L On or Off (Default is Off). If set toOn, it opens an editor where you can enter yoursignature. The signature will be added to the end ofyour message before it is sent to your recipient. If the SMS is too long after adding the signature, thesignature will be ignored. Storage locationYou can press L Change to select the preferredstorage location of your messages: SIM card (Default)or Mobile phone.MMSThis menu allows you to set your MMS center andpersonalize your MMS settings. The options include: ProfilesYou can select or edit the parameters.Sender visibilityYou can press L Change to set this option On or off.It is used to set if your identity will be visible whenMMS is sent.PriorityThis option allows you to set the priority level of yourMMS. You can set Low, Normal (default) or High.Delivery reportYou can press L Change to set this option On or off.When set to On, a report will be sent to notify you ifthe MMS has been delivered to the recipient. x-saber_master_en.book  Page 46  Wednesday, November 14, 2007  12:42 PM
Messages 47Read reportYou can press L Change to set this option On or off.When set to On, a report will be sent to notify you ifthe MMS has been read by the recipient. Expiry timeAllows you to select the duration by which your MMSwill be stored in the MMS center. You can choosefrom 6 hours, 12 hours, 1 day, 1 week or Maximum(default). RetrievalAllows you to select Automatic, Deferred, Auto in homenetwork when downloading of MMS messages.x-saber_master_en.book  Page 47  Wednesday, November 14, 2007  12:42 PM
48 My Files9. My FilesThis menu allows you to store the files in differentfolders (Pictures,  Videos,  Sounds,  Others) to facilitatemore efficient management of files in your phone andthe memory card. In addition, you can obtaininformation regarding your phone and memory card,such as number of files, memory utilised, percentage ofmemory utilised via the Memory status option. PicturesWhen you enter this menu, the photos which youhave taken using the phone's camera as well aspictures you have downloaded via MMS, WAP, BTor USB will be displayed in a list. 1. Select My files > Pictures and press , to enter themenu.2. Press L Options to carry out the followingoperations to a selected file:Options DescriptionView View the picture in full screen.Send  Send the selected file: Via bluetoothand Via MMS.Advanced Copy: Copy the selected file toanother folder.Cut: Similar to copy, but the originalfile will be deleted.Rename: Modify the name of theselected file.Details: Display detailed informationof the selected photo, such as lastmodified date, file size, etc. Add frame: Add a photo frame to theselected picture by pressing </>.Available only when the picture size is176*220.Use As contact ID: If you select this option,the phonebook list will be displayed.After you have selected a contact fromthe phonebook, press L Select  toassociate the picture to the selectedcontact. Only available for picture of 176*220or smaller.x-saber_master_en.book  Page 48  Wednesday, November 14, 2007  12:42 PM
My Files 493. The folder options include: VideosWhen you enter this menu, the videos which you haverecorded using the phone's camera as well as videosyou have downloaded via MMS, WAP, BT or USBwill be displayed as a list.1. Select My files > Videos and press , to enter themenu.2. Press L Options to carry out the followingoperations to a selected file:As wallpaper: If the selected photo is176*220 or smaller, it will bedisplayed as wallpaper in its originalsize. If it is larger than 176*220, it willbe re-sized accordingly. Delete Delete the selected picture.Slide show If you select this option, the screenwill display the full screen view of allthe pictures in the form of slideshowevery 4 seconds. Press any key to exitfrom the slide show mode. ChangeviewYou can select to view the pictures inList view, Grid view or Full screen.Sort Sort the pictures and folders by name,date, or size.SelectmultipleSelect one by one: select the pictureone by one and then Cut,  Copy orDelete them.Select all: select all the pictures andthen Cut, Copy or Delete them.Open Browse the selected folder.Advanced Rename: Modify the name of theselected folder.Details: View detailed information ofthe selected folder.Delete Delete the selected folder.ChangeviewSelect List view or Grid view.Sort Sort the pictures and folders by nameor date.x-saber_master_en.book  Page 49  Wednesday, November 14, 2007  12:42 PM
50 My Files3. The folder options and their operations are thesame as Pictures menu.Videos are played in the middle of the screen. A statusbar is displayed at the top of the screen. The keypadoperations when playing videos are as follows: SoundsWhen you enter this menu, the sounds which youhave stored or downloaded via MMS, WAP, BT orUSB will be displayed in a list. 1. Select My files > Sounds and press , to enter themenu.2. Press L Options to carry out the followingoperations to a selected file:Options DescriptionPlay/Pause Play the selected video.Send Send the selected file: Via Infrared, Viabluetooth and Via MMS.Advanced Copy: Copy the selected file toanother folder.Cut: Similar to copy, but the originalfile will be deleted.Rename: Modify the name of theselected file.Details: Display detailed informationof the selected video, such as lastmodified date, file size, etc. Delete Delete the selected video.ChangeviewYou can select to view the video filesin List view, Grid view.Sort Sort the videos and folders by name,date, or size.SelectmultipleSelect one by one: select the videos oneby one and then Cut, Copy or Deletethem.Select all: select all the videos and thenCut, Copy or Delete them.Key Operation,Start/pause playback.LFull screen mode.<Long press to rewind.>Long press to fast forward.RExit/return to an upper menu level.)Return to idle screen.x-saber_master_en.book  Page 50  Wednesday, November 14, 2007  12:42 PM
My Files 513. The folder options and their operations are thesame as Pictures menu.Memory statusAll memory capacity, used memory capacity and freememory capacity between all memory capacity andused in both the mobile phone and memory card willbe displayed.SettingsThe phone has a micro SD memory card slot toincrease the phone's memory.  The phone supportsFAT16 and FAT32 format micro SD cards up to2GB.  Go to Memory card tab > Settings to uninstallor format the memory card.Memory cardThe phone has a micro SD memory card slot toincrease the phone's memory. The phone supportsFAT16 and FAT32 format micro SD cards up to2GB. You can uninstall or format the memory card.Play Play the selected audio file.Send The available options are: Viabluetooth and Via MMS.Advanced Copy: Copy the selected file toanother folderCut: Similar to copy, but the originalfile will be deletedRename: Modify the name of theselected fileDetails: Display detailed informationof the selected audio file, such as lastmodified date, file size, etc. Use You can set the audio file: Asincoming call ringtone or As ContactID. Delete Delete the selected audio file.Change view Select List view or Grid view.Sort Sort the audios and folders by nameor date.SelectmultipleSelect one by one: select the audiofiles one by one and then Cut, Copyor Delete them.Select all: select all the audio files andthen Cut, Copy or Delete them.x-saber_master_en.book  Page 51  Wednesday, November 14, 2007  12:42 PM
52 Tools10. ToolsCalendarThis menu displays the calendar. You can select Dayview, Week view or Month view. You can create newappointments, view appointments list, delete ormodify appointments in the calendar. The calendarstores the alarm date and time of every event. If thecurrent date and time correspond with the date andtime of the event, the phone will emit an alarm (ifneeded), and the screen will display a prompt toindicate that a new event has arrived. You can create a maximum of 30 events. The list willdisplay part of the contents. Once you have selectedan event, you can press , to view the detailedinformation.1. Enter the menu.2. The options include: View day, View Week, Newevent, Go to date, Advanced.Add new eventThe list of events will be displayed. When you add anew event, you need to enter the correspondinginformation of the event, such as subject, location,start date, start time, end date, end time, reminderand repeat method.If the memory space for events is full, the phone willprompt you that there is no more space. When editing date and time, the phone will displaythe default or the selected date and time. You canedit or confirm them directly. The maximum length of an event is 40 characters. Alert typeNo reminder, On time, 5 min. before, 15 min. before,1 hour before, 1 day before and other (the remindertime can be set by you).Repeat methodThe phone provides the following repeat methods:Once, Daily, Weekly, Monthly and Annually.When you change the date and time of your phone, thenext alert will be repeated based on the modified dateand time of the phone. When you switched off the phone, the organizer alert willbe postponed until the next time you switch on the phone.For repeated events, only the latest one will be alerted. x-saber_master_en.book  Page 52  Wednesday, November 14, 2007  12:42 PM
Tools 53AlarmThis phone supports 24-hour alarm.The available options are:If you have downloaded your own ring tones and haveselected such a ring tone to be the alarm alert, thenafter you set the alarm and switched off the phone, thealert tone will be changed back to the original factorysettings. This does not apply if the ring tone you havechosen is one that comes as default with your phone. CalculatorYour mobile phone has a built in calculator. Enter thenumbers with the keypad.The maximum length of the numbers and the result is10 digits. The result of the calculator is indicative.Options DescriptionSimple alarmA simple alarm rings only once. Set thealarm status to On or Off by pressingL Change. When set to On, you needto specify the alarm time and press ,or L OK to confirm.Reccurent alarmA recurrent alarm rings according tothe day you specify in a week. Forexample, if you press , to selectSunday and Monday, the alarm clockwill ring every Sunday and Monday. Alarm tone Select an alarm tone.Snooze Select On or Off.Options Description+Addition-Subtraction>Multiplication<Division, or L Options > CalculateEquals.*To toggle between negative andpositive figures.L Options > % Add a percentage symbol.L Options > ModularCalculate a remainders of a division.#Add a decimal point.x-saber_master_en.book  Page 53  Wednesday, November 14, 2007  12:42 PM
54 ToolsVoice recorderThis menu allows you to record a voice memo.From the main menu, select Tools > Voice recorder.To start recording, press L Option and select Newepisode or ,. During the process, the recorded timewill be displayed in real time. To stop recording, pressR and the file will be saved in My files > Sounds. International clockThe International clock allows you to check the timeof the major cities of the world. You can activate ordeactivate the clock display in the Clock status sub-menu by pressing L Change to toggle between Onand Off.Local settingsTo set the local time zone. The screen displays a worldmap with the current date and time. A verticalhighlight in green indicates the current zone on themap, and a text bar shows the display with ‘GMT’ andthe current cities.Move the highlight with < / > key to update otherinformation in real time.You can access the following options:Foreign settingsTo set the foreign time zone. The operations andoptions are the same as Local time zone. However, Settime option is not available in the menu. Switch local/foreignSelect the L Change. Press L or OK to switch thetime between the local and foreign clocks.Stop watchYour phone features a stop watch and the minimumunit is 0.1 second.The starting time is 00:00.0, in the format “mm:ss.n”,where mm stands for minutes of the watch, which canbe any number from 0 to 59; ss stands for seconds, anumber between 0 and 59; n stands for 0.x second, xSelect Choose the current time zone as thelocal setting.Set time Open time editor screen.Daylight savingTurn summer time on or off. City list Open an information screen with alist of cities in the currentlyhighlighted time zone.x-saber_master_en.book  Page 54  Wednesday, November 14, 2007  12:42 PM
Tools 55being any number from 0 to 9. The stopwatch willstart the timing when you press L Start or ,. Youcan pause the timing, press L Pause, to resume LGo, to stop the timing, press R Stop.Unit converterThis application allows you to convert many types ofunits such as exchange rate, area, energy, mass, power,pressure, temperature and volume.You need to enter the conversion Type,  Amount 1,Amount 2, Unit 1 and Unit 2. Press + or - to switchbetween the different input boxes.CountdownThis feature is very simliar to the alarm clock, exceptthat you will be alerted of the remaining time, and thephone will emit an alarm at the end of the count-down. The alarm tone is the same as your alarm clock.The minimum time is 1 minute. The format of thetime is hh:mm:ss, and the maximum time input is 23hours 59 minutes 59 seconds. You can start the countdown by pressing , key orL Option to start or edit time timer. To stopcountdown, press L Pause, to reset, pressLOption to continue or reset. and you can exit themenu by pressing the R Back.The count-down timer will switch on automaticallyand emit an alarm at the end of the count-down evenif your phone is switched off.FirewallThis function provides a simple and quick method foryou to avoid nuisance calls and SMS. Blacklistcontains a list of phone numbers from which you donot wish to receive calls or SMS.Select Tools > Firewall > Enable and choose betweenthe following options:•SMS • Incoming call • SMS and incoming call•OffTo add phone numbers into the black list, select Blacklist, press LAdd or OK on Add new, then you cancarry out the following operations:Option OperationNewnumberOpen the phone number editor,enter the new number and save thenumber into the black list.x-saber_master_en.book  Page 55  Wednesday, November 14, 2007  12:42 PM
56 ToolsYou can press +/- to select a particular number in theblack list, then press L Options to carry out thefollowing operations:Contacts Open the phonebook list and select aphone number for saving into theblack list.Change Open the phone number editor, toedit the selected number in the blacklist.Delete Delete the selected number in theblack list.x-saber_master_en.book  Page 56  Wednesday, November 14, 2007  12:42 PM
Contacts 5711. ContactsYour phone features two phonebooks. The SIMphonebook is located on your SIM card and thenumber of entries you can store depends on the SIMcard. The second phonebook (Smart phonebook) isintegrated in the phone memory and the maximumnumber of name cards you can store is 1000 (anamecard can consist of a name, 4 phone numbers,groups, email address, address, and postal code) etc.The SIM card is the default phonebook, but theentries in the two phonebooks are combined, sortedand displayed as a list. When you add a new contactto your phonebook, the new contact will only beadded to the phonebook you have selected.You can store up to 1000 name cards, provided otherfeatures in the phone such as Organizer, Schedules,Sounds, Pictures, and Videos, etc. did not use up alarge amount of the phone's memory space.Create contactsTo create a new SIM/phone contact:To create a contact, you must enter at least a phonenumber.Most of the fields are free-text, which means you canenter alphanumeric data using the text entry functionsof your mobile phone (for more information on textentry, see “Text and number entry” on page 18).Enter New Contact Press , and select Contacts >View contacts > <Add new>.Enter contact detailsEnter the following for SIMcard contacts.•Name•NumberEnter the following foronboard phonebook contacts:•Name• Mobile•Home• Office and etcStore the new contactPress L Save.x-saber_master_en.book  Page 57  Wednesday, November 14, 2007  12:42 PM
58 ContactsPhonebook OptionsIn the phonebook, you can display the details of acontact by selecting it and pressing L Options tocarry out the following operations:View groupThe View group feature allows you to organize yourcontacts so that you can associate images and/orringtones with a group of contacts and send messagesto all the members of the group. From the Contactsmenu, select View group and the list of groups isdisplayed.Options DescriptionView View the details of the selected contact.SendmessageSend a SMS or MMS to the contact.Dial Call the contact.Handsfree dial Call the contact by handsfree mode.Delete Delete the contact.Add to blacklist Add the contact into the blacklist.Go to Go to the website in the record (ifavailable).Default numberSet Mobile number, Home number orOffice number as the default number(if record is in the phone).Send ContactSend the selected record: via SMS orvia Bluetooth.Copy to SIMCopy the phone entry to SIM card.Copy to phoneCopy the SIM entry to phone.Move to SIMSimilar to copy, but the source recordwill be deleted after copy.Move to phoneSimilar to copy, but the source recordwill be deleted after copy.Add picture Add a picture ID to the contact. Thisoption is only available for contacts inthe onboard phonebook.SelectmultipleSelect one contact at a time or selectall contacts.x-saber_master_en.book  Page 58  Wednesday, November 14, 2007  12:42 PM
Contacts 59ViewSelect a group and press L Options > View to displaythe members of the group.Group OptionsSpecial numbersThis menu allows you to keep a list of useful numberssuch as your own numbers, service numbers,voicemail and SOS numbers.Quick call This feature allows you to set your 4 of your preferredor most frequently dialled numbers. You can thenquickly call one of them by selecting the correspondingicon or picture on the screen, thereby eliminating theneed to enter and browse the contact list.You may edit a list of quick calls.Options DescriptionView Display the group members.Rename Rename the group.Message Send an SMS or MMS to members ofa group.Reset Restore group to default settings.Options DescriptionMy number View,  Edit or Clear your own phonenumber.Service numbersThis entry of the SIM phonebookallow you to select one of the availableservices provided by your operator andto copy it into the selected phonebook.Voice mail numberDial the number for your voice mailservice provider.SOS Display emergency phone number.IP number (China & HK only)Dial IP prefix of your networkoperator.Enter Quick call menu Press , to enter themain menu from idlemode and select Contacts> Quick call.Go to the desired icon positionPress the navigationkeys.x-saber_master_en.book  Page 59  Wednesday, November 14, 2007  12:42 PM
60 ContactsAdvancedThis menu provides you with advanced features sothat you can view and edit your contacts:Add a number to the selected location and then display all the contacts or return to the main menu.L Add or R BackSelect a contact from the phonebook.Press + or -.Confirm the added contact and add picture or Cancel.Press L Select orR Back.Options DescriptionDefault contact listSwitch contact list between SIM,Phone or All.Default contact locationSelect the new contact entry saved onthe SIM or phone memory.Copy to SIM Copy all the entries to SIM.Copy to phoneCopy all the entries to Phone.Move to SIMMove all the entries to SIM. Move to phoneMove all the entries to Phone.Delete all contactsDelete all contacts.x-saber_master_en.book  Page 60  Wednesday, November 14, 2007  12:42 PM
Profiles 6112. ProfilesYour mobile phone has been preconfigured with thefollowing modes: You can activate and modify all the modes, exceptFlight mode and Silent mode. These 2 modes can onlybe activated and viewed.The profiles and their respective parameters are asfollows:•Personal (default) • Car • Flight • Home • Meeting • Outdoors• SilentPersonal Ring volume Level 9Ringtones DefaultAlert type RingKey sound OnBacklight level HighCar Ring volume Level 8Ringtones DefaultAlert type RingKey sound OffBacklight level MaximumFlight Ring volume SilenceRingtones DefaultAlert type OffKey sound OffBacklight level HighHome Ring volume Level 4Ringtones DefaultAlert type RingKey sound OffBacklight level Highx-saber_master_en.book  Page 61  Wednesday, November 14, 2007  12:42 PM
62 ProfilesProfile selectionTo select a different profile:Personalise settingsThe available options include:Meeting Ring volume SilenceRingtones DefaultAlert type VibrateKey sound OffBacklight level MediumOutdoors Ring volume Level 9Ringtones DefaultAlert type RingKey sound OffBacklight level MaximumSilent Ring volume SilenceRingtones DefaultAlert type NoneKey sound OffBacklight level MediumGo to Profiles menuPress , to enter the main menufrom idle mode and select Profiles. Select the desired profile.Press + or -.Enter the Options menuPress L Options. You may select:•Activate: To activate the profile.•Personalize: To modify the settingin the profile.Options DescriptionRing volume Select from 10 volume levels.Ringtone Select the ringtone for Contacts,Call,  Other calls,  Alarm,Appointments,  Calendar,Messages or Cell info.Alert type Select an alert type: Ring only,Vibrate only,  Ring and Vibrate,Vibrate then ring or None.Key sound Turn the key sound On or Off.x-saber_master_en.book  Page 62  Wednesday, November 14, 2007  12:42 PM
Profiles 63Backlight level Select a backlight level:Maximum, High, Medium, Lowx-saber_master_en.book  Page 63  Wednesday, November 14, 2007  12:42 PM
64 Connectivity13. ConnectivityThis menu provides you with more features to set upa connection with these external devices.BluetoothYour phone supports Bluetooth wireless technology,allowing connection to a compatible Bluetoothdevice. To ensure interoperability between otherBluetooth devices, please check with themanufacturers of other devices. The Bluetoothconnection can be subjected to interference fromobstructions such as walls or other electronic devices.To use Bluetooth connection, the device with whichyou want to establish a connection must supportBluetooth function. Please contact the device'smanufacturer or its accompanied documentation.Establish a Bluetooth connectionTo activate, press , to enter the main menu from idlemode and then select Connectivity > Bluetooth. On theBluetooth screen, select Activate. Next, select Searchfor devices. When the list of devices appears, press Lto select the device you wish to establish a connectionwith.If you do not intend to use the Bluetooth feature forsome time, you should deactivate it in order toconserve battery power.Bluetooth menuOptions DescriptionActivate Turn Bluetooth feature On or Off. Search for devicesSearch for the external devices thatyou can connect to.My devices Display the bluetooth devices thatyou can connect to.You can select the desired device bypressing L in the devices list. Youcan also open the Options menu of thedevice. The options are: Connect/Disconnect (if applicable)Browse files (if applicable)Activate/Deactivate stereo (if applicable)RenameDeletex-saber_master_en.book  Page 64  Wednesday, November 14, 2007  12:42 PM
Connectivity 65When searching for a device, you are presented with alist of any devices discovered within the range of yourBluetooth-enabled phone. As soon as you select adevice and a connection is made, you are prompted toenter a passkey in order to pair with the device. Thispasskey is supplied by the manufacturer of the otherBluetooth device. Refer to its documentation forfurther information. The passkey feature ensures thatonly legitimate connections are allowed to connecteither to your device or to the selected device.USB functionConnect your phone to a PC via USB cable, yourphone will then behave like a USB drive.  You canaccess your phone memory and memory card.  You canupload and download music, videos and pictures viathe USB cable, and the size of file transfer is unlimiteduntil your memory is full.Besides, your phone can perform PC connectionswith the Mobile Phone Tools.  From main menu,select  Connectivity > USB drive > PC SYNC, you canconnect your phone to the computer via Bluetooth;select USB drive > Off, you can connect your phone tothe computer via Bluetooth or USB cable.  PCsoftware offers instant sychronization between yourphone and your computer, and enables you to backupyour mobile phone data and recover the data saved inthe computer, receive SMS and edit your mobilephone contacts.When the transfer is finished, please make sure thatyou safely remove your device by clicking  .Settings Select to display more features:•My name: edit the name of thedevice•Visibility: choose to show or hide thedevice by select toggle On or Off•My Profiles: lists the phone’savailable profilesx-saber_master_en.book  Page 65  Wednesday, November 14, 2007  12:42 PM
66 Calls14. CallsMost options described in this chapter are operatorand/or subscription dependent and require either aPIN2 code or a phone code. For more information onPIN codes, see “Security” on page 70.Call listThis menu provides you with a list of calls you havemissed, answered and made. The calls include All calls,Missed calls, Answered call and Outgoing calls, whichare displayed in chronological order with the mostrecent call at the top of the list. Select a call from oneof the lists and press OK, then press L Options toaccess the following:Clear historyThis menu allows you to clear the call history in:Outgoing/Answered/Missed/Delete all. Press L Selectto confirm deletion and R Back to cancel deletion.Call settingsThis menu allows you to configure the call settings:Options DescriptionSave Save the number if the number is notin the Contacts list.Delete Delete the selected number from thelist.Dial Call the selected number.Send messageSend a message to the selected number.You can send by SMS or MMS.Edit numberOpen the contacts list and edit thenumber if it is in the contacts list.Add to black listTo add the phone number into theblack list, see “Firewall” on page 55.Options DescriptionAuto answerTurn  Auto answer on/off. When thisfunction is on, the incoming call will beanswered automatically after 10 seconds.Any keyanswerTurn Any key answer on/off. When thisfunction is on, you can answerincoming calls by pressing any key.x-saber_master_en.book  Page 66  Wednesday, November 14, 2007  12:42 PM
Calls 67MinutereminderSelect On or Off to activate or deactivatethe minute reminder during a call. Thedefault is Off and the default setting is45 seconds.Call servicesThe available options include:•Call time: Display the duration ofyour calls and their charges: Last call,Total incoming calls,  Total outgoingcalls and Total calls.•Call waiting: Select Enable or Cancel,or check Status.This feature is network/ subscriptiondependent.•Own ID: Select Show ID or Hide ID orSet by network to determine yourphone number or identity will bedisplayed or not to the called party.•Caller ID: To check your operatorsetting of showing the identity ofyour caller.This feature is network/ subscriptiondependent.•Cost settings: This option is availableonly when the charge information isincluded in your SIM card. You canview information of the current calland all recent calls. You need to enterthe PIN2 code to manage,maximum cost credit and unit rate. Call divert Set the following call divert options: Allvoice calls, If out of reach, If no reply, Ifbusy. •When All voice calls is on, all incomingcalls will be diverted to the pre-setnumber without any reminder. •When If out of reach is on, incomingcalls will be diverted to the pre-setnumber when the user is notconnected to the network. •When If no reply is on, incoming callswill be diverted if the user does notanswer. •When If busy is on, calls will bediverted if the user is already onlineor if the call is rejected.• You can also check the Status of yourcall diverts or Cancel all call diverts.x-saber_master_en.book  Page 67  Wednesday, November 14, 2007  12:42 PM
68 CallsAuto redialYou can set auto redial option On or Off.  When set toOn and the party you wish to call is not connected,you will be asked to redial or not.  Call barringThis menu allows you to limit the useof your phone to specific calls bypreventing the reception or making ofdifferent types of calls. To activate callbarring, you need to enter acommunication limit code. This PIN2code will then be sent to the networkfor validation.Note that this operation only supportsGSM calls. The types of calls you can bar are asfollows:• All outgoing calls• All international calls• Only here & home• All incoming calls• Incoming if abroadYou can also check the Status of yourcall barring or Cancel all call barring. x-saber_master_en.book  Page 68  Wednesday, November 14, 2007  12:42 PM
Settings 6915. SettingsYou can configure your Xenium 9@9q mobile phoneto best suit your usage preference. You can configurethe following settings: General,  Display,  Sounds  andConnectivity.GeneralThis menu allows you to configure some generalsettings:Enter the menu Press , to enter the mainmenu from idle mode andselect Settings.Select a settings menu Press < or >.Enter the menu options Press + or -.Options DescriptionActive flip Select On or Off. You can change thecurrent selection by pressing L.When you select On, you can answeran incoming call simply by openingthe flip.Languages Set the display language of the phone.Time & date •Display time: Select On or Off.When you select On, the timeinformation will be displayed inidle screen.•Time zone: Go to Internationalclock menu and change the timezone.•Set time: Set the time in theformat HH:MM.•Set date: Set the date.•Time format: Set the time formatas 24 hours or 12 hours.•Date format: Set the date format asYYY/MM/DD,  YYYY.MM.DD,DD.MM.YYYY,  YYYY-MM-DD orDD-MM-YYYY.•Power-on time: Set a time for thephone to be switched on. You canselect  On or Off. When you selectOn, you need to enter the time youwant your phone to be switched on. •Power-off time: same as above.x-saber_master_en.book  Page 69  Wednesday, November 14, 2007  12:42 PM
70 SettingsDisplayYou may configure your phone with different displaysettings:Security •PIN protection: Select On or Off.When you select On, you need toenter the PIN code when youswitch on the phone. The default PIN code is networkdependent on your service provider.Please contact your service operatorfor the PIN information.•Change PIN: Modify the PIN code.•Change PIN2: Modify the PIN2code.•Safeguard: You can safeguardimportant information such asmessages, contacts on your phone byactivating safeguard. You can alsochange the safeguard password.The default safeguard password is0000.Shortcuts Displays a list of shortcut features.You can set a new shortcut key byestablishing a link between a certainfeature and a numeric or navigationkey. You can also change or delete anexisting shortcut key.DefaultstorageSet the default storage location: Phonememory or Memory card.Memory statusYou can check the memory status ofContacts, Messaging and My files. Youcan also check the memory status ofmemory card if it is inserted.Default settingsRestore your phone settings to thedefault values. Options DescriptionWallpaper Turn wallpaper display On or Off.Backlight levelSelect from 4 backlight levels. You canselect the backlight level by pressing +or - keys. Press , or L to confirm. Backlight durationSelect backlight duration from 60seconds, 30 seconds and 15 seconds.x-saber_master_en.book  Page 70  Wednesday, November 14, 2007  12:42 PM
Settings 71SoundsYou can set your phone to operate with differentsound profiles. For details, see “Profiles” on page 61.If you have downloaded your own ring tones and haveselected such a ring tone to be the alarm alert, thenafter you set the alarm and switched off the phone, thealert tone will be changed back to the original factorysettings. This does not apply if the ring tone you havechosen is one that comes as default with your phone.ConnectivityCall settingsFor more information, see “Call settings” on page 66.Message settingsFor more information, see “Message Settings” on page 45.Network settingsThe network name will be displayed on the idlescreen. If the phone is not able to identify the networkname, it will display the country code and thenetwork code of the unknown network.Select networkIt will vary according to the search mode you haveselected. If you select Automatic, the network will besearched automatically. If you select Manual, thesearch will commence only when you confirm to startsearching. Greeting Turn greetings On or Off. When youselect  On, you can edit the greetingsmessage. The maximum length of greetings is 20Chinese words or 50 English characters.Options DescriptionAlert type You can select Ring only, Vibrate only,Vibrate then ring or None.Ringtones Select the ringtone for Contacts calls,Appointments,  Messages,  Cell info,Alarm and Other calls.Ring volumeSelect from 10 volume levels.Key sound Turn key sound On or Off.Shutter soundSelect from 3 shutter sounds. You canalso select Off.Low battery Turn warning On or Off.x-saber_master_en.book  Page 71  Wednesday, November 14, 2007  12:42 PM
72 SettingsSearch modeYou can select Automatic or Manual.Preferred NetworksPreferred network list is stored in the SIM card. Itspecifies the priority by which your phone will registerto the available network during automatic registration. 1. In idle mode, press , to enter the main menu. 2. Select Settings > Connectivity > Network settings >Preferred networks and press ,.3. Press , or L Select  to enter the preferrednetwork list. The most preferred network will beat the top of the list. L4. Press +/- to select a certain network and press LOption.5. You can then select to Insert, Add to end or Deletethe selected network.Attach GPRSThis option allows you to set the GPRS attach modeduring PDP session. You can choose either one of thefollowing:• Always attached• Attached during PDP sessionBrowserVarious parameters relative to browser can be setunder this option, including WAP parameters andPush message.WAP profiles You can set up to 5 groups of WAP profiles. You canactivate and use one of the profiles. At the same time,you can edit or directly connect to the address. SelectEdit to access the following settings:•Profile name: A name to identify the server.•IP address: The numeric address of the server innnn.nnn.nnn.nnn format.•Port: The port number on the server. The numberis usually 0 (=9201).•Homepage: The URL of the homepage.•Linger time: The duration your phone staysconnected to the WAP.•Connection: Select HTTP or WSP connection.•CSD profiles: Select one of the CSD profiles.•GPRS profiles: Select one of the GPRS profiles.•Bearer: Select CSD or GPRS.x-saber_master_en.book  Page 72  Wednesday, November 14, 2007  12:42 PM
Icons & Symbols 73Icons & SymbolsIn idle mode, several icons and symbols can bedisplayed on the sub-display and main screen. Thestatus, network and battery icons are displayed all thetime. The rest of the icons are displayed if the featureis available, and not displayed if the feature isunavailable.If the network symbol is not displayed, it implies thatthe network is currently unavailable. You may be in abad reception area; moving to a different location mayhelp.Network  - Network icon comprises of 2portions. The left portion indicateswhether or not your phone is alreadyregistered with a network, and the rightportion indicates signal strength in 5levels (from no signal to strongest).Battery - Indicates battery level with 5battery level indicator bars. Whencharging, a scrolling icon will be displayed.International roaming - Displayed whenyour phone is registered to a networkother than your own.Whether to log on GPRS - There are 2GPRS status which are mutuallyexclusive: GPRS network is available butnot in use; or GPRS network is availableand in use. The icon will be displayed onlywhen you have logged on to GPRS.SMS - Indicates that you have at least oneunread message. The first icon indicatesthat the memory is full, while the secondicon indicates that there is unread SMSwhile the memory is full.MMS - Indicates there is a MMS message.WAP Push message - Indicates there is aWAP push message. Go to Browser > PushInbox to check it.Voicemail- Indicates voice messages thathave not been heard.Alarm Clock - Indicates that the alarmclock is activated.Vibration - Your phone will vibrate whenthere is an incoming call or when thealarm clock rings.Miss call - Indicates there is a miss call.x-saber_master_en.book  Page 73  Wednesday, November 14, 2007  12:42 PM
74 Icons & SymbolsCall Divert - Indicates that the call divertfunction is activated.Silence - Indicates that silent mode isactivated.Auto answer - Indicates that Auto answeris on.MP3 Key Locked - Indicates that the MP3key is locked.Memory card - Indicates the memory cardis in use.Bluetooth - Feature is activated.Camera’s multishot - Indicates camera willtake multiple 3 shots.Camera’s night mode- Indicates cameranight mode is on.Camera’s self-timer - Indicates camera’sself timer is on.Capture - Indicates OK to capture photo.Camera’s zoom - Indicates zoom featureof the camera is on.Start recording - Indicates OK to startvideo recording.Stop recording - Indicates OK to stopvideo recording.Video MMS on - Indicates video recordingin MMS size is on.Video MMS off - Indicates video recordingin MMS size is off.Alarm - Indicates the alarm is on.Countdown timer - Indicates thecountdown timer is due on thesubdisplay.Event - Alerts you an organiser event isdue.SMS - Indicates there is a SMS message.In call - Indicates the phone is in a call.x-saber_master_en.book  Page 74  Wednesday, November 14, 2007  12:42 PM
Icons & Symbols 75Incoming call - Indicates there is anincoming call.Music - Indicates the music feature is on.Outgoing call - Indicates the phone is in anoutgoing call.Reject call - Indicates there is a rejectedcall.Silence incoming call ringer - Indicates thatthe incoming call ringer has been silenced.x-saber_master_en.book  Page 75  Wednesday, November 14, 2007  12:42 PM
76 PrecautionsPrecautionsRadio WavesYour cellular mobile phone is a low powerradio transmitter and receiver. When it isoperating, it sends and receives radio waves.The radio waves carry your voice or datasignal to a base station that is connected to thetelephone network. The network controls the powerat which the phone transmits.• Your phone transmits/receives radio waves in theGSM frequency (900 / 1800 / 1900 MHz).• The GSM network controls transmission power(0.01 to 2 watts).• Your phone complies with all relevant safetystandards.• The CE mark on your phone shows compliancywith European electromagnetic compatibility (Ref.89/336/EEC) and low voltage directives (Ref. 73/23/EEC).Your cellular mobile phone is your responsibility. Toavoid damage to yourself, to others or to the phoneitself, read and follow all the safety instructions andmake them known to anyone borrowing yourphone.Furthermore to prevent unauthorized use ofyour phone:Keep your phone in a safe place and keep itout of small children's reach.Avoid writing down your PIN code. Try toremember it instead. Switch off the phone and remove the battery if you aregoing to leave it unused for a long time.Change your PIN code after purchasing the phoneand to activate call restriction options.The design of your phone complies with allapplicable laws and regulations. Howeveryour phone may cause interference withother electronic devices. Consequently youshould follow all local recommendations andregulations when using your cellular phone both athome and when away. Regulations on the use ofcellular phones in vehicles and aircraft areparticularly stringent.Public concern has been focused for some time on thepossible health risks for users of cellular phones. Thecurrent research on radio wave technology, includingthe GSM technology, has been reviewed and safetystandards have been drawn up to ensure protection fromexposure to radio wave energy. Your cellular telephonecomplies with all applicable safety standards and theRadio Equipment and Telecommunications TerminalEquipment Directive 1999/5/EC.x-saber_master_en.book  Page 76  Wednesday, November 14, 2007  12:42 PM
Precautions 77Always switch off your phoneInadequately protected or sensitive electronicequipment may be affected by radio energy. Thisinterference can lead to accidents.Before boarding an aircraft and/or whenpacking the phone in your luggage: the useof mobile phones in an aircraft may bedangerous for the operation of the aircraft, disrupt themobile phones network and may be illegal.In  hospitals, clinics, other health carecentres and anywhere else where you may bein the close vicinity of medical equipment.In areas with a potentially explosiveatmosphere (e.g. petrol stations and alsoareas where the air contains dust particles,such as metal powders).In a vehicle transporting flammable products (even ifthe vehicle is parked) or a vehicle powered by liquefiedpetroleum gas (LPG), check first that the vehiclecomplies with the applicable safety rules.In areas where you are requested to turn off radiotransmitting devices, such as quarries or other areaswhere blasting operations are in progress.Check with the vehicle manufacturer thatelectronic equipment used in your vehiclewill not be affected by radio energy.PacemakersIf you have a pacemaker:• Always keep the phone more than 15 cm from yourpacemaker when the phone is switched on, in orderto avoid potential interference.• Do not carry the phone in a breast pocket.• Use the ear opposite to the pacemaker to minimizethe potential interference.• Switch off your phone if you suspect thatinterference is taking place.Users of hearing aidsIf you are a user of a hearing aid, consult yourphysician and hearing aid manufacturer to learnwhether your particular device is susceptible tocellular phone interference.Improved performanceIn order to improve the performance of your phone,reduce radio energy emission, reduce batteryconsumption and ensure safe operation adhere to thefollowing guidelines:x-saber_master_en.book  Page 77  Wednesday, November 14, 2007  12:42 PM
78 PrecautionsFor the optimal and satisfactory operation ofthe phone, you are recommended to use thephone in the normal operating position(when not using in hands-free mode or witha hands-free accessory).• Do not expose your phone to extreme temperatures.• Treat the phone with care. Any misuse will void theInternational Guarantee.• Do not immerse the phone in any liquid; if yourphone is damp, switch it off, remove the battery.and let them dry for 24hrs before using them again.• To clean the phone, wipe it with a soft cloth.• Placing and receiving calls consumes the sameamount of battery energy. However, the mobileconsumes less energy in idle screen when kept inthe same place. When in idle screen and while youare moving, your phone consumes energy totransmit updated location information to thenetwork. Setting the backlight for a shorter periodof time as well as avoiding unnecessary navigatingin the menus will also help to save the battery'senergy for longer phoning and stand-byperformances.Battery information• Your phone is powered by a rechargeable battery.• Use specified charger only.• Do not incinerate.• Do not deform or open the battery.• Do not allow metal objects (such as keys in yourpocket) to short circuit the battery contacts.• Avoid exposure to excessive heat (>60°C or 140°F),moisture or caustic environments.You should only use Philips authenticbattery and accessories, as the use of anyother accessories may damage your phoneand may be dangerous, and will make allguarantees for your Philips phone null andvoid. The use of an incorrect type of battery may alsocause an explosion.Make sure damaged parts are replaced immediately bya qualified technician and that they are replaced withgenuine Philips replacement parts.x-saber_master_en.book  Page 78  Wednesday, November 14, 2007  12:42 PM
Precautions 79Do not use your phone while drivingSpeaking on the telephone while drivinglowers your concentration, which can bedangerous. Adhere to the followingguidelines:• Give your full attention to driving. Pull off the roadand park before using the phone.• Respect the local regulations in countries where youdrive and use your GSM phone.• If you want to use your phone in a vehicle, install thehands-free car kit which is designed for that purpose.• Ensure that your phone and car kit do not block anyair bags or other security devices fitted in your car.The use of an alarm system to operate a vehicle's lightsor horn to indicate incoming phone calls is prohibitedon public roads in some countries. Check localregulations.EN60950 NormIn case of hot weather or after a prolonged exposure tothe sun (e.g., behind a window or a windscreen), thetemperature of your phone's casing might increase,especially when featuring a metallic finish. Be verycareful in this case when picking up your phone and alsoavoid using it with an ambient temperature over 40°C.For pluggable phone, the socket-outlet shall beinstalled near the phone and shall be accessible. Environmental careRemember to observe the local regulationsregarding the disposal of the packagingmaterials, exhausted batteries and old phoneand please promote recycling.Philips has marked the battery and packaging withstandard symbols designed to promote recycling andappropriate disposal of your eventual waste.The labelled packaging material isrecyclable.A financial contribution has been madeto the associated national packagingrecovery and recycling system.The plastic material is recyclable (alsoidentifies the type of plastic).x-saber_master_en.book  Page 79  Wednesday, November 14, 2007  12:42 PM
80WEEE Marking in the DFU: “Information to the Consumer”Disposal of your old productYour product is designed and manufactured withhigh quality materials and components, which can berecycled and reused. When this crossed-out wheeled binsymbol is attached to a product it meansthe product is covered by the EuropeanDirective 2002/96/ECPlease inform yourself about the localseparate collection system for electricaland electronic products.Please act according to your local rules and do notdispose of your old products with your normalhousehold waste. The correct disposal of your oldproduct will help prevent potential negativeconsequences for the environment and humanhealth.FCC Compliance StatementThis equipment has been tested and found to complywith the limits for a Class B digital device, pursuantto Part 15 of the FCC Rules. These limits  aredesigned to provide reasonable protection againstharmful interference in a residential installation.This equipment generates, uses and can radiate radiofrequency energy and, if not installed and used inaccordance with the instructions, may cause harmfulinterference to radio communications. However,there is no guarantee that interference will not occurin a particular installation. If this equipment does cause harmful interference toradio or television reception, which can bedetermined by turning the equipment off and on, theuser is encouraged to try to correct the interferenceby one or more of the following measures: -- Reorient or relocate the receiving antenna. -- Increase the separation between the equipmentand receiver. -- Connect the equipment into an outlet on a circuitdifferent from that to which the receiver isconnected. Any changes or modifications not expresslyapproved by the party responsible for compliancecould void the user’s authority to operate theequipment. Some electronic devices are susceptible toelectromagnetic interference sent by phone ifinadequately shielded. Please use phone at least20cm or as far as you can from TV set,adio and otherautomated office equipement soas to avoid interference.9@9q_Precautions.fm  Page 80  Friday, January 4, 2008  10:43 AM
81TroubleshootingThe phone does not switch onRemove/reinstall the battery. Then charge the phoneuntil the battery icon stops scrolling. Unplug fromcharger and try to switch on the phone.Your phone doesn’t return to the idle screenLong press the hangup key or switch off the phone,check that the SIM card and the battery have beeninstalled correctly and switch it on again.The network symbol is not displayedThe network connection is lost. Either you are in aradio shadow (in a tunnel or between tall buildings) oryou are outside the network coverage area. Try fromanother place, try to reconnect to the network(especially when abroad), check that the antenna is inplace if your mobile has an external antenna, or contactyour network operator for assistance/information.The display doesn’t respond (or the display responds slowly) to key pressesThe display responds more slowly at very lowtemperatures. This is normal and does not affect theoperation of the phone. Take the phone to a warmerplace and try again. In other cases, please contact yourphone supplier.Your battery seems to over heatYou might be using a charger that was not intendedfor use with your phone. Make sure you always use thePhilips authentic accessory shipped with your phone.Your phone doesn’t display the phone numbers of incoming callsThis feature is network and subscription dependent.If the network does not send the caller’s number, thephone will display Call 1 or Withheld instead. Contactyour operator for detailed information on this subject.You can’t send text messagesSome networks don’t allow message exchanges withother networks. First check that you entered thenumber of your SMS centre, or contact your operatorfor detailed information on this subject.You have the feeling that you miss some callsCheck your call divert options.The display shows INSERT SIM Check that the SIM card has been inserted correctly.If the problem remains, your SIM card may bedamaged. Contact your operator.x-saber_master_en.book  Page 81  Wednesday, November 14, 2007  12:42 PM
82When attempting to use a feature in the menu, the mobile displays NOT ALLOWEDSome features are network dependent. Therefore,they are only available if the network or yoursubscription supports them. Contact your operatorfor detailed information on this subject.Your phone is not chargingIf your battery is completely flat, it might take severalminutes of pre-charge (up to 10 minutes in somecases) before the charging icon is displayed on thescreen.x-saber_master_en.book  Page 82  Wednesday, November 14, 2007  12:42 PM
83Philips Authentic AccessoriesSome accessories, such as a standard battery and acharger, are included as standard accessories in yourmobile phone package. Additional accessories mayalso be provided or sold separately. Package contentsmay therefore vary.To maximize the performance of your Philips phoneand not to void the warranty, always purchase PhilipsAuthentic Accessories that are specially designed foruse with your phone. Philips Consumer Electronicscannot be held liable for any damages due to use withnon authorized accessories.ChargerCharges your battery in any AC outlet. Small enoughto carry in a briefcase/handbag.Data connect kitProvides easy data connection to your Philips mobilephone. The USB cable enables high-speedcommunication between your phone and yourcomputer. The provided software allows you todownload pictures and melodies and to synchronizeyour contacts and appointments.Deluxe HeadsetThe integrated answer button offers you a simple wayto answer your calls. Simply answer an incoming callby pressing the button or long press to reject theincoming call.x-saber_master_en.book  Page 83  Wednesday, November 14, 2007  12:42 PM
84Trademark DeclarationJAVA is a trademark of SunMicrosystems, Inc.T9® is a trademark of TegicCommunications Inc.Bluetooth™ is a trade-markowned by telefonaktiebolagetL M Ericsson, Sweden andlicensed to Philips.Tegic Euro. Pat. App. 0842463x-saber_master_en.book  Page 84  Wednesday, November 14, 2007  12:42 PM
87Limited warranty1.  What Does This Limited Warranty Cover?Philips warrants to the original retail purchaser(“Consumer” or “You”) that this Philips cellularproduct and all accessories originally provided byPhilips in the sales package (“Product”) are freefrom defects in materials, design andworkmanship under normal use in accordancewith the operating instructions and pursuant tothe following terms and conditions. This limitedwarranty extends only to the Consumer forProducts purchased and used in the originalcountry of purchase. The limited warranty isvalid only in Philips’ intended country of sales ofthe product.2.  How Long is The Limited Warranty Period?The limited warranty period for the Productextends for ONE (1) YEAR from the date ofpurchase of the Product, documented by validproof of purchase. The limited warranty fororiginal Philips rechargeable battery extends forsix (6) months from the date of purchase.3.  What Will Philips Do if The Product is Not FreeFrom Material Defects in Materials andWorkmanship During The Limited WarrantyPeriod?During the limited warranty period, Philips or itsauthorized service representative will, at itsoption either repair or replace, without charge forparts or labour, a materially defective Productwith new or refurbished parts or Product andreturn such repaired or replaced Product to theConsumer in working condition. Philips willretain defective parts, modules or equipment.Repaired or replaced Product will be covered bythis limited warranty for the balance of theoriginal limited warranty period or ninety (90)days from the date of repair or replacementwhichever is longer. Repair or replacement ofProduct, at Philips’ option is your exclusiveremedy.4.  What is Not Covered By This Limited Warranty?This limited warranty does not cover:a)  Product that has been subjected to misuse,accident, shipping or other physical damage,improper installation, abnormal operationhandling, neglect, inundation, fire, water orother liquid intrusion; orx-saber_master_en.book  Page 87  Wednesday, November 14, 2007  12:42 PM
88b)  Product that has been damaged due torepair, alteration, or modification by anyonenot authorized by Philips; orc)  Product that has reception or operationproblems caused by signal conditions,network reliability or cable or antennasystems; ord)  Product defects or problems caused by useswith non-Philips products or accessories; or e)  Product which warranty/quality stickers,product serial number or electronic serialnumber has been removed, altered orrendered illegible; or f)  Product purchased, used, serviced, orshipped for repair from outside the originalcountry of purchase, or used for commercialor institutional purposes (including but notlimited to Products used for rentalpurposes); or g)  Product returned without valid proof ofpurchase or which proof of purchase hasbeen altered or is illegible.h) Normal wear and tear or Force Majeure.5.  How Do You Get Warranty Service?a)  Return the Product to an authorized servicecenter of Philips. You may contact the localPhilips office for the location of the nearestauthorized service center.b) The SIM card must be removed from theProduct before it is given to Philips. Philipsassumes no liability for damaged or loss ofthe SIM card or the data contained therein.c) If the Product failure is not covered by thislimited warranty, or this limited warranty isinapplicable, void or invalid due to anyterms and conditions stated herein, theConsumer will be charged for the cost ofrepair or replacement of the Product and allother related cost incurred in repairing orreplacing the Product.d)  IMPORTANT - you are required to returnthe Product together with a valid proof ofpurchase which must identify the point ofpurchase, date of purchase, Product modeland Product serial number clearly.6. Other Limitation: This Warranty is The EntireAgreement.EXCEPT FOR THE EXPRESSWARRANTIES SET FORTH ABOVE ANDTHOSE IMPLIED BY LAW AND WHICHCANNOT BE EXCLUDED OR MODIFIEDBY AGREEMENT, PHILIPS PROVIDES NOOTHER WARRANTY WHETHER EXPRESSOR IMPLIED (WHETHER BY STATUTE,UNDER THE OPERATION OF LAW OROTHERWISE) AND SPECIALLY DISCLAIMSx-saber_master_en.book  Page 88  Wednesday, November 14, 2007  12:42 PM
89ANY WARRANTY OF SATISFACTORYQUALITY MERCHANTABILITY ORFITNESS FOR A PARTICULAR PURPOSE.PHILIPS’ TOTAL LIABILITY FORDAMAGES RELATING TO OR ARISINGOUT OF THE PURCHASE OR USE OF THEPRODUCT, REGARDLESS OF THE TYPEOR CAUSE OF SUCH DAMAGE OR THEFORM OR CHARACTERISATION OF THECLAIM ASSERTED (E.G. CONTRACT ORTOPIT), SHALL NOT EXCEED THEORIGINAL PURCHASE PRICE PAID FORTHE PRODUCT.HOWEVER IN NO EVENT SHALL PHILIPSBE LIABLE FOR ANY PUNITIVE, SPECIAL,INCIDENTAL, INDIRECT ORCONSEQUENTIAL DAMAGES (INCLUDINGBUT NOT LIMITED TO THE LOSS OFUSE, LOSS OF TIME, INCONVENIENCE,COMMERIAL LOSS, LOST PROFITS, LOSTBUSINESS OPPORTUNITIES, COST OFSUBSTITUTION OF GOODS ORSERVICES, INVESTMENTS, DAMAGE TOGOODWILL OR REPUTATION, OR LOSSOF DATA AND CLAIMS BY THIRDPARTIES) RESULTING FROM PURCHASEOR USE OF THE PRODUCT, TO THEFULLEST EXTENT ALLOWED BY LAW,WHETHER OR NOT PHILIPS HAS BEENADVISED OF THE POSSIBILTY OF SUCHDAMAGES. THESE LIMITATIONS SHALLAPPLY NOTWITHSTANDING THEFAILURE OF THE ESSENTIAL PURPOSEOF ANY LIMITED REMEDY.This limited warranty represents the completeand exclusive agreement between the Consumerand Philips with respect to this cellular Productand it supercedes all prior agreements betweenthe parties, oral or written, and all othercommunications between the parties relating tothe subject matter of this limited warranty. Nocarrier, retailer, agent, dealer, employee, thereof,or employee of Philips is authorized to makemodifications to this limited warranty and youshould not rely on any such representation.This limited warranty does not affect theConsumer’s statutory rights under applicablenational laws in force.x-saber_master_en.book  Page 89  Wednesday, November 14, 2007  12:42 PM
90 Specific Absorption Rate InformationSpecific Absorption Rate InformationInternational standardsTHIS MOBILE PHONE MEETS THE INTERNATIONAL RECOMMENDATIONS FOR EXPOSURE TO RADIO WAVESYour mobile phone is a radio transmitter and receiver. It is designed and manufactured not to exceed the limitsfor exposure to radio frequency (RF) energy defined by the international standards. These recommendationshave been established by the International Commission on Non-Ionizing Radiation Protection (ICNIRP) and,the Institute of Electrical and Electronics Engineers (IEEE) that forecast a substantial safety margin for assuringthe protection of all persons, regardless of age and health.The exposure recommendations for mobile phones use a measurement unit known as the Specific AbsorptionRate (SAR). The SAR limit recommended by the ICNIRP for the mobile phones used by the general public is2.0W/kg averaged over ten grams of tissue and, is 1,6W/kg averaged over one gram of tissue by IEEE Std1528 for the head.Tests for SAR have been conducted using recommended operating positions with the mobile phone transmittingat its highest certified power level in all tested frequency bands. Although the SAR is determined at the highestcertified power level, the actual SAR levels of the mobile phone while operating are generally below themaximum SAR value. This is because the phone is designed to operate at multiple power levels so as to use onlythe power required to reach the network. In general, the closer you are to a base station antenna, the lower thepower output. While there may be differences between the SAR levels of various phones and at various positions, they all meetthe international protection standards for exposure to radio waves. The highest SAR value for this Philips Xenium 9@9q mobile phone when tested for compliance against thestandard was 0,266W/kg for ICNIRP recommendation and 0,076W/kg for IEEE Std 1528. For limiting the radio waves exposure, it is recommended to reduce the mobile phone call duration or to use aheadset. The purpose of those precautions is to take the mobile phone away from the head and the body.9@9Q_SAR.fm  Page 90  Friday, January 4, 2008  10:35 AM
Specific Absorption Rate Information 91USAYour wireless phone is a radio transmitter and receiver. It is designed and manufactured not to exceed limitsfor exposure to radio frequency (RF) energy set by the Federal Communications Commission (FCC) of theU.S. Government. These limits are part of comprehensive guidelines and establish permitted levels of RFenergy for the general population. The guidelines are based on standards that were developed by independentscientific organizations through periodic and thorough evaluation of scientific studies. The standards includea substantial safety margin designed to assure the safety of all persons, regardless of age or health. Theexposure standard for wireless fixed phoned employs a unit of measurement known as the Specific AbsorptionRate, or SAR. The SAR limits set by the FCC are 1.6W/kg. Tests for SAR are conducted using standardoperating positions accepted by the FCC with the phone transmitting as its highest certified power level in alltested frequency bands. Although the SAR is determined at the highest certified power level, the actual SAR level of the phone whileoperating can be well below the maximum value. This is because the phone is designed to operate at multiplepower levels so as to use only the power required to reach the network. In general, the closer you are to awireless base station, the lower the output power. The Highest SAR Values for this model phone when testedfor use on the Right cheek were 0.266 mW/g.This device complies with part 15 of the FCC Rules. Operation is subject to the following two conditions:(1) This device may not cause harmful interference, and(2) this device must accept any interference received, including interference that may cause undesiredoperation.9@9Q_SAR.fm  Page 91  Friday, January 4, 2008  10:35 AM

Navigation menu