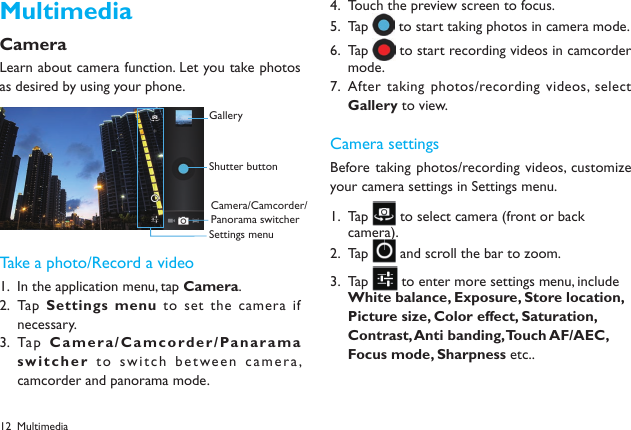
Sang Fei Consumer Communications W5510 UMTS/GSM Smartphone with Bluetooth/Wifi User Manual

Shenzhen Sang Fei Consumer Communications Co., Ltd. UMTS/GSM Smartphone with Bluetooth/Wifi

User Manual

SR701W5510
Back of the phone: 5.0Mpix camera  Power keyBackSide volume keyTo uch screenHeadphone jackDTV antennaFront cameraHomeRecent Charger/micro USB port connector
1Your PhoneHome screenYou may activate functions of this device by operations on the touch screen. There are five main screens, which could  be switched by sliding to the left or the right. Tap   in any interface to go back to the main screen. Tap an application icon on the main screen to start that application. Tap [Apps Panel   ] to find all applications.Your phone’s home screen consists of the following areas:Status BarApplication iconsShortcut iconsApps Panel
2KeysLearn about the main keys:Key Definition FunctionPower key -Press to turn on/off the screen display.-Press and hold to access the Phone options, choose Silent, Airplane mode, Power off or Mobile Data.Home key -Return to the home screen.-Press and  hold to open the list of recent applications.Back key -Back to the previous screen or exit.-Hide the onscreen keyboard while it’s opened.Menu key -Open options menu available on the current screen.-Hide the onscreen options menu while it's opened.Key Definition FunctionVolume key -Volume up/down.-Press to turn to silent mode while there is a call.ShortcutsLearn about the shortcuts:Key Definition FunctionMessage Quick access to message.Dial Quick access to dial phone.Contacts Quick access to phonebook.Browser Quick access to browser.Apps Panel Tap to into the applications screen.Notification PanelWhen you get a new notification, you can open the Your Phone
3Notifications panel to see what event notification or new information you have received. The Notifications panel lets you quickly switch between recently-opened apps.To open the Notifications panel, press and hold the status bar, then slide your finger downward.If you have several notifications, you can scroll down the screen to see them all. Status IconLearn about the status icons on the screen.Icons FunctionYour phone will not ring when receiving a call.Your phone will vibrate when receiving a call.Flight mode activated.Your phone is connected to a GSM/WCDMA network. The more bars are shown the better the reception is.Icons FunctionCall in progress.Call on hold.Speakerphone activated.You have a missed call.New SMS or MMS.New Email.WLAN is activated.The bars indicate the battery level.Connected to PC.Bluetooth is activated.The alarm clock is activated.The headset is plugged into the phone.Error occurred or caution required.Your Phone
4Table of contentsGetting started-----------------------------------6Assembling and Charge---------------------------------6Insert a Micro SD card (Memory card)--------------8Personalize your phone---------------------------------9Basic function-----------------------------------10Calls------------------------------------------------------10Messaging------------------------------------------------11Email------------------------------------------------------11Multimedia---------------------------------------13Camera--------------------------------------------------13Music-----------------------------------------------------14FM Player-------------------------------------------------15Digital television (DTV) ------------------------------15Search and Web--------------------------------16Search settings------------------------------------------16Web browser-------------------------------------------16Internet connections--------------------------17Bluetooth------------------------------------------------17Wi-Fi-----------------------------------------------------18Settings-------------------------------------------19Sound setting--------------------------------------------19Screen settings------------------------------------------19Factory data reset--------------------------------------20Safety & Precaution----------------------------21Table of contents
5Getting startedCongratulations on your purchase and welcome to Philips!To get the most of your product and enjoy all Philips has to offer, register your product at: www.philips.com/mobilephonesMore details about your product, please access:www.philips.com/support Note:Please read the safety instructions in the "Safety & • Precaution" section before use.Assembling and ChargeLearn  about installing SIM  card  and charging  the battery for the first use. Insert SIM cardFollow the steps below to insert your SIM card. Remember  to turn off your mobile phone before removing the back cover. Remove the back cover.1.  Take out the battery.2.  Getting started
6Insert the SIM card.3. Install the battery.4.  Replace the back cover.5.  Charge the batteryA new battery is partially charged. The battery icon in the upper-right corner  shows the battery level of charging status.  Getting started
7Getting started TipsYou can use the phone while it is charging.• Keeping the  charger plugged to  the mobile phone when • the battery is  fully charged will  not damage the  battery. The only way to turn off the charger is to unplug it, so it is advisable to use an easily accessible power socket. If you do not intend  to use your phone for several days, • we recommend that you remove the battery. If a fully charged battery left unused, it will lost its charge • over time. If a battery is being used for the first time or the battery • has not  been used for a  prolonged period,  it may take longer time to recharge. Insert a Micro SD card Insert a memory cardSee the image below for additional information:          1. Push the card door            2. Lift the card door3. Insert the card       4. Put down and lock the                                   card doorRemove the memory cardBefore removing a  memory card, first unmount  it for safe removal.In idle screen, tap 1.   > System settings > Storage > Unmount SD card.Press down the card holder and push out the 2. memory card. Note:Do not  remove a memory card while  the device • is transferring or accessing information to prevent corrupting or damaging the files in the memory card. Format the memory cardFormatting your memory card on a PC may cause 12
8Getting startedincompatibilities with your device, please format the memory card only on the device. In idle screen tap   > System settings > Storage > Unmount SD card > Erase SD card > Erase everything to format the memory card. Note:Before formatting the  memory card, remember to  make • backup copies of all important data stored on your device. The manufacturer’s warranty does  not cover loss  of data resulting from user actions.Use as mass storageMemory  card can be used as  mass storage when connected with PC. You can synchronize data between your computer and memory card.Connect the phone and PC with USB cable.1. Drag down the Notification panel, and tap 2.  USB connected > Turn on USB storage.On your computer, then you can check/edit the 3. content of memory card. Note:Before turning on  USB storage, make sure you have • mounted the memory card to your phone.Personalize your phoneMake the phone  look and sound just  the way you want  it to.  Personalize it  with a different wallpaper, skin, ringtone, and notification sound for events such as incoming  text, email, and calendar reminders.Change the wallpaper: Tap 1.   > Wallpaper to choose the one you want, or press and hold the blank area of the home screen to change.Add widgets/shortcuts to the home screen: Tap  2. , press and hold the widget or icon you want to add,  drag it to a location.Rearrange or remove widgets and  icons: Press 3. and hold the widget or icon you want to move, drag it to a new location.Delete the widgets and  icons: Press and hold 4. the widget or icon, drag it to the deletion area on the top of the screen.
9Basic functionCallsMake a call from DialerTap  1.   in the home  screen to  enter dialer interface.Input the phone number you want to dial in the 2. interface, tap    to make a call. Note:•   can be used to delete mistake number.Answer/Reject a callAnswer a call: when a  call comes in, slide the 1. phone button   right to answer the call.Reject  a  call: when  a  call  comes  in, slide  the 2. phone button   left to reject the call.Reject a call with  message: when a call comes 3. in, slide the phone button   top to reject the call with message. TipsWhen a  call is in progress,  use the buttons  onscreen • to mute or unmute the microphone or to turn  the speakerphone on or off. When a  call is in progress,  you can  tap • Hold  and  then tap Add call  to add a  new call, the first call  will be hold automatically.Call a phone number in a  text message or emailTap and hold the phone number within  the 1. message or email to have menu options.Select to call with the SIM card you want.2. Make an emergency callTap    in the main  screen to  enter dialer interface, and dial the emergency number for your locale, and then tap    .Basic function
10MessagingSend a SMS/MMS messageIn the idle mode, tap 1.   > .Tap  2.   to edit or  add the receiver from Contacts.Tap the text box to edit the text message.3. Tap  4.   to add Pictures/Videos/Audio/ VCard/Slideshow if you want to sent an MMS message.Tap  5.   to send message  or tap   to save the message as a draft.  Note:There is a limit  on  the number of  characters for a  single • text message.  If  you exceed  the limit, your text message will be  delivered as one but  will  be billed as more than one message.Your text  message automatically becomes  a multimedia • message if you enter an email address as the recipient, add a message subject, attach an item, or compose a very long message.Message setting optionsYou can set  storage,  delivery reports, message ringtone etc. by tapping Messaging >   >Settings.EmailYou may receive and send emails via Email. Set up EmailIn the applications menu, tap 1.  Email.Input email address and password, tap 2.  Next, give this account a name, your name (displayed on outgoing messages) , tap Next. You may also  use Manual setup for the  email account:Input email address and password.1. Tap  2.  Manual setup to select the  type of account.Finish details like server. 3. Tap 4.  Next to complete the setup.Basic function
11Basic function Note:When you are finished setting up  the  email account, the • email messages are downloaded to your device.Consult your mail service provider for the  mail server • configuration.Send emailsYou may send emails to one or more recipients.Before sending, add the recipient email address, or select from Contacts. In the applications menu, tap 1.  Email.Tap 2.   for the editing interface.Tap  3.  To  and  input the recipient’s email address. If necessary, tap   >Add Cc/Bcc to input other recipient’s email address for cc or bcc. Tap 4.  Subject and input the subject.Tap 5.  Compose email and input the text.Tap    6.   > Attach file to insert the file as needed.Tap 7.   to send the email.Receive emailsIn the applications menu, tap 1.  Email.Tap 2.   to refresh the email list. The device will connect to  the server and 3. download emails. All emails received will be saved in the Inbox.Tap the email to read.4. During reading, tap 5.   to reply the email to the sender; tap   and tap Forward to  forward the email to others; tap   and tap Reply all to reply to all contacts in the email.
12MultimediaCameraLearn about camera function. Let you take photos as desired by using your phone. Take a photo/Record a videoIn the application menu, tap 1.  Camera.Tap  2.  Settings menu to set the  camera if necessary.Tap  3.  Ca m e r a / C a mcor d e r / Pa nar a m a switcher to switch between camera, camcorder and panorama mode.Touch the preview screen to focus.4. Tap 5.   to start taking photos in camera mode.Tap 6.   to start recording videos in camcorder mode.After taking photos/recording videos, select 7. Gallery to view.Camera settingsBefore taking photos/recording videos, customize your camera settings in Settings menu.Tap 1.   to select camera (front or back camera).  Tap 2.   and scroll the bar to zoom.Tap 3.   to enter more settings menu, include White balance, Exposure, Store location, Picture size, Color effect, Saturation, Contrast, Anti banding, Touch AF/AEC, Focus mode, Sharpness etc.. GalleryShutter buttonCamera/Camcorder/Panorama switcherSettings menuMultimedia
13MultimediaMusicYou can play your favorite music through music player. Note:Please install  the memory  card with  music saved before • playing music.Play MusicIn the application menu, tap 1.  Music. Select  the song you want to start playback.In now playing screen, tap 2.   >Add  to playlist, you can place the song in current playlist, or create a new playlist.In now playing screen, tap 3.   >Use as ringtone, you can set the current music as ringtone.Function DefinitionPlay and resume playback.Pause playback.Select previous track.Select next track.Select the play mode:• Repeating current song. • Repeating all song.Activate Shuffle mode, play current in randomly.Select to enter into playlist. TipsWhen listening to music, adjust the volume to a moderate • level. Continuous  exposure to  high volume may impair your hearing.
14FM PlayerTo listen to the  FM Player, you must connect headset, which serves as the radio antenna. Tap  , you can find more menu:Scan1.  : Tap to search the radio frequency automatically.Start recording/Stop recording2.  : Tap  to record FM radio.Settings3.  : Set Regional band, Audio output mode, A lte rna te  frequ enc y,  Record duration and Revert to factory defaults.Sleep4.  : Tap select Auto-off sleep time.All channels5.  : Tap to view all channels.MultimediaPress to turn on/off radioHeadset/Speaker switcherSwitch next / previous radioTap '+' to add a new frequency;Tap preset frequency to selectthe frequency.
15Digital television (DTV) Your phone supports digital television based on Terrestrial Integrated Services Digital Broadcasting (ISDB-T).Tap   , you can find more menu:Scan1.  : Tap to search the radio frequency automatically.Start recording/Stop recording2.  : Tap  to Switch next / previous chanelView chanel listTa p to view more menuSingal of DTV Chanel nameCapture screenrecord FM radio.Settings3.  : Set Regional band, Audio output mode, A lte rna te  frequ enc y,  Record duration and Revert to factory defaults.Sleep4.  : Tap select Auto-off sleep time.All channels5.  : Tap to view all channels.
16Search and WebYou can search for information on the phone and on the Web by using Google Search.Search settingsTap Search widget in home screen or tap 1.   >  Search to enter search screen.Tap 2.   > Search settings.Tap  3.  Searchable items to select  items you want included when doing a search.Tap  4.  Clear shortcuts  to clear shortcuts to recently chosen search suggestions. TipsTa p •  in search screen to quickly select search range(all/web/apps/people).Web browserOpen the web browser and start surng the Web.Going to a webpageTap  1.  Browser to enter the wap, then  tap URL field on top of  the screen to input the  web address. Note:URL bar  will auto-disappear, and  will auto-appear when • slide down on the screen.Tap 2.   button on URL bar,  to open multiple browser windows or switch among them.Tap 3.   >Bookmarks to view bookmarks list.Tap  4.   >Save to bookmarks  to  add  the current web as a bookmark. TipsYou can  swipe your finger on the  screen to  navigate and • view other areas of the webpage or pinch to zoom in/out.Search and Web
17Internet connectionsBluetoothThe device supports wireless Bluetooth connection to create wireless connections between the device and the Bluetooth earphone, hands  free vehicle-mounted phone equipment,  computer or other devices for data exchange.Turn on/ off BluetoothIn the applications menu, tap 1.  Settings.Tap  2.  Bluetooth to select or  clear Bluetooth check box. Note:Turn off Bluetooth when not in use to save battery power, • or in  places where using a wireless device is  prohibited, such as on board an aircraft and in hospitals.Receive data via BluetoothTurn on the  Bluetooth function,  then tap 1. Settings> Bluetooth, tap the device name on the top to make the device visible. Note:You can  set the device visibility timeout by tap •   > Visibility timeout. Tap2.   Search for devices on the bottom.Select a device, enter a pair password and select 3. Pair to pair with the other device. On the receiving device, accept the file.4.  Note:Some devices, especially headsets  or hands-free car kits, • may have a fixed Bluetooth PIN, such as 0000. If the other device has a PIN, you must enter it.Send data via BluetoothSelect a file or item, such as a contact or media 1. file from an appropriate application or file.Tap 2.   > Share>Bluetooth.Select a paired Bluetooth device on the  list, 3. then the file will be sent directly.Internet connections
18 Internet connectionsWi-FiYou may connect  to Wi-Fi for wireless internet and download.Connect to Wi-FiIn the applications menu, tap 1.  Settings>Wi-Fi.Select or clear Wi-Fi check box.2. Wi-Fi search and connectionIn the applications menu, tap 1.  Settings>Wi-Fi.If W-Fi is  on, tap 2.  Scan. The device will list  the networks in the range being searched. Select the network to be connected, and tap 3. Connect. Note:If necessary, input the wireless password and other • information, then tap Connect. The wireless indicator     will show in the  status  line after the  device reaches the network.
19SettingsSound settingVolumeIn the applications menu, tap 1.  Settings> Sound >Volumes.Scroll the volume indicator to adjust, select and 2. tap OK to save.In the main screen, press the volume on the 3. side to adjust the  ringtone & notifications volume. Press the volume down key to set as vibration mode and silent mode.  Note:Press the•  [Power Key] for a  while,  and tap the  silent mode/ vibration mode/ normal mode in this option menu as a short cut to activate the corresponding mode.Ringtone SettingsYou can select  the ringtone you like to set as incoming ringtone.In the applications menu, tap 1.  Settings>Sound >Phone ringtone.Scroll the ringtone  list up and  down, tap the 2. ringtone name to listen; select one and tap OK to save.Screen settingsSet wallpaperIn the main screen, tap 1.   to open the options.Tap 2.  Wallpaper and select from Gallery,  Live wallpapers or Wallpapers. Scroll the wallpaper thumbnails  to select the 3. wallpaper you like and tap Set wallpaper.Live wallpaperYou may set the screen with live wallpaper.In the main screen, tap 1.   to open the menu options.Ta p 2.  Wallpaper and select from Live wallpapers.Select the wallpaper you like and  tap 3.  Set wallpaper.Settings
20 SettingsBrightness settingIn the applications menu, tap 1.  Settings  > Display > Brightness.Scroll to adjust the brightness, tap 2.  OK to save.Screen timeout settingYou can set the screen timeout time to adjust the time before the screen automatically locks.In the applications menu, tap 1.  Settings  > Display > Sleep.Select and tap the screen timeout time to finish 2. the settings.Factory data resetIn the applications menu, tap 1.  Settings> Backup & reset.Tap 2.  Factory data reset.Tap 3.  Reset phone.Tap  4.  Erase everything and  the phone will restart and reset to the factory data.
21Safety & PrecautionPrecautionKeep your phone away from small childrenKeep your phone and  all accessories out of  the reach of small children. Small parts may cause  choking  or serious injury if swallowed.Radio WavesYour phone  transmits/receives radio waves in the  GSM frequency (850/900/1800/1900MHz) and WCDMA frequency (850/1900MHz). Check with  the vehicle manufacturer that  electronic equipment used  in your vehicle will  not  be affected by radio energy.Switch off your phoneTurn off the phone when in an aircraft. The use of mobile phones in an aircraft may be dangerous for the operation of the  aircraft,  disrupt  the mobile phones  network and may be illegal. In hospitals, clinics, other health care centers and anywhere else where you may be in the  close vicinity of medical equipment. In areas with a  potentially explosive atmosphere (e.g. petrol stations and also areas where the air contains dust particles, such as metal powders).In a vehicle transporting flammable   products or  a vehicle powered by liquefied petroleum gas (LPG).In quarries or other areas where blasting operations are in progress.Your mobile phone and your carAvoid using your phone  while  driving and obey  all regulations that restrict the use of  mobile  phones while driving. Use hands free accessories to increase your safety when possible. Ensure that your phone and car kit do not block any air bags or other security devices fitted in your car.Handle your phone carefully and sensiblyFor the optimal and  satisfactory operation  of the phone you are recommended to use  the phone in the  normal operating position. Do not immerse the phone in any liquid; if your phone • is damp, switch it off, remove the battery and let them dry for 24hrs before using them again. To clean the phone, wipe it with a soft cloth.• In hot  weather or  after prolonged exposure to the • sun (e.g.,  behind a window or  a windscreen), the temperature of your phone's casing might increase.  Be very careful in this case  when  picking up your phone and also  avoid using it  with an ambient temperature over 40° C.Protect batteries from damageYou should  only use Philips Authentic Accessories, as the use of any other accessories may damage your phone and may be dangerous, and will  make all  guarantees for your Philips phone null and void. The use of an unspecified type of battery may also cause an explosion.Safety & Precaution
22Make sure damaged parts  are replaced immediately by a qualified  technician and that they are replaced with genuine Philips replacement parts.Your phone is powered by a rechargeable battery. • Use specied charger only. • Do not incinerate. • Do not deform or open the battery.• Do not  allow metal objects  (such as keys in your • pocket) to short circuit the battery contacts.Avoid exposure to excessive heat (>60° C or 140° F), • moisture or caustic environments.Environmental careRemember to observe the local regulations regarding the disposal of  the packaging materials,  exhausted  batteries and old  phone and please promote their recycling. Philips has  marked the  battery and  packaging with standard symbols designed to  promote the  recycling and appropriate disposal of your eventual waste. : The labeled packaging material is recyclable.  : A financial contribution has been made to the associated national packaging recovery and recycling system. : The plastic material is recyclable (also identifies the type of plastic).WEEE  Marking  in  the  DF U: “Information  to  the Consumer” Disposal of your old product Your product is designed  and manufactured with high quality materials and components, which can be recycled and reused.When this  crossed-out wheeled  bin symbol is attached to  a  product  it  means  the  product  is  covered  by  the European Directive 2002/96/ECPlease inform yourself about the local separate collection system for electrical and electronic products.Please act  according to  your local rules  and do not dispose of your old products with your normal household  waste. The correct disposal of your old product will help prevent potential negative consequences for the environment and human health.This device may contain commodities, technology or  software subject to  export  laws and  regulations from the US  and other countries. Diversion contrary to law is prohibited.TipsPacemakersIf you have a pacemaker:Always keep the phone  more than  15 cm from your • pacemaker when the phone is switched on, in order to avoid potential interference.Do not carry the phone in a breast pocket.• Use  the ear opposite  to  the pacemaker to  minimize • the potential interference.Switch off your phone if you suspect that interference • is taking place.Hearing aidsIf you are a user of  a hearing aid,  consult  your physician and hearing aid manufacturer to learn whether your particular device is susceptible to cellular phone interference.Safety & Precaution
23Safety & PrecautionHow to prolong the battery life of your phoneTo  have your mobile phone function properly, sufficient battery power is important.  For the power-saving purpose, do the following, if applicable:Turn off the Bluetooth function of your phone.• Set the backlight level and duration of your phone to a • low value.Turn on the auto keypad lock; turn off the key sounds, • tap vibration, or vibration alerts.Establish GPRS  connection when needed. Otherwise, • your phone will keep searching for GPRS  connection, and drain your battery power.Turn off your phone if there is no coverage. Otherwise, • the phone  will keep searching for network, and drain your battery power.TroubleshootingThe phone does not switch onRemove/reinstall the  battery. Then charge the phone  until  the battery icon stops scrolling. Unplug the charger and try to switch the mobile on.The display shows BLOCKED when you switch on  the phoneSomebody tried  to use your phone but didn’t know the PIN code or  the unblocking code (PUK). Contact  your service provider.The display shows IMSI failureThis problem is related to your subscription. Contact your operator.Your phone doesn’t return to home screenLong press the Power key or switch off the phone, check that the SIM card and the battery are installed correctly and switch it on again.The network symbol is not displayedThe network connection is lost. Either you are in a radio shadow (in a  tunnel or between tall buildings) or  you are outside the network coverage area. Try from another place to reconnect to the network(Especially when  abroad),  check  that the antenna is in place if your mobile has an external antenna, or contact your network operator for assistance/information.The  display doesn’t  respond (or  the  display responds slowly) to key pressesThe display responds more slowly at very low temperatures. This is normal  and does not affect the operation of  the  phone. Take the phone to a warmer place and try again. In other cases please contact your phone supplier.Your battery seems to over heatYou might  be using a charger  that was not intended  for use with your phone. Make sure you always use the Philips authentic accessory shipped with your phone.Your phone  doesn’t display the phone numbers  of incoming callsThis feature is  network and subscription  dependent. If the network doesn’t send the caller’s number, the phone will display Call 1  or Withheld instead. Contact your operator for detailed
24information on the subject.You can’t send text messagesSome networks don’t allow message exchanges with  other networks. First check that you have entered the number of your SMS centre, or contact your operator for detailed  information on this subject.You can’t receive and/or store JPEG picturesA picture may not be accepted by your mobile phone if it is too large, if its name is too long, or if it doesn’t have the correct file format.You feel that you have missed some callsCheck your call forwarding options.When charging, the battery  icon  shows no bar and  the outlines ashingOnly charge the battery  in an environment where the temperature does not go below 0°C (32°F) or above 50°C (113°F).In other cases please contact your phone supplier.The display shows SIM failureCheck that  the SIM card has been inserted correctly. If the problem persists, your SIM card may be damaged. Contact your operator.When attempting  to use a  feature in  the menu,  the display shows NOT ALLOWEDSome features are network dependent. They are only available, therefore, if the network or your subscription supports them. Contact your operator for detailed information on this subject.The display shows INSERT YOUR SIM CARDCheck that  the SIM card has been inserted correctly. If the problem persists, your SIM card may be damaged. Contact your operator.The autonomy of  your phone  seems lower than indicated on the user guideThe autonomy is  linked to your settings  (e.g., ringer  volume, backlight duration)  and the features you use. To increase the autonomy, and whenever possible, you must deactivate features you do not use.Your phone doesn’t work well in your carA car contains many metallic parts that absorb electromagnetic waves which  can affect the  phone’s performance. A  car kit is available to provide you with an  external  antenna and enables you to make and receive phone calls  without handling the handset. Note:Check with  the local authorities whether  or not you are • allowed to use the phone while driving.Your phone is not chargingIf the battery is completely flat, it might take several minutes of precharge (up to 5  minutes in some  cases)  before the charging icon is displayed on the screen.The picture captured with the  phone camera is not clearMake sure that the camera lens on both sides is clean.Safety & Precaution
25Safety & PrecautionTrademark DeclarationAndroid Android is a trademark of Google, Inc.Bluetooth™ Bluetooth™ is  a trade-mark owned by telefonaktiebolaget L  M Ericsson, Sweden and licensed to Philips.Philips PHILIPS and  PHILIPS’ Shield Emblem are registered trademarks of  Koninklijke Philips Electronics N.V. manufactured by Shenzhen Sang Fei Consumer Communications  Co., Ltd.  Under  license from Koninklijke Philips Electronics N.V..         Limited warranty1.  What Does This Limited Warranty Cover?Philips warrants to the original  retail purchaser (“Consumer” or “You”)  that  this Philips cellular product and  all  accessories originally provided by Philips in the sales package (“Product”) is free from defects in materials, design  and workmanship under normal use  in accordance with  the operating instructions and pursuant to  the following terms  and conditions. This limited warranty extends only to the Consumer for Products purchased and used  in the original  country of  purchase. The limited warranty is valid only in Philips’ intended country of sales of the product.2.  How Long is The Limited Warranty Period?The limited warranty period for the Product extends for ONE (1) YEAR from the date of purchase of the Product, documented by valid proof of purchase. The limited warranty for original  Philips rechargeable battery extends for six  (6)  months from the date of purchase.3.  What Will Philips do if The Product is Not Free from Material Defects in Materials and Workmanship during the Limited Warranty Period?During the  limited warranty period, Philips or its authorized service representative will, at its option either repair or replace, without charge  for parts or labour, a  materially defective Product with new  or refurbished parts  or Product and return such repaired or  replaced Product to the  Consumer in working condition. Philips will  retain defective parts, modules or equipment. Repaired or  replaced Product will be covered by this limited warranty for the balance  of  the original limited warranty period or ninety (90)  days from the date of repair or replacement whichever is longer.  Repair or replacement of Product, at Philips’ option is your exclusive remedy.4.  What is Not Covered by This Limited Warranty?This limited warranty does not cover:a) Product that has been subjected to misuse, accident, shipping or other  physical damage, improper installation, abnormal operation  handling,   neglect,  inundation, fire, water  or  other liquid intrusion; orb) Product that has  been damaged due to  repair, alteration, or modification by anyone not authorized by Philips; orc) Product that has reception or operation problems caused by signal conditions, network reliability or cable or antenna systems; or
26d) Product defects or problems caused by uses with non-Philips products or accessories; ore) Product which  warranty/quality stickers, product serial number or electronic serial number has  been removed, altered or rendered illegible; orf) Product purchased, used, serviced, or shipped for repair from outside the original country of purchase, or used for commercial or institutional  purposes (including but not  limited to Products used for rental purposes); org) Product returned without valid proof of purchase or which proof of purchase has been altered or is illegible.h) Normal wear and tear or Force Majeure.5.  How Do You Get Warranty Service?a) Return the Product to an authorized service center of Philips. You may contact  the local Philips  office  for the location  of the nearest authorized service center.b) The SIM card must be removed from the Product before it is given to Philips. Philips assumes no  liability for damaged or loss of the SIM card or the data contained therein.c) If the Product failure is not  covered by this limited warranty, or this  limited warranty is  inapplicable, void or invalid due to any terms and conditions  stated herein, the Consumer  will  be charged for the cost repair or replacement of the Product and all other related cost incurred in repairing or replacing the Product.d) IMPORTANT  -  you are required to return the Product together a valid proof of purchase which must identify the point of purchase, of purchase, Product model and Product serial number clearly.6.   Other Limitation: This Warranty is The Entire Agreement.EXCEPT FOR THE EXPRESS WARRANTIES SET FORTH ABOVE AND THOSE IMPLIED BY LAW AND WHICH CANNOT BE EXCLUDED  OR MODIFIED BY AGREEMENT, PHILIPS PROVIDES NO  OTHER WARRANTY WHETHER EXPRESS OR IMPLIED (WHETHER BY STATUTE, UNDER THE OPERATION  OF LAW OR OTHERWISE) AND SPECIALLY DISCLAIMS ANY WARRANTY OF SATISFACTORY QUALITY MERCHANTABILITY  OR  FITNESS FOR A PARTICULAR PURPOSE.PHILIPS’ TOTAL LIABILITY FOR  DAMAGES RELATING TO OR ARISING OUT  OF THE PURCHASE OR USE  OF THE PRODUCT, REGARDLESS OF THE TYPE OR CAUSE OF SUCH DAMAGE OR THE FORM  OR CHARACTERISATION OF THE CLAIM ASSERTED (E.G. CONTRACT OR TOPIT), SHALL NOT EXCEED THE ORIGINAL PURCHASE  PRICE PAID FOR THE PRODUCT.HOWEV ER  IN  NO  EVENT   SHALL  PHILIPS  B E  LIABL E FOR ANY PUNITIVE, SPECIAL, INCIDENTAL, INDIRECT OR CONSEQUENTIAL  DAMAGES (INCLUDING BUT NOT LIMITED TO THE LOSS  OF  USE, LOSS OF TIME, INCONVENIENCE, COMMERIAL LOSS, LOST PROFITS, LOST BUSINESS OPPORTUNITIES,  COST  OF SUBSTITUTION OF GOODS  OR SERVICES,  INVESTMENTS, DAMAGE TO GOODWILL OR  REPUTATION, OR LOSS OF  DATA AND CLAIMS BY THIRD PARTIES) RESULTING FROM PURCHASE OR USE  OF THE PRODUCT, TO THE FULLEST  EXTENT ALLOWED BY LAW, WHETHER OR NOT PHILIPS HAS BEEN Safety & Precaution
27Safety & PrecautionADVISED OF THE POSSIBILTY  OF  SUCH DAMAGES. THESE LIMITATIONS SHALL APPLY NOTWITHSTANDING THE FAILURE OF THE ESSENTIAL  PURPOSE  OF ANY LIMITED REMEDY.This limited  warranty represents the complete  and exclusive agreement between the  Consumer and Philips  with respect to this cellular  Product and  it  supersedes all prior agreements between the  parties, oral  or written, and all  other communications between the  parties relating to the  subject matter of this limited warranty. No carrier, retailer, agent, dealer, employee, thereof, or employee of Philips is authorized to make modifications to  this limited warranty and you should  not rely on any such representation. This limited warranty does not  affect the Consumer’s statutory rights under applicable national laws in force.FCC Regulations This mobile  phone complies with part 15  of the FCC Rules. Operation is  subject to the following two conditions: (1) This device may not cause harmful  interference, and (2) this  device must accept any interference received, including interference that may cause undesired operation.This mobile  phone has been tested  and found to  comply with the  limits for a  Class B digital device, pursuant  to Part 15 of  the FCC Rules. These limits  are designed to  provide reasonable protection against harmful interference in a residential installation. This  equipment  generates  uses and can radiated radio frequency energy and, if not installed and used in accordance with the instructions, may cause harmful interference to radio  communications. However, there is no  guarantee that interference will not  occur  in a particular installation  If  this equipment does cause harmful interference to radio or television reception, which can be determined by turning the equipment off and on, the user is encouraged to try to correct the interference by one or more of the following measures:-Reorient or relocate the receiving antenna.-Increase the separation between the equipment and receiver.-Connect the  equipment into an outlet  on a circuit different from that to which the receiver is connected.-Consult the  dealer or an experienced  radio/TV technician for help.Changes or  modifications not expressly approved by the party responsible for compliance  could void the  user‘s authority to operate the equipment.The antenna(s)  used for this transmitter must not be co-located or  operating in conjunction with  any other  antenna  or transmitter.RF Exposure Information (SAR)This mobile  phone meets the government’s requirements for exposure to radio waves.This phone  is designed and manufactured not  to  exceed the emission limits  for exposure to radio frequency (RF) energy set by the Federal Communications Commission  of the U.S. Government.  The exposure standard for wireless mobile phones employs a unit of measurement known as the Specific Absorption Rate, or
28 Safety & PrecautionSAR.    The SAR limit  set by the FCC is 1.6W/kg.   *Tests for SAR are conducted  using standard operating  positions accepted by the FCC with the phone transmitting at its  highest certified power level in all tested  frequency bands.  Although the SAR  is determined at  the  highest certified power level, the actual SAR level of the phone while operating can be well below the maximum value.  This is  because the phone  is designed to operate at  multiple power levels so as  to  use only the  poser required to reach the network.  In general, the closer you are to a wireless base station antenna, the lower the power output.The highest  SAR value for  the model phone  as  reported to the FCC  when tested for use at the ear  is 0.793 W/kg and when worn on the body, as described in  this user guide, is 1.143W/kg  (Body-worn measurements differ among phone models, depending  upon available accessories and  FCC requirements.)While there may be differences between the SAR  levels of various phones  and at various positions, they all meet  the government requirement.The FCC has granted an Equipment Authorization for this model phone with  all reported SAR levels evaluated as in compliance with the FCC RF exposure guidelines.  SAR information on this model phone is on file with the FCC and can be found under the Display Grant section of www.fcc.gov/oet/ea/fccid after searching on FCC ID:   VQR-W5510For body worn operation, this phone has been tested and meets the FCC RF exposure guidelines for use with an accessory that contains no  metal and the positions  the handset a minimum  of 1.0 cm from the body.  Use of other accessories may not ensure compliance with FCC RF exposure guidelines.  If you do no t use a body-worn accessory and are not holding the phone at the ear, position the handset a minimum of 1.0 cm from your body when the phone is switched on.Please make sure the temperature for production unit will  be between -10~50 ˚C.

Navigation menu