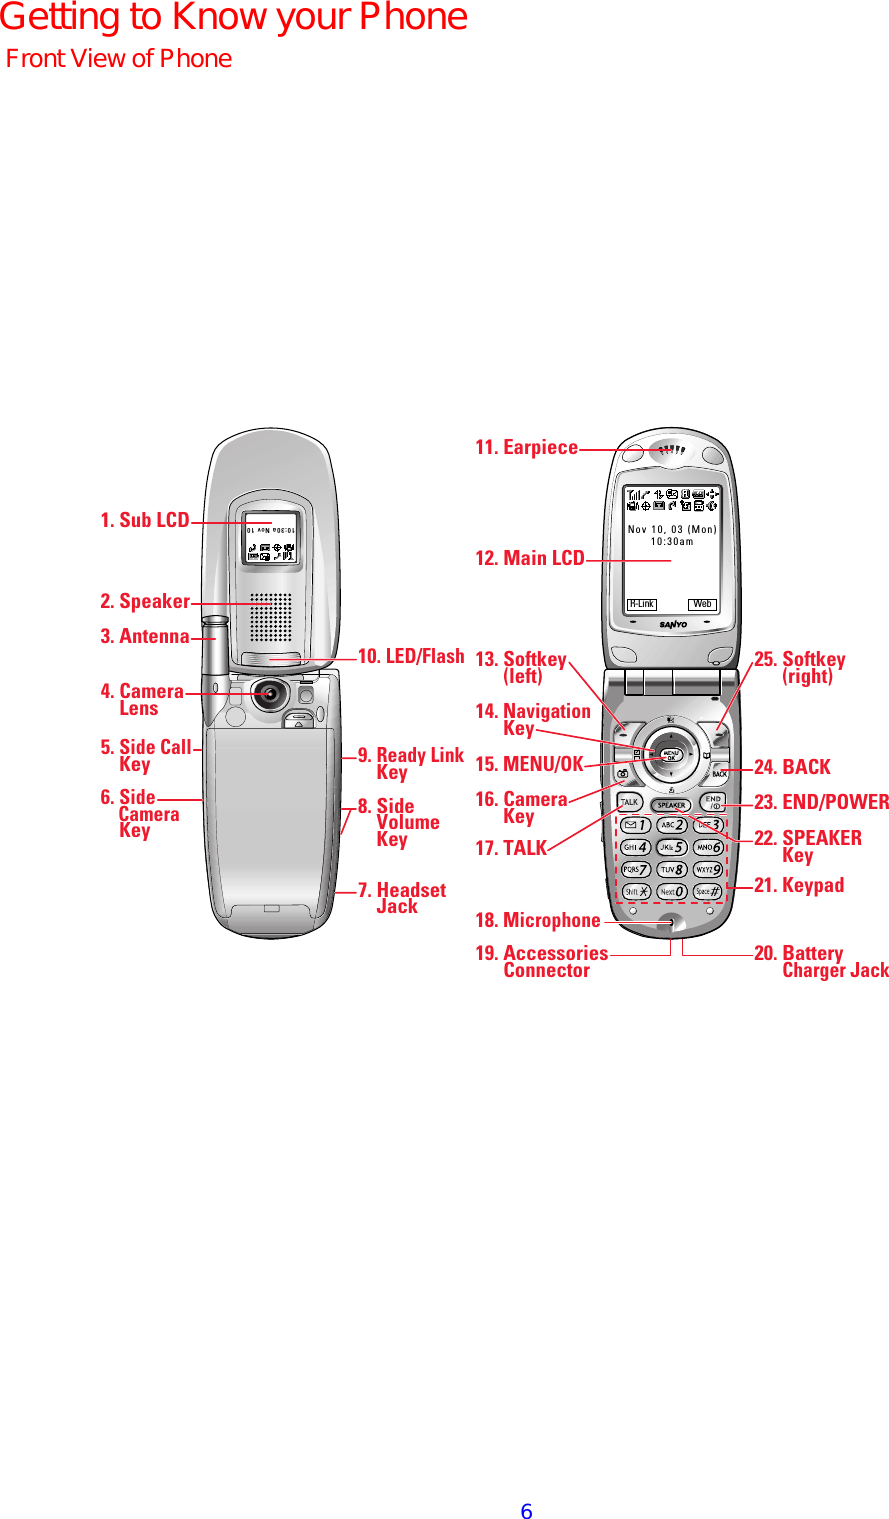
Sanyo Electric Co SCP-55H Tri-Mode dual-Band Analog/ PCS Phone (AmPS/CDMA) User Manual

Sanyo Electric Co Ltd Tri-Mode dual-Band Analog/ PCS Phone (AmPS/CDMA) Users Manual

Users Manual

SCP-5500 Operating Guide (Draft) Dual-Band /Tri-Mode
 1 Table of ContentsTable of ContentsTable of ContentsTable of Contents        Getting to Know your PhoneGetting to Know your PhoneGetting to Know your PhoneGetting to Know your Phone…………………………………………………………………………………………………………………………………………………………………………....6666 Front View of Phone................................................................................................6 Viewing the Display Screen...................................................................................8 Turning your Phone On and Off ................................................... .......................9 Unlocking the Phone...............................................................................................9 Using the Battery ....................................................................................................10 Displaying your Phone Number ...........................................................................11  Making and Answering Calls Making and Answering Calls Making and Answering Calls Making and Answering Calls  ............................................................................................................................................................................................................ 11112222    Making Calls ............................................................................................................12 Answering Calls.......................................................................................................12 Using the Speakerphone ........................................................................................13 Changing Ringer Volume.......................................................................................13 Adjusting Volume During a Conversation..........................................................13 Muting a Call............................................................................................................13 Missed Call Notification .........................................................................................14 Calling Emergency Numbers ................................................................................14 Dialing Options ........................................................................................................14 In-Call Options.........................................................................................................15 End-of-Call Options.................................................................................................16 Saving a Phone Number.........................................................................................16 Finding a Phone Number.......................................................................................17 Dialing and Saving Phone Numbers With Pauses............................................17 Four-Digit Dialing ...................................................................................................18 Dialing From the Internal Phone Book...............................................................18 Using One-Touch Speed Dialing...........................................................................18  Controlling Your PhoneControlling Your PhoneControlling Your PhoneControlling Your Phone’’’’s Settingss Settingss Settingss Settings ................................................................................................................................................................................................................................ 19191919    Sound Settings .........................................................................................................19 Ringer Types.............................................................................................................19 Selecting Ringer Types for Voice Calls…………………………………………..19 Selecting Ringer Types for Voicemail …..…….……………………....…..……..19 Selecting Ringer Types for Messages ...................................................................20 Setting Tone Length, Start-up/Power-off Tone or Voice Prompt .....................20 Adjusting the Phone’s Volume Settings...............................................................20 Alert Notification .....................................................................................................21
 2 Silence All..................................................................................................................22 Display Settings ………………………………………...…………………………22 Changing the Greeting… .......................................................................................22 Changing the Backlight Time Length .................................................................23 Changing the Display Screen................................................................................23 Setting the Display for Incoming Calls................................................................24 Setting the Display for the Standby Mode..........................................................24 Changing the Screen Saver ...................................................................................25 Changing the Display for My Buddy ...................................................................25 Changing the Display Color...................................................................................25 Changing the Font Size ..........................................................................................26 Location Settings………………………………………………………………..…26 Setting Airplane Mode............................................................................................27 Setting TTY Mode....................................................................................................27 Phone Setup Options…………………………………...…………………………27 My Shortcut ..............................................................................................................27 Auto Answer Mode ..................................................................................................28 Setting Flip Options ................................................................................................28 Setting Any Key Answer.........................................................................................28 Setting Abbreviated Dialing ..................................................................................29 Headset Mode...........................................................................................................29 Setting Side Key Guard..........................................................................................29 Sleep Mode................................................................................................................30 Setting Message Notification.................................................................................30 Changing the Menu Language .............................................................................30     Setting Your Phone’s SecuritySetting Your Phone’s SecuritySetting Your Phone’s SecuritySetting Your Phone’s Security................................................................................................................................................................................................................ 31313131    Accessing the Security Menu.................................................................................31 Locking Your Phone.................................................................................................31 Unlocking Your Phone ............................................................................................31 Changing the Lock Code ........................................................................................31 Calling in Lock Mode ..............................................................................................32 Restricting Calls.......................................................................................................32 Using Special Numbers..........................................................................................32 Erasing the Internal Phone Book.........................................................................33 Erasing the Downloads...........................................................................................33 Resetting Your Phone..............................................................................................33 Resetting and Locking Your Phone through SMS .............................................34
 3 Controlling Your Controlling Your Controlling Your Controlling Your Roaming Roaming Roaming Roaming ExperienceExperienceExperienceExperience ........................................................................................................................................................ 35353535    Understanding Roaming........................................................................................35 Setting Your Phone’s Roam Mode ........................................................................36 Controlling Roaming Charges Using Call Guard..............................................36  Navigating Through MenusNavigating Through MenusNavigating Through MenusNavigating Through Menus................................................................................................................................................................................................................................ 38383838    Menu Navigation.....................................................................................................38 Menu Structure........................................................................................................38 Viewing the Menus..................................................................................................39  Managing Call HistoryManaging Call HistoryManaging Call HistoryManaging Call History................................................................................................................................................................................................................................................................ 41414141    Viewing Call History...............................................................................................41 Call History Options ...............................................................................................41 Making a Call From Call History .........................................................................41 Saving a Phone Number From Call History  .....................................................42 Prepending a Phone Number From Call History..............................................43 Erasing Call History ...............................................................................................43  Using your Internal Phone BookUsing your Internal Phone BookUsing your Internal Phone BookUsing your Internal Phone Book................................................................................................................................................................................................ 44444444    Internal Phone Book Entry Options ....................................................................44 Selecting a Character Input Mode........................................................................45 Entering Characters Using T9 Text Input .........................................................45 Adding a Word to the T9 Database ......................................................................45 Entering Characters by Tapping the Keypad ....................................................46 Using Smart Punctuation ......................................................................................47 Entering Numbers, Symbols, Canned Suffix and Smileys ..............................47 Adding a New Internal Phone Book Entry.........................................................48 Finding Internal Phone Book Entries .................................................................49 Adding a Phone Number or Address to an Internal Phone Book Entry…....50 Editing an Internal Phone Book Entry ...............................................................51 Selecting a Ringer/Image Type for an Entry ......................................................52 Secret Internal Phone Book Entries ....................................................................52 Dialing PCS Services ..............................................................................................53 Storing Special Numbers in the Phone Book .....................................................53 Using Different Dialing Methods..........................................................................54 My PCS Phone Number .........................................................................................55
 4 Personal OrganizerPersonal OrganizerPersonal OrganizerPersonal Organizer........................................................................................................................................................................................................................................................................................ 56565656    Managing Schedules...............................................................................................56 Adding an Event to the Scheduler........................................................................56 Event Alerts..............................................................................................................57 Event Alert Menu ....................................................................................................58 Editing an Event......................................................................................................58 Adding a Call Alarm to the Scheduler .................................................................58 Call Alarm Alerts .....................................................................................................59 Call Alarm Menu .....................................................................................................59 Editing Call Alarms.................................................................................................59 Erasing a Day’s Events or Call Alarms................................................................60 Going to Today’s Scheduler Menu.........................................................................60 Adding To Do Items.................................................................................................60 Viewing To Do List...................................................................................................61 Editing To Do Items.................................................................................................61 Adding To Do Item to Schedule.............................................................................61 Deleting Items from the To Do List ......................................................................61 Viewing Event, Call Alarm or To Do List ............................................................62 Purging All Events, Call Alarms or To Do List...................................................62 Displaying User Address........................................................................................62 Getting to know Icon Indication............................................................................63 Displaying the Version Information .....................................................................63 Using your Phone’s Tools………………………………………...………………..63 Using the Calculator ...............................................................................................63 Using World Clock...................................................................................................64  Using Using Using Using Your PhoneYour PhoneYour PhoneYour Phone’’’’s s s s Voice ServicesVoice ServicesVoice ServicesVoice Services ................................................................................................................................................................................ 65656565    Using Voice-Activated Dialing..............................................................................65 Programming Voice Dial Tag to Your Phone......................................................65 Erasing All Voice Dialing Tags .............................................................................66 Recording Voice Memos .........................................................................................66 Voice Memo Options................................................................................................67 Erasing Voice Memos..............................................................................................67 Setting Up Screen Call ...........................................................................................68  Using VoicemailUsing VoicemailUsing VoicemailUsing Voicemail............................................................................................................................................................................................................................................................................................................ 70707070    Setting Up Your Voicemail .....................................................................................70 Voicemail Notification.............................................................................................70
 5 New Voicemail Message Alerts..............................................................................70 Retrieving Your Voicemail Messages....................................................................71 Voicemail Options ....................................................................................................71 Clearing the Message Icon.....................................................................................73 Using Caller ID........................................................................................................73 Responding to Call Waiting ...................................................................................73 Making a Three-Way Call ......................................................................................74 Using Call Forwarding ...........................................................................................74 Messages ...................................................................................................................75 New Messages..........................................................................................................75 Message Storage ......................................................................................................75 Displaying Messages...............................................................................................75 Changing the Displaying Font Size of a Message..............................................76 Message Options......................................................................................................76 Prepending a Phone Number From a Message .................................................76 Extracting Phone Numbers or E-mail/Web Address From a Message .................77 Creating Folders for Messages......................................................................... …78 Adding a Folder To the Message...................................................................... …79 Moving a Message Into the Other Folder.......................................................….79 Editing Folders....................................................................................................... .79 Erasing a Folder Including Messages................................................................ .80 Erasing All Messages.........................................................................................….80     Safety Safety Safety Safety ........................................................................................................................................................................................................................................................................................................................................................................ 81818181    Getting the Most Out of Your Reception .............................................................81 Maintaining Safe Use of and Access to Your Phone .........................................82 Caring for the Battery.............................................................................................84 Acknowledging Special Precautions and the FCC Notice................................85
Nov 10, 03 (Mon)10:30amR-Link Web10:30a Nov 1025. Softkey      (right)4. Camera    Lens5. Side Call    Key13. Softkey      (left)17. TALK14. Navigation      Key15. MENU/OK16. Camera      Key12. Main LCD19. Accessories      Connector21. Keypad20. Battery      Charger Jack2. Speaker3. Antenna1. Sub LCD6. Side     Camera    Key18. Microphone11. Earpiece23. END/POWER10. LED/Flash9. Ready Link    Key7. Headset    Jack8. Side     Volume    Key24. BACK22. SPEAKER      KeyGetting to Know your PhoneFront View of Phone6
 7 1. Sub LCD: Sub LCD: Sub LCD: Sub LCD: Lets you monitor the phone’s status and see who’s calling without opening the phone. 2.2.2.2.    SPEAKERSPEAKERSPEAKERSPEAKER: Allows you hands-free conversation while in speakerphone mode. Lets you hear the different ringers and sounds.      3.3.3.3.    AntenAntenAntenAntennananana: Fully extend the antenna for the best reception.    4.4.4.4.    Camera Lens: Camera Lens: Camera Lens: Camera Lens: This built-in camera lens lets you take.    5.  Side Call key:Side Call key:Side Call key:Side Call key: Let you place or receive calls without opening the phone. 6.  Side Camera Key:Side Camera Key:Side Camera Key:Side Camera Key: Press to display Camera Mode. Let you mute the ringer when receiving incoming calls. 7. Headset Jack: Headset Jack: Headset Jack: Headset Jack: Insert the plug of the headset (sold separately) for hands-free phone use. 8.  Side Volume keys: Side Volume keys: Side Volume keys: Side Volume keys: Let you adjust the receiver volume during a call, or ringer volume in standby mode. 9.  Ready Link keyReady Link keyReady Link keyReady Link key: Press to activate Ready Link mode. 10. LED/FlashLED/FlashLED/FlashLED/Flash: Shows your phone ’s connection status at a glance. You can take pictures clearly with this flash about 1.5 ft distance. 11. EarpieceEarpieceEarpieceEarpiece: Lets you hear the caller’s voice. 12. Main Main Main Main LCDLCDLCDLCD (display) (display) (display) (display): Displays the phone’s main menu, features, modes, etc. 13. SoftSoftSoftSoftkey (left)key (left)key (left)key (left): Lets you select the menu corresponding to the bottom left line on the Main LCD. 14. Navigation KeyNavigation KeyNavigation KeyNavigation Key: Lets you navigate quickly and easily through the menu options. You can access a menu shortcuts by pressing        =Phone Book (Find Name),           =My Shortcut, ▲  = Messaging and  ▼ =Downloads. 15. MMMMENU/OKENU/OKENU/OKENU/OK: Lets you access the phone’s menus and select menu options. 16. Camera KeyCamera KeyCamera KeyCamera Key: Accesses the Pictures menu. 17. TALKTALKTALKTALK: Lets you place or receive a call, answer Call Waiting or use Three-Way Calling and Voice Dial. 18. MicrophoneMicrophoneMicrophoneMicrophone: To speak into or record your voice.... 19. Accessories Connector: Accessories Connector: Accessories Connector: Accessories Connector: Connect accessories, such as Travel Charger (included), Desktop Charger, or PCS Connection Kit (sold separately). 20.  Battery Charger Jack: Battery Charger Jack: Battery Charger Jack: Battery Charger Jack: To Charge your phone’s battery. 21. KeypadKeypadKeypadKeypad: Lets you enter numbers, letters and characters, and navigate within Menus. Press and hold 2-9 key to make a Speed Dial call. 22. Speaker KeySpeaker KeySpeaker KeySpeaker Key: Lets you place or receive calls in speakerphone mode. You can also use it to activate Voice Dial and Memo recording. 23. END/PEND/PEND/PEND/POWEROWEROWEROWER: Lets you turn the phone On/Off, end a call, or return to standby mode. 24. BACKBACKBACKBACK: : : : Lets you to clear characters from the screen Time/Date while the phone is in use. 25. SoftSoftSoftSoftkkkkey (right)ey (right)ey (right)ey (right): Lets you select the menu corresponding to the bottom right line on the Main LCD.
 8 Viewing the Display ScreenViewing the Display ScreenViewing the Display ScreenViewing the Display Screen    This list identifies some of the more common symbols you’ll see on your display screen.     shows your current signal strength. The more lines you have, the stronger your   signal.     means your phone cannot find a signal.     tells you a call is in progress.     indicates the Vision services is dormant.     indicates the Vision services is active.       indicates the Vision services is disabled.     indicates you have text messages waiting.     indicates you have voicemail messages waiting. Press and hold    1    to call your      voicemail box.     indicates you have text messages and voicemail messages waiting.     indicates the phone is on another service provider’s network (Main LCD only).    shows the level of your battery charge. The more black you see, the more power you have left. It turns   while charging.     indicates you have menus to scroll (Main LCD only).     indicates the vibrate feature is set to ON.     indicates volume level 4 and vibrate feature is set to ON.     indicates the Location Service of your phone is enabled.     indicates the Location Service of your phone is disabled.     indicates you have new caller’s message.     indicates the Screen Call Auto setting is ON.     indicates you have new downloaded data.    indicates the speakerphone mode is set to ON     indicates Headset mode is Ready Link Call and Headset is connected.     indicates Ready Link Call is available.     indicates Ready Link Call is unavailable.     indicates TTY mode is set to ON when you connect TTY devices.
 9 SoftkeysSoftkeysSoftkeysSoftkeys    You can select the menus, which are described at the bottom line of the display by pressing the corresponding softkeys (left/right). In this User Manual, the explanation for selecting such menus are as shown below: Press Memo (right softkey).   (Press the right softkey corresponding to Memo).        Turning your PhTurning your PhTurning your PhTurning your Phone Oone Oone Oone Onnnn and O and O and O and Offffffff    Turning your Phone On:Turning your Phone On:Turning your Phone On:Turning your Phone On:    To turn your phone on, press END/. Once your phone is On, it displays “Looking for service...”, indicating that your phone is searching for a signal. When your phone finds a signal, it automatically enters standby mode – the phone’s idle state. At this point, you are ready to begin making and receiving calls. If your phone is unable to find a signal after 15 minutes of searching, a Power Save feature is automatically activated. When a signal is found, your phone automatically returns to standby mode.  In power save mode, your phone searches for a signal periodically without your intervention. You can also initiate a search for PCS Service by pressing any key (when your phone is turned On). Tip: Tip: Tip: Tip: The Power Save feature helps to conserve your battery power when you are in an area where there is no signal. Turning your Phone Off:Turning your Phone Off:Turning your Phone Off:Turning your Phone Off:    Press and hold END/ for two seconds until you see the powering down animation on the display screen.   Your screen remains blank while your phone is off (unless the battery is charging).     Unlocking the PhoneUnlocking the PhoneUnlocking the PhoneUnlocking the Phone    1. Press END/ to turn the phone on. 2. Press Unlock (left softkey). 3. Enter your four-digit lock code. For security purposes, the code is not visible as you type.
 10Using the BatUsing the BatUsing the BatUsing the Batteryteryterytery    InstallingInstallingInstallingInstalling the Battery the Battery the Battery the Battery    Your PCS Phone comes with a Lithium Ion battery. Follow these steps to install it: 1. Place the battery into the space beneath the antenna with the metal contacts at the bottom, facing downward. 2. Gently press down until it’s in place and the battery release latch snaps. Removing Removing Removing Removing thethethethe Battery Battery Battery Battery    To remove your battery for charging or for other reason, follow these easy steps: 1. Make sure the power is off so that you don’t lose any stored numbers or messages. 2. Press up the battery release latch and hold the battery. 3. Then pull it up and out at a 45-degree angle.     Charging the BatteryCharging the BatteryCharging the BatteryCharging the Battery    Your PCS Phone comes with a rechargeable battery. You should charge the battery as soon as possible so you can begin using your phone. Keeping track of your battery’s charge is important. If your battery level becomes too low, your phone automatically turns off and you’ll lose all the information you were just working on. For a quick check of your phone’s battery level, glance at the battery charge indicator located in the upper-right corner of your phone’s display screen. If the battery charge gets too low, the battery icon    appears and the phone sounds a warning tone. Always use a recommended Desktop Charger, Travel Charger or Vehicle Power Adapter to charge your battery.   Warning! Warning! Warning! Warning! Using the wrong battery charger could cause damage to your phone and void the warranty.     Using the Using the Using the Using the TravelTravelTravelTravel Charger Charger Charger Charger    To use the travel charger provided with your phone: 1. Plug the travel charger into a wall outlet. 2. Plug the other end into the travel charger into the bottom of your phone (with the battery installed).   Charging when your phone is turned on: The battery icon    appears on the display while charging. The battery icon turns to   when charging is complete.   Charging when your phone is turned off: The battery icon    appears, and the message “BATTERY CHARGING-Power Off-” is shown on the display while charging. When the battery is completely discharged, you may
 11wait for several minutes until the message is shown on the display. The battery icon turns to  , and message changes to “CHARGING COMPLETE-Power Off-” when charging is complete.          Displaying your Phone NumberDisplaying your Phone NumberDisplaying your Phone NumberDisplaying your Phone Number To display your phone number: 1.  Press MENU/OK to display the main menu. 2. Select SettingsSettingsSettingsSettings and press MENU/OK. 3. Select Phone InfoPhone InfoPhone InfoPhone Info and press MENU/OK. 4. Select PhonePhonePhonePhone#### UserID  UserID  UserID  UserID and press MENU/OK. Note: Note: Note: Note: To access the phone’s main menu, press MENU/OK from standby mode. Menu items may be selected by highlighting them with the Navigation key and pressing MENU/OK, or you can press the number corresponding to the menu item on your keypad.
 12Making Making Making Making and Answering and Answering and Answering and Answering CallsCallsCallsCalls    Making CallsMaking CallsMaking CallsMaking Calls    1.  Make sure your phone is On. 2.  Enter a phone number. (If you make a mistake while dialing, press Back to erase one digit at a time. Press and hold Back to erase the entire number). 3.  Press TALK or SPEAKER (To make a call when you are roaming and Call Guard is enabled, press MENU/OK, highlight Roam CallRoam CallRoam CallRoam Call    or Roam:Roam:Roam:Roam:SpeakerSpeakerSpeakerSpeaker and press MENU/OK ). 4.  When you’re finished, press END/. Tip: Tip: Tip: Tip: To redial your last outgoing call, press TALK or SPEAKER twice.     Answering CallsAnswering CallsAnswering CallsAnswering Calls    1.  Make sure your phone is on. If your phone is off, incoming calls go to voicemail. 2.  When your phone rings, press TALK or SPEAKER. Depending on your settings, your PCS Phone notifies you of incoming calls in the following ways:   The phone rings and/or vibrates.   The LED flashes.   The backlight illuminates.   The screen displays an incoming call message.   If available, the phone number of the caller is displayed.   If the phone number is in your Internal Phone Book, the Phone Book entry’s name is displayed.   The picture is displayed when you have set the downloaded picture to “Incoming Calls”.   The following options are also displayed by pressing MENU/OK. To select an option, highlight it and press MENU/OK.   Call GuardCall GuardCall GuardCall Guard to answer the call when you are in roaming (This feature appears when you are in digital area and analog service area). See “Call Guard” on pages 36-37.   Answer Answer Answer Answer to answer the call.   Answer:Speaker Answer:Speaker Answer:Speaker Answer:Speaker to answer the call in speakerphone mode.   Screen Call Screen Call Screen Call Screen Call to answer the call by using pre-recorded announcement. (This feature appears when you are in Service area or digital roaming area). See pages 68-69 for setting up.   QuieQuieQuieQuiet Ringer t Ringer t Ringer t Ringer to mute the ringer. (This feature appears when the ringer is set). To answer a call when you are roaming and Call Guard is enabled, you must press MENU/OK, highlight AnswerAnswerAnswerAnswer or Answer:SpeakerAnswer:SpeakerAnswer:SpeakerAnswer:Speaker and press MENU/OK to answer the call. See “Call Guard” on pages 36-37. Note: Note: Note: Note: If your phone is off. Incoming calls go to voicemail. 3.  To disconnect the call, press END/ .
 13 Using the SpeakerphoneUsing the SpeakerphoneUsing the SpeakerphoneUsing the Speakerphone    The speakerphone feature lets you hear audio through the speaker and talk without holding the phone. When the speakerphone is activated, use the Side Volume key to adjust the volume. To activate the speakerphone during a call:   Press SPEAKER. -or- Press Menu, highlight Speaker OnSpeaker OnSpeaker OnSpeaker On and press OK. To turn the speakerphone off:   Press SPEAKER. -or- Press Menu, highlight Speaker OfSpeaker OfSpeaker OfSpeaker Offfff and press OK.  Changing Ringer VolumeChanging Ringer VolumeChanging Ringer VolumeChanging Ringer Volume    To change the ringer volume, adjust the Side Volume key when the clamshell is open in standby mode. Note: Note: Note: Note: To change the ringer volume from the main menu, see “Adjusting the Phone’s Volume Settings” on page 20.        AdjuAdjuAdjuAdjusting Volume During a Conversationsting Volume During a Conversationsting Volume During a Conversationsting Volume During a Conversation    Whether you need to hear more or less of a conversation, adjust the Side Volume key, or press ▲/▼  on the Navigation key during a call.     Muting a CallMuting a CallMuting a CallMuting a Call    There are times when it’s necessary to mute a call so that your caller does not hear you or certain background noise. To use this function during a call: 1.  Press MENU/OK to display the options. 2. Highlight Mute Mute Mute Mute and press MENU/OK. When the phone is muted, “Mute“Mute“Mute“Mute”””” appears on the display. To unmute a call: 1.  Press MENU/OK to display the options. 2. Highlight Unmute Unmute Unmute Unmute and press MENU/OK.
 14Missed Call NotificationMissed Call NotificationMissed Call NotificationMissed Call Notification    When an incoming call is not answered, the Missed Call log is displayed on your screen. To display the list of Missed Calls :   Press View (left softkey). If the phone is locked, you need to press Unlock (left softkey), then enter the lock code and press View (left softkey). To dial the last Missed Call Number:   Highlight the entry and press TALK or SPEAKER .  Calling Emergency NumbersCalling Emergency NumbersCalling Emergency NumbersCalling Emergency Numbers    You can place calls to 911 (dial 9 1 1 and press TALK or SPEAKER), even if your phone is locked or your account is restricted. Once the dial is made, you will enter Emergency mode. The phone tries to dial to 911 automatically until the dial will be connected. While you are in the Emergency mode, all phone calls can be received. To exit from the Emergency mode, follow these instructions: 1. Press END/. 2.  Press MENU/OK to display the options. 3. Highlight Exit EmergencyExit EmergencyExit EmergencyExit Emergency and press MENU/OK.     Dialing OptionsDialing OptionsDialing OptionsDialing Options    Dialing options are displayed when you press MENU/OK after entering numbers in the standby mode. To select an option, highlight it and press MENU/OK.   Call Call Call Call to dial the phone number. (If you are roaming and have the Call Guard feature activated, you need take extra step. See “Call Guard” on pages 36-37).   Call:Speaker On Call:Speaker On Call:Speaker On Call:Speaker On to dial the phone number in speakerphone mode.(If you are roaming and have the Call Guard feature activated, You need take extra step. See the “Call Guard” on pages 36-37.)   Ready LinkReady LinkReady LinkReady Link to make a Ready Link Call.   Save Phone# Save Phone# Save Phone# Save Phone# to save the phone number in your Internal Phone Book. (See “Saving a Phone Number” on page 16).   Find Find Find Find to display Internal Phone Book entries that end with the digits you enter. (See “Finding a Phone Number” on page 17).   HHHH    Hard Pause Hard Pause Hard Pause Hard Pause to insert a hard pause. (See “Dialing and Saving Phone Numbers With Pauses” on page 17).   TTTT    2222----Second Pause Second Pause Second Pause Second Pause to insert a 2-second pause. (See “Dialing and Saving Phone Numbers With Pauses” on page 17).   Hyphen Hyphen Hyphen Hyphen to insert a hyphen manually where you like, however they are mainly for show.
 15(See “Dialing and Saving Phone Numbers With Pauses” on page 17). TipTipTipTip: To speed dial a pone number from the standby mode, press and hold appropriate speed dial key locations 2-9. See page 18 for setting. This option appears when you press after entering 4-digit and press MENU/OK.   Abbrev. Dial Abbrev. Dial Abbrev. Dial Abbrev. Dial to dial the phone number in your Internal Phone Book that ends with the four digits you enter. (See “Four-Digit Dialing” on page 18). This option appears when you enter four or more digits and press MENU/OK.     InInInIn----Call OptionsCall OptionsCall OptionsCall Options    During a call, your phone displays menu options by pressing MENU/OK. To select an option, highlight it and press MENU/OK.   Flash Flash Flash Flash to answer an incoming Call Waiting call or connect a third party during Three-Way Calling.   Mute Mute Mute Mute or UnmuteUnmuteUnmuteUnmute        Select Mute Mute Mute Mute to mute your phone’s microphone. Select Unmute Unmute Unmute Unmute to reactivate the         Microphone.   Speaker OnSpeaker OnSpeaker OnSpeaker On or Speaker OffSpeaker OffSpeaker OffSpeaker Off to route the phone’s audio through the speaker. You can adjust the speakerphone volume using the Side Volume key.     Three Three Three Three ----Way Call Way Call Way Call Way Call to call a third party.     Call History Call History Call History Call History to use like a main menu. (See “Managing Call History” on  pages 41-43).   Phone Book Phone Book Phone Book Phone Book to use like a main menu. (See “Using Your Internal Phone Book” on pages 45-55).   Voicemail Voicemail Voicemail Voicemail to use like a main menu. (See pages 70-80).   Settings Settings Settings Settings to use like a main menu. (See “Controlling Your Phone’s Settings” on pages 19-30.)   Tool/ExtrasTool/ExtrasTool/ExtrasTool/Extras    to use like a main menu. (See “Calendar” menu instructions on        pages 56-62).   Voice ServicesVoice ServicesVoice ServicesVoice Services to use like a main menu. (See pages 65-67). Note:Note:Note:Note: Flash menu appears in Call Waiting and Three-Way Call. Mute menu does not appear during a 911 call. Three-Way Call Menu does not appear in Roaming area.
 16EndEndEndEnd----ofofofof----Call OptionsCall OptionsCall OptionsCall Options    After receiving a call from or making a call to a phone number that is not in your Internal Phone Book, the phone number and the duration of the call is displayed. You can display the following menu options by pressing MENU/OK within 10 seconds after disconnecting the call. To select an option, highlight it and press MENU/OK.   Call Again Call Again Call Again Call Again to dial the phone number.   Call: Speaker On Call: Speaker On Call: Speaker On Call: Speaker On to dial the phone number in speakerphone mode.   Save Phone# Save Phone# Save Phone# Save Phone# to save the phone number in your Internal Phone Book. (See “Saving a Phone Number” on page 16). After receiving a call from or making a call to a phone number that is in your Internal Phone Book, the Phone Book entry name, phone number and the duration of the call are displayed. You can display the following menu options by pressing MENU/OK within 10 seconds after disconnecting the call. To select an option, highlight it and press MENU/OK.   Call Again Call Again Call Again Call Again to dial the phone number.   Call:Speaker On Call:Speaker On Call:Speaker On Call:Speaker On to dial the phone number in speakerphone mode.   Go to Go to Go to Go to Phone BookPhone BookPhone BookPhone Book    to save the other phone number into the same entry in your Internal Phone Book. Note:Note:Note:Note:    The End-of-Call options are not displayed for calls identified as No ID or Restricted.     Saving a Phone NumberSaving a Phone NumberSaving a Phone NumberSaving a Phone Number    Your PCS Phone can store a total of 500 phone numbers in 300 Internal Phone Book entries. Each Phone Book entry can store 7 phone numbers, and the entry’s name can contain 16 characters. Your phone automatically sorts the Internal Phone Book entries alphabetically. To save a number from the main menu: 1.  Enter a phone number. 2. Press MENU/OK. 3. Highlight Save Phone# Save Phone# Save Phone# Save Phone# and press MENU/OK. 4.  Select a label by highlighting HomeHomeHomeHome, WorkWorkWorkWork, MobileMobileMobileMobile, PagerPagerPagerPager, DataDataDataData, Fax  Fax  Fax  Fax or No Label No Label No Label No Label and press MENU/OK. 5.  Enter a Name, and press MENU/OK. (See “Selecting a Character Input Mode” on page 45.) Or you can also save the phone number without a name by pressing MENU/OK from the name entry display, highlighting Yes Yes  Yes  Yes and then pressing MENU/OK. If you have already stored entries in the Contacts, you are prompted to select the following entry modes:
 17  New Name New Name New Name New Name to enter a name directly.   From PhFrom PhFrom PhFrom Ph.... Book  Book  Book  Book to select a name from Contacts entry list. 6.  Press Save (left softkey). After you have saved the number, the new Internal Phone Book entry is displayed. (See “Internal Phone Book Entry Options” on page 44).     Finding a Phone NumberFinding a Phone NumberFinding a Phone NumberFinding a Phone Number    Your phone searches the phone number in your Internal Phone Book that ends with the digits you entered. To find a phone number: 1.  Enter four or more digits and press MENU/OK. The more numbers you enter, the more specific the search becomes. 2. Highlight Find Find Find Find and press MENU/OK. 3.  The Contacts entry list that ends with the digits you entered appears. 4.  Highlight your desired entry.   Press MENU/OK to display the entry details.   Press TALK or SPEAKER to dial.  Dialing and Saving Phone Numbers WithDialing and Saving Phone Numbers WithDialing and Saving Phone Numbers WithDialing and Saving Phone Numbers With Pauses Pauses Pauses Pauses    You can dial or save phone numbers with pauses for use with automated systems, such as voicemail or credit card billing numbers. If you select a hard pause, the next set of numbers is sent when you press TALK or SPEAKER. If you select a 2-second pause, your phone automatically sends the next set of numbers after two seconds. Note: Note: Note: Note: You can have multiple pauses in a phone number and combine 2-second and hard pauses. To dial or save phone numbers with pauses: 1.  Enter the phone number and press MENU/OK. 2.  Highlight either Hard Pause Hard Pause Hard Pause Hard Pause or 2222----Sec. Pause Sec. Pause Sec. Pause Sec. Pause and press MENU/OK. Hard Pauses are displayed as an “H” and 2-sec. pauses as a “T”. 3.  Enter additional numbers. 4. Press MENU/OK, highlight CallCallCallCall or Call:Speaker OnCall:Speaker OnCall:Speaker OnCall:Speaker On to dial the number or Save Phone#Save Phone#Save Phone#Save Phone# to save the number in your Internal Phone Book and press MENU/OK. When dialing a number with a Hard pause, press MENU/OK and highlight Send Tone Send Tone Send Tone Send Tone and press MENU/OK to send the next set of numbers.
 18FourFourFourFour----Digit DialingDigit DialingDigit DialingDigit Dialing    Enter four digits and press MENU/OK to display the 4-Digit Dialing option. If you select Abbrev.DialAbbrev.DialAbbrev.DialAbbrev.Dial, your phone dials the phone number in your Internal Phone Book that ends with the four digits you entered. See page 29 for setting this feature. To use 4-Digit Dialing: 1.  Dial the last four digits of an Internal Phone Book entry’s phone number. 2.  Press MENU/OK to display the menu options. 3. Highlight Abbrev.Dial Abbrev.Dial Abbrev.Dial Abbrev.Dial and press MENU/OK or TALK or SPEAKER. Note: Note: Note: Note: 4-Digit Dialing dials the first number in your Internal Phone Book that matches the four digits.     Dialing From the InDialing From the InDialing From the InDialing From the Internal Phone Bookternal Phone Bookternal Phone Bookternal Phone Book    1.  Press MENU/OK to access the main menu. 2. Highlight ContactsContactsContactsContacts    and press MENU/OK. 3. Highlight Find Find Find Find Entry Entry Entry Entry and press MENU/OK.   Press right on the Navigation key for the shortcut (steps 1 through 3). 4.  Use your Navigation key to scroll through the Phone Book list and highlight one of the appropriate entries and press MENU/OK. 5.  Select the box under your desired memory location by scrolling. 6.  Press Options (right softkey) for the menu options. 7.  Highlight your desired feature and press MENU/OK.  Using OneUsing OneUsing OneUsing One----ToToToTouch Speed Dialinguch Speed Dialinguch Speed Dialinguch Speed Dialing    With this feature, you can dial Speed Dial entries using one key press for locations 2-9. To use One-Touch Dialing    for Speed Dial locations 2-9:   Press and hold the appropriate key for two seconds. The display confirms that the number has been dialed when it shows “Connecting…”.
 19Controlling Your PhoneControlling Your PhoneControlling Your PhoneControlling Your Phone’’’’s Settingss Settingss Settingss Settings    Reminder:Reminder:Reminder:Reminder:    To access the phone ’s main menu, press MENU/OK from standby mode. Menu items may be selected by highlighting them with the Navigation key and pressing MENU/OK .        Sound SettingsSound SettingsSound SettingsSound Settings    Ringer TypesRinger TypesRinger TypesRinger Types    Ringer types help you identify incoming calls and messages. You can assign ringer types to individual Internal Phone Book entries, types of calls and types of messages. ●  Programmed RingersProgrammed RingersProgrammed RingersProgrammed Ringers include a variety of standard ringer types and familiar music. ●  Vibrating RingerVibrating RingerVibrating RingerVibrating Ringer alerts you to call or messages without disturbing others. ●  Downloaded Downloaded Downloaded Downloaded Ringers Ringers Ringers Ringers can be downloaded right to your phone.     Selecting Ringer Types for Voice CallsSelecting Ringer Types for Voice CallsSelecting Ringer Types for Voice CallsSelecting Ringer Types for Voice Calls    Your PCS Phone provides a variety of ringer options, which allow you to customize your ringer and volume settings. To select a ringer type for voice calls so you recognize when a certain type of call is coming in by the ringer: 1. Press MENU/OK to access the main menu. 2. Select SettingsSettingsSettingsSettings and press MENU/OK. 3. Select SoundsSoundsSoundsSounds and press MENU/OK. 4. Select Ringer TypeRinger TypeRinger TypeRinger Type and press MENU/OK. 5. Highlight Voice CallsVoice CallsVoice CallsVoice Calls and press MENU/OK. 6. Select the menu under With Caller IDWith Caller IDWith Caller IDWith Caller ID, No Caller ID No Caller ID No Caller ID No Caller ID or RoamingRoamingRoamingRoaming and   press MENU/OK. 7. Highlight your desired ringer type and press MENU/OK.   If you selected Animation Ringer, preview display starts after step 7 above.   : Get New: Get New: Get New: start up a Browser and you can select an item to download.  Selecting Ringer Types for Voicemail Selecting Ringer Types for Voicemail Selecting Ringer Types for Voicemail Selecting Ringer Types for Voicemail      To select a ringer type for voicemail: 1.    Press MENU/OK to access the main menu. 2. Select SettingsSettingsSettingsSettings and press MENU/OK. 3. Select SoundsSoundsSoundsSounds and press MENU/OK. 4. Select Ringer TypeRinger TypeRinger TypeRinger Type and press MENU/OK. 5. Highlight Voicemail Voicemail Voicemail Voicemail and press MENU/OK. 6.  Select the menu under VoicemailVoicemailVoicemailVoicemail and press MENU/OK.
 207.  Highlight your desired ringer type and press MENU/OK.   Get New:Get New:Get New:Get New: start up a Browser and you can select an item to download.       Selecting Ringer Types for MessagesSelecting Ringer Types for MessagesSelecting Ringer Types for MessagesSelecting Ringer Types for Messages    To select a ringer type for text messages: 1. Press MENU/OK to access the main menu. 2. Select SettingsSettingsSettingsSettings and press MENU/OK. 3. Select SoundsSoundsSoundsSounds and press MENU/OK. 4. Select Ringer TypeRinger TypeRinger TypeRinger Type and press MENU/OK. 5. Highlight MessagingMessagingMessagingMessaging and press MENU/OK. 6. Select the menu under MessagingMessagingMessagingMessaging and press MENU/OK. 7. Highlight your desired ringer type and press MENU/OK.   Get New:Get New:Get New:Get New: start up a Browser and you can select an item to download.     Setting Tone Length, StartSetting Tone Length, StartSetting Tone Length, StartSetting Tone Length, Start----up/Powerup/Powerup/Powerup/Power----off Toneoff Toneoff Toneoff Tone or Voice Prompt or Voice Prompt or Voice Prompt or Voice Prompt    You can determine the length of your key beep (you hear this when you press any key) or type of the Start-up/Power off tone (sounds when you turn the phone on/off on this feature). 1. Press MENU/OK to access the main menu. 2. Select SettingsSettingsSettingsSettings and press MENU/OK. 3. Select SoundsSoundsSoundsSounds and press MENU/OK. 4. Select OthersOthersOthersOthers and press MENU/OK. 5. Select the menu under Tone LengthTone LengthTone LengthTone Length, StartStartStartStart----up Toneup Toneup Toneup Tone, PowerPowerPowerPower----off Toneoff Toneoff Toneoff Tone or Voice Prompt Voice Prompt Voice Prompt Voice Prompt      and press MENU/OK. 6. Highlight your desired option and press MENU/OK.     Get New:Get New:Get New:Get New: start up a Browser and you can select an item to download. TipTipTipTip: The volume of Start-up Tone and Power-off Tone can be set through the volume setting. See page 20-21 for instructions.    TipTipTipTip: : : : When ringer volume is set to Silence AllSilence AllSilence AllSilence All, voice prompts cannot be heard.     Adjusting the PhoneAdjusting the PhoneAdjusting the PhoneAdjusting the Phone’’’’s Volume Settingss Volume Settingss Volume Settingss Volume Settings    To change the ringer/ key volume 1.  Press MENU/OK to access the main menu. 2. Select SettingsSettingsSettingsSettings and press MENU/OK. 3. Select SoundsSoundsSoundsSounds and press MENU/OK. 4. Select Ringer/Key Vol.Ringer/Key Vol.Ringer/Key Vol.Ringer/Key Vol., and press MENU/OK.   5. Highlight Ringer Volume,Ringer Volume,Ringer Volume,Ringer Volume, StartStartStartStart----up/Pwup/Pwup/Pwup/Pw----offoffoffoff or Key Beep Key Beep Key Beep Key Beep and Press MENU/OK. 6.  Highlight your desired volume level and press MENU/OK.
 21  Vibrate Vibrate Vibrate Vibrate alerts you to calls or messages without disturbing others.    ●●●●    Ringer OffRinger OffRinger OffRinger Off to set the Voice Call ringer volume to off.(Only appears in Ringer Volume Setting). ●●●●            Silence AllSilence AllSilence AllSilence All to set all the ringer volume to off. (Only appears in Ringer Volume   Setting).  To Adjust Earpiece volume: 1.  Press MENU/OK to access the main menu. 2. Select Settings Settings Settings Settings and press MENU/OK. 3. Select Sounds Sounds Sounds Sounds and press MENU/OK. 4. Select Receiver Vol. Receiver Vol. Receiver Vol. Receiver Vol. and press MENU/OK. 5.  Select your desired volume level and press MENU/OK. TipTipTipTip: You can adjust the ringer volume in standby mode by using the Side Volume key on or the earpiece volume during a call by using  ▲/▼  on the Navigation keys or                   Side Volume key.   Alert NotificationAlert NotificationAlert NotificationAlert Notification    Your phone comes with several different options to keep you aware of what’s going on by sounding the alert or ringer.   ServiceServiceServiceServicessss sets alert On or Off for network services parameter changes.   Voicemail Voicemail Voicemail Voicemail sets alert to notify you of caller’s message(s).   Messaging Messaging Messaging Messaging sets alert to notify you of text message(s).   Minute BeepMinute BeepMinute BeepMinute Beep sets a minute reminder that beeps ten seconds before the end of each minute during a call.   Signal FadeSignal FadeSignal FadeSignal Fade sets alert to notify you when your phone loses a signal during a call. To set the alerts: 1. Press MENU/OK to access the main menu. 2. Select SettingsSettingsSettingsSettings and press MENU/OK. 3. Select SoundsSoundsSoundsSounds and press MENU/OK. 4. Select AlertsAlertsAlertsAlerts and press MENU/OK. 5. Highlight your desired option and press MENU/OK. 6. If you selected ServiceServiceServiceService, Minute BeepMinute BeepMinute BeepMinute Beep or Signal FadeSignal FadeSignal FadeSignal Fade, select OnOnOnOn or OffOffOffOff. If you selected VoicemailVoicemailVoicemailVoicemail    or MessagingMessagingMessagingMessaging, select OnceOnceOnceOnce, Repeat AlertRepeat AlertRepeat AlertRepeat Alert or OffOffOffOff.  Tip: Tip: Tip: Tip: Repeat AlertRepeat AlertRepeat AlertRepeat Alert sounds every two minutes for twenty minutes.
 22Silence AllSilence AllSilence AllSilence All    There may be times when you need to silence your phone entirely. The phone’s Silent Mode allows you to mute all sounds without turning your phone off. To change your phone’s Silent Mode: 1.    Press MENU/OK to access the main menu. 2. Select Settings Settings Settings Settings and press MENU/OK. 3.    Select Sounds Sounds Sounds Sounds and press MENU/OK. 4.    Select Ringer/Key Vol. Ringer/Key Vol. Ringer/Key Vol. Ringer/Key Vol. and press MENU/OK. 5.    Select the menu under Ringer VolumRinger VolumRinger VolumRinger Volumeeee    and press MENU/OK. 6.    Highlight Silence All Silence All Silence All Silence All and press MENU/OK. Tip: Tip: Tip: Tip: When Ringer Volume is set as Silence AlSilence AlSilence AlSilence Alllll, other items are changed to Off Off Off Off and cannot be highlighted by cursor.     Display SettingsDisplay SettingsDisplay SettingsDisplay Settings Changing the GreetingChanging the GreetingChanging the GreetingChanging the Greeting    The greeting can be up to 15 characters and is displayed on the first line of your phone’s display screen in standby mode. To change your greeting: 1. Press MENU/OK to access the main menu. 2. Select SettingsSettingsSettingsSettings and press MENU/OK. 3. Select DisplayDisplayDisplayDisplay and press MENU/OK. 4. Highlight GreetingGreetingGreetingGreeting and press MENU/OK. 5. Select either UsernameUsernameUsernameUsername or CustomCustomCustomCustom.   UsernameUsernameUsernameUsername to display the username when you are signed in.   CustomCustomCustomCustom to customize the greeting by entering characters (Press Back to erase single character, press and hold Back to erase entire entry. See pages 46-48 for the entering method.) 6.Press MENU/OK. NoteNoteNoteNote: When Calendar or Screen Saver is set for standby display, greeting is not displayed.
 23Changing the Backlight Time LengthChanging the Backlight Time LengthChanging the Backlight Time LengthChanging the Backlight Time Length    The backlight setting lets you select how long the display screen and keypad are backlit after any key press is made. To change the backlight setting: 1. Press MENU/OK to access the main menu. 2. Select SettiSettiSettiSettingsngsngsngs and press MENU/OK. 3. Select DisplayDisplayDisplayDisplay and press MENU/OK. 4. Highlight BacklightBacklightBacklightBacklight and press MENU/OK. 5. Select the menu under MainMainMainMain LCDLCDLCDLCD or KeyKeyKeyKey and press MENU/OK.   6. Select Always OnAlways OnAlways OnAlways On, Always OffAlways OffAlways OffAlways Off or your defined time length, and press MENU/OK.   Always OffAlways OffAlways OffAlways Off always turns the Backlight off.   Always OnAlways OnAlways OnAlways On always turns the Backlight on. NoteNoteNoteNote: Always OnAlways OnAlways OnAlways On setting returns to previous value on next power cycle. To change Keypad backlight setting: 1.    From the step 5 above, select the menu under Key Key Key Key or Sub LCD Sub LCD Sub LCD Sub LCD and press MENU/OK. 2.    Select Always Off Always Off Always Off Always Off or your defined time length, and press MENU/OK. NoteNoteNoteNote: Long backlight setting affects the battery’s talk and standby times.     Changing the Display ScreenChanging the Display ScreenChanging the Display ScreenChanging the Display Screen    This feature lets you display the animation as a display for Standby, Outgoing calls or Service Search. To assign the Animation: 1. Press MENU/OK to access the main menu. 2. Select SettingsSettingsSettingsSettings and press MENU/OK. 3. Select DisplayDisplayDisplayDisplay and press MENU/OK. 4. Highlight AnimationAnimationAnimationAnimation and press MENU/OK. 5. Highlight StandbyStandbyStandbyStandby, Outgoing Calls Outgoing Calls Outgoing Calls Outgoing Calls or    ServiServiServiService Searchce Searchce Searchce Search and press MENU/OK. ●  Press Preview (right softkey) to see an example display. 6. Select the menu under the item and press MENU/OK. 7. Highlight your desired option and press MENU/OK.   For standby, also set animation starting time. Select the option under after after after after then highlight your desired setting time.   PresetPresetPresetPreset: the pre-programmed data.   DownloadsDownloadsDownloadsDownloads: start up a browser and you can select an item to download. To deactivate this feature, select Off Off Off Off during step 7 above.
 24Setting the Display for Incoming CalSetting the Display for Incoming CalSetting the Display for Incoming CalSetting the Display for Incoming Callslslsls    You can set the color or downloaded image (screen saver) data to be shown on the Incoming Call display. Follow these steps: 1. Press MENU/OK to access the main menu. 2. Select SettingsSettingsSettingsSettings and press MENU/OK. 3. Select DisplayDisplayDisplayDisplay and press MENU/OK. 4. Highlight Incoming CallsIncoming CallsIncoming CallsIncoming Calls and press MENU/OK. 5. Select the menu under Incoming CallsIncoming CallsIncoming CallsIncoming Calls and press MENU/OK. 6. Highlight your desired color or downloaded image (screen saver) data or picture and press MENU/OK. ●  Get NewGet NewGet NewGet New: start up a Browser and you can select an item to download. ●  If you select the downloaded image (screen saver) data or picture during step 6 above, press Preview (right softkey) to see an example display. NoteNoteNoteNote: PCS Connection kit must be purchased for downloading the data from PC.  Setting the Display for tSetting the Display for tSetting the Display for tSetting the Display for the Standby Modehe Standby Modehe Standby Modehe Standby Mode    This feature enables you to select a variety of items to display on the standby mode. Follow these steps: 1. Press MENU/OK to access the main menu. 2. Select SettingsSettingsSettingsSettings and press MENU/OK. 3. Select DisplayDisplayDisplayDisplay and press MENU/OK. 4. Highlight StanStanStanStandbydbydbydby    DisplayDisplayDisplayDisplay and press MENU/OK. 5. Select your desired item and press MENU/OK.   Screen SaverScreen SaverScreen SaverScreen Saver selects the screen saver to display.     CalendarCalendarCalendarCalendar displays the Calendar.   Digital Clock Digital Clock Digital Clock Digital Clock displays the local time in digital mode.   Analog ClockAnalog ClockAnalog ClockAnalog Clock displays the local time in analog mode.   World ClockWorld ClockWorld ClockWorld Clock displays the time of the selected country along with the local time. You can scroll the World Clock list by pressing right or left on the Navigation key for changing country, Summer (left softkey) / Standard (right softkey) for changing between summer and standard time if applicable. The " * " icon indicates the summer time. TipTipTipTip: You can also display the World Clock from Tools/Extras menu. See “Using the World Clock” on page 64.   DefaultDefaultDefaultDefault sets this feature to default. 6. After following each system prompt or confirming the preview display, press MENU/OK to save the setting.
 25Changing the Changing the Changing the Changing the Screen SaverScreen SaverScreen SaverScreen Saver    Your new PCS Phone offers you the option of displaying a screen saver while in standby mode. To assign a screen saver: 1.  Press MENU/OK to access the main menu. 2. Select Settings Settings Settings Settings and press MENU/OK. 3. Select Display Display Display Display and press MENU/OK. 4. Highlight Standby Display Standby Display Standby Display Standby Display and press MENU/OK. 5. Select Screen Saver Screen Saver Screen Saver Screen Saver and press MENU/OK. 6.  Select the menu under Screen Saver Screen Saver Screen Saver Screen Saver and press MENU/OK. 7.  Highlight your desired screen saver, and press MENU/OK.   Get New: Get New: Get New: Get New: start up a Browser and you can select an item to download.     Press Preview (right softkey) during step 7 above to see an example display. 8.  Press Save (left softkey) to save the screen saver. Tip: Tip: Tip: Tip: In no service area, Screen Saver, Calendar, Time (Large), or World Clock cannot be shown on the standby display.        Changing the Display for Changing the Display for Changing the Display for Changing the Display for My BuddyMy BuddyMy BuddyMy Buddy This feature enables you to see a funny animation for 30 seconds on the Main LCD after opening the flip. Follow these steps: 1. Press MENU/OK to access the main menu. 2. Select SettingsSettingsSettingsSettings and press MENU/OK. 3. Select DisplayDisplayDisplayDisplay and press MENU/OK. 4. Highlight My Buddy My Buddy My Buddy My Buddy and press MENU/OK. 6. Select On On On On or Off Off Off Off and press MENU/OK. Press Preview (right softkey) to see a display preview.     Changing thChanging thChanging thChanging the Display Colore Display Colore Display Colore Display Color    To change the display color scheme: 1. Press MENU/OK to access the main menu. 2. Select SettingsSettingsSettingsSettings and press MENU/OK. 3. Select DisplayDisplayDisplayDisplay and press MENU/OK. 4. Highlight ColorColorColorColor and press MENU/OK. 5. Highlight Main LCD Main LCD Main LCD Main LCD or Sub LCD Sub LCD Sub LCD Sub LCD and press MENU/OK. 6. Select your desired color and press MENU/OK.
 26ChangingChangingChangingChanging    the the the the Font SizeFont SizeFont SizeFont Size    There are four font size settings for the message notification and browser. To change the font size, follow these steps: 1. Press MENU/OK to access the main menu. 2. Select SettingSettingSettingSettingssss and press MENU/OK. 3. Select DisplayDisplayDisplayDisplay and press MENU/OK. 4. Highlight Font SizeFont SizeFont SizeFont Size and press MENU/OK. 5. Highlight MessageMessageMessageMessage or BrowserBrowserBrowserBrowser and press MENU/OK. 6. Highlight Small Small Small Small or NormalNormalNormalNormal, and press MENU/OK.   7. Select your desired font size. ●  Press Preview (right softkey) to display a font size example. 8. Press MENU/OK to set the selected font. TipTipTipTip: From the font example display, you can see the larger/smaller font displays by pressing the right or left on the Navigation key.      Location Settings Location Settings Location Settings Location Settings    To enable your phone’s Location feature: 1. Press MENU/OK to access the main menu. 2. Select SettingsSettingsSettingsSettings and press MENU/OK. 3. Select LocationLocationLocationLocation and press MENU/OK. 4.Press MENU/OK or OK. Or wait a few seconds until the message scrolls down completely. 5.Select OnOnOnOn and press MENU/OK.   To deactivate this feature, select OffOffOffOff during step 5 above. TipTipTipTip: These icons lets you know whether information of your position is sent to the network or not. If you are in no service or roaming area, indication is always     indicates the Location Service is enabled.   indicates the Location Service is disabled.
 27Setting Airplane ModeSetting Airplane ModeSetting Airplane ModeSetting Airplane Mode    This feature shuts all Incoming Calls or Outgoing Calls (except for 911 dialing) to prevent interference with aircraft electronics. To set Airplane Mode: 1.  Press MENU/OK to access the main menu. 2. Select SettingsSettingsSettingsSettings and press MENU/OK. 3. Highlight OthersOthersOthersOthers and press MENU/OK. 4. Highlight Airplane ModeAirplane ModeAirplane ModeAirplane Mode and press MENU/OK. 5.  Read the message, and press MENU/OK or OK (left softkey).   Press Cancel (right softkey) to return to the Setting display. 6. Select On On On On and press MENU/OK.   To deactivate this feature, select OffOffOffOff during step 5 above. Note: Note: Note: Note: While in Airplane mode, your phone’s standby screen will display “Phone Off“.  Setting TTY MoSetting TTY MoSetting TTY MoSetting TTY Modededede    This feature set the TTY Mode to On or Off. A TTY (also known as TDD or Text Telephone), is a telecommunications device that allows people who are deaf or hard of hearing, or who have speech or language disabilities, to communicate by telephone. Connect the TTY device to the Headset Jack of Your PCS Phone. Then, type the message you want to send on the TTY’s keyboard. To Turn the TTY Mode On or Off: 1.  From the standby mode, press ##889. 2. Press MENU/OK. 3. Highlight Save Phone#Save Phone#Save Phone#Save Phone# and press MENU/OK. 4.  Press MENU/OK or OK. Or wait a few seconds until the message scrolls down completely. 5. Select Enable Enable Enable Enable or DisableDisableDisableDisable and press MENU/OK.     Phone Setup OptionsPhone Setup OptionsPhone Setup OptionsPhone Setup Options    My ShortcutMy ShortcutMy ShortcutMy Shortcut    You can arrange your own shortcut menu. 1. Press MENU/OK to access the main menu. 2. Select SettingsSettingsSettingsSettings and press MENU/OK. 3. Select OthersOthersOthersOthers and press MENU/OK. 4. Highlight My ShortcutMy ShortcutMy ShortcutMy Shortcut and press MENU/OK. 5. Select the menu under My ShortcutMy ShortcutMy ShortcutMy Shortcut and press MENU/OK. 6. Highlight your desired menu option and press MENU/OK.   Press Info (right softkey) during step 5 above to see the My Shortcut information.
 28Auto AnswerAuto AnswerAuto AnswerAuto Answer Mode Mode Mode Mode    This feature sets the phone to automatically pick up after 5 or 15 seconds. This feature works with the hands-free car kit and headset (sold separately). To activate this feature: 1. Press MENU/OK to access the main menu. 2. Select SettingsSettingsSettingsSettings and press MENU/OK. 3. Select OthersOthersOthersOthers and press MENU/OK. 4. Highlight Auto Answer Auto Answer Auto Answer Auto Answer and press MENU/OK. 5. Highlight Car Kit/HeadsetCar Kit/HeadsetCar Kit/HeadsetCar Kit/Headset and press MENU/OK. 6. Select either 5 Seconds5 Seconds5 Seconds5 Seconds or 15 seconds15 seconds15 seconds15 seconds and press MENU/OK.     To deactivate this feature, select OffOffOffOff during step 5 above.     Setting Flip OptionsSetting Flip OptionsSetting Flip OptionsSetting Flip Options    This feature enables you to answer incoming calls by opening the clamshell so that you don’t have to press TALK or SPEAKER. To activate this feature: 1.  Press MENU/OK to access the main menu. 2. Select Settings Settings Settings Settings and press MENU/OK. 3. Select Others Others Others Others and press MENU/OK. 4. Highlight Open/Close Flip Open/Close Flip Open/Close Flip Open/Close Flip and press MENU/OK. 5. Highlight Open Open Open Open and press MENU/OK. 6. Select Answer CallAnswer CallAnswer CallAnswer Call and press MENU/OK.     To deactivate this feature, highlight No Action No Action No Action No Action during step 5 above.  Setting Any Key AnswerSetting Any Key AnswerSetting Any Key AnswerSetting Any Key Answer    This feature allows you to answer incoming calls by pressing any key (except MENU/OK, END, BACK, Side Volume key, Ready Link key, and Navigation key). To activate this feature: 1. Press MENU/OK to access the main menu. 2. Select SSSSettingsettingsettingsettings and press MENU/OK.- 3. Select OthersOthersOthersOthers and press MENU/OK. 4. Highlight Any Key AnswerAny Key AnswerAny Key AnswerAny Key Answer and press MENU/OK.   5. Select OnOnOnOn and press MENU/OK. To deactivate this feature, select OffOffOffOff during step 5 above.
 29Setting Setting Setting Setting Abbreviated DialingAbbreviated DialingAbbreviated DialingAbbreviated Dialing    Abbreviated Dialing is another form of speed dialing. If the last four digits you enter do not match any stored phone book entry, the digits are automatically prepended with the digits specified using the following steps. To activate this feature: 1. Press MENU/OK to access the main menu. 2. Select SettingsSettingsSettingsSettings and press MENU/OK. 3. Select OthersOthersOthersOthers and press MENU/OK. 4. Highlight Abbrev. DialAbbrev. DialAbbrev. DialAbbrev. Dial and press MENU/OK. 5. Select EnableEnableEnableEnable and press MENU/OK. 6. Enter a six-digit number and press MENU/OK or OK (left softkey). If you want to deactivate this feature, select DisableDisableDisableDisable during step 5 above. TipTipTipTip: If you enter less than 6 digits, the display shows a warning message.          Headset ModeHeadset ModeHeadset ModeHeadset Mode    To set Headset mode: 1.1.1.1.Press to access the main menu. 2.2.2.2.Select Settings Settings Settings Settings and press MENU/OK . 3.3.3.3.Select Others Others Others Others and press MENU/OK. 4.4.4.4.Highlight Headset Mode Headset Mode Headset Mode Headset Mode and press MENU/OK. 5.5.5.5.Select Voice Call Voice Call Voice Call Voice Call or Ready Link Ready Link Ready Link Ready Link and press MENU/OK.   Press InfoInfoInfoInfo (right softkey) during step 5 above to see the Headset Mode information.   To deactivate this feature, select Off Off Off Off during step 5 above.     Setting Side Key GuardSetting Side Key GuardSetting Side Key GuardSetting Side Key Guard    This feature enables you to lock your side key (Ready Link key, Side Volume key and Side Call key)while the clamshell is closed. To activate this feature: 1.  Press MENU/OK to access the main menu. 2. Select Settings Settings Settings Settings and press MENU/OK. 3. Select Others Others Others Others and press MENU/OK. 4.  Highlight Side Key Guard Side Key Guard Side Key Guard Side Key Guard and press MENU/OK. 5. Select On On On On and press MENU/OK.   “Side Key Guard” message appears on the Sub LCD when you press any side key while the clamshell is closed.   To deactivate this feature, select OffOffOffOff    during step 5 above. NoteNoteNoteNote: This feature does not apply when the clamshell is open.
 30Sleep ModeSleep ModeSleep ModeSleep Mode    This feature helps conserve your battery power by restricting the display. To set sleep mode: 1.  From standby mode, press MENU/OK to display the main menu. 2. Select SettSettSettSettingsingsingsings and press MENU/OK. 3. Select DisplayDisplayDisplayDisplay and press MENU/OK. 4. Highlight Sleep ModeSleep ModeSleep ModeSleep Mode and press MENU/OK. 5. Highlight Main LCD Main LCD Main LCD Main LCD or Sub LCD Sub LCD Sub LCD Sub LCD and press MENU/OK. 6.  Select your desired option and press MENU/OK. To deactivate this feature, highlight OffOffOffOff during step 6 above.  Setting Message NotificationSetting Message NotificationSetting Message NotificationSetting Message Notification    You can see message notification when you receive Text message or Voicemail while you are in PCS applications or Browser mode. 1. Press MENU/OK to access the main menu. 2. Select SettingsSettingsSettingsSettings and press MENU/OK. 3. Select MessagingMessagingMessagingMessaging and press MENU/OK. 4. Check the box next to Games/AppsGames/AppsGames/AppsGames/Apps or Browser Browser Browser Browser and press Save (left softkey).   Press InfoInfoInfoInfo (right softkey) during step 4 above to see the Messages information.     Changing the Menu LanguageChanging the Menu LanguageChanging the Menu LanguageChanging the Menu Language    When you first turn your phone on, the menus are displayed in English. To change the menu language to Spanish, follow these steps. 1. Press MENU/OK to access the main menu. 2. Select SettingsSettingsSettingsSettings and press MENU/OK. 3. Select OthersOthersOthersOthers and press MENU/OK. 4. Highlight LanguageLanguageLanguageLanguage and press MENU/OK. 5. Select EspañolEspañolEspañolEspañol and press MENU/OK.
 31Setting Your Phone’s SecuritySetting Your Phone’s SecuritySetting Your Phone’s SecuritySetting Your Phone’s Security    Accessing the Security MenuAccessing the Security MenuAccessing the Security MenuAccessing the Security Menu    You must enter your lock code to view the Security menu. To access the Security menu: 1. Press MENU/OK to access the main menu. 2. Select SettingsSettingsSettingsSettings and press MENU/OK. 3. Select Security Security Security Security and press MENU/OK. 4. Enter lock code. Tip: Tip: Tip: Tip: If you can’t recall your lock code, try using the last four digits of either your Social Security number or PCS Phone Number or try 0000.    Locking Your PhoneLocking Your PhoneLocking Your PhoneLocking Your Phone    When your phone is locked, your phone allows you to restrict the incoming calls and make calls except 911 and special numbers. To lock your phone: 1. From the Security Menu display (See “Accessing the Security Menu” on page 31), select Lock Lock Lock Lock PhonePhonePhonePhone and press MENU/OK. 2. Select Lock nowLock nowLock nowLock now or On Power On Power On Power On Power----uuuupppp and press MENU/OK. 3. Depending on your preference, highlight either Full LockFull LockFull LockFull Lock or Except Incom.CallsExcept Incom.CallsExcept Incom.CallsExcept Incom.Calls and press MENU/OK. ●  Full Lock: Full Lock: Full Lock: Full Lock: All phone calls except for Emergency# or Special #s cannot be made. And no phone calls can be received except for Special #s. ●  Except Incom.Calls.: Except Incom.Calls.: Except Incom.Calls.: Except Incom.Calls.: All phone calls except for Emergency# or Special #s cannot be made. But all incoming calls can be received. TipTipTipTip: If you want to cancel the “On Power-up” setting before turning the phone off, select UnlockedUnlockedUnlockedUnlocked during step 2 above. UnlUnlUnlUnlocking Your Phoneocking Your Phoneocking Your Phoneocking Your Phone    To unlock your phone: 1. From the Locked display, press Unlock (left softkey). 2. Enter your lock code.  Changing the Lock CodeChanging the Lock CodeChanging the Lock CodeChanging the Lock Code    1. From the Security Menu display (See “Accessing the Security Menu” on page 31),   highlight OthersOthersOthersOthers and press MENU/OK. 2. Highlight Change LockChange LockChange LockChange Lock and press MENU/OK. 3.    Enter new lock code, 1234 1234 1234 1234 for example, in the box under New CodNew CodNew CodNew Codeeee. 4.    Reenter the new lock code in the box under Reenter CodReenter CodReenter CodReenter Codeeee.
 32Calling in Lock MCalling in Lock MCalling in Lock MCalling in Lock Modeodeodeode    You can place calls to 911 and to your special numbers when in lock mode. To place an outgoing call in lock mode:   To call an Emergency number or special number, enter the phone number and   press TALK or SPEAKER. (For Emergency numbers, see “Calling Emergency Numbers” on page 14).  Restricting CallsRestricting CallsRestricting CallsRestricting Calls    You can restrict both incoming calls and outgoing calls if necessary. (The Restrict Calls setting does not apply to 911). To restrict calls: 1.  From the Security Menu display (See “Accessing the Security Menu” on page 31), select OthersOthersOthersOthers and press MENU/OK. 2. Highlight Limit UseLimit UseLimit UseLimit Use and press MENU/OK. 3.  Select the menu under Outgoing CallsOutgoing CallsOutgoing CallsOutgoing Calls or Incoming CallsIncoming CallsIncoming CallsIncoming Calls and press MENU/OK. 4.  Highlight your desired option and press MENU/OK. Options:   Allow AllAllow AllAllow AllAllow All: You can make or receive all calls.   Phone Book OnlyPhone Book OnlyPhone Book OnlyPhone Book Only: Only Phone Book entries, Voicemail, or Special #s are available to make or receive calls.   Special #s OnlySpecial #s OnlySpecial #s OnlySpecial #s Only: Only three special numbers’ entries are available to make or receive calls.   NoteNoteNoteNote: To unrestrict all calls, select Allow All Allow All Allow All Allow All during step 4 above. NoteNoteNoteNote: Restricted incoming calls are forwarded to voicemail.    Using Special NumbersUsing Special NumbersUsing Special NumbersUsing Special Numbers    You can save three special numbers in addition to your Internal Phone Book entries (the same number may be in both directories). You can make and receive calls from special numbers even when your phone is locked. To add or replace a special number: 1.  From the Security Menu display (See “Accessing the Security Menu” on page 31), highlight OthersOthersOthersOthers and press MENU/OK. 2. Highlight Special #sSpecial #sSpecial #sSpecial #s and press MENU/OK. 3. Highlight the box under the entry number and press MENU/OK. 4. Enter your desired phone number and press MENU/OK. -or- Press Options (right softkey), then highlight From PhFrom PhFrom PhFrom Ph.... Book Book Book Book or VoicemailVoicemailVoicemailVoicemail and press MENU/OK.
 33To insert pauses into a number: 1. From the step 4 above, enter the phone number and press Options (right softkey) for the options. 2. Highlight Hard PauseHard PauseHard PauseHard Pause, 2222----Second PauseSecond PauseSecond PauseSecond Pause or HyphenHyphenHyphenHyphen, and press MENU/OK. 3.Finish entering the rest of the numbers, and press MENU/OK. NoteNoteNoteNote: During Speed Dial entry, There are no Speed Dial options associated with special numbers.  Erasing the Internal Phone BookErasing the Internal Phone BookErasing the Internal Phone BookErasing the Internal Phone Book    To erase all the names and phone numbers in your Internal Phone Book: 1.From the Security Menu display (See “Accessing the Security Menu” on page 31), highlight Erase PhErase PhErase PhErase Ph. . . . BookBookBookBook and press MENU/OK. 2. If you’re sure you want to erase your Phone Book, highlight YesYesYesYes and press MENU/OK.  Erasing the DownloadsErasing the DownloadsErasing the DownloadsErasing the Downloads    To erase all the downloaded data from web: 1.From the Security Menu display (See “Accessing the Security Menu” on page 31), highlight EraseDownloadEraseDownloadEraseDownloadEraseDownload and press MENU/OK. 2.  If you’re sure you want to erase downloaded data from web, highlight YesYesYesYes and press MENU/OK.   If you have assigned downloaded data, the function returns to its default setting.  Resetting Your PhoneResetting Your PhoneResetting Your PhoneResetting Your Phone    Resetting the phone restores all the factory defaults, including the ringer types and display settings. The Internal Phone Book, Call History, Scheduler and Messages are not affected. To reset your phone: 1.From the Security Menu display (See “Accessing the Security Menu” on page 31), highlight Reset PhoneReset PhoneReset PhoneReset Phone, and press MENU/OK. 2. If you’re sure you want to reset your phone, highlight YesYesYesYes and press MENU/OK.
 34Resetting and Locking Your Phone through SMSResetting and Locking Your Phone through SMSResetting and Locking Your Phone through SMSResetting and Locking Your Phone through SMS    When your phone is lost or stolen, you can erase your important personal information (such as phone book entries, call history and messages) and lock your phone by sending a special formatted SMS message to your phone. Send the following format from your computer: \\RESET **<Passcode>**RESET <Passcode> – your defined passcode. Default Passcode is 11-digit ESN(Electronic Serial Number) which is written on the package or phone itself. To activate this feature, the following presetting is required: 1. Press MENU/OK to access the main menu. 2. Select SettingsSettingsSettingsSettings and press MENU/OK. 3. Select SecuritySecuritySecuritySecurity and press MENU/OK. 4. Enter your lock code. 5. Select OthersOthersOthersOthers and press MENU/OK. 6. Highlight Found MeFound MeFound MeFound Me and press MENU/OK. 7. Highlight Reset/LockReset/LockReset/LockReset/Lock and press MENU/OK. 8. Select EnableEnableEnableEnable and press MENU/OK. To unlock a phone that has been locked through SMS, bring the phone to Customer center.  Changing the PasscodeChanging the PasscodeChanging the PasscodeChanging the Passcode    To change the passcode for the special formatted SMS messages. 1.    Press MENU/OK to access the main menu. 2.    Select Settings Settings Settings Settings and press MENU/OK. 3.    Select Security Security Security Security and press MENU/OK. 4.    Enter lock code. 5.    Select Others Others Others Others and press MENU/OK. 6.    Highlight Found Me Found Me Found Me Found Me and press MENU/OK. 7.    Highlight Chg passcode Chg passcode Chg passcode Chg passcode and press MENU/OK. 8.    Enter new passcode in the box under New Passcode New Passcode New Passcode New Passcode (11 digits). 9.    Reenter the new passcode in the box under Reenter CodReenter CodReenter CodReenter Code.
 35 Controlling Your Roaming ExperienceControlling Your Roaming ExperienceControlling Your Roaming ExperienceControlling Your Roaming Experience    Understanding RoamingUnderstanding RoamingUnderstanding RoamingUnderstanding Roaming    Recognizing Icons on the Display ScreenRecognizing Icons on the Display ScreenRecognizing Icons on the Display ScreenRecognizing Icons on the Display Screen    Your phone’s display screen always lets you know when you’re off the Nationwide PCS Network and whether your phone is operating in analog or digital mode. The following chart indicates what you’ll see depending on where you’re using your phone.         Main LCDMain LCDMain LCDMain LCD        Roaming IndicatorRoaming IndicatorRoaming IndicatorRoaming Indicator     Nationwide PCS Network   Other/Analog Networks             Sub LCDSub LCDSub LCDSub LCD    Roaming IndicatorRoaming IndicatorRoaming IndicatorRoaming Indicator    AnalogAnalogAnalogAnalog Indicator Indicator Indicator Indicator    Nationwide PCS Network     Other Digital Networks  Digital RoamDigital RoamDigital RoamDigital Roam        Analog Networks      Analog RoamAnalog RoamAnalog RoamAnalog Roam     Tip: Tip: Tip: Tip: Remember, when you are using your phone off the Nationwide PCS Network, always dial numbers using 11 digits (1 + area code + number). Note: Note: Note: Note: You will pay a higher per-minute rate for roaming calls.     Roaming on Other Digital NetworksRoaming on Other Digital NetworksRoaming on Other Digital NetworksRoaming on Other Digital Networks    When you’re roaming on other digital networks, your call quality and security will be similar to the quality you receive when making calls while on the enhanced Nationwide PCS Network. You may not be able to access certain calling features. Roaming on Analog NetworksRoaming on Analog NetworksRoaming on Analog NetworksRoaming on Analog Networks    When you roam on analog networks, you will experience a similar quality provided by other analog carriers today. Although some calling features will be unavailable, you can still make and receive calls and access voicemail. You will experience a few differences:     You are more likely to experience static, cross-talk, fade-out and dropped calls.   Some calling features, which are standard on the enhanced Nationwide PCS Network, such as Call Waiting PCS products and services and direct international dialing, are unavailable.   Though callers can leave voicemail messages while you are roaming, you will not receive notification until you return to the Nationwide PCS Network.  While roaming, you can periodically check your voicemail for new messages by dialing 1+areacode+your PCS Phone Number.    Press    *    when you hear your greeting and enter your pass code at the
 36prompt.   There are security and privacy risks (eavesdropping and cloning) that exist with conventional analog services today.   Your battery needs recharging sooner when you use your phone for analog roaming. Note: Note: Note: Note: If you’re on a call when you leave the Nationwide PCS Network and enter an area where roaming is available (whether digital or analog), your call is dropped. If your call is dropped in an area where you think PCS Service is available, turn your phone off and on again to reconnect to the Nationwide PCS Network.    Note: Note: Note: Note: When using your phone in analog mode, the handset may feel warm. This behavior is normal for analog operation.        Setting Your PhoneSetting Your PhoneSetting Your PhoneSetting Your Phone’’’’s Roam Modes Roam Modes Roam Modes Roam Mode    Your PCS Phone allows you to control your ability to roam. By using the Roaming Roaming Roaming Roaming menu option, you can determine which signals your phone accepts. Set MoSet MoSet MoSet Modededede    Choose from three different settings on your dual band/tri mode phone to control your roaming experience: 1.    Press MENU/OK to access the main menu. 2.    Select Settings  Settings  Settings  Settings and press MENU/OK. 3.    Select Roaming Roaming Roaming Roaming and press MENU/OK. 4.    Highlight Set Mode Set Mode Set Mode Set Mode and press MENU/OK. 5.    To select an option, select it and press MENU/OK.   PCSPCSPCSPCS   Automatic Automatic Automatic Automatic    AnalogAnalogAnalogAnalog   CellularCellularCellularCellular  Controlling Roaming Charges Using Controlling Roaming Charges Using Controlling Roaming Charges Using Controlling Roaming Charges Using Call GuardCall GuardCall GuardCall Guard    In addition to the roaming icon, Call Guard alerts you when roaming charges apply. This feature makes it easy to manage your roaming charges by reminding you when you make or receive roaming calls. It also requires you to take additional steps before placing or answering a roaming call. These additional steps are not required when you make or receive calls while on the enhanced Nationwide PCS Network. To Turn the Call Guard Feature On or Off:To Turn the Call Guard Feature On or Off:To Turn the Call Guard Feature On or Off:To Turn the Call Guard Feature On or Off:    1.  Press MENU/OK to access the main menu. 2. Select SettingsSettingsSettingsSettings and press MENU/OK.
 373. Select Roaming Roaming Roaming Roaming and press MENU/OK. 4. Highlight Call Guard Call Guard Call Guard Call Guard and press MENU/OK.   5. Select On On On On or Off Off Off Off and press MENU/OK.       To Place Roaming Calls With Call Guard On:To Place Roaming Calls With Call Guard On:To Place Roaming Calls With Call Guard On:To Place Roaming Calls With Call Guard On:    1.    From the standby mode, dial 1 + area code + the seven-digit number. (You can also initiate a call from the Internal Phone Book, Call History or Messaging). 2.    Press TALK or SPEAKER or press MENU/OK, highlight Call Call Call Call or Call:Speaker On  Call:Speaker On  Call:Speaker On  Call:Speaker On and press MENU/OK. 3.    Press    1    to proceed while the pop-up message is displayed.    -or-       Press any key to erase the pop-up message, then press MENU/OK, highlight   Roam Call Roam Call Roam Call Roam Call or Roam:Speaker  Roam:Speaker  Roam:Speaker  Roam:Speaker and press MENU/OK. To Answer IncoTo Answer IncoTo Answer IncoTo Answer Incoming Roaming Calls With Call Guard On:ming Roaming Calls With Call Guard On:ming Roaming Calls With Call Guard On:ming Roaming Calls With Call Guard On:    1.    Press TALK or SPEAKER. 2.    Press    1    to proceed while the pop-up message is displayed.   -or- 1. Press MENU/OK, highlight Answer Answer Answer Answer or Answer:Speaker  Answer:Speaker  Answer:Speaker  Answer:Speaker and press MENU/OK. Remember if the Call Guard feature is set to OnOnOnOn, you need to take extra steps to make and receive roaming calls even if you have selected the Analog  Analog  Analog  Analog setting.
 38Navigating Through MenusNavigating Through MenusNavigating Through MenusNavigating Through Menus    Menu NavigationMenu NavigationMenu NavigationMenu Navigation    The Navigation key on your PCS Phone allows you to scroll through menus quickly and easily. To navigate through a menu, simply press the  ▲/▼  on Navigation key. As you navigate through the menu, menu options are highlighted. Select an option by highlighting it and pressing MENU/OK.     Menu StructureMenu StructureMenu StructureMenu Structure    Selecting Menu ItemsSelecting Menu ItemsSelecting Menu ItemsSelecting Menu Items    As you navigate through a menu, the options are highlighted. Select an option by highlighting it and pressing MENU/OK. For example, if you want to view your last incoming call: 1.    Press MENU/OK to access the main menu. 2.    Highlight Call History Call History Call History Call History and press MENU/OK. (It may already be highlighted). 3.    Press  ▼on the Navigation key to highlight Incoming Calls Incoming Calls Incoming Calls Incoming Calls and press MENU/OK.   If you have received any calls, they are displayed on the screen.     Backing Up Within a MenuBacking Up Within a MenuBacking Up Within a MenuBacking Up Within a Menu    To go to the previous menu: Press Back To go to the standby display: Press END/.     ShortcutsShortcutsShortcutsShortcuts    Left Navigation key (    ) to take a shortcut to the My Shortcut menu. Right Navigation key (    ) to take a shortcut to the phone book (Find Name). Up Navigation key (▲) to take a shortcut to the Messaging. Down Navigation key(▼) to take a shortcut to the Downloads.
 39Viewing the MenusViewing the MenusViewing the MenusViewing the Menus    Menu Diagram Menus let you check or change your phone settings. The following outline shows your phone’s menu structure. 1.1.1.1.    Call History 1. Outgoing Calls 2.  Incoming Calls 3.  Missed Calls 4.  Erase History 2.2.2.2.    Contacts 1. Find/Add Entry 2.  Speed Dial#s 3.  My Phone# 4.  Services 3.3.3.3.    Messaging 1. Send Message 2.  PictureMail(xx) 3.  Text Msg(xxx) 4.  Go to PCS Mail 5.  Voicemail 4.4.4.4.    Web 5.5.5.5.    Picture/Video 1. Take Picture 2.  Take Video 3.  My Video 4.  Online Media 5.  Account Info 6.  Setting 6.6.6.6.    Downloads 1. Games 2. Ringers 3. Screen Savers 4. Applications 5. Dynamic 6. Others 7.7.7.7.    Settings 1. Sounds 2. Display
 403. PCS Vision 4. Location 5. Roaming 6. Messaging 7. Security 8. Others 8.8.8.8.    Tools/Extras 1. Calendar 2. Calculator 3. World Clock 4. PC Sync 9.9.9.9.    Voice Services 1. Voice Memo 2. Screen Call 3. Voice Dial
 41Managing Call HistoryManaging Call HistoryManaging Call HistoryManaging Call History    Viewing Call History Viewing Call History Viewing Call History Viewing Call History      You’ll find your Call History invaluable. It is a list of the last 20 phone numbers or Internal Phone Book entries for each calls you placed, accepted or missed. Call History makes redialing a number fast and easy. It is continually updated as new numbers are added to the beginning of the list and the oldest entries are removed from the bottom of the list. Each entry contains the phone number (if it is available) and Internal Phone Book entry name (if the phone number is in your Internal Phone Book). Duplicate calls (same number and type of call) may only appear once on the list. To view a Call History entry: 1.    Press MENU/OK to access the main menu. 2.    Highlight Call History Call History Call History Call History and press MENU/OK. 3.    Highlight Outgoing CallsOutgoing CallsOutgoing CallsOutgoing Calls, Incoming Calls Incoming Calls Incoming Calls Incoming Calls or Missed Calls Missed Calls Missed Calls Missed Calls and press MENU/OK.     Call History OptionsCall History OptionsCall History OptionsCall History Options    For additional information and options for a particular call, highlight a Call History entry and press MENU/OK. This feature gives you the option of selecting:   Call Call Call Call to dial the phone number.   Call:Speaker On Call:Speaker On Call:Speaker On Call:Speaker On to dial the phone number with speakerphone mode.   Save Phone# Save Phone# Save Phone# Save Phone# to save the phone number if it is not already in your Internal Phone Book (if applicable) or if the caller’s phone number has already been stored in the any Phone Book entry, Go to Phone Book  Go to Phone Book  Go to Phone Book  Go to Phone Book appears instead of Save PhoneSave PhoneSave PhoneSave Phone#. (See “Saving a Phone Number From Call History” on page 42).   Prepend Prepend Prepend Prepend to add numbers to the beginning of the phone number. (See “Prepending a Phone Number From Call History” on page 43).   View View View View to view the caller’s information....   Erase Erase Erase Erase to erase the entry. Tip: Tip: Tip: Tip: You can also view the next Call History entry by pressing the Navigation key right or view the previous entry by pressing the Navigation key left.        Making a Call from Call HistoryMaking a Call from Call HistoryMaking a Call from Call HistoryMaking a Call from Call History    To place a call from Call History: 1.  Press MENU/OK to access the main menu. 2. Select Call History Call History Call History Call History and press MENU/OK. 3. Select Outgoing CallsOutgoing CallsOutgoing CallsOutgoing Calls, Incoming Calls Incoming Calls Incoming Calls Incoming Calls or Missed CallsMissed CallsMissed CallsMissed Calls. 4. Press MENU/OK. 5.  Highlight the entry you want to call by scrolling through the list.
 426.  Press TALK or SPEAKER . -or-     Press MENU/OK, highlight Call Call Call Call or Call:Speaker OnCall:Speaker OnCall:Speaker OnCall:Speaker On    and press MENU/OK. Note: Note: Note: Note: You cannot make calls from Call History to entries identified as No ID or Restricted.       Saving a Phone Number FrSaving a Phone Number FrSaving a Phone Number FrSaving a Phone Number From Call Historyom Call Historyom Call Historyom Call History    Your PCS Phone can store up to 300 Internal Phone Book entries. Phone Book entries can store up to a total of 500 phone numbers and each entry’s name can contain 16 characters. To save a phone number from Call History: 1.    Highlight the call history entry you want to save. 2.    Press MENU/OK to display the options. 3.    Highlight Save Phone# Save Phone# Save Phone# Save Phone# and press MENU/OK. 4.    Highlight appropriate label (Home, Work, Mobile, Pager, Data, Fax or No Label), and press MENU/OK. 5. Enter a Name, and press MENU/OK or OK (left softkey). Or you can also save the phone number without a name by pressing MENU/OK from the name entry display, highlight Yes  Yes  Yes  Yes and then press MENU/OK. If you have already stored entries in the Phone Book, you are prompted to select the following entry mode.   New Name New Name New Name New Name to enter a name directly.   From Ph. Book From Ph. Book From Ph. Book From Ph. Book to select a name from Phone Book entry list. 6.    Press Save (left softkey). Note: Note: Note: Note: You cannot save phone numbers from calls identified as No ID or Restricted. If the selected entry has already been stored in the phone book, “AlternateAlternateAlternateAlternate” appears during step 3 above. After you have saved the number, the new Internal Phone Book entry is displayed. (See “Internal Phone Book Entry Options” on page 44.)
 43Prepending a Phone Number From Call HistorPrepending a Phone Number From Call HistorPrepending a Phone Number From Call HistorPrepending a Phone Number From Call Historyyyy    If you need to make a call from Call History and you happen to be outside your local area code, you can add the appropriate prefix by following these steps: 1.    Highlight a call history entry and press MENU/OK. 2.    Highlight Prepend Prepend Prepend Prepend and press MENU/OK. 3.    Enter the digits you want to add to the number. If you want to save the number, press MENU/OK and select Save Phone#  Save Phone#  Save Phone#  Save Phone# from options. If not, the changes only apply to the current call. To select an option, highlight it and press MENU/OK.   Call Call Call Call to dial the phone number.   Call: Speaker On Call: Speaker On Call: Speaker On Call: Speaker On to dial the phone number with speakerphone mode.   Save Phone# Save Phone# Save Phone# Save Phone# to store the phone number in your Internal Phone Book.   Hard Pause Hard Pause Hard Pause Hard Pause to insert a hard pause. (See “Dialing and Saving Phone Numbers With Pauses” on page 17).   2222----SecSecSecSec.... Pause  Pause  Pause  Pause to insert a 2-second pause. (See “Dialing and Saving Phone Numbers With Pauses” on page 17).     Erasing Call HistoryErasing Call HistoryErasing Call HistoryErasing Call History    To erase individual Call History entries, see “Call History Options” on page 41. To erase Call History: 1.    Press MENU/OK to access the main menu. 2.    Select Call History Call History Call History Call History and press MENU/OK. 3. Select Erase HistoryErase HistoryErase HistoryErase History and press MENU/OK. 4. Highlight the category you want to erase and press MENU/OK. 5.    Highlight Yes Yes  Yes  Yes and press MENU/OK.   You can also select All CallsAll CallsAll CallsAll Calls at the previous step 4 above to erase all Call History.
 44Using your Internal Phone BookUsing your Internal Phone BookUsing your Internal Phone BookUsing your Internal Phone Book    Internal Phone Book Entry OptionsInternal Phone Book Entry OptionsInternal Phone Book Entry OptionsInternal Phone Book Entry Options    To access an Internal Phone Book Entry’s options, display the entry list, highlight an entry and press MENU/OK, then select a phone number and press Options (right softkey). To select an option, highlight it and press MENU/OK.   EditEditEditEdit to edit your desired label   Call Call Call Call to dial the phone number. (If you are roaming and have the Call Guard feature activated, you are required to take an extra step to proceed. See “Controlling Roaming Charges Using Call Guard” on pages 36-37).   Call:Speaker On Call:Speaker On Call:Speaker On Call:Speaker On to dial the phone number with speakerphone mode.   Call Alarm Call Alarm Call Alarm Call Alarm to set the call alarm to the entry.   Set Speed Dial Set Speed Dial Set Speed Dial Set Speed Dial to set the speed dial to the entry.   Set Voice Dial Set Voice Dial Set Voice Dial Set Voice Dial to set the voice dial to the entry.   Prepend Prepend Prepend Prepend to alter a phone number by adding additional numbers. When you are in edit display the following options are displayed:   Send PCS MailSend PCS MailSend PCS MailSend PCS Mail to send the email. (Only EmailEmailEmailEmail label)   Visit Site Visit Site Visit Site Visit Site to visit the Website. (Only Web Web Web Web label)   EditEditEditEdit to edit your desired label.   Erase Erase Erase Erase to erase your desired label.  Tip: Tip: Tip: Tip: You can view the next entry by pressing the right Navigation key or view the previous entry by pressing left on the Navigation key.     You can erase the selected entry from the Phone Book list. 1.Press right on the Navigation key to display the Phone Book list. 2.Press Options (Right softkey). 3.Highlight Erase EntryErase EntryErase EntryErase Entry and press MENU/OK. 4.Highlight Yes  Yes  Yes  Yes and press MENU/OK.
 45Selecting a Character Input ModeSelecting a Character Input ModeSelecting a Character Input ModeSelecting a Character Input Mode    Your PCS Phone™ provides convenient ways to enter words, letters, punctuation and numbers whenever you are prompted to enter text (for example, when adding an Internal Phone Book entry). To change the character input mode: 1.    When you display a screen where you can enter text, press right softkey to display the input mode menu. 2.Highlight your desired mode from T9 Word, AlphabetT9 Word, AlphabetT9 Word, AlphabetT9 Word, Alphabet, SYMBOL, NUMBERSYMBOL, NUMBERSYMBOL, NUMBERSYMBOL, NUMBER,   CANNED SUFFIX CANNED SUFFIX CANNED SUFFIX CANNED SUFFIX ,or SMILEYSSMILEYSSMILEYSSMILEYS and press MENU/OK.     Entering Characters Using T9 Text InputEntering Characters Using T9 Text InputEntering Characters Using T9 Text InputEntering Characters Using T9 Text Input    T9 Text Input lets you enter text in your PCS Phone by pressing keys just once per letter. (To select the T9 Word T9 Word T9 Word T9 Word mode when entering text, see “Selecting a Character Input Mode” on page 45). T9 Text Input analyzes the letters you enter using an intuitive word database and creates a suitable word. (The word may change as you type). If the word you want does not display after you have entered all the letters, press Next 0 to scroll through additional word selections. To accept a word and insert a space, press Space #. If you make a mistake, press Back to erase a single character. Press and hold Back to delete an entire entry.     Adding Adding Adding Adding a a a a Word to Word to Word to Word to the the the the T9 DatabaseT9 DatabaseT9 DatabaseT9 Database    If a word you want to enter does not display as an option when you are using T9 Text Input, you can add it to the database. To add a word to the database: 1.    Select the AlphAlphAlphAlphabet abet abet abet input mode. 2. Enter the word using multi-tap text entry. (See “Entering Characters by Tapping the Keypad” on pages 46-47). Then press right softkey, highlight T9 Word T9 Word T9 Word T9 Word and press MENU/OK. The word will appear as an option the next time you scroll through options during T9 Text Input.
 46 Entering Entering Entering Entering Characters by Tapping the KeypadCharacters by Tapping the KeypadCharacters by Tapping the KeypadCharacters by Tapping the Keypad    To enter characters by tapping the keypad, select the Alphabet Alphabet Alphabet Alphabet mode (see “Selecting a Character Input Mode” on page 45). Press the corresponding key until the desired character appears. By default, the first letter of a word is capitalized and following letters are lowercase. Characters scroll in the following order: English Sequence Key Upper Case  Lower Case 1  . , @ 1 ? ! * # / 2 ABC2  abc2 3 DEF3  def3 4 GHI4  ghi4 5 JKL5  jkl5 6 MNO6  mno6 7 PQRS7  pqrs7 8 TUV8  tuv8 9 WXYZ9  wxyz9 0 0 # Space *  Unshifted One-character-shifted  Caps Lock   In Spanish mode, characters scroll in the following order. Spanish Sequence Key Key Upper Case  Lower Case 1  . , @ 1 ¿ ? ¡ ! * # / 2 AÁBC2  aábc2 3 DEÉF3  deéf3 4 GHIÍ4  ghií4 5 JKL5  jkl5 6 MNÑOÓ6  mnñoó6 7 PQRS7  pqrs7 8 TUÚÜV8  tuúüv8 9 WXYZ9  wxyz9 0 0 # Space *  Unshifted One-character-shifted  Caps Lock   See page 30 for changing Spanish entering mode. After a character is entered, the cursor automatically advances to the next space after two
 47seconds or when you enter a character not on the same key.        Using Smart PunctuationUsing Smart PunctuationUsing Smart PunctuationUsing Smart Punctuation    “Smart punctuation” is available while using in T9 mode. It’s a quick and easy way to type email domains, possessive forms and contractions. When you press    1 ,   T9 displays a period. However, as you continue to type, T9 determines the appropriate mark based on your word database. For example, to type “It’s Easy.”   Press  4   8   1   7  Space #  3   2   7   9   1 . Tip: Tip: Tip: Tip: The beginning of the word after the space is changed to upper/lower case depending on the entry field. You can change the shift by pressing Shift *.     Entering NumbersEntering NumbersEntering NumbersEntering Numbers, , , , Symbols,Symbols,Symbols,Symbols,    Canned SuffixCanned SuffixCanned SuffixCanned Suffix and Smileys and Smileys and Smileys and Smileys    Entering NUMBEREntering NUMBEREntering NUMBEREntering NUMBER    To enter numbers, select the NUMBER NUMBER NUMBER NUMBER mode and press the appropriate key (see “Selecting a Character Input Mode” on page 45). 1.    In a text entry field, press right soft key. 2.    Highlight NUMBER NUMBER NUMBER NUMBER and press MENU/OK. 3. Press the corresponding numeric key to enter the number. Shortcut:Shortcut:Shortcut:Shortcut: Press and hold the corresponding numeric key to enter the number directly.    Entering SYMBOLEntering SYMBOLEntering SYMBOLEntering SYMBOL    To enter symbols, select the SYMBOL SYMBOL SYMBOL SYMBOL mode. (See “Selecting a Character Input Mode” on page 45).  1.    In a text entry field, press right soft key. 2.    Highlight SYMBOLSYMBOLSYMBOLSYMBOL and press MENU/OK. 3.    Highlight the line that includes your desired symbol. 4.    Press the corresponding key (1 ~ 0) with each symbol.   -or-   Highlight your desired symbol by using the Navigation key, and press MENU/OK.
 48 Symbol ListSymbol ListSymbol ListSymbol List    1111    2222    3333    4444    5555    6666    7777    8888    ....    ----    @@@@    ????    !!!!    ****    ####    ''''    ((((    ))))    ““““        :   :   :   :    ;;;;    "  ^ ```` <<<<    >>>>    ++++    / / / /         $$$$    %%%%    &&&&    [[[[    ]]]]    ====    ««««    »»»»    ____    ||||    ~~~~    {{{{    }}}}    °°°°    ¿¿¿¿    ¡¡¡¡    ¢¢¢¢    ££££    §§§§        Entering CANNED SUFFIXEntering CANNED SUFFIXEntering CANNED SUFFIXEntering CANNED SUFFIX    To enter canned suffix, select the CANNED SUFFIXCANNED SUFFIXCANNED SUFFIXCANNED SUFFIX mode (see “Selecting a Character Input Mode” on page 45). 1. In a text entry field, press right soft key. 2. Highlight CANNED SUFFIX CANNED SUFFIX CANNED SUFFIX CANNED SUFFIX and press MENU/OK. 3. Highlight the line that includes your desired smiley. 4. Highlight your desired smiley by using the Navigation key and press MENU/OK.  Entering SMILEYSEntering SMILEYSEntering SMILEYSEntering SMILEYS    To enter smile picture, select the SMILEYSSMILEYSSMILEYSSMILEYS mode (see “Selecting a Character Input Mode” on page 45). 1. In a text entry field, press right soft key. 2. Highlight SMILEYS SMILEYS SMILEYS SMILEYS and press MENU/OK. 3. Highlight the line that includes your desired smiley. 4. Press the corresponding key (1~4) with each smiley.   -or-     Highlight your desired smiley by using the Navigation key and press MENU/OK.  Adding a New Internal Phone Book EntryAdding a New Internal Phone Book EntryAdding a New Internal Phone Book EntryAdding a New Internal Phone Book Entry    Your PCS Phone can store up to 300 Internal Phone Book entries. Phone Book entries can store up to a total of 500 phone numbers and the entry’s name can contain 16 characters. To add a new entry: 1.    Press MENU/OK to access the main menu. 2.    Press MENU/OK to display the menu options. 3.    Highlight Save PhoneSave PhoneSave PhoneSave Phone#, and press MENU/OK. 4.    Highlight your desired label and press MENU/OK. 5.    Enter a name and press MENU/OK or OK (left softkey). Or you can also save the phone number without a name by pressing MENU/OK from the name entry display, highlight Yes Yes Yes  Yes
 49and then press MENU/OK. If you have already stored entries in the Phone Book, you are prompted to select the following entry mode.   New Name New Name New Name New Name to enter a name directly.   From Ph. Book From Ph. Book From Ph. Book From Ph. Book to select a name from Phone Book entry list. 6.    Press Save (left softkey).   -or- 1.    Press MENU/OK to access the main menu. 2.    Select Contacts Contacts Contacts Contacts and press MENU/OK. 3.    Select Add New EntryAdd New EntryAdd New EntryAdd New Entry and press MENU/OK. 4.    Enter a name and press MENU/OK or OK (left softkey). 5.    Select the box under your desired label and press MENU/OK. 6.    Enter the number or address and press MENU/OK. 7.    Press Save (left softkey).   If you want to store the number without name, press MENU/OK or OK (left softkey) before you enter the name during step 4 above and select YesYesYesYes . After you have saved the number, the new Internal Phone Book entry is displayed. (See “Internal Phone Book Entry Options” on page 44).     Finding Internal Phone Book EntriesFinding Internal Phone Book EntriesFinding Internal Phone Book EntriesFinding Internal Phone Book Entries    There are several ways to display your Internal Phone Book entries. Follow the steps outlined in the sections below to display entries from the Internal Phone Book menu. Finding NamesFinding NamesFinding NamesFinding Names    You can review all the entries stored in your Internal Phone Book or find an entry quickly by following these simple steps: 1.    Press MENU/OK to access the main menu. 2.    Select ContactsContactsContactsContacts and press MENU/OK. 3.    Select Find NameFind NameFind NameFind Name and press MENU/OK.   Press the right Navigation key for the shortcut (steps 1 through 3). 4.    To select the entry, scroll through the list using your Navigation key.   5. Highlight your desired entry and press MENU/OK to locate a specific label.     Press Options (right softkey) for the menu options.  Finding EntriesFinding EntriesFinding EntriesFinding Entries    To find an Internal Phone Book entry by its entry first letters: 1.    Press the right Navigation key. 2.    Enter the first letter of the name or part of a name using multi-tap method. 3.    Highlight your desired entry by scrolling through the phone book entry and press   MENU/OK.
 50  If you enter a single letter, the display shows the list that begins with that letter. -or- 1.    From the standby mode, enter 4 digits or more. 2.    Press MENU/OK. 3.    Highlight Find Find Find Find and press MENU/OK. 4.    The phone book entry list that includes the numbers that ends with the digits you entered appears. 5.    Scroll through the list to select your desired entry. 6.    Press TALK or SPEAKER to make a call. Finding Speed Dial NumbersFinding Speed Dial NumbersFinding Speed Dial NumbersFinding Speed Dial Numbers    To find phone numbers you have stored in speed dial locations: 1.    Press MENU/OK to access the main menu. 2.    Highlight Contacts Contacts Contacts Contacts and press MENU/OK. 3.    Highlight Favorites Favorites Favorites Favorites and press MENU/OK. 4.    Speed dial numbers list appears. Finding Voice Dial NumbersFinding Voice Dial NumbersFinding Voice Dial NumbersFinding Voice Dial Numbers    To find phone numbers you have stored in Voice Dial: 1.    Press MENU/OK to access the main menu. 2.    Select Voice ServiceVoice ServiceVoice ServiceVoice Servicessss    and press MENU/OK. 3.    Select Voice Dial Voice Dial Voice Dial Voice Dial and press MENU/OK. 4.    Select Review Review Review Review or Review:Speaker  Review:Speaker  Review:Speaker  Review:Speaker and press MENU/OK. 5.    Voice Dial number’s list appears.        Adding a Phone Number or Address to an Internal Phone Book EntryAdding a Phone Number or Address to an Internal Phone Book EntryAdding a Phone Number or Address to an Internal Phone Book EntryAdding a Phone Number or Address to an Internal Phone Book Entry    To add a phone number or address to an entry: 1.    Press MENU/OK to access the main menu. 2.    Select ContactsContactsContactsContacts and press MENU/OK.   3.    Select Find Find Find Find Entry Entry Entry Entry and press MENU/OK.   Press the right Navigation key for the shortcut (steps 1 through 3). 4.    Highlight the entry you wish to add phone numbers/email/web addresses and press MENU/OK. 5.    Highlight a phone number and press Options(right softkey). Then highlight Edit Edit Edit Edit and press MENU/OK. -or- Highlight an Email address or Web address, then press Edit (right softkey). 6. Highlight the box under the label you wish to add. 7. Enter the number or address and press MENU/OK. 8.    Press Save (left softkey).
 51Editing an Internal Phone Book EntryEditing an Internal Phone Book EntryEditing an Internal Phone Book EntryEditing an Internal Phone Book Entry    To make changes to an entry: 1.    Display an Internal Phone Book entry. 2.    Highlight the entry you wish to edit and press MENU/OK. 3. Select the Phone number and press Options(right softkey).Then highlight Edit and     Press MENU/OK.   -or-     Highlight an Email address or Web address, then press Edit (right softkey). 4. Highlight the box under the following labels and edit by using the Number keys.   Name Name Name Name to change the entry’s name. Enter the new name. (See “Entering Characters by Tapping the Keypad” on pages 46-47).   Home Home Home Home to change the entry’s phone number. Enter the new home phone number.   Work Work Work Work to change the entry’s phone number. Enter the new work phone number.   Mobile Mobile Mobile Mobile to change the entry’s phone number. Enter the new mobile phone number.   Pager Pager Pager Pager to change the entry’s pager number. Enter the new pager number.   Data Data Data Data to change the entry’s number for data. Enter the new data number.   Fax Fax Fax Fax to change the entry’s fax number. Enter the new fax number.   No Label No Label No Label No Label to change the entry’s number. Enter the new number.   Email Email Email Email to change the entry’s email address. Enter the new email address.   Web Web Web Web to change the entry’s web address. Enter the new web address.   Ringer Ringer Ringer Ringer to assign a ringer type to the entry. (See “Selecting a Ringer/Image Type for an Entry” on page 52).   ImageImageImageImage    to assign an image type to the entry. (See “Selecting a Ringer/Image Type for an Entry” on page 52). 5. Press Save (left softkey). Tip: Tip: Tip: Tip: You can also store the phone number in the Pager, Data and Fax Category.
 52Selecting a Ringer/Selecting a Ringer/Selecting a Ringer/Selecting a Ringer/Image Image Image Image Type for an EntryType for an EntryType for an EntryType for an Entry    You can assign a ringer/image type to an Internal Phone Book entry so you can identify the caller by the ringer or image type.   To select a ringer type for an entry: 1.    Press right on the Navigation key. 2. . . . Select the entry you want to set the incoming ringer or image, and press MENU/OK. 3. Press Options (right softkey). 4. Highlight Edit Edit Edit Edit and press MENU/OK. 5.    Select the menu under Ringer Ringer Ringer Ringer or Image Image Image Image by scrolling up or down and   press MENU/OK. 6.  Highlight your desired ringer type or images and then press MENU/OK.   Get New:Get New:Get New:Get New: Start up a Browser and you can select an item to download.   Normal:Normal:Normal:Normal: RingerRingerRingerRinger equivalents to With Caller ID or Roaming setting (see page 19). Image Image Image Image equivalents to Incoming Calls setting (see page 24).   None:None:None:None: the setting equivalent to off. 7.  Press Save (left softkey).   To confirm the ringer, highlight Ringer and press Play(right softkey).   To see a display preview, press Preview (right softkey)during step 7 above. Then   press Sub LCD(right softkey) to see the Sub LCD preview.(You may also check the Image through the external display). Use your Navigation key to adjust the position of the image.   If you set an Animation Ringer and an Image, your PCS Phone plays the ringer of Animation Ringer and displays the selected Image.    Secret Internal Phone Book EntriesSecret Internal Phone Book EntriesSecret Internal Phone Book EntriesSecret Internal Phone Book Entries    You can hide an entry’s phone number(s) and require your lock code to edit the entry by making it secret. The entry name is still displayed, but the entry’s phone number is replaced by “(Secret).” To make an entry secret: 1.    Press right on the Navigation key. 2.    Scroll to the Internal Phone Book entry you want to tag Secret. 3.    Press Options (right softkey) to display the menu options. 4.    Highlight Set SecreSet SecreSet SecreSet Secretttt and press MENU/OK. 5.    Enter 4 digits lock code. 6.    Select On On On On and press MENU/OK. ●  To make an entry public, select OffOffOffOff during step 6 above. Tip: Tip: Tip: Tip: If you can’t recall your lock code, try using the last four digits of either your Social Security number or PCS Phone Number or try 0000.
 53Dialing PCS ServicesDialing PCS ServicesDialing PCS ServicesDialing PCS Services    You must be in digital mode to access PCS Services. To dial a service: 1.    Press MENU/OK to access the main menu. 2.    Select Contacts Contacts Contacts Contacts and press MENU/OK. 3.    Select Services Services Services Services and press MENU/OK. 4. Select Dir AssistanceDir AssistanceDir AssistanceDir Assistance, Account InfAccount InfAccount InfAccount Infoooo, or VoiceCommand VoiceCommand VoiceCommand VoiceCommand and press MENU/OK. 5.    Press TALK or SPEAKER. -or-  Press MENU/OK, highlight Call Call Call Call or Call:Call:Call:Call: Speaker OnSpeaker OnSpeaker OnSpeaker On and press MENU/OK.        Storing Special Numbers in the Phone BookStoring Special Numbers in the Phone BookStoring Special Numbers in the Phone BookStoring Special Numbers in the Phone Book    Using the Pause FeatureUsing the Pause FeatureUsing the Pause FeatureUsing the Pause Feature    Generally, when you call an automated system like voicemail boxes or credit card companies, you are required to enter a password or calling card number. Rather than entering the numbers manually each time, you can store the numbers in your Internal Phone Book, separated by special characters called “pauses”. Using Two Different Types of PausesUsing Two Different Types of PausesUsing Two Different Types of PausesUsing Two Different Types of Pauses    There are two different types of pauses that you can use when storing a number in your Internal Phone Book.   Hard Hard Hard Hard PPPPauses auses auses auses cause the phone to stop dialing until you select Send Tone  Send Tone  Send Tone  Send Tone or press TALK or SPEAKER .To display Send TonSend TonSend TonSend Toneeee, press MENU/OK, highlight Send Tone Send Tone Send Tone Send Tone and press MENU/OK.   2222----SecSecSecSec.... Pause  Pause  Pause  Pause waits two seconds before sending the next string of digits. To insert pauses into a number: 1.    Enter the number you want to dial. 2.    Press MENU/OK to display the menu options. 3.    Highlight:   Hard Pause Hard Pause Hard Pause Hard Pause for a hard pause.   2222----SecSecSecSec.... Pause  Pause  Pause  Pause for a timed pause.   Hyphen Hyphen Hyphen Hyphen for a hyphen (see following section). 4.    Press MENU/OK to insert a pause or manual hyphen. 5.    Finish entering the rest of the numbers, then dial or save the entered number. See pages16-17 for saving.
 54Using HyphensUsing HyphensUsing HyphensUsing Hyphens    You can add hyphens to your Internal Phone Book numbers, however they are mainly for show. You can insert hyphens manually where you like, or choose automatic hyphenation, which inserts hyphens according to the North American Numbering Plan. Entering a manual hyphen suspends any automatic hyphenation for that number.        Using Different Dialing MethodsUsing Different Dialing MethodsUsing Different Dialing MethodsUsing Different Dialing Methods    Prepend DialingPrepend DialingPrepend DialingPrepend Dialing    Prepend dialing allows you to alter a phone number in your Phone Book by adding additional numbers. For example, if your Internal Phone Book entry was entered without an area code and you are out of town, you can prepend that entry with the appropriate area code. 1.    Highlight the phone number stored in Contacts entry using one of the previously described methods. 2.    Press Options (right softkey) to display the menu options. 3.    Highlight PrependPrependPrependPrepend, and press MENU/OK. 4.    Enter the digits you wish to prepend. 5.    Press TALK or SPEAKER.   -or-      Press MENU/OK to display the menu options, then highlight CallCallCallCall    or   Call:Speaker OnCall:Speaker OnCall:Speaker OnCall:Speaker On and press MENU/OK.     Using Speed DialUsing Speed DialUsing Speed DialUsing Speed Dial    With this feature you can dial Internal Phone Book entries with one key press for locations 2-9. Save your memory locations 2-9 for speed dialing or your most commonly used phone numbers. Speed dial numbers must be stored in your Contacts to use this feature. To store a speed dial number: 1.    Press right on the Navigation key. 2.    Highlight the Internal Phone Book entry, which want to set a speed dial number. 3. Press MENU/OK. 4.    Select the box under the phone number you want to set a speed dial. 5.    Press Options (right softkey) to display the menu options. 6.    Highlight Set Favorites Set Favorites Set Favorites Set Favorites and press MENU/OK. 7.    To select a corresponding speed dial number from 2-9, highlight an unassigned number and press MENU/OK. -or- 1.    Press MENU/OK to access the main menu. 2.    Select ContacContacContacContacts ts ts ts and press MENU/OK. 3.    Select Favorites Favorites Favorites Favorites and press MENU/OK.
 554.    To select a corresponding speed dial number from 2-9, highlight an unassigned number and press MENU/OK. 5.    Highlight the entry from the list and press MENU/OK. 6.    Select the phone number you want to set a speed dial, and press MENU/OK. To use speed dial: 1.    From the standby mode, press and hold the appropriate key that corresponds to the         memory location for approximately two seconds. -or- 1.    From the standby mode, press the appropriate key, and then press TALK or SPEAKER . The display confirms that the number has been dialed when it shows    “Connecting…”.  My PCS Phone NumberMy PCS Phone NumberMy PCS Phone NumberMy PCS Phone Number    To display your phone number: 1. Press MENU/OK to access the main menu.. 2. Select Contacts Contacts Contacts Contacts and press MENU/OK. 3. Select My Phone#My Phone#My Phone#My Phone# and press MENU/OK.
 56Personal OrganizerPersonal OrganizerPersonal OrganizerPersonal Organizer    Managing SchedulesManaging SchedulesManaging SchedulesManaging Schedules    CalendarCalendarCalendarCalendar    Use the Calendar to remind you of events or important calls you need to make. You can schedule up to 100 events, 15 Call Alarms and 20 To-Do Items. Setting the Time/DateSetting the Time/DateSetting the Time/DateSetting the Time/Date    In no service area or Analog service area, it’s necessary to set actual time and date to use Calendar function. Set the current Time/Date by using numeric keys and/or the Navigation key (right or left: move cursor,▲/▼: change value). To display the time setting display, press MENU/OK, then highlight Calendar Calendar Calendar Calendar and press MENU/OK.   It's available from 12:00 AM, Jan 1, 2000 to 11:59 PM, Dec 31, 2099. Setting HolidaysSetting HolidaysSetting HolidaysSetting Holidays    You can set your personal holidays by displaying the data in red on the Calendar display. The default holidays displayed in red are Sundays and National holidays. You can set holidays from Jan 1,2000 to Dec 31,2020. 1.Press MENU/OK to access the main menu. 2. Select Tools/ExtrasTools/ExtrasTools/ExtrasTools/Extras and press MENU/OK. 3.    Select CCCCalendaalendaalendaalendarrrr and press MENU/OK.   4. Highlight the day you want to set to the holiday by using the Navigation key.     (left : previous day, right : next day, up : previous week, down: next week).   5.    Press Options (right softkey). 6.    Highlight Set Date Set Date Set Date Set Date or Set WeeSet WeeSet WeeSet Weekly kly kly kly from the options, and press MENU/OK. Options:   Set Date Set Date Set Date Set Date sets the selected date to the holiday.   Set Weekly Set Weekly Set Weekly Set Weekly sets the weekly holidays.   Reset Date Reset Date Reset Date Reset Date resets the holiday setting for the selected date.   Reset Weekly Reset Weekly Reset Weekly Reset Weekly resets the weekly holiday setting.   Reset All Reset All Reset All Reset All resets all the holiday settings and returns to the default settings. 7.    If you selected Set WeeklySet WeeklySet WeeklySet Weekly, Reset Weekly Reset Weekly Reset Weekly Reset Weekly or Reset AllReset AllReset AllReset All, you’ll be prompted to select Yes Yes  Yes  Yes or NoNoNoNo. Tip: Tip: Tip: Tip: The current day is framed by a rectangle.     Adding an Event to the SchedulerAdding an Event to the SchedulerAdding an Event to the SchedulerAdding an Event to the Scheduler    Your Scheduler helps organize your time and reminds you of important events. To add an event: 1.    Press MENU/OK to access the main menu. 2. Select Tools/ExtrasTools/ExtrasTools/ExtrasTools/Extras and press MENU/OK. 3. Select Calendar Calendar Calendar Calendar and press MENU/OK.
 574.    Highlight the day you want to add an event to by using the Navigation key and press     MENU/OK. 5.    From the event list display, press Options (right softkey) to display the options. 6.    Highlight Add EventAdd EventAdd EventAdd Event and press MENU/OK. 7.    Highlight Schedule Schedule Schedule Schedule and press MENU/OK. 8.    Enter the description and press MENU/OK or press MENU/OK without entering the description. 9.    Select the menu under the following event details, and press MENU/OK.   Description Description Description Description Entering a description of your event (up to 14 characters).   From From From From Scheduling the start time.   To To To To Scheduling the end time.   Location Location Location Location Editing the location of your event (up to 14 characters).   Alarm Alarm Alarm Alarm Select your desired setting from OnOnOnOn or OffOffOffOff.   Alarm Time Alarm Time Alarm Time Alarm Time Editing the alarm time (number of hours or minutes before the event starts). Default alarm times are 10 minutes.   Repeat Repeat Repeat Repeat Repeating the event. Select NoneNoneNoneNone, DailyDailyDailyDaily, WeeklyWeeklyWeeklyWeekly, MonthlyMonthlyMonthlyMonthly, or YearlyYearlyYearlyYea rl y. 10.    Press Save (left softkey) to add the event. Tip: Tip: Tip: Tip: Press the up/down navigation to scroll by week through the Scheduler calendar, and the Side Volume key to scroll by month.     Event AlertsEvent AlertsEvent AlertsEvent Alerts    There are several ways your PCS Phone alerts you of scheduled events:   By playing the alert tone. (Depends on the setting Alert and Key Volume).   By blinking the LED.   By displaying event’s description on the Main LCD when the clamshell is open.   By displaying event’s description on the Sub LCD when the clamshell is closed.   By lighting backlight of LCD. (Depends on the setting Backlight). Note: Note: Note: Note: Default alarm times are 10 minutes for Meetings, Events and dining Appointments, 24 hours for Special Occasions and zero minutes for Call Alarms.
 58Event Alert MenuEvent Alert MenuEvent Alert MenuEvent Alert Menu    When your phone is turned on and you have an event alarm scheduled, your phone alerts you and displays the event summary.   1.    Press MENU/OK or View (left softkey) to silence the alarm and see the unchecked event list. 2. Highlight the unchecked event and press MENU/OK to see the event details, or           press Options for following options. To select an option, highlight it and press     MENU/OK .   Snooze Snooze Snooze Snooze to repeat the alarm in ten minutes.   Exit Exit Exit Exit to delete the event (even if it is a repeating event). Note: Note: Note: Note: If you press Exit (right softkey) during step 1, you are prompted to confirm unchecked event. Select YesYesYesYes to view and No  No  No  No to cancel.        Editing aEditing aEditing aEditing an En En En Eventventventvent    1.    From the event list display, highlight one of events, and press MENU/OK.    2.    The event details appear. 3.    Select the box under each item you want to edit, and press MENU/OK. 4.    Enter or select a new setting and press MENU/OK. 5.    Press Save (left softkey).        Adding a Call Alarm to the SchedulerAdding a Call Alarm to the SchedulerAdding a Call Alarm to the SchedulerAdding a Call Alarm to the Scheduler    To add a Call Alarm from the Scheduler: 1.    Press MENU/OK to access the main menu. 2. Select Tools/ExtrasTools/ExtrasTools/ExtrasTools/Extras and press MENU/OK. 3. Select Calendar Calendar Calendar Calendar and press MENU/OK. 4.    Highlight the day you want to add an event to by using the Navigation key and press     MENU/OK. 5.    From the event list display, press Options (right softkey) to display the options. 6.    Highlight Add EventAdd EventAdd EventAdd Event and press MENU/OK. 7.    Highlight Call AlarmCall AlarmCall AlarmCall Alarm and press MENU/OK. 8.    Enter the phone number directly or press Options (right softkey) for options.   From From From From PhPhPhPh. Book. Book. Book. Book    select the number from your desired phone book entry.   Voicemail Voicemail Voicemail Voicemail select the number for voicemail access. 9.    Then select the box under the following items and press MENU/OK.   Time/Date Time/Date Time/Date Time/Date Editing the start time/date.   Repeat Repeat Repeat Repeat Repeating the Call Alarm. Select NoneNoneNoneNone, DDDDailyailyailyaily, WeeklyWeeklyWeeklyWeekly, Monthly Monthly Monthly Monthly or YearlyYearlyYearlyYea rl y. 10.    Press Save (left softkey).
 59Call Alarm Call Alarm Call Alarm Call Alarm AlertsAlertsAlertsAlerts    There are several ways your PCS Phone alerts you of scheduled call alarm:   By playing the alert tone. (Depends on the setting Alert and Key Volume).   By blinking the LED.      By displaying name or phone number on the Main LCD when the clamshell is open.   By displaying name or phone number on the Sub LCD when the clamshell is closed.   By lighting backlight of LCD. (Depends on the setting Backlight).        Call AlarmCall AlarmCall AlarmCall Alarm Menu Menu Menu Menu    When your phone is turned on and you have scheduled a call alarm, your phone alerts you and displays the following options. To select an option, highlight it and press MENU/OK.  1.    Press MENU/OK or View (left softkey) to see the call alarm details. 2.    Highlight the unchecked event and press to see the call alarm details. 3.    Press Options (right softkey) to display the options. 4.    Highlight an option and press MENU/OK.   Call Call Call Call to dial the scheduled phone number.   Call: Speaker On Call: Speaker On Call: Speaker On Call: Speaker On to dial the phone number in speakerphone mode.   SnoSnoSnoSnooze oze oze oze to repeat the alarm in ten minutes.   Save Phone# Save Phone# Save Phone# Save Phone# to save the scheduled phone number if it is not already in your Internal Contacts or if the caller’s phone number has already been stored in the any Phone Book entry, Alternate  Alternate  Alternate  Alternate appears instead of Save PhoSave PhoSave PhoSave Phonenenene####.   Erase Erase Erase Erase to delete the call alarm (even if it is a repeating event). Note: Note: Note: Note: If you press Exit (right softkey) during step 1, you are prompted to confirm unchecked event. Select YesYesYesYes to view and No  No  No  No to cancel.     Editing Call Alarms Editing Call Alarms Editing Call Alarms Editing Call Alarms      To change a Call Alarm: 1.    From the Event list display, highlight one of call alarms, and press MENU/OK. 2.    The call alarm details appear. 3.    Select the box under each item you want to edit and press MENU/OK.   4.    Enter or select a new setting and press MENU/OK. 5.    Press Save (left softkey).
 60Erasing a Day’s Events or Call AlarmsErasing a Day’s Events or Call AlarmsErasing a Day’s Events or Call AlarmsErasing a Day’s Events or Call Alarms    To erase a scheduled day’s events: 1.    From the Event list display, highlight one of event or call alarms, and press MENU/OK. 2.    The Event details appear and press Options (right softkey). 3.    Highlight ErasErasErasErase e e e and press MENU/OK. 4.    Select Yes Yes Yes Yes and press MENU/OK.     Going to Today’s Scheduler MenuGoing to Today’s Scheduler MenuGoing to Today’s Scheduler MenuGoing to Today’s Scheduler Menu    If you are viewing the Scheduler menu and wish to go to the Scheduler menu for today’s date: To view your scheduled events and Call Alarms: 1.    From the standby mode, press MENU/OK. 2. Select Tools/ExtrasTools/ExtrasTools/ExtrasTools/Extras and press MENU/OK. 3.    Highlight Calendar Calendar Calendar Calendar and press MENU/OK.   Press  ▲  on the Navigation key for the shortcut (steps 1 and 2). 4.    Then, a “      ” is displayed next to the date if an event or call alarms is scheduled. 5.    To view an individual day, highlight the day by using the Navigation key (left: previous day, right: next day, up: previous week, down: next week) and press MENU/OK. 6.    Highlight one of the events or call alarms from the list, and press MENU/OK. The details display appears. To view a future/past day’s scheduled Events, follow these steps: 1.    From the Event list display, press Options (right softkey). 2.    Highlight Go To Date Go To Date Go To Date Go To Date and press MENU/OK. 3.    Enter the date by using numeric keys and the Navigation key and press MENU/OK OK (left softkey). 4.    Press MENU/OK again to view the day’s Event List.  Adding To Do ItemAdding To Do ItemAdding To Do ItemAdding To Do Itemssss    Your phone can store and manage 20 To Do items. To add an entry to your To Do List: 1.    From the Event list display, press Options (right softkey). 2.    Highlight To Do ListTo Do ListTo Do ListTo Do List and press MENU/OK. 3.    From To Do List display, press Options (right softkey). 4.    Highlight Add ItemAdd ItemAdd ItemAdd Item and press MENU/OK. 5.    Highlight Description Description Description Description or Priority Priority Priority Priority and press MENU/OK.   Description Description Description Description Entering a description of the To-Do (up to 14 characters).   Priority Priority Priority Priority Editing the To-Do’s priority. You can select from NormalNormalNormalNormal, !Urgent  !Urgent  !Urgent  !Urgent or √DoneDoneDoneDone. 6. Press Save (left softkey).
 61Viewing To Do ListViewing To Do ListViewing To Do ListViewing To Do List    To view your To Do List: 1.    From Event list display, press Options (right softkey). 2.    Highlight To Do List To Do List To Do List To Do List and press MENU/OK.   To see the details of each To Do item, select an item and press MENU/OK.  Editing To Do ItemsEditing To Do ItemsEditing To Do ItemsEditing To Do Items    To edit your To Do item: 1. From the To Do list display, highlight the item you want to edit and   press MENU/OK. 2. Edit description or change the priority and press Save(right softkey).  Adding To Do Item to ScheduleAdding To Do Item to ScheduleAdding To Do Item to ScheduleAdding To Do Item to Schedule    To add your To Do item to schedule: 1. From the To Do List display, highlight the item you want to add to schedule and     press Options (right softkey). 2. Highlight Add to Schedule Add to Schedule Add to Schedule Add to Schedule and press    MENU/OK. 3. Enter the description using your keypad and press MENU/OK. 4. Press Save(right softkey).   Add To Schedule Add To Schedule Add To Schedule Add To Schedule extracts the item from the To-Do list and makes it a scheduled event.     Deleting Items from the To Do ListDeleting Items from the To Do ListDeleting Items from the To Do ListDeleting Items from the To Do List    1.  From To Do List display, highlight the item you want to erase and press Options (right softkey).    2. Highlight your Erase ItemErase ItemErase ItemErase Item, Erase Selections Erase Selections Erase Selections Erase Selections or Erase AllErase AllErase AllErase All and press MENU/OK. Erase Item Erase Item Erase Item Erase Item erases an item from the To Do List. Erase Selection Erase Selection Erase Selection Erase Selection erases the selected To Do item at one time. Press MENU/OK to check the box next to To Do Item and press Erase (left softkey) to erase. To check all boxes, press Options (right softkey), then highlight Check All Check All Check All Check All and press MENU/OK. Erase All Erase All Erase All Erase All erases the all To Do items. 3.    Highlight Yes Yes Yes Yes and press MENU/OK.
 62Viewing Viewing Viewing Viewing Event, Call Alarm or To Do ListEvent, Call Alarm or To Do ListEvent, Call Alarm or To Do ListEvent, Call Alarm or To Do List    To view their memory space and options: 1.    From Event List display, press Options (right softkey). 2. Highlight View MemoryView MemoryView MemoryView Memory and press MENU/OK. 3.    Highlight Schedule EventSchedule EventSchedule EventSchedule Event, Call Alarm Call Alarm Call Alarm Call Alarm or To Do ListTo Do ListTo Do ListTo Do List and press MENU/OK. For further options, 4.    Press Options (right softkey). 5.    Highlight an option and press MENU/OK. Options:   Erase Old Erase Old Erase Old Erase Old deletes the old events or call alarms.   Erase Selection Erase Selection Erase Selection Erase Selection deletes the To Do you selected (see “Deleting Item from the To Do List” on page 61).   Erase Done Erase Done Erase Done Erase Done deletes the To Do that is done.   Erase All Erase All Erase All Erase All deletes the all events, Call Alarms or To Do items. 6.    Highlight Yes Yes  Yes  Yes or NoNoNoNo, and press MENU/OK.     Purging All Events, Call Alarms or To Do ListPurging All Events, Call Alarms or To Do ListPurging All Events, Call Alarms or To Do ListPurging All Events, Call Alarms or To Do List    To delete all scheduled events, call alarms or To Do List: 1.    From Event list display, press Options (right softkey). 2.    Highlight ErErErErase Memory ase Memory ase Memory ase Memory and press MENU/OK. 3.    Highlight one item from the Options and press MENU/OK. Options:   Erase Old Erase Old Erase Old Erase Old deletes the old events, Call Alarms or completed To Do items.   Erase All Erase All Erase All Erase All deletes the all events, Call Alarms or To Do items. 4.    Highlight Yes Yes Yes Yes or NNNNoooo, and press MENU/OK.     Displaying User AddressDisplaying User AddressDisplaying User AddressDisplaying User Address    Display the current user address you have signed in: 1.    Press MENU/OK to access the main menu. 2. Select SettingsSettingsSettingsSettings and press MENU/OK. 3.    Select Phone InfPhone InfPhone InfPhone Infoooo and press MENU/OK. 4. Select Phone#Phone#Phone#Phone# UserID UserID UserID UserID and press MENU/OK.   If you sign out, “Vision Disabled” appears on the display.   Your phone number also appears on the display.
 63Getting to know Icon IndicationGetting to know Icon IndicationGetting to know Icon IndicationGetting to know Icon Indication    You can see the explanation of icons that appear on the display. 1.  From the standby mode, press MENU/OK to display the main menu. 2. Select SettingsSettingsSettingsSettings and press MENU/OK. 3. Select Phone InfoPhone InfoPhone InfoPhone Info and press MENU/OK. 4. Select HelpHelpHelpHelp and press MENU/OK. 5.  Select the item you want to see the explanation and press MENU/OK. 6.  The icons explanation appears and scrolls down automatically. 7.  Press Done (left softkey) or END/ to end.   Use the up/down Navigation key to scroll the message manually.  Displaying the Version InformationDisplaying the Version InformationDisplaying the Version InformationDisplaying the Version Information    Display the version number of the software, hardware, PRL (Preferred Roaming List), PRI (Product Release Instructions), etc. Installed on your PCS Phone. 1.  From the standby mode, press MENU/OK to display the main menu. 2. Select SettingsSettingsSettingsSettings and press MENU/OK. 3. Select Phone InfoPhone InfoPhone InfoPhone Info and press MENU/OK. 4. Select VersionVersionVersionVersion and press MENU/OK.     Using your phoneUsing your phoneUsing your phoneUsing your phone’’’’s Toolss Toolss Toolss Tools    In addition to features designed to help make you more efficient and organized, your new PCS phone also offers for your entertainment and amusement.     Using the CalculatorUsing the CalculatorUsing the CalculatorUsing the Calculator    Your phone comes with a built-in calculator function. To use this feature, follow these easy steps: 1.    From the standby mode, press MENU/OK to display the main menu. 2.    Select Tools/ExtrasTools/ExtrasTools/ExtrasTools/Extras, and press MENU/OK. 3.    Select CalculatorCalculatorCalculatorCalculator, and press MENU/OK. 4.    Enter numbers using your keypad. Press    .    (left softkey)    to insert a decimal point. 5.    Press the appropriate Navigation key for an arithmetic option.       (up for addition, down for subtraction, left for multiplication, right for division) 6.    Enter numbers, and press MENU/OK for the result.   To clear the numbers, press CLR (right softkey).   To end calculation, press END/.
 64Using the World ClockUsing the World ClockUsing the World ClockUsing the World Clock    This feature is available only in digital area. 1.    From the standby mode, press MENU/OK to display the main menu. 2.    Select Tools/ExtrasTools/ExtrasTools/ExtrasTools/Extras, and press MENU/OK. 3.    Select World ClockWorld ClockWorld ClockWorld Clock, and press MENU/OK. 4.    World Clock display appears.   Press right or left on the Navigation key for changing country. Press Summer (left softkey)    or Standard (right softkey) for changing between summer and standard time if applicable. “*” is shown in the summer time.
 65Using Your PhoneUsing Your PhoneUsing Your PhoneUsing Your Phone’’’’s Voice Servicess Voice Servicess Voice Servicess Voice Services    UsingUsingUsingUsing Voice Voice Voice Voice----Activated DialingActivated DialingActivated DialingActivated Dialing    You can use a Voice Dial tag to automatically dial a phone number in your Internal Phone Book. To use a Voice Dial tag to call a phone number: 1. From the standby mode, press TALK or SPEAKER shortly. 2. Follow the voice prompts and recite the entry’s Voice Dial tag into your phone’s microphone. NoteNoteNoteNote: Record Voice Dial tags in a quiet environment and without the aid of an accessory (for example, a headset or Hands-Free Car Kit).  Programming Voice Dial Tag to Your PhoneProgramming Voice Dial Tag to Your PhoneProgramming Voice Dial Tag to Your PhoneProgramming Voice Dial Tag to Your Phone    To program a voice dial tag: 1. From the standby mode, press MENU/OK to display the main menu. 2. Select VoiceVoiceVoiceVoice    ServiceServiceServiceServicessss and press MENU/OK. 3. Select Voice DialVoice DialVoice DialVoice Dial and press MENU/OK. 4. Select ProgramProgramProgramProgram and press MENU/OK. 5. The phone will prompt you to say the name you want to program. Wait for the beep and then say the name. 6. Respond to the prompt by repeating the name after the beep. 7. Enter or highlight the entry (name) in the phone book entry list. 8. Press MENU/OK. 9. Select the labeled category that includes your desired phone number. Then display shows “Voice Dial Recorded”. Reviewing Voice Dialing EntriesReviewing Voice Dialing EntriesReviewing Voice Dialing EntriesReviewing Voice Dialing Entries    1.  From the standby mode, press MENU/OK to display the main menu. 2. Select Voice ServicesVoice ServicesVoice ServicesVoice Services and press MENU/OK. 3.  Select Voice DialVoice DialVoice DialVoice Dial and press MENU/OK. 4.  Select RevieRevieRevieReviewwww and press MENU/OK. 5.    Highlight the desired entry and press MENU/OK. -or- Highlight the desired entry and press Options (right softkey). Highlight PlayPlayPlayPlay, and press MENU/OK.      Highlight Erase Erase Erase Erase during step 5 above, and then select Yes Yes Yes Yes to erase voice dial tag.
 66Erasing Erasing Erasing Erasing All All All All Voice Dialing Voice Dialing Voice Dialing Voice Dialing TagsTagsTagsTags    To erase all Voice Dialing tags: 1.  From the standby mode, press MENU/OK to display the main menu. 2. Select Voice ServiceVoice ServiceVoice ServiceVoice Service and press MENU/OK. 3.  Select Voice DialVoice DialVoice DialVoice Dial and press MENU/OK. 4.  Select Erase AllErase AllErase AllErase All and press MENU/OK. 5.  Highlight YesYesYesYes and press MENU/OK.     Recording Recording Recording Recording Voice Voice Voice Voice MemosMemosMemosMemos    To record a memo in standby mode: 1.  Press and hold Memo (right softkey). Starts recording after the beep. -or- 1.  From the standby mode press MENU/OK to display the main menu. 2. Select Voice ServicesVoice ServicesVoice ServicesVoice Services and press MENU/OK. 3. Select Voice MemoVoice MemoVoice MemoVoice Memo and press MENU/OK. 4. Select RecordRecordRecordRecord and press MENU/OK. 5.    Start recording after the beep. To end the recording of your memo: 1. Wait for 18 seconds or press MENU/OK or BACK while recording. -or- 1. Press END/ and disconnect the call while recording in Use State. To record a conversation during a phone call: 1. Press MENU/OK to display the options. 2. Select Voice Voice Voice Voice ServicesServicesServicesServices and press MENU/OK. 3. Select Voice MemoVoice MemoVoice MemoVoice Memo and press MENU/OK. 4. Select RecordRecordRecordRecord and press MENU/OK. 5. Start recording after the beep. To end the recording of your conversation: 1. Wait for 18 seconds or press MENU/OK BACK while recording. -or- 1. Press END/ and disconnect the call while recording in Use State. It also stops recording when the other party hangs up the call.   Recording Memo is disabled while you are in Analog Service area.   When the recording capacity is full, highlight old memo, and press Options (right softkey) and select ErasErasErasEraseeee, and press MENU/OK. Note: Note: Note: Note: Your phone can store a total of 4 memos for 18 seconds each.
 67Voice Voice Voice Voice Memo OptionsMemo OptionsMemo OptionsMemo Options    To play the memos you have recorded: 1. From the standby mode press MENU/OK to display the main menu. 2. Select Voice ServicesVoice ServicesVoice ServicesVoice Services and press MENU/OK. 3. Select Voice MemoVoice MemoVoice MemoVoice Memo and press MENU/OK.   Press Memo (right softkey) shortly for the shortcut step 1 to 3 above. 4. Select PlayPlayPlayPlay and press MENU/OK. 5. Highlight one memo from the list. -or- Highlight AllAllAllAll if you want to play all memos continuously. 6. Press MENU/OK.   You can change the speed of message playing by pressing Slow (left softkey) or Fast (right softkey)   To play the newer/older memo, press left/right on the Navigation key.   Wait for ending or press MENU/OK to stop playing.   Press Options (right softkey), highlight Erase during step 5 above, and then select Yes Yes Yes Yes to erase your desired one memo. TipTipTipTip: Voice Memo is stored with the date and time stamp in reverse chronological order except when it’s recorded in no service area.     Erasing Erasing Erasing Erasing Voice Voice Voice Voice MemosMemosMemosMemos    To erase all Voice Memo: 1.  From the standby mode press MENU/OK to display the main menu. 2. Select Voice ServicesVoice ServicesVoice ServicesVoice Services and press MENU/OK. 3. Select Voice MemoVoice MemoVoice MemoVoice Memo and press MENU/OK. 4. Select PlayPlayPlayPlay and press MENU/OK. 5.  Display the memo list, highlight AllAllAllAll and press Options (right softkey). 6. Highlight Erase AllErase AllErase AllErase All and press MENU/OK. 7. Highlight YesYesYesYes and press MENU/OK. -or- 1.  From the standby mode, press MENU/OK to display the main menu. 2. Select Voice ServicesVoice ServicesVoice ServicesVoice Services and press MENU/OK. 3. Select Voice MemoVoice MemoVoice MemoVoice Memo and press MENU/OK. 4. Select Erase AllErase AllErase AllErase All and press MENU/OK. 5. Highlight YesYesYesYes and press MENU/OK.
 68Setting Up Screen CallSetting Up Screen CallSetting Up Screen CallSetting Up Screen Call    This feature enables you to answer incoming calls by using pre-recorded announcements, either one that is pre-recorded or one that you record. You can also record the caller’s message into the Voice Memo list (See “Using Your Phone’s Voice Services” on pages 65-67). You can decide whether you answer the call immediately or not during the caller’s recording. Activating Screen CallActivating Screen CallActivating Screen CallActivating Screen Call    To start Screen Call when you have incoming calls: 1. Press MENU/OK to display the options. 2. Highlight Screen CallScreen CallScreen CallScreen Call and press MENU/OK. To set Auto Screen Call: 1. From the standby mode, press MENU/OK to display the main menu. 2. Select Voice ServicesVoice ServicesVoice ServicesVoice Services and press MENU/OK. 3. Select Screen CallScreen CallScreen CallScreen Call and press MENU/OK. 4. Highlight AutoAutoAutoAuto and press MENU/OK. 5. Highlight OnOnOnOn and press MENU/OK.   If you want to change the answer time, enter your desired number (from 1 to 16 seconds) by using numeric keys or up/down on the Navigation key. 6. Press MENU/OK or OK (left softkey). Then the icon is displayed on the standby display. TipTipTipTip: If new caller’s message is waiting, appears on the display. The memos recorded while activating “Screen Call” are shown with “√” or “!” icon in the list. (“√”: once played, !: not played yet) TipTipTipTip: While the caller ’s recording: Pressing END/ stops recording and disconnects the call. Pressing TALK or SPEAKER answers call.     Selecting Announcement for Screen CallSelecting Announcement for Screen CallSelecting Announcement for Screen CallSelecting Announcement for Screen Call    1. From the standby mode, press MENU/OK to display the main menu. 2. Select Voice ServicesVoice ServicesVoice ServicesVoice Services and press MENU/OK. 3. Select Screen CallScreen CallScreen CallScreen Call and press MENU/OK. 4. Highlight AnnouncementAnnouncementAnnouncementAnnouncement and press MENU/OK. 5. Depending on your preference, select PrePrePrePre----Recorded Recorded Recorded Recorded or CustomCustomCustomCustom. 6. Press MENU/OK.  Recording Name for PreRecording Name for PreRecording Name for PreRecording Name for Pre----Recorded AnnouncementRecorded AnnouncementRecorded AnnouncementRecorded Announcement    1. From the standby mode, press MENU/OK to display the main menu. 2. Select Voice ServicesVoice ServicesVoice ServicesVoice Services and press MENU/OK. 3. Select Screen CallScreen CallScreen CallScreen Call and press MENU/OK. 4. Select AnnouncementAnnouncementAnnouncementAnnouncement and press MENU/OK.
 695. Select PrePrePrePre----RecordedRecordedRecordedRecorded press Options (right softkey). 6. Highlight Record NameRecord NameRecord NameRecord Name and press MENU/OK.   When your name has already been recorded, select YesYesYesYes or NoNoNoNo for overwriting. 7. Press MENU/OK to start 1st recording. 8. After the 1st recording, press MENU/OK to start the 2nd recording. 9. To stop recording, wait for 12 seconds or press MENU/OK.   Erasing the recorded name, select Erase NameErase NameErase NameErase Name during step 6 above.   Playing the pre-recorded announcement, select PlayPlayPlayPlay during step 6 above.     Recording Customized Recording Customized Recording Customized Recording Customized AnnouncementAnnouncementAnnouncementAnnouncement    1. Follow the step 1to 4 above. 2. Select CustomCustomCustomCustom and press Options (right softkey). 3. Highlight RecordRecordRecordRecord and press MENU/OK.   When your name has already been recorded, select YesYesYesYes or NoNoNoNo for overwriting. 4. Press MENU/OK to start 1st recording. 5. After the 1st recording, press MENU/OK again to start 2nd recording. 6. To stop recording, wait for 12 seconds or press MENU/OK.   Erasing the recorded announcement, select Erase Erase Erase Erase during step 3 above.   Playing the customized announcement, select PlayPlayPlayPlay during step 3 above.
 70Using VoicemailUsing VoicemailUsing VoicemailUsing Voicemail    Setting Up Your VoicemailSetting Up Your VoicemailSetting Up Your VoicemailSetting Up Your Voicemail    All unanswered calls to your PCS Phone are automatically transferred to voicemail, even if your phone is in use or turned off. Therefore, you will want to set up your PCS voicemail box and personal greeting as soon as your PCS Phone is activated. To set up voicemail: 1.    Press and hold    1 . 2.    Follow the system prompts to create your pass code, record your greeting, record your name announcement and choose whether to activate One-Touch Message Access (a feature that lets you press one key to access messages and bypasses the need for you to enter your pass code). Note: Note: Note: Note: The voicemail setup process may vary in certain Affiliate areas.     Voicemail NotificationVoicemail NotificationVoicemail NotificationVoicemail Notification    There are several ways your PCS Phone alerts you:   By displaying a message on the Main LCD when the clamshell is open.   By displaying a message on the Sub LCD when the clamshell is closed.   By sounding the assigned ringer type.   By the LED blinking red.   By displaying    at the top of the LCD.     New Voicemail Message AlertsNew Voicemail Message AlertsNew Voicemail Message AlertsNew Voicemail Message Alerts    When you receive a new voicemail message, your phone alerts you and prompts you to call your voicemail, press TALK or SPEAKER. To call your Voicemail menu, press MENU/OK or OK (left softkey).   ImportantImportantImportantImportant: When you are roaming off the Nationwide PCS Network, you may not receive notification of new voicemail messages. It is recommended that you periodically check your voicemail by dialing 1 + area code + your PCS Phone Number. When your voicemail box answers, press    *    and enter your pass code. You will be charged roaming rates when accessing voicemail while roaming off the Nationwide PCS Network. Note:Note:Note:Note: Your phone accepts messages even when it is turned off. However, you are only notified of new messages when your phone is turned on and you are in a PCS Service Area.
 71Retrieving Your Voicemail MessagesRetrieving Your Voicemail MessagesRetrieving Your Voicemail MessagesRetrieving Your Voicemail Messages    You can review your messages directly from your PCS Phone or from any other touch-tone phone. To dial from your PCS Phone, you can either speed dial your voicemail box or use the menu keys. Using OneUsing OneUsing OneUsing One----Touch Message Access:Touch Message Access:Touch Message Access:Touch Message Access:      Press and hold    1 . Follow the system prompts.   Using the Menu Keys on Your PCS Phone to Access your Messages:Using the Menu Keys on Your PCS Phone to Access your Messages:Using the Menu Keys on Your PCS Phone to Access your Messages:Using the Menu Keys on Your PCS Phone to Access your Messages:    1.  From the standby mode, press MENU/OK to display the main menu. 2. Select MessageMessageMessageMessage and press MENU/OK. 3. Select Voicemail Voicemail Voicemail Voicemail and press MENU/OK. 4. Highlight Call VoicemailCall VoicemailCall VoicemailCall Voicemail    or Call: Speaker On Call: Speaker On Call: Speaker On Call: Speaker On    and press MENU/OK. NoteNoteNoteNote: You are charged for airtime minutes when you are accessing your voicemail from your PCS Phone. Using a Phone Other ThUsing a Phone Other ThUsing a Phone Other ThUsing a Phone Other Than Your PCS Phone to Accessan Your PCS Phone to Accessan Your PCS Phone to Accessan Your PCS Phone to Access    Your Messages:Your Messages:Your Messages:Your Messages:    1.  Dial your PCS Phone Number. 2.  When your voicemail answers, press    * . 3.  Enter your pass code.  Voicemail OptionsVoicemail OptionsVoicemail OptionsVoicemail Options    Your PCS Phone offers several options for organizing and accessing your voicemail. Using Expert ModeUsing Expert ModeUsing Expert ModeUsing Expert Mode    Using the Expert mode setting for your personal voicemail box helps you navigate Through the voice system more quickly by shortening the voice prompts you hear at Each level. To turn Expert mode on or off: 1.    Press and hold    1    to access your voicemail. If your voicemail box contains any new       or saved messages, press    * to access the main voicemail menu. 2.  Following the system prompts, press    3    to change your Personal Options. 3.  Press  4   for expert mode. 4.  Press    1    to turn Expert mode on or off. Setting Up GroSetting Up GroSetting Up GroSetting Up Group Distribution Listsup Distribution Listsup Distribution Listsup Distribution Lists    Create up to 20 separate group lists, each with up to 20 customers. 1.    Press and hold    1    to access your voicemail. 2.    Following the system prompts, press    3    to change your Personal Options. 3.    Press  2  for Administrative Options. 4.    Press    5    for Group Distribution Lists. 5.    Follow the voice prompts to create, edit, rename or delete group lists.
 72PCS CallbackPCS CallbackPCS CallbackPCS Callback    Return a call after listening to a message without disconnecting from voicemail. 1.    After listening to a message, press    8 . 2.    Enter the phone number. 3.    Once the call is complete, you’re returned to the voicemail main menu. VoicemailVoicemailVoicemailVoicemail----totototo----Voicemail MessageVoicemail MessageVoicemail MessageVoicemail Message    Record and send a voice message to other PCS Voicemail customers. 1.    From the main voicemail menu, press    2    to send a message. 2.    Follow the voice prompts to enter the phone number. 3.    Follow the voice prompts to record and send your voice message. VoicemailVoicemailVoicemailVoicemail----totototo----Voicemail Message ReplyVoicemail Message ReplyVoicemail Message ReplyVoicemail Message Reply    Reply to a voice message received from any other PCS Voicemail customer. 1.    After listening to a voice message, press    8      8 . 2.    Follow the voice prompts to record and send your reply. VoicemailVoicemailVoicemailVoicemail----totototo----Voicemail Message ForwardingVoicemail Message ForwardingVoicemail Message ForwardingVoicemail Message Forwarding    Forward a voice message, except those marked “Private,” to other PCS Voicemail customers. 1.    After listening to a message, press    4 . 2.    Follow the voice prompts to enter the phone number. 3.    Follow the voice prompts to record your introduction and forward the voice message. VoicemailVoicemailVoicemailVoicemail----totototo----Voicemail Receipt RequestVoicemail Receipt RequestVoicemail Receipt RequestVoicemail Receipt Request    Receive confirmation that your voice message has been listened to when you send, forward or reply to a message to other PCS customers. 1.    After you have recorded a message, press   1    to indicate you are satisfied with the message you recorded. 2.    Press    4    to mark receipt requested. Continue RecordingContinue RecordingContinue RecordingContinue Recording      Before pressing to indicate you are satisfied with the message you recorded, press to continue recording. Extended Absence GreetingExtended Absence GreetingExtended Absence GreetingExtended Absence Greeting    When your phone is turned off or you are off the Nationwide PCS Network for an extended period, this greeting can be played instead of your normal personal greeting. 1.    From the main voicemail menu, press    3    for Personal Options. 2.    Press  3  for Greetings. 3.    Press    3    to record an Extended Absence Greeting.
 73Clearing the Message Clearing the Message Clearing the Message Clearing the Message IconIconIconIcon    Your phone may temporarily continue to display the icon after you have checked your voice and text messages. To clear the icon from the display screen: 1.  From the standby mode, press MENU/OK to display the main menu. 2. Select Messaging Messaging Messaging Messaging and press MENU/OK. 3. Select Voicemail Voicemail Voicemail Voicemail and press MENU/OK. 4. Highlight Clear Count Clear Count Clear Count Clear Count and press MENU/OK. 5. Highlight Yes Yes  Yes  Yes and press MENU/OK.     Using Caller IDUsing Caller IDUsing Caller IDUsing Caller ID    Caller ID lets you know who’s calling by displaying the number of the person calling when your phone rings. Similarly, if you call someone who has this feature, your phone number displays on their phone. If the caller’s name and number are already stored in your Internal Phone Book, the corresponding name appears with the number. To block your phone number from being displayed for a specific outgoing call: 1.    Press  *   6   7 . 2.    Enter the number you want to call. 3.    Press TALK or SPEAKER .   To permanently block your number, call Customer center.     Responding to Call WaitingResponding to Call WaitingResponding to Call WaitingResponding to Call Waiting    Call Waiting alerts you to incoming calls while you’re on a call by sounding beeps. The display screen informs you that a call is coming in and shows the caller’s phone number (if it is available and you are in digital mode). To respond to an incoming call while you’re on a call:   Press TALK or SPEAKER (or press MENU/OK, highlight Flash Flash Flash Flash and press MENU/OK). This puts the first caller on hold and answers the second call.   To switch back to the first caller, press TALK or SPEAKER (or press MENU/OK, highlight Flash Flash Flash Flash and press MENU/OK) again. Tip: Tip: Tip: Tip: For those calls where you don’t want to be interrupted, you can temporarily disable Call Waiting by pressing before placing your call. Call Waiting is automatically reactivated once you end the call.
 74Making a ThreeMaking a ThreeMaking a ThreeMaking a Three----Way CallWay CallWay CallWay Call    With Three-Way Calling, you can talk to two people at the same time. When using this feature, the normal airtime rates will be charged for each of the two calls. 1.    Enter a number you wish to call and press TALK or SPEAKER. 2.    Once you have established the connection, press TALK or SPEAKER (or press MENU/OK, highlight ThreeThreeThreeThree----Way Call Way Call Way Call Way Call and press MENU/OK) to put the first caller on hold. 3.    Dial the second number you wish to call. 4.    Press TALK or SPEAKER (or press MENU/OK, highlight Call Call Call Call or Call:Call:Call:Call: Speaker OnSpeaker OnSpeaker OnSpeaker On and press MENU/OK). 5.    When you’re connected to the second party, press TALK or SPEAKER once more (or press MENU/OK, highlight Flash Flash Flash Flash and press MENU/OK) to begin your three-way call. If one of the people you called hangs up during your call, you and the remaining caller stay connected. If you initiated the call and are the first to hang up, all three callers are disconnected. Tip: Tip: Tip: Tip: You can also select a phone number from Internal Phone Book, Call History or Messages, etc. by pressing MENU/OK before you enter a phone number during step 3 above.    Note: Note: Note: Note: Call Waiting and Three-Way Calling may not be available while roaming off the Nationwide PCS Network.     Using Call ForwardingUsing Call ForwardingUsing Call ForwardingUsing Call Forwarding    Call Forwarding lets you forward all your incoming calls to another phone number – even when your phone is turned off. You can continue to make calls from your phone with Call Forwarding activated. To To To To Activate Call ForwardingActivate Call ForwardingActivate Call ForwardingActivate Call Forwarding    1.    Press  *   7   2 . 2.    Enter the area code and phone number to which your future calls should be forwarded. 3.    Press TALK or SPEAKER .You will hear a tone to confirm the activation of Call Forwarding. To Deactivate Call ForwardinTo Deactivate Call ForwardinTo Deactivate Call ForwardinTo Deactivate Call Forwardingggg    1. 1. 1. 1. Press  *   7   2   0 . 2. 2. 2. 2. Press TALK or SPEAKER .You will hear a tone to confirm the deactivation. Note: Note: Note: Note: You are charged a higher rate for calls you have forwarded.
 75MessagesMessagesMessagesMessages    These appear on your screen as Notifications Notifications Notifications Notifications and include numeric messages (pages),Messages, Updates, and Mail.     New MessagesNew MessagesNew MessagesNew Messages    When you receive a new Message, your phone alerts you and press View (left softkey) to display the message details.   Press Call (left softkey) to dial the phone number   Press Go (left softkey) to go to the web site.   Press Cancel (right softkey) to return to the message folder list.     Message StorageMessage StorageMessage StorageMessage Storage    Your PCS Phone can store up to 200 Messages. When the message memory is 90% full, a warning message prompts you to erase messages to obtain additional memory space.     Displaying MessagesDisplaying MessagesDisplaying MessagesDisplaying Messages    To display a Message from the message notification alert, see “New Messages” on page 75. To display a Message from the main menu: 1.  From the standby mode, press MENU/OK to display the main menu. 2. Select MessagMessagMessagMessaginginginging and press MENU/OK. 3. Select NotificationsNotificationsNotificationsNotifications and press MENU/OK. Then the folder list appears. 4. Highlight Unfiled Unfiled Unfiled Unfiled or your defined folder, and press MENU/OK. 5.  Highlight the header of the message you want to see, and press MENU/OK. An icon appears at the left side of each header of the message. The icons are as follows.  New message  Urgent message Read message   Read Urgent message If the sender’s information has already been stored in the phone book, the corresponding name or phone number appears as the header of the message. If nothing has been stored, the phone number or text that was included in the message appears as the header of the message. To read other messages:   Press left on the Navigation key to read the previous message.   Press right on the Navigation key to read the next message.
 76Changing the Displaying Font Size of a MessageChanging the Displaying Font Size of a MessageChanging the Displaying Font Size of a MessageChanging the Displaying Font Size of a Message    After you display a Message, press MENU/OK to display message options. To adjust the displaying font size: 1. Highlight Font Size Font Size Font Size Font Size by scrolling, and press MENU/OK. 2.  Highlight your desired font size, and press MENU/OK.     Message OptionsMessage OptionsMessage OptionsMessage Options    After you display a Message, press MENU/OK to display message options. To select an option, highlight it and press MENU/OK.   Call Back Call Back Call Back Call Back to dial the phone number of the sender (if applicable).   Call:Speaker On Call:Speaker On Call:Speaker On Call:Speaker On to dial the phone number of the sender with speakerphone mode (if applicable)   Save Phone# Save Phone# Save Phone# Save Phone# to save the sender’s phone number if it is not already in your Internal Phone Book (if applicable). Or if the sender’s phone number has already been stored in the any Phone Book entry, Alternate Alternate Alternate Alternate appears instead of Save PhoneSave PhoneSave PhoneSave Phone#.   Prepend Prepend Prepend Prepend to add numbers to the beginning of the phone number (if applicable). (See Prepending a Phone Number from a Message” on page 76).   Extract Info Extract Info Extract Info Extract Info to extract phone numbers, email or web addresses (if there are numbers or addresses contained in the text message). (See pages 77-78).   Erase Erase Erase Erase to erase the message.     Add Folder Add Folder Add Folder Add Folder to add the folder. (See “Adding a Folder to the Messages” on   Page79).   Move Message Move Message Move Message Move Message to move the message into the other folder. (See “Moving a Message Into the Other Folder” on page 79).   Font Size Font Size Font Size Font Size to adjust the font size depending on your preference. (See “Changing the Displaying Font Size of a Message” on page 76). Note: Note: Note: Note: If the incoming message does not have a call back number, “Call Back”, “Call:Speaker On “,”Alternate/Save Phone#” and “Prepend” are not shown.  Prepending a Phone Number From a MessagePrepending a Phone Number From a MessagePrepending a Phone Number From a MessagePrepending a Phone Number From a Message    After you display a Message that contains call back number, press MENU/OK to display message options. If you happen to be outside your local area code and need to add a prefix to a phone number: 1. Highlight Prepend Prepend Prepend Prepend and press MENU/OK. 2.  Enter the digits or pauses (see below) you want to add to the number. If you want to save the number, press MENU/OK and select the Save Phone#Save Phone#Save Phone#Save Phone# option. If not, the changes only apply to the current call.
 773.  To select an option, highlight it and press MENU/OK.   Call Call Call Call to dial the phone number.   Call: Speaker On Call: Speaker On Call: Speaker On Call: Speaker On to dial the scheduled phone number with speakerphone mode.   Save Save Save Save Phone# Phone# Phone# Phone# to store the phone number in your Internal Phone Book.   Hard Pause Hard Pause Hard Pause Hard Pause to insert a hard pause. (See “Dialing and Saving Phone Numbers With Pauses” on page 17).   2222----Second Pause Second Pause Second Pause Second Pause to insert a 2-second pause. (See “Dialing and Saving Phone Numbers With Pauses” on page 17).  Extracting Extracting Extracting Extracting Phone Numbers or Phone Numbers or Phone Numbers or Phone Numbers or Email/Web Address From a MessageEmail/Web Address From a MessageEmail/Web Address From a MessageEmail/Web Address From a Message    After you display a message, press MENU/OK to display message options. To extract a phone number contained in the message: 1 Highlight Extract InfoExtract InfoExtract InfoExtract Info,    and press MENU/OK. 2 Highlight PhonPhonPhonPhoneeee#, Email Address Email Address Email Address Email Address or Web AddressWeb AddressWeb AddressWeb Address, and press MENU/OK. All the phone numbers, email addresses or web addresses contained in the message are displayed. (If there is no appropriate information to extract from the message, the numbers or addresses are not displayed). 3  Highlight the number or address you want to extract. 4  Press MENU/OK to display the options. 5  To select an option, highlight it and press MENU/OK. “Phone#” options:“Phone#” options:“Phone#” options:“Phone#” options:      Call Call Call Call to dial the phone number.   Call: Speaker On Call: Speaker On Call: Speaker On Call: Speaker On to dial the scheduled phone number with speakerphone mode.   Save Phone# Save Phone# Save Phone# Save Phone# to save the phone number if it is not already in your Internal Phone Book. Or if the phone number has already stored in the Phone Book entry, Alternate Alternate Alternate Alternate appears instead of Save PhoneSave PhoneSave PhoneSave Phone#.   Display Phone# Display Phone# Display Phone# Display Phone# to display the phone number.   Prepend Prepend Prepend Prepend to add numbers to the beginning of the phone number. (See “Prepending a Phone Number From a Message” on pages 76-77.) “Email Address” options:“Email Address” options:“Email Address” options:“Email Address” options:      Send PCS Mail Send PCS Mail Send PCS Mail Send PCS Mail to send email   Display Address Display Address Display Address Display Address to display the email or Web address.   Save Address Save Address Save Address Save Address to save the email address if it is not already in your Internal Phone Book. Or if the email address is already stored in the Phone Book entry, Alternate Alternate Alternate Alternate appears instead of Save AddresSave AddresSave AddresSave Addresssss. “Web Address” options:“Web Address” options:“Web Address” options:“Web Address” options:      Visit Site Visit Site Visit Site Visit Site to visit the website (if applicable).   DisplDisplDisplDisplay Address ay Address ay Address ay Address to display the web address.
 78  Save Address Save Address Save Address Save Address to save the web address if it is not already in your Internal Phone Book. Or if the web address is already stored in the Phone Book entry, Alternate Alternate Alternate Alternate appears instead of Save AddressSave AddressSave AddressSave Address.     Creating Creating Creating Creating FFFFolders for olders for olders for olders for MessagesMessagesMessagesMessages    You can create up to ten folders to store your Messages. 1.  From the standby mode, press MENU/OK to display the main menu. 2. Select MessagingMessagingMessagingMessaging and press MENU/OK. 3. Select NotificationsNotificationsNotificationsNotifications and press MENU/OK. Then the folder list appears. 4.  From the folder list display, press Options (right softkey). 5. Highlight Create Folder Create Folder Create Folder Create Folder and press MENU/OK. 6.  Enter a folder name from 3 to 13 letters and press MENU/OK or OK (left softkey). See “Selecting a Character Input Mode” on page 45.   Pressing Save (left softkey) allows you to save the folder name. 7.  If you want the message to be filed into the folder automatically, select the menu under the Auto FilingAuto FilingAuto FilingAuto Filing and press MENU/OK. 8. Highlight On On On On and press MENU/OK. 9.  Select the box under the Keyword Keyword Keyword Keyword by scrolling down and press MENU/OK. 10.  Enter a keyword from 3 to 14 letters and press MENU/OK or OK (left softkey). 11.  Press Save (left softkey). Note: Note: Note: Note: If 10 user-defined folders exist, “Create Folder” menu disappears. If you want to add a set optional feature to the new folder: 1. From the step 7 above, scroll down to select menu under the other option and highlight it and press MENU/OK.   Notify Notify Notify Notify to select displaying the notification to on or off when you have a message matching the defined folder.   EnvelopEnvelopEnvelopEnvelopeeee Icon  Icon  Icon  Icon to select displaying the envelope icon on or off when you have a message matching the defined folder. 2.    After selecting the each setting, press Save (left softkey).
 79Adding a Folder To the MessageAdding a Folder To the MessageAdding a Folder To the MessageAdding a Folder To the Message    When the message contains any word of 3 to 14 letters, you can classify the message to your defined folder. If 10 user defined folder exist, “Add Folder” menu disappears. 1.  After you display a message, press MENU/OK to display message options. 2. Highlight Add Folder Add Folder Add Folder Add Folder by scrolling and press MENU/OK. 3.  Enter a folder name from 3 to 13 letters and press MENU/OK or OK (left softkey). See “Selecting a Character Input Mode” on page 45. 4.  If you want the message to be filed into the folder automatically, select the menu under the Auto Filing Auto Filing Auto Filing Auto Filing and press MENU/OK. 5. Highlight On On On On and press MENU/OK. 6.  Select the box under the Keyword Keyword Keyword Keyword by scrolling    down    and press MENU/OK. 7.  Enter a keyword and press MENU/OK. -or-  Go to Keyword MatchKeyword MatchKeyword MatchKeyword Match and press MENU/OK. Select a keyword from the Keyword Match list. 8.  Press Save (left softkey). If you want to set optional feature to the added folder: 1.          From the step 7 above, scroll down to select other menu options. Highlight the menu under each item and press MENU/OK.   Notify Notify Notify Notify to select displaying the notification to on or off when you have a message matching the defined folder.   EnvelopEnvelopEnvelopEnvelopeeee Icon  Icon  Icon  Icon to select displaying the envelope icon to on or off when you have the message matching the defined folder. 2.       After selecting the each setting, press Save (left softkey).     Moving a Moving a Moving a Moving a MessageMessageMessageMessage Into the Other Folder Into the Other Folder Into the Other Folder Into the Other Folder    After you display a Message, press MENU/OK to display message options. You need at least one defined folder.   If you want to move the message into the other folder: 1. Highlight Move Message Move Message Move Message Move Message by scrolling and press MENU/OK. 2.  Highlight your desired folder and press MENU/OK.     Editing FoldersEditing FoldersEditing FoldersEditing Folders    To edit a folder: 1.  From the folder list display, highlight your desired folder except for UnfiledUnfiledUnfiledUnfiled. 2.  Press Options (right softkey). 3. Highlight Edit Folder Edit Folder Edit Folder Edit Folder and press MENU/OK. 4.  Select the box under the desired option to edit and press MENU/OK.   Folder Name Folder Name Folder Name Folder Name to edit the folder name.
 80  AutoAutoAutoAuto Filing  Filing  Filing  Filing to set auto filing to on or off.   Keyword Keyword Keyword Keyword to change the folder’s keyword. Incoming messages are automatically filtered into the folder if they contain the Keyword you enter.   NotifNotifNotifNotifyyyy    to change the notification setting to on or off.   EnvelopEnvelopEnvelopEnvelopeeee Icon  Icon  Icon  Icon to change the icon setting to on or off. 5.  Enter or select your new name/setting. 6.  Press MENU/OK or OK (left softkey). 7.  Press Save (left softkey).     Erasing a Folder Including MessagesErasing a Folder Including MessagesErasing a Folder Including MessagesErasing a Folder Including Messages    1.  From the folder list display, highlight the folder you want to erase. 2.  Press Options (right softkey). 3. Highlight Erase Folder Erase Folder Erase Folder Erase Folder and press MENU/OK. 4. Highlight Yes Yes  Yes  Yes and press MENU/OK. Note: Note: Note: Note: The messages within the folder are also erased. If the folder contains a new message, you are prompted to select Erase Erase Erase Erase or Don’t EraseDon’t EraseDon’t EraseDon’t Erase. Erasing All MessagesErasing All MessagesErasing All MessagesErasing All Messages    To erase all messages: 1.  From the folder list display, press Options (right softkey) to display the menu options. 2. Highlight Erase All Msgs Erase All Msgs Erase All Msgs Erase All Msgs and press MENU/OK. 3.  Highlight In This Folder In This Folder In This Folder In This Folder or In All Folders In All Folders In All Folders In All Folders and press MENU/OK. 4. Highlight Yes Yes  Yes  Yes and press MENU/OK. To erase all messages already read: 1.  From the folder list display, press Options (right softkey) to display the menu options. 2.  Highlight Erase Old Msgs Erase Old Msgs Erase Old Msgs Erase Old Msgs and press MENU/OK. 3.  Highlight In This Folder In This Folder In This Folder In This Folder or In All FolderIn All FolderIn All FolderIn All Folderssss    and press MENU/OK. 4. Highlight Yes Yes  Yes  Yes and press MENU/OK. Note: Note: Note: Note: If the folder contains a new message, you are prompted to select Erase  Erase  Erase  Erase or Don’t EraseDon’t EraseDon’t EraseDon’t Erase.    Note: Note: Note: Note: To erase an individual message, see “Message Options” on 76.
 81SafetySafetySafetySafety    Getting the Most Out of Your ReceptionGetting the Most Out of Your ReceptionGetting the Most Out of Your ReceptionGetting the Most Out of Your Reception    Keeping Tabs on Signal StrengthKeeping Tabs on Signal StrengthKeeping Tabs on Signal StrengthKeeping Tabs on Signal Strength    The quality of each call you make or receive depends on the signal strength in your area. Your phone informs you of the current strength by displaying a number of bars next to the signal strength icon. The more bars displayed, the stronger the signal. If you’re inside a building, being near a window may give you better reception. Understanding Power Save FeatureUnderstanding Power Save FeatureUnderstanding Power Save FeatureUnderstanding Power Save Feature    If your phone is unable to find a signal after 15 minutes of searching, a Power Save feature is automatically activated. If your phone is active, it periodically rechecks service availability or you can check it yourself by pressing any key. Anytime the Power Save feature is activated, a message displays on the screen. When a signal is found, your phone returns to standby mode. Understanding How Your Phone OperUnderstanding How Your Phone OperUnderstanding How Your Phone OperUnderstanding How Your Phone Operatesatesatesates    Your phone is basically a radio transmitter and receiver. When it’s turned on, it receives and transmits radio frequency (RF) signals. When you use your phone, the system handling your call controls the power level. This power can range from 0.01  μwatts to 0.2 watts in digital mode. Knowing Radio Frequency SafetyKnowing Radio Frequency SafetyKnowing Radio Frequency SafetyKnowing Radio Frequency Safety    The design of your Phone complies with updated NCRP standards described below.   In 1991-92, the Institute of Electrical and Electronics Engineers (IEEE) and the American National Standards Institute (ANSI) joined in updating ANSI’s 1982 standard for safety levels with respect to human exposure to RF signals. More than120 scientists, engineers and physicians from universities, government health agencies and industries developed this updated standard after reviewing the available body of research. In 1993, the Federal Communications Commission (FCC) adopted this updated standard in a regulation. In August 1996, the FCC adopted hybrid standard consisting of the existing ANSI/IEEE standard and the guidelines published by the National Council of Radiation Protection and Measurements (NCRP). Maintaining Your Phone’s Peak PerformanceMaintaining Your Phone’s Peak PerformanceMaintaining Your Phone’s Peak PerformanceMaintaining Your Phone’s Peak Performance    There are several simple guidelines to operating your phone properly and maintaining safe, satisfactory service.   Hold the phone with the antenna up, fully-extended and over your shoulder.   Try not to hold, bend or twist the phone’s antenna.   Don’t use the phone if the antenna is damaged.   Speak directly into the mouthpiece.   Avoid exposing your phone and accessories to rain or liquid spills. If your phone does get wet, immediately turn the power off and remove the battery. If it’s inoperable, return it to a Store or call Customer center for service.  NoteNoteNoteNote: For the best care of your phone, only authorized personnel should service your phone and accessories. Faulty service may void the warranty.
 82Maintaining Safe Use of and Access to Your PhoneMaintaining Safe Use of and Access to Your PhoneMaintaining Safe Use of and Access to Your PhoneMaintaining Safe Use of and Access to Your Phone    FAILURE TO FOLLOW THE INSTRUCTIONS OUTLINED MAY LEAD TO SERIOUS PERSONAL INJURY AND POSSIBLE PROPERTY DAMAGE Using Your Phone While DrivUsing Your Phone While DrivUsing Your Phone While DrivUsing Your Phone While Drivinginginging    Talking on the phone while driving (or operating the phone without a hands-free device) is prohibited in some jurisdictions. Laws vary as to specific restrictions. Remember that safety always comes first. When using your phone in the car:   Get to know your phone and its features, such as speed dial and redial.   When available, use a hands-free device.   Position your phone within easy reach.   Let the person you are speaking to know you are driving; if necessary, suspend the call in heavy traffic or hazardous weather conditions.   Do not take notes or look up phone numbers while driving.   Dial sensibly and assess the traffic; if possible, place calls when you are not moving or before pulling into traffic.   Do not engage in stressful or emotional conversations that may divert your attention from the road.   Dial 9 1 1 TALK to report serious emergencies. It’s free from your wireless phone.   Use your phone to help others in emergencies.   Call roadside assistance or a special non-emergency wireless number when necessary. TipTipTipTip: Purchase an optional Hands-Free Car Kit. Following Safety GuidelinesFollowing Safety GuidelinesFollowing Safety GuidelinesFollowing Safety Guidelines    To operate your phone safely and efficiently, always follow any special regulations in a given area. Turn your phone off in areas where use is forbidden or when it may cause interference or danger. Using Your Phone Near Other Electronic DevicesUsing Your Phone Near Other Electronic DevicesUsing Your Phone Near Other Electronic DevicesUsing Your Phone Near Other Electronic Devices    Most modern electronic equipment is shielded from radio frequency (RF) signals. However, RF signals from wireless phones may affect inadequately shielded electronic equipment. RF signals may affect improperly installed or inadequately shielded electronic operating and entertainment systems in motor vehicles. Check with the manufacturer or its representative to determine if these systems are adequately shielded from external RF signals. Also check with the manufacturer regarding any equipment that has been added to your vehicle. Consult the manufacturer of any personal medical devices, such as pacemakers and hearing aids, to determine if they are adequately shielded from external RF signals. NoteNoteNoteNote: Always turn off the phone in health care facilities and request permission before using the phone near medical equipment. Turning Off Your Phone Before FlyingTurning Off Your Phone Before FlyingTurning Off Your Phone Before FlyingTurning Off Your Phone Before Flying    Turn off your phone before boarding any aircraft. To prevent possible interference with aircraft systems, the U.S. Federal Aviation Administration (FAA) regulations require you to have permission from a crew member to use your phone while the plane is on the ground. To prevent any risk of
 83interference, FCC regulations prohibit using your phone while the plane is in the air. Turning Off Your Phone in Dangerous AreasTurning Off Your Phone in Dangerous AreasTurning Off Your Phone in Dangerous AreasTurning Off Your Phone in Dangerous Areas    To avoid interfering with blasting operations, turn off your phone when in a blasting area or in other areas with signs indicating that two-way radios should be turned off. Construction crews often use remote-control RF devices to set off explosives. Turn off your phone when you’re in any area that has a potentially explosive atmosphere. Although it’s rare, your phone or its accessories could generate sparks. Sparks could cause an explosion or a fire resulting in bodily injury or even death. These areas are often, but not always, clearly marked. They include:   Fueling areas such as gas stations   Below deck on boats   Fuel or chemical transfer or storage facilities   Areas where the air contains chemicals or particles such as grain, dust or metal powders   Any other area where you would normally be advised to turn off your vehicle engine NoteNoteNoteNote: Never transport or store flammable gas, liquid or explosives in the compartment of your vehicle that contains your phone or accessories. Restricting Children ’s Access to Your PhoneRestricting Children ’s Access to Your PhoneRestricting Children ’s Access to Your PhoneRestricting Children ’s Access to Your Phone    Your PCS Phone is not a toy. Children should not be allowed to play with it because they could hurt themselves and others, damage the phone or make calls that increase your phone bill.
 84Caring for the BatteryCaring for the BatteryCaring for the BatteryCaring for the Battery    Protecting Your BatteryProtecting Your BatteryProtecting Your BatteryProtecting Your Battery    The guidelines listed below help you get the most out of your battery’s performance.     Use only PCS-approved batteries and desktop chargers. These chargers are designed to maximize battery life. Using other batteries or chargers voids your warranty and may cause damage.   In order to avoid damage, charge the battery only in temperatures that range from 32º F to 113º F (0º C to 45º C).   Don’t use the battery charger in direct sunlight or in high humidity areas, such as the bathroom.   Never dispose of the battery by incineration.   Keep the metal contacts on top of the battery clean.   Don’t attempt to disassemble or short-circuit the battery.   The battery may need recharging if it has not been used for a long period of time.   It’s best to replace the battery when it no longer provides acceptable performance. It can be recharged hundreds of times before it needs replacing.   Don’t store the battery in high temperature areas for long periods of time. It’s best to follow these storage rules: Less than one month: 4º F to 140º F (-20º C to 60º C) More than one month: 4º F to 113º F (-20º C to 45º C)     Disposal of Lithium Ion (LiIon) BatteriesDisposal of Lithium Ion (LiIon) BatteriesDisposal of Lithium Ion (LiIon) BatteriesDisposal of Lithium Ion (LiIon) Batteries    For safe disposal options of your LiIon batteries, contact your nearest PCS-authorized service center. Special noteSpecial noteSpecial noteSpecial note: Be sure to dispose of your battery properly. In some areas, the disposal of batteries in household or business trash may be prohibited. NoteNoteNoteNote: For safety, do not handle a damaged or leaking LiIon battery.
 85Acknowledging Special Precautions and the FCC NoticeAcknowledging Special Precautions and the FCC NoticeAcknowledging Special Precautions and the FCC NoticeAcknowledging Special Precautions and the FCC Notice    FCC NoticeFCC NoticeFCC NoticeFCC Notice    The phone may cause TV or radio interference if used in close proximity to receiving equipment. The FCC can require you to stop using the phone if such interference cannot be eliminated. Vehicles using liquefied petroleum gas (such as propane or butane) must comply with the National Fire Protection Standard (NFPA-58). For a copy of this standard, contact the National Fire Protection Association, One Batterymarch Park, Quincy, MA02269, Attn: Publication Sales Division. NoteNoteNoteNote: This equipment has been tested and found to comply with the limits for a Class B digital device, pursuant to part 15 of the FCC Rules. These limits are designed to provide reasonable protection against harmful interference in a residential installation. This equipment generates, uses, and can radiate radio frequency energy and, if not installed and used in accordance with the instructions, may cause harmful interference to radio communications. However, there is no guarantee that interference will not occur in a particular installation. If this equipment does cause harmful interference to radio or television reception, which can the interference by one or more of the following measures:   Reorient or relocate the receiving antenna.   Increase the separation between the equipment and receiver.   Connect the equipment into an outlet on a circuit different from that to which the receiver is connected.   Consult the dealer or an experienced radio/TV technician for help. CautionsCautionsCautionsCautions    Any changes or modifications to your phone not expressly approved in this document could void your warranty for this equipment and void your authority to operate this equipment. Only use approved batteries, antennas and chargers. The use of any unauthorized accessories may be dangerous and voids the phone warranty if said accessories cause damage or a defect to the phone. Although your phone is quite sturdy, it is a complex piece of equipment and can be broken. Avoid dropping, hitting, bending or sitting on it. BodyBodyBodyBody----Worn OperationWorn OperationWorn OperationWorn Operation    To maintain compliance with FCC RF exposure requirements, Body-worn operations are restricted to belt-clips, holsters or similar accessories that have no metallic component in the assembly and that provide at least xx cm separation between the device, including its antenna whether extended or retracted, and the user’s body. Use of non-recommended accessories may violate FCC RF exposure requirements.  For more information about RF exposure, please visit the FCC website at www.fcc.gov. Specific Absorption Rate (SAR) for Wireless PhonesSpecific Absorption Rate (SAR) for Wireless PhonesSpecific Absorption Rate (SAR) for Wireless PhonesSpecific Absorption Rate (SAR) for Wireless Phones    The SAR is a value that corresponds to the relative amount of RF energy absorbed in the head of a user of a wireless handset. The SAR value of a phone is the result of an extensive testing, measuring and calculation process. It does not represent how much RF the phone emits. All phone models are
 86tested at their highest value in strict laboratory settings. But when in operation, the SAR of a phone can be substantially less that the level reported to the FCC. This is because of a variety of factors including its proximity to a base station antenna, phone design and other factors. What is important to remember is that each phone meets strict federal guidelines. Variations in SARs do not represent a variation in safety.   All phones must meet the federal standard, which incorporates a substantial margin of safety. As stated above, variations in SAR values between different model phones do not mean variations in safety. SAR values at or below the federal standard of 1.6 W/kg are considered safe for use by the public. The highest reported SAR values of SCP-5500 are: AMPS/CDMA modes (Part 22) - Head: xx W/kg; Body-worn: xx W/kg PCS CDMA mode (Part 24) - Head: xx W/kg; Body-worn: xx W/kg   FCC Radio Frequency Emission This phone meets the FCC Radio Frequency Emission Guidelines. FCC ID number: XXXX. More information on the phone’s SAR can be found from the following FCC website: http://www.fcc.gov/oet/fccid.

Navigation menu