Sanyo Electric Co SCP-82H Tri-Mode Dual-Band Analog/ PCS Phone (AMPS/ CDMA) User Manual
Sanyo Electric Co Ltd Tri-Mode Dual-Band Analog/ PCS Phone (AMPS/ CDMA) Users Manual
Users Manual
SCP-8200
Operating Guide
(Draft)
Dual-Band /Tri-Mode
1
Table of Contents
Table of ContentsTable of Contents
Table of Contents
Getting to Know Your Phone.................................................................................................6
Front View of Phone............................................................................................................................6
Key Functions........................................................................................................................................7
Viewing the Display Screen .............................................................................................................8
Turning Your Phone On and Off.....................................................................................................9
Unlocking the Phone...........................................................................................................................9
Using the Battery.............................................................................................................................. 10
Displaying Your Phone Number...................................................................................................11
Making and Answering Calls ............................................................................................ 12
Making Calls....................................................................................................................................... 12
Answering Calls................................................................................................................................. 12
Using the Speakerphone ................................................................................................................ 13
Changing the Ringer Volume ....................................................................................................... 13
Adjusting Volume During a Conversation .............................................................................. 13
Muting a Call ...................................................................................................................................... 13
Missed Call Notification ................................................................................................................. 14
Calling Emergency Numbers....................................................................................................... 14
Dialing Options .................................................................................................................................. 14
In-Call Options................................................................................................................................... 15
End-of-Call Options.......................................................................................................................... 16
Saving a Phone Number................................................................................................................. 16
Finding a Phone Number............................................................................................................... 16
Dialing and Saving Phone Numbers With Pauses.............................................................. 17
Abbreviated Dialing ......................................................................................................................... 17
Dialing From the Contacts Directory........................................................................................ 17
Using Speed Dialing......................................................................................................................... 18
Controlling Your Phone’s Settings.................................................................................. 19
Sound Settings.................................................................................................................................... 19
Ringer Types........................................................................................................................................ 19
Selecting Ringer Types for Voice Calls...................................................................................... 19
Selecting Ringer Types for Voicemail........................................................................................ 19
Selecting Ringer Types for Messages........................................................................................ 20
Setting Tone Length, Start-up/Power-off Tone or Voice Prompt.................................... 20
Adjusting the Phone’s Volume Settings.................................................................................... 20
Alert Notification............................................................................................................................... 21
Silence All ............................................................................................................................................. 21
Display Settings................................................................................................................................. 22
2
Changing the Text Greeting.......................................................................................................... 22
Changing the Backlight Time Length ...................................................................................... 22
Changing the Display Screen....................................................................................................... 22
Changing the Display for Incoming Calls ............................................................................... 23
Changing the Display for the Standby Mode......................................................................... 23
Changing the Screen Saver........................................................................................................... 24
Changing the Display for My Buddy......................................................................................... 24
Changing the Phone’s Main Menu Style ................................................................................. 24
Changing the Theme Color ........................................................................................................... 25
Changing the Font Size .................................................................................................................. 25
Location Settings............................................................................................................................... 25
Airplane Mode .................................................................................................................................... 25
TTY Use With PCS Service........................................................................................................... 26
Phone Setup Options....................................................................................................................... 26
My Shortcut......................................................................................................................................... 26
Auto Answer Mode............................................................................................................................ 26
Setting the Open/Close Flip Options......................................................................................... 27
Setting Any Key Answer................................................................................................................. 27
Setting the Side Key Guard.......................................................................................................... 27
Setting Abbreviated Dialing.......................................................................................................... 28
Headset Mode ..................................................................................................................................... 28
Sleep Mode........................................................................................................................................... 28
Setting Message Notification........................................................................................................ 28
Changing the Menu Language.................................................................................................... 29
Setting Your Phone’s Security ........................................................................................... 30
Accessing the Security Menu........................................................................................................ 30
Locking Your Phone.......................................................................................................................... 30
Unlocking Your Phone..................................................................................................................... 30
Changing the Lock Code ................................................................................................................ 30
Calling in Lock Mode ....................................................................................................................... 31
Restricting Calls................................................................................................................................. 31
Using Special Numbers .................................................................................................................. 31
Erasing the Contacts Directory................................................................................................... 32
Erasing All Downloads.................................................................................................................... 32
Resetting Your Phone....................................................................................................................... 32
Resetting and Locking Your Phone Through SMS.............................................................. 32
Controlling Your Roaming Experience ....................................................................... 34
Understanding Roaming................................................................................................................ 34
Setting Your Phone’s Roam Mode............................................................................................... 35
Controlling Roaming Charges Using Call Guard................................................................ 36
3
Navigating Through Menus ............................................................................................... 37
Menu Navigation............................................................................................................................... 37
Menu Structure.................................................................................................................................. 37
Managing Call History........................................................................................................... 38
Viewing History.................................................................................................................................. 38
Call History Options ........................................................................................................................ 38
Making a Call from Call History................................................................................................. 38
Saving a Phone Number From Call History.......................................................................... 39
Prepending a Phone Number From Call History ................................................................ 39
Erasing Call History ........................................................................................................................ 39
Using the Contacts Directory ............................................................................................ 41
Displaying the Contacts List ........................................................................................................ 41
Contacts List Entry Options......................................................................................................... 41
Selecting a Character Input Mode............................................................................................. 41
Entering Characters Using T9 Text Input.............................................................................. 42
Adding a Word to the T9 Database............................................................................................ 42
Entering Characters by Tapping the Keypad........................................................................ 43
Entering Numbers, Symbols, Preset Suffix and Smileys
................................................. 44
Adding a New Contacts List Entry............................................................................................ 45
Finding Contacts List Entries...................................................................................................... 45
Adding a Phone Number or Address to a Contacts Entry................................................ 46
Editing an Contacts Entry............................................................................................................. 46
Selecting a Ringer/Image Type for an Entry.......................................................................... 47
Secret Contacts Entries .................................................................................................................. 47
Dialing PCS Services ....................................................................................................................... 48
Personal Organizer.................................................................................................................... 49
Managing the Scheduler ................................................................................................................ 49
Adding an Event to the Scheduler ............................................................................................. 49
Event Alerts......................................................................................................................................... 50
Event Alert Menu.............................................................................................................................. 50
Viewing the Event List.................................................................................................................... 51
Editing an Event................................................................................................................................51
Adding a Call Alarm to the Scheduler...................................................................................... 51
Call Alarm Alerts............................................................................................................................... 51
Call Alarm Menu............................................................................................................................... 52
Editing Call Alarm............................................................................................................................ 52
Erasing Day’s Events or Call Alarms........................................................................................ 52
Viewing a Feature/Past Day’s Scheduled Events................................................................. 52
4
Adding To Do List Items................................................................................................................. 53
Viewing the To Do List .................................................................................................................... 53
Editing To Do List Items ................................................................................................................ 53
Adding a To Do List Item to the Schedule............................................................................... 53
Deleting Items from the To Do List............................................................................................ 53
Purging All Events, Call Alarms or To Do List...................................................................... 54
Displaying Your User Address ..................................................................................................... 54
Finding Icon Definitions................................................................................................................. 54
Displaying the Version Information........................................................................................... 55
Displaying Advanced Information.............................................................................................. 55
Using Your Phone’s Tools................................................................................................................ 55
Using the Calculator........................................................................................................................ 55
Using the World Clock..................................................................................................................... 55
Using Your Phone’s Voice Services................................................................................. 57
Using Voice-Activated Dialing...................................................................................................... 57
Programming Voice Dial Tag........................................................................................................ 57
Erasing All Voice Dial Tags ........................................................................................................... 57
Recording Voice Memos .................................................................................................................. 58
Reviewing Voice Memo.................................................................................................................... 58
Erasing Voice Memos....................................................................................................................... 59
Setting Up Screen Call.................................................................................................................... 59
Activating Screen Call..................................................................................................................... 59
Selecting Announcement for Screen Call ................................................................................ 60
Recording Your Name for a Pre-Recorded Announcement............................................... 60
Recording a Customized Announcement................................................................................. 60
Reviewing an Announcement....................................................................................................... 60
Erasing an Announcement............................................................................................................ 61
Using Voicemail............................................................................................................................ 62
Setting Up Your Voicemail............................................................................................................. 62
Voicemail Notification...................................................................................................................... 62
New Voicemail Message Alerts.................................................................................................... 62
Retrieving Your Voicemail Messages......................................................................................... 63
Voicemail Options.............................................................................................................................. 63
Using Caller ID .................................................................................................................................. 65
Responding to Call Waiting........................................................................................................... 65
Making a Three-Way Call.............................................................................................................. 65
Using Call Forwarding.................................................................................................................... 66
Messages............................................................................................................................................... 67
New Messages .................................................................................................................................... 67
Message Storage................................................................................................................................67
5
Sending a Message in the Outbox Folder................................................................................ 67
Message Options................................................................................................................................67
Displaying Messages........................................................................................................................ 69
Changing the Displaying Font Size of a Message................................................................ 69
Prepending a Phone Number From a Message.................................................................... 70
Creating Folders for Messages..................................................................................................... 70
Moving a Message Into the Another Folder........................................................................... 71
Editing Folders................................................................................................................................... 71
Erasing a Folder ................................................................................................................................71
Erasing Selected Messages in All Folders............................................................................... 71
Safety ................................................................................................................................................... 72
Getting the Most Out of Your Reception.................................................................................. 72
Maintaining Safe Use of and Access to Your Phone............................................................ 73
Caring for the Battery..................................................................................................................... 74
Acknowledging Special Precautions and the FCC Notice................................................ 75
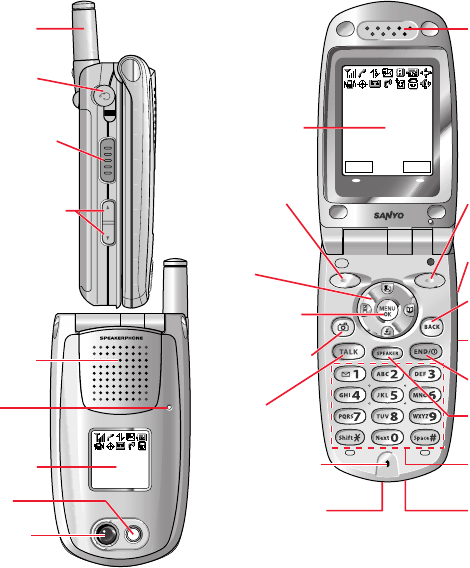
Mar 01, 04 (Mon)
12:30pm
R-Link Web
12:30p Mar 01
25. Softkey
(right)
2. Headset
Jack
3. Ready Link
Button
7. Sub LCD
4.
Side Volume
Key
11. Softkey
(left)
15. TALK
12.
Navigation
Key
13.
MENU/OK
14.
Camera Key
10. Main LCD
17. Accessories
Connector 18. Charger Jack
9. Camera
Lens
8. Flash
5. Speaker
6. LED
Indicator
1. Antenna
16.
Microphone
26. Earpiece
21. END/POWER
22.
Side Camera Key
23. BACK
20. SPEAKER Key
24. Side Call Key
19. Keypad
Getting to Know Your Phone
Front View of Phone
6

7
Key Functions
Key FunctionsKey Functions
Key Functions
1.
1.1.
1.
Antenna:
Antenna: Antenna:
Antenna: Fully extend the antenna for the best reception.
2.
2.2.
2.
Headset Jac
Headset JacHeadset Jac
Headset Jack
kk
k Insert the plug of a headset (sold separately) for hands-free phone use.
3.
3. 3.
3.
Ready Link Button:
Ready Link Button: Ready Link Button:
Ready Link Button: Press to access the PCS Ready Link List.
4.
4.4.
4.
Side Volume Key:
Side Volume Key: Side Volume Key:
Side Volume Key: Lets you adjust the receiver volume during a call or ringer volume in
standby mode.
5.
5.5.
5.
Speaker:
Speaker:Speaker:
Speaker:
Allows you hands-free conversation while in speakerphone mode. Lets you hear
the different ringers and sounds.
6.
6. 6.
6.
LED Indicator:
LED Indicator: LED Indicator:
LED Indicator: Shows your phone’s connection status at a glance.
7.
7.7.
7.
Sub LCD:
Sub LCD: Sub LCD:
Sub LCD: Lets you monitor the phone’s status and see who’s calling without opening the
phone.
8.
8.8.
8. Flash:
Flash: Flash:
Flash:
The built-in flash lets you take pictures in low light.
..
.
9.
9.9.
9. Camera Lens:
Camera Lens: Camera Lens:
Camera Lens: The built-in camera lens lets you take pictures.
10
1010
10.
..
.
Main LCD (display):
Main LCD (display): Main LCD (display):
Main LCD (display): Displays the phone’s main menu, features, modes, etc.
11.
11.11.
11.
Softkey (left)
Softkey (left) Softkey (left)
Softkey (left):
: :
: Lets you select the menu corresponding to the bottom left line on the
Main LCD.
12
1212
12.
..
.
Navigation key:
Navigation key: Navigation key:
Navigation key: Lets you navigate quickly and easily through the menu options. You can
access the menu shortcuts by pressing =Contacts, =Shortcut, ▲ =Messaging,
and ▼ =Downloads.
13.
13.13.
13.
MENU/OK:
MENU/OK: MENU/OK:
MENU/OK: Lets you access the phone’s menus and select menu options.
14.
14.14.
14.
Camera Key:
Camera Key: Camera Key:
Camera Key: Lets you access the Pictures menu and take pictures.
15
1515
15.
. .
.
TALK:
TALK: TALK:
TALK: Lets you place or receive calls, answer Call Waiting, or use Three-Way Calling and
Voice Dial.
16.
16. 16.
16.
Microphone:
Microphone: Microphone:
Microphone: To speak into or record your voice.
17.
17. 17.
17.
Accessories Connector
Accessories ConnectorAccessories Connector
Accessories Connector: Connects optional accessories such as a USB cable.
18. Charger Jack
18. Charger Jack18. Charger Jack
18. Charger Jack: Connects the Travel Charger (included) or Desktop Charger (sold
separately).
19.
19. 19.
19.
Keypad:
Keypad: Keypad:
Keypad: Lets you enter numbers, letters, and characters, and navigate within menus.
Press and hold keys 2-9 for speed dialing.
20.
20. 20.
20. SPEAKER Key:
SPEAKER Key: SPEAKER Key:
SPEAKER Key: Lets you place or receive calls in speakerphone mode. You can also use it
to activate Voice Dial and Memo recording
21.
21.21.
21.
E
E E
END/POWER:
ND/POWER: ND/POWER:
ND/POWER: Lets you turn the phone On/Off, end a call, or return to standby mode.
22
2222
22.
..
. Side Camera Key
Side Camera KeySide Camera Key
Side Camera Key: Lets you access the Pictures menu and take pictures.
23.
23.23.
23.
BACK:
BACK: BACK:
BACK: Lets you clear characters from the screen or display Time/Date while the phone is
in use.
24
2424
24.
. .
.
Side Call Key:
Side Call Key: Side Call Key:
Side Call Key: Lets you place or receive calls without opening the phone..
25.
25. 25.
25.
Softkey (right):
Softkey (right): Softkey (right):
Softkey (right): Lets you select the menu corresponding to the bottom right line on the
Main LCD.
26
2626
26. Earpiece:
Earpiece: Earpiece:
Earpiece: Lets you hear the caller’s voice.

8
Viewing the Display Scr
Viewing the Display ScrViewing the Display Scr
Viewing the Display Screen
eeneen
een
This list identifies some of the more common symbols you’ll see on your display screen.
shows your current signal strength. The more lines you have, the stronger your
signal.
means your phone cannot find a signal.
tells you a call is in progress.
indicates the Vision services is dormant.
indicates the Vision services is active.
indicates the Vision services is disabled.
indicates you have text messages waiting.
indicates you have voicemail messages waiting. Press and hold 1 to call your
voicemail box.
indicates you have text messages and voicemail messages waiting.
indicates the phone is on another service provider’s network (Main LCD only).
shows the level of your battery charge. The more black you see, the more power
you have left. It turns while charging.
indicates you have menus to scroll (Main LCD only).
indicates the vibrate feature is set to ON.
indicates volume level 4 and vibrate feature is set to ON.
indicates the Location Service of your phone is enabled.
indicates the Location Service of your phone is disabled.
indicates you have new caller’s message.
indicates the Screen Call Auto setting is ON.
indicates you have new downloaded data.
indicates the speakerphone mode is set to ON.
indicates Headset mode is PCS Ready Link Call and Headset is connected.
indicates PCS Ready Link Call is available.
indicates PCS Ready Link Call is unavailable.
indicates TTY mode is set to ON when you connect TTY devices.

9
Softkeys
SoftkeysSoftkeys
Softkeys
You can select the menus, which are described at the bottom line of the display by pressing the
corresponding softkeys (left/right). In this User Manual, the explanation for selecting such
menus are as shown below:
Press Memo
Memo Memo
Memo (right softkey).
(Press the right softkey corresponding to Memo
MemoMemo
Memo.)
Turning Your Phone O
Turning Your Phone OTurning Your Phone O
Turning Your Phone On
nn
n and O
and O and O
and Off
ffff
ff
Turning Your Phone On:
Turning Your Phone On:Turning Your Phone On:
Turning Your Phone On:
To turn your phone on, press END/.
Once your phone is On, it displays “Looking for service...”, indicating that your phone is
searching for a signal. When your phone finds a signal, it automatically enters standby mode –
the phone’s idle state. At this point, you are ready to begin making and receiving calls. If your
phone is unable to find a signal after 15 minutes of searching, a Power Save feature is
automatically activated. When a signal is found, your phone automatically returns to standby
mode.
In power save mode, your phone searches for a signal periodically without your intervention.
You can also initiate a search for PCS Service by pressing any key (when your phone is turned
On).
Tip:
Tip: Tip:
Tip: The Power Save feature helps to conserve your battery power when you are in an area
where there is no signal.
Turning Your Phone Off:
Turning Your Phone Off:Turning Your Phone Off:
Turning Your Phone Off:
Press and hold END/ for two seconds until you see the powering down animation on the display
screen.
Your screen remains blank while your phone is Off (unless the battery is charging).
Unlocking the Phone
Unlocking the PhoneUnlocking the Phone
Unlocking the Phone
1. Press END/ to turn the phone on.
2. Press Unlock
UnlockUnlock
Unlock (left softkey).
3. Enter your four-digit lock code. For security purposes, the code is not visible as you type.
10
Using the Bat
Using the BatUsing the Bat
Using the Battery
terytery
tery
Installing the Battery
Installing the BatteryInstalling the Battery
Installing the Battery
Your PCS Phone comes with a Lithium Ion battery. Follow these steps to install it:
1. Place the battery into the space beneath the antenna with the metal contacts at the bottom,
facing downward.
2. Gently press down until it’s in place and the battery release latch snaps.
Removing
Removing Removing
Removing the
thethe
the Battery
Battery Battery
Battery
To remove your battery for charging or for other reason, follow these easy steps:
1. Make sure the power is off so that you don’t lose any stored numbers or messages.
2. Press up the battery release latch and hold the battery.
3. Then pull it up and out at a 45-degree angle.
Charging the Battery
Charging the BatteryCharging the Battery
Charging the Battery
Your PCS Phone comes with a rechargeable battery. You should charge the battery as soon as
possible so you can begin using your phone.
Keeping track of your battery’s charge is important. If your battery level becomes too low, your
phone automatically turns off and you’ll lose all the information you were just working on. For a
quick check of your phone’s battery level, glance at the battery charge indicator located in the
upper-right corner of your phone’s display screen. If the battery charge gets too low, the battery
icon appears and the phone sounds a warning tone.
Always use a recommended Desktop Charger, Travel Charger or Vehicle Power Adapter to
charge your battery.
Warning!
Warning! Warning!
Warning! Using the wrong battery charger could cause damage to your phone and void the
warranty.
Using the
Using the Using the
Using the T
TT
Travel
ravelravel
ravel Charger
Charger Charger
Charger
To use the travel charger provided with your phone:
1. Plug the travel charger into a wall outlet.
2. Plug the other end into the travel charger into the bottom of your phone (with the battery
installed).
Charging when your phone is turned on:
The battery icon appears on the display while charging.
The battery icon turns to when charging is complete.
Charging when your phone is turned off:
The battery icon appears, and the message “BATTERY CHARGING-Power Off-” is
shown on the display while charging. When the battery is completely discharged, you may
wait for several minutes until the message is shown on the display. The battery icon turns
to
, and message changes to “CHARGING COMPLETE-Power Off-” when charging is
complete.

11
Displaying Your Phone Number
Displaying Your Phone NumberDisplaying Your Phone Number
Displaying Your Phone Number
To display your phone number:
1. Press MENU/OK to display the main menu.
2. Select Settings
SettingsSettings
Settings and press MENU/OK.
3. Select Phone Info
Phone InfoPhone Info
Phone Info and press MENU/OK.
4. Select Phone
PhonePhone
Phone#
##
# UserID
UserID UserID
UserID and press MENU/OK.
Note:
Note: Note:
Note: To access the phone’s main menu, press MENU/OK from standby mode. Menu items may
be selected by highlighting them with the Navigation key and pressing MENU/OK, or you can
press the number corresponding to the menu item on your keypad.

12
Making
Making Making
Making and Answering
and Answering and Answering
and Answering Calls
CallsCalls
Calls
Making Calls
Making CallsMaking Calls
Making Calls
1. Make sure your phone is On.
2. Enter a phone number. (If you make a mistake while dialing, press Back to erase one digit
at a time. Press and hold Back to erase the entire number.)
3. Press TALK or SPEAKER . (To make a call when you are roaming and Call Guard is
enabled, press MENU/OK, highlight Roam Call
Roam CallRoam Call
Roam Call
or Roam:Speaker
Roam:SpeakerRoam:Speaker
Roam:Speaker and press MENU/OK .)
4. When you’re finished, press END/ to end the call.
Tip:
Tip: Tip:
Tip: To redial your last outgoing call, press TALK or SPEAKER twice.
Answering Calls
Answering CallsAnswering Calls
Answering Calls
1. Make sure your phone is On. If your phone is Off, incoming calls go to voicemail.
2. When your phone rings, press TALK or SPEAKER.
Depending on your settings, your PCS Phone notifies you of incoming calls in the following
ways:
The phone rings and/or vibrates.
The LED flashes.
The backlight illuminates.
The screen displays an incoming call message.
If available, the phone number of the caller is displayed.
If the phone number is in your Contacts list, the Contacts entry’s name is displayed.
The picture is displayed when you have set the downloaded picture to “Incoming Calls”.
The following options are also displayed by pressing MENU/OK. To select an option,
highlight it and press MENU/OK.
Call Guard
Call GuardCall Guard
Call Guard to answer the call when you are in roaming. (This feature appears when you
are in digital area and analog service area.) See “Call Guard” on page 36.
Answer
Answer Answer
Answer to answer the call.
Answer:Speaker
Answer:Speaker Answer:Speaker
Answer:Speaker to answer the call in speakerphone mode.
Don
DonDon
Don’
’’’t Answer
t Answer t Answer
t Answer to hang up the incoming call and return to Web while you are in the Web
operation. (This feature appears when PCS Vision access is dormant.)
Screen Call
Screen Call Screen Call
Screen Call to answer the call by using pre-recorded announcement. (This feature appears
when you are in Service area or digital roaming area.) See page 58 for setting up.
Quiet Ringer
Quiet Ringer Quiet Ringer
Quiet Ringer to mute the ringer. (This feature appears when the ringer is set.)
Exit
Exit Exit
Exit to exit the options.
To answer a call when you are roaming and Call Guard is enabled, you must press MENU/OK,
select Answer
AnswerAnswer
Answer or Answer:Speaker
Answer:SpeakerAnswer:Speaker
Answer:Speaker and press MENU/OK to answer the call. See “Call Guard” on
page 36.
Note:
Note: Note:
Note: If your phone is Off. Incoming calls go to voicemail.
3. To disconnect the call, press END/ .
13
Using the Speakerphone
Using the SpeakerphoneUsing the Speakerphone
Using the Speakerphone
The speakerphone feature lets you hear audio through the speaker and talk without holding
the phone. When the speakerphone is activated, use the Side Volume key to adjust the volume.
To turn the speakerphone on during a call:
Press SPEAKER.
-or-
Press MENU/OK, highlight Speaker On
Speaker OnSpeaker On
Speaker On and press MENU/OK.
To turn the speakerphone off during a call:
Press SPEAKER.
-or-
Press MENU/OK, highlight Speaker Off
Speaker OffSpeaker Off
Speaker Off and press MENU/OK.
Changing the Ringer Volume
Changing the Ringer VolumeChanging the Ringer Volume
Changing the Ringer Volume
To change the ringer volume, adjust the Side Volume key when the clamshell is open in
standby mode.
Note:
Note: Note:
Note: To change the ringer volume from the main menu, see “Adjusting the Phone’s Volume
Settings” on page 20.
Adjusting Volume During a Conversation
Adjusting Volume During a ConversationAdjusting Volume During a Conversation
Adjusting Volume During a Conversation
Whether you need to hear more or less of a conversation, adjust the Side Volume key, or press
▲/▼ on the Navigation key during a call.
Muting a Call
Muting a CallMuting a Call
Muting a Call
There are times when it’s necessary to mute a call so that your caller does not hear you or
certain background noise.
To mute a call with the Flip Open:
Press MENU/OK, highlight Mute
MuteMute
Mute, and press MENU/OK. When the phone is muted,
“Mute
MuteMute
Mute” appears on the display.
To unmute a call with the Flip Open:
Press MENU/OK, highlight Unmute
UnmuteUnmute
Unmute, and press MENU/OK.

14
Missed Call Notification
Missed Call NotificationMissed Call Notification
Missed Call Notification
When an incoming call is not answered, the Missed Call log is displayed on your screen.
To display the Missed Call entry:
Press View
View View
View (left softkey).
If the phone is locked, you need to press Unlock
UnlockUnlock
Unlock (left softkey), then enter the lock code and press
View
ViewView
View (left softkey).
To call the entry:
Highlight the entry you want to call and press TALK or SPEAKER .
Calling
CallingCalling
Calling Emergency Numbers
Emergency Numbers Emergency Numbers
Emergency Numbers
You can place calls to 911 (dial 9 1 1 and press TALK), even if your phone is locked or your
account is restricted. Once the dial is made, you will enter Emergency mode. The phone tries to
dial to 911 automatically until the dial will be connected. While you are in the Emergency mode,
all phone calls can be received.
To exit from the Emergency mode, follow these instructions:
1. Press END/.
2. Press MENU/OK to display the options.
3. Select Exit Emergency
Exit EmergencyExit Emergency
Exit Emergency and press MENU/OK.
Dialing Options
Dialing OptionsDialing Options
Dialing Options
Dialing options are displayed when you press MENU/OK after entering numbers in the
standby mode.
To select an option, select it and press MENU/OK.
Call
Call Call
Call to dial the phone number. (If you are roaming and have the Call Guard feature
activated, you need take extra step. See “Call Guard” on page 36.)
Call:Speaker On
Call:Speaker On Call:Speaker On
Call:Speaker On to dial the phone number in speakerphone mode.(If you are roaming and
have the Call Guard feature activated, you need take extra step. See the “Call Guard” on
page 36.)
Save Phone#
Save Phone# Save Phone#
Save Phone# to save the phone number in your Contacts Directory. (See “Saving a Phone
Number” on page 16.)
Find
Find Find
Find to display Contacts entries that end with the digits you enter. (See “Finding a Phone
Number” on page 16.)
H
HH
H
Hard Pause
Hard Pause Hard Pause
Hard Pause to insert a hard pause. (See “Dialing and Saving Phone Numbers With
Pauses” on page 17.)
T
TT
T
2
22
2-
--
-Sec
SecSec
Sec.
..
. Pause
Pause Pause
Pause to insert a 2-second pause. (See “Dialing and Saving Phone Numbers With
Pauses” on page 17.)
Hyphen
Hyphen Hyphen
Hyphen to insert a hyphen manually where you like, however they are mainly for show.
(See “Dialing and Saving Phone Numbers With Pauses” on page 17.)
Tip
TipTip
Tip: To speed dial a pone number from the standby mode, press and hold appropriate speed
dial key locations 2-9. See page 18 for setting.
This option appears when you press after entering 4-digit and press MENU/OK.

15
Abbrev. D
Abbrev. DAbbrev. D
Abbrev. Dial
ial ial
ial to dial the phone number in your Contacts list that ends with the four digits
you enter. (See “Abbreviated Dialing” on page 17.)
This option appears when you enter four or more digits and press MENU/OK.
In
InIn
In-
--
-Call Options
Call OptionsCall Options
Call Options
During a call, your phone displays menu options by pressing MENU/OK.
To select an option, highlight it and press MENU/OK.
Flash
Flash Flash
Flash to answer an incoming Call Waiting call or connect a third party during Three-Way
Calling.
Mute
Mute Mute
Mute or Unmute
UnmuteUnmute
Unmute
to select Mute
Mute Mute
Mute to mute your phone’s microphone. Select Unmute
Unmute Unmute
Unmute to
reactivate the microphone.
Speaker On
Speaker OnSpeaker On
Speaker On or Speaker Off
Speaker OffSpeaker Off
Speaker Off to route the phone’s audio through the speaker. You can adjust
the speakerphone volume using the Side Volume key.
Three
Three Three
Three -
--
-Way Call
Way Call Way Call
Way Call to call a third party.
Call History
Call History Call History
Call History to access the Cal History menu. (See “Managing Call History” on page 38.)
Contacts
Contacts Contacts
Contacts to access the Contacts menu. (See “Using the Contacts Directory” on page 41.)
Messaging
Messaging Messaging
Messaging to access the Messaging menu.
Settings
Settings Settings
Settings to access the Settings menu. (See “Controlling Your Phone’s Settings” on page 19.)
Tool/Extras
Tool/ExtrasTool/Extras
Tool/Extras
to access the Tools/Extras menu. (See “Calendar” menu instructions on
Page 49.)
Voice Services
Voice ServicesVoice Services
Voice Services to access the Voice Services menu. (See page 56.)
Note:
Note:Note:
Note: The Flash menu appears only for Call Waiting and Three-Way Calling. The Mute menu
does not appear during a 911 call. The Three-Way Call Menu does not appear in Roaming
areas.

16
End
EndEnd
End-
--
-of
ofof
of-
--
-Call Options
Call OptionsCall Options
Call Options
To display the following options, press MENU/OK within 10 seconds after disconnecting a call.
To select an option, highlight it and press MENU/OK.
Call Again
Call Again Call Again
Call Again to dial the phone number.
Call: Speaker On
Call: Speaker On Call: Speaker On
Call: Speaker On to dial the phone number in speakerphone mode.
Save Phone#
Save Phone# Save Phone#
Save Phone# to save the phone number in your Contacts list. Go to Phone Book
Go to Phone BookGo to Phone Book
Go to Phone Book appears
when the number is already in your Contacts list. (See “Saving a Phone Number” on this
page.)
Note:
Note:Note:
Note:
The End-of-Call options are not displayed for calls identified as No ID or Restricted.
Saving a Phone Number
Saving a Phone NumberSaving a Phone Number
Saving a Phone Number
Your PCS Phone can store a total of 500 phone numbers in 300 Contacts entries. Each entry
can store 7 phone numbers, and the entry’s name can contain 16 characters. Your phone
automatically sorts the Contacts entries alphabetically.
To save a number from the main menu:
1. Enter a phone number.
2. Press MENU/OK.
3. Select Save Phone#
Save Phone# Save Phone#
Save Phone# and press MENU/OK.
4. Select a label by Selecting Home
HomeHome
Home, Work
WorkWork
Work, Mobile
MobileMobile
Mobile, Pager
PagerPager
Pager, Data
DataData
Data, Fax
Fax Fax
Fax or No Label
No Label No Label
No Label and press
MENU/OK.
5. Enter a name and press MENU/OK.
If you have already stored entries in the Contacts list, you are prompted to select the
following entry modes:
New Name
New Name New Name
New Name to enter a name directly.
From Ph
From PhFrom Ph
From Ph.
..
. Book
Book Book
Book to select a name from Contacts entry list.
6. Press Save
Save Save
Save (left softkey).
After you have saved the number, the new Contacts entry is displayed. (See “Contacts List
Entry Options” on page 41).
Finding a Phone Number
Finding a Phone NumberFinding a Phone Number
Finding a Phone Number
You can search Contacts entries for phone numbers that contain a specific string of numbers.
To find a phone number:
1. Enter the last four or more digits of the number and press MENU/OK. The more numbers
you enter, the more specific the search becomes.
2. Select Find
Find Find
Find and press MENU/OK.
3. The Contacts entry that ends with the digits you entered appears.
4. Select your desired entry.
Press MENU/OK to display the entry details.
Press TALK or SPEAKER to dial.
17
Dialing and Saving Phone Numbers With Pauses
Dialing and Saving Phone Numbers With PausesDialing and Saving Phone Numbers With Pauses
Dialing and Saving Phone Numbers With Pauses
You can dial or save phone numbers with pauses for use with automated systems, such as
voicemail or credit card billing numbers. If you select a hard pause, the next set of numbers are
sent when you press TALK. If you select a 2-second pause, your phone automatically sends the
next set of numbers after two seconds.
Note:
Note: Note:
Note: You can have multiple pauses in a phone number and combine 2-second and hard pauses.
To dial or save phone numbers with pauses:
1. Enter the phone number and press MENU/OK.
2. Select either Hard Pause
Hard Pause Hard Pause
Hard Pause or 2
22
2-
--
-Sec. Pause
Sec. Pause Sec. Pause
Sec. Pause and press MENU/OK. Hard Pauses are
displayed as an “H” and 2-second pauses as a “T”.
3. Enter additional numbers.
4. To dial the number, press TALK or SPEAKER. (When dialing a number with a hard pause,
press TALK to send the next set of numbers.)
- or -
To save the number in your Contacts list, press MENU/OK, highlight Save Phone#
Save Phone#Save Phone#
Save Phone#, and
press MENU/OK.
Abbreviated Dialing
Abbreviated DialingAbbreviated Dialing
Abbreviated Dialing
When you enter four digits of a phone number, the screen displays “Abbrev. Dial.” Your phone
dials the phone number in your Contacts list that ends with the four digits you entered.
To make a call using Abbreviated Dialing:
1. Enter the last four digits of a Contacts entry’s phone number.
2. Press MENU/OK to display the dialing options.
3. Select Abbrev.Dial
Abbrev.Dial Abbrev.Dial
Abbrev.Dial and press MENU/OK or TALK or SPEAKER.
Note:
Note: Note:
Note: If there are more than two matched numbers in your Contacts list, the alphabetically
former number will be dialed. If there is no matched number, your phone dials the number you
set for abbreviated dial with the last 4-digits you entered.
Dialing From the Contacts Director
Dialing From the Contacts DirectorDialing From the Contacts Director
Dialing From the Contacts Directory
yy
y
1. Press MENU/OK to access the main menu.
2. Select Contacts
ContactsContacts
Contacts
and press MENU/OK.
3. Select Find
FindFind
Find/Add
/Add/Add
/Add
Entry
Entry Entry
Entry and press MENU/OK.
Shortcut
ShortcutShortcut
Shortcut: Press right on the Navigation key to list entries.
4. Use your Navigation key to scroll through the Contacts list, highlight your desired entry,
and press MENU/OK.
5. Highlight the number you want to call.
6. Press Options
OptionsOptions
Options (right softkey) for the menu options.
7. Select Call
CallCall
Call or Call:Speaker On
Call:Speaker OnCall:Speaker On
Call:Speaker On and press MENU/OK to make a call.
Tip
TipTip
Tip: You can also make a call by pressing TALK, SPEAKER, or Call
CallCall
Call(left softkey) during step
5 above.

18
Using Speed Dialing
Using Speed DialingUsing Speed Dialing
Using Speed Dialing
With this feature, you can dial your favorite entries using one key press for location 2-9.
To use speed dial for voice calls:
From standby mode, press and hold the appropriate key for approximately two seconds.
- or -
From standby mode, press the appropriate key and press TALK or SPEAKER.

19
Controlling Your Phone
Controlling Your PhoneControlling Your Phone
Controlling Your Phone’
’’’s Settings
s Settingss Settings
s Settings
Reminder:
Reminder:Reminder:
Reminder:
To access the phone ’s main menu, press MENU/OK from standby mode. Menu
items may be selected by highlighting them with the Navigation key and pressing
MENU/OK .
Sound Settings
Sound SettingsSound Settings
Sound Settings
Ringer Types
Ringer TypesRinger Types
Ringer Types
Ringer types help you identify incoming calls and messages. You can assign ringer types to
individual Contacts entries, types of calls and types of messages.
● Programmed Ringers
Programmed RingersProgrammed Ringers
Programmed Ringers include a variety of standard ringer types and familiar music.
● Vibrating Ringer
Vibrating RingerVibrating Ringer
Vibrating Ringer alerts you to call or messages without disturbing others.
● Downloaded
Downloaded Downloaded
Downloaded Ringers
Ringers Ringers
Ringers can be downloaded right to your phone.
Selecting Ringer Types for Voice Calls
Selecting Ringer Types for Voice CallsSelecting Ringer Types for Voice Calls
Selecting Ringer Types for Voice Calls
Your PCS Phone provides a variety of ringer options, which allow you to customize your ringer
and volume settings.
To select a ringer type for voice calls so you recognize when a certain type of call is coming in by
the ringer:
1. Press MENU/OK to access the main menu.
2. Select Settings
SettingsSettings
Settings and press MENU/OK.
3. Select Sounds
SoundsSounds
Sounds and press MENU/OK.
4. Select Ringer Type
Ringer TypeRinger Type
Ringer Type and press MENU/OK.
5. Select Voice Calls
Voice CallsVoice Calls
Voice Calls and press MENU/OK.
6. Select the menu under With Caller ID
With Caller IDWith Caller ID
With Caller ID, No Caller ID
No Caller ID No Caller ID
No Caller ID or Roaming
RoamingRoaming
Roaming and press MENU/OK.
7. Select your desired ringer type and press MENU/OK.
Get New:
Get New: Get New:
Get New: start up the Browser and you can select an item to download.
Selecting Ringer Types for Voicemail
Selecting Ringer Types for Voicemail Selecting Ringer Types for Voicemail
Selecting Ringer Types for Voicemail
To select a ringer type for voicemail:
1. Press MENU/OK to access the main menu.
2. Select Settings
SettingsSettings
Settings and press MENU/OK.
3. Select Sounds
SoundsSounds
Sounds and press MENU/OK.
4. Select Ringer Type
Ringer TypeRinger Type
Ringer Type and press MENU/OK.
5. Select Voicemail
Voicemail Voicemail
Voicemail and press MENU/OK.
6. Select the menu under Voicemail
VoicemailVoicemail
Voicemail and press MENU/OK.
7. Select your desired ringer type and press MENU/OK.
Get New:
Get New:Get New:
Get New: start up the Browser and you can select an item to download.

20
Selecting Ringer Types for Messages
Selecting Ringer Types for MessagesSelecting Ringer Types for Messages
Selecting Ringer Types for Messages
To select a ringer type for text messages:
1. Press MENU/OK to access the main menu.
2. Select Settings
SettingsSettings
Settings and press MENU/OK.
3. Select Sounds
SoundsSounds
Sounds and press MENU/OK.
4. Select Ringer Type
Ringer TypeRinger Type
Ringer Type and press MENU/OK.
5. Select Messaging
MessagingMessaging
Messaging and press MENU/OK.
6. Select the menu under Messaging
MessagingMessaging
Messaging and press MENU/OK.
7. Select your desired ringer type and press MENU/OK.
Get New:
Get New:Get New:
Get New: start up the Browser and you can select an item to download.
Setting Tone Length, S
Setting Tone Length, SSetting Tone Length, S
Setting Tone Length, Start
tarttart
tart-
--
-up/Power
up/Powerup/Power
up/Power-
--
-off Tone
off Toneoff Tone
off Tone or Voice Prompt
or Voice Prompt or Voice Prompt
or Voice Prompt
You can determine the length of your key beep (you hear this when you press any key) or type
of the Start-up/Power off tone (sounds when you turn the phone on/off on this feature).
1. Press MENU/OK to access the main menu.
2. Select Settings
SettingsSettings
Settings and press MENU/OK.
3. Select Sounds
SoundsSounds
Sounds and press MENU/OK.
4. Select Others
OthersOthers
Others and press MENU/OK.
5. Select the menu under Tone Length
Tone LengthTone Length
Tone Length, Start
StartStart
Start-
--
-up Tone
up Toneup Tone
up Tone, Power
PowerPower
Power-
--
-off Tone
off Toneoff Tone
off Tone or Voice Prompt
Voice Prompt Voice Prompt
Voice Prompt and
press MENU/OK.
6. Select your desired option and press MENU/OK.
Get New:
Get New:Get New:
Get New: start up the Browser and you can select an item to download.
Tip
TipTip
Tip: The volume of Start-up Tone and Power-off Tone can be set through the volume setting. See
page 20 for instructions.
Adjusting the Phone
Adjusting the PhoneAdjusting the Phone
Adjusting the Phone’
’’’s Volume Settings
s Volume Settingss Volume Settings
s Volume Settings
To change the ringer/ key volume
1. Press MENU/OK to access the main menu.
2. Select Settings
SettingsSettings
Settings and press MENU/OK.
3. Select Sounds
SoundsSounds
Sounds and press MENU/OK.
4. Select Ringer/Key Vol.
Ringer/Key Vol.Ringer/Key Vol.
Ringer/Key Vol., and press MENU/OK.
5. Select Ringer Volume,
Ringer Volume,Ringer Volume,
Ringer Volume, Start
StartStart
Start-
--
-up/Pw
up/Pwup/Pw
up/Pw-
--
-off
offoff
off or Key Beep
Key Beep Key Beep
Key Beep and press MENU/OK.
6.
6.6.
6.
Select your desired volume level and press MENU/OK.
●
●●
●
Ringer Off
Ringer OffRinger Off
Ringer Off to set the Voice Call ringer volume to off. (Only appears in Ringer Volume
Setting).
●
●●
●
Silence All
Silence AllSilence All
Silence All to set all the ringer volume to off. (Only appears in Ringer Volume
Setting).
Tip:
Tip: Tip:
Tip: When ringer volume is set to Silence All
Silence AllSilence All
Silence All, voice prompts cannot be heard.
21
To Adjust Earpiece or Speaker volume:
1. Press MENU/OK to access the main menu.
2. Select Settings
Settings Settings
Settings and press MENU/OK.
3. Select Sounds
Sounds Sounds
Sounds and press MENU/OK.
4. Select either Receiver Vol.
Receiver Vol. Receiver Vol.
Receiver Vol. and press MENU/OK.
5. Select Earpiece
EarpieceEarpiece
Earpiece or Speaker
SpeakerSpeaker
Speaker and press MENU/OK.
6. Select your desired volume level and press MENU/OK.
Tip
TipTip
Tip: You can adjust the ringer volume in standby mode by using the Side Volume key, and
adjust earpiece volume during a call by using ▲/▼ on the Navigation key or Side Volume key.
Alert Notification
Alert NotificationAlert Notification
Alert Notification
Your phone comes with several different options to keep you aware of what’s going on by
sounding the alert or ringer.
Service
ServiceService
Service sets alert On or Off for network services parameter changes.
Vo
VoVo
Voicemail
icemail icemail
icemail sets alert to notify you of caller’s messages.
Messaging
Messaging Messaging
Messaging sets alert to notify you of text messages.
Minute Beep
Minute BeepMinute Beep
Minute Beep sets a minute reminder that beeps ten seconds before the end of each minute
during a call.
Signal Fade
Signal FadeSignal Fade
Signal Fade sets alert to notify you when your phone loses a signal during a call.
To set the alerts:
1. Press MENU/OK to access the main menu.
2. Select Settings
SettingsSettings
Settings and press MENU/OK.
3. Select Sounds
SoundsSounds
Sounds and press MENU/OK.
4. Select Alerts
AlertsAlerts
Alerts and press MENU/OK.
5. Select your desired option and press MENU/OK.
6. If you selected Service
ServiceService
Service, Minute Beep
Minute BeepMinute Beep
Minute Beep or Signal Fade
Signal FadeSignal Fade
Signal Fade, select On
OnOn
On or Off
OffOff
Off.
If you selected Voicemail
VoicemailVoicemail
Voicemail
or Messaging
MessagingMessaging
Messaging, select Once
OnceOnce
Once, Repeat Alert
Repeat AlertRepeat Alert
Repeat Alert, or Off
OffOff
Off.
Tip:
Tip: Tip:
Tip: Repeat Alert
Repeat AlertRepeat Alert
Repeat Alert sounds every two minutes for twenty minutes.
Silence All
Silence AllSilence All
Silence All
There may be times when you need to silence your phone entirely. The phone’s Silence All
option allows you to mute all sounds without turning your phone off:
To activate Silence All:
1.
Press MENU/OK to access the main menu.
2. Select Settings
Settings Settings
Settings and press MENU/OK.
3.
Select S
SS
Sounds
ounds ounds
ounds and press MENU/OK.
4.
Select Ringer/Key Vol.
Ringer/Key Vol. Ringer/Key Vol.
Ringer/Key Vol. and press MENU/OK.
5.
Select the menu under Ringer Volum
Ringer VolumRinger Volum
Ringer Volume
ee
e
and press MENU/OK.
Select Silence All
Silence All Silence All
Silence All and press MENU/OK.
Tip:
Tip: Tip:
Tip: When Ringer Volume is set as Silence Al
Silence AlSilence Al
Silence All
ll
l, other items are changed to Off
Off Off
Off and cannot
be selected by cursor.

22
Display Settings
Display SettingsDisplay Settings
Display Settings
Changing the Text Greeting
Changing the Text GreetingChanging the Text Greeting
Changing the Text Greeting
The text greeting can be up to 15 characters and is displayed on your phone’s screen in standby
mode. You may choose to display a custom greeting or default greeting.
To display or change your custom greeting:
1. Press MENU/OK to access the main menu.
2. Select Settings
SettingsSettings
Settings and press MENU/OK.
3. Select Display
DisplayDisplay
Display and press MENU/OK.
4. Select Greeting
GreetingGreeting
Greeting and press MENU/OK.
5. Select Custom
Custom Custom
Custom and press MENU/OK.
You can customize the greeting by entering a personalized greeting.
6. Press MENU/OK.
Changing the Backlight Time Length
Changing the Backlight Time LengthChanging the Backlight Time Length
Changing the Backlight Time Length
The backlight setting lets you select how long the display screen and keypad are backlit after
any key press is made.
To change the Main LCD or Sub LCD backlight setting:
1. Press MENU/OK to access the main menu.
2. Select Settings
SettingsSettings
Settings and press MENU/OK.
3. Select Display
DisplayDisplay
Display and press MENU/OK.
4. Select Backlight
BacklightBacklight
Backlight and press MENU/OK.
5. Select the menu under Main
MainMain
Main LCD
LCDLCD
LCD or Sub LCD
Sub LCDSub LCD
Sub LCD and press MENU/OK.
6. Select Always On
Always OnAlways On
Always On, Always
Always Always
Always Off
OffOff
Off or your defined time length, and press MENU/OK.
Always Off
Always OffAlways Off
Always Off always turns the Backlight off.
Always On
Always OnAlways On
Always On keeps the backlight on indefinitely.
Note
NoteNote
Note: The Always On
Always OnAlways On
Always On setting returns to previous value on next time you turn on the phone.
To change the Keypad backlight setting:
1. Select Key
KeyKey
Key during previous step 5, and press MENU/OK.
2. Select Always Off
Always OffAlways Off
Always Off or your defined time length and press MENU/OK.
Note
NoteNote
Note: Long backlight setting affects the battery’s talk and standby times.
Changing the Display Screen
Changing the Display ScreenChanging the Display Screen
Changing the Display Screen
Your new PCS Phone offers animation for what you see on the display screen during standby
mode, Outgoing Calls, or Service Search.
To assign the animation:
1. Press MENU/OK to access the main menu.
2. Select Settings
SettingsSettings
Settings and press MENU/OK.
3. Select Display
DisplayDisplay
Display and press MENU/OK.
4. Select Animation
AnimationAnimation
Animation and press MENU/OK.
5. Select Standby
StandbyStandby
Standby, Outgoing Calls
Outgoing Calls Outgoing Calls
Outgoing Calls or
Service Search
Service SearchService Search
Service Search and press MENU/OK.
6. Select the menu under the item and press MENU/OK.

23
7. Select your desired option and press MENU/OK.
Press Preview
PreviewPreview
Preview (right softkey) to see a sample display.
For standby, you will also set the animation starting time. Select the option under after
afterafter
after and
press MENU/OK, then highlight your desired setting time and press MENU/OK.
Preset
PresetPreset
Preset uses the pre-programmed animation.
Get New
Get NewGet New
Get New to start up the Browser so you can select an item to download.
To deactivate this feature, select Off
Off Off
Off during step 7 above.
Changing the Display for Incoming Calls
Changing the Display for Incoming CallsChanging the Display for Incoming Calls
Changing the Display for Incoming Calls
You can set the color or downloaded image (screen saver) data to be shown on the Incoming Call
display.
Follow these steps:
1. Press MENU/OK to access the main menu.
2. Select Settings
SettingsSettings
Settings and press MENU/OK.
3. Select Display
DisplayDisplay
Display and press MENU/OK.
4. Select Incoming Calls
Incoming CallsIncoming Calls
Incoming Calls and press MENU/OK.
5. Select the menu under Incoming Calls
Incoming CallsIncoming Calls
Incoming Calls and press MENU/OK.
6. Select your desired color or downloaded image (screen saver) and press MENU/OK.
● Get New
Get NewGet New
Get New: start up the Browser and you can select an item to download.
● If you select the downloaded image (screen saver) data or picture during step 6 above, press
Preview
PreviewPreview
Preview (right softkey) to see an example display.
Changing the Display for the Standby Mode
Changing the Display for the Standby ModeChanging the Display for the Standby Mode
Changing the Display for the Standby Mode
This feature enables you to select a variety of items to display in standby mode.
To set your standby display:
1. Press MENU/OK to access the main menu.
2. Select Settings
SettingsSettings
Settings and press MENU/OK.
3. Select Display
DisplayDisplay
Display and press MENU/OK.
4. Select Standby
StandbyStandby
Standby
Display
DisplayDisplay
Display and press MENU/OK.
5. Select your desired item and press MENU/OK.
Screen Saver
Screen SaverScreen Saver
Screen Saver selects the screen saver to display.
Calendar
CalendarCalendar
Calendar displays the Calendar.
Digital Clock
Digital Clock Digital Clock
Digital Clock displays the local time in digital mode.
Analog Clock
Analog ClockAnalog Clock
Analog Clock displays the local time in analog mode.
World Clock
World ClockWorld Clock
World Clock displays the time of the selected country along with the local time. You can
scroll the World Clock list by pressing right or left on the Navigation key for changing
country, Summer
SummerSummer
Summer (left softkey) / Standard
StandardStandard
Standard (right softkey) for changing between summer
and standard time if applicable. The " * " icon indicates the summer time.
Default
Default Default
Default returns the standby display to its default setting.
6. Press MENU/OK to save the setting to follow each system prompt or when confirming the
preview display.
24
Changing the
Changing the Changing the
Changing the Screen Saver
Screen SaverScreen Saver
Screen Saver
Your new PCS Phone offers you the option of displaying a screen saver while in standby mode.
To assign a screen saver:
1. Press MENU/OK to access the main menu.
2. Select Settings
Settings Settings
Settings and press MENU/OK.
3. Select Display
Display Display
Display and press MENU/OK.
4. Select Standby Display
Standby Display Standby Display
Standby Display and press MENU/OK.
5. Select Screen Saver
Screen Saver Screen Saver
Screen Saver and press MENU/OK.
6. Select the menu under Screen Saver
Screen Saver Screen Saver
Screen Saver and press MENU/OK.
7. Select your desired screen saver, and press MENU/OK.
Get New:
Get New: Get New:
Get New: start up the Browser and you can select an item to download.
Press Preview
PreviewPreview
Preview (right softkey) during step 7 above to see an example display.
8. Press Save
Save Save
Save (left softkey) to save the screen saver.
Tip:
Tip: Tip:
Tip: In no service area, Screen Saver, Calendar, Time (Large), or World Clock cannot be shown
on the standby display.
Changing the Display for
Changing the Display for Changing the Display for
Changing the Display for My Buddy
My BuddyMy Buddy
My Buddy
This feature enables you to see a funny animation for 30 seconds on the Main LCD after
opening the flip.
Follow these steps:
1. Press MENU/OK to access the main menu.
2. Select Settings
SettingsSettings
Settings and press MENU/OK
3. Select Display
DisplayDisplay
Display and press MENU/OK.
4. Select My Buddy
My Buddy My Buddy
My Buddy and press MENU/OK.
5. Select On
On On
On or Off
Off Off
Off and press MENU/OK.
Press Preview
PreviewPreview
Preview (right softkey) during step 5 above to see a display preview. Press the right
softkey to switch between Main/Sub LCD’s display preview.
Press Info
InfoInfo
Info (left softkey) to see My Buddy information.
Changing the Phone
Changing the PhoneChanging the Phone
Changing the Phone’
’’’s Main Menu Style
s Main Menu Styles Main Menu Style
s Main Menu Style
To select the display’s main menu style:
1. Press MENU/OK to access the main menu.
2. Select Settin
SettinSettin
Settings
gs gs
gs and press MENU/OK.
3. Select Display
Display Display
Display and press MENU/OK.
4. Select Main Menu
Main MenuMain Menu
Main Menu and press MENU/OK.
5. Select either Graphic
GraphicGraphic
Graphic or Text
TextText
Text and press MENU/OK.
25
Changing the Theme Color
Changing the Theme ColorChanging the Theme Color
Changing the Theme Color
To change the display’s color scheme:
1. Press MENU/OK to access the main menu.
2. Select Settings
SettingsSettings
Settings and press MENU/OK.
3. Select Display
DisplayDisplay
Display and press MENU/OK.
4. Select Color
ColorColor
Color and press MENU/OK.
5. Select Main LCD
Main LCD Main LCD
Main LCD or Sub LCD
Sub LCD Sub LCD
Sub LCD and press MENU/OK.
6. Select your desired color and press MENU/OK.
Changing
ChangingChanging
Changing
the
the the
the Font Size
Font SizeFont Size
Font Size
There are four font size settings for the message notification and browser. To change the font
size, follow these steps:
1. Press MENU/OK to access the main menu.
2. Select Settings
SettingsSettings
Settings and press MENU/OK.
3. Select Display
DisplayDisplay
Display and press MENU/OK.
4. Select Font Size
Font SizeFont Size
Font Size and press MENU/OK.
5. Select Message
MessageMessage
Message or Browser
BrowserBrowser
Browser and press MENU/OK.
6. Select your desired font size.
● Press Preview
PreviewPreview
Preview (right softkey) to display a font size example.
7. Press MENU/OK to set the selected font.
Tip
TipTip
Tip: From the font example display, you can see the larger/smaller font displays by pressing the
right or left on the Navigation key.
Location Settings
Location SettingsLocation Settings
Location Settings
To enable your phone’s Location feature:
1. Press MENU/OK to access the main menu.
2. Select Settings
SettingsSettings
Settings and press MENU/OK.
3. Select Location
LocationLocation
Location and press MENU/OK.
4. Press MENU/OK or OK
OKOK
OK(left softkey).
5. Select On
OnOn
On and press MENU/OK.
To deactivate this feature, select Off
OffOff
Off during step 5 above.
Tip
TipTip
Tip: When the Location feature is on, your phone’s standby screen will display the icon.
When Location is turned off, the icon will display.
Airplane Mode
Airplane ModeAirplane Mode
Airplane Mode
When your phone is in Airplane Mode, it cannot send or receive any calls (expect for 911 dialing)
or access online information. You may still use the phone’s other features, such as Games, Voice
Memos, Calendar, etc., while you are in Airplane Mode.
To set Airplane Mode:
1. Press MENU/OK to access the main menu.
2. Select Settings
SettingsSettings
Settings and press MENU/OK.
3. Select Others
OthersOthers
Others and press MENU/OK.
4. Select Airplane Mode
Airplane ModeAirplane Mode
Airplane Mode and press MENU/OK.

26
5. Read the message, and press MENU/OK or OK
OKOK
OK (left softkey).
Press Cancel
CancelCancel
Cancel (right softkey) to return to the previous menu.
6. Select On
On On
On and press MENU/OK.
To deactivate this feature, select Off
OffOff
Off during step 5 above.
Note:
Note: Note:
Note: While in Airplane mode, your phone’s standby screen will display “Phone Off“.
TTY Use With PCS Service
TTY Use With PCS ServiceTTY Use With PCS Service
TTY Use With PCS Service
This feature set the TTY Mode to On or Off.
A TTY (also known as TDD or Text Telephone), is a telecommunications device that allows
people who are deaf or hard of hearing, or who have speech or language disabilities, to
communicate by telephone. Connect the TTY device to the Headset Jack of Your PCS Phone.
Then, type the message you want to send on the TTY’s keyboard.
To Turn the TTY Mode On or Off:
1. Press MENU/OK to access the main menu.
2. Select Settings
Settings Settings
Settings and press MENU/OK.
3. Select Others
OthersOthers
Others and press MENU/OK.
4. Select TTY
TTY TTY
TTY and press MENU/OK.
5. You will see a message on the display. Press OK
OKOK
OK (left softkey) to continue.
6. Select Enable
EnableEnable
Enable or Disable
DisableDisable
Disable and press MENU/OK.
Phone Setup Options
Phone Setup OptionsPhone Setup Options
Phone Setup Options
My Shortcut
My ShortcutMy Shortcut
My Shortcut
You can arrange your own shortcut menu.
1. Press MENU/OK to access the main menu.
2. Select Settings
SettingsSettings
Settings and press MENU/OK.
3. Select Others
OthersOthers
Others and press MENU/OK.
4. Select My Shortcut
My ShortcutMy Shortcut
My Shortcut and press MENU/OK.
5. Select the menu under My
MyMy
My Shortcut
ShortcutShortcut
Shortcut and press MENU/OK.
6. Select your desired menu option and press MENU/OK.
Press Info
InfoInfo
Info (right softkey) during step 5 above to see an information screen.
Auto Answer
Auto AnswerAuto Answer
Auto Answer Mode
Mode Mode
Mode
This feature sets the phone to automatically pick up after 5 or 15 seconds. This feature works
with the hands-free car kit and headset (sold separately).
To activate this feature:
1. Press MENU/OK to access the main menu.
2. Select Settings
SettingsSettings
Settings and press MENU/OK.
3. Select Others
OthersOthers
Others and press MENU/OK.
4. Select Auto Answer
Auto Answer Auto Answer
Auto Answer and press MENU/OK.
5. Select Car Kit/Headset
Car Kit/HeadsetCar Kit/Headset
Car Kit/Headset and press MENU/OK.

27
6. Select either 5 Seconds
5 Seconds5 Seconds
5 Seconds or 15 Seconds
15 Seconds15 Seconds
15 Seconds and press MENU/OK.
To deactivate this feature, select Off
OffOff
Off during step 5 on the previous page.
Setting the Open/Close Flip Options
Setting the Open/Close Flip OptionsSetting the Open/Close Flip Options
Setting the Open/Close Flip Options
This feature enables you to answer an incoming call by opening the flip or to end a call by
closing the flip.
To activate the Open Flip feature:
1. Press MENU/OK to access the main menu.
2. Select Settings
Settings Settings
Settings and press MENU/OK.
3. Select Others
Others Others
Others and press MENU/OK.
4. Select Open/Close Flip
Open/Close Flip Open/Close Flip
Open/Close Flip and press MENU/OK.
5. Select Open
Open Open
Open and press MENU/OK.
6. Select Answer Call
Answer CallAnswer Call
Answer Call and press MENU/OK.
To deactivate this feature, select No Action
No Action No Action
No Action during step 5 above.
Setting Any Key Answer
Setting Any Key AnswerSetting Any Key Answer
Setting Any Key Answer
This feature allows you to answer incoming calls by pressing any key (except MENU/OK, END,
BACK, [Side Volume key], [Ready Link button], [Side Call key],[Side Camera key], or
Navigation key).
To activate this feature:
1. Press MENU/OK to access the main menu.
2. Select Settings
SettingsSettings
Settings and press MENU/OK.-
3. Select Others
OthersOthers
Others and press MENU/OK.
4. Select Any Key Answer
Any Key AnswerAny Key Answer
Any Key Answer and press MENU/OK.
5. Select On
OnOn
On and press MENU/OK.
To deactivate this feature, select Off
OffOff
Off during step 5 above.
Setting the Side Key Guard
Setting the Side Key GuardSetting the Side Key Guard
Setting the Side Key Guard
This feature enables you to lock your side keys (Ready Link button, Side Volume key, Side
Call key, and Side Camera key) while the flip is closed.
To activate this feature:
1. Press MENU/OK to access the main menu.
2. Select Settings
SettingsSettings
Settings and press MENU/OK.
3. Selecting Others
OthersOthers
Others and press MENU/OK.
4. Select Side Key Guard
Side Key GuardSide Key Guard
Side Key Guard and press MENU/OK.
5. Select On
OnOn
On and press MENU/OK.
Key Guard
Key GuardKey Guard
Key Guard appears on the Sub LCD when you press any side key while the flip is closed.
To deactivate this feature, select Off
OffOff
Off during step 5 above.
Note
NoteNote
Note: This feature does not apply when the flip is open.

28
Setting
Setting Setting
Setting Abbreviated Dialing
Abbreviated DialingAbbreviated Dialing
Abbreviated Dialing
Abbreviated Dialing is another form of speed dialing. If the last four digits you enter do not
match any stored Contacts entry, the digits are automatically prepended with the digits
specified using the following steps.
To activate this feature:
1. Press MENU/OK to access the main menu.
2. Select Settings
SettingsSettings
Settings and press MENU/OK.
3. Select Others
OthersOthers
Others and press MENU/OK.
4. Select Abbrev.
Abbrev. Abbrev.
Abbrev. Dial
DialDial
Dial and press MENU/OK.
5. Select Enable
EnableEnable
Enable and press MENU/OK.
6. Enter a six-digit number and press MENU/OK or OK
OK OK
OK (left softkey).
If you want to deactivate this feature, select Disable
DisableDisable
Disable during step 5 above.
Tip
TipTip
Tip: If you enter less than 6 digits, the display shows a warning message.
Headset Mode
Headset ModeHeadset Mode
Headset Mode
To set Headset mode:
1. Press to access the main menu.
2. Select Settings
Settings Settings
Settings and press MENU/OK .
3. Select Others
Others Others
Others and press MENU/OK.
4. Select Headset Mode
Headset Mode Headset Mode
Headset Mode and press MENU/OK.
5. Select Voice Call
Voice Call Voice Call
Voice Call or Ready Link
Ready Link Ready Link
Ready Link and press MENU/OK.
Press Info
InfoInfo
Info (right softkey) during step 5 above to see the Headset Mode information.
To deactivate this feature, select Off
Off Off
Off during step 5 above.
Sleep Mode
Sleep ModeSleep Mode
Sleep Mode
This feature helps conserve your battery power by restricting the display.
To set sleep mode:
1. From standby mode, press MENU/OK to display the main menu.
2. Select Settings
SettingsSettings
Settings and press MENU/OK.
3. Select Display
DisplayDisplay
Display and press MENU/OK.
4. Select Sleep Mode
Sleep ModeSleep Mode
Sleep Mode and press MENU/OK.
5. Select Main LCD
Main LCD Main LCD
Main LCD or Sub LCD
Sub LCD Sub LCD
Sub LCD and press MENU/OK.
6. Select your desired option and press MENU/OK.
To deactivate this feature, Select Off during step 6 above.
Setting Message Notification
Setting Message NotificationSetting Message Notification
Setting Message Notification
You can see message notification when you receive Text message or Voicemail while you are in
PCS applications or Browser mode.
1. Press MENU/OK to access the main menu.
2. Select Settings
SettingsSettings
Settings and press MENU/OK.
3. Select Messaging
MessagingMessaging
Messaging and press MENU/OK.

29
4. Select Display Pop
Display PopDisplay Pop
Display Pop-
--
-up
upup
up and press MENU/OK.
5. Check the box next to Games/Apps
Games/AppsGames/Apps
Games/Apps, Browser
Browser Browser
Browser or Voice Calls
Voice Calls Voice Calls
Voice Calls and press Save
SaveSave
Save (left softkey).
Press Info
InfoInfo
Info (right softkey) during step 4 on the previous page to see the Messages
information.
Changing the Menu Language
Changing the Menu LanguageChanging the Menu Language
Changing the Menu Language
When you first turn your phone on, the menus are displayed in English.
To change the menu language to Spanish, follow these steps.
1. Press MENU/OK to access the main menu.
2. Select Settings
SettingsSettings
Settings and press MENU/OK.
3. Select Others
OthersOthers
Others and press MENU/OK.
4. Select Language
LanguageLanguage
Language and press MENU/OK.
5. Select English
EnglishEnglish
English or Español
EspañolEspañol
Español and press MENU/OK.

30
Setting Your Phone’s Security
Setting Your Phone’s SecuritySetting Your Phone’s Security
Setting Your Phone’s Security
Accessing the Security Menu
Accessing the Security MenuAccessing the Security Menu
Accessing the Security Menu
You must enter your lock code to view the Security menu.
To access the Security menu:
1. Press MENU/OK to access the main menu.
2. Select Settings
SettingsSettings
Settings and press MENU/OK.
3. Select Security
Security Security
Security and press MENU/OK.
4. Enter lock code.
Tip:
Tip: Tip:
Tip: If you can’t recall your lock code, try using the last four digits of either your Social Security
number or PCS Phone Number or try 0000.
Locking Your Phone
Locking Your PhoneLocking Your Phone
Locking Your Phone
When your phone is locked, your phone allows you to restrict the incoming calls and make calls
except 911 and special numbers.
To lock your phone:
1. From the Security Menu display (See “Accessing the Security Menu” on this page), select
Lock Phone
Lock PhoneLock Phone
Lock Phone and press MENU/OK.
2. Select Lock Now
Lock NowLock Now
Lock Now or On Power
On Power On Power
On Power-
--
-up
upup
up and press MENU/OK.
3. Depending on your preference, select either Full Lock
Full LockFull Lock
Full Lock or Except Incom.Calls
Except Incom.CallsExcept Incom.Calls
Except Incom.Calls and press
MENU/OK.
● Full Lock:
Full Lock: Full Lock:
Full Lock: All phone calls except for Emergency# or Special #s cannot be made. And no
phone calls can be received except for Special #s.
● Except Incom.Calls.:
Except Incom.Calls.: Except Incom.Calls.:
Except Incom.Calls.: All phone calls except for Emergency# or Special #s cannot be made.
But all incoming calls can be received.
Tip
TipTip
Tip: If you want to cancel the “On Power-up” setting before turning the phone off, select
Unlocked
UnlockedUnlocked
Unlocked during step 2 above.
Unlocking Your Phone
Unlocking Your PhoneUnlocking Your Phone
Unlocking Your Phone
To unlock your phone:
1. From the Locked display, press Unlock
UnlockUnlock
Unlock (left softkey).
2. Enter your lock code.
Changing the Lock Code
Changing the Lock CodeChanging the Lock Code
Changing the Lock Code
1. From the Security Menu display (See “Accessing the Security Menu” on this page), select
Others
OthersOthers
Others and press MENU/OK.
2. Select Change Lock
Change LockChange Lock
Change Lock and press MENU/OK.
3.
Enter new lock code, 1234
12341234
1234
for example, in the box under New Cod
New CodNew Cod
New Code
ee
e.
4.
Reenter the new lock code in the box under Reenter Cod
Reenter CodReenter Cod
Reenter Code
ee
e.

31
Calling in Lock Mode
Calling in Lock ModeCalling in Lock Mode
Calling in Lock Mode
You can place calls to 911 and to your special numbers when in lock mode.
To place an outgoing call in lock mode:
To call an Emergency number or special number, enter the phone number and
press TALK or SPEAKER. (For Emergency numbers, see “Calling Emergency Numbers”
on page 14).
Restricting Calls
Restricting CallsRestricting Calls
Restricting Calls
You can restrict both incoming calls and outgoing calls if necessary. (The Restrict Calls setting
does not apply to 911).
To restrict calls:
1. From the Security Menu display (See “Accessing the Security Menu” on the previous page),
select Others
OthersOthers
Others and press MENU/OK.
2. Select Limit Use
Limit UseLimit Use
Limit Use and press MENU/OK.
3. Select the menu under Outgoing Calls
Outgoing CallsOutgoing Calls
Outgoing Calls or Inco
IncoInco
Incoming Calls
ming Callsming Calls
ming Calls and press MENU/OK.
4. Select your desired option and press MENU/OK.
Options:
Allow All
Allow AllAllow All
Allow All: You can make or receive all calls.
PhoneBook
PhoneBook PhoneBook
PhoneBook Only
OnlyOnly
Only: Only Contacts entries, Voicemail, or special numbers are available to
make or receive calls.
Special #s Only
Special #s OnlySpecial #s Only
Special #s Only: Only three special numbers’ entries are available to make or receive calls.
Note
NoteNote
Note: Restricted incoming calls are forwarded to voicemail.
Using Special Numbers
Using Special NumbersUsing Special Numbers
Using Special Numbers
You can save three special numbers in addition to your Contacts list entries (the same number
may be in both directories). You can make and receive calls from special numbers even when
your phone is locked.
To add or replace a special number:
1. From the Security Menu display (See “Accessing the Security Menu” on the previous page),
select Others
OthersOthers
Others and press MENU/OK.
2. Select Special #s
Special #sSpecial #s
Special #s and press MENU/OK.
3. Select the box under the entry number and press MENU/OK.
4. Enter your desired phone number and press MENU/OK.
-or-
Press Options
OptionsOptions
Options (right softkey), select From Ph
From PhFrom Ph
From Ph.B
.B.B
.Book
ookook
ook or Voicemail
VoicemailVoicemail
Voicemail and press MENU/OK.
To insert pauses into a number:
1. From the step 4 above, enter the phone number and press Option
OptionOption
Options
ss
s (right softkey) for the
options.
2. Select Hard Pause
Hard PauseHard Pause
Hard Pause, 2
22
2-
--
-Sec. Pause
Sec. PauseSec. Pause
Sec. Pause or Hyphen
HyphenHyphen
Hyphen, and press MENU/OK.
3. Finish entering the rest of the numbers, and press MENU/OK.
Note
NoteNote
Note: There are no Speed Dial options associated with special numbers.

32
Erasing the Contacts Directory
Erasing the Contacts DirectoryErasing the Contacts Directory
Erasing the Contacts Directory
To erase all the names and phone numbers in your Contacts Directory:
1. From the Security Menu display (See “Accessing the Security Menu” on page 30), select
Erase Ph
Erase PhErase Ph
Erase Ph.
..
.Book
BookBook
Book and press MENU/OK.
2. If you’re sure you want to erase your Contacts, Select Yes
YesYes
Yes and press MENU/OK.
Erasing All Downloads
Erasing All DownloadsErasing All Downloads
Erasing All Downloads
To erase all the downloaded data from web:
1.From the Security Menu display (See “Accessing the Security Menu” on page 30), Select
Erase Download
Erase DownloadErase Download
Erase Download and press MENU/OK.
2. If you’re sure you want to erase downloaded data from web, Select Yes
YesYes
Yes and press
MENU/OK.
If you have assigned downloaded data, the function returns to its default setting.
Resetting Your Phon
Resetting Your PhonResetting Your Phon
Resetting Your Phone
ee
e
Resetting the phone restores all the factory defaults, including the ringer types and display
settings. The Contacts list, Call History, Scheduler and Messages are not affected.
To reset your phone:
1. From the Security Menu display (See “Accessing the Security Menu” on page 30), Select
Reset Phone
Reset PhoneReset Phone
Reset Phone, and press MENU/OK.
2. If you’re sure you want to reset your phone, select Yes
YesYes
Yes and press MENU/OK.
Resetting and Locking Your Phone Through SMS
Resetting and Locking Your Phone Through SMSResetting and Locking Your Phone Through SMS
Resetting and Locking Your Phone Through SMS
When your phone is lost or stolen, you can erase your important personal information (such as
Contacts entries, call history and messages) and lock your phone by sending a special formatted
SMS message to your phone.
Send the following format from your computer:
\\RESET **<Passcode>**RESET
<Passcode> – your defined passcode.
The default passcode is your phone’s 11-digit ESN (Electronic Serial Number),
which is written on the package or on the phone itself.
To activate this feature, the following presetting is required:
1. Press MENU/OK to access the main menu.
2. Select Settings
SettingsSettings
Settings and press MENU/OK.
3. Select Security
SecuritySecurity
Security and press MENU/OK.
4. Enter your lock code.
5. Select Others
OthersOthers
Others and press MENU/OK.
6. Select Found Me
Found MeFound Me
Found Me and press MENU/OK.
7. Select Reset/Lock
Reset/LockReset/Lock
Reset/Lock and press MENU/OK.
8. Select Enable
EnableEnable
Enable and press MENU/OK.
To unlock a phone that has been locked through SMS, bring the phone to Customer center.

33
Changing the Passcode
Changing the PasscodeChanging the Passcode
Changing the Passcode
To change the passcode for the special formatted SMS messages:
1. Follow steps 1-6 on the previous page.
2. Select Chg Passcode
Chg PasscodeChg Passcode
Chg Passcode and press MENU/OK.
3. Enter new passcode in the box under New Passcode
New PasscodeNew Passcode
New Passcode (11 digits).
4. Reenter the new passcode in the box under Reenter Code
Reenter CodeReenter Code
Reenter Code.
34
Controlling Your Roaming Experience
Controlling Your Roaming ExperienceControlling Your Roaming Experience
Controlling Your Roaming Experience
Understanding Roaming
Understanding RoamingUnderstanding Roaming
Understanding Roaming
Recognizing Icons on the Display Screen
Recognizing Icons on the Display ScreenRecognizing Icons on the Display Screen
Recognizing Icons on the Display Screen
Your phone’s display screen always lets you know when you’re off the Nationwide PCS Network
and whether your phone is operating in analog or digital mode. The following chart indicates
what you’ll see depending on where you’re using your phone.
Main LCD/Sub
Main LCD/Sub Main LCD/Sub
Main LCD/Sub LCD
LCDLCD
LCD
Roaming Indicator
Roaming IndicatorRoaming Indicator
Roaming Indicator
Analog Indicator
Analog IndicatorAnalog Indicator
Analog Indicator
Other Digital Networks
Digital Roam
Analog Networks
Analog Roam
Tip:
Tip:Tip:
Tip: Remember, when you are using your phone off the Nationwide PCS Network, always dial
numbers using 11 digits (1 + area code + number).
Note:
Note: Note:
Note: You will pay a higher per-minute rate for roaming calls.
Roaming on Other Digital Networks
Roaming on Other Digital NetworksRoaming on Other Digital Networks
Roaming on Other Digital Networks
When you’re roaming on other digital networks, your call quality and security will be similar to
the quality you receive when making calls while on the enhanced Nationwide PCS Network.
You may not be able to access certain calling features.
Roaming on Analog Networks
Roaming on Analog NetworksRoaming on Analog Networks
Roaming on Analog Networks
When you roam on analog networks, you will experience a similar quality provided by other
analog carriers today. Although some calling features will be unavailable, you can still make
and receive calls and access voicemail. You will experience a few differences:
You are more likely to experience static, cross-talk, fade-out and dropped calls.
Some calling features, which are standard on the enhanced Nationwide PCS Network,
such as Call Waiting PCS products and services and direct international dialing, are
unavailable.
Though callers can leave voicemail messages while you are roaming, you will not receive
notification until you return to the Nationwide PCS Network. While roaming, you can
periodically check your voicemail for new messages by dialing 1+areacode+your PCS
Phone Number. Press * when you hear your greeting and enter your pass code at the
prompt.
There are security and privacy risks (eavesdropping and cloning) that exist with
conventional analog services today.
Your battery needs recharging sooner when you use your phone for analog roaming.
35
Note:
Note: Note:
Note: If you’re on a call when you leave the Nationwide PCS Network and enter an area
where roaming is available (whether digital or analog), your call is dropped. If your call is
dropped in an area where you think PCS Service is available, turn your phone off and on
again to reconnect to the Nationwide PCS Network.
Note:
Note: Note:
Note: When using your phone in analog mode, the handset may feel warm. This behavior is
normal for analog operation.
Setting Your Phone
Setting Your PhoneSetting Your Phone
Setting Your Phone’
’’’s Roam Mode
s Roam Modes Roam Mode
s Roam Mode
Your PCS Phone allows you to control your ability to roam. By using the Roaming
Roaming Roaming
Roaming menu option,
you can determine which signals your phone accepts.
Set Mode
Set ModeSet Mode
Set Mode
Choose from three different settings on your dual band/tri mode phone to control your roaming
experience:
1.
Press MENU/OK to access the main menu.
2.
Select Settings
Settings Settings
Settings and press MENU/OK.
3.
Select Roaming
Roaming Roaming
Roaming and press MENU/OK.
4.
Select Set Mode
Set Mode Set Mode
Set Mode and press MENU/OK.
5.
To select an option from the following and press MENU/OK.
PCS
PCSPCS
PCS
Automatic
Automatic Automatic
Automatic
Analog
AnalogAnalog
Analog

36
Controlling Roaming Charges Using
Controlling Roaming Charges Using Controlling Roaming Charges Using
Controlling Roaming Charges Using Call Guard
Call GuardCall Guard
Call Guard
In addition to the roaming icon, Call Guard alerts you when roaming charges apply. This
feature makes it easy to manage your roaming charges by reminding you when you make or
receive roaming calls. It also requires you to take additional steps before placing or answering a
roaming call. These additional steps are not required when you make or receive calls while on
the enhanced Nationwide PCS Network.
To Turn the Call Guard Feature On or Off:
To Turn the Call Guard Feature On or Off:To Turn the Call Guard Feature On or Off:
To Turn the Call Guard Feature On or Off:
1. Press MENU/OK to access the main menu.
2. Select Settings
SettingsSettings
Settings and press MENU/OK.
3. Select Roaming
Roaming Roaming
Roaming and press MENU/OK.
4. Select Call Guar
Call GuarCall Guar
Call Guard
d d
d and press MENU/OK.
5. Select On
On On
On or Off
Off Off
Off and press MENU/OK.
To Place Roaming Calls With Call Guard On:
To Place Roaming Calls With Call Guard On:To Place Roaming Calls With Call Guard On:
To Place Roaming Calls With Call Guard On:
Press any key to erase the pop-up message, press MENU/OK, highlight Roam Call
Roam CallRoam Call
Roam Call, or
Roam:Speaker On
Roam:Speaker OnRoam:Speaker On
Roam:Speaker On and press MENU/OK.
- or -
1. From standby mode, dial 1 + area code + the seven-digit number. (You can also initiate a
call from the Contacts directory, Call History, or Messaging.)
2. Press TALK or SPEAKER (or press MENU/OK and highlight Call
CallCall
Call or Call:Speaker
Call:SpeakerCall:Speaker
Call:Speaker On
OnOn
On)
and press MENU/OK.
3. Press 1 to proceed while the pop-up message is displayed.
To Answer Incoming Roaming Calls With Call Guard On:
To Answer Incoming Roaming Calls With Call Guard On:To Answer Incoming Roaming Calls With Call Guard On:
To Answer Incoming Roaming Calls With Call Guard On:
1.
Press TALK or SPEAKER.
2. Press 1 to proceed while the pop-up message is displayed.
-or-
Press MENU/OK, Select Answer
Answer Answer
Answer or Answer:Speaker
Answer:Speaker Answer:Speaker
Answer:Speaker and press MENU/OK.
Remember if the Call Guard feature is set to On
OnOn
On, you need to take extra steps to make and
receive roaming calls even if you have selected the Analog
Analog Analog
Analog setting.
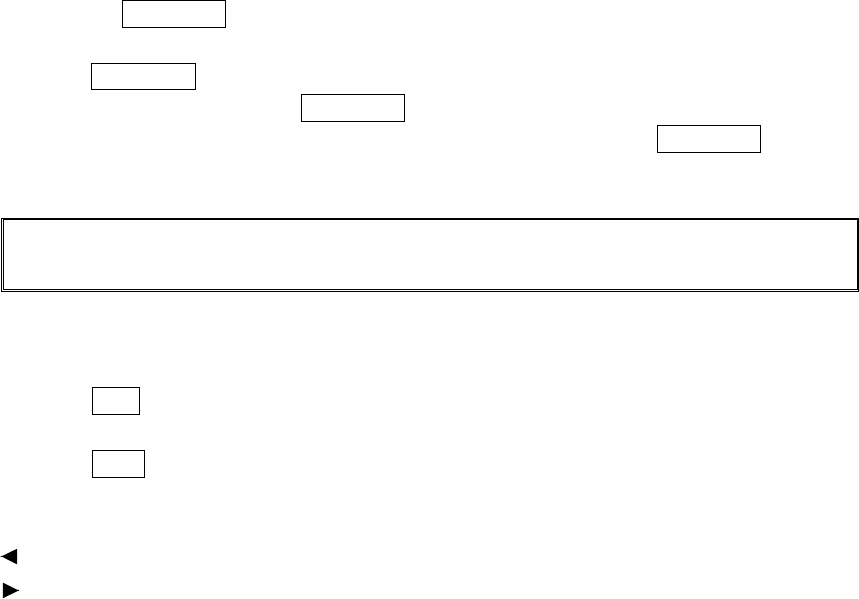
37
Navigating Through Menus
Navigating Through MenusNavigating Through Menus
Navigating Through Menus
Menu Navigation
Menu NavigationMenu Navigation
Menu Navigation
The Navigation key on your PCS Phone allows you to scroll through menus quickly and easily.
To scroll bar at the right of the menu keeps track of your position in the menu at all times.
To navigate through a menu, simply press ▲/▼ on the Navigation key.
Menu Structure
Menu StructureMenu Structure
Menu Structure
Selecting Menu Items
Selecting Menu ItemsSelecting Menu Items
Selecting Menu Items
As you navigate through a menu, the options are highlighted. Select an option by highlighting it
and pressing MENU/OK.
For example, if you want to view your last incoming call:
1.
Press MENU/OK to access the main menu.
2.
Select Call History
Call History Call History
Call History and press MENU/OK. (It may already be highlighted).
3.
Press ▼on the Navigation key to highlight Incoming Calls
Incoming Calls Incoming Calls
Incoming Calls and press MENU/OK.
If you have received any calls, they are displayed on the screen.
Note
NoteNote
Note:
: :
: You may also select numbered menu items by pressing the corresponding number on
your keypad.
Backing Up Within a Menu
Backing Up Within a MenuBacking Up Within a Menu
Backing Up Within a Menu
To go to the previous menu:
Press Back.
To return to standby mode:
Press END/.
Shortcuts
ShortcutsShortcuts
Shortcuts
on the Navigation key is a shortcut to the My Shortcut menu.
on the Navigation key is a shortcut to the Contacts.
▲ on the Navigation key is a shortcut to the Messaging menu.
▼ on the Navigation key is a shortcut to the Downloads menu.

38
Managing Call History
Managing Call HistoryManaging Call History
Managing Call History
Viewing History
Viewing History Viewing History
Viewing History
You’ll find your Call History invaluable. It is a list of the last 20 phone numbers or Contacts
entries for each call you placed, accepted or missed. Call History makes redialing a number fast
and easy. It is continually updated as new numbers are added to the beginning of the list and
the oldest entries are removed from the bottom of the list.
Each entry contains the phone number (if it is available) and Contacts List entry name (if the
phone number is in your Contacts list). Duplicate calls (same number and type of call) may only
appear once on the list.
To view a Call History entry:
1.
Press MENU/OK to access the main menu.
2.
Select Call History
Call History Call History
Call History and press MENU/OK.
3.
Select Outgoing Calls
Outgoing CallsOutgoing Calls
Outgoing Calls, Incoming Calls
Incoming Calls Incoming Calls
Incoming Calls or Missed Calls
Missed Calls Missed Calls
Missed Calls and press MENU/OK.
Call History Options
Call History OptionsCall History Options
Call History Options
For additional information options on a particular call, highlight a Call History entry and press
Options
OptionsOptions
Options (right softkey).
Call
Call Call
Call to dial the phone number.
Call:Speaker On
Call:Speaker On Call:Speaker On
Call:Speaker On to dial the phone number in speakerphone mode.
Save Phone#
Save Phone# Save Phone#
Save Phone# to save the phone number (if applicable). If the caller’s phone number is
already saved in your Contacts list, Go to Phone Book
Go to Phone BookGo to Phone Book
Go to Phone Book appears. (See “Saving a Phone
Number From Call History” on page 39.)
Prepend
Prepend Prepend
Prepend to add numbers to the beginning of the phone number. (See “Prepending a Phone
Number From Call History” on page 39.)
Copy to Personal
Copy to Personal Copy to Personal
Copy to Personal to copy the phone number to the Ready Link Personal List. (Only
appears when PCS Ready Link mode is set to enable and the number does not match any
stored entry in your Personal List.)
Erase
Erase Erase
Erase to erase the entry.
Making a Call from Call History
Making a Call from Call HistoryMaking a Call from Call History
Making a Call from Call History
To place a call from Call History:
1. Press MENU/OK to access the main menu.
2. Select Call History
Call History Call History
Call History and press MENU/OK.
3. Select Outgoing Calls
Outgoing CallsOutgoing Calls
Outgoing Calls, Incoming Calls
Incoming Calls Incoming Calls
Incoming Calls or Missed Calls
Missed CallsMissed Calls
Missed Calls.
4. Press MENU/OK.
5. Select the entry you want to call by scrolling through the list.
6. Press TALK or SPEAKER .
-or-
Press Options
Options Options
Options (right softkey), highlight Call
CallCall
Call or Call:Speaker On
Call:Speaker OnCall:Speaker On
Call:Speaker On, and press MENU/OK.
Note:
Note: Note:
Note: You cannot make calls from Call History to entries identified as No ID or Restricted.
39
Saving a Phone Number From Call History
Saving a Phone Number From Call HistorySaving a Phone Number From Call History
Saving a Phone Number From Call History
Your PCS Phone can store up to 300 Contacts entries. Contacts entries can store up to a total of
500 phone numbers and each entry’s name can contain 16 characters.
To save a phone number from Call History to your Contacts list:
1.
Select the Call History entry you want to save.
2.
Press Options
OptionsOptions
Options (right softkey) to display the options.
3.
Select Save Phone#
Save Phone# Save Phone#
Save Phone# and press MENU/OK.
4.
Select appropriate label (Home, Work, Mobile, Pager, Data, Fax or No Label), and press
MENU/OK.
5. Enter a name, and press MENU/OK.
If you have already stored entries in the Contacts list, you are prompted to select the
following entry mode.
New Name
New Name New Name
New Name to enter a name directly.
From Ph.Book
From Ph.Book From Ph.Book
From Ph.Book to select a name from Contacts list.
6.
Press Save
SaveSave
Save (left softkey).
Note:
Note: Note:
Note: You cannot save phone numbers already in your Contacts list from calls identified as No
ID or Restricted. If the selected entry has already been stored in the Contacts list, Go to Phone
Go to Phone Go to Phone
Go to Phone
Book
BookBook
Book appears during step 3 above.
Prepending a Phone Number From Call History
Prepending a Phone Number From Call HistoryPrepending a Phone Number From Call History
Prepending a Phone Number From Call History
If you need to make a call from Call History and you happen to be outside your local area code,
you can add the appropriate prefix by following these steps:
1. Highlight a call history entry and press Options
Options Options
Options (right softkey).
2. Highlight Prepend
PrependPrepend
Prepend and press MENU/OK.
3. Enter the digits you want to add to the number.
4. Press TALK or SPEAKER to make a call.
To select another option, press MENU/OK, highlight it, and press MENU/OK.
Call
CallCall
Call to dial the phone number.
Call:Speaker On
Call:Speaker OnCall:Speaker On
Call:Speaker On to dial the phone number in speakerphone mode.
Save Phone#
Save Phone#Save Phone#
Save Phone# to store the phone number in your Contacts directory.
Hard Pause
Hard PauseHard Pause
Hard Pause to insert a hard pause.
2
22
2-
--
-Sec. Pause
Sec. PauseSec. Pause
Sec. Pause to insert a 2-second pause.
Erasing Call History
Erasing Call HistoryErasing Call History
Erasing Call History
To erase individual Call History entries, see “Call History Options” on the previous page.
To erase Call History:
1. Press MENU/OK to access the main menu.
2. Select Call History
Call HistoryCall History
Call History and press MENU/OK.
3. Select Erase History
Erase HistoryErase History
Erase History and press MENU/OK.
4. Select Outgoing Calls
Outgoing CallsOutgoing Calls
Outgoing Calls, Incoming Calls
Incoming CallsIncoming Calls
Incoming Calls, Missed Calls
Missed CallsMissed Calls
Missed Calls, or All Calls
All CallsAll Calls
All Calls and press MENU/OK.

40
5. Select Voice Call Log
Voice Call LogVoice Call Log
Voice Call Log or Ready Link Log
Ready Link LogReady Link Log
Ready Link Log and press MENU/OK.
Voice Call Log
Voice Call LogVoice Call Log
Voice Call Log to erase Call History for Voice Calls.
Ready Link Log
Ready Link LogReady Link Log
Ready Link Log to erase Call History for PCS Ready Link Calls.
6. Select Yes
YesYes
Yes and press MENU/OK.

41
Using the Contacts Directory
Using the Contacts DirectoryUsing the Contacts Directory
Using the Contacts Directory
Displaying the Contacts List
Displaying the Contacts ListDisplaying the Contacts List
Displaying the Contacts List
1. Press MENU/OK to access the main menu.
2. Select Contacts
ContactsContacts
Contacts and press MENU/OK.
3. Select Find/Add Entry
Find/Add EntryFind/Add Entry
Find/Add Entry and press MENU/OK.
Contacts List Entry Options
Contacts List Entry OptionsContacts List Entry Options
Contacts List Entry Options
To access a Contacts entry’s options, display the Contacts list, highlight an entry and press
MENU/OK, then select a phone number and press Options
OptionsOptions
Options (right softkey). To select an option,
highlight it and press MENU/OK.
Edit
EditEdit
Edit to edit the selected entry.
Call
Call Call
Call to dial the selected number.
Call:Speaker On
Call:Speaker On Call:Speaker On
Call:Speaker On to dial the phone number in speakerphone mode.
Send Message
Send Message Send Message
Send Message to send a text message.
Call Alarm
Call Alarm Call Alarm
Call Alarm to set a call alarm for the entry.
Set Speed Dial
Set Speed Dial Set Speed Dial
Set Speed Dial to assign speed dial numbers to your favorite entries.
Set Voice Dial
Set Voice Dial Set Voice Dial
Set Voice Dial to assign speed dial numbers to your favorite entries.
Prepend
Prepend Prepend
Prepend to alter a phone number by adding numbers to the beginning of the entry.
Copy t
Copy tCopy t
Copy to Personal
o Personal o Personal
o Personal to copy the phone number to your Ready Link Personal List. (Only
appears when PCS Ready Link mode is set to enable and the number does not match any
stored entry in your Personal List.)
Tip:
Tip: Tip:
Tip: You can view the next entry by pressing the right on the Navigation key or view the
previous entry by pressing left on the Navigation key.
To erase the selected entry from the Contacts list.
1. From standby mode, press right on the Navigation key to display the Contacts list.
2. Highlight the entry you wish to delete using the Navigation key.
3. Press Options
Options Options
Options (right softkey).
4. Highlight Erase Contact
Erase ContactErase Contact
Erase Contact and press MENU/OK.
5. Select Yes
YesYes
Yes and press MENU/OK.
Selecting a Character Input Mode
Selecting a Character Input ModeSelecting a Character Input Mode
Selecting a Character Input Mode
Your PCS Phone provides convenient ways to enter words, letters, punctuation, and numbers
whenever you are prompted to enter text (for example, when adding an Contacts List entry).
To change the character input mode:
1.
When you display a screen where you can enter text, press right softkey button.
2. To select a character input mode, highlight it and press MENU/OK.

42
Entering Characters Using T9 Text Input
Entering Characters Using T9 Text InputEntering Characters Using T9 Text Input
Entering Characters Using T9 Text Input
T9 Text Input lets you enter text in your PCS Phone by pressing keys just once per letter. (To
select the T9 Word
T9 Word T9 Word
T9 Word mode when entering text, see “Selecting a Character Input Mode” on page
41.)
T9 Text Input analyzes the letters you enter using an intuitive word database and creates a
suitable word. (The word may change as you type.) If the word you want does not display after
you have entered all the letters, press Next 0 to scroll through additional word selections. To
accept a word and insert a space, press Space #.
If you make a mistake, press Back to erase a single character. Press and hold Back to delete an
entire entry.
Adding
Adding Adding
Adding a
a a
a Word to
Word to Word to
Word to the
the the
the T9 Database
T9 DatabaseT9 Database
T9 Database
If a word you want to enter does not display as an option when you are using T9 Text Input, you
can add it to the database.
To add a word to the database:
1.
Select the Alphabet
Alphabet Alphabet
Alphabet input mode.
2. Enter the word using multi-tap text entry. (See “Entering Characters by Tapping the
Keypad” on page 43.)
3. Press the right softkey, highlight T9 Word
T9 Word T9 Word
T9 Word and press MENU/OK. The word will appear as
an option the next time you scroll through options during T9 Text Input.

43
Entering
Entering Entering
Entering Characters by Tapping the Keypad
Characters by Tapping the KeypadCharacters by Tapping the Keypad
Characters by Tapping the Keypad
To enter characters by tapping the keypad, select the Alphabet
Alphabet Alphabet
Alphabet mode (see “Selecting a
Character Input Mode” on page 41). Press the corresponding key until the desired character
appears. By default, the first letter of a word is capitalized and following letters are lowercase.
Characters scroll in the following order:
English Sequence
Key
Upper Case Lower Case
1 . , @ 1 ? ! * # /
2 ABC2 abc2
3 DEF3 def3
4 GHI4 ghi4
5 JKL5 jkl5
6 MNO6 mno6
7 PQRS7 pqrs7
8 TUV8 tuv8
9 WXYZ9 wxyz9
0 0
# Space
* Unshifted One-character-shifted Caps Lock
In Spanish mode, characters scroll in the following order.
Spanish Sequence Key
Key
Upper Case Lower Case
1 . , @ 1 ¿ ? ¡ ! * # /
2 AÁBC2 aábc2
3 DEÉF3 deéf3
4 GHIÍ4 ghií4
5 JKL5 jkl5
6 MNÑOÓ6 mnñoó6
7 PQRS7 pqrs7
8 TUÚÜV8 tuúüv8
9 WXYZ9 wxyz9
0 0
# Space
* Unshifted One-character-shifted Caps Lock
See page 29 for changing Spanish entering mode.
After a character is entered, the cursor automatically advances to the next space after two
seconds or when you enter a character not on the same key.
44
Entering Numbers
Entering NumbersEntering Numbers
Entering Numbers,
, ,
, Symbols,
Symbols,Symbols,
Symbols,
Preset Suffix
Preset SuffixPreset Suffix
Preset Suffix and Smileys
and Smileys and Smileys
and Smileys
Entering NUMBERS
Entering NUMBERSEntering NUMBERS
Entering NUMBERS
To enter numbers:
1.
In a text entry field, press the right soft key.
2.
Select NUMBER
NUMBER NUMBER
NUMBER and press MENU/OK.
3. Press the corresponding numeric key to enter the number.
Shortcut:
Shortcut:Shortcut:
Shortcut: Press and hold the corresponding number key to enter the number directory in
alphabet mode or T9 mode.
Entering SYMBOLS
Entering SYMBOLSEntering SYMBOLS
Entering SYMBOLS
To enter symbols:
1.
In a text entry field, press the right softkey.
2.
Select SYMBOL
SYMBOLSYMBOL
SYMBOL and press MENU/OK.
3.
Select the line that includes your desired symbol.
4.
Press the corresponding key (1 ~ 8) with each symbol.
-or-
Select your desired symbol by using the Navigation key, and press MENU/OK.
Entering
Entering Entering
Entering PRESET
PRESET PRESET
PRESET SUFFIXES
SUFFIXESSUFFIXES
SUFFIXES
To enter preset suffixes:
1. In a text entry field, press the right softkey.
2. Select PRESET
PRESETPRESET
PRESET SUFFIX
SUFFIX SUFFIX
SUFFIX and press MENU/OK.
3. Select your desired word by using the Navigation key and press MENU/OK.
Entering SMILEYS
Entering SMILEYSEntering SMILEYS
Entering SMILEYS
To enter smile pictures (“emoticons”)
1. In a text entry field, press right softkey.
2. Select SMILEYS
SMILEYS SMILEYS
SMILEYS and press MENU/OK.
3. Select the line that includes your desired smiley.
4. Press the corresponding key (1~4) with each smiley.
-or-
Select your desired smiley by using the Navigation key and press MENU/OK.

45
Adding a New Contacts List Entry
Adding a New Contacts List EntryAdding a New Contacts List Entry
Adding a New Contacts List Entry
Your PCS Phone can store up to 300 Contacts entries. Contacts entries can store up to a total of
500 phone numbers and the entry’s name can contain 16 characters.
To add a new entry:
1. Press MENU/OK to access the main menu.
2. Select Contacts
ContactsContacts
Contacts and press MENU/OK.
3. Select F
FF
Find/Add Entry
ind/Add Entryind/Add Entry
ind/Add Entry and press MENU/OK.
Press right on the Navigation key for the shortcut (steps 1 through 3).
4. Highlight <New Contact>
<New Contact><New Contact>
<New Contact> and press MENU/OK.
5. Enter a name and press MENU/OK.
6. Select a label field and press MENU/OK.
Name
NameName
Name to enter a new entry’s name.
Ho
HoHo
Home
meme
me to enter a new entry’s home number.
Work
WorkWork
Work to enter a new entry’s work number.
Mobile
MobileMobile
Mobile to enter a new entry’s mobile number.
Pager
PagerPager
Pager to enter a new entry’s pager number.
Data
DataData
Data to enter a new entry’s number for data.
Fax
FaxFax
Fax to enter a new entry’s fax number.
No L
No LNo L
No Label
abelabel
abel to enter a new entry’s phone number.
Email
EmailEmail
Email to enter a new entry’s email address.
Web
Web Web
Web to enter a new entry’s Web address.
Ringer
Ringer Ringer
Ringer to assign a ringer type to the entry.
Image
Image Image
Image to assign an image type to the entry.
7. Enter right on the Navigation key to display the Contacts list.
8. Press Save
Save Save
Save (left softkey) and press MENU/OK.
- or -
1. Press right on the Navigation key to display the Contacts list.
2. Press Options
OptionsOptions
Options (right softkey).
3. Highlight Add New Contact
Add New ContactAdd New Contact
Add New Contact and press MENU/OK.
4. Follow step 5-8 above.
Finding Conta
Finding ContaFinding Conta
Finding Contacts List Entries
cts List Entriescts List Entries
cts List Entries
There are several ways to display your Contacts list entries. Follow the steps outlined in the
sections below to display entries from the Contacts menu.
Finding
Finding Finding
Finding Entries
EntriesEntries
Entries
You can review all the entries stored in your Contacts list or find an entry quickly by following
these simple steps.
To find Contacts list entries:
1.
Press MENU/OK to access the main menu.
2.
Select Contacts
ContactsContacts
Contacts and press MENU/OK.
3.
Select Find
FindFind
Find/Add Entry
/Add Entry /Add Entry
/Add Entry and press MENU/OK.
Press the right Navigation key for the shortcut (steps 1 through 3).

46
4. Use your Navigation key to scroll through the Contacts list.
- or -
Enter the first letter of the name or part of the name. (The display shows the entry
beginning with the letter entered.)
5. Press MENU/OK to display the entry’s details.
Fi
FiFi
Finding Speed Dial Numbers
nding Speed Dial Numbersnding Speed Dial Numbers
nding Speed Dial Numbers
To find phone numbers you have stored in speed dial locations:
1.
Press MENU/OK to access the main menu.
2.
Select Contacts
Contacts Contacts
Contacts and press MENU/OK.
3.
Select Speed Dial #s
Speed Dial #s Speed Dial #s
Speed Dial #s and press MENU/OK. (The Speed Dial numbers list appears.)
Findin
FindinFindin
Finding Voice Dial Numbers
g Voice Dial Numbersg Voice Dial Numbers
g Voice Dial Numbers
To find phone numbers you have stored in Voice Dial:
1.
Press MENU/OK to access the main menu.
2.
Select Voice Service
Voice ServiceVoice Service
Voice Services
ss
s
and press MENU/OK.
3.
Select Voice Dial
Voice Dial Voice Dial
Voice Dial and press MENU/OK.
4.
Select Review
Review Review
Review or Rev:Speaker
Rev:Speaker Rev:Speaker
Rev:Speaker and press MENU/OK.
(The Voice Dial numbers list appears.)
Adding a Phone Number or Address to a Contacts Entry
Adding a Phone Number or Address to a Contacts EntryAdding a Phone Number or Address to a Contacts Entry
Adding a Phone Number or Address to a Contacts Entry
To add a phone number or address to an entry:
1.
Press MENU/OK to access the main menu.
2.
Select Contacts
ContactsContacts
Contacts and press MENU/OK.
3. Select Find
FindFind
Find/Add
/Add/Add
/Add
Entry
Entry Entry
Entry and press MENU/OK.
● Press the right on the Navigation key for the shortcut (steps 1 through 3).
4. Highlight the entry to which you wish to add phone numbers or email/Web address and
press MENU/OK.
5. Highlight a phone number, press Options
OptionsOptions
Options (right softkey), highlight Edit
EditEdit
Edit, and press
MENU/OK.
- or -
Highlight an email address or Web address and press Edit
EditEdit
Edit (right softkey).
6. Highlight the label field you want to add and press MENU/OK.
7. Enter the number or address and press MENU/OK.
8. Press Save
SaveSave
Save (left softkey).
Editing an Contacts Entry
Editing an Contacts EntryEditing an Contacts Entry
Editing an Contacts Entry
To make changes to an entry:
1.
Press right on the Navigation key.
2.
Select the entry you wish to edit and press MENU/OK.
3. Select the Phone number and press Options
Options Options
Options (right softkey) highlight Edit
EditEdit
Edit and
press MENU/OK.
-or-
Select an email address or Web address, then press Edit
Edit Edit
Edit (right softkey).
4. Select the label filed you want to edit and press MENU/OK.

47
5. Select the entry by using your keypad and press MENU/OK.
6. Press Save
SaveSave
Save (left softkey) to save your changes.
Tip: You can also store the phone number in the pager, Data, and Fax Category.
Selecting a Ringer/
Selecting a Ringer/Selecting a Ringer/
Selecting a Ringer/Image
Image Image
Image Type for an Entry
Type for an EntryType for an Entry
Type for an Entry
You can assign a ringer/image type to a Contacts entry so you can identify the caller by the
ringer or image type.
To select a ringer type for an entry:
1.
Press right on the Navigation key.
2.
. .
.
Select the entry you want to set the incoming ringer or image, and press MENU/OK.
3. Press Options
Options Options
Options (right softkey).
4. Select Edit
Edit Edit
Edit and press MENU/OK.
5. Select the menu under Ringer
Ringer Ringer
Ringer or Image
Image Image
Image by scrolling up or down and
press MENU/OK.
6. Select your desired ringer type or images and then press MENU/OK.
Ringer & Voice
Ringer & Voice Ringer & Voice
Ringer & Voice to notify you with Ringer and Voice. (Ringer only.)
Vibrate
Vibrate Vibrate
Vibrate to notift you by vibrating. (Ringer only.)
Get New
Get New Get New
Get New to start up a Browser and you can select an item to download.
Normal
Normal Normal
Normal to set Ringer
RingerRinger
Ringer to the With Caller ID or Roaming setting or to set Image
ImageImage
Image to the
Incoming Calls setting.
None
NoneNone
None to turn the ringer or image type off.
7. Press Save
Save Save
Save (left softkey).
To confirm the ringer, select Ringer
RingerRinger
Ringer and press Play
Play Play
Play (right softkey).
To see a display preview, press Preview
PreviewPreview
Preview (right softkey) during step 7 above. Then press Sub
Sub Sub
Sub
LCD
LCDLCD
LCD(right softkey) to see the Sub LCD preview.(You may also check the Image through the
external display.)
If you set an Animation Ringer and an Image, your PCS Phone plays the ringer of
Animation Ringer and displays the selected Image.
Secret Contacts Entries
Secret Contacts EntriesSecret Contacts Entries
Secret Contacts Entries
You can hide an entry’s phone number(s) and require your lock code to edit the entry by making
it secret. The entry name is still displayed, but the entry’s phone number is replaced by
“(Secret).”
To make an entry secret:
1.
Press right on the Navigation key.
2.
Scroll to the Contacts entry you want to tag secret.
3.
Press Options
OptionsOptions
Options (right softkey) to display the menu options.
4.
Select Set Secre
Set SecreSet Secre
Set Secret
tt
t and press MENU/OK.
5.
Enter 4 digits lock code.
48
6.
Select On
On On
On and press MENU/OK.
To make an entry public, select Off
OffOff
Off during step 6 above.
Tip:
Tip: Tip:
Tip: If you can’t recall your lock code, try using the last four digits of either your Social Security
number or PCS Phone Number or try 0000.
Dialing PCS Services
Dialing PCS ServicesDialing PCS Services
Dialing PCS Services
You must be in digital mode to access PCS Services.
To dial a service:
1.
Press MENU/OK to access the main menu.
2.
Select Contacts
Contacts Contacts
Contacts and press MENU/OK.
3.
Select Services
Services Services
Services and press MENU/OK.
4. Select Cust Solution
Cust SolutionCust Solution
Cust Solutions
ss
s, Dir Assistance
Dir AssistanceDir Assistance
Dir Assistance, Account Inf
Account InfAccount Inf
Account Info
oo
o, or VoiceCommand
VoiceCommand VoiceCommand
VoiceCommand and press
MENU/OK.
5.
Press TALK or SPEAKER.
-or-
Press MENU/OK, highlight Call
Call Call
Call or Call:
Call:Call:
Call: Speaker On
Speaker OnSpeaker On
Speaker On and press MENU/OK.

49
Personal Organizer
Personal OrganizerPersonal Organizer
Personal Organizer
Managing the Scheduler
Managing the SchedulerManaging the Scheduler
Managing the Scheduler
Calendar
CalendarCalendar
Calendar
Use the Calendar to remind you of events or important calls you need to make. You can
schedule up to 100 events, 15 Call Alarms and 20 To-Do Items.
Setting the Time/Date
Setting the Time/DateSetting the Time/Date
Setting the Time/Date
In no service area or Analog service area, it’s necessary to set actual time and date to use
Calendar function. Set the current Time/Date by using numeric keys and/or the Navigation key
(right or left: move cursor, ▲/▼: change value). To display the time setting display, press
MENU/OK and select Tools/Extras
Tools/Extras Tools/Extras
Tools/Extras and press MENU/OK, then select Calendar
Calendar Calendar
Calendar and
press MENU/OK.
It's available from 12:00 AM, Jan 1, 2000 to 11:59 PM, Dec 31, 2099.
Setting Holidays
Setting HolidaysSetting Holidays
Setting Holidays
You can set your personal holidays by displaying the data in red on the Calendar display. The
default holidays displayed in red are Sundays and National holidays.
You can set holidays from Jan 1,2000 to Dec 31,2020.
1. Press MENU/OK to access the main menu.
2. Select Tools/Extras
Tools/ExtrasTools/Extras
Tools/Extras and press MENU/OK.
3.
Select Calenda
CalendaCalenda
Calendar
rr
r and press MENU/OK.
4. Select the day you want to set to the holiday by using the Navigation key.
(left : previous day, right : next day, up : previous week, down: next week).
5.
Press Options
Options Options
Options (right softkey).
6.
Select Set Date
Set Date Set Date
Set Date or Set Weekly
Set Weekly Set Weekly
Set Weekly from the options, and press MENU/OK.
Options:
Set Date
Set Date Set Date
Set Date sets the selected date to the holiday.
Set Weekly
Set Weekly Set Weekly
Set Weekly sets the weekly holidays.
Reset Date
Reset Date Reset Date
Reset Date resets the holiday setting for the selected date.
Reset Weekly
Reset Weekly Reset Weekly
Reset Weekly resets the weekly holiday setting.
Reset All
Reset All Reset All
Reset All resets all the holiday settings and returns to the default settings.
7.
If you selected Set Weekly
Set WeeklySet Weekly
Set Weekly, Reset Weekly
Reset Weekly Reset Weekly
Reset Weekly or Rese
ReseRese
Reset All
t Allt All
t All, you’ll be prompted to select Yes
Ye s Yes
Yes or No
NoNo
No.
Tip:
Tip: Tip:
Tip: The current day is framed by a rectangle.
Adding an Event to the Scheduler
Adding an Event to the SchedulerAdding an Event to the Scheduler
Adding an Event to the Scheduler
Your Scheduler helps organize your time and reminds you of important events.
To add an event:
1.
Press MENU/OK to access the main menu.
2. Select Tools/Extras
Tools/ExtrasTools/Extras
Tools/Extras and press MENU/OK.
3. Select Calendar
Calendar Calendar
Calendar and press MENU/OK.
4. Select the day you want to add an event to by using the Navigation key and press
MENU/OK.
50
5.
From the event list display, press Options
Options Options
Options (right softkey) to display the options.
6.
Select Add Event
Add EventAdd Event
Add Event and press MENU/OK.
7.
Select Schedule
Schedule Schedule
Schedule and press MENU/OK.
8.
Enter the description and press MENU/OK or press MENU/OK without entering the
description.
9.
Select the menu under the following event details, and press MENU/OK.
Description
Description Description
Description Entering a description of your event (up to 14 characters).
From
From From
From to scheduling the start time.
To
To To
To to scheduling the end time.
Location
Location Location
Location to editing the location of your event (up to 14 characters).
Alarm
Alarm Alarm
Alarm to select your desired setting from On
OnOn
On or Off
OffOff
Off.
Alarm Time
Alarm Time Alarm Time
Alarm Time to editing the alarm time (number of hours or minutes before the event starts).
Default alarm times are 10 minutes.
Repeat
Repeat Repeat
Repeat to repeating the event. Select None
NoneNone
None, Daily
DailyDaily
Daily, Weekly
WeeklyWeekly
Weekly, Monthly
MonthlyMonthly
Monthly, or Yearly
YearlyYearly
Yea rl y.
10.
Press Save
SaveSave
Save (left softkey) to add the event.
Tip:
Tip: Tip:
Tip: Press the ▲/▼ on the navigation to scroll by week through the Scheduler calendar,
and the Side Volume key to scroll by month.
Event Alerts
Event AlertsEvent Alerts
Event Alerts
There are several ways your PCS Phone alerts you of scheduled events:
By playing the alert tone. (Depends on the setting Alert and Key Volume.)
By blinking the LED.
By displaying event’s description on the Main LCD when the clamshell is open.
By displaying event’s description on the Sub LCD when the clamshell is closed.
By lighting backlight of LCD. (Depends on the setting Backlight.)
Note:
Note: Note:
Note: Default alarm times are 10 minutes for Meetings, Events and dining Appointments, 24
hours for Special Occasions and zero minutes for Call Alarms.
Event Alert Menu
Event Alert MenuEvent Alert Menu
Event Alert Menu
When your phone is turned on and you have an event alarm scheduled, your phone alerts you
and displays the event summary.
1.
Press MENU/OK or View
ViewView
View (left softkey) to silence the alarm and see the unchecked event list.
2. Select the unchecked event and press MENU/OK to see the event details, or press Options
OptionsOptions
Options
(right softkey) for following options. To select an option, Select it and press MENU/OK .
Snooze
Snooze Snooze
Snooze to repeat the alarm in ten minutes.
Exit
Exit Exit
Exit to delete the event (even if it is a repeating event).
Note:
Note: Note:
Note: If you press Exit
Exit Exit
Exit (right softkey) during step 1, you are prompted to confirm unchecked
event. Select Yes
YesYes
Yes to view and No
No No
No to cancel.

51
Viewing the Event List
Viewing the Event ListViewing the Event List
Viewing the Event List
To View your Event list:
1. Press MENU/OK to access the main menu.
2. Select Tools/Extras
Tools/ExtrasTools/Extras
Tools/Extras and press MENU/OK.
3. Select Calendar
Calendar Calendar
Calendar and press MENU/OK.
4. Select the data for which you set events and press MENU/OK.
Editing a
Editing aEditing a
Editing an E
n En E
n Event
ventvent
vent
1.
From the event list display, highlight an event and press MENU/OK.
2.
Select the box under each item you want to edit, and press MENU/OK.
3.
Enter or select a new setting and press MENU/OK.
4.
Press Save
SaveSave
Save (left softkey).
Adding a Call Alarm to the Scheduler
Adding a Call Alarm to the SchedulerAdding a Call Alarm to the Scheduler
Adding a Call Alarm to the Scheduler
To add a Call Alarm from the Scheduler:
1.
Press MENU/OK to access the main menu.
2. Select Tools/Extras
Tools/ExtrasTools/Extras
Tools/Extras and press MENU/OK.
3. Select Calendar
Calendar Calendar
Calendar and press MENU/OK.
5. Select the day you want to add an event to by using the Navigation key and press
MENU/OK.
5.
From the event list display, press Options
Options Options
Options (right softkey) to display the options.
6.
Select Add Event
Add EventAdd Event
Add Event and press MENU/OK.
7.
Select Call Alarm
Call AlarmCall Alarm
Call Alarm and press MENU/OK.
8.
Enter the phone number directly or press Options
Options Options
Options (right softkey) for options.
From
From From
From Ph
PhPh
Ph. Book
. Book. Book
. Book
select the number from your desired Contacts list.
Voicemail
Voicemail Voicemail
Voicemail select the number for voicemail access.
9.
Select the box under the following items and press MENU/OK.
Time/Date
Time/Date Time/Date
Time/Date Editing the start time/date.
Alarm
Alarm Alarm
Alarm to select the ringer alarm.
Repeat
Repeat Repeat
Repeat Repeating the Call Alarm. Select None
NoneNone
None, Daily
DailyDaily
Daily, Weekly
WeeklyWeekly
Weekly, Monthly
Monthly Monthly
Monthly or Yearly
YearlyYearly
Ye arl y .
10.
Press Save
SaveSave
Save (left softkey).
Call Alarm
Call Alarm Call Alarm
Call Alarm Alerts
AlertsAlerts
Alerts
There are several ways your PCS Phone alerts you of scheduled call alarm:
By playing the alert tone. (Depends on the setting Alert and Key Volume.)
By blinking the LED.
By displaying name or phone number on the Main LCD when the clamshell is open.
By displaying name or phone number on the Sub LCD when the clamshell is closed.
By lighting backlight of LCD. (Depends on the setting Backlight.)

52
Call Alarm
Call AlarmCall Alarm
Call Alarm Menu
Menu Menu
Menu
When your phone is turned on and you have scheduled a call alarm, your phone alerts you and
displays the name or phone number.
1. Press MENU/OK or View
ViewView
View (left softkey) to silence the alarm and see the call alarm details.
2. Highlight the unchecked event and press MENU/OK to see the call alarm details, or press
Options
Options Options
Options (right softkey) for the following options (to select an option, highlight it and press
MENU/OK.):
Call
CallCall
Call to dial the scheduled phone number.
Call:Speaker On
Call:Speaker OnCall:Speaker On
Call:Speaker On to dial the scheduled phone number in speakerphone mode.
Snooze
SnoozeSnooze
Snooze to repeat the alarm in ten minutes.
Save Phone#
Save Phone#Save Phone#
Save Phone# to save the scheduled phone number in your Contacts list. Go to Phone Book
Go to Phone BookGo to Phone Book
Go to Phone Book
appears when the number is already in your Contacts list.
Note:
Note:Note:
Note: If you press Exit
Exit Exit
Exit (left softkey) during step 2 above, you are prompted to erase the
unchecked event. Select Yes
YesYes
Yes to erase or No
No No
No to cancel.
Editing Call Alarm
Editing Call Alarm Editing Call Alarm
Editing Call Alarm
1.
From the Event list display, select one of call alarms, and press MENU/OK.
2.
Select the box you want to edit and press MENU/OK.
3.
Enter or select a new setting and press MENU/OK.
3. Press Save
SaveSave
Save (left softkey).
Erasing Day
Erasing DayErasing Day
Erasing Day’
’’’s Events or Call Alarms
s Events or Call Alarmss Events or Call Alarms
s Events or Call Alarms
To erase a scheduled day’s events or call alarms:
1. From the Event list display, highlight one of the events or call alarms and press
Options
OptionsOptions
Options (right softkey).
2. Highlight Erase Event
Erase EventErase Event
Erase Event and press MENU/OK.
3. Select Yes
YesYes
Yes and press MENU/OK.
Viewing a Feature/Past Day
Viewing a Feature/Past DayViewing a Feature/Past Day
Viewing a Feature/Past Day’
’’’s Scheduled Events
s Scheduled Eventss Scheduled Events
s Scheduled Events
To View a feature/past day’s scheduled events, follow these steps:
1. From the Event list display, press Options
OptionsOptions
Options (right softkey).
2. Highlight Go to Date
Go to DateGo to Date
Go to Date and press MENU/OK.
3. Enter the date by using numeric keys and the Navigation key and press MENU/OK or
OK
OK OK
OK (left softkey).
4. Press MENU/OK once again to view the day’s Event List.

53
Adding To Do List Items
Adding To Do List ItemsAdding To Do List Items
Adding To Do List Items
Your phone can store and manage 20 To Do items.
To add an entry to your To Do List:
1.
From the Event list display, press Options
Options Options
Options (right softkey).
2. Highlight To Do List
To Do ListTo Do List
To Do List and press MENU/OK.
3. Highlight Options
Options Options
Options (right softkey).
4. Highlight Add Item
Add ItemAdd Item
Add Item and press MENU/OK.
5. Enter the description (up to 14 characters) and press MENU/OK.
6. Select the menu under Priority
PriorityPriority
Priority and press MENU/OK to edit the To Do’s priority. You can
select from Normal
NormalNormal
Normal, Urgent
UrgentUrgent
Urgent, or √
√√
√Done
DoneDone
Done.
7. Press Save
SaveSave
Save (left softkey).
Viewing the To Do List
Viewing the To Do ListViewing the To Do List
Viewing the To Do List
To view your To Do List:
1.
From Event list display, press Options
OptionsOptions
Options (right softkey).
2.
Select To Do List
To Do List To Do List
To Do List and press MENU/OK.
To see the details of each To Do item, select an item and press MENU/OK.
Editing To Do List Items
Editing To Do List ItemsEditing To Do List Items
Editing To Do List Items
To edit your To Do item:
1. From the To Do List display, highlight the item you want to edit and press MENU/OK.
2. Highlight the box you want to edit and press MENU/OK.
3. Edit the description or change the priority, and press MENU/OK.
4. Press Save
SaveSave
Save (left softkey).
Adding a To Do List Item to the Schedule
Adding a To Do List Item to the ScheduleAdding a To Do List Item to the Schedule
Adding a To Do List Item to the Schedule
To add your To Do item to schedule:
1. From the To Do List display, highlight the item you want to add to schedule and press
Options
OptionsOptions
Options (right softkey).
2. Highlight Add to Schedule
Add to Schedule Add to Schedule
Add to Schedule and press
MENU/OK.
3. Enter the description using your keypad and press MENU/OK.
4. Press Save
Save Save
Save (right softkey).
Add To Schedule
Add To Schedule Add To Schedule
Add To Schedule extracts the item from the To-Do list and makes it a scheduled event.
Deleting Items from the To Do List
Deleting Items from the To Do ListDeleting Items from the To Do List
Deleting Items from the To Do List
1. From To Do List display, highlight the item you want to erase and press
Options
OptionsOptions
Options (right softkey).
2. Select your Erase Item
Erase ItemErase Item
Erase Item, Erase Selections
Erase Selections Erase Selections
Erase Selections or Erase All
Erase AllErase All
Erase All and press MENU/OK.
Erase Item
Erase Item Erase Item
Erase Item erases an item from the To Do List.
Erase Selection
Erase Selection Erase Selection
Erase Selection erases the selected To Do item at one time. Press MENU/OK to check the
box next to To Do Item and press Erase
EraseErase
Erase (left softkey) to erase. To check all boxes, press
Options
OptionsOptions
Options (right softkey), then Select Check All
Check All Check All
Check All and press MENU/OK.

54
Erase All
Erase All Erase All
Erase All erases the all To Do items.
3. Select Yes
Yes Yes
Yes and press MENU/OK.
Viewing Memory in Your Scheduler
To view available memory space and options:
1. From Event list display, press Options
OptionsOptions
Options (right softkey).
2. Highlight View Memory
View MemoryView Memory
View Memory and press MENU/OK.
3. Highlight Schedule
ScheduleSchedule
Schedule, Call Alarm
Call AlarmCall Alarm
Call Alarm, or To Do List
To Do ListTo Do List
To Do List and press MENU/OK.
For further options:
4. Press Options
OptionsOptions
Options (right softkey).
5. Highlight an option and press MENU/OK.
Options:
Erase Old
Erase OldErase Old
Erase Old delete old events or call alarms.
Erase Selection
Erase SelectionErase Selection
Erase Selection deletes the To Do List items you selected.
Erase Done
Erase DoneErase Done
Erase Done deletes the To Do List items that have been completed.
Erase Al
Erase AlErase Al
Erase All
ll
l deletes all events, call alarms, or To Do List items.
6. Select Yes
YesYes
Yes or No
NoNo
No and press MENU/OK.
Purging All Events, Call Alarms or To Do List
Purging All Events, Call Alarms or To Do ListPurging All Events, Call Alarms or To Do List
Purging All Events, Call Alarms or To Do List
To delete all scheduled events, call alarms or To Do List:
1.
From Event list display, press Options
OptionsOptions
Options (right softkey).
2.
Select Erase Memory
Erase Memory Erase Memory
Erase Memory and press MENU/OK.
3.
Select one item from the Options and press MENU/OK.
Options:
Erase Old
Erase Old Erase Old
Erase Old deletes the old events, Call Alarms or completed To Do items.
Erase All
Erase All Erase All
Erase All deletes the all events, Call Alarms or To Do items.
4.
Select Yes
Yes Yes
Yes or N
NN
No
oo
o, and press MENU/OK.
Displaying Your User Address
Displaying Your User AddressDisplaying Your User Address
Displaying Your User Address
Display the current user address you have signed in:
1.
Press MENU/OK to access the main menu.
2. Select Settings
SettingsSettings
Settings and press MENU/OK.
3. Select Phone Inf
Phone InfPhone Inf
Phone Info
oo
o and press MENU/OK.
4. Select Phone#
Phone#Phone#
Phone# Use
Use Use
UserID
rIDrID
rID and press MENU/OK.
If you sign out, “PSC Vision Disabled” appears on the display.
Finding Icon Definitions
Finding Icon DefinitionsFinding Icon Definitions
Finding Icon Definitions
You can see the explanation of icons that appear on the display.
1. Press MENU/OK to display the main menu.
2. Select Settings
SettingsSettings
Settings and press MENU/OK.
3. Select Phone Info
Phone InfoPhone Info
Phone Info and press MENU/OK.
4. Select Help
HelpHelp
Help and press MENU/OK.
5. Select the item for which you want to see the explanation and press MENU/OK.

55
6. The icons explanation appears and scrolls down automatically.
7. Press Done
DoneDone
Done (left softkey) or END/ to end.
Use the ▲/▼ on the Navigation key to scroll the message manually.
Displaying the Version Information
Displaying the Version InformationDisplaying the Version Information
Displaying the Version Information
Display the version number of the software, hardware, PRL (Preferred Roaming List), PRI
(Product Release Instructions), etc., installed on your PCS Phone.
1. Press MENU/OK to access the main menu.
2. Select Settings
SettingsSettings
Settings and press MENU/OK.
3. Select Phone Info
Phone InfoPhone Info
Phone Info and press MENU/OK.
4. Select Version
VersionVersion
Version and press MENU/OK.
Displaying Advanced Information
Displaying Advanced InformationDisplaying Advanced Information
Displaying Advanced Information
To display advanced information such as technology and frequency:
1. Press MENU/OK to access the main menu.
2. Select Settings
SettingsSettings
Settings and press MENU/OK.
3. Select Phone Info
Phone InfoPhone Info
Phone Info and press MENU/OK.
4. Select Advanced
AdvancedAdvanced
Advanced and press MENU/OK.
Using Your Phone
Using Your PhoneUsing Your Phone
Using Your Phone’
’’’s Tools
s Toolss Tools
s Tools
In addition to features designed to help make you more efficient and organized, your
new PCS phone also offers for your entertainment and amusement.
Using the Calculator
Using the CalculatorUsing the Calculator
Using the Calculator
Your phone comes with a built-in calculator function.
To use this feature, follow these easy steps:
1.
From the standby mode, press MENU/OK to display the main menu.
2.
Select Tools/Extr
Tools/ExtrTools/Extr
Tools/Extras
asas
as, and press MENU/OK.
3.
Select Calculator
CalculatorCalculator
Calculator, and press MENU/OK.
4.
Enter numbers using your keypad. Press . (left softkey)
to insert a decimal point.
5.
Press the appropriate Navigation key for an arithmetic option.
(up for addition, down for subtraction, left for multiplication, right for division)
6.
Enter numbers, and press MENU/OK for the result.
To clear the numbers, press CLR
CLRCLR
CLR (right softkey).
To end calculation, press END/.
Using the World Clock
Using the World ClockUsing the World Clock
Using the World Clock
This feature is available only in digital area.
1.
Press MENU/OK to display the main menu.
2.
Select Tools/Extras
Tools/ExtrasTools/Extras
Tools/Extras, and press MENU/OK.
3.
Select World Clock
World ClockWorld Clock
World Clock, and press MENU/OK.
4.
World Clock display appears.
56
Press right or left on the Navigation key for changing country.
Press Summer
SummerSummer
Summer
(left softkey)
or Standard
StandardStandard
Standard (right softkey) to select between daylight savings and
standard time (if applicable).

57
Using Your Phone
Using Your PhoneUsing Your Phone
Using Your Phone’
’’’s Voice Services
s Voice Servicess Voice Services
s Voice Services
Using Voice
Using VoiceUsing Voice
Using Voice-
--
-Activated Dialing
Activated DialingActivated Dialing
Activated Dialing
You can use a Voice Dial tag to automatically dial a phone number in your Contacts directory.
To use a Voice Dial tag to call a phone number:
1. From the standby mode, press TALK or SPEAKER briefly.
2. Follow the voice prompts and recite the entry’s Voice Dial tag into your phone’s microphone.
Programming Voice Dial Tag
Programming Voice Dial TagProgramming Voice Dial Tag
Programming Voice Dial Tag
To program a voice dial tag:
1. Press MENU/OK to display the main menu.
2. Select Voice
VoiceVoice
Voice
Service
ServiceService
Services
ss
s and press MENU/OK.
3. Select Voice Dial
Voice DialVoice Dial
Voice Dial and press MENU/OK.
4. Select Program
ProgramProgram
Program and press MENU/OK.
5. The phone will prompt you to say the name you want to program. Wait for the beep and
then say the name.
6. Respond to the prompt by repeating the name after the beep.
7. Enter or highlight the entry (name) in the Contacts list and press MENU/OK.
8. Select the labeled category that includes your desired phone number and press MENU/OK.
The display shows “Voice Dial Recorded”.
Reviewing Voice
Reviewing Voice Reviewing Voice
Reviewing Voice Dial Tags
Dial TagsDial Tags
Dial Tags
1. From the standby mode, press MENU/OK to display the main menu.
2. Select Voice Services
Voice ServicesVoice Services
Voice Services and press MENU/OK.
3. Select Voice Dial
Voice DialVoice Dial
Voice Dial and press MENU/OK.
4. Select Review
ReviewReview
Review or Rev:Speaker
Rev:SpeakerRev:Speaker
Rev:Speaker and press MENU/OK.
5. Select the desired entry and press MENU/OK.
-or-
Select the desired entry and press Options
OptionsOptions
Options
(right softkey). To select an option, highlight it
and press MENU/OK.
Options:
Play
Play Play
Play to play the recorded voice dial tag.
Speaker On
Speaker OnSpeaker On
Speaker On to play the recorded voice dial tag in speakerphone mode. (If you are
speakerphone mode, the option will appear as Speaker Off
Speaker OffSpeaker Off
Speaker Off to deactivate.)
Erase
EraseErase
Erase to erase the voice dial tag. Select Yes
Yes Yes
Yes to erase and No
NoNo
No to cancel.
Erasing All Voice Dial Tags
Erasing All Voice Dial TagsErasing All Voice Dial Tags
Erasing All Voice Dial Tags
To erase all voice dial tags:
1. Press MENU/OK to access the main menu.
2. Select Voice Services
Voice ServicesVoice Services
Voice Services and press MENU/OK.
3. Select Voice Dial
Voice DialVoice Dial
Voice Dial and press MENU/OK.
4. Select Erase All
Erase AllErase All
Erase All and press MENU/OK.
5. Select Yes
Yes Yes
Yes and press MENU/OK.

58
Recording
Recording Recording
Recording Voice
Voice Voice
Voice Memos
MemosMemos
Memos
To record a memo in standby mode:
1. Press MENU/OK to access the main menu.
2. Select Voice Services
Voice ServicesVoice Services
Voice Services and press MENU/OK.
3. Select Voice Memo
Voice MemoVoice Memo
Voice Memo and press MENU/OK.
4. Select Record
RecordRecord
Record and press MENU/OK.
5. Start recording after the beep.
Press and hold SPEAKER to record in speakerphone mode (steps 1 through 5 above).
To end the recording of your memo:
Press MENU/OK , BACK or END/.
To record a conversation during a phone call:
1. During a call, press MENU/OK to display the options.
2. Select Voice
Voice Voice
Voice Services
ServicesServices
Services and press MENU/OK.
3. Select Voice Memo
Voice MemoVoice Memo
Voice Memo and press MENU/OK.
4. Select Record
RecordRecord
Record and press MENU/OK.
5. Start recording after the beep.
To end the recording of your conversation:
Wait for 18 seconds or press MENU/OK or BACK while recording.
-or-
Press END/ and disconnect the call.
It also stops recording when the other party hangs up the call.
Memo recording is disabled while you are in roaming in analog service area.
When the recording capacity is full, highlight old memo, and press Erase
EraseErase
Erase (left softkey) to
make roam from additional menus.
Note:
Note: Note:
Note: Your phone can store up to 12 memos and the total available recording time is 72 seconds
(maximum of 18 seconds per memo).
Reviewing Voice Memo
Reviewing Voice MemoReviewing Voice Memo
Reviewing Voice Memo
To play the voice memos you have recorded:
1. Press MENU/OK to access the main menu.
2. Select Voice Services
Voice ServicesVoice Services
Voice Services and press MENU/OK.
3. Select Voice Memo
Voice MemoVoice Memo
Voice Memo and press MENU/OK.
4. Select Play
Play Play
Play or Play:Speaker
Play:SpeakerPlay:Speaker
Play:Speaker and press MENU/OK.
5. Select one memo from the list and press MENU/OK.
- or -
If you want to play all memos continuously, highlight All
AllAll
All and press MENU/OK.
6. Press MENU/OK to stop playing.
Press Slow
SlowSlow
Slow (left softkey) or Fast
Fast Fast
Fast (right softkey) to change the playing speed.
To play the newer/older memo, press left or right on the Navigation key.
Tip:
Tip:Tip:
Tip: To set the speakerphone mode on or off, press Options
Options Options
Options (right softkey), highlight Speaker
Speaker Speaker
Speaker
On/Off
On/Off On/Off
On/Off and press MENU/OK during step 5 above.

59
Erasing
Erasing Erasing
Erasing Voice
Voice Voice
Voice Memos
MemosMemos
Memos
To erase individual memos:
1. Press MENU/OK to access the main menu.
2. Select Voice Services
Voice ServicesVoice Services
Voice Services and press MENU/OK.
3. Select Voice Memo
Voice MemoVoice Memo
Voice Memo and press MENU/OK.
4. Select Play
PlayPlay
Play or Play:Speaker
Play:SpeakerPlay:Speaker
Play:Speaker and press MENU/OK.
5. Display the memo list, highlight the memo you want to erase, and press
Options
OptionsOptions
Options (right softkey).
6. Select Erase
Erase Erase
Erase and press MENU/OK.
7. Select Yes
YesYes
Yes and press MENU/OK.
To erase all voice memos:
1. Follow steps 1-5 above.
2. Select Erase All
Erase AllErase All
Erase All and press MENU/OK.
3. Select Yes
YesYes
Yes and press MENU/OK.
- or -
1. Press MENU/OK to access the main menu.
2. Select Voice Services
Voice ServicesVoice Services
Voice Services and press MENU/OK.
3. Select Voice Memo
Voice MemoVoice Memo
Voice Memo and press MENU/OK.
4. Select Erase All
Erase AllErase All
Erase All and press MENU/OK.
5. Select Yes
YesYes
Yes and press MENU/OK.
Setting Up Screen Call
Setting Up Screen CallSetting Up Screen Call
Setting Up Screen Call
This feature enables you to screen incoming calls by using recorded announcements either one
that is pre-recorded or one that you record. You can also record the caller’s message into the
Voice Memo list. To listen to the message, see “Reviewing Voice Memo” on page 57.
Activa
ActivaActiva
Activating Screen Call
ting Screen Callting Screen Call
ting Screen Call
To start Screen Call when you have incoming calls:
1. Press MENU/OK to display the options.
2. Select Screen Call
Screen CallScreen Call
Screen Call and press MENU/OK.
To set Auto Screen Call:
1. Press MENU/OK to access the main menu.
2. Select Voice Services
Voice ServicesVoice Services
Voice Services and press MENU/OK.
3. Select Screen Call
Screen CallScreen Call
Screen Call and press MENU/OK.
4. Select Auto
AutoAuto
Auto and press MENU/OK.
5. Select On
OnOn
On and press MENU/OK.
6. Set the answering time by using numeric keys or ▲/▼ on the Navigation key.
7. Press MENU/OK or OK
OKOK
OK (left softkey) .

60
Selecting Announcemen
Selecting AnnouncemenSelecting Announcemen
Selecting Announcement for Screen Call
t for Screen Callt for Screen Call
t for Screen Call
To select an announce menu:
1. Press MENU/OK to access the main menu.
2. Select Voice Services
Voice ServicesVoice Services
Voice Services and press MENU/OK.
3. Select Screen Call
Screen CallScreen Call
Screen Call and press MENU/OK.
4. Select Announcement
AnnouncementAnnouncement
Announcement and press MENU/OK.
5. Depending on your preference, select Pre
PrePre
Pre-
--
-Recorded
Recorded Recorded
Recorded or Custom
CustomCustom
Custom
and press
MENU/OK.
Recording Your Name for a Pre
Recording Your Name for a PreRecording Your Name for a Pre
Recording Your Name for a Pre-
--
-Recorded Announcement
Recorded AnnouncementRecorded Announcement
Recorded Announcement
To record your name:
1. Press MENU/OK to access the main menu.
2. Select Voice Services
Voice ServicesVoice Services
Voice Services and press MENU/OK.
3. Select Screen Call
Screen CallScreen Call
Screen Call and press MENU/OK.
4. Select Announcement
AnnouncementAnnouncement
Announcement and press MENU/OK.
5. Select Pre
PrePre
Pre-
--
-Recorded
RecordedRecorded
Recorded press Edit
EditEdit
Edit (right softkey).
6. Select Record Name
Record NameRecord Name
Record Name and press MENU/OK.
When your name has already been recorded, select Yes
YesYes
Yes or No
NoNo
No to overwrite the existing
recording.
7. Press MENU/OK to start first recording.
8. After the first recording, press MENU/OK to start the second recording.
9. Press MENU/OK to stop recording.
Tip :
Tip :Tip :
Tip : Recording terminate automatically after 12 seconds.
Recording a Customized
Recording a Customized Recording a Customized
Recording a Customized Announcement
AnnouncementAnnouncement
Announcement
To record an announcement:
1. Follow the step 1-4 steps above.
2. Select Custom
CustomCustom
Custom and press Edit
EditEdit
Edit (right softkey).
3. Select Record
RecordRecord
Record and press MENU/OK.
When your announcement has already been recorded, select Yes
YesYes
Yes or No
NoNo
No to overwrite the
existing recording.
4. Press MENU/OK to start first recording.
Tip:
Tip:Tip:
Tip: Recording terminates automatically after 12 seconds.
Reviewing an Announcement
Reviewing an AnnouncementReviewing an Announcement
Reviewing an Announcement
To review an announcement:
1. Press MENU/OK to access the main menu.
2. Select Voice Services
Voice ServicesVoice Services
Voice Services and press MENU/OK.
3. Select Screen Call
Screen CallScreen Call
Screen Call and press MENU/OK.
4. Select Announc
AnnouncAnnounc
Announcement
ementement
ement and press MENU/OK.
5. Select Pre
PrePre
Pre-
--
-Recorded
RecordedRecorded
Recorded or Custom
CustomCustom
Custom and press Edit
Edit Edit
Edit (right softkey).
6. Highlight Play
PlayPlay
Play or Play:Speaker
Play:SpeakerPlay:Speaker
Play:Speaker and press MENU/OK.

61
Erasing an Announcement
Erasing an AnnouncementErasing an Announcement
Erasing an Announcement
To erase an announcement:
1. Follow steps 1 to 5 on the previous page.
2. Select Erase Name
Erase NameErase Name
Erase Name to erase name for Pre-Recorded and press MENU/OK.
- or -
Select Erase
EraseErase
Erase to erase message for Custom and press MENU/OK.
3. Select Yes
YesYes
Yes and press MENU/OK.
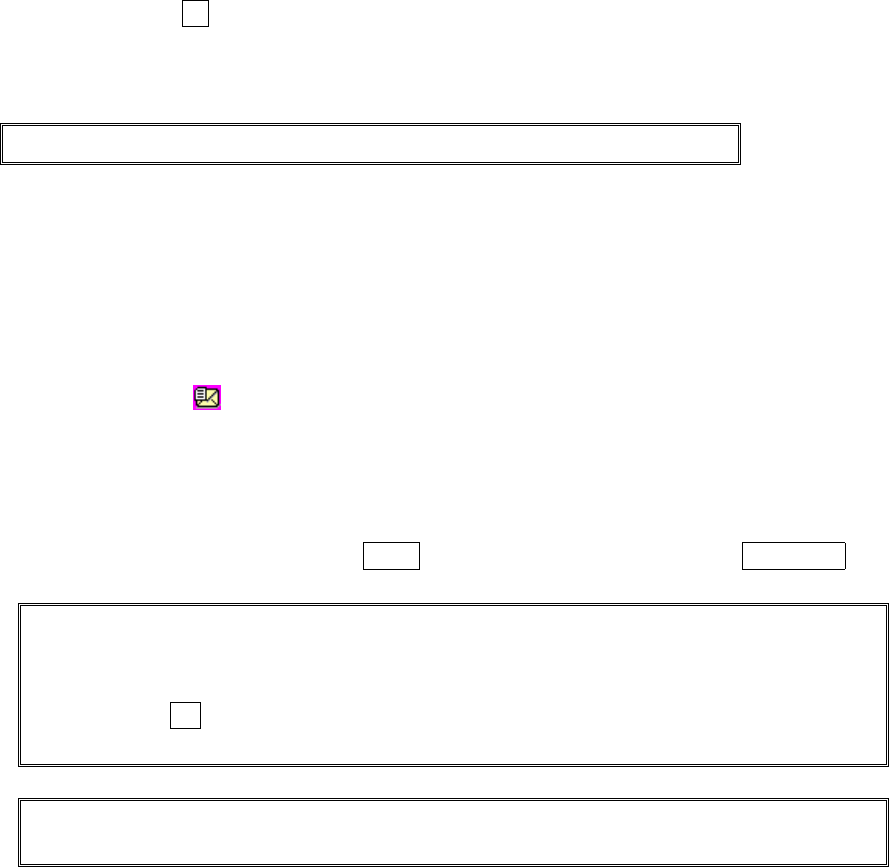
62
Using Voicemail
Using VoicemailUsing Voicemail
Using Voicemail
Setting Up Your Voicemail
Setting Up Your VoicemailSetting Up Your Voicemail
Setting Up Your Voicemail
All unanswered calls to your PCS Phone are automatically transferred to voicemail, even if
your phone is in use or turned off. Therefore, you will want to set up your PCS voicemail box
and personal greeting as soon as your PCS Phone is activated.
To set up voicemail:
1.
Press and hold 1 .
2.
Follow the system prompts to create your pass code, record your greeting, record your name
announcement and choose whether to activate One-Touch Message Access (a feature that lets
you press one key to access messages and bypasses the need for you to enter your pass code).
Note:
Note: Note:
Note: The voicemail setup process may vary in certain Affiliate areas.
Voicemail Notification
Voicemail NotificationVoicemail Notification
Voicemail Notification
There are several ways your PCS Phone alerts you:
By displaying a message on the Main LCD when the clamshell is open.
By displaying a message on the Sub LCD when the clamshell is closed.
By sounding the assigned ringer type.
By the LED blinking red.
By displaying at the top of the LCD.
New Voicemail Message Alerts
New Voicemail Message AlertsNew Voicemail Message Alerts
New Voicemail Message Alerts
When you receive a new voice message, your phone alerts you and prompts you to call your
voicemail.
To call your voicemail, press and hold TALK. To display your Missed Log, press MENU/OK or
OK
OKOK
OK (left softkey).
Important
ImportantImportant
Important: When you are roaming off the Nationwide PCS Network, you may not receive
notification of new voicemail messages. It is recommended that you periodically check your
voicemail by dialing 1 + area code + your PCS Phone Number. When your voicemail box
answers, press * and enter your pass code. You will be charged roaming rates when
accessing voicemail while roaming off the Nationwide PCS Network.
Note:
Note:Note:
Note: Your phone accepts messages even when it is turned off. However, you are only notified of
new messages when your phone is turned on and you are in a PCS Service Area.
63
Retrieving Your Voicemail Messages
Retrieving Your Voicemail MessagesRetrieving Your Voicemail Messages
Retrieving Your Voicemail Messages
You can review your messages directly from your PCS Phone or from any other touch-tone
phone. To dial from your PCS Phone, you can either speed dial your voicemail box or use the
menu keys.
Using One
Using OneUsing One
Using One-
--
-Touch Message Access:
Touch Message Access:Touch Message Access:
Touch Message Access:
Press and hold 1 . Follow the system prompts.
Using th
Using thUsing th
Using the Menu Keys on Your PCS Phone to Access Your Messages:
e Menu Keys on Your PCS Phone to Access Your Messages:e Menu Keys on Your PCS Phone to Access Your Messages:
e Menu Keys on Your PCS Phone to Access Your Messages:
1. Press MENU/OK to access the main menu.
2. Select Messaging
Messaging Messaging
Messaging and press MENU/OK.
3. Select Voicemail
Voicemail Voicemail
Voicemail and press MENU/OK.
4. Select Call Voicemail
Call VoicemailCall Voicemail
Call Voicemail
and press MENU/OK.
Note
NoteNote
Note: You are charged for airtime minutes when you are accessing your voicemail from your
PCS Phone.
Using a Phone Other Than Your PCS Phone to Access
Using a Phone Other Than Your PCS Phone to AccessUsing a Phone Other Than Your PCS Phone to Access
Using a Phone Other Than Your PCS Phone to Access
Your Messages:
Your Messages:Your Messages:
Your Messages:
1. Dial your PCS Phone Number.
2. When your voicemail answers, press * .
3. Enter your pass code.
Tip:
Tip:Tip:
Tip: When you call into voicemail you first hear the header information (date, time, and sender
information) for the message. To skip directly to the message, press 4 during the header.
Voicemail Options
Voicemail OptionsVoicemail Options
Voicemail Options
Your PCS Phone offers several options for organizing and accessing your voicemail.
Using Expert
Using ExpertUsing Expert
Using Expert Mode
Mode Mode
Mode
Using the Expert mode setting for your personal voicemail box helps you navigate
Through the voice system more quickly by shortening the voice prompts you hear at
Each level.
To turn Expert mode on or off:
1.
Press and hold 1 to access your voicemail. If your voicemail box contains any new
or saved messages, press * to access the main voicemail menu.
2. Following the system prompts, press 3 to change your Personal Options.
3. Press 4 for expert mode.
4. Press 1 to turn Expert mode on or off.
Set
SetSet
Setting Up Group Distribution Lists
ting Up Group Distribution Liststing Up Group Distribution Lists
ting Up Group Distribution Lists
Create up to 20 separate group lists, each with up to 20 customers.
1.
Press and hold 1 to access your voicemail.
2.
Following the system prompts, press 3 to change your Personal Options.
3.
Press 2 for Administrative Options.
4.
Press 5 for Group Distribution Lists.
5.
Follow the voice prompts to create, edit, rename or delete group lists.

64
PCS Callback
PCS CallbackPCS Callback
PCS Callback
Return a call after listening to a message without disconnecting from voicemail.
1.
After listening to a message, press 8 .
2.
Once the call is complete, you’re returned to the voicemail main menu.
Voicemail
VoicemailVoicemail
Voicemail-
--
-to
toto
to-
--
-Voicemail Message
Voicemail MessageVoicemail Message
Voicemail Message
Record and send a voice message to other PCS Voicemail customers.
1.
From the main voicemail menu, press 2 to send a message.
2.
Follow the voice prompts to enter the phone number.
3.
Follow the voice prompts to record and send your voice message.
Voicemail
VoicemailVoicemail
Voicemail-
--
-to
toto
to-
--
-Voicemail Message Reply
Voicemail Message ReplyVoicemail Message Reply
Voicemail Message Reply
Reply to a voice message received from any other PCS Voicemail customer.
1.
After listening to a voice message, press 2 .
2.
Follow the voice prompts to record and send your reply.
Voicemail
VoicemailVoicemail
Voicemail-
--
-to
toto
to-
--
-Voicemail Message Forwarding
Voicemail Message ForwardingVoicemail Message Forwarding
Voicemail Message Forwarding
Forward a voice message, except those marked “Private,” to other PCS Voicemail customers.
1.
After listening to a message, press 6 .
2.
Follow the voice prompts to enter the phone number.
3.
Follow the voice prompts to record your introduction and forward the voice message.
Voicemail
VoicemailVoicemail
Voicemail-
--
-to
toto
to-
--
-Voicemail Receipt Request
Voicemail Receipt RequestVoicemail Receipt Request
Voicemail Receipt Request
Receive confirmation that your voice message has been listened to when you send, forward or
reply to a message to other PCS customers.
1.
After you have recorded a message, press 1 to indicate you are satisfied with the
message you recorded.
2. Press 4 to mark receipt requested.
3. Press 1 to send your voicemail message.
Continue Recording
Continue RecordingContinue Recording
Continue Recording
Before pressing 1 to indicate you are satisfied with the message you recorded, press 4
to continue recording.
Extended Absence Greeting
Extended Absence GreetingExtended Absence Greeting
Extended Absence Greeting
When your phone is turned off or you are off the Nationwide PCS Network for an extended
period, this greeting can be played instead of your normal personal greeting.
1.
From the main voicemail menu, press 3 for Personal Options.
2.
Press 3 for Greetings.
3.
Press 3 to record an Extended Absence Greeting.
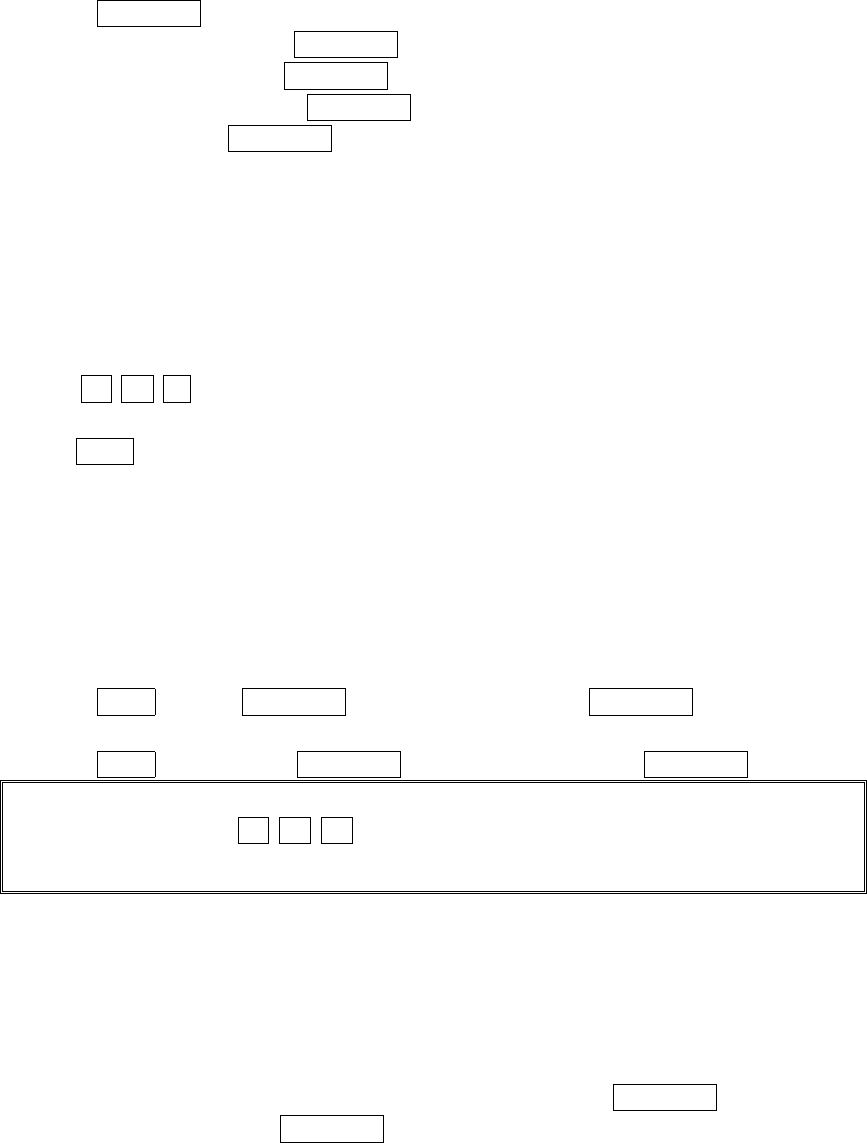
65
Clearing the Message
Clearing the Message Clearing the Message
Clearing the Message Icon
IconIcon
Icon
Your phone may temporarily continue to display the icon after you have checked your voice and
text messages.
To clear the icon from the display screen:
1. Press MENU/OK to access the main menu.
2. Select Messaging
Messaging Messaging
Messaging and press MENU/OK.
3. Select Voicemail
Voicemail Voicemail
Voicemail and press MENU/OK.
4. Select Clear Count
Clear Count Clear Count
Clear Count and press MENU/OK.
5. Select Yes
Yes Yes
Yes and press MENU/OK.
Using Caller ID
Using Caller IDUsing Caller ID
Using Caller ID
Caller ID lets you know who’s calling by displaying the number of the person calling when your
phone rings. Similarly, if you call someone who has this feature, your phone number displays
on their phone. If the caller’s name and number are already stored in your Contacts Directory,
the corresponding name appears with the number.
To block your phone number from being displayed for a specific outgoing call:
1.
Press * 6 7 .
2.
Enter the number you want to call.
3.
Press TALK.
To permanently block your number, call PCS Customer center.
Responding to Call Waiting
Responding to Call WaitingResponding to Call Waiting
Responding to Call Waiting
Call Waiting alerts you to incoming calls while you’re on a call by sounding beeps. The display
screen informs you that a call is coming in and shows the caller’s phone number (if it is
available and you are in digital mode).
To respond to an incoming call while you’re on a call:
Press TALK (or press MENU/OK, highlight Flash
Flash Flash
Flash and press MENU/OK).
This puts the first caller on hold and answers the second call.
Press TALK again (or press MENU/OK, highlight Flash
Flash Flash
Flash and press MENU/OK).
Tip:
Tip: Tip:
Tip: For those call where you don’t want to be interrupted, you can temporarily disable Call
Waiting by pressing * 7 0 before placing your call. Call Waiting is automatically
reactivated once you end the call.
Making a Three
Making a ThreeMaking a Three
Making a Three-
--
-Way Call
Way CallWay Call
Way Call
With Three-Way Calling, you can talk to two people at the same time. When using this feature,
the normal airtime rates will be charged for each of the two calls.
To make a three-way call:
1. Enter a number you wish to call and press TALK or SPEAKER.
2. Once you have established the connection, press TALK (or press MENU/OK, highlight
Three-Way Call, and press MENU/OK). This puts the first caller on hold and dials the
second number.
66
3. Dial the second number you wish to call and press TALK (or press MENU/OK, highlight
Call or Call:Speaker On, and press MENU/OK).
4. When you’re connected to the second party, press TALK again (or press MENU/OK,
highlight Flash, and press MENU/OK) to begin your three-way call.
If one of the people you called hangs up during your call, you and the remaining caller stay
connected. If you initiated the call and are the first to hang up, all three callers are
disconnected.
Tip:
Tip:Tip:
Tip: You can also begin a Three-Way Call by displaying a phone number stored in your
Contacts list, Call History, or Messaging. To call the third party, press MENU/OK during step
3 above.
Note:
Note:Note:
Note: Call Waiting and Three-Way Calling may not be available while roaming off the PCS
Network.
Using Call Forwarding
Using Call ForwardingUsing Call Forwarding
Using Call Forwarding
Call Forwarding lets you forward all your incoming calls to another phone number – even when
your phone is turned off. You can continue to make calls from your phone with Call Forwarding
activated.
To Activate Call Fo
To Activate Call FoTo Activate Call Fo
To Activate Call Forwarding
rwardingrwarding
rwarding
1.
Press * 7 2 .
2.
Enter the area code and phone number to which your future calls should be forwarded.
3.
Press TALK. You will hear a tone to confirm the activation of Call Forwarding.
To Deactivate Call Forwarding
To Deactivate Call ForwardingTo Deactivate Call Forwarding
To Deactivate Call Forwarding
1.
1. 1.
1. Press * 7 2 0 .
2.
2. 2.
2. Press TALK. You will hear a tone to confirm the deactivation.
Note:
Note: Note:
Note: You are charged a higher rate for calls you have forwarded.

67
Messages
MessagesMessages
Messages
These appear on your screen as Notifications
Notifications Notifications
Notifications and include numeric messages (pages),Messages,
Updates, and Mail.
New Messages
New MessagesNew Messages
New Messages
When you receive a new Message, your phone alerts you and press View
View View
View (left softkey) to display
the message details.
Press Call
CallCall
Call (left softkey) to dial the phone number
Press Reply
ReplyReply
Reply (left softkey) to reply the message.
Press Go
GoGo
Go (left softkey) to go to the web site.
Press Forward
Forward Forward
Forward (left softkey) to forward the message. (Appears only if there are no phone
numbers and URLs in the message.)
Press Options
OptionsOptions
Options (right softkey) to display options.
Message Storage
Message StorageMessage Storage
Message Storage
Your PCS Phone can store up to 200 received and 180 sent Messages. When the message
memory is full, a warning message prompts you to erase messages to obtain additional memory
space.
Sending a Message in the Outbox Folder
Sending a Message in the Outbox FolderSending a Message in the Outbox Folder
Sending a Message in the Outbox Folder
If a failure occurs when you try to send a message, the message goes to the Outbox folder.
To send the message:
1. Press MENU/OK to access the main menu.
2. Select Messaging
MessagingMessaging
Messaging and press MENU/OK.
3. Select Text Msg
Text MsgText Msg
Text Msg and press MENU/OK.
4. Select Outbox
OutboxOutbox
Outbox and press MENU/OK.
5. Select the message you wish to send, and press Send
SendSend
Send (left softkey).
Me
MeMe
Message Options
ssage Optionsssage Options
ssage Options
Several options are available when you display a folder list, message list, or message details,
and press Options
OptionsOptions
Options (right softkey). To select an option, highlight it and press MENU/OK.
Folder list options:
Select Inbox
InboxInbox
Inbox, Sent
SentSent
Sent, Outbox
OutboxOutbox
Outbox, Drafts
DraftsDrafts
Drafts, or your defined folder and press Options
OptionsOptions
Options (right softkey). To
select an option, highlight it and press MENU/OK.
Edit Folder
Edit FolderEdit Folder
Edit Folder to edit the folder (user defined folder only).
Erase Folder
Erase FolderErase Folder
Erase Folder to erase the folder (user defined folder only).
Create Folder
Create FolderCreate Folder
Create Folder to create a new user defined folder.
Compose New
Compose NewCompose New
Compose New to compose a new message.
Erase Message
Erase MessageErase Message
Erase Message to erase a message.
Message list options:
To display message list options select Inbox
Inbox Inbox
Inbox (and defined folder), Sent
SentSent
Sent, Outbox
OutboxOutbox
Outbox, or Drafts
DraftsDrafts
Drafts and
press MENU/OK. Then press Options
OptionsOptions
Options (right softkey).

68
Reply
ReplyReply
Reply to reply to the message. (Inbox only.)
Forward
ForwardForward
Forward to forward the message. Select from From Phone Book, Mobile Phone#, or Email
Address. (Inbox and Sent only.)
Edit
Edit Edit
Edit to edit a message. (Outbox and Drafts only.)
Send
SendSend
Send to send a message. (Outbox and Drafts only.)
Move
MoveMove
Move to move a message to the Inbox or to your defined folder. Select a folder and press
MENU/OK, or press <New Folder>
<New Folder><New Folder>
<New Folder> to create a new folder. (Inbox only.)
Lock
LockLock
Lock to lock a message. Locked message will not be erased automatically. To unlock a
locked message, select Unlock
UnlockUnlock
Unlock and press MENU/OK. (Inbox and Sent only.)
Compose New
Compose New Compose New
Compose New to compose a new message.
Erase
Erase Erase
Erase to erase the selected message.
Erase Read Msgs
Erase Read Msgs Erase Read Msgs
Erase Read Msgs to erase read messages in the folder. (Inbox only.)
Erase All
Erase All Erase All
Erase All to erase all messages in the folder (except locked messages). A warning message
appears if there are unread messages.
Messages details options
After you display the Message list in the Inbox, Sent, or your defined folder, press MENU/OK to
display the message details. Press Options
OptionsOptions
Options (right softkey) to display message options. To select
an option, highlight it and press MENU/OK.
Call
Call Call
Call (Go to List) to call a number in the message. Select a number and press MENU/OK or
Call
CallCall
Call (left softkey) to make a call. Press and hold [Ready Link Button] and to make a Ready
Link Call.
Call:Speaker On
Call:Speaker OnCall:Speaker On
Call:Speaker On to call in speaker mode. Select a number and press MENU/OK or Call
Call Call
Call
(left softkey) to make a call. Press and hold [Ready Link Button] to make a Ready Link call.
Prepend
PrependPrepend
Prepend to add numbers to the beginning of the phone number (if applicable).
Go to URL List
Go to URL ListGo to URL List
Go to URL List to display URLs in the message. Press Go
GoGo
Go (left softkey) or select a URL and
press MENU/OK to go to the site.
Send Message
Send MessageSend Message
Send Message to display phone numbers and email address to send a message.
Reply
ReplyReply
Reply to reply to the message. (Message in Inbox and defined folder only.)
Forward
Forward Forward
Forward to forward the message. Select from From Phone Book
From Phone BookFrom Phone Book
From Phone Book, Mobile Phone#
Mobile Phone#Mobile Phone#
Mobile Phone#, or Email
Email Email
Email
Address
AddressAddress
Address.
Move
Move Move
Move to move the message to another folder. Select a folder and press MENU/OK or press
<New Folder>
<New Folder><New Folder>
<New Folder> to create new folder. (Message in Inbox and defined folder only.)
Lock
Lock Lock
Lock to lock the message. Locked message will not be erased automatically. To unlock
message, select Unlock
UnlockUnlock
Unlock and press MENU/OK.
Font Size
Font SizeFont Size
Font Size to change the font size from Small
SmallSmall
Small or Normal
NormalNormal
Normal.
Save to Ph. Book
Save to Ph. BookSave to Ph. Book
Save to Ph. Book to save the phone number, email address and URLs. Select a data
category and press MENU/OK to save.
Go to Ph. Book
Go to Ph. BookGo to Ph. Book
Go to Ph. Book to go to the Contacts list (if applicable).
Compose New
Compose NewCompose New
Compose New to compose a new message.
Erase
EraseErase
Erase to erase the message.

69
Displaying Messages
Displaying MessagesDisplaying Messages
Displaying Messages
To display a Message from the message notification alert, see “New Messages” on
page 66.
To display a Message from the main menu:
1. Press MENU/OK to access the main menu.
2. Select Messag
MessagMessag
Messaging
inging
ing and press MENU/OK.
3. Select Text Msg
Text MsgText Msg
Text Msg and press MENU/OK. (The folder list appears.)
4. Select Inbox
InboxInbox
Inbox, Sent
SentSent
Sent, Outbox
OutboxOutbox
Outbox, Drafts
DraftsDrafts
Drafts, or your defined folder and press MENU/OK. (The
message list appears.)
5. Highlight the header of the message you want to see and press MENU/OK. (The message
detail appears.)
An icon appears at the left side of each header of the message. The icons are as follows:
New message
Urgent message
Read message
Read Urgent message
If the sender’s information has already been stored in the Contacts, the corresponding name or
phone number appears as the header of the message. If nothing has been stored, the phone
number or text that was included in the message appears as the header of the message.
To read other messages:
Press left on the Navigation key to read the previous message.
Press right on the Navigation key to read the next message.
Changing the Displaying Font Size of a Message
Changing the Displaying Font Size of a MessageChanging the Displaying Font Size of a Message
Changing the Displaying Font Size of a Message
After you display a Message, press Options
OptionsOptions
Options (right softkey) to display message options.
To adjust the displaying font size:
1. Select Font Size
Font Size Font Size
Font Size by scrolling, and press MENU/OK.
2. Select Small
SmallSmall
Small or Normal
NormalNormal
Normal and press MENU/OK.

70
Prepending a Phone Number From a Message
Prepending a Phone Number From a MessagePrepending a Phone Number From a Message
Prepending a Phone Number From a Message
After you display a Message, press MENU/OK to display message options.
If you happen to be outside your local area code and need to add a prefix to a phone number:
1. Select Prepend
Prepend Prepend
Prepend and press MENU/OK.
2. Enter the digits or pauses (see below) you want to add to the number. If you want to save
the number, press MENU/OK and select the Save Phone#
Save Phone#Save Phone#
Save Phone# option. If not, the changes only
apply to the current call.
3. To select an option, highlight it and press MENU/OK.
Call
Call Call
Call to dial the phone number.
Call: Speaker On
Call: Speaker On Call: Speaker On
Call: Speaker On to dial the scheduled phone number with speakerphone mode.
Save Phone#
Save Phone# Save Phone#
Save Phone# to store the phone number in your Contacts Directory.
Hard Pause
Hard Pause Hard Pause
Hard Pause to insert a hard pause. (See “Dialing and Saving Phone Numbers With
Pauses” on page 17).
2
22
2-
--
-Sec
SecSec
Sec.
..
. Pause
Pause Pause
Pause to insert a 2-second pause. (See “Dialing and Saving Phone Numbers With
Pauses” on page 17).
Hyphen
Hyphen Hyphen
Hyphen to insert a hyphen.
Creating
Creating Creating
Creating F
FF
Folders for Messages
olders for Messagesolders for Messages
olders for Messages
You can create up to ten folders to store your Messages.
1. Press MENU/OK to display the main menu.
2. Select Messaging
MessagingMessaging
Messaging and press MENU/OK.
3. Select Text Msg
Text Msg Text Msg
Text Msg and press MENU/OK.
4. Press Options
Options Options
Options (right softkey).
5. Select Create Folder
Create FolderCreate Folder
Create Folder and press MENU/OK.
6. Enter a folder name and press MENU/OK or OK
OK OK
OK (left softkey).
Pressing Save
SaveSave
Save (left softkey) allows you to save the folder name.
7. If you want the message to be filed into the folder automatically, select the menu under
Auto Filing
Auto FilingAuto Filing
Auto Filing and press MENU/OK.
8. Select On
OnOn
On and press MENU/OK.
9. Select the box under Keyword
KeywordKeyword
Keyword by scrolling down and press MENU/OK.
10. Enter a keyword and press MENU/OK or OK
OKOK
OK (left softkey).
11. Press Save
SaveSave
Save (left softkey).
If you want to set an optional feature to the added folder:
1. During step 9 above, scroll down to select other menu options. Highlight the menu under
each item and press MENU/OK.
Notify
NotifyNotify
Notify to set the display notification to on or off when you have a message matching the
defined folder.
Envelop
EnvelopEnvelop
Envelope
ee
e Icon
Icon Icon
Icon to set the envelope icon display to on or off when you have a message
matching the defined folder.
2. After selecting each setting, press Save
SaveSave
Save (left softkey).

71
Moving a Message Into the Another Folder
Moving a Message Into the Another FolderMoving a Message Into the Another Folder
Moving a Message Into the Another Folder
After you display a Message, press Options
OptionsOptions
Options (right softkey) to display message options. You need
at least one defined folder.
If you want to move the message into the other folder:
1. Select Move
Move Move
Move and press MENU/OK.
2. Select your desired folder and press MENU/OK.
Editing Folders
Editing FoldersEditing Folders
Editing Folders
To edit a folder:
1. From the folder list display, highlight a defined folder.
2. Press Options
OptionsOptions
Options (right softkey).
3. Select Edit Folder
Edit FolderEdit Folder
Edit Folder and press MENU/OK.
4. Select the box under your desired option and press MENU/OK.
Folder Name
Folder NameFolder Name
Folder Name to edit the folder name.
Auto Filing
Auto FilingAuto Filing
Auto Filing to set auto filing to on or off.
Keyword
KeywordKeyword
Keyword to change the folder’s keyword. (Incoming messages are automatically filtered into
the folder if they contain the Keyword you enter.)
Notify
NotifyNotify
Notify to change the notification setting to on or off.
Envelope Icon
Envelope IconEnvelope Icon
Envelope Icon to change the icon setting to on or off.
5. Enter or select a new folder name/setting.
6. Press MENU/OK or OK
OKOK
OK (left softkey).
7. Press Save
SaveSave
Save (left softkey).
Erasing a Folder
Erasing a FolderErasing a Folder
Erasing a Folder
1. From the folder list display, highlight the folder you want to erase.
2. Press Options
OptionsOptions
Options (right softkey).
3. Select Erase Folder
Erase Folder Erase Folder
Erase Folder and press MENU/OK.
4. Select Yes
Yes Yes
Yes and press MENU/OK.
Note:
Note: Note:
Note: The messages within the folder are also erased. If the folder contains a new message, you
are prompted to select Erase
Erase Erase
Erase or Don’t Erase
Don’t EraseDon’t Erase
Don’t Erase.
Erasing Selected Messages in All Folders
Erasing Selected Messages in All FoldersErasing Selected Messages in All Folders
Erasing Selected Messages in All Folders
To erase all messages:
1. From the folder list display, press Options
OptionsOptions
Options (right softkey) to display the menu options.
2. Select Erase
Erase Erase
Erase Messa
MessaMessa
Messags
gs gs
gs and press MENU/OK.
3. Select Read
ReadRead
Read, Unread
UnreadUnread
Unread, and/or Sent
Sent Sent
Sent and press MENU/OK to check the appropriate box(es).
4. After selecting the boxes, press Done
Done Done
Done (left softkey).
5. Select Erase
EraseErase
Erase and press MENU/OK to erase selected messages. (Expect locked messages.)

72
Safety
SafetySafety
Safety
Getting the Most Out of Your Reception
Getting the Most Out of Your ReceptionGetting the Most Out of Your Reception
Getting the Most Out of Your Reception
Keeping Tabs on Signal Strength
Keeping Tabs on Signal StrengthKeeping Tabs on Signal Strength
Keeping Tabs on Signal Strength
The quality of each call you make or receive depends on the signal strength in your area. Your phone
informs you of the current strength by displaying a number of bars next to the signal strength icon.
The more bars displayed, the stronger the signal. If you’re inside a building, being near a window
may give you better reception.
Understanding Power Save Feature
Understanding Power Save FeatureUnderstanding Power Save Feature
Understanding Power Save Feature
If your phone is unable to find a signal after 15 minutes of searching, a Power Save feature is
automatically activated. If your phone is active, it periodically rechecks service availability or you can
check it yourself by pressing any key. Anytime the Power Save feature is activated, a message
displays on the screen. When a signal is found, your phone returns to standby mode.
Understanding How Your Phone Operates
Understanding How Your Phone OperatesUnderstanding How Your Phone Operates
Understanding How Your Phone Operates
Your phone is basically a radio transmitter and receiver. When it’s turned on, it receives and
transmits radio frequency (RF) signals. When you use your phone, the system handling your call
controls the power level. This power can range from 0.01 μwatts to 0.2 watts in digital mode.
Knowing Radio Frequency Safety
Knowing Radio Frequency SafetyKnowing Radio Frequency Safety
Knowing Radio Frequency Safety
The design of your Phone complies with updated NCRP standards described below.
In 1991-92, the Institute of Electrical and Electronics Engineers (IEEE) and the American National Standards
Institute (ANSI) joined in updating ANSI’s 1982 standard for safety levels with respect to human exposure to RF
signals. More than120 scientists, engineers and physicians from universities, government health agencies and
industries developed this updated standard after reviewing the available body of research. In 1993, the Federal
Communications Commission (FCC) adopted this updated standard in a regulation. In August 1996, the FCC
adopted hybrid standard consisting of the existing ANSI/IEEE standard and the guidelines published by the
National Council of Radiation Protection and Measurements (NCRP).
Maintaining Your Phone’s Peak Performance
Maintaining Your Phone’s Peak PerformanceMaintaining Your Phone’s Peak Performance
Maintaining Your Phone’s Peak Performance
There are several simple guidelines to operating your phone properly and maintaining safe,
satisfactory service.
Hold the phone with the antenna up, fully-extended and over your shoulder.
Try not to hold, bend or twist the phone’s antenna.
Don’t use the phone if the antenna is damaged.
Speak directly into the mouthpiece.
Avoid exposing your phone and accessories to rain or liquid spills. If your phone does get wet,
immediately turn the power off and remove the battery. If it’s inoperable, return it to a Store or
call Customer center for service.
Note
NoteNote
Note: For the best care of your phone, only authorized personnel should service your phone and
accessories. Faulty service may void the warranty.

73
Maintaining Safe Use of and Access to Your Phone
Maintaining Safe Use of and Access to Your PhoneMaintaining Safe Use of and Access to Your Phone
Maintaining Safe Use of and Access to Your Phone
FAILURE TO FOLLOW THE INSTRUCTIONS OUTLINED MAY LEAD TO SERIOUS
PERSONAL INJURY AND POSSIBLE PROPERTY DAMAGE
Using Your Phone While D
Using Your Phone While DUsing Your Phone While D
Using Your Phone While Driving
rivingriving
riving
Talking on the phone while driving (or operating the phone without a hands-free device) is
prohibited in some jurisdictions. Laws vary as to specific restrictions. Remember that safety always
comes first. When using your phone in the car:
Get to know your phone and its features, such as speed dial and redial.
When available, use a hands-free device.
Position your phone within easy reach.
Let the person you are speaking to know you are driving; if necessary, suspend the call in heavy traffic or
hazardous weather conditions.
Do not take notes or look up phone numbers while driving.
Dial sensibly and assess the traffic; if possible, place calls when you are not moving or before pulling into
traffic.
Do not engage in stressful or emotional conversations that may divert your attention from the road.
Dial 9 1 1 TALK to report serious emergencies. It’s free from your wireless phone.
Use your phone to help others in emergencies.
Call roadside assistance or a special non-emergency wireless number when necessary.
Tip
TipTip
Tip: Purchase an optional Hands-Free Car Kit.
Following Safety Guidelines
Following Safety GuidelinesFollowing Safety Guidelines
Following Safety Guidelines
To operate your phone safely and efficiently, always follow any special regulations in a given area.
Turn your phone off in areas where use is forbidden or when it may cause interference or danger.
Using Your Phone Near Other Electronic Devices
Using Your Phone Near Other Electronic DevicesUsing Your Phone Near Other Electronic Devices
Using Your Phone Near Other Electronic Devices
Most modern electronic equipment is shielded from radio frequency (RF) signals. However, RF
signals from wireless phones may affect inadequately shielded electronic equipment. RF signals may
affect improperly installed or inadequately shielded electronic operating and entertainment systems
in motor vehicles. Check with the manufacturer or its representative to determine if these systems
are adequately shielded from external RF signals. Also check with the manufacturer regarding any
equipment that has been added to your vehicle. Consult the manufacturer of any personal medical
devices, such as pacemakers and hearing aids, to determine if they are adequately shielded from
external RF signals.
N
NN
Note
oteote
ote: Always turn off the phone in health care facilities and request permission before using the
phone near medical equipment.
Turning Off Your Phone Before Flying
Turning Off Your Phone Before FlyingTurning Off Your Phone Before Flying
Turning Off Your Phone Before Flying
Turn off your phone before boarding any aircraft. To prevent possible interference with aircraft
systems, the U.S. Federal Aviation Administration (FAA) regulations require you to have permission
from a crew member to use your phone while the plane is on the ground. To prevent any risk of
interference, FCC regulations prohibit using your phone while the plane is in the air.
Turning Off Your Phone in Dangerous Areas
Turning Off Your Phone in Dangerous AreasTurning Off Your Phone in Dangerous Areas
Turning Off Your Phone in Dangerous Areas
To avoid interfering with blasting operations, turn off your phone when in a blasting area or in other
areas with signs indicating that two-way radios should be turned off. Construction crews often use

74
remote-control RF devices to set off explosives. Turn off your phone when you’re in any area that has
a potentially explosive atmosphere.
Although it’s rare, your phone or its accessories could generate sparks. Sparks could cause an
explosion or a fire resulting in bodily injury or even death. These areas are often, but not always,
clearly marked. They include:
Fueling areas such as gas stations
Below deck on boats
Fuel or chemical transfer or storage facilities
Areas where the air contains chemicals or particles such as grain, dust or metal powders
Any other area where you would normally be advised to turn off your vehicle engine
Note
NoteNote
Note: Never transport or store flammable gas, liquid or explosives in the compartment of your vehicle that
contains your phone or accessories.
Restricting Children ’s Access to Your Phone
Restricting Children ’s Access to Your PhoneRestricting Children ’s Access to Your Phone
Restricting Children ’s Access to Your Phone
Your PCS Phone is not a toy. Children should not be allowed to play with it because they could hurt
themselves and others, damage the phone or make calls that increase your phone bill.
Caring for the Battery
Caring for the BatteryCaring for the Battery
Caring for the Battery
Protecting Your Battery
Protecting Your BatteryProtecting Your Battery
Protecting Your Battery
The guidelines listed below help you get the most out of your battery’s performance.
Use only PCS-approved batteries and desktop chargers. These chargers are designed to
maximize battery life. Using other batteries or chargers voids your warranty and may cause
damage.
In order to avoid damage, charge the battery only in temperatures that range from 32º F to 113º
F (0º C to 45º C).
Don’t use the battery charger in direct sunlight or in high humidity areas, such as the
bathroom.
Never dispose of the battery by incineration.
Keep the metal contacts on top of the battery clean.
Don’t attempt to disassemble or short-circuit the battery.
The battery may need recharging if it has not been used for a long period of time.
It’s best to replace the battery when it no longer provides acceptable performance. It can be
recharged hundreds of times before it needs replacing.
Don’t store the battery in high temperature areas for long periods of time. It’s best to follow
these storage rules:
Less than one month: 4º F to 140º F (-20º C to 60º C)
More than one month: 4º F to 113º F (-20º C to 45º C)
Disposal of Lithium Ion (LiIon) Batteries
Disposal of Lithium Ion (LiIon) BatteriesDisposal of Lithium Ion (LiIon) Batteries
Disposal of Lithium Ion (LiIon) Batteries
For safe disposal options of your LiIon batteries, contact your nearest PCS-authorized service center.
Special note
Special noteSpecial note
Special note: Be sure to dispose of your battery properly. In some areas, the disposal of batteries in
household or business trash may be prohibited.
Note
NoteNote
Note: For safety, do not handle a damaged or leaking LiIon battery.

75
Acknowledging Spec
Acknowledging SpecAcknowledging Spec
Acknowledging Special Precautions and the FCC Notice
ial Precautions and the FCC Noticeial Precautions and the FCC Notice
ial Precautions and the FCC Notice
FCC Notice
FCC NoticeFCC Notice
FCC Notice
The phone may cause TV or radio interference if used in close proximity to receiving equipment. The
FCC can require you to stop using the phone if such interference cannot be eliminated.
Vehicles using liquefied petroleum gas (such as propane or butane) must comply with the National
Fire Protection Standard (NFPA-58). For a copy of this standard, contact the National Fire
Protection Association, One Batterymarch Park, Quincy, MA02269, Attn: Publication Sales Division.
Note
NoteNote
Note: This equipment has been tested and found to comply with the limits for a Class B digital device,
pursuant to part 15 of the FCC Rules. These limits are designed to provide reasonable protection
against harmful interference in a residential installation.
This equipment generates, uses, and can radiate radio frequency energy and, if not installed and
used in accordance with the instructions, may cause harmful interference to radio communications.
However, there is no guarantee that interference will not occur in a particular installation. If this
equipment does cause harmful interference to radio or television reception, which can the
interference by one or more of the following measures:
Reorient or relocate the receiving antenna.
Increase the separation between the equipment and receiver.
Connect the equipment into an outlet on a circuit different from that to which the receiver is
connected.
Consult the dealer or an experienced radio/TV technician for help.
Cautions
CautionsCautions
Cautions
Any changes or modifications to your phone not expressly approved in this document could void your
warranty for this equipment and void your authority to operate this equipment. Only use approved
batteries, antennas and chargers. The use of any unauthorized accessories may be dangerous and
voids the phone warranty if said accessories cause damage or a defect to the phone.
Although your phone is quite sturdy, it is a complex piece of equipment and can be broken. Avoid
dropping, hitting, bending or sitting on it.
Body
BodyBody
Body-
--
-Worn Operation
Worn OperationWorn Operation
Worn Operation
To maintain compliance with FCC RF exposure requirements, Body-worn operations are restricted
to belt-clips, holsters or similar accessories that have no metallic component in the assembly and
that provide at least 1.9 cm separation between the device, including its antenna whether extended
or retracted, and the user’s body. Use of non-recommended accessories may violate FCC RF exposure
requirements.
For more information about RF exposure, please visit the FCC website at www.fcc.gov.
Specific Absorption Rate (S
Specific Absorption Rate (SSpecific Absorption Rate (S
Specific Absorption Rate (SAR) for Wireless Phones
AR) for Wireless PhonesAR) for Wireless Phones
AR) for Wireless Phones
The SAR is a value that corresponds to the relative amount of RF energy absorbed in the head of a
user of a wireless handset. The SAR value of a phone is the result of an extensive testing, measuring
and calculation process. It does not represent how much RF the phone emits. All phone models are
tested at their highest value in strict laboratory settings. But when in operation, the SAR of a phone
can be substantially less that the level reported to the FCC. This is because of a variety of factors
including its proximity to a base station antenna, phone design and other factors. What is important
to remember is that each phone meets strict federal guidelines. Variations in SARs do not represent
76
a variation in safety.
All phones must meet the federal standard, which incorporates a substantial margin of safety. As
stated above, variations in SAR values between different model phones do not mean variations in
safety. SAR values at or below the federal standard of 1.6 W/kg are considered safe for use by the
public.
The highest reported SAR values of SCP-8200 are:
AMPS/CDMA modes (Part 22) - Head: 1.30 W/kg; Body-worn: 1.01 W/kg
PCS CDMA mode (Part 24) - Head: 1.13 W/kg; Body-worn: 1.01 W/kg
FCC Radio Frequency Emission
FCC Radio Frequency EmissionFCC Radio Frequency Emission
FCC Radio Frequency Emission
This phone meets the FCC Radio Frequency Emission Guidelines. FCC ID number: AEZSCP-82H
More information on the phone’s SAR can be found from the following FCC website:
http://www.fcc.gov/oet/fccid.