Sanyo DP58D34 72 39D14M X93Z2全 User Manual To The 3ff9bd49 B359 4442 A931 109e9cbdf315
User Manual: Sanyo DP58D34 to the manual
Open the PDF directly: View PDF ![]() .
.
Page Count: 31
720P HDTV
1080P HDTV
DP42D24
DP50E44
DP55D44
DP58D34
DP65E34
Model: DP39D14
Model:

1
The mains plug is used as disconnect device, the disconnect device shall remain readily
operable.
WARNING
apparatus.
2
1.
2.
3.
4.
5.
6.
7.
8.
9.
10.
11.
12.
13.
14.
15.
16
3
Note to CATV system installer:
This reminder is provided to call CATV system installer’s attention to Article 820-40 of the NEC that
provides guideline for proper grounding and , in particular, specifies that the cable ground shall be
connected to the grounding system of the building, as close to the point of cable entry as practical.”
17.
18.
19.
20.
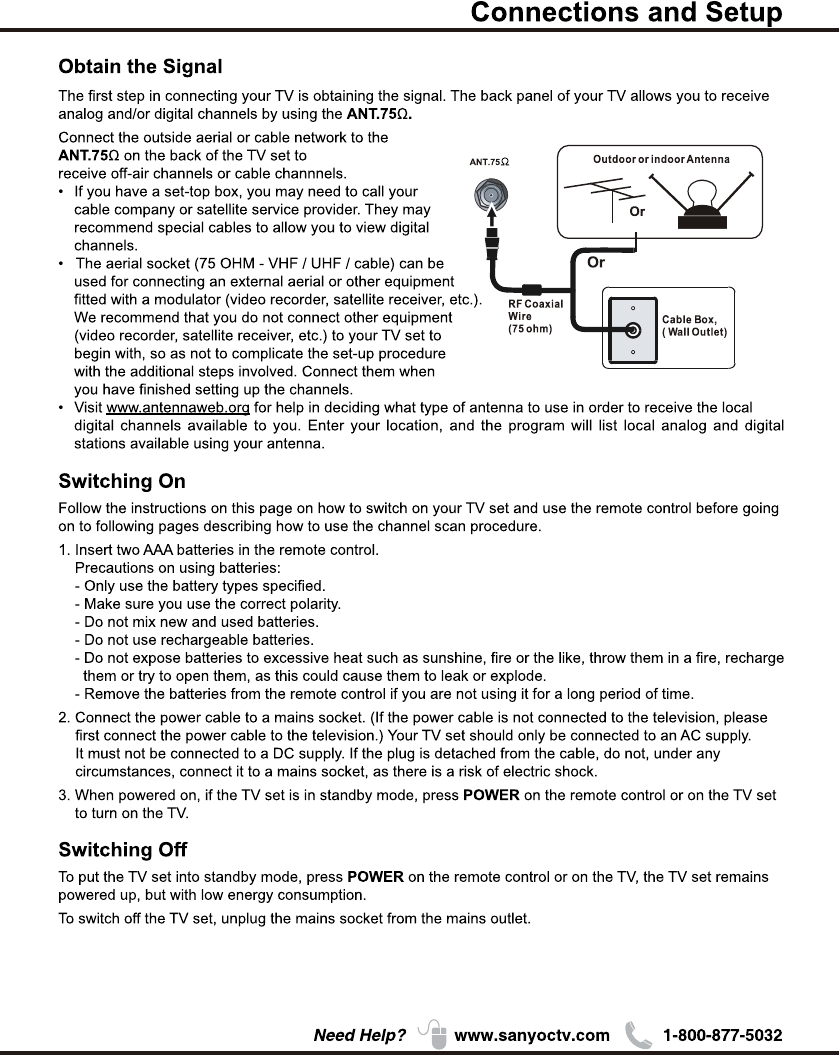
An outside antenna system should not be located in the vicinity of overhead power lines or other
electrical light or power circuits, or where it can fall into such power lines or circuits. When
installing an outside antenna system, extreme care should be taken to keep from touching such
power lines or circuits as contact with them might be fatal.
Wall or Ceiling Mounting – The product should be mounted to a wall or ceiling only as
recommended by the manufacturer.
Apparatus shall not be exposed to dripping or splashing, and no object filled with liquids, such as
vases, shall be placed on it.
When the MAINS plug is used as the disconnect device, the disconnect device shall remain
readily operable.

4
Table of Contents
Chapter 1: Connections and Setup
Chapter 2: Menu Operation
Chapter 3:Other Information
5
5
6
7
7
8
9
10
12
13
13
13
14
16
1
2
16
16
17
18
19
20
21
22
23
23
23
24
25
26
28
28
28
29
Before Initial Setup ..............................................................................................................................
Check Supplied Parts...........................................................................................................................
Attaching Your TV to the Stand Base..................................................................................................
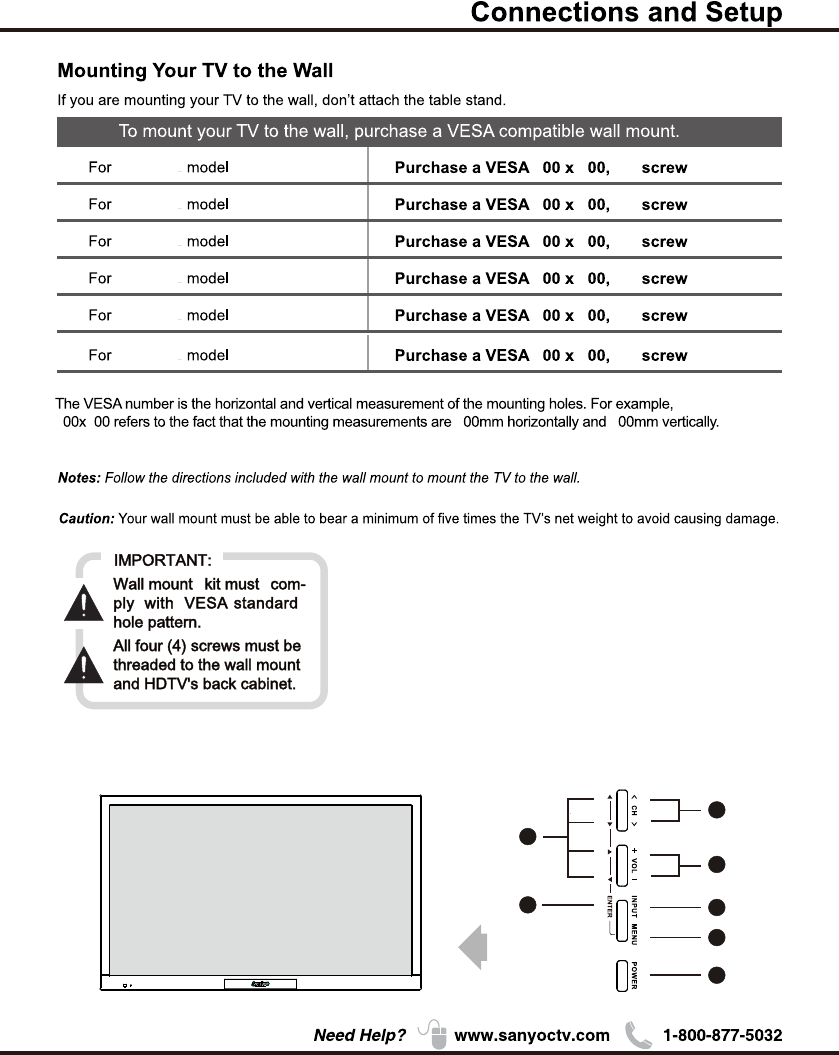
Mounting Your TV to the Wall .............................................................................................................
Buttons on the TV ................................................................................................................................
Explanation of jacks on TV ..................................................................................................................
Choose Your Connections ....................................................................................................................
MHL ....................................................................................................................................................
Remote Control Functions ..................................................................................................................
Obtain the Signal ................................................................................................................................
Switching On .......................................................................................................................................
Switching Off .......................................................................................................................................
Setup Wizard .......................................................................................................................................
Input List ..............................................................................................................................................
Important Information ...........................................................................................................................
Important Safety Insructions ................................................................................................................
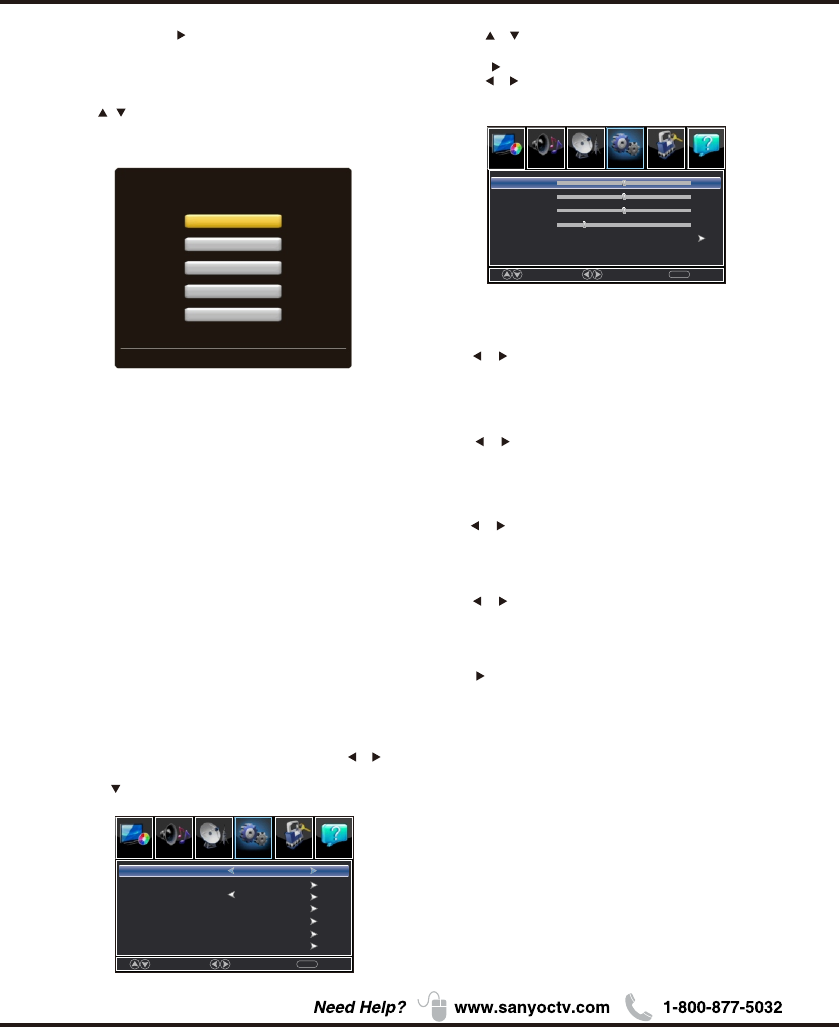
Menu .....................................................................................................................................................
Picture ..................................................................................................................................................
Sound ...................................................................................................................................................
Channel ................................................................................................................................................
Setup ....................................................................................................................................................
Lock .....................................................................................................................................................
Help ......................................................................................................................................................
PC ........................................................................................................................................................
VIDEO/HDMI ......................................................................................................................................
USB ......................................................................................................................................................
Photo ....................................................................................................................................................
Roku .....................................................................................................................................................
Frequently Asked Questions (FAQS) ....................................................................................................
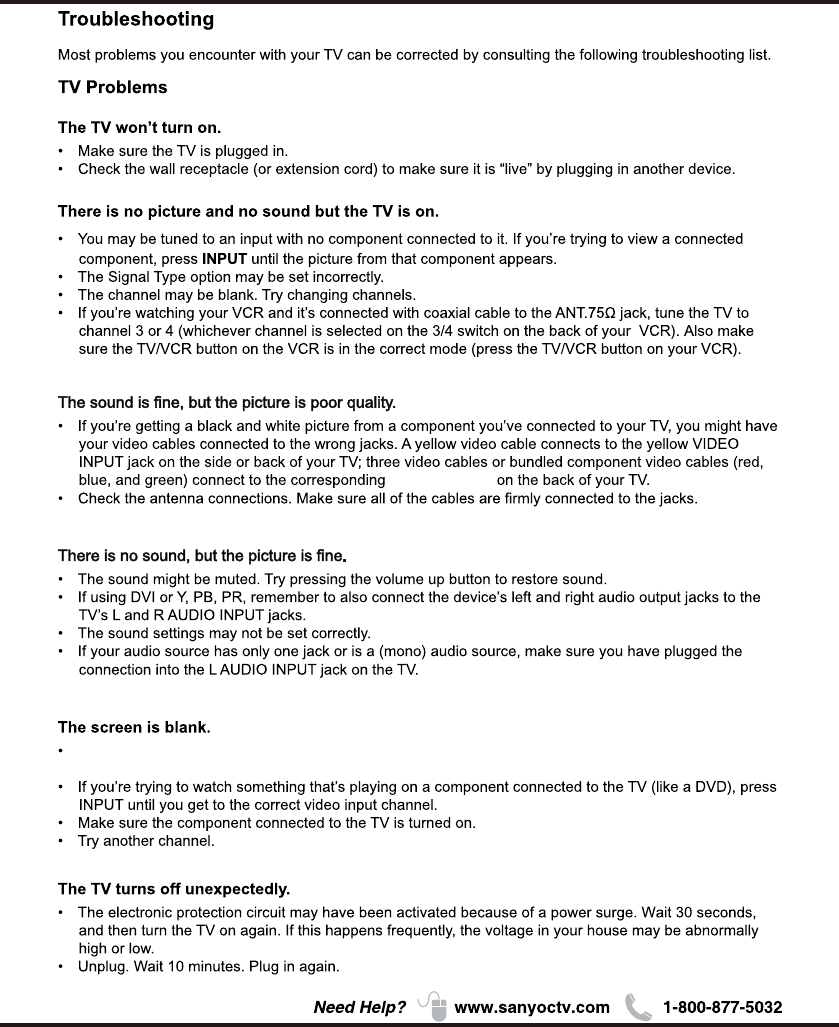
Troubleshooting ....................................................................................................................................
Care and Cleaning ...............................................................................................................................
Television Specifications .......................................................................................................................
.........................................................................................................................................
Limited Warranty ...................................................................................................................................
Specification
5
Chapter 1
QUIK'N EASY Setup Guide
Parts for Stand Base
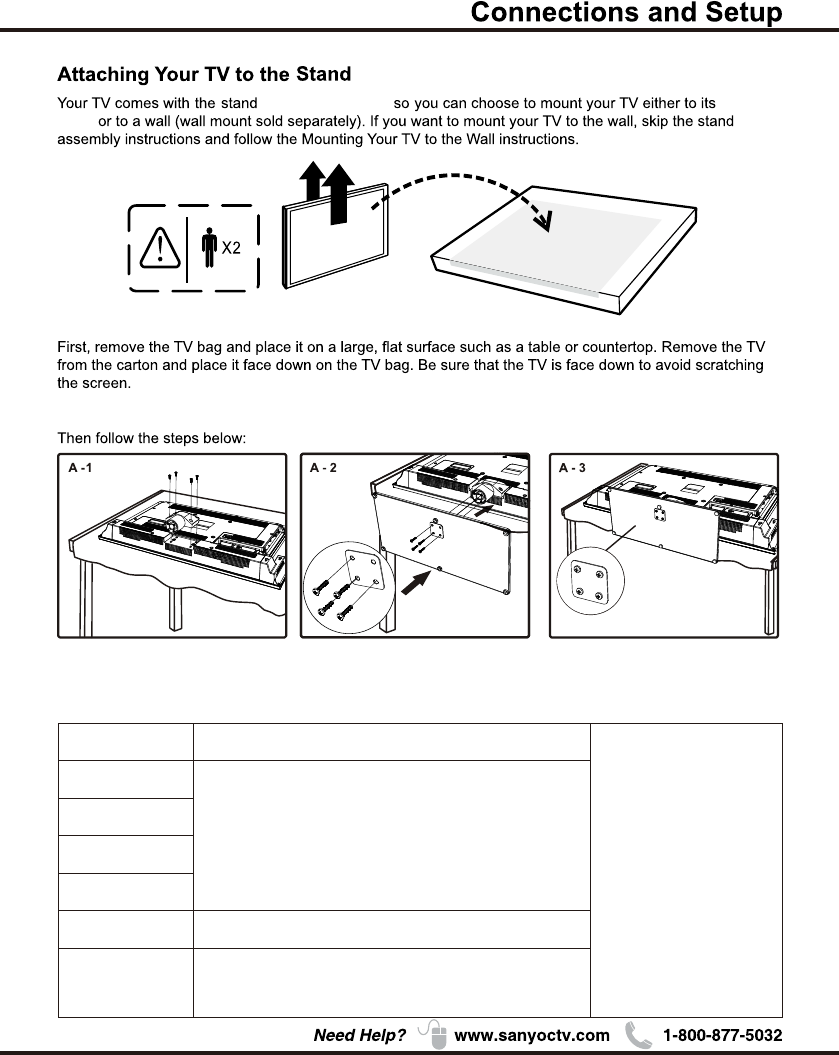
6
Note:The picture of stand installation is just for the reference, please base on the material object for
the real sample.
For model DP58D34, please just follow A - 2, A - 3.
①M5 (5mm) Diameter, Length-12mm (maximum)
②M4 (4mm) Diameter, Length-20mm (maximum)
Base
base unassembled table
stand
Note:Stand base screws
are located in the
literature package.
Mounting screws measurements
DP42D24
DP50E44
DP55D44
DP58D34
DP65E34
DP39D14
Model
①M5 (5mm) Diameter, Length-12mm (maximum)
M5 (5mm) Diameter, Length-16mm (maximum)
②M5 (5mm) Diameter, Length-16mm (maximum)
① ②①
7
1 11 1
Recommendation to buy screws : top use M6X12. max 15mm); BTM use M6 ( X16. max (20mm)
Buttons on the TV
Take a certain model for an example:
1
2
3
4
5
6
7
DP39D14
DP42D24
DP50E44
DP55D44
DP58D34
DP65E34
M6
M6
M6
M6
M6
M6
2
2
4
2
4
4
2
2
2
2
2
4
For model DP58D34, please remove neck cover and stand neck before mounting.
8
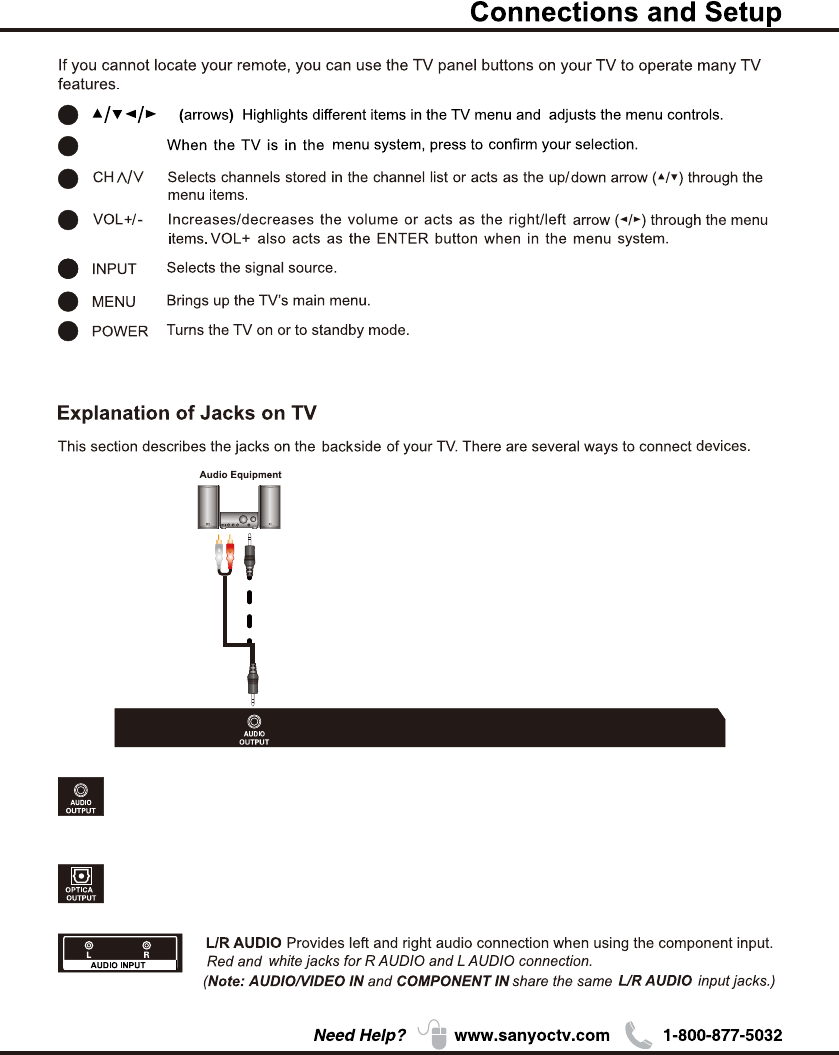
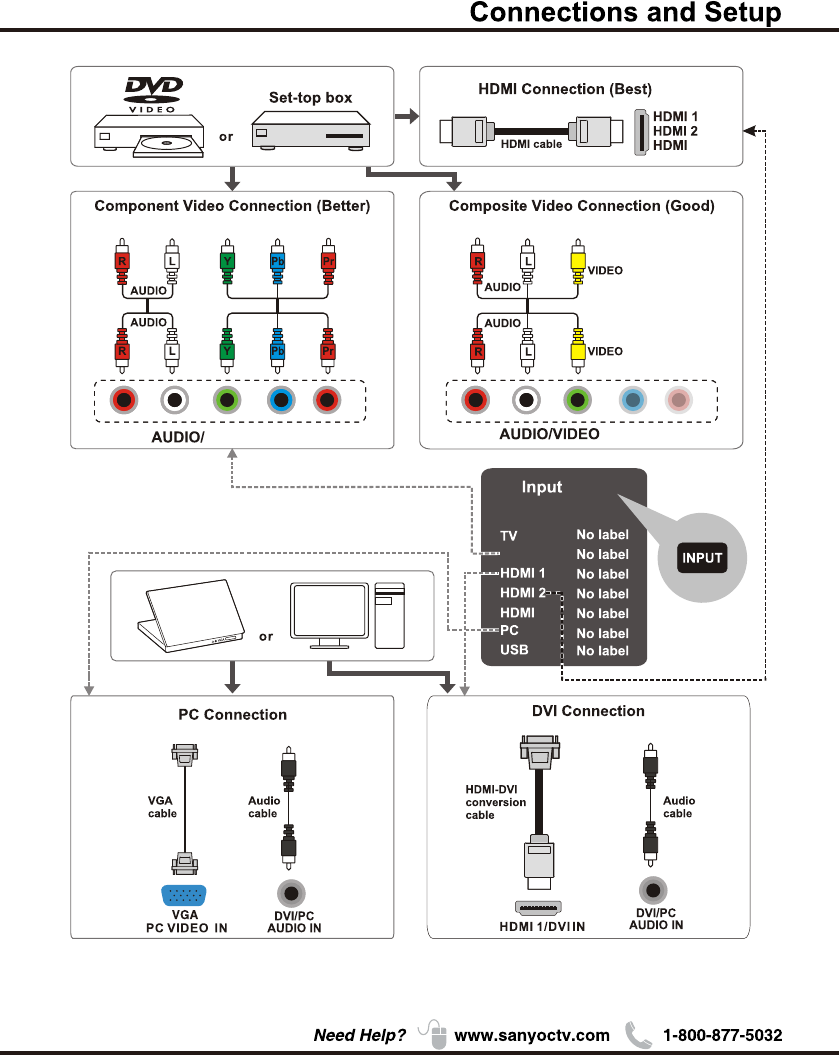
OPTICAL OUTPUT:It is possible to output audio through the digital audio terminal.
AUDIO OUTPUT the socket provides composite audio connection.
support amplified high power audio equipment. Please adjust the volume directly on
the external audio equipment. Please do not connect headphones directly to the TV.
The TV can
(Please base on the material object for the real sample.)
1
2
3
4
55
6
7
ENTER
9
ANTENNA/CABLE IN this socket can be used to connect the outside aerial
(including the analog signal and the digital signal)
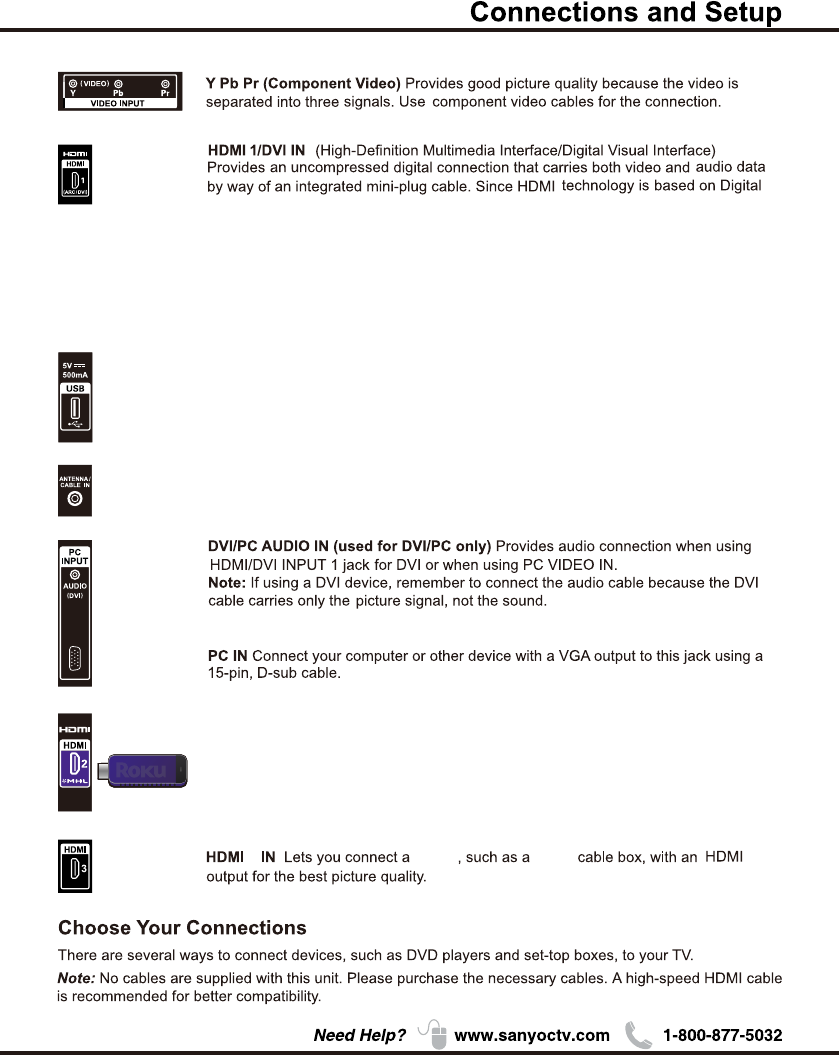
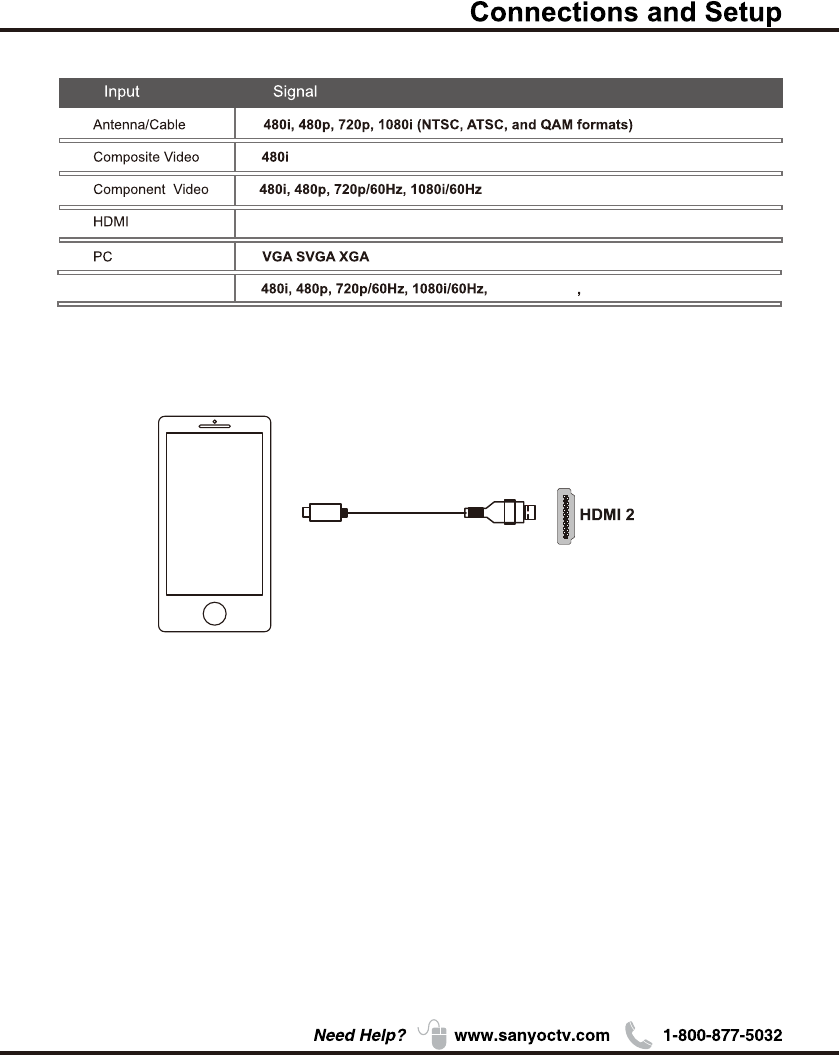
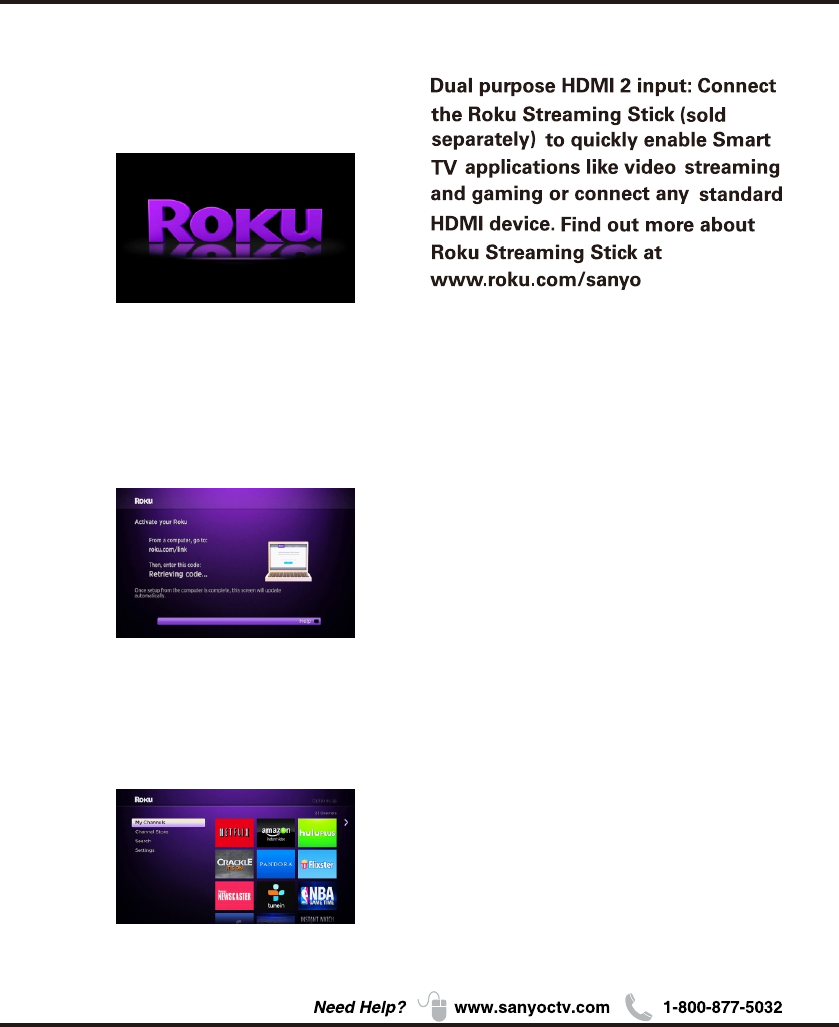
HDMI 2/*MHL(High-Definition Multimedia Interface/Mobile High-Definition Link)
Provides an uncompressed digital connection that carries both video and
audio data by way of an integrated mini-plug cable. Since HDMI technology is
based on Mobile High-Definition Link(MHL),the jack on the side of your TV is also
compatible with MHL Device. Connect the Roku Streaming Stick (sold separately)
to quickly enable Smart TV applications.
3Device Digital
(For DVI input, it's audio input is shared with PC audio input)
Note: For the audio receiver control ARC, firstly you must have a device which supports
HDMI ARC, then connect it to the HDMI1 port. When the "ARC/CEC Setting" is enabled on
your TV, the TV set's speakers will mute automatically and the audio will be outputted on
your ARC sound device system.
Visual Interface (DVI), the jack on the side of your TV is also compatible with DVI
devices.
USB Allows you to connect a compatible mass storage device for the display of JPEG
pictures on the TV.
10
The MHL (Mobile High-Definition Link) enables the TV to communicate with connected MHL-compatible
device. When connecting MHL-compatible device, TV simultaneously charges the connected device
while playing photo/music/video from it. You can use the TV remote control to control the connected MHL
-compatible device.
• If “MHL Equipment Control”(P20) is set to “On” , the TV automatically switches to MHL mode
when MHL-compatible device is connected to HDMI I2 (MHL) jack.
• You can continue normal usage of the connected MHL-compatible device (such as receiving calls)
depending on its capability.
• Some remote functions may not be available depending on features of the connected MHL-compatible
device.
Please refer to the device manual for details.
• You can continue charging the MHL-compatible device even when the TV is in standby mode.
• This product is officially MHL-certified for guaranteed operation with other MHL-certified devices. If you
encounter any problems when using the MHL function, please consult the device manufacturer for support.
(*MHL)
MHL
MHL2.11080p/30Hz 1080p/60Hz
Compatibility
WXGA
480i, 480p, 720p/60Hz, 1080i/60Hz, 1080p/60Hz
11
3
3
List
Video
(*MHL)
VIDEO INPUT INPUT
REMARK: Due to slim back cover, we recommend connecting the PC with a standard VGA
cable, avoiding cables with thicker connectors/plugs.
(For Model: DP50E44, DP55D44, DP58D34, DP65E34)
12
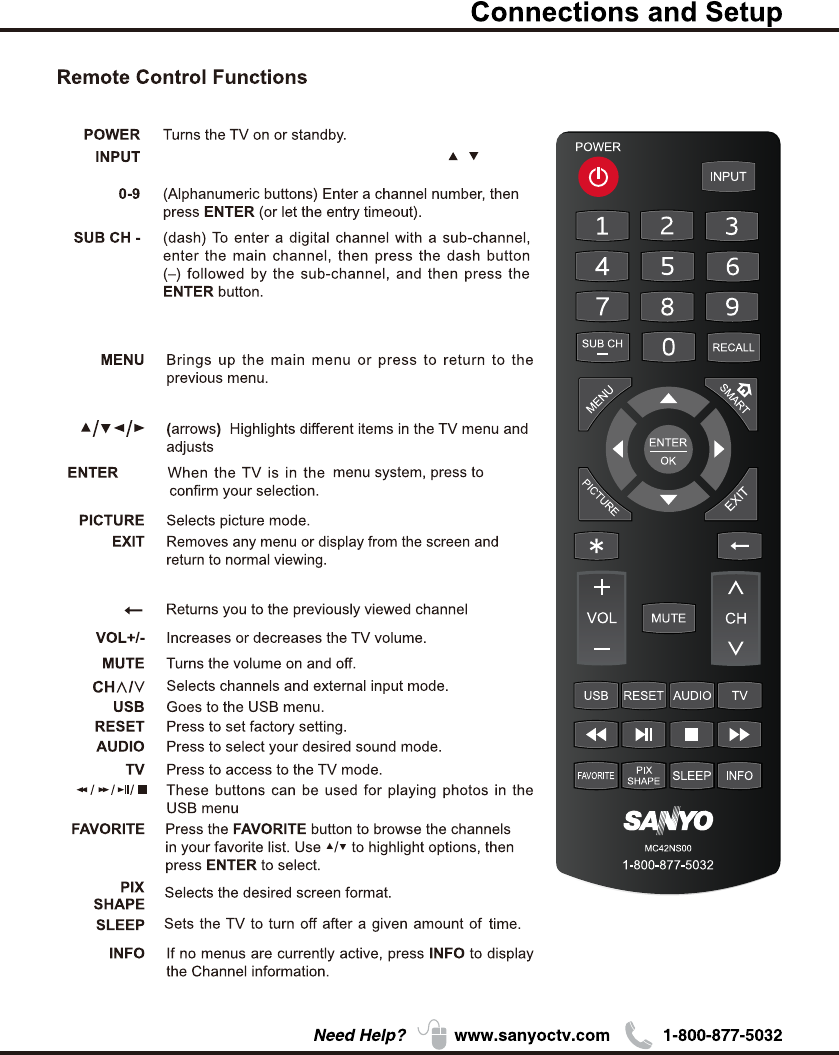
Press to
select the desired option
open the Input list, then press / to
.
*
/OK
RECALL press the RECALL button return to the previously
viewed channel and replay for Roku.
Special function for Roku.
SMART Return to the Home screen for Roku.
for Roku.
the menu and Roku control.
and Roku.
13
14
ENERGY STAR is a set of power-saving
guidelines issued by the U.S.
Environmental Protection Agency(EPA).
ENERGY STAR is a joint program of the U.S.
Environmental Protection Agency and the
U.S.Department of Energy helping us all
save money and protect the environment
through energy efficient products and
practices.
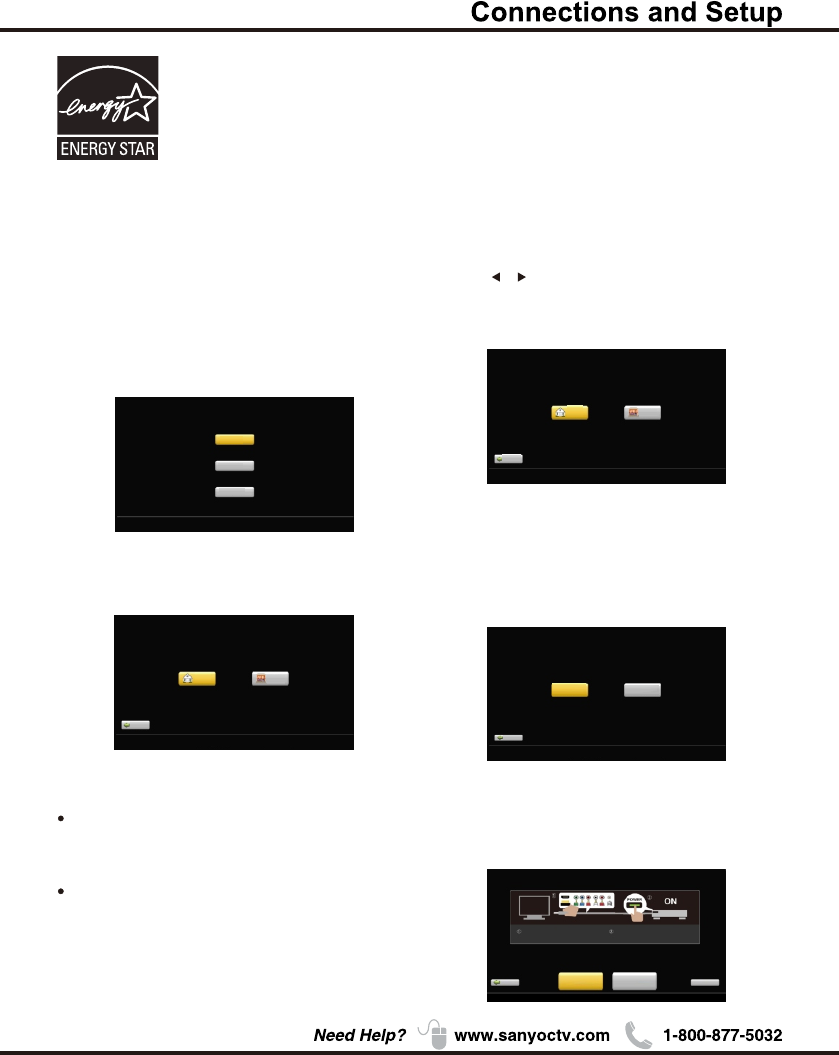
A menu screen asks you to set the location for TV.
Choosing“Home Mode” for the TV assigns the
optimal picture settings for most home
environments.
ENERGY STAR qualification. Use ◄/► to
select the desired location setting(“Home
Mode or “Store Mode”); then press ENTER
/OK to continue to the next screen.
Setup Wizard
Connect an RF cable to the TV's ANTENNA/CABLE
IN terminal.
Select TV Location
1. Press / button on the remote control to select
Home Mode or Store Mode.
2. Press ENTER button to go.
1. Choose "Quick setup" or "Step by step" to setup
your new television.
2. Press ENTER button to go.
Use ARROW keys to highlight your choice and then press ENTER/OK key.
Use ARROW keys to highlight your choice and then press ENTER/OK key.
Please select proper location for you TV.
Please select proper location for your TV.
Display will be adjusted for best result.
Display will be adjusted for best result.
Home mode qualifies
for ENERGY STAR.
Store mode is for the
Store mode is for the
retail display setup
retail display setup
Home
Home
Store
Store
Home mode is for saving energy
Home mode is for saving energy
and reducing power consumption.
and reducing power consumption.
Previous
Previous
Regresa
Regresa
Use ARROW keys to highlight your choice and then press ENTER/OK key.
Previous
Choose"Quick setup"or"Step by step"
to set up your new television.
Quick setup
(Advanced users)
Setp by setp
(Recommended)
Please Select Language
English
French
Spanish
Use ARROW keys to highlight your choice and then press ENTER/OK key.
A menu screen asks you to select language among
English, French and Spanish.
Choosing“Store Mode”,which is not
ENERGY STAR compliant, sets the unit up
with predefined settings for retail displays.
In this setting, the power consumption may
exceed the requirements of the Previous Air
Search Start Cable
Search Start Skip
Please connect all inputs
to the terminals.
Make sure all of your
equipments switched on.
Use ARROW keys to highlight your choice and then press ENTER/OK key.
If you choose Please connect all
equipment to the TV's inputs and switch them on.
Then press ◄/► button to choose between an Air or
Cable search.
"Quick setup",
(Quick setup chosen)
Choose Initial Setup method
Home mode qualifies
for ENERGY STAR.
15
Chapter 2
Analog channels:0Digital channels:0
Channel search will be complete when blue progress bar reaches 100%
(PLEASE DO NOT INTERRUPT THE CHANNEL SEARCH,IT MAY TAKE A WHILE)
Use ARROW keys to highlight your choice and then press ENTER/OK key.
Analog channels:_ _ Digital channels:_ _
Input search result:
Video HDMI1 HDMI2/MHL HDMI3
Finish Repeat
Channel search result: Successfully Completed
Choose Antenna Information to get a high definition
picture, then press ◄/► button to choose between
an Air or Cable search.
Air
Search channels form an indoor or outdoor antenna.
【 】
Press the Finish button to finalize the Initial Setup and
enjoy watching TV.
NOTE: If you need to do the process again, please
choose Repeat.
【 】Cable
Search channels from the cable provider.
Previous Continue
Use ARROW keys to highlight your choice and then press ENTER/OK key.
Connection check phase: Video
please turn on the power of apparatus and check connection.
DVD/Blu-ray
GAME
Y
(VIDEO)
Pb
Pr
L
R
Composite Component
Video
HDMI 1
HDMI 2/MHL
HDMI 3
Please choose a connection method.
Previous Continue
Use ARROW keys to highlight your choice and then press ENTER/OK key.
Connection check phase: Video
please turn on the power of apparatus and check connection.
DVD/Blu-ray
GAME
Y
(VIDEO)
Pb
Pr
L
R
Composite Component
Video
HDMI 1
HDMI 2/MHL
HDMI 3
Neither type of connection could be confirmed.
Previous Continue
Use ARROW keys to highlight your choice and then press ENTER/OK key.
Connection check phase: HDMI
please turn on the power of apparatus and check connection.
DVD/Blu-ray
GAME
Video
HDMI 1
HDMI 2/MHL
HDMI 3
At least one connection cannot be checked.
Previous Continue
Use ARROW keys to highlight your choice and then press ENTER/OK key.
Connection check phase: HDMI
please turn on the power of apparatus and check connection.
DVD/Blu-ray
GAME
Video
HDMI 1
HDMI 2/MHL
HDMI 3
Connection was successful.
If "Step by step" is chosen, options will be more detailed.
Press Continue button to advance.
Use ARROW keys to highlight your choice and then press ENTER/OK key.
Previous
Choose"Quick setup"or"Step by step"
to set up your new television.
Quick setup
(Advanced users)
Setp by setp
(Recommended)
(Setp by setp chosen)
Looking for a high definition picture?
Please take a moment to review the required connections.
Antenna Information
Previous
Air
Search Start
Cable
Search Start Skip
Use ARROW keys to highlight your choice and then press ENTER/OK key.
Use ARROW keys to highlight your choice and then press ENTER/OK key.
Analog channels:_ _ Digital channels:_ _
Input search result:
Video HDMI1 HDMI2/MHL HDMI3
Next Repeat
Channel search result: Successfully Completed
Press
Press Next button to check connection in detail.
Repeat button to do the process again.
Press Continue button to go next.
If any connection is found, then you can see "Connection
was successful." with blue color.
16
Input List
Press INPUT button to select among TV/VIDEO
/HDMI 1/HDMI 2/HDMI 3/PC/USB
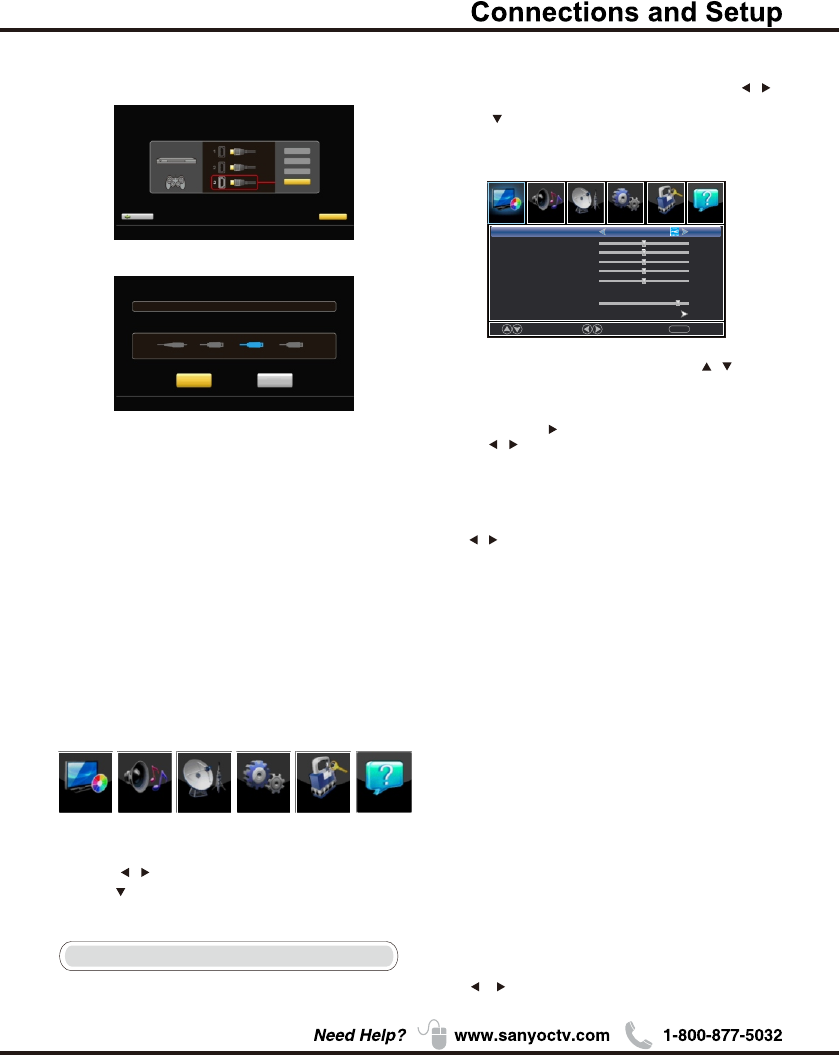
Menu
1. Press MENU to display the main menu or return to
the previous menu or close the main menu.
2. Press / to highlight the desired menu icon, and
press to .enter
Menu Operation
Picture
1. Press MENU to enter the main menu, Press /
button to select.
2. Press to enter. (Press MENU again to exit or
back to parent menu.)
Move Select
MENU
Return
【Picture Mode】
Adjust picture mode to change picture appearance.
Press / button to select(Power Saving/Standard /
Vivid / Mild / Manual).
Standard Produces a highly defined image in a
normally lit room.
Vivid Produces a highly defined image in a
brightly lit room
Mild Produces a highly defined image in a
soft lit room.
Manual Select to customize picture settings.
Power Saving Select to power saving mode settings.
Note: "Power Saving"make this product qualify for
ENERGY STAR, if you select some other options,the
power consumption may change.
Picture
Sound
Sound
Setup
Setup
Lock
LockChannel
Picture Mode
Brightness
Contrast
Color
Tint
Sharpness
Color Temperature
Backlight
Detailed Setting
Power Saving
50
50
50
Normal
50
50
90
Picture
Chapter 2
Help
Channel
Help
3.While Picture Mode is "manual",Press / button
to select among Picture Mode/Brightness/Contrast/
Color / Tint / Sharpness / Color Temperature /
Backlight/Detailed Settings.
4.Press ENTER / to enter.
5.Press / button to adjust.
6.Press MENU to exit it.
Analog channels:_ _ Digital channels:_ _
Input search result:
Video HDMI1 HDMI2/MHL HDMI3
Finish Repeat
Channel search result: Successfully Completed
Use ARROW keys to highlight your choice and then press ENTER/OK key.
【Brightness】
Adjust darkness of black sections in the picture.
Press / button to adjust.
Items below are active while Picture mode
set to Manual. otherwise, they are gray.
Previous Continue
Use ARROW keys to highlight your choice and then press ENTER/OK key.
Connection check phase: HDMI
please turn on the power of apparatus and check connection.
DVD/Blu-ray
GAME
Video
HDMI 1
HDMI 2/MHL
HDMI 3
At least one connection cannot be checked.
Press the Finish button to finalize the Initial Setup and
enjoy watching TV.
NOTE: If you need to do the process again, please
choose Repeat.
Connections that are found will be highlighted in blue
color.
Successfully Completed
【Tint】
Adjust the hue (Red,Green,Blue) of the picture.
Press button to adjust. /
【Sharpness】
Object edges are enhanced for picture detail.
Press button to adjust. /
【Color Temperature】
Change the overall color cast of the picture.
Normal
Warm
Cool
Produces a vivid image.
Produces a red-hued image.
Produces a gentle blue-hued image.
【Backlight】
【Detailed Setting】
Adjust the backlight brightness
Press button to adjust. /
Press button to enter.
Menu OperationMenu Operation
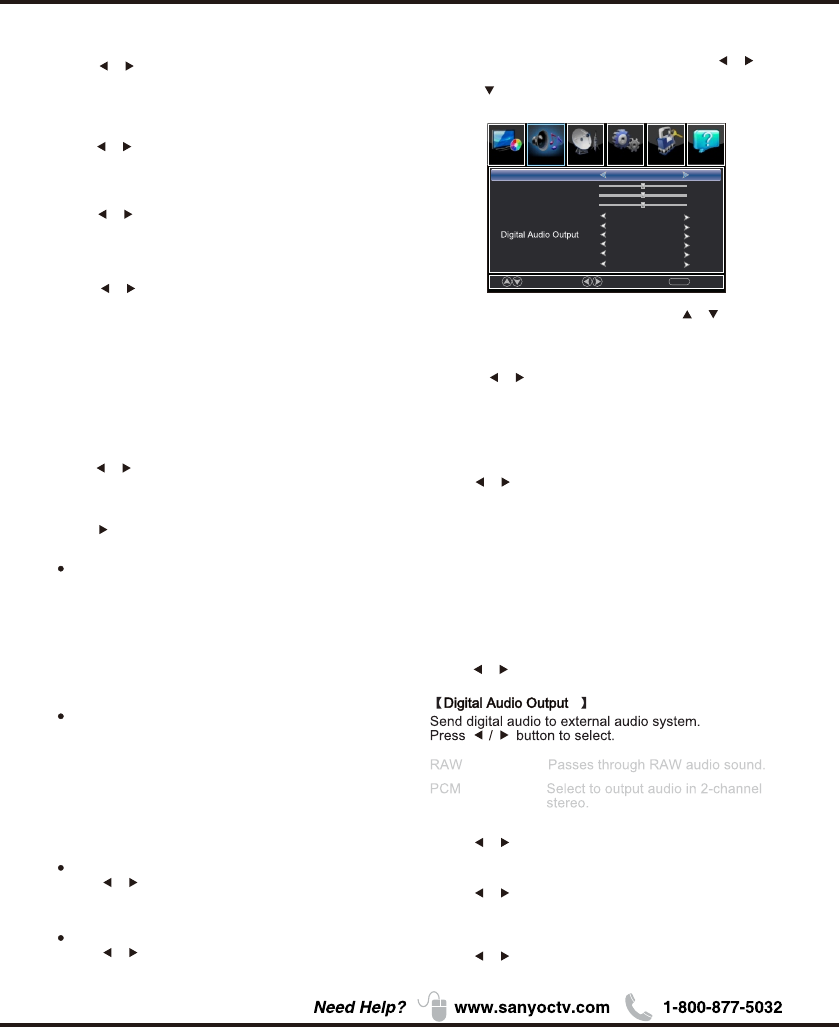
Sound
1.Press MENU to enter the main menu, Press /
button
to select.
2.Press to enter. (Press MENU again to exit or back to
parent menu.)
3.While Sound mode is "manual", Press / button to
select among Sound Mode / Bass / Treble / Balance /
MTS / Audio Language / Digital Audio Output / Surround
Sound / ARC/CEC Setting / Auto Volume Control.
4.Press / button to adjust.
5.Press MENU again or back to parent menu.
【 】Surround sound
【Auto Volume Control】
Set the auto volume control.
Press / button to select (On / Off).
Press / button to select (On / Off).
【Color】
Adjust the color intensity of the picture.
Press button to adjust. /
【Contrast】
Adjust the white level of the picture.
Press / button to adjust.
17
Aspect Ratio
Adjust how the picture fills the screen.
Wide
Zoom
Automatically Aspect Ratio Normal adjust
based on TV size and TV program.
Use to watch wide screen(16:9)
content.
Expands image to fill screen. Top and
button maybe cut off.
Noise Reduction
Set options to reduce video noise.
Off
Select to turn off video noise detection.
Low Detect and reduce low video noise.
Medium Detect and reduce moderate video
High Detect and reduce enhanced video
noise.
noise.
Move Select
MENU
Return
Setup LockPicture
Picture Sound
Sound Mode
Bass
Treble
Audio Language
ARC/CEC Setting
Surround Sound
Standard
50
50
0
English
Off
RAW
Off
Balance
MTS
Stereo
【MTS】
Configures the multi-track sound. It is only available in ATV.
Press button to select (Stereo/SAP/Mono). /
Mono Sets the sound to mono.
Stereo Sets the sound to stereo when stereo
is not available, the sound is
automatically switched to mono.
SAP Sets the sound to the second audio
program.
【Audio Language】
Select the language supported by the chosen digital
channel. It is available Only in DTV.
Press button to select (English / / ). / French Spanish
Help
Channel
Auto Volume Control
Off
【 】ARC/CEC Setting
Press / button to select (On / Off).
Enhanced Motion
Press / button to select (On / Off).
(Only available for model: DP55D44 )
Enhanced Sync
Press / button to select (On / Off).
(Only available for model: DP58D34, DP65E34 )
Channel
1.Press ENU to enter the main menu, Press M /
button to select.
2.Press to enter. ( ENU again to exit or
back to parent menu.)
MPress
3.If current source is TV,Press / button to select
among Air/Cable / Auto Scan/Favorite / Channel List/
Show/Hide / Channel Number / Channel Label.
4.Press button to adjust. /
5.Press ENU again or back to parent menu. M
【Air/Cable】
Select signal type.
Press button to select (Air/Cable). /
【Auto Scan】
Automatically search for channels.
Press / button to enter. ENTER
Are you sure to Auto
Scan?
No Yes
Analog
Digital
RF CH
Total Found
1
0
4
1
:
:
:
:
【Favorites】
Add channels to create a favorite list.
Press ENTER/ button to enter.
Press ENTER/ button to enter.
【Channel List】
Create list for channels.
【Show/Hide】
Show or hide the channels in your program list.
Press / button to enter.ENTER
Press / button to enter.ENTER
【Channel Number】
Show the channel number.
Press button to adjust. /
【Channel Label】
Create labels for channels, up to 7 characters.
18
Move
Select
Select
Move
MENU
MENU
Return
Return
Sound Setup Lock
PicturePicture Channel
Favorite
Channel List
Show/Hide
Channel Number
Channel Label
Auto Scan
Air/Cable Air
Channel
Channel
Channel Label
Channel Label
3-0
3-0
4-0
4-0
5-0
5-0
6-0
6-0
7-0
7-0
Prev
Prev
1/ 1
1/ 1
Next
Next
Press ok’change ‘
Press‘ok’change
Move
Move
Return
Return
MENU
MENU
Hide
Menu Operation
Help
Sound Setup Lock
PicturePicture Channel Help
Sound Setup Lock
PicturePicture Channel Help
Sound Setup Lock
PicturePicture Channel Help
3.Press / button to select among Menu Language /
Closed Caption /Over Scan/Input Label /
Other settings /Restore Default /Setup Wizard /
Sleep Timer.
4.Press button to adjust. /
5. ENU again or back to parent menu. Press M
【Menu language】
Press button to select language (English / /
Français / Español.)
【Closed Caption】
Adjust Closed Captioning settings. Only available
under TV and AV source.
Press / button to enter. ENTER
CC Mode
Turn Closed Captioning on/off.
Press button to select (CC Off / CC On / CC /
On Mute).
Analog CC
Set Closed Captioning for standard(analog) program.
Press button to select (CC1 / CC2 / CC3 / /
CC4 / Text1 / Text2 / Text3 / Text4).
Digital CC
Set Closed Captioning for digital program.
Press button to select (Service1 / Service2 / /
Service3 / Service4 / Service5 / Service6 / Off).
Setup
1.Press MENU to enter the main menu, Press /
Button to select.
2.Press to enter. (Press MENU again to exit or
back to parent menu.)
19
Move Select
MENU
Return
LockChannelPicture
Picture Sound
English
Off
Setup
Menu Language
Closed Caption
Over Scan
Other Settings
Input Label
Restore Default
Setup Wizard
Adjust the digital Closed Captioning setting.
Mode
Set the look of digital Closed Captioning.
Press button to select (Default / Custom). /
Font Style
Select from 8 font styles.
Press button to select (Default / Font 0 / Font 1 / /
Font 2 / Font 3 / Font 4 / Font 5 / Font 6 / Font 7).
Option
Font Size
Adjust the size of the digital Closed Captioning font.
Press button to select (Default /Normal / Small /Large).
Press / button to enter.ENTER
Menu Operation
FG Opacity
Adjust the transparency of the digital Closed Captioning
font.
Press button to select (Default / Solid / Flashing //
Translucent / ).Transparent
BG Opacity
Adjust the digital Closed Captioning background
transparency.
Press button to select (Default / Solid / /
Flashing / Translucent / ). Transparent
*Note: All the options can be adjusted while the
mode is Custom.
FG Color
Adjust the color of the digital Closed Captioning font.
Press button to select (Default/ White /Red /
Green / Blue / Yellow / Magenta / Cyan).
/
BG Color
Adjust the digital Closed Captioning background color.
Press button to select (Default/ Black / Red /
Green /Blue/ Yellow / Magenta / Cyan).
/
【Input Label】
【Over Scan】
Press / button to enter. ENTER
Press button to select (Off / On). /
The setting of Over Scan on/off
Help
Sleep Timer Off
Lock
1.Press ENU to enter the main menu, Press M /
button to select.
4.Press / button to select among Change Password /
System Lock / Input Block / US Rating / Canada Rating /
RRT Setting / Reset RRT.
5.Press button to adjust. /
6.Press ENU again or back to parent menu. M
20
2.Press to enter.(
)
Press ENU again to exit or
back to parent menu.
M
3.Enter your 4-digital password. Default password is
0000.
0-9
MENU
Return
Enter Password
-----
Press the code the enter a new 4-digital password
then re-enter it to confirm.
【Change Password】
Move Next
MENU
Return
Input Block
US Rating
Canada Rating
RRT Setting
Reset RRT
System Lock
Change Password
Off
【Other Settings】
Press / button to enter. ENTER
Audio Only
Play the audio with the picture turned off. When you
turn the Audio Only on and exit the OSD menu, the
panel will be dark; and then press any key
to exit the Audio Only
status.
(except
Mute key and VOL -/+ key)
Press button to select(Off / On). /
Press button to select(On / Off). /
Press button to select(Off / On). /
Press button to select(Off / On). /
Press button to select. /
Blue Screen
The setting of Blue Screen on/off
Video Setting
Store Demo
MHL Equipment Control
To relevant settings for video.
About this TV set presentation.
When "On" is selected, the HDMI2 source will auto-
matically be chosen when MHL equipment is
connected.
When "Off" is selected, the HDMI2 source will need
to be selected manually.
【System Lock】
Lock or unlock the buttons on the TV.
Press button to select(Off / On). /
Menu Operation
【US Rating】
Restrict movie and TV programs by US Ratings.
Only available when "System Lock" is "on".
Move Select
MENU
Return
Video
HDMI 1
PC
USB
TV
HDMI 2
UnBlock
UnBlock
UnBlock
UnBlock
UnBlock
UnBlock
Press ENTER/ button to enter.
【Input Block】
Block or unblock the input sources.
Press ENTER/ button to enter.
Press button to select(Unblock / Block). /
ChannelPicture
Picture Sound Setup Lock Help
ChannelPicture
Picture Sound Setup Lock Help
ChannelPicture
Picture Sound Setup Lock Help
HDMI 3 UnBlock
【Sleep Timer】
Set a timer for the TV to turn off automatically.
Press / button to select(Off / 5min / 10min
/ 15min / 30min / 60min / 90min / 120min / 180min
/240min).
TV
The TV rating compose of two aspects: age-based
and content-based.
Age
TV-Y
TV-Y7
TV-G
TV-PG
TV-14
TV-MA
Define
General audience
Parental guidance suggested
Parents strongly cautioned
Retricted
No one 17 and under admitted
Adult audience only
Note: The content ratings will increase depending on
the level of the age-based rating.
For example, a program with a TV-PG V(violence)
rating may contain moderate violence, while a TV-14 V
(violence) rating may contain intense violence.
So locking a higher level option will automatically
cause locking the options that has more sensitive level.
MPAA
This system defines the rating control which come
from MPAA rules.
Rating
G
PG
PG-13
R
NC-17
X
Define as
General audience. All ages admitted.
Parental guidance suggested. Some
material may not be suitable for children.
Parents strongly cautioned. Some
material may be inappropriate for children
under 13.
Restricted. Children under 17 require
accompanying parent or adult guardian.
No one 17 and under admitted.
Adult audience only.
21
【Canada Rating】
Restrict movie and TV programs by Canadian Ratings.
Only available when "System Lock" is "on".
For Canada, the rating setting include the following options:
Canada English, Canada .French
Canada English
These ratings are for programs which are using
English rating system.
Rating
C
C8+
G
PG
14+
18+
Defined as
Children
Children 8 years and older
General programming
Parental guidance
Viewers 14 and older
Adult programming
Canada
The ratings are for programs which are using
French rating system.
French
Rating
G
8 ans+
Defined as
General
Not recommended for children under
age 8
13 ans+ Not recommended for children under
age 13
Move Select
MENU
Return
FV
V
S
L
D
ALL
TV Rating
Press OK to Lock or Unlock
16 ans+
18 ans+
Not recommended for children
under age 16
This program is restricted to adults
RRT Setting】【
Display an advance V-Chip rating table for digital
channels.
The item is available only When current stream has
downloadable rating data.
Press ENTER/ button to enter.
Menu Operation
【Reset RRT】
Reset the RRT to default.
The item is available only When current stream has
downloadable rating data.
Help
1.Press ENU to enter the main menu, Press M /
button to select.
2.Press to enter. ( ENU again to exit or
back to parent menu.)
MPress
Sound Setup Lock
PicturePicture
Help
ChannelPicture
Picture Sound Setup Lock Help
Channel
MENU
Return
Next
Help
【H-Pos】
Adjust the horizontal position of the picture.
Press button to adjust. /
【V-Pos】
Adjust the vertical position of the picture.
Press button to adjust. /
【Clock】
Minimize vertical stripes in the screen image.
Press button to adjust. /
【Phase】
Minimize horizontal distortion.
Press button to adjust. /
【Auto】
Adjust to the PC signal timing automatically.
Press button to enter.
*Note:
1. PICTURE menu and description are the same as that
for TV mode.
2. Audio Language in SOUND menu is invalid.
3. TIME menu and description are the same as that for
TV mode.
4.Close Caption in SETUP menu is invalid.
5.US, Canada, RRT Setting and Reset RRT in LOCK
menu is invalid.
6.PC mode has no CHANNEL menu.
PC
1.Press to select PC source.INPUT
2.Press ENU to enter the main menu, Press
button to select Setup menu.
M /
3.Press to select PC Settings.
4.Press / button to select among H-Pos / V-Pos /
Clock / Phase / Auto .
5.Press to enter.
6.Press button to adjust. /
7.Press ENU again or back to parent menu. M
22
Move Adjust
MENU
Return
H-Pos
V-Pos
Clock
Phase
Auto
50
50
50
25
Menu Operation
Move sig
MENU
Return
English
Off
Menu Language
Closed Caption
Over Scan
Other Settings
Input Label
Restore Default
PC Settings
LockChannelPicture
Picture Sound Setup Help
LockChannelPicture
Picture Sound Setup Help
【Help】
Get help from the following choices.
Press / button to select(Auto Recovery/
Self Test /Connection Guide / Antenna Guide /
Contact Us).
3.Press ENTER / to enter.
4.Press MENU to exit it
On screen help
What would you like to do?
Auto Recovery
Self Test
Connection Guide
Antenna Guide
Contant Us
Use ARROW keys to highlight your choice and then press ENTER/OK key.
【Auto Recovery】
Quickly find which source has signal by auto
recovery page.
【Self Test】
To test if the TV set is OK or not.
【Connection Guide】
To enter into a page for quick connection test.
【Antenna Guide】
To enter into antenna guide page,with the guide
page,you can conntect your antenna cable step by
step.
【Contact Us】
Some ways to contact us.
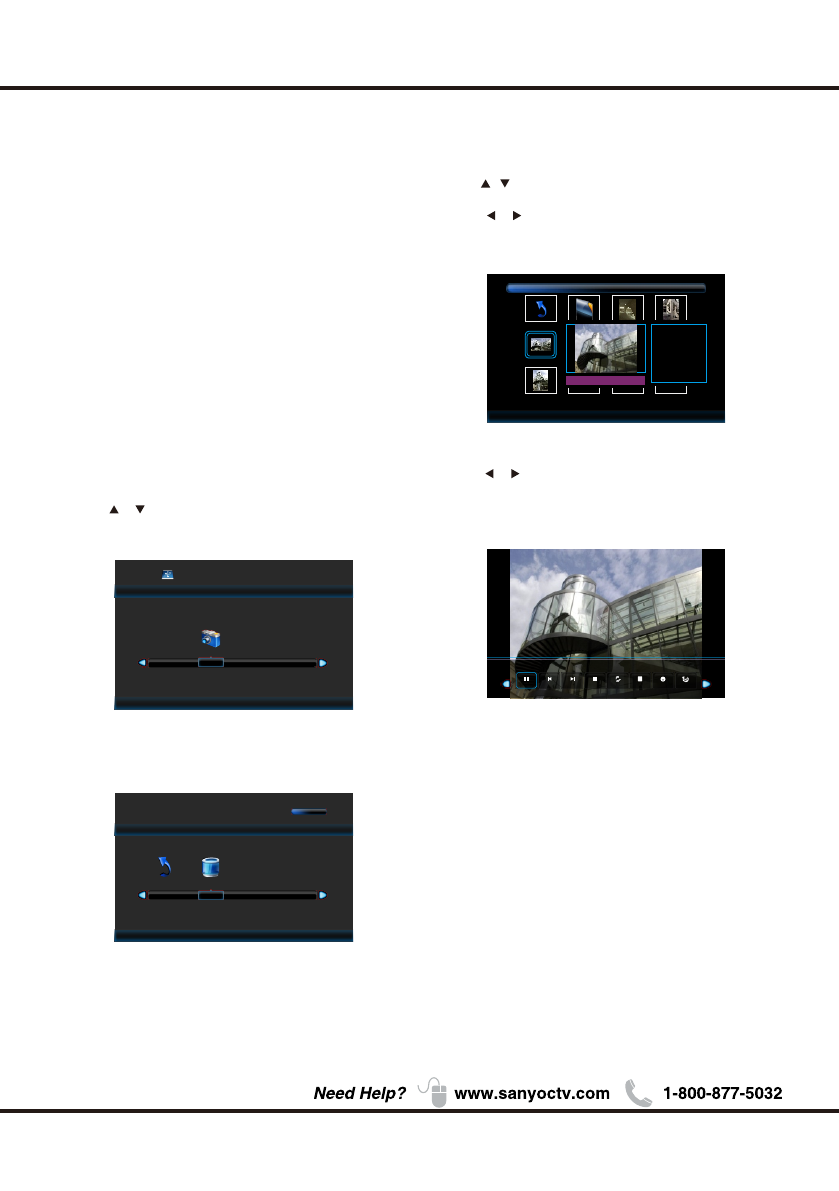
5.Press / button to select the file you want to watch
in the file selecting menu, then press ENTER button to
displaypicture.
Photo
*Note: Only support JPG format
23
1.Press INPUT button to display the input source list.
2.Press / button to select USB.
3.Press button to enter .
4.Press / button to select drive disk you want to
watch, then press button to enter.
ENTER
ENTER
Press button to enter. ENTER
Menu Operation
Photo
USB 2.0
CReturn
1 / 1
C:\
img20051.jpg
img2005123.jpg img2005124.jpg
img20051.jpg
Return
Resolution: 1024 X 768
Size: 582KBytes
Date: 2008/03/24
Time: 16:41:53
Pau se Pre v. N ext Stop Rep eat ALL P lay lis t Info. Rotate
1 / 2
* Before operating Media menu, Plug in USB
device, then press INPUT button to set the Input
Source to USB.
Note:
Press / button to select USB in the Source menu,
then press ENTER button to access.
USB
VIDEO / HDMI
1. PICTURE menu and description are the same as that
for TV mode.
2. Audio Language in SOUND menu is invalid.
3. TIME menu and description are the same as that for
TV mode.
4.The function of Close Caption is available only in AV/TV
mode.
5.US, Canada, RRT Setting and Reset RRT in LOCK
menu is invalid.
6.Composite/ COMPONENT / HDMI mode has no
CHANNEL menu.
24
Menu Operation
Roku
1. Access the Roku. The Roku logo should appear after
a few seconds.
2.After Roku logo appears on screen, please wait
patiently for about a minute.
3. If Roku does not activate, please follow the
Roku network connection wizard.
4. If Roku is successfully activated, the following
screen will appear.
25
Other Information
Chapter 3
26
Other Information
VIDEO INPUT
Check your connections. If you used Composite yellow, red, and white cables to connect, make
sure they're connected to the green VIDEO INPUT, and the red and white
27
Other Information
Lock Enter Password System lock, System lock
28
Other Information
Specification
NOTE: Dimensions are in inches
35.0 (w/stand)
38.1 (w/stand)
22.6 (w/stand)
24.3 (w/stand)
7.3 (w/stand)
7.3 (w/stand)
35.0 (w/out stand)
38.1 (w/out stand)
20.8 (w/out stand)
22.6 (w/out stand)
3.0 (w/out stand)
3.6 (w/out stand)
70 watts
70 watts
20.5Ibs (w/stand)
23.8Ibs (w/stand)
Power AC Power Weight
Requirement Consumption Width Height Depth
DP42D24
DP50E44
DP55D44
DP58D34
Source:
AC 120V, 60Hz
DP65E34
44.5 (w/stand)
49.1 (w/stand)
51.5 (w/stand)
57.9 (w/stand)
27.9 (w/stand)
30.5 (w/stand)
33.0 (w/stand)
36.2 (w/stand)
9.1 (w/stand)
9.8 (w/stand)
10.4 (w/stand)
19.7 (w/stand)
44.5 (w/out stand)
49.1 (w/out stand)
51.5 (w/out stand)
57.9 (w/out stand)
25.8 (w/out stand)
28.8 (w/out stand)
30.8 (w/out stand)
33.9 (w/out stand)
2.1 (w/out stand)
3.9 (w/out stand)
4.0 (w/out stand)
2.1 (w/out stand)
DP39D14
90 watts
110 watts
150 watts
140 watts
Model
41.6Ibs (w/stand)
45.6Ibs (w/stand)
61.3Ibs (w/stand)
81.6Ibs (w/stand)
60Hz
120Hz (For Model: DP58D34, DP65E34)
(For Model: DP39D14, DP42D24, DP50E44, DP55D44)

29

72-39D14M-X93Z2
• MHL, Mobile High-Definition Link and the MHL Logo are trademarks or
registered trademarks of MHL Licensing, LLC.
California
