Saris Cycling Group CPU2FT3 Bicycle Monitoring Transmitter User Manual manual
Saris Cycling Group Inc Bicycle Monitoring Transmitter manual
Contents
- 1. manual
- 2. final manual
manual
Joule 2.0 User Guide page 1
The Leader in P o we r .
CycleOps Joule™ 2.0
User Guide
TABLE OF CONTENTS (Chapters)
1. Starting Out......................................................................................................3
Buttons
Mount
Battery
Navigation
2. Dashboard Mode.........................................................................................14
Display Actions
Navigation
Dashboard Categories
3. Reports Mode................................................................................................16
Navigation
Report Metrics
4. Activities Mode.............................................................................................19
Intervals
Scripted Workouts
Manual Workouts
Course Workouts
Pausing, Saving and/or Deleting a Workout
5. Sensors............................................................................................................25
Setting Up/Pairing Sensors
Calibrating Devices
6. Setup Joule™.................................................................................................28
7. Setup User.......................................................................................................29
8. History..............................................................................................................31
9. Troubleshooting Joule™...........................................................................33
10. Important Precautions............................................................................34
11. Technical Specifications for Joule™...................................................37
12. Joule™ Warranty........................................................................................39
13. Definition of Terms...................................................................................40

Joule 2.0 User Guide page 3
Chapter 1: Starting Out
Visit www.cycleops.com to learn more about Saris Cycling Group and:
-Register product and activate warranty
-View frequently asked questions
-View instructional videos
-Sign up for the CycleOps Power newsletter
-View product and technical updates from CycleOps Power
WARNING: Always consult a physician before beginning or modifying any exercise program.
Unpacking Joule™
Remove all parts from the box to ensure the following contents are included:
PACKAGE CONTENTS:
Item Part Description Qty
1. Joule™ 2.0 computer 1
2. Chest strap (optional) 1
3. Stem/handlebar mount 1
4. Zip ties 4
5. Training with Power DVD 1
6. PowerAgent CD w/Complete User Guides 1
7. USB cable 1
Please contact the local dealer or Saris Cycling Group with any questions at 1-800-783-7257.
Joule 2.0 User Guide page 4
Chapter 1: Starting Out
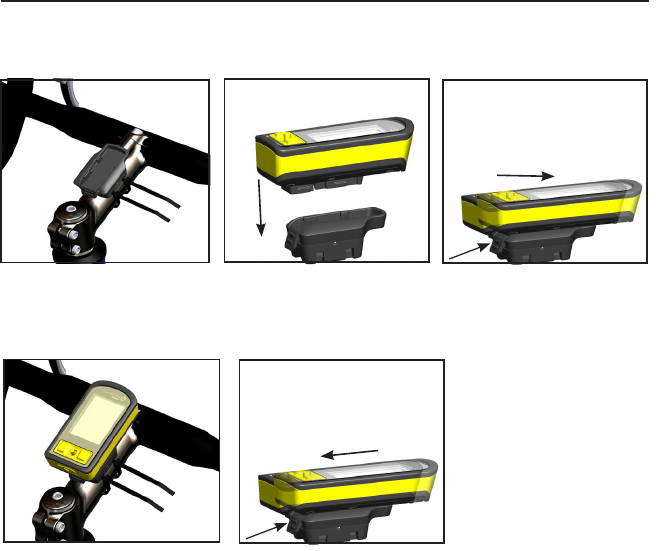
3. Slide Joule™ forward into
mount.
5. To remove Joule™, press down
on the release lever and slide
Joule™ back.
Mount
The CycleOps Joule™ 2.0 mount can be used in either stem or handlebar orientations. The mount
is preassembled for the stem orientation.
1. For stem orientation insert two
zip ties through bottom of mount
and secure to stem.
2. Slide Joule™ down above mount.
4. Be sure to check Joule™, is
secure in mount.
Joule 2.0 User Guide page 5
Chapter 1: Starting Out
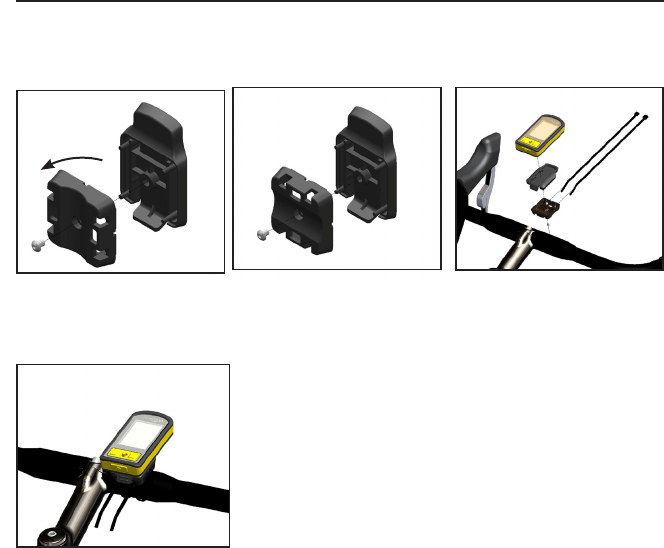
2. Insert screw threw bottom of
mount. 3. Insert two zip ties through bottom
of mount. Tighten by pulling on the
zip ties to secure mount.
1. Remove screw that holds bot-
tom of mount and rotate bottom
90 degrees.
Mount
If desired, change from the preassembled stem orientation to a handlebar orientation.
4. Handlebar orientation.

Joule 2.0 User Guide page 6
HEART RATE MONITOR
Position the heart rate monitor strap above torso as pictured. The strap
should rest just beneath the pectoralis muscles of the chest. For best
results slightly moisten the electrodes where contact is made with skin.
The heart rate strap must be worn to enable the heart rate function. It
should be snug enough to stay in place during the ride.
NOTE: The chest strap for Joule™ uses a coded frequency and is not
compatible with other manufacturer’s chest straps. If heart rate is not
displayed, consult Chapter 5: Sensors.
Chapter 1: Starting Out
Battery
CycleOps Joule™ 2.0 is powered by a built-in lithium-ion battery that can be recharged using the
included USB cable and a computer. A 5VDC 400mA charger can also be used (not included). A
fully charged battery can run for approximately 20 hours before it must be recharged. Recharging
completely will take approximately three hours. The battery level is indicated in the title bar.
WARNING: This product contains a Lithium battery. See Important Precautions section for more
information on page %%.
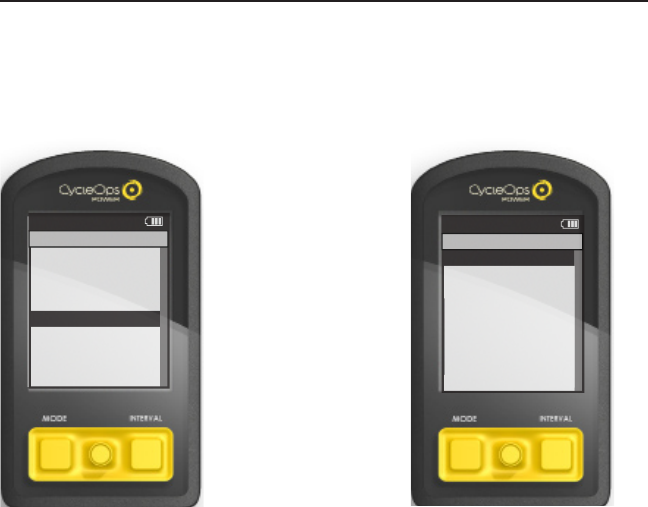
Chapter 1: Starting Out
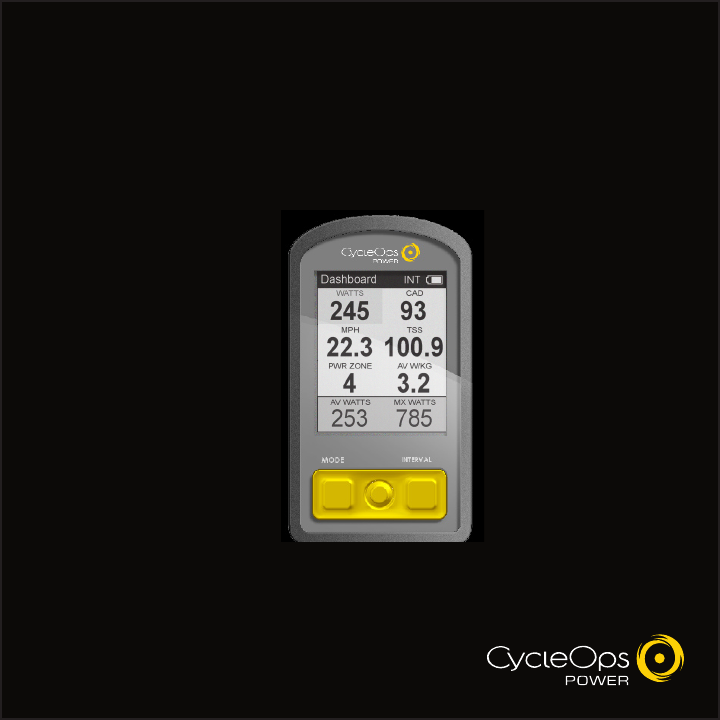
Dashboard
W/KG
MX WATTSAV WATTS
212 876
407 5.2
MPHCAD
27.4 98
MILES FT GAIN
37.8 987
WATTS
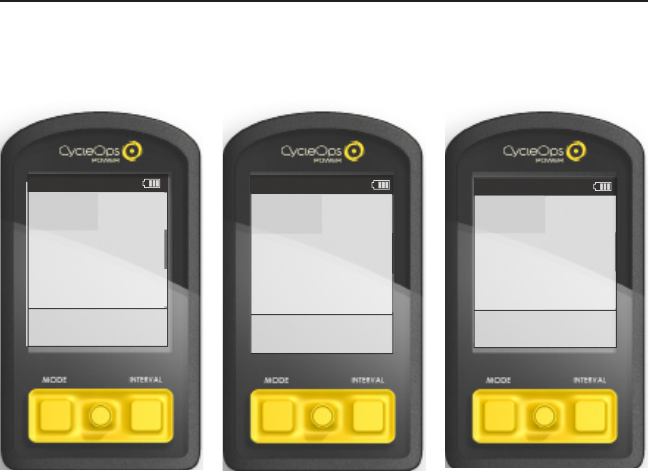
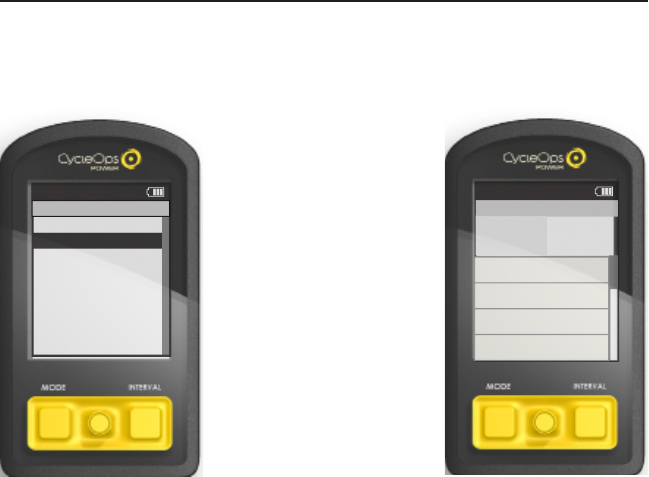
1. Press Mode or Interval button
to turn on Joule™ 2.0. Note:
Pressing joystick will not turn
Joule™ 2.0 on.
2. Plug the mini-USB cable into
the mini-USB port on the back
of Joule™ 2.0 and plug the
other end into an available USB
port on a computer.
3. A standard AC adapter to wall
outlet is available separately.
Joule 2.0 User Guide page 8
Chapter 1: Starting Out
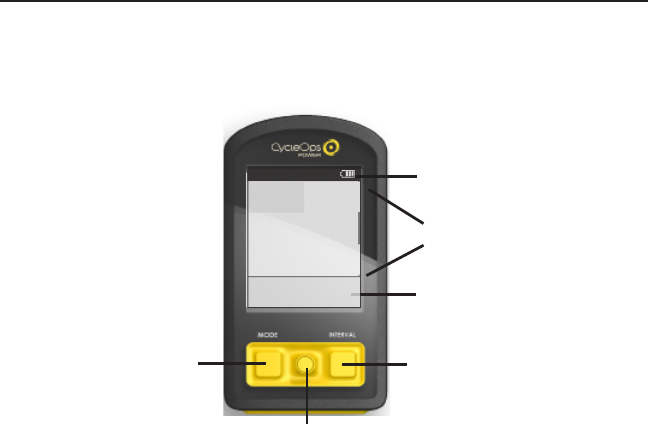
MODE button
Joystick
INTERVAL button
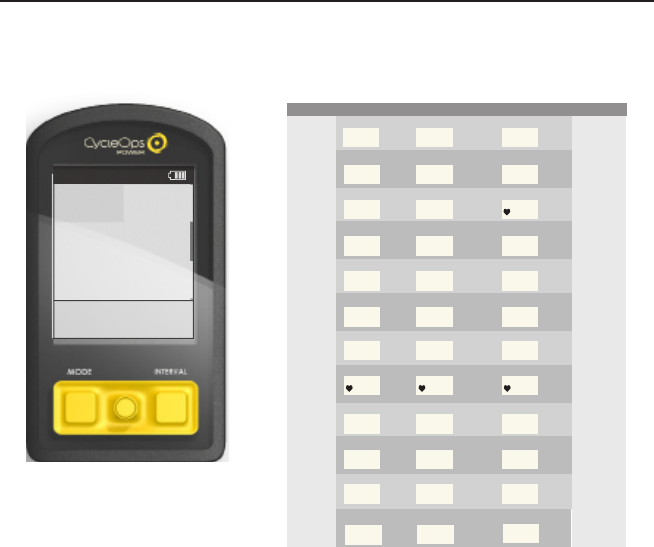
Display Actions
There are two buttons and a joystick to navigate Joule™ 2.0.
Title bar
Detailed view
Dashboard
Dashboard
W/KG
MX WATTSAV WATTS
212 876
407 5.2
MPHCAD
27.4 98
MILES FT GAIN
37.8 987
WATTS

Joule 2.0 User Guide page 9
Chapter 1: Starting Out
Button + Action Function Detail
Joystick Press left/right Move Move within a screen or change screens
Press up/down Move Move within a screen or scroll screen
Press in and release Switch Switch metrics in dashboard, change date
ranges in reports or select settings in menu
Hold Switch Switch dashboard category settings
MODE Press in and release Switch Switch between dashboard, reports, activities, menu
Press in and release Back Navigate “back” in menu mode
Hold for 2 seconds Pause Display “Ride Paused” screen
INTERVAL Press in and release Mark Stop previous interval and mark next
Hold for 2 seconds Switch Switch dashboard to “Interval Mode”
(INT) metrics for that interval (i.e. avg watts) versus
entire ride
MODE Hold for 2 seconds Find Initiates finding previously paired sensors
+
INTERVAL
Display Actions
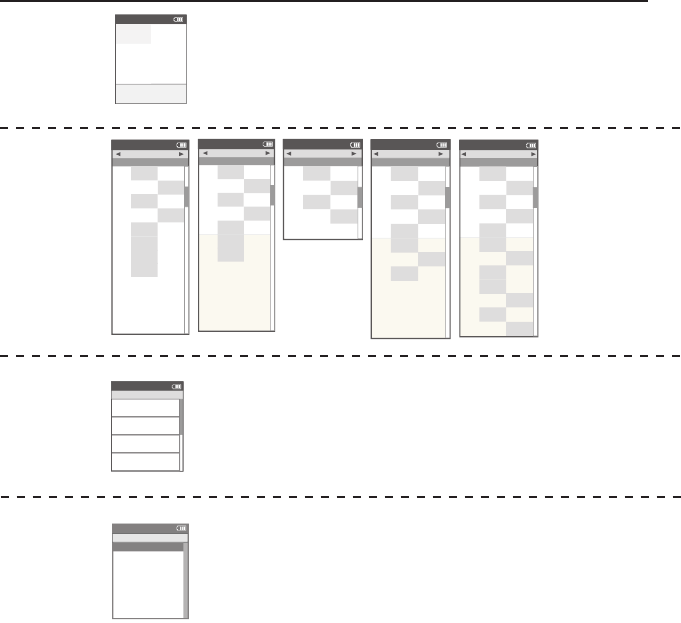
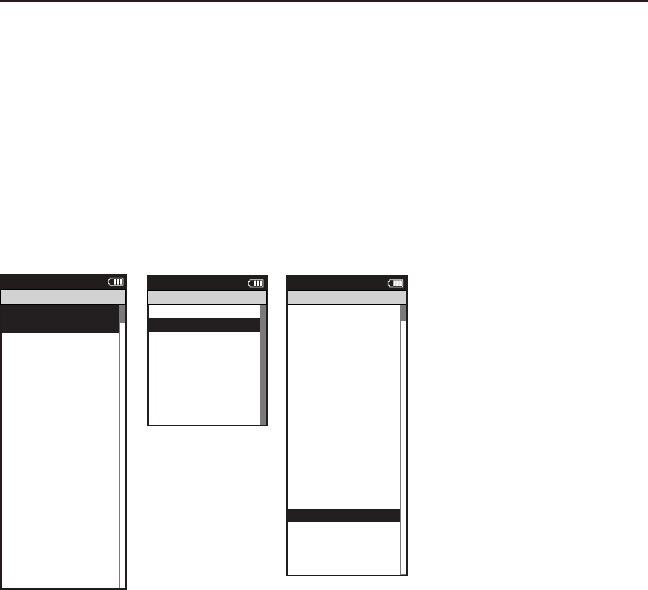
Chapter 1: Starting Out
Dashboard
mode:
To view customizable
metrics while riding.
Reports
mode:
To view how a
current ride com-
pares to previous
rides.
Activities
mode:
To view what
should be done
while riding
(intervals, courses
and workouts).
Dashboard
W/KG
MX W A TTSA V W A TTS
212 876
407 5.2
MPHCAD
27.4 98
MILES FT GAIN
37.8 987
W A TTS
Intervals
Activities
4
2999
w
250
hr
0:00:00
99999. 9
mi
3
2999
w
0:00:00
99999. 9
mi
2
2999
w
250
hr
0:00:00
99999. 9
mi
1
2999
w
250
hr
0:00:00
99999. 9
mi
250
hr
INT
Report
Reports
2/2/09
RIDE
TIME
A V
WATTS
A V
CAD
2WK MEAN
Summary
MILES
75 125
KJ
432 376
337 311
TEMP
F
52 56
105 94
A V
MPH
22 20
A V
HR
167 165
1:45:33 00:59:45
INT
Report
Reports
2/2/09
A V
WATTS
ZERO
WATTS
NP
2WK
Po wer Detail
MX
WATTS
478 641
ZERO
WATTS
10% 6%
258 205
A V
W/KG
3.12.2
MX
W/KG
7.35.2
378 299
00:05:12 00:09:06
INT
Report
Reports
2/2/09
KJ
2WK
W o rk
KJ/HR
289 482
TSS
3.71.0
IF
2.03.1
653 329
INT
Report
Reports
2/2/09
5 SEC
5 MIN
20 MIN
2WK
Peak Power
30 SEC
779 791
1 MIN
759 653
748 801
533 476
30 MIN
512 419
40 MIN
349 382
60 MIN
291 196
910 839
INT
Report
Reports
2/2/09
1
4
5
2WK
Time in Power Zones
2
00:20:22 00:24:51
3
00:44:16 00:49:23
01:00:29 01:01:44
00:13:34 00:12:31
6
00:08:03 00:05:01
1
10% 12%
2
15% 14%
3
30% 23%
4
41% 45%
5
12% 11%
6
3% 5%
00:15:04 00:12:33
INT
Sensors>
Setup Joule >
Setup User >
Workouts>
History >
Sensors>
Main >
Exit Menu
<
Report
Menu
Main
Menu
mode:
To setup prefer-
ences, manage
workouts, history
and sensors.
Chapter 1: Starting Out
Report
Reports
2/2/09
1
4
5
2WK
Time in HR Zones
2
00:05:09 00:09:45
3
00:49:03 00:35:14
00:19:58 00:15:32
00:05:02 00:03:21
1
11% 10%
2
9% 13%
3
70% 40%
4
21% 18%
5
6% 8%
00:09:51 00:07:31
INT
Report
Reports
2/2/09
FT
GAIN
V A M
2WK
Climbing
A V
GRADE
10% 15%
FT
LOST
226 112
349 509
2156 958
INT
Report
Reports
2/2/09
>4
W/KG
>10
W/KG
2WK
Surges
>6
W/KG
79
>8
W/KG
11 10
13 15
54
INT
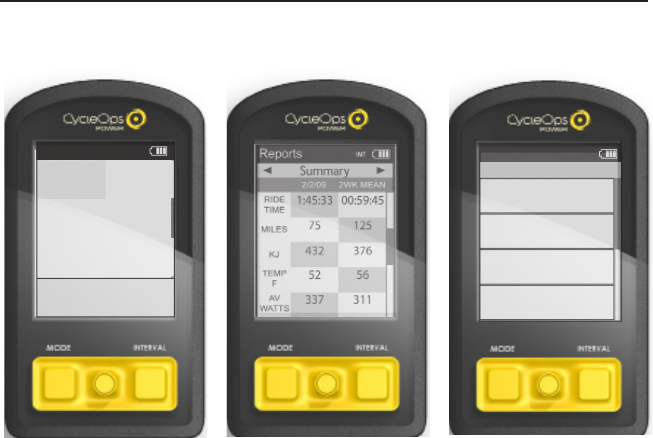
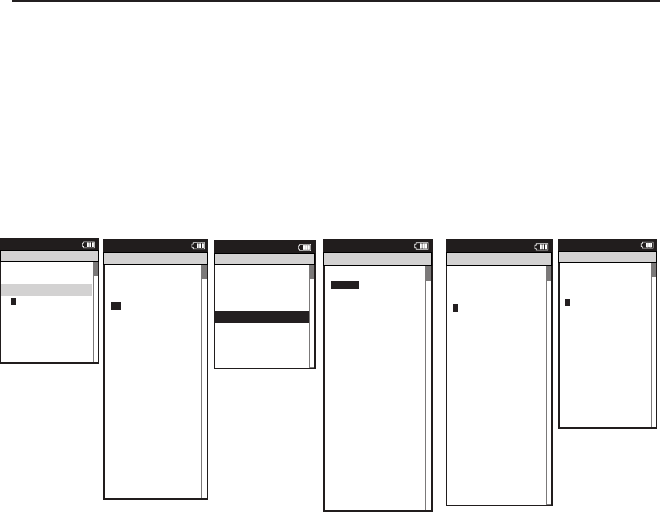
Joule 2.0 User Guide page 12
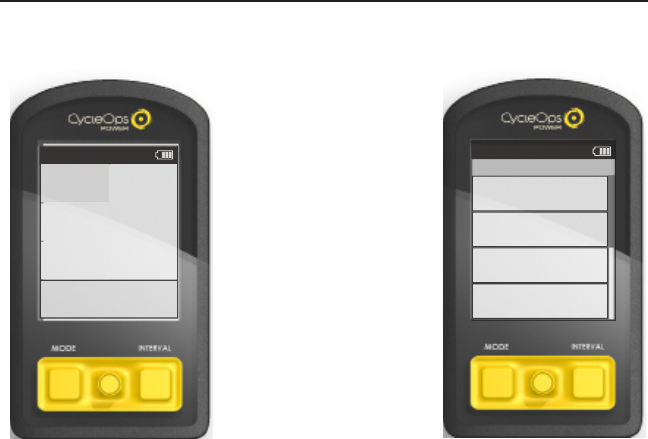
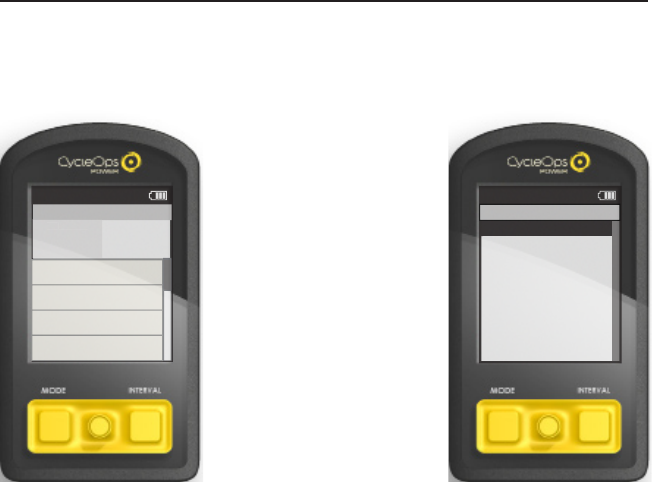
1. Press the MODE button once
to switch from dashboard mode
to report mode.
2. Press the MODE button again
to switch from report mode to
activities mode.
3. Press the MODE button again
to switch from activities mode
to menu mode.
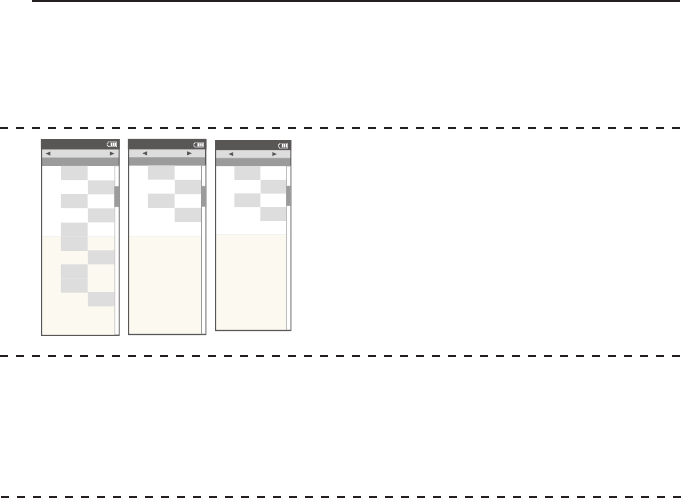
Chapter 1: Starting Out
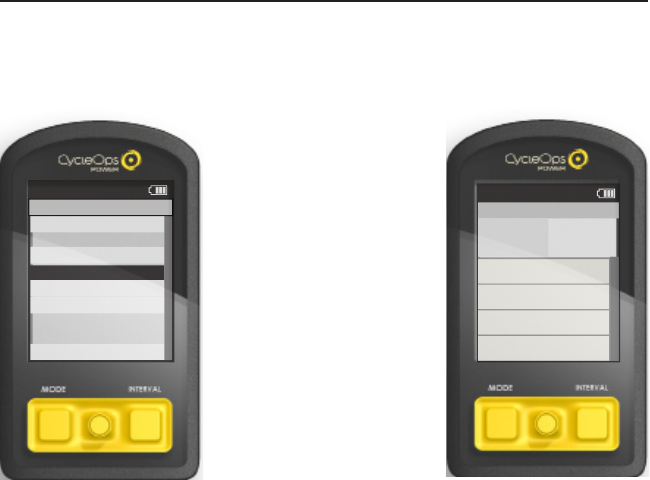
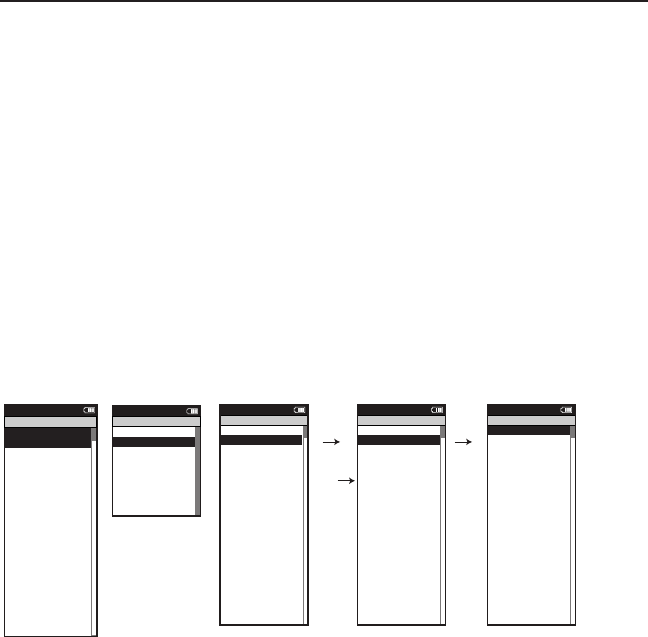
Navigation
Joule™ has four modes of functionality: dashboard, reports, activites and menu indicated by the
title bar.
Dashboard
W/KG
MX WATTSAV WATTS
212 876
407 5.2
MPHCAD
27.4 98
MILES FT GAIN
37.8 987
WATTS
Intervals
Activities
4
2999
w
250
hr
0:00:00
99999. 9
mi
3
2999
w
0:00:00
99999. 9
mi
2
2999
w
250
hr
0:00:00
99999. 9
mi
1
2999
w
250
hr
0:00:00
99999. 9
mi
250
hr
INT

Joule 2.0 User Guide page 13
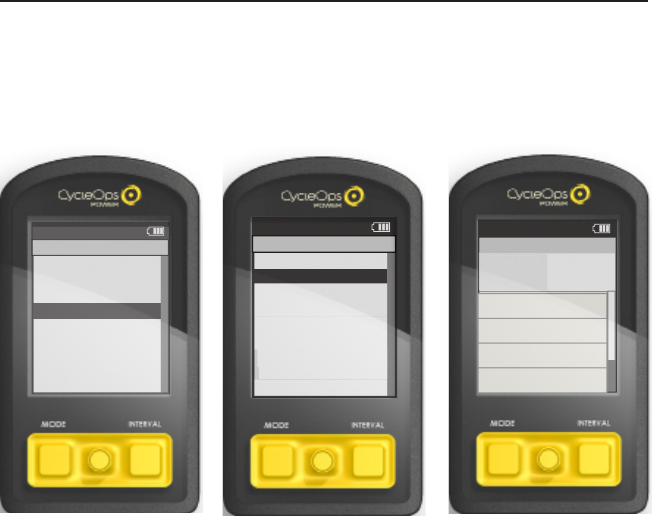
4. Press the MODE button again
to switch from menu mode
back to dashboard mode.
Navigation
Joule™ has four modes of functionality: dashboard, reports, activites and menu indicated by the
title bar.
Chapter 1: Starting Out
Sensors>
Setup Joule >
Setup User >
Workouts>
History >
Sensors>
Main >
Exit Menu
<
Report
Menu
Main
Joule 2.0 User Guide page 14
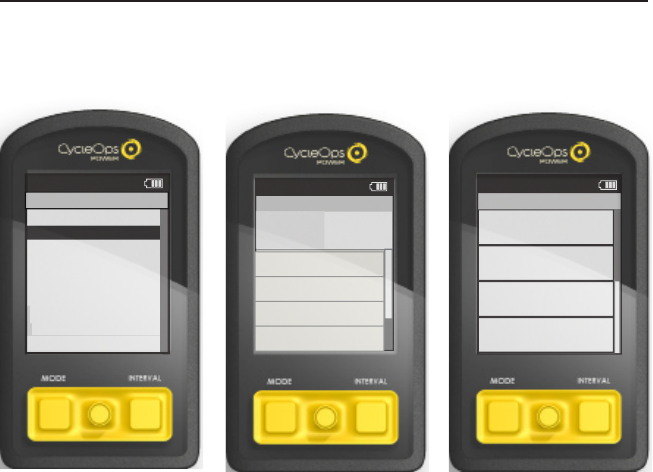
1. Move joystick to the desired
metric. Note: it is shaded.
2.Press joystick to rotate metrics
from detailed view to dash-
board. (Example: watts, av watts,
mx watts). In order to change
detailed view, move joystick to
desired metric.
3. Press in and hold joystick to
change and switch through
available categories. Note: Press
in and hold MODE button to
pause a ride or stop, save and/
or delete ride. Once a ride is
stopped and saved, it is added
to the Reports and History
calculation.
Chapter 2: Dashboard Mode
Navigation
The dashboard shows current ride data. It displays 6 metrics that can easily be configured to
create a customizable dashboard. The detailed view shows additional data from the highlighted
group in the dashboard.
Dashboard
W/KG
20 MIN
5 MIN
435 307
512 5.2
MPHCAD
27.4 98
MILES FT GAIN
37.8 987
5 SEC
Dashboard
W/KG
MX WATTSAV WATTS
212 876
407 5.2
MPHCAD
27.4 98
MILES FT GAIN
37.8 987
WATTS
Dashboard
W/KG
WATTS
MX WAT TS
876 407
212 5.2
MPHCAD
27.4 98
MILES FT GAIN
37.8 987
AV WAT TS
Joule 2.0 User Guide page 15
Chapter 2: Dashboard Mode
Dashboard Categories
To customize the dashboard, choose 6 categories from the following12 available categories.
Each dashboard category is made up of 3 metrics.
Dashboard
W/KG
MX WATTSAV WATTS
212 876
407 5.2
MPHCAD
27.4 98
MILES FT GAIN
37.8 987
WATTS
Category Metric 1Metric 2Metric 3
Powerwatts average watts
average watts/kg
current power zone average power zone
maximum watts/kg
maximum watts
Wa tts/kg watts/kg
Zones
Peak Power
Scores
Wo rk
Speed
V A M
2999 29992999
WA TTS
W/KG
AV WATTSMXWA T TS
20.0
PWR ZONE
6
A V PWR ZONE
4.2
heart rate zone
HR ZONE
3
5sec Peak Power 5min Peak Power
5 SEC
2999
5 MIN
2999
20 min Peak Power
20 MIN
2999
training stress score normalized power
TSS
500.1
NORM PWR
2999
intensity factor
IF
2.000
kilojoules kilojoules / hour
KJ
9999
KJ/HR
9999
training stress score
TSS
9999
Cadence rpmaverage rpm
CAD
250
A V CAD
250
maximum rpm
MX CAD
250
current speed average speed
MPH
99.9
A V MPH
99.9
maximum speed
MX MPH
99.9
current grade current altitude ft or m
current altitude ft or m
% GRADE
45.0
ALTITUDE FT
29999
total ascent ft or m
total ascent ft or m
FT GAIN
9999
vertical ascent
VA M
Heart Rate
Climbing
heart rate average heart rate
HR
250
A V HR
250
MX HR
250
maximum heart rate
AV W/KG
20.0
MX W/KG
20.0
Ride ride time
99:59:59
MILE
time of day
12:59
99.99
ride distance
RIDE TIME HR CLOCK PM
29999 9999
ALTITUDE FTFT GAIN
45.0
Joule 2.0 User Guide page 16
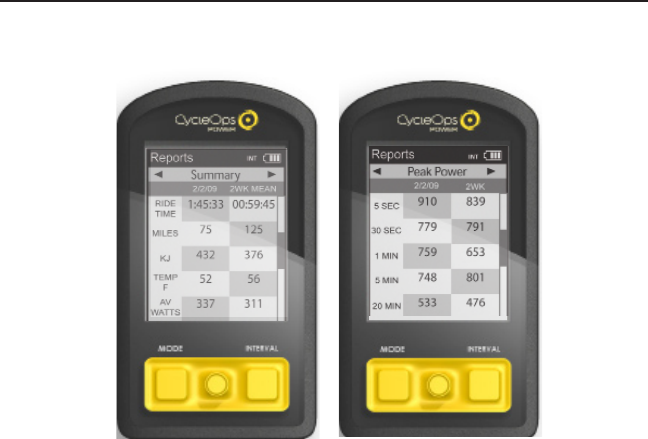
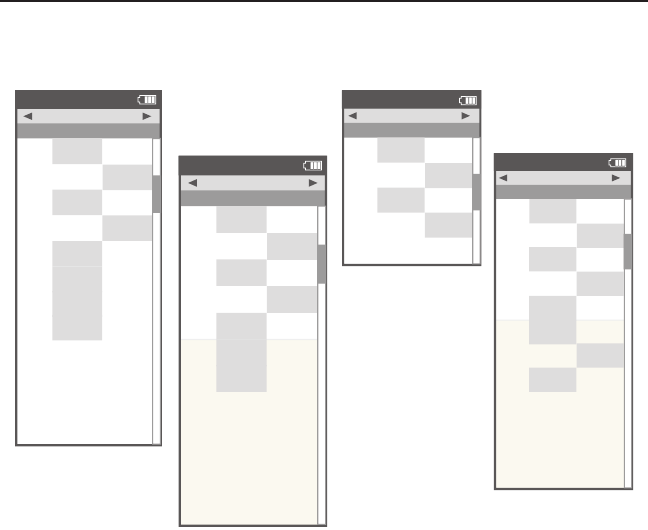
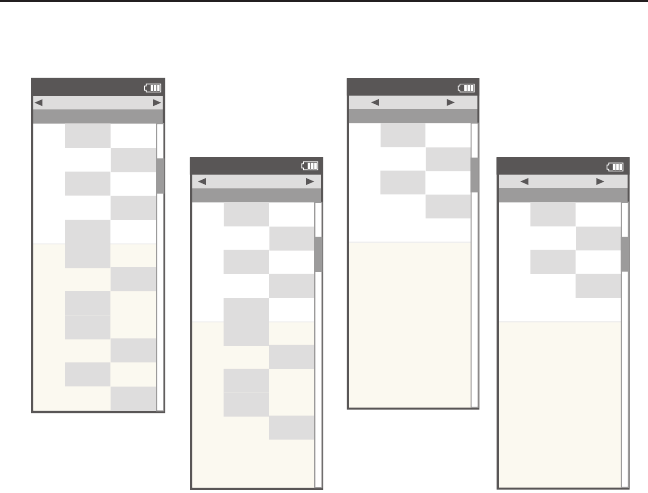
1. Press joystick left/right to
page through eight reports.
Press joystick up/down to scroll
screen. The left column of data
displays the current ride. The
right column displays an average
of the rides completed over the
selected time frame. Note: the
highlighted metrics represents
the higher of the two metrics.
2. Press in and release joystick to
change date ranges.
Navigation
Joule™ provides eight reports with an easy comparison of the current ride and historical aver-
ages so information can be seen in context.
Chapter 3: Reports Mode
Joule 2.0 User Guide page 17
Chapter 3: Reports Mode
Report
Reports
2/2/09
RIDE
TIME
AV
WATTS
AV
CAD
2WK MEAN
Summary
MILES
75 125
KJ
432 376
337 311
TEMP
F
52 56
105 94
AV
MPH
22 20
AV
HR
167 165
1:45:33 00:59:45
INT
Report
Reports
2/2/09
AV
WATTS
ZERO
WATTS
NP
2WK
Power Detail
MX
WATTS
478 641
ZERO
WATTS
10% 6%
258 205
AV
W/KG
3.12.2
MX
W/KG
7.35.2
378 299
00:05:12 00:09:06
INT
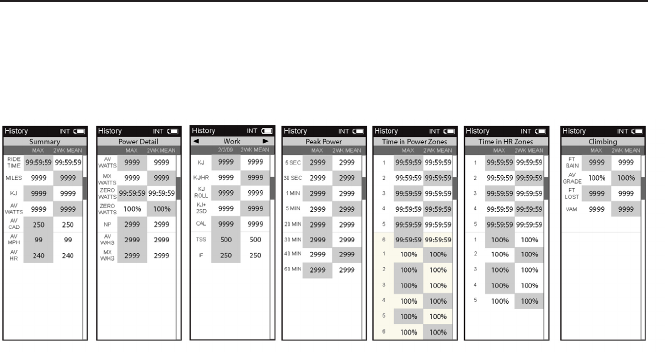
In depth view of power
specific information for
new insight into ride
intensity and character-
ics. Includes normalized
power, watter per kilo-
gram of body weight and
time spent at zero watts.
Basic information with
minimal manipulation or
calculation and how they
compare to previous rides.
Note: Ride time equals time
moving. Average watts is
calculated without zeros
and is time weighted.
Report Details
Joule™ provides eight reports that provide an easy comparison of the ride and historical aver-
ages so information can be seen in the context. See Definition of Terms for an explanation of
metrics on page %.
Report
Reports
2/2/09
KJ
2WK
Work
KJ/HR
289 482
TSS
3.71.0
IF
2.03.1
653 329
INT
Report
Reports
2/2/09
5 SEC
5 MIN
20 MIN
2WK
Peak Power
30 SEC
779 791
1 MIN
759 653
748 801
533 476
30 MIN
512 419
40 MIN
349 382
60 MIN
291 196
910 839
INT
Key measures for quan-
tifying work completed,
including TrainingPeaks’
Training Stress Score (TSS)
and Intensity Factor (IF).
Full array of peak power data
for indication of ride intensity
at key physiological markers
of current fitness compared
to previous performances.
Joule 2.0 User Guide page 18
Report
Reports
2/2/09
1
4
5
2WK
Time in HR Zones
2
00:05:09 00:09:45
3
00:49:03 00:35:14
00:19:58 00:15:32
00:05:02 00:03:21
1
11% 10%
2
9% 13%
3
70% 40%
4
21% 18%
5
6% 8%
00:09:51 00:07:31
INT
Report
Reports
2/2/09
1
4
5
2WK
Time in Power Zones
2
00:20:22 00:24:51
3
00:44:16 00:49:23
01:00:29 01:01:44
00:13:34 00:12:31
6
00:08:03 00:05:01
1
10% 12%
2
15% 14%
3
30% 23%
4
41% 45%
5
12% 11%
6
3% 5%
00:15:04 00:12:33
INT
Time spent in physiologi-
cal relevant power zones
in absolute minutes and
as a percent of total time.
Time spent in physiologi-
cal relevant heart rate
zones in absolute minutes
and as percent of total
time.
Chapter 3: Reports Mode
Report
Reports
2/2/09
FT
GAIN
VAM
2WK
Climbing
AV
GRADE
10% 15%
FT
LOST
226 112
349 509
2156 958
INT
Report
Reports
2/2/09
>4
W/KG
>10
W/KG
2WK
Surges
>6
W/KG
79
>8
W/KG
11 10
13 15
54
INT
Detailed indication of
climbing including total
altitude gained and lost,
vertical ascent (VAM) and
grade.
Quantification of how many
accelerations or “matches”
were burned during a ride
over 4, 6, 8 and 10 watts
per kilogram. Note: A surge
is counted whenever
three consecutive values
(someword) w/kg value and
recorded.
Joule 2.0 User Guide page 19
Activites Overview
Joule™ activities mode manages intervals and workouts.
Chapter 4: Activities Mode
Intervals
Activities
4
168
w
182
hr
0:18:22
5.1
mi
3
142
w
0:33:16
12. 3
mi
2
139
w
182
hr
0:30:04
9.9
mi
1
11 9
w
170
hr
00:1 1 :27
3.4
mi
184
hr
INT
Hill Workout
Activities
TRG SLOPE
T
R
G
S
L
O
P
E
10%
WATTS
2999
Current Segment:6 00:42:23
10% 250b 999.9m i
Segment:5 01:42:23
8% 250b 999.9m i
Segment:4 01:42:23
7% 250b 999.9m i
Segment:3 01:42:23
15% 250b 999.9m i
>
Hill Workout
Intervals >
Manual>
Ironman Wisconsin >
Coach's T e mpo >
Paoli >
Back
<
Report
Menu
Workouts
Main >
Main >
Joule 2.0 User Guide page 20
1. Intervals can be marked at any
point during the ride and from
any mode by pressing INTERVAL
button.
2. To view intervals from the dash-
board hold INTERVAL button until
“INT” is displayed in the title bar.
Note: All dashboard data now per-
tains to the active interval only.
3. To exit interval mode, hold
INTERVAL button again.
4. To view all interval data press
MODE button to navigate to activ-
ity mode.
Note: Activity mode shows all
intervals completed with the cur-
rent interval at the top of the list.
Average power, heart rate, interval
time and distance are displayed for
each interval.
Intervals
Intervals may be viewed from activity mode or dashboard mode.
Chapter 4: Activities Mode
Dashboard
W/KG
MX WAT TS
AV WAT TS
212 876
402 5.2
MPHCAD
27.4 98
MILES FT GAIN
37.8 987
WATTS
INT
Intervals
Activities
4
168
w
182
hr
0:18:22
5.1
mi
3
142
w
0:33:16
12. 3
mi
2
139
w
182
hr
0:30:04
9.9
mi
1
11 9
w
170
hr
00:1 1 :27
3.4
mi
184
hr
INT
Joule 2.0 User Guide page 21
Sensors>
Setup Joule >
Setup User >
Workouts>
History >
Sensors>
Main >
Exit Menu
<
Report
Menu
Main
Hill Workout
Activities
TRG SLOPE
T
R
G
S
L
O
P
E
10%
WATTS
2999
Current Segment:6 00:42:23
10% 250b 999.9m i
Segment:5 01:42:23
8% 250b 999.9m i
Segment:4 01:42:23
7% 250b 999.9m i
Segment:3 01:42:23
15% 250b 999.9m i
>
Hill Workout
Intervals >
Manual>
Ironman Wisconsin >
Coach's T e mpo >
Paoli >
Back
<
Report
Menu
Workouts
Main >
Main >
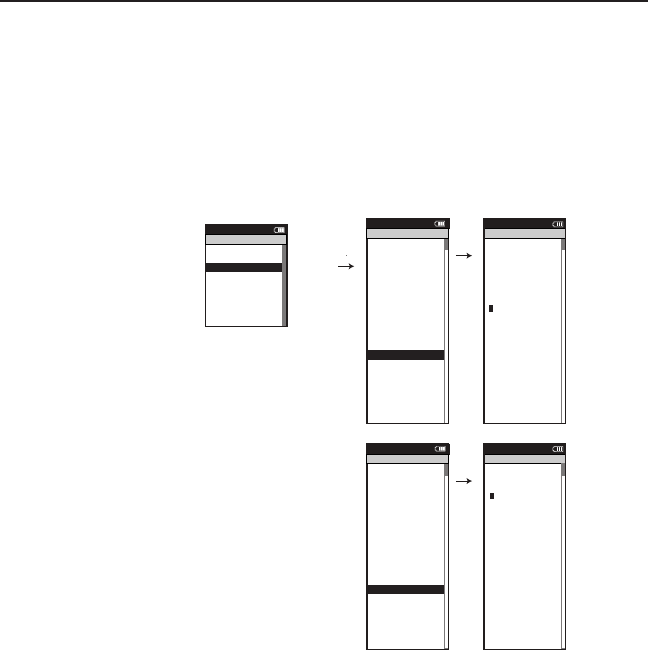
Scripted Workouts
Joule™ allows for three types of workouts: scripted, manual and courses. Script workouts allow
for a list of workout parameters to be followed versus carrying a piece of paper. Manual workouts
are compatible with the CycleOps 400 Pro indoor cycle and PowerBeam trainer only and allow for
precise control over a target power or slope. Courses are also only compatible with the CycleOps
400 Pro indoor cycle and PowerBeam trainer and allow for duplication of a terrain based profile,
such as a favorite outdoor course or ride.
Chapter 4: Activities Mode
1. Create scripted workout using PowerAgent
software.
2. Title and save scripted workout in Power-
Agent and transfer to Joule™.
3. Press MODE button to navigate to menu
mode.
4. Select Workouts
5. Select Hill Workout
6. Joule™’s activity mode will now display the
scripted workout.
Joule 2.0 User Guide page 22
Manual Workouts
Controlled resistance technology can take workouts to the next level with target based training.
There are two types of controlled resistance units: PowerBeam Pro trainer and 400 Pro indoor
cycle. Choose to alter the target wattage or slope. The gearing may be changed on the 400 Pro
indoor cycle. Note: A manual workout will only work with a controlled resistance unit.
Chapter 4: Activties Mode
>
Manual Workout >
Select Workout
Back
<
Report
3:16p
Workouts
1. Press MODE button to navigate
to menu mode.
Note: A manual workout will begin
automatically if Joule is paired to a
controlled resistance unit.
2. Select manual workout. Within
activity mode the manual resis-
tance control is in the upper left
box and current power is in the top
right hand box.
3. Press Joystick in to change
resistance type. Gearing can be
adjusted on a 400 Pro Indoor Cycle.
Note: Intervals may still be marked
by pressing INTERVAL button. Scroll
intervals by pressing joystick up/
down.
Report
Manual Workout
4:38P
TRG PWR
TR
G
PWR
300
WATTS
289
Current:6 01:42:23
2999w 250b 999.9m i
Interval:5 01:42:23
2999w 250b 999.9m i
Interval:4 01:42:23
2999w 250b 999.9m i
Interval:3 01:42:23
2999w 250b 999.9m i
Joule 2.0 User Guide page 23
Chapter 4: Activities Mode
Course Workouts
Controlled resistance technology can take workouts to the next level with target based training.
There are two types of controlled resistance units: PowerBeam trainer and 400 Pro indoor cycle.
Choose to alter the target slope. The gearing change be changed on the 400 Pro indoor cycle.
1. Take outdoor ride or emailed
file and convert to workout us-
ing PowerAgent software. Note:
Workouts can also be built based in
PowerAgent based on slope.
2. Title and save course workout in
PowerAgent and transfer to Joule™.
3. Press MODE button to navigate to
menu mode.
4. Select course workout (i.e. Iron-
man Wisconsin).
5. Press in joystick to change be-
tween target slope or target watts.
6. Press joystick up/down to adjust
target slope. Gearing can be ad-
justed on indoor cycle.
Note: Courses can only be ridden
with a controlled resistance unit,
like the CycleOps 400 Pro indoor
cycle and PowerBeam trainer.
Ironman Wisconsin
Activities
GEAR
G
EAR
1
WATTS
2999
Segment:6
10% 999.9mi
Segment:5
8% 999.9mi
Segment:4
7% 999.9mi
Segment:3
15% 999.9mi
>
Hill Workout
Intervals >
Manual>
>
Ironman Wisconsin >
Coach's T e mpo >
Paoli >
The Gun Show >
Back
<
Report
Menu
Workouts
Joule 2.0 User Guide page 24
Pausing, Saving or Deleting a Workout
A workout, like any ride can be paused, saved or deleted.
1. Hold the MODE button to
acccess ride paused screen.
2. Move joystick to up/down
to pause, stop and save or
delete workout.
Note: there will be a confirma-
tion screen before deleting a
ride. Stop and save will stop
the workout and save it to
History.
Chapter 4: Activities Mode
>
Resume ride >
Stop and Save >
Stop and Delete >
Report
12:02p
INT
Ride Paused
Report
Intervals
Activities
TRG PWR
T
R
G
PWR
300
WATTS
289
Current:6 01:42:23
2999w 250b 999.9m i
Interval:5 01:42:23
2999w 250b 999.9m i
Interval:4 01:42:23
2999w 250b 999.9m i
Interval:3 01:42:23
2999w 250b 999.9m i
INT
Joule 2.0 User Guide page 25
1. Press the MODE button until Menu mode appears.
2. Select Sensors.
3. Select the desired sensor type (Power, Cadence, Speed, Heart Rate or RU); make sure
sensor is awake and isolated from other active sensors by 65 feet/20 meters).
4. For Power sensors, select type of power meter. (PowerTap, Indoor Cycle -IC, ANT+, SRM,
Quarq)
5. Select Start Pairing. Note: If a heart rate strap was purchased with Joule™ with it
will already be paired to Joule™ .
6. After successful pairing, Joule™ should display a five digit code corresponding to the
sensor. (Pairing may take up to 60 seconds).
7. Select Name and/or Wheel Circumferance to edit if desired.
8. Select Active Sensor to save as the primary sensor and return to sensor list.
9. Only activate sensors will be found by Joule™.
Follow above steps for Setting Up any Power, Cadence, Speed, Heart Rate or Resistance Unit sen-
sor. Note: It is recommended the Auto Zero setting for PowerTap remain selected as yes, unless
using a track hub.
Chapter 5: Sensors
Setting Up Sensors
Joule™ is compatible witn many ANT+ sesnors, each having a unique code. A sensor is defined as
ANT + compatible power meters, cadence sensors, speed sensors, heart rate straps and CycleOps
resistance units. Joule™ needs to be paired to each sensor to ensure proper functionality.
Power Sensor: >
- None
Cadence Sensor: >
>
Speed Sensor: >
- None >
Heart Rate Sensor:>
- None >
RU Sensor >
-None >
Y>
>
Auto Zero (Y or N):
Y>
Re-Pair Sensor >
Re-Pair Sensor >
Delete Sensor >
PT Data>
Pair >
Pair New Sensor >
Back
<
Report
Menu
Sensors
- None
Select Sensor >
- PowerSensor1 >
Sensor ID >
Add PowerTap >
The Gun Show >
Torque O set >
Torque O set >
Torque O set >
>
Add IC Power >
Add ANT+ >
Pair New Sensor >
Back
<
Report
Menu
Power Sensor
Activate Sensor >
>
>
00000 >
Wheel Circumference:>
02096 >
Auto Zero (Y or N): >
Y>
Auto Zero (Y or N): >
Y>
>
Auto Zero (Y or N):
Y>
Re-Pair Sensor >
Cancel Pairing >
Delete Sensor >
Calibration >
Pair >
Pair New Sensor >
Back
<
Report
Menu
PowerSensor1
Sensor ID:
PowerSensor1
Name: >
Start Pairing >
Activate Sensor >
>
>
PAIRING >
Wheel Circumference:>
02096 >
Auto Zero (Y or N): >
Y>
Auto Zero (Y or N): >
Y>
>
Auto Zero (Y or N):
Y>
Re-Pair Sensor >
Cancel Pairing >
Delete Sensor >
Calibration >
Pair >
Pair New Sensor >
Back
<
Report
Menu
PowerSensor1
Sensor ID:
PowerSensor1
Name: >
Start Pairing >
Activate Sensor >
>
>
12345 >
Wheel Circumference:>
02096 >
Auto Zero (Y or N): >
Y>
Auto Zero (Y or N): >
Y>
>
Auto Zero (Y or N):
Y>
Re-Pair Sensor >
Cancel Pairing >
Delete Sensor >
Calibration >
Pair >
Pair New Sensor >
Back
<
Report
Menu
PowerSensor1
Sensor ID:
PowerSensor1
Name: >
Start Pairing >
blink

Joule 2.0 User Guide page 26
1. Press the MODE button until Menu mode appears.
2. Select RU Sensor
3. Select Calibration
4. After successful pairing, Joule™ should display a five digit code corresponding to the
sensor. (Pairing may take up to 60 seconds).
5. Select Roll Down, Manual or Restore to Default to calibrate resistance unit.
6. Select Back to access the Menu.
Chapter 5: Sensors
Calibrating Sensors
For accurate PowerTap and indoor cycle readings, it is important to frequently zero the torque. If
the current power display is positive or negative while coasting the torque must be zeroed. This
operation must be done while stopped with no tension on the chain, pedals and the the trans-
mission icon must be illuminated. For calibration of other power sensor please refer to that sensor
manufacturer’s calibration recomendations.
Activate Sensor >
Name: >
12345 >
>
12345 >
Weight - lbs: >
12.1 >
1234 >
Auto Zero (Y or N): >
Y >
>
RUSENSOR1 >
Sensor ID: >
60054 >
>
>
>
>
Delete Sensor >
>
>
>
Back
<
Report
Menu
RUSensor1
Cancel Pairing
Delete Sensor
RU Data
Calibration
>
>
Start Pairing
>
Roll Down>
Manual >
Reset to Defaults >
Sensor ID >
Sensor ID >
The Gun Show >
T o rque O set >
Manual Calibration >
T o rque O set >
Back
Report
Menu
Calibration
Po wer Sensor: 9999 w >
>
Roll Down Calibration
Wheel Circumference >
Wheel Circumference >
The Gun Show >
Auto Zero >
Auto Zero >
Pair >
Roll Down>
Manual >
Reset to Defaults >
Sensor ID >
Sensor ID >
The Gun Show >
T o rque O set >
Manual Calibration >
T o rque O set >
Pair New Sensor >
Back
<
Report
Menu
Calibration
Pedal to 18-22 MPH >
XX >
Hold for (sec): >
XXX >
Current Speed: >
XX.X >
T o rque O set >
Manual Calibration >
T o rque O set >
Pair >
Completed >
Back
<
Report
Menu
Roll Down
Use up/down to >
match ERU to power >
sensor number. >
T u :>
XXXXX >
ERU Power:>
T o rque O set >
Manual Calibration >
T o rque O set >
XXX >
Po wer Sensor:
XXX >
Back
<
Report
Menu
Manual Calibration
Po wer Sensor: 9999 w >
>
Roll Down Calibration
Wheel Circumference >
Wheel Circumference >
The Gun Show >
Auto Zero >
Auto Zero >
Pair >
Roll Down>
Manual >
Reset to Defaults >
Sensor ID >
Sensor ID >
The Gun Show >
T o rque O set >
Manual Calibration >
T o rque O set >
Pair New Sensor >
Back
<
Report
Menu
Calibration
Restoring Defaults >
match ERU to power >
sensor number. >
ERU Power >
Completed >
The Gun Show >
T o rque O set >
Manual Calibration >
T o rque O set >
Completed >
Pair New Sensor >
Back
<
Report
Menu
Reset Calibration
Joule 2.0 User Guide page 27
Chapter 5: Sensors
1. Press the MODE button until Menu mode appears.
2. Select Sensors
3. Select Sensor (Example: Ashley Race W).
4. Select Delete Sensor
5. Select Yes to confirm. Note: If deleting an active sensor a new sensor must be selected.
Deleting Sensors
Deleting sensors when not in use will help to optimize Joule™ efficiency.
Activate Sensor >
>
>
31864 >
Wheel Circumference:>
02096 >
Auto Zero (Y or N): >
Y>
Auto Zero (Y or N): >
Y>
>
Auto Zero (Y or N):
Y>
Re-Pair Sensor >
Cancel Pairing >
Delete Sensor>
Calibration >
Pair >
Pair New Sensor >
Back
<
Report
Menu
Ashley Race W
Sensor ID:
Ashley Race W
Name:>
Start Pairing >
Power Sensor: >
- Ashley Race W
Cadence Sensor: >
>
Speed Sensor: >
- SpeedSensor1 >
Heart Rate Sensor: >
- HRSensor1 >
RU Sensor >
-RUSensor1 >
Y>
>
Auto Zero (Y or N):
Y>
Re-Pair Sensor >
Re-Pair Sensor >
Delete Sensor >
PT Data >
Pair >
Pair New Sensor >
Back
<
Report
Menu
Sensors
- CadenceSensor1
Select Sensor >
Ashley Race W >
Sensor ID >
Add PowerTap >
The Gun Show >
To rque O set >
To rque O set >
To rque O set >
>
Add IC Power >
Add ANT+ >
Pair New Sensor >
Back
<
Report
Menu
Ashley Race W
Ashley Train W >
Joule 2.0 User Guide page 28
1. Press the MODE button until Menu mode appears.
2. Select Setup Joule™
3. Select Date and Time, Display, Memory, Joule™ Mode, Joule™ Data, or Test Mode
to edit desired computer setting.
4. Select Back to access the Menu.
Chapter 6: Setting Up Joule™
Setting Up Joule™
Setting up Joule™ will allow for editing Date and Time, Backlight, Power/Speed/Cadence Smooth-
ing with Zeros, Memory, End Ride Time, Record Control, Sleep Time, Firmware Version, Odometer
and Test Mode.
Date:>
Feb 26 2009 >
Time:>
>
Clock Format: >
12 >
Automatic DST: >
On >
DST E ective:>
On >
>
P5ower Zones
HR Zones >
Pair New Sensor >
Back
<
Report
Menu
INT
Date & Time
04:55 pm
Firmware Version: >
01:00 >
Odometer >
>
Reset Odometer >
90 >
Power Avg (sec): >
Designed in: >
Madison, WI by >
Saris Cycling Group >
800-783-7257 >
>
1
Speed Avg (sec): >
1 >
Language: >
English >
Units: >
English >
Pair New Sensor >
Back
<
Report
Menu
INT
CPU Data
512356
End Ride Time (min): >
>
90
Clear Memory >
>
Clear Ride Memory >
90 >
Power Avg (sec): >
1 >
Power Zeros: >
With >
Cadence Av g (sec): >
>
1
Units: >
English >
Pair New Sensor >
Back
<
Report
Menu
INT
Memory
5
Backlight Level:>
2 >
Backlight Time (sec): >
>
Contrast: >
5 >
Zero averaging: >
With >
Power Avg (sec): >
1 >
Cadence Av g (sec): >
>
1
Speed Avg (sec): >
1 >
Language: >
English >
Units: >
English >
Pair New Sensor >
Back
<
Report
Menu
INT
Display
10
>
Record Control >
>
Sleep Time: >
1 >
Power Avg (sec): >
1 >
Power Zeros: >
With >
Cadence Av g (sec): >
>
1
Speed Avg (sec): >
1 >
Language: >
English >
Units: >
English >
Pair New Sensor >
Back
<
Report
Menu
INT
CPU Mode
Speed
Frequency >
057 >
Power>
>
End Ride Time (min): >
Start Radio Test >
Stop Radio Test >
Designed in: >
Madison, WI by >
Saris Cycling Group >
800-783-7257 >
Units: >
English >
Pair New Sensor >
Back
<
Report
Menu
INT
Test Mode
3
Note: Power smoothing
adjusts the rate at which the
displayed metric updates.
1=fastest, 30=slowest. Note:
End ride time controls how
long Joule waits after no
speed is measured before the
current ride is automatically
stopped saved to history.
Note: End ride
time controls
when the current
ride automatically
is saved to History
and Reports.
Note: Record control
sets how Joule™
manages recording
of data. Speed setting
starts recording when
speed is present.
Heart rate setting
starts recording any-
time heart is present.
Joule 2.0 User Guide page 29
1. Press the MODE button until Menu mode appears.
2. Select Setup User
3. Enter Name, Active, Weight Pounds, Height Inches, Date of Birth, Gender, Power
Zones and Heart Rate Zones. using the joystick to switch letter or number value.
4. Select Back to access the Menu.
Note: TSS calculations use the upper values of the threshold zone.
Chapter 7: Setting Up User
Setting Up User Profile
Setting up a user profile is important for Joule™ to display the most accurate information.
Name: >
New User >
Active: >
X >
Weight - lbs: >
XXX >
Height - in: >
XXX >
Date of Birth: >
Feb 02 1974 >
Gender: >
>
Male
Po wer Zones >
HR Zones >
The Gun Show >
Auto Zero >
Po wer Zones >
HR Zones >
Pair New Sensor >
Back
<
Report
Menu
Setup User
>
>
XXXX XXXX>
The Gun Show >
Auto Zero >
Po wer Zones >
HR Zones >
Pair New Sensor >
Back
<
Report
Menu
Po wer Zones
Zone
Upper Limit
1: Recovery >
123 >
2: Endurance >
123 >
3: T hreshold >
4: Race Pace >
123 >
5: Maximum >
123 >
>
6: Supra Max
MAX >
123
Name: >
Jesse >
Active (1-5): >
X >
Weight - lbs: >
XXX >
Height - in: >
XXX >
Date of Birth: >
Feb 02 1974 >
Gender: >
>
Male
Po wer Zones >
HR Zones >
The Gun Show >
Auto Zero >
Po wer Zones >
HR Zones >
Pair New Sensor >
Back
<
Report
Menu
Setup User
>
>
>
6: Supra Max
XXXX XXXX>
Gender >
The Gun Show >
Auto Zero >
Po wer Zones >
HR Zones >
Pair New Sensor >
Back
<
Report
Menu
Heart Rate Zones
Sensors >
Setup Joule >
Setup User >
Workouts >
History >
Sensors >
Main >
Exit Menu
<
Report
Menu
Main
Zone
Upper Limit
1: Recovery >
>
2: Endurance >
123 >
3: T hreshold >
4: Race Pace >
123 >
5: Maximum >
123 >
>
6: Supra Max
MAX >
123
123

Joule 2.0 User Guide page 30
1. Press the MODE button until Menu mode appears.
2. Select Setup User
3. Edit Name, Active, Weight Pounds, Height Inches, Date of Birth, Gender, Power
Zones and Heart Rate Zones using the joystick to switch letter or number value.
4. Select Back to access the Menu.
Chapter 7: Setting Up User
Editing User Profile
Edit user profile to reflect changes to weight, power zones, heart rate zones and to ensure the
most accurate information.
Name: >
New User >
Active: >
X >
Weight - lbs: >
XXX >
Height - in: >
XXX >
Date of Birth: >
Feb 02 1974 >
Gender: >
>
Male
Po wer Zones >
HR Zones >
The Gun Show >
Auto Zero >
Po wer Zones >
HR Zones >
Pair New Sensor >
Back
<
Report
Menu
Setup User
>
>
XXXX XXXX>
The Gun Show >
Auto Zero >
Po wer Zones >
HR Zones >
Pair New Sensor >
Back
<
Report
Menu
Po wer Zones
Zone
Upper Limit
1: Recovery >
123 >
2: Endurance >
123 >
3: T hreshold >
4: Race Pace >
123 >
5: Maximum >
123 >
>
6: Supra Max
MAX >
123
Name: >
Jesse >
Active (1-5): >
X >
Weight - lbs: >
XXX >
Height - in: >
XXX >
Date of Birth: >
Feb 02 1974 >
Gender: >
>
Male
Po wer Zones >
HR Zones >
The Gun Show >
Auto Zero >
Po wer Zones >
HR Zones >
Pair New Sensor >
Back
<
Report
Menu
Setup User
>
>
>
6: Supra Max
XXXX XXXX>
Gender >
The Gun Show >
Auto Zero >
Po wer Zones >
HR Zones >
Pair New Sensor >
Back
<
Report
Menu
Heart Rate Zones
Sensors >
Setup Joule >
Setup User >
Workouts >
History >
Sensors >
Main >
Exit Menu
<
Report
Menu
Main
Zone
Upper Limit
1: Recovery >
>
2: Endurance >
123 >
3: T hreshold >
4: Race Pace >
123 >
5: Maximum >
123 >
>
6: Supra Max
MAX >
123
123
Joule 2.0 User Guide page 31
Chapter 8: History
Previous Rides
History mode allows for comparing a previously ridden ride against averages. History contains
three views: previous rides, max and totals.
1. Press MODE button to navi-
gate to Menu.
2. Move joystick to up/down
to History.
3. Move joystick to up/down to
previous rides.
4. Previous rides view is select-
ing a destined ride date to
compare against two week,
four week, eight week, six
month and twelve month
averages. Note: the two week
through twelve month average
does not include the selected
ride.
Max view is the max values
achieved for each report
metric over the average on two
week, four week, etc.
Total view is the toal values
achieved for each report
metric over the average on two
week, four week, etc.
Sensors>
Setup Joule >
Setup User >
Workouts>
History >
Sensors>
Main >
Exit Menu
<
Report
Menu
Main
Previous Rides >
Reports - Max >
Reports - To tals >
Back
<
Report
Menu
History
Joule 2.0 User Guide page 32
Chapter 8: History
Viewing History
Access all reports in History mode.

Joule 2.0 User Guide page 33
No display on computer screen
· Computer is asleep – Press MODE or INTERVAL on the computer to wake up the computer.
· Computer is too cold- operating temp. is 32 to 110 degrees Fahrenheit
Computer display is on, but there is no transmission of data.
· Hub is asleep - spin the wheel to wake up the hub.
· Computer has not “found” the hub. Press and hold MODE and INTERVAL button until “Find” ap-
pears on Title Bar. Make sure hub is awake by rotating wheel once.
· Batteries need replacement - replace the hub batteries as shown in the maintenance section
of the User Guide
Power seems incorrect
·Torque value is not zeroed. To manually zero torque, go to Menu, Sensors, Select Sensor, Calibra-
tion. Manual Zero the hub. Torque is now being displayed.
If re-zeroing the torque does not recalibrate the unit, call Saris Cycling Group customer service
at 1-800-783-7257.
Speed seems incorrect
· Wheel size incorrect -refer to Sensors to enter the correct size in corresponding sensor.
Chapter 9: Troubleshooting Joule™

Joule 2.0 User Guide page 34
© 2009 Saris Cycling Group, Inc.
5253 Verona Road
Madison WI 53711 USA
Telephone: 800.783.7257 or 608.274.6550
Fax: 608.274.1702
All rights reserved. No part of this publication may be copied, photographed, reproduced, translated,
transmitted electronically or placed on digital media without the prior written consent of Saris Cycling
Group, Inc.
Trademarks
Saris Cycling Group, Inc , Joule™ 2.0, PowerTap and the PowerTap logo, are all registered trademarks of
Saris Cycling Group, Inc. All other product, brand, or trade names used in this manual may be trademarks
or registered trademarks of their respective owners.
Modifications
Saris Cycling Group, Inc reserves the right to make improvements and/or updates to the products
described herein at any time without notice.
FCC Statement of Compliance:
Statement of Compliance for FCC and Industry Canada:
“This device complies with Industry Canada and Part 15 of the FCC Rules. Operation is subject to the
following two conditions: (1) This device may not cause harmful interference, and (2) this device must
accept any interference received, including interference that may cause undesired operation.”
The term “IC:” before the radio certification number only signifies that Industry Canada technical specifi-
cations were met.
Changes or modifications to this device not expressly approved by the party responsible for compliance
with FCC regulations (the manufacturer) could void the user’s authority to operate the equipment.
Chapter 10: Important Precautions

Joule 2.0 User Guide page 35
NOTE: This equipment has been tested and found to comply with the limits for a Class B digital
device, pursuant to Part 15 of the FCC Rules. These limits are designed to provide reasonable
protection against harmful interference in a residential installation. This equipment generates,
uses and can radiate radio frequency energy and, if not installed and used in accordance with
the instructions, may cause harmful interference to radio communications. However, there is no
guarantee that interference will not occur in a particular installation. If this equipment does cause
harmful interference to radio or television reception, which can be determined by turning the
equipment off and on, the user is encouraged to try to correct the interference by one or more of
the following measures:
-- Reorient or relocate the receiving antenna.
-- Increase the separation between the equipment and receiver.
-- Connect the equipment into an outlet on a circuit different from that to which the receiver is
connected.
-- Consult the dealer or an experienced radio/TV technician for help.
WARNING: Always consult a physician before beginning or modifying any exercise program.
Precautions:
Keep eyes on the road. Do not become overly engaged with CycleOps Joule™ 2.0 •
display.
We recommend getting familiar with the computer functions while stationary.•
The computer and chest strap are water resistant, not water proof. Avoid sustained •
water contact and do not deliberately place CycleOps Joule™ 2.0 or its components in
water or under high-pressure sprays.
Avoid spraying the unit directly with solvent mixture. Do not use thinner or other •
solvents to clean parts.
Failure to adhere to these precautions may cause premature failure or incorrect opera-•
tion of the unit and may void the warranty.
Chapter 10: Important Precautions

Battery Warnings:
Charge battery at temperature range of 0-45 degrees Celcius. engaged with CycleOps •
Joule™ 2.0 display.
Do not immerse the battery in water or seawater, and keep the battery in a cool dry •
environment during stands by period. functions while stationary.
Do not connect the battery to an electrical outlet.•
Do not strike or throw the battery against hard surfaces. •
Do not transportor store the battery together with metal objects such as necklaces, •
hairpins, etc.
Do not heat or dispose in fire or water. Do not modify or dissassembly the battery. It •
will be dangerrous and may cause ignition, heating leakage or explosion.
Do not short-circuit positive (+) and negative (-) teminals. Keep away from metal or •
other conductive materials. Jumbling the batteries of direct contact with positive (+)
and negative (-) terminals or other conductive materials may cause short-circuit.
Do not reverse the positive (+) and negative (-) terminals. •
Do not solder the battery directly. Excessive heating may cause deformation of the bat-•
tery components such as the gasket, which may lead to the battery swelling, leakage,
explosion or ignition.
Do not use abnormal cell which has damages by shipping stress, drop short or some-•
thing else, and which gives off electrolyte odor.
Do not use battery in a location where static electricity is rich, otherwise, the safety •
devices may be damaged, causing a harmful situation.
If the battery gives off an oder, generates heat or becomes discolored, or in any way •
appears abnormals during use, recharging or storage, immediately remove it from the
device or battery charger and stop using it.
Do not use sharp things to hit the battery. •
Chapter 10: Important Precautions

Joule 2.0 User Guide page 37
USB STICK
Information to go here.
Image Here
Chapter 11: Technical Specifications for Joule™

Joule 2.0 User Guide page 38
Chapter 11: Technical Specifications for Joule™
Interval Data Storage Unlimited
Interval Display Unlimited
Operational Temperature 0 to 45 degrees Celsius or 32 to 108 Fahrenheit
Battery Life 20 hours approx.
Battery Type Rechargeable
Range of Measurement:
Accuracy +/-1.5%
Signal Transmission 2.4 Ghz
Power 0-1999 Watts
Torque 0-1999 inch-lbs.
Speed 2-59 mph (3-95 KPH)
Distance 0.00 to 9999.99 (Miles)
Trip Time 0.00.00-999.99 Minutes
Cadence 40-240 RPM
Total energy 0-99999 KiloJoule™s
Odometer 0-99999 Miles or Kilometers
Heart Rate 0-255 BPM (Beats per Minute)

Joule 2.0 User Guide page 39
Chapter 12: Joule™ Warranty
CycleOps Joule™ is warranted to the original retail purchaser to be free from defects in materi-
als and workmanship. Warranty coverage is valid to the original purchaser only and proof of
purchase will be required.
Electronics - 1 year
This warranty does not cover:
1. Normal wear and tear.
2. Any damage, failure or loss caused by accident, misuse, neglect, abuse, improper assembly,
improper maintenance, or failure to follow instructions or warnings in User Guide .
3. Use of products in a manner or environment for which they were not designed.
Limitations
The foregoing warranties are in lieu of and exclude all other warranties not expressly set forth
herein, whether expressed or implied by operation of law or otherwise, including, but not limited
to, warranties of merchantability or fitness for a particular purpose. Saris Cycling Group shall in no
event be liable for incidental or consequential losses, damages or expenses in connection with its
exercise products. Saris Cycling Group’s liability hereunder is expressly limited to the replacement
of goods not complying with this warranty or, at Saris Cycling Group election, to the repayment of
an amount of the purchase price of the exercise product in question. Some states do not permit
the exclusion or limitation of implied warranties or incidental or consequential damages, so the
preceding limitations and exclusions may not apply to.
Procedures
Warranty service will be performed by Saris Cycling Group or an authorized Saris Cycling Group
Dealer. The original purchaser must provide proof of purchase. Service calls and/or tranation to
and from the Authorized Saris Cycling Group Dealer are the responsibility of the purchaser.

Joule 2.0 User Guide page 40
Chapter 13: Definition of Terms
Watts
1. The basic unit of power equal to 1 joule per second. 2. 1 joule of energy release in 1 second. 3. A
common unit used to express effort or intensity amongst professional cyclists.
Watts per Kilogram of body weight (W/KG)
1. Calculation of watts generated divided by the weight of a cyclist and their bicycle. 2. Normaliza-
tion intended to provide a comparison between cyclists of differing body weights.
Training Zones
1. Discrete bins or intervals specific to a particular energy or physiological system. From short
maximal efforts to long maximal efforts these energy systems run along a continuum from an-
aerobic to aerobic metabolic pathways. Common reference points for this continuum include the
power at lactate threshold and power at VO2 max.
Zero Watts
1. Time on the bicycle when the athlete is not pedaling or transferring any measurable power
output to the pedals or rear hub. For the team captain or leader, accumulating a high percentage
of time at zero watts can be extremely important to their ability to conserve energy and maintain
reserves for a strong finish.
Recovery Zone
1. An easy exercise intensity where there is minimal stress or strain on the body. 2. On a 1 to 10 rat-
ing of perceived exertion scale, the recovery zone corresponds to a 1 to 2 or “really easy” to “easy”.
3. On a 6 to 20 rating of perceived exertion scale, the recovery zone corresponds to a 6 to 10 or
“very very light” to “very light.” 4. An exercise intensity dependent solely on aerobic metabolism
of primarily fat. 5. An exercise intensity that can be held for an indefinite time frame.
Endurance Zone
1. A moderate exercise intensity where there is some stress or strain on the body 2. On a 1 to 10
RPE scale, an intensity corresponding to 3 to 4 or “moderate” to “sort of hard”. 3. On a 6 to 20 RPE
scale, an intensity corresponding to a 10 to 13 or “fairly light” to “somewhat hard.” 4. An exercise
intensity depending on the aerobic metabolism of both fat and carbohydrate. 5. An exercise
intensity that can be held as long as the athlete were supplied with an influx of carbohydrate (i.e.,
allowed to eat).

Joule 2.0 User Guide page 41
Chapter 13: Definition of Terms
Lactate Threshold (LT) Zone
1. A hard intensity zone marked by a sudden increase in breathing rate. 2. On a 1 to 10 RPE scale,
an intensity corresponding to a 5 to 7 or “hard” to “really hard.” 3. On a 6 to 20 RPE scale, an inten-
sity corresponding to a 13 to 16 or “somewhat hard” to “very hard”. 4. A range of exercise intensity
beginning at a slight inflection or rise in the blood lactate over a resting baseline to an intensity
corresponding with a blood lactate 2 to 3 mM above a resting baseline. 5. A demarcation between
aerobic metabolism to a mix of anaerobic and aerobic metabolism. 6. An all out exercise intensity
that can be held between 40 minutes to 2 hours depending on the availability of stored carbohy-
drate or glycogen within the body.
Race Pace Zone
1. An extremely hard or all out intensity zone. 2. On a 1 to 10 RPE scale, an intensity corresponding
to a 7 to 8 or “really hard” to “really really hard.” 3. On a 6 to 20 RPE sale, an intensity correspond-
ing to a 16 to 18 or “very hard” to “very very hard.” 4. An exercise intensity dependent primarily on
the aerobic and anaerobic metabolism of carbohydrate. 5. An all out exercise intensity that can be
held between 10 minutes to 30 minutes.
Max Zone
1. An all out or maximal intensity zone. 2. On a 1 to 10 RPE scale, an intensity corresponding to a
9 to 10 or “really really hard” to “maximal.” 3. On a 6 to 20 RPE scale, an intensity corresponding
to an 18 to 20, or “very very hard” to “maximal.” 4. An exercise intensity that elicits the causes the
body to reach its maximal capacity to consume oxygen (i.e., an exercise intensity that elicits VO2
max). 5. An all out or maximal effort that can be held between 2 to 8 minutes or an average of 4
minutes.
Supra-Max Zone
1. A very short, all out effort that exceeds the power output associated with VO2 max or a person’s
max zone. 2. An exercise intensity that is almost entirely dependent on the anaerobic metabolism
of stored ATP, Phosphagens, and carbohydrates. 3. An all out effort lasting 1 second to 2 minutes.

Joule 2.0 User Guide page 42
Chapter 13: Definition of Terms
VO2 Max 1. The maximal amount of oxygen that a person can consume and process measured
in liters of oxygen per minute (absolute) or in milliliters of oxygen per minute per kilogram of
body weight (normalized to body weight). 2. The upper limit of aerobic metabolism. 3. A strong
predictor of endurance performance in a mixed population of individuals. 4. An exercise intensity
corresponding with the maximal power output a person can hold between 2 to 8 minutes.
Lactate Threshold
1. An exercise intensity where the production of lactate or appearance of lactate in the blood
exceeds the removal or disappearance of lactate from the blood. 2. An exercise intensity charac-
terized by a sudden increase in breathing rate or ventilation. 3. An exercise intensity where indi-
viduals begin to feel a burning sensation in working muscle. 4. An exercise intensity considered to
be hard. 5. An exercise intensity that can be held for a prolonged period of time ranging from 40
minutes to 2 hours. 6. Amongst athletes with similar VO2 max values the power at lactate thresh-
old is the strongest predictor of performance.
Lactate Threshold Break Point
1. The power output or exercise intensity where blood lactate just begins to increase above its
resting baseline. 2. An exercise intensity characterized as somewhat hard. 3. The upper end of
the endurance training zone and the bottom end of the lactate threshold zone. 4. An exercise
intensity that can be held for 1 to 3 hours or as long as there is available stored carbohydrate or
glycogen.
Lactate Threshold > 1mM
1. The power output or exercise intensity where the blood lactate is equal to 1 mM above its
resting baseline. 2. An exercise intensity characterized as hard. 3. The mid point of the lactate
threshold training zone. 4. An exercise intensity that can be held for 1 to 2 hours.
Lactate Threshold 4 mM
1. The power output or exercise intensity at a blood lactate level of 4 mM or 2 to 3 mM above
baseline. 2. An exercise intensity characterized as very hard. 3. The upper limit of the lactate
threshold zone. 4. An exercise intensity that can be held for 30 minutes to 1 hour.

Joule 2.0 User Guide page 43
Chapter 13: Definition of Terms
Peak Sustainable Power or Peak Power
1. The highest average power output that can be held for a given duration. 2. For most individuals
a peak sustainable power or peak power output lasting 4 to 8 minutes is equivalent to an inten-
sity that elicits their VO2 max, or maximal capacity to consume oxygen. 3. For most individuals a
peak sustainable power output lasting 20 to 40 minutes is equivalent to an intensity that elicits
their lactate threshold or a value of blood lactate 2 to3 mM above their baseline blood lactate. 4.
For most individuals a peak sustainable power output lasting 40 minutes to 2 hours is equivalent
to an intensity that elicits their lactate threshold, or a value of blood lactate just above to 1 mM
above their baseline blood lactate. 5. In cycling, the peak sustainable power for any given dura-
tion is analogous to their best performance for a given time. For example, a runner might have a
personal best of 5 minutes in a mile run and 35 minutes in a 10 km run, whereas a cyclist might
have a personal best or peak sustainable power of 400 watts for 5 minutes and 340 watts for 35
minutes.
Normalized Power
1. An estimate of the power that you could have maintained for the same physiological “cost” if
your power output had been perfectly constant.
Intensity Factor (IF) 1. Ratio of normalized power to power output at threshold. 2. A convenient
way of comparing the relative intensity of a training session or race either within or between
riders, taking into account changes or differences in threshold power. Typical IF values for various
training sessions or races are as follows:
• Lessthan0.75recoveryrides
• 0.75-0.85endurance-pacedtrainingrides
• 0.85-0.95temporides,aerobicandanaerobicintervalworkouts(workandrestperiods
combined), longer (>2.5 h) road races
• 0.95-1.05lactatethresholdintervals(workperiodonly),shorter(<2.5h)roadraces,
criteriums, circuit races, longer (e.g., 40 km) TTs
• 1.05-1.15shorter(e.g.,15km)TTs,trackpointsrace
• Greaterthan1.15prologueTT,trackpursuit,trackmiss-and-out

Joule 2.0 User Guide page 44
Chapter 13: Definition of Terms
Training Stress Score (TSS) 1. Modeled after Dr. Eric Bannister’s heart rate-based training impulse
(TRIMPS), takes into account both the intensity (i.e., IF) and the duration of each training session.
The following scale can be used as an approximate guide:
• Lessthan150-low(recoverygenerallycompletebyfollowingday)
• 150-300-medium(someresidualfatiguemaybepresentthenextday,butgoneby
2nd day)
• 300-450-high(someresidualfatiguemaybepresentevenafter2days)
• Greaterthan450-veryhigh(residualfatiguelastingseveraldayslikely)
Kilojoule or Kjoule
1. 1000 Joules. 2. A unit of energy equal to the work done by a force of 1000 newtons acting
through a distance of 1 meter. 3. A measure of mechanical energy or the energy released when a
force is applied to an object or body. 4. A common unit used to express the total volume or work
accomplished during a given workout, ride, or exercise bout. 5. A unit or measure used to express
the total training load. 6. The average power output in watts multiplied by the time in seconds
divided by 1000.
Calorie
1. A unit of energy equal to that needed to raise the temperature of 1 gram or ml of water 1 ˚C. 2.
A measure of thermal energy or the energy released when a fuel or substrate is burned.
Kilocalorie or Kcal
1. 1000 calories. 2. A unit of energy equal to that needed to raise the temperature of 1 kilogram or
liter of water 1 ˚C. 3. A measure of the amount of energy in food 4. On U.S. food labels, 1 Calorie,
spelled with a capital “C”, rather than a lower case “c” is equal to 1 Kilocalorie or Kcal. 5. 4.186
Kjoules 6. For a given person, the total energy burned in Kcals is equal to the total Kjoules of work
performed on a bicycle divided by 4.186 divided by the percent fraction (i.e., 22% = 0.22) of that
person’s gross mechanical efficiency. 7. 1 to 1.2 multiplied by the total Kjoules.
Cadence
1. The number of pedal revolutions per minute.

Joule 2.0 User Guide page 45
Chapter 13: Definition of Terms
Heart Rate
1. The number of time the heart beats each minute or beats per minute or BPM. 2. Although the
heart rate response is reflective of the cardiovascular strain it is by no means always indicative of
the metabolic strain or external power output.
Maximal Heart Rate
1. The highest achievable heart rate during an all out 2 minute to 8-minute effort. 2. The highest
heart rate recorded during competition or training. 3. The heart rate associated with the power
output at VO2 max. 4. Commonly estimated as 220 – Age. 5. Better estimated as 208 – (0.7 x Age).
Velocity
1. The distance traveled in a given time frame normally expressed in meters per second, kilome-
ters per hour, or miles per hour. 2. Speed. 3. Power divided by the total resistance impeding move-
ment. 4. A function of a cyclist’s power output and all of the forces resisting that cyclist’s forward
motion.
Rate of Ascent
1. The vertical speed traveled or climbed in feet per hour or meters per hour. 2. The VAM or vertical
ascent in meters per hour. 3. A reflection of a cyclist’s power output on climbs steeper than 7%
in grade. At an 8% grade, a rate of ascent of 1800 meters per hour requires a power output of 6.3
watts per kg and is considered the upper limit for climbing speed in professional cyclists.

Joule 2.0 User Guide page 46
Chapter 13: Definition of Terms
Elevation Gain or Rise
1. The total vertical distance in feet or meters traveled or climbed over a given distance ridden.
Percent Grade
1. A measure of the steepness of a climb where a 100% grade or 45-degree road angle is equal to
a 1-meter vertical increase in elevation (rise) for each 1-meter traveled horizontally (run). 2. The
rise or vertical increase in elevation divided by the run or horizontal distance traveled multiplied
by 100 (rise ÷ run x 100). 3. 100 x Tangent (slope). 4. The elevation gain divided by the square root
of the actual distance traveled squared minus the elevation gain squared (Elevation Gain / [square
root (Actual Distance 2 – Elevation Gain2)])
Shallow Grade or Hill
1. A road with a percent grade between 2 to 4%.
Moderate Grade or Hill
1. A road with a percent grade between 4 to 6%
Steep Grade or Hill
1. A road with a percent grade between 6 to 8%
Wicked Steep
1. Any road, trail, path, climb or mountain greater than 8% in grade.
Category 1 to 4 Climb
1. A rating system used to rank the difficulty of a climb that is based on a combination of the
length, grade, and location of the climb on the course. A category 1 climb is considered the most
difficult while a category 4 climb is considered the least difficult.
Hors Category Climb
1. A climb that is so difficult that it is beyond categorization. 2. Any climb longer and steeper than
a category 1 climb. 3. The most difficult climb in the Tour de France.

Joule 2.0 User Guide page 47
Chapter 13: Definition of Terms
Ride Time
1. The total elapsed time while moving. Most calculations (averages etc.) are based on this time vs.
the total elapsed time since the ride began or the time spent pedaling.
Distance
1. The length from start to finish along ridden roads measured in meters, kilometers, or miles
where 1000 meters is equal to 1 kilometer and 1 kilometer is equal to 0.62 miles.