User Manual

Model number. SW2783.
Warranty. This product is guaranteed against manufacturing defects for
one (1) year from the original date of purchase. Swivl’s sole obligation
in the event of such defects during this period is to repair or replace the
defective part or product with a comparable part or product. This is done
at Swivl’s sole discretion. Except for such replacement, the sale, or other
handling of this product is without warranty, condition or other liability
even though the defect or loss is caused by negligence or other fault.
Damage resulting from use, misuse, accident, or normal wear and tear is
not covered by this or any warranty. Swivl assumes no liability for inciden-
tal or consequential damages relating to or resulting from the use of this
product or any of its parts. When servicing your warranty request, Swivl
may require
you to furnish proof of purchase. Visit swivl.com/warranty for details.
Attention. “Made for iPod”, “Made for iPhone” “Made for iPad” mean that an electronic accessory
has been designed to connect specically to iPod, iPhone, or iPad respectively, and has been
certied by the developer to meet Apple performance standards. Apple is not responsible for the
operation of this device or its compliance with safety and regulatory standards. Please note that
the use of this accessory with iPod or iPhone may aect wireless performance.
Carrying and handling.
Product contains sensitive components. Do not drop, disassemble,
microwave, burn, paint or insert foreign objects into device. Do not use if it has been damaged.
AC Charger. The product is designed to be used only with the Swivl approved AC charger.
Oulet. The socket-outlet shall be installed near the equipment and shall be easily accessible.
Lanyard.
The lanyard is only intended for use with adults. It does not contain a safety breakaway
for use with children (under the age of 8).
Infrared Interference. This product uses IR technology. Direct interference from strong IR sources,
such as sun, plasma TVs, and some types of light xtures, may aect its performance. Remove the
interference, or direct the product away from from the IR source.
Radio Frequency Interference. This product uses 2.4Ghz wireless technology for wireless audio
transmission. High saturation of similar technology in the immediate vicinity may degrade audio.
Battery. The lithium polymer batteries are hazardous and can cause serious injury. Manufacturer
cannot be held liable for misuse. Battery should be replaced only by Swivl or a Swivl authorized ser-
vice provider, and must be recycled or disposed of separately from household waste in accordance
with local regulations.
Avoid water. Do not expose this product to water or rain, or handle near wet locations. Do not spill
food or liquid on the product. In the case that it gets wet, unplug any cables and allow it to fully dry
before turning it back on again. Damage due to liquid is not covered.
Avoid operation. Do not use this product while driving. Use of this product may be prohibited while
travelling in aircraft as it emits radio frequencies during operation.
Ports. The micro USB and shutter interface on the base are not used during normal operation.
Information Guide
1/2
Acceptable temperatures.
The product is designed to be used between 0 degrees and 40
degrees C (32 degrees and 104 degrees F).
It can be stored between -20 degrees and 50 degrees
C (-4 degrees and 122 degrees F). Low or high temperature conditions might lead the product
to temporarily stop working, or working properly. Allow unit to return to room temperature after
storage at high or low temperatures before operation.
FCC Statement.
This device complies with Part 15 of the FCC Rules. Operation is subject
to the following two conditions: (1) this device may not cause harmful interference, and (2)
this device must accept any interference received,
including interference that may cause
undesired operation. NOTE: This equipment has been tested and found to comply with the
limits for a Class B digital device, pursuant to Part 15 of the FCC Rules. These limits are designed
to provide reasonable protection against harmful interference in a residential installation. This
equipment generates, uses, and can radiate radio frequency energy and, if not installed and used
in accordance with the instructions, may cause harmful interference to radio communications.
However, there is no guarantee that interference will not occur in a particular installation. If
this equipment does cause harmful interference to radio or television reception, which can be
determined by turning the
equipment o and on, the user is encouraged to try to correct the
interference by one or more of the following measures:
Reorient or relocate the receiving antenna,
Increase the separation between the equipment and receiver, Connect the equipment into an
outlet on a circuit dierent from that to which the receiver is connected and Consult the dealer
or an experienced radio/TV technician for help.
I
mportant.
Any modications to the unit, unless expressly approved by the party responsible
for compliance, could void the user’s authority to operate the equipment. The product has
demonstrated EMC compliance under conditions that included the use of compliant peripheral
devices and shielded cables between system components. It is important that you use the
compliant peripheral devices and shielded cables between system components to reduce the
possibility of causing interference to radios, televisions and other electronics devices.
Canadian Compliance Statement.
Complies with the Canadian ICES-003 Class B specications.
Cet appareil numerique de la lass B est conforme a la norme NMB-003 du Canada. This device
complies with RSS 210 of Industry Canada. This Class B device meets all the requirements of
the Canadian
interference-causing equipment regulations. Cet appareil numerique de la Classe
B respecte toutes les exigences du Reglement sur le materiel brouilleur du Canada. This device
complies with Industry Canada license-exempt RSS-210 standard(s). Operation is subject to
the following two conditions: (1) this device may not cause interference, and (2) this device must
accept any interference, including
interference that may cause undesired operation of the
device.
Cet appareil est conforme aux normes CNR exemptes de licence d’Inustrie Canada. Le
fonctionnement est soumis aux deus conditions suivantes: (1) cet appareil ne doit pa provoquer
d’interferences et (2) cet appareil doit accepter toute interference, y compris celles susceptibles
de provoquer un fonctionnement non souhaite de l’appareil.
EU Compliance Statement. Swivl hereby declares that this wireless device is in compliance with
the essential requirements and other relevant provisions of the R&TTE Directive.
TM and © 2015 Swivl. All rights reserved. Swivl, the Swivl logo and all other company, product and
service names or slogans are trademarks of Swivl. Patent pending.
iPad, iPhone, and iPod touch are trademarks of Apple, Inc., registered in the U.S. and other coun-
tries.
Swivl | 1354 El Camino Real | San Carlos CA 94070 | (888) 837 6209
Printed in China. MC-00319.
Information Guide
2/2
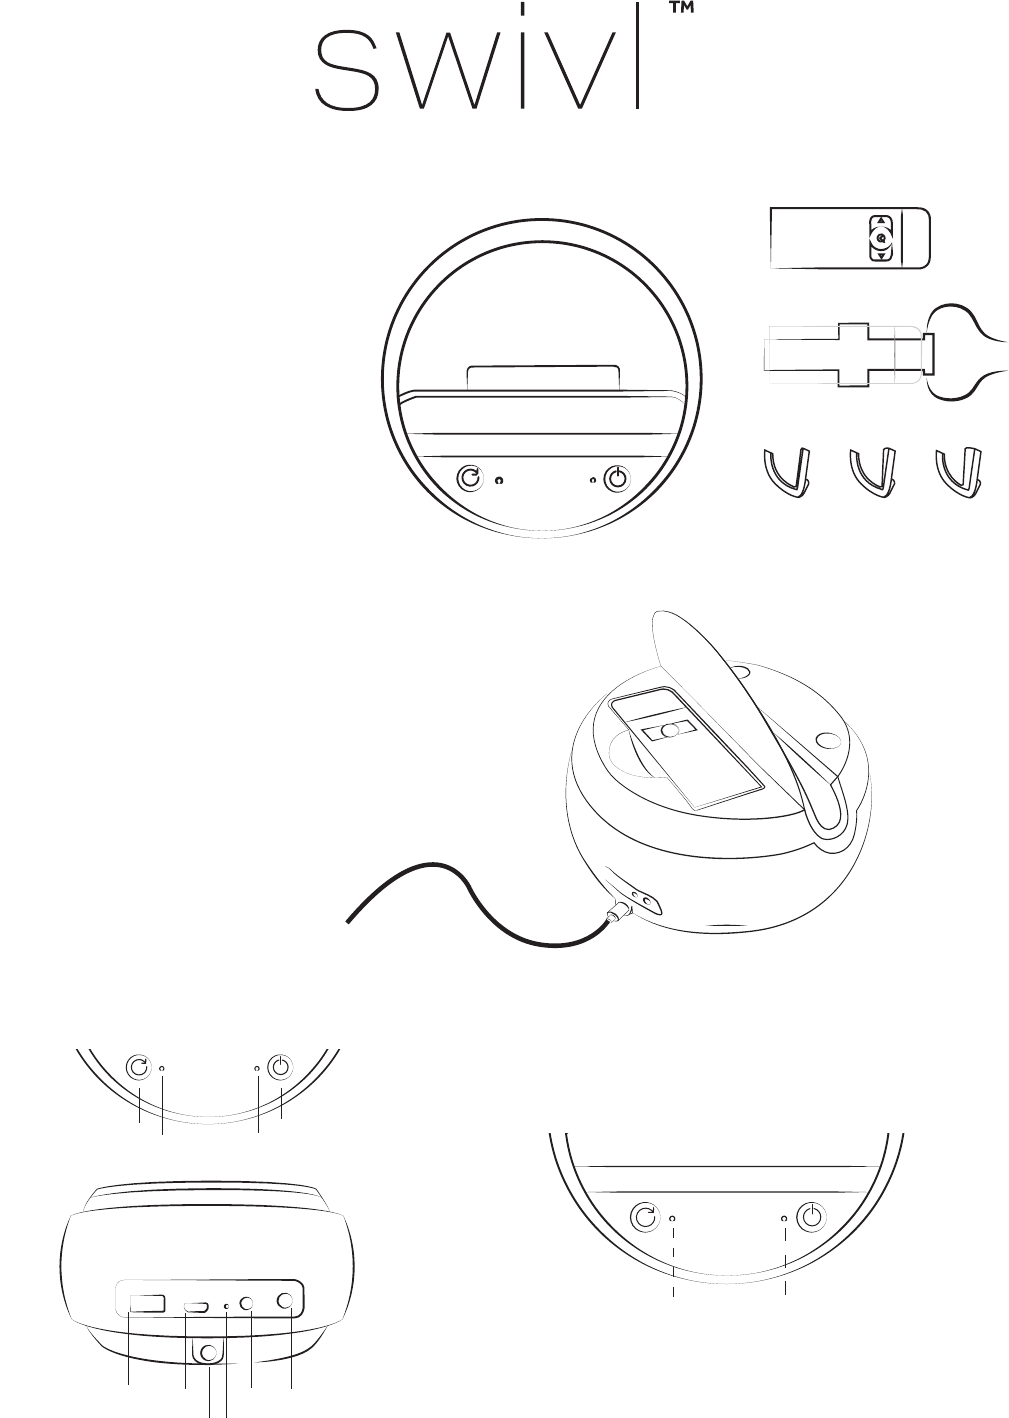
What’s included?
Base
Marker
Shims
Includes Base, Marker, Lanyard, Shims, Wall
Charger, International Adapter Plugs (for in-
ternational shipments only) and Audio Cable.
ABC
Marker Lanyard Clip
Quick start guide
Getting Started.
1
Solid Red - On, unconnect-
ed to Marker
Flashing Red - Low battery
(both LEDs)
Solid Green - On, connect-
ed to Marker
Solid Red - Bluetooth not
connected
Flashing Red - Bluetooth
ready to pair
Solid Green - Bluetooth
connected
Power
Bluetooth
Sync
Marker status
USB Micro USB
Charge status
Audio
Power
Shutter
The marker is stored in the integrated charging dock
under the lid towards the back of the Swivl. Plug in
your Swivl and charge them both at the same time.
When plugged in, the LED lights indicate the following.
Flashing Green - Base charging
Flashing Red - Marker charging
Solid Green - All charged

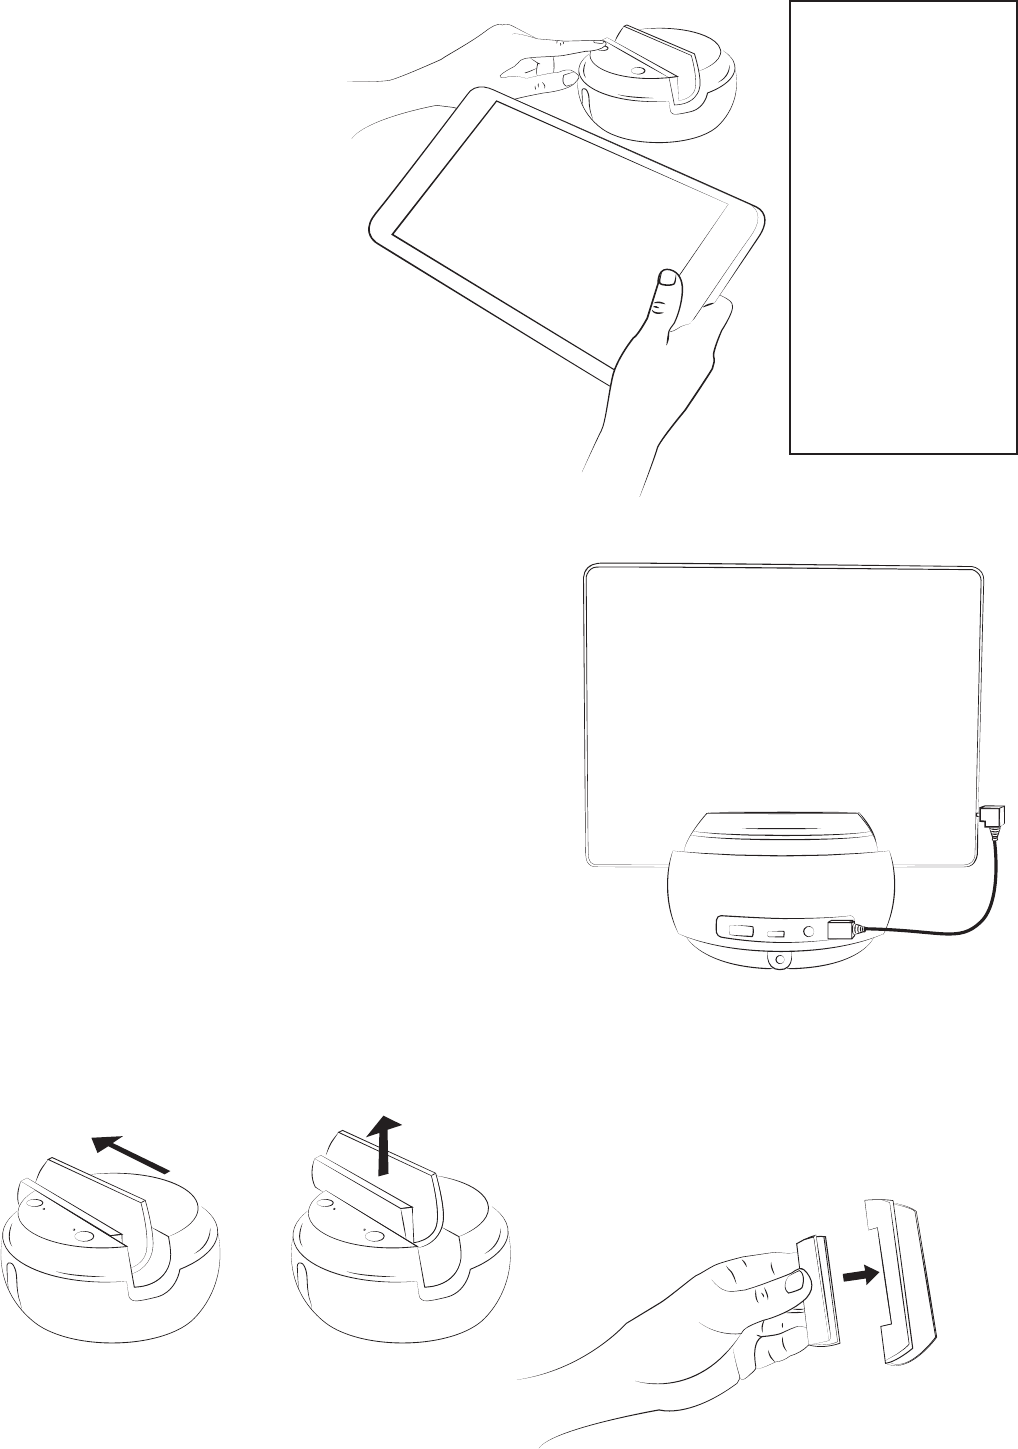
Adjusting t.
Push removable grip holder left.
Then lift to remove.
Remove shim from grip holder.
2
Mounting and audio.
Mount your mobile device into the Swivl base. It is recommended that
you use the front facing camera, so you can see the display during cap-
ture. Plug the audio cable into the base and the mobile device to receive
wireless microphone feed from the marker.
Connecting your Device.
Power on your Swivl by holding the power button
down on the base. The LED light should be green,
which indicates that the base is turned on and
connected to the marker.
Next, connect your device using Bluetooth.
Press and hold sync button on the Swivl Base until
Bluetooth status light ashes red. Open the Blue-
tooth menu on your mobile device and make sure
Bluetooth is turned on. Pair mobile device with
Swivl. Follow prompts to complete connection and
download/open Swivl Capture app.
The settings menu in the Swivl Capture app allow
you to adjust the settings of the Swivl Robot. Also works with Android
mobile devices and cameras.
Go to swivl.com/support
for more information on
compatibility.
iPhone 6
iPhone 6+
iPhone 5S
iPhone 5C
iPhone 5
iPhone 4S
iPhone 4
iPad Air and iPad Air 2
iPad mini with Retina display
iPad mini
iPad (4th generation)
iPad (3rd generation)
iPod touch (5th generation)
iPod touch (4th generation)
Made for

3
Grip t.
Select a shim and test on edge of mobile
device. Fit should be snug with no force. Return
shim to grip holder and place in base.
A mount anything kit is available to purchase
and use with larger devices or cases.
ABC
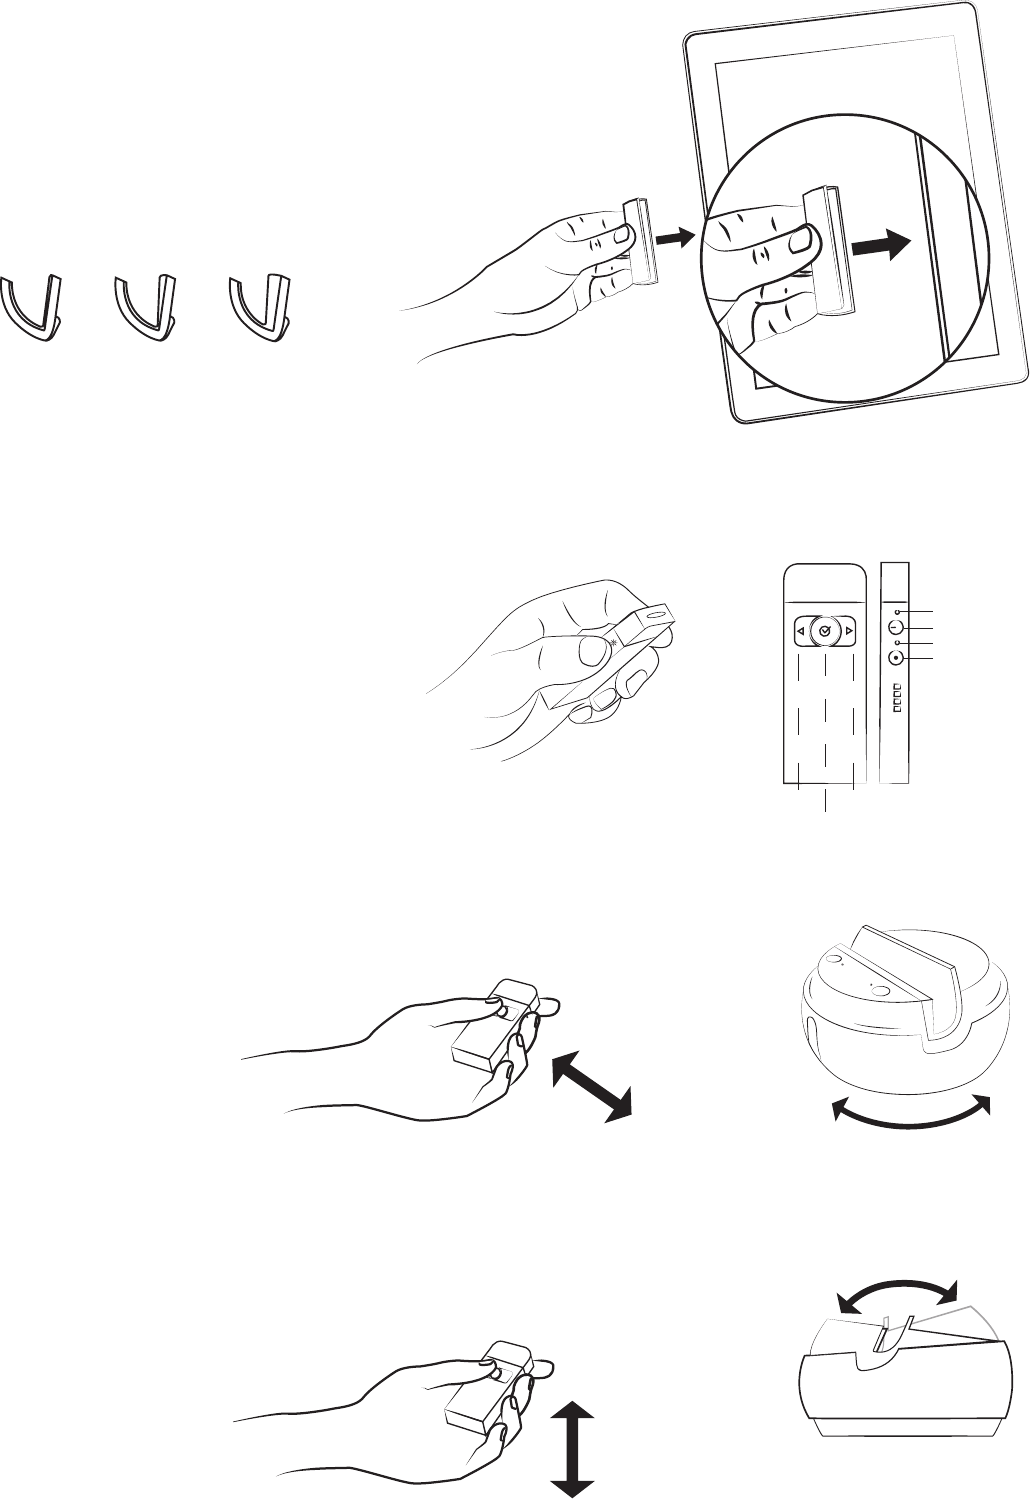
Ensure that the power is on the base, then hold down
the power button on the marker. The LED lights on the
marker indicate the following
Solid Red - On, unconnected to Base
Flashing Red - Low battery
Solid Green - On, Connected to Base
Solid Red - Recording
The advanced settings in the Swivl Capture app allow
you to adjust the auto tilt, disable tracking, and set the
checkmark action.
Power on.
Horizontal motion.
Press and hold action button on
marker. Move then hold hand still.
Once you have downloaded the app,
you can set tilt to be “always on” in the
settings menu.
Stand back 3-6 feet. Move hand from
one side to another using deliberate
motions.
Vertical motion.
Back/Left
Action
Forward/Right
Power
Record
Power status
Record status
Microphone

Capturing presentations.
Presentations can be uploaded to Swivl Cloud to sync with your videos. Follow the process below and the Swivl Capture app will
automatically sync to your library. Presentations can can be uploaded before or after collecting video and our intellegent slide
syncing will even match your slides with your video content.
Create content using any stan-
dard presentation tool, incluing
Powerpoint, Keynote and more.
Presentations must be saved as
a .pdf, .ppt, .pptx .png or .jpeg.
Navigate to cloud.swivl.com and
within the library tab follow the
prompts to upload presenta-
tions.
Open Swivl Capture app library
to sync content. Select “Capture
Video + Slides” and begin your
presentation.
4
Capturing video.
While Swivl can be used with applications such as Google Hangouts, Skype, FaceTime and native camera or recording apps, the
Swivl Capture App allows for easy capture and distribution of content.
Once you have opened the Swivl Capture app, follow the prompts to create a free Swivl Cloud account. Or go to cloud.swivl.
com to create your account then enter your credentials into Swivl Capture app. Launch the app and use the record button on the
marker to begin capturing video.
Managing content.
Once you have completed video capture, upload your video to Swivl Cloud. Video length and storage space are unlimited and the
automatic upload feature keeps the process easy and simple. Within the cloud, users are able to upload presentations to play
alongside video, making the experience more meaningful and engaging for viewers. Users are able to upload lesson plans, notes,
interactive whiteboard content or PowerPoint slides to share to play alongside the video,. Videos are transformed into multimedia
presentations that can be embedded within an LMS, class webpage or even emailed to viewers.
Alternatively you can save videos to your Photo Library or download them directly to your computer through iTunes to use with any
editing and hosting solution.
Sharing content.
Our collaboration features includes an interactive player with time stamped commenting and viewer analytics. We also provide
group management features for sharing, institutional tools for managing users and much more. Our production features allow
you to edit and produce video and slides for easy integration with other services.

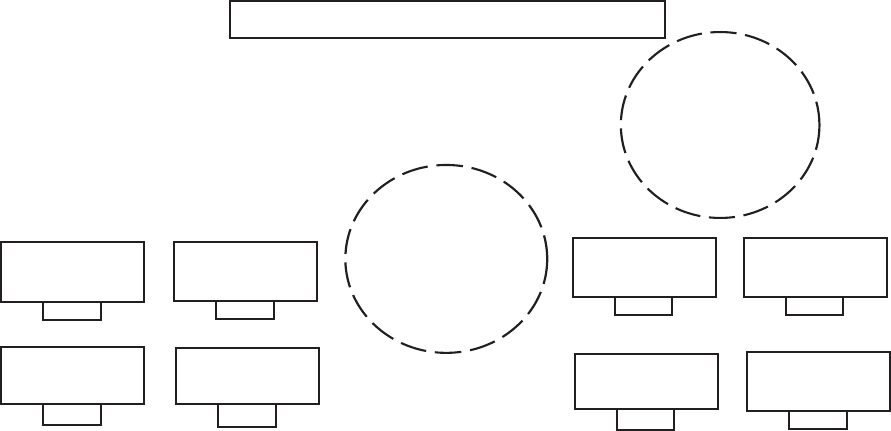
whiteboard or projection screen
Best for content
capture of whiteboards
and of the instructor
Best for capturing
class interactions
For more information visit www.swivl.com
1354 El Camino Real | San Carlos CA 94070 | (888) 837 6209 | support@swivl.com
TM and © 2015 Swivl. All rights reserved. Swivl, the Swivl logo and all other company, product and
service names or slogans are trademarks of Swivl. Patent pending.
iPad, iPhone, and iPod touch are trademarks of Apple, Inc., registered in the U.S. and other countries.
Designed in California.
5
Desk Desk Desk Desk
Desk Desk Desk Desk
Positioning and room setup.
Place Swivl approximately 6-15 feet from the presenter. Use our Swivl oor or table stand for the best results. The heads-up dis-
play allows the presenter to view the live recording and uploaded presentations. See other uses on Swivl.com for ideas when using
Swivl in the classroom.
The marker can be held or attached to the presenter using the lanyard or clip. Note the positioning of the marker as lose clothing
may interfere with tracking.
Swivl Capture app is also designed to project your presentation to an audience while capturing video. Wirelessly project with any
iOS device using an Apple TV or with any Android device and Chromecast. Use our projection kit and stand to connect your digital
projector or displays.

What’s included?
Base
Marker
Shims
Includes Base, Marker, Lanyard, Shims, Wall
Charger, International Adapter Plugs (for in-
ternational shipments only) and Audio Cable.
ABC
Marker Lanyard Clip
Quick start guide
Getting Started.
1
Solid Red - On, unconnect-
ed to Marker
Flashing Red - Low battery
(both LEDs)
Solid Green - On, connect-
ed to Marker
Solid Red - Bluetooth not
connected
Flashing Red - Bluetooth
ready to pair
Solid Green - Bluetooth
connected
Power
Bluetooth
Sync
Marker status
USB Micro USB
Charge status
Audio
Power
Shutter
The marker is stored in the integrated charging dock
under the lid towards the back of the Swivl. Plug in
your Swivl and charge them both at the same time.
When plugged in, the LED lights indicate the following.
Flashing Green - Base charging
Flashing Red - Marker charging
Solid Green - All charged
Adjusting t.
Push removable grip holder left.
Then lift to remove.
Remove shim from grip holder.
2
Mounting and audio.
Mount your mobile device into the Swivl base. It is recommended that
you use the front facing camera, so you can see the display during cap-
ture. Plug the audio cable into the base and the mobile device to receive
wireless microphone feed from the marker.
Connecting your Device.
Power on your Swivl by holding the power button
down on the base. The LED light should be green,
which indicates that the base is turned on and
connected to the marker.
Next, connect your device using Bluetooth.
Press and hold sync button on the Swivl Base until
Bluetooth status light ashes red. Open the Blue-
tooth menu on your mobile device and make sure
Bluetooth is turned on. Pair mobile device with
Swivl. Follow prompts to complete connection and
download/open Swivl Capture app.
The settings menu in the Swivl Capture app allow
you to adjust the settings of the Swivl Robot. Also works with Android
mobile devices and cameras.
Go to swivl.com/support
for more information on
compatibility.
iPhone 6
iPhone 6+
iPhone 5S
iPhone 5C
iPhone 5
iPhone 4S
iPhone 4
iPad Air and iPad Air 2
iPad mini with Retina display
iPad mini
iPad (4th generation)
iPad (3rd generation)
iPod touch (5th generation)
iPod touch (4th generation)
Made for
3
Grip t.
Select a shim and test on edge of mobile
device. Fit should be snug with no force. Return
shim to grip holder and place in base.
A mount anything kit is available to purchase
and use with larger devices or cases.
ABC
Ensure that the power is on the base, then hold down
the power button on the marker. The LED lights on the
marker indicate the following
Solid Red - On, unconnected to Base
Flashing Red - Low battery
Solid Green - On, Connected to Base
Solid Red - Recording
The advanced settings in the Swivl Capture app allow
you to adjust the auto tilt, disable tracking, and set the
checkmark action.
Power on.
Horizontal motion.
Press and hold action button on
marker. Move then hold hand still.
Once you have downloaded the app,
you can set tilt to be “always on” in the
settings menu.
Stand back 3-6 feet. Move hand from
one side to another using deliberate
motions.
Vertical motion.
Back/Left
Action
Forward/Right
Power
Record
Power status
Record status
Microphone

Capturing presentations.
Presentations can be uploaded to Swivl Cloud to sync with your videos. Follow the process below and the Swivl Capture app will
automatically sync to your library. Presentations can can be uploaded before or after collecting video and our intellegent slide
syncing will even match your slides with your video content.
Create content using any stan-
dard presentation tool, incluing
Powerpoint, Keynote and more.
Presentations must be saved as
a .pdf, .ppt, .pptx .png or .jpeg.
Navigate to cloud.swivl.com and
within the library tab follow the
prompts to upload presenta-
tions.
Open Swivl Capture app library
to sync content. Select “Capture
Video + Slides” and begin your
presentation.
4
Capturing video.
While Swivl can be used with applications such as Google Hangouts, Skype, FaceTime and native camera or recording apps, the
Swivl Capture App allows for easy capture and distribution of content.
Once you have opened the Swivl Capture app, follow the prompts to create a free Swivl Cloud account. Or go to cloud.swivl.
com to create your account then enter your credentials into Swivl Capture app. Launch the app and use the record button on the
marker to begin capturing video.
Managing content.
Once you have completed video capture, upload your video to Swivl Cloud. Video length and storage space are unlimited and the
automatic upload feature keeps the process easy and simple. Within the cloud, users are able to upload presentations to play
alongside video, making the experience more meaningful and engaging for viewers. Users are able to upload lesson plans, notes,
interactive whiteboard content or PowerPoint slides to share to play alongside the video,. Videos are transformed into multimedia
presentations that can be embedded within an LMS, class webpage or even emailed to viewers.
Alternatively you can save videos to your Photo Library or download them directly to your computer through iTunes to use with any
editing and hosting solution.
Sharing content.
Our collaboration features includes an interactive player with time stamped commenting and viewer analytics. We also provide
group management features for sharing, institutional tools for managing users and much more. Our production features allow
you to edit and produce video and slides for easy integration with other services.
whiteboard or projection screen
Best for content
capture of whiteboards
and of the instructor
Best for capturing
class interactions
For more information visit www.swivl.com
1354 El Camino Real | San Carlos CA 94070 | (888) 837 6209 | support@swivl.com
TM and © 2015 Swivl. All rights reserved. Swivl, the Swivl logo and all other company, product and
service names or slogans are trademarks of Swivl. Patent pending.
iPad, iPhone, and iPod touch are trademarks of Apple, Inc., registered in the U.S. and other countries.
Designed in California.
5
Desk Desk Desk Desk
Desk Desk Desk Desk
Positioning and room setup.
Place Swivl approximately 6-15 feet from the presenter. Use our Swivl oor or table stand for the best results. The heads-up dis-
play allows the presenter to view the live recording and uploaded presentations. See other uses on Swivl.com for ideas when using
Swivl in the classroom.
The marker can be held or attached to the presenter using the lanyard or clip. Note the positioning of the marker as lose clothing
may interfere with tracking.
Swivl Capture app is also designed to project your presentation to an audience while capturing video. Wirelessly project with any
iOS device using an Apple TV or with any Android device and Chromecast. Use our projection kit and stand to connect your digital
projector or displays.