Satellite Tracking of People AA70038 BluTag User Manual User Guide 1
Satellite Tracking of People LLC BluTag User Guide 1
Contents
- 1. User Guide 1
- 2. User Guide 2
User Guide 1

Satellite Tracking of People LLC
Users Guide
Version 6.2
Sixth Edition, Amendment 2 (November 2004)
VeriTracks, BluTag® and various software icons are worldwide registered
trademarks of Satellite Tracking of People LLC (STOP).
The software described herein has U.S. and Foreign Patents Pending.
STOP provides this publication as is without warranty of any kind, expressed or
implied, including, but not limited to, the implied warranties of merchantability
or fitness for a particular purpose.
This publication could include technical inaccuracies or typographical errors.
Changes are periodically made to the information contained herein; these
changes will be incorporated in new editions of the publication. STOP may
make improvements and/or changes to the products described in this publication
at any time.
Reproduction of this document is expressly forbidden.
© 2005 Satellite Tracking of People LLC. All rights reserved.

VeriTracks Users Manual
Satellite Tracking Of People iii
Table of Contents
Chapter 1: About VeriTracks and BluTag®............................................ 1
About this document................................................................................. 1
Getting Help .............................................................................................. 2
Chapter 2: Getting Started .......................................................................... 3
System Requirements .............................................................................. 3
VeriTracks Overview............................................................................. 4
BluTag®..................................................................................................... 5
Detailed System Processes ..................................................................... 6
Logging In.............................................................................................. 6
Understanding the Menu Options........................................................ 7
Understanding Search and Data Entry Page Features ..................... 9
User Discussion Forum...................................................................... 10
Chapter 3: Registering an Offender.......................................................... 11
Hardware Components........................................................................... 11
Enrolling a New Tracked Offender ........................................................ 13
Offender Profile................................................................................... 13
Offender Addresses............................................................................ 14
Tracking Device .................................................................................. 15
Zones................................................................................................... 15
Preparing the BluTag® Device for Use................................................. 16
Chapter 4: Supervising an Offender......................................................... 17
Software Components............................................................................ 17
Searching for a Tracked Offender Record........................................ 17
Offender Status................................................................................... 18
Inventory.............................................................................................. 19

VeriTracks Users Manual
iv Satellite Tracking Of People
Zones ...................................................................................................20
Chapter 5: Conducting Searches ..............................................................23
Incident Hit Search..................................................................................23
Incident Search........................................................................................24
Tracked Offender Search........................................................................24
Zone Search ............................................................................................25
Zone Hit Search.......................................................................................25
Chapter 6: Understanding Reports............................................................27
The Report Frame ...................................................................................27
Incident Hit Search Results ....................................................................28
Incident Search Results ..........................................................................29
Tracked Offender Search Results..........................................................31
Zone Search Results...............................................................................33
Zone Hit Search Results.........................................................................33
Chapter 7: Administration ..........................................................................35
Incident.....................................................................................................35
Zone .........................................................................................................37
Preferences..............................................................................................39
Profile ...................................................................................................40
Notifications .........................................................................................41
Map Preferences.................................................................................42
User Accounts .........................................................................................44
Chapter 8: Maps .........................................................................................47
Map Components ....................................................................................47
Map Features...........................................................................................48
Map Toolbar.............................................................................................49
Best Practices When Working With Maps .............................................54
Chapter 9: Training Exercises ...................................................................55

VeriTracks Users Manual
Satellite Tracking Of People v
Exercise 1 Registering an Offender ................................................... 55
Exercise 1a Attach the Device............................................................ 57
Exercise 2 Notifications....................................................................... 57
Exercise 3 Conducting a Tracked Offender Search.......................... 62
Creating a Text Report....................................................................... 62
Creating a Map Report....................................................................... 64
Track Point Details ............................................................................. 64
Identify Features ................................................................................. 65
Adding Another Offenders Tracks .................................................... 66
Playback Tracks ................................................................................. 66
Map Details and Layer Lists............................................................... 68
Exercise 4 Jump to Map Address....................................................... 69
Exercise 5 Creating Zones.................................................................. 69
Exercise 6 Incident Hit Search............................................................ 71
Exercise 7 Incident Search ................................................................. 72
Exercise 8 Preferences ....................................................................... 73

VeriTracks Users Manual
Satellite Tracking Of People 1
Chapter 1: About VeriTracks and
BluTag®
VeriTracks is an innovative public safety tool developed by General
Dynamics Advanced Information Systems and offered exclusively by STOP.
VeriTracks employs a combination of data integration, geo-mapping, and
Global Positioning Satellite (GPS) technology to effectively remove the
anonymity of non-incarcerated criminals under the supervision of local, state
or federal criminal justice agencies. VeriTracks is applicable for arrestees on
pre-trial release; convicted criminals on probation and other forms of
community control; and parolees. The system uses GPS technology to
constantly track the precise location of offenders and link that data to the
location and time of reported crime incidents. The system also electronically
monitors certain exclusion and inclusion zones for violations. Any
intersection of a tracked individual with a crime incident or zone violation is
electronically pushed to the appropriate police and corrections agency for
action.
BluTag® is a one-piece device, about the same size as a small PC mouse,
comfortable to wear and weighs in at just 6 ounces. It has a fully rechargeable
battery, tamper resistant strap, panic alarm, personal alarm notification; on-
board management controls and is completely waterproof to 15 feet.
BluTag® not only is an ideal system to monitor offenders and defendants in
their homes, but it is an even more powerful tool when used to remotely track
these individuals when they leave their homes for work, meetings, school,
treatment and even court appearances.
About this document
This Users Manual describes the use of VeriTracks software and the BluTag®
equipment. It will enable you to maximize the value of the program's special
features by showing tips and techniques where appropriate.
For easier reading, look for the following conventions in this document:
§"Select" refers to selecting an option from the screen with your mouse.
§"Enter" refers to entering text or data into a field using the keyboard.
§"=>" indicates a series of selections to be made.
§Key + Key indicates that two keys on the keyboard should be pressed at the
same time.

VeriTracks Users Manual
2Satellite Tracking Of People
§Filenames, on-screen options, and field names are shown in bold arial
typeface.
§Information to be entered using the keyboard is shown in courier new
typeface.
Getting Help
The technical support staff at VeriTracks is pleased to assist you with any
questions you may have regarding the operation of VeriTracks and BluTag®.
You can reach us by calling:
1-877-588-7225
10455 White Granite Drive
Oakton, Virginia 22124
Or send an email to:
VeriTracks Support
VeriTracks.Support@veridian.com

VeriTracks Users Manual
Satellite Tracking Of People 3
Chapter 2: Getting Started
Because VeriTracks is Internet-based, you will need a 128-bit encrypted
browser, such as MS Internet Explorer® 5.5 or higher. If your browser does not
have sufficient encryption capability, a message will appear and you will be
directed to a site where an upgraded browser can be downloaded. For further
assistance, contact our technical support personnel.
Note: The Back button will not work with VeriTracks on the web for
security reasons. Please use the Last Result or Back options shown on the
interface.
System Requirements
To maximize use of your connection to the VeriTracks server, here are some
requirements you should be aware of:
1. Cookies must be enabled on your web browser, for log-in identification
purposes only.
2. JavaScript must be enabled on your web browser. (Note: for both #1 and
#2, these should be enabled by default when using MS Internet Explorer®
5.5 or higher).
3. The best screen resolution setting is at a minimum, 600X800, and optimal,
1024X768. You can verify this setting by Right Clicking on your desktop
anywhere => select Properties => select Settings tab => verify Screen
Resolution from there.
4. Using web applications has advantages as well, such as using both left and
right mouse clicks, double clicking is not required, and there is a status
window available to let you know when you have multiple windows open.
VeriTracks Users Manual
4Satellite Tracking Of People
VeriTracks Overview
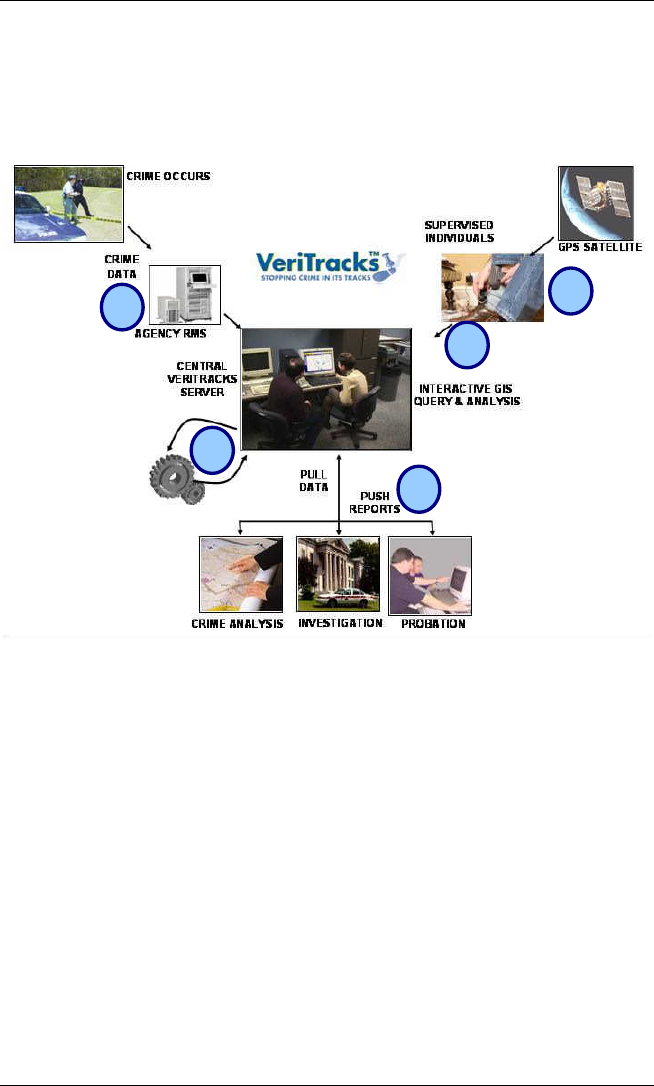
1. The Offender Tracking Unit (OTU) determines and records the offender
location.
2. The OTU data is collected and stored on the VeriTracks central server.
3. Crime incident data from local law enforcement agencies is collected and integrated
with offender location data.
4. The hit engine determines correlation between offender location and the location of
crime incidents to determine if the offender was in the vicinity of the crime when it
occurred.
5. Criminal Justice users access the central server through a user friendly web interface
to analyze and investigate offender movement, crime patterns and the correlation of
offender location with crime incidents, investigative zones and probationary zones.
1
2
3
4
5

VeriTracks Users Manual
Satellite Tracking Of People 5
BluTag®
BluTag® is a one-piece device, about the same size as a small PC mouse,
comfortable to wear and weighs in at just 6 ounces. It has a fully rechargeable
battery, tamper resistant strap, panic alarm, personal alarm notification; on-
board management controls and is completely waterproof to 15 feet. Thanks to
intelligent battery management software, the battery lasts in excess of 30 hours
even when used in fully active tracking mode. BluTag® can be fully recharged
in just 30 minutes.
BluTag® not only is an ideal system to monitor offenders and defendants in
their homes, but it is an even more powerful tool when used to remotely track
these individuals when they leave their homes for work, meetings, school,
treatment and even court appearances.
The monitoring system uses the wireless network for remote programming of
new control parameters into BluTag® such as inclusion or exclusion zones.
BluTag® uses the same network for sending location data and alarms to the
monitoring system to make the solution easy to use for the agency.
VeriTracks Users Manual
6Satellite Tracking Of People
Detailed System Processes
Logging In
In order to begin using the VeriTracks system, please verify that your
machine and browser meet the system requirements listed in the GETTING
STARTED section of this manual.
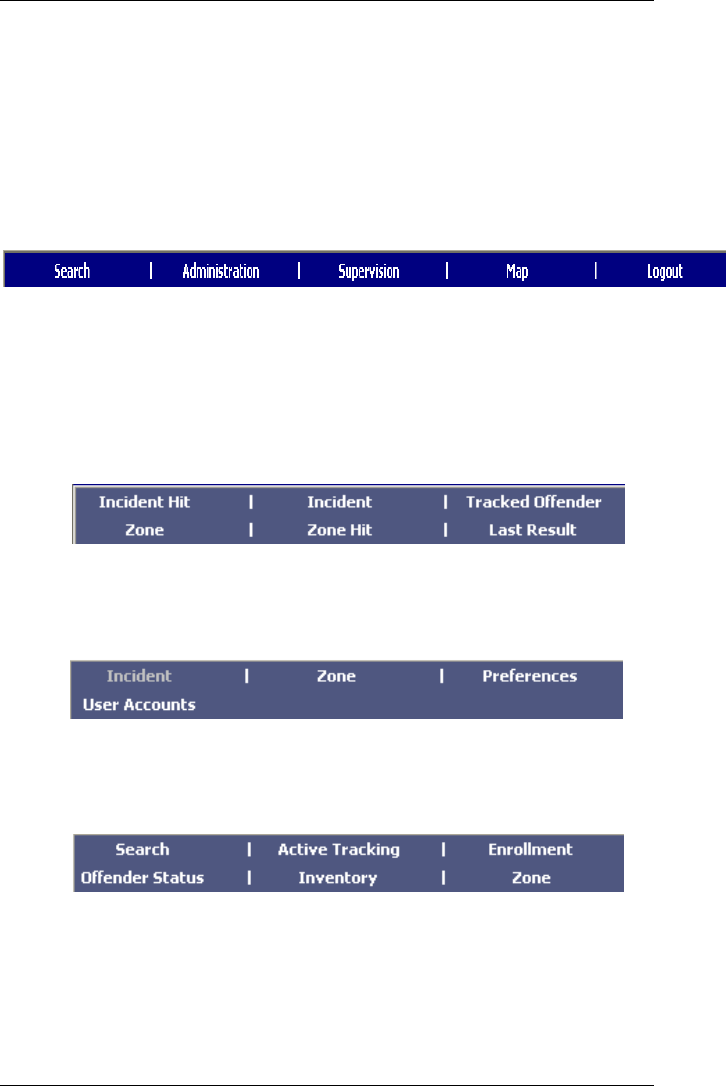
1. To get started, open up your MS Internet Explorer® browser.
2. In the address line on the Home Page, enter the following address:
https://YOUR_STATE.veritracks.com,(for example, if your
agency is located in Florida, then the address would be
https://florida.veritracks.com) you will be brought to the log-in screen for
VeriTracks. (Note: You may log-in to the training site for learning
purposes at https://training.veritracks.com).
3. To log-in, you will need to enter YOUR OWN User Name and Password
that has been assigned to you.
4. If you forget your password, you can have it emailed to you. To receive
your password via email, enter your username in the space provided and
then click on the link Click here in the instructions next to the Password
entry box.
5. Click on the Login button when you have finished entering in your account
information.
VeriTracks Users Manual
Satellite Tracking Of People 7
Understanding the Menu Options
The VeriTracks home page consists of a Menu Bar and the Display Area in
the center of the page. The Menu Bar is accessible from every VeriTracks
web page, while the Display Area changes to reflect the selected VeriTracks
function.
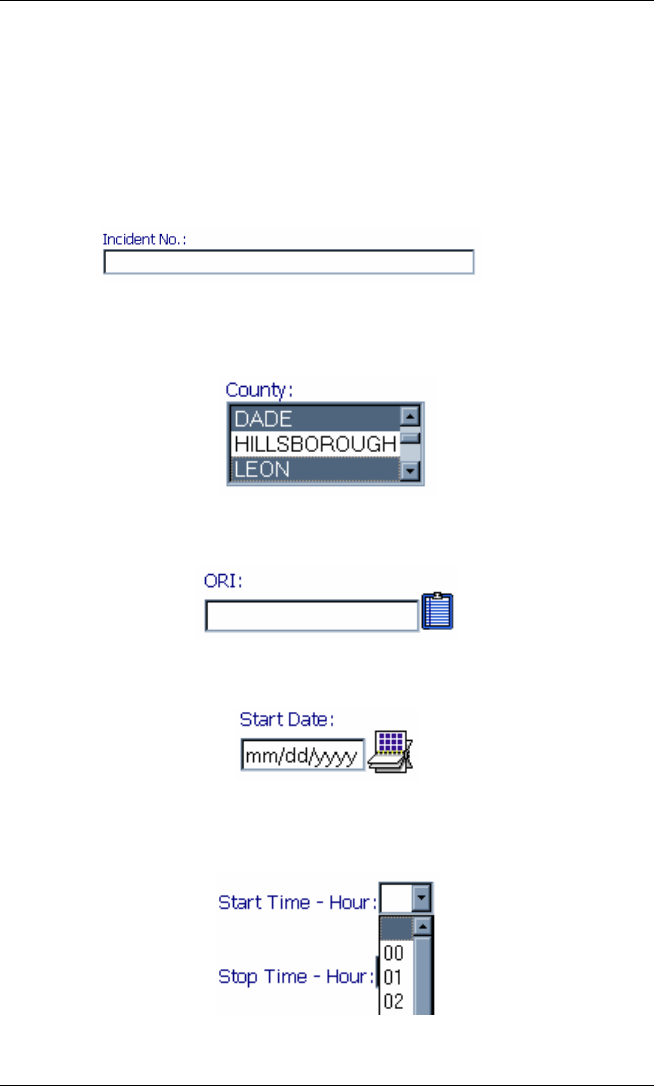
This is the VeriTracks Main Menu, accessible from all pages.
The VeriTracks Menu Bar is divided into six sections:
1. The Search link takes you to search pages where you can define specific
parameters for your search. The menu below drops down when you move
your mouse over the Search link.
2. The Administration link allows you to add or modify incident and zone
data, or administer your user name, password, and preferences. The menu
below drops down when you move your mouse over the Administration
link.
3. The Supervision link allows you to conduct offender searches, enroll a new
offender, to administer and schedule device commands and inventory, and
to create zones. The menu below drops down when you move your mouse
over the Supervision link.
4. The Map link allows you to map an address or to retrieve previously
mapped addresses. The map data entry box drops down when you move
your mouse over the Map link.

VeriTracks Users Manual
8Satellite Tracking Of People
5. The Logout link logs you out of VeriTracks. If you close your browser
you will automatically time out your session. Please remember to select the
Logout option to disconnect your session.
VeriTracks Users Manual
Satellite Tracking Of People 9
Understanding Search and Data Entry Page Features
All Data Entry and Search pages within VeriTracks have a number of
common features and functions.
1. Text Boxes Text boxes allow direct data entry using the keyboard, where
multiple values can be entered separated by commas.
2. Scrolling List Boxes List boxes allow you to pick items from a list.
Multiple items can be selected by holding down the control <CTRL> key
and selecting the item with the mouse.
3. Text Box/Clipboard Pop-up Combination These boxes can be used like
a text box or you may use the clipboard to pop-up a pick list of valid values.
4. Date Fields All dates can be input directly or picked off a calendar pop-
up list.
5. Drop Down List Boxes The drop down list boxes allow you to type
information directly into the box and search the list or pick one item off a
list that drops down. In these fields, you cannot select multiple values.

VeriTracks Users Manual
10 Satellite Tracking Of People
6. Buttons All search pages have TEXT, MAP, and RESET buttons. TEXT
will produce a text report of the data you queried for. MAP will produce a
map of the Incident or Tracks you queried for. RESET will clear your
query and let you start over. Data Entry pages will include the ADD button.
When you have entered all the data to register a new offender or to create a
new zone, you will need to click on the ADD button to add the information
to the database.
User Discussion Forum
A User Discussion Forum is available on the home page of the VeriTracks
website. Select the Discussion Forum link and a new browser window will open
with a standard internet bulletin board/forum page layout. To post a message or
to start a new discussion topic, you will need to register as a forum user. This is
separate from your VeriTracks account. A valid email address is required and
an activation message will be sent to that address. The purpose of the forum is
to allow VeriTracks users from all over the country to discuss topics and
issues related to VeriTracks and to share tips and information. The
administrator reserves the right to remove messages that are deemed
inappropriate. Although the support team monitors the discussion forum, it is
not recommended to use this avenue for reporting system problems or bugs.
Please use the support email for those kinds of issues:
veritracks.support@veridian.com.

VeriTracks Users Manual
Satellite Tracking Of People 11
Chapter 3: Registering an Offender
In order to start using the VeriTracks system, you will need to register your
agencys offenders in the system and activate the BluTag® device.
Hardware Components
Summary of BluTag® Specifications:
·Single one piece device, including GPS and GSM/GPRS
·On board logic controller programmable over the air
·Remote programming of multiple inclusion and exclusion zones
·Battery re-charge period about 30 minutes
·Weighs only 6 ounces
·High temperature stability
·Buzzer or Vibration alarm can be programmed and sent immediately
·Soft push panic alarm
·Waterproof
·Tamper resistant fiber optic strap
GSM - Global System for Mobile Communications. This is the standard
digital technology for wireless phones in Europe and much of the rest of the
world. GSM is becoming increasingly popular in the United States. It is gaining
ground in the U.S. though it is broadcast on a different frequency than the
system used in Europe.
GSM is offered domestically by T-Mobile, Cingular, and AT&T Wireless.
BluTag® currently uses the T-Mobile network which provides the largest GSM
coverage. GSM phones have a distinctive feature: a small, removable plastic
card, called a SIM card that stores user account information, including the phone
number and speed dial entries, on an embedded chip.
GPRS - General Packet Radio Service. This is a faster version of GSM,
which speeds up data transmission for things like email and Web browsing. It
operates at the speed of a slow home dial-up modem, usually 30-40 kilobits per
second. In wireless phone lingo it is considered a 2.5G technology, which will
eventually be replaced by much faster 3G data technologies. BluTag® will
operate on GPRS.

VeriTracks Users Manual
12 Satellite Tracking Of People
The BluTag® Tracking Unit
BluTag® is the worlds first all-in-one real-time offender tracking device
designed to be worn continuously on an offenders ankle. BluTag® uses the
Global Positioning System (GPS) location verification technologies to monitor
and report positions to a custom designed, web based monitoring system.
The BluTag® has a fully rechargeable battery, tamper resistant strap, panic
alarm, personal alarm notification; on-board
management controls and is completely
waterproof to 15 feet. The battery lasts in excess
of 24 hours even when used in fully active
tracking mode. A low battery signal will alert
when the battery needs to be recharged. The
battery can be fully recharged in 30-45 minutes by
simply attaching a charging coupler to the bottom
of the device. Offenders or defendants can
recharge the battery anywhere. Failure to
recharge is an alert that goes to the officer and
should be addressed as a program violation.
The Internet based monitoring system uses the
wireless network for remote programming of new
control parameters into BluTag® such as
inclusion or exclusion zones.
BluTag® is set to one mode, Fully Active where all location data is reported in
near real-time.
The BluTag® is easily
installed by simply sizing the
ankle and clicking in a
premeasured tamper resistant
fiber optic strap. If the fiber
optic light is interrupted a
tamper notice is sent to the
officer.
Fully web enabled custom
monitoring, mapping, and
control software enable staff
to monitor large caseloads 24
hours per day.
VeriTracks Users Manual
Satellite Tracking Of People 13
Enrolling a New Tracked Offender
To add a new offender to VeriTracks:
1. When you mouse over the Supervision menu option, select Enrollment
from the list.
2. Under the Enrollment option, you can Enroll and UnEnroll your offenders.
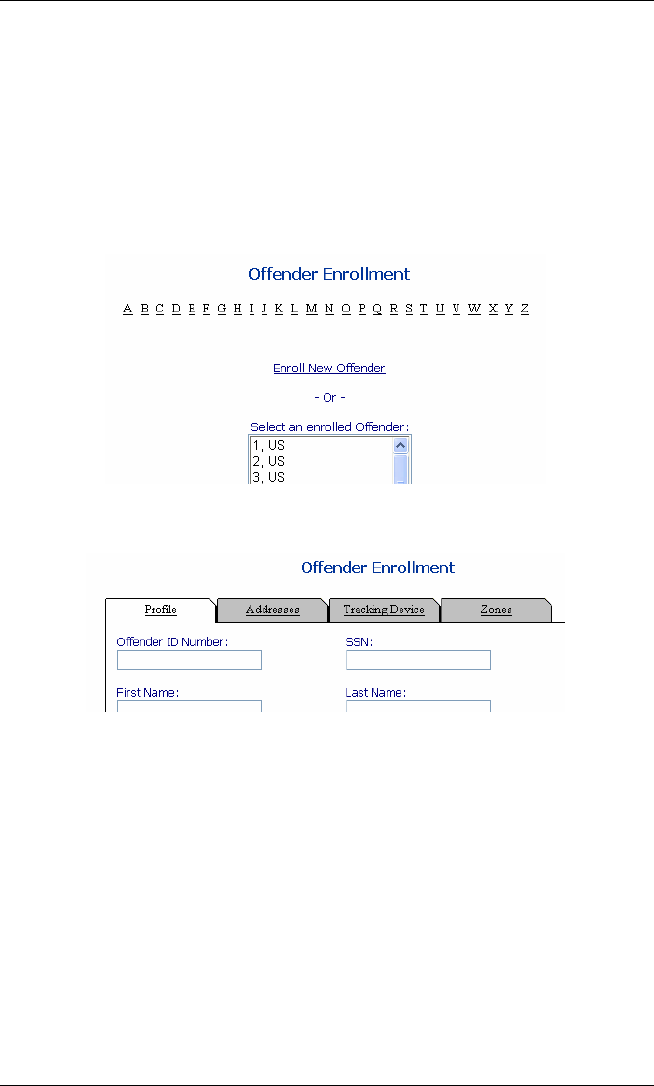
3. Select Enroll New Offender to add a new offender to the system.
4. There are four tabs/areas for enrollment: Profile,Addresses,Tracking
Device, and Zones. (NOTE: not all fields are required information).
Offender Profile
Offender ID Number This field contains the offender
identification number. This number may
vary by agency, depending on what you
would like to use for a unique identifier.
SSN The offenders Social Security Number.
First Name The offenders First Name.
Last Name The offenders Last Name.
Height The offenders height in inches.

VeriTracks Users Manual
14 Satellite Tracking Of People
Weight The offenders weight in pounds.
Hair Color Select the hair color from the drop down
listing.
Eye Color Select the eye color from the drop down
listing.
Gender Select the gender from the drop down
listing.
Race Select the race from the drop down listing.
Birth Date This field contains the offenders date of
birth. You may enter this or select the date
from the calendar pop-up listing.
Probation Officer Select the Probation Officer from the drop
down listing.
Supervision Type Select the Supervision Type from the drop
down listing.
Supervision Office Select the Supervision Office from the drop
down listing.
Supervision Begin Date Enter the Begin Date for Supervision, or
select the date from the calendar pop-up
listing.
Supervision End Date Enter the End Date for Supervision, or select
the date from the calendar pop-up listing.
Prior Offenses Select the Prior Offenses from the drop
down listing.
Sex Offender Select the Sex Offender Check Box if the
offender is a convicted Sex Offender.
Offender Addresses
Home Address:
Street Number The offenders Home Street Number.
Street Name The offenders Home Street Name.
City The offenders Home Address City.
State The offenders Home Address State.

VeriTracks Users Manual
Satellite Tracking Of People 15
Zip The offenders Home Address Zip Code.
Phone Number The offenders Home Phone Number.
Work Address:
Street Number The offenders Work Street Number.
Street Name The offenders Work Street Name.
City The offenders Work Address City.
State The offenders Work Address State.
Zip The offenders Work Address Zip Code.
Phone Number The offenders Work Phone Number.
Tracking Device
The Tracking Device tab allows you to access assigned devices and to assign
new ones. When you have accessed an enrolled offender you will see their
tracking device information on this tab of the enrollment process. From here
you can modify it if need be.
Click on the Modify Device Assigned link to assign a device to a new offender
or to modify a currently assigned device. There are two steps for assigning a
device to an offender: select the device you wish to assign to the offender from
the Devices drop-down listing, and then select the device template you wish to
apply to the device from the Device Default Configurations drop-down listing.
Zones
The Zones tab allows you to view zones that are currently applied to an offender
and assign existing zones to an offender. There are three (3) types of zones:
Active, Passive and Global Zones.
Active zones are assigned to and monitored on a 24 hour/7 day-a-week, active
basis within the device itself. Notifications for Active Zone violations can be set
up to your preferences and sent out for immediate response.
Passive zones are monitored on a scheduled, passive basis by software
correlation between track points and defined zones. The notifications for passive
zone violations are generally emailed to users on a daily basis.
Global zones are applied to all offenders being monitored within the
VeriTracks program.

VeriTracks Users Manual
16 Satellite Tracking Of People
Each type of zone can be assigned to individual offenders or to all offenders.
Modify Zones Assigned is a link that will allow you to select from a list of
zones in the VeriTracks program that you can assign to your offenders. The
zones listed for availability are zones created by anyone in your ORI. To add a
zone to an offenders monitoring simply click on the zone name in the listing on
the left hand side of the page and move it into either the Active or Passive zone
list on the right. In addition to these zones, zones that have been designated as
Global are automatically assigned to each offender enrolled. These Global
zones can be created by anyone in your state and assigned to all offenders.
Preparing the BluTag® Device for Use
Once you have completed enrolling an offender into the Veritracks system, the
activation is almost complete. The devices arrive to each agency in what is
called sleep mode. Once you have enrolled your offender and assigned the
device you will need to attach the device physically to the offender. To do this
follow these easy steps:
1. Measure the ankle: Each device comes with multiple straps to fit
different size ankles. You will need to measure the offenders ankle to
select the correct sized strap for attachment.
2. Attach the device: Each device is a one-piece self contained unit. The
straps are attached by inserting them into the slots on either side of the
device. Included with the device are small plastic clips that will fit on
the ends of the strap using the holes in the strap itself. Once the clips
are in place, slide the end of the strap into the device opening. Wrap
this strap around the offenders ankle and insert the other end in the
same manor.

VeriTracks Users Manual
Satellite Tracking Of People 17
Chapter 4: Supervising an Offender
Software Components
When you mouse over Supervision on the Main Menu, the Supervision Menu
options will appear.
From here you can choose the function you wish to use in regards to your
offenders.
Searching for a Tracked Offender Record
There are two ways to find an existing tracked offender record: from the
Supervision Menu and from the Search Menu.
To conduct a Tracked Offender Search you can enter any or all of the following
fields to limit the data result set returned:
Office The office the offender is registered with.
Select the office from the drop-down listing.
Exclude Offenders Off Monitoring Select this check box to search
ONLY on offenders who are currently being
monitored, excluding those who are no
longer on monitoring.
Offender Name-DC No The offenders name and unique identifier
assigned to the offender by the Department
of Corrections. Click on the clipboard pop-
up listing to select the offender you wish to
see.
City of Residence The city where the offender resides.
Zip Code of Residence The zip code of the city where the offender
resides.
Race The race of the offender.
Sex The sex of the offender.

VeriTracks Users Manual
18 Satellite Tracking Of People
Probation Officer The officer responsible for the offender.
You can select an officer name from the
drop-down listing.
Start/Stop Dates The dates you would like to include in your
search for offender tracks. You may also
limit this search by hours and minutes.
Offender Status
The Offender Status option provides you with a report of your offenders
device and positioning information.
NOTE: The information provided in the Offender Status report is current
as of the last phone call by the device. (When violations and other alerts
occur, officers are notified by email. It is possible that between the time a
notification is received and the time an officer checks in with VeriTracks,
the violation or alert maybe cleared.)
There are five (5) different functions available for your information: Device
Status, Last Position, Contact Offenders, Command Results, and
Violations.
1. Device Status: This report provides you with current information about
your offender and their device. Included is: Offender Name, Last Contact,
Low Battery, Zone Violation, Movement without GPS, and Tamper
Violation.
a. Offender Name: Displays the offender(s) name that you wish to
view.
b. Last Contact: Displays the date and time that the device last had
contact with the VeriTracks server to exchange data.
c. Low Battery: Displays a green checkmark to indicate the battery
life is okay, or a red if the battery charge is low.
d. Zone Violation: Displays a green checkmark to indicate that there
are currently no zone violations, or a red to indicate there has
been a zone violation.
e. Movement without GPS: Displays a green checkmark to indicate
that GPS has effectively monitored the location of the offender, or
a red to indicate that during movement the device changed
from one cell to another and GPS did not monitor the device
during that time. This produces a violation and a notification to
the officer supervising that offender.

VeriTracks Users Manual
Satellite Tracking Of People 19
f. Tamper Violation: Displays a green checkmark to indicate that
there has not been a tamper violation on the device strap, or a red
to indicate that the device strap has been tampered with and
must be replaced.
2. Last Position: This tab will display a map that will show you the last
position of the offender with the last call the device made to the server. If
you have selected more than one (1) offender to view in the Offender Status
report, it may not be as useful to view multiple offenders on the same map.
The map will display the date and time of the last position for the offender
on the map as well.
3. Contact Offenders: This tab will allow you to contact an offender by
activating commands on the device. You can Activate Buzzer which sends
the command to buzz the offenders device. You can Activate Vibrate
which sends the command to cause the device to vibrate. You can Request
Device Data which sends the command to provide you with information
about the device. You can use this command to ping the position of the
device. Each agency will have policies set as to what the offender should
do when the device is contacted.
4. Command Results: This tab provides a listing of commands that have
been sent out to devices within your agency. This information is provided
to you so that you know that the command has been received by the device.
Displayed is the command that was issued, who it was issued by, the
offender that the command applies to, the command type, status and when it
is completed/cleared. In addition the start date and time and the end date
and time will be displayed. There is a Refresh button on this screen so
that you can continue to refresh the server to check for new status on your
commands.
5. Violations: This tab will provide you with a violation report for the
offender(s) that you selected. The default date/time range is the previous
24 hour period. You can change the date/time range to view previous
reports.
Inventory
The Inventory menu option is where your agency will monitor your device
inventory. There are several sub-menu options available to assist you in
monitoring your device inventory: Inventory List, Change Device(s) Status,
Change Device(s) Owner, Device Assignment Report and Device History
Report.

VeriTracks Users Manual
20 Satellite Tracking Of People
1. Inventory List: Displays all devices within your agencies inventory,
including each devices serial number, the offender that it is assigned to (if
any), and the status of each device (NEEDS REPAIR, PRE-SHIPPING,
RECEIVED, RETURNED, SHIPPED, ASSIGNED, UNASSIGNED).
2. Change Device(s) Status: Select the device you wish to change the status
on by clicking in that devices row of information. To select more than one
device in the list, hold down your control key on your keyboard while you
select each device you wish to change. Below the list of devices is a drop-
down listing of status options to choose from. Select the new status for that
device. Click on the Submit button to save the changes.
3. Change Device(s) Owner: Certain agencies will be set-up as a parent
company with possibly multiple agencies within its hierarchy. Devices can
be moved around within these hierarchies. In order to reassign a device
within your agency structure, the device must be unassigned. Select the
device you wish to change the owner of by clicking in that devices row of
information. To select more than one device in the list, hold down your
control key on your keyboard while you select each device you wish to
change. Below the list of devices is a drop-down listing of all agencies
within your agencies hierarchy that you have privileges to reassign devices.
Select the agency from the list to change the owner.
4. Device Assignment Report: Displays a listing of all devices within your
agency that are assigned to offenders. In order to create this report select
the date from the calendar that you wish to view. The report provides you
with the serial number of the devices, the ORI that the device belongs, the
offender that the device is assigned to, the start date and end date (if the
device has been unassigned on the date you selected) and the status of the
device (ASSIGNED or UNASSIGNED).
5. Device History Report: Displays a report of all devices assigned to your
agency. This report is also dependent upon the hierarchy of how your
agency was created. If your agency is at the highest level of the hierarchy
you will be able to see all of the agencies within your structure. This is an
information only report.
Zones
Zones are created as a useful way to better track offender movements. You will
be notified when an offender violates a zone that has been assigned to them.
There are two types of zones: Inclusion or Exclusion; and three types of
monitoring of zones: Active, Passive, or Global.

VeriTracks Users Manual
Satellite Tracking Of People 21
Inclusion zones are created to define an area in which on offender needs to
remain. For example, if they are confined to only their home and work, zones
can be created around each location, including the specific times the zone is
effective. You can then monitor when an offender leaves their assigned zones.
Exclusion zones are created to define an area(s) where an offender should not
be. For example, an offender has been ordered to stay clear of their former
spouses home. A zone can be set up around that home, assigned specifically to
that offender, and activated at all times. When the offender enters into this zone,
this will produce a violation.
The following are the steps necessary to create a zone:
1. There are two ways to access the zone menu, either by mousing over the
Supervision or the Administration menu options and selecting Zone. You
can create a new zone or select one that you have previously created.
2. Click on Add New Zone to begin the process for creating a new zone.
3. Complete the Zone Entry fields as follows:
Zone Name Name your zone. Be sure to use a specific
name that is meaningful to you. Each
organization may want to come up with a
naming schema.
Street No The Zone Address Street Number.
Street Name The Zone Address Street Name.
Cross Street Name The Zone Address Cross Street Name, if
any.
City The Zone Address City Name.
Zip Code The Zone Address Zip Code.
Latitude The Zone Address Latitude.
Longitude The Zone Address Longitude.
Geocode Click on this button to produce the Latitude
and Longitude coordinates from the address
entered. The address MUST be able to
produce Latitude and Longitude in order for
you to be able to map the address. HINT: if
the Geocode does not work, try using an
address of a neighboring building or home
and adjust your zone definition
appropriately.

VeriTracks Users Manual
22 Satellite Tracking Of People
Buffer Distance Enter in Feet, Yards, and/or Miles the buffer
distance for the zone.
Exclusion/Inclusion Select if this is to be an Exclusion or
Inclusion Zone.
Start/Stop Dates Enter or select the Start and Stop Dates from
the calendar pop-up for the zone.
Offender Name DC No Enter or select the Offender Name(s) from
the clipboard pop-up that this zone will be
assigned to.
Schedule The zone will be effective during specific
times. You can set-up the zone schedule
from here by selecting times for each day,
selecting everything when the zone applies
all the time, or use the smart select to
specify periods of time across each day.
Reset/Add Select the Reset button to start your zone
entry again. Select the Add button to add
the new zone.

VeriTracks Users Manual
Satellite Tracking Of People 23
Chapter 5: Conducting Searches
VeriTracks provides the user with the ability to conduct searches on offenders
as well as crime incidents and crime incident hits (where available), and zone
hits. The following details how to use the various search capabilities in
VeriTracks.
Incident Hit Search
The Incident Hit search allows you to search for offender tracks that have come
within the vicinity of a reported crime during the specified crime time and
within 1,000 feet of the reported crime location. Not all agencies will have
crime data available to them. This function is only enabled when crime data is
available and collected into the VeriTracks central server.
To conduct the Incident Hit Search you can enter any or all of the following
fields to limit the data result set returned:
Incident Hit No The unique identifier assigned to the hit by
the VeriTracks system.
County The County in which the Incident occurred.
ORI/Agency The Originating Agency responsible for
investigating the Incident.
Agency Case No The Case Number assigned by the ORI,
which may be the same as the Agency
Incident Number.
Primary Offense The nature/type code assigned by the agency
to describe the incident.
Offender Name-DC No The offender whose tracks crossed the
incident, causing a hit to occur.
Maximum Distance (ft.) The distance the offenders tracks were from
the incident.
Minimum No. Points The amount of time the tracked offender
was near the incident, the higher the points
the longer the time period. This varies

VeriTracks Users Manual
24 Satellite Tracking Of People
depending on the device used, as some
devices track points more frequently.
Start/Stop Dates The dates you would like to include in your
search for incident hits.
Incident Search
The Incident search allows you to search for reported Crime Incidents. This
information is only available when crime data is collected into the VeriTracks
central server from local law enforcement agencies.
To conduct the Incident Search you can enter any or all of the following fields to
limit the data result set returned:
Incident No The unique identifier for the incident
assigned by Veritracks.
County The County in which the incident occurred.
ORI/Agency The Originating Agency responsible for
investigating the Incident.
Agency Case No The Case Number assigned by the ORI,
which may be the same as the Agency
Incident Number.
Primary Offense The nature/type code assigned by the agency
to describe the incident.
Disposition The current disposition of the crime
incident.
Start/Stop Dates The dates you would like to include in your
search for incident hits.
Tracked Offender Search
NOTE: Please see Chapter 4, page 17, with information for conducting a
Tracked Offender Search.

VeriTracks Users Manual
Satellite Tracking Of People 25
Zone Search
The Zone search allows you to search for Zones that have been created by your
ORI.
To conduct the Zone Search you can enter any or all of the following fields to
limit the data result set returned:
Zone POC The individual responsible for initiating the
zone.
County The County in which the zone was defined.
ORI/Agency The Originating Agency responsible for the
zone.
Zone No The unique identifier of the zone assigned
by Veritracks.
Street Name The name of the Street defined in the zone.
Zip Code The zip code defined in the zone.
Offender Name-DC No The offender whose tracks crossed the
incident, causing a hit to occur.
Zone Hit Search
The Zone Hit search allows you to search for offender tracks that have violated
defined Zones created by your ORI.
To conduct the Zone Hit search you can enter any or all of the following fields to
limit the data result set returned:
Zone Hit No The unique identifier of the offender tracks
that occur outside an inclusion zone or
inside an exclusion zone assigned by
Veritracks.
Zone POC The individual responsible for initiating the
zone.
County The County in which the zone was defined.
ORI/Agency The Originating Agency responsible for the
zone.
Zone No The unique identifier of the zone assigned
by Veritracks.

VeriTracks Users Manual
26 Satellite Tracking Of People
Street Name The name of the Street defined in the zone.
Minimum No Points The amount of time the tracked offender
was near in violation of the zone, the higher
the points the longer the time period. This
varies depending on the device used, as
some devices track points more frequently.
Offender Name-DC No The offender whose tracks crossed the
incident, causing a hit to occur.
Start/Stop Dates The dates you would like to include in your
search for incident hits.
VeriTracks Users Manual
Satellite Tracking Of People 27
Chapter 6: Understanding Reports
When users conduct searches you can either create text reports of the results or
map the results. Each text report has common functionalities. The report frame
is the same the report contents change based on the report type.
The Report Frame
Each report is framed by a common set of information and buttons.
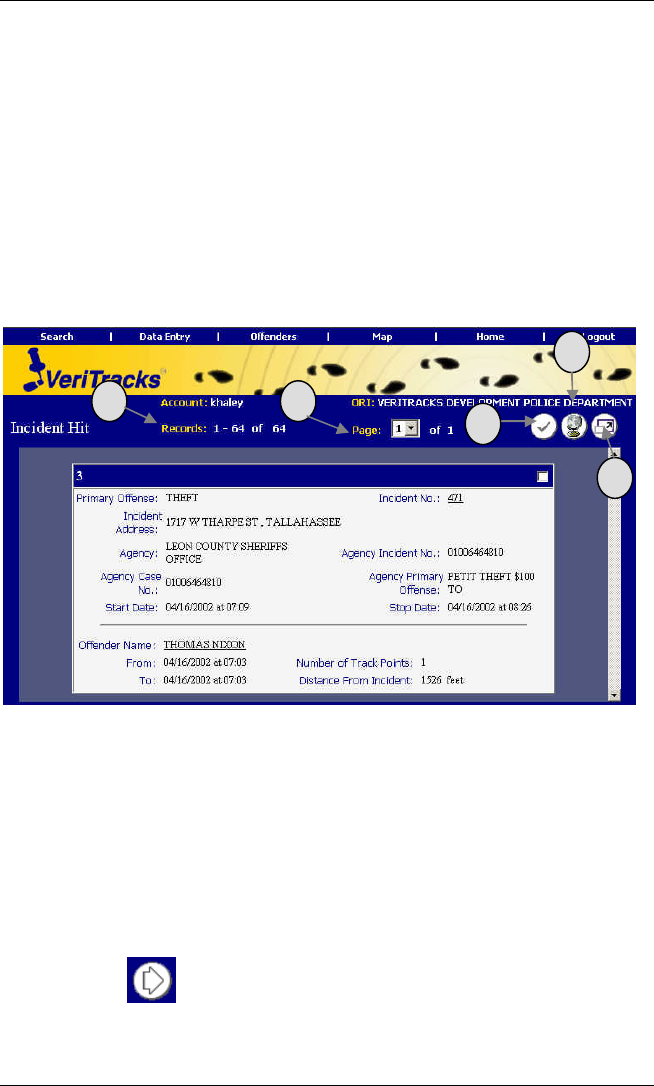
1. Records: This number indicates how many records were returned
based on your search. If you choose a link from an email notification
then this number should only be one (1).
2. Page: This number indicates how many pages of results have been
returned. VeriTracks is set to show only 100 records per screen.
This number will indicate when there is more than one (1) page in the
result set. To access the next page, select the page number you would
like to view from the drop down listing. A new button will appear at
the top as well. This arrow button will also advance you to the next
page.
1
2
3
4
5
VeriTracks Users Manual
28 Satellite Tracking Of People
3. Select All Records: Each individual record is displayed on its own
note card. You can select individual or multiple note cards by clicking
in the top right hand corner of the cards, adding a check to signify
selection, or if you want to select all records, click on this button.
4. Map Selected Records: To view your selected or all results on a map,
click on this icon. Be sure to select the individual or multiple
records you wish to view on the map first.
5. View as Table: To view your result set in table format click on this
icon. This view allows users to sort their data using any column
you wish. If your result set is large it also makes browsing through the
data easier. To sort on any column in the result set in table format,
click on the column header link and the table will automatically
reformat the report within the table.
Incident Hit Search Results
Enter the appropriate information into the Search Page options to retrieve the
Incident Hit information you are looking for. You may also start this search
from your daily Incident Hit Notification email link. Simply click on the link of
the Incident Hit that interests you and you will be brought into VeriTracks, log-
in and the report will automatically generate.
1
2
3
4
5

VeriTracks Users Manual
Satellite Tracking Of People 29
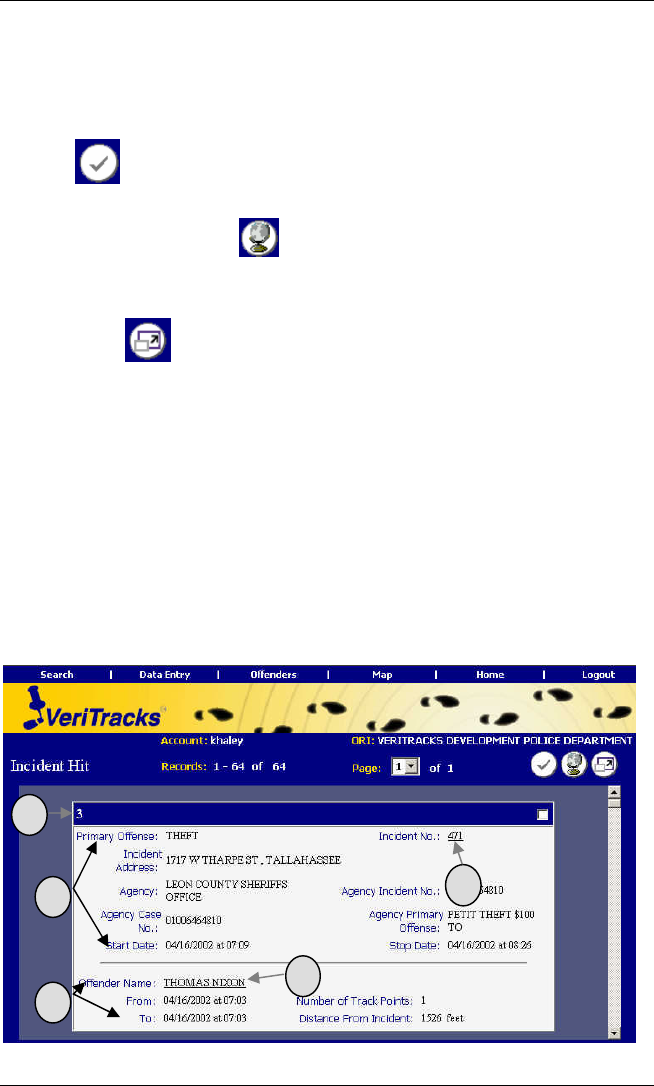
From the above report you are provided with information about the incident and
about the offender who caused the hit to be generated. You can choose to
map one or more incident hits from this report by simply selecting the individual
incident hits note cards, or all of them, and then clicking on the Map Selected
Records button.
Below is an explanation of how to effectively use this report:
1. VeriTracks Incident Hit Number: The VeriTracks hit engine
automatically assigns a unique number to each hit returned. This
number is displayed on the top left hand corner of each note card. This
number can be used in future searches for ease of re-retrieving records.
2. Incident Information: This section on the note card provides the
details about the reported incident.
3. Incident No. Hyperlink: This is the VeriTracks generated Incident
Number. The hyperlink opens up the incident report for this incident so
you can obtain more detailed information about that incident.
4. Offender Information: This section on the note card provides the
details about the time/date range, number of track points and the closest
recorded distance from the incident that the offender tracks crossed the
reported incident information. This information crossed with the
incident information is what caused the hit to be generated.
5. Offender Name Hyperlink: This link opens up the offender details
report (see below) for this offender with detailed information about the
offender.
Incident Search Results
Enter the appropriate information into the Search Page options to retrieve the
Incident information you are looking for. This search option allows you to view
one (1) or multiple Incidents in the same report.
VeriTracks Users Manual
30 Satellite Tracking Of People
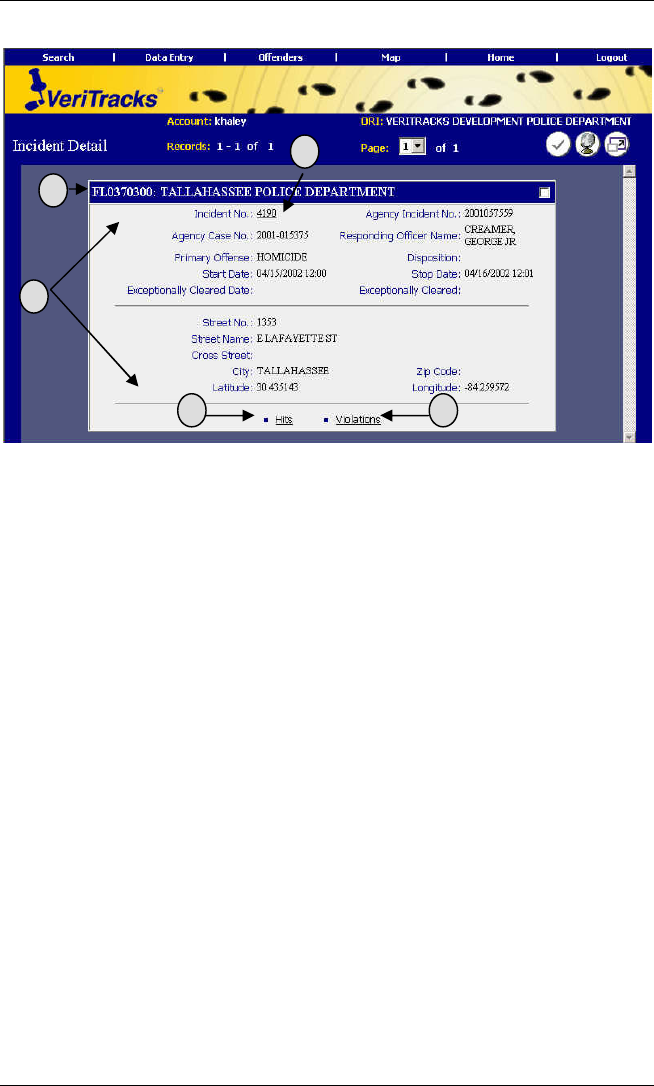
From the above report you are provided with information about the incident. In
addition, there are links on each Crime Incident note card that will take you to
crime incident hit and violation information. You can choose to map one or
more incidents from this report by simply selecting the individual incident note
cards, or all of them, and then clicking on the Map Selected Records button.
Below is an explanation of how to effectively use this report:
1. Reporting Agencies ORI: VeriTracks will display the agency ORI
and agency name for which the incident was reported.
2. Incident Information: This section on the note card provides the
details about the reported incident.
3. Incident No. Hyperlink: This is the VeriTracks generated Incident
Number. The hyperlink opens up the incident report for this incident so
you can obtain more detailed information about that incident.
4. Hits Hyperlink: This link provides a text report of any hits that
occurred for that particular incident.
5. Violations Hyperlink: This link displays a listing of offenders who
had device violations during the specified crime time period. This
includes the distance and time from the last good point for the offender
before the violation. The violation report will show only the 100
closest offender violations.
1
2
3
5
4
VeriTracks Users Manual
Satellite Tracking Of People 31
Tracked Offender Search Results
Enter the appropriate information into the Search Page options to retrieve the
Offender information you are looking for. This search option allows you to
view one (1) or multiple Offenders in the same report.
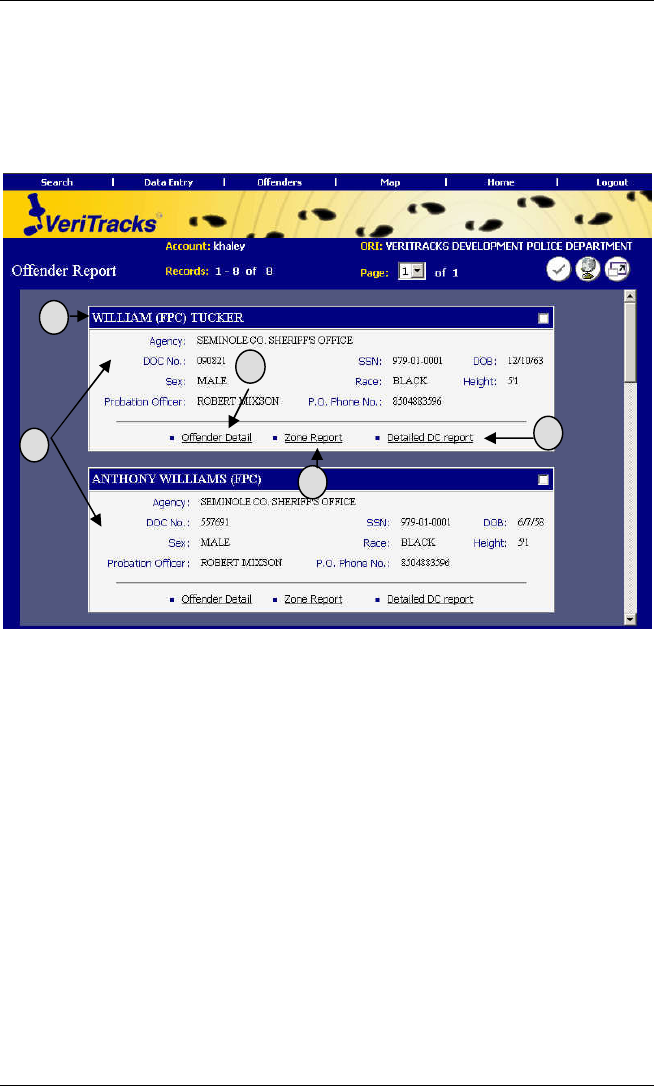
From the above report you are provided with information about the Offender(s).
In addition, there are links on each Offender note card that will take you to
Offender Detail, Zone Report, and Detailed DC Report. You can choose to
map one or more offenders from this report by simply selecting the individual
offender note cards, or all of them, and then clicking on the Map Selected
Records button.
Below is an explanation of how to effectively use this report:
1. Offenders Name: VeriTracks will display the offenders name on
each individual note card.
2. Offender Information: This section on the note card provides the
details about the offender.
3. Offender Detail Hyperlink: This link will give you detailed
information about an offender for a specified period of time, i.e., the
time frame you selected to run the report for. You can obtain specific
1
2
3
5
4

VeriTracks Users Manual
32 Satellite Tracking Of People
information about the offender as well as the listed Probation Officers
name and phone number. On this report are several other links.
a. Alerts: The Violation Alert Summary details if the offender
had any device violations during the specified period of time.
It lists the Violation Date/Time, Violation Cleared, the
Violation code, and the Duration that the violation occurred.
These violations include, but are not limited to, Bracelet
Gone,Bracelet Strap, and Motion No GPS.
b. Device Summary: This link provides details about the
device. Not only does it list the Violations of the device, but it
also lists when the Device at Rest, and Device in Charger.
c. Incident Hits: This link will take you to a table listing of all
Incident Hits that the offender had for that specified time
period. This report lists the Primary Offense, with links to the
Incident reports, the reporting agency, the Points and Distance
from the Incident, and the Start/Stop Date and Time.
d. Zone Hits: This link provides a table listing of any Zone
Violations for this offender for the specified period of time.
This report lists the Zone Name, the Violation Date, the ORI,
and POC (point of contact), the number of Points in the
violation, and the Zone Type.
4. Zone Report Hyperlink: This link provides a text report of any zones
that this particular offender has been assigned to. Anytime a user
creates a zone they have the rights to assign individuals whom they
wish to keep out of an Exclusion Zone, or individuals whom they wish
to keep inside an Inclusion Zone. Users can do this individually or
there is an option to select ALL offenders. This report applies ONLY
to Zones that an individual offender has been assigned to.
5. Detailed DC Report Hyperlink: This link opens up a new browser
window and will take you to the Public Web Site for the Florida
Department of Corrections. This link currently is only connected for
use in Florida. This site provides information to the public about
offenders currently on Parole or Probation through the Florida
Department of Corrections. For investigative purposes, this site
provides officers with more information about offenders, such as alias
names used, last known verified address, and even provides a
photograph.
VeriTracks Users Manual
Satellite Tracking Of People 33
Zone Search Results
Enter the appropriate information into the Search Page options to retrieve the
Zone information you are looking for. This search option allows you to view
one (1) or multiple Zones in the same report.
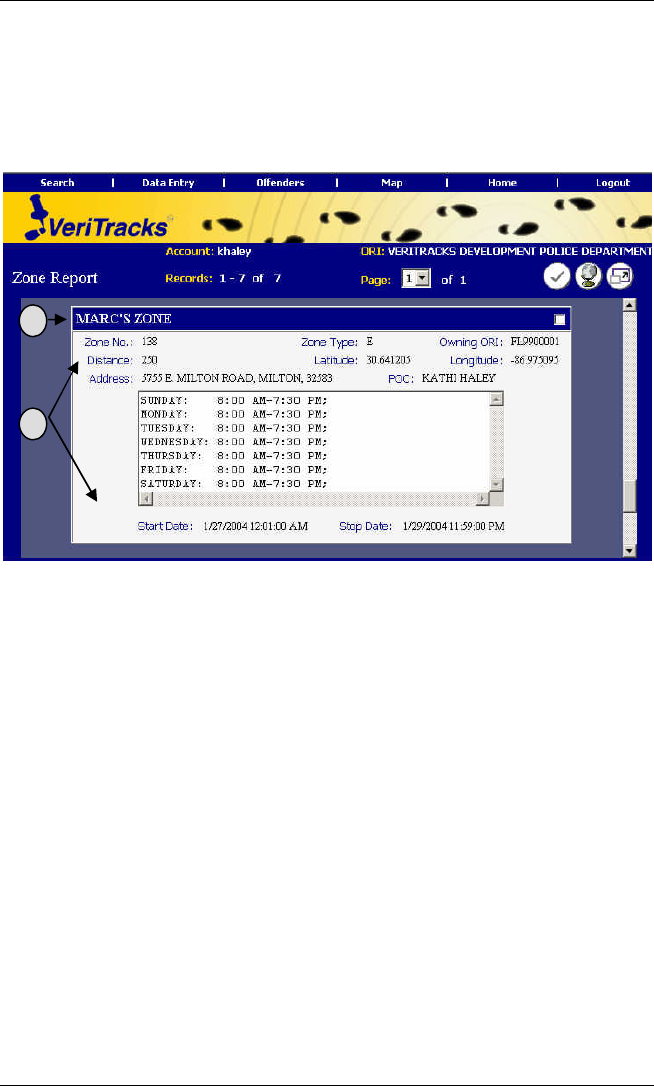
From the above report you are provided with information about the Zone(s).
You can choose to map one or more zones from this report by simply selecting
the individual zone note cards, or all of them, and then clicking on the Map
Selected Records button.
Below is an explanation of how to effectively use this report:
1. Zones Name: VeriTracks will display the zones name on each
individual note card.
2. Zone Information: This section on the note card provides the details
about the Zone.
Zone Hit Search Results
Enter the appropriate information into the Search Page options to retrieve the
Zone Hit information you are looking for. This search option allows you to
view one (1) or multiple Zone Hits in the same report.
1
2
VeriTracks Users Manual
34 Satellite Tracking Of People
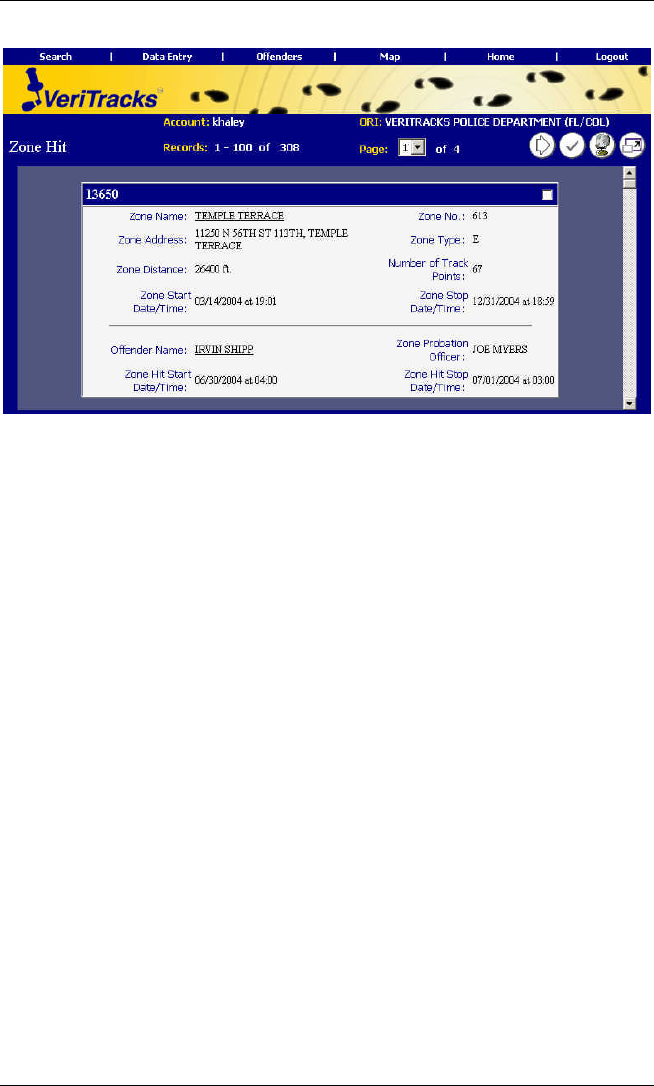
From the above report you are provided with information about the Zone(s) and
any associated Hits on those zones. You can choose to map one or more zone
hits from this report by simply selecting the individual zone hit note cards, or all
of them, and then clicking on the Map Selected Records button.
Below is an explanation of how to effectively use this report:
1. Zone Hit Number: The VeriTracks hit engine automatically assigns
a unique number to each hit returned. This number is displayed on the
top left hand corner of each note card. This number can be used in
future searches for ease of re-retrieving records.
2. Zone Information: This section on the note card provides the details
about the Zone.
3. Zone Name Hyperlink: This link opens up the zone report (see
above) for this zone with detailed information about the zone.
4. Offender Information: This section on the note card provides the
details about the offender, whose tracks violated the zone, thus causing
the Hit.
5. Offender Name Hyperlink: This link opens up the offender details
report (see above).

VeriTracks Users Manual
Satellite Tracking Of People 35
Chapter 7: Administration
VeriTracks provides the ability for users to administer their own account
information, to select the types of notifications they would like to receive, and
an additional place to go to create zones. A section under Administration was
also included for smaller agencies to be able to input their own crime incident
data when they do not have a system currently in place for this purpose.
Incident
The Incident Data Entry option is available for smaller law enforcement
agencies that do not have an automated Crime Incident entry system already in
place, like a CAD system or RMS. Electronic formatting of data is required in
order to feed the data into VeriTracks. This function will not be used by most
agencies.
Incident data is entered on three screens. The first screen is the Incident Entry
screen. Once the Incident data is entered and the incident record is added,
offense and suspect information can be added as well.
Incident Data:
Agency Incident Number The Agency Incident Number is assigned by
the ORI or Agency, which may be the same
as the Agency Case Number.
Start/Stop Date & Time The Start and Stop Date and Time of the
Crime Incident as reported.
Street No The Incident Address Street Number.
Street Name The Incident Address Street Name.
Cross Street Name The Incident Address Cross Street Name, if
any.
City The Incident Address City Name.
Zip Code The Incident Address Zip Code.
Latitude The Incident Address Latitude.
VeriTracks Users Manual
36 Satellite Tracking Of People
Longitude The Incident Address Longitude.
Geocode Click on this button to produce the Latitude
and Longitude coordinates from the address
entered. The address MUST be able to
produce Latitude and Longitude in order for
you to be able to map the address. HINT: if
the Geocode does not work, try using an
address of a neighboring building or home
and adjust your zone definition
appropriately.
Primary Offense Select form the list of Primary Offenses that
define the Crime Incident.
Disposition The current Disposition of the Crime
Incident.
Agency Case No. The Agency Case Number is assigned by the
ORI or Agency, which may be the same as
the Agency Incident Number.
Cleared Exceptionally Select from the list of Cleared criteria.
Responding Officer Name The Officer that Responds to the Crime
Incident Call.
Cleared Date The date the Incident was Exceptionally
Cleared.
After entering information about the Crime Incident you will click on the Add
button. Once you have added the incident information into VeriTracks, you
may then add additional information.
Click on the Add Offense link at the bottom of the Incident Entry page and
enter any or all of the following information:
Offense Data:
UCR Offense Code Select the UCR Offense Code from the
drop-down listing.

VeriTracks Users Manual
Satellite Tracking Of People 37
Offense Attempted/Completed Select whether the offense was
attempted but not completed or actually
completed from the drop-down listing.
Suspect Used Select from the listing any items the suspect
used while committing the offense.
Bias Motivation Select from the drop-down listing any Bias
Motivation.
Location Type Select from the drop-down listing the
Location Type.
Number of Premises Entered Enter the Number of Premises Entered.
Method of Entry Select from the drop-down listing the
Method of Entry.
Type of Weapon Force Involved Select from the listing any weapons
that were used while committing this
offenses.
Crime Act Type Select from the listing the Crime Act
Type(s).
Gang Related Type Select from the listing if there was any Gang
Related Type involved with this offense.
After entering information about the Crime Incident and Offense information,
you will click on the Add button. You may also have information to enter about
the Suspect. Return to the incident by navigating back to the Data Entry=>
Incident=> Select the Incident from the drop down listing. Click on the Add
Suspect link at the bottom of the Incident Entry page and enter any or all of the
following information:
Suspect Data:
Age of Suspect Enter the age of the suspect.
Sex of Suspect Select the gender of the suspect from the
drop-down listing.
Race of Suspect Select the race of the suspect from the drop-
down listing.
Zone
Zones are created as a useful way to better track offender movements. You will
be notified when an offender violates a zone that has been assigned to them.

VeriTracks Users Manual
38 Satellite Tracking Of People
There are two types of zones: Inclusion or Exclusion; and three types of
monitoring for zones: Active, Passive, or Global.
Inclusion zones are created to define an area in which on offender needs to
remain. For example, if they are confined to only their home and work, zones
can be created around each location, including the specific times the zone is
effective. You can then monitor when an offender leaves their assigned zones.
Exclusion zones are created to define an area(s) where an offender should not
be. For example, an offender has been ordered to stay clear of their former
spouses home. A zone can be set up around that home, assigned specifically to
that offender, and activated at all times. When the offender enters into this zone,
this will produce a violation.
The following are the steps necessary to create a zone:
1. There are two ways to access the zone menu, either by mousing over the
Offender or the Data Entry menu options and selecting Zone. You can
create a new zone or select one that you have previously created.
2. Click on Add New Zone to begin the process for creating a new zone.
3. Complete the Zone Entry fields as follows:
Zone Name Name your zone. Be sure to use a specific
name that is meaningful to you. Each
organization may want to come up with a
naming schema.
Street No The Zone Address Street Number.
Street Name The Zone Address Street Name.
Cross Street Name The Zone Address Cross Street Name, if
any.
City The Zone Address City Name.
Zip Code The Zone Address Zip Code.
Latitude The Zone Address Latitude.
Longitude The Zone Address Longitude.
Geocode Click on this button to produce the Latitude
and Longitude coordinates from the address
entered. The address MUST be able to
produce Latitude and Longitude in order for
you to be able to map the address. HINT: if
the Geocode does not work, try using an

VeriTracks Users Manual
Satellite Tracking Of People 39
address of a neighboring building or home
and adjust your zone definition
appropriately.
Buffer Distance Enter in Feet, Yards, and/or Miles the buffer
distance for the zone.
Exclusion/Inclusion Select if this is to be an Exclusion or
Inclusion Zone.
Start/Stop Dates Enter or select the Start and Stop Dates from
the calendar pop-up for the zone.
Offender Name-DC No Enter or select the Offender Name(s) from
the clipboard pop-up that this zone will be
assigned to.
Schedule The zone will be effective during specific
times. You can set-up the zone schedule
from here by selecting times for each day,
selecting everything when the zone applies
all the time, or use the smart select to
specify periods of time across each day.
Reset/Add Select the Reset button to start your zone
entry again. Select the Add button to add
the new zone.
Preferences
There are two types of users defined within VeriTracks: Law Enforcement
Officers/Crime Analysts and Supervising Officers/Probation Officers. The
Preferences menu option allows the user to modify their own account and select
the types of notifications they wish to receive from VeriTracks. In addition,
users can set up how they want their default map layers to be displayed. Each of
these options can be accessed by clicking on the appropriate folder tab.
For BOTH Law Enforcement and Probation Officers, some of your user account
information is modifiable. You DO NOT have privileges to modify your
Username, First Name, Last Name or Contact Type. The following are the
fields required to create a user account.

VeriTracks Users Manual
40 Satellite Tracking Of People
Profile
User Name The unique identifier for your user account
assigned by your agency VeriTracks
administrator.
First Name Your first name entered by your agency
VeriTracks administrator.
Last Name Your last name entered by your agency
VeriTracks administrator.
Password Your password will originally be assigned
by your agency VeriTracks administrator,
but you will be able to modify this as you
see fit.
Confirm Password You will need to type your password in two
times for verification.
User Time Zone This allows the user to set the Time Zone in
which VeriTracks should display data.
Email Each user will need to enter their email
address and keep that up-to-date in order to
receive the VeriTracks notifications.
Active Email This email address is used for the officer to
receive immediate notifications on their
offenders movements. This can be the
same email address listed above or another
one, like on your cell phone or Blackberry.
Phone Your phone number where you can be
reached.
Contact Type Your contact type is assigned to you
automatically, and cannot be modified,
depending on the type of agency you work
for, i.e., law enforcement or corrections.
The above fields are common for both types of users. Once you have updated
your user account information, you will need to click on the Update button.

VeriTracks Users Manual
Satellite Tracking Of People 41
Notifications
Law Enforcement/Crime Analysts
Law enforcement offices have fewer choices for notifications. They can only be
notified about Zone Hits and Crime Incident Hits. For Zone Hit notifications,
you can choose the notifications based on who set up the Zone. The following
information pertains to Law Enforcement/Crime Analyst users:
Zones I set up Selecting this check box will ensure
notification of any Zone Hits on Zones you
have created.
Zones my ORI or Agency set up Selecting this check box will ensure
notification of any Zone Hits on Zones
anyone in your agency has created.
Incidents reported by ORI or Agency Selecting this check box will ensure
notification of any Crimes reported by your
agency.
Supervising Officers/Probation Officers
Probation offices can be notified about Zone Hits, Incident Hits and equipment
related violations. For Zone Hit notifications, you can choose the notifications
based on who set up the Zone.
NOTE: To receive notifications based on individuals you supervise, the
probation officer MUST add the offenders they supervise to the Offender
Name-DC No listing.
Offender Name-DC No You will have to select Offender names of
those individuals you are responsible for
and/or are interested in tracking. You can
enter the names directly or select them from
the clipboard pop-up listing. These are the
individuals that will then apply to
notifications on your individuals only.
The following information pertains to Supervising Officers/Probation Officers
users:
Zones I set up Selecting this check box will ensure
notification of any Zone Hits on Zones you
have created.

VeriTracks Users Manual
42 Satellite Tracking Of People
Zones my ORI or Agency set up
Selecting this check box will ensure
notification of any Zone Hits on Zones
anyone in your ORI or Agency has created.
Zones violated by my individuals only
Selecting this check box will ensure
notification of any Zone Hits on Zones
violated by your individuals you selected
above.
Zones violated by my ORI or Agency
Selecting this check box will ensure
notification of any Zone Hits on Zones
violated by all offenders defined in your
ORI or Agency.
Incidents hit by my ORI or Agency
Selecting this check box will ensure
notification of any Incident Hits where
offenders in your ORI or Agency were near
the Incidents.
Incidents hit by my individuals only
Selecting this check box will ensure
notification of any Incident Hits where your
individual offenders were near the Incidents.
Device violations by my ORI or Agency
Selecting this check box will ensure
notification of any Device violations by any
offenders defined in your ORI or Agency.
Device violations by my individuals only
Selecting this check box will ensure
notification of any Device violations by any
of your individual offenders.
Map Preferences
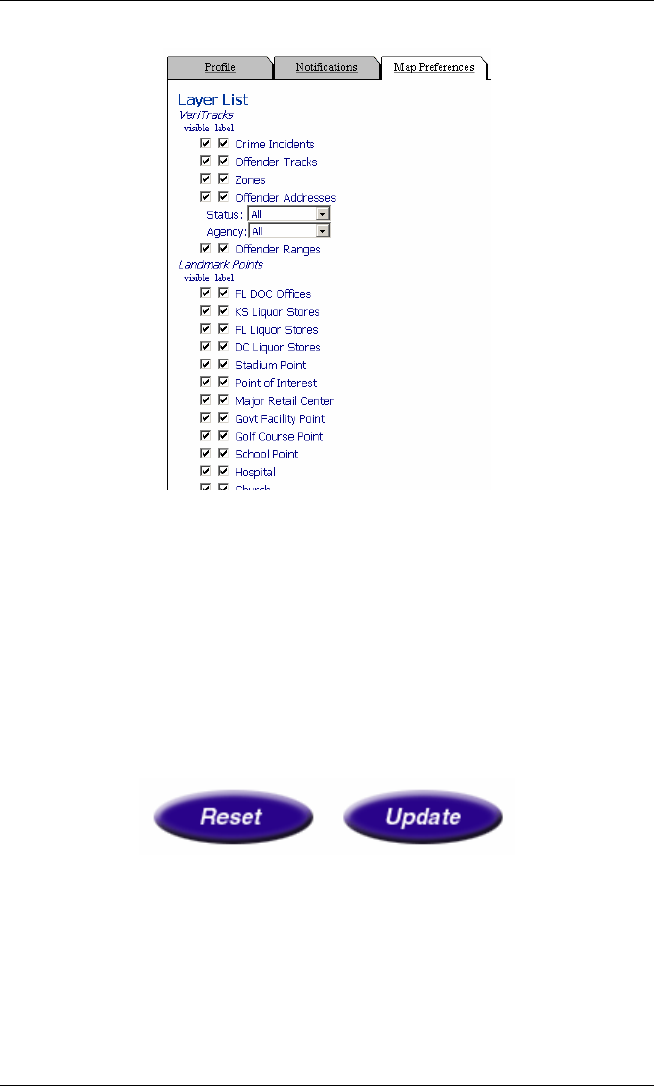
The Map Preferences tab will take you to the entire listing of map layer options.
From here you can select and deselect the layers you wish to see by default on
your maps. You can also change your defaults from the map toolbar as well.
Best practice is to change your map preferences prior to creating a map. That
way the changes are saved and take effect when you do go to create a map.
VeriTracks Users Manual
Satellite Tracking Of People 43
Each map layer list can be either visible and/or labeled. To remove the layer
completely, you need only deselect the item in the visible check box as that will
remove the option for visible and label at the same time. You can modify this
list as often as you like until you have the map layers as you would like them.
NOTE: The offender address layer has been restored to a single map layer that
can now be customized to show offender addresses by Status with "Current, Off
Monitoring, or All" options, and by Agency, with "My ORI, My Individuals, or
All" options. This enhancement removes the clutter on maps in areas dense with
extraneous addresses.
When you have finished selecting your preferences, be sure to click on the
Update button. You can also click on Reset to nullify your changes.
VeriTracks Users Manual
44 Satellite Tracking Of People
User Accounts
Each agency will have an administrator account assigned for their use in order to
manage user accounts. Administrators will be able to create users as needed and
to modify user information.
In the main menu bar of the VeriTracks Home Page place your cursor over
the Administration menu option. The administration menu will appear below.
Select the User Accounts option by clicking on the link.
You will have the option here to Create New Users or to Modify Existing User
Accounts.
Click on the Add New User option.
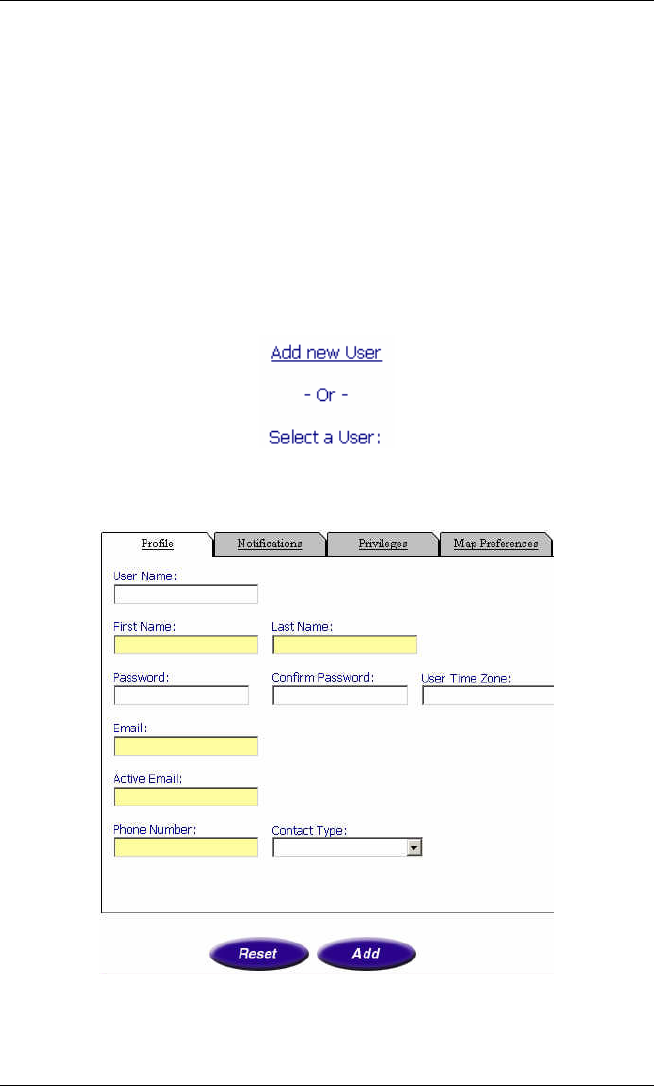
To create a new user, enter the following information:

VeriTracks Users Manual
Satellite Tracking Of People 45
User Name Assign a user name for the new account.
You may want to use your agencys
conventions for assigning user names, for
ease of use.
First and Last Name Enter the first and last name of the new user.
Password/Confirm Password Either assign a password and confirm it for
the user, or as is recommended enter an
arbitrary password (like password or
changeme) to allow the user to enter their
own preferred password once they start
using the system. Be sure to enter the
password in both places.
User Time Zone Select the time zone in which the user is
located from the drop down listing.
Email Enter the users email address. This also
can be entered by the user when they log in
for the first time. It is not a mandatory field
for account creation.
Active Email This email address is used for immediate
notification of offender movements. Users
should enter an address in where they wish
to receive these types of alerts.
Phone Number Enter the users phone number. This also
can be entered by the user when they log in
for the first time. It is not a mandatory field
for account creation.
Contact Type Select the type of user this new account will
be. There are three (3) contact types:
Crime Analyst, Data Steward, and
Probation Officer. Law Enforcement users
are classified as Crime Analysts;
Parole/Probation/Corrections users are
classified as Probation Officers; and Data
Stewards are generally users that will serve
as data entry and enrollment officers.
To complete the creation of a new user, navigate to the Privileges tab.

VeriTracks Users Manual
46 Satellite Tracking Of People
General users need to be granted Zone Configuration Privileges in order
to be able to create and edit new Hot Zones in VeriTracks.
The Incident Configuration Privileges rights allow users to enter Crime
Incident information. This feature is only used for smaller agencies who
do not already have an RMS system for Incident reporting. In addition to
selecting this privilege, the administrator for Veritracks will have to
grant access to the agency ORI.
The User Maintenance Privileges are reserved for users who will be
creating and modifying user accounts. Each agency needs to decide who
should have the rights to administer users.
The rest of the information is optional for the Administrator. It is
recommended to have users log-in to VeriTracks and navigate to
Preferences to change their own password, input their own phone number
and email address, and to select the types of notifications they wish to
receive. Users can also access their map preferences from here to change
their map layers.
Once you have entered the necessary information click on the Add
button. Click on Reset if you would like to enter the information again.

VeriTracks Users Manual
Satellite Tracking Of People 47
Chapter 8: Maps
The Map function in VeriTracks allows you to jump directly to a location on a
map. There are two ways to access this function:
First, you can mouse over the Map link on the main menu bar. This will
provide you with a drop-down box in which you can enter the address
information to be mapped.
Second, if you click on the Map link on the main menu bar, you will be
redirected to the Map Data Entry screen. Here you can enter the address
information or select from a drop-down listing of previous addresses you have
mapped.
When you have entered the address information in either location, you will need
to click on the Map button to create the map.
Map Components
The mapping functionality in VeriTracks is very robust and provides the user
with many features. The components of the maps are:
Map Area The map area is where the map and any
geographic elements and map features are
displayed.
Navigation Star The navigation star allows you to navigate
around the map by panning in any direction.
You need only click on the direction on the
star that you wish to pan your map. The
navigation star is located to the upper left
side of the map area.
Toolbar The toolbar contains tools for manipulating
data on the map. The toolbar is located to
the left of the map area.
Map Date/Time Range The Map Date/Time Range indicates the
valid time range for map features. This
information is located above the map area.
Map Scale The map scale shows the map scale at a
selected zoom level. The map scale
information is located above the map area
on the left-hand side.

VeriTracks Users Manual
48 Satellite Tracking Of People
Status Bar The status bar shows status information such
as latitude and longitude location of a point.
If you click and drag a box around some
point(s) the status bar displays distance as
well. The status bar is located under the
map area in the lower portion of the browser
window.
Map Features
The features of the maps are:
Crime Incidents The crime incidents are represented by
different colored thumbtacks, with each
color indicating the crime type.
Offender Tracks The offender tracks are represented by
different colored dots, with each color
indicating a specific mapped offender.
Zones The zones are represented by a pink
(Exclusion) or green (Inclusion) circle.
Offender Home Location The offender home locations are represented
by a black house symbol. You can add the
text for the name of the offender who lives
there as well (to be defined in the Map
Toolbar section).
Offender Work Location The offender work locations are represented
by a black factory symbol. You can add the
text for the name of the offender who lives
there as well (to be defined in the Map
Toolbar section).
Violation Display The violation display can be enabled by
selecting the Label Offender Tracks option
from the Show/Hide Layer List pop-up (to
be defined in the Map Toolbar section).
Red Circle denotes Bracelet Gone.
Red Square denotes Bracelet Strap.
Red Triangle denotes Motion with No GPS.
Green Triangle denotes Device at Rest.
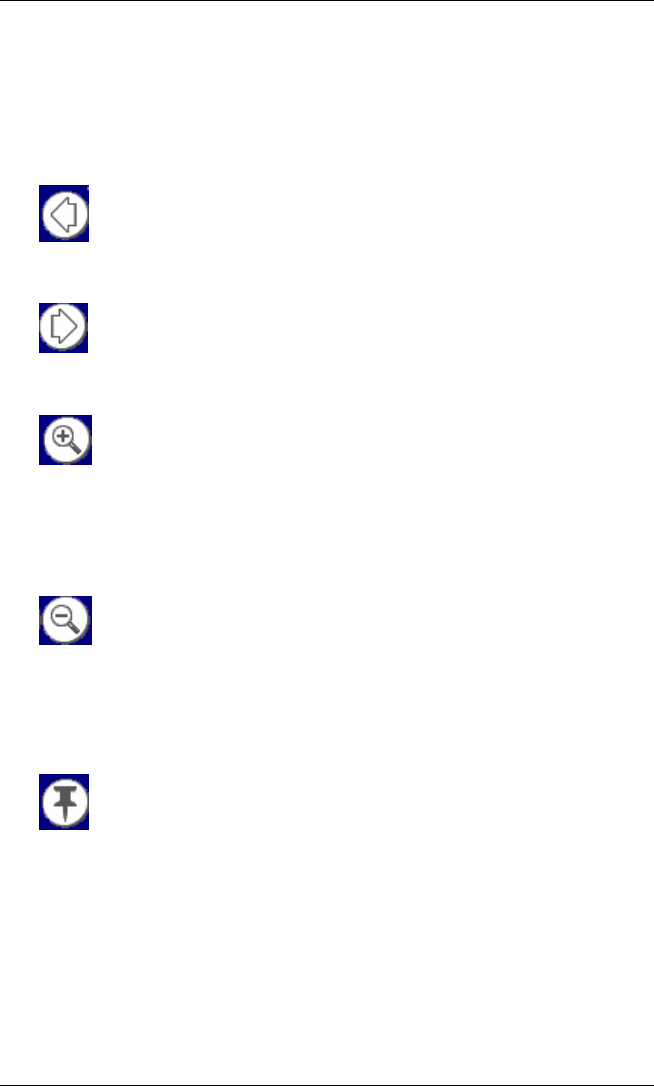
VeriTracks Users Manual
Satellite Tracking Of People 49
Green Square denotes Device in Charger.
Map Toolbar
The map toolbar contains the following functionality:
Back The back icon allows you to go to previous
maps created during your current session.
You can only go back ten maps.
Forward The forward icon allows you to go forward
to maps when using the back button to go
between previous maps.
Zoom In The zoom in icon allows you to focus in on
a selected area of the map. To use this
feature, click on the icon to zoom an overall
10% or draw a box around the desired
location on the map and then click on this
icon.
Zoom Out The zoom out icon allows you to focus in on
a selected area of the map. To use this
feature, click on the icon to zoom an overall
10% or draw a box around the desired
location on the map and then click on this
icon.
Select Incidents The select incidents icon allows you to
display incidents that occurred in a selected
area of the map. To use this feature, draw a
box around the desired location of the map
and then click the icon. NOTE: The
incidents that appear also correspond with
the defined time of the map.
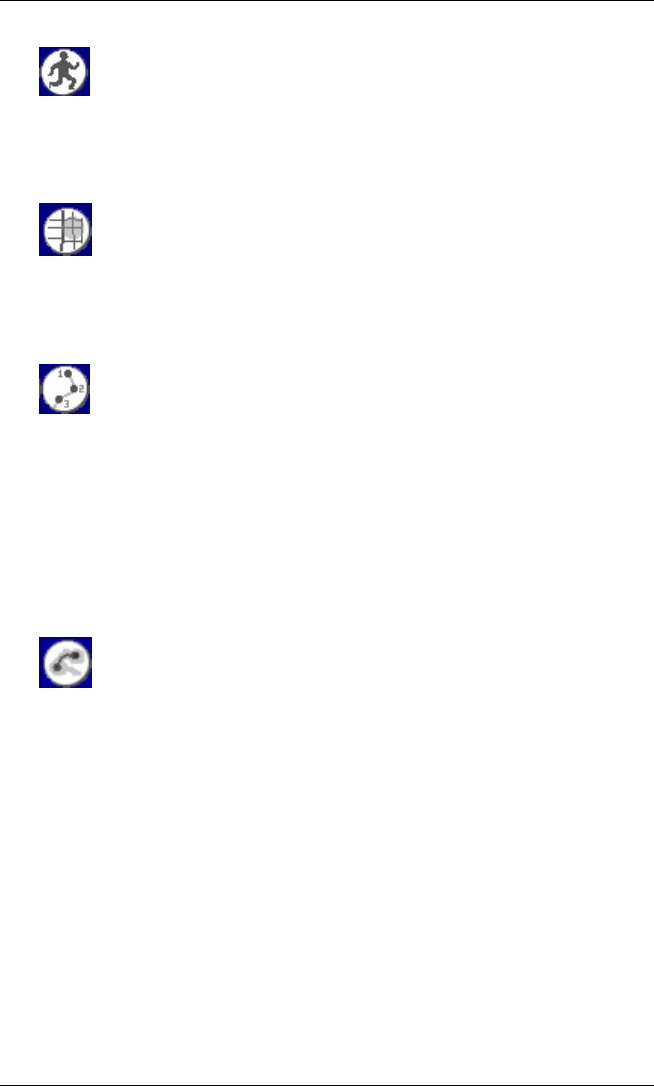
VeriTracks Users Manual
50 Satellite Tracking Of People
Select Tracks The select tracks icon allows you to display
offender tracks that occurred in a selected
area of the map. To use this feature, draw a
box around the desired location of the map
and then click the icon.
Select Zones The select zones icon allows you to display
zones that cross a selected area on the map.
To use this feature, draw a box around the
desired location of the map and then click
the icon.
Connect Track Points from Start Date/Time
The connect track points from start date/time
icon allows you to connect track points for a
selected offender, beginning with the earliest
point to fall within the date range of the
map. To use this feature, select an
offenders track on the map by drawing a
box around one track point to identify the
offender, and then select the Connect Track
Points icon.
Show Offender Range
This density layer depicts hot spots where
most of an offenders track points occur.
This layer is created for each offender from
their entire history of points stored in
VeriTracks. The result can be used to
visualize an offenders home range, which
covers where the offender has been and
highlights areas where the offender spends
most of their time. This layer will be
recalculated once per week. To use this
feature, select an offenders track on the
map by drawing a box around one track
point to identify the offender and then select
the Show Offender Range icon.
VeriTracks Users Manual
Satellite Tracking Of People 51
Identify Features The identify features icon allows you to
view a text report for selected incidents,
tracks or zones. To use this feature, draw a
box on the desired location of the map, to
include all items (i.e., offender tracks,
incident markers and offender address/work
locations) and then click the Identify
Features icon.
Show/Hide Legend The show/hide legend icon allows you to
display or hide the map legend.
Show/Hide Layer List The show/hide layer list icon allows you to
select different map layers such as
institutions, roads and water bodies to
display.
Change Date/Time Parameters
The change date/time parameters icon
allows you to specify a different date or time
range for the map. This comes in handy
when you are looking at a map that spans
multiple days and you want to narrow the
result set down to a particular time period.
Reverse Geocode The reverse geocode icon allows users to
select a point on the map and then obtain the
address for that point. To do this, click on a
location on an active map and then click on
the Reverse Geocode icon. The system will
display an estimated address for that point.
If you draw a box on the active map and
click on this icon, it will provide an address
for the closest point in the upper left hand
corner of the box.
VeriTracks Users Manual
52 Satellite Tracking Of People
Create/Edit Zone The create/edit zone icon allows the user to
set the center and radius of a zone on the
map. While you are on an active map that
you wish to create a new zone, click on the
Create/Edit Zone icon. This will place a
small blue ball onto the middle of your map.
Drag that blue ball to create the
circumference of the zone you wish to
create. Then move the center green ball to
the location of the zone (it does not have to
be exactly the center of the map).
Playback Tracks The playback tracks icon allows the user to
view the movement from one track point to
the next from the earliest point on map. To
use this feature, from an active map that
contains offender tracks (can include
multiple offenders), click on the Playback
Tracks icon. This will regenerate the map
for you and add a new tool bar at the top of
the map. You can move through the
offender tracks by using the VCR-like
buttons for playing, stepping through,
stepping back and pausing.
In addition, the bar can be dragged to allow
you to control the movement of the tracks.
When tracking a single offender, the
playback symbol is a green dot with a blue
trail depicting the previous five track points.
If your offenders tracks move off of the
current map, the map will automatically pan
and resume playback once it refreshes.
Print Map The print map icon opens a new window
containing the map with a legend of the
Offender Tracks that can be printed by the
user.

VeriTracks Users Manual
Satellite Tracking Of People 53
Re-center Map The recenter map icon allows you to select a
point or area on the map by clicking the spot
with your mouse or drawing a box around
the area and clicking on the recenter map
icon to re-center the map to that point or
area.
USGS Imagery As a demonstration of the power of aerial
photography to orient the user to the relative
map scale and provide a source of ground
truth, we have linked the USGS imagery
available on Microsoft's TerraServer
beneath the VeriTracks maps. Toggle
between the map and the imager by clicking
the camera button that has been added at the
bottom of the map navigation tools.

VeriTracks Users Manual
54 Satellite Tracking Of People
Best Practices When Working With Maps
Construct small searches to maximize performance and keep your map results
legible.
·Use the search pages to restrict your results to specific parameters such
as primary offense, UCR code or ORI or Agency.
·Limit the date range you are using, whenever possible. Wide date
ranges for tracks and incidents may turn up false positives on the
map.
·Use the zoom in icon to access greater detail on a specific location of
the map.
·If you receive a warning message that your box encompasses too large
an area, stop the search and draw a smaller box.
If you make a mistake in sizing the map, use the back icon on the tool bar to
return to your previous map.
Do not use the Back button on your browser when working with the map report.
If you need to rebuild your map from your text report page, use the Last Results
link under Search on the main menu.

VeriTracks Users Manual
Satellite Tracking Of People 55
Chapter 9: Training Exercises
The following sections will detail, using exercises, how to use the Veritracks
system. In order to get the most out of using the Training Site, please follow
along with the examples.
Exercise 1 Registering an Offender
The first step in using the VeriTracks system is to your register your offenders
and assign devices. Your organization has decided to use the BluTag® device
for tracking purposes.
1. Access the VeriTracks website: https://demo.veritracks.com
2. Enter your User Name and Password then click on the Login button.
3. Once the system validates your account information, you will be
directed to the Home Page. From here you have all of the
VeriTracks menu options available for your use. You will need to
navigate to the Supervision menu option.
4. Mouse over the Supervision link and select Enrollment.Select the
Enroll New Offender link. Enter information as necessary to enroll a
new offender. The following is an example. (NOTE: if you are going
to assign PTU devices to training attendees, enter their information into
the system):
Profile:
a. Offender ID Number VT12345
b. SSN 123-45-6789
c. *First Name Edgar
d. *Last Name Poe
e. Height 6
f. Weight 206
g. Hair Color Brown
h. Eye Color Green
i. Gender Male
j. Race - White

VeriTracks Users Manual
56 Satellite Tracking Of People
k. Birth Date 01/12/1976
l. Probation Officer Choose from the list
m. Supervision Type Choose from the list
n. Supervision Office Choose from the list
o. Supervision Begin Date Select todays date
p. Supervision End Date Select an end date
q. Prior Offenses Select from the list
r. Sex Offender Click the check box if the offender is a sec
offender
Addresses:
Home Information:
s. Street Number 123
t. Street Name Main St., Apt. 106
u. City, State, Zip Fairfax, VA 22030
v. Phone Number (703) 555-7676
Work Information:
w. Street Number 678
x. Street Name Carmichael Ave.
y. City, State, Zip Fairfax, VA 22030
z. Phone Number (703) 555-9393
Tracking Device: Click on the Modify Device Assigned link to
assign a device to your new offender.
aa. Devices Select the device you wish to assign to this new
offender from the drop-down listing.
bb. Device Default Configurations Select the device template
you wish to apply to the device for use by your new offender.
Zones: Click on the Modify Zones Assigned link to assign zones to
your new offender.
cc. Available Zones Select a zone or zones from the list on the
right that you wish to apply to your new offender.

VeriTracks Users Manual
Satellite Tracking Of People 57
dd. Selected Active Zones for Offender To add zones for
Active monitoring, select the zone from the list on the left and
click on the right arrow button to add it to your active zones
list.
ee. Selected Passive Zones for Offender To add zones for
Passive monitoring, select the zone from the list on the left
and click on the right arrow button to add it to your passive
zones list.
Click on the Add button at the bottom of the screen to save the
information for your new offender. If you wish to start over and enter
in new information, click on the Reset button to clear all data entered.
Exercise 1a Attach the Device
After you have completed registering the new offender, you will need to set up
the device equipment.
1. Once you have completed the registration process, you will need to
attach the BluTag®.
2. Measure the offenders ankle and select the correct size strap fro
attachment.
3. Insert the two (2) clips onto one end of the strap. The straps have
notches that will line up with the holes in the strap ends. Once you
have those in place, and clip on either side of the end of the strap, click
the strap into the BluTag® device. Prepare the second set of clips,
wrap the strap around the offenders ankle and attach the device to the
offender by clicking the second end of the strap into the BluTag®.
4. The offender is ready to go.
Exercise 2 Notifications
Probation Officers and Law Enforcement Officers will generally start their use
of the VeriTracks system by accessing their daily email notifications. As
previously defined in the Data Entry section of this guide, users have the option
to select the type(s) of notifications they wish to receive on a daily basis. This
exercise is based on several assumptions:
1. The user is defined as a Parole/Probation Officer.
2. The user has opted to receive notifications about their individual
offenders.

VeriTracks Users Manual
58 Satellite Tracking Of People
3. The user has their own account information for logging into the system.
On the training site, your instructor will give you temporary log in
information to be used with the training site.
https://training.veritracks.com
4. The user has verified that their computer access meets the minimum
specifications outlined at the beginning of this guide.
From the sample Email Notification below, you can access information from the
web about the offenders in the training database:
****************************************************************
* WILLIAM (FPC) TUCKER *
****************************************************************
DOC No.: 090821 SSN: 595-01-8361 Probation Officer: ROBERT MIXSON
https://training.veritracks.com/veritracks_offender_report.asp?offenderP
O=ROBERT
MIXSON&startDate=04/02/2002&startHours=00&startMinutes=00&stopD
ate=04/02/2002&stopHours=23&stopMinutes=59
Violation Activity Summary
None
Incident Hit Activity Summary
Primary Offense: OTHER
Agency: TALLAHASSEE POLICE DEPARTMENT
Points-Dist.: 1 -555ft.
Start/Stop: From: 04/02/2001 at 00:00 To: 04/02/2001 at 00:00
Primary Offense: BURGLARY
Agency: TALLAHASSEE POLICE DEPARTMENT

VeriTracks Users Manual
Satellite Tracking Of People 59
Points-Dist.: 1 -1958ft.
Start/Stop: From: 04/02/2001 at 04:00 To: 04/02/2001 at 04:00
Primary Offense: OTHER
Agency: TALLAHASSEE POLICE DEPARTMENT
Points-Dist.: 1 -1958.4 ft.
Start/Stop: From: 04/02/2001 at 04:00 To: 04/02/2001 at 04:00
Primary Offense: BURGLARY
Agency: TALLAHASSEE POLICE DEPARTMENT
Points-Dist.: 6 -107ft.
Start/Stop: From: 04/02/2001 at 11:36 To: 04/02/2001 at 12:36
Primary Offense: DISORDERLY CONDUCT
Agency: TALLAHASSEE POLICE DEPARTMENT
Points-Dist.: 1 -490.6ft.
Start/Stop: From: 04/02/2001 at 22:00 To: 04/02/2001 at 22:00
Zone Hit Activity Summary
None
****************************************************************
Each Offender Notification will give you information about your offenders that
are currently being tracked. The information you receive will include a
Violation Activity Summary,Incident Hit Activity Summary, and Zone Hit
Activity Summary. The notification will be based on the offenders that you
selected when updating your account under Data Entry>>Admin. You may
also receive notifications based on all offenders being tracked by your
organization, if you have selected that option.
On your daily notification you will have a link that will take you into the live
VeriTracks site. For training purposes, we will be accessing the Training Site.
When you click on the link, or enter the address into your web browser address
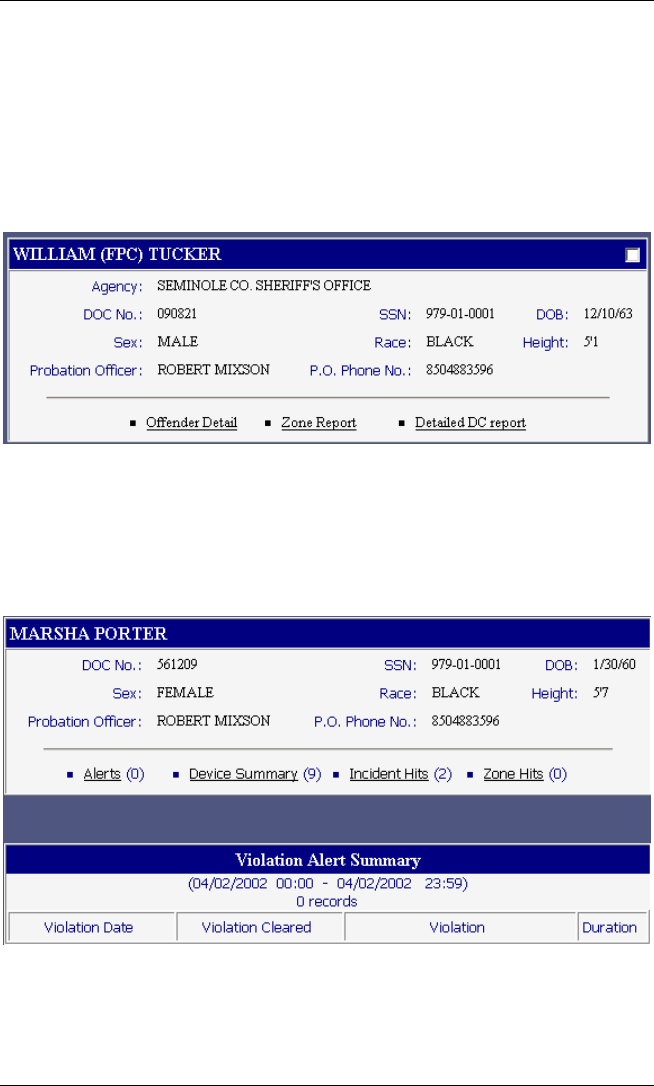
VeriTracks Users Manual
60 Satellite Tracking Of People
line, you will then be prompted to log into VeriTracks. If you are accessing
the training site, use the account information given to you by the instructor. If
you are accessing your State VeriTracks site, then use your own assigned user
name and password (which will be given to you at a later date).
Once you have logged in successfully to VeriTracks, you will be directed to
the Tracked Offender Search Results screen. Here you will see note cards for
each of your offenders (see example below):
Each card contains information about your offender, including the Agency,
Department of Corrections assigned number, personal information, and the
Probation Officer designation and their phone number.
Additionally, there are links at the bottom of each card to access information
about the offenders tracks. Click on the Offender Detail link for Marsha
Porter to access more detailed information about this offender.
The Offender Detail will allow you to look at information about your
offenders Violations, Incident and Zone Hits. Marsha, in this example, did not
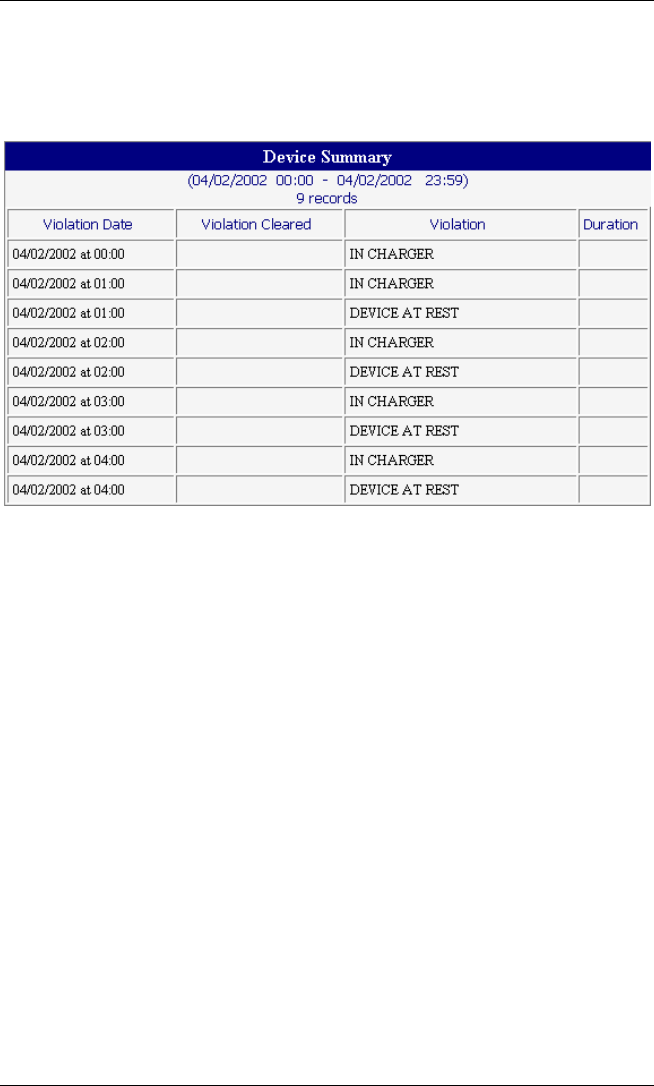
VeriTracks Users Manual
Satellite Tracking Of People 61
have any Alerts or Zone Hits. She did, however have Device Violations and
Incident Hits. To see these, click on the links:
Device Summary:
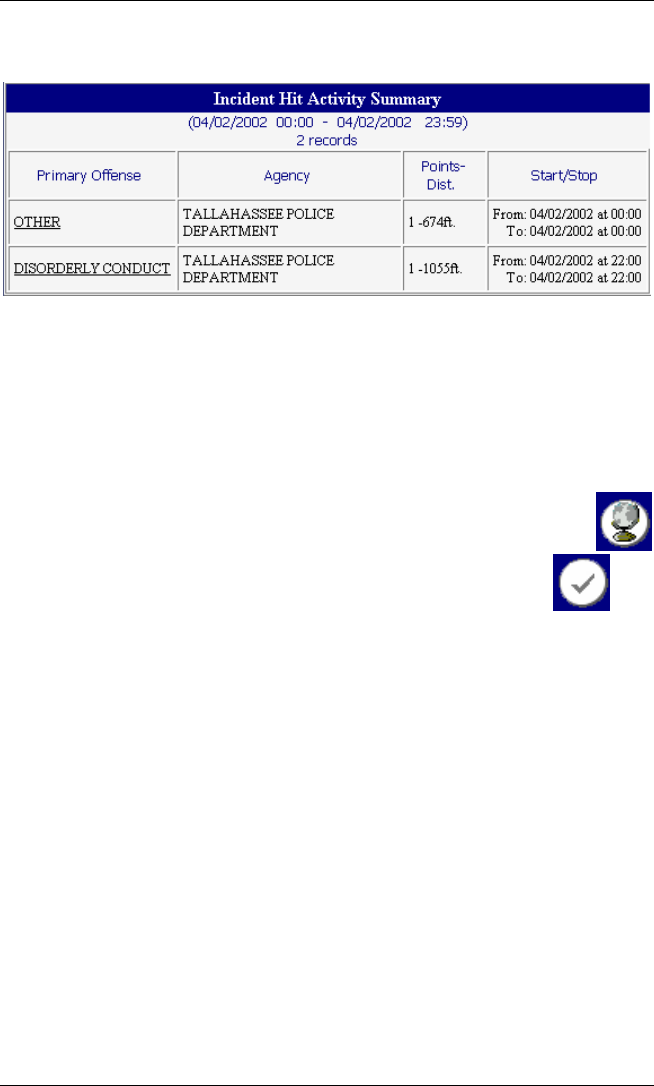
VeriTracks Users Manual
62 Satellite Tracking Of People
Incident Hits:
On the Incident Hits list, you also have access to retrieve information about each
Incident. Click on the Incident link you wish to retrieve. The Points-Dist.
indicates how many points were tracked within the vicinity of that crime
incident time and how close the closest point was to the incident.
At this point you may want to select one of the offender note cards and create a
mapping of the offender tracks. To do this:
1. Select the specific offender note card by clicking in the check box in
the top right corner of the card and then click on the Map icon.
To map all offender tracks you can select the Select All icon
and then click on the map icon.
2. Take sometime to get familiar with the map area. Refer to the Maps
section on pg. 23 for further assistance on the map features and tools.
Exercise 3 Conducting a Tracked Offender
Search
In this exercise you are going to begin to use the Search function in
VeriTracks.
Creating a Text Report
1. Navigate to the Supervision>>Search menu option. Clicking on the
Search link will take you to the search page for tracked offenders.
2. Problem: Find out what offenders supervised by probation officer
Robert Mixson were doing on 2 April 2002.

VeriTracks Users Manual
Satellite Tracking Of People 63
3. On the Tracked Offender search page, click on the Probation Officer
Clipboard Popup Box. This will display a list of all the Probation
Officers from the Training ORI or Agency.
4. Select Robert Mixson (there are 2 ways to find a name in the list: 1
use the scroll bar to navigate up and down the list; and 2 select any
name in the list and type the first letter of the name you are looking for
and you will jump to the beginning of the list starting with that letter).
Click on the Close button. This will add Robert Mixsons name to the
search page Probation Officer field.
5. The next step will be to enter the date we would like to limit our results
to. You can do this by using your keyboard to enter the date in the
Start Date field. There is a suggested formatting in the field to follow.
The other option is to click on the popup calendar. If you choose this
option, be sure to navigate to the correct year. Another helpful feature,
once you have entered the date in the Start Date field, click on your
Tab key on your keyboard and the same date will automatically
populate the Stop Date field. You can then modify it if need be to
another date for your search range. The times will automatically set to
00:00 and 23:59, to include the entire day. If your search requires only
a certain portion of the day, then you can modify the times as needed.
6. Click on the Text button to create your Text report.
7. Results: You will note that Probation Officer Robert Mixson has eight
(8) offenders being monitored on the system in April of 2002. You will
be able to look over the note cards and see who these offenders are.
This may look familiar, as the link you used from the Offender
Notification was for this information.
8. Take a few minutes here to look over the Offender cards. Look at a
few Offender Details reports and get familiar with the type of
information that you will receive on a daily basis.
9. Zone Report: Unfortunately, when the database was populated for
training purposes, the offenders had not been set-up with zones;
therefore there are no zone hits to look at. Before you leave the
training class, we will have an opportunity to look at some Zone Hits.
10. The Detailed DC Report is specific to the State using the application.
In FL this link is used to access the Department of Corrections (DOC)
public website that has a listing of all offenders currently in the DOC
system on parole and/or probation. This link can be customized for
needs of any State. For training purposes, you can access this site using
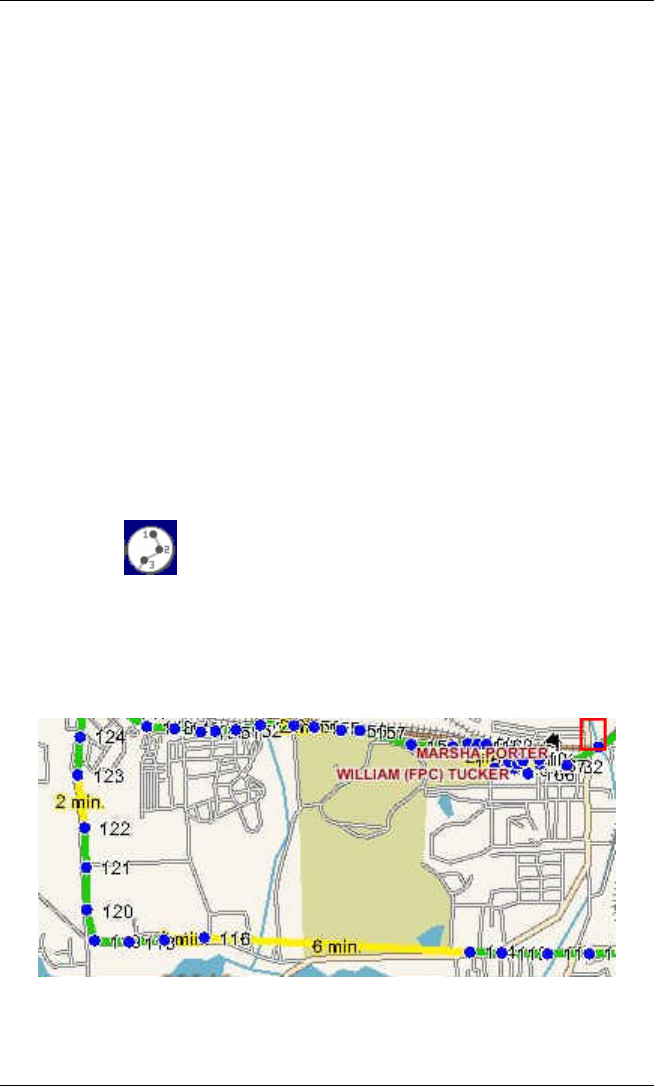
VeriTracks Users Manual
64 Satellite Tracking Of People
the links for the data contained within the training database. The
offenders are real, but may not currently be within the FL DOC.
Creating a Map Report
1. Create a map of the record for William Tucker. Select the note card for
William Tucker and click on the Map icon. View his tracks within the
map area. What does this view of the data tell you?
Track Point Details
1. Connect Track Points: As you look at an offenders tracks on the
map, there is only a small amount of data that you can obtain from just
those tracks. Questions you might have would be: Where did the
tracks originate from at the beginning of the time period in the result
set? In which direction did the offender start off and end during the
time period? How many times did an offender pass a particular
location on the map, i.e., a school, a known drug house, etc? In order
to begin looking at the activities for the offender for that time period,
you can connect their track points using the Connect Track Points
icon.
2. In order to do this you will need to drag a box around any of the track
points for that offender. Once you have selected a point, click on the
Connect Track Points icon and the points will be connected starting at
the very first track point for that time period. The points will be
numbered and connected with various colored lines.
3. These colored lines also having meaning. The line colors are Green,
Yellow and Red connecting the track points.
VeriTracks Users Manual
Satellite Tracking Of People 65
a. Green Lines denote that less than a minute has passed
between the times that those two points were recorded.
b. Yellow Lines denote that somewhere between two to ten
minutes has passed between the times that those two points
were recorded.
c. Red Lines denote that more than ten minutes has passed
between the times that those two points were recorded. This
will be listed as a violation and maybe something you would
want to check on.
Identify Features
1. Another feature to use to obtain more detailed information about your
map and the tracks, is to use the Identify Features tool. You can
simply select an area of interest on your map that contains track points
and/or incidents by dragging a box around the area using your mouse.
When you have selected the area on the map, click on the Identify
Features icon.
2. The Identify Features tool provides you with more information
specific to the tracks, in addition to Offender Address information, and
Crime Incident information. Keep in mind that the ONLY information
that comes up with this tool is information contained within the
confines of the area that you selected on the map. The reports retrieved
are the Offender Report, Offender Address, and Incident Report.
3. The Offender Report provides you with the Date, Time, Latitude,
Longitude, Speed, Direction, Status and Select Points. Now the
tracks are starting to tell a story. Not only can you tell the time a track
was actually recorded, but you can see how fast the offender was
moving and in what direction.
4. The Status lets you know if there were any violations recorded with
those tracks. The code used for Status is:
a. No-gps denotes Motion with No GPS.
b. Br-gon denotes Bracelet Gone, where the bracelet is separated
from the GPS device.
c. Br-str denotes Bracelet Strap, tampering or trying to cut the
strap off.
d. Chrg denotes the Device is in the Charger.

VeriTracks Users Manual
66 Satellite Tracking Of People
e. Rest denotes the Device is at Rest.
4. The Select Tracks radio buttons allow you to select a particular track
based on the time, direction, or speed that you are interested in, see the
corresponding track on the map, and then use the up and down arrow
keys on your keyboard to follow the tracks from that point.
5. Take a few minutes and Identify Features for various areas of the
map.
Adding Another Offenders Tracks
1. Another feature with the VeriTracks application is that you can view
more than one offenders tracks on the same map for the same time
period. This can be useful if you are interested in offenders who spend
time together or who may frequent the same locations.
2. To add another offenders tracks to your map, navigate back to
Search>>Last Result. This will bring you back to our initial text
report of offenders who are supervised by Robert Mixson. You DO
NOT want to use the Back button on your browser.
3. Select the records for William Tucker and Marsha Porter. You do this
by clicking in the check box of each offenders note card.
4. Click on the Map icon. This will map the two offenders tracks.
5. NOTE: it is important to consider the offenders that you wish to track
on the same map. If they live far apart or spend most of their time on
opposite sides of town, the map will have to zoom further out,
providing less detail, in order to be able to see both of their tracks for
that time period. Consider carefully what it is you wish to see on your
map first.
6. Your map should now contain two sets of tracks, denoted by the
different colored points.
Playback Tracks
1. The Playback Tracks tool allows users to move from one track point
to the next from the earliest point on the map.
2. From the map created in the previous instructions, the map for William
Tucker and Marsha Porter, select the Playback Tracks icon.
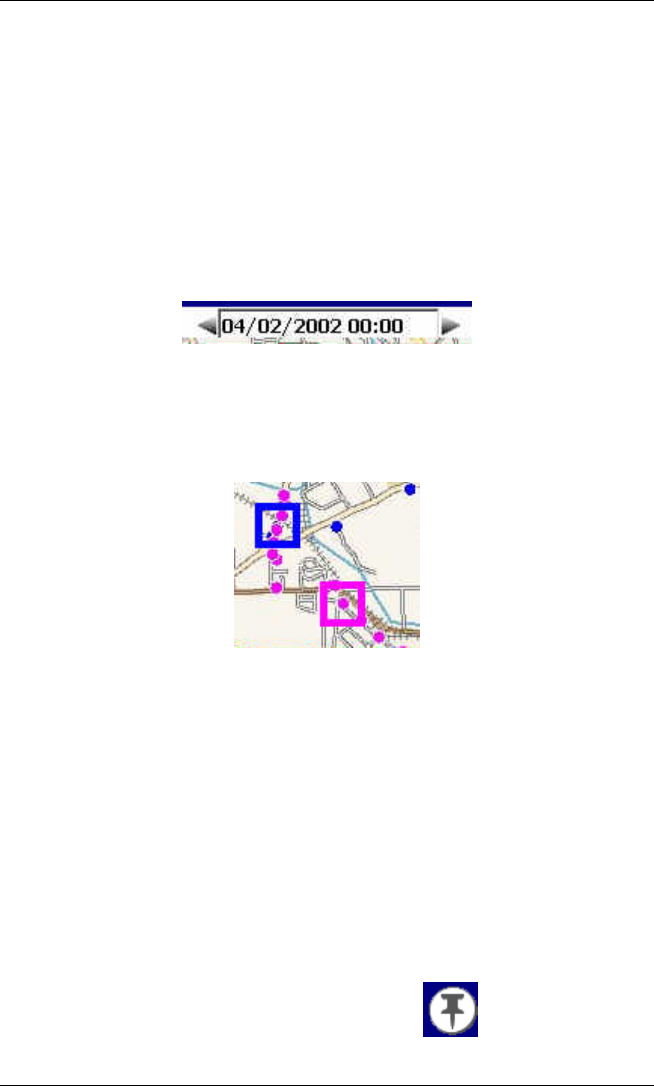
VeriTracks Users Manual
Satellite Tracking Of People 67
You do not need to select anything on the map itself to work with this
feature.
3. Once you click on the Playback Tracks icon, VeriTracks will
recreate your map. Appearance wise, it will be the same. What you
will notice that has changed is the addition of the double arrows at the
top right portion of the map. This allows you to navigate through the
various time stamps throughout the map time. When this box first
appears with the double arrows it will be empty. When you click using
your mouse on the arrow on the right, it will populate with the first
recorded time.
4. When you first click on that right arrow and start the time
advancement, the specific points on the map will be highlighted with
boxes around those track points. As you move through time, the boxes
will move around the map area to highlight where each offender was
located at each time.
5. When you have advanced through the entire time for the map, a
message will be displayed to let you know you have reached the end.
6. NOTE: You can use your mouse to click on the right arrow to advance
the time forward or the left arrow to go backwards. Once you have
clicked that right arrow the first time to get the time started, you may
also then use your right and left arrow keys on your keyboard.
7. Another question you might have while viewing tracks on a map is:
Were there any crime incidents that occurred in the vicinity of the
offenders tracks for the time period that the tracks were recorded? An
easy way to find this out is by using your mouse to draw a box around
the map area where the offender tracks are located. From there you can
select the Show Incidents icon to pull any incidents into your map.
Keep in mind that these incidents fall within the area of the box you
drew, as well as the time of the map itself.
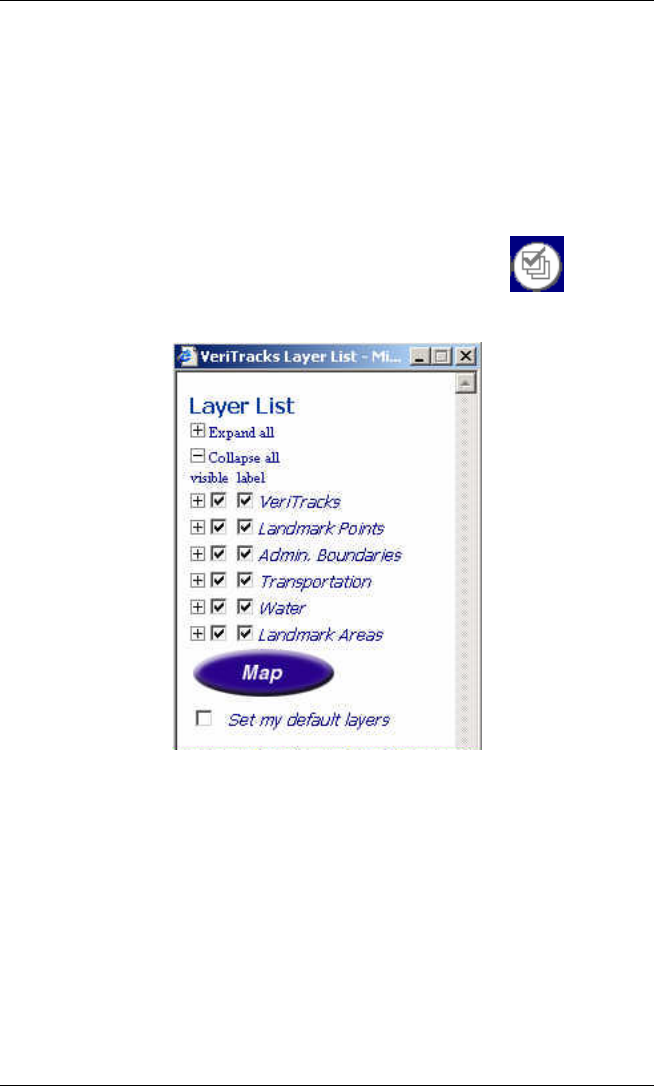
VeriTracks Users Manual
68 Satellite Tracking Of People
Map Details and Layer Lists
1. Maps are initially displayed with maximal geographic elements (i.e.,
roads, county lines) to allow users full access to map layers. You have
the option to change geographic detail to your map by turning on or off
map layers. NOTE: there will be certain map layer features that are
available only at certain zoom levels. If a map layer is grayed out that
means it is just not available at this particular zoom level.
2. Click the Show/Hide Layer List icon on the toolbar.
3. The Layer List setting box will appear.
4. Select the layers and labels you want to display. You can modify this
as often as you like to make your maps more meaningful to you. Once
you have selected your layers and labels, click on the Map button. You
may notice in the listing that there are layer categories. You also have
the option to shut off the layers under any heading by deselecting the
heading option. For example, if you do not wish to see any Landmark
Areas layers, which would include things like State and National Parks,
Airports and other items, you can simply deselect the category option
to shut off all of these layers for your current map. This will not
become a default. Also note that if the category heading is selected but
you have deselected items within the list, the default setting has
precedence.

VeriTracks Users Manual
Satellite Tracking Of People 69
5. You may also set your selections as the default layers for your future
mappings. Scroll down in the Layer List and select the check box to
Set my default layers. You can reset your default as often as you like
as well.
Exercise 4 Jump to Map Address
Users may have a need to simply map an address. There are two options for
jumping to an address on the map.
1. Move the mouse cursor over the Map main menu option without
clicking on it. This provides a drop-down box containing fields in
which you can enter the address information. When you have entered
the address information, click on the Map Address link.
2. If you click on the Map main menu option it will open an address
search page. The benefit to using this address mapping option is that
the system will store the previous addresses that you have mapped and
provide them to you in a drop-down listing to choose from. In this
manner you can retrieve maps of addresses you have previously
created.
3. For this exercise, jump on the map to an address of your choice. You
may choose which option you would like to use. NOTE: with the
mapping functionality in VeriTracks all addresses have to be able to
be Geocoded, in other words, a latitude and longitude must be obtained.
If for some reason the address you are searching for does not return a
latitude and longitude, the address cannot be mapped and the system
will tell you this. You may need to use an address of a nearby store or
home and try that instead. You can always adjust your view on the
map once you have retrieved the area.
Exercise 5 Creating Zones
There are many uses for Zones when monitoring offender movements.
VeriTracks has data entry pages that allow you to add new zones or to
update/modify existing zones.
1. To create a New Zone, navigate to the Data Entry main menu option.
From the Data Entry menu, select Zone.
2. Select the Add New Zone link to access the Zone Data Entry Page.
3. If you need to modify an existing zone, you can select the zone from
the drop-down listing.

VeriTracks Users Manual
70 Satellite Tracking Of People
4. When creating a new zone there are a number of data entry fields you
will need to fill in.
a. Zone Name Name your Zone. It is best to give your zone a
meaningful and unique name to differentiate it from other
zones created by you or others in your ORI or Agency.
b. Street Address For purposes of this exercise you can enter
any address that you would like to use for this zone. Maybe
your home or work address.
c. City/Zip Code The City and Zip Code of the address.
d. Geocode At this point you need to attempt to Geocode for
that zip code. As mentioned previously, if the system cannot
obtain a latitude and longitude for that address, you cannot use
the address for the zone. Be sure to verify your address
information.
e. Buffer Distance Enter the values for how large you want the
zone to be.
f. Exclusion or Inclusion Select what type of zone you want
this to be.
g. Start Date/End Date The dates for the zone.
h. Offenders Select the offender(s) that this zone will be
applied.
i. Time Select the times that the zone will be in effect. This
can be different or the same for multiple days. You can also
use the Select All and the Smart Select options to make it
easier to set up similar times throughout the week.
j. Lastly you need to click on the Add button. A new page will
appear indicating that the zone has been created.
k. In order to update a zone, you select the zone you wish to
update/modify from the drop-down listing. Make the
necessary changes to the zone definition and then click on the
Update button. The next page will let you know that the zone
has been updated.
5. You can also create a Map Based Zone (this could be an alternative if
you cannot Geocode a particular address). This allows the user to set
the center and radius of a zone on the map itself.

VeriTracks Users Manual
Satellite Tracking Of People 71
6. From the map (you can use the Map Address feature or use a map
from a Tracked Offender search result), select the Edit Zone icon
from the toolbar.
7. Click on the blue dot in the center of the map to adjust the radius of the
zone (NOTE: a green dot becomes the center of the zone).
8. Move the green dot to change the center of the zone.
9. Select the Edit Zone icon again to go to the zone entry page where you
need to name the zone and save it. You will also need to finish
entering the details for the zone, including the start/stop dates, the
offenders and the times.
Exercise 6 Incident Hit Search
In this exercise you will learn how to conduct a simple Incident Hit Search.
1. Problem: Find Incident Hits on THEFTS in LEON County that
occurred between 15 and 23 April 2002.
2. Select Leon from the County list box.
3. Select Thefts from the VeriTracksPrimary Offense list.
4. Enter 04/15/2002 for the Start Date and 04/23/2002 for the Stop Date.
5. Click on the Text button at the bottom of the search page to create a
text report of your results.
6. Each Hit Report (note card) describes the crime incident on the top
half of the card and the offender information on the bottom half.
7. Included on the report are the number of points in range of the incident
and the distance of the closest point.
8. Up to 100 records will be displayed per page and can be viewed by
scrolling up and down.
9. Additional pages of data can be viewed by clicking the Next Page
button (this Next Page link is not visible if there is only one page).
10. Records can also be viewed in a table by clicking on the View as Table
icon.

VeriTracks Users Manual
72 Satellite Tracking Of People
11. In table view you can sort the information on any column just by
simply clicking on the column header of the data you wish to sort on.
12. Lastly, you can view any of the Incidents on the map as well just by
selecting the Incident and clicking on the Map icon.
Exercise 7 Incident Search
You can search for Incidents in VeriTracks as well. You may want to conduct
Incident searches based on information you have received from law enforcement
officials or read in the paper. What you might be looking for is a particular
crime and you want to know if any of your offenders were in the vicinity of that
crime when it occurred.
1. Problem: Find all tracked offenders in the vicinity of a homicide in
Leon County. The homicide was reported by the Tallahassee
Police Department and has a case number of 2001-025375.
2. Select Leon from the County list box.
3. Click on the ORI or Agency clipboard popup listing. Select
FL0370300 Tallahassee Police Department. Click on the Close
button.
4. Select or type the case number 2001-015375 in the Agency Case No.
box.
5. Click on the Map button to map the incident.
6. To learn more information about the Incident you can draw a box
around the push pin icon that represents the Homicide and click on the
Identify Features icon.
7. To fully answer the question raised in this exercise, you need to find
out if any of your tracked offenders were in the vicinity of the incident
when it was reported.
8. Use your mouse again to draw a box around the push pin that
represents this incident. It should be the only one on your map. This
time, however, you may want to make the box relatively big to define
an area around the incident address.
9. Click on the Select Tracks icon to see if there were any tracked
offenders in the vicinity of this incident. Clicking on this icon
will retrieve any tracks for you of offenders that were in the vicinity
(within the box that you drew) of that incident during that incident time

VeriTracks Users Manual
Satellite Tracking Of People 73
(be sure to notice the crime incident time reported for the crime). The
tracks will come up if they fall within the confines of the area you
defined, as well as, within one-half hour before the reported crime start
time up to one-half hour after the crime stop time.
10. Be sure to use the Identify Features tool to get more information about
the crime and about the offenders whose tracks came up in the search.
11. Another way to find out who the tracks belong to is to bring up the
Legend by clicking on the Show/Hide Legend icon. This will
bring up additional information about what is contained within your
map, including the color code for incident types, the offenders whose
tracks you are looking at, and other map legend information. The
Legend list can be moved anywhere on the screen and can be moved
up and down to view the entire list.
Exercise 8 Preferences
Each user will have their own user name and password assigned to them by an
administrator. Users have the option of modifying some of their user account
information. Users should always remember to check their own account
information for accuracy.
1. Navigate to the Administration main menu option. From the drop-
down listing, select Preferences.
2. If you would like to change your password, be sure to type in your new
password in BOTH the Password and Confirm Password boxes.
3. Users need to be sure to keep an up-to-date email address in the system
in order to receive Offender Notifications and system updates and
alerts. Users may also update their phone number information.
4. You will also need to select the Offenders you wish to receive
notifications on.
5. Lastly, users need to select which notifications you wish to receive.
Please refer back to the Administration>>Preferences section of this
Users Guide for details about the notifications.

VeriTracks Users Manual
74 Satellite Tracking Of People
Index
Active Email....................................32
Administration..... iv, 7, 21, 27, 36, 65
Age of Suspect.................................29
Agency Case No ............ ..................28
Agency Incident Number .................27
Back................................................41
Bias Motivation ...............................29
bro wser set ting s ................................ 3
Buffer Distance................................31
Change Date/Time Parameters..........43
Change Device(s) Owner................20
Change Device(s) Status.................20
City........................................... 27, 30
Cleared Date....................................28
Cleared Exceptionally......................28
Command Results ..........................19
Confirm Password............... ............ .32
Connect Track Points from Start
Date/Time ...................................42
Contact Offenders..........................19
Contact Type ...................................32
Crime Act Type ...............................29
Crime incident data........................... 4
Crime Incidents ...............................40
data integration ................................. 1
Device Assignment Report .............20
Device History Report....................20
Device Status..................................18
Disposition ......................................28
Edit Zone.........................................44
Email...............................................32
Enrollment .....................................13
Exclusion/Inclusion..........................31
First Name.......................................32
Forward...........................................41
Gang Related Type ..........................29
Geocode ....................................28, 30
geo-mapping..................................... 1
Global Positioning Satellite
GPS ............................................. 1
GPRS..............................................11
GPS.............................................1, 40
GSM ...............................................11
help.................................................. 2
hit engine.......................................... 4
Home ............................................... 6
Identify Features ..............................43
Incident Data Entry..........................27
Incident Hit search ...........................23
Incident search.................................24
Inventory............................. iii, 19, 20
Last Name .......................................32
Last Position...................................19
Last Results .....................................46
Latitude.....................................27, 30

VeriTracks Users Manual
Satellite Tracking Of People 75
Location Type..................................29
Logout ............................................. 8
Longitude.................................. 28, 30
Map.iv, v, 7, 34, 39, 40, 41, 54, 56, 58,
60, 61, 62, 63, 64
Map Area ........................................39
Map Co m po nents.............................39
Map Date/Time Range .....................39
Map Features...................................40
Map Scale........................................39
Map Toolbar....................................41
Maps ...............................................39
Method of Entry...............................29
Nav igation Star................................39
Notifications....................................33
Number of Premises Entered ............29
Offender Home Location..................40
Offender Name-DC No .............. 31, 33
Offender Status...................iii, 18, 19
Offender Tracking Unit
OTU............................................. 4
Offender Tracks...............................40
Offender Work Location ..................40
Offense Attempted/Completed .........29
OTU................................................. 4
Password .........................................32
Phone ..............................................32
Playback Tracks...............................44
Preferences......................................31
Primary Offense...............................28
Print Map ........................................44
Race ................................................29
Re-center Map .................................45
Reset/Add........................................31
Responding Officer Name................28
Reverse Geo code .............................43
Schedule..........................................31
search..............................................17
Searchiii, iv, v, 7, 9, 17, 46, 52, 54, 58,
63, 64
Select Incident.................................41
Select Tracks ...................................42
Select Zone......................................42
Sex of Suspect .................................29
Show Offender Range......................42
Show/Hide Layer List ......................43
Show/Hide Legend ... ... ... ... ... ...... ... ..43
Start/Stop Date & Time....................27
Start/Sto p Dates...............................31
Status Bar........................................40
Street Name ............................... 27, 30
Street No ...... ............ ................. 27, 30
Supervision....7, 13, 14, 17, 21, 47, 48,
54
Suspect Used ...................................29
telephone s uppo rt.............................. 2
Toolbar............................................39
Tracked Offender Search..................24
Tracking Device ............ iii, 13, 15, 48
Type of Weapon Force Involved.......29
UCR Offense Code ..........................28
Username ........................................32

VeriTracks Users Manual
76 Satellite Tracking Of People
USGS Imagery.................................45
Vio latio n D isp lay.............................40
Violations .......................................19
BluTag® ...ii, iii, 1, 2, 5, 11, 12, 16, 47,
49
Zip Code .............................. ..... 27, 30
Zone Hit search................................25
Zone Name......................................30
Zone search .....................................25
Zones ... iii, iv, v, 13, 15, 16, 20, 25, 29,
33, 34, 38, 40, 48, 49, 61
Zoom In...........................................41
Zoom Out........................................41