Satellite Tracking of People DB11107 BluDrive User Manual Satellite Tracking of People
Satellite Tracking of People LLC BluDrive Satellite Tracking of People
User guide
BluDrive
User’s Guide
Version 1.02
DriveBy
FCC ID: S5EDB11107
For handheld operation this device has been tested and meets the FCC RF exposure
guidelines. The highest reported SAR value is: 0.0068(W/kg)
FCC regulatory statement for Part 15 devices -
This device complies with Part 15 of the FCC Rules. Operation is subject to the following
two conditions:
(1) This device may not cause harmful interference, and
(2) This device must accept any interference received, including interference that
may cause undesired operation.
Changes or modifications not expressly approved by the party responsible for compliance
could void the user's authority to operate this equipment.
VeriTracks™, BluTag®, BluHome™, BluDrive™ and various software icons are worldwide registered
trademarks of Satellite Tracking of People LLC (STOP).
Software and Hardware described herein has U.S. and Foreign Patents Pending.
STOP provides this publication as is without warranty of any kind, expressed or
implied, including, but not limited to, the implied warranties of merchantability or
fitness for a particular purpose.
This publication could include technical inaccuracies or typographical errors.
Changes are periodically made to the information contained herein; these changes
will be incorporated in new editions of the publication. STOP may make
improvements and/or changes to the products described in this publication at any
time.
Reproduction of this document is expressly forbidden.
© 2007 Satellite Tracking of People LLC. All rights reserved.
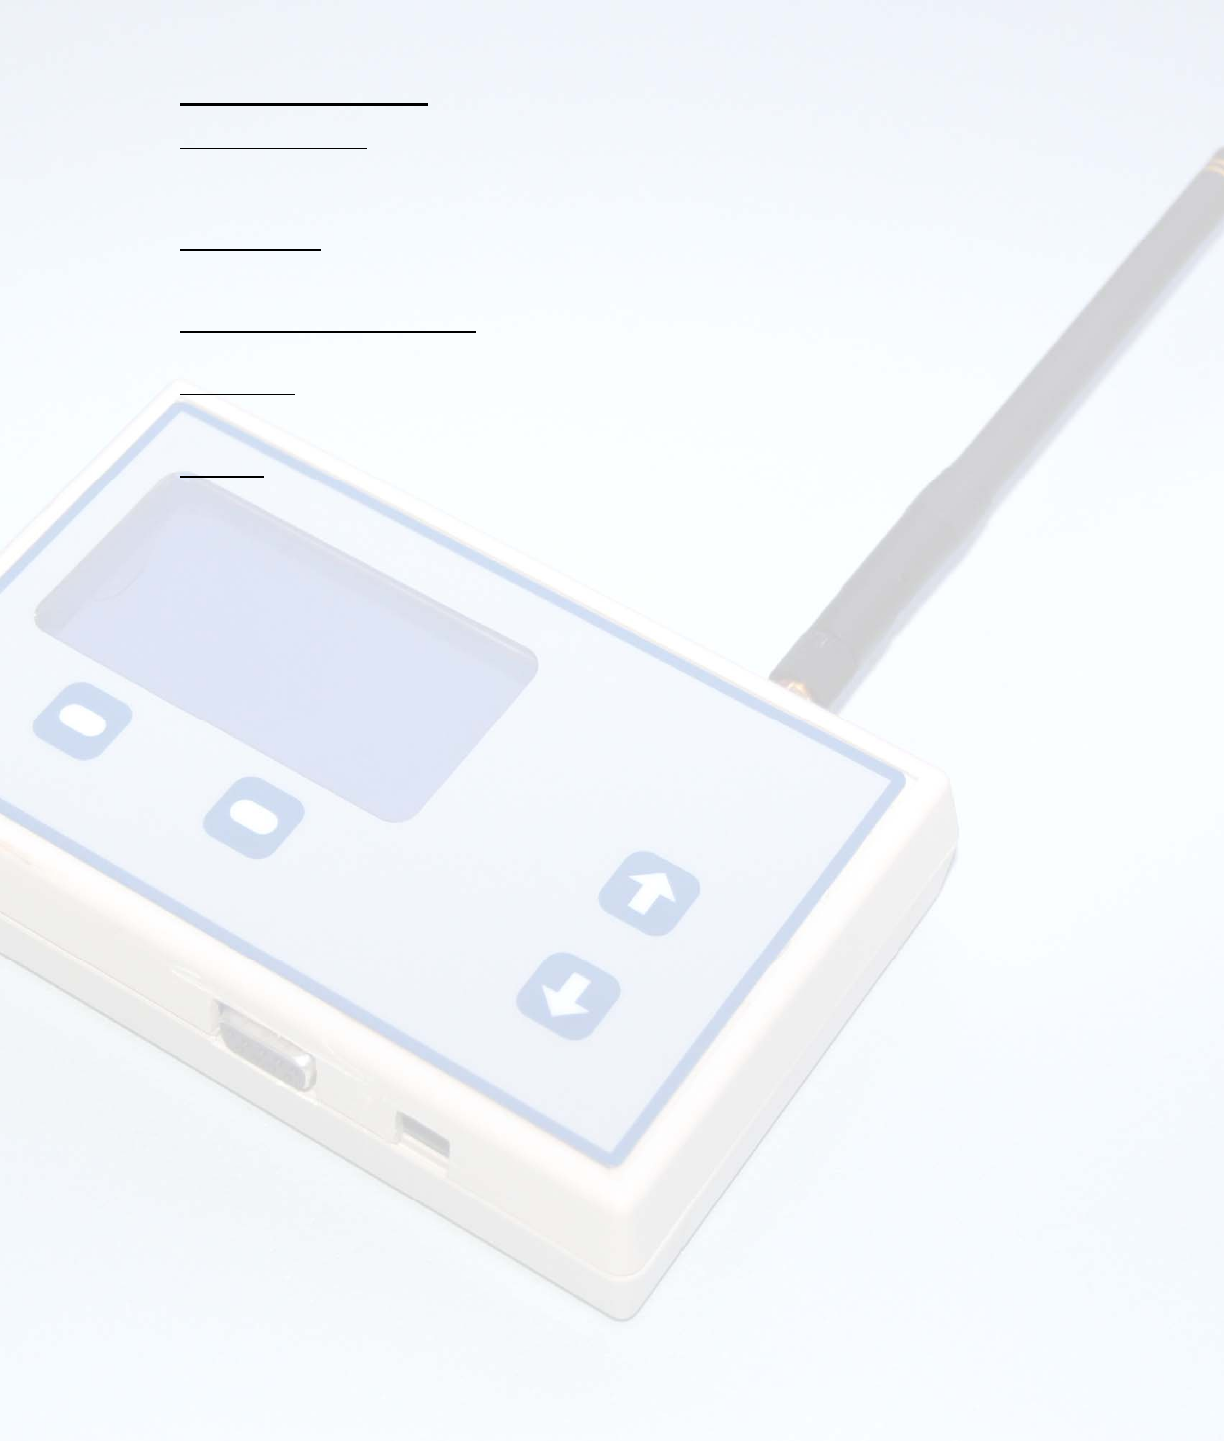
External Features
Battery and Charging
Unit is accompanied by a 12V charging device.
Estimated time to fully charge is 2 hours.
Typical battery life is 30 hours in monitoring mode.
RF Functionality
The typical RF range is 300 feet (in open unrestricted area).
Actual RF performance will vary based on environmental conditions.
Connection to Personal Computer
Requires USB to Serial cable (supplied) and installation of PC software (supplied)
Device Stand
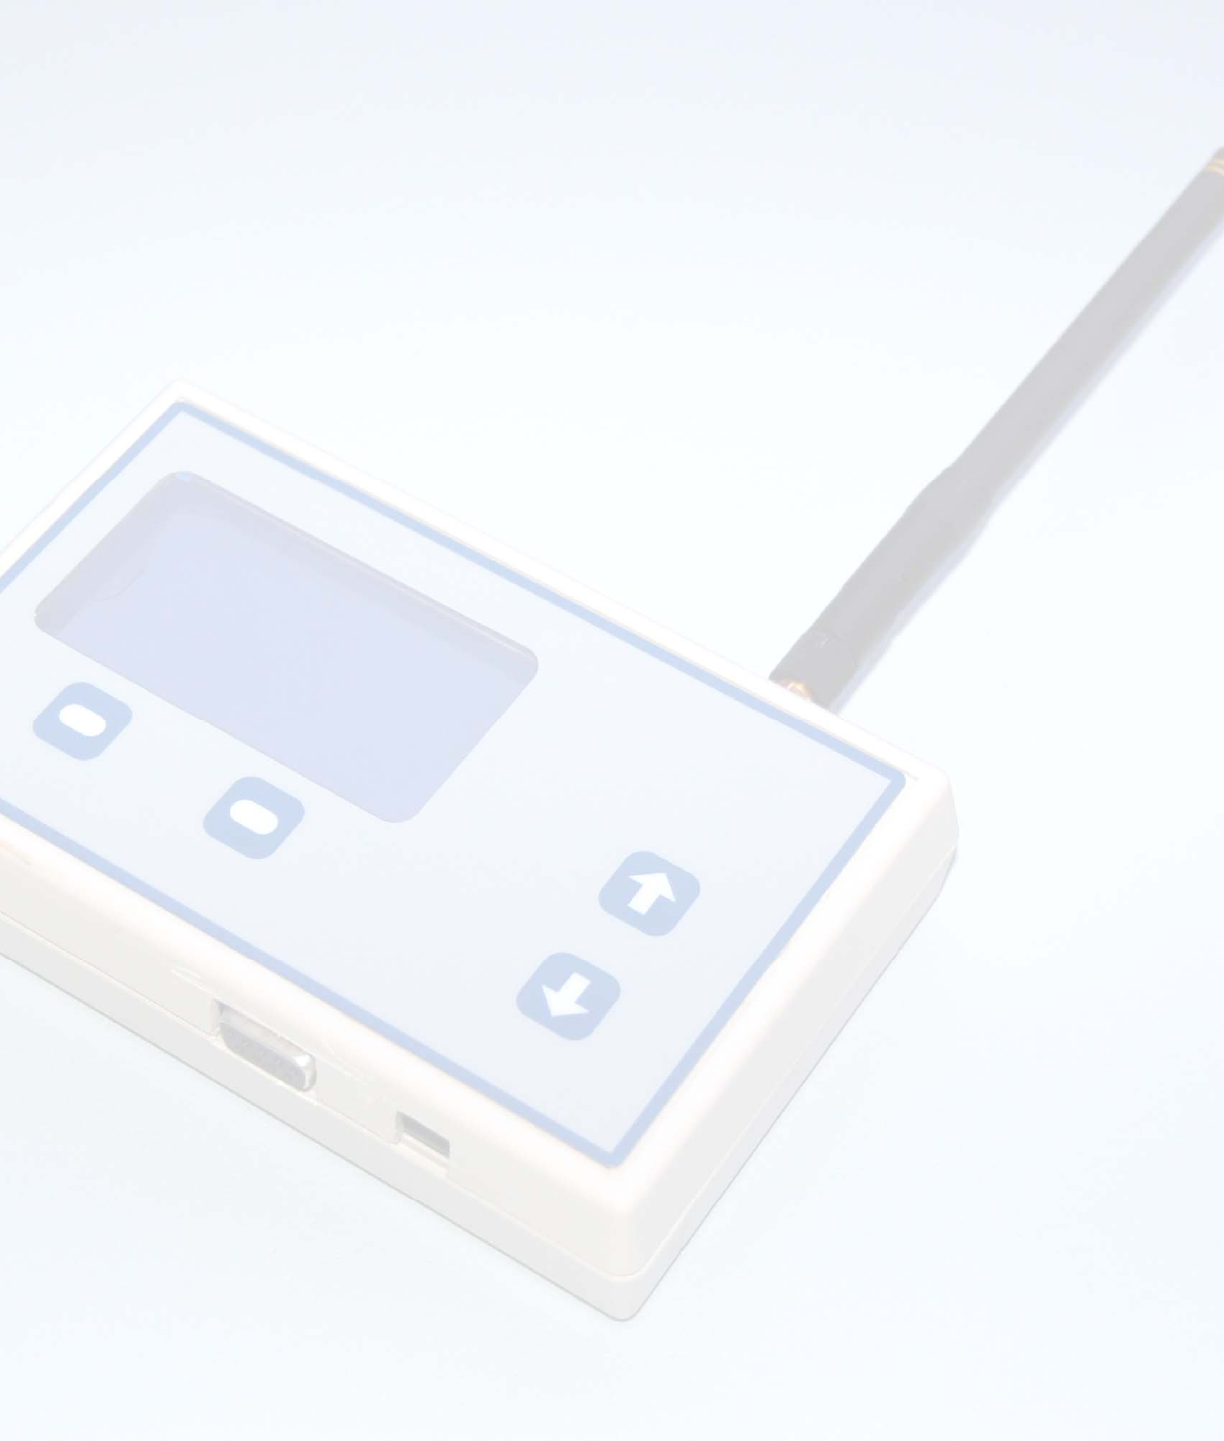
The case is designed with a stand on the back of the unit whereby the user can place the unit on a tabletop
and view data more easily. This functionality is similar to a picture frame.
Durability
The case is made of hardened plastics to accommodate a rugged work environment.
Instructions for Use
There are four main modes of operation: Standby, Monitoring, Logging and Off.
Standby:
In this mode, the RF circuitry is switched off to conserve power. The user functions are accessible
and the other operating modes are entered from here. This is the default power up mode. Upload of log data
is only available in this mode.
Monitoring:
In this mode, the RF circuitry is on and set to receive. Any broadcast from a compatible device
picked up by the unit is decoded and the information displayed. The user has a number of options including
logging the received data. Exiting this mode returns the unit to Standby.
Logging:
In this mode, the RF circuitry is on and set to receive. Any broadcast from a compatible device
picked up by the unit is decoded and the information displayed. The data is time stamped and automatically
logged. Exiting this mode returns the unit to Standby.
Off:
In this mode, the unit is put into an ultra low power state with all circuitry except the processor off. The
processor is in sleep mode to further reduce power. This mode is exited by pressing and holding the power key
for 3 seconds or applying external power. The unit returns to Standby mode. A very low battery will cause an
orderly shutdown and the Off state to be entered.
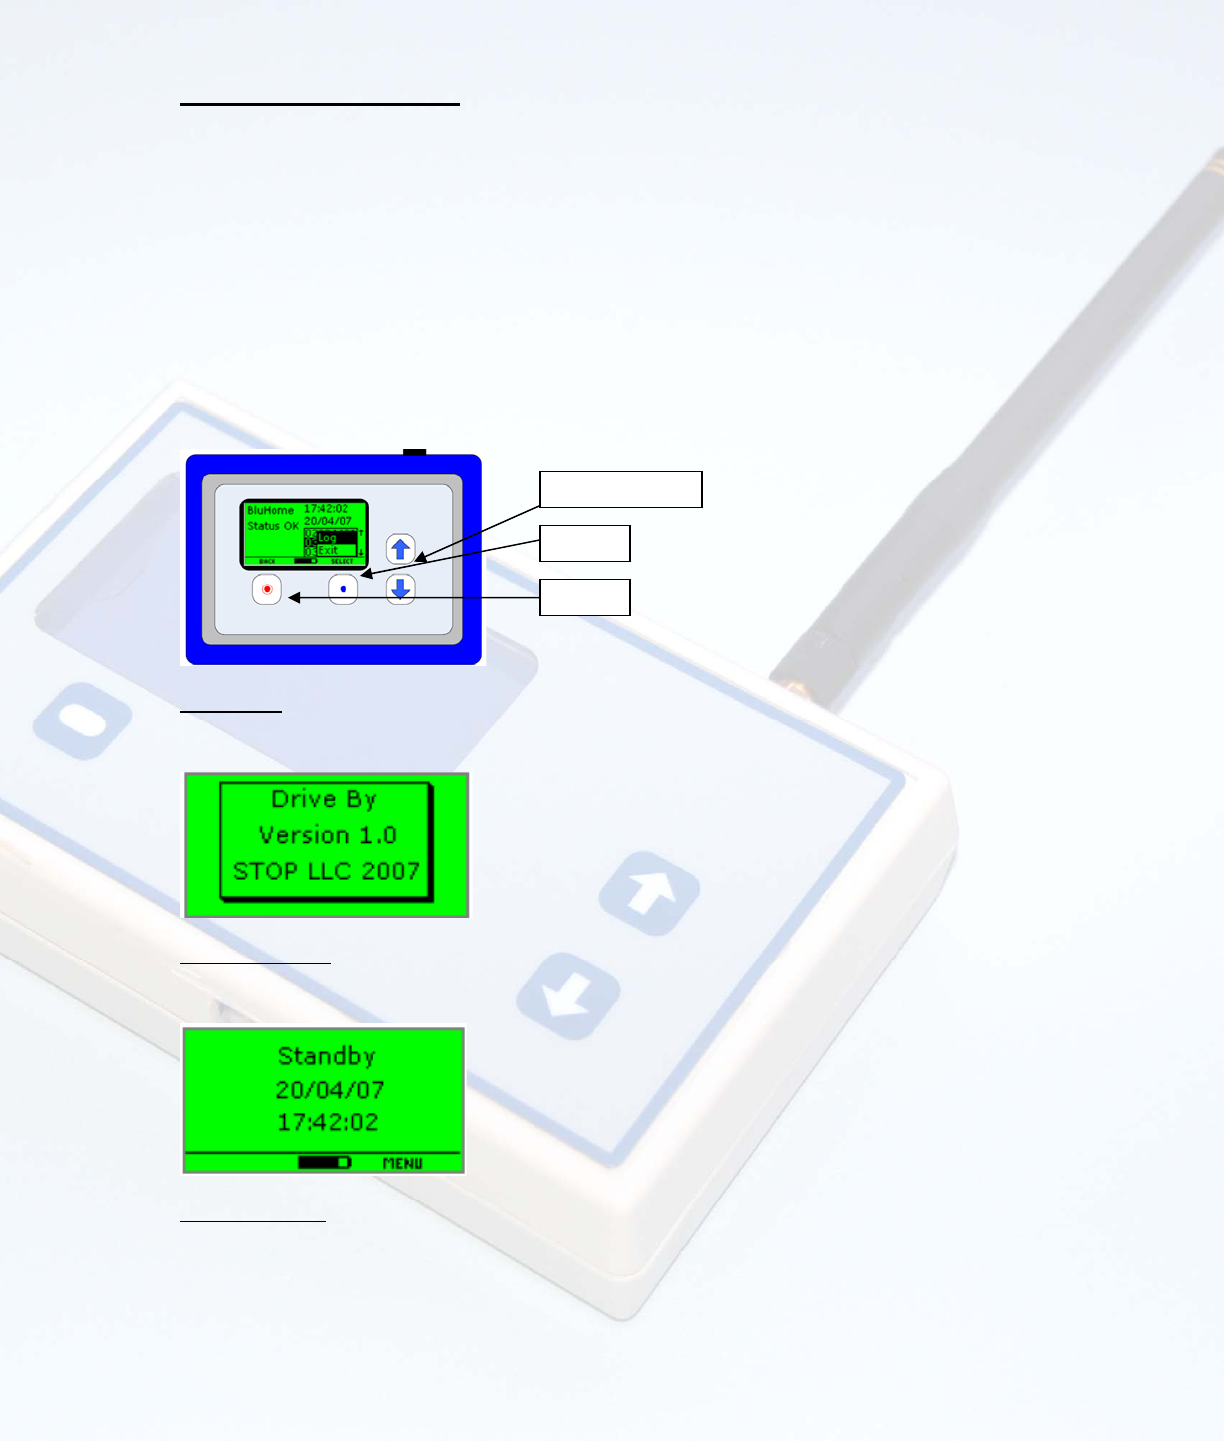
Menu
On/Of
f
Scroll Up/Down
Power Up
The unit is turned on by pressing the On/Off button and holding it down for 3 seconds. The unit will initially display the
version screen and will then enter Standby mode.
Standby Mode
The standby menu will display the current date and time. The remaining battery capacity will be indicated using the
battery level graphic at the bottom of the screen.
Menu Options
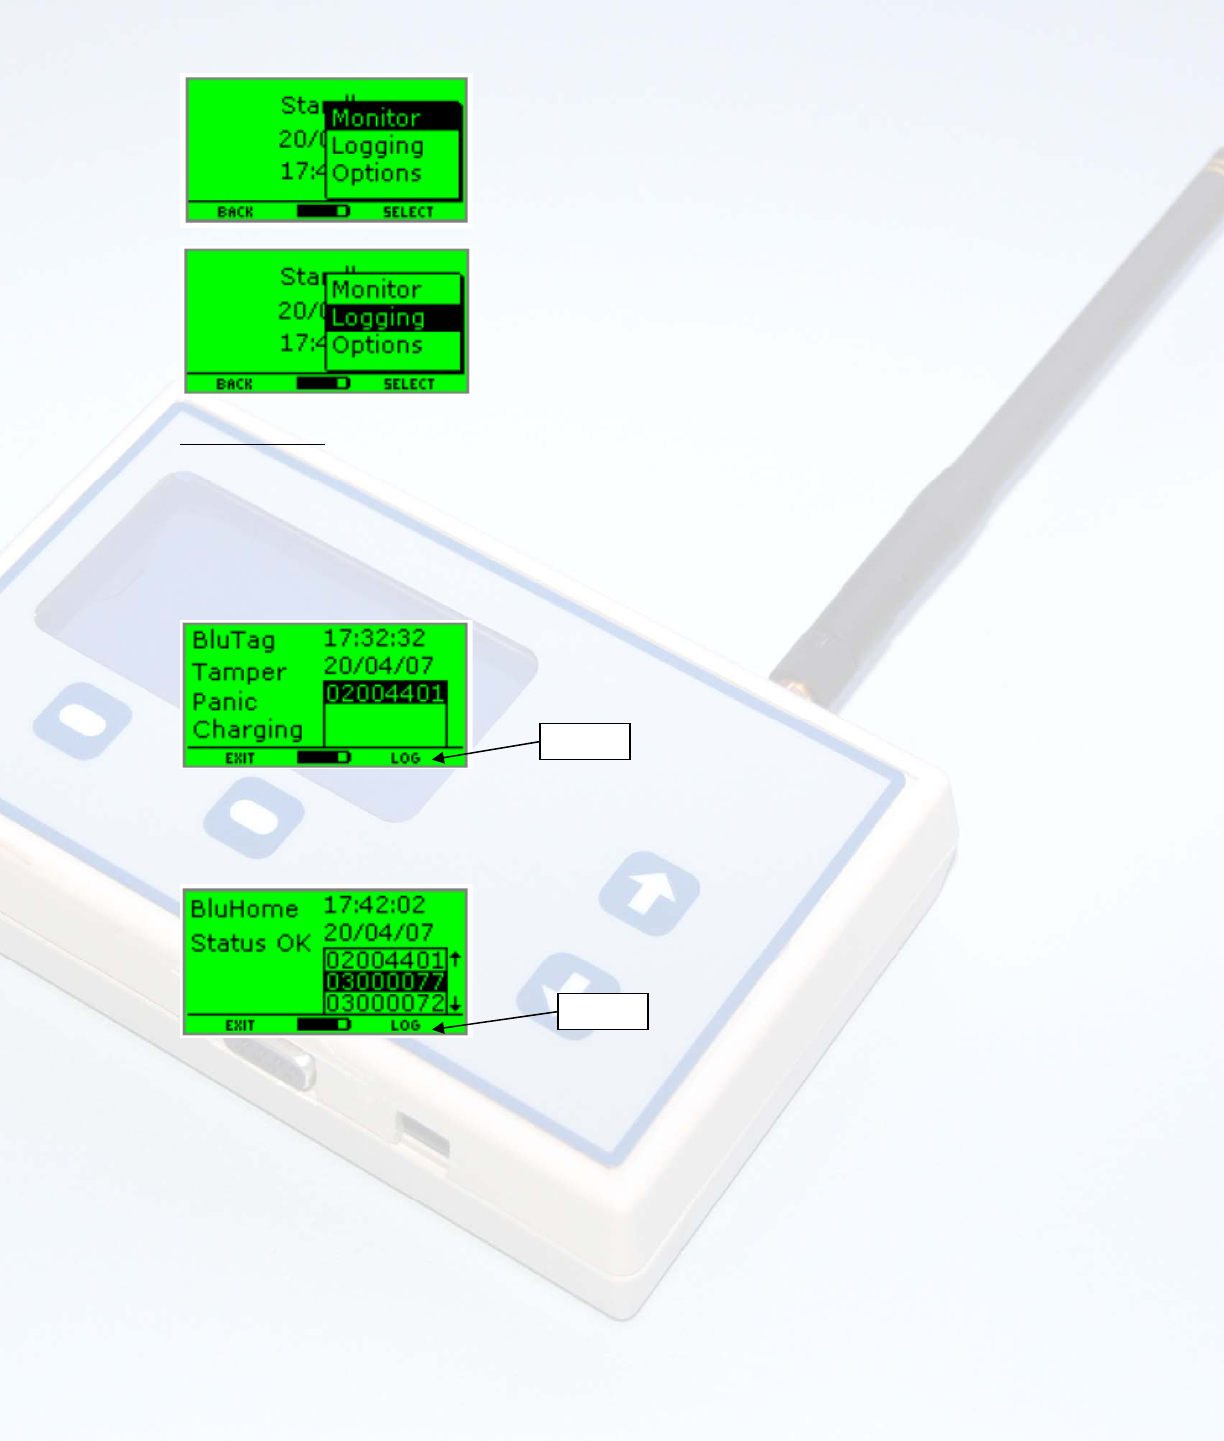
From standby mode, pressing the menu button will activate the menu options: Monitor, Logging and Options. The
desired menu item is selected using the up and down arrow keys. The current menu item will be highlighted. After
selection using the arrow key, pressing the menu key will activate the desired menu option. Navigation option s (select,
back, exit, etc.) are provided at the bottom of the screen.
Monitor Mode
This mode is entered by selecting the “Monitor” item from the Standby menu. In this mode, any broadcast from a
compatible device picked up by the unit will be decoded and the information displayed. The unit will continually listen for
RF traffic and add the ID of any received devices to the device list. The device type, time and date of last received data
and status information will be displayed for the device. If no alarm flags are active “Status OK” will be displayed.
In addition, the screen will also show an indication of RSSI (received signal strength indication) which can be used to
roughly evaluate the distance from the unit. Further, for units with software greater than 4_111, the version can also be
indicated.
Any new devices received will be added to the top of the list. The highlighted device may be changed using the up/down
arrows. The displayed information will change to match the highlighted device. If more than three devices have been
heard, the arrows at the side of the device box will indicate whether there are more devices before or after the ones
displayed.
Options
Options
The compatible devices and their alarm status messages are as follows:
Blutag:
Tamper, Low Battery, Panic, Charging
BluBox:
Power Loss, Movement, Tamper
BluHome:
Tamper
BluBand:
Tamper, Low Battery
BluFone:
Tamper
From Monitor mode, pressing the “Options” selection as shown above will open a menu that allows offers two selections:
Log Device and Send Command.
Log Device: This option will write the data for the unit selected to memory. In this case, only one record will
be written as compared to Logging mode which writes all records. The data included in this record is Device
Number, Status, Device Type, Date and Time.
Send Command: This option will allow the user to send a command from the Drive By unit to the selected
device. The following commands are available:
o Delete Log – Erases data stored related to the selected unit (use with caution).
o Set Active – Changes selected unit to active tracking.
o Set Passive – Changes selected unit to passive tracking.
o Sleep Device – Puts selected device to sleep.
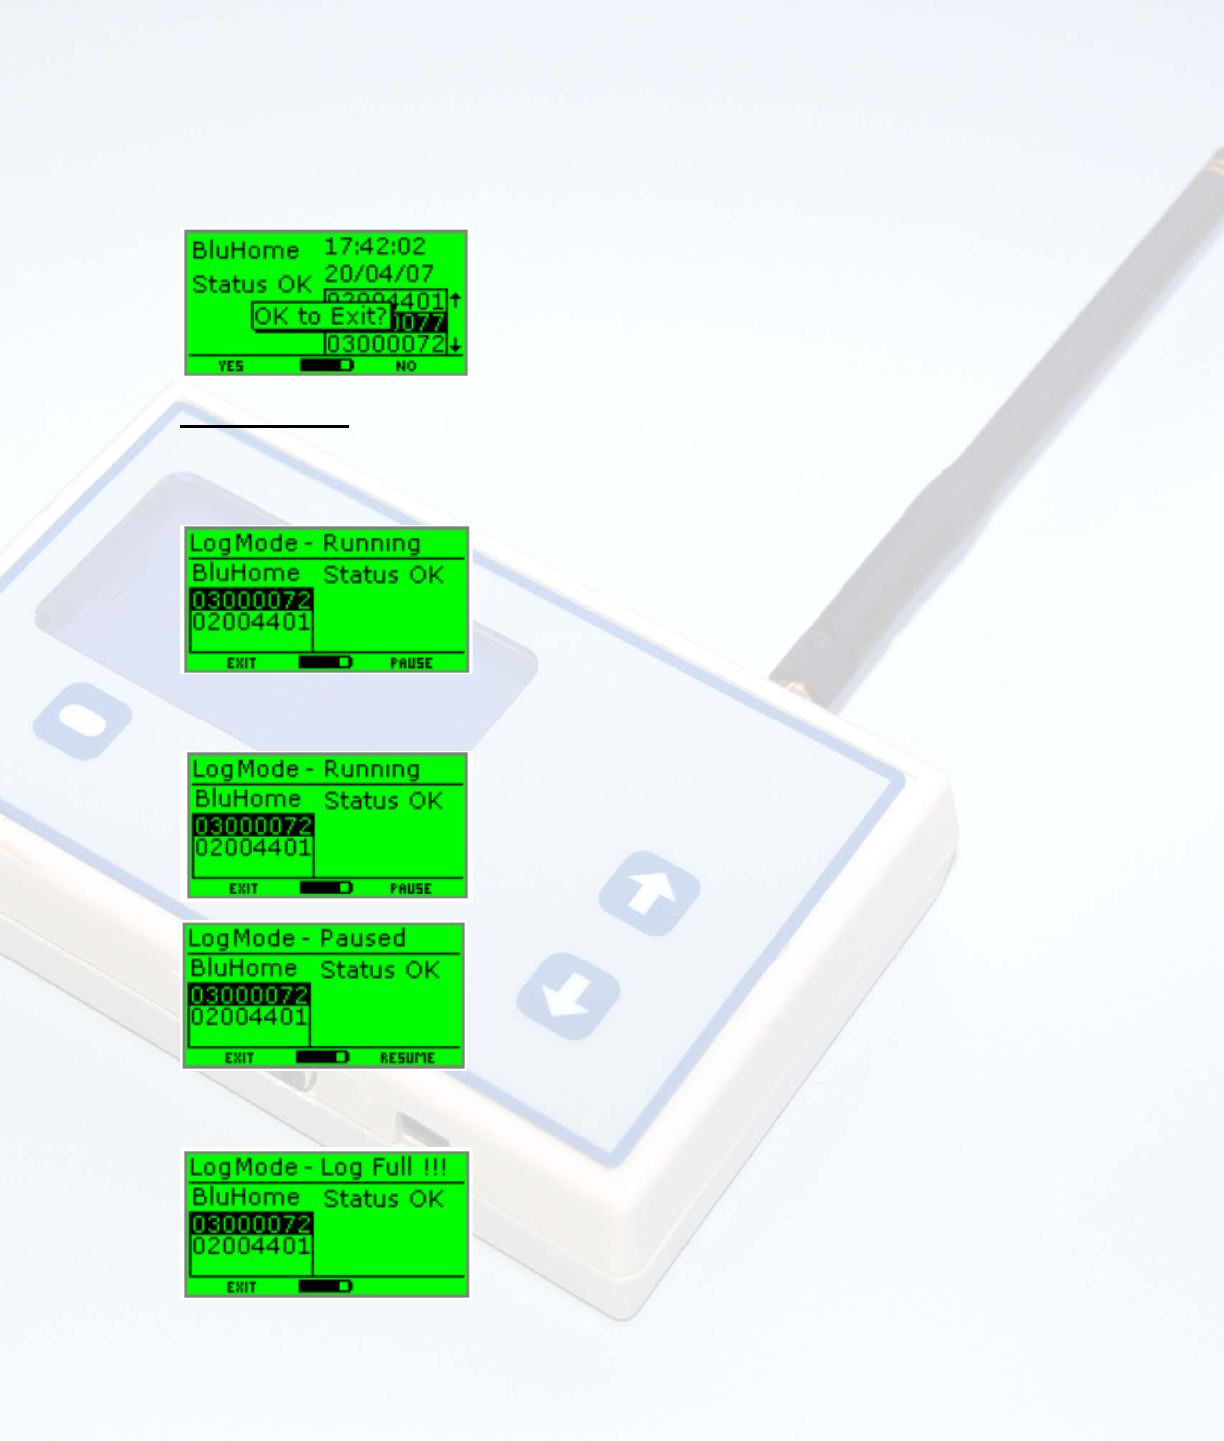
Pressing the left function key in monitoring mode will bring up the exit confirmation banner. Pressing the left function
key will cause the unit to return to standby mode. Pressing the right function key or no key presses in 5 seconds will
return operation back to monitor mode.
Logging Mode
This mode is entered by selecting the “Logging” item from the standby menu. The unit will monitor RF traffic from
compatible devices and display any received devices in the device list box. The details and status of the highlighted
device will be displayed. Any further received devices will be added to the list. The highlighted device can be changed
using the up and down keys.
If logging is running (default on entering mode), the received device, status and timestamp will be logged. Logging may
be suspended the right function key (“Pause”). Pressing the right function key again (“Resume”) will resume logging.
If the log becomes full or is full on entering logging mode, this will be indicated on the display and the buzzer will sound
briefly.
Logging mode can be exited at anytime by pressing the left hand function key. The confirmation banner will be
displayed.
Options Menu
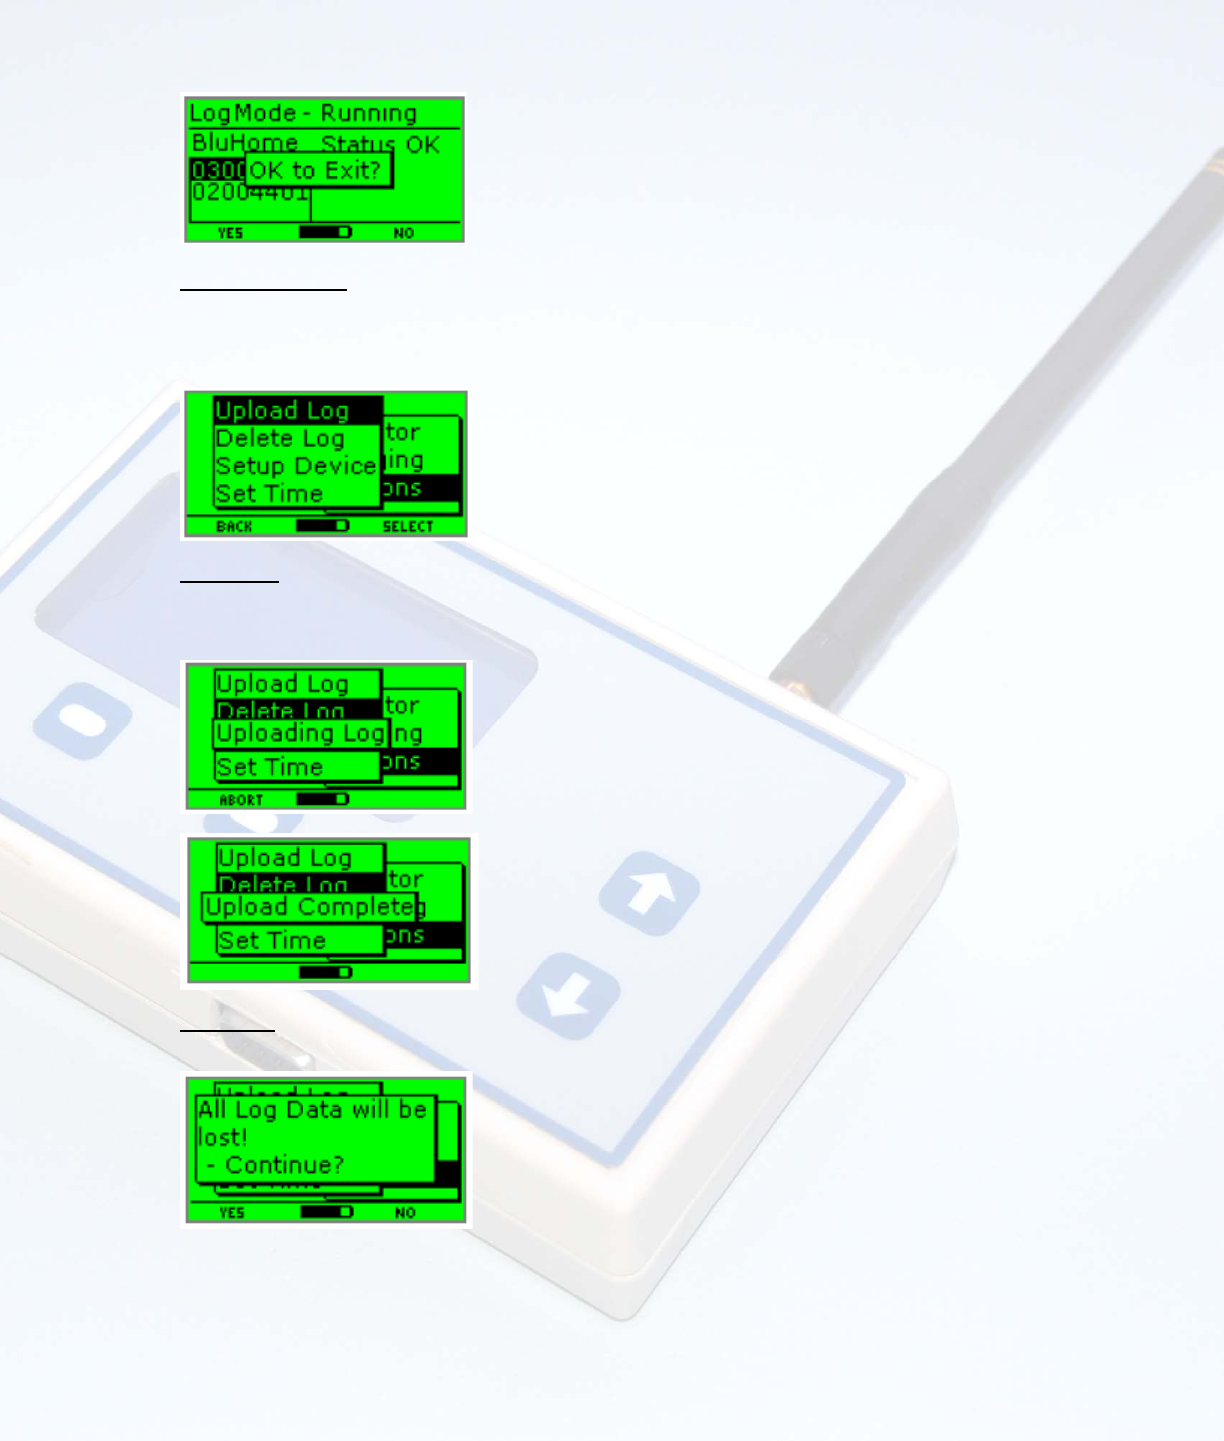
The Options menu is selected from the Standby menu. The selection options include: Upload Log, Delete Log, Setup
Device and Set Time. The current menu item will be highlighted. The current menu item can be changed by pressing the
up or down arrow key. Pressing the right hand function key will select the highlighted menu item. Pressing the left hand
function key or no key press in 10 seconds will return the unit to the Standby menu.
Upload Log
The item is selected from the Options menu. The uploading log banner will be displayed and the log data transmitted
through the serial port. Once uploaded, the completion banner will be displayed to 2 seconds. Control will pass back to
the Options menu. The upload can be aborted at any point by pressing the left function key.
Delete Log
This item is selected from the Options menu. A confirmation banner will be displayed.
Pressing the left function key will return control back to the Options menu. Pressing the right function key will delete the
log data. The status will be displayed before returning to the Options menu.
Setup Device
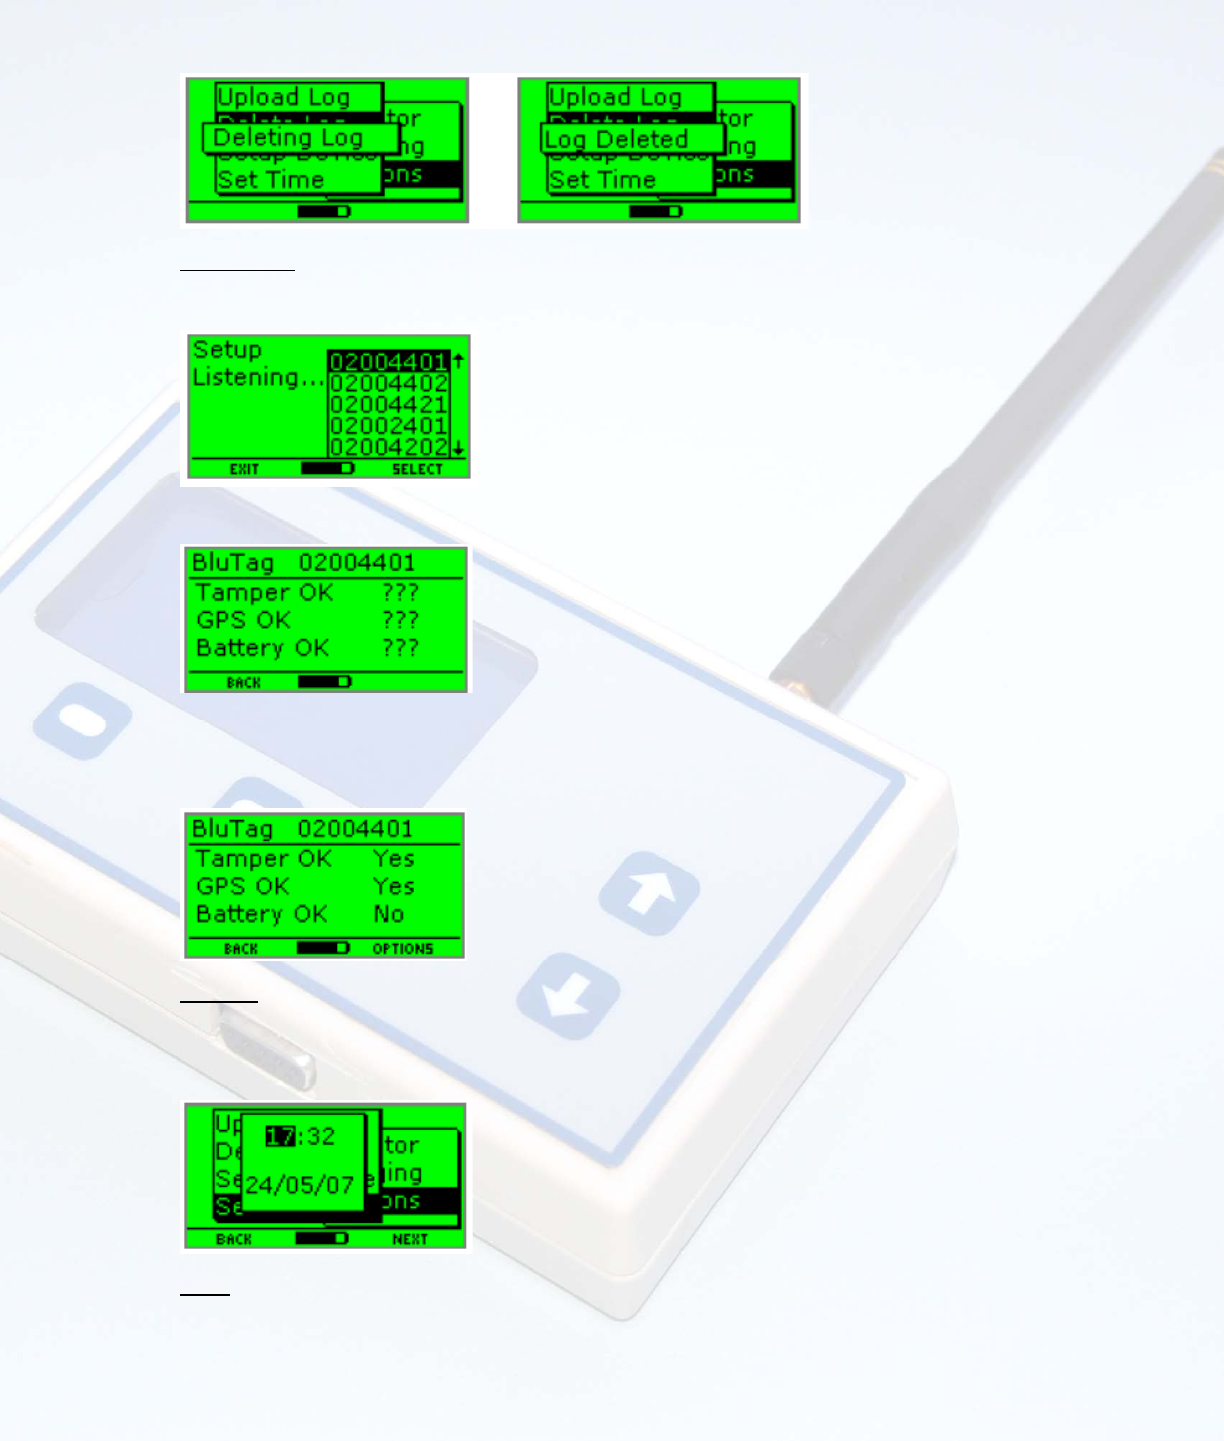
The Setup Device mode is entered through the Options menu. The unit will enter listening mode and display any devices
received which are compatible with setup. The highlighted device can be changed using the up and down arrow keys.
Pressing the right function key will select the device for setup and the setup monitor screen will be entered.
The unit will reply to the next ping from the selected device with a setup command. The status of any setup pings
received following this will be displayed. If no ping is received from the selected device within 1 minute, the status will
return to “???”. Pressing the left hand function key will return to the “Setup Listening” screen. Pressing the right hand
function key will bring up the Options menu.
Set Time
The set time window is opened from the Options menu. The value to be changed will be highlighted and can be changed
using the up and down arrow keys. Pressing the right function key will move to the next value. Pressing the left function
key will move to the previous value. Pressing the right function key when on the last value or pressing the left function
key on the first value will close the window and save the new time.
Other
When powered on, the unit can be powered off by pressing and holding the left function key for 3 seconds. When
powered off, the unit can be powered on by pressing and holding the left function key for 3 seconds.
To reduce power consumption, the LCD backlight will be switched off after 5 seconds with no button press. The following
events will switch the backlight on and reset the 5 second timer: button press, device data received in monitor mode,
device data received in setup mode.