Savi Technology 614T-V1 Active RF ID Tag ST614 & ST615 User Manual
Savi Technology Inc Active RF ID Tag ST614 & ST615
Contents
- 1. compliance notice
- 2. install guide
- 3. Install guide
- 4. compliance notes
Install guide

Installation Guide
SaviTag ST-614/ST-615
Version 0.1
Published September 2006
Part number xxx-xxxxxx Rev A
Documentation for SaviTag ST-614/ST-615, version .1
Copyright © 2006 Savi Technology, Inc. All rights reserved.
Information in this manual is subject to change without
notice and does not represent a commitment from the vendor.
The software and/or databases described in this document are
furnished under a license agreement or nondisclosure
agreement. The software and/or databases may be used or
copied only in accordance with the terms of the agreement. It
is against the law to copy the software on any medium except
as specifically allowed in the license or nondisclosure
agreement.
Savi, Savi SmartChain, SmartChain, and Batch Collection
are registered trademarks, and EchoPoint, Savi GateReader,
Savi MobileReader, Savi Retriever, SaviReader, SaviTag,
Savi Technology, SmartSeal, UDAP, and Universal Data
Appliance Protocol are trademarks of Savi Technology, Inc.
Other product names mentioned in this guide may be
trademarks or registered trademarks of their respective
owners and are hereby acknowledged.
Savi Technology, Inc.
615 Tasman Drive
Sunnyvale, CA 94089-1707
Phone: 1-408-743-8000
Facsimile: 1-408-543-8650
www.savi.com

SaviTag ST-614/ST-615 Installation Guide 5
Contents
Introduction
Features . . . . . . . . . . . . . . . . . . . . . . . . . . . . . . . . . . . . . . . . . . . . . 7
Tag ST-614/ST-615 Description . . . . . . . . . . . . . . . . . . . . . . . . . . . 8
Specifications . . . . . . . . . . . . . . . . . . . . . . . . . . . . . . . . . . . . . . . 8
Model Description . . . . . . . . . . . . . . . . . . . . . . . . . . . . . . . . . . 10
Contacting Customer Support . . . . . . . . . . . . . . . . . . . . . . . . . . . 10
Installing SaviTag ST-614/ST-615
Required Tools and Materials . . . . . . . . . . . . . . . . . . . . . . . . . . . 13
Commissioning SaviTag ST-614/ST-615 . . . . . . . . . . . . . . . . . . . 13
Conserving the Battery . . . . . . . . . . . . . . . . . . . . . . . . . . . . . . . . 15
Low Battery Warning . . . . . . . . . . . . . . . . . . . . . . . . . . . . . . . . 15
Avoiding Overpolling . . . . . . . . . . . . . . . . . . . . . . . . . . . . . . . . 15
Placing the Tag . . . . . . . . . . . . . . . . . . . . . . . . . . . . . . . . . . . . . . . 17
Example Asset Mounting Locations . . . . . . . . . . . . . . . . . . . . 18
Mounting SaviTag ST-614/ST-615 . . . . . . . . . . . . . . . . . . . . . . . 19
Mounting SaviTag ST-614/ST-615 Using Pressure Sensitive Tape
19
Mounting SaviTag ST-614/ST-615 Using Rivets . . . . . . . . . . . 23
Mounting SaviTag ST-614/ST-615 Using Other Methods . . . . 24
Removing Pressure Sensitive Tape-Mounted Tags . . . . . . . . . . . 25
Appendix A: PST Reliability and Durability

6 SaviTag ST-614/ST-615 Installation Guide

Features
SaviTag ST-614/ST-615 Installation Guide 7
Introduction
SaviTag™ ST-614/ST-615 is an active RFID tag that is purpose-bulit for
locating, tracking, and managing medium to high value assets in
Department of Defence (ST-614) and commercial (ST-615) applications.
Fully compatible with fixed and handheld Savi® readers, these tags feature
up to 270 feet (82.3 meters) of omnidirectional line-of-sight range. Battery
life, using lithium cells, is typically five years. SaviTag ST-614/ST-615 is
also certified as safe for operation with live ordnance.
Features
◆433 MHz, active RFID technology with up to 270-foot (82.3 m) range
for monitor, wake-up, and RF write/read
◆123 KHz receiver for slot level, chokepoint tag wake-up and short range
commissioning
◆Small form factor design ideally suited for medium and large assets,
such as shipping containers, vehicles, and 463L aircraft pallets.
◆Rugged, weatherproof design
◆Built-in 1KB firmware allows readers to rapidly collect asset
configuration and maintenance information stored on the tag.

CHAPTER
Introduction
8 SaviTag ST-614/ST-615 Installation Guide
Tag ST-614/ST-615 Description
Specifications
Specification Description
Physical characteristics Length: 6.8inches (17.3 cm)
Width: .99 inch (2.5 cm)
Height: .68 inch (1.7 cm)
Weight:
Color: ST-614: Gray, ST-615: Black
Environment Temperature: MIL-STD-810F Methods 501.4 and 502.4
-26° to 158° F (-32° to 70° C) Operating, -40°F to 185° F
(-40° to 85° C) Storage
Humidity: MIL-STD-810F Method 507.4:
100% at 50° C, non-condensing
Salt fog:MIL-STD-810F Method 509.4
Low pressure (altitude): MIL-STD-810F Method 500.4
Maximum altitude 40,000 ft.
RF receiver/transmitter Ultra High Frequency transceiver:
Frequency: 433.92 MHz
Modulation: FSK, deviation +/- 50 KHz
Data rate: 27.8 Kbps
Data coding: Manchester
Communication range (unobstructed): Typical range is 270
feet (82.3 m) line-of-sight when mounted onto an asset and
communicating with a Savi Fixed Reader SR-650-101 or
SaviReader 410R.
Maximum transmit power: 0.6 mW
Air protocol:
ST-614 only: EBCS Commands (22-bit tag identification
supported)
ST-614 and ST-615: Savi EchoPoint Air Protocol 2.1 (32-bit
tag identification supported)

Tag ST-614/ST-615 Description
SaviTag ST-614/ST-615 Installation Guide 9
LF receiver Low Frequency receiver (downlink)
Frequency: 123 KHz
Modulation: ASK On-Off Keying
Data rate: Average 1.6 Kbps, 50% duty cycle
Data coding: Pulse Width Modulation
Communication range: Up to 12 feet from EchoPoint SP-
651/652-211 Signpost. Up to 3.5 feet from (Intermec) SMR-
650 Mobile Readers.
Up to 12 feet (3.66 meters) with Savi Signpost (model
SP-65x-xxx)
Air protocol: Savi EchoPoint Air Protocol 1.1
Network Wireless: RF read/write capable
Memory Onboard non-volatile memory 1K
Antenna Internal UHF: Omni loop antenna
Shock and vibration Shock: MIL-STD-810F 514.5 Loose cargo test
Vibration: MIL-STD-810F 514.4 Random vibration
Power Battery type: non-replaceable lithium-ion
Battery life: Approximately 5 years depending on usage
Power management: UHF sleep mode prevents unwanted
collections, enabled/disabled by LF link. Over-polling
protection algorithm to extend battery life.
Diagnostics: Reports low tag battery status when battery is
too low to support 500 UHF reads.
Specification Description

CHAPTER
Introduction
10 SaviTag ST-614/ST-615 Installation Guide
Model Description
Part number: ST-614-001 and ST-615-001
Description: SaviTag ST-614-001 and SaviTag ST 615-001
Onboard memory: 1K Serial EEPROM – User memory
Contacting Customer Support
If you cannot find the information you need in this guide, contact Savi
Customer Support.
◆Call 1-888-994-SAVI (North America only) or 1-408-743-8888
between 9 a.m. and 5 p.m. Pacific time.
Regulatory approvals Radiated emission (intentional): U.S. emissionstandards as
contained in FCC Part 15 subclauses 15.231a, 15.231e, and
15.240. European Community emission standards as
contained in EN 300 220-1 (433 MHz) and EN 301 489-1.
Korean MIC regulation 2005-50 (433 MHz). Compliance
with ISO 18000-7 specifications
Electromagnetic immunity: 80 MHz to 1,000 MHz, 3 V/m
in accordance with EN 301 489-1.
ESD compliance: Exposed to 8 kV air discharge or 4 kV
contact discharge in accordance with EN 301 489-1.
Radiated emission (unintentional): U.S. emissions
standards as contained in FCC Part 15 and European
Community emission standards as contained in EN 301
489-1
Ordnance Safety (ST-614 only): HERO Certification at 4”
distance. Self-certified at 1” distance through ARDEC.
Markings: Savi Name & Logo, Product Model Number, Serial
Number, ARDEC / HERO Label (ST-614 only), EMC
Compliance Label.
Mounting ✦Pressure-sensitive tape mounting kit
✦Magnetic mounting kit
Software Savi SmartChain® Site Manager, Retriever, or Savi
SmartChain® Client Tools 4.0
Specification Description

Contacting Customer Support
SaviTag ST-614/ST-615 Installation Guide 11
◆Send email to help@savi.com.
◆Check www.savi.com/support for information.
When you contact Savi Customer Support by telephone or email,
have the following information available:
◆Contact information (company name, your name, email, and
phone number)
◆Problem description
◆Product type and location
◆Serial number or license information

CHAPTER
Introduction
12 SaviTag ST-614/ST-615 Installation Guide

Required Tools and Materials
SaviTag ST-614/ST-615 Installation Guide 13
Installing SaviTag ST-
614/ST-615
Required Tools and Materials
Before you begin installation of SaviTag ST-614/ST-615, make sure you
have the following materials available:
◆SaviTag ST-614/ST-615
◆Savi SmartChain Client Tools 4.0 or TAV Tools 3.6x or later
◆Pressure sensitive tape (provided)
◆Two (2) zip ties (provided) or:
◆Alternatively: Two (2) rivets and a handheld rivet gun
Commissioning SaviTag ST-614/ST-
615
You can commission SaviTag ST-614/ST-615 using the low-frequency UHF
interface.
You can send a low frequency command from SmartChain Mobile Manager
to SaviTag ST-614/ST-615 to enable the UHF receiver.
Note:
SmartChain Mobile Manager cannot process this command while
the Savi Mobile Reader is charging. If the external power supply to the
mobile reader is plugged in, you must disconnect it and remove the
mobile device from the charging unit to run the command.
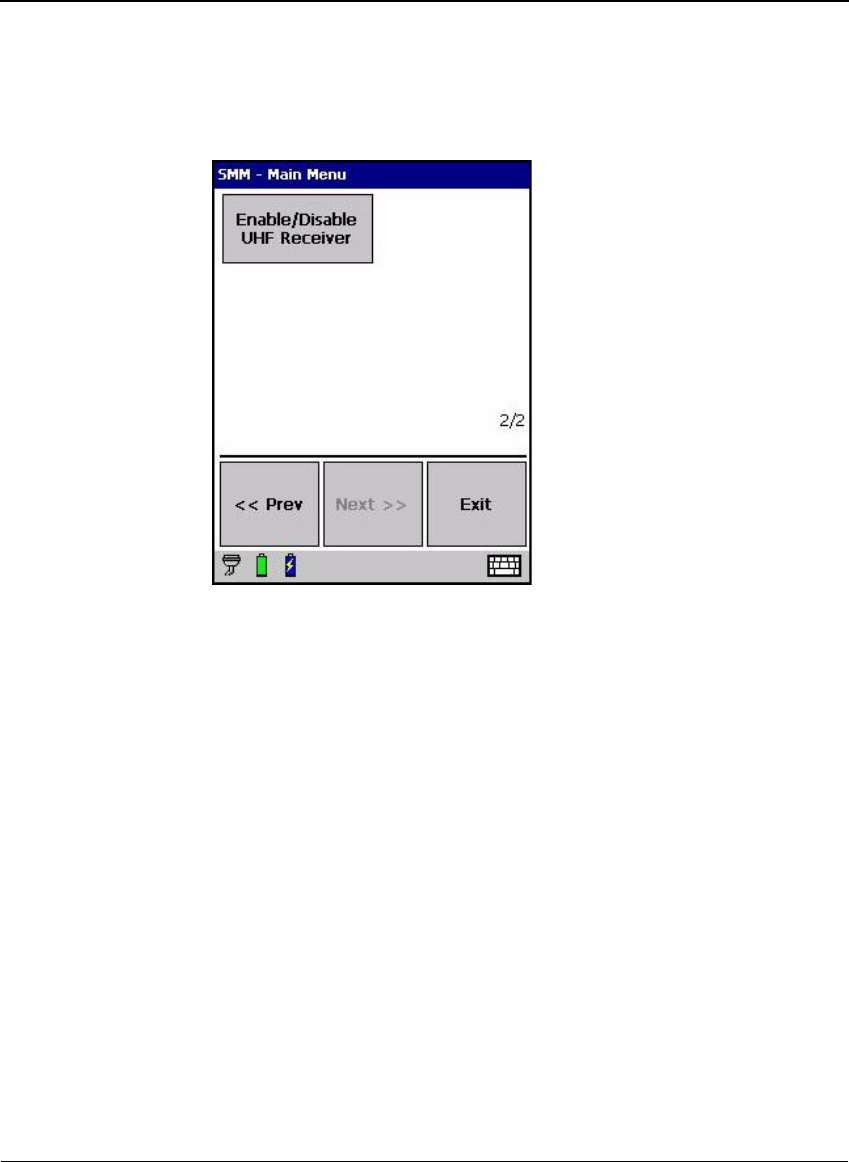
1. Start SmartChain Mobile Manager.
2. On the Main Menu, select Next >> to view the second page of
commands.
CHAPTER
Installing SaviTag ST-614/ST-615
14 SaviTag ST-614/ST-615 Installation Guide
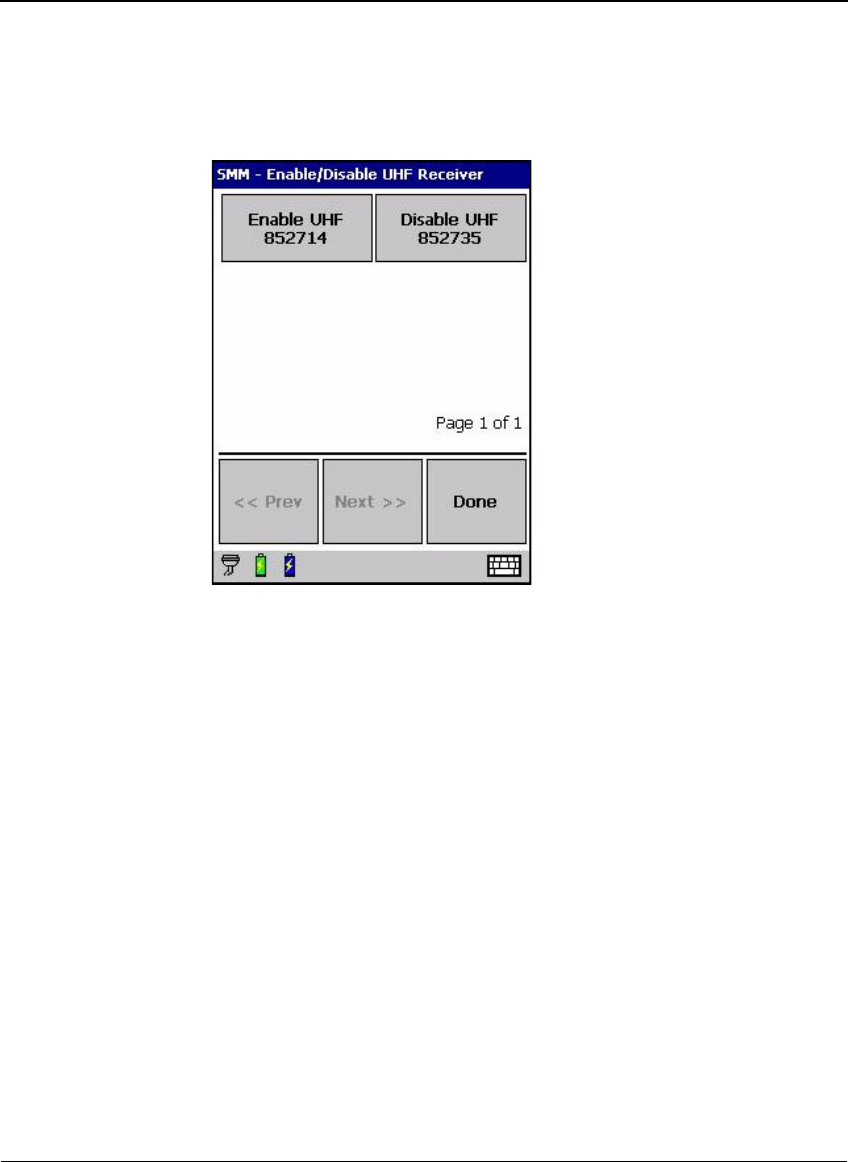
3. Select Enable/Disable Tag UHF Receiver.
Savi SmartChain Mobile Manager searches for and displays a list of all
SaviTag ST-614/ST-615 within range and indicates if they can be
enabled or disabled.
Conserving the Battery
SaviTag ST-614/ST-615 Installation Guide 15
4. Select a tag to enable its UHF receiver.
5. Select OK to close the confirmation message.
6. Select another tag to enable or select Done.
Conserving the Battery
SaviTag ST-614/ST-615 is equipped with a non-replaceable battery which
can become depleted by excessive accessing through overpolling.
Low Battery Warning
The battery will last approximately three to five years. When the battery is
too low to support two complete shipments, the tag will report a low-battery
message to the SaviChain software. At that time, the SaviTag ST-614/ST-
615 battery is depleted and the tag must be replaced.
Avoiding Overpolling
The most common cause of early battery depletion is overpolling from
leaving the tag in an area where the tag is idle within range of an RF
interrogator, such as in a warehouse or shipping yard.
CHAPTER
Installing SaviTag ST-614/ST-615
16 SaviTag ST-614/ST-615 Installation Guide
The SaviTag has an algorithm to identify when it is in an idle environment
and manage its power consumption. In addition, you can put the SaviTag
ST-614/ST-615 to sleep or wake it from a sleeping state manually by
enabling or disabling the UHF receiver. With the UHF receiver disabled, the
tag stops responding to tag collections from any fixed or mobile reader
initiating UHF collection commands.
To put the SaviTag ST-614/ST-615 to sleep using the SmartChain Mobile
Manager, follow these steps:
Note:
SmartChain Mobile Manager cannot process this command while
the Savi Mobile Reader is charging. If the external power supply to the
mobile reader is plugged in, you must disconnect it and remove the
mobile device from the charging unit to run the command.
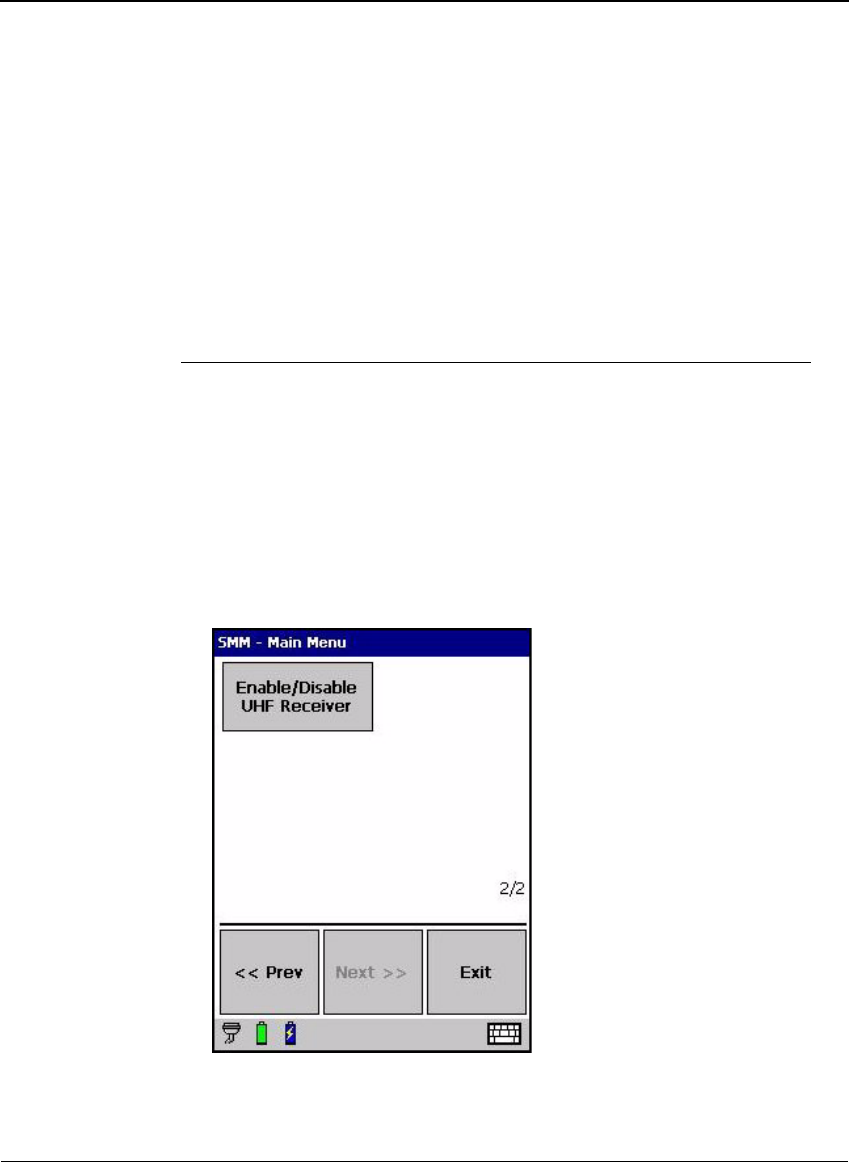
1. Start SmartChain Mobile Manager.
2. On the Main Menu, select Next >> to view the second page of
commands.
3. Select Enable/Disable Tag UHF Receiver.
Placing the Tag
SaviTag ST-614/ST-615 Installation Guide 17
Savi SmartChain Mobile Manager searches for and displays a list of all
SaviTag ST-654 within range and indicates if they can be enabled or
disabled.
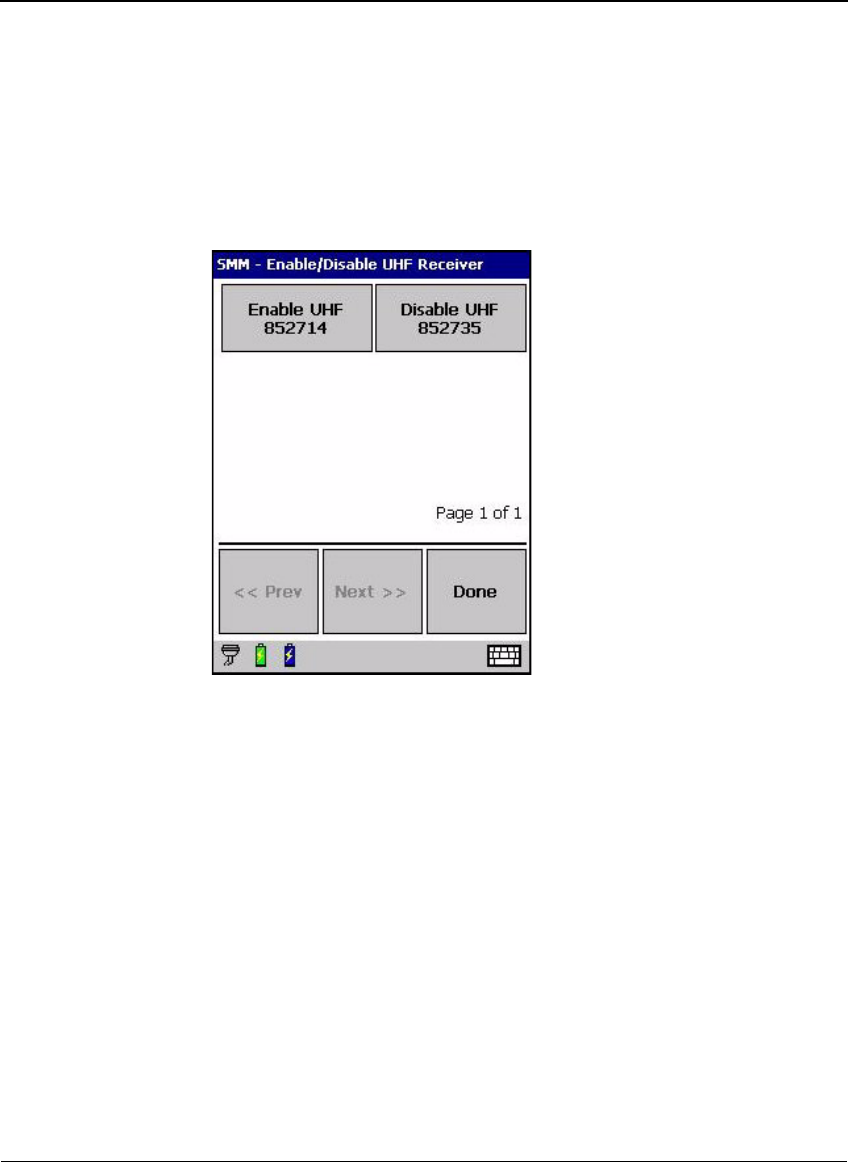
4. Select a tag to disable its UHF receiver.
5. Select OK to close the confirmation message.
6. Select another tag to disable or select Done.
To wake the SaviTag ST-614/ST-615, follow the steps outlined for taking
the SaviTag out of storage mode, as described in “Commissioning SaviTag
ST-614/ST-615” on page 13.
Placing the Tag
Savi Technology recommends that you mount SaviTag ST-614/ST-615 on a
flat surface. For optimal radio communication, place SaviTag ST-614/ST-
615 as high as possible, safe from impact (for example, between the ribs of
an ISO-type shipping container), and away from obstructions on the asset.
When SaviTag ST-614/ST-615 is mounted in its optimal position:
◆It is mounted at no less than a 4-foot (1.21 meters) elevation.
CHAPTER
Installing SaviTag ST-614/ST-615
18 SaviTag ST-614/ST-615 Installation Guide
SaviTag ST-614/ST-615 will achieve a 270-foot (82.3 m) read range to
SR-410 and SR-650 fixed readers. To achieve the most consistent
communications with SaviTag ST-614/ST-615, the fixed readers must be
mounted:
◆To have an unobstructed line of sight to the tag
◆At 20 feet (6 meters) or higher
◆With the reader dome pointed downward
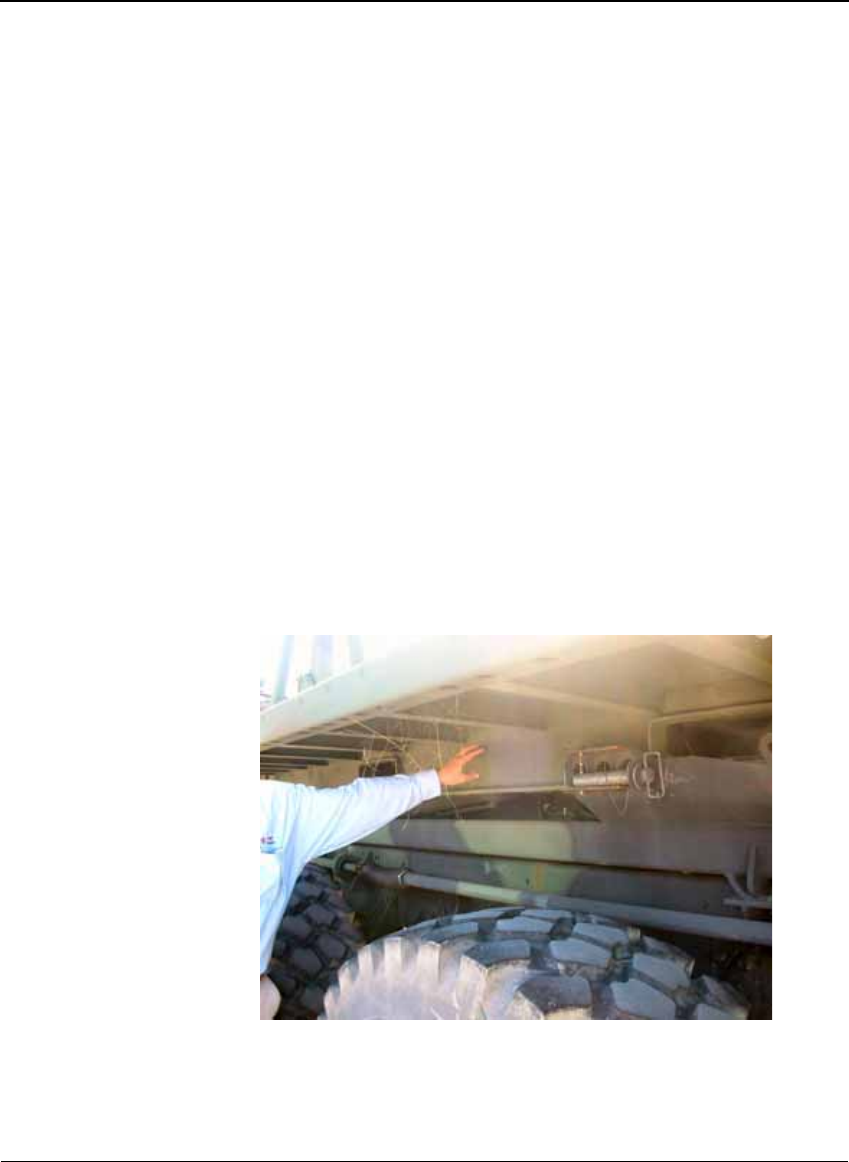
Example Asset Mounting Locations
M3 Container Roll-in/out Platform (CROP) Mounting Locations
Recommended mounting locations for an M3 Container Roll-in/out
Platform (CROP) and other mobile assets are shown in the following
pictures.
Figure -1 Primary CROP location for SaviTag ST-614/ST-615
Figure 1 Alternative location for mounting SaviTag ST-614/ST-615 to CROP.

Mounting SaviTag ST-614/ST-615
SaviTag ST-614/ST-615 Installation Guide 19
ISO Container Mounting Locations
Figure -1 Examples of tag mounting locations on mobile assets
463L Pallet Mounting Locations
Figure -2 Tag mounting locations on 463L pallet
Mounting SaviTag ST-614/ST-615
The primary mounting tool for SaviTag ST-614/ST-615 is pressure sensitive
tape, but you also have the option to use rivets, screws, or zip-ties.
Whichever mounting method you select, the goal is to prevent accidental
loss of the tag by sudden impact, vibration, or shock during transport. The
fastener you choose often depends on the material from which the asset or
container is constructed and your personal preference.
SaviTag ST-614/ST-615 includes these recommended mounting fasteners:
◆Pressure sensitive tape (PST)
◆Rivets
◆Magnetic mount STA-610-M (must be ordered separately)
Unlike similar products, there is no plastic mounting sleeve option.
You can also use the following alternative fastening methods:
◆Tie-wraps (included in STA-610-RPK)
◆Twine
◆Screws
Mounting SaviTag ST-614/ST-615 Using
Pressure Sensitive Tape
The recommended mounting method is pressure-sensitive tape (PST) to
attach a SaviTag ST-614/ST-615. The only brand of PST that Savi
CHAPTER
Installing SaviTag ST-614/ST-615
20 SaviTag ST-614/ST-615 Installation Guide
Technology recommends for mounting SaviTags is 3M Corporation’s
Automotive Acrylic Plus Attachment Tape.
For ease of installation, during manufacturing Savi installs this PST on the
back of the tag. PST mounting kits are also available for separate purchase.
Figure -3 SaviTag ST-614/ST-615 factory installed PST
Preparing the Surface for PST Application
PST is suitable for almost any smooth, flat surface made of metal or plastic.
Metal surfaces may be coated with most paints, including Chemical Agent
Resistant Coating (CARC). It is, however, extremely important that you
follow proper surface preparation to enable optimal adhesion.
PST is not intended for attachment to wooden surfaces because of the
surface roughness of wood, and the wicking of rain or spray through wood
fiber. Screws are the preferred mounting method for wooden surfaces.
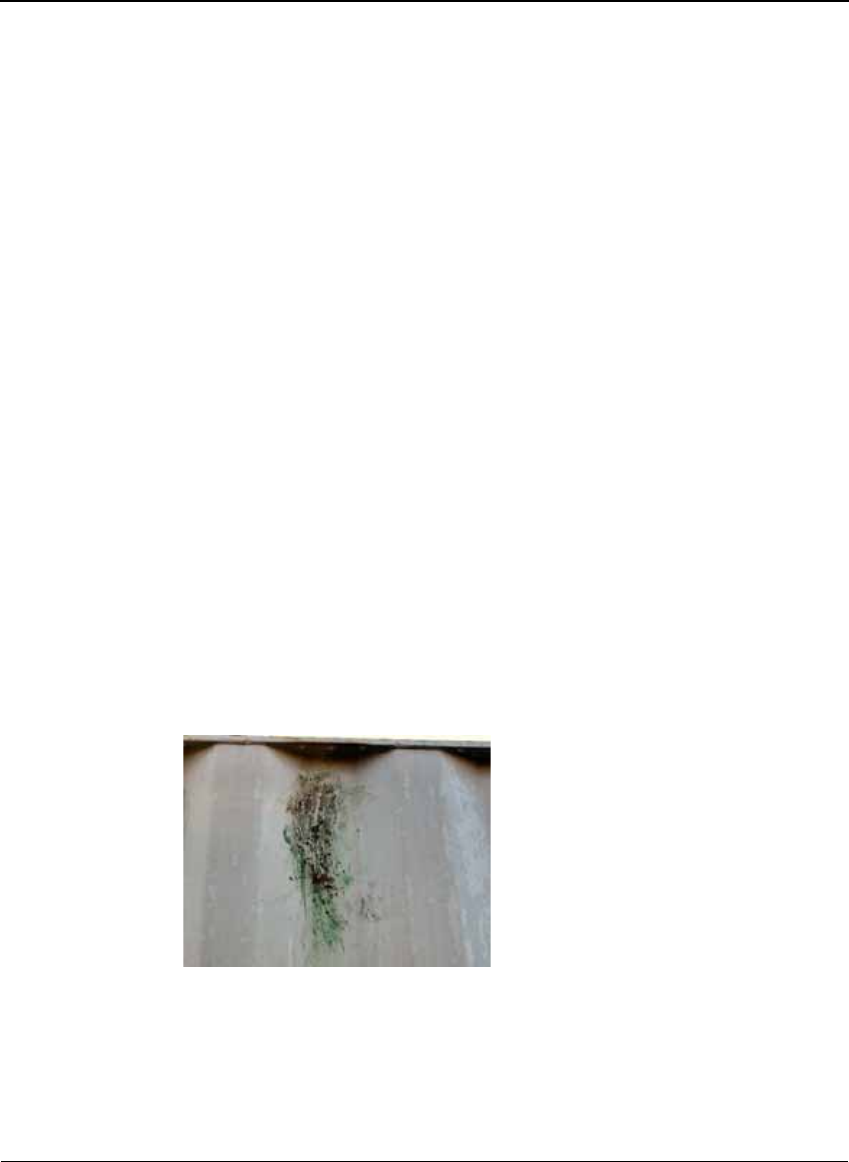
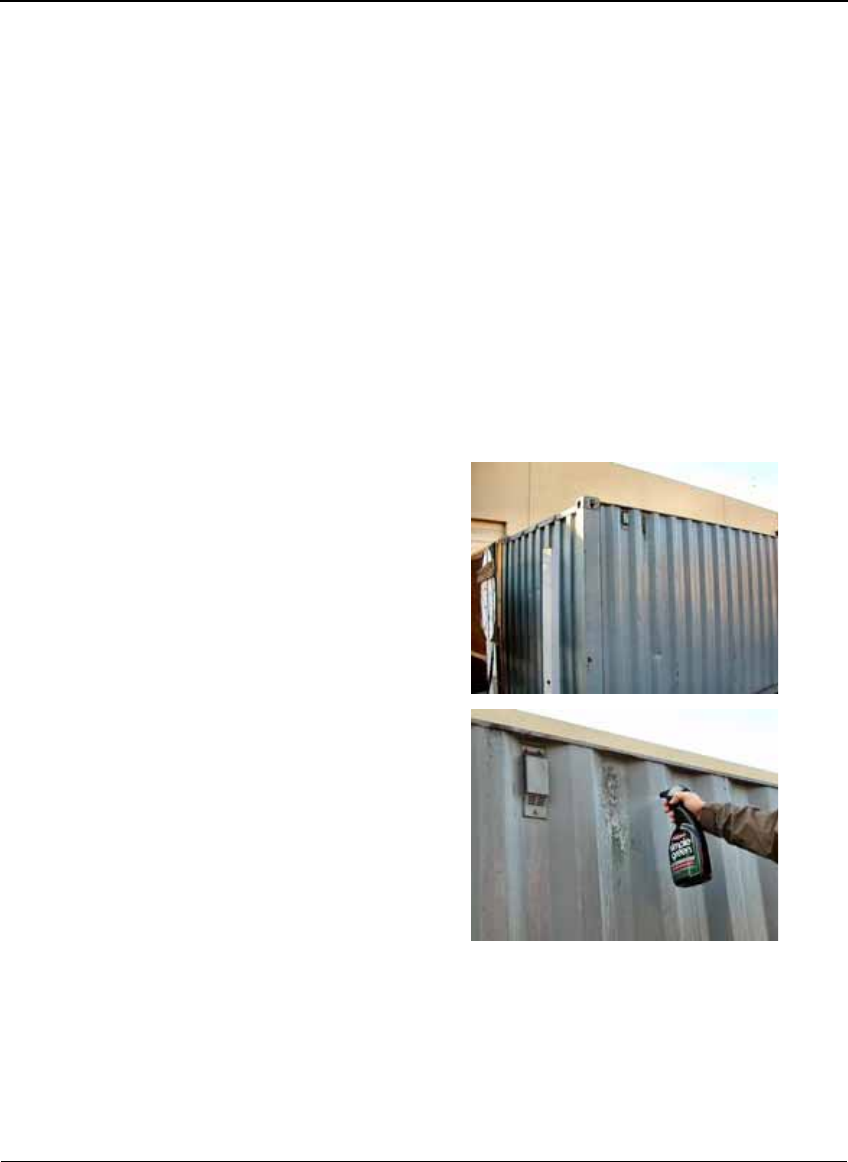
PST surface preparation is a simple, but critical process. The surface
cleaning procedure on page 21 demonstrates how to clean a shipping
container that has greasy residue and dirt on the intended mounting
surface as shown in Figure -4.
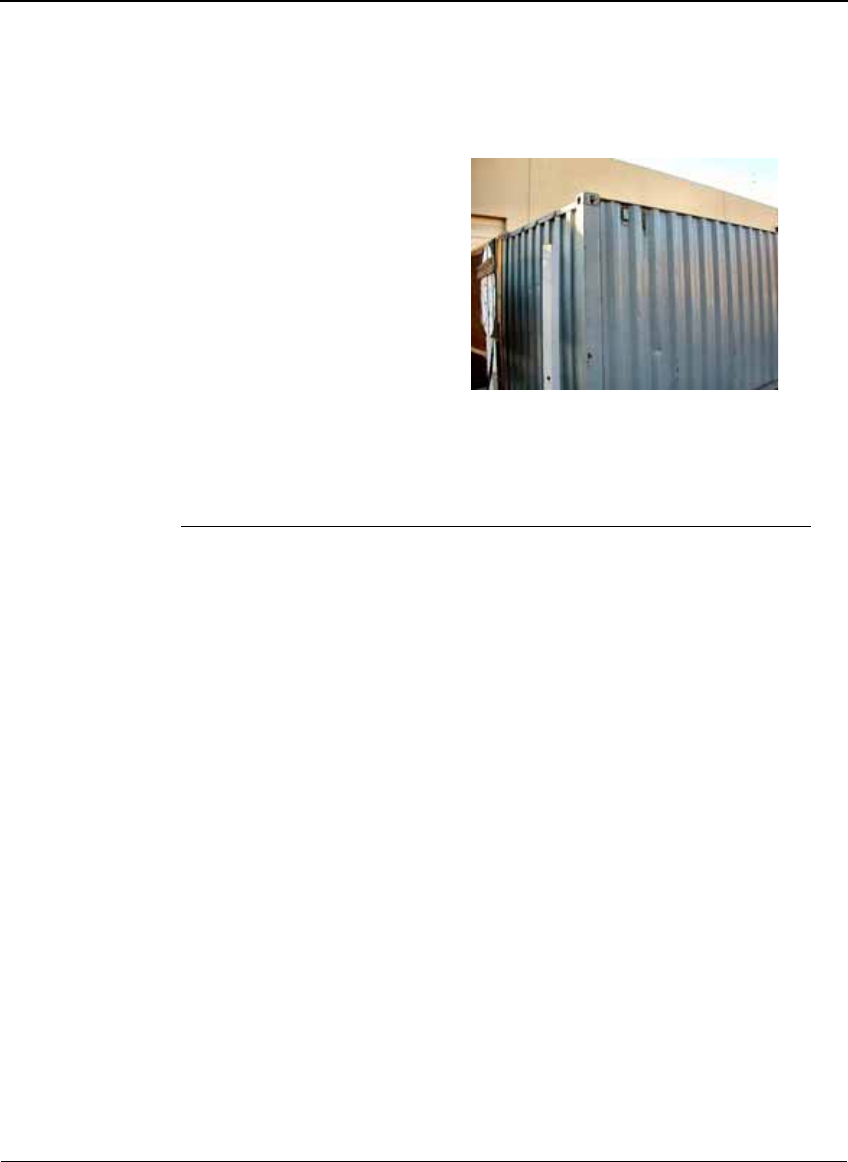
Figure -4 Dirty, greasy mount location
This demonstration was performed at about 50 degrees Fahrenheit on a
mounting surface covered with moisture and condensation. The optimum
mounting surface temperature for PST application is 60 degrees Fahrenheit
or above. At this temperature full adhesion strength will be achieved within
Mounting SaviTag ST-614/ST-615
SaviTag ST-614/ST-615 Installation Guide 21
a few hours. But 3M has successfully applied PST to exposed surfaces
at temperatures as low as 40 degrees Fahrenheit. Even at these lower
temperatures, tags can be installed immediately after PST application;
full adhesion strength will be achieved within 24 hours.
Make sure you have the following cleaning materials available:
◆General purpose cleaner. Any commercial cleaner with a degreaser;
for example Formula 409® Cleaner, Ajax® All-Purpose Cleaner,
or Simple Green® All-Purpose Industrial Degreaser
◆Rags or paper towels
◆Scrub brush, bucket, and mild soap and water solution if needed
To clean the surface:
1. Determine where the
SaviTag ST-614/ST-615 is
to be attached to the
shipping container or asset.
Be sure that the surface to
which the tapes will be
applied is flat.
2. Spray a liberal amount
of general purpose cleaner
onto the mounting surface.
CHAPTER
Installing SaviTag ST-614/ST-615
22 SaviTag ST-614/ST-615 Installation Guide
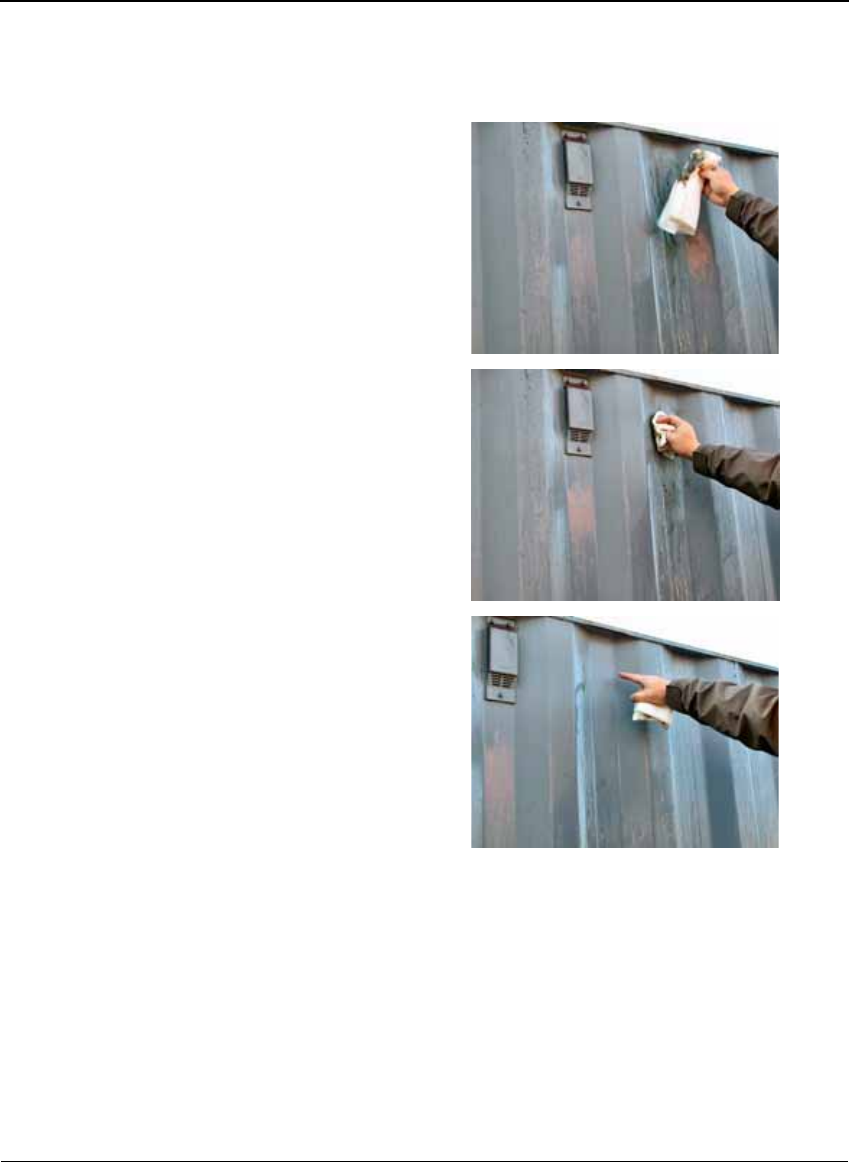
3. Using rags or paper towels,
clean the mounting surface
so it is free of dirt, rust, and
loose paint flakes.
4. If the surface is heavily
soiled, use a mild soap and
water solution to scrub the
surface clean.
5. Ensure that the mounting
surface is free from
moisture and condensation.
Mounting SaviTag ST-614/ST-615
SaviTag ST-614/ST-615 Installation Guide 23
Applying the Tag
Mounting SaviTag ST-614/ST-615 Using Rivets
Note:
If you want to mount SaviTag ST-614/ST-615 using rivets,
consider removing the PST as outlined in “Removing Pressure Sensitive
Tape-Mounted Tags” on page 25.
1. Determine where the SaviTag ST-614/ST-615 is to be attached to the
asset.
2. Use a marker to mark on the shipping container or asset the location of
the rivet holes on the tag.
3. On the asset, drill holes at the locations you marked in step 2.
4. Return to the location where the tag is to be attached to the asset. Align
the rivet holes on the tag with the rivet holes you made in step 3.
5. Push the head of the rivets through the tag.
Figure -5 Insert rivets
6. Use the handheld rivet gun to clip the nail of the rivet and secure the tag
to the asset. Avoid fastening the rivets too tightly so as not to damage the
tag.
1. Return to the location
where the tag is to be
attached to the shipping
container or asset.

CHAPTER
Installing SaviTag ST-614/ST-615
24 SaviTag ST-614/ST-615 Installation Guide
Mounting SaviTag ST-614/ST-615 Using Other
Methods
You can mount SaviTag ST-614/ST-615 using some or all of the fasteners
listed on page 19. You will need to provide your own rivets or screws.
Figure -6 SaviTag ST-614/ST-615 mounting holes
The tag is equipped with a tie-wrap groove to ensure that SaviTag ST-
614/ST-615 is securely fastened.
Figure -7 Use the tie-wrap to secure the tag

Removing Pressure Sensitive Tape-Mounted Tags
SaviTag ST-614/ST-615 Installation Guide 25
Removing Pressure Sensitive Tape-
Mounted Tags
Savi recommends that you leave the tag attached to the asset for later reuse,
but if it is necessary to remove the tag:
1. Lift one end of the RFID
tag with a putty knife or
chisel and separate the tape.
2. Remove the tape on the tag
or mounting surface by
rubbing with dry thumbs.
3. Use a scouring pad with
a mild soap and water
solution to remove any
remaining adhesive.

CHAPTER
Installing SaviTag ST-614/ST-615
26 SaviTag ST-614/ST-615 Installation Guide

SaviTag ST-614/ST-615 Installation Guide 27
Appendix A: PST
Reliability and
Durability
3M Corporation has conducted extensive environmental testing on their
Automotive Acrylic Plus Attachment Tape. In addition, Savi has conducted
its own independent environmental tests of PST using SaviTag ST-410 as a
test platform. The U.S. Army (Tobyhanna Army Depot) has also tested PST
for use on surfaces treated with Chemical Agent Resistant Coating (CARC).
All these tests confirm that PST is an appropriate choice for mounting
SaviTags.
◆Savi Technology successfully conducted the following tests upon
samples of 3M PST:
❖Extreme temperature (–40º to +70º Celsius)
❖Step test (200 pounds applied in shear)
❖Shock (140g or 120 lbs.)
❖Vibration (MIL-STD-810E)
❖Salt fog (MIL-STD-810E)
❖Corrosive liquids
❖Peel test (50 pounds of peel force)
Savi’s tests confirm the excellent adhesion integrity and reliability of 3M
PST.
◆3M Corporation conducted a longevity test of PST. They found no
significant degradation in the performance of PST even after five years
of service on a test vehicle. As long as the surface is prepared properly,
PST will work reliably for five years or longer. See “Preparing the
Surface for PST Application” on page 20.
◆3M Corporation compared the peel strength of a new roll of PST versus
a roll that had been aged 21 months. In all cases, the aged roll matched
performance of the new roll in tests conducted over a 72-hour period.

CHAPTER
Appendix A: PST Reliability and Durability
28 SaviTag ST-614/ST-615 Installation Guide