Savi Technology 654T-V2 EchoPoint Series SR-645 Tag User Manual Installation Guide
Savi Technology Inc EchoPoint Series SR-645 Tag Installation Guide
Contents
- 1. Manual
- 2. FCC statements
Manual

,QVWDOODWLRQ*XLGH
6DYL7DJ67
9HUVLRQ
Published October 2004
Part number 805-04400-001 Rev C
Documentation for SaviTag ST-654, version 1.0
Copyright © 2004 Savi Technology, Inc. All rights reserved.
Information in this manual is subject to change without notice and does not represent
a commitment from the vendor. The software and/or databases described in this
document are furnished under a license agreement or nondisclosure agreement. The
software and/or databases may be used or copied only in accordance with the terms
of the agreement. It is against the law to copy the software on any medium except as
specifically allowed in the license or nondisclosure agreement.
Savi, Savi SmartChain, SmartChain, and Batch Collection are registered trademarks,
and EchoPoint, Savi GateReader, Savi MobileReader, Savi Retriever, SaviReader,
SaviTag, Savi Technology, SmartSeal, UDAP, and Universal Data Appliance
Protocol are trademarks of Savi Technology, Inc.
Other product names mentioned in this guide may be trademarks or registered
trademarks of their respective owners and are hereby acknowledged.
Savi Technology, Inc.
615 Tasman Drive
Sunnyvale, CA 94089-1707
Phone: 1-408-743-8000
Facsimile: 1-408-543-8650
www.savi.com

6DYL7DJ67,QVWDOODWLRQ*XLGH
&RQWHQWV
1,QWURGXFWLRQ
Features . . . . . . . . . . . . . . . . . . . . . . . . . . . . . . . . . . . . . . . . . . . . . 5
SaviTag ST-654 Description . . . . . . . . . . . . . . . . . . . . . . . . . . . . . 6
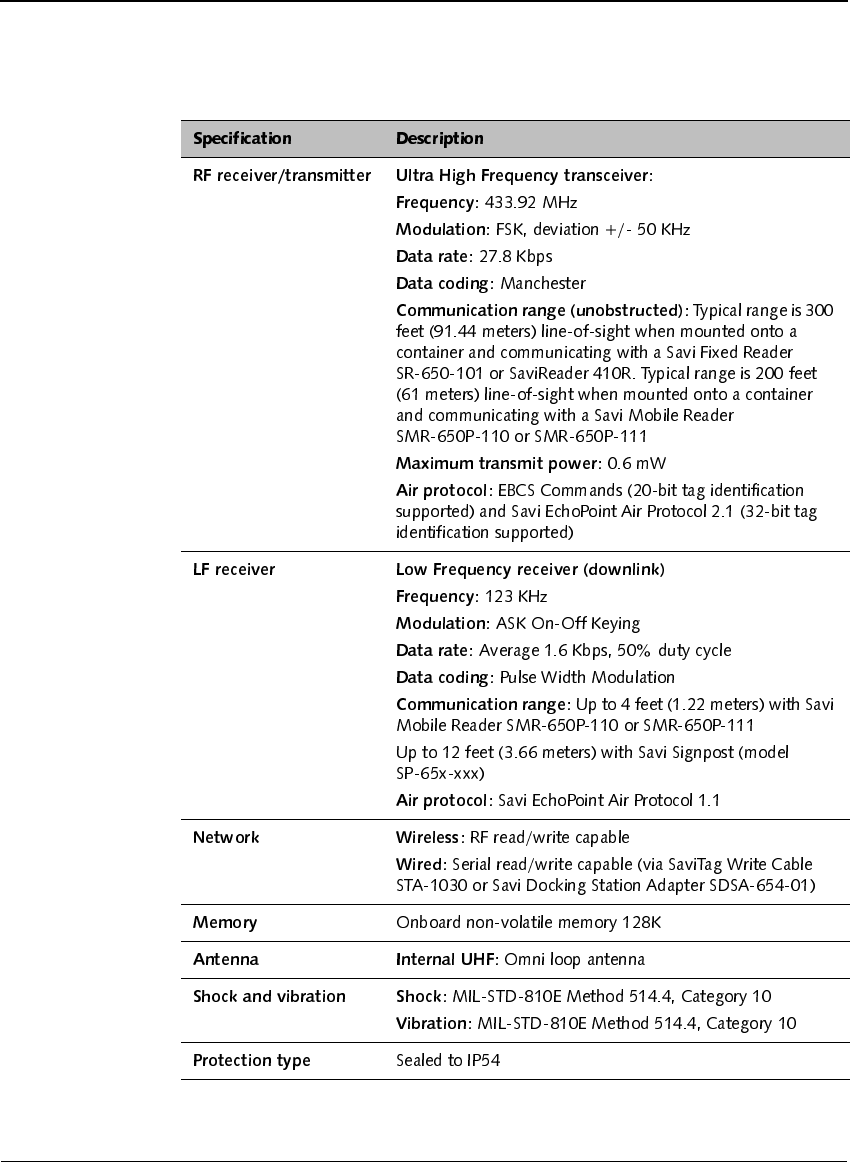
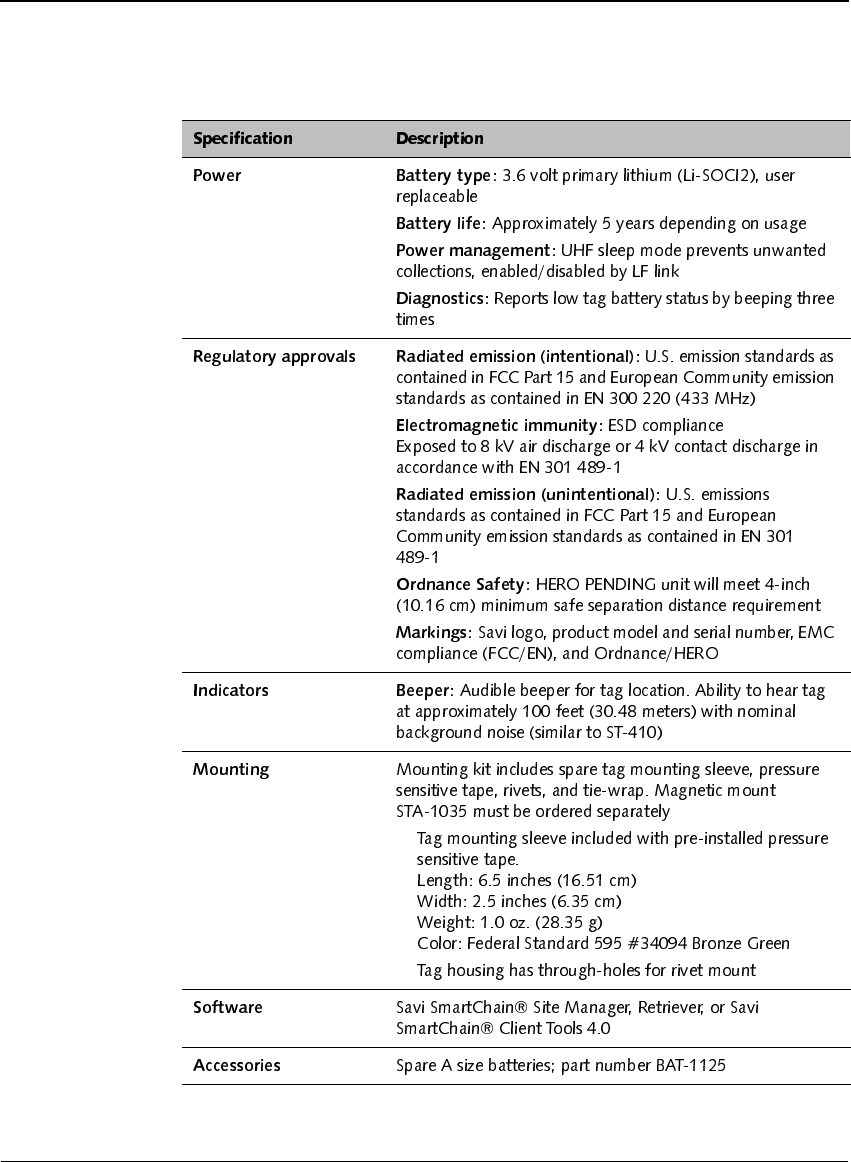
Specifications . . . . . . . . . . . . . . . . . . . . . . . . . . . . . . . . . . . . . . . 6
Model Description . . . . . . . . . . . . . . . . . . . . . . . . . . . . . . . . . . . 9
Contacting Customer Support . . . . . . . . . . . . . . . . . . . . . . . . . . . . 9
2,QVWDOOLQJ6DYL7DJ67
Required Tools and Materials . . . . . . . . . . . . . . . . . . . . . . . . . . . 11
Commissioning SaviTag ST-654 with SaviTag
Write Cable STA-1030 . . . . . . . . . . . . . . . . . . . . . . . . . . . . . . . . . 11
Commissioning SaviTag ST-654 with SDSA-654-01
and Savi Docking Station . . . . . . . . . . . . . . . . . . . . . . . . . . . . . . . 13
Replacing the Battery . . . . . . . . . . . . . . . . . . . . . . . . . . . . . . . . . . 14
Tag Placement . . . . . . . . . . . . . . . . . . . . . . . . . . . . . . . . . . . . . . . 15
Mounting SaviTag ST-654 . . . . . . . . . . . . . . . . . . . . . . . . . . . . . . 17
Mounting SaviTag ST-654 Using Pressure Sensitive Tape . . . 18
Mounting SaviTag ST-654 Using Rivets . . . . . . . . . . . . . . . . . 27
Mounting SaviTag ST-654 Without a Mounting Sleeve . . . . . 28


)HDWXUHV
6DYL7DJ67,QVWDOODWLRQ*XLGH
,QWURGXFWLRQ
SaviTag™ ST-654 is a high performance active RFID tag suited for
applications including shipping containers, vehicles, and other large asset
tracking equipment. Available with 128K or 240K of programmable
memory, SaviTag ST-654 supports a broad range of applications in multiple
system configurations. Fully compatible with fixed and handheld Savi®
readers, these tags feature up to 300 feet (91.44 meters) of omnidirectional
line-of-sight range. Battery life, using lithium cells, is typically five years.
SaviTag ST-654 is also certified as safe for operation with live ordnance.
)HDWXUHV
◆433 MHz, active RFID technology with up to 300-foot (91.44) range for
monitor, wake-up, and RF write/read
◆123 KHz receiver for slot level, chokepoint tag wake-up and short range
commissioning
◆Small form factor design ideally suited for shipping containers, vehicles,
and other large assets
◆Rugged, weatherproof design
◆Fast 28 Kbps data rate powered by a lithium battery
◆Battery is easily replaced by hand using a coin or a screwdriver
◆Built-in firmware database allows readers to rapidly search for specific
information saved on the tag
&+$37(5
,QWURGXFWLRQ
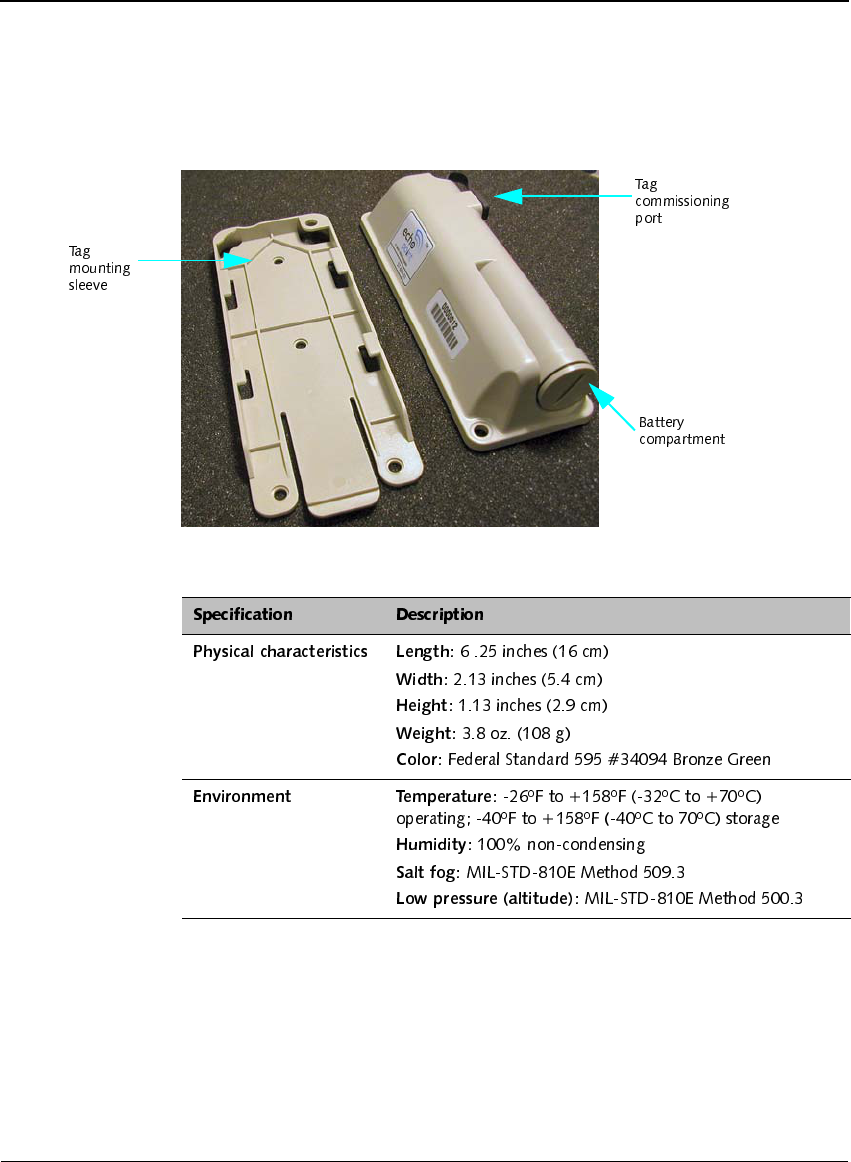
6DYL7DJ67'HVFULSWLRQ
6SHFLILFDWLRQV
6DYL7DJ67'HVFULSWLRQ
6DYL7DJ67,QVWDOODWLRQ*XLGH
&+$37(5
,QWURGXFWLRQ
✦
✦

&RQWDFWLQJ&XVWRPHU6XSSRUW
6DYL7DJ67,QVWDOODWLRQ*XLGH
0RGHO'HVFULSWLRQ
Part number: ST-654-001
Description: SaviTag ST-654-001
Onboard memory: 128K Serial EEPROM – User memory
&RQWDFWLQJ&XVWRPHU6XSSRUW
If you cannot find the information you need in this guide, contact Savi
Customer Support.
◆Call 1-888-994-SAVI (North America only) or 1-408-743-8888
between 9 a.m. and 5 p.m. Pacific time.
◆Send email to help@savi.com.
◆Check www.savi.com/support for information.
When you contact Savi Customer Support by telephone or email,
have the following information available:
◆Contact information (company name, your name, email, and
phone number)
◆Problem description
◆Product type and location
◆Serial number or license information

&+$37(5
,QWURGXFWLRQ

5HTXLUHG7RROVDQG0DWHULDOV
6DYL7DJ67,QVWDOODWLRQ*XLGH
,QVWDOOLQJ6DYL7DJ67
5HTXLUHG7RROVDQG0DWHULDOV
Before you begin installation of SaviTag ST-654, make sure you have
the following materials available:
◆SaviTag ST-654
◆SaviTag Write Cable STA-1030
◆Savi SmartChain Client Tools 4.0 or TAV Tools 3.6x or later
◆One 3.6V lithium battery, size A (provided)
◆A coin or screwdriver
◆Tag mounting sleeve
◆Two rivets or pressure sensitive tape (provided) and a handheld rivet gun
◆One tie-wrap (provided)
&RPPLVVLRQLQJ6DYL7DJ67ZLWK
6DYL7DJ:ULWH&DEOH67$
ST-654 tags are shipped from the factory with the battery installed in the
reverse direction to preserve battery life. Before you attempt to commission
SaviTag ST-654, make sure the battery is properly installed. See “Replacing
the Battery” on page 14.
You can commission SaviTag ST-654 using SaviTag Write Cable
STA-1030, which you can purchase separately.
&+$37(5
,QVWDOOLQJ6DYL7DJ67
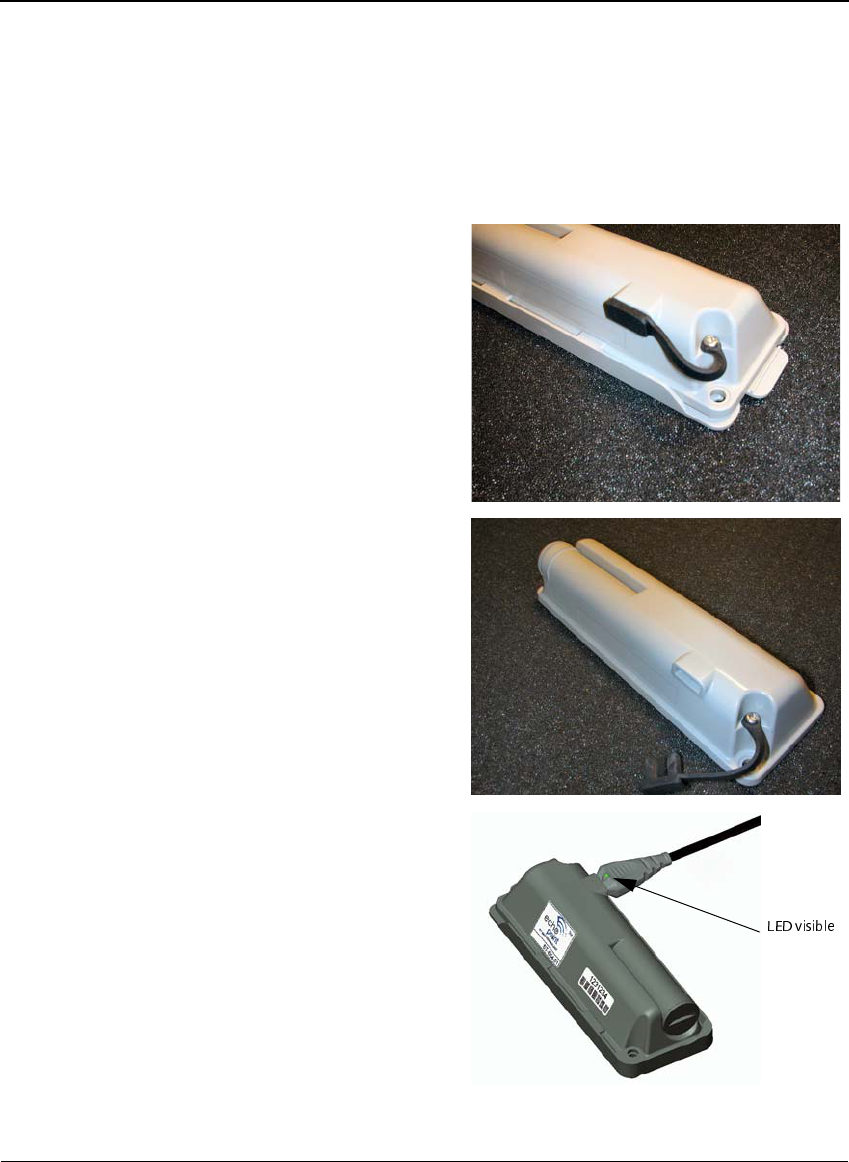
Connect SaviTag Write Cable STA-1030 to an available serial port on
the host computer.
Locate the tag
commissioning port on
the SaviTag ST-654.
Unplug the rubber cap
covering the port.
Insert SaviTag Write Cable
STA-1030, with the LED
up, into the ST-654 tag
commissioning port. Start
the tag commissioning
application. The LED is lit
when the application writes
data to the tag.

&RPPLVVLRQLQJ6DYL7DJ67ZLWK6'6$DQG6DYL'RFNLQJ6WDWLRQ
6DYL7DJ67,QVWDOODWLRQ*XLGH
&RPPLVVLRQLQJ6DYL7DJ67ZLWK
6'6$DQG6DYL'RFNLQJ6WDWLRQ
You can commission SaviTag ST-654 using the SDSA-654-01 and docking
station (model SDS-2002 shown, which you can purchase separately).
With the Savi EchoPoint label
right-side up, insert the
adapter into the docking
station until the adapter stops.
The adapter has a magnetic
contact that adheres to the
Savi Docking Station
SDS-2002 when fully
inserted.
Unplug the rubber cap
covering the write port on the
tag and ensure that the Savi
EchoPoint label on the tag is
upside down. Note the lit
Contact LED on the docking
station. The tag is ready for
commissioning.
Start the tag commissioning
application. When the tag
commissioning application
writes data to the tag, the
Data LED is lit.
&+$37(5
,QVWDOOLQJ6DYL7DJ67
5HSODFLQJWKH%DWWHU\
SaviTag ST-654 is equipped with non-volatile memory. Stored data is not
lost when you replace the battery.
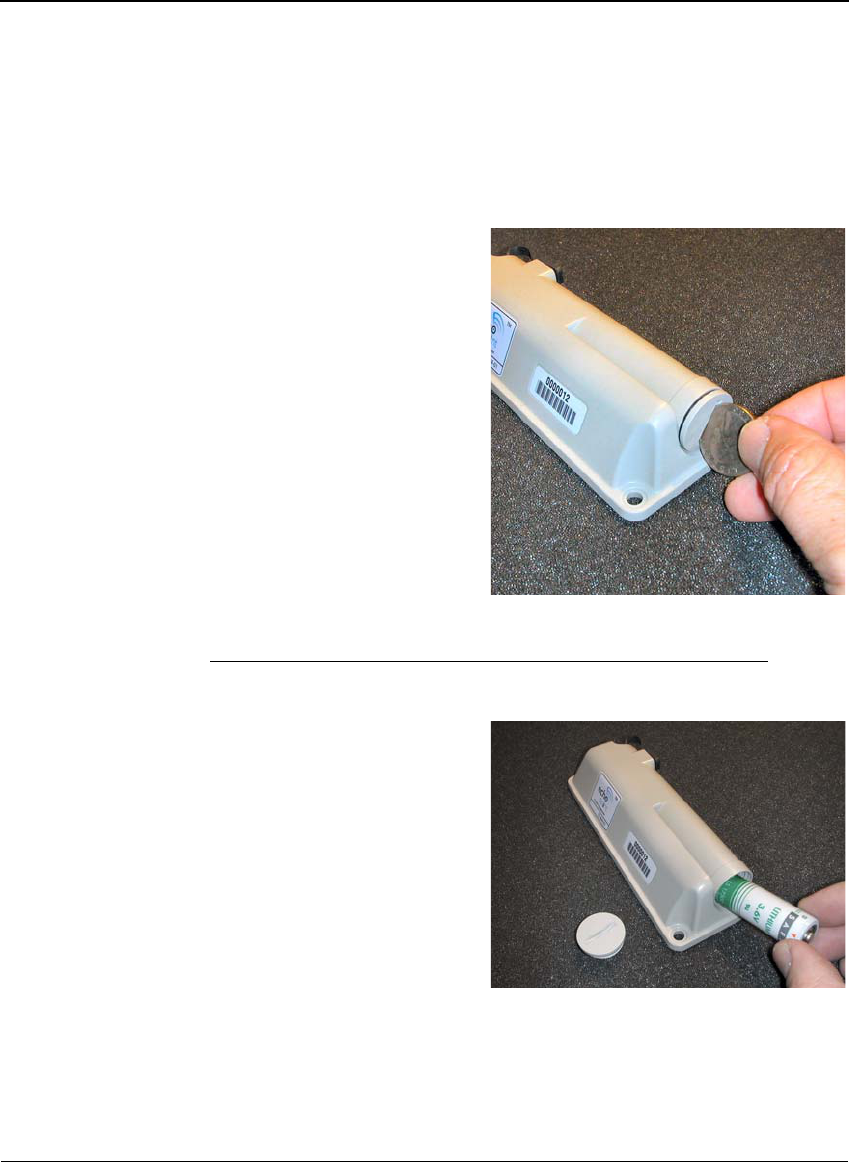
Using a coin or screwdriver,
turn the battery cover
counterclockwise.
When removing the battery
cover, hold on to it to avoid
dropping it.
Remove the discharged battery from its compartment.
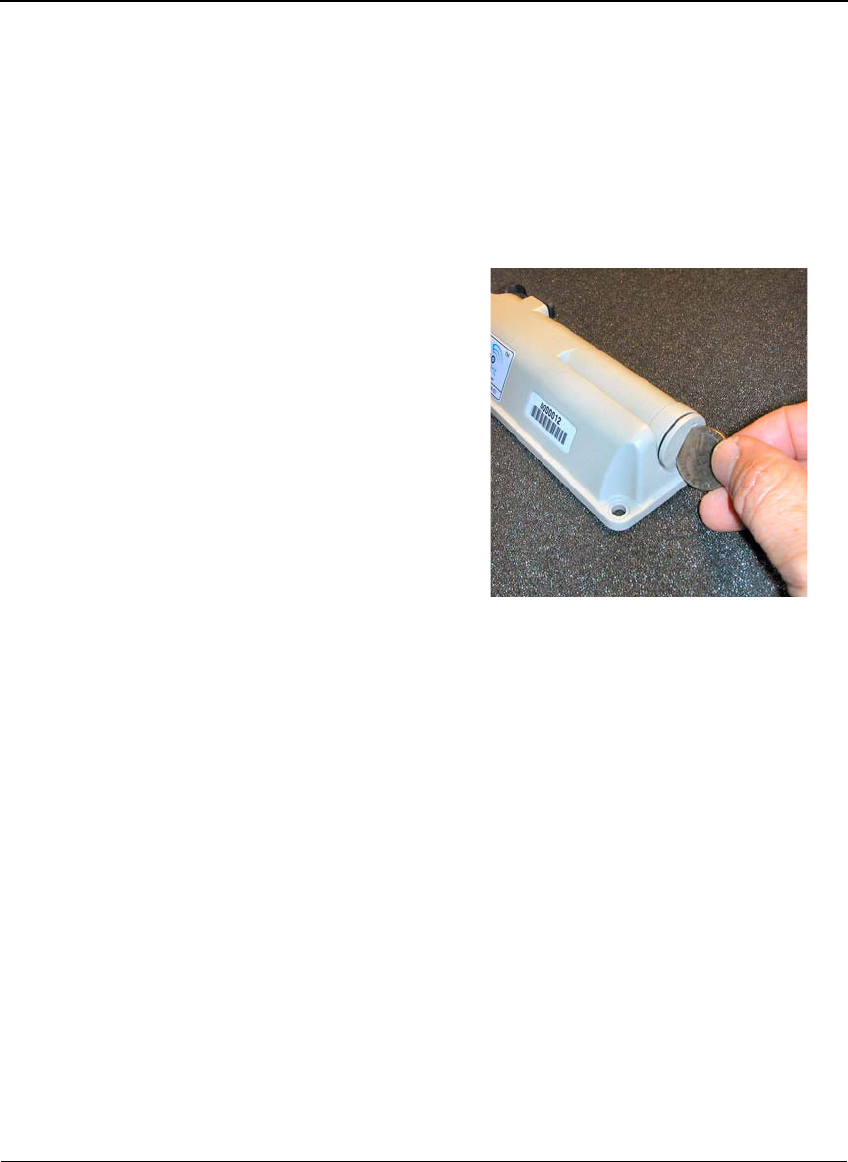
:DUQLQJ
7KHOLWKLXPEDWWHU\FDQEHKDUPIXOWRWKHHQYLURQPHQW
)ROORZFXUUHQWSURFHGXUHVIRUVDIHO\GLVSRVLQJRIOLWKLXPEDWWHULHV
Install an A 3.6V lithium
battery, matching the negative
(–) and positive (+) terminals
to the symbols shown on the
ST-654 housing. The tag will
not work if you install the
battery in the wrong direction
(reversed).
7DJ3ODFHPHQW
6DYL7DJ67,QVWDOODWLRQ*XLGH
7DJ3ODFHPHQW
Savi Technology recommends that you mount SaviTag ST-654 on a flat
surface, with the tag’s longitudinal axis aligned vertically. For optimal radio
communication, place SaviTag ST-654 as high as possible, safe from
impact (for example, between the ribs of an ISO-type shipping container),
and away from obstructions on the asset.
When SaviTag ST-654 is mounted in its optimal position:
◆It is mounted at no less than a 6-foot (1.8 meters) elevation.
◆The tag’s longitudinal axis is aligned vertically. See “Applying the Tag”
on page 23 for a mounting example.
The tag beeps twice if you install a fully charged battery. The tag beeps
three times if you install a battery with low charge; replace it with a
charged battery. When removing and replacing a charged battery, you
may need to wait a few seconds after replacing the battery to hear the
confirmation beep.
Replace the battery cover
using a coin or screwdriver.
With the coin placed in the
battery cover groove, push the
cover in. Turn the battery
cover counterclockwise 1/4 to
1/2 of a turn to properly seat
the cover. Turn the battery
cover clockwise until it fits
flush with the tag case. Be
careful not to overtighten.
Make sure the battery cover is
completely closed and that it
is not cross-threaded.
Dispose of the used battery according to local safety requirements.
&+$37(5
,QVWDOOLQJ6DYL7DJ67
SaviTag ST-654 will achieve a 300-foot (91.44 meters) read range to
SR-410 and SR-650 fixed readers. To achieve the most consistent
communications with SaviTag ST-654, the fixed readers must be mounted:
◆To have an unobstructed line of sight to the tag
◆At 20 feet (6 meters) or higher
◆With the reader dome pointed downward
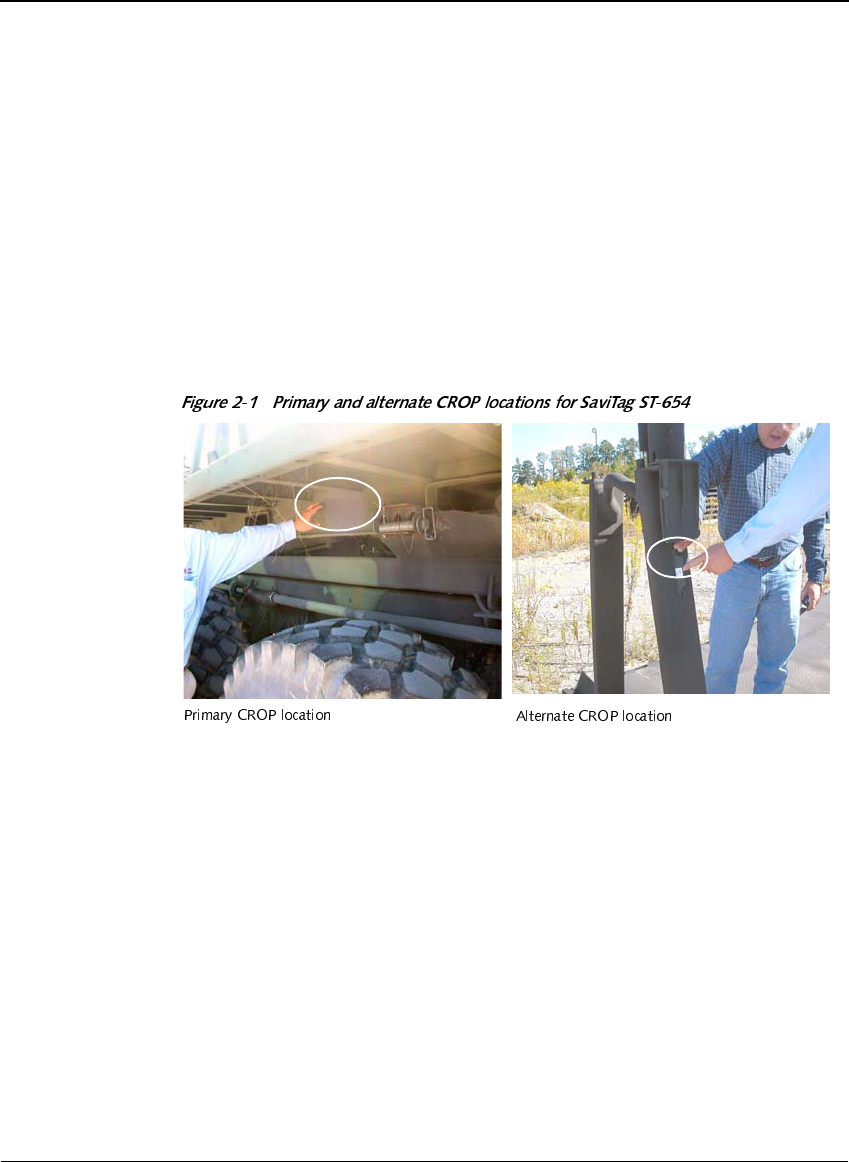
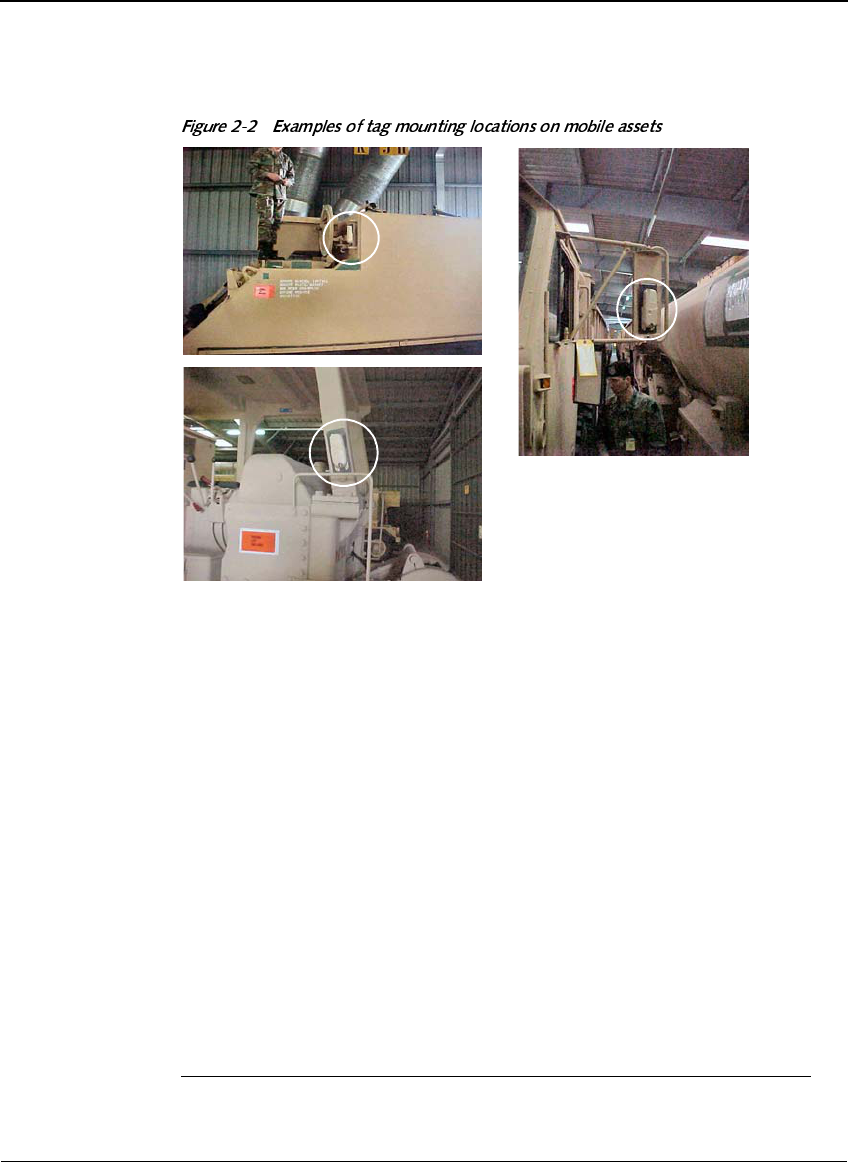
Recommended mounting locations for an M3 Container Roll-in/out
Platform (CROP) and other mobile assets are shown in the following
pictures.
0RXQWLQJ6DYL7DJ67
6DYL7DJ67,QVWDOODWLRQ*XLGH
0RXQWLQJ6DYL7DJ67
You can choose among several mounting methods for SaviTag ST-654,
including using pressure sensitive tape, rivets, or a plastic mounting sleeve.
Whichever mounting method you select, the goal is to prevent accidental
loss of the tag by sudden impact, vibration, or shock during transport. The
fastener you choose often depends on the material from which the asset or
container is constructed and your personal preference.
SaviTag ST-654 includes these recommended mounting fasteners:
◆Rivets
◆Pressure sensitive tape (PST)
◆Magnetic mount STA-1035 (must be ordered separately)
You can also use the following alternative fastening methods:
◆Velcro, 3M SJ3550 Dual Lock Reclosable Fastener, 1 inch (2.5 cm) wide
◆Tie-wraps
◆Twine
◆Screws
&DXWLRQ
8VHWKHVHDQGRWKHUDOWHUQDWLYHPHWKRGVDW\RXURZQULVN
&+$37(5
,QVWDOOLQJ6DYL7DJ67
0RXQWLQJ6DYL7DJ678VLQJ3UHVVXUH
6HQVLWLYH7DSH
If it is not possible or practical to use screws or rivets, you can use pressure
sensitive tape (PST) to attach a SaviTag ST-654. The only brand of PST
that Savi Technology recommends for mounting SaviTags is
3M Corporation’s Automotive Acrylic Plus Attachment Tape.
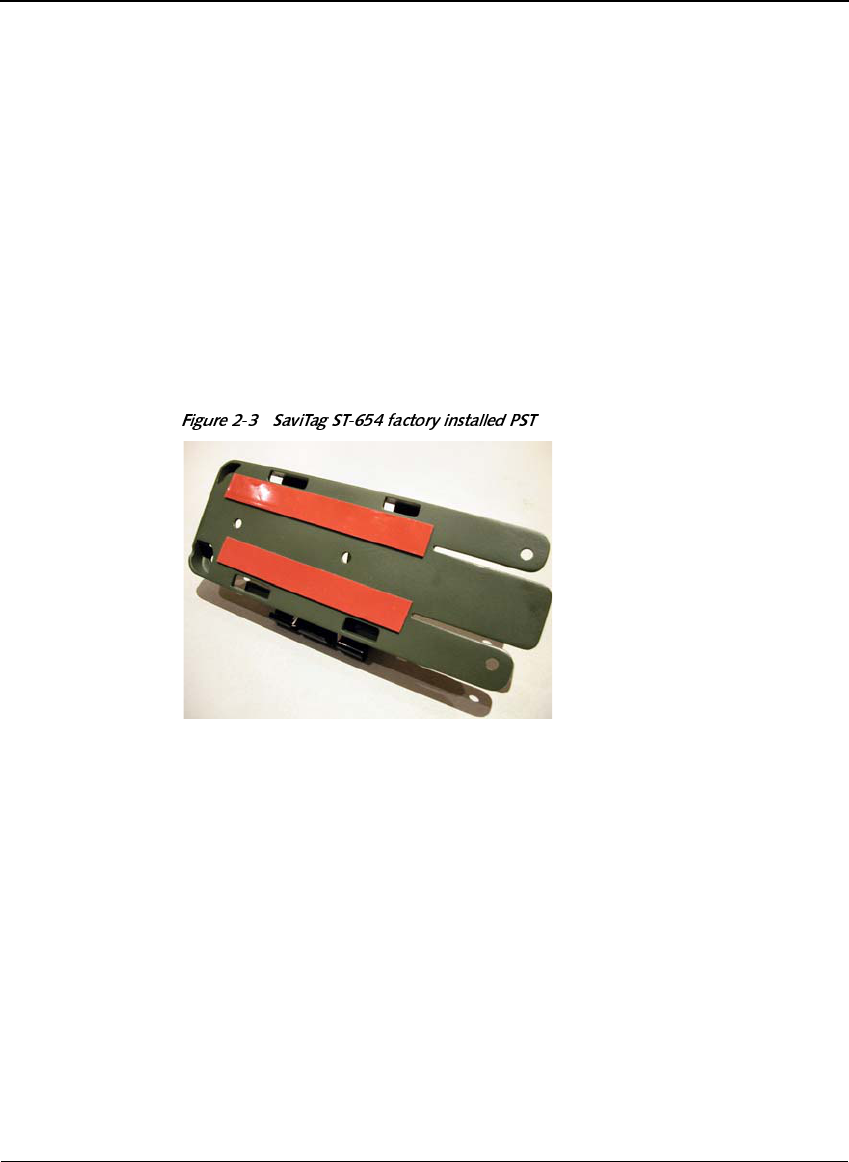
For ease of installation, during manufacturing Savi installs this PST on the
back of the plastic mounting sleeve. PST mounting kits are also available
for separate purchase.
Once a mounting sleeve is fastened to an asset, you can leave it on the asset
even after SaviTag ST-654 is removed so it is available for future use with
other compatible SaviTags. Prior to re-use, visually inspect the
PST-mounted sleeve to make sure it is attached securely. If necessary,
reinstall the sleeve using new PST.
3675HOLDELOLW\DQG'XUDELOLW\
3M Corporation has conducted extensive environmental testing on their
Automotive Acrylic Plus Attachment Tape. In addition, Savi has conducted
its own independent environmental tests of PST using SaviTag ST-410 as a
test platform. The U.S. Army (Tobyhanna Army Depot) has also tested PST
for use on surfaces treated with Chemical Agent Resistant Coating (CARC).
All these tests confirm that PST is an appropriate choice for mounting
SaviTags.

0RXQWLQJ6DYL7DJ67
6DYL7DJ67,QVWDOODWLRQ*XLGH
◆Savi Technology successfully conducted the following tests upon
samples of 3M PST:
❖Extreme temperature (–40º to +70º Celsius)
❖Step test (200 pounds applied in shear)
❖Shock (140g or 120 lbs.)
❖Vibration (MIL-STD-810E)
❖Salt fog (MIL-STD-810E)
❖Corrosive liquids
❖Peel test (50 pounds of peel force)
Savi’s tests confirm the excellent adhesion integrity and reliability
of 3M PST.
◆3M Corporation conducted a longevity test of PST. They found no
significant degradation in the performance of PST even after five years
of service on a test vehicle. As long as the surface is prepared properly,
PST will work reliably for five years or longer. See “Preparing the
Surface for PST Application” on page 19.
◆3M Corporation compared the peel strength of a new roll of PST versus
a roll that had been aged 21 months. In all cases, the aged roll matched
performance of the new roll in tests conducted over a 72-hour period.
3UHSDULQJWKH6XUIDFHIRU367$SSOLFDWLRQ
PST is suitable for almost any smooth, flat surface made of metal or plastic.
Metal surfaces may be coated with most paints, including Chemical Agent
Resistant Coating (CARC). It is, however, extremely important that you
follow proper surface preparation to enable optimal adhesion.
PST is not intended for attachment to wooden surfaces because of the
surface roughness of wood, and the wicking of rain or spray through wood
fiber. Screws are the preferred mounting method for wooden surfaces.
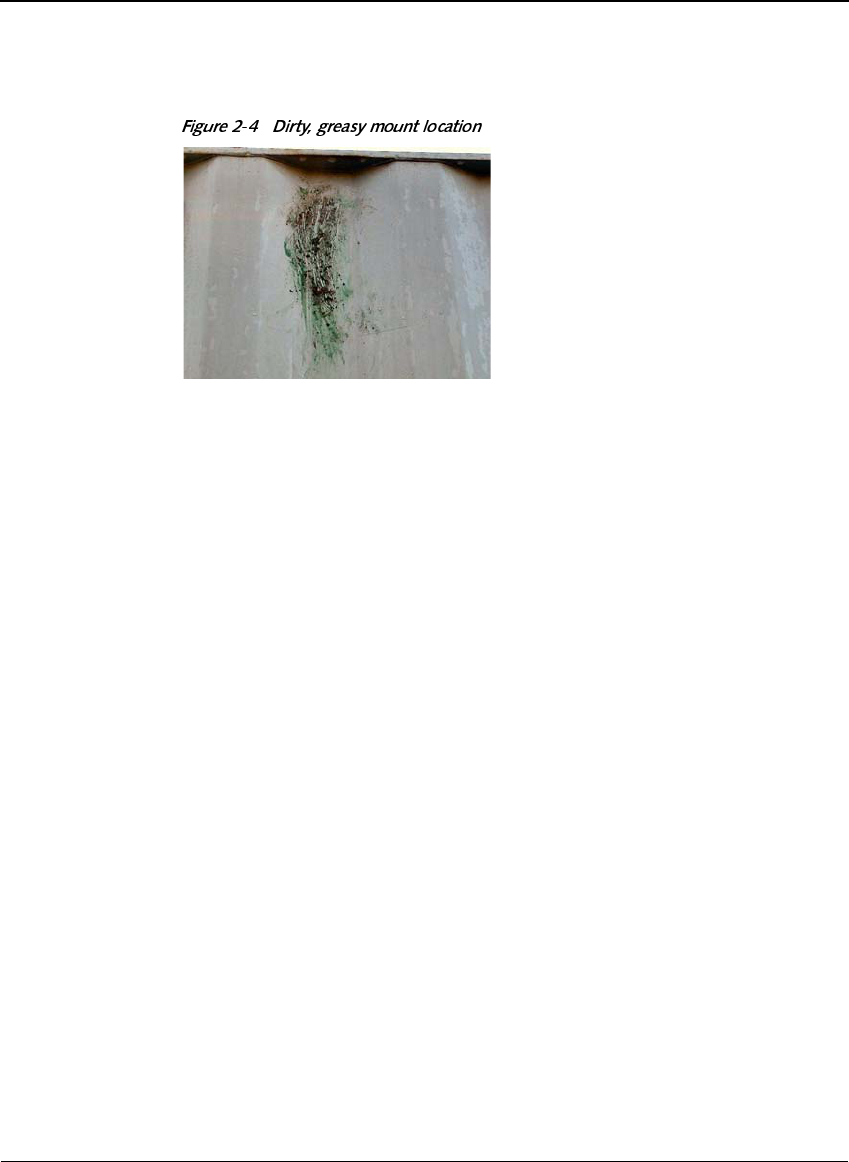
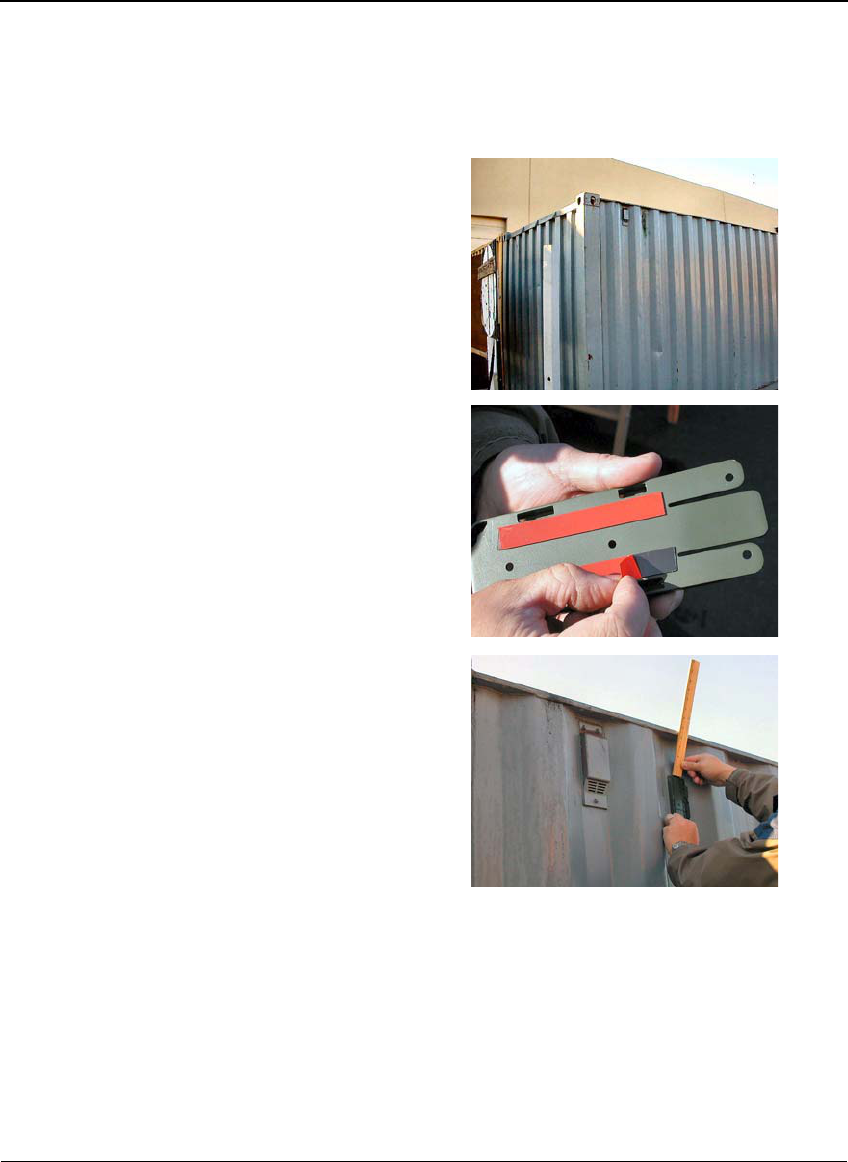
PST surface preparation is a simple, but critical process. The surface
cleaning procedure on page 21 demonstrates how to clean a shipping
container that has greasy residue and dirt on the intended mounting
surface as shown in Figure 2-4.
&+$37(5
,QVWDOOLQJ6DYL7DJ67
This demonstration was performed at about 50 degrees Fahrenheit on a
mounting surface covered with moisture and condensation. The optimum
mounting surface temperature for PST application is 60 degrees Fahrenheit
or above. At this temperature full adhesion strength will be achieved within
a few hours. But 3M has successfully applied PST to exposed surfaces
at temperatures as low as 40 degrees Fahrenheit. Even at these lower
temperatures, tags can be installed immediately after PST application;
full adhesion strength will be achieved within 24 hours.
Make sure you have the following cleaning materials available:
◆General purpose cleaner. Any commercial cleaner with a degreaser;
for example Formula 409® Cleaner, Ajax® All-Purpose Cleaner,
or Simple Green® All-Purpose Industrial Degreaser
◆Rags or paper towels
◆Scrub brush, bucket, and mild soap and water solution if needed
0RXQWLQJ6DYL7DJ67
6DYL7DJ67,QVWDOODWLRQ*XLGH
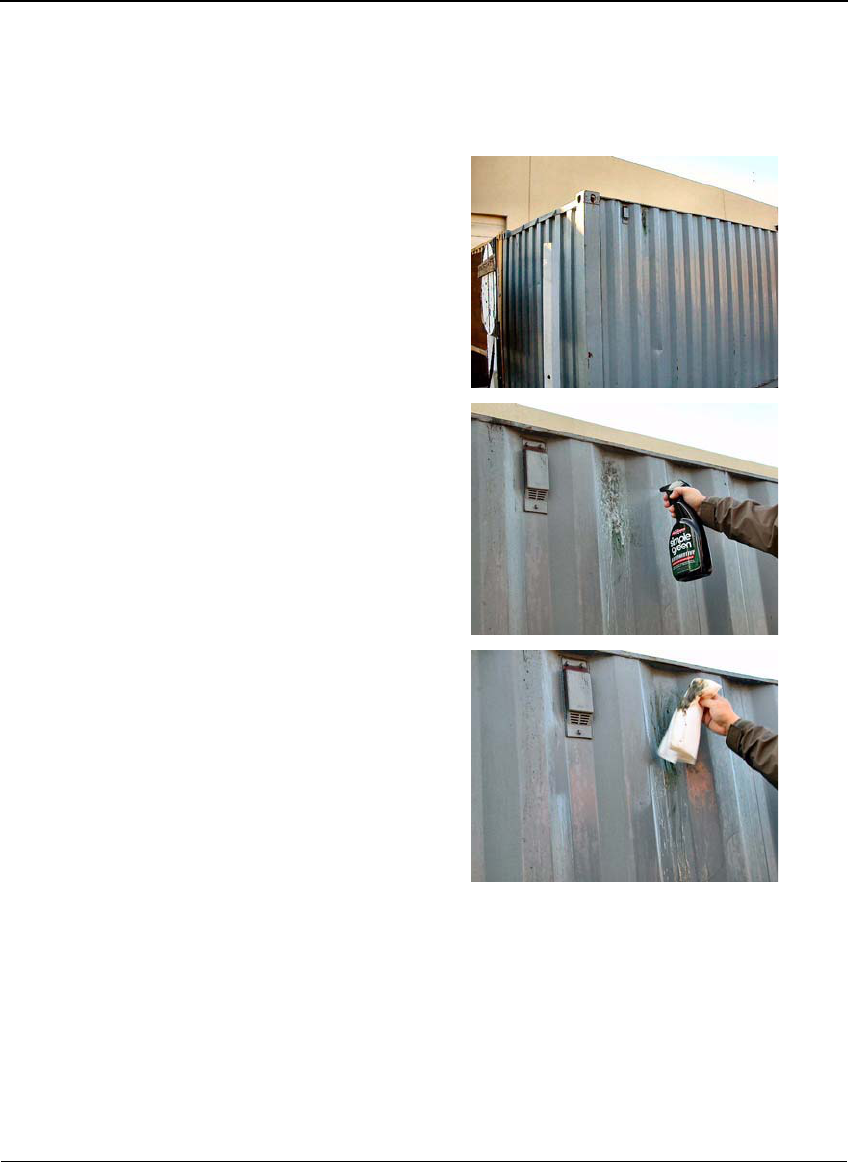
To clean the surface:
Determine where the
mounting sleeve or
SaviTag ST-654 is to be
attached to the shipping
container or asset. Be sure
that the surface to which the
tapes will be applied is flat.
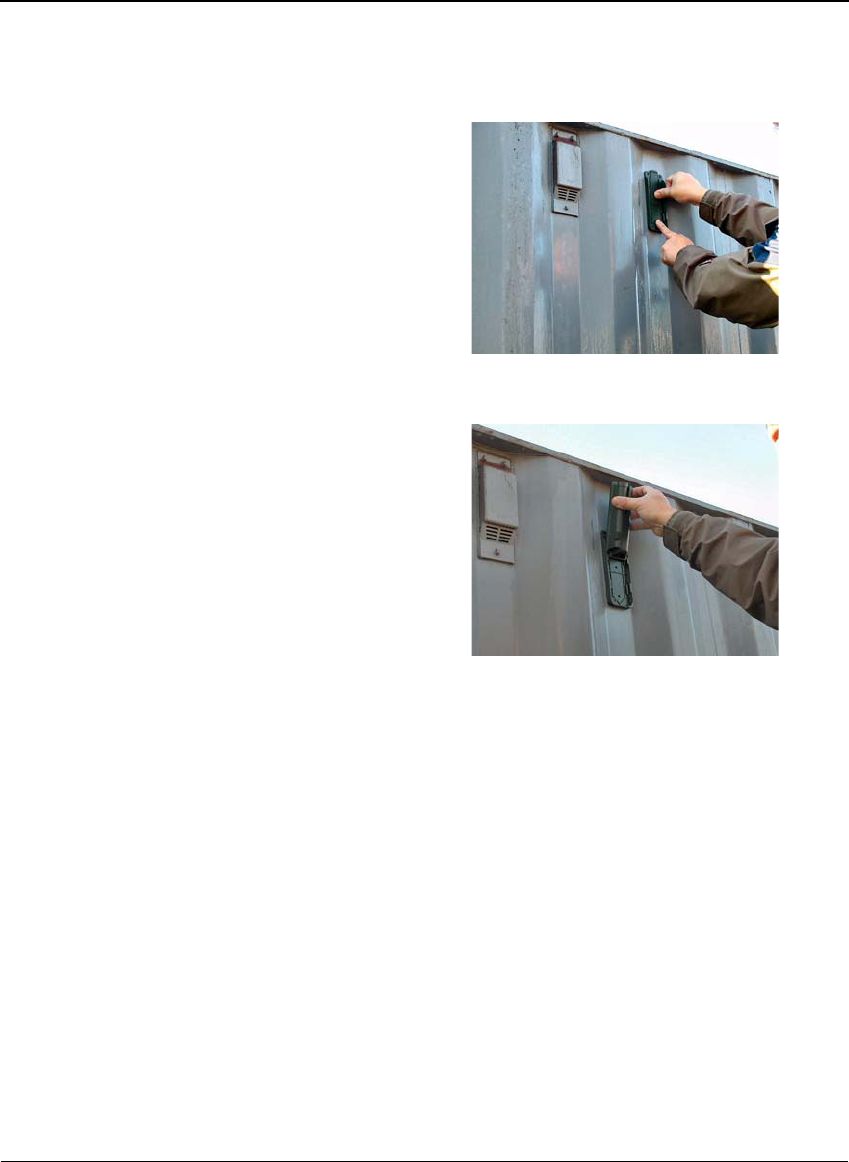
Spray a liberal amount
of general purpose cleaner
onto the mounting surface.
Using rags or paper towels,
clean the mounting surface
so it is free of dirt, rust, and
loose paint flakes.
&+$37(5
,QVWDOOLQJ6DYL7DJ67
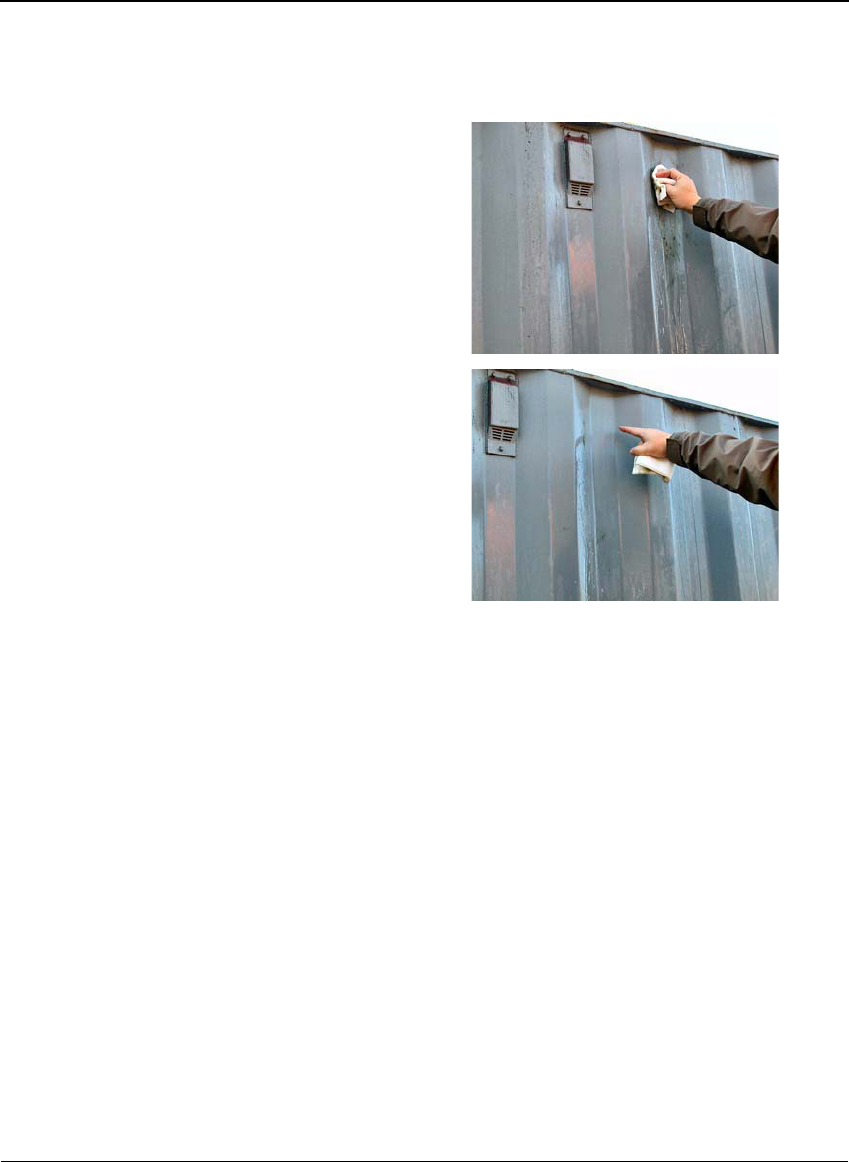
If the surface is heavily
soiled, use a mild soap and
water solution to scrub the
surface clean.
Ensure that the mounting
surface is free from
moisture and condensation.
0RXQWLQJ6DYL7DJ67
6DYL7DJ67,QVWDOODWLRQ*XLGH
$SSO\LQJWKH7DJ
Return to the location
where the mounting sleeve
or tag is to be attached to
the shipping container or
asset.
Obtain a mounting sleeve
with PST installed and
carefully remove the red
protective film covering.
Avoid touching the PST
adhesive. You can also
apply PST directly to the
back of a tag that is to be
mounted without a sleeve.
Position the sleeve, making
sure the retaining clip is
pointed up. Make sure there
is at least 4 inches (10 cm)
of vertical clearance above
the ST-654 sleeve to allow
the ST-654 tag to be
inserted. Be sure that the
surface to which you will
apply the tape is flat, and
that the sleeve or tag can
move freely to compress
the tape in the next step.
&+$37(5
,QVWDOOLQJ6DYL7DJ67
When the sleeve or tag is
straight, press it into place.
Apply pressure to the tape
strips by pushing firmly
against the tag or inside
surface of the sleeve. To
assure a good bond, apply
as much finger pressure as
possible and work fingers
up and down the area over
the tape strips.
If applicable, insert the tag
into the sleeve and insert a
wire loop or nylon tie-wrap
through the two retaining
ears. No tape curing time is
required prior to installing
the tag.
0RXQWLQJ6DYL7DJ67
6DYL7DJ67,QVWDOODWLRQ*XLGH
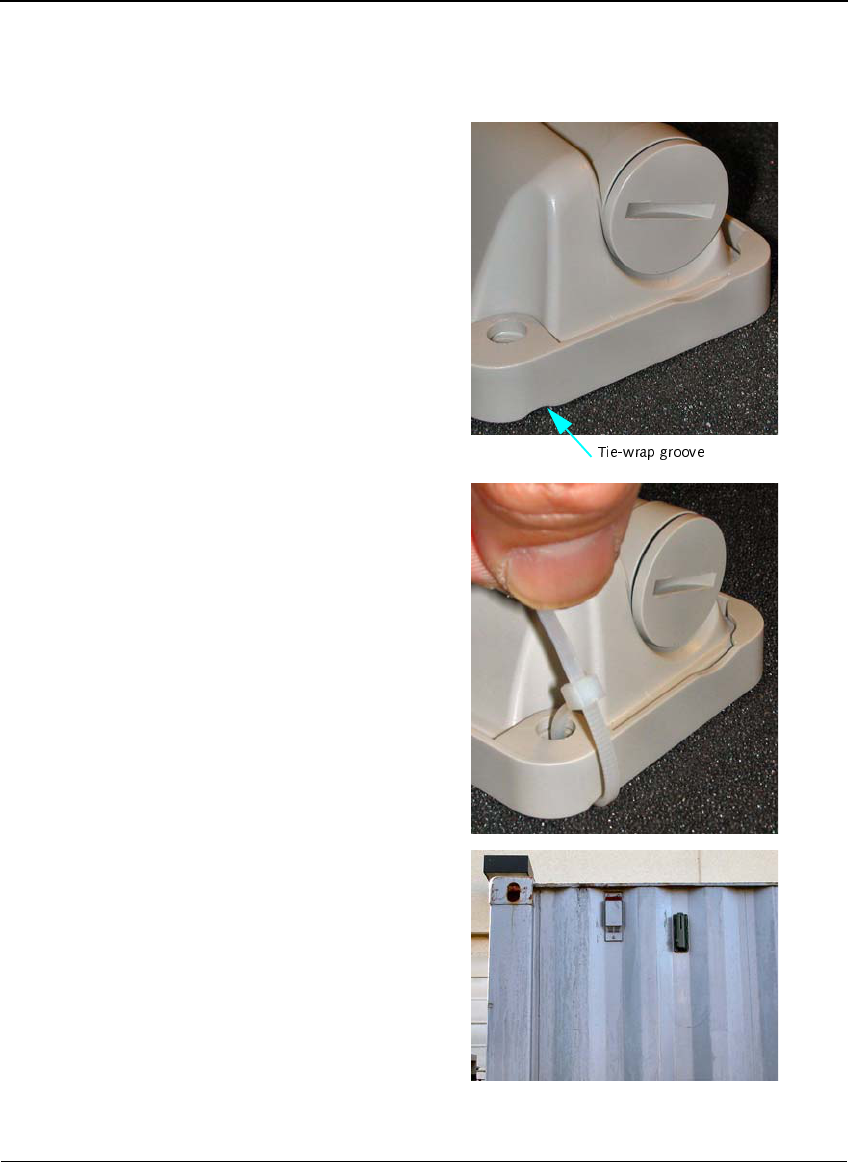
The mounting sleeve is
equipped with a tie-wrap
groove to ensure that
SaviTag ST-654 is securely
fastened.
To prevent the tag from
dislodging from the tag
mounting sleeve as a result
of sudden impact or
extreme shocks, insert the
supplied tie-wrap through
the sleeve.
When you are done, the
mounted tag looks like this.
&+$37(5
,QVWDOOLQJ6DYL7DJ67
5HPRYLQJ3UHVVXUH6HQVLWLYH7DSH0RXQWHG6OHHYHVRU7DJV
Savi recommends that you leave the mounting sleeve attached to the
shipping container or asset for later reuse, but if it is necessary to remove
the sleeve or tag:
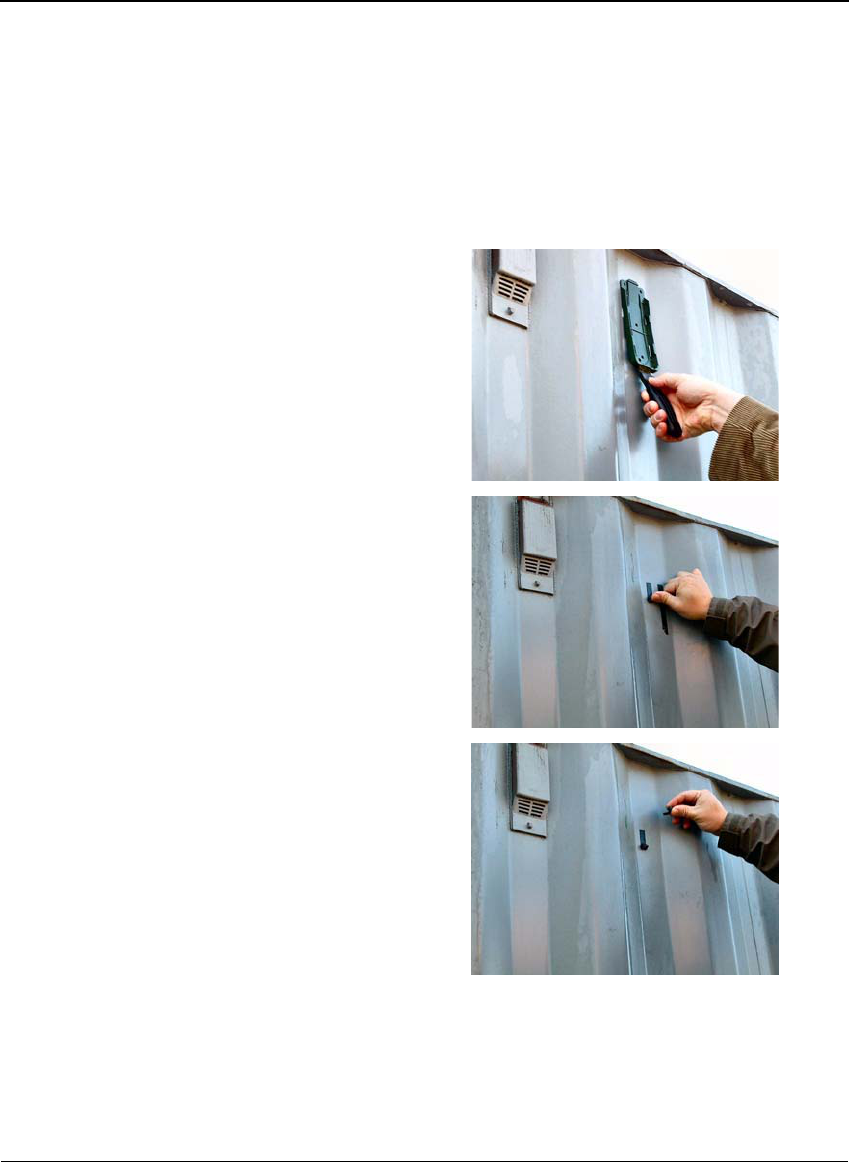
Lift one end of the
mounting sleeve or RFID
tag with a putty knife or
chisel and separate the tape.
Remove the tape on the
sleeve, tag, or mounting
surface by rubbing with
dry thumbs.
Use a scouring pad with
a mild soap and water
solution to remove any
remaining adhesive.
0RXQWLQJ6DYL7DJ67
6DYL7DJ67,QVWDOODWLRQ*XLGH
0RXQWLQJ6DYL7DJ678VLQJ5LYHWV
1RWH
,I\RXZDQWWRPRXQW6DYL7DJ67XVLQJULYHWVFRQVLGHU
UHPRYLQJWKH367DVRXWOLQHGLQ´5HPRYLQJ3UHVVXUH6HQVLWLYH7DSH
0RXQWHG6OHHYHVRU7DJVµRQSDJH
Determine where the mounting sleeve or SaviTag ST-654 is to be
attached to the shipping container or asset. Make sure there is at least
4 inches (10 cm) of vertical clearance above SaviTag ST-654 mounting
sleeve to allow the tag to be inserted.
Using a marker, mark on the shipping container or asset the location
of the rivet holes on the tag mounting sleeve.
On the shipping container, drill holes at the locations you marked
in step 2.
Return to the location where the mounting sleeve or tag is to be attached
to the shipping container or asset. Align the rivet holes on the tag
mounting sleeve with the rivet holes you made in step 3.
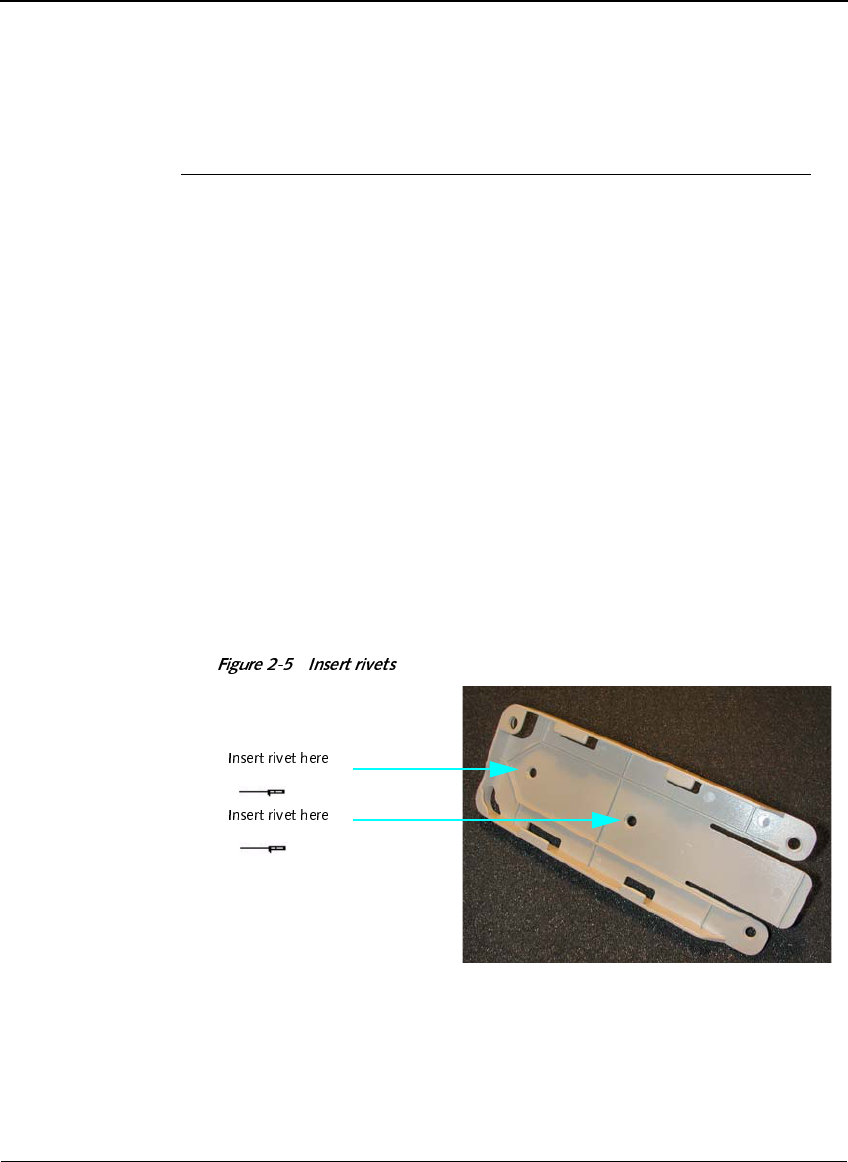
Push the head of the rivets through the tag mounting sleeve.
Use the handheld rivet gun to clip the nail of the rivet and secure the
tag mounting sleeve to the shipping container or asset. Avoid fastening
the rivets too tightly so as not to damage the mounting sleeve.
&+$37(5
,QVWDOOLQJ6DYL7DJ67
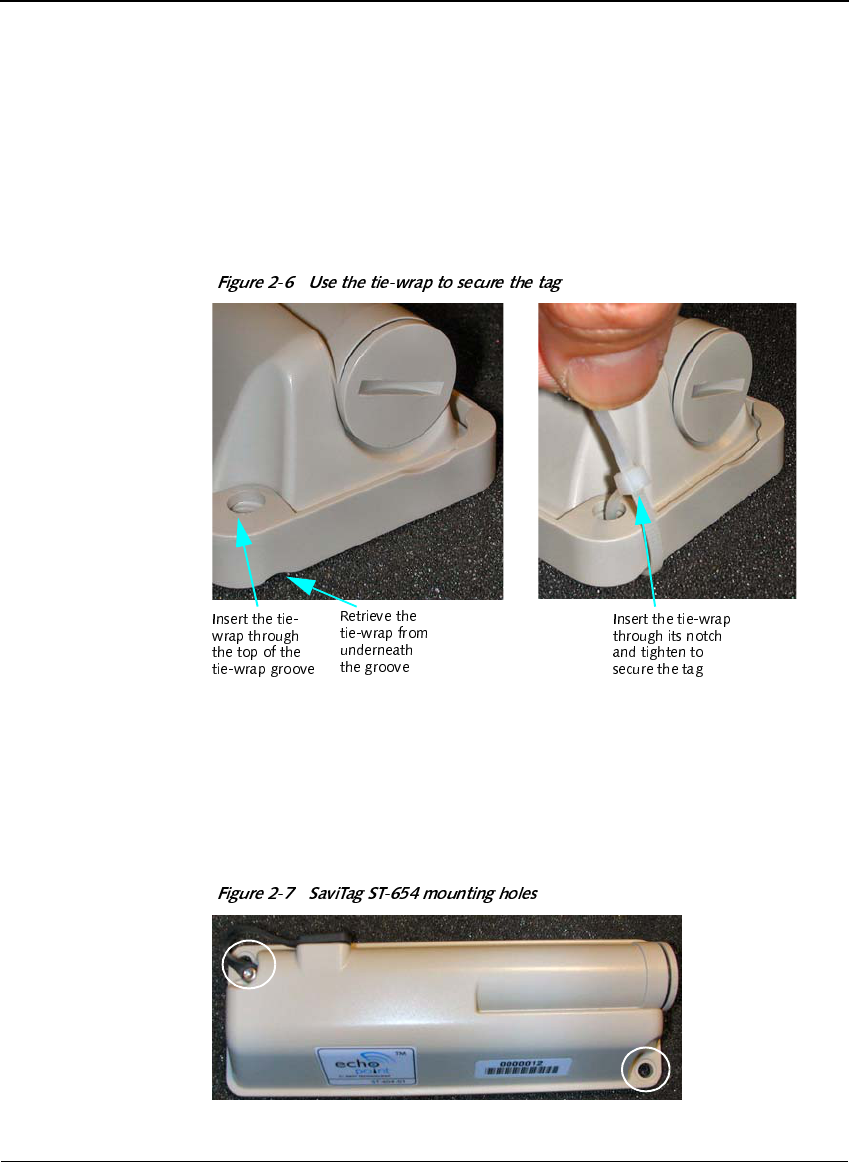
To prevent the tag from dislodging from the tag mounting sleeve as a
result of sudden impact or extreme shocks, insert the supplied tie-wrap
through the sleeve.
The mounting sleeve is equipped with a tie-wrap groove to ensure that
SaviTag ST-654 is securely fastened.
0RXQWLQJ6DYL7DJ67:LWKRXWD0RXQWLQJ
6OHHYH
You can mount SaviTag ST-654 without a plastic mounting sleeve using
some or all of the fasteners listed on page 17. You will need to provide
your own rivets or screws.