Savi Technology 674T-V2 RFID Tag User Manual ST674
Savi Technology Inc RFID Tag ST674
Contents
- 1. user manual pt 1
- 2. user manual pt 2
user manual pt 1

Installation Guide
Savi ST-674 Sensor Tag

Published February 2009
Part number 805-05829-901 Rev A
Documentation for SaviTag ST-674
Copyright © 2009 Savi Technology, Inc. All rights reserved. Unpublished - rights reserved
under the Copyright Laws of the United States.
EchoPoint, Savi, Savi SensorTag, Savi SmartChain, Savi SmartStart, Savi Technology,
Savi’s Nested Visibility, SaviTag, SmartChain, the EchoPoint Logo, and the Savi Logo are
trademarks or registered trademarks of Savi Technology, Inc. in the United States and other
countries.
Information in this manual is subject to change without notice and does not represent a
commitment from the vendor. The software and/or databases described in this document
are furnished under a license agreement or nondisclosure agreement. The software and/or
databases may be used or copied only in accordance with the terms of the agreement. It is
against the law to copy the software on any medium except as specifically allowed in the
license or nondisclosure agreement.
THIS DOCUMENTATION CONTAINS CONFIDENTIAL INFORMATION AND
TRADE SECRETS OF SAVI TECHNOLOGY, INC. USE, DISCLOSURE OR REPRO-
DUCTION IS PROHIBITED WITHOUT THE PRIOR EXPRESS WRITTEN PERMIS-
SION OF SAVI TECHNOLOGY, INC.
U.S. GOVERNMENT RIGHTS
Use, duplication or disclosure by the U.S. government is subject to restrictions set forth in
the Savi Technology, Inc. license agreement and as provided in DFARS 227.7202-1(a) and
227.7202-3(a) (1995), DFARS 252.227-7013(c)(1)(ii) (OCT 1988), FAR 12.212(a) (1995),
FAR 52.227-19 or FAR 52.227-14 (ALT III), as applicable. Savi Technology, Inc.
Other product names mentioned in this guide may be trademarks or registered trademarks
of their respective owners and are hereby acknowledged.
Savi Technology.
351 E. Evelyn Avenue
Mountain View, CA 94041-1530
Phone: 1-650-316-4700
Facsimile: 1-650-316-4750
www.savi.com

3
Contents
1
Savi ST-674 Sensor Tag Description . . . . . . . . . . . . . . . . . . . . . . 5
Features . . . . . . . . . . . . . . . . . . . . . . . . . . . . . . . . . . . . . . . . . . . . . . . . . . 6
Activating the Tag . . . . . . . . . . . . . . . . . . . . . . . . . . . . . . . . . . . . . . . . . . 6
Initializing the Tag. . . . . . . . . . . . . . . . . . . . . . . . . . . . . . . . . . . . . . . . . . 9
Placing the Tag for Best Performance . . . . . . . . . . . . . . . . . . . . . . . . . . 10
Mounting the Tag. . . . . . . . . . . . . . . . . . . . . . . . . . . . . . . . . . . . . . . . . . 12
Replacing the Battery. . . . . . . . . . . . . . . . . . . . . . . . . . . . . . . . . . . . . . . 14
Contacting Savi Support . . . . . . . . . . . . . . . . . . . . . . . . . . . . . . . . . . . . 15
Specifications. . . . . . . . . . . . . . . . . . . . . . . . . . . . . . . . . . . . . . . . . . . . . 16

4
5
Savi ST-674 Sensor Tag
Description
The Savi ST-674 tag is an active RFID tag for real-time tracking and
environmental monitoring of sensitive, perishable items such as medical
supplies, food stuff, and ammunition. The ST-674’s sensors monitor and
log environmental conditions, both temperature and humidity, of assets
and their contents during transport and while in storage.
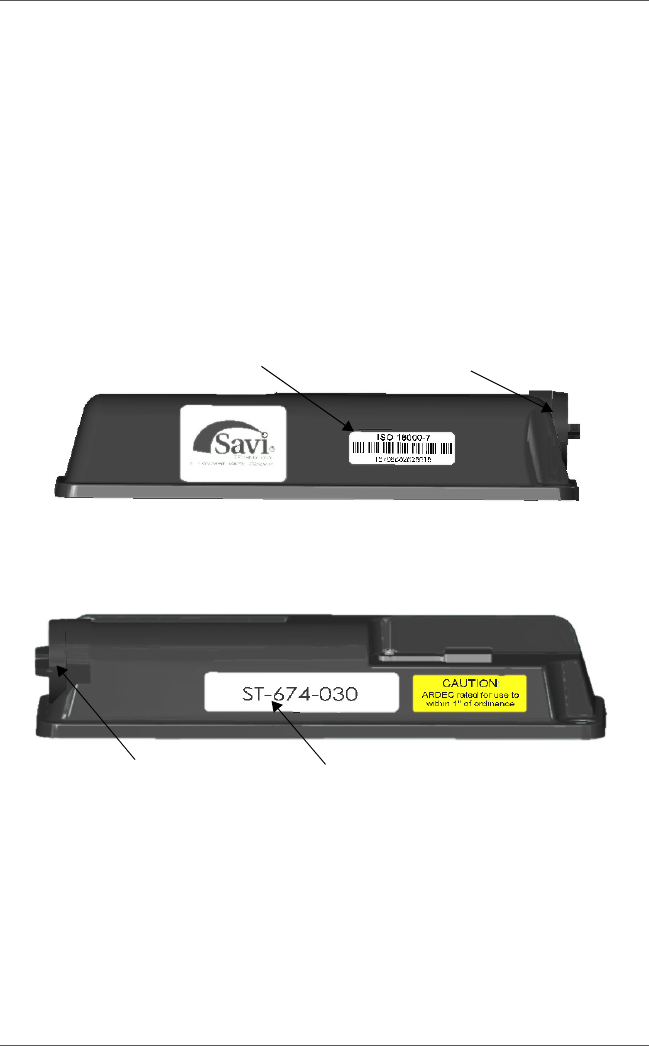
Figure 1: Front view
Tag ID number Battery compartment
Figure 2: Rear view
Battery compartment
Tag model number

Savi ST-674 Sensor Tag Installation Guide
6
Figure 3: Bottom view
Sensor port
Features
• ISO 18000-7 compliant active RFID tag with environmental sensor
capability
• Ideal for tracking sensitive items such as medical supplies, food, and
ammunition
• Supports low-frequency technology for more precise locating
capabilities
• Supports USB for reading and writing
• FCC, HERO, ETSI, RoHS (Directive 2002/95/EC) certified
Activating the Tag
The tag is shipped in sleep mode. You must remove and re-insert the
battery to wake up the tag. After you re-insert the battery, you can
initialize the tag.
1. Remove the battery cap.
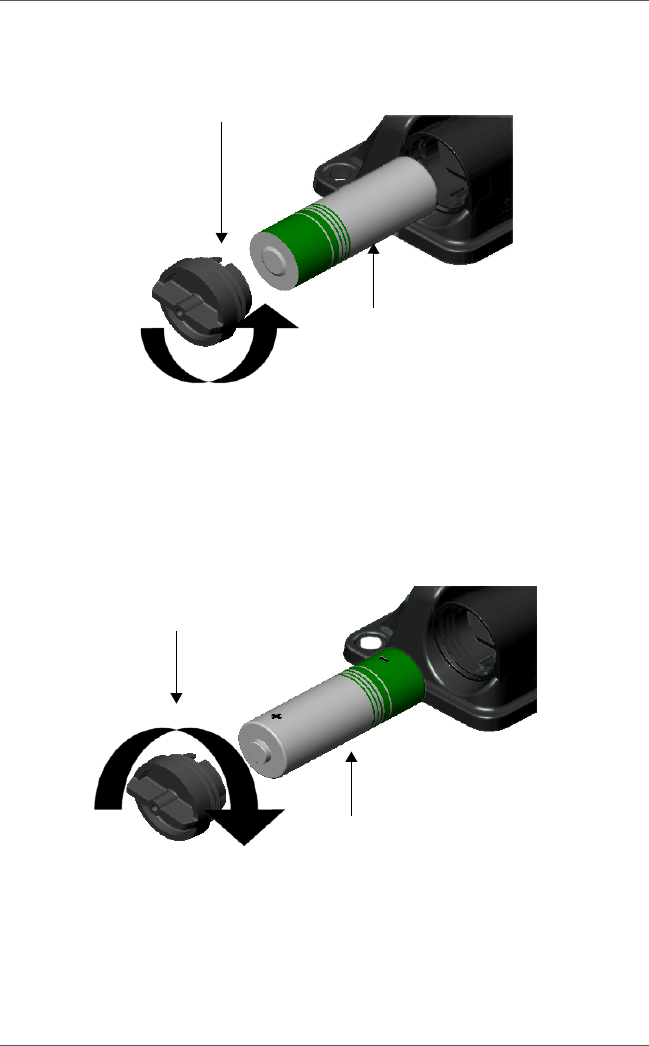
Turn cap to open
Remove battery as shipped
Activating the Tag
7
2. Remove the battery. Wait a few seconds and then reinsert the battery,
matching the negative (–) and positive (+) terminals to the symbols
shown on the tag housing. The tag will not work if you install the
battery in the wrong direction (reversed).
Turn cap to close
Correct battery orientation
Whenever a battery is inserted into a tag, the tag will emit 5 beeps.
Savi ST-674 Sensor Tag Installation Guide
8
Then, if the tag emits a long (1/2 second beep), that means it has an
internal sensor failure.
Then, the tag will emit 2 short beeps to indicate adequate battery
voltage or 3 short beeps if a fresh battery is required.
Whenever a battery is inserted into a tag, the tag assumes that it is a
fresh battery. Inserting a used battery into a tag may result in what
appears to be a premature battery failure.
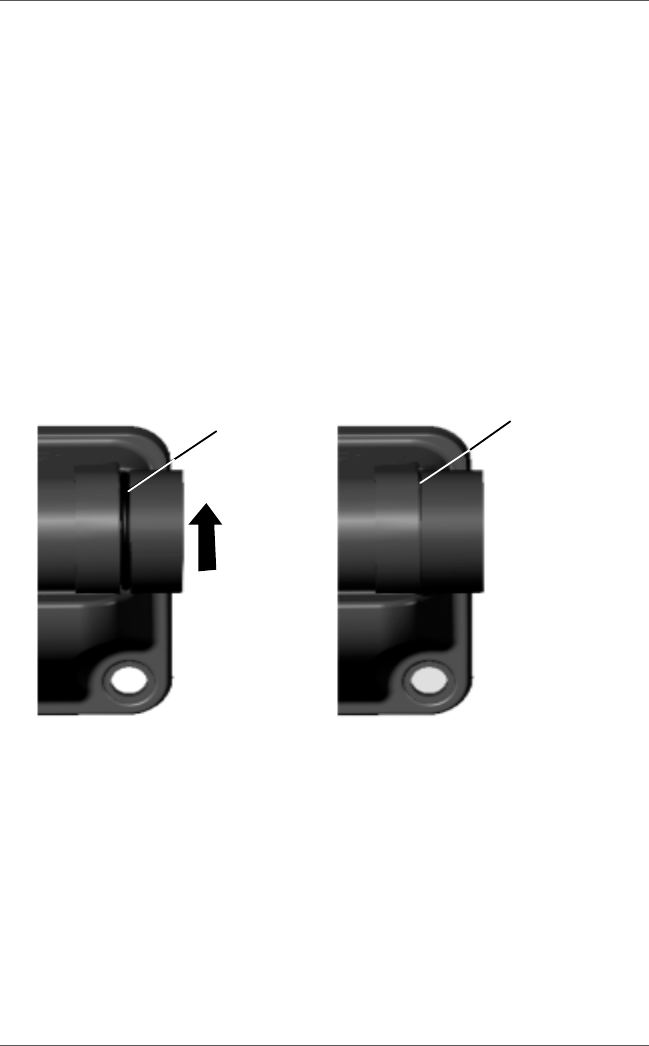
3. Replace the battery cap on the tag. Continue tightening the cap until
it is secure.
Improper
O-ring exposed
Turn cap
until tight
Proper
O-ring hidden
If the O-ring is not properly compressed by the cap, water leakage and
damage may occur.
Note: When the tag is not in use, disable the tag by removing, reversing,
and re-inserting the battery. Store the battery at room temperature
(50-80 °F or 10-27 °C ).
Initializing the Tag
9
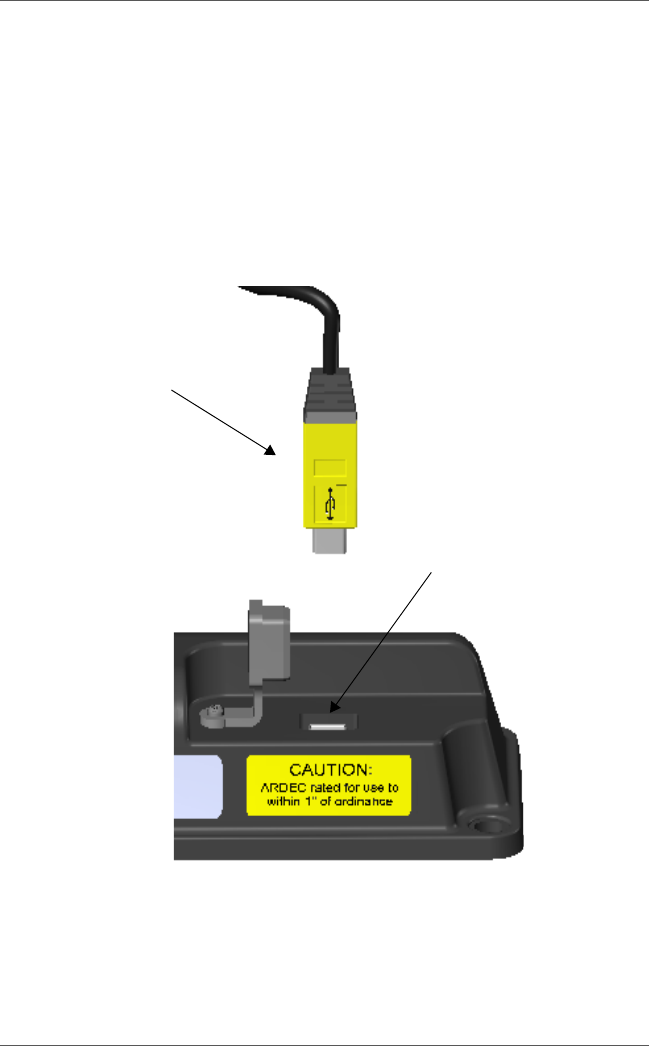
Initializing the Tag
Once you activate the tag, you can initialize it for immediate use.
1. Unplug the USB port cover.
2. Insert the USB cable into the USB port on the tag and connect the other
end to the USB port on the computer.
USB cable
USB port

Savi ST-674 Sensor Tag Installation Guide
10
3. Refer to the Savi SmartChain Mobile User Guide or the Savi Smart-
Chain WorkStation User Guide for instructions on the initialization
process.
Placing the Tag for Best
Performance
Savi Technology recommends that you mount the tag on a flat surface,
with the tag aligned vertically. For best performance, place the tag as high
as possible, safe from impact (for example, between the ribs of an
ISO-type shipping container), and away from obstructions on the asset.
Mount the tag by adhering the tag and supplied plastic mounting sleeve
with pressure sensitive tape (PST) to the inside or outside of a Class VIII
container or plastic, cardboard, or wood container or box.
Typical locations include mounting the tag inside the middle of the
container or on the outside of the container on a flat surface.
For best performance, make sure the tag is:
• Mounted on a metal surface.
• Mounted at no less than a 6 foot (1.8m) elevation.
• Mounted vertically.
• Not mounted behind or between metal objects
• Secured to the Optional Mounting Bracket to provide the minimum
clearance to the asset (.575 inch or 1.5 cm)
Placing the Tag for Best Performance
11
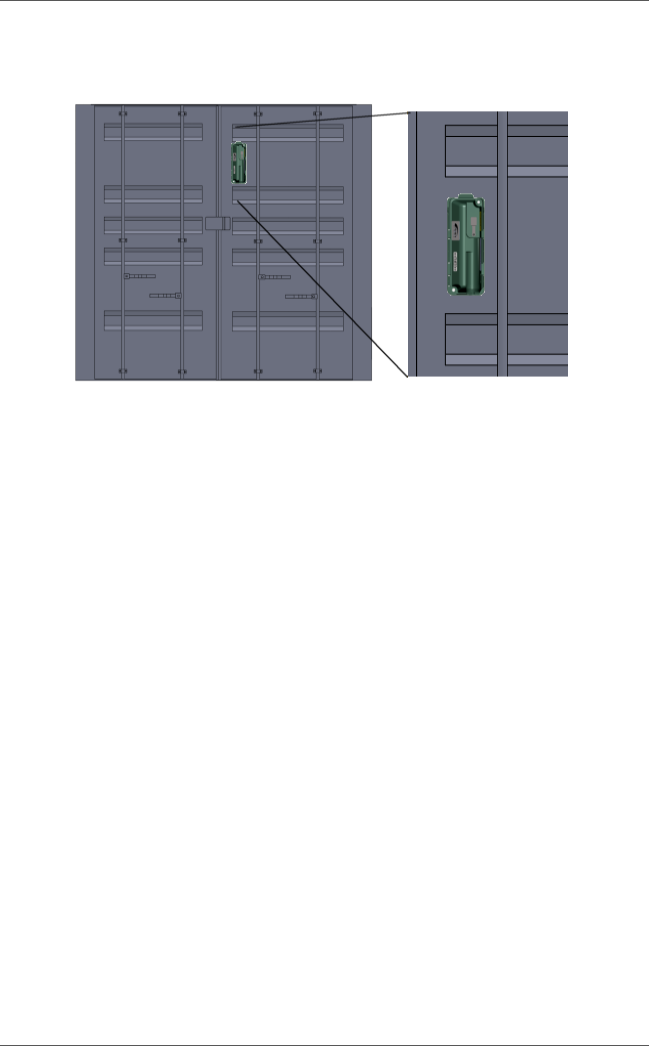
Figure 4: Asset tag mounted on an ISO container door
Note: Make sure you clean the surface of the container or other asset
before attaching the tag.
The tag will have 400-foot (122m) read/write range to Savi SR-650 Fixed
Readers. For the most consistent communications with the tag, the Fixed
Readers must be mounted:
• to have an unobstructed line-of-sight to the tag
• at 20 feet (6m) or higher
caution: Tags mounted close to the ground may have less range.
Follow the instructions in the Savi Fixed Reader documentation to locate
and position the Savi Fixed Reader for best performance.

Savi ST-674 Sensor Tag Installation Guide
12
Mounting the Tag
You can choose among several mounting methods for the tag, including
using pressure sensitive tape (PST) or a plastic mounting sleeve.
Whichever mounting method you select, the goal is to prevent accidental
loss of the tag by sudden impact, vibration, or shock during transport. The
fastener you choose often depends on the material from which the asset or
container is constructed and your personal preference.
There are two accessory mounting packages, which are sold separately:
• Savi Mounting Kit STA-1260-Black, which includes PST
• Savi Magnetic Mounting Kit STA-1261-Black
You can also use the following alternative fastening methods:
• Tie-wraps
•Twine
• Screws
caution: Use these and other alternative methods at your own risk.
If it is not possible or practical to use screws, use PST to attach the tag.
Use only 3M Corporation’s Automotive Acrylic Plus Attachment Tape®.
For ease of installation, the tag comes with this PST on the back of the
plastic mounting sleeve. PST mounting kits are also available for separate
purchase.
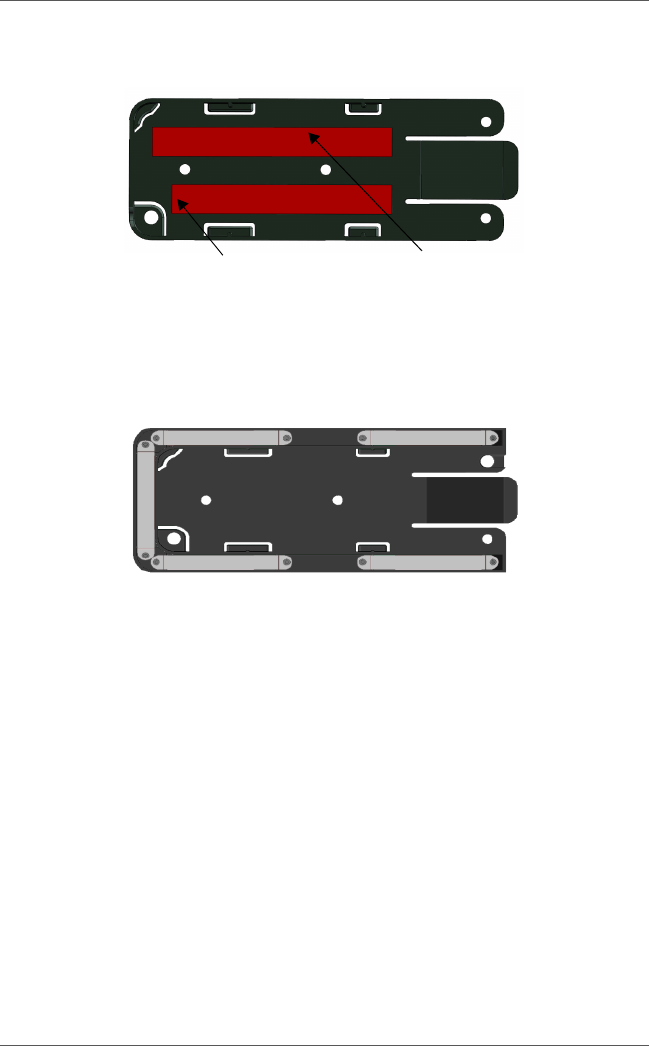
Pressure sensitive tape
Mounting the Tag
13
The magnetic mount clamps directly onto the metal surface. The magnets
hold the tag securely, but allow the tag and the magnetic bracket to be
removed quickly.
Once a mounting sleeve is fastened to an asset, you can leave it on the
asset even after the tag is removed so it is available for future use with
other compatible tags. Prior to re-use, visually inspect the PST-mounted
sleeve to make sure it is attached securely. If necessary, reinstall the
sleeve using new PST.
Asset tags and mounting sleeves have a security hole through which a
nylon keeper band may be passed and tightened to secure the tag in place.

Security hole
Savi ST-674 Sensor Tag Installation Guide
14
Replacing the Battery
The tag is equipped with non-volatile memory, which means stored data is
not lost when you replace the battery.
1. Remove the battery cap.
2. Remove the discharged battery from its compartment.
For more information, see “Activating the Tag” on page 6. The lithium
battery can be harmful to the environment. Follow current procedures
for safely disposing of lithium batteries. The battery cannot be reused
or recharged.
3. Install a 3.6V lithium "A" battery, matching the negative (–) and posi-
tive (+) terminals to the symbols shown on the tag housing. The tag
will not work if you install the battery in the wrong direction
(reversed).
4. Replace the battery cap on the tag.
Whenever a battery is inserted into a tag, the tag will emit 5 short
beeps, one second apart.

Contacting Savi Support
15
Then, if the tag emits a long (1/2 second beep), that means it has an
internal sensor failure. Remove the battery and insert it again. If the tag
emits the same long (1/2 second) beep, do not use the tag.
Then, the tag will emit 2 short beeps to indicate adequate battery
voltage or 3 beeps to indicate inadequate battery voltage. 3 short beeps
means the tag needs a fresh battery.
Whenever a battery is inserted into a tag, the tag assumes that it is a
fresh battery. Inserting a used battery into a tag may result in what
appears to be a premature battery failure.
After the beep, continue tightening the cap until it is secure.
Contacting Savi Support
If you cannot find the information you need, contact Savi Support
Services.
• Check http://supportcenter.savi.com for contact information.
• Send an email to help@savi.com.
• Call 1-888-994-SAVI (North America only) or 1-650-316-4760
between 5 a.m. and 5 p.m. Pacific time.
When you contact Savi Support Services by telephone or email, have the
following information available:
• Contact information (company name, your name, email, and phone
number)
• Problem description
• Software version
•Product type
• Serial number or license information

Savi ST-674 Sensor Tag Installation Guide
16
Specifications
Model Numbers ST-674-030: Sensor tag
ST-674-030-NSN: Sensor tag with label
Physical
Characteristics
Dimensions: 6.2 in. (15.8 cm) x 2.1 in. (5.4 cm) x 1.1
in. (2.8 cm)
Weight: 3.8 ounces (108g)
Color: Black
Environmental Temperature: -32°C to +70°C operating; -40°C to
+85°C storage
Humidity: 95% non-condensing
Vibration and shock: MIL-STD-810F
Weatherproofing: IP64
Manufacturing: RoHS Directive 2002/95/EC
Wireless (UHF
Tr a n s c e i v e r )
Frequency: 433 MHz
Communication range (unobstructed): 400 ft.
(122m) operating read/write range (outdoors,
non-obstructed) from Savi SR-650 reader
Protocols: ISO 18000-7, EchoPoint
Wireless (LF
Receiver)
Frequency: 123 kHz
Communication range: Greater than 20 ft. (6m)
from SP-651-211 Signpost or SP-652-211 Signpost
Reader
Protocol: EchoPoint
Power Battery type: 3.6 volt lithium, replaceable by user
without tools
Battery life: Approximately 4 years at 2 collections
per day. Over-polling protection algorithm to extend
battery life

Specifications
17
Digital Sensor memory: 32 Kbytes on-board non-volatile
memory
Database memory: 128 Kbytes on-board
non-volatile memory
Wired interface: USB 1.1, USB 2.0
Accessories Mounting:
• Pressure sensitive tape
• Savi Mounting Kit STA-1260-Black (sold sepa-
rately)
• Savi Magnetic Mounting Kit STA-1261-Black (sold
separately)
Approval Radio Type Approval: FCC Part 15, EN 300 220 (433
MHz)
EMC and Immunity: EN 301 489
Ordnance: HERO Certified, ARDEC rating of 1 in.
(2.5 cm)
Environmental
Sensors
Temperature: Senses and samples temperature with
adjustable sample period and adjustable alarm
thresholds
Humidity: Senses and samples humidity with
adjustable sample period and adjustable alarm
thresholds

Savi ST-674 Sensor Tag Installation Guide
18