Schlage Lock CHEETAH Connected Touchscreen (Wireless Door Lock TX) User Manual
Schlage Lock Company Connected Touchscreen (Wireless Door Lock TX)
Users Manual
User’s Guide
TouchScreen Deadbolt
with Alarm
2
ENGLISH
CONTENTS
Security You Hear Instantly ......................2
Customer Service and Help ..................3
Lock Parts ................................................ 4
Locking and Unlocking .............................5
Replacing the Batteries ............................5
Emergency Key Override ..........................5
Programming the TouchScreen .................6
Finding your Default Codes ................. 6
About Programming ............................ 6
Function Procedures ............................7
Function Descriptions ..........................7
Programming the Alarm ...........................8
Powering the Alarm ............................. 8
Adjusting the Sensitivity Level ............. 8
Changing the Alert Setting ..................9
Alert Setting Descriptions .................... 9
Troubleshooting ..................................... 10
Factory Default Reset ........................ 11
My Codes ...............................................12
Best Practices ....................................12
Default Programming and User Codes
Locations ........................................... 12
Nexia Home Intelligence Functions ........14
Function Descriptions ........................14
The Nexia Home Bridge .....................14
Function Procedures ..........................14
Warranty and FCC/IC Statements ...........15
PLEASE KEEP THIS GUIDE
This guide contains important information about your lock!
• Default User Codes and Programming Code are located on the yellow sticker on the back
of this guide! You will need these if you ever need to reset your lock back to factory
default settings!
• Instructions for adding and deleting user codes, changing the lock behavior,
troubleshooting, customer service and more are explained in this guide!
• The yellow sticker also contains your serial number, which may be needed for warranty
and customer service support.
NEED HELP?
Please call customer support before returning the product to the store.
Customer Service and Help
If you need us to help you, we are here for you!
Toll-Free Calling From:
U.S.A.: (888) 805-9837
Canada: (800) 997-4734
Mexico: 018005067866
Visit our web sites for videos,
FAQs and more:
Web: www.schlage.com
REGISTER YOUR PRODUCT
Document your purchase and register your warranty
at RegisterMySchlage.com, or use the included
registration card.

3
ENGLISH
LOCK SETUP
Follow these steps to get your lock set up and ready to use.
1. More information coming soon.
4
ENGLISH
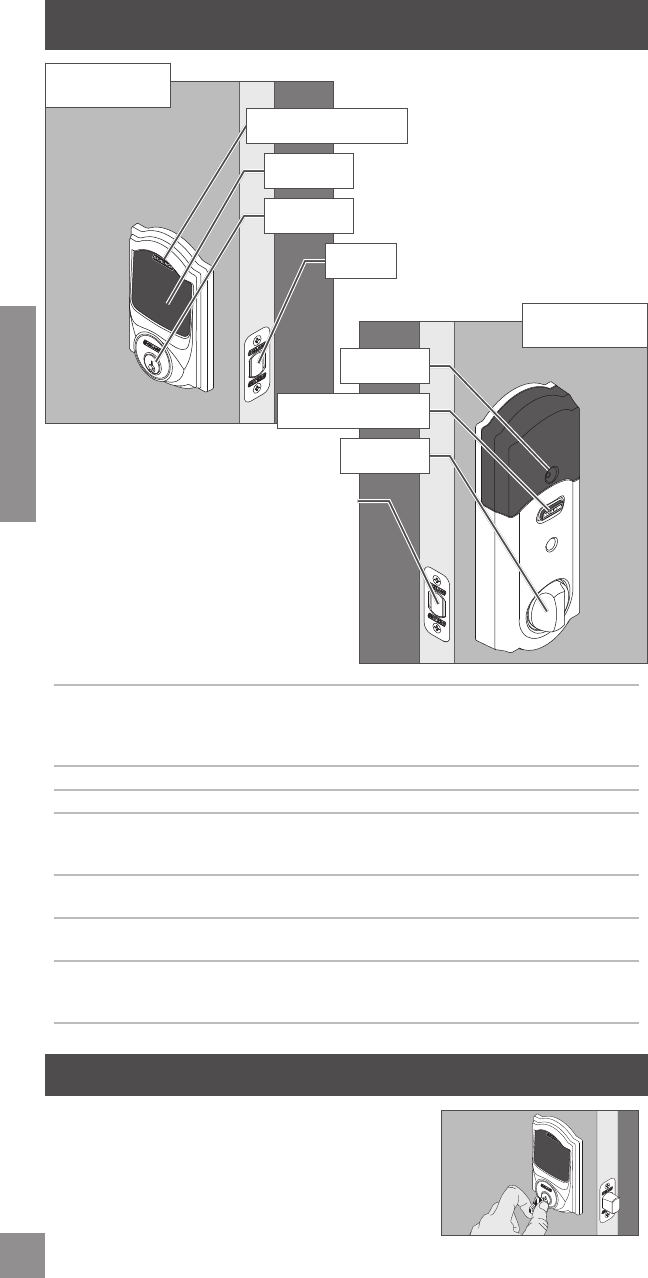
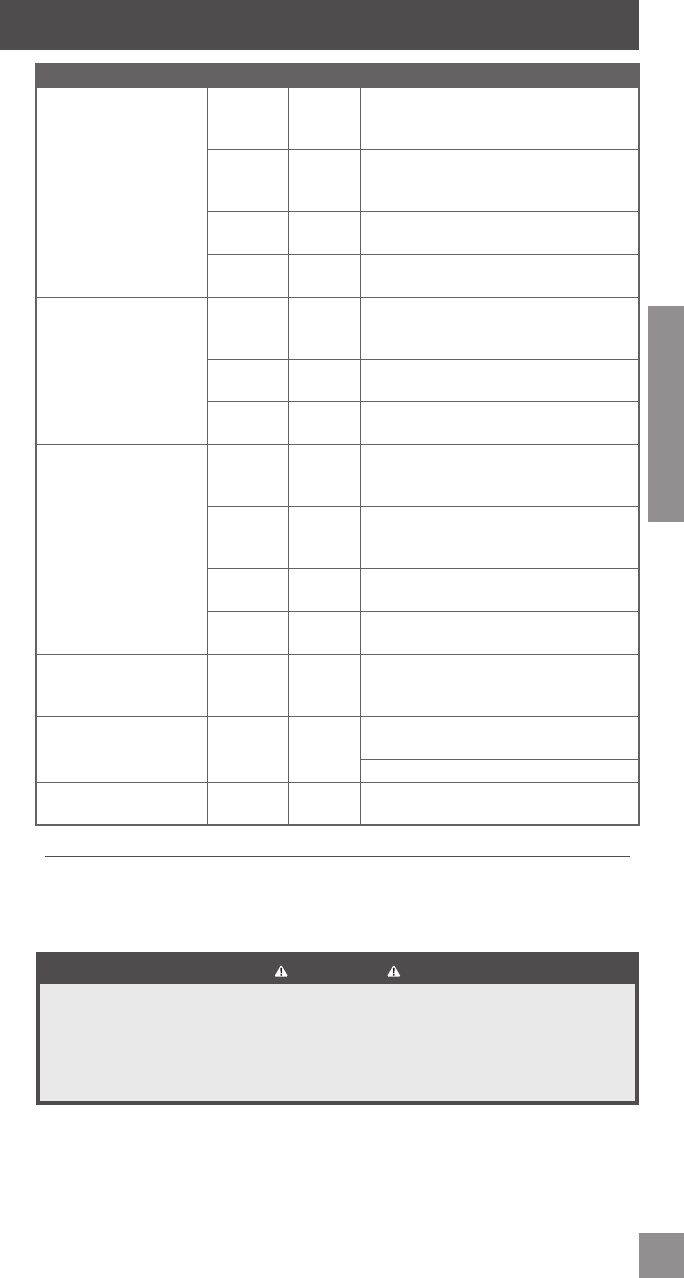
LOCK PARTS
Inside Schlage Button • Located on the inside of the door.
• Has three distinct lights and used to set and program the
alarm. Programming the Alarm on page 8.
• This button does not lock or unlock the door.
Thumbturn • Used to lock and unlock the door from the inside.
Outside Schlage Button • Located on the outside of the door.
Touchscreen • Remains unlit until the Outside Schlage Button is pressed.
• Located on the outside of the door.
• Used to enter codes for programming and unlocking.
Cylinder • Used only in emergency situations to unlock the lock.
Emergency Key Override on page 4.
Alarm • Sounds alerts based on the chosen settings. Programming
the Alarm on page 8.
Bolt • Automatically extends and retracts when the touchscreen is
used.
• Manually extends and retracts when the thumbturn is rotated.
EMERGENCY KEY OVERRIDE
Emergency Key Override can be used when the battery is
completely dead, or when no valid User Code is known.
Insert key and rotate to unlock, just like any lock. See
Replacing the Batteries on page 5.
DOOR INTERIOR
Alarm Assembly
DOOR EXTERIOR
Keypad Assembly
Outside Schlage Button
Touchscreen
Cylinder
Alarm
Inside Schlage Button
Thumbturn
Bolt
5
ENGLISH
LOCKING AND UNLOCKING
If you make a mistake while entering a User Code, press the Outside Schlage Button and
start again.
Locking from the Outside Locking from the Inside
Press the Outside
Schlage Button.
The lock will lock.1
Rotate the Inside
Thumbturn.
1 If the Lock & Leave feature is disabled, a valid User Code must be entered to lock the door. See Enable/Disable Lock
& Leave on page 7.
Unlocking from the Outside Unlocking from the Inside
Press the Outside
Schlage Button
and then enter a
valid User Code
into the Keypad.
The green success
check mark will
light and the lock
will unlock.
If the red error X
lights, the User
Code was not
valid.
Rotate the Inside
Thumbturn.
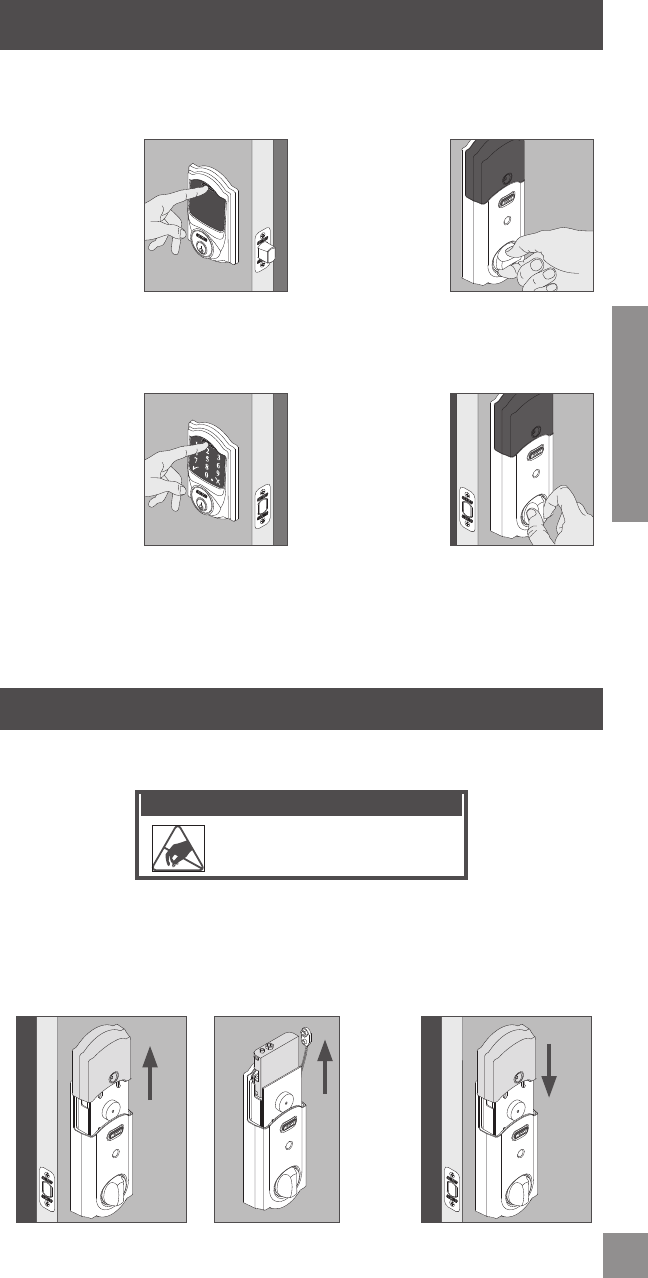
REPLACING THE BATTERIES
Replace the batteries in your lock at the same time each year that you test and replace the
batteries in your smoke alarms. This will ensure continued reliable operation.
ELECTROSTATIC DISCHARGE WARNING!
DO NOT TOUCH the green board! You
may damage the lock.
1. Remove the inside
cover.
2. Unsnap the battery
cable, remove the
battery tray and replace
the batteries.
3. Replace the battery tray
with the batteries facing
the door. Snap the
battery cable to the tray
and replace the cover.
6
ENGLISH
Programming Procedures
Extend the deadbolt before beginning.
Determine how long you want your user codes to be BEFORE adding any user codes. If
you change the user code length after adding user codes, all existing user codes will be
deleted!
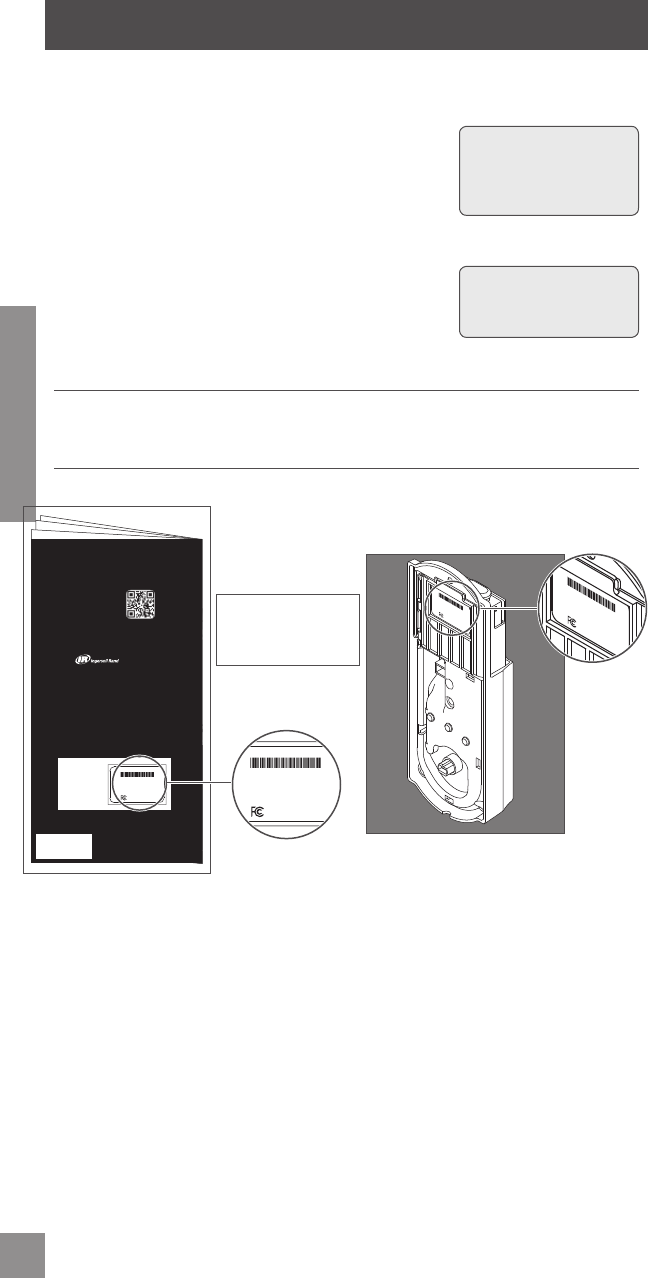
Finding your Default Codes
Default Codes are located on the back of the
Alarm Assembly, and on the back of this guide.
Want to see a video of programming
before you begin? Browse to
www.schlage.com.
The lock comes preset with a unique
default Programming Code and two
unique default User Codes. You can
either use these codes to operate
your lock or change them using the
instructions in this guide.
User Codes can also be programmed
using the Nexia Home Intelligence
System. Browse to www.nexiahome.
com for more information.
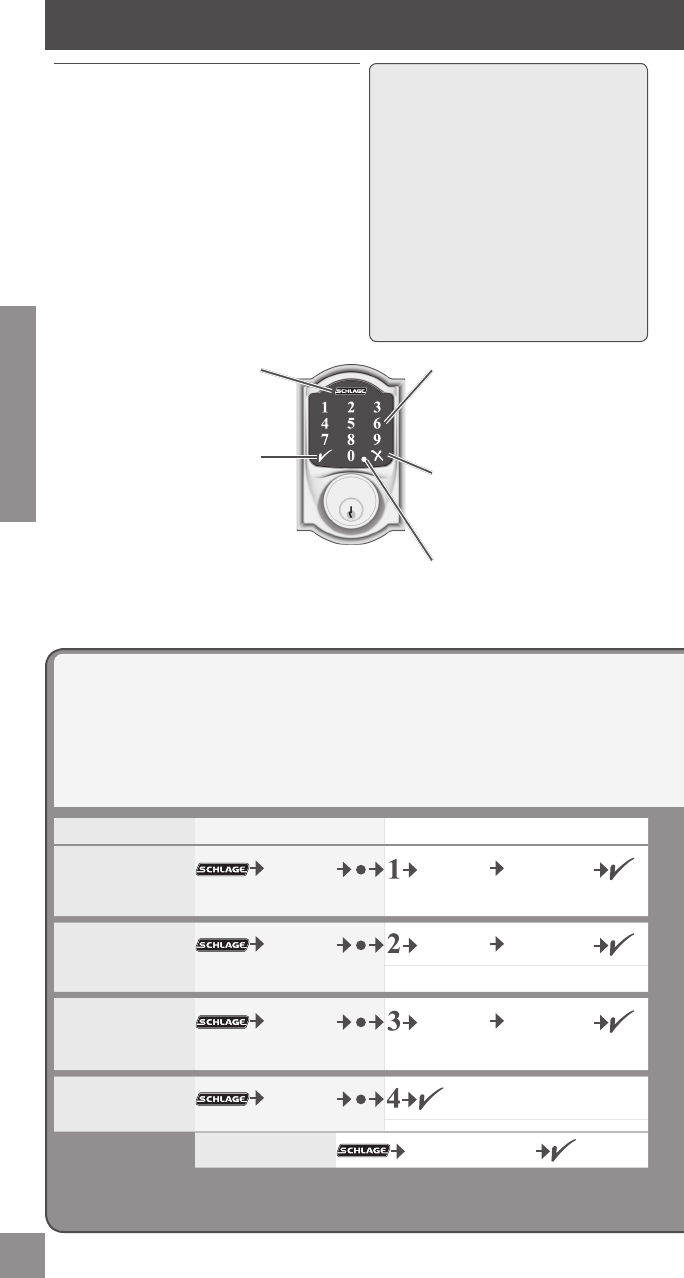
Green Check Mark
Blinks when a number key is
pressed and when a function is
complete.
Red X
If there is a problem during
programming, you will see the red
error X.
Outside Schlage Button
The Schlage button is the fi rst
button you will press in the
programming process.
TouchScreen
Use the numbers on the
TouchScreen to enter codes and
for programming.
PROGRAMMING THE TOUCHSCREEN
Function Enter Programming Mode Function Steps
Add User Code
6 Digit
Programming
Code
New 4-8 Digit
User Code
Same New 4-8
Digit User Code
Blinking 2 blinks +
2 beeps
Delete User Code
6 Digit
Programming
Code
4-8 Digit User
Code
Same 4-8 Digit
User Code
Blinking 2 blinks +
2 beeps
Change
Programming Code
6 Digit
Programming
Code
New 6 Digit
Programming
Code
Same New 6 Digit
Programming
Code
Blinking 2 blinks +
2 beeps
Enable Vacation
Mode
6 Digit
Programming
Code
2 blinks + 2 beeps
Blinking
Disable Vacation
Mode 6 Digit Programming Code
2 blinks +
2 beeps
Programming Indicator
Blinks while in Programming
Mode.

7
ENGLISH
You can add or delete another User Code, without leaving programming mode. Press 1 or
2 respectively after the green success symbol and start at the Function Steps again.
If you make a mistake, press the Outside Schlage Button to leave Programming Mode,
and then start over. Programming Mode will automatically time out after 30 seconds of
inactivity.
Programming Descriptions
Add User Code User Codes are used for unlocking the lock. Codes can be 4 - 8
digits long. All codes must be the same length. See Change
User Code Length.
Delete User Code Removes one User Code
Change Programming
Code
The Programming Code is used to put the lock into Programming
Mode. It is 6 digits long.
Enable Vacation Mode When Vacation Mode is enabled, no User Codes can be entered
into the TouchScreen. This provides extra security while you are
away from your home for an extended period of time.
Disable Vacation Mode Returns lock to normal operation.
Enable/Disable Beeper The beeper can be turned off if desired. Beeps will still sound
during programming.
Delete ALL User Codes Removes ALL User Codes from the lock.
Enable/Disable Lock
& Leave
When Lock & Leave Mode is enabled, the lock can be locked
from the outside by simply pressing the Outside Schlage Button.
When disabled, a User Code must be entered to lock from the
outside. This feature is enabled by default.
Change User Code
Length
You can change the length of the User Codes in your lock. User
Codes can be 4 - 8 digits in length. Default is 4 digits. Changing
the User Code length will delete all existing User Codes!
Enable/Disable Auto
Lock
When Auto-Lock is enabled, the lock will automatically relock
itself 30 seconds after being unlocked. This feature is disabled
by default.
Function Enter Programming Mode Function Steps
Enable/Disable
Beeper
6 Digit
Programming
Code
Enable: 2 blinks + 2 beeps
Disable:1 blink + 1 beep
Blinking
Delete ALL User
Codes
6 Digit
Programming
Code
Wait for 6 Digit
Programming
Code
Blinking 3 blinks +
3 beeps
3 blinks +
3 beeps
Warning Removes ALL User Codes from the lock. User Codes cannot be retrieved
after they are deleted!
Enable/Disable Lock
& Leave
6 Digit
Programming
Code
Enable: 2 blinks + 2 beeps
Disable:1 blink + 1 beep
Blinking
Change User Code
Length
6 Digit
Programming
Code
Desired User
Code Length
2 blinks +
2 beeps
Blinking
Warning Changing the User Code length will delete all existing User Codes!
Enable/Disable Auto
Lock
6 Digit
Programming
Code
Enable: 2 blinks + 2 beeps
Disable:1 blink + 1 beep
Blinking
8
ENGLISH
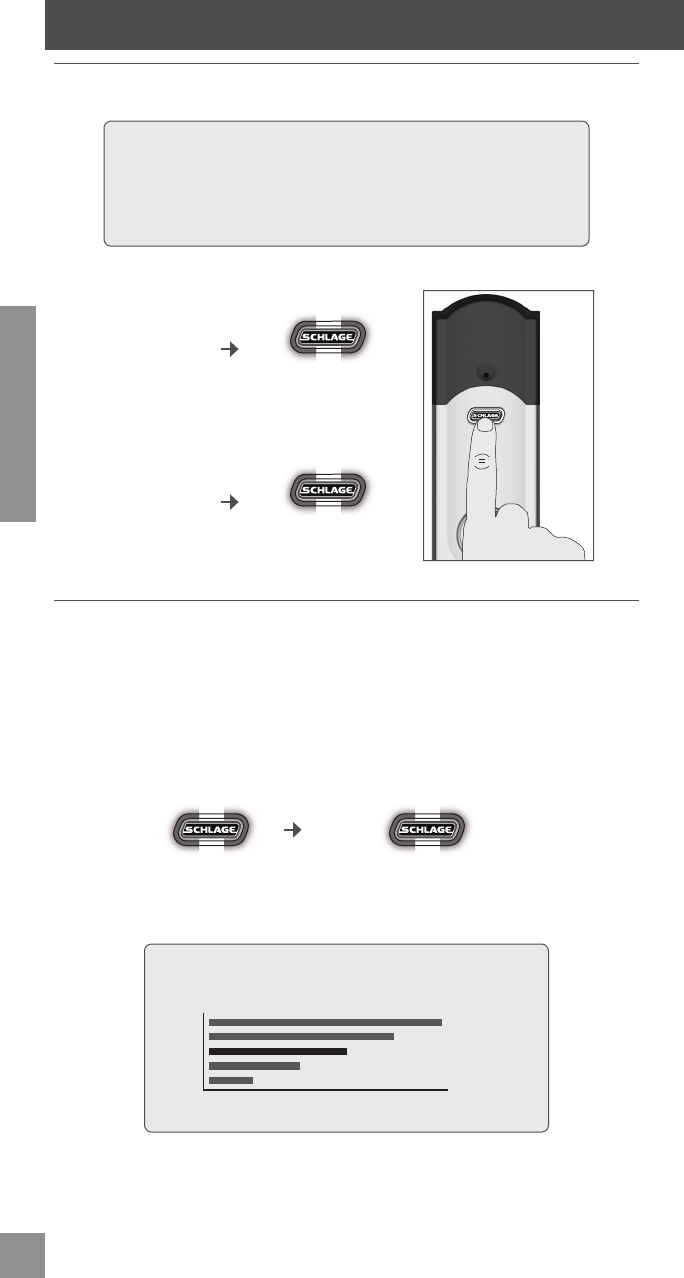
Powering the Alarm
The alarm is turned off by default. After installation, you’ll need to turn on your alarm.
Program the alarm using the Inside Schlage Button, shown below.
Not sure your alarm is turned on? Simply press the Inside Alarm Button
once. It will beep and light up to confi rm it is activated. If it does not,
try turning the alarm on again, and check the batteries.
For videos and more, browse to alarm.schlage.com.
Turn the Alarm
ON
Press and hold
Release after fi rst fl ash
(about 5 seconds)
Turn the Alarm
OFF
Press and hold
Release after second fl ash
(about 6 seconds)
Adjusting the Sensitivity Level
The lock comes preset to a sensitivity level of three. If your alarm is sounding too frequently,
or not frequently enough, try changing this setting.
You do not need to adjust this setting unless the alarm is sounding too frequently or not
frequently enough.
Press and hold
Click the button until the number
of fl ashes matches your desired
sensitivity setting.
Release after third
fl ash (about 10
seconds).
1 - 5 Flashes
As you cycle through the fi ve levels, the alarm will beep
the same number of times as each setting level.
1
2
3
4
5
1 2 3 4 5
Sensitivity
Level/Beeps
LOW HIGH
PROGRAMMING THE ALARM
9
ENGLISH
Changing the Alarm Setting
After you power on the alarm, it will be preset to the Forced Entry alert, by default. If you want
to change it from Forced Entry to another alert setting, follow these simple steps:
The alarm must fi rst be powered on before changing the alert setting!
Press and hold.
Release after fi rst
fl ash (about 2
seconds)
Tamper Alert Click the button until the
MIDDLE light is lit.
SENSITIVITY
Activity Alert Click the button until the
LEFT light is lit.
Forced Entry Alert Click the button until the
RIGHT light is lit.
Alert Setting Descriptions
ALARM DESCRIPTION TRIGGER LIGHTS SOUNDS
Activity Perfect for monitoring doors
while you’re at home.
• After the alarm is
triggered, there is a built-in
3-second delay for it to
reset
Every time
the door
opens or
closes
Middle LED
light fl ashes
Two short
beeps
Tamper As the most sensitive alert
setting, the Tamper Alert senses
even subtle activity at the lock,
not just when the door opens,
notifying you immediately of any
tampering.
• Built-in 60-second delay
before device alarms allows
you to exit and lock the
door
Every
time the
thumbturn/
lock is
disturbed
Left and
right LED
lights fl ash
alternately
15 second
Alarm
(90 dB=similar
to the volume
of your smoke
alarm)
Forced
Entry
Perfect for nighttime or when
you’re away from home.
• Acts as an effective deterrent
by instantly alerting you, and
others nearby, at fi rst impact
against your door
• Least sensitive mode – many
choose to use this alert setting
all the time
Every time
signifi cant
force pushes
against the
door—like
when
someone
tries to kick
it in.
All lights on
the LED track
fl ash
Three-minute
shrill, steady
alarm
(90 dB=similar
to the volume
of your smoke
alarm)
If you want to silence an alarm early, press and
hold the Inside Schlage Button until the alarm
sound stops.
10
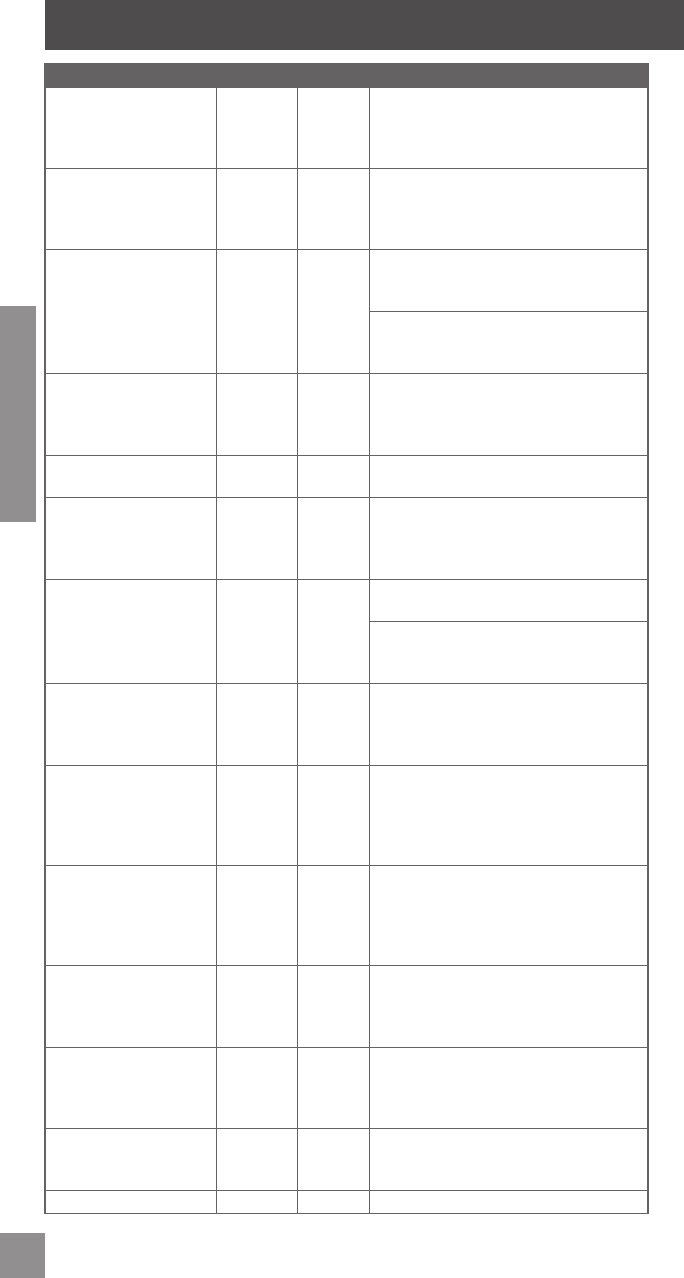
ENGLISH
PROBLEM SOUNDS LIGHTS SOLUTION
Alarm sounds too
frequently or false alarm
Alarm — Sensitivity level is too high (at 1 or 2)
and should be adjusted to a less sensitive
level (3, 4 or 5). See Adjusting the
Sensitivity Level on page 8.
The tamper alert is not
sounding.
— — There is a 60-second delay before device
alarms to allow you to exit and lock the
door. See Alert Setting Descriptions on
page 9.
I forgot my Programming
Code.
— — Check the back of this guide or the
back of the Alarm Assembly for default
Programming Code.
If needed, restore lock to factory settings.
See Factory Default Reset on page
11.
I need to delete a
User Code that I don’t
remember.
— — Delete all User Codes. Then add all
needed User Codes back into the lock.
See Programming the TouchScreen on
page 6.
User Code does not
unlock lock.
1 beep 1 Red X User Code entered is not a valid User
Code.
User Code cannot be
entered after Outside
Schlage button is
pressed
1 beep 1 Red X Vacation Mode is enabled. Disable
Vacation Mode. See Disable Vacation
Mode on page 6.
User Code cannot be
entered after Outside
Schlage button is
pressed.
1 beep 1 Red X Too many incorrect User Codes have been
entered. Wait 30 seconds and try again.
If keypad does not respond after 30
seconds, then replace battery. See
Replacing the Batteries on page 5.
User Code cannot be
entered after Outside
Schlage button is
pressed
1 beep 1 Red X Batteries are dead. See Replacing the
Batteries on page 5.
Backlighting does not
come on when Outside
Schlage button is
pressed and User Code
cannot be entered.
— — Batteries are completely dead and no
electronic operations are possible. See
Replacing the Batteries on page 5.
After entering a User
Code to unlock the lock,
the yellow dot is fl ashing
and there is a delay
before unlock.
— Yellow
dot
fl ashing
Battery is low and should be replaced. See
Replacing the Batteries on page 5.
Inside Alarm Button is
fl ashing but no alarms
are sounding.
— 3 Red X
fl ashes
every 5
minutes
Battery is low and should be replaced. See
Replacing the Batteries on page 5.
Pressing Schlage button
when lock is unlocked
does not cause lock to
relock.
— — The Lock & Leave feature is not enabled.
See Enable/Disable Lock & Leave on
page 7.
Lock will not stay in
programming mode.
— Yellow
dot
fl ashing
An incorrect entry was made during the
programming process.
Alarm will not sound. — — Alarm is turned off.
TROUBLESHOOTING
11
ENGLISH
PROBLEM SOUNDS LIGHTS SOLUTION
Cannot add a new User
Code
— Yellow
dot
fl ashing
“1” was not pressed after entering
programming mode.
2 beep 2 Red X 30 User Codes already exist. Delete a
User Code before adding a new one. See
Delete User Code on page 6.
2 beep 2 Red X Second User Code entry did not match
fi rst User Code entry.
2 beep 2 Red X The new User Code matches the fi rst 4 - 6
digits of the existing Programming Code.
Cannot delete a User
Code
— Yellow
dot
fl ashing
“2” was not pressed after entering
programming mode.
2 beep 2 Red X First User Code entered did not match any
current User Code.
2 beep 2 Red X Second User Code entered did not match
fi rst User Code entry.
Cannot change
Programming Code.
Yellow
dot
fl ashing
“3” was not pressed after entering
programming mode.
2 beep 2 Red X Second Programming Code entered
did not match fi rst Programming Code
entered.
2 beep 2 Red X Programming code entered second time
is incorrect.
2 beep 2 Red X First 4 - 6 digits of new Programming
Code match an existing User Code.
Cannot delete all User
Codes
— Yellow
dot
fl ashing
“6” was not pressed after entering
programming mode.
Deadbolt will not extend
or retract as expected.
Several
beeps
Red X
fl ashing
Check door preparation to make sure the
bolt is not jammed
Batteries are weak and should be replaced.
NEXIA services are not
available.
— — The lock has not been properly enrolled
into a bridge.
Factory Default Reset
When should you perform a Factory Default Reset?
• If you want to move the lock to a different door
• If you have forgotten your Programming Code, you can restore the default codes
WARNING
Locate the default programming and User Codes on the back of this guide or the back
of the Alarm Assembly before beginning! Default programming and User Codes will
be restored. All existing User Codes and current Programming Code will be erased.
CUSTOMER SERVICE CANNOT RETRIEVE LOST DEFAULT CODES! DO NOT
RESTORE FACTORY SETTINGS UNLESS YOU CAN LOCATE THE DEFAULT CODES.
1. Disconnect the batteries. See Replacing the Batteries on page 5.
2. Press and hold the Outside Schlage Button.
3. While holding the Outside Schlage Button, reconnect the batteries.
4. Release the Outside Schlage Button.
The lock will go through the setup routine again. See the TouchScreen Deadbolt with
Alarm Installation Guide for more information.
12
ENGLISH
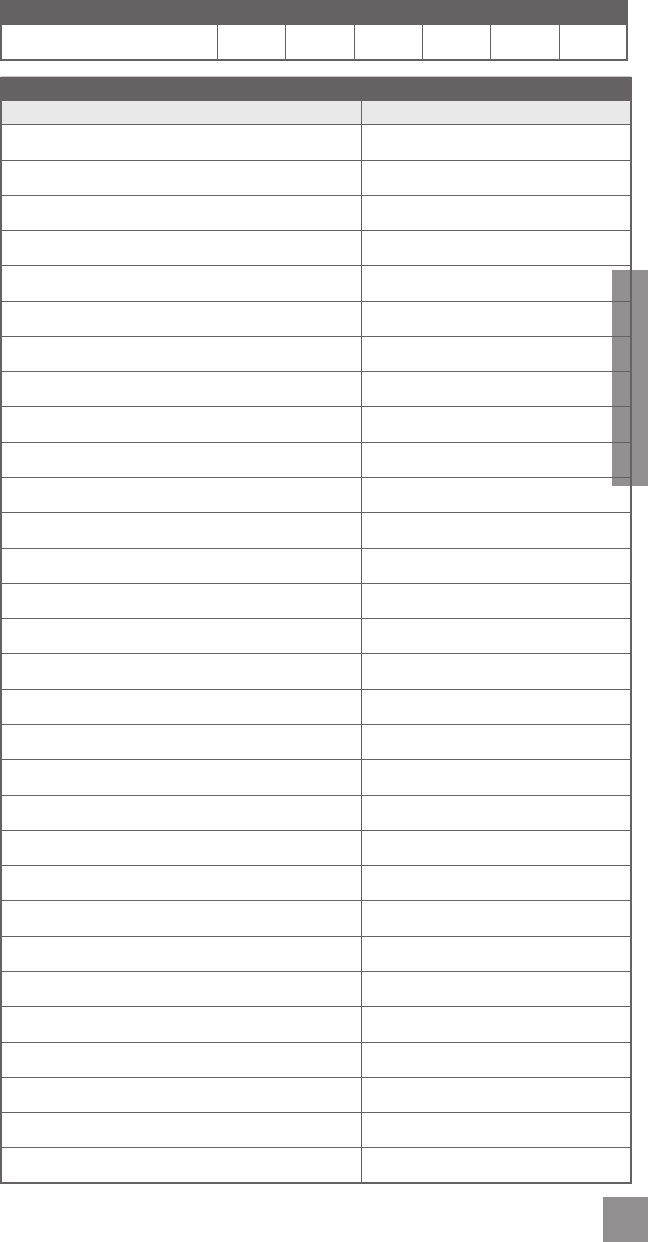
MY CODES
Use these tables to record Programming and User Codes that you program into the lock.
The Programming Code can be any combination of six numbers entered into the keypad to
put the lock in programming mode. The fi rst 4 - 6 numbers (depending on User Code length)
must be different from all of the User Codes currently in the
lock. One Programming Code is programmed into the lock by
default. This code can be found on the yellow stickers, one on
the back of the Alarm Assembly and one on the back of this
guide
User Codes
A User Code can be any combination of 4 - 8 numbers entered
into the keypad to unlock the lock. These four digits must be
different from the fi rst four digits of the Programming Code.
Two User Codes are programmed into the lock by default.
These two codes can be found on the yellow stickers, one on
the back of the Inside Alarm Assembly and one on the back of this guide.
Best Practices
• Give each person their own unique User Code.
• Change User and Programming Codes periodically to ensure security.
Default Programming and User Codes Locations
Codes are located on the sticker on the back of this guide. They are also located on the back
of the Alarm Assembly.
Use a pencil to enter
the codes in the boxes
so you can easily
change them later.
Up to 30 User Codes
can be stored in the
lock at one time.
installation or programming, don’t return
the Keypad Lock to the store. Our Schlage
Customer Service representatives are ready
to help.
Toll-Free: 1.888.805.9837
Live Chat: schlage.com
Ingersoll Rand Residential Solutions, a business comprised of well-
known brands like Schlage® and Trane®, delivers safety, comfort and
ef ciency to homeowners throughout North America. Our quality
products, services and solutions include mechanical and electronic
locks, heating and air conditioning systems, indoor air quality
solutions, advanced controls, portable security systems and remote
home management.
moc.dnarllosregni.www 4681-748-008
moc.egalhcs.www
moc.enart.www
If you have questions about any part of
installation or programming, don’t return
the Keypad Deadbolt with Built-in Alarm
to the store. Our Schlage Customer Service
representatives are ready to help.
Toll-Free: 1.888.805.9837
Live Chat: schlage.com
To learn more about this
product, scan the code with
your smartphone.
Download the app at
scanlife.com.
© 2012 Ingersoll Rand
All rights reserved.
Printed in Country
24060857 Rev. 06/12-a1
24060857
Default Programming Code
Default User Codes
Default Codes
SCHLAGE
00000000
BE469
Firmware Ver.: xxx-x
Programming Code: 000000
User Code A: 0000
User Code B: 0000
0000000-000
00000000
FCC ID: xxxxxxxx
SCHLAGE
00000000
BE469
Firmware Ver.: xxx-x
Programming Code: 000000
User Code A: 0000
User Code B: 0000
0000000-000
00000000
FCC ID: xxxxxxxx
The same codes
are located in both
places.
SCHLAGE
00000000
BE469
Firmware Ver.: xxx-x
Programming Code: 000000
User Code A: 0000
User Code B: 0000
0000000-000
00000000
FCC ID: xxxxxxxx
SCHLAGE
00000000
BE469
Firmware Ver.: xxx-x
Programming Code: 000000
User Code A: 0000
User Code B: 0000
0000000-000
00000000
FCC ID: xxxxxxxx
DO NOT remove the sticker from the back of the lock! If you lose your programming code,
you can reset your lock back to these default codes.
13
ENGLISH
DATE PROGRAMMING CODE
USER NAME USER CODE
Example: John Smith 1234
1.
2.
3.
4.
5.
6.
7.
8.
9.
10.
11.
12.
13.
14.
15.
16.
17.
18.
19.
20.
21.
22.
23.
24.
25.
26.
27.
28.
29.
30.
14
ENGLISH
NEXIA HOME INTELLIGENCE FUNCTIONS
This lock is equipped with a
Z-Wave radio, which allows it
to integrate seamlessly with
the Nexia Home Intelligence
System. Enrolling is the
process of adding the lock to
your Nexia Home Intelligence
account. To enroll the lock,
you must fi rst have a Nexia
Home Bridge and Nexia Home
Intelligence account.
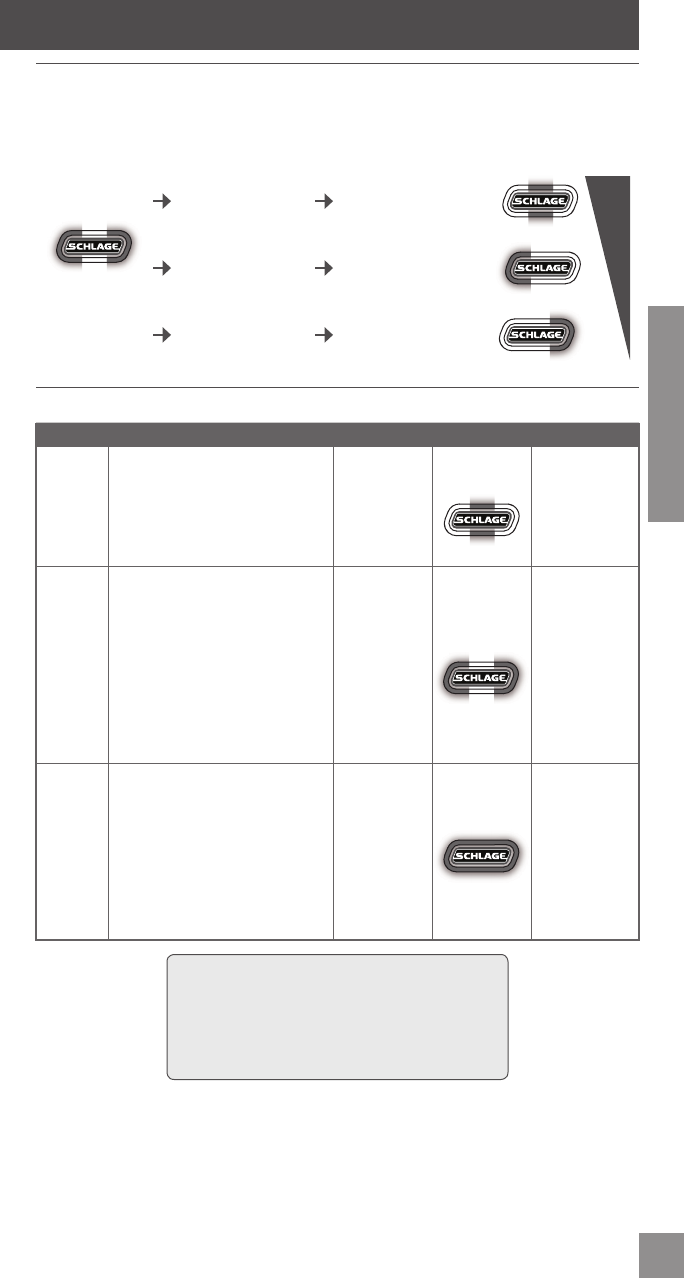
Function Descriptions
Enroll the Lock Turns the Z-Wave radio on and enrolls the lock.
Verify Lock Enrollment Verifi es that the lock is enrolled in a Z-Wave network. You do not
need to put the Bridge into enrollment mode for verifi cation
Unenroll the Lock Unenrolls the lock and turns the Z-Wave radio off.
The Nexia Home Bridge
To enroll the lock, you must fi rst put your Nexia
Home Bridge into enrollment mode:
1. Install a fresh, high-quality 9V battery into the
Bridge.
2. Hold the Bridge within 6 feet (1.8 meters) of the
lock throughout the entire enrollment process.
3. Press and release the plus (+) button on the
Bridge.
4. Then perform the following functions on the lock.
To unenroll the lock, you must fi rst put your
Nexia Home Bridge into unenrollment mode:
1. Install a fresh, high-quality 9V battery into the
Bridge.
2. Hold the Bridge within 6 feet (1.8 meters) of the lock throughout the entire unenrollment
process.
3. Press and release the minus (-) button on the Bridge.
4. Then perform the following steps on the lock.
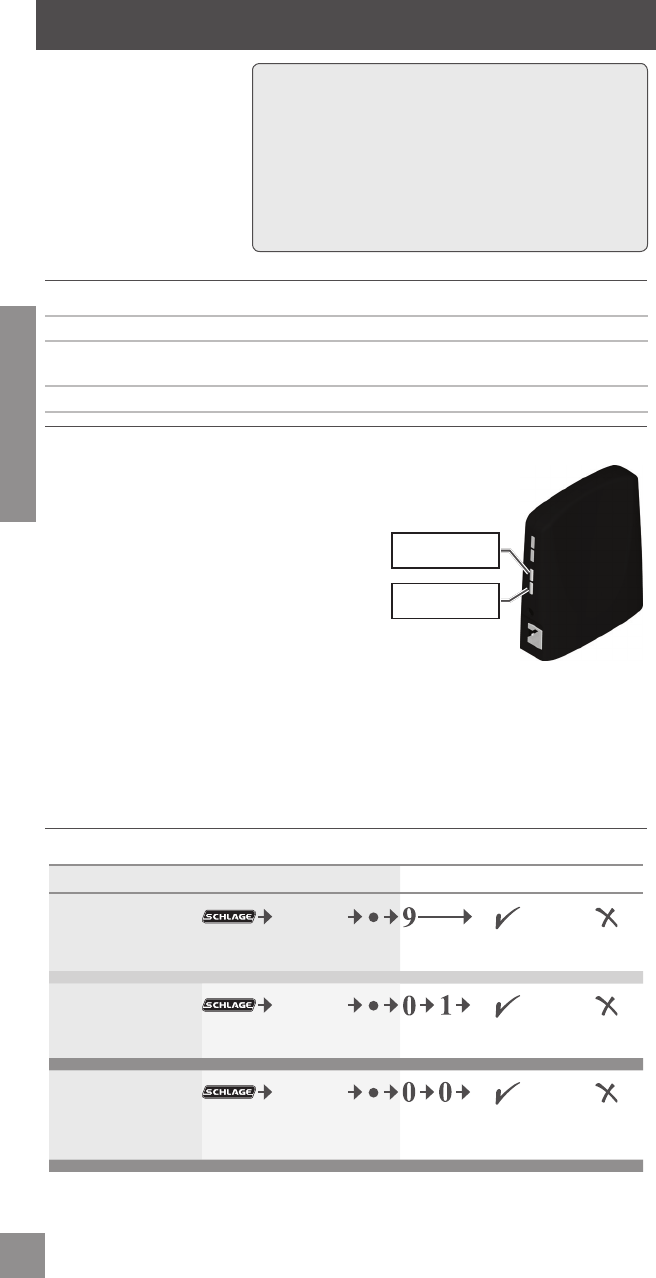
Function Procedures
Function Enter Programming Mode Function Steps
Enroll the Lock
6 Digit
Programming
Code
OR
Blinking The lock was
enrolled.
The lock was
not enrolled.
Verify Lock
Enrollment
6 Digit
Programming
Code
OR
Blinking The lock is
enrolled.
The lock is not
enrolled.
Unenroll the Lock
6 Digit
Programming
Code
OR
Blinking The lock was
unenrolled.
Unerollment
failed. The lock
is still enrolled.
For more information about Nexia Home Intelligence,
please browse to www.nexiahome.com.
The Z-Wave radio is disabled by default to conserve
battery life. When the lock is enrolled for the fi rst time,
the radio is automatically enabled.
If you no longer wish to use the Nexia Home Intelligence
system, make sure to unenroll the lock to conserve
battery life.
+
-
Plus Button
Minus Button

15
ENGLISH
WARRANTY AND FCC/IC STATEMENTS
Lifetime Limited Mechanical and Finish Warranty and 1-Year Limited Electronics Warranty
Subject to the terms and conditions of the warranty, Schlage extends a lifetime limited mechanical and fi nish warranty and a
one-year limited electronics warranty to the original consumer user (“Original User”) of our Schlage brand product (“Product”)
against defects in material and workmanship, as long as the Original User occupies the residential premises upon which the
Product was originally installed. See www.schlage.com for specifi c warranty details and limitations, or contact Schlage Customer
Service at (888) 805-9837 in the U.S. and Canada or (800) 506-7866 in Mexico for assistance.
FCC Interference Statement
This equipment has been tested and found to comply with the limits for a Class B digital device, pursuant to Part 15 of the
FCC Rules. These limits are designed to provide reasonable protection against harmful interference in a residential installation.
This equipment generates uses and can radiate radio frequency energy and, if not installed and used in accordance with the
instructions, may cause harmful interference to radio communications. However, there is no guarantee that interference will
not occur in a particular installation. If this equipment does cause harmful interference to radio or television reception, which
can be determined by turning the equipment off and on, the user is encouraged to try to correct the interference by one of the
following measures:
- Reorient or relocate the receiving antenna.
- Increase the separation between the equipment and receiver.
- Connect the equipment into an outlet on a circuit different from that to which the receiver is connected.
- Consult the dealer or an experienced radio/TV technician for help.
This device complies with Part 15 of the FCC Rules. Operation is subject to the following two conditions:
1. This device may not cause harmful interference, and
2. This device must accept any interference received, including interference that may cause undesired operation.
Changes or modifi cations not expressly approved by the party responsible for compliance could void the user’s authority to
operate the equipment.
RF Exposure
To comply with FCC/IC RF exposure requirements for mobile transmitting devices, this transmitter should only be used or
installed at locations where there is at least 20 cm separation distance between the antenna and all persons.
Under Industry Canada regulations, this radio transmitter may only operate using an antenna of a type and maximum (or lesser)
gain approved for the transmitter by Industry Canada. To reduce potential radio interference to other users, the antenna type
and its gain should be so chosen that the equivalent isotropically radiated power (e.i.r.p.) is not more than that necessary for
successful communication.
Conformément aux normes d’Industrie Canada, ce transmetteur radio ne peut fonctionner qu’avec une antenne dont le type
et le gain maximum sont approuvés par Industrie Canada. Pour réduire les risques d’interférences radio encourus par d’autres
utilisateurs, le type et le gain de l’antenne doivent être choisis de façon à ce que la puissance rayonnée isotrope équivalente
(PIRE) ne soit pas supérieure à celle nécessaire pour établir une bonne communication.
This Device complies with Industry Canada License-exempt RSS standard(s). Operation is subject to the following two
conditions: 1) this device may not cause interference, and 2) this device must accept any interference, including interference
that may cause undesired operation of the device.
Cet appareil est conforme norme Industrie Canada RSS exempts de licence (s). Son fonctionnement est soumis aux deux
conditions suivantes: 1) cet appareil ne doit pas provoquer d’interférences, et 2) cet appareil doit accepter toute interférence, y
compris les interférences pouvant provoquer un fonctionnement indésirable de l’appareil.
Ingersoll Rand Residential Solutions, a business comprised of well-
known brands like Schlage® and Trane®, delivers safety, comfort and
effi ciency to homeowners throughout North America. Our quality
products, services and solutions include mechanical and electronic
locks, heating and air conditioning systems, indoor air quality
solutions, advanced controls, portable security systems and remote
home management.
800-847-1864 www.ingersollrand.com
www.schlage.com
www.trane.com
If you have questions about any part of
installation or programming, don’t return
the Keypad Deadbolt with Built-in Alarm
to the store. Our Schlage Customer Service
representatives are ready to help.
Toll-Free: 1.888.805.9837
Live Chat: schlage.com
To learn more about this
product, scan the code with
your smartphone.
Download the app at
scanlife.com.
© 2012 Ingersoll Rand
All rights reserved.
Printed in Country
24060840 Rev. 09/12-a5
24060840
Default Programming Code
Default User Codes
P
l
ace
Sti
c
k
e
r H
e
r
e
Default Codes